
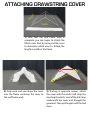
1) Now that the roof frame work is
complete, you can begin to attach the
tted cover. Start by laying out the cover
to determine which way it is folded, the
length or width or the frame.
2) Grab each end and drape the cover
over the frame centering the cover to
the roof frame work.
3) Starting at opposite corners, attach
the cover with the elastic ball straps by
inserting the elastic cord of the ball strap
underneath the cover and through the
grommet. Then pull taught until the ball
stops.
ATTACHING DRAWSTRING COVER
Width
Length

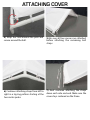
ATTACHING COVER
4) Wrap the cord around the pole and
secure around the ball.
5) Be sure all four corners are attached
before attaching the remaining ball
straps.
6) Continue attaching straps from left to
right in a zig zag pattern starting at the
two center peaks.
7) Next continue attaching the straps
down each side and end. Make sure the
cover stays centered on the frame.

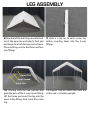
8) Now that all the ball straps are attached.
Insert the pipe into each plastic foot pad
and begin to attach the legs to the frame.
Place each leg next to the three and four
way ttings.
9) Slide a c-clip on to each corner leg
before inserting them into the 3-way
ttings.
10) Starting with the two outside legs
grab the base of the 3-way corner tting.
Lift the frame and insert the leg into the
open 3-Way tting. Next insert the center
leg.
11) Repeat step on other side until the
entire unit is standing upright.
LEG ASSEMBLY
Insert First
Insert First
Insert Second

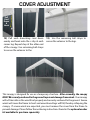
COVER ADJUSTMENT
12) Pull each drawstring cord down
evenly and hook onto the c-clip at each
corner leg. Repeat step at the other end
of the canopy. Use remaining ball straps
to secure the valances to the
13) Use the remaining ball straps to
secure the valances to the legs.
Pull
Cord
Down
&
Hook
This canopy is designed for use as a temporary structure. After assembly, the canopy
MUST BE securely anchored to the ground to prevent damage from winds. Your canopy
will act like a kite in the wind if not properly and securely anchored to the ground. Severe
winds will cause the frame to twist and unanchored legs will fall, thereby collapsing the
canopy. If severe winds are expected, you must remove the cover from the frame to
prevent damage. Please follow the anchoring instructions found in the optional anchor
kit available for purchase separately.

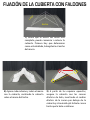
1) Ahora que el marco del techo esta
completo, puede comenzar a colocar la
cubierta. Primero hay que determinar
como esta doblada, la longitud o el ancho
del marco.
2) Agarra cada extremo y cubra el marco
con la cubierta, centrando la cubierta
sobre el marco del techo.
3) A partir de las esquinas opuestas,
asegure la cubierta con las correas
elásticas de bola, insertando el cordón
elástico de la correa por debajo de la
cubierta y a través del ojal. Estire la correa
hasta que la bola se detiene.
FIJACIóN DE LA CUBIERTA CON FALDONES
Ancho
Largo

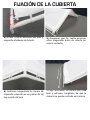
4) Enrolle la correa alrededor del tubo y
enganche alrededor de la bola.
5) Asegúrese que las cuatro esquinas
estén aseguradas antes de colocar las
correas restantes.
6) Continuar asegurando las correas de
izquierda a derecha en un patrón de zig
zag a partir del pico.
7) Siga atachando las correas por cada
lado y extremo. Asegúrese de que la
cubierta se quede centrada en el marco.
FIJACIóN DE LA CUBIERTA

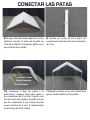
8) Ya que estan atachado todas las correas
elasticas, Inserte el tubo de la pata en
cada base plástica. Ponga las patas en el
piso al lado de su toldo.
9) Deslice un C-clip en las 4 patas de
esquina antes de conectar los conectores
de 3 via.
10) Comience a jar las patas a la
estructura. Coloque cada pata junto a
los conectores de 3 y 4 vías. A partir con
las dos patas de esquina, levante la base
por los conectores 3 vías. Inserte la pata
en el conector de 3 vías. A continuación
inserte las patas del centro.
CONECTAR LAS PATAS
Inserte Primero
Inserte Segundo
Inserte Primero
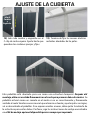
11) Repita el paso en el otro lado hasta
que la unidad entera está parada.

AJUSTE DE LA CUBIERTA
Este pabellón está diseñado para uso como una estructura temporal. Después del
montaje, debe ser anclada rmemente en el suelo para prevenir daño de vientos. Su
pabellón actuará como un cometa en el viento si no es correctamente y rmemente
anclado al suelo. Vientos severos causará que el marco se tuerza y que las patas se caigan,
así se derrumbaba el pabellón. Si se esperan vientos severos, debe quitar la cubierta de
la estructura para evitar daños. Por favor, siga las instrucciones de anclaje encontradas
en el kit de anclaje opcional disponible para su compra por separado.
12) Jale cada cordón y enganche en el
C-clip de cada esquina. Ajuste hasta que
quenden los cordones parejos y jos.
13) Termina de jar las correas elasticas
restantes alrededor de las patas.
Jale el
Cordón
y
Enganche
-
 1
1
-
 2
2
-
 3
3
-
 4
4
-
 5
5
-
 6
6
-
 7
7
-
 8
8


King Canopy TDS10206T Guía de instalación
- Tipo
- Guía de instalación
en otros idiomas
Artículos relacionados
Otros documentos
-
 ShelterLogic 23521 Guía de instalación
-
 ShelterLogic 25757 Guía de instalación
-
 ShelterLogic 22535 Guía de instalación
-
 ShelterLogic 25774 Guía de instalación
-
 ShelterLogic 25776 Guía de instalación
-
 ShelterLogic 25779 Guía de instalación
-
 ShelterLogic 70443 El manual del propietario
-
Jumpking JK1331 El manual del propietario
-
Ozone Instinct Manual de usuario
-


