
FCS Board Mount
Quick Start Guide

EN-1
FCS Board Mount
Quick Start Guide
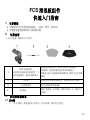
1. Key Features
• Attach the camera to any type of board (surf, ski or skate etc.)
• Easily remove and remount the camera.
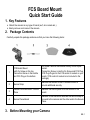
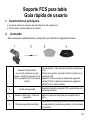
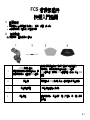
2. Package Contents
Carefully unpack the package and ensure that you have the following items:
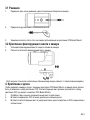
3. Before Mounting your Camera
1
FCS Board Mount
-with Fix Screw on the top,
Connection Screw in the middle
and FCS Plug on the bottom
Fix Screw- Mounts the camera directly via the tripod
socket.
Connection Screw- Links the Fix Screw and FCS Plug.
FCS Plug-Plugs into the FCS centre fin socket on your
board.( FCS centre fin socket is not included in the
package)
2
Secure Strap
Secures the camera to the FCS board mount to
provide additional security.
3
Double Faced Adhesive - Secure
Piece
Adheres the secure piece onto the surface of the
board.
4
Secure Piece-Board
Adheres to the board and attaches the secure strap at
one end to the camera and the other end to the Secure
Piece.

EN-2
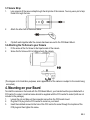
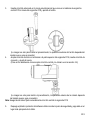
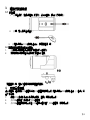
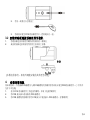
3.1 Secure Strap
1. Loop one end of the secure strap through the strap hole of the camera. You may use a pin to help
thread it through the hole.
2. Attach the other half to the secure piece.
3. Clip both ends together after the camera has been secured to the FCS Board Mount.
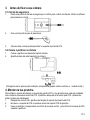
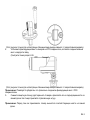
3.2 Attaching the Fix Screw to your Camera
1. Fit the screw of the Fix Screw to the tripod socket of the camera.
2. Screw the Fix Screw until it is tightened onto the camera.
(The diagram is for illustration purposes, outer appearance of the camera is subject to the model being
connected)
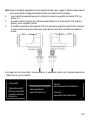
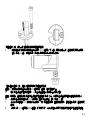
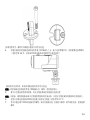
4. Mounting on your Board
To install the camera on the board with the FCS Board Mount, your board should be pre-installed with a
FCS centre fin socket. A matched screw should be supplied with the FCS centre fin socket (both are not
included in the package).
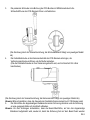
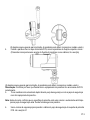
1. Loosen the nut and take out the connection screw from the FCS board mount.
2. Plug the FCS plug into the FCS centre fin socket on your board.
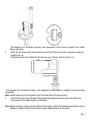
3. Insert the matched screw into the hole of the FCS centre fin socket through the loophole of the
FCS plug and then tighten the screw.

EN-3
(The diagram is for illustration purpose, outer appearance of the screw is subject to the model
being connected)
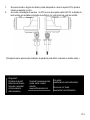
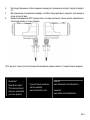
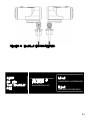
4. Attach the Fix Screw with Camera onto the top of the FCS plug, insert the connection screw and
retighten the nut.
(For details about how to attach the Fix Screw to your Camera, refer to section 3.2.)
(The diagram is for illustration purpose, outer appearance of the camera is subject to the model being
connected)
Note: Please make sure to fit the gears of the Fix Screw to the FCS plug correctly
5. Peel off the protective membrane of the double faced adhesive-secure piece and adhere the
secure piece to a suitable location on the board.
Note: Before mounting, make sure the surface of the board on which the double faced adhesive will be
adhered is clean so that the secure piece can be affixed securely to the board.

EN-4
6. Use the secure strap to link up the camera and secure piece of the FCS board mount. Refer to
section 3.1.
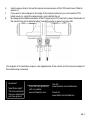
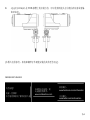
7. If you want to make changes to the angle of the camera positioned, you can loosen the FCS
board mount nut, adjust the camera angle, and re-tighten the nut.
8. By changing the installed orientation of the FCS plug on the FCS centre fin socket, the direction of
the camera lens can be adjusted either towards the surfer or away from the surfer.
(The diagram is for illustration purpose, outer appearances of the camera and the screw are subject to
the models being connected)
Questions?
Need Some Help?
This manual should
help you understand
your new product.
If you still have questions,
visit our website:
www.iontheaction.com
Like Us:
www.facebook.com/iontheaction
Tweet Us:
www.twitter.com/iontheaction

DE-1
FCS-Boardhalterung
Kurzanleitung
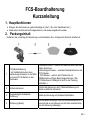
1. Hauptfunktionen
• Bringen Sie die Kamera an jedem Boardtyp an (Surf-, Ski- oder Skateboard etc.)
• Dabei kann die Kamera leicht abgenommen und wieder angebracht werden.
2. Packungsinhalt
Entfernen Sie vorsichtig die Verpackung und kontrollieren Sie, ob folgendes Zubehör erhalten ist:
1
FCS-Boardhalterung
- mit Feststellschrauben oben,
Verbindungsschrauben in der Mitte
und einem FCS-Stecker an der
Unterseite
Feststellschraube – montiert die Kamera direkt über den
Stativ-Anschluss.
Verbindungsschraube – verbindet Feststellschraube und
FCS-Stecker.
FCS-Stecker – wird an die FCS-Buchse mit
Mittellamelle auf Ihrem Board angeschlossen. (Die
FCS-Buchse mit Mittelgrat ist nicht in der Packung
enthalten.)
2 Sicherheitsriemen
Sichert die Kamera an der FCS-Boardhalterung und
bietet zusätzliche Sicherheit.
3
Doppelseitiges Klebeband -
Sicherung
Klebt die Sicherung auf die Board-Oberfläche.
4 Sicherung (Board)
An das Board anbringen und den Sicherheitsriemen mit
einem Ende an der Kamera und mit dem anderen Ende
an der Sicherung befestigen.

DE-2
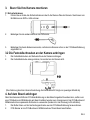
3. Bevor Sie Ihre Kamera montieren
3.1 Sicherheitsriemen
1. Führen Sie ein Ende des Sicherheitsriemens durch die Riemen-Öse der Kamera. Sie können zum
Einfädeln einen Stift zu Hilfe nehmen.
2. Befestigen Sie die andere Hälfte an der Sicherung.
3. Befestigen Sie beide Enden aneinander, nachdem die Kamera sicher an der FCS-Boardhalterung
angebracht ist.
3.2 Die Feststellschrauben an der Kamera anbringen
1. Die Feststellschrauben am Stativanschluss der Kamera anbringen.
2. Die Feststellschraube solange drehen, bis sie fest an der Kamera sitzt.
(Die Zeichnung dient der Veranschaulichung; die Kameraansicht hängt vom jeweiligen Modell ab)
4. Auf dem Board anbringen
Damit die Kamera mithilfe der FCS-Boardhalterung an das Board angebracht werden kann, sollte zuvor
eine FCS-Buchse mit Mittellamelle am Board installiert worden sein. Zusammen mit der FCS-Buchse mit
Mittellamelle ist eine passende Schraube zu verwenden (beides ist in der Packung nicht enthalten).
1. Die Mutter lösen und die Verbindungsschraube aus der FCS-Boardhalterung herausnehmen.
2. FCS-Stecker an die FCS-Buchse mit Mittellamelle auf Ihrem Board anschließen.

DE-3
3. Die passende Schraube in die Bohrung der FCS-Buchse mit Mittellamelle durch die
Schlaufenöffnung des FCS-Steckers führen und festziehen.
(Die Zeichnung dient der Veranschaulichung; die Schraubenansicht hängt vom jeweiligen Modell
ab)
4. Die Feststellschraube an die Kamera oberhalb des FCS-Steckers anbringen, die
Verbindungsschraube einführen und die Mutter anziehen.
(Wie die Feststellschraube an Ihrer Kamera angebracht wird, wird im Abschnitt 3.2 näher
beschrieben.)
(Die Zeichnung dient der Veranschaulichung; die Kameraansicht hängt vom jeweiligen Modell ab)
Hinweis: Bitte sicherstellten, dass das Gewinde der Feststellschraube korrekt zum FCS-Stecker passt
5. Die Schutzfolie des doppelseitigen Klebebandes an der Sicherung abziehen und die Sicherung
an eine geeignete Stelle auf dem Brett aufkleben.
Hinweis: Vor dem Anbringen sicherstellen, dass die Board-Oberfläche, auf der das doppelseitige
Klebeband aufgebracht wird, sauber ist, damit die Sicherung fest auf dem Board fixiert werden

DE-4
kann.
6. Kamera und Sicherung der FCS-Boardhalterung mit dem Sicherungsriemen verbinden. Siehe
Abschnitt 3.1.
7. Wenn der Winkel der angebrachten Kamera verändert werden soll, können Sie die Mutter der
FCS-Boardhalterung lösen, den Kamerawinkel anpassen und die Mutter wieder anziehen.
8. Wenn Sie die Ausrichtung des installierten FCS-Steckers oder der FCS-Buchse mit Mittellamelle
ändern, kann die Richtung des Kameraobjektivs entweder in Richtung des Surfers oder vom
Surfer weg angepasst werden.
(Die Zeichnung dient der Veranschaulichung; die Kamera- und Schraubenansicht hängt vom jeweiligen
Modell ab).
Fragen?
Benötigen Sie Hilfe?
Dieses Handbuch
soll Ihnen helfen, Ihr
neues Produkt zu
verstehen.
Wenn Sie noch Fragen
haben,
Besuchen Sie unsere
Website:
www.iontheaction.com
Gefällt mir:
www.facebook.com/iontheaction
Senden Sie uns einen Tweet:
www.twitter.com/iontheaction

FR-1
Monture FCS pour planche
Guide de démarrage rapide
1. Caractéristiques principales
• Permet d'attacher la caméra à n'importe quel type de planche (surf , sky ou skateboard, etc.).
• Permet l'installation et le retrait aisé de la caméra.
2. Contenu de la boîte
Déballez le contenu de la boîte avec précautions et confirmez la présence des éléments suivants :
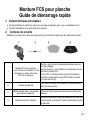
1
Monture FCS pour planche
- avec vis fixe sur le dessus, vis de
connexion au milieu et la prise
FCS sur le dessous.
Vis fixe - pour monter la caméra directement avec un
port pour trépied.
Vis de connexion - pour effectuer la connexion entre la
vis fixe et la prise FCS.
Prise FCS - se branche dans le port FCS d'aileron
central sur votre planche (port FCS d'aileron central
non livré dans le kit).
2
Cordon de sécurité
Pour fixer la caméra à la monture FCS pour planche
pour plus de sécurité.
3
Adhésif double face - pour fixation
de la pièce de sécurité.
Permet de fixer la pièce de sécurité à la surface de la
planche.
4
Pièce de sécurité - planche
Se colle à la planche et permet d'attacher le cordon de
sécurité entre la caméra et l'autre extrémité de la pièce
de sécurité.

FR-2
3. Avant de monter votre caméra
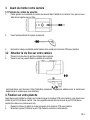
3.1 Fixation du cordon de sécurité
1. Faites passez une extrémité du cordon de sécurité dans l'œillet de la caméra. Vous pouvez vous
aider d'une aiguille pour ce faire.
2. Fixez l'autre extrémité à la pièce de sécurité.
3. Enclenchez chaque extrémité après fixation de la caméra à la monture FCS pour planche.
3.2 Attacher la vis fixe sur votre caméra
1. Placez la vis fixe dans le port pour trépied de la caméra.
2. Vissez la vis fixe jusqu'à fixation complète à la caméra.
(les illustrations sont fournies à titre d'indication seulement. L'apparence extérieure de la caméra est
dépendante du modèle que vous attachez).
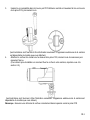
4. Fixation sur votre planche
Avant de pouvoir installer la caméra sur la planche avec la monture FCS pour planche, vous devez avoir
installé le port FCS d'aileron central. Une vis compatible devrait être livrée avec le port FCS d'aileron
central (tous deux non livrés avec le kit).
1. Desserrez l'écrou et retirez la vis de connexion de la monture FCS pour planche.
2. Branchez la prise FCS dans le port FCS d'aileron central sur votre planche.

FR-3
3. Insérez la vis compatible dans le trou du port FCS d'aileron central en traversant le trou en boucle
de la prise FCS, puis serrez la vis.
(les illustrations sont fournies à titre d'indication seulement. L'apparence extérieure de la caméra
est dépendante du modèle que vous attachez).
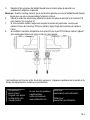
4. Attachez la vis fixe à la caméra sur le dessus de la prise FCS, insérez la vis de connexion puis
resserrez l'écrou.
(Pour obtenir plus de détails sur comment fixer la vis fixe à votre caméra, reportez-vous à la
section 3.2.)
(les illustrations sont fournies à titre d'indication seulement. L'apparence extérieure de la caméra est
dépendante du modèle que vous utilisez).
Remarque : Assurez-vous d'insérer la vis fixe correctement dans le pas de vis de la prise FCS

FR-4
5. Décollez le film protecteur de l'adhésif double face et collez la pièce de sécurité à un
emplacement adapté sur la planche.
Remarque : Avant le montage, assurez que la surface de la planche qui recevra l'adhésif double face est
propre pour que celui-ci puisse adhérer fortement à celle-ci.
6. Utilisez le cordon de sécurité pour attacher la caméra à la pièce de sécurité de la monture FCS
pour planche. Voir la section 3.1
7. Si vous souhaitez modifier l'angle selon laquelle la caméra est positionnée, vous pouvez
desserrer l'écrou de la monture FCS pour planche, régler l'angle de la caméra puis resserrer
l'écrou.
8. En modifiant l'orientation d'installation de la prise FCS sur le port FCS d'aileron central, l'objectif
de la caméra peut être tourné vers le surfer ou à son opposé.
(les illustrations sont fournies à titre d'indication seulement. L'apparence extérieure de la caméra et du
casque est dépendante du modèle que vous attachez).
Des questions ?
Besoin d'aide ?
Ce guide vous aidera
à comprendre votre
nouveau produit
Si vous avez des questions
supplémentaires,
visitez notre site web :
www.iontheaction.com
Aimez nous :
www.facebook.com/iontheaction
Twittez nous :
www.twitter.com/iontheaction

IT-1
Supporto da tavola FCS
Guida Rapida
1. Caratteristiche principali
• Consente di fissare la videocamera a ogni tipo di tavola (surf, sci, skate ecc.).
• Montaggio e smontaggio della videocamera facili.
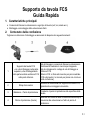
2. Contenuto della confezione
Togliere con attenzione l’imballaggio e assicurarsi di disporre dei seguenti elementi:
1
Supporto da tavola FCS
-con vite di fissaggio nella parte
superiore, vite di collegamento
nella parte centrale e attacco FCS
nella parte inferiore
Vite di fissaggio: consente di fissare la videocamera
direttamente mediante lo zoccolo per treppiede.
Vite di collegamento: collega la vite di fissaggio e
l'attacco FCS.
Attacco FCS: si fissa allo zoccolo per pinna centrale
FCS sulla tavola ( lo zoccolo per pinna non è incluso
nella confezione).
2
Strap di sicurezza
Assicura la videocamera al supporto da tavola FCS,
garantendo una maggiore sicurezza.
3
Biadesivo - Pezzo di protezione
Fa aderire il pezzo di protezione alla superficie della
tavola.
4
Pezzo di protezione (tavola)
Aderisce alla tavola e fissa un'estremità dello strap di
sicurezza alla videocamera e l'altro al pezzo di
protezione.

IT-2
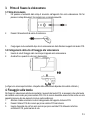
3. Prima di fissare la videocamera
3.1 Strap di sicurezza
1. Far passare un’estremità dello strap di sicurezza nell'apposito foro sulla videocamera. Per far
passare lo strap attraverso il foro aiutarsi con un utensile appuntito.
2. Fissare l'altra estremità al pezzo di protezione.
3. Congiungere le due estremità dopo che la videocamera è stata fissata al supporto da tavola FCS
.
3.2 Collegamento della vite di fissaggio alla videocamera
1. Inserire la vite di fissaggio nello zoccolo per treppiede sulla videocamera.
2. Avvitare fino a quando la vite non è ben serrata.
(La figura è a solo scopo illustrativo. L'aspetto della videocamera dipende dal modello utilizzato.)
4. Fissaggio sulla tavola
Per fissare la videocamera alla tavola mediante il supporto da tavola FCS, è necessario che sulla tavola
sia installato uno zoccolo per pinna centrale FCS. Con lo zoccolo dovrebbe essere fornita anche una vite
apposita (nessuno dei due elementi è incluso nella confezione).
1. Allentare il dado ed estrarre la vite di collegamento dal supporto da tavola FCS.
2. Fissare l'attacco FCS allo zoccolo per pinna centrale FCS sulla tavola.
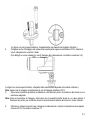
3. Inserire l'apposita vite nel foro sullo zoccolo per pinna centrale FCS attraverso la feritoia
sull'attacco FCS, quindi serrare la vite.

IT-3
(La figura è a solo scopo illustrativo. L'aspetto della vite dipende dal modello utilizzato.)
4. Collegare la vite di fissaggio alla videocamera nella parte superiore dell'attacco FCS, inserire la
vite di collegamento e serrare il dado.
(Per dettagli su come collegare la vite di fissaggio alla videocamera, consultare la sezione 3.2.)
(La figura è a solo scopo illustrativo. L'aspetto della videocamera dipende dal modello utilizzato.)
Nota: assicurarsi di collegare correttamente la vite di fissaggio all'attacco FCS.
5. Rimuovere la pellicola protettiva sul biadesivo e far aderire il pezzo di protezione alla tavola in una
posizione adeguata.
Nota: prima di procedere al fissaggio, assicurarsi che la superficie della tavola su cui deve aderire il
biadesivo sia pulita, per consentire al pezzo di protezione di aderire alla tavola in modo ottimale.
6. Utilizzare lo strap di sicurezza per collegare la videocamera e il pezzo di protezione del supporto
da tavola FCS. Consultare la sezione 3.1.

IT-4
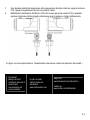
7. Se si desidera modificare l'angolazione della videocamera, allentare il dado sul supporto da tavola
FCS, regolare l'angolazione e serrare nuovamente il dado.
8. Modificando l'orientamento dell'attacco FCS sullo zoccolo per pinna centrale FCS, è possibile
regolare la direzione della lente della videocamera verso la persona o lontano dalla persona.
(La figura è a solo scopo illustrativo. L'aspetto della videocamera e della vite dipendono dai modelli.)
Domande?
Bisogno d’aiuto?
Il presente manuale ti
aiuterà nella
comprensione del
nuovo prodotto.
In caso di dubbi,
visita il nostro sito
all’indirizzo
www.iontheaction.com.
Seguici su
www.facebook.com/iontheaction
Twittaci su
www.twitter.com/iontheaction

SP-1
Soporte FCS para tabla
Guía rápida de usuario
1. Características principales
• Acopla la cámara a cualquier tipo de tabla (surf, ski o skate etc.)
• Fácil montaje y desmontaje de la cámara.
2. Contenido
Abre el paquete cuidadosamente y asegúrate que contiene los siguientes artículos:
1
Soporte FCS para tabla
-con tornillo central en la parte
superior, tornillo de conexión en el
centro y enganche FCS en la parte
inferior
Tornillo central – Para montar la cámara directamente
en él.
Tornillo de conexión- conecta el tornillo central con el
enganche FCS.
Enganche FCS-se acopla al sistema de enganche
central FCS de tu tabla (este sistema de enganche
central FCS no viene incluido)
2
Cordón de seguridad
Asegura la cámara al soporte FCS y proporciona una
seguridad adicional.
3
Adhesivo doble cara – Pieza de
seguridad
Adhiere la pieza de seguridad a la superficie de la
tabla.
4
Pieza de seguridad para tabla
Se adhiere a la tabla y se ajusta un extremo del cordón
de seguridad a la pieza de seguridad y el otro extremo
a la cámara.

SP-2
3. Antes de montar la cámara
3.1 Cordón de seguridad
1. Ata uno de los extremos del cordón de seguridad al agujero previsto para ello en la cámara.
Utiliza un objeto punzante para hacerlo pasar a través del agujero.
2. Acopla el otro extremo a la pieza de seguridad.
3. Junta los dos extremos después de que la cámara haya sido fijada al soporte FCS.
3.2 Acoplar el tornillo central a la cámara
1. Ajusta el tornillo central a la cámara en la rosca prevista para él que se encuentra en la parte
inferior de la cámara.
2. Atorníllalo hasta que esté firmemente sujeto a la cámara.
(La imagen es solo para ilustrar el procedimiento, la apariencia externa de la cámara depende del
modelo que se vaya a conectar)
4. Montar la cámara sobre la tabla
Para instalar la cámara sobre la tabla con el soporte FCS, deberías tener preinstalado el sistema de
enganche central FCS en tu tabla. Un tornillo adecuado al sistema FCS debería ir incluido con él (ambos
no incluidos en este paquete).
1. Afloja la tuerca y saca el tornillo de conexión del soporte FCS.
2. Acopla el enganche FCS en el sistema de enganche central FCS de tu tabla.

SP-3
3. Inserta el tornillo adecuado en la rosca prevista para él que viene en el sistema de enganche
central FCS a través del enganche FCS y aprieta el tornillo.
(La imagen es solo para ilustrar el procedimiento, la apariencia externa del tornillo depende del
modelo que se vaya a conectar)
4. Acopla el tornillo central con la cámara a la parte superior del enganche FCS, inserta el tornillo de
conexión, y ajusta la tuerca.
(Para ver los detalles de cómo acoplar el tornillo central y la cámara ve a la sección 3.2.)
(La imagen es solo para ilustrar el procedimiento, la apariencia externa de la cámara depende
del modelo que se vaya a conectar)
Nota: Asegúrate de haber fijado correctamente el tornillo central al enganche FCS
5. Despega el plástico protector del adhesivo doble cara de la pieza de seguridad y pega ésta en el
lugar más apropiado de la tabla.

SP-4
Nota: Antes de acoplarla asegúrate de que la superficie donde vayas a pegar el adhesivo está limpia de
modo que la pieza de seguridad pueda ser fijada correctamente sobre la tabla.
6. Usa el cordón de seguridad para unir la cámara y la pieza de seguridad del soporte FCS. Ver
sección 3.1.
7. Si quieres cambiar el ángulo de la cámara puedes aflojar la tuerca del soporte FCS, ajustar el
ángulo y volver a apretar la tuerca.
8. Al cambiar la orientación del enganche FCS en el sistema de enganche central FCS, la dirección
en la que enfoca la lente de la cámara se puede ajustar tanto hacia el surfista como desde el
surfista.
(La imagen es solo para ilustrar el procedimiento, la apariencia externa de la cámara depende del
modelo que se vaya a conectar)
¿Preguntas?
¿Necesitas ayuda?
Este manual debería
ayudarte a entender
el producto.
Si todavía tienes preguntas
visita nuestra web:
www.iontheaction.es
Like Us:
www.facebook.com/iontheaction
Tweet Us:
www.twitter.com/iontheaction

PT-1
Suporte de prancha FCS
Guia de iniciação rápido
1. Características principais
• Fixa a câmara a qualquer tipo de prancha. (surf, ski ou skate etc.)
• Facilita a montagem e desmontagem.
2. Conteúdo da embalagem
Abre cuidadosamente a embalagem e confirma que tens os seguintes acessórios:
1
Suporte prancha FCS
-com parafuso de fixação no topo
e ligação ao encaixe FCS na parte
de baixo.
Parafuso de fixação – Fixa a câmara diretamente via o
encaixe de tripé.
Parafuso de ligação- junta o parafuso ao encaixe da
FCS.
Encaixa a FCS no centro do encaixe FCS..( O encaixe
FCS não está incluído na embalagem)
2 Correia de segurança Garante a segurança da câmara ao encaixe da FCS
3
Adesivo duple face para
segurança
Cola a peça de segurança na superfície da prancha.
4 Peça de segurança da prancha
Cola na prancha e fixa a correia de segurança numa
ponta e na peças de segurança na oura..

PT-2
3. Antes de fixar a sua câmara
3.1 Correia de segurança
1. Passa uma ponta da correia de segurança no orifício para o efeito na câmara. Utiliza um alfinete
para passear a correia.
2. Fixa a outra ponta à peça de segurança
3. Clipe as duas correias juntas para fixar no suporte de prancha FCS.
3.2 Coloca o parafuso na câmara
1. Coloca o parafuso no sapata de tripé da câmara.
2. Aparafusa bem até estar apertado na câmara.
(O diagrama serve apenas para ilustração, as aparências podem mudar conforme o modelo fixado.)
4. Montar na tua prancha
Para instalar o suporte da câmara no suporte de prancha FCS, a tua prancha deve estar pré instalada
com o sistema de encaixe central da FCS. O parafuso adequado é fornecido pela FCS. (ambos não
estão incluídos na embalagem).
1. Desaperta a rosca e tira o parafuso de fixação do suporte de prancha da FCS.
2. Encaixa o o suporte da FCS no encaixe central do suporte FCS da prancha..
3. Insere o parafuso correspondente no orifício do encaixe central pelo orifício do encaixe da FCS
e aperta o parafuso..

PT-3
(O diagrama serve apenas para ilustração. A aparência pode diferir consoante o modelo usado.)
4. Coloca o parafuso fixo no topo da tomada FCS, coloca o parafuso de fixação e aperta a rosca..
(Para saber mais pormenores acerca da fixação do parafuso na sua câmara, lê a secção)
(O diagrama serve apenas para ilustração. A aparência pode diferir consoante o modelo usado.)
Observação: Confirma por favor que fixaste bem o equipamento do parafuso fixo ao encaixe da FCS
corretamente
5. Tira a membrana do autocolante dupla face da peça de segurança e cola a peça de segurança
num sítio apropriado da prancha..
Nota: Antes de colar, confirma que a superfície da prancha onde vais colocar o autocolante está limpo
para a peça de segurança estar fixa de forma segura na prancha..
6. Usa a correia de segurança para prender a câmara à peça de segurança do suporte de prancha
FCS. Lê a secção 3.1

PT-4
7. Se queres mudar o ângulo da câmara, podes desapertar a rosca do suporte FCS, ajustar a
câmara e reapertar a rosca..
8. Ao mudar a orientação do encaixe da FCS no eixo do suporte central da FCS, a direção da
lente e pode ser ajustada em direção do surfista ou for a do ângulo de visão do surfista..
(O diagrama serve apenas para ilustração. A aparência pode diferir consoante o modelo usado.)
Perguntas?
Precisas de ajuda?
Este manual deveria
te ajudar a perceber
o funcionamento
deste acessório.
Se ainda tiveres perguntas
podes visitar o nosso
website:
www.ionthecamera.com
Faz gosto:
www.facebook.com/iontheaction
Envia-nos um Tweet:
www.twitter.com/iontheaction

RU-1
FCS Board Mount
Руководство по быстрому запуску
1. Основные функции
• Крепление камеры к любому типу доски (серфинг, лыжи, скейт и т.д.)
• Удобно снимать и крепить камеру.
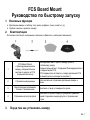
2. Комплектация
Осторожно достаньте содержимое упаковки и убедитесь в наличии следующего:
1
FCS Board Mount
-с фиксирующим винтом
сверху, соединительным
винтом по центру и FCS
соединителем снизу
Фиксирующий винт- крепит камеру прямо к
штативному гнезду.
Соединительный винт- Соединяет Фиксирующий винт
c соединителем FCS.
FCS соединитель-вставить в гнездо крепления FCS
на вашей доске (не входит в комплект)
2
Страховочный ремешок
Дополнительная страховка крепления камеры к
доске.
3
Двухсторонний клеящияся
стикер- Страховочный
Приклеить стикер к поверхности доски.
4
Страховочная штука-доска
Приклеить к доске/стикеру и прикрепить ремешок
одной стороной к камере другой к страховочной
штуке
3. Перед тем как установить камеру

RU-2
3.1 Ремешок
1. Проденьте один конец ремешка через специальное отверстие в камере.
2. Прикрепите другой конец к страховочной штуке.
3. Защелкните клипсу после того как камера установленна на крепление FCS Board Mount.
3.2 Крепление фиксирующего винта к камере
1. Установите фиксирующий винт в гнездо штатива на камере.
2. Полностью затяните фиксирующий винт в камеру.
(Этот рисунок только для иллюстрации. Внешний вид камеры зависит от закрепляемой модели)
4. Крепление к доске
Чтобы закрепить камеру к доске с помощью крепления FCS Board Mount, на вашей доске должно
быть установлено гнездо крепления FCS. Соответствующий винт должен прилагаться к гнезду
крепления FCS (не входит в комплект FCS Board Mount).
1. Ослабьте гайку и выньте соединительный винт из крепления.
2. Вставьте соединитель FCS в гнездо крепления на вашей доске.
3. Вставьте соответствующий винт в гнездо крепления
через отверстие на FCS соединителе и
затяните винт.

RU-3
(Этот рисунок только для иллюстрации. Внешний вид камеры зависит от закрепляемой модели)
4. Установите фиксирующий винт с камерой на FCS соединитель, вставьте соединительный
винт и закрутите гайку.
(Смотрите также раздел 3.2.)
(Этот рисунок только для иллюстрации. Внешний вид камеры зависит от закрепляемой модели)
Примечание: Пожалуйста убедитесь что правильно соединили фиксирующий винт с FCS
соединителем.
5. Снимите защитную пленку двустороннего стикера и приклейте его на подходящее место на
вашей доске. На стикер приклейте страховочную штуку.
Примечание: Перед тем как приклеивать стикер вычистите соответствующее
место на вашей
доске.

RU-4
6. Используйте ремешок чтобы соединить камеру со страховочной штукой. Смотрите раздел
3.1.
7. Для изменения угла крепления камеры, остабьте гайку крепления, измените угол камеры и
снова затяните гайку.
8. Изменяя направление FCS соединителя на гнезде крепления, можно менять направления
объектива камеры от или к райдеру.
(Этот рисунок только для иллюстрации. Внешний вид камеры зависит от закрепляемой модели)
Questions?
Need Some Help?
This manual should
help you understand
your new product.
If you still have questions,
visit our website:
www.iontheaction.com
Like Us:
www.facebook.com/iontheaction
Tweet Us:
www.twitter.com/iontheaction

繁-1
FCS 滑浪板組件
快速入門指南
1. 主要特徵
• 安裝相機至任何類型的滑浪板上(衝浪、滑雪,滑冰等)
• 可便捷迅速地將相機取下或重新安裝
2. 包裝內容
小心打開包裝,確保你有以下配件:
1
FCS 滑浪板組件
-頂部帶有滑浪板連接頂座元件,中
間帶連接螺母,底部帶 FCS 插頭
滑浪板連接頂座元件- 安裝於相機的三腳架插孔
連接螺母- 連接滑浪板頂座元件和 FCS 插頭
FCS 插頭-插入滑浪板 FCS 插槽裏面 (附件不包含 FCS
插槽)
2
安全繩 連接相機與 FCS 滑浪板元件,增強相機的安全保障
3
安全繩座膠墊 將安全繩座粘貼至滑浪板
4
安全繩座
粘貼于滑浪板,安全繩的一端系於相機,另一端系于安
全繩座

繁-2
3. 相機安裝前準備
3.1 安全繩
1. 將安全繩的一端繞進相機上的帶孔,你可以借助一根針將它穿進孔;
2. 將另一端系在安全繩座上;
3. 將相機安裝至 FCS 滑浪板組件後,把兩端扣在一起。
3.2 安裝滑浪板連接頂座元件至相機
1. 將滑浪板連接頂座元件螺絲放到相機的三腳架孔;
2. 旋動滑浪板連接頂座元件直到它在相機上扣緊。
(本圖僅供參考,相機外觀隨安裝的具體型號而定)
4. 安裝至滑浪板
你必須借助一個滑浪板FCS插槽及與此FCS插槽配用的螺絲釘將相機安裝至FCS滑浪板組件。(二者均不包
含於本包裝)
1. 鬆開 FCS 滑浪板元件上的連接件螺母,並取下連接件螺絲釘;
2. 將 FCS 插頭插入滑浪板的 FCS 插槽內;
3. 將 FCS 插槽配用的螺絲釘經 FCS 插頭半圓孔插入 FCS 插槽內,擰緊螺絲釘;

繁-3
(本圖僅供參考,螺絲釘外觀隨安裝的具體型號而定)
4. 將裝有相機的滑浪板連接頂座元件裝於 FCS 插頭上方,插上連接件螺絲釘,重新旋緊連接件螺母;
(請參考第 3.2 節,獲知如何將滑浪板連接頂座元件安裝至相機)
(相機圖片僅供參考,相機外觀隨安裝的具體型號而定)
注意:將滑浪板連接頂座元件裝于FCS插頭時,確保二者的齒輪吻合。
5. 撕下安全繩座膠墊的保護膜,將安全繩座粘貼至滑浪板合適的位置;
注意:安裝前,確保滑浪板表面安全繩座膠墊粘貼的區域潔淨,以便安全繩座被牢固地粘貼在滑浪板上。
6. 使用安全繩連接相機和 FCS 滑浪板上面的安全繩座(請參考第 3.1 節);
7. 你可以通過調節 FCS 滑浪板元件螺母,來改變拍攝角度。僅需鬆開螺母,調節相機角度,重新旋緊
螺母;
8. .通過改變 FCS 插頭在 FCS 插槽上的安裝方位,可以使相機鏡頭方向朝向飆網者或者偏離飆網者。

繁-4
(本圖片僅供參考,相機和螺絲釘外觀隨安裝的具體型號而定)
有些問題?
需要一些幫助?
本手冊將幫助你瞭解你的
新產品
如果您還有問題,請
訪問我們的網頁:
www.iontheaction.com
聯繫我們:
www.facebook.com/iontheaction
關注我們:
www.twitter.com/iontheaction

简-1
FCS 滑浪板组件
快速入门指南
1. 主要特征
• 安装相机至任何类型的滑浪板上(冲浪、滑雪,滑冰等)
• 可便捷迅速地将相机取下或重新安装
2. 包装内容
小心打开包装,确保你有以下配件:
1
FCS 滑浪板组件
-顶部带有滑浪板连接顶座组件,中
间带连接螺母,底部带 FCS 插头
滑浪板连接顶座组件- 安装于相机的三脚架插孔
连接螺母- 连接滑浪板顶座组件和 FCS 插头
FCS 插头-插入滑浪板 FCS 插槽里面 (附件不包含 FCS
插槽)
2 安全绳 连接相机与 FCS 滑浪板组件,增强相机的安全保障
3 安全绳座胶垫 将安全绳座粘贴至滑浪板
4
安全绳座
粘贴于滑浪板,安全绳的一端系于相机,另一端系于安
全绳座
3. 相机安装前准备
3.1 安全绳
1. 将安全绳的一端绕进相机上的带孔,你可以借助一根针将它穿进孔;

简-2
2. 将另一端系在安全绳座上;
3. 将相机安装至 FCS 滑浪板组件后,把两端扣在一起。
3.2 安装滑浪板连接顶座组件至相机
1. 将滑浪板连接顶座组件螺丝放到相机的三脚架孔;
2. 旋动滑浪板连接顶座组件直到它在相机上扣紧。
(本图仅供参考,相机外观随安装的具体型号而定)
4. 安装至滑浪板
你必须借助一个滑浪板FCS插槽及与此FCS插槽配用的螺丝钉将相机安装至FCS滑浪板组件。(二者均不
包含于本包装)
1. 松开 FCS 滑浪板组件上的连接件螺母,并取下连接件螺丝钉;
2. 将 FCS 插头插入滑浪板的 FCS 插槽内;
3. 将 FCS 插槽配用的螺丝钉经 FCS 插头半圆孔插入 FCS 插槽内,拧紧螺丝钉;

简-3
(本图仅供参考,螺丝钉外观随安装的具体型号而定)
4. 将装有相机的滑浪板连接顶座组件装于 FCS 插头上方,插上连接件螺丝钉,重新旋紧连接件螺母;
(请参考第 3.2 节,获知如何将滑浪板连接顶座组件安装至相机)
(相机图片仅供参考,相机外观随安装的具体型号而定)
注意:将滑浪板连接顶座组件装于FCS插头时,确保二者的齿轮吻合。
5. 撕下安全绳座胶垫的保护膜,将安全绳座粘贴至滑浪板合适的位置;
注意:安装前,确保滑浪板表面安全绳座胶垫粘贴的区域洁净,以便安全绳座被牢固地粘贴在滑浪板上。
6. 使用安全绳连接相机和 FCS 滑浪板上面的安全绳座(请参考第 3.1 节);
7. 你可以通过调节 FCS 滑浪板组件螺母,来改变拍摄角度。仅需松开螺母,调节相机角度,重新旋紧
螺母;

简-4
8. .通过改变 FCS 插头在 FCS 插槽上的安装方位,可以使相机镜头方向朝向冲浪者或者偏
离冲浪者。
(本图片仅供参考,相机和螺丝钉外观随安装的具体型号而定)
AM-QG-5021-9L-EU2
有些问题?
需要一些帮助?
本手册将帮助你了解你的新产品
如果您还有问题,请
访问我们的网页:
www.iontheaction.com
联系我们:
www.facebook.com/iontheaction
关注我们:
www.twitter.com/iontheaction
-
 1
1
-
 2
2
-
 3
3
-
 4
4
-
 5
5
-
 6
6
-
 7
7
-
 8
8
-
 9
9
-
 10
10
-
 11
11
-
 12
12
-
 13
13
-
 14
14
-
 15
15
-
 16
16
-
 17
17
-
 18
18
-
 19
19
-
 20
20
-
 21
21
-
 22
22
-
 23
23
-
 24
24
-
 25
25
-
 26
26
-
 27
27
-
 28
28
-
 29
29
-
 30
30
-
 31
31
-
 32
32
-
 33
33
-
 34
34
-
 35
35
-
 36
36
-
 37
37


iON FCS Board Mount Guía de inicio rápido
- Tipo
- Guía de inicio rápido
- Este manual también es adecuado para
en otros idiomas
- français: iON FCS Board Mount Guide de démarrage rapide
- italiano: iON FCS Board Mount Guida Rapida
- português: iON FCS Board Mount Guia rápido
Artículos relacionados
Otros documentos
-
LevelOne WBR-6022 Quick Installation Manual
-
-
AL-KO Hauswasserwerk "HW 4500 FCS" Manual de usuario
-
 BSS Audio FCS-966 El manual del propietario
-
STIHL KM FCS Straight Edger Manual de usuario
-
-
-
Thrustmaster 2960782 2961068 Manual de usuario
-
Ferm CDM1049 El manual del propietario
-
