Galaxy 72135078 El manual del propietario
- Categoría
- Aspiradoras
- Tipo
- El manual del propietario
Este manual también es adecuado para

Owner's Manual
Manual del Propietario
TM
Vacuum Cleaner
Aspiradora
Models/Modelos
721.35078
721.35079
CAUTION: Read and follow all safety
and operating instructions before first
use of this product.
CUIDADO: Lea y sigue todas las
instrucciones de operaci6n y seguridad
antes del use de este producto.
Sears, Roebuck and Co.
www.sears.com
P/No.: 3828FI3841C
Directions for Use
It is a violation of Federal law to use this
product in a manner inconsistent with its
labeling.
Direcciones de uso
Es una violaci6n ala ley Federal utilizar
este producto de una manera contraria
con su etiquetado.
Hoffman Estates, IL60179 U.S.A.

Before UsingYourNewVacuum.......................2
GalaxyVacuumCleanerWarranty ................2
ImportantSafety Instructions............................3
Partsand Features.............................................4
AssemblyInstructions.......................................5
OperatingInstructions.......................................6
CordRelease....................................................6
AutomaticHeightAdjustment...........................7
HandleReleaseandPositions..........................7
On/OffSwitch....................................................7
Attachments......................................................7
AttachmentsUseChart.....................................9
VacuumingTips................................................9
PerformanceFeatures....................................10
Vacuum Cleaner Care....................................... 1t
Vacuum Storage............................................. 1t
Cleaning Exterior and Attachments ................ 11
Dust Bag Changing ......................................... 12
Motor Safety Filter Cleaning ........................... 13
Exhaust Filter Cleaning and Replacement.....13
Belt Changing and Agitator Cleaning .............. 14
Agitator Servicing ............................................ 16
Clog Removal ................................................. 17
Troubleshooting ............................................... 18
Master Protection Agreements ........................ 19
Service ................................................ Back Cover
Please read this guide. It will help you assemble and operate your new Galaxy vacuum in the safest
and most effective way.
For more information about the care and operation, call your nearest Sears store.
You will need the complete model and serial numbers when requesting information.
Your vacuum's model and serial numbers are located on the Model and Serial Number Plate.
Use the space below to record the model number and serial number of your new Galaxy vacuum.
Model No.
Serial No.
Date of Purchase
Keep this book and your sales check (receipt) in a safe place for future reference.
LIMITED ONE YEAR WARRANTY ON GALAXY VACUUM CLEANER
This warranty is for oneyear from the date of purchase, and includes only private household
vacuum cleaner use. During the warranty year, when this vacuum cleaner is operated and
maintained according to the owner's manual instructions, Sears will repair any defects in material
or workmanship free ofcharge.
This warranty excludes vacuum bags, belts, light bulbs, and filters, which are expendable parts
and become worn during normal use.
For warranty service, return this vacuum cleaner to the nearest Sears Parts and Repair
Center in the United States.
This warranty applies only while this product is in use in the United States.
This warranty gives you specific legal rights, and you may also have other rightswhich vary from
state to state.
Sears, Roebuck and Co., D/817WA, Hoffman Estates, IL 60170
-2-

m
I_/Al_l_l I I_1/__
U --/'_1_1_11 I_1_1 - To reduce the risk of fire, electric shock, or injury:
Your safety is important to us. To reduce the risk of fire, electric shock, injury to
persons or damage when using your vacuum cleaner, follow basic safety precautions
including the following:
Read this manual before assembling or using
¢our vacuum cleaner.
Use your cleaner only as described in this
manual. Use only with supplied attachments.
To reduce the risk of electric shock- Do not
use outdoors or on wet surfaces.
Do not vacuum up water.
Disconnect electrical supply before servicing
or cleaning out brush area. Failure to do so
could result in electric shock or brush suddenly
starting.
Always turn cleaner off before connecting or
disconnecting the hose.
Always turn cleaner off before unplugging.
Do not unplug by pulling on cord. To unplug,
grasp the plug, not the cord.
Hold plug when rewinding onto cord reel.
Do not allow plug to whip when rewinding.
Do not use with damaged cord or plug. If
cleaner is not working as it should, has been
dropped, damaged, left outdoors, or dropped
into water, return it to a Sears Service Center.
Do not pull or carry by cord, use cord as a
handle, close door on cord, or pull cord around
sharp edges or corners. Do not run cleaner over
cord. Keep cord away from heated surfaces.
De not leave cleaner when plugged in. Unplug
from outlet when not in use and before servicing.
Do not allow to be used as a toy. Close attention
is necessary when used by er near children.
Do not handle plug or cleaner with wet hands.
Do not operate the cleaner with a punctured
hose. Replace if cut or worn. Avoid vacuuming
sharp objects.
De not use withany openingblocked;keep
free of dust, lint,hair and anythingthat may
reduceair flow.
Keephair,looseclothing,fingers, and all parts
of bodyawayfrom openingsandmovingparts.
De not use cleanerwithoutdust bagand/or
filters in place.
Alwayschangethe dust bagaftervacuuming
carpetcleanersor freshener,powdersandfine
dust.These productsclogthe bag,reduce
airflowand cancausethe bagto burst. Failure
to change bagcould causepermanentdamage
to the cleaner.
Keepthe PEbag(withholes)awayfrombabies
andchildren,donotusein cribs,beds,carriages,
or playpens.This thinfilm mayclingto noseand
mouthandpreventbreathing.
De not usethecleanerto pick upsharp hard
objects,smalltoys, pins,paper,etc.Theymay
damagethe cleaneror dustbag.
Donot pickupanythingthatisburningorsmoking,
suchascigarettes,matches,or hotashes.
Donotusevacuumcleaner
topick upflammableorcombustibleliquids
(gasoline,cleaningfluids,perfumes,etc.),or use
in areaswheretheymay bepresent.Thefumes
fromthesesubstancescancreatea fire hazard
or explosion.
Useextra care when cleaningon stairs.Donot
put onchairs,tables,etc.Keeponfloor.
Youare responsiblefor makingsurethat your
vacuumcleaneris not usedbyanyone unable
to operate it properly.
SAVE THESE INSTRUCTIONS
Proper assembly and safe use of your vacuum cleaner are your responsibilities. Your cleaner is
intended only for household use. Read this Owner's Manual carefully for important use and
safety information. This guide contains safety statements under warning and caution symbols.
Please pay special attention to these boxes and follow any instructions given. WARNING
statements alert you to such hazards as fire, electric shock, burns and serious personal injury.
CAUTION statements alert you to such hazards as moderate personal injury and/or property damage.
-3-

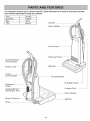
It is importanttoknow yourvacuumcleaner's partsandfeaturesto assureits properand safe
use, Reviewthesebeforeusingyour cleaner.
Item Part No.
Dust Bag 50688
Belt 5275
Filter 86878
Handle
Hose Holder
Dust
Quick
Cord Hanger
Exhaust Panel
Bumper
Lower
Cord Hanger
Extension
Wand
Dusting
Upholstery Tool
Motor
Hose
On/Off Switch
E-Z Belt
Crevice Tool
Floor Nozzle
Agitator
-4-

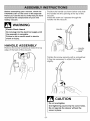
Before assemblingyour vacuum,checkthe
PACKINGLISTonthe coverof the separate
Parts List. Use this list to verify that you have
received all the components of your new
Galaxy vacuum.
WARNING
ElectricShock Hazard
Donotplugintothe electricalsupplyuntil
the assemblyiscomplete,
Failureto doso could resultin electric
shockor injury,
HANDLE ASSEMBLY
Remove the screw located just below the top
edge of the back of the vacuum.
Positionthe handle as shown below and slide
the handle into the opening at the top of the
vacuum.
Insert the screw so it passes through the
handle into the vacuum.
Tighten the screw securely with a screwdriver.
It may be necessary to adjust the handle
slightly.
CAUTION
Donotovertighten,
Overtightening could stripthe screwholes,
Donot operatethe cleanerwithoutthe
screwin place,
-5-

HOSE ASSEMBLY
After the handle has been assembled, attach the
lower hose holder (see below). Insert the upper
hose end into the opening on the upright back.
Place the hose over the hose holder. Clip the
hose into the lower hoseholder. Slide and twist
the lower hose end into the hosecoupling on the
floor nozzle. Makesure hose is firmly connected
before using the vacuum.
Handle
Holder
Hose
Holder
Upper
Hose
End
Coupling
CORD ASSEMBLY
Makesure the quick release cord hanger is in
the upright position. _,,
Lock the cord into
place by forcing it Notch
intothe locking \ .....
notchon the body
of the upper cord
hanger as shown.
This helps keep the
power cord out of Cord
the path of the floor
nozzle.
Release Cord
Ranger
Cord
Cord
Ranger
Wrap the
power cord
around the
quick release
cord hanger
and lower cord
hanger, and
clip the plug
onto the power
cord.
OPERATING INSTRUCTIONS
1, Turn the quick
release cord hanger
to either side and
down to releasethe
power cord.
Quick
Release
Cord
Hanger
2, Unclipthe power cord plug from the power
cord and pullthe cord off the quick release cord
hanger. Check to be sure the power cord is still
locked into the locking notch. See CORD
ASSEMBLY.
3, Check to see if the cleaner has bag
installed. See DUST BAG CHANGING.
4, Plugthe polarized power cord into a 120
Volt electrical outlet.
-6-
NOTE: To reducethe riskofelectricshock,this
vacuumcleanerhas apolarizedplug, one bladeis
widerthanthe other.Thisplug willfit in a polarized
outletonlyone way.Ifthe plugdoesnotfit fully in
the outlet,reversethe plug. If it stilldoesnotfit,
contacta qualifiedelectricianto installthe proper
outlet.Do notchange the pluginanyway.
WARNING
Personal Injury and Product Damage
Hazard!
•DONOTpluginifswitchisinONposition,
Personalinjuryor productdamagecould
result,
•DONOTuseoutletsabovecounters,Damage
toitemsinsurroundingareacouldoccur.

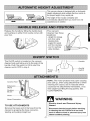
ThisvacuumcleanerisdesignedwithanAutomatic
HeightAdjustmentwhichadjuststhefloornozzleto
the properheightofanycarpetpile.
Theheightoffloornozzleisinstantlyand
automaticallyadjustedwhenyoumovefromone
carpetedareatoanother.
Release the handle by tilting the handle back
and pushing on either front nozzle corner with
your foot.
The vacuum
cleaner has three
positions:
- Uprightfor storage
andwhenusing
cleaningtools.
-Angledfor carpet
andfloorcleaning.
- Lowfor reaching
underfurniture.
The On/Off switch is located on the vacuum
cleaner body just below and to the side of the
handle. Push the switch to ON to start the
cleaner and to OFF to stop it.
Cord
Handle
Switch
Crevice Tool _'_'
• i
Extension_'_ ii
Wand
Dusting __ i
Brush
Hose
Hose Connector
TO USE ATTACHMENTS
Remove the lower end ofthe hose from the
cleaner by grasping the hose connector,
twisting and pulling straight out.
NOTE: The motor protector may open causing
poor pick up, when using attachments or when
cleaning new carpet, due to reduced airflow
caused by the attachments themselves, orby
new carpet fuzz filling the bag quickly. See
CLOG REMOVAL.
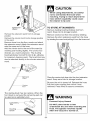
WARNING
Electric shock and Personal Injury
Hazard
Disconnectelectricalsupplybeforeservicing
orcleaningtheunit.Failuretodosocould
resultinelectricshockorpersonalinjuryfrom
cleanersuddenlystarting,
-7-

Extension
Wand
Removethe extensionwand fromits storage
position.
Removethe crevicetool from its storageposition
in the wand.
Remove hose from the floor nozzle and attach
the extension wand.Attach the extension wand
onto the open end of the hose.
Add the crevice tool to the end ofthe wand by
inserting and twistingslightly. The crevice tool
doubles as a wand extension. The dusting
brush/upholstery tool will fitonto itstip, allowing
for maximumcleaning reach. The brush/tool may
also be attached directly to the shorter extension
wand.
i!::._
The dusting brush has two options. When the
front brush is removed the remaining part can
be used as an upholstery tool.
Upholstery_@
Brush
CAUTION
When using attachments, be careful
not to overextend the hose when
reaching. Trying to reach beyond the
hose stretch capability could cause
the cleaner to tip over.
TO STORE ATTACHMENTS
Remove dusting brush/upholstery tool from
wand. Snap into its storage location.
Remove crevice tool from the wand by twisting.
Remove the short extension wand from the hose
bytwistingthe wandand pullingitfrom the hose end.
Placethe crevicetool downintothe shortextension
wand. Snap wand into its storage location.
Be sure the unit is turned off. Reinsert the hose
fully into hose coupling from which it was
removed. Press firmly to assure connection.
WARNING
Personal Injury Hazard
DO NOT place hands or feet
underneath the unit when inserting the
hose. The agitator revolves rapidly
when the vacuum is turned on.
-8-

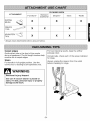
CLEANINGAREA
ATTACHMENT Between
Furniture* Cushions* Drapes* Stairs Wails
DUSTING ___ X X X
BRUSH
CREVICE_TOOL X X X
UPHOLSTERY_
TOOL X X X
* Always cleanattachmentsbeforeusingon fabrics.
Carpet edges
Guide either side or the front of the nozzle
along a baseboard. The full length brushes help
remove dirt at carpet edges.
Stairs
Put handle in full upright position. Use the
crevice tool or dusting brush/upholstery tool.
WARNING
Personal Injury Hazard
Use care if vacuumcleaneris placedon
stairs, If it falls, personalinjury or property
damagecould result.
For bestcleaning results, keep the airflow
passage clear.
Occasionally, check each of the areas indicated
for clogs.
Always unplug the cleaner from the outlet
before checking for clogs.
-9-

WARNING
Electric Shock And Personal Injury
Hazard
Disconnect electrical supply before
servicing or cleaning the unit.
Failure to do so could result in
electric shock or personal injury from
cleaner suddenly starting.
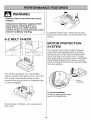
E-Z BELT CHECK
Turn off and unplug the unit. The E-Z Belt
Check consists of two latches on the top of the
floor nozzle. These latches allow for easy
removalof the nozzle coverto changethe belt
or clean the agitator.
Place thumbs on latches, push outward, and
raise cover.
To replace nozzle cover, insert tabs into slots,
lower cover onto nozzle, and push latchesin to
secure.
MOTOR PROTECTION
SYSTEM
This vacuum has a motor protector by-pass
valve which automatically opens to provide
cooling air to the motor when aclog prevents
the normal flow ofair to the motor. If the by-
pass valve opens to prevent motoroverheating
and possible damage to the vacuum, you will
noticea change of sound as air rushes through
the valve opening.
Protector
To correct problem:
Check for and remove clogs.
See CLOG REMOVAL.
-10-

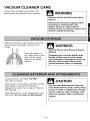
VACUUM CLEANER CARE
Always follow alI safety precautions when
cleaning and servicing the vacuum cleaner.
WARNING
Electric Shock And Personal Injury
Hazard
Disconnect electrical supply before
servicing or cleaning the unit.
Failure to do so could result in
electric shock or personal injury from
cleaner suddenly starting.
Gather the cord and wrap it loosely around the
quick release cord hanger and lower cord
hanger.
Store the cleaner in a
dry, indoor area, on the
floor with the handle
locked in the upright
position.
WARNING
Electric Shock And Personal Injury
Hazard
Wrapping the cord too tightly puts
stress on the cord and can cause
cord damage. A damaged cord is an
electric shock hazard and could
cause personal injury or damage.
Unplug cord from wall outlet. DO NOT
drip water on cleaner.
Clean exterior using a clean, soft cloth that has
been dipped in a solution of mild liquid
detergent and water, then wrung dry. Wipe dry
after cleaning.
Wash attachments in warm soapy water, rinse
and air dry. Do not clean in dishwasher.
CAUTION
Do not use attachments if they are
wet. Attachments used in dirty areas,
such as under a refrigerator, should
not be used on other surfaces until
they are washed. They could leave
marks.
-11-

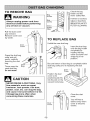
TO REMOVE BAG
WARNING
Always unplug power cord from
electrical outlet before performing
any service on vacuum.
Pull the dust cover /-7
grip forward. _._._
Remove cover and i_
lay aside. _
Dust
Cover _._.
Graspthe dust bag
collar and pull
gently,carefully
removing the dust
bag.
Throw away the Bag
useddust bag.
Donot reuse.
CAUTION
NEVER REUSE A DUST BAG. Very
fine materials, such as carpet
freshener, face powder, fine dust,
plaster, soot, etc. can clog the bag
and cause it to burst before it is full.
Change bag more often when
vacuuming these materials.
Bag
Holder
Bag
Cavity
Motor
Safety
Filter_
Check the bag
holder and the
motorsafety filter.
If either is blocked,
replaceorcleanthem.
SEEMOTORSAFETY
FILTERCLEANING.
TO REPLACE BAG
Unfold the new dust bag.
Insert thedust bag
onto the bag holder
completely by
holding the bag
collar as shown and
snapping it into
position.
Be sure bottom of dust bag is completely within
dust bag cavity prior to replacing the dust
cover.
.Dust /N l
Position the dust _,,._._. _ _-"_-_
cover so its
positioning tab fits
into the slot on the k,,__@
vacuum body base.
Dust
Cover
Close the dust
cover.
You will hear a
distinct snap when
cover is securely
closed.
-12-

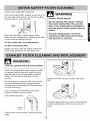
Check motorsafety filter frequently.
If the motor safety filter, located in the bottom of
the dust bag cavity is dirty, remove it by pulling
forward out from underthe ribs.
Filter
Wash the foam filter in warm soapy water.
Rinse and dry thoroughly bysqueezing the filter
in your hand and letting it air dry.
DO NOT wash filter in the dishwasher.
DO NOT install damp filter.
Replace the foamfilter by sliding it back into
place under the ribs in the dust bag cavity.
WARNING
Electric Shock Hazard
Do not operate the cleaner without
the motor safety filter. Be sure the
filter is dry and properly installed to
prevent motor failure and/or electric
shock.
Always unplug power cord from
electrical outlet before performing
any service on vacuum.
WARNING
Do not operate without exhaust filter.
Clean the exhaust filter when it becomes dirty,
or replace it with a newone. Wash the dirty
filter beneath cold, running water to clean it.
Allow to air dry before returning itto the
vacuum.
Do not attempt to clean the filter with a brush.
A brush will permanently damage the filter,
causing dust to blow back into the room when
you arevacuuming.
Ifyou use vacuum frequently, you should
replace the filter every 6 months.
Check filter frequently. /_
Dust_
Cover 1
Pullthe dust cover forward. Remove and lay
aside.
Remove the exhaust filter by pulling it out.
Replacethe filter so that the gray side faces
out.
Carefully replace the dust cover by placing tabs
in slots and pushing in until cover snaps into
place.
-13-

WARNING
Electric Shock or Personal Injury
Hazard
Disconnect electrical supply before
servicing or cleaning the unit.
Failure to do so could result in
electric shock or personal injury
from cleaner suddenly starting.
Frequently check and remove hair, string and
lint build-up in the agitator brusharea. If build-up
becomes excessive, follow the steps below.
TO REMOVE BELT
Slide E-Z Belt
Check latches
outward and
remove nozzle
cover.
Disconnect power cord from electrical outlet.
Latches
Nozz
Cover
Position hands on the agitator. If the belt is still
attached to the agitator, sever with scissors and
remove it. Carefully lift the right end ofthe
agitator and then the left end.
Agitato_
Note: Itmay be necessary to pull on the edge
of the bumper to allow the ends of the agitator
to be removed easily.
WARNING
Personal Injury Hazard
Be careful when removing the
agitator as the belt tension is high.
Failure to do 8o could result in
personal injury from the agitator
releasing quickly and snapping away.
TO CLEAN AGITATOR
Note: Inorder to keepcleaning efficiency high
andto prevent damage to your vacuum, the
agitator must be cleaned every time the belt is
changed.
The agitator must be cleaned according to the
following schedule:
Vacuum Use Clean Agitator
HEAVY every week
(used daily)
MODERATE every month
(used 2-3 times/week)
LIGHT every 2 months
(used 1time/week)
CAUTION
Do not disassemble the end cap,
or you will damage the agitator.
End Cap
-14-

TO REPLACE BELT
Loop the new belt on the motor shaft.
/
"_New
/ Belt
Belt_
Pulley
Note: See PARTS AND FEATURES for belt
number.
Loop the other end of the belt on the belt pulley
on the agitator.
Insert the left end cap, arrow down, into its slot
in the nozzle base. Pull the agitator forward and
insert the right endcap, arrow down, into its slot
in the nozzle base.
Note: Care mustbe taken due to the belt
tension during reassembly.
Agit
a Nozzle
J Base Slot
Bumper End Cap
Press firmly, checking to see that each end is
completely inserted.
Check to see that the belt is centered on the
belt pulley. Turn the agitator with your fingers to
see that it turns freely.
Replace the nozzle cover and secure the
latches.
Latches
_ o ",
Nozz
-15-

_ WARNING
Electric Shock or Personal Injury
Hazard
Disconnect electrical supply before
servicing or cleaning the unit.
Failure to do so could result in
electric shock or personal injury
from cleaner suddenly starting.
TO CHECK AGITATOR
Turn the vacuum over to check for worn agitator
brushes. When brushes are worn to the level of
the baseplate belt guard, replace the agitator.
Base Plate Belt Guard
TO REPLACE AGITATOR
Remove the nozzle cover andagitator. See
BELT CHANGING AND AGITATOR
CLEANING.
Replace agitator with a new one.
Reassemble the belt, agitator and nozzle cover.
See BELT CHANGING AND AGITATOR
CLEANING.
-16-

Always follow all safety precautions when
cleaning and servicing the vacuum cleaner.
WARNING
Electric Shock Or Personal Injury
Hazard
Disconnect electrical supply before
servicing or cleaning the unit.
Failure to do so could result in
electric shock or personal injury
from cleaner suddenly starting.
If the cleaner does not seem to have adequate
suction, first check to see if the bag is full or if a
filter is clogged. See instructions in DUST BAG
CHANGING and MOTOR SAFETY FILTER
CLEANING.
If the bag and filter areas arefree of clogs,
check the hose area. Remove the lower end of
the hosefrom the cleaner by grasping the hose
connector, twisting, and pulling straight out.
Plug in the vacuum
andturn it on.
Stretch the hoseto
maximum length
andthen allow the
hose to return to its
storage length.
Turn the unit off
and unplug the unit.
Remove any visible
clogs from the
hose. Hose
Connector
Reqnsert the hose into the opening on the
lower body from which it was removed. Press
firmly to assure connection.
Ifthe bag ,filters, andthe hose areas are
free of clogs, check the floor nozzle area.
Tocheck this area, see the sections on BELT
CHANGING AND AGITATOR CLEANING.
Return the cleaner tothe upright position before
plugging into an electrical outlet.
For best cleaning results,
keep the airflow passage
open. You should check
your vacuum
occasionally for clogs.
The arrows in this figure
indicate the airflow path
where clogs occur.
Unplug vacuum before
checking for clogs.
WARNING
Personal Injury Hazard
DO NOT place hands or feet
underneath the unit when inserting
the hose. The agitator revolves
rapidly when the vacuum is turned on
and is in the carpet setting.
-17-

Review this chart to find do-it-yourself solutions for minor performance problems. Any other service
needed, other than those described in this owner's manual, should be performed by a Sears or other
qualified service representative.
WARNING ElectricShockHazard
Disconnect electrical supply before servicing or cleaning the unit.
Failure to do so could result in electric shock or personal injury.
Cleaner won't 1. Unplugged at wall outlet. 1. Plug in firmly, press the ON/OFF switch to ON.
start. 2. Tripped circuit breaker/blown 2. Reset circuit breaker or replace fuse.
fuse at household service
panel.
3. ON/OFF switch not turned ON. 3. Push ON/OFF switch to ON.
Poor job of dirt
pick-up.
1. Full or clogged dust bag.
2. Worn agitator.
3. Clogged nozzle or dirt tube.
4. Clogged hose.
5. Hole in hose.
6. Broken/misplaced belt.
7. Hose not inserted fully.
8. Motor protection system
activated.
9. Dirty filters.
1. Change dust bag, (page 12).
2. Replace agitator, (page 16).
3. Clean nozzle area, (page 17).
4. Check for clogs, (page 17).
5. Replace hose.
6. Replace/fix belt, (page 14-15).
7. Insert hose fully, (page 7-8).
8. Check for clogs, (page 17).
9. Clean filters, (page 13).
Cleanerpicks up 1.Wrong pile height setting. 1. Adjust setting, (page 7).
movable rugs, or
pushes too hard.
Agitator does not 1.Broken belt. 1. Replace belt, (page 15).
turn. 2. Belt installed incorrectly. 2. Check BELT CHANGING AND AGITATOR
CLEANING, (page 14-15).
Performance 1.Full or clogged dust bag. 1. Change dust bag, (page 12).
indicator, some 2. Dirty filters. 2. Clear filters (page 13).
models, is red. 3. Clogged airflow passage-dirt 3. Clear clogfrom airflow passage, (page 17).
tube nozzle, hose.
4. Certain attachment tools. 4. Should return to normal when tool is removed.
Air flow restricted 1.Attachment use restricts air 1. Check ATTACHMENTS, (page7-8).
with attachment flow.
use. Sound 2. Newcarpet fuzz clogged air 2. Check CLOG REMOVAL andclean hose
changes, path. (page 17).
Excessive noise 1.Belt rubbing on carpet/bare 1. Push selector all the way forward.
as vacuum is floor selector shaft.
shut off.
-18-

Master Protection Agreements
Congratulations on making a smart purchase.
Yournew Galaxy" productisdesigned and
manufacturedfor years ofdependable operation.
Butlike allproducts, it may requirepreventive
maintenanceor repairfrom timeto time.
That'swhenhaving a Master ProtectionAgreement
cansave you money and aggravation.
Purchasea Master ProtectionAgreement now and
protectyourselffrom unexpected hassleand
expense.
The Master ProtectionAgreement also helpsextend
the life of yournew product.Here's what'sincludedin
the Agreement:
[_ Expert service by our12,000 professionalrepair
specialists
[_ Unlimited service and no charge for partsand
laboron all coveredrepairs
[_ "No-lemon" guarantee - replacementofyour
coveredproduct iffour or moreproductfailures
occurwithintwelve months
[_ Product replacement if yourcoveredproduct
can'tbefixed
[_ Annual Preventive Maintenance Check at your
request- noextracharge
[_ Fast help by phone - phonesupportfrom a
Searstechnicianonproducts requiringin-home
repair,plusconvenientrepairscheduling
[_ Power surge protection againstelectrical
damage due to powerfluctuations
[_ Rental reimbursement ifrepairofyourcovered
producttakes longer thanpromised
Once you purchasethe Agreement, a simple phone
call is all that it takesfor you toschedule service.
You can call anytime day or night, or schedule a
service appointment online.
Sears has over 12,000 professional repair specialists,
who have access to over 4.5 million quality parts and
accessories. That's the kind of professionalismyou
can count onto help prolongthe lifeof your new
purchasefor years to come. Purchase your Master
Protection Agreement today!
Some limitations and exclusions apply.
For prices and additional information call
1-800-827-6655.
Sears Installation Service
For Sears professionalinstallation of home
appliances, garage door openers, water heaters, and
other major home items,in the U.S.A. call
1-800-4-MY-HOME ®
-19-

Antes de utilizar la nueva aspiradora ............... 1
Garantia Galaxy para la aspiradora ............... 1
Instruccionesimportantesacercade laseguridad.......2
Piezas y funciones .............................................. 3
Instrucciones de montaje .................................. 4
Instrucciones de funcionamiento ..................... 5
Extracci6n del cable.......................................... 5
Ajuste autom_.tico de aitura .............................. 6
Desbloqueo y posiciones del asa ..................... 6
Interruptor de encendido y apagado ................. 6
Accesorios ........................................................ 6
Diagrama de utilizaci6n de los accesorios ........8
Consejos para la aspiracibn ............................. 8
Caractefisticas de rendimiento ......................... 9
Mantenimientodelaaspiradora......................10
AImacenamientode la aspiradora..................10
Limpiezadelexteriory los accesorios............10
Cambiodela bolsaparael polvo...................11
Limpiezadelfiltro de seguridaddel motor......12
Cambioy sustituci6ndelfiltro de escape.......12
Cambiodela correay limpiezadel agitador...13
Mantenimientodelagitador............................15
Eliminaci6nde obstrucciones.........................16
Resolucibndeproblemas................................17
AcuerdosAcercaDe La Proteccibn................18
Reparacibn..................................Cubiertatrasera
Leaesta guia. Leayudar_ a realizarelmontajey a utilizarla nuevaaspiradoraGalaxyde la formam_s seguray
eficaz.
Llameal almac_nSears m&scercano sidesea obtenerrn&sinformaci6nacercadel cuidadoy el mantenimiento.
Necesitar_.los nt_merosde seriey demodeloal solicitarla inforrnaci6n.
Los n_merosdeeeriey de modelode la aspiradorase encuentranenla placa del n_merodeseriey demodelo.
Utiliceel siguiente espacioparaanotar estosnt_merosde la nuevaaspiradoraGalaxy.
N-°de mode[o:
N-°de serie:
Fecha de compra:
Guarde este [ibro y [a prueba de compra (recibo) en lugar seguro para su posterior consuita.
ANO DE GARANT[A LIMITADA PARA LA ASPIRADORA GALAXY
Esta garantfaestar_,vigente durante un afio a partir de la fecha de compra e incluyeL_nicamente
la utilizaci6n personal para casa de la aspiradora. Durante este afio de garantfa, siempre y cuando
la aspiradora funcione y setrate segt_nlas instrucciones del manual del propietario, Sears
reparar_,los defectos del materialo de la mane de obra sin coste alguno.
Esta garantfaexcluye las bolsas de aspiraci6n, correas, bombillas y filtros, que son piezas
sustituibles y se pueden desgastar durante la utilizaci6n normal.
Devuelva esta aspiradora al centro de reparaciones y piezas mac cercano en Estados
Unidoe para obtener la reparacibn incluida en la garantia.
Esta garantfase aplica L_nicamentesi el producto se utiliza en Estados Unidos.
Esta garantfa le otorga derechos jurfdicos especfficos asf come otros derechos que dependeran
del estado en que seencuentre.
Sears, Roebuck and Co., D/817WA, Hoffman Estates, IL 60170
-1-

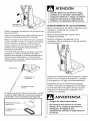
ATENel0N- 0r0reducirelriesg0dequesepr0duzcanfueg0s,sacudidaselectricss0da_0spers0nales:
Su seguridad es importante para nosotros, para reducir el riesgo de que se
produzcan fuegos, sacudidas electricas o da_os personales al utilizar la aspiradora,
siga estas precauciones de seguridad:
Leaestemanualantesdemontaroutilizarlaaspiradora.
UtilicelaaspiradoratJnicamentedelaformaenquese
describeenestemanualUtiliceunicamentelosaccesorios
suministrados.
NOaspireagua.
Parareducirelpeligrodequeseproduzcansacudidas
electricas,nolautiliceenelexteriornisobresuperficies
mojadas.
Deseonecteelsuministroelectricoantesderealizar
reparacionesolimpiarlazonadelcepillo.Sino
desconectalaunidad,sepodrfanproducirsacudidas
electricasoelencendidorepentinodelcepillo.
Apaguelaaspiradorasiempreantesdeconectaro
desconectarlamanguera.
Apagueaiemprelaaspiradoraantesdedesconectarla.
Nodesenchufeelaparatotirandodelcable.Sujeteel
enchufey noelcableparadesconectarlo.
Sestengaelenchufealenrollarlabobinadelcable.
Intentequeelcablenoseenrollebruscamente.
Noutiliceelcablenielenchufesiest;_daSado.Sila
aspiradoranofuncionacomedebiera,sehacafdo,est;_
daSada,sehadejadoenelexteriorosehacafdoalagua,
devuelvalaalCentredemantenimientodeSears.
Notiredelcable,manejalaaspiradoraperelniIoutilice
comeasa,nopilleelcableconlapuertaniIopaseper
bordesniesquinasafilados.
Notransportelaaspiradoraatravesdelcable.Uantenga
elcablealejadodesuperficiescalientes.
Nodejelaaspiradorasinsupervisidnsiest;_enchufada.
DesenchtJfeladelatomadelaparedcuandonolautilicey
tambienantesdelmantenimiento.
Nodejequeseutilicecomejuguete.Tengaespecial
cuidadocuandolautilicennihososeutilicecercadeellos.
Nomanejeelenchufenilaaspiradoraconlasmanes
mojadas.
Noutilicelaaspiradorasilamangueraest;_perforada.
Sustituyalasiestacortadao desgastada.Eviteaspirar
objetosafilados.
Nolautilicesilasaperturasest;_nbloqueadas,
mantengalassinpolvo,hilas,pelosocualquiercosaque
redujeseelflujodeaire.
MantengalabolsaPE(conagujeros)lejosdebebesy
niSos,nolautilicecercadecunas,camas,carritoso
parquecitosinfantiles.Estafinapelfculapuedeaferrarsea
lanarizyalabocaeimpedirlarespiracbn.
Mantengalasaperturasy laspiezasmoviblesalejadas
delpelo,ropasuelta,dedosyotraspartesdelcuerpo.
Noutilicelaaspiradorasinlabolsaparaelpolvoy/osin
losfiltrosensulugar.
Cambieeiemprelabolsaparaelpolvodes.puesde
aspirarproductosdelimpieza(pelves,ambientadores,
etc.)paraalfombras.Estosproductospuedenobstruirla
bolsa,reducirelflujodeaireypuededarlugaraquese
quemelabolsa.Sinosecambialabolsasepueden
producirdaSospermanentesenlaaspiradora.
Noutilicelaaspiradorapararecogeroberosafilados,
juguetespequehos,papeles,pins,etc.,yaquepodrfan
daSarlaaspiradoraolabolsaparaelpolvo.
Norecoaelementosqueardanohumeen,come
ogarros,cer asoeenzas.
Noutilicelaaspiradorapararecogerliquidosinflamables
oIfquidoscombustibles(gasolina,fluidosdelimpieza,
perfumes,etc.)nilautiliceenzonascercadeestos
p,rod,uctos.Lo,s.emanacionesdeestassustanciaspueden
earlugarapellgrosoexploslones.
Tengaespecialcuidadoallimpiarescaleras.Nola
coloquesobresillas,mesas,etc.Uantengalasobreel
suelo.
Tendralaresponsabilidaddeasegurarsequela
aspiradoranolautilizanadiequenoestecapacitadopara
utilizarlaadecuadamente.
GUARDE ESTASINSTRUCCIONES
Ser_.responsabledelmontajey deunautilizacionseguraadecuadadelaaspiradora.Laaspiradoraesta
disehadaparautilizarlaL_nicamenteenel hogar.Leaconatenci6nel Manualdelpropietarioparaobtener
informacionimportanteacercadela utilizaciony seguridaddelaparato.Estagufacontieneinformacion
relativaala seguridadbajolossfmbolosdeadvertenciay atenci6n.Presteatencbnespacialalas cajascon
estossfmbolosy sigalasinstruccionesquese dan.LainformaciondeADVERTENClAle avisaqueexisten
peligroscome,fuego,sacudidaselectricas,fuegosy daSospersonalesseries.Lainformacionde
ATENOIC)Nleavisaquehaypeligroscome,dahopersonalmoderadoy/odahosenla propiedad.
-2-

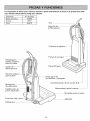
It is importanttoknow yourvacuumcleaner's partsandfeaturesto assureits properand safe
use, Reviewthesebeforeusingyour cleaner.
Elemento N° depieza
Bolsade polvo 50688
Correa 5275
Filtro 86878
Asa
Soporte de
la Manguera
Cubierta antipolvo
Desbloqueo
rapido Gancho
para el cable
Cable de
alimentaci6n
Gancho Inferior
para Cable
Manguera
de extensi6n
Cepillo para el
polvo/tapiceria
Protector del
Manguera
Panel de escape
Parachoques_
Interrupter de
encendido y apagado
Comprobaci6n de la correa
Herramienta para hueco_
_""_"_%_ Boquilla para el suelo
Agitador
-3-

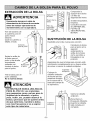
Antesde montarlaaspiradora,compruebela
LISTADE EMPAQUETADOque se encuentra
en lacubiertade lalistade piezas. Utiliceesta
listapara comprobarque ha recibidotodos los
elementosde la nuevaaspiradoraGalaxy.
_ ADVERTENCIA
Peligrodesacudidael_ctrica
Noconectelaunidadal suministro el_ctrico
hastaque el montajese hayacomptetado,
Si nodesconectalaunidad,se podrian
producirsacudidas el_ctricaso da_os,
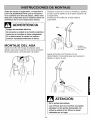
MONTAJE DEL ASA
Quite eltornillo del mango Iocalizadojusto
debajo del borde superior de la parte posterior
de la aspiradora, ver ilustracion de arriba.
Coloque el asa tal y como se muestra y deslice
el asa hacia la apertura de la parte superior de
la aspiradora.
Introduzca el tornillo porel asa hastala
aspiradora.
/ Orfco
III v"/iI "_""\ deltornillo
Ajuste el tornillo con firmeza con un
destomillador. Es posible que sea necesario
ajustar un pocoel asa.
_ ATENClON
No Io aprietedemasiado.
Losorificiospara los tornillossepueden
estropearsi los aprietademasiado.No
utilicelaunidadsi losfittrosnoestdn
colocadosen su lugar,
-4-

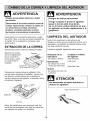
MONTAJE DEL MANGUERA
Trasmontarel mango,acopleelmangodelamanguera
flexibleinferior(veracontinuaoi6n).Inserteel extremode
tamangueraflexiblesuperiorenIaaberturaenla parte
posteriordelaunidad.Coloquelamangueraflexiblesobre
eImangodelamanguera.Enganchetamangueraflexible
enetmangodetamangaeraflexibleinferior.Desliceygire
elextremodeIamangueraflexibleinferiorsobrelaoonexion
paramangueraenlatoberadesuelo.AsegOresedeque
lamangueraestefirmementeoonectadaantesdeutilizar
laaspiradora.
Mani
de Ia Manguera
uera
de Ia manguera
Punta superior
de tamanguera )le de
Ia Manguera
MONTAJE DEL CABLE
Aseg_rese de queel gancho del cable est,.
hacia arriba.
Btoquee el cable en su
tugar forz_.ndolo en ta Muesca
muesca de bloqueo
del asa sobre el
cuerpo deI gancho del
cable superior de ta
forma indicada.
Asi, eI cable de atimentaci6n
alimentaci6n se
mantendr_, fuera deI
camino de ta boquiIIa de
aspiraci6n.
et cable de
desb!oqueo
alimentaci6n
inferior
del cable
Lfe el cable
alrededor del
desacoplamiento
rapido y deI gancho
inferior del cable y
asegure el enchufe
con el cable.
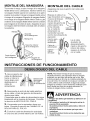
INSTRUCCIONES DE FUNCIONAMIENTO
1. Gire el gancho del I [
cable de desbloqueo Lr-,_l
hacia un lateral y Gancho ara
......... p
haeia abajo para /_ _X desbloqueo
desbloquear el //_//] _ I\\_\\ delcable
cable de //////I I \\/lllde alimentaci6n
alimentacion. ,,-i i ,,,
2. Desconecteel enchufe del cable electrico
de su cable y tirelo del gancho de liberacion
r_.pidapara cable.
Compruebe que elcable de alimentacion sigue
bloqueado en la muesca de bloqueo. Consulte
la seccion de MONTAJE DEL CABLE.
3. Compruebe que la aspiradora tiene una
bolsa. Consulte la seccion de CAMBIO DE LA
BOLSA PARA EL POLVO.
4. Enchufe et cable de alimentaci6n polarizado
en una toma de corbente etectrica de 120 Voltios.
-5-
NOTA:Parareduciretriesgodequeseproduzcan
sacudidaselectricas,estaaspiradoratieneunenchufe
polarizadoconunahojamasanchaquelaotra.Este
enchufeencajaraenlatomadecorrientepolarizadade
unasolaforma.Sielenchufenoencajaporcompletoen
latoma,delelavueltaal enchufe.Sisiguesinencajar,
p6ngaseencontactoconunelectricistacualificadopara
queleinstaleunatomadeoorrienteadecuada.No
cambiedeningunaformaelenchufe.
ADVERTENCIA
iPeligro dedahos personalesydahos en el
)roducto!
NOconecteelenchufesielinterruptorestaenla
posici6nONdeencendido.
$epodrianproducirda_ospersonatesycta_osen
elproducto.
•NOutilicetomasdecorrientesquehayasobre
cogtadores,
$epodrianproducirda_osenloselementosque
rodeanlazona.

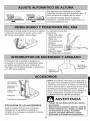
EstaaspiradoraestAdise_adaconunAjuste
AutomAticodeAlturaquefijala boquilladelpisoala
alturaapropiadadecualquierpilardeltapete.
Laalturadelaboquilladelpisoesajustada
instantaneay automaticamentecuandomuevade
unaareaentapetadaaotra,
Desacople el mango pisando la parte en relieve
a carla lado de la boca y tirando con la mano
del mango hacia detr_.sy haeiaabajo.
La aspiradora tiene tres
posiciones:
- Hacia arriba para
guardarla y para
utilizar las
herramientas de
limpieza.
- En diagonal para
limpiar alfombras
y suelos.
- Baja para Ilegar
por debajo de los muebles.
El interruptor de encendido y apagado se
eneuentra en el cuerpo de la aspiradora justo
pordebajo del lateral del asa.Coloque el
interruptor en ON para encender la aspiradora
yen OFF para apagarla.
alimentaci6n
Asa
Interruptor
deencendido
ado
Conector de la manguera
UTILIZACION DE LOS ACCESORIOS
Quite elextremo inferior de la manguera
alargable de la aspiradora sujetando el
conector de la manguera y gir_.ndoloy tirando
de el hacia fuera.
-6-
NOTA: El protector del motor sepuede abrir y
dar lugar a una recogida de polvo deficiente al
utilizar losaccesorios o al limpiar una alfombra
nueva. Esto se debe a que el flujo de aire se ha
redueido per los propios aecesorios o per la
pelusa de la nueva alfombra que ha Ilenado la
bolsa rapidamente. Consulte la seccion de
ELIMINACION DE OBSTRUCCIONES.
ADVERTENCIA
Peligro desacudidas electricas y dafios
personales.
Desconecteel suministroel_ctricoantes de
realizarreparacioneso limpiarlaunidad. Si
no desconectalaunidad,se podrian
producirsacudidaselectricaso da_os
personalesal encenderselaaspiradora.

Manguera /
de extensi6r
Quite la manguera de extensi6n de la posicion de
almacenamiento.
Retire la herramienta para lugares diffciles de su
posici6n de almacenamiento en el mango.
Retire la manguera de la tobera de suelo y Onalaal
mango extraible. Acople la manguera de extensi
6n en el extremo de apertura de la manguera.
Acople tambi6n la herramienta para huecos al
extremo de la manguera introduci@ndola y
gir6.ndola suavemente.
La herramienta para huecos se dobla como otra
manguera, ya que la herramienta de cepillo !
tapiceria se encajara en la punta permitiendo el
m6.ximo alcance de limpieza. La herramienta /
cepillo tambi@ se puede acoplar directamente a
la manguera de extension.
L ll
Manguera ":::':"
extensi6/Z"Manguelade
///Herrarnienta para
huecos
El cepillo para el polvo ofrece dos opciones. Cuando
se quita el cepillo delantero, la pieza que queda se
3uede utilizar COmBherramienta para tapice@s.
Herramienta par_
el polvo
ATENClON
Cuando utilice los accesorios, tenga
cuidado de no extender demasiado la
manguera mientras Io alarga. Si intenta
alargarlo mas allfi de la capacidad de
extensi6n, la aspiradora podria caerse.
ALIMIACENAMIENTODE LOS ACCESORIOS
Quite laherramienta de cepillo / tapicerias de la
manguera. Col6quela en su lugar de
almacenamiento.
Quite laherramienta para huecos de la
manguera girandola.
Quite lamanguera de extensi6n de la
manguera. Gire la manguera y tire del extremo
de la manguera.
Coloque la herramienta para huecos en la parte
inferior de la manguera de extensi6n. Coloque
la manguera en su lugar de almacenamiento.
AsegOresede que la unidad esta apagada.
Vuelva a introducir la manguera porcompleto
en el acople de la manguera delque la quit&
Presione con firmeza para asegurar que la
conexi6n escorrecta.
ADVERTENClA
Peligro de dafios personales.
NO coloque las manos ni los pies
debajo de la unidad al introducir la
manguera. El agitador gira
rfipidamente cuando la aspiradora se
enciende.
-7-

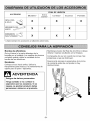
ZONA DE LIMPIEZA
ACCESORIO Entre
Muebles* Cortinas* Escaleras Paredes
cojines*
CEPILLOPARA___> X X X
ELPOLVO
HERRAMIENTAPAR_
HUECOS _ X X X
HERRAMIENTA_-_
PARATAPICERIAS_ X X X
* Limpiesiemprelosaccesoriosal utilizarlossobretelas.
Bordes de alfombras Mantenga el paso del flujo de aire libre si desea
obtener mejores resultados en la limpieza.
Gufeel lateral o la partedelantera de la
boquilla por el rodapi& Los cepillos de alcance
completo podr_.nquitar la suciedad de los
bordesde las alfombras.
Escaleras
Coloque el asa hacia arriba. Utilice la
herramienta para huecos o la herramienta de
cepillo para el polvo / tapicerfas.
ADVERTENCIA
Peligro de daSos personales.
Tenga cuidado si va a utilizar la
aspiradora por las escaleras. Si se
cayese, se podrian producir dahos
personales o dahos en el producto.
Compruebe de vez en cuando las zonas m_.s
propensas aque se obstruyan.
Desconecte siempre la aspiradora de latoma
de corriente antes de comprobar si hay
obstrucciones.
-8-

ADVERTENCIA
Peligro de sacudidas electricas y
dahos personales.
Desconecteelsuministro el_ctricoantesde
realizarreparacioneso limpiarla unidad,Si
nodesconectala unidad,se podrian
_roducir sacudidas el_ctricasodahos
_ersonalesal encendersela aspiradora.
COMPROBACION DE LA
CORREA E-Z
En la comprobaci6n de la correa E-Z ubicada
en la parte superior de la boquilla para el suelo,
hay dos cierres para extraer con facilidad la
cubierta de la boquilla para cambiar la correa o
limpiar el agitador. Coloque los dedos gordos
sobre los cierres, deslfcelos hacia fuera y eleve
la cubierta.
Introduzca las pesta_as en las ranuras, baje la
cubierta de la boquilla y deslice nuevamente
los cierres de forma segura para sustituir la
cubierta de la boquilla.
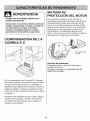
SISTEMA DE
PROTECCION DEL MOTOR
Laaspiradora cuenta con una v_.lvulade
derivaci6n del protector del motor que se abre
autom_.ticamentepara que entre aire frfo al
motorsi hay obstrucciones que eviten el flujo
normalde aire hacia el motor. Si la valvula de
derivaci6n se abre para que el motor no se
sobrecaliente y la aspiradora pueda sufrir
dahos, notara que el sonidocambia cuando el
aire pasa por la apertura de la v_.lvula.
motor
Solucion de problemas:
Compruebe que no hay obstrucciones o
quftelas si las hay.
Consulte la seccion de ELIMINAClON DE
OBSTRUCClONES.
-9-

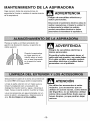
MANTENIMIENTO DE LA ASPIRADORA
Siga siempre todas las precauciones de
seguridad al limpiar o realizar el mantenimiento
de Ia aspiradora.
Recoja el cable y enrollelo alrededor del
ADVERTENCIA
Peligro de sacudidas electricas y
da_os personales.
Desconecteelsuministroelectricoantesde
realizarreparacioneso limpiarlaunidad.$i
nodesconectalaunidad,se podrian
producirsacudidaselectricaso dahos
personalesal encenderselaaspiradora.
gancho de liberaci6n rapida y ei gancho de
cabie superior.
Guarde la aspiradora
en lugar seco en eI
interior sobre el suelo
con el asa bloqueada
en la posici6n hacia
arriba.
ADVERTENCIA
Peligro de sacudidas electricas y
dahos personales.
Si enrolla el cable demasiado tenso, el
cable estzibajo presion y se puede dahar.
Si el cable se da_a, se pueden producir
sacudidas electricas y posibles da_os
personales o en el producto.
Desconecte el cable de la toma de corriente de
ia pared, NO vierta agua sobre la aspiradora,
Limpie la parte exterior con un trapo suave y
iimpio humedecido con una solucion de
detergente Iiquido neutro y agua y retuerza el
trapo. Sequela parte exterior cuando la limpie.
Lavelos accesorios en agua templada con un
poco dejab6n, enju_.guelosy dejelos secar al
aire. No los limpie en el lavavajillas.
ATENCI6N
No utilice los accesorios si estan
mojados. Los accesorios que se
utilizan en zonas sucias, como detras
del frigorifico, no se deberian utilizar
sobre otras superficies hasta que se
hayan limpios, ya que podrian dejar
marcas.
-10-

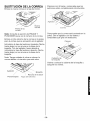
EXTRACCIONDE LA BOLSA
F.I ADVERTENCIA
Desconecte siempre el cable de
alimentacion de latoma de corriente
antes de realizar operaciones de
mantenimiento con laaspiradora.
Tire del asidero de /--7
la cubierta para el .._b'_..
polvo hacia __
delante. __j _
Quite la cubierta y /1
dejela al lade.
Cubierta_
parael polvo_
Sujete la anilla de
la bolsa para el
polvo y tire de ella
suavemente,
quitando con Bolsapara
cuidado la bolsa el polvo
para elpolvo.
Tire la bolsa para el
polvo utilizada.
No la vuelva utilizar.
ATENCION
NO REUTILICE NUNCA UNA BOLSA
PARA EL POLVO. Los materiales
muy pequeffos como, polvos para la
limpieza de la alfombra, el polvo,
yeso, hollin, etc. pueden obstruir la
bolsa y provocar que se queme antes
de que este Ilena. Cambie la bolsa
con mas frecuencia si va a aspirar
este tipo de materiales.
Sujeci6n de
la bolsa
Hueco de la
bolsa
Filtro de
seguridad
del m_
Compruebela
sujeci6ndela bolsa
y elfiltro de
seguridaddel motor.
Si est_.nbloqueados,
Ifmpielos.
Consultela secci6n
de LIMPIEZADEL
FILTRODE
SEGURIDADDEL
MOTOR.
SUSTITUClON DE LA BOLSA
Desdoble una bolsa nueva para el polvo.
Introduzca la bolsa
/_ para el pOIvoen la
sujecion
sosteniendo la
anilla de la bolsa
come se indica y
bloqueela en su
posicion.
AsegL_resede que la bolsa para elpolvo est,.
introducida completamente en su hueco antes
de volver a colocar la cubierta antipolvo.
Cubie, a /H Ill
Coloque la an_
cubierta antipolvo
de forma que las
pestahas encajen
en la ranura de la
base del cuerpo de
la aspiradora.
Cubierta
antipolvo
Cierre la cubierta
antipolvo.
Escuchar_.un
chasquido diferente
cuando la cubierta
este cerrada per
complete.
-11-

Compruebe con frecuencia el filtro de
seguridad del motor.
Si elfiltro de seguridad del motor, que se
encuentra en la parte inferior del hueco de la
bolsa para el polvo,est,. sucio, tire de el hacia
abajo por debajo de losbordes.
Filtro I_ra 1://_
Lave el filtro para el humo con agua templada
con jabon. Enjugtgueloy sequelo sacudiendolo
con la mano y dejandolo secar al aire.
NO lave el filtro en el lavavajillas.
NO coloque el filtro si esta mojado.
Vuelva a colocar el filtro para el humo
deslizgmdolohacia su lugar per debajo de los
bordes del hueco para la bolsa del polvo.
ADVERTENCIA
Peligro de sacudida electrica
No utilice la aspiradora si el filtro de
seguridad del motor no esta
colocado en su lugar. Asegt_rese de
que el flltro esta seco y
correctamente colocado para evitar
que se produzcan fallos de
funcionamiento y sacudidas
electricas.
Desconecte siempre el cable de
alimentacion de la toma de corriente
antes de realizar operaciones de
mantenimiento con la aspiradora.
ADVERTENCIA
No utilicela unidad sin elfiltro de
escape en sulugar.
Limpieel filtro de escape cuando se ensucio o
sustit{Jyalopor uno nuevo. Lave el filtro sucio
bajo el grifode agua frfa para limpiarlo. Deje
que se seque antes de volverlo a poner en la
aspiradora.
No limpie el filtro con un cepillo. El cepillo
dahara de forma permanente el filtro, dando
lugar aque el polvo vuelva a
Ilegar ala habitacion que esta /_
aspirando. _?_
Si utiliza la aspiradora _"_ j _i
con frecuencia, sustituya _I
el filtro cada 6 meses. |
Cubierta_
Compruebe con antipolvo t
frecuencia el filtro.
Tire de la cubierta antipolvo hacia delante.
Quitela y dejela al lado.
ie_ Quite el filtro deFiltrod escape tirando de
e__ el hacia fuera.
Sustituya el filtre de modo quela cara negra
mirehacia fuera, i,_y_
Vuelva a poner
con atenci6n la
cubierta antipelve
co,oc o, s
pestahas en las /
/
ranuras y
presionando
sobre ella hasta
que se bloquee
en su lugar.
-12-

ADVERTENCIA
Peligrode sacudida8el_ctricaso dai_os
personales.
Desconecteelsuministroet_ctricoantesde
realizarreparacione8o limpiarlaunidad.Si
nodesconectalaunidad,8e podrian
producirsacudidas el_ctricaso daSos
personalesal encenderselaaspiradora.
Compruebe con frecuencia esta zona y quite
los pelos, hilas, tiras que se hayan quedado en
el cepillo. Si la suciedad es excesiva, siga
estos pasos.
EXTRACCIONDELACORREA
Disconnect power cord from electrical outlet.
Deslice los cierres Cierres
de la comprobaci6n
de la correa E-Z _"_,_"_
hacia fueray quite _.,_'_ _ /
la cubierta de la _:_ -*_, ,/,,,"_
boquilla. _____._
Cubiert_t_"--,,,,_/_/
de la boquilla"-,,,,_,_
Coloque las manos sobre el agitador. Si la
correa sigue acoplada al agitador, c6rtela con
las tijeras y qdtela. Eleve con suavidad el
extremo derecho del agitador y despues, eleve
el extreme izquierdo.
j...--"
Agitador
J
Correa
Nota: Esposible que sea necesario tirar del
borde del parachoques para que los extremos
del agitador se quiten con facilidad.
ADVERTENCIA
Peligro de dahos personales
Tenga cuidado al quitar el agitador
pues la correa esta muy tensa.
Si no Io hace, podria daSarse ya que
el agitador se suelta rapidamente y le
golpearia.
LIMPIEZA DEL AGITADOR
Nota: Para mantener la alta eficacia de
limpieza y evitar que se produzcan da_os en la
aspiradora, el agitador se debera limpiar cada
vez quecambie la correa.
Limpie el agitador siguiendo estos pasos:
Utilizacion de la Limpieza A FONDO
aspiradora delagitador
(se utiliza a diario) cada semana
MODERADA cada mes
(se utiliza dos o tres
veces por semana) cada dos mes
SUAVE
(se utiliza una vez a la
semana)
tiN,odeATENCION
smonte el tapbn extremo o
r& el agitador.
Tapa del extremo
/-
J
-13-

SUSTITUCIONDELACORREA
Enlace la nueva correa en el eje del motor.
Nueva
j/
correa
Poleade la
correa
Nota: Consulte la seccion de PIEZASY
FUNCIONES para ver el nL_merode la correa.
Enlace el otro extremo de la correa en la polea
para la correa que se encuentra en el agitador.
Introduzca la tapa del extremo izquierdo (flecha
hacia abajo)en su ranura en la basede la
baquilla. Tire del agitador hacia delante e
introduzca la tapa del extremo derecho (flecha
hacia abajo)en su ranura en la base de la
baquilla.
Nota: Tenga cuidado al volver acolocar la
correa debido a la tension que est,. sufre.
Agit " "" Boquilla
Ranura de la base
Parachoques Tapa del extremo
Presione con firmeza y compruebe que los
extremos est_.ncompletamente introducidos.
Ag_
/
CorCea
Compruebe que la correa esta centrada en la
pole& Gire el agitador con los dedos y
compruebe quegira sin obst_.culos.
Cierres
Cubi
la boquilla
Vuelva a colocar la cubierta de la boquilla y
asegure los cierres.
-14-

_ ADVERTENCIA
Peligro de sacudidas electricas o
dafios personales.
Desconecte el suministro electrico
antes de realizar reparaciones o limpiar
la unidad. Si no desconecta la unidad,
se podrian producir sacudidas
electricas o dafios personales al
encenderse la aspiradora.
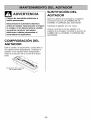
COMPROBACION DEL
AGITADOR
Dele la vuelta a la aspiradora y compruebe si
los cepillos estan desgastados. Sustituya el
agitador si los cepillos est_.ndesgastados
hasta la proteccion de la correa de la placa
base.
rot cc
SUSTITUCION DEL
AGITADOR
Quite lacubierta de la boquilla y el agitador.
Consulte la secci6n de CAMBIO DE LA
CORREA Y LIMPIEZA DELAGITADOR.
Sustituya el agitador por unonuevo.
Vuelva a montar la correa, agitador y la
cubierta de la boquilla. Consulte la seccion de
CAMBIO DE LA CORREAY LIMPIEZA DEL
AGITADOR.
-15-

Siga siempretodas las precauciones de
seguridad al limpiaro realizar el mantenimiento
de la aspiradora.
ADVERTENCIA
Peligro de sacudidas electricas o
daSos personales.
Desconecte el suministro electrico
antes de realizar reparaciones o limpiar
la unidad. Si no desconecta la unidad,
se podrian producir sacudidas
electricas o daSos personales al
encenderse la aspiradora.
Si parece que la aspiradora no succiona
adecuadamente, compruebe si la bolsa esta
Ilenao el filtro est,. obstruido. Consulte la
seccion de CAMBIO DE LA BOLSA PARA EL
POLVO y LIMPIEZA DEL FILTRO DE
SEGURIDAD DEL MOTOR.
Compruebe la zona de la manguera si la bolsa
y elfiltro no tienen obstrucciones.
Quite elextremo inferiorde la manguera
alargable de la aspiradora sujetando el
conector de la manguera y gir_.ndoloy tirando
de el hacia fuera.
Conecte la
aspiradora y
enciendala.
Alargar la
manguera hasta el
maximo y deje que
vuelva asu
posici6n para el
almacenamiento.
Apague la
aspiradora y
desenchufela.
Quite las
obstrucciones
visibles de la
manguera.
-Manguera
_Conector de la
Manguera
Vuelva a introducir la manguera en la apertura
de la parte inferior del cuerpo de donde la
quit6. Presione con firmeza para asegurar que
la conexion es correcta.
Si la bolsa, los filtros, y las areas de la manguera
noestanobstruidos,reviseel _.readelatoberade suelo.
Para revisar esta _.rea,consulte lassecciones
CAMBIO DE CORREA Y LIMPIEZA DEL
MEZCLADOR.
Vuelva a colocar la aspiradora en posici6n
derecha antes de conectarla a la toma de
corriente.
Mantenga el paso del
flujo de aire libre abierto
si desea obtener mejores
resultados al limpiar.
Debera comprobar la
aspiradora de vez en
cuando para ver si hay
obstrucciones. Las
flechas del dibujo le
indican la ruta del flujo de
aire donde se producen
las obstrucciones.
Desconecte la aspiradora
antes de comprobar si
hay obstrucciones.
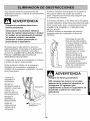
ADVERTENCIA
Peligro de daSos personales.
NO coloque las manos ni los pies
debajo de la unidad al introducir la
manguera. El agitador gira
rapidamente cuando la aspiradora se
enciende y este en el valor para
alfombras.
-16-

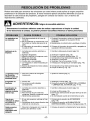
Revise esta tabla para encontrar las soluciones que usted mismo puede aplicar si surgen pequeSos
problemas en la utilizaci6n del producto. Si fuera necesario aplicar soluciones diferentes a la que se
describen en este manual del propietario, p6ngase en contacto con Sears o con un t6cnico de
reparaciones cualificado.
ADVERTENCIA Peligro desacudidaelectrica
Deaconecteelauminiatroel_ctricoantesde realizarreparacioneao limpiarlaunidad.
Sinodeaconectalaunidad,ae podrianproduciraacudidaael_ctricaao da_oa peraonalea
La aspiradora no 1. Est_ desconectada de la toma de 1. Con6ctelo firmemente y coloqueel interruptor de
se enciende, corriente, encendidoy apagado en la posici6n ON de
2. Se ha producido un cortocircuito o se encendido.
hafundido un fusible del panel de la 2. Restablezca el cottocircuitos y sustituya el fusible.
casa.
3. El interruptor de encendido y apagado 3. Coloque el interruptor de encendido y apagado en
no est,. en ON. la posici6n ON de encendido.
Ineficacia en la 1. Cambie la bolsa para el polvo (p_.g. 12).
limpieza.
1. La bolsa para el polvo est_ Ilena u
obstruida.
2. Agitador desgastado.
3. Boquilla obstruida o manguera sucia.
4. Manguera obstruida.
5. Manguera perforada.
6. Correa rota o rnal colocada.
7. La manguera no est_ introducida por
completo.
8. Sistemadeproteccibndel motoractivado.
9. Filtrossucios.
2. Sustituya el agitador (p_.g. 16).
3. Limpie la zona de la boquilla (p_.g. 17).
4. Compruebe si hay obstrucciones (p_.g. 17).
5. Sustituya la manguera.
6. Sustituya / fije la correa (p_g. 14-15).
7. Introduzca la manguera por completo (p_.g.7-8).
8. Compruebe si hay obstrucciones (p_.g. 17).
9. Limpie los filtros (p _.g.13).
Laaspiradorarecoge 1.Valor de la altura del recogedor 1. Ajuste los valores (pdg. 7).
lasalfombrillas inadecuado.
sueltaso aspiracon
demasiadafuerza.
El agitador no 1. Correa rota. 1. Sustituya la correa (p_.g. 15).
funciona. 2. La correa no est,. instalada 2. Consulte la secci6n de CAMBIO DE LA CORREA
correc_amente. Y LIMPIEZA DEL AGITADOR (p_g. 14-15).
El indicador de 1. La bolsa para el polvoestd llena u 1. Cambie la bolsa para el poIvo (p_.g.12).
utilizacion de obstruida.
algunos modelos 2. Filtrossucios. 2. Limpie los _tros (p_.g. 13).
esta en rojo. 3. Paso del flujo de aire obstruido: 3. Elimine las obstrucciones del paso del flujo de aire
rnanguera, boquilla, rnanguera sucios. (p_.g. 17).
4. Herramientas accesodas. 4. Se normalizar_, cuando la herramienta se quite.
Flujode sire 1. El uso del accesorio restringe elflujo 1. Cornpruebe la secci6n de ACCESORIOS
restringido al utilizar de air& (p_.g.7-8).
un sccesorio. El 2. Las pelusas de la nueva alfombra ban 2. Consulte la seccibn de ELIMINACION DE
sonido cambia, obstruidola ruta del aire. OBSTRUCCIONES y limpie la manguera (p_.g17).
Ruido excesivo 1. Roce de la manguera con el eje del 1. Coloque el selector oompletamente hacia delante.
cuando la selector para alfombra / suelo.
aspiradora esta
apagada.
-17-

Acuerdos acerca de la proteccion
Le felicitamos porsu sabia elecci6n al haber
adquirido este producto.
Este nuevo produotoGalaxy_ha sidediseSado y
fabricado durante aSos defuncionamiento serioy
forma. Pero,al igualque el restode productos,
necesitaun mantenimiento preventivoo realizar
ciertas reparaciones de vez en cuando.
Por eso, con estos Acuerdos acerca de la protecci6n
ahorrar_,tiempo y dinero y evitar_,daSos mayores.
Adquiera estosAcuerdos acerca de la protecci6n y
prot_jase contra gastos y problemasinesperados.
Los Acuerdos acerca de la protecci6n tambi_n le
ayudar_.na ampliar la duraci6n de este nuevo
producto. En losAcuerdos se incluyen:
[_ Servicio experto por m_.sde 12.000 t_cnicosde
reparaci6nprofesionales
[_ Servicio ilimitado sin costes paralas piezasy el
trabajorealizadoentodaslas reparaciones
oubiertas
[_ Garantia anual: sustituoi6ndel produotocubierto
si se producencuatroo m_.sfallos en doce meses
[_ Sustitucion del producto siel productooubierto
no se puede arreglar
[_ Mantenimiento prevenUvo anual siempreque Io
solicitesincostesextra
[_ Atencion de ayuda al cliente: ayudatelef6nica
por parlede un t_onicode Searsaceroade los
produotosque preoisenreparaoionesoaseras,
ademasde una programaci6nsobre reparaciones
[_ Proteccion contra cortes elL=ctricosque pueden
provocardaSosel_otrioosdebido alas
fluotuaciones de energia
[_ Reembolso si la reparaoi6ndel produotooubierto
tardamas de Ioque seestableci6
Si adquiere estos Acuerdos, s61otendr_,que hacer
una Ilamadatelef6nica paraactivar este servicio.
PodraIlamar acualquier horadel aliao conseguir una
cita online para el servicio.
EnSears hay m_.sde 12.000 t_cnicos de reparaci6n
profesionalesque tienen acceso a unos 4,5 millones
de piezas y accesorios de calidad. Este es el tipo de
profesionalidad con la que puede contar para
prolongar la duraci6n de este productodurante aSos.
Adquiera ya su Acuerdo acerca de la protecci6n.
Se aplican algunas Iimitaciones y excepciones.
Llame al 1-800-827-6655 si desea obtener m,_s
informacion acerca de los precios.
Servicios de Instalacibn Sears
Para solicitar servicios de instalaci6n
profesionales de Sears de electrodom_sticos,
mandos de apertura de puertas de garajes,
calentadores de agua y otros aparatos en los
Estados Unidos, puede Ilamar a
1-800-4-MY-HOME _
-18-


Your Home
For repair - in your home - of all major brand appliances,
lawn and garden equipment, or heating and cooling systems,
no matter who made it, no matter who sold it!
For the replacement parts, accessories and
owner's manuals that you need to do-it-yourself.
For Sears professional installation of home appliances
and items like garage door openers and water heaters.
1-800-4-MY-HOME ® Anytime, day or night
(1-800-469-4663) (U.S.A. and Canada)
www.sears.com www.sears.ca
Our Home
For repair of carry-in products like vacuums, lawn equipment,
and electronics, call or go on-line for the nearest
Sears Parts and Repair Center.
1-800-488-1222 Anytime, day or night (U.SA only)
www.sears.com
To purchase a protection agreement (U.S.A.)
or maintenance agreement (Canada) on a product serviced by Sears:
1-800-827-6655 (U.S.A.) 1-800-361-6665 (Canada)
Para pedir serviciode reparacion
a domicilio, ypara ordenar piezas:
1-888-SU-HOGARsM
(1-888-784-6427)
Au Canada pour service en fran£ais:
1-800-LE-FOYER Mc
(1-800_533-6937)
www sears.ca
© Sears, Roebuck and Co.
TM SM
® Registered Trademark / Trademark / Service Mark of Sears, Roebuck and Co.
TM
® Marca Registrada / Marca de Fabbca / SMMarca de Servicio de Sears, Roebuck and Co.
MC MD
Marque de commerce / Marque deposee de Sears, Roebuck and Co.
-
 1
1
-
 2
2
-
 3
3
-
 4
4
-
 5
5
-
 6
6
-
 7
7
-
 8
8
-
 9
9
-
 10
10
-
 11
11
-
 12
12
-
 13
13
-
 14
14
-
 15
15
-
 16
16
-
 17
17
-
 18
18
-
 19
19
-
 20
20
-
 21
21
-
 22
22
-
 23
23
-
 24
24
-
 25
25
-
 26
26
-
 27
27
-
 28
28
-
 29
29
-
 30
30
-
 31
31
-
 32
32
-
 33
33
-
 34
34
-
 35
35
-
 36
36
-
 37
37
-
 38
38
-
 39
39


Galaxy 72135078 El manual del propietario
- Categoría
- Aspiradoras
- Tipo
- El manual del propietario
- Este manual también es adecuado para
en otros idiomas
- English: Galaxy 72135078 Owner's manual
Otros documentos
-
Kenmore 116.38412 Manual de usuario
-
 Kenmore Elite 125.21814610 El manual del propietario
-
-
-
-
-
-
-
-
LG V-U8040NB El manual del propietario
