LG WM3370HRA/00 El manual del propietario
- Categoría
- Lavadoras
- Tipo
- El manual del propietario
Este manual también es adecuado para

Life's Good
OWNER'S MANUAL
SHING MACHINE
Please read ths owneCs manual thoroughiy before operat ng and keep if handy
for reference at ai tree%
WM3370H_A
MFL68639703
vet 080514.00

2 PRODUCT FEATURES
PRODUCT FEATU R ES
The inverter direct drive motor, which is directly attached to the drum, is capable of producing mui
tiple distinct different motions for optimal washing performance with very little noise and vibration,
The motor assembly a_so contains fewer moving parts, thus resulting in fewer repairs.
Should you experience any technical difficulty with your washing machine, it has the capability of
transmitting data by phone to the Customer Information Center, The ceil center agent records the
data transmitted from your machine and uses it to analyze the issue, providing a fast and effective
diagnosis (Refer to page 45).
Cleaning of the tub on a reguiar monthly basis using Tub Ciean can help keep the tub clean and
fresh.
Safely and conveniently secure the door s{ightiy ajar with the magnetic door ptunger. This wilt pro_
mote air circulation and allow the interior of the machine to dry. To use this feature, after the load has
been removed, do not close the door completely.
When the magnetic door plunger comes into contact with, the metal washer cabinet, it witi secure the
door slightly open allowing the interior of the washer to dr,/
The large capacity stainless steeI drum offers extreme durability and is tilted to improve efficiency
and allow easier access for large items,
Use this option to disable the controls during a wash cycle, This option can prevent children from
changing cycles or operating the machine.
The four-compartment dispenser drawer makes it easy to separate the p_e.-wash detergent, main
iaundP¢ detergent, liquid bleach, and fabric softener into different eompa_ments.
LG's unique, high temperature steam cycles help to remove tough stains,
The Tag On feature works on most NFC equipped smart phones by communicating with your Tag
On equipped LG appliance. Using the LG Smart Laundry application, the Tag On feature allows you
to diagnose your appliance, download new cycles, and see the status of your appliance by simply
touching the smart phone to the Tag On logo of the appliance.

TABL£ OF CONTBNTS 3
TABLE OF CONTENTS
2 PRODUCT FEATURES
4 IMPORTANT SAFETY INSTRUCTIONS
8 INTRODUCING YOUR WASHING MACHINE
8 Parts ancJ Accesr_or es
9 Centre{ panel lieature
11 INSTALLATION INSTRUCTIONS
11
12
13
14
15
16
17
1'7
Preview nslat_atioe o_de
Checking arid crees ng the proper Joc_#ion
Unpacking and tamer ng shippng bolt
Contract ng the water lnes
Connectif_g the @ain ne
_veting the washing machine
Piugging n the pewor cord and g_ound ng
-lest run
18 PREPARATION
18 Sorting wash oads
18 _ Precaut one lbr abdc care before _ash cycle
19 --Fabric care abes
19 Sort ng !aundry
20 Uing de_erger t/fabric seftener
20 - Reeorernended deJe_gent
20 - [ oading the dispenser
22 USING YOUR WASHING MACHINE
22 Basic operation
23 Cycle guide
24 Wash cycles
24 _ Reduce a s'_dry allergens, AHergiene TM
24 _ Reduce aur dry bacfeda Sanffary
24 - BJankets or bury terns, Bulky/Large
24 _ Normal items Coffon/Normal
24 _ _¢drnkle free tern Perm.Press
24 - Shee_ terns, Delieefes
24 - Quick was_ Speed Wash
25 Cycle rood f er buttens
25 Set¢ing options befere the o/de
25 - Setting the water temperature Wash Temp
25 _ Setting the sp_ speed Spin Speed
25 - Se_ting so evai of _aundry, SaiJ Level
26 _ Ad_us¢ing the melody and buiton tones, Signal
26 _ Prewashing Pre Wash
26 _ Rinse dran arid spn only Rinse+Spin
26 Addng an exlra rnse cycle Extra Rinse
26 - F:%;_sefl ng the start time, Delay Wash
26 o E[ffcien Jy cleaning Steam
27 _ Addin _ extra water te IRe wash and rnse cycles
Wafer Pl_s
27 - Savng e#ergy, Cold Wash _
27 Serf ng options durng ff_e cycle
27 ._Button ock feature, Ch#d Lock
28 Saving a custom zed wash cyCkzs PGM Save
28 - Selecting your cus omi ed cycle Custom PGM
28 . Tumb ng delhes to prevertwrinkes Fresh Care
29 B@e_e using the 'Tag On function
29 _ lo use the "Tag On fund_on
2g - The Tag On gude
30 h_g On
36 MAINTENANCE
36 Cae
36 • Care after wash
36 Care ir cold ctmes
37 C caning
37 - C_ean r g the drurn_ Tub CJean
38 o Clean ng the detergent dispenser drawe_
3g CIear_ ng the water nlet fi_lers
40 o C_ean ng the d_an pur_p flier
41 C_ean ng the door sam
42 TROUBLESHOOTING
42 Checking error rnessages
43 Before calling for service
44 SPECIFICATIONS
45 USING SMART DIAGNOSIS _
46 V,/ARRANTY

4 IMPORTANT SAFETY NSTRUCTSONS
IMPORTANT SAFETY INSTRUCTIONS
READ ALL INSTRUCTIONS BEFORE USE
A WARNING
}:or your safety, the information in this manual must be fogowed to minimize the risk of fire, explosion, or electric
shock, or to prevent property damage, inja w to persons, or death,
Your safety and the safety of others are very important,
We have provided marly impo_ant safety messages in this manual and on your" appliance Always read and abe
ail screw message&
This is the safety alert symbol.
This symbol alerts you to potential hazards that can kiB or hurt you and others.
All safety messages wilt follow the _fe4y alert symbol and either the word DANGER, WARNING or CAUTION.
These words mean:
A DANGER
You will be kiited or seriously iniured ff yoa don't immediately fo_ow instructions
AWARNING
You can be killed or se_rioasly injured if you don't fol|ow instructio#s.
CAUTION
You may be slightly injured or cause damage to tbe product if you do not follow i_struction&
All safety messages will teil you what the poteatlal hazard is, tell you how to reduce the chance of injury, and tell
you what can happen if the instruclions are not fomlowed
eASeSSAFETy_R
A WARNING
To reduce the risk of fire, eiectde shock, or in}ury to persons when using this appliance, follow basic: precautions,
including the following
, Use this appliance o_ly for its intended purpose as described
in this Owner's Manual
- Before _se, the washer must _ propedy installed as
described in ths manual
, Do not wash articles that have beer] previously cleaned in,
,washedi_, soaked in, or spotted with gasoline, dry cleaning
so,vents, or other flammable or explosive substances, as
they give off vapors that could igrgte or explode,
• Do not add gasoline, dry c!eaniag solvents, or other
flammable or expiosive substasces to the wash water. These
substances give off vapors that could ignite or e×plode_
• Under certain conditions, hydrogee gas may be produced in
a hot water system that has not been used for 2 weeks or
more, HYDROGENGAS IS EXPLOSPTE,ff the hot water
system has net been used for such a period, before using the
washer, turn on aI{hot water faacets and _etthe water flow
from each for severa_ minutes, This _-_illre}ease any
accumulated hydrogen gas. As the gas is flammable, do not
smoke or use an open flame durie g flris time,
• Do not allow children to p_ayon or in the "washer,Close
supervision of children is necessary when the washer is used
nee[ children,
, Before the washer is removed from service or discarded,
remove the lid to prevent children from climbing inside.
• Do not instalt or store the washer' where it will be exposed to
the weather or freezing temperatures,
• Do net tamper with controls,
• Keep the area andemeath and around your appliances flee
of combustibie matsriais (lint, paper, rags, etc.), gasoline,
chemicals and other flammable vapors and liquids,
*Do no__epairor replace any part ofthe washer or attempt
any servicing other than as described in this maeaaL We
strongly recommend that coy service be performed by a
qualified technician
*See Insta_letion instructions for grounding requiremeets_
, ALWAYS fo_low the fabric care instructions supplied by the
garment manufacturer:
*Do not place items exposed to cooking og inyour washer
Items contaminated with cook;n9 oiis may cent#buts to a
chemical reaction that could cause a load to catch fire
, Use fabric s_ofteeersor products to eliminate static on,ly as
recommended by the manufacturer.
*This washer is not designed for maritime use or for mobile
installations sash as in RVs,aircraft, etc,
*Turn off the water faucets and unph_gthe washer if the
machine is to be [eft for an extended period of time, such as
during vacations
*Packaging material see be dangerous for children. There is a
risk of suff_ation! Keepall packaging from childree,
-Always check the inside of the washer for foreige objects
before ioading laundry, Keepthe lid closed when nat in use,
, Do net reach into the appliance if the tub or agitator is
mov rig,
*WARNING :This product contains chemicals known to the
State of California to causecancer and bidh ddeets or other
reproductive harm. Wa_ hasdaafterhandling.

!MP©R_I_NT SA_'ETY N%[RUCT!QNS 5
IMPORTANT SAFETY INSTRUCTIONS
READ ALL INSTRUCTIONS BEFORE USE
_WARNING
For your safety, the information in this manual must be foltowed to minimize the risk of fire, explosion, or
ele_ric shock, or to prevent property damage, injury to persons, or death,
This appliance must be grounded In the event of malfunction or breakdown, grounding wifl reduce the
risk of ele_de shock by providing a path of least resistance for etectric current. This appliance is equipped
with, a cord having an equipmentogrounding conductor and grounding plug. The ping must be plugged
into an appropriate outlet that is propedy installed and grounded in accordance with afl local codes and
ordinances.
WARNING
Improper connection of the equipmenbgrounding conductor can result in risk of ete_ric shock. Check with
a qualified electrician or servicer if you are in doubt as to whether the appliance is pro_rly grounded. Do
not modify the plug provided with the appliance, if it does not fit the outlet, have a proper outlet installed
by a qualified ele_rician. Failure to follow these warnings can cause serious injury, fire, electric shock, or
death.

6 IMPORTANT SAFETY NSTRUCTaONS
IMPORTANT SAFETY INSTRUCTIONS
READ ALL INSTRUCTIONS BEFORE USE
A WARNING
For your safety, the information in this manual must be to[towed to minimize the risk of fire, explosion, or electric
shock, or to prevent prope_y damage, injury to persons_ or death.
SAFETY INSTRUCTIONS FOR INSTA;LLATtON
A WARNING
To reduce the risk of fire, electric shock, or iniury to persons when using this appliance, follow basic precautions,
in¢iuding the following,
- Refer to iNSTALLATiON INSTRUCTIONS for detaiied
grounding procedures. Installation instructions are
packed with the washer for inslaHer's reference if the
washer is moved to a new location, have it checked
aod reinstailed by a qualified service technician
Failure to follow this warning can cause serious iniury;
fro, elecWie shock, or death,
. Do not, under any circumstances, cut or remove the
third (ground) prong from the power cot& Failure to
fellow this warning can cause serious iniury, fire,
electric shock, or death.
- For persona[ safety, this applia_ce must be propedy
grounded Failure to fo[!ow this warning can cause
serious injuH, fire, electric shock_ or death.
- The power cord of this appliance is equipped with a
3@rong (grounding) plug which mates with a standard
3 prong (grounding) wail eerier to minimize the
possibili w d electric shock from this appliance.
• This washer must be plugged into a 120 V,-,60Hz
grounded eager, Failure to follow this warning can
cause serious injury, fire, electric shock, or death
, Have the wall outlet and circuit checked by a qua}flied
electrician to make sure the oudet is properly
grounded. Fa#ure to follow this warning can cause
serious iojury, fire, electric shock, or death.
. Where a _andard 2,,prong wall outlet is encountered,
it is your personal responsibility and obligation to
have it replaced with a properly grounded 3 prong
wa_l outlet Failure to follow this warning can cause
serious iniu_, fire, ebctric shock, or death.
- Do not install on carpet. Install washer on a solid floor,
Failu_e to follow this warning can cause serious leak
damage,
• Do not remove ground prong. Do not use an adapter
or extension cord. Plug into a grounded 3_prong
outlet. Faiiure to follow these warnings can cause
sedous injury, fire, electric shock, or death,
, The washer shoutd aiways be plugged into its own
individual elecldcal outlet which has a voltage rating
that matches the rating plate, This provktes the best
performance and also prevents overloading house
w#ing circuits which could cause a fire hazard from
overheated wires.
• Never unplug your washer by puiHog on the power
cord. Always grip plug firmly arid pull straight out
from the oatlet. Failare to follow this warning can
cause serious injury, fire, electric shock, or death,
• Repair or immediately replace all power cords that
have become frayed or otherwise damaged, Do not
use a cord that shows cracks or abrasion damage
along its length or at either end. Faiture to fotiow this
warning can cause serious iniury, fire, electric shock,
or death,
•When installing or moving the washer, be careful not
to pinch, crush, or damage the power cord Failure to
follow this warning can cause serious injury, fire,
elecldc shock_ or death
• The washer must be installed and electrically
grounded by a qualified service person in accordance
wRh _oca_codes to prevent shock hazard and assure
stability dudng operation.
• The washer is heavy, Two or more people may be
needed to install and move the appliance, Faiture to
do so can, resutt in back or other injury.
• Store and install the washer where it will not be
exposed to temperatures below freezing or exposed to
outdoor weather conditions. Failure to follow this
warning can cause serious leak damage.
• To reduce the risk of electric shock, do not install the
washer in humid spaces Failure to fofiow this warning
can cause serious injury, fire, electric shock, or death,
•To reduce the risk of injury to persons, adhere to air
indust H recommended safety procedures including
the use of long sleeved gloves and safety glasses.
Failure to follow all of the safety warnings in this
maoua[ could result in prope_y damage, injurl to
persoos or death_

!MP©R_I_NT SAFETY NS_RUCT!QNS
IMPORTANT SAFETY INSTRUCTIONS
READ ALL INSTRUCTIONS BEFORE USE
AWARNING
For your safety_ the information in this manual must be fo_owed to minimize the risk of fire, explosion, or
ele_dc shock, or to prevent property damage injury to persoes, or death
RUCTDN CLEANfftG, AND DISPOSAL
A WARNING
To reduce the risk of fine, eiectdc shock, or injury to persons when using this appliance, follow basic
precautions_ including the following.
•Unpfug the washer before cleaning to avoid the
risk of eiectdc shocL
• Never use harsh chemicals, abrasive cleaners, or
solvents to clean the washer. They will damage the
finish,
• Do not put oily or greasy rags or clothing on, top of
the washer. These substances give off vapors that
could ignite the materials.
• Do not wash items that are soiled wkh vegetable
or cooking oil. These items may contain some oil
a_er lauedering. Due to the remaining oil, the
fabric may smoke or catch fire by itself.
• Disconnect this appliance from the power supply
before attempting any user maintenance, Turning
the controls to the OFF position does not
disconnect this appliance from the power supply
Failure to follow this warning can cause serious
injury, fire, electric shock, or death,
• Do not combine iaundw products for use in one
load unless specified on the label.
- Do not mix chlorine bleach with ammonia or acids
such as vinegar. Follow package directions when
using laundry products, Incorrect usage can
produce poisonous gas, resulting in serious injury
or death.
• Do not reach into the washer while parts are
moving. Before loading, unloading, or adding
items, press the START/PAUSE button and allow
the drum to coast to a complete stop before
reaching inside. Failure to follow this warning can
cause serious injury, fire, electric shock, or death
. Do not allow children to play on or in the washer.
Close supervision of children is necessary when
the washer is used near children. As children grow,
teach them the propec safe use of all apptiances.
Failure to comply with these warnings could result
in serious injury to persons or death.
. Destroy the carton, plastic bag, and other packing
materials after the washer is unpacked. Children
might use them for play. Cartons covered with
rugs, bedspreads, or plastic sheets can become
airtight chambers, Failure to comply with these
warnings could result in serious iniury to persons
or death,
* Keep laundry products out of children's reach. To
prevent injuH to persons, observe air warnings on
product labels. Failure to comply with these
warnings could resuk in serious injury to persons
or death.
. Before your washer is removed from service or
discarded, remove the door to the washing
compartment to avoid the danger of children or
small animals gettingtrapped inside. Failure to do
so can result in serious injury to persons or death.
. Make sure the dispenser drawer is closed at all
times when not being filled with laundry produ_s.
Fa lure to keep the drawer dosed can result in
personal injury or flooding.
SAVE THESE INSTRUCTIONS

8 INTRODUCING YOUR WASHING MACHINE
INTRODUCING YOUR WASHING MACHINE
Parrs and Accessories
Parts
Wafer inJets
holt_
Accessories
included Accessories
Capsfor covering
Hot/cOWhosesWaterNon-skidpads shipping boltholes
Wrench
Tie strap Elbow bracket
¢--
':Optlonai Accessories
Pedestal Stacking Kit
{sold separately} (sold separately)

NTr4_ODUCING"fOUR /_AS4 NG MACH! ,_E 9
Control panel features
Cycle selector Display
Power
Buffon
Operation
BUtton
Start/ rearer Spin Soil S_9na_
Pause Temperature Speed Level Sound
Buffon Selection Selection Selection Selection
Button Buffon Button Buffon
? De_:rip_ioa
• A!tergieneTM
bor cotton, underwear (seepage 24)
Cotton/Normal
For general laundry, such as cotton Toshirts or towels (see page 24)
Porto. Press
,.For wrinkteofree fabrics (see page 24)
Delicates
- For sheer and delicate fabrics (see page 24}
Speed Wash
,- For small quantities of lightly soiled items (see page 24)
Downioad Cycle .....
- Thisposition is for _owmoaaable cycles,
The default cycle in this position isSmall Load, (See page 29]
Tub Clean
- For cleaning the wash tub {see page 37)
(Px_eserepeatedly Selects the water temperature for the wash cycle (see page 25).
_elect water temperature from 5 settings.
(Press repeatedly} Selects the spin speed at the desired level (see page 25)
Select Spin speed from 5 se_i_gs
(_ess repeatediy)Selects a wash cycle by soii level (see page 25).
bele¢_ soiNleve_from 5 settings,
, (Press repeatedly) Selects the volume of the button tones and the end of cycle
melody {see page 26)

10 INTRODUCING YOJR WASFHNG MA('[ HINE
Opera€ion (continued)
(Press before wash cycle} Pre-wash heavily soiled laundry (Seepage 26L
(Pressand hold during wash cycle} Activates or cancels Child Lockfeature,
(Seepage 27L
(Press bdore wash cycle} To add water during wash and rinse cycle
(See page 271.
{Press before wash cycle)Add an extra rinse to the selected cycle, {see page 26,}
Use this option to rinse detergent from the load {See page 26}
Set the start time of the wash cycle. (See page 26},
(Press before starting, wash cycle/Use this option to add steam for extra
cleaning power (See page 26)
(Press and hold before starting wash cycle} Tumbles clothes after cycle
• Use this option to heip reduce energy consumption (See page, 27}.
• (Press and hold} Saves the cL_rrent cycle and settings for use at a later time.
• (Press once) Restores the previously saved seltings. {See page 27_28}
Display Door lock
indicator
.............................................................................................................................................
Cycle Delay [sfimafed lime remaining/
process wash error message display
indieafer i,ndica,for (See page 42)
Deser!ption '__"_°":_'="T'_":T '
* This portion of the display shows which stage of the wash cycle is
currentty underway (LoadSensing, Wash, Rinse or Spin},
* Indicates that the door is locked, The washer door will lock while the
washer is operating, The door can be unlocked by pressing the Start:/
Pause button to _op the washer,
passed,
When the Start/Pause button is pressed, the washer automatically
detects the wash toad (weight) and optimizes the washing time,
based on the selected cycle and options, The display will then
................!r,_!s_tt _h s_t!mate _!m _eme!n!,, tq th es!t ct_ w__ qyc!e_...............................

NSTALLA[ION NSTRUCT!ONS _1
+
INSTALLATION INSTRUCTIONS
Preview installation order
Checking and choosing
the proper location
Unpacking and removing
shipping bolts
Conned_ng the water ine
Connecting the drain _ne
Leve/ng the washing Plugging !n the power
machine cord and grounding
Tea_run
Failure to do so can result in back or other injur%
• Store and install the washer where it veil not be exposed to temperatures below freezing or
exposed to outdoor weather conditions Faiture to fottow this warning can cause serious injury,
fire, electric shock, or death_
• Properly ground the washer to conform with ali governing codes and ordinances, Fature to follow
this warning can cause serious injury; firs, electric shock, or death.
• To redu_-e the risk of electric shock, do not instal the washer in humid spaces, Failure to folow
this warning can cause serious injury; fire, electric shock, or death,
• The base opening must not be obstructed by carpeting when the washer is insta/ed on a carpeted
floor,
• Do not remove the ground prong, Do not use an adapter or extension cord, Plug into a grounded
3 prong outlet, Failure to follow this warning can cause serious injur% fire_ electric shock, or
death,
.... !

_2 INSTALLATION NSTRL CTIONS
Checking and choosing the proper location
Install the washing machine on a solid floor that
is strong and rigid enough to suppo_ the weight
of the washing machine, even when fu/y loaded,
without flexing or bouncing, If the floor has too
much flew you may need to reinforce it to make
it more rigid, ffthe floor is not solid, it may cause
severe vibration and noise.
1 Clean the floor before installation.
- Make sure to select sold and smooth ground.
2 Two or more people are needed for moving and
unpacking the washing machine_
3 Allow for sufficient space between the walls and
the washing machine for installation.
You must aIIow sufficient space for water fnes, the
drain line, and airflow.
@ NOTE
• The floor must be strong and rigid enough
to support the weight of the washer) when
fully loaded, without flexing or bouncing, If
your floor has too much flex, you may need
to reinforce it to make it more rigid.
A floor that is adequate for a top-loading
washer may not be rigid enough for a front°
loading washer, due to the difference in the
spin speed and direction, if the floor is not
solid, your washer may vibrate and you may
hear and feel the vibration throughout your
house,
• Before installing the washer, make sure
the floor is clean, dry and free of dust, dirt,
water and oil so the washer feet can not
siide easil% Leveling feet that can move or
slide on the floor can contribute to excess
vibration and noise due to poor contact with
the floor.
• If a drip pan must be used, take extra care
to folow the instructions provided with the
drip pan and make sure the leveling feet are
adjusted for firm and even contact with the
pan_ Use of drip pans and failure to properly
level the machine may result in increased
vibration and noise during operation.
......... .......
77V= =

NSTALLAT ON NSTRUCT ONS _3
Unpacking and removing shipping bolts 1
When removing the washer from the carton base,
be sure to remove the foam drum support in the
middle of the carton base,
ff you must tay the washer down to remove the
base packaging materials, always lay it carefully on
its side.
Do NOT lay the washer on its #oct or beck.
Ste_ing with the bottom two shipping bolts,
use the wrench (included) to fully loosen eli four
shipping bolts by turning them counterclockwise.
Remove the bolt assemblies by wiggMing them
slightly while pulling them out
Retainer
Foam Tub Carton Base
Support
2 Locate the four hole caps included in the
accessory pack and install them Jn the shipph_g
bolt holes.
................................
/i_,_
7 {i
i )
i
r@ NOTE
• Save the bolt assemblies for future u_ To
prevent damage to internal components, DO
NOT transport the washer without reinstaiiing
the shipping bolts.
• Failure to remove shipping bolts and retainers
may cause severe vibration end noise, which
can lead to permanent damage to the washer.
The cord is secured to the back of the washer
with a shipping bolt to help prevent operation
with shipping bolts in place.

14 INS'TALLAT_ON NSTRL CTION$
Connecting the water lines
Check the rubber seams on both ends of the
Hoses,
.-insert a rubber seal into the threaded fittings on,
both ends of each hose to prevent leaking.
Rubber seat
4 Connect the hoses to the water inlets tightfy
by hand and then tighten another 2/3 turn with
pliers°
-,Connect the blue hose to the cold water inlet
and the red hose to the hot water inlet,
'_ _ Water hose
(% faucet}
Water hose
(To water inlet on the
washing machine}
Connect the water supply hoses to the HOT and
COLD water faucets tightly by hand and then
tighten another 2/3 turn with pliers,
Connect the blue hose to a cold water faucet
and the red hose to a hot water fauceL
5 Check for Ieaks by turning on the faucets
If water leaks, check steps 1 to 4 again.
:ri__. ,_@ NOTE .......................................................................................................................................................................................................................................................
/" • For your safety, and for extended product
life, use only authorized components. The
manufacturer is not responsible for product
_t malfunction or accidents caused by the use of
separately purchased unauthorized parts.
Use new hoses when you instalt the washing
i_ :_" machine. Do not reuse oid hoses_ Use only the
inlet hoses provided with the washer, LG does
(_ WAR N JN G not recommend the use of aftermarket hoses,
.... • Periodically check the hoses for cracks, leaks
Do not overtighten. Damage to the coupling and wear, and replace the hoses every 5 years.
can result, ...., Do not stretch the water hoses intentionally,
and make sure that they are not crushed by
After connecting the inlet hoses to the water
faucets, turn on the water faucets to flush out
foreign sub_Aances {dirt, sand or sawdust} in the
water lines, Let water drain into a bucket_ and
check the water temperature to ma!,-e sure you've
connected the hoses to the correct faucets,
other objects.
* Water sapp{y pressure must be between
14_5 psi and 142 psi (100._980 kPaL if the
water supply pressure is more than 142 psi, a
pressure reducing valve must be installed
o To provide optimum washing performance the
hot water temperature shouid be set at 120-
135°F (48_57_C) and the cold at 60_F (15_'CL

NSTALLA"f ON !NSTRUCT OHS _5
Connecting the drain line
Secure the drain hose in place to prevent it from
moving and leaking.
_@ NOTE
• The drain hose should be propedy secure&
Failure to properly secure the drain hose can
result in flooding and malfunction.
• The end of the drain hose should not be lower
than 29 inches (73.66 era} or higher than 96
inches (244.8 cm) from the bottom of the
washer.
• The drain must be installed in accordance with
any applicable local codes and regulations.
• Make sure that the water lines are not
stretched, pinched, crushed, or kinked.
Ciip the end of the hose into the elbow bracket.
Connect the elbow bracket within 4 inches (10
cm} from the end of the drain hose. if the drain
hose is extended mere than 4 inches (10 cm)
beyond the end of the elbow bracket, mold or
microorganisms could spread to the inside of
the washer.
No more than
i 4 inches (10 cm)
w bracket
insert the end of the drain hose into the
standpipe.
Bracket
3 Use a tie strap to secure the drain hose in p_ace.
CHp the end of the hose into the elbow bracket
_.Connecl the elbow bracket within 4 inches (10
cm) of the end of the drain hose. If the drain
hose is extended more than 4 inches (10 cm}
beyond the end of the elbow bracket, mold or
microorganisms could spread to the inside of
the washer.
-_ No more than
....._ 4 inches (10 cm}
w bracket
2 Hang the end of the drain hose over the side of
the laundry t[_b.
_W Bracket
Drain Hose
3 Use a tie strap t:o secure the drain hose in place.

16 INSTALLATION NSTRL CTION$
Leveling the washing machine
The washer tub of your new washing machine
spins at very high speeds_ To minimize vibration,
noise, and unwanted movement, the floor must be
perfectly leveI and solid.
1 Check that the washing machine is level
-Check the precise levelness by rocking the top
edges of the washing machine or placing a level
on the washing machine. The slope beneath the
washing machine must not exceed 1_, and aII
four leveling fee,t must rest firmly on the floor.
Level
2 Turn the lower leveling feet clockwise to levet the
washing machine
Turning the lower leveling feet clockwise raises
the washing machine.
Raise
3 Turn the Iocknuts counterclockwise and tighten
them when the washing machine is level,
nuts securely
using
fhe wrench.
4 Cheek the washing machine's levelness again,
_-Pash or rock the top edges of the washing
machine gently to make sure that the washing
machine does not reel
- if the washing machine rocks, repeat steps 1 to
3.
A WARNING
" Using the washing machine without leveling
it may result in maffunction caused by the
production of excess vibration and noise.
• tf you are installing the washing machine
on the optional pedestal, you must adi_st
the leveling feet on the pedestal to level the
washing machine. The washing machines
leveling feet should be minimized, Turn the
iocknuts counterclockwise to secure.
, Use the leveling feet only when you level the
washing machine. If you raise the leveling feet
ueeecessadiy, it may cause abnormal vibration
of the washing machine,
2
3
if you install the washing machine on a slippery
surface_ it may move because of excessive
vibration, Incorre_ leveling may cause malfunction
through noise and vibration, tf this occurs, lay the
nomskid pads under the leveling feet and adiust the
level,
1 Clean the floor to attach the non-skid pads.
Use a dry rag to remove and clean foreign
objects or moisture, if moisture remains, the
non-skid pads may slip.
Adiust the level a_er placing the washing
machine in the installation area.
Place the adhesive side of the non_,skid pad on
the floor;
tt is most effective to instatl the nomskid pads
under the front legs if it is hard to place the
pads under the front legs, place them under fhe
back Kegs,
This side up 0
......... X
A_i"
Remove
backing
4 Check the washing machine's levelness again,
= Push or rock the top edges of the washing
machine gently to make sure that the washing
machine does not rock. If the washing macMne
rocks, level the washing machine again.

NSTALLA[ION NSTRLJCT!ONS 17
+
Plugging in the power cord and
grounding
Make sure to ground the washing machine to
prevent a sho_ circuit or an efectric shock when
plugging in.
Piug in the ele_rical outlet without additiona_
grounding,
- _ WAR N IN G
• The power outlet must be within 60 inches (1.5 m)
d either side of the washer.
• The appfance and outlet must be positioned so
that the plug is easily accessible,
, Do not ovedoad the outiet with mote than one
appliance,
• The outlet must be grounded in accordance with
current wiring codes and regulations
• A time-delay fuse or circul breaker is
recommended,
• it is the personal responsibility and obligation
of the product owner to have a proper outlet
installed by a qualified electrician,
• Do not use a worn or damaged power cord or
power plug, Replace or repair it immediately.
Fature to do so may result in death, fire, electric
shock, or malfunction,
, Do not modify the power cord and take care not to
damage it when instating or moving the washing
machine. Failure to do so may result in death, fire,
electric shock, or product maffunction.
• Make sure that the washing machine is grounded.
• Connect this washing machine to a grounded
outlet conforming to the rating prior to use,
Faifure product to do so may result in fire, electric
shock, or product malfunction.
• Do not use adaptors or extension cords, The
washing machine should always be plugged
into its own individual electrical outlet which has
a voltage rating that matches the rating plate.
Fa/ure to do so may result in fire, electric shock
or disorder.
• Do not damage or cut off the ground prong of
the power cord. Doing so may cause death, fire,
electric shock, or product malfunction.
Teet run
Check if the washing machine is properly iosta/ed
and run a test cycle,
1 Load the washing machine with 6 pounds of
laundry.
2 Press _i ) and turn/,@ to the right.
3 Press =j_+____ to Rinse+Spin.
4 vress ,),
- The wash cycle starts.
5 Check if water is supplied, that the washing
machine does not rock or vibrate excessively,
and that it drains well during the spin cycle.
- tf water leaks during water suppb/, see page
14, Connecting the water/nes to connect them
properly,
- tf the washing machine rocks and vibrates
excessively, see page 16, Leveling the washing
machine to level it again.
- If the drain does not work, see page 15,
Connecling the drain line to inetal the drain line
propedy,

18 PRU_A A_TON
PREPARATION
Sorfing wash loads
Precautions for fabric care before fhe wash cycle
Read and observe the follevving to prevent shrinkage or damage to clethes
Check atl pockets to make sure that they are
empty
,- kems such as ciips, matches, pens, coins, and
keys can damage beth your washer and your
clothes
4_ Ciose zippers, hooks, and drawstrings to
prevent these items from snagging or tang_ing
on other clothes.
Pretreat heavily stained areas before washing.
- Doing so will produce clean, stMmfree results
Brush heavy soil, dust, or hair off fabrics before
washing,
Laundry may not wash clean if there is dirt or
sand on the fabrics, or items may be
damaged due to panicles rubbing against
sheer fabrics
Wash blankets individually
Washing more than one blanket together may
produce unsatisfactory results due to tangling
or an unbalanced toad,
4i, Combine large and small items in a load. Load
large items first.
Large items should not be more than half of
the totai wash load
4, The washer can be fuliy loaded, but the drum
shouid not be tightly packed with items,
_The door of the washer should close easily.
Always separate fabrics according to their
colors and wash them separately to prevent
colors from running.
o Fabrics may be damaged or become stained
due to fabric dyes running, or due to foreign
objects transferring from one fabric to
another.
Do not wash singJe items, except for bulky
items such as blankets Make sure to wash
Iaundry in similar types of loads.
- Washing a single small item may result in the
tub becoming unbalanced, vibrating and
making a noise,
Do not wash waterproof clothes,
This may cause abnormal vibration, or may
cause the load to bounce, :which could
damage the tub,
Check if there are any foreign objects in the
door seal and take extra care that clothes do
not get caught there,
--Foreign objects in the door seat may stain
clothes, and water may leak if clothes get
caught in the door seal
Wash underwear or small, light items in a
laundry net.
-Smatl, light items may get caught in the door
seal, and a brassiere hook may damage other
items or the tub.

PREPARA"rON 19
Fabric care labels
Most articles of clothing feature fabric care
tabels that include instructions for proper care.
W
Washing
Water
Temperature
U
A
A
A
Bleach
symbols
Hand Wash
Machine Wash, Normal
.Cycte
Use Permanent Press/
Wrinkle Resistant
washing machine
setting [which has a
cool down or cold sRray
petoro, et#e s!o_(ver s:!2_n_......
Use Gentle/Delicate
washing machine
setting [slow a_itatiqn
and/or reduced wash
time),
Do Not Wash
Do Not Wring
Hot
Warm
Cold/Cool
Any Bleach (When
Neeeed)
Do Not Bleach
Sorting laundry
It is recommended that you sort fauedw into
similar loads that are washable in the same
cycle,
Refer to the following chart for sorting clothes

20 PR{{PARATION
Using Detergent/Fabric Softener
Recommended Detergent
Make sure to use HE (High-Efficiency} detergent
for frontqoading washing machines. HE
detergents dissofve more efficiently and produce
fewer suds to ensure efficient washing and
rinsing, Use the correct amount of detergent as
indicated on the detergent packaging.
Specially designed to use only
(High-Efficiency) detergent
,-@ NOTE .............................................................................................................................................................................................................................................................
* Only use HE detergents, because using a
regular detergent may produce excessive
suds
" HE detergents produce fewer suds dissolve
more efficiently to improve washing and
' rinsing performanee, and hetp to keep the
interior of your washer clean.
, Use less detergent for soft water,
, Wipe up any spills immediateb/, as liquids
could damage the finish and the control
panel of the washing machine,
, Using too much detergent can cause a build_
Loading the Dispenser
The detergent dispenser drawer of the washing
machine has a dispenser compartment for
each detergent type. Add each detergent to its
appropriate compartment
! Pull out the detergent dispenser drawer:
2 Add each detergent to its appropriate
compartment,
• If you use a liquid detergent, check if the
liquid detergent cup is in place
- If you use a powdered detergent, remove the
iiquid detergent cup and put the powder h_
the main wash detergent compartment,
Liq
bleach
Main wash Pre-wash
detergent detergent
compaRmenf eompaRment
3 Close the detergent dispenser drawer slowly.
Slamming the detergent dispenser drawer
may result in the detergent overflowing into
another compartment or pouring into the tub
earlier than programmed,
_@ NOTE
It is normal for a small amount of water te
remain in the dispenser compartments at the
end of the cycie,
J

US_N( YOURWASHNG MACH ,_g 21
Add liquid or powdered detergent to this
compartment when using the Pre_Wash option.
Always use HE (High Efficiency) detergent with
your washing machine,
_@ NOTE
• When using the pre-wash option, if liquid
detergent is to be used for the main wash,
remember to use the liquid detergent cup
accessory in the main wash dispenser, to
prevent the main wash liquid detergent
from being dispensed with the pre-wash
detergent.
, The amount d detergent added for the Pre,-
Wash option is _ the amount recommended
for the main wash cycle. For example, if the
main wash cycle requires one measure of
detergent, add $/2 measure for the Pre_Wash
option.
This compa_rnent holds laundry detergent for the
main wash, cycle, which is added to the load at
the beginning of the cycie, Always use HE (High
Efficiency} detergent ,with your washing machine,
Never exceed the manufactureCs
recommendations when adding detergent, Using
too much detergent can result in detergent
buildup on clothing and the waahec Either
powdered or Hquid detergent may be used.
@ NOTE .........................................................................................................................................................................................................................................................
,,Liquid or powdered cotor-_safe bleach may be
added to the main wash compartment with
detergent of the same type,
• When using liquid detergent, make sure the
liquid detergent cup and insert are in place,
Do not exceed the maximum fill line,
• When using powdered detergent, remove
the insert and liquid detergent cup from the
compartment, Powdered detergent will not
dispense with the liquid detergent cup and
insert in ptace.
This compartment holds liquid chlorine bleach,
which witl be dispensed automatically at the
proper time during the wash cycle,
_@ NOTE
, Do not add powdered or liquid coloPsafe
bleach to this compartment,
• Always follow the manufacturer's
recommendations when adding bteach. Do
not exceed the maximum fill line, Using too
much bleach can damage fabrics,
• Never pour undiluted liquid chlorine bleach
directly onto the load or into the drum_
Fabrics may be damaged.
This compartment holds liquid fabric softener,
which will be automatically dispensed during the
final rinse cycle,
@ NOTE
• Always follow the manufacturer's
recommendations when adding fabric
so_ener, Do not exceed the maximum fill
line, Using too much fabric so_ener may
result in stained clothes,
• Dilute concentrated fabric softeners with
warm water Do not exceed the maximum fill
line,
• Never pour fabric softener directly onto the
load or into the drum.

22 USNG YOUR WASHNG MACHINE
USING YOUR WASHING MACHINE
Basic operafion
Load the laundry into the washing machine and close the door,
Press C_,
= The lights around the cycle selector knob will illuminate and a chime wilt
sound,
Turn (:,(j:Lto the desired cycle.
The proper defauk option is automatically set according to the wash cycle.
See page 23, Cycle guide, for more detailed default options for each cycle,
,- See page 24, Wash cyctes_ for details on the wash cycles.
To change the options, press the option button and select the desired
option, See page 25, Setting options before cycle, for more details on
options,
.- Skip to step 4 to use the defauit setting without changing the options.
Add the proper amount of detergent and additions (bleach, softener) into the
detergent dispenser drawer,
- See page 20, Using detergent/fabric softener, for more details on using
detergent,
The washing machine wilt start,
When the metody plays, the wash cycle is finished,
When the washing cycle is finished, the door will unlock, Open the door
and remove the _aundry immediateb/,
o Make sure to check around the door seat when taking out the finished load,
Small items may be caught in the door seal.
_,A WARNING .....................
TO reduce the risk of fire, electric shock, or injury to persons, read the iMPORTANT SAFETY
INSTRUCTIONS before operating this appliance.

US!HG"fOUR A_AS4 NG MACH! ,_E 23
Cycle guide
The cycle guide below shows the options and recommended fabric types for each cycle. • = Available option
F_iCTYFEEST_MA_D "T
........:oLLLC::_:_Loooo.............
Thiscycleis 89
designed to clean
the t_b
" Co_toe underwear, %-i-_-'-3'2- .......
pillOW®vers,
bedsheeCs,baby
wear
aeaerwear,work High _orma_ _
clothes, dia_rs, Me,}am /Ught
eta, /Low
Large ffems sash as 56
blarlkets and
comforters
CottOn linen, 51 •84
Norton! towels,
shifts sheets,jeans
m ×ed ands CoN IL_ i "
_P _'Dressshires/pan,s, 53 _62
wrinkie4ree
dmhie_, £o!d
cottonNeed
clothing, taNecloth_
_i;_Ze_°-SiesW_gi°_,bloase_°°°°-°_..........._......................
nylons,sheeror lac
arments
L!ght!ysoiied i--_
c:lotmr_g
andsmall ioads
Cycle time depends on water p_essure, Wpe and amount of toad and chosen additional o )tions.
To pro_eet your garments, not every wash/rinse temperature, spin speed, soil level, or option is
avaiiabie with ever,/cycle,

24 USNG YOUR WASHNG MACHINE
Wash cycles
You can wash laundry items more thoroughly by
sebcting the wash cycle that best suits the type
of items to be washed Turn _i:) to the desired
cycie_ When you select a wash'_'_'_cycle,the light
for the corresponding wash cycle witt turn on,
See page 22, Basic operation, for mere details on
operating methods,
Reduce laundry allergens, AHergiene _j_
This cycte is a powerfut_ high temperature cycle
designed specifically to reduce certain albrgens,
@ NOTE
, Selecting the Altergiene TM cycle
automatically incorporates steam into the
wash cycle.
* The Aliergiene TM cycle can significantly
reduce allergens in bedding and clothing,
, The Altergiene TM cycle helps reduce dust
mite populations and helps reduce allergens.
, Due to the higher energy and temperatures
used, the Atlergiene TM cycle is not
recommended for wool, silk, leather, or any
other deticate or temperature sensitive items,
Reduce laundry bacteria, Sa__ tary
NSF International (formerly the National
Sanitation Foundation), certifies that the Sanitary
cycle reduces 99.9% of bacteria on laundr% and
none of the bacteria will carry over onto the next
laundry load,
Wrinkle free items, Perm Press
This cycle is for washing items such as wrinkle
free clothes or tablecloths to minimize wrinkles.
Sheer items, De/icates
This cycle is for washing lingede or sheer and
lacy cbthes which can easily be damaged.
Quick wash, Speed Was#'_
Use the Speed Wash cycle to quickly wash lightly
soiled clothing and small loads. For high wash
and rinse efficiency, it is recommended to wash
smal_ _oads of 23 lightly soiled garments.
,-@ NOTE
Use very Httle detergent in this cycle For
additional rinsing, you can add an extra rinse
by using the option button.
Blankets or bulky items, Bu/ky!La_*{_e
This cycfe isfor washing blankets o_bulky items.
Normal items, Carton/Norms/
Use this cycle to wash ail normal items, except
deiica[e fabrics such as woot or sill

US!NG"fOUR /_AS;H NG MAC:4 NE 25
Cycle modifier buttons
Each cycle has preset settings that are selected
automatically, You may also customize the
settings using the cycle modifier buttons, Press
the button for that option to view and select other
settings.
The washer automatically adjusts the water level
for the type and size of wash load for best results
and maximum efficiency, it may seem there is no
water inside the drum in some cycles, but this is
normal,
@ NOTE:
* To protect your garments, not every wash/
rinse temperature, spin speed, soil level, or
option is avaitabie with ever,/cycle, See the
Setting options before the cycle
You san select and add the desired optional
functions before you start the wash cycle,
Setting the water temperature_
Wash Temp,,
The optimum water temperature is set
automatically for each cycle To change the
water temperature setting for a cycle, follow
the instructions below: Remember to set the
appropriate temperature, as specified in the
fabric care tabels on your clothing,
1 Press (0;f/and turn _} to the desired cycle.
2 Press repeatedly to select the desired
water temperature:
When you press the button, an indlcator light
for the corresponding selection will turn on in
the display,
You can now modify other cycte settings and
add options (see page 25-28), or proceed to
step 4 to begin the cycle_
Press k_;,
-@ NOTE
• Cold rinses use less energy,
• Your washer features a heating demeet to
boost the hot water temperature for Extra
Hot settings, This provides improved wash
performance at normal water heater settings.
• Select the water temperature suitable for
the type of load you are washing, FoItow the
fabric care label for best results_
Se#i;ng spin speed_ Spin S_;eed
Higher spin speeds extract more water from
clothes, reducing drying time and saving energy,
Some fabrics, such as delicates, require a slower
spin speed, To protect your clothing, not nil
spin speeds are available for alt cycles The
optimum spin speeds for each cycle have been
set automatically, To change the spin speed for a
cycle, follow the instructions below,
1 Press <:_ and turn ';':'
_0_ to the desired° cycle.
2 Press _ repeatedly to select the desired
spin speed.
When you press the button, an indicator light
for the corresponding selection will turn on in
the display_
3 Yeu can now modify other cycle se_ings and
add options (see page 25-28), or proceed to step
4 to begin the cycle
4 Press (_
@ NOTE ,
The Spin Speed button also activates the
Drain & Spin cycle to drain the tub and spin
clothes; for example, if you want to remove
clothes before the cycle has ended, To use
Drain & Spin, press the Power button, then
press the Spin Speed button repeatedly to
select a spin speed. Press the StardPause
button, to begin,
Seffing soil level of laundry_ Soil Level
You can wash your laundry more thoroughly
by setting the proper soil level on the washing
machine. The soil level for each cycle has been
set automatically, To change the soil level for a
cycle, follow the instructions below.
1 Press :_, and turn _%
/i__ to the desired cycle.
2 Press repeatedly to select a soil level,
- When you press the button, an indicator Hght
fer the corresponding selection wifl turn on in
the display,
You can now modify other cycle settings and
add options {see page 25-28), or proceed to
step 4 to begin the cycle.
4 Press k.,;,
@ NOTE
• Ligh:tJy soiled loads may take tess time and
heavily soiled loads may add time to the
i. cycle,
..... /

26 USNG YOUR WASH NG MACHINE
Adjusting the melody and buffon tones,
The washing machine plays a melody when the
wash cycle is finished. The buttons make a sound
each time a button is pressed. The melody and
button tones can be changed or they can be
turned off if desired.
I Presa_:
Turn {_ to the desired cycle.
2
3
4
Press ,Adjust the melody and button
tones as desired.
You can now modify other cycle settings and
add options (see page 25-28), or proceed to
step 4 to begin the cycle.
Press ./.
Prewashing, Pre Was_
Preowash for 16 minutes when clothes are cow
ered in dirt or dusL This feature is suitable for
heavily soiled items.
1 Press (_) and turn (6_ to seiect the desired
cycle,
2 ress L_._J.
-;':%i "_ light 'will turn on.
You can now modify other cycle settings and
add options (see page 25..28}, or proceed to
step 4 to begin the cycle.
4 Press _,_'i
Rinse_ drain and spin only_ Ri_s_+Sp r_
Use this cycle to rinse detergent from the load.
1 Press o} and turn _} to select the desired
cycle.
2
3
You can now modify other cycle settings and
add options (see page 25-28}, or proceed to
step 4 to begin the cycle.
4 Pufse _:;_:J.
Adding extra rinse cycle, Extra Ri_;e
*You can add an extra rinse cycte to the default
rinse cycle.
_ tO setect the
1 Pressi® and turn desffed
cycle
2 Press ,
- _._ ;;light will turn on.
3 You can now modify other cycle settings and
add options (see page 25-28), or proceed to
step 4 to begin the cycle.
4 Press _,
Presetting the start time, ©e_ay Wash
You can set the desired start time
1 Press _ and turn _ to the desired cycle.
2 "You can now modify other cycle settings and
add options (see page 25-28).
3 Press i repeatedly to select the desired
start time.
_ light will turn on.
- The set start time appears on the display
panel.
--Each press d the button increases the delay
time by one hoar, up to 19 hours.
4 Press _..
High temperature_ Sfeam
Adding the Steam option to these cycles helps to
enhance washing performance.
By using hot steam fabrics get the cleaning ben-
efits of a super hot wash.
1 Press {_i_ and turn _ to select the desired
cycle
2 Press The washer wilt automatically
adjust the cycle settings.
3 Set any other desired options.
4 Press (_
_A WAR N ING
• Do not touch the door during steam cycles.
The door surface can become very hot. Allow
the door fock to release before opening the
door.
Do not attempt to override the door Iock
mechanism or reach into the washer during
a steam cycte. Steam can cause severe
burns.

US!N( "fOUR WASH NG MACI_INE 27
Adding Extra .Water to the Wash and Rinse
Cycles_ Wat_er _':_/ua
You can rinse the load more thoroughly by
adding extra water to the wash and rinse cycles.
_® .,.)_ the desired cycle
1 Press and turn (_: to
2 Press
--The indicator light will turn on,
Go to step 4 to accept the default settings
without changing the options Press the cycle
modifier buttons to change the cycle settings
if desired, Press the option buttons to add
options if desired,
4 Press ;_,
Saving energy, Co_d Was_ _
Adding the Cold Wash TM option reduces
energy usage and provides the same washing
performance as a warm water wash,
By using six different washing motions {'Tumbling,
Roiling, Stepping, Scrubbing, Swing, Filtration),
fabrics get the cleaning benefits, without the
energy usage,
1 Press (_, and turn C_! to select the desired
cycle°
:11 ......................i
2 Press; _-, The washer will automatically
adjust the cycle settings,
3 Set any other desired options,
4 Press(_;.
Setting options during the cycle
You can add desired options during the wash
cycle.
Bu#on lock feature, Chad Lock
You can lock the washing machine to prevent
children or others from changing the cycle
settings by pressing the buttons during the cycte,
Press and hold ["_ for three seconds during
L
the wash cycle.
- When the Child Lock is enabled, a _'L message
and the remaining wash time are displayed,
in turn, on the display panel of the washing
machine,
(When the Child Lock is activated,)
Press and hotd for three seconds during
the wash cycle.
_-@ NOTE
* Child Lock remains active aRer the cycle
ends, To cancel Child Lock, turn the washer
on and then press and hold the PreWash
button, for three seconds.
@ NOTE
• When you select the Cold Wash _ option,
wash time will be increased up to ten
minutes,
• For high wash efficiency, use this option
with, less than 8 pounds {3,6 kg} of laundry
(approximately 8 thick towels),

28 USNG YOUR WASH NG MACHINE
Saving customized wash cycler PGM S_sw_
YOu can save a cycle with all the settings and
options you use most frequently.
I Press _6)and turn {0._ to select the desired
cycle.
2 Modify the cycle settings and add other
options tsee pages 2528), if desired,
3 Press the StadjPause button to start the cycle.
4 Press and hold _:_ for three seconds during
the ,wash cycle,
,_The cycle with your preferred settings and
options is saved
Selecting your customized cycle,
Custom PGM
You can recall the customized wash cycle you
had previously saved
1 Press {_} after then press
2 Press (_}
Tumbling clothes to prevent wrinkles, F'resh
Use this function when you are not able to
take out your clothes as soon as the wash
cycle ends,
1 cycle.Press,,, and turn _ to select the desired
Press and hold for three seconds
during the was_ cycie_o
- The light wilt turn on,
3 You can now modify other cycle settings and
add options (see page 25 28), or proceed to
step 4 to begin the cycle.
4 Press (i_
@ NOTE
• This function provides periodic tumbling for
up to about 19 hours to prevent wrinkles.
If you press the START/PAUSE or ON/OFF
button, you can unload your laundry at am/"
time.

US!HG"fOUR /rASH NG MACI_INZ. 29
Before using the Tag On function
The Tag On fuoction allows you to conveniently use
the LG Smart Diagnosist% Cycle Download, and
Laundry Stats features to communicate with your
appliance right from your own smart phone
1 Download the LG Smart Laondry&DW App to
your sma_ phone,
2 Turn on the NFC (Near Field Communication)
function in your smart phone
The Tag On function can be used with most smart
phones equipped with the NFC function and based
on the Android operating system (ca).
Enter the "S_tings" menu
of the smart phone and
select _Share & Connect"
under "WIRELESS&
NETWORKS"
Turning on the NFC function of the smart
phone
N_
L
2 Set "NFC" and "Direct
Android Beam" to ON and
set_t "NFC".
3 Check"Use Read and Write[
P2P receive",
4@ NOTE ........................................................................................................................................................................
, Depending on the smart phone manufacturer
and Android OS version the NFC activation
process may differ. Refer to the manual of your
smart phone for deta#s
The Tag On icon
When you use the Tag On function, position your
smart phone so that the NFC antenna on the back of
your smart phone matches the position of the Tag
On con on the appliance, tf you do not: know the
of your NFC antenna, move your smart
! phone very slightly in a circular motion until the
application verifies the connection,
_y
".._ Because of the characteristics of NFC, if the
transmission distance is too far, or if there is a metal
sticker or a thick case on the phone transmission
will not be good, In some cases, NFCoequipped
phones may be unable to transmit successfi_lly.
Press [_] in the LG Smart Laundry&DW app for a
more detailed guide on how to use the Tag On
function,

30 USNG YOUR WASH NG MACHINE
Tag On
This feature allows you to use LG Smart
DiagnoaieT% Cycle Download, and Laundry Stets
when you touch the LG epplience'e Tag On _ogo with
your NFCoequipped smart phone
Tag On self-diagnosis using LG Smart
Laundry&DW application
Instatt LG Smart Laundry&DW' application on e
NFC-equipped smertphoae,
Ins_all the application from the Play store end
run it
!_!_!iiii_i_i!ii_!i@_!iii!i!!_i_!_iii_iii_!i_i!i!_i_!_i_!_i_!_i_!_i_!_i_!_i_!_i_!_i_ii!i!ii_!_!_!i_i_iii!i!i!i_I_iii!i!ili_i_iii!i!i_i_i¸iii!i!i!i_i¸iii!i!i!i_i_iii!i!i!i¸i:iii!i!ili_i¸ililli!i_i_ii!_ii_ii!i!
4 Touch the Tag On logo,
When e Tag On screen
appears (see et dght), tap
your smart phone on the
Tag On icon on the right
side of the wesher's
control panet
- if it isn't recognized, touch
your "LG Smart
Leundry&DW' application
to see the detailed guide
(This might happen due to
the different NFC antenna
positions for each phone_)
5 Check the diagnosis results
and solutions
it shows the diagnosis
results on the cycles
recently used.
Select 'Tag On _by using the
top icons or the bottom
iCOnS
* images are for reference oniy. The LG Smart
Laundry&DW application may be updated,
3 Selec_ 'Tag On Diagnosis',

US!NG fOUR WASH NG MACH!NB 31
Tag On Smart Diagnosis
I Select 'Press to Celt LG
Service _on the Smart
Diagnosis Result screen.
2
3
Select your Country.
Agree to the terms and Conditions of the Use and
Privacy Policy by pressing "l accept."
Enter your phone number in the fluid, Use this
phone number when talking to the LG customer
service representative to enabie them to find your
Sme_ Diagnosis data,
5 Press the Cali button to
initiate the ¢a|i to LG*s
Support Center,
Images are for reference only, The LG Sme_
Laundry&DW application may be updated,

32 USNG YOUR WASH NG MACHINE
Tag On Cycle Download
Tag On Cycle Download alows you to down}cad
cycles for later use. The cycle is available at the
Downioad Cycle position on the control panel until
another cycle is downloaded.
Instatt 'LG Smart Laundry&DW' Application on a
NFC-equipped sma_phone
- Install the Application from the Play store and
run it.
Touch the Tag On logo
- When a Tag On screen
appears (see at right), tap
your sinai1 phone on the
Tag On icon on the dght
side of the washeCs
control panel.
If k iseX recognized, touch
your 'LG Smart
Laundry&DW' app to see
the detailed guide. (This
might happen due to the
different NFC antenna
positions for each phone.)
Seleef a cvcte to download,
- You can also check the
existing cycles already
downloaded,
Se_e_ Tag On _by using the
top icons or the bottom
icons,
Select 'Tag On Cycle
Download'.
To_Jch the Tag On logo
-When a Tag On screen
appears {see at right}, tap
_/our sreaR phone on the
Tag On icon on the right
side of the washer's
_.ontrol panel.
- ff i! isn't recognized, touch
[_] on the upper right
of
the Tag On screen on your
'LG Sma# Lauedry&DW"
app to see the detailed
guide, tThis might happen
due 1o the different NFC
antenna positions for each
phone.)
The new cycle is
downloaded suceessfullyl
. Check whether the new
cycle is downloaded by
turning the cycle selector
knob to Download Cycle°
Images are for reference ordy
The LG Sma_ Laundry&:DW application may be
updated.

US!NG fOUR WASH NG MACH!NB 33
Laundry Stats
Laundry Stats can tell you
when the next Tub Clean cycle
is needed for your washer and
also tell yea details of your last
10 cycles
1 Select 'Tag On' by using the
top icons or the bottom
icons.
Laundry Stats - Tub Clean
1 Select 'How to dean the
tub' in the Laundry Stats
screen
2 Select 'Laundry Stats'_
2 Follow the instructions on
the phone to see how to
prepare the machine for
Tub Clean.
3 Select "Sta_ Tub Clean
cycle' at the bosom of the
screen.
When the Tag On screen
appears (see at right}, tap
your smart: phone to the Tag
On togo on the right side of
the washer*s control panel
- If the app does not
recognize the appliance's
F_n, logo, touch the
_l in the upper right
corner of your srna_
phone's sc[een to see the
detailed guide. (This might
happen due to the different
NFC antenna positions for
each phone.}
Images are for reference only.
The LG Sma_ Laundw&DW
application may be updated.
4 When the Tag On screen
appears (see at right} tap
your smart phone to the
Tag On logo on the right
side d the washer's
controt panel
5 Verify that the Tub Clean
cycle has begun.
* Images are for reference
only, The LG Sma_
Laundry&DW application
may be updated

34 USNG YOUR WASH NG MACHINE
Laundry Stats - Washer Diary
Select "Washer Diary" at the
bottom of the Laundry Stats
screen,
,-The Washer Diary disptays
a chart showing the last
tao cycles used,
., Details of the Most Used
cycte and the Most Recent
cycle will also be
dispiayedo
Sete_ the "Run Cycle Again _
The Most Used cycle or
Most Recent cycle can be
immediately started by
selecting the "Run Cycle
Again _ button
4 Check whether washing
sta_s with the selected
cycle,
--The screen as Shown
appears and washing
starts immediately on the
selected cycle,
_meges are for re_ere{_ce o_ly, The LG Smart
Laund_f&DW application may be updated,
3 Touch the Tag On logo,
= When a Tag On screen
appears (see at right}, tap
your smart phone oe the
Tag Oe icon on the right
side of the washer's control
panel,
'LG Smart Laandry&DW'
application to see the
detailed guide, (This might
happen due to the different
NFC antenna positions for
each phone.}

US!NG "fOUR WASH NG MACI_INE 35
Tag On Cycle Set
Tag On Cycle Set allo_sesyou to
automatically adjust the cycle
and settir_gs based on your
laundry needs,
1 Seiect 'Tag On _by using the
top icons or the bottom
icons,
2 Select 'Tag On Cycle Set'.
When the Tag On screen
appears (see at right), tap
your sma_ phone to the Tag
On logo on the right side of
the washer*s control panel
-If the app does not
recognize the appiiance*s
rln logo, touch the
in the upper right
corner of your sma_!
phone's screen to see the
detailed guide, {This might
happen due to the different
NFC antenna positions for
each phone,}
Select a taundry category
based on the issue you want _'_*_'_'_'
the machine to focus on,
5 After selecting the category;
a list of specific cycles witl
appear, Select the cycle __ _#
based on your needs,
6 When the Tag On screen
appears {see at right), tap
your smart phone to the _et ehi_eat_ dkty
Tag On logo on the right sp_ w_
side of the washer's control
panel,
7 After" tagging the machine
with your phone, the cycle
will aut:omatically start. _*_<_ _, _,
Verify the correct cycle and
se_ings were selected.
tmages are for reference only; The LG Smart
Laundry&DW application may be updated.

36 MANT NANCY:(
MAINTENANCE
Care
Care after wash
After the cycle is finished, wipe the door and the
inside of the door seat to remove any moisture,
Leave the door open to dry the tub interior, Wipe
the body of the washing machine with a dry cloth
to remove any moisture.
"A WARNING
" Unptug the washer before cleaning to avoid
the risk of electric shock, Failure to follow
this warning can cause serious injury, fire,
electric shock or death,
• Never use harsh chemicats, abrasive
cleaners, or solvents to clean the washer,
They will damage the finish,
• Do not use volatile substances (benzene,
paint thinner, atcohol, acetone_ etc.} or
detergents with strong chemical components
when cleaning the washing machine. Doing
so may cause discoloration or damage to the
machine, or it may cause a fire
Care in cold climates
Follow the instructions for storing the washing
machine for an extended period of time in cold
ciimates where it may be exposed to freezing
temperatures,
1 Turn off the faucets connected with the water
lines
2 Unscrew the ,water _ines from back of the
washer
3 Empty any ,water out of the water lines,
4 Press (®L
5 Open the door and add 1 ga#on (3.8 L) of
nontoxic recreational vehicle (RV) antifreeze to
the empty washer tub. Close the door,
6 Press to select draining and spinning,
7 Press(;i:;.
Drain the water from the washing machine
for 1 minute, Not all of the RV antifreeze will
be expelte&
8 Press (_. to turn off the washing machine and
pull out the power plug.
9 Dry the tub interior with a soft cloth, and close
the door.
10 Press down hard on the disengage button and
remove the detergent dispenser drawer,
11 Drain the water from the detergent dispenser
drawer and dry out each compartment.
12 Store the washing machine in an upright
position,
_-@NOTE
* To remove the antifreeze after storing the
washing machine, add detergent to the
dispenser, and run one cycle Do not load
an,/laundry at this time
....................[.....................................
1 Turn off the faucets connected with the water
tines,
2 Pour hot water on the frozen faucets to thaw
the water tines and remove them
3 Immerse the water lines in hot water to thaw
them,
4 Connect the water lines with the water inlets
of the washing machine and with the faucets
See page 14, Connecting the water lines for
details.
5 Turn on the faucets,
6 Press "0_,
7
8 Press i;_).
= Verify the water fills properly,

MAINTENANCe] 37
1 Pour hot water in the washer tub and close the
door,
oWait for 10 minutes.
2 Press (@} after 10 minutes.
3 Preset _ ] for draining and spinning
4 Prees('!i),
- Check if the water drains,
Cleaning
Periodically clean the washing machine to heip
maintain its performance and to minimize the
chance of malfunction,
Cleaning the drum, 'Tub C/can
Improper instaftation or use of the washing
machine in a humid space for a long period
of time potentially could lead to a buildup of
detergent residue in the washing machine that
may produce mildew or musty smells. If you
clean the washer tub regularly on a monthly basis
using Tab Clean it witi minimize the possibility
that detergent residue wilt build up and mildew
or musty smells may occur:
I Add tub cleaner or lime scale remover to the
detergent dispenser drawer.
--Do not exceed the maximum detergent limit
line when you add it, Detergent may remain
in the washer tub after cleaning,
- When you use liquid chlorine bleach, load it
into the liquid chlorine bleach compartment
When you use a powdered c[eane£ pull out
the liquid detergent cup and add cleaner to
the main wash detergent corr_partmant.
When you use cleaning tablets, place them
directly into the washer tub, (Do not add tablet
cleaner to the drawer.)
2 Press (®,},
3 Turn @ to Tub Cleam
- _ ¢L r_essage appears in the display,
- The indication light for Tub Clean turns on,
4 Press (_,;
@ NOTE
• Never load laundry while using Tub Clean
The laundry may be damage& Make sure to
clean the washer tub when it is empty_
It is recommended to leave the door open
a_er finishing the laundry to keep the tub
clean
• [t is recommended that Tub C_ean should be
repeated monthly.
• If you notice mildew or musty smells, run
Tub Clean once a week for three consecutive
weeks,
• Safely and conveniently secure the door
slightly a_ar with the a magnetic door
plunger, This will promote air circulation and
help the machine to dry,

38 MA NT87NANC F':
When the power is on and the L cL message
blinks, it means the washer tub needs cleaning,
Use Tub Ctean to clean the washer tube The
timing of the automatic alert for cleaning the
washer tub depends on the frequency of use,
however, the message will generally appear
every 1,_2 months.
If you tive in, an area with hard water, mineram
scale san form on the internal components
of the washing machine, Take extra care to
periodically clean the mineral buildup on the
internal components to extend the tifespan of the
washing machine_
Check if the descaler is suitabte for cleaning the
washer tub before using it and run the Tub Clean
cycle_ See page 30, Tub clean for details on tub
clean,
@ NOTE ...............................................................................................................................................................................................................................................................
• In a_eas with hard water, it is recommended
to use a water softener,
• Make sure to remove all leads from the
ii
washer tub before cleaning the washer tub,
Cleaning the washer tub together with a load
may result in contamination of or damage to
the laundry.
Wipe lime buildup or other spots on stainless
steef with a soft cloth soaked in stainless steel
cleaner.
Cleaning the detergent dispenser drawer
Leaving detergent in the detergent dispenser
drawer for an extended period of time or using
the washing machine for a long period of time
may cause the buildup of sca_es in the detergent
dispenser drawer. Pull out and clean the
detergent dispenser drawer once a week,
1 Pull out the detergent dispenser drawer.
2 Press down hard on the disengage button and
remove the detergent dispenser drawer_
3 Remove the inserts from the drawer,
4 Clean them with warm water
Use a soft cloth or brush for cleaning and
remove any residue,
5 Wipe any moisture with a dry towel or cloth
after c[eaning.
6 Replace the detergent dispenser drawer,
A WARNING
Do not spray water inside the cabinet Doing
so may cause fire or electric shock,
_@ NOTE

MAINTENANC:_[ 39
Cleaning €he waCer inlet filters
Clean the water inlet filters periodically to prevent
clogging, Take extra care to clean the water inlet
fikers in areas using hard water, Water may not
be supplied if there are foreign obiects, such as
rust, sand, or stones in the water inlet fitters,
1 Press (_, to turn off the washing machine and
pull out the plug,
2 Turn off the faucets connected with the water
inlets
3 Remove the water inlets.
4 Pull out the ,water inlet filter
A WARNING .....................................................................................................,
• Unplug the power cord and turn off the
faucets before cleaning, Failure to do so may
cause electric shock,
• Do not use the washing machine without the
inlet filters, tf you use the washing machine
without the inlet filters it witl cause teaks and
malfunction,
• ff you use the washing machine in an area
with hard water; the inlet filter may become
clogged due to lime buildup, Contact your
nearest LG customer service center if the
inlet filter is not clean or is missing,
.................................................................................................................................................................................................................................................................................................................................................................p
_@ NOTE
" _E message will blink on the display when
the water pressure in the detergent drawer
is weak or an inlet filter is clogged with di_t.
Clean the inlet filter,
\
5 Remove foreign objects from the water inlet
filter,
Soak the water inlet filters in white vinegar or
a lime scafe remover or use a toothbrush to
remove foreign objects and rinse thorougMy,
6 Press the water {ntet filters back into place.
7 Reattach the water lines to the washing
machine,

40 MA NT NANCY:(
Cleaning the drain pump filter
The washing machine fails to drain if the drain
pump filter is ciogge& Periodically clean the
drain filter to prevent clogging with foreign
objects,
1 Press (@_)to turn off the washing machine and
pa_ out the plug,
2 Open the drain pump filter cover,
6 Recap the plug onto the drain hose and
reattach the drain hose,
7 lnse_ the drain pump filter,
Unclip the drain hose and remove the plug
from the drain hose to drain the remaining
water,
Twist the pump filter counterclockwise to
remove.
i! ii_i
8 Close the drain pump filter cover
WARNING
J Make sure to unplug the electricai cord
before cleaning, Failure to do so may cause
electric shock,
° Opening the drain filter wiJl result in water
oved_owing if there is water in the washer
tub, Make sure to check if the water is
completely drained before opening the drain
filter.
• Using the washing machine without
the drain filter or with an incorrectly
assembled drain filter may cause leaks or
_@ NOTE
5 Clean the pump fitter and opening,

MAINTENANCe: 4]
(:leaning the door seal
Clean the door seal once a month to prevent
bui)d--up of dirt in the door seal
1 Wear rubber gloves and protective goggles.
2 Dilute 3/4 cup (177 ml) of liquid chlorine b_each
in 1 gallon (3,8 L) of water.
3 Soak a sponge or a soft e)oth in this diluted
solution and wipe all around the door seal
4 Wipe any moisture with a dry towel or cloth
after c)eaning.
5 Leave the door open to al)ow the door seai to
dry complete)y,
CAUTION
* Cleaning the door seal with an undiluted
solution may cause malfunction of the door
seal and washing machine parts,

42 "fROUB .£%4Oe)T/NG
TROUBLESHOOTING
Checking error messages
if the following message appears on the display, check the foliowing and take the appropriate corrective action,
_"--"::'7::"......... a_ses"':':eT';' SolutiOnS ........................................
Item of clothing has gathered on one side of the tub. Rearrange items to help balance the toad,
There are not enough items in the machine_ Stuffed animals or mats can become unbalanced
items are tangled or banche& or load is too small during spinning arid the washing machine may fail to
Did you wash a stuffed animal, a mat, or knitwear? drain, Rearrange the knitwear to help balance the load
Did you wash more than one heavy blanket at once? and drain it again.
...........................................................................................................................................Put one blanket in at a time.
Water isnot supplied or the water pressure is few Turn on the faucets,
Is the faucet turned off7 ffa faucet is frozen, thaw it with warm water
Is the water suppb_'stopped or the faucet frozen? If the inlet filter is clogged, clean it, (see page 39 )
Is the water pressure low or is an in_etfilter e_ogged? Connect the water _inepropedy with the cold water
Is the water line propedy connected with the cold inlet. (see page 14}
water inlet'? Check that the water lines are not pinched or bent,
is the water Ine pinched or bent? Take extra carethat water lines arenot twisted or
.pinched bjeets:...........................................................
Water line leaks in connection Connect the water lines properly with the faucets, (see
Are the water lines connected with the faucets page 14}
prop____edy_____.__
.......dE i! The tub does not rotate Ciear door area and make sure door isclosed and
[......... Is the door completely c{osed and locked? is the door locked, If the message keeps appearing, unplug the
area free from c_othiq_ or other items? )ower and contact your nearest LG service center.
The washiog machine drains slowly or not at a{I[s the Lower the drain hose within 3 feet below the end of
drain hose inatalied over 3 _/4feet (1 m} beyond the en_ the eibew bracket,
_* of the elbow braeket? Place the drain hose on a smooth surface to prevent
[s the drain hose pinched or clogged inside? bending,
[s the drain hose frozen? if the drain hoses are frozen, thaw them in warm
is the drain hose clogged with foreign obiects? water:
i Press to turn off the washing machine and press it
A
power
failure has occurred,
Control Error Unplug the power cord and contact your nearest LG
service center,
The water supply does not stop • Unplug the power cord and contact your nearest LG
• Do the water supply and the drain keep repeating in service center
turn?
is the water level too low or high compared with the , U_plug the power cord and contact your nearest LG
size of the fond? service center.
Is the washing machine overloaded? machine,
• if the load size is big, the tub may not rotate due to
anoverheatedmotor,A,owtheweaningmacbine
to stand for a while and restart the cycle Unplug
the power cord and contact yournearest LG service
To clean up the tub, please run the Tub . Please empty the tub arid inse_ bleach into the
Clean cycle, detergent dispenser and sele_ the Tub Clean cycle.
, If you want to skip the Tub Clean, turn the cycle
............... selector knob or push the option buttons to seine1
L_: CL a cycle, The message wi_! keep appearing until a
few wash cycles have been completed, after which
it will disappear until the next scheduled time to
e_ean the tub.

Before calling for service
Chock the following before catting for service
........:"F';_;_ PossibleCauses '- ':"_'s'"_'_]_'G°_'_--'-- "_--'- "_
Do you hear a sound when you dose or lock This sound is normaJ and occurs when the
°is_ih_e"wash] _ati[_sing";wa'ier;?"...............This sound is normal as the drain pump
sound drains water from the washing machine after
tb_Zye_e.
Splashing sound isthe washing machine 'washing a load of This sound is normal as the load is moving
laundry? up and down during the wash and rinse
CyCleS
Ratt_ieg and c_ankingnoise Are there any foreign obiects such as keys Cheek if there are any foreign obiects in the
coins, or safety pins in the tub or drain fiJter? tub and drain the fiJter after stopping the
cycle,
Unplug the power cord and contact your
nearest LG service center if the noise persists
Thumping sound Is the washing machine ovedoaded_ This sound is normal and occurs when the
_sthe bad out of balance? load is o_t of balance Stop the cycle and
Vibrating noise Are the shipping botts removed? See #age 13, Unpacking and ramovi#g
is the load evenly distributed in the tub? shipping boJtsto remove the shipping boits,
Is the washing machine _eve_balanced? Stop the cycle and rearrange the [sad for
Is the weshing machine installed on a solid balancing.
and smooth surface? See page !6, Leveling the washing machine
to leveJthe washing machine.
Check if the floor is solid and level
Water leaking around washer iswater _eakingfrom the faucet or the water Check the faucets or water lines
line? If the water tines are !oose!¥ connected, see
is a drain pipe or a drain hose clogged? page t4, Connecting water lines to connect
them properly,
Unclog the drain pipe or drain hose Contact
Excessive suds or failure to Did you use more than the recommended Use the recommended amount of detergent
rinse amount of detergent? for bad.
[s the soil [eve[ higher than the sizeof the ff the soil _eve[is low, reduce the detergent
load? quantiW to {assthan the recommended _eveh
___/_ Only usedetergent wth the HE {High,
Efficiency} logo,
Staining Did you add detergent directly to the tub? Make sure to _oaddetergent into the
Did you remove the load immediately after it detergent dispenser drawer,
finished? Remove the ioad immediately after itfinishesi
Did you sort and wash the cbthes by color or Sort and separate da¢_colors from Jight or
soil? white ones, a_d heaviJy soi_ed items from
lightly soiled ones. See page 19,Sorting
[aUgdhYfor@re!!s

84 SPC_FCAT_ON
Probiem
Wrinkling
Power is not turned on
The door does not open
when the cycle pauses or
finishes
Did you remove the load immediately aRer it
finished?
Did you ovedoad the tub?
Is the power cord plugged in prepedy7
Has a house fuse blown, a circuit breaker
tripped, or a power outage _eurred7
Possible Causes So!utions
Remove the load immediately after it finishes,
Do not overload the tub,
Hot water rinse can cause garments to
wrinNe Check the inlet hose connections,
Make sure that the piug is secured in a
g_otmded 3-prong, 120V (60 Hz} outlet.
Reset the circuit breaker or replace the
fuse, Do not ir_creasethe fuse capacity. If
the problem is a circuit overload have it
.c b_ a 9ualified eleetriciam
is the temperature in the tub too high? The washing machine has a safe_y lock built
is the water Leveii_ washer high? i_to the door to prevent burns. Leave the
door closed and wait unti_the door lock icon
disappears from the display,
Ailow _hewasher to complete the
The wash eys{e time is Is the washing machine overloaded? Am
longerthanusual otheroptionsaddedtothewash eyrie?
It is musty or moidy n the Has the incorrect detergent been used?
tub Did you clean the tub periodically?
See page 37, dean the inside and outside of
the washing machine periodically.
SPECIFICATIONS
MOdel WM3370H_A
..........................................Front Loading Washer
E{eetdcal requirements 120 VAC @ 60 Ha
Dimensions 68,6 cm (W) X 75,6 cm (D} X 9&3 cm (H), 129.5 cm (D with door open)
27" (W) X 293/4" (D) X 3811/16" (H}, 51" (D wkh door open)
Net weight gOkg (198,4 ibs)
Max. water pressure 14.5- 142 PSI (100 .-980 kpa)

USNGS_r_O_goss 45
USING Sma_ Diagnosis TM
Should you exper ence any piobJerns with your Washer, t [sos the capabi[ ty of transmitt ng data to
your sm;:_rt phone using the Ld} Smart [ 4_undry App_icat on or va your telephone to the LG call center:
Smart ©i_:_gnosis _ c£_nno¢ be _ct vated unless your w_sher is turned on by press n9 the POWER but
ton If your washer is _r'_ble to turn on, then troubleshooting must be done without using Smart
Di{agnos sr_
Audible Diagnosis
Smart Diagnosis TM Using "Your Smart
Phone
1 Download the LG Smart Laundry application on
your sma_ phone_
2. Open the LG Smart Laundry application on your
smart phone Press the right arrow bu_on to ad-
vance to the next screen
3. Press the RECORD button on the sma_ phone and
then hold the mouth piece of the smart phone
near the Smart Diagnosis TM logo on the Washer.
4. With the phone held ie place, press and hold the
Wash Temp bu_on for three seconds.
5 Keep the phone in place until the tone transmis_
sion has finished This takes about six seconds
and the display will count down the time
6, When the recording is complete, view the diagno-
sis by press#_g the Next bunco on the phone
-@ NOTE ................................................................................................................................................................................................................................................
* Smart Diagnosis TM iS a troubleshooting feature
designed to assist, not replace, the traditional
method of troubleshooting through service
calls, The effectiveness of this feature depends
upon various factors, including, but not limited
to, the reception d the ceitular phone being
used for transmission, any external noise that
may be present during the transmission, and
the acoustics of the room where the machine
is located. Accordingly. LG does not guarantee
that Smart Diagnosis TM wou_d accurately tro[_
bJeshoot any given issue,
Smart Diagnosis TM Through the
CallCenter
1. Call the LG call center at: (LG US} 1800-243-0000
{LG Canada) 1 888-542 2623
2. When instructed to do so by the call center agent.
hold the mouthpiece of your phone over the
Smart Diagnosis TM iogo on the machine, Hold the
phone no more than one inch from (but not touch°
ing) the machine.
displays_reen:..........................................................................................................................................
3 Press and hold the Wash Temp button for three
seconds.
4 Keep the phone in place until the tone transmis-
sion has finished. This takes about six seconds
and the display will count down the time.
5. Oece the countdown is over and the tones have
_opped, resume your conversation with the cali
cenZer agent, who will then be able to assist you in
using the information transmitted for anaiysis.

46 WARRANTY
LG WASHING MACHINE LIMITED WARRANTY (USA)
WARRANTY:
LG Electronics U.SA inc (' LG' } warrants you[ LG Washing Mach _}e(*'product") against defect in matedais or workmanship
under normal household usa, during the warranty pored set _orth bek_w LG wil_ at its optlon, repair or _ep_ase the p_}d_ct
This limited war, an w is vald on_y to the original _etail purcha er of the p_oduct is not ass}g_abie o_ t_aaaferrab_e to any
subsequent pu_chase_ or oae_, end appfles only when the product is pa[chesed through an LG author zed dealer or dietr_butor
and used within the Ur_ite# States {"U,S/') iuchJding U.S. Tstdto[ie ,
Note: Replacemeet products and repair parts may be _'_ewor tactoW-rernar_ufactored and ere warranted for the remain_og
port,DO of the orig_nai ueifs warra_ty period or nineW (90) days, wh chever is longer. Please retah_ dated receipt or deiiveP_
ticket as evidence of the Da_e of Purchase for proof of warranty (you may be required to submit a copy to LG or authorized
i ep[esentatJve)_
WARRANTY PERIOD:
Period One {1} year from date of Ten 10) years from date of Lifetime from date of
odginai retall purchase: original retail pomhase: odgi_al re_ai{ purchase;
Scope of Warranty Any intema_ _unctional Drum Motor
Pa_s & Labor (Starer, Rotor, and Hall Seaao_ Stainless Steel Drum
LG will provide pe_a & labor to Parts only, Customer w_l _ responsible for any labor or in-
Remark repair or replace defective home
parts setvi_ to replace def_ive parts.
HOW SERVICE IS HANDLED: In-Home Service
Imhome service wll be provided_ as arab{able, daring tl_e warranty period subject to sePvicer availability within the US_ To
receive fe home serv_ae_ the p[odect most be unobstructed and accessible to service personnel if the in*home service _pag
cermet be comp}cted_ it may be necessary to remove, repai_ and return the prod_ct, ff in-home service is onavsi_able, LG may
elech at its option, to provide h_r traneporta#on o{ the prs-due_ to and fore an LG authorized service center.
THIS LIM_TED WARRANTY DOES NOT COVER:
! Service tdps to deliver, p_ck up Or install the product o_ for h_st_uct on on p_oduct use
2 Replacing house fuses or resetBng o_ chcuit breakers, correction of house whng or piambing or correction of product
installation
3 Damage o_ faih_[e caused by leaky/broken/frozen water pipes, restricted drain tines, inadequate or fl_tr_rrupted wa_er supply
or in,adequate aepply of an.
4, Damage or faiiore eauae_ by accidents, peats and verm e, i[ghtn n9 wh_d, fire, floods or acts of God.
5. Damage or failure _eeuiting frum misuse, abuse, improper natailat_on repair or mah_tenance_ _mproper repair i_e_udes use
of parts not approved or specified by LG
6. Damage or failure caused by unauthorized modification or alteration to #_e p_odoct_
7, Damage or fai_ura caused by incorrect eiectdcal c_rrent, voltage, or plumb og _;odes.
8. Cosmetic damage, includag so,air;has dents, chips o_ other damage to the finish of the product, uoIess sech damage
reaufls from defect_ in materials or workmanship and is _eported to LG within seve_ (7)'calendar days from the date ot
delivery.
& Damage or missing itsms to any eiaplay, open box, d_acounted, or refurbished product,
1O, Prod_ct where the o_iginal factoP¢ soda/numbers have been removed, defaced o_ changed in any way,
t 1. Refzairs when product is o_d in other than normal a_d usual houeehoid use (a.g. rental, commemia_ use, offices, or
recraatiooal facilities} or contrary to the instrusfloes outlined in the owner's maru_aL
12, The removal arid rainstagation of the Product if it _sg_stalted in a_)inaccesaibie h}cat_on,
TH_S WARRANTY iS iN UEU OF ANY el'HER WARRANTY; EXPRESS OR iMPLIED. INCLUDING AND WITHOUT UMITATION
TO_ ANY WARRANTY OF MERCHANTABILITY OR FITNESS FOR A PARTICULAR PURPOSE, TO THE EXTENT ANY IMPUED
'¢_%ABRANTY iS REQUIRED BY LAW, THIS WARRAN_ iS LIMITED iN DUR_XTiON TO THE TERM PERIOD EXPRESSED ABOVE,
REPAIR OR REPLACEMENT AS PROVIDED UNDER THIS WA,RRAN'P¢ iS THE" EXCLUSIVE REMEDY FOR THE CUSTOMER
NEITHER THE MANUFACTURER NOR ITS U.S. DISTR_BUTOR SHALL BE LIABLE FOR ANY INCIDENTAL, CONSEQUENTIAL
INDiREC% SPECIAL, OR PUNiTiVE DAMAGES OF ANY NATURE, INCLUDING AND WITHOUT LIMITAZION TO, LOST REVENUES
OR PROFITS, OR ANY OTHER DAMAGE WHETHER BASED IN CONTRAC% TORT, OR OTHERWISE
SOME STATES DO NOT ALLOW THE EXCLUSION OR LIMiTATiON OF INCIDENTAL OR CONSEQUENTIAL DAMAGES OR
LiMiTATiONS ON NOW LONG AN iMPLiED WARRANTY LASTS, SO THE ABOVE EXCLUSION OR UM|TATION MAY NOT APPLY
TO YOU THiS WARRANTY GIVES YOU SPECiFiC iEGAL RIGHTS AND YOU MAY ALSO HAVE OTHER RIGHTS THA_ VARY
FROM STATE TO STATE
HOW TO OBTAIN WARRANTY SERVICE & ADDiTiONAL iNFORMATiON: Wdte your warranty information below:
Cal! _,?_0_243@g00 or vist our website at _ww, lg,com.
Mai_ tot LG Customer Irdormation Canter {ATTN: CIC}
20i James Record Road, Huntavtge, AL 35824
ProUdest Registration leformatiors
Modab
Serial Number:
Date of Purchase:

WARRANTY 47
LG WASHING MACHINE LIMITED WARRANTY (CANADA)
WARRANTY:
Should ym_r LG Washer (_Produet ") fail due to a defeat in material o_ workmanship under normal borne use during the warranty
pe_od set forth below, LG Caeada will at its o{_floe repair m the Product upon reeeipt of proef o{ orig#_al mdaii pemhase. This
warranty is aaffd only to the odgb_a[ retai[ p#rchaser o_ the p_odaet and applies only to a Product distributed M Canada by LG
Canada or an authorized Canadian distdb_ator thereof, The warranty only apples to Prodoete _oeated ned used within Canada
Period One (11 year from the date of Ten (10) years from the date of
odgina} retaff purchase or_ginat retail purchase
Ps_s and Labor DD Motor
Scope o{ Warranty (internal./fuectionsI pa_s on_y} (Stster, Rotor, Hal Sensor)
RemaA Washer
Extended Component Warranly {Pa_s Only)
(Consumer wiJt he charged for Labor after one (1) year from the
date of p_rchsse)
I_ Repb_s-ement products and pads are warraeted for the remaining portion of the odgina_ warranty period or ninety (90) days,
whichever _agreater.
Replacement products and parts may be eew or remarl_daetu_ed
I_ LG Autho_ ad Service Center warranties their repair work for thirty {30} days_
LG Canada's sole liability is {ira{ted to the warranty set oat above. E×cept as expressly provided above, LG Caeada makes no
ned hereby dieelaime aH ether warraeties and conditions _espeetin 9 the} p_'odact, whether e×preea or implied, i_e!udh_g_ but net
bruited to any implied war_aety or ¢oeditioe of merchantability or hteess for a particalar p{_fpoae, and eo represeetatioee shah
be bMdin9 on LG Canada, LG Canada does not authorize any person to emote or asseme for it any other warranty obligation or
_iabil ty in ¢oeeeetio# with the product To the exteet that any warranty or coedition is implled by law, it _slimited to the express
warranty period abow}. LG Canada, the manufacture_ or d strib#to sha{t not be _iab[e fo_ any incidents!, eo_seq#ential, special,
direct o_ indirect damages ices of geodwil_ {oat protds_ pue_tive or esemp_aw damages or soy other damage whether adsieg
Directly or indirectly h'om any soetractoa_ breach, fundameetsi or othe_iae, or from a#y acts or ornissioee tort, or otherwise.
This warranty gives yea a_¢ific _et}ai debts, You reay have other debts which may vary from ptovir_se to province depending on
app_iaaNe provincial laws,
Any term of this warranty that negates or varies any implied condition or ws_raety under provincial law is severable where it
conflicts w_th prov_eeia| _aw w_tbo[_t affeat{n 9 the remainder of th_s warreety s tam_m
1. _e_`_i_etrip_de_ive_pi_k_p*orinst_I[thepr_o_:_i_ga_#_mer_ope_oti_n_thepr_d_;_pairorr_p_ace_t_
hiaea o_ sorre_tion a_ wirieg, o_ aorre_lioe of unauthorized repaksdnateHation
2. Failure d _he product to perfe_m during pew_,_r failures and ieterr_p_ioes or inadequate e_e_,'tfica_set,ace.
3. Damage ca_d by leaky or broken water p_pea, ffozeu water pipes, estdcted drsh_ Iir_es, nadequste or interrupted wster supply
or iaadeq_ate supply of air.
a Damageresultieg_m_r_tingthePmdu_t_rresNeatmesp_ere_r_mraK_t_theie_r_i_s_t_inediethePr_duc_
owner's manaaL
& Damage te the Pmdoel cau_d by accidents, peats arid vermim _ightn eg wied, fire, floods, o_ acts d God.
6. Damage resulting from the misuse abuse improf_er iesta_atiam repab, or maintenaese of the ProducL Improper repair includes
use d pars not appmw_d or specified by LG Caeada,
7. Damage or prod#at fa{l_re caused by oeaothedsed modification or a_temtkm, or use for other than its intended purpose, or
[es_tieg from any wate_ leakage d_e to imprapa_ installation,
8. Damage or P_<_oct failure caused hy iecorrecl electrical correeb voitege, commercial or industrial use, or _se d accesser{as,
sompoeent% or cleanieg preducts that are not approved by LG Caeada,
9. Damage cau_d by traeapor_atloe ned headline, ins_dieg scratches, deers, chips, and/or other damage to the finish of your
pr_×_r% enleas such damsse resoits from detests in materials or workmaeahip ned is reposed wthin one _1_,weak of delivery.
10 Damage or misaieg items to say display, open box, d_scounted, or _ef_rbished Product,
t !, Prod#_,_s with original soda[ numbers theft have h_eenremoved_ a_tered, or sachet be readi@ determiee& ModeJ and Serial
numbers, aio_g with odsiea[ re_aii sales receipt, are requ#ed for warraety vaiidatioe.
12, Increases ie s#bty COsts and additioeal utility e×panses.
t& Replay>Jacket d light be_ba, fitters, or a_y eenaarnable pa_ts.
14. Repairs whee yoor Product is _Jsed_e other than eorraa_ ned [_saal hoa_ho_d use (iedudieg, without limitat on, eotnmeraia_ use,
ie offices or recreat_oea_ taciiities or aoetrary to the iestr_ctioes e_#Hned ie the Product oweeCa ma_ua_
15. Costs associated wth removal ef the Product #ore your home for repairs
16. The remoua_ and _e eetal_atioe of the Prede_# if it is inets#ed ie an ieasceasiMe {coat, on or _sm}t i_sta_ed ir_accordance with
published inata_b_tioe instructions, inched eg the Prodect owner's and increaSe#on manuals,
t7 Ac_:essedes to the Predu_._ each as door bins d[awers_ hand,as, sheiw_s, _c. ABe excluded are pars besides the_ that were
erigiealJy ktaluded with the Product
All costs associated with the ai_:,ve excluded circumstances shall be borne by the eoneomer.
For complete warranty data Is and customer assistaece, Write your warranty iefom_stioe below:
#{ease call or visit our website:
Call !oP_8.-542_2623 {24 bot_rs a day, 365 days a year} and select Product Registration l:nformation:
the appropriate Option from the mane, or visit Our website MedeI:
at http:/,zw-wwJg.eom Serial Number:
[)ate of Purchase:

48 MEMO

Life's Geod
MANUAL DE PROP/ETAR_O
LAVADORA
Lea aferfiamenfe esfe manual del usuario antes de poner en
funcionamienfo su/avadora y f6n9a!o a mano de referenc a en todo
rTsomenl"o
WM337OH_A
MFL68639703

CARACTERS'[CASDBL P ODUCTO
CARACTERiSTICAS DEL PRODUCTO
Ei motor inverter direct drive, montado en el tambor, puede producir diferentes movimientos para
[ograr unos resuitados de lavado 6ptimos, con muy poco ruido y vibraciomes El coejunto det motor
tambi_n contiene menos partes en movimiento_ 1oque supone menos reparaciones.
Si experimenta atguna dificultad t_enica con su tavadora, 6ste tiene la capacidad de transmitir
informac_6n per tel6fono al Centre de Atenci6n al Cliente. El agente de servicio al cliente guarda
la informaci6n transmitida de su m_quina y la utitiza para analizar el problema, faciiit_ndoie un
diagn6stico r_pido y elective, {Consuite ia p_giaa 45)
La limpieza regular del tambor una vez at rues utilizando Tub Clean ayudar_ a mantener el tambor
iimpio y fresco.
Mantenga la paerta tigeramente abierta de manera segura 7 conveniente utiiizando el retenedor
magn_tico Esto ayudar_ con la circuiaci6n de! aire y mantendr_ fresco eI interior de la maquina.
Para utiHzar esta funci6n, despues de remover la carga, no cierre ta puerta completamente Cuando
el retenedor magn6tico entre en contacto con eI metaI dei gaMnete de la iavadora, se mantendr_ la
puerta ligeramente abierta permitiendo que se seqae ei interior de la un_dad.
Ei tambor de acero inoxidabte de gran eapacidad ofrece maxima durabilidad y se incHna mejorando
ta eficieneia y permitiendo acceso m&s facH para prendas grandes,
Use esta opci6n para desactivar los controles durante un ciclo de iavado_ Esta opci6n evita que los
ni_oa puedan cambiar los cicles o el funcionamiento de ta m_quina, Tambi6n puede utilizarse para
desactivar controles para trabajos de limpieza,
Et caj6e dispensador de euatro compartimentos facilita la separaci6n del detergente de prelavado,
detergente de lavado principal, blanqueador I_quido y suavizante en compartimeatos diferentes,
Los excepcionales cicios de vapor a aka temperatura de LG ayudan a remover las manchas m_s
dificiles
La funcidn Tag On (Etiqueta) funciona en ta mayoda de telefonos inteligentes equipados con
comunicacidn de campo cercano (NFC, per sus sigmas en ieg|es} at comunicarse con su electrodomestico
LG equipado con Tag On, AI usar la aplicacJ6n "LG Sma_ Laundry" (lavado intetigente de LG), la
funci6n Tag On is permitir_ diagnosgcar su electrodom6st_co, descargar nuevas ciclos y ver el estado
de su electrodomestico, simplemente tocando con su telefono inte#gente el Iogotipo de Tag On del
electrodomestico,

NDICE 3
2 CARACTERJSTICAS DEL PRODUCTO
4 INSTRUCCIONES IMPORTANTES DE
SEGURIDAD
8 INTRODUCClON A LA LA>,/ADORA
8 Partes y Acceso_ os
9 Carecter sticss de/paneJ d centro_
1 1 INSTRUCCIONES DE INSTALACI6N
11 Vista p_eva de 6tden de instMaci6n
12 Com,probaci6n y e_ecc 6n de a ubicaci6n adec Jad,,_
13 Desemba aje ¥ retire de _es tornillos de trsnsporte
14 Coee×i6n de tes tubedas de agua
15 Conex 6n del tube de desagQe
16 Niveiac 6n de a bvadora
17 Cor ex 6n dei enchufe y ia tome de tieea
17 Piueba de funcionare er_to
18 PREPARACION
18 C asific_c 6n de [as csr_jas de _avado
18 _ Precauc ones pare e cu dado de los tejidos
arffers del eicto de _avado
19 _ Etiquetas de cudado de as teas
19 _ Clasif cac 6n de Is carga de rope
20 Utilizac 6n de_ dete_gente/suavi_ante
20 - Detergente recomendado
20 Cargando e dspensador
22 UTILIZACION DE LA LAVADORA
22 Funcio_ ;_m r_rtto bi_s co
23 Gu_e de cicbs
24 Cices de!evade
24 _ Reduc r el at6rgenos en tavandeda, Allergiene TM
24 - Red _c r as bactedas en Ia colada, Sanitary
24 - Ma,ntas o rope vo uminosa, Bulky/Large
24 Rope normal, CotfontNermel
24 , Rope sn arrugas, Perm, Press
24 --Prendas decades Deiicafes
24 - Lavedo d_pdQ Speed VVash
25 Botones mod_ cadores de ciclo
25 Opc ones de aiuste antes deI cie[o
25 -- aju_te de Is lemg_ratula dd ague, Wash Temp,
25 A_uste de a w_ocidad de cen rfugado Spin Speed
25 , Auste de rive de sueedad de a coeds, Sell Level
26 , lkjc ste de a rreeds y tore de los botones, Signal
26 P_etavado Pl'e Wash
26 - $6to enjuagar, escurr_ y c:entrifuga_
Rinse+Spin
26 _ A_W_dendocsod en}u gJ e×t_a Extra Rinse
26 Preajuetedel tiernpode inco Delay Wash
26 - Limpeza efs ente_ Steam
26 _ A_de agua durante e ciclode Iavado y
en uaqu_ _Nater Plus
27 Ahorro de energia_ Cold Wash TM
27 Opciones de a)uste durante el ccio
27 _ Funcien de btoquee de bofones Child Leek
28 - Cereo guarder e_do personalizado PGM Save
28 - C6me sefeec ona_ s eee per o_-ai zade, Custom PGM
28 Secede de ias pt'endas papa evter arrugas,
Fresh Ca_'e
29 Antes d_ !,ttilisar bfunc 6n "X_g On
29 _ Use de _a fenc 6n Tag On
29 _ E_ cone de Tag On
30 Ta@ On
36 MANTZNIMIENTO
36 Cuidados
36 -, Cufdados tr;;£; el lava<do
36 - CukJados en dlrna fries
37 Limp eza
37 - Limp eze det tenqboD Tub Clean
38 - L i_npieze del ea_6n dispensador de def_wgente
39 o- L mp eza de los fiitros de enhada de ague
40 = Limpieze d@ fi_tro de a bornbe de desegQe
41 I mpieza de Is junta de _a puerta
42 SOLUCION DE PROBLEMAS
42 Cer°np_obac 6n de os _'r ensaes de er'ror
43 Antes de l÷mar af servcio t@cn co
44 ESPECtFICAC|ONES
45 UTILIZACION DEL SMART DIAGNOSIS TM
46 GARANTJA

4 INSTRLCC O_4_:/S MPORTANTES DE SEGURIDAD
INSTRUCCIONES IMPORTANTES DE SEGURIDAD
LEA TODAS LAS iNSTRUCCIONES ANTES DE USAR
A ADVERTENCIA
Pot su seguridad, debe seguir la informaci6n indicada en este manual para minimizar el riesgo de incen,-
dio o expiosi6n, descarga el6xtrica, o para prevenir daffos a [a propiedad, lesiones personates o muewse,
S_ seguridad y la de otros es muy impo_nte,
Hemos inctuido rnuchos mensajes importantes de seguridad en este manual yen su electrodom6sti
co. Lea y cumpta siempre con todos los mensajes de seguddad.
A PELIGRO
Corre desgo de muerte o de sufnr heridas sedas si no sigue las instrucciones inmediatamente.
A ADVERTENClA
Corre riesgo de muerte o de sufdr heridas serias si no sigue las instrucciones.
PRECAUClON
De no seguir ias instrucciones podria sufdr daSos ieves o causar dafios en el producto.
Todos los mensaies de seguddad ie indicar_n cu_l es el desgo potential, c6mo reducir las posib#ida-.
des de sufdr heridas y qua podria suceder si no se siguen las instruc¢iones,
DE SEGUBID#D
A ADVERTENCIA
Para minimizar et desgo de incendio o e×plosi6n, descarga el6ctrica, o para prevenir tesiones persona_es
cuaado use electrodomesticos, se deben seguir precauciones basicas de seguddad, incluyendo tas siguientes:
mos enfatisamente qua una persona caiifi_da realiceel
_rvicio demantenimiento,
' Antes_ _s_r, la _a_ d_ estar ®rre'_mente i:nst_l_ , Veaiaain#_on_ de iaatala_n paralos r_uis_ de toms a
_mo s_ede_dbe e# este msnaa! 8_ra,
• Ests lavado_a noest_ dise_ada parausa madno o instalacio
nes movi_estales m6viles talescoma vehiculos se_o_sves,ete_
v_;one&
. A_tes@pen__a_v_-a fueradeservideo_ tirar{a,quite
pu_ _ra p_e_enirq#eI_ niS0ssemetan_ntro
, Not_uetee _oscontroles.
#a&
ms_@ma_

NSTRUCC ONBS IMPORTANT_:S DE 5_G JR_DAD 5
INSTRUCCIONES IMPORTANTES DE SEGURIDAD
LEA TODAS LAS INSTRUCCIONES ANTES DE USAR
A ADVERTENCIA
Per su seguridad, se debe seguir la informaci6r_ indicada en este manual para minimizar el riesgo de incen-
dio o e×piosi6n, descarga el_x_rica, o para prevenir daSos a la propiedad, lesiones personales, o muerte.
Este aparate debe set conectado a tierra. En e_ caso de descompostura o mat funcionamiento, la co.-
ne×i6n a tierra reduce el riesgo de recibir una descarga el_ctrica at proveer una via de menor resieteno
cia a la corriente el_ctrica, Este aparato esta equipado con un cabie que tiene ue conductor de equipo
a tierra y ena ctavija de tierra, La clavija debe ser conectada en una toma de corriente adecuada que
este apropiadamente instalada y conectada a tierra de acuerdo con los c6digos y ordenanzas locales.
A ADVERTENCIA
cas, 0 muerte.

INSTF_LCC O_:/$ MPORTANTI::_S DE S_GUF_ DAD
INSTRUCCIONES IMPORTANTES DE SEGURIDAD
LEA TODAS LAS INSTRUCCIONES ANTES DE USAR
A ADVERTENCIA
Per su seguridad, so debe seguir la _nformacign indicada on este manual pare minimizer e[ ries9o de incen-
die o explosi6n, descarga elgxtrica, o pare prevenir da_os ala propiedad, lesiones personales o muerte
_RUCClONE
A ADVERTENCIA
Para minimizar el ries9o de incendio oexplosign_ descarga eigctrica, opara prevenir lesiones persona,_
_es cuando use electrodom_sticos, se deben seguir precauciones basicas de seguridad, incluyendo tae
siguientes:
* Consu_ las tNS_UCCIONES DE tNSTALACION pare an
procedimiento detallado _ conexign a tierr& Las instrue-
ciones de inst_acidn son inclu_das con su lavadora para
ser utiiizadas come refereeeia, Si mueve la lavadora a
una eueva ubicacign, contrate a una persona de_sarvi,_
tie caiiScada pare que [a revise y _eiestaie. Si no se
sample con esta adveAencia se podran producir heridas
graves, incendios, descargas el6ctdcas, o mue_e,
Bajo _in_?.,nacircunstancia dei;er_ eerier o eliminar h
tercera pJnta (de loma atie-re} del c_le de alimentac_n.
Sieo se eumple con esta advertencia se podrae produ-
cir heridas graves, ineeedios, descargaa elgclricaa, o
mue_e_
e Pare su seguridad _rsonal, este electrodomgsl_co de_
ester adecuadamerrte conectad_ a tierra Si no se c_mgle
con esta advertencia se podr_n producir heridas graves,
incendios, deterges e_@;tricas, o mue_e,
. El _e de _orriente do e_e e_ectr_gsti_ co_tiene un
enchufe _ 3 cabl_ (conexi_ a tierra) que _ cf._q_a a un
tomacorrieete de pared estander _ 3 _biea (cone_dn a
_erra) para minimizar _aposibilidad do desges de des-
cargas e_@trieas per pa_e del mismo.
* La iav_dora debars es_ar co_ec_ada a un tomac_-riente
con cone_d6n a tierra de 120 V~ 60 Hertz Si no se cum-
p_econ esta advertencia se podrae produ@ heridas
graves, incendios, descargas el@tricas0 o maerte.
. Coetrate a an el_icis_a calfficado _ra qua revise ei
tomacorrieete y el @cuRe eieetrico _ et fin de aseg_rar
qua e_enchufe es_ _rrec_amente conectado a tierr& Si
eo se cumpie con esta adve_enc}a se podran producir
heridas graves, ineandios_ descargas elecrticas, o maeP
te
En _so _ center coo ue temacorriente do pared de 2
cables, ea su reaponsabilk_ y obligaci6n reemp_azarle per
#e de _red de 3 _bles _rrectamente
c_nect_'So a _err& Si nO se ¢ampie con esta adve_encia
se podran producir heridas graves, ineendioa, descar-
gas ei@tricas, o mae_e.
. No iestale la tavad_a sobre una alfombra, tes_aie_ tavado_
ra sobre un P4_ s_ido. E_incumplimiento de es_a adver-
ten¢ia guede causar dafios provocados per fags de
ague.
. No elimine etcable de conexie_qa tierr& No u_ un _
d<_ro cable de exte_sige, Cor,eete la lavadora en _n tom,a*
corriente con cene_J6_ a tierra de 3 cable& Si no se
eumple con esta adverteneia se podr_n produeir heridas
graves, incendios0 deacargas elgetricas, o maerte,
La lavadera deber_ ester siempre cceec'_a_ a un enc;_u_e
in_vidual con un ind{ea _ voltaic eq_i'alente ai qua figure
e_qsU etJqueta de caracler_cas t_c_i_s, Esto garantiza
el major funcionamiento y adem_s previene ta sobre,
carga de {os ckc#itos del begat, Io cual podria oeasionar
riesgos de ineeedio debido al reca_entamiente de ca-
bias.
Nue_ desenehufe su lavadora tirando del cable de
rrie_qte,Siempre tome el enehufe flrmemente y _le e_
mJsrr_ohaeia fuera _ra r_rarle. Sieo se eampie con
esta adverteneia se podr_n produek heridas graves,
iecendios, descargas ele_ricas, o muerte.
. Si el cordgn de alimentaci6e es da_de, este debe
reempiazado per ei fabricante o aa a_ente _ servieb
autorizade _ra e_r eualquier riesgo.
• AI instalar o camb_ar _ tugar la Javador& evffe rode _ de
cortes u otros defies en el cable de cgrriente, Si no se
eump_e con esta advertencia se podrgn produeir heridas
graves, inc:e_dios, descargas electricas, o muerte.
_ lavadora debeser insSaladay conectade a tJerra per una
persona especializada dot sePdcio t_ceieo cumpliendo con
teacgdigos bcales pare prevenir rieegoa de descargas y
asegurar fa estabiJidad durante el funcionamiento.
• La lavadora es pesade, Se necesitae dos o maa personas
_ra instalar y tras_a@r el ele_odem_s_, Si esto no se
cumple se podran preducir diversas heddas.
• A_maceae e instate la lavadora _de no este ex43ueataa
tem_raturas bajo core o a condicioees clim_tticas en
_reas exteriore& Si ao se cumple con esta advertencia
se podr_n prodaeir da_os per fagas de agaa
, Cgn el fin de redueir ei de_ de descar_s eiectrieas no
in_ale la tavadera on espados hOmedes, Si eo se cumple
con esta adverteecia se podr_n prod_cir betides graves,
incentives, descargas e_etricas, o muerte.
Pare red_¢k ei riesgo de lesiones _soPat_, cumpia con
todes los do segaridad re_mendedes
laied_a_ia,inalu_sn_oelusede guantes con manges
_rgas y galas de seguridad, En case de no cumplir con
todas _aeadve_teneias de seguridad de este manual se
podrae prod_eir daSos sobre la propiedad, iesiones
personales o la mue_e.

NSTRUCCONBSIMPORTANT_}SD_SSGJROA©7
INSTRUCClONES IMPORTANTES DE SEGURIDAD
LEA TODAS LAS INSTRUC ANTES DE USAR
A ADVERTENCIA
Per su seguridad, se debe segair Ia informacidn indicada en este manual para minimizar el riesgo de incen-
die o explosi6n, descarga el6ctrica, o para preveeir daSos a la propiedad, lesiones personales o mueAe.
A ADVERTENCIA
Para minimizar el desgo de incendio o explosi6n, descarga ei6ctrica, e para prevenir lesiones persona°
les cuando use electrodom6sticos, se deben seguir precauciones basicas de seguddad, incluyendo ias
siguientes:
• Desenehbffe la _vadora antes de IJmpiar b misma
para evitar et riesgo de descargas el6ctricas,
• Nunca utilice qulmicos fuertes, limpiadores abrasi-
v_os o solventes _ra limpiar su lavador& Los mis..
rues daSa_an el acabado de la unidad.
• No coloque trapos con grasa o aceite encima de la
lavadora° Estas sustancias emiten vapores que
podrian prender fuego a los materiales.
- No lave prendas que esten sucias con aceite vege-
ta! o de cocin& Las mismas pueden quedar con
algo de aceite laego det iavado. Debido al aceite
que permanece, la tela paede despedir humo o
prenderse faego per si sola.
• De_onecte este electrodem6stJco del tomac_
rriente antes de realizar cualqu_r _po de _nte-
nimfento. Colocar los _ntroles ee la #icii6n
OFF (apagado) no el elecb_odom6stico
de la to_ de corriente, No cumplir con esta
advertencia, podra ocasionar heridas graves,
incendios_ desca_gas ei_ctricas, o muerte_
• No combine diferentes productos de Isvanderh en
uca m{s_ carga a rnenea que esto _ especifique
en la etiqueta,
• No mezcle cloro con a_nlaco o _idos co_ el
vinagre. Siga las instrucciones de! paque_ cuande
u_lico productos de lavander_, Ei use incorrecto
paede producir gases t6xicos, Io que podria
resuftar en {esiones graves o la muerte,
• No coloque las manes dentro de la lavadora cuan-
do sus _rtes esten en rnovimiento. _tes de
cargar, descargar o agregar prendas, pulse el
bot6n de iNIC!O/PAUSA y es_re hasta que el
tambor se detenga totalmente antes de _locar las
rr_r_os dentro, Si no se cumple con esta adver-
tencia se podran producir heridas graves, incen-
dies, descargas ef6ctricas, o muerte,
* No _rmita que lea ni_os _ueguen sobre o dent.re
de la law_lora. Si _y nifea cerca mientras la lava-
dora esta en funcior_miento es necesario super¢i-
sarlos de cerca+ A medida que los niftea crezcan,
eea65etes s_bre el use adecuado y _guro de
todea los ele cos, Siestas adverten
cias no se cumplen se poddan producir heddas
graves.
- Destruya _ bolsa pl&stica y otros mater_les de
em_laje una vez retira_ la la'_dora. Es _ible
que los ni_os deseen u_r_s para jugar, _ carte*
nes cubiert_s con alfombra, colchas o I_minas de
pl_stico se pueden convertir en _maras hermeti-
cas, Si estas advertencias no se cumplen se
podrtan producir heridas graves o muerte.
, Mantenga los productos de lavanderia fuera del
alcance de Io,s hires, Pars evitar heridas, cumpla
con todas _s a_Jertencias que figuran en lasetF
quetas de los productos. Siestas adverteneias no
se camplen se poddan producir heddas graves.
. Antes de que su lavadora sea quitsa_ de _p_icio o
desechada, quite la pue_ del compartimiento de
Is lavadora _ra e_¢i_r el peligro de que los nifios o
peque_ animales queden atrapadea dentro_ El
no hacerlo paede ocasionar tesiones personalea
graves o la muerte,
GUARDE ESTAS INSTRUCCIONES

8 INTRODUCC ©N A LA LAVADORA
INTRODUCCION A LA LAVADORA
Partes y Accesorios
Partes
Accesorios
Aeces_rios inc_u_dos
Ent"radas de ague
de bombs de desagQe
nitro de bombs de desagQe
Mat_guera de desag_e
Tapones pare
Mangueras de Gomas cubrir los
agua ca#entei antidestizantes odficiosdebs
fria tomi_fos de
trans_rte
LIave
Cable de
Brida
S0_e de®d0
/papafiatlamsn_ere
dede_,_Se}
A_*cesor_s OlCeionales
Pedestat Paquete de apitado
(Adquiddo per
{Adquiddo per separado) separado)
....@ NOTA
,, Pdngase en contacto con el Departamento de atenci6n al cliente de LG, en el n(_mero 1-800_243_
0000 (I 888_542-2623 en CanadS)si felts, alguno de los accesodos,
• Para su seguridad, y con el fin de extender la vide Qtil de su tavadora, utilice s6to compon, entes
autorizados, El fabricante no se hace responsabte de los faHos del producto o accidentes cause-
dos por la utilizeci6n de piezas o componentes no autorizados,
• Las im_genes de esta guia pueden no coincidir con los componentes y accesorios reales, y
est_Jn sujetas a cambios por parte det fabdcante sin previo aviso para fines de me_ora del pro*
............d!_cto:........................................................................................................................................................................................................................................................................................................................................................................................................................................................................

I 4'TRODUCC ©N A LA LAVADORA 9
Caracferisficas del panel de control
Selector de CicJos Funcionamiento Pantalla
P
Bot6n de Encendido Bot6n de Bof_ de _ecc_ Bot6n deSebcci6_ B_ de %nido @ _a
I nlcio! Pausa deTel_e_aturade deVeJc<Madde SeI÷cci6nde _at de selection
Funcionamiento Agua Centdfugade Nvelde%_ie@d @l _t6n
BoV_,n _ Desc__
• Enciende y apaga la lavadora,
(Durante el ciclo de lavado} Detiene el funcionamiento, y canceta los ajustea,
, Allergiene TM
Para aigod6n, ropa interior (vease pagina 24)
San_r_, (SANITARiO)
- Para ropa interior, pa_ales, etc. (vease pagina 24)
Bulky/Large &_OLUMIN:OSO)
- Para el lavado genera, L como camisetas de atgod6n o toallas (v@ase p&gina 24}
Porto. Press (PLANCHADO PERM_E_Et
- Para teiidos delicados (vease p_gina 24)
Deli_tes (DEUCADOS)
Para peq;ue_as cantidades de ropa poco sucia (v_ase p_gina 24)
Downl_d _c/e(DESCARGA DE CIICLOS)
oEsta posici6n es para los ciclos descatgabtes. El ciclo predeterminado de esta
posici6n es Small Load (Carga Peque_a) (vease p_gina 29)
Tub Clean (LtMPI_ DE TINA}
Para la !impieza de ta cuba (vease pagina 37)
Inicia o po archa eI cic!o de la lavadora,
Si no puisa el bot6n :_ en 4 minutos tras ia selecci6n de un cicIo, ia
lavad0ra se apagara autom&ticamente.
(Pulse repetidamente) Se_ecciona el nive_ de suciedad (vease pagina 25},
............................................................................................................oSeleoc!on_o_2iy_,l ..................................................................................
• (Pulse repetidamente} Selecciona ana meiodia o sonido de bot6n sag6n
la seffal (V6ase pagina 26).

10 INTRODUCC 0N A {,A LA;YADORA
Funcior_amie_sto (continua¢i6_
el bot6n (V@ase p_gina 27).
{Pulse antes del cicto de [avado) Para aBadir agua durante el cicto de
lavado y acIarado (V6as÷ p4gina 26),
Use este opci6n para enjuagar el detergente de la carga (vease p_gina 26),
Programe et tiempo de retardo en la cu:al se iniciara el ciclo de lavado,
{vease p_gina 26),
Utilice esta opci6n para reducir su consumo de energia (Vease pagina 27>,
Pantalla
Indicado_ de Indicador de[ Panfalla de tiempo restanfe
proceso de programa de estimadoimensa_e de e_ror
¢ido i#_cio de [avado (Vease p_glna 42}
O CENTRiFUGADO)
pu_s de una se ha ¢ompletado el tiempo de espera fiiado,

INSTF_ JCCION_S DL _NSTALACIC N 11
INSTRUCCIONES DE INSTALACION
Vista previa del orden de instalaci6n
i
ComprobacJ6m y eiecci6n
de la ubic_cJ6n adec_4ada
DesembaJaje y retire de
los femiiJos de transporte
Conexi6n de ios tubes
de ague
Cone×i6n deJ tube de
desagQe
Nivelaci6n de ta Cenexi6rt deJ enchufe y ta
lavadora tome de tierre
Prueba de funetona-
miente
, _ ADVERTENCIA
• La lava_ra es pesad& Se necesitan @s o m&s _r,_gr_as _ra instalar y tras!_r el eJectrodem6sti_.
Si esto no se cumple se podran sufrir heridas en ia espaJda u otras herida.
• AJmacene e instale la IErvadora en un J__,ar no ex4_uesto a tem_ratJuras inferio_es alas de congelaci6n ni
a _ intemperie. Si no se cumpie con esta advertencia se podr_n produeir heridas graves, ineendlos,
descargas eldctricas o muerte
• Pare su seguridad _rsonal, este electrodom6stic_o de_ set conectado a tierra adecuadamente.
. @necte a _erra la lavadora siguiendo redes los _igos y ordenanzas lega{es. Si no se cumpte con
esta advertencia se podran producir heridas graves, incendios, descargas eidctricas o muerte.
• La apertura de ta base no debe estar obstrulda per una atfombra caando la iavadora se instale en
un piso atfombrado,
• No elimine el cable de c_)nexi6n a tierra. No use un adaptador o prolongador. Enchufe en un tomacc_
rriente con cgne_6n a tierra de 3 cables. Si no se cumpte con esta advert'encia se podran producir
heridas graves, incendios, descargas eldctricas o muerte

12 INS'/RLCC ON_:iS DE NSTALACION
Comprobact6n y el;ecct6n de la ubtcaci6n
adeeuada
Instate la Javadora sobre un sue[o con [a resiso
tencia y rigidez suficiente para soportar el peso
de la m_quina, incluso con ta carga comp!eta,
sin que se flexione o rebote. Si e[ sueto tiene una
flexibilidad excesiva, quiz_s deba reforzarse para
hacerla m_s hacerto mas rigido. Si el sue[o no
es resistente, puede causar vibraciones y ruidos
intensos.
1 Limpie el suelo antes de la instaiaci6n,
Aseg@rese de seieccionar un suelo resistent÷
y [iso.
2 Se necesitan dos o m4s personas para mover
y desempacar la Javadora.
3 Deje espacio suflciente entre las paredes y la
tavadora para su instalaci6m
Deje espacio suficiente espacio para tas tabedae
de agua, el tubo de desagQe y el flujo de aire.
@ NOTA .........................................................................................................................................................................
• Aseg0rese de _ermitir molduras de parades,
puertas o sueJo pot si desea aumentar el
......esPat!°;_qt,!erid°, .........................................................,J
@ NOTA
* El suelo debe set io suficientemente fuerte
y rigido como para soportar el peso de la
lavadora cuando est6 eompletamente carga
da, sin qua se combe o rebote. Si su sue[o
es demasiado flexible, necesitar_ reforzado
para hacerlo m_s rfgido. Un suelo adecua..
do para una [avadora de carga superior no
tiene porqu6 set Io suficientemente rigido
para una [avadora de carga frontal, debido
a la diferencia de veloeidad y direcci6n de [a
rotaci6n, Si el suelo no es s6tido, su lavado-
ra vibrar& yes posible que escuche y sienta
[a vibraci6n en toda [a casa
, Antes de instalar la [avadora, asegurese de
que el piso est6 timpio, seco y libre de poivi-
Ifo, suciedad, agua y aceites para qua [as pa _
tas de [a lavadora no puedan desiizarse f_cit -_
mente, Si [as paras niveladoras se despiazan
o deslizan sobre el piao, pueden producirse
vibraciones y ruidos excesivos debido a un
contaeto deficiente (:on ei sueio,
* Si debe utiiizarse una bandeja co[ectora
tenga especial cuidado de seguir las instruc:_
ciones provistas con la bandeia colectora
y verifique qua las patas niveladoras esten
a}ustadas para lograr un contacto firme y
niveiado con la bandeja, El uso de bandejias
eolectoras y si[a m_quinna no es nive[ada
adecuadamente estas condicioes pueden ge_
nerar vibraciones y ruidos excesivos durante
e_ funcionamiento_
S
.......5 ............I
77/_ _
@ NOTA
Consutte las intrucciones del PEDESTAL o
paquete de torre opcional antes de instaiar
con un PSDESTAL o paquete de torreo

[NSTRUCC_ONESDE NSTA ACION _3
Desempaque y retiro de los tornillos de
fransporte
AI retirar la lavadora de la base de cart6n, aseg0 ,-
rese de quitar et soporte del tambor de espuma
colocado en la mitad de la base de ca_6n,
Si debe acostar la iavadora para quitar los ma-
teriales de empaque de ta base, h_galo siempre
cuidadosamente sobre su parte lateral, NQ acues-
te fa _avadora sobre ta pa_e fronta_ o posterior:
Soporfede Base
tambor de de
espuma canon
1 Quite los dos pernos de transpose de la par-
te inferior con fa Itave ingfesa (incluida) para
soltar pot compteto fos cuatro pemos de
transporte, girandolos en el sentido opuesto al
de _as agujas dei reloj, Quite los pemos rno-
vi6ndolos un poco de lado a lado mientras tira
de elIos para sacartos,
2 Empuje tos tapones {incluidos) en los onficios
de los torniiios de transporte,
Ta
agu]ero
.....@ NOTA
• Guarde los pernos para futuros usos, Para
prevenir da_os en los componentes internos,
NO transporte la iavadora sin reinstalar los
pernos de transporte,
• No remueva los tornittos de transporte u
otros materiafes de empa que pueden causar
vibraciones y ruidos excesivos, Io cuaI puede
resultar en da_os permanentes a la lavadora,
El cable est_ asegurado a la parte posterior
tornillos colocados, /

14 INS'/RLCC ONf:iS DE NSTALACION
Conexi6n de las fuberias de agua
Revise Ins juntas herm6ticas de goma de am_
bos extremos de ]a mangueras.
._lnserte una junta de goma en fos acoples
roscados de cada manguera para evitar fikra-
cionee,
Junta hermetica
de goma
Looooooooooooo-f:2}}) Junta hermetica
4 Conecte bs mangueras a tas entradas de agua
con la mane a continuaci6n, utitice unos alica_
tee para apretadas otto 2/3 de vuelta,
- Conecte la manguera azul a la entrada de
agua fria y la manguera roia a ta entrada de
agua catiente,
de agua
caliente
Manguera de agua
(A entrada de agua de
la lavadora)
de agua
Coneete las tuberias de agua a Ins Ifaves de
paso de agua caliente y fria y apriete Ins co_
nexiones con la mane, A congnuaci6n, utiliee
unos aticates para apretarlas otro 2/3 de vuelta.
o Conecte ia manguera azui aun grlfo de agua
fr_a y ta manguera roja aun grifo de agua
caliente,
Despu6s de eonectar las mangueras de entra._
daa fos grifos de agua abra Ins Haves de agua
para etiminar sustancias extra,as (suciedad,
arena o serrm) de las tuberias de agua. Drene
el agua en un cubo, y verifique la temperatura
del agua para asegurarse de qua ha conectado
Ias mangueras a los grifos correctos.
_A ADVERTENCIA
No aju_e _s mangueras en exceso Hacerlo
puede da_ar laa v_lvulas, causando fugas y
5 Compruebe qua no haya fugas abdendo las
llaves de agua
Si hay fugas de agua, verffique de nuevo los
pasos 1 a 4,
-@ NOTA .................................................................................................................................................
• Para su seguridad y para una vida QtH mas
prolongada det producto, utiiice soio ¢ompo-
nentes autorlzados. El fabrieante no es res*
ponsable del funclonamiento incorrecto del
producto o accidentes eausados por et uso
de piezas no autorizadas.
Util{ce mangueras nuevas para la {nstalaci6n
de ia tavadora. No vuelva a utilizar mangue o
ras vie}as. Utiliee _nicamente las mangueras
suministradas con la tavadora, LG no reco_
mienda el uso de otras mangueras adquid.-
das en los comercios.
• Revise periodicamente las mangueras pot s{
hubiera grietas, fugas y desgaste, y sustit(s-
yalas cada 5 a6os,
• No est{re ins mangueras de agua intencio
nalmente y asegQrese de que no queden
aplastadas por otros objetos
• La presi6n de las tuberias de agua debeser
entre 14,5 psi y 142 psi (100 ,_980 kpaL Si {a
presi6n de {a tubeda de agua es superior a
142 psi {980 kPa), debe instatarse una v_lvuta
reductora de preside.
- Para el 6primo desempeSo de su lavadora,
la temperatura de su agua caHente debe set
entre 120q35°F (48_57°C} y el de su agua frfa
debe set 60"F(15 C}.

[NSTRUCC ONES DK INS?7_LACI©N _5
Conexi6n del fubo de desag_e
Asegure la manguera de desagL]e en su lugar
pare evitar que se mueva y pierda.
_2 NOTA
La manguera de desagee debe fliarse corree
tamente. En case contrado podda resultar
en inundaci6n o funcionamiento incorrecto
* El extreme de fa manguera de desagQe no
debe ser manor a 7366 cm (29 puJg_} ni mayor
a 244,8 cm (96 puig.} de_e ia pa_e inferior de
ta lavadora.
* El desag0e debe instalarse de acuerdo con
tas regulaeioeee nacionaies y locales apHca_
bias.
* No estire las maegueras de ague ieteneio-
nalmente y asegQreee de qua no queden
apiastadas per otros objetos.
Fije e{ extreme de la manguera en el soporte
de code.
- Conecte el code a una distaneia no superior
a 4 pt_igadas(10 cm) del extreme de la man
guera de desag_e. Si el code se coloca a una
distancia superior a 4 pulgadas(10 cm} de_
extreme de la manguera de desag(:_e, poddan
aparecer hongos o microorganismos en el
interior de ta _avadora.
_ No m_s de 4
puigadas(10 cm)
rfe de code
2 }eserte el extreme de [a manguera de desagQe
en el tube de subida
de codo
Fiie el extreme de ia manguera en el soporte
de code.
Coeeete el soporte tipo code a un mSximo de
10 cm (4 putgadas) del extreme de [a man
guera de desag_e. Si el code se co_oca a una
distancia superior a 4 puigadas
(10 era} del extreme de ta manguera de dee
ague, podrian apareeer hongos o microorga-
nismos en el interior de ia [avadora.
2 Cuelgue et extreme de [a manguera de des_
agile del lade de la tin&
Manguera de drenaje
3 Utitice uea bdda pare fijar [a manguera de
desag_e en su poslci6n.
Manguera de drenaje
3 Utiliee una brida para fijar fa manguera de
desaDOe ee su posici6m

]6 INSTRLCC ON_:iS DE NSTALACION
Nivelaci6n de la lavadora
El tambor de su nueva [avadora gira a alta ve[oci
dad . Para redueir las vibraciones, et ruido y los
movimientos no deseados, et suelo debe estar
nivetado y debe set ann superfieie s61ida.
1 Verifique que la lavadora est6 nivelada.
--Compruebe la nivelaci6n meciendo los extra..
moa superiorea de [a lavadora o co[ocando
un nivel sobre la maquina. La inelinaei6n
debajo de ta tavadora no debeser superior a
1_, y |as cuatro paras deben estar firmemente
apoyadas en el suelo.
Gire [as patas de niveiaci6n de ta lavadora en
sentido de laa manecittaa de[ relo] para nive_
[aria,
Gire las patas de nivetaci6n de [a [avadora en
sentido de [as maneciHas del reloj para [e-
vantar la lavadora.
Para _e,¢a_tsr
Gire [as contratuercas en sentido contrario a
tas manecitlas del relej y apri6telas cuando [a
tavadora est6 nivetada.
[as 4 tuetcas
utifizande [a ilave
4 Verifique naevamente la niveiaci6n de ta [avadora
- Empuje o saeuda los extremes superiores de
[a [avadora suavemente para aaegurarse qua
la m_quina no est6 meci6ndose.
En easo que [a lavadora est6 meci6ndoae,
repita los pasos 1 a 3.
A PRECAUCION
• Si utiiiza ia lavadora sin niveiada, pueden
producirse falios de funeionamiento causa
dos pot el exeeso de vibraciones y ruido.
- Siesta inataiando la lavadora sobre el pe_
destai opciona[, ajuste Ins patna de nivela..
cidn del pedestal para nivelar ia maquina.
Las patas de nivelaci6n de [a [avadora deben
minimizarse. Gire [as eontratuercas en se_t{ o
do contrario a tas aguiaa del reioj para aius _
tar[as
• Utilice Ins I_tas de nivelaci6n s61o _ra niveiar
[a lavadora. Si eleva las patas de nive[aci6n
de forma inneeesada, puede causar vibraeio-
nes an6maIas de la lavadora.
Si instala la lavadora sobre una superficie resba--
ladiza, _a misma podda moverse debido a {as
vibraeiones excesivas. La nivelaci6n ineorrecta
paede eausar fallos de funcionamiento debido a
los ruidos y vibraciones. Si esto ocurre, cotoque
las aimohadillas antidestizantes ba}o las patas
niveiadoras y ajuste el niveL
1 Limpie el suefo antes de co[ocar los apoyos
a ntideslizantes.
--Utilice an trapo seco para eiiminar y limpiar
los obje[os extrafos o la hurnedad. Si q_eda
humedad, poddan resbalar los apoyos antP
deslizantes.
2 Ajuate el nivel tras eolocar la lavadora en el
_rea de instalaci6n°
3 Cotoque el [ado adhesivo del apoyo antidesli
zante sobre el suelo.
La forma m_'_s efeetiva de instalaei6n de los
apoyoa antideslizantes es bajo las patas de
lanterns Si es dificit coiocar los apoyos bajo
las patas delanteraa, co{6queias bajo Ins
paras traseras.
E_fe tara
atp_
Retire la
prote¢ci6n
4 Verifique nuevamente {a nivelaci6n de ia lava
dora
Empuie o sacuda los extremoa superiores de
[a lavadora suavemente para asegurarse que
ta maquina no est6 meci6ndose. Si la [avadora
est_ meei6ndose, nive{e de nuevo la lavadora.

[NSTRUCCION_S DE _NS'TALACI©N 17
Conexi6n de| enchufe y ta foma de fierra
Conecte a tierra Ja Iavadora para evitar un corto._
circuito o descargas el6ctricas durante ta co.-
nexi6n
¸¸
Cone_:e el enchufe en ta toma sin conexi6n a tierra
adicionaL
_ PRECAUClON
* El_._rriente _ estar d_qtro de un _rea
mhirre _ 1,5 m (60 pu_s)a _quiera de los
* B y el tomaeorriente deLen
_r co_ _ for_e ta! que se #aeda acceder
al er_hufe faci!_
* No el tomao:_rriertte con _ de un
, El t_arrierr_e _ estar puesto a _rra de
a_rdo _n _ c_aos y las regula_
ca_eado_k_s.
. _ r_ie_ _Jl_ un fij_ de demora
_mpo o d_yvntor.
- Es responsabilidad y obtigaci6n del producto
del dueSo dei produ_o pedir a un electdcista
catificado que instaie el tomacorriente adecua-
do.
. No _lice un cableo eP,chufe desr_.ado o dace.
Rep_relos o oEn caso
contrario, podrfa haber peligro de incendio,
descargas el6ctricas o fallos del aparato.
. No mod_que el cab_ _ aJim_ y _r_
c%_ de no da_arlodurante _ ir_sta_&qo cua_
mL_Ta _ la__ra, En caSO cOntrariO pod#a
haber peligro de incendio, descargas el6cld_s
mai funcionamiento del producto.
, de que _ _wadora esl_ conectadaa
tierr&
. Conecte esta _,r_a a una toma el_r_ d_
y a_dec'_ a su .En caso contrario,
podria hair peligro de descargas el6ctricas,
incendio o falios det a_ratlp.
. No _F_e o _ _ extep_si_no La
lavadora deb_r_ set cenectada siempre en s_
propia toma de alimentaci6n_ compatible con Io
indicado en ta placa de @racteristicas En caso
contrario, podria haber _tigro de descargas
el6ctricas, incendio o mat funcionamiento del
produ_o.
. No date ni cr._le el co_uctr._ _ t_ inter_ del
_hu'fe. En caso COntrario, podrla haber peiigro
de muerte, incendio, descargas eJ6ctdcas o
Prueba de funcionamiento
Compruebe si la iavadora ha sido instalada co --
rrectamente y realice una p_ueba de funciona-
miento.
! Cargue la lavadora con 6 libras (3 kg) de ropa.
2 Pulse (i%.
3
4
5
ENJ UAGUE+CENTRIFUGADO°
o Se inicia el ciclo de _avado.
Coompruebe que la m4quina no se est6 me-
ciendo ni vibre en exceso si se suministra
agua, y que desag0e correctamente durante eJ
ciclo de centrifugado,
Si se producen fugas de agua duran,te el
suministro de agua, consuite ta p_gina 14,
Conexi6n correcta de ias tu_rias de agua.
Si ta lavadora se mese y vibra excesivamen-
te, consuke la p4gina 16, Niveiaci_n de la
[avadora, para nivelarla de nuevo.
Si et desagQe no funciona, consuite Ja p_gi-
na sobre la, ConexJ6n de! conducto _ desagOe
pa_"a instalarto correctamente.

18 PRU_S,ACd;N
¢lasificaci6n de las cargas de lavado
Precauciones para el cuidado de los tejiclos antes del ctc|o de lavado
Lea y cumpJa con ias siguientes instrucciones para evitar que ta ropa se encoja o se da6e
Revise todos los bolsiilos para asegurarse de
que eaten vacios,
Articulos como clips, cerillos, pJumas, mona
das Y Ilaves pueden daBar su tavadora o sus
prendas_
• Cierre las cremalteras, ganchos y cordones
para prevenir que estos articulos se enganchen
o se enreden en otras prendaso
41,Realice un pretratamiento de tas areas mas
sacias antes del iavado_
- De eate modo, 1ograrB mejores resut_dos
Combine prendas grandes y pequeBas en una
carg& Cargue primero las prendas grandea,
Las prendas grandes no daber_n set mas de Ja
mitad de la carga de lavado total
Cepiile fa suciedad, polvo o cabeHo de los teji=
dos antes del iavado,
--La ropa sucia podda no quedar limpia si hay
tierra o arena en los tejides, o las prendas
podrian daSarse debido al roce de las part[cu_
las centre las telas trasparentes,
Lave las mantas individualmente,
._Lavar m@s de uea frazada per vez podria
causar un mal lavado debido a un enredo o
carga desequiiibrad&
Separe las prendas per colo_es y 18velas per
separado para evitar que se corran los colores
Las prendas podrian daSarse o mansharse
porque los tintes de tas prendas desti_ee, o
per obietos extra6os que se traasfieren de un
teildo a otto,
Se puede cargar la lavadora cornpJetamente,
pero el tambor no puede quedar colmado de
prendas.
La compuerta de la tavadora debera cerrar
con facilidad,
No tare prendas individuales, a menos que se
trate de ropa voluminosa, come mantas o simi-
lares, AsegOrese de lavar ta rope en tipos simi.-
lares de cargas,
Si lava una sota preeda, puede desequiIibrarse
el tambor y se producirSn vibraciones y rui-
dos.
No lave prendas impermeables,
.. Podda causar vibracioees an6malas o qae Ja
carga rebotase y da6ara el tambor
Compruebe que no have nieg_e otro objeto
extraf_o ee la junta herm6tica de la puerta y
tenga macho cuidado de que no queden em
ganchadas Jas prendas,
Los objetos extraBos en la puerta paeden
manchar la ropay podrian producirse fugas
de agua sila rope queda enganchada en ta
junta herm6tica de la puertao
Lave ta rope interior u objetos pequeSos y
iigeros en una maJla de tavado,
Las prendas peque6as y _igeras podrian en.-
ganeharse en la junta de ia puerta, y ue gan _
cho de an sost6e podda da6ar otrae prendas.

PREPARACIC N 19
Etiquetas d;e cuidado de las felas
La mayoria de tas prendas de vestir tienen
etiquetas de cuidado de las telas para lograr un
cuidado adecuado
Lavado a maquina,
cicto normal
Utilice e_ ajuste de
planchado perman, ente
y resistente a !as
arrugas (que tiene un
enfriado, e rociado
con agua fr[a antes del
.................................... !
Utitiee el ajuste de
prendas delicadas
_ (agitacidn lenta yi
o t!em#o de lavado
reducidoL
........._ ........No tavar
No escurrir
,.. Ca_iente
,. 'Tibia,
. Fria
A
A
B_anqueado ....................................................£e cesarl ...............................................................................
......................................................._ No utilizar blanqueador
W
Lavado
'remperatura del
agua
Clasificaci6n de la carga de ropa
Se recomienda clasificar la ropa en ¢argas
similares que puedan lavarse en el mismo ciclo,
Consulte el cuadro siguiente pars elasifiear la ropa.

20 PR[{PARAC _)N
Ufilizaci6n de defergenfe/suavizan-
fe
Detergenfe recomendado
AsegQrese de usar detergente HE (Aka Eficacia)
para Javadoras de carga frontal Los detergentes
de aita eficacia (HE) se disuetven rnejor y produo
ten menos espuma para garantizar un lavado y
ac{arado eficaz Use la cantidad correcta de deter,,
ge#te tal como se indica en e_ envase,
Espeicialmente diseSado para usar s61o
det_gente de affa eficacia (HE)
NOTA ...................................................................................................................................................................................................................................................,
E
Use solo detergentes de airs efieacia, porque
si usa uno normal puede hacer demasiada
' espuma,
* Los detergentes de alta eficiencia producen
menos espuma, se disuelven de forma m_s
eficiente para mejorar et lavado y el enjuao
gue, y ayudan a mantener limpio el interior
de la tavadora.
, Utilice menos detergente para agua blanda,
, Limpie inmediatamente las salpicaduras de
detergente, ya que poddan da_ar et acabado
y el panel de control de la tavadora_
* La utilizaci6n de demasiado detergente pue..
de causar acumulaci6n en el tambor y afec _
tar et funcionamiento de ta lavadora.
* Si utiliza un detergente que no se disuelve
con facilidad o un detergente de alta visco
' sidad, _ste de_ara residuos en el tambor; los
cuales podran no enjuagarse correctamente,
Cargando el dispensador
EI caj6n dispensador de detergente de la lava
dora tiene un compardmento dispensador para
cada tipo de detergente_ Ponga cada detergente
en el compartimento adecuado.
1 Saque el caidn dispensador de detergente.
2 Ponga cada detergente en ef compartimento
adecuado.
- Si _tiliza un detergente tiquido aseg_rese que
est6 colocada la ca_ka del detergente iiquido,
- Si utitiza dete[gente en polvo, retire la cajita
del detergente liquido y ponga el detergente
en polvo en el comparfimento dei detergente
gel lavado principal.
Corn
del blar_queador
con lejla
liquido
_-Compartimenfo
de! suavizante
fiquido
Compa_imen¢o Compartimento
del detergenfe del detergenfe
de lavado de prelavado
principal
3 Cierre el caj6n dispensador lentamente
- Si cierra et ¢aj6n con fuerza puede desbordarse
e| defergente a otto ¢ompartimento o dispen-
sarse en el fambor anfes de Io programado.
[-@ NOTA
• Es normal q_e una cantidad peque_a de
agua permanezca en tos compa_imientos de
suministro al final del ciclo,

PREPARACS©N 21
Agregue e[ detergente tiquido o en polvo a este
compsrtimiento euando se usa is opci6n de
Prewash (preiavado). Use siempre detergente
t}po HE (Aitaeficienc_a) con su tavadors.
@ NOTA
• Si usted va a utiiizar detergente [iquido para
el lavado principal y va a agregar [a opc_Cn
de pre4avado, recuerde uti_izar el accesor_o
recipiente para detergente ffquido en el com.-
pa_imiento det Isvado principal para evitar
que el detergente ffquido de lavado principal
se dispense con el detergente de pre tavado.
• La cantidad de detergente agregado para Is
opci6n de pre[avado debe set la mkad de ia
Este compartimiento alberga ei detergente para
el cielo de tavado principal, e_ cuaI se agrega a la
carga al principio det ciclo.
Cuando agregue detergente nunea sobrepase las
recoraendaciones del fabrieante. Uti_izar dema-
siado detergente puede resuitar en [a acumuma-
cion del mismo en las prendas y en la lavadora
Se paede utiiizar tanto detergente ffquido como
en polvo.
@ NOTA
• Se puede agregar blanqueador compatible
con [a ropa de color, liquido o en polvo at
compartimiento de [avado principal junto
con detergente del mismo tipo_
• Cuando utHice detergente Hquido, aseg5rese
de que {a cajita y el inserto se encuentren
colocados en su sitio. No exceda la ffnea de
tienado m_×imo,
• Cuando utilice detergente en polvo, quite el
inserto y fa capita de detergente liquido de!
compartimiento. El detergente en poivo nO
se dispenssr_ si est_n si la cajita de deter-
genre ffquido y el inserto est_n coIocados.
Eate compa_imiento alberga blanqueador tiqui
do, que se dispensar_ autom_ticamente en el
momento adecuado del cicio de tavado.
:@ NOTA
• NO agregue bianqueador compatible con la
ropa de color [iquido o en polvo a este corn
pa_imiento_
• Siga siempre las recomendaciones de[ fabri _.
cante cuando agregue blanqueador. No ex_-
ceda la tinea de tlensdo maximo. Usar dema_
;i siado bianqueador puede daffar las telas.
• Nunca agregue bianqueador liquido no dilui
.... do directamente en la carga o en el tambor.
Eete compartimiento aiberga el suavizante liqui
do de teIas, que se dispeneara automaticamente
durante el eicfo de eniuague finat,
-@ NOTA
• Siga siempre [as recomendaciones de[ fabri_
csnte cuando agregue suavizante, No exceds
[a ffnea de llenado maximo_ Usar demasiado
suavizante puede causar que [as te[as se
mancheno
Diluya con agua caliente los suavizantes de
tela concentrados. No exceds ta linea de
lienado mAximo.
Nunca agregue suavizante de tela directa_

22 UTLIZACONDELALAVADORA
UTILIZACION DE LA LAVADORA
Funcionamienfo b_sico
Cargue ta ropa en la [avadora y cierre la puerta.
- Las lucca akededor del dial selector de cic[os se Huminar_n y sonata una
seffal acL_stica.
Gire _..J",;a CP o deseado,
- Se selecciona autom4ticamente _aopci6n per defecto segQn el cielo de
[evade, Conspire la p_gina 2:3, Gu_ de ciclos, pare ross informaei6n sobre
las opciones per ddecto de cada ¢ielo de lavado
- Consutte la pagina 24, eiclos de lavado, pare m&a informaci6n sobre los
cielos de [evade.
Para cambiar laa opciones, pulse et botSn de opci6n y seleccione la opei6a
deseada. Consufte ta pagina 25, _uste de o-#:iones antes _i ciclo, pare mas
informaci6n sobre las opeiones
- SaUte a[ paso 4 pare utilizer los ajustes per defecto sin cambiar las opciones.
Affada la eantidad adecuada de detergente y aditivos (blanqueador, suav
zante} en el ca}6n dispensador de detergente,
.oConsulte la p_gina 20, Use _1 detergente/s_vizante, pare mas informaci6n
sebre Ja utilizaei6n del detergente.
La tavadora se pondra en funcionamiente,
Cuando suene Ja me_odla, habr_ terminado el cie[o de lavado.
o Cuando haya terminado el cicto de lavado se desbloqueara _ Is puerta, Abra
la puerta y retire ta coMada inmediatemente.
AsegQrese de reviser a!rededor de la junta herm_tica de la puerta cuando
retire la rope. Pueden quedar atrapados ob_etos pequeSos,

UT L_ZAC ©N D8 LA LAVADORA 23
Guia de ciclos
La gui_a de cielos indicada m_s abaio muestra Ins opeiones y tipos de telas recomendadas pa_'a cada cicHo
Q = Opcion dispoeible
CiCLOT_mDErEJi_o
T;];_ Eslecicloesta Imln AVADO _A WASHTM _ustCAREdissffado pars •
limpiar la tambo_
interior, fuDdas o
almohadas,
sabanas, ropa
de bebe
rlor muy su._
cia, ropa de
trabajo,paaales,
etc.
-,"""°'°°'°'°"'°-°-°00°°,"°°
Normal to,fins, camisas g1L'Cdit o ni " AlgodSn 'ii"enzocargassaba,as,rm×tasi'ea's' ..............................................
'Pei:m_...... Camisae de vestW
Press pantslones ropa
sis arrugas ropa •
mezs!a poli6ste_
a!Aod6n maateles
vestJ5nylon, p_en-
das cos encaie
"" 21
Wash suela y cargas
pequenas
Pars proteger sus prendas de vestir, no todas ins temperaturas de lavadoleefuague, velocidades de
centrifugado, nlveies de sucledad u opciones estae dispoeibles en cada ciclo.

24 U'T[ ZAC_OM D LA LAVADORA
Cities de Invade
Puede lavar la ropa de farina mas intensive seiec
¢ionando el ¢iclo de tavado m_s adecuado par_
et ripe de prendas que se van a lavar. Gire el(__)
al ¢iclo deseado. Cuando selecsione un ciclo de
_avado, se iluminar_ ia luz pare el cicio de lavado
correspondiente. Consulte ta pagina 22, Funcie
namiento b_sico, pare m_s informaci6n sabre tos
m6todos de funcionamiento,
Reducir el a|6rgenos de lavanderia, Alle_o_
Este ciclo es Un ciclo patents y de alta temperatu-
ra diseSado para reducir especificamente ciertoa
a|6rgenos.
_@ NOT#, ,
• La selecci6n det ciclo Allergiene TM automaticao
meets incorpora el vapor en el cicio de_ Iavado.
, El ciclo Allergiene TM puede apreciaMemente
reducir afergenos en fa rope de came y la rope,
, El cicio Altergiene TM ayuda a reducir po
btaciones de aacaros dei polvillo y ayuda a
reducir aiergenos_
• Debido al use de ta alta energia y temperatu,,
re, et ciclo Altergiene TM no es recomendado
para la lane, la seda, el cuero, ni cualquJer otto
art/culo deficado y sensible a la temperature.
Reducir Ins bacterias en |a coiada, Sanitary
NSF international (anteriormente, National Sani-
tation Foundation, Fundaci6n National de Sanea--
miento}, certifica que este aisle de tavado reduce
el 99,9% de baeterias en la cotada a t_av6s de la
aita temperature, cuando se utiliza con detergen_
te en polvo.
i _ Protocela 172
Rend|re|ante de sani_izacibn _ra
.,_" lavaderas residenciales, comers|ales y
de _maito familiar
Mantas o ropa voluminosa, B@_#/Large
Este ciclo se utilize pare el Invade de mantas o
ropas voluminosas.
Rope normal, Cot't@S_q©Tma/
Utilice este ciclo pare lavar prendas norrnales,
excep¢o tejidos deticados, come maria o seda.
Rope sin arrugas, Perm Press
Este ciclo se utiliza pare laver rope sin arrugas o
maeteles, pare reducir ta aparici6n de arrugas.
Prendas delicadas, Dedicates
Kate cicto se utilize pare laver leeceria o rope con
encajes qua se pueda da6ar f_citmente,
Lavado r_pido, Speed Wash
Use el ciclo de lavado de velocidad para lavado
rSpido de ropa levemente susie y serge pequeo
ha. Pare ei tavado y enjuague de a[ta eficiencia
se recomiendan cargas pequeSa de 2_3 prendas
levemente sucias
_@ NOTA ..............................................................................................................................................................

UT L/ZAC ©N DE LA LAVADORA 2[5
Botones modificadores de ciclo
Coda cicto tiene ajustes preprogramables qae se
seleccionae autom8ticamentm Tambi6n puede
persooalizar los ajustes utitizando los botones mo_
dificadores de ciclo, Apriete el boton para ver esa
olxsi6n y seleccionar otros ajustes,
La iavadora a_usta automaticameote e[ oive[ de
ague segun el tipo y tamaSo de la carga de Iavado
pars proporcionar los mejores resultados y eficien
cia m_xima, Puede pareeer qua no hay agua dentro
del tamber en a[ganos cities pare esto es normal.
• @ NOTA
* Pare proteger sus prendas de vestJr, no todas
las temperaturas de lavadoienj;uague, velocb
dades de centrifugado, niveles de suciedad u
; opciones estan disponibles en coda ciclo. Yea
HaGu_a de ciclos pare obtener m_s detalles.
Opciones de ajusfe antes del ciclo
Usted puede seteccionar y agregar las opciones
deseadas antes de iniciar ciclo de tavado.
Ajusfe de la temperature del ague, Wa_;h 7_mp.
La temperatura del agua 6prima se ajuata de ma
hera autom_tlca para cada ciclo, Para cambiar rues
ajustea de ta temperature del agua para un ciclo0
sign las instrucciones indicadas a continuaci6n.
Recuerde establecer _s temperatura apropiada,
tal come to especifican tas etiquetas de cuidado
de tas prendas a laver,
1 Pulse (®}y gire _) al ciclo deseado,
2 Pulse repetidamente pare seleccionar la
temperature de ague deseada.
- Cuando preaiona el bot6m se encendera en
la pantalla una hJz indieadora parala setec--
ci6n correspondiente.
3 Ahora puede modificar otros sjustes del ciclo
y agregar opciones (v6ase p_g, 25 28), o pro
cede con el paso 4 para irficiar el ciclo,
4 Pulsei,';'.
,-@ NOTA
• Los enjuagues fries utilizan manes energia,
- Su lavadora cuenta con un eiemento de ca
lentamiento qua propuisa la temperature del
ague catiente para ajustes extra catientes.
Esto brieda un major desempe_o de lavado
con configuraci6n normal del calentador de
ague
• Seieccione la temperatura de agua adecuada
pare el tipo de cargo qua se encuentra lavam
do Siga las instrucciones de la etiqueta de
mantenimiento de la tela pare obtener los
..........meJ0reS resu!tados: ................................................................................................................................
Ajuste de la velocidad de cenffifugado, Spi_ Speed
Los velocidades de centdfagado m_s altas extraen m_s
agua de las prendas, Io qua reduce el tiempo de seca
do y ahorra energia, Algunos tejidos, come las pron.-
das deticadas, reqaieren una velocidad de centnfugado
manor, A los fines de proteger sus prendas, no todas
los veiacidades de centnfugado est_n disponibles
pare redes los cities, Las velocidades de centdfugado
6ptimas para cada ciclo hen side a}ustadas de manera
automation, Para cambiar la vebcidad de centrifugado
pare an cicio, siga tas instrucciones a continuaci6n.
1 Pulse Y g_re _} al ciclo deseado.
2 Pulse _ repetidamente para seteccionar la
velocidad de centrifugado deseada,
oCuando presiona el bot6e, se encender_ en ta
pantalla una tuz indicadora para ta selecci6n
correspondiente,
3 Ahors puede modificar otros ajustes del title y
agregar opeiones (v6ase p_g, 25 28), o precede
con el paso 4 pare iniciar et ciclo.
4 Puise (_!'),
,-@ NOTA
• Et botoe de veloeidad de centrifugado tam
bi@n active el ciclo de desague y centrifuge
do a fin de vaciar el tambor Y centrifugar las
prendas; per ejemplo, si desea quitar ta ropa
.............antes de que el cicto haya f!na!!zado, ...............................
Ajusfe del nivel de suciedad de la eolada_
So_;Level
Puede hacer un lavado m_s intensive de la rope
aiustando ei nivel de suciedad en la lavadora, El
nivel de suciedad de cads eiclo ha side ajustado
de manera automatica, Pare cambiar el nivel de
suciedad pare un aisle, sign las instrucciones a
continuaci6n,
1 Pulse _. y gire _?_ al cido desesdo.
2 Pulse _ repetidamente pare seteccionar
un nivel de suciedad.
•- Cuando presiona el bot6n, se encendera en
la pantalla una luz indicadora parala setec:-
cidn correspondiente,
3 Ahora puede mod:ificar otros a}ustes del eiclo
y agregar opciones (v6ase p_g. 25_28), o pro.
ceda con el paso 4 para iniciar el ciclo.
4 Pulse (_(}.
r'@ NOTA ...............................................................................................................................................................................................................................................
•Las cargas levemente sucias pueden tar_
dar menos tiempo y las cargas muy su-
cias pueden agregar tiempo al ciclo ....

26 UTLZACK_}N D LALAVADORA
Ajusfe de la melodfa y tono de los botones_
Signa_
La lavadora reproduce una melodia cuando ha
terminado el cicto de iavado, Los botones emiten
un sonido cuando se pulsan_ La melod_a y tones
de los botones pueden cambiarse o apagarse.
1 Paise i/®_,
2 Gire {_ al ciclo deseado,
3
_, _uste la metodta y los tones de
Paise
fos botones segGn Io desem
4 Ahora peede modificar otros ajustes del side
y agregar opciones (vease peg 25-28), o pro-
ceda con eI paso 4 para iniciar eI cicIo
5 Pulse (i_}.
Prelavado_ Pre Vd;_sh
Haga el preiavado per 16 minutes cuando la rope
tiene euciedad o polvo. Esta funci6n es adec#ada
para rope may sacim
1 Pu_se @: y gire _/ai cic}o deseado,
2 Puise '-'; para seieccional el Pre Waeh_
- Se iluminar_ la luz _l
3 Ahora puede modificar otros ajustes del title
y agregar opciones (v_ase p_g. 25_28}, o pro_
cede con el paso 4 pare iniciar el €isle.
4 Pulse (_}.
S610 enjuagar, escurrir y eentri{ugar,
Rinse+Spi/'_
Use este ciclo para laver detergente de la carga.
1 Pulse _) y gire @ at ciclo deseado.
2
3 Ahora puede modificar otros ajustes del c.iclo
y agregar opciones (v6ase p_:g. 25_28}, o pro_
ceda con et paso 4 pare iniciar el cicio.
4 Pulse ('_'_
A_tade ague durante el cic|o de lavado y
enjuague _Wat÷r Plus
Puede aclarar la carga m_s a fondo affadieodo
ross agua a los cities de lavado y aciarado.
1 Pulse(i®} ' _'......y gtre @ pare seieccionar el ciclo
deseado.
2 Pulse
Se encendera el piloto
3 Vaya al panto 4 para aceptar tos ajustes per
defecto sin cambiar tas opciones, Pulse los
botones modificadores del cicfo si desea sam °
biar los ajustes, Pulse ios botones opcionaies
si desea a_sadir opciones.
4 Puse_
Affadiendo ciclo de enjuague extra, Ext:a Rinse
Puede a_adir _n cic_o de eniuague extra al cicio
de enjuague per defecto
1 Pulse (_} y gire _ al cielo deseado.
p ................
2 ulse _,_ .
"- Se ilaminar_ [a [UZ
3 Ahora puede modificar otros ajustes def cicfo
y agregar opciones (vease pSg. 25-28), o pro-
ceda con el paso 4 para inieiar el cicto.
4 Pulse {_}.
Preajuste det tiempo de inicio_ Delay Wash
Puede ajustar el tiempo de inicio deseado
i Pulse (_y gire _ al ei¢to deseado.
2 Ahora puede modificar otros a_ustes del ¢icto
y agregar opciones (v6ase p_g. 25 28}.
3 Pulse repet_dameete para seleccionar
e[ tiempo de inieio deseado.
- Se iiuminara [a iUZ [;:_ .
-Cada vez que se aprieta este bot6n se au.o
menta el tiempo de demote en iapsos de 1
hera. haste 19 horaso
4 Pu se/_}
Alia femperatura_ S'f_am
Agregar la opci6n de vapor (Steam) a estos ciclos
ayuda a mejorar et rendimiento dei iavado.
Ai user vapor caiiente tos tejidos obtienen los be-
neficios de timpieza de un s(Jper lavado caliente.
1 Pulse _}V gire _"/S.J9pare seleccionar el cicio
deseado.
2 Puise La lavadora aiustar8 automatica
mente las configuraciones del cicio.
3 Programe cuaiquiera de [as demas opciones
deseadas.
4 Pulse /,

UT L/ZAC 0N DE LA LAVADORA 27
_A ADVERTENCIA .....................................................................................................................................................,
* No toque la compuerta detente los delos de
vapor. La superficie de la compuerta puede
ester may caliente. Permita que el seguro de
ta compuerta se tibere antes de abrir ta aomo
puerta.
- No imente four el mecanism4) de seguro de
la compuer_ o meter la _no dentro de la
_vadora detente un ciclo de va_r, Et vapor
puede causer quemaduras severas
@ NOTA -"
, No se pueden user todos los ciclos con la
opci6n STEAM (vapor),
* Puede que ei vapor no sea ciarameete visible
durante los ciclos de vapor. Esto es normal,
Demasiado vapor podria da¢_ar ins prendas.
- No utilice ei ,vapor en teias deiicadas tales
como lane, seda o tales qua se decoloren
J
Ahorro de energla_ Cold Wash
Agregar la opci6n Cold Wash TMa estos ciclos
brinda una reduccidn de energia y el mismo
desempe_o de iavado queun lavado con ague
tibia. Mediante et uso de 6 movimientos de lava_
do diferentes (rotaci6n, balaeceo, saito, refrega-
do, osciaici6n y filtraci6n), las reins obtienen los
beeefieios del lavado sin el gasto de energia,
1 Pulse ,_y g_re@ a_cicfo deseado,
2 Pulse ]_*_" La lavadora ajastara autom_tica
mente tas configuraciones det cicto,
3 Prograrne cualquiera de Ins dem4s opciones
deseadas,
4 Pusoiii:
Opciones de ajusfe durante el ciclo
Puede affadir las opeiones deseadas detente el ciclo
de lavado,
Funet6n de bloqueo de bofones, Chtd Lock
Puede btoquear la lavadora para evitar que los
ni_os u otras personas cambien los ajustes del
cicto puJsando los botones,
Mantenga pulsado IP_" ! tres segundos durante
el ciclo de lavado.
Con el BLOQUEO INFANTIL aetivado, se mos_
trara un mensaje {_L) Y el tiempo restante de
favado_ a so vez_ en Ja pantaila deJ panel de la
lavadora.
(Cuando est_ activado el BLOQUEO iNFANTIL)
Mantenga paisado [:'_1 tres segundos
durante
el ciclo de lavado.
( @ NOTA
BLOQUEO PARA NII(_OS se mantlene des _
pu6s del fin del cicto Si desea desactivar
esta funci6n, presione y sostenga 3 segun
dos el bo_6n PRELAVADO,

_8 UT L ZAC_ON D LALAVADORA
Como 9uardar ciclo personalizado_
PGM Save
Puede guardar ue ciclo con todos tos ajustes y
opcioees qua usted utilice con mayor frecuencia.
1
2
3
Para guardar el ciclo
Pulse _i) y g re @ a ciclo deseado,
Haga los ajustes y agregue las opciones de _
seadas,
- Mantenga puisado per tres segundos
durante el cic[o de lavado,
- Ei ciclo con sus a}ustes y opciones preferidas
hart sido guardados.
C6mo sel:ecc!onar su cido personalizado,
C_stom PGM
Puede seleccionar el ciclo de lavado personaHza
do qua hab_a guardado previamente,
1 Para seleccionar el ciclo
2 Puise
.... Luego pu se '_ ,
3 Pulse :',_)
Secado de las prendas para evitar arruga%
Utilice esta funci6e cuando no pueda retirar la
ropa de la lavadora apenas se terrnina el ciclo de
tavado,
1 Pulse y gire _} al cicto deseado,
2 Mantenga pulsados _ por 3 segandos,
- La luz se encender_
3 Seleccione _as opciones deeeadas
Ahora puede modificar otros ajustes det ciclo
y agregar opeioaes (v_ase p_g, 25_28), o
proceda con et paso 4 para iniciar el ciclo,
4 Pu se (:_i}
NOTA
Esta funci6n hace qua el tambor gire peri6di-
cameete hasta aproximadamente 19 horas
para prevenir arrugas, Si presioea ef bot6n
de INICtOiPAUSA o el bot6n de ENCENDtDO!
APAGADO, puede retirar sa ropa de la lava_
dora ee cuaiquier momento.

UT L/ZAC©N DE LA LAVADORA 29
Antes de ufilizar la funci6n Tag On
La fueci6n Tag On te permite usar convenientemee
telas caracteffsticas Smart Diagnosis TM (diagedstico
inteligente}, Cycle Download (descarga de cities}, y
Laundry Stats (estado del equipo) para comu_icarse
con sa e_eetrodom6stico desde su propio telefono
inteligente Pare utilizar la funci6n Tag On:
1 Deecargue ta Aplicaci6e LG Smart
Laundry&DW a su tel6fono inteligente,
2 Eecienda la funci6e NFC (Near Field Communica-
tion) comunicaci6n con los alrededores) ee s_
tet6fono ieteligente.
Se puede usar la fueei6n Tag On con la mayeria de
telefonos inteligentes que est_n eqaipados con la
i@ NOTA
Dependiendo de_fabdcante de[ tei6fone intellgente y d_
la versi6a de OS de Android, es posiNe qae el proceso
de aclivaci6n del NFC sea diferente, ConsaIte elmanes}
de su tei6fono inteiigente pare obtene_ m_s datalles.
El fcono de Tag On
funci6n NFC y tiene el sistema operative (OS) Android,
ubicar sa teldone inteligente al asar la funci6n Tag On con
las f_nciones Smart Diagnosis TM {diagn6stico inteligente),
Cycle Download (descarga de cities), y Laundry Stats (esta_
do del eqaipo) de la Ap_icas{6n LG Smart Laundry&DW,
f
Encencttdo de la funci6n
NFC del tel_fone inteligente
1 Ingrese at menQ 'Settings" e_
(Configuraciones) del tel6 o _:__
forte inteligente y seieccio., e _i/_ i_.:_
ne "Share & Connect '_ _ _,,_ ',.
(Compa_ir y Conectar)
bajo et menu "WIRELESS
& NETWORKS" (teaiambri
co y redes}.
2 Ponga "NFC" y "Direct
Android Beam" en ON
(aetivado) y elija "NFC".
Marque ta opei6n "Use
Read and WriteiP2P re
ceive° (Usar Leer y Escri-
biriReoepci6n P2P)°
!_2_!¸..........................................................................................
Cuando ut:i_ice[afunci6n TagOn coloque su tel6fone inteii
gents de mane_aqua Is antena de NFCen Is par_et_aserade{
tel6f0no sea igual a Is I_Sici6n del icono de Tag On en e_
elsct_odom6stico, Si no seneca is posici6n de su antena NFC,
mueva su tel6fono inteiigsnte suavemente hasiendo un movi--
mient0 circu ar haste qua _aapiicacV_nverifique la conexi6n.
Debide a tas caraeteristieas de NFC, si fa distancia de
transmisi6e es may leio% o si hay aria pegatina met_iica
o el tei6foeo tieee usa carcase grease, ia transmision no
ser_ buena. En algunos cases, los tel6fonos equipados
con NFC pueden no ser capaces de transmitir con 6xito,
Presione [I; en la Aplieaci6n LG Sma_
Laundry&DW para una guia mSs detallada sobre
c6mo usar ta funci6n Tag On.

30 uT[ ZAC_(_}N © LA LAVADORA
Tag On
Esta funci6n utilize ins funciones Smart Diagnosis TM
(diagn6stico inteiigente), Cycie Download (descarga
de cic_os), y Laundry Stats (estados del equipo) de
LG al tocar con su te_6fono inteligente equipado con
comunicaci6n de campo cercano (NFC) el iogotipo
de Tag On de su electrodom6stico LG,
Autodiagn6sfico de Tag On usando la
aplicaci6n LG Sma_ Laundry&D'¢,,/
1 tnstale ta apticaci6n "LG Smart Laundry&DW '_
en un tet_fono intetigente equipado con NFC.
--Instale la aplicaci6e desde la tienda Play y c6rrala,
4 Toque et logo de Tag On,
--Cuando aparezca una pan--
talon de Tag On (yea a {a
derecha), toque el icono de
Tag On de su tel6fono
inteligente del lade dere
cho del panel de control de
_a lavadora.
Si no le reconoce, toque
en la parte superior
dereeha de la pantalla de
Tag On en su apticaci6n LG
Smart Laundry/DW pare
ver una guia detaHada,
(Esto puede ocurdr a cause de las difereetes
posiciones de la antena de NFC en cada tei6 o
fono}
5 Revise el diagn6stico, resul-
tados y so_uciones.
Muestra los resuttados del
diagn6stico en los dos
_iJltimos cities utilizados,
Se_eccione Tag On,
Paede usar la tarjeta de
tnicio y los iconos en la
parte inferior de la pantalla,
Lea este c6digo QR con su tel6fono
intetigente para acceder
rapidamente ata Aplicaci6n LG
Smart Laundry&DW y descargarla,
Las im_genes son solo para referencia. Es posi -
hie que se actualize la apiicaci6e LG Smart
Laundry&DW.
3 Seteccione Tag On Diagno..
sis (diagn6stico de Tag On}.

UT L_ZAC ©N D8 LA LAVADORA 31
Diagn6sfico inteligenfe con Tag On
1 Seleecione 'Press to Call LG
Service' (*Presione aqui
para Ilamar ai servicio de
soporte LG*} en la pantalta
Smart Diagnosis Result
(resultado del diagn6stico
inteligente},
2 Seleccione su pa_s.
3 Acepte [os terminos y condicio_es de uso y ia po[iti-
ca de privacidad, presionando "1 accept" (°Acepto"),
4 ingrese su nGmero de tel6fono en el campo,
Utilice este m.'Jmero de tel_fono al comunicar-
se con el servicio al cliente de LG para que
puedan encontrar los datos de su diagn6stico
inteligente_
5 Presione et bot6n Call (Lia
mar} pare iniciar la Ilamada
al Centro de Soporte de LG.
* Las im_geees soe soto para referencia. La apli
caci6n real de "LG Smart Lauedry&DW ° pue-
den ser diferentes.

32 uT [ ZACff}_,,_ © LA LAVADORA
Descarga de ciclo Tag On,
La descarga de cielo Tag On te permite descaP
gar eielos para sa posterior usa Siempre puede
velvet a descargar el ciclo Smafi Load, si as/Jo
desea.
1 lnstaie fa ap[icaci6n "LG Smart Laundry&DW"
ea an tet_fono inteligente equipado con NFC.
- Instale [a apficaci6n desde [a tienda Play y ¢6rraJa.
Seleccione Tag On
Puede user Ja tarjeta de
Inicio y los iconos en la par °
te inferior de la pantaH&
3 Seleeeione Tag On CycJe
Download.
Toque el logo de Tag On,
Cuando aparezcauna panta[la de
Tag On (yea a la @roche), toq_._e
el icar_ode Tag Onde suteJdoso
inteligente dei Jadederecho de!
panel de control de Jalavadera.
.-Si n0 Io resonate, toque _ els
[a p_rte su_rior @roche de [a
pantaHa de Tag Onen sa apiicao
ci6n LG Smart Laar_drdDW pare
vet u_a gu_adetalIada
(Esto paede oeurrir eeausa de
ins diNrentes posiciones de Ja
criteria de NFCen ca@ te_efe#o_
Seleceioae un cic_o a descargar.
Tambi_e puede reviser los ciclos 0
existeetes ya descargados.
Toque el logo de Tag On. ",, ,
Cuando aparezca una Pante° _e_<_;_ ',,
[ia de Tag On (yea a [a dare-,
cha), toque el icono de Tag
On de su telefoao inteligente ' a_
del lade derecho del panel
de control de la lavadora.
° Si no [o reconoce, toque
en la pa_e superior derecha
de la pantalia de Tag On en
au aplicaei6n LG Smart _e_'_
LaundryiDW pars vet uaa _,_, , _,,,_,_,<_
gu odeta Wa.{Estopoodo
oeurdr a causa de ias dife,
rentes posiciones de la
antena de NFC eo coda
to[of one).
iEI naevo cielo ha side des
cargado exitosamente!
- Compreebe qae el nuevo
side se haya daseargado
girando la perilla de selee-
cidn de elate haste "Down
load Cycle".
Los imageries son eolo pare
referenc_a Es posible qua se
actualiza la apiicacidn LG
Smart Laundry&DW,

UT L_ZAC ©N D8 LA LAVADORA 33
Laundry Stats (estaclos de| equipo)
La funci6n Laundry Stats (estado del equipo)
puede informarte cu_ndo es
necesario reatizar et pr6ximo
ciclo de limpieza de tins de
su lavadora (Tub Clean) y
tambi6n darie detailes de los
Oltimos 10 ciclos utilizados.
1 Seleccione'Tag On' usan-
do los iconos supedores o
infe{ iores,
Laundry Stats (estado del equip) - Tub
Clean
1 Seleccione 'How to ctean the
tub' ('C6mo limpiar la tins'}
en ta pantaHa Laundry Stats.
2 Seleccione'Laundry Stats'.
Siga las instrucciones en
e_ tel6fono para vet cdmo ,_,,,,_...........
preparar el equipo pars la _.,_,_
limpieza de tina.
3 Seleccione 'Start Tub Clean
cycle' (qniciar ciclo de lim--
pieza de tins'} en la parts
inferior de la pantalla.
3 Cuando aparezca la pantalla
de Tag On (yea a la dere
cha), toque con su telefono
inteiigente el Iogotipo de
Tag On ubicado ee el lado
derecho del panel de control
de la iavadora o secadora,
Si la aplicaci6n no recono-
fa pantaiia de su tetefono
inteligente pars vet la gu_a
detaHada. (Esto puede ocuo
rrir por causa de las diferen o
tes posiciones de ta antena
de NFC en cads tetdono).
* Las imageries son solo pars
referencia. Es posible que fa
aplicaci6n "LG Sma_
Laundry&DW" sea actuali-
zada,
4 Cuando aparezca ta pantalla
de Tag On {como se indica
m_s abajo), toque con su teb-
fono iateligente el Iogotipo de
Tag On abicado en et lado
derecho dei paeet de control
de ta tavadora,
5 Verifiqae que el ciclo Tub
Clean se hays iniciado,
* Las imageries son solo pars
referencia. Es posibte que
la aplicaci6n "LG Smart
Laundrv&DW" sea actuali,.
zada,

34 uT[ ZAC_©ND LALAVADORA
Laundry Stats (estado del equipo) - Was-
her Diary (registro de la lavadora)
1 Seleccioee °Washer Diary"
(registro de la lavadora) en
ta pantatia Laundry Stats.
- El registro de la lavadora
mostrar_ un cuadro con
los _itimos diez eielos
utilizados
- Tambi6n se mostraran
los datos dei cielo mas
utiiieado y del ciclo m_s
reciente.
Se_eecioee le ope{6n _Rue
Cycle Again ° (velvet a iaiciar
cielo}.
- Et cielo mac utilizado o et
eicto m_s reciente pueden
iniciarse de inmediato al
seteccionar el bot6n "Ran
Cyete Again%
4 Verifique que el lavado se
inicie en et ciclo sefeccio-
nado.
- Aparecera la pantalla que
se muestra m&e abajo y
el lavado se iniciara de
inmediato en el eielo
seieccionado.
* Las imagenes son solo para referencia Es posi
ble que la aplicaei6n "LG Smart Laundry&DW"
sea actualizada
Toque el Iogotipo de Tag
On_
Cuando aparezca ana
pantal{a de Tag On (ver a
la de_eha), toque con su
tel6fono inteiigente et
_eono de Tag On ubieado
en el lado derecho del
panet de control de ia
lavadora.
--Si no 1o reconoce, toque
tin de Tag On en su epli.-
caci6n 'LG Smart
Laundry&DW para ver la guia detal{ada.
(Esto puede ocurrir pot causa de {as diferen_
tea posiciones de la antena de NFC en cada
teiefono).

UT L/ZAC©N DE LA LAVADORA 35
Ajuste de| ciclo Tag On
A_uste de_cic[o Tag On [e permite descargar ciclos
pare sa posterior uso. El ciclo estate dispoeibie e# la
posici6n Down[sad Cycle (Decargar ciclo) de[ panel de
controf hasta queun mJevo cic]o sea descargado.
1 Se[eccione 'Tag On _usando los i_conos supe
riores o inferiores.
2 Seleccione 'Tag On Cycie
Set'.
4 Seteecione aria categoda
de lavado en base at tejido
en el que desea que su
equipo se centre. _._
5 Luego de seleccionar la
eategoria aparece_ una
lista de cietos especffieos,
Seteccione el cic!o en base
a sus necesidades.
Se[eccione 'Tag-m Down
load' para descargar e[
ciclo, o 'Tag meet' para
a}ustar automaticamente
el ciclo y tas configuracio
ees_
o Si la aplicaci6n no reco-
noce et Iogotipo de Tag
On de[ equipo, toque
[_] en la esquina su-
perior derecha de ta pare
talla de su tei6fono inteli_
gente pare vet la guia
detaHada. (Esto puede
ocurrir pot causa de las
diferentes posiciones de
la antena de NFC en cada
te_6foeo).
6 Cuaedo aparezca ia pantalia
de 'Tag Oe {Yea ala dere-
cha}, toque con su tel6fono
inteligente el togotipo de Fet _iidre_ _ d!_"
Tag On ubicado ee e[ lado
derecho del panel de control
de [a lavadorao
}
7 Luego de etiquetar el equi
po con su tel_fono, el ciclo
iniciar_ autom_ticamente, _ _-w_#
Verifique que se hayan
seieccionado el cicio y
coefigurscioeee correctas,
Lag imSgenes son solo para
referencia. Es posible que
la aplicaci6n "LG Smart
Laundry&DW" sea actuali-
zada.

36 MANTENIM ENTO
MANTENIMIENTO
Cuidados
Cuidados tras el lavado
Una vez finalizado et ciclo, Bmpie !a puerta y el inte..
rior de ta junta herm6tiea de la pue_a pars eliminar
Jahumedad. Deje la puerta abierta para secar el
interior del tambor. Limpie eJ cuerpo de la tavadora
con un trapo seeo pars etiminar la humedad,
...._ ADVERTENClA
• Desen_e _ @_dora ar_ _ limpiar _ misma _ra
e<'r_arel rie_ _ de_cargas el_. Si no se cam-
pie con esta adve_eneia se podr_e produck hefidas
graves, incendio% descargas el6ctri_s o meuse.
lim_ abras+¢_so _etes. Los mismos dafiarSn
• su aspecto.
h_ _, etcJ o deterge_es c_ _pon_es _t-
mir_)s fuertes durante _ _ de la l_rs, Podria
deco[o_ar o daffar {a lavadora, o causar un ineendio
Cuidados en climas frios
Siga {as instrucciones pars atmacenar la lavadora
si no Iava a utilizar durante un largo periodo de
tiempo en elimas frios donde la misma podria
verse expuesta a temperaturas baio cero.
1 Cierre las llaves de paso conectadas alas
tuberias de agua.
2
3
4
5
6
7
Sueite las tuberias de agua de ias [laves de agu&
Vacie el agua de las tuber/as.
Pulse (.%:,
Abra la puerta y affada 1 gat6n (3,8 litros) de
anticongelante para vehieulos recreativos (RV)
no t6xicos en el tambor vado de la [avadora
Cierre la puerta.
PuJse pars ei dreeaie y centrifugaci6e_
Pu_se_i.
,.Vacfe ei agua de la lavadora durante un minu o
to. No se expuJsara todo el anticonge[ante RV.
8 Pulse (_: pars apagar [a lavadora y desconeete
el enchufe.
9 Seque el interior de[ tambor con un trapo
suave y cierre la puerta.
10 Presione coo fuerza el bot6n pars desengan-
cffar el caj6n dispensador de detergente y
ex:tr_igalo_
11 Vacie el agua del caj6n y seque los comparti-
mentoso
12 Guarde [a lavadora en posici6n vertical,
,@ NOTA
Para eliminar et anticongeIante tras guardar
; la lavadora, affada detergente al dispensador
y ejecute un cicto. No introduzca toga en la
i tavadora,
1 Cierre las Ilaves de paso conectadas alas
tubedaa de agua,
2 Vierta agua ealiente en [as Haves congetadas
pare descongelar las tuber[as y eu6itelas,
3 Sumetia la:s tuberias de agua en agua caliente
pars deseongeladas_
4 Conecte tas tubedas de agua a tas entradas de
_a lavadora y las [laves de agua.
- Consulte en ta p_giea 14, _ne_J6n de las
t_ber[as _ agua, para informaci6n acerca de
las conexi6n de Jas tuberias de agua,
5 Abra las liaves de paso.
6 Pulse t
7 Pulse [a perilla _ :,
8 Pulse
* Verifique que el agua se llene correctamente

MANTENIM ENTO 37
1 V_erta agua caliente en el tambor de ta tavado--
ray cierre ta puerta,
,_Espere 10 minutos_
2 Pulse (_) despu_e de 10 minutos
3 Pulse _
4 Pulse @,
Verifique si se vacia el agua,
Limpieza
Peri6dicamente limpie su lavadora para ayudar
a mantener su rendimiento y para mieimizar Ins
posibilidades de funcionamiento defectuoso
Limpieza del lamber, 'Tub CHe_n
Instalaci6n incorrecta o uso de la lavadora en
en espacio hQmedo por periodos prolongados
podda resultar en la acumulaci6n de residuo de
detergente en la tavadora ¥ _sto podda eausar
moho u ofores a humeda& Si usted iimpia su
lavadora regularmente una vez al rues utitizando
Tub Clean minirnizar_ _ la posibilidad de que se
acumule residuo de detergente y que aparezcan
ofores a moho o humedad,
1 Affada un limpiador para tambor o removedor
de cal en elcaj6n dispensador de detergente,
- Cuando Io affada, no exceda la iinea deJ nivel
m_ximo para detergente, Puede quedar de-
tergente en el tambor tras la [impiez&
- Cuando utilice blanqueador &on tej_, c_rgue{o
en el compartimento de [a lejia,
- Cuando _iiice un limpiador en polvo, saque el
recipiente del detergente ffquido y aff_dalo
en el ¢ompartimento del detergente de tava,.
do principal.
- Cuando utJlice tabletas, col6queias directa--
mente dentro del tambo_.
2 Pulse (_J
3 G!re la perilla _ para Tub Clean
Se muestra el _ensaje (E eL) ee la pantalla.
Se iluminara la Iuz indicadora Tub Clean.
4 Pulse _),
@ NOTA .......................................................................................................................................................................................................................................................
. Nunca meta prendas dentro de la lavadora
cuando utilice Tub Clean. Las prendas pue o
den da_arse. Aseg6rese de [impiar su tam
bor cuando el mismo est@ vacio.
- Se recomienda dejar la puerta abierta des-
pu6s de finalizado el iavado para mantener
[imp_a ta cubela.
• Se recomienda usar el programa de Tub
Clean una vez al mes.
• Si nora un o[or a moho o a viejo, ejecute ta
"TubClean por 3 semanas consecutivas.
J Asegure la puerta de manera segura y con
veniente dej_ndola levemente abierta con el
_mbolo magn6tico para ta puertao

38 MANTt(NIM _.N TO
Cuando se enciende la favadora y se parpadea et
mensaje teL, significa que el tambor de la lavado.
ra neeesita ser limpiado. Utiliee la Tub Clean, Et
aler_a de indicaei6n automAtica para la limpieza
del tambor depende de la frecuencia de uso, pero
eJ mensaie generalmente parpadearA cada 1_2
meses.
Si vive en un Area con agua dura, puede acumu *
Jarse tacal ee tos componentes internos de la
lavadora. Debe tenet cuidado de limp|at peri6db
camente Jas acumuiaciones de cat en los compo-
nentes internos pare prolonger la vida 6tH de la
lavadora.
Compruebe si el descaicificador es adecuado
para el tambor antes de utilizado y rea|izar el
eiclo de UMPIEZA DE TIBIA Consulte la pAgina
32, Lkr_pieza del tambor, pare mAs detailes sobre
su limpieza.
_@ NOTA ....i
Limpieza del caj6n dispensador de defer-
genre
Si deja detergente en el eaj6n dispensador duran ,-
te un periodo prolongado de tiempo o utiliza la
Javadora durante mucho tiempo, puede aeumu--
larse eal en el ca_6n. Retire ,/limpie et caj6n una
vez por semana_
I Extraiga el eaj6n dispensador de detergente.
2 Presione con fuerza eI bot6n para desengam
char y extraiga el cai6n dispensador de deter
genre.
3 Retire las inserciones del caiAn,
4 Limpieias con agua tibia_
Utiiice un trapo o ue cepillo suave para lim-
piary eiiminar euatquier residuo,
5 Limpie la humedad con una toalta o trapo
seeo.
6 Vueiva a coloeer el ca_6n dispensador de de*
tergente,
Limpie la acumulaci6n de cal u otras man, chas
sobre el acero inoxidable con un trapo suave
empapado en iirnpiador para acero inoxidable.
_@' NOTA
, No utilice iana metAl|ca o limpiadores abrasio
vos, ya que podria daSar la lavadora.
A ADVERTENCIA
@ NOTA
Utitice 6ni@mente ague para limpiar el cai6n
dispensador de detergente, Aseg@rese de user
el ciclo ENJUAGUE+CENTRIFUGADO (v6ase
pAgina 26) pare enjuagar el tambor antes deJ
title de 1evade cuando utiJiee detergente pare
timpiar el tambor:

MANTRN_M EN'TO 39
Ltmpieza de los filfros de entrada de agua
Limpie peri6dicamente los filtros de agua pars
evitar que se obstruyam
Ponga especial cuidado de limpiar los filtros de
entrada de agua en _reas en las qua se utilice
agua dura, El agua podda no suministrarse
correctamente si hay objetos extraSos, como •
6xido, arena o piedras en los filtros de entrada
de agua.
1
2:
3
Pulse para apagar la tavadora y desconecte
ei enchufe,
Cierre {as Ilaves de paso conectadas a Ins
mangueras de agua.
Retire ins mangueras de agua.
;A ADVERTENCIA
• De_ne_e el enchufe y cierre ins 1laves
_ antes de la limpieza, En caso contrade,
pueden producirse descargas electricas,
No utilice la lavadora sin los filtros de en_rads,
En caso contrario, podrlan producirse fugas
y fallos de funcionamiento.
Si utiliza fa lavadora en un area con agua
dura, el filt_'e podr8 obstruirse debido a la
acumuiaci6n de sarro, P6ngase en contacto
con el servicio de atenci6n al ctiente de LG si
no se puede limpiar correctamente el filtro o
se ha perdido,
-@ NOTA
" Parpadear_ en la pants{Is el mensaj_e (_ _)
cuando la presi6n de agua en el caj6n del
detergente sea baja o si el fiitro de entrada
esta" atascado con suciedad, Limpie el fintro
_, de entrada del agua.
4 Extraiga et filtro de entrada de agua,
6 Elimine objetos extra_os del filtro de entrada
de agua,
o Deje en remojo los filtros de entrada de agua
en vinagre Manse o removedor de sarro,
o utiliee un cepillo dental pars eiiminar los
objetos e×tra_os.
6 Vuelva a colocar los filtros de entrada de agua en
su posici6n,
7 Vuelva a conectar las tuberias de agua a la
lavadora,

40 MANTEN M ENTO
Limpieza del fi|fro de la bomba de desag_e
La lavadora no se vaciar8 correctamente si eI
filtro de la bomba de desag_e est_ obstruido_
Limpie peri6dieamente el filt_'e pare evitar obs-
truccioees per objetos e×traSos.
I Pulse (_i__pare apagar la lavadora y descoeecte
el enchufe.
2 Abra la tape del filtro de la bomba de desag(_e_
3 _re de ta reanguera de desag0e pare extraerta
y quite el tap6n de fa manguera para vaciar el
agua restante,
4 Gire el filtro en la direcci6n opuesta a tas ma-
necillas del reloi pare quitarlo.
6 Vuelva a colocar el tap6n de la manguera e
intredQzcala en et alojamiento
7 Introduzca eI filt_o de la bomba de desagQe.
8 Ciefre la tapa del filtro de la bomba de des _
agQe.
A ADVERTENCIA
* Aaeg_rese de desconectar el enchufe de la
I_dora antes de limpiarla. En case contrario,
pueden producirse deseargas el_ctricas.
* Af abrir el fiitro de desag0e se desbordar_ el
ague si queda agua en el tambor. Compruebe
que se ha_ vaciade el _ _mpletamente
antes de abrir el filtro de desag(Je.
.Usar la lavadora sin el filtro de desagOe o
con un fittro de desagSe real conectado pue_
de causer p@didas o el real funcionamieeto
de !a !avadora.
:-@ NOTA ......................................................................................................................................
5 Limpie el filtro de la bomba y la abertura.

MANTRN_M EN"I'O 41
Ltmpieza de |a junta de la puerta
Limpie la junta herm6tica de ta puerta una vez at
mes para evitar fa acurnulaci6n de suciedad.
1 Utiiice guantes de goma y gafas de protecci6n.
2 Diluya 3/4 de taza (177 m|) de Manqueador
Iiquido con fejia ea 1 gal6n (3,8 litros) de agua.
3 Remoie una eaponia o un trapo suave en esta
soluci6n dilulda y limpie toda la zona alrede
dot de la junta de la pue_a.
4 Seque ta humedad con una toaHa o trapo seco,
5 Deje la pue_ta abierta para que la junta se
seque completamente.

42 SOLoC_©N DE PROBL_MAS
SOLUCION DE PROBLEMAS
Comprobaci6n de los mensajes de error
Si aparece et siguiente meesaie ee Is pantalla, compruebe Is siguiente y tome ts acci6n corrective apropiada
Reorganice la rope pare equilibrar la ca_ga
Lospai_cheso atf0mbrillaspueden_esequilb[a[aedu[a_teel
cent fugadsy talavad0rapadtianoracierel agueRe0[gan;ca_a
uE ropede puntsparee_uilbratla mergeyvadee/aguede m_eva,
Lave s61o ana manta,
Abra Ins Iiaves de paso,
Si [a [lave de paso est_ congelada0 descong6[ela
con agua salients,
Sie_fil_rode sr_t_adaestaobstruida,limpMo,tv_asapagi_a39}
Canasta eorrectamenta [a tubeda de agua ee [a
entrada de agua fria, (v6ase pagina 14L
E Compraebe qua lastabedas de ague noeatenap[asladas
o retorddas. Tease machocaidado de qua Inst_b_r_asde
• Conecte correctamente las tuberias de agua
en Ins flaves de ague, (v_aae pagina t4),
rias de a_ua la,,_sJ!aves do,o,99_J a_.............................................................................................................................................................................................
No hay sufidente ropa en la lavadora
LSe ha acumulado la rope eeuna zone o la ca_ga es
demasiado pequefia'?
zLas prendas est_n enredadas o a_ntonadas, o[a
carga es demasia_o peque_a?
zEatapaavandoun paache,unaa_ffombrIh o _e_ de pa_o?
_Estaba lavando dos mantas iu:n_s?
No se suministra agua o la presi6n del ague es
bai&
zEst_ eer_sda ia ilave de paso7
LNohaysamini_re de_a o laib_ dspasoaslacor_gslada'i
LEa baja is preai6n de[ agaa o hay un fittro de
entrada obstruido?
Lee ha conec_ado corr_tamente Is tuberia de
agua ee la entrada de ague fria7
_E_an Instube#as de ague aplastadas o r_orcidas?
Fuga ee [a coeexi6n de la tubefia de ague
LEst_n correctamente conectadas ran tube-
El tambor no gira,
LEsta ta puerta bien terraria y trabada?
ZESta el _rea de [a puerta tibre de rope y
o__r2.s.. ;!i_..............
La lavadora veda el ague con tentitud o no 1o base
zSe ha instalado ta manguera de d_agQe a
rnas de I metro dot soporte de coda?
_Est_apls_ada o ata_ada la mahgue_a en el interior?
LEst_ congelada ia manguera de desagQe?
zEs_ obsrtutda la manguera de desagL_e con
objetos extra_os?
La alimentaci6n el6ctrica se ha ieterrumpido
durante el funcionamiento,
Error de control,
No se pare el sumJnistro de agua
zSe repiten en secuencia el suministro de
ag.[4a _ el vaciado?
El nivel de ague no est_ controlado
LEa et nivel de agua demasiado baioo atto
co,m,garado con el tama¢_o de la sara:a?
El tambor no gira.
4Est_ sobrecargada la tavadora?
Para limpiar el tambor, se[eeciene el ciclo
de Iimpieza del tambor
Oespeja et _rea de la puerta y asegu_ase de qua la
puerta esta cerrada y trabad& Si sigue agates[ends
el mensaie, desconecte e[ enchufs _ p6ngase ee
contacts son el servicio t6cnico de LG m_s careens.
Baje la manguera de desagSe basra 3 pies
par debajo det extreme de[ soporte de code.
Coloque [a manguera de deeagQe sabre una
superficie suave pare evitar que sedobie,
Si Ins mangueras de desagiJe asian eongeia
des, descong61elas en sgua caliente_
Abra el tap6n de [a manguera de desagiJe y
etimine ta suciedad,
, Pulse (®) pare apagar fa lavadora y p_dseto
de nuevo pare encendeda,
Desconecte ef enchufe y p6ngase en contac
to con et servicio t6cnico de LG m_s cercano,
Desconecte el enchufe y pongase en con*
tecta con el servicio t6cnico de LG m_s
cerca£:o: .......................................................................................................................................
El sen_r de[ nivel de ague no funciona sorrectamante.
Descone_e el enchufe y p6ngase en cgets_[o
con e! _rvicio t6cnico de LG man careens,
Reorganice el tama6o de ta carga y vuelva
a poner en funcJonamiento ia iavadora,
Si la sarga as dsmasiado grands, at tambor podria
no sitar debido a una sobracarga deI motor Deie
reposar _am_quina amos minutes y p6nga[a en
fuesionamiento de nuevo Si aparece de suave ei
mensaja, deaconecte e_enchafe y p6ngase en cen_,
taste con e! servicio t6c_ico de LG man carcass,
Vacie el tambor e [ntroduzca leiia en el csj6n dis-
penssdor y seleccioea el cicIo LIMPIEZA DE TINA,
Si quiets sattsa_seel ciclo "fi_bClean,g[re [aparilla de
_lecci6n de side o presions los betones de epci6n pare
ss_eccionaruncicto, El mensais segair_ aparecisndo
haste qua se hayan completado algunos ciclos de lava,,
do, [aego de loscaales da_parscera hasla el pr6x[mo
_ado pare lira.pierel tambon

SOL UC©N OE PROBLEMAS 43
Anfes de Ilamar al servicio f_cnico
Haga las siguientes corn _robaciones antes de ilamar al servicio tecnico_
_nido de ci_ _LOye un sonido cuando cierra y Este sonido es normal cuando ee
bioquea o desbloquea la pue[ta? cierra, se bloquea o desbloquea ta
...................................................................................................................................................................................puerta,.
Soaido de silbido Lee esta rociando agua en el tam_ Este son]do es normal cuando el
bor? agua se est_ rociando o circulando
Zumbido o sonidode
borbotones
Sonidode_lpicaduraa
Sonido de traqueteo
Sonido de golpas
Rui® de vibrac_On
Fu_s de agua alrede _
dot de la lavadora
•LEst& vaciando agua la mavadora?
LEsta lavando una carga la _avado-
ra?
zLHay aig(m ob_eto, como llaves,
monedas, o alfiieres en e_ tambor o
el filtro de dasagSe?
• LEsta sobrecargada ta lavadora?
LEst_ equilibrada la carga?
/Lee han quitado los torniHos de
transporte?
t:Esta la carga distdbu_da uniforme-
mente en et tambor?
LEst_ bien nivelada la lavadora?
/Lee ha instalado ta lavadora sobre
una supefficie resistente y lisa?
LSale agua del grifo o de ia tuberia
del agua7
_Hay una manguera o tubo de des_
ag{_e obstru_do?
,,zHa utilizado una cantidad de deter-
genre superior a la recomendada?
_Es el nivel de suciedad superior al
tamaSo de la carga?
Espuma e:_esiva o fa_
de enjuague
durante el ciclo,
Este sonido es normal y se produce
cuando ta bomba de desagGe vacia
de la tavadora traset ciclo,
Este sonido es normal cuando la car-
ga se mueve arriba y abajo durante
Comp_'uebe si hay objetos extra_os
en el tambor y el fittro de desagee
t_as detener et ciclo,
Deseonecte el enchufe y p6ngase en
contacto con ei servicio t6cnico de
LG m_s cercano,
Este sonido as normal y se proda_
ca cuando se ha desequilihrado la
carga Detenga el ciclo y reorganice
ja .....................
Consulte ia p_gina 13, Desembalaje !/
retiro de los pernos de embalaje, para
m_s informaci6n sobre Ra retirada
de los tornillos de transpose,
Detenga el cUo y reorganice la
carga para equilibrarfa,
Consulte ta pagina 16, Nivelaci6n de
la lavadora, para nivefar ta lavadora,
Compruebe si el suelo es resistente
Revise las Ilaves de paso o fas tube-
rias de agua.
Si las tubertas de agua se ban
dejado sueltas, consutte la p_gina
14, Cone_ de las tuberlas de agua0
para conectar_aa correctamente,
Desatasque el tubo de desagQe o la
manguera de desag_Je, Si es nece o
sario, p6ngase en contacto con un
fontanero.
Utilice la cantidad de detergente
recomendada para ta carga,
Si el nivel de suciedad es bajo, reo
duzca ta cantidad de detergente y
utitice menos detergente del reco-
mendado,

44 ESP_LCIFlCACON
Ro_ arrugada
La_vadora no se er_
dende
Lapuerta no _ abre
cuan_ se hace u_ pau-
en el side o c_ndo
finali_
Eltiempo de Invade es
m_s largo de Io normal
Hay mobs o hum_
en el tambor
CaU_ _siBes
LHa aSadido el detergente direeta-
mente al tambor?
_Ha retirado la carga inmediatamen-
te despu_s que se acab6 el ei¢lo?
LHa separado la ropa per cotores o
suciedad?
LHa retirado la carga inmediatamen-
te despues que se acab6 el ciclo?
LHa sobreeargado el tambor?
_Ha invertido ins entradas de agua
caliente y agua fria?
_Se ha conectado eorrectamente ei
enchufe?
L_ene un fusible fuedido, se ha
disparado ef interrupter de circuits,
o se ha producido an corte de sumi-
nBtro ei6etrico?
LEs demasiado alta Ia temperatura
en el tambor?
zEst_ el tambor tleno de agua?
LEsta sobrecargada la tavadora?
LSe hen af_adido opciones at ciclo
de Invade?
Lee ha utilizado una cantidad inco-
rrecta de detergente?
tee limpia et tambor peri6dicamen-
re?
" AsegQrese de eargar el detergente
en el ca_6n dispeesador.
dares y prendas blancas y la ropa
may sucia de Ins preedas poco sucias,
Consuite la p_gina 19, Ciasificad6o de
, Retire la rod inmediatamente cuan_
do haya aeabado el siclo.
• No sobrecargue et tambor.
, El ague caliente hace que se arrugue
[a rope. Revise fas conexiones de [as
_ueras de entrada de aqua.
• Aseg_Jrese de que el encbufe est6 co
ned.ado ee ana toma de 3 ciavijas con
conexi6e a tierra de 120 V (@ Hz).
, Reetabiezca e[ interrupter de dreuito o
cambie el fusible.
No coloque un fusiMe de mayor capaci--
dad. Si el probiema es una sobrecarga
dei ci_uito, solicite la reparaei6n aun
eiectridsta cuaifficado.
La lavadora tiene un bisques de segu o
ddad integrado en ta puerta pare evita[
quemaduras, Deje la paerta cerrada y
espere haste que desaparezca et icons
de bisques de la pae_ de !a panta!t&
Deje que la lavadora finalice el cielo
programado o pulse el bot6n Spin,
Esto es normal. La bva@ra ajusta auto-
maticameete e[ fiempo de iavado para
la canfidad de ropa, la presi6n del agua,
la temperatura del ague y cuaiquier
otra condici6n de fundonamiento,
Consulte [a p4gina 37, [impie el
interior y el exterior de ia lavadora
peri6dieamente
ESPECIFICACIONES
_tO WM_70H*A
Lsvadora de carga frontal
Requisites eI@tricos
Medidas
Peso nets
Veioci@d m_× de centrifugado
60 Hz
5,6 cm (F) X 98,3 cm (AI), 129,5 em (F con pue_a abierta}
27'* (An) X 293/4" {F}X 3811/16" (AI), 51" {F con ta puerta abierta)
[1300 RPM
i4,5 ._142 PSi (i00 - 980 kpa)

UT/L!ZACI©N DEL Sm_f Dago'_os s 45
UTILIZACI6N DEL Smart Diagnosis TM
S tuviera z_lg6_'_problema con su _aw_do_a, la rnisma posee _a capacidad de hansrn_t i' datos a un
te_fono intetgente J! Iizando la apli(::aciGn _:_rr,a_t Laundry de LG o reed a_te el teW:gono aJ Ce_]t_o de
ate_ e6n tetef6_ }ca de LG. Sma_i Diagnosis "_ no p_ede set activado a menos que s_ secado_a esto
encerld da pulsando et bot6n de AL IMEN1AC!©N(_>O;WER) %i su lavadora rto puede er_cenders%
tendra_ que _oealiza_ y lavadora tos p_oblemas sff_ utit za_ Smart [)iagnos s'_
Diagn6stico sonoro
Smart Diagnosis TM utilizando su fel6fo-
no infeligenfe
1_Descargue la aplicaci6n Smart Laundry de LG en
su telefono inteligente.
2. Abra la aplicacidn Smart Laundry de LG en su
telefono inteligente, Presione el botdn fleeha haeia
la derecha pare avanzar ala sfguiente pantalla
3, Presione et bot6n Grabaci6n del tei6foeo
inteligente y mantenga la boquilia del tei6fono
inteligente junto at logotipo de Smart D_agnos_s TM
de la lavadora,
4. Con et tet6fono en su sitio, pulse y manSenga
puisado eI bot6n de Control De La [_] durante
tres seguedos.
5. Mantenga el telefono en el sitio haste que la
transmisi6n del tono haya terminado, Esto tema
unos 6 segundos y {a panta|la mostrara la cuenta
regresiva de #empo.
6, AI finalfzar la grabaei6n, yea el resuitado dei
diagn6stico presionaedo et bot6n Siguiente del
_eWfono.
.....@ NOTA ............................................................................................................................................................................................................................................
- Smart Diagnosis_(Diagnostico _nteligente) es
una funci6n de resoiuci6n de proMemas dise_a.-
da pare asistir, no reemplazar, at metodo tradi-
cional de resoluci6n de probWrnas a trav6s de
Iiamadas de servicio t6cnico, La efectividad de
esta fuaci6n depende de diversos factores, entre
los cua_es se incluyen, la recepci6n def tet6:fono
ce|utar utilizado pare la transrnisi6n, tualqa{,er
ruido externo que pueda presentarse durante ta
transmisi6n, y la acOstica de la habitaci6n don-,
de est_ ubicada la lavadora, Pot Io tanto, LG no
garaetiza que Srnart Diagnosis TM resueNe con
£reeisi6n cualquier cuesti6n dada
......... /
Smart Diagnosis TM a trav6s del Centro
de atenci6n telef6nica
1 Uame al Centre de atenci6n telef6nica de LG
Electronics a| tel6fono: (LG EE,UU ) 1,-800°243 o
0000(LG Canad&} 1_888-542_2623.
2, Cuando se to iedique el agente demCentre de
atenci6n telef6nica, maetenga el mic:r6fono de su
tei6fono sobre el Iogotipo Smart Diagnosis TM det
equipo. Sostenga el telefeno a no mas de una
pulgada o 25 cm (pero sin toear) el equipo,
pantall&
3 PuL__mantenga pulsado et bot6n de Control De
La L= j durante tres segundos,
4. Mantenga e] tel6fono en e[ sltio haste que la
transmis[6n det tono haya termieado. Esto tome
unos 6 segundos y la pantaila mostrar_ la cuenta
regresiva de tiempoo
5 Una vez que la cuenta regresiva haya fieaHzado y
los tonos se hayan detenido, reanude ta converse
ci6n con el agente del Centre de atenci6n telef6ni
ca, que sere capaz de ayudade en ta utitizaei6n de
ta inforrnaci6n transmitida pare su analisiso

46 GARANTiA
GARANTIA LIMITADA PARA LAVADORA LG (EE.UU.)
COBERTURA DE _ GARANT[&:
LG Ebcl_onics U.S.A ins "G'/gsrant_za ss avadors LG {"produ¢lo'} co,ira c_s_q_*er def_to en mat_,.'{_les o marts de obn_bajo un _ss dom¢}stico
nofnw,!, d#_snt_ et per odo de garantia ir_icado m_s ad@bn_ y LG podr_ repsrs_ o ssstitu _ s/p_odusto, baio t;ue×d_sivo cr_tedo EAS gara#da
links@ te_e vadez _61opars e_com_[ader rninorista o! ginal dal pro_iucte no pser:_sceder_ o tlansfed_se a c_a_qu_e_#somp_a@_to es_ano
po_edos y _ ap_b8 sob Cus_&_ e!pr_xlusto _ hays s6qulddo _ tray@ r_ ,_e @stdb_i_JorLG autorizado y se Isys util_zadoen _stsdo Unidos/'%E_
UU "}_ t3d_ dos _l_ Te_rilo_'ic,s de EE,UU
Nots: Lt_s p_,_'.!uct4"_de s_lstituch3n o p_ezas de repa_sci6n pueden _ nuevos o _srna_u_astura(_'s er_{sbdca y _er_d_@_9srsnds pars e_
tiempo resla_te del periods ork_inat de gsra_ia o novena (90} d_as, e} que _,_am#s largo. G[_arde ia fa(2u_'a o ei iust{fisa_Le de compra
corns pr_eb_3 de la f_;hs d_ compra _ara _a_sra_t#_ (se/e podds pedit que envie ura eopia a LG o w3 re-p_'esents_te a_Jtorizado},
PERIODO DE G,CJ_ANTJA:
Periods Un(i]aSea_rtkde_fecha_e Diez(10_a_apa_kde_afecb_de T_:_a_avk_a_tiid_l_fec_hade
comers _g_r_al _mprs odgi_,a_: _prs er_inal:
A:!ea_ de _a_rs_ Cus_ub_ _za i_ern_uP, cbnsl Motor del _mb0_" Tsmbor de stere ir_sb_
(estator, rotor y ser,_r Hs{l)
LG s_miaist,_ar_ _s piezasy _ _!o £iezas Elslime ser_ res_n_ _ _ mar# de obra e
0bservsc_9 mane de obra pars fa r_r_i_ o re_r_b_ _ dom_il_o _ra _asus_ucbn _ bs pieza8 _e'_eotuosas
Bust#._Jir__sspb_s _est_a&
COMO SE PRESTA EL SERVICIO: Ser,4cb a domicil_
El se_.c_ a _omicilio _ _estar& segfm este _Jsponible eurar_te e__r_ de _rarr_fa segen _ dispon_tidad det _sonat de
services t_!k,'nico en EEUU. Pars recibir ser,,@_o a _micilio el prod_-'lo _eber_ eslar aocesib_ y sin obstru¢cior_s pars el personat de
ser¢_io. Si _ se pu_ preslar el _r,Z_4o de repar_r_ a d¢,m_i{io, _uede set tie--rio retJrar, re_rar y de-,,otver el prodL,_o Si
no est,t dispontb-le et se_¢icio a _itio_ LG podr_ de_id#- _ f_:_l_P_rt_transports pars el #roduoto a y desde cualqu_er _rvicio t_cn_
LG, seg_tn su elan.
ESTA GARAN%_ UMJTADA NO CUBRE:
1, Desplaz_rn_entos de s_r,4c_o pats el e_v_o r_ogk;_a o
instataci## #el products o pa{'s dsr instn_cciones sobrs la
utili acibn de_ productoo
2. S_stituci6_ de los _usibles de fav v_enda o p_esta sn
&_nc{onamier_o de ios d syumores, con'esei6n de Is
i_stslsci6rt el(_cti'ica de la cass o fo_taneda o correction de
Is _nstalscibn del produc_o.
3. Dahos o fai_os causados pot tubos de agua con f_gas o
_uturas_ tu_os de sgua co#gela_J@s, tubos de desag(_e
atascados, sum_#istro de sgua r_adecuado o co_
il_te_upcionss o su_'ninist_o de ai_ inade, suado.
4 Dafios al products causados pot accide_tes, pestes e
insectos, rayos, v_ento, fuego, inu_dac_ones o ca_sss (is
_er/8 _'t_8yor
5. Dafios O fa[_os _esultsntes de un uso _nadeeuad@ abusos,
instals{:i6{1, reparacio_es o manter_imiento _r_corfec-tos. L_;
n;paraciortes i_cor_ectss i_cluye_ la util_z_ciot_ de plezas
no ap_obadas o espssificadas pot LG,
6, Dafios o {altos causados pot la modificaci6n u siteraci6n
no autorizada del products
7, Danos o taros sausados pot _ cord{eRie elSstri@}, tel_si6n
o codigos de f_bntsner a h"tcon'ectos
& Da#os cosm#_ticos_ inc_e_dos a_ahszos, aboltsduras u otros
dshos en el acabado _ei products, a menos q_e !os da6os
se_n resultado de defe<;tos de mateda_es o roans de ob_a y
ss nforme a tG e_ un piazo _e siete (7} d_as csle_dsdos a
partir de la fecha de ent_'ega
9, Dahos o fa_ta de siementos s_ cualquie_ prod#sis de
exposici6n, caja abie_a, de dess'eento o reacondicionado
10 Productos e# k_s que se hays borrsdo_ desdibuisdo o
esrnbiado el mJmero de sede ol'iginsl de k{b_ica,
11. Repa_aciones cua_do me este dando al products una
[_t lizaci6n di_erente del _so domestics norm_i {pot
eiemplo, aiqu _er; uso comefcial, oficinas e ir_stalas{o_es
_'ecreativss) o co.tiaras a ISS instrucciones del manua_ del
p_opietsrio det products.
12. La _etifads y nueva instal_@dn del products sJse ha
ins€sisals e_ u_a ubicaciOn inaccesible.
ESTA GARANT_A EXCLUY_ CUALOUIER OTRA GARANTiA, EXPRESA O _MPLiCITA, JNCLUYENDO Y SiN LIMITACION A
CUALQUi_R GARANTiA DE COMERCIAB_UDAD O ADECUAC!0N A UN FiN PARTICULAR. £N EL GRADO EN QUE CUALQUIER
GARANTiA IMPLiCITA SEA REQUERIDA POR LEY, ESTA GARANTiA SE UMITARA _N SU DURACION AL PERIODO iNDICADO
ANTERIORMENTE LA REPARACi0N 0 SUSTITUCi0N
BAJO _STA GARANT{A ES LA 0NICA SOLUC!0N PARA _L CLIENT£. NI EL FABRICANTE, N_ SUS D!STRIBUIDORES EN
E£.UU. SERAN RESPONSABL£S DE CUALQU_ER DANO INCIDENTA&_ CONSECUENC_AL, IND_RECTO, ESPEC#AL O PUNIT_VO
DE CUALQUiER TIPO, _NCLUIDAS SiN UMiTACION PERDIDAS DE INGRESOS O BENE_CIOS O CUALQUIER OTRO DA{40
BASADOS _N CONTRATOS, RESPONSABILiDADES EXTRACONTRACTUALES 0 DE OTRO TIPO
iNCLUYENDO Y SiN UMITACION A PERMITEN LA EXCLUS_0N 0 UMITACION DE LOS DA_4OS INCIDENTALES 0
CONSECUENCJALES 0 LAS LIMITACiONES SOBR£ LA DURACION DE UNA GARANTiA IMPL_C_TA. POR LO QUE PUEDEN
NO SER APUCABLES A SU CASO LAS CITADAS EXCLUSION_S ES%A GARANTiA LE CONF{ERE DERECHOS LEGALES
ESPECiF_COS Y TAMSIEN PUEDE TENER OTROS DERECROS QUE VARiAN DE UNOS ESTADOS A OTROS.
COMO OBTENER S_RVICiO D_ GARANTiA E INFORMACION AD_C_ONAL
Uame al n0me_o !.890_243o0000 o visits _uestro sitio web en woe_w Ig.som
Si desea ponerse en contacts pot cortes: Cent,s _e irfformaci¢.}r_ _._iclients LG (AT'I! CiC}
201 James Record Road, Huntsville, AL 35824

M[MO47

ureasGeod
www_Jgcorn
-
 1
1
-
 2
2
-
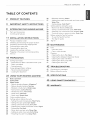 3
3
-
 4
4
-
 5
5
-
 6
6
-
 7
7
-
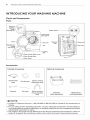 8
8
-
 9
9
-
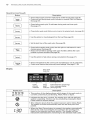 10
10
-
 11
11
-
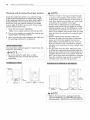 12
12
-
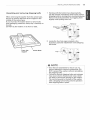 13
13
-
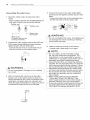 14
14
-
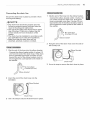 15
15
-
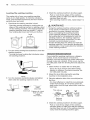 16
16
-
 17
17
-
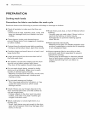 18
18
-
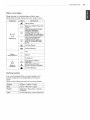 19
19
-
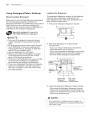 20
20
-
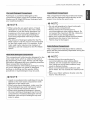 21
21
-
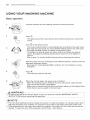 22
22
-
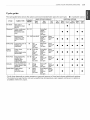 23
23
-
 24
24
-
 25
25
-
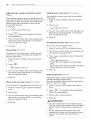 26
26
-
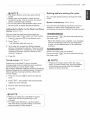 27
27
-
 28
28
-
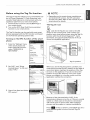 29
29
-
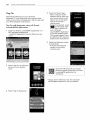 30
30
-
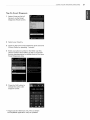 31
31
-
 32
32
-
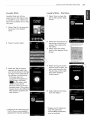 33
33
-
 34
34
-
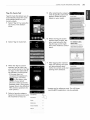 35
35
-
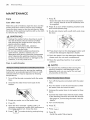 36
36
-
 37
37
-
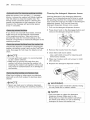 38
38
-
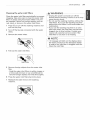 39
39
-
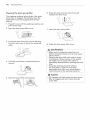 40
40
-
 41
41
-
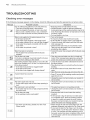 42
42
-
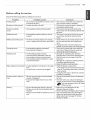 43
43
-
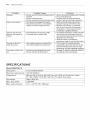 44
44
-
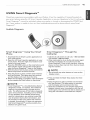 45
45
-
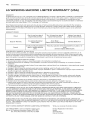 46
46
-
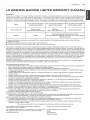 47
47
-
 48
48
-
 49
49
-
 50
50
-
 51
51
-
 52
52
-
 53
53
-
 54
54
-
 55
55
-
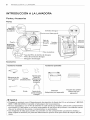 56
56
-
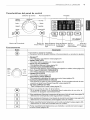 57
57
-
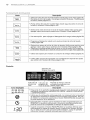 58
58
-
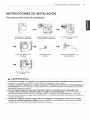 59
59
-
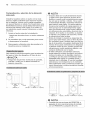 60
60
-
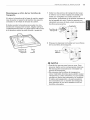 61
61
-
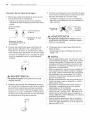 62
62
-
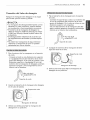 63
63
-
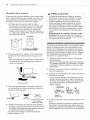 64
64
-
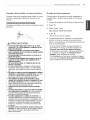 65
65
-
 66
66
-
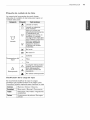 67
67
-
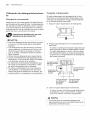 68
68
-
 69
69
-
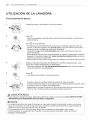 70
70
-
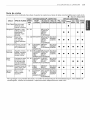 71
71
-
 72
72
-
 73
73
-
 74
74
-
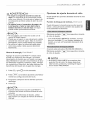 75
75
-
 76
76
-
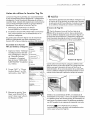 77
77
-
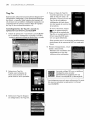 78
78
-
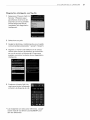 79
79
-
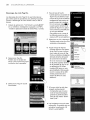 80
80
-
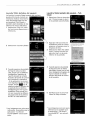 81
81
-
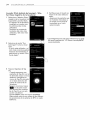 82
82
-
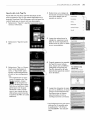 83
83
-
 84
84
-
 85
85
-
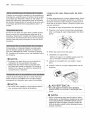 86
86
-
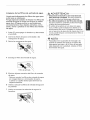 87
87
-
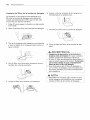 88
88
-
 89
89
-
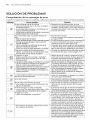 90
90
-
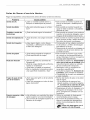 91
91
-
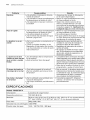 92
92
-
 93
93
-
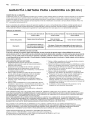 94
94
-
 95
95
-
 96
96


LG WM3370HRA/00 El manual del propietario
- Categoría
- Lavadoras
- Tipo
- El manual del propietario
- Este manual también es adecuado para
en otros idiomas
- English: LG WM3370HRA/00 Owner's manual
Artículos relacionados
-
LG WM3700HVA El manual del propietario
-
LG Electronics WM3700HWA Manual de usuario
-
LG WM3800HWA El manual del propietario
-
-
LG WM3250HWA El manual del propietario
-
LG WT7200CW El manual del propietario
-
LG Electronics WT5270CW El manual del propietario
-
-
-
