KTM 90212912044 El manual del propietario
- Tipo
- El manual del propietario

INFORMATION
KTM PowerParts, HUSQVARNA Husky Power, HUSABERG Pure Tech
KTM - Sportmotorcycle AG
Stallhofnerstraße 3
A-5230 Mattighofen
www.ktm.com
Husqvarna Motorcycles GmbH
Stallhofnerstraße 3
A-5230 Mattighofen
www.husqvarna-motorcycles.com
KTM - Sportmotorcycle AG
Division HUSABERG
Stallhofnerstraße 3
A-5230 Mattighofen
www.husaberg.com
SIDE BAG CARRIER 3.213.240
*3213240*
90212912044 06.2014

Le agradecemos que se haya decidido por este producto.
Este producto de alta calidad está probado para la competición y se ha desarrollado específi camente para las exigencias de este deporte. Para poder
garantizar los máximos niveles de seguridad y funcionalidad, es imprescindible que el producto se monte correctamente. Por este motivo, es muy importante
que siga las instrucciones del manual de montaje o que se ponga en contacto con su concesionario autorizado. El (cuasi) fabricante y el proveedor de este
producto no se harán responsables del montaje y el uso incorrectos.
¡Muchas gracias!
Wir freuen uns, dass Sie sich für dieses Produkt entschieden haben.
Unser hochwertiges Qualitätsprodukt ist rennerprobt und wurde speziell für sportliche Herausforderungen entwickelt. Eine korrekte Montage des
Produktes ist unerlässlich, um ein Maximum an Sicherheit und Funktionalität gewährleisten zu können. Bitte befolgen Sie daher die Montageanleitung
oder wenden Sie sich an Ihren autorisierten Fachhändler. Für falsche Montage oder Verwendung dieses Produktes kann der (Quasi) Hersteller bzw.
Lieferant nicht zur Verantwortung gezogen werden.
Vielen Dank.
Thank you for choosing this product.
Our high quality product has been tested under racing conditions and was developed specifi cally for use in sports activities. Correct installation of the pro-
duct is essential to ensure that a maximum degree of safety and functionality is achieved. Therefore, please follow the installation instructions or contact
your authorized dealer. The (quasi) manufacturer or supplier cannot be held responsible for products that are incorrectly mounted or inappropriately used.
Thank you.
Grazie per aver scelto questo prodotto.
Questo nostro prodotto di pregiata qualità è collaudato nelle competizioni ed è stato sviluppato specifi camente per gare sportive. Il montaggio corretto del
prodotto è fondamentale per garantirne la massima sicurezza e funzionalità. Rispettare quindi le istruzioni di montaggio o rivolgersi al proprio concessio-
nario autorizzato. Il produttore (detentore del marchio)/fornitore non può essere considerato responsabile per un montaggio o impiego errato del presente
prodotto.aVi ringraziamo per l’attenzione!
Merci d‘avoir porté votre choix sur ce produit.
Notre produit de haute qualité est éprouvé pour les compétitions et a été conçu spécialement pour un usage sportif. Un montage approprié du produit
est indispensable pour garantir une sécurité et une fonctionnalité maximales du véhicule. C‘est pourquoi nous vous invitons à suivre scrupuleusement le
manuel de montage ou à vous adresser à votre revendeur agréé. En cas de montage ou d‘utilisation non conformes de ce produit, le (quasi )constructeur
ou le fournisseur déclinent toute responsabilité.
Merci !
9 ENGLISH
15 ITALIANO
21 FRANÇAIS
27 ESPAÑOL
3 DEUTSCH

3
ESPANOL FRANCAIS ITALIANO ENGLISH DEUTSCH
Lieferumfang:
2x Bundschraube M6x12 0025060126
2x Unterlegscheibe 0021080003
2x Bundschraube M8x20 0035080206S
2x Mutter 0926080003
4x Senkschraube M6x20 0991060202
2x Zylinderschraube M6x20 0984060203
4x Kofferaufnahme
2x Kofferaufnahme hinten
1x Befestigungslasche links
1x Befestigungslasche rechts
4x Gummi 61005013000
2x Aufnahme Kofferträger
1x Aufnahme Kofferträger links
1x Aufnahme Kofferträger rechts
1x Taschenträger links
1x Taschenträger rechts

ESPANOL FRANCAIS ITALIANO ENGLISH DEUTSCH
4
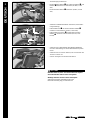
Hauptarbeit:
– Schrauben
entfernen und Haltegriffe abnehmen.
– Schrauben
entfernen.
– Schrauben
entfernen.
– Schrauben
entfernen.
– Schrauben
mit Scheiben entfernen und Beifahrerfuß-
rastenträger abnehmen.
– Schrauben
entfernen.
Vorarbeit:
Beifahrersitzbank und Sitzbank abnehmen (siehe Bedie-
nungsanleitung).
HINWEIS:
Falls nicht anders erwähnt, sind die nachfolgenden Arbeits-
schritte auf beiden Fahrzeugseiten durchzuführen.

5
ESPANOL FRANCAIS ITALIANO ENGLISH DEUTSCH
– Schrauben
der Seitenverkleidungen entfernen.
– Rechte Seitenverkleidung ausfädeln und zur Seite ab-
nehmen.
– Beifahrerfußrastenträger
mit den Aufnahmen Koffer-
träger , Originalscheiben und Originalschrauben
montieren und festziehen (26 Nm, Loctite 243).
– Bohrung
auf Ø 5mm aufbohren und ein M6-Gewinde
schneiden.
HINWEIS:
Gewinde mindestens 10mm tief schneiden.
Gegebenenfalls mit den Bundschrauben M6x12 gegen-
prüfen.
– Linke Seitenverkleidung ausfädeln und zur Seite drü-
cken.
HINWEIS:
Die linke Seitenverkleidung kann wegen dem montierten
Sitzbankschloss nicht vollständig abgenommen werden.

ESPANOL FRANCAIS ITALIANO ENGLISH DEUTSCH
6
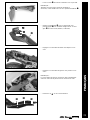
– Befestigungslaschen
positionieren.
– Schrauben
der Seitenverkleidungen montieren und
festziehen (2 Nm).
– Seitenverkleidungen positionieren.
– Markierten Bereich
ausschneiden.
– Befestigungslaschen
positionieren.
– Wie dargestellt bis zur Kante markieren.
– Schraube
entfernen.
– Untere Seitenverkleidungen abnehmen.
– Untere Seitenverkleidungen positionieren.
– Schraube
hinten montieren, aber noch nicht festzie-
hen.

7
ESPANOL FRANCAIS ITALIANO ENGLISH DEUTSCH
– Aufnahme Kofferträger links mit den Bundschrauben
M6x12 montieren, aber noch nicht festziehen.
– Gummis
positionieren.
– Haltegriffe positionieren.
– Schrauben
montieren und festziehen (31 Nm).
– Schrauben
montieren und festziehen (10 Nm).
– Schrauben
montieren und festziehen (5 Nm).
– Schrauben
montieren und festziehen (10 Nm).
– Schrauben
montieren und festziehen (5 Nm).
– Aufnahme Kofferträger rechts mit den Bundschrau-
ben M6x12 montieren, aber noch nicht festziehen.
– Gummis
positionieren.

ESPANOL FRANCAIS ITALIANO ENGLISH DEUTSCH
8
– Sitzbank und Beifahrersitzbank montieren (siehe Bedie-
nungsanleitung).
– Kofferaufnahmen
mit Senkschrauben M6x20
montieren und festziehen (10 Nm, Loctite 243).
– Kofferaufnahmen hinten
mit Zylinderschrauben
M6x20 montieren und festziehen (10 Nm, Locti-
te 243).
– Seitentaschen (76012925000 SEITENTASCHENSET;
nicht im Lieferumfang) auf den Kofferaufnahmen positio-
nieren.
– Seitentaschen nach unten drücken, bis ein Einrasten der
Taschen zu hören ist.
– Schloss verriegeln und Schlüssel abziehen.
– Taschenträger positionieren.
– Bundschrauben M8x20
mit Unterlegscheiben und
Muttern montieren und festziehen (25 Nm, Loctite
243).
– Bundschrauben M6x12
festziehen (10 Nm, Loctite
243).
ACHTUNG
Bitte beachten Sie, dass sich beim Fahren mit Gepäck
das Fahrverhalten ändern kann. Sturzgefahr!
Wichtige Hinweise für das Fahren mit Gepäck:
Zulässige Höchstgeschwindigkeit 130 km/h.
Maximale Zuladung 5kg pro Seitentasche.

9
ESPANOL FRANCAIS ITALIANO ENGLISH DEUTSCH
Scope of supply:
2x collar screws M6x12 0025060126
2x washers 0021080003
2x collar screws M8x20 0035080206S
2x nuts 0926080003
4x countersunk screws M6x20 0991060202
2x cylinder screws M6x20 0984060203
4x case mounts
2x case mounts, rear
1x fastening tab, left
1x fastening tab, right
4x rubber sleeves 61005013000
2x case carrier mounts
1x case carrier mount, left
1x case carrier mount, right
1x bag carrier, left
1x bag carrier, right

ESPANOL FRANCAIS ITALIANO ENGLISH DEUTSCH
10
Main work:
– Remove screws
and take off the grab handles.
– Remove screws
.
– Remove screws
.
– Remove screws
.
– Remove screws
and the washers and take off the
passenger footrest bracket .
– Remove screws
.
Preliminary work:
Remove the passenger seat and the seat (see Owner's
Manual).
NOTE:
Unless otherwise specifi ed, the following operations need to
be performed on both sides of the vehicle.

11
ESPANOL FRANCAIS ITALIANO ENGLISH DEUTSCH
– Remove screws
from the side covers.
– Pull out the right side cover and take it off sideways.
– Mount the passenger footrest bracket with the case
carrier mounts and the original screws and wash-
ers and tighten (26 Nm, Loctite 243).
– Drill open hole to Ø 5 mm and cut an M6 thread.
NOTE:
Cut the thread at least 10 mm deep.
If necessary, check using the M6x12 collar screws .
– Pull out the left side cover and push it sideways.
NOTE:
The left side cover cannot be taken off completely because
of the mounted seat lock.

ESPANOL FRANCAIS ITALIANO ENGLISH DEUTSCH
12
– Position the fastening tabs .
– Mount screws
on the side covers and tighten (2 Nm).
– Position the side covers.
– Cut out the marked area .
– Position the fastening tabs .
– Apply markings up to edge as depicted.
– Remove screw
.
– Take off the lower side covers.
– Position the lower side covers.
– Mount screw
at the rear but do not tighten yet.

13
ESPANOL FRANCAIS ITALIANO ENGLISH DEUTSCH
– Mount the left case carrier mount with collar
screws M6x12 but do not tighten yet.
– Position rubber sleeves .
– Position the grab handles.
– Mount screws
and tighten (31 Nm).
– Mount screws
and tighten (10 Nm).
– Mount screws
and tighten (5 Nm).
– Mount screws
and tighten (10 Nm).
– Mount screws
and tighten (5 Nm).
– Mount the right case carrier mount with collar
screws M6x12 but do not tighten yet.
– Position rubber sleeves .

ESPANOL FRANCAIS ITALIANO ENGLISH DEUTSCH
14
– Mount the seat and the passenger seat (see Owner's
Manual).
– Mount case mounts with countersunk
screws M6x20 and tighten (10 Nm, Loctite 243).
– Mount the rear case mounts with cylinder
screws M6x20 and tighten (10 Nm, Loctite 243).
– Position the side bags (76012925000 SIDE BAG SET;
not included) on the case mounts.
– Push the side bags down until you hear the bags engage.
– Lock the lock and remove the key.
– Position the bag carriers.
– Mount collar screws M8x20 with washers and
nuts and tighten (25 Nm, Loctite 243).
– Tighten collar screws M6x12 (10 Nm, Loctite 243).
Please note that carrying luggage can change the han-
dling characteristics. Danger of falling!
Important information for carrying luggage:
Permissible maximum speed: 130 km/h
Maximum weight per case: 5 kg
WARNING

15
ESPANOL FRANCAIS ITALIANO ENGLISH DEUTSCH
Materiale fornito:
N. 2 viti fl angiate M6x12 0025060126
N. 2 rondelle 0021080003
N. 2 viti fl angiate M8x20 0035080206S
N. 2 dadi 0926080003
N. 4 viti a testa svasata M6x20 0991060202
N. 2 viti a testa cilindrica M6x20 0984060203
N. 4 supporti bauletto
N. 2 supporti bauletto posteriori
N. 1 linguetta di fi ssaggio sinistra
N. 1 linguetta di fi ssaggio destra
N. 4 gommini 61005013000
N. 2 supporti portapacchi
N. 1 supporto portapacchi sinistro
N. 1 supporto portapacchi destro
N. 1 supporto borse laterali a sinistra
N. 1 supporto borse laterali a destra

ESPANOL FRANCAIS ITALIANO ENGLISH DEUTSCH
16
Operazione principale:
– Rimuovere le viti e togliere le maniglie.
– Rimuovere le viti .
– Rimuovere le viti .
– Rimuovere le viti .
– Rimuovere le viti con le rondelle e togliere il supporto
della pedana passeggero .
– Rimuovere le viti .
Operazione preliminare:
Rimuovere la sella del passeggero e quella del conducente
(v. manuale d'uso).
NOTA:
Se non specifi cato diversamente, le operazioni di seguito
riportate vanno eseguite su entrambi i lati del veicolo.

17
ESPANOL FRANCAIS ITALIANO ENGLISH DEUTSCH
– Rimuovere le viti delle fi ancatine.
– Sfi lare la fi ancatina destra e riporla di lato.
– Montare il supporto della pedana passeggero con
i supporti portapacchi , le rondelle originali e le viti
originali , quindi serrare (26 Nm, Loctite 243).
– Praticare il foro con un Ø di 5 mm e realizzare una
fi lettatura M6.
NOTA:
La fi lettatura deve avere una profondità minima di 10 mm.
Se necessario effettuare una controprova con le viti fl angiate
M6x12 .
– Sfi lare la fi ancatina sinistra e spingerla di lato.
NOTA:
A causa della serratura della sella, la fi ancatina sinistra non
può essere rimossa completamente.

ESPANOL FRANCAIS ITALIANO ENGLISH DEUTSCH
18
– Posizionare le linguette di fi ssaggio .
– Montare le viti delle fi ancatine e serrarle (2 Nm).
– Posizionare le fi ancatine.
– Tagliare la zona contrassegnata .
– Posizionare le linguette di fi ssaggio .
– Fare un contrassegno fi no al bordo come mostrato
nella fi gura.
– Rimuovere la vite .
– Rimuovere le fi ancatine inferiori.
– Posizionare le fi ancatine inferiori.
– Montare la vite posteriore, ma non serrarla ancora.

19
ESPANOL FRANCAIS ITALIANO ENGLISH DEUTSCH
– Montare il supporto portapacchi sinistro con le viti
fl angiate M6x12 , ma non serrare ancora.
– Posizionare i gommini .
– Posizionare le maniglie.
– Montare le viti e serrarle (31 Nm).
– Montare le viti e serrarle (10 Nm).
– Montare le viti e serrarle (5 Nm).
– Montare le viti e serrarle (10 Nm).
– Montare le viti e serrarle (5 Nm).
– Montare il supporto portapacchi destro con le viti
fl angiate M6x12 , ma non serrare ancora.
– Posizionare i gommini .

ESPANOL FRANCAIS ITALIANO ENGLISH DEUTSCH
20
- Montare la sella del conducente e quella del passeggero (v.
manuale d'uso).
– Montare i supporti bauletto con le viti a testa svasata
M6x20 e serrare (10 Nm, Loctite 243).
– Montare i supporti bauletto posteriori con le viti a
testa cilindrica M6x20 e serrare (10 Nm, Loctite 243).
– Posizionare le borse laterali (76012925000 SET BORSE
LATERALI; non in dotazione) sui supporti bauletto.
– Spingere le borse laterali verso il basso, in modo da
sentire che si innestano in sede.
– Bloccare la serratura e sfi lare la chiave.
– Posizionare il supporto borse laterali.
– Montare le viti fl angiate M8x20 con le rondelle e i
dadi , quindi serrare (25 Nm, Loctite 243).
– Serrare le viti fl angiate M6x12 (10 Nm, Loctite 243).
I bagagli possono modifi care il comportamento di mar-
cia del veicolo. Pericolo di caduta!
Avvertenze importanti per la guida con bagaglio:
Velocità massima ammessa: 130 km/h.
Carico massimo 5 kg per borsa.
ATTENZIONE

21
ESPANOL FRANÇAIS ITALIANO ENGLISH DEUTSCH
Contenu de la livraison :
2x Vis à épaulement M6x12 0025060126
2x Rondelle de calage 0021080003
2x Vis à épaulement M8x20 0035080206S
2x Écrou 0926080003
4x Vis noyée M6x20 0991060202
2x Vis à tête cylindrique M6x20 0984060203
4x Axe de porte-bagages
2x Axe de porte-bagages arrière
1x Patte de fi xation de gauche
1x Patte de fi xation de droite
4x Caoutchouc 61005013000
2x Logement pour porte-bagages
1x Logement pour porte-bagages de gauche
1x Logement pour porte-bagages de droite
1x Porte-sacoche de gauche
1x Porte-sacoche de droite

ESPANOL FRANÇAIS ITALIANO ENGLISH DEUTSCH
22
Travaux principaux :
– Retirer les vis et déposer les poignées de maintien.
– Retirer les vis .
– Retirer les vis .
– Retirer les vis .
– Retirer les vvis avec les rondelles et déposer le re-
pose-pied passager .
– Retirer les vis .
Travaux préalables :
Déposer la selle passager et la selle du pilote (voir le manuel
d'utilisation).
REMARQUE :
Sauf indication contraire, les opérations suivantes doivent
être réalisées des deux côtés du véhicule.

23
ESPANOL FRANÇAIS ITALIANO ENGLISH DEUTSCH
– Retirer les vis sur les caches latéraux.
– Dégager le cache latéral de droite et le déposer sur le
côté.
– Monter le repose-pied avec les logements pour
porte-bagages , les rondelles d'origine et les vis d'ori-
gine et serrer le tout (26 Nm, Loctite 243).
– Percer un trou de Ø 5mm et tarauder avec un pas M6.
REMARQUE :
Tarauder au moins jusqu'à 10mm de profondeur.
Au besoin, contre-vérifi er avec les vis à épaulement M6x12 .
– Dégager le cache latéral de gauche et le pousser sur le
côté.
REMARQUE :
Le cache latéral de gauche ne peut pas être complètement
enlevé en raison de la présence de la serrure de la selle.

ESPANOL FRANÇAIS ITALIANO ENGLISH DEUTSCH
24
– Placer les attaches de fi xation .
– Monter et serrer les vis des caches latéraux (2 Nm).
– Mettre en place les caches latéraux.
– Découper la zone marquée .
– Placer les attaches de fi xation .
– Repérer au feutre jusqu'au bord comme illustré.
– Enlever la vis .
– Enlever les caches latéraux du bas.
– Mettre en place les caches latéraux du bas.
– Introduire la vis à l'arrière, sans la serrer.

25
ESPANOL FRANÇAIS ITALIANO ENGLISH DEUTSCH
– Monter le porte-bagages de gauche en le fi xant avec
les vis à épaulementM6x12 sans les serrer.
– Placer les caoutchoucs .
– Placer les poignées de maintien.
– Monter et serrer les vis (31 Nm).
– Monter et serrer les vis (10 Nm).
– Monter et serrer les vis (5 Nm).
– Monter et serrer les vis (10 Nm).
– Monter et serrer les vis (5 Nm).
– Monter le porte-bagages de droite en le fi xant avec
les vis à épaulementM6x12 sans les serrer.
– Placer les caoutchoucs .

ESPANOL FRANÇAIS ITALIANO ENGLISH DEUTSCH
26
– Monter la selle du pilote et la selle passager (voir le ma-
nuel d'utlisation).
– Monter et serrer les axes de porte-bagages avec les
vis noyées M6x20 (10 Nm, Loctite 243).
– Monter et serrer les axes de porte-bagages arrière
avec les vis noyées M6x20 (10 Nm, Loctite 243).
– Placer les sacoches latérales (76012925000 KIT DE
SACOCHES LATÉRALES ; non inclus dans l'étendue de
la livraison) sur les axes de porte-bagages.
– Pousser les sacoches latérales vers le bas jusqu'à ce
qu'elles s'engagent de façon audible.
– Verrouiller le cadenas et retirer la clé.
– Placer le porte-bagages.
– Monter et serrer les vis à épaulement M8x20 avec les
rondelles de calage et les écrous (25 Nm, Loctite
243).
– Serrer les vis à épaulement M6x12 (10 Nm, Loctite
243).
Ne pas négliger que lors des déplacements avec les
bagages, la tenue de route n'est pas la même. Risque de
chute !
Consignes importantes pour les trajets avec les bagages:
Vitesse maximale admissible 130 km/h.
Charge utile maximale 5kg par sacoche latérale.
ATTENTION

27
ESPAÑOL FRANCAIS ITALIANO ENGLISH DEUTSCH
Volumen de suministro:
2 tornillos de collarín M6x12 0025060126
2 arandelas 0021080003
2 tornillos de collarín M8x20 0035080206S
2 tuercas 0926080003
4 tornillos de cabeza avellanada M6x20 0991060202
2 tornillos cilíndrico M6x20 0984060203
4 alojamientos para maleta
2 alojamientos traseros para maleta
1 brida de fi jación izquierda
1 brida de fi jación derecha
4 gomas 61005013000
2 alojamientos para portamaletas
1 alojamiento para portamaletas izquierdo
1 alojamiento para portamaletas derecho
1 portamaletas izquierdo
1 portamaletas derecho

ESPAÑOL FRANCAIS ITALIANO ENGLISH DEUTSCH
28
Trabajos principales:
– Retirar los tornillos y quitar los asideros.
– Retirar los tornillos .
– Retirar los tornillos .
– Retirar los tornillos .
– Retirar los tornillos con las arandelas y quitar el repo-
sapiés del acompañante .
– Retirar los tornillos .
Trabajos previos:
- Quitar el asiento y el asiento del acompañante (véase el
manual de instrucciones).
NOTA:
Si no se indica lo contrario, las operaciones que se indican a
continuación deben realizarse en ambos lados del vehículo.

29
ESPAÑOL FRANCAIS ITALIANO ENGLISH DEUTSCH
– Retirar los tornillos de los carenados laterales.
– Sacar el carenado lateral derecho y quitarlo hacia el
lado.
– Montar el reposapiés del acompañante con los alo-
jamientos del portamaletas , las arandelas originales
y los tornillos originales y apretarlos (26 Nm, Loctite
243).
– Perforar un agujero de Ø 5 mm y labrar una rosca
M6.
NOTA:
Debe labrarse una rosca de, como mínimo, 10 mm de pro-
fundidad.
Si fuera necesario, utilizar los tornillos de collarín M6x12
para comprobar que sea correcta.
– Sacar el carenado lateral izquierdo y presionarlo hacia el
lado.
NOTA:
Debido a que está montada la cerradura del asiento, el care-
nado lateral izquierdo no se puede sacar completamente.

ESPAÑOL FRANCAIS ITALIANO ENGLISH DEUTSCH
30
– Colocar las bridas de fi jación .
– Montar y apretar los tornillos de los carenados latera-
les (2 Nm).
– Colocar los carenados laterales.
– Cortar el área marcada .
– Colocar las bridas de fi jación .
– Marcar hasta el borde , tal como se muestra en la
ilustración.
– Retirar el tornillo .
– Quitar los carenados laterales inferiores.
– Colocar los carenados laterales inferiores.
– Montar el tornillo en la parte trasera, pero no apretar-
lo todavía.

31
ESPAÑOL FRANCAIS ITALIANO ENGLISH DEUTSCH
– Montar el alojamiento del portamaletas izquierdo
con los tornillos de collarín M6x12 , pero no apretarlo
todavía.
– Colocar las gomas .
– Colocar los asideros.
– Montar y apretar los tornillos (31 Nm).
– Montar y apretar los tornillos (10 Nm).
– Montar y apretar los tornillos (5 Nm).
– Montar y apretar los tornillos (10 Nm).
– Montar y apretar los tornillos (5 Nm).
– Montar el alojamiento del portamaletas derecho con
los tornillos de collarín M6x12 , pero no apretarlos
todavía.
– Colocar las gomas .

ESPAÑOL FRANCAIS ITALIANO ENGLISH DEUTSCH
32
– Montar el asiento y el asiento del acompañante (véase el
manual de instrucciones).
– Montar y apretar los alojamientos para maleta con los
tornillos de cabeza avellanada M6x20 (10 Nm, Loctite
243).
– Montar y apretar los alojamientos traseros de la maleta
con los tornillos cilíndricos M6x20 (10 Nm, Loctite
243).
– Colocar las maletas laterales (76012925000 JUEGO DE
MALETAS LATERALES; no incluido) en los alojamientos
de las maletas.
– Presionar las maletas laterales hacia abajo hasta que
encajen de manera audible.
– Bloquear la cerradura y extraer la llave.
– Colocar el portamaletas.
– Montar y apretar los tornillos de collarín M8x20 con
las arandelas y las tuercas (25 Nm, Loctite 243).
– Apretar los tornillos de collarín M6x12 (10 Nm, Loctite
243).
Tenga en cuenta que el comportamiento de la motocicle-
ta puede cambiar al conducir con equipaje. ¡Peligro de
caída!
Advertencias importantes para conducir con equipaje:
Velocidad máxima permitida: 130 km/h.
Carga útil máxima: 5 kg por maleta lateral.
ATENCION
-
 1
1
-
 2
2
-
 3
3
-
 4
4
-
 5
5
-
 6
6
-
 7
7
-
 8
8
-
 9
9
-
 10
10
-
 11
11
-
 12
12
-
 13
13
-
 14
14
-
 15
15
-
 16
16
-
 17
17
-
 18
18
-
 19
19
-
 20
20
-
 21
21
-
 22
22
-
 23
23
-
 24
24
-
 25
25
-
 26
26
-
 27
27
-
 28
28
-
 29
29
-
 30
30
-
 31
31
-
 32
32


KTM 90212912044 El manual del propietario
- Tipo
- El manual del propietario
en otros idiomas
- français: KTM 90212912044 Le manuel du propriétaire
- italiano: KTM 90212912044 Manuale del proprietario
- Deutsch: KTM 90212912044 Bedienungsanleitung
Artículos relacionados
-
KTM 60312927044 El manual del propietario
-
-
-
-
-
-
-
-
-