
MANUAL DE USUARIO
SMART KIT (MÓDULO WI-FI)
NOTA IMPORTANTE:
Lea el manual detenidamente antes de instalar o
conectar su smart kit (módulo Wi-Fi). Asegúrese
de guardar este manual para futuras consultas.
V.2

CONTENIDOS
ESPECIFICACIONES.......................................
PRECAUCIONES .............................................
DESCARGA E INSTALACIÓN DE LA APP.....
INSTALACIÓN DEL SMART KIT.....................
REGISTRO DE USUARIO................................
CONFIGURACIÓN DE LA RED........................
CÓMO USAR LA APP......................................
FUNCIONES ESPECIALES..............................
1
2
3
4
5
6
7
8
1
1
2
3
4
5
16
18
DECLARACIÓN DE CONFORMIDAD
Por la presente, declaramos que este Smart Kit
cumple con los requisitos esenciales y otras
disposiciones relevantes de la Directiva 2014/53 /
UE. Se adjunta una copia del DoC completo.
(Solo productos de la Unión Europea)
V.2

1
1
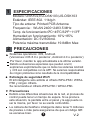
ESPECIFICACIONES
Modelo: OSK102,EU-OSK103,US-OSK103
Estándar: IEEE 802. 11b/g/n
Tipo de antena: Printed PCB Antenna
Frequencia : WLAN 2400~2483.5 MHz
Temp. de funcionamiento
:0 C~45 C/32 F~113 F
Humedad en funcionamiento: 10%~85%
Alimentación: DC 5V/300mA
Potencia máxima transmitida: 19.8dBm Max
2 PRECAUCIONES
Sistemas operativos: iOS, Android.
(Versiones: iOS 8.0 o posterior, Android 4.0 o posterior)
Por favor, mantén tu app actualizada a la última versión.
Debido a situaciones especiales que pueden ocurrir,
explicamos explícitamente que no todos los sistemas Android
y i OS son compatibles con la APP. No seremos responsables
de ningún problema como resultado de la incompatibilidad.
Estrategia de seguridad Wi-Fi
El kit inteligente solo admite el cifrado WPA-PSK / WPA2-
PSK y ningún cifrado.
Se recomienda el cifrado WPA-PSK / WPA2-PSK.
Precauciones
Debido a las diferentes situaciones de la red, el proceso de
control puede tener un tiempo de espera. Si se produce
esta situación, la pantalla entre el panel y la app puede no
ser la misma, por favor no se sienta confundido.
La cámara del teléfono inteligente debe tener 5 millones
de píxeles o más para asegurarse de que el código QR
se escanee bien.
V.2

2
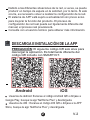
PRECAUCIÓN: El siguiente código QR solo sirve para
descargar la aplicación. Es totalmente diferente del
código QR incluido con SMART KIT.
3
DESCARGA E INSTALACIÓN DE LA APP
Android iOS
Usuarios de A ndroid: Escanee el código Android QR o diríjase a
Google Play, busque la app 'NetHome Plus' y descárguela.
Usuarios de iOS : Escanee el código iOS QR o diríjase a la APP
Store, busque la app ‘NetHome Plus” y descárguela.
Debido a las diferentes situaciones de la red, a veces, se puede
producir un tiempo de espera en la solicitud, por lo tanto. Si esto
ocurre, es necesario volver a realizar la configuración de la red.
El sistema de APP está sujeto a actualización sin previo aviso
para mejorar la función del producto. El proceso de
configuración de red real puede ser ligeramente diferente del
manual, el proceso real prevalecerá.
Consulte con el servicio técnico para obtener más información.
V.2

3
ADVERTENCIA
4
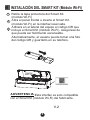
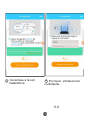
INSTALACIÓN DEL SMART KIT (Módulo Wi-Fi)
Insertar
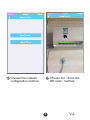
Retire la tapa protectora del Smart Kit.
(módulo Wi-Fi)
Abra el panel frontal e inserte el Smart Kit.
(módulo Wi-Fi) en la interfaz reservada.
Adhiera en el lateral del equipo el código QR que
incluye el Smart Kit (módulo Wi-Fi). Asegúrese de
que pueda ser fácilmente escaneable.
Alternativamente, el usuario puede tomar una foto
del código QR y guardarlo en su teléfono.
1
2
3
:Esta interfaz es solo compatible
con el Smart Kit (módulo Wi-Fi) del fabricante.
V.2

4
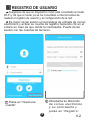
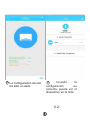
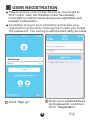
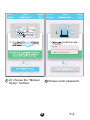
1 Pulse en "Crear una
cuenta"
2 Introduzca su dirección
de correo electrónico
y su contraseña y
pulse en 'Registro'.
Crea Acc
rgot passwo rd?
5 REGISTRO DE USUARIO
Asegúrese de que su dispositivo móvil esté conectado al router
Wi-Fi y de que el router ya se ha conectado a Internet antes de
realizar el registro de usuario y la configuración de la red.
Es mejor iniciar sesión en la bandeja de entrada de correo
electrónico y activar su cuenta de registro haciendo clic en el
enlace en caso de que olvide la contraseña. Puede iniciar
sesión con las cuentas de terceros.
V.2

5
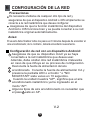
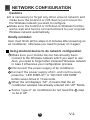
6 CONFIGURACIÓN DE LA RED
Configuración de red con un dispositivo Android:
Precauciones
Es necesario olvidarse de cualquier otro tipo de red y
asegurarse de que el dispositivo Android o iOS simplemente se
conecte a la red inalámbrica que desea configurar.
Asegúrese de que la función inalámbrica del dispositivo
Android o iOS funcione bien y se pueda conectar a su red
inalámbrica original automáticamente.
Aviso:
El usuario debe finalizar todos los pasos en 8 minutos después de encender el
aire acondicionado; de lo contrario, deberá encenderlo nuevamente.
1
2
3
4
Asegúrese de que su dispositivo móvil ya se haya
conectado a la red inalámbrica que desea usar.
Además, debe olvidar otra red inalámbrica irrelevante
en caso de que influya en su proceso de configuración.
Desconecte la fuente de alimentación del aire
acondicionado.
Conecte la fuente de alimentación CA y
presione la pantalla LED o el botón " o "NO
MOLESTAR" siete veces en 10 segundos.
Cuando la unidad muestra "AP", significa que el aire
acondicionado inalámbrico ya ha ingresado en el
modo "AP".
Algunos tipos de aire acondicionado no necesitan que
el paso 2 esté en AP.
V.2

6
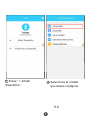
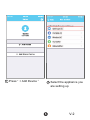
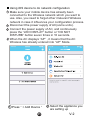
5 Pulse “ + Añadir
dispositivo ” 6 Seleccione la unidad
que desea configurar
V.2

7
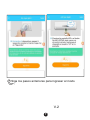
7 Siga los pasos anteriores para ingresar al modo
"AP".
V.2

8
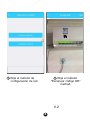
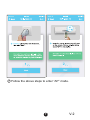
8 Elija el método de
configuración de red
9 Elija el método
"Escanear código QR”
method.
V.2

9
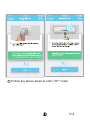
9 O escoja el método
"Configuración manual" 10 Por favor, introduzca la
contraseña.
V.2

10
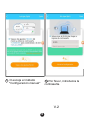
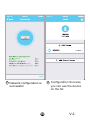
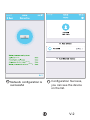
La configuración de red
ha sido un éxito
11
12 Cuando la
configuración es
correcta, puede ver el
dispositivo en la lista.
V.2

11
Configuración de red con un dispositivo iOS:
2
4
3
1
Asegúrese de que su dispositivo móvil ya se haya
conectado a la red inalámbrica que desea usar.
Además, debe olvidar otra red inalámbrica irrelevante
en caso de que influya en su proceso de configuración.
Desconecte la fuente de alimentación del aire
acondicionado.
Conecte la fuente de alimentación CA y
presione la pantalla LED o el botón " o "NO
MOLESTAR" siete veces en 10 segundos.
Cuando la unidad muestra "AP", significa que el aire
acondicionado inalámbrico ya ha ingresado en el
modo "AP".
5 Pulse “ + Añadir
dispositivo ” 6 Sele cione la unidad
que desea configurar
V.2

12
7 Siga los pasos anteriores para ingresar al modo
"AP".
V.2

13
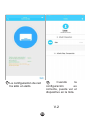
8 Conéctese a la red
inalámbrica.
9 Por favor, introduzca la
contraseña.
V.2

14
La configuración de red
ha sido un éxito
10
11 Cuando la
configuración es
correcta, puede ver el
dispositivo en la lista.
V.2

15
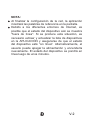
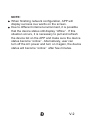
NOTA:
Al finalizar la configuración de la red, la aplicación
mostrará las palabras de referencia en la pantalla.
Debido a los diferentes entornos de Internet, es
posible que el estado del dispositivo aún se muestre
"fuera de línea". Si se produce esta situación, es
necesario extraer y actualizar la lista de dispositivos
en la APLICACIÓN y asegurarse de que el estado
del dispositivo esté "en línea". Alternativamente, el
usuario puede apagar la alimentación y encenderla
nuevamente. El estado del dispositivo se pondrá en
línea luego de unos minutos.
V.2

16
7
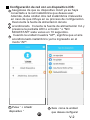
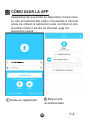
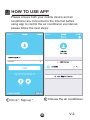
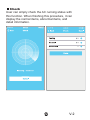
CÓMO USAR LA APP
1 Pulse en registrarse
SIM!
082
cc
2 Elija el aire
acondicionado
Asegúrese de que tanto su dispositivo móvil como
su aire acondicionado estén conectados a Internet
antes de utilizar la aplicación para controlar el aire
acondicionado a través de Internet, siga los
siguientes pasos:
V.2

17
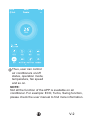
3 De este modo, el usuario puede controlar el
estado de ON / OFF del aire acondicionado, el
modo de funcionamiento, la temperatura, la
velocidad del ventilador, etc.
NOTA:
No todas las funciones de la aplicación están
disponibles en el aire acondicionado. Por ejemplo:
ECO, Turbo, función Swing... consulte el manual del
usuario para obtener más información.
V.2

18
8
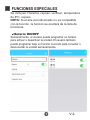
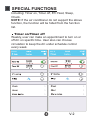
FUNCIONES ESPECIALES
Se incluyen: Horarios, reposo, verificar, temperatura
de 8ºC, reposo.
NOTA: Si el aire acondicionado no es compatible
con la función, la función se ocultará de la lista de
funciones.
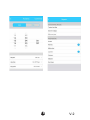
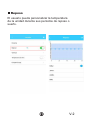
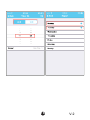
Horario ON/OFF
Semanalmente, el usuario puede programar un horario
para activar o desactivar la unidad. El usuario también
puede programar bajo un horario concreto para conectar o
desconectar la unidad semanalmente.
V.2

19
V.2

20
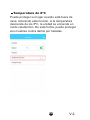
Temperatura de 8ºC
Puede proteger su hogar cuando está fuera de
casa. Activando esta función, si la temperatura
desciende de los 8ºC, la unidad se enciende en
modo calefacción. De esta forma, puede proteger
sus muebles contra daños por heladas.
V.2

21
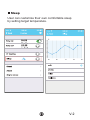
Reposo
El usuario puede personalizar la temperatura
de la unidad durante sus periodos de reposo o
sueño.
V.2

22
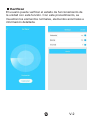
Verificar
El usuario puede verificar el estado de funcionamiento de
la unidad con esta función. Con este procedimiento, se
muestran los elementos normales, elementos anormales e
información detallada.
V.2

23
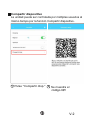
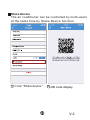
Compartir dispositivo
La unidad puede ser controlada por múltiples usuarios al
mismo tiempo por la función Compartir dispositivo.
1 Pulse "Compartir disp." 2 Se muestra el
código QR
V.2

24
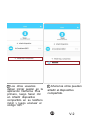
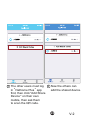
3 Los otros usuarios
deben iniciar sesión en la
aplicación Nethome Plus
primero, luego hacer clic
en Añadir dispositivo
compartido en su teléfono
móvil y luego ecanear el
código QR.
4 Ahora los otros pueden
añadir el dispositivo
compartido.
V.2

25
(1) Este dispositivo no puede causar interferencia; y
(2) Este dispositivo debe aceptar todas las interferencias,
incluidas las interferencias que pueden causar un
funcionamiento no deseado del dispositivo.
Utilice el dispositivo únicamente de acuerdo con las
instrucciones proporcionadas.
Los cambios o modificaciones a esta unidad no aprobados
expresamente por la parte responsable del cumplimiento
podrían anular la autoridad del usuario para operar el
equipo.
Este dispositivo cumple con los límites de exposición a la
radiación de la FCC establecidos para un entorno no
controlado. Para evitar la posibilidad de exceder los límites
de exposición a la radiofrecuencia de la FCC, la
proximidad del ser humano a la antena no debe ser inferior
a 20 cm (8 pulgadas) durante el funcionamiento normal.
NOTA: Este equipo ha sido probado y cumple con los
límites para un dispositivo digital de Clase B, de
conformidad con la parte 15 de las Normas de la FCC.
Estos límites están diseñados para proporcionar una
protección razonable contra interferencias perjudiciales en
una instalación residencial. Este equipo genera, utiliza y
puede emitir energía de radiofrecuencia y, si no se instala
y utiliza de acuerdo con las instrucciones, puede causar
interferencias perjudiciales en las comunicaciones de
radio. Sin embargo, hay no hay garantía de que no se
produzcan interferencias en un instalación particular.
PRECAUCIONES:
FCC ID: 2AS2HMZNA19
IC : 24951-MZNA19
Este dispositivo cumple con la Parte 15 de las Reglas de la FCC y
los RSSs exentos de licencia de la industria de Canadá. La
operación está sujeta a las siguientes dos condiciones:
V.2

26
Si este equipo causa interferencias perjudiciales en la
recepción de radio o televisión, lo cual puede
determinarse encendiendo y apagando el equipo, se
recomienda al usuario que intente corregir la
interferencia tomando una o más de las siguientes
medidas:
--Reorientar o reubicar la antena receptora.
--Aumentar la separación entre los equipos.
y el receptor.
--Conectar el equipo a una toma de corriente en un
circuito diferente al que está conectado el receptor.
--Consulte al distribuidor o a un técnico con
experiencia en radio / TV.
V.2

La compañía no será responsable de los
problemas causados por Internet,
enrutadores inalámbricos y dispositivos
inteligentes. Por favor, póngase en
contacto con el proveedor de los mismos
para obtener más ayuda.
V.2

USER MANUAL OF SMART KIT
IMPORTANT NOTE:
Read the manual carefully before installing or
connecting your Smart kit(Wireless module). Make
sure to save this manual for future reference.
V.2

CONTENTS
DECLARATION OF CONFORMITY
SPECIFICATION...............................................
PRECAUTIONS ...............................................
DOWNLOAD AND INSTALL APP....................
INSTALL THE SMART KIT...............................
USER REGISTRATION ...................................
NETWORK CONFIGURATION.........................
HOW TO USE APP............................................
SPECIAL FUNCTIONS......................................
1
2
3
4
5
6
7
8
1
1
2
3
4
5
16
18
Hereby, we declare that this Smart kit is in
compliance with the essential requirements and
other relevant provisions of Directive 2014/53/EU.
A copy of the full DoC is attached.
(European Union products only)
V.2

1
1
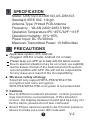
SPECIFICATION
Model: OSK102,EU-OSK103,US-OSK103
Standard: IEEE 802. 11b/g/n
Antenna Type: Printed PCB Antenna
Frequency : WLAN 2400~2483.5 MHz
Operation Temperature:0 C~45 C/32 F~113 F
Operation Humidity: 10%~85%
Power Input: DC 5V/300mA
Maximum Transmitted Power: 19.8dBm Max
Please keep you APP up to date with the latest version.
Due to special situation may be occurred, we explicitly
claims below: Not all of the Android and i OS system
are compatible with APP. We will not be responsible
for any issue as a result of the incompatibility.
W
Cautions
ireless safety strategy
Smart kit only support WPA-PSK/WPA2-P SK
encryption and none encryption .
WPA-PSK/WPA2-PSK encryption is recommended.
Due to differ ent network situation, control process
may return time-ou t sometimes. If this situa tion
occurs, the display between board an d App may not
be the same, please do not feel confused.
Smart Phone camera needs to be 5 million pixels o r
above to make sure scan QR code we ll.
2PRECAUTIONS
Applicable system: iOS, Android.
(Suggest: iOS 8.0 or later, Android 4.0 or later)
V.2

2
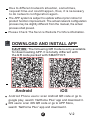
CAUTION: The following QR Code is only available
for downloading AP P. It is totally different with
the QR code packed with SMART KIT.
Due to differ ent network situation, sometimes,
request time-out could happen, thus, it is necessary
to do network configuration again.
Pleas e C heck The Service Web site For More information.
3DOWNLOAD AND INSTALL APP
Android iOS
Android Phone users: scan Android QR code or go to
google play, search ‘NetHome Plus” app and download it.
iOS users: scan iOS QR code or go to APP Store,
search ‘NetHome Plus” app and download it.
The APP system is subject to update without prior notice for
product function improvement. The actual network configuration
process may be slightly different from the manual, the actual
process shall prevail.
V.2

3
WARNING
4
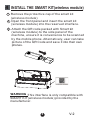
INSTALL THE SMART KIT(wireless module)
Remove the protective cap of the smart kit
(wireless module)
Open the front panel and insert the smart kit
(wireless module) into the reserved interface.
Insert
Attach the QR code packed with Smart kit
(wireless module) to the side panel of the
machine, ensure it is convenience to be scanned
by the mobile phone. Alternatively, user can take
picture of the QR Code and save it into their own
phones.
1
2
3
:This interface is only compatible with
SMART KIT(wireless module) provided by the
manufacturer.
V.2

4
12
Click "Sign up " Enter your email address
an d password, and then
cl ick " "Registration
VI 5
0
Crea Acc
Fo
rgot passwo rd?
5USER REGISTRATION
Please ensure your mobile device is connected to
Wi-Fi router. Also, the Wireless router has already
connected to Internet before doing user registration and
network configuration.
It is better to log in your email box and active your
registration account by clicking link in case you forget
the password. You can log in with the third party accounts.
V.2

5
6NETWORK CONFIGURATION
Cautions
Kindly reminder:
Using Android device to do network configuration
It is necessary to forget any other around network and
make sure the Android or iOS device just connect to
the Wireless network you want to configure.
Make sure the Android or iOS device Wireless function
works well and can be connected back to your original
Wireless network automatically.
connect to the Wireless network which you want to use.
Also, you need to forget other irrelevant Wireless network
in case it influences your configuration process.
press the “ LED DISPLAY” or “DO NOT DISTURB”
button seven times in 10 seconds.
When the unit displays “AP”, it means that the air
conditioner wireless has already entered into “AP” Mode.
User must finish all the steps in 8 minutes after powering on
air conditioner, otherwise you need to power on it again.
1
2
2
3
4
Make sure your mobile device has already been
Disconnect the power supply of air conditioner.
Connect the power supply of AC, and continuously
Some type of air conditioner do not need the step
to be in AP.
V.2

6
5Press “ + Add Device ” 6Select the appliance you
are setting up
V.2

7
7Follow the above steps to enter “AP” mode.
V.2

8
8Choose the network
configuration method.
9Choose the “ Scan the
QR code ” method.
V.2

9
9 Or choose the “Manual
Setup” method. Please enter password
10
line_test
V.2

10
12
Network configuration is
successful
11
Configuration Success,
you can see the device
on the list.
WLAN
WLAN
WLAN
V.2

11
Using iOS device to do network configuration
5Press “ + Add Device ” 6Select the appliance you
are setting up
1
2
3
4
Make sure your mobile device has already been
connected to the Wireless network which you want to
use. Also, you need to forget other irrelevant Wireless
network in case it influences your configuration process.
Disconnect the power supply of AC(some units).
Connect the power supply of AC, and continuously
press the “LED DISPLAY” button or “DO NOT
DISTURB” button seven times in 10 seconds.
When the AC displays “AP” , it means that the AC
Wireless has already entered into “AP” Mode.
V.2

12
7Follow the above steps to enter “AP” mode.
V.2

13
8 Connect to the Wireless
network.
Please enter password
9
line_test
V.2

14
11
Network configuration is
successful
10
Configuration Success,
you can see the device
on the list.
WLAN
WLAN
WLAN
V.2

15
NOTE:
When finishing network configuration, APP will
display success cue words on the screen.
Due to different internet environment, it is possible
that the device status still display “offline” . If this
situation occurs, it is necessary to pull and refresh
the device list on the APP and make sure the device
status become “online” . Alternatively, user can
turn off the AC power and turn on it again, the device
status will become “online” after few minutes.
V.2

16
7HOW TO USE APP
1Click " Sign up "
SIM!
082
cc
2Choose the air conditioner.
Please ensure both your mobile device and air
conditioner are connected to the Internet before
using app to control the air conditioner via internet,
please follow the next steps:
V.2

17
3Thus, user can control
air conditioners on/off
status, operation mode,
temperature, fan speed
and so on.
NOTE:
Not all the function of the APP is available on air
conditioner. For example: ECO, Turbo, Swing function,
please check the user manual to find more information.
V.2

18
8SPECIAL FUNCTIONS
Including: Timer on, Timer off, 8 C Heat, Sleep,
Check.
NOTE: If the air conditioner do not support the above
function, the function will be hided from the function
list.
Timer on/Timer off
Weekly, user can make an appointment to turn on or
off AC on specific time. User also can choose
circulation to keep the AC under schedule control
every week.
V.2

19
V.2

20
User can let the AC run under 8 C Heat by one-click.
When people go outside, this function can protect
your furniture from frost damage.
8 C Heat
V.2

21
Sleep
User can customize their own comfortable sleep
by setting target temperature.
V.2

22
Check
User can simply check the AC running status with
this function. When finishing this procedure, it can
display the normal items, abnormal items, and
detail information.
V.2

23
Share Device
The air conditioner can be controlled by multi-users
at the same time by Share Device function.
1Click " "
Share device 2QR code display.
V.2

24
3The other users must log
in Nethome Plus app
first, then click Add Share
Device on their own
mobile, then ask them
to scan the QR code.
"
" "
"
4Now the others can
add the shared device.
V.2

25
CAUTIONS:
This d evice co mplies with Pa rt 1 5 o f the F CC R ules
and In dustry Can ada's lice nce- exemp t RSSs.
Operat ion is sub ject to the f ollow in g two con d ition s:
(1) This d evice may not cause int erferen ce; a nd
(2) This d evice must accep t a ny in ter fe re nce , including
inte rf erence tha t may ca use und esire d op erat ion of
the de vice .
Only operate the device in accordance with the instructions
supplied.
Changes or modifications to this unit not expressly
approved by the party responsible for compliance could
void the user's authority to operate the equipment.
This device complies with FCC radiation exposure limits
set forth for an uncontrolled environment. In order to avoid
the possibility of exceeding the FCC radio frequency
exposure limits, human proximity to the antenna shall not
be less than 20cm (8 inches) during normal operation.
NOTE: This equipment has been tested and found to
comply with the limits for a Class B digital device,
pursuant to part 15 of the FCC Rules. These limits are
designed to provide reasonable protection against
harmful interference in a residential installation. This
equipment generates, uses and can radiate radio
frequency energy and, if not installed and used in
accordance with the instructions, may cause harmful
interference to radio communications. However, there
is no guarantee that interference will not occur in a
IC : 24951-MZNA19
FCC ID: 2AS2HMZNA19
V.2

26
particular installation. If this equipment does cause
harmful interference to radio or television reception,
which can be determined by turning the equipment off
and on, the user is encouraged to try to correct the
interference by one or more of the following measures:
--Reorient or relocate the receiving antenna.
--Increase the separation between the equipment
and receiver.
--Connect the equipment into an outlet on a circuit
different from that to which the receiver is connected.
--Consult the dealer or an experienced radio/TV
technician for help.
V.2

Company will not be liable for any issues
and problems caused by Internet, Wireless
Router and Smart Devices. Please contact
the original provider to get further help.
V.2
-
 1
1
-
 2
2
-
 3
3
-
 4
4
-
 5
5
-
 6
6
-
 7
7
-
 8
8
-
 9
9
-
 10
10
-
 11
11
-
 12
12
-
 13
13
-
 14
14
-
 15
15
-
 16
16
-
 17
17
-
 18
18
-
 19
19
-
 20
20
-
 21
21
-
 22
22
-
 23
23
-
 24
24
-
 25
25
-
 26
26
-
 27
27
-
 28
28
-
 29
29
-
 30
30
-
 31
31
-
 32
32
-
 33
33
-
 34
34
-
 35
35
-
 36
36
-
 37
37
-
 38
38
-
 39
39
-
 40
40
-
 41
41
-
 42
42
-
 43
43
-
 44
44
-
 45
45
-
 46
46
-
 47
47
-
 48
48
-
 49
49
-
 50
50
-
 51
51
-
 52
52
-
 53
53
-
 54
54
-
 55
55
-
 56
56
-
 57
57
-
 58
58


EAS ELECTRIC MAJESTIC25K Manual de usuario
- Tipo
- Manual de usuario
- Este manual también es adecuado para
en otros idiomas
- English: EAS ELECTRIC MAJESTIC25K User manual
Otros documentos
-
mundoclima MUPR-H6M “MultiSplit Wall type” Manual de usuario
-
-
PREMIUM PIAW18180B Manual de usuario
-
Olimpia Splendid DOLCECLIMA Air Pro 13 A+ Manual de usuario
-
-
 Olimpia Splendid OSK102 Manual de usuario
-
-
LG Electronics LP1415WXRSM Guía del usuario
-
Hisense DH70W1WG-0 Manual de usuario
-
Panasonic CSXZ50XKEW Instrucciones de operación
