LG GT57BPWK El manual del propietario
- Categoría
- Neveras
- Tipo
- El manual del propietario

Model Name*=color number
P/No. MFL67527903-12
ENGLISH ESPAÑOL
www.lg.com
OWNER’S MANUAL
TOP FREEZER
REFRIGERATOR
Please read this manual carefully before operating
your appliance and retain it for future reference.
LTCS20220*
LTCS24223*
L
LTCS20120*
GT66BP*
GT58BP*
GT57BP*K
TNS20220*
Copyright © 2012 - 2017 LG Electronics Inc. All Rights Reserved.
Copyright © 2012 - 2017 LG Electronics Inc. Todos los Derechos Reservados.


1
Important Safety Instructions 2-3
Requirements for Ground Connection 3
Parts and Features 4
Refrigerator Installation 5-12
Unpacking 5
Installation 5
How to remove and Install the
Refrigerator Doors 6-7
How to reverse and Install the
Refrigerator Doors 8-11
Closing and Aligning the Doors 12
Using your Refrigerator 13-17
Ensuring Proper Air Circulation 13
Adjusting the Controls
13
Adjusting Control Settings
14
Food Storage Guide
14
Refrigerator Shelves
16
16
Pantry Drawer
Ice Tray
16
Humidity Controlled Crispers 17
Door Bins 17
Dairy Bin 17
Refrigerator Care and Cleaning 18-19
Refrigerator Cleaning 18
Outside 18
Inside 18
Door Lining & Gaskets 18
Plastic Parts (Covers and Panel)
Back Cover 18
Replacing Refrigerator Lights
19
snoitpurretnI rewoP
When Going on Vacation 19
When Moving
About the Automatic Ice Maker 20
Connecting the Water Line 21-23
Troubleshooting Guide 24-29
Warranty
31-32
TABLE OF CONTENTS
TABLE OF CONTENTS
Spanish Version 34
Smart Diagnosis
TM
Door Alarm
19
18
18
30
30

2
This manual contains several important safety notices. Always read and obey all of the following safety messages.
This is the safety alert symbol. This symbol is a warning to potential dangers that could cause death, injury
or damage to you, others or the product. All safety messages will follow after this warning symbol and the
word “DANGER”, “CAUTION” or “WARNING”. These words mean:
You may be killed or suffer fatal damage if you do not follow instructions.
You may be killed or seriously injured if you do not follow instructions.
Indicates a potentially hazardous situation which, if not avoided, may result in minor injury
or damage to the product.
All safety messages inform you of potential danger, advise you on how to reduce the risk of injury and tell you what
can occur if the instructions are not followed.
To reduce the risk of fire, electrical shock or personal
injury, the following precaution measures should be
followed:
ţNEVER disconnect the refrigerator by pulling the
power cord, always grip the plug firmly and disconnect
it directly from the outlet.
ţImmediately repair or replace all faulty or damaged
service cables. Do not use cords that have cracks or
abrasion damage on the length of the cord or on the
plug.
ţWhen moving your refrigerator, take care not to roll
over the electrical cord.
ţDO NOT store or use gasoline or other combustible
liquids or vapors in proximity with this or any other
electrical appliance.
ţDO NOT permit children to climb, stand or swing from
the doors or shelves of the refrigerator. This
can cause
serious injury to them and damage to the product.
ţKeep your fingers away from areas in which they
can become caught, such as the doors, hinges and
cabinets. Be careful closing the doors when children
are near.
ţUnplug the refrigerator before cleaning or repairing.
NOTE: We strongly recommend that any repair
services be performed by a qualified professional.
ţBefore replacing a burned-out light bulb, unplug the
refrigerator or shut down the circuit breaker to avoid
contact with a live wire (the bulb could break while
being replaced). NOTE: Setting the control to the OFF
position does not disconnect the power from the light
bulb circuit.
ţDo not keep bottles in the freezer compartment, they
could explode after freezing and cause damage.
ţFor your safety, this product should be pr
operly
gr
ounded. Have a qualified professional check the
electrical circuit and outlet to ensure a proper ground
connection.
ţRead all instructions before utilizing the product. Utilize
this product only as explicitly expressed in this guide.
ţOnce the refrigerator is operating, avoid touching cold
surfaces of the freezer with damp or wet hands; the
skin could become adhered to these surfaces.
ţIn refrigerators with an automatic ice dispenser, avoid
contact with moving parts of the ejector mechanism
or with the heating mechanism that discharges the
cubes. DO NOT place your fingers or hands in the
ice dispenser mechanism while the refrigerator is
connected.
ţDO NOT refreeze foods which have already thawed.
The Department of Agriculture of the United States, in
your Bulletin of Home and Gardens No. 69 establishes
that:
“...You can refreeze food that has thawed if they contain
ice crystals or are cold and below 40 °F (4 °C)”.
“...Ground beef, perishable food or seafood that is
discolored or has an unpleasant odor should not be
frozen or consumed. Consumption of melted ice cream
should also be avoided. If the odor or color of food is
questionable, discard it. The food may be dangerous to
consume”.
“Partial thawing or refreezing reduces the quality of the
food, especially fruit, vegetables and prepared meals.
The quality of red meat is less affected than that of
other foods. Use refrozen products as soon as possible
in order to maintain their quality”.
KEEP THESE INSTRUCTIONS
IMPORTANT SAFETY INSTRUCTIONS
SAFETY MESSAGES
WARNING
DANGER
WARNING
CAUTION
ţDo not store any living animal inside your refrigerator.
WARNING. This product contains chemicals known to the State of California to cause cancer and birth defects
or other reproductive harm.
Wash hands after handling. (USA only)

3
This appliance is not intended for use by children, persons with physical or mental disabilities, persons with reduced
sensory or mental capacity, or persons that lack experience or know-how, unless they have supervision or instruction
in relation to the use of the appliance by the person responsible for their safety. Children should be supervised to
assure that they do not play with the appliance.
Children becoming trapped or suffocated is not
a problem of the past. Discarded and abandoned
refrigerators are a hazard, even if they remain there
“for just a few days”. If you would like to dispose of
your old refrigerator, please follow the instructions
below to prevent any accidents.
BEFORE DISPOSING YOUR REFRIGERATOR
OR FREEZER WHEN NO LONGER IN USE:
Remove the doors and magnetic gaskets.
Leave the shelves in place so that children
cannot easily become stuck in them.
IMPORTANT: Attentively read the following.
TO CONNECT ELECTRICITY
WARNING
ELECTRICAL SHOCK HAZARD
FOR YOUR PERSONAL SAFETY, this appliance must
be properly grounded. Have a qualified electrician
check your wall outlet to ensure that the plug is
grounded properly.
3 prong
grounding type
wall receptacle
3 prong
grounding Ensure proper
plug ground exists
before use
RECOMMENDED GROUNDING METHOD
Your refrigerator must always be plugged to its own
outlet which is adequately grounded. The energy current
should only be 115 V ~ 60 Hz, AC or 127 V ~ 60 Hz, AC
(according to the National rating). and fused at 15 or 20
A. This provides the best performance and prevents an
overload which could cause a fire from the overheating
of the cables. It is recommended that a separate circuit
be used for this appliance, as well as a receptacle that
cannot be disconnected with a switch.
Do not use an extension cable.
It is your responsibilit
y and obligation to replace tw
o-
prong outlets with that of an adequately grounded three-
prong outlet.
Do not, under any circumstance, cut or extract the third
prong from the plug.
NOTE: Before installation, cleaning or replacing light
bulbs, you must disconnect the appliance from the
power source. When finished, plug the appliance back in
and adjust the thermostat to the desired position.
USE OF EXTENSION CABLES
We do not recommend the use of extension cables.
However, if you still choose to utilize an extension cable,
it is absolutely necessary that it is listed in the UL (in
the United States) or CSA (in Canada), that it supports
three-pronged plugs and that the electrical current
support a minimum of 15 A and 120 V.
The use of an extension cable will increase the amount
of space needed behind the refrigerator.
WARNING
REPLACING ELECTRICAL CABLE
If the power cord is damaged, it must be replaced by
our service center or qualified LG technician to avoid
any risk.
CAUTION
DANGER:
CHILDREN MAY BECOME TRAPPED
CFC DISPOSAL
REQUIREMENTS FOR GROUND CONNECTION
Your old refrigerator may have a cooling system that
uses CFC’s (chlorofluorocarbons). CFC affects the
stratospheric layer of the ozone.
f you decide to throw out
your old refrigerator, ensure that CFC contaminants are
properly disposed of by a qualified professional. If you
intentionally remove the CFC refrigerant, you could be
subject to fines or prison in accordance with environmental
legislation in effect.
If you no longer require the use of this unit, contact the
local authorities to dispose of this product in a safe way
because it uses Cycle-Pentane or Pentane as foaming
and flammable gases for insulation. Gases insulation
material require special removal process. This product
contains flammable insulation and refrigerant gases.
WARNING:
Do not extend or modify the power cord length, damage
the power cord may cause electric shock or damage the
unit.
It is recommended use a separate circuit for this product
as well as receptacle which can not be disconnected with
a switch. Do not use extension cords or adapters
ungrounded.

4
PARTS AND FEATURES
Use this page to become more familiar with the parts and features of your refrigerator. Page references are
included for your convenience.
NOTE: This guide covers several models. The refrigerator you have purchased may have some or all of the items
listed below. The locations of the features shown below may not match your model.
Custom Cube Icemaker *
Ice Bin *
Ice Tray *
Freezer Shelf
Freezer Temperature Control
Refrigerator Temperature Control
Shelves
Refrigerator Light (LED)
Panty Drawer
A
B
C
H
F
G
E
D
I
J
K
L
M
N
A
B
C
D
E
F
G
H
N
P
I
J
O
M
K
O
P
L
Crispers
F-Deco Duct
Smart Diagnosis *
TM
Door Alarm *
Freezer Light (LED)
Freezer Door Bins
Dairy Bin
Refrigerator Door Bins
* On some models

5
REFRIGERATOR INSTALLATION
WARNING
EXCESSIVE WEIGHT HAZARD
Use the assistance of two or more persons to move or
install the refrigerator. Not following these instructions
may cause injury to the back and other parts of the
body.
UNPACKING
Before installing your refrigerator, remove any tape
or temporary stickers. Do not remove any stickers
that feature warnings, the model serial number or the
technical label of the product located on the back of the
refrigerator.
To remove adhesive tape residue, rub it well with your
fingers and a little liquid detergent. Clean with warm
water and let dry.
Do not use sharp instruments, rubbing alcohol, flammable
liquids or abrasive cleaning products to remove the
adhesive tape or glue. These products can
damage the
surface of your refrigerator. For more information, see
the section on “Impo
NOTE: Remove protective film on doors before plugging
in the unit (on some models).
rtant Safety Instructions”.
The shelves come already installed in their factory
position. Remove the shelves and replace them
according to your spacing needs.
Moving Your Refrigerator:
Your refrigerator is extremely heavy. Make sure you
protect the floor when moving your refrigerator for
cleaning or servicing. Always pull your refrigerator
straight out when moving it. Do not shift from side
to side or “walk” the refrigerator when attempting to
move it as this can cause damage to the floor.
WARNING
EXPLOSION HAZARD
Keep all flammable materials and vapors (such as
gasoline) away from the refrigerator. Not following
these instructions may cause death, explosion or fire
INSTALLATION
1.
2.
3.
CAUTION: Avoid placing the unit near heat
sources, direct sunlight or humidity.
ONCE INSTALLED
1. Carefully clean your refrigerator and remove and dust
accumulated during shipping.
2. Install accessories such as the ice bin, door racks,
shelves, etc., in their proper places. These are already
packed to prevent any possible damage during
shipping.
3. Leave your refrigerator on for 2 to 3 hours before
storing food inside. Verify that there is a flow of cold air
in the freezer compartment to ensure proper cooling.
Your refriger
ator is now re
ady for use.
WARNING:
ţTake care when working with the hinges, base cover
and stops, etc. You may injure yourself.
ţDO not place your hands or any tools in the air vents,
the base cover or in the bottom of the refrigerator. This
may cause injury or electrical shock.
Keep a Proper Distance from Adjacent Objects
Please keep the refrigerator at an adequate distance
from other objects. Insufficient spacing can reduce the
refrigerator’s freezing efficiency and increase electricity
consumption.
2” (5.08 cm)
2” (5.08 cm)
2” (5.08 cm) 2” (5.08 cm)
REFRIGERATOR INSTALLATION
CAUTION:
This appliance is intended to be used in household and
similar applications such as: staff kitchen areas in shops,
offices and other working environments; farm houses
and by clients in hotels, motels and other residential type
environments, bed and breakfast type environments,
catering and similar non-retail applications.
Avoid placing the unit near heat sources, direct
sunlight, or humidity.
To avoid vibration, the unit should be leveled and
placed on even floor. If needed, adjust the leveling
screws to compensate for an unleveled floor. The front
should be slightly taller than the rear to ensure that the
doors close properly. The leveling screws can easily be
turned by slightly tilting the front of the refrigerator,
turning the leveling screws clockwise ( ) to raise it
and counter-clockwise ( ) t
o lower it.
Install the refrigerator in an area between 55 °F (13 °C)
and 110 °F (43 °C). If the surrounding temperature is
lower or higher than previously mentioned, it can
adversely affect the unit.

6
HOW TO REMOVE AND INSTALL THE REFRIGERATOR DOORS
If entrance is lees than 35 inches wide, the refrigerator’s door will need to be removed.
IMPORTANT: Before starting, turn off and unplug the refrigerator. Remove all food and the racks from the doors.
TOOLS YOU MIGHT NEED OR USE
3/8 in
10 mm
Hex Socket Wrench Phillips Screwdriver No. 2 Flat Head Screwdriver Adjustable Wrench
WARNING
ELECTRICAL SHOCK HAZARD
Before you begin, either unplug the refrigerator or
turn off the power at the circuit breaker or fuse box.
Remove food and any door rack from the refrigerator.
Failure to do so could result in death or serious injury.
1. Removing Freezer Door
ţGently pry off the Top Hinge Cover with a flat head
screwdriver and remove it. See Fig. 1.
ţUsing 10 mm or 3/8 inch socket wrench, remove
the three bolts and lift the Top Hinge (See Fig. 2). Set
parts aside.
ţLift freezer door slightly and remove it (See Fig. 3) Set
parts aside.
2. Removing Refrigerator Door
ţ Loose and remove the two bolts and the screw to
remove the middle hinge bracket from refrigerator
housing (Figure 4). Set parts aside (Figure 5).
ţLift up door slightly and remove it (See Figure 6).
REFRIGERATOR INSTALLATION
Hinge Pin
Middle Hinge Bracket
Fig. 1
Fig. 3
Middle
Hinge Bracket
Fig. 4
Fig. 5
1/4 in
(For additional support on this topic, including helpful videos, please visit us at: www.lg.com
).
Fig. 2

7
To replace doors, begin with refrigerator door and then
follow with freezer door.
3. Replacing Refrigerator Door
Set door on Bottom Hinge Pin (See Figure 7).
Place hinge pin of middle bracket inside the hinge pin
insert on the top of the door (See Figure 8). Hold the
door in place and line up the hinge with the holes in
the refrigerator housing.
Use the two bolts and the screw to refasten the middle
hinge with the refrigerator housing. See Figure 9.
4. Replacing Freezer Door
Set the freezer door onto the Middle Hinge pin (Figure
10).
Place upper hinge in the top of the freezer door and
line up the hinge with the holes in top of refrigerator.
Use the three bolts to fasten the hinge (See Figure 11).
Carefully, force the top hinge cover back into place over
hinge (See Figure 12).
REFRIGERATOR INSTALLATION
Fig. 8
Fig. 9
Fig. 12
Bottom Hinge Pin
Fig. 6
Fig. 10
Fig. 7
REFRIGERATOR INSTALLATION
Fig. 11

8
HOW TO REVERSE AND INSTALL THE REFRIGERATOR DOORS (on some models)
You may find it more convenient to have the doors converted from the left opening type (factory installed) to the right
opening type. Directions refer to the right side as the side on your right as you face the unit.
TOOLS YOU MIGHT NEED OR USE
WARNING
ELECTRICAL SHOCK HAZARD
Before you begin, either unplug the refrigerator or
turn off the power at the circuit breaker or fuse box.
Remove food and any door rack from the refrigerator.
Failure to do so could result in death or serious injury.
1. Removing Freezer Door
Gently pry off the top hinge cover with a flat head
screwdriver and remove.
Using 10mm or 3/8 inch socket wrench, remove the
three bolts and lift off the top hinge. Set parts aside
Slightly lift up the refrigerator door and remove it.
Turn the freezer door upside down on a non-scratch
surface. Loosen the screw to remove the Door
Closer/Stop and Hinge Pin Insert.
Move the Hinge Pin Insert Bracket to the other side of
the door, keeping the same orientation, and move the
Hinge Pin Insert into the hole on the left side of the
bracket.
Reverse the Door Closer/Stop by flipping it over. Place it
on top of the Hinge Pin Insert Bracket, and tighten both
down with the screw.
Pry off the cover on the top left side of the refrigerator to
uncover the screw holes.
Set the freezer door and top hinge parts to the side and
remove the refrigerator door.
REFRIGERATOR INSTALLATION
Hinge Pin
Middle Hinge Bracket
Hinge Pin
Insert Bracket
Hinge Pin Insert
Cover
(on top of
refrigerator)
3/8 in
10 mm
Hex Socket Wrench Phillips Screwdriver No. 2 Flat Head Screwdriver
1/4 in

9
2. Reversing and Reinstalling Refrigerator Door
Using a ¼” socket wrench, loosen and remove Hinge
Pin from the Middle Hinge Bracket. Remove washer
underneath the middle hinge and set aside.
NOTE: At this point the door will be loose. Slightly lift the
door and remove it.
Loosen and remove the two bolts and use the Phillips
head screwdriver to remove the Middle Hinge Bracket
from the refrigerator housing. Set parts aside.
Remove the washer from the Bottom Hinge Pin.
Using a ¼” socket wrench, loosen and remove the
Hinge Pin from the Bottom Hinge. Reattach the
Hinge Pin to the opposite side of the hinge.
NOTE: This is easier to do while the hinge is still
attached.
Using a 3/8’’ socket wrench with a 2-Inch extension
and screwdriver, loosen the two bolts and one screw, and
remove the Bottom Hinge from right side of the housing.
Remove the Decorative Caps on the bottom of the
refrigerator housing. You will need these holes for the
Bottom Hinge.
Move the Bottom Hinge to the left side of the housing,
keeping the same orientation, and reattach with the
two bolts and one screw. The flat screw must be
placed on the exterior side of the hinge. Move the
Decorative Bolt to the hole on the lower right side
of the housing.
Turn the refrigerator door upside down on a
nonsc
to remove the Bottom Hinge Pin Insert Bracket
with the Hingr Pin Insert.
ratching surface. Loosen the two screws
REFRIGERATOR INSTALLATIONREFRIGERATOR INSTALLATION

10
Take out the Hinge Pin Insert and move the Bracket to
the other side of the door, keeping the same orientation.
Place the Hinge Pin Insert into the left side of the bracket.
Tighten the Hinge Pin Bracket to the door.
With a flat-head screwdriver, carefully pry off and
remove the cover over the screw holes on the left side of
refrigerator housing.
Remove the outer lower Decorative Screw from the
housing at the area between the freezer and refrigerator
doors. (You will need this hole for the Middle Hinge
Bracket.)
Flip the Middle Hinge Bracket, (flange will now be on
top) position it on left side of the refrigerator and reattach
with two bolts and a Phillips screwdriver. Place the
refrigerator door down over the pin on the bottom hinge.
Place the washer between the refrigerator door and
middle hinge and re-attach Hinge Pin to Hinge Bracket
with a ¼” socket wrench.
NOTE: Bracket has been flipped, but Hinge Pin stays
in the same orientation with its hexagonal end facing
upward.
Insert the Decorative Screw into the outer hole on the
right side of the housing. Attach cover on the right side.
Cover is force-fitted.
REATTACHING THE DOORS
Place the freezer door down over the Hinge Pin on the
Middle Hinge Pin Bracket.
Place the Upper Hinge Pin on top of the freezer door
and line up the Upper Hinge with holes on top of the
refrigerator. Use the three bolts to replace the Hinge.
Hinge
Pin Bracket
Hinge Pin
Insert
Hinge
Pin Bracket
Hinge Pin Insert
Middle Hinge
Bracket
Flange
Decorative
Screw
REFRIGERATOR INSTALLATION

11
Tighten the bolts. Force-fit Top Hinge Cover over Top
Hinge.
Replace cover on the top left side of the refrigerator
to the right top to cover the holes. Cover is also
force-fitted.
After changing doors, make sure that the corners
of the Door Gaskets are not folded over. To ensure a
good seal, apply a small amount of silicon grease on
the corners of gaskets.
Corners
Cover (on top of
refrigerator)
REFRIGERATOR INSTALLATION
REFRIGERATOR INSTALLATION

12
CLOSING AND ALIGNING THE DOORS
To avoid vibration, the unit must be leveled. If necessary,
adjust the Leveling Legs to compensate for unevenness
of the floor. The front should be slightly higher than the
rear to aid in door closing.
Your refrigerator has three front leveling screws, one on
the right and one on the left. If your refrigerator seems
unstable or if you would like the doors to close more
easily, simply adjust the inclination of the refrigerator by
following the instructions below:
NOTE: Third leveling screw is used for protection of
hinge lower.
1. Plug the refrigerator into a 3 prong grounded outlet.
Move the refrigerator into its final position.
2.
Use a 11/16” (18 mm) wrench or an adjustable wrench
to adjust the leveling screws (see Figure A), turning
clockwise to raise the side of the refrigerator and
counter-clockwise to lower it. It may take several turns
to adjust it to the inclination you would like.
NOTE: Having someone push against the top of the
refrigerator takes some weight off the leveling screws.
This will make it easier to adjust the screws.
3. Open both doors again and check to make sure that
they close easily. If not, tilt the refrigerator slightly
more to the rear by turning both Leveling Screws
clockwise. It may take several more turns, and you
should turn both Leveling Screws the
same times.
Door Alignment
If the space between your doors is uneven, follow the
instructions below to align the doors:
1. Gently pry off the Top Hinge Cover with a flat head
screwdriver and remove.
2. Loosen the Top Hinge Bolts using a 10 mm or 13/32
inch socket wrench or open-end wrench.
3. Have someone hold the freezer door so the space
between the two doors is even, and retighten the top
hinge bolts.
4. Replace the Top Hinge Cover.
REFRIGERATOR INSTALLATION
Figure A

13
ENSURING PROPER AIR CIRCULATION
In order to obtain stable temperature, the air must flow
between the freezer and refrigerator sections. As shown
in the illustration below, the cold air enters through
the bottom part and circulates upward. This air returns
below the freezer floor and the rest of the air enters the
refrigerator section through the top vent.
Do not block any of these vents with packages of food.
This can interrupt the flow of air and cause temperature
and moisture problems.
IMPORTANT: Because air circulates between both
sections, any odors formed in one section will transfer
to the other. You must thoroughly clean both sections to
eliminate odors. To prevent odor transfer and drying out
of food, make sure you wrap or cover foods tightly (See
the “Food Storage Guide” section for details).
NOTE:
If you close the fresh food
compartment door applying
more force than necessary,
freezer door may get open and
close again, due internal air flow
of refrigerator.
ADJUSTING THE CONTROLS
ţYour refrigerator has two controls that allow you to
regulate the temperature the freezer and refrigerator
compartments.
ţRefrigerator Control
Initially set the Refrigerator Control on the middle
setting (number 3). To do so, press the TEMPERATURE
ADJUST button until it reaches the middle position
(the third LED turns ON). Leave the refrigerator on this
setting for 24 hours to reach the correct temperature.
After 24 hours, adjust the compartment temperature
as you desire. ALWAYS wait 24 hours before you adjust
the temperature. If you want to set the refrigerator
compartment temperature to a warmer temperature
than the current, continue pressing the TEMPERATURE
ADJUST button until it reaches the desired temperature.
ţDemo Mode (For Store Use Only)
Demo Mode disables all cooling in
the refrigerator and freezer sections to conserve energy
while on display in a retail store. When activated, OFF
will display on the control panel.
To deactivate:
Press the TEMPERATURE ADJUST button until your
desired temperature setting is reached. The OFF light
will turn off once the Demo Mode is deactivated.
ţFreezer Control
The freezer control should come from factory on the
middle setting (number 3). Wait 24 hours before
adjusting the freezer compartment temperature. Roll
the knob to set the freezer temperature as you desire.
ALWAYS wait 24 hours after any adjustment to reach the
desired temperature.
NOTE: Setting at higher number of the Freezer
compartment, the temperature of freezer compartment
becomes colder.
TEMPERATURE
ADJUST
COLDESTCOLD
USING YOUR REFRIGERATORUSING YOUR REFRIGERATOR

14
ADJUSTING CONTROL SETTINGS
Give the refrigerator time to cool down completely before
adding food. It is best to wait 24 hours before adding
food to the refrigerator. The mid-settings indicated in the
previous section should be correct for normal household
refrigerator usage. The controls are set correctly when
milk or juice is cold to your liking and ice cream is firm.
The refrigerator control functions as the thermostat for
the entire appliance. The higher the number setting, the
longer the compressor will run to keep the temperature
colder. The freezer control adjusts the cold air flow from
the freezer to the refrigerator. Setting the freezer control
to a lower temperature keeps more cold air in the freezer
compartment to make it colder.
If you need to adjust the temperature in the refrigerator
or freezer, begin by adjusting the refrigerator first. Wait
24 hours after the refrigerator adjustment to check the
freezer temperature. If it is too warm or too cold, then
adjust the freezer control as well.
Use the settings listed in the table below as a guide.
CONDITION/REASON: RECOMMENDED
ADJUSTMENT:
REFRIGERATOR section
is too warm
Opening the door often
Adding a large amount
of food
Room temperature is
very warm
Adjust the
REFRIGERATOR setting
to the next highest
number and wait 24
hours, then check.
FREEZER section is too
warm/ ice is made too
slowly
Opening the door often
Adding a large amount
of food
Room temperature is
very low (not cycling
often enough)
Using ice frequently
Air vents blocked by
objects
Adjust the FREEZER
setting to the next
highest number and wait
24 hours, then check.
Remove any objects
blocking air flow.
REFRIGERATOR section
is too cold
Controls not set
correctly for your
conditions
Adjust the
REFRIGERATOR setting
to the next lowest
number and wait 24
hours, then check.
FREEZER section is too
cold
Controls not set
correctly for your
conditions
Adjust the FREEZER
setting to the next lowest
number and wait 24
hours, then check.
FOOD STORAGE GUIDE
ITEMS HOW TO STORE
Storing Fresh Food Wrap or store food in the
refrigerator in airtight and
moisture-proof material unless
otherwise noted. This prevents
food odor and taste transfer
throughout the refrigerator. For
dated products, check date code
to ensure freshness.
Butter or
margarine
Store opened butter in a covered
dish or in a closed compartment.
When storing a larger quantity,
wrap in freezer packing and
freeze.
Cheese Store in original packaging until
you are ready to use it. Once
opened, tightly rewrap with
plastic wrap or aluminum foil.
Vegetables with
skins (carrots,
peppers)
Place in bags or plastic containers
inside the crisper.
Fruit Wash and let dry; store in plastic
bags in the refrigerator. Do not
wash or pit berries until you
are ready to eat them. Berries
should be selected and kept in
their original packaging (if there
is any) or in a paper bag closed
halfway and set on a shelf.
Leafy Vegetables Remove original packaging and
trim any dirty or discolored parts.
Wash in cold water and drain.
Place in a plastic bag or plastic
container and store in the crisper.
Fish Consume fish or seafood the
same day purchased.
Chef Fresh Store any meat in original airtight,
moisture-proof packaging.
Rewrap if necessary.
Leftovers Cover leftovers with plastic
wrap or aluminum foil. Plastic
containers with airtight lids can
also be used.
USING YOUR REFRIGERATOR

15
Packaging Recommendations:
Us se s containers.
Us s containers o surface.
Package f o resistance.
Wr yered stic.
Use wat roo stic.
Us rec s t store frozen foods.
Follow these
or container instructions in order
t
re est freezing
Do not use:
Bread r
Plas c o safe f storing.
Containers seals.
Wax wax stic.
Thin wr ot wat roof.
Freezing
IMPORTANT:
o k ottle freez
c r t ter free
caus
For the a use of your freezer do not store exces
food. not introduce a large of unfrozen f
that cannot frozen within 24 hours (no re
2–3 or ,91 kg - 1,36 kg of food squar
inch of ce in the freezer). Sufficient ce st
left in order for the air to circulate r around
es. Leave enough ce in order to close y
refrigerator ty.
Storage
es can vary on the t
quality of the food, the way its or
container used, (in c son to air and ty),
the t rature it stored in. Ice crystals f
inside your are it indicates the air
t av condensed.
NOTE: Let w
foods cool off at r t ratur
for ro ately 30 then wr accordingly
the ethods ove and freeze. By letting y
w foods cool off fore you introduce to y
freez save y rgy.
WARNING
SUFFOCATING DANGER
Adequate ventilation is required when using dry ic
ry ice is oxide (CO
2). When it e rates
roduces oxygen, causing dizziness, slight headache
unconsciousness or death. not inhale these r
and r ventilate the r while in use fdryic
USING YOUR REFRIGERATORUSING YOUR REFRIGERATOR

16
REFRIGERATOR SHELVES
The glass shelves in your refrigerator are adjustable to
meet your individual storage needs.
Adjusting the shelves to fit different heights of items will
make finding the exact item you want easier. Doing so
will also reduce the amount of time the refrigerator door
is open which will save energy.
IMPORTANT: Do not clean glass shelves with warm water
while they are cold. Shelves may break if exposed to
sudden temperature changes or impact.
NOTE: Glass shelves are heavy. Use special care when
removing them.
Adjusting Shelves
Remove shelves from the shipping position and replace
shelves in the position you want.
To remove a shelf—Tilt up the back of the shelf in the
direction of 1 and lift it in the direction of 2 . Pull
the shelf out.
To reinstall a shelf—Slide the shelf into the guides
until it stops.
PANTRY DRAWER (on some models)
To remove the Pantry Drawer:
Grasp the drawer handle and pull it forward to the drawer
stop. Lift up and pull out.
To replace the Pantry Drawer:
Slide the drawer back all the way past the drawer stop.
Ice Tray (On some models)
indicated in the picture. Do not
overfill with water or ice cubes
will be difficult to remove
freezer dial to 3.
Twist the ice tray to remove the
ice cubes
so may result in damage to the
tray.
pour water on the back of the
tray or soak it in water before
removing ice cubes.
USING YOUR REFRIGERATOR
1
2
1
2

17
HUMIDITY CONTROLLED CRISPERS
The crispers provide fresher tasting fruit and vegetables
by letting you easily control humidity inside the drawer.
You can control the amount of humidity in the
moisturesealed crispers by adjusting the control to any
setting between VEGETABLES and FRUIT.
VEGETABLES keeps moist air in the crisper for best
storage of fresh, leafy vegetables.
FRUIT lets moist air out of the crisper for best storage
of fruit.
To remove and install the crisper drawers:
1. Pull the crisper drawer out to the drawer stop.
2. Lift the front of the crisper up, then pull it straight out.
3. To install, slightly tilt up the front, insert the drawer into
the frame and push it back into place, past the drawer
stop.
To remove the crisper glass:
1. Remove the crisper drawers (as described above).
2. Reach in under the glass and lift up.
3. Gently push the glass up and out.
To remove the crisper cover:
1. Remove both crisper drawers.
2. Remove the crisper glass.
3. While holding the support and crisper cover, pull up
and out.
DOOR BINS
The door bins are removable for easy cleaning and
adjustment.
1. To remove the bin, simply lift the bin up and pull
straight out.
2. To replace the bin, slide it in above the desired support
and push down until it snaps into place.
NOTE: Some bins may vary in appearance and will
only fit in one location.
DAIRY BIN
1. To remove the Dairy Bin, simply lift up and pull out.
2. To replace the Dairy Bin, slide it in above the desired
support slots and push down until it stops.
USING YOUR REFRIGERATORUSING YOUR REFRIGERATOR
Dairy Bin

18
WARNING
EXPLOSION HAZARD
Do not use flammable cleaners. Not following these
instructions can cause death, explosion or fire.
The refrigerator, as well as the freezer, do their own
de-freezing. This process does not prevent the build
up of contaminants, therefore it is suggested that you
clean both parts once a month; clean spilled liquids
immediately.
REFRIGERATOR CLEANING
ţUnplug your refrigerator.
ţPull out all of the removable parts (such as the
vegetable and dairy doors).
ţUse a clean sponge (or a soft rag) and use it with
lukewarm water mixed with detergent. Do not use
abrasive or concentrated cleaners.
ţHand wash it, and dry it thoroughly.
ţPlug the refrigerator back in.
OUTSIDE
Wax the outside in order to create better protection. Make
sure you use a product specifically design to be used
for electro-domestic products (car wax is acceptable).
Use a clean, soft rag, and perform this task twice a year.
For metal-made refrigerators, do not wax, simply clean
it with water and detergent. Do not use concentrated or
abrasive products.
In case of STS, apply cleaner in same direction that hair
line of STS.
NOTE: Avoid the usage of chemical products that
contain phosphates or bleach.
INSIDE (Allow freezer to slightly warm up a small
degree to prevent cloth from sticking)
In order to eliminate bad odors, clean the inside of
the refrigerator with a mixture of baking powder and
lukewarm water (one teaspoon of baking powder per cup
of water). Ensure that the powder dissolves thoroughly, in
order to prevent any sort of damage.
DOOR LINING AND GASKETS
Use only a mild detergent (such as dish soap).
PLASTIC PARTS (Covers and Panels)
Do not use abrasive, paper or rough products. These
could damage the product.
BACK COVER
WARNING
ELECTRICAL SHOCK HAZARD
Before you begin, either unplug the refrigerator or turn
off power at the circuit breaker or fuse box.
NOTE: Back Cover should only be
removed by a qualified technician.
In order to get an efficient
performance of your refrigerator,
clean the back cover of it at least
twice a year.
REPLACING REFRIGERATOR LIGHTS
The refrigerator and freezer compartment lights
are LED interior lighting, and service should
be performed by a qualified technician.
WARNING
ELECTRIC SHOCK HAZARD
Before replacing a burned-out light bulb, either unplug
the refrigerator or turn off power at the circuit breaker
or fuse box.
BACK
COVER
REFRIGERATOR CARE AND CLEANING

19
POWER INTERRUPTIONS
1. In case of a black out, call your electric company and
ask how long it will last.
2. In case of a 24 hour or less black out, do not open the
refrigerator; this will keep the food fresh.
3. In case of a longer black out, do one of the following
options:
ţ Pull out all of the frozen food and keep them in an ice
chest.
ţ Put 2 lbs (907 g) of frozen ice (make sure you use
gloves) for each square foot (28 L) inside the freezer.
This task will preserve the food from 2 to 4 days.
ţ In case you do not possess neither ice chest or dry ice,
consume your food as soon as possible.
REMEMBER: In a power failure, a full freezer stays cold
longer than a partially filled one. A freezer full of meat
stays cold longer than a freezer full of baked goods. If
you see that food contains ice crystals, it may be safely
refrozen, although the quality and flavor may be affected.
If the condition of the food is poor or if you feel it unsafe,
dispose of it.
WHEN GOING ON VACATION
If you decide to leave your refrigerator on when going
away, consider these steps:
1. Consume all of the perishable items and freeze the
rest.
2. Empty the ice bin.
If you decide to leave your refrigerator off:
1. Remove all of the food.
2. Unplug your refrigerator.
3. Clean and dry it well.
4. Make sure the doors stay open (use blocks or tape) in
or
der to prevent bad odors and fungi from happening.
WHEN MOVING
If you decide to take your refrigerator with you when
moving, consider the following:
1. Remove all of the food from it, and place the frozen
food in an ice chest with dry ice.
2. Unplug your refrigerator.
3. Empty the water from its tray.
4. Clean and dry it with a rag.
5. Pull out all of the removable parts, and wrap them with
adhe
sive tape.
6. Depending on the model of the refrigerator, lift the top
part of the refrigerator so it can roll with ease, or screw
the levelers so it won´t scratch the floor. Consult to the
section “Closing and Aligning Doors”.
7. Keep the doors closed with the cable glued to the
refrigerator cabinet with an adhesive tape.
When your refrigerator arrives to your home, put
everything back into place and read the
section
“Refrigerator Installation” in order to obtain installation
preparation. In case your refrigerator has a factory ice
maker, remember you have to reconnect the water
supply.
REFRIGERATOR CARE AND CLEANINGREFRIGERATOR CARE AND CLEANING

20
NOTE: The automatic Ice maker is only included in some
models. Check your specifications of your refrigerator.
WARNING
PERSONAL INJURY HAZARD
Avoid contact with any moving parts of the ejector
mechanism or with the heater that releases the ice
cubes. DO NOT place your fingers in the automatic ice
maker when the refrigerator is plugged in.
OPERATING INSTRUCTIONS
After turning on your refrigerator, the ice will start to be
made between 12 and 24 hours.
Identify your ice maker type.
Type 1
The ice maker produces 8 cubes per cycle (between 64
and 128 cubes in a 24 hour period), depending on the
temperature of the freezer, the times in which the door
opens, and other using conditions (amount of food in
the freezer, etc).
If the refrigerator is used before the connection of water
to the ice maker was performed, you must turn its dial
to O (off).
When the water connections are performed, turn its dial
to I (on).
The ice maker will fill up (and start making ice) between
12 and 24 hours after the refrigerator is turned on.
Throw away the first batch of ice. Make sure that nothing
interferes with the sensor.
When the ice reaches the sensor, the ice maker will stop
to make ice immediately.
It’s normal that some ice gets stuck. If the ice is not used
frequently, the older cubes of ice will be opaque in color,
smaller, and with a strange flavor.
YOU MUST TURN THE SWITCH TO O (OFF)
When the water supply is interrupted for many hours.
When the ice container is left out of its place for more
than one or two minutes.
When the refrigerator will not be in use for various
days.
NORMAL SOUNDS
The valve will emit a buzzing sound when the ice maker
is full of water. If the switch is placed in the on position
the buzz will still be heard even when the water pipe
has not been connected. To avoid this sound, move
switch to O (off) position.
NOTE: The ice maker can get damaged if the switch is
kept in the ON position before the water pipe has been
connected.
While
the ice maker is filling up with water and
producing ice, you will hear the sound of the ice falling
and water flowing through the pipes.
PREPARING FOR VACATIONS
Move the ice maker switch to the O (off) position and cut
the flow of water going into the refrigerator.
If room temperature is at freezing point, have a
specialized technician drain the flow of water from the
inner pipes (certain models) to avoid broken pipe related
damage.
ABOUT THE AUTOMATIC ICE MAKER
Icemaker
Power Switch
Ice detecting
sensor
You will hear the sound of cubes dropping into the
bin and water running in the pipes as the icemaker
refills.
NOTE: To avoid water spilling, the unit should be leveled
and placed on even floor. Do not remove the ice bin
from the ice maker for a long period, doing so may
cause ice spilling.
NOTE: Never store beverage cans or other items in the
ice bin for the purpose of rapid cooling. Doing so may
damage the ice maker or the container may burst.

21
NOTE: It is necessary to have a water source when both
water and/or ice dispensers are available in your product.
BEFORE START
The water source is not guaranteed by the refrigerator
manufacturer. Follow instructions carefully in order to
reduce damage.
Air located inside the water pipes can cause hammering
or tapping causing damage to the inner pipes or water
spillage in the inside of the refrigerator. Call a qualified
plumber to fix such hammering on the connections
before installing the water pipe.
To avoid burn damage or such, never connect refrigerator
to hot water pipes.
If you are to use the refrigerator before connecting it
to the water source, make sure the ice maker is the off
position.
Never attempt to install the ice maker pipes in areas
where room temperature is below freezing point.
When using any electrical device (like a drill) during
the installation, make sure device is doubly isolated or
making ground to prevent risk of electrical surge or
discharge.
All installations should be done considering local water
and drainage requirements.
If an inverted osmosis water filtration system is
connected to the cold water source, the water hose
installation is not assured or guaranteed by the
refrigerator or automated ice maker manufacturer.
Follow the next instructions carefully to minimize costly
water related damages.
When having an inverted osmosis water filtration
system connected to the cold-water flow, the water
pressure for such system must be at least between
40-60 PSI or 0,27 MPa (2,8 kg · f / cm ² ~ 4,2 kg · f
/ cm ², (2,8 kg · f / cm ² ~ 4,2 kg · f / cm ², less than
2 ~ 3 seconds to fill a 7 oz of capacity cup [0,2 liters]).
If the inverted osmosis water filtration system pressure
is less than 21 PSI or 0,14 MPa (1,5 kg · f / cm ², more
than four (4) seconds to fill a 7 oz of capacity cup [0,2
liters]):
a) Identify if the sediments filter in the inverted osmosis
system is being blocked. Replace filter if necessary.
b) Allow inverted osmosis system storage tank to refill
after extensive usage.
c) Call a qualified plumber if the inverted osmosis water
pressure problem continues.
REQUIREMENTS
1/4” (6,35 mm) in diameter copper pipe
to connect refrigerator to the water
pipe. Make sure both terminals are
cut in a squared manner.
To determine how much pipe material is needed,
measures the distances between the valves located
behind the refrigerator and the source of water and add
to that 8 feet (2,4 m). Make sure there is sufficient pipe
material to allow the free movement of the refrigerator
from the wall
A cold water source. Water pressure should be between
0,138 and 0,82 MPa or 20 and 120 PSI for models not
containing water filter and between 0,276 and 0,82
MPa or 40 and 120 PSI for models containing water
filter.
A drill.
Adjustable 1/2”(12,7 mm) key.
Flat and Phillips style (star) screwdriver.
Two 1/4” (6,35 mm) diameter
compression nuts with two
sides to connect the copper
pipe to the refrigerator valve.
If your current copper pipe has some
reduction on the ends, it will be
necessary to get and adaptor (found
in hardware stores) to connect the
water line to the refrigerator. It is also
possible to cut such reductions with a pipe cutter and
use the compression connections mentioned above.
Bypass valve to connect to
the cold water line. The valve
must have a water opening
with an interior 5/32” (3,46
mm) diameter in the cold-
water connection point.
These valves can be located
in any cold-water connection package. Before buying
make sure such valve meets local standards and
requirements.
INSTALLATION INSTRUCTIONS
Install the valve to the pipe that you use to drink water.
CAUTION: Connect to potable water supply only.
1. CLOSE THE MAIN WATER SOURCE
Open the nearest water faucet to let water flow and
empty pipes.
2. SELECT THE LOCATION OF THE
VALVE
Select the location of the valve that
will provide a better access. It is best
to connect to a vertical pipeline. When
connecting to a horizontal pipeline is
necessary, make the connection in the
lateral or upper area instead of the
lower area to prevent accumulation of
sediment.
CONNECTING THE WATER LINECONNECTING THE WATER LINE

22
3. DRILL A HOLE FOR THE VALVE
Drill a 1/4” (6,35 mm) diameter
hole in the water pipeline.
Remove jagged edges produces
after perforation. Make sure water
does not reach the drill. Not
performing the 1/4” (6,35 mm)
perforation can lead to a low or
smaller ice production.
4. TIGHTEN THE VALVE
Tight the valve into the cold water pipeline with a tube
trap.
Pipe Clamp
Saddle Type Vertical Cold
Shutoff Valve Water Pipe
NOTE: Codes for 248 CMR pipelines of the state of
Massachusetts must be attached to the connection.
Valves of this type are banned in Massachusetts. Call an
authorized plumber by the norms and regulations of
your country.
5. TIGHTEN THE TRAP
Tighten the trap until the sealing ring begins to grow.
NOTE: Make sure it is not too tight, this can break the
pipe.
Washer
Pipe Clamp Inlet End
Clamp Screw
6. PLACE THE PIPELINE
Place the pipeline between the cold water pipe and the
refrigerator. Place it through a hole in the wall or floor
(behind the refrigerator or next to the cabinet) as close
to the wall as possible.
NOTE: Make sure there is a sufficient amount of extra
pipeline (8 feet [244 mm] coiled up three times with a
10” [25 cm] in diameter) to allow free movement of the
refrigerator from the wall after installation was made.
7. CONNECT PIPELINE TO VALVE
Place the compression nut and the copper pipe ferule at
the end of the pipe and connect to the valve. Make sure
the pipe is completely inserted into the valve. Tighten
nut carefully.
S
addle Type
Shutoff Valve Compression Nut
Packing Nut
Outlet Valve Ferule (sleeve)
8. DRAIN THE PIPE
Open the main water source (1) and drain the pipe until
water comes out clear.
Allow water flow from the bypass valve (2) and close after
draining 1/4 of a gallon (1L) of water.
9. CONNECT PIPE TO REFRIGERATOR
NOTES:
Before making connection to refrigerator, make sure
it is not connected to any energy source. If your
refrigerator does not have a water filter, it is advised
to install one.
If your water source contains sand or related particles
that can travel to the valve, install a water filter near the
refrigerator.
IMPORTANT: Never use old or used hoses. Always use
new ones to have a better use and experience. Connect
always to a potable water source to avoid security and
health issues.
1
2
CONNECTING THE WATER LINE

23
Remov (1) f v ca a
o s e ce.
ce c es f a of
se o c ve as f
os
T /4 6 m)
T
es
/4
6
F Ref a
eve
o f om es s ca
ef a o , o fi s
Af e wa ds, se o
o ze.
10. OPEN THE BYPASS VALVE
T c
c eaks. ce acces
cov c esso .
11. CONNECT TO REFRIGERATOR
F aw a doe
o a e ef a
w P ef a s
w
12. TURN ICE MAKER ON
T ce mak s o ON o Ice mak
s af e s a a
of 15 °F (-9 ° ) ess. oma c c
s ca ON o
1
CONNECTING THE WATER LINECONNECTING THE WATER LINE

24
UNDERSTANDING SOUNDS YOU MAY HEAR
Your new refrigerator may make sounds that your old one
did not make. Most of the new sounds are normal. Hard
surfaces, like the floor, walls and cabinets, can make the
sounds seem louder than they actually are. The following
describes the kinds of sounds you may hear and what
may be causing them..
Clicking:
The defrost control will click when the automatic defrost
cycle begins and ends. The thermostat control (or
refrigerator control, depending on the model) will also
click when cycling on and off.
Rattling:
Rattling noises may come from the flow of refrigerant, the
water line, or items stored on top of the refrigerator.
Whooshing:
refrigerator and freezer compartments.
fan.
the refrigerator when the doors are open.
Gurgling:
As each cycle ends, you may hear a gurgling sound
caused by the refrigerant flowing through the cooling
system.
Popping:
Contraction and expansion of the inside walls.
Sizzling:
Water dripping on the defrost heater during a defrost
cycle.
Vibrating Noise:
If the side or back of the refrigerator is touching a
cabinet or wall, some of the normal vibrations may make
an audible sound. To eliminate the noise, make sure that
the sides and back cannot vibrate against any wall or
cabinet.
Dripping:
Water running into the drain pan during the defrost cycle.
Pulsating or High-Pitched Sound:
Your refrigerator is designed to run more efficiently to
keep your food items at the desired temperature.
The high efficiency compressor may cause your
new refrigerator to run longer than your old one,
but is still more energy efficient than previous models.
While the refrigerator is running, it is normal to hear
a pulsating or high-pitched sound.
Proble Possible Causes Solutions
Refrigerator is not
cooling.
The power supply cord is unplugged. Firmly plug the cord into a live outlet with
proper voltage (see Electrical & Grounding
Requirements).
A household fuse has blown or a
circuit breaker has tripped.
Replace the fuse or reset the circuit
breaker. If the problem persists, contact
an electrician.
The refrigerator control is set to the
OFF position.
Refer to the Setting the Controls section.
The refrigerator is in the defrost cycle. Wait about 30 minutes for defrost cycle
to end.
The OFF light is illuminated. The refrigerator is in DEMO mode. The
Demo Mode disables the cooling system
and only the lamps and display will work
normally.
To disable Demo Mode, press the
TEMPERATURE ADJUST button until you
set the desire temperature level. When
demo mode is deactivated, the OFF light will
turn off.
TROUBLESHOOTING GUIDE
TEMPERATURE
ADJUST
COLDESTCOLD

25
Problem Possible Causes Solutions
Lights do not
work
The power supply cord is unplugged. Firmly plug the cord into a live outlet
with proper voltage (refer to Electrical &
Grounding Requirements).
An LED light has malfunctioned. Before proceeding to replace LED, unplug the
refrigerator or turn off power at the circuit
breaker or fuse box.
NOTE: The refrigerator and freezer
compartment lamps are LED interior lighting,
and service should only be performed by a
qualified technician.
Vibration or
rattling
noise.
The refrigerator is not resting solidly
on the floor.
Floor is weak or uneven or leveling legs need
adjusting. See the Installation section for
leveling instructions.
Compressor
seems
to run too much.
The refrigerator that was replaced was an
older model.
Modern refrigerators require more operating
time but use less energy due to more efficient
technology.
The room temperature is warmer
than normal.
The compressor will run longer under warm
conditions. At normal room temperatures
(70°F) expect your compressor to run about
40% to 80% of the time. Under warmer
conditions, expect it to run even more often.
The refrigerator should not be operated in
surrounding temperatures above 110°F.
The door is opened often or a large
amount of food has just been added.
Adding food and opening the door warms the
refrigerator, requiring the compressor to run
longer in order to cool the refrigerator back
down. In order to conserve energy, try to get
everything you need out of the refrigerator
at once, keep food organized so it is easy to
find, and close the door as soon as the food is
removed. (Refer to the Food Storage Guide.)
The refrigerator was recently plugged in
and the refrigerator control was set
correctly.
The refrigerator will take up to 24 hours to
cool completely
The refrigerator control is not set correctly
for the surrounding conditions.
See the Adjusting Control Settings section.
The doors are not closed completely. Firmly push the doors shut. If they will not
shut all the way, see “Doors will not close
completely” in the Troubleshooting section.
The back cover is dirty. This prevents air transfer and makes the motor
work harder. Clean the back cover. Refer to
the Care and Cleaning section.
TROUBLESHOOTING GUIDETROUBLESHOOTING GUIDE

26
Problem Possible Causes Solutions
Doors will not
close completely.
The refrigerator is not level. See the Leveling and Door Alignment section.
Food packages are blocking the
door open.
Rearrange food containers to clear door and
door shelves.
The ice bin, crisper cover, pans,
shelves, door bins or baskets are
out of position.
Push bins all the way in and put crisper cover,
pans, shelves and baskets into their correct
positions. See the Using Your Refrigerator
section for more information.
The gaskets are sticking. Clean gaskets and the surfaces that they
touch. Rub a thin coat of appliance polish or
kitchen wax on the gaskets after cleaning.
The refrigerator wobbles or seems unstable. Level the refrigerator. Refer to the Leveling
and Door Alignment for more information.
The doors were removed during product
installation and not properly replaced.
Remove and replace the doors according to
the Removing and Replacing Refrigerator
Handles and Doors section, or call a qualified
technician.
Frost or ice
crystals on frozen
food.
The door is not closing properly. See “Doors will not close completely” in the
Troubleshooting section.
The door is opened often. When the door is opened, warm, humid air is
allowed in the freezer, resulting in frost.
Ice has bad taste
or odor.
The icemaker was recently installed. Discard the first few batches of ice to avoid
discolored or bad tasting ice.
The ice has been stored for too long. Throw away old ice and make a new supply.
The food has not been wrapped tightly in
either compartment.
Rewrap foods since odors may migrate to the
ice if food is not wrapped properly.
The water supply contains minerals such as
sulfur.
A water filter may need to be installed to
eliminate taste and odor problems.
The interior of the refrigerator needs
cleaning.
See Care and Cleaning section for more
information.
The ice storage bin needs cleaning. Empty and wash bin. Discard old cubes.
There is water in
the defrost drain
pan.
The refrigerator is defrosting. The water will evaporate. It is normal for
water to drip into the defrost pan.
It is more humid than normal. Expect that the water in the defrost pan will
take longer to evaporate. This is normal when
it is hot or humid.
TROUBLESHOOTING GUIDE

27
Problem Possible Causes Solutions
The refrigerator
seems to make
too much noise.
The sounds may be normal for your
refrigerator.
Refer to the Understanding Sounds You May
Hear section for more information.
The icemaker is
not producing
ice or not
enough ice.
New installation. Wait 12 to 24 hours after icemaker
installation for ice production to begin. Wait
72 hours for full ice production.
The refrigerator is not connected to a water
supply or the supply shutoff valve is not
turned on.
Connect refrigerator to the water supply and
turn water shutoff valve fully open.
Reverse osmosis water filtration system is
connected to your cold water supply.
Reverse osmosis filtration systems can reduce
the water pressure below the minimum
amount and result in icemaker issues. (Refer to
Water Pressure section.)
Kink in the water source line. A kink in the line can reduce water flow.
Straighten the water source line.
Ice demand has exceeded storage capacity. The icemaker will produce approximately 95
cubes in a 24 hour period.
NOTE: An extra ice bucket is provided in
the freezer section for additional storage
capacity.
The icemaker is not turned on. Locate the icemaker ON/OFF switch and
confirm it is in the ON (I) position.
There is something on the ice-detecting
sensor.
Foreign substances or frost on the icedetecting
sensor can interrupt ice production.
Make sure the sensor area is clean at all times
for proper operation.
The temperature setting for the freezer is
too warm.
The recommended temperature for the freezer
compartment for normal ice production is
0°F. If the freezer temperature is warmer, ice
production will be affected.
The doors are opened often. If the doors of the unit are opened often,
ambient air will warm the refrigerator which
will prevent the unit from maintaining the
set temperature. Lowering the refrigerator
temperature can help, as well as not opening
the doors as frequently.
The doors are not closing properly. If the doors are not properly closed, ice
production will be affected. See “Doors will
not close completely” in the Troubleshooting
section for more information.
Refrigerator or
Freezer section
is too cold.
Controls are not set correctly for conditions. If the temperature is too cold, raise the
temperature setting one increment at a time
(refer to the Setting the Controls section).
When changing control settings, wait 24 hours
before making additional adjustments.
TROUBLESHOOTING GUIDE
TROUBLESHOOTING GUIDE

28
TROUBLESHOOTING GUIDE
Problem Possible Causes Solutions
Temperature
is too warm or
there is interior
moisture buildup.
The air vents are blocked. Cold air circulates
from the freezer to the fresh food section
and back again through air vents in the wall
dividing the two sections.
Locate air vents by using your hand to sense
airflow and move all packages that block
vents and restrict airflow. (See air flow
diagram below.)
The doors are opened often. Opening the door warms the refrigerator,
requiring the compressor to run longer in
order to cool the refrigerator back down. In
order to conserve energy, try to get everything
you need out of the refrigerator at once, keep
food organized so it is easy to find, and close
the door as soon as the food is removed.
The control is not set correctly for the
surrounding conditions.
If the temperature is too warm, change the
setting one increment at a time. Refer to the
Setting the Controls section. Wait 24 hours
for temperatures to stabilize or even out.
A large amount of food has just been
added to the refrigerator or freezer.
Adding food warms the refrigerator. It can
take a few hours for the refrigerator to return
to normal temperature.
The food is not packaged correctly. Wrap food tightly and wipe off damp
containers prior to storing in the refrigerator
to avoid moisture accumulation. If necessary,
repackage food according to the guidelines in
the Food Storage Guide section.
The doors are not closing completely. See “Doors will not close completely” in the
Troubleshooting section.
The weather is humid. In humid weather, air carries moisture
into the refrigerator when the doors are
opened. Increased humidity in the freezer or
refrigerator compartments can lead to frost or
condensation.
An automatic defrost cycle was completed. It is normal for droplets to form on the interior
back wall after the refrigerator automatically
defrosts.

29
TROUBLESHOOTING GUIDE
Problem Possible Causes Solutions
The doors are
difficult to open.
The gaskets are dirty or sticky. Clean the gaskets and the surfaces that they
touch. Rub a thin coat of appliance polish or
kitchen wax on the gaskets after cleaning.
The door is reopened within a short time
after having been opened.
When you open the door, warmer air enters
the refrigerator. As the warm air cools, it can
create a vacuum. If the door is hard to open,
wait one minute to allow the air pressure to
equalize, then see if it opens more easily.
Frozen food
in refrigerator
compartment.
The temperature control in the refrigerator
compartment is set too cold.
Press the Temperature Adjust button to set
the refrigerator compartment to a warmer
temperature.
Refrigerator is installed in a cold location. When room temperature is below 41°F (5°C),
food can freeze. The refrigerator should not
be operated in temperatures below 55°F
(13°C).
Food with a high water content was placed
too close to the cold air discharge vent.
Place food with a high water content toward
the front of the refrigerator.
TROUBLESHOOTING GUIDE

30
SMART DIAGNOSIS
TM
Smart Diagnosis
TM
(on some models)
D
Door Alarm (on some models)
DOOR ALARM
1.
2.
3.
4.
Using Smart Diagnosis
TM
5.
Should you experience any problems with your refrigerator, it has the capability of transmitting data via your telephone to
the Smart Diagnosis
TM
team. This gives you the capability of speaking directly to our trained specialists. The specialist
records the data transmitted from the machine and uses it to analyze the issue, providing a fast, effective diagnosis.
If you experience problems with your refrigerator, call to the LG service center. Only use the Smart Diagnosis
TM
feature
when instructed to do so by the agent. The transmission sounds that you will hear are normal and sound similar to a fax
machine.
Smart Diagnosis
TM
cannot be activated unless the refrigerator is connected to power. If the refrigerator is unable to turn
on, then troubleshooting must be done without using Smart Diagnosis
TM
.
The Door Alarm function is designed to prevent refrigerator
malfunctions that could occur if the refrigerator door
remains open. If the refrigerator door remains open for
longer than 1 minute, an alarm sounds at 30-second
intervals. The alarm will stop when both refrigerator doors
are closed properly.
NOTE: This function cannot be deactivated.
Open the refrigerator door.
Press and hold the Fridge Temp button until you hear 4
beeps.
Once you hear four beeps, open the freezer door and
place the mouthpiece of your phone near the Smart
Diagnosis
TM
speaker located on the right hinge of the
door.
Keep the phone in place until the tone transmission has
finished.
Once the tones have stopped, the refrigerator will be
turned off briefly and then turned back on automati-
cally. Resume your conversation with the specialist,
who will be able to assist you in using the information
transmitted for analysis.
NOTE:
For best results, do not move the phone while the
tones are being transmitted.
If the call center agent is not able to get an accurate
recording of the data, you may be asked to try again.

31
WARRANTY
LG ELECTRONICS U.S.A., INC.
LG REFRIGERATOR LIMITED WARRANTY - U.S.A.
Should your LG Refrigerator (“Product”) fail due to a defect in materials or workmanship under normal home use, during
the warranty period set forth below, LG will at its option repair or replace the product. This limited warranty is valid only to
the original retail purchaser of the product and applies only when purchased and used within the United States including
U.S. Territories. Proof of original retail purchase is required to obtain warranty service under this limited warranty.
WARRANTY PERIOD
Refrigerator
Sealed System
(Condenser, Dryer, Connecting Tube and Evaporator) Inverter Compressor
One (1) year from the date
of original retail purchase.
One (1) year from the date
of original retail purchase.
Seven (7) years from
the date of original retail
purchase.
Ten (10) years from the date of
original retail purchase.
Parts and Labor
(internal/functional parts
only)
Parts and Labor Parts only
(Consumer will be charged
for labor)
Part only
(Consumer will be charged for
labor)
Noises associated with normal operation and failure to follow instructions found in the use and care and installation guides or
operating the unit in an unsuitable environment will not be covered under this warranty.
Replacement products and parts are warranted for the remaining portion of the original warranty period or ninety (90) days,
whichever is greater.
Replacement products and parts may be new or remanufactured.
THIS WARRANTY IS IN LIEU OF ANY OTHER WARRANTY, EXPRESS OR IMPLIED, INCLUDING WITHOUT LIMITATION,
ANY WARRANTY OF MERCHANTABILITY OR FITNESS FOR A PARTICULAR PURPOSE. TO THE EXTENT ANY IMPLIED
WARRANTY IS REQUIRED BY LAW, IT IS LIMITED IN DURATION TO THE EXPRESS WARRANTY PERIOD ABOVE. NEITHER
THE MANUFACTURER NOR ITS U.S. DISTRIBUTOR SHALL BE LIABLE FOR ANY INCIDENTAL, CONSEQUENTIAL, INDIRECT,
SPECIAL, OR PUNITIVE DAMAGES OF ANY NATURE, INCLUDING WITHOUT LIMITATION, LOST REVENUES OR PROFITS,
OR ANY OTHER DAMAGE WHETHER BASED IN CONTRACT, TORT, OR OTHERWISE. Some states do not allow the exclusion
or limitation of incidental or consequential damages or limitations on how long an implied warranty lasts, so the above exclusion
or limitation may not apply to you. This warranty gives you specific legal rights and you may also have other rights that vary from
state to state.
THIS LIMITED WARRANTY DOES NOT COVER:
1. Service trips to deliver, pick up, install, or repair the
product; instruct the customer on operation of the
product; repair or replace fuses or correct wiring or
plumbing, or correction of unauthorized repairs/
installation.
2. Failure of product to perform during power failures and
interruptions or inadequate electrical service.
3. Damage caused by leaky or broken water pipes, frozen
water pipes, restricted drain lines, inadequate or
interrupted water supply or inadequate supply of air.
4. Damage resulting from operating the product in a
corrosive atmosphere or contrary to the instructions
outlined in the product owner’s manual.
5. Damage to the product caused by accidents, pests and
vermin, lightning, wind, fire, floods, or acts of God.
6. Damage resulting from misuse, abuse, improper
installation, repair, or maintenance. Improper repair
includes use of parts not approved or specified by LG.
7. Damage or failure caused by unauthorized modification
or alteration, or if it is used for other than the intended
purpose, or any water leakage where the unit was not
properly installed.
8. Damage or failure caused by incorrect electrical current,
voltage, or plumbing codes, commercial or industrial
use, or use of accessories, components, or consumable
cleaning products that are not approved by LG.
9. Damage caused by transportation and handling,
including scratches, dents, chips, and/or other damage
to the finish of your product, unless such damage
results from defects in materials or workmanship and
is reported within one (1) week of delivery.
10. Damage or missing items to any display, open box,
discounted, or refurbished product.
11. Products with original serial numbers that have been
removed, altered, or can not be readily determined.
Model and Serial numbers, along with original retail
sales receipt, are required for warranty validation.
12. Increases in utility costs and additional utility
expenses.
13. Replacement of light bulbs, filters, or any consumable
parts.
14. Repairs when your product is used in other than normal
and usual household use (e.g. commercial use, offices,
and recreational facilities) or contrary to the instructions
outlined in the product owner’s manual.
15. Costs associated with removal of your product from your
home for repairs.
16. The removal and reinstallation of the product if it is
installed in an inaccessible location or is not installed
in accordance with published installation instructions,
including LG’s owner’s and installation manuals.
17. Shelves, door bins, drawers, handles, accessories, and
other parts besides those that were originally included
with this particular model.
The cost of repair or replacement under these excluded circumstances shall be borne by the consumer.
For complete warranty details and customer assistance,
please call or visit our website:
Call 1-800-243-0000 (24 hours a day, 365 days a year) and
select the appropriate option from the menu, or visit our website
at www.lg.com
Or by mail: LG Customer Information Center:
P. O. Box 240007, 201 James Record Road Huntsville, Alabama
35813
ATTN: CIC
Write your warranty information below:
Product Registration Information:
Model:
Serial Number:
Date of Purchase:

32
WARRANTY
LG ELECTRONICS CANADA, INC.
LG REFRIGERATOR LIMITED WARRANTY - Canada
WARRANTY: Should your LG Refrigerator (“Product”) fail due to a defect in material or workmanship under normal home use during
the warranty period set forth below, LG Canada will at its option repair or replace the Product upon receipt of proof of original retail
purchase.
This warranty is valid only to the original retail purchaser of the product and applies only to a Product distributed in Canada by LG
Canada or an authorized Canadian distributor thereof. The warranty only applies to Products located and used within Canada.
WARRANTY PERIOD: (Note: If the original date of purchase can not be verified,
the warranty will begin sixty (60) days from the date of manufacture)
Refrigerator/Freezer
Sealed System
(Condenser, Dryer, Connecting Tube and
Evaporator)
Inverter Compressor
One (1) year from the date of
original retail purchase.
One (1) year from the date
of original retail purchase.
Seven (7) years from the date
of original retail purchase.
Ten (10) years from the date of
original retail purchase.
Parts and Labor
(internal/functional parts
only)
Parts and Labor Parts only
(Consumer will be charged
for labor)
Part only
(Consumer will be charged for
labor)
Noises associated with normal operation and failure to follow instructions found in the use and care and installation guides or
operating the unit in an unsuitable environment will not be covered under this warranty.
Replacement products and parts are warranted for the remaining portion of the original warranty period or ninety (90) days,
whichever is greater.
Replacement products and parts may be new or remanufactured.
LG Authorized Service Center warranties their repair work for thirty (30) days.
LG CANADA’S SOLE LIABILITY IS LIMITED TO THE WARRANTY SET OUT ABOVE. EXCEPT AS EXPRESSLY PROVIDED
ABOVE, LG CANADA MAKES NO AND HEREBY DISCLAIMS ALL OTHER WARRANTIES AND CONDITIONS RESPECTING THE
PRODUCT, WHETHER EXPRESS OR IMPLIED, INCLUDING, BUT NOT LIMITED TO, ANY IMPLIED WARRANTY OR CONDITION
OF MERCHANTABILITY OR FITNESS FOR A PARTICULAR PURPOSE, AND NO REPRESENTATIONS SHALL BE BINDING ON
LG CANADA. LG CANADA DOES NOT AUTHORIZE ANY PERSON TO CREATE OR ASSUME FOR IT ANY OTHER WARRANTY
OBLIGATION OR LIABILITY IN CONNECTION WITH THE PRODUCT. TO THE EXTENT THAT ANY WARRANTY OR CONDITION
IS IMPLIED BY LAW, IT IS LIMITED TO THE EXPRESS WARRANTY PERIOD ABOVE. LG CANADA, THE MANUFACTURER OR
DISTRIBUTOR SHALL NOT BE LIABLE FOR ANY INCIDENTAL, CONSEQUENTIAL, SPECIAL, DIRECT OR INDIRECT DAMAGES,
LOSS OF GOODWILL, LOST PROFITS, PUNITIVE OR EXEMPLARY DAMAGES OR ANY OTHER DAMAGE, WHETHER ARISING
DIRECTLY OR INDIRECTLY FROM ANY CONTRACTUAL BREACH, FUNDAMENTAL OR OTHERWISE, OR FROM ANY ACTS OR
OMISSIONS, TORT, OR OTHERWISE. This warranty gives you specific legal rights. You may have other rights which may vary
from province to province depending on applicable provincial laws. Any term of this warranty that negates or varies any implied
condition or warranty under provincial law is severable where it conflicts with provincial law without affecting the remainder of
this warranty’s terms.
THIS LIMITED WARRANTY DOES NOT COVER:
1. Service trips to deliver, pick up, install, or repair the product;
instruct the customer on operation of the product; repair or
replace fuses or correct wiring or plumbing, or correction of
unauthorized repairs/installation.
2. Failure of product to perform during power failures and
interruptions or inadequate electrical service.
3. Damage caused by leaky or broken water pipes, frozen water
pipes, restricted drain lines, inadequate or interrupted water
supply or inadequate supply of air.
4. Damage resulting from operating the product in a corrosive
atmosphere or contrary to the instructions outlined in the
product owner’s manual.
5. Damage to the product caused by accidents, pests and vermin,
lightning, wind, fire, floods, or acts of God.
6. Damage resulting from misuse, abuse, improper installation,
repair, or maintenance. Improper repair includes use of parts not
approved or specified by LG.
7. Damage or failure caused by unauthorized
modification or
alteration, or if it is used for other than the intended purpose, or
any water leakage where the unit was not properly installed.
8. Damage or failure caused by incorrect electrical current, voltage,
or plumbing codes, commercial or industrial use, or use of
accessories, components, or consumable cleaning products that
are not approved by LG.
9. Damage caused by transportation and handling, including
scratches, dents, chips, and/or other damage to the finish
of your product, unless such damage results from defects in
materials or workmanship and is reported within one (1) week of
delivery.
10. Damage or missing items to any display, open box, discounted,
or refurbished product.
11. Products with original serial numbers that have been removed,
altered, or can not be readily determined. Model and Serial
numbers, along with original retail sales receipt, are required for
warrant
y validation.
12. Increases in utility costs and additional utility expenses.
13. Replacement of light bulbs, filters, or any consumable parts.
14. Repairs when your product is used in other than normal
and usual household use (e.g. commercial use, offices, and
recreational facilities) or contrary to the instructions outlined in
the product owner’s manual.
15. Costs associated with removal of your product from your home
for repairs.
16. The removal and reinstallation of the product if it is installed in
an inaccessible location or is not installed in accordance with
published installation instructions, including LG’s owner’s and
installation manuals.
17. Shelves, door bins, drawers, handles, accessories, and other
parts besides those that were originally included with this
particular model.
The cost of repair or replacement under these excluded circumstances shall be borne by the consumer.
For complete warranty details and customer assistance,
please call or visit our website:
Call 1-888-542-2623 (24 hours a day, 365 days a year)
and select the appropiate option from the menu, or visit
our website at www.lg.com
Write your warranty information below:
Product Registration Information:
Model:
Serial Number:
Date of Purchase:

ESPAÑOL
www.lg.com
MANUAL DE USUARIO
REFRIGERADOR
CON CONGELADOR SUPERIOR
Lea detenidamente este manual antes
de empezar a utilizar el refrigerador y guárdelo
como referencia para el futuro.

34
Instrucciones Importantes de Seguridad 35-36
Cuidado de su Refrigerador 51-52
Requerimientos de Conexión a Tierra 36
Partes y Características 37
Instalación del Refrigerador 38-45
Desempaque 38
Instalación 38
Removiendo y reemplazando
puertas
39-40
Como cambiar el sentido de apertura
a las puertas del Refrigerador 41-44
Cierre y Alineación de Puertas 45
Uso del Refrigerador 45-50
Circulación Apropiada del Aire 45
Ajuste de los Controles 46
Cómo regular los Ajustes de los Controles 46-47
Guía para Almacenar Alimentos 47
Para guardar Alimentos Congelados 48
Estantes del Refrigerador
Cajón de Carnes Frías 49
Recipiente para Hielos
Cajón con Control de Humedad
50
Anaqueles en la Puerta del Refrigerador
Compartimiento de Lácteos
Para limpiar su Refrigerador 51
Exterior 51
Puertas y Empaques (Sellos) 51
Partes Plásticas 51
Cubierta Trasera 51
Cómo cambiar las luces (LED) 51
Interrupciones de Energía 52
Cuidados durante las Vacaciones 52
Cuidados cuando Usted se muda 52
Garantía
62
Acerca de la Fábrica de Hielo Automática 53
Cómo conectar la Tubería de agua 54-56
Guía de solución de problemas 57-61
TABLA DE CONTENIDOTABLA DE CONTENIDO
Interior 51
Versión Inglés 1
Smart Diagnosis
MR
Alarma de la Puerta
63
62
49
49
50
50

35
Hemos incluido muchos mensajes importantes de seguridad en este manual. Lea y obedezca siempre todos los
mensajes de seguridad.
Este es el símbolo de advertencia de seguridad. Este símbolo le advierte sobre peligros potenciales
que pueden ocasionar la muerte o una lesión a usted y a los demás, así como daños al producto. Todos
los mensajes de seguridad irán a continuación del símbolo de advertencia de seguridad y de la palabra
“PELIGRO”, “PRECAUCIÓN” o “ADVERTENCIA”. Estas palabras significan:
Si no sigue las instrucciones de inmediato, usted puede morir o sufrir una lesión grave.
Si no sigue las instrucciones de inmediato, usted puede morir o sufrir una lesión grave.
Si no sigue las instrucciones, usted puede morir o sufrir una lesión grave. Indica una
situación de peligro inminente la cual, si no se evita, puede resultar en
daños menores o
daños al producto.
Todos los mensajes de seguridad le dirán el peligro potencial, le dirán cómo reducir las posibilidades de sufrir una
lesión y lo que puede suceder si no se siguen las instrucciones.
Para reducir el riesgo de fuego, choque eléctrico o
lesiones a personas, se deben tomar las siguientes
medidas de precaución:
NUNCA desconecte su refrigerador jalando del cable,
siempre tome firmemente el enchufe y desconéctelo
directamente de la fuente de poder.
Repare o reemplace inmediatamente todos los cables
de servicio que se han dañado. No use cables que
tengan fracturas o daños por abrasión a lo largo del
cable o en el enchufe.
Cuando mueva su refrigerador, tenga cuidado de no
pisar el cable de alimentación con los rodillos del
aparato.
NO almacene sustancias explosivas tales como latas
de aerosol con un agente inflamable dentro de este
aparato.
NO permita que los niños suban, cuelguen o trepen las
puertas o parrillas del refrigerador. Pueden lesionarse
y dañar el producto.
Mantenga sus dedos alejados de aquellas áreas en
las que se pueden lesionar tales como las áreas de
cierre de puertas, bisagras y estantes. Tenga cuidado
al cerrar las puertas cuando los niños se encuentren
cerca.
Desenchufe el refrigerador antes de limpiarlo o hacer
cualquier reparación.
NOTA: Le recomendamos
realizar cualquier clase d
e servicio con una persona
calificada.
Antes de cambiar una bombilla quemada, desenchufe
el refrigerador o desconecte el circuito de poder para
evitar el contacto con un filamento vivo (la bombilla se
puede romper mientras se cambia). NOTA: Ajustando
los controles a la posición de OFF (apagado) no
desconecta la energía del circuito de la iluminación.
Para su seguridad, este producto debe estar conectado
a tierra de manera apropiada. Haga revisar su circuito
de electricidad por un electricista calificado para
para asegurar una buena conexión a tierra.
No guarde botellas en el compartimento del
congelador, ya que podrían estallar al congelarse y
causar daños.
Lea todas las instrucciones antes de utilizar el
producto. Utilice el producto únicamente para el fin
que se describe en esta guía.
Una vez que el refrigerador se encuentra en operación,
no toque con las manos mojadas las superficies
frías del congelador, la piel puede adherirse a las
superficies.
En aquellos refrigeradores con fábrica automática
de hielo, evite contacto con las partes móviles
del mecanismo expulsor o con el mecanismo de
calentamiento que libera los cubos, NO coloque sus
dedos o manos en ellos cuando el refrigerador está
conectado.
NO vuelva a congelar los alimentos que hayan sido
descongelados previamente. El Departamento de
Agricultura de los Estados Unidos, en su Boletín de
Casas y Jardines No. 69 establece que:
“..Ud. puede volver a congelar los alimentos que han sido
congelados previamente si contienen cristales de hielo o
éstos continúan fríos – de bajo de 40 °F (4 °C)”.
“...La carne molida, perecederos o pescado que estén
descoloridos o sin olor no deben ser congelados ni
ingeridos. La nieve derretida tampoco debe consumirse.
Si el olor o color de la comida es cuestionable, deshágase
de ella, puede ser peligroso”.
“Descongelar parcialmente o volver a congelar los
alimentos reduce la calidad de éstos, especialmente las
frutas, vegetales y alimentos preparados. La calidad de
las
carnes rojas puede mantenerse mayor tiempo que
los demás alimentos. Use los productos que vuelva a
congelar tan pronto como sea posible para mantener
su calidad”.
GUARDE ESTAS INSTRUCCIONES
PELIGRO
ADVERTENCIA
PRECAUCIÓN
MENSAJES DE SEGURIDAD
ADVERTENCIA
INSTRUCCIONES IMPORTANTES DE SEGURIDAD
No meta animales vivos dentro del refrigerador.
ADVERTENCIA. Este producto contiene quimicos conocidos por el Estado de California de causar cáncer y
defectos de nacimiento u otros daños reproductivos.
Lávese las manos después de manipular. (Solo
USA)

36
PRECAUCIÓN
Este aparato no está destinado para su uso por las personas (incluidos niños) con capacidad física, sensorial o
mental reducida, falta de experiencia y conocimientos, a menos que se les haya dado la supervisión o instrucción en
relación con el uso del aparato por la persona responsable de su seguridad. Los niños deben ser supervisados para
asegurar que no jueguen con el aparato.
El quedar atrapado y asfixia
en niños no es un
problema del pasado. Los refrigeradores tirados y
abandonados son un peligro, aún si van a quedar ahí
“por unos cuantos días”. Si Ud. está por deshacerse
de su refrigerador viejo, por favor siga las siguientes
instrucciones para prevenir accidentes.
ANTES DE TIRAR SU REFRIGERADOR O
CONGELADOR CUANDO YA NO SE USE:
Quite las puertas o los empaques magnéticos.
Deje los estantes en su lugar, así los niños no
pueden meterse en ellos con facilidad.
IMPORTANTE: Lea con atención lo siguiente.
CONEXIÓN
ADVERTENCIA
PELIGRO DE CHOQUE ELÉCTRICO
PARA SU SEGURIDAD PERSONAL, este aparato
debe estar aterrizado apropiadamente. Haga revisar
por un personal experto sus contactos de pared para
asegurarse de que el enchufe está conectado a tierra
apropiadamente.
Receptáculo de
pared aterrizado
para 3 terminales
Clavija de Asegúrese de
3 terminales que la conexión
para tierra existe
MÉTODO DE CONEXIÓN A TIERRA
RECOMENDADO
Se recomienda que se utilice un circuito separado para
este producto, así como un receptáculo que no pueda
ser desconectado con un interruptor. No utilizar exten-
siones o adaptadores sin puesta a tierra.
Es su responsabilidad y obligación reemplazar aquellos
receptáculos de 2 terminales por uno de 3 terminales
conectado debidamente a tierra.
Bajo ninguna circunstancia corte o arranque la tercera
terminal (tierra) del enchufe.
NOTA: Antes de instalar, limpiar o cambiar
los focos,
desconecte el refrigerador. Cuando haya terminado,
vuelva a conectar el refrigerador y ajuste el control (de
termostato, refrigerador o congelador, según su modelo)
a la posición deseada.
USO DE CABLES DE EXTENSIÓN
Nosotros le recomendamos que no utilice los cables
de extensión. Sin embargo, si usted desea utilizar un
cable de extensión, es absolutamente necesario que se
encuentre en la lista de UL (en los Estados Unidos) o en
la lista de la CSA (en Canada), que tenga 3 terminales y
que soporte una carga de energía de 15 A (mínimo) y
120 V.
El uso de un cable de extensión incrementará el área
que su refrigerador necesita en la parte de atrás.
ADVERTENCIA
REEMPLAZO DE CABLE DE CORRIENTE
Si el cordón de alimentación se daña, éste debe ser
reemplazado por el fabricante, por nuestro centro de
servicio o personal calificado por LG para evitar algún
riesgo.
PELIGRO: LOS NIÑOS PUEDEN QUEDAR ATRAPADOS
CÓMO DESECHAR LOS CFC
REQUERIMIENTOS DE CONEXIÓN A TIERRA
Su refrigerador debe estar siempre conectado a un
circuito propio que esté conectado adecuadamente a
tierra. La alimentación de energía debe ser únicamente
de 115 V
~ 60 Hz, CA ó 127 V ~ 60 Hz, CA (de acuerdo
a los requerimientos de conexión que su país necesite) y
con fusibles de 15 ó 20 A. Esto brinda el mejor desem-
peño y previene de las sobrecargas de energía que
pueden provocar un incendio debido al sobrecalenta-
miento de los cables.
No alargue o modifique la longitud del cable de alimen-
tación, dañar el cable de alimentación podría causarle
una descarga eléctrica o dañar el aparato.
Su refrigerador viejo tiene un sistema de refrigeración
que utiliza CFC (clorofluorocarbonos). Los CFC afectan a
la capa estratosfera de ozono. Si Usted tira su refrigera-
dor viejo, asegúrese que el refrigerante CFC sea elimi-
nado de la manera apropiada por personal calificado. Si
Usted libera intencionalmente el refrigerante CFC puede
estar sujeto a multas o prisión de acuerdo a las legisla-
ciones ambientales vigentes.
Si ya no requiere del uso de esta unidad, contacte a las
autoridades locales para deshacerse de este producto
de forma segura ya que usa Ciclo-Pentano o Pentano
como gases inflamables espumantes para el
aislamiento. Los gases del material de aislamiento
requieren un proceso especial de eliminación. Este
producto contiene gases aislantes y refrigerante
inflamables.
ADVERTENCIA:
REQUERIMIENTOS DE CONEXIÓN A TIERRA

37
PARTES Y CARACTERÍSTICAS
Use esta sección para que Ud. se familiarice con las partes y características de su nuevo refrigerador.
NOTA: Esta guía cubre distintos modelos. Su refrigerador puede tener algunas o todas las características
y partes que se muestran en la siguiente lista. Algunas de las localizaciones de las partes tal vez no con-
cuerden con su modelo.
Fábrica de Hielo Automática *
Recipiente para Hielo *
Bandeja de hielos *
Estante del Congelador
Control de Temperatura del Congelador
Control de Temperatura del Refrigerador
Estantes
Luz del Refrigerador (LED)
Cajón Pantry
A
B
C
H
F
G
E
D
I
J
K
L
M
N
A
B
C
D
E
F
G
H
N
P
I
J
O
M
O
P
L
Compartimento de Verduras
Deco Duct del congelador
Smart Diagnosis
MR
*
Alarma de la Puerta *
Luz del Congelador (LED)
Anaqueles en la Puerta del Congelador
Compartimento para Productos Lácteos
Anaqueles en la Puerta del Refrigerador
* En algunos modelos
K

38
INSTALACIÓN DEL REFRIGERADOR
ADVERTENCIA
PELIGRO DE PESO EXCESIVO
Use la ayuda de dos o más personas para mover e
instalar el refrigerador, no seguir estas instrucciones
puede ocasionar lesiones en la espalda u otras partes
del cuerpo.
DESEMPAQUE
Antes de instalar su refrigerador, despegue y remueva
las cintas y etiquetas temporales. No retire aquellas
etiquetas que muestren advertencias, el modelo y
número de serie o la ficha técnica del producto que se
encuentra en la parte posterior del refrigerador.
Para quitar los residuos de cinta o adhesivo, frote bien
con sus dedos un poco de detergente líquido para vaji-
llas encima del adhesivo. Limpie con agua tibia y seque.
No utilice instrumentos filosos, alcohol para fricciones,
líquidos inflamables o productos de
limpieza abrasivos
para quitar la cinta adhesiva o goma. Estos productos
pueden dañar la superficie de su refrigerador. Para
obtener más información, vea la sección “In
NOTA: Retire el plástico protector de las puertas antes
de enchufar la unidad (en algunos modelos).
strucciones
Importantes de Seguridad”. Las parrillas vienen instaladas
en su posición de fábrica acomódelas de acuerdo a sus
necesidades de espacio.
Cómo mover su refrigerador:
Su refrigerador es muy pesado, cuando lo mueva
para limpiarlo o darle servicio, proteja el piso. Al
mover el refrigerador, siempre tire directamente
hacia fuera. Cuando lo trate de mover, no lo menee
de lado a lado ni lo haga “caminar” ya que podría
dañar el piso.
ADVERTENCIA
PELIGRO DE EXPLOSIÓN
Mantenga los materiales y vapores inflamables (tales
como gasolina) alejados del refrigerador. No seguir
esta instrucción puede ocasionar la muerte, explosión
o incendio.
INSTALACIÓN
1. Evite colocar la unidad cerca de fuentes de calor, rayos
de sol directos o humedad.
2.
3. Instale el refrigerador en un área que se encuentre
entre 55 °F (13 °C) y 110 °F (43 °C). Si la temperatura
se encuentra fuera de estos rangos, el enfriamiento
del aparato puede afectarse.
PRECAUCIÓN: Evite colocar el refrigerador cerca
de fuentes de energía, luz solar o humedad.
UNA VEZ INSTALADO
1. Limpie cuidadosamente su refrigerador y remueva el
polvo acumulado durante el envío.
2. Instale los accesorios tales como el recipiente para
hielos, cajones, parrillas, etc., en los lugares apropiados.
Estos se encuentran empacados para prevenir daños
durante el transporte.
3. Deje su refrigerador encendido de 2 a 3 horas antes
de guardar alimentos. Verifique el flujo de aire frío en
el compartimento del congelador para asegura
rse de
que la unidad enfría apropiadamente. Su refrigerador
ahora está listo para usarse.
ADVERTENCIA:
Tenga cuidado cuando trabaje con la bisagra, la
cubierta de la base, los topes, etc., puede lastimarse.
No ponga sus manos o herramientas en las salidas
de aire, la cubierta de la base o en la parte de abajo
del refrigerador, puede lastimarse o recibir un choque
eléctrico.
A una distancia adecuada de elementos cercanos
2” (5.08 cm)
2” (5.08 cm)
2” (5.08 cm) 2” (5.08 cm)
INSTALACIÓN DEL REFRIGERADOR
Para evitar la vibración, su refrigerador debe estar
nivelado y sobre un piso firme. Si se require, ajuste los
tornillos niveladores para compensar el desnivel del
suelo. El frente debe de estar ligeramente más alto
que la parte posterior para facilitar el cierre de las
puertas. Los tornillos de nivelación puede girar
fácilmente levantado un poco el refrigerador de la
parte frontal, gire los tornillos en favor de las maneci-
llas del reloj ( ) para levantar la unidad o en contra
de las manecillas ( ) para bajarla.
Por favor, mantenga el refrigerador a una distancia
prudente de otros objetos. Una distancia demasiado
reducida entre la unidad y elementos cercanos puede
ocasionar reducción de la capacidad de congelación y
aumento del consumo de electricidad.
Este aparato está destinado a ser usado en aplicaciones
domésticas y similares, tales como: áreas de personal de
cocina en tiendas, oficinas y otros ambientes de trabajo;
casas de campo y por clientes en hoteles, moteles y
otros ambientes tipo residencial; entornos de
alojamiento y desayuno de tipo hostelería y similares
aplicaciones no comerciales.
PRECAUCIÓN:

39
Soporte de la
Bisagra Central
REMOVIENDO Y REEMPLAZANDO PUERTAS
Si la entrada tiene menos de 35 pulgadas de ancho, se necesitará quitar las puertas del refrigerador.
IMPORTANTE: Antes de empezar, apague el refrigerador y desconéctelo. Quite la comida y los anaqueles de las
puertas.
HERRAMIENTAS QUE USTED PUEDE NECESITAR
3/8 pulg
10 mm
ADVERTENCIA
PELIGRO DE CHOQUE ELÉCTRICO
Antes de comenzar, desconecte el refrigerador
o interrumpa la corriente de electricidad en el
cortacircuitos o caja de fusibles. Quite los alimentos y
cualquier anaquel o los recipientes de usos múltiples.
No seguir estas instrucciones puede ocasionar la
muerte o una lesión grave.
1. Para Quitar la puerta del Congelador
Suavemente levante y quite con el destornillador de
cabeza plana la tapa de la bisagra superior (vea Fig. 1).
Usando la llave tubular de 10 mm o de 3/8 pulgadas,
quite los tres tornillos y levante la bisagra superior (vea
Fig. 2).
Levante un poco la puerta del congelador y sáquela.
(Fig. 3). Coloque a un lado.
2. Para quitar puerta del refrigerador.
Suelte y quite los dos tornillos, con el destornillador
Phillips quite el soporte de la bisagra central del marco
del refrigerador (Fig. 4). Coloque las partes a un lado
(Figura 5).
Levante un poco la puerta y sáquela. (Vea Figura 6).
Fig. 1
Fig. 4
Fig. 5
Soporte de
Bisagra Central
Pivote de
Bisagra
Fig. 3
INSTALACIÓN DEL REFRIGERADOR
1/4 pulg
Llave Tubular de Cabeza Hexagonal Destornillador Phillips Destornillador Plano Llave Inglesa Ajustable
(Para obtener asistencia adicional sobre este tema incluyendo videos útiles, por favor visítenos en: www.lg.com)
Fig. 2

40
INSTALACIÓN DEL REFRIGERADOR
Para volver a colocar las puertas, comience con la
puerta del refrigerador y continúe con la puerta del
congelador..
3. Para Instalar la puerta del Refrigerador
Coloque la puerta en el pivote de la Bisagra Inferior
(Figura 7).
Coloque el pivote de la Bisagra Central dentro del
pivote de inserción localizado en la parte superior de
la puerta del refrigerador (Fig. 8). Sostenga la puerta
en su lugar y alinee el soporte de la Bisagra Central
con los orificios en el marco del refrigerador.
Utilice los dos tornillos y el destornillador Phillips para
reajustar el soporte de la Bisagra Central con la puerta
en el marco del refrigerador (Fig. 9).
4. Para Instalar la puerta del Congelador
Coloque la puerta del congelador dentro del soporte
de la Bisagra Central (Figura 10).
Cuidadosamente coloque la tapa de la Bisagra Superior
hasta que encaje sobre la Bisagra (Fig. 12).
Fig. 8
Fig. 9
Fig. 11
Fig. 12
Bottom
Hinge Pin
Fig. 6
Fig. 10
Fig. 7
INSTALACIÓN DEL REFRIGERADOR

41
C
(en algunos modelos)
ÓMO CAMBIAR EL SENTIDO DE APERTURA A LAS PUERTAS DEL REFRIGERADOR
Puede que encuentre más conveniente convertir las puertas del estilo de abrir del lado izquierdo (instalado de
fabrica) para abrir del lado derecho. Las direcciones hacen referencia al lado derecho como su lado derecho al mirar
la unidad.
HERRAMIENTAS QUE USTED PUEDE NECESITAR
ADVERTENCIA
PELIGRO DE CHOQUE ELÉCTRICO
Antes de comenzar, desconecte el refrigerador
o interrumpa la corriente de electricidad en el
cortacircuitos o caja de fusibles. Quite los alimentos y
cualquier anaquel o los recipientes de usos múltiples.
No seguir estas instrucciones puede ocasionar la
muerte o una lesión grave.
PUERTA DEL CONGELADOR REVERSIBLE
Suavemente levante y quite con el destornillador de
cabeza plana la Tapa de la Bisagra Superior.
Usando la llave tubular de 10mm o de 3/8 pulgadas,
quite los 3 tornillos y levante la Bisagra Superior. Coloque
las partes a un lado.
Levante un poco y sáquela.
Cambie al lado opuesto el Cierra Puerta/Retén virándolo,
colocándolo encima del Soporte del Pivote de Inserción
de Bisagra y ajustando ambos con el tornillo.
Levante la tapa que está en el lado izquierdo de la parte
superior del re
frigerador para encontrar los orificios de
los tornillos.
Coloque la puerta del congelador y las partes de
la Bisagra Superior a un lado y quite la puerta del
refrigerador.
Coloque la puerta del refrigerador al revés en una
superficie que no raye la puerta y afloje los tornillos
para sacar el Cierra Puerta/Retén y el Pivote de
Inserción de Bisagra.
Soporte del Pivote
de Inserción de Bisagra
Pivote de Inserción
de Bisagra
Tapa
(en la parte superior
del refrigerador)
INSTALACIÓN DEL REFRIGERADOR
3/8 pulg
10 mm
Llave Tubular de Cabeza Hexagonal Destornillador Phillips Destornillador Plano
1/4 pulg
Pivote de
Bisagra
Soporte de
Bisagra Central

42
INSTALACIÓN DEL REFRIGERADOR
2. INVERTIR Y VOLVER A PONER LA PUERTA DEL
REFRIGERADOR
Utilizando una llave tubular de ¼ pulgadas, afloje y quite
el Pivote de Bisagra del Soporte del Pivote de Inserción
de la Bisagra Central. Quite las arandelas debajo de la
bisagra central y colóquelas a un lado.
NOTA: A este punto la puerta estará floja, levántela
un poco y sáquela.
Afloje y quite los 2 tornillos y use el destornillador Phillips
para quitar el Soporte de Bisagra Central del marco del
refrigerador. Coloque las partes a un lado.
Quite las arandelas de Pivote de Bisagra Inferior.
Utilizando una llave tubular de ¼ pulgadas, afloje y quite
el Pivote de Bisagra de la Bisagra Inferior. Vuelva a poner
el Pivote de Bisagra al lado opuesto de la Bisagra.
NOTA: Esto es más fácil hacerlo cuando la Bisagra aún
está puesta.
Utilizando una llave tubular de 10mm o de 13/32
pulgadas con 2 pulgadas de extensión, afloje los 3
tornillos y quite la Bisagra Inferior del lado derecho
del marco.
A este nivel, quite el Tornillo Decorativo que est‡ en la
parte inferior del marco del re
frigerador del lado
izquierdo.Necesitará el orificio para la Bisagra Inferior.
Mueva la Bisagra Inferior al lado izquierdo del marco,
manteniendo la misma orientación, y vuelva a colocar
con los 3 tornillos. Ahora mueva el Tornillo Decorativo al
orificio en el lado derecho del marco.
Coloque la puerta del refrigerador al revés en una
superficie que no raye la puerta. Afloje los otros dos
tornillos y quite el Soporte en conjunto con el Pivote
de Inserción de Bisagra inferior.

43
Saque el Pivote de Inserción de Bisagra y mueva el
Soporte al otro lado de la puerta, manteniendo la misma
orientación. Coloque el Pivote de Inserción de Bisagra
en el lado izquierdo del soporte. Ajuste el Soporte del
Pivote de Bisagra a la puerta.
Con un destornillador de cabeza plana, cuidadosamente
levante y quite la tapa que está sobre los orificios de los
tornillos en el lado izquierdo del marco del refrigerador.
Quite el Tornillo Decorativo del marco de la parte inferior
externa entre las puertas del congelador y el refrigerador.
(Necesitará este orificio para el Soporte de la Bisagra
Central)
Siguiendo la ilustración, gire el Soporte de la Bisagra
Central (la Pestaña quedará hacia arriba) y posiciónela
en el lado izquierdo del refrigerador y vuelva a unirla con
dos tornillos y el destornillador Phillips. Coloque la puerta
del refrigerador sobre el pivote de la bisagra inferior.
Coloque la arandela entre la puerta del refrigerador y
la bisagra central y vuelva a unir el Pivote de Bisagra al
Soporte de Bisagra con una llave tubular de ¼ pulgadas.
NOTA: El soporte se ha girado, pero el Pivote de Bisagra
se queda en la misma orientación con su lado hexagonal
hacia arriba.
Coloque el Tornillo Decorativo en el orificio exterior
del lado derecho del marco. Ponga la tapa en el lado
derecho. La tapa se ajusta a la fuerza.
VOLVER A UNIR LA PUERTA DEL CONGELADOR
Coloque la puerta del congelador sobre el Pivote de
Bisagra del Soporte del Pivote de Bisagra Central.
Coloque el Pivote de Bisagra Superior en la parte
superior de la puerta del congelador y alinee la Bisagra
Superior con los orificios en la parte superior del
refrigerador. Utilice los 3 tornillos para volver a poner
la Bisagra.
Soporte de
Inserción de
Bisagra
Pivote de
Inserción
Soporte de
Inserción de
Bisagra
Pivote de
Inserción
Soporte de Bisagra
Central
Pestaña
Tornillo
Decorativo
INSTALACIÓN DEL REFRIGERADOR

44
USO DEL REFRIGERADOR
Ajuste los tornillos. Con fuerza ajuste la Tapa de la
Bisagra Superior sobre la Bisagra Superior.
Reemplace la tapa del lado izquierdo del refrigerador
al lado derecho superior para cubrir los orificios.
La tapa también se ajusta con fuerza.
Asegúrese que las cuatro esquinas del empaque
de la puerta no esten dobladas. Para cerciorarse de
un buen sellado, aplique una pequeña cantidad de
silicon en la junta.
Esquinas
Tapa (en la parte
superior del
refrigerador)
INSTALACIÓN DEL REFRIGERADOR

45
CIERRE Y ALINEACIÓN DE PUERTAS
Su refrigerador cuenta con tres tornillos niveladores:
uno en el lado izquierdo y otro en el lado derecho. Si
su refrigerador se encuentra inestable o si Ud. desea
que las puertas cierren más fácil, ajuste la inclinación del
refrigerador realizando lo siguiente:
Nota: El tercer tornillo nivelador es usado para proteger
la bisagra de la parte de abajo de la puerta.
1. Conecte el refrigerador a un enchufe de 3 terminales.
Mueva el refrigerador a su posición final.
2. Use un desarmador plano para ajustar los tornillos
niveladores (Vea Figura A), en el sentido de las
manecillas del reloj para elevar y en contra de las
manecillas del reloj para bajarlo. Se deberán dar
las vueltas necesarias para ajustar a la inclinación
deseada.
NOTA: Para faciliar la nivelación, haga que alguien
levante un poco la parte superior del refrigerador; esto
quitará algo de peso sobre los tornillos niveladores.
3. Abra ambas puertas y asegúrese que cierren con
facilidad. Si no, incline un poco más el refrigerador
hacia atrás, girando los tornillos niveladores a favor
de las manecillas del reloj. Esto puede tomar varias
vueltas, y deberá girar las mismas veces en ambos
lados.
ALINEACIÓN DE LAS PUERTAS
Si el espacio entre sus puertas es desigual, siga las
siguientes instrucciones para la alineación de las puertas:
1. Quite la cubierta de la bisagra superior.
2. Afloje los tornillos de la bisagra superior usando una
llave inglesa o de boca tubular de 10 mm.
3. Ponga una persona para sostener la puerta en su
lugar o coloque entre las puertas algo que mantenga
el espacio mientras usted ajusta los tornillos de la
bisagra superior.
4. Coloque la cubierta de la bisagra superior.
CIRCULACIÓN APROPIADA DEL AIRE
Para obtener temperaturas estables, el aire debe fluir
entre las secciones del congelador y refrigerador. Como
se muestra en la ilustración de abajo, el aire frío entra a
través de la parte inferior y circula hacia arriba, este aire
regresa por debajo del piso del congelador y el resto
del aire entra a la sección del refrigerador a través de la
ventila superior.
No bloquee ninguna de estas ventilas con paquetes
de comida. Si las ventilas se bloquean, el flujo de aire
se interrumpe, lo que puede ocasionar problemas de
humedad.
IMPORTANTE: Debido a que el aire circula entre ambas
secciones del refrigerador, los olores pueden transferirse
fácilmente, Ud. debe limpiar ambas secciones para
eliminar olores. Para prevenir la transferencia de olores
o resequedad en los alimentos, cubra adecuadamente
la comida. (Para mayores detalles, vea la Sección “Guía
para Almacenar Alimentos”).
NOTA: Si usted cierra la puerta
del compartimiento de
alimentos frescos, aplicando
más fuerza de la necesaria,
puede abrirse y cerrarse otra
vez la puerta del congelador,
esto debido al flujo de aire
interno del refrigerador.
Figure A
USO DEL REFRIGERADOR

46
USO DEL REFRIGERADOR
AJUSTE DE LOS CONTROLES
Su refrigerador cuenta con dos controles que le
permiten regular la temperatura en los compartimentos
del refrigerador y congelador.
Control del Refrigerador
Fije inicialmente el Control del Refrigerador en el ajuste
medio. Presione el botón de TEMPERATURE ADJUST
hasta que alcance la posición media (el tercer LED se
enciende). Deje el refrigerador en este ajuste por 24
horas para alcanzar la temperatura correcta. Después
de 24 horas, ajuste el compartimento de temperatura
como Ud. lo desee. Siempre espere mínimo 24
horas antes de ajustar la temperatura. Si requiere
ajustar el compartimento del refrigerador a un modo
de temperatura menos frío que el actual, continúe
presionando el botón de TEMPERATURE ADJUST hasta
que se encienda el LED indicado.
Demostración (Para uso exclusivo de la Tienda)
El modo demostración deshabilita el sistema de enfriado;
unicamente las lamparas y el control de temperatura
trabajan correctamente.
Para deshabilitar:
Para deshabilitar presiona el botón TEMPERATURE
ADJUST hasta llegar al nivel deseado de temperatura y
la luz de OFF se apague.
Control del Congelador
El Control del Congelador debe de venir de fábrica
en el ajuste medio, número 3. Espere 24 horas antes
de ajustar la temperatura del compartimento del
congelador y variarla. Gire la perilla para el ajuste de
la temperatura del congelador como desee. Siempre
espere 24 horas después de cualquier cambio para
alcanzar la temperatura deseada.
NOTA: Fijando un número mas alto en el congelador, la
temperatura del compartimiento del congelador llega a
ser más fría.
CÓMO REGULAR LOS AJUSTES DEL CONTROL
Antes de introducir alimentos a su refrigerador, deje que
éste se enfríe primero, dejando pasar 24 horas desde
el momento en que usted conecta el refrigerador. El
ajuste medio indicado en la sección anterior corres-
ponde a un enfriamiento normal de un refrigerador. Los
controles han sido ajustados de manera correcta, de tal
forma que la leche y jugo se encuentren tan fríos como
usted lo desea y los helados (mantecados) tienen una
consistencia firme.
El control del refrigerador funciona como un termostato
(para las secciones del refrigerador y congelador).
Mientras más alto se encuentre el ajuste, mayor será el
tiempo de operación del compresor para mantener las
temperaturas más frías. El control del congelador ajusta
el flujo de aire frío del congelador hacia el refrigerador.
Si Ud. necesita ajustar las temperaturas en el refrigerador
o congelador, comience ajustando el refrigerador.
Espere 24 horas antes de realizar éste ajuste para verificar
la temperatura del congelador. Si ésta se encuentra tibia
o muy fría, entonces ajuste el control del congelador.
Use los ajustes mostrados en la lista de la siguiente
pagina como guía para realizar cambios.
TEMPERATURE
ADJUST
COLDESTCOLD
USO DEL REFRIGERADOR

47
CONDICIÓN/RAZÓN: AJUSTE
RECOMENDADO:
La sección del REFRIGERADOR
se encuentra “tibia”
Se abre la puerta
frecuentemente
Se almacena gran cantidad
de alimentos.
La temperatura ambiente es
muy alta
Ajuste el control
del
REFRIGERADOR
al siguiente dígito
superior, espere 24
horas y verifique.
La sección del CONGELADOR
se encuentra “tibia”/ Los hielos
no se forman rápidamente
Se abre la puerta
frecuentemente
Se almacena gran cantidad
de alimentos.
La temperatura ambiente es
muy baja (no se realizan ciclos
suficientemente frecuentes).
Se utilizan hielos muy
frecuentemente.
El difusor de aire se ha
bloqueado con algunos
artículos.
Ajuste el control
del
CONGELADOR
al siguiente dígito
superior, espere 24
horas y verifique.
La sección del REFRIGERADOR
está muy fría
El control no se encuentra
ajustado a las condiciones
deseadas.
Ajuste el
control del
REFRIGERADOR
al siguiente dígito
inferior, espere 24
horas y verifique.
La sección del CONGELADOR
está muy fría
El control no se encuentra
ajustado a las condiciones
deseadas.
Ajuste el control
del CONGELADOR
al siguiente dígito
inferior, espere 24
horas y verifique.
GUÍA PARA ALMACENAR ALIMENTOS
ARTÍCULOS CÓMO ALMACENARLOS
Alimentos
Frescos
Guarde o envuelva los alimentos en
recipientes cerrados o bolsas que
eviten la entrada de aire y humedad.
Esto evitará que los olores y sabores
de los alimentos se transfieran
dentro del refrigerador.
Mantequilla o
Margarina
Mantenga la mantequilla cubierta en
un recipiente o en el compartimento
cerrado. Cuando desee almacenar
una mayor cantidad, envuélvala y
guárdela en el congelador.
Queso Guarde el queso en su envoltura
original hasta que se desee
usarlo. Una vez abierto, envuélvalo
firmemente con envoltura plástica o
papel aluminio.
Leche Limpie los cartones de leche; para
un mejor almacenaje, colóquela en
una charola interior, no en una de la
puerta.
Huevos Guárdelos en su empaque original o
en el recipiente para huevos.
Fruta Lave y deje secar la fruta. Después
guárdela en bolsas de plástico
dentro del refrigerador. No lave o
enjuague
las moras hasta que están
listas para consumirse. Las moras
deben de ser seleccionadas y
guardadas en su empaque original
(si lo hay) o en una bolsa de papel
a medio cerrar dentro de uno de los
cajones.
Vegetales con
Hojas
Quite la envoltura original y remueva
de los vegetales aquellas partes
sucias o descoloridas. Lávelos con
agua fría y escúrralos. Colóquelos
en una bolsa o contenedor plástico
y guárdelos en el cajón de vegetales
del refrigerador.
Vegetales con
Piel (pimiento,
zanahoria)
Colóquelos en bolsas o
contenedores plásticos dentro del
cajón de vegetales del refrigerador.
Pescado Consuma los pescados y mariscos
el mismo día que los adquirió.
Carne Conserve la carne en su empaque
original, el cual no debe permitir la
entrada de aire y humedad. Si es
necesario, envuelva de nuevo.
Sobras de
Alimentos
Cubra las sobras con envoltura de
plástico o papel aluminio. También
puede usar contenedores plásticos
con tapas firmes.
USO DEL REFRIGERADOR

48
USO DEL REFRIGERADOR
PARA GUARDAR ALIMENTOS CONGELADOS
NOTA: Para mayor información acerca de cómo preparar
los alimentos para congelarlos así como para ver el
tiempo que pueden ser almacenados, consulte una guía
sobre congelamiento o una guía para cocinar.
Empaque
Una buena congelación depende de un empaque
correcto. Cuando usted cierra y sella el empaque, no
permitirá el acceso de aire y humedad a los alimentos.
Un mal empaque resultará en la transmisión de olores y
sabores dentro del refrigerador, así como la resequedad
de los alimentos congelados.
Recomendaciones de Empaque:
Usar contenedores plásticos con tapas rígidas.
Utilizar envases o jarras de superficies lisas.
Empacar con papel aluminio de alta resistencia.
Envolver con papel revestido con plástico.
Utilizar plástico impermeable.
Usar bolsas de plástico especiales para congelar.
Siga las instrucciones del empaque o recipiente para
lograr un mejor congelamiento.
No utilice:
Envolturas del pan.
Recipientes de plástico que no sean de polietileno.
Recipientes sin tapas rígidas o firmes.
Papel encerado o plástico encerado.
Envolturas delgadas o poco permeables.
Congelamiento
IMPORTANTE: No guarde botellas en el
compartimento del congelador; ya que podrían estallar
al congelarse y causar daños.
Su refrigerador no congelará rápidamente cualquier
cantidad excesiva de alimentos. No introduzca una
cantidad mayor de alimentos sin congelar de la que
pueda congelarse dentro de 24 horas (no más de 2 a 3
libras ó ,91 kg a 1,36 kg de alimento por pie cúbico del
espacio en el congelador). Deje el suficiente espacio en
el congelador para que el aire circule alrededor de los
paquetes. Deje suficiente espacio al frente para que la
puerta cierre sin dificultad.
Los tiempos de almacenaje pueden variar de acuerdo
a la calidad y tipo de comida, el tipo de empaque o
envoltura usada (a prueba de humedad y aire) y a la
temperatura de almacenaje. Los cristales de hielo
formado dentro de un empaque cerrado son normales,
lo que indica que la humedad de los alimentos y el aire
contenido dentro del empaque se han condensado.
NOTA: Deje que los alimentos calientes se enfríen a
temperatura ambiente durante 30 minutos, después
envuélvalos con los métodos mencionados y congélelos.
Al enfriar los alimentos calientes antes de introducirlos
al congelador, Ud. ahorra energía.
ADVERTENCIA
PELIGRO DE SOFOCAMIENTO
Ventile adecuadamente la habitación cuando utilice
hielo seco. El hielo seco es Dióxido de Carbono
(CO
2) congelado. Cuando se evapora, éste emana
Oxígeno, causando mareos, dolores de cabeza leves,
inconciencia o muerte por sofocamiento. Abra una
ventana y no inhale estos vapores.
USO DEL REFRIGERADOR

49
ESTANTES DEL REFIGERADOR
Los estantes en su refrigerador son ajustables para
cumplir con sus necesidades de almacenamiento. Todos
los estantes en esta unidad son de cristal.
Almacenar artículos similares juntos en su refrigerador
y ajustar los estantes para los diferentes tamaños de
ciertos artículos hará que su búsqueda de un artículo
específico sea más fácil; también reducirá el tiempo que
la puerta del refrigerador se queda abierta, ahorrando
energía
IMPORTANTE:No limpie los estantes de cristal con agua
tibia cuando estén fríos. Pueden romperse si se exponen
a un cambio súbito de temperatura o impacto como el
de un tropiezo. Para su protección, los estantes de cristal
están hechos con cristal templado, que se rompe en
pequeños pedazos.
NOTA: Los estantes de cristal son pesados. Utilice
cuidado especial al sacarlos para evitar que se le caiga.
Estantes Ajustables
Cambie los estantes de la posición de envío, a la posición
que desea.
Para sacar un estante: Levante la parte de atrás del
estante y jale el estante hacia afuera.
Para cambiar de lugar un estante: Deslize el estante
hasta que pare.
CAJÓN DE CARNES FRÍAS
Para remover el cajón de carnes frías:
Aguante la gaveta por la manija, jale hacia al frente
hasta que pare la gaveta, levante y saque.
Para colocar el cajon de carnes frías:
Deslice el cajon hacia atras hasta que tope.
RECIPIENTE PARA HIELO
(En algunos modelos)
indicado en la imagen. No lo
desborde de agua, o los cubos
de hielo serán difíciles de sacar.
ajusta el disco del congelador
a 3.
Para sacar los cubos de hielo,
tuerzael recipiente:
hielo. Hacerlo resultaría en
daño al recipiente.
cubos de hielo, vierta agua
en la parte de atrás del
recipiente o remoje en agua
antes de sacar los hielos.
1
2
1
2
USO DEL REFRIGERADOR

50
USO DEL REFRIGERADOR
CAJÓN CON CONTROL DE HUMEDAD
Los cajones para verduras mantienen el sabor y la
frescura de la fruta y la verdura al permitir controlar
fácilmente la humedad dentro del cajón.
Para controlar la cantidad de humedad en los cajones
para verduras con sellado antihumedad, ajuste el control
en cualquier posición entre VEGETABLES (verdura) y
FRUIT (fruta).
VEGETABLES mantiene un aire húmedo en el cajón
para un mejor almacenamiento de las verduras frescas
y de hoja.
FRUIT lmantiene el aire húmedo fuera del cajón para
un mejor almacenamiento de la fruta.
DESMONTAJE DEL CAJÓN CON CONTROL DE
HUMEDAD:
1. Jale la gaveta de la sección del compartimiento de
verduras hasta el punto de detención..
2.Levante la gaveta y hale hacia usted para sacarla.
3. Para volverla a colocar, deslice la gaveta
completamente hacia atrás pasar el punto de
detención.
Para sacar el cristal del compartimiento de verduras:
1. Saque las gavetas del compartimiento de verduras..
2. Para sacar el cristal encima del compartimiento de
verduras, alcance llegar por debajo del cristal y
levante.
3. Saque el cristal hacia arriba.
Para sacar la tapa del compartimiento de verduras:
1. Saque ambas gavetas del compartimiento.
2. Sacar el cristal del compartimiento de verduras.
3. Mientras sujeta el soporte y la tapa del
compartimento de verduras, jale ambos hacia arriba
y hacia afuera.
ANAQUELES EN LA PUERTA DEL REFRIGERADOR
Los anaqueles de puerta se pueden sacar para fácil
limpieza.
1. Para sacar los anaqueles, empuje los lados del anaquel
mientras levanta. El anaquel saldrá fácilmente.
2. Para volver a colocar los anaqueles, empuje hacia
adentro y hacia abajo en el set de soportes
deseados.
NOTA: Algunos contenedores pueden variar en
apariencia y sólo encajan en un solo lugar.
COMPARTIMIENTO DE LÁCTEOS
1. Para sacar el compartimiento de lácteos, simplemente
levante y saque.
2. Para volverlo a colocar, deslícelo sobre las ranuras de
soporte deseadas y empuje hasta que se detenga.
USO DEL REFRIGERADOR
Compartimiento de Lácteos

51
CUIDADO DE SU REFRIGERADOR
ADVERTENCIA
PELIGRO DE EXPLOSIÓN
Utilice limpiadores no inflamables. No seguir ésta
instrucción puede ocasionar la muerte, explosión o
incendio.
Tanto el refrigerador como el congelador realizan deshielo
automático, a pesar de esto, limpie ambas secciones
una al vez al mes para prevenir la formación de olores.
Limpie los derrames de líquidos inmediatamente.
PARA LIMPIAR SU REFRIGERADOR
Desconecte su refrigerador.
Quite todas las partes desmontables del interior, tales
como las parrillas, compartimentos para verduras, etc.
Use una esponja limpia o un trapo suave con un poco
de detergente con agua tibia. No use limpiadores
abrasivos o detergentes concentrados.
Lave a mano, enjuague y seque las superficies.
Enchufe el refrigerador o vuelva a conectar el
suministro eléctrico.
EXTERIOR
Encere las superficies exteriores pintadas de metal para
brindarles mayor protección, realice esta acción con cera
para electrodomésticos (o cera suave para automóviles)
y aplíquela con un trapo suave y limpio; hágalo al menos
2 veces por año.
Para productos con exterior de acero inoxidable, utilice
una esponja limpia o un trapo suave con detergente en
agua tibia; seque la superficie con una franela suave. No
use limpiadores abrasivos o concentrados.
NOTA: Evite el contacto de la superficie de la puerta con
productos químicos que contengan fosfatos o cloros.
INTERIOR (permita al congelador calentarse un
poco para que el trapo no se pegue)
Para eliminar olores, limpie el interior del refrigerador con
una mezcla de polvo para hornear (Royal) y agua tibia.
Mezcle 2 cucharadas de polvo para hornear en agua
(26 gr de soda por cada litro de agua). Asegúrese que el
polvo para hornear (soda) se disuelva por completo para
que no raye las superficies del refrigerador.
PUERTAS Y EMPAQUES (SELLOS)
Para la limpieza de éstos, no utilice ceras limpiadoras,
detergentes concentrados, blanqueadores o limpiadores
que contengan partes plásticas de petróleo.
PARTES PLÁSTICAS (Cubiertas y Paneles)
No utilice toallas de papel, aspersores para vidrio,
limpiadores abrasivos o fluidos inflamables, éstos
pueden rayar o dañar el material.
CUBIERTA TRASERA
ADVERTENCIA
PELIGRO DE CHOQUE ELÉCTRICO
Antes de comenzar, desenchufe el refrigerador
o desconecte la corriente de electricidad en el
cortacorriente o caja de fusibles. No seguir estas
instrucciones puede ocasionar la muerte o una lesión
severa.
NOTA: La tapa posterior solo
debe ser removida por un
técnico calificado. Para un
funcionamiento eficiente de su
refrigerador, limpie la cubierta
por lo menos 2 veces al año.
CÓMO CAMBIAR LAS LUCES (LED)
Las luces del compartimento refrigerador y el
congelador son LED iluminación interior, y el
servicio debe ser realizado por un técnico
calificado.
ADVERTENCIA
PELIGRO DE CHOQUE ELÉCTRICO
Antes de reemplazar la luces (LED) de
un compartimento, desenchufe el refrigerado o corte
la corriente en el disyuntor o en la caja de fusibles.
CUBIERTA
TRASERA

52
CUIDADO DE SU REFRIGERADOR
INTERRUPCIONES DE ENERGÍA
1. Si se desconecta la energía de su hogar, llame a su
compañía de energía y pregunte cuánto tiempo durará
sin suministro eléctrico.
2. Si no habrá energía en las próximas 24 horas o menos,
mantenga las puertas del refrigerador cerradas, para
que los alimentos se mantengan fríos y congelados.
3. Si no habrá energía por más de 24 horas, use alguna
de las siguientes opciones:
Saque todos los alimentos congelados y guárdelos en
una hielera.
Coloque en el congelador 2 lbs (907 g) de hielo seco
por cada pie cúbico (28 L) del espacio del congelador.
Esto ayudará a que los alimentos congelados duren
así de 2 a 4 días. Utilice guantes para manejar el hielo
seco, ya que puede sufrir quemaduras.
Si no cuenta con hielo seco o hielera, consuma lo
antes po
sible los alimentos perecederos.
RECUERDE: Un congelador lleno se mantiene más
tiempo frío que uno parcialmente lleno. Un congelador
lleno de carne se mantiene más tiempo frío que uno que
contenga pastelillos u otros alimentos horneados.
Si usted observa que los alimentos tienen cristales de
hielo, éstos pueden volver a congelarse sin problema,
aunque la calidad y sabor pueden variar. Si los alimentos
no se encuentran en buenas condiciones o Ud. cree que
no es saludable ingerirlos, deséchelos.
CUIDADOS DURANTE LAS VACACIONES
Si Ud. decide dejar el refrigerador funcionando mientras
está ausente, siga estos pasos para preparar su
refrigerador antes de irse.
1. Consuma todos los artículos perecederos y congele
el resto.
2. Vacíe el recipiente para hielos.
Si Ud. decide apagar el refrigerador antes de irse, siga
e
stos pasos:
1. Saque toda la comida del refrigerador.
2. Desconecte su refrigerador.
3. Limpie el refrigerador, enjuáguelo y séquelo bien.
4. Fije bloques de goma o de madera con cinta adhesiva
a ambas puer
tas para que queden abiertas y el aire
circule. Esto evita que se formen olores y que crezcan
hongos.
CUIDADOS CUANDO USTED SE MUDA
Si Ud. muda su refrigerador a una casa nueva, siga los
siguientes pasos para prepararse para la mudanza.
1. Saque toda la comida del refrigerador y empaque los
alimentos congelados con hielo seco.
2. Desconecte su refrigerador.
3. Vacíe el agua de la bandeja colectora.
4. Limpie y seque con un trapo.
5. Saque todas las partes desmontables, envuélvalas
bien
y asegúrelas con cinta adhesiva para que no se
sacudan durante la mudanza.
6. Según el modelo, levante la parte delantera del
refrigerador para que ruede con facilidad o atornille
las patas niveladoras para no rayar el piso. Consulte la
sección “Cierre y Alineación de Puertas”.
7. Sostenga las puertas cerradas y el cable pegado al
gabinete del refrigerador con cinta adhesiva.
Cuando llegue a la casa nueva, ponga todo de nuevo
y lea la sección “Instalación del Refrigerador” para
obtener instrucciones de preparación. Además, si su
refrigerador tiene fábrica de hielo automática, recuerde
volver a conectar el suministro de agua al refrigerador.
CUIDADO DE SU REFRIGERADOR

53
ACERCA DE LA FÁBRICA DE HIELO AUTOMÁTICA
NOTA: La Fábrica de Hielos Automática la incluyen solo
algunos modelos. Revise la especificación del suyo.
ADVERTENCIA
PELIGRO DE DAÑOS PERSONALES
Evite el contacto con las partes móviles del mecanismo
expulsor o con el calentador que libera los cubos. NO
introduzca los dedos en la fábrica de hielo automática
cuando el refrigerador se encuentra conectado.
INSTRUCCIONES DE OPERACIÓN
Después de instalar su refrigerador, se empezará a
fabricar hielo al pasar entre 12 y 24 horas.
Identifique su tipo de Fábrica de Hielo
Tipo 1
La fábrica de hielos produce 8 cubos por ciclo (entre 64
y 126 cubos en un período de 24 horas), dependiendo
de la temperatura del compartimento del congelador,
el número de veces en las que se abre la puerta y
otras condiciones de uso.
Si el refrigerador es operado antes de que haya hecho
la conexión de agua de la fábrica de hielos, Ud. Debe
accionar el interruptor a la posición de O (apagado).
Cuando ya se hayan realizado las conexiones de agua,
accione el interruptor a la posición I (encendido).
La fábrica de hielos se llenará de agua entre 12 y 24
horas después de que su refrigerador fue instalado
correctamente, transcurrido este lapso empezará la
fabricación de hielos
Tire los primeros hielos que salgan de la fábrica de
hielos para así limpiar la tubería de agua. Asegúrese
de que nada interfiere con el brazo sensor. Cuando el
recipiente se llena al nivel del brazo sensor, la fábrica de
hielo dejará de producir cubos.
Es normal que algunos cubos queden pegados; si el
hielo no se usa frecuentemente, los hielos viejos estarán
opacos, con sabor extraño y más pequeños.
UD. DEBE ACCIONAR EL INTERRUPTOR A LA
POSICIÓN O (OFF, APAGADO)
Cuando el suministro de agua sea interrumpido por
varias horas.
Cuando el recipiente de hielos se encuentre fuera de
su lugar por más de 1 ó 2 minutos.
Cuando el refrigerador no vaya a ser usado por varios
días.
SONIDOS NORMALES
La válvula emitirá un zumbido cuando llene de agua
la fábrica de hielos. Si el interruptor se encuentra
en la posición de encendido, el zumbido seguirá
escuchándose aún y cuando no se haya conectado la
tubería de agua. Para evitar este sonido, accione el
interruptor a la posición O (apagado).
NOTA: La fábrica de hielos se puede dañar si se mantiene
accionado el interruptor en la posición I (encendido)
antes de haber conectado a la tubería de agua.
Mient
ras la fábrica de hielos se llena de agua y expulsa
los hielos Ud. escuchará ruidos de hielos caer y agua
fluir por las tuberías.
PREPARÁNDOSE PARA LAS VACACIONES
A
NOTA: Para evitar desbordamiento de agua, colocar el
refrigerador sobre una superficie plana. No remueva
la bandeja de hielo mucho tiempo de la máquina de
hielo, pude provocar desbordamiento de hielo.
NOTA: Nunca almacene latas de bebidas u otros
artículos en el depósito de hielo con el propósito de
que se enfríe rápidamente. Si lo hace, puede dañar la
máquina de hielo o los contenedores podrían estallar.
ccione el interruptor de la fábrica de hielos a la
posición O (apagado) y corte el suministro de agua al
refrigerador. Si la temperatura ambiente se encuentra en
el punto de congelación del agua, haga que un técnico
especializado drene el suministro de agua y las tuberías
interiores del refrigerador (en algunos modelos) para
evitar daño debido a conexiones o tuberías rotas.
Fábrica de hielo
Interruptor de
alimentación
Sensor de
detección de
hielo
Escuchará el sonido de los cubos de hielo al caer en
el depósito y el agua corriendo por las tuberías
cuando se rellena la fábrica de hielo.

54
CÓMO CONECTAR LA TUBERÍA DE AGUA
NOTA: La línea de agua es necesaria instalarla cuando
las características de los dispensadores de agua y/o
hielo están disponibles en su producto.
ANTES DE COMENZAR
La instalación de la tubería de agua no está garantizada
por el fabricante del refrigerador o de la fábrica de hielos.
Siga las instrucciones cuidadosamente para minimizar
el riesgo de daños al producto.
El aire en la tubería de agua puede provocar martilleos
en las conexiones, lo que puede causar daños a las
tuberías internas del refrigerador o derrame de agua al
interior. Llame a un plomero calificado para corregir los
martilleos en las conexiones antes de instalar la tubería
de agua.
Para evitar quemaduras y daños al producto, no conecte
su refrigerador a las tuberías de agua caliente.
Si usa su refrigerador antes de conectar el suministro de
agua, asegúrese de que la fábrica de hielo se encuentra
en la posición O (apagado).
No instale las tuberías de la fábrica de hielos en áreas en
las cuales la temperatura ambiente se encuentre bajo el
punto de congelación del agua.
Cuando utilice cualquier dispositivo eléctrico (como
un taladro) durante la instalación, asegúrese de que el
dispositivo esté doblemente aislado o conectado a tierra
para prevenir el riesgo de choque eléctrico.
Toda instalación deberá hacerse de acuerdo con los
requerimientos locales de agua y drenaje.
Si un sistema de filtración de agua por ósmosis inversa
está conectado al suministro de agua fría, la instalación
de la manguera no se garantiza por el fabricante del
refrigerador o de la fábrica de hielo automática. Siga
las siguientes instrucciones cuidadosamente para
minimizar el riesgo de daños costosos por agua.
Si un sistema de filtración de agua por ósmosis
inversa está conectado al suministro de agua fría, la
presión del agua para el sistema de ósmosis inversa
debe tener un mínimo de 40 a 60 PSI ó 0,27 MPa a
0,41 MPa (2,8 kg · f / cm ² ~ 4,2 kg · f / cm ², menos
de 2 ~ 3 segundos para llenar una taza de 7 oz de
capacidad [0,2 litros]).
Si la presión del agua del sistema de ósmosis inversa
es menor de 21 PSI ó 0,14 MPa (1,5 kg · f / cm ²,
más de 4 segundos para llenar una taza de 7 oz de
capacidad [0,2 litros]):
a) Compruebe si está bloqueado el filtro de sedimentos
en el sistema de ósmosis inversa. Reemplace el filtro si
es necesario.
b) Permitir que el tanque de almacenamiento del
sistema de ósmosis inversa se rellene después de un
uso intenso.
c) Si el problema sobre la presión de agua de ósmosis
inversa se mantiene, llame a un plomero calificado.
REQUERIMIENTOS
Tubería de Cobre de 1/4” (6,35 mm) de
diámetro para conectar el refrigerador
a la tubería de agua. Asegúrese que
ambas terminales se corten cuadradas.
Para determinar cuánta tubería puede
necesitar, mida la distancia desde la válvula que se
encuentra en la parte de atrás del refrigerador, hasta
el suministro de agua. Después sume 8 pies (2,4 m).
Asegúrese de que exista suficiente tubería extra para
permitir el libre movimiento del refrigerador desde la
pared.
Un suministro de agua fría. La presión del agua debe
estar entre 0,138 y 0,82 MPa o 20 y 120 PSI en los
modelos que no cuenten con filtro de agua y entre
0,276 y 0,82 MPa o 40 y 120 PSI en los modelos que
cuenten con filtro de agua.
Taladro.
Llave Ajustable de 1/2 “ (12,7 mm).
Desatornillador plano y tipo Phillips (Estrella).
Dos tuercas de compresión de
1/4” (6,35 mm) de diámetro
con 2 mangas para conectar
la tubería de cobre a la válvula
del refrigerador.
Si su tubería de cobre actual cuenta
con alguna reducción en los extremos,
necesitará un adaptador (disponible
en las ferreterías) para conectar la
línea de agua al refrigerador. También
puede cortar la reducción con un cortador de tubo y
después utilizar las conexiones de compresión arriba
mencionadas.
Válvula de paso para
conectar a la línea de agua
fría. La válvula debe tener
una entrada de agua con
un diámetro mínimo interior
de 5/32” (3,46 mm) en
el punto de conexión del
AGUA FRÍA. Estas válvulas se pueden encontrar en
cualquier paquete de conexión de agua. Antes de
comprar, asegúrese de que la válvula cumpla con los
reglamentos locales.
INSTRUCCIONES DE INSTALACIÓN
Instale la válvula en la tubería donde Ud. frecuenta
ingerir agua.
PRECAUCIÓN: Conectar solamente al suministro
de agua potable.
1. CIERRE EL SUMINISTRO PRINCIPAL DE AGUA
Abra la llave más cercana para dejar fluir el agua y vaciar
las tuberías.
CÓMO CONECTAR LA TUBERÍA DE AGUA

55
2. SELECCIONE LA LOCALIZACIÓN DE LA
VÁLVULA
Seleccione la localización para la válvula
que mejor se le facilite el acceso. Es
mejor conectar en una tubería vertical.
Cuando sea necesario conectar en una
tubería horizontal, haga la conexión en
la parte superior o lateral, en vez de
hacerlo en la parte inferior, para prevenir
la acumulación de sedimentos.
3. TALADRE UN ORIFICIO PARA LA VÁLVULA
Taladre un orificio de 1/4” (6,35
mm) diámetro en la tubería de
agua. Elimine la rebaba que quede
después de hacer la perforación.
Tenga cuidado de que el agua
no llegue al taladro. Si no realiza
la perforación de 1/4” (6,35 mm)
puede resultar en una producción
pobre de hielo o cubos más pequeños.
4. APRIETE LA VÁLVULA
Apriete la válvula a la tubería de agua fría con una
trampa para tubos.
Trampa
Válvula Tipo Tubería
Llave Vertical para Agua Fría
NOTA: Los códigos de tubería 248CMR del estado de
Massachusetts deben estar adheridos a la conexión. Las
válvulas de este tipo están prohibidas en Massachusetts.
Consulte con su plomero autorizado por las normas y
regulaciones de su país.
5. APRIETE LA TRAMPA
Apriete la trampa hasta que la rondana selladora
empiece a agrandarse.
NOTA: No apriete de más, ya que podría romper la
tubería.
Rondana
Trampa Toma de Agua
Tornillo
6. ACOMODE LA TUBERÍA
Acomode la tubería entre la línea de agua fría y el
refrigerador.
Acomode la tubería a través de una perforación hecha
en la pared o piso (detrás del refrigerador o a un lado del
gabinete) tan cerca de la pared como sea posible.
NOTA: Asegúrese de que exista suficiente tubería extra
(unos 8 pies [244 mm] enrollados en 3 vueltas de
10” [25 cm] de diámetro) para permitir al refrigerador
moverse fuera de la pared después de la instalación.
7. CONECTE LA TUBERÍA A LA VÁLVULA
Ponga la tuerca de compresión y la férula para la tubería
de cobre al final de la tubería y conéctela a la válvula.
Asegúrese que la tubería está completamente insertada
en la válvula. Apriete la tuerca con precaución.
Válvula Tipo LLave Tuerca de
Compresión
Tuerca de
Empaque
Válvula de Férula (Manga)
Salida
8. DRENE LA TUBERÍA
Abra el suministro principal de agua (1) y drene la tubería
hasta que el agua esté clara.
Abra el agua en la válvula de paso (2) y cierre después
de haber drenado 1/4 de galón (1L) de agua.
1
2
CÓMO CONECTAR LA TUBERÍA DE AGUA

56
CÓMO CONECTAR LA TUBERÍA DE AGUA
9. CONECTE LA TUBERÍA AL REFRIGERADOR
NOTAS:
Antes de hacer la conexión al refrigerador, asegúres
de que éste no esté conectado al suministro
energía.
Si su refrigerador no cuenta con filtro de agua,
recomendamos que instale uno. Si su suministro
agua contiene arena o partículas que puedan s
llevadas a través de la válvula, instale un filtro de
cerc refrigerador.
IMPORTANTE: No utilice mangueras viejas, gas
o usadas, sólo use nuevas para hacer un mejor uso
lograr un mejor servicio. Conecte sólo al suministro
o r s seguridad salud.
Retire el tapón protector (1) de la rosca de la
c rt ost éste.
Coloque la tuerca de compresión y la férula al final de
Inserte la en la válvula de conexión
adentro como le sea po Apriete mientras sos
Apriete el de conexión (casa) al sujetador de
parte trasera del refrigerador. Primero afloje el t
que sostiene el sujetador. Después, inserte el
conexión de casa en el orificio. Finalmente, vuelva
apre tornillo.
10. ABRA LA VÁLVULA DE PASO
Apriete todas las conexione
que tengan fugas. Vuelva
poner la rtadeacceso
compresor.
11. CONECTE EL REFRIGERADOR
Arregle la de agua
tal manera que ésta no
rar con el refrigerador o
pared. Empuje el refriger
red.
12. ENCIENDA LA FÁBRICA DE HIELO
Accione el interruptor de la f ca de hielo a la po
I (encendido). La f ca de hielo no empezará
operar hasta que alcance su temperatura de oper
de 15 °F (-9 °C) o menor. Comenzará su oper
automática si el interruptor se encuentra en la po
I encendido).
1
T
(6.35mm)
(6.35mm)
/
/
4”
4”
razadera
Tuerc
Compresión
Férula
C
Refrigerador
CÓMO CONECTAR LA TUBERÍA DE AGUA

57
DESCRIPCIÓN DE LOS SONIDOS QUE SE
PUEDEN ESCUCHAR
Es posible que su nuevo refrigerador haga ruidos que el
antiguo no hacía. La mayoría de los nuevos sonidos son
normales. Las superficies duras, como el suelo, las
paredes y los muebles, pueden hacer que los sonidos
parezcan más fuertes de lo que realmente son. A
continuación, se describen los tipos de sonidos que se
pueden escuchar y qué los puede estar causando.
Clics:
El control de descongelación emitirá un “clic” al comenzar
y al finalizar el ciclo de descongelación. El control del
termostato (o control del refrigerador, en función del
modelo) también emitirá un “clic” al iniciar o finalizar un
ciclo.
Traqueteo:
Los ruidos de traqueteos pueden proceder del flujo del
refrigerante, la tubería de agua o de artículos almacenados
encima del refrigerador.
Ruido de aspas:
a través de los compartimentos del refrigerador y del
congelador.
a través del condensador.
congelador o en el lado izquierdo del refrigerador
cuando las puertas están abiertas.
Borboteo:
Al finalizar cada ciclo, es posible que oiga un sonido de
borboteo causado por el refrigerante fluyendo por el
sistema de refrigeración.
Crujido:
Contracción y expansión de las paredes interiores.
Crepitación:
El agua cayendo en el calentador de descongelación
durante un ciclo de descongelación.
Ruido de vibración:
Si el lateral o la parte posterior del refrigerador está en
contacto con un mueble o una pared, algunas de las
vibraciones normales pueden producir un sonido audible.
Para eliminar el ruido, asegúrese de que los laterales
y la parte posterior no puedan vibrar contra las paredes
o los muebles.
Goteo:
El agua cayendo en la batea de drenaje durante el ciclo
de descongelación.
Sonido de pulsación o agudo:
Su refrigerador está diseñado para funcionar de forma
más eficiente para conservar los alimentos a la
temperatura deseada. El compresor de alta eficiencia
puede hacer que su nuevo refrigerador funcione durante
más tiempo que su antiguo refrigerador, y aún así
será más eficiente energéticamente que los modelos
anteriores. Mientras el refrigerador está en
funcionamiento, es normal escuchar un sonido
de pulsación o agudo.
Problema Posibles Causas Soluciones
El refrigerador
no enfría.
El cable de alimentación no está enchufado. Enchufe firmemente el cable en una toma de
corriente con el voltaje adecuado (consulte
Requisitos eléctricos y de conexión a tierra).
Se ha fundido un fusible o ha saltado el
disyuntor.
Sustituya el fusible o reinicie el disyuntor. Si el
problema persiste, póngase en contacto con un
electricista.
El control del refrigerador está en la posición
OFF.
Consulte la sección Ajuste de los controles.
El refrigerador está en el ciclo de
descongelación.
Espere unos 30 minutos a que termine el ciclo
de descongelación.
El refrigerador está en Modo demostración. El refrigerador se ha puesto en un modo parcial
(Demostración) que se encuentra en el
programa que almacena.
El modo demostración deshabilita el sistema de
enfriado; unicamente las lamparas y el control
de temperatura trabajan correctamente.
Para deshabilitar presiona el botón
TEMPERATURE ADJUST hasta llegar al
nivel deseado de temperatura y la luz de
OFF se apague.
COLD
TEMPERATURE
ADJUST
COLDEST
GUÍA DE SOLUCIÓN DE PROBLEMAS

58
GUÍA DE SOLUCIÓN DE PROBLEMAS
CUIDADO DE SU REFRIGERADOR
Problema Posibles Causas Soluciones
Las luces no
funcionan.
El cable de alimentación no está
enchufado.
Enchufe firmemente el cable en una toma de
corriente con el voltaje adecuado (consulte
Requisitos eléctricos y de conexión a tierra).
Se ha fundido una bombilla. Sustitúyala con una bombilla para electrodomésticos
con los mismos vatios, tamaño y forma disponible en
su ferretería habitual. (Consulte la sección Sustitución
de la bombilla). Desenchufe el refrigerado o corte la
corriente en el disyuntor o en la caja de fusibles.
NOTA: La lámpara del compartimiento del refrigerador
es una iluminación interior mediante LED, por lo que
el mantenimiento deberá ser realizado por un técnico
calificado.
Ruido de
vibración
o traqueteo.
El refrigerador no está sólidamente
apoyado en el suelo.
El suelo es poco sólido o irregular, o es necesario
ajustar los pies de nivelación. Consulte la sección
Instalación para obtener instrucciones sobre la
nivelación.
El compresor
parece que
funciona
demasiado.
El refrigerador sustituido era un
modelo antiguo.
Los refrigeradores modernos requieren más tiempo
de funcionamiento pero consumen menos energía
gracias a una tecnología más eficiente.
La temperatura ambiente es más
cálida de lo habitual.
El compresor funcionará más tiempo en condiciones
calurosas. A temperaturas ambiente normales, (21 °C) el
compresor debería funcionar entre el 40% y el 80% del
tiempo. En condiciones más calurosas, sería esperable que
funcionara incluso más a menudo. No se debería usar el
refrigerador si la temperatura supera los 43 ºC.
La puerta se abre a menudo o se
acaba de introducir una gran
cantidad de alimentos.
Cuando se introducen alimentos o se abren las puertas,
aumenta la temperatura del refrigerador, lo que obliga al
compresor a funcionar más tiempo para volver a enfriar
el refrigerador. Para ahorrar energía, intente sacar todo lo
que necesite del refrigerador de una sola vez, mantenga
los alimentos organizados para que resulte fácil
encontrarlos y cierre la puerta en cuanto se saque el
alimento. (Consulte la Guía para el almacenamiento de
alimentos).
El refrigerador se enchufó hace
poco tiempo y el control del
refrigerador se ajustó
correctamente..
El refrigerador puede tardar hasta 24 horas en enfriarse
completamente.
El control del refrigerador no está
correctamente ajustado para las
condiciones medioambientales.
Consulte la sección Ajuste de los controles.
Las puertas no están completamente
cerradas.
Empuje firmemente para cerrar las puertas. Si no se
cerraran, consulte el apartado “Las puertas no se cierran
completamente” en la sección Guía para la solución de
problemas.
La tapa posterior está sucia. Esto impide la transferencia de aire y obliga al motor a
trabajar más duramente. Limpie la tapa posterior. Consulte
la sección Cuidado y limpieza.
GUÍA DE SOLUCIÓN DE PROBLEMAS

59
Problema Posibles Causas Soluciones
Las puertas
no se cierran
completamente
El refrigerador no está nivelado. Consulte la sección Nivelación y alineación
de las puertas.
Hay paquetes de alimentos
bloqueando la puerta que impiden que
se cierre.
Reorganice los contenedores de alimentos para
liberar la puerta y los estantes de la puerta.
El depósito de hielo, la tapa del cajón
para verduras, las bateas, los estantes,
las bandejas de las puertas o las cestas
no están en su sitio.
Coloque correctamente las bandejas, la tapa del
cajón para verduras, las bateas, los estantes y las
cestas. Consulte la sección Uso del refrigerador
para obtener más información.
Los empaques de la puerta se pegan.
Limpie los empaques de las puertas y las superficies
de contacto.
Aplique una fina capa de cera para
electrodomésticos o cera de cocina en los empaques
después de limpiarlas.
El refrigerador se bambolea o parece
inestable.
Nivele el refrigerador. Consulte la sección
Nivelación y alineación de las puertas para obtener
más información.
Las puertas se desmontaron durante
la instalación del producto y no se
volvieron a colocar correctamente.
Desmonte y vuelva a colocar las puertas siguiendo
las instrucciones de la sección Desmontaje y
sustitución de las manijas y puertas del refrigerador
o llame a un técnico cualificado.
Escarcha o
cristales de hielo
sobre los
alimentos
congelados.
La puerta no se cierra correctamente. Consulte el apartado “Las puertas no se cierran
completamente” en la sección Guía para la
solución de problemas.
La puerta se abre a menudo. Si la puerta está abierta, el aire húmedo y caliente
penetra en el congelador, produciendo escarcha.
El hielo huele o
sabe mal.
La máquina de hielo se instaló hace
poco tiempo.
Deseche las primeras tandas de hielo para evitar
hielo manchado o con mal sabor.
El hielo ha estado almacenado
demasiado tiempo.
Deseche el hielo antiguo y fabrique un nuevo
suministro.
Hay alimentos que no se han
envuelto herméticamente en algún
compartimento.
Vuelva a envolver los alimentos ya que, si no están
correctamente envueltos, los olores podrían migrar
hasta el hielo.
El suministro de agua contiene
minerales como el azufre.
Es posible que deba reemplazar el filtro de agua
para eliminar los problemas de olor y sabor..
El interior del refrigerador necesita una
limpieza.
Consulte la sección Cuidado y limpieza para
obtener más información.
El depósito de hielo necesita una
limpieza.
Vacíe y limpie el depósito. Deseche los cubitos
antiguos.
Hay agua en
la batea de
drenaje de la
descongelación.
El refrigerador se está descongelando. El agua se evaporará. Es normal que gotee agua
en la batea de descongelación.
Hay más humedad de lo habitual. Sería esperable que el agua de la batea de
descongelación tarde más en evaporarse. Eso es
normal cuando hace calor o hay humedad.
GUÍA DE SOLUCIÓN DE PROBLEMAS

60
GUÍA DE SOLUCIÓN DE PROBLEMAS
Problema Posibles Causas Soluciones
El refrigerador
parece que hace
demasiado ruido.
Los sonidos podrían ser normales
para su refrigerador.
Consulte la sección Descripción de los sonidos
que se pueden escuchar para obtener más
información.
La máquina de
hielo no está
fabricando
hielo o no en la
cantidad
suficiente.
La instalación es nueva. Espere de 12 a 24 horas tras la instalación de
la máquina de hielo para que comience la
fabricación de hielo. Espere 72 horas para que
la fabricación de hielo esté a pleno rendimiento.
El refrigerador no está conectado a
un suministro de agua o la válvula de
corte del suministro no está abierta.
Conecte el refrigerador al suministro de agua
y abra completamente la válvula de corte de
agua.
Tiene conectado un sistema de
filtración de agua de ósmosis inversa
al suministro de agua fría.
Los sistemas de filtración de agua de ósmosis
inversa pueden reducir la presión de agua por
debajo del mínimo y provocar problemas en la
máquina de hielo. (Consulte la sección Presión
del agua).
La tubería de entrada de agua está
retorcida.
Si la tubería está retorcida se puede ver
reducido el flujo de agua. Desenrede la tubería
de entrada de agua.
La demanda de hielo ha superado la
capacidad de almacenamiento.
La máquina de hielo fabricará aproximadamente
95 cubitos en un período de 24 horas.
NOT
A: En la sección del congelador, se incluye
un depósito de hielo adicional para aumentar
la capacidad de almacenamiento.
La máquina de hielo no está
encendida.
Localice el interruptor de ENCENDIDO/
APAGADO de la máquina de hielo y confirme
que está en la posición ON (I).
Hay algo en el sensor de detección
de hielo.
La presencia de sustancias extrañas o de
escarcha en el sensor de detección de hielo
pueden interrumpir la fabricación de hielo.
Asegúrese de que el área del sensor esté
siempre limpia para que el funcionamiento sea
correcto.
El ajuste de temperatura del
congelador es demasiado cálido.
La temperatura recomendada para el
compartimento del congelador para una
fabricación normal de hielo es de –18 °C (0 °F).
Si la temperatura del congelador es
superior, la fabricación de hielo se verá
afectada.
Las puertas se abren a menudo. Si las puertas de la unidad se abren a menudo,
el aire ambiental calentará el refrigerador
e impedirá que la unidad pueda mantener la
temperatura establecida.
Para ayudar a resolver este problema puede
bajar la temperatura del refrigerador, además
de no abrir la puerta con tanta frecuencia.
Las puertas no se cierran
correctamente.
Si las puertas no se cierran correctamente, la
fabricación de hielo se verá afectada. Consulte
el apartado “Las puertas no se cierran
completamente” en la sección Guía para la
solución de problemas para obtener más
información.
La puerta del compartimento de
hielo no se cierra correctamente.
Si la puerta del compartimento de hielo no se
cierra correctamente, la fabricación de hielo se
verá afectada. Asegúrese de que la puerta del
compartimento de hielo está cerrada para un
funcionamiento correcto. Consulte la sección
Características del refrigerador.
GUÍA DE SOLUCIÓN DE PROBLEMAS

61
Problema Posibles Causas Soluciones
La temperatura
es demasiado
cálida o hay una
acumulación
de humedad en
el interior.
Los conductos de ventilación del aire
están bloqueados. El aire frío circula
desde el congelador hacia la sección
de alimentos frescos y vuelta atrás de
nuevo a través de los conductos de
ventilación del aire que hay en la pared
que divide las dos secciones.
Con la mano, busque los conductos de
ventilación del aire para sentir el flujo de aire y
mover todos los paquetes que bloquean los
conductos de ventilación y restringen el flujo
de aire. (Consulte el siguiente diagrama de
flujo de aire).
Las puertas se abren a menudo. Al abrir las puertas, aumenta la temperatura
del refrigerador, lo que obliga al compresor a
funcionar más tiempo para volver a enfriar el
refrigerador. Para ahorrar energía, intente sacar
todo lo que necesite del refrigerador de una
sola vez, mantenga los alimentos organizados
para que resulte fácil encontrarlos y cierre
la puerta en cuanto se saque el alimento.
El control no está correctamente
ajustado para las condiciones
medioambientales.
Consulte la sección Ajuste de los controles.
Espere 24 horas a que se estabilicen o nivelen
las temperaturas. Si la temperatura es
demasiado fría o demasiado caliente, cambie
el ajuste en incrementos de un grado cada vez.
Consulte la sección Ajuste de los controles.
Se acaba de introducir una gran
cantidad de alimentos al refrigerador o
al congelador.
La introducción de alimentos calienta el
refrigerador. El refrigerador tardará unas horas
en recuperar la temperatura normal.
Los alimentos no están empaquetados
correctamente.
Envuelva los alimentos herméticamente y
seque los contenedores húmedos antes de
almacenarlos en el refrigerador para evitar la
acumulación de humedad. Si es necesario,
vuelva a empaquetar los alimentos siguiendo
las instrucciones de la sección Guía para el
almacenamiento de alimentos.
Las puertas no se cierran
completamente.
Consulte el apartado “Las puertas no se cierran
completamente” en la sección Guía para la
solución de problemas.
El tiempo es húmedo. Cuando el ambiente es húmedo, el aire
transporta humedad al interior del refrigerador
cuando se abren las puertas. El aumento de
humedad en los compartimentos del
congelador o refrigerador pueden provocar la
aparición de escarcha o condensación.
Se ha completado un ciclo completo de
descongelación automática.
Es normal que se formen gotas en la pared
interior tras la descongelación automática del
refrigerador.
GUÍA DE SOLUCIÓN DE PROBLEMAS

62
SMART DIAGNOSIS
MR
Smart Diagnosis
MR
(en algunos modelos)
D
Alarma de la Puerta (en algunos modelos)
ALARMA DE LA PUERTA
1.
2.
3.
4.
Usando Smart Diagnosis
MR
5.
Si tiene algún problema con su refrigerador, puede transmitir datos a través de su teléfono al centro de servicios. Esto le
otorga la capacidad de hablar directamente con nuestros especialistas capacitados. El especialista registra los datos
transmitidos desde su máquina y los utiliza para analizar el problema, brindándole un diagnóstico rápido y efectivo.
Si experimenta problema con su refrigerador, llame al centro de servicio LG. Únicamente utilice la función Smart Diagno-
sis
MR
cuando el representante del centro de servicio le indique hacerlo. Los sonidos de transmisión que escuchará son
normales y suenan de forma parecida a un equipo de fax.
La función Smart Diagnosis
MR
no puede ser activada al menos que el refrigerador esté conectado a una fuente de
energía. Si su refrigerador no enciende, entonces el problema debe solucionarse sin utilizar Smart Diagnosis
MR
.
La función de la alarma de la puerta está diseñada para
prevenir un mal funcionamiento del refrigerador si la puerta
del refrigerador permance abierta. Si la puerta del refrigera-
dor está abierta por más de 1 minuto, una alarma sonará
cada 30 segundos. La alarma se detendrá cuando ambas
puertas del refrigerador se encuentren cerradas correcta-
mente.
NOTA: Esta función no se puede desactivar.
Abra la puerta del refrigerador.
Presione el botón del Control de Temperatura del
Refrigerador hasta que escuche 4 sonidos.
Al finalizar los cuatro sonidos, abra la puerta del conge-
lador y coloque el télefono cerca del altavoz de Smart
Diagnosis
MR
, localizado en la bisagra de la puerta.
Mantenga el télefono en este lugar hasta que los tonos
de transmisión hayan finalizado.
Una vez que los tonos se han detenido, el refrigerador
se apagará brevemente y se encenderá de nuevo
automáticamente. Continúe su conversación con el
especialista, el cual le asistirá en usar la información
transmitida para análisis.
NOTA:
Para mejores resultados, no mueva el télefono mien-
tras los tonos están siendo transmitidos.
Si el agente de servicio no obtiene un resultado
preciso de la grabación, es probable que se le pida
repetir los pasos anteriores.

63
GARANTÍA
LG ELECTRONICS U.S.A., INC.
FRIGORÍFICO LG GARANTÍA LIMITADA - U.S.A.
En caso de que su Frigorífico LG (“Producto”) falle por defectos de material o mano de obra bajo circunstancias de uso
doméstico normal durante el período de garantía descrito a continuación, LG, a su criterio, reparará o reemplazará el
producto. Esta garantía limitada es sólo válida para el comprador original del producto y se aplicará sólo cuando la compra
y el uso se haya realizado dentro de los Estados Unidos, incluyendo los territorios de EE.UU. Para solicitar un servicio
cubierto por esta garantía limitada, será necesario presentar el comprobante de compra original.
PERÍODO DE GARANTÍA
Frigorífico
(Condensador,Filtro desecante,Tubo conector
y Evaporador)
Compresor Inverter
Un (1) año a partir de la
fecha original de compra.
Un (1) año a partir de la
fecha original de compra.
Siete (7) años a partir de la
fecha original de compra.
Diez (10) años a partir de la fecha
original de compra.
Piezas y mano de obra
(sólo piezas internas/
funcionales)
árarboc el eS( sazeip olóSarbo ed onam y sazeiP
mano de obra al
consumidor)
Sólo piezas (Se le cobrará mano
)rodimusnoc la arbo ed
Ruidos asociados con operaciones y fallas normales encontradas en las instrucciones de uso y cuidado y las guias de instalacion u
operacion de la unidad en un ambiente inapropiado no seran cubiertas bajo esta garantia.
Los productos y piezas reemplazados están garantizados por la parte que reste del período original de la garantía o por noventa
(90) días, el período que sea más largo de los dos.
Los productos y piezas reemplazados pueden ser nuevos o reacondicionados.
ESTA GARANTÍA SUSTITUYE A CUALQUIER OTRA GARANTÍA, EXPRESA O IMPLÍCITA, INCLUYENDO, SIN LIMITACIONES,
CUALQUIER GARANTÍA DE COMERCIABILIDAD O ADECUACIÓN A UN FIN PARTICULAR. HASTA EL EXTREMO PERMITIDO
POR LA LEY PARA UNA GARANTÍA IMPLÍCITA, LA DURACIÓN SE LIMITA AL PERIODO DE GARANTÍA EXPRESA INDICADO
ANTERIORMENTE. NI EL FABRICANTE NI EL DISTRIBUIDOR DE EE.UU. SERÁN RESPONSABLES DE CUALQUIER DAÑO
EXTRAORDINARIO POR MOTIVOS AJENOS, INDIRECTOS, ESPECIALES, O DAÑOS PUNITIVOS DE CUALQUIER NATURALEZA,
INCLUYENDO SIN LIMITACIONES, PÉRDIDAS DE BENEFICIOS, O CUALQUIER OTRO DAÑO YA SEA MENCIONADO EN EL
CONTRATO, ACUERDO, O CUALQUIER OTRO SUPUESTO. Algunos estados no permiten la exclusión o limitación de daños
extraordinarios o ajenos o limitaciones sobre la duración de una garantía implícita, por lo tanto la exclusión o limitación citada
arriba puede que no se le aplique a usted. Esta garantía le otorga derechos legales específicos y podría tener otros derechos que
variarán dependiendo del estado.
ESTA GARANTÍA LIMITADA NO CUBRE:
1. Desplazamientosdel servicio para entregar, recoger, instalar
o reparar el producto, instruir al cliente en el funcionamiento
del producto , reparar o reemplazarfusibles o corregir
cableados o fontanería o para realizar correcciones de
reparaciones o instalaciones no autorizadas.
2. Averías de funcionamiento del producto durante cortes
eléctricos e interrupciones del servicio eléctrico.
3. Daños causados por tuberías de agua con fugas o rotas,
ejanerd ed sotcudnoc ,sadalegnoc auga ed saírebut
sodaiporpani auga
ed sortsin
imus ,sodaeuqolb
interrumpidos o suministros de aire inadecuados.
4. Daños provocados por un uso del producto en una atmósfera
corrosiva o contraria a las instrucciones enmarcadas en el
manual del propietario del producto.
5. Daños al producto provocados por accidentes, plagas y
parásitos, rayos, viento, fuego, inundaciones o actos de la
Naturaleza.
6. Daños provocados por un uso indebido, abuso, instalación,
reparación o mantenimiento inadecuados. Una reparación
inadecuada que incluya piezas no aprobadas o especificadas
por LG.
7. Daños o fallos provocados por una modificación o alteración
no autorizada, o por un uso más allá de su propósito
o cualquier fuga de agua causada por una incorrecta
instalación de la unidad.
8. Daños o fallos prov
ocados por una incorrecta corriente
eléctrica, voltaje, normativas de fontanería, uso comercial o
industrial, o uso de accesorios, componentes, o productos
de limpieza desechables que no estén aprobados por
LG .
9. Daños provocados por transporte y manipulación,
incluyendo arañazos, limaduras, astillados y/o cualquier
otro daño al acabado de su producto, a menos que tales
daños sean producto de defectos en los materiale
s o en la
fabricación y sea informado en el plazo de una (1) semana
desde su entrega.
1
0. Daños u objetos desaparecidos de cualquier producto de
o sodajaber sotcudorp o atreiba ajac al noc ,n
óicatneserp
reacondicionados.
11. Productos cuyo número de serie original haya sido retirado
alterado o no s
ea legible con claridad. Para la validación de
la garantía serán necesarios el recibo de c
ompra original, el
número de serie y el número
del modelo
.
12. Incrementos de los costes de utilidad y gastos de utilidad
adicionales.
13. Sustitución de bombillas, filtros o cualquier otra pieza
desechable.
14. Reparaciones cuando su
producto haya sido usado de forma
diferente al uso doméstico normal ( p.ej. uso comercial, en
oficinas y lugares de ocio) o contrario a las instrucciones
enmarcadas en el manual del
propietario del producto.
15. Costes asociados a la retirada del producto de su hogar
para reparaciones.
16. La retirada y reinstalación del producto si se encuentra
instalado en un lugar inaccesible o no está instalado de
acuerdo con lo publicado en el manual de instalación del
producto, incluyendo los manuales LG del propietario y de
instalación.
17. Las estanterías, cestas de las puertas, cajones, manillas, y
otras piezas a
parte de aquellas que venían incluidas con
este modelo en
particular
.
El costo de la reparación o sustitución bajo estas circunstancias excluidas será asumido por el cliente.
Escriba la información de su garantía debajo:
Información de registro del producto:
Modelo:
Número de serie:
Fecha de la compra:
Para obtener una información más detallada de la garantía y
asistencia al cliente, Por favor llame o visite nuestra página web:
Llame al 1-800-243-0000 (24 horas al día, 365 días al año) y
seleccione la opción apropiada del menú o visite nuestra página
web en: www.lg.com
O por correo: Centro de información al cliente LG:
P.O. Box 240007, 201 James Record Road Huntsville, Alabama
35813
ATTN: CIC

63
NOTES / NOTAS


1-800-243-0000
1-888-865-3026
1-888-542-2623
USA, Consumer User
USA, Commercial User
CANADA
LG Customer Information Center
www.lg.com
Register your Product Online!
For additional support including helpful videos,
please visit us at:
www.lg.com
-
 1
1
-
 2
2
-
 3
3
-
 4
4
-
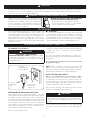 5
5
-
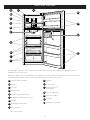 6
6
-
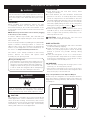 7
7
-
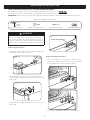 8
8
-
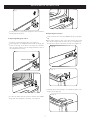 9
9
-
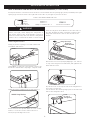 10
10
-
 11
11
-
 12
12
-
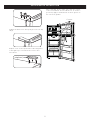 13
13
-
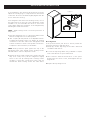 14
14
-
 15
15
-
 16
16
-
 17
17
-
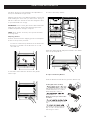 18
18
-
 19
19
-
 20
20
-
 21
21
-
 22
22
-
 23
23
-
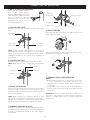 24
24
-
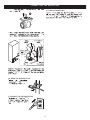 25
25
-
 26
26
-
 27
27
-
 28
28
-
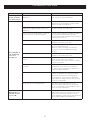 29
29
-
 30
30
-
 31
31
-
 32
32
-
 33
33
-
 34
34
-
 35
35
-
 36
36
-
 37
37
-
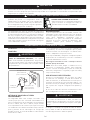 38
38
-
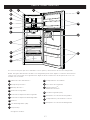 39
39
-
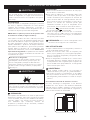 40
40
-
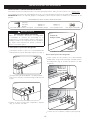 41
41
-
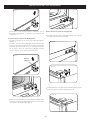 42
42
-
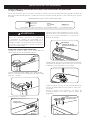 43
43
-
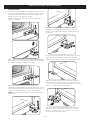 44
44
-
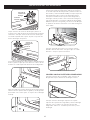 45
45
-
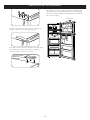 46
46
-
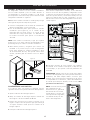 47
47
-
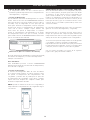 48
48
-
 49
49
-
 50
50
-
 51
51
-
 52
52
-
 53
53
-
 54
54
-
 55
55
-
 56
56
-
 57
57
-
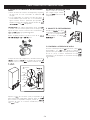 58
58
-
 59
59
-
 60
60
-
 61
61
-
 62
62
-
 63
63
-
 64
64
-
 65
65
-
 66
66
-
 67
67
-
 68
68


LG GT57BPWK El manual del propietario
- Categoría
- Neveras
- Tipo
- El manual del propietario
en otros idiomas
- English: LG GT57BPWK Owner's manual
Artículos relacionados
-
LG GT66BPS El manual del propietario
-
LG LTCS24223D/01 El manual del propietario
-
LG LTNC11121V El manual del propietario
-
LG LTCS20120S El manual del propietario
-
LG 904092 Manual de usuario
-
LG Electronics 1435208 El manual del propietario
-
LG Electronics LTCS20220W Manual de usuario
-
LG GM-T248QS El manual del propietario
-
-
LG LTN16385PL/00 El manual del propietario
Otros documentos
-
LG Electronics LTCS24223W Guía del usuario
-
Haier HRB15N3BGS Manual de usuario
-
-
 Kenmore Elite 79579043314 El manual del propietario
-
Haier HFZ248AA El manual del propietario
-
Kenmore 99033 El manual del propietario
-
Magic Chef MCDR1000WE Manual de usuario
-
Magic Chef HMDR1000BE Manual de usuario
-
-
