Bella 5.3 QT Touchscreen Air Convection Fryer El manual del propietario
- Categoría
- Pequeños electrodomésticos de cocina
- Tipo
- El manual del propietario
Este manual también es adecuado para

5.3 QT TOUCHSCREEN AIR CONVECTION FRYER
FREIDORA DE CONVECCÍON POR AIRE 5.3 QT
CON PANTALLA TÁCTIL
Instruction Manual (Recipe Guide)
Manual de instrucciones (Guía de recetas)
Register your product and get support at:
Para registrar y obtener asistencia de su producto ir:
www.bellahousewares.com

THANK YOU
For Your Purchase
BellaLifestyle
BellaLife
@
bellahousewares.com
#get inspired
Register
& sign up for special
announcements and trendy
recipes!
Tell us what you think!
Rate, review or ask us a question.

Table of Contents
Important Safeguards .................................................................................................................................. 2
Additional Important Safeguards ...............................................................................................................3
Notes on the Plug .........................................................................................................................................4
Notes on the Cord.........................................................................................................................................4
Plasticizer Warning ....................................................................................................................................... 4
Electric Power................................................................................................................................................4
Getting To Know Your 5.3QT Touchscreen Air Convection Fryer ..........................................................5
Control Panel Details ....................................................................................................................................6
Control Panel Settings .................................................................................................................................7
Before Using for the First Time ..................................................................................................................8
Operating Instructions ................................................................................................................................. 8
Manual Operation ......................................................................................................................................... 9
8 FOOD MENU (M) PRESETS
(French Fries | Shrimp | Roast | Chicken | Fish | Steak | Cheese Melt | Bacon) .................................9
2 Easy-assist Functions: PREHEAT (P) and QUICK 5 (5) ..........................................................................9
Air Frying Technique .................................................................................................................................. 10
A Note on Air Frying Pre-packaged Frozen Foods .................................................................................10
Air Convection Frying Chart (Includes Preset Food Menu Items) ........................................................ 11
User Maintenance Instruction ..................................................................................................................12
Care & Cleaning Instructions ....................................................................................................................12
Storing Instructions ....................................................................................................................................12
Troubleshooting ..........................................................................................................................................13
Recipes .................................................................................................................................................... 14-19
Warranty ......................................................................................................................................................20
Índice
Medidas de seguridad importantes ......................................................................................................... 21
Otras medidas de seguridad importantes ..............................................................................................22
Notas sobre el enchufe .............................................................................................................................. 23
Notas sobre el cable ...................................................................................................................................23
Advertencia sobre plasticantes .............................................................................................................. 23
Corriente eléctrica .....................................................................................................................................23
Conozca a su 5.3QT freidora de convección por aire con pantalla táctil ..........................................24
Detalles sobre el panel de control ...........................................................................................................25
Ajustes del panel de control .....................................................................................................................26
Antes de utilizar por primera vez .............................................................................................................27
Instrucciones de uso ..................................................................................................................................27
Operación manual ......................................................................................................................................28
8 PREAJUSTES DE COMIDAS (M)
(Papas fritas | Camarones| Asados | Pollo | Pescado | Bistec | Fundir queso | Tocino) ..................... 28
Función sencilla: PRECALENTAR (P) ........................................................................................................28
Al freír con aire ...........................................................................................................................................29
Una nota sobre freír por aire alimentos preenvasados y congelados ................................................29
Carta de freír con aire (Incluye preajustes de la carta de comidas) ....................................................30
Instrucciones de mantenimiento .............................................................................................................. 31
Instrucciones de cuidado y limpieza ........................................................................................................31
Instrucciones de almacenamiento ...........................................................................................................31
Soluciones de problemas .......................................................................................................................... 32
Recetas ................................................................................................................................................... 33-38
Garantía........................................................................................................................................................39

2
IMPORTANT SAFEGUARDS
When using electrical appliances, basic safety precautions should always be
followed, including the following:
1. READ ALL INSTRUCTIONS.
2. DO NOT touch hot surfaces. Use handles or knobs. Use oven mitts
orpotholders.
3. To protect against electric shock do not immerse cord, plugs, or appliancein
water or other liquid.
4. This appliance is not intended for use by persons (including children) with
reduced physical, sensory or mental capabilities, or lack of experience
and knowledge, unless they have been given supervision or instruction
concerning use of the appliance by a person responsible for their safety.
5. Close supervision is necessary when any appliance is used by
or near children.
6. Unplug from outlet when not in use and before cleaning. Allow to cool
beforeputting on or taking off parts, and before cleaning the appliance.
7. DO NOT operate any appliance with a damaged cord or plug or after
the appliance malfunctions, or has been damaged in any manner.
Bring it to a qualied technician for examination, repair or electrical
ormechanicaladjustment.
8. The use of accessory attachments not recommended by the appliance
manufacturer may cause injuries.
9. DO NOT use outdoors.
10. DO NOT let cord hang over edge of table or counter, or touch hot surfaces.
11. DO NOT place on or near a hot gas or electric burner, or in a heated oven.
12. Extreme caution must be used when moving an appliance containing hot oil
or other hot liquids.
13. To disconnect, pull the frying basket out of the body. Then remove plug from
wall outlet.
14. DO NOT use appliance for other than intended use.
15. Make sure the frying basket is locked into the front of the drawer – both frying
basket handle tabs must be fully inserted into the notches on the top of the
basket drawer.
16. Always make sure frying basket drawer is fully closed, with frying basket
handle locked securely in the drawer, whileAirFryer is in operation.
WARNING: Air Fryer will not operate unless frying basket drawer
is fullyclosed.
CAUTION: After hot air frying, the frying basket and frying basket drawer
and the cooked foods are hot. Extremecaution must be used when
handlingthehot Air Fryer basket/drawer.
FOR HOUSEHOLD USE ONLY
SAVE THESE INSTRUCTIONS

3
ADDITIONAL IMPORTANT
SAFEGUARDS
CAUTION, HOT SURFACES: This appliance generates heat and escaping steam
during use. Proper precautions must be taken to prevent the risk of burns, res
or other injury to persons or damage to property.
CAUTION: This appliance is hot during operation and retains heat for some
time after turning OFF. Always use oven mitts when handling hot materials and
allow metal parts to cool before cleaning. Do not place anything on top of the
appliance while it is operating or while it is hot.
1. All users of this appliance must read and understand this instruction manual
before operating or cleaning this appliance.
2. The cord to this appliance should be plugged into a 120V AC electrical
outletonly.
3. If this appliance begins to malfunction during use, immediately pull the frying
basket out of the body. Then remove plug from wall outlet. DO NOT use or
attempt to repair the malfunctioning appliance.
4. DO NOT leave this appliance unattended during use.
5. DO NOT immerse power cord in any liquid. If the power cord to this appliance
is damaged, it must be replaced by contacting Consumer Service.
6. Keep the cord out of reach from children and infants to avoid the risk of
electric shock and choking.
7. Place the Air Fryer on a at, heat-resistant work area.
8. DO NOT obstruct the air outlet or air inlets on the back and sides of the Air Fryer,
with any objects. Avoid escaping steam from the air outlet during airfrying.
9. Keep appliance at least 4 inches away from walls or other objects during
operation.
10. Always use the frying basket handle to open frying basket drawer.
11. DO NOT replace the empty frying basket drawer (without the frying basket)
into the Air Fryer body. Check to make sure the frying basket is locked in
position in the drawer.
WARNING: After air frying, make sure to place the frying basket drawer on a
at, heat-resistant surface before pressing the basket release button.
WARNING: Under- or over-lling the frying basket may damage the Air Fryer
and could result in serious personal injury.
12. Never move a hot Air Fryer or an Air Fryer containing hot food. Allow to cool
before moving.
WARNING! This Touchscreen Air Convection Fryer should not be used
to boil water.
WARNING! This Touchscreen Air Convection Fryer should never be used
to deep fry foods.

4
NOTES ON THE PLUG
This appliance has a polarized plug (one blade is wider than the other). To reduce
the risk of electric shock, this plug will t in a polarized outlet only one way. If the
plug does not t fully into the outlet, reverse the plug. If it still does not t, contact
a qualied electrician. Do not modify the plug in any way.
NOTES ON THE CORD
A. A short power-supply cord (or detachable power-supply cord) is to be
provided to reduce the risk resulting from becoming entangled in or tripping
over a longer cord.
B. Longer detachable power-supply cords or extension cords are available and
may be used if care is exercised in their use.
C. If a long detachable power-supply cord or extension cord is used :
1. The marked electrical rating of the cord or extension cord should be
at least as great as the electrical rating of the appliance;
2. If the appliance is of the grounded type, the extension cord should be
a grounding-type3-wire cord;
3. The longer cord should be arranged so that it does not drape over
the countertop or table top where it can be pulled on by children
or tripped over unintentionally
PLASTICIZER WARNING
CAUTION: To prevent Plasticizers from migrating from the nish of the counter top or
table top or other furniture, place NON-PLASTIC coasters or place mats between the
appliance and the nish of the counter top or table top. Failure to do so may cause
the nish to darken; permanent blemishes may occur or stains can appear.
ELECTRIC POWER
If the electrical circuit is overloaded with other appliances, your appliance may not
operate properly. It should be operated on a separate electrical circuit from other
appliances.
Note: keep illustration
callouts aligned

5
Figure 1A
Basket Parts
Figure 1
Digital Touchscreen
Control
Air Convection
Fryer Body
Digital display
(Temperature
and Timer)
Timer Control
Frying Basket
Basket Release
Button
Getting To Know Your 5.3 QT Touchscreen Air Convection Fryer
Product may vary slightly from illustration
Frying Basket Drawer
Cool Touch Quick-Click
Handle
Power Cord with
Polarized Plug
Adjustable Control
(Temperature
and Timer)
Temperature
Control
Air Outlet
Clear Basket Lock
Basket Release Button
Frying Basket Drawer
Removable
Frying Basket with
Cool Touch Handle

6
Control Panel Details
1. Once the frying basket drawer and frying basket are properly locked into the Digital Air Convection
Fryer body, the red POWER (
) button will illuminate.
2. Press the red POWER (
) button. The default TEMP: 370ºF and TIME: 15:00 minutes will alternate
on the digital display. The red POWER (
) button will turn white.
3. Press the START (
) button to begin air frying for 15 minutes at 370ºF.
4. Press the POWER (
) button to turn the Digital Air Convection Fryer OFF.
The white fan icon (
) will continue to ash for 20 seconds.
Timer Control Buttons
Selecting the timer control (min), add or decrease cooking time using the
+
and
–
symbols.
This enables you to add or decrease cooking time, one minute at a time. Keeping the button held down
will rapidly change the time.
Temperature Control Buttons
Selecting the temperature control (°F), add or decrease temperature using the
+
and
–
symbols. This
enables you to add or decrease cooking temperature 10°F at a time. Keeping the button held down will
rapidly change the temperature. Temperature control range: 180°F – 400°F.
MENU (M) Presets Button
Selecting the MENU (M) presets button enables you to scroll through the 8 preset menu options.
Once selected, the predetermined time and cooking temperature function begins.
NOTE: You can override the MENU presets by increasing or decreasing TIME and TEMP manually.
MENU Preset Choices
8 presets to choose from: French Fries, Shrimp, Roast, Chicken, Fish, Steak, Cheese melts and Bacon.
Digital Display
This display will keep track of the temperature and remaining cook time.
White Fan Icon
The ashing, White Fan Icon will appear when the Air Convection Fryer is turned on and for up to
20 seconds after it is turned off .
Adjustable Control (Temperature and Timer)
The
+
and
–
symbols enable you to add or decrease cooking temperature and time.
Preset Menu
White Fan Icon
Digital Display
Power Button
Preheat
Adjustable
Control
(Temperature
and Timer)
Menu Timer Control Button
Temperature
Control Button
Start / Pause
Button

7
Control Panel Settings
(M) MENU FOOD TEMP AIR FRY TIME TIME ACTION
French Fries, 4 – 6 cups
(fresh, hand cut, or frozen)
(1/4 – 1/3 inch thick)
400°F 22 min 6 min
shake & brush or
spray oil if needed
Shrimp
(thawed, battered), 2 lb
320°F 8 min 4 min turn over, shake
Meat, Roast, Chops,
2 - 4 lbs
400°F 25 min 12 min
turn over
test for doneness
Chicken
2 lb (fresh/thawed)
360°F 20 min 10 min
turn over
test for doneness
Fish, 2 lb
400°F 10 min 5 min
turn over
test for doneness
Steak,
2 – 4 lbs, well done
400°F 12 min 6 min
turn over
test for doneness
Cheese Melt
340°F 3 min 8 min
turn over sandwich
stir 4x, check for
doneness
Bacon, thin cut, 1 lb
thick cut
400°F 10 min 5 min
turn over
test for doneness
PREHEAT
400°F 3 min ——
program Air Fryer
for recipe
IMPORTANT! When using the PREHEAT (P) function, reduce nal cooking TIME by 3 minutes.
IMPORTANT! Depending on the thickness and/or density of foods, it may be necessary to use a meat
thermometer to check cooking progress after preset TIME has expired.

8
Before Using for the First Time
1. Remove all packing material and labels from the inside
and outside of the Air Convection Fryer. Check that there
is no packaging underneath and around the frying basket
and drawer.
2. Your Air Convection Fryer is shipped with the frying basket
locked into the drawer, inside the Air Convection Fryer body.
Firmly grasp the frying basket handle, slide the clear basket
lock on top of the handle forward and pull the frying basket
drawer out; place on a at, clean work area.
3. To unlock and remove the frying basket from the drawer:
slide the clear basket lock on top of the handle forward to
expose the basket release button. Press the basket release
button with your thumb and lift the frying basket up and
out of the drawer. (See Figure 2.)
4. Wash frying basket and drawer in hot, soapy water.
5. DO NOT IMMERSE THE AIR FRYER BODY IN WATER.
WipeAir Convection Fryer body with a damp cloth.
Dry all parts thoroughly.
6. Lock the clean frying basket into the drawer. There are
2 tabs on each side of the handle. Slide the 2 handle tabs
into the notches on the top of the basket drawer. With the
basket lock forward, place and the button depressed, an
audible click can be heard as the frying basket handle locks
securely into place. (See Figure 3.)
IMPORTANT: Slide the clear basket lock back over the
basket release button to prevent accidental frying basket release.
7. Replace the assembled frying basket/drawer into the Air Convection Fryer body.
NOTE: During rst use, the Air Convection Fryer may emit a slight odor. This is normal and will not
affect the avor or air convection frying.
Operating Instructions
IMPORTANT! The maximum food capacity recommended for this air frying basket is
4.4 lbs, 4 - 6 cups, depending. The air frying basket will accommodate up to a
9 inch round x 3 inch deep bake or pie pan.
WARNING! This Air Convection Fryer should not be used to boil water.
WARNING! This Air Convection Fryer should never be used to deep fry foods.
1. Place the Air Convection Fryer on a at, heat-resistant work area, close to an electrical outlet.
2. Firmly grasp the frying basket handle to open frying basket drawer; then remove the drawer from
the body and place on a at, clean surface.
3.
Place food into the frying basket. Do not overll. To ensure proper cooking and air circulation,
NEVER ll the frying basket more than 2/3 full. When air frying fresh vegetables, we do not
recommend adding more than 4 to 6 cups of food to the frying basket.
4. Insert the assembled frying basket drawer into the front of the Air Convection Fryer. Always make
sure frying basket drawer is fully closed.
5. Plug cord in the wall outlet. An audible beep will sound and a red POWER (
) button will appear
on a black background.
6. To begin, press the red POWER (
) button.
7. The touchscreen control panel will appear. POWER (
) button will turn white.
8. The default TIME and TEMP: 15:00 minutes and 370ºF will alternate on the digital display.
IMPORTANT: If no buttons are pressed, the Digital Air Convection Fryer will remain
in standby mode
Figure 3
Figure 2

9
Manual Operation
1. To adjust the default air frying TIME, select timer control button (MIN), press the (+) or (–) on
the right side of the control panel to advance or decrease TIME in 1 minute increments,
from 1 to 60 minutes.
NOTE: Timer can also be adjusted when time reects on the digital display
2. To adjust the default air frying Temperature, select temperature control button (°F), press the
(
+) or (–) on the right side of the control panel to adjust the default (370°F) TEMP from 180°F
to 400°F in 10 degree increments.
NOTE: Temperature can also be adjusted when temperature reects on the digital display using
3. When the desired TIME and TEMP appear on the digital display, press the START (
) button to turn
the Air Convection Fryer ON. The white convection fan (
) will twirl when the Air Convection Fryer
is in operation. The preset TIME will begin to count down. TEMP and remaining TIME will alternate
on the digital display.
IMPORTANT: If no buttons are pressed, the Digital Air Convection Fryer will remain in standby mode.
4. To turn the Air Convection Fryer OFF at any time, or to reset the TIME, simply press the white POWER
(
) button.
NOTE: To halt air frying immediately, pull the frying basket drawer out of the body at any time.
When the drawer is replaced, air frying will resume.
5. When the remaining TIME reaches 00:00, the red POWER (
) button will appear and the white
convection fan (
) will continue to twirl for 20 seconds. 5 beeps will sound as the Air Convection
Fryer automatically turns OFF.
8 FOOD MENU (M) PRESETS (French Fries | Shrimp | Roast | Chicken | Fish | Steak |
Cheese Melt | Bacon)
1. To use food MENU options, simply press (M). Each time MENU (M) is pressed, the next food option
will illuminate.
2. When the desired food menu option icon is illuminated, press the START (
) button to turn the
Air Convection Fryer ON.
IMPORTANT: If (
M) is not pressed again, the Digital Air Convection Fryer will remain in
standby mode.
NOTE: The quantity, density, weight of food will alter the total cooking time necessary.
Remember, frying smaller batches will result in shorter cooking times and higher food quality.
IMPORTANT: Always check food halfway through cooking time to determine nal cook
TIME and TEMP.
3. To adjust the air frying TIME during operation, press (
+) or (–) on the right side of the control panel
to advance or decrease time in 1 minute increments to 60 minutes. Press the (
+) or (–) on the right
side of the control panel to adjust TEMP in 10 degree increments.
Easy-assist Function: PREHEAT (P)
Save time and make perfect air frying effortless.
1. PREHEAT: If a recipe calls for a preheated oven, or, when cooking meats or proteins that benet
from a hot initial sear, use PREHEAT (
P) function. Insert the empty air frying basket/drawer into the
body of the Air Convection Fryer. Press MENU (
M) until (P) illuminates.
• Press the START (
) button to begin.
• The default TIME and TEMP: 3:00 minutes and 400ºF will alternate on the digital display.
• When 5 beeps sound, place food into frying basket, program the Air Convection Fryer, and air
fry to perfection.
IMPORTANT! When using the PREHEAT (
P) function, reduce nal cooking recipe or preset
TIME by 3 minutes.

10
Air Frying Technique
1. Please consult the Air Frying Chart and/or follow package directions for suggested TIME and TEMP.
2. Always pat food dry before cooking to encourage browning and avoid excess smoke.
3. To assure even cooking/browning, ALWAYS open the basket drawer halfway through the cook time
and check, turn or shake foods in the frying basket. Some recipes may call for brush or spray oil
halfway through cooking. Adjust TIME or TEMP if needed.
CAUTION: Always use oven mitts when handling the hot air fryer basket.
CAUTION: Make sure the clear basket lock is in the locked position when shaking foods for the Air
Convection Fryer. To avoid damage to persons or personal property, do not press the basket release
button while shaking the frying basket.
CAUTION: Hot oil can collect at the base of the drawer. To avoid risk of burns or personal injury, or
to avoid oil from contaminating air fried foods, always unlock and remove the frying basket from
the drawer before emptying. NEVER turn the drawer upside down with the frying basket attached.
4. Allow cooked foods to rest for 5 to 10 minutes. Remove the drawer from the machine and place on a
at, heat resistant surface. Then remove frying basket from the drawer.
5. Shake air fried foods out onto serving area. Promptly return the frying basket to the drawer and lock
into place. Continue air frying subsequent batches, if any.
6.
To avoid excess smoke, when cooking naturally high fat foods, such as bacon, chicken wings or
sausages, it may be necessary to empty fat from the frying basket drawer between batches.
7. For crispier results, air fry small batches of freshly breaded foods. Create more surface area by
cutting food into smaller pieces. Press breading onto food to help it adhere. Refrigerate breaded
foods for at least 30 minutes before frying.
8. Arrange breaded food in frying basket so that food is not touching to allow air ow
on all surfaces.
9. Spray oils work best. Oil is distributed evenly and less oil is needed. Canola, olive, avocado,
coconut, grapeseed, peanut, or vegetable oil work well.
10. Unplug the Air Convection Fryer when not in use.
A Note on Air Frying Pre-packaged Frozen Foods
1. Where microwave ovens often produce hot, mushy results and toaster ovens take forever, air
convection frying assures reasonably fast, crispy, delicious results!
2. As a rule, depending on the food and amount to be cooked, suggested cook TIMES may have to be
reduced slightly. Always check food halfway through cooking time to determine nal cook TIME and
TEMP.
3. Always check cooking progress after TIME has expired.

11
Air Convection Frying Chart (Includes Preset Food Menu Items)
WARNING! Times are estimated and based on average sizes and weights.
ALWAYS USE A MEAT THERMOMETER TO ENSURE THAT MEAT, POULTRY AND FISH ARE COOKED
THOROUGHLY BEFORE SERVING.
NOTE: Frying smaller batches will result in shorter cooking times and higher food quality. Adjust air
frying temperatures and times as necessary to suit your taste.
NOTE: Unless food is pre-packaged and pre-oiled, for browned and crispy results, all foods should be
lightly oiled before air frying.
FOOD TEMP AIR FRY TIME ACTION
Root Vegetables,
3 - 4 cups fresh (roasted)
370ºF 15 - 20 min toss with oil, shake 3x
Asparagus,
3 - 4 cups, fresh thin stems
370ºF 7 - 9 min spray with oil, shake 2x
Green Beans, Sugar Snap Peas,
3 - 4 cups fresh
370ºF 7 - 9 min spray with oil, shake 1x
Broccoli, 3 - 4 cups fresh (roasted) 370ºF 5 - 7 min spray with oil, shake 3x
Brussels Sprouts,
halved, 3 - 4 cups fresh
370ºF 8 - 10 min spray with oil, shake 2x
Butternut Squash,seeded,
1/2 inch chunks, 3 - 4 cups fresh
370ºF 15 min spray with oil, shake 3x
Fennel, fresh, chopped,
3 - 4 cups fresh
370ºF 7 - 9 min spray with oil, shake 2x
Fried Sweet Potato Fries
(fresh, hand cut, 1/8 to 1/4-inch thick)
400ºF 13 - 15 min spray with oil, shake 3x
French Fries, Idaho Potatoes, 2 - 3
(fresh, hand cut, 1/4 to 1/3 inch thick)
(frozen, 1/4 to 1/3 inch thick)
400ºF
400ºF
12 min
12 min
spray with oil, shake 3x
spray with oil, shake 3x
Meat, Roast, Chops 360ºF 25 min
rub or spray with oil,
add seasoning, turn over
test for doneness
Ribeye Steaks, (2) 1.25 lb,
1-1/2 inch thick, room temp.
medium rare
medium
well done
400ºF
400ºF
400ºF
Preheat +6 min
Preheat +10 min
Preheat +14 min
rub or spray with oil,
add seasoning, turn over
test for doneness, rest
15 minutes - check at 12
minutes, rest 15 minutes
Hamburgers, 1/3 lb (up to 4),
rare - well
350ºF
Preheat
+3 – 6 min
spray with oil, add
seasoning, turn over test
for doneness
Chicken Wings, 2-3 lb
(fresh/thawed)
360ºF 20 min
spray with oil, shake 2x
test for doneness
Chicken Tenders/Fingers, boneless 360ºF 18 - 20 min spray with oil, shake 1x
Chicken Pieces, bone in 360ºF 20 - 30 min
spray with oil, turn over
test for doneness
Fish Filet (fresh, thawed, battered) 400ºF 10 min
spray with oil, turn over
test for doneness
Shrimp (thawed, battered), 1- 2 lb 320ºF 8 min
spray with oil, turn over,
shake
PLEASE NOTE:
The USDA recommends that meats such as beef and lamb, etc. should be cooked to an internal
temperature of 145ºF/63ºC. Pork should be cooked to an internal temperature of 160ºF/71ºC and poultry
products should be cooked to an internal temperature of 170ºF/77ºC - 180ºF/82ºC to be sure any harmful
bacteria has been killed. When reheating meat/poultry products, they should also be cooked to an
internal temperature of 165ºF/74ºC.

12
User Maintenance Instructions
This appliance requires little maintenance. It contains no user-serviceable parts. Any servicing requiring
disassembly other than cleaning must be performed by a qualied appliance repair technician.
Care & Cleaning Instructions
WARNING! Allow the Air Convection Fryer to cool fully before cleaning.
1. Unplug the Air Convection Fryer. Remove frying basket from the drawer. Make sure the frying basket
drawer and frying basket have cooled completely before cleaning.
2. Wash the basket drawer and frying basket in hot soapy water. Do not use metal kitchen utensils or
abrasive cleansers or cleaning products as this may damage the non-stick coating.
3. The frying basket and frying basket drawer are dishwasher-safe. For best results, place in the top rack
of your dishwasher to clean.
4. Wipe the Air Convection Fryer body with a soft, non-abrasive damp cloth after every use
Storing Instructions
1. Make sure the Air Convection Fryer is unplugged and all parts are clean and dry before storing.
2. Never store the Air Convection Fryer while it is hot or wet.
3. Lock the frying basket into the drawer, and store inside the Air Convection Fryer body.
4. Store Air Convection Fryer in its box or in a clean, dry place.

13
Troubleshooting
PROBLEM POSSIBLE CAUSE SOLUTION
The AIR FRYER
does not work
• The Air Convection Fryer is not
plugged in.
• The Air Convection Fryer has
turned itself OFF
• Plug cord into the wall outlet.
• To begin, press the red POWER
(
) button.
• Make sure the frying basket/drawer
is assembled correctly and fully
inserted into the Air Convection
Fryer body.
• Press MENU (M) until the desired
food option illuminates. Press
the START
( ) button to begin
operation
Food not
cooked
• The Frying Basket is overloaded. • Fry smaller batches of food.
• Shake foods 2x or 3x during the
cooking process.
• Increase TEMP.
• Increase air fry TIME.
Food is not
fried evenly
• The Frying Basket is overloaded. • Fry smaller batches of food.
• Apply a light, even coat of spray oil
to food before frying
• Shake foods 2x or 3x during the
cooking process.
• Fry smaller batches of food.
Frying basket/
drawer won’t
slide into the
Air Convection
Fryer body
properly
• The Frying Basket is overloaded. • Fry smaller batches of food.
• Air Convection Fryer will not turn
ON until the frying basket/drawer
is assembled correctly and fully
inserted into the Air Convection
Fryer body
White smoke
coming
from the Air
Convection
Fryer
• The Air Convection Fryer is
overloaded with oil.
• The frying basket and drawer
have not been cleaned.
• When frying heavily oily foods,
such as bacon, it may be necessary
to clean the frying basket drawer
more frequently.
• Clean frying basket and drawer
after each use.
Fresh fries
are not fried
evenly
• The Frying Basket is overloaded. • Soak, rinse and fully dry potatoes
before frying.
• Use fresh, rm potatoes.
Fries are not
crispy
• Raw fries have too much water. • Use a clean kitchen towel to wrap
and dry potato sticks thoroughly
before adding oil.
• Cut potato sticks smaller.
• Shake and spray potatoes
frequently.

Recipes
14
Lemon Za’atar Chicken with Eggplant & Zucchini
Za’atar is popular Middle Eastern spice mixture dating back to ancient times. We have enveloped
the chicken with this aromatic blend of thyme, sumac, wild oregano and toasted sesame seeds.
Fresh lemon adds moist citrus notes.
The Air Fryer is the perfect tool for preparing moist and luscious, roasted chicken, the frying
basket allows drippings (liquid avor) to permeate the vegetables and stream down into the
easy-to-clean drawer.
Serves 6
• 1 (3 1/2 - 4 1/2 lb) whole chicken
• 1 lemon, zested and halved
• 1 teaspoon salt, divided
• 1 Chinese eggplant
• 1 zucchini
• 1 cup za’atar seasoning
1. Remove the chicken giblets.
2. Rinse the chicken inside and out. Trim all excess fat and use paper towels to pat dry. Work
your hands inside the chicken skin to loosen from the meat. Use a sharp paring knife to
puncture all fat pockets. Make 3 to 4 slits along the chicken’s backbone to relieve extra fat.
3. Liberally coat the chicken inside and out with za’atar. Generously rub za’atar under
the chicken skin. Squeeze each lemon half over the chicken; squeeze again and place inside
the chicken cavity.
4. Tuck the wing tips under the body of the chicken. To ensure crispy skin,
refrigerate the chicken uncovered for 30 minutes before air frying.
5. Trim the eggplant and zucchini, cut into discs, then use to cover the bottom of the
Air Fryer basket. Lay the chicken, breast side down, onto the bed of vegetables.
6. Use food MENU preset for CHICKEN. When the CHICKEN icon (
) illuminates, press the
START (
) button to begin air frying at 360ºF. Increase the TIME to 30 minutes.
7. Turn the chicken over, breast side up. Sprinkle lemon zest over the breast of the chicken.
8. Continue air frying CHICKEN at 365ºF for 25 minutes, or until the juices run clear when you
cut between a leg and thigh or when a meat thermometer inserted into the thickest part of
the thigh reads 170ºF/77ºC - 180ºF/82ºC.
9. Remove the chicken and vegetables to a platter and tent with aluminum foil for about
20 minutes. Slice the chicken onto a platter and serve it with the vegetables.

Recipes
15
Air Fried Onion Blossom
• Aluminum foil to cover onion
3/4 cup rice our
• 1 large sweet Vidalia onion
3/4 cup Italian seasoned breadcrumbs
• 3 teaspoons olive oil
• 4 tablespoon Cajun seasoning mix, divided
• 2 tablespoons yogurt
• 1 tablespoon water
• 2 large eggs
1. 3 bowl breading station: Mix breadcrumbs with olive oil, 2 tablespoons Cajun seasoning.
2. In a small bowl, mix 2 tablespoons Cajun seasoning into the our.
3. In another bowl, beat yogurt, water and eggs.
4. Create the Blossom. Peel onion, cut off top. Place cut side down onto a cutting board.
5. Starting 1/2 inch from the root, cut downward, all the way to the cutting board. Repeat to
make 4 evenly spaced cuts around the onion.
6. Continue slicing between each section until there are 8 cuts in total.
7. Place sliced onion in an ice water bath for at least 2 hours to overnight. Remove from water,
pat dry. Open onion so petals are exposed.
8. Place onion in a large bowl. Sprinkle onion generously with our mixture. Make sure to get
in between all petals. Turn onion upside down to remove excess our.
9. Using a ladle, ladle the egg mixture into every crevice. Lift up onion and turn to make sure
excess egg drips away.
10. Sprinkle onion very generously with breadcrumb mixture. Press breadcrumbs between
every petal.
11. Place the breaded onion blossom into the frying basket.
12. Cover and tent the top of the onion with aluminum foil.
13. Use food MENU preset for CHICKEN. When the CHICKEN icon (
) illuminates, press the
START (
) button to begin air frying at 360ºF for 20 minutes.
14. Check doneness of the onion.
15. Remove foil. Increase TEMP to 400ºF and continue air frying for an additional 5 minutes
until browned and crisp.

Recipes
16
General’s Tso’s Wife’s Air Fried Cauliower
If General’s Tso had a wife, and she had an Air Fryer, she would surely air fry this scrumptious dish.
• 1 head (4 cups) cauliower
• 2 tablespoons canola oil
• 4 to 6 seeded and stemmed dried red chilies
Sauce
• 2 tablespoon unseasoned rice vinegar
• 2 teaspoon sesame oil
• 1/4 cup oyster sauce
• 2 tablespoons water, or more as needed
• 2 tablespoon grated ginger
• 4 cloves garlic, grated
Garnish
• Brown rice
• Toasted sesame seeds
1. Combine all sauce ingredients in a large bowl. Trim cauliower into orets and toss into the
bowl. Add chilies. Coat the orets well and add to the Air Fryer basket.
2. Air fry for 12 to 14 minutes at 365ºF, shake halfway.

Recipes
17
Spicy Air Fried Pizza Rolls
Crispy, spicy bites of goodness, dipped in a avorful tomato sauce, these Pizza Rolls will be the
hit of any party or gathering. A great way to use leftovers, the possibilities are endless.
• Olive oil spray
• 2 spicy hot Italian sausages, casings removed
• 2 cups shredded Mozzarella cheese, or any cheese of your choice
• 4 jalapeño peppers, seeds, stems removed, chopped
• 1/2 lb mushrooms, sliced
• Won ton wrappers
• Creamy Tomato Spaghetti Sauce, for dipping
• 1 egg, whisked, to seal the rolls
1. Cook the Italian sausage, mushrooms and peppers in the frying basket.
2. Use food MENU preset for BACON. When the BACON icon (
) illuminates, press the
START (
) button to begin air frying at 400ºF, stirring every 5 minutes for 10 - 15 minutes
until fully browned.
3. Drain sausage and veggies onto a plate of paper towels. When cool enough to handle,
crumble cooked sausage into small pieces. Combine sausage, mushrooms,
peppers in a small bowl.
4. Place a won ton wrapper at onto the working surface. In the lower portion of the wrapper,
form a line of ingredients: sausage mixture topped with a handful of cheese.
5. Roll once around, then fold in the sides. Continue rolling until the Pizza Roll is formed.
Brush a small amount of egg wash onto the end of the wrapper to seal. Repeat until the
frying basket is lled.
6. Place assembled Pizza Rolls seam-side-down into the Air Fryer basket. Spray with olive oil.
7. Air fry at 370ºF for 8 to 10 minutes. Turn Pizza Rolls over halfway through air frying.
8. Serve with your favorite tomato sauce for dipping.

Recipes
18
Air Fried Zucchini Fries
Serves 4
• 2 zucchini squash, trimmed into spears
• Salt
• Kosher salt, to taste
• 2 tablespoons olive oil
• 1/2 cup panko breadcrumbs
• 2 tablespoons Parmesan herb seasoning
Yogurt Pesto Dip
• 3 tablespoons plain yogurt
• 1 tablespoon basil pesto
1. Cut zucchini in half lengthwise. Cut each half into 3 long spears. Cut the spears in half to
form zucchini fries.
2. Sprinkle the zucchini fries with salt and place in a colander for at least 10 minutes to
2 hours, to draw out excess moisture.
3. Blot zucchini dry with paper towels; then add to a large mixing bowl.
4. Drizzle olive oil over the zucchini fries and stir until they are all well coated.
5. Add panko breadcrumbs, oil and seasoning to a plate, mix well.
6. Roll the oiled zucchini into the panko, coating all sides and pressing rmly so that the
crumbs adhere.
IMPORTANT: Work in batches, do not overcrowd the Air Fryer basket.
7. Air fry at 360ºF, until slightly crisp and golden brown, about 10 minutes, turning the spears
over halfway through air frying.
8. Transfer zucchini fries to a platter, sprinkle with salt. Combine yogurt and pesto in a small
dish. Serve immediately.

Recipes
19
8 Minute Banana Chocolate Chip Cupcakes
Fresh, moist banana goodness in every bite. Light and sweet, these cup cakes are so easy to
make and they bake in 8 just minutes! These sweet bites go anywhere. Grab one with a cup of
coffee, kids with a glass of milk. Air fry as many little cakes as you need, then store the remaining
batter and air fry fresh cupcakes tomorrow!
• Foil cupcake liners
• Coconut oil baking spray
• 1 (16 oz.) box white cake mix, your favorite brand
• 1 egg white
• 1 egg
• 3 tablespoons vegetable oil
• 1 ripe banana, mashed
• 1 1/4 cup unsweetened vanilla or plain almond milk
• 1 cup crushed chocolate chip or chocolate sandwich cookies
• 1/4 cup chocolate chips
• 1/4 cup butterscotch chips
1. Mash the banana in a large bowl. Add the remainder of the ingredients and mix
until well blended.
2. Place foil cupcake liners into the frying basket. Generously spray foil cupcake liners with
coconut oil. Fill cupcake liners equally, no more than 2/3 full with batter.
3. Air fry at 365ºF, until golden, about 8 minutes.
4. Check for doneness. Insert a toothpick in the center of the cupcake; if it comes out clean
cupcakes are fully baked. If not, continue to air fry for 1 additional minute if needed.

Limited TWO-YEAR Warranty
SENSIO Inc. hereby warrants that for a period of TWO YEARS from the date
of purchase, this product will be free from mechanical defects in material and
workmanship, and for 90 days in respect to non-mechanical parts. At its sole
discretion, SENSIO Inc. will either repair or replace the product found to be
defective, or issue a refund on the product during the warranty period.
The warranty is only valid for the original retail purchaser from the date of initial
retail purchase and is not transferable. Keep the original sales receipt, as proof of
purchase is required to obtain warranty validation. Retail stores selling this product
do not have the right to alter, modify, or in any way revise the terms and conditions
of the warranty.
EXCLUSIONS:
The warranty does not cover normal wear of parts or damage resulting from
any of the following: negligent use of the product, use of improper voltage or
current, improper routine maintenance, use contrary to the operating instructions,
disassembly, repair, or alteration by anyone other than qualied SENSIO Inc.
personnel. Also, the warranty does not cover Acts of God such as re, oods,
hurricanes, or tornadoes.
SENSIO Inc. shall not be liable for any incidental or consequential damages caused
by the breach of any express or implied warranty. Apart from the extent prohibited
by applicable law, any implied warranty of merchantability or tness for a particular
purpose is limited in time to the duration of the warranty. Some states, provinces or
jurisdictions do not allow the exclusion or limitation of incidental or consequential
damages, or limitations on how long an implied warranty lasts, and therefore, the
above exclusions or limitations may not apply to you. The warranty covers specic
legal rights which may vary by state, province and/or jurisdiction.
HOW TO OBTAIN WARRANTY SERVICE:
You must contact Customer Service at our toll-free number: 1-866-832-4843.
A Customer Service Representative will attempt to resolve warranty issues over the
phone. If the Customer Service Representative is unable to resolve the problem,
you will be provided with a case number and asked to return the product to
SENSIO Inc. Attach a tag to the product that includes: your name, address, daytime
contact telephone number, case number, and description of the problem. Also,
include a copy of the original sales receipt. Carefully package the tagged product
with the sales receipt, and send it (with shipping and insurance prepaid) to SENSIO
Inc.’s address. SENSIO Inc. shall bear no responsibility or liability for the returned
product while in transit to SENSIO Inc.’s Customer Service Center.
20

21
MEDIDAS DE SEGURIDAD
IMPORTANTES
Cuando se usan artefactos eléctricos, se deben siempre seguir las precauciones
básicas de seguridad, incluso lo siguiente:
1. LEA TODAS LAS INSTRUCCIONES.
2. No toque las supercies calientes. Utilice las asas o los mangos. Utilice guantes
de cocina o porto ollas.
3. Para protegerse del riesgo de descarga eléctrica, no sumerja el cable, el
enchufe ni la unidad en agua ni en ningún otro líquido.
4. Este electrodoméstico no debe ser utilizado por personas (incluidos niños)
con capacidades físicas, sensoriales o mentales reducidas, o con falta de
experiencia y conocimientos, a menos que una persona responsable de su
seguridad les haya brindado supervisión o instrucciones sobre el uso de los
electrodomésticos.
5. Los niños deben ser supervisados para asegurarse de que no juegan con el
aparato.
6. Desenchufe el electrodoméstico del tomacorriente cuando no esté en uso y
antes de limpiarlo. Deje que el aparato se enfríe antes de colocar, limpiar o
retirar piezas.
7. No utilice ningún electrodoméstico que tenga un cable o enchufe dañado, que
muestre un funcionamiento defectuoso o que se haya dañado de cualquier
manera. Lleve el electrodoméstico a un técnico calicado para que lo examine,
lo repare o le haga ajustes eléctricos o mecánicos.
8. El uso de accesorios no recomendados o vendidos por el fabricante puede
causar fuego, descarga eléctrica o lesiones.
9. No lo utilice en exteriores.
10. No permita que el cable cuelgue del borde de la mesa o encimera o toque
supercies calientes.
11. NO coloque el aparato encima de, cerca de o en un quemador eléctrico o de
gases calientes, ni dentro una estufa encendida.
12. Se debe tener extrema precaución al mover un aparato que contenga aceite
caliente u otros líquidos calientes.
13. Para desconectar, saque la cesta de freír del cuerpo y retire el enchufe del
tomacorriente de la pared.
14. No utilice el aparato para otro uso que no sea el previsto.
15. Asegúrese de que la cesta de frituras está bloqueada en la parte delantera del
cajón - ambas lengüetas del mango de la cesta de frituras deben insertarse
completamente en las muescas en la parte superior del cajón de la cesta.
16. Asegúrese siempre de que el cajón de la cesta de frituras esté completamente
cerrado, con el mango de la cesta de frituras bloqueado rmemente en el
cajón, mientras que la freidora está en funcionamiento.
ADVERTENCIA: La freidora de aire no funcionara a menos que el cajón de la
cesta de frituras este completamente cerrado.
PRECAUCIÓN: Después de freír el aire caliente, la cesta de frituras y el cajón
de la cesta de frituras y los alimentos cocidos están calientes. Se debe tener
extrema precaución al manejar la cesta / cajón de la cesta de fritura caliente.
SOLO PARA EL USO DOMESTICO

22
OTRAS MEDIDAS DE
SEGURIDAD IMPORTANTES
PRECAUCIÓN, SUPERFICIES CALIENTES: Este aparato emite calor y se escape el
vapor durante el uso. Se deben tomar las medidas necesarias para evitar riesgos
de quemaduras, incendios u otras lesiones a personas o daños a la propiedad.
PRECAUCIÓN: Este aparato está caliente durante el funcionamiento y retiene
el calor durante algún tiempo después de apagarlo. Siempre use guantes de
horno cuando maneje materiales calientes y permita que las partes metálicas se
enfríen antes de limpiar. No coloque nada encima del aparato mientras este en
funcionamiento o mientras este caliente.
1. Todos los usuarios de este electrodoméstico deben leer y comprender este
manual de instrucciones antes de poner en funcionamiento o limpiar el
aparato.
2. Enchufe la unidad solamente en un tomacorriente de 120V de CA.
3. Si el aparato comienza a funcionar mal durante el uso, retire la cesta de frituras
del cuerpo inmediatamente. Luego, desconecta el enchufe del tomacorriente.
No utilice ni intente reparar el aparato que funciona mal.
4. No deje este aparato desatendido durante el uso.
5. No sumerja el cable de alimentación en ningún líquido. Si el cable de
alimentación de este aparato está dañado, debe ser reemplazado por el servicio
de atención al consumidor.
6. Mantenga el cable fuera del alcance de los niños y bebés para evitar el riesgo
de descarga eléctrica y asxias.
7. Coloque la freidora de aire sobre una supercie nivelada, resistente al calor.
8. No obstruya la salida de aire o las entradas de aire en la parte posterior y en
los laterales de la freidora con cualquier objeto. Evite el escape de vapor de la
salida de aire cuando freía con aire.
9. Mantenga el aparato alejado al menos 4 pulgadas de las paredes u otros
objetos durante su funcionamiento.
10. Siempre use la manija de la cesta de freír para abrir el cajón de la cesta de freír.
11. No reemplace el cajón de la cesta de freír vacía (sin la cesta de freír) en
el cuerpo de la freidora de Aire. Compruebe que la cesta de frituras esté
bloqueada en su posición en el cajón.
ADVERTENCIA: Después de freír el aire, asegúrese de colocar el cajón de
la cesta de frituras sobre una supercie plana y resistente al calor antes de
presionar el botón de apertura de la cesta.
ADVERTENCIA: El llenado o el llenado excesivo de la cesta de frituras puede
dañar la freidora y causar lesiones graves.
12. Nunca mueva una freidora de aire caliente o una freidora de aire que
contenga alimentos calientes. Deje enfriar antes de mover.
¡ADVERTENCIA! Esta freidora no se debe usar para hervir agua.
¡ADVERTENCIA! Esta freidora nunca se debe usar para freír alimentos
en aceite abundante.
GUARDE ESTAS INSTRUCCIONES

23
NOTAS SOBRE EL ENCHUFE
Este aparato tiene un enchufe polarizado (una hoja es más ancha que la otra).
Para reducir el riesgo de descarga eléctrica, este enchufe encajará en una toma de
corriente polarizada sólo de una manera. Si el enchufe no entra completamente
en el tomacorriente, invierta el enchufe. Si el enchufe no puede encajar en la
toma eléctrica, póngase en contacto con un electricista calicado. No modique el
enchufe de ninguna manera.
NOTAS SOBRE EL CABLE
A. Un cable corto de alimentación (o cable de alimentación desmontable) es
suministrado para reducir el riesgo de que se enreden o se tropiecen con un
cable más largo.
B. Cables de alimentación más largos y removibles o las alargadoras son
disponibles y se pueden utilizarlos si se ejerce cuidado.
C. Si un cable largo y removible o una alargadora sea usado:
1. La potencia eléctrica marcada del cordón o de la alargadora debe ser,
por lo menos, tan fuerte como la potencia eléctrica del aparato;
2. Si el aparato es del tipo con conexión a tierra, el cable o la alargadora
debe ser un enchufe de 3 hojas con conexión a tierra;
3. El cordón debe estar dispuesto de manera que no cuelga del borde
de la encimera o la mesa donde pueda ser tirado por niños o donde
alguien se tropiece involuntariamente con el cable.
ADVERTENCIA SOBRE LOS PLASTIFICANTES
PRECAUCIÓN: A n de evitar que los plasticantes se adhieran al acabado de la
encimera, la mesa u otro mueble, coloque un posafuentes o salvamanteles que
NO SEA DE PLÁSTICO entre el electrodoméstico y la supercie de la encimera
o mesa. Si no se hace esto, es posible que el acabado se oscurezca, se formen
marcas permanentes o aparezcan manchas.
CORRIENTE ELÉCTRICA
Si el circuito eléctrico esta sobrecargado con otros artefactos, es posible que el
electrodoméstico no funcione correctamente. El electrodoméstico debe funcionar
en un circuito eléctrico separado de otros aparatos.
Note: keep illustration
callouts aligned

24
Conozca a su 5.3QT freidora de convección por aire con pantalla táctil
El producto puede variar con respecto a la ilustración.
Figura 1A
Partes de
la cesta de freír
Figura 1
Pantalla de control
táctil y digital
Cuerpo de la
freidora de aire
por convección
Pantalla digital
(Temperatura y
temporizador)
Control de
temporizador
Cesta de freír
Botón de liberación
de la cesta
Cajón de cesta de freír
Mango frío al tacto
Cable de alimentación
con enchufe polarizado
Controles ajustables
(Temperatura
y tiempo)
Control de
temperatura
Salida
de aire
Cerradura transparente
de lacesta
Botón de apertura
para la cesta
Cesta de frituras
Cesta de frituras
removible con
mangos frescos
al tacto

25
Detalles del panel de control
1. Una vez que el cajón de la cesta de freír y la cesta de freír estén correctamente encerrados en el
cuerpo de la freidora de convección por aire digital, se iluminará el botón rojo de inicio (
).
2. Pulse el botón rojo POWER (
). La TEMP predeterminada: 370ºF y TIME: 15:00 minutos se
alternarán en la pantalla digital. El botón rojo POWER (
) se pondrá blanco.
3. Pulse el botón de inicio (START) (
) para comenzar a freír con aire durante 15 minutos a 370ºF.
4. Pulse el botón de encendido (POWER) (
) para apagar la freidora de convección de aire digital.
El icono del ventilador blanco (
) continuará parpadeando durante 20 segundos.
Botones de control del temporizador
Seleccione el control del temporizador (min), agregue o disminuya el tiempo de cocción usando los
símbolos
+
y
–
.
Esto le permite agregar o disminuir el tiempo de cocción, de un minuto a la vez. Mantenga el botón
presionado cambiará rápidamente el tiempo.
Botones de control de temperatura
Seleccione el control de temperatura (°F), agregue o disminuya la temperatura usando los símbolos
+
y
–
. Esto le permite agregar o disminuir la temperatura de cocción a 10°F por vez. Mantenga el botón
presionado cambiará rápidamente la temperatura. Rango de control de temperatura: 180°F - 400°F.
Botón de ajustes de la Carta de comidas (M)
Seleccione el botón de ajustes de la Carta de comidas (M) le permite desplazarse por las 8 opciones del
menú preestablecido.
Una vez seleccionada, comienza la función predeterminada de tiempo y temperatura de cocción.
NOTA:
Puede anular los ajustes preajustados de MENÚ aumentando o disminuyendo TIEMPO y TEMP
manualmente.
Opciones predeterminadas de la Carta de comidas
8 preajustes para elegir: papas fritas, camarones, asados, pollo, pescado, carne, fundir queso y tocino.
Pantalla digital
Esta pantalla hará un seguimiento de la temperatura y el tiempo de cocción restante.
Ícono del ventilador blanco
El ícono de ventilador blanco parpadeante aparecerá cuando se encienda la freidora de convección de
aire y hasta 20 segundos después de que se apague.
Controles ajustables (temperatura y temporizador)
Los símbolos
+
y
–
le permiten agregar o disminuir la temperatura y el tiempo de cocción.
Carta de
comidas
preajustada
Ícono de
ventilador
blanco
Pantalla digital
Botón de
encendido
Precalentar
Controles
ajustables
(temperatura y
temporizador)
Carta de
comidas
Botón de control
de temporizador
Botón de
control de
temperatura
Botón Inicio /
Detener

26
Ajustes del panel de control
(M) CARTA DE COMIDAS TEMP
TIEMPO
PARA FREIR
TIEMPOS
PARA
VERIFICAR
LA COCCIÓN
(SUGERIDOS)
OPERACIÓN
Papas fritas, 4 - 6 tazas
(frescas, cortadas a mano,
1/4 a 1/3-pulg. de espesor)
400°F 22 mins 6 mins
Agite, frote o rocíe
con aceite si sea
necesario
Camarones, (descongelados,
rebozado), 2 lb.
320°F 8 mins 4 mins Voltee, agite
Carne, asado, chuleta,
2 - 4 lbs.
400°F 25 mins 12 mins
voltee y compruebe
que esté cocido
Pollo, 2 lb.,
(frescos/rebozados)
360°F 20 mins 10 mins
voltee y compruebe
que esté cocido
Pescado, 2 lb.
400°F 10 mins 5 mins
voltee y compruebe
que esté cocido
Bistec,
2 – 4 lbs., bien hecho
400°F 12 mins 6 mins
voltee y compruebe
que esté cocido
Queso fundido
340°F 3 mins 8 mins
Voltee el sándwich
4x, compruebe
queesté cocido
Tocino, nos, 1 lb. gruesos
400°F 10 mins 5 mins
voltee y compruebe
que esté cocido
PRECALENTAMIENTO
400°F 3 mins ——
Ajuste la freidora
para la receta
deseada
¡IMPORTANTE! Cuando la función de PRECALENTAMIENTO (P) está en funcionamiento, reduzca el
último TIEMPO (TIME) de cocción en 3 minutos.
¡IMPORTANTE! Dependiendo del grosor y/o la densidad de los alimentos, podría ser necesario usar
un termómetro de carne para vericar el progreso de cocción después de que el TIEMPO
preestablecido haya expirado.

27
Antes de utilizar por primera vez
1. Retire todo el material de embalaje y las etiquetas desde
el interior y fuera de la freidora de convección por aire.
Comprueba que no hay embalaje debajo o alrededor de la
cesta de freír
2. Su freidora de convección por aire viene con la cesta de
freír bloqueada en el cajón, dentro del cuerpo de la freidora.
Agarre fuerte el mango de la cesta de freír, deslice la
cerradura transparente en la parte superior del mango hacia
adelante y tire el cajón de la cesta de freír; coloque en un
área trabajo nivelada y limpia.
3. Para desbloquear y sacar la cesta de freír del cajón: Deslice la
cerradura transparente de la cesta en la parte superior del
mango hacia adelante para exponer el botón de liberación de
la cesta. Pulse el botón de liberación de la cesta con el pulgar
y levante la cesta de freír hacia arriba y hacia afuera del cajón.
(Véase gura 2)
4. Lave la cesta de freír y el cajón en el agua caliente y jabonosa.
5. NO SUMERJA EL CUERPO DE LA FREIDORA EN AGUA.
Limpie el cuerpo de la freidora con un paño húmedo.
Seca bien todas las partes.
6. Bloquear la cesta de freír limpia en el cajón. Hay 2 etiquetas en
cada lado del mango. Deslice las 2 etiquetas del mango en las
muescas en la parte superior del cajón de la cesta. Con la cesta
cerrada delante y el botón presionado, se puede escuchar un
clic audible cuando el mango de la cesta de freír se traba de
forma segura en su lugar. (Véase gura 3)
IMPORTANTEE: Deslice la cerradura de la cesta hacia atrás sobre el botón de liberación de la cesta para
evitar la liberación accidental de la cesta de freír.
7. Vuelva a colocar la cesta/cajón de freír ensamblada en el cuerpo de la freidora de convección por aire.
NOTA: Durante el primer uso, la freidora puede emitir un olor ligero. Esto es normal y no afectará el
sabor ni las frituras.
Instrucciones de uso
¡IMPORTANTE! La capacidad máxima de alimentos recomendada para esta cesta de freír es de 4.4 libras y
de 4 a 6 tazas. La cesta acomoda moldes de hornear hasta 9 pulgadas de ancho x 3 pulgadas de profundidad.
¡ADVERTENCIA! Esta unidad no debe utilizarse para hervir agua.
¡ADVERTENCIA! Esta freidora de convección por aire nunca debe ser usado para freír alimentos en aceite abundante.
1. Coloque la freidora de aire por convección en un área de trabajo plana y resistente al calor, cerca de
un tomacorriente.
2. Agarre rmemente el mango de la cesta de freír para abrir el cajón de la cesta de freír; Luego retire
el cajón de la caja principal y colóquelo en una supercie plana y limpia.
3. Coloque los alimentos en la cesta de freír. No llene demasiado. Para asegurar una cocción y
circulación de aire adecuadas, NUNCA llene la cesta de freír más de 2/3. Al freír las verduras frescas
con aire, no recomendamos agregar más de 4 a 6 tazas de comida a la cesta de frituras.
4. Coloque el cajón ensamblado de la cesta de freír en la parte frontal de la freidora por convección.
Asegúrese siempre de que el cajón de la cesta de freír esté completamente cerrado.
5. Enchufe el cable en un tomacorriente. Se escuchará un pitido y un botón rojo POWER (
)
aparecerá sobre un fondo negro.
6. Para empezar, presione el botón rojo POWER (
).
7. Aparecerá el panel de control de la pantalla táctil. El botón POWER (
) se pondrá blanco.
8. La hora y la temperatura predeterminadas: 15:00 minutos y 370ºF se alternarán en
la pantalla digital.
IMPORTANTE: Si no se presiona ningún botón, la freidora de convección de aire digital
permanecerá en el modo de espera
Figura 3
Figura 2

28
Manual de funcionamiento
Para ajustar el tiempo de freír con aire, pon el control del temporizador en (MIN), pulse el botón(+) o (–)
en el lado derecho del panel de control para avanzar o disminuir el tiempo en incrementos de 1 minuto,
de 1 a 60 minutos
NOTA: El temporizador también se puede ajustar cuando el tiempo se reeja en la pantalla digital
2. Para justar la temperatura, seleccione el botón (°F), pulse (
+) o (–) en el lado derecho del panel de
control para ajustar la TEMP (370°F) de 180°F a 400°F en incrementos de 10 grados.
3. Cuando aparezca el TIEMPO y la TEMP deseados en la pantalla, pulse el botón de encender (
) para
encender la freidora de convección. El ventilador de convección blanco ( ) girará cuando la freidora
de convección esté en funcionamiento. El TIEMPO preestablecido comenzará a contar hacia atrás.
TEMP y TIEMPO se alternarán en la pantalla digital.
IMPORTANTE:
Si no se presiona ningún botón, la freidora de convección de aire digital
permanecerá en el modo de espera.
4. Para apagar la freidora de convección por aire en cualquier momento, o para restablecer la hora
(TIEMPO), simplemente presione el botón blanco de ENCENDIDO (
) .
NOTA:
Para detener, saque el cajón del cuerpo en cualquier momento. Cuando se reemplaza el
cajón, se reanudará la fritura.
5. Cuando el TIEMPO restante llegue a 00:00, el ventilador de convección bianco (
) seguirá girando
durante 20 segundos, hasta que aparezca el ENCENDIDO (POWER) rojo (
) . Sonarán 5 pitidos
cuando la freidora de convección por aire se apague automáticamente
8 PREAJUSTES DE COMIDAS (M) (Papas fritas | Camarones | Asados | Pollo |
Pescado | Bistec | Fundir queso | Tocino)
1. Para usar las opciones de la CARTA de comida, simplemente pulse (M). Cada vez que se presiona
CARTA (MENU) (M), la siguiente opción de comida se iluminará..
2. Cuando el ícono de la opción de la carta de comida deseado esté iluminado, pulse el botón de inicio
() para encender la freidora de convección por aire.
IMPORTANTE: Si (M) no se vuelve a presionar, la freidora de convección de aire digital permanecerá
en el modo de espera.
NOTA: La cantidad, densidad, el peso de los alimentos van a cambiar el tiempo de cocción
necesario. Recuerde, freír en lotes más pequeños dará como resultado tiempos de cocción más
cortos y una mayor calidad de las comidas.
IMPORTANTE: Siempre revise los alimentos a la mitad del tiempo de cocción para determinar el
TIEMPO y TEMP de cocción.
3. Para ajustar el TIEMPO (TIME) de fritura durante la operación, pulse (
+) o (–) en el lado derechodel
panel de control para avanzar o reducir el tiempo en incrementos de 1 minuto a 60 minutos. Pulse
el (
+) o (–) en el lado derecho del panel de control para ajustar TEMP en incrementos de 10 grados
Función sencilla: PRECALENTAR (P)
Ahorre tiempo y haga las frituras perfectas sin esfuerzo.
1. PRECALENTAR: Si una receta requiere un horno precalentado o, al cocinar carnes o proteínas
que se benecian de un precalentamiento inicial, use la función PRECALENTAMIENTO (P).
Coloque la cesta / cajón de freír vacío en el cuerpo de la freidora de convección por aire.
Pulse CARTA (MENU) (M) hasta que (P) se ilumine.
• Pulse el botón de inicio (
) para comenzar.
• La hora y la temperatura predeterminadas: 3:00 minutos y 400ºF alternarán en
la pantalla digital.
• Cuando suenen 5 pitidos, coloque los alimentos en la cesta de freír, programe la freidora de
convección por aire y fría a la perfección.
¡IMPORTANTE! Cuando use el ajuste PRECALENTAR (P), reduzca el tiempo nal de la receta o el
tiempo predeterminado en 3 minutos.

29
Al freír por aire
1. Por favor, consulte la Carta de freír por aire y/o siga las instrucciones del paquete para TIEMPO y
TEMP sugeridos.
2. Siempre seque la comida antes de cocinar para estimular el dorado y evitar el exceso de humo.
3. Para garantizar una cocción/tostado uniforme, SIEMPRE abra el cajón de la cesta a la mitad del
tiempo de cocción y verique, gire o agite los alimentos en la cesta de freír. Algunas recetas
requieren que rociar con aceite en aerosol hasta la mitad de la cocción. Ajuste TIEMPO o TEMP si
es necesario.
PRECAUCIÓN: Siempre use guantes para horno cuando maneje la cesta caliente de la freidora.
PRECAUCIÓN: Asegúrese de que la cerradura transparente de la cesta esté en la posición
bloqueada al agitar los alimentos de la freidora. Para evitar lesiones o daños a bienes personales,
no pulse el botón de liberación de la cesta mientras agita la cesta de freír.
PRECAUCIÓN: El aceite caliente puede acumularse en la base del cajón. Para evitar el riesgo de
quemaduras o lesiones personales, o para evitar que el aceite contamine los alimentos fritos con
aire, siempre desbloquee y retire la cesta de freír del cajón antes de vaciarlo. NUNCA voltee el
cajón boca abajo con la cesta para freír.
4. permita que los alimentos cocinados descansen de 5 a 10 minutos. Retire el cajón de la máquina y
colóquelo sobre una supercie nivelada y resistente al calor. Luego, retire la cesta de freír del cajón.
5. Agite las comidas fritas al aire en un área de trabajo. Vuelve a colocar rápidamente la cesta de freír
al cajón y asegúrela en su lugar. Siga freír los lotes siguientes si tiene.
6. Para evitar el exceso de humo, cuando cocine alimentos grasos, como tocino, alitas de pollo o
salchichas, sería necesario vaciar la grasa del cajón de la cesta de freír entre lotes.
7. Para obtener resultados más crujientes, fría pequeños lotes de alimentos recién empanados. Haga
más espacio cortando los alimentos en pedazos más pequeños. Pulse los empanados en la comida
para ayudarlo a adherirse. Refrigere los alimentos empanados durante al menos 30 minutos antes
de freírlos
8. Coloque los alimentos empanados en la cesta de freír para que los alimentos no se toquen para
permitir el ujo de aire.
9. Los aerosoles de aceite son mejor. El aceite se distribuye de manera uniforme y va a utilizar menos
aceite. El aceite de canola, de oliva, de aguacate, de coco, de semillas de uva, de maní o el aceite
vegetal funcionan bien.
10. Desenchufe la freidora cuando no esté en uso.
Una nota sobre freír por aire alimentos preenvasados y congelados
1. ¡Donde los hornos de microondas producen resultados calientes y pesados y los hornos
tostadores toman tiempo, las frituras de convección por aire aseguran resultados rápidos,
crujientes y deliciosos!
2. Como regla general, dependiendo de la comida y la cantidad a cocinar, los TIEMPOS sugeridos
de cocción deben ser reducido un poco. Siempre compruebe los alimentos a la mitad del tiempo
de cocción para determinar el TIEMPO (TIME) y TEMP de cocción nal.
3. Verique siempre el progreso de cocción después de que el TIEMPO (TIME) haya expirado.

30
(Carta de freír de convección por aire (Incluye preajustes de la carta de alimentos))
¡ADVERTENCIA! Los tiempos son estimados y se basan en tamaños y pesos promedio.
SIEMPRE UTILICE UN TERMÓMETRO DE CARNE PARA ASEGURARSE DE QUE LA CARNE, LA AVES Y
EL PESCADO SE COCINEN COMPLETAMENTE ANTES DE SERVIR.
NOTA: Freír lotes más pequeños resultarán en tiempos de cocción más cortos y una mayor calidad de los
alimentos. Ajuste las temperaturas y los tiempos de freír según sea necesario para parecer a su gusto.
NOTA: A menos que los alimentos estén preenvasados y preengrasados, para obtener resultados
dorados y crujientes, todos los alimentos deben estar engrasados un poco antes de freír por aire.
ALIMENTOS TEMP
TIEMPO PARA FREÍR
ACTION
Tubérculos comestibles,
3-4 tazas frescas (tostadas)
370ºF 15 - 20 minss
voltee con aceite, agítelo 3x
Espárragos, 3 - 4 tazas, tallos delgados 370ºF 7 - 9 mins
rocíe con aceite, agítelo 2x
Judías verdes, guisantes dulces,
3 - 4 tazas frescas
370ºF 7 - 9 mins
rocíe con aceite, agítelo 1x
Brócoli, 3 - 4 tazas frescas (tostadas) 370ºF 5 - 7 mins
rocíe con aceite, agítelo 3x
Coles de Bruselas, cortad a la mitad,
3 - 4 tazas frescas
370ºF 8 - 10 mins
rocíe con aceite, agítelo 2x
Calabazas, sin semillas, Piezas de
1/2pulgada, 3 -4 tazas frescas
370ºF 15 mins
spray with oil, shake 3x
Hojas de hinojo, frescas,
cortadas
,
3 - 4 tazas frescas
370ºF 7 - 9 mins
rocíe con aceite, agítelo 2x
Batatas fritas, (Frescas, cortado a mano,
de1/8 a 1/4 de pulgada de grosor)
400ºF 13 - 15 mins
rocíe con aceite, agítelo 3x
Papas fritas, Papas de Idaho, 2 - 3
(Fresco, cortado a mano, de
1/4
a 1/3 de
pulgada de grosor) (congelado,
1/4
a 1/3
de pulgada de grosor)
400ºF
400ºF
12 mins
12 mins
rocíe con aceite, agítelo 3x
rocíe con aceite, agítelo 3x
Carne, Asado, Chuleta 360ºF 25 mins
Frote o rocíe con aceite,
agregue aderezos, voltee y
compruebe que esté cocido
Bistec/Entrecot, (2) 1.25 lb., 1 -1/2pulgada
de espesor, temperatura ambiente,
medio raro,
mediano,
bien hecho
400ºF
400ºF
400ºF
Precaliente + 6 mins
Precaliente + 10 mins
Precaliente + 14 mins
Frote o rocíe con aceite,
agregue aderezos, voltee
y compruebe que esté
cocido, deje a un lado ara
15minutos - compruébelo a
12 minutos, deje a un lado
para 15minutos
Hamburguesas,
1/3 lbs (hasta 4), raras - bien hecho
350ºF
Precaliente
+ 3 - 6 mins
Frote o rocíe con aceite,
agregue aderezos, voltee y
compruebe que esté cocido
Alitas de pollo,
2-3 lbs. (fresca / descongelada)
360ºF 20 mins
rocíe con aceite, agítelo 2x,
compruebe que esté cocido
Palitos de pollo, sin hueso 360ºF 18 - 20 mins
rocíe con aceite, agítelo 1x
Piezas de pollo, con hueso 360ºF 20 - 30 mins
Rocíe con aceite, voltee
ycompruebe que esté cocido
Filete de pescado
(fresco,descongelado, empanado)
400ºF 10 mins
Rocíe con aceite, voltee
ycompruebe que esté cocido
Camarones
(descongelados,empanados), 1 -2 lbs.
320ºF 8 mins
Rocíe con aceite, voltee
yagite
TENGA EN CUENTA:
El USDA recomienda que las carnes como la carne de res y el cordero, etc., se cocinen a una temperatura
interna de 145ºF / 63ºC. El cerdo debe cocinarse a una temperatura interna de 160ºF / 71ºC y las carnes de
ave deben ser cocinados a una temperatura interna de 170ºF/77ºC - 180ºF/82ºC para asegurarse de que
cualquier bacteria dañina ha sido matada. En el recalentamiento de carnes/carnes de ave, también deben
cocinarse a una temperatura interna de 165ºF/74ºC.

31
Instrucciones de mantenimiento
Este aparato requiere poco mantenimiento. No contiene piezas que el usuario pueda reparar. Cualquier
servicio que requiera el desmontaje que no sea la limpieza debe ser realizada por un técnico calicado.
Instrucciones de cuidado y limpieza
¡ADVERTENCIA! Deje que la freidora se enfríe completamente antes de limpiar.
1 Desenchufe la freidora de aire. Retire la cesta de frituras del cajón. Asegúrese de que el cajón de la
cesta de frituras y la cesta de fritura se hayan enfriado completamente antes de limpiar.
2. Lave el cajón de la cesta y la cesta de frituras en agua jabonosa y caliente. No utilice utensilios de
cocina metálicos ni limpiadores o productos de limpieza abrasivos, ya que esto podría dañar la
capa antiadherente
3. La cesta de freír y el cajón de la cesta de freír son aptos para lavaplatos.
Para obtener los mejores resultados, colóquelo en el estante superior de su lavaplatos para limpiar.
4. Limpie el cuerpo de la freidora de aire con un trapo húmedo, suave y no abrasivo para limpiar.
Instrucciones de almacenamiento
1. Asegúrese de que la freidora este desenchufada y todas las piezas estén limpias y secas antes de
guardarlas.
2. Nunca almacene la freidora de aire mientras este caliente o húmeda.
3. Bloquee la cesta de freír en el cajón y guárdela dentro del cuerpo de la freidora de convección de aire.
4. Almacene la freidora de aire en su caja o en un lugar limpio y seco.

32
Solucíon de problemas
PROBLEMA CAUSA POSIBLE SOLUCIÓN
La freidora
nofunciona
• La freidora no está enchufada
• La freidora se ha apagado
• Enchufe el cable en el tomacorriente
de pared.
• Para empezar, pulse el ENCENDIDO
(POWER)
( )
rojo.
• Asegúrese de que la cesta/cajón de
freír esté ensamblado bien y bien
colocado en el cuerpo de la freidora.
• Pulse CARTA (M) hasta que se
ilumine la opción de comida
deseada. Pulse el botón de inicio
( )
para comenzar la operación
Comidas
no están
cocinadas
• La cesta de freír está
sobrecargada
• Fría pequeños lotes de comidas.
• Agite los alimentos 2 veces o
3veces durante la cocción
• Aumente TEMP
• Aumente el TIEMPO de fritura
Comidas
no están
cocinadas
La comida
no se fríe
uniformemente
• La cesta de freír está
sobrecargada
• Fría lotes pequeños de comida.
• Aplique una capa ligera y uniforme
de aceite en aerosol a los alimentos
antes de freír.
• Agite los alimentos 2 veces o 3 veces
durante el proceso de cocción.
• Fría lotes pequeños de comida.
La cesta de
freír/el cajón
nose desliza
enel cuerpo
bien
• La cesta de freír está
sobrecargada
• Fría lotes pequeños de comida.
• La freidora no se enciende hasta
que la cesta/cajón de freír esté
ensamblada bien y bien colocado en
el cuerpo de la freidora.
Humo blanco
se escapa de
lafreidora
• La freidora está
sobrecargadacon aceite
• La cesta y el cajón de freír
nosehan limpiado
• Al freír alimentos con mucha grasa,
como el tocino, sería necesario
limpiar el cajón de la cesta de freír
con más frecuencia.
• Limpie la cesta de freír y el cajón
después de cada uso.
Las papas
fritasno se fríen
uniformemente
• La cesta de freír está
sobrecargada
• Remoje, enjuague y seque bien las
papas antes de freírlas.
• Use papas crudas y rmes.
Las papas
fritas no
soncrujientes
• Las papas fritas crudas tienen
demasiada agua
• Use una toalla de cocina limpia
para envolver y secar bien las papas
antes de agregar aceite.
• Corte las papas en pedazos más
pequeñas.
• Agite y rocíe las papas con
frecuencia.

Recetas
33
Pollo de limón con Za’atar y berenjena
Za’atar es una especia popular de Oriente Medio que se remonta a la antigüedad. Hemos
envuelto al pollo con esta mezcla aromática de tomillo, zumaque, orégano y semillas de sésamo
tostado. El limón fresco da sabores cítricos y húmedos.
La freidora de aire es la herramienta perfecta para preparar pollo asado jugoso y delicioso, la
cesta de freír permite que los goteos (sabor líquido) marinan las verduras y se viertan en el cajón
fácil de limpiar.
Serves 6
• 1 (3 1/2 – 4 1/2 lb) pollo entero
• 1 limón, pelado y cortado a la mitad
• 1 cucharadita de sal, dividida
• 1 berenjena china
• 1 calabacín
• 1 taza de condimento zaatar
1. Retire los menudos de pollo.
2. Enjuague el pollo por dentro y por fuera. Recorte todo el exceso de grasa y use toallas de
papel para secar. Pon tus manos dentro de la piel del pollo para soltar la carne. Use un
cuchillo alado para perforar todos los trozos de grasa. Corte de 3 a 4 rajas a lo largo de la
columna vertebral del pollo para quita la grasa extra.
3. Cubra generosamente el pollo por dentro y por fuera con zaatar. Frota generosamente
zaatar debajo de la piel de pollo. Exprime cada mitad de limón sobre el pollo; exprime de
nuevo y coloque dentro la cavidad del pollo.
4. Meta las puntas de las alas debajo del cuerpo del pollo. Para garantizar una piel crujiente,
refrigere el pollo sin cubrir durante 30 minutos antes de freírlo al aire.
5. Recorte la berenjena y el calabacín, córtelos en discos y luego cubra la parte inferior de la
cesta de la freidora de aire. Coloque el pollo, con la pechuga hacia abajo, sobre la cama
de verduras.
6. Use el menú de alimentos predenido para POLLO. Cuando el ícono POLLO (
) se ilumina,
presione el botón START (
) para comenzar a freír a 360 ° F. Aumente el TIEMPO a 30
minutos.
7. Dé la vuelta al pollo, con la pechuga hacia arriba. Espolvoree la ralladura de limón sobre la
pechuga del pollo.
8. Siga friendo al aire a 365ºF durante 25 minutos, o hasta que los jugos salgan limpios cuando
corta entre una pata y el muslo o cuando un termómetro indique 170ºF/77ºC - 180ºF / 82ºC.
9. Retire el pollo y las verduras en un plato y tienda con papel de aluminio por
aproximadamente 20 minutos. Corta el pollo en un plato y sírvelo con las verduras

Recetas
34
Flor de cebolla frita con aire
• 3/4 taza de harina de arroz
• 1 cebolla grande
• 3/4 taza de pan rallado italiano
• 3 cucharaditas de aceite de oliva
• 4 cucharadas de mezcla de condimentos Cajun, dividida
• 2 cucharadas de yogur
• 1 cucharada de agua
• 2 huevos grandes
1. Estación de empanado de 3 boles: mezcle las migas de pan con aceite de oliva, 2
cucharadas de sazón cajún.
2. En un bol pequeño, mezcle 2 cucharadas de condimento cajun en la harina.
3. En otro bol, bata el yogur, el agua y los huevos.
4. Hacer la or: Pele la cebolla, corte la parte superior. Coloque el lado cortado hacia abajo en
una tabla para cortar.
5. Comenzando 1/2 pulgada desde la raíz, corte hacia abajo hasta la tabla de cortar. Repita
para hacer 4 cortes espaciados uniformemente alrededor de la cebolla.
6. Siga cortando entre cada sección hasta que haya 8 cortes en total.
7. Coloque la cebolla en rodajas en un baño de agua con hielo durante al menos 2 horas
durante la noche. Retire del agua, seque con palmaditas. Abra la cebolla para que los
pétalos estén abiertos.
8. Coloque la cebolla en un bol grande. Rocíe la cebolla generosamente con la mezcla de
harina. Asegúrese de meterse entre todos los pétalos. Voltee la cebolla boca abajo para
eliminar el exceso de harina.
9. Con un cucharón, vierta la mezcla de huevo en cada grieta. Levante la cebolla y gírela para
asegurarse de que el exceso de huevo gotee.
10. Espolvoree la cebolla muy generosamente con la mezcla de migas de pan. Pulse las migas
de pan entre todos los pétalos.
11. Coloque la or de cebolla empanizada en la cesta de freír.
12. Cubra la parte superior de la cebolla con papel de aluminio.
13. Use la Carta de alimentos para POLLO (CHICKEN). Cuando el ícono CHICKEN (
) se ilumina,
pulse el botón de inicio (START) (
) para comenzar a freír a 360ºF durante 20 minutos
14. Verique el cocimiento de la cebolla.
15. Retire el papel de aluminio. Aumente la TEMP a 400ºF y siga friendo con aire durante 5
minutos adicionales hasta que se dore y se ponga crujiente.

Recetas
35
Colior frita según la esposa de General Tso
Si el General Tso tuviese esposa y ella tuviera una freidora, seguramente cocinaría
este riquísimo plato.
• 1 cogollo (4 tazas) de colior
• 2 cucharadas de aceite de canola
• 4 a 6 chiles rojos secos y con semillas
Salsa
• 2 cucharadas de vinagre de arroz sin sazonar
• 2 cucharaditas de aceite de sésamo
• 1/4 taza de salsa de ostras
• 2 cucharadas de agua o más según sea necesario
• 2 cucharadas de jengibre rallado
• 4 dientes de ajo rallados
Aderezo
• Arroz integral
• semillas de sésamo tostadas
1. Combine todos los ingredientes de la salsa en un tazón grande. Corte la colior en oreros
y mezcle en el tazón. Agregue chiles. Cubra bien las ores y coloque en la cesta de la
freidora de aire.
2. Fría con aire a 365ºF durante 12 a 14 minutos, agite a los 6 minutos.

Recetas
36
Bollos picantes de pizza fritos con aire
Crujientes y picantes bocadillos de bondad, bañados en una sabrosa salsa de tomate, estos
rollos de pizza serán el éxito de cualquier esta o reunión. Una excelente manera de usar sobras,
las posibilidades son innitas.
• aceite de oliva en aerosol
• 2 salchichas italianas picantes, peladas
• 2 tazas de queso mozzarella rallado, o cualquier queso de su elección
• 4 chiles jalapeños, semillas, tallos eliminados, picados
• 1/2 lb de setas, en rodajas
• Masas de wonton
• Salsa cremosa de espagueti de tomate, para sumergir
• 1 huevo, batido, para sellar los rollos
1. Cocine la salchicha italiana, las setas y los pimientos en la cesta de freír
2. Use el menú de alimentos predenido para BACON. Cuando el ícono BACON (
) se ilumina,
pulse el botón START (
) para comenzar a freír a 400 ° F, revolviendo cada 5 minutos
durante 10 - 15 minutos hasta que se dore por completo.
3. Escurra la salchicha y las verduras en un plato de toallas de papel. Cuando esté lo
sucientemente frío para manipular, desmenuce la salchicha cocida en pedazos pequeños.
Combine salchichas, setas y pimientos en un bol pequeño.
4. Coloque una masa de won ton en la supercie de trabajo. En la parte inferior de la masa
forma una línea de ingredientes: mezcla de salchicha cubierta con un puñado de queso.
5. Enrolle una vez y luego doble los lados. Siga enrollando hasta que se forme el rollo de
pizza. Cepille una pequeña cantidad de huevos en el extremo del bollo para sellar. Repita
hasta que la cesta de freír esté llena.
6. Coloque los bollos de pizza hacia abajo en la cesta de la freidora de aire. Rocíe con aceite de
oliva.
7. Fría con aire a 375ºF durante 8 a 10 minutos. De la vuelta a los bollos de pizza hasta la mitad
de la freidura.
8. Sirva con su salsa de tomate favorita para mojar.

Recetas
37
Papas de calabacín fritas con aire
Para servir 4 personas
• 2 calabaza calabacín, recortada en rodajas
• Sal
• Sal kosher, a gusto
• 2 cucharadas de aceite de oliva
• 1/2 taza de migas de pan Panko
• 2 cucharadas de condimento de hierba de parmesano
Salsa de yogur y pesto
• 3 cucharadas de yogurt natural
• 1 cucharada de pesto de albahaca
1. Corte los calabacines por la mitad a lo largo. Corta cada mitad en 3 rodajas largas. Corta las
rodajas por la mitad para formar papas con calabacín.
2. Espolvoree las papas de calabacín con sal y colóquelas en un colador durante al menos 10
minutos a 2 horas, para extraer el exceso de humedad.
3. Seque el calabacín con toallas de papel; luego agrega a un bol grande.
4. Rocíe aceite de oliva sobre las papas fritas de calabacín y mezcle hasta que estén bien
cubiertas.
5. Agregue pan rallado Panko, aceite y condimento a un plato, mezcle bien.
6. Enrolle el calabacín engrasado en el Panko, cubriendo todos los lados y presionando
rmemente para que las migas se peguen.
IMPORTANTEE: trabaje con lotes, no sobrecargue la cesta de la freidora de aire.
7. Fría con aire a 365ºF, hasta que esté ligeramente crujiente y dorado, unos 10 minutos,
girando las rodajas hasta la mitad de freírlas.
8. Traslade las papas fritas de calabacín a un plato, espolvoree con sal. Combina el yogur y el
pesto en un plato pequeño. Sirva inmediatamente.

Recetas
38
Cupcakes de bananas y pepitas de chocolate
(preparados en 8 minutos)
Bananas frescas y jugosas en cada bocado. Ligero y dulce, estos cupcakes son muy fáciles de
hacer y se hornean en 8 minutos. Estos postres dulces van a cualquier parte. Tome uno con una
taza de café, y los niños pueden tomar un vaso de leche. Fría todos los pequeños pasteles que
necesite, ¡guarde la masa restante y los cupcakes frescos al día siguiente!
• Moldes de papel de aluminio para cupcakes
• Aceite de coco en aerosol
• 1 (16 oz.) paquete de preparados para pasteles blancos, de su marca favorita
• 1 clara de huevo
• 1 huevo
• 3 cucharadas de aceite vegetal
• 1 banana madura, aplastada
• 1-1/4 taza de leche de almendras, de vainilla o natural, sin azúcar
• 1 taza de galletas con pepitas de chocolate molidas
• 1/4 taza de pepitas de chocolate
• 1/4 taza pepitas de butterscotch
1. Haga puré la banana en un bol grande. Agregue el resto de los ingredientes y mezcle hasta
que estén bien mezclados.
2. Coloque papel de aluminio en la cesta de freír. Rocié bien los moldes de cupcake de
aluminio con aceite de coco. Llene los moldes de los cupcakes por igual, no más de 2/3 con
la mezcla.
3. Fría con aire a 365ºF, hasta que esté dorado, aproximadamente 8 minutos.
4. Verique que esté cocido. Pon un palillo en el centro del cupcake; si sale limpio, los
cupcakes están completamente horneados. De lo contrario, continúe freír al aire por 1
minuto adicional si es necesario.

Garantía limitada de DOS AÑOS
Mediante la presente, SENSIO Inc. garantiza que, durante el plazo de DOS AÑOS a
partir de la fecha de compra, este producto no presentará defectos mecánicos en el
material ni en la mano de obra, y durante 90 días, no los presentará en las piezas no
mecánicas. A su entera discreción, SENSIO Inc. reparará o reemplazará el producto
que resulte defectuoso, o emitirá un reembolso por el producto durante el plazo de
garantía.
Esta garantía es válida únicamente para el comprador minorista original a partir
de la fecha de compra minorista inicial y no es transferible. Conserve el recibo de
compra original, ya que se exige una prueba de compra para obtener la validación
de la garantía. Las tiendas minoristas no tienen derecho a alterar, modicar ni
corregir de ninguna manera los términos y condiciones de la garantía.
EXCLUSIONES:
La garantía no cubre el desgaste normal de las piezas ni el daño ocasionado por
cualquiera de las siguientes causas: uso negligente del producto, uso de un voltaje
o corriente incorrectos, mantenimiento de rutina inadecuado, uso contrario al de
las instrucciones de funcionamiento, desarmado, reparación o alteración a cargo de
personas que no sean miembros del personal calicado de SENSIO Inc. Asimismo,
la garantía no cubre actos de la naturaleza, como incendios, inundaciones,
huracanes o tornados.
SENSIO Inc. no asumirá responsabilidad por daños incidentales o resultantes
ocasionados por la violación de cualquier garantía expresa o implícita. Salvo en
la medida en que lo prohíban las leyes aplicables, cualquier garantía implícita de
comerciabilidad o aptitud para un propósito particular se limita temporalmente a la
duración de la garantía. Algunos estados, provincias o jurisdicciones no permiten la
exclusión ni la limitación de daños incidentales o resultantes, o limitaciones sobre
la duración de una garantía implícita y, por lo tanto, es posible que las exclusiones o
limitaciones mencionadas no le correspondan. La garantía cubre derechos legales
especícos que pueden variar de un estado, una provincia o una jurisdicción a
otros.
CÓMO OBTENER EL SERVICIO DE GARANTÍA:
Debe comunicarse con el Servicio de atención al cliente a nuestro número
telefónico gratuito: 1-866-832-4843. Un representante del Servicio de atención
al cliente intentará resolver los problemas referidos a la garantía por teléfono.
Si este no puede resolver el problema, le proporcionarán un número de caso y
le solicitarán que devuelva el producto a SENSIO Inc. Adhiera una etiqueta al
producto que incluya: su nombre, dirección, número telefónico de contacto durante
el día, número de caso y descripción del problema. Además, incluya una copia del
recibo de compra original. Envuelva cuidadosamente el producto etiquetado con
el recibo de compra, y envíelo (con el envío y el seguro prepagados) a la dirección
de SENSIO Inc. SENSIO Inc. no asumirá obligación ni responsabilidad alguna por el
producto devuelto que esté en el trayecto hacia el Centro de servicio al cliente de
SENSIO Inc.
39

GRACIAS
Para su compra
BellaLifestyle
BellaLife
@
bellahousewares.com
inspírate
Registrarse
y rmar para arriba para
anuncios especiales y los ingresos
de la moda!
Cuéntanos lo que piensas!
Evaluar, revisar o hacernos una
pregunta.
!
40


For customer service questions or comments
Dudas o comentarios contactar el departamento de servicio al cliente
1-866-832-4843 / [email protected]
BELLA is a registered trademark of Sensio Inc., Montréal, Canada H3B 3X9.
All rights reserved.
BELLA es una marca registrada de Sensio Inc., Montréal, Canada H3B 3X9.
Todos los derechos reservados.
SO_315582 Rev. 2
-
 1
1
-
 2
2
-
 3
3
-
 4
4
-
 5
5
-
 6
6
-
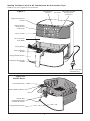 7
7
-
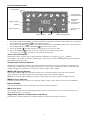 8
8
-
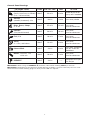 9
9
-
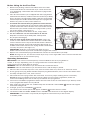 10
10
-
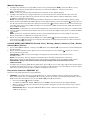 11
11
-
 12
12
-
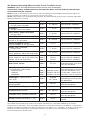 13
13
-
 14
14
-
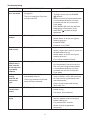 15
15
-
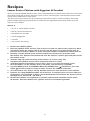 16
16
-
 17
17
-
 18
18
-
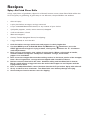 19
19
-
 20
20
-
 21
21
-
 22
22
-
 23
23
-
 24
24
-
 25
25
-
 26
26
-
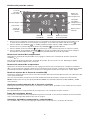 27
27
-
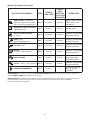 28
28
-
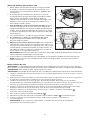 29
29
-
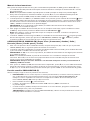 30
30
-
 31
31
-
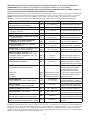 32
32
-
 33
33
-
 34
34
-
 35
35
-
 36
36
-
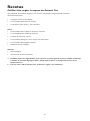 37
37
-
 38
38
-
 39
39
-
 40
40
-
 41
41
-
 42
42
-
 43
43
-
 44
44


Bella 5.3 QT Touchscreen Air Convection Fryer El manual del propietario
- Categoría
- Pequeños electrodomésticos de cocina
- Tipo
- El manual del propietario
- Este manual también es adecuado para
en otros idiomas
Artículos relacionados
-
Bella 5.3 QT Touchscreen Air Convection Fryer El manual del propietario
-
-
-
-
-
-
-
-
-