MasterCool HIGH PRECISION CHARGING SCALE Instrucciones de operación
- Categoría
- Escalas personales
- Tipo
- Instrucciones de operación
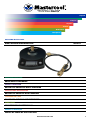
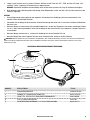
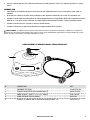
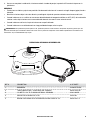
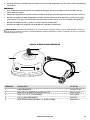
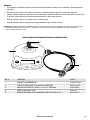
MasterCool HIGH PRECISION CHARGING SCALE es una balanza de carga de alta precisión diseñada para pesar con precisión refrigerantes y otros fluidos. Con una capacidad de 5000 gramos y una precisión de 1 gramo, esta báscula es ideal para aplicaciones que requieren mediciones precisas. La báscula también cuenta con una función de tara que permite a los usuarios restar el peso del recipiente o contenedor del peso total, lo que facilita la medición del peso neto del contenido.
MasterCool HIGH PRECISION CHARGING SCALE es una balanza de carga de alta precisión diseñada para pesar con precisión refrigerantes y otros fluidos. Con una capacidad de 5000 gramos y una precisión de 1 gramo, esta báscula es ideal para aplicaciones que requieren mediciones precisas. La báscula también cuenta con una función de tara que permite a los usuarios restar el peso del recipiente o contenedor del peso total, lo que facilita la medición del peso neto del contenido.


-
 1
1
-
 2
2
-
 3
3
-
 4
4
-
 5
5
-
 6
6
-
 7
7
-
 8
8
-
 9
9
-
 10
10
-
 11
11
-
 12
12
-
 13
13
-
 14
14
-
 15
15
-
 16
16


MasterCool HIGH PRECISION CHARGING SCALE Instrucciones de operación
- Categoría
- Escalas personales
- Tipo
- Instrucciones de operación
MasterCool HIGH PRECISION CHARGING SCALE es una balanza de carga de alta precisión diseñada para pesar con precisión refrigerantes y otros fluidos. Con una capacidad de 5000 gramos y una precisión de 1 gramo, esta báscula es ideal para aplicaciones que requieren mediciones precisas. La báscula también cuenta con una función de tara que permite a los usuarios restar el peso del recipiente o contenedor del peso total, lo que facilita la medición del peso neto del contenido.
en otros idiomas
- français: MasterCool HIGH PRECISION CHARGING SCALE Mode d'emploi
- italiano: MasterCool HIGH PRECISION CHARGING SCALE Istruzioni per l'uso
- English: MasterCool HIGH PRECISION CHARGING SCALE Operating instructions
- Deutsch: MasterCool HIGH PRECISION CHARGING SCALE Bedienungsanleitung
- Nederlands: MasterCool HIGH PRECISION CHARGING SCALE Handleiding
- português: MasterCool HIGH PRECISION CHARGING SCALE Instruções de operação
Artículos relacionados
-
MasterCool HIGH PRECISION CHARGING SCALE Instrucciones de operación
-
-
-
-
MasterCool 98209 Instrucciones de operación
-
-
MasterCool 98210-BL Instrucciones de operación
Otros documentos
-
Rothenberger Refrigerant scale ROSCALE 120 Manual de usuario
-
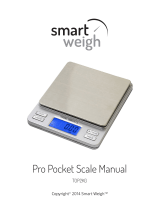 Smart Weigh top2kg Manual de usuario
-
HAEGER KS-05B.002B Manual de usuario
-
-
Joycare JC-189 Manual de usuario
-
Yellow Jacket Digital Electronic Charging Scales Manual de usuario
-
 Smart Weigh FBA_ACE200 Manual de usuario
-
Kiwi KKS-1100 Manual de usuario

