
0099001431E-02
PLEASE SAVE THIS OWNERS MANUAL AND READ BEFORE EACH USE. This manual
will explain how to use the battery charger safely and effectively. Please read and follow
these instructions and precautions carefully.
POR FAVOR CONSERVE ESTE MANUAL DEL USUARIO Y LEALO ANTES DE CADA
USO. En este manual le explica cómo utilizar el cargador de batería de manera segura y
conable. Por favor, lea y siga las siguientes instrucciones y precauciones.
6V/12V Universal Charger
for Ride-on Toys
6V/12V Cargador universal
para juguetes montar-en
OWNERS MANUAL
MANUAL DEL USUARIO

CONTENTS
IMPORTANT SAFETY INSTRUCTIONS – SAVE THESE INSTRUCTIONS ........................................................3
PERSONAL SAFETY PRECAUTIONS .................................................................................................................3
PREPARING TO CHARGE ...................................................................................................................................4
CHARGER LOCATION .........................................................................................................................................4
DC CONNECTION PRECAUTIONS .....................................................................................................................4
GROUNDING AND AC POWER CORD CONNECTIONS ...................................................................................4
FEATURES ...........................................................................................................................................................5
CONTROL PANEL ................................................................................................................................................5
ASSEMBLY INSTRUCTIONS ...............................................................................................................................5
OPERATING INSTRUCTIONS .............................................................................................................................5
MAINTENANCE AND CARE ................................................................................................................................6
TROUBLESHOOTING ..........................................................................................................................................6
SPECIFICATIONS ................................................................................................................................................7
REPLACEMENT PARTS/ACCESSORIES ...........................................................................................................7
BEFORE RETURNING FOR REPAIRS ................................................................................................................7
LIMITED WARRANTY ..........................................................................................................................................7
CONTENIDOS
INSTRUCCIONES IMPORTANTES DE SEGURIDAD – GUARDE ESTAS INSTRUCCIONES ..........................8
PRECAUCIONES DE SEGURIDAD PERSONAL ................................................................................................8
PREPARACIÓN PARA LA CARGA ......................................................................................................................9
UBICACIÓN DEL CARGADOR ............................................................................................................................9
PRECAUCIONES DE CONEXIÓN EN CC ...........................................................................................................9
CONEXIONES A TIERRA Y ENERGÍA DE CA .....................................................................................................9
CARACTERÍSTICAS ..........................................................................................................................................10
PANEL DE CONTROL ........................................................................................................................................10
INSTRUCCIONES DE MONTAJE ......................................................................................................................10
INSTRUCCIONES DE OPERACIÓN ..................................................................................................................11
MANTENIMIENTO Y CUIDADO .........................................................................................................................12
LOCALIZACIÓN Y SOLUCIÓN DE PROBLEMAS .............................................................................................12
ESPECIFICACIONES .........................................................................................................................................12
REPUESTOS / ACCESORIOS ...........................................................................................................................12
ANTES DE DEVOLVER A REPARACIONES .....................................................................................................13
GARANTÍA LIMITADA .........................................................................................................................................13

• 3 •
1. IMPORTANT SAFETY INSTRUCTIONS – SAVE THESE INSTRUCTIONS
1.1 SAVE THESE INSTRUCTIONS – This manual contains important safety and operating instructions.
1.2 Keep out of reach of children.
1.3 Do not expose the charger to rain or snow.
1.4 Use of an attachment not recommended or sold by the battery charger manufacturer may result in a risk
of re, electric shock or injury to persons.
1.5 To reduce the risk of damage to electric plug and cord, pull by the plug rather than the cord when
disconnecting charger.
1.6 An extension cord should not be used unless absolutely necessary. Use of improper extension cord
could result in a risk of re and electric shock. If an extension cord must be used, make sure:
• The pins on plug of extension cord are the same number, size and shape as those of plug on charger.
• The extension cord is properly wired and in good electrical condition.
• The wire size is large enough for AC ampere rating of charger as specied in section 6.
1.7 Do not operate charger with damaged cord or plug – replace the cord or plug immediately.
1.8 Do not operate charger if it has received a sharp blow, been dropped, or otherwise damaged in any way;
take it to a qualied serviceman.
1.9 Do not disassemble charger; take it to a qualied serviceman when service or repair is required. Incorrect
reassembly may result in a risk of electric shock or re.
1.10 To reduce risk of electric shock, unplug charger from outlet before attempting any maintenance or
cleaning. Turning off controls will not reduce this risk.
1.11 WARNING: RISK OF EXPLOSIVE GASES.
a. WORKING IN VICINITY OF A LEAD-ACID BATTERY IS DANGEROUS. BATTERIES GENERATE
EXPLOSIVE GASES DURING NORMAL BATTERY OPERATION. FOR THIS REASON, IT IS OF UTMOST
IMPORTANCE THAT YOU FOLLOW THE INSTRUCTIONS EACH TIME YOU USE THE CHARGER.
b. To reduce risk of battery explosion, follow these instructions and those published by battery manufacturer
and manufacturer of any equipment you intend to use in vicinity of battery. Review cautionary markings
on these products and on engine.
2. PERSONAL SAFETY PRECAUTIONS
2.1 Consider having someone close enough by to come to your aid when you work near a lead-acid battery.
2.2 Have plenty of fresh water and soap nearby in case battery acid contacts skin, clothing, or eyes.
2.3 Wear complete eye protection and clothing protection. Avoid touching eyes while working near battery.
2.4 If battery acid contacts skin or clothing, wash immediately with soap and water. If acid enters eye,
immediately ood eye with running cold water for at least 10 minutes and get medical attention immediately.
2.5 NEVER smoke or allow a spark or ame in vicinity of battery or engine.
2.6 Be extra cautious, to reduce risk of dropping a metal tool onto battery. It might spark or short-circuit
battery or other electrical part that may cause explosion.
2.7 Remove personal metal items such as rings, bracelets, necklaces, and watches when working with a lead-
acid battery. A lead-acid battery can produce a short-circuit current high enough to weld a ring or the like to
metal, causing a severe burn.
2.8 Use charger for charging 6V and 12V LEAD-ACID rechargeable batteries. It is not intended to supply
power to a low voltage electrical system other than in a starter-motor application. Do not use battery
charger for charging dry-cell batteries that are commonly used with home appliances. These batteries
may burst and cause injury to persons and damage to property.
2.9 NEVER charge a frozen battery.
6V/12V Universal Charger for Ride-on Toys
OWNERS MANUAL
PLEASE SAVE THIS OWNERS MANUAL AND READ BEFORE EACH USE.
This manual will explain how to use the charger safely and effectively.
Please read and follow these instructions and precautions carefully.

• 4 •
3. PREPARING TO CHARGE
3.1 Make sure you have one of the battery systems listed in Replacement Parts/Accessories.
3.2 Remove the battery from the vehicle to charge. Make sure all accessories in the vehicle are off, to
prevent arcing.
3.3 Clean the battery and examine for excessive wear, cracks, bulging or damage. If damage is detected, do
not charge – replace immediately. If the battery is hot, allow it to cool before charging.
3.4 Study all battery manufacturer’s specic precautions.
3.5 Make sure area around battery is well ventilated while the battery is being charged. Gas can be forcefully
blown away by using a piece of cardboard or other non-metallic material as a fan.
4. CHARGER LOCATION
4.1 Locate charger as far away from battery as DC cables permit.
4.2 Never place charger directly above battery being charged; gases from battery will corrode and damage charger.
4.3 Never allow battery acid to drip on charger when reading electrolyte specic gravity or lling battery.
4.4 Do not operate charger in a closed-in area or restrict ventilation in any way.
4.5 Do not set a battery on top of charger.
5. DC CONNECTION PRECAUTIONS
5.1 Connect and disconnect DC output connectors only after removing AC cord from electric outlet.
5.2 Never connect the output cable assemblies together for use in other applications, such as external
battery or other power source charging, or to extend the output cable length, as reverse polarity and/or
overcharge conditions will occur.
6. GROUNDING AND AC POWER CORD CONNECTIONS
6.1 This battery charger is for use on a nominal 120 volt circuit. The plug must be plugged into an outlet that
is properly installed and grounded in accordance with all local codes and ordinances. The plug pins must
t the receptacle (outlet). Do not use with an ungrounded system.
6.2 DANGER: Never alter the AC cord or plug provided – if it does not t the outlet, have a proper grounded
outlet installed by a qualied electrician. An improper connection can result in a risk of an electric shock
or electrocution.
NOTE: Pursuant to Canadian Regulations, use of an adapter plug is not allowed in Canada. Use of an
adapter plug in the United States is not recommended and should not be used.
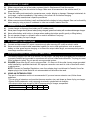
6.3 USING AN EXTENSION CORD
The use of an extension cord is not recommended. If you must use an extension cord, follow these
guidelines:
• Pins on plug of extension cord must be the same number, size, and shape as those of plug on charger.
• Ensure that the extension cord is properly wired and in good electrical condition.
• Wire size must be large enough for the AC ampere rating of charger, as specied:
Length of cord (feet) 25 50 100 150
AWG* size of cord 18 18 16 16
*AWG-American Wire Gauge

• 5 •
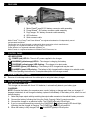
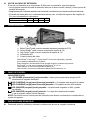
7. FEATURES
4
1
5
2
3
1. MotionTrendz
®
small 6/12V battery connector cable assembly
2. Power Wheels
®
12V battery connector cable assembly
3. Peg Perego
®
12V battery connector cable assembly
4. LED indicators
5. Quick-connect cable
MotionTrendz
®
, Peg Perego
®
and Power Wheels
®
are registered trademarks of independently owned
and operated companies.
This product has not been licensed or endorsed by these companies or their manufacturers.
Peg Perego
®
is a registered trademark of Peg Perego
®
U.S.A. Inc.
Power Wheels
®
is a registered trademark of Mattel
®
, Inc.
MotionTrendz
®
is a registered trademark of Ballard Pacic Resources, Inc.
8. CONTROL PANEL
LED INDICATORS
POWER (red) LED lit – There is AC power supplied to the charger.
CHARGING (yellow/orange) LED lit – The charger is charging the battery.
CHARGING (yellow/orange) LED ashing – The charger is in abort mode.
CHARGED (green) LED ashing – The battery is 80% charged and may be used.
CHARGED (green) LED pulsing – The battery is fully charged and the charger is in maintain mode.
NOTE: See Operating Instructions for a complete description of the charger modes.
9. ASSEMBLY INSTRUCTIONS
9.1 Remove all cord wraps and uncoil the cables prior to using the battery charger.
10. OPERATING INSTRUCTIONS
BATTERY INFORMATION
This charger can be used with 6 and 12V batteries; it automatically detects your battery type.
CHARGING
NOTE: Examine the battery for excessive wear, cracks, bulging or damage each time you charge it. If
damage is detected, do not charge the battery; replace it immediately. If the battery is hot, allow it to cool
before charging.
1. Select the proper output cable by matching the output cable connector to the vehicle’s battery connector.
2. Connect the battery, following the Using the Quick-Connect Cable Connectors section.
3. Connect the charger to an electrical outlet. The POWER
(red) LED will light.
4. If you’ve connected everything correctly, the CHARGING
(yellow/orange) LED should light,
indicating that the charger is charging. The POWER
(red) LED will remain lit.
5. When the battery is fully charged, the
CHARGED (green) LED will pulse.

• 6 •
IMPORTANT: This charger does not have an ON/OFF switch. ON and OFF are controlled by plugging
in the charger to the AC wall outlet. The charger will not supply current to the connector until a battery is
properly connected.
USING THE QUICK-CONNECT CABLE CONNECTORS
1. Connect the cable connector to the charger. Make sure to place the charger on a dry, non-ammable
surface.
2. With the charger disconnected from the wall outlet, connect the cable connector by connecting the
blue connector to the blue connector on the end of the charger cable. Connect the other end of the
cable connector to the battery or ride-on toy charging outlet.
NOTE: See Replacement Parts/Accessories for more connector information.
NOTE: Never connect the cable connectors together for use in other applications, such as external
battery or other power source charging, or to extend the output cable length, as reverse polarity and/or
overcharge conditions will occur.
QUICK CHARGE
When the CHARGED
LED begins to ash, the battery is ready to use. Unplug the charger from
the wall outlet and then disconnect the charger from the battery. NOTE: The CHARGING
LED will
remain lit while the CHARGED
LED is ashing.
COMPLETE CHARGE
Charge completion is indicated by the CHARGED
(green) LED. When pulsing, the charger has
switched to the maintain mode of operation. When ready to use, unplug the charger from the wall outlet
and then disconnect the charger from the battery.
CHARGING TIMES
Complete charge will usually take between 3-6 hours. Times may vary, depending on the battery’s level
of discharge.
NOTE: For longer battery life, the battery must be completely charged after two consecutive quick
charges (example: quick-quick-complete).
MAINTAIN MODE (FLOAT MODE MONITORING)
When the CHARGED
(green) LED is pulsing, the charger has started maintain mode. In this mode, the
charger keeps the battery fully charged by delivering a small current when necessary.
ABORTED CHARGE
If charging cannot be completed normally, charging will abort. When charging aborts, the charger’s
output is shut off, and the CHARGING
(yellow/orange) LED will ash. To reset after an aborted
charge, unplug the charger from the AC outlet, wait a few moments and plug it back in.
11. MAINTENANCE AND CARE
11.1 After use and before performing maintenance, unplug and disconnect the battery charger.
11.2 Use a dry cloth to wipe all battery corrosion and other dirt or oil from the connector, cords and the charger case.
11.3 Store inside, in a cool, dry place.
12. TROUBLESHOOTING
PROBLEM POSSIBLE CAUSE REASON/SOLUTION
All three LEDs come on for 2
seconds, then turn off.
The charger is plugged into an AC
outlet.
No problem; this is normal.
CHARGING
(yellow/orange)
LED is ashing.
Charger is in abort mode. Unplug the charger from the AC
outlet, wait a few moments and plug
it back in.
CHARGED
(green) LED is
ashing.
The battery’s charge is 80% or
higher.
No problem; this is normal.

• 7 •
PROBLEM POSSIBLE CAUSE REASON/SOLUTION
The charger will not turn on when
properly connected.
AC outlet is dead.
Poor electrical connection.
Battery is defective.
Check for open fuse or circuit
breaker supplying the AC outlet.
Check power cord and extension
cord for a loose tting plug.
Have the battery checked.
I cannot select a 6V or 12V
setting.
The charger is equipped with
Auto Voltage Detection, which
automatically detects the voltage
and charges the battery.
No problem; this is normal.
13. SPECIFICATIONS
Input Voltage ..................................................................................................... 120V AC @ 60Hz, 0.92A
Output Voltage ............................................................................ 6V or 12V, with Auto Voltage Detection
Output Current Rating ........................................................................................3A
@
6V and 3A
@
12V
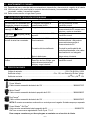
14. REPLACEMENT PARTS/ACCESSORIES
Power Wheels
®
12V battery connector cable assembly ........................................................................... 3899002776Z
MotionTrendz
®
Small 6/12V battery connector cable assembly .............................................................. 3899002855Z
Peg Perego
®
12V battery connector cable assembly ........................................................................... 3899002780Z
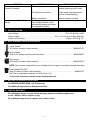
NOTE: The connector shown below is not included with the charger. It must be purchased separately.
Power Wheels
®
/Kid Trax
®
Small 6V battery connector cable assembly...........................................................................3899002778
Kid Trax
®
is a registered trademark of Pacific Cycle
™
LLC.
To purchase connectors, please contact Customer Service.
15. BEFORE RETURNING FOR REPAIRS
For REPAIRS OR RETURNS, visit 365rma.com
Visit batterychargers.com for Replacement Parts.
16. LIMITED WARRANTY
For information on our one year limited warranty, please visit batterychargers.com
or call 1-800-621-5485 to request a copy.
Go to batterychargers.com to register your product online.

• 8 •
1. INSTRUCCIONES IMPORTANTES DE SEGURIDAD – GUARDE ESTAS INSTRUCCIONES
1.1 GUARDE ESTAS INSTRUCCIONES – Este manual contiene instrucciones operativas y de seguridad
de importancia.
1.2 Manténgase fuera del alcance de los niños.
1.3 No exponga el cargador a la lluvia o a la nieve.
1.4 El uso de un accesorio no recomendado o suministrado por el fabricante del cargador de batería puede
provocar riesgo de incendio, descarga eléctrica o lesiones a personas.
1.5 Para reducir el riesgo de daños al enchufe o cable eléctrico, jale del enchufe en lugar de jalar del cable
al desconectar el cargador.
1.6 No se debe utilizar un alargador a menos que resulte absolutamente necesario. El uso de un alargador
inadecuado puede provocar riesgo de incendio o descarga eléctrica. En caso de que deba utilizarse un
alargador, asegúrese de que:
• Los pasadores en el enchufe del alargador posean el mismo número, tamaño y forma que aquellos
presentes en el enchufe del cargador.
• El alargador se encuentre correctamente conectado y en buenas condiciones eléctricas.
• El tamaño del cable sea lo sucientemente extenso para el amperaje en CA del cargador como se
especica en la sección 6.
1.7 No utilice el cargador si el mismo posee un enchufe o cable dañado; substituya el cable o el enchufe
inmediatamente por una persona calicada en el ramo.
1.8 No utilice el cargador si el mismo recibió un golpe fuerte, si se cayó o si sufrió daños de cualquier otra
forma; hágalo revisar por una persona capacitada que efectúe reparaciones.
1.9 No desarme el cargador; hágalo revisar por una persona capacitada que efectúe reparaciones cuando
necesite servicio de mantenimiento o una reparación. Volver a ensamblar el cargador en forma
incorrecta puede provocar riesgo de incendio o descarga eléctrica.
1.10 Para reducir el riesgo de descarga eléctrica, desenchufe el cargador del tomacorriente antes de intentar
llevar a cabo cualquier actividad de mantenimiento o limpieza. El simple apagado de los controles no
reducirá este riesgo.
1.11 ADVERTENCIA: RIESGO DE GASES EXPLOSIVOS.
a. RESULTA PELIGROSO TRABAJAR EN FORMA CERCANA A UNA BATERÍA DE PLOMO. LAS
BATERÍAS GENERAN GASES EXPLOSIVOS DURANTE SU NORMAL FUNCIONAMIENTO. POR
ESTE MOTIVO, RESULTA DE SUMA IMPORTANCIA QUE SIGA LAS INSTRUCCIONES CADA VEZ
QUE UTILIZA EL CARGADOR.
b. Para reducir el riesgo de explosión de una batería, siga estas instrucciones y aquellas publicadas por
el fabricante de la batería y por el fabricante de cualquier equipo que intente utilizar en la proximidad
de la batería. Revise las pautas de precaución en estos productos y en el motor.
2. PRECAUCIONES DE SEGURIDAD PERSONAL
2.1 Considere la idea de que alguna persona se encuentre cerca suyo para poder ayudarlo cuando trabaje
en forma cercana a una batería de plomo-ácido.
2.2 Cuente con una gran cantidad de agua potable y jabón a mano en caso de que el ácido de la batería
tenga contacto con su piel, ropa u ojos.
2.3 Utilice protección visual y corporal completa, incluyendo gafas de seguridad y prendas de protección. Evite
tocar sus ojos mientras trabaje en forma cercana a la batería.
2.4 Si el ácido de la batería tiene contacto con su piel o su ropa, lave de inmediato el área afectada con agua y
jabón. En caso de que ingrese ácido en un ojo, sumerja el mismo de inmediato bajo agua potable corriente
por al menos 10 minutos y obtenga atención médica en forma inmediata.
6V/12V Cargador universal para juguetes montar-en
MANUAL DEL USUARIO
POR FAVOR CONSERVE ESTE MANUAL DEL USUARIO Y LEALO ANTES DE CADA
USO. En este manual le explica cómo utilizar el cargador de batería de manera
segura y conable. Por favor, lea y siga las siguientes instrucciones y precauciones.

• 9 •
2.5 NUNCA fume o permita la presencia de chispas o llamas en la proximidad de una batería o motor.
2.6 Tenga especial cuidado para reducir el riesgo de dejar caer una herramienta de metal sobre la batería.
Esto podría provocar chispas o un cortocircuito en la batería o en cualquier otra pieza eléctrica que
podría provocar una explosión.
2.7 No utilice elementos personales de metal tales como anillos, pulseras, collares y relojes al trabajar con
una batería de plomo-ácido. Una batería de plomo-ácido puede producir una corriente de cortocircuito lo
sucientemente elevada como para soldar un anillo o provocar efectos similares sobre el metal, causando una
quemadura de gravedad.
2.8 Utilice este cargador solamente para cargar baterías de tipo PLOMO-ÁCIDO. Este cargador no está
destinado a suministrar energía a sistemas eléctricos de baja tensión más que en una aplicación de
un motor de arranque. No utilice este cargador de batería para cargar baterías de pila seca que por lo
general se utilizan con artefactos domésticos. Estas baterías podrían explotar y provocar lesiones a
personas o daño a la propiedad.
2.9 NUNCA cargue una batería congelada.
3. PREPARACIÓN PARA LA CARGA
3.1 Asegúrese de que tiene uno de los sistemas de baterías lista de Repuestos / Accesorios.
3.2 Retire la batería del vehículo para cargarla. Asegúrese de que todos los accesorios del vehículo estén
apagados, para evitar la formación de arcos.
3.3 Limpie la batería y examinar si hay desgaste excesivo, grietas, abultamiento o daños. Si se detectan daños,
no cargue – sustituya inmediatamente. Si la batería está caliente, deje que se enfríe antes de cargarla.
3.4 Estudie todas las precauciones especícas del fabricante de la batería.
3.5 Hacer área segura alrededor de la batería esté bien ventilada mientras la batería se está cargando. El gas
puede ser redirigido mediante el uso de un pedazo de cartón u otro material no metálico como un ventilador.
4. UBICACIÓN DEL CARGADOR
4.1 Ubique el cargador a la mayor distancia posible de la batería como lo permitan los cables de CC.
4.2 Nunca ubique el cargador directamente por encima de la batería que se carga; los gases de la batería
corroerán y dañarán el cargador.
4.3 Nunca permita que el ácido de la batería gotee sobre el cargador al leer el peso especíco del electrolito
o al cargar la batería.
4.4 No utilice el cargador en un área cerrada o restrinja la ventilación en cualquier forma.
4.5 No ubique la batería encima del cargador.
5. PRECAUCIONES DE CONEXIÓN EN CC
5.1 Conecte y desconecte los conectores de salida C.C. sólo después de haber desconectado el enchufe
de C.A. del tomacorriente eléctrico.
5.2 Nunca conecte cualquiera de los dos juegos de cables de salida, para aplicarlo de otra forma, tal como
batería externa u otra fuente de poder de carga, o para alargar el cable de salida, esto ocasionará
polaridad invertida o sobrecarga.
6. CONEXIONES A TIERRA Y ENERGÍA DE CA
6.1 Este cargador de batería está destinado a un uso en un circuito con tensión nominal de 120 V. El enchufe
se debe conectar a un tomacorriente adecuadamente instalado y que cuente con descarga a tierra de
acuerdo con todas las ordenanzas y códigos. Los pasadores del enchufe deben adaptarse al receptáculo
(tomacorriente). No utilizar con un sistema que no posea descarga a tierra.
6.2 PELIGRO: Nunca altere el cable o enchufe de C.A. suministrado, si no se ajusta al tomacorriente, haga
instalar un tomacorriente adecuado con descarga a tierra por medio de un electricista capacitado. Una
conexión inadecuada puede provocar un riesgo de descarga eléctrica o electrocución.
NOTA: De acuerdo a las Leyes Canadienses, el uso de un enchufe adaptador no es permitido en el
Canada. El uso de un enchufe como adaptador no se recomienda y no debe ser utilizado Estados Unidos.

• 10 •
6.3 USO DE UN CABLE DE EXTENSIÓN
El uso de una extensión no se recomienda. Si debe usar una extensión, siga estas pautas:
• Las clavijas del enchufe del cable de extensión debe ser el mismo número, tamaño y forma que las del
enchufe del cargador.
• Asegúrese de que el cable de extensión esté conectado correctamente y en buenas condiciones eléctricas.
• El tamaño del cable debe ser lo sucientemente extenso para el calibre de amperios del cargador de
CA, como se especica a continuación:
Longitud del cable (pies) 25 50 100 150
Calibre del cable AWG* 18 18 16 16
*AWG-American Wire Gauge
7. CARACTERÍSTICAS
4
1
5
2
3
1. MotionTrendz
®
cable conector ensamble de batería pequeña de 6/12V
2. Power Wheels
®
cable conector ensamble de batería de 12V
3. Peg Perego
®
cable conector ensamble de batería de 12V
4. Indicadores LED
5. Conexión rápida del cable
MotionTrendz
®
, Peg Perego
®
y Power Wheels
®
son marcas registradas y operadas
por compañías independientes y legítimas.
Estas compañías y sus fabricantes no han otorgado licencia ni endosado este producto.
Peg Perego
®
, es una marca registrada de Peg Perego
®
U.S.A. Inc.
Power Wheels
®
es una marca registrada de Mattel
®
, Inc.
MotionTrendz
®
es una marca registrada de Ballard Pacic Resources, Inc.
8. PANEL DE CONTROL
INDICADORES LEDS
LED POWER (alimentación) [rojo] encendido – Indica que la presencia de energía de CA
suministrada al cargador de batería.
LED CHARGING (carga) [amarillo/naranja] encendido – El cargador está cargando la batería.
LED CHARGING (carga) [amarillo/naranja] parpadea – El cargador está en modo anulada.
LED CHARGED (cargado) [verde] parpadea – La batería está cargada a un 80% y puede
ser utilizado.
LED CHARGED (cargado) [verde] pulsante – La carga de la bateria está completa
y que el cargador cambió a modo mantener.
NOTA: Consulte la sección Instrucciones de Operación para obtener una descripción completa de los
modos del cargador.
9. INSTRUCCIONES DE MONTAJE
9.1 Desenrede todos los cordones y extienda los cables antes de usar el cargador de baterías.

• 11 •
10. INSTRUCCIONES DE OPERACIÓN
INFORMACIÓN DE LA BATERÍA
Este cargador se puede utilizar con baterías de 6 y 12 Voltios; este detecta automáticamente el tipo de batería.
CARGA
NOTA: Revise la batería para prevenir que tenga un desgaste excesivo, grietas, protuberancias o daños
cada vez que la cargue. Si el daño se detecta, no cargue la batería; reemplácela de inmediato. Si la
batería está caliente, deje que se enfríe antes de cargarla.
1. Seleccione el cable de salida apropiado que concuerde con el cable conector de salida y el conector
de la batería del vehículo.
2. Conecte la batería, de acuerdo a la sección Uso de Conectores de Cables de Conexión Rápida.
3. Conecte el cargador a la toma de corriente. El LED POWER (alimentación) [rojo] se encenderá.
4. Si la conexión es correcta, el LED CHARGING
(carga) [amarillo/naranja] debe estar encendido,
indicando que se está realizando la carga. La luz LED POWER
(rojo) seguirá siendo iluminado.
5. Cuando la batería está completamente cargada, la luz LED CHARGED
(cargado) [verde] se pulso.
IMPORTANTE: Este cargador no tiene un interruptor ON/OFF (Apagado/Encendido). ON/OFF son
controlados al enchufar el cargador a la toma de pared de CA. El cargador no suministra corriente a los
conectores hasta que la batería está correctamente conectada.
USO DE CONECTORES DE CABLES DE CONEXIÓN RÁPIDA
1. Conecte cualquiera de los dos juegos de cables de salida al cargador. Asegúrese de colocar el
cargador sobre una supercie seca y no inamable.
2. Mientras el cargador esté desenchufado del tomacorriente, conecte en ensamble de cables de
seguridad, conectando el conector azul al otro conector azul de la punta del cable del cargador.
Conecte la otra punta del ensamble de cables a la batería.
NOTA: Ver la sección Repuestos / Accesorios para más información sobre los conectores.
NOTA: Nunca conecte cualquiera de los dos juegos de cables de salida, para aplicarlo de otra forma, tal
como batería externa u otra fuente de poder de carga, o para alargar el cable de salida, esto ocasionará
polaridad invertida o sobrecarga.
PARA CARGA RÁPIDA
Cuando la luz LED CHARGED
(cargado) [verde] comienza a parpadear, la batería está lista para
usar. Desconecte el cargador del tomacorriente y posteriormente desconecte el cargador de la batería.
NOTA: La luz LED CHARGING
(carga) [amarillo/naranja] continuará encendida mientras la luz LED
CHARGED
(cargado) [verde] parpadea.
CARGA COMPLETA
Carga completa se indica mediante el CHARGED
(cargado) [verde] LED. Cuando pulsante, el
cargador ha pasado al modo de mantener la operación. Cuando esté lista para su uso, desconecte el
cargador del tomacorriente y posteriormente desconecte el cargador de la batería.
TIEMPOS DE CARGA
Carga completa suele durar entre 3-6 horas. Los tiempos pueden variar, dependiendo del nivel de la
batería de la descarga.
NOTA: Para una vida más duradera de la batería, la batería debe estar completamente cargada
después de dos cargas consecutivas (ejemplo: rápido-rápido-completo).
MODO DE MANTENIMIENTO (MONITOREO A MODO DE FLOTE)
Cuando el LED CHARGED
(cargado) [verde] esté pulsando, quiere decir que pasó al modo de
mantenimiento. En este modo el cargador mantiene la batería totalmente cargada mediante la entrega
de una pequeña corriente cuando sea necesario.
CARGA ANULADA
Si no se puede completar la carga normalmente, la carga se anulará. Cuando se anule la carga, la
salida del cargador se apagará y se ilumina el LED CHARGING
(carga) [amarillo/naranja] se
parpadea. Para reiniciar después de que se anula la carga, desenchufe el cargador de la toma de CA,
espere unos minutos y vuelva a enchufarlo.

• 12 •
11. MANTENIMIENTO Y CUIDADO
11.1 Después de usar y antes de realizar mantenimiento, desenchufe y desconecte el cargador de la batería.
11.2 Utilice un paño seco para limpiar la corrosión de toda la batería y otra suciedad o aceite de el
conectador, cables y carcasa del cargador.
11.3 Debe conservarse en un lugar fresco y seco.
12. LOCALIZACIÓN Y SOLUCIÓN DE PROBLEMAS
PROBLEMA CAUSA POSIBLE SOLUCIÓN
Las tres luces LED encienden por
2 segundos, después se apagan.
El cargador se conecta al
tomacorriente de CA.
No hay problema; es una
condición normal.
CHARGING
(carga) [amarillo/
naranja] LED parpadea.
Cargador está en modo de anular. Desenchufe el cargador del
tomacorriente de CA, espere unos
minutos y vuelva a conectarla.
CHARGED
(cargado) [verde]
LED parpadea.
La carga de la batería es 80% o
superior.
No hay problema; es una
condición normal.
El cargador no se enciende
incluso al estar bien conectado.
Tomacorriente de CA fuera de
funcionamiento.
Conexión eléctrica deciente.
Batería defectuosa.
Controle la posible presencia de
fusibles abiertos o disyuntores
que suministren energía al
tomacorriente de CA.
Controle la posible pérdida del
enchufe perteneciente a los cables
de alimentación o al alargador.
Haga revisar la batería.
No puedo seleccionar los 6 o 12
Voltios.
El cargador está equipado con
Detección de Auto Voltaje, que
automáticamente detecta el
voltaje y carga la batería.
No hay problema; es una
condición normal.
13. ESPECIFICACIONES
Voltaje de entrada ............................................................................................. 120V CA @ 60Hz, 0,92A
Salida de voltaje ...................................................................... 6V o 12V, con Detección de Auto Voltaje
Salida de corriente ................................................................................................. 3A
@
6V y 3A
@
12V
14. REPUESTOS / ACCESORIOS
Power Wheels
®
Cable conector ensamble de batería de 12V ................................................................. 3899002776Z
MotionTrendz
®
Cable conector ensamble de batería pequeña de 6/12V ............................................... 3899002855Z
Peg Perego
®
Cable conector ensamble de batería de 12V ................................................................. 3899002780Z
NOTA: El conector se muestra a continuación no se incluye con el cargador. Se debe comprar por separado.
Power Wheels
®
/ Kid Trax
®
Cable conector ensamble de batería pequeña de 6V ............................................................3899002778
Kid Trax
®
es una marca registrada de Pacific Cycle ™ LLC.
Para comprar conectores, por favor póngase en contacto con el servicio al cliente.

• 13 •
15. ANTES DE DEVOLVER A REPARACIONES
Para REPARACIONES O DEVOLUCIONES, visite 365rma.com
Visite batterychargers.com para obtener piezas de repuesto.
16. GARANTÍA LIMITADA
Para obtener información sobre nuestra garantía limitada de un año, visite batterychargers.com
o llame al 1-800-621-5485 para solicitar una copia.
Visite nuestra página en batterychargers.com para registrar su producto en línea.
-
 1
1
-
 2
2
-
 3
3
-
 4
4
-
 5
5
-
 6
6
-
 7
7
-
 8
8
-
 9
9
-
 10
10
-
 11
11
-
 12
12
-
 13
13


en otros idiomas
- English: Schumacher CR1 Owner's manual
Artículos relacionados
-
Schumacher Electric CR6CR6 El manual del propietario
-
Schumacher Electric CR1 El manual del propietario
-
-
-
-
-
Schumacher Electric TB4 El manual del propietario
-
-
Schumacher Electric CR6CR6 El manual del propietario
-
Schumacher CR8 24V Universal Charger for Ride-on Toys UL 1-2 El manual del propietario
