VULCAN & WOLF Fryer Filtering Solid-State Digital Guía de inicio rápido
- Tipo
- Guía de inicio rápido

F-32989 (September 2011)
www.VulcanHart.com • Fryer Technical Support: 1-800-814-2028
STEPS
1-
3
STEPS
4 -7
TIP: Use provided
crumb scoop to
remove and suspend
crumbs on the bottom
of tank before
proceeding to Step 1.
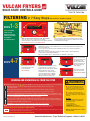
SOLID STATE CONTROLS GUIDE
VULCAN FRYERS
FILTERING in 7 Easy Steps (for revisions V4.00 or higher)
Make sure that the Power Switch is in the “ON” position.
Fryer must have power to operate the motor/pump.
Fryer Temperature should be between 300-350 Degrees Fahrenheit.
RECOMMENDED: ADD OIL TREATMENT MEDIA.
Open the fryer doors and ensure that the filter drawer is pushed
back into place under the fryer with the “S” Tube Suction Connector
and Receptacle Block engaged.
When filtering is finished, close
the red drain valve by turning
the red drain handle.
FILL VAT displays.
• Allow all of the oil to ow back into the fryer
from the filter pan. It is normal to see air
bubbles in the tank towards the end of filtering.
• When the lter pan is empty, push the
FILTER button to turn off the motor/pump.
• Oil level should be between the Min/Max
lines on the tank back. VAT FULL displays.
(Display is asking if the tank is full).
Once the oil level has been
checked and verified, press
the TEMP button. The
burners will automatically
turn back on and the fryer
will resume heating. HIT
TEMP displays.
After pressing the TEMP
button the fryer resumes
heating. HEATING displays.
• Turn the drain valve to allow the oil to drain into the lter pan below. The burners will automatically turn off.
• While draining the tank, use the provided tank brush to move the residue at the bottom and sides of the
tank down into drain tube.
• To turn on the lter motor/pump, push the FILTER button located on the control panel, holding it for
approximately 3 seconds.
• Allow the oil to cycle through the ltering operation for about 3 minutes or until satised that the
oil and fry tank are clean. DRAINING displays.
TIP: Use provided tank brush to clean and remove food particles on the fry tank.
“S” TUBE SUCTION
CONNECTOR RECEPTACLE BLOCK
FILTER BUTTON DISPLAY
TEMP.
BUTTON
vulcan
7
64
2
5
1
3
DRAINING AND DISCARDING OIL FROM THE FRYER
HOT FRYING COMPOUND AND PARTS CAN
CAUSE BURNS. USE CARE WHEN OPERATING,
CLEANING, OR SERVICING THE FRYER. USE CARE
WHEN FILTERING. DO NOT LEAVE UNATTENDED.
SPILLING HOT FRYING COMPOUND CAN
CAUSE SEVERE BURNS. DO NOT MOVE THE FRYER
WITHOUT FIRST DRAINING ALL FRYING COMPOUND
FROM TANK.
IMPORTANT:
IF POWER IS MISTAKENLY TURNED OFF DURING
THE FILTERING OPERATION, THE CORRECTIVE
ACTION IS AS FOLLOWS:
1. CLOSE DRAIN VALVE
2. TURN POWER SWITCH ON
3. IMMEDIATELY OPEN DRAIN VALVE
4. CONTINUE FILTERING OPERATION PER STEPS 1-6
NOTE: NOT RECOMMENDED TO BE USED WITH
SOLID SHORTENING.
S
S
A
Follow ltering instructions steps
2
–
4
, however DO NOT put oil treatment media into fryer. Drain the fryer oil into the lter pan.
B
Attach the quick disconnect hose to the discard male quick disconnect tting. Do not connect hose while
motor/pump is running.
C
Place other end of the discard hose into a container that is large enough to retain the discarded shortening.
D
To start the discard operation, lter switch behind door must be in the “use hose to discard only” position.
YOU MUST USE THE FILTER BUTTON ON THE DIGITAL CONTROL TO DISCARD THE OIL. Press the FILTER button on the
digital control and hold for approximately 3 seconds to activate the motor/pump. Oil will begin to ow through the hose and into
the container. PLEASE NOTE that the display will not change for this operation.
E
To turn off the motor/pump, simply push the FILTER button on the digital control again. Push the lter switch behind door
back to the “use hose to rinse & ll” position. Disconnect the discard hose. Be careful to let the hose drain before putting away.
Close the drain valve and rell the fry tank with new oil.
WARNING: Hose connection will be HOT. Use protective heat resistant gloves when handling.
NOTE: If discard vessel is not large enough to hold the entire shortening amount, stop the ow by pushing the FILTER button to turn the
motor/pump
off. Empty the container and resume discard operation by pushing the FILTER button and holding it for approximately 3 seconds
.
THESE INSTRUCTIONS ARE FOR FRYERS WITHOUT REAR OIL RECLAMATION CONNECTIONS.
NOTICE Open the ltering drawer approximately 1” to allow any oil in the return line to run back into the lter pan. This will take about 30 seconds to
complete. Then open the drawer completely to clean lter components.
THESE INSTRUCTIONS ARE FOR FRYERS WITHOUT REAR OIL RECLAMATION CONNECTIONS.
USE HOSE
TO DISCARD
ONLY
USE HOSE
TO RINSE
& FILL
USE HOSE
TO DISCARD
ONLY
USE HOSE
TO RINSE
& FILL
WARNING

F-32989 (Setiembre 2011)
www.VulcanHart.com • Asistencia técnica para el freidor: 1-800-814-2028
FREIDORA VULCAN
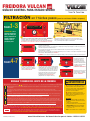
GUÍA DE CONTROL PARA ESTADO SÓLIDO
FILTRACIÓN en 7 fáciles pasos (para las revisiones V4.00 o mayores)
Cerciórese que el botón de encendidio esté en la posición “ENCENDIDO”.
La freidora debe estar encendido para operar el motor/bomba.
La temperatura de la freidora debe estar entre 300-350 grados Fahrenheit.
RECOMENDACIÓN: AGREGAR EL MEDIO DE TRATAMIENTO DE ACEITE
Abra las puertas de la freidora y cerciórese que el cajón del filtro esté
encajado en su lugar bajo la freidora con el Conector de succión del tubo
en S y que el Bloque del receptáculo esté habilitado.
• Gire la válvula de drenaje para permitir que el aceite drene hacia la bandeja del ltro abajo. Los quemadores se
apagarán automáticamente.
• Mientras se drene el estanque, use el cepillo que se adjunta para el tanque para empujar los residuos del fondo y de los
lados del estanque hacia el tubo de drenaje.
• Para encender el motor/bomba, presione el botón del ltro ubicado en el panel de control, presionándolo por
aproximadamente 3 segundos
• Deje que el aceite haga el ciclado de la operación de ltración por unos 3 minutos o hasta que el estanque de aceite para
freír esté limpio. En la pantalla aparece DRENAJE.
CONSEJO: Use el cepillo para estanques que se adjunta para limpiar y retirar las partículas de comida en el estanque para freír.
CONECTOR
DE SUCCIÓN DEL
TUBE EN “S” BLOQUE DEL RECEPTACULO
BOTÓN DE FILTRO PANTALLA
BOTÓN DE LA
TEMPERATURA
CONSEJO: Use la
pala para migajas que
viene con el ltro para
retirar y suspender las
migajas al fondo del
estanque antes de
proceder al paso 1.
PASOS
1-
3
PASOS
4 -7
Cuando termine la filtración, cierre
la válvula roja de drenaje girando la
manilla roja de drenaje. La pantalla
muestra LLENAR TANQUE.
• Deje que todo el aceite vuelva a la freidora desde la
bandeja de filtro. Es normal que se vean burbujas en
el estanque cuando se llega al final de la filtración.
• Cuando la bandeja de ltro está vacía, presione
el botón del filtro para encender el motor/bomba.
• El nivel del aceite debe estar entre las líneas
Mín/Máx en la parte de atrás del estanque.
• La pantalla muestra TANQUE LLENO.
(Preguntando si el estanque está lleno)
Una vez que se verifica el
nivel del aceite, presione
el botón de la temperatura.
Los quemadores volverán a
encenderse automáticamente
y la freidora volverá a calentar.
La pantalla muestra
AUMENTAR LA TEMPERATURA.
Después de presionar el botón
de la temperatura, la freidora
vuelve a calentar. La pantalla
muestra CALENTANDO.
7
64
vulcan
5
2
1
3
A
Siga las instrucciones de ltrado, pasos
2
–
4
,
pero NO ponga los medios de tratamiento de aceite en la freidora. Drene el aceite de la freidora en el recipiente del ltro.
B
Acople la manguera de desconexión rápida al adaptador macho de desconexión rápida. No conecte la manguera cuando el motor o la bomba estén
en funcionamiento.
C
Coloque el otro extremo de la manguera de desecho en un recipiente que sea sucientemente grande para retener la grasa desechada.
D
Para iniciar el procedimiento de vaciado, el interruptor del ltro que se encuentra en la parte posterior de la puerta debe estar en la posición “use hose to
discard only”.
DEBE USAR EL FILTER BUTTON(BOTÓN FILTRO) EN EL CONTROL DE LA DIGITAL PARA DESECHAR EL ACEITE. Presione el botón “lter” (ltro) en
el control de la digital y no lo suelte por aproximadamente 3 segundos para activar el motor/bomba. El aceite empezará a uir por la manguera hacia el
recipiente. PLEASE NOTE (OBSERVE) de que el visor en la pantalla no cambiará con esta operación.
E
Para apagar el motor/bomba, simplemente presione de nuevo el botón “lter” (ltro) en el control de la digital . Coloque el interruptor del ltro que se
encuentra en la parte posterior de la puerta nuevamente en la posición “use hose to rinse & ll”. Desconecte la manguera de desecho. Tenga cuidado y
asegúrese de que la manguera se drene totalmente antes de guardarla. Cierre la válvula de drenaje y vuelva a llenar el tanque de la freidora con aceite nuevo.
PRECAUCIÓN: La conexión de la mangera estará CALIENTE. Use los guantes protectores resistentes al calor cuando la está utilizando.
NOTA: Si el recipiente de desecho no es lo sucientemente grande para aguantar la cantidad completa de grasa, detenga la salida aprentando el botón de FILTER
(FILTRO) para apagar el motor/la bomba. Vacíe el contenido del recipiente y comience de nuevo la operación de desecho, aprentando el botón de FILTER (FILTRO) y
aguantándolo aproximadamente 3 segundos. ESTAS INSTRUCCIONES SON PARA LAS FREIDORAS SIN CONEXIONES DE RECUPERACIÓN DE ACEITE EN LA PARTE DE ATRÁS.
ATENCIÓN Abra el compartimiento del ltro durante aproximadamente 1 minuto para permitir que cualquier resto de aceite que haya quedado en la línea
de retorno vuelva a entrar a la olla del ltro. Esto proceso llevará aproximadamente 30 segundos. Luego, abra por completo el compartimiento para limpiar los
componentes del ltro. ESTAS INSTRUCCIONES SON PARA FREIDORAS SIN CONEXIÓN PARA RETIRAR EL ACEITE POR ATRÁS
DRENAJE Y DESECHO DEL ACEITE DE LA FREIDORA
LAS PARTES Y LOS COMPONENTES CALIENTES DE
LA FREIDORA PUEDEN CAUSAR QUEMADURAS. TENGA
CUIDADO AL OPERAR, LIMPIAR O DARLE MANTENIMIENTO
A LA FREIDORA. TENGA CUIDADO CUANDO HAGA EL
FILTRADO. NO LA DEJE DESATENDIDA.
DERRAMAR COMPONENTES CALIENTES DE LA
FREIDORA PUEDEN CAUSAR QUEMADURAS SEVERAS. NO
MUEVA LA FREIDORA, SIN DRENAR ANTES TODOS LOS
COMPONENTES DEL TANQUE.
IMPORTANTE:
SI POR ERROR SE APAGA DURANTE LA OPERACIÓN DE
FILTRADO, LA ACCIÓN PARA CORREGIR LA SITUACIÓN ES
LA SIGUIENTE:
1. CIERRE LA VÁLVULA DE DRENAJE
2. PONGA EL INTERRUPTOR EN POSICIÓN DE ENCENDIDO
3. INMEDIATAMENTE
ABRA LA VÁLVULA DE DRENAJE
4. CONTINÚE LA OPERACIÓN DE FILTRADO SIGUIENDO
LOS PASOS DEL 1 AL 6
NOTA: NO SE RECOMIENDA SU USO CON GRASA SÓLIDA.
S
S
USE HOSE
TO DISCARD
ONLY
USE HOSE
TO RINSE
& FILL
USE HOSE
TO DISCARD
ONLY
USE HOSE
TO RINSE
& FILL
ADVERTENCIA
-
 1
1
-
 2
2


VULCAN & WOLF Fryer Filtering Solid-State Digital Guía de inicio rápido
- Tipo
- Guía de inicio rápido
en otros idiomas
Artículos relacionados

Otros documentos
-
Pitco Frialator SG14RS El manual del propietario
-
Oster ODF540 Manual de usuario
-
Pitco SGC El manual del propietario
-
Magic Chef MCCGF40A-P Manual de usuario
-
-
Pitco Frialator SGF Manual de usuario
-
Kenmore Fryer 69298 Manual de usuario
-
Elite EDF-888XT Manual de usuario
-
DeLonghi D28313UXBK Guía del usuario