Tripp Lite UBC41 El manual del propietario
- Categoría
- Cargadores de bateria
- Tipo
- El manual del propietario
Este manual también es adecuado para

1
Owner’s Manual
UBC41
4-in-1 Battery Charger
AC: 100-240V, 50-60 Hz DC: 12/24/36/48V Selectable
Important Safety Instructions 2
Controls 3
Installation 3
Operation 4
Mounting (Optional) 4
Specifications 5
Maintenance and Service 5
Warranty and Product Registration 6
Espanol 7
Francais 13
Русский
19
PROTECT YOUR INVESTMENT!
Register your product for quicker service and ultimate peace of mind.
You could also win an ISOBAR6ULTRA surge protector—a $100 value!
www.tripplite.com/warranty
1111 W. 35th Street, Chicago, IL 60609 USA • www.tripplite.com/support
Copyright © 2015 Tripp Lite. All rights reserved.

2
Important Safety Instructions
SAVE THESE INSTRUCTIONS!
This manual contains important instructions and warnings that should be followed during the installation, operation and
storage of all Tripp Lite Chargers.
Location Warnings
• Do not mount unit with its front or rear panel facing down (at any angle). Mounting in this manner will seriously inhibit the unit’s internal
cooling, eventually causing product damage not covered under warranty.
• Use your charger in a location or compartment that minimizes exposure to heat, dust, direct sunlight and moisture. Flooding the unit with
water will cause it to short-circuit and could cause personal injury due to electric shock.
• For proper ventilation, allow a minimum 2 inches of clearance at front and back of the charger. To avoid overheating, the compartment
that houses the charger must be properly ventilated with adequate outside air flow. The heavier the load of connected equipment, the
more heat will be generated by the unit.
• Do not install or use the charger near flammable materials, fuel or chemicals.
Battery Connection Warnings
• Because explosive hydrogen gas can accumulate near batteries if they are not well ventilated, do not connect to batteries in a “dead air”
compartment. The battery compartment should have some ventilation to outside air.
• Sparks may result during final battery connection. Always observe proper polarity as batteries are connected.
• Do not allow objects to contact the DC input terminals or battery terminals. Do not short or bridge these terminals together. Serious
personal injury or property damage could result.
Service Warnings
• During service work, both the AC source and battery should be disconnected.
• Potentially lethal voltages exist when the AC source is connected.
• An energy hazard exists when the battery is connected to the charger and AC source.
Equipment Connection Warnings
• Use of this equipment in life support applications where failure of this equipment can reasonably be expected to cause the failure of the
life support equipment or to significantly affect its safety or effectiveness is not recommended. Do not use this equipment in the presence
of a flammable anesthetic mixture with air, oxygen or nitrous oxide.
Operation Warnings
• Your charger is designed only for battery charging. It cannot be used as a power supply.
• Only charge lead-acid, NiMH and enclosed cell batteries.
• Do not attempt to charge a battery whose voltage differs from the charger’s selected voltage setting.
• Your charger does not require routine maintenance.
• Your charger is designed with an aluminum heat-sink housing that safely dissipates excess heat. Avoid touching the unit during charging,
as external temperatures can reach up to 122°F (50°C).

3
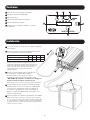
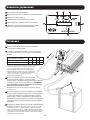
Controls
A
B
C D E
F
A
Battery Voltage Selection Button
B
High/Low Charge Rate Switch
C
Error (Red) LED
D
Bulk/Accept (Yellow) LED
E
Charging/Float (Green) LED
F
Battery Charge % / Battery Voltage Selector LEDs
Installation
115
115
230
2
5
3
1
3
4
1
Select the appropriate mains voltage for your region.
2
Set the High/Low Charge Rate Switch according to battery’s
capacity:
DC Output Voltage to Battery
12V 24V 36V 48V
Set to “High”
30A 30A 25A 15A
Set to “Low”
10A 10A 10A 7A
Note: The “Low” setting is recommended for general battery charging
and batteries whose charge has been severely depleted. The “high”
setting will charge a battery faster, but repeated fast charges may
overcharge a battery and reduce useful battery life. Reference your
battery manufacturer’s charging instructions to determine the
proper setting.
3
Insert the power cord’s C19 connector into the
charger’s C20 power inlet. Then plug the other
end of the power cord into an available AC power
outlet. CAUTION: Do not establish power
connections with an ungrounded AC outlet.
Note: Complete Step 3 before connecting the
charger to a battery.
4
Once an AC power connection is established, press the
Battery Voltage Selection button to match the battery’s
voltage (12/24/36/48V). LEDs will illuminate in the Battery
Charge % / Battery Voltage Selector bar to correspond
with the desired charging voltage.
5
Connect the charger’s clamps to the battery terminals.
Note: Always attach the red clamp to the positive (POS, P, +) battery
terminal before attaching the black clamp to the negative (NEG, N, -)
terminal. For unmarked terminals, the positive post usually has a larger
diameter than the negative post. When disconnecting the charger, reverse
the order of the connecting steps.

4
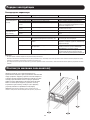
Operation
Mounting (Optional)
LED Indicators
LED (Color) LED Status Operation Status Description/Solution
Normal Operation
Bulk/Accept (Yellow) Solid Soft start Current is charging slowly
Slow flash Bulk constant current charging Battery drawing maximum charge current
Fast flash Absorption constant voltage charging Battery reaches set voltage limit; adjusts to draw
less charge current
Very fast flash Finish constant voltage charging Battery near 100% capacity; approaching
floating status
Charging/Float (Green) LED Slow flash Floating Battery charge full
Fast flash Floating Battery charge full and floating current < 0.5 A
Abnormal Operation
Error (Red) Flash 2x Charger cannot connect to battery or broken
DC fuse
Check fuse and replace if broken
Flash 3x Battery voltage is too high or too low Check that battery voltage selected on charger
matches battery’s voltage
Flash 4x Shorted internal thermal sensor or open circuit
Defective thermal sensor; follow the Service
instructions on the next page
Flash 5x Internal overheat protection Unit cooling down; will automatically restart upon
reaching average internal operating temperature
Notes:
• Battery voltage selection cannot be changed during charging; the battery must be disconnected before selecting the charger voltage.
• The battery is fully charged when the green LED is illuminated. You can stop charging the battery at this point or keep it connected in floating status.
• To end a charging session, disconnect the AC power cord from the source, then disconnect the charger’s clamps from the battery terminals.
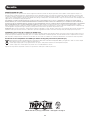
The 4-in-1 Charger can be mounted to a horizontal surface. To
mount, install four fasteners (not included) through the charger’s
mounting slots into a rigid surface. Secure the fasteners as far
back in the mounting slots as possible, otherwise the fasteners
may loosen and cause the charger to slide back and forth.
Note: The user is responsible for determining if the hardware and mounting
surface are suitable to support the charger.
115

5
Specifications
Maintenance and Service
Maintenance
Your Tripp Lite Charger requires no maintenance and contains no user-serviceable or replaceable parts, but should be kept dry at all times.
Periodically check, clean and tighten all cable connections as necessary, both at the unit and at the battery.
Service
Your Tripp Lite product is covered by the warranty described in this manual. A variety of Extended Warranty and On-Site Service Programs
are also available from Tripp Lite. For more information on service, visit www.tripplite.com/support. Before returning your product for service,
follow these steps:
1. Review the installation and operation procedures in this manual to insure that the service problem does not originate from a misreading
of the instructions.
2. If the problem continues, do not contact or return the product to the dealer. Instead, visit www.tripplite.com/support.
3. If the problem requires service, visit www.tripplite.com/support. Click “Product Returns” from the left-side drop down or menu bar, then
select the “Request Return (RMA)” link. From here you can request a Returned Material Authorization (RMA) number, which is required
for service. This simple on-line form will ask for your unit’s model and serial numbers, along with other general purchaser information.
The RMA number, along with shipping instructions will be emailed to you. Any damages (direct, indirect, special or consequential) to the
product incurred during shipment to Tripp Lite or an authorized Tripp Lite service center are not covered under warranty. Products shipped
to Tripp Lite or an authorized Tripp Lite service center must have transportation charges prepaid. Mark the RMA number on the outside
of the package. If the product is within its warranty period, enclose a copy of your sales receipt. Return the product for service using an
insured carrier to the address given to you when you request the RMA.
Input Voltage
100V ~ 240V Manual Switch
Input Frequency
50 / 60 Hz
Current (Without Load)
< 0.1A
Maximum Output Current
< 15A
Maximum Efficiency in Max Power
> 80%
Output Voltage
12V 24V 36V 48V
Maximum Ampere Imax
(Input Voltage Switch Set to “High”)
30A 30A 25A 15A
Minimum Ampere Imax
(Input Voltage Switch Set to “Low”)
10A 10A 10A 7A
Maximum Output Charging Power
450W 900W 1000W 900W
Voltage Sensor Startup Position
5V
Charging Range
8 ~ 14.8V 16 ~ 29.6V 30 ~ 39.9V 40 ~ 60V
Average Charging Voltage (Vblk)
14.5V 29V 42.6V 56.5V
Floating Charging Voltage (Vflt)
13.3V 26.6V 39.9V 53.2V
Protection Functions
Short Circuit Protection
Reverse Connection Protection
Internal Overheat Protection
Voltage / Current Precision
< 5%
Longest Floating Charging Time
No Limitation
Operating Ambient Temperature
Full Load: -4° ~ 140°F (-20° ~ 60°C)
Operating Ambient Humidity
Maximum 95% RV , Not Condensing
Cooling System
Automatic adjust fan according to internal temperature
Average Internal Temperature
<150°F (< 70°C)
Dimensions [L x W x H]
11.8 x 8.8 x 4 in. (300 x 223 x 101 mm)
Weight
9.9 lb. (4.5 kg)
Note: If the battery voltage is below the charge range, the charger may not run (turn on). For example, this can occur when the terminal voltage for a 12V battery is less
than 8V.

6
Warranty and Product Registration
1- Year Limited Warranty
Seller warrants this product, if used in accordance with all applicable instructions, to be free from original defects in material and workmanship for a period of 1 year from the date of
initial purchase. If the product should prove defective in material or workmanship within that period, Seller will repair or replace the product, in its sole discretion. Service under this
Warranty can only be obtained by your delivering or shipping the product (with all shipping or delivery charges prepaid) to: Tripp Lite, 1111 W. 35th Street, Chicago, IL 60609 USA.
Seller will pay return shipping charges. Visit www.tripplite.com/support before sending any equipment back for repair.
THIS WARRANTY DOES NOT APPLY TO NORMAL WEAR OR TO DAMAGE RESULTING FROM ACCIDENT, MISUSE, ABUSE OR NEGLECT. SELLER MAKES NO EXPRESS WARRANTIES
OTHER THAN THE WARRANTY EXPRESSLY SET FORTH HEREIN. EXCEPT TO THE EXTENT PROHIBITED BY APPLICABLE LAW, ALL IMPLIED WARRANTIES, INCLUDING ALL WARRANTIES
OF MERCHANTABILITY OR FITNESS, ARE LIMITED IN DURATION TO THE WARRANTY PERIOD SET FORTH ABOVE; AND THIS WARRANTY EXPRESSLY EXCLUDES ALL INCIDENTAL AND
CONSEQUENTIAL DAMAGES. (Some states do not allow limitations on how long an implied warranty lasts, and some states do not allow the exclusion or limitation of incidental or
consequential damages, so the above limitations or exclusions may not apply to you. This Warranty gives you specific legal rights, and you may have other rights which vary from
jurisdiction to jurisdiction).
WARNING: The individual user should take care to determine prior to use whether this device is suitable, adequate or safe for the use intended. Since individual applications are
subject to great variation, the manufacturer makes no representation or warranty as to the suitability or fitness of these devices for any specific application.
Product Registration
Visit www.tripplite.com/warranty today to register your new Tripp Lite product. You’ll be automatically entered into a drawing for a chance to win a FREE Tripp Lite product!*
* No purchase necessary. Void where prohibited. Some restrictions apply. See website for details.
Regulatory Compliance Identification Numbers
For the purpose of regulatory compliance certifications and identification, your Tripp Lite product has been assigned a unique series number. The series number can be found on the
product nameplate label, along with all required approval markings and information. When requesting compliance information for this product, always refer to the series number. The
series number should not be confused with the marketing name or model number of the product.
WEEE Compliance Information for Tripp Lite Customers and Recyclers (European Union)
Under the Waste Electrical and Electronic Equipment (WEEE) Directive and implementing regulations, when customers buy new electrical and electronic equipment from
Tripp Lite they are entitled to:
• Send old equipment for recycling on a one-for-one, like-for-like basis (this varies depending on the country)
• Send the new equipment back for recycling when this ultimately becomes waste
Tripp Lite has a policy of continuous improvement. Specifications are subject to change without notice.
1111 W. 35th Street, Chicago, IL 60609 USA • www.tripplite.com/support

7
Manual del propietario
UBC41
Cargador de Batería 4 en 1
CA: 100-240V, 50/60 Hz CD: 12/24/36/48V Seleccionable
Instrucciones de Seguridad Importantes 8
Controles 9
Instalación 9
Operación 10
Instalación (Opcional) 10
Especificaciones 11
Mantenimiento y Servicio 11
Garantía 12
English 1
Francais 13
Русский
19
1111 W. 35th Street, Chicago, IL 60609 USA • www.tripplite.com/support
Copyright © 2015 Tripp Lite. Todos los derechos reservados.

8
Instrucciones de Seguridad Importantes
¡CONSERVE ESTAS INSTRUCCIONES!
Este manual contiene instrucciones y advertencias importantes que deben seguirse durante la instalación, operación y
almacenamiento de todos los Cargadores de Tripp Lite.
Advertencias de Ubicación
• No instale la unidad con su panel frontal o posterior viendo hacia abajo (en cualquier ángulo). Instalarlo de esta manera inhibirá
seriamente el enfriamiento interno de la unidad, causando eventualmente daño al producto no cubierto por la garantía.
• Instale su cargador en una ubicación o compartimiento que minimice la exposición al calor, polvo, luz solar directa y humedad. Inundar la
unidad con agua le causará un corto circuito y podría causar lesiones personales debido a un choque eléctrico.
• Deje un espacio libre de 51 mm [2”] como mínimo al frente y en la parte posterior del cargador para ventilación adecuada. Para evitar
sobrecalentamiento, el compartimiento que aloja el cargador debe estar correctamente ventilado con flujo de aire externo adecuado.
Mientras más pesada sea la carga del equipo conectado, mayor será el calor generado por la unidad.
• No instale el cargador cerca de materiales inflamables, combustibles o químicos.
Advertencias para la Conexión de la Batería
• Debido que cerca de las baterías puede acumularse hidrógeno explosivo si no se mantienen bien ventiladas, no se conecte a baterías en
compartimientos sin circulación de aire. El compartimiento de la batería debe tener alguna ventilación al aire externo.
• Durante la conexión final de la batería pueden producirse chispas. Observe siempre la polaridad correcta al conectar las baterías.
• No permita objetos que hagan contacto con las terminales de entrada de CD. No ponga en corto o puentee las terminales entre sí. Puede
ocasionar una lesión seria o daño a la propiedad.
Advertencias de Servicio
• Durante el mantenimiento, tanto la fuente de CA como la batería deben desconectarse.
• Cuando se conecta la fuente de CA existen voltajes potencialmente letales.
• Existe un riesgo de descarga eléctrica cuando la batería es conectada al cargador y a la fuente de CA.
Advertencias para la Conexión del Equipo
• El uso de este equipo en aplicaciones de soporte de vida en donde la falla de este equipo pueda razonablemente hacer suponer que
causará fallas en el equipo de soporte de vida o afecte significativamente su seguridad o efectividad, no está recomendado. No use este
equipo en la presencia de una mezcla anestésica inflamable con aire, oxigeno u óxido nitroso.
Advertencias de Operación
• Su cargador está diseñado únicamente para carga de baterías. No puede usarse como fuente de alimentación.
• Solo baterías de plomo-ácido, NiMH y de celda cerrada.
• No intente cargar una batería cuyo voltaje difiera del parámetro de voltaje seleccionado del cargador.
• Su cargador no requiere mantenimiento de rutina.
• Su cargador está diseñado con un gabinete de aluminio absorbente del calor que disipa con seguridad el calor excesivo. Evite tocar la
unidad durante la carga, ya que las temperaturas externas pueden llegar hasta 50° C.

9
Controles
A
B
C D E
F
A
Botón de Selección de Voltaje de la Batería
B
Interruptor de Corriente CD Alta/Baja
C
LED de Error (Rojo)
D
LED de Suministro/Aceptación (Amarillo)
E
LED de Carga/Flotación (Verde)
F
LEDs Selectores de Carga de la Batería % / Voltaje
de la Batería
Instalación
115
115
230
2
1
5
3
3
4
1
Seleccione el voltaje de la red del servicio público apropiado
para su región.
2
Coloque el Interruptor de Corriente CD Alta/Baja de acurdo
con la capacidad de corriente de la batería:
Voltaje de Salida de CD a la Batería
12V 24V 36V 48V
Coloque en "Alta [High]"
30A 30A 25A 15A
Coloque en “Baja [Low]”
10A 10A 10A 7A
Nota: El parámetro “Baja [Low]” es recomendado para carga de
baterías en general y baterías cuya carga ha sido agotada
severamente. El parámetro “Alta [high]” cargará más rápido una
batería, pero cargas rápidas repetidas pueden sobrecargar una
batería y reducir su vida útil. Consulte las instrucciones de
carga del fabricante de su batería para determinar el
parámetro adecuado.
3
Inserte el conector C19 del cable de alimentación
en la entrada de energía C20 del cargador.
Enchufe después el otro extremo del cable de
alimentación en un tomacorriente disponible de CA.
PRECAUCIÓN: No establezca conexiones de energía con
un tomacorriente de CA sin conexión a tierra.
Nota: Complete el Paso 3 antes de conectar el cargador a una batería.
4
Una vez establecida una conexión de alimentación de CA,
oprima el botón de selección de Voltaje de la Batería para
concordar con la capacidad de voltaje de la batería. Se
encenderán los en la barra del Selector de Carga de la
Batería % / Voltaje de la Batería para corresponder con el
voltaje de carga deseado.
5
Conecte las pinzas del cargador a las terminales de la batería
Nota: Conecte siempre la pinza roja a la terminal positiva de la batería
(POS, P, +) antes de conectar la pinza negra a la terminal negativa (NEG,
N, -). Para terminales no marcadas, el poste positivo tiene normalmente
un diámetro mayor que el negativo. Al desconectar el cargador, invierta el
orden de los pasos de conexión.

10
Operación
Instalación (Opcional)
Indicadores LED
LED (Color) Estado de LED Estado de Operación Descripción/Solución
Operación Normal
Suministro/Aceptación
(Amarillo)
Sólido Arranque suave La corriente está cargando lentamente
Destello lento Carga de corriente de suministro constante Corriente de carga máxima por descarga de batería
Destello rápido Carga de voltaje constante por absorción La batería alcanza el límite de voltaje establecido;
se ajusta para drenar menos corriente
Destello muy
rápido
Finalizar carga de voltaje constante Batería cerca del 100% de capacidad;
aproximándose al estado flotante
LED de Carga/Flotación
(Verde)
Destello lento Flotación Batería Totalmente Cargada
Destello rápido Flotación Batería totalmente cargada y corriente flotante
< 0.5 A
Operación Anormal
Error (Rojo) 2x Destellos El cargador no se puede conectar a la batería o
fusible de CD inservible
Compruebe el fusible y remplácelo si se voló
3x Destellos El voltaje de la batería es demasiado alto o
demasiado bajo
Compruebe que el voltaje de la batería
seleccionado en el cargador concuerda con el
voltaje de la batería
4x Destellos Detector térmico interno en corto o circuito abierto Detector térmico defectuoso; Siga las instrucciones
de Servicio en la siguiente página
5x Destellos Protección interna contra sobrecalentamiento Enfriamiento de la Unidad; reiniciará
automáticamente una vez que se alcance la
temperatura interna de operación promedio
Notas:
• La selección del voltaje de la batería no puede cambiarse durante la carga.
• La batería está completamente cargada cuando el LED verde está encendido. En este punto puede detener la carga de la batería o mantenerla conectada en
estado de flotación.
• Para terminar una sesión de carga, desconecte el cable de alimentación de CA de la fuente, entonces desconecte las pinzas del cargador de las terminales de la
batería.
El cargador 4 en 1 puede instalarse sobre una superficie
horizontal. Para instalarlo, coloque cuatro tornillos (no incluidos)
a través de las ranuras de montaje del cargador en una
superficie rígida. Apriete los tornillos tan lejos hacia atrás de las
ranuras como sea posible, de lo contrario los tornillos pueden
aflojarse y causar que el cargador de deslice hacia atrás y hacia
adelante.
Nota: El usuario es responsable de determinar si los accesorios y la
superficie de instalación son adecuados para soportar el cargador.
115

11
Especificaciones
Mantenimiento y Servicio
Mantenimiento
Su Cargador Tripp Lite no requiere mantenimiento y no contiene partes reemplazables o a las que el usuario pueda dar servicio, pero
siempre debe mantenerse seco. Periódicamente si fuera necesario, revise, limpie y apriete todas las conexiones de cable, tanto en la
unidad como en la batería.
Servicio técnico
Su producto Tripp Lite está cubierto por la garantía descrita en este manual. Tripp Lite también pone a su disposición una variedad de
Garantías extendidas y Programas de servicio técnico en el sitio. Si desea más información sobre el servicio técnico, visite
www.tripplite.com/support. Antes de devolver su producto para servicio técnico, siga estos pasos:
1. Revise la instalación y los procedimientos de operación que se encuentran en este manual para asegurarse de que el problema de
servicio no se debe a una mala lectura de las instrucciones.
2. Si el problema persiste, no se comunique ni devuelva el producto al mayorista. En cambio, visite www.tripplite.com/support.
3. Si el problema exige servicio técnico, visite www.tripplite.com/support. Desde aquí puede solicitar un número de Autorización de Material
Devuelto (RMA), que se necesita para el servicio técnico. En este sencillo formulario en línea se le solicitarán los números de serie y
modelo de la unidad, junto con otra información general del comprador. El número RMA y las instrucciones para el envío se le enviarán
por correo electrónico. La presente garantía no cubre ningún daño (directo, indirecto, especial o consecuencial) del producto que ocurra
durante el envío a Tripp Lite o a un centro de servicio técnico de Tripp Lite autorizado. Los productos enviados a Tripp Lite o a un centro
de servicio técnico de Tripp Lite autorizado deben tener prepagos los cargos de transporte. Escriba el número RMA en el exterior del
embalaje. Si el producto se encuentra dentro del período de garantía, adjunte una copia de su recibo de venta. Envíe el producto para
servicio técnico mediante un transportador asegurado a la dirección que se le proporcionó cuando solicitó el número RMA.
Voltaje de Entrada
100V ~ 240V
Frecuencia de Entrada
50 / 60 Hz
Corriente (Sin carga)
< 0.1A
Corriente Máxima de Salida
< 15A
Eficiencia Máxima en Potencia Máxima
> 80%
Voltaje de Salida
12V 24V 36V 48V
Amperaje Máximo Imax
30A 30A 25A 15A
(Interruptor de Voltaje de Entrada Colocado en “High”)
10A 10A 10A 7A
Amperaje Mínimo Imax
450W 900W 1000W 900W
(Interruptor de Voltaje de Entrada Colocado en “Low”)
5V
Potencia de Carga de Salida Máxima
8 ~ 14.8V 16 ~ 29.6V 30 ~ 39.9V 40 ~ 60V
Posición de Arranque de Detector de Voltaje
14.5V 29V 42.6V 56.5V
Rango de Carga
13.3V 26.6V 39.9V 53.2V
Voltaje Promedio de Carga (Vblk)
Protección contra Cortocircuito
Protección contra Conexión Invertida
Protección Interna contra Sobrecalentamiento
Precisión de Voltaje / Corriente
< 5%
Tiempo de Carga Flotante más Prolongado
Sin Limitación
Temperatura Ambiente de Operación
Plena Carga: -20° ~ 60°C
Humedad Ambiente de Funcionamiento
Máximo 95% RV, Sin Condensación
Sistema de Enfriamiento
Ventilador de ajuste automático de acuerdo a la temperatura interna
Temperatura Interna Promedio
< 70° C
Dimensiones [Largo x Ancho x Altura]
300 x 223 x 101 mm
Peso
4.5 kg

12
Garantía
GARANTÍA LIMITADA DE 1 AÑO
El vendedor garantiza que este producto no tiene defectos originales de materiales ni de mano de obra por un período de un año a partir de la fecha original de compra, si se
utiliza de acuerdo con todas las instrucciones correspondientes. En caso de demostrarse dentro de ese período que el producto tiene defectos de materiales o de mano de obra,
el vendedor lo reparará o reemplazará a su exclusiva discreción. El servicio técnico bajo esta garantía solo puede ser obtenido si usted entrega o envía el producto (con todos los
cargos de envío o entrega prepagos) a: Tripp Lite; 1111 W. 35th Street; Chicago IL 60609; EE. UU. El vendedor abonará los cargos de envío de devolución. Visite www.tripplite.com/
support antes de enviar cualquier equipo para reparación.
ESTA GARANTÍA NO CUBRE EL DESGASTE NORMAL NI LOS DAÑOS CAUSADOS POR ACCIDENTES, MAL USO, ABUSO O NEGLIGENCIA. EL VENDEDOR NO OFRECE NINGUNA
GARANTÍA EXPRESA QUE NO SEA LA ESTABLECIDA EXPRESAMENTE EN EL PRESENTE DOCUMENTO. EXCEPTO EN LA MEDIDA EN QUE LO PROHIBAN LAS LEYES APLICABLES, LA
DURACIÓN DE TODAS LAS GARANTÍAS IMPLÍCITAS, INCLUIDAS LAS DE COMERCIABILIDAD O APTITUD, SE LIMITA AL PERÍODO DE GARANTÍA ANTES MENCIONADO Y ESTA GARANTÍA
EXCLUYE EXPRESAMENTE TODOS LOS DAÑOS INCIDENTALES E INDIRECTOS. (Algunos Estados no permiten las limitaciones a la duración de una garantía implícita y algunos
Estados no permiten la exclusión o limitación de los daños incidentales o indirectos, de modo que las limitaciones o exclusiones antes mencionadas pueden no corresponder en su
caso. Esta garantía le otorga derechos legales específicos y usted puede tener otros derechos que varían de una jurisdicción a otra).
ADVERTENCIA: Antes de usar este dispositivo, cada usuario debe ocuparse de determinar si es apto, adecuado o seguro para el uso que pretende darle. Dado que las aplicaciones
individuales están sujetas a diversas variaciones, el fabricante no representa ni garantiza la idoneidad o condición de estos dispositivos para cualquier aplicación específica.
Cumplimiento de las normas de los números de identificación
Para fines de identificación y certificación del cumplimiento de las normas, su producto Tripp Lite tiene asignado un número de serie único. Puede encontrar el número de serie en
la etiqueta de la placa de identificación del producto, junto con los símbolos de aprobación e información requeridos. Al solicitar información sobre el cumplimiento de las normas
para este producto, siempre mencione el número de serie. El número de serie no debe ser confundido con el nombre de identificación ni con el número de modelo del producto.
Información de sobre Cumplimiento de la WEEE para Clientes de Tripp Lite y Recicladores (Unión Europea)
Según la Directiva de Residuos de Aparatos Eléctricos y Electrónicos (Waste Electrical and Electronic Equipment, WEEE) y sus reglamentos, cuando los clientes compran
nuevos equipos eléctricos y electrónicos a Tripp Lite, tienen derecho a:
• Enviar equipos antiguos para reciclaje según una base de uno por uno, entre productos similares (esto varía dependiendo del país)
• Enviar el equipo nuevo de vuelta para reciclaje cuando este se convierta finalmente en desecho
Tripp Lite tiene una política de mejoramiento continuo. Las especificaciones están sujetas a cambio sin previo aviso.
1111 W. 35th Street, Chicago, IL 60609 USA • www.tripplite.com/support

13
Manuel du propriétaire
UBC41
Chargeur de batterie 4 en 1
CA : 100 à 240 V, 50/60 Hz CC : 12/24/36/48 V Sélectionnable
Consignes de sécurité importantes 14
Contrôles 15
Installation 15
Utilisation 16
Montage (optionnel) 16
Spécifications 17
Maintenance et entretien 17
Garantie 18
English 1
Espanol 7
Русский
19
1111 W. 35th Street, Chicago, IL 60609 USA • www.tripplite.com/support
Copyright © 2015 Tripp Lite. Tous droits réservés.

14
Consignes de sécurité importantes
CONSERVEZ CES INSTRUCTIONS
Ce manuel contient des instructions et des avertissements importants qui doivent être respectés pendant l’installation,
l’utilisation et l’entreposage de tous les chargeurs Tripp Lite.
Mises en garde concernant le placement
• Ne pas monter l’appareil avec ses panneaux avant ou arrière orientés vers le bas (peu importe l’angle). Monter le système de cette façon
aurait pour effet de bloquer le système de refroidissement interne de l’appareil, causant ainsi des dommages sérieux et non couverts par
la garantie.
• Installez votre chargeur dans un endroit ou un compartiment qui minimise l’exposition à la chaleur, la poussière, la lumière directe du
soleil et l’humidité. Inonder l’appareil avec de l’eau provoquerait un court-circuit, ce qui pourrait causer des blessures dues à des chocs
électriques.
• Pour assurer une ventilation adéquate, laissez un espace libre d’au moins 5 cm (2 po) à l’avant et à l’arrière du chargeur. Pour éviter la
surchauffe, le compartiment qui contient le chargeur doit avoir une bonne ventilation avec un débit d’air extérieur adéquat. Plus la charge
de l’équipement branché est élevée, plus l’appareil produira de la chaleur.
• N’installez pas le chargeur près de matériaux inflammables, de carburant ou de produits chimiques.
Avertissements liés au branchement de la batterie
• Dû au fait que du gaz hydrogène explosif peut s’accumuler à proximité des batteries si la ventilation n’est pas adéquate, ne branchez pas
les batteries dans un compartiment « sans courant d’air ». Le compartiment de la batterie doit avoir une ventilation avec l’air extérieur.
• Des étincelles peuvent se produire lors du raccordement final des batteries. Lorsque vous branchez des batteries, veillez à toujours bien
respecter les polarités.
• Évitez tout contact entre des objets et les bornes d’entrée CC. Ne créez pas de court-circuit ou de pontage entre ces bornes. Cela
risquerait d’engendrer des blessures graves ou des dommages matériels.
Avertissements liés à l’entretien
• Débranchez la source d’entrée CA et la batterie avant d’effectuer des travaux d’entretien.
• Des tensions potentiellement mortelles existent lorsque la source d’alimentation CA est raccordée.
• Un risque de choc électrique existe aussi longtemps que la batterie est raccordée au chargeur et à la source CA.
Avertissements liés au branchement de l’équipement
• Il est déconseillé d’utiliser cet équipement dans des applications médicales où une panne de cet équipement pourrait normalement
provoquer la panne de l’équipement de survie ou altérer notablement sa sécurité ou son efficacité. Ne pas utiliser cet équipement en
présence d’un mélange anesthétique inflammable avec de l’air, de l’oxygène ou de l’oxyde nitreux.
Avertissements liés à l’utilisation
• Le chargeur est conçu pour le chargement des batteries seulement. Il ne doit pas être utilisé comme source d’alimentation électrique.
• Rechargez uniquement des batteries d’accumulateur au plomb, des batteries au NiMH et des éléments de pile protégés.
• Ne tentez pas de charger une batterie dont la tension diffère du paramètre de tension sélectionné sur le chargeur.
• Le chargeur n’exige aucun entretien régulier.
• Le chargeur est conçu avec un boîtier de dissipateur de chaleur en aluminium qui libère, en toute sécurité, l’excès de chaleur. Évitez de
toucher l’appareil durant le chargement, car les températures externes peuvent atteindre jusqu’à 50 °C.

15
Contrôles
A
B
C D E
F
A
Bouton de sélection de tension de la batterie
B
Commutateur de courant CC élevé/faible
C
Voyant à DEL d’erreur (rouge)
D
Voyant à DEL pulsé/accepter (jaune)
E
Voyant à DEL charge/maintien (vert)
F
Voyants à DEL de % de charge de la batterie/sélection de
tension de la batterie
Installation
115
115
230
2
1
5
3
3
4
1
Sélectionnez la tension secteur appropriée pour votre région.
2
Réglez le commutateur de courant CC élevé/faibleen fonction
de la capacité de courant de la batterie :
Tension de sortie CC vers la batterie
12 V 24 V 36 V 48 V
Régler sur « High » (élevé)
30 A 30 A 25 A 15 A
Régler sur « Low » (faible)
10 A 10 A 10 A 7 A
Remarque : Le paramètre « Low » (faible) est recommandé pour le
chargement de batteries ordinaires et des batteries qui sont pratiquement
épuisées. Le paramètre « high » (élevé) chargera la batterie plus
rapidement, mais des charges rapides répétées risquent de
surcharger la batterie et en réduire la vie utile. Consultez les
instructions de recharge du fabricant de votre batterie pour
déterminer le bon réglage.
3
Insérez le connecteur C19 du cordon
d’alimentation dans l’entrée d’alimentation
C20 du chargeur. Branchez ensuite l’autre
extrémité du cordon d’alimentation dans une
prise de courant secteur disponible. MISE EN
GARDE: Ne pas raccorder à une prise de courant
secteur non mise à la masse.
Remarque : Terminez l’Étape 3 avant de raccorder le chargeur à la
batterie.
4
Une fois le raccordement à l’alimentation du secteur
effectué, appuyez sur le bouton de sélection de la tension
de la batterie qui correspond à la capacité de tension de la
batterie. Les voyants à DEL correspondant à la tension de
chargement souhaitée s’allumeront sur la barre % de charge
de la batterie/sélection de tension de la batterie.
5
Branchez les pinces du chargeur aux bornes de la batterie.
Remarque : Placez toujours la pince rouge sur la borne positive de la
batterie (POS, P, +) avant de placer la pince noire sur la borne négative
(NEG, N, -). Si les bornes ne portent aucune marque, le diamètre de
la borne positive est normalement plus large que celui de la borne
négative. Au moment de débrancher le chargeur, effectuez les étapes de
branchement dans l’ordre inverse.

16
Utilisation
Montage (optionnel)
Voyants à DEL
DEL (couleur) État de la DEL État opérationnel Description/solution
Fonctionnement normal
Pulsé/accepter (jaune) Allumée en continu Démarrage en douceur Recharge lente
Clignotement lent Recharge par forte intensité constante
(« bulk charge »)
La batterie utilise l'intensité de charge maximale
Clignotement rapide Recharge à tension constante
(« absorption charge »)
La batterie a atteint la limite de tension configurée.
S'ajuste pour utiliser une intensité de charge plus faible
Clignotement très
rapide
Recharge à tension constante de fin
(« floating charge »)
La batterie est proche de 100 % de sa capacité.
S'approche de son état de maintien
Voyant à DEL charge/maintien
(vert)
Clignotement lent Maintien Batterie complètement chargée
Clignotement rapide Maintien Batterie complètement chargée et intensité de
maintien < 0,5 A
Fonctionnement anormal
Erreur (rouge) Clignote 2 fois Le chargeur ne peut pas se connecter à la
batterie ou le fusible CC est fondu
Vérifiez le fusible et remplacez-le le cas échéant
Clignote 3 fois La tension de la batterie est trop élevée ou
trop faible.
Vérifiez que la tension de la batterie sélectionnée sur
le chargeur correspond bien à la tension de la batterie.
Clignote 4 fois Court-circuit au niveau du capteur thermique
interne ou circuit ouvert
Capteur thermique défectueux. Suivez les instructions
liées à l'entretien à la page suivante.
Clignote 5 fois Protection interne contre la surchauffe Appareil en cours de refroidissement, redémarrera
automatiquement après avoir atteint la température de
fonctionnement interne moyenne
Remarques :
• La sélection de tension de la batterie ne peut pas être changée durant le chargement.
• La batterie est complètement chargée lorsque le voyant à DEL vert est allumé. Vous pouvez arrêter la recharge de la batterie à ce stade ou la laisser branchée
dans l’état de maintien (« floating »).
• Pour mettre fin à une session de recharge, débranchez le cordon d’alimentation CA de la source, puis débranchez les pinces du chargeur des bornes de la batterie.
Le chargeur 4 en 1 peut être monté sur une surface horizontale.
Pour le montage, installez quatre fixations (non incluses) à
travers les fentes de montage du chargeur, puis dans une
surface rigide. Placez les fixations aussi loin que possible dans
les fentes de montages, sinon les fixations risqueraient de se
desserrer et de laisser le chargeur glisser d’avant en arrière.
Remarque : L’utilisateur est responsable de déterminer si les fixations et la
surface de montage sont appropriées pour supporter le chargeur.
115

17
Spécifications
Maintenance et entretien
Maintenance
Le chargeur Tripp Lite ne nécessite aucun entretien et ne comporte aucune pièce réparable ou remplaçable par l’utilisateur, mais il doit
toujours être au sec. Périodiquement, vérifiez, nettoyez et resserrez tous les raccords de câblage, au besoin, au niveau de l’appareil et de la
batterie.
Entretien
Votre produit Tripp Lite est couvert par la garantie décrite dans ce manuel. Une variété de garantie prolongées et de programmes de service
sur place sont également disponibles chez Tripp Lite. Pour plus de renseignements sur le service, visitez www.tripplite.com/support. Avant de
retourner votre produit pour entretien ou réparation, suivez les étapes suivantes :
1. Relisez les directives d’installation et de fonctionnement de ce manuel afin de vous assurer que le problème n’a pas pour origine une
mauvaise lecture des directives.
2. Si le problème persiste, ne pas communiquer ou renvoyer le produit au vendeur. À la place, visitez www.tripplite.com/support.
3. Si le problème nécessite une réparation, visitez www.tripplite.com/support. De cet endroit, vous pouvez demander un numéro
d’autorisation de retour de matériel (RMA) qui est exigé pour une réparation. Ce formulaire en ligne simple vous demandera le numéro
de modèle et le numéro de série de votre unité ainsi que d’autres renseignements généraux concernant l’acheteur. Le numéro RMA,
ainsi que les instructions concernant le transport vous seront acheminées par courriel. Tout dommage (direct, indirect, spécial ou fortuit)
survenu au produit pendant le transport à Tripp Lite ou à un centre de service autorisé Tripp Lite est exclu de la garanti. Les produits
expédiés à Tripp Lite ou à un centre de service autorisé doivent être prépayés. Inscrire le numéro RMA sur le paquet. Si le produit est
encore couvert par la garantie de deux ans, joindre une copie de votre facture d’achat. Retourner le produit pour réparation par un
transporteur assuré à l’adresse qui vous a été donnée lorsque vous avez demandé le RMA.
Tension d'entrée
100 V ~ 240 V
Fréquence d'entrée
50/60 Hz
Intensité (sans charge)
< 0,1 A
Intensité maximale de sortie
< 15 A
Efficacité maximum à puissance maximale
> 80 %
Tension de sortie
12 V 24 V 36 V 48 V
Intensité maximale (Imax) (Commutateur de tension d’entrée sur « High » (élevé))
30 A 30 A 25 A 15 A
Intensité minimum (Imin) (Commutateur de tension d’entrée sur « Low » (faible))
10 A 10 A 10 A 7 A
Puissance de charge de sortie maximale
450 W 900 W 1 000 W 900 W
Position de démarrage du capteur de tension
5 V
Plage de charge
8 à 14,8 V 16 à 29,6 V 30 à 39,9 V 40 à 60 V
Tension de charge moyenne (Vblk)
14,5 V 29 V 42,6 V 56,5 V
Tension de charge de maintien (Vflt)
13,3 V 26,6 V 39,9 V 53,2 V
Fonctions de protection
Protection contre les courts-circuits
Protection contre les branchements inversés
Protection interne contre la surchauffe
Précision de la tension/intensité
< 5 %
Durée maximale de charge de maintien
Aucune limite
Température ambiante de fonctionnement
Charge complète : -20 à 60 °C
Humidité ambiante de fonctionnement
HR de 95 % maximum, sans condensation
Système de refroidissement
Ventilateur à réglage automatique en fonction de la température interne
Température interne moyenne
< 70 °C (< 150 °F)
Dimensions [L x P x H]
300 x 223 x 101 mm
Poids
4,5 kg

18
Garantie
GARANTIE LIMITÉE DE 1 AN
Le vendeur garantit que ce produit, s’il est utilisé selon toutes les directives applicables, est exempt de défauts d’origine de matériel et de main-d’oeuvre pour une période de 1 an à
partir de la date initiale d’achat. Si le produit s’avère défectueux en matériel ou en main-d’oeuvre durant cette période, le vendeur réparera ou remplacera le produit à sa discrétion.
Vous pouvez obtenir un service selon cette garantie seulement en livrant ou en expédiant le produit (avec les frais d’expédition et de livraison prépayés) à : Tripp Lite, 1111 W. 35th
Street, Chicago, IL 60609 USA. Le vendeur paiera les frais d’expédition de retour. Visitez www.tripplite.com/support avant de retourner de l’équipement pour réparation.
CETTE GARANTIE NE S’APPLIQUE PAS À L’USURE NORMALE OU AUX DOMMAGES RÉSULTANT D’ACCIDENTS, DEMAUVAIS USAGE, D’ABUS OU DE NÉGLIGENCE. LE VENDEUR
N’OFFRE AUCUNE GARANTIE EXPLICITE AUTRE QUE LA GARANTIE EXPRESSÉMENT SIGNIFIÉE À LA PRÉSENTE. EXCEPTÉ SELON LES LIMITES DE LA LOI APPLICABLE, TOUTES
LES GARANTIES IMPLICITES, Y COMPRIS TOUTES LES GARANTIES DE QUALITÉ MARCHANDE OU DE CONFORMITÉ À UN BESOIN PARTICULIER, SONT LIMITÉES EN DURÉE À LA
PÉRIODE DE GARANTIE ÉNONCÉE CI DESSUS ET CETTE GARANTIE EXCLUE EXPLICITEMENT TOURS LES DOMMAGES ACCESSOIRES OU CONSÉCUTIFS. Certaines juridictions ne
permettent pas la limitation de la durée d’une garantie implicite et certaines juridictions ne permettent pas la limitation ou l’exclusion de dommages accessoires ou consécutifs, en
conséquence, les limitations et les exclusions ci dessus pourraient ne pas s’appliquer à vous. Cette garantie vous donne des droits légaux spécifiques et vous pourriez avoir d’autres
droits selon les juridictions.
MISE EN GARDE : L’utilisateur devra prendre soin de déterminer avant de l’utiliser si cet appareil convient, est adéquat et sûr pour l’usage prévu. Puisque les applications
individuelles sont sujettes à de grandes variations, le fabricant ne fait aucune représentation ni n’offre de garantie quand à l’applicabilité et à la conformité de ces appareils pour
une application particulière.
Numéros d’identification de conformité aux règlements
À des fins de certification et d’identification de conformité aux règlements, votre produit Tripp Lite a reçu un numéro de série unique. Ce numéro se retrouve sur la plaque
signalétique du produit, avec les inscriptions et informations d’approbation requises. Lors d’une demande d’information de conformité pour ce produit, utilisez toujours le numéro de
série. Il ne doit pas être confondu avec le nom de la marque ou le numéro de modèle du produit.
L’information de conformité WEEE pour les clients de Tripp Lite et recycleurs (Union européenne)
Sous les directives et règlements de déchet d’équipements électrique et électronique (Waste Electrical and Electronic Equipment, WEEE), lorsque les clients achètent le
matériel électrique et électronique neuf de Tripp Lite ils sont autorisés à :
• Envoyer le vieux matériel pour le recyclage sur une base de un-contre-un et en nature (ceci varie selon le pays)
• Renvoyer le matériel neuf pour recyclage quand ceci devient éventuellement un rebut
La politique de Tripp Lite en est une d’amélioration continue. Les spécifications sont sujettes à changement sans préavis.
1111 W. 35th Street, Chicago, IL 60609 USA • www.tripplite.com/support

19
Руководство пользователя
UBC41
Зарядное устройство “4-в-1”
Переменный ток: 100-240 В, 50/60 гц Постоянный ток: 12/24/36/48 В (на выбор)
Важные указания по технике безопасности
20
Элементы управления
21
Установка
21
Порядок эксплуатации
22
Монтаж (по желанию пользователя)
22
Технические характеристики
23
Уход и техническое обслуживание
23
Гарантийные обязательства
24
English 1
Espanol 7
Francais 13
1111 W. 35th Street, Chicago, IL 60609 USA • www.tripplite.com/support
Охраняется авторским правом © 2015 Tripp Lite. Перепечатка запрещается.

20
Важные указания по технике безопасности
СОХРАНИТЕ НАСТОЯЩИЕ УКАЗАНИЯ!
В настоящем руководстве содержатся важные указания и предупреждения, которые необходимо соблюдать в процессе
установки, эксплуатации и хранения всех зарядных устройств Tripp Lite.
Предупреждения относительно места установки
• Запрещается устанавливать устройство с расположением его лицевой или задней панели по направлению вниз (под любым углом).
Установка ИБП подобным образом приведет к созданию серьезных препятствий для системы внутренней вентиляции устройства и, в
конечном итоге, к повреждению ИБП, на которое не распространяются гарантийные условия.
• Установите свое зарядное устройство в каком-либо месте или шкафу, где он подвергался бы минимальному воздействию тепла, пыли,
прямого солнечного света и влаги. Попадание воды внутрь устройства приведет к короткому замыканию и может причинить вред здоровью
людей вследствие поражения электрическим током.
• Для обеспечения надлежащего воздухообмена свободное пространство с передней и задней сторон зарядного устройства должно
составлять не менее 50 мм. Во избежание перегрева пространство, в котором располагается зарядное устройство, должно надлежащим
образом проветриваться достаточным потоком наружного воздуха. Чем выше нагрузка, создаваемая подключенным оборудованием, тем
больше тепла будет выделяться данным устройством.
• Не устанавливайте зарядное устройство вблизи воспламеняемых, топливных или химических материалов.
Предупреждения относительно подключения батареи
• Поскольку при недостаточной вентиляции вблизи батарей возможно скопление взрывоопасного газообразного водорода, не подключайте
батареи к зарядному устройству в местах с затрудненной циркуляцией воздуха. Батарейный отсек должен иметь некоторое сообщение с
внешней средой.
• При окончательном подключении батареи к нагрузке возможно искрообразование. Обязательно соблюдайте правильную полярность при
подключении батарей.
• Не допускайте контакта каких-либо предметов со входными клеммами постоянного тока. Не закорачивайте и не шунтируйте эти клеммы
между собой. Это может причинить существенный вред здоровью людей или материальный ущерб.
Предупреждения относительно технического обслуживания
• При выполнении работ по техническому обслуживанию источник переменного тока и батарея должны быть отключены от устройства.
• При подключенном источнике переменного тока внутри корпуса зарядного устройства имеются опасные для жизни напряжения.
• При подключении батареи к зарядному устройству и источнику переменного тока имеет место энергетический опасный фактор.
Предупреждения относительно подключения оборудования
• Не рекомендуется использовать данное оборудование в системах жизнеобеспечения в тех случаях, когда его сбой с большой
вероятностью приведет к сбою оборудования жизнеобеспечения или значительному снижению его безопасности или эффективности.
Запрещается использовать данное оборудование при наличии воспламеняющихся смесей анестетических газов с воздухом, кислородом
или закисью азота.
Предупреждения относительно порядка эксплуатации
• Приобретенное вами зарядное устройство предназначено только для зарядки батарей. В качестве источника питания оно использоваться
не может.
• Заряжайте с его помощью только свинцово-кислотные, никель-металл-гибридные и закрытые аккумуляторные батареи.
• Не заряжайте батареи с напряжением, отличающимся от установленного на зарядном устройстве.
• Ваше зарядное устройство не требует регулярного технического обслуживания.
• Конструкцией вашего зарядного устройства предусматривается алюминиевый корпус с радиатором, безопасно рассеивающим избыточное
тепло. Не прикасайтесь к устройству во время зарядки, поскольку его внешние поверхности могут нагреваться до 50°C.

21
Элементы управления
A
B
C D E
F
A
Кнопка выбора напряжения батареи
B
Переключатель режимов постоянного тока “Сильный/Слабый”
C
СИД Error (“Ошибка”) (красный)
D
СИД Bulk/Accept (“Объемный/принять”) (желтый)
E
СИД Charging/Float (“Зарядка/холостой ход”) (зеленый)
F
СИДы Battery Charge % / Battery Voltage Selector (“Заряд
батареи % / Переключатель напряжений батареи”)
Установка
115
115
230
2
1
5
3
3
4
1
Выберите номинальное значение сетевого напряжения,
используемого в вашем регионе.
2
Установите переключатель режимов постоянного тока High/
Low (“Сильный/Слабый”) в соответствии с текущей емкостью
батареи:
Выходное напряжение постоянного
тока, подаваемого на батарею
12 В 24 В 36 В 48 В
Установить на “High” (“Сильный”) 30 А 30 А 25 А 15 А
Установить на “Low” (“Слабый”) 10 A 10 A 10 A 7A
Примечание. Положение “Слабый” рекомендуется использовать
для обычной зарядки батарей, а также для батарей с существенно
истощенным зарядом. При использовании положения “high”
(“сильный”) зарядка батареи производится быстрее, но
частое использование режима быстрой зарядки может
подвергать батарею избыточному заряду, сокращая тем
самым ее полезный ресурс. Для определения надлежащего
положения см. указания по зарядке, полученные от
производителя вашей батареи.
3
Вставьте разъем C19 шнура питания в во входной
разъем питания C20 зарядного устройства. Затем
вставьте разъем, находящийся на другом конце шнура питания,
в свободную розетку питания переменного тока. ВНИМАНИЕ!
Не устанавливайте силовые соединения с незаземленной
розеткой питания переменного тока.
Примечание. Перед подключением зарядного устройства к батарее
выполните Шаг 3.
4
После подключения к сети питания переменного тока нажмите
на кнопку выбора напряжения батареи для установки зарядного
устройства на номинальное напряжение батареи. На шкале
Battery Charge % / Battery Voltage Selector (“Заряд батареи % /
Переключатель напряжений батареи”) загораются светодиодные
индикаторы, соответствующие желаемому значению зарядного
напряжения.
5
Подсоедините зажимы зарядного устройства к клеммам батареи.
Примечание. Обязательно соединяйте сначала зажим красного цвета
с положительной (POS, P, +) клеммой батареи, а затем зажим черного
цвета к отрицательной (NEG, N, -) клемме. При отсутствии каких-либо
обозначений положительная клемма имеет больший диаметр по сравнению
с отрицательной. При отключении зарядного устройства производите
отсоединение в обратном порядке.

22
Порядок эксплуатации
Монтаж (по желанию пользователя)
Светодиодные индикаторы
СИД (цвет) Состояние СИД Статус режима работы Описание/Способ решения
Нормальный режим
Bulk/Accept
("Объемный/принять")
(желтый)
Горит непрерывно Плавный пуск Медленная зарядка
Мигает с низкой частотой
Объемный заряд постоянным током Батарея отбирает максимальный зарядный ток
Мигает с высокой
частотой
Абсорбционная зарядка постоянным напряжением Напряжение батареи достигает установленного
предела с последующей корректировкой в сторону
уменьшения отбираемого тока
Мигает со сверхвысокой
частотой
Завершение зарядки постоянным напряжением Емкость батареи около 100%; приближение к
состоянию холостого хода
СИД Charging/Float
("Зарядка/холостой
ход") (зеленый)
Мигает с низкой частотой
Холостой ход Батарея полностью заряжена
Мигает с высокой
частотой
Холостой ход Батарея полностью заряжена, ток холостого хода
< 0,5 А
Нарушение нормального режима
Ошибка (красный) Мигает 2 раза Зарядное устройство не может зарядить батарею
или перегорел предохранитель постоянного тока
Проверьте состояние предохранителя и замените
его в том случае, если он перегорел
Мигает 3 раза Слишком высокое или слишком низкое напряжение
батареи
Проверьте соответствие напряжения батареи,
выбранного на зарядном устройстве, номинальному
напряжению батареи
Мигает 4 раза Короткое замыкание внутреннего теплового датчика
или обрыв цепи
Неисправность теплового датчика; выполните
указания, изложенные в разделе Техническое
обслуживание на следующей странице
Мигает 5 раз Защита от внутреннего перегрева Устройство охлаждается с последующей
автоматической перезагрузкой при достижении
среднего значения внутренней рабочей температуры
Примечания:
• Во время зарядки изменение выбранного напряжения батареи невозможно.
• Включение светодиодного индикатора зеленого цвета указывает на то, что батарея полностью заряжена. В этот момент вы можете прекратить зарядку
батареи или оставить ее подключенной в состоянии холостого хода.
• Для завершения сеанса зарядки отсоедините шнур питания переменного тока от источника, а затем отсоедините зажимы зарядного устройства от клемм
батареи.
Зарядное устройство “4-в-1” может монтироваться на
горизонтальной поверхности. Для осуществления такого монтажа
следует прикрепить зарядное устройство к жесткой поверхности
с помощью четырех крепежных элементов (в комплект поставки
не входят) через монтажные пазы в его корпусе. Крепежные
элементы следует фиксировать в монтажных пазах как можно
ближе к тыльной стороне зарядного устройства, поскольку
в противном случае они могут ослабнуть и дать зарядному
устройству возможность перемещаться взад-вперед.
Примечание.Пользователь отвечает за оценку способности этой
оснастки и поверхности монтажа выдержать вес зарядного устройства.
115

23
Технические характеристики
Уход и техническое обслуживание
Уход
Ваше зарядное устройство марки Tripp Lite не требует технического обслуживания и не содержит каких-либо деталей, обслуживаемых или
заменяемых пользователем, но должен содержаться в сухом состоянии в течение всего времени эксплуатации. Периодически проверяйте,
очищайте и подтягивайте все кабельные соединения как на устройстве, так и на батарее.
Сервисное обслуживание
На продукцию компании Tripp Lite распространяется гарантия, описанная в данном руководстве. Также доступны различные программы
продлеваемой гарантии и обследования на объекте от компании Tripp Lite. Для получения более подробной информации о сервисном
обслуживании посетите веб-сайт компании www.tripplite.com/support. Перед возвратом продукции для обслуживания, выполните следующие
шаги:
1. Просмотрите инструкции по установке и эксплуатации, изложенные в данном руководстве, чтобы убедиться, что проблемы происходят не
из-за неправильного понимания инструкций.
2. Если проблема сохраняется, не обращайтесь и не возвращайте инвертор/зарядное устройство торговому посреднику. Вместо этого
посетите веб-сайт www.tripplite.com/support.
3. Если для решения проблемы требуется ремонт, посетите веб-сайт www.tripplite.com/support. Здесь можно сделать запрос о номере
разрешения на возврат (RMA), который необходим для ремонта. В этой простой интерактивной форме нужно будет заполнить номер
модели устройства и его серийный номер, а также общую информацию о покупателе. Номер RMA вместе с инструкциями по отправке
будет выслан по электронной почте. Любые повреждения (прямые, косвенные, умышленные или побочные) продукции, полученные в
результате транспортировки в компанию Tripp Lite или в уполномоченный сервисный центр, гарантией не покрываются. Транспортировка
продукции в компанию Tripp Lite или в авторизованный сервисный центр должна быть оплачена отправителем. На внешней стороне
упаковки нанесите номер разрешения на возврат. Если продукт находится на гарантии, вложите копию чека или документа на
приобретение. Доставку продукции для обслуживания осуществляйте через застрахованных перевозчиков по адресу, полученному вместе
с разрешением на возврат.
Входное напряжение 100 В ~ 240 В
Частота входного тока 50 / 60 Гц
Ток (без нагрузки) < 0,1 А
Максимальный выходной ток < 15 А
Максимальный КПД при максимальной мощности > 80%
Выходное напряжение 12 В 24 В 36 В 48 В
Максимальный ток в амперах (Imax) (при установке
переключателя входного напряжения в положении “сильный”)
30 А 30 А 25 А 15 А
Минимальный ток в амперах (Imax) (при установке
переключателя входного напряжения в положении “слабый”)
10 A 10 A 10 A 7A
Максимальная выходная зарядная мощность 450 Вт 900 Вт 1000 Вт 900 Вт
Начальное положение измерителя напряжения 5 В
Диапазон зарядных напряжений 8 ~ 14,8 В 16 ~ 29,6 В 30 ~ 39,9 В 40 ~ 60 В
Среднее зарядное напряжение (Vblk) 14,5 В 29 В 42,6 В 56,5 В
Зарядное напряжение холостого хода (Vt) 13,3 В 26,6 В 39,9 В 53,2 В
Защитные функции
Защита от короткого замыкания
Защита от подключения с обратной полярностью
Защита от внутреннего перегрева
Точность измерения напряжения/тока < 5%
Максимальное время зарядки на холостом ходу Без ограничений
Рабочий диапазон температур окружающей среды При полной нагрузке: -20° ~ 60°C
Рабочий диапазон влажности окружающей среды Максимальная относительная влажность 95%, без образования конденсата
Система охлаждения
Автоматическая корректировка скорости вращения вентилятора в зависимости от
температуры внутри корпуса
Средняя внутренняя температура < 70°C
Размеры [Д x Ш x В] 300 x 223 x 101 мм
Вес 4,5 кг

24
Гарантийные обязательства
Условия 1-летней ограничеzнной гарантии
Продавец гарантирует отсутствие изначальных дефектов материала или изготовления в течение 1 лет с момента первой покупки данного изделия при условии его использования
в соответствии со всеми применимыми к нему указаниями. В случае проявления каких-либо дефектов материала или изготовления в течение указанного периода Продавец
осуществляет ремонт или замену данного изделия исключительно по своему усмотрению.
ДЕЙСТВИЕ НАСТОЯЩЕЙ ГАРАНТИИ НЕ РАСПРОСТРАНЯЕТСЯ НА СЛУЧАИ ЕСТЕСТВЕННОГО ИЗНОСА ИЛИ ПОВРЕЖДЕНИЯ В РЕЗУЛЬТАТЕ АВАРИИ, НЕНАДЛЕЖАЩЕГО
ИСПОЛЬЗОВАНИЯ, НАРУШЕНИЯ ПРАВИЛ ЭКСПЛУАТАЦИИ ИЛИ ХАЛАТНОСТИ. ПРОДАВЕЦ НЕ ПРЕДОСТАВЛЯЕТ НИКАКИХ ЯВНО ВЫРАЖЕННЫХ ГАРАНТИЙ ЗА ИСКЛЮЧЕНИЕМ
ПРЯМО ИЗЛОЖЕННОЙ В НАСТОЯЩЕМ ДОКУМЕНТЕ. ЗА ИСКЛЮЧЕНИЕМ СЛУЧАЕВ, ЗАПРЕЩЕННЫХ ДЕЙСТВУЮЩИМ ЗАКОНОДАТЕЛЬСТВОМ, ВСЕ ПОДРАЗУМЕВАЕМЫЕ
ГАРАНТИИ, ВКЛЮЧАЯ ВСЕ ГАРАНТИИ ПРИГОДНОСТИ ДЛЯ ПРОДАЖИ ИЛИ ИСПОЛЬЗОВАНИЯ ПО НАЗНАЧЕНИЮ, ОГРАНИЧЕНЫ ПО ПРОДОЛЖИТЕЛЬНОСТИ ДЕЙСТВИЯ
ВЫШЕУКАЗАННЫМ ГАРАНТИЙНЫМ СРОКОМ; КРОМЕ ТОГО, ИЗ НАСТОЯЩЕЙ ГАРАНТИИ ЯВНЫМ ОБРАЗОМ ИСКЛЮЧАЮТСЯ ВСЕ ПОБОЧНЫЕ, СЛУЧАЙНЫЕ И КОСВЕННЫЕ
УБЫТКИ. (В некоторых штатах не допускается введение ограничений на продолжительность действия тех или иных подразумеваемых гарантий, а в некоторых - исключение или
ограничение размера побочных или косвенных убытков. В этих случаях вышеизложенные ограничения или исключения могут на вас не распространяться. Настоящая гарантия
предоставляет вам конкретные юридические права, а набор других ваших прав может быть различным в зависимости от юрисдикции).
ВНИМАНИЕ! До начала использования данного устройства пользователь должен убедиться в том, что оно является пригодным, соответствующим или безопасным для
предполагаемого применения. В связи с большим разнообразием конкретных применений производитель не дает каких-либо заверений или гарантий относительно пригодности
данных изделий для какого-либо конкретного применения или их соответствия каким-либо конкретным требованиям.
Идентификационные номера, свидетельствующие о соответствии нормативным требованиям
С целью идентификации, а также сертификации соответствия нормативным требованиям, приобретенному Вами изделию компании Tripp Lite присвоен уникальный серийный номер.
Серийный номер, вместе со всей необходимой информацией и маркировками об одобрении, указан на ярлыке изготовителя, прикрепленном к изделию. При запросе информации о
соответствии нормативным требованиям всегда сообщайте серийный номер изделия. Не следует путать серийный номер с маркой или номером модели изделия.
Информация для клиентов компании Tripp Lite о соблюдении требований директивы ЕС об отходах электрического и
электронного оборудования (WEEE)
Согласно директиве ЕС об отходах электрического и электронного оборудования (WEEE) и применимым нормам в случаях, когда покупатели приобретают новое
электрическое и электронное оборудование компании Tripp Lite, они имеют право на следующее:
• Отправку старого оборудования, которое является эквивалентным по количеству и идентичным полученному новому оборудованию, на утилизацию (это условие может
отличаться в зависимости от страны).
• Отправку нового оборудования обратно на утилизацию, когда оно в конечном итоге становится изношенным Политика компании Tripp Lite направлена на постоянное
улучшение качества продукции и услуг. Спецификации могут быть изменены без уведомления.
Компания Tripp Lite постоянно совершенствует свою продукцию. В связи с этим возможно изменение технических характеристик без предварительного уведомления.
1111 W. 35th Street, Chicago, IL 60609 USA • www.tripplite.com/support
15-07-026 93-34A7_RevA
-
 1
1
-
 2
2
-
 3
3
-
 4
4
-
 5
5
-
 6
6
-
 7
7
-
 8
8
-
 9
9
-
 10
10
-
 11
11
-
 12
12
-
 13
13
-
 14
14
-
 15
15
-
 16
16
-
 17
17
-
 18
18
-
 19
19
-
 20
20
-
 21
21
-
 22
22
-
 23
23
-
 24
24


Tripp Lite UBC41 El manual del propietario
- Categoría
- Cargadores de bateria
- Tipo
- El manual del propietario
- Este manual también es adecuado para
en otros idiomas
Artículos relacionados
-
Tripp Lite APS Sine Wave Inverter El manual del propietario
-
Tripp Lite APSX2012SW Manual de usuario
-
Tripp Lite Sine Wave Inverters El manual del propietario
-
-
-
Tripp Lite PowerVerter Manual de usuario
-
-
Tripp Lite SmartPro Rackmount UPS El manual del propietario