
Contents
English
Français
Español
Português
繁體中文
简体中文
Bahasa Indonesia
ไทย
Ver.02.01.02


- 1
User’s Manual
Gateway NE71B

2 - Table of Contents
TABLE OF CONTENTS
Starting your computer 4
Wireless connection ........................................... 4
Registration ........................................................ 5
Software installation ........................................... 6
Recovery ............................................................ 6
Having trouble? .................................................. 6
Computer Basics 8
Safety and comfort ............................................. 8
Safety precautions ...................................... 8
Health precautions.................................... 11
Getting to know your computer 14
Top view - display ............................................ 15
Top view - keyboard......................................... 16
Special keys.............................................. 17
Front view......................................................... 20
Left view ........................................................... 21
Right view......................................................... 23
Base view......................................................... 25
Touchpad 26
Touchpad basics .............................................. 26
Touchpad gestures .......................................... 27
Upgrading your computer 28
Expanding through options .............................. 28
Connectivity options.................................. 28
Power supply 33
AC power adapter ............................................ 33
Battery pack ..................................................... 34
Battery pack characteristics...................... 34
Replacing the battery pack ....................... 36
Installing or removing the battery pack ..... 36
Charging the battery................................. 37
Checking the battery level........................ 37
Optimizing battery life............................... 38
Battery-low warning.................................. 38
Power management 40
Saving power................................................... 40
Software 43
Using Windows and your software .................. 43
Internet security offer ............................... 43
Gateway Recovery Management............. 43
Internet 44
First steps on the net....................................... 44
Protecting your computer ......................... 44
Choose an Internet Service Provider ....... 44
Network connections................................ 46
Surf the Net! ............................................. 50
Security .................................................... 50
Recovery 59
Creating a recovery backup............................. 59
Creating a drivers and applications backup..... 62
Recovering your system .................................. 65
Reinstalling drivers and applications........ 66
Returning to an earlier system
snapshot................................................... 69
Returning your system to its factory
condition................................................... 70
Recovering from Windows ....................... 71
Recovering from a recovery backup ........ 75
Frequently asked questions 79
Tips and hints for using Windows 8................. 82

Table of Contents - 3
Three concepts you might want to
keep in mind.............................................. 82
How do I access the charms?................... 82
How do I get to Start? ............................... 82
How do I jump between apps?.................. 83
How do I turn off my computer?................ 83
Why is there a new interface?................... 83
How do I unlock my computer?................. 84
How do I personalize my computer?......... 84
I want to use Windows in the way
that I'm used to - give me my
desktop back!............................................ 85
Where are my apps?................................. 85
What is a Microsoft ID (account)? ............ 87
How do I add a favorite to Internet
Explorer?.................................................. 87
How do I check for Windows
updates? .................................................. 88
Where can I get more information?.......... 88
Regulatory information 89
Environment 107
Software license 110
Index 113
C
opyright © 10/2012. All Rights Reserved.
G
ateway NE71B User’s Manual
T
his revision: 5 October 2012
V
isit registration.gateway.com and discover the benefits of being a customer of
G
ateway.
Remark: All images are for reference purposes only. Actual configuration may vary.

4 - Starting your computer
STARTING YOUR COMPUTER
Thank you for purchasing this Gateway computer!
This guide has been designed to introduce you to the features of your
computer and assist in your computing experience.
After setting up and starting your computer, as shown in the setup
instructions, it will ask you questions that will help you connect to the
Internet. Your computer will then configure installed software.
WIRELESS CONNECTION
To connect to a wireless network, first check the wireless features of your
computer are on, and that the router or modem you want to connect to is
also correctly configured.
• If wireless is not on, press the Windows key ( ) + W, type "Wireless"
and then click on Wireless. Click the toggle switch under Wi-Fi to
enable the wireless connection. Click again to disable.
• To connect to a network, press the Windows key ( ) + W, type
"Wireless" and then click on Connect to a network. Select your
network and enter the password if required.
• After a short delay, your computer should connect to the Internet.
If your network is not detected, or your computer does not connect to the
Internet, please refer to your ISP or router’s documentation. After your
computer starts and you can use it, open Internet Explorer and follow the
instructions.

Starting your computer - 5
Alternatively, use a network cable to connect directly to a network port
on your router. Please refer to your ISP or router’s guide.
REGISTRATION
When using your computer for the first time, it is recommended that you
register it. This gives you access to some useful benefits, such as:
• Faster service from our trained representatives.
• Membership in the Gateway community: receive promotions and
participate in customer surveys.
• The latest news from Gateway.
How to register
During the initial startup of your computer, a window will invite you to
register. Please fill in the information and click Next. The second window
you'll see contains optional fields that will help us to provide you with a
more personable customer service experience.
Another option
Another way to register your Gateway product is to visit our website at
registration.gateway.com. Choose your country and follow the simple
instructions.
After registering, you will be sent a confirmation email with important
information that you should keep in a safe place.

6 - Starting your computer
SOFTWARE INSTALLATION
Your computer will automatically install software and prepare your
computer for use. This may take some time, please do not turn off your
computer; wait until the installation has finished.
RECOVERY
You should create recovery discs as soon as you are able. The Gateway
Recovery Management program allow you to create recovery discs and
then to restore or reinstall applications and drivers provided by Gateway.
HAVING TROUBLE?
Gateway provides several options to support your purchase.
Gateway support
Make sure you write down your computer serial number, date and place of
purchase and model name on the area provided in this guide; save your
proof of purchase. Before you call us, please write down any error
message that accompanies the problem, and have the computer in front of
you and switched on if possible. Having these items to hand when
contacting us will ensure better and quicker service.
Gateway website
Remember to visit www.gateway.com - Check out the support section for
up-to-date information, help, drivers and downloads.

Starting your computer - 7
Warranty and contact information
You can find information about the warranty for your computer and how to
contact technical support in your computer’s Warranty.

8 - Computer Basics
COMPUTER BASICS
SAFETY AND COMFORT
Safety precautions
Please follow the guidelines below to use your computer comfortably and
to avoid health problems.
Computer environment
Make sure that the computer:
• Is used on a stable surface, stand or table. A fall can seriously damage
the computer.
• Is not used on a surface that vibrates, or used when taking part in sport,
exercise or other activities in a dynamic environment. Vibration or
movement can loosen fastenings, damage internal components and
even cause battery leakage.
• Is away from direct sunlight and sources of heat.
• Is away from magnetic fields or any device generating static electricity.
• Is kept at least 30 centimetres (one foot) away from a mobile phone.
• Is not in a dusty or damp environment.
• Is not used near water. Never spill liquids of any kind on or into your
computer.
• Is not placed on a carpet or any other surface that may have an
electrical charge.

Computer Basics - 9
Please note
• Slots and openings are provided for ventilation to ensure reliable
operation of the product and to protect it from overheating. These
openings must not be blocked or covered. The openings should never
be blocked by placing the product on a bed, sofa, rug or other similar
surface. This product should never be placed near or over a radiator or
heat register, or in a built-in installation unless proper ventilation is
provided.
• Never push objects of any kind into this product through cabinet slots as
they may touch dangerous voltage points or short-out parts that could
result in a fire or electric shock. Never spill liquid of any kind onto or into
the product.
• To avoid damage of internal components and to prevent battery
leakage, do not place the product on a vibrating surface.
• Never use it under sporting, exercising, or any vibrating environment
which will probably cause unexpected short current or damage rotor
devices, HDD, optical drive, and even exposure risk from lithium battery
pack.
Cables
Make sure that:
• Cables are not strained and that there is no risk of people walking or
tripping over them.
• Other devices do not crush the cables.

10 - Computer Basics
• The power cable is connected to the computer before connecting the
power cable to the AC power outlet.
• The power cable is unplugged from the power outlet before
disconnecting the power cable from the computer.
• Three-pin power cords are connected to a grounded power outlet.
• The power outlet is easily accessible and as close to the computer as
possible (do not overload it with too many adapters).
If your computer uses an external AC adapter:
• Do not cover or place objects on the AC adapter. Allow the adapter to
cool properly during use by keeping it clear of objects.
• Only use the AC adapter that is supplied with your computer. Although
other adapters may look similar, using them can damage your computer.
If a replacement is required, use only parts certified for use with your
computer.
Cleaning your computer
• Always unplug your computer from the power outlet before cleaning it.
• Do not use liquid or aerosol cleaners, use a damp cloth instead.
• Never spray cleaning product directly on the screen.
• If you spill liquid on your computer, switch it off immediately, unplug the
AC adapter, remove the battery and make sure it is completely dry
before switching it on again. Wait overnight if necessary.
Note: If your computer includes slots for memory cards or expansion
devices, plastic ’dummies’ may be installed in the card slots. Dummies

Computer Basics - 11
protect unused slots from dust, metal objects or other particles. Save
the dummies for use when no cards are in the slots.
Servicing your computer
Do not attempt to service your computer yourself, as opening or removing
covers may expose you to dangerous voltage or other risks. Refer all
servicing to qualified service personnel.
Unplug your computer from the wall outlet and refer servicing to qualified
service personnel when:
• the power cord or plug is damaged, cut or frayed,
• liquid was spilled into the product,
• the product was exposed to rain or water,
• the product has been dropped or the case has been damaged,
• the product exhibits a distinct change in performance,
• the product does not operate normally after following the operating
instructions
Note: Adjust only those controls that are covered by the operating
instructions, since improper adjustment of other controls may result in
damage and will often require extensive work by a qualified technician
to restore the product to normal condition.
Health precautions
• The bottom surface, areas around ventilation openings and AC adapter
may get hot. To avoid injury, ensure they do not come in contact with
your skin or body.

12 - Computer Basics
• Your device and its enhancements may contain small parts. Keep them
out of the reach of small children.
• The computer and accessories may contain small parts. Keep them out
of the reach of small children.
• If you work or play for hours at a time, then make sure you take regular
breaks. Look away from the computer's screen once in a while. Do not
use your computer if you are tired.
• Arrange your computer so that you can work in a natural and relaxed
position. Place items that you use frequently within easy reach.
• Position your computer directly in front of you for increased safety and
comfort. Ensure that your keyboard and touchpad are at a comfortable
height. The screen should be about 45-70 cm (18-30 inches) from your
eyes.
If you use your computer for long periods while sitting at a desk, invest
in an external keyboard for improved comfort.
• To protect your hearing, when using speakers or headphones, increase
volume gradually until you can hear clearly and comfortably; do not
increase the volume level after your ears have adjusted. Do not listen to
high volumes for extended periods. Do not increase the volume to block
out noisy surroundings; decrease the volume if you cannot hear people
speaking near you.
• The computer’s underside, power adapter and the air from
ventilation slots may become hot during use. Avoid
continuous body contact and do not place the computer on
your lap while it is operating.

Computer Basics - 13
• Ensure that the computer’s ventilation slots and openings are never
obstructed or covered. Do not place the computer on a soft surface
(such as a carpet, chair or bed) that may block ventilation slots.
• Do not push objects of any kind into ventilation or case slots as they
may touch dangerous voltage points or short-out parts that may result in
a fire or electric shock.
• Some disorders of the hands, wrists, arms, neck, shoulders, legs and
back may be associated with, or aggravated by certain repetitive
actions. To reduce your risk of developing these disorders, type with
your wrists straight and your hands and wrists floating above the
keyboard. If you experience periods of pain, tingling, numbness or other
discomfort, please contact your doctor.
• We advise that parents monitor the use of games by their children. If you
or your child experience any of the following symptoms: dizziness,
blurred vision, eye or muscle twitches, loss of consciousness,
disorientation, any involuntary movement or convulsion, IMMEDIATELY
discontinue use and consult your doctor. This may happen even if the
person has no medical history of epilepsy.

14 - Getting to know your computer
GETTING TO KNOW YOUR
COMPUTER
After setting up your computer, as illustrated in the setup instructions, let
us show you around your new Gateway computer.
Gateway NE71B

Getting to know your computer - 15
TOP VIEW - DISPLAY
1
2
3
# Icon Item Description
1 Webcam
Web camera for video communication.
A light next to the Webcam indicates that the
webcam is active.
2 Microphone Internal microphone for sound recording.
3 Display screen
Also called Liquid-Crystal Display (LCD),
displays computer output.

16 - Getting to know your computer
TOP VIEW - KEYBOARD
1
2
5
3
4
# Icon Item Description
1
Power button /
indicator
Turns the computer on and off. Indicates the
computer's power status.
2 Keyboard
For entering data into your computer.
- Special keys are described on page 17.
3 Touchpad
Touch-sensitive pointing device which
functions like a computer mouse.

Getting to know your computer - 17
Special keys
Your computer’s keyboard includes keys that activate special functions.
The function of each key is clearly marked with an icon.
4
Click buttons (left
and right)
The left and right side of the button function as
left and right selection buttons.
5 Speakers Deliver stereo audio output.
Icon Function Description
Fn
Hotkey for second
function
Activates a second function on certain keys.
E.g. press the Fn key to activate the F1 to F12 keys.
Help Opens the help menu.
Backup
Allows you to create backup copies of your computer;
either the entire system or only selected files and
folders. Create a regular schedule or make copies
whenever you want.
Communication
Enables/disables the computer’s communication
devices.
Display toggle
Switches display output between the display screen,
external monitor (if connected) and both.
Screen blank
Turns the display screen backlight off to save power.
Press any key to return.
# Icon Item Description

18 - Getting to know your computer
Touchpad toggle Turns the internal touchpad on and off.
Play/Pause Play or pause a selected media file.
Stop Stop playing the selected media file.
Previous Return to the previous media file.
Next Jump to the next media file.
Brightness down Decreases the screen brightness.
Brightness up Increases the screen brightness.
Social Networking
Opens the Social Networks application.
- If this application is not installed, the key will start
your instant messenging application.
Volume up Increases the sound volume.
Volume down Decreases the sound volume.
Speaker toggle Turns the speakers on and off.
Icon Function Description

Getting to know your computer - 19
Hotkeys
The computer uses hotkeys (key combinations) to access function keys
and navigation commands.
To activate hotkeys, press and hold the Fn key (bottom left) before
pressing the other key in the hotkey combination.
- Note: It is not necessary to press the Fn key to use the F1 to F12 function keys when
starting your computer or when using the BIOS.
To swap the hotkey and special function of the F1 to F12 keys, change the function
key setting in the BIOS (to open the BIOS press F2 when starting your computer,
then select the Main menu and change Function key behavior to Function keys).
Hotkey Function Description
Fn + Special keys
(see page 17)
Function keys Activates the F1 to F12 keys.
Fn + Home Scrolls to the beginning of a document.
Fn + End Scrolls to the end of a document.
Fn + Page up Scrolls up a page in a document.
Fn + Page Down Scrolls down a page in a document.

20 - Getting to know your computer
FRONT VIEW
1 2
- Note: The front panel indicators are visible even when the computer cover is closed.
# Icon Item Description
1
Power indicator Indicates the computer's power status.
Battery indicator
Indicates the computer's battery status.
- Charging: The light shows amber when the
battery is charging.
- Fully charged: The light shows blue when in
AC mode.
HDD indicator Indicates when the hard disk drive is active.
Communication
indicator
Indicates the computer’s wireless connectivity
device status.
2 Multi-in-1 card reader
Accepts Secure Digital (SD), MultiMediaCard
(MMC), Memory Stick PRO (MS PRO), xD-
Picture Card (xD).
- Push to remove/install the card. Only one
card can operate at any given time.

Getting to know your computer - 21
LEFT VIEW
21 3 4 56
# Icon Item Description
1
Kensington lock slot
Connects to a Kensington-compatible
computer security lock.
- Wrap the computer security lock cable
around an immovable object such as a table
or handle of a locked drawer.
Insert the lock into the notch and turn the key
to secure the lock.
Some keyless models are also available.
2
Ventilation and
cooling fan
Allows the computer to stay cool.
- Do not cover or obstruct the openings.
3 Ethernet (RJ-45) port
Connects to an Ethernet 10/100/1000-based
network.
4
External display
(VGA) port
Connects to a display device (e.g., external
monitor, LCD projector).
5 HDMI port
Supports high-definition digital video
connections.

22 - Getting to know your computer
Information on USB 3.0
• Compatible with USB 3.0 and earlier devices.
• For optimal performance, use USB 3.0-certified devices.
• Defined by the USB 3.0 specification (SuperSpeed USB).
6 USB port
Connects to USB devices.
- If a port is black, it is USB 2.0 compatible, if
it is blue it is also USB 3.0 compatible (see
below).
# Icon Item Description

Getting to know your computer - 23
RIGHT VIEW
12 3 4 5 6 7
# Icon Item Description
1
Headphones /
speaker jack
Connects to audio line-out devices (e.g.,
speakers, headphones).
- Supports compatible 3.5 mm headsets with
built-in microphone (e.g. Acer smart
handheld headsets).
Microphone jack Accepts inputs from external microphones.
2 USB ports
Connects to USB devices.
- If a port is black, it is USB 2.0 compatible, if
it is blue it is also USB 3.0 compatible (see
below).
3 Optical drive Internal optical drive; accepts CDs or DVDs.
4
Optical disk access
indicator
Lights up when the optical drive is active.

24 - Getting to know your computer
Information on USB 3.0
• Compatible with USB 3.0 and earlier devices.
• For optimal performance, use USB 3.0-certified devices.
• Defined by the USB 3.0 specification (SuperSpeed USB).
5
Optical drive eject
button
Ejects the optical disk from the drive.
6
Emergency eject
hole
Ejects the optical drive tray when the computer
is turned off.
- Carefully insert a straightened paper clip to
eject the optical drive tray.
7 DC-in jack Connects to your computer’s AC adapter.
# Icon Item Description

Getting to know your computer - 25
BASE VIEW
1
4
2
3
# Icon Item Description
1 Battery bay Houses the computer's battery pack.
2 Battery release latch
Releases the battery for removal. Insert a
suitable tool and slide to release.
3
Memory
compartment
Houses the computer's main memory.
Hard disk bay
Houses the computer's hard disk (secured with
screws).
4
Ventilation and
cooling fan
Allows the computer to stay cool.
- Do not cover or obstruct the openings.

26 - Touchpad
TOUCHPAD
TOUCHPAD BASICS
The touchpad controls the arrow (or 'cursor') on the screen. As you slide
your finger across the touchpad, the cursor will follow this movement.
Press the left or right side of the button located beneath the touchpad to
perform selection and execution functions. These two areas are similar to
the left and right buttons on a mouse. Tapping on the touchpad is the
same as clicking the left side of the button.
Note: The touchpad is sensitive to finger movement; the lighter the
touch, the better the response.
Please keep the touchpad and your fingers dry and clean.
The cursor is controlled by some basic gestures:
• Single-finger slide: Slide a finger across the touchpad to
move the cursor.
• Single-finger tap: Lightly tap the touchpad with your finger, to
perform a 'click', which will select or start an item. Quickly
repeat the tap to perform a double tap or 'double click'.
• Drag: Press and hold the left side of the selection button, or tap twice
anywhere on the touchtap, then slide a second finger across the
touchpad to select all items in an area.

Touchpad - 27
TOUCHPAD GESTURES
Windows 8 and many applications support touchpad gestures that use
one or more fingers.
Note:
Support for touchpad gestures depends on the active application.
These allow you to control applications with a few simple gestures, such as:
• Swipe in from edge: Access Windows tools
by swiping into the center of the touchpad
from the right, top or left.
• Swipe in from right edge: Toggle the charms.
• Swipe in from top edge: Toggle the app commands.
• Swipe in from left edge: Switch to the previous app.
• Two-finger slide: Swiftly scroll through web pages,
documents and playlists by placing two fingers on the
touchpad and moving both in any direction.
• Two-finger pinch: Zoom in and out of photos, maps and
documents with a simple finger-and-thumb gesture.

28 - Upgrading your computer
UPGRADING YOUR COMPUTER
EXPANDING THROUGH OPTIONS
Your computer offers you many options for a complete computing
experience.
Connectivity options
Ports allow you to connect peripheral devices to your computer. For
instructions on how to connect different external devices to the computer,
read the following section.
Memory card reader
Memory cards are used in a wide selection of digital
cameras, PDAs, MP3 players and mobile phones.
Inserting a memory card
1. Align the card so that the connector points towards
the port, with the connectors facing down.
2. Carefully slide the card into the port. If you find you need to use any
force to insert the card, try reorientating the card slightly.
3. Push the card until it clicks into place. A few millimetres of the card will
extend from beyond the slot.
If the card contains some files, the Windows Auto Play window may
appear (this depends on the contents of the card) and ask you if you wish

Upgrading your computer - 29
to use a program to access the contents of the card. Select an option
here if it is appropriate, otherwise select Cancel. If the card contains no
files, or unknown files, a window will open showing the contents of the
card.
SD, SDHC and SDXC cards
Different types of SD cards cover different capacities, while using the
same overall design. SD cards contain up to 4 GB, SDHC cards contain
up to 32 GB, and SDXC cards can contain up to 2048 GB (2 TB). Your
computer provides an SDHC or SDXC compatible card reader.
Note: SDXC memory cards can only be used in an SDXC-compatible
reader; SD and SDHC cards can be used in either type.
Removing
a card from a memory card reader
1. Click on Show hidden icons
arrow in the Notification Area (next
to the clock).
2. Click on the Safely Remove
Hardware icon.
3. Click on Eject SD Card (or the
name of the device).
4. Wait until a Safe to Remove
Hardware message is displayed.
5. Remove the card.
3
2
1

30 - Upgrading your computer
Built-in networking
The built-in networking allows you to connect
your computer to an Ethernet-based network.
Connect an Ethernet cable from the Ethernet
(RJ-45) port on the chassis of the computer to
a network jack or hub on your network.
Universal Serial Bus (USB)
The USB port is a high-speed serial bus
which allows you to connect USB peripherals
without taking up system resources.
Certain computers may include one or more
USB 3.0 ports. These resemble standard
USB ports, except they include additional
internal connections and are blue. You may
use USB 3.0 compatible devices with these
ports to benefit from faster transfer speeds.
Video port
Connect to a monitor with a VGA or DVI port (the type of connection
supported depends on your computer’s configuration). The appropriate

Upgrading your computer - 31
cable is usually included with the monitor.
Follow these steps to connect an monitor to your computer:
1. Check that the computer is powered off and the monitor power switch is
turned off.
2. Attach the video cable to the monitor port on the computer. Secure the
cable connection with the screws provided.
3. Connect the monitor power cable and plug it into a properly grounded
wall outlet.
4. Follow any setup instructions in the monitor's user's guide.
5. Turn on power to the monitor, then the computer.
6. Make sure that the current resolution and refresh rate do not exceed the
specifications of the monitor. If necessary change the display settings
used by the computer.
Note: To access the display controls, press the Windows key ( ) +
W, type "Display" and then click on Display.

32 - Upgrading your computer
High-Definition Multimedia Interface (only for certain models)
HDMI (High-Definition Multimedia
Interface) is an industry-supported,
uncompressed, all-digital audio/video
interface. HDMI provides an interface
between any compatible digital audio/
video source, such as a set-top box,
DVD player, and A/V receiver and a
compatible digital audio and/or video
monitor, such as a digital television
(DTV), over a single cable.
Use the HDMI port on your computer to connect with high-end audio and
video equipment. Single cable implementation allows tidy setup and fast
connection.
Headphones and microphone
These two ports allow you to connect audio devices. Use the headphone
port to plug in stereo headphones or powered speakers. Plugging an
audio device to the headphone port disables the built-in speakers. Use the
microphone port to connect an external microphone for mono recording;
plugging in an external microphone disables the built-in microphone.

Power supply - 33
POWER SUPPLY
AC POWER ADAPTER
Your computer can use the supplied external power adapter (a power
'brick') to run on AC power. A power cable is provided that is appropriate
for the country where the computer was purchased.
The power adapter provides adequate power to run your computer and
recharge the battery pack at the same time.
Caution: Do not cover or place objects on the AC adapter.
Keeping the adapter clear of objects allows the adapter to cool
properly during use.
Only use the AC adapter that is supplied with your computer. Although
other adapters may look similar, using them can damage your computer.

34 - Power supply
Warning: The AC adapter and the underside of the computer can
become hot after prolonged use. This is normal, but may cause
injury with prolonged contact.
BATTERY PACK
The computer uses a battery pack that gives you extended use between
charges.
Battery pack characteristics
The battery pack has the following characteristics:
• Employs current battery technology standards.
• Delivers a battery-low warning.
The battery is recharged whenever you connect the computer to the AC
adapter. Your computer supports charge-in-use, enabling you to recharge
the battery while you continue to operate the computer. However,
recharging with the computer turned off results in a significantly faster
charge time.
The battery will come in handy when you travel or during a power failure. It
is advisable to have an extra fully-charged battery pack available as
backup. Contact your dealer for details on ordering a spare battery pack.
Maximizing the battery’s life
Like all other batteries, your computer’s battery will degrade over time.
This means that the battery's performance will diminish with time and use.

Power supply - 35
To maximize your battery’s life, you are advised to adhere to the
recommendations set out below.
Conditioning a new battery pack
Before you use a battery pack for the first time, there is a “conditioning”
process that you should follow:
1. Insert the new battery without turning the computer on.
2. Connect the AC adapter and fully charge the battery.
3. Disconnect the AC adapter.
4. Turn on the computer and operate using battery power.
5. Fully deplete the battery.
6. Reconnect the AC adapter and fully charge the battery again.
Follow these steps again until the battery has been charged and
discharged three times.
Use this conditioning process for all new batteries, or if a battery hasn’t
been used for a long time. If the computer is to be stored for more than
two weeks, you are advised to remove the battery pack from the unit.
Warning: Do not expose battery packs to temperatures below 0
°C (32 °F) or above 45 °C (113 °F). Extreme temperatures may
adversely affect the battery pack.
By following the battery conditioning process you condition your battery to
accept the maximum possible charge. Failure to follow this procedure will
prevent you from obtaining the maximum battery charge, and will also
shorten the effective lifespan of the battery.

36 - Power supply
In addition, the useful lifespan of the battery is adversely affected by the
following usage patterns:
• Using the computer on constant AC power with the battery inserted. If
you want to use constant AC power, you are advised to remove the
battery pack after it is fully charged.
• Not discharging and recharging the battery to its extremes, as described
above.
• Frequent use; the more you use the battery, the faster it will reach the
end of its effective life. A standard computer battery has a life span of
about 300 charges.
Replacing the battery pack
The notebook uses lithium batteries. Replace the battery with the same
type as that which came bundled with your product. Use of another battery
may present a risk of fire or explosion.
Warning: Batteries may explode if not handled properly. Do not
disassemble or dispose of them in fire. Keep them away from
children. Follow local regulations when disposing of used
batteries.
Installing or removing the battery pack
Important! Before removing the battery from the unit, connect the AC
adapter if you want to continue using your computer. Otherwise, turn
off the computer first.

Power supply - 37
To install a battery pack:
1. Align the battery with the open battery bay; make sure that the end with
the contacts will enter first, and that the top surface of the battery is
facing up.
2. Slide the battery into the battery bay and gently push until the battery
locks in place.
To remove a battery pack:
1. Slide the battery release latch to release the battery.
2. Pull the battery from the battery bay.
Charging the battery
To charge the battery, first make sure that it is correctly installed in the
battery bay. Plug the AC adapter into the computer, and connect to a
mains power outlet. You can continue to operate your computer on AC
power while your battery is charging. However, charging the battery with
the computer turned off results in a significantly faster charge time.
Note: You are advised to charge the battery before retiring for the day.
Charging the battery overnight before traveling enables you to start
the next day with a fully-charged battery.
Checking the battery level
The Windows power meter indicates the current battery level. Rest the
cursor over the battery/power icon on the taskbar to see the battery’s
present charge level.

38 - Power supply
Optimizing battery life
Optimizing battery life helps you get the most out of battery operation,
prolonging the charge/recharge cycle and improving recharging efficiency.
You are advised to follow the suggestions set out below:
• Purchase an extra battery pack.
• Use AC power whenever possible, reserving battery for on-the-go use.
• Eject a PC Card if it is not being used, as it will continue to draw power
(for selected models).
• Store the battery pack in a cool, dry place. The recommended
temperature is 10 °C (50 °F) to 30 °C (86 °F). Higher temperatures
cause the battery to self-discharge faster.
• Excessive recharging decreases the battery life.
• Look after your AC adapter and battery.
Battery-low warning
When using battery power pay attention to the Windows power meter.
Warning: Connect the AC adapter as soon as possible after the
battery-low warning appears. Data will be lost if the battery to
become fully depleted and the computer shuts down.

Power supply - 39
When the battery-low warning appears, the recommended course of
action depends on your situation:
Situation Recommended Action
The AC adapter and
a power outlet are
available.
1. Plug the AC adapter into the computer, and then
connect to the mains power supply.
2. Save all necessary files.
3. Resume work.
Turn off the computer if you want to
recharge the battery rapidly.
An extra fully charged
battery pack is
available.
1. Save all necessary files.
2. Close all applications.
3. Shut down the operating system to turn off the
computer.
4. Replace the battery pack.
5. Turn on the computer and resume work.
The AC adapter or a
power outlet is
unavailable.
You have no spare
battery pack.
1. Save all necessary files.
2. Close all applications.
3. Shut down the operating system to turn off the
computer.

40 - Power management
POWER MANAGEMENT
This computer has a built-in power management unit that monitors system
activity. System activity refers to any activity involving one or more of the
following devices: keyboard, mouse, hard disk, peripherals connected to
the computer, and video memory. If no activity is detected for a period of
time, the computer stops some or all of these devices in order to conserve
energy.
SAVING POWER
Disable Fast startup
Your computer uses Fast startup to start quickly, but also uses a small
amount of power to check for signals to start. These checks will slowly
drain your computer’s battery.
If you prefer to reduce your computer’s power requirements and
environmental impact, turn off Fast startup:
Note: If Fast startup is off, your computer will take longer to start from
Sleep.
Your computer will also not start if it receives an instruction to start
over a network (Wake on LAN).

Power management - 41
1. Open the Desktop.
2. Click Power Options in the Notification area.
3. Select More Power Options.
4. Select Choose what the power buttons do.
5. To access Shutdown Settings, select Change settings that are
currently unavailable.

42 - Power management
6. Scroll down and disable Turn on fast startup.
7. Select Save changes.

Software - 43
SOFTWARE
USING WINDOWS AND YOUR SOFTWARE
Gateway computers include software to help you use your computer; the
programs and categories available on your computer depend on the
model purchased.
Internet security offer
It is vital to protect your computer from viruses and attacks over the
Internet (see Security on page 50). An comprehensive Internet security
suite, including a free trial subscription period, is offered when you first
start your computer. You should activate this protection before connecting
to the Internet. This security suite protects your computer from the most
recent online threats and protects your personal data (bank account
credentials, credit card numbers, passwords, and more).
Gateway Recovery Management
To prepare your computer for system recovery options, you should create
a set of recovery discs as soon as possible. See page 59 for more
information.

44 - Internet
INTERNET
FIRST STEPS ON THE NET
Protecting your computer
It is vital to protect your computer from viruses and attacks over the
Internet (see Internet security offer on page 43 and Security on page 50).
A comprehensive Internet security program is offered when you first start
your computer. You should activate this protection as soon as possible,
certainly before you connect to the Internet.
Choose an Internet Service Provider
Using the Internet has become a natural part of daily
computing. Just a few simple steps can connect you to a
vast collection of knowledge and communication tools.
To accomplish these steps you should first select an
Internet Service Provider (ISP), which supplies the
connection between your computer and the Internet. You
should research the ISPs available in your region, not
forgetting to talk to friends and family about their experiences or to check
reviews and consumer reports. The ISP you select will provide instructions
on how to connect to the Internet (you may need additional software or a
special ‘box’ that connects to your phone line).

Internet - 45
Connection types
Depending on your computer model, your location and your
communication needs, you have several ways to connect to the Internet.
Dial-up
Some computers include a telephone dial-up (‘modem’) connector. This
allows you to connect to the Internet using your telephone line. With a dial-
up connection, you cannot use the modem and the telephone
simultaneously on a single phone line. This type of connection is
recommended only if you have limited use of the Internet as the
connection speed is low and connection time is typically charged per hour.
DSL (e.g. ADSL)
DSL (Digital Subscriber Line) is an ‘always-on’ connection that runs over
the phone line. As DSL and phone do not use the same frequencies, you
can use your telephone at the same time you are connected to the Internet
(this requires a ‘micro-filter’ on each telephone socket to avoid
interference). To be eligible for DSL, you must be located near an DSL-
equipped phone exchange (service is sometimes unavailable in rural
areas). Connection speeds vary depending on your location, but DSL
generally provides very fast and reliable Internet connection. As the
connection is always-on, it is generally charged at fixed monthly rates.
Note: A DSL connection requires an appropriate modem. A modem is
usually provided by the ISP when you register. Many of these
modems include an ‘router’ that provides network and wi-fi access.

46 - Internet
Cable
A cable connection provides fast and always-on Internet service via a
cable television line. This service is generally available in large cities. You
can use your telephone and watch cable TV at the same time you are
connected to the Internet.
3G (WWAN or 'Wireless Wide-Area Network')
A 3G connection allows you to use cellular networks (such as those used
by a mobile phone) to connect to the Internet while away from home. The
socket for a SIM card may be built in to your computer, or may require an
external device, such as a USB modem or even an appropriately equipped
mobile phone.
Note: If your computer includes a SIM card slot, you require a
compatible SIM card and a contract with a cellular provider.
Before using the 3G features, check with your service provider to see
if any additional charges will be incurred, especially roaming charges.
Network connections
A LAN (Local Area Network) is a group of computers (for example, within
an office building or home) that share a common communications line and
resources. When you set up a network, you can share files, peripheral
devices (such as a printer) and an Internet connection. You can set up a
LAN using wired technologies (such as Ethernet) or wireless technologies
(such as WiFi or Bluetooth).

Internet - 47
Wireless networks
A wireless LAN or WLAN is a wireless local area network, which may link
two or more computers without using wires. Setting up a wireless network
is easy and allows you to share files, peripheral devices and an Internet
connection.
What are benefits of a wireless network?
Mobility
Wireless LAN systems allow you and other users of your home network to
share access to files and devices connected to the network, for example a
printer or scanner.
Also you can share an internet connection with other computers in your
home.
Installation speed and simplicity
Installing a wireless LAN system can be fast and easy and eliminates the
need to pull cables through walls and ceilings.
Components of a wireless LAN
To set up your Wireless network at home you need to have the following:
Access point (router)
Access points (routers) are two-way transceivers that broadcast data into
the surrounding environment. Access points act as a mediator between
wired and wireless network. Most routers have a built-in DSL modem that
will allow you access to a high speed DSL internet connection. The ISP
(Internet Service Provider) you have chosen normally supplies a modem/

48 - Internet
router with the subscription to their services. Read carefully the
documentation supplied with your Access point/router for detailed setup
instructions.
Network cable (RJ45)
A network cable (also called RJ45 cable) is used to connect the host
computer to the access point (see illustration below); this type of cable
may also be used to connect peripheral devices to the access point.
Wireless adapter
An internal wireless adapter is normally already installed in your
computer. A button or controls in Windows allow you to activate or
deactivate the adapter.

Internet - 49
Diagram of a working network
1. Access point/router
2. Desktop computer
3. Modem
4. Printer
5. Portable computer
6. PDA/Smartphone
7. Network cables
(RJ45)
Turning on/off a wireless network connection
Most computers feature a ‘WiFi’ button that turns the network connection
on or off. If your computer has wireless access, but does not feature a
Communication button, you may turn your wireless network on or off, or
control what is shared over the network with the network management
options. Press the Windows key ( ) + W, type "HomeGroup" and then
click on HomeGroup.
Warning: Using wireless devices while flying in aircraft is
prohibited. Switch off all devices before boarding an aircraft;
they may be dangerous to the operation of the aircraft, disrupt
1
2
3
4
5
6
7

50 - Internet
communications, and even be illegal.
Surf the Net!
To surf the Internet, you need a program called an
Internet browser. Internet Explorer provides an easy and
secure web browsing experience. As soon as you have
your Internet access installed and you are connected,
from Start, click the Internet Explorer tile or the icon
located on Desktop and take your Internet experience to a
new level!
Gateway website
To get you started why not visit our website, www.gateway.com.
Gateway is dedicated to provide you with on-going personalized support.
Check out our Support section to get help tailored to your needs.
www.gateway.com is your portal to a world of online activities and
services: visit us regularly for the latest information and downloads!
Security
You are probably eager to explore everything the Internet has to offer. In
order for you to be safe online, Gateway has pre-installed Symantec’s
award-winning Norton Internet Security™ on your computer.
Norton Internet Security runs quietly in the background to block today’s
complex threats and protect your identity when you shop, bank, or browse
online.

Internet - 51
Norton Internet Security blocks online identity theft, detects and eliminates
spyware, removes viruses and Internet worms, protects against hackers.
Definitions
What is a virus?
Malicious software, typically called ‘viruses’, are programs designed to
infect and damage computers. Most viruses are transmitted over the
Internet, emails or malicious Web sites. A typical virus will replicate and
pass itself undetected to multiple computers. Other forms of nuisance,
such as Trojan horses, worms or spam can infect your computer in various
ways, using up resources or clogging up a network.
Note: Gateway guarantees that your computer was 100% virus free
at the time of purchase and does not cover damages due to viruses.
What is spyware?
Spyware refers to generally unwanted programs that are downloaded onto
your computer while connected to the Internet, often without you knowing
it. Once it has infected your computer, it can snoop on your browsing
activity, collect personal information, cause pop-up ads to appear, or even
change the configuration of your computer. Spyware consumes resources
on your computer; it can slow down your Internet connection or entire
computer system, and even cause crashes.
Spyware is sometimes used by unscrupulous companies to monitor and
track the sites you visit on the Internet so as to determine your web-surfing
habits and display targeted pop-up ads on your screen. However, some
kinds of spyware go beyond simple tracking and actually monitor

52 - Internet
keystrokes and capture passwords, posing a serious security risk.
What is malware?
Malicious software, also known as malware, is software designed to
deliberately harm your computer. For example, viruses, worms, and
Trojan horses are malicious software. To help protect your computer
against malware, make sure it is using up-to-date antivirus and anti-
malware software.
What is a personal firewall?
A personal firewall is a software program designed to prevent
unauthorized access to or from a private network. It acts as a shield to
protect your Internet connection from unwanted connections, some of
which may attempt to take control of your computer to install or re-
distribute viruses or malicious programs. Each connection to your
computer is monitored - programs that attempt to receive information
without your permission are detected and the firewall will display an alert.
You can then decide if you will allow the connection, if the connection is to
a program you are currently using then normally you would allow it (i.e. a
game connecting to a multi-player server or an encyclopaedia making a
content update).
How to protect your computer
Cybercrime prevention can be straight-forward - when armed with a little
technical advice and common sense, many attacks can be avoided. In
general, online criminals are trying to make their money as quickly and
easily as possible. The more difficult you make their job, the more likely

Internet - 53
they are to leave you alone and move on to an easier target. The tips
below provide basic information on how you can prevent online fraud.
Keep your computer current with the latest patches and updates
One of the best ways to keep attackers away from your computer is to
apply patches and other software fixes when they become available. By
regularly updating your computer, you block attackers from being able to
take advantage of software flaws (vulnerabilities) that they could otherwise
use to break into your system.
While keeping your computer up-to-date will not protect you from all
attacks, it makes it much more difficult for hackers to gain access to your
system, blocks many basic and automated attacks completely, and might
be enough to discourage less-determined attackers, so they will give up
and look for a more vulnerable computer elsewhere.
More recent versions of Microsoft Windows and other popular software
can be configured to download and apply updates automatically so that
you do not have to remember to check for the latest software. Taking
advantage of auto-update features in your software is a great start toward
keeping yourself safe online.
Protect your computer with security software
Several types of security software are necessary for basic online security.
Security software essentials include firewall and antivirus programs. A
firewall is usually your computer's first line of defense-it controls who and
what can communicate with your computer online. You could think of a
firewall as a sort of "policeman" that watches all the data attempting to
flow in and out of your computer on the Internet, allowing communications

54 - Internet
that it knows are safe and blocking "bad" traffic such as attacks from ever
reaching your computer.
The next line of defense many times is your antivirus software, which
monitors all online activities such as email messages and Web browsing
and protects an individual from viruses, worms, Trojan horse and other
types of malicious programs. Your antivirus and antispyware software
should be configured to update itself, and it should do so every time you
connect to the Internet.
Integrated security suites such as Norton Internet Security, which combine
firewall, antivirus, antispyware with other features such as antispam and
parental controls, have become popular as they offer all the security
software needed for online protection in a single package. Many people
find using a comprehensive security suite an attractive alternative to
installing, configuring and updating several different types of security
software.
A complete version of Norton Internet Security™ is pre-installed on your
Gateway system. It includes a free trial subscription to protection updates.
Make sure you Activate it!
Choose strong passwords and keep them safe
Passwords are a fact of life on the Internet today; we use them for
everything from ordering flowers and online banking to logging into our
favorite airline Web site to see how many miles we have accumulated.
The following tips can help make your online experiences secure:
• Selecting a password that cannot be easily guessed is the first step
toward keeping passwords secure and out of the wrong hands. Strong

Internet - 55
passwords have eight characters or more and use a combination of
letters, numbers and symbols (e.g., # $ % ! ?). Avoid using any of the
following as your password: your login name, anything based on your
personal information such as your last name, and words that can be
found in the dictionary, especially "password". Try to select especially
strong, unique passwords for protecting activities like online banking.
• Keep your passwords in a safe place and try not to use the same
password for every service you use online.
• Change passwords on a regular basis, at least every 90 days. This can
limit the damage caused by someone who has already gained access to
your account. If you notice something suspicious with one of your online
accounts, one of the first steps you can take is to change your
password.
Protect your personal information
Exercise caution when sharing personal information such as your name,
home address, phone number, and email address online. To take
advantage of many online services, you will inevitably have to provide
personal information in order to handle billing and shipping of purchased
goods. Since not divulging any personal information is rarely possible, the
following list contains some advice for how to share personal information
safely online:
• Keep an eye out for phony email messages. Things that indicate a
message may be fraudulent are misspellings, poor grammar, odd
phrasing, Web site addresses with strange extensions, Web site
addresses that are entirely numbers where there are normally words,

56 - Internet
and anything else out of the ordinary. Additionally, phishing messages
will often tell you that you have to act quickly to keep your account open,
update your security, or urge you to provide information immediately or
else something bad will happen. Don't take the bait.
• Don't respond to email messages that ask for personal
information. Legitimate companies will not use email messages to ask
for your personal information. When in doubt, contact the company by
phone or by typing in the company Web address into your Web browser.
Don't click on the links in these messages as they make take you to
fraudulent, malicious Web sites.
• Steer clear of fraudulent Web sites used to steal personal
information. When visiting a Web site, type the address (URL) directly
into the Web browser rather than following a link within an email or
instant message. Fraudsters often forge these links to make them look
convincing.
A shopping, banking or any other Web site where sensitive information
should have an "S" after the letters "http" (i.e. https://www.yourbank.com
not http://www.yourbank.com). The "s" stands for secure and should
appear when you are in an area requesting you to login or provide other
sensitive data. Another sign that you have a secure connection is the
small lock icon in the bottom of your web browser (usually the right-hand
corner).
• Pay attention to privacy policies on Web sites and in software. It is
important to understand how an organization might collect and use your
personal information before you share it with them.

Internet - 57
• Guard your email address. Spammers and "phishers" sometimes send
millions of messages to email addresses that may or may not exist in
hopes of finding a potential victim. Responding to these messages or
even downloading images ensures you will be added to their lists for
more of the same messages in the future. Also be careful when posting
your email address online in newsgroups, blogs or online communities.
Online offers that look too good to be true usually are
The old saying "there's no such thing as a free lunch" still rings true today.
Supposedly "free" software such as screen savers or smileys, secret
investment tricks sure to make you untold fortunes, and contests that
you've surprisingly won without entering are the enticing hooks used by
companies to grab your attention.
While you may not directly pay for the software or service with money, the
free software or service you asked for may have been bundled with
advertising software ("adware") that tracks your behavior and displays
unwanted advertisements. You may have to divulge personal information
or purchase something else in order to claim your supposed content
winnings. If an offer looks so good it's hard to believe, ask for someone
else's opinion, read the fine print, or even better, simply ignore it.
Review bank and credit card statements regularly
The impact of identity theft and online crimes can be greatly reduced if you
can catch it shortly after your data is stolen or when the first use of your
information is attempted. One of the easiest ways to get the tip-off that
something has gone wrong is by reviewing the monthly statements

58 - Internet
provided by your bank and credit card companies for anything out of the
ordinary.
Additionally, many banks and services use fraud prevention systems that
call out unusual purchasing behavior (i.e. if you live in Texas and all of the
sudden start buying refrigerators in Budapest). In order to confirm these
out of the ordinary purchases, they might call you and ask you to confirm
them. Don't take these calls lightly; this is your hint that something bad
may have happened and you should take necessary action.
Protect your computer with Windows security tools
Windows provides a variety of protection applications.
Windows Updates
If you have an active Internet connection, Windows can check for
important updates for your computer and install them automatically. These
updates include security patches and program updates that can improve
your computing experience and help protect your computer against new
viruses and attacks.
How do I know when my computer is at risk?
If the Action Center reports an alert, or if your computer behaves
erratically, crashes unexpectedly or if some of your programs do not work
correctly, your computer may be infected by malicious software. However,
do not blame every computer problem on a virus! If you suspect your
computer is infected, the first thing to do is update, if you have not already
done so, and run your antivirus and anti-spyware software.

Recovery - 59
RECOVERY
If you are having trouble with your computer, and the frequently asked
questions (see page 79) do not help, you can 'recover' your computer - i.e.
return it to an earlier state.
This section describes the recovery tools available on your computer.
Gateway provides Gateway Recovery Management, which allows you to
create a recovery backup, a drivers and applications backup, and to start
recovery options, either using Windows tools, or the recovery backup.
Note: Gateway Recovery Management is only available with a pre-
installed Windows operating system.
Important: We recommend that you create a Recovery Backup
and Drivers and Applications Backup and as soon as possible.
In certain situations a full recovery will require a USB recovery
backup.
CREATING A RECOVERY BACKUP
To reinstall from a USB storage drive, you must first create a recovery
backup. The recovery backup includes the entire original contents of your
computer’s hard drive, including Windows and all factory-loaded software
and drivers. Using this backup will restore your computer to the same
state as when you purchased it, while giving you an option to retain all
settings and personal data.
Note:
Make sure you have a USB drive with a capacity of at least 16 GB.

60 - Recovery
1. From Start, type 'Recovery' and then click Gateway Recovery
Management in the list of apps.
2. Click Create Factory Default Backup. The Recovery Drive window
opens.

Recovery - 61
Make sure Copy contents from the recovery partition to the recovery
drive is selected. This provides the most complete and safest recovery
backup.
3. Plug in the USB drive then click Next.
• Make sure your USB drive has enough capacity before continuing.
The recovery backup requires at least 16 GB of storage
4. You will be shown the backup progress on the screen.
5. Follow the process until it completes.
6. After creating the recovery backup, you can choose to delete the
recovery information on your computer. If you delete this information,
you can only use the USB recovery backup to restore your computer, if
you lose or erase the USB drive, you cannot restore your computer.

62 - Recovery
7. Unplug the USB drive and label it clearly.
Important: Write a unique, descriptive label on the backup, such
as 'Windows Recovery Backup'. Make sure you keep the backup
in a safe place that you will remember.
CREATING A DRIVERS AND APPLICATIONS BACKUP
To create a Drivers and Applications Backup, that contains the factory-
loaded software and drivers needed by your computer, you may use either
a USB storage drive or, if your computer features a DVD recorder, one or
more blank recordable DVDs.

Recovery - 63
1. From Start, type 'Recovery' and then click Gateway Recovery
Management in the list of apps.
2. Click Create Drivers and Applications Backup.
Plug in the USB drive or insert a blank DVD into the optical drive, then
click Next.

64 - Recovery
• If you are using a USB drive, make sure your USB drive has enough
capacity before continuing.
• If using DVDs, it will also show the number of blank, recordable discs
you will need to complete the recovery discs. Make sure that you
have the required number of identical, blank discs.

Recovery - 65
3. Click Start to copy files.You will be shown the backup progress on the
screen.
4. Follow the process until it completes:
• If you are using optical discs, the drive ejects each disc as it
completes burning it. Remove the disc from the drive and mark it with
a permanent marker.
If multiple discs are required, insert a new disc when prompted, then
click OK. Continue until the process is complete.
• If you are using a USB drive, unplug the drive and label it clearly.
Important: Write a unique, descriptive label on each backup,
such as 'Drivers and Applications Backup'. Make sure you keep
the backup in a safe place that you will remember.
RECOVERING YOUR SYSTEM
To recover your system:
1. Perform minor fixes.
If only one or two items of software or hardware have stopped working
correctly, the problem may be solved by reinstalling the software or the
device drivers.
To reinstall software and drivers that were pre-installed at the factory,
see "Reinstalling drivers and applications" on page 66.
For instructions on reinstalling software and drivers that were not pre-
installed, see that product’s documentation or support Web site.
2. Revert to a previous system condition.
If reinstalling software or drivers does not help, then the problem may be

66 - Recovery
solved by returning your system to a previous state when everything
was working correctly.
For instructions, see "Returning to an earlier system snapshot" on
page 69.
3. Reset your operating system.
If nothing else has solved the problem and you want to reset your
system, but keep your user information, see "Returning your system
to its factory condition" on page 70.
4. Reset your system to its factory condition.
If nothing else has solved the problem and you want to reset your
system to factory condition, see "Returning your system to its factory
condition" on page 70.
Reinstalling drivers and applications
As a troubleshooting step, you may need to reinstall the applications and
device drivers that came pre-installed on your computer from the factory.
You can reinstall using either your hard drive or the backup you have
created.
• Other applications - If you need to reinstall software that did not come
pre-installed on your computer, you need to follow that software’s
installation instructions.
• New device drivers - If you need to reinstall device drivers that did not
come pre-installed on your computer, follow the instructions provided
with the device.

Recovery - 67
If you are reinstalling using Windows and the recovery information stored
on your computer:
•From Start, type 'Recovery' and then click Gateway Recovery
Management in the list of apps.
• Click Reinstall Drivers or Applications.

68 - Recovery
• You should see the Contents section of the Gateway Resource
Center.
• Click the install icon for the item you want to install, then follow
the onscreen instructions to complete the installation. Repeat
this step for each item you want to reinstall.
If you are reinstalling from a Drivers and Applications Backup on a DVD or
USB drive:
1. Insert the Drivers and Applications Backup into the disc drive or
connect it to a free USB port.
• If you inserted a DVD wait for Gateway Resource Center to start.
• If Gateway Resource Center does not start automatically, press
the Windows key + <E>, then double-click on the optical drive icon.

Recovery - 69
• If you are using a USB drive, press the Windows key + <E>, then
double-click on the drive that contains the backup. Double-click on
ResourceCenter.
2. You should see the Contents section of the Gateway Resource
Center.
3. Click the install icon for the item you want to install, then follow the
onscreen prompts to complete the installation. Repeat this step for
each item you want to reinstall.
Returning to an earlier system snapshot
Microsoft System Restore periodically takes a 'snapshot' of your system
settings and saves them as restore points. In most cases of hard-to-
resolve software problems, you can return to one of these restore points to
get your system running again.

70 - Recovery
Windows automatically creates an additional restore point each day, and
also each time you install software or device drivers.
Note: For more information about using Microsoft System Restore,
from Start, type 'Help' and then click Help and Support in the list of
apps. Type 'Windows system restore' in the Search Help box, then
press Enter.
Returning to a restore point
1. From Start, type 'Control Panel' and then click Control Panel in the list
of apps.
2. Click System and Security > Action Center, then click Recovery at
the bottom of the window.
3. Click Open System Restore, then Next.
4. Click the latest restore point (at a time when your system worked
correctly), click Next, then Finish.
5. A confirmation window appears; click Yes. Your system is restored
using the restore point you specified. This process may take several
minutes, and may restart your computer.
Returning your system to its factory condition
If your computer experiences problems that are not recoverable by other
methods, you may need to reinstall everything to return your system to its
factory condition. You can recover from either your hard drive or the
recovery backup you have created.

Recovery - 71
• If you can still run Windows and have not deleted the recovery partition,
see "Recovering from Windows" on page 71.
• If you cannot run Windows, your original hard drive has been completely
re-formatted or you have installed a replacement hard drive, see
"Recovering from a recovery backup" on page 75.
Recovering from Windows
Start Gateway Recovery Management:
•From Start, type 'Recovery' and then click Gateway Recovery
Management in the list of apps.
Two options are available, Restore Factory Settings (Reset my PC) or
Customized Restore (Refresh my PC).
Restore Factory Settings deletes everything on your hard drive, then
reinstalls Windows and all software and drivers that were pre-installed on
your system. If you can access important files on your hard drive, back
them up now. See "Restore Factory Settings with Gateway Recovery
Management" on page 72.
Customized Restore will attempt to retain your files (user data) but will
reinstall all software and drivers. Software installed since you purchased
your PC will be removed (except software installed from the Windows

72 - Recovery
Store). See "Customized Restore with Gateway Recovery
Management" on page 74.
Restore Factory Settings with Gateway Recovery Management
1. Click Restore Factory Settings.
Caution: 'Restore Factory Settings' will erase all files on your
hard drive.
2. If your computer is configured with two operating systems (only
available on certain systems), a window opens with the option to restore
either Windows 7 or Windows 8. If you choose Windows 7, your
computer will restart and restore Windows 7. If you choose Windows 8,
Reset your PC opens, as described below.
Note: To fully enjoy Windows 8 features after changing from Windows
7, enter the BIOS (press <F2> when starting your computer) and

Recovery - 73
change Boot Mode to UEFI. If you reinstall Windows 7, you must
change Boot Mode back to Legacy before restarting your computer.
3. The Reset your PC window opens.
Images for reference only.
4. Click Next, then choose how to erase your files:
a. Just remove my files quickly erases all files before restoring your
computer and takes about 30 minutes.
b. Fully clean the drive completely cleans the drive after each file is
erased, so no files can be viewed after the recovery. Cleaning the
drive takes much longer, up to 5 hours, but is much more secure as
old files are completely removed.
5. Click Reset.
6. The recovery process begins by restarting your computer, then
continues by copying files to your hard drive.
7. After the recovery has finished, you can start using your computer by
repeating the first-start process.

74 - Recovery
Customized Restore with Gateway Recovery Management
1. Click Customized Restore (Retain User Data).
2. The Refresh your PC window opens.
3. Click Next, then Refresh.
4. The recovery process begins by restarting your computer, then continues
by copying files to your hard drive. This process takes about 30 minutes.

Recovery - 75
Recovering from a recovery backup
To recover from a recovery backup on a USB drive:
1. Find your recovery backup.
2. Plug in the USB drive and turn on your computer.
3. If it is not already enabled, you must enable the F12 Boot Menu:
a. Press <F2> when starting your computer.
b. Use the left or right arrow keys to select the Main menu.
c. Press the down key until F12 Boot Menu is selected, press <F5> to
change this setting to Enabled.
d. Use the left or right arrow keys to select the Exit menu.
e. Depending on the type of BIOS your computer uses, select Save
Changes and Exit or Exit Saving Changes and press Enter. Select
OK or Yes to confirm.
f. Your computer will restart.
4. During startup, press <F12> to open the boot menu. The boot menu
allows you to select which device to start from, select the USB drive.
a. Use your arrow keys to select USB Device, then press Enter.
b. Windows starts from the recovery backup instead of the normal
startup process.
5. Select your keyboard type.
6. Select Troubleshoot and then choose the type of recovery to use:

76 - Recovery
a. Click Advanced then System Restore to start Microsoft System
Restore:
Microsoft System Restore periodically takes a 'snapshot' of your
system settings and saves them as restore points. In most cases of
hard-to-resolve software problems, you can return to one of these
restore points to get your system running again.
b. Click Reset your PC to start the reset process:
Reset your PC deletes everything on your hard drive, then reinstalls
Windows and all software and drivers that were pre-installed on your
system. If you can access important files on your hard drive, back
them up now. See "Reset your PC from the recovery backup" on
page 77.
c. Click Refresh your PC to start the refresh process:
Refresh your PC will attempt to retain your files (user data) but will
reinstall all software and drivers. Software installed since you
purchased your PC will be removed (except software installed from
the Windows Store). See "Refresh your PC from the recovery
backup" on page 78.

Recovery - 77
Reset your PC from the recovery backup
Caution: Reset your PC will erase all files on your hard drive.
1. The Reset your PC window opens.
Images for reference only.
2. Click Next.
3. Select the operating system to recover (normally only one option is
available).
4. Choose to keep any changes to the hard drive:
a. If you have deleted the recovery partition or otherwise changed the
partitions on the hard drive and want to keep these changes, select
No
.
b. To completely restore your computer to Factory Settings, select Yes.
5. Choose how to erase your files:
a. Just remove my files quickly erases all files before restoring your
computer and takes about 30 minutes.
b. Fully clean the drive completely cleans the drive after each file is
erased, so no files can be viewed after the recovery. Cleaning the
drive takes much longer, up to 5 hours, but is much more secure as

78 - Recovery
old files are completely removed.
6. Click Reset.
7. After the recovery has finished, you can start using your computer by
repeating the first-start process.
Refresh your PC from the recovery backup
1. The Refresh your PC window opens.
2. Click Next.
3. Select the operating system to recover (normally only one option is
available).
4. Click Refresh.
5. The recovery process begins by restarting your computer, then continues
by copying files to your hard drive. This process takes about 30 minutes.

Frequently asked questions - 79
FREQUENTLY ASKED QUESTIONS
The following is a list of possible situations that may arise during the use
of your computer. Easy solutions are provided for each one.
I turned on the power, but the computer does not start or boot up
Look at the power indicator:
• If it is not lit, no power is being supplied to the computer. Check the
following:
• If you are using on the battery, it may be low and unable to power the
computer. Connect the AC adapter to recharge the battery pack.
• Make sure that the AC adapter is properly plugged into the computer
and to the power outlet.
• If it is lit, check the following:
• Is a disc in the optical drive? Remove it and press <Ctrl> + <Alt> +
<Del> to restart the system.
• Do you have a USB storage device (USB disk or smartphone)
plugged into your computer? Unplug it and press <Ctrl> + <Alt> +
<Del> to restart the system.
Nothing appears on the screen
The computer’s power management system automatically blanks the
screen to save power. Press any key to turn the display back on.

80 - Frequently asked questions
If pressing a key does not turn the display back on, three things might be
the cause:
• The brightness level might be too low. Press (increase) to adjust the
brightness level.
• The display device might be set to an external monitor. Press
to
toggle the display back to the computer.
• If the Sleep indicator is lit, the computer is in Sleep mode. Press and
release the power button to resume.
No audio is heard from the computer
Check the following:
• The volume may be muted. In Windows, look at the volume control
(speaker) icon on the taskbar. If it is crossed-out, click the icon and
deselect the Mute all option.
• The volume level may be too low. In Windows, look at the volume
control icon on the taskbar. You can also use the volume control buttons
to adjust the volume.
• If headphones, earphones or external speakers are connected to the
line-out port on the computer, the internal speakers automatically turn
off.
I want to eject the optical drive tray without turning on the power
There is a mechanical eject hole on the optical drive. Simply insert the tip
of a pen or paperclip into the hole and push to eject the tray.

Frequently asked questions - 81
The keyboard does not respond
Try attaching an external keyboard to a USB port on the computer. If it
works, contact your dealer or an authorized service center as the internal
keyboard cable may be loose.
The printer does not work
Check the following:
• Make sure that the printer is connected to a power outlet and that it is
turned on.
• Make sure that the printer cable is connected securely to a USB port
and the corresponding port on the printer.

82 - Frequently asked questions
TIPS AND HINTS FOR USING WINDOWS 8
We know this is a new operating system that will take some getting used
to, so we've created a few pointers to help you get started.
Three concepts you might want to keep in mind
1. Start
The Start button is no longer available; you can launch apps from the Start
screen.
2. Tiles
Live tiles are similar to thumbnails of the apps.
3. Charms
Charms allow you to perform useful functions, such as sharing content,
turning off your PC or changing settings.
How do I access the charms?
Move the cursor to the upper or lower right-hand corner of the screen to
access the charms, or press the Windows key + <C>.
How do I get to Start?
Press the Windows key on the keyboard; press the Windows key + <C>
and click Start; or move the cursor to the lower left-hand corner of the
screen and click Start.

Frequently asked questions - 83
How do I jump between apps?
Move the cursor to the left-hand edge of the screen to view thumbnails of
apps that are currently running.
You may also press the Windows key + <Tab> to open and scroll through
the current apps.
How do I turn off my computer?
Press the Windows key + <C>, click Settings > Power and select the
action you'd like to take. Alternatively, from Desktop, click Gateway
Power Button and select the action you'd like to take.
Why is there a new interface?
The new interface for Windows 8 is designed to work well with touch input.
Windows Store apps will automatically use the whole screen and don't
require closing in the traditional way. Windows Store apps will be
displayed on Start using live-tiles.
What are ’live tiles?’
Live tiles are similar to thumbnails of the apps that will be updated with
new content whenever you're connected to the Internet. So, for example,
you can view weather or stock updates without needing to open the app.

84 - Frequently asked questions
How do I unlock my computer?
Press the any key and click on a user account icon to unlock the
computer. If your account has a password set, you will need to enter the
password to continue.
How do I personalize my computer?
You can personalize Start with a different background image or by
arranging the tiles to suit your personal needs.
To change the background, press the Windows key + <C> and click
Settings > Change PC settings > Personalize. Click Start screen at the
top of the page and select a color and image.
How do I move tiles?
Click and hold a tile to select it, then drag it to the place on Start that you
want it to appear. Other tiles will be moved to accommodate the tile in its
new location.
Can I make tiles bigger or smaller?
Right-click on a tile, then select Smaller or Larger from the menu that
appears at the bottom of the screen.
How do I personalize the Lock screen?
You can personalize the lock screen with a different image or to show you
quick status and notifications to suit your personal needs.

Frequently asked questions - 85
To change the background, press the Windows key + <C> and click
Settings > Change PC settings > Personalize. Click Lock screen at the
top of the page and select the image and apps you would like to see on
the lock screen.
So, how do I close an app?
Move the cursor to the top of the screen and click and drag the window
downwards to close the app.
You can close apps from the thumbnails on the left-hand edge of the
screen by right-clicking on a thumbnail and selecting Close.
Can I change the screen resolution?
From Start, start typing ’Control Panel’ to open Search and display the
results; click Control Panel > Adjust screen resolution.
I want to use Windows in the way that I'm used to - give me my
desktop back!
From Start click the Desktop tile to see a traditional desktop. You can pin
apps you frequently use to the taskbar to easily open them.
If you click an app that is not a Windows Store app, Windows will
automatically open the app using Desktop.
Where are my apps?
From Start, simply start typing the name of the app you would like to open,
and Search will automatically open and list results.

86 - Frequently asked questions
To view the complete list of apps, press the space bar or the Menu key
and click All apps.
How do I make an app appear on Start?
If you're in All apps and you want to make an app appear on Start, you can
select the app and right-click on it. Select Pin to Start from the menu that
appears at the bottom of the screen.
How do I remove a tile from Start?
Right-click the tile and click Unpin from Start from the menu that appears
at the bottom of the screen.
How do I make an app appear on my taskbar in Desktop?
If you're in All apps and you want to make an app appear on the taskbar in
Desktop, you can select the app and right-click on it. Select Pin to
taskbar from the menu that appears at the bottom of the screen.
How do I install apps?
You can download Windows Store apps from Store. You will need to have
a Microsoft ID to purchase and download apps from Store.
I can't find apps like Notepad and Paint! Where are they?
From Start you can simply start typing the name of the app you're looking
for to open Search and list the results. Alternatively, open All apps and
scroll to ’Windows Accessories’ to see the list of legacy programs.

Frequently asked questions - 87
What is a Microsoft ID (account)?
A Microsoft account is an email address and password that you use to
sign in to Windows. You can use any email address, but it is best if you
choose the one you already use to communicate with friends and sign in
to your favorite websites. When you sign in to your PC with a Microsoft
account, you'll connect your PC to the people, files, and devices you care
about.
Do I need one?
You do not need a Microsoft ID to use Windows 8, but it makes life easier
because you can sync data across different machines you sign in to using
a Microsoft ID.
How do I get one?
If you've already installed Windows 8 and didn't sign in with a Microsoft
account or you don't have a Microsoft account and want to get one, press
the Windows key + <C> and click Settings > Change PC settings >
Users > Switch to a Microsoft account, and follow the onscreen
instructions.
How do I add a favorite to Internet Explorer?
Internet Explorer 10 doesn't have traditional favorites, instead you can pin
shortcuts to Start. Once you have the page open, right-click anywhere on
the page to open the menu at the bottom of the screen. Click Pin to Start.

88 - Frequently asked questions
How do I check for Windows updates?
Press the Windows key + <C> and click Settings > Change PC settings
> Windows Updates. Click Check for updates now.
Where can I get more information?
For more information please visit:
• Windows 8 tutorials: www.gateway.com/windows8-tutorial
• Support FAQs: support.gateway.com

Regulatory information - 89
REGULATORY INFORMATION
PREVENTION OF HEARING LOSS
- Caution: Permanent hearing loss may occur if earphones or headphones
are used at high volume for prolonged periods of time.
- A pleine puissance, l’écoute prolongée du baladeur peut endommager
l’oreille de l’utilisateur.
CAUTION when listening:
To protect your hearing, follow these instructions.
- Increase the volume gradually until you can hear clearly and comfortably.
- Do not increase the volume level after your ears have adjusted.
- Do not listen to music at high volumes for extended periods.
- Do not increase the volume to block out noisy surroundings.
- Decrease the volume if you can’t hear people speaking near you.
R
ADIO DEVICE REGULATORY NOTICE
- Note: Regulatory information below is for models with wireless LAN and/or Bluetooth
only.
Compliance accessories
The accessories associated with this equipment are: shielded video cable when an
external monitor is connected. These accessories are required to be used in order to
ensure compliance with FCC rules.
C
ALIFORNIA PROPOSITION 65 WARNING
This product contains chemicals known to the State of California to cause cancer, birth
defects, and/or other reproductive harm. For additional information regarding this product
warning, go to www.gateway.com/prop65
.

90 - Regulatory information
日本 (JAPAN)
本装置は、第二種情報装置(住宅地域またはその隣接した地域において使用されるべき
情報装置)デ住宅地域での電波障害防止を目的とした情報装置等電波障害自主規制協議
会 (VCCI)基準に適合しております。
しかし、本装置をラジオ、テレビジョン受信機に、近接してご使用になると、受信障害
の原因となることがあります。本書の説明にしたがって正しい取り扱いをしてくださ
い。
W
IRELESS ADAPTER REGULATORY INFORMATION
USA — FCC and FAA
The FCC with its action in ET Docket 96-8 has adopted a safety standard for human
exposure to radio frequency (RF) electromagnetic energy emitted by FCC certified
equipment. The wireless adapter meets the Human Exposure limits found in OET Bulletin
65, supplement C, 2001, and ANSI/IEEE C95.1, 1992. Proper operation of this radio
according to the instructions found in this manual will result in exposure substantially
below the FCC’s recommended limits.
- The following safety precautions should be observed:
Do not touch or move antenna while the unit is transmitting or receiving.
- Do not hold any component containing the radio such that the antenna is very close
or touching any exposed parts of the body, especially the face or eyes, while
transmitting.
- Do not operate the radio or attempt to transmit data unless the antenna is connected;
this behavior may cause damage to the radio.
Use in specific environments:
- The use of wireless adapters in hazardous locations is limited by the constraints
posed by the safety directors of such environments.
- The use of wireless adapters on airplanes is governed by the Federal Aviation
Administration (FAA).
- The use of wireless adapters in hospitals is restricted to the limits set forth by each
hospital.

Regulatory information - 91
Antenna Use
In order to comply with FCC RF exposure limits, low gain integrated antennas should be
located at a minimum distance of 20 cm (8 inches) or more from the body of all persons
or at a minimum distance as specified by the FCC module grant conditions. FCC grants
can be viewed from the FCC Equipment Authorization website at https://fjallfoss.fcc.gov/
oetcf/eas/reports/GenericSearch.cfm by entering the FCC ID printed on the module label.
Explosive Device Proximity Warning
Warning: Do not operate a portable transmitter (including this wireless adapter) near
unshielded blasting caps or in an explosive environment unless the transmitter has been
modified to be qualified for such use
Antenna Warnings
- Warning: To comply with the FCC and ANSI C95.1 RF exposure limits, it is
recommended that for the wireless adapter installed in a desktop or portable
computer, the antenna for this wireless adapter to be installed so as to provide a
separation distance of at least 20 cm (8 inches) from all persons or at the minimum
distance as specified by the module grant conditions. FCC grants can be viewed from
the FCC Equipment Authorization website at https://fjallfoss.fcc.gov/oetcf/eas/
reports/GenericSearch.cfm by entering the FCC ID printed on the module label.
- Warning: The wireless adapter is not designed for use with high-gain directional
antennas.
Use On Aircraft Caution
- Caution: Regulations of the FCC and FAA prohibit airborne operation of radio-
frequency wireless devices (wireless adapters) because their signals could interfere
with critical interfere with critical aircraft instruments.
Local Restrictions on 802.11a, 802.11b, 802.11g and 802.11n Radio Usage
- Caution: Due to the fact that the frequencies used by 802.11a, 802.11b, 802.11g and
802.11n wireless LAN devices may not yet be harmonized in all countries, 802.11a,
802.11b, 802.11g and 802.11n products are designed for use only in specific
countries, and are not allowed to be operated in countries other than those of

92 - Regulatory information
designated use. As a user of these products, you are responsible for ensuring that
the products are used only in the countries for which they were intended and for
verifying that they are configured with the correct selection of frequency and channel
for the country of use. Any deviation from the permissible power and frequency
settings for the country of use is an infringement of national law and may be punished
as such.
Wireless Interoperability
The wireless adapter is designed to be interoperable with other wireless LAN products
that are based on direct sequence spread spectrum (DSSS) radio technology and to
comply with the following standards:
- IEEE Std. 802.11b compliant Standard on Wireless LAN
- IEEE Std. 802.11g compliant Standard on Wireless LAN
- IEEE Std. 802.11a compliant Standard on Wireless LAN (applies to devices
supporting 802.11a)
- IEEE Std. 802.11n draft 2.0 compliant on Wireless LAN
- Wireless Fidelity certification, as defined by the Wi-Fi Alliance
The Wireless Adapter and Your Health
The wireless adapter, like other radio devices, emits radio frequency electromagnetic
energy. The level of energy emitted by the wireless adapter, however, is less than the
electromagnetic energy emitted by other wireless devices such as mobile phones. The
wireless adapter operates within the guidelines found in radio frequency safety standards
and recommendations. These standards and recommendations reflect the consensus of
the scientific community and result from deliberations of panels and committees of
scientists who continually review and interpret the extensive research literature. In some
situations or environments, the use of the wireless adapter may be restricted by the
proprietor of the building or responsible representatives of the applicable organization.
Examples of such situations may include:
- Using the wireless adapter on board airplanes, or

Regulatory information - 93
- Using the wireless adapter in any other environment where the risk of interference
with other devices or services is perceived or identified as being harmful.
If you are uncertain of the policy that applies to the use of wireless adapters in a specific
organization or environment (an airport, for example), you are encouraged to ask for
authorization to use the adapter before you turn it on.
FCC Radio Frequency Interference Requirements (applies to device supporting
802.11a)
This device is restricted to indoor use due to its operation in the 5.15 to 5.25 GHz and
5.470 to 5.725 GHz frequency ranges. FCC requires this product to be used indoors for
the frequency ranges 5.15 to 5.25 GHz and 5.470 to 5.725 GHz to reduce the potential
for harmful interference to co-channel mobile satellite systems. High power radars are
allocated as primary users of the 5.25 to 5.35 GHz and 5.65 to 5.85 GHz bands. These
radar stations can cause interference with and /or damage this device. No configuration
controls are provided for this wireless adapter allowing any change in the frequency of
operations outside the FCC grant of authorization for U.S operation according to Part
15.407 of the FCC rules.
USA — Federal Communications Commission (FCC)
This device complies with Part 15 of the FCC Rules. Operation of the device is subject to
the following two conditions:
- This device may not cause harmful interference.
- This device must accept any interference that may cause undesired operation.
- Note: The radiated output power of the adapter is far below the FCC radio frequency
exposure limits. Nevertheless, the adapter should be used in such a manner that the
potential for human contact during normal operation is minimized. To avoid the
possibility of exceeding the FCC radio frequency exposure limits, you should keep a
distance of at least 20 cm between you (or any other person in the vicinity), or the
minimum separation distance as specified by the FCC grant conditions, and the
antenna that is built into the computer. Details of the authorized configurations can
be found at http://www.fcc.gov/oet/ea/
by entering the FCC ID number on the device.

94 - Regulatory information
Interference Statement
This wireless adapter has been tested and found to comply with the limits for a Class B
digital device, pursuant to Part 15 of the FCC Rules. These limits are designed to provide
reasonable protection against harmful interference in a residential installation. This
wireless adapter generates, uses, and can radiate radio frequency energy. If the wireless
adapter is not installed and used in accordance with the instructions, the wireless adapter
may cause harmful interference to radio communications. There is no guarantee,
however, that such interference will not occur in a particular installation. If this wireless
adapter does cause harmful interference to radio or television reception (which can be
determined by turning the equipment off and on), the user is encouraged to try to correct
the interference by taking one or more of the following measures:
- Reorient or relocate the receiving antenna of the equipment experiencing the
interference.
- Increase the distance between the wireless adapter and the equipment experiencing
the interference.
- Connect the computer with the wireless adapter to an outlet on a circuit different from
that to which the equipment experiencing the interference is connected.
- Consult the dealer or an experienced radio/TV technician for help.
- Note: The adapter must be installed and used in strict accordance with the
manufacturer's instructions as described in the user documentation that comes with
the product. Any other installation or use will violate FCC Part 15 regulations.
Canada — Industry Canada (IC)
This device complies with RSS210 of Industry Canada. Cet appareil se conforme à
RSS210 de Canada d'Industrie.
- Caution: When machine supports and using IEEE 802.11a wireless LAN, this
product is restricted to indoor use due to its operation in the 5.15- to 5.25 GHz
frequency range. Industry Canada requires this product to be used indoors for the
frequency range of 5.15 GHz to 5.25 GHz to reduce the potential for harmful
interference to co-channel mobile satellite systems. High power radar is allocated as

Regulatory information - 95
the primary user of the 5.25 to 5.35 GHz and 5.65 to 5.85 GHz bands. These radar
stations can cause interference with and/or damage to this device. The maximum
allowed antenna gain for use with this device is 6dBi in order to comply with the
E.I.R.P limit for the 5.25 to 5.35 and 5.725 to 5.85 GHz frequency range in point-to-
point operation. To comply with RF exposure requirements all antennas should be
located at a minimum distance of 20 cm, or the minimum separation distance allowed
by the module approval, from the body of all persons.
- Attention: l’utilisation d’un réseau sans fil IEEE802.11a est réstreinte à une
utilisation en intérieur à cause du fonctionement dans la bande de fréquence 5,15 -
5,25 GHz. Industry Canada requiert que ce produit soit utilisé à l’intérieur des
bâtiments pour la bande de fréquence 5,15 - 5,25 GHz afin de réduire les possibilités
d’interférences nuisibles aux canaux co-existants des systèmes de transmission
satellites. Les radars de puissances ont fait l’objet d’une allocation primaire de
fréquences dans les bandes 5,25 - 5,35 GHz et 5 65 - 5 85 GHz. Ces stations radar
peuvent créer des interférences avec ce produit et/ou lui être nuisible. Le gain
d’antenne maximum permissible pour une utilisation avec ce produit est de 6 dBi afin
d’être conforme aux limites de puissance isotropique rayonnée équivalente (P.I.R.E.)
applicable dans les bandes 5,25 - 5,35 GHz et 5,725 - 5,85 GHz en fonctionement
point-à-point. Se pour conformer aux conditions d'exposition de RF toutes les
antennes devraient être localisées à une distance minimum de 20 cm, ou la distance
de séparation minimum permise par l'approbation de module, du corps de toutes les
personnes.
This Class B digital apparatus complies with Canadian ICES-003.
Cet appareil numérique de la classe B est conforme a la norme NMB-003 du Canada.
"To prevent radio interference to the licensed service, this device is intended to be
operated indoors and away from windows to provide maximum shielding. Equipment (or
its transmit antenna) that is installed outdoors is subject to licensing."

96 - Regulatory information
« Pour empêcher que cet appareil cause du brouillage au service faisant l'objet d'une
licence, il doit être utilisé a l'intérieur et devrait être placé loin des fenêtres afin de fournir
un écran de blindage maximal. Si le matériel (ou son antenne d'émission) est installé à
l'extérieur, il doit faire l'objet d'une licence. »
European Union
List of applicable countries
This product must be used in strict accordance with the regulations and constraints in the
country of use. For further information, contact the local office in the country of use.
Please see http://ec.europa.eu/enterprise/rtte/implem.htm
for the latest country list.
List of National Codes
T
HIS EQUIPMENT MAY BE OPERATED IN THE FOLLOWING COUNTRIES:I
Country
ISO 3166
2 letter
code
Country
ISO 3166
2 letter
code
Country
ISO 3166
2 letter
code
Country
ISO 3166
2 letter
code
Austria AT Germany DE Malta MT United Kingdom GB
Belgium BE Greece GR Netherlands NT Iceland IS
Cyprus CY Hungary HU Poland PL Liechtenstein LI
Czech Republic CZ Ireland IE Portugal PT Norway NO
Denmark DK Italy IT Slovakia SK Switzerland CH
Estonia EE Latvia LV Slovenia SL Bulgaria BG
Finland FI Lithuania LT Spain ES Romania RO
France FR Luxembourg LU Sweden SE Turkey TR

Regulatory information - 97
The low band 5.15 -5.35 GHz is for indoor use only.
This equipment complies with the essential requirements of the European Union directive
1999/5/EC. See Statements of European Union Compliance, and more details refer to the
attached Declaration of Conformity.
English
Hereby, ACER INC., declares that this devise is in
compliance with the essential requirements and other
relevant provisionns of Directive 1999/5/EC.
Česky [Czech]
ACER INC. tímto prohlašuje, že toto zařízení je ve shodě se
základními požadavky a dalšími příslušnými ustanoveními
směrnice 1999/5/ES.
Daansk [Danish]
Undertegnede ACER INC. erklærer herved, at følgende
udstyr overholder de væsentlige krav og øvrige relevante krav
i direktiv 1999/5/EF.
Deutsch
[German]
Hiermit erklärt ACER INC., dass sich das Gerät Radiolan in
Übereinstimmung mit den grundlegenden Anforderungen und
den übrigen einschlägigen Bestimmungen der Richtlinie
1999/5/EG befindet.
Eesti [Estonian]
Käesolevaga kinnitab ACER INC. seadme vastavust direktiivi
1999/5/EÜ põhinõuetele ja nimetatud direktiivist tulenevatele
teistele asjakohastele sätetele.

98 - Regulatory information
Español
[Spanish]
Por medio de la presente ACER INC. declara que el
dispositivo cumple con los requisitos esenciales y
cualesquiera otras disposiciones aplicables o exigibles de la
Directiva 1999/5/CE.
Ελληνικά
[Greek]
∆ια του παρόντος η ACER INC. δηλώνει ότι η παρούσα
συσκευή συµµορφώνεται προς τις ουσιώδεις απαιτήσεις και
τις λοιπές διατάξεις της Οδηγίας 1999/5/ ΕΚ.
Français
[French]
Par la présente ACER INC. déclare que cet appareil est
conforme aux exigences essentielles et aux autres
dispositions pertinentes de la directive 1999/5/CE.
Íslenska
[Icelandic]
Hér með lýsir ACER INC. yfir því að er í samræmi við
grunnkröfur og aðrar kröfur, sem gerða r eru í tilskipun
1999/5/EC.
Itaaliano [Italian]
Con la presente ACER INC. dichiara che questo dispositivo è
conforme ai requisiti essenziali ed alle altre disposizioni
pertinenti stabilite dalla direttiva 1999/5/CE.
Latviski [Latvian]
Ar šo ACER INC. deklarē, ka šī ierīce atbilst Direktīvas
1999/5/EK būtiskajām prasībām un citiem ar to saistītajiem
noteikumiem.

Regulatory information - 99
Lietuvių
[Lithuanian]
Šiuo ACER INC. deklaruoja, kad šis įrenginys atitinka
esminius reikalavimus ir kitas 1999/5/EB Direktyvos
nuostatas.
Malti [Maltese]
Hawnhekk, ACER INC., jiddikjara li dan jikkonforma mal- ti
ijiet essenzjali u ma provvedimenti o rajn relevanti li he mm
fid-Dirrettiva 1999/5/EC.
Magyar
[Hungarian]
Alulírott, ACER INC. nyilatkozom, hogy a készülék megfelel a
vonatkozó alapveto követelményeknek és az 1999/5/EC
irányelv egyéb eloírásainak.
Nederlands
[Dutch]
Hierbij verklaart ACER INC. dat het toestel voldoet aan de
essentiële eisen en de andere relevante bepalingen van
richtlijn 1999/5/EG.
Norsk
[Norwegiann]
ACER INC. erklærer herved at utstyret er i samsvar med de
grunnleggende krav og øvrige relevante krav i direktiv
1999/5/EF.
Polski [Polish]
Niniejszym ACER INC. oświadcza, że urządzenie jest zgodne
z zasadniczymi wymogami oraz pozostałymi stosownymi
postanowieniami Dyrektywy 1999/5/EC.
Português
[Portuguese]
ACER INC. declara que este dispostivo está conforme com
os requisitos essenciais e outras disposições da Directiva
1999/5/CE.

100 - Regulatory information
France
Pour la France métropolitaine :
2,400 - 2,4835 GHz (Canaux 1à 13) autorisé en usage intérieur
2,400 - 2,454 GHz (canaux 1 à 7) autorisé en usage extérieur
Pour la Guyane et la Réunion :
2,400 - 2,4835 GHz (Canaux 1à 13) autorisé en usage intérieur
2,420 - 2,4835 GHz (canaux 5 à 13) autorisé en usage extérieur
Pour tout le territoire Français :
Seulement 5,15 -5,35 GHz autorisé pour le 802.11a
Slovensko
[Slovenian]
ACER INC. izjavlja, da je ta naprava skladna z bistvenimi
zahtevami in ostalimi relevantnimi določili Direktive
1999/5/ES.
Slovensky
[Slovak]
ACER INC. týmto vyhlasuje, že zariadenie spĺňa základné
požiadavky a všetky príslušné ustanovenia Smernice
1999/5/ES.
Suomi [Finnish]
ACER INC. vakuuttaa täten että tämä laite on direktiivin 1999/
5/EY oleellisten vaatimusten ja sitä koskevienn direktiivin
muiden ehtojen mukainen.
Svenska
[Swedish]
Härmed intygar ACER INC. att denna enhet står i
överensstämmelse med väsentliga egenskapskrav och
övriga relevanta bestämmelser som framgår av direktiv
1999/5/EG.

Regulatory information - 101
L'utilisation de cet equipement (2,4 GHz WLAN) est soumise à certaines restrictions :
- La puissance maximale autorisée en intérieur est de 100 mW pour 2400 - 2483,5 MHz.
- La puissance maximale autorisée est de 100 mW en extérieur pour 2400 - 2454 MHz.
- La puissance maximale autorisée est de 10 mW en extérieur, 2454 - 2483,5 MHz.
Pour les dernières restrictions, voir http://www.art-telecom.fr.
Italy
The use of these equipments is regulated by:
1.D.L.gs 1.8.2003, n. 259, article 104 (activity subject to general authorization) for outdoor
use and article 105 (free use) for indoor use, in both cases for private use.
2.D.M. 28.5.03, for supply to public of RLAN access to networks and telecom services.
L’uso degli apparati è regolamentato da:
1.D.L.gs 1.8.2003, n. 259, articoli 104 (attività soggette ad autorizzazione generale) se
utilizzati al di fuori del proprio fondo e 105 (libero uso) se utilizzati entro il proprio fondo,
in entrambi i casi per uso private.
2.D.M. 28.5.03, per la fornitura al pubblico dell’accesso R-LAN alle reti e ai servizi di
telecomunicazioni.
Belgium
Dans le cas d'une utilisation privée, à l'extérieur d'un bâtiment, au-dessus d'un espace
public, aucun enregistrement n'est nécessaire pour une distance de moins de 300 m.
Pour une distance supérieure à 300 m un enregistrement auprès de l'IBPT est requise.
Pour les enregistrements et licences, veuillez contacter l'IBPT.
In geval van privé-gebruik, buiten een gebouw, op een openbare plaats, is geen registratie
nodig, wanneer de afstand minder dan 300 m is. Voor een afstand groter dan 300 m is
een registratie bij BIPT vereist. Voor registraties en licenties, gelieve BIPT te contacteren.

102 - Regulatory information
Brazil
Este equipamento opera em caráter secundário, isto é, não tem direito a proteção contra
interferência prejudicial, mesmo de estações do mesmo tipo, e não pode causar
interferência a sistemas operando em caráter primário.
Pakistan
Pakistan Telecommunication Authority (PTA) Approved
Morocco
The operation of this product in the radio channel 2 (2417 MHz) is not authorized in the
following cities: Agadir, Assa-Zag, Cabo Negro, Chaouen, Goulmima, Oujda, Tan Tan,
Taourirt, Taroudant and Taza.
The operation of this product in the radio channels 4, 5, 6 and 7 (2425 - 2442 MHz) is not
authorized in the following cities: Aéroport Mohamed V, Agadir, Aguelmous, Anza,
Benslimane, Béni Hafida, Cabo Negro, Casablanca, Fès, Lakbab, Marrakech, Merchich,
Mohammédia, Rabat, Salé, Tanger, Tan Tan, Taounate, Tit Mellil, Zag.
Japan
5 GHz 帯は室内でのみ使用のこと
Korea
당해 무선설비는 운용 중 전파혼신 가능성이 있음
Taiwan
第十二條
經型式認證合格之低功率射頻電機,非經許可,公司、商號或使用者均不得擅自變更頻
率、加大功率或變更原設計之特性及功能。
第十四條
低功率射頻電機之使用不得影響飛航安全及干擾合法通信 ; 經發現有干擾現象時,應立即
停用,並改善至無干擾時方得繼續使用。
前項合法通信,指依電信法規定作業之無線通信。
低功率射頻電機須忍受合法通信或工業、科學及醫療用電波輻射性電機設備之干擾。

Regulatory information - 103
MODIFICATIONS TO THE PRODUCT
CE Marking
Gateway cannot be held responsible for unauthorized modifications made by the user and
the consequences thereof, which may alter the conformity of the product with the CE
Marking.
Radio frequency interference
The manufacturer is not responsible for any radio or TV interference caused by
unauthorised modifications to this equipment.
C
ONNECTIONS AND REMOTE EARTHS
PELV (Protected Extra Low Voltage)
To ensure the extra-low voltage integrity of the equipment, only connect equipment with
mains-protected electrically-compatible circuits to the external ports.
SELV (Safety Extra Low Voltage)
Every input and output of this product is classified as Safety Extra Low Voltage.
Remote earths
To prevent electrical shock, connect all local (individual office) computers and computer
support equipment to the same electrical circuit of the building wiring. If you are unsure,
check the building wiring to avoid remote earth conditions.
Building supply
Only connect the equipment to a building supply that is in accordance with current wiring
regulations in your country. In the U.K., these are the IEE regulations.
P
OWER SUPPLY AND CABLES
Power supply
The power supply socket-inlet and socket-outlet (if equipped) are classified as Hazardous
Voltage.

104 - Regulatory information
You must unplug the power supply cord and remove the battery to disconnect the
equipment from the power supply. In that aim, the socket-outlet should be installed near
to the equipment and should be easily accessible.
Input rating: Refer to the rating label on the bottom of the computer and ensure that your
power adapter complies with the specified rating.
Under no circumstances should the user attempt to disassemble the power supply. The
power supply has no user-replaceable parts. Inside the power supply are hazardous
voltages that can cause serious personal injury.
A defective power supply must be returned to your dealer.
Power cables and plug
This Product requires a grounded power cord and plug. The plug only fits in a grounded
power outlet. Make sure the power outlet is properly grounded before inserting the plug.
Do not insert the plug into a non-grounded power outlet. Contact your electrician for
details.
The cord length must not exceed 2.5 metres. To prevent electrical hazards, do not remove
or disable the ground contact on the power cord. Replace the power cord if it gets
damaged. Contact your dealer for an exact replacement. In Europe, the plug must be
rated for 250 VAC, 10 amp minimum. The plug must display an international agency
approval marking. The cord must be suitable for use in the end-user country. Consult your
dealer or the local electrical authorities if you are unsure of the type of power cord to use
in your country.
Cables
For cables which are not delivered with the Product in the computer's packaging:
The EMC performance of the system is guaranteed only if the cable and interface use
efficient shielding.
The use of shielded interface cable is required for USB, IEEE1394, serial, printer, game,
analog or digital audio/ video, PS2, TV or FM antennas, and generally all high-speed
cable interfaces.

Regulatory information - 105
Use only UL Listed No. 26AWG or larger telecommunication cords.
Only Ethernet LAN or RTC modem cable can have length exceeding 3 metres.
Gateway recommends that you add a ferrite core round clip to each cable connecting your
computer to a hardware device that was not included with your computer.
- Ferrite reference: 28A-2029 from Steward (two loops)
During product certification, Gateway used the following cable quality:
- USB2.0 Certified Cables from Hama 46778
- IEEE1394 shielded FireWire from Hama 50011
- RCA-RCA shielded Audio/Video Cables from Thomson KHC001M, KHC012M,
KHC028M
- Stereo Jack shielded Audio cables from Hama 43330H, 42714H
Heat Build-up and Portable Computers
The AC adapter and the underside of the computer can become hot after prolonged use.
Sustained physical contact with either should be avoided.
C
HASSIS COVER REMOVAL AND REPLACEMENT
Before removing the chassis cover to service or modify the equipment, you must
disconnect all power and modem cords, and remove or disable the battery.
- Caution: Some components inside the computer can become hot after prolonged
use.
You then must close the chassis before you plug in and switch on the equipment.
L
ASER COMPLIANCE STATEMENT
The optical devices are tested and certified to be compliant with International
Electrotechnical Commission IEC60825-1 and European EN60825-1 standards for Class
1 laser products.
Class 1 laser products are not considered hazardous. The optical devices are designed
such that there is never human access to laser radiation above a Class 1 level during
normal operation or prescribed maintenance conditions.

106 - Regulatory information
The optical devices installed in your computer are designed for use solely as components
of such electronic product and therefore do not comply with the appropriate requirements
of Code of Federal Regulation Sec. 1040.10 and Sec. 1040.11 for COMPLETE laser
products.
Because exposure to laser radiation is extremely hazardous, under no circumstances
should the user attempt to disassemble the laser device.
P
ACKAGING
The packaging of this product is compliant with the European Environmental Directive 94/
62/EC from December 20th 1994 and its equivalent in the French Legislation by the
Decree 98-638 from july 20th 1998.
C
OMPLIANT WITH RUSSIAN REGULATORY CERTIFICATION

Environment - 107
ENVIRONMENT
OUR COMMITMENT TO ENVIRONMENTAL PROTECTION
Environment has been at the heart of our products.
Gateway is committed to limit the environmental impact of its products during product life
cycle.
Starting at design phase, with a very strict procurement policy, maximum attention is given
to electronic components in order to limit their weight in heavy metals such as lead,
cadmium, chromium, mercury, etc. Suppliers are asked, for each part of any product, to
respect all regulations.
As far as end-of-life products are concerned, measures have been taken to anticipate and
facilitate the recycling of all our products. Thus, all plastic parts heavier than 25 grams
used in Gateway products are labelled ISO 11469. This label allows a quick recognition
of the material and eases its valorisation. Likewise, desktop computers are designed to
be easily dismantled, with screws being replaced by clips.
P
RODUCT DISPOSAL
The 2002/96/EC Directive, known as Waste Electrical and Electronic
Equipment (WEEE) Directive, requires that used electrical and electronic
products must be disposed of separately from normal household waste in
order to promote reuse, recycling and other forms of recovery and to
reduce the quantity of waste to be eliminated with a view to reducing
landfill and incineration. The crossed-out dustbin logo is there to remind
you that these products must be sorted separately for disposal. These
rules concern all Gateway products and also all accessories, such as keyboard, mouse,
speakers, remote control, etc. When you have to dispose of such products, make sure
that they are correctly recycled by checking with your local authority, or by returning your
old equipment to your retailer if you are replacing it. For information, visit
www.gateway.com/about/corp_responsibility/environment.php.

108 - Environment
Battery disposal (when applicable)
Before disposing of your equipment ensure that you have removed any batteries that may
be fitted in the equipment. European law states that batteries must be collected for
disposal separately from household waste. Do not throw your used batteries in the
dustbin. Dispose of your used batteries via a battery collection scheme where available,
or ask your distributor or local authority what infrastructures you can use. Your efforts will
enable the safe collection, recycling and destruction of used batteries and will help protect
the environment and reduce health hazards.
- Caution: Risk of explosion if battery is replaced by an incorrect type. Dispose of
used batteries according to the instructions.
ENERGY STAR
Gateway's ENERGY STAR qualified products save your money by
reducing energy cost and protecting the environment without sacrificing
features or performance. Gateway is proud to offer our customers
products with the ENERGY STAR mark.
What is ENERGY STAR?
Products that are ENERGY STAR qualified use less energy and prevent greenhouse gas
emissions by meeting strict energy efficiency guidelines set by the U.S. Environmental
Protection Agency. Gateway is committed to offering products and services worldwide
that help customers save money, conserve energy and improve the quality of our
environment. The more energy we can save through higher energy efficiency, the more
we reduce greenhouse gases and the risks of climate change. More information refers to
www.energystar.gov or www.energystar.gov/powermanagement.
- Note: Information in this section may not apply to your computer.
Gateway ENERGY STAR qualified products:
- produce less heat and reduce cooling loads in warmer climates.
- automatically go into "display Sleep" and "computer Sleep" mode after 10 and 30
minutes of inactivity, respectively.

Environment - 109
- wake from "Sleep" mode if the keyboard is pressed or mouse is moved.
- save more than 80% energy when in "Sleep" mode.
ENERGY STAR and the ENERGY STAR mark are registered U.S. marks.

110 - Software license
SOFTWARE LICENSE
- Note: Most of the software applications are already preinstalled on your Gateway
computer. They are ready to use or to set up. However, some titles require a CD or
DVD to run. You will find these discs in your computer's packaging.
Gateway License Agreement (CD and/or DVD Products). This copy of the original is your
proof of license. Please treat it as valuable property.
Important!
Read carefully before installing the software.
The following License Agreement applies to you. This is a legal agreement between you
(either individual or an entity) and Gateway. By installing the software you are agreeing to
be bound by the terms of this Agreement. If you do not agree to the terms of this
Agreement, promptly return your entire computer system, the unopened software
packet(s), if any, as well as the accompanying terms (including written materials or other
container(s)) in the place you obtained them for a full refund.
G
ATEWAY SOFTWARE LICENSE
1. Grant of License
This Gateway License Agreement (“License”) permits you to use one copy of the specified
version of the Gateway SOFTWARE identified above (which may include at least one CD
or DVD disc) on any single computer, provided the SOFTWARE is in use on only one
computer at any time. If you have multiple Licenses for the SOFTWARE, then at any time
you may have as many copies of the SOFTWARE in use as you have Licenses. The
SOFTWARE is “in use” on a computer when it is loaded into the temporary memory (i.e.
RAM) or installed in the permanent memory (e.g. hard disk, CD and/or DVD, or other
storage device of that computer, except that a copy installed on a network server for the
sole purpose of distribution of other computer is not “in use.” If the anticipated number of
users of the SOFTWARE will exceed the number of applicable Licenses, then you must
have a reasonable mechanism or process in place to assure that the number of persons

Software license - 111
using the SOFTWARE concurrently does no exceed the number of Licenses. If the
SOFTWARE is permanently installed on the hard disk or the storage device of a computer
(other than a network server) and one person uses that computer more than 80% of the
time it is in use, then that person may also use the SOFTWARE on a portable or home
computer.
2. Copyright
The SOFTWARE is owned by Gateway or its suppliers and is protected by United States
copyright laws and international treaty provision. Therefore, you must treat the
SOFTWARE like any other copyrighted material (e.g. a book or musical recording) except
that you may transfer the CD and/or DVD disc portion of the SOFTWARE, if any, to a
single hard disk provided you keep the original solely for backup or archival purposes. You
may not copy the CD and/or DVD disc portion of the SOFTWARE or the written materials
accompanying the SOFTWARE.
3. Other restrictions
You may not rent or lease the SOFTWARE, but you may transfer the SOFTWARE and
accompanying written materials on a permanent basis provided you retain no copies and
the recipient agrees to the terms of this Agreement. You may not reverse engineer,
decompile or disassemble the SOFTWARE. Any transfer of the SOFTWARE must include
the most recent update and all prior versions.
T
HIRD PARTY SOFTWARE OR FREE SOFTWARE LICENSE INFORMATION
Software pre-loaded, embedded or otherwise distributed with the products provided by
Gateway does contain free or third party software programs (the “Free Software”), which
are licensed under the terms GNU General Public License (the “GPL”). The Free Software
is marked as such. Your copying, distribution and/or modification of the Free Software
shall be subject to the terms of the GPL.
The Free Software is distributed in the hope that, but it will be useful WITHOUT ANY
WARRANTY; without even the implied warranty of MERCHANTABILITY or FITNESS
FOR A PARTICULAR PURPOSE. The provisions of the GNU General Public License
shall always apply. You may access http://www.gnu.org directly to obtain a copy of the

112 - Software license
GPL or write to the free Software Foundation, Inc. and request a copy. The address of the
Free Software Foundation, Inc is: 59 Temple Place - Suite 330, Boston, MA, 02111-1307,
USA.
For a period of three (3) years as commencing from your receipt of this software, you may
obtain a complete machine-readable copy of the source code for the Free Software under
the terms of the GPL without charge except for the cost of media, shipping, and handling,
upon a written request to us.
Contact us if you have any further questions. Our mailing address is 8F, 88, Sec. 1, Hsin
Tai Wu Rd., Hsichih, New Taipei City 221, Taiwan.

Index - 113
INDEX
A
audio troubleshooting.................................. 80
B
Batteries................................................. 108
battery disposal ..................................... 108
battery pack
battery-low warning
........................... 38
characteristics ................................... 34
charging............................................. 37
checking charge level....................... 37
installing............................................. 37
low conditions.................................... 39
maximizing life................................... 34
optimizing........................................... 38
removing ............................................ 37
using the first time............................. 35
brightness
hotkeys
.............................................. 18
Browser .................................................... 50
C
Cables ................................................ 9, 103
CD-ROM
ejecting manually
.............................. 80
troubleshooting ................................. 80
charging
checking level
.................................... 37
Cleaning your computer.......................... 10
computer
features
.............................................. 14
on indicator ........................................ 20
Computer environment.............................. 8
connections
network
.............................................. 30
Cursor....................................................... 26
D
Display
hotkeys
.............................................. 17
display
troubleshooting
................................. 79
Drives
Memory card reader
.......................... 28
DSL........................................................... 45

114 - Index
E
Environment........................................... 107 Epilepsy warning...................................... 13
F
FAQ. See frequently-asked questions
Firewall
..................................................... 52
frequently-asked questions ..................... 79
front view.................................................. 20
G
Gateway Recovery Management ........... 43
H
Health precautions .................................. 11 hotkeys ..................................................... 19
I
Interference............................................ 103
Internet
Connection
.................................. 44, 45
Firewall .............................................. 52
Internet Service Provider (ISP) ............... 44
K
Keyboard
hotkeys
.............................................. 19
keyboard
troubleshooting
.................................. 81
L
LAN (Local Area Network) ...................... 46 left view..................................................... 20
M
Maintenance
Recovery Management
.............. 43, 59
Malware.................................................... 52
Memory card reader ................................ 28
Modem...................................................... 45
N
network..................................................... 30
Network connections............................... 46
Norton Internet Security .................... 50, 54

Index - 115
P
ports ......................................................... 28
Power cords............................................... 9
printer
troubleshooting
................................. 81
problems .................................................. 79
CD-ROM............................................ 80
display................................................ 79
keyboard............................................ 81
printer................................................. 81
startup................................................ 79
R
Recovery
Recovery Management
.............. 43, 59
Regulatory Information.................... 89, 107
Removable media devices...................... 29
Removing hardware ................................ 29
S
Safety precautions..................................... 8
Security
Antivirus
............................................. 52
Updates ............................................. 58
Software
Software License
............................. 110
speakers
hotkey
................................................ 18
troubleshooting.................................. 80
Spyware ................................................... 51
T
touchpad .................................................. 26 using ............................................ 26–??
U
Uninstalling hardware.............................. 29
universal serial bus.................................. 30
Update
Windows automatic updates
............ 58
V
view
front
.................................................... 21
left ...................................................... 21
right .................................................... 23

116 - Index
W
Warranty..................................................... 7
WiFi .................................................... 46, 47
Windows
Using Windows
.................................. 43
Windows automatic updates ............ 58
Ver.02.01.02

- 1
Manuel d’utilisation
Gateway NE71B

2
SOMMAIRE
Démarrer votre ordinateur 4
Connexion sans-fil.............................................. 4
Enregistrement................................................... 5
Installation des logiciels ..................................... 6
Récupération...................................................... 6
Vous avez des problèmes ?............................... 7
Informatique de base 8
Sécurité et confort .............................................. 8
Précautions de sécurité .............................. 8
Précautions de santé ................................ 12
Découvrir votre ordinateur 15
Vue supérieure - affichage ............................... 16
Vue supérieure - clavier ................................... 17
Touches spéciales .................................... 18
Vue frontale...................................................... 21
Vue gauche ...................................................... 22
Vue droite......................................................... 24
Vue de la base ................................................. 26
Pavé tactile 27
Informations de base du pavé tactile ............... 27
Gestes du pave tactile...................................... 28
Mettre votre ordinateur à niveau 29
Extension avec des options ............................. 29
Options de connectivité............................. 29
Alimentation 35
Adaptateur c.a.................................................. 35
Pile ................................................................... 36
Caractéristiques de la pile......................... 36
Remplacer la batterie................................ 39
Installation ou retrait de la pile .................. 39
Charge de la pile ...................................... 40
Vérification du niveau de la pile ............... 40
Optimisation de l’autonomie de la pile ..... 40
Avertissement de pile basse .................... 41
Gestion de l’alimentation 43
Économie d’énergie......................................... 43
Logiciels 46
Utiliser Windows et vos logiciels...................... 46
Offre de sécurité Internet ......................... 46
Gateway Recovery Management............. 46
Internet 47
Premiers pas sur le net.................................... 47
Protéger votre ordinateur ......................... 47
Choisir un fournisseur de service
Internet ..................................................... 47
Connexions réseau .................................. 50
Surfez sur le Net ! .................................... 53
Sécurité .................................................... 54
Récupération 64
Créer une sauvegarde de récupération........... 64
Créer la sauvegarde des pilotes et des
applications...................................................... 69
Récupération de votre système....................... 71
Réinstaller les pilotes et les
applications .............................................. 72
Retourner à un instantané antérieur du
système.................................................... 75
Retourner votre système à son état
d’usine...................................................... 77
Récupérer depuis Windows ..................... 78

Sommaire - 3
Récupérer depuis une sauvegarde de
récupération.............................................. 82
Foire aux questions 86
Conseils et astuces pour utiliser
Windows 8........................................................ 89
Il y a trois concepts vous pouvez
vouloir garder à l’esprit.............................. 89
Comment puis-je accéder aux charms ? .. 89
Comment puis-je aller à Démarrer ?......... 89
Comment puis-je passer d’une appli à
une autre ?................................................ 90
Comment puis-je éteindre mon
ordinateur ?............................................... 90
Pourquoi y a-t-il une nouvelle interface
?................................................................ 90
Comment déverrouiller mon ordinateur ? . 91
Comment personnaliser mon
ordinateur ?............................................... 91
Je veux utiliser Windows comme j’en
ai l’habitude. Rendez-moi mon bureau ! .. 92
Où sont mes applis ? ............................... 93
Qu’est-ce qu’un ID (compte) Microsoft ?.. 94
Comment ajouter un favori à Internet
Explorer ?................................................. 95
Comment puis-je rechercher les mises
à jour Windows ?...................................... 95
Où puis-je avoir plus d’informations ?...... 95
Informations réglementaires 96
Environnement 115
Licence logicielle 118
Index 121
C
opyright © 2012. Tous droits réservés.
M
anuel d’utilisation de la Gateway NE71B
C
ette révision : 20 juillet 2012
V
isitez registration.gateway.com et découvrez les avantages des clients Gateway.
Remarque : Toutes les images sont pour référence seulement. La configuration du produit
p
eut varier.

4
DÉMARRER VOTRE ORDINATEUR
Nous vous remercions de votre achat de cet ordinateur Gateway !
Ce guide a été conçu pour vous présenter les fonctionnalités de votre
ordinateur et vous aider dans votre expérience informatique.
Après avoir installé et démarré votre ordinateur, comme indiqué dans les
instructions d’installation, il vous posera des questions qui vous aideront à
vous connecter à Internet. Votre ordinateur configurera alors les logiciels
installés.
CONNEXION SANS-FIL
Pour vous connecter à un réseau sans-fil, vérifiez d’abord que les
fonctions sans-fil de votre ordinateur sont activées, et que le routeur ou le
modem auquel vous souhaitez vous connecter est également
correctement configuré.
• Si la fonction sans-fil n’est pas activée, appuyez la touche Windows
( ) + W, saisissez « sans fil » puis cliquez sur Sans fil. Cliquez le
commutateur sous Wi-Fi pour activer la connexion sans-fil. Cliquez à
nouveau pour désactiver.
• Pour vous connecter à un réseau, appuyez sur la touche Windows
( ) + W, saisissez « sans fil » puis cliquez sur Connexion à un
réseau. Sélectionnez votre réseau, et entrez le mot de passe si
nécessaire.
• Après un court délai, votre ordinateur devrait se connecter à Internet.

Démarrer votre ordinateur - 5
Si votre réseau n’est pas détecté, ou si votre ordinateur ne se connecte
pas à Internet, veuillez consulter votre FSI ou de la documentation du
routeur. Après le démarrage de votre ordinateur et quand vous pouvez
l’utiliser, ouvrez Internet Explorer et suivez les instructions.
Vous pouvez également utiliser un câble réseau pour vous connecter
directement à un port réseau sur votre routeur. Veuillez consulter votre
FSI ou de le guide du routeur.
ENREGISTREMENT
Lors de la première utilisation de votre ordinateur, il est recommandé de
l’enregistrer. Cela vous donne accès à des avantages utiles, tels que :
• Service plus rapide de nos représentants entraînés.
• Participation à la communauté Gateway : recevez des promotions et
participez à nos enquêtes clients.
• Les dernières actualités de Gateway.
Comment s’enregistrer
Pendant le démarrage initial de votre ordinateur, une fenêtre vous invitera
à l’enregistrer. Veuillez remplir les informations et cliquez sur Suivant. La
seconde fenêtre affichée contiendra des champs optionnels qui nous
aideront à vous fournir une expérience de service client plus personnelle.

6
Une autre option
Une autre manière d’enregistrer votre produit Gateway est de visiter notre
site Web sur registration.gateway.com. Choisissez votre pays et suivez
les simples instructions.
Après l’enregistrement, nous vous enverrons un courriel de confirmation
avec les données importantes que vous devrez conserver précieusement.
INSTALLATION DES LOGICIELS
Votre ordinateur installera automatiquement les logiciels et préparera
votre ordinateur pour l’utilisation. Cela peut prendre un certain temps,
veuillez ne pas éteindre votre ordinateur. Attendez que l’installation soit
terminée.
RÉCUPÉRATION
Créez des disques de récupération dès que possible. Le programme
Récupération permet de créer des disques de récupération puis de
restaurer ou de réinstaller les applications et les pilotes fournis par
Gateway.

Démarrer votre ordinateur - 7
VOUS AVEZ DES PROBLÈMES ?
Gateway fournit plusieurs options pour le support de votre achat.
Support Gateway
N’oubliez pas de noter le numéro de série, la date et le lieu d’achat, ainsi
que le modèle de votre ordinateur dans l’espace fourni dans ce manuel ;
mettez de côté de votre preuve d’achat. Avant de vous nous appelez,
veuillez noter le message d’erreur qui accompagne le problème et vous
installer devant votre ordinateur, ce dernier devant être si possible allumé.
Ces éléments nous permettront de vous offrir un service plus rapide et de
meilleure qualité.
Site Web Gateway
N’oubliez pas de visiter www.gateway.com - Consultez la section de
support, elle contient des informations mises à jour, de l’aide, des pilotes
et des téléchargements.
Informations de garantie et de contact
Vous pouvez trouver des informations sur la garantie de votre ordinateur
et comment contacter le support technique dans la Garantie de votre
ordinateur.

8
INFORMATIQUE DE BASE
SÉCURITÉ ET CONFORT
Précautions de sécurité
Veuillez suivre les instructions ci-dessous pour utiliser votre ordinateur
confortablement et éviter les problèmes de santé.
Environnement de l’ordinateur
Assurez-vous que l’ordinateur :
• Est utilisé sur une surface, un support ou une table stable. Une chute
pourrait gravement endommager l’ordinateur.
• N’est pas utilisé sur une surface qui vibre, ou utilisé en prenant part au
sport, à l’exercice ou à d’autres activités dans un environnement
dynamique. Les vibrations ou les mouvements peuvent desserrer les
fixations, endommager les composants internes et même provoquer
des fuites de la pile.
• Est éloigné du soleil et des sources de chaleur.
• Est éloigné de champs magnétiques ou de tout appareil qui produit de
l’électricité statique.
• Est maintenu à au moins 30 centimètres (un pied) de distance d’un
téléphone cellulaire.
• N’est-ce pas dans un environnement poussiéreux ou humide.

Informatique de base - 9
• N’est pas utilisé à proximité de l’eau. Ne renversez jamais de liquides,
quels qu’ils soient, sur ou dans votre ordinateur.
• N’est pas placé sur un tapis ou toute autre surface qui peut avoir une
charge électrique.
Remarque
• Des fentes et ouvertures sont prévues pour la ventilation afin d’assurer
un fonctionnement fiable de l’appareil vidéo et de le protéger d’une
éventuelle surchauffe. Ces ouvertures ne doivent pas être obstruées ou
couvertes. Ces ouvertures ne doivent jamais être bloquées, par
exemple en posant l’appareil sur un lit, un canapé, un tapis ou toute
autre surface similaire. Il ne doit jamais être placé à proximité ou au
contact d’un radiateur ou d’une source de chaleur. Il ne doit pas être
placé dans une installation encastrée à moins qu’une ventilation
suffisante ne soit assurée.
• N’insérez jamais des objets dans les ouvertures du boîtier de l’appareil
car ceux-ci pourraient toucher des points à haute tension ou créer un
court-circuit et poser un risque d’incendie ou d’électrocution. Ne
renversez jamais de liquide sur l’appareil.
• Pour réduire le risque de dommage interne et pour éviter que la batterie
ne fuie, ne posez pas l’appareil sur un endroit sujet à des vibrations.
• Ne l’utilisez jamais dans un environnement sportif, d’exercice ou vibrant
qui pourrait probablement causer un court-circuit inopiné ou
endommager les périphériques rotatifs, disque dur, lecteur optique, et
même créer un risque d’exposition pour la batterie au lithium.

10
Câbles
Assurez-vous que :
• Les câbles ne sont pas trop tendus et qu’il n’y a pas de risque de
personne marchant ou trébuchant dessus.
• D’autres appareils n’écrasent pas les câbles.
• Le câble d’alimentation est connecté à l’ordinateur avant de connecter
le câble d’alimentation à la prise électrique.
• Le câble d’alimentation est débranché de la prise électrique avant de
déconnecter le câble d’alimentation de l’ordinateur.
• Les cordons d’alimentation à trois broches sont connectés à une prise
électrique mise à la terre.
• La prise électrique est facilement accessible et aussi proche que
possible de l’ordinateur (ne la surchargez pas avec trop d’adaptateurs).
Si votre ordinateur utilise un adaptateur c.a. externe :
• Ne couvrez pas ou ne placez pas d’objets sur l’adaptateur c.a.
Permettez à l’adaptateur de refroidir correctement pendant l’utilisation
en l’éloignant d’autres objets.
• N’utilisez que l’adaptateur c.a. qui est fourni avec votre ordinateur. Bien
que d’autres adaptateurs puissent lui ressembler, les utiliser peut
endommager votre ordinateur. Si un remplacement est nécessaire,
utilisez uniquement les composants certifiés pour une utilisation avec
votre ordinateur.

Informatique de base - 11
Nettoyer votre ordinateur
• Débranchez toujours votre ordinateur de la prise électrique avant de le
nettoyer.
• N’utilisez pas de liquide ou d’aérosol de nettoyage, utilisez au contraire
un chiffon humide.
• Ne pulvérisez jamais de produit de nettoyage directement sur l’écran.
• Si vous renversez un liquide sur votre ordinateur, éteignez-le
immédiatement, débranchez l’adaptateur c.a., retirez la pile et assurez-
vous qu’il est complètement sec avant de le rallumer. Attendez la nuit si
nécessaire.
Remarque : Si votre ordinateur comporte des fentes pour cartes
mémoire ou périphériques d’extension, des cartes factices en
plastique peuvent être installées dans les fentes. Celles-ci protègent
les fentes non utilisées de la poussière, des objets métalliques et
d’autres particules. Conservez les cartes factices pour utilisation les
fentes ne contiennent pas de carte.
Réparer votre ordinateur
N’essayez jamais de réparer vous-même votre ordinateur : l’ouverture ou
la dépose des couvercles vous expose à divers risques, électrocution
notamment. La réparation doit être confiée à un spécialiste.
Débranchez votre ordinateur de la prise électrique et adressez-vous à un
technicien qualifié quand :
• Le cordon d’alimentation est endommagé, coupé ou dénudé.
• Un liquide a été renversé dans l’appareil.

12
• Le produit a été exposé à la pluie ou à de l’eau.
• L’appareil est tombé ou le châssis a été endommagé.
• Les performances de l’appareil deviennent irrégulières.
• L’appareil ne fonctionne pas correctement après avoir respecté les
consignes d’utilisation.
Remarque : Effectuez uniquement les réglages indiqués dans les
consignes d’utilisation ; d’autres réglages incorrects risquent de
provoquer des dommages nécessitant l’intervention prolongée d’un
technicien qualifié.
Précautions de santé
• La surface inférieure, les zones autour des ouvertures de ventilation et
l’adaptateur secteur peuvent devenir chauds. Pour éviter des blessures,
assurez-vous qu’ils n’entrent pas en contact avec votre peau ou votre
corps.
• Votre appareil ainsi que ses accessoires peuvent contenir de petites
pièces. Gardez-les hors de portée des jeunes enfants.
• L’ordinateur et les accessoires peuvent contenir des petits composants.
Éloignez-les des jeunes enfants.
• Si vous travaillez ou jouez pendant des heures, assurez-vous de faire
des pauses régulières. Éloignez votre regard de l’écran de l’ordinateur
de temps en temps. N’utilisez pas votre ordinateur si vous êtes fatigué.
• Organisez votre ordinateur afin que vous puissiez travailler dans une
position naturelle et détendue. Placez les éléments que vous utilisez
souvent à portée de main.

Informatique de base - 13
• Positionnez votre ordinateur directement en face de vous pour plus de
sécurité et de confort. Assurez-vous que votre clavier et pavé tactile
sont à une hauteur confortable. L’écran devrait être à environ 45-70 cm
(18-30 pouces) de vos yeux.
Si vous utilisez votre ordinateur pendant de longues périodes, assis à
un bureau, achetez un clavier externe pour un confort amélioré.
• Pour protéger votre ouïe, lors de l’utilisation de haut-parleurs ou d’un
casque d’écoute, augmentez le volume progressivement jusqu’à ce que
vous pouvez entendre clairement et confortablement, n’augmentez pas
le niveau de volume après que vos oreilles se sont habituées. N’écoutez
pas à un fort volume pendant une période prolongée. N’augmentez pas
le volume afin de bloquer les bruits environnants ; baissez le volume si
vous n’entendez pas les personnes qui parlent près de vous.
• Le dessous de l’ordinateur, l’adaptateur c.a. et l’air des fentes
de ventilation peuvent devenir chauds pendant l’utilisation.
Évitez le contact continu du corps et ne placez pas
l’ordinateur sur vos genoux lorsqu’il est en fonctionnement.
• Veillez à ce que les fentes de ventilation et les ouvertures de l’ordinateur
ne soient pas obstruées ou recouvertes. Ne placez pas l’ordinateur sur
une surface souple (comme un tapis, une chaise ou un lit), qui
pourraient bloquer les fentes de ventilation.
• N’enfoncez pas d’objets dans les fentes du châssis ou de ventilation car
ils pourraient entrer en contact avec des points de voltage ou court-
circuiter des éléments, d’où un risque d’incendie ou d’électrocution.

14
• Certains troubles des mains, des poignets, des bras, du cou, des
épaules, des jambes et du dos peuvent être associés à, ou aggravés
par certaines actions répétitives. Pour réduire votre risque de
développer ces troubles, tapez avec vos poignets droits et vos mains et
les poignets légèrement au-dessus du clavier. Si vous avez des
périodes de douleurs, fourmillements, engourdissements ou autres
gênes, veuillez contacter votre médecin.
• Nous conseillons aux parents de contrôler l’utilisation des jeux par leurs
enfants. Si vous ou votre enfant avez les symptômes suivants : vertiges,
vision floue, tremblements des yeux ou des muscles, perte de
conscience, désorientation, tout mouvement involontaire ou convulsion,
cessez IMMÉDIATEMENT l’utilisation et consultez votre médecin. Cela
peut se produire même si la personne n’a pas d’antécédents médicaux
de l’épilepsie.

Découvrir votre ordinateur - 15
DÉCOUVRIR VOTRE ORDINATEUR
Après avoir configuré votre ordinateur comme illustré dans les instructions
d’installation, nous allons vous faire explorer votre nouvel ordinateur
Gateway.
Gateway NE71B

16
VUE SUPÉRIEURE - AFFICHAGE
# Icône Élément Description
1 Webcaméra
Webcaméra pour communication vidéo.
Une lumière à côté de la webcaméra indique
que la webcaméra est active.
2 Microphone
Microphone interne pour l’enregistrement
sonore.
3 Écran d’affichage
Également appelé affichage à cristaux liquides
(ACL), affiche les données de l’ordinateur.
1
2
3

Découvrir votre ordinateur - 17
VUE SUPÉRIEURE - CLAVIER
# Icône Élément Description
1
Bouton/Indicateur
d’alimentation
Met l’ordinateur sous tension et hors tension.
Indique l’état d’alimentation de l’ordinateur.
2Clavier
Pour l’entrée des informations dans votre
ordinateur.
- Les touches spéciales sont décrites à la
page 18.
3 Pavé tactile
Périphérique de pointage sensible au touché
qui fonctionne comme une souris.
1
2
5
3
4

18
Touches spéciales
Le clavier de votre ordinateur comporte des touches qui activent des
fonctions spéciales. La fonction de chaque touche est clairement indiquée
par une icône.
4
Boutons (gauche et
droit)
Le côté gauche et le côté droit du bouton
fonctionnent comme boutons de sélection
gauche et droite.
5 Haut-parleurs Produit le son stéréo.
Icône Fonction Description
Fn
Touche spéciale
pour la seconde
fonction
Active une seconde fonction sur certaines touches.
P.ex., appuyez la touche Fn pour activer les touches F1
à F12.
Aide Ouvre le menu de l’aide.
Backup
Permet de créer des copies de sauvegarde de votre
ordinateur, que ce soit de l’intégralité du système ou
uniquement certains fichiers et dossiers. Créez une
planification régulière ou faites des copies quand vous
le voulez.
Communication
Active/désactive les périphériques de communication
de l’ordinateur.
Choix de
l’affichage
Permet de permuter l’affichage entre l’écran d’affichage,
le moniteur externe (s’il est connecté) et les deux.
# Icône Élément Description

Découvrir votre ordinateur - 19
Écran noir
Désactive le rétroéclairage de l’écran pour économiser
l’énergie. Appuyez sur une touche pour le rallumer.
Pavé tactile Active et désactive le pavé tactile interne.
Lecture/Pause
Lisez ou effectuez une pause d’un fichier multimédia
sélectionné.
Arrêter Arrêtez la lecture du fichier multimédia sélectionné.
Précédent Retournez au fichier multimédia précédent.
Suivant Passez au fichier multimédia suivant.
Luminosité - Diminue la luminosité de l’écran.
Luminosité + Augmente la luminosité de l’écran.
Réseau social
Ouvre l’application Réseaux sociaux.
- Si cette application n’est pas installée, la touche
démarrera votre application messagerie instantanée.
Volume + Augmente le volume sonore.
Volume - Diminue le volume sonore.
Haut-parleur Active et désactive les haut-parleurs.
Icône Fonction Description

20
Touches spéciales
L’ordinateur utilise des touches spéciales (combinaisons de touches) pour
accéder aux touches de fonction et aux commandes de navigation.
Pour activer les touches spéciales, appuyez et maintenez la touche Fn
(en bas à gauche) avant d’appuyer sur l’autre touche dans la combinaison
de la touche spéciale.
- Remarque : Il n’est pas nécessaire d’appuyer sur la touche Fn pour utiliser les
touches de fonction F1 à F12 lorsque vous démarrez votre ordinateur ou lorsque
vous utilisez le BIOS.
Pour échanger la touche spéciale et la fonction spéciale des touches F1 à F12,
changez le paramètres de la touche de fonction dans le BIOS (pour ouvrir le BIOS
appuyez sur F2 lors du démarrage de votre ordinateur, puis sélectionnez le menu
Main (Principal) et changez Function key behavior (Comportement des touches de
fonction) sur Function keys (Touches de fonction)).
Touche spéciale Fonction Description
Fn + Touches
spéciales (voir
page 18)
Touches de
fonction
Active les touches F1 à F12.
Fn + Accueil Défile au début d’un document.
Fn + Fin Défile à la fin d’un document.
Fn + Page Préc
Défile d’une page vers le haut dans un
document.
Fn + Page Suiv
Défile d’une page vers le bas dans un
document.

Découvrir votre ordinateur - 21
VUE FRONTALE
# Icône Élément Description
1
Indicateur
d’alimentation
Indique l’état d’alimentation de l’ordinateur.
Indicateur de la pile
Indique l’état de la pile de l’ordinateur.
- Charge : La lumière est orange lorsque la
pile se recharge.
- Pleine charge : La diode est bleue en mode
c.a.
Indicateur du
disque dur
Indique l’activité du disque dur.
Indicateur de
communication
Indique l’état du périphérique de connectivité
sans fil de l’ordinateur.
1 2

22
- Remarque : Les indicateurs du panneau avant sont visibles même lorsque l’écran
ACL est fermé.
VUE GAUCHE
2
Lecteur de cartes
multiples en un
Accepte une carte mémoire Secure Digital (SD),
MultiMediaCard (MMC), Memory Stick Pro
(MS PRO), et xD-Picture (xD).
- Poussez pour retirer/installer la carte. Seule
une carte peut fonctionner à un moment
donné.
# Icône Élément Description
1
Fente pour cadenas
Kensington
Se connecte à un cadenas de sécurité pour
ordinateur Kensington.
- Enroulez le câble du cadenas de sécurité
pour ordinateur autour d’une table, de la
poignée d’un tiroir verrouillé, ou de tout autre
objet fixe.
Insérez le cadenas dans l’encoche et
tournez la clef pour verrouiller le cadenas.
Certains modèles ne possèdent pas de clef.
# Icône Élément Description
21 3 4 56

Découvrir votre ordinateur - 23
Informations sur USB 3.0
• Compatible avec USB 3.0 et périphériques USB antérieurs.
• Pour des performances optimales, utilisez des périphériques certifiés
USB 3.0.
• Défini par la spécification USB 3.0 (SuperSpeed USB).
2
Ventilation et
ventilateur de
refroidissement
Permet à l’ordinateur de rester froid.
- Ne couvrez pas et ne bloquez pas les
ouvertures.
3 Port Ethernet RJ-45
Se connecte à un réseau Ethernet 10/100/1000
Base.
4
Port d’affichage
(VGA) externe
Se connecte à un périphérique d’affichage
(p.ex. un moniteur externe, un projecteur ACL).
5Port HDMI
Supporte les connexions vidéo numériques à
haute définition.
6 Ports USB
Se connectent à des périphériques USB.
- Si un port est noir, il est compatible USB 2.0,
si un port est bleu, il est également
compatible USB 3.0 (voir ci-dessous).
# Icône Élément Description

24
VUE DROITE
# Icône Élément Description
1
Prise haut-parleurs/
casque
Se connecte à des périphériques audio en
sortie (p.ex. haut-parleurs ou un casque
d’écoute stéréo).
- Supporte les casques d’écoute 3,5 mm
compatibles avec microphone intégré (p.ex.
casques d’écoute pour téléphone intelligent
Acer).
Prise microphone Accepte les entrées de microphones externes.
2Port USB
Se connectent à des périphériques USB.
- Si un port est noir, il est compatible USB 2.0,
si un port est bleu, il est également
compatible USB 3.0 (voir ci-dessous).
3 Lecteur optique
Lecteur optique interne, accepte les CD ou les
DVD.
12 3 4 5 6 7

Découvrir votre ordinateur - 25
Informations sur USB 3.0
• Compatible avec les périphériques USB 3.0 et version antérieure.
• Pour des performances optimales, utilisez des périphériques certifiés
USB 3.0.
• Défini par la spécification USB 3.0 (SuperSpeed USB).
4
Indicateur d’accès du
disque optique
S’allume lorsque le lecteur optique est actif.
5
Bouton d’éjection du
lecteur optique
Éjecte le disque optique du lecteur.
6
Trou d’éjection
d’urgence
Éjecte le plateau du lecteur optique lorsque
l’ordinateur est hors tension.
- Insérez délicatement un trombone pour
éjecter le plateau du lecteur optique.
7 Prise d’entrée c.c.
Se connecte à l’adaptateur c.a. de votre
ordinateur.
# Icône Élément Description

26
VUE DE LA BASE
# Icône Élément Description
1 Baie de la pile Contient la pile de l’ordinateur.
2
Loquet de libération
de la pile
Libère la pile pour le retrait. Insérez un outil
approprié et faites glisser pour libérer.
3
Compartiment
mémoire
Contient la mémoire principale de l’ordinateur.
Baie du disque dur
Contient le disque dur de l’ordinateur (fixé avec
des vis).
4
Ventilation et
ventilateur de
refroidissement
Permet à l’ordinateur de rester froid.
- Ne couvrez pas et ne bloquez pas les
ouvertures.
1
4
2
3

Pavé tactile - 27
PAVÉ TACTILE
INFORMATIONS DE BASE DU PAVÉ TACTILE
Le pavé tactile contrôle la flèche (ou ‘curseur’) sur l’écran. Lorsque vous
faites glisser votre doigt sur le pavé tactile, le curseur suivra ce
mouvement.
Appuyez sur le côté gauche ou droit du bouton situé sur le bord du pavé
tactile pour sélectionner et exécuter. Ces deux zones sont similaires au
bouton gauche et au bouton droit d’une souris. Taper sur le pavé tactile
est équivalent à un clic gauche du côté gauche du bouton.
Remarque : Le pavé tactile est sensible aux mouvements du doigt ;
la réponse est d'autant meilleure que le touché est léger.
Veuillez garder le pavé tactile ainsi que vos doigts secs et propres.
Le curseur est contrôlé par quelques gestes de base :
• Glissé à un seul doigt : Faites glisser votre doigt sur le pavé
tactile pour déplacer le curseur.
• Appui à un seul doigt : Tapez légèrement sur le pavé tactile,
pour effectuer un 'clic', ce qui sélectionnera ou démarrera un
élément. Tapez rapidement deux fois pour effectuer un 'double clic'.
• Glisser : Appuyez et maintenez sur le côté gauche du bouton de
sélection ou appuyez deux fois n’importe où sur le pavé tactile, puis
faites glisser un second doigt sur le pavé tactile pour sélectionner tous
les éléments dans une zone.

28
GESTES DU PAVE TACTILE
Windows 8 et de nombreuses applications prennent en charge les gestes
du pavé tactile qui utilisent un ou plusieurs doigts.
Remarque :
La prise en charge des gestes du pavé tactile dépend de
l'application active.
Cela permet de contrôler les applications avec quelques gestes simples,
tels que :
• Faites glisser depuis le bord : Accédez
aux outils depuis Windows en faisant glisser
vers le centre du pavé tactile depuis la
droite, le haut ou la gauche.
• Faites glisser depuis le bord droit : Basculez les charms.
• Faites glisser depuis le bord supérieur : Basculez les commandes
des applis.
• Faites glisser depuis le bord gauche : Passez à l'appli précédente.
• Glissé à deux doigts : Faites défiler rapidement les pages
Web, documents et listes de lecture en plaçant deux doigts
sur le touchpad et en déplaçant les deux dans n'importe quelle
direction.
• Pincement de deux doigts : Faites un zoom avant et arrière
sur les photos, cartes et documents avec un simple geste
doigt-et-pouce.

Mettre votre ordinateur à niveau - 29
METTRE VOTRE ORDINATEUR À
NIVEAU
EXTENSION AVEC DES OPTIONS
Votre ordinateur offre de nombreuses options pour expérience
informatique complète.
Options de connectivité
Les ports permettent de connecter des périphériques à votre ordinateur.
Pour des instructions sur la connexion des différents périphériques à
l’ordinateur, lisez la section suivante.
Lecteur de carte mémoire
Les cartes mémoire sont utilisées dans une vaste
sélection d’appareils photo numériques, ANP,
lecteurs MP3 et téléphones cellulaires.
Insérer une carte mémoire
1. Alignez la carte de sorte que les connecteurs soient dirigés vers le port
et vers le bas.
2. Faites glisser la carte doucement dans le port. Si vous trouvez que vous
avez besoin de forcer pour insérer la carte, essayez de réorienter la
carte légèrement.

30
3. Poussez la carte jusqu’à ce qu’elle s’enclenche en place. Quelques
millimètres de la carte dépasseront de la fente.
Si la carte contient des fichiers, la fenêtre de lecture automatique de
Windows peut apparaître (cela dépend du contenu de la carte) et vous
demandera si vous souhaitez utiliser un programme pour accéder au
contenu de la carte. Sélectionnez une option ici, si cela est approprié,
sinon cliquez sur Annuler. Si la carte ne contient pas de fichiers, ou des
fichiers inconnus, une fenêtre s’ouvre affichant le contenu de la carte.
Cartes SD, SDHC et SDXC
De différents types de cartes SD recouvrent de différentes capacités, tout
en utilisant la même conception globale. Les cartes SD contiennent
jusqu’à 4 Go, les cartes SDHC contiennent jusqu’à 32 Go, et les cartes
SDXC peuvent contenir jusqu’à 2048 Go (2 To). Votre ordinateur fournit
un lecteur de carte compatible SDHC ou SDXC.
Remarque : Les cartes mémoire SDXC ne peuvent être utilisées que
dans un lecteur compatible SDXC. Les cartes SD et SDHC peuvent
être utilisées dans les deux types.

Mettre votre ordinateur à niveau - 31
Retirer une carte d’un lecteur de carte mémoire
1. Cliquez sur la flèche Afficher les
icônes cachées dans la Zone de
notification (à côté de l’horloge).
2. Cliquez sur l’icône Retirer le
périphérique en toute sécurité.
3. Cliquez sur Éjecter la carte SD
(ou le nom du périphérique).
4. Attendez l’affichage du message
Le matériel peut être retiré en
toute sécurité.
5. Retirez la carte.
Fonction réseau intégrée
La fonction réseau intégrée permet de
connecter votre ordinateur à un réseau
Ethernet.
Connectez un câble Ethernet du port Ethernet
(RJ-45) sur l’ordinateur à une prise réseau ou
à un concentrateur réseau.
3
2
1

32
Universal Serial Bus (USB)
Le port USB est un port série à haute vitesse
qui permet de connecter des périphériques
USB sans occuper les ressources du
système.
Certains ordinateurs peuvent avoir un ou
plusieurs ports USB 3.0. Ils ressemblent aux
ports USB standards, sauf qu’ils
comprennent d’autres connexions internes et
sont bleus. Vous pouvez utiliser des
périphériques compatibles USB 3.0 avec ces
ports pour bénéficier de vitesses de transfert
plus rapides.
Port vidéo
Connectez à un moniteur avec un port VGA ou DVI (le type de connexion
supportée dépend de la configuration de votre ordinateur). Le câble
approprié est généralement fourni avec le moniteur.
Procédez comme suit pour connecter un moniteur à votre ordinateur :
1. Vérifiez que l’ordinateur est hors tension et l’interrupteur d’alimentation
du moniteur est éteint.
2. Branchez le câble vidéo au port du moniteur sur l’ordinateur. Fixez la
connexion du câble de avec les vis fournies.
3. Connectez le câble d’alimentation du moniteur et branchez-le dans une
prise électrique correctement mise à la terre.

Mettre votre ordinateur à niveau - 33
4. Suivez toutes les instructions d’installation dans le manuel d’utilisation
du moniteur.
5. Allumez le moniteur, puis l’ordinateur.
6. Assurez-vous que la résolution et la fréquence de rafraîchissement
n’excèdent pas les spécifications du moniteur. Si nécessaire, modifiez
les paramètres d’affichage utilisés par l’ordinateur.
Remarque : Pour accéder aux contrôles d’affichage, appuyez la
touche Windows ( ) + W, saisissez « Affichage » puis cliquez sur
Affichage.
Interface multimédia haute définition (seulement pour certains modèles)
HDMI (interface multimédia haute
définition) est une interface audio/
vidéo entièrement numérique, non
comprimée, largement prise en
charge. HDMI fournit une interface
entre toute source audio/vidéo
numérique compatible, telle qu’un
décodeur, un lecteur de DVD et un
récepteur A/V, et un audio numérique
et/ou moniteur vidéo compatible, tel
qu’un téléviseur numérique, sur un seul câble.
Utilisez le port HDMI sur votre ordinateur pour connecter un équipement
audio et vidéo haut de gamme. Un seul câble permet une installation
propre et une connexion rapide.

34
Casque d’écoute et microphone
Ces deux ports vous permettent de connecter des périphériques audio.
Utilisez le port casque pour brancher un casque d’écoute stéréo ou haut-
parleurs alimentés. Brancher un périphérique audio au port casque
désactive les éventuels haut-parleurs intégrés. Utilisez le port microphone
pour connecter un microphone externe pour un enregistrement mono.
Brancher un microphone externe désactive le microphone intégré.

Alimentation - 35
ALIMENTATION
ADAPTATEUR C.A.
Votre ordinateur peut utiliser l’adaptateur d’alimentation externe fourni
(une « brique » d’alimentation) pour fonctionner sur le courant alternatif.
Le câble d’alimentation fourni est approprié pour le pays où l’ordinateur a
été acheté.
L’adaptateur d’alimentation fournit une alimentation suffisante pour faire
fonctionner votre ordinateur et recharger la pile en même temps.
Attention : Ne couvrez pas ou ne placez pas d’objets sur
l’adaptateur c.a. Éloigner l’adaptateur d’autres objets lui permet
de refroidir correctement pendant l’utilisation.

36
N’utilisez que l’adaptateur c.a. qui est fourni avec votre ordinateur. Bien
que d’autres adaptateurs puissent lui ressembler, les utiliser peut
endommager votre ordinateur.
Avertissement : L’adaptateur c.a. et le dessous de l’ordinateur
peuvent devenir chauds après une utilisation prolongée. Ceci est
normal, mais peut causer des blessures en cas de contact
prolongé.
PILE
L’ordinateur utilise une pile qui vous offre de longues durées d’utilisation
entre chaque recharge.
Caractéristiques de la pile
La pile a les caractéristiques qui suivent :
• Utilisation des standards technologiques actuels.
• Émission d’un avertissement de pile basse.
La pile se recharge à chaque fois que vous connectez l’adaptateur c.a. à
l’ordinateur. Votre ordinateur a une fonction de charge en utilisation,
permettant de recharger la pile tout en continuant à utiliser l’ordinateur.
Cependant, la recharge avec l’ordinateur éteint permet un temps de
charge beaucoup plus rapide.

Alimentation - 37
La pile est pratique lorsque vous voyagez ou lors de coupures
d’électricité. Il est recommandé d’avoir une pile de rechange chargée,
disponible pour un éventuel remplacement. Contactez votre revendeur
pour des détails sur la commande d’une pile supplémentaire.
Maximalisation de la durée de vie de la pile
Comme toutes les autres piles, la pile de votre ordinateur se dégrade à la
longue. Cela signifie que les performances de la pile diminuent avec le
temps et l’utilisation.
Pour maximaliser l’autonomie de la pile, il est conseillé de respecter les
recommandations ci-dessous.
Conditionnement d’une nouvelle pile
Avant la première utilisation d’une pile, un processus de
« conditionnement » doit d’abord être suivi :
1. Insérez la nouvelle pile dans l’ordinateur. Ne mettez pas l’ordinateur
sous tension.
2. Connectez l’adaptateur c.a. et chargez complètement la pile.
3. Déconnectez l’adaptateur c.a.
4. Mettez l’ordinateur sous tension et utilisez-le sur l’alimentation de la pile.
5. Videz entièrement la pile.
6. Connectez de nouveau l’adaptateur c.a. et chargez encore
complètement la pile.
Procédez encore ainsi jusqu’à ce que la pile se charge et se décharge
trois fois.

38
Utilisez ce processus de conditionnement pour toutes les nouvelles piles
ou si une pile n’a pas été utilisée depuis longtemps. Lorsque l’ordinateur
n’est pas en utilisation pendant plus de deux semaines, il est conseillé de
retirer la pile de l’unité.
Avertissement : N’exposez pas les piles à des températures
inférieures à 0°C (32°F) ou supérieures à 45°C (113°F). Les
températures extrêmes peuvent être néfastes pour la pile.
En suivant ce processus de conditionnement, vous conditionnez votre pile
pour accepter la charge maximale possible. Le non-respect de cette
procédure ne permet pas d’avoir la charge maximale de la pile et
raccourcira également la durée de vie effective de votre pile.
De plus, la durée de vie utile de la pile est affectée de manière négative
par ces types d’utilisation :
• Utilisation constante de l’ordinateur sur l’alimentation c.a. avec la pile
insérée. Si vous souhaitez utiliser l’ordinateur constamment sur
l’alimentation c.a., il est conseillé de retirer la pile de l’ordinateur une fois
pleinement chargée.
• Ne pas décharger/recharger la pile à ses extrêmes comme décrit ci-
dessus.
• Fréquence d’utilisation ; la pile atteindra la fin de sa vie effective
d’autant plus vite que vous l’utilisez souvent. Une pile d’ordinateur
standard a une durée de vie d’environ 300 charges.

Alimentation - 39
Remplacer la batterie
L’ordinateur notebook utilise des batteries au lithium. Remplacez la
batterie par une batterie du même type que celle fournie avec votre
appareil. Une batterie d’un autre type peut poser un risque d’incendie ou
d’explosion.
Avertissement : Les batteries incorrectement manipulées
risquent d’exploser. Vous ne devez jamais les démonter, ni les
exposer au feu. Éloignez-les des enfants. Respectez la
réglementation locale pour mettre au rebut les batteries usagées.
Installation ou retrait de la pile
Important ! Avant de retirer la pile de l’unité, connectez l’adaptateur
c.a. si vous souhaitez continuer à utiliser l’ordinateur. Dans le cas
contraire, mettez d’abord l’ordinateur hors tension.
Pour installer une pile :
1. Alignez la pile sur la baie de la pile ouverte. Assurez-vous que
l’extrémité avec les contacts entre en premier et que la surface
supérieure de la pile est dirigée vers le haut.
2. Faites glisser la pile dans sa baie et poussez la pile doucement jusqu’à
ce qu’elle se verrouille en place.
Pour retirer une pile :
1. Faites glisser le loquet de libération de la pile pour libérer la pile.
2. Tirez la pile de sa baie.

40
Charge de la pile
Pour charger la pile, assurez-vous d’abord qu’elle est correctement
installée dans la baie de la pile. Branchez l’adaptateur c.a. à l’ordinateur et
connectez à une prise électrique. Vous pouvez continuer à utiliser votre
ordinateur sur l’alimentation c.a. pendant la recharge de votre pile.
Cependant, la recharge avec l’ordinateur éteint permet un temps de
charge beaucoup plus rapide.
Remarque : Il est recommandé de recharger la pile avant le coucher.
Charger la pile la nuit avant un voyage permet de commencer la
journée suivante avec une pile pleinement chargée.
Vérification du niveau de la pile
La jauge de la pile de Windows indique le niveau actuel de la pile. Placez
le curseur sur l’icône pile/alimentation sur la barre des tâches pour voir le
niveau actuel de la pile.
Optimisation de l’autonomie de la pile
L’optimisation de l’autonomie de la pile vous aide à obtenir le maximum
des piles, prolongeant le cycle charge/recharge et améliorant l’efficacité
de la recharge. Il est recommandé de suivre les suggestions ci-dessous :
• Achetez une pile supplémentaire.
• Utilisez l’adaptateur c.a. autant que possible, réservant la pile pour
l’utilisation en déplacement.
• Éjectez la Carte PC lorsqu’elle n’est pas utilisée, car elle continue à
consommer de l’énergie (pour certains modèles).

Alimentation - 41
• Conservez la pile dans un endroit frais et sec. La température
recommandée est 10°C (50°F) à 30°C (86°F). Des températures
conduisent la pile à s’auto-décharger plus rapidement.
• Trop de recharges réduisent l’autonomie de la pile.
• Prenez soin de votre adaptateur c.a. et de la pile.
Avertissement de pile basse
Lors de l’utilisation de l’alimentation de la pile, surveillez la jauge de la pile
de Windows.
Avertissement : Connectez l’adaptateur c.a. dès que possible
après que l’avertissement de pile basse apparaît. Les données
seront perdues si la pile se vide complètement et l’ordinateur
s’éteint.
Lorsque l’avertissement de pile basse apparaît, la liste des actions
recommandées dépend de votre situation :
Condition Action recommandée
L’adaptateur c.a. et
une prise électrique
sont disponibles.
1. Branchez l’adaptateur c.a. à l’ordinateur, puis
connectez au réseau électrique.
2. Enregistrez tous les fichiers devant l’être.
3. Remettez-vous au travail.
Éteignez l’ordinateur si vous souhaitez
recharger la pile rapidement.

42
Une pile de rechange
chargée est
disponible.
1. Enregistrez tous les fichiers devant l’être.
2. Fermez toutes les applications.
3. Arrêtez le système d’exploitation pour éteindre
l’ordinateur.
4. Remplacez la pile.
5. Allumez l’ordinateur et remettez-vous au travail.
L’adaptateur c.a. ou
une prise électrique
n’est pas disponible.
Vous n’avez pas de
pile de rechange.
1. Enregistrez tous les fichiers devant l’être.
2. Fermez toutes les applications.
3. Arrêtez le système d’exploitation pour éteindre
l’ordinateur.
Condition Action recommandée

Gestion de l’alimentation - 43
GESTION DE L’ALIMENTATION
Cet ordinateur a une unité de gestion de l’alimentation intégrée qui
supervise l’activité du système. L’activité du système comprend toute
activité qui implique un ou plus des périphériques suivants : clavier,
souris, disque dur, périphériques connectés à l’ordinateur et mémoire
vidéo. Si aucune activité n’est détectée pendant une période de temps
spécifiée, l’ordinateur arrête certains ou tous ces périphériques pour
conserver l’énergie.
ÉCONOMIE D’ÉNERGIE
Désactiver le démarrage rapide
Votre ordinateur utilise le Démarrage rapide pour démarrer rapidement,
mais utilise également une petite quantité d’énergie pour vérifier les
signaux pour démarrer. Ces vérifications déchargeront lentement la pile
de votre ordinateur.
Si vous préférez réduire les besoins en énergie de votre ordinateur et
l’impact environnemental, désactivez le Démarrage rapide :
Remarque : Si le Démarrage rapide est désactivé, votre ordinateur
prendra plus de temps pour démarrer depuis la Veille.
Votre ordinateur ne démarrera également pas s’il reçoit une
instruction pour démarrer sur un réseau (Wake on LAN).

44
1. Ouvrez le Bureau.
2. Cliquez sur Options d’alimentation dans la
Zone de notification.
3. Sélectionnez Plus d’options d’alimentation.
4. Sélectionnez Choisir l’action des boutons d’alimentation.
5. Pour accéder aux paramètres d’arrêt, sélectionnez Modifier des
paramètres actuellement non disponibles.

Gestion de l’alimentation - 45
6. Défilez vers le bas et désactivez Activer le démarrage rapide.
7. Sélectionnez Enregistrer les modifications.

46
LOGICIELS
UTILISER WINDOWS ET VOS LOGICIELS
Les ordinateurs Gateway comportent des logiciels pour vous aider à
utiliser votre ordinateur ; les programmes et catégories disponibles sur
votre ordinateur dépendent du modèle acheté.
Offre de sécurité Internet
Il est vital de protéger votre ordinateur contre les virus et les attaques sur
Internet (voir Sécurité à la page 54). Un programme complet de sécurité
sur Internet, y compris une période d’essai gratuite, est proposé lorsque
vous démarrez votre ordinateur. Activez cette protection avant de vous
connecter à Internet. Cette suite de sécurité protège votre ordinateur
contre les menaces en ligne les plus récentes et protège vos données
personnelles (informations d’identifiants de compte bancaire, numéro de
carte de crédit, mots de passe, et plus).
Gateway Recovery Management
Pour préparer votre ordinateur pour les options de récupération du
système, vous devez créer un ensemble de disques de récupération dès
que possible. Voir page 64 pour plus d’informations.

Internet - 47
INTERNET
PREMIERS PAS SUR LE NET
Protéger votre ordinateur
Il est vital de protéger votre ordinateur contre les virus et les attaques sur
Internet (voir Offre de sécurité Internet à la page 46 et Sécurité à la page
54). Un programme complet de sécurité sur Internet est offert lorsque
vous démarrez votre ordinateur. Activez cette protection dès que possible,
et certainement avant de vous connecter à Internet.
Choisir un fournisseur de service Internet
Utiliser Internet est devenu une partie naturelle de
l’informatique quotidienne. Quelques étapes simples
peuvent vous connecter à une vaste collection de
connaissances et d’outils de communication. Pour
accomplir ces étapes, vous devez d’abord sélectionner
un fournisseur de service Internet (FSI), qui fournit les
connexions entre votre ordinateur et Internet.
Renseignez-vous sur les fournisseurs de services Internet disponibles
dans votre région, sans oublier de parler à vos amis et votre famille au
sujet de leurs expériences ou de consulter les enquêtes et les rapports
des associations de consommateurs. Le FSI que vous choisirez fournira
des instructions sur la façon de vous connecter à Internet (vous pourrez
avoir besoin d’un logiciel supplémentaire ou d’un boîtier qui se connecte à
votre ligne téléphonique).

48
Types de connexion
En fonction de votre modèle d’ordinateur, de votre situation et de vos
besoins de communication, vous pouvez vous connecter à Internet de
plusieurs manières.
Connexion téléphonique
Certains ordinateurs comportent un connecteur téléphonique (‘modem’).
Cela vous permet de vous connecter à Internet en utilisant votre ligne
téléphonique. Avec une connexion téléphonique, vous ne pouvez pas
utiliser le modem et le téléphone en même temps sur une seule ligne
téléphonique. Ce type de connexion est recommandé uniquement si vous
avez un besoin limité d’utilisation d’Internet car la vitesse de connexion est
faible et le temps de connexion est généralement facturé à l’heure.
Connexion DSL (p.ex. ADSL)
La connexion DSL (ligne d’abonné numérique) est une connexion toujours
activée qui fonctionne via la ligne téléphonique. La connexion DSL et le
téléphone n’utilisant pas les mêmes fréquences, vous pouvez utiliser votre
téléphone en même temps que vous êtes connecté à Internet (ce qui
nécessite un ‘micro-filtre’ sur chaque prise téléphonique pour éviter les
interférences). Pour pouvoir avoir une connexion DSL, vous devez être
situé à proximité d’un central téléphonique équipé pour le DSL (le service
est parfois inaccessible dans les zones rurales). Les vitesses de
connexion varient en fonction de votre situation géographique, mais la
connexion DSL fournit généralement un accès très rapide et fiable à
Internet. Comme la connexion est toujours active, elle est généralement
facturée avec des forfais mensuels fixes.

Internet - 49
Remarque :
Une connexion DSL nécessite un modem approprié. Un
modem est généralement fourni par le FSI lorsque vous vous abonnez.
Un grand nombre de ces modems comprennent un ‘routeur’ qui fournit
un accès réseau et Wi-Fi.
Câble
Une connexion par câble fournit un service Internet rapide et toujours actif
par l’intermédiaire d’une ligne de télévision par câble. Ce service est
généralement disponible dans les grandes villes. Vous pouvez utiliser
votre téléphone et regarder la télévision par câble en même temps que
vous êtes connecté à Internet.
3G (réseau étendu sans-fil)
Une connexion 3G permet d’utiliser les réseaux cellulaires (comme ceux
utilisés par un téléphone cellulaire) pour vous connecter à Internet quand
vous êtes loin de la maison. La fente d’une carte SIM peut être intégrée à
votre ordinateur, ou un périphérique externe peut être nécessaire, comme
un modem USB ou même un téléphone cellulaire équipé de façon
appropriée.
Remarque : Si votre ordinateur comporte une fente de carte SIM, une
carte SIM compatible est nécessaire ainsi qu’un contrat avec un
fournisseur de service cellulaire.
Avant d’utiliser les fonctionnalités 3G, vérifiez auprès de votre
fournisseur de service pour voir si des frais supplémentaires seront
nécessaires, en particulier les frais d’itinérance.

50
Connexions réseau
Un réseau local est un groupe d’ordinateurs (par exemple, dans un
immeuble de bureaux ou à domicile) qui partagent une ligne de
communication et des ressources en commun. Lorsque vous configurez
un réseau, vous pouvez partager des fichiers, des périphériques (comme
une imprimante) et une connexion Internet. Vous pouvez mettre en place
un réseau local en utilisant les technologies câblées (Ethernet) ou les
technologies sans-fil (comme le Wi-Fi ou Bluetooth).
Réseaux sans-fil
Un réseau local sans-fil peut relier deux ou plusieurs ordinateurs sans
utiliser de fils. La mise en place d’un réseau sans-fil est facile et permet de
partager des fichiers, des périphériques et une connexion Internet.
Quels sont les avantages d’un réseau sans-fil ?
Mobilité
Les systèmes de réseau sans-fil vous permettent et à d’autres utilisateurs
de votre réseau de partager l’accès aux fichiers et aux périphériques
connectés au réseau, par exemple une imprimante ou un scanneur.
Vous pouvez également partager une connexion Internet avec d’autres
ordinateurs de votre domicile.
Rapidité et simplicité d’installation
Installer un système de réseau sans-fil peut être rapide et facile et élimine
le besoin de tirer des câbles à travers les murs et les plafonds.

Internet - 51
Composants d’un réseau local sans-fil
Pour configurer votre réseau sans-fil à la maison, vous devez disposer
des composants suivants :
Point d’accès (routeur)
Les points d’accès (routeurs) sont les émetteur-récepteur bidirectionnels
qui diffusent des données dans l’environnement. Les points d’accès
agissent comme des médiateurs entre le réseau câblé et le réseau sans-
fil. La plupart des routeurs ont un modem DSL intégré qui vous permettra
d’accéder à une connexion Internet DSL à haute vitesse. Le FSI
(fournisseur de service Internet) que vous avez choisi fournit normalement
un modem/routeur avec l’abonnement à ses services. Lisez attentivement
la documentation fournie avec votre point d’accès/routeur pour de plus
amples instructions.
Câble réseau (RJ45)
Un câble réseau (aussi appelé câble RJ45) est utilisé pour connecter
l’ordinateur au point d’accès (voir l’illustration ci-dessous), ce type de
câble peut également être utilisé pour connecter des périphériques au
point d’accès.
Adaptateur sans-fil
Un adaptateur sans-fil interne est normalement déjà installé dans
votre ordinateur. Un bouton ou des contrôles dans Windows vous
permettent d’activer ou de désactiver l’adaptateur.

52
Schéma d’un réseau fonctionnel
1. Point d’accès/routeur
2. Ordinateur de
bureau
3. Modem
4. Imprimante
5. Ordinateur portable
6. ANP/Téléphone
intelligent
7. Câbles réseau
(RJ45)
Activer/Désactiver une connexion réseau sans-fil
La plupart des ordinateurs ont un bouton ‘Wi-Fi’ qui active ou désactive la
connexion réseau. Si votre ordinateur a l’accès sans-fil, mais n’a pas de
bouton Communication, vous pouvez activer ou désactiver votre réseau
sans-fil, ou contrôler ce qui est partagé sur le réseau avec les options de
gestion du réseau. Appuyez la touche Windows ( ) + W, saisissez
« Groupe résidentiel » puis cliquez sur Groupe résidentiel.
1
2
3
4
5
6
7

Internet - 53
Avertissement : L’utilisation des appareils sans-fil en vol dans
un avion est interdite. Éteignez tous les appareils avant
d’embarquer, ils peuvent être dangereux pour le fonctionnement
de l’avion, peuvent perturber les communications et peuvent
même être illégaux.
Surfez sur le Net !
Pour surfer sur Internet, vous avez besoin d’un
programme appelé un navigateur Internet. Internet
Explorer fournit un moyen simple et sûr de navigation
sur le Web. Dès que vous avez installé votre accès à
Internet et que vous êtes connecté, cliquez sur le
raccourci Internet Explorer sur le bureau de Windows et
faites l’expérience d’Internet à un autre niveau !
Site Web Gateway
Pour commencer, pourquoi ne pas visiter notre site Web,
www.gateway.com.
Gateway s’engage à vous fournir un support continu personnalisé.
Consultez notre section de Support pour obtenir de l’aide adaptée à vos
besoins.
www.gateway.com est votre portail vers un monde d’activités et de
services en ligne : visitez-nous régulièrement pour obtenir les dernières
informations et les téléchargements !

54
Sécurité
Vous êtes sans doute impatient de découvrir tout ce qu’Internet peut offrir.
Afin que vous soyez en sécurité en ligne, Gateway a préinstallé le logiciel
primé Norton Internet Security™ de Symantec sur votre ordinateur.
Norton Internet Security fonctionne discrètement en arrière-plan pour
bloquer les menaces complexes d’aujourd’hui et protéger votre identité
lorsque vous faites vos achats, visitez le site de votre banque, ou
naviguez en ligne.
Norton Internet Security bloque le vol d’identité en ligne, détecte et élimine
les logiciels espions, supprime les virus et les vers Internet, protège contre
les pirates informatiques.
Définitions
Qu’est-ce qu’un virus ?
Les logiciels malveillants, généralement appelé « virus », sont des
programmes conçus pour infecter les ordinateurs et les endommager. La
plupart des virus sont transmis par Internet, courriels ou des sites Web
malveillants. Un virus typique se reproduira et se transmettra inaperçu sur
de nombreux ordinateurs. D’autres formes de nuisances, comme les
chevaux de Troie, les vers ou les pourriels peuvent infecter votre
ordinateur de diverses façons, en utilisant les ressources ou en opérant
l’obstruction d’un réseau.
Remarque : Gateway vous garantit que votre ordinateur était 100%
sans virus au moment de l’achat et ne couvre pas les dommages dus
à des virus.

Internet - 55
Qu’est-ce qu’un logiciel espion ?
Les logiciels espions sont généralement des programmes indésirables qui
sont téléchargés sur votre ordinateur lorsqu’il est connecté à Internet,
souvent sans que vous le sachiez. Une fois qu’ils ont infecté votre
ordinateur, ils peuvent épier votre activité de navigation, recueillir des
informations personnelles, causer l’apparition de fenêtres publicitaires, ou
même changer la configuration de votre ordinateur. Un logiciel espion
consomme des ressources sur votre ordinateur, il peut ralentir votre
connexion Internet ou tout le système informatique, et même provoquer
des plantages.
Les logiciels espions sont parfois utilisés par les entreprises sans
scrupules pour contrôler et surveiller les sites que vous visitez sur Internet
afin de déterminer vos habitudes de navigation sur le Web et afficher des
fenêtres publicitaires ciblées sur votre écran. Toutefois, certains types de
logiciels espions vont au-delà du simple suivi et surveillent les frappes et
capturent les mots de passe, posant un risque pour la sécurité.
Qu’est-ce qu’un maliciel ?
Les logiciels malveillants, également appelés maliciels, sont des logiciels
conçus pour endommager délibérément votre ordinateur. Par exemple, les
virus, les vers et les chevaux de Troie sont des logiciels malveillants. Pour
aider à protéger votre ordinateur contre les logiciels malveillants, assurez-
vous qu’il utilise un logiciel anti-logiciels espions et anti-maliciels à jour.
Qu’est-ce qu’un pare-feu personnel ?
Un pare-feu personnel est un logiciel conçu pour empêcher tout accès
non autorisé vers ou depuis un réseau privé. Il agit comme un bouclier

56
pour protéger votre connexion Internet de connexions non désirées, dont
certaines peuvent essayer de prendre le contrôle de votre ordinateur pour
installer ou redistribuer des virus ou des programmes malveillants.
Chaque connexion à votre ordinateur est contrôlée - les programmes qui
tentent de recevoir des informations sans votre autorisation sont détectés
et le pare-feu affiche une alerte. Vous pouvez alors décider si vous voulez
permettre la connexion, si la connexion est à un programme que vous
utilisez actuellement alors normalement vous pouvez la permettre (c.-à-d.
un jeu se connectant à un serveur multi-joueurs ou une encyclopédie
mettant à jour le contenu).
Comment protéger votre ordinateur
La prévention de la cybercriminalité peut être simple, avec un peu de
conseils techniques et de sens commun de nombreuses attaques peuvent
être évitées. En général, les criminels en ligne essaient de gagner de
l’argent aussi rapidement et facilement que possible. Plus vous rendez
leur travail difficile, plus ils sont susceptibles de vous laisser tranquille et
de passer à une cible plus facile. Les conseils ci-dessous fournissent des
informations de base sur la façon dont vous pouvez empêcher la fraude
en ligne.
Gardez votre ordinateur à jour avec les derniers correctifs et mises à jour
Une des meilleures façons de tenir les attaquants hors de votre ordinateur
est d’appliquer les correctifs et autres mises à jour logicielles dès qu’ils
sont disponibles. En mettant régulièrement à jour votre ordinateur, vous
empêcherez les attaquants de pouvoir profiter des failles des logiciels
(vulnérabilités) qu’ils pourraient utiliser pour pénétrer votre système.

Internet - 57
Bien que garder votre ordinateur à jour ne vous protégera pas de toutes
les attaques, cela rend beaucoup plus difficile pour les pirates d’accéder à
votre système, bloque de nombreuses attaques simples et complètement
automatisées, et peut être assez pour décourager les moins déterminés
des attaquants, pour qu’ils abandonnent et recherchent alors un
ordinateur plus vulnérable ailleurs.
Des versions plus récentes de Microsoft Windows et d’autres logiciels
populaires peuvent être configurées pour être téléchargées et pour
appliquer automatiquement les mises à jour de sorte que vous n’avez pas
à vous rappeler de vérifier les derniers logiciels. Profiter des fonctions de
mise à jour auto de votre logiciel est un excellent point de départ pour que
vous restiez en sécurité en ligne.
Protégez votre ordinateur avec le logiciel de sécurité
Plusieurs types de logiciels de sécurité sont nécessaires pour la sécurité
en ligne de base. Les logiciels de sécurité essentiels comprennent les
programmes antivirus et pare-feu. Un pare-feu est généralement la
première ligne de défense de votre ordinateur, il contrôle qui et quoi peut
communiquer avec votre ordinateur en ligne. On peut penser à un pare-
feu comme une sorte de « gendarme » qui regarde toutes les données
essayant de rentrer et de sortir de votre ordinateur sur Internet, acceptant
le communications dont il sait qu’elles sont sûres et bloquant le
« mauvais » trafic, comme les attaques, les empêchant d’accéder à votre
ordinateur.
La prochaine ligne de défense est souvent votre logiciel antivirus, qui
surveille toutes les activités en ligne telles que les courriels et la

58
navigation sur le Web et protège contre les virus, vers, chevaux de Troie
et autres types de programmes malveillants. Votre logiciel antivirus et anti-
logiciels espions doit être configuré pour se mettre à jour, et il doit le faire
à chaque fois que vous vous connectez à Internet.
Les suites de sécurité intégrées, comme Norton Internet Security, qui
combinent pare-feu, antivirus, anti-logiciels espions avec d’autres
fonctionnalités telles que antipourriel et contrôle parental, sont populaires
car elles offrent toute la sécurité nécessaire pour la protection en ligne
dans un seul progiciel. Beaucoup de gens utilisent une suite complète de
sécurité comme une alternative intéressante à l’installation et la
configuration des différents types de logiciels de sécurité.
Une version complète of Norton Internet Security™ est préinstallée
sur votre système Gateway. Elle comprend un abonnement d’essai
gratuit aux mises à jour de protection. Assurez-vous de l’activer !
Choisissez des mots de passe forts et gardez-les sécurisés
Les mots de passe sont une réalité de la vie sur Internet aujourd’hui, nous
les utilisons pour tout, depuis la commande de fleurs et les services
bancaires en ligne à la connexion au site Web de notre compagnie
aérienne préférée pour voir combien de miles que nous avons accumulés.
Les conseils suivants peuvent aider à sécuriser votre expérience en ligne :
• Choisir un mot de passe qui ne peut pas être facilement deviné, est la
première étape vers le maintien de mots de passe sécurisés et à l’abri
de mauvaises mains. Les mots de passe forts ont huit caractères ou
plus et utilisent une combinaison de lettres, de chiffres et de symboles
(p. ex., # $ % ! ?). Évitez d’utiliser ce qui suit comme mot de passe :

Internet - 59
votre nom de connexion, tout ce qui est basé sur vos informations
personnelles telles que votre nom de famille, et les mots que l’on peut
trouver dans le dictionnaire, particulièrement « mot de passe ». Essayez
de sélectionner des mots de passe uniques et particulièrement forts
pour protéger les activités comme la banque en ligne.
• Conservez votre mot de passe dans un endroit sûr et essayez de ne
pas utiliser le même mot de passe pour chaque service que vous
utilisez en ligne.
• Changez les mots de passe de manière régulière, au moins tous les 90
jours. Cela peut limiter les dégâts causés par quelqu’un qui a déjà
obtenu l’accès à votre compte. Si vous remarquez quelque chose de
suspect avec un de vos comptes en ligne, l’une des premières mesures
que vous pouvez faire est de changer votre mot de passe.
Protégez vos informations personnelles
Soyez prudent lors de l’échange d’informations personnelles tels que
votre nom, votre adresse, numéro de téléphone et adresse de courriel en
ligne. Pour profiter de nombreux services en ligne, vous aurez
inévitablement à fournir des informations personnelles afin de gérer la
facturation et l’expédition de marchandises achetées. Puisque ne
divulguer aucune information personnelle est rarement possible, la liste
qui suit contient quelques conseils sur la manière de partager des
informations personnelles en ligne en toute sécurité :
• Gardez l’œil ouvert pour les courriels de charlatans. Ce qui indique
qu’un message peut être frauduleux sont les erreurs d’orthographe, la
mauvaise grammaire, les tournures de phrases étranges, les adresses

60
de sites Web avec des extensions étranges, les adresses de sites Web
qui sont composées entièrement de nombres là où il y a normalement
des mots, et toutes autres choses qui ne semblent pas habituelles. En
outre, les messages d’hameçonnage vous diront souvent que vous
avez à agir rapidement afin de garder votre compte ouvert, de mettre à
jour de votre sécurité, ou vous demande instamment de fournir des
informations immédiatement, ou bien quelque chose de mauvais va se
passer. Ne mordez pas à l’hameçon.
• Ne répondez pas aux courriels qui demandent des informations
personnelles. Les sociétés légitimes n’utilisent pas les courriels pour
vous demander vos informations personnelles. En cas de doute,
contactez la société par téléphone ou en tapant l’adresse Web de la
société dans votre navigateur Web. Ne cliquez pas sur les liens dans
ces messages, car ils peuvent vous emmener vers pour des sites Web
frauduleux et malveillants.
• Ne vous approchez pas des sites Web frauduleux utilisés pour
voler des informations personnelles. Lors de la visite d’un site Web,
tapez l’adresse (URL) directement dans le navigateur Web, plutôt que
de suivre un lien dans un courriel ou un message instantané. Les
fraudeurs falsifient souvent ces liens pour leur donner une apparence
convaincante.
Un site de magasinage, de service bancaire ou tout autre site Web avec
des informations sensibles devraient avoir un « S » après les lettres
« http » (c.-à-d. https://www.votrebanque.com et non pas http://
www.votrebanque.com). Le « s » signifie sécurisé et devrait apparaître
lorsque vous êtes dans une zone vous demandant de vous connecter

Internet - 61
ou de fournir d’autres données sensibles. Un autre signe que vous avez
une connexion sécurisée est la petite icône de cadenas dans le bas de
votre navigateur Web (généralement le coin droit).
• Portez attention aux politiques de confidentialité sur les sites Web
et dans les logiciels. Il est important de comprendre comment une
organisation peut recueillir et utiliser vos informations personnelles
avant de les partager avec eux.
• Protégez votre adresse de courriel. Les polluposteurs et
« hameçonneurs » envoient parfois des millions de messages à des
adresses de courriel qui peuvent exister ou non dans l’espoir de trouver
une victime potentielle. Répondre à ces messages, ou même
télécharger des images assure que vous serez ajouté à leurs listes de
plusieurs des mêmes messages à l’avenir. Aussi soyez prudent lorsque
vous envoyez votre adresse de courriel en ligne, dans des groupes de
discussion, des blogues ou des communautés en ligne.
Les offres en ligne qui semblent trop belles pour être vraies le sont
généralement
Le vieil adage « il n’y a pas de repas gratuit » est toujours vrai aujourd’hui.
Les logiciels prétendument « gratuits » tels que les écrans de veille ou les
binettes, les astuces secrètes d’investissement qui vous rendront à coup
sûr très riche, et les concours que vous avez remportés avec surprise
sans y avoir participé sont les séduisants hameçons utilisés par les
entreprises pour attirer votre attention.
Bien que vous pouvez ne pas payer directement pour le logiciel ou le
service avec de l’argent, le logiciel ou le service gratuit que vous avez

62
demandé peuvent avoir été livrés avec un logiciel publicitaire (« pubiciel »)
qui permet de suivre votre comportement et affiche des publicités
indésirables. Il est possible que vous deviez divulguer des informations
personnelles ou acheter quelque chose d’autre en vue d’obtenir vos gains
supposés. Si une offre semble tellement bonne que c’est difficile à croire,
demandez l’avis de quelqu’un d’autre, lisez les lignes en petits caractères,
ou encore mieux, ignorez-la simplement.
Consultez vous relevés bancaires et de cartes de crédit régulièrement
L’impact de l’usurpation d’identité et des crimes en ligne peut être
grandement réduit si vous pouvez le constater peu de temps après que
vos données sont volées ou lors de la première tentative d’utilisation de
vos informations. Un des moyens les plus faciles pour obtenir l’indice que
quelque chose va mal est l’examen des relevés mensuels fournis par
votre banque et les sociétés de cartes de crédit pour déceler ce qui sort
de l’ordinaire.
En outre, de nombreuses banques et services utilisent des systèmes de
prévention de la fraude qui décèlent les comportements inhabituels
d’achat (c.-à-d. si vous vivez au Québec et soudainement vous
commencez à acheter des réfrigérateurs à Budapest). Afin de confirmer
ce qui sort de l’ordinaire dan les achats, ils peuvent vous appeler et vous
demander de les confirmer. Ne prenez pas ces appels la légère, c’est le
signe que quelque chose de mauvais peut avoir eu lieu et que vous
devriez prendre les mesures nécessaires.

Internet - 63
Protégez votre ordinateur avec les outils de sécurité Windows
Windows fournit diverses applications de protection.
Mises à jour de Windows
Si vous avez une connexion Internet active, Windows peut rechercher les
mises à jour importantes pour votre ordinateur et les installer
automatiquement. Ces mises à jour comprennent des correctifs de
sécurité et les mises à jour des programmes qui peuvent améliorer votre
expérience informatique et vous aider à protéger votre ordinateur contre
les nouveaux virus et attaques.
Comment puis-je savoir si mon ordinateur fait face à un risque ?
Si le Centre d’action fait état d’une alerte, ou si votre ordinateur se
comporte de manière erratique, se plante de manière inattendue ou si
certains de vos programmes ne fonctionnent pas correctement, votre
ordinateur peut être infecté par des logiciels malveillants. Toutefois, il ne
faut pas blâmer tous les problèmes de l’ordinateur sur un virus ! Si vous
soupçonnez que votre ordinateur est infecté, la première chose à faire est
de mettre à jour, si vous ne l’avez pas déjà fait, et lancez votre logiciel
antivirus et anti-logiciels espions.

64
RÉCUPÉRATION
Si vous rencontrez des problèmes avec votre ordinateur, et la foire aux
questions (voir page 86) ne vous aide pas, vous pouvez ‘récupérer’ votre
ordinateur – c’est-à-dire le retourner à un état antérieur.
Cette section décrit les outils de récupération disponibles sur votre
ordinateur. Gateway fournit Gateway Recovery Management, qui vous
permet de créer une sauvegarde de récupération, une sauvegarde des
pilotes et des applications, et de démarrer les options de récupération, soit
en utilisant les outils de Windows, ou la sauvegarde de récupération.
Remarque : Gateway Recovery Management n’est disponible
qu’avec un système d’exploitation Windows préinstallé.
Important : Nous vous recommandons de créer une sauvegarde
de récupération et une sauvegarde des pilotes et des
applications dès que possible.
Dans certaines situations, une récupération complète
nécessitera une sauvegarde de récupération USB.
Créer une sauvegarde de récupération
Pour réinstaller depuis un lecteur de stockage USB, vous devez d’abord
créer une sauvegarde de récupération. La sauvegarde de récupération
comprend l’ensemble du contenu original du disque dur de votre
ordinateur, y compris Windows et tous les logiciels et pilotes chargés en
usine. Utiliser cette sauvegarde restaurera votre ordinateur au même état
que lorsque vous l’avez acheté, tout en vous donnant l’option de
conserver tous les paramètres et données personnelles.

Récupération - 65
Remarque :
Assurez-vous d’avoir un lecteur USB avec une capacité
d’au moins16 Go.
1. Depuis Démarrer, saisissez ‘Recovery’ puis cliquez sur Gateway
Recovery Management dans la liste des applis.

66
2. Cliquez sur Créer une sauvegarde par défaut de l’usine. La fenêtre
Lecteur de récupération s’ouvre.
Assurez-vous que Copier le contenu de la partition de récupération
sur le disque de récupération est sélectionné. Cela fournit la
sauvegarde de récupération la plus complète et la plus sûre.

Récupération - 67
3. Branchez le lecteur USB, puis cliquez sur Suivant.
• Assurez-vous que votre lecteur USB a une capacité suffisante avant
de continuer. La sauvegarde de récupération nécessite un stockage
d’au moins 16 Go.
4. La progression de la sauvegarde sera affichée à l’écran.
5. Continuez le processus jusqu’à sa fin.

68
6. Après avoir créé la sauvegarde de récupération, vous pouvez choisir de
supprimer les informations de récupération sur votre ordinateur. Si vous
supprimez ces informations, vous ne pouvez utiliser que la sauvegarde
de récupération USB pour restaurer votre ordinateur, si vous perdez ou
effacer le lecteur USB, vous ne pouvez pas restaurer votre ordinateur.
7. Débranchez le lecteur USB et marquez-le clairement.
Important : Écrivez une description unique de la sauvegarde, par
exemple ‘Sauvegarde de récupération Windows’. Assurez-vous
de conserver la sauvegarde dans un endroit sûr dont vous vous
souviendrez.

Récupération - 69
Créer la sauvegarde des pilotes et des
applications
Pour créer une sauvegarde des pilotes et des applications, qui contient les
logiciels chargés en usine et les pilotes nécessaires à votre ordinateur,
vous pouvez utiliser soit un lecteur de stockage USB ou, si votre
ordinateur dispose d’un graveur de DVD, un ou plusieurs DVD
enregistrables vierges.
1. Depuis Démarrer, saisissez ‘Recovery’ puis cliquez sur Gateway
Recovery Management dans la liste des applis.
2. Cliquez sur Créer la sauvegarde des pilotes et des applications.
Branchez le lecteur USB ou insérez un DVD vierge dans le lecteur
optique, puis cliquez sur Suivant.

70
• Si vous utilisez un lecteur USB, assurez-vous que votre lecteur USB
a une capacité suffisante avant de continuer.
• Si vous utilisez des DVD, le nombre de disques vierges
enregistrables dont vous aurez besoin pour les disques de
récupération sera également affiché. Assurez-vous d’avoir le nombre
de disques vierges identiques.

Récupération - 71
3. Cliquez sur Démarrer pour copier les fichiers. La progression de la
sauvegarde sera affichée à lécran.
4. Continuez le processus jusqu’à sa fin :
• Si vous utilisez des disques optiques, le lecteur éjecte chaque disque
lorsqu’il a fini de le graver. Retirez le disque du lecteur et marquez-le
avec un marqueur permanent.
Si plusieurs disques sont nécessaires, insérez un nouveau disque à
l’invite, puis cliquez sur OK. Continuer jusqu’à la fin du processus.
• Si vous utilisez un lecteur USB, débranchez le lecteur et marquez-le
clairement.
Important : Écrivez une description unique sur chaque
sauvegarde, par exemple ‘Sauvegarde des pilotes et des
applications’. Assurez-vous de conserver la sauvegarde dans un
endroit sûr dont vous vous souviendrez.
Récupération de votre système
Pour récupérer votre système :
1. Effectuez des corrections mineures.
Si seulement un ou deux éléments logiciels ou matériels ont cessé de
fonctionner correctement, le problème peut être résolu en réinstallant
les logiciels ou les pilotes de périphériques.
Pour réinstaller les logiciels et les pilotes qui ont été préinstallés à
l’usine, voir « Réinstaller les pilotes et les applications » à la
page 72.

72
Pour des instructions sur la réinstallation des logiciels et des pilotes qui
n’ont pas été préinstallés, voir la documentation de ce produit ou le site
Web d’assistance.
2. Rétablissez à un état antérieur du système.
Si la réinstallation du logiciel ou des pilotes n’aide pas, alors le problème
peut être résolu en retournant votre système à un état antérieur quand
tout fonctionnait correctement.
Pour des instructions, voir « Retourner à un instantané antérieur du
système » à la page 75.
3. Réinitialisez votre système d’exploitation.
Si rien d’autre n’a résolu le problème et vous voulez réinitialiser votre
système, mais garder vos informations utilisateur, voir « Retourner
votre système à son état d’usine » à la page 77.
4. Réinitialisez votre système à son état d’usine.
Si rien d’autre n’a résolu le problème et vous voulez réinitialiser votre
système à l’état d’usine, voir « Retourner votre système à son état
d’usine » à la page 77.
Réinstaller les pilotes et les applications
Au cours d’un dépannage, il peut être nécessaire de réinstaller les
applications et les pilotes de périphériques qui ont été préinstallés sur
votre ordinateur à l’usine. Vous pouvez réinstaller en utilisant soit votre
disque dur ou la sauvegarde que vous avez créée.

Récupération - 73
• Autres applications - Si vous devez réinstaller un logiciel qui n’était pas
préinstallé sur votre ordinateur, vous devez suivre les instructions
d’installation de ce logiciel.
• Nouveau pilotes de périphériques - Si vous devez réinstaller des pilotes
de périphériques qui n’étaient pas préinstallés sur votre ordinateur,
suivez les instructions fournies avec les périphériques.
Si vous réinstallez à l’aide de Windows et les informations de récupération
sont stockées sur votre ordinateur :
• Depuis Démarrer, saisissez ‘Recovery’ puis cliquez sur Gateway
Recovery Management dans la liste des applis.
• Cliquez sur Réinstaller les pilotes ou les applications.

74
• Vous devriez voir la section Contenus du Centre de ressource
Gateway.
• Cliquez sur l’icône installer de l’élément que vous voulez
installer, puis suivez les instructions à l’écran pour terminer
l’installation. Répétez cette étape pour chaque élément que vous
souhaitez réinstaller.
Si vous réinstallez depuis une Sauvegarde des pilotes et des applications
sur un DVD ou lecteur USB :
1. Insérez Sauvegarde des pilotes et des applications dans le lecteur
de disque ou connectez-la à un port USB libre.
• Si vous insérez un DVD, attendez le démarrage du Centre de
ressource Gateway.
• Si le Centre de ressource Gateway ne démarre pas
automatiquement, appuyez sur la touche Windows + <E>, puis
double-cliquez sur l’icône du lecteur optique.

Récupération - 75
• Si vous utilisez un lecteur USB, appuyez sur la touche Windows +
<E>, puis double-cliquez sur le lecteur qui contient la sauvegarde.
Double-cliquez sur ResourceCenter.
2. Vous devriez voir la section Contenus du Centre de ressource
Gateway.
3. Cliquez sur l’icône installer de l’élément que vous voulez installer,
puis suivez les invites à l’écran pour terminer l’installation.
Répétez cette étape pour chaque élément que vous souhaitez
réinstaller.
Retourner à un instantané antérieur du système
La Restauration du système de Microsoft prend périodiquement des
‘instantanés’ de vos paramètres système et les enregistre comme points
de restauration. Dans la plupart des cas de problèmes logiciels difficiles à
résoudre, vous pouvez retourner à un de ces points de restauration pour
faire fonctionner à nouveau votre système.

76
Windows crée automatiquement un nouveau point de restauration chaque
jour, et chaque fois que vous installez des logiciels ou des pilotes de
périphériques.
Remarque : Pour plus d’informations sur l’utilisation de la
Restauration du système de Microsoft, depuis Démarrer, saisissez
‘Aide’ puis cliquez sur Aide et support dans la liste des applis.
Saisissez ‘restauration du système Windows’ dans la zone
Rechercher dans l’Aide, puis appuyez sur Entrée.
Retourner à un point de restauration:
1. Depuis Démarrer, saisissez ‘Panneau de configuration’ puis cliquez sur
Panneau de configuration dans la liste des applis.
2. Cliquez sur Système et sécurité > Centre d’action, puis cliquez sur
Récupération en bas de la fenêtre.
3. Cliquez sur Ouverture de Restauration du système, puis sur Suivant.
4. Cliquez sur le dernier point de restauration souhaité (à un moment où
votre système a fonctionné correctement), cliquez sur Suivant, puis sur
Terminer.
5. Une fenêtre de confirmation apparaît. Cliquez sur Oui. Votre système
est restauré à l’aide du point de restauration que vous avez spécifié. Ce
processus peut prendre quelques minutes, et peut redémarrer votre
ordinateur.

Récupération - 77
Retourner votre système à son état d’usine
Si votre ordinateur rencontre des problèmes qui ne sont pas récupérables
par d’autres méthodes, il peut être nécessaire de retourner tout votre
système à son état d’usine. Vous pouvez récupérer depuis soit votre
disque dur ou la sauvegarde de récupération que vous avez créée.
• Si vous pouvez encore exécuter Windows et vous n’avez pas supprimé
la partition de récupération, voir « Récupérer depuis Windows » à la
page 78.
• Si vous ne pouvez pas exécuter Windows, votre disque dur d’origine a
été entièrement reformaté ou vous avez installé un remplacement de
disque dur, voir « Récupérer depuis une sauvegarde de
récupération » à la page 82.

78
Récupérer depuis Windows
Démarrez Gateway Recovery Management :
• Depuis Démarrer, saisissez ‘Recovery’ puis cliquez sur Gateway
Recovery Management dans la liste des applis.
Deux options sont disponibles, Restaurer les paramètres d’usine
(Réinitialiser mon PC) ou Restauration personnalisée (Actualiser mon
PC).
Restaurer les paramètres d’usine efface tout sur votre disque dur, puis
réinstalle Windows et tous les logiciels et pilotes qui ont été préinstallés
sur votre système. Si vous pouvez accéder aux fichiers importants sur
votre disque dur, sauvegardez-les maintenant. Voir « Restaurer les
paramètres d’usine avec Gateway Recovery Management » à la
page 79.
Restauration personnalisée essaiera de conserver vos fichiers
(données de l’utilisateur), mais réinstallera tous les logiciels et les pilotes.
Les logiciels installés depuis que vous avez acheté votre PC seront
supprimés (à l’exception des logiciels installés à partir de Windows Store).
Voir « Restauration personnalisée avec Gateway Recovery
Management » à la page 81.

Récupération - 79
Restaurer les paramètres d’usine avec Gateway Recovery Management
1. Cliquez sur Restaurer les paramètres d’usine.
Attention : ‘Restaurer les paramètres d’usine’ effacera tous les
fichiers sur votre disque dur.
2. La fenêtre Réinitialiser votre PC s’ouvre.
Les images sont mises uniquement à titre de référence.

80
3. Cliquez sur Suivant, puis choisissez comment effacer vos fichiers :
a. Simplement supprimer mes fichiers efface rapidement tous les
fichiers avant la restauration de votre ordinateur et prend environ 30
minutes.
b. Entièrement nettoyer le lecteur nettoie complètement le disque
après que chaque fichier est effacé, ainsi aucun fichier ne peut être
affiché après la récupération. Nettoyer le lecteur prend beaucoup
plus de temps, jusqu’à 5 heures, mais c’est beaucoup plus sûr car les
anciens fichiers sont complètement supprimés.
4. Cliquez sur Réinitialiser.
5. Le processus de récupération commence par le redémarrage de votre
ordinateur, puis se poursuit par la copie des fichiers sur votre disque
dur.
6. Après la fin de récupération, vous pouvez commencer à utiliser votre
ordinateur en répétant le processus de premier démarrage.

Récupération - 81
Restauration personnalisée avec Gateway Recovery Management
1. Cliquez sur Restauration personnalisée (conserver les données
utilisateur).
2. La fenêtre Actualiser votre PC s’ouvre.
3. Cliquez sur Suivant, puis sur Actualiser.
4. Le processus de récupération commence par le redémarrage de votre
ordinateur, puis se poursuit par la copie des fichiers sur votre disque
dur. Ce processus prend environ 30 minutes.

82
Récupérer depuis une sauvegarde de récupération
Pour récupérer depuis une sauvegarde de récupération sur un lecteur
USB :
1. Trouvez votre sauvegarde de récupération.
2. Branchez votre lecteur USB et allumez votre ordinateur.
3. S’il n’est pas déjà activé vous devez activer le Menu de démarrage
F12 :
a. Appuyez sur <F2> au démarrage de votre ordinateur.
b. Utilisez les touches fléchées gauche ou droite pour sélectionner le
menu Main.
c. Appuyez sur la touche jusqu’à ce que F12 Boot Menu soit
sélectionné, appuyez sur <F5> pour changer ce paramètre sur
Enabled>.
d. Utilisez les touches fléchées gauche ou droite pour sélectionner le
menu Exit.
e. Selon le type de BIOS utilisé par votre ordinateur, sélectionnez Save
Changes and Exit ou Exit Saving Changes et appuyez sur Entrée.
Sélectionnez OK ou Yes pour confirmer.
f. Votre ordinateur redémarrera.
4. Lors du démarrage, appuyez sur <F12> pour ouvrir le menu de
démarrage. Le menu de démarrage vous permettra de sélectionner le
périphérique de démarrage, sélectionnez le lecteur USB.
a. Utilisez vos touches fléchées pour sélectionner USB Device, puis
appuyez sur Entrée.

Récupération - 83
b. Windows démarre depuis la sauvegarde de récupération au lieu du
processus de démarrage normal.
5. Sélectionnez votre type de clavier.
6. Sélectionnez Dépanner et choisissez le type de récupération à utiliser :
a. Cliquez sur Avancé puis sur Restauration du système pour
démarrer la Restauration du système de Microsoft :
La Restauration du système de Microsoft prend périodiquement un
‘instantané’ de vos paramètres système et les enregistre comme
points de restauration. Dans la plupart des cas de problèmes logiciels
difficiles à résoudre, vous pouvez retourner à un de ces points de
restauration pour faire fonctionner à nouveau votre système.
b. Cliquez sur Réinitialiser votre PC pour démarrer le processus de
réinitialisation :
Réinitialiser votre PC efface tout sur votre disque dur, puis réinstalle
Windows et tous les logiciels et pilotes qui ont été préinstallés sur
votre système. Si vous pouvez accéder aux fichiers importants sur
votre disque dur, sauvegardez-les maintenant. Voir « Réinitialiser
votre PC depuis la sauvegarde de récupération » à la page 84.
c. Cliquez sur Actualiser votre PC pour démarrer le processus
d’actualisation :
Actualiser votre PC essaiera de conserver vos fichiers (données de
l’utilisateur), mais réinstallera tous les logiciels et les pilotes. Les
logiciels installés depuis que vous avez acheté votre PC seront
supprimés (à l’exception des logiciels installés à partir de Windows
Store). Voir « Actualiser votre PC depuis la sauvegarde de
récupération » à la page 85.

84
Réinitialiser votre PC depuis la sauvegarde de récupération
Attention : Réinitialiser votre PC effacera tous les fichiers sur
votre disque dur.
1. La fenêtre Réinitialiser votre PC s’ouvre.
Les images sont mises uniquement à titre de référence.
2. Cliquez sur Suivant.
3. Sélectionnez le système d’exploitation à récupérer (normalement une
seule option est disponible).
4. Choisissez de conserver les modifications éventuelles sur le disque
dur :
a. Si vous avez supprimé la partition de récupération ou modifié les
partitions d’une quelconque manière sur le disque dur et vous
souhaitez conserver ces modifications, sélectionnez Non.
b. Pour restaurer complètement votre ordinateur aux paramètres
d’usine, sélectionnez Oui.
5. Choisir comme effacer vos fichiers :
a. Simplement supprimer mes fichiers efface rapidement tous les
fichiers avant la restauration de votre ordinateur et prend environ
30 minutes.

Récupération - 85
b. Entièrement nettoyer le lecteur nettoie complètement le disque
après que chaque fichier est effacé, ainsi aucun fichier ne peut être
affiché après la récupération. Nettoyer le lecteur prend beaucoup
plus de temps, jusqu’à 5 heures, mais c’est beaucoup plus sûr cas les
anciens fichiers sont complètement supprimés.
6. Cliquez sur Réinitialiser.
7. Après la fin de récupération, vous pouvez commencer à utiliser votre
ordinateur en répétant le processus de premier démarrage.
Actualiser votre PC depuis la sauvegarde de récupération
1. La fenêtre Actualiser votre PC s’ouvre.
2. Cliquez sur Suivant.
3. Sélectionnez le système d’exploitation à récupérer (normalement une
seule option est disponible).
4. Cliquez sur Actualiser.
5. Le processus de récupération commence par le redémarrage de votre
ordinateur, puis se poursuit par la copie des fichiers sur votre disque
dur. Ce processus prend environ 30 minutes.

86 - Foire aux questions
FOIRE AUX QUESTIONS
Vous trouverez ici une liste des situations qui peuvent apparaître lors de
l’utilisation de l’ordinateur, ainsi que des solutions pour chacune.
J’ai mis sous tension, mais l’ordinateur ne démarre pas ou ne s’initialise
pas
Vérifiez l’indicateur d’alimentation :
• Si l’indicateur n’est pas allumé, l’ordinateur n’est pas alimenté. Vérifiez
ce qui suit :
• Si vous utilisez la pile, son niveau de charge peut être trop bas et ne
pas pouvoir alimenter l’ordinateur. Connectez l’adaptateur c.a. pour
recharger la pile.
• Assurez-vous que l’adaptateur c.a. est branché de manière
appropriée à l’ordinateur et à une prise électrique.
• Si l’indicateur est allumé, vérifiez ce qui suit :
• Le lecteur optique contient-il un disque ? Retirez-le et appuyez sur
<Ctrl> + <Alt> + <Suppr> pour redémarrer le système.
• Avez-vous un périphérique de stockage USB (clé USB ou un
téléphone intelligent) branché à votre ordinateur ? Débranchez-le et
appuyez sur <Ctrl> + <Alt> + <Suppr> pour redémarrer le système.

Foire aux questions - 87
Rien n’apparaît à l’écran
Le système de gestion de l’alimentation de l’ordinateur éteint l’écran
automatiquement pour économiser l’énergie. Appuyez sur une touche
pour rallumer l’écran.
Si l’appui sur une touche ne rallume pas l’écran, il peut y avoir trois
raisons :
• Le niveau de la luminosité est peut-être trop bas. Appuyez sur
(augmenter) pour ajuster le niveau de la luminosité.
• Le périphérique d’affichage est peut-être réglé sur un moniteur externe.
Appuyez sur
pour retourner l’affichage à l’ordinateur.
• Si l’indicateur de Sommeil est allumé, l’ordinateur est en mode de
Sommeil. Appuyez et relâchez le bouton d’alimentation pour la reprise.
Aucun son ne sort de l’ordinateur
Vérifiez ce qui suit :
• Le son est peut-être désactivé. Dans Windows, vérifiez l’icône de
contrôle du son (un haut-parleur) sur la barre des tâches. Si elle est
barrée, cliquez sur l’icône et désélectionnez l’option Tous muets.
• Le niveau du volume est peut-être trop bas. Dans Windows, vérifiez
l’icône de contrôle du son sur la barre des tâches. Vous pouvez utilisez
les boutons de contrôle du volume pour ajuster le volume.
• Si un casque d’écoute stéréo, des écouteurs ou des haut-parleurs
externes sont connectés au port de sortie audio de l’ordinateur, les haut-
parleurs internes sont éteints automatiquement.

88 - Foire aux questions
Je veux éjecter le plateau du lecteur optique sans mettre l’ordinateur
sous tension
Le lecteur optique a un trou d’éjection mécanique. Insérez tout
simplement la pointe d’un stylo ou d’un trombone dans le trou et appuyez
pour éjecter le plateau.
Le clavier ne répond pas
Essayez de connecter un clavier externe au port USB sur l’ordinateur. S’il
fonctionne, contactez votre revendeur ou un centre de service agréé car le
câble interne du clavier est peut-être déconnecté.
L’imprimante ne fonctionne pas
Vérifiez ce qui suit :
• Assurez-vous que l’imprimante est branchée à une prise électrique et
est sous tension.
• Assurez-vous que le câble de l’imprimante est bien branché dans un
port USB et dans le port correspondant de l’imprimante.

Foire aux questions - 89
Conseils et astuces pour utiliser Windows 8
Nous savons que c’est un nouveau système d’exploitation et qu’un certain
temps sera nécessaire pour s’y habituer, c’est pourquoi nous avons créé
quelques conseils pour vous aider à commencer.
Il y a trois concepts vous pouvez vouloir garder à l’esprit
1. Démarrer
Le bouton Démarrer n’est plus disponible ; vous pouvez lancer les applis
depuis l’écran Démarrer.
2. Tiles
Les Live tiles sont similaires aux miniatures des applis.
3. Charms
Les charms vous permettent d’exécuter des fonctions utiles, telles que
partager le contenu, éteindre votre PC ou modifier les paramètres.
Comment puis-je accéder aux charms ?
Déplacez le curseur vers le coin supérieur ou inférieur droit de l’écran pour
accéder aux charms, ou appuyez sur la touche Windows + <C>.
Comment puis-je aller à Démarrer ?
Appuyez sur la touche Windows sur le clavier, appuyez sur la touche
Windows + <C> et cliquez sur Démarrer, ou déplacez le curseur vers le
coin inférieur gauche de l’écran et cliquez sur Démarrer.

90
Comment puis-je passer d’une appli à une autre ?
Déplacez le curseur vers le bord gauche de l’écran pour afficher les
miniatures des applis qui sont actuellement exécutées.
Vous pouvez également appuyer la touche Windows + <Tab> pour ouvrir
et défiler dans les applis actuelles.
Comment puis-je éteindre mon ordinateur ?
Appuyez la touche Windows + <C>, cliquez sur Paramètres >
Alimentation et sélectionnez l’action que vous voulez effectuer. Vous
pouvez également depuis le Bureau cliquer sur Bouton d’alimentation
Gateway et sélectionnez l’action que vous voulez effectuer.
Pourquoi y a-t-il une nouvelle interface ?
La nouvelle interface de Windows 8 est conçue pour fonctionner avec la
saisie tactile. Les applis de Windows Store utiliseront automatiquement
tout l’écran et ne nécessitent pas d’être fermées de la manière
traditionnelle. Les applis de Windows Store seront affichées sur Démarrer
en utilisant les Live tiles.
Que sont les ‘Live tiles’ ?
Les Live tiles sont similaires aux miniatures des applis qui seront mises à
jour avec du nouveau contenu chaque fois que vous êtes connecté à
Internet. Ainsi, par exemple, vous pouvez afficher la météo ou les mises à
jour de la bourse sans avoir à ouvrir l’appli.

Foire aux questions - 91
Comment déverrouiller mon ordinateur ?
Appuyez sur n’importe quelle touche et cliquez sur une icône de compte
utilisateur pour déverrouiller l’ordinateur. Si votre compte a un mot de
passe, vous devrez entrer le mot de passe pour continuer.
Comment personnaliser mon ordinateur ?
Vous pouvez personnaliser Démarrer avec une image d’arrière-plan ou en
organisant les vignettes pour répondre à vos besoins personnels.
Pour changer l’arrière-plan, appuyez la touche Windows + <C> et cliquez
sur Paramètres > Changer les paramètres du PC > Personnaliser.
Cliquez sur Écran Démarrer en haut de la page et sélectionnez une
couleur et une image.
Comme déplacer les tiles ?
Cliquez et maintenez une tile pour la sélectionner, puis faites la glisser sur
l’endroit de l’écran Démarrer où vous voulez qu’elle apparaisse. D’autres
tiles seront déplacées pour accommoder la tile dans son nouvel
emplacement.
Puis-je agrandir ou réduire les tiles ?
Cliquez-droit sur une tile, puis sélectionnez Plus petite ou Plus grande
dans le menu qui apparaît en bas de l’écran.

92
Comment puis-je personnaliser l’écran verrouillé ?
Vous pouvez personnaliser l’écran verrouillé avec une image différente ou
pour afficher votre statut rapide et les notifications pour répondre à vos
besoins personnels.
Pour changer l’arrière-plan, appuyez la touche Windows + <C> et cliquez
sur Paramètres > Changer les paramètres du PC > Personnaliser.
Cliquez sur Écran verrouillé en haut de la page et sélectionnez l’image et
les applis que vous souhaitez voir sur l’écran verrouillé.
Alors, comment puis-je fermer une appli ?
Déplacez le curseur vers le haut de l’écran et cliquez puis faites glisser la
fenêtre vers le bas pour fermer l’appli.
Vous pouvez fermer des applis à partir des miniatures sur le bord gauche
de l’écran en cliquant-droit sur une miniature et en sélectionnant Fermer.
Puis-je changer la résolution de l’écran ?
Depuis Démarrer, commencez à saisir ‘Panneau de configuration’ pour
ouvrir Rechercher et afficher les résultats. Cliquez sur Panneau de
configuration > Ajuster la résolution de l’écran.
Je veux utiliser Windows comme j’en ai l’habitude. Rendez-moi
mon bureau !
Depuis Démarrer cliquez sur la vignette du Bureau pour voir un bureau
traditionnel. Vous pouvez épingler des applis que vous utilisez
fréquemment sur la barre des tâches pour les ouvrir facilement.

Foire aux questions - 93
Si vous cliquez sur une applis qui n’est pas une appli Windows Store,
Windows ouvrira l’appli automatiquement sous Bureau.
Où sont mes applis ?
Depuis Démarrer, commencez simplement à saisir le nom de l’appli que
vous souhaitez ouvrir, et Rechercher s’ouvrir automatiquement et listera
les résultats.
Pour afficher la liste complète des applis, appuyez sur la barre d’espace
ou la touche Menu et cliquez sur Toutes les applis.
Comment puis-je faire apparaître une appli sur Démarrer ?
Si vous êtes dans Toutes les applis et vous souhaitez faire apparaître une
appli sur Démarrer, vous pouvez sélectionner l’appli et cliquer-droit
dessus. Sélectionnez Épingler au menu Démarrer dans le menu qui
apparaît en bas de l’écran.
Comment supprimer une vignette de Démarrer ?
Cliquez-droit sur la vignette, puis sélectionnez Détacher du menu
Démarrer dans le menu qui apparaît en bas de l’écran.
Comment puis-je faire apparaître une appli sur ma barre des tâches
dans le Bureau ?
Si vous êtes dans Toutes les applis et vous souhaitez faire apparaître une
appli sur la barre des tâches dans Bureau, vous pouvez sélectionner
l’appli et cliquer-droit dessus. Sélectionnez Épingler à la barre des
tâches dans le menu qui apparaît en bas de l’écran.

94
Comment puis-je installer des applis ?
Vous pouvez télécharger des applis Windows Store depuis le Store. Un ID
Microsoft sera nécessaire pour acheter et télécharger des applis depuis le
Store.
Je ne peux pas trouver des applis comme Bloc-notes et Paint ! Où sont-
ils ?
Depuis Démarrer, vous pouvez simplement commencer à saisir le nom de
l’appli que vous recherchez pour ouvrir Rechercher et lister les résultats.
Vous pouvez également ouvrir Toutes les applis et faites défiler jusqu’à
‘Accessoires Windows’ pour voir la liste des programmes hérités.
Qu’est-ce qu’un ID (compte) Microsoft ?
Un compte Microsoft est une adresse de courriel et mot de passe que
vous utilisez pour vous connecter à Windows. Vous pouvez utiliser
n’importe quelle adresse de courriel, mais il est préférable de choisir celle
que vous utilisez déjà pour communiquer avec les amis et vous connecter
à vos sites Web préférés. Lorsque vous vous connectez à votre PC avec
un compte Microsoft, vous connecterez votre PC aux personnes, fichiers
et appareils que vous aimez.
Est-ce nécessaire ?
Un ID Microsoft n’est pas nécessaire pour utiliser Windows 8, mais cela
rend la vie plus facile parce que vous pouvez synchroniser les données
entre différentes machines auxquelles vous vous connectez à l’aide d’un
ID de Microsoft.

Foire aux questions - 95
Comment puis-je en obtenir un ?
Si vous avez déjà installé Windows 8 et vous ne vous êtes pas connecté
avec un compte Microsoft ou vous n’avez pas de compte Microsoft et vous
souhaitez en obtenir un, appuyez la touche Windows + <C> et cliquez sur
Paramètres > Changer les paramètres du PC > Utilisateurs > Passer à
un compte Microsoft, et suivez les instructions à l’écran.
Comment ajouter un favori à Internet Explorer ?
Internet Explorer 10 n’a pas les favoris traditionnels, au lieu de cela vous
pouvez épingler des raccourcis à Démarrer. Une fois que la page est
ouverte, cliquez-droit n’importe où sur la page pour ouvrir le menu en bas
de l’écran. Cliquez sur Épingler au menu Démarrer.
Comment puis-je rechercher les mises à jour Windows ?
Appuyez la touche Windows + <C> et cliquez sur Paramètres > Changer
les paramètres du PC > Mise à jour Windows. Cliquez sur Rechercher
les mises à jour maintenant.
Où puis-je avoir plus d’informations ?
Pour plus d’informations, veuillez visiter :
• Tutoriels de Windows 8 : www.gateway.com/windows8-tutorial
• FAQ d’assistance : support.gateway.com

96
INFORMATIONS RÉGLEMENTAIRES
PRÉVENTION DE PERTE AUDITIVE
- Attention : Une perte permanente de l’audition peut se produire si des
écouteurs ou un casque sont utilisés à un volume élevé pendant une
longue période.
- A pleine puissance, l’écoute prolongée du baladeur peut endommager l’oreille de
l’utilisateur.
Avertissement pour l’écoute
Pour protéger votre ouïe, respectez ces instructions.
- Augmentez le volume graduellement jusqu’à ce que vous puissiez
entendre clairement et confortablement.
- N’augmentez pas le volume après que votre ouïe se soit adaptée.
- N’écoutez pas de musique à un fort volume pendant une période prolongée.
- N’augmentez pas le volume pour ne pas entendre les environnements bruyants.
- Diminuez le volume si vous ne pouvez pas entendre les gens qui parlent près de
vous.
A
VIS RÉGLEMENTAIRE DU PÉRIPHÉRIQUE RADIO
- Remarque : Les informations réglementaires ci-dessous sont pour les modèles avec
réseau sans-fil et/ou Bluetooth seulement.
Accessoires de conformité
Les accessoires associés à cet équipement sont les suivants : un câble vidéo blindé
lorsqu’un moniteur externe est branché. Ces accessoires doivent être utilisés en vue
d’assurer le respect des réglementations de la FCC.

Informations réglementaires - 97
AVERTISSEMENT DE LA PROPOSITION 65 DE LA CALIFORNIE
Ce produit contient des produits chimiques connus de l’état de Californie pour causer le
cancer, des malformations congénitales et/ou d’autres anomalies de la reproduction. Pour
plus d'informations sur cet avertissement, allez à www.gateway.com/prop65.
日本
(JAPON)
本装置は、第二種情報装置(住宅地域またはその隣接した地域において使用されるべき
情報装置)デ住宅地域での電波障害防止を目的とした情報装置等電波障害自主規制協議
会(VCCI)基準に適合しております。
しかし、本装置をラジオ、テレビジョン受信機に、近接してご使用になると、受信障害
の原因となることがあります。本書の説明にしたがって正しい取り扱いをしてくださ
い。
I
NFORMATIONS RÉGLEMENTAIRES DE L’ADAPTATEUR SANS FIL
USA — FCC and FAA
The FCC with its action in ET Docket 96-8 has adopted a safety standard for human
exposure to radio frequency (RF) electromagnetic energy emitted by FCC certified
equipment. The wireless adapter meets the Human Exposure limits found in OET Bulletin
65, supplement C, 2001, and ANSI/IEEE C95.1, 1992. Proper operation of this radio
according to the instructions found in this manual will result in exposure substantially
below the FCC’s recommended limits.
- The following safety precautions should be observed:
Do not touch or move antenna while the unit is transmitting or receiving.
- Do not hold any component containing the radio such that the antenna is very close
or touching any exposed parts of the body, especially the face or eyes, while
transmitting.

98
- Do not operate the radio or attempt to transmit data unless the antenna is connected;
this behavior may cause damage to the radio.
Use in specific environments:
- The use of wireless adapters in hazardous locations is limited by the constraints
posed by the safety directors of such environments.
- The use of wireless adapters on airplanes is governed by the Federal Aviation
Administration (FAA).
- The use of wireless adapters in hospitals is restricted to the limits set forth by each
hospital.
Antenna Use
In order to comply with FCC RF exposure limits, low gain integrated antennas should be
located at a minimum distance of 20 cm (8 inches) or more from the body of all persons
or at a minimum distance as specified by the FCC module grant conditions. FCC grants
can be viewed from the FCC Equipment Authorization website at https://fjallfoss.fcc.gov/
oetcf/eas/reports/GenericSearch.cfm by entering the FCC ID printed on the module label.
Explosive Device Proximity Warning
Warning: Do not operate a portable transmitter (including this wireless adapter) near
unshielded blasting caps or in an explosive environment unless the transmitter has been
modified to be qualified for such use
Antenna Warnings
- Warning: To comply with the FCC and ANSI C95.1 RF exposure limits, it is
recommended that for the wireless adapter installed in a desktop or portable
computer, the antenna for this wireless adapter to be installed so as to provide a
separation distance of at least 20 cm (8 inches) from all persons or at the minimum
distance as specified by the module grant conditions. FCC grants can be viewed from
the FCC Equipment Authorization website at https://fjallfoss.fcc.gov/oetcf/eas/
reports/GenericSearch.cfm by entering the FCC ID printed on the module label.

Informations réglementaires - 99
- Warning: The wireless adapter is not designed for use with high-gain directional
antennas.
Use On Aircraft Caution
- Caution: Regulations of the FCC and FAA prohibit airborne operation of radio-
frequency wireless devices (wireless adapters) because their signals could interfere
with critical interfere with critical aircraft instruments.
Local Restrictions on 802.11a, 802.11b, 802.11g and 802.11n Radio Usage
- Caution: Due to the fact that the frequencies used by 802.11a, 802.11b, 802.11g and
802.11n wireless LAN devices may not yet be harmonized in all countries, 802.11a,
802.11b, 802.11g and 802.11n products are designed for use only in specific
countries, and are not allowed to be operated in countries other than those of
designated use. As a user of these products, you are responsible for ensuring that
the products are used only in the countries for which they were intended and for
verifying that they are configured with the correct selection of frequency and channel
for the country of use. Any deviation from the permissible power and frequency
settings for the country of use is an infringement of national law and may be punished
as such.
Wireless Interoperability
The wireless adapter is designed to be interoperable with other wireless LAN products
that are based on direct sequence spread spectrum (DSSS) radio technology and to
comply with the following standards:
- IEEE Std. 802.11b compliant Standard on Wireless LAN
- IEEE Std. 802.11g compliant Standard on Wireless LAN
- IEEE Std. 802.11a compliant Standard on Wireless LAN (applies to devices
supporting 802.11a)
- IEEE Std. 802.11n draft 2.0 compliant on Wireless LAN
- Wireless Fidelity certification, as defined by the Wi-Fi Alliance

100
The Wireless Adapter and Your Health
The wireless adapter, like other radio devices, emits radio frequency electromagnetic
energy. The level of energy emitted by the wireless adapter, however, is less than the
electromagnetic energy emitted by other wireless devices such as mobile phones. The
wireless adapter operates within the guidelines found in radio frequency safety standards
and recommendations. These standards and recommendations reflect the consensus of
the scientific community and result from deliberations of panels and committees of
scientists who continually review and interpret the extensive research literature. In some
situations or environments, the use of the wireless adapter may be restricted by the
proprietor of the building or responsible representatives of the applicable organization.
Examples of such situations may include:
- Using the wireless adapter on board airplanes, or
- Using the wireless adapter in any other environment where the risk of interference
with other devices or services is perceived or identified as being harmful.
If you are uncertain of the policy that applies to the use of wireless adapters in a specific
organization or environment (an airport, for example), you are encouraged to ask for
authorization to use the adapter before you turn it on.
FCC Radio Frequency Interference Requirements (applies to device supporting
802.11a)
This device is restricted to indoor use due to its operation in the 5.15 to 5.25 GHz and
5.470 to 5.725 GHz frequency ranges. FCC requires this product to be used indoors for
the frequency ranges 5.15 to 5.25 GHz and 5.470 to 5.725 GHz to reduce the potential
for harmful interference to co-channel mobile satellite systems. High power radars are
allocated as primary users of the 5.25 to 5.35 GHz and 5.65 to 5.85 GHz bands. These
radar stations can cause interference with and /or damage this device. No configuration
controls are provided for this wireless adapter allowing any change in the frequency of
operations outside the FCC grant of authorization for U.S operation according to Part
15.407 of the FCC rules.

Informations réglementaires - 101
USA — Federal Communications Commission (FCC)
This device complies with Part 15 of the FCC Rules. Operation of the device is subject to
the following two conditions:
- This device may not cause harmful interference.
- This device must accept any interference that may cause undesired operation.
- Note: The radiated output power of the adapter is far below the FCC radio frequency
exposure limits. Nevertheless, the adapter should be used in such a manner that the
potential for human contact during normal operation is minimized. To avoid the
possibility of exceeding the FCC radio frequency exposure limits, you should keep a
distance of at least 20 cm between you (or any other person in the vicinity), or the
minimum separation distance as specified by the FCC grant conditions, and the
antenna that is built into the computer. Details of the authorized configurations can
be found at http://www.fcc.gov/oet/ea/
by entering the FCC ID number on the device.
Interference Statement
This wireless adapter has been tested and found to comply with the limits for a Class B
digital device, pursuant to Part 15 of the FCC Rules. These limits are designed to provide
reasonable protection against harmful interference in a residential installation. This
wireless adapter generates, uses, and can radiate radio frequency energy. If the wireless
adapter is not installed and used in accordance with the instructions, the wireless adapter
may cause harmful interference to radio communications. There is no guarantee,
however, that such interference will not occur in a particular installation. If this wireless
adapter does cause harmful interference to radio or television reception (which can be
determined by turning the equipment off and on), the user is encouraged to try to correct
the interference by taking one or more of the following measures:
- Reorient or relocate the receiving antenna of the equipment experiencing the
interference.
- Increase the distance between the wireless adapter and the equipment experiencing
the interference.

102
- Connect the computer with the wireless adapter to an outlet on a circuit different from
that to which the equipment experiencing the interference is connected.
- Consult the dealer or an experienced radio/TV technician for help.
- Note: The adapter must be installed and used in strict accordance with the
manufacturer's instructions as described in the user documentation that comes with
the product. Any other installation or use will violate FCC Part 15 regulations.
Canada — Industry Canada (IC)
This device complies with RSS210 of Industry Canada. Cet appareil se conforme à
RSS210 de Canada d'Industrie.
- Caution: When machine supports and using IEEE 802.11a wireless LAN, this
product is restricted to indoor use due to its operation in the 5.15- to 5.25 GHz
frequency range. Industry Canada requires this product to be used indoors for the
frequency range of 5.15 GHz to 5.25 GHz to reduce the potential for harmful
interference to co-channel mobile satellite systems. High power radar is allocated as
the primary user of the 5.25 to 5.35 GHz and 5.65 to 5.85 GHz bands. These radar
stations can cause interference with and/or damage to this device. The maximum
allowed antenna gain for use with this device is 6dBi in order to comply with the
E.I.R.P limit for the 5.25 to 5.35 and 5.725 to 5.85 GHz frequency range in point-to-
point operation. To comply with RF exposure requirements all antennas should be
located at a minimum distance of 20 cm, or the minimum separation distance allowed
by the module approval, from the body of all persons.
- Attention: l’utilisation d’un réseau sans fil IEEE802.11a est réstreinte à une
utilisation en intérieur à cause du fonctionement dans la bande de fréquence 5,15 -
5,25 GHz. Industry Canada requiert que ce produit soit utilisé à l’intérieur des
bâtiments pour la bande de fréquence 5,15 - 5,25 GHz afin de réduire les possibilités
d’interférences nuisibles aux canaux co-existants des systèmes de transmission
satellites. Les radars de puissances ont fait l’objet d’une allocation primaire de
fréquences dans les bandes 5,25 - 5,35 GHz et 5 65 - 5 85 GHz. Ces stations radar
peuvent créer des interférences avec ce produit et/ou lui être nuisible. Le gain
d’antenne maximum permissible pour une utilisation avec ce produit est de 6 dBi afin

Informations réglementaires - 103
d’être conforme aux limites de puissance isotropique rayonnée équivalente (P.I.R.E.)
applicable dans les bandes 5,25 - 5,35 GHz et 5,725 - 5,85 GHz en fonctionement
point-à-point. Se pour conformer aux conditions d'exposition de RF toutes les
antennes devraient être localisées à une distance minimum de 20 cm, ou la distance
de séparation minimum permise par l'approbation de module, du corps de toutes les
personnes.
This Class B digital apparatus complies with Canadian ICES-003.
Cet appareil numérique de la classe B est conforme a la norme NMB-003 du Canada.
"To prevent radio interference to the licensed service, this device is intended to be
operated indoors and away from windows to provide maximum shielding. Equipment (or
its transmit antenna) that is installed outdoors is subject to licensing."
« Pour empêcher que cet appareil cause du brouillage au service faisant l'objet d'une
licence, il doit être utilisé a l'intérieur et devrait être placé loin des fenêtres afin de fournir
un écran de blindage maximal. Si le matériel (ou son antenne d'émission) est installé à
l'extérieur, il doit faire l'objet d'une licence. »
Union européenne
Liste de pays concernés
Ce périphérique doit être utilisé en stricte conformité avec les réglementations et les
contraintes du pays d’utilisation. Pour des informations complémentaires, contactez le
bureau local du pays d’utilisation. Veuillez consulter http://ec.europa.eu/enterprise/rtte/
implem.htm pour la dernière liste de pays.
Liste de codes de pays
Cet appareil peut être utilisé dans les pays suivants :
Pays
Code à
2 lettres
ISO 3166
Pays
Code à
2 lettres
ISO 3166
Pays
Code à
2 lettres
ISO 3166
Pays
Code à
2 lettres
ISO 3166
Autriche AT Allemagne DE Malte MT Royaume-Uni GB
Belgique BE Grèce GR Néerlandais NT Islande IS

104
La bande basse 5,15 à-5,35 GHz est pour une utilisation en intérieur uniquement.
Cet é est conforme aux exigences essentielles des Directives du Conseil Européen, des
standards et autres documents normatifs de la directive 1999/5/EC de l’Union
européenne. Voir les Déclarations de conformité de l’Union européenne, et pour plus de
détails consulter la Déclaration de conformité jointe.
Chypre CY Hongrie HU Pologne PL Liechtenstein LI
République
Tchèque
CZ Irlande IE Portugal PT Norvège NO
Danemark DK Italie IT Slovaquie SK Suisse CH
Estonie EE Lettonie LV Slovénie SL Bulgarie BG
Finlande FI Lituanie LT Espagne ES Roumanie RO
France FR Luxembourg LU Suède SE Turquie TR
English
Hereby, ACER INC., declares that this devise is in
compliance with the essential requirements and other
relevant provisionns of Directive 1999/5/EC.
Česky [Czech]
ACER INC. tímto prohlašuje, že toto zařízení je ve shodě se
základními požadavky a dalšími příslušnými ustanoveními
směrnice 1999/5/ES.
Daansk [Danish]
Undertegnede ACER INC. erklærer herved, at følgende
udstyr overholder de væsentlige krav og øvrige relevante krav
i direktiv 1999/5/EF.
Pays
Code à
2 lettres
ISO 3166
Pays
Code à
2 lettres
ISO 3166
Pays
Code à
2 lettres
ISO 3166
Pays
Code à
2 lettres
ISO 3166

Informations réglementaires - 105
Deutsch
[German]
Hiermit erklärt ACER INC., dass sich das Gerät Radiolan in
Übereinstimmung mit den grundlegenden Anforderungen und
den übrigen einschlägigen Bestimmungen der Richtlinie
1999/5/EG befindet.
Eesti [Estonian]
Käesolevaga kinnitab ACER INC. seadme vastavust direktiivi
1999/5/EÜ põhinõuetele ja nimetatud direktiivist tulenevatele
teistele asjakohastele sätetele.
Español
[Spanish]
Por medio de la presente ACER INC. declara que el
dispositivo cumple con los requisitos esenciales y
cualesquiera otras disposiciones aplicables o exigibles de la
Directiva 1999/5/CE.
Ελληνικά
[Greek]
∆ια του παρόντος η ACER INC. δηλώνει ότι η παρούσα
συσκευή συµµορφώνεται προς τις ουσιώδεις απαιτήσεις και
τις λοιπές διατάξεις της Οδηγίας 1999/5/ ΕΚ.
Français
[French]
Par la présente ACER INC. déclare que cet appareil est
conforme aux exigences essentielles et aux autres
dispositions pertinentes de la directive 1999/5/CE.
Íslenska
[Icelandic]
Hér með lýsir ACER INC. yfir því að er í samræmi við
grunnkröfur og aðrar kröfur, sem gerða r eru í tilskipun
1999/5/EC.

106
Itaaliano [Italian]
Con la presente ACER INC. dichiara che questo dispositivo è
conforme ai requisiti essenziali ed alle altre disposizioni
pertinenti stabilite dalla direttiva 1999/5/CE.
Latviski [Latvian]
Ar šo ACER INC. deklarē, ka šī ierīce atbilst Direktīvas
1999/5/EK būtiskajām prasībām un citiem ar to saistītajiem
noteikumiem.
Lietuvių
[Lithuanian]
Šiuo ACER INC. deklaruoja, kad šis įrenginys atitinka
esminius reikalavimus ir kitas 1999/5/EB Direktyvos
nuostatas.
Malti [Maltese]
Hawnhekk, ACER INC., jiddikjara li dan jikkonforma mal- ti
ijiet essenzjali u ma provvedimenti o rajn relevanti li he mm
fid-Dirrettiva 1999/5/EC.
Magyar
[Hungarian]
Alulírott, ACER INC. nyilatkozom, hogy a készülék megfelel a
vonatkozó alapveto követelményeknek és az 1999/5/EC
irányelv egyéb eloírásainak.
Nederlands
[Dutch]
Hierbij verklaart ACER INC. dat het toestel voldoet aan de
essentiële eisen en de andere relevante bepalingen van
richtlijn 1999/5/EG.
Norsk
[Norwegiann]
ACER INC. erklærer herved at utstyret er i samsvar med de
grunnleggende krav og øvrige relevante krav i direktiv
1999/5/EF.

Informations réglementaires - 107
Polski [Polish]
Niniejszym ACER INC. oświadcza, że urządzenie jest zgodne
z zasadniczymi wymogami oraz pozostałymi stosownymi
postanowieniami Dyrektywy 1999/5/EC.
Português
[Portuguese]
ACER INC. declara que este dispostivo está conforme com
os requisitos essenciais e outras disposições da Directiva
1999/5/CE.
Slovensko
[Slovenian]
ACER INC. izjavlja, da je ta naprava skladna z bistvenimi
zahtevami in ostalimi relevantnimi določili Direktive
1999/5/ES.
Slovensky
[Slovak]
ACER INC. týmto vyhlasuje, že zariadenie spĺňa základné
požiadavky a všetky príslušné ustanovenia Smernice
1999/5/ES.
Suomi [Finnish]
ACER INC. vakuuttaa täten että tämä laite on direktiivin 1999/
5/EY oleellisten vaatimusten ja sitä koskevienn direktiivin
muiden ehtojen mukainen.
Svenska
[Swedish]
Härmed intygar ACER INC. att denna enhet står i
överensstämmelse med väsentliga egenskapskrav och
övriga relevanta bestämmelser som framgår av direktiv
1999/5/EG.

108
France
Pour la France métropolitaine :
2,400 - 2,4835 GHz (Canaux 1à 13) autorisé en usage intérieur
2,400 - 2,454 GHz (canaux 1 à 7) autorisé en usage extérieur
Pour la Guyane et la Réunion :
2,400 - 2,4835 GHz (Canaux 1à 13) autorisé en usage intérieur
2,420 - 2,4835 GHz (canaux 5 à 13) autorisé en usage extérieur
Pour tout le territoire Français :
Seulement 5,15 -5,35 GHz autorisé pour le 802.11a
L'utilisation de cet equipement (2,4 GHz WLAN) est soumise à certaines restrictions :
- La puissance maximale autorisée en intérieur est de 100 mW pour 2400 - 2483,5 MHz.
- La puissance maximale autorisée est de 100 mW en extérieur pour 2400 - 2454 MHz.
- La puissance maximale autorisée est de 10 mW en extérieur, 2454 - 2483,5 MHz.
Pour les dernières restrictions, voir http://www.art-telecom.fr.
Italy
The use of these equipments is regulated by:
1.D.L.gs 1.8.2003, n. 259, article 104 (activity subject to general authorization) for outdoor
use and article 105 (free use) for indoor use, in both cases for private use.
2.D.M. 28.5.03, for supply to public of RLAN access to networks and telecom services.
L’uso degli apparati è regolamentato da:
1.D.L.gs 1.8.2003, n. 259, articoli 104 (attività soggette ad autorizzazione generale) se
utilizzati al di fuori del proprio fondo e 105 (libero uso) se utilizzati entro il proprio fondo,
in entrambi i casi per uso private.
2.D.M. 28.5.03, per la fornitura al pubblico dell’accesso R-LAN alle reti e ai servizi di
telecomunicazioni.

Informations réglementaires - 109
Belgium
Dans le cas d'une utilisation privée, à l'extérieur d'un bâtiment, au-dessus d'un espace
public, aucun enregistrement n'est nécessaire pour une distance de moins de 300 m.
Pour une distance supérieure à 300 m un enregistrement auprès de l'IBPT est requise.
Pour les enregistrements et licences, veuillez contacter l'IBPT.
In geval van privé-gebruik, buiten een gebouw, op een openbare plaats, is geen registratie
nodig, wanneer de afstand minder dan 300 m is. Voor een afstand groter dan 300 m is
een registratie bij BIPT vereist. Voor registraties en licenties, gelieve BIPT te contacteren.
Brazil
Este equipamento opera em caráter secundário, isto é, não tem direito a proteção contra
interferência prejudicial, mesmo de estações do mesmo tipo, e não pode causar
interferência a sistemas operando em caráter primário.
Pakistan
Pakistan Telecommunication Authority (PTA) Approved
Morocco
The operation of this product in the radio channel 2 (2417 MHz) is not authorized in the
following cities: Agadir, Assa-Zag, Cabo Negro, Chaouen, Goulmima, Oujda, Tan Tan,
Taourirt, Taroudant and Taza.
The operation of this product in the radio channels 4, 5, 6 and 7 (2425 - 2442 MHz) is not
authorized in the following cities: Aéroport Mohamed V, Agadir, Aguelmous, Anza,
Benslimane, Béni Hafida, Cabo Negro, Casablanca, Fès, Lakbab, Marrakech, Merchich,
Mohammédia, Rabat, Salé, Tanger, Tan Tan, Taounate, Tit Mellil, Zag.
Japan
5 GHz 帯は室内でのみ使用のこと
Korea
당해 무선설비는 운용 중 전파혼신 가능성이 있음

110
Taiwan
第十二條
經型式認證合格之低功率射頻電機,非經許可,公司、商號或使用者均不得擅自變更頻
率、加大功率或變更原設計之特性及功能。
第十四條
低功率射頻電機之使用不得影響飛航安全及干擾合法通信 ; 經發現有干擾現象時,應立即
停用,並改善至無干擾時方得繼續使用。
前項合法通信,指依電信法規定作業之無線通信。
低功率射頻電機須忍受合法通信或工業、科學及醫療用電波輻射性電機設備之干擾。
M
ODIFICATIONS DU PRODUIT
Marquage CE
Gateway ne peut pas être tenu pour responsable des modifications non autorisées par
l’utilisateur et des conséquences de celles-ci, qui peuvent modifier la conformité du
produit avec le marquage CE.
Interférence de fréquence radio
Le fabricant n’est pas responsable des interférences radio ou télévision causées par des
modifications non autorisées de cet équipement.
B
RANCHEMENTS ET MISE À LA TERRE DISTANTE
PELV (très basse tension de protection)
Pour garantir l’intégrité des tensions extra-basses de l’équipement, ne raccordez aux
ports externes de ce dernier que des équipements pourvus de circuits électriques
protégés.
SELV (très basse tension de sécurité)
Chaque entrée et sortie de ce produit est classée SELV.

Informations réglementaires - 111
Mise à la terre distante
Pour éviter les décharges électriques, branchez tous les ordinateurs et équipements
locaux (bureaux individuels) au même circuit électrique du câblage du bâtiment. En cas
de doute, vérifiez le câblage du bâtiment pour éviter toute mise à la terre distante.
Liaison électrique
Pour que cet équipement fonctionne en toute sécurité, branchez-le uniquement sur une
source d’alimentation conforme aux législations sur le câblage électrique en vigueur dans
votre pays. Au Royaume-Uni, il s’agit de la norme IEE.
A
LIMENTATION ET CÂBLES
Alimentation
La prise d’alimentation d’entrée et la prise de sortie (si équipé) sont classées à tension
dangereuse.
Vous devez débrancher le cordon d’alimentation et retirer la pile pour débrancher
l’équipement de l’alimentation électrique. Dans cet objectif, la prise électrique doit être
installée à proximité de l’équipement et doit être facilement accessible.
Valeur nominale en entrée : Regardez l’étiquette de valeur nominale sur le dessous de
l’ordinateur et assurez-vous que votre adaptateur d’alimentation est conforme à la valeur
nominale spécifiée.
En aucun cas l’utilisateur ne doit tenter de démonter l’alimentation. L’alimentation n’a pas
de pièces remplaçables par l’utilisateur. L’alimentation contient des tensions dangereuses
qui peuvent causer des blessures graves.
Une alimentation défectueuse doit être retournée à votre revendeur.
Câbles d’alimentation et prise
Ce produit nécessite un cordon d’alimentation et une prise mis à la terre. La prise ne peut
s’insérer que dans une prise électrique mise à la terre. Assurez-vous que la prise
électrique est correctement mise à la terre avant d’insérer la prise. N’insérez pas la prise
dans une prise électrique non mise à la terre. Contactez votre électricien pour des détails.

112
La longueur du cordon ne doit pas dépasser 2,5 mètres. Pour éviter les risques
électriques, ne retirez pas ou ne désactivez pas le contact avec la terre sur le cordon
d’alimentation. Remplacez le cordon d’alimentation s’il est endommagé. Contactez votre
revendeur pour un remplacement identique. En Europe, la prise doit avoir une valeur
nominale de 250 Vc.a., 10 ampères minimum. La prise doit afficher la marque
d’homologation d’une agence internationale. Le cordon doit être adapté à l’usage du pays
de l’utilisateur final. Consultez votre revendeur ou les autorités électriques locales si vous
n’êtes pas sûr du type de cordon d’alimentation à utiliser dans votre pays.
Câbles
Pour les câbles qui ne sont pas livrés avec le produit dans l’emballage de l’ordinateur :
La performance EMC du système n’est garantie que si le câble et l’interface utilisent un
blindage efficace.
L’utilisation de câbles d’interface blindés est nécessaire pour les interfaces USB,
IEEE1394, série, imprimante, jeu, audio/vidéo analogique ou numérique, PS2, antennes
de télévision ou FM et, plus généralement, tous les interfaces de câbles haut-débit.
Utilisez uniquement des cordons de télécommunication listés UL No. 26AWG ou plus
grands.
Seuls les câbles réseau Ethernet LAN ou modem RTC peuvent être supérieurs à
3 mètres.
Gateway vous recommande d’ajouter une perle de ferrite à chaque câble reliant votre
ordinateur à un périphérique qui n’était pas fourni avec votre ordinateur.
- Référence de la ferrite : 28A-2029 de Steward (deux boucles)
Au cours de la certification des produits, Gateway a utilisé les qualités de câbles
suivantes :
- Câbles certifiés USB 2.0 de Hama 46778
- Câbles blindés FireWire IEEE1394 de Hama 50011
- Câbles audio/vidéo blindés RCA-RCA de Thomson KHC001M, KHC012M,
KHC028M

Informations réglementaires - 113
- Câbles audio blindés à prise stéréo de Hama 43330H, 42714H
Augmentation de la chaleur et ordinateurs portables
L’adaptateur c.a. et le dessous de l’ordinateur peuvent devenir chauds après une
utilisation prolongée. Un contact physique prolongé avec l’un ou l’autre devrait être évité.
R
ETRAIT ET DE REMPLACEMENT DU CAPOT DU CHÂSSIS
Avant de retirer le capot du châssis pour réparer ou modifier l’équipement, vous devez
déconnecter tous les cordons alimentation et de modem, et retirer ou désactiver la pile.
- Attention : Quelques composants à l’intérieur de l’ordinateur peuvent devenir
chauds après une utilisation prolongée.
Vous devez fermer le châssis avant de brancher et d’allumer l’équipement.
D
ÉCLARATION DE CONFORMITÉ LASER
Les périphériques optiques sont testés et certifiés conformes aux normes IEC60825-1 de
la Commission électrotechnique internationale et EN60825-1 européenne pour les
produits laser de classe 1.
Les produits laser de classe 1 ne sont pas considérés comme dangereux. Les
périphériques optiques sont conçus de telle façon qu’il n’y a jamais d’accès humain à un
rayonnement laser au-dessus d’un niveau de classe 1 au cours du fonctionnement
normal ou de la maintenance.
Les périphériques optiques installés sur votre ordinateur sont conçus pour être utilisés
exclusivement comme composants de ce produit électronique, et ne sont donc pas
conformes aux exigences des Sec. 1040.10 et Sec. 1.040.11 du Code de réglementation
fédéral pour les produits laser COMPLETS.
Parce que l’exposition à un rayonnement laser est extrêmement dangereuse, en aucun
cas l’utilisateur ne doit tenter de démonter l’appareil laser.
E
MBALLAGE
L’emballage de ce produit est compatible avec directive européenne sur l’environnement
94/62/CE du 20 Décembre 1994 et son équivalent dans la législation française par le
décret 98-638 du 20 juillet 1998.

114
CONFORME À LA CERTIFICATION RÉGLEMENTAIRE RUSSE

Environnement - 115
ENVIRONNEMENT
NOTRE ENGAGEMENT EN FAVEUR DE LA PROTECTION DE L’ENVIRONNEMENT
L’environnement a toujours été au cœur de nos produits.
Gateway s’est engagé à limiter l’impact environnemental de ses produits au cours du
cycle de vie des produits.
À partir de la phase de conception, avec une politique d’achat très stricte, un maximum
d’attention est accordée aux composants électroniques en vue de limiter leur poids en
métaux lourds comme le plomb, le cadmium, le chrome, le mercure, etc. Les fournisseurs
sont invités, pour chaque partie d’un produit, à respecter toutes les règlementations.
Pour ce qui est de la fin de vie des produits, des mesures ont été prises pour anticiper et
faciliter le recyclage de tous nos produits. Ainsi, toutes les pièces de plastique de plus de
25 grammes utilisées dans les produits Gateway sont marquées ISO 11469. Ce
marquage permet une reconnaissance rapide du matériau et facilite sa valorisation. De
même, les ordinateurs de bureau sont conçus pour être facilement démontables, avec
des vis remplacées par des fixations.
É
LIMINATION DU PRODUIT
La directive 2002/96/CE, dite Directive des déchets d’équipements
électriques et électroniques (DEEE), exige que les produits électriques et
électroniques usagés soient éliminés séparément des ordures
ménagères en vue de promouvoir la réutilisation, le recyclage et les
autres formes de valorisation et de réduire la quantité de déchets à
éliminer, en vue de réduire l’enfouissement et l’incinération. Le logo de
poubelle rayée est là pour vous rappeler que ces produits doivent être
triés séparément à l’élimination. Ces règles concernent tous vos produits Gateway et
également tous les accessoires, tels que clavier, souris, haut-parleurs, télécommande,
etc. Lorsque vous devez éliminer ces produits, assurez-vous qu’ils sont correctement

116
recyclés en vérifiant auprès de votre administration locale, ou en retournant votre ancien
matériel à votre revendeur si vous le remplacez. Pour des informations, visitez
www.gateway.com/about/corp_responsibility/environment.php.
Élimination des piles (si applicable)
Avant d’éliminer votre équipement assurez-vous d’avoir retiré les piles qui peuvent être
installées dans l’équipement. Le droit européen prévoit que les piles doivent être
collectées pour une l’élimination séparée des déchets ménagers. Ne jetez pas vos piles
usagées dans la poubelle. Éliminez vos piles usagées par un système de collecte des
piles lorsqu’il est disponible, ou demandez à votre distributeur ou à l’administration locale
quelles infrastructures peuvent être utilisées. Vos efforts permettront la sécurité de la
collecte, le recyclage et la destruction de batteries usagées et aideront à protéger
l’environnement et réduire les risques pour la santé.
- Attention : Risque d’explosion si la pile est remplacée par un type incorrect.
Éliminez les piles usagées en respect avec les instructions.
ENERGY STAR
Les produits qualifiés ENERGY STAR d'Gateway vous font économiser
de l'argent en réduisant les coûts énergétiques et en protégeant
l'environnement, sans compromettre les fonctionnalités ou les
performances. Gateway est fier d'offrir à ses clients des produits pourvus
du label ENERGY STAR.
Qu'est que ENERGY STAR ?
Les produits qualifiés ENERGY STAR utilisent moins d'énergie et empêchent les
émissions de gaz à effet de serre en respectant des directives strictes sur l’efficacité
énergétique définies par l’agence américaine de protection de l’environnement. Gateway
s’engage à proposer dans le monde entier des produits et services qui aident les
consommateurs à faire des économies, économiser l’énergie et améliorer la qualité de
l'environnement. Plus nous pouvons économiser d'énergie en étant plus efficaces, plus

Environnement - 117
nous pourrons réduire les gaz à effet de serre et les risques de changement climatique.
Vous trouverez plus de renseignements sur le site www.energystar.gov ou
www.energystar.gov/powermanagement.
- Remarque : Les informations de cette section peuvent ne pas s’appliquer votre
ordinateur.
Les produits qualifiés ENERGY STAR Gateway :
- Produisent moins de chaleur et réduisent les charges de refroidissement, ainsi que
les ambiances surchauffées.
- Passent automatiquement en mode de « veille écran » et « veille ordinateur »
respectivement après 10 et 30 minutes d'inactivité.
- Sortez l'ordinateur du mode veille en pressant une touche du clavier ou en déplaçant
la souris.
- En mode « veille », les ordinateurs économisent plus de 80% d'énergie.
ENERGY STAR et le label ENERGY STAR sont des marques déposées aux États-Unis.

118
LICENCE LOGICIELLE
- Remarque : La plupart des applications logicielles sont déjà préinstallées sur votre
ordinateur Gateway. Elles sont prêtes à être utilisées ou configurées. Toutefois,
certains titres nécessitent un CD ou un DVD pour être exécutés. Vous trouverez ces
disques dans l'emballage de votre ordinateur.
Accord de licence Gateway (produits sur CD et/ou DVD). Cette copie de l’original est votre
preuve de licence. Veuillez la traiter comme un bien de valeur.
Important !
Lisez soigneusement avant d’installer les logiciels.
L’accord de licence suivant s’applique à vous. C’est un accord légal entre vous (une
personne physique ou morale) et Gateway. En installant le logiciel, vous acceptez d’être
lié par les termes de cet accord. Si vous n’acceptez pas les termes de cet accord,
retournez immédiatement votre système informatique complet, le(s) paquet(s) logiciel(s)
non ouvert(s), le cas échéant, ainsi que les termes l’accompagnant (y compris pour les
documents écrits ou autre(s) emballage(s)) à l’endroit où vous les avez obtenus pour un
remboursement complet.
G
ATEWAY LICENCE LOGICIELLE
1. Concession de licence
Cet accord de licence Gateway (« Licence ») vous permet d’utiliser une copie de la
version spécifiée des LOGICIELS Gateway identifiés ci-dessus (qui peuvent comprendre
au moins un CD ou un DVD) sur un seul ordinateur, à condition que les LOGICIELS soient
utilisés sur seulement un ordinateur à tout moment. Si vous disposez de plusieurs
Licences pour les LOGICIELS, alors à tout moment, vous pouvez avoir autant de copies
des LOGICIELS en utilisation que vous avez de Licences. Les LOGICIELS sont « en
utilisation » sur un ordinateur lorsqu’ils sont chargés dans la mémoire temporaire (c.-à-d.
la mémoire vive) ou installés dans la mémoire permanente (p.ex., disque dur, CD et/ou
DVD, ou autre périphérique de stockage de cet ordinateur), à l’exception d’une copie

Licence logicielle - 119
installée sur un serveur de réseau dans le seul but de la distribution à d’autres ordinateurs
qui n’est pas « en utilisation ». Si le nombre prévu d’utilisateurs des LOGICIELS excède
le nombre de Licences applicables, vous devez disposer d’un mécanisme raisonnable ou
d’un processus en place pour assurer que le nombre de personnes utilisant les
LOGICIELS simultanément ne dépasse pas le nombre de Licences. Si les LOGICIELS
sont installés de façon permanente sur le disque dur ou le périphérique de stockage d’un
ordinateur (autre qu’un serveur de réseau) et une personne utilise l’ordinateur plus de
80% de son temps d’utilisation, alors cette personne peut également utiliser les
LOGICIELS sur un ordinateur portable ou domestique.
2. Droit d’auteur
Les LOGICIELS sont la propriété de Gateway ou de ses fournisseurs et sont protégés par
les lois du copyright des États-Unis et les traités internationaux. Par conséquent, vous
devez traiter les LOGICIELS comme tout autre matériel protégé par le droit d’auteur (par
exemple un livre ou un enregistrement musical), à l’exception que vous pouvez transférer
le contenu des LOGICIELS du CD et/ou DVD, le cas échéant, vers un seul disque dur à
condition de conserver l’original uniquement pour des fins de sauvegarde ou d’archivage.
Vous ne pouvez pas copier le CD et/ou DVD des LOGICIELS ou la documentation écrite
qui accompagne les LOGICIELS.
3. Autres restrictions
Vous ne pouvez pas louer les LOGICIELS, mais vous pouvez transférer les LOGICIELS
et les documents écrits de manière permanente à condition de ne conserver aucune copie
et que le destinataire accepte les termes de cet accord. Vous ne pouvez pas faire de
l’ingénierie inverse, décompiler ou désassembler les LOGICIELS. Tout transfert des
LOGICIELS doit inclure la plus récente mise à jour et toutes les versions antérieures.

120
INFORMATIONS DE LICENCE DES LOGICIELS TIERS OU LOGICIELS LIBRES
Les logiciels préchargés, embarqués ou distribués avec les produits fournis par Gateway
contiennent des logiciels tiers ou logiciels libres (les « Logiciel libres »), lesquels sont
fournis sous licence selon les termes de la Licence publique générale GNU (la « GPL »).
Les Logiciels libres sont marqués comme tels. Votre copie, distribution et/ou modification
des Logiciels libres est soumise aux termes de la GPL.
Les Logiciels libres sont distribués dans l’espoir qu’il seront utiles SANS AUCUNE
GARANTIE ; sans même la garantie implicite de VALEUR MARCHANDE ou
D’ADÉQUATION À UNE APPLICATION PARTICULIÈRE. Les dispositions de la Licence
publique générale GNU seront toujours applicables. Vous pouvez accéder directement à
http://www.gnu.org afin d’obtenir une copie de la GPL ou écrivez à la Free Software
Foundation, Inc et demandez une copie. L’adresse de la Free Software Foundation, Inc
est : 59 Temple Place - Suite 330, Boston, MA, 02111-1307, États-Unis.
Pendant une période de trois (3) ans à compter de votre réception de ce logiciel, vous
pouvez obtenir une copie lisible par machine du code source des Logiciels libres selon
les termes de la GPL, sans frais, sauf pour le coût des supports, de l’expédition et de la
manutention, sur demande écrite que vous nous adresserez.
Contactez-nous si vous avez d’autres questions. Notre adresse postale est 8F, 88, Sec.
1, Hsin Tai Wu Rd., Hsichih, New Taipei City 221, Taiwan.

Index - 121
INDEX
A
Affichage
touches spéciales
........................... 18
affichage
guide de dépannage
...................... 87
audio
guide de dépannage
...................... 87
C
Câbles ......................................... 10, 111
CD-ROM
éjection manuelle
........................... 88
guide de dépannage....................... 88
charge
vérification du niveau
...................... 40
Clavier
guide de dépannage
....................... 88
touches spéciales .......................... 20
connexions
réseau
........................................... 31
Connexions réseau .............................. 50
Cordons d’alimentation......................... 10
Curseur ............................................... 27
D
DSL..................................................... 48
E
Élimination des piles........................... 116
Entretien
Programme Recovery
Management
.................................. 46
Environnement................................... 115
Environnement de l’ordinateur ................ 8
Épilepsie, avertissement....................... 14
F
FAQ. Voir Foire aux questions
Foire aux questions
.............................. 86
Fournisseur de service Internet (FSI) .... 47

122
G
Garantie................................................ 7 Gateway
Programme Recovery
Management
.................................. 46
H
haut-parleurs
guide de dépannage
....................... 87
touche spéciale.............................. 19
I
Imprimante
guide de dépannage
....................... 88
Informations réglementaires.......... 96, 115
Interférence ....................................... 110
Internet
Connexion
............................... 47, 48
Pare-feu ........................................ 55
L
Lecteur de carte mémoire ..................... 29
Lecteurs
Lecteur de carte mémoire
............... 29
Logiciel espion ..................................... 55
Logiciels
Licence logicielle
.......................... 118
luminosité
touches spéciales
.......................... 19
M
Maintenance
Recovery Management
................... 64
Maliciel ................................................ 55
Mise à jour
Mises à jour automatiques de
Windows
........................................ 63
Modem .......................................... 48, 49
N
Navigateur ........................................... 53
Nettoyer votre ordinateur ...................... 11
Norton Internet Security.................. 54, 58

Index - 123
O
ordinateur
fonctionnalités
................................ 15
indicateur d’activation..................... 21
P
Pare-feu............................................... 55
pavé tactile .......................................... 27
utilisation ................................. 27–27
Périphériques de stockage amovibles ... 31
pile
avertissement de pile basse
............ 41
caractéristiques.............................. 36
charge ........................................... 40
conditions basses........................... 41
installation...................................... 39
maximaliser l’autonomie ................. 37
optimisation ................................... 40
première utilisation ......................... 37
retrait....................................... 39, 40
vérification du niveau de charge...... 40
Piles .................................................. 116
ports.................................................... 29
Précautions de santé............................ 12
Précautions de sécurité .......................... 8
Problèmes ........................................... 86
affichage........................................ 87
CD-ROM ....................................... 88
Clavier........................................... 88
démarrage ..................................... 86
Imprimante .................................... 88
R
Récupération
Programme Recovery
Management
.................................. 46
Recovery Management .................. 64
réseau ................................................. 31
Réseau local........................................ 50
S
Sécurité
Antivirus
......................................... 56
Mises à jour ................................... 63
T
touches spéciales................................. 20
U
universal serial bus............................... 32

124
V
vue
avant
............................................. 22
droite ............................................. 24
gauche .......................................... 22
vue frontale.......................................... 21
vue gauche.......................................... 21
W
Wi-Fi.................................................... 50
Windows
Mises à jour automatiques de
Windows
........................................ 63
Utiliser Windows ............................ 46
Ver.02.01.02

- 1
Manual del usuario
Gateway NE71B

2
TABLA DE CONTENIDO
Encendido de la computadora 4
Conexión inalámbrica......................................... 4
Registro.............................................................. 5
Instalación del software...................................... 6
Recuperación ..................................................... 6
¿Tiene problemas? ............................................ 7
Principios básicos de la
computadora 8
Seguridad y comodidad ..................................... 8
Precauciones de seguridad ........................ 8
Precauciones de salud.............................. 12
Conocimiento de la computadora 15
Vista superior - pantalla ................................... 16
Vista superior - teclado .................................... 17
Teclas especiales ..................................... 18
Vista frontal ...................................................... 21
Vista izquierda.................................................. 22
Vista derecha ................................................... 24
Vista de base ................................................... 26
Touchpad 28
Principios básicos del touchpad....................... 28
Gestos de touchpad ......................................... 29
Actualización de la computadora 30
Expansión mediante opciones ......................... 30
Opciones de conectividad......................... 30
Fuente de alimentación 36
Adaptador de CA.............................................. 36
Batería.............................................................. 37
Características de la batería..................... 37
Sustitución de la batería ........................... 39
Instalación o extracción de la batería....... 40
Carga de la batería .................................. 41
Comprobación del nivel de batería .......... 41
Optimización de la vida de la batería ....... 41
Aviso de batería baja ............................... 42
Administración de energía 44
Ahorro de energía............................................ 44
Software 47
Uso de Windows y el Software........................ 47
Oferta de seguridad para Internet............ 47
Gateway Recovery Management ............ 47
Internet 48
Primeros pasos en la Red ............................... 48
Protección de la computadora ................. 48
Elija un Proveedor de servicios de
Internet ..................................................... 48
Conexiones de red ................................... 51
¡Navegue por Internet! ............................. 54
Seguridad................................................. 55
Recovery 65
Crear una copia de seguridad de
recuperación.................................................... 66
Crear una copia de seguridad de
aplicaciones y controladores ........................... 70
Recuperación del sistema ............................... 72
Reinstalar controladores y aplicaciones... 73
Regresar a una captura de pantalla
de sistema anterior................................... 77
Restauración del sistema al estado
de fábrica ................................................. 78
Recuperación desde Windows................. 78

Tabla De Contenido - 3
Recuperación desde una copia de
seguridad de recuperación ....................... 83
Preguntas frecuentes 88
Consejos y sugerencias para el uso de
Windows 8........................................................ 91
Deberá tener en cuenta tres conceptos.... 91
¿Cómo accedo a los charms? .................. 91
¿Cómo llego a Inicio? ............................... 91
¿Cómo salto entre aplicaciones?.............. 92
¿Cómo apago la computadora? ............... 92
¿Por qué hay una nueva interfaz?............ 92
¿Cómo desbloqueo la computadora?....... 93
¿Cómo personalizo la computadora?....... 93
Quiero usar Windows como solía
hacerlo, ¡devuélvame mi escritorio! .......... 94
¿Dónde están mis aplicaciones? ............. 95
¿Qué es un ID de Microsoft (cuenta)? ..... 96
¿Cómo agrego un favorito a Internet
Explorer?.................................................. 97
¿Cómo busco actualizaciones de
Windows?................................................. 97
¿Dónde puedo obtener más
información?............................................. 97
Información reglamentaria 98
Medioambiente 117
Licencia de Software 120
Índice 123
Visite registration.gateway.com y descubra los beneficios de ser cliente de Gateway.
Observación: Todas las imágenes son únicamente a título de referencia. La configuración
real puede variar.
Copyright © 2012. Todos los derechos reservados.
Manual del usuario de Gateway NE71B
Esta revisión: 6 de julio de 2012

4
ENCENDIDO DE LA COMPUTADORA
¡Gracias por comprar esta computadora Gateway!
Esta guía ha sido diseñada para presentarle las funciones de la
computadora y asistirlo en su nueva experiencia con la computadora.
Luego de instalar y encender la computadora, como se muestra en las
instrucciones de instalación, le hará preguntas que lo ayudarán a
conectarse a Internet. La computadora configurará entonces el software
instalado.
CONEXIÓN INALÁMBRICA
Para conectarse a una red inalámbrica, primero verifique que las
características inalámbricas de la computadora estén activadas, y que el
router o módem que desea conectar esté también correctamente
configurado.
• Si la función inalámbrica no está a activada, presione la tecla de
Windows ( ) + W, escriba "Inalámbrico" y luego haga clic en
Inalámbrico. Haga clic en el interruptor debajo de Wi-Fi para habilitar la
conexión inalámbrica. Vuelva a hacer clic para deshabilitarla.
• Para conectarse a una red, presione la tecla de Windows ( ) + W,
ingrese "Inalámbrico" y luego haga clic en Conectar a una red.
Seleccione su red e ingrese la contraseña de ser necesario.
• Luego de unos segundos, la computadora debería conectarse a
Internet.

Encendido de la computadora - 5
Si no se detecta su red, o su computadora no se conecta a Internet,
consulte la documentación del router o ISP. Una vez que encienda la
computadora y pueda usarla, abra Internet Explorer y siga las
instrucciones.
Como alternativa, use un cable de red para conectarse directamente
a un puerto de red en el router. Consulte la guía del router o ISP.
REGISTRO
Se recomienda registrar la computadora al utilizarla por primera vez. Esto
le da acceso a beneficios útiles tales como:
• Un servicio más rápido de parte de nuestros representantes
capacitados.
• Membresía en la comunidad Gateway: Promociones y participación en
nuestras encuestas a clientes.
• Las últimas novedades de Gateway.
Cómo registrarse
Durante el inicio de la computadora, una ventana lo invitará a registrarse.
Complete la información y haga clic en Siguiente. La segunda ventana
contendrá campos opcionales que nos ayudarán a brindarle una atención
al cliente más personalizada.

6
Otra opción
Otra manera de registrar su producto Gateway es visitar nuestro sitio Web
en registration.gateway.com. Elija su país y siga las siguientes
instrucciones.
Luego de la registración, le enviaremos un mail de confirmación con
información importante que deberá guardar en un lugar seguro.
INSTALACIÓN DEL SOFTWARE
Su computadora instalará automáticamente el software y se preparará
para su uso. Esto puede tomar un tiempo, no apague la computadora;
espere hasta que haya finalizado la instalación.
RECUPERACIÓN
Usted debería crear discos de recuperación tan pronto como sea posible.
El programa
Recovery le permite crear discos de recuperación y luego
restaurar o reinstalar aplicaciones y controladores provistos por Gateway.

Encendido de la computadora - 7
¿TIENE PROBLEMAS?
Gateway le brinda varias opciones para respaldar su compra.
soporte de Gateway
Asegúrese de escribir el número de serie, la fecha y el lugar de compra, y
el nombre del modelo de su computadora en el área provista en esta guía;
guarde el comprobante de compra. Antes de llamarnos, escriba cualquier
mensaje de error que acompaña el problema, y tenga la computadora
frente a usted y encendida de ser posible. Si tiene estos elementos a
mano al contactarse con nosotros, podremos ofrecerle un servicio mejor y
más rápido.
Sitio Web de Gateway
Recuerde visitar www.gateway.com - Consulte la sección Soporte para
obtener información actualizada, ayuda, controladores y descargas.
Información de contacto y garantía
Puede encontrar información sobre la garantía de su computadora y
sobre cómo contactar al soporte técnico en la Garantía de la
computadora.

8
PRINCIPIOS BÁSICOS DE LA
COMPUTADORA
SEGURIDAD Y COMODIDAD
Precauciones de seguridad
Siga las siguientes instrucciones para usar la computadora de manera
cómoda y evitar problemas de salud.
Entorno de la computadora
Asegúrese de que la computadora:
• Sea usada en superficies estables. Si la computadora se cae puede
sufrir graves daños.
• No sea usada en una superficie que vibra, o mientras se practica algún
deporte, o se realiza algún ejercicio u otra actividad en un entorno
dinámico. La vibración o el movimiento pueden aflojar fijaciones, dañar
componentes internos e incluso causar fuga de batería.
• No esté expuesta a la luz del sol directa o a fuentes de calor.
• Esté siempre alejada de campos magnéticos o cualquier otro
dispositivo que genere electricidad estática.
• Esté al menos a 30 centímetros (un pie) de teléfonos celulares.
• No esté en un entorno húmedo y lleno de polvo.
• No sea usada cerca del agua. No derrame ningún tipo de líquido sobre
el producto.

Principios básicos de la computadora - 9
• No sea colocada sobre una alfombra o cualquier otra superficie que
pueda recibir una carga eléctrica.
Nota
• Hay ranuras y aberturas de ventilación que aseguran un funcionamiento
fiable del producto y protección contra sobrecalentamiento. No bloquee
ni cubra estas aberturas. Las aberturas no deben bloquearse nunca al
colocar el producto encima de una cama, sofá, alfombra u otra
superficie similar. Nunca coloque el producto encima de un radiador o
similar, ni tampoco encima de una instalación integrada salvo que la
ventilación sea apropiada.
• Nunca introduzca objetos de ningún tipo en las ranuras de la caja, ya
que podrían tocar puntos de tensión peligrosos o cortocircuitar piezas, y
provocar un incendio o descarga eléctrica. Nunca derrame líquido de
ningún tipo en el producto.
• Para evitar que se produzcan daños en los componentes internos y
fugas en la batería, no coloque el producto sobre una superficie
vibratoria.
• No lo utilice cuando haga deporte, practique ejercicio o se encuentre en
un entorno vibratorio, ya que pueden producirse daños o un
cortacircuito en los dispositivos rotores, en el disco duro o en la unidad
óptica, e incluso la batería de litio puede quedar expuesta.

10
Cables
Asegúrese de que:
• Los cables no estén estrangulados y que no haya peligro de que
alguien los pise o se tropiece con ellos.
• Otros dispositivos no aplasten los cables.
• El cable de alimentación esté conectado a la computadora antes de
conectarlo a la toma de corriente de CA.
• El cable de alimentación esté desenchufado de la toma de corriente
antes de desconectarlo de la computadora.
• Los cables de alimentación de tres clavijas estén conectados a una
toma de corriente conectada a tierra.
• La toma de corriente sea fácilmente accesible y esté lo más cerca
posible de la computadora (no la sobrecargue con demasiados
adaptadores).
Si la computadora usa un adaptador de CA externo:
• No cubra el adaptador de CA ni coloque objetos sobre él. Permita que
el adaptador se enfríe durante el uso manteniéndolo libre de objetos.
• Use únicamente el adaptador de CA suministrado con la computadora.
Aunque otros adaptadores se vean similares, su uso puede dañar la
computadora. Si necesita uno nuevo, use únicamente piezas que estén
autorizadas para usar con la computadora.

Principios básicos de la computadora - 11
Limpieza de la computadora
• Siempre desconecte la computadora de la toma de corriente antes de
limpiarla.
• No use líquidos ni aerosoles de limpieza, en cambio use un paño
húmedo.
• Nunca pulverice un producto de limpieza directamente en la pantalla.
• Si derrama líquido en la computadora, apáguela inmediatamente,
desenchufe el adaptador de CA, quite la batería y asegúrese de que
esté completamente seca antes de encenderla nuevamente. Espere
toda la noche si es necesario.
Nota: Si la computadora incluye ranuras para tarjetas de memoria o
dispositivos de expansión, se deben instalar tarjetas ficticias de
plástico en estas ranuras. Estas tarjetas protegen las ranuras no
utilizadas del polvo, objetos metálicos u otras partículas. Guarde las
tarjetas para utilizarlas cuando no haya tarjetas en las ranuras.
Reparación de la computadora
No intente reparar computadora usted mismo, ya que al abrir o quitar las
tapas podría exponerse a puntos de voltaje peligrosos u otros riesgos.
Derive todas las reparaciones al personal técnico calificado.
Desconecte la computadora de la toma de corriente y conéctese con
personal técnico calificado en las siguientes situaciones:
• el cable de alimentación o el enchufe están dañados o desgastados,
• se ha derramado líquido sobre el producto,
• el producto fue expuesto a la lluvia o el agua,

12
• el producto se ha caído o se ha dañado la caja,
• el rendimiento del producto ha cambiado,
• el producto no funciona normalmente luego de haber seguido las
instrucciones de funcionamiento.
Nota: Ajuste sólo los controles que se describen en las instrucciones
de funcionamiento, ya que el ajuste incorrecto de otros controles
puede provocar daños y trabajo extra para los técnicos calificados
para restaurar las condiciones normales del producto.
Precauciones de salud
• La superficie inferior, las áreas que rodean las aberturas de ventilación
y el adaptador de CA se pueden calentar. Para evitar lesiones,
asegúrese de que no entran en contacto con su piel o su cuerpo.
• Este dispositivo y sus accesorios pueden contener piezas pequeñas.
Manténgalos lejos del alcance de los niños pequeños.
• La computadora y los accesorios pueden contener piezas pequeñas.
Manténganlas fuera del alcance de los niños.
• Si trabaja o juega durante horas, asegúrese de tomar descansos
regulares. De vez en cuando aleje la vista de la pantalla de la
computadora. No use la computadora si está cansado.
• Acomode la computadora para poder trabajar en una posición natural y
relajada. Coloque los elementos que utiliza con frecuencia cerca de su
alcance.

Principios básicos de la computadora - 13
• Coloque la computadora directamente frente a usted para una mayor
seguridad y confort. Asegúrese de que el teclado y el touchpad estén a
una buena altura. La pantalla debe estar a unos 45-70 cm (18-30
pulgadas) de los ojos.
Si utiliza la computadora durante largos períodos desde un escritorio,
invierta en un teclado externo para mayor comodidad.
• Para proteger los oídos, al usar altavoces o auriculares, suba el
volumen gradualmente hasta que pueda oír claramente; no suba el
nivel del volumen una vez que sus oídos se hayan adaptado. No use
volumen alto durante períodos prolongados. No suba el volumen para
bloquear ruidos a su alrededor; baje el volumen si no puede escuchar a
las personas que hablan a su alrededor.
• La parte inferior de la computadora, el adaptador de
alimentación y el aire de las ranuras de ventilación pueden
calentarse durante el uso. Evite el contacto corporal continuo
y no coloque la computadora en la falda mientras está
funcionando.
• Asegúrese de que las ranuras y aberturas para ventilación no estén
bloqueadas ni tapadas. No coloque la computadora sobre superficies
blandas (como alfombras, sillas o camas) que pueden bloquear las
ranuras de ventilación.
• No introduzca ningún tipo de objeto en las ranuras de ventilación, ya
que podría tocar puntos de voltaje peligrosos o causar un cortocircuito
en algunas piezas y provocar un incendio o una descarga eléctrica.

14
• Algunas afecciones de manos, muñecas, brazos, cuello, hombros,
piernas y espalda pueden estar asociadas con ciertas acciones
repetitivas o pueden verse agravadas por ellas. Para reducir el riesgo
de desarrollar estas afecciones, escriba con las muñecas derechas y
con las manos y muñecas flotando sobre el teclado. Si tiene períodos
de dolor, cosquilleo, entumecimiento u otra molestia, consulte a su
médico.
• Aconsejamos que los padres controlen el uso de juegos por parte de
sus hijos. Si usted o su hijo experimentan alguno de los siguientes
síntomas: mareos, visión borrosa, tics en el ojo o nerviosos, pérdida de
conciencia, desorientación, o cualquier convulsión o movimiento
involuntario, suspenda INMEDIATAMENTE el uso y consulte a su
médico. Esto puede suceder incluso si la persona no tiene historia
médica de epilepsia.

Conocimiento de la computadora - 15
CONOCIMIENTO DE LA
COMPUTADORA
Luego de instalar la computadora, como se ilustra en las instrucciones de
instalación, déjenos enseñarle su nueva computadora Gateway.
Gateway NE71B

16
VISTA SUPERIOR - PANTALLA
# Ícono Elemento Descripción
1 Cámara Web
Cámara Web para comunicación de video.
Una luz junto a la Webcam indica que la
webcam está activa.
2 Micrófono Micrófono interno para grabaciones de sonido.
3
Pantalla del
visualizador
También llamada Pantalla de cristal líquido
(LCD por sus siglas en inglés), visualiza la
salida de la computadora.
1
2
3

Conocimiento de la computadora - 17
VISTA SUPERIOR - TECLADO
# Ícono Elemento Descripción
1
Indicador/botón de
encendido
Activa y desactiva la computadora. Indica el
estado de la energía de la computadora.
2 Teclado
Para ingresar datos en la computadora.
- Las teclas especiales se describen en
página 18.
3 Touchpad
Dispositivo señalador sensible al tacto que
funciona como un ratón de computadora.
1
2
5
3
4

18
Teclas especiales
El teclado de la computadora incluye teclas que activan funciones
especiales. La función de cada tecla está marcada claramente con un
icono.
4
Hacer clic en
botones (izquierdo y
derecho)
El lado izquierdo y derecho de la función botón
como botones de selección de izquierda y
derecha.
5 Altavoces Reproduce la salida de audio estéreo.
Ícono Función Descripción
Fn
Tecla de acceso
directo para
segunda función
Activa un segunda función en determinadas teclas.
Por ejemplo, presione la tecla Fn para activar las teclas
F1 a F12.
Ayuda Abre el menú Ayuda.
Backup
Le permite crear copias de seguridad de la
computadora, ya sea de todo el sistema o de las
carpetas y los archivos seleccionados. Cree un
programa regular o haga copias cuando lo desee.
Comunicación
Activa/desactiva los dispositivos de comunicación de la
computadora.
Selección de
pantalla
Cambia la salida entre la pantalla, el monitor externo
(si está conectado) y ambos.
# Ícono Elemento Descripción

Conocimiento de la computadora - 19
Pantalla en blanco
Apaga la retroiluminación de la pantalla para conservar
energía. Presione cualquier tecla para volver.
Touchpad Enciende y apaga el touchpad interno.
Reproducir/pausa
Reproduzca o pause un archivo de medios
seleccionado.
Detener
Detenga la reproducción del archivo de medios
seleccionado.
Anterior Regrese al archivo de medios anterior.
Siguiente Pase al archivo de medios siguiente.
Disminuir brillo Disminuye el brillo de la pantalla.
Aumentar brillo Aumenta el brillo de la pantalla.
Redes sociales
Abre la aplicación Redes sociales.
- Si esta aplicación no está instalada, la tecla iniciará
la aplicación de mensajería instantánea.
Subir volumen Sube el volumen del sonido.
Bajar volumen Baja el volumen del sonido.
Ícono Función Descripción

20
Teclas de acceso directo
La computadora utiliza teclas de acceso directo (combinaciones de teclas)
para acceder a
teclas de función y comandos de navegación.
Para activar las teclas d acceso directo, mantenga presionada la tecla Fn
(botón derecho) antes de presionar la otra tecla de la combinación.
- Nota: No es necesario presionar la tecla Fn para usara las teclas de función F1 a
F12 al encender la computadora o al usar el BIOS.
Para intercambiar la tecla de acceso directo y la función especial de las teclas F1 a
F12, cambie la configuración de la tecla en el BIOS (para abrir el BIOS presione F2
al encender la computadora, luego seleccione el menú Principal y cambie el
Comportamiento de la tecla de función a Teclas de función).
Control de
parlantes
Enciende y apaga los altavoces.
Tecla de acceso
directo
Función Descripción
Fn + teclas
especiales (consulte
página 18)
Teclas de
función
Activa las teclas F1 a F12.
Fn + Inicio Va hasta el comienzo del documento.
Fn + Fin Va hasta el final del documento.
Fn + Re Pág Sube una página en un documento.
Fn + Av Pág Baja una página en un documento.
Ícono Función Descripción

Conocimiento de la computadora - 21
VISTA FRONTAL
- Nota: Los indicadores del panel frontal son visibles incluso cuando la computadora
está cerrada.
# Ícono Elemento Descripción
1
Indicador de
energía
Indica el estado de la energía de la
computadora.
Indicador de batería
Indica el estado de la batería de la computadora.
- Cargando: La luz se vuelve amarilla cuando
se está cargando la batería.
- Carga completa: La luz se vuelve azul en
modo CA.
Indicador de unidad
de disco duro
Indica si el disco duro está activo.
Indicador de
comunicación
Indica el estado del dispositivo de conectividad
inalámbrico de la computadora.
2
Lector de tarjetas
todo en uno
Acepta Secure Digital (SD), MultiMediaCard
(MMC), Memory Stick PRO (MS PRO),
xD-Picture Card (xD).
- Pulse para extraer/instalar la tarjeta.
Sólo puede operar una tarjeta a la vez.
1 2

22
VISTA IZQUIERDA
# Ícono Elemento Descripción
1
Ranura de bloqueo
Kensington
Conexión para el bloqueo de seguridad de una
computadora compatible con Kensington.
- Coloque un cable de seguridad para
computadoras alrededor de un objeto fijo, tal
como una mesa o la manija de un cajón
cerrado con llave.
Introduzca el candado en la ranura y gire la
llave.
También hay modelos sin llave.
2
Ventilación y
ventilador
Permite que la computadora se mantenga
fresca.
- No cubra ni obstruya las aberturas.
3
Puerto Ethernet
(RJ-45)
Conexión para redes basadas en Ethernet
10/100/1000.
4
Puerto de monitor
externo (VGA)
Conexión a un dispositivo de visualización
(por ejemplo, monitor externo, proyector LCD).
21 3 4 56

Conocimiento de la computadora - 23
Información sobre USB 3.0
• Compatible con dispositivos USB 3.0 y anteriores.
• Para un rendimiento óptimo, utilice dispositivos con certificación
USB 3.0.
• Definido por la especificación USB 3.0 (SuperSpeed USB).
5 Puerto HDMI
Admite conexiones de video digital de alta
definición.
6 Puertos USB
Conexión a dispositivos USB.
- Si un puerto es negro, significa que es
compatible con USB 2.0. Si es azul, también
es compatible con USB 3.0 (véase a
continuación).
# Ícono Elemento Descripción

24
VISTA DERECHA
# Ícono Elemento Descripción
1
Conector de altavoz/
auriculares
Conexión a dispositivos de salida de audio
(por ejemplo, parlantes, auriculares).
- Admite auriculares de 3,5 mm compatibles
con micrófono integrado (por ejemplo,
auriculares portátiles inteligentes de Acer).
Conector de
micrófono
Acepta entradas de micrófonos externos.
2 Puerto USB
Conexión a dispositivos USB.
- Si un puerto es negro, significa que es
compatible con USB 2.0. Si es azul, también
es compatible con USB 3.0 (véase a
continuación).
3 Unidad óptica Unidad óptica interna; acepta CD o DVD.
12 3 4 5 6 7

Conocimiento de la computadora - 25
Información sobre USB 3.0
• Compatible con dispositivos USB 3.0 y anteriores.
• Para un rendimiento óptimo, utilice dispositivos con certificación
USB 3.0.
• Definido por la especificación USB 3.0 (SuperSpeed USB).
4
Indicador de acceso
a la unidad óptica.
Se ilumina cuando la unidad óptica se
encuentra activa.
5 Botón de expulsión Expulsa el disco óptico de la unidad.
6
Orificio de expulsión
de emergencia
Expulsa la bandeja de la unidad óptica cuando
la computadora está apagada.
- Inserte con cuidado un clip de papel estirado
para expulsar la bandeja de la unidad
óptica.
7 Enchufe de entrada
Se conecta al adaptador de CA de la
computadora.
# Ícono Elemento Descripción

26
VISTA DE BASE
# Ícono Elemento Descripción
1
Compartimento de
la batería
Aloja la batería de la computadora.
2
Pestillo de
liberación de la
batería
Libera la batería para su extracción. Introduzca
una herramienta adecuada y deslícela para su
liberación.
1
4
2
3

Conocimiento de la computadora - 27
3
Compartimento de
la memoria
Aloja la memoria principal de la computadora.
Compartimento del
disco duro
Aloja el disco duro de la computadora (fijado con
tornillos).
4
Ventilación y
ventilador
Permite que la computadora se mantenga
fresca.
- No cubra ni obstruya las aberturas.
# Ícono Elemento Descripción

28
TOUCHPAD
PRINCIPIOS BÁSICOS DEL TOUCHPAD
El touchpad controla la flecha (o 'cursor') en la pantalla. Al deslizar el
dedo sobre el touchpad, el cursor seguirá este movimiento.
Presione el lado izquierdo o derecho del botón ubicado debajo del
touchpad para realizar funciones de selección y ejecución. Estas dos
áreas son similares a los botones derecho e izquierdo de un mouse.
Pulsar en el touchpad es lo mismo que hacer clic en el lado izquierdo del
botón.
Nota: El touchpad es sensible al movimiento del dedo; cuando más
suave el movimiento, mejor será la respuesta.
Mantenga el touchpad y sus dedos secos y limpios.
El cursor está controlado por algunos gestos básicos:
• Desplazar un solo dedo: Desplace un dedo sobre el
touchpad para mover el cursor.
• Pulsación con un solo dedo: Pulse ligeramente el touchpad
con su dedo para realizar un 'clic', que seleccionará o iniciará
un elemento. Repita rápidamente la pulsación para realizar una
pulsación doble o 'doble clic'.
• Arrastrar: Presione durante unos segundos la parte izquierda del botón
de selección, o pulse dos veces en cualquier lugar del touchtap, luego
deslice el segundo dedo sobre el touchpad para seleccionar todos los
elementos en un área.

Touchpad - 29
GESTOS DE TOUCHPAD
Windows 8 y muchas aplicaciones admiten gestos de touchpad que usan
uno o más dedos.
Nota:
La compatibilidad con gestos de touchpad depende de la
activación activa.
Esto le permite controlar aplicaciones con unos pocos gestos simples, tales
como:
• Deslizar hacia adentro desde el borde:
Acceda a las herramientas de Windows
deslizando el dedo hacia el centro del
touchpad desde la derecha, arriba o la
izquierda.
• Deslizar hacia adentro desde el borde derecho: Seleccione
charms.
• Deslizar hacia adentro desde el borde superior: Seleccione los
comandos de aplicaciones.
• Deslizar hacia adentro desde el borde izquierdo: Cambe a la
aplicación anterior.
• Deslizar con dos dedos: Recorra rápidamente páginas web,
documentos y listas de reproducción colocando dos dedos en
el touchpad y moviéndolos juntos en cualquier dirección.
• Sujetar con dos dedos: Amplíe y reduzca fotos, mapas y
documentos con un simple gesto del índice y el pulgar.

30
ACTUALIZACIÓN DE LA
COMPUTADORA
EXPANSIÓN MEDIANTE OPCIONES
Su computadora ofrece muchas opciones para una experiencia
informática completa.
Opciones de conectividad
Los puertos le permiten conectar dispositivos periféricos a la
computadora. Para obtener instrucciones sobre cómo conectar diferentes
dispositivos externos a la computadora lea la próxima sección.
Lector de tarjetas de memoria
Se usan tarjetas de memoria en una amplia selección
de cámaras digitales, PDA, reproductores de MP3 y
teléfonos celulares.
Inserción de una tarjeta de memoria
1. Alinee la tarjeta de manera que el conector apunte hacia el puerto, con
los conectores hacia abajo.
2. Deslice con cuidado la tarjeta en el puerto. Si ve que necesita usar más
fuerza para introducir la tarjeta, intente volver a orientar levemente la
tarjeta.

Actualización de la computadora - 31
3. Empuje la tarjeta hasta que haga clic. Unos pocos milímetros de la
tarjeta sobresaldrán de la ranura.
Si la tarjeta contiene algunos archivos, puede aparecer la ventana
Reproducción automática de Windows (esto depende de los contenidos
de la tarjeta) y preguntarle si desea usar el programa para acceder a los
contenidos de la tarjeta. Seleccione una opción aquí si es apropiado, de
lo contrario seleccione Cancelar. Si la tarjeta no contiene archivos, o
contiene archivos desconocidos, se abrirá una ventana que muestra los
contenidos de la tarjeta.
Tarjetas SD, SDHC y SDXC
Los diferentes tipos de tarjetas SD cubren diferentes capacidades,
aunque usan el mismo diseño global. Las tarjetas SD contienen hasta
4 GB, las tarjetas SDHC contienen hasta 32 GB, y las tarjetas SDXC
contienen hasta 2048 GB (2 TB). Su computadora contiene un lector de
tarjetas compatible con SDHC o SDXC.
Nota: Las tarjetas de memoria SDXC solo pueden ser utilizadas en
un lector compatible con SDXC; las tarjetas SD y SDHC pueden ser
utilizadas en cualquiera de los dos lectores.

32
Extracción de una tarjeta de un lector de tarjetas de memoria
1. Haga clic en la flecha Mostrar
iconos ocultos en el Área de
notificaciones (junto al reloj).
2. Haga clic en el icono Quitar
hardware con seguridad.
3. Haga clic en Expulsar tarjeta SD
(o el nombre del dispositivo).
4. Espere hasta que aparezca el
mensaje Es seguro retirar el
hardware.
5. Quitar la tarjeta.
Redes integradas
Las redes integradas le permiten conectar su
computadora a una red basada en Ethernet.
Conecte un cable Ethernet desde el puerto
Ethernet (RJ-45) en la cubierta de la
computadora a un concentrador o conector de
red en su red.
3
2
1

Actualización de la computadora - 33
Bus serie universal (USB por sus siglas en
inglés)
El puerto USB es un bus serial de alta
velocidad que le permite conectar periféricos
USB sin usar recursos valiosos del sistema.
Ciertas computadoras pueden incluir uno o
más puertos USB 3.0. Estos puertos se
asemejan a los puertos USB estándar,
excepto que incluyen conexiones internas
adicionales y son de color azul. Puede
utilizar dispositivos compatibles con USB 3.0
con estos puertos para beneficiarse con una
mayor velocidad de transferencia.
Puerto de video
Conecte a un monitor con un puerto VGA o DVI (el tipo de conexión
admitida depende de la configuración de su computadora). Generalmente
el monitor incluye el cable apropiado.
Siga estos pasos para conectar un monitor a su computadora:
1. Verifique que la computadora esté apagada y que el interruptor de
corriente del monitor esté apagado.
2. Conecte el cable de video al puerto del monitor en la computadora.
Asegure la conexión del cable con los tornillos provistos.
3. Conecte el cable de corriente del monitor y enchúfelo a una toma
conectada correctamente a tierra.

34
4. Siga las instrucciones de instalación en la guía del usuario del monitor.
5. Encienda el monitor, luego la computadora.
6. Asegúrese de que la resolución y la frecuencia de actualización
actuales no excedan las especificaciones del monitor. De ser necesario,
cambie la configuración de pantalla de la computadora.
Nota: Para acceder a los controles de pantalla, presione la tecla de
Windows ( ) + W, escriba "Pantalla" y luego haga clic en Pantalla.
Interfaz multimedia de alta definición (sólo para determinados modelos)
HDMI (Interfaz multimedia de alta
definición) es una interfaz de audio/
video completamente digital, no
comprimida respaldada por la
industria. HDMI ofrece una interfaz
entre cualquier fuente de audio/video
digital compatible, como
decodificadores, reproductores de
DVD y receptores A/V, y un monitor
de audio y/o video digital compatible,
como un televisor (DTV), con un solo
cable.
Use el puerto HDMI en su computadora para conectar equipos de audio y
video de alta gama. La implementación de un solo cable permite una
instalación prolija y una conexión rápida.

Actualización de la computadora - 35
Auriculares y micrófono
Estos dos puertos le permiten conectar dispositivos de audio. Use el
puerto para auriculares para conectar auriculares estéreos o altavoces.
Enchufar un dispositivo al puerto para auriculares, deshabilita los
altavoces integrados. Use el puerto para el micrófono para conectar un
micrófono externo para mono grabación; enchufar un micrófono externo
deshabilita el micrófono integrado.

36
FUENTE DE ALIMENTACIÓN
ADAPTADOR DE CA
La computadora puede usar el adaptador de corriente suministrado (una
batería tipo 'brick') para funcionar con corriente AC. Se suministra un
cable de alimentación apropiado para el país donde se compró la
computadora.
El adaptador de corriente suministra la corriente adecuada para que
funcione la computadora y al mismo tiempo recarga la batería.
Precaución: No cubra el adaptador de CA ni coloque objetos
sobre él. Mantener el adaptador libre de objetos permitirá que
este se enfríe correctamente durante el uso.

Fuente de alimentación - 37
Use únicamente el adaptador de CA suministrado con la computadora.
Aunque otros adaptadores se vean similares, su uso puede dañar la
computadora.
Advertencia: El adaptador de CA y la parte inferior de la
computadora pueden calentarse luego del uso prolongado. Esto
es normal, pero el contacto prolongado puede causar lesiones.
BATERÍA
La computadora usa una batería que le brida un uso prolongado entre
cargas.
Características de la batería
La batería tiene las siguientes características:
• Utiliza estándares actuales de tecnología de batería.
• Envía un aviso de batería baja.
La batería se recarga cuando conecta la computadora al adaptador de
CA
. La computadora soporta carga en uso, permitiéndole recargar la
batería mientras continúa usando la computadora. Sin embargo, recargar
la batería con la computadora apagada es mucho más rápido.
La batería será práctica cuando viaja y durante un corte de energía. Se
recomienda tener otra batería completamente cargada de reserva.
Contacte a su distribuidor para obtener detalles de cómo conseguir una
batería de repuesto.

38
Maximización de la vida de la batería
Como las demás baterías, su batería se degradará con el tiempo. Esto
significa que el rendimiento de la batería disminuirá con tiempo y el uso.
Para maximizar la vida de la batería, se le aconseja seguir las
recomendaciones que se encuentran a continuación.
Preparación de una batería nueva
Antes de usar una batería por primera vez, hay un proceso de
“preparación” que debe seguir:
1. Introduzca la batería sin encender la computadora.
2. Conecte el adaptador de CA y cargue la batería por completo.
3. Desconecte el adaptador de CA.
4. Encienda la computadora y trabaje con la carga de la batería.
5. Descargue la batería por completo.
6. Vuelva a conectar el adaptador de CA y cargue la batería por completo
nuevamente.
Vuelva a seguir estos pasos hasta que la batería se haya cargado y
descargado tres veces.
Utilice este proceso de preparación para todas las baterías nuevas, o si
una batería no ha sido utilizada durante mucho tiempo. Si la computadora
permanecerá guardada durante más de dos semanas, se recomienda
extraer la batería de la unidad.

Fuente de alimentación - 39
Advertencia: No exponga la batería a temperaturas inferiores a
0°C (32°F) o superiores a 45°C (113°F). Las temperaturas
extremas pueden perjudicar la batería.
Al seguir el proceso de preparación, usted prepara la batería para lograr
la máxima carga posible. La omisión de este procedimiento impedirá que
obtenga la máxima carga y acortará la vida útil de la batería.
Además, la vida útil de la batería se ve perjudicada por los siguientes
patrones de uso:
• Usar la computadora constantemente enchufada a la corriente alterna
con la batería en su interior. Si quiere usar corriente alterna
constantemente, se recomienda extraer la batería una vez que se haya
cargado.
• No descargar y recargar la batería al extremo, como se describe más
abajo.
• Uso frecuente; cuanto más use la batería, más rápido llegará al final de
su vida útil. Una batería de computadora estándar tiene una vida útil de
unas 300 cargas.
Sustitución de la batería
El portátil utiliza baterías de litio. Sustituya la batería por una del mismo
tipo que la suministrada con el producto. El uso de otra batería puede
comportar riego de incendio o explosión.

40
Advertencia: Las baterías pueden explotar si no se manejan
correctamente. No las desmonte ni las arroje al fuego.
Manténgalas lejos del alcance de los niños. Siga la normativa
local al eliminar las baterías usadas.
Instalación o extracción de la batería
¡Importante! Antes de extraer la batería de la unidad, conecte el
adaptador de CA si desea seguir usando la computadora. De lo
contrario, apáguela primero.
Para instalar una batería:
1. Alinee la batería con la bahía de la batería abierta, asegúrese de que el
extremo con los contactos ingrese primero y que la parte superior de la
batería quede hacia arriba.
2. Deslice la batería dentro de la bahía de la batería y empuje con cuidado
hasta que la batería se trabe.
Para extraer una batería:
1. Deslice el pestillo de liberación de la batería para liberarla.
2. Extraiga la batería de la bahía de la batería.

Fuente de alimentación - 41
Carga de la batería
Para cargar la batería, asegúrese primero de que está correctamente
instalada en la bahía de la batería. Enchufe el
adaptador de CA en la
computadora, y conéctelo a una toma de corriente principal. Puede seguir
utilizando la computadora enchufada mientras se carga la batería. Sin
embargo, cargar la batería con la computadora apagada es mucho más
rápido.
Nota: Se recomienda cargar la batería al final del día. Cargar la
batería de noche antes de viajar le permite comenzar el día con una
batería totalmente cargada.
Comprobación del nivel de batería
El medidor de energía de Windows indica el nivel actual de la batería.
Apoye el cursor sobre el ícono de batería/energía en la barra de tareas
para ver el nivel de carga actual de la batería.
Optimización de la vida de la batería
La optimización de la vida de la batería le ayuda a aprovechar al máximo
la batería, prolongando el ciclo de recarga/carga y mejorando la eficiencia
de la recarga. Se aconseja seguir las siguientes recomendaciones:
• Compre una batería extra.
• Utilice la corriente alterna siempre que sea posible, reservando la
batería para cuando esté afuera.
• Expulse la Tarjeta de PC si no la está usando, ya que continuará
gastando energía (para modelos seleccionados).

42
• Guarde la batería en un lugar fresco y seco. Se recomienda una
temperatura de 10°C (50°F) a 30°C (86 °F). Una mayor temperatura
hará que la batería se auto descargue más rápido.
• La recarga excesiva acorta la vida de la batería.
• Cuide el adaptador de CA y la batería.
Aviso de batería baja
Cuando está usando la carga de la batería preste atención al medidor de
energía
de Windows.
Advertencia: Conecte el adaptador de CA lo más rápido posible
en cuanto aparezca el aviso de batería baja. Se perderá
información si la batería se descarga por completo y la
computadora se apaga.
Cuando aparece el aviso de batería baja, el procedimiento a seguir
recomendado depende de la situación:
Situación Procedimiento recomendado
El adaptador de CA y
el cable de
alimentación se
encuentran
disponibles.
1. Enchufe el adaptador de CA a la computadora,
y luego conéctelo a la principal fuente de
energía.
2. Guarde los archivos necesarios.
3. Reanude el trabajo.
Apague la computadora si desea recargar
rápidamente la batería.

Fuente de alimentación - 43
Hay otra batería
totalmente cargada
disponible.
1. Guarde los archivos necesarios.
2. Cierre todas las aplicaciones.
3. Apague el sistema operativo para apagar la
computadora.
4. Reemplace la batería.
5. Encienda la computadora y reanude el trabajo.
El adaptador de CA y
el cable de
alimentación no se
encuentran
disponibles.
No tiene una batería
de repuesto.
1. Guarde los archivos necesarios.
2. Cierre todas las aplicaciones.
3. Apague el sistema operativo para apagar la
computadora.
Situación Procedimiento recomendado

44
ADMINISTRACIÓN DE ENERGÍA
Esta computadora tiene una unidad de administración de energía
integrada que monitorea la actividad del sistema. La actividad del sistema
se refiere a cualquier actividad que involucre uno o más de los siguientes
dispositivos: teclado, mouse, disco duro, periféricos conectados a la
computadora y memoria de video. Si no se detecta actividad durante un
período de tiempo, la computadora detiene algunos o todos estos
dispositivos para conservar energía.
AHORRO DE ENERGÍA
Deshabilitar Inicio rápido
Su computadora usa Inicio rápido para iniciarse rápidamente, pero
también usa una pequeña cantidad de energía para buscar señales para
el inicio. Estas verificaciones consumirán lentamente la batería de su
computadora.
Si prefiere reducir el impacto ambiental y los requisitos de energía de su
computadora, apague Inicio rápido:
Nota: Si Inicio rápido está apagado, a su computadora le llevará más
tiempo salir de Suspensión.
La computadora tampoco se iniciará si recibe instrucciones de iniciar
en una red (Wake on LAN).

Administración de energía - 45
1. Abra el Escritorio.
2. Haga clic en Opciones de energía en el Área de
notificaciones.
3. Seleccione Más opciones de energía.
4. Seleccione Elegir el comportamiento de los botones de encendido.
5. Para acceder a la Configuración de apagado, seleccione Cambiar la
configuración que no está actualmente disponible.

46
6. Desplácese hacia abajo y deshabilite Encender Inicio rápido.
7. Seleccione Guardar cambios.

Software - 47
SOFTWARE
USO DE WINDOWS Y EL SOFTWARE
Las computadoras de Gateway incluyen un software para ayudarlo a usar
la computadora; los programas y categorías disponibles en la
computadora dependen del modelo comprado.
Oferta de seguridad para Internet
Es esencial que proteja la computadora de virus y ataques en Internet (ver
Seguridad en página 55). Cuando enciende la computadora por primera
vez, se le ofrece un paquete integral de seguridad para Internet, que
incluye un período de suscripción de prueba gratuita. Usted deberá
activar esta protección antes de conectarse a Internet. Este paquete de
seguridad protege la computadora de las amenazas en línea más
recientes y protege su información personal (credenciales de cuenta
bancaria, números de tarjeta de crédito, contraseñas, etc.).
Gateway Recovery Management
Para preparar la computadora para las opciones de recuperación del
sistema, debe crear un conjunto de discos de recuperación lo antes
posible. Consulte página 65 para más detalles.

48
INTERNET
PRIMEROS PASOS EN LA RED
Protección de la computadora
Es esencial que proteja la computadora de virus y ataques en Internet (ver
Oferta de seguridad para Internet en página 47 y Seguridad en página
55). Se ofrece un programa de seguridad para Internet completo cuando
inicia la computadora por primera vez. Usted debe activar esta protección
lo antes posible, antes de conectarse a Internet.
Elija un Proveedor de servicios de Internet
El uso de Internet se ha convertido en una parte natural
de la informática diaria. Unos pocos pasos simples
pueden conectarlo a una vasta colección de
herramientas de comunicación y conocimientos. Para
realizar estos pasos primero debe seleccionar un
Proveedor de servicios de Internet (PSI), que provee la
conexión entre la computadora e Internet. Debe buscar
el PSI disponible en su región, sin olvidar hablar con amigos y familiares
sobre sus experiencias o revisar reseñas e informes de consumidores. El
PSI que seleccione le brindará instrucciones sobre cómo conectar Internet
(quizá necesite un software adicional o una ‘caja’ especial que se conecte
a la línea telefónica).

Internet - 49
Tipos de conexión
Según el modelo de la computadora, la ubicación y las necesidades de
comunicación, usted tiene varias maneras de conectarse a Internet.
Acceso telefónico
Algunas computadoras incluyen un conector de acceso telefónico
(‘módem’). Esto le permite conectarse a Internet usando la línea
telefónica. Con una conexión de acceso telefónico, usted no puede usar
el módem y el teléfono simultáneamente en una sola línea telefónica. Se
recomienda este tipo de conexión solo si tiene un uso limitado de Internet
ya que la velocidad de conexión es baja y se cobra por hora el tiempo de
conexión.
DSL (por ejemplo, ADSL)
DSL (Línea digital de abonados) es una conexión ‘permanente’ que opera
en la línea telefónica. Como la DSL y el teléfono no usan las mismas
frecuencias, puede usar el teléfono mientras está conectado a Internet
(esto requiere un ‘microfiltro’ en cada caja de teléfono para evitar
interferencia). Para poder tener DSL, usted debe estar ubicado cerca de
central telefónica con DSL (algunas veces el servicio no es encuentra
disponible en áreas rurales). La velocidad de la conexión varía según la
ubicación, pero generalmente DSL provee una conexión de Internet muy
rápida y confiable. Como la conexión es permanente, generalmente se
cobra una tarifa fija mensual.

50
Nota:
Una conexión DSL requiere un módem apropiado.
Generalmente el PSI suministra un módem cuando pide el servicio.
Muchos de estos módems incluyen un ‘router’ que provee acceso
inalámbrico y a la red.
Cable
Una conexión de cable brinda un servicio de Internet permanente por
medio de una línea de televisión por cable. Generalmente este servicio se
encuentra disponible en grandes ciudades. Usted puede usar su teléfono
y mirar TV por cable al mismo tiempo que está conectado a Internet.
3G (WWAN o 'Red inalámbrica de área amplia')
Una conexión 3G le permite usar redes celulares (como aquellas usadas
por un teléfono móvil) para conectarse a Internet cuando se encuentra
lejos de casa. El enchufe para una tarjeta SIM puede estar integrado en la
computadora, o quizá necesite un dispositivo externo, tal como un módem
USB o incluso un teléfono móvil adecuadamente equipado.
Nota: Si la computadora incluye una ranura para la tarjeta SIM,
necesitará una tarjeta SIM compatible SIM y un contrato con el
proveedor del servicios móviles.
Antes de usar las funciones 3G, consulte con su proveedor de
servicios para ver si habrá cargos adicionales, en especial gastos del
servicio de roaming (itinerante).

Internet - 51
Conexiones de red
Una LAN (Red de área local) es un grupo de computadoras (por ejemplo,
dentro de un edificio de oficinas o una casa) que comparten recursos y
una línea común de comunicaciones. Cuando configure una red, puede
compartir archivos, dispositivos periféricos (como una impresora) y una
conexión de Internet. Usted puede configurar una LAN mediante
tecnologías alámbricas (como Ethernet) o tecnología inalámbricas (como
WiFi o Bluetooth).
Redes inalámbricas
Una LAN inalámbrica o WLAN es una red de área local inalámbrica, que
puede unir dos o más computadoras sin usar cables. Configurar una red
inalámbrica es fácil y le permite compartir archivos, dispositivos
periféricos y una conexión de Internet.
¿Cuáles son los beneficios de una red inalámbrica?
Movilidad
Los sistemas de LAN inalámbricos permiten que usted y otros usuarios de
su red doméstica compartan el acceso a archivos y dispositivos
conectados a la red, por ejemplo, una impresora o un escáner.
También puede compartir una conexión de Internet con otras
computadoras dentro de su casa.
Velocidad y simplicidad de instalación
La instalación de un sistema de LAN inalámbrico puede ser rápido y fácil y
elimina la necesidad de pasar cables por paredes y techos.

52
Componentes de una LAN inalámbrica
Para configurar la red inalámbrica en casa usted debe tener lo siguiente:
Punto de acceso (router)
Los puntos de acceso (routers) son transceptores de dos vías que emiten
datos en el próximo. Los puntos de acceso actúan como un mediador
entre una red alámbrica e inalámbrica. La mayoría de los routers tienen
un módem DSL integrado que le permitirá acceder a una conexión de
Internet DSL de alta velocidad. El PSI (Proveedor de servicios de Internet)
que usted ha elegido normalmente provee un módem/router con el abono
de los servicios. Lea con cuidado los documentos suministrados con el
punto de acceso/router para obtener instrucciones detalladas sobre la
configuración.
Cables de red (RJ45)
Se usa un cable de red (también llamado cable RJ45) para conectar la
computadora principal al punto de acceso (ver la ilustración a
continuación); este tipo de cable también puede ser usado para conectar
dispositivos periféricos al punto de acceso.
Adaptador inalámbrico
Normalmente la computadora tiene un adaptador inalámbrico
instalado. Un botón o controles en Windows le permiten activar o
desactivar el adaptador.

Internet - 53
Diagrama de una red activa
1. Punto de acceso/
router
2. Computadora de
escritorio
3. Módem
4. Impresora
5. Computadora portátil
6. PDA/Teléfono
inteligente
7. Cables de red
(RJ45)
Encendido/Apagado de una Conexión de red WiFi
La mayoría de las computadoras ofrecen un botón ‘WiFi’ que enciende y
apaga la conexión de red. Si la computadora tiene acceso inalámbrico
pero no ofrece un botón de Comunicación, puede encender o apagar la
red inalámbrica, o controlar lo que se está compartiendo en la red con las
opciones de gestión de redes. Presione la tecla de Windows (
) + W,
escriba "HomeGroup" y luego haga clic en HomeGroup.
1
2
3
4
5
6
7

54
Advertencia: Está prohibido el uso de dispositivos inalámbricos
al volar en aviones. Apague todos los dispositivos antes de subir
a bordo de un avión; estos pueden ser peligrosos para el
funcionamiento del avión, interrumpir la comunicación, e
incluso pueden estar prohibidos.
¡Navegue por Internet!
Para navegar por Internet, necesita un programa
llamado explorador
de Internet. Internet Explorer ofrece
una experiencia de navegación en la web fácil y segura.
En cuanto tenga instalado el acceso a Internet y esté
conectado, haga clic en el acceso directo de Internet
Explorer ubicado en el escritorio de Windows y ¡lleve su
experiencia de Internet a otro nivel!
Sitio Web de Gateway
Para comenzar visite nuestro sitio web, www.gateway.com.
Gateway está dedicado a brindarle soporte personalizado continuo.
Consulte la sección Soporte para recibir ayuda adaptada a sus
necesidades.
www.gateway.com es su portal al mundo de las actividades y los
servicios en línea: ¡visítenos regularmente para obtener las últimas
descargas e información!

Internet - 55
Seguridad
Seguramente esté impaciente por explorar todo lo que Internet tiene para
ofrecer. Para poder estar seguro en línea, Gateway ha preinstalado el
premiado Norton Internet Security™ de Symantec en la computadora.
Norton Internet Security funciona silenciosamente para bloquear las
amenazas complejas actuales y proteger su identidad cuando compra,
hace operaciones bancarias o navega en línea.
Norton Internet Security bloquea la suplantación de identidad en línea,
detecta y elimina Spyware, elimina virus y gusanos de Internet, y protege
contra piratas informáticos.
Definiciones
¿Qué es un virus?
Los software maliciosos, llamados típicamente ‘virus’, son programas
diseñados para infectar y dañar las computadoras. La mayoría de los
virus se transmiten a través de Internet, correos electrónicos o sitios Web
maliciosos. Un virus típico se duplicará y pasará a múltiples
computadoras sin ser detectado. Otras formas de molestia, como
Troyanos, gusanos o spam pueden infectar la computadora, usando
recursos u obstruyendo una red.
Nota: Gateway garantiza que su computadora estaba 100% libre de
virus al momento de la compra y no cubre daños provocados por
virus.

56
¿Qué es un Spyware?
Spyware se refiere a los programas no deseados descargados en la
computadora mientras está conectado a Internet, a menudo sin que usted
se de cuenta. Una vez que ha infectado la computadora, puede husmear
en su actividad de exploración, recoger información personal, causar la
aparición de anuncios publicitarios emergentes, o incluso cambiar la
configuración de la computadora. El Spyware consume los recursos de la
computadora; puede hacer más lenta la conexión de Internet o todo el
sistema de la computadora, e incluso puede causar un fallo en el sistema.
Algunas empresas inescrupulosas usan Spyware para monitorear y
rastrear los sitios que usted visita en Internet para determinar sus hábitos
de navegación y mostrar determinados anuncios publicitarios emergentes
en la pantalla. Sin embargo, algunos tipos de Spyware van más allá de un
simple rastreo y monitorean pulsaciones de teclas y capturan
contraseñas, representando un serio peligro para la seguridad.
¿Qué es el malware?
El software malicioso, también conocido como malware, es un software
diseñado para dañar deliberadamente la computadora. Por ejemplo, los
virus, los gusanos informáticos y los Troyanos son software maliciosos.
Para ayudar a proteger la computadora contra malware, asegúrese de
usar un software antivirus y anti-malware actualizado.

Internet - 57
¿Qué es un firewall personal?
Un firewall personal es un programa de software diseñado para impedir el
acceso no autorizado a una red privada o desde ella. Actúa como un
escudo para proteger la conexión de Internet desde conexiones no
deseadas, algunas de las cuales intentan controlar su computadora para
instalar o redistribuir virus y programas maliciosos. Cada conexión a su
computadora es monitoreada, se detectan los programas que intentan
recibir información sin su permiso y el firewall mostrará una alerta. Luego
puede decidir si permitirá la conexión, si la conexión es a un programa
que usted está usando normalmente lo permitiría (es decir, un juego que
se conecta a un servidor multijugador o una enciclopedia que hace
actualización de contenido).
Cómo proteger la computadora
Prevenir el delito informático puede ser sencillo. Con algunos consejos
técnicos y un poco de sentido común se pueden evitar muchos ataques.
En general, los criminales en línea intentan ganar dinero de forma rápida
y fácil. Si hace que el trabajo les resulte difícil, es probable que lo dejen
tranquilo y que busquen un blanco más fácil. Los siguientes consejos
brindan información básica sobre cómo evitar el fraude en línea.

58
Mantenga la computadora al día con los últimos parches y
actualizaciones
Una buena manera de mantener alejados a los atacantes es aplicar
parches y correcciones de software cuando se encuentren disponibles. Al
actualizar regularmente la computadora, usted evita que los atacantes
puedan aprovecharse de los defectos del software (vulnerabilidades) que
de lo contrario podrían usar para entrar al sistema.
Aunque mantener la computadora actualizada no lo protegerá de todos
los ataques, hace que sea mucho más difícil para los piratas informáticos
acceder a su sistema. También bloquea por completo muchos ataques
básicos y automatizados, y eso puede ser suficiente para desalentar a
atacantes menos empeñados, para que se rindan y busquen una
computadora más vulnerable.
Las versiones más recientes de Microsoft Windows y otros software
populares pueden ser configuradas para descargar y aplicar
actualizaciones automáticamente para que usted no tenga acordarse de
buscar el último software. Aprovechar la función de actualización
automática en el software es un gran comienzo para mantenerse seguro
en línea.

Internet - 59
Proteja la computadora con software de seguridad
Se necesitan muchos tipos de software de seguridad para la seguridad
básica en línea. Los elementos esenciales del software de seguridad
incluyen programas antivirus y firewall. Generalmente el firewall es la
primera línea de defensa de la computadora, controla quién y qué puede
comunicarse con su computadora en línea. Puede pensar en un firewall
en términos de un “policía” que vigila toda la información que intenta fluir
dentro y fuera de la computadora en Internet. El firewall permite las
comunicaciones seguras y evita que tanto el tráfico "malo" como los
ataques lleguen a la computadora.
La siguiente línea de defensa muchas veces es el software antivirus, que
monitorea todas las actividades en línea como correos electrónicos y
exploración en la Web y protege contra virus, gusanos informáticos,
Troyanos y otros tipos de programas maliciosos. El software antivirus y
antispyware debe estar configurado para actualizarse solo, y debe hacerlo
cada vez que usted se conecta a Internet.
Los conjuntos de herramientas de seguridad integrados tales como el
Norton Internet Security, que combinan firewall, antivirus, antispyware con
otras características como antispam y controles para padres, se han
vuelto muy populares ya que ofrecen todo el software de seguridad
necesario para la protección en línea en un solo paquete. Para muchas
personas, usar un paquete de seguridad integral es una alternativa
atractiva en lugar de instalar, configurar y actualizar diferentes tipos de
software de seguridad.

60
Una versión completa de Norton Internet Security™ está
preinstalada en el sistema de Gateway. Incluye una suscripción de
prueba gratuita para las actualizaciones de protección. ¡Asegúrese
de Activarlo!
Elija contraseñas fuertes y manténgalas en un lugar seguro
Las contraseñas son una realidad en Internet hoy en día. Las usamos
para todo, para pedir flores y usar la banca electrónica e incluso para
ingresar al sitio Web de nuestra línea aérea favorita para ver cuantas
millas hemos acumulado. Los siguientes consejos pueden ayudarlo a que
sus experiencias en líneas sean seguras:
• La selección de una contraseña que no pueda ser adivinada fácilmente
es el primer paso para mantener las contraseñas seguras y lejos de las
manos equivocadas. Las contraseñas fuertes tienen ocho o más
caracteres y usan una combinación de letras, números y símbolos (por
ejemplo, # $ % ! ?). Evite usar lo siguiente como contraseña: el nombre
de usuario, cualquier cosa que se base en información personal como
el apellido, y palabras que puedan ser encontradas en el diccionario,
especialmente “contraseña”. En especial, trate de seleccionar
contraseñas fuertes y únicas para proteger actividades como la banca
electrónica.
• Guarde las contraseñas en un lugar seguro e intente no usar la misma
contraseña para todos los servicios que usa en línea.
• Cambie las contraseñas regularmente, al menos cada 90 días. Esto
puede limitar el daño causado por alguien que haya obtenido acceso a
su cuenta. Si nota algo sospechoso con alguna de sus cuentas en línea,
lo primero que debe hacer es cambiar la contraseña.

Internet - 61
Proteja la información personal
Tenga cuidado al compartir información personal como nombre, dirección,
número de teléfono y dirección de correo electrónico en línea. Para
aprovechar muchos servicios en línea, inevitablemente debe suministrar
información personal para manejar la facturación y el envío de productos
comprados. Como es casi imposible no divulgar información personal, la
siguiente lista contiene algunos consejos sobre cómo compartir
información personal en línea de forma segura:
• Esté atento a mensajes de correo electrónicos falsos. Las faltas de
ortografía, los errores gramaticales, la redacción extraña, las
direcciones de sitios Web con extensiones raras, las direcciones de
sitios que contienen solo números cuando por lo general tienen
palabras, o cualquier otra cosa fuera de lo común indican que un
mensaje puede ser fraudulento. Además, los mensajes de fraude
electrónico a menudo le dirán que tiene que actuar rápidamente para
mantener la cuenta abierta, actualizar la seguridad o insistirán en que
brinde información inmediatamente o de lo contrario algo malo
sucederá. No muerda el anzuelo.
• No responda a mensajes de correo electrónico que solicitan
información personal. Las empresas legítimas no usarán mensajes
de correo electrónico para solicitar información personal. Si tiene
dudas, contacte a la empresa telefónicamente o escribiendo a la
dirección Web de la empresa en el explorador. No haga clic en los
enlaces que se encuentran dentro de estos mensajes ya que pueden
llevarlo a sitios Web maliciosos y fraudulentos.

62
• Manténgase alejado de sitios Web fraudulentos utilizados para
robar información personal. Cuando visite un sitio Web, escriba la
dirección (URL) directamente en el explorador en lugar de seguir un
enlace dentro de un correo electrónico o mensaje instantáneo. Los
defraudadores a menudo falsifican estos enlaces para que se vean
convincentes.
Un sitio Web de tiendas, bancos o cualquier otro sitio Web con
información confidencial debe tener una "S" luego de las letras "http"
(por ejemplo, https://www.subanco.com no
http://www.subanco.com ). La "s" es sinónimo de seguro y debe
aparecer cuando se encuentra en un área que le solicita ingresar y
suministrar datos confidenciales. Otra señal de que tiene una conexión
segura es el ícono del pequeño candado en la parte inferior del
explorador (generalmente en la esquina derecha).
• Preste atención a las políticas de privacidad en los sitios Web y en
el software. Es importante entender cómo una organización puede
recolectar y usar su información personal antes de compartirla con
ellos.
• Proteja la dirección de correo electrónico. Los spammers y
“estafadores” a veces envían millones de mensajes a direcciones de
correo electrónico que pueden o no existir con la esperanza de
encontrar alguna víctima. Responder a estos mensajes o incluso
descargar imágenes asegura que usted será agregado a sus listas para
más mensajes similares en el futuro. También tenga cuidado al publicar
su dirección de correo electrónico en línea en grupos de noticias, blogs
o comunidades en línea.

Internet - 63
Las ofertas en línea que parecen demasiado buenas para ser verdad
generalmente lo son
El viejo dicho: “nada es gratis en la vida” sigue siendo verdad en la
actualidad. Los software supuestamente "gratis" como protectores de
pantalla o smileys, trucos de inversión secretos que le harán ganar
fortunas y concursos que sorprendentemente ha ganado sin siquiera
haber entrado son anzuelos atractivos usados por las empresas para
llamar su atención.
Aunque quizá usted no paga el software o servicio directamente con
dinero, el software o servicio gratis que pidió puede haber incluido
software de publicidad ("adware") que rastrea su comportamiento y
muestra avisos no deseados. Quizá deba divulgar información personal o
comprar algo más para poder reclamar lo que supuestamente ha ganado.
Si una oferta parece tan buena que es difícil de creer, pida otra opinión,
lea la letra pequeña, o mejor aún, simplemente ignórela.
Revise regularmente los extractos de cuenta y de tarjeta de crédito
Puede reducir el impacto de la suplantación de identidad y de los
crímenes en línea si puede descubrirlos poco después de que la
información haya sido robada o cuando se intente por primera vez usar la
información. Una forma fácil de tener un indicio claro de que hay algo
malo es revisar los extractos mensuales entregados por el banco y las
empresas de tarjetas de crédito para ver si hay algo fuera de lo normal.
Además, muchos bancos y servicios usan sistemas de prevención del
fraude que reconocen comportamientos de compras inusuales (por
ejemplo, si usted vive en Texas y de repente comienza a comprar neveras

64
en Budapest). Para confirmar estas compras fuera de lo común, quizá lo
llamen para que las confirme. No tome estás llamadas a la ligera; este es
un indicio de que algo malo puede haber sucedido y debe tomar las
medidas necesarias.
Proteja la computadora con herramientas de seguridad de Windows
Windows le brinda una variedad de aplicaciones de seguridad.
Windows Actualizaciones
Si usted tiene una conexión a Internet activa, Windows puede buscar
actualizaciones importantes para la computadora e instalarlas
automáticamente. Estas actualizaciones incluyen actualizaciones de
programas y parches de seguridad que pueden mejorar la experiencia
informática y proteger la computadora de nuevos virus y ataques.
¿Cómo sé si la computadora se encuentra en peligro?
Si el Centro de actividades informa una alerta, o si la computadora se
comporta de manera irregular, falla inesperadamente o si alguno de los
programas no funcionan correctamente, la computadora puede estar
infectada por un software malicioso. Sin embargo, ¡no culpe a un virus de
todos los problemas de la computadora! Si sospecha que la computadora
está infectada, lo primero que debe hacer es actualizar, si es que aún no
lo ha hecho, y ejecutar el software antivirus y antispyware.

Recovery - 65
RECOVERY
Si tiene problemas con su computadora, y las preguntas frecuentes
(consultar
página 88) no lo ayudan, puede 'recuperar' su computadora, es
decir, regresarla a un estado anterior.
Esta sección describe las herramientas de recuperación disponibles en su
computadora. Gateway suministra Gateway Recovery Management, que
le permite crear una copia de seguridad de recuperación, una copias de
seguridad de aplicaciones y controladores, e iniciar opciones de
recuperación, ya sea mediante herramientas de Windows o la copia de
seguridad de recuperación.
Nota: Gateway Recovery Management solo está disponible con un
sistema operativo Windows preinstalado.
Importante: Se recomienda la creación de una Copia de
seguridad de recuperación y Copia de seguridad de aplicaciones
y controladores lo antes posible.
En ciertas situaciones, una recuperación total necesitará una
copia de seguridad de recuperación USB.

66
Crear una copia de seguridad de recuperación
Para reinstalar desde una unidad de almacenamiento USB, primero
deberá crear una copia de seguridad de recuperación. La copia de
seguridad de recuperación incluye todo el contenido original del disco
duro de su computadora, incluyendo Windows y los softwares y
controladores de fábrica. Con esta copia de seguridad se restaurará la
computadora al mismo estado que tenía cuando la compró, brindándole,
al mismo tiempo, una opción para conservar todas las configuraciones y
datos personales.
Nota:
Asegúrese de tener una unidad USB con una capacidad de al
menos 16 GB.
1. Desde Inicio, escriba 'Recuperación' y luego haga clic en Gateway
Recovery Management en la lista de aplicaciones.

Recovery - 67
2. Haga clic en Crear copia de seguridad de los valores
predeterminados de fábrica. Se abrirá la ventana Unidad de
recuperación .
Asegúrese de que la opción Copiar los contenidos de la partición de
recuperación a la unidad de recuperación esté seleccionada. Esto
brindará la copia de seguridad de recuperación más completa y segura.

68
3. Conecte la unidad USB y haga clic en Siguiente.
• Asegúrese de que la unidad USB tenga la capacidad suficiente antes
de continuar. La copia de seguridad de recuperación requiere un
almacenamiento de por lo menos 16 GB
4. El progreso de la copia de seguridad aparecerá en la pantalla.
5. Siga el proceso hasta que haya terminado.

Recovery - 69
6. Luego de crear la copia de seguridad de recuperación, usted puede
elegir eliminar la información de recuperación en su computadora. Si
elimina esta información, solo podrá usar la copia de seguridad de
recuperación USB para restaurar su computadora, si pierde o borra la
unidad USB, no podrá restaurar su computadora.
7. Desconecte la unidad USB y etiquétela claramente.
Importante: Escriba una etiqueta única y descriptiva en la copia
de seguridad, como 'Copia de seguridad de recuperación de
Windows'. Asegúrese de guardar la copia de seguridad en un
lugar seguro que vaya a recordar.

70
Crear una copia de seguridad de aplicaciones y
controladores
Para crear una Copia de seguridad de aplicaciones y controladores , que
contenga los softwares y controladores de fábrica que su computadora
necesita, puede utilizar una unidad de almacenamiento USB o, si su
computadora tiene una grabadora de DVD, uno o más DVD vírgenes
regrabables.
1. Desde Inicio, escriba 'Recuperación' y luego haga clic en Gateway
Recovery Management en la lista de aplicaciones.
2. Haga clic en Crear copias de seguridad de aplicaciones y
controladores.
Enchufe la unidad USB o inserte un DVD virgen en la unidad óptica,
luego haga clic en Siguiente.

Recovery - 71
• Si está usando una unidad USB, asegúrese de que su unidad USB
tenga capacidad suficiente antes de continuar.
• Si utiliza DVD, también aparecerá el número de discos vírgenes
grabables que necesitará para completar los discos de recuperación.
Asegúrese de tener el número requerido de discos vírgenes
idénticos.

72
3. Haga clic en Inicio para copiar archivos. El progreso de la copia de
seguridad aparecerá en la pantalla.
4. Siga el proceso hasta que haya terminado:
• Si utiliza discos ópticos, la unidad expulsará cada disco a medida que
termina de grabarlo. Quite el disco de la unidad y márquelo con un
marcador permanente.
Si se requieren discos múltiples, introduzca un nuevo disco cuando
se lo soliciten, luego haga clic en OK. Continúe hasta que el proceso
haya terminado.
• Si está usando una unidad USB, desconecte la unidad y etiquétela
claramente.
Importante: Escriba una etiqueta única y descriptiva en cada
copia de seguridad, como 'Copia de seguridad de aplicaciones y
controladores'. Asegúrese de guardar la copia de seguridad en
un lugar seguro que vaya a recordar.
Recuperación del sistema
Para recuperar el sistema:
1. Realice arreglos menores.
Si solo uno o dos elementos de software o hardware han dejado de
funcionar correctamente, se puede resolver el problema mediante la
reinstalación de los controladores del dispositivo o del software.
Para reinstalar software y controladores que fueron preinstalados en
fábrica, consulte "Reinstalar controladores y aplicaciones" en
página 73.

Recovery - 73
Para obtener instrucciones sobre la reinstalación de software y
controladores que no fueron preinstalados, consulte el sitio Web de
soporte o la documentación de ese producto.
2. Volver a un estado anterior del sistema.
Si reinstalar el software o los controladores no es de ayuda, entonces
se puede resolver el problema volviendo el sistema a un estado anterior
cuando todo funcionaba correctamente.
Para obtener instrucciones, consulte "Regresar a una captura de
pantalla de sistema anterior" en página 77.
3. Reinicie su sistema operativo.
Si nada más ha solucionado el problema y usted quiere volver al estado
de fábrica del sistema, pero manteniendo su información de usuario,
consulte "Restauración del sistema al estado de fábrica" en
página 78.
4. Volver al estado original de fábrica del sistema.
Si nada más ha solucionado el problema y usted quiere volver al estado
de fábrica del sistema, consulte "Restauración del sistema al estado
de fábrica" en página 78.
Reinstalar controladores y aplicaciones
Como un paso para la solución de problemas, quizá necesite reinstalar
las aplicaciones y los controladores del dispositivo que estaban
preinstalados en la computadora de fábrica. Usted puede realizar la
reinstalación usando el disco duro o la copia de seguridad que ha creado.

74
• Otras aplicaciones – Si necesita reinstalar un software que no vino
preinstalado en la computadora, debe seguir las instrucciones de
instalación de ese software.
• Nuevos controladores de dispositivo – Si necesita reinstalar
controladores de dispositivo que no estaban preinstalados en la
computadora, siga las instrucciones provistas con el dispositivo.
Si está realizando la reinstalación utilizando Windows y la información de
recuperación almacenada en su computadora:
•Desde Inicio, escriba 'Recuperación' y luego haga clic en Gateway
Recovery Management en la lista de aplicaciones.
• Haga clic en Reinstalar controladores o aplicaciones.

Recovery - 75
• Debe consultar la sección Contenidos del Gateway Centro de
recursos.
• Haga clic en el icono instalar del elemento que desea instalar,
luego siga las instrucciones en la pantalla para completar la
instalación. Repita este paso para cada elemento que desea
reinstalar.
Si está realizando la reinstalación desde una Copia de seguridad de
aplicaciones y controladores en un DVD o unidad USB:
1. Inserte la Copia de seguridad de aplicaciones y controladores en la
unidad de disco o conéctela a un puerto USB libre.
• Si insertó un DVD, espere a que se inicie el Gateway Centro de
recursos.

76
•Si el Gateway Centro de recursos no se inicia automáticamente,
presione la tecla de Windows + <E>, luego haga doble clic en el
icono de la unidad óptica.
• Si está usando una unidad USB, presione la tecla de Windows +
<E>, haga doble clic en la unidad que contiene la copia de seguridad.
Haga doble clic en Centro de recursos.
2. Debe consultar la sección Contenidos del Gateway Centro de
recursos.
3. Haga clic en el icono instalar del elemento que desea instalar,
luego siga las indicaciones en la pantalla para completar la
instalación. Repita este paso para cada elemento que desea reinstalar.

Recovery - 77
Regresar a una captura de pantalla de sistema anterior
Restauración del sistema de Microsoft toma periódicamente una ‘captura
de pantalla’ de la configuraciones del sistema y las guarda como puntos
de restauración. En la mayoría de los casos de problemas de software
difíciles de resolver, puede volver a uno de estos puntos de recuperación
para que el sistema vuelva a funcionar.
Windows crea automáticamente un punto de restauración adicional todos
los días, y también cada vez que usted instala controladores de
dispositivos o software.
Nota: Para mayor información sobre el uso de la Restauración del
sistema de Microsoft, desde Inicio, escriba 'Ayuda' y luego haga clic
en Ayuda y soporte en la lista de aplicaciones. Escriba 'Restauración
del sistema de Windows' en el cuadro Buscar ayuda, luego presione
Intro.
Volver a un punto de restauración
1. Desde Inicio, escriba 'Panel de control' y luego haga clic en Panel de
control en la lista de aplicaciones.
2. Haga clic en Sistema y seguridad > Centro de actividades, luego
haga clic en Recuperación en la parte inferior de la ventana.
3. Haga clic en Abrir Restaurar sistema, luego Siguiente.
4. Haga clic en el último punto de restauración (en un momento en el que
el sistema funcionaba correctamente), haga clic en Siguiente, luego
Terminar.

78
5. Aparecerá una ventana de confirmación; haga clic en Sí. Se restaura el
sistema mediante el uso del punto de restauración especificado. Este
proceso puede tardar varios minutos, y usted puede reiniciar la
computadora.
Restauración del sistema al estado de fábrica
Si la computadora tiene problemas no recuperables por otro método,
quizá deba reinstalar todo para restaurar el sistema al estado de fábrica.
Usted puede realizar la recuperación desde el disco duro o la copia de
seguridad de recuperación que ha creado.
• Si aún puede ejecutar Windows y no ha eliminado la partición de
recuperación, consulte "Recuperación desde Windows" en
página 78.
• Si no puede ejecutar Windows y su disco duro original ha sido
totalmente reformateado o usted ha instalado un disco duro nuevo,
consulte "Recuperación desde una copia de seguridad de
recuperación" en página 83.
Recuperación desde Windows
Iniciar Gateway Recovery Management:
• Desde Inicio, escriba 'Recuperación' y luego haga clic en Gateway
Recovery Management en la lista de aplicaciones.

Recovery - 79
Hay dos opciones disponibles, Restaurar la configuración de fábrica
(Reiniciar mi PC) o Restauración personalizada (Actualizar mi PC).
Restaurar la configuración de fábrica elimina todo del disco duro, luego
reinstala Windows y todos los software y controladores que estaban
preinstalados en el sistema. Si puede acceder a archivos importantes en
el disco duro, haga una copia de seguridad de ellos ahora. Consulte
"Restaurar la configuración de fábrica con Gateway Recovery
Management" en página 80.
Restauración personalizada intentará conservar sus archivos (datos de
usuario) pero reinstalará el software y los controladores. El software
instalado desde que compró la computadora será eliminado (salvo el
software instalado desde Windows Store). Consulte
"Restauración
personalizada con Gateway Recovery Management" en página 82.

80
Restaurar la configuración de fábrica con Gateway Recovery
Management
1. Haga clic en Restaurar la configuración de fábrica.
Precaución: 'Restaurar la configuración de fábrica' eliminará
todos los archivos del disco duro.
2. Se abrirá la ventana Reinicie su PC.
Imágenes sólo como referencia.

Recovery - 81
3. Haga clic en Siguiente, luego elija cómo borrar sus archivos:
a. Solo eliminar mis archivos borra rápidamente todos los archivos
antes de restaurar su computadora y toma unos 30 minutos.
b. Limpiar totalmente la unidad limpia completamente la unidad luego
de la eliminación de cada archivo, por lo que no se verán archivos
luego de la recuperación. Limpiar la unidad toma mucho más tiempo,
hasta 5 horas, pero es mucho más seguro ya que se eliminan
completamente los archivos antiguos.
4. Haga clic en Reiniciar.
5. El proceso de recuperación comienza reiniciando la computadora,
luego continúa con el copiado de los archivos al disco duro.
6. Cuando haya finalizado la recuperación, puede comenzar a usar su
computadora repitiendo el proceso de inicio por primera vez.

82
Restauración personalizada con Gateway Recovery Management
1. Haga clic en Restauración personalizada (Conservar datos del
usuario).
2. Se abrirá la ventana Actualice su PC.
3. Haga clic en Siguiente, luego Actualizar.

Recovery - 83
4. El proceso de recuperación comienza reiniciando la computadora,
luego continúa con el copiado de los archivos al disco duro. Este
proceso tomará unos 30 minutos.
Recuperación desde una copia de seguridad de recuperación
Para realizar una recuperación desde una copia de seguridad de
recuperación en una unidad USB:
1. Encuentre su copia de seguridad de recuperación.
2. Enchufe la unidad USB y encienda su computadora.
3. Si no está habilitado, deberá habilitar el F12 Boot Menu:
a. Presione <F2> al iniciar la computadora.
b. Use las teclas de flecha izquierda o derecha para seleccionar el
menú Main.
c. Presione la tecla abajo hasta que se seleccione F12 Boot Menu,
presione <F5> para cambiar esta configuración a Enabled.
d. Use las teclas de flecha izquierda o derecha para seleccionar el
menú Exit.
e. Según el tipo de BIOS que utilice su computadora, seleccione
Guardar cambios y salir o Guardar cambios al salir y presione
Intro. Seleccione Aceptar o Sí para confirmar.
f. Se reiniciará la computadora.

84
4. Durante el inicio, presione <F12> para abrir el menú de arranque. El
menú de arranque le permite seleccionar desde qué dispositivo desea
realizar el inicio, seleccione la unidad USB.
a. Use las teclas de flechas para seleccionar Unidad USB, luego
presione Intro.
b. Windows se inicia de la copia de seguridad de recuperación en lugar
del proceso de inicio normal.
5. Seleccione su tipo de teclado.
6. Seleccione Solucionar problemas y luego elija el tipo de recuperación
que desea usar:
a. Haga clic en Avanzada luego Restaurar sistema para iniciar
Restaurar sistema de Microsoft:
Restauración del sistema de Microsoft toma periódicamente una '
captura de pantalla' de la configuraciones del sistema y las guarda
como puntos de restauración. En la mayoría de los casos de
problemas de software difíciles de resolver, puede volver a uno de
estos puntos de recuperación para que el sistema vuelva a funcionar.
b. Haga clic en Reinicie su PC para comenzar el proceso de reinicio:
Reinicie su PC elimina todo del disco duro, luego reinstala Windows
y todos los software y controladores que estaban preinstalados en el
sistema. Si puede acceder a archivos importantes en el disco duro,
haga una copia de seguridad de ellos ahora. Consulte "Reinicie su
PC desde la copia de seguridad de recuperación" en página 85.

Recovery - 85
c. Haga clic en Actualice su PC para comenzar el proceso de
actualización:
Actualice su PC intentará conservar sus archivos (datos de usuario)
pero reinstalará el software y los controladores. El software instalado
desde que compró la computadora será eliminado (salvo el software
instalado desde Windows Store). Consulte "Actualice su PC desde
la copia de seguridad de recuperación" en página 87.
Reinicie su PC desde la copia de seguridad de recuperación
Precaución: Reinicie su PC borrará todos los archivos en el
disco duro.
1. Se abrirá la ventana Reinicie su PC.
Imágenes sólo como referencia.
2. Haga clic en Siguiente.
3. Seleccione el sistema operativo para realizar la recuperación
(normalmente solo una opción está disponible).

86
4. Elija conservar cambios en el disco duro:
a. Si eliminó la partición de recuperación o cambió las particiones en el
disco duro y quiere conservar estos cambios, seleccione No.
b. Para restaurar completamente su computadora a la configuración de
fábrica, seleccione Sí.
5. Elija cómo eliminar sus archivos:
a. Solo eliminar mis archivos borra rápidamente todos los archivos
antes de restaurar su computadora y toma unos 30 minutos.
b. Limpiar totalmente la unidad limpia completamente la unidad luego
de la eliminación de cada archivo, por lo que no se verán archivos
luego de la recuperación. Limpiar la unidad toma mucho más tiempo,
hasta 5 horas, pero es mucho más seguro ya que se eliminan
completamente los archivos antiguos.
6. Haga clic en Reiniciar.
7. Cuando haya finalizado la recuperación, puede comenzar a usar su
computadora repitiendo el proceso de inicio por primera vez.

Recovery - 87
Actualice su PC desde la copia de seguridad de recuperación
1. Se abrirá la ventana Actualice su PC.
2. Haga clic en Siguiente.
3. Seleccione el sistema operativo para realizar la recuperación
(normalmente solo una opción está disponible).
4. Haga clic en Actualizar.
5. El proceso de recuperación comienza reiniciando la computadora,
luego continúa con el copiado de los archivos al disco duro. Este
proceso tomará unos 30 minutos.

88 - Preguntas frecuentes
PREGUNTAS FRECUENTES
La siguiente es una lista de posibles situaciones que pueden surgir
durante el uso de la computadora. Se suministran soluciones fáciles para
cada una de ellas.
Encendí la computadora, pero no se inicia ni arranca
Mire el indicador de energía:
• Si no está encendido, la computadora no está recibiendo energía.
Compruebe lo siguiente:
• Si está usando la batería, es posible que esté baja y no pueda
encender la computadora. Conecte el adaptador de CA para recargar
la batería.
• Asegúrese de que el adaptador de CA esté correctamente enchufado
a la computadora y a la toma de corriente.
• Si está encendido, compruebe lo siguiente:
• ¿Hay un disco en la unidad óptica? Quítelo y presione <Ctrl> + <Alt>
+ <Supr> para reiniciar el sistema.
• ¿Hay un dispositivo de almacenamiento USB (disco USB o teléfono
inteligente) enchufado a la computadora? Desenchúfelo y presione
<Ctrl> + <Alt> + <Supr> para reiniciar el sistema.

Preguntas frecuentes - 89
No aparece nada en la pantalla.
El sistema de administración de energía de la computadora pone
automáticamente la pantalla en blanco para ahorrar energía. Presione
cualquier tecla para volver a activar la pantalla.
Si presionar una tecla no activa la pantalla, tres cosas pueden ser
la causa:
• Puede que el nivel de brillo esté demasiado bajo. Presione
(aumentar) para ajustar el nivel de brillo.
• El dispositivo de visualización puede estar conectado a un monitor
externo. Presione
para regresar la pantalla a la computadora.
• Si el indicador de Suspensión está encendido, la computadora está en
modo Suspender. Presione y suelte el botón de encendido para
reanudar.
No se escucha audio de la computadora
Compruebe lo siguiente:
• El volumen puede estar en modo silencio. En Windows, mire el icono de
control de volumen (parlante) en la barra de tareas. Si está tachado,
haga clic en el icono y desmarque la opción Silenciar todo.
• Puede que el nivel de volumen esté demasiado bajo. En Windows, mire
el icono de control de volumen en la barra de tareas. También puede
usar los botones de control de volumen para ajustar el volumen.
• Si se conectan auriculares, audífonos o parlantes externos al puerto de
salida en la computadora, los parlantes internos se apagan
automáticamente.

90 - Preguntas frecuentes
Quiero expulsar la bandeja de la unidad óptica sin encender la
computadora
Hay un orificio de expulsión mecánica en la unidad óptica. Simplemente
inserte la punta de un bolígrafo o un clip en el orificio y empuje para
expulsar la bandeja.
El teclado no responde
Intente conectar un teclado externo a un puerto USB en la computadora.
Si funciona, contacte a su distribuidor o a un centro de servicio autorizado
ya que puede estar suelto el cable del teclado interno.
La impresora no funciona
Compruebe lo siguiente:
• Asegúrese de que la impresora esté conectada a una toma de corriente
y esté encendida.
• Asegúrese de que el cable de la impresora esté bien conectado a un
puerto USB y al puerto correspondiente en la impresora.

Preguntas frecuentes - 91
Consejos y sugerencias para el uso de Windows 8
Sabemos que este es un nuevo sistema operativo al que habrá que
acostumbrarse, así que hemos creado algunas sugerencias para ayudarle
a dar los primeros pasos.
Deberá tener en cuenta tres conceptos
1. Inicio
El botón de Inicio ya no está disponible; podrá iniciar aplicaciones desde
la pantalla Inicio.
2. Tiles
Los Live tiles son similares a las miniaturas de las aplicaciones.
3. Charms
Charms le permite realizar funciones útiles, como compartir contenido,
apagar su PC o cambiar la configuración.
¿Cómo accedo a los charms?
Mueva el cursor hacia la esquina derecha superior o inferior de la pantalla
para acceder a los charms, o presione la tecla de Windows + <C>.
¿Cómo llego a Inicio?
Presione la Tecla de Windows en el teclado; presione la Tecla de
Windows + <C> y haga clic en Inicio; o mueva el cursor hacia la esquina
izquierda inferior de la pantalla y haga clic en Inicio.

92
¿Cómo salto entre aplicaciones?
Mueva el cursor hacia el borde izquierdo de la pantalla para ver
miniaturas de aplicaciones que se están ejecutando actualmente.
También puede presionar la tecla de Windows + <Tab> para abrir y
recorrer los aplicaciones actuales.
¿Cómo apago la computadora?
Presione la Tecla de Windows + <C>, haga clic en Configuración >
Encendido y seleccione la acción que desea realizar. Como alternativa,
desde Escritorio, haga clic en Gateway Botón de encendido y
seleccione la acción que desea realizar.
¿Por qué hay una nueva interfaz?
La nueva interfaz para Windows 8 está diseñada para funcionar bien con
la entrada táctil. Las aplicaciones de la Tienda de Windows usarán
automáticamente toda la pantalla y no requerirán un cierre de la manera
tradicional. Las aplicaciones de la Tienda de Windows aparecerán en
Inicio mediante live-tiles.
¿Qué son los ‘live tiles’?
Los Live tiles son similares a las miniaturas de las aplicaciones que serán
actualizadas con nuevo contenido cada vez que usted se conecta a
Internet. Entonces, por ejemplo, podrá ver actualizaciones de tiempo o
acciones sin la necesidad de abrir la aplicación.

Preguntas frecuentes - 93
¿Cómo desbloqueo la computadora?
Presione cualquier tecla y haga clic en el icono de una cuenta de usuario
para desbloquear la computadora. Si su cuenta tiene una contraseña
establecida, deberá ingresarla para continuar.
¿Cómo personalizo la computadora?
Puede personalizar Inicio con una imagen de fondo diferente u
organizando los mosaicos según sus propias necesidades.
Para cambiar el fondo, presione la tecla de Windows + <C> y haga clic en
Configuración > Cambiar configuración de PC > Personalizar. Haga
clic en Pantalla Inicio en la parte superior de la página y seleccione un
color y una imagen.
¿Cómo muevo los mosaicos?
Haga clic durante unos segundos en un mosaico para seleccionarlo,
luego arrástrelo al lugar en Inicio donde usted quiera que aparezca. Se
moverán otros mosaicos para acomodar el mosaico en su nueva
ubicación.
¿Puedo agrandar o achicar los mosaicos?
Haga clic con el botón derecho en un mosaico, luego seleccione Más
pequeño o Más grande desde el menú que aparece en la parte inferior
de la pantalla.

94
¿Cómo personalizo la pantalla de Bloqueo?
Puede personalizar la pantalla de bloqueo con una imagen diferente o
para que muestre rápidamente el estado y notificaciones según sus
propias necesidades.
Para cambiar el fondo, presione la tecla de Windows + <C> y haga clic en
Configuración > Cambiar configuración de PC > Personalizar. Haga
clic en Pantalla de bloqueo en la parte superior de la página y seleccione
la imagen y las aplicaciones que desea ver en la pantalla de bloqueo.
Entonces, ¿cómo cierro una aplicación?
Mueva el cursor hacia la parte superior de la pantalla y haga clic y arrastre
la ventana hacia abajo para cerrar la aplicación.
Puede cerrar aplicaciones desde las miniaturas en el borde izquierdo de
la pantalla haciendo clic con el botón derecho en una miniatura y
seleccionando Cerrar.
¿Puedo cambiar la resolución de la pantalla?
Desde Inicio, comience a escribir ‘Panel de control’ para abrir Buscar y
que aparezcan los resultados; haga clic en Panel de control > Ajustar
resolución de pantalla.
Quiero usar Windows como solía hacerlo, ¡devuélvame mi
escritorio!
Desde Inicio haga clic en el mosaico Escritorio para ver un escritorio
tradicional. Puede anclar aplicaciones de uso frecuente a la barra de
tareas para abrirlos con facilidad.

Preguntas frecuentes - 95
Si hace clic en una aplicación que no es una aplicación de la Tienda de
Windows, Windows la abrirá automáticamente mediante Escritorio.
¿Dónde están mis aplicaciones?
Desde Inicio, simplemente comience a escribir el nombre de una
aplicación que desea abrir y Buscar se abrirá automáticamente y mostrará
los resultados en una lista.
Para ver la lista completa de aplicaciones, presione la barra espaciadora
o la Tecla de menú y haga clic en Todas las aplicaciones.
¿Cómo hago para que mi aplicación aparezca en Inicio?
Si está en Todas las aplicaciones y quiere que aparezca una aplicación
en Inicio, puede seleccionar la aplicación y hacer clic con el botón
derecho en ella. Seleccione Anclar a Inicio desde el menú que aparece
en la parte inferior de la pantalla.
¿Cómo elimino un mosaico de Inicio?
Haga clic con el botón derecho en el mosaico y haga clic en Desanclar
de Inicio desde el menú que aparece en la parte inferior de la pantalla.
¿Cómo hago para que mi aplicación aparezca en mi barra de tareas en
Escritorio?
Si está en Todas las aplicaciones y quiere que aparezca una aplicación
en la barra de tareas en Escritorio, puede seleccionar la aplicación y
hacer clic con el botón derecho en ella. Seleccione Anclar a barra de
tareas desde el menú que aparece en la parte inferior de la pantalla.

96
¿Cómo instalo aplicaciones?
Puede descargar aplicaciones de la Tienda de Windows desde Tienda.
Deberá tener un ID de Microsoft para comprar y descargar aplicaciones
desde Tienda.
¡No puedo encontrar aplicaciones como Notepad y Paint! ¿Dónde
están?
Desde Inicio simplemente puede comenzar a escribir el nombre de la
aplicación que está buscando para abrir Buscar y que aparezcan los
resultados en una lista. Como alternativa, abra Todas las aplicaciones y
desplácese hasta ‘Accesorios de Windows’ para ver la lista de los
programas heredados.
¿Qué es un ID de Microsoft (cuenta)?
Una cuenta Microsoft es una dirección de correo electrónico y una
contraseña que se utiliza para iniciar sesión en Windows. Puede usar
cualquier dirección de correo electrónico, pero es mejor si elije la que usa
para comunicarse con amigos e iniciar sesión en sus sitios Web favoritos.
Cuando inicia sesión en su PC con una cuenta de Microsoft, conectará su
PC a las personas, los archivos y los dispositivos que a usted le interesan.
¿Necesito uno?
No necesita un ID de Microsoft para usar Windows 8, pero facilita las
cosas porque usted puede sincronizar sus datos en diferentes máquinas
en las que inicia sesión mediante el ID de Microsoft.

Preguntas frecuentes - 97
¿Cómo lo obtengo?
Si ya instaló Windows 8 y no inició sesión con una cuenta de Microsoft o
no tiene una cuenta de Microsoft y quiere obtener una, presione la tecla
de Windows + <C> y haga clic en Configuración > Cambiar
configuración de PC > Usuarios > Cambiar a una cuenta de
Microsoft, y siga las instrucciones en la pantalla.
¿Cómo agrego un favorito a Internet Explorer?
Internet Explorer 10 no tiene favoritos tradicionales, pero usted puede
anclar accesos directos a Inicio. Una vez que la página está abierta, haga
clic con el botón derecho en la página para abrir el menú en la parte
inferior de la pantalla. Haga clic en Anclar a Inicio.
¿Cómo busco actualizaciones de Windows?
Presione la tecla de Windows + <C> y haga clic en Configuración >
Cambiar configuración de PC > Actualizaciones de Windows. Haga
clic en Buscar actualizaciones ahora.
¿Dónde puedo obtener más información?
Para obtener más información, visite:
• Tutoriales de Windows 8: www.gateway.com/windows8-tutorial
• Preguntas frecuentes de soporte: support.gateway.com

98
INFORMACIÓN REGLAMENTARIA
PREVENCIÓN DE LA PÉRDIDA DE LA AUDICIÓN
- Precaución: Puede producirse una pérdida de audición permanente si se
utilizan audífonos o auriculares a alto volumen durante períodos de tiempo
prolongados.
- A pleine puissance, l’écoute prolongée du baladeur peut endommager l’oreille de
l’utilisateur.
PRECAUCIÓN al escuchar
Para proteger su audición siga las siguientes instrucciones.
- Aumente el volumen gradualmente hasta que pueda oír de manera clara
y cómoda.
- No aumente el nivel de volumen una vez que sus oídos se han adaptado.
- No escuche música a un volumen alto durante períodos prolongados.
- No aumente el volumen para bloquear un entorno ruidoso.
- Disminuya el volumen si no puede oír a las personas que hablan cerca de usted.
N
ORMAS REGLAMENTARIAS SOBRE DISPOSITIVOS DE RADIO
-
Nota:
La siguiente información reglamentaria es únicamente para modelos con
Bluetooth y/o LAN inalámbrica.
Accesorios de conformidad
Los accesorios asociados con este equipo son: un cable blindado para video cuando se
conecta un monitor externo. Se deben utilizar estos accesorios con el fin de garantizar el
cumplimiento de las normas de la FCC.

Información reglamentaria - 99
ADVERTENCIA DE LA PROPUESTA 65 DE CALIFORNIA
Este producto contiene productos químicos reconocidos por el Estado de California como
causantes de cáncer, defectos de nacimiento y/u otros daños reproductivos. Para obtener
información adicional con respecto a esta advertencia sobre el producto, vaya a
www.gateway.com/prop65.
日本
(JAPÓN)
本装置は、第二種情報装置(住宅地域またはその隣接した地域において使用されるべき
情報装置)デ住宅地域での電波障害防止を目的とした情報装置等電波障害自主規制協議
会(VCCI)基準に適合しております。
しかし、本装置をラジオ、テレビジョン受信機に、近接してご使用になると、受信障害
の原因となることがあります。本書の説明にしたがって正しい取り扱いをしてくださ
い。
N
FORMACIÓN SOBRE LA NORMATIVA APLICABLE AL ADAPTADOR INALÁMBRICO
USA — FCC and FAA
The FCC with its action in ET Docket 96-8 has adopted a safety standard for human
exposure to radio frequency (RF) electromagnetic energy emitted by FCC certified
equipment. The wireless adapter meets the Human Exposure limits found in OET Bulletin
65, supplement C, 2001, and ANSI/IEEE C95.1, 1992. Proper operation of this radio
according to the instructions found in this manual will result in exposure substantially
below the FCC’s recommended limits.
- The following safety precautions should be observed:
Do not touch or move antenna while the unit is transmitting or receiving.
- Do not hold any component containing the radio such that the antenna is very close
or touching any exposed parts of the body, especially the face or eyes, while
transmitting.

100
- Do not operate the radio or attempt to transmit data unless the antenna is connected;
this behavior may cause damage to the radio.
Use in specific environments:
- The use of wireless adapters in hazardous locations is limited by the constraints
posed by the safety directors of such environments.
- The use of wireless adapters on airplanes is governed by the Federal Aviation
Administration (FAA).
- The use of wireless adapters in hospitals is restricted to the limits set forth by each
hospital.
Antenna Use
In order to comply with FCC RF exposure limits, low gain integrated antennas should be
located at a minimum distance of 20 cm (8 inches) or more from the body of all persons
or at a minimum distance as specified by the FCC module grant conditions. FCC grants
can be viewed from the FCC Equipment Authorization website at https://fjallfoss.fcc.gov/
oetcf/eas/reports/GenericSearch.cfm by entering the FCC ID printed on the module label.
Explosive Device Proximity Warning
Warning: Do not operate a portable transmitter (including this wireless adapter) near
unshielded blasting caps or in an explosive environment unless the transmitter has been
modified to be qualified for such use
Antenna Warnings
- Warning: To comply with the FCC and ANSI C95.1 RF exposure limits, it is
recommended that for the wireless adapter installed in a desktop or portable
computer, the antenna for this wireless adapter to be installed so as to provide a
separation distance of at least 20 cm (8 inches) from all persons or at the minimum
distance as specified by the module grant conditions. FCC grants can be viewed from
the FCC Equipment Authorization website at https://fjallfoss.fcc.gov/oetcf/eas/
reports/GenericSearch.cfm by entering the FCC ID printed on the module label.

Información reglamentaria - 101
- Warning: The wireless adapter is not designed for use with high-gain directional
antennas.
Use On Aircraft Caution
- Caution: Regulations of the FCC and FAA prohibit airborne operation of radio-
frequency wireless devices (wireless adapters) because their signals could interfere
with critical interfere with critical aircraft instruments.
Local Restrictions on 802.11a, 802.11b, 802.11g and 802.11n Radio Usage
- Caution: Due to the fact that the frequencies used by 802.11a, 802.11b, 802.11g and
802.11n wireless LAN devices may not yet be harmonized in all countries, 802.11a,
802.11b, 802.11g and 802.11n products are designed for use only in specific
countries, and are not allowed to be operated in countries other than those of
designated use. As a user of these products, you are responsible for ensuring that
the products are used only in the countries for which they were intended and for
verifying that they are configured with the correct selection of frequency and channel
for the country of use. Any deviation from the permissible power and frequency
settings for the country of use is an infringement of national law and may be punished
as such.
Wireless Interoperability
The wireless adapter is designed to be interoperable with other wireless LAN products
that are based on direct sequence spread spectrum (DSSS) radio technology and to
comply with the following standards:
- IEEE Std. 802.11b compliant Standard on Wireless LAN
- IEEE Std. 802.11g compliant Standard on Wireless LAN
- IEEE Std. 802.11a compliant Standard on Wireless LAN (applies to devices
supporting 802.11a)
- IEEE Std. 802.11n draft 2.0 compliant on Wireless LAN
- Wireless Fidelity certification, as defined by the Wi-Fi Alliance

102
The Wireless Adapter and Your Health
The wireless adapter, like other radio devices, emits radio frequency electromagnetic
energy. The level of energy emitted by the wireless adapter, however, is less than the
electromagnetic energy emitted by other wireless devices such as mobile phones. The
wireless adapter operates within the guidelines found in radio frequency safety standards
and recommendations. These standards and recommendations reflect the consensus of
the scientific community and result from deliberations of panels and committees of
scientists who continually review and interpret the extensive research literature. In some
situations or environments, the use of the wireless adapter may be restricted by the
proprietor of the building or responsible representatives of the applicable organization.
Examples of such situations may include:
- Using the wireless adapter on board airplanes, or
- Using the wireless adapter in any other environment where the risk of interference
with other devices or services is perceived or identified as being harmful.
If you are uncertain of the policy that applies to the use of wireless adapters in a specific
organization or environment (an airport, for example), you are encouraged to ask for
authorization to use the adapter before you turn it on.
FCC Radio Frequency Interference Requirements (applies to device supporting
802.11a)
This device is restricted to indoor use due to its operation in the 5.15 to 5.25 GHz and
5.470 to 5.725 GHz frequency ranges. FCC requires this product to be used indoors for
the frequency ranges 5.15 to 5.25 GHz and 5.470 to 5.725 GHz to reduce the potential
for harmful interference to co-channel mobile satellite systems. High power radars are
allocated as primary users of the 5.25 to 5.35 GHz and 5.65 to 5.85 GHz bands. These
radar stations can cause interference with and /or damage this device. No configuration
controls are provided for this wireless adapter allowing any change in the frequency of
operations outside the FCC grant of authorization for U.S operation according to Part
15.407 of the FCC rules.

Información reglamentaria - 103
USA — Federal Communications Commission (FCC)
This device complies with Part 15 of the FCC Rules. Operation of the device is subject to
the following two conditions:
- This device may not cause harmful interference.
- This device must accept any interference that may cause undesired operation.
- Note: The radiated output power of the adapter is far below the FCC radio frequency
exposure limits. Nevertheless, the adapter should be used in such a manner that the
potential for human contact during normal operation is minimized. To avoid the
possibility of exceeding the FCC radio frequency exposure limits, you should keep a
distance of at least 20 cm between you (or any other person in the vicinity), or the
minimum separation distance as specified by the FCC grant conditions, and the
antenna that is built into the computer. Details of the authorized configurations can
be found at http://www.fcc.gov/oet/ea/
by entering the FCC ID number on the device.
Interference Statement
This wireless adapter has been tested and found to comply with the limits for a Class B
digital device, pursuant to Part 15 of the FCC Rules. These limits are designed to provide
reasonable protection against harmful interference in a residential installation. This
wireless adapter generates, uses, and can radiate radio frequency energy. If the wireless
adapter is not installed and used in accordance with the instructions, the wireless adapter
may cause harmful interference to radio communications. There is no guarantee,
however, that such interference will not occur in a particular installation. If this wireless
adapter does cause harmful interference to radio or television reception (which can be
determined by turning the equipment off and on), the user is encouraged to try to correct
the interference by taking one or more of the following measures:
- Reorient or relocate the receiving antenna of the equipment experiencing the
interference.
- Increase the distance between the wireless adapter and the equipment experiencing
the interference.

104
- Connect the computer with the wireless adapter to an outlet on a circuit different from
that to which the equipment experiencing the interference is connected.
- Consult the dealer or an experienced radio/TV technician for help.
- Note: The adapter must be installed and used in strict accordance with the
manufacturer's instructions as described in the user documentation that comes with
the product. Any other installation or use will violate FCC Part 15 regulations.
Canada — Industry Canada (IC)
This device complies with RSS210 of Industry Canada. Cet appareil se conforme à
RSS210 de Canada d'Industrie.
- Caution: When machine supports and using IEEE 802.11a wireless LAN, this
product is restricted to indoor use due to its operation in the 5.15- to 5.25 GHz
frequency range. Industry Canada requires this product to be used indoors for the
frequency range of 5.15 GHz to 5.25 GHz to reduce the potential for harmful
interference to co-channel mobile satellite systems. High power radar is allocated as
the primary user of the 5.25 to 5.35 GHz and 5.65 to 5.85 GHz bands. These radar
stations can cause interference with and/or damage to this device. The maximum
allowed antenna gain for use with this device is 6dBi in order to comply with the
E.I.R.P limit for the 5.25 to 5.35 and 5.725 to 5.85 GHz frequency range in point-to-
point operation. To comply with RF exposure requirements all antennas should be
located at a minimum distance of 20 cm, or the minimum separation distance allowed
by the module approval, from the body of all persons.
- Attention: l’utilisation d’un réseau sans fil IEEE802.11a est réstreinte à une
utilisation en intérieur à cause du fonctionement dans la bande de fréquence 5,15 -
5,25 GHz. Industry Canada requiert que ce produit soit utilisé à l’intérieur des
bâtiments pour la bande de fréquence 5,15 - 5,25 GHz afin de réduire les possibilités
d’interférences nuisibles aux canaux co-existants des systèmes de transmission
satellites. Les radars de puissances ont fait l’objet d’une allocation primaire de
fréquences dans les bandes 5,25 - 5,35 GHz et 5 65 - 5 85 GHz. Ces stations radar
peuvent créer des interférences avec ce produit et/ou lui être nuisible. Le gain
d’antenne maximum permissible pour une utilisation avec ce produit est de 6 dBi afin

Información reglamentaria - 105
d’être conforme aux limites de puissance isotropique rayonnée équivalente (P.I.R.E.)
applicable dans les bandes 5,25 - 5,35 GHz et 5,725 - 5,85 GHz en fonctionement
point-à-point. Se pour conformer aux conditions d'exposition de RF toutes les
antennes devraient être localisées à une distance minimum de 20 cm, ou la distance
de séparation minimum permise par l'approbation de module, du corps de toutes les
personnes.
This Class B digital apparatus complies with Canadian ICES-003.
Cet appareil numérique de la classe B est conforme a la norme NMB-003 du Canada.
"To prevent radio interference to the licensed service, this device is intended to be
operated indoors and away from windows to provide maximum shielding. Equipment (or
its transmit antenna) that is installed outdoors is subject to licensing."
« Pour empêcher que cet appareil cause du brouillage au service faisant l'objet d'une
licence, il doit être utilisé a l'intérieur et devrait être placé loin des fenêtres afin de fournir
un écran de blindage maximal. Si le matériel (ou son antenne d'émission) est installé à
l'extérieur, il doit faire l'objet d'une licence. »
Union Europea
Lista de países aplicables
Este producto dispositivo debe usarse de acuerdo con las normas y restricciones del país
de uso. Para más información, comuníquese con el organismo regulador del país de uso.
Consulte http://ec.europa.eu/enterprise/rtte/implem.htm
para la última lista de países.
Lista de Códigos nacionales
Este equipo puede ser operado en los siguientes países:
País
ISO 3166
código de
2 letras
País
ISO 3166
código
de
2 letras
País
ISO 3166
código
de
2 letras
País
ISO 3166
código
de
2 letras
Austria AT Alemania DE Malta MT Reino Unido GB
Bélgica BE Grecia GR Países bajos NT Islandia IS

106
La banda baja 5,15 -5,35 GHz está destinada únicamente al uso en interiores.
Este equipo cumple con los principales requisitos de la directiva 1999/5/EC de la Unión
Europea. Consulte las Declaraciones sobre el cumplimiento normativo en la Unión
Europea y más información disponible en la Declaración de Conformidad adjunta.
Chipre CY Hungría HU Polonia PL Liechtenstein LI
República
Checa
CZ Irlanda IE Portugal PT Noruega NO
Dinamarca DK Italia IT Eslovaquia SK Suiza CH
Estonia EE Letonia LV Eslovenia SL Bulgaria BG
Finlandia FI Lituania LT España ES Rumania RO
Francia FR Luxemburgo LU Suecia SE Turquía TR
English
Hereby, ACER INC., declares that this devise is in
compliance with the essential requirements and other
relevant provisionns of Directive 1999/5/EC.
Česky [Czech]
ACER INC. tímto prohlašuje, že toto zařízení je ve shodě se
základními požadavky a dalšími příslušnými ustanoveními
směrnice 1999/5/ES.
Daansk [Danish]
Undertegnede ACER INC. erklærer herved, at følgende
udstyr overholder de væsentlige krav og øvrige relevante krav
i direktiv 1999/5/EF.
País
ISO 3166
código de
2 letras
País
ISO 3166
código
de
2 letras
País
ISO 3166
código
de
2 letras
País
ISO 3166
código
de
2 letras

Información reglamentaria - 107
Deutsch
[German]
Hiermit erklärt ACER INC., dass sich das Gerät Radiolan in
Übereinstimmung mit den grundlegenden Anforderungen und
den übrigen einschlägigen Bestimmungen der Richtlinie
1999/5/EG befindet.
Eesti [Estonian]
Käesolevaga kinnitab ACER INC. seadme vastavust direktiivi
1999/5/EÜ põhinõuetele ja nimetatud direktiivist tulenevatele
teistele asjakohastele sätetele.
Español
[Spanish]
Por medio de la presente ACER INC. declara que el
dispositivo cumple con los requisitos esenciales y
cualesquiera otras disposiciones aplicables o exigibles de la
Directiva 1999/5/CE.
Ελληνικά
[Greek]
∆ια του παρόντος η ACER INC. δηλώνει ότι η παρούσα
συσκευή συµµορφώνεται προς τις ουσιώδεις απαιτήσεις και
τις λοιπές διατάξεις της Οδηγίας 1999/5/ ΕΚ.
Français
[French]
Par la présente ACER INC. déclare que cet appareil est
conforme aux exigences essentielles et aux autres
dispositions pertinentes de la directive 1999/5/CE.
Íslenska
[Icelandic]
Hér með lýsir ACER INC. yfir því að er í samræmi við
grunnkröfur og aðrar kröfur, sem gerða r eru í tilskipun
1999/5/EC.

108
Itaaliano [Italian]
Con la presente ACER INC. dichiara che questo dispositivo è
conforme ai requisiti essenziali ed alle altre disposizioni
pertinenti stabilite dalla direttiva 1999/5/CE.
Latviski [Latvian]
Ar šo ACER INC. deklarē, ka šī ierīce atbilst Direktīvas
1999/5/EK būtiskajām prasībām un citiem ar to saistītajiem
noteikumiem.
Lietuvių
[Lithuanian]
Šiuo ACER INC. deklaruoja, kad šis įrenginys atitinka
esminius reikalavimus ir kitas 1999/5/EB Direktyvos
nuostatas.
Malti [Maltese]
Hawnhekk, ACER INC., jiddikjara li dan jikkonforma mal- ti
ijiet essenzjali u ma provvedimenti o rajn relevanti li he mm
fid-Dirrettiva 1999/5/EC.
Magyar
[Hungarian]
Alulírott, ACER INC. nyilatkozom, hogy a készülék megfelel a
vonatkozó alapveto követelményeknek és az 1999/5/EC
irányelv egyéb eloírásainak.
Nederlands
[Dutch]
Hierbij verklaart ACER INC. dat het toestel voldoet aan de
essentiële eisen en de andere relevante bepalingen van
richtlijn 1999/5/EG.
Norsk
[Norwegiann]
ACER INC. erklærer herved at utstyret er i samsvar med de
grunnleggende krav og øvrige relevante krav i direktiv
1999/5/EF.

Información reglamentaria - 109
Polski [Polish]
Niniejszym ACER INC. oświadcza, że urządzenie jest zgodne
z zasadniczymi wymogami oraz pozostałymi stosownymi
postanowieniami Dyrektywy 1999/5/EC.
Português
[Portuguese]
ACER INC. declara que este dispostivo está conforme com
os requisitos essenciais e outras disposições da Directiva
1999/5/CE.
Slovensko
[Slovenian]
ACER INC. izjavlja, da je ta naprava skladna z bistvenimi
zahtevami in ostalimi relevantnimi določili Direktive
1999/5/ES.
Slovensky
[Slovak]
ACER INC. týmto vyhlasuje, že zariadenie spĺňa základné
požiadavky a všetky príslušné ustanovenia Smernice
1999/5/ES.
Suomi [Finnish]
ACER INC. vakuuttaa täten että tämä laite on direktiivin 1999/
5/EY oleellisten vaatimusten ja sitä koskevienn direktiivin
muiden ehtojen mukainen.
Svenska
[Swedish]
Härmed intygar ACER INC. att denna enhet står i
överensstämmelse med väsentliga egenskapskrav och
övriga relevanta bestämmelser som framgår av direktiv
1999/5/EG.

110
France
Pour la France métropolitaine :
2,400 - 2,4835 GHz (Canaux 1à 13) autorisé en usage intérieur
2,400 - 2,454 GHz (canaux 1 à 7) autorisé en usage extérieur
Pour la Guyane et la Réunion :
2,400 - 2,4835 GHz (Canaux 1à 13) autorisé en usage intérieur
2,420 - 2,4835 GHz (canaux 5 à 13) autorisé en usage extérieur
Pour tout le territoire Français :
Seulement 5,15 -5,35 GHz autorisé pour le 802.11a
L'utilisation de cet equipement (2,4 GHz WLAN) est soumise à certaines restrictions :
- La puissance maximale autorisée en intérieur est de 100 mW pour 2400 - 2483,5 MHz.
- La puissance maximale autorisée est de 100 mW en extérieur pour 2400 - 2454 MHz.
- La puissance maximale autorisée est de 10 mW en extérieur, 2454 - 2483,5 MHz.
Pour les dernières restrictions, voir http://www.art-telecom.fr.
Italy
The use of these equipments is regulated by:
1.D.L.gs 1.8.2003, n. 259, article 104 (activity subject to general authorization) for outdoor
use and article 105 (free use) for indoor use, in both cases for private use.
2.D.M. 28.5.03, for supply to public of RLAN access to networks and telecom services.
L’uso degli apparati è regolamentato da:
1.D.L.gs 1.8.2003, n. 259, articoli 104 (attività soggette ad autorizzazione generale) se
utilizzati al di fuori del proprio fondo e 105 (libero uso) se utilizzati entro il proprio fondo,
in entrambi i casi per uso private.
2.D.M. 28.5.03, per la fornitura al pubblico dell’accesso R-LAN alle reti e ai servizi di
telecomunicazioni.

Información reglamentaria - 111
Belgium
Dans le cas d'une utilisation privée, à l'extérieur d'un bâtiment, au-dessus d'un espace
public, aucun enregistrement n'est nécessaire pour une distance de moins de 300 m.
Pour une distance supérieure à 300 m un enregistrement auprès de l'IBPT est requise.
Pour les enregistrements et licences, veuillez contacter l'IBPT.
In geval van privé-gebruik, buiten een gebouw, op een openbare plaats, is geen registratie
nodig, wanneer de afstand minder dan 300 m is. Voor een afstand groter dan 300 m is
een registratie bij BIPT vereist. Voor registraties en licenties, gelieve BIPT te contacteren.
Brazil
Este equipamento opera em caráter secundário, isto é, não tem direito a proteção contra
interferência prejudicial, mesmo de estações do mesmo tipo, e não pode causar
interferência a sistemas operando em caráter primário.
Pakistan
Pakistan Telecommunication Authority (PTA) Approved
Morocco
The operation of this product in the radio channel 2 (2417 MHz) is not authorized in the
following cities: Agadir, Assa-Zag, Cabo Negro, Chaouen, Goulmima, Oujda, Tan Tan,
Taourirt, Taroudant and Taza.
The operation of this product in the radio channels 4, 5, 6 and 7 (2425 - 2442 MHz) is not
authorized in the following cities: Aéroport Mohamed V, Agadir, Aguelmous, Anza,
Benslimane, Béni Hafida, Cabo Negro, Casablanca, Fès, Lakbab, Marrakech, Merchich,
Mohammédia, Rabat, Salé, Tanger, Tan Tan, Taounate, Tit Mellil, Zag.
Japan
5 GHz 帯は室内でのみ使用のこと
Korea
당해 무선설비는 운용 중 전파혼신 가능성이 있음

112
Taiwan
第十二條
經型式認證合格之低功率射頻電機,非經許可,公司、商號或使用者均不得擅自變更頻
率、加大功率或變更原設計之特性及功能。
第十四條
低功率射頻電機之使用不得影響飛航安全及干擾合法通信 ; 經發現有干擾現象時,應立即
停用,並改善至無干擾時方得繼續使用。
前項合法通信,指依電信法規定作業之無線通信。
低功率射頻電機須忍受合法通信或工業、科學及醫療用電波輻射性電機設備之干擾。
M
ODIFICACIONES AL PRODUCTO
Marca CE
Gateway no será responsable de las modificaciones no autorizadas realizadas por el
usuario y sus consecuencias, que puedan alterar la conformidad del producto con la
marca CE.
Interferenciade radiofrecuencia
El fabricante no es responsable de cualquier interferencia de radio o TV causada por las
modificaciones no autorizadas a este equipo.
C
ONEXIONES Y TIERRA REMOTAS
Tensión extra-baja de protección (PELV por sus siglas en inglés)
Para asegurar la integridad de tensión extra-baja del equipo, conecte únicamente
equipos con circuitos eléctricamente compatibles y protegidos contra la corriente a los
puertos externos.
Tensión extra-baja de seguridad (SELV por sus siglas en inglés)
Toda entrada y salida de este producto está clasificada como Tensión extra-baja de
seguridad.

Información reglamentaria - 113
Tierras remotas
Para evitar descargas eléctricas, conecte todas las computadoras locales (oficina
individual) y el equipo de soporte informático al mismo circuito eléctrico del cableado del
edificio. Si no está seguro, verifique el cableado del edificio para evitar condiciones de
tierra remota.
Suministro del edificio
Conecte los equipos al suministro de un edificio únicamente si este está de acuerdo con
las normas de instalación eléctrica de su país. En el Reino Unido, estas son las normas
IEE.
F
UENTE DE ALIMENTACIÓN Y CABLES
Fuente de alimentación
Los enchufes de entrada y salida (si está incluido) de la fuente de alimentación están
clasificados como Voltaje peligroso.
Debe desenchufar el cable de alimentación y quitar la batería para desconectar el equipo
de la fuente de alimentación. Para eso, el enchufe debe instalarse cerca del equipo y
debe ser de fácil acceso.
Potencia nominal de entrada: Verifique la etiqueta de potencia en la parte inferior de la
computadora para asegurarse de que el adaptador cumple con la potencia nominal
especificada.
El usuario no debe, bajo ninguna circunstancia, intentar desarmar la fuente de
alimentación. La fuente de alimentación no tiene partes que puedan ser reemplazadas
por el usuario. Dentro de la fuente de alimentación hay voltajes peligrosos que pueden
causar serias lesiones.
Debe devolver una fuente de alimentación defectuosa a su distribuidor.

114
Enchufe y cables de alimentación
Este producto requiere un enchufe y un cable de alimentación conectados a tierra. El
enchufe sólo encaja en una toma de corriente con conexión a tierra. Asegúrese de que
esta toma está conectada a tierra correctamente antes de insertar el enchufe. No
introduzca el enchufe en una toma que no esté conectada a tierra. Consulte a su
electricista para más detalles.
El cable no debe superar los 2,5 metros de largo. Para evitar riesgos eléctricos, no quite
ni inhabilite la conexión a tierra del cable de alimentación. Reemplace el cable de
alimentación si está dañado. Contacte a su distribuidor para conseguir uno nuevo que
sea igual. En Europa, el enchufe debe ser para 250 VAC, 10 amperios mínimo. El enchufe
debe tener una marca de aprobación de un organismo internacional. El cable debe ser
apropiado para el uso en el país del usuario final. Consulte a su distribuidor o a las
autoridades eléctricas locales si no está seguro del tipo de cable que se debe usar en su
país.
Cables
Para cables que no son entregados con el producto en el empaque de la computadora:
El rendimiento EMC del sistema está garantizado únicamente si el cable y la interfaz usan
blindaje suficiente.
Se requiere el uso de cable de interfaz blindado para antenas de FM o TV, USB,
IEEE1394, series, impresoras, juegos, audio/video analógico o digital, PS2, y
generalmente todas las interfaces de cable de alta velocidad.
Use únicamente cables de telecomunicación 26AWG certificados por UL o más grandes.
Únicamente el cable módem Ethernet LAN o RTC puede superar los 3 metros de largo.
Gateway recomienda que le agregue un clic redondo con núcleo de ferrita a cada cable
que conecte la computadora a un dispositivo hardware que no ha sido entregado con la
computadora.
- Referencia de ferrita: 28A-2029 de Steward (dos lazos)

Información reglamentaria - 115
Durante la certificación del producto, Gateway utilizó la siguiente calidad de cables:
- Cables USB 2.0 certificados de Hama 46778
- FireWire blindados IEEE1394 de Hama 50011
- Cables de Audio/Video blindados RCA-RCA de Thomson KHC001M, KHC012M,
KHC028M
- Cables de Audio blindados estéreo de Hama 43330H, 42714H
Acumulación de calor y computadoras portátiles
El adaptador de CA y la parte inferior de la computadora pueden calentarse luego de un
uso prolongado. Se debe evitar el contacto físico prolongado con cualquiera de los dos.
E
XTRACCIÓN Y REEMPLAZO DE LA TAPA DEL CHASIS
Antes de retirar la tapa del chasis para hacer el mantenimiento del equipo o modificarlo,
debe desconectar todos los cables de alimentación y del módem, y quitar o deshabilitar
la batería.
- Precaución: Algunos componentes dentro de la computadora pueden calentarse
luego del uso prolongado.
Luego debe cerrar el chasis antes de enchufar o encender el equipo.
D
ECLARACIÓN DE CONFORMIDAD PARA PRODUCTOS LÁSER
Los dispositivos ópticos están probados y certificados para cumplir con las normas de la
Comisión Electrotécnica Internacional IEC60825-1 y europea EN60825-1 para productos
láser clase 1.
Los productos láser clase 1 no son considerados peligrosos. Los dispositivos ópticos
están diseñados de manera tal que nunca haya acceso humano a la radiación láser por
encima del nivel Clase 1 durante condiciones de funcionamiento normal o de
mantenimiento recomendado.
Los dispositivos ópticos instalados en la computadora están diseñados para ser usados
únicamente como componentes de ese tipo de producto electrónico y, por lo tanto, no
cumplen con los requerimientos apropiados del Código de regulación federal Sec.
1040.10 y Sec. 1040.11 para productos láser COMPLETOS.

116
Debido a que la exposición a la radiación láser es extremadamente peligrosa, el usuario
no debe, bajo ninguna circunstancia, intentar desarmar el dispositivo láser.
EMPAQUE
El empaque de este producto cumple con la Directiva medioambiental europea
94/62/EC desde el 20 de diciembre de 1994 y su equivalente en la Legislación francesa
por el Decreto 98-638 desde el 20 de julio de 1998.
C
ONFORME A LA CERTIFICACIÓN NORMATIVA DE RUSIA

Medioambiente - 117
MEDIOAMBIENTE
NUESTRO COMPROMISO CON LA PROTECCIÓN MEDIOAMBIENTAL
El medioambiente ha sido el centro de nuestros productos.
Gateway se compromete a limitar el impacto ambiental de sus productos durante la vida
útil del producto.
Comienza en la fase de diseño, con una política muy estricta de adquisición, se le da
máxima atención a los componentes electrónicos para limitar el peso en metales pesados
tales como plomo, cadmio, cromo, mercurio, etc. Se les solicita a todos proveedores que
respeten todas las normas, para cada parte de los productos.
En cuanto a los productos fuera de uso, se han tomado medidas para anticipar y facilitar
el reciclado de todos nuestros productos. De este modo, todas las partes plásticas de
más de 25 gramos utilizadas en productos Gateway son etiquetadas como ISO 11469.
Esta etiqueta permite un rápido reconocimiento del material y reduce su valoración. Así
mismo, se diseñan las computadoras de escritorio para que puedan ser fácilmente
desmanteladas, y los tornillos son reemplazados por clips.
D
ESECHO DEL PRODUCTO
La directiva 2002/96/EC, conocida como Directiva sobre residuos de
equipos eléctricos y electrónicos (WEEE), exige que los productos
eléctricos y electrónicos sean desechados aparte de los residuos
domésticos. El objetivo es promover la reutilización, el reciclado y otras
formas de recuperación y reducir la cantidad de residuos para disminuir
el relleno sanitario y la incineración. El logo del bote de basura tachado
está para recordarle que estos productos deben ser clasificados para su
disposición. Estas normas se aplican a todos los productos Gateway y a todos los
accesorios, como el teclado, el ratón, los altavoces, el control remoto, etc. Cuando deba
desechar esos productos, asegúrese de que sean reciclados correctamente

118
consultándolo con la autoridad local, o devolviendo el equipo viejo a su proveedor si lo
está reemplazando. Para mayor información, visite www.gateway.com/about/
corp_responsibility/environment.php.
Desecho de la batería (cuando corresponda)
Antes de desechar su equipo, asegúrese de haber quitado las baterías que puedan estar
en el equipo. Las leyes europeas establecen que las baterías no deben ser desechadas
junto a los residuos domésticos. No arroje las baterías usadas en el bote de basura.
Deseche las baterías usadas a través de un esquema de recogida de baterías cuando
sea posible, o pregúntele a su distribuidor o a la autoridad local acerca de las
infraestructuras que puede usar. Su esfuerzo posibilitará la recogida, el reciclado y la
destrucción seguros de baterías usadas y ayudará a proteger el medioambiente y a
reducir los riesgos para la salud.
- Precaución: El uso de una batería incorrecta puede provocar riesgo de explosión.
Deseche las baterías gastadas de acuerdo a las instrucciones.
ENERGY STAR
Los productos calificados con la ENERGY STAR de Gateway le permiten
ahorrar dinero reduciendo el coste de la energía y protegiendo el medio
ambiente sin afectar a las funciones o al rendimiento. En Gateway
estamos orgullosos de ofrecer a nuestros clientes productos con la marca
ENERGY STAR.
¿Qué es ENERGY STAR?
Los productos calificados con la ENERGY STAR consumen menos energía y evitan las
emisiones de gas de efecto invernadero cumpliendo unos estrictos requisitos de uso
eficiente de la energía establecidos por la agencia de protección medioambiental de
EE.UU. Gateway se compromete a ofrecer productos y servicios en todo el mundo que
ayuden a los clientes a ahorrar dinero, conservar la energía y mejorar la calidad de
nuestro medio ambiente. Cuanta más energía podamos ahorrar mediante un uso más

Medioambiente - 119
eficiente de la energía, más reduciremos los gases de efecto invernadero y los riesgos
de que cambie el clima. Para más información, consulte www.energystar.gov o
www.energystar.gov/powermanagement.
- Nota: Puede que la información de esta sección no se aplique a su equipo.
Los productos calificados con la ENERGY STAR de Gateway:
- Producen menos calor, y reducen las cargas de refrigeración y el recalentamiento.
- Entran automáticamente en el modo de "suspensión de la pantalla" y "suspensión
del ordenador" tras 10-30 minutos de inactividad respectivamente.
- Desactive el modo de suspensión pulsando el teclado o moviendo el ratón.
- En el modo de "suspensión", los ordenadores ahorrarán más del 80% de energía.
ENERGY STAR y la marca de ENERGY STAR son marcas registradas en EE.UU.

120
LICENCIA DE SOFTWARE
- Nota: La mayoría de las aplicaciones de software ya están preinstaladas en la
computadora Gateway. Están listas para ser usadas o configuradas. Sin embargo,
algunos títulos requieren un CD o DVD para ejecutarse. Encontrará estos discos en
el embalaje de la computadora.
Contrato de licencia (Productos CD y/o DVD) de Gateway. Esta copia del original es la
prueba de licencia para usted. Trátelo como algo valioso.
¡Importante!
Lea cuidadosamente antes de instalar el software.
El siguiente Contrato de licencia se aplica a usted. Este es un contrato legal entre usted
(ya sea un individuo o una entidad) y Gateway. Al instalar el software usted está
aceptando los términos de este Contrato. Si usted no acepta los términos de este
Contrato, devuelva inmediatamente todo el sistema informático, el paquete de software
cerrado, si corresponde, como así también los términos adjuntos (incluyendo material
escrito u otros recipientes) en el lugar que los obtuvo para que le devuelvan el importe
total.
G
ATEWAY LICENCIA DE SOFTWARE
1. Otorgamiento de licencia
Este contrato de licencia (“Licencia”) de Gateway le permite usar una copia de la versión
especificada del SOFTWARE de Gateway antes identificado (que puede incluir al menos
un disco de CD o DVD) en una sola computadora, siempre que el SOFTWARE esté en
uso en una sola computadora en cualquier momento. Si usted tiene Licencias múltiples
para el SOFTWARE, entonces en cualquier momento puede tener en uso tantas copias
del SOFTWARE como Licencias. El SOFTWARE está “en uso” en una computadora
cuando está cargada en la memoria temporal (es decir, RAM) o instalada en la memoria
permanente (por ejemplo, disco duro, CD y/o DVD), u en otro dispositivo de
almacenamiento de la computadora, excepto que una copia instalada en un servidor de

Licencia de Software - 121
red con el solo propósito de distribución a otra computadora no está “en uso”. Si el
número de usuarios anticipado del SOFTWARE excederá el número de Licencias
aplicables, entonces debe tener un mecanismo o proceso razonable para asegurar que
el número de personas que usan el SOFTWARE simultáneamente no exceda el número
de Licencias. Si el SOFTWARE está instalado de forma permanente en el disco duro o
en el dispositivo de almacenamiento de una computadora (que no sea un servidor de red)
y una persona usa esa computadora más del 80% del tiempo que está en uso, entonces
esa persona también puede usar el SOFTWARE en una computadora portátil o
doméstica.
2. Copyright
El SOFTWARE es propiedad de Gateway o de sus proveedores y está protegido por la
disposición del tratado internacional y las leyes de copyright de los Estados Unidos. Por
lo tanto, debe tratar el SOFTWARE como cualquier otro material con derechos de autor
(por ejemplo, un libro o una grabación musical) excepto que transfiera la porción del
SOFTWARE del CD y/o DVD, si aplica, a un solo disco duro siempre y cuando usted
guarde el original únicamente con fines de archivo o como copia de seguridad. No puede
copiar la porción del CD y/o DVD del SOFTWARE o el material escrito que lo acompaña.
3. Otras restricciones
No puede alquilar o arrendar el SOFTWARE, pero puede transferir el SOFTWARE y el
material escrito que lo acompaña de forma permanente siempre y cuando usted no se
quede con copias y el destinatario acepte los términos de este Contrato. No se puede
realizar una ingeniería inversa del SOFTWARE, ni tampoco descompilarlo o desmontarlo.
Cualquier transferencia del SOFTWARE debe incluir la actualización más reciente y
todas las versiones previas.

122
INFORMACIÓN SOBRE LICENCIAS DE SOFTWARE GRATUITOS O SOFTWARE DE OTROS
FABRICANTES
El software precargado, grabado o distribuido con los productos provistos por Gateway
contienen programas de software gratuitos o de otros fabricantes (el “Software gratuito”),
que están autorizados de acuerdo con los términos de la Licencia Pública General (la
“GPL”) de GNU. El Software gratuito está marcado como tal. El copiado, la distribución y/
o modificación del Software gratuito estarán sujetos a los términos de la GPL.
El Software gratuito se distribuye con el fin de que pueda ser de utilidad para los usuarios,
pero no se ofrece NINGUNA GARANTÍA, ni siquiera la garantía implícita de
COMERCIABILIDAD o IDONEIDAD PARA UN FIN DETERMINADO. Siempre se
aplicarán las disposiciones de la Licencia General Pública de GNU. Puede ingresar
directamente a http://www.gnu.org para obtener una copia de la GPL o escribir a la Free
Software Foundation, Inc. (Fundación para el software gratuito) y pedir una copia. La
dirección de la Free Software Foundation, Inc es: 59 Temple Place - Suite 330, Boston,
MA, 02111-1307, USA.
Durante un período de (3) años comenzando desde la fecha en que recibe este software,
usted puede obtener una copia completa legible por máquina del código fuente para el
software gratuito de acuerdo con los términos de la GPL sin cargo alguno, salvo los
gastos del soporte, el envío y la entrega, por un pedido hecho a nosotros.
Contáctenos si tiene alguna pregunta. Nuestra dirección de correo es 8F, 88, Sec. 1, Hsin
Tai Wu Rd., Hsichih, New Taipei City 221, Taiwán.

Índice - 123
ÍNDICE
A
Actualizar
Actualizaciones automáticas de
Windows
........................................ 64
Advertencia de epilepsia ...................... 14
audio
Resolución de problemas
............... 89
B
batería
aviso de batería baja
...................... 42
características................................ 37
carga ............................................. 41
comprobación del nivel de carga..... 41
extracción ................................ 40, 41
instalación...................................... 40
malas condiciones ......................... 42
maximización de la vida ................. 38
optimización................................... 41
primer uso ..................................... 38
Baterías............................................. 118
brillo
teclas de acceso directo
................. 19
bus serie universal ............................... 33
C
Cables ......................................... 10, 113
Cables de alimentación ........................ 10
carga
comprobación del nivel
................... 41
CD-ROM
expulsar manualmente
................... 90
Resolución de problemas ............... 90
computadora
características
................................ 15
en indicador................................... 21
conexiones
red
................................................ 32
Conexiones de red ............................... 51
Cursor ................................................. 28
D
desecho de la batería ......................... 118
Dispositivos de medios extraíbles ......... 32
DSL..................................................... 49
E
Entorno de la computadora.................... 8 Explorador........................................... 54

124
F
Firewall................................................ 57
G
Garantía ............................................... 7 Gateway
Programa Recovery Management
... 47
I
impresora
Resolución de problemas
............... 90
Información reglamentaria ............ 98, 117
Interferencia....................................... 112
Internet
Conexión
................................. 48, 49
Firewall.......................................... 57
L
LAN (Red de área local) ....................... 51
Lector de tarjetas de memoria............... 30
Limpieza de la computadora................. 11
M
Malware............................................... 56
Mantenimiento
Programa Recovery Management
... 47
Recovery Management .................. 65
Medioambiente .................................. 117
Módem .......................................... 49, 50
N
Norton Internet Security.................. 55, 60
P
Pantalla
teclas de acceso directo
................. 18
pantalla
Resolución de problemas
............... 89
parlantes
Resolución de problemas
............... 89
tecla de acceso directo............. 19, 20
Precauciones de salud ......................... 12
Precauciones de seguridad .................... 8
preguntas frecuentes............................ 88
Preguntas frecuentes. Ver preguntas
frecuentes
problemas
............................................ 88
CD-ROM ....................................... 90
impresora ...................................... 90
inicio.............................................. 88

Índice - 125
pantalla.......................................... 89
teclado........................................... 90
Proveedor de servicios de Internet
(PSI)
.................................................... 48
puertos ................................................ 30
R
Recuperación
Programa Recovery Management
... 47
Recovery Management .................. 65
red ...................................................... 32
S
Seguridad
Actualizaciones
.............................. 64
Antivirus......................................... 57
Software
Licencia de Software
.................... 120
Spyware .............................................. 56
T
Teclado
teclas de acceso directo
................. 20
teclado
Resolución de problemas
............... 90
teclas de acceso directo ....................... 20
touchpad ............................................. 28
usando .................................... 28–28
U
Unidades
Lector de tarjetas de memoria
......... 30
V
vista
derecha
......................................... 24
frontal ............................................ 22
izquierdo........................................ 22
vista frontal .......................................... 21
vista izquierda...................................... 21
W
WiFi..................................................... 51
Windows
Actualizaciones automáticas de
Windows
........................................ 64
Uso de Windows............................ 47
Ver.02.01.02


- 1
Manual do Usuário
Gateway NE71B

2
CONTEÚDO
Iniciar o seu computador 4
Ligação sem fios ................................................ 4
Registo ............................................................... 5
Instalação de software ....................................... 6
Recovery ............................................................ 6
Tem problemas? ................................................ 6
Básicos do computador 8
Segurança e conforto......................................... 8
Precauções de segurança .......................... 8
Precauções de saúde ............................... 12
Conhecer o seu computador 15
Vista de topo - ecrã .......................................... 16
Vista de topo – teclado..................................... 17
Teclas especiais ....................................... 18
Vista frontal ...................................................... 21
Vista esquerda ................................................. 22
Vista direita ...................................................... 24
Visão da base .................................................. 26
Teclado táctil 27
Princípios fundamentais do teclado táctil......... 27
Gestos do teclado táctil.................................... 28
Actualizar o seu computador 29
Expandir através de opções............................. 29
Opções de conectividade.......................... 29
Fonte de alimentação 35
Transformador CA............................................ 35
Bateria.............................................................. 36
Características da Bateria......................... 36
Substituição da bateria ............................. 38
Instalação e remoção da bateria............... 39
Carga da bateria ...................................... 39
Verificação da carga da bateria ............... 40
Optimização da vida da bateria................ 40
Advertência de baixa carga da bateria..... 40
Gestão de energia 42
Poupar energia................................................ 42
Software 45
Utilização do Windows e Software .................. 45
Oferta de Segurança da Internet.............. 45
Gateway Recovery Management............. 45
Internet 46
Primeiros passos na Internet........................... 46
Proteger o seu computador...................... 46
Escolha um Fornecedor de Servios
Internet ..................................................... 46
Ligações de rede...................................... 48
Navegar na Net! ....................................... 52
Segurança................................................ 52
Recuperação 62
Criar uma cópia de segurança de
recuperação..................................................... 63
Criar cópia de segurança de controladores
e de aplicações................................................ 67
Recuperar o sistema ....................................... 69
Reinstalar controladores e aplicações ..... 70
Regressar a uma captura de sistema
anterior ..................................................... 73
Repor o sistema para o estado de
fábrica ...................................................... 75
Recuperar a partir do Windows................ 75

Conteúdo - 3
Recuperar a partir da cópia de
segurança de recuperação ....................... 79
Perguntas frequentes 83
Dicas e sugestões para usar o
Windows 8........................................................ 86
Existem três conceitos que deverá ter
em mente.................................................. 86
Como acedo a charms?............................ 86
Como acedo a Iniciar?.............................. 86
Como salto entre aplicações?................... 87
Como desligo o meu computador?........... 87
Porque existe uma nova interface? .......... 87
Como desbloqueio o meu computador?... 88
Como personalizo o meu computador?.... 88
Quero usar o Windows da forma que
estava habituado - quer o ambiente
de trabalho de volta! ................................. 89
Onde estão as minhas aplicações? ......... 90
O que é um ID Microsoft (conta)? ............ 91
Como adiciono um favorito ao Internet
Explorer?.................................................. 92
Como verifico a existência de
atualizações Windows?............................ 92
Onde posso obter mais informações? ..... 92
Informação regulatória 93
Ambiente 112
Licença de software 115
Índice Remissivo 118
C
opyright © 2012.Todos os direitos reservados.
M
anual do Usuário Gateway NE71B
Esta revisão: 20 julho 2012
V
isite registration.gateway.com e descubra os benefícios de ser um cliente Gateway.
Nota: Todas as imagens servem apenas como referência. A configuração efectiva poderá
v
ariar.

4
INICIAR O SEU COMPUTADOR
Obrigado por ter adquirido este computador Gateway!
Este manual foi concebido para apresentar as características do seu
computador e para o auxiliar na sua experiência de trabalho com o
mesmo.
Depois de instalar e iniciar o seu computador, como indicado nas
instruções de instalação, deverá responder a algumas perguntas que o
irão ajudar a ligar-se à Internet. O seu computador irá então configurar o
software instalado.
LIGAÇÃO SEM FIOS
Para ligar a uma rede sem fios, primeiro verifique se as funcionalidades
sem fios do seu computador estão ligadas, e que o router ou modem ao
qual deseja ligar também está devidamente configurado.
• Se não tiver ligada a função sem fios, prima a tecla Windows ( ) + W,
digite "Wireless" e depois clique em Sem fios. Clique no interruptor em
Wi-Fipara ativar a ligação sem fios. Clique novamente para desativar.
• Para ligar a uma rede, prima a tecla Windows ( ) + W, digite
"Wireless" e depois clique em Ligar a uma rede. Selecione a sua rede
e introduza a palavra-passe se necessário.
• Após um breve momento, o seu computador deverá ligar-se à Internet.

Iniciar o seu computador - 5
Caso a sua rede não seja detectada, ou caso o seu computador não se
ligue à Internet, consulte a documentação do seu ISP ou router. Depois
de iniciar, pode utilizar o computador, abra o Internet Explorer e siga as
instruções.
Como alternativa, utilize um cabo de rede para ligar directamente a
uma porta de rede no seu router. Consulte o guia do seu ISP ou router.
REGISTO
Quando utiliza o seu computador pela primeira vez, é recomendado que o
registe. Tal irá permitir-lhe usufruir de alguns benefícios, como:
• Serviço mais rápido, prestado pelos nossos representantes.
• Registo na comunidade Gateway: recepção de promoções e
participação em inquéritos ao cliente.
• As últimas notícias da Gateway.
Como se Registar
Durante o arranque iniciar do seu portátil ou computador de secretária,
uma janela irá convidá-lo(a) a registar-se. Preencha a informação e clique
em Seguinte. A segunda janela que verá contém campos opcionais que
nos ajudarão a dar-lhe uma experiência mais pessoal de apoio ao cliente.
Outra opção
Outra forma de registar o seu produto Gateway é visitar o nosso site em
registration.gateway.com. Escolha o seu país e siga as simples
instruções.

6
Depois de registar, ser-lhe-á enviado um correio electrónico de
confirmação, com informações importantes que deverá guardar em local
seguro.
INSTALAÇÃO DE SOFTWARE
O seu computador irá instalar automaticamente o software e preparar o
seu computador para utilização. Poderá demorar algum tempo, não
desligue o seu computador; aguarde até que a instalação tenha
terminado.
RECOVERY
Deverá criar discos de recuperação assim que possível. O programa
Recuperação permite-lhe criar discos de recuperação e restaurar ou
reinstalar aplicações e controladores fornecidos pela Gateway.
TEM PROBLEMAS?
Gateway apresenta várias opções para o auxiliar com a sua compra.
assistência Gateway
Não se esqueça de anotar o número de série do seu computador, data e
local de compra e o nome do modelo na área para o efeito, neste guia;
guarde a sua prova de compra. Antes de nos contactar, anote qualquer
mensagem de erro que acompanhe o problema, e tenha o computador à
sua frente e ligado, caso seja possível. Tendo estes elementos à mão
garante, quando nos contactar, uma assistência melhor e mais rápida.

Iniciar o seu computador - 7
Website da Gateway
Não se esqueça de visitar gateway.com – Veja a secção de suporte para
informações actualizadas, ajuda, controladores e transferências.
Informação de Garantia e de Contacto
Pode encontrar a informação sobre a garantia do seu computador e como
contactar o suporte técnico na Garantia do seu computador.

8
BÁSICOS DO COMPUTADOR
SEGURANÇA E CONFORTO
Precauções de segurança
Siga as linhas de orientação abaixo, para utilizar o seu computador
confortavelmente e para evitar problemas de saúde.
Ambiente do computador
Certifique-se que o computador:
• É utilizado numa superfície, suporte ou mesa estável. Uma queda
poderá danificar seriamente o computador.
• Não é utilizado numa superfície que vibra, nem utilizado quando pratica
desporto, exercício ou outras actividades num ambiente dinâmico. A
vibração ou movimento pode soltar apertos, danificar componentes
internos e até causar fugas na bateria.
• Está afastado da luz solar directa e de fontes de calor.
• Está afastado de campos magnéticos ou dispositivos geradores de
electricidade estática.
• Está afastado pelo menos 30 centímetros (um pé) de um telemóvel.
• Não está num ambiente com poeira nem humidade.
• Não é utilizado perto de água. Nunca entorne líquidos de nenhum tipo
sobre ou no produto.

Básicos do computador - 9
• Não é colocado sobre um tapete ou qualquer outra superfície que
possa ter carga eléctrica.
Nota
• As ranhuras e aberturas existentes servem para ventilação; para
assegurar o bom funcionamento do produto e para evitar o seu
sobreaquecimento. Estas aberturas não devem ser bloqueadas ou
cobertas. As aberturas nunca devem ser bloqueadas pela colocação do
produto sobre uma cama, um sofá, um tapete ou sobre qualquer outra
superfície do género. Este produto nunca deve ser colocado perto ou
sobre um radiador ou saída de ar quente, ou numa instalação embutida
a não ser que seja fornecida a ventilação adequada.
• Nunca introduza qualquer tipo de objectos neste produto através das
ranhuras da caixa, uma vez que poderão tocar em pontos de voltagem
perigosos ou provocar curto circuitos que podem resultar em incêndio
ou em choques eléctricos. Nunca derrame qualquer tipo de líquido
sobre o produto.
• Para evitar danos ao nível dos componentes internos e para evitar a
fuga de líquido da bateria, não coloque o produto sobre superfícies que
vibrem.
• Nunca use em condições esportivas, de exercício ou vibratórias, o que
provavelmente causará curtos-circuitos inesperados ou danos aos
dispositivos do rotor, HDD, unidade óptica e até mesmo exposição ao
risco da bateria de lítio.

10
Cabos
Certifique-se que:
• Os cabos não estão esticados e que não há risco de alguém tropeçar
nos mesmos.
• Outros dispositivos não estão a esmagar os cabos.
• O cabo de alimentação é ligado ao computador antes de ligar o cabo de
alimentação à tomada de alimentação CA.
• O cabo de alimentação é desligado da tomada antes de desligar o cabo
de alimentação do computador.
• Cabos de alimentação de três pinos estão ligados a uma tomada
eléctrica ligada à terra.
• A tomada eléctrica é de fácil acesso e tão próxima do computador
quanto possível (não sobrecarregue com muitos transformadores).
Se o seu computador utiliza um adaptador CA externo:
• Não tape nem coloque objectos sobre o adaptador CA. Deixe o
adaptador arrefecer devidamente durante a utilização, mantendo-o
afastado de objectos.
• Utilize apenas o transformador CA fornecido com o seu computador.
Embora outros transformadores possam parecer semelhantes, utilizá-
los pode danificar o seu computador. Se for necessária uma
substituição, utilize apenas peças certificadas para utilização com o seu
computador.

Básicos do computador - 11
Limpar o seu computador
• Desligue sempre o computador da tomada eléctrica antes de o limpar.
• Não utilize produtos de limpeza em líquido ou aerossol, utilize antes um
pano humedecido.
• Nunca utilize produtos de limpeza em spray directamente sobre o ecrã.
• Se entornar líquidos no seu computador, desligue-o imediatamente,
desligue o adaptador CA, remova a bateria e certifique-se que está
totalmente seca antes de voltar a ligar. Espere uma noite, se
necessário.
Nota: Se o seu computador incluir ranhuras para cartões de memória
ou dispositivos de expansão, pode ser que estejam instalada
protecções plásticas nas mesmas. Elas protegem as ranhuras não
usadas contra poeira, objectos metálicos e outras partículas. Guarde
as protecções para usar quando não houver cartões nas ranhuras.
Reparar o seu Computador
Não tente reparar o computador por si próprio, pois a abertura ou a
remoção das tampas podem expô-lo a voltagens perigosas ou outros
riscos. Todos os serviços de assistência devem ser prestados por pessoal
técnico qualificado.
Desligue o computador da tomada eléctrica e entregue-o a pessoal de
assistência qualificado, nas seguintes condições:
• quando o cabo ou ficha de alimentação estiver danificado ou
descarnado,
• se algum líquido for derramado no produto,

12
• se o produto for exposto à chuva ou água,
• se o produto cair ou o seu exterior tiver sido danificado,
• se o produto demonstrar uma perda de desempenho,
• se o produto não funcionar normalmente quando as instruções de
utilização forem seguidas
Nota: Ajuste apenas os controlos que estão descritos nas instruções
de utilização, uma vez que o ajuste incorrecto de outros controlos
pode provocar danos que exijam trabalho especializado por parte de
um técnico qualificado para restaurar a condição normal do produto.
Precauções de saúde
• A superfície inferior, as áreas em torno das aberturas de ventilação e o
adaptador CA podem aquecer. Para evitar danos pessoais, certifique-
se que não entram em contacto com a sua pele ou corpo.
• O seu dispositivo e respectivos acessórios podem conter componentes
pequenos. Mantenha-os fora do alcance de crianças pequenas.
• O computador e acessórios podem conter peças pequenas. Mantenha-
as fora do alcance de crianças pequenas.
• Se trabalhar ou jogar muitas horas seguidas, não se esqueça de fazer
pausas regulares. Descanse a vista, não olhando para o ecrã do
computador de vez em quando. Não utilize o computador se estiver
cansado.
• Prepare o seu computador de modo a poder trabalhar numa posição
natural e relaxada. Coloque os itens que usa frequentemente ao
alcance.

Básicos do computador - 13
• Posicione o computador directamente em frente de si para maior
segurança e conforto. Certifique-se que o teclado e painel táctil estão a
uma altura confortável. O ecrã deverá estar a cerca de 45-70 cm (18-
30 polegadas) dos seus olhos.
Se utilizar o seu computador durante longos períodos de tempo sentado
a uma secretária, invista num teclado externo para conforto adicional.
• Para proteger a sua audição, quando utiliza altifalantes ou
auscultadores, aumente o volume de forma gradual até ouvir de forma
clara e confortável; não aumente o nível de volume depois de os seus
ouvidos se terem ajustado. Não utilize volumes altos durante períodos
de tempo alargados. Não aumente o volume para bloquear ambientes
ruidosos; diminua o volume se não conseguir ouvir pessoas a falar
perto de si.
• A base do computador, adaptador de energia e o ar das
ranhuras de ventilação poderão aquecer durante a utilização.
Evite contacto contínuo com o corpo e não coloque o
computador no seu colo enquanto está ligado.
• Certifique-se que as ranhuras de ventilação e aberturas do computador
não estão obstruídas nem tapadas. Não coloque o computador numa
superfície mole (como carpete, cadeira ou cama) que possa bloquear
as ranhuras de ventilação.
• Não introduza objectos de nenhum tipo na ventilação ou ranhuras da
caixa, pois podem tocar pontos de tensão perigosa ou colocar as peças
em curto-circuito, o que pode provocar um incêndio ou choque
eléctrico.

14
• Alguns problemas com as mãos, pulsos, braços, pescoço, ombros,
pernas e costas podem estar associados com, ou agravados por certas
acções repetitivas. Para reduzir o risco de desenvolver tais problemas,
escreva com os pulsos direitos e as mãos e pulsos posicionados acima
do teclado. Se sentir dores, formigueiro, dormência ou qualquer outro
desconforto, contacte o seu médico.
• Recomendamos que os pais monitorizem o uso de jogos pelas
crianças. Se sentir ou a sua criança sentir qualquer dos seguintes
sintomas: tonturas, visão desfocada, tiques oculares ou musculares,
perda de consciência, desorientação, qualquer movimento involuntário
ou convulsões, pare IMEDIATAMENTE de utilizar o computador e
consulte o seu médico. Poderá acontecer até em pessoas sem
antecedentes médicos de epilepsia.

Conhecer o seu computador - 15
CONHECER O SEU COMPUTADOR
Depois de montar o computador tal como indicado nas instruções, deixe-
nos mostrar-lhe o seu novo Gateway computador.
Gateway NE71B

16
VISTA DE TOPO - ECRÃ
# Ícone Item Descrição
1 Webcam
Câmara web para comunicações vídeo.
Uma luz junto da Webcam indica que a
webcam está ativa.
2 Microfone Microfone interno para gravação de som.
3Ecrã
Também chamado ecrã de cristais líquidos
(LCD), permite visualizar a informação do
computador.
1
2
3

Conhecer o seu computador - 17
VISTA DE TOPO – TECLADO
# Ícone Item Descrição
1
Indicador/Botão de
alimentação
Liga e desliga o computador. Indica o estado
da alimentação do computador.
2 Teclado
Para introduzir informações no seu
computador.
- As teclas especiais estão descritas na
página 18.
3 Teclado táctil
Dispositivo apontador sensível ao toque, que
funciona como um rato de computador.
1
2
5
3
4

18
Teclas especiais
O teclado do seu computador inclui teclas que activam funções especiais.
A função de cada tecla está marcada com um ícone.
4
Botões de clique
(esquerdo e direito)
O lado esquerdo e direito do botão funciona
como os botões de selecção esquerdo e
direito.
5 Altifalantes Obtenha saída de áudio em estéreo.
Ícone Função Descrição
Fn
Tecla de atalho
para função
secundária
Activa uma segunda função em certas teclas.
Por ex., prima a tecla Fn para activar as teclas F1 a F12.
Ajuda Abre o menu de ajuda.
Backup
Permite-lhe criar cópias de segurança de todo o seu
sistema, ou apenas de ficheiros ou pastas
seleccionados. Crie um agendamento regular ou realize
cópias sempre que o desejar.
Comunicação
Activa/desactiva os dispositivos de comunicação do
computador.
Comutação de
visualização
Alterna a saída entre o ecrã de visualização, o monitor
externo (se está ligado) e ambos.
# Ícone Item Descrição

Conhecer o seu computador - 19
Ecrã em branco
Desliga a luz de fundo do ecrã de visualização para
economizar energia. Prima qualquer tecla para retomar
a actividade.
Comutação de
teclado táctil
Liga e desliga o teclado táctil interno.
Reproduzir/
Pausar
Reproduz ou pausa um ficheiro multimédia
seleccionado.
Parar Para a reprodução do ficheiro multimédia seleccionado.
Anterior Retorna ao ficheiro multimédia anterior.
Seguinte Avança até ao ficheiro multimédia seguinte.
Reduzir
luminosidade
Reduz a luminosidade do ecrã.
Aumentar
luminosidade
Aumenta a luminosidade do ecrã.
Rede social
Abre a aplicação de Redes Sociais.
- Se esta aplicação não estiver instalada, a tecla irá
iniciar a aplicação de mensagens instantâneas.
Aumentar volume Aumenta o volume de som.
Diminuir volume Diminui o volume de som.
Ícone Função Descrição

20
Teclas de atalho
O computador utiliza teclas de atalho (combinação de teclas) para aceder
a teclas de função e comandos de navegação.
Para activar as teclas de atalho, prima e mantenha premida a tecla Fn
(canto inferior esquerdo) antes de premir a outra tecla na combinação de
teclas de atalho.
- Nota: Não é necessário premir a tecla Fn para utilizar as teclas de função F1 a F12
quando inicia o seu computador, nem quando utiliza a BIOS.
Para trocar a tecla de atalho e função especial das teclas F1 a F12, altere a definição
da tecla de função na BIOS (para abrir a BIOS prima F2 quando inicia o computador,
e depois seleccione o menu Main (Principal) e altere o Comportamento das teclas
de função para Teclas de função).
Comutação de
altifalante
Liga e desliga os altifalantes.
Tecla de atalho Função Descrição
Fn + Teclas especiais
(ver página 18)
Teclas de
funções
Activa as teclas F1 a F12.
Fn + Home Desloca até ao início de um documento.
Fn + End Desloca até ao final de um documento.
Fn + Page Up
Desloca uma página para cima num
documento.
Fn + Page Down
Desloca uma página para baixo num
documento.
Ícone Função Descrição

Conhecer o seu computador - 21
VISTA FRONTAL
- Nota: Os indicadores no painel dianteiro são visíveis mesmo com a tampa do
monitor fechada.
# Ícone Item Descrição
1
Indicador de
alimentação
Indica o estado da alimentação do computador.
Indicador da bateria
Indica o estado da bateria do computador.
- A carregar: A luz é âmbar quando a bateria
está a carregar.
- Carga completa: A luz é azul no modo CA.
Indicador HDD Indica quando o disco rígido está activo.
Indicador de
comunicação
Indica o estado do dispositivo de ligação sem
fios do computador.
2
Leitor de cartões
vários-em-um
Aceita cartões Secure Digital (SD),
MultiMediaCard (MMC), Memory Stick PRO
(MS PRO), xD-Picture Card (xD).
- Empurre para remover/instalar o cartão.
Apenas pode ser utilizado um cartão de
cada vez.
1 2

22
VISTA ESQUERDA
# Ícone Item Descrição
1
Ranhura para fecho
Kensington
Liga a um cadeado de segurança Kensington
(ou compatível).
- Enrole o cabo de bloqueio de segurança do
computador em torno de um objecto imóvel,
como por exemplo uma mesa ou o puxador
de uma gaveta fechada.
Introduza o cabo de segurança na ranhura e
rode a chave para proteger o bloqueio.
Também estão disponíveis modelos sem
chave.
2
Ventilação e
ventoinha de
arrefecimento
Permite ao computador manter-se fresco.
- Não tape nem obstrua as aberturas.
3 Porta Ethernet (RJ-45) Liga a uma rede Ethernet de base 10/100/1000.
4
Ligação a ecrã
externo (VGA)
Liga a um dispositivo de visualização
(por exemplo, monitor externo, projector LCD).
21 3 4 56

Conhecer o seu computador - 23
Informações sobre USB 3.0
• Compatível com dispositivos USB 3.0 e anteriores.
• Para melhor desempenho, utilize dispositivos com certificação USB 3.0.
• Definido pela especificação USB 3.0 (USB SuperSpeed).
5 Porto HDMI
Suporta ligações de vídeo digital de alta
definição.
6Portas USB
Liga a dispositivos USB.
- Se uma porta for preta é compatível com
USB 2.0, se for azul é também compatível
com USB 3.0 (ver abaixo).
# Ícone Item Descrição

24
VISTA DIREITA
# Ícone Item Descrição
1
Tomada de
auscultadores/
altifalante
Liga a dispositivos de saída de áudio
(por exemplo, altifalantes, auscultadores).
- Suporta auscultadores 3,5 mm compatíveis,
com microfone integrado (por exemplo,
auscultadores Acer smart handheld).
Tomada para
microfone
Aceita entradas de microfones externos.
2Porta USB
Liga a dispositivos USB.
- Se uma porta for preta é compatível com
USB 2.0, se for azul é também compatível
com USB 3.0 (ver abaixo).
3 Unidade óptica Unidade óptica interna; aceita CDs ou DVDs.
4
Indicador de acesso
do disco óptico
Acende quando a unidade óptica está activa.
12 3 4 5 6 7

Conhecer o seu computador - 25
Informações sobre USB 3.0
• Compatível com dispositivos USB 3.0 e anteriores.
• Para melhor desempenho, utilize dispositivos com certificação USB 3.0.
• Definido pela especificação USB 3.0 (USB SuperSpeed).
5
Botão de ejecção da
unidade óptica
Ejecta o disco óptico da unidade.
6
Furo de ejecção de
emergência
Ejecta o tabuleiro da unidade óptica quando o
computador está desligado.
- Introduza, com cuidado, um clip endireitado
para ejectar o tabuleiro da unidade óptica.
7
Tomada de entrada
CC
Liga ao transformador CA do seu computador.
# Ícone Item Descrição

26
VISÃO DA BASE
# Ícone Item Descrição
1 Baía da bateria Contém a bateria do computador.
2
Patilha de libertação
da bateria
Liberta a bateria para remoção. Introduza uma
ferramenta adequada e deslize para libertar.
3
Compartimento da
memória
Aloja a memória principal do computador.
Compartimento do
disco rígido
Aloja o disco rígido do computador (seguro por
parafusos).
4
Ventilação e
ventoinha de
arrefecimento
Permite ao computador manter-se fresco.
- Não tape nem obstrua as aberturas.
1
4
2
3

Teclado táctil - 27
TECLADO TÁCTIL
PRINCÍPIOS FUNDAMENTAIS DO TECLADO TÁCTIL
O painel táctil controla a seta (ou ‘cursor’) no ecrã. À medida que
arrasta o dedo no painel táctil, o cursor segue este movimento.
Prima os botões esquerdo o direito, situados na extremidade do teclado
táctil, para efectuar funções de selecção e de execução. Estas duas áreas
são semelhantes aos botões esquerdo e direito de um rato. Tocar no
teclado táctil equivale a clicar com o botão esquerdo.
Nota: O teclado táctil é sensível aos movimentos dos dedos.Assim,
quanto mais leve for o toque, melhor será a resposta.
Mantenha o teclado táctil e os seus dedos secos e limpos.
O cursor é controlado por alguns gestos básicos:
• Deslocar um dedo: Desloque um dedo pela superfície do
teclado táctil para movimentar o cursor.
• Toque com um dedo: Dê um só toque no teclado táctil com o
seu dedo para executar um clique, que irá seleccionar ou
iniciar um item. Rapidamente, toque novamente para realizar dois
toques ou "duplo toque".
• Arrastar: Mantenha premido o lado esquerdo do botão de selecção ou
toque duas vezes em qualquer área do painel táctil, quando deslizar um
segundo dedo pelo painel táctil, selecciona todos os itens na área.

28
GESTOS DO TECLADO TÁCTIL
O Windows 8 e muitas aplicações são compatíveis com gestos do teclado
táctil com um ou mais dedos.
Nota:
A compatibilidade com gestos do teclado táctil depende da
aplicação activa.
Isto permite-lhe controlar as aplicações com uns simples gestos, como:
• Deslizar o dedo a partir de um canto:
Aceda às ferramentas Windows deslizando
a partir da direita, centro ou esquerda do
teclado táctil para o centro.
• Deslizar o dedo a partir do canto direito: Comutar charms.
• Deslizar o dedo a partir do canto superior: Comutar comandos de
aplicações.
• Deslizar o dedo a partir do canto esquerdo: Activar a aplicação
anterior.
• Deslocar dois dedo: Percorra rapidamente páginas web,
documentos e listas de reprodução com dois dedos no
teclado táctil e movendo ambos os dedos em qualquer
direcção.
• Apertar dois dedo: Aumente e diminua o zoom de fotos,
mapas e documentos com simples gestos com o indicador e
polegar.

Actualizar o seu computador - 29
ACTUALIZAR O SEU COMPUTADOR
EXPANDIR ATRAVÉS DE OPÇÕES
O seu computador apresentam muitas opções para uma completa
experiência de computação.
Opções de conectividade
As portas permitem-lhe ligar dispositivos periféricos ao seu computador.
Para instruções sobre como ligar diferentes dispositivos externos ao
computador, leia a secção seguinte.
Leitor de cartões de memória
Os cartões de memória são utilizados em muitas
câmaras digitais, PDA, leitores MP3 e telemóveis.
Inserir um cartão de memória
1. Alinhe o cartão de modo a que o conector fique
virado para a porta, com os conectores virados para baixo.
2. Com cuidado, deslize o cartão para dentro da porta. Se sentir
necessidade de usar mais força para inserir o cartão, tente reorientá-lo
ligeiramente.
3. Empurre o cartão até encaixar com um clique. Ficarão para fora da
ranhura alguns milímetros do cartão.
Se o cartão contiver alguns ficheiros, a janela de Reprodução
Automática do Windows poderá aparecer (consoante o conteúdo do

30
cartão), e ser-lhe-á perguntado se deseja utilizar um programa para
aceder ao conteúdo do cartão. Seleccione aqui uma opção que seja
adequada, caso contrário, seleccione Cancelar. Se o cartão não
contiver quaisquer ficheiros ou ficheiros desconhecidos, uma janela será
aberta, com o conteúdo do cartão.
Cartões SD, SDHC e SDXC
Diferentes tipos de cartões SD possuem diferentes capacidades,
mantendo o mesmo design global. Cartões SD podem conter até 4 GB,
cartões SDHC conter até 32 GB, e cartões SDXC conter até 2048 GB (2
TB). O seu computador fornece um leitor de cartões compatível com
SDHC ou SDXC.
Nota: Os cartões de memória SDXC apenas podem ser usados num
leitor compatível com SDXC; Cartões SD e SDHC podem ser usados
em qualquer tipo.

Actualizar o seu computador - 31
Remover um cartão de um leitor de cartões de memória
1. Clique na seta Mostrar ícones
ocultos na Área de Notificações
(junto do relógio).
2. Clique no ícone Remover
Hardware em Segurança.
3. Clique em Ejectar Cartão SD (ou
no nome do dispositivo).
4. Aguarde até a mensagem É
seguro remover o hardware.
5. Remova o cartão.
Armazenamento incorporado
A função de rede incorporada permite-lhe ligar
o seu computador a uma rede de base
Ethernet.
Ligue um cabo de Ethernet desde a porta de
rede Ethernet (RJ-45) que se encontra no
chassis do computador, a uma tomada de rede
ou ao hub da rede local.
3
2
1

32
Universal Serial Bus (USB)
A porta Universal Serial Bus (USB) 2.0 é um
bus série de alta velocidade que permite
ligar periféricos USB sem ter de consumir
recursos do sistema.
Certos computadores podem incluir uma ou
mais portas USB 3.0. São parecidas com as
portas USB normais, mas incluem ligações
internas adicionais e são azuis. Pode utilizar
dispositivos compatíveis com USB 3.0 com
estas portas, para usufruir de velocidades de
transferência mais rápidas.
Porta vídeo
Ligue a um monitor com porta VGA ou DVI (o tipo de ligação suportado
depende da configuração do seu computador). O cabo adequado é
normalmente incluído com o monitor.
Siga estes passos para ligar um monitor ao seu computador:
1. Verifique se o computador está desligado e o interruptor de alimentação
do monitor está desligado.
2. Ligue o cabo vídeo à porta monitor do computador. Prenda a ligação
cabo com os parafusos fornecidos.
3. Ligue o cabo de alimentação do monitor e ligue-o a uma tomada
eléctrica com ligação terra.
4. Siga as instruções de configuração no manual do utilizador do monitor.

Actualizar o seu computador - 33
5. Ligue a energia do monitor, e depois o computador.
6. Certifique-se que a resolução actual e taxa de actualização não
excedem as especificações do monitor. Caso seja necessário, altere as
definições de imagem utilizadas pelo computador.
Nota: Para aceder aos controlos do ecrã, prima a tecla Windows
( ) + W, digite "Display" e depois clique em Ecrã.
Interface multimédia de alta definição(apenas para determinados
modelos)
A HDMI (interface multimédia de alta
definição) é uma interface áudio/
vídeo totalmente digital, sem
compressão, reconhecida pela
indústria. A HDMI proporciona, com
um cabo único, uma interface entre a
fonte de áudio/vídeo digital
compatível, como por exemplo uma
caixa de configuração (set-top box),
leitor de DVD ou receptor A/V, e um
monitor de áudio/vídeo digital compatível, como por exemplo uma
televisão digital (DTV).
Use a porta HDMI do seu computador para ligar a equipamentos
sofisticados de áudio e vídeo. A implementação de cabo único permite
efectuar a instalação e a ligação com rapidez e facilidade.

34
Auscultadores e microfone
Estas duas portas permitem-lhe ligar dispositivos áudio. Utilize a porta de
auscultadores para ligar auscultadores estéreo ou altifalentes com
corrente. Ligar um dispositivo áudio à porta auscultador desactiva os
altifalantes integrados. Utilize a porta microfone para ligar um microfone
externo para gravação mono; ligar um microfone externo desactiva o
microfone integrado.

Fonte de alimentação - 35
FONTE DE ALIMENTAÇÃO
TRANSFORMADOR CA
O seu computador pode utilizar o transformador externo (um “bloco” de
alimentação) para usar energia CA. É fornecido um cabo de alimentação
que serve para o país onde foi adquirido o computador.
O transformador fornece energia adequada a correr o computador e
recarregar a bateria ao mesmo tempo.
Precaução: Não tape nem coloque objectos sobre o adaptador
CA. Manter o transformador livre de objectos ajuda-o a arrefecer
devidamente durante a utilização.

36
Utilize apenas o transformador CA fornecido com o seu computador.
Embora outros transformadores possam parecer semelhantes, utilizá-los
pode danificar o seu computador.
Aviso: O adaptador CA e a parte debaixo do computador podem
ficar quentes após uma utilização prolongada. É normal, mas
poderá causar danos devido ao contacto prolongado.
BATERIA
O computador utiliza uma bateria que proporciona uma utilização
duradoura entre carregamentos.
Características da Bateria
A bateria possui as seguintes características:
• Utiliza os padrões tecnológicos atuais para baterias.
• Emite uma advertência de baixa carga.
A bateria é recarregada sempre que o computador é ligado ao
transformador CA. Seu computador permite recarregar a bateria enquanto
continuar a utilizá-lo. Entretanto, a recarga é significativamente mais
rápida quando o computador está desligado.
A bateria é útil ao utilizar o computador numa viagem ou durante uma
queda de energia eléctrica. Recomendamos que tenha, como reserva,
uma bateria adicional totalmente carregada. Entre em contacto com seu
revendedor para solicitar uma bateria adicional.

Fonte de alimentação - 37
Maximização da vida da bateria
Assim como todas as baterias, a do seu computador também se degrada
com o tempo. Isto significa que o desempenho da bateria diminuirá com o
tempo e o uso.
Para maximizar a duração da sua bateria, siga as recomendações abaixo.
Condicionamento de uma bateria nova
Antes de usar a bateria pela primeira vez, há um processo de
"condicionamento" que deve ser seguido:
1. Introduza a nova bateria no computador. Não ligue o computador.
2. Ligue o adaptador CA e carregue a bateria totalmente.
3. Desligue o adaptador de corrente alternada.
4. Ligue o computador e utilize-o com a alimentação da bateria.
5. Esvazie a bateria totalmente.
6. Volte a ligar o adaptador CA e recarregue a bateria totalmente.
Repita estes passos até que a bateria tenha sido carregada e
descarregada três vezes.
Use este processo de condicionamento para todas as baterias novas, ou
se a bateria não foi usada por muito tempo. Se o computador for ficar
guardado por mais de duas semanas, recomenda-se remover a bateria do
mesmo.
Aviso: Não exponha as baterias a temperaturas inferiores a 0ºC
(32ºF) ou superiores a 45ºC (113ºF). Temperaturas extremas
podem prejudicar a bateria.

38
Seguindo o processo de condicionamento da bateria, ela poderá aceitar a
máxima carga possível. O não seguimento deste procedimento impedirá
que obtenha a máxima carga da bateria, além de encurtar sua vida-útil.
Além disto, a vida-útil da bateria é prejudicada pelos seguintes padrões
de utilização:
• Usar o computador constantemente com a bateria instalada e a
alimentação CA ligada. Se desejar usar a alimentação CA, recomenda-
se remover a bateria depois que esteja totalmente carregada.
• Não descarregue nem recarregue a bateria aos seus extremos, como
descrito abaixo.
• Uso frequente; quanto mais a bateria for usada, mais rápido ela
chegará ao fim da vida-útil. Uma bateria normal de computador tem
uma durabilidade de aproximadamente 300 ciclos de carga.
Substituição da bateria
A série de computadores portáteis utiliza baterias de lítio. Substitua a
bateria por uma outra de tipo equivalente à fornecida juntamente com o
produto. A utilização de uma bateria de tipo diferente poderá resultar em
incêndio ou explosão.
Atenção: As baterias podem explodir se não forem manuseadas
adequadamente. Não as desmonte nem as deite no fogo.
Mantenha fora do alcance das crianças. Deite fora as baterias
usadas cumprindo as regulamentações locais.

Fonte de alimentação - 39
Instalação e remoção da bateria
Importante! Antes de remover a bateria do computador, ligue o
adaptador CA se deseja continuar utilizando-o. Caso contrário,
desligue o computador primeiro.
Para instalar a bateria:
1. Alinhe a bateria com o compartimento; certifique-se de que a
extremidade com contactos entre primeiro e que a parte superior da
bateria esteja voltada para cima.
2. Deslize a bateria para dentro do compartimento e empurre-
asuavemente até que fique travada na posição correcta.
Para remover a bateria:
1. Deslize a trava para liberar a bateria.
2. Puxe a bateria para fora do compartimento.
Carga da bateria
Para carregar a bateria, primeiro certifique-se de que esteja instalada
correctamente no seu compartimento. Ligue o adaptador CA no
computador e na tomada de energia eléctrica. É possível continuar a
utilizar o computador com alimentação CA enquanto a bateria é
carregada. Entretanto, a recarga é significativamente mais rápida quando
a bateria com o computador está desligado.
Nota: Recomenda-se carregar a bateria após parar de trabalhar.
Recarregar a bateria durante a noite antes de viajar permite-lhe
começar o dia seguinte com a bateria totalmente carregada.

40
Verificação da carga da bateria
O indicador de energia do Windows indica o nível de carga actual da
bateria. Deixe o cursor sobre o ícone de bateria/alimentação na barra de
tarefas para saber o nível de carga actual da bateria.
Optimização da vida da bateria
Optimizar a vida da bateria ajuda a obter o máximo da sua capacidade,
aumentando o ciclo de carga/descarga e melhorando a eficiência de
recarga. Recomenda-se seguir as sugestões abaixo:
• Adquira uma bateria adicional.
• Use a alimentação CA sempre que possível, reservando a bateria para
utilização em viagens.
• Ejecte a Placa PC quando não estiver em uso, pois ela consome
energia (para modelos seleccionados).
• Guarde a bateria num local frio e seco. A temperatura recomendada é
de 10°C (50°F) a 30°C (86°F). Temperaturas mais altas aceleram a
autodescarga da bateria.
• Recarga excessiva diminui a vida da bateria.
• Cuide do adaptador CA e da bateria
Advertência de baixa carga da bateria
Ao usar a energia da bateria, observe o indicador de energia do Windows.
Atenção: Ligue o adaptador CA logo que possível quando
aparecer a advertência de baixa carga da bateria. Pode haver
perda de dados se a bateria se esgotar completamente e o
computador desligar.

Fonte de alimentação - 41
Quando aparecer a advertência de baixa carga da bateria, a atitude a
tomar dependerá da sua situação:
Situação Acção Recomendada
O adaptador CA e
uma tomada eléctrica
estão disponíveis.
1. Ligue o adaptador CA no computador e na
tomada de energia eléctrica.
2. Guarde todos os ficheiros necessários.
3. Retorne ao trabalho.
Desligue o computador se desejar
recarregar a bateria rapidamente.
Uma bateria adicional
totalmente carregada
está disponível.
1. Guarde todos os ficheiros necessários.
2. Feche todas as aplicações.
3. Encerre o sistema operacional e desligue o
computador.
4. Substitua a bateria.
5. Ligue o computador e retorne ao trabalho.
O adaptador CA ou
uma tomada eléctrica
não estão
disponíveis.
Não há qualquer
bateria reserva.
1. Guarde todos os ficheiros necessários.
2. Feche todas as aplicações.
3. Encerre o sistema operacional e desligue o
computador.

42
GESTÃO DE ENERGIA
Este computador tem uma unidade incorporada para gestão de energia
que monitoriza a atividade do sistema. A atividade do sistema envolve
qualquer um, ou mais, dos seguintes dispositivos: teclado, rato, disco
rígido, periféricos ligados às computador e memória de vídeo. Caso não
seja detectada qualquer actividade durante um determinado período de
tempo, o computador pára alguns ou todos estes dispositivos para poupar
energia.
POUPAR ENERGIA
Desactive o arranque rápido
O seu computador usa uma funcionalidade de arranque rápido para iniciar
rapidamente mas também usa uma pequena quantidade de energia para
procurar sinais para iniciar. Estas verificações drenam lentamente a
bateria do computador.
Se preferir reduzir os requisitos de energia e o impacto ambiental do seu
computador, desactive o arranque rápido:
Nota: Se desactivar o arranque rápido, o seu computador demora
mais tempo a iniciar a partir do modo de suspensão.
O seu computador não iniciará se receber instruções para iniciar
através de uma rede (Wake on LAN).

Gestão de energia - 43
1. Abra o ambiente de trabalho.
2. Clique em Opções de energia na área de
notificações.
3. Seleccione Mais Opções de Energia.
4. Seleccione Escolha o que fazem os botões.
5. Para aceder às definições de encerramento, seleccione Alterar as
definições que estão actualmente não disponíveis.

44
6. Percorra para baixo e desactive Activar arranque rápido.
7. Seleccione Guardar alterações.

Software - 45
SOFTWARE
UTILIZAÇÃO DO WINDOWS E SOFTWARE
Os computadores Gateway incluem software para o ajudar a utilizar o seu
computador; os programas e categorias disponíveis no seu computador
dependem do modelo adquirido.
Oferta de Segurança da Internet
É importante proteger o seu computador contra vírus e ataques pela
Internet (consulte Segurança na página 52). Um pacote exaustivo de
segurança de Internet, que inclui um período de subscrição gratuita,
oferecido quando primeiro inicia o seu computador. Deve activar esta
protecção antes de ligar à Internet. Este pacote de segurança protege o
seu computador contra as mais recentes ameaças online e protege os
seus dados pessoais (credenciais de contas bancárias, números de
cartão de crédito, palavras-passe e muito mais).
Gateway Recovery Management
Para preparar o computador para opções de recuperação do sistema,
deve criar um conjunto de discos de recuperação assim que for possível.
Consulte página 62 para mais informações.

46
INTERNET
PRIMEIROS PASSOS NA INTERNET
Proteger o seu computador
É importante proteger o seu computador contra vírus e ataques pela
Internet (consulte Oferta de Segurança da Internet na página 45 e
Segurança na página 52). É oferecido um programa de segurança da
Internet abrangente quando primeiro inicia o seu computador. Deverá
activar esta protecção quanto antes, sobretudo antes de se ligar à
Internet.
Escolha um Fornecedor de Servios Internet
Utilizar a Internet faz parte de forma natural da utilização
diária do computador. Em poucos passos pode ficar
ligado a uma vasta colecção de conhecimentos e
ferramentas de comunicação. Para efectuar estes
passos, tem de seleccionar primeiro um Fornecedor de
Serviços de Internet (ISP), que estabelece a ligação
entre o computador e a Internet. Deve procurar
Fornecedores de Internet disponíveis na sua região,
sem se esquecer de falar com amigos e familiares sobre as suas
experiências bem como consultar análises e relatórios de consumidores.
O Fornecedor de Internet ir fornecer as instruções sobre como
estabelecer a ligação à Internet (pode precisar de software adicional ou
uma ‘caixa’ especial para a ligação à linha telefónica).

Internet - 47
Tipos de ligações
Em função do seu modelo de computador, localização e necessidades de
comunicação, existem vários modos de ligação à Internet.
Dial-Up (por acesso telefónico)
Alguns computadores incluem um conector de telefone dial-up (´modem´).
Isto permite-lhe ligar à Internet através da sua linha telefónica. Com a
ligação por linha telefónica, não pode utilizar um modem e o telefone
simultaneamente na mesma linha. Este tipo de ligação é recomendado
unicamente se tiver uma utilização reduzida de Internet dado que a
velocidade de ligação é baixa e o tempo de ligação é normalmente
cobrado à hora.
DSL (por ex., ADSL)
A DSL (Digital Subscriber Line) é uma ligação "contínua" efectuada
através da linha telefónica. Dado que a DSL e o telefone não utilizam as
mesmas frequências, pode utilizar o seu telefone ao mesmo tempo que
está ligado à Internet. Parra poder utilizar a DSL, deve estar situado
próximo de uma central do fornecedor da linha telefónica (este serviço
pode não estar disponível em zonas rurais). As velocidades da ligação
variam consoante a sua localização, mas a DSL fornece normalmente
uma ligação à Internet muito rápida e fiável. Dado que a ligação é
contínua, é normalmente cobrada uma tarifa mensal fixa.
Nota:
Uma ligação DSL requer um modem adequado. O modem é
geralmente fornecido pelo ISP quando se regista. Muitos destes
modems incluem um ‘router’ que fornece acesso à rede e wi-fi.

48
Cabo
A ligação por cabo permite um acesso Internet rápido e contínuo através
da linha do cabo de televisão. Este serviço está normalmente disponível
nas grandes cidades. Pode utilizar o telefone e ver televisão por cabo
enquanto está ligado à Internet.
3G (WWAN ou 'Wireless Wide-Area Network')
Uma ligação 3G permite-lhe utilizar as redes celulares (como as utilizadas
por um telemóvel) para ligar à Internet quando fora de casa. A ranhura
para o cartão SIM poderá estar embutida no seu computador, ou poderá
requerer um dispositivo externo, como um modem USB ou mesmo um
telemóvel devidamente equipado.
Nota: Se o seu computador incluir uma ranhura para cartões SIM,
será necessário um cartão SIM compatível e um contrato com um
fornecedor de serviços móveis.
Antes de utilizar as funcionalidades 3G, contacte o seu fornecedor de
serviços para saber se existem custos adicionais, em especial taxas
de roaming.
Ligações de rede
A LAN (Rede de área local) é formada por um grupo de computadores
(por exemplo, dentro de um escritório ou uma residência) que partilham
uma linha de comunicações e recursos comuns. Ao configurar uma rede,
pode partilhar ficheiros, dispositivos periféricos (como, por exemplo, uma
impressora.) e até mesmo uma ligação à Internet. Pode configurar uma
LAN utilizando tecnologias por fios (como a Ethernet) ou sem fios (como a
Wi-Fi ou Bluetooth).

Internet - 49
Redes sem fios
Uma LAN ou WLAN é uma rede de área local sem fios, que está ligada a
dois computadores ou mais sem utilizar cabos. A configuração de uma
rede Wi-Fi é fácil e permite partilhar ficheiros, dispositivos periféricos e
uma ligação à Internet.
Quais são os benefícios de uma rede sem fios?
Mobilidade
Os sistema LAN sem fios permitem-lhe o acesso partilhado, ou de outros
utilizadores da sua rede doméstica, a ficheiros e dispositivos ligados à
rede, por exemplo, uma impressora ou scanner.
É também possível partilhar uma ligação à Internet com outros
computadores em sua casa.
Velocidade e simplicidade de instalação
Instalar um sistema LAN sem fios pode ser rápido e fácil e acaba com a
necessidade de colocar cabos através de paredes e tectos.

50
Componentes de uma LAN sem fios
Para configurar uma rede sem fios em casa, é necessário o seguinte:
Ponto de acesso (router)
Os pontos de acesso (routers) são transceptores de duas vias que
transmitem dados para um ambiente circundante. Os pontos de acesso
são uma espécie de mediadores entre redes ligadas e redes sem fios. A
maioria dos routers tem um modem DSL incorporado que permite aceder
a uma ligação de Internet DSL de alta velocidade. Normalmente, quando
subscreve os serviços de um ISP (fornecedor de serviços Internet) é-lhe
fornecido um modem/router. Leia cuidadosamente a documentação
fornecida com o seu ponto de acesso/router para obter instruções de
instalação detalhadas.
Cabo de rede (RJ45)
Um cabo de rede (também chamado RJ45) é utilizado para ligar o
computador anfitrião ao ponto de acesso (ver ilustração abaixo); este tipo
de cabo é também utilizado para ligar dispositivos periféricos ao ponto de
acesso.
Adaptador sem fios
Normalmente, já existe um adaptador sem fios interno instalado no
computador. Um botão ou controlos no Windows permitem-lhe
activar ou desactivar o adaptador.

Internet - 51
Diagrama de uma rede em funcionamento
1. Ponto de acesso/
router
2. Computadores de
secretária
3. Modem
4. Impressora
5. Computador portátil
6. PDA/Webpad
7. Cabos de rede
(RJ45)
Ligar/desligar uma Ligação de rede sem fios
A maior parte dos computadores tem um botão ‘WiFi’ que liga e desliga a
ligação de rede. Se o seu computador tiver acesso sem fios, mas não
tiver um botão Comunicação, poderá ligar ou desligar a sua rede sem fios,
ou controlar o que é partilhado pela rede, nas opções de gestão de rede.
Prima a tecla Windows ( ) + W, digite "HomeGroup" e depois clique em
HomeGroup.
Atenção: É proibido o uso de dispositivos sem fios quando voa
numa aeronave. Desligue todos os dispositivos antes de
embarcar; podem prejudicar o funcionamento da aeronave,
perturbar comunicações e até mesmo ser ilegais.
1
2
3
4
5
6
7

52
Navegar na Net!
Para navegar na Internet, necessita de um programa
denominado navegador de Internet. O Internet Explorer
proporciona uma experiência mais fácil e mais segura
de navegação pela Internet. Logo que tenha o seu
acesso Internet instalado e estiver ligado, clique no
atalho do Internet Explorer situado no seu ambiente de
trabalho e torne a sua experiência da Internet num nível
superior!
Website da Gateway
Pode começar por visitar o nosso website www.gateway.com!
A Gateway está empenhada em fornecer-lhe um apoio contínuo e
personalizado. Consulte a nossa secção Support (Apoio) para obter um
apoio adequado às suas necessidades.
www.gateway.com constitui o portal para um mundo de actividades e
serviços on-line: visite-nos regularmente para ter acesso às informações e
downloads mais recentes!
Segurança
Deve estar desejoso de explorar todas as possibilidades oferecidas pela
Internet. Para garantir a sua segurança on-line, a Gateway pré-instalou o
programa premiado, Norton Internet Security™ no seu computador.
O novo Norton Internet Security funciona discretamente em Segundo
plano para bloquear as ameaças complexas actuais e proteger a sua
identidade quando efectua compras, transacções bancárias ou navega
on-line.

Internet - 53
O Norton Internet Security impede o roubo de identidade on-line, detecta
e elimina spyware, remove vírus e Internet worms, protege contra
hackers.
Definições
O que é um vírus?
Os softwares perigosos, geralmente denominados “vírus”, são programas
concebidos para infectar e danificar os computadores. A maioria dos vírus
são transmitidos via Internet, e-mails ou websites perigosos. Um vírus
comum replicar-se-á e passará sem ser detectado por vários
computadores. Outras formas de prejuízo, como os cavalos de Tróia,
worms ou spam podem infectar o seu computador de várias formas,
utilizando recursos ou entupindo a rede.
Nota: Gateway garante que o seu computador está 100% livre de
vírus na data de aquisição do produto e não cobre os danos
provocados por vírus.
O que é um Spyware?
Spyware refere-se a programas geralmente indesejados que são
transferidos para o seu computador enquanto está ligado à Internet,
muitas vezes sem o seu conhecimento. Uma vez o computador infectado,
pode vigiar a sua actividade de navegação, recolher informações
pessoais, fazer com que apareçam janela com publicidade ou mesmo
alterar a configuração do seu computador. O spyware consome recursos
do seu computador, pode abrandar a sua ligação à Internet ou de todo o
sistema do computador e mesmo provocar avarias.

54
O spyware é por vezes utilizado por empresas sem escrúpulos para
controlar e identificar os sites que visita na Internet para determinar os
seus hábitos de utilização da Internet e apresentar janelas de publicidade
específicas no seu ecrã. No entanto, alguns tipos de spyware vão além da
simples identificação e controlo mesmo as batidas no teclado e recolhem
palavras-chaves o que constitui um grande risco de segurança.
O que é um malware?
O software perigoso, também conhecido como malware, é um software
concebido para prejudicar deliberadamente o seu computador. Por
exemplo, vírus, worms e cavalos de Tróia são softwares perigosos. Para
ajudar a proteger o seu computador contra malware, certifique-se de que
está a utilizar software antivírus e anti-malware actualizado.
O que é uma firewall pessoal?
Uma firewall pessoal é um software concebido para evitar o acesso não
autorizado ou para realizar uma rede privada. Funciona como um escudo
para proteger a ligação à Internet de ligações indesejadas, algumas das
quais podem tentar tomar controlo do seu computador para instalar ou
redistribuir vírus ou programas nocivos. Cada ligação ao seu computador
é controlada; os programas que tentem receber informações sem a sua
autorização são detectados e a firewall apresenta um alerta. Pode então
decidir permitir a ligação, se esta for de um programa que está a utilizar
então normalmente deveria autorizá-lo (por ex., um jogo ligando para um
servidor com vários jogadores ou uma enciclopédia efectuando uma
actualização de conteúdos).

Internet - 55
Como proteger o computador
A prevenção do cibercrime pode ser muito simples – quando armado com
alguns conselhos técnicos e senso comum, muitos ataques podem ser
evitados. Regra geral, os criminosos online estão a tentar ganhar dinheiro
o mais rápido e facilmente possível. Quando mais lhes dificultar a tarefa,
mais provável é que o deixem em paz e avancem para um alvo mais fácil.
As dicas em baixo oferecem informações básicas sobre como prevenir a
fraude online.
Mantenha o computador actualizado com os mais recentes patches e
actualizações.
Uma das melhores formas de manter os atacantes afastados do seu
computador é a aplicação de patches e outras correcções de software
quando são disponibilizados. Ao actualizar o seu computador
regularmente, impede que os atacantes se aproveitem das falhas no
software (vulnerabilidades), que de outra forma poderiam utilizar para
aceder ao seu sistema.
Embora manter o computador actualizado não o proteja de todos os
ataques, dificulta muito o acesso dos piratas informáticos ao seu sistema,
bloqueia completamente muitos ataques básicos e automáticos e pode
ser o suficiente para desencorajar o atacante menos determinado para
que desista e vá procurar um computador mais vulnerável noutro local.
As versões mais recentes do Microsoft Windows e de outros softwares
populares podem ser configuradas para transferir e aplicar as
actualizações automaticamente, para que não se tenha de lembrar de
procurar o software mais recente. Aproveitar as funções de actualização
automática do seu software é um óptimo começo para se manter seguro
online.

56
Proteja o computador com software de segurança
São necessários vários tipos de software de segurança para ter a
segurança básica online. Os softwares de segurança essenciais incluem
programas firewall e antivírus. Um firewall é geralmente a primeira linha
de defesa do seu computador – controla quem e o que pode comunicar
com o computador online. Pode pensar no firewall como uma espécie de
"polícia" que observa os dados que tentam entrar e sair do computador
pela Internet, permitindo as comunicações que sabe serem seguras e
bloqueando o "mau" tráfego, como os ataques, impedindo-os de sequer
chegarem ao computador.
A linha de defesa seguinte muitas vezes é o software antivírus, que
monitoriza todas as actividades online, como as mensagens de e-mail e a
navegação na Internet, e protege um indivíduo de vírus, worms, cavalos
de Tróia e outros tipos de programas maliciosos. O seu software antivírus
e antispyware deve ser configurado para se actualizar automaticamente e
deve fazê-lo sempre que se ligar à Internet.
Os conjuntos de segurança integrados, como o Norton Internet Security,
que combinam firewall, antivírus e antispyware com outras funções como
antispam e controlo parental, tornaram-se muito populares por
oferecerem todo o software de segurança necessário para protecção
online num único pacote. Muitos consideram a utilização de um pacote
abrangente de segurança uma boa alternativa à instalação, configuração
e actualização de vários tipos de software de segurança.
O seu sistema da tem uma versão completa do Norton Internet
Security™ pré-instaladaGateway. Inclui uma subscrição gratuita de
teste para actualizações de protecção. Não se esqueça de o Activar!

Internet - 57
Escolha palavras-passe fortes e mantenha-as em segurança
As palavras-passe são um facto na Internet de hoje; utilizamo-las para
tudo, desde encomendar flores e realizar actividades bancárias online, até
entrar no website da nossa companhia aérea preferida para ver quantas
milhas acumulámos. As dicas seguintes podem ajudar a tornar as suas
experiências online seguras:
• Seleccionar uma palavra-passe que não possa ser facilmente
adivinhada é o primeiro passo para manter as palavras-passe em
segurança e longe das mãos erradas. As palavras-passe fortes têm oito
caracteres ou mais e utilizam uma combinação de letras, números e
símbolos (por exemplo, # $ % ! ?). Evite a utilização de qualquer um
dos seguintes elementos como palavra-passe: o seu nome de início de
sessão, qualquer coisa baseada nas suas informações pessoais, como
o seu apelido, e palavras que se podem encontrar no dicionário, em
especial “palavra-passe”. Tentar seleccionar palavras-passe
especialmente fortes e únicas para proteger actividades como
operações bancária online.
• Mantenha as suas palavras-passe num local seguro e não utilize a
mesma palavra-passe para todos os serviços online.
• Altere as palavras-passe regularmente, pelo menos a cada 90 dias. Isto
pode limitar os danos provocados por alguém que já tenha obtido
acesso à sua conta. Se notar algo de suspeito numa das suas contas
online, um dos primeiros passos que pode tomar é alterar a palavra-
passe.

58
Proteja as suas informações pessoais
Tenha cuidado quando partilhar informações pessoais online, como o seu
nome, endereço de casa, número de telefone e endereço de e-mail. Para
beneficiar de muitos serviços online, terá inevitavelmente de dar
informações pessoais para poder tratar da facturação e do envio dos bens
comprados. Como é raro não ter de divulgar informações pessoais, a
seguinte lista contém alguns conselhos sobre como partilhar informações
pessoais online em segurança:
• Esteja atento a mensagens de e-mail falsas. As coisas que indicam
que uma mensagem pode ser fraudulenta são erros ortográficos,
gramática incorrecta, expressões estranhas, endereços da Internet com
extensões estranhas, endereços da Internet compostos totalmente por
números quando normalmente existem palavras e qualquer outra coisa
invulgar. Para além disso, as mensagens de phishing muitas vezes
dizem que tem que agir rapidamente para manter a sua conta aberta,
actualizar a segurança ou insistem para que forneça informações
imediatamente senão algo mau pode acontecer. Não morda o isco.
• Não responda a mensagens de e-mail que pedem informações
pessoais. As empresas legítimas não utilizam mensagens de e-mail
para lhe pedir informações pessoais. Em caso de dúvida, contacte a
empresa por telefone ou digite o endereço da Internet da empresa no
web browser. Não clique nas hiperligações destas mensagens, pois
podem levá-lo para websites fraudulentos e maliciosos.

Internet - 59
• Mantenha-se afastado de websites utilizados para roubar
informações pessoais. Quando visitar um website, digite o endereço
(URL) directamente no web browser, em vez de seguir uma
hiperligação num e-mail ou mensagem instantânea. As pessoas que
cometem a fraude muitas vezes forjam as hiperligações para que
pareçam convincentes.
Um sítio da Internet onde se faça compras, actividades bancárias ou
em que se partilhem informações confidenciais deve ter um "S" depois
das letras "http" (ou seja https://www.yourbank.com não http://
www.yourbank.com). O "s" quer dizer seguro e deve aparecer quando
está numa área em que se pede para iniciar uma sessão ou dar outros
dados confidenciais. Outro sinal de que tem uma ligação segura é o
pequeno ícone de um cadeado na parte inferior do seu web browser
(geralmente no canto direito).
• Preste atenção às políticas de privacidade nos websites e no
software. É importante compreender como uma organização poderá
recolher e utilizar as suas informações pessoais antes de as partilhar
com eles.
• Proteja o seu endereço de e-mail. Por vezes, os spammers e os
“phishers” enviam milhões de mensagens para endereços de e-mail
que podem ou não existir com esperança de encontrarem uma
potencial vítima. Responder a estas mensagens, ou mesmo transferir
imagens, garante que será adicionado às listas deles para receber mais
mensagens iguais no futuro. Tenha cuidado também ao publicar o seu
endereço de e-mail online em grupos de notícias, blogues ou
comunidades online.

60
As ofertas online que parecem demasiado boas para serem verdade,
geralmente são
O velho ditado "nada é de graça" ainda hoje é verdade. O software
supostamente "gratuito", como protecções de ecrã ou smileys, truques de
investimento secretos que lhe garantem fortunas fantásticas e concursos
que surpreendentemente ganhou sem se ter inscrito são iscos atraentes
que as empresas utilizam para conseguir a sua atenção.
Embora possa não pagar directamente pelo software ou serviço em
dinheiro, o software ou serviço grátis que pediu pode estar agrupado com
software publicitário ("adware") que "espia" o seu comportamento e
apresenta anúncios não desejados. Pode ter que divulgar informações
pessoais ou comprar outra coisa para reclamar o seu suposto prémio. Se
uma oferta parecer demasiado boa para ser verdade, pergunte a opinião
de outra pessoa, leia as letras pequenas ou, melhor ainda, simplesmente
ignore.
Analise regularmente os extractos bancários e dos cartões de crédito
O impacto do roubo de identidade e dos crimes online pode ser bastante
reduzido se os conseguir detectar pouco depois dos seus dados serem
roubados ou aquando da primeira tentativa de utilização das suas
informações. Uma das formas mais fáceis de ver se algo correu mal é
analisando os extractos mensais fornecidos pelo banco e pelas empresas
dos cartões de crédito e ver se existe algo de anormal.
Adicionalmente, muitos bancos e serviços utilizam sistemas de prevenção
de fraude que detectam comportamentos estranhos ao fazer as compras
(ou seja, se viver no Texas e de repente começar a comprar frigoríficos

Internet - 61
em Budapeste). Para confirmar essas compras fora do normal, podem-lhe
telefonar e pedir para as confirmar. Leve estas chamadas a sério, são a
sua dica de que pode ter acontecido algum ataque e que deve tomar as
acções necessárias.
Proteja o seu computador com as ferramentas de segurança do
Windows
O Windows oferece várias aplicações de protecção.
Actualizações do Windows
Se tiver uma ligação de Internet activa, o Windows pode procurar
actualizações importantes para o seu computador e instalá-las
automaticamente. Estas actualizações incluem patches de segurança e
actualizações de programas que podem melhorar a sua experiência de
trabalho com o computador e ajudar a proteger o seu computador contra
novos vírus e ataques.
Como é que sei quando o meu computador está em risco?
Se o Centro de Acções comunicar um alerta ou se o seu computador tiver
um comportamento anormal, se se fechar sem razão ou se algum dos
seus programas não funcionar correctamente, o seu computador pode
esta infectado por um software perigoso. No entanto, não atribua as
culpas de qualquer problema do computador a um vírus! Se suspeitar que
o seu computador está infectado, a primeira coisa a fazer é actualizá-lo
(caso ainda o não o tenha feito) e executar o software antivírus e anti-
spyware.

62
RECUPERAÇÃO
Se tiver problemas com o seu computador e as perguntas mais
frequentes não o ajudarem, pode 'recuperar' o seu computador – ou seca,
repô-lo o estado anterior.
Esta secção descreve as ferramentas de recuperação no seu
computador. Gateway oferece Gateway Recovery Management, que lhe
permitir criar uma cópia de segurança para recuperação, uma cópia de
segurança de controladores e aplicações e para iniciar as opções de
recuperação, usando as ferramentas do Windows ou a cópia de
segurança de recuperação.
Nota: Gateway Recovery Management está apenas disponível num
sistema operativo Windows pré-instalado.
Importante: Recomendamos que crie uma Cópia de Segurança
de Recuperação e Cópia de Segurança de Controladores e de
Aplicações e assim que possível.
Em algumas situações, uma recuperação total requer uma cópia
de segurança de recuperação em USB.

Recuperação - 63
CRIAR UMA CÓPIA DE SEGURANÇA DE RECUPERAÇÃO
Para reinstalar a partir de uma unidade de armazenamento USB, tem
primeiro de criar a cópia de segurança de recuperação. A cópia de
segurança de recuperação inclui todo o conteúdo original do disco rígido
do seu computador, incluindo Windows e todo o software e controladores
carregados em fábrica. Com esta cópia de segurança restaurará o
computador para o mesmo estado em que o adquiriu, enquanto lhe
confere a opção de manter todas as definições e dados pessoais para
uma recuperação posterior.
Nota:
Certifique-se de que tem uma unidade USB com capacidade de,
pelo menos, de 16 GB.
1. A partir de Iniciar, introduza "Recovery" e depois clique em Gateway
Recovery Management na lista de aplicações.

64
2. Clique em Criar Cópia de Segurança de Predefinições de Fábrica. A
janela da Unidade de Recuperação abre-se.
Certifique-se de que selecciona Copiar conteúdo das partições de
recuperação para a unidade de recuperação. Isto garante a cópia de
segurança de recuperação mais completa e mais segura.

Recuperação - 65
3. Ligue a unidade USB e clique em Seguinte.
• Certifique-se de que a unidade USB tem capacidade suficiente antes
de continuar. A cópia de segurança de recuperação requer pelo
menos 16 GB de armazenamento
4. Irá aparecer no ecrã o progresso de cópia de segurança.
5. Siga o processo até que esteja concluído.

66
6. Depois de criar a cópia de segurança de recuperação, pode optar por
eliminar a informação de recuperação do seu computador. Se eliminar
esta informação, só pode usar a cópia de segurança de recuperação
USB para restaurar o seu computador, se perder ou eliminar a unidade
USB, não pode restaurar o seu computador.
7. Desligue a unidade USB e identifique-a claramente.
Importante: Escreva uma identificação única, descritiva da cópia
de segurança como ‘Cópia de segurança de recuperação do
Windows’. Certifique-se que mantém a cópia de segurança em
local seguro, e onde não se esqueça.

Recuperação - 67
CRIAR CÓPIA DE SEGURANÇA DE CONTROLADORES E DE
APLICAÇÕES
Para criar uma cópia de segurança de controladores e de aplicações, que
contenha o software e carregadores carregados na fábrica exigidos pelo
seu computador, pode usar uma unidade de armazenamento USB ou, se
o seu computador estiver equipado com gravador de DVD, um ou mais
DVDs vazios graváveis.
1. A partir de Iniciar, introduza "Recovery" e depois clique em Gateway
Recovery Management na lista de aplicações.
2. Clique em Criar Cópia de Segurança de Controladores e
Aplicações.
Ligue a unidade USB ou insira um DVD vazio na unidade ótica, e depois
clique em Seguinte.

68
• Se utilizar uma unidade USB, certifique-se de que a unidade USB
tem capacidade suficiente antes de continuar.
• Se utilizar DVDs, será mostrado o número de discos vazios e
graváveis que irá necessitar para concluir os discos de recuperação.
Certifique-se de que dispõe do número necessário de discos em
branco.

Recuperação - 69
3. Clique em Iniciar para copiar ficheiros. Será mostrado o progresso da
cópia de segurança no ecrã.
4. Siga o processo até que esteja concluído:
• Se usar discos ópticos, a unidade ejecta cada disco após a gravação.
Retire o disco da unidade e identifique-o com um marcador de tinta
permanente.
Se forem necessários vários discos, insira um disco novo quando
solicitado e clique em OK. Continue até que o processo esteja
concluído.
• Se usar uma unidade USB, desligue a unidade e identifique-a
claramente.
Importante: Escreva uma identificação única, descritiva em cada
cópia de segurança como ‘Cópia de segurança de controladores
e de aplicações’. Certifique-se que mantém a cópia de segurança
em local seguro, e onde não se esqueça.
RECUPERAR O SISTEMA
Para recuperar o seu sistema:
1. Realize pequenas correcções.
Se apenas um ou dois itens de software ou hardware tiverem deixado
de funcionar correctamente, o problema poderá ser resolvido através
da reinstalação do software ou controladores do dispositivo.
Para reinstalar o software e controladores pré-instalados de fábrica,
consulte "Reinstalar controladores e aplicações" na página 70.

70
Para instruções sobre como reinstalar software ou controladores não
pré-instalados, consulte a documentação desse produto ou o website
de suporte.
2. Reverter para um estado de sistema anterior.
Se reinstalar o software ou controladores não ajudar, então o problema
poderá ser solucionado revertendo o seu sistema a um estado anterior,
quando tudo estava a funcionar correctamente.
Para instruções, consulte "Regressar a uma captura de sistema
anterior" na página 73.
3. Reinicie o seu sistema operativo.
Caso nada tenha resolvido o seu problema, e desejar repor o seu
sistema para o estado de fábrica, mas manter a informação de
utilizador, consulte "Repor o sistema para o estado de fábrica" na
página 75.
4. Repor o sistema para o estado de fábrica.
Caso nada tenha solucionado o seu problema, e desejar repor o seu
sistema para o estado de fábrica, consulte "Repor o sistema para o
estado de fábrica" na página 75.
Reinstalar controladores e aplicações
Como passo intermédio de resolução de problemas, poderá ter de
reinstalar as aplicações e os controladores do dispositivos que vieram
pré-instalados com o seu computador. Pode reinstalar utilizando ou o seu
disco rígido ou a cópia de segurança que criou.

Recuperação - 71
• Outras aplicações – Caso tenha de reinstalar o software não pré-
instalado no seu computador, terá de seguir as instruções de instalação
desse software.
• Novos controladores de dispositivo – Caso tenha de reinstalar
controladores de dispositivos não pré-instalados no seu computador,
terá de seguir as instruções que acompanham o dispositivo.
Se reinstalar com o Windows e a informação de recuperação armazenada
no seu computador:
• A partir de Iniciar, introduza "Recovery" e depois clique em Gateway
Recovery Management na lista de aplicações.
• Clique em Reinstalar Aplicações ou Controladores.

72
• Deverá ver a secção Conteúdo do Gateway Centro de Recursos.
• Clique no ícone instalar para o item que deseja instalar, e
depois siga as instruções no ecrã para concluir a instalação.
Repita este passo para cada item que deseja reinstalar.
Se reinstalar a partir de uma cópia de segurança de controladores e de
aplicações num DVD ou unidade USB:
1. Insira a Cópia de segurança de controladores e de aplicações na
unidade do disco ou ligue-a a uma porta USB livre.
• Se inserir um DVD, aguarde até o Gateway Centro de Recursos
iniciar.
• Se o Gateway Centro de Recursos não iniciar automaticamente,
prima a tecla Windows + <E>, e depois clique duas vezes no ícone
da unidade óptica.

Recuperação - 73
• Se usar uma unidade USB, prima a tecla Windows + <E>, depois
clique duas vezes na unidade que contém a cópia de segurança.
Clique duas vezes no Centro de Recursos.
2. Deverá ver a secção Conteúdo do Gateway Centro de Recursos.
3. Clique no ícone instalar para o item que deseja instalar, e depois
siga as instruções no ecrã para concluir a instalação. Repita este
passo para cada item que deseja reinstalar.
Regressar a uma captura de sistema anterior
O Restauro do Sistema da Microsoft tira um ‘instantâneo’ das definições
do seu sistema e guarda-os como pontos de restauro. Na maior parte dos
casos mais complicados de problemas de software, pode reverter para
um desses pontos de restauro para voltar a ter o sistema a funcionar.

74
O Windows cria automaticamente um ponto de restauro adicional todos
os dias, e também sempre que instala software ou controladores de
dispositivo.
Nota: Para mais informações acerca do Restauro de Sistema
Microsoft, a partir de Iniciar, introduza ‘Ajuda’ e depois clique em
Ajuda e Suporte na lista de aplicações. Introduza 'Restauro do
sistema windows’ na caixa de Pesquisa de Ajuda, e depois prima
Enter.
Retomar um ponto de restauro
1. A partir de Iniciar, introduza ’Painel de Controlo’ e depois clique em
Painel de Controlo na lista de aplicações.
2. Clique em Sistema e Segurança > Centro de Acção, depois clique em
Recuperação no fundo da janela.
3. Clique em Abrir Restauro do Sistema e depois Seguinte.
4. Clique no último ponto de restauro ( numa altura em que o seu sistema
esteja a funcionar corretamente), clique em Seguinte, depois em
Concluir.
5. Aparece uma janela de confirmação; clique em Sim. O seu sistema
será restaurado utilizando o ponto de restauro especificado. Este
processo poderá demorar vários minutos e reiniciar o seu computador.

Recuperação - 75
Repor o sistema para o estado de fábrica
Caso o seu computador tenha problemas não recuperáveis através de
outros métodos, poderá ter de reinstalar tudo para repor o sistema para o
estado de fábrica. Pode recuperar utilizando ou o seu disco rígido ou a
cópia de segurança de recuperação que criou.
• Se ainda conseguir executar o Windows e não eliminou a partição de
recuperação, consulte "Recuperar a partir do Windows" na
página 75.
• Caso não consiga utilizar o Windows e o seu disco rígido original tenha
sido totalmente reformatado ou tiver instalado um disco rígido de
substituição, consulte "Recuperar a partir da cópia de segurança de
recuperação" na página 79.
Recuperar a partir do Windows
Inicie GatewayRecovery Management:
• A partir de Iniciar, introduza ’Recovery’ e depois clique em Gateway
Recovery Management na lista de aplicações.
Estão disponíveis duas opções, Restaurar Definições de Fábrica (Repor
o meu PC) ou Restauro Personalizado (Actualizar o meu PC).

76
Restaurar Definições de Fábrica elimina tudo no seu disco rígido,
depois reinstala o Windows e todo o software e controladores pré-
instalados no seu sistema. Caso consiga aceder a ficheiros importantes
no seu disco rígido, faça agora uma cópia de segurança dos mesmos.
Consulte "Restaurar Definições de Fábrica com Gateway Recovery
Management" na página 76.
Restauro Personalizado irá tentar reter os seus ficheiros (dados de
utilizador) mas irá reinstalar todo o software e controladores. O software
instalado desde que comprou o seu PC será removido (excepto software
instalado a partir da Windows Store). Consulte "Restauro personalizado
com Gateway Recovery Management" na página 78.
Restaurar Definições de Fábrica com Gateway Recovery Management
1. Clique em Restaurar Definições de Fábrica.

Recuperação - 77
Precaução: 'Restaurar Definições de Fábrica' eliminará todos os
ficheiros no seu disco rígido.
2. Abre-se a janela Repor o seu PC.
Imagens apenas para referência.
3. Clique em Seguinte, depois escolha como eliminar os seus ficheiros:
a. Remover apenas os meus ficheiros elimina rapidamente todos os
ficheiros antes de restaurar o seu computador e demora cerca de 30
minutos.
b. Limpar completamente a unidade limpa completamente a unidade
depois de cada ficheiros ser eliminado, por isso não é possível
visualizar ficheiros depois da recuperação. A limpeza da unidade
demora muito mais, até 5 horas, mas é muito mais segura porque os
ficheiros antigos são completamente removidos.
4. Clique em Repor.
5. O processo de recuperação começa por reiniciar o seu computador, e
depois continua a copiar ficheiros para o seu disco rígido.
6. Depois de terminar a recuperação, pode começar a usar o seu
computador, repetindo o processo de primeiro arranque.

78
Restauro personalizado com Gateway Recovery Management
1. Clique em Restauro Personalizado (Manter Dados do Utilizador).
2. Abre-se a janela Actualizar o seu PC.
3. Clique em Seguinte, depois em Actualizar.
4. O processo de recuperação começa por reiniciar o seu computador, e
depois continua a copiar ficheiros para o seu disco rígido. Este
processo demora cerca de 30 minutos.

Recuperação - 79
Recuperar a partir da cópia de segurança de recuperação
Para recuperar a partir de uma cópia de segurança de recuperação numa
unidade USB:
1. Encontre a sua cópia de segurança.
2. Ligue uma unidade USB e ligue o seu computador.
3. Se ainda não estiver activado, tem de activar o Menu de Arranque F12
(F12 Boot Menu):
a. Prima <F2> quando inicia o seu computador.
b. Utilize as setas esquerda e direita para seleccionar o menu
Principal.
c. Prima a tecla baixo até que esteja seleccionado Menu de Arranque
F12, prima <F5> para alterar esta definição para Enabled>.
d. Utilize as setas esquerda ou direita para seleccionar o menu Exit.
e. Dependendo do tipo de BIOS do seu computador, seleccione Save
Changes and Exit ou Exit Saving Changes e prima Enter.
Seleccione OK ou Yes para confirmar.
f. O seu computador irá reiniciar.
4. Durante o arranque, prima <F12> para abrir o menu de arranque. O
menu de arranque permite-lhe seleccionar qual o dispositivo do qual
iniciar, seleccione a unidade USB.
a. Utilize as teclas de seta para seleccionar USB Device, e depois
prima Enter.

80
b. O Windows inicia a partir da cópia de segurança em vez do processo
de arranque normal.
5. Seleccione o tipo do seu teclado.
6. Seleccione Troubleshoot e depois seleccione o tipo de recuperação a
usar:
a. Clique em Advanced depois em System Restore para iniciar o
Restauro do Sistema Microsoft:
O Restauro do Sistema da Microsoft tira periodicamente um
‘instantâneo’ das definições do seu sistema e guarda-os como
pontos de restauro. Na maior parte dos casos mais complicados de
problemas de software, pode reverter para um desses pontos de
restauro para voltar a ter o sistema a funcionar.
b. Clique em Reset your PC para iniciar o processo de reposição:
Reset your PC elimina tudo no seu disco rígido, depois reinstala o
Windows e todo o software e controladores pré-instalados no seu
sistema. Caso consiga aceder a ficheiros importantes no seu disco
rígido, faça agora uma cópia de segurança dos mesmos. Consulte
"Repor o seu PC a partir da cópia de segurança de recuperação"
na página 81.
c. Clique em Refresh your PC para iniciar o processo de actualização:
Refresh your PC irá tentar reter os seus ficheiros (dados de
utilizador) mas irá reinstalar todo o software e controladores. O
software instalado desde que comprou o seu PC será removido
(exceto software instalado a partir da Windows Store). Consulte
"Actualizar o seu PC a partir da cópia de segurança de
recuperação" na página 82.

Recuperação - 81
Repor o seu PC a partir da cópia de segurança de recuperação
Precaução: Repor o seu PC eliminará todos os ficheiros no seu
disco rígido.
1. Abre-se a janela Repor o seu PC.
Imagens apenas para referência.
2. Clique em Seguinte.
3. Seleccione o sistema operativo para recuperar (normalmente só está
disponível uma opção).
4. Seleccione se pretende manter as alterações no disco rígido:
a. Se eliminou a partição de recuperação ou, de outro modo, alterou as
partições no disco rígido e quer manter essas alterações, seleccione
Não.
b. Para restaurar completamente as Definições da Fábrica no seu
computador, seleccione Sim.
5. Escolha como eliminar os seus ficheiros:
a. Remover apenas os meus ficheiros elimina rapidamente todos os
ficheiros antes de restaurar o seu computador e demora cerca de 30
minutos.

82
b. Limpar completamente a unidade limpa completamente a unidade
depois de cada ficheiros ser eliminado, por isso não é possível
visualizar ficheiros depois da recuperação. A limpeza da unidade
demora muito mais, até 5 horas, mas é muito mais segura porque os
ficheiros antigos são completamente removidos.
6. Clique em Repor.
7. Depois de terminar a recuperação, pode começar a usar o seu
computador, repetindo o processo de primeiro arranque.
Actualizar o seu PC a partir da cópia de segurança de recuperação
1. Abre-se a janela Actualizar o seu PC.
2. Clique em Seguinte.
3. Seleccione o sistema operativo para recuperar (normalmente só está
disponível uma opção).
4. Clique em Actualizar.
5. O processo de recuperação começa por reiniciar o seu computador, e
depois continua a copiar ficheiros para o seu disco rígido. Este
processo demora cerca de 30 minutos.

Perguntas frequentes - 83
PERGUNTAS FREQUENTES
A lista que se segue é relativa a situações que podem ocorrer durante a
utilização do computador. São fornecidas soluções fáceis para cada uma
das situações.
Liguei a alimentação, mas o computador não arranca nem inicializa
Observe o indicador de alimentação:
• Se não estiver aceso, o computador está sem alimentação. Verifique o
seguinte:
• Se o computador estiver a funcionar através da bateria, esta poderá
estar fraca e não ser capaz de alimentar o computador. Ligue o
adaptador de corrente alternada para recarregar a bateria.
• Certifique-se de que o adaptador de corrente alternada está bem
ligado ao computador e à tomada eléctrica.
• Se estiver aceso, verifique o seguinte:
• Está um disco na unidade óptica? Remova-o e prima <Ctrl> +
<Alt> + <Del> para reiniciar o sistema.
• Tem um dispositivo de armazenamento USB (disco ou smartphone
USB) ligado ao seu computador? Retire-o e prima <Ctrl> + <Alt> +
<Del> para reiniciar o sistema.

84 - Perguntas frequentes
Não aparece nada no ecrã
O sistema de gestão de energia do computador apaga automaticamente o
ecrã para poupar energia. Prima uma tecla qualquer para ligar novamente
o ecrã.
Se ao premir uma tecla o ecrã não voltar ao normal, isso poderá dever-se
a uma destas três causas:
• O nível de brilho pode estar demasiado baixo. Prima (aumentar)
para ajustar o nível de brilho.
• O dispositivo de visualização poderá estar ajustado para um monitor
externo. Prima para regressar à imagem do computador.
• Se o indicador de Suspensão estiver aceso, o computador está no
modo de Suspensão. Prima e solte o botão de alimentação para
retomar.
Não há saída de áudio do computador
Verifique o seguinte:
• O som pode estar desligado. Observe o ícone de controlo de volume
(altifalante) na barra de tarefas do Windows. Se estiver marcado, clique
no ícone e anule a selecção da opção Tudo sem som.
• O nível de volume pode estar demasiado baixo. Observe o ícone do
controlo de volume na barra de tarefas do Windows. Pode igualmente
utilizar os botões de controlo do volume para regular o volume.
• Se auscultadores, auriculares ou altifalantes externos estiverem ligados
à porta de saída do computador, os altifalantes internos são desligados
automaticamente.

Perguntas frequentes - 85
Pretendo ejectar o tabuleiro da unidade óptica sem ligar a alimentação
Existe um orifício para ejecção mecânica na unidade óptica. Basta
introduzir a ponta de uma esferográfica ou clip no orifício e empurrar para
ejectar o tabuleiro.
O teclado não responde
Experimente ligar um teclado externo a uma porta USB do computador.
Se funcionar, contacte o seu revendedor ou um centro de assistência
técnica autorizado, uma vez que o cabo do teclado interno poderá estar
solto.
A impressora não funciona
Verifique o seguinte:
• Certifique-se de que a impressora está conectada a uma tomada
eléctrica e que está ligada (On).
• Certifique-se que o cabo da impressora está bem ligado a uma porta
USB e à porta correspondente na impressora.

86
Dicas e sugestões para usar o Windows 8
Sabemos que é um novo sistema operativo, e que é necessário algum
treino, por isso criámos algumas dicas para o ajudar a começar.
Existem três conceitos que deverá ter em mente
1. Iniciar
O botão Iniciar já não está disponível; pode abrir aplicações a partir do
ecrã Iniciar.
2. Tiles
Live tiles são idênticos às miniaturas das aplicações.
3. Charms
Charms permite-lhe executados funções úteis, como partilha de conteúdo,
desligar o seu PC ou alterar definições.
Como acedo a charms?
Desloque o cursor até ao canto superior ou inferior direito do ecrã para
aceder a charms ou prima a tecla Windows + <C>.
Como acedo a Iniciar?
Prima a tecla Windows no teclado; prima a tecla Windows + <C> e clique
em Iniciar ou mova o cursor para o canto inferior esquerd do ecrã e clique
em Iniciar.

Perguntas frequentes - 87
Como salto entre aplicações?
Desloque o cursor até à margem esquerda do ecrã para ver miniaturas
das aplicações em execução.
Pode também premir a tecla Windows + <Tab> para abrir e percorrer as
aplicações actuais.
Como desligo o meu computador?
Prima a tecla Windows + <C>, clique em Definições > Energia e
seleccione a acção que gostaria de executar. Alternativamente, no
ambiente de trabalho, clique no Botão Energia Gateway e seleccione a
acção a executar.
Porque existe uma nova interface?
A nova interface para Windows 8 foi criada para funcionar correctamente
com toques. As aplicações Windows Store utilizam automaticamente todo
o ecrã e não necessitam de ser encerrados da forma tradicional. As
aplicações Windows Store serão apresentadas em Iniciar usando live-
tiles.
O que são ‘live tiles’?
Live tiles são semelhantes às miniaturas das aplicações que serão
actualizadas com novos conteúdos sempre que se ligar à Internet. Por
exemplo, pode ver atualizações meteorológicas ou de ações sem ter de
abrir a aplicação.

88
Como desbloqueio o meu computador?
Prima qualquer tecla e clique num ícone de conta de utilizador para
desbloquear o computador. Se a sua conta tiver uma palavra-passe
configurada, terá de introduzir a palavra-passe para continuar.
Como personalizo o meu computador?
Pode personalizar Iniciar com uma imagem de fundo diferente ou
reordenando os mosaicos para se adaptar às suas necessidades.
Para alterar o fundo, prima a tecla Windows + <C> e clique em
Definições > Alterar definições do PC > Personalizar. Clique em Ecrã
iniciar no topo da página e selecione uma cor e imagem.
Como movo tiles?
Clique longamente um tile para o selecionar, e depois arraste-o até ao
local em Iniciar onde deseja que fique. Os outros tiles serão movidos para
acomodar o tile na nova localização.
Posso tornar os tiles maiores ou menores?
Clique num tile com o botão direito, e depois selecione Menor ou Maior
do menu que aparece no fundo do ecrã.
Como personalizo o ecrã de Bloqueio?
Pode personalizar o ecrã de bloqueio com uma imagem diferente ou
mostrar o seu estado rápido e notificações para se adaptar às suas
necessidades.

Perguntas frequentes - 89
Para alterar o fundo, prima a tecla Windows + <C> e clique em
Definições > Alterar definições do PC > Personalizar. Clique em Ecrã
de bloqueio no topo da página e selecione a imagem e aplicações que
deseja ver no ecrã de bloqueio.
Então, como fecho uma aplicação?
Mova o cursor até ao topo do ecrã e clique e arraste a janela para baixo,
para encerrar a aplicação.
Pode encerrar aplicações a partir das miniaturas na margem esquerda do
ecrã, clicando com o botão direito numa miniatura e seleccionando
Encerrar.
Posso alterar a resolução do ecrã?
Em Iniciar, comece a introduzir "Painel de Controlo" para abrir Pesquisar
e mostrar os resultados; clique em Painel de Controlo > Ajustar
resolução do ecrã.
Quero usar o Windows da forma que estava habituado - quer o
ambiente de trabalho de volta!
A partir de Iniciar clique no tile Ambiente de trabalho para ver o
tradicional ambiente de trabalho. Pode afixar aplicações que usa
frequentemente à barra de tarefas para os abrir facilmente.
Se clicar numa aplicação que não seja uma aplicação Windows Store, o
Windows abre automaticamente a aplicação utilizando o ambiente de
trabalho.

90
Onde estão as minhas aplicações?
A partir de Iniciar, basta começar a introduzir o nome da aplicação que
deseja abrir, e Pesquisarirá abrir automaticamente abrir e apresentar os
resultados.
Para ver a lista completa de aplicações, prima a barra de espaços ou a
tecla Menu e clique em Todas as aplicações.
Como faço aparecer uma aplicação em Iniciar?
Se estiver em Todas as aplicações e quiser que uma aplicação apareça
em Iniciar, pode seleccionar a aplicação e clicar nele com o botão direito.
Selecione Afixar em Iniciar a partir do menu que aparece no fundo do
ecrã.
Como removo um tile de Iniciar?
Clique no tile com o botão direito e clique em Remover de Iniciar no
menu que aparece no fundo do ecrã.
Como faço aparecer uma aplicação na minha barra de tarefas no
Ambiente de trabalho?
Se estiver em Todas as aplicações e quiser que uma aplicação apareça
na barra de tarefas de Ambiente de trabalho, pode seleccionar a
aplicação e clicar nele com o botão direito. Selecione Afixar à barra de
tarefas a partir do menu que aparece no fundo do ecrã.

Perguntas frequentes - 91
Como instalo aplicações?
Pode transferir aplicações Windows Store de Store. Precisará de um ID
Microsoft para comprar e transferir aplicações de Store.
Não encontro aplicações como Bloco de Notas e Paint! Onde estão?
A partir de Iniciar pode simplesmente começar a introduzir o nome da
aplicação que procura para abrir Pesquisar e apresentar os resultados.
Alternativamente, abra Todas as aplicações e percorra até ‘Acessórios
Windows’ para ver a lista de programas antigos.
O que é um ID Microsoft (conta)?
Uma conta Microsoft é um endereço de correio eletrónico e palavra-passe
que usa para iniciar a sessão no Windows. Pode usar qualquer endereço
de email, mas é melhor se escolher aquele que utiliza para comunicar
com amigos e iniciar a sessão nos seus sites favoritos. Quando inicia a
sessão no seu PC com uma conta Microsoft, estará a ligar o seu PC às
pessoas, ficheiros e dispositivos que lhe interessam.
Necessito de um?
Não necessita de um ID Microsoft para usar o Windows 8, mas torna mais
fácil a sua vida porque pode sincronizar dados por diferentes máquinas
em que inicia a sessão com um ID Microsoft.

92
Como obtenho um?
Se já instalou o Windows 8 e ainda não iniciou a sessão com uma conta
Microsoft ou não tem uma conta Microsoft e quiser uma, prima a tecla
Windows + <C> e clique em Definições > Alterar definições do PC >
Utilizadores > Mudar para uma conta Microsoft e siga as instrções no
ecrã.
Como adiciono um favorito ao Internet Explorer?
O Internet Explorer não tem os tradicionais favoritos, em vez disso pode
afixar atalhos a Iniciar. Uma vez aberta a página, clique com o botão
direito em qualquer parte da página para abrir o menu no fundo do ecrã.
Clique em Afixar a Iniciar.
Como verifico a existência de atualizações Windows?
Prima a tecla Windows + <C> e clique em Definições > Alterar
definições do PC > Actualizações do Windows. Clique em Verificar
agora atualizações.
Onde posso obter mais informações?
Para mais informações, visite:
• Tutoriais Windows 8: www.gateway.com/windows8-tutorial
• FAQs de suporte: suporte.gateway.com

Informação regulatória - 93
INFORMAÇÃO REGULATÓRIA
PREVENÇÃO DE PERDAS DE AUDIÇÃO
- Precaução: Poderá ocorrer perda permantente de audição caso sejam
usados auscultadores ou auriculares num volume elevado durante longos
períodos de tempo.
- A pleine puissance, l’écoute prolongée du baladeur peut endommager l’oreille de
l’utilisateur.
PRECAUÇÕES enquanto ouve
Para proteger os seus ouvidos, siga as instruções em baixo.
- Aumente o volume gradualmente até obter um nível de som claro e
confortável.
- Não aumente o nível de volume quando já tiver obtido um nível
confortável.
- Não ouça música muito alta por longos períodos de tempo.
- Não aumente o volume de som de forma a disfarçar o ruído ambiente.
- Reduza o volume se não conseguir ouvir o que as pessoas próximo de si estão a
dizer.
A
VISO RELATIVO AOS DISPOSITIVOS RÁDIO
- Nota:
A informação que se segue destina-se apenas aos modelos com LAN sem
fios e/ou Bluetooth.
Acessórios compatíveis
Os acessórios associados a este equipamento são: Cabo vídeo blindado quando um
monitor externo se encontra ligado. Estes acessórios devem ser utilizados para garantir
a conformidade com as normas FCC.

94
AVISO DA CALIFORNIA PROPOSITION 65 (PROPOSIÇÃO CALIFORNIANA 65)
Este produto contém químicos reconhecidos pelo Estado da Califórnia como causadores
de cancro, defeitos no feto e/ou outros danos reprodutivos. Para informação adicional
sobre o aviso deste produto, aceder a www.gateway.com/prop65.
日本
(JAPAN)
本装置は、第二種情報装置(住宅地域またはその隣接した地域において使用されるべき
情報装置)デ住宅地域での電波障害防止を目的とした情報装置等電波障害自主規制協議
会(VCCI)基準に適合しております。
しかし、本装置をラジオ、テレビジョン受信機に、近接してご使用になると、受信障害
の原因となることがあります。本書の説明にしたがって正しい取り扱いをしてくだ
さい。
W
IRELESS ADAPTER REGULATORY INFORMATION
USA — FCC and FAA
The FCC with its action in ET Docket 96-8 has adopted a safety standard for human
exposure to radio frequency (RF) electromagnetic energy emitted by FCC certified
equipment. The wireless adapter meets the Human Exposure limits found in OET Bulletin
65, supplement C, 2001, and ANSI/IEEE C95.1, 1992. Proper operation of this radio
according to the instructions found in this manual will result in exposure substantially
below the FCC’s recommended limits.
- The following safety precautions should be observed:
Do not touch or move antenna while the unit is transmitting or receiving.
- Do not hold any component containing the radio such that the antenna is very close
or touching any exposed parts of the body, especially the face or eyes, while
transmitting.

Informação regulatória - 95
- Do not operate the radio or attempt to transmit data unless the antenna is connected;
this behavior may cause damage to the radio.
Use in specific environments:
- The use of wireless adapters in hazardous locations is limited by the constraints
posed by the safety directors of such environments.
- The use of wireless adapters on airplanes is governed by the Federal Aviation
Administration (FAA).
- The use of wireless adapters in hospitals is restricted to the limits set forth by each
hospital.
Antenna Use
In order to comply with FCC RF exposure limits, low gain integrated antennas should be
located at a minimum distance of 20 cm (8 inches) or more from the body of all persons
or at a minimum distance as specified by the FCC module grant conditions. FCC grants
can be viewed from the FCC Equipment Authorization website at https://fjallfoss.fcc.gov/
oetcf/eas/reports/GenericSearch.cfm by entering the FCC ID printed on the module label.
Explosive Device Proximity Warning
Warning: Do not operate a portable transmitter (including this wireless adapter) near
unshielded blasting caps or in an explosive environment unless the transmitter has been
modified to be qualified for such use
Antenna Warnings
- Warning: To comply with the FCC and ANSI C95.1 RF exposure limits, it is
recommended that for the wireless adapter installed in a desktop or portable
computer, the antenna for this wireless adapter to be installed so as to provide a
separation distance of at least 20 cm (8 inches) from all persons or at the minimum
distance as specified by the module grant conditions. FCC grants can be viewed from
the FCC Equipment Authorization website at https://fjallfoss.fcc.gov/oetcf/eas/
reports/GenericSearch.cfm by entering the FCC ID printed on the module label.

96
- Warning: The wireless adapter is not designed for use with high-gain directional
antennas.
Use On Aircraft Caution
- Caution: Regulations of the FCC and FAA prohibit airborne operation of radio-
frequency wireless devices (wireless adapters) because their signals could interfere
with critical interfere with critical aircraft instruments.
Local Restrictions on 802.11a, 802.11b, 802.11g and 802.11n Radio Usage
- Caution: Due to the fact that the frequencies used by 802.11a, 802.11b, 802.11g and
802.11n wireless LAN devices may not yet be harmonized in all countries, 802.11a,
802.11b, 802.11g and 802.11n products are designed for use only in specific
countries, and are not allowed to be operated in countries other than those of
designated use. As a user of these products, you are responsible for ensuring that
the products are used only in the countries for which they were intended and for
verifying that they are configured with the correct selection of frequency and channel
for the country of use. Any deviation from the permissible power and frequency
settings for the country of use is an infringement of national law and may be punished
as such.
Wireless Interoperability
The wireless adapter is designed to be interoperable with other wireless LAN products
that are based on direct sequence spread spectrum (DSSS) radio technology and to
comply with the following standards:
- IEEE Std. 802.11b compliant Standard on Wireless LAN
- IEEE Std. 802.11g compliant Standard on Wireless LAN
- IEEE Std. 802.11a compliant Standard on Wireless LAN (applies to devices
supporting 802.11a)
- IEEE Std. 802.11n draft 2.0 compliant on Wireless LAN
- Wireless Fidelity certification, as defined by the Wi-Fi Alliance

Informação regulatória - 97
The Wireless Adapter and Your Health
The wireless adapter, like other radio devices, emits radio frequency electromagnetic
energy. The level of energy emitted by the wireless adapter, however, is less than the
electromagnetic energy emitted by other wireless devices such as mobile phones. The
wireless adapter operates within the guidelines found in radio frequency safety standards
and recommendations. These standards and recommendations reflect the consensus of
the scientific community and result from deliberations of panels and committees of
scientists who continually review and interpret the extensive research literature. In some
situations or environments, the use of the wireless adapter may be restricted by the
proprietor of the building or responsible representatives of the applicable organization.
Examples of such situations may include:
- Using the wireless adapter on board airplanes, or
- Using the wireless adapter in any other environment where the risk of interference
with other devices or services is perceived or identified as being harmful.
If you are uncertain of the policy that applies to the use of wireless adapters in a specific
organization or environment (an airport, for example), you are encouraged to ask for
authorization to use the adapter before you turn it on.
FCC Radio Frequency Interference Requirements (applies to device supporting
802.11a)
This device is restricted to indoor use due to its operation in the 5,15 to 5,25 GHz and
5,470 to 5,725 GHz frequency ranges. FCC requires this product to be used indoors for
the frequency ranges 5,15 to 5,25 GHz and 5,470 to 5,725 GHz to reduce the potential
for harmful interference to co-channel mobile satellite systems. High power radars are
allocated as primary users of the 5,25 to 5,35 GHz and 5,65 to 5,85 GHz bands. These
radar stations can cause interference with and /or damage this device. No configuration
controls are provided for this wireless adapter allowing any change in the frequency of
operations outside the FCC grant of authorization for U.S operation according to Part
15,407 of the FCC rules.

98
USA — Federal Communications Commission (FCC)
This device complies with Part 15 of the FCC Rules. Operation of the device is subject to
the following two conditions:
- This device may not cause harmful interference.
- This device must accept any interference that may cause undesired operation.
- Note: The radiated output power of the adapter is far below the FCC radio frequency
exposure limits. Nevertheless, the adapter should be used in such a manner that the
potential for human contact during normal operation is minimized. To avoid the
possibility of exceeding the FCC radio frequency exposure limits, you should keep a
distance of at least 20 cm between you (or any other person in the vicinity), or the
minimum separation distance as specified by the FCC grant conditions, and the
antenna that is built into the computer. Details of the authorized configurations can
be found at http://www.fcc.gov/oet/ea/
by entering the FCC ID number on the device.
Interference Statement
This wireless adapter has been tested and found to comply with the limits for a Class B
digital device, pursuant to Part 15 of the FCC Rules. These limits are designed to provide
reasonable protection against harmful interference in a residential installation. This
wireless adapter generates, uses, and can radiate radio frequency energy. If the wireless
adapter is not installed and used in accordance with the instructions, the wireless adapter
may cause harmful interference to radio communications. There is no guarantee,
however, that such interference will not occur in a particular installation. If this wireless
adapter does cause harmful interference to radio or television reception (which can be
determined by turning the equipment off and on), the user is encouraged to try to correct
the interference by taking one or more of the following measures:
- Reorient or relocate the receiving antenna of the equipment experiencing the
interference.
- Increase the distance between the wireless adapter and the equipment experiencing
the interference.

Informação regulatória - 99
- Connect the computer with the wireless adapter to an outlet on a circuit different from
that to which the equipment experiencing the interference is connected.
- Consult the dealer or an experienced radio/TV technician for help.
- Note: The adapter must be installed and used in strict accordance with the
manufacturer's instructions as described in the user documentation that comes with
the product. Any other installation or use will violate FCC Part 15 regulations.
Canada — Industry Canada (IC)
This device complies with RSS210 of Industry Canada. Cet appareil se conforme à
RSS210 de Canada d'Industrie.
- Caution: When machine supports and using IEEE 802.11a wireless LAN, this
product is restricted to indoor use due to its operation in the 5,15- to 5,25 GHz
frequency range. Industry Canada requires this product to be used indoors for the
frequency range of 5,15 GHz to 5,25 GHz to reduce the potential for harmful
interference to co-channel mobile satellite systems. High power radar is allocated as
the primary user of the 5,25 to 5,35 GHz and 5,65 to 5,85 GHz bands. These radar
stations can cause interference with and/or damage to this device. The maximum
allowed antenna gain for use with this device is 6dBi in order to comply with the
E.I.R.P limit for the 5,25 to 5.35 and 5,725 to 5,85 GHz frequency range in point-to-
point operation. To comply with RF exposure requirements all antennas should be
located at a minimum distance of 20 cm, or the minimum separation distance allowed
by the module approval, from the body of all persons.
- Attention: l’utilisation d’un réseau sans fil IEEE802.11a est réstreinte à une
utilisation en intérieur à cause du fonctionement dans la bande de fréquence 5,15 -
5,25 GHz. Industry Canada requiert que ce produit soit utilisé à l’intérieur des
bâtiments pour la bande de fréquence 5,15 - 5,25 GHz afin de réduire les possibilités
d’interférences nuisibles aux canaux co-existants des systèmes de transmission
satellites. Les radars de puissances ont fait l’objet d’une allocation primaire de
fréquences dans les bandes 5,25 - 5,35 GHz et 5 65 - 5,85 GHz. Ces stations radar
peuvent créer des interférences avec ce produit et/ou lui être nuisible. Le gain
d’antenne maximum permissible pour une utilisation avec ce produit est de 6 dBi afin

100
d’être conforme aux limites de puissance isotropique rayonnée équivalente (P.I.R.E.)
applicable dans les bandes 5,25 - 5,35 GHz et 5,725 - 5,85 GHz en fonctionement
point-à-point. Se pour conformer aux conditions d'exposition de RF toutes les
antennes devraient être localisées à une distance minimum de 20 cm, ou la distance
de séparation minimum permise par l'approbation de module, du corps de toutes les
personnes.
This Class B digital apparatus complies with Canadian ICES-003.
Cet appareil numérique de la classe B est conforme a la norme NMB-003 du Canada.
"To prevent radio interference to the licensed service, this device is intended to be
operated indoors and away from windows to provide maximum shielding. Equipment (or
its transmit antenna) that is installed outdoors is subject to licensing."
« Pour empêcher que cet appareil cause du brouillage au service faisant l'objet d'une
licence, il doit être utilisé a l'intérieur et devrait être placé loin des fenêtres afin de fournir
un écran de blindage maximal. Si le matériel (ou son antenne d'émission) est installé à
l'extérieur, il doit faire l'objet d'une licence. »
European Union
Lista de países aplicáveis
Este produto deve ser usado em conformidade com as leis e restrições do país de uso.
Para mais informações, entre em contacto com o órgão regulador no país de uso.
Consulte http://ec.europa.eu/enterprise/rtte/implem.htm
para a lista de países mais
actual.
Lista de Códigos Nacionais
Este equipamento pode ser utilizado nos seguintes países:
País
Código
ISO 3166
de duas
letras
País
Código
ISO 3166
de duas
letras
País
Código
ISO 3166
de duas
letras
País
Código
ISO 3166
de duas
letras
Áustria AT Alemanha DE Malta MT Reino Unido GB
Bélgica BE Grécia GR Holanda NT Islândia IS

Informação regulatória - 101
The low band 5,15 -5,35 GHz is for indoor use only.
This equipment complies with the essential requirements of the European Union directive
1999/5/EC. See Statements of European Union Compliance, and more details refer to the
attached Declaration of Conformity.
Chipre CY Hungria HU Polónia PL Liechtenstein LI
República
Checa
CZ Irlanda IE Portugal PT Noruega NO
Dinamarca DK Itália IT Eslováquia SK Suíça CH
Estónia EE Letónia LV Eslovénia SL Bulgária BG
Finlândia FI Lituânia LT Espanha ES Roménia RO
França FR Luxemburgo LU Suécia SE Turquia TR
English
Hereby, ACER INC., declares that this devise is in
compliance with the essential requirements and other
relevant provisionns of Directive 1999/5/EC.
Česky [Czech]
ACER INC. tímto prohlašuje, že toto zařízení je ve shodě se
základními požadavky a dalšími příslušnými ustanoveními
směrnice 1999/5/ES.
Daansk [Danish]
Undertegnede ACER INC. erklærer herved, at følgende
udstyr overholder de væsentlige krav og øvrige relevante krav
i direktiv 1999/5/EF.

102
Deutsch
[German]
Hiermit erklärt ACER INC., dass sich das Gerät Radiolan in
Übereinstimmung mit den grundlegenden Anforderungen und
den übrigen einschlägigen Bestimmungen der Richtlinie
1999/5/EG befindet.
Eesti [Estonian]
Käesolevaga kinnitab ACER INC. seadme vastavust direktiivi
1999/5/EÜ põhinõuetele ja nimetatud direktiivist tulenevatele
teistele asjakohastele sätetele.
Español
[Spanish]
Por medio de la presente ACER INC. declara que el
dispositivo cumple con los requisitos esenciales y
cualesquiera otras disposiciones aplicables o exigibles de la
Directiva 1999/5/CE.
Ελληνικά
[Greek]
∆ια του παρόντος η ACER INC. δηλώνει ότι η παρούσα
συσκευή συµµορφώνεται προς τις ουσιώδεις απαιτήσεις και
τις λοιπές διατάξεις της Οδηγίας 1999/5/ ΕΚ.
Français
[French]
Par la présente ACER INC. déclare que cet appareil est
conforme aux exigences essentielles et aux autres
dispositions pertinentes de la directive 1999/5/CE.
Íslenska
[Icelandic]
Hér með lýsir ACER INC. yfir því að er í samræmi við
grunnkröfur og aðrar kröfur, sem gerða r eru í tilskipun
1999/5/EC.

Informação regulatória - 103
Itaaliano [Italian]
Con la presente ACER INC. dichiara che questo dispositivo è
conforme ai requisiti essenziali ed alle altre disposizioni
pertinenti stabilite dalla direttiva 1999/5/CE.
Latviski [Latvian]
Ar šo ACER INC. deklarē, ka šī ierīce atbilst Direktīvas
1999/5/EK būtiskajām prasībām un citiem ar to saistītajiem
noteikumiem.
Lietuvių
[Lithuanian]
Šiuo ACER INC. deklaruoja, kad šis įrenginys atitinka
esminius reikalavimus ir kitas 1999/5/EB Direktyvos
nuostatas.
Malti [Maltese]
Hawnhekk, ACER INC., jiddikjara li dan jikkonforma mal- ti
ijiet essenzjali u ma provvedimenti o rajn relevanti li he mm
fid-Dirrettiva 1999/5/EC.
Magyar
[Hungarian]
Alulírott, ACER INC. nyilatkozom, hogy a készülék megfelel a
vonatkozó alapveto követelményeknek és az 1999/5/EC
irányelv egyéb eloírásainak.
Nederlands
[Dutch]
Hierbij verklaart ACER INC. dat het toestel voldoet aan de
essentiële eisen en de andere relevante bepalingen van
richtlijn 1999/5/EG.
Norsk
[Norwegiann]
ACER INC. erklærer herved at utstyret er i samsvar med de
grunnleggende krav og øvrige relevante krav i direktiv
1999/5/EF.

104
Polski [Polish]
Niniejszym ACER INC. oświadcza, że urządzenie jest zgodne
z zasadniczymi wymogami oraz pozostałymi stosownymi
postanowieniami Dyrektywy 1999/5/EC.
Português
[Portuguese]
ACER INC. declara que este dispostivo está conforme com
os requisitos essenciais e outras disposições da Directiva
1999/5/CE.
Slovensko
[Slovenian]
ACER INC. izjavlja, da je ta naprava skladna z bistvenimi
zahtevami in ostalimi relevantnimi določili Direktive
1999/5/ES.
Slovensky
[Slovak]
ACER INC. týmto vyhlasuje, že zariadenie spĺňa základné
požiadavky a všetky príslušné ustanovenia Smernice
1999/5/ES.
Suomi [Finnish]
ACER INC. vakuuttaa täten että tämä laite on direktiivin 1999/
5/EY oleellisten vaatimusten ja sitä koskevienn direktiivin
muiden ehtojen mukainen.
Svenska
[Swedish]
Härmed intygar ACER INC. att denna enhet står i
överensstämmelse med väsentliga egenskapskrav och
övriga relevanta bestämmelser som framgår av direktiv
1999/5/EG.

Informação regulatória - 105
France
Pour la France métropolitaine :
2,400 - 2,4835 GHz (Canaux 1à 13) autorisé en usage intérieur
2,400 - 2,454 GHz (canaux 1 à 7) autorisé en usage extérieur
Pour la Guyane et la Réunion :
2,400 - 2,4835 GHz (Canaux 1à 13) autorisé en usage intérieur
2,420 - 2,4835 GHz (canaux 5 à 13) autorisé en usage extérieur
Pour tout le territoire Français :
Seulement 5,15 -5,35 GHz autorisé pour le 802.11a
L'utilisation de cet equipement (2,4 GHz WLAN) est soumise à certaines restrictions :
- La puissance maximale autorisée en intérieur est de 100 mW pour 2400 - 2483,5 MHz.
- La puissance maximale autorisée est de 100 mW en extérieur pour 2400 - 2454 MHz.
- La puissance maximale autorisée est de 10 mW en extérieur, 2454 - 2483,5 MHz.
Pour les dernières restrictions, voir http://www.art-telecom.fr.
Italy
The use of these equipments is regulated by:
1.D.L.gs 1.8.2003, n. 259, article 104 (activity subject to general authorization) for outdoor
use and article 105 (free use) for indoor use, in both cases for private use.
2.D.M. 28.5.03, for supply to public of RLAN access to networks and telecom services.
L’uso degli apparati è regolamentato da:
1.D.L.gs 1.8.2003, n. 259, articoli 104 (attività soggette ad autorizzazione generale) se
utilizzati al di fuori del proprio fondo e 105 (libero uso) se utilizzati entro il proprio fondo,
in entrambi i casi per uso private.
2.D.M. 28.5.03, per la fornitura al pubblico dell’accesso R-LAN alle reti e ai servizi di
telecomunicazioni.

106
Belgium
Dans le cas d'une utilisation privée, à l'extérieur d'un bâtiment, au-dessus d'un espace
public, aucun enregistrement n'est nécessaire pour une distance de moins de 300 m.
Pour une distance supérieure à 300 m un enregistrement auprès de l'IBPT est requise.
Pour les enregistrements et licences, veuillez contacter l'IBPT.
In geval van privé-gebruik, buiten een gebouw, op een openbare plaats, is geen registratie
nodig, wanneer de afstand minder dan 300 m is. Voor een afstand groter dan 300 m is
een registratie bij BIPT vereist. Voor registraties en licenties, gelieve BIPT te contacteren.
Brazil
Este equipamento opera em caráter secundário, isto é, não tem direito a proteção contra
interferência prejudicial, mesmo de estações do mesmo tipo, e não pode causar
interferência a sistemas operando em caráter primário.
Pakistan
Pakistan Telecommunication Authority (PTA) Approved
Morocco
The operation of this product in the radio channel 2 (2417 MHz) is not authorized in the
following cities: Agadir, Assa-Zag, Cabo Negro, Chaouen, Goulmima, Oujda, Tan Tan,
Taourirt, Taroudant and Taza.
The operation of this product in the radio channels 4, 5, 6 and 7 (2425 - 2442 MHz) is not
authorized in the following cities: Aéroport Mohamed V, Agadir, Aguelmous, Anza,
Benslimane, Béni Hafida, Cabo Negro, Casablanca, Fès, Lakbab, Marrakech, Merchich,
Mohammédia, Rabat, Salé, Tanger, Tan Tan, Taounate, Tit Mellil, Zag.
Japan
5 GHz 帯は室内でのみ使用のこと
Korea
당해 무선설비는 운용 중 전파혼신 가능성이 있음

Informação regulatória - 107
Taiwan
第十二條
經型式認證合格之低功率射頻電機,非經許可,公司、商號或使用者均不得擅自變更頻
率、加大功率或變更原設計之特性及功能。
第十四條
低功率射頻電機之使用不得影響飛航安全及干擾合法通信 ; 經發現有干擾現象時,應立即
停用,並改善至無干擾時方得繼續使用。
前項合法通信,指依電信法規定作業之無線通信。
低功率射頻電機須忍受合法通信或工業、科學及醫療用電波輻射性電機設備之干擾。
A
LTERAÇÕES REALIZADAS NO PRODUTO
Marca CE
Gateway não pode ser considerada responsável por alterações não autorizadas feitas
pelo utilizador e respectivas consequências, que podem alterar a conformidade do
produto com as certificações da marca CE.
Interferência da frequência de rádio
O fabricante não se responsabiliza por quaisquer interferências na recepção de televisão
ou rádio provocadas por modificações não autorizadas neste equipamento.
C
ONEXÕES E LIGAÇÕES À TERRA REMOTAS
PELV (tensão muito baixa protegida)
Para garantir a integridade de tensão muito baixa do aparelho, ligue-o às portas externas
apenas com circuitos eléctricos compatíveis e protecção da rede.
SELV (tensão muito baixa de segurança)
Cada entrada e saída deste produto está classificada como tensão muito baixa de
segurança.

108
Ligações à terra remotas
Para prevenir choques eléctricos, ligue todos os computadores locais (escritório
individual) e equipamento de apoio de computadores ao mesmo circuito eléctrico das
ligações eléctricas do edifício. Se não tiver a certeza, verifique as ligações eléctricas do
edifício para evitar situações de ligação à terra remotas.
Corrente eléctrica do edifício
Ligue apenas o equipamento a uma corrente que esteja em conformidade com as
regulamentações de ligações eléctricas em vigor no seu país. No Reino Unido, as normas
IEE são as seguintes.
F
ONTE DE ALIMENTAÇÃO E CABOS
Fonte de alimentação
As tomadas de entrada e de saída da fonte de alimentação (quando equipadas) são
classificadas como tensão perigosa.
Deve desligar o cabo de alimentação eléctrica e remover a bateria para desligar o
equipamento da corrente eléctrica. Neste sentido, a tomada de saída deve ser instalada
junto ao equipamento e deve ser de fácil acesso.
Voltagem de entrada: Consulte a etiqueta de voltagem no fundo do computador e
certifique-se que o seu transformador cumpre a voltagem especificada.
O utilizador nunca deverá tentar desmontar a fonte de alimentação. A fonte de
alimentação não contém componentes que possam ser substituídas pelo utilizador. A
própria fonte de alimentação contém tensões perigosas que podem provocar ferimentos
físicos graves.
Se a fonte de alimentação apresentar defeitos, deve devolvê-la ao revendedor.
Cabos e ficha de alimentação
Este produto requer um cabo e ficha de alimentação com ligação terra. A ficha encaixa
apenas em tomadas de electricidade ligadas à terra. Certifique-se que a tomada eléctrica
está devidamente ligada à terra antes de introduzir a ficha. Não insira a ficha numa
tomada de electricidade não ligada à terra. Consulte o seu electricista para obter
informações mais detalhadas.

Informação regulatória - 109
O comprimento do cabo não deve exceder os 2,5 metros. Para evitar a ocorrência de
choques eléctricos, não retire nem desactive o contacto com a terra do cabo de
alimentação. Se o cabo de alimentação for danificado, substitua-o. Contacte o
revendedor de modo a efectuar uma substituição correcta. Na Europa, a ficha tem que
estar classificada para 250 V CA, no mínimo de 10 amperes. A ficha tem que apresentar
uma marca de homologação duma instituição internacional. O cabo deve ser adequado
ao país do utilizador final. Contacte o revendedor ou as autoridades locais para a
electricidade, se não tiver a certeza do tipo de cabo de alimentação que deve utilizar no
país onde reside.
Cabos
Em relação aos cabos que não são fornecidos com o Produto na embalagem do
computador:
A compatibilidade electromagnética do sistema só é garantida se o cabo e a interface
tiverem uma blindagem eficiente.
É necessária a utilização de um cabo com interface blindado para USB, IEEE1394, série,
impressora, jogos, áudio/vídeo analógico ou digital, Ethernet LAN, PS2, antenas de TV
ou FM e, em geral, todas as interfaces de cabos de alta velocidade.
Utilize apenas cabos de telecomunicações com a marca UL n.º 26AWG ou maiores.
Apenas o cabo da Ethernet LAN ou do modem RTC pode ter um comprimento superior
a 3 metros.
Gateway recomenda que adicione um grampo redondo de núcleo de ferrite a cada cabo
ligando o seu computador a um dispositivo de hardware que não foi fornecido com o seu
computador.
- Referência da ferrite: 28A-2029 da Steward (dois ganchos)
Durante a certificação do produto, a Gateway utilizou as seguintes qualidades de cabo:
- Cabos certificados USB2.0 da Hama 46778
- FireWire blindada IEEE1394 da Hama 50011

110
- Cabos de áudio/vídeo blindados RCA-RCA da Thomson KHC001M, KHC012M,
KHC028M
- Cabo áudio blindado da ficha estéreo da Hama 43330H, 42714H
Computadores portáteis e aquecimento interno
O adaptador CA e a parte debaixo do computador podem ficar quentes após uma
utilização prolongada. Deverá ser evitado o contacto físico com ambas as partes.
R
EMOÇÃO E SUBSTITUIÇÃO DA TAMPA DO CHASSIS
Antes de remover a tampa do chassis para prestar assistência ou modificar o
equipamento, é necessário desligar todos os cabos de alimentação e do modem e retirar
ou desactivar a bateria.
- Cuidado: Alguns componentes no interior do computador pode ficar quentes após
uma utilização prolongada.
Depois, tem de fechar o chassis antes de inserir os cabos e ligar o equipamento.
D
ECLARAÇÃO DE CONFORMIDADE LASER
Os dispositivos ópticos são testados e certificados para estarem em conformidade com
as normas da Comissão Electrotécnica Internacional IEC60825-1 e EN60825-1
europeias para produtos laser de Classe 1.
Os produtos a laser da classe 1 não são considerados perigosos. Os dispositivos ópticos
foram concebidos de forma a evitar qualquer exposição a radiações laser acima do nível
da classe 1, durante o funcionamento normal ou nas condições de manutenção
indicadas.
Os dispositivos ópticos instalados no seu computador foram concebidos para uso
exclusivo enquanto componentes de tais produtos electrónicos e, logo, não estão em
conformidade com os requisitos específicos do código de normas federais Sec. 1040.10
e Sec. 1040.11 para produtos a laser COMPLETOS.
Uma vez que a exposição à radiação laser é extremamente perigosa, o utilizador não
deverá nunca, sob quaisquer circunstâncias, tentar desmontar o dispositivo a laser.

Informação regulatória - 111
ACONDICIONAMENTO
O acondicionamento deste produto está em conformidade com a Directiva ambiental
europeia 94/62/CE de 20 de Dezembro de 1994 e com a sua equivalente na legislação
francesa pelo Decreto 98-638 de 20 de Julho de 1998.
E
M CONFORMIDADE COM A CERTIFICAÇÃO REGULAMENTAR RUSSA

112
AMBIENTE
O NOSSO COMPRIMISSO COM A PROTECÇÃO AMBIENTAL
O ambiente tem tido um papel importante na criação dos nossos produtos.
Gateway está empenhada em limitar o impacto ambiental dos seus produtos durante o
respectivo ciclo de vida.
Começando pela fase de concepção, com uma política de aquisição muito restrita, é dado
o máximo de atenção aos componentes electrónicos para limitar o seu peso em metais
pesados, como chumbo, cádmio, crómio, mercúrio, etc. Pede-se aos fornecedores, de
cada peça de qualquer produto, que respeitem todos os regulamentos.
No que diz respeito aos produtos no final da vida útil, foram tomadas medidas para
antecipar e facilitar a reciclagem de todos os nossos produtos. Por isso, todas as peças
de plástico utilizadas nos produtos da Gateway que pesam mais de 25 gramas têm a
etiqueta ISO 11469. Esta etiqueta permite o reconhecimento rápido do material e facilita
a sua valorização. Da mesma forma, os computadores de secretária são concebidos para
serem facilmente desmontados, substituindo-se os parafusos por clips.
E
LIMINAÇÃO DO PRODUTO
A directiva 2002/96/CE, conhecida como directiva de resíduos de
equipamentos eléctricos e electrónicos (REEE), exige que os produtos
electrónicos e eléctricos usados sejam eliminados em separado dos
resíduos domésticos para promover a reutilização, reciclagem e outras
formas de recuperação e reduzir a quantidade de detritos a eliminar,
tendo em vista a redução de aterros sanitários e incineração. O símbolo
do balde do lixo riscado destina-se a lembrá-lo que estes produtos devem
ser eliminados em separado. Estes regulamentos aplicam-se a todos os
produtos Gateway e a todos os acessórios, como teclados, ratos, colunas, telecomandos,
etc. Quando eliminar este tipo de produtos, consulte a autoridade local ou devolva o
equipamento usado ao seu revendedor, caso o vá substituir, de modo a se certificar de
que é correctamente reciclado. Para mais informações, visit www.gateway.com/about/
corp_responsibility/environment.php.

Ambiente - 113
Eliminação de bateria (se for aplicável)
Antes de deitar fora o seu equipamento, certifique-se que retirou todas as baterias que
possam estar dentro do equipamento. A legislação europeia declara que as baterias têm
de ser recolhidas para serem eliminadas em separado do lixo doméstico. Não coloque as
baterias usadas no balde do lixo. Coloque as baterias usadas num ponto de recolha
específico, quando disponível, ou consulte o seu distribuidor ou autoridade local para
saber que infra-estruturas pode usar. A sua colaboração permitirá a recolha, reciclagem
e destruição seguras das baterias usadas, ajudando a proteger o ambiente e a reduzir o
risco para a saúde.
- Precaução: Risco de explosão caso a bateria seja substituída por uma de tipo
incorrecto. Elimine as baterias usadas de acordo com as instruções.
ENERGY STAR
Os produtos Gateway com ENERGY STAR poupam-lhe dinheiro ao
reduzir o custo de energia e protegendo o ambiente sem sacrificar
funcionalidades ou desempenho. A Gateway orgulha-se de oferecer aos
nossos clients produtos com a marca ENERGY STAR.
O que é a ENERGY STAR?
Produtos com ENERGY STAR utilizam menos energia e evitam emissões de gases com
efeito estufa ao cumprir rigorosas orientações de eficiência energética definidas pela
Agência de Protecção Ambiental dos E.U.A. A Gateway está empenhada em oferecer
produtos e serviços a nível mundial que ajudem os clientes a poupar dinheiro, a poupar
energia e a melhorar a qualidade do ambiente. Quanto mais energia pudermos poupar
com mais eficiência energética, mais conseguiremos reduzir a emissão de gases com
efeito estufa e o risco de alterações climáticas. Para mais informações consulte
www.energystar.gov ou www.energystar.gov/powermanagement.
- Nota: As informações desta secção podem não aplicar-se ao seu computador.
Produtos Gateway com ENERGY STAR:
- Produzem menos calor e reduzem cargas de arrefecimento e climas quentes.

114
- Passam automaticamente para os modos “suspensão de ecrã” e “suspensão do
computador” após 10 e 30 minuots de inactividade, respectivamente.
- Desperte o computador do modo suspensão premindo o teclado ou mexendo no
rato.
- Os computadores pouparão mais de 80% da energia no modo “suspensão”.
A ENERGY STAR e a marca ENERGY STAR são marcas registadas dos E.U.A.

Licença de software - 115
LICENÇA DE SOFTWARE
- Nota: A maioria dos softwares já está pré-instalada no seu computador Gateway.
Estão prontos para ser utilizados e configurados. Contudo, alguns requerem a
introdução de um CD ou DVD. Estes discos encontram-se na embalagem do
computador.
Acordo de licença Gateway(produtos de CD e/ou DVD). Esta cópia do original constitui a
sua prova de licença. Conserve-a como uma propriedade valiosa.
Importante!
Ler com atenção antes de instalar o software
O Acordo de licença seguinte aplica-se a si. Trata-se de um acordo legal entre si (quer
individualmente quer como entidade) e a Gateway. Ao instalar o software compromete-
se a obedecer aos termos deste Acordo. Caso o cliente não concorde com os termos
deste Acordo, deverá devolver o computador, o(s) pacote(s) de software não aberto(s) e,
se existirem, os termos que o acompanham (incluindo materiais escritos e arquivos ou
outro(s) recipiente(s)) ao local de aquisição para um reembolso total.
G
ATEWAY LICENÇA DE SOFTWARE
1. Concessão de licença
Este Acordo de licença da Gateway (“Licença”) permite-lhe utilizar uma cópia da versão
específica do SOFTWARE da Gateway identificado acima (que pode incluir pelo menos
um disco CD ou DVD) num único computador, sob condição do SOFTWARE ser apenas
utilizado num único computador a qualquer momento. Se o cliente dispuser de diversas
licenças para o SOFTWARE, então poderá utilizar em qualquer momento tantas cópias
do SOFTWARE quantas licenças possuir. O SOFTWARE está “a ser utilizado” num
computador quando é carregado na memória temporária (isto é, a RAM) ou instalado na
memória permanente (por exemplo, disco rígido, CD e/ou DVD-ROM ou noutro suporte
de armazenamento desse computador), exceptuando o caso em que uma cópia é
instalada num servidor de rede, com fins exclusivamente de distribuição, de outro

116
computador, caso em que o SOFTWARE não está “a ser utilizado”. Se o número
antecipado de utilizadores do SOFTWARE exceder o número de licenças aplicáveis,
então o cliente terá que dispor de um mecanismo ou processo razoável para assegurar
que o número de pessoas que utilizam o SOFTWARE simultaneamente não exceda o
número de licenças. Se o SOFTWARE estiver instalado de forma permanente no disco
rígido ou num dispositivo de armazenamento de um computador (que não um servidor de
rede) e se uma pessoa utilizar esse computador durante mais de 80% do tempo em que
este está a ser utilizado, então essa pessoa poderá também utilizar o SOFTWARE num
computador portátil ou doméstico.
2. Direitos de autor
O SOFTWARE é propriedade da Gateway ou dos fornecedores e encontra-se protegido
pelas leis de direitos de autores dos Estados Unidos da América e pela disposição do
tratado internacional. Por conseguinte, deve tratar o SOFTWARE como qualquer outro
material protegido pelos direitos de autor (por ex. livro ou gravação musical) excepto que
pode transferir a parte do disco CD e/ou DVD do SOFTWARE, se existir, para um único
disco rígido, sob condição de guardar o original apenas para fins de cópia de segurança
e arquivo. O cliente não pode copiar parte do disco CD e/ou DVD do SOFTWARE ou os
materiais escritos que acompanham o SOFTWARE.
3. Outras restrições
O cliente não pode alugar ou efectuar leasing do SOFTWARE, mas pode transferir o
SOFTWARE e os materiais escritos que o acompanham numa base permanente desde
que não retenha quaisquer cópias e desde que o destinatário concorde com os termos
deste contrato. O cliente não pode alterar a engenharia, decompor ou desmontar o
SOFTWARE. Qualquer transferência do SOFTWARE terá que incluir a actualização mais
recente e todas as versões anteriores.

Licença de software - 117
INFORMÇÃO SOBRE LICENÇA DE SOFTWARE DE TERCEIROS E SOFTWARE DE LICENÇA LIVRE
O software pré-carregado, integrado ou distribuído de qualquer outra forma com os
produtos fornecidos pela Gateway no contém programas de software de terceiros ou
livres (o Software Livre), que são licenciados ao abrigo dos termos da Licença Pública
Geral GNU (a GPL). O Software Livre é identificado como tal. As cópias, distribuição e/
ou alterações que fizer do Software Livre estão sujeitas aos termos da GPL.
O software Livre é distribuído na esperança de que seja útil, mas SEM QUALQUER
GARANTIA; nem mesmo com a garantia implícita de COMERCIABILIDADE ou
ADEQUAÇÃO PARA UM FIM ESPECÍFICO. As provisões da Licença Pública Geral GNU
devem ser sempre aplicadas. Pode aceder directamente a http://www.gnu.org para obter
uma cópia da GPL ou escrever à Free Software Foundation, Inc. e solicitar uma cópia. A
morada da Free Software Foundation, Inc é: 59 Temple Place - Suite 330, Boston, MA,
02111-1307, USA.
Durante um período de três (3) anos com início na recepção por si deste software, pode
obter um exemplar legível por uma máquina do código-fonte do Software Livre ao abrigo
dos termos da GPL sem qualquer custo excepto o custo do suporte, porte e
processamento, através de pedido escrito dirigido a nós.
Agradecemos que nos contacte se tiver mais questões. A nossa morada para
correspondência 8F, 88, Sec. 1, Hsin Tai Wu Rd., Hsichih, New Taipei City 221, Taiwan.

118
ÍNDICE REMISSIVO
A
Actualizar
Actualizações automáticas do
Windows
........................................ 61
altifalantes
resolução de problemas
................. 84
tecla de atalho ......................... 19, 20
Ambiente ........................................... 112
Ambiente do computador........................ 8
áudio
resolução de problemas
................. 84
Aviso de epilepsia ................................ 14
B
bateria
advertência de baixa carga da
bateria
........................................... 40
características................................ 36
carregar......................................... 39
condições baixas............................ 41
instalar........................................... 39
maximizar a duração...................... 37
optimizar........................................ 40
remover......................................... 39
utilizar pela primeira vez................. 37
verificar o nível de carga ................ 40
Baterias............................................. 113
Browser............................................... 52
C
Cabo de alimentação............................ 10
Cabos.......................................... 10, 108
carregar
verificar o nível
............................... 40
CD-ROM
ejectar manualmente
...................... 85
resolução de problemas ................. 85
computador
funcionalidades
.............................. 15
indicador de ligado......................... 21
Cursor ................................................. 27
D
Dispositivos multimédia amovíveis ........ 31 DSL..................................................... 47

Índice Remissivo - 119
E
Ecrã
teclas de atalho
.............................. 18
ecrã
resolução de problemas
................. 84
Eliminação de bateria......................... 113
F
FAQ. Consulte perguntas frequentes
Firewall
................................................ 54
Fornecedor de Servios Internet (ISP) .... 46
G
Garantia................................................ 7 Gateway
Programa Recovery Management
... 45
I
impressora
resolução de problemas
................. 85
INFORMAÇÃO REGULATÓRIA ... 93, 112
Interferência....................................... 107
Internet
Firewall
.......................................... 54
Ligação ................................... 46, 47
L
LAN (Rede de Área Local).................... 48
Leitor de cartões de memória ............... 29
ligações
rede
............................................... 31
Ligações de rede ................................. 48
Limpar o seu computador ..................... 11
luminosidade
teclas de atalho
.............................. 19
M
Malware............................................... 54
Manutenção
Programa Recovery Management
... 45
Recovery Management .................. 62
Modem ................................................ 47
N
Norton Internet Security.................. 52, 56
P
perguntas frequentes............................ 83 portas.................................................. 29

120
Precauções de saúde........................... 12
Precauções de segurança ..................... 8
problemas............................................ 83
arranque ........................................ 83
CD-ROM ....................................... 85
ecrã............................................... 84
impressora..................................... 85
teclado .......................................... 85
R
Recovery
Programa Recovery Management
... 45
Recuperação
Recovery Management
.................. 62
rede..................................................... 31
S
Segurança
Actualizações
................................. 61
Antivírus ........................................ 55
Software
Licença de software
..................... 115
Spyware .............................................. 53
T
Teclado
teclas de atalho
.............................. 20
teclado
resolução de problemas
................. 85
teclado táctil......................................... 27
utilizar...................................... 27–27
teclas de atalho.................................... 20
U
Unidades
Leitor de cartões de memória
......... 29
universal serial bus .............................. 32
V
vista
direita
............................................ 24
esquerda ....................................... 22
frente............................................. 22
vista esquerda ..................................... 21
vista frontal .......................................... 21
W
WiFi............................................... 48, 49
Windows
Actualizações automáticas do
Windows
........................................ 61
Utilizar o Windows ......................... 45
Ver.: 02.01.02

- 1
使用手冊
Gateway NE71B

2
目錄
啟動您的電腦 4
無線連線............................................................. 4
註冊 .................................................................... 5
軟體安裝............................................................. 5
復原 .................................................................... 6
遇到問題嗎?...................................................... 6
電腦基本知識 7
安全及使用舒適性 .............................................. 7
安全守則 ..................................................... 7
健康守則 ................................................... 10
認識您的電腦 12
上視圖 - 顯示器 ................................................ 13
上視圖 - 鍵盤 .................................................... 14
特殊按鍵 ................................................... 15
前視圖 .............................................................. 18
左視圖 .............................................................. 19
右視圖 .............................................................. 20
底視圖 .............................................................. 22
觸控板 23
觸控板基本操作................................................ 23
觸控板手勢 ....................................................... 24
升級電腦 25
透過選購品擴充................................................ 25
連線用選購項目......................................... 25
電源供應器 30
AC 電源轉接器 ................................................. 30
電池組 .............................................................. 31
電池組特性................................................ 31
更換電池組................................................ 33
安裝或取下電池組 ..................................... 33
電池充電................................................... 33
檢查電池電量............................................ 34
最佳化電池使用壽命................................. 34
低電量警告 ............................................... 34
電源管理 36
省電 ................................................................. 36
軟體 38
使用 Windows 和您的軟體............................... 38
網際網路安全防護 .................................... 38
Gateway Recovery Management............. 38
網際網路 39
上網的必要工作 ............................................... 39
保護電腦................................................... 39
選擇網際網路服務提供者.......................... 39
網路連線................................................... 41
瀏覽網路! ............................................... 44
安全性 ...................................................... 44
復原 51
建立復原備份................................................... 51
建立磁碟機和應用程式備份 ............................. 54
復原您的系統................................................... 57
重新安裝驅動程式和應用程式 .................. 57
回到先前的系統快照................................. 60
將系統回到出廠預設狀態.......................... 61
從 Windows 復原...................................... 61
從復原備份中復原 .................................... 65
常見問題 69
使用 Windows 8 的秘訣和提示 ........................ 71
有三個要記住的觀念................................. 71
如何存取 Charms?.................................. 71

目錄
- 3
如何進入開始功能表?.............................. 71
我要如何在應用程式間進行切換?............ 71
如何關閉我的電腦? ................................. 72
為什麼要使用新介面?.............................. 72
如何將我的電腦解除鎖定?....................... 72
如何個人化我的電腦?.............................. 72
我想要以我習慣的方式來使用 Windows。
還我桌面!................................................ 74
我的應用程式在哪裡?.............................. 74
何謂 Microsoft ID ( 帳戶 )?....................... 75
如何將我的最愛新增到
Internet Explorer? ................................... 76
如何檢查 Windows Update? ................... 76
哪裡可獲得更多資訊? ............................. 76
法規資訊 77
環境 94
軟體授權 96
索引 98
Gateway 歡迎您點進 registration.gateway.com 來看看加入會員的優惠好康!
備註:所有圖片僅供參考。實際組態可能有所不同。
著作權 © 2012 版權所有
Gateway NE71B 使用手冊
本修訂版本:2012 年 7 月 20 日

4
啟動您的電腦
感謝您購買 Gateway 電腦!
本手冊的設計用意在於介紹電腦的功能並協助提升您的電腦使用體驗。
在設定並啟動電腦之後,如設定指示中所示,畫面上將會出現各種問題,
以協助您連上網際網路。接著電腦會設定所安裝的軟體。
無線連線
若要連線到無線網路,請先檢查電腦的無線功能是否開啟,且所要連線的路
由器或數據機是否設定正確。
• 若無線網路未開啟,按下 Windows 鍵 () + W,輸入 「無線網路」然後
按一下 「無線網路」。 按一下 Wi-Fi 下的切換開關,以啟用無線連線。 再
按一次則可停用。
• 若要連線至網路,按下 Windows 鍵 () + W,輸入 「無線網路」,然後
按一下連線至網路。 選取網路,輸入密碼 ( 如果需要的話 )。
• 過一段時間後,電腦應該即可連上網際網路。
如果未偵測到您的網路,或電腦未連線到網際網路,請參閱 ISP 或路由器的
說明文件。在電腦啟動並可開始使用後,開啟 Internet Explorer,然後依照
指示進行。
或者,也可以使用網路線直接連接到路由器上的網路埠。請洽詢您的
ISP
或參閱路由器的使用指南。

啟動您的電腦
- 5
註冊
建議您在第一次使用電腦時立刻為產品進行註冊。註冊可以讓您獲得一些好
處,包括:
• 由專業的代表人員提供快速服務。
• 獲得 Gateway 社群成員資格:可以收到我們的促銷資訊,並參加客戶調
查活動。
• 收到來自 Gateway 的最新消息。
註冊方式
一開始啟動電腦時,會出現一個視窗,邀請您完成註冊。請填入相關資訊,
然後按一下 「下一步」。接下來出現的視窗則包含選擇性的欄位,這些資訊
可幫助我們為您提供更個人化的客戶服務體驗。
其他選項
另一個註冊 Gateway 產品的方式,就是造訪我們的網站:
registration.gateway.com。選擇您所在的國家 / 地區,依照出現的簡易指
示進行。
完成註冊後,我們會寄給您一封確認的電子郵件,當中含有一些重要資訊,
請您務必妥善保管。
軟體安裝
電腦會自動安裝軟體並準備電腦,供您開始使用。這可能需要一段時間,
此時請勿關閉電腦;並靜候電腦完成安裝。

6
復原
您應該在允許時立即建立復原光碟。復原程式可讓您建立復原光碟,還能接
著還原或重新安裝 Gateway 提供的應用程式及驅動程式。
遇到問題嗎?
Gateway 提供多種購買支援選項。
Gateway
支援
務必記下您電腦的序號、購買日期和地點,以及本手冊上的型號名稱;同時
請保留購買證明。打電話給我們之前,請寫下引發問題時顯示的任何錯誤訊
息,再將電腦備妥在身旁,然後開啟電源 ( 如果可行的話 )。若能在連絡我
們之前先準備好這些事項,將有助於改善並加速我們的服務流程。
Gateway
網站
別忘了造訪 www.gateway.com, 查看我們的 「支援」區段,取得最新的資
訊、說明、驅動程式和下載。
保固和連絡資訊
您可以在電腦的保固中找到電腦的保固資訊,以及如何聯絡技術支援服務的
資訊。

電腦基本知識
- 7
電腦基本知識
安全及使用舒適性
安全守則
請遵循以下的電腦使用指南,以確保使用舒適性及避免健康上的問題。
電腦環境
請確認電腦的使用環境:
• 放在穩固的檯面、支架或桌面上使用。若讓電腦掉落,可能嚴重毀損。
• 請勿在震動的檯面上使用,或在運動、健身或其他動態環境的活動期間使
用。震動或移動會讓固定機制鬆脫、損傷內部元件,甚至造成電池漏液。
• 遠離陽光直射及熱源。
• 遠離磁場或任何會產生靜電的裝置。
• 遠離行動電話至少 30 公分 (1 英呎 )。
• 非處於充滿灰塵或潮濕的環境。
• 請勿在靠近水邊處使用。切勿將任何液體灑潑在電腦上或內部。
• 請勿放在地毯或其他會產生靜電的表面上使用。
注意
• 產品上的縫隙及開口有通風功效,可確保產品穩定運作並避免過熱。因此
請勿擋住或蓋住開口,亦請勿放在床鋪、沙發、地毯及其他相似表面上。
除非有適當的通風,否則絕對不要將本產品放在靠近電暖爐或導熱器的地
方,或置放於密閉空間中。

8
• 請勿將任何種類的物體塞入本產品的縫隙中,以免接觸到危險的高壓點或
短路部分,而造成火災或電擊。請勿潑灑任何種類的液體於本產品的上方
或內部。
• 為避免損壞內部零件及造成電池漏電,請勿將本產品置於震動的表面上。
• 請勿在參加體育活動、運動,或任何會造成意外短路或損壞轉動裝置、
硬碟、光碟機,以及可能讓鋰電池暴露在危險下的震動環境中使用本產品。
連接線
請確定下列事項:
• 請勿讓電源線呈現繃緊狀態,且不要讓其他人有機會踩踏或纏繞在電源
線上。
• 請勿讓其他裝置壓在電源線上。
• 先將電源線連接至電腦,然後再插入 AC 電源插座。
• 在將電源線從電腦拔出之前,先從電源插座中拔出。
• 三針腳電源線需接到接地的電源插座。
• 電源插座應在方便取得的位置,並盡可能靠近電腦 ( 請勿插入太多電源轉
接器,讓電壓過載 )。
如果電腦使用外接式 AC 電源轉接器:
• 請勿將物品覆蓋或放置在 AC 電源轉接器上。清除所有物品,讓電源轉接
器在使用期間獲得適當冷卻。
• 只能使用電腦隨附的 AC 電源轉接器。使用外觀類似的其他電源轉接器可
能讓電腦毀損。如果需要更換元件,只能使用通過電腦使用認證的元件。

電腦基本知識
- 9
清理您的筆記型電腦
• 請先將電腦電源線從電源插座中拔出,再進行清潔工作。
• 請勿使用液體或氣體的清潔劑,以濕布清潔即可。
• 請勿直接在螢幕上噴灑清潔產品。
• 如果不慎將液體灑在電腦上,請立即關機、拔出 AC 電源轉接器、取出電
池,並確定完全乾燥後再開機使用。必要時需等至隔日。
注意:電腦若附有記憶卡插槽或其它延伸裝置,可能會有防塵待機卡
安裝於記憶卡插槽中。防塵待機卡可保護未使用的插槽,避免灰塵、金
屬物體或其他小雜物的掉入。當插槽內未放入介面卡時,請使用防塵
待機卡。
維修電腦
請勿嘗試自行維修電腦,打開或移除外蓋可能引發觸電或其他危險。請由專
業人員進行維修。
若發生下列情形,請自牆壁插座拔除電腦電源,並由專業人員進行維修:
• 電源線或插頭已損壞、斷裂或磨損時,
• 液體灑入產品內部時,
• 產品暴露於雨水或水分時,
• 產品掉落或外殼受損時,
• 產品出現明顯的效能異常,
• 在遵循操作指示的情況下,產品仍無法正確操作。
注意:您只能調整操作指示中提及的控制項,未正確調整其他控制項
可能會造成電腦毀損,且需要由合格的維修人員進行經常性的維修,才
能讓產品恢復正常狀態。

10
健康守則
• 筆記型電腦底部表面、通風孔周圍及 AC 電源轉換器可能會過熱。為了
避免造成傷害,請務必勿讓皮膚或身體碰觸到這些裝置和裝置周圍。
• 您的裝置與其配件可能含有小零件,請放置在兒童無法拿取之處。
• 本電腦和配件含有小型零件,請放置在兒童無法拿取之處。
• 不論是長時間工作或娛樂,請安排適當的休息時間。應每隔一段時間將眼
睛看向電腦螢幕以外的地方。勞累時請停止使用電腦。
• 請將電腦放在適當的位置,讓您能夠自然、舒適地進行工作。請將經常使
用的物品放在方便拿取的位置。
• 請將電腦放在正前方,以提高安全和使用舒適性。確定鍵盤和觸控板放在
適當的高度。螢幕應與您的眼睛保持 45 至 70 公分 (18 至 30 英吋)的
距離。
如果要長時間坐在書桌前使用電腦,建議您購買一組外接式鍵盤,以提高
使用電腦時的舒適性。
• 為保護您的聽力,在使用喇叭或耳機時,請慢慢將音量提高到清楚且舒適
的程度;您的耳朵適應後就不要再提高音量。請勿長時間使用高音量。
請勿提高音量來蓋過週遭的噪音;當無法聽到身旁人的談話時,表示需要
降低音量。
• 電腦底部、電源轉接器,以及從散熱孔排出的空氣,在使用
時可能會變熱。避免長時間接觸,且請勿將運作中的電腦放
在腿上。
• 確定電腦的散熱孔和孔槽未被阻塞或擋住。請勿將電腦放在
柔軟的表面上 ( 例如地毯、椅子或床墊 ),因為這樣會阻塞散熱孔。
• 請勿將任何物體插入散熱孔或機殼插槽中,以免接觸到危險的電壓接點或
造成零件短路,因而引發火災或觸電。

電腦基本知識
- 11
• 有些重複性的動作可能引發或造成手掌、手腕、頸部、肩膀、腿部和後背
出現某些不適。為避免這些不適情形的發生,輸入文字時請伸直手腕,並
將手掌和手腕放在鍵盤上方。如果您感受到痛感、刺痛、麻痺或其他不舒
服的感覺,請尋求醫療協助。
• 建議父母應注意子女所玩的遊戲。如果您或您的子女出現下列徵狀:暈
眩、視線模糊、眼睛或肌肉抽蓄、意識不清、失去方向感、任何不自主的
運動或痙攣,請立即停止使用並尋求醫療協助。無癲癇病史的正常人也可
能出現上述情形。

12
認識您的電腦
在依照設定指示中所提及的說明完成電腦的設定之後,就讓我們為您展示一
下全新 Gateway 電腦
的各項功能吧!
Gateway NE71B

認識您的電腦
- 13
上視圖 - 顯示器
#
圖示 項目 說明
1
網路攝影機
網路攝影機,用於進行視訊通訊。
網路攝影機旁的燈號顯示已啟用網路攝影機。
2
麥克風 內建的麥克風,用於錄音。
3
顯示螢幕
亦稱為液晶顯示器 (Liquid-Crystal Display,
LCD),可用於顯示電腦的輸出資訊。
1
2
3

14
上視圖 - 鍵盤
#
圖示 項目 說明
1
電源按鈕 / 指示燈 開啟和關閉電腦。 表示電腦的電源狀態。
2
鍵盤
可用來將資料輸入電腦。
-
特殊按鍵說明於第
15
頁。
3
觸控板
觸控感應式移動游標裝置,功能等同於電腦的
滑鼠。
1
2
5
3
4

認識您的電腦
- 15
特殊按鍵
電腦的鍵盤包含可啟動特殊功能的按鍵。 每個按鍵的功能都以圖示清楚
標示。
4
點選鍵 ( 左和右 )
左及右按鈕的功能就跟左選取鍵與右選取鍵
相同。
5
喇叭 傳送立體聲音效輸出。
圖示 功能 說明
Fn
第二功能的快速鍵
可啟動某些按鍵上的第二功能。
例如,按下
Fn
鍵可啟動
F1
至
F12
鍵。
說明 開啟說明功能表。
Backup
可讓您為電腦,或整個系統,或選取的檔案和資料夾建
立備份副本, 您還可以根據排程或隨時視需要執行
備份。
通訊 啟用 / 停用電腦的通訊裝置。
螢幕顯示切換
在螢幕及外接顯示器 ( 如有連接 ) 之間切換,或同時
顯示。
螢幕空白
關閉顯示螢幕背光,以節省電力。 按下任意鍵即可
返回。
#
圖示 項目 說明

16
觸控板切換鈕 開啟和關閉內建的觸控板。
播放 / 暫停 播放或暫停選取的媒體檔。
停止 停止播放選取的媒體檔。
上一個 返回上一個媒體檔。
下一個 跳到下一個媒體檔。
調低亮度 調低螢幕亮度。
調高亮度 調高螢幕亮度。
社交網路
開啟社交網路應用程式。
-
假如未安裝該應用程式,則按鍵會改為啟動即時通訊
應用程式。
提高音量 提高喇叭音量。
降低音量 降低喇叭音量。
喇叭切換鈕 開啟和關閉喇叭。
圖示 功能 說明

認識您的電腦
- 17
快速鍵
電腦使用快速鍵 ( 組合鍵 ) 來存取功能鍵及導覽指令。
若要使用快速鍵,請先按住 Fn 鍵 ( 左下角 ),再按下組合鍵的另一按鍵。
-
注意:
若要在啟動電腦或使用
BIOS
時使用
F1
至
F12
功能鍵,不需要按下
Fn
鍵。
若要切換
F1
至
F12
鍵的快速鍵及特殊功能,請在
BIOS
中變更功能鍵設定
(
若要開
啟
BIOS
,請在電腦啟動時按下
F2
,接著選取 「
Main
」
(
主要
)
功能表,然後將
「
Function key behavior
」
(
功能鍵行為
)
變更為 「
Function keys
」
(
功能鍵
))
。
快速鍵 功能 說明
Fn + 特殊鍵
(
請參閱第
15
頁
)
功能鍵 啟動 F1 至 F12 鍵。
Fn +
首頁 捲動到文件開始處。
Fn + End
捲動到文件結尾處。
Fn + Page Up
在文件中向上捲動一頁。
Fn + Page Down
在文件中向下捲動一頁。

18
前視圖
-
注意:即使在電腦螢幕闔上時,您依然可看見位於前面板的狀態指示燈。
#
圖示 項目 說明
1
電源指示燈 表示電腦的電源狀態。
電池指示燈
表示電腦的電池狀態。
-
充電中:
當電池充電時,指示燈會亮琥珀色。
-
充電完畢:
當使用
AC
電源模式時,指示燈
會亮藍色。
硬碟指示燈 當存取硬碟時,指示燈會亮起。
通訊指示燈 表示電腦無線連線能力的狀態。
2
多合一讀卡機
可支援 Secure Digital (SD)、MultiMediaCard
(MMC)、Memory Stick PRO (MS PRO)、
xD-Picture Card (xD)。
-
推一下即可取出
/
安裝記憶卡。
無論何時皆只
能使用一張卡片。
1 2

認識您的電腦
- 19
左視圖
#
圖示 項目 說明
1
Kensington 安全鎖
插槽
連接到與 Kensington 相容的電腦安全鎖。
-
將電腦安全鎖電纜線繞著無法移動的物品打
個圈,例如,桌子或鎖住的抽屜把手。
再將鎖插入鎖孔中,並轉動鑰匙以便上鎖。
此外,還有些無鑰匙安全鎖的型號可供使用
者選擇。
2
散熱孔和冷卻風扇
讓電腦保持冷卻狀態。
-
請勿阻塞或擋住開口。
3
乙太網路 (RJ-45)
連接埠
連接到以 10/100/1000 為基礎的乙太網路。
4
外接顯示螢幕 (VGA)
連接埠
連接到顯示器裝置 ( 例如:外接式顯示器、
LCD 投影機 )。
5
HDMI 連接埠 支援高清晰度數位視訊連線。
21 3 4 56

20
USB 3.0
資訊
• 相容於 USB 3.0 和較舊的 USB 裝置。
• 如需達到最佳效能,請使用具 USB 3.0 認證的裝置。
• 使用 USB 3.0 規格 (SuperSpeed USB)。
右視圖
6
USB 埠
連接到 USB 裝置。
-
如果連接埠為黑色,表示為
USB 2.0
相容;
如果為藍色,則可同時相容
USB 3.0 (
請參閱
下方
)
。
#
圖示 項目 說明
1
耳機 / 喇叭插孔
連接外接音訊輸出裝置的插孔 ( 例如:喇叭、
耳機 )。
-
支援內建麥克風相容的
3.5 mm
耳機
(
例如:
Acer
智慧型手持裝置的耳機
)
。
麥克風插孔 接受從外接麥克風所輸入的聲音。
#
圖示 項目 說明
12 3 4 5 6 7

認識您的電腦
- 21
USB 3.0
資訊
• 相容於 USB 3.0 和較舊的 USB 裝置。
• 如需達到最佳效能,請使用具 USB 3.0 認證的裝置。
• 使用 USB 3.0 規格 (SuperSpeed USB)。
2
USB 埠
連接到 USB 裝置。
-
如果連接埠為黑色,表示為
USB 2.0
相容;
如果為藍色,則可同時相容
USB 3.0 (
請參閱
下方
)
。
3
光碟機 內部光碟機,可放入 CD 或 DVD。
4
光碟存取指示燈 當正在存取光碟時,指示燈會亮起。
5
光碟退出按鈕 可將光碟從光碟機中退出。
6
緊急退出孔
可在電腦關機狀態下退出光碟機托盤。
-
小心將扳直的迴紋針插入,退出光碟機托盤。
7
DC 輸入插孔 連接到電腦的 AC 變壓器。
#
圖示 項目 說明

22
底視圖
#
圖示 項目 說明
1
電池槽 用於安裝電腦的電池組。
2
電池卸除卡榫
用於卸下電池組。 用適當的工具插入,然後推
開,將其卸除。
3
記憶體槽 用於安裝電腦的主記憶體。
硬碟槽 用於安裝電腦的硬碟 ( 以螺絲鎖定 )。
4
散熱孔和冷卻風扇
讓電腦保持冷卻狀態。
-
請勿阻塞或擋住開口。
1
4
2
3

觸控板
- 23
觸控板
觸控板基本操作
觸控板控制螢幕上的箭頭
(
或 「游標」
)
。
當您在觸控板上滑動手指時,
游標會隨之移動。
按觸控板邊緣的左邊或右邊按鈕,可以進行選取及執行的功能。
這兩個區域
的效果,相當於滑鼠的左右按鍵。
輕輕地在觸控板上點幾下,效果與滑鼠的
左按鍵相同。
注意:觸控板對手指移動相當敏感。因此,碰觸的動作愈輕,則回應
效果愈佳。
請保持觸控板和手指的乾燥與清潔。
游標由某些基本手勢控制:
• 單指滑動:手指在觸控板上任意滑動,感覺螢幕游標隨著手指
的動作而移動。
• 單指點選: 輕點觸控板可執行點擊滑鼠左鍵的功能,以選取或
啟動項目。 快速重複點擊可執行雙點擊,或點擊滑鼠左鍵兩下
的功能。
• 拖拉: 按住選取按鈕左下角不放,或在觸控板任何位置點兩下,然後將第
二隻手指滑過觸控板來選取區域中的所有項目。

24
觸控板手勢
Windows 8
和許多應用程式支援使用一或多隻手指的觸控板手勢。
注意:
依作用中的應用程式支援觸控板手勢。
您可以使用幾個簡單的觸控動作來控制應用程式,例如:
• 從邊緣向內滑動: 從右側、上面或左側滑向觸
控板中央,可存取 Windows 工具。
• 從右側邊緣向內滑動:切換 Charms。
• 從上面邊緣向內滑動:切換應用程式指令。
• 從左側邊緣向內滑動:切換至先前的應用程式。
• 雙指滑動:將兩根手指放在觸控板上,並向任何方向移動,即
可在網頁、文件或播放清單中捲動。
• 以兩根手指縮放:透過簡易的食指及大拇指觸碰,可放大及縮
小相片、地圖和文件。

升級電腦
- 25
升級電腦
透過選購品擴充
本電腦提供許多不同的選購品,能帶給您最完整的運算體驗。
連線用選購項目
連接埠可讓您將週邊裝置和電腦互相連接,有關如何將其它外接裝置連接到
電腦的詳細說明,請參閱下列章節,以獲取更詳細資訊。
讀卡機
記憶卡被廣泛應用於各種數位相機、PDA、MP3 播放器
和行動電話中。
插入記憶卡
1. 將記憶卡接點部分朝下,接點對齊插槽。
2. 小心將記憶卡插入插槽。如果需要一些力氣才能插入記憶卡,請嘗試稍微
調整記憶卡的插入位置。
3. 用力壓下記憶卡,直到聽到喀嚓聲。記憶卡會有一些部分突出插槽之外。
如果記憶卡內含有部分檔案,就會出現 「Windows
自動播放
」視窗
( 視記憶卡中的內容而定 ),並詢問您是否要使用程式存取記憶卡中的內
容。請選取適用選項,或選取 「取消」。如果記憶卡內沒有檔案,或包含
未知的檔案,則會直接開啟瀏覽視窗,顯示記憶卡中的內容。

26
SD
、
SDHC
和
SDXC
記憶卡
不同類型的 SD 記憶卡,雖然整體設計相同,但容量卻不相同。 SD 記憶卡
可容納最多 4 GB,SDHC 記憶卡可容納最多 32 GB,而 SDXC 記憶卡則可
容納最多 2048 GB (2 TB)。 本電腦包含 SDHC 或 SDXC 記憶卡相容的
讀卡機。
注意:
SDXC
記憶卡只能用在
SDXC
相容的讀卡機;
SD
和
SDHC
記
憶卡則可用在任何一種讀卡機。
移除
讀卡機中的記憶卡
1. 按一下
通知區域
( 在時鐘旁 ) 中的
「顯示隱藏圖示」箭頭。
2. 按一下 「安全移除硬體」圖示。
3. 按一下 「退出 SD 卡」 ( 或裝置
名稱 )。
4. 等待
「安全地移除硬體」
訊息出現。
5. 移除記憶卡。
3
2
1

升級電腦
- 27
內建網路功能
內建網路功能,可讓電腦連接至乙太網路架構的
區域網路。
將乙太網路連接線從電腦機身的乙太網路
(RJ-45) 埠,連接到網路的網路插孔或集線器。
通用序列匯流排
(USB)
USB 2.0 埠為讓您串接其他 USB 周邊裝置,
且不需要佔用珍貴系統資源的高速序列匯
流排。
有些電腦可能提供一或多個 USB 3.0 埠。這些
連接埠與標準的 USB 埠類似,但還包含額外
的內部接頭,且為藍色。您可以在這些埠上使
用相容的 USB 3.0 裝置,得到更快的傳輸
速度。

28
影像埠
連接具備 VGA 或 DVI 埠的顯示器 ( 支援的連線類型視電腦組態而定 )。
顯示器通常會隨附適用的連接線。
請依下列步驟將顯示器連接至電腦:
1. 確定電腦已關機,且顯示器電源也已關閉。
2. 將視訊連接線接到電腦的顯示器埠。使用隨附螺絲將連接線接頭固定。
3. 將顯示器電源線重新接上,另一端插入可用的接地電源插座。
4. 請依照顯示器使用手冊中任何的安裝指示進行。
5. 先啟動顯示器電源,接著啟動電腦。
6. 確定目前的解析度和更新頻率未超出顯示器的規格。必要時變更電腦使用
的顯示設定。
注意:使用顯示控制的方式:按下
Windows
鍵
() + W
,輸入
「顯示器」然後按一下 「顯示器」。
高畫質多媒體介面
(
僅適用於特定機型
)
HDMI ( 高畫質多媒體介面 ) 是一種業
界支援、無壓縮、之全數位影音介面。
HDMI 是以一條訊號線作為相容數位
影音來源 ( 例如機上盒、DVD 放影機
和 A/V 接收器 ) 和相容數位音樂
和 / 或視訊播放器 ( 例如數位電視
(DTV)) 之間的介面。

升級電腦
- 29
使用您電腦上的 HDMI 連接埠來連接高級影音設備。利用單一訊號線做快速
連接,並且減少雜亂過多的纜線。
耳機和麥克風
這兩個連接埠可讓您連接音訊裝置。耳機連接埠可用來插入立體聲耳機或主
動式喇叭。只要將音訊裝置插入耳機連接埠,內建喇叭便會停用。麥克風連
接埠可用來連接外接式麥克風,以進行單聲道錄音;插入外接式麥克風時,
內建麥克風便會停用。

30
電源供應器
AC 電源轉接器
本電腦可以使用隨附的外接式電源轉接器 ( 電源「供應盒」),以 接 上 AC 電
源使用。 電源線會依購買電腦的所在國家提供適用的規格。
電源轉接器可提供電腦運作所需要的適當電力,並同時為電池組充電。
注意: 請勿將物品覆蓋或放置在 AC 電源轉接器上。 清除轉接器上的
所有物品,讓電源轉接器在使用期間獲得適當冷卻。
只能使用電腦隨附的 AC 電源轉接器。 使用外觀類似的其他電源轉接器可能
讓電腦毀損。

電源供應器
- 31
警告: AC 電源轉接器和電腦底部在長時間使用後可能會變熱, 此為正
常情形,但長時間與人體接觸仍會造成傷害。
電池組
本電腦使用的電池組只要充飽電,即可讓您使用電腦一段很長的時間。
電池組特性
本電腦採用的電池組具備下列特性:
• 採用最新電池技術標準。
• 低電量警告功能。
只要您將電腦連接到 AC 電源轉接器,電池就會開始充電。 本電腦支援充電
時使用功能,因此您可以一邊充電,一邊繼續使用電腦。 但是,如果在關機
狀態下充電,則會大大縮短充電時間。
在您旅行或斷電時,電池組是隨時可以派上用場的得力幫手。 因此我們建議
您可以另外再準備一顆完全充電的電池組,以作為不時之需。 如需購買電池
組,請與當地經銷商聯絡。
最大化電池使用壽命
筆記型電腦的電池與一般電池相同,都是消耗品。 表示都有一定的使用時
間,其性能會隨著使用時間的越長而逐漸降低。
為最大化電池使用壽命,請參閱下列建議設定。

32
調整新的電池組
當第一次使用電池組之前,您應依下列步驟為其進行調整動作:
1. 請先不要開機,將新電池組插入電腦中。
2. 將 AC 電源轉接器接上電腦與電源,將電池完全充滿電。
3. 拔掉 AC 電源轉接器。
4. 使用電池電源打開電腦,並開始使用。
5. 讓電池完全放電。
6. 重新接上 AC 電源轉接器,並再次對電池進行完全充電。
重複上述步驟,直至電池完全充放電三次。
對於所有新電池組,或長時間未使用的電池,我們建議您務必執行此步驟。
如果電腦會閒置不用達兩週以上,建議您務必先將電池組取出。
警告: 切勿將電池組擺置於攝氏 0 度以下,或 45 度以上的溫度。 否則
異常溫度會影響電池組的使用效能。
在進行電池調整後,您的電池就可以接受最大化充電作業。 如果未執行這個
調整動作,電池即使充滿電,也可能不是最大充電量,更會縮短電池使用
壽命。
此外,在下列情況中使用電池,也會影響電池使用壽命:
• 當電池置於電腦內時,卻仍持續使用 AC 電源。 如果您要使用 AC 電 源 ,
建議您先取出完全充電後的電池組。
• 未依新電池組使用限制中的方式進行完全放電和充電。
• 經常使用電腦。使用電池時間越長,當然其使用壽命也會更短。 標準電池
組約可充放電 300 次。

電源供應器
- 33
更換電池組
筆記型電腦是使用鋰電池組。更換與隨附電池相同型號的電池,若使用其他
型號的電池可能會發生火災或爆炸。
警告:未正確處理電池可能會爆炸。請勿拆解電池或將電池丟棄到火
中。請將電池放在孩童拿不到的地方。請根據當地法規棄置用過的
電池。
安裝或取下電池組
重要!
在移除電池組之前,如果您還想繼續使用電腦,請接上
AC
電
源轉接器。
否則,請先關機。
安裝電池組:
1. 請將電池組對準電池槽前緣,要確定先插入的是有接頭的一端,並且電池
的頂面要朝上。
2. 將電池輕輕地推入電池槽內,直至電池固定位置為止。
移除電池組:
1. 滑動電池釋放開關。
2. 從電池槽中取出電池組。
電池充電
若要對電池充電時,請先確定電池是否已正確安裝至電池槽中。 再將 AC 電
源轉接器連接至電腦,並將另一端連接到牆壁上的主電源插座。 當電池充電
時,您仍然可以繼續以 AC 電源操作電腦。 但是,如果在關機狀態下充電,
則會大大縮短充電時間。

34
注意:
我們建議您在使用的前一天對電池充電。
在您旅行前整晚對電
池充電,好讓您第二天出門可以攜帶完全充滿電的電池組。
檢查電池電量
Windows 電源計量器顯示目前剩餘電池電量。 只要將游標指向工具列上的
電池 / 電源計量器圖示,就可以看到目前電池的剩餘電量。
最佳化電池使用壽命
最佳化電池使用壽命可以讓您充分利用電池效能,以延長充電週期,提高充
電效率。 以下是我們的建議事項:
• 另外選購一組電池組。
• 盡可能使用 AC 電源轉換器,以保留電池電力,供旅行之需。
• 如果未使用 PC 卡,請將其退出,因為會耗電 ( 視型號而定 )。
• 請將電池置放在涼爽、乾燥的地方。 建議的溫度為攝氏 10 度
( 華氏 50 度 ) 到 30 度 ( 華氏 86 度 )。 太高的溫度會加速電池自放電過程。
• 過度充電也會縮短電池使用壽命。
• 請隨時檢查您的 AC 電源轉接器並注意電池使用情況。
低電量警告
在使用電池電源時,請隨時注意 Windows 工具列上的電源計量器情況。
警告: 當出現低電量警告訊息後,請儘速接上 AC 電源轉接器。 如果
電池電量完全用盡,電腦就會關機,屆時所有未儲存的重要資料都會
遺失。

電源供應器
- 35
下表列出當出現低電量警告訊息時的因應之道:
狀況 因應之道
可使用 AC 電源轉接
器與電源插座。
1. 請將 AC 電源轉接器連接到電腦,再將另一端連
接到主電源。
2. 儲存所有需要的檔案。
3. 繼續剛剛的工作。
如果想快速充電,請先關閉電腦。
可使用另一個已完全
充電的電池組。
1. 儲存所有需要的檔案。
2. 關閉所有應用程式。
3. 關閉作業系統並關閉電腦電源。
4. 更換電池組。
5. 重新啟動電腦,並繼續剛剛的工作。
沒有 AC 電源轉接器
和電源插座可使用。
並且也沒有備用的電
池組。
1. 儲存所有需要的檔案。
2. 關閉所有應用程式。
3. 關閉作業系統並關閉電腦電源。

36
電源管理
本電腦內建一個電源管理單元,可監視系統活動。 所謂系統活動是指牽涉下
列一個或多個裝置的任何執行動作, 包括鍵盤、滑鼠、硬碟、連接至電腦的
周邊設備及視訊記憶體。 若在指定的一段時間內,系統偵測不到任何動作,
系統將會暫停一個或所有裝置的活動,以節省電力。
省電
停用快速開機
為了加快開機速度,您的電腦有使用快速開機功能。但是,其也會使用少量
電力來檢查開機訊號。 不過,這些檢查僅會緩慢消耗電腦的電池電力。
如果想要降低電腦電力的用量和對於環境的衝擊,請關閉快速開機:
注意:
如果關閉快速開機,電腦將會花費較長的時間從睡眠模式中
喚醒。
如果電腦接收到網路開機指示
(Wake on LAN
,網路喚醒
)
,其也不會
啟動。
1. 開啟桌面。
2. 在通知區域中,按一下電源選項。
3. 選取更多電源選項。

電源管理
- 37
4. 選取選擇按下電源按鈕時的行為。
5. 若要存取關閉設定值,請選取變更目前無法使用的設定值。
6. 向下捲動並停用啟動快速開機。
7. 選取儲存變更。

38
軟體
使用 WINDOWS 和您的軟體
Gateway 電腦包含可輔助您使用電腦的軟體;您電腦上可用的程式和類別將
依購買的機型而定。
網際網路安全防護
網際網路上充斥著各種病毒和攻擊,因此一定要懂得如何保護您的電腦
( 請參閱第 44 頁的<
安全性
> )。在您初次啟動電腦時,畫面上會出現完整
功能的網際網路安全套裝軟體,包含免費試用期。您應該在連上網際網路之
前啟動此防護功能。此安全套裝軟體可保護電腦抵抗最新的線上威脅,並保
護您的個人資料 ( 銀行帳戶憑證、信用卡卡號、密碼等 )。
Gateway Recovery Management
為了讓電腦針對系統復原選項進行準備作業,您應該立即建立一套復原光
碟。請參閱第 51 頁,以瞭解詳細資訊。

網際網路
- 39
網際網路
上網的必要工作
保護電腦
網際網路上充斥著各種病毒和攻擊,因此一定要懂得如何保護您的電腦
( 請參閱第 38 頁的<
網際網路安全防護
>和第 44 頁的<
安全性
> )。在您
初次啟動電腦時,畫面上會出現擁有完整功能的網際網路安全程式,您應該
在連上網際網路之前盡快啟動此防護功能。
選擇網際網路服務提供者
瀏覽網際網路已成為每日不可或缺的電腦使用行為。只要
幾個簡單的步驟,就可以馬上取得各式各樣的知識和通訊
工具。若要完成這些步驟,您應該先選取
網際網路服務提
供者
(ISP),這樣才能在電腦和網際網路之間建立連線。
您應該先瞭解所在區域有哪些可用的 ISP,另外也別忘了
詢問親朋好友的使用經驗,或查看雜誌上的調查或消費者
使用報告。您所選取的 ISP 會提供如何連上網際網路的相
關指示 ( 可能需要額外軟體,或專用的 「電話盒」以連接電話線 )。
連線類型
根據您的電腦機型、所在位置和通訊需求,您有多種連上網際網路的方式可供
選擇。

40
撥接
部分電腦會提供電話撥號 ( 「數據機」 ) 接頭,此接頭可讓您使用電話線連
上網際網路。透過撥號連線,您就可以同時在同一條電話線上使用數據機和
電話。此連線類型只建議在不需要長時間存取網際網路時使用,因為此連線
速度較慢,而且連線時間是以小時計費。
DSL (
例如
ADSL)
DSL ( 數位用戶線路 ) 是一種 「永不中斷」的連線,透過電話線傳輸。由於
DSL 和電話使用不同的頻率,因此可以在連上網際網路的同時使用電話
( 各電話插槽必須安裝 「濾波器」,以減少干擾 )。若要使用 DSL,您必須
位在具備 DSL 設備的電話交換機附近 ( 郊區通常不提供此服務 )。連線速度
會依位置而不同,但 DSL 一般可以提供較快且較可靠的網際網路連線。
由於連線永不中斷,所以通常是以月付制收費。
注意:
DSL
連線需要使用適當的數據機,此數據機一般會在您申請服務
時由
ISP
提供。許多的數據機都會包含 「路由器」功能,以提供網路
和
Wi-Fi
存取。
纜線
纜線連線提供高速且永不中斷的網際網路服務,透過有線電視線路傳輸,
但通常只有大城市才會提供此服務。您可以在連上網際網路的同時,邊使用
電話,邊觀看有線電視。
3G (WWAN
或 「無線廣域網路」
)
3G 連線可讓您在戶外使用行動電話網路 ( 與行動電話所使用的相同 ) 連上
網際網路。若要使用此連線,您的電腦必須內建 SIM 卡插槽或使用外接式
裝置,例如 USB 數據機或具備適當設備的行動電話。

網際網路
- 41
注意:
如果您的電腦已內建
SIM
卡插槽,就需要有相容的
SIM
卡,
以及與行動電話提供者簽署的電信合約。
使用
3G
功能之前,請洽詢您的服務供應者,瞭解使用
3G
是否會產生
其他費用,尤其是否會有漫遊費。
網路連線
LAN (區域網路) 是由一群電腦組成 (例如在辦公大樓或住家內),這些電腦可
以共用常用的通訊線路和資源。在設定網路時,您可以設成共用檔案、週邊
裝置 ( 例如印表機 ) 和網際網路連線。您可以將 LAN 設定成使用有線技術
( 例如乙太網路 ) 或無線技術 ( 例如 WiFi 或藍牙 )。
無線網路
無線 LAN 或 WLAN 就是無線區域網路,不需使用線路即可連結兩台以上的
電腦。無線網路的設定程序很簡單,而且也可以讓您共用檔案、週邊裝置和
網際網路連線。
無線網路有哪些優點?
高行動力生活
無線 LAN 系統可讓位在住家網路內的您和其他使用者來共用檔案和網路連
線裝置 ( 例如印表機或掃描器 ) 的存取權。
此外,您也可以與住家內的其他電腦共用網際網路連線。
安裝快速又方便
安裝無線 LAN 系統不需要太多時間、程序方便,而且又不需要在牆壁和天
花板上牽線。

42
無線
LAN
的使用元件
在住家設定無線網路需要下列元件:
存取點
(
路由器
)
存取點 ( 路由器 ) 是一種雙向的收發器,可以將資料向四周廣播。存取點可
做為有線和無線網路之間的中介器。大部分的路由器都已內建 DSL 數據機,
可讓您存取高速的 DSL 網際網路連線。您選擇的 ISP ( 網際網路服務
提供者 ) 一般會在您申購服務後提供數據機 / 路由器。如需詳細的設定指示,
請詳讀存取點 / 路由器隨附的說明文件。
網路線
(RJ45)
網路線 ( 亦稱為 RJ45 連接線 ) 可用來將電腦主機連接至存取點 ( 請見
下圖 );此類型的連接線也可以用來連接週邊裝置與存取點。
無線網路卡
您的電腦正常來說應該已經安裝內建的無線網路卡。您可以使用
Windows 內的按鈕或控制來啟動或停用無線網路卡。

網際網路
- 43
運作中網路的圖解
1. 存取點 / 路由器
2. 桌上型電腦
3. 數據機
4. 印表機
5. 可攜式電腦
6. PDA/ 智慧型手機
7. 網路線 (RJ45)
開啟
/
關閉
WiFi
網路連線
大部分的電腦都有 「WiFi」按鈕,可用來開啟或關閉網路連線。如果您的電
腦具備無線存取功能,但未擁有
通訊
按鈕,您可以透過網路管理選項來開啟
或關閉無線網路,或控制要在網路上共用哪些資料。按下 Windows 鍵
( ) + W,輸入 「HomeGroup」然後按一下 「HomeGroup」。
警告:禁止在搭乘飛機飛行時使用無線裝置。登機前請先關閉所有裝
置,因其可能會在飛航時造成危害或干擾相關通訊設備,並且有觸犯
相關法令的風險。
1
2
3
4
5
6
7

44
瀏覽網路!
若要瀏覽網際網路,您需要安裝一種稱為網際網路瀏覽器
的程式。Internet Explorer 可以讓您輕鬆且安全地瀏覽網
頁。安裝好網際網路存取並連上網路之後,請按一下
Windows 桌面上的 Internet Explorer 捷徑,然後就可以開
始享受全新的網路瀏覽體驗!
Gateway
網站
若要開始使用,別忘了造訪我們的網站:www.gateway.com。
Gateway 努力提供您個人專屬的持續支援。請查看我們的
支援
區段,以取得
滿足您個人需求的協助。
www.gateway.com 是您進入豐富的線上活動及服務的入口。請定期造訪我
們的網站,以取得最新資訊及下載!
安全性
您可能迫不及待地想探索網路上的一切事物,但為了保護您的上網安全,
Gateway 已在您的電腦上預先安裝了 Symantec 廣受好評的 Norton
Internet Security
™。
Norton Internet Security 可在背景中安靜執行,不只能封鎖當下複雜的安全
威脅,還能在您使用線上購物、網路銀行和瀏覽網路時保護您的身分資料。
Norton Internet Security 可以封鎖線上的個人資訊竊取情形、偵測並消除間
諜程式、移除病毒和網際網路蠕蟲,以及抵抗駭客的攻擊。

網際網路
- 45
定義
何謂病毒?
惡意軟體 ( 一般稱為 「病毒」 ) 是一種設計來感染電腦並造成損失的程式,
且大部分的病毒都是透過網際網路、電子郵件或惡意網站傳送。一般的病毒
都會自行複製,並在不被偵測到的情況下傳送到多台電腦上。其他形式的侵
害,包括特洛伊木馬程式、蠕蟲或垃圾郵件,則會透過各種方式來感染您的
電腦,像是耗盡資源或讓網路癱瘓等。
注意:
Gateway
保證您的電腦在購買時絕無感染病毒,但對於日後因病
毒所造成的損失則不負任何責任。
何謂間諜程式?
間諜程式泛指一般不想要的程式,這些程式會在您連上網路時下載到電腦,
且通常在您不知情的情況下進行。一旦電腦受到感染後,程式便會窺探電腦
的瀏覽活動、收集個人資訊、顯示彈出式廣告,甚至變更電腦設定。間諜程
式會耗盡電腦資源,讓網路瀏覽速度或整個電腦系統速度變慢,甚至造成
當機。
有些惡意公司還會利用間諜程式來監控並追蹤您在網際網路上造訪的網站,
據以判斷您的網路瀏覽行為,然後再將目標的彈出式廣告顯示在您的螢幕
上。有些間諜程式不只會追蹤行為,甚至還會監控使用者的輸入內容並擷取
密碼,引發嚴重的安全風險。
何謂惡意軟體?
惡意軟體 ( 亦稱為 Malware) 是一種蓄意設計來傷害您電腦的軟體,包括病
毒、蠕蟲和特洛伊木馬程式都算是惡意軟體。若要保護您的電腦不受惡意軟
體的侵擾,請確定電腦使用的是最新的防毒軟體和防惡意軟體。

46
何謂個人防火牆?
個人防火牆是一種軟體程式,專門設計來防止未經授權的使用者存取私有網
路。個人防火牆可以做為屏障,防止您的網際網路連線中出現非必要的連
線,因為這些連線會嘗試控制您的電腦,然後在電腦上安裝病毒或惡意程
式,或是繼續向外散佈。防火牆會監控您電腦的所有連線,偵測嘗試在未經
您授權下接收資訊的程式,然後顯示警示。接著您可以決定是否要允許連
線,或者先決定連線是否連至目前使用中的程式,然後再允許該連線 ( 例如:
連到多重玩家伺服器的遊戲程式,或正在更新內容的百科全書程式 )。
如何保護您的電腦
網路犯罪的遏止不需要太複雜的程序,只要擁有一些技術建議和常識就可以
避免掉許多攻擊。網路犯罪一般只求在最短的時間內、以最輕鬆的方式賺取
金錢。一旦要花的時間變長,這些罪犯就會改變目標,轉向較輕鬆的目標下
手。下面的小秘訣提供如何避免線上詐欺的基本資訊。
讓電腦隨時安裝最新的修補程式和更新軟體
要讓電腦抵抗攻擊最好的其中一種方法,就是在廠商提供修補程式和其他的
軟體修正時,馬上套用這些程式。藉由定期更新電腦,您就可以阻止攻擊者
利用軟體的瑕疵 ( 弱點 ),否則他們可能會使用這些弱點來入侵您的系統。
雖然更新電腦也不見得能抵抗所有的攻擊,但卻能讓攻擊者難以進入您的系
統,能完全封鎖許多的基本攻擊和自動攻擊,而且也能讓三心二意的攻擊者
放棄,並轉向攻擊弱點更多的別台電腦。
較新版本的 Microsoft Windows 和其他常見軟體可以設定為自動下載並套
用更新,這樣您就不用費心檢查更新的軟體。若要開始強化您的上網安全,
請多加利用軟體的 「自動更新」功能。

網際網路
- 47
利用安全性軟體保護您的電腦
要保護您基本的線上安全,會需要用到許多類型的安全性軟體。安全性軟體
基本上包含防火牆和防毒程式。防火牆通常是電腦的第一道防線,它可以控
制與您電腦進行通訊的對象及內容。您可以將防火牆當成 「警察」,這位警
察監控著網路上嘗試進出您電腦的所有資料流量,只有安全的通訊可以進
出,至於攻擊等 「惡意」流量則會被封鎖,無法進入您的電腦。
第二道防線一般是防毒軟體,它可以監控電子郵件訊息和網頁瀏覽等所有的
線上活動,並保護個人不受病毒、蠕蟲、特洛伊木馬程式和其他類型之惡意
程式的侵擾。您應該將防毒軟體和防間諜軟體設定成自動更新,而且每次連
上網路時都應執行更新。
像 Norton Internet Security 這類的整合式安全性套裝軟體,包含了防火牆、
防毒軟體、防間諜軟體,以及防垃圾郵件和家長控管等其他功能,將線上防
護所需要的所有安全性軟體整合在單一套件中,受到廣泛使用。很多人也發
現,使用完整的安全性套裝軟體要比個別安裝、設定及更新各種安全性軟體
要輕鬆得多。
您的 Gateway 系統上已預先安裝了完整版的 Norton Internet Security™,
其包含免費試用的防護更新訂閱。別忘了啟動其功能!
選擇強性密碼並妥善保管
密碼是現代網路生活中不可或缺的要素;不管任何的網路行為都需要密碼,
包括線上訂花、使用網路銀行,以及登入最愛的航空公司網站檢視累計哩程
等等。以下的小秘訣有助於提升您網路使用體驗的安全;
• 保護密碼安全及避免他人使用的第一步,便是設定一組不容易被猜出的密
碼。強性密碼由八個以上的字元組成,可使用字母、數字和符號 ( 例如:
#、$、%、!、?)。 但請避免在密碼中使用下列資料:您的登入名稱、以個
人資訊為基礎的任何內容 ( 例如姓氏 ),以及字典中查得到的文字 ( 尤其

48
是「password」 )。請嘗試選取強度較高、獨一無二的密碼來保護網路銀
行等活動。
• 將您的密碼妥善保管,並試著不要讓所有的線上服務都使用相同的密碼。
• 至少每隔 90 天定期變更密碼。當已有其他人能夠存取您的帳戶時,這可
以降低可能造成的損害。如果您發現其中一個線上帳號出現可疑情事,
該做的第一件事就是馬上變更密碼。
保護您的個人資訊
當您在線上分享姓名、住家地址、電話號碼和電子郵件地址等個人資訊時,
務必小心謹慎。在利用各種線上服務時,您不可避免地需要提供個人資訊,
才能處理購買物品時的付費和運送問題。要想不洩露任何個人資訊幾乎是不
可能,因此我們針對如何在線上安全地分享個人資訊,提出了下列的建議
清單:
• 留意偽造的電子郵件訊息。有幾個地方可以辨識訊息是否為假造的,包括
拼字錯誤、文法錯誤、用字遣詞不正常、網站位址含有奇怪的延伸、網站
位址全部由數字組成 ( 一般由文字組成 ),以及任何的異常情形。此外,
網路釣魚訊息一般會要求您趕快執行動作,以保持帳號開通、更新安全
性,或是催促您馬上提供資訊,否則就會發生不好的後果。但您可千萬不
要上當!
• 不要理會要求您輸入個人資訊的電子郵件訊息。只要是合法的公司,就不
會利用電子郵件訊息來詢問您的個人資訊。當有任何疑問時,請直接以電
話連絡該公司,或在網頁瀏覽器中輸入該公司的網址。請勿按下訊息中的
連結,因為您可能會被帶往詐騙的惡意網站。
• 避開會竊取個人資訊的詐騙網站。當要造訪網站時,請不要按電子郵件或
即時通訊中的連結,而是直接在網頁瀏覽器中輸入位址 (URL)。詐欺犯通
常會偽造這些連結,讓它們看似合法。

網際網路
- 49
當購物、銀行或任何其他網站需要輸入機密資訊時,其 「http」字母後方
應加上 「S」 ( 例如 https://www.yourbank.com,而不是
http://www.yourbank.com)。這個 「s」是安全 (Secure) 的意思,當您被
要求登入或提供其他機密資料時就會出現。如果是安全連線,網頁瀏覽器
底部 ( 通常在右下角 ) 還會出現一個小型的鎖頭圖示。
• 注意網站和軟體中的隱私權政策。在與組織分享您的個人資訊時,應該先
瞭解組織是如何收集及使用這些資訊。
• 保護您的電子郵件地址。垃圾郵件寄件者和 「網路釣魚者」常常會寄出
數百萬封的訊息,不論收件的電子郵件地址是否存在,用隨機的方式來尋
找可能的受害者。一旦您回應這些訊息或下載影像,您就會被加入他們的
清單,日後就會收到更多他們所寄的訊息。此外,在新聞群組、部落格或
線上社群中張貼您的電子郵件地址時,也必須小心。
過於美好的線上優惠通常不會是真的
有句俗話說:「天下沒有白吃的午餐」,同樣適用於網路世界。像是螢幕保
護程式和表情符號等 「免費」軟體、保證賺錢的神奇投資術,以及未報名卻
意外贏得的比賽,都是公司用來吸引您注意力的誘餌。
雖然您不一定直接付費使用軟體或服務,但您要求的免費軟體或服務卻可能
隨附廣告軟體 ( 「Adware」 ),追蹤您的行為並顯示不想要的廣告。您可能
需要透露個人資訊或購買其他物品,才能取得所謂的獎品。如果獎品看起來
過於美好,讓人難以置信,請尋求他人的意見、詳讀其細則,或甚至完全忽
略該訊息 ( 這是最好的作法 )。
定期檢閱銀行和信用卡公司的對帳單
如果您能在資料失竊後或有人初次嘗試使用您的資訊時,馬上發現此類情
形,就能有效降低身分資料遭竊和線上犯罪的影響程度。其中一個可以輕鬆

50
找出異常情形的方式,就是檢閱銀行和信用卡公司每個月寄送的對帳單中是
否有任何可疑項目。
此外,許多的銀行和服務都使用防詐騙系統,會在出現異常的購買行為時通
知用戶 ( 例如:您住在台北,但卻在美國購買許多的冰箱 )。為了確認是否
為異常購物,這些公司可能會打電話給您,要求您確認。千萬不要忽視這些
電話;因為這可能表示有犯罪正在進行中,而您需要採取必要動作。
利用
Windows
安全性工具保護您的電腦
Windows 提供許多的防護應用程式。
Windows Updates
如果您有可用的網際網路連線,Windows 就可以檢查電腦是否有重要更新,
並自動安裝這些更新。這些更新包含安全性修補程式及程式更新,可以改善
電腦的使用體驗,並協助電腦抵抗新興的病毒和攻擊。
要如何得知我的電腦存在風險?
如果
「行動作業中心」
回報警示,或電腦行為不穩定、意外當機,或某些程
式無法正常運作,即表示您的電腦可能已被惡意軟體感染。不過,並非所有
的電腦問題皆起因於病毒!如果您懷疑電腦可能遭到感染,請先進行更新
( 若尚未更新 ),然後執行防毒軟體和防間諜軟體。

復原
- 51
復原
如果電腦發生問題,且常見問題 ( 請參閱第 69 頁 ) 無法協助您解決時,可
試著 「復原」電腦 ( 例如回到先前的狀態 )。
此小節說明了電腦上可用的復原工具。Gateway 所提供的 Gateway
Recovery Management 除了可讓您建立
復原備份
、
驅動程式和應用程式備
份
外,還可讓您使用 Windows 工具或復原備份開始進行復原。
注意:
Gateway Recovery Management
僅適用於預先安裝的
Windows
作業系統。
重要: 我們建議您立即建立
復原備份
和
驅動程式和應用程式備份
。
在某些情況下,完整的復原程序將會需要 USB 復原備份。
建立復原備份
若要從 USB 儲存裝置重新安裝,您必須先建立復原備份。 復原備份包括整
個電腦硬碟的原始內容,包括 Windows 和所有出廠時預設載入的軟體和驅
動程式。 使用此備份可將您的電腦還原至購買當時的狀態,同時讓您選擇保
留所有的設定及個人資料。
注意:
請確認您的
USB
磁碟機有至少
16 GB
的容量。

52
1. 從
開始
處,輸入 「Recovery」,然後在應用程式清單中按一下 Gateway
Recovery Management。
2. 按一下建立原廠預設備份。 接著,會開啟
復原磁碟機
視窗。

復原
- 53
請確認已選取將復原分割區的內容複製到復原磁碟機。 此選項會最完整
且安全的復原備份。
3. 插入 USB 磁碟機,然後按一下下一步。
• 請確認 USB 磁碟機空間是否足夠,然後再繼續。 復原備份需要至少
16 GB 儲存空間
4. 接著畫面上會出現備份進度。
5. 依照流程將其完成。

54
6. 建立復原備份後,您可選擇刪除電腦上的復原資訊。 如果刪除此資訊,您
僅可使用 USB 復原備份來還原電腦。如果遺失或清除 USB 磁碟機,您
便無法還原電腦。
7. 拔出 USB 磁碟機並將其清楚標示。
重要: 在備份上寫入獨一無二的說明標籤,例如 「Windows 復原備
份」。 務必將備份媒體放在安全好記的位置。
建立磁碟機和應用程式備份
您可使用 USB 儲存磁碟機;或者,如果電腦備有 DVD 燒錄機、一或多張可
燒錄 DVD,您亦可建立磁碟機和應用程式備份 ( 包含電腦所需之出廠時預設
載入的軟體和驅動程式 )。

復原
- 55
1. 從
開始
處,輸入 「Recovery」,然後在應用程式清單中按一下 Gateway
Recovery Management。
2. 按一下建立驅動程式和應用程式備份。
插入 USB 磁碟機,或將空白 DVD 放入光碟機,然後按一下下一步。
• 若您使用 USB 磁碟機,請確認其空間是否足夠,然後再繼續。

56
• 如果使用 DVD,此對話方塊會顯示完成回復光碟所需要使用的空白可
燒錄光碟數目。 確認您已備妥所需數目的相同空白光碟。
3. 按一下開始即可複製檔案。接著畫面上會出現備份進度。
4. 依照流程將其完成:
• 如果使用光碟,光碟機會在完成每片光碟的燒錄後退出光碟。 從光碟機
中取出光碟,然後使用油性筆加以標示。
若需要使用多張光碟,請在出現提示時放入新的光碟,然後按一下「確
定」。 繼續直到完成所有流程。
• 如果使用 USB 磁碟機,請將其拔出並清楚標示。
重要: 在每個備份上寫入獨一無二的說明標籤,例如 「驅動程式和應
用程式備份」。 務必將備份媒體放在安全好記的位置。

復原
- 57
復原您的系統
回復您的系統:
1. 執行次要修正。若僅有一或兩個軟體或硬體項目停止正常運作,則只要重
新安裝軟體或裝置驅動程式,即可解決此問題。
若要重新安裝出廠時預先安裝的硬體和驅動程式,請參閱第 57 頁的 「重
新安裝驅動程式和應用程式」 。
如需關於將未預先安裝之軟體和驅動程式重新安裝的指示,請參閱該產品
的文件,或是支援網站。
2. 轉換至先前的系統狀態。
若重新安裝軟體或驅動程式沒有任何助益,則可將系統復原至先前所有運
作皆正常無誤的狀態。
如需相關指示,請參閱第 60 頁的 「回到先前的系統快照」 。
3. 重設作業系統。
如果問題無解需要重設系統,但是要保留使用者資訊時,請參閱第 61 頁
的 「將系統回到出廠預設狀態」 。
4. 將系統重設為出廠預設狀態。
若其他方法皆未能解決問題,且您想要將系統回復到出廠狀態,請參閱第
61 頁的 「將系統回到出廠預設狀態」 。
重新安裝驅動程式和應用程式
您可能需要重新安裝在出廠時已預先安裝在電腦上的應用程式和裝置驅動
程式,此為疑難排解步驟的一部分。 您可以使用硬碟或已建立的備份來重新
安裝。

58
• 其它應用程式 - 若您需要重新安裝電腦未預先安裝的軟體,則必須遵循軟
體的安裝指示。
• 新增裝置驅動程式 - 若您需要重新安裝電腦未預先安裝的裝置驅動程式,
請遵循裝置隨附的指示。
如果要使用
Windows
和電腦上儲存的復原資訊進行重新安裝:
• 從
開始
處,輸入「Recovery」,然後在應用程式清單中按一下 Gateway
Recovery Management。
• 按一下重新安裝驅動程式或應用程式。

復原
- 59
• 您可參閱 Gateway 資源中心的內容區塊。
• 針對要安裝的項目按一下安裝圖示,然後遵循螢幕指示完成安裝。
針對要安裝的每個項目重複執行此步驟。
如果要從
DVD
或
USB
磁碟機的驅動程式和應用程式備份中重新安裝:
1. 將驅動程式和應用程式復原放入光碟機,或將其連接到可用的 USB
連接埠。
• 如果已放入 DVD,請等待 Gateway 資源中心啟動。
• 如果 Gateway 資源中心沒有自動開啟,請按下 Windows
鍵
+ <E>,
然後在光碟機圖示上按兩下。
• 如果使用 USB 磁碟機,請按下 Windows
鍵
+ <E>,然後在包含備份
的磁碟機上按兩下。 在 ResourceCenter 上按兩下。

60
2. 您可參閱 Gateway 資源中心的內容區塊。
3. 針對要安裝的項目按一下安裝圖示,然後遵循螢幕指示完成安裝。
針對要安裝的每個項目重複執行此步驟。
回到先前的系統快照
Microsoft 系統還原會定期為系統設定執行 「快照」,並將這些快照儲存為
還原點。 您可以針對大部分難以解決的軟體問題,選擇回到其中一個還原點
以便重新執行系統。
Windows 會定期在每天,或每次安裝軟體或裝置驅動程式時,建立一個額
外的還原點。
注意
: 如需關於使用 Microsoft 系統還原的詳細資訊,請從
開始
處輸入
「說明」,然後在應用程式清單中按一下說明及支援。 在 「搜尋說明」
方塊中,輸入 「Windows 系統還原」,然後按下 Enter。

復原
- 61
回到還原點
1. 從
開始
處,輸入 「控制台」,然後在應用程式清單中按一下控制台。
2. 按一下系統及安全性 > 行動作業中心,然後按一下視窗底部的復原。
3. 按一下開啟系統復原,然後再按一下下一步。
4. 按一下最新的還原點 ( 系統正常運作的時間點 ),再按一下下一步,然後
按一下完成。
5. 顯示確認視窗;按一下是。 使用指定的還原點還原系統。 此程序可能需要
花上幾分鐘,並重新啟動電腦。
將系統回到出廠預設狀態
若電腦遇到其他方法無法回復的問題,則您可能需要重新安裝所有項目,以
便使系統回到出廠預設狀況。 您可以從硬碟或已建立的復原備份來進行
復原。
• 若您仍可執行 Windows,且尚未刪除復原分割區,請參閱第 61 頁的「從
Windows 復原」 。
• 若您無法執行 Windows,且原始硬碟已經過重新格式化,或是已安裝替
換硬碟,請參閱第 65 頁的 「從復原備份中復原」 。
從 Windows 復原
開啟 Gateway Recovery Management:
• 從
開始
處,輸入 「Recovery」,然後在應用程式清單中按一下 Gateway
Recovery Management。

62
有兩個可用的選項 - 還原為原廠預設值 ( 重設我的電腦 ) 或自訂還原 ( 重新
整理我的電腦 )。
還原為原廠預設值會刪除硬碟中的所有內容,然後重新安裝 Windows 和系
統預先安裝的所有軟體與驅動程式。 若您可以存取硬碟中的重要檔案,請立
即予以備份。 請參閱
第 63 頁的 「利用 Gateway Recovery Management
還原為原廠預設值」 。
自訂還原將會嘗試保留您的檔案 ( 使用者資料 ),但會重新安裝所有的軟體
和驅動程式。 購買電腦時所安裝的軟體將會被移除 ( 除了從 Windows 市集
安裝的軟體 )。 請參閱第 64 頁的「利用 Gateway Recovery Management
自訂復原」 。

復原
- 63
利用
Gateway Recovery Management
還原為原廠預設值
1. 按一下還原為原廠預設值。
警告: 「還原為原廠預設值」將會刪除所有硬碟上的檔案。
2. 重設電腦視窗會開啟。
影像僅供參考。

64
3. 按一下下一步,然後選擇刪除檔案的方式:
a. 僅移除我的檔案會在復原電腦前快速刪除所有檔案,所需時間約為
30 分鐘。
b. 完全清除磁碟機會在刪除每個檔案後完全清除磁碟機;也就是說,復原
後會看不到任何檔案。 清除磁碟機會花費較久時間 (5 小時左右 ),但 是
由於舊的檔案皆已完全移除,所以安全性上也較沒疑慮。
4. 按一下重設。
5. 將電腦重新啟動即會開始執行復原程序,接著則會將檔案複製到硬碟中以
繼續作業。
6. 復原結束後,您可重複首次使用程序開始使用電腦。
利用
Gateway Recovery Management
自訂復原
1. 按一下自訂還原 ( 保留使用者資料 )。

復原
- 65
2. 重新整理電腦視窗會開啟。
3. 按一下下一步,然後按一下重新整理。
4. 將電腦重新啟動即會開始執行復原程序,接著則會將檔案複製到硬碟中以
繼續作業。 此程序會花費約 30 分鐘。
從復原備份中復原
若要從 USB 磁碟機的復原備份中復原:
1. 尋找復原備份。
2. 插入 USB 磁碟機,然後啟動電腦。
3. 如果該功能尚未啟用,則您必須啟用 F12 Boot Menu:
a. 啟動電腦時按下 <F2>。
b. 使用向左或向右方向鍵選取 「主要」功能表。
c. 按向下鍵,直到選取 F12 Boot Menu,再按下 <F5>,將此設定變更為
Enabled。
d. 使用向左或向右方向鍵選取 Exit 功能表。
e. 根據電腦使用的 BIOS 類型,選取 Save Changes and Exit 或 Exit
Saving Changes,然後按下 Enter。 選取 OK 或 Yes 以確認。
f. 這樣即會重新啟動電腦。

66
4. 在開機期間,按下 <F12> 即可開啟開機功能表。 您可以在開機功能表中
選取開機裝置,例如 USB 磁碟機。
a. 使用方向鍵選取 USB 裝置,然後按下 Enter。
b. Windows 便會從復原備份啟動,而不會執行正常的啟動程序。
5. 選取鍵盤類型。
6. 選取疑難排解,然後選擇要使用的復原類型:
a. 按一下進階,然後按一下系統還原,以啟動 Microsoft 系統還原:
Microsoft 系統還原會定期為系統設定執行 「快照」,並將這些快照儲
存為還原點。 您可以針對大部分難以解決的軟體問題,選擇回到其中一
個還原點以便重新執行系統。
b. 按一下重設電腦,以啟動重設程序:
重設電腦會刪除硬碟中的所有內容,然後重新安裝 Windows 和系統預
先安裝的所有軟體與驅動程式。 若您可以存取硬碟中的重要檔案,請立
即予以備份。 請參閱第 67 頁的 「從復原備份重設電腦」 。
c. 按一下重新整理電腦,以啟動重新整理程序:
重新整理電腦將會嘗試保留您的檔案 ( 使用者資料 ),但會重新安裝所
有的軟體和驅動程式。 購買電腦時所安裝的軟體將會被移除 ( 除了從
Windows 市集安裝的軟體 )。 請參閱第 68 頁的「從復原備份重新整理
電腦」 。

復原
- 67
從復原備份重設電腦
Caution: 重設電腦將會刪除所有硬碟上的檔案。
1. 重設電腦視窗會開啟。
影像僅供參考。
2. 按一下下一步。
3. 選取要復原的作業系統 ( 通常僅有一個選項可選擇 )。
4. 選擇以將任何變更保留到硬碟:
a. 如果您已刪除復原分割區或已變更硬碟上的分割區,並想要保留這些變
更,請選取否。
b. 若要將電腦完全還原為原廠預設值,請選取是。
5. 選擇刪除檔案的方式:
a. 僅移除我的檔案會在復原電腦前快速刪除所有檔案,所需時間約為
30 分鐘。
b. 完全清除磁碟機會在刪除每個檔案後完全清除磁碟機;也就是說,復原
後會看不到任何檔案。 清除磁碟機會花費較久時間 (5 小時左右 ),但是
由於舊的檔案皆已完全移除,所以安全性上也較沒疑慮。
6. 按一下重設。
7. 復原結束後,您可重複首次使用程序開始使用電腦。

68
從復原備份重新整理電腦
1. 重新整理電腦視窗會開啟。
2. 按一下 「下一步」。
3. 選取要復原的作業系統 ( 通常僅有一個選項可選擇 )。
4. 按一下重新整理。
5. 將電腦重新啟動即會開始執行復原程序,接著則會將檔案複製到硬碟中以
繼續作業。 此程序會花費約 30 分鐘。

常見問題
- 69
常見問題
以下列出使用本電腦時,可能會發生的情況,並提供簡單的解決方法。
我按下電源按鈕,電腦卻未啟動或開機
檢查電源指示燈:
• 如果指示燈沒亮,表示電腦沒有接上電源。請依下列逐項檢查:
• 若您是使用電池組,有可能是電量不足,導致無法正常供電給電腦。這
時,請接上 AC 電源轉接器,讓電池組開始重新充電。
• 若您是使用 AC 電源轉接器,請檢查 AC 電源轉接器兩端是否有鬆脫,
是否正確連接到電腦及電源插座。
• 如果指示燈亮著,請檢查:
• 光碟機是否放入了光碟? 取出光碟,接著按下 <Ctrl> + <Alt> + <Del>
重新開機。
• 電腦是否插入了 USB 儲存裝置 (USB 隨身碟或智慧型手機 )? 拔出裝
置,接著按下 <Ctrl> + <Alt> + <Del> 重新開機。
顯示幕上沒有出現任何影像
本電腦的電源管理系統,為了節省電力,會將螢幕自動變暗。只要按下任何
按鍵即可回復正常的螢幕顯示。
如果按下任何按鍵仍無法回復正常螢幕,有可能是下列情況:
• 螢幕亮度調得太低。按一下 <Fn> + < > ( 增加 ) 以調整螢幕亮度。
• 螢幕顯示輸出可能設定為外接顯示器。按一下 ,將顯示螢幕切換回
電腦。

70
• 若睡眠指示燈亮著,表示本電腦正處於睡眠模式。按一下電源按鈕後放開
即可喚醒電腦。
電腦音效沒有作用
請依下列逐項檢查:
• 音量可能設為靜音。請檢查 Windows 工作列上的音量控制圖示。如果該
圖示被畫上橫線,點選該圖示,並取消 「靜音」選項。
• 音量可能調得太低。請檢查 Windows 工作列上的音量控制圖示。或是使
用電腦上的音量控制鍵來調高音量。
• 如果耳機或是外接喇叭連接到電腦的音訊輸出插孔,則內建喇叭將會自動
關閉。
我想要在不開機的情況下,退出光碟機托盤
在光碟機上有一個手動的緊急退出孔。只要將迴紋針或筆尖插入該退出孔並
向內推,即可退出光碟機托盤。
鍵盤沒有回應
試著把外接式鍵盤連接到電腦的 USB 2.0 埠。如果可使用,請與您的經銷商
或是授權服務中心連繫,讓他們檢查內部鍵盤連接線是否脫落。
印表機無法正常工作
請依下列逐項檢查:
• 請確認印表機是否有連接電源插座,且印表機電源已開啟。
• 請確認是否穩固地將印表機纜線連接到 USB 連接埠及印表機上對應的連
接埠。

常見問題
- 71
使用 Windows 8 的秘訣和提示
我們了解這是需要習慣的新作業系統,因而建立了一些指標來幫助您快速
入門。
有三個要記住的觀念
1.
開始
不再有開始按鈕;您可從 「開始」畫面啟動應用程式。
2. 動態磚
動態磚類似於應用程式的縮圖。
3. Charms
Charms 可讓您執行一些有用的功能,例如分享內容、將電腦關機或變更
設定。
如何存取 Charms?
將游標移至螢幕的右上或右下角以存取 Charms,或者按下 Windows
鍵
+
<C>。
如何進入
開始
功能表?
按下鍵盤的 Windows
鍵
;按下 Windows
鍵
+ <C> 並按一下開始;或將游
標移至畫面左下角並按一下開始。
我要如何在應用程式間進行切換?
將游標移到螢幕的左側邊緣,以檢視目前執行中之應用程式的縮圖。

72
您也可以按下 Windows
鍵
+ <Tab>,來開啟和捲動目前的應用程式。
如何關閉我的電腦?
按一下 Windows
鍵
+ <C>,然後按一下設定 > 電源並選取您要進行的動作。
或者,在
桌面
按一下 Gateway Power Button,然後選取您要進行的動作。
為什麼要使用新介面?
Windows 8 的新介面是專為方便觸控輸入而設計。 Windows 市集的應用程
式將會自動使用全螢幕,且不需要以傳統方式將其關閉。 Windows 市集的
應用程式將會以動態磚模式顯示在開始畫面上。
何謂 「動態磚」?
動態磚類似於應用程式的縮圖,每當連線到網際網路時內容便會更新。 所
以,舉例來說,您不需要開啟應用程式即可檢視天氣或股票更新。
如何將我的電腦解除鎖定?
按下任意鍵,並按一下使用者帳戶圖示,以解除鎖定電腦。 如果帳戶有設定
密碼,請輸入密碼以繼續。
如何個人化我的電腦?
您可使用不同的背景影像或重排動態磚來個人化
開始
畫面,以便符合個人需
求。
若要變更背景,請按下 Windows
鍵
+ <C>,並按一下設定 > 變更電腦
設定 > 個人化。 按一下頁面上方的開始畫面,並選取顏色和影像。

常見問題
- 73
如何移動動態磚?
按住動態磚以選取,然後將其拖曳到
開始
畫面上想要放置的地方。 其它動態
磚將會移動,以讓該磚能夠塞入其新位置。
如何讓動態磚放大或縮小?
在動態磚上按一下滑鼠右鍵,然後從顯示在畫面下方的功能表中選取縮小或
放大。
如何個人化鎖定畫面?
您可使用不同的影像,或以顯示快速狀態和通知的方式來個人化鎖定畫面,
以便符合個人需求。
若要變更背景,請按下 Windows
鍵
+ <C>,並按一下設定 > 變更電腦
設定 > 個人化。 按一下頁面上方的鎖定畫面,並選取想要顯示在鎖定畫面上
的影像和應用程式。
那麼,如何關閉應用程式?
將游標移到畫面上方,然後將視窗按住並向下拖曳即可關閉應用程式。
您可從畫面左手邊的縮圖來關閉應用程式,方法是在縮圖上按一下滑鼠右
鍵,並選取關閉。
是否可變更畫面解析度?
從
開始
處輸入 「控制台」,以開啟
搜尋
並顯示結果;按一下控制台 > 調整螢
幕解析度。

74
我想要以我習慣的方式來使用 Windows。還我桌面!
從
開始
,按一下桌面磚以顯示傳統的桌面模式。 您可將常用應用程式釘選到
工作列,以方便將其開啟。
若您按一下非 Windows 市集的應用程式,Windows 將會自動在
桌面
模式下
開啟應用程式。
我的應用程式在哪裡?
從
開始
處,簡單輸入想要開啟之應用程式的名稱,
搜尋
功能便會自動開啟並
列出結果。
若要檢視應用程式的完整清單,請按下空格鍵或
功能表鍵
,然後按一下所有
應用程式。
如何讓應用程式顯示在開始上?
如果是在
所有應用程式
中,且想要讓某個應用程式顯示在
開始
上,您可選取
該應用程式,並在上面按一下滑鼠右鍵。 從顯示在畫面下方的功能表中選取
釘選到開始畫面。
如何從 「開始」移除動態磚?
在磚上按一下滑鼠右鍵,再從顯示在畫面下方的功能表中按一下從開始畫面
取消釘選。
如何讓應用程式顯示在桌面的工作列上?
如果是在
所有應用程式
中,且想要讓某個應用程式顯示在
桌面
的工作列上,
您可選取該應用程式,並在上面按一下滑鼠右鍵。 從顯示在畫面下方的功能
表中選取釘選到工作列。

常見問題
- 75
如何安裝應用程式?
您可從
市集
下載 Windows 市集應用程式。 您必須要有 Microsoft ID,以 便 從
市集
購買並下載應用程式。
我找不到像是記事本或小畫家的應用程式!
它們到哪裡去了?
從
開始
處,簡單輸入正在尋找之應用程式的名稱,以開啟
搜尋
功能並列出結
果。 或者,開啟
所有應用程式
,然後捲動到 「Windows 附屬應用程式」,以
顯示舊版程式的清單。
何謂 Microsoft ID ( 帳戶 )?
Microsoft 帳戶是一個用來登入 Windows 的電子郵件地址和密碼。 您可使用
任何的電子郵件地址,但建議選擇已使用的電子郵件地址,來與朋友聯繫並
登入我的最愛網站。 當使用 Microsoft 帳戶登入電腦時,電腦將會與您所關
心的連絡人、檔案和裝置連線。
我需要嗎?
並非要有 Microsoft ID 才能使用 Windows 8。不過,您可使用 Microsoft ID
在不同且已登入的機器上同步資料,讓生活更加便利。
如何取得?
若您已安裝 Windows 8 且尚未使用 Microsoft 帳戶登入,或您沒有 Microsoft
帳戶且想要申請一個,請按下 Windows
鍵
+ <C> 並按一下設定 > 變更電腦
設定 > 使用者 > 切換至 Microsoft 帳戶,然後遵循螢幕上的指示進行。

76
如何將我的最愛新增到 Internet Explorer?
Internet Explorer 10 沒有舊式的我的最愛,而是讓您將捷徑釘選到
開始
。 當
頁面開啟時,在頁面上的任何地方按一下滑鼠右鍵,畫面下方的功能表便會
開啟。 按一下釘選到開始畫面。
如何檢查 Windows Update?
按下 Windows
鍵
+ <C> 並按一下設定 > 變更電腦設定 > Windows
Updates。 按一下立即檢查更新。
哪裡可獲得更多資訊?
如需詳細資訊,請造訪:
• Windows 8 教學課程: www.gateway.com/windows8-tutorial
• 支援常見問題: support.gateway.com

法規資訊
- 77
法規資訊
預防聽力喪失
-
注意:長時間以高音量使用耳機,可能造成聽力永久喪失。
- A pleine puissance, l’écoute prolongée du baladeur peut endommager
l’oreille de l’utilisateur.
聆聽時的注意事項
為保護您的聽力,請遵守以下指示。
- 逐漸增加音量,直到您能清晰舒適地聆聽音樂。
- 勿在耳朵已習慣後又增加音量。
- 勿長時間以高音量聆聽音樂。
- 勿為阻絕吵雜的環境而增加音量。
- 若您無法聽見他人對您說的話,請降低音量。
無線電裝置法規注意事項
-
注意:以下法規資訊僅適用於無線網路及
(
或
)
藍牙裝置。
相容配件
本設備的相關配件如下: 連接外接螢幕的屏蔽視訊連接線。 必須使用這些配件,以確保遵
循 FCC 規定。
美國加州第
65 號法案警告事項
本產品內含在美國加利福尼亞州已確知會引發癌症、先天缺陷和 / 或其他生育障礙的化學
物質。 如需關於本產品警告內容的詳細資訊,請移至 www.gateway.com/prop65。

78
日本 (JAPAN)
本装置は、第二種情報装置(住宅地域またはその隣接した地域において使用されるべき
情報装置)デ住宅地域での電波障害防止を目的とした情報装置等電波障害自主規制協議
会(VCCI)基準に適合しております。
しかし、本装置をラジオ、テレビジョン受信機に、近接してご使用になると、受信障害
の原因となることがあります。本書の説明にしたがって正しい取り扱いをしてくだ
さい。
W
IRELESS ADAPTER REGULATORY INFORMATION
USA — FCC and FAA
The FCC with its action in ET Docket 96-8 has adopted a safety standard for human
exposure to radio frequency (RF) electromagnetic energy emitted by FCC certified
equipment. The wireless adapter meets the Human Exposure limits found in OET Bulletin
65, supplement C, 2001, and ANSI/IEEE C95.1, 1992. Proper operation of this radio
according to the instructions found in this manual will result in exposure substantially
below the FCC’s recommended limits.
- The following safety precautions should be observed:
Do not touch or move antenna while the unit is transmitting or receiving.
- Do not hold any component containing the radio such that the antenna is very close
or touching any exposed parts of the body, especially the face or eyes, while
transmitting.
- Do not operate the radio or attempt to transmit data unless the antenna is connected;
this behavior may cause damage to the radio.
Use in specific environments:
- The use of wireless adapters in hazardous locations is limited by the constraints
posed by the safety directors of such environments.
- The use of wireless adapters on airplanes is governed by the Federal Aviation
Administration (FAA).
- The use of wireless adapters in hospitals is restricted to the limits set forth by each
hospital.

法規資訊
- 79
Antenna Use
In order to comply with FCC RF exposure limits, low gain integrated antennas should be
located at a minimum distance of 20 cm (8 inches) or more from the body of all persons
or at a minimum distance as specified by the FCC module grant conditions. FCC grants
can be viewed from the FCC Equipment Authorization website at https://fjallfoss.fcc.gov/
oetcf/eas/reports/GenericSearch.cfm by entering the FCC ID printed on the module label.
Explosive Device Proximity Warning
Warning: Do not operate a portable transmitter (including this wireless adapter) near
unshielded blasting caps or in an explosive environment unless the transmitter has been
modified to be qualified for such use
Antenna Warnings
- Warning: To comply with the FCC and ANSI C95.1 RF exposure limits, it is
recommended that for the wireless adapter installed in a desktop or portable
computer, the antenna for this wireless adapter to be installed so as to provide a
separation distance of at least 20 cm (8 inches) from all persons or at the minimum
distance as specified by the module grant conditions. FCC grants can be viewed from
the FCC Equipment Authorization website at https://fjallfoss.fcc.gov/oetcf/eas/
reports/GenericSearch.cfm by entering the FCC ID printed on the module label.
- Warning: The wireless adapter is not designed for use with high-gain directional
antennas.
Use On Aircraft Caution
- Caution: Regulations of the FCC and FAA prohibit airborne operation of radio-
frequency wireless devices (wireless adapters) because their signals could interfere
with critical interfere with critical aircraft instruments.
Local Restrictions on 802.11a, 802.11b, 802.11g and 802.11n Radio Usage
- Caution: Due to the fact that the frequencies used by 802.11a, 802.11b, 802.11g and
802.11n wireless LAN devices may not yet be harmonized in all countries, 802.11a,
802.11b, 802.11g and 802.11n products are designed for use only in specific
countries, and are not allowed to be operated in countries other than those of

80
designated use. As a user of these products, you are responsible for ensuring that
the products are used only in the countries for which they were intended and for
verifying that they are configured with the correct selection of frequency and channel
for the country of use. Any deviation from the permissible power and frequency
settings for the country of use is an infringement of national law and may be punished
as such.
Wireless Interoperability
The wireless adapter is designed to be interoperable with other wireless LAN products
that are based on direct sequence spread spectrum (DSSS) radio technology and to
comply with the following standards:
- IEEE Std. 802.11b compliant Standard on Wireless LAN
- IEEE Std. 802.11g compliant Standard on Wireless LAN
- IEEE Std. 802.11a compliant Standard on Wireless LAN (applies to devices
supporting 802.11a)
- IEEE Std. 802.11n draft 2.0 compliant on Wireless LAN
- Wireless Fidelity certification, as defined by the Wi-Fi Alliance
The Wireless Adapter and Your Health
The wireless adapter, like other radio devices, emits radio frequency electromagnetic
energy. The level of energy emitted by the wireless adapter, however, is less than the
electromagnetic energy emitted by other wireless devices such as mobile phones. The
wireless adapter operates within the guidelines found in radio frequency safety standards
and recommendations. These standards and recommendations reflect the consensus of
the scientific community and result from deliberations of panels and committees of
scientists who continually review and interpret the extensive research literature. In some
situations or environments, the use of the wireless adapter may be restricted by the
proprietor of the building or responsible representatives of the applicable organization.
Examples of such situations may include:
- Using the wireless adapter on board airplanes, or

法規資訊
- 81
- Using the wireless adapter in any other environment where the risk of interference
with other devices or services is perceived or identified as being harmful.
If you are uncertain of the policy that applies to the use of wireless adapters in a specific
organization or environment (an airport, for example), you are encouraged to ask for
authorization to use the adapter before you turn it on.
FCC Radio Frequency Interference Requirements (applies to device supporting
802.11a)
This device is restricted to indoor use due to its operation in the 5.15 to 5.25 GHz and
5.470 to 5.725 GHz frequency ranges. FCC requires this product to be used indoors for
the frequency ranges 5.15 to 5.25 GHz and 5.470 to 5.725 GHz to reduce the potential
for harmful interference to co-channel mobile satellite systems. High power radars are
allocated as primary users of the 5.25 to 5.35 GHz and 5.65 to 5.85 GHz bands. These
radar stations can cause interference with and /or damage this device. No configuration
controls are provided for this wireless adapter allowing any change in the frequency of
operations outside the FCC grant of authorization for U.S operation according to Part
15.407 of the FCC rules.
USA — Federal Communications Commission (FCC)
This device complies with Part 15 of the FCC Rules. Operation of the device is subject to
the following two conditions:
- This device may not cause harmful interference.
- This device must accept any interference that may cause undesired operation.
- Note: The radiated output power of the adapter is far below the FCC radio frequency
exposure limits. Nevertheless, the adapter should be used in such a manner that the
potential for human contact during normal operation is minimized. To avoid the
possibility of exceeding the FCC radio frequency exposure limits, you should keep a
distance of at least 20 cm between you (or any other person in the vicinity), or the
minimum separation distance as specified by the FCC grant conditions, and the
antenna that is built into the computer. Details of the authorized configurations can
be found at http://www.fcc.gov/oet/ea/
by entering the FCC ID number on the device.

82
Interference Statement
This wireless adapter has been tested and found to comply with the limits for a Class B
digital device, pursuant to Part 15 of the FCC Rules. These limits are designed to provide
reasonable protection against harmful interference in a residential installation. This
wireless adapter generates, uses, and can radiate radio frequency energy. If the wireless
adapter is not installed and used in accordance with the instructions, the wireless adapter
may cause harmful interference to radio communications. There is no guarantee,
however, that such interference will not occur in a particular installation. If this wireless
adapter does cause harmful interference to radio or television reception (which can be
determined by turning the equipment off and on), the user is encouraged to try to correct
the interference by taking one or more of the following measures:
- Reorient or relocate the receiving antenna of the equipment experiencing the
interference.
- Increase the distance between the wireless adapter and the equipment experiencing
the interference.
- Connect the computer with the wireless adapter to an outlet on a circuit different from
that to which the equipment experiencing the interference is connected.
- Consult the dealer or an experienced radio/TV technician for help.
- Note: The adapter must be installed and used in strict accordance with the
manufacturer's instructions as described in the user documentation that comes with
the product. Any other installation or use will violate FCC Part 15 regulations.
Canada — Industry Canada (IC)
This device complies with RSS210 of Industry Canada. Cet appareil se conforme à
RSS210 de Canada d'Industrie.
- Caution: When machine supports and using IEEE 802.11a wireless LAN, this
product is restricted to indoor use due to its operation in the 5.15- to 5.25 GHz
frequency range. Industry Canada requires this product to be used indoors for the
frequency range of 5.15 GHz to 5.25 GHz to reduce the potential for harmful
interference to co-channel mobile satellite systems. High power radar is allocated as

法規資訊
- 83
the primary user of the 5.25 to 5.35 GHz and 5.65 to 5.85 GHz bands. These radar
stations can cause interference with and/or damage to this device. The maximum
allowed antenna gain for use with this device is 6dBi in order to comply with the
E.I.R.P limit for the 5.25 to 5.35 and 5.725 to 5.85 GHz frequency range in point-to-
point operation. To comply with RF exposure requirements all antennas should be
located at a minimum distance of 20 cm, or the minimum separation distance allowed
by the module approval, from the body of all persons.
- Attention: l’utilisation d’un réseau sans fil IEEE802.11a est réstreinte à une
utilisation en intérieur à cause du fonctionement dans la bande de fréquence 5.15 -
5.25 GHz. Industry Canada requiert que ce produit soit utilisé à l’intérieur des
bâtiments pour la bande de fréquence 5.15 - 5.25 GHz afin de réduire les possibilités
d’interférences nuisibles aux canaux co-existants des systèmes de transmission
satellites. Les radars de puissances ont fait l’objet d’une allocation primaire de
fréquences dans les bandes 5.25 - 5.35 GHz et 5.65 - 5.85 GHz. Ces stations radar
peuvent créer des interférences avec ce produit et/ou lui être nuisible. Le gain
d’antenne maximum permissible pour une utilisation avec ce produit est de 6 dBi afin
d’être conforme aux limites de puissance isotropique rayonnée équivalente (P.I.R.E.)
applicable dans les bandes 5.25 - 5.35 GHz et 5.725 - 5.85 GHz en fonctionement
point-à-point. Se pour conformer aux conditions d'exposition de RF toutes les
antennes devraient être localisées à une distance minimum de 20 cm, ou la distance
de séparation minimum permise par l'approbation de module, du corps de toutes les
personnes.
This Class B digital apparatus complies with Canadian ICES-003.
Cet appareil numérique de la classe B est conforme a la norme NMB-003 du Canada.
"To prevent radio interference to the licensed service, this device is intended to be
operated indoors and away from windows to provide maximum shielding. Equipment (or
its transmit antenna) that is installed outdoors is subject to licensing."

84
« Pour empêcher que cet appareil cause du brouillage au service faisant l'objet d'une
licence, il doit être utilisé a l'intérieur et devrait être placé loin des fenêtres afin de fournir
un écran de blindage maximal. Si le matériel (ou son antenne d'émission) est installé à
l'extérieur, il doit faire l'objet d'une licence. »
European Union
適用國家清單
本產品的使用應嚴格遵守產品使用國家的法規及限制。 如需詳細資訊,請聯絡產品使用國
家當地的辦公室。 請參閱 http://ec.europa.eu/enterprise/rtte/implem.htm
,以瞭解最新的
國家清單。
國碼清單
本設備可在下列國家中操作:
The low band 5.15 -5.35 GHz is for indoor use only.
This equipment complies with the essential requirements of the European Union directive
1999/5/EC. See Statements of European Union Compliance, and more details refer to the
attached Declaration of Conformity.
國家
ISO 3166
2 字碼
國家
ISO 3166
2 字碼
國家
ISO 3166
2 字碼
國家
ISO 3166
2 字碼
奧地利
AT
德國
DE
馬爾他
MT
英國
GB
比利時
BE
希臘
GR
荷蘭
NT
冰島
IS
塞浦路斯
CY
匈牙利
HU
波蘭
PL
列支敦斯登
LI
捷克共和國
CZ
愛爾蘭
IE
葡萄牙
PT
挪威
NO
丹麥
DK
義大利
IT
斯洛伐克
SK
瑞士
CH
愛沙尼亞
EE
拉脫維亞
LV
斯洛維尼亞
SL
保加利亞
BG
芬蘭
FI
立陶宛
LT
西班牙
ES
羅馬尼亞
RO
法國
FR
盧森堡
LU
瑞典
SE
土耳其
TR

法規資訊
- 85
English
Hereby, ACER INC., declares that this devise is in
compliance with the essential requirements and other
relevant provisionns of Directive 1999/5/EC.
Česky [Czech]
ACER INC. tímto prohlašuje, že toto zařízení je ve shodě se
základními požadavky a dalšími příslušnými ustanoveními
směrnice 1999/5/ES.
Daansk [Danish]
Undertegnede ACER INC. erklærer herved, at følgende
udstyr overholder de væsentlige krav og øvrige relevante krav
i direktiv 1999/5/EF.
Deutsch
[German]
Hiermit erklärt ACER INC., dass sich das Gerät Radiolan in
Übereinstimmung mit den grundlegenden Anforderungen und
den übrigen einschlägigen Bestimmungen der Richtlinie
1999/5/EG befindet.
Eesti [Estonian]
Käesolevaga kinnitab ACER INC. seadme vastavust direktiivi
1999/5/EÜ põhinõuetele ja nimetatud direktiivist tulenevatele
teistele asjakohastele sätetele.
Español
[Spanish]
Por medio de la presente ACER INC. declara que el
dispositivo cumple con los requisitos esenciales y
cualesquiera otras disposiciones aplicables o exigibles de la
Directiva 1999/5/CE.

86
Ελληνικά
[Greek]
∆ια του παρόντος η ACER INC. δηλώνει ότι η παρούσα
συσκευή συµµορφώνεται προς τις ουσιώδεις απαιτήσεις και
τις λοιπές διατάξεις της Οδηγίας 1999/5/ ΕΚ.
Français
[French]
Par la présente ACER INC. déclare que cet appareil est
conforme aux exigences essentielles et aux autres
dispositions pertinentes de la directive 1999/5/CE.
Íslenska
[Icelandic]
Hér með lýsir ACER INC. yfir því að er í samræmi við
grunnkröfur og aðrar kröfur, sem gerða r eru í tilskipun
1999/5/EC.
Itaaliano [Italian]
Con la presente ACER INC. dichiara che questo dispositivo è
conforme ai requisiti essenziali ed alle altre disposizioni
pertinenti stabilite dalla direttiva 1999/5/CE.
Latviski [Latvian]
Ar šo ACER INC. deklarē, ka šī ierīce atbilst Direktīvas
1999/5/EK būtiskajām prasībām un citiem ar to saistītajiem
noteikumiem.
Lietuvių
[Lithuanian]
Šiuo ACER INC. deklaruoja, kad šis įrenginys atitinka
esminius reikalavimus ir kitas 1999/5/EB Direktyvos
nuostatas.
Malti [Maltese]
Hawnhekk, ACER INC., jiddikjara li dan jikkonforma mal- ti
ijiet essenzjali u ma provvedimenti o rajn relevanti li he mm
fid-Dirrettiva 1999/5/EC.

法規資訊
- 87
Magyar
[Hungarian]
Alulírott, ACER INC. nyilatkozom, hogy a készülék megfelel a
vonatkozó alapveto követelményeknek és az 1999/5/EC
irányelv egyéb eloírásainak.
Nederlands
[Dutch]
Hierbij verklaart ACER INC. dat het toestel voldoet aan de
essentiële eisen en de andere relevante bepalingen van
richtlijn 1999/5/EG.
Norsk
[Norwegiann]
ACER INC. erklærer herved at utstyret er i samsvar med de
grunnleggende krav og øvrige relevante krav i direktiv
1999/5/EF.
Polski [Polish]
Niniejszym ACER INC. oświadcza, że urządzenie jest zgodne
z zasadniczymi wymogami oraz pozostałymi stosownymi
postanowieniami Dyrektywy 1999/5/EC.
Português
[Portuguese]
ACER INC. declara que este dispostivo está conforme com
os requisitos essenciais e outras disposições da Directiva
1999/5/CE.
Slovensko
[Slovenian]
ACER INC. izjavlja, da je ta naprava skladna z bistvenimi
zahtevami in ostalimi relevantnimi določili Direktive
1999/5/ES.
Slovensky
[Slovak]
ACER INC. týmto vyhlasuje, že zariadenie spĺňa základné
požiadavky a všetky príslušné ustanovenia Smernice
1999/5/ES.

88
France
Pour la France métropolitaine :
2.400 - 2.4835 GHz (Canaux 1à 13) autorisé en usage intérieur
2.400 - 2.454 GHz (canaux 1 à 7) autorisé en usage extérieur
Pour la Guyane et la Réunion :
2.400 - 2.4835 GHz (Canaux 1à 13) autorisé en usage intérieur
2.420 - 2.4835 GHz (canaux 5 à 13) autorisé en usage extérieur
Pour tout le territoire Français :
Seulement 5.15 -5.35 GHz autorisé pour le 802.11a
L'utilisation de cet equipement (2.4 GHz WLAN) est soumise à certaines restrictions :
- La puissance maximale autorisée en intérieur est de 100 mW pour 2400 - 2483.5 MHz.
- La puissance maximale autorisée est de 100 mW en extérieur pour 2400 - 2454 MHz.
- La puissance maximale autorisée est de 10 mW en extérieur, 2454 - 2483.5 MHz.
Pour les dernières restrictions, voir http://www.art-telecom.fr.
Italy
The use of these equipments is regulated by:
Suomi [Finnish]
ACER INC. vakuuttaa täten että tämä laite on direktiivin 1999/
5/EY oleellisten vaatimusten ja sitä koskevienn direktiivin
muiden ehtojen mukainen.
Svenska
[Swedish]
Härmed intygar ACER INC. att denna enhet står i
överensstämmelse med väsentliga egenskapskrav och
övriga relevanta bestämmelser som framgår av direktiv
1999/5/EG.

法規資訊
- 89
1.D.L.gs 1.8.2003, n. 259, article 104 (activity subject to general authorization) for outdoor
use and article 105 (free use) for indoor use, in both cases for private use.
2.D.M. 28.5.03, for supply to public of RLAN access to networks and telecom services.
L’uso degli apparati è regolamentato da:
1.D.L.gs 1.8.2003, n. 259, articoli 104 (attività soggette ad autorizzazione generale) se
utilizzati al di fuori del proprio fondo e 105 (libero uso) se utilizzati entro il proprio fondo,
in entrambi i casi per uso private.
2.D.M. 28.5.03, per la fornitura al pubblico dell’accesso R-LAN alle reti e ai servizi di
telecomunicazioni.
Belgium
Dans le cas d'une utilisation privée, à l'extérieur d'un bâtiment, au-dessus d'un espace
public, aucun enregistrement n'est nécessaire pour une distance de moins de 300 m.
Pour une distance supérieure à 300 m un enregistrement auprès de l'IBPT est requise.
Pour les enregistrements et licences, veuillez contacter l'IBPT.
In geval van privé-gebruik, buiten een gebouw, op een openbare plaats, is geen registratie
nodig, wanneer de afstand minder dan 300 m is. Voor een afstand groter dan 300 m is
een registratie bij BIPT vereist. Voor registraties en licenties, gelieve BIPT te contacteren.
Brazil
Este equipamento opera em caráter secundário, isto é, não tem direito a proteção contra
interferência prejudicial, mesmo de estações do mesmo tipo, e não pode causar
interferência a sistemas operando em caráter primário.
Pakistan
Pakistan Telecommunication Authority (PTA) Approved
Morocco
The operation of this product in the radio channel 2 (2417 MHz) is not authorized in the
following cities: Agadir, Assa-Zag, Cabo Negro, Chaouen, Goulmima, Oujda, Tan Tan,
Taourirt, Taroudant and Taza.

90
The operation of this product in the radio channels 4, 5, 6 and 7 (2425 - 2442 MHz) is not
authorized in the following cities: Aéroport Mohamed V, Agadir, Aguelmous, Anza,
Benslimane, Béni Hafida, Cabo Negro, Casablanca, Fès, Lakbab, Marrakech, Merchich,
Mohammédia, Rabat, Salé, Tanger, Tan Tan, Taounate, Tit Mellil, Zag.
Japan
5 GHz 帯は室内でのみ使用のこと
Korea
당해 무선설비는 운용 중 전파혼신 가능성이 있음
Taiwan
第十二條
經型式認證合格之低功率射頻電機,非經許可,公司、商號或使用者均不得擅自變更頻率、
加大功率或變更原設計之特性及功能。
第十四條
低功率射頻電機之使用不得影響飛航安全及干擾合法通信 ; 經發現有干擾現象時,應立即
停用,並改善至無干擾時方得繼續使用。
前項合法通信,指依電信法規定作業之無線通信。
低功率射頻電機須忍受合法通信或工業、科學及醫療用電波輻射性電機設備之干擾。
產品修改
CE 標示
Gateway 對於使用者在未經授權下對產品進行的任何修改及後續結果概不負責,此類修改
將讓產品不再符合 CE 標示的規定。
無線電頻率干擾
在未經授權下對此設備進行任何修改,因而造成的任何無線電或電視干擾,製造商概不
負責。

法規資訊
- 91
連線和遠端接地
PELV ( 防護超低電壓 )
為確保設備超低電壓的完整性,您只能將具有防護插頭相容電子電路的設備連接至外接式
連接埠。
SELV ( 安全超低電壓 )
本產品所有的輸入和輸出都歸類為 「安全超低電壓」。
遠端接地
為避免電擊,請將所有的本機 ( 各辦公室 ) 電腦和電腦支援設備連接到建築佈線的同一電
路。 如果不確定是否安全,請檢查建築的佈線線路,以避免遠端接地的情形。
建築供電
本設備只能連接到符合您國內最新佈線法規的建築供電線路。 若在英國,則應符合 IEE
法規。
電源供應器和電源線
電源供應器
電源供應器的母插座和公插座 ( 如果有的話 ) 已歸類為 「危險電壓」。
您必須拔除電源供應器的電源線並取出電池,以中斷設備的電源。 公插座應安裝在設備附
近,且需方便插入。
額定輸入: 請參閱電腦底部的額定值標籤,並確定您的電源轉接器符合指定的額定值。
使用者不論在任何情況下均不得嘗試拆解電源供應器, 電源供應器並無可供使用者替換的
零件。 電源供應器內部具有足以造成嚴重人身傷害的危險電壓。
您應該將有瑕疵的電源供應器退回給經銷商。
電源線和電源插頭
本產品需使用接地電源線和電源插頭。 此插頭僅適合用於與接地插座連接。 請在插入插頭
前,確認該插座已接地。 請勿將插頭插入一個非接地式的插座。 如需詳細資訊,請與電氣
技師洽詢。

92
電源線長度不得超過 2.5 公尺。 為避免電擊,請勿拆除或隔絕電源線上的接地接點。 若 發
現電源線毀損,請立即更換。 如需更換相同品,請連絡您的經銷商。 如在歐洲,請使用額
定 250 VAC,10 安培 ( 最少 ) 的插頭。 插頭上必須有國際機構的審核標示。 必須使用適用
於使用者所在國家的電源線。 如果您不確定國內可以使用何種類型的電源線,請洽詢您的
經銷商或當地的授權電力機關。
連接線
針對未在電腦包裝箱中連同產品一併提供的連接線:
只有在連接線和介面具有有效的屏蔽時,才能確保系統的 EMC 效能。
必須使用屏蔽的介面連接線包括:USB、IEEE1394、序列、印表機、遊戲、類比或數位
音訊 / 視訊、PS2、電視或 FM 天線,以及所有通用的高速連接線介面。
只能使用 UL Listed No. 26AWG 或更大的電信線路。
只有乙太網路 LAN 或 RTC 數據機連接線的長度可以超過 3 公尺。
Gateway 建議您在連接電腦與非電腦隨附之硬體裝置的每條連接線上加上一個鐵酸鹽心
圓形夾。
- 鐵酸鹽夾參考型號: Steward 28A-2029 ( 雙圈 )
在取得產品憑證期間,Gateway 使用下列的連接線品質:
- 通過 USB2.0 認證的連接線,型號:Hama 46778
- IEEE1394 屏蔽的 FireWire 連接線,型號:Hama 50011
-RCA-RCA 屏蔽的音訊 / 視訊連接線,型號:Thomson KHC001M、KHC012M、
KHC028M
- 立體聲插孔屏蔽音訊連接線,型號:Hama 43330H、42714H
熱生成及可攜式電腦
AC 電源轉接器和電腦底部在長時間使用後可能會變熱。 應避免讓身體長時間接觸這兩個
設備。
機殼蓋的移除及更換
在移除機殼蓋,對設備進行維修或修改之前,您必須先拔除所有的電源線和數據機連接線,
並取出或停用電池。

法規資訊
- 93
-
小心:
電腦內的部分元件在長時間使用後可能會變熱。
完成工作後,您必須先關上機殼,才能接上電源線並啟動設備。
雷射遵循聲明
此光學裝置已經過測試及認證,符合第 1 級雷射產品的國際電工委員會 IEC60825-1 和 歐
盟 EN60825-1 標準。
第 1 級雷射產品不屬於危險等級。 在正常操作或依規定維護下,此光學裝置的設計絕不會
讓人體接觸到第 1 級以上的雷射光。
電腦內安裝的光學裝置設計僅可作為此電子產品的元件使用,因此未符合美國聯邦條例中
完整雷射產品第 1040.10 節和第 1040.11 節的適用需求。
但暴露於雷射光仍具有相當的危險性,因此使用者不論在任何情況下均不得嘗試拆解雷射
裝置。
包裝
本產品的包裝符合歐盟在 1994 年 12 月 29 日發佈的 94/62/EC 環保指令,同時符合法國
在 1998 年 7 月 20 日發佈的 98-638 法規。
符合於俄羅斯法規認證

94
環境
我們對環保的承諾
我們的產品一向以環保為出發點。
Gateway 致力於讓我們的產品不會在使用壽命期間對環境造成任何影響。
從設計階段開始,我們便對電子元件採行嚴格的採購政策,以減少鉛、鎘、鉻、水銀等重
金屬的重量。而且全部產品中各項元件的供應商均需遵從所有法規。
對於所有使用壽命已屆的產品,我們也採取必要措施,以進行並加速所有產品的回收工作。
Gateway 產品中使用的所有重量超過 25 公克的塑膠零件都貼有 ISO 11469 標示,有助於
快速辨識材質並簡化定價。同樣地,桌上型電腦也設計成以扣片取代螺絲,方便拆解。
產品棄置
2002/96/EC 指令,亦稱為廢棄電子電機設備 (WEEE) 指令,規定廢棄的
電子電機產品必須與一般的家庭廢棄物分開處理,以推廣再利用、回收及
其他形式的再製,並減少廢棄物的數量,以減少垃圾掩埋及焚化處理。
貼有畫著 X 的垃圾筒標誌,意在提醒您這些產品必須分類處理。這些規則
適用於所有的 Gateway 產品,以及鍵盤、滑鼠、喇叭、遙控器等所有配
件。當您要棄置這些產品時,請洽詢您當地的授權機關以瞭解正確的回收
方式,如果是要更換舊設備,則請送返經銷商。如需詳細資訊,請造訪
www.gateway.com/about/corp_responsibility/environment.php。
電池棄置 ( 在適用情況下 )
在棄置設備之前,請務必先移除設備中安裝的電池。歐盟法律中規定,電池不得與其他家
庭廢棄物一併處理。請勿將廢棄電池丟進垃圾筒。請透過電池收集計畫處理您的廢棄電池,
或是向經銷商或當地的授權機關詢問有哪些途徑可供利用。您所付出的心力有助於廢棄電
池的安全收集、回收及拆解,為環保盡一份心力,並減少對健康的危害。
-
注意:若未正確更換電池,則會有爆炸的危險。請依據相關指示處理廢棄電池。

環境
- 95
ENERGY STAR ( 能源之星 )
Gateway 的 ENERGY STAR ( 能源之星 ) 合格產品不止可以降低能源費用,
幫您節省開支,還能兼顧環保與效能。Gateway 很榮幸為客戶提供貼有
ENERGY STAR ( 能源之星 ) 標章的產品。
何謂 ENERGY STAR ( 能源之星 ) ?
通過 ENERGY STAR ( 能源之星 ) 規範的產品不只低耗電,且必須符合由美
國環保署 (US Environmental Protection Agency,EPA) 所訂定的嚴格能源規範,不能產
生對溫室效應有害的氣體。Gateway 一向致力於在全球各地提供能夠協助客戶節省開支、
節能省電且改善環境品質的產品和服務。透過更高的節能效率,我們就能節省更多能源,
也更能減少溫室氣體的排放並降低氣候變異的風險。如需詳細資訊,請造訪:
www.energystar.gov 或 www.energystar.gov/powermanagement 網站。
-
注意:
本章的資訊不一定適用於您的電腦。
Gateway 的 ENERGY STAR ( 能源之星 ) 合格產品具備下列特點:
- 可產生更少的熱氣並減少散熱負荷,同時避免溫室效應。
- 顯示器和電腦可在閒置達 10 和 30 分鐘後分別自動進入 「顯示器睡眠」和 「電腦
睡眠」模式。
- 按下鍵盤按鍵或移動滑鼠即可喚醒處於睡眠模式中的電腦。
- 「睡眠」模式下的電腦可節省 80% 以上的能源。
ENERGY STAR 和 ENERGY STAR 標章是經過註冊的美國標章。

96
軟體授權
-
注意:大部分的軟體應用程式都已預先安裝在您的
Gateway
電腦上,您現在就可以
開始使用或設定這些程式。不過,有些程式需要插入
CD
或
DVD
才能執行,這些光
碟可在電腦的包裝中找到。
Gateway 授權合約 (CD 和 / 或 DVD 產品 )。這份原始資料的影本可作為購買證明。請將
其視為個人資產,妥善保管。
重要!
安裝軟體之前請先詳閱本合約。
以下授權合約的授權對象為您。本合約載明您 ( 個人或個體 ) 與 Gateway 之間的法律關
係。安裝本軟體之後,即表示您同意受到本合約中條款之約束。如果您不同意本合約中的
條款,請立即將整個電腦系統、未打開的軟體套件 ( 如果有的話 ),以及隨附的項目 ( 包括
書面資料或其他包裝 ) 退回當初購買的地方,以取回全部款項。
G
ATEWAY 軟體授權
1. 授權之授予
本 Gateway 授權合約 (「以下稱「授權」」 允許您在任何一台電腦上使用一份上述指定版
本的 Gateway 軟體副本 ( 包括至少一份 CD 或 DVD 光碟 ),且本軟體不論何時都只能在
一台電腦上使用。如果您擁有軟體的多份授權,則可以使用與授權數相同份數的軟體副本。
軟體在電腦上的 「使用中」狀況,包括載入暫存記憶體 ( 例如:RAM),或安裝於永久性
記憶體 ( 例如:硬碟、CD 和 / 或 DVD,或電腦上其他的儲存裝置 ),但不含為了散佈到其
他電腦而安裝在網路伺服器上的非 「使用中」副本。如果預期的軟體使用者數量超過可用
的授權份數,則您應該建立一個適當的機制或程序,以確保同時間使用軟體的人數不會超
過授權份數。如果軟體是永久安裝於電腦的硬碟或儲存裝置 ( 而非網路伺服器 ) 上,且某
一使用者使用電腦的時間超過該電腦總使用時間的 80%,則這位使用者也可以將軟體安裝
在可攜式電腦或家用電腦上使用。

軟體授權
- 97
2. 版權
本軟體擁有者為 Gateway 或其供應商,且受到美國版權法及國際條約條款的保護。本軟
體等同任何其他受版權保護之資料 ( 例如:書籍或音樂錄音 ),此外您也可以將 CD 和 / 或
DVD 光碟上的軟體部分 ( 如果有的話 ) 轉移到單一硬碟,以作為備份或封存之用,但前提
是您必須擁有光碟正本。但您不得複製 CD 和 / 或 DVD 光碟上的軟體部分或軟體隨附的書
面資料。
3. 其他限制
您不得出租或租賃軟體,但可以永久轉移軟體和隨附的書面資料,前提是您不可保留任何
副本,且接收人必須同意本合約之條款。您不得對軟體進行還原工程、解編或反向組譯。
不論在任何情況下轉移軟體,均必須包含最新的更新和所有先前版本。
協力廠商軟體或自由軟體授權資訊
Gateway 提供之產品所預先載入、內建或散佈的軟體中包含自由軟體或協力廠商的軟體程
式 ( 以下稱 「自由軟體」 ),這些程式依 GNU 通用公共授權 ( 以下稱 「GPL」 ) 之條款進
行授權。本程式為「自由軟體」。您 可 依 GPL 條款對「自由軟體」進行複製、散佈和 / 或修改。
「自由軟體」是基於使用目的而散佈,但不提供任何保固;且不對適售性或特殊用途之合
適性提供默示保固。GNU 通用公共授權之條款應永遠適用。您可以直接進入
http://www.gnu.org 取得 GPL 的副本,或寫信給 「自由軟體基金會」以索取副本。「自由
軟體基金會」的地址如下:59 Temple Place - Suite 330, Boston, MA, 02111-1307, USA。
您可在收到本軟體起的三 (3) 年內向我們提出書面申請,依 GPL 條款您會免費收到一份電
腦可讀取的 「自由軟體」原始碼副本,而您只需要支付媒體、寄送和處理費。
如果您有任何進一步的問題,請與我們連絡。我們的郵寄地址:221 新北市汐止區新台五
路一段 88 號 8 樓。

98
索引
C
CD-ROM
ejecting manually
......................................... 70
疑難排解........................................................... 70
D
DSL ............................................................................. 40
F
FAQ. 請參閱常見問題
L
LAN ( 區域網路 )................................................... 41
N
Norton Internet Security.............................. 44, 47
P
ports............................................................................ 25
W
WiFi............................................................................. 41
Windows
Windows 自動更新
...................................... 50
使用 Windows ............................................... 38
三畫
干擾 ............................................................................. 90

索引
-
99
五畫
充電
檢查電量
........................................................... 34
左視圖 ........................................................................ 18
六畫
印表機
疑難排解
........................................................... 70
安全守則 ..................................................................... 7
安全性
更新
.................................................................... 50
防毒軟體........................................................... 46
七畫
快速鍵 ........................................................................ 17
更新
Windows 自動更新
...................................... 50
防火牆 ........................................................................ 46
八畫
卸除式媒體裝置..................................................... 26 法規資訊 .............................................................. 77, 94
九畫
亮度
快速鍵
................................................................ 16
保固 ............................................................................... 6
前視圖 ........................................................................ 18
音訊
疑難排解
........................................................... 70
十一畫
健康守則 ................................................................... 10
問題 ............................................................................. 69
CD-ROM .......................................................... 70
印表機................................................................ 70
開機..................................................................... 69
鍵盤..................................................................... 70
顯示器................................................................ 69
常見問題 ................................................................... 69
清潔電腦 ..................................................................... 9
軟體
軟體授權
........................................................... 96
通用序列匯流排..................................................... 27
連接線 ..................................................................... 8, 91
連線
網路
.................................................................... 27

100
十二畫
喇叭
快速鍵
................................................................ 16
疑難排解........................................................... 70
復原
Recovery Management ............................ 51
復原管理程式 ................................................. 38
惡意軟體 ................................................................... 45
游標............................................................................. 23
視圖
右
......................................................................... 20
左 ......................................................................... 19
前 ......................................................................... 19
間諜程式 ................................................................... 45
十三畫
閘道
復原管理程式
................................................. 38
電池 ............................................................................. 94
電池棄置 ................................................................... 94
電池組
充電
..................................................................... 33
安裝..................................................................... 33
低電量................................................................ 35
低電量警告 ...................................................... 34
特性..................................................................... 31
移除 .................................................................... 33
第一次使用...................................................... 32
最大化使用壽命 ............................................ 31
最佳化 ............................................................... 34
檢查充電量...................................................... 34
電源線 .......................................................................... 8
電腦
功能
.................................................................... 12
指示燈 ............................................................... 18
電腦環境 ..................................................................... 7
十四畫
磁碟機
讀卡機
................................................................ 25
網路 ............................................................................. 27
網路連線 ................................................................... 41
網際網路
防火牆
................................................................ 46
連線 .................................................................... 39
網際網路服務提供者 (ISP)............................... 39
維護
Recovery Management............................ 51
維護權限
復原管理程式
................................................. 38
十五畫
數據機 ........................................................................ 40

索引
-
101
十七畫
環境 ............................................................................. 94
鍵盤
快速鍵
................................................................ 17
疑難排解........................................................... 70
十八畫
瀏覽器 ........................................................................ 44
二十畫
觸控板 ........................................................................ 23 使用 .................................................................... 23
二十二畫
讀卡機 ........................................................................ 25
二十三畫
顯示器
快速鍵
................................................................ 15
疑難排解........................................................... 69
二十四畫
癲癇警告 ................................................................... 11
Ver.: 02.01.02


- 1
用户手册
Gateway NE71B

2
目录
启动计算机 4
无线连接............................................................. 4
注册 .................................................................... 5
软件安装............................................................. 5
恢复 .................................................................... 6
遇到问题? ......................................................... 6
计算机基础 7
安全和舒适 ......................................................... 7
安全防范 ..................................................... 7
健康防范 ................................................... 10
了解您的电脑 12
俯视图 - 显示器 ................................................ 13
俯视图 - 键盘 .................................................... 14
特殊键 ....................................................... 15
前视图 .............................................................. 18
左视图 .............................................................. 19
右视图 .............................................................. 21
底视图 .............................................................. 23
触控板 24
触控板的基本操作 ............................................ 24
触控板手势 ....................................................... 24
升级您的计算机 26
使用选项扩展性能 ............................................ 26
连接选项 ................................................... 26
电源 30
AC 适配器 ........................................................ 30
电池组 .............................................................. 31
电池组特点................................................ 31
更换电池组................................................ 33
安装或卸下电池组 ..................................... 33
给电池充电 ............................................... 33
检查电池电量............................................ 34
优化电池寿命............................................ 34
电量不足警告............................................ 34
电源管理 36
节能 ................................................................. 36
软件 38
使用 Windows 和您的软件............................... 38
提供 Internet 安全..................................... 38
Gateway Recovery Management............. 38
互联网 39
上网的第一步................................................... 39
保护计算机 ............................................... 39
选择一家 “Internet 服务提供商”............ 39
网络连接................................................... 41
网上冲浪! ............................................... 44
安全 .......................................................... 44
还原 51
创建还原备份................................................... 51
创建驱动程序和应用程序备份.......................... 54
还原系统 .......................................................... 57
重新安装驱动程序和应用程序 .................. 57
返回之前的系统快照................................. 60
将系统恢复到出厂时的状态 ...................... 61
从 Windows 还原...................................... 61
从还原备份进行还原................................. 65
常见问题 69
对使用 Windows 8 的建议和提示 .................... 71
有三大概念您需要记住 ............................. 71
我如何访问 Charms? .............................. 71

目录
- 3
如何进入开始?......................................... 71
如何在应用程序之间切换?....................... 71
如何关闭我的电脑? ................................. 72
为什么有新的界面? ................................. 72
如何解锁我的电脑? ................................. 72
如何个性化我的电脑?.............................. 72
我要以习惯的方式使用 Windows -
还回我的桌面!......................................... 73
我的应用程序在哪里?.............................. 74
什么是 Microsoft ID ( 帐户 )? ................... 75
我如何将收藏夹添加到
Internet Explorer?.................................... 75
如何检查 Windows 更新? ....................... 75
我在哪里可获得更多信息? ...................... 76
规范信息 77
环境 94
软件使用许可 96
索引 98
版
权所有 © 2012 保留所有权利。
G
ateway NE71B 用户手册
本
次修订:2012 年 7 月 20 日
G
ateway 欢迎您点进 registration.gateway.com 来看看注册会员的多重优惠。
备
注:所有图解仅用于参考目的。实际配置可能有所不同。

4
启动计算机
感谢您购买 Gateway 计算机!
本指南旨在向您介绍您计算机的功能并对您的运算体验提供支持。
设置并启动计算机后 ( 如设置说明中所示 ),将问您一些问题,这些问题有
助于连接到 Internet。 然后计算机将对安装的软件进行配置。
无线连接
要连接到无线网络,先检查计算机的无线功能是否开启以及要连接的路由器
或调制解调器是否正确配置。
• 如果无线未打开,按 Windows 键 () + W,输入 “Wireless”(无线),
然后单击无线。 单击 Wi-Fi 下方的切换开关可启用无线连接。 再次单击
可禁用。
• 要连接到网络,按 Windows 键 ()+W,输入 “Wireless”(无线),然
后单击连接到网络。 如需要,选择您的网络并输入密码。
• 短暂延迟后,计算机应连接到 Internet。
如果未检测到您的网络,或者如果您的计算机未连接到 Internet,请参见
ISP 或路由器使用手册。 计算机启动后,打开 Internet Explorer 并按说明进
行操作。
或者使用网线直接连接到路由器的网络端口。
请参见
ISP
或路由器的
用户指南。

启动计算机
- 5
注册
当首次使用您的计算机时,建议您进行注册。 这可给您带来有用的好处,
例如:
• 享受专业代表提供的快捷服务。
• Gateway 社区中的成员: 获得促销信息,并参加客户调查。
• 来自 Gateway 的最新新闻。
如何注册
首次启动计算机时,将出现一个窗口,邀请您注册。 请填写信息并单击下一
步。 您将看到的第二个窗口含有可选的字段,这有助我们向您提供更多个性
化的客户服务体验。
另一个选项
注册 Gateway 产品的另一个方式是访问我们的网站:
register.gateway.com。 选择您所在国家,再按照简单提示进行操作。
注册后,将向您发送一封确认电子邮件以及您应保存在安全地方的重要
资料。
软件安装
您的计算机将自动安装软件并准备让您使用。 这可能需要一些时间,请勿关
闭计算机;等待安装完成。

6
恢复
您应尽快创建还原光盘。 还原程序可让您创建还原光盘,然后可还原或重新
安装 Gateway 提供的应用程序和驱动程序。
遇到问题?
Gateway 为您的购买提供多个选项支持。
Gateway
支持
确保您写下计算机的序列号、购买日期和地点以及本指南中提供的型号名
称;保存购买本产品的凭证。 如果您给我们打电话,请写下随问题出现的任
何错误信息,如可能,请将计算机置于您面前并打开。 联系我们时将这些项
目置于旁边能够确保您获得更好和更快的服务。
Gateway
网站
记得访问 www.gateway.com!查看“支持”部分以获得最新的信息、帮助、
驱动程序和下载。
保修和联系信息
您可在 “保修”中查看有关计算机保修和如何联系技术支持的信息。

计算机基础
- 7
计算机基础
安全和舒适
安全防范
请按以下指南使用计算机这样能够让您在舒适地使用计算机的同时避免人
身伤害问题。
计算机环境
确保计算机:
• 在稳固的表面、工作台和桌子上使用。 掉在地上会严重损坏计算机。
• 不要在振动的表面上使用,或在运动、锻练或在动态环境下的其它活动时
使用。 振动或运动会松开扣件、损坏内部元件甚至造成电池漏电。
• 不要受到阳光直晒并远离热源。
• 远离磁场或任何产生静电的设备。
• 离手机至少 30 厘米 ( 一英尺 )。
• 不要在灰尘较多或潮湿的环境下使用。
• 不要在近水的位置使用。 不要让任何液体溅落到 ( 进 ) 电脑。
• 不要放在地毯或任何可能有电荷的表面上。

8
注意
• 开槽和开口用于通风目的,以确保产品稳定运行和防止过热。切勿堵塞或
盖住这些开口。切勿将本产品放置在床、沙发、地毯或其它类似表面上,
以免堵塞开口。切勿将本产品放置在散热器或热调节器附近或上方;除
非能提供良好通风,否则也不要放置在内部空间中。
• 切勿将任何物品从机壳上的开槽塞入本产品内,以免误触高压或造成部
件短路,引起火灾或电击。切勿使任何液体溅到本产品表面或内部。
• 切勿将本产品放置在震动表面上,以免内部组件受损和电池漏液。
• 请勿在进行体育运动时或在震动环境中使用本产品,否则可能导致短路
意外或损坏转子装置、硬盘驱动器、光驱,甚至存在锂电池组爆炸的
危险。
线缆
确保:
• 不要让线缆拉紧且没有人踩在线缆上或被绊的风险。
• 不要让其它设备压到线缆。
• 在将电源线连接到交流电插座之前,将电源线连接到计算机。
• 在将电源线与计算机断开连接之前,将电源线从电源插座拔出。
• 三芯电源线要连接到接地电源插座。
• 电源插座能够轻松地够到,并尽量靠近计算机 ( 切勿超负荷连接过多的适
配器 )。
如果您的计算机使用外接交流适配器:
• 切勿在交流适配器上覆盖或放置物体。保持适配器上没有其它物体,可让
适配器在使用时适当冷却。

计算机基础
- 9
• 仅使用随机配套的 AC 适配器。虽然其它适配器似乎类似,但使用这些适
配器可能会损坏您的计算机。如需更换,仅使用通过鉴定可用于您的计算
机的部件。
清洁计算机
• 清洁前始终将计算机的电源线从电源插座上拔下。
• 切勿使用液体或气雾洗涤剂,应使用湿布。
• 切勿将清洁产品直接喷到屏幕上。
• 如果有液体溅到计算机上,请立即关闭电源,拔下交流适配器,取出电
池,确认已完全干燥后再重新开机。 如有必要,请等待一晚。
注:如果计算机配有存储卡或扩展设备插槽,可在插槽中安装塑料防
尘待机卡。
防尘待机卡可防止灰尘、金属物体或其他杂质进入未使用
的插槽。
如果插槽中未安装板卡,请保留防尘待机卡。
维修计算机
切勿尝试自行维修您的计算机,打开或卸下护盖可能会使您遭到危险电压的
电击或其它风险。 一切维修服务应由专业维修人士提供。
在以下情况下,将计算机的电源线从壁装电源插座上拔下并请有资质的维修
人员进行维修:
• 电源线或插头损坏或磨损
• 液体溅入本产品
• 有雨水或水溅到本产品
• 产品不小心掉落到地面或外壳有损伤
• 该设备性能明显改变
• 若依照说明书进行操作而本产品仍然无法正常运作

10
注:您只能调整说明书中所提及的控制因为如果调整不当可能导致设
备受损。而这通常需要专业技术人员进行额外的维修才能将设备恢复
到原来的状态。
健康防范
• 底面、通风口周围的区域以及交流电适配器可能会产生热。为避免受到伤
害,请确保不要让您的皮肤或身体碰到这些区域。
• 您的设备及其增强组件可能包含小配件。请将它们放置在儿童拿不到的
地方。
• 计算机和附件可能含有小配件。 请将它们放置在儿童够不到的地方。
• 如果您一次工作或玩数小时,请确保有正常的休息时间。 一段时间后,将
视线离开计算机屏幕。 如果觉得疲劳,切勿使用计算机。
• 合理摆放计算机,使您能够在一个自然和轻松的位置上工作。 将经常使
用的物品放在容易够到的位置。
• 将计算机置于正前方,以提高安全性和舒适性。 确保键盘和触控板在舒
适的高度上。 屏幕应离眼睛约 45-75 厘米 (18-30 英寸 ) 的位置。如果您
长时间使用计算机建议使用外接键盘以提高舒适度。
• 为保护您的听力在使用指示器和耳机时慢慢提高音量直到您能够清晰舒
服地听到切勿在耳朵适应后提高音量。 切勿听高音量的时间过长。 切勿
提高音量来阻止周围的噪音;如果您无法听到附近的说话声,请降低音
量。
• 使用过程中,计算机的底部、电源适配器和来自通风槽的空气
可能会变热。 避免身体持续接触,且切勿将运行中的计算机置
于膝上。

计算机基础
- 11
• 确保计算机的通风槽和通风孔没有被堵塞或盖住。 切勿将计算机置于柔
软的表面上 ( 地毯、椅子或床上 ),这样会堵住通风槽。
• 切勿将任何物品插入该设备的通风槽或机箱槽内,以免误触高压或造成
部件短路,引起火灾或电击。
• 在手、手腕、臂、颈、肩、腿和背部可能会出现与某些重复运作相关的不
适或症状加重。 为降低这些不适症状加重的风险,用手腕直击并使手和
手腕浮在键盘上。 如果您经历了一段时间的疼痛、麻刺、麻木或其它不
适,请联系医生。
• 我们建议父母对孩子玩电子游戏进行监督。 如果您或孩子有以下任何症
状: 头晕、视力模糊、眼睛或肌肉痉挛、意识不清、定向障碍、任何不自
觉的运动或抽搐,立即停止使用计算机并咨询医生。 一个人即使没有癫
痫的病史,也可能发生这一症状。

12
了解您的电脑
当您按照安装说明中的示例安装完电脑后,就让我们一起来熟悉您新购的
Gateway 电脑吧。
Gateway NE71B

了解您的电脑
- 13
俯视图 - 显示器
#
图标 项目 说明
1
摄像头
网络相机,用于视频通信。
网络摄像头旁边的灯表示网络摄像头已激活。
2
麦克风 用于录音的内置麦克风。
3
显示屏
也称为液晶显示屏 (LCD),显示电脑输出的
内容。
1
2
3

14
俯视图 - 键盘
#
图标 项目 说明
1
电源按钮 / 指示灯
用于打开和关闭电脑电源。 根据亮灯情况可检
视目前电脑电源的状态。
2
键盘
将数据输入到电脑中。
-
特殊键见第
15
页的说明。
3
触控板 触摸式定位设备,功能和电脑鼠标相同。
4
单击按钮 ( 左和右 )
该按钮左侧和右侧起到左选和右选按钮功能的
作用。
5
扬声器 提供立体声音频输出。
1
2
5
3
4

了解您的电脑
- 15
特殊键
您电脑的键盘包含激活特殊功能的键。 各键的功能均有图标明确标示。
图标 功能 说明
Fn
第二功能热键
激活某些键的第二功能。
例如,按
Fn
键可激活
F1
至
F12
键。
帮助 打开帮助菜单。
Backup
让您创建电脑的备份,或者备份整个系统,或者仅备份
所选的文件和文件夹。 随时可创建正常时间表或制作
备份。
通信 启用 / 禁用电脑的通信设备。
显示屏幕切换
可以在以下三种显示方式间切换:只使用显示屏、
只使用已连接的外部显示器、同时使用显示屏和外部
显示器。
屏幕空白
关闭显示屏背光以节省电量。 按任意键将恢复正常
显示。
触控板切换 用于打开和关闭内置触控板。
播放 / 暂停 播放或暂停选定的媒体文件。
停止 停止播放选定的媒体文件。

16
上一个 返回上一个媒体文件。
下一个 跳至下一个媒体文件。
调低亮度 调低屏幕亮度。
调高亮度 调高屏幕亮度。
社交网络
打开社交网络应用程序。
-
如果未安装此应用程序,则该键会启动您的即时消息
应用程序。
调高音量 调高扬声器音量。
调低音量 调低扬声器音量。
扬声器切换 打开或关闭扬声器。
图标 功能 说明

了解您的电脑
- 17
热键
电脑使用热键 ( 组合键 ) 来操作 功能键和执行导航命令。
要激活热键,先按住 Fn 键 ( 左下角 ),然后再按热键组合中的另一个键。
-
注:
当启动电脑或使用
BIOS
时无需按
Fn
键来使用
F1
至
F12
功能键。
要更换热键和
F1
至
F12
键的特殊功能,在
BIOS
中更改功能键设置
(
要打开
BIOS
,
在启动电脑时按
F2
,然后选择
Main
菜单并将功能键行为更改至功能键
)
。
热键 功能 说明
Fn + 特殊键
(
请参见第
15
页
)
功能键 激活 F1 至 F12 键。
Fn +
主画面 滚动到文档开始位置。
Fn +
结束 滚动到文档结尾位置。
Fn +
上一页 在文档中向上滚动一页。
Fn +
下一页 在文档中向下滚动一页。

18
前视图
-
注:即使在
LCD
显示屏关阖上也能看到前面板处的状态指示灯。
#
图标 项目 说明
1
电源指示灯 根据亮灯情况可检视目前电脑电源的状态。
电池指示灯
根据亮灯情况可检视目前电脑电池的状态。
-
正在充电:
当电池在充电时,指示灯显示琥
珀色。
-
完全充电:
当处在
AC
模式时,指示灯显示
蓝色。
硬盘指示灯 硬盘活动时,该指示灯亮。
通信指示灯 表示电脑的无线连接设备状态。
2
多合一读卡器
可支持安全数码卡 (SD)、多媒体卡 (MMC)、
PRO 记忆棒 (MS PRO) 及 xD-Picture 卡 (xD)。
-
轻推取下
/
安装存储卡。
任何时候,仅支持读
取一张卡。
1 2

了解您的电脑
- 19
左视图
#
图标 项目 说明
1
Kensington 安全锁
插槽
连接 Kensington 兼容电脑安全锁。
-
您可以将电脑锁链与不可移动的物体相连,
例如桌子或者上锁的抽屉手柄。
将锁插入锁孔中,然后旋转钥匙便可上锁。
您也可以选购不配钥匙的型号。
2
通风和冷却风扇
让电脑保持冷却。
-
切勿遮挡槽口。
3
以太网络 (RJ-45) 端口 连接 10/100/1000 以太网。
4
外部显示器 (VGA) 端口
连接显示设备 ( 例如:外接显示器、
LCD 投影机 )。
5
HDMI 端口 支持高清数字视频连接。
21 3 4 56

20
有关
USB 3.0
的信息
• 与 USB 3.0 和较早设备兼容。
• 用 USB 3.0 认可设备获得最优性能。
• 符合 USB 3.0 (SuperSpeed USB) 技术规范。
6
USB 端口
连接 USB 装置。
-
如果端口为黑色,则兼容
USB 2.0
,如果端口
为蓝色,则兼容
USB 3.0
(参见下文)。
#
图标 项目 说明

了解您的电脑
- 21
右视图
#
图标 项目 说明
1
耳机 / 扬声器插孔
连接音频输出设备 ( 例如:扬声器、耳机 )。
-
支持带内置麦克风的
3.5 mm
兼容耳机
(
例如
Acer
智能手持耳机
)
。
麦克风插口 连接外接麦克风。
2
USB 端口
连接 USB 装置。
-
如果端口为黑色,则兼容
USB 2.0
,如果端
口为蓝色,则兼容
USB 3.0
(参见下文)。
3
光驱 内置光驱,可支持读取 CD 或 DVD。
4
光驱访问指示灯 当光驱被激活时指示灯会亮起。
5
光驱弹出按钮 按下此按钮可弹出光驱。
6
紧急弹出孔
当电脑关闭时,可弹出光驱托盘。
-
小心插入拉直的回形针可退出光驱托盘。
12 3 4 5 6 7

22
有关
USB 3.0
的信息
• 与 USB 3.0 和较早设备兼容。
• 用 USB 3.0 认可设备获得最优性能。
• 符合 USB 3.0 (SuperSpeed USB) 技术规范。
7
直流电源输入插孔 连接到电脑的 AC 适配器。
#
图标 项目 说明

了解您的电脑
- 23
底视图
#
图标 项目 说明
1
电池槽 安装电池组。
2
电池释放闩锁
释放电池闩锁可取下电池组。 插入适用的工具
并滑动可释放闩锁。
3
内存槽 安装电脑主内存的位置。
硬盘槽 安装电脑硬盘的位置 ( 用螺丝紧固 )。
4
通风和冷却风扇
让电脑保持冷却。
-
切勿遮挡槽口。
1
4
2
3

24
触控板
触控板的基本操作
触控板能够控制屏幕上的箭头 (或 “光标”)。
当手指滑过触控板时,光
标将随之移动。
使用位于触控板下方的左右按钮可以完成选择和执行操作。 这两个区域相
当于普通鼠标的左键和右键。 轻击触摸板与单击鼠标左键的效果相同。
注:触控板对手指的移动十分敏感;您点触动作越轻,响应越好。
请保持触控板和手指
的干燥和清洁。
光标由一些基本手势控制。
• 单指滑动:在触控板 上移动手指就可以移动光标。
• 单指点按: 用手指轻击触控板可执行 “单击”操作,该操作将
选择或启动一个项目。 快速重复点按可执行点按两下或 “双
击”。
• 拖动: 按住触控板的左侧选择按钮,或点按触控板的任意位置两次,然后
在触控板上滑动手指可选择区域中的所有项目。
触控板手势
Windows 8 和许多应用程序支持触控板手势,手势使用一个或多个手指。
注:
支持触控板手势,取决于活动的应用程序。
这样,您就能够通过几个简单的手势来控制应用程序,例如:

触控板
- 25
• 从边缘向内滑动:从触控板的右侧、顶部或左
侧向中心滑动可访问 Windows 工具。
• 从右侧向内滑动:切换 Charms。
• 从顶部向内滑动:切换应用程序命令。
• 从左侧向内滑动:切换到上一个应用程序。
• 双指滑动:将两个手指放在触控板上并向任意方向移动可快速
在网页、文档和播放列表上滚动。
• 双指收放:利用拇指加食指的简单手势放大或缩小照片、地图
和文档。

26
升级您的计算机
使用选项扩展性能
计算机提供了许多选项,为您带来完整的计算体验。
连接选项
端口可让您将外设连接到您的计算机。 有关如何将各种外设连接到本计算
机的说明,请阅读以下章节以了解详情。
存储卡读卡器
存储卡读卡器用于范围广泛的数码相机、PDA、MP3 播
放器和手机。
插入存储卡
1. 将卡的接口向下对准端口。
2. 小心将卡插入端口。 如果感觉插卡时比较费力,请稍微调整卡的方向。
3. 轻推存储卡,使其卡定到位。 存储卡会有几厘米伸出卡槽外。
如果卡上包含文件,可能会显示 Windows
自动播放
窗口 ( 取决于卡上的
内容 ),询问您是否要使用某程序访问卡上的内容。 在此处选择相应选项
或选择取消。 如果卡上没有文件,或包含未知文件,将打开显示卡上内容
的窗口。

升级您的计算机
- 27
SD
、
SDHC
和
SDXC
卡
不同类型的 SD 卡有不同的容量,但其整体设计相同。 SD 卡最高容量可达
4 GB,SDHC 卡为 32 GB,SDXC 卡为 2048 GB (2 TB)。 您的计算机提供
SDHC 或 SDXC 兼容读卡器。
注:
SDXC
存储卡只可在
SDXC
兼容读卡器中使用,而
SD
和
SDHC
卡在这两种读卡器中均可使用。
将
存储卡从存储卡读卡器上拔下
1. 单击
通知区域
(时钟旁边) 的显示隐
藏图标箭头。
2. 单击安全删除硬件图标。
3. 单击退出 SD 卡 ( 或设备的名称 )。
4. 稍候直到显示
安全移除硬件
信息。
5. 移除存储卡。
3
2
1

28
内置网络
您可以通过内置网络连接以太网络。
请使用以太网络线将计算机外部的以太网络端
口 (RJ-45) 与提供网络接入服务的网络接口或
集线器相连接。
通用串行总线
(USB)
通过高速通用串行总线 (USB 2.0) 端口,您可
以连接各种 USB 外设,而不占用系统资源。
某些计算机可能含有一个或多个 USB 3.0 端
口。 这些类似的标准 USB 端口为蓝色 ( 除非
它们包含其它的内部连接 )。 您可通过这些端
口使用 USB 3.0 兼容设备以受益于更快的传
输速度。
视频端口
通过 VGA 或 DVI 端口连接到显示器 ( 支持的
连接类型取决于计算机的配置 )。 显示器通常
含有适用的线缆。
请按以下步骤将显示器连接到计算机上:
1. 检查计算机和显示器电源是否均已关闭。
2. 将视频线连接到计算机的显示器端口。用配套螺丝固定连线。

升级您的计算机
- 29
3. 将显示器电源线插入接地的墙面插座。
4. 按显示器用户指南中的安装说明进行操作。
5. 打开显示器电源,然后启动计算机。
6. 确认当前分辨率和刷新率没有超过显示器规格。如有必要,可更改计算机
使用的显示设置。
注:要访问显示控制,按
Windows
键
() + W
,输入 “
Display
”(显
示),然后单击显示。
高清晰度多媒体接口
(
仅限部分型号
)
HDMI ( 高清晰度多媒体接口 ) 是一种
业界通用、未压缩、全数字音频 / 视频
接口。 HDMI 能够通过一根信号线,在
任何兼容数字音频/视频源(如机顶盒、
DVD 播放机和 A/V 接收器 ) 和兼容数
字音频和 / 或视频显示器 ( 如数字电视
(DTV)) 之间提供一个接口。
使用电脑上的 HDMI 端口与高端音频
和视频设备连接。 信号线的敷设能够
进行整齐的装配和快速连接。
耳机和麦克风
这两个端口让您连接音频设备。 使用耳机端口可插入立体声耳机或有源扬
声器。 将音频设备插入耳机端口将禁用内置扬声器。 使用麦克风端口可连
接外接麦克风以进行单声道录音;插入外接麦克风将禁用内置麦克风。

30
电源
AC 适配器
您的电脑可用随机提供的外接电源适配器 ( 笔记本电源 ) 以交流电供电运
行。 提供的电源线适用于电脑的购买所在国家。
电源适配器提供足够的电源来运行电脑并为电池组充电。
注意: 切勿在交流适配器上覆盖或放置物体。 保持适配器上没有其它
物体,可让适配器在使用时适当冷却。
仅使用随机配套的 AC 适配器。虽然其它适配器似乎类似,但使用这些适配
器可能会损坏您的电脑。

电源
- 31
警告: 在长时间使用后,交流适配器和电脑的底部会变热。 这是正常
现象,但长时间接触可能会造成伤害。
电池组
本电脑使用的电池组,可以在电池组充电后,持续长时间使用。
电池组特点
该电池组具有以下特点:
• 采用最新电池技术标准。
• 具有电量不足警告功能。
只要您将电脑连接到 AC 适配器,电池就会开始充电。 此款电脑支持充电时
使用,可以让您在充电过程中继续使用电脑。 但是,在关机情况下充电,会
大大缩短充电时间。
在您旅行或断电时,电池随时可供使用。 建议您多备一个完全充电的电池
组,作为备用。 请联络经销商以了解订购备用电池组的详细信息。
最大限度延长电池的寿命
与其它所有电池一样,此款电脑中的电池用久了也会退化。 也就是电池的性
能会随着使用时间的延长而逐渐降低。
为最大限度延长电池的寿命,建议您遵循以下建议。

32
精调新电池组状态
在首次使用电池组之前,您应执行一个 “精调”过程:
1. 将新电池插入电脑。不要开机。
2. 连接 AC 适配器并对电池完全充电。
3. 断开 AC 适配器。
4. 打开电脑,使用电池电源运行。
5. 电池完全耗尽。
6. 重新连接 AC 适配器并再次对电池完全充电。
再次执行这些步骤,直至电池被充电和放电三次。
对所有新电池,或长期不使用的电池,执行这一精调过程。 如果电脑要存放
两周以上,建议您从装置中取出电池组。
警告: 请勿将将电池组置于 0°C (32°F) 以下或 45°C (113°F) 以上的温
度下。 异常温度会影响电池组的性能。
执行电池精调过程之后,电池就可以接受最大可能的充电。 如果未执行这个
过程,您将无法获得最大的电池充电,并且也会缩短电池的使用寿命。
另外,如果在以下情况下使用电池,也会影响电池的使用寿命:
• 插入电池的状态下,电脑一直使用交流电。 如果您一直使用交流电,建议
您在完全充电后取出电池组。
• 没有如上所述完全放电和充电。
• 经常使用。使用电池的时间越长,其使用寿命缩短的也就越快。 标准电脑
电池的寿命大约为 300 次充电

电源
- 33
更换电池组
本笔记本电脑系列使用锂电池维修时。更换时请使用与本产品配套电池类型
相同的电池。使用其他电池可能会引起火灾或爆炸。
警告:若电池使用不当,会发生爆炸。请勿擅自拆散电池或将电池置
于火中。将电池放在远离儿童的地方。依当地规定处理废弃电池。
安装或卸下电池组
重要!如果要继续使用电脑,在取出电池之前连接
AC
适配器。
或者,
先关闭电脑。
安装电池组:
1. 将电池对准插入到空置的电池槽,确定先插入的是有接点的一头,并且电
池的顶面朝上。
2. 将电池推入电池槽,轻轻推直至电池锁定到位。
卸下电池组:
1. 推动电池释放销以释放电池。
2. 从电池槽中取出电池。
给电池充电
要给电池充电,首先要确定电池已正确安装到电池槽中。 将 AC 适配器接插
到电脑,再连接到主电源插座。 电池充电时,您仍然可以继续靠交流电使用
电脑。 但是,在关机情况下充电,会大大缩短充电时间。
注意:
建议您在一天工作结束之后对电池充电。
在您旅行前整晚对电
池充电,让您第二天出行时带上完全充电的电池。

34
检查电池电量
Windows 电源表指示当前的电池电量。 将光标放到工具栏上的电池 / 电源
图标上可以看到电池现在的充电电量。
优化电池寿命
优化电池寿命可以让您充分利用电池的电能,延长充电周期,提高充电效
率。 建议您遵循以下建议:
• 购买另外的电池组。
• 只要可能就使用交流电,留着电池在路上时使用。
• 如果未使用 PC 卡,请将其退出,因为它会耗电 ( 仅指定型号 )。
• 将电池组保存在阴凉干燥的地方。建议温度为 10°C (50°F) 至 30°C
(86°F)。温度较高会使电池自放电过程加快。
• 过分充电会缩短电池的寿命。
• 监视 AC 适配器和电池情况。
电量不足警告
使用电池电源时,请留心 Windows 的电源表。
警告: 出现电量不足警告信息后,请尽快连接上 AC 适配器。 如果电
池电量完全用完,电脑就会关闭,数据将会丢失。

电源
- 35
出现电量不足警告信息后,根据当时情况建议采取以下措施:
情况 建议的操作
备有 AC 适配器和电
源插座。
1. 将适配器接插到电脑,然后连接到主电源。
2. 保存所有需要的文件。
3. 继续工作。
如果您想快速充电,请关闭电脑。
备有另外一个完全充
电的电池。
1. 保存所有需要的文件。
2. 关闭所有应用程序。
3. 关闭操作系统以关闭电脑。
4. 更换电池组。
5. 打开电脑,继续工作。
没有 AC 适配器和电
源插座。
您没有备用电池组。
1. 保存所有需要的文件。
2. 关闭所有应用程序。
3. 关闭操作系统以关闭电脑。

36
电源管理
本款电脑拥有内置电源管理单元,可监控系统活动。 系统活动是指涉及以下
一个或多个设备的活动: 键盘、鼠标、硬盘、外设以及视频内存。 如果在一
段时间之后没有检测到任何活动,电脑会停止这些部分或所有设备以节省
能源。
节能
禁用快速启动
您的电脑使用“快速启动”可加快启动速度,但也会使用少量的电能来检查
启动信号。 这些检查会慢慢消耗电脑的电池。
如果您要降低电脑的功耗和对环境的影响,请关闭 “快速启动”:
注:
如果快速启动被关闭,您的电脑将需要更长的时间从睡眠模式中
启动。
如果您的电脑收到通过网络启动
(
局域网唤醒
)
的指令,它也不会
启动。
1. 打开桌面。
2. 单击通知区域中的电源选项。
3. 选择更多电源选项。

电源管理
- 37
4. 选择选择电源按钮的功能。
5. 要访问 “关闭设置”,选择更改当前无法使用的设置。
6. 向下滚动并禁用打开快速启动。
7. 选择保存更改。

38
软件
使用 WINDOWS 和您的软件
Gateway 计算机包括帮助您使用计算机的软件;计算机上的可用程序和类
别取决于您购买的型号。
提供 Internet 安全
保护您的计算机不受 Internet 上的病毒危害和攻击至关重要 ( 请参见第 44
页的
安全
)。 当您首次启动计算机时,会提供一个综合的 Internet 安全套件,
包括一个免费试用期。 您应在连接到 Internet 之前激活此保护。 此安全套
件能够保护您的计算机免受最新的网上威胁并保护您的个人数据 ( 包括银行
帐户证书、信用卡号码和密码等 )。
Gateway Recovery Management
要为计算机准备系统还原选项,您应尽快创建一套还原光盘。 详情请参见第
51 页。

互联网
- 39
互联网
上网的第一步
保护计算机
保护您的计算机不受 Internet 上的病毒危害和攻击至关重要 ( 请参见第 38
页的
提供
Internet
安全
和第 44 页的
安全
)。 建议在您首次启动计算机时,
使用一款全面的 Internet 安全程序。 您在连接到 Internet 之前,应尽快激活
此保护。
选择一家 “Internet 服务提供商”
使用 Internet 已成为日常计算机的自然属性。 只需数个简
单的步骤就能够将您连接到海量的知识和通信工具上。 要
完成这些步骤,您首先应选择一家 Internet
服务提供商
(ISP),它提供了计算机和 Internet 之间的连接。 您应搜索
一下您所在地区的 ISP 提供商,不要忘了与朋友和家人谈
谈他们的经验或查看一下评论和消费者的报导。 您选择的
ISP 将提供有关如何连接到 Internet 的指导 ( 您可能需要
其它软件或特殊的 “盒子”来连接到电话线 )。
连接类型
根据您的计算机型号、所在的位置和通信需求,您有多种方式可连接到
Internet
。

40
拨号
某些计算机含有电话拨号 ( “调制解调器” ) 连接器。 这让您能够通过电话
线连接到 Internet。 通过拨号连接,您不能在同一根电话线上同时使用调制
解调器和电话。 此类连接仅在您使用 Internet 有限的情况下推荐,因为此种
连接的速度慢,且一般是按小时收费的。
DSL (
如
ADSL)
DSL ( 数字用户线 ) 是一种 “始终联机”的连接,它通过电话线传输。 DSL
和电话使用不同的频率,您可在连接到 Internet 的同时使用电话 ( 每个电话
插孔上需要一个 “分频器”以避免干扰 )。 要符合 DSL 的使用条件,您必
须位于配备 DSL 电话交换机的附近 ( 有时此服务在农村地区不提供 )。 连接
速度在很大程度上取决于您的位置,但 DSL 一般能够提供非常快的速度和
可靠的 Internet 连接。 由于连接是始终保持的,因此它一般是按每月固定费
率收取的。
注:
DSL
连接需要适当的调制解调器。
调制解调器通常由您登记的
ISP
提供。
这些调制解调器多数包括一个 “路由器”,它提供网络和
wi-fi
接入。
线缆
有线连接通过有线电视线,提供快速和“始终联机”的 Internet 服务。 此服
务一般在大城市中提供。 您可在连接到 Internet 的同时,使用电话和观看有
线电视。
3G (WWAN
或
“无线广域网络”
)
利用 3G 连接,即使出门在外,也可使用蜂窝网络 ( 例如手机使用的网络 )
连接到 Internet。您的计算机可能已内建 SIM 卡的插槽,否则可能需要一个
外接设备,如 USB 调制解调器或甚至是有适当配备的手机。

互联网
- 41
注:
如果您的计算机含有
SIM
卡槽,您需要兼容的
SIM
卡以及与手机
提供商的合同。
使用
3G
功能前,请咨询服务提供商是否会收取额外费用,特别是漫游
费。
网络连接
LAN (局域网) 是一组共享一根公共通信线和资源的计算机 (例如,在办公楼
或家中 )。 当您设置网络时,可共享文件、外设 ( 如打印机 ) 和 Internet 连
接。 您可使用有线技术 ( 如以太网 ) 或无线技术 ( 如 WiFi 或蓝牙 ) 建立
LAN。
无线网络
无线 LAN 或 WLAN 是无线局域网,它无需通过网线即可连接两台或更多的
计算机。 设置无线网络非常方便,并可让您共享文件、外设和 Internet 连
接。
无线网络有何好处?
移动性
无线 LAN 系统可让您和您家庭网络中的其他用户共享对文件和连接到联网
设备的访问,例如打印机或扫描仪。
您还可与家中的其它计算机共享 Internet 连接。
安装快速简便
安装无线 LAN 系统快速简便,无需在墙上和天花板上拉网线。

42
无线
LAN
的构成
要在家中设置无线网络,需要以下条件 :
接入点
(
路由器
)
接入点 ( 路由器 ) 是双向收发器,它将数据播送到周围的环境。 接入点起到
有线和无线网线之间传递器的作用。 多数路由器有内置的 DSL 调制解调
器,可让您接入高速 DSL Internet 连接。 您选择的 ISP (Internet 服务提供
商 ) 一般在申请他们的服务时都提供调制解调器 / 路由器。 仔细阅读随接入
点 / 路由器提供的文件,以了解详细的设置说明。
网线
(RJ45)
网线 ( 也称为 RJ45 线缆 ) 用于将主机连接到接入点 ( 见以下图解 ) ;此类线
缆也可用于将外设连接到接入点。
无线适配器
内置式无线适配器一般已安装在您的计算机中。 Windows 中的按钮或
控件,可激活或禁用适配器。

互联网
- 43
工作网络图
1. 接入点 / 路由器
2. 台式计算机
3. 调制解调器
4. 打印机
5. 便携式计算机
6. PDA/Smartphone
7. 网线 (RJ45)
打开
/
关闭无线网络连接
多数计算机有“WiFi”按钮,可打开或关闭网络连接。 如果您的计算机有无
线接入,但没有
通信
按钮,可通过网络管理选项来打开或关闭无线网络或控
制网络上共享的内容。 按 Windows 键 ( ) + W,输入 “HomeGroup”(家
庭组),然后单击 HomeGroup。
警告:乘坐飞机时严禁使用无线设备。 登机前请关闭所有的设备;这
些设备可能会对飞机的操作造成危险和中断通信,甚至是违法的。
1
2
3
4
5
6
7

44
网上冲浪!
要在网上冲浪,您需要称为 Internet 浏览器的程序。
Internet Explorer 提供了简便安全的网络浏览体验。 一 旦
您安装了 Internet 接入并连接,单击 Windows 桌面上的
Internet Explorer 快捷方式,即可使您的 Internet 体验提
高到新的水平!
Gateway
网站
要开始享受,请立即访问我们的网站:www.gateway.com。
Gateway 致力于向您提供不断完善的个性化支持。 请查看我们的
支持
部
分,有助于满足您的需要。
www.gateway.com 是您进入在线活动和服务世界的大门: 定期访问我们
以获得最新的信息并进行下载!
安全
您可能热衷于搜索 Internet 提供的各种内容。 为确保您的在线安全,
Gateway 在您的计算机上预安装了 Symantec 获奖的 Norton Internet
Security
™。
Norton Internet Security 能够安静地在后台阻止各种威胁,并在您进行网上
购物、使用网上银行或在线浏览时,保护您的身份。
Norton Internet Security 能够阻止在线身份盗窃、检测和消除间谍软件、删
除病毒和 Internet 蠕虫病毒,以及保护计算机免受黑客攻击。

互联网
- 45
定义
什么是病毒?
恶意软件,一般称为揬多数病毒通过 Internet、电子邮件或恶意网站进行传
播。 典型的病毒会复制并在未被检测到的情况下自行传播到多台计算机。
损害计算机的其它方式,如木马、蠕虫或垃圾广告会以不同的方式感染您的
计算机、耗尽资源或堵塞网络。
注:
Gateway
我们保证您的计算机在购买时
100%
没有病毒,且因病
毒而造成的损坏不属保修范围。
什么是间谍软件?
间谍软件一般是指在您的计算机连接到 Internet 时,在您不知道的情况下下
载的有害程序。 一旦它感染到您的计算机,它就会窥探您浏览活动、收集个
人信息、造成弹出广告,甚至更改计算机的配置。 间谍软件会消耗计算机的
资源;使 Internet 连接或整个计算机系统的速度下降,甚至会造成计算机崩
溃。
间谍软件有时会被不道德的公司用于监视和跟踪您在 Internet 上访问的站
点,以确定您网上冲浪的爱好,并在您的屏幕上显示有针对性的弹出式广
告。 但是,某些类型的间谍软件的行为远远超出了简单的跟踪,实际上监视
了键击并捕捉密码,这造成了严重的安全风险。
什么是恶意软件?
恶意的软件,也称为
恶意软件
,是专门设计用于故意损坏您计算机的软件。
例如,病毒、蠕虫和木马就是恶意软件。 为保护计算机不受恶意软件的侵
扰,确保使用更新的防病毒软件和防恶意软件。

46
什么是个人防火墙?
个人防火墙是经专门设计用于防止未经授权的访问或私人网络的软件。 它
起到防护罩的作用,可保护您的 Internet 连接免受有害连接,这些连接中有
部分会尝试控制您的计算机,以安装或散布病毒或恶意程序。 与您计算机的
每个连接都是受到监控 - 能够检测出试图未经您的允许接收信息的程序,而
防火墙将显示报警。 然后您可决定是否允许连接,如果要连接到您正在使用
的程序,您一般会允许 ( 如:连接多个玩家服务器的游戏或内容更新的百科
全书 )。
如何保护您的计算机
网络犯罪的预防可以是非常直接的 - 如果获得一些技术建议并有一定的常
识,许多攻击都可得到避免。 一般而言,网上罪犯都会尝试尽快和尽量轻松
地赚钱。 您让他们的工作变得越困难,他们就会越快地离开您并转到另一个
更容易的目标。 以下技巧提供了如何防止网上欺诈的基本信息。
使您的计算机有最新的补丁程序和更新
让攻击者远离您计算机的最好方法之一是,只要可能,就要应用补丁程序和
其它软件补丁。 通过定期更新计算机,您就能够使攻击者无法利用软件流程
的优势 ( 弱点 ),否则他们就能利用这一点进入您的系统。
虽然保持计算机的更新不能免受所有的攻击,但它能够使黑客进入您系统的
攻击变得更加困难,完全阻止许多初级和自动的攻击,可能足以阻止并不坚
决的攻击者,转而寻找其它更有价值的计算机。
较新版本的 Microsoft Windows 和其它流行软件都能自动下载和更新,因此
您无需记得检查最新的软件。 利用软件中的自动更新功能,是让您安全在线
的良好开端。

互联网
- 47
用安全软件保护您的计算机
有必要用几类安全软件来实现基本的在线安全。 安全软件主要包括防火墙
和防病毒程序。 防火墙通常是您计算机的第一道防线 - 它对谁和什幺能够
与您的计算机在线通信进行控制。 您可以认为防火墙是一类 “警察”,他看
护着所有试图通过 Internet 流入和流出您计算机的数据,允许它认为安全的
通信,并阻止 “坏”的通信量 ( 如攻击 ) 无法进入您的计算机。
在许多情况下,第二道防线是防病毒软件,它能够监视所有的在线活动,如
电子邮件信息和网上浏览,并保护个人免受病毒、蠕虫、木马和其它类型的
恶意程序的侵害。 您的防病毒软件和防间谍软件的软件应配置成自动更新,
应每次连接到 Internet 时都更新一次。
集成的安全套件 ( 如:Norton Internet Security) 整合了防火墙、防病毒、防
间谍软件以及其它功能 ( 如:反垃圾邮件和家长控制 ) 已经非常流行,因为
它们在一个软件包中提供了在线保护所需的所有安全软件。 许多人发现使
用综合安全套件是安装、配置和更新多种安全软件的有吸引力的替代方案。
完整版 Norton Internet Security™ 已预安装在您的 Gateway 系统中。 包
括一个免费的试用版来保护更新。 确认处于激活状态!
选择强密码并安全保存
在当今的 Internet 中,密码是一个无法更改的事实;从订花和使用在线银行
业务,到登录我们收藏的航空公司网站以查看累积的英里数,我们每件事都
要使用密码。 以下技巧能帮助您获得安全的在线体验:
• 选择无法轻易猜到的密码是保护密码安全且不落到坏人手中的第一步。
强密码有八个或更多字符,并使用字母、数字和符号的组合 ( 如 , # $ % !
?)。避免使用任何以下内容作为密码: 您的登录名、任何基于您个人信息
的内容,如您的姓和可在字典中查到的字,特别是“密码”。 尝试选择特
别强和唯一的密码,以保护诸如在线银行业务等活动。

48
• 将密码保存在安全的地方,并尝试在使用每个在线服务时,不使用相同的
密码。
• 定期更改密码,至少每 90 天一次。 这样做会限制某些已获得您帐户密码
的人造成损害。 如果您注意到有个在线帐户出现令人怀疑的情况,您要
做的第一步就是更改密码。
保护您的个人信息
在线共享诸如您的名字、家庭地址、电话号码和电子邮件地址等个人信息时
要警惕。 为使用许多在线服务时,您不可避免地必须提供个人信息,以处理
帐单和购物运送事宜。 由于不泄露任何个人信息几乎是不可能的,因此以下
列表包含了一些有关如何在线安全分享个人信息的建议:
• 警惕假冒的邮件地址。一些情况显示信息可能是欺诈性的,这些情况包
括:拼写错误、语法错误百出、措词奇怪、网站地址特别长、一般应该是
文字的地方却都是数字以及任何不正常的情况。 此外,钓鱼信息会经常
告诉您必须赶紧打开帐户,更新安全性,或敦促您立即提供信息,否则会
有其它不测。 不要上钩。
• 切勿回复询问个人信息的电子邮件。合法的公司不会使用电子邮件信息
来询问您的个人信息。 如有疑问,请电话联系该公司或在浏览器中输入
该公司的网址。 切勿单击这些信息中的链接,因为这些链接会让您进入
欺诈、恶意的网站。
• 避开用于盗取个人信息的欺诈网站。当访问网站时,直接将地址 (URL) 输
入到浏览器,而不要用电子邮件或即时消息中的链接。 欺诈者经常伪造
这些链接,使之看上去令人信服。
在购物、银行或任何有敏感信息的其它网站上,在字母 http 后面应有一
个“S” ( 即 https://www.yourbank.com 而不是 http://
www.yourbank.com)。“ s”表示安全,并且在您被要求登录或提供其它

互联网
- 49
敏感资料时应出现此字母。 您有安全链接的另一个记号是网站浏览器按
钮中的一个小锁图标 ( 通常是右角上 )。
• 注意网站和软件中的隐私政策。在您与一个组织分享您的个人信息之前,
了解该组织是如何收集和使用这些信息是非常重要的。
• 保护您的电子邮件地址。垃圾邮件发送者和 “钓鱼者”有时会发送数以
百万计的信息到可能存在或可能不存在的邮件地址,希望能从中找到可
能的牺牲者。 对这些信息作出回应或者甚至下载图像,肯定会使您被加
到他们今后发送更多相同信息的列表中。 将电子邮件地址在线张贴到新
闻组、博客或在线通信时也是要注意的。
通常在线提供的信息看上去好得令人无法相信
“没有免费的午餐”这句老话在今天仍然正确。 想象中的 “免费”软件 ( 如
屏保或笑脸 )、肯定会让您获得数不清财富的秘密投资骗局,以及您意外赢
得未参加的竞赛,是某些公司吸引您的注意力而采用的引您上当的诱饵。
虽然您可能不会直接付钱给软件或服务,但您寻找的免费软件或服务已与广
告软件 ( “adware” ) 捆绑,它会跟踪您的行为并显示无用广告。 您可能不
得不透露个人信息或购买其它东西以获取您信以为真的令人满足的获奖。
如果出现的机会之好令人不敢相信,请询问他人的意见,阅读具体要求,或
者最好不理睬它。

50
定期核对银行的信用卡对帐单
如果您能够在数据被盗后或者您的信息被首次尝试使用后很快就发现,则盗
用身份和网络犯罪带来的冲击就会大大降低。 要获得出现问题警告的最便
捷方法之一,是查看您的银行或信用卡公司每月就有关不正常事件提供的声
明。
此外,许多银行和机构使用防欺诈系统,会对异常的购买行为发出警告 ( 即
如果您住在德克萨斯州,却突然在布达佩斯购买几台冰箱这样的行为 )。 为
了确认这些异常的购买行为,他们可能会打电话给您并请您确认这些行为。
切勿轻视这些电话,这是给您的提示,即有不好的事情可能已经发生,您应
采取必要的行动。
用
Windows
安全软件保护您的计算机
Windows 提供了各种保护应用程序。
Windows Updates
如果您已有有效的 Internet 连接, Windows 能够检查计算机的更新并自动
进行安装。 这些更新包括安全补丁和程序更新,这些能够提高运算性能并有
助于保护计算机免受新病毒的侵害和攻击。
我如何知道我的计算机存在风险?
如果
操作中心
报警,或计算机工作不正常、意外崩溃或部分程序运行不正
常,表明您的计算机可能被恶意软件感染。 但切勿将任何计算机的问题都指
责为病毒!如果您怀疑计算机被感染,首先要做的是更新,如果您没这样
做,则运行杀毒软件和防间谍软件的软件。

还原
- 51
还原
如果您的计算机出现故障,且常见问题解答 ( 参见第 69 页 ) 无法提供帮助,
您可以 “还原”计算机 - 即返回之前的状态。
本章节描述本计算机可用的还原工具。Gateway 提供了 Gateway Recovery
Management,可让您创建
还原备份
、
驱动程序和应用程序备份
以及启动恢
复选项,并可使用 Windows 工具或还原备份。
注:
Gateway Recovery Management
只有在安装
Windows
操作系统
的情况下方可使用。
重要: 我们建议您尽快创建
还原备份
和
驱动程序和应用程序备份
。
在某些情形中,全面恢复需要 USB 还原备份。
创建还原备份
要从 U 盘重新安装,您必须先创建还原备份。 还原备份包含计算机硬盘中
的整个原始内容,包括 Windows 和出厂加载的所有软件和驱动程序。 使用
此备份可将您的计算机还原到您购买时的状态,同时让您选择保留所有设置
和个人数据。
注:
请确认
U
盘容量至少为
16 GB
。

52
1. 从
开始
,输入 “还原”然后单击应用程序列表中的 Gateway Recovery
Management。
2. 单击创建默认出厂设置备份。
还原驱动器
窗口将打开。

还原
- 53
请确认选择了将还原分区的内容复制到还原驱动器。 此功能提供了最完
整和最安全的还原备份。
3. 插入 U 盘,然后单击下一步。
• 继续前确认 U 盘有足够的空间。 还原备份需要至少有 16 GB 的存储
空间
4. 您将在屏幕上看到备份进程。
5. 继续此进程直至完成。

54
6. 创建还原备份后,您可以选择删除计算机中的还原信息。 如果选择删除
此信息,您只能使用 USB 还原备份来恢复计算机,如果丢失或擦除 U
盘,您就无法恢复计算机。
7. 拔出 U 盘并明确标示。
重要: 写下唯一的描述性标签,如“Windows 还原备份”。 确保将备
份放在您记得的安全地方。
创建驱动程序和应用程序备份
要创建驱动程序和应用程序备份 ( 包含计算机所需的工厂加载的软件和驱动
程序 ),您可使用 U 盘,或者如果计算机配备了 DVD 刻录机,还需要一张
或多张空白的可刻录 DVD 光盘。

还原
- 55
1. 从
开始
,输入 “还原”然后单击应用程序列表中的 Gateway Recovery
Management。
2. 单击创建驱动程序和应用程序备份。
插入 U 盘或将空白 DVD 光盘插入光驱,然后单击 下一步。
• 如果使用 U 盘,继续前请确认有足够的容量。

56
• 如果使用光盘,它还将告诉您完成还原光盘所需的空白、可刻录光盘的
数量。 确认您已准备好所需数量、相同的空白光盘。
3. 单击开始复制文件。您将在屏幕上看到备份进程。
4. 继续此进程直至完成:
• 如果使用光盘,驱动器完成刻录后将退出光盘。 从驱动器中取出光盘,
然后用记号笔标注。
如果需要多张光盘,按照提示插入新光盘,然后单击确定。 继续该过程
直至完成。
• 如果您使用 U 盘,拔出 U 盘并清楚标示。
重要: 写下唯一的描述性标签,如 “驱动程序和应用程序备份”。 确
保将备份放在您记得的安全地方。

还原
- 57
还原系统
还原系统:
1. 实施小修复。
如果只有一或二个软件项目或硬件无法正常工作,可以通过重新安装该
软件或设备驱动程序来解决问题。
要重新安装工厂预装的软件或驱动程序,请参见第 57 页的 “重新安装驱
动程序和应用程序”。
有关重新安装非工厂预装软件和驱动程序的说明,请参见该产品的文档
或技术支持网站。
2. 还原到之前的系统状态。
如果重新安装软件或驱动程序无法解决问题,可通过将系统还原到之前
一切都正常的状态来解决问题。
有关说明,请参见第 60 页的 “返回之前的系统快照”。
3. 重新启动操作系统。如果未解决问题而且您希望将系统恢复到出厂时的
状态,但需保留用户信息,请参见第 61 页的 “将系统恢复到出厂时的状
态”。
4. 将系统恢复到出厂时的状态。
如果未解决问题而且您希望将系统恢复到出厂时的状态,请参见第 61 页
的 “将系统恢复到出厂时的状态”。
重新安装驱动程序和应用程序
作为故障排除的步骤,您可能需要重新安装工厂预装的应用程序和设备驱动
程序。 您可以使用您创建的硬盘或备份来重新安装。

58
• 其它应用程序 - 如果您需要重新安装非工厂预安装的软件,则需按照该软
件的安装说明进行操作。
• 新设备驱动程序 - 如果您需要重新安装非工厂预安装的设备驱动程序,则
需按照随设备提供的说明书进行操作。
如果使用
Windows
重新安装并将还原信息存储在计算机中:
• 从
开始
,输入“还原”然后单击应用程序列表中的 Gateway Recovery
Management。
• 单击重新安装驱动程序或应用程序。

还原
- 59
• 您会看到 Gateway 资源中心的内容部分。
• 单击您要安装项目的安装图标,然后按照屏幕提示完成安装。 重
复上述步骤重新安装您需要的其它项目。
如果您从
DVD
光盘或
U
盘的 “驱动程序和应用程序备份”中重新安装:
1. 将驱动程序和应用程序备份插入光驱或连接到可用的 USB 端口。
• 如果您插入 DVD 光盘,请等待 Gateway 资源中心启动。
• 如果 Gateway 资源中心未自动启动,按 Windows
键
+ <E>,然后
双击光驱图标。
• 如果您使用 U 盘,按 Windows
键
+ <E>,然后双击含有备份内容的驱
动器。 双击资源中心。

60
2. 您会看到 Gateway 资源中心的内容部分。
3. 单击您要安装项目的安装图标,然后按照屏幕提示完成安装。 重复
上述步骤重新安装您需要的其它项目。
返回之前的系统快照
Microsoft System Restore 将定期对系统设置进行 “快照”并保存为还原
点。 在遇到多数难以解决的软件问题时,您可还原到这些还原点之一,以使
系统再度正常运行。
Windows 将每天自动创建一个额外的还原点,也会在您安装软件或设备驱
动程序时创建一个还原点。
注
: 要了解更多有关 Microsoft System Restore 的信息,从入
开始
,输
入 “帮助”然后单击应用程序列表中的帮助和支持。 在 “搜索帮助”
框内输入 Windows system restore( Windows 系统恢复 ), 然 后 按
Enter。

还原
- 61
恢复到还原点
1. 从
开始
,输入 “控制面板”,然后单击应用程序列表中的控制面板。
2. 单击系统和安全 > 操作中心,然后单击屏幕底部的还原。
3. 单击打开系统还原,然后单击下一步。
4. 单击最近还原点 ( 系统正常工作的那一次 ),单击下一步,然后单击
完成。
5. 将显示确认窗口;单击是。 您的系统使用您指定的还原点进行还原。 该
过程可能需要几分钟时间并可能重启计算机。
将系统恢复到出厂时的状态
如果用其它办法都无法解决计算机遇到的问题,您可能需要重装所有软件以
使系统恢复到出厂时的状态。 您可以从您创建的硬盘或还原备份来还原。
• 如果您仍可运行 Windows 且尚未删除还原分区,请参见第 61 页的 “从
Windows 还原”。
• 如果您无法运行 Windows 而原始硬盘已经被完全重新格式化,或者您已
经安装替代硬盘,请参见第 65 页的 “从还原备份进行还原”。
从 Windows 还原
启动 Gateway Recovery Management:
• 从
开始
,输入“还原”,然后单击应用程序列表中的 Gateway Recovery
Management。

62
有两个选项可供选择:恢复出厂设置 ( 重置我的计算机 ) 或自定义还原 ( 刷
新我的计算机 )。
恢复出厂设置会删除硬盘中的所有内容,然后重新安装系统中预安装的
Windows、所有的软件和驱动程序。 如果您可以访问硬盘中的重要文件,请
立即备份。 请参见
第 63 页的 “用 Gateway Recovery Management 恢复
出厂设置”。
自定义恢复将试图保留您的文件 ( 用户数据 ),但仍将重新安装所有的软件
和驱动程序。 自您购买计算机之日起安装的软件将被删除 ( 从 Windows
Store 安装的除外 )。 请参见第 64 页的 “用 Gateway Recovery
Management 自定义还原”。

还原
- 63
用
Gateway Recovery Management
恢复出厂设置
1. 单击恢复出厂设置。
注意: “恢复出厂设置 “会擦除硬盘中的所有文件。
2. 重置您的计算机窗口将打开。
图片仅供参考。

64
3. 单击下一步,然后选择擦除文件的方式:
a. 只删除我的文件可在恢复计算机前快速擦除所有文件,需约 30 分钟。
b. 全面清理硬盘可在擦除所有文件后清理硬盘,因此还原后无法看到任
何文件。 清理硬盘所需时间长得多,最长可达 5 小时,但因旧文件被
彻底删除而安全得多。
4. 单击重置。
5. 重启计算机开始还原进程,然后继续将文件复制到硬盘。
6. 还原完成后,重复首次启动过程开始使用计算机。
用
Gateway Recovery Management
自定义还原
1. 单击自定义还原 ( 保留用户数据 )。

还原
- 65
2. 刷新计算机窗口将打开。
3. 单击下一步,然后单击刷新。
4. 重启计算机开始还原进程,然后继续将文件复制到硬盘。 此进程需约
30 分钟。
从还原备份进行还原
从 U 盘中的还原备份进行还原:
1. 找到还原备份。
2. 插入 U 盘并开启计算机。
3. 如果未启用,必须启用 F12
启动菜单
:
a. 启动计算机时,按 <F2>。
b. 使用左右箭头键选择主菜单。
c. 按向下箭头键,直到 F12 启动菜单被选中,按 <F5> 可将此设置更改
为启用。
d. 使用左右箭头键选择退出菜单。
e. 根据计算机使用的 BIOS 类型,选择 Save Changes and Exit 或 Exit
Saving Changes,然后按 Enter。 选择 OK 或 Yes 以确认。
f. 计算机将重新启动。

66
4. 启动过程中,按 <F12> 打开引导菜单。 您可在引导菜单中选择开始启动
的设备,例如 U 盘。
a. 使用箭头键选择 USB 设备,然后按 Enter。
b. 从还原备份而非常规的启动程序启动 Windows。
5. 选择键盘类型。
6. 选择故障排除,然后要使用的还原类型:
a. 单击高级,然后按系统还原可开始 Microsoft System Restore:
Microsoft System Restore 将定期对系统设置进行“快照”并保存为还
原点。 在遇到多数难以解决的软件问题时,您可还原到这些还原点之
一,以使系统再度正常运行。
b. 单击重置计算机开始进行重置:
重置计算机会删除硬盘中的所有内容,然后重新安装系统中预安装的
Windows、所有的软件和驱动程序。 如果您可以访问硬盘中的重要文
件,请立即备份。 参见第 67 页的 “从还原备份重置计算机”。
c. 单击刷新计算机以开始刷新:
刷新计算机将试图保留您的文件 ( 用户数据 ),但仍将重新安装所有的
软件和驱动程序。 自您购买计算机之日起安装的软件将被删除 ( 从
Windows 商店安装的除外 )。 参见第 68 页的 “从还原备份刷新计算
机”。

还原
- 67
从还原备份重置计算机
注意: 重置计算机会擦除硬盘中的所有文件。
1. 重置您的计算机窗口将打开。
图片仅供参考。
2. 单击下一步
3. 选择要还原的操作系统 ( 一般只有一个可用选项 )。
4. 选择保留对硬盘的任何更改:
a. 如果在硬盘上有已删除的还原分区,或有已更改的分区且要保留这些
更改,请选择否。
b. 要将计算机完全恢复至出厂设置,请选择是。
5. 选择擦除文件的方式:
a. 只删除我的文件可在恢复计算机前快速擦除所有文件,需约 30 分钟。
b. 全面清理硬盘可在擦除所有文件后清理硬盘,因此还原后无法看到任
何文件。 清理硬盘所需时间长得多,最长可达 5 小时,但因旧文件被
彻底删除而安全得多。
6. 单击重置。
7. 还原完成后,重复首次启动过程开始使用计算机。

68
从还原备份刷新计算机
1. 刷新计算机窗口将打开。
2. 单击下一步。
3. 选择要还原的操作系统 ( 一般只有一个可用选项 )。
4. 单击刷新。
5. 重启计算机开始还原进程,然后继续将文件复制到硬盘。 此进程需约
30 分钟。

常见问题
- 69
常见问题
以下是在您的日常电脑操作过程中可能会出现的问题。我们针对这些问题提
供了简单的解决方案。
我打开了电源,但是电脑未启动或开机
检查电源指示灯。
• 如果电源指示灯未亮,表明电源未接通。请检查以下方面:
• 如果您使用电池组供电,很可能是电力不足,无法为电脑的操作提供足
够的电源。请连接 AC 适配器为电池组充电。
• 请确保 AC 适配器已经正确连接到电脑和电源插座。
• 如果电源指示灯亮着,请检查以下项目:
• 光驱里是否装有光盘?取出光盘并按 <Ctrl> + <Alt> + <Del>,重启
系统。
• 电脑上是否插有 USB 存储设备 (USB 盘或智能手机 )? 拔出该设备并
按 <Ctrl> + <Alt> + <Del>,重启系统。
屏幕上什么也没有
可能是笔记本电脑的电源管理系统自动关闭显示屏电源以节省电能。请按任
意键以恢复正常显示。
如果按任意键仍未恢复正常显示,可能是下列三种原因:
• 显示屏亮度等级太低。按 <Fn> + < > ( 调高 ) 来调节亮度等级。

70
• 显示设备被设置为外部显示器。按 将显示切换回笔记本电脑显
示屏。
• 若睡眠指示灯亮着,说明电脑处于睡眠模式。按下电源按钮并释放即可将
电脑唤醒。
电脑没有声音
请检查以下项目:
• 音量可能被设置为静音。在 Windows 中,检查任务栏上的音量控制图
标。如果图标被标示横线,请单击该图标,然后取消选择全部静音选项。
• 音量可能设的太低。在 Windows 中,任务栏上的音量控制图标,或使用
音量控制按鍵來調整音量。
• 如果电脑的音频输出插孔中已经连接了头戴式耳机、耳机或外部扬声器,
则内建扬声器将自动关闭。
我要在电脑关闭时弹出光驱托盘
在光驱上有一个紧急弹出孔。您只需将钢笔或大头针的尖端插入紧急弹出孔
即可弹出光驱托盘。
键盘无响应
尝试将外置式键盘连接到电脑的 USB 端口。如通过该键盘可进行输入,可
能内置键盘的连线松了。请联系销售商或联络授权服务中心寻求协助。
打印机无法打印
请检查以下项目:
• 请确认打印机已经连接到电源,并且已经打开电源。
• 确认打印机线缆已安全连接到 USB 端口和打印机的相应端口。

常见问题
- 71
对使用 Windows 8 的建议和提示
我们知道这是一个新的操作系统,需要加以熟悉,因此我们创建了一些指针
来帮助您开始了解。
有三大概念您需要记住
1.
开始
“开始”按钮不会再有;您可从 “开始”屏幕来启动应用程序。
2. Tiles (瓷砖)
Live tiles 类似于应用程序的缩略图。
3. Charms
Charms 可让您执行实用的功能,如共享内容、关闭电脑或更改设置。
我如何访问 Charms?
将光标移动到屏幕的右上角或右下角可访问 Charms,或按 Windows
键
+
<C>。
如何进入
开始
?
按键盘上的 Windows
键
;按 Windows
键
+ <C> 并单击开始;或将光标移
动到屏幕的左下角并单击开始。
如何在应用程序之间切换?
将光标移动到屏幕的左侧可查看当前运行的应用程序缩略图。
您还可以按 Windows
键
+ <Tab> 以打开并在当前应用程序之间滚动。

72
如何关闭我的电脑?
按 Windows
键
+ <C>,单击设置 > 电源并选择要进行的操作。 或从
桌面
,
单击 Gateway 电源按钮并选择要进行的操作。
为什么有新的界面?
Windows 8 的新界面是专门配合触摸输入设计的。 Windows Stor 应用程序
会自动使用整个屏幕且无需以传统方式关闭。 Windows Store 应用程序将
使用 live-tiles 显示在 “开始”屏幕上。
什么是 “
Live tiles
”?
“Live tiles”类似于应用程序的缩略图,只要您连接到 Internet,它们就会更
新新内容。 例如,您可以查看天气或股票的最新动态而无需打开应用程序。
如何解锁我的电脑?
按任意键,然后单击用户帐户图标可解锁计算机。 如果您的帐户设置了密
码,则需输入密码以继续。
如何个性化我的电脑?
您可用不同的背景图像或安排瓷砖来个性化
开始
以适应您的个人需要。
要更改背景,按 Windows
键
+ <C> 并单击设置 > 更改计算机设 > 个性化。
单击页面顶部的开始屏幕并选择颜色和图像。
如何移动瓷砖?
按住瓷砖或选择它,然后将其拖动到您要在
开始
中放置的位置。 其它瓷砖将
会移动,以让该瓷砖能够塞入其新位置。

常见问题
- 73
我能否让瓷砖变得更大或更小?
右键单击瓷砖,然后从屏幕底部出现的菜单中选择更小或更大。
我如何个性化搣锁定攠屏幕?
您可用不同的图像,或以显示快速状态和通知的方式来个性化锁定屏幕,以
适应您的个人需要。
要更改背景,按 Windows
键
+ <C> 并单击设置 > 更改计算机设 > 个性化。
单击页面顶部的锁定屏幕并选择您要在锁定屏幕上看到的图像和应用程序。
如何关闭应用程序?
将光标移动到屏幕顶部,然后单击并拖动该窗口可关闭此应用程序。
您可从屏幕左侧的缩略图中关闭应用程序,方法是右键单击缩略图并选择
关闭。
我能否更改屏幕分辨率?
从
开始
,开始输入 “控制面板”可打开
搜索
并显示结果;单击控制面板 >
调整屏幕分辨率。
我要以习惯的方式使用 Windows - 还回我的桌面!
从
开始
单击桌面瓷砖可看到传统的桌面。 您可将常用的应用程序锁定到任
务栏以方便打开这些程序。
如果您单击不是 Windows Store 应用程序的程序, Windows 将自动在
桌面
下打开该应用程序。

74
我的应用程序在哪里?
从
开始
,只需开始输入要打开的应用程序名称,
搜索
将自动打开并列出
结果。
要查看应用程序的完整列表,按空格键或
菜单键
并单击所有应用程序。
我如何让应用程序出现在 “开始”上?
如果您在
所有应用程序
中且要让应用程序出现在
开始
中,您可选择应用程序
并右键单击该程序。 从屏幕底部出现的菜单中选择锁定到开始。
如何从搣开始攠删除瓷砖?
右键单击瓷砖,然后从屏幕出现的菜单中单击从 “开始”解锁。
我如何让应用程序出现在桌面的任务栏上?
如果您在
所有应用程序
中且要让应用程序出现在
桌面
的任务栏中,您可选择
应用程序并右键单击该程序。 从屏幕底部出现的菜单中选择锁定到任务栏。
如何安装应用程序?
您可从
商店
下载 Windows Store 应用程序。 您需要 Microsoft ID 才能购买
并从
商店
下载应用程序。
我无法找到诸如 “记事本”或 “画图”等应用程序!
它们在哪里?
从
开始
,只需输入要找到并打开的应用程序名称,即可打开
搜索
并列出结
果。 或者,打开
所有应用程序
并滚动到 “Windows Accessories”可看到旧
系统的程序列表。

常见问题
- 75
什么是 Microsoft ID ( 帐户 )?
Microsoft 帐户是您用于登录到 Windows 的电子邮件地址和密码。 您可使
用任何电子邮件地址,但建议选择已使用的电子邮件地址,来与好友通信和
登录到收藏网站。 当您用 Microsoft 帐户登录到计算机时,计算机将连接到
您关心的人、文件和设备。
我需要一个吗?
并非要有 Microsoft ID 才能使用 Windows 8,但 Microsoft ID 会让生活变得
更轻松,因为您可使用 Microsoft ID 同步登录的不同设备的数据。
如何获得?
如果您已安装 Windows 8 但未用 Microsoft 帐户登录,或者您没有
Microsoft 帐户并要一个,按 Windows
键
+ <C> 并单击设置 > 更改计算机
设置 > 用户 > 切换到 Microsoft 帐户,然后按屏幕说明操作。
我如何将收藏夹添加到 Internet Explorer?
Internet Explorer 10 没有传统的收藏夹,取而代之的是您可以将快捷方式锁
定到
开始
。 打开该页面后,右键单击页面上的任何位置可打开屏幕底部的菜
单。 单击锁定到开始。
如何检查 Windows 更新?
按 Windows
键
+ <C> 并单击设置 > 更改计算机设置 > Windows 更新。 单
击立即检查更新。

76
我在哪里可获得更多信息?
详情请访问:
• Windows 8 教程: www.gateway.com/windows8-tutorial
• 支持常见问题: support.gateway.com

规范信息
- 77
规范信息
预防听力损失
-
注意:如果长时间以高音量使用耳机,可能会造成永久性听力丧失。
- A pleine puissance, l’écoute prolongée du baladeur peut endommager
l’oreille de l’utilisateur.
听音乐时的注意事项
为保护听力,请遵循下列注意事项。
- 逐渐调高音量,直至能够清楚舒适地收听。
- 听觉适应后不要再调高音量。
- 不要长时间以高音量收听音乐。
- 不要通过调高音量来掩盖周围噪音。
- 若听不到周围人的讲话,应调低音量。
无线设备规范声明
-
注:以下规范信息仅适用于具备
WLAN
和
/
或蓝牙功能的型号。
符合规则的附件
本设备配备的附件为: 连接外接显示器的屏蔽视频线缆。 需使用这些附件以确保符合 FCC
规则。
加州提案
65 警告
本产品含有加州当局已知可导致癌症、出生缺陷和 / 或生殖系统受损的化学品。 有关本产
品警告的其它信息,请访问 www.gateway.com/prop65。

78
日本 (JAPAN)
本装置は、第二種情報装置(住宅地域またはその隣接した地域において使用されるべき
情報装置)デ住宅地域での電波障害防止を目的とした情報装置等電波障害自主規制協議
会(VCCI)基準に適合しております。
しかし、本装置をラジオ、テレビジョン受信機に、近接してご使用になると、受信障害
の原因となることがあります。本書の説明にしたがって正しい取り扱いをしてくださ
い。
W
IRELESS ADAPTER REGULATORY INFORMATION
USA — FCC and FAA
The FCC with its action in ET Docket 96-8 has adopted a safety standard for human
exposure to radio frequency (RF) electromagnetic energy emitted by FCC certified
equipment. The wireless adapter meets the Human Exposure limits found in OET Bulletin
65, supplement C, 2001, and ANSI/IEEE C95.1, 1992. Proper operation of this radio
according to the instructions found in this manual will result in exposure substantially
below the FCC’s recommended limits.
- The following safety precautions should be observed:
Do not touch or move antenna while the unit is transmitting or receiving.
- Do not hold any component containing the radio such that the antenna is very close
or touching any exposed parts of the body, especially the face or eyes, while
transmitting.
- Do not operate the radio or attempt to transmit data unless the antenna is connected;
this behavior may cause damage to the radio.
Use in specific environments:
- The use of wireless adapters in hazardous locations is limited by the constraints
posed by the safety directors of such environments.
- The use of wireless adapters on airplanes is governed by the Federal Aviation
Administration (FAA).

规范信息
- 79
- The use of wireless adapters in hospitals is restricted to the limits set forth by each
hospital.
Antenna Use
In order to comply with FCC RF exposure limits, low gain integrated antennas should be
located at a minimum distance of 20 cm (8 inches) or more from the body of all persons
or at a minimum distance as specified by the FCC module grant conditions. FCC grants
can be viewed from the FCC Equipment Authorization website at https://fjallfoss.fcc.gov/
oetcf/eas/reports/GenericSearch.cfm by entering the FCC ID printed on the module label.
Explosive Device Proximity Warning
Warning: Do not operate a portable transmitter (including this wireless adapter) near
unshielded blasting caps or in an explosive environment unless the transmitter has been
modified to be qualified for such use
Antenna Warnings
- Warning: To comply with the FCC and ANSI C95.1 RF exposure limits, it is
recommended that for the wireless adapter installed in a desktop or portable
computer, the antenna for this wireless adapter to be installed so as to provide a
separation distance of at least 20 cm (8 inches) from all persons or at the minimum
distance as specified by the module grant conditions. FCC grants can be viewed from
the FCC Equipment Authorization website at https://fjallfoss.fcc.gov/oetcf/eas/
reports/GenericSearch.cfm by entering the FCC ID printed on the module label.
- Warning: The wireless adapter is not designed for use with high-gain directional
antennas.
Use On Aircraft Caution
- Caution: Regulations of the FCC and FAA prohibit airborne operation of radio-
frequency wireless devices (wireless adapters) because their signals could interfere
with critical interfere with critical aircraft instruments.
Local Restrictions on 802.11a, 802.11b, 802.11g and 802.11n Radio Usage

80
- Caution: Due to the fact that the frequencies used by 802.11a, 802.11b, 802.11g and
802.11n wireless LAN devices may not yet be harmonized in all countries, 802.11a,
802.11b, 802.11g and 802.11n products are designed for use only in specific
countries, and are not allowed to be operated in countries other than those of
designated use. As a user of these products, you are responsible for ensuring that
the products are used only in the countries for which they were intended and for
verifying that they are configured with the correct selection of frequency and channel
for the country of use. Any deviation from the permissible power and frequency
settings for the country of use is an infringement of national law and may be punished
as such.
Wireless Interoperability
The wireless adapter is designed to be interoperable with other wireless LAN products
that are based on direct sequence spread spectrum (DSSS) radio technology and to
comply with the following standards:
- IEEE Std. 802.11b compliant Standard on Wireless LAN
- IEEE Std. 802.11g compliant Standard on Wireless LAN
- IEEE Std. 802.11a compliant Standard on Wireless LAN (applies to devices
supporting 802.11a)
- IEEE Std. 802.11n draft 2.0 compliant on Wireless LAN
- Wireless Fidelity certification, as defined by the Wi-Fi Alliance
The Wireless Adapter and Your Health
The wireless adapter, like other radio devices, emits radio frequency electromagnetic
energy. The level of energy emitted by the wireless adapter, however, is less than the
electromagnetic energy emitted by other wireless devices such as mobile phones. The
wireless adapter operates within the guidelines found in radio frequency safety standards
and recommendations. These standards and recommendations reflect the consensus of
the scientific community and result from deliberations of panels and committees of
scientists who continually review and interpret the extensive research literature. In some

规范信息
- 81
situations or environments, the use of the wireless adapter may be restricted by the
proprietor of the building or responsible representatives of the applicable organization.
Examples of such situations may include:
- Using the wireless adapter on board airplanes, or
- Using the wireless adapter in any other environment where the risk of interference
with other devices or services is perceived or identified as being harmful.
If you are uncertain of the policy that applies to the use of wireless adapters in a specific
organization or environment (an airport, for example), you are encouraged to ask for
authorization to use the adapter before you turn it on.
FCC Radio Frequency Interference Requirements (applies to device supporting
802.11a)
This device is restricted to indoor use due to its operation in the 5.15 to 5.25 GHz and
5.470 to 5.725 GHz frequency ranges. FCC requires this product to be used indoors for
the frequency ranges 5.15 to 5.25 GHz and 5.470 to 5.725 GHz to reduce the potential
for harmful interference to co-channel mobile satellite systems. High power radars are
allocated as primary users of the 5.25 to 5.35 GHz and 5.65 to 5.85 GHz bands. These
radar stations can cause interference with and /or damage this device. No configuration
controls are provided for this wireless adapter allowing any change in the frequency of
operations outside the FCC grant of authorization for U.S operation according to Part
15.407 of the FCC rules.
USA — Federal Communications Commission (FCC)
This device complies with Part 15 of the FCC Rules. Operation of the device is subject to
the following two conditions:
- This device may not cause harmful interference.
- This device must accept any interference that may cause undesired operation.
- Note: The radiated output power of the adapter is far below the FCC radio frequency
exposure limits. Nevertheless, the adapter should be used in such a manner that the
potential for human contact during normal operation is minimized. To avoid the
possibility of exceeding the FCC radio frequency exposure limits, you should keep a

82
distance of at least 20 cm between you (or any other person in the vicinity), or the
minimum separation distance as specified by the FCC grant conditions, and the
antenna that is built into the computer. Details of the authorized configurations can
be found at http://www.fcc.gov/oet/ea/
by entering the FCC ID number on the device.
Interference Statement
This wireless adapter has been tested and found to comply with the limits for a Class B
digital device, pursuant to Part 15 of the FCC Rules. These limits are designed to provide
reasonable protection against harmful interference in a residential installation. This
wireless adapter generates, uses, and can radiate radio frequency energy. If the wireless
adapter is not installed and used in accordance with the instructions, the wireless adapter
may cause harmful interference to radio communications. There is no guarantee,
however, that such interference will not occur in a particular installation. If this wireless
adapter does cause harmful interference to radio or television reception (which can be
determined by turning the equipment off and on), the user is encouraged to try to correct
the interference by taking one or more of the following measures:
- Reorient or relocate the receiving antenna of the equipment experiencing the
interference.
- Increase the distance between the wireless adapter and the equipment experiencing
the interference.
- Connect the computer with the wireless adapter to an outlet on a circuit different from
that to which the equipment experiencing the interference is connected.
- Consult the dealer or an experienced radio/TV technician for help.
- Note: The adapter must be installed and used in strict accordance with the
manufacturer's instructions as described in the user documentation that comes with
the product. Any other installation or use will violate FCC Part 15 regulations.
Canada — Industry Canada (IC)
This device complies with RSS210 of Industry Canada. Cet appareil se conforme à
RSS210 de Canada d'Industrie.

规范信息
- 83
- Caution: When machine supports and using IEEE 802.11a wireless LAN, this
product is restricted to indoor use due to its operation in the 5.15- to 5.25 GHz
frequency range. Industry Canada requires this product to be used indoors for the
frequency range of 5.15 GHz to 5.25 GHz to reduce the potential for harmful
interference to co-channel mobile satellite systems. High power radar is allocated as
the primary user of the 5.25 to 5.35 GHz and 5.65 to 5.85 GHz bands. These radar
stations can cause interference with and/or damage to this device. The maximum
allowed antenna gain for use with this device is 6dBi in order to comply with the
E.I.R.P limit for the 5.25 to 5.35 and 5.725 to 5.85 GHz frequency range in point-to-
point operation. To comply with RF exposure requirements all antennas should be
located at a minimum distance of 20 cm, or the minimum separation distance allowed
by the module approval, from the body of all persons.
- Attention: l’utilisation d’un réseau sans fil IEEE802.11a est réstreinte à une
utilisation en intérieur à cause du fonctionement dans la bande de fréquence 5,15 -
5,25 GHz. Industry Canada requiert que ce produit soit utilisé à l’intérieur des
bâtiments pour la bande de fréquence 5,15 - 5,25 GHz afin de réduire les possibilités
d’interférences nuisibles aux canaux co-existants des systèmes de transmission
satellites. Les radars de puissances ont fait l’objet d’une allocation primaire de
fréquences dans les bandes 5,25 - 5,35 GHz et 5 65 - 5 85 GHz. Ces stations radar
peuvent créer des interférences avec ce produit et/ou lui être nuisible. Le gain
d’antenne maximum permissible pour une utilisation avec ce produit est de 6 dBi afin
d’être conforme aux limites de puissance isotropique rayonnée équivalente (P.I.R.E.)
applicable dans les bandes 5,25 - 5,35 GHz et 5,725 - 5,85 GHz en fonctionement
point-à-point. Se pour conformer aux conditions d'exposition de RF toutes les
antennes devraient être localisées à une distance minimum de 20 cm, ou la distance
de séparation minimum permise par l'approbation de module, du corps de toutes les
personnes.
This Class B digital apparatus complies with Canadian ICES-003.
Cet appareil numérique de la classe B est conforme a la norme NMB-003 du Canada.

84
"To prevent radio interference to the licensed service, this device is intended to be
operated indoors and away from windows to provide maximum shielding. Equipment (or
its transmit antenna) that is installed outdoors is subject to licensing."
« Pour empêcher que cet appareil cause du brouillage au service faisant l'objet d'une
licence, il doit être utilisé a l'intérieur et devrait être placé loin des fenêtres afin de fournir
un écran de blindage maximal. Si le matériel (ou son antenne d'émission) est installé à
l'extérieur, il doit faire l'objet d'une licence. »
European Union
适用国家列表
本产品的使用必须严格遵守使用国的规定和限制。 要了解更多信息,请联系使用国的当地
办事处。 请参见 http://ec.europa.eu/enterprise/rtte/implem.htm
以了解最新的国家列表。
国家代码列表
本设备可在以下国家中运行:
The low band 5.15 -5.35 GHz is for indoor use only.
This equipment complies with the essential requirements of the European Union directive
1999/5/EC. See Statements of European Union Compliance, and more details refer to the
attached Declaration of Conformity.
国家
ISO 3166
2 字母代码
国家
ISO 3166
2 字母代码
国家
ISO 3166
2 字母代码
国家
ISO 3166
2 字母代码
奥地利
AT
德国
DE
马耳他
MT
英国
GB
比利时
BE
希腊
GR
荷兰
NT
冰岛
IS
塞浦路斯
CY
匈牙利
HU
波兰
PL
列支敦士登
LI
捷克共和国
CZ
爱尔兰
IE
葡萄牙
PT
挪威
NO
丹麦
DK
意大利
IT
斯洛伐克
SK
瑞士
CH
爱沙尼亚
EE
拉脱维亚
LV
斯洛文尼亚
SL
保加利亚
BG
芬兰
FI
立陶宛
LT
西班牙
ES
罗马尼亚
RO
法国
FR
卢森堡
LU
瑞典
SE
土耳其
TR

规范信息
- 85
English
Hereby, ACER INC., declares that this devise is in
compliance with the essential requirements and other
relevant provisionns of Directive 1999/5/EC.
Česky [Czech]
ACER INC. tímto prohlašuje, že toto zařízení je ve shodě se
základními požadavky a dalšími příslušnými ustanoveními
směrnice 1999/5/ES.
Daansk [Danish]
Undertegnede ACER INC. erklærer herved, at følgende
udstyr overholder de væsentlige krav og øvrige relevante krav
i direktiv 1999/5/EF.
Deutsch
[German]
Hiermit erklärt ACER INC., dass sich das Gerät Radiolan in
Übereinstimmung mit den grundlegenden Anforderungen und
den übrigen einschlägigen Bestimmungen der Richtlinie
1999/5/EG befindet.
Eesti [Estonian]
Käesolevaga kinnitab ACER INC. seadme vastavust direktiivi
1999/5/EÜ põhinõuetele ja nimetatud direktiivist tulenevatele
teistele asjakohastele sätetele.
Español
[Spanish]
Por medio de la presente ACER INC. declara que el
dispositivo cumple con los requisitos esenciales y
cualesquiera otras disposiciones aplicables o exigibles de la
Directiva 1999/5/CE.

86
Ελληνικά
[Greek]
∆ια του παρόντος η ACER INC. δηλώνει ότι η παρούσα
συσκευή συµµορφώνεται προς τις ουσιώδεις απαιτήσεις και
τις λοιπές διατάξεις της Οδηγίας 1999/5/ ΕΚ.
Français
[French]
Par la présente ACER INC. déclare que cet appareil est
conforme aux exigences essentielles et aux autres
dispositions pertinentes de la directive 1999/5/CE.
Íslenska
[Icelandic]
Hér með lýsir ACER INC. yfir því að er í samræmi við
grunnkröfur og aðrar kröfur, sem gerða r eru í tilskipun
1999/5/EC.
Itaaliano [Italian]
Con la presente ACER INC. dichiara che questo dispositivo è
conforme ai requisiti essenziali ed alle altre disposizioni
pertinenti stabilite dalla direttiva 1999/5/CE.
Latviski [Latvian]
Ar šo ACER INC. deklarē, ka šī ierīce atbilst Direktīvas
1999/5/EK būtiskajām prasībām un citiem ar to saistītajiem
noteikumiem.
Lietuvių
[Lithuanian]
Šiuo ACER INC. deklaruoja, kad šis įrenginys atitinka
esminius reikalavimus ir kitas 1999/5/EB Direktyvos
nuostatas.
Malti [Maltese]
Hawnhekk, ACER INC., jiddikjara li dan jikkonforma mal- ti
ijiet essenzjali u ma provvedimenti o rajn relevanti li he mm
fid-Dirrettiva 1999/5/EC.

规范信息
- 87
Magyar
[Hungarian]
Alulírott, ACER INC. nyilatkozom, hogy a készülék megfelel a
vonatkozó alapveto követelményeknek és az 1999/5/EC
irányelv egyéb eloírásainak.
Nederlands
[Dutch]
Hierbij verklaart ACER INC. dat het toestel voldoet aan de
essentiële eisen en de andere relevante bepalingen van
richtlijn 1999/5/EG.
Norsk
[Norwegiann]
ACER INC. erklærer herved at utstyret er i samsvar med de
grunnleggende krav og øvrige relevante krav i direktiv
1999/5/EF.
Polski [Polish]
Niniejszym ACER INC. oświadcza, że urządzenie jest zgodne
z zasadniczymi wymogami oraz pozostałymi stosownymi
postanowieniami Dyrektywy 1999/5/EC.
Português
[Portuguese]
ACER INC. declara que este dispostivo está conforme com
os requisitos essenciais e outras disposições da Directiva
1999/5/CE.
Slovensko
[Slovenian]
ACER INC. izjavlja, da je ta naprava skladna z bistvenimi
zahtevami in ostalimi relevantnimi določili Direktive
1999/5/ES.
Slovensky
[Slovak]
ACER INC. týmto vyhlasuje, že zariadenie spĺňa základné
požiadavky a všetky príslušné ustanovenia Smernice
1999/5/ES.

88
France
Pour la France métropolitaine :
2,400 - 2,4835 GHz (Canaux 1à 13) autorisé en usage intérieur
2,400 - 2,454 GHz (canaux 1 à 7) autorisé en usage extérieur
Pour la Guyane et la Réunion :
2,400 - 2,4835 GHz (Canaux 1à 13) autorisé en usage intérieur
2,420 - 2,4835 GHz (canaux 5 à 13) autorisé en usage extérieur
Pour tout le territoire Français :
Seulement 5,15 -5,35 GHz autorisé pour le 802.11a
L'utilisation de cet equipement (2,4 GHz WLAN) est soumise à certaines restrictions :
- La puissance maximale autorisée en intérieur est de 100 mW pour 2400 - 2483,5 MHz.
- La puissance maximale autorisée est de 100 mW en extérieur pour 2400 - 2454 MHz.
- La puissance maximale autorisée est de 10 mW en extérieur, 2454 - 2483,5 MHz.
Pour les dernières restrictions, voir http://www.art-telecom.fr.
Italy
The use of these equipments is regulated by:
Suomi [Finnish]
ACER INC. vakuuttaa täten että tämä laite on direktiivin 1999/
5/EY oleellisten vaatimusten ja sitä koskevienn direktiivin
muiden ehtojen mukainen.
Svenska
[Swedish]
Härmed intygar ACER INC. att denna enhet står i
överensstämmelse med väsentliga egenskapskrav och
övriga relevanta bestämmelser som framgår av direktiv
1999/5/EG.

规范信息
- 89
1.D.L.gs 1.8.2003, n. 259, article 104 (activity subject to general authorization) for outdoor
use and article 105 (free use) for indoor use, in both cases for private use.
2.D.M. 28.5.03, for supply to public of RLAN access to networks and telecom services.
L’uso degli apparati è regolamentato da:
1.D.L.gs 1.8.2003, n. 259, articoli 104 (attività soggette ad autorizzazione generale) se
utilizzati al di fuori del proprio fondo e 105 (libero uso) se utilizzati entro il proprio fondo,
in entrambi i casi per uso private.
2.D.M. 28.5.03, per la fornitura al pubblico dell’accesso R-LAN alle reti e ai servizi di
telecomunicazioni.
Belgium
Dans le cas d'une utilisation privée, à l'extérieur d'un bâtiment, au-dessus d'un espace
public, aucun enregistrement n'est nécessaire pour une distance de moins de 300 m.
Pour une distance supérieure à 300 m un enregistrement auprès de l'IBPT est requise.
Pour les enregistrements et licences, veuillez contacter l'IBPT.
In geval van privé-gebruik, buiten een gebouw, op een openbare plaats, is geen registratie
nodig, wanneer de afstand minder dan 300 m is. Voor een afstand groter dan 300 m is
een registratie bij BIPT vereist. Voor registraties en licenties, gelieve BIPT te contacteren.
Brazil
Este equipamento opera em caráter secundário, isto é, não tem direito a proteção contra
interferência prejudicial, mesmo de estações do mesmo tipo, e não pode causar
interferência a sistemas operando em caráter primário.
Pakistan
Pakistan Telecommunication Authority (PTA) Approved
Morocco
The operation of this product in the radio channel 2 (2417 MHz) is not authorized in the
following cities: Agadir, Assa-Zag, Cabo Negro, Chaouen, Goulmima, Oujda, Tan Tan,
Taourirt, Taroudant and Taza.

90
The operation of this product in the radio channels 4, 5, 6 and 7 (2425 - 2442 MHz) is not
authorized in the following cities: Aéroport Mohamed V, Agadir, Aguelmous, Anza,
Benslimane, Béni Hafida, Cabo Negro, Casablanca, Fès, Lakbab, Marrakech, Merchich,
Mohammédia, Rabat, Salé, Tanger, Tan Tan, Taounate, Tit Mellil, Zag.
Japan
5 GHz 帯は室内でのみ使用のこと
Korea
당해 무선설비는 운용 중 전파혼신 가능성이 있음
Taiwan
第十二條
經型式認證合格之低功率射頻電機,非經許可,公司、商號或使用者均不得擅自變更頻
率、加大功率或變更原設計之特性及功能。
第十四條
低功率射頻電機之使用不得影響飛航安全及干擾合法通信 ; 經發現有干擾現象時,應立即
停用,並改善至無干擾時方得繼續使用。
前項合法通信,指依電信法規定作業之無線通信。
低功率射頻電機須忍受合法通信或工業、科學及醫療用電波輻射性電機設備之干擾。
对产品的改动
CE 标志
Gateway 对于用户未经授权的可能改变有 CE 标志产品符合性的改动和由此造成的后果,
不承担责任。
无线频率接口
对于任何由未经授权对本设备的改动而造成的无线电或电视干扰,厂家不承担责任。

规范信息
- 91
连接和远程接地
PELV ( 有保护的特低电压 )
为确保设备特低电压的完整性,只能将有电源保护的电磁兼容电路的设备连接到外部端
口。
SELV ( 安全的特低电压 )
本产品的输入和输出均为安全的特低电压。
远程接地
为防止电击,将所有的本地 ( 个人办公室 ) 计算机和计算机支持的设备连接到建筑布线的
相同的电路上。 如果您不确定,请检查建筑布线以避免远程接地的麻烦。
建筑物电源
仅将设备连接到符合所在国当前布线规则的建筑物电源。 在英国,是 IEE 规则。
电源和线缆
电源
电源插头和插座 ( 如配备 ) 被定级为 “危险电压”。
您必须将电源线拔出并将电池取出以断开设备与电源的连接。 为达到此目的,插座应安装
在设备附近,并易够到。
输入额定电流: 参见计算机底部的额定电流标签,以确保您的适配器符合特定的额定电
流。
在任何情况下,用户均不得尝试拆卸电源。 电源没有用户可更换的部件。 在电源内有危险
电压,会造成严重的人身伤害。
有缺陷的电源必须退还给经销商。
电源线和插头
本产品需要一条接地电源线和插头。 插头仅适用于接地的电源插座。 插上插头前,请确认
电源插座已正确接地。 切勿将插头插入未接地的电源插座。 详情请联系您的电工。

92
电线长度不得超过 2.5 米。 为防止电击危险,切勿去除或废除电源线的接地接触器。 如 果
电源线损坏,应更换电源线。 请联系经销商按原样更换。 在欧洲,插头必须额定为
250 VAC,最低 10 amp。 插头必须显示国际机构的认证标志。 线缆必须适用于最终用户
的国家。 如果您不确定要在所在国使用的电源线类型,请咨询经锁商或当地的电力机构。
线缆
对于计算机包装中非随本产品提供的线缆:
系统的 EMC 性能只有在线缆和接口采用有效屏蔽的情况下才有保证。
以下情况需使用屏蔽接口的线缆:USB、 IEEE1394、串行、打印机、游戏、模拟或数字
音频 / 视频、 PS2、电视或 FM 天线,以及一般所有的高速线缆接口。
仅使用有 UL 认证的 No. 26AWG 或更大型号电信线缆。
仅有以太局域网或 RTC 调制解调器线缆的长度可超过 3 米。
Gateway 建议对连接计算机与非随机提供的硬件设备的线缆添加一个铁氧体磁芯环绕夹。
- 铁氧体参照: Steward 28A-2029 ( 双线圈 )
在产品认证过程中, Gateway 采用以下线缆质量:
- Hama 46778 的 USB2.0 认证线缆
- Hama 50011 的 IEEE1394 屏蔽火线
- Thomson KHC001M、 KHC012M、 KHC028M 的 RCA-RCA 屏蔽音频 / 视频线
- Hama 43330H、 42714H 插口屏蔽式立体声音频线
生热和便携式计算机
在长时间使用后, AC 适配器和计算机的底部会变热。 应避免身体持续接触发热的位置。
机箱盖的卸下和更换
卸下机箱盖进行维护和维修之前,必须断开所有电源和调制解调器线缆的连接,并取出或
禁用电池。
-
注意:
长时间使用后,计算机内的某些部件会发热。
在您插入电源并打开设备之前,必须关闭机箱。

规范信息
- 93
激光产品符合性声明
光学设备经过测试和认证,符合国际电工委员会 IEC60825-1 和欧洲 EN60825-1 的 1 级
激光产品的标准。
1 级激光产品被认为没有危险。 此光学设备的设计使用环境为:在正常操作过程中或规定
的维护环境下,任何人都不会接触到 1 级以上激光幅射。
安装在您计算机中的光学设备经过专门设计,仅作为此类电子产品的组件使用,因此不符
合美国联邦法规 Sec. 1040.10 和 Sec. 1040.11 有关 “完整的”激活产品的适当要求。
由于接触激光幅射非常危险,在任何情况下,用户都不得尝试拆卸激光设备。
包装
本产品的包装符合 1994 年 12 月 20 日发布的欧洲环保指令 94/62/EC,相当于 1998 年
7 月 20 日发布的法国立法 Decree 98-638。
符合俄国认证

94
环境
我们对环保的承诺
环境是我们产品的核心。
Gateway 承诺限制产品在其使用寿命中对环境的影响。
从设计阶段开始,通过非常严格的采购政策,对电子元件投以最大的关注以限制重金属的
重量,如铅、镉、铬、汞等。对于任何产品的任何部分,都要求供应商遵守所有的规定。
至于寿命终止产品,已采取措施来预先和促进我们所有产品的循环利用。 因此,所有使用
Gateway 的产品并重于 25 g 的塑料部件都有 ISO 11469 的标签。通过此标签,可快速识
别材料并放松其限价措施。 同样,台式计算机经专门设计,可轻松拆卸,螺丝被卡夹所
替代。
产品处置
2002/96/ 欧盟指令,即电子电器设备废弃物 (WEEE) 指令,要求废旧电子
和电器产品必须与一般的家庭生活垃圾分开处理,以推动重复利用、循环
利用和其它形式的回收利用,并降低要填埋和焚化的废弃物数量。 打叉的
垃圾箱标志是提醒您这些产品必须加以分类处置。 这些规则涉及您所有的
Gateway 产品和所有附件 ( 例如键盘、鼠标、扬声器、遥控器等 )。当您
必须对此类产品进行处理时,请咨询当地部门,确保进行正确回收,如果
要更换产品,请将旧设备退还给零售商。详情请访问
www.gateway.com/about/corp_responsibility/environment.php。
电池处置 ( 如适用 )
处置您的设备之前,确保您已取出了任何可能放在设备中的电池。 欧洲法律规定,电池必
须从生活垃圾中收集出来,以进行分别处置。 切勿将废弃电池扔进垃圾箱。 通过电池收集
方案 ( 在适用的场合 ),或询问经销商或您所用公共设施的当地机构,对废弃电池进行处
置。 您的努力将能够对废弃电池进行安全的收集、循环利用和销毁,并将有助于环保和降
低健康危害。
-
注意:如果更换类型不正确的电池会有爆炸的危险。
依照规定处理废弃电池。

环境
- 95
能源之星
Gateway 有“能源之星”认证的产品能够降低能源成本并具有环保效果而
无需牺牲功能或性能,从而为您省钱。Gateway 很自豪能够向客户提供带
“能源之星”标志的产品。
什么是 “能源之星”?
具备 “能源之星”认证的产品符合美国环保署制定的严格的节能方针,消
耗较少的能源并能够防止温室气体的排放。Gateway 承诺在全球提供的产品和服务能够帮
助客户省钱、节能和提高环境质量。我们通过较高的能效而节约更多的能源,就能更多地
降低温室气体的排放和气候变化的风险。详情请参见网站 www.energystar.gov 或
www.energystar.gov/powermanagement。
-
注:
本节信息可能不适用于您的电脑。
Gateway 能源之星认证产品:
- 产生较少的热量并降低冷却负荷和减轻气候变暖。
- 停止活动 10 和 30 分钟后,自动进入 “显示睡眠”和 “电脑睡眠”模式。
- 按下键盘或移动鼠标可将电脑从睡眠模式中唤醒。
- 在 “睡眠”模式下,电脑将节省 80% 以上的能源。
“能源之星”和 “能源之星”的标志是经注册的美国标志。

96
软件使用许可
-
注:多数软件应用程序已预安装在您的
Gateway
计算机中。
它们已可使用或设置。
但是,某些则需要
CD
或
DVD
来运行。
您可以在计算机的包装中找到这些光盘。
Gateway 使用许可协议 (CD 和 / 或 DVD 产品 )。 此份原件是您使用许可的凭证。 请将其
按有价值的财产处理。
重要 !
安装软件之前请仔细阅读。
以下使用许可协议适用于您。 这是您 ( 个人或实体 ) 和 Gateway 之间签订的协议,在安装
软件后,表明您已同意受本协议中条款的约束。 如果您不同意本协议中的条款,请立即将
您在购买时为其支付全部款项的整个电脑系统、未打开的软件包 ( 如有 ) 以及随货提供的
其它物品 ( 包括书面资料或其它包装物 ) 返还。
G
ATEWAY 软件使用许可
1. 使用许可的授予
本 Gateway 使用许可协议 ( 以下简称“协议”) 允许您在任何一台计算机使用上述确认的
一份指定版本的 Gateway 软件 ( 可能包括至少一张 CD 或 DVD 光盘 ),前提是该软件在
任何时候只能在一台计算机上使用。 如果您有该软件的多个使用许可,则在任何时候都可
使用与所拥有的使用许可数量相同的该软件备份。 当该软件加载到临时存储器 ( 即
RAM)、永久性存储器 ( 如硬盘、 CD 和 / 或 DVD) 或该计算机的其它存储设备时,就表明
该软件 “在使用”,但将该软件安装在网络服务器中,其唯一的目的是分发给其它不 “在
使用”的计算机的情况除外。 如果预计使用该软件的用户数将超出适用的使用许可数,则
您必须有合适的机制或流程,确保目前使用该软件的人数不超过使用许可的数量。 如果该
软件为永久性安装在一台计算机的硬盘存储设备中 ( 除网络服务器外 ),一个人员使用该计
算机 80% 以上的时间,然后该人员也可以在便携式或家用计算机上使用该软件。

软件使用许可
- 97
2. 著作权
该软件由 Gateway 或其供应商拥有,受美国版权法和国际条约规定的保护。 因此,您必
须将该软件按任何其它有版权的资料 ( 如书或音乐唱片 ) 处理,如果您将原始光盘仅用作
备份或归档目的,可将该软件的 CD 和 / 或 DVD 光盘部分传输 ( 如有 ) 到一个硬盘。 您不
可复制该软件的 CD 和 / 或 DVD 光盘部分或随软件提供的书面材料。
3. 其它限制
您不可出租或租赁该软件,但您可以永久性转让该软件和所附的书面材料,前提是您没有
保留拷贝以及受让人同意本协议的条款。 您不可对本软件进行反向工程、反编译或反汇
编。 本软件的任何转让必须包括最新更新和之前的所有版本。
第三方软件或自由软件使用许可信息
Gateway 预加载、嵌入在产品中或随产品提供的软件含有自由软件或第三方软件程序 ( 以
下简称 “自由软件” ),这些软件都获得 GNU 通用公共许可证 ( 以下简称 “GPL” ) 的使
用许可。” 自由软件有此标识。 您对自由软件的复制、分发和 ( 或 ) 修改应遵守 GPL 的条
款。
自由软件的分发是希望该软件得以使用,但没有任何保证;也没有任何商销性或特殊用途
适用性的暗示保证。 GNU 通用公共许可证中的规定应始终得到遵守。 您可直接访问 http:/
/www.gnu.org 以获得 GPL 或写信给 Free Software Foundation, Inc. 要求获得此文件。
Free Software Foundation, Inc 的地址: 59 Temple Place - Suite 330, Boston, MA, 02111-
1307, USA。
从您接受此软件开始的三年内,您书面通知我们即可免费获得一份 GPL 项下自由软件的
完整可机读源代码,但媒体、运输和处理的费用除外。
如果您有任何其它问题,请联系我们。 我们的邮寄地址是:台湾新北市汐止区新台五路
一段 88 号 8 楼。

98
索引
A
安全防范 ............................................... 7
安全性
更新
.............................................. 50
杀毒软件....................................... 46
C
CD-ROM
故障排除
....................................... 70
手动弹出 ....................................... 70
常见问题 ............................................. 69
常见问题 请参见常见问题
充电
检查电量
....................................... 34
触控板 ................................................ 24
使用........................................ 24–24
存储卡读卡器 ...................................... 26
D
DSL.................................................... 40
打印机
故障排除
....................................... 70
电池.................................................... 94
电池处置 ............................................. 94
电池组
安装
.............................................. 33
充电.............................................. 33
电量不足 ....................................... 35
电量不足警告 ................................ 34
检查充电电量 ................................ 34
首次使用 ....................................... 32
特点.............................................. 31
卸下.............................................. 33
优化.............................................. 34
最大限度延长寿命 ......................... 31
电脑
特性
.............................................. 12
指示灯 .......................................... 18
癫痫警告............................................. 11
电源线 .................................................. 8
调制解调器 ......................................... 40
端口.................................................... 26
E
恶意软件 ............................................. 45

索引
- 99
F
防火墙 ................................................ 46
G
干扰.................................................... 90
更新
Windows 自动更新
........................ 50
光标.................................................... 24
规范信息....................................... 77, 94
H
还原
还原管理程序
................................ 38
Recovery Management.................. 51
互联网
防火墙
.......................................... 46
连线.............................................. 39
环境.................................................... 94
J
Internet 服务提供商 (ISP)..................... 39
计算机环境............................................ 7
间谍软件 ............................................. 45
健康防范 ............................................. 10
键盘
故障排除....................................... 70
热键.............................................. 17
K
可移动存储装置................................... 27
L
LAN ( 局域网 )..................................... 41
连接
网络.............................................. 28
亮度
热键
.............................................. 16
浏览器 ................................................ 44
N
Norton Internet Security................. 44, 47

100
Q
前视图 ................................................ 18
清洁计算机............................................ 9
驱动器
存储卡读卡器 ................................ 26
R
热键.................................................... 17 软件
软件使用许可 ................................ 96
S
视图
前
................................................. 19
右 ................................................. 21
左 ................................................. 19
W
WiFi.................................................... 41
Windows
使用 Windows
............................... 38
Windows 自动更新 ........................ 50
universal serial bus.............................. 28
网关
还原管理程序 ................................ 38
网络.................................................... 28
网络连接 ............................................. 41
维护
还原管理程序
................................ 38
Recovery Management ................. 51
问题.................................................... 69
CD-ROM ...................................... 70
打印机 .......................................... 70
键盘.............................................. 70
启动.............................................. 69
显示器 .......................................... 69
X
线缆................................................ 8, 91
显示器
故障排除
....................................... 69
热键.............................................. 15
Y
扬声器
故障排除
....................................... 70
热键........................................ 15, 16
音频
故障排除
....................................... 70
Z
质保...................................................... 6 左视图 ................................................ 18
Ver.: 02.01.02

- 1
Manual Pengguna
Gateway NE71B

2
DAFTAR ISI
Menghidupkan komputer 4
Koneksi nirkabel................................................. 4
Pendaftaran........................................................ 5
Pemasangan piranti lunak.................................. 6
Pemulihan .......................................................... 6
Punya masalah? ................................................ 7
Dasar Komputer 8
Keselamatan dan Kenyamanan ......................... 8
Peringatan Keselamatan............................. 8
Peringatan Kesehatan .............................. 12
Mengenal komputer Anda 15
Pandangan atas ............................................... 16
Pandangan atas ............................................... 17
Tombol khusus.......................................... 18
Tampak depan ................................................. 21
Tampak kiri....................................................... 23
Tampak kanan ................................................. 25
Tampak bawah................................................. 27
Panel sentuh 28
Dasar-dasar panel sentuh................................ 28
Gestur panel sentuh......................................... 29
Memutakhirkan komputer Anda 30
Berekspansi melalui pilihan.............................. 30
Pilihan konektivitas ................................... 30
Sumber daya 36
Adaptor Daya AC ............................................. 36
Unit baterai....................................................... 37
Karakteristik unit baterai ........................... 37
Mengganti unit baterai .............................. 39
Memasang dan melepaskan unit baterai.. 40
Mengisi daya baterai................................. 40
Memeriksa tingkat daya baterai ............... 41
Mengoptimalkan masa pakai baterai ....... 41
Peringatan baterai hampir habis .............. 42
Manajemen daya 44
Menyimpan daya ............................................. 44
Piranti lunak 47
Menggunakan Windows dan Piranti Lunak
Anda ................................................................ 47
Tawaran Keamanan Internet.................... 47
Gateway Recovery Management............. 47
Internet 48
Langkah pertama di Internet............................ 48
Melindungi komputer Anda ...................... 48
Pilih ‘Internet Service Provider
(Penyedia Layanan Internet)’................... 48
Sambungan Jaringan ............................... 51
Jelajahi Internet!....................................... 54
Keamanan................................................ 55
Pemulihan 66
Membuat cadangan pemulihan ....................... 67
Membuat driver dan cadangan aplikasi........... 70
Memulihkan sistem Anda ................................ 73
Menginstal ulang driver dan Aplikasi........ 74
Mengembalikan ke potret sistem
sebelumnya.............................................. 77
Mengembalikan sistem Anda ke kondisi
pabrik ....................................................... 79
Memulihkan dari dalam Windows ............ 80
Memulihkan dari cadangan pemulihan
Anda......................................................... 84

Daftar Isi - 3
Tanya jawab 88
Tip dan petunjuk untuk menggunakan
Windows 8........................................................ 91
Ada tiga konsep yang mungkin perlu
Anda ingat................................................. 91
Bagaimana saya dapat mengakses
charms? .................................................... 91
Bagaimana cara Mulai? ............................ 91
Bagaimana cara melompat di antara
aplikasi?.................................................... 92
Bagaimana cara mematikan komputer? ... 92
Mengapa ada antarmuka baru?................ 92
Bagaimana cara membuka komputer?..... 93
Bagaimana cara memersonalisasi
komputer?................................................. 93
Saya ingin menggunakan Windows
dengan cara yang sudah biasa bagi
saya – kembalikan desktop saya!............. 94
Di mana aplikasi saya? ............................ 94
Apakah (akun) Microsoft ID itu?............... 96
Bagaimana cara menambahkan favorit
ke Internet Explorer?................................ 96
Bagaimana cara memeriksa
ketersediaan pemutakhiran Windows? .... 97
Di mana terdapat informasi
selengkapnya?......................................... 97
Informasi Peraturan 98
Lingkungan 117
Lisensi Piranti lunak 120
Indeks 123
K
unjungi registration.gateway.com untuk mendapat manfaat sebagai seorang
p
elanggan Gateway.
Pendapat: Semua diagram hanya digunakan sebagai referensi. Desain sesungguhnya
m
ungkin berbeda.
Hak cipta © 2012. Hak cipta dilindungi undang-undang.
G
ateway NE71B Manual Pengguna
Revisi ini: 20 Juli 2012

4
MENGHIDUPKAN KOMPUTER
Terima kasih Anda telah membeli komputer ini Gateway!
Panduan ini dibuat untuk memperkenalkan Anda dengan fitur komputer
dan membantu Anda dalam pengalaman berkomputer.
Setelah mempersiapkan dan menghidupkan komputer Anda seperti
diperlihatkan pada petunjuk persiapan, maka Anda ditanya yang akan
membantu Anda menyambung dengan Internet. Kemudian komputer
Anda akan mengkonfigurasikan piranti lunak terpasang.
KONEKSI NIRKABEL
Untuk menyambung ke jaringan nirkabel, pertama cek fitur nirkabel pada
komputer Anda yang harus aktif, dan router atau modem yang ingin Anda
sambungkan juga telah dikonfigurasi dengan benar.
• Jika nirkabel tidak aktif, tekan tombol Windows ( ) + W, ketik
“Nirkabel” lalu klik Nirkabel. Klik sakelar tombol pada Wi-Fi untuk
mengaktifkan sambungan nirkabel. Klik lagi untuk menonaktifkan.
• Untuk menyambungkan ke jaringan, tekan tombol Windows ( ) + W,
ketik "Nirkabel" lalu klik Sambungkan ke jaringan. Pilih jaringan Anda
dan masukkan sandi jika diminta.
• Setelah sedikit kelambatan, komputer Anda seharusnya dapat
menyambung dengan Internet.

Menghidupkan komputer - 5
Jika jaringan Anda belum terdeteksi atau komputer Anda belum
menyambung dengan Internet, harap rujuk dokumen ISP atau router
Anda. Setelah komputer Anda hidup dan Anda bisa menggunakannya,
buka Internet Explorer dan ikuti petunjuknya.
Cara lain, gunakan kabel jaringan untuk menyambung langsung
dengan port jaringan di router Anda. Harap rujuk dengan panduan ISP
atau router Anda.
PENDAFTARAN
Ketika Anda menggunakan komputer untuk pertama kalinya, Anda
dianjurkan untuk segera meregistrasikan komputer. Dengan registrasi ini
Anda akan memperoleh keuntungan yang bermanfaat, seperti:
• Layanan lebih cepat dari perwakilan kami yang terlatih.
• Keanggotaan dalam komunitas Gateway: menerima promosi dan
berpartisipasi dalam survei pelanggan.
• Berita terbaru dari Gateway.
Cara Mendaftar
Selama pengawalan (startup) komputer untuk pertama kalinya, sebuah
jendela muncul mengundang Anda untuk melakukan registrasi. Harap isi
informasi yang diperlukan dan klik Berikut. Jendela kedua yang akan
Anda lihat berisi ruas opsional yang akan membantu kami memberi Anda
pengalaman layanan pelanggan yang lebih menyenangkan.

6
Opsi Lain
Cara lain untuk meregistrasikan produk Gateway Anda adalah dengan
mengunjungi situs web kami di register.gateway.com. Pilih negara Anda
dan ikuti petunjuknya yang sederhana.
Setelah kami menerima registrasi produk Anda, email konfirmasi yang
berisi data penting akan dikirimkan kepada Anda. Simpan data tersebut di
tempat aman.
PEMASANGAN PIRANTI LUNAK
Komputer Anda akan otomatis menginstal piranti lunak dan
mempersiapkan komputer untuk digunakan. Hal ini butuh waktu beberapa
lama, harap jangan mematikan komputer, tunggu sampai instalasi selesai.
PEMULIHAN
Anda secepatnya bila mungkin harus membuat disk pemulihan. Program
Gateway Recovery Management tersedia untuk membuat disk pemulihan
dan kemudian dapat memperbaiki atau menginstal ulang aplikasi dan
driver diberikan oleh Gateway.

Menghidupkan komputer - 7
PUNYA MASALAH?
Gateway berikan beberapa pilihan untuk membantu pembelian Anda.
Gateway dukungan
Pastikan Anda menulis nomor seri, tanggal dan tempat pembelian serta
nama model komputer Anda di sampul panduan ini; simpan bukti
pembelian Anda. Jika Anda menghubungi kami, tulis setiap pesan
kesalahan yang menyebabkan masalah, dan tempatkan komputer di
depan Anda serta aktifkan jika mungkin. Dengan menyiapkan item ini
ketika menghubungi kami akan memastikan layanan yang lebih cepat dan
lebih baik.
Gateway situs web
Ingatlah untuk mengunjungi www.gateway.com - Tandai bagian dukungan
untuk mendapatkan informasi terbaru, bantuan, driver dan unduhan.
Jaminan dan informasi kontak
Anda dapat menemukan informasi tentang jaminan komputer Anda dan
cara menghubungi dukungan teknis pada Jaminan komputer Anda.

8
DASAR KOMPUTER
KESELAMATAN DAN KENYAMANAN
Peringatan Keselamatan
Ikuti panduan di bawah ini untuk menggunakan komputer Anda dengan
nyaman dan menghindari masalah kesehatan.
Lingkungan Komputer
Pastikan bahwa komputer:
• Digunakan pada permukaan, penyangga atau meja yang stabil. Jika
jatuh, komputer dapat menjadi rusak berat.
• Tidak digunakan di atas permukaan yang bergetar, atau digunakan
ketika berolahraga, senam atau aktivitas lainnya dalam lingkungan yang
dinamis. Getaran atau gerakan dapat melonggarkan pengencang,
merusak komponen internal dan bahkan menyebabkan baterai bocor.
• Jauh dari sinar matahari langsung dan sumber panas.
• Jauh dari medan magnet atau perangkat yang menghasilkan listrik
statis.
• Berjarak setidaknya 30 sentimeter (satu kaki) dari ponsel.
• Tidak berada di lingkungan berdebu atau lembab.
• Tidak digunakan di dekat air. Jangan sekali-kali menumpahkan cairan
apapun pada komputer Anda.
• Tidak diletakkan di atas karpet atau permukaan lainnya yang
mempunyai muatan listrik.

Dasar Komputer - 9
Catatan
• Slot dan rongga tersedia sebagai ventilasi untuk menjamin keandalan
pengoperasian dan melindungi produk dari panas yang berlebihan.
Rongga tersebut tidak boleh tertutup atau terhalang. Rongga tidak
boleh terhalang dengan meletakkan produk ini di atas kasur, sofa,
matras, atau permukaan lainnya yang sejenis. Produk ini tidak boleh
diletakkan di dekat atau di atas radiator maupun sumber panas, atau
instalasi terpasang, kecuali jika terdapat ventilasi yang memadai.
• Jangan masukkan benda apapun ke dalam produk ini melalui slot
kabinet karena dapat menyentuh titik tegangan berbahaya atau
menyebabkan hubungan arus pendek yang akan menimbulkan
kebakaran atau sengatan arus listrik. Jangan tumpahkan cairan apapun
pada atau ke dalam produk.
• Untuk menghindari kerusakan komponen internal dan mencegah
kebocoran baterai, jangan letakkan produk ini di atas permukaan yang
bergetar.
• Jangan gunakan produk ini di area yang menimbulkan guncangan,
hentakan, atau getaran, karena dapat menyebabkan hubungan singkat
atau kerusakan perangkat rotor, HDD, Drive optik, bahkan bahaya
kontak luar dari unit baterai lithium.
Kabel
Pastikan bahwa:
• Kabel tidak tegang dan bahwa tidak ada risiko orang akan berjalan di
atas atau tersandung kabel.

10
• Perangkat lain tidak menggencet kabel.
• Kabel daya tersambung ke komputer sebelum menyambungkan kabel
daya ke stopkontak listrik.
• Kabel daya dicabut dari stopkontak sebelum mencabut kabel daya dari
komputer.
• Kabel daya dengan tiga kaki disambungkan ke stopkontak yang
diardekan.
• Stopkontak mudah diakses dan berada sedekat mungkin dengan
komputer (jangan memberi muatan berlebih dengan terlalu banyak
adaptor).
Jika komputer Anda menggunakan adaptor listrik eksternal:
• Jangan menutupi atau menempatkan benda di atas adaptor listrik.
Biarkan adaptor mendingin dengan baik selama penggunaan dengan
menjauhkannya dari benda lain.
• Hanya gunakan adaptor listrik yang disertakan dengan komputer Anda.
Kendati adaptor lain mungkin kelihatan serupa, menggunakan adaptor
lain dapat merusak komputer Anda. Jika diperlukan penggantian, hanya
gunakan suku cadang yang disetujui untuk digunakan pada komputer
Anda.
Membersihkan Komputer Anda
• Selalu cabut komputer Anda dari stopkontak sebelum
membersihkannya.
• Jangan menggunakan pembersih cairan atau aerosol, gunakan kain
lembab.

Dasar Komputer - 11
• Jangan sekali-kali menyemprotkan produk pembersih langsung ke
layar.
• Jika Anda menumpahkan cairan ke komputer Anda, segera matikan
komputer, cabut adaptor listriknya, lepaskan baterai dan pastikan
komputer benar-benar kering sebelum Anda menghidupkannya lagi.
Tunggu selama semalam jika perlu.
Catatan: Jika komputer Anda dilengkapi dengan slot untuk kartu
memori atau perangkat ekspansi, slot kartu tersebut mungkin diisi
dengan kartu tiruan dari plastik (kartu dummy). Kartu tiruan ini akan
melindungi slot yang tidak digunakan dari debu, benda logam, atau
partikel lainnya. Simpan kartu tiruan tersebut untuk dipasang lagi saat
tidak ada kartu dalam slot.
Menyervis Komputer Anda
Jangan mencoba memperbaiki sendiri komputer Anda, karena membuka
atau menutup penutupnya, bisa membuat Anda terpapar tegangan
berbahaya atau risiko lainnya. Serahkan seluruh perbaikan kepada teknisi
servis ahli.
Cabut konektor komputer ini dari stopkontak, kemudian bawa ke teknisi
servis ahli bila:
• kabel daya atau konektor rusak, terpotong, atau terkelupas,
• cairan tertumpah ke produk,
• produk terkena hujan atau air,
• produk terjatuh atau casing rusak,
• performa produk menunjukkan perubahan nyata,

12
• produk tidak berfungsi seperti biasa setelah menjalankan petunjuk
pengoperasian.
Catatan: Atur hanya kontrol yang tertera pada petunjuk
pengoperasian, karena pengaturan kontrol lainnya yang tidak sesuai
dapat menyebabkan kerusakan dan sering kali menyulitkan teknisi
ahli untuk mengembalikan produk ke kondisi normal.
Peringatan Kesehatan
• Permukaan bagian bawah, daerah di sekitar celah ventilasi dan adaptor
AC mungkin menjadi panas. Guna menghindari cedera, pastikan kulit
atau tubuh Anda jangan sampai tersentuh bagian tersebut.
• Perangkat ini beserta perangkat tambahannya mungkin dilengkapi
dengan beberapa komponen kecil. Jauhkan dari jangkauan anak-anak.
• Komputer dan aksesori mungkin terdiri dari suku cadang kecil. Jauhkan
dari jangkauan anak-anak.
• Jika Anda bekerja atau bermain selama berjam-jam, pastikan Anda
beristirahat secara teratur. Sesekali waktu palingkan penglihatan dari
layar komputer. Jangan menggunakan komputer jika Anda lelah.
• Atur komputer Anda sehingga Anda dapat bekerja dengan posisi alami
dan relaks. Letakkan benda yang sering Anda gunakan di tempat yang
mudah dijangkau.
• Letakkan komputer langsung di depan Anda untuk keselamatan dan
kenyamanan yang lebih baik. Patikan kenyamanan ketinggian keyboard
dan panel sentuh. Layar hendaknya sekitar 45-70 cm (18-30 inci) dari
mata Anda.

Dasar Komputer - 13
Sambil duduk, ketika Anda menggunakan komputer Anda yang berada
di meja dalam jangka waktu lama, demi kenyamanan bisa lebih baik,
belilah keyboard eksternal.
• Untuk melindungi pendengaran Anda, ketika menggunakan pengeras
suara atau headphone, naikkan volume secara perlahan-lahan sampai
Anda dapat mendengar dengan jelas dan nyaman, jangan menaikkan
volume yang telah dirasa sesuai oleh telinga Anda. Hindari
mendengarkan dengan volume tinggi dalam waktu lama. Jangan
menaikkan volume untuk menghilangkan suara bising sekitar Anda,
kurangi volume jika Anda tidak dapat mendengar orang yang berbicara
di dekat Anda.
• Bagian bawah komputer, adaptor daya, dan udara dari slot
ventilasi mungkin menjadi panas selama penggunaan.
Hindari kontak fisik yang terus menerus dan jangan letakkan
komputer di atas pangkuan Anda saat komputer digunakan.
• Pastikan slot dan rongga ventilasi tidak pernah terhalang atau tertutup.
Jangan meletakkan komputer di atas permukaan lembut (seperti karpet,
kursi atau tempat tidur) yang bisa menghalangi slot ventilasi.
• Jangan masukkan benda apapun ke dalam ventilasi melalui slot casing
karena benda tersebut dapat menyentuh titik tegangan berbahaya atau
menyebabkan hubungan arus pendek yang akan menimbulkan
kebakaran atau sengatan arus listrik.

14
• Beberapa gangguan tangan, pergelangan tangan, leher, bahu, kaki dan
punggung mungkin terkait, atau diperparah, oleh tindakan yang
berulang-ulang. Untuk mengurangi risiko mengalami gangguan ini, ketik
dengan pergelangan tangan lurus lalu tangan dan pergelangan tangan
Anda mengambang di atas keyboard. Jika Anda merasa nyeri, geli,
kesemutan atau ketidaknyamanan lainnya, hubungi dokter Anda.
• Kami menasihati orang tua agar memantau penggunaan permainan
komputer oleh anak-anak mereka. Jika anak Anda mengalami gejala
berikut: pusing, pandangan kabur, mata atau otot berkedut, hilang
kesadaran, bingung, gerakan atau kejang tak sadar, SEGERA hentikan
penggunaan dan konsultasikan ke dokter. Ini mungkin terjadi sekalipun
orang yang bersangkutan tidak mempunyai riwayat medis epilepsi.

Mengenal komputer Anda - 15
MENGENAL KOMPUTER ANDA
Setelah mempersiapkan komputer seperti pada gambar dalam petunjuk,
kami akan menunjukkan bagian-bagian komputer Gateway baru Anda.
Gateway NE71B

16
PANDANGAN ATAS
# Ikon Item Keterangan
1 Kamera web
Webcam untuk komunikasi video.
Lampu di sebelah Kamera web menunjukkan
bahwa kamera aktif.
2 Mikrofon Mikrofon internal untuk perekaman suara.
3 Layar tampilan
Juga disebut Liquid-Crystal Display (LCD),
menampilkan keluaran komputer.
1
2
3

Mengenal komputer Anda - 17
PANDANGAN ATAS
# Ikon Item Keterangan
1
Indikator/tombol
daya
Menghidupkan/mematikan komputer.
Menunjukkan status daya komputer.
2 Keyboard
Untuk memasukkan data ke komputer.
- Tombol khusus dijelaskan pada
halaman 18.
3 Panel sentuh
Perangkat penunjuk sensitif sentuhan yang
berfungsi seperti mouse komputer.
1
2
5
3
4

18
Tombol khusus
Keyboard komputer Anda terdapat tombol yang mengaktifkan fungsi
khusus. Fungsi setiap tombol dengan jelas diberi tanda dengan suatu
ikon.
4
Tombol klik (kiri dan
kanan)
Sisi kiri dan kanan fungsi tombol seperti tombol
pemilihan kiri dan kanan.
5 Pengeras suara Menghasilkan keluaran audio stereo.
Ikon Fungsi Keterangan
Fn
Tombol pintas
sebagai fungsi
tambahan
Aktifkan fungsi tambahan pada tombol tertentu.
Mis, tekan tombol Fn untuk mengaktifkan tombol F1
sampai F12.
Bantuan Buka menu Bantuan.
Cadangan
Dengan alat ini Anda dapat membuat salinan cadangan
seluruh sistem Anda, atau hanya file dan folder tertentu.
Buat jadwal teratur atau buat salinan bila Anda inginkan.
Komunikasi
Mengaktifkan/menonaktifkan perangkat komunikasi
komputer.
Tombol layar
Mengalihkan output tampilan antara layar tampilan,
monitor eksternal (jika dipasang), dan keduanya.
# Ikon Item Keterangan

Mengenal komputer Anda - 19
Layar kosong
Menonaktifkan cahaya latar layar tampilan untuk
menghemat daya. Tekan tombol apa saja untuk
kembali.
Tombol panel
sentuh
Mengaktifkan dan menonaktifkan panel sentuh internal.
Putar/Jeda Memutar atau menjeda file media yang dipilih.
Berhenti Menghentikan pemutaran file media yang dipilih.
Sebelumnya Kembali ke file media sebelumnya.
Berikutnya Lompat ke file media berikutnya.
Kecerahan
berkurang
Mengurangi kecerahan layar.
Kecerahan
meningkat
Meningkatkan kecerahan layar.
Jejaring Sosial
Buka aplikasi Jejaring Sosial.
- Jika aplikasi ini tidak diinstal, tombol tersebut akan
memulai aplikasi perpesanan instan Anda.
Volume naik Menaikkan volume suara.
Ikon Fungsi Keterangan

20
Tombol pintas
Komputer menggunakan tombol pintas (kombinasi tombol) untuk
mengakses tombol fungsi dan perintah navigasi.
Untuk mengaktifkan tombol pintas, tekan terus tombol Fn (kiri bawah)
sebelum menekan tombol lain pada kombinasi tombol pintas.
- Catatan: Tidak perlu menekan tombol Fn untuk menggunakan tombol fungsi F1
sampai F12 ketika memulai komputer atau ketika menggunakan BIOS.
Untuk menukar tombol pintas dan fungsi khusus tombol F1 sampai F12, ganti
Volume turun Menurunkan volume suara.
Tombol pengeras
suara
Mengaktifkan dan menonaktifkan pengeras suara.
Tombol pintas Fungsi Keterangan
Fn + Tombol
khusus (lihat
halaman 18)
Tombol Fungsi Mengaktifkan tombol F1 sampai F12.
Fn + Beranda Gulir mulai awal dokumen.
Fn + Akhir Gulir pada akhir dokumen.
Fn + Page Up Gulir ke atas halaman pada suatu dokumen.
Fn + Page Down
Gulir ke bawah halaman pada suatu
dokumen.
Ikon Fungsi Keterangan

Mengenal komputer Anda - 21
setelan tombol fungsi di BIOS (untuk membuka BIOS tekan F2 ketika memulai
komputer Anda, kemudian pilih menu Utama dan ganti reaksi tombol Fungsi
menjadi tombol Fungsi).
TAMPAK DEPAN
# Ikon Item Keterangan
1
Indikator daya Menunjukkan status daya komputer.
Indikator baterai
Menunjukkan status baterai komputer.
- Mengisi daya: Lampu menyala kuning
kecokelatan bila daya baterai sedang diisi.
- Daya terisi penuh: Lampu menyala biru bila
dalam mode AC.
Indikator HDD Menunjukkan bila hard disk drive aktif.
Indikator komunikasi
Menunjukkan status perangkat konektivitas
nirkabel komputer.
1 2

22
2
Pembaca kartu
Multi-in-1
Menerima Secure Digital (SD), MultiMediaCard
(MMC), Memory Stick PRO (MS PRO),
xD-Picture Card (xD).
- Tekan untuk melepas/memasang kartu.
Hanya satu kartu yang bisa beroperasi saat
Anda menggunakannya.
# Ikon Item Keterangan

Mengenal komputer Anda - 23
- Catatan: Indikator panel depan akan terlihat meskipun penutup komputer dalam
keadaan tertutup.
TAMPAK KIRI
# Ikon Item Keterangan
1
Slot kunci
Kensington
Menghubungkan ke kunci keamanan komputer
yang kompatibel dengan kunci Kensington.
- Lilitkan kabel kunci keamanan komputer ke
benda sekitar yang tidak dapat bergerak,
misalnya, meja atau gagang laci yang
terkunci.
Masukkan kunci ke dalam lubang, kemudian
putar kunci untuk menguncinya.
Juga tersedia beberapa model tanpa kunci.
2
Slot ventilasi dan
kipas pendingin
Biarkan komputer tetap dingin.
- Jangan tutup atau halangi lubangnya.
3 Port ethernet (RJ-45)
Menghubungkan ke jaringan berbasis Ethernet
10/100/1000.
4
Port tampilan (VGA)
eksternal
Menghubungkan perangkat tampilan
(mis., monitor eksternal, proyektor LCD).
21 3 4 56

24
Informasi mengenai USB 3.0
• Kompatibel dengan USB 3.0 dan perangkat sebelumnya.
• Untuk kinerja optimal, gunakan perangkat USB 3.0 besertifikat.
• Ditentukan oleh spesifikasi USB 3.0 (SuperSpeed USB).
5 Port HDMI Mendukung koneksi video digital definisi tinggi.
6Port USB
Menghubungkan ke perangkat USB.
- Jika sebuah port berwarna hitam, port itu
kompatibel dengan USB 2.0, jika port itu
berwarna biru, port itu juga kompatibel
dengan USB 3.0 (lihat di bawah).
# Ikon Item Keterangan

Mengenal komputer Anda - 25
TAMPAK KANAN
# Ikon Item Keterangan
1
Jack headphone/
pengeras suara
Menghubungkan ke perangkat line-out audio
(mis. pengeras suara, headphone).
- Mendukung headset 3,5 mm yang
kompatibel dengan mikrofon terintegrasi
(misalnya, headset perangkat genggam
cerdas Acer).
Jack mikrofon Menerima input dari mikrofon eksternal.
2Port USB
Menghubungkan ke perangkat USB.
- Jika sebuah port berwarna hitam, port itu
kompatibel dengan USB 2.0, jika port itu
berwarna biru, port itu juga kompatibel
dengan USB 3.0 (lihat di bawah).
3 Drive optik Drive optik internal; menerima CD atau DVD.
4
Indikator akses disk
optik
Menyala saat drive optik aktif.
12 3 4 5 6 7

26
Informasi mengenai USB 3.0
• Kompatibel dengan USB 3.0 dan perangkat sebelumnya.
• Untuk kinerja optimal, gunakan perangkat USB 3.0 besertifikat.
• Ditentukan oleh spesifikasi USB 3.0 (SuperSpeed USB).
5
Tombol pengeluaran
drive optik
Mengeluarkan disk optik dari drive.
6
Lubang pengeluaran
darurat
Mengeluarkan nampan drive optik saat
komputer mati.
- Dengan cermat masukkan klip kertas lurus
untuk mengeluarkan nampan drive optik.
7 Jack DC-in Sambungkan adaptor AC komputer Anda.
# Ikon Item Keterangan

Mengenal komputer Anda - 27
TAMPAK BAWAH
# Ikon Item Keterangan
1 Tempat baterai Tempat unit baterai komputer.
2
Penutup pelepas
baterai
Untuk melepaskan baterai. Masukkan alat yang
sesuai lalu seret untuk melepaskannya.
3
Kompartemen
memori
Untuk memasang memori utama komputer.
Bay hard disk
Untuk memasang hard disk komputer
(dipasang dengan sekrup).
4
Slot ventilasi dan
kipas pendingin
Biarkan komputer tetap dingin.
- Jangan tutup atau halangi lubangnya.
1
4
2
3

28
PANEL SENTUH
DASAR-DASAR PANEL SENTUH
Panel sentuh mengontrol panah (atau 'kursor') pada layar. Ketika Anda
menggeser jari Anda di seluruh panel sentuh, kursor akan mengikuti
gerakan ini.
Tekan tombol kiri atau kanan yang terdapat di bawah panel sentuh untuk
memilih dan menjalankan fungsi eksekusi. Kedua area tersebut serupa
dengan tombol kiri dan kanan pada mouse. Mengetuk panel sentuh sama
dengan mengklik sisi kiri tombol.
Catatan: Panel sentuh peka terhadap gerakan jari; semakin ringan
sentuhan, semakin peka.
Jaga panel sentuh dan jari Anda tetap kering dan bersih.
Kursor dikontrol dengan beberapa gestur dasar:
• Geseran satu jari: Geser jari Anda pada panel sentuh untuk
menggerakkan kursor.
• Ketukan satu jari: Ketuk ringan panel sentuh dengan jari,
untuk melakukan sebuah ‘klik’, yang akan memilih atau
menjalankan sebuah item. Ulangi mengetuk dengan cepat untuk
melakukan ketukan dua kali atau 'klik dua kali'.
• Menarik: Tekan dan tahan sisi kiri tombol pemilihan, atau ketuk dua kali
di mana saja di panel sentuh, kemudian gesekkan satu jari pada panel
sentuh untuk memilih di suatu area.

Panel sentuh - 29
GESTUR PANEL SENTUH
Windows 8 dan banyak aplikasi mendukung gestur panel sentuh yang
menggunakan satu atau beberapa jari.
Catatan:
Dukungan untuk gestur panel sentuh bergantung pada
aplikasi aktif.
Dengan begitu memungkinkan Anda mengendalikan aplikasi dengan
beberapa gestur sederhana, seperti:
• Geser masuk dari tepi: Akses alat-alat
Windows dengan menggeser ke bagian
tengah panel sentuh dari kanan, atas atau
kiri.
• Geser masuk dari tepi kanan: Mengubah charms.
• Geser masuk dari tepi atas: Mengubah perintah aplikasi.
• Geser masuk dari tepi kiri: Mengalihkan ke aplikasi sebelumnya.
• Geseran dua jari: Bergulir di antara halaman web, dokumen
dan daftar putar dengan cepat, dengan meletakkan dua jari
pada panel sentuh dan menggerakkan kedua dua jari tersebut
ke arah mana saja.
• Geseran dua jari: Memperbesar dan memperkecil foto, peta
dan dokumen dengan gerakan jari dan jempol yang
sederhana.

30
MEMUTAKHIRKAN KOMPUTER
ANDA
BEREKSPANSI MELALUI PILIHAN
Komputer Anda ini memberikan banyak opsi pengalaman berkomputer
yang lengkap.
Pilihan konektivitas
Melalui sejumlah port yang tersedia, Anda dapat menyambungkan
perangkat periferal ke komputer Anda. Untuk petunjuk tentang cara
menyambungkan perangkat eksternal lainnya ke komputer, bacalah
bagian berikut ini.
Pembaca kartu memori
Kartu memori digunakan dalam beragam pilihan
kamera digital, PDA, pemutar MP3 dan ponsel.
Memasukkan kartu memori
1. Luruskan kartu sehingga konektor mengarah ke
port, dengan konektor menghadap ke bawah.
2. Dorong kartu dengan hati-hati ke dalam port. Jika Anda merasa perlu
menggunakan sedikit tenaga untuk memasukkan kartu tersebut, coba
sedikit arahkan kembali kartu tersebut.

Memutakhirkan komputer Anda - 31
3. Dorong kartu tersebut hingga terpasang dengan benar hingga terdengar
suara klik. Kartu menonjol beberapa milimeter dari slotnya.
Jika kartu berisi beberapa file, jendela Windows Auto Play akan muncul
(ini bergantung pada isi kartu) dan meminta Anda apakah Anda ingin
menggunakan sebuah program untuk mengakses isi kartu tersebut. Pilih
sebuah opsi di sini jika opsi tersebut sesuai, jika tidak pilih Batal. Jika
kartu tidak berisi file, atau file yang tidak dikenal, jendela akan terbuka
menunjukkan isi kartu tersebut.
Kartu SD, SDHC dan SDXC
Dengan menggunakan desain keseluruhan yang sama pada tipe kartu SD
yang berbeda, terdapat kapasitas yang berlainan. Kartu SD dapat
menampung hingga 4 GB, kartu SDHC dapat menampung hingga 32 GB,
sedangkan kartu SDXC dapat menampung hingga 2048 GB (2TB).
Komputer Anda dapat memberikan pembaca kartu yang kompatibel
dengan SDHC atau SDXC.
Catatan: Kartu memori SDXC hanya dapat digunakan pada pembaca
yang kompatibel dengan SDXC; sedangkan kartu SD dan SDHC bisa
digunakan pada salah satu diantara kedua tipe tersebut.

32
Melepas kartu dari pembaca kartu memori
1. Klik panah Tampilkan ikon
tersembunyi di Area Notifikasi (di
sebelah jam).
2. Klik ikon Copot Peranti Keras
Dengan Aman.
3. Klik Keluarkan Kartu SD (atau
nama perangkat).
4. Tunggu sampai muncul pesan
Aman untuk Mencopot Piranti
Keras.
5. Lepaskan kartu.
Jaringan terpasang
Fitur jaringan terpasang tersedia untuk
menghubungkan komputer ke jaringan
berbasis Ethernet.
Untuk menggunakan fitur jaringan, pasang
kabel Ethernet dari port Ethernet (RJ-45) pada
chassis komputer ke konektor jaringan atau
hub di jaringan Anda.
3
2
1
3
2
1

Memutakhirkan komputer Anda - 33
USB (Universal Serial Bus)
Port USB 2.0 adalah serial bus berkecepatan
tinggi untuk menyambungkan periferal USB
tanpa mengambil sumber daya sistem yang
lebih penting.
Ada komputer tertentu dilengkapi dengan
lebih dari satu port USB 3.0. Port USB 3.0
mirip dengan port USB standar, kecuali port
USB 3.0 dilengkapi dengan koneksi internal
tambahan yang berwarna biru. Anda bisa
menggunakan perangkat kompatibel
USB 3.0 untuk memperoleh manfaat dengan
kecepatan transfer yang lebih cepat.
Port video
Hubungkan ke monitor dengan port VGA atau DVI (tipe koneksi yang
didukung tergantung pada konfigurasi komputer Anda). Kabel yang sesuai
bisanya disertakan dengan monitor.
Ikuti langkah ini untuk menghubungkan monitor ke komputer Anda:
1. Periksa bahwa komputer telah dimatikan dan sakelar daya monitor
dimatikan.
2. Pasang kabel video ke port monitor pada komputer. Kencangkan
koneksi kabel dengan sekrup yang diberikan.
3. Hubungkan kabel daya monitor dan colokkan kabel daya ke stopkontak
yang dibumikan dengan benar.

34
4. Ikuti setiap petunjuk pengaturan pada panduan pengguna monitor.
5. Hidupkan monitor, kemudian hidupkan komputer.
6. Pastikan bahwa resolusi dan refresh rate aktif tidak melebihi spesifikasi
monitor. Jika perlu, ubah pengaturan tampilan yang digunakan oleh
komputer.
Catatan: Untuk mengakses kontrol tampilan, tekan tombol Windows
( ) + W, ketik “Tampilan” lalu klik Tampilan.
High-Definition Multimedia Interface (hanya untuk model tertentu)
Antarmuka Multimedia Definisi Tinggi
(HDMI) adalah sebuah antarmuka
yang didukung industri, tidak
dimampatkan, audio/video serba
digital. HDMI memberi antarmuka di
antara segala sumber audio/video
digital yang kompatibel, seperti set-
top box, pemutar DVD, dan penerima
A/V serta audio digital dan/atau
monitor video yang kompatibel,
seperti televisi digital (DTV), melalui satu buah kabel.
Gunakan port HDMI pada komputer Anda untuk melakukan koneksi
dengan peralatan audio dan video mutakhir. Dengan penggunaan kabel
tunggal bisa tercipta pengaturan yang rapi dan koneksi yang cepat.

Memutakhirkan komputer Anda - 35
Headphone dan mikrofon
Dengan dua port ini dapat menyambung dengan perangkat audio.
Gunakan port headphone untuk dicolokkan dengan headphone stereo
atau pengeras suara aktif. Dengan mencolokkan perangkat audio pada
port headphone akan menonaktifkan pengeras suara internal. Gunakan
port mikrofon untuk menyambungnya dengan mikrofon eksternal untuk
perekaman mono; dengan mencolokkan mikrofon eksternal akan
menonaktifkan mikrofon internal.

36
SUMBER DAYA
ADAPTOR DAYA AC
Komputer Anda dapat menggunakan adaptor daya (power 'brick')
eksternal yang disertakan untuk berjalan pada daya AC. Kabel daya yang
disediakan sesuai dengan negara tempat pembelian komputer.
Adaptor daya memberi daya yang memadai untuk menjalankan komputer
Anda dan pada saat yang sama mengisi ulang daya baterai kemasan.
Perhatian: Jangan menutupi atau menempatkan benda di atas
adaptor AC. Jauhkan adaptor dari benda lain memungkinkan
adaptor mendingin dengan baik selama penggunaan.

Sumber daya - 37
Hanya gunakan adaptor AC yang disertakan dengan komputer Anda.
Kendati adaptor lain mungkin kelihatan serupa, menggunakan adaptor lain
dapat merusak komputer Anda.
Peringatan: Adaptor daya dan bagian bawah komputer dapat
menjadi panas selama penggunaan yang lama. Hal ini adalah
normal, tetapi dapat menyebabkan cedera karena kontak yang
lama.
UNIT BATERAI
Komputer menggunakan unit baterai yang memberikan waktu
penggunaan lama sebelum daya diisi kembali.
Karakteristik unit baterai
Berikut adalah karakteristik unit baterai:
• Menggunakan standar teknologi baterai saat ini.
• Memberikan peringatan baterai hampir habis.
Baterai akan terisi ulang setiap kali Anda menghubungkan komputer ke
adaptor AC. Komputer Anda mendukung pengisian daya saat digunakan,
sehingga Anda dapat mengisi ulang daya baterai sewaktu
mengoperasikan komputer. Namun, pengisian ulang daya baterai saat
komputer dimatikan akan sangat mempersingkat waktu pengisian daya.
Baterai akan bermanfaat bila Anda bepergian atau saat listrik mati.
Sebaiknya miliki unit baterai yang terisi penuh daya sebagai cadangan.
Untuk informasi lengkap tentang pemesanan unit baterai cadangan,
hubungi dealer Anda.

38
Memaksimalkan masa pakai baterai
Sama seperti semua baterai lainnya, performa bateraikomputer Anda
akan menurun seiring waktu. Artinya, performa baterai akan menurun
akibat waktu dan penggunaan.
Untuk memaksimalkan masa pakaibaterai, sebaiknya ikuti saran yang
dijelaskan di bawah ini.
Mempersiapkan unit baterai baru
Sebelum menggunakan unit baterai untuk pertama kalinya, Andaharus
mengikuti proses “persiapan”:
1. Pasang baterai baru tanpa menghidupkan komputer.
2. Sambungkan adaptor AC, lalu isi penuh daya baterai.
3. Lepaskan sambungan adaptor AC.
4. Hidupkan komputer, lalu operasikan komputer menggunakan daya
baterai.
5. Habiskan daya baterai.
6. Sambungkan kembali adaptor AC, lalu isi penuh daya baterai.
Ulangi langkah-langkah tersebut hingga daya baterai terisi dan habis
sebanyak tiga kali.
Gunakan proses persiapan ini untuk semua baterai baru atau jika baterai
telah lama tidak digunakan. Jika komputer akan disimpan selama lebih
dari dua minggu, sebaiknya lepaskan unit baterai dari komputer.

Sumber daya - 39
Peringatan: Jangan biarkan unit baterai berada dalam suhu di
bawah 0°C (32°F) atau di atas 45°C (113°F). Suhu berlebihan
dapat berdampak buruk bagi unit baterai.
Dengan mengikuti proses persiapan baterai berarti Anda mempersiapkan
baterai untuk menerima pengisian daya semaksimal mungkin. Jika Anda
tidak mengikuti prosedur tersebut, maka pengisian daya baterai tidak akan
maksimal dan akan mempersingkat efektivitas masa pakai baterai.
Berikut adalah pola penggunaan yang akan berdampak buruk terhadap
masa pakai baterai:
• Menggunakan komputer dengan daya AC tetap dan baterai terpasang.
Jika Anda ingin menggunakan daya AC tetap, sebaiknya lepaskan unit
baterai setelah daya baterai terisi penuh.
• Jangan habiskan daya dan isi ulang daya baterai secara berlebihan,
seperti dijelaskan di atas.
• Penggunaan rutin; semakin sering menggunakan baterai, maka akan
semakin cepat efektivitas masa pakai berakhir. Masa pakai baterai
komputer standar adalah sekitar 300 kali pengisian daya.
Mengganti unit baterai
Notebook ini menggunakan baterai lithium. Ganti baterai dengan tipe
sama yang dikirim bersama produk Anda. Bila menggunakan baterai lain
maka ada kemungkinan terjadi bahaya kebakaran atau timbul ledakan.

40
Peringatan: Baterai dapat meledak jika tidak ditangani dengan
benar. Jangan bongkar atau buang baterai ke dalam api. Jauhkan
dari jangkauan anak-anak. Patuhi peraturan setempat bila akan
membuang baterai bekas.
Memasang dan melepaskan unit baterai
Penting! Sebelum melepaskan baterai dari unit, sambungkan
adaptor AC jika Anda ingin terus menggunakan komputer. Jika tidak,
matikan komputer lebih dulu.
Untuk memasang unit baterai:
1. Sejajarkan baterai dengan tempatnya yang terbuka; pastikan bagian
tepi dengan bidang kontak masuk lebih dulu dan permukaan atas
baterai menghadap ke atas.
2. Dorong baterai ke dalam tempatnya, lalu dorong secara perlahan
hingga baterai terkunci dengan benar.
Untuk melepaskan unit baterai:
1. Geser kunci pelepas baterai untuk melepaskan baterai.
2. Tarik baterai dari tempatnya.
Mengisi daya baterai
Untuk mengisi daya baterai, pastikan dulu baterai terpasang dengan
benar pada tempatnya. Pasang adaptor AC ke komputer, lalu
sambungkan ke stopkontak. Anda dapat terus mengoperasikan komputer
dengan daya AC sementara daya baterai diisi. Namun, pengisian daya

Sumber daya - 41
saat komputer dimatikan akan sangat mempersingkat waktu pengisian
daya.
Catatan: Sebaiknya isi daya baterai sebelum selesai menggunakan
komputer. Sebaiknya isi daya baterai sepanjang malam sebelum
bepergian agar Anda dapat menggunakan komputer dengan baterai
terisi penuh pada keesokan harinya.
Memeriksa tingkat daya baterai
Indikator daya Windows menunjukkan tingkat baterai aktual. Arahkan
kursor pada ikon baterai/daya di baris tugas untuk melihat tingkat daya
baterai yang tersedia.
Mengoptimalkan masa pakai baterai
Mengoptimalkan masa pakai baterai akan membantu Anda
memaksimalkan penggunaan baterai, memperpanjang siklus pengisian/
pengisian ulang daya, dan meningkatkan efisiensi pengisian ulang daya.
Sebaiknya ikuti saran yang dijelaskan di bawah ini:
• Beli unit baterai tambahan.
• Gunakan daya AC bila memungkinkan, menghemat daya baterai untuk
digunakan saat bepergian.
• Keluarkan Kartu PC jika tidak digunakan karena kartu tersebut akan
terus akan menggunakan daya (untuk model tertentu).
• Simpan unit baterai di tempat yang sejuk dan kering. Suhu yang
disarankan adalah 10°C (50°F) hingga 30°C (86°F). Suhu yang lebih
tinggi mengakibatkan daya baterai lebih cepat habis.

42
• Pengisian ulang daya yang berlebihan akan mengurangi masa pakai
baterai.
• Rawat adaptor AC dan baterai Anda.
Peringatan baterai hampir habis
Bila menggunakan daya baterai, perhatikan indikator daya Windows.
Peringatan: Sambungkan adaptor AC segera setelah peringatan
daya baterai hampir habis muncul di layar. Data akan hilang jika
daya baterai benar-benar habis dan komputer mati.
Bila peringatan daya baterai hampir habis muncul, tindakan yang
disarankan akan tergantung pada kondisi Anda:
Kondisi Tindakan yang disarankan
Tersedia adaptor AC
dan catu daya.
1. Pasang adaptor AC ke komputer, lalu
sambungkan ke stopkontak.
2. Simpan semua file yang diperlukan.
3. Lanjutkan tugas Anda.
Matikan komputer jika Anda ingin mengisi
ulang daya baterai dengan cepat.

Sumber daya - 43
Tersedia unit baterai
tambahan yang terisi
penuh daya.
1. Simpan semua file yang diperlukan.
2. Tutup semua aplikasi.
3. Matikan sistem operasi untuk mematikan
komputer.
4. Ganti unit baterai.
5. Hidupkan komputer, kemudian lanjutkan tugas
Anda.
Tidak tersedia
adaptor AC dan catu
daya.
Anda tidak memiliki
unit baterai
cadangan.
1. Simpan semua file yang diperlukan.
2. Tutup semua aplikasi.
3. Matikan sistem operasi untuk mematikan
komputer.
Kondisi Tindakan yang disarankan

44
MANAJEMEN DAYA
Komputer ini mempunyai unit manajemen daya internal yang memonitor
aktivitas sistem. Aktivitas sistem merujuk pada setiap aktivitas yang
melibatkan satu atau beberapa perangkat berikut: keyboard, mouse, hard
disk, periferal yang tersambung ke komputer, dan memori video. Jika tidak
ada aktivitas yang terdeteksi selama beberapa saat, komputer
menghentikan sebagian atau semua perangkat ini untuk menghemat
energi.
MENYIMPAN DAYA
Menonaktifkan Pengawalan cepat
Komputer Anda menggunakan Pengawalan cepat untuk memulai dengan
cepat, tapi juga menggunakan sedikit daya untuk memeriksa sinyal untuk
memulai. Pemeriksaan ini lambat laut akan menghabiskan baterai.
Jika Anda memilih untuk mengurangi kebutuhan daya komputer dan
dampak lingkungan, nonaktifkan Pengawalan cepat.
Catatan: Jika Pengawalan cepat tidak aktif, komputer Anda perlu
waktu lebih lama untuk memulai dari mode Tidur.
Komputer Anda juga tidak akan memulai jika menerima instruksi
untuk memulai melalui jaringan (Wake on LAN).

Manajemen daya - 45
1. Buka Desktop.
2. Klik Opsi Daya di area Notifikasi.
3. Pilih Opsi Daya Lainnya.
4. Pilih Memilih apa yang dilakukan oleh tombol
daya.
5. Untuk mengakses Pengaturan Mematikan, pilih Ubah setelan yang
saat ini tidak tersedia.

46
6. Gulir ke bawah dan nonaktifkan Aktifkan pengawalan cepat.
7. Pilih Simpan perubahan.

Piranti lunak - 47
PIRANTI LUNAK
MENGGUNAKAN WINDOWS DAN PIRANTI LUNAK ANDA
Gateway Komputer dilengkapi dengan piranti lunak guna membantu Anda
menggunakan komputer; pprogram dan kategori yang tersedia di
komputer Anda bergantung pada model yang dibeli.
Tawaran Keamanan Internet
Penting sekali bagi Anda untuk melindungi komputer dari virus dan
serangan melalui Internet (lihat Keamanan di halaman 55). Anda akan
menerima usulan program keamanan Internet yang komprehensif ketika
Anda pertama kali memulai komputer Anda. Anda seharusnya
mengaktifkan perlindungan ini sesegera mungkin, tentu saja sebelum
Anda terhubung ke Internet. Satu set kemanan ini melindungi komputer
Anda dari ancaman online paling terakhir dan melindungi data pribadi
Anda (surat kepercayaan akun bank, nomor kartu kredit, kata sandi dan
banyak lagi yang lain).
Gateway Recovery Management
Untuk mempersiapkan komputer Anda bagi opsi pemulihan sistem, Anda
seharusnya sesegera mungkin membuat satu set disk pemulihan. Mencari
halaman 66 informasi selengkapnya.

48
INTERNET
LANGKAH PERTAMA DI INTERNET
Melindungi komputer Anda
Penting sekali bagi Anda untuk melindungi komputer dari virus dan
serangan melalui Internet (lihat Tawaran Keamanan Internet di halaman
47 dan Keamanan di halaman 55). Anda akan menerima usulan program
keamanan Internet yang komprehensif ketika Anda pertama kali memulai
komputer Anda. Anda seharusnya mengaktifkan perlindungan ini
sesegera mungkin, tentu saja sebelum Anda terhubung ke Internet.
Pilih ‘Internet Service Provider (Penyedia Layanan Internet)’
Menggunakan Internet telah menjadi bagian yang wajar
dalam berkomputer sehari-hari. Dengan beberapa
langkah sederhana saja Anda dapat terhubung dengan
banyak pengetahuan dan alat komunikasi yang sangat
besar. Untuk melaksanakan langkah ini, pertama kali
Anda harus memilih Internet Service Provider (ISP),
yang memberi koneksi antara komputer dan Internet.
Anda harus meneliti ISP yang tersedia di wilayah Anda, jangan lupa
berbicara dengan teman dan keluarga tentang pengalaman mereka atau
membaca ulasan dan laporan konsumen. ISP yang Anda pilih akan
memberi petunjuk tentang cara terhubung ke Internet (Anda mungkin
memerlukan piranti lunak tambahan atau ‘kotak’ khusus yang
menghubungkan Anda ke saluran telepon Anda).

Internet - 49
Jenis Sambungan
Anda mempunyai beberapa cara untuk tersambung ke Internet, bergantung
pada model komputer, lokasi dan kebutuhan Anda.
Dial-Up
Beberapa komputer dilengkapi dengan konektor telepon (‘modem’) dial-
up. Ini memungkinkan Anda terhubung ke Internet menggunakan saluran
telepon. Dengan sambungan dial-up, Anda tidak dapat menggunakan
modem dan telepon secara bersamaan pada satu saluran telepon. Jenis
sambungan ini hanya disarankan jika Anda menggunakan Internet secara
terbatas, karena kecepatan sambungan ini lambat dan biasanya
dikenakan beban biaya sambungan per jam.
DSL (misalnya ADSL)
DSL (Digital Subscriber Line) adalah sambungan yang ‘selalu
tersambung’ yang berjalan melalui saluran telepon. Karena DSL dan
telepon tidak menggunakan frekuensi yang sama, Anda dapat
menggunakan telepon pada saat yang sama Anda terhubung ke Internet
(ini memerlukan ‘filter mikro’ pada setiap soket telepon guna menghindari
interferensi.) Untuk bisa mendapatkan sambungan DSL, lokasi Anda
harus berada di dekat sentral telepon yang dilengkapi dengan DSL
(kadang-kadang layanan ini tidak tersedia di daerah pedesaan).
Kecepatan sambungan bervariasi bergantung pada lokasi Anda, tetapi
DSL pada umumnya memberi sambungan Internet yang sangat cepat dan
tepercaya. Karena sambungan ini selalu tersambung, biasanya
sambungan ini dikenakan tarif tetap per bulan.

50
Catatan:
Sambungan ADSL memerlukan modem yang tepat. Modem
biasanya disediakan oleh ISP ketika Anda mendaftar. Kebanyakan
modem ini dilengkapi dengan ‘router’ yang memberi akses jaringan
dan wi-fi.
Kabel
Sambungan kabel memberi layanan Internet yang ‘selalu tersambung’ dan
cepat melalui saluran televisi kabel. Layanan ini biasanya tersedia di kota
besar. Anda dapat menggunakan telepon dan menonton TV kabel pada
saat yang sama ketika terhubung dengan Internet.
3G (WWAN atau 'Jaringan Area Luas Nirkabel')
Dengan sambungan 3G Anda bisa menggunakan jaringan seluler (seperti
jaringan yang digunakan pada ponsel) untuk terhubung dengan Internet
pada saat jauh dari rumah. Soket untuk kartu SIM mungkin terintegrasi
dengan komputer Anda, atau mungkin memerlukan perangkat eksternal,
seperti modem USB atau bahkan ponsel dilengkapi dengan fitur yang
sesuai.
Catatan: Jika komputer Anda dilengkapi dengan slot kartu SIM, Anda
memerlukan kartu SIM yang kompatibel dan sudah membuat
perjanjian sambungan dengan provider seluler.
Sebelum Anda menggunakan fitur 3G, tanyakan kepada penyedia
layanan untuk mengetahui apakah akan ada beban tambahan yang
timbul, khususnya biaya roaming (berkelana).

Internet - 51
Sambungan Jaringan
LAN (Local Area Network (Jaringan Area Lokal)) adalah sekelompok
komputer (misalnya, di kantor atau di rumah) yang berbagi saluran
komunikasi dan sumber daya bersama. Bila Anda membuat jaringan,
Anda dapat berbagi file, perangkat periferal (misalnya printer) dan
sambungan Internet. Anda dapat membuat LAN menggunakan teknologi
yang menggunakan kabel (misalnya Ethernet) atau teknologi nirkabel
(misalnya WiFi atau Bluetooth).
Jaringan nirkabel
LAN atau WLAN nirkabel adalah jaringan area lokal nirkabel, yang bisa
menghubungkan lebih dari dua komputer tanpa menggunakan kabel.
Membuat jaringan nirkabel mudah dilakukan dan memungkinkan Anda
berbagi file, perangkat periferal dan sambungan Internet.
Apakah keuntungan jaringan nirkabel?
Mobilitas
Dengan sistem LAN nirkabel memungkinkan Anda dan pengguna lain
jaringan rumah Anda untuk berbagi akses ke file dan perangkat yang
tersambung ke Internet, misalnya printer atau scanner.
Anda juga dapat berbagi sambungan Internet dengan komputer lain di
rumah Anda.
Kecepatan dan Kemudahan Instalasi
Menginstal sistem LAN nirkabel bisa cepat dan mudah serta tidak harus
menarik kabel melalui dinding dan langit-langit.

52
Komponen LAN Nirkabel
Untuk membuat jaringan nirkabel di rumah, Anda perlu mempunyai item
berikut:
Titik akses (router)
Titik akses (router) adalah transceiver dua arah yang memancarkan data
ke lingkungan sekitar. Titik akses bertindak sebagai mediator antara
jaringan berkabel dan nirkabel. Kebanyakan router mempunyai modem
DSL terintegrasi yang memungkinkan Anda mengakses sambungan
Internet DSL kecepatan tinggi. ISP (Internet Service Provider) yang telah
Anda pilih biasanya memberi modem/router dengan berlangganan untuk
memperoleh layanannya. Baca dengan seksama dokumentasi yang
disertakan tentang Titik akses/router untuk petunjuk penyiapan (setup)
yang rinci.
Kabel jaringan (RJ45)
Kabel jaringan (juga disebut kabel RJ45) digunakan untuk
menghubungkan komputer induk ke titik akses (lihat ilustrasi di bawah);
jenis kabel ini bisa juga digunakan untuk menghubungkan perangkat
periferal ke titik akses.
Adaptor nirkabel
Adaptor nirkabel internal biasanya diinstal di komputer Anda.
Tombol atau alat kontrol pada Windows memungkinkan Anda
mengaktifkan atau menonaktifkan adaptor.

Internet - 53
Diagram jaringan kerja
1. Titik akses/router
2. Komputer desktop
3. Modem
4. Printer
5. Komputer portabel
6. PDA/Smartphone
7. Jaringan kabel
(RJ45)
Mengaktifkan/menonaktifkan sambungan jaringan nirkabel
Sebagian besar komputer dilengkapi dengan tombol ‘WiFi’ yang
mengaktifkan atau menonaktifkan sambungan jaringan. Jika komputer
Anda mempunyai akses nirkabel, tetapi tidak dilengkapi tombol
Komunikasi, Anda bisa mengaktifkan atau menonaktifkan jaringan
nirkabel, atau mengendalikan apa yang bisa dibagi-pakai melalui jaringan
tersebut dengan opsi manajemen jaringan. Tekan tombol Windows ( ) +
W, ketik “GrupRumah” lalu klik GrupRumah.
1
2
3
4
5
6
7

54
Peringatan: Dilarang menggunakan perangkat nirkabel pada
saat berada di pesawat terbang. Matikan semua perangkat
sebelum Anda naik pesawat terbang; perangkat tersebut bisa
berbahaya bagi pengoperasian pesawat, mengganggu
komunikasi, dan bahkan bisa dianggap ilegal.
Jelajahi Internet!
Untuk menjelajahi Internet, Anda memerlukan program
yang disebut browser internet. Internet Explorer
memberi pengalaman menelusuri web yang mudah dan
aman. Segera setelah akses Internet Anda diinstal dan
sudah tersambung, klik pintasan Internet Explorer yang
terletak di desktop Windows dan tingkatkan pengalaman
ber-Internet Anda.
Gateway situs web
Untuk memulai, kunjungi saja situs web kami, www.gateway.com.
Gateway dibuat khusus untuk memberi dukungan pribadi yang terus
menerus kepada Anda. Lihat bagian Dukungan untuk mendapatkan
bantuan yang disesuaikan bagi kebutuhan Anda.
www.gateway.com adalah pintu gerbang Anda menuju dunia aktivitas
dan layanan online: kunjungi kami secara berkala untuk mendapatkan
informasi dan unduhan terbaru!

Internet - 55
Keamanan
Anda mungkin sangat antusias untuk menjelajahi segala hal yang
ditawarkan Internet. Agar Anda selalu aman saat online, Gateway
sebelumnya telah menginstal Norton Internet Security™ dari Symantec
yang telah memperoleh penghargaan pada komputer Anda.
Norton Internet Security™ dengan baik dapat berjalan di latar belakang
untuk memblokir ancaman yang kompleks dewasa ini serta melindungi
identitas Anda ketika berbelanja, melakukan transaksi bank, atau
melakukan penjelajahan secara online.
Norton Internet Security memblokir pencurian identitas online, mendeteksi
dan melenyapkan peranti mata-mata, menghapus virus dan cacing
Internet, serta melindungi komputer dari peretas.
Definisi
Apakah Virus itu?
Piranti lunak jahat, biasanya disebut ‘virus’, adalah program yang didesain
untuk menginfeksi dan merusak komputer. Kebanyakan virus
ditransmisikan melalui Internet, email atau situs web jahat. Virus normal
akan menduplikasikan dan lewat tanpa terdeteksi ke beberapa komputer.
Bentuk gangguan lainnya, seperti Trojan horse (kuda Troyan), cacing,
atau spam dapat menginfeksi komputer dengan berbagai cara,
menghabiskan sumber daya atau menyumbat jaringan.
Catatan: Gateway jamin komputer Anda 100% bebas virus pada saat
pembelian dan tidak rusak disebabkan virus.

56
Apakah peranti mata-mata itu?
Peranti mata-mata mengacu pada program yang tidak diinginkan yang
diunduh ke komputer Anda ketika terhubung ke internet, sering kali tanpa
Anda ketahui. Setelah peranti mata-mata menginfeksi komputer Anda,
peranti mata-mata dapat mengintai aktivitas penjelajahan (browsing)
Anda, mengumpulkan informasi pribadi Anda, menyebabkan munculnya
sembul, atau bahkan mengubah konfigurasi komputer Anda. Peranti
mata-mata memakan sumber daya pada komputer Anda dan dapat
memperlambat sambungan Internet atau keseluruhan sistem, bahkan
dapat menyebabkan lumpuhnya komputer.
Peranti mata-mata kadang-kadang digunakan oleh perusahaan yang tidak
bertanggung jawab untuk memantau dan melacak situs yang Anda
kunjungi di Internet guna menentukan kebiasaan Anda berselancar di
Internet serta menampilkan iklan sembul di layar Anda. Namun demikian,
beberapa jenis peranti mata-mata lebih dari sekadar melacak dan
sebenarnya memantau ketukan tombol serta mengambil kata sandi dan
juga fungsi lainnya yang menimbulkan risiko keamanan yang sudah pasti.
Apakah program jahat itu?
Peranti lunak jahat, juga dikenal dengan malware, adalah peranti lunak
yang dengan sengaja dibuat untuk membahayakan komputer Anda.
Misalnya, virus, cacing, dan kuda Troyan adalah peranti lunak jahat.
Untuk membantu melindungi komputer Anda dari malware, pastikan
komputer Anda menggunakan peranti lunak antivirus dan peranti lunak
anti-malware terbaru.

Internet - 57
Apakah firewall (tembok api) pribadi itu?
Firewall pribadi adalah program peranti lunak yang dibuat untuk
mencegah akses tanpa izin ke atau dari jaringan perseorangan. Firewall
pribadi bertindak sebagai perisai untuk melindungi sambungan Internet
Anda dari sambungan yang tidak diinginkan, sebagian sambungan
tersebut berusaha menguasai komputer Anda untuk menginstal atau
mendistribusikan ulang virus atau program jahat. Setiap sambungan ke
komputer Anda dipantau – program yang berusaha menerima informasi
tanpa izin Anda dideteksi dan firewall akan menampilkan suatu
peringatan. Anda kemudian dapat memutuskan apakah mengizinkan
sambungan itu, jika sambungan tersebut adalah ke program yang sedang
Anda gunakan sekarang ini maka biasanya Anda akan izinkan (misalnya
permainan yang terhubung ke server multi-pemain atau ensiklopedia yang
membuat pembaruan konten).
Cara melindungi komputer Anda
Pencegahan Cybercrime dapat dilakukan dengan mudah – apabila diberi
dengan sedikit nasihat teknis dan akal sehat, maka banyak serangan
dapat dihindari. Pada umumnya, penjahat online berusaha mencari uang
secepat dan semudah mungkin. Semakin Anda menyulitkan pekerjaan
mereka, semakin besar mereka membiarkan Anda dan pindah ke sasaran
yang lebih mudah. Tip di bawah ini memberi informasi dasar tentang cara
Anda dapat mencegah penipuan online.

58
Selalu perbarui komputer Anda dengan perbaikan dan pembaruan
(update) terkini.
Salah satu cara terbaik menjauhkan penyerang dari komputer Anda
adalah dengan menerapkan perbaikan dan membetulkan piranti lunak bila
kesemuanya tersedia. Dengan memperbarui komputer Anda secara
berkala, maka Anda dapat memblokir penyerang sehingga mereka tidak
bisa memanfaatkan cacat (kerentanan) peranti lunak yang dapat mereka
gunakan untuk menerobos sistem Anda.
Kendati senantiasa memperbarui komputer Anda tidak akan melindungi
Anda dari semua serangan, namun cara ini dapat membuat peretas
(hacker) sulit mengakses sistem Anda, memblokir menyeluruh banyak
serangan dasar dan otomatis, serta mungkin cukup untuk mematahkan
penyerang yang tekatnya kurang sehingga mencari komputer yang lebih
rentan di lain tempat.
Versi yang lebih baru Microsoft Windows dan peranti lunak populer
lainnya dapat dikonfigurasi untuk mengunduh dan menerapkan
pembaruan secara otomatis sehingga Anda tidak harus mengingat untuk
mengontrol ketersediaan perangkat lunak terkini. Dengan memanfaatkan
fitur “pembaruan otomatis” dalam peranti lunak Anda adalah langkah awal
yang sangat bagus untuk menjaga keamanan saat online.
Lindungi komputer Anda dengan peranti lunak keamanan.
Beberapa jenis piranti lunak keamanan perlu bagi keamanan online dasar.
Piranti lunak yang sangat perlu terdiri dari program firewall dan antivirus.
Firewall biasanya merupakan pertahanan garis depan komputer Anda –
firewall mengendalikan siapa yang menyampaikan dan apa yang dapat

Internet - 59
disampaikan pada komputer Anda secara online. Anda dapat
menganggap firewall seperti “polisi” guna mengawasi semua data yang
berusaha masuk kedalam dan keluar dari komputer Anda melalui Internet,
yang mengizinkan informasi yang diketahui tetap aman dan memblokir
lalu lintas “jelek” seperti serangan agar jangan sampai menerobos
komputer Anda.
Sering kali pertahanan garis kedua adalah piranti lunak antivirus Anda,
yang memantau semua aktivitas online seperti pesan email, dan
penelusuran Web serta melindungi komputer dari virus, worm, kuda
Troyan dan jenis program jahat lainnya. Piranti lunak antivirus dan anti
mata-mata Anda seharusnya dikonfigurasi untuk memperbarui secara
otomatis, dan program itu seharusnya bisa melakukan pembaruan
otomatis setiap saat Anda terhubung ke Internet.
Satu set keamanan terpadu seperti Norton Internet Security
mengombinasikan firewall, antivirus, antispyware dengan fitur lainnya
seperti antispam dan pengawasan orangtua telah menjadi populer karena
program itu menawarkan semua piranti lunak keamanan yang diperlukan
untuk perlindungan online dalam satu paket sederhana. Banyak orang
berpendapat bahwa menggunakan satu set keamanan sebagai alternatif
untuk menginstal, mengonfigurasi dan memperbarui beberapa jenis piranti
lunak keamanan yang berbeda.
Satu versi lengkap Norton Internet Security™ telah diinstal
sebelumnya pada Gateway sistem Anda. Versi ini berisi langganan
gratis untuk pembaruan perlindungan selama masa percobaan.
Pastikan Anda Mengaktifkannya!

60
Pilih kata sandi yang kuat dan amankan sandi itu.
Kata sandi merupakan fakta kehidupan di Internet dewasa ini; kita
menggunakan kata sandi untuk segala hal mulai dari memesan bunga
dan perbankan online sampai masuk ke situs Web maskapai
penerbangan favorit kita guna melihat berapa biaya perjalanan yang telah
kita kumpulkan. Tip berikut ini dapat membantu mengamankan
pengalaman online Anda:
• Memilih kata sandi yang tidak dapat ditebak dengan mudah merupakan
langkah pertama untuk mengamankan kata sandi dan menjauhkan dari
jangkauan pelanggar hukum. Kata sandi yang kuat memiliki lebih dari
delapan karakter dan menggunakan kombinasi huruf, angka serta
simbol (misalnya, # $ % ! ?). Hindari menggunakan berikut ini sebagai
kata sandi Anda: nama login Anda, sesuatu yang berdasarkan pada
informasi pribadi seperti nama belakang Anda, dan kata yang dapat
ditemukan di kamus, khususnya "kata sandi". Coba untuk memilih kata
sandi yang unik dan kuat guna melindungi aktivitas seperti perbankan
online.
• Simpan kata sandi Anda di tempat yang aman dan coba jangan
menggunakan kata sandi yang sama untuk setiap layanan online yang
Anda gunakan.
• Ubah kata sandi secara berkala, setidaknya setiap 90 hari. Hal ini dapat
membatasi kerugian yang disebabkan oleh seseorang yang telah
memperoleh akses ke akun Anda. Jika Anda melihat ada sesuatu yang
mencurigakan pada salah satu akun online, salah satu langkah pertama
yang dapat dilakukan adalah mengganti kata sandi.

Internet - 61
Lindungi informasi pribadi Anda.
Berhati-hatilah ketika memberi informasi pribadi seperti nama, alamat
rumah, nomor telepon, dan alamat email Anda saat online. Untuk
memanfaatkan banyak layanan online, Anda tentu saja harus memberi
informasi pribadi guna menangani penagihan dan pengiriman barang
yang dibeli. Karena jarang sekali diminta, Anda tidak perlu
mengungkapkan informasi pribadi, daftar berikut ini berisi beberapa
nasihat bagaimana memberi informasi pribadi secara aman saat online:
• Waspada terhadap pesan email palsu. Hal-hal yang menandakan
bahwa sebuah pesan mungkin palsu adalah ejaan salah, tata bahasa
buruk, penyampaian yang aneh, alamat situs Web dengan ekstensi
aneh, alamat situs Web yang seluruhnya angka di mana biasanya
adalah kata, serta hal-hal lain yang janggal. Selain itu, pesan
pengelabuan seringkali akan memberi tahu bahwa Anda harus
bertindak cepat terhadap akun Anda yang tetap terbuka, memperbarui
keamanan, atau mendesak Anda untuk segera memberi informasi, jika
tidak maka sesuatu yang buruk akan terjadi. Jangan ikuti bujukan itu!
• Jangan merespons pesan email yang meminta informasi pribadi.
Perusahaan yang sah tidak akan menggunakan pesan email untuk
meminta informasi Anda. Bila ragu, hubungi perusahaan tersebut lewat
telepon atau ketikkan alamat Web perusahaan ke browser Web Anda.
Jangan mengklik tautan pesan ini karena tautan tersebut akan
membawa Anda ke situs Web jahat.

62
• Hindari situs Web penipuan yang digunakan untuk mencuri
informasi pribadi Anda. Ketika mengunjungi situs Web, ketik alamat
(URL) langsung di browser Web dan tidak mengikuti tautan dalam email
atau pesan instan. Penipu biasanya memalsukan tautan ini untuk
membuatnya kelihatan meyakinkan.
Situs web belanja, perbankan atau lainnya di mana terdapat informasi
sensitif seharusnya mengandung huruf “S” setelah "http" (misalnya
https://www.yourbank.com bukan http://www.yourbank.com). Huruf “s”
singkatan dari secure (aman) dan seharusnya tampak ketika Anda
berada di area yang meminta Anda untuk login (masuk) atau memberi
data sensitif lainnya. Tanda lain bahwa Anda mempunyai sambungan
yang aman adalah ikon gembok kecil di dasar browser Web Anda
(biasanya di sudut kanan).
• Perhatikan kebijakan privasi mengenai situs Web dan piranti lunak.
Anda perlu memahami cara perusahaan mengumpulkan informasi dan
menggunakan informasi pribadi Anda sebelum Anda memberi informasi
pribadi kepada mereka.
• Lindungi alamat email Anda. Pengirim pesan spam dan "pengelabu"
kadang-kadang mengirim jutaan pesan ke alamat email yang mungkin
ada atau mungkin tidak ada dengan harapan menemukan korban
potensial. Merespons pesan ini atau bahkan mengunduh gambarnya
dapat dipastikan Anda akan ditambahkan ke dalam daftar mereka untuk
mendapatkan pesan yang sama di kemudian hari. Berhati-hatilah juga
ketika Anda mengeposkan alamat email Anda secara online di
newsgroup, blog atau komunitas online.

Internet - 63
Penawaran online yang sulit dipercaya biasanya memang tidak dapat
dipercaya.
Pepatah lama “tidak ada makan siang gratis” masih berlaku hingga saat
ini. Piranti lunak yang tampaknya “gratis” seperti screen saver (pengaman
layar) atau smiley (tersenyum), adalah trik investasi rahasia yang pasti
dapat membuat Anda sangat beruntung, dan kontes yang anehnya telah
Anda menangkan tanpa terpikat bujukan yang menggiurkan digunakan
oleh perusahaan untuk menarik perhatian Anda.
Meskipun Anda mungkin tidak membayar piranti lunak atau layanan
tersebut dengan uang secara langsung, namun piranti lunak atau layanan
gratis yang Anda minta mungkin telah disertai dengan piranti lunak
pengiklanan (“peranti iklan") yang melacak perilaku Anda dengan
menampilkan iklan yang tidak diinginkan. Anda mungkin harus
mengungkapkan informasi pribadi atau membeli sesuatu yang lain untuk
menagih sesuatu yang sepertinya Anda menangkan. Jika sebuah tawaran
tampak begitu bagus dan sulit untuk dipercaya, mintalah pendapat orang
lain, dengan membaca cetakan yang begitu bagus atau yang lebih baik
lagi, abaikan saja.
Kaji ulang laporan bank dan kartu kredit secara berkala.
Dampak pencurian identitas dan kejahatan online bisa sangat dikurangi
jika Anda dapat menangkap segera setelah data Anda dicuri atau ketika
informasi pribadi Anda dicoba digunakan untuk pertama kalinya. Salah
satu cara termudah mendapatkan petunjuk bahwa telah terjadi sesuatu
yang tidak benar adalah dengan mengkaji ulang laporan bulanan yang

64
diberikan oleh bank atau perusahaan kartu kredit Anda guna mengetahui
adanya sesuatu yang tidak lazim.
Di samping itu, banyak bank dan layanan menggunakan sistem
pencegahan penipuan yang melaporkan perilaku pembelian yang tidak
wajar (misalnya, jika Anda tinggal di Texas dan tiba-tiba mulai membeli
lemari es di Budapest). Untuk mengonfirmasi pembelian yang tidak wajar
ini, mereka mungkin menelepon Anda dan meminta Anda
mengonfirmasikan pembelian itu. Jangan menganggap ringan telepon ini,
ini adalah isyarat bahwa ada hal buruk yang telah menimpa Anda dan
Anda seharusnya segera mengambil tindakan yang diperlukan.
Lindungi komputer Anda dengan alat keamanan Windows
Windows memberi Anda beragam aplikasi perlindungan.
Pembaruan Windows
Jika Anda mempunyai sambungan Internet aktif, Windows dapat
memeriksa pembaruan yang penting bagi komputer Anda dan
menginstalnya secara otomatis. Pembaruan ini terdiri dari perbaikan
keamanan dan pembaruan program yang dapat menyempurnakan
pengalaman berkomputer Anda dan membantu melindungi komputer
Anda dari virus dan serangan baru.
Bagaimana saya mengetahui bahwa komputer saya berada dalam
bahaya?
Jika Pusat Aksi memberi peringatan, atau jika komputer Anda menjadi
tidak menentu, tiba-tiba crash (lumpuh) atau jika beberapa program Anda
tidak berjalan dengan benar, maka komputer Anda mungkin terinfeksi oleh

Internet - 65
piranti lunak jahat. Namun, jangan menyalahkan setiap masalah komputer
pada virus! Jika Anda mencurigai komputer Anda terinfeksi, hal pertama
yang harus dilakukan adalah memperbarui piranti lunak antivirus dan anti-
spyware – jika Anda belum memperbaruinya, lalu jalankan.

66
PEMULIHAN
Jika Anda punya masalah dengan komputer, sedangkan pertanyaan
Tanya Jawab (lihat halaman 88) tidak membantu, Anda dapat
memulihkan komputer - misalnya, mengembalikannya ke keadaan awal.
Bagian ini menjelaskan alat pemulihan yang dapat digunakan di komputer
Anda. Gateway yang menyediakan Gateway Recovery Management,
sehingga memungkinkan Anda membuat cadangan pemulihan,
pengandar dan cadangan aplikasi, dan memulai opsi pemulihan,
menggunakan alat Windows, atau cadangan pemulihan.
Catatan: Gateway Recovery Management hanya ada bersama
dengan sistem pengoperasian Windows yang sudah diinstal
sebelumnya.
Penting: Kami menyarankan Anda sesegera mungkin membuat
Cadangan Pemulihan dan Pengandar serta Cadangan Aplikasi.
Dalam keadaan tertentu pemulihan lengkap akan membutuhkan
cadangan pemulihan USB.

Pemulihan - 67
Membuat cadangan pemulihan
Untuk menginstal ulang dari kandar penyimpanan USB, sebelumnya Anda
harus membuat cadangan pemulihan. Cadangan pemulihan dilengkapi
seluruh konten orisinal kandar keras komputer, termasuk Windows dan
semua perangkat lunak dan pengandar yang diinstal dari pabrik. Dengan
menggunakan cadangan Ini akan memulihkan komputer Anda ke keadaan
yang sama dengan ketika Anda membelinya, pada saat yang sama juga
memberi Anda opsi untuk mempertahankan semua setelan dan data
pribadi.
Catatan:
Pastikan Anda memiliki drive USB dengan kapasitas
setidaknya 16 GB.
1. Dari Mulai, ketik 'Pemulihan' lalu klik Gateway Recovery Management
di dalam daftar aplikasi.

68
2. Klik Buat Cadangan Default Pabrik. Jendela Drive Pemulihan akan
terbuka.
Pastikan konten Salin dari partisi pemulihan ke drive pemulihan
dipilih. Dengan begitu akan memberikan cadangan pemulihan
terlengkap dan teraman.

Pemulihan - 69
3. Colokkan drive USB, kemudian klik Berikutnya.
• Pastikan drive USB Anda punya kapasitas yang cukup sebelum
melanjutkan. Cadangan pemulihan membutuhkan setidaknya
penyimpanan 16 GB
4. Anda akan diperlihatkan dengan jalannya pembuatan cadangan di
layar.
5. Ikuti proses tersebut sampai selesai:
6. Setelah membuat cadangan pemulihan, Anda dapat memilih untuk
menghapus informasi pemulihan di komputer Anda. Jika Anda hapus
informasi ini, Anda hanya dapat menggunakan cadangan pemulihan
USB untuk memulihkan komputer Anda, jika Anda kehilangan atau
menghapus drive USB tersebut, maka Anda tidak dapat memulihkan
komputer Anda.

70
7. Cabut drive USB dan labelnya dengan jelas.
Penting: Tulis label keterangan yang khas pada cadangan,
misalnya ‘Cadangan Pemulihan Windows' Pastikan cadangan
tetap aman di tempatnya yang selalu Anda ingat.
Membuat driver dan cadangan aplikasi
Untuk membuat Driver dan Cadangan Aplikasi, yang berisi driver dan
perangkat lunak yang diinstal dari pabrik yang diperlukan oleh komputer
Anda, Anda mungkin dapat menggunakan drive penyimpanan USB, jika
komputer Anda dilengkapi perekam DVD, lebih dari satu DVD yang dapat
merekam.

Pemulihan - 71
1. Dari Mulai, ketik 'Pemulihan' lalu klik Gateway Recovery Management
di dalam daftar aplikasi.
2. Klik Buat Driver dan Cadangan Aplikasi.
Colokkan drive USB atau masukkan DVD kosong ke dalam drive optik,
lalu klik Berikutnya.

72
• Jika Anda menggunakan drive USB, pastikan kapasitasnya
mencukupi sebelum melanjutkan.
• Jika menggunakan DVD, kotak dialog juga akan memberi tahu Anda
jumlah cakram kosong yang dapat ditulisi yang akan Anda perlukan
untuk membuat cakram pemulihan. Pastikan Anda mempunyai
cakram kosong dan identik sejumlah yang diperlukan.

Pemulihan - 73
3. Klik Mulai untuk menyalin file. Anda akan diperlihatkan dengan jalannya
pembuatan cadangan di layar.
4. Ikuti proses tersebut sampai selesai:
• Jika Anda menggunakan disk optik, drive akan mengeluarkan setiap
disk setelah selesai membakarnya. Keluarkan disk dari drive dan
tandai dengan spidol permanen.
Jika diperlukan beberapa disk, masukkan disk baru ketika diminta,
kemudian klik OK. Lanjutkan merekam disk sampai proses selesai.
• Jika Anda menggunakan drive USB, cabut drive-nya dan labelnya
dengan jelas.
Penting: Tulis label keterangan yang khas pada setiap cadangan,
misalnya ‘Driver dan Cadangan Aplikasi'. Pastikan cadangan
tetap aman di tempatnya yang selalu Anda ingat.
Memulihkan sistem Anda
Untuk memulihkan sistem Anda:
1. Lakukan perbaikan kecil.
Jika hanya satu atau dua piranti lunak atau perangkat keras yang tidak
lagi berjalan dengan benar, masalah tersebut bisa diselesaikan dengan
menginstal ulang piranti lunak atau driver perangkat.
Untuk memulihkan perangkat lunak dan driver yang telah diinstal
sebelumnya di pabrik, lihat "Menginstal ulang driver dan Aplikasi"
pada halaman 74.
Untuk petunjuk mengenai penginstalan ulang piranti lunak dan driver
yang tidak diinstal sebelumnya, lihat situs Web dokumentasi produk
atau dukungan teknis.

74
2. Kembalikan ke kondisi sistem sebelumnya.
Jika penginstalan ulang perangkat lunak atau driver tidak membantu,
maka problem tersebut bisa dipecahkan dengan mengembalikan sistem
Anda ke keadaan sebelumnya ketika segala sesuatunya bekerja
dengan benar.
Untuk petunjuknya, lihat "Mengembalikan ke potret sistem
sebelumnya" pada halaman 77.
3. Reset sistem operasi Anda.
Jika tidak ada cara lain lagi yang dapat memecahkan masalah tersebut
dan Anda ingin mereset sistem Anda ke kondisi pabrik dengan
mempertahankan informasi pengguna, lihat "Mengembalikan sistem
Anda ke kondisi pabrik" pada halaman 79
4. Reset sistem Anda ke kondisi pabrik.
Jika tidak ada cara lain lagi yang dapat memecahkan masalah tersebut
dan Anda ingin mereset sistem Anda ke kondisi pabrik, lihat
"Mengembalikan sistem Anda ke kondisi pabrik" pada halaman 79.
Menginstal ulang driver dan Aplikasi
Sebagai langkah pemecahan ulang, Anda mungkin perlu menginstal ulang
aplikasi dan driver yang diinstal sebelumnya pada komputer Anda dari
pabrik. Anda dapat melakukan pemulihan mungkin menggunakan hard
drive atau mungkin dengan disk cadangan yang telah Anda buat.
• Piranti lunak baru - Jika Anda perlu memulihkan piranti lunak yang tidak
diinstal sebelumnya pada komputer Anda, maka Anda perlu mengikuti
petunjuk instalasi piranti lunak itu.

Pemulihan - 75
• Driver perangkat baru - Jika Anda perlu memulihkan driver perangkat
yang tidak diinstal sebelumnya pada komputer Anda, ikuti petunjuk
yang diberikan bersama perangkat itu.
Jika Anda melakukan pemulihan menggunakan Windows dan informasi
pemulihan yang tersimpan di komputer:
•Dari Mulai, ketik 'Pemulihan' lalu klik Gateway Recovery
Management di dalam daftar aplikasi.
• Klik Instal ulang Driver atau Aplikasi.

76
• Anda sebaiknya melihat bagian Konten pada Gateway Pusat
Sumber Daya.
• Klik ikon instal untuk item yang ingin Anda instal, kemudian
ikuti petunjuk pada layar guna melakukan instalasi. Ulangi
langkah ini untuk setiap item yang ingin Anda instal ulang.
Jika Anda memulihkan dari Driver dan Cadangan Aplikasi yang ada di
DVD atau drive USB:
1. Masukkan Driver dan Cadangan Aplikasi ke dalam disk drive atau
sambungkan ke port USB bebas.
• Jika Anda sudah memasukkan DVD tunggu Gateway Pusat Sumber
Daya untuk mulai.
•Jika Gateway Pusat Sumber Daya belum mulai otomatis, tekan
tombol Windows + <E>, kemudian klik dua kali pada ikon drive
optik.

Pemulihan - 77
• Jika Anda menggunakan drive USB, tekan tombol Windows + <E>,
kemudian klik dua kali pada drive yang berisi cadangan. Klik dua kali
pada Pusat Sumber Daya.
2. Anda sebaiknya melihat bagian Konten pada Gateway Pusat Sumber
Daya.
3. Klik ikon instal untuk item yang ingin Anda instal, kemudian ikuti
petunjuk pada layar guna melakukan instalasi. Ulangi langkah ini
untuk setiap item yang ingin Anda instal ulang.
Mengembalikan ke potret sistem sebelumnya
Pemulihan Sistem Microsoft secara berkala ‘memotret’ setelan sistem
Anda dan menyimpannya sebagai titik pemulihan. Pada kebanyakan
permasalahan piranti lunak yang sulit dipecahkan, Anda dapat kembali ke
salah satu titik pemulihan ini agar sistem Anda berjalan lagi.

78
Windows secara otomatis membuat titik pemulihan tambahan setiap hari,
dan juga setiap saat Anda menginstal piranti lunak atau driver perangkat.
Catatan: Untuk informasi selengkapnya tentang menggunakan
Pemulihan Sistem Microsoft, dari Mulai, ketik ‘Bantuan’ lalu klik
Bantuan dan Dukungandalam daftar aplikasi. Ketik ‘Pemulihan
sistem Windows’ dalam kotak Bantuan Pencarian, kemudian tekan
Enter.
Untuk kembali ke titik pemulihan:
1. Dari Mulai, ketik'Panel Kontrol' dan kemudian klik Panel Kontrol dalam
daftar aplikasi.
2. Klik Sistem dan Keamanan > Pusat Aksi, kemudian klik Pemulihan di
bagian dasar jendela.
3. Klik Buka Pemulihan Sistem, lalu Berikutnya.
4. Klik titik pemulihan terbaru (pada saat sistem Anda bekerja dengan
benar), klik Berikutnya, kemudian Selesai.
5. Jendela konfirmasi muncul; klik Ya. Sistem Anda sudah dipulihkan
menggunakan titik pemulihan yang Anda tetapkan. Proses ini mungkin
berlangsung selama beberapa menit, dan mungkin harus
menghidupkan ulang komputer Anda.

Pemulihan - 79
Mengembalikan sistem Anda ke kondisi pabrik
Jika komputer Anda mengalami masalah yang tidak dapat dipulihkan
dengan metode lain, mungkin Anda perlu menginstal ulang semuanya
guna mengembalikan sistem Anda ke kondisi pabrik. Anda dapat
melakukan pemulihan mungkin menggunakan hard drive atau mungkin
dengan cadangan pemulihan yang telah Anda buat.
• Jika Anda masih menjalankan Windows dan telah menghapus partisi
pemulihan, lihat "Memulihkan dari dalam Windows" pada
halaman 80.
• Jika Anda tidak dapat menjalankan Windows, hard drive orisinal Anda
telah diformat ulang atau Anda telah menginstal hard drive pengganti,
lihat "Memulihkan dari cadangan pemulihan Anda" pada
halaman 84.

80
Memulihkan dari dalam Windows
Mulai Gateway Recovery Management:
•Dari Mulai, ketik 'Pemulihan' lalu klik Gateway Recovery Management
di dalam daftar aplikasi.
Tersedia dua pilihan, Pulihkan Setelan Pabrik (Reset PC saya) atau
Pemulihan Disesuaikan (Segarkan PC saya).
Pulihkan Setelan Pabrik menghapus apa saja pada hard drive Anda,
kemudian menginstal ulang Windows dan semua perangkat lunak serta
driver yang telah diinstal sebelumnya pada sistem Anda. Jika Anda dapat
mengakses file penting pada hard drive, buat cadangannya sekarang.
Lihat "Pulihkan Setelan Pabrik dengan Gateway Recovery
Management" pada halaman 81.
Pemulihan Disesuaikan akan berusaha menyimpan file Anda (data
pengguna) tapi akan menginstal ulang semua perangkat lunak dan driver.
Perangkat lunak yang diinstal sejak Anda membeli PC akan dihapus
(kecuali perangkat lunak yang diinstal dari Windows Store). Lihat
"Pemulihan Disesuaikan dengan Gateway Recovery Management"
pada halaman 83.

Pemulihan - 81
Pulihkan Setelan Pabrik dengan Gateway Recovery Management
1. Klik Pulihkan Setelan Pabrik.
Perhatian: 'Pulihkan Setelan Pabrik' akan menghapus semua file
di hard drive Anda.
2. Jendela Reset PC Anda akan terbuka.
Ilustrasi hanya untuk referensi.

82
3. Klik Berikutnya, kemudian pilih cara menghapus file Anda:
a. Hanya dengan membuang file saya dengan cepat menghapus
semua file sebelum memulihkan komputer Anda yang membutuhkan
waktu kira-kira 30 menit.
b. Membersihkan dengan benar hard drive akan benar-benar dapat
membersihkan hard drive setelah setiap file dihapus, sehingga tidak
ada lagi file dapat dilihat setelah pemulihan. Membersihkan hard
drive memerlukan waktu hingga 5 jam, namun lebih aman karena file
lama benar-benar dibuang.
4. Klik Reset.
5. Proses pemulihan mulai dengan menghidupkan ulang komputer Anda,
kemudian lanjutkan dengan menyalin file ke hard drive Anda.
6. Setelah pemulihan selesai, Anda dapat mulai menggunakan komputer
Anda dengan mengulangi proses pertama kali mulai.

Pemulihan - 83
Pemulihan Disesuaikan dengan Gateway Recovery Management
1. Klik Pemulihan Disesuaikan (Simpan Data pengguna).
2. Jendela Segarkan PC Anda akan terbuka.
3. Klik Berikutnya, kemudian Segarkan.
4. Proses pemulihan mulai dengan menghidupkan ulang komputer Anda,
kemudian lanjutkan dengan menyalin file ke hard drive Anda. Proses ini
membutuhkan waktu kira-kira 30 menit.

84
Memulihkan dari cadangan pemulihan Anda
Untuk memulihkan dari cadangan pemulihan pafa drive USB:
1. Cari cadangan pemulihan Anda:
2. Colokkan drive USB dan hidupkan komputer Anda.
3. Jika ini belum diaktifkan, Anda harus mengaktifkan Menu Boot F12:
a. Tekan <F2> ketika mulai menghidupkan komputer.
b. Gunakan tombol panah kanan atau kiri untuk memilih menu Main.
c. Tekan tombol tersebut sampai F12 Boot Menu dipilih, tekan <F5>
untuk mengubah pengaturan ini ke Enabled.
d. Gunakan tombol panah kanan atau kiri untuk memilih menu Exit.
e. Bergantung pada jenis BIOS komputer Anda gunakan, pilih Save
Changes and Exit atau Exit Saving Changes dan tekan Enter. Pilih
OK atau Yes untuk mengonfirmasi.
f. Komputer akan melakukan start ulang.
4. Selama permulaan, tekan <F12> untuk membuka menu boot. Menu
boot memungkinkan Anda untuk memilih dari perangkat mana akan
memulai, pilih drive USB.
a. Gunakan tombol panah untuk memilih USB Device, kemudian tekan
Enter.
b. Windows mulai dari cadangan pemulihan alih-alih dari proses
pengawalan normal.
5. Pilih tipe keyboard.

Pemulihan - 85
6. Pilih Troubleshoot dan kemudian pilih tipe pemulihan yang digunakan:
a. Klik Advanced kemudian System Restore untuk mulai Pemulihan
Sistem Microsoft:
Pemulihan Sistem Microsoft secara berkala ‘memotret’ setelan
sistem Anda dan menyimpannya sebagai titik pemulihan. Pada
kebanyakan permasalahan piranti lunak yang sulit dipecahkan, Anda
dapat kembali ke salah satu titik pemulihan ini agar sistem Anda
berjalan lagi.
b. Klik Reset your PC untuk mulai proses reset:
Reset your PC menghapus apa saja pada hard drive Anda,
kemudian menginstal ulang Windows dan semua piranti lunak serta
driver yang telah diinstal sebelumnya pada sistem Anda. Jika Anda
dapat mengakses file penting pada hard drive, buat cadangannya
sekarang. Lihat "Reset PC Anda dari cadangan pemulihan" pada
halaman 86.
c. Klik Refresh your PC untuk mulai proses segarkan:
Refresh your PC akan berusaha menyimpan file Anda (data
pengguna) tapi akan menginstal ulang semua perangkat lunak dan
driver. Perangkat lunak yang diinstal sejak Anda membeli PC akan
dihapus (kecuali perangkat lunak yang diinstal dari Windows Store).
Lihat "Segarkan PC Anda dari cadangan pemulihan" pada
halaman 87.

86
Reset PC Anda dari cadangan pemulihan
Perhatian: Reset PC Anda akan menghapus semua file di hard
drive Anda.
1. Jendela Reset PC Anda akan terbuka.
Ilustrasi hanya untuk referensi.
2. Klik Berikutnya.
3. Pilih sistem operasi untuk memulihkan (biasanya hanya satu pilihan
yang tersedia).
4. Pilih untuk menyimpan perubahan apa pun ke hard drive.
a. Jika Anda telah menghapus partisi pemulihan atau jika tidak
merubahnya pada hard drive dan ingin menyimpan perubahan
tersebut, pilih Tidak.
b. Untuk benar-benar memulihkan komputer Anda menjadi Setelan
Pabrik, pilih Ya.
5. Pilih cara menghapus file Anda:
a. Hanya dengan membuang file saya dengan cepat menghapus
semua file sebelum memulihkan komputer Anda yang membutuhkan
waktu kira-kira 30 menit.

Pemulihan - 87
b. Membersihkan dengan benar hard drive akan benar-benar dapat
membersihkan hard drive setelah setiap file dihapus, sehingga tidak
ada lagi file dapat dilihat setelah pemulihan. Membersihkan hard
drive memerlukan waktu hingga 5 jam, namun lebih aman karena file
lama benar-benar dibuang.
6. Klik Reset.
7. Setelah pemulihan selesai, Anda dapat mulai menggunakan komputer
Anda dengan mengulangi proses pertama kali mulai.
Segarkan PC Anda dari cadangan pemulihan
1. Jendela Segarkan PC Anda akan terbuka.
2. Klik Berikutnya.
3. Pilih sistem operasi untuk memulihkan (biasanya hanya satu pilihan
yang tersedia).
4. Klik Segarkan.
5. Proses pemulihan mulai dengan menghidupkan ulang komputer Anda,
kemudian lanjutkan dengan menyalin file ke hard drive Anda. Proses ini
membutuhkan waktu kira-kira 30 menit.

88 - Tanya jawab
TANYA JAWAB
Berikut adalah daftar kemungkinan kondisi yang dapat terjadi saat Anda
menggunakan komputer. Tersedia solusi mudah untuk setiap kondisi.
Saya menyalakan daya, tapi komputer tidak start atau melakukan boot
Lihat indikator daya:
• Jika tidak menyala, berarti daya tidak mengalir ke komputer. Periksa
kondisi di bawah ini:
• Jika Anda menggunakan baterai, mungkin daya baterai lemah
sehingga tidak dapat menghidupkan komputer. Pasang adaptor AC
untuk mengisi ulang daya unit baterai.
• Pastikan adaptor AC terpasang dengan benar ke komputer dan
stopkontak.
• Jika menyala, periksa kondisi di bawah ini:
• Apakah ada cakram di dalam cakram optik? Ambil cakram tersebut
dan tekan <Ctrl> + <Alt> + <Del> untuk menghidupkan ulang sistem.
• Apakah Anda mempunyai perangkat penyimpanan USB (disk USB
atau ponsel cerdas) yang dicolokkan ke komputer? Cabut cakram
tersebut dan tekan <Ctrl> + <Alt> + <Del> untuk menghidupkan
ulang sistem.

Tanya jawab - 89
Tidak ada tampilan apapun pada layar
Sistem manajemen daya komputer akan secara otomatis menonaktifkan
layar untuk menghemat daya. Tekan tombol apa saja untuk mengaktifkan
kembali layar.
Jika layar tidak aktif saat tombol ditekan, tiga kemungkinan penyebabnya
adalah:
• Tingkat kecerahan mungkin terlalu rendah. Tekan (meningkat) untuk
mengatur tingkat kecerahan.
• Perangkat layar mungkin diatur ke monitor eksternal. Tekan untuk
mengganti tampilan kembali ke komputer.
• Jika indikator Tidur menyala, berarti komputer berada dalam mode
Tidur. Tekan dan lepas tombol daya untuk melanjutkan.
Tidak terdengar suara dari komputer
Periksa kondisi di bawah ini:
• Volume suara mungkin dinonaktifkan. Di Windows, lihat ikon kontrol
volume (speaker) pada baris tugas. Jika bertanda silang, klik ikon
tersebut, kemudian batalkan pilihan Mute all.
• Tingkat volume suara mungkin terlalu rendah. Di Windows, lihat ikon
kontrol volume pada baris tugas. Anda juga dapat menggunakan tombol
kontrol volume untuk mengatur volume suara.
• Jika headphone, earphone, atau speaker eksternal tersambung ke port
keluaran komputer, maka speaker internal akan secara otomatis
dinonaktifkan.

90 - Tanya jawab
Saya ingin melepas tempat drive optik tanpa menghidupkan komputer
Lubang pelepas mekanik terdapat pada drive optik. Cukup masukkan
ujung pena atau penjepit kertas ke dalam lubang tersebut, kemudian
dorong untuk melepaskan tempat drive optik tersebut.
Keyboard tidak merespons
Coba pasang keyboard eksternal ke port USB pada komputer. Jika
berfungsi, hubungi dealer atau pusat layanan resmi karena kabel
keyboard internal mungkin longgar.
Printer tidak berfungsi
Periksa kondisi di bawah ini:
• Pastikan printer telah tersambung ke stopkontak dan dihidupkan.
• Pastikan bahwa kabel printer terhubung erat ke port USB dan port yang
sesuai pada printer.

Tanya jawab - 91
Tip dan petunjuk untuk menggunakan Windows 8
Kami tahu ini adalah sistem operasi baru yang memerlukan waktu untuk
mengenalinya dengan baik, oleh karena itu kami membuat beberapa
petunjuk bagi Anda untuk memulai.
Ada tiga konsep yang mungkin perlu Anda ingat
1. Mulai
Tombol Mulai tidak lagi tersedia; Anda dapat meluncurkan aplikasi dari
layar Mulai.
2. Tiles
Live tiles mirip dengan gambar kecil aplikasi.
3. Charms
Charms memungkinkan Anda melakukan fungsi berguna, misalnya
berbagi konten, mematikan PC Anda atau mengganti setelan.
Bagaimana saya dapat mengakses charms?
Gerakkan kursor ke sudut kanan atas atau bawah layar untuk mengakses
Charms, atau tekan tombol Windows + <C>.
Bagaimana cara Mulai?
Tekan tombol Windows pada keyboard; tekan tombol Windows + <C> dan
klik Mulai; atau gerakkan kursor ke sudut kiri bawah layar dan klik Mulai.

92
Bagaimana cara melompat di antara aplikasi?
Gerakkan kursor ke tepi kiri layar untuk menampilkan gambar kecil
aplikasi yang saat ini sedang berjalan.
Anda juga dapat menekan tombol Windows + <Tab> untuk membuka dan
bergulir di antara aplikasi aktif.
Bagaimana cara mematikan komputer?
Tekan tombol Windows + <C>, klik Pengaturan > Daya dan pilih tindakan
yang ingin Anda lakukan. Atau, dari Desktop, klik Gateway Tombol Daya
dan pilih tindakan yang ingin Anda lakukan.
Mengapa ada antarmuka baru?
Antarmuka baru untuk Windows 8 ini didesain untuk berfungsi dengan
baik menggunakan input sentuhan. Aplikasi Windows Store secara
otomatis akan menggunakan seluruh layar dan tidak perlu ditutup dengan
cara tradisional. Aplikasi Windows Store akan ditampilkan pada menu
Mulai menggunakan live-tiles.
Apakah ‘live-tiles’ itu?
Live-tiles mirip dengan gambar kecil aplikasi yang akan diperbarui dengan
konten baru apabila Anda terhubung ke Internet. Jadi, misalnya, Anda
dapat menampilkan pembaruan cuaca atau saham tanpa perlu membuka
aplikasi tersebut.

Tanya jawab - 93
Bagaimana cara membuka komputer?
Tekan sembarang tombol dan klik akun pengguna untuk membuka
komputer. Jika sandi pada akun Anda telah diatur, Anda perlu
memasukkan sandi tersebut untuk melanjutkan.
Bagaimana cara memersonalisasi komputer?
Anda dapat memersonalisasi Mulai dengan gambar latar belakang
berbeda atau dengan menyusun ubin untuk menyesuaikan dengan
kebutuhan Anda pribadi.
Untuk mengganti latar belakang, tekan tombol Windows + <C> dan klik
Pengaturan > Ubah Pengaturan PC > Personalisasi. Klik layar Mulai di
bagian atas halaman dan pilih warna dan gambar.
Bagaimana cara memindahkan tiles?
Klik dan tahan untuk memilihnya, kemudian seret ke tempat pada Mulai di
mana Anda ingin menampilkannya. Tiles lain akan dipindah untuk
mengakomodasi tile dalam lokasi baru.
Dapatkah tiles diperbesar atau diperkecil?
Klik kanan tile, kemudian pilih Lebih kecil atau Lebih besar dari menu
yang muncul di bagian dasar layar.
Bagaimana cara memersonalisasikan Layar penguncian?
Anda dapat memersonalisasikan layar penguncian dengan gambar
berbeda atau menampilkan status dan pembaruan cepat yang sesuai
dengan kebutuhan Anda.

94
Untuk mengganti latar belakang, tekan tombol Windows + <C> dan klik
Pengaturan > Ubah Pengaturan PC > Personalisasi. Klik Layar
penguncian di bagian atas halaman dan pilih gambar dan aplikasi yang
ingin Anda tampilkan pada layar penguncian.
Jadi, bagaimana saya menutup aplikasi?
Gerakkan kursor ke bagian atas layar dan klik lalu seret jendela tersebut
turun untuk menutup aplikasi.
Anda dapat menutup aplikasi dari gambar kecil di tepi kiri layar dengan
mengklik kanan gambar kecil dan memilih Tutup.
Dapatkah resolusi layar diganti?
Dari Mulai, mulai ketik ‘Panel Kontrol’ untuk membuka Cari dan
menampilkan hasil; klik Panel Kontrol > Sesuaikan resolusi layar.
Saya ingin menggunakan Windows dengan cara yang sudah
biasa bagi saya – kembalikan desktop saya!
Dari Mulai klik ubin Desktop untuk menampilkan desktop tradisional.
Anda dapat menyematkan aplikasi yang sering Anda gunakan ke bilah
tugas agar mudah membukanya.
Jika Anda klik aplikasi yang bukan aplikasi Windows Store, Windows
secara otomatis akan membuka aplikasi menggunakan Desktop.
Di mana aplikasi saya?
Dari Mulai, cukup mulai ketik nama aplikasi yang ingin Anda buka, dan
Cari secara otomatis membuka daftar hasil.

Tanya jawab - 95
Untuk melihat daftar aplikasi lengkap, tekan bilah spasi atau tombol Menu
dan klik Semua aplikasi.
Bagaimana cara menampilkan aplikasi pada Mulai?
Jika Anda berada di Semua aplikasi dan ingin menampilkan aplikasi di
Mulai, Anda dapat memilih aplikasi dan mengklik kanan Mulai. Pilih
Sematkan ke Mulai dari menu yang muncul di bagian dasar layar.
Bagaimana cara menghapus tile dari Mulai?
Klik kanan ubin dan klik Lepaskan dari menu Mulai dari menu yang
muncul di bagian dasar layar.
Bagaimana cara menampilkan aplikasi pada bilah tugas di Desktop?
Jika Anda berada di Semua aplikasi dan ingin menampilkan aplikasi pada
bilah tugas di Desktop, Anda dapat memilih aplikasi dan mengklik kanan
Mulai. Pilih Sematkan pada bilah tugas dari menu yang muncul di
bagian dasar layar.
Bagaimana cara menginstal aplikasi?
Anda dapat mengunduh aplikasi Windows Store dari Store. Anda perlu
memiliki Microsoft ID untuk membeli dan mengunduh aplikasi dari Store.
Saya tidak dapat menemukan aplikasi seperti Notepad and Paint! Di
mana aplikasi tersebut?
Dari Mulai Anda dapat mulai mengetik nama aplikasi yang Anda cari untuk
membuka Cari dan membuat daftar hasilnya. Atau, buka Semua aplikasi
dan gulir ke ‘Aksesori Windows’ untuk menampilkan daftar program lama.

96
Apakah (akun) Microsoft ID itu?
Akun Microsoft adalah alamat email dan sandi yang Anda gunakan untuk
masuk ke Windows. Anda dapat menggunakan alamat email apa saja,
tapi yang terbaik adalah jika memilih alamat email yang sudah digunakan
untuk berkomunikasi dengan teman dan masuk situs web favorit Anda.
Ketika masuk ke PC dengan akun Microsoft, Anda akan menghubungkan
PC dengan orang, file, dan perangkat yang Anda perhatikan.
Apakah saya memerlukan akun itu?
Anda tidak memerlukan Microsoft ID untuk menggunakan Windows 8, tapi
akun itu memudahkan Anda menyinkronkan data di seluruh komputer
yang menggunakan Microsoft ID untuk masuk.
Bagaimana cara mendapatkannya?
Jika Anda sudah menginstal Windows 8 dan tidak masuk dengan akun
Microsoft atau tidak memiliki akun Microsoft dan ingin mendapatkannya,
ketuk tombol Windows + <C> dan klik Pengaturan > Ubah Pengaturan
PC > Pengguna > Alihkan ke akun Microsoft, dan ikuti petunjuk pada
layar.
Bagaimana cara menambahkan favorit ke Internet Explorer?
Internet Explorer 10 tidak memiliki favorit tradisional, sebagai gantinya
Anda dapat menyematkan pintasan ke Mulai. Setelah halaman terbuka,
klik kanan di mana saja di halaman itu untuk membuka menu di bagian
dasar layar. Klik Sematkan ke Mulai.

Tanya jawab - 97
Bagaimana cara memeriksa ketersediaan pemutakhiran
Windows?
Tekan tombol Windows + <C> dan klik Pengaturan > Ubah Pengaturan
PC > Pemutakhiran Windows. Klik Periksa pemutakhiran sekarang.
Di mana terdapat informasi selengkapnya?
Untuk Informasi lebih lanjut, kunjungi:
• Tutorial Windows 8: www.gateway.com/windows8-tutorial
• Mendukung FAQ: support.gateway.com

98
INFORMASI PERATURAN
MENCEGAH HILANGNYA PENDENGARAN
- Perhatian: Hilangnya pendengaran secara tetap kemungkinan terjadi jika
earphone atau headphone digunakan dengan besar volume sangat tinggi
dalam waktu lama.
- A pleine puissance, l’écoute prolongée du baladeur peut endommager l’oreille de
l’utilisateur.
PERHATIAN ketika mendengarkan
Untuk melindungi pendengaran Anda, ikuti petunjuk dibawah ini.
- Besarkan bertahap volume sampai Anda dapat mendengar dengan jelas
dan nyaman.
- Jangan besarkan tinggi volume setelah kuping Anda sudah sesuai
mendengarkannya.
- Jangan mendengarkan musik dengan volume tinggi untuk waktu yang lama.
- Jangan besarkan volume saat membatasi bising di sekeliling.
- Turunkan besar volume jika tidak dapat mendengarkan orang berbicara dekat Anda.
P
ERHATIAN PERATURAN PERANGKAT RADIO
-
Catatan:
Informasi peraturan dibawah adalah untuk model dengan LAN dan/atau
Bluetooth nirkabel saja.
Aksesori yang sesuai
Aksesori yang berhubungan dengan perlengkapan ini adalah: kabel video berpelindung
apabila dihubungkan dengan monitor eksternal. Aksesori ini harus digunakan untuk
memastikan kepatuhan terhadap peraturan FCC.

Informasi Peraturan - 99
PERINGATAN CALIFORNIA PROPOSISI 65
Produk ini mengandung bahan kimia yang di Negara Bagian California dianggap
menyebabkan kanker, cacat kelahiran, dan/atau bahaya reproduksi lainnya. Untuk
informasi tambahan terkait dengan peringatan produk ini, lihat www.gateway.com/prop65.
日本
(JAPAN)
本装置は、第二種情報装置(住宅地域またはその隣接した地域において使用されるべき
情報装置)デ住宅地域での電波障害防止を目的とした情報装置等電波障害自主規制協議
会(VCCI)基準に適合しております。
しかし、本装置をラジオ、テレビジョン受信機に、近接してご使用になると、受信障害
の原因となることがあります。本書の説明にしたがって正しい取り扱いをしてくださ
い。
W
IRELESS ADAPTER REGULATORY INFORMATION
USA — FCC and FAA
The FCC with its action in ET Docket 96-8 has adopted a safety standard for human
exposure to radio frequency (RF) electromagnetic energy emitted by FCC certified
equipment. The wireless adapter meets the Human Exposure limits found in OET Bulletin
65, supplement C, 2001, and ANSI/IEEE C95.1, 1992. Proper operation of this radio
according to the instructions found in this manual will result in exposure substantially
below the FCC’s recommended limits.
- The following safety precautions should be observed:
Do not touch or move antenna while the unit is transmitting or receiving.
- Do not hold any component containing the radio such that the antenna is very close
or touching any exposed parts of the body, especially the face or eyes, while
transmitting.

100
- Do not operate the radio or attempt to transmit data unless the antenna is connected;
this behavior may cause damage to the radio.
Use in specific environments:
- The use of wireless adapters in hazardous locations is limited by the constraints
posed by the safety directors of such environments.
- The use of wireless adapters on airplanes is governed by the Federal Aviation
Administration (FAA).
- The use of wireless adapters in hospitals is restricted to the limits set forth by each
hospital.
Antenna Use
In order to comply with FCC RF exposure limits, low gain integrated antennas should be
located at a minimum distance of 20 cm (8 inches) or more from the body of all persons
or at a minimum distance as specified by the FCC module grant conditions. FCC grants
can be viewed from the FCC Equipment Authorization website at https://fjallfoss.fcc.gov/
oetcf/eas/reports/GenericSearch.cfm by entering the FCC ID printed on the module label.
Explosive Device Proximity Warning
Warning: Do not operate a portable transmitter (including this wireless adapter) near
unshielded blasting caps or in an explosive environment unless the transmitter has been
modified to be qualified for such use
Antenna Warnings
- Warning: To comply with the FCC and ANSI C95.1 RF exposure limits, it is
recommended that for the wireless adapter installed in a desktop or portable
computer, the antenna for this wireless adapter to be installed so as to provide a
separation distance of at least 20 cm (8 inches) from all persons or at the minimum
distance as specified by the module grant conditions. FCC grants can be viewed from
the FCC Equipment Authorization website at https://fjallfoss.fcc.gov/oetcf/eas/
reports/GenericSearch.cfm by entering the FCC ID printed on the module label.

Informasi Peraturan - 101
- Warning: The wireless adapter is not designed for use with high-gain directional
antennas.
Use On Aircraft Caution
- Caution: Regulations of the FCC and FAA prohibit airborne operation of radio-
frequency wireless devices (wireless adapters) because their signals could interfere
with critical interfere with critical aircraft instruments.
Local Restrictions on 802.11a, 802.11b, 802.11g and 802.11n Radio Usage
- Caution: Due to the fact that the frequencies used by 802.11a, 802.11b, 802.11g and
802.11n wireless LAN devices may not yet be harmonized in all countries, 802.11a,
802.11b, 802.11g and 802.11n products are designed for use only in specific
countries, and are not allowed to be operated in countries other than those of
designated use. As a user of these products, you are responsible for ensuring that
the products are used only in the countries for which they were intended and for
verifying that they are configured with the correct selection of frequency and channel
for the country of use. Any deviation from the permissible power and frequency
settings for the country of use is an infringement of national law and may be punished
as such.
Wireless Interoperability
The wireless adapter is designed to be interoperable with other wireless LAN products
that are based on direct sequence spread spectrum (DSSS) radio technology and to
comply with the following standards:
- IEEE Std. 802.11b compliant Standard on Wireless LAN
- IEEE Std. 802.11g compliant Standard on Wireless LAN
- IEEE Std. 802.11a compliant Standard on Wireless LAN (applies to devices
supporting 802.11a)
- IEEE Std. 802.11n draft 2.0 compliant on Wireless LAN
- Wireless Fidelity certification, as defined by the Wi-Fi Alliance

102
The Wireless Adapter and Your Health
The wireless adapter, like other radio devices, emits radio frequency electromagnetic
energy. The level of energy emitted by the wireless adapter, however, is less than the
electromagnetic energy emitted by other wireless devices such as mobile phones. The
wireless adapter operates within the guidelines found in radio frequency safety standards
and recommendations. These standards and recommendations reflect the consensus of
the scientific community and result from deliberations of panels and committees of
scientists who continually review and interpret the extensive research literature. In some
situations or environments, the use of the wireless adapter may be restricted by the
proprietor of the building or responsible representatives of the applicable organization.
Examples of such situations may include:
- Using the wireless adapter on board airplanes, or
- Using the wireless adapter in any other environment where the risk of interference
with other devices or services is perceived or identified as being harmful.
If you are uncertain of the policy that applies to the use of wireless adapters in a specific
organization or environment (an airport, for example), you are encouraged to ask for
authorization to use the adapter before you turn it on.
FCC Radio Frequency Interference Requirements (applies to device supporting
802.11a)
This device is restricted to indoor use due to its operation in the 5.15 to 5.25 GHz and
5.470 to 5.725 GHz frequency ranges. FCC requires this product to be used indoors for
the frequency ranges 5.15 to 5.25 GHz and 5.470 to 5.725 GHz to reduce the potential
for harmful interference to co-channel mobile satellite systems. High power radars are
allocated as primary users of the 5.25 to 5.35 GHz and 5.65 to 5.85 GHz bands. These
radar stations can cause interference with and /or damage this device. No configuration
controls are provided for this wireless adapter allowing any change in the frequency of
operations outside the FCC grant of authorization for U.S operation according to Part
15.407 of the FCC rules.

Informasi Peraturan - 103
USA — Federal Communications Commission (FCC)
This device complies with Part 15 of the FCC Rules. Operation of the device is subject to
the following two conditions:
- This device may not cause harmful interference.
- This device must accept any interference that may cause undesired operation.
- Note: The radiated output power of the adapter is far below the FCC radio frequency
exposure limits. Nevertheless, the adapter should be used in such a manner that the
potential for human contact during normal operation is minimized. To avoid the
possibility of exceeding the FCC radio frequency exposure limits, you should keep a
distance of at least 20 cm between you (or any other person in the vicinity), or the
minimum separation distance as specified by the FCC grant conditions, and the
antenna that is built into the computer. Details of the authorized configurations can
be found at http://www.fcc.gov/oet/ea/
by entering the FCC ID number on the device.
Interference Statement
This wireless adapter has been tested and found to comply with the limits for a Class B
digital device, pursuant to Part 15 of the FCC Rules. These limits are designed to provide
reasonable protection against harmful interference in a residential installation. This
wireless adapter generates, uses, and can radiate radio frequency energy. If the wireless
adapter is not installed and used in accordance with the instructions, the wireless adapter
may cause harmful interference to radio communications. There is no guarantee,
however, that such interference will not occur in a particular installation. If this wireless
adapter does cause harmful interference to radio or television reception (which can be
determined by turning the equipment off and on), the user is encouraged to try to correct
the interference by taking one or more of the following measures:
- Reorient or relocate the receiving antenna of the equipment experiencing the
interference.
- Increase the distance between the wireless adapter and the equipment experiencing
the interference.

104
- Connect the computer with the wireless adapter to an outlet on a circuit different from
that to which the equipment experiencing the interference is connected.
- Consult the dealer or an experienced radio/TV technician for help.
- Note: The adapter must be installed and used in strict accordance with the
manufacturer's instructions as described in the user documentation that comes with
the product. Any other installation or use will violate FCC Part 15 regulations.
Canada — Industry Canada (IC)
This device complies with RSS210 of Industry Canada. Cet appareil se conforme à
RSS210 de Canada d'Industrie.
- Caution: When machine supports and using IEEE 802.11a wireless LAN, this
product is restricted to indoor use due to its operation in the 5.15- to 5.25 GHz
frequency range. Industry Canada requires this product to be used indoors for the
frequency range of 5.15 GHz to 5.25 GHz to reduce the potential for harmful
interference to co-channel mobile satellite systems. High power radar is allocated as
the primary user of the 5.25 to 5.35 GHz and 5.65 to 5.85 GHz bands. These radar
stations can cause interference with and/or damage to this device. The maximum
allowed antenna gain for use with this device is 6dBi in order to comply with the
E.I.R.P limit for the 5.25 to 5.35 and 5.725 to 5.85 GHz frequency range in point-to-
point operation. To comply with RF exposure requirements all antennas should be
located at a minimum distance of 20 cm, or the minimum separation distance allowed
by the module approval, from the body of all persons.
- Attention: l’utilisation d’un réseau sans fil IEEE802.11a est réstreinte à une
utilisation en intérieur à cause du fonctionement dans la bande de fréquence 5,15 -
5,25 GHz. Industry Canada requiert que ce produit soit utilisé à l’intérieur des
bâtiments pour la bande de fréquence 5,15 - 5,25 GHz afin de réduire les possibilités
d’interférences nuisibles aux canaux co-existants des systèmes de transmission
satellites. Les radars de puissances ont fait l’objet d’une allocation primaire de
fréquences dans les bandes 5,25 - 5,35 GHz et 5 65 - 5 85 GHz. Ces stations radar
peuvent créer des interférences avec ce produit et/ou lui être nuisible. Le gain
d’antenne maximum permissible pour une utilisation avec ce produit est de 6 dBi afin

Informasi Peraturan - 105
d’être conforme aux limites de puissance isotropique rayonnée équivalente (P.I.R.E.)
applicable dans les bandes 5,25 - 5,35 GHz et 5,725 - 5,85 GHz en fonctionement
point-à-point. Se pour conformer aux conditions d'exposition de RF toutes les
antennes devraient être localisées à une distance minimum de 20 cm, ou la distance
de séparation minimum permise par l'approbation de module, du corps de toutes les
personnes.
This Class B digital apparatus complies with Canadian ICES-003.
Cet appareil numérique de la classe B est conforme a la norme NMB-003 du Canada.
"To prevent radio interference to the licensed service, this device is intended to be
operated indoors and away from windows to provide maximum shielding. Equipment (or
its transmit antenna) that is installed outdoors is subject to licensing."
« Pour empêcher que cet appareil cause du brouillage au service faisant l'objet d'une
licence, il doit être utilisé a l'intérieur et devrait être placé loin des fenêtres afin de fournir
un écran de blindage maximal. Si le matériel (ou son antenne d'émission) est installé à
l'extérieur, il doit faire l'objet d'une licence. »
European Union
Daftar negara yang relevan
Produk ini harus digunakan dengan benar-benar mematuhi peraturan dan batasan yang
berlaku di negara tempat perangkat digunakan. Untuk informasi lebih lanjut, hubungi
kantor setempat di negara perangkat ini digunakan. Harap lihat http://ec.europa.eu/
enterprise/rtte/implem.htm untuk mengetahui daftar negara terbaru.
Daftar Kode Nasional
Peralatan ini dapat dioperasikan di negara-negara berikut:
Negara
ISO 3166
2 kode huruf
Negara
ISO 3166
2 kode huruf
Negara
ISO 3166
2 kode huruf
Negara
ISO 3166
2 kode huruf
Austria AT Jerman DE Malta MT Inggris GB
Belgia BE Yunani GR Belanda NT Islandia IS
Siprus CY Hungaria HU Polandia PL Liechtenstein LI

106
The low band 5.15 -5.35 GHz is for indoor use only.
This equipment complies with the essential requirements of the European Union directive
1999/5/EC. See Statements of European Union Compliance, and more details refer to the
attached Declaration of Conformity.
Rep. Ceko CZ Irlandia IE Portugal PT Norwegia NO
Denmark DK Italia IT Slowakia SK Swiss CH
Estonia EE Latvia LV Slovenia SL Bulgaria BG
Finlandia FI Lithuania LT Spanyol ES Romania RO
Prancis FR Luksemburg LU Swedia SE Turki TR
English
Hereby, ACER INC., declares that this devise is in
compliance with the essential requirements and other
relevant provisionns of Directive 1999/5/EC.
Česky [Czech]
ACER INC. tímto prohlašuje, že toto zařízení je ve shodě se
základními požadavky a dalšími příslušnými ustanoveními
směrnice 1999/5/ES.
Daansk [Danish]
Undertegnede ACER INC. erklærer herved, at følgende
udstyr overholder de væsentlige krav og øvrige relevante krav
i direktiv 1999/5/EF.
Negara
ISO 3166
2 kode huruf
Negara
ISO 3166
2 kode huruf
Negara
ISO 3166
2 kode huruf
Negara
ISO 3166
2 kode huruf

Informasi Peraturan - 107
Deutsch
[German]
Hiermit erklärt ACER INC., dass sich das Gerät Radiolan in
Übereinstimmung mit den grundlegenden Anforderungen und
den übrigen einschlägigen Bestimmungen der Richtlinie
1999/5/EG befindet.
Eesti [Estonian]
Käesolevaga kinnitab ACER INC. seadme vastavust direktiivi
1999/5/EÜ põhinõuetele ja nimetatud direktiivist tulenevatele
teistele asjakohastele sätetele.
Español
[Spanish]
Por medio de la presente ACER INC. declara que el
dispositivo cumple con los requisitos esenciales y
cualesquiera otras disposiciones aplicables o exigibles de la
Directiva 1999/5/CE.
Ελληνικά
[Greek]
∆ια του παρόντος η ACER INC. δηλώνει ότι η παρούσα
συσκευή συµµορφώνεται προς τις ουσιώδεις απαιτήσεις και
τις λοιπές διατάξεις της Οδηγίας 1999/5/ ΕΚ.
Français
[French]
Par la présente ACER INC. déclare que cet appareil est
conforme aux exigences essentielles et aux autres
dispositions pertinentes de la directive 1999/5/CE.
Íslenska
[Icelandic]
Hér með lýsir ACER INC. yfir því að er í samræmi við
grunnkröfur og aðrar kröfur, sem gerða r eru í tilskipun
1999/5/EC.

108
Itaaliano [Italian]
Con la presente ACER INC. dichiara che questo dispositivo è
conforme ai requisiti essenziali ed alle altre disposizioni
pertinenti stabilite dalla direttiva 1999/5/CE.
Latviski [Latvian]
Ar šo ACER INC. deklarē, ka šī ierīce atbilst Direktīvas
1999/5/EK būtiskajām prasībām un citiem ar to saistītajiem
noteikumiem.
Lietuvių
[Lithuanian]
Šiuo ACER INC. deklaruoja, kad šis įrenginys atitinka
esminius reikalavimus ir kitas 1999/5/EB Direktyvos
nuostatas.
Malti [Maltese]
Hawnhekk, ACER INC., jiddikjara li dan jikkonforma mal- ti
ijiet essenzjali u ma provvedimenti o rajn relevanti li he mm
fid-Dirrettiva 1999/5/EC.
Magyar
[Hungarian]
Alulírott, ACER INC. nyilatkozom, hogy a készülék megfelel a
vonatkozó alapveto követelményeknek és az 1999/5/EC
irányelv egyéb eloírásainak.
Nederlands
[Dutch]
Hierbij verklaart ACER INC. dat het toestel voldoet aan de
essentiële eisen en de andere relevante bepalingen van
richtlijn 1999/5/EG.
Norsk
[Norwegiann]
ACER INC. erklærer herved at utstyret er i samsvar med de
grunnleggende krav og øvrige relevante krav i direktiv
1999/5/EF.

Informasi Peraturan - 109
Polski [Polish]
Niniejszym ACER INC. oświadcza, że urządzenie jest zgodne
z zasadniczymi wymogami oraz pozostałymi stosownymi
postanowieniami Dyrektywy 1999/5/EC.
Português
[Portuguese]
ACER INC. declara que este dispostivo está conforme com
os requisitos essenciais e outras disposições da Directiva
1999/5/CE.
Slovensko
[Slovenian]
ACER INC. izjavlja, da je ta naprava skladna z bistvenimi
zahtevami in ostalimi relevantnimi določili Direktive
1999/5/ES.
Slovensky
[Slovak]
ACER INC. týmto vyhlasuje, že zariadenie spĺňa základné
požiadavky a všetky príslušné ustanovenia Smernice
1999/5/ES.
Suomi [Finnish]
ACER INC. vakuuttaa täten että tämä laite on direktiivin 1999/
5/EY oleellisten vaatimusten ja sitä koskevienn direktiivin
muiden ehtojen mukainen.
Svenska
[Swedish]
Härmed intygar ACER INC. att denna enhet står i
överensstämmelse med väsentliga egenskapskrav och
övriga relevanta bestämmelser som framgår av direktiv
1999/5/EG.

110
France
Pour la France métropolitaine :
2,400 - 2,4835 GHz (Canaux 1à 13) autorisé en usage intérieur
2,400 - 2,454 GHz (canaux 1 à 7) autorisé en usage extérieur
Pour la Guyane et la Réunion :
2,400 - 2,4835 GHz (Canaux 1à 13) autorisé en usage intérieur
2,420 - 2,4835 GHz (canaux 5 à 13) autorisé en usage extérieur
Pour tout le territoire Français :
Seulement 5,15 -5,35 GHz autorisé pour le 802.11a
L'utilisation de cet equipement (2,4 GHz WLAN) est soumise à certaines restrictions :
- La puissance maximale autorisée en intérieur est de 100 mW pour 2400 - 2483,5 MHz.
- La puissance maximale autorisée est de 100 mW en extérieur pour 2400 - 2454 MHz.
- La puissance maximale autorisée est de 10 mW en extérieur, 2454 - 2483,5 MHz.
Pour les dernières restrictions, voir http://www.art-telecom.fr.
Italy
The use of these equipments is regulated by:
1.D.L.gs 1.8.2003, n. 259, article 104 (activity subject to general authorization) for outdoor
use and article 105 (free use) for indoor use, in both cases for private use.
2.D.M. 28.5.03, for supply to public of RLAN access to networks and telecom services.
L’uso degli apparati è regolamentato da:
1.D.L.gs 1.8.2003, n. 259, articoli 104 (attività soggette ad autorizzazione generale) se
utilizzati al di fuori del proprio fondo e 105 (libero uso) se utilizzati entro il proprio fondo,
in entrambi i casi per uso private.
2.D.M. 28.5.03, per la fornitura al pubblico dell’accesso R-LAN alle reti e ai servizi di
telecomunicazioni.

Informasi Peraturan - 111
Belgium
Dans le cas d'une utilisation privée, à l'extérieur d'un bâtiment, au-dessus d'un espace
public, aucun enregistrement n'est nécessaire pour une distance de moins de 300 m.
Pour une distance supérieure à 300 m un enregistrement auprès de l'IBPT est requise.
Pour les enregistrements et licences, veuillez contacter l'IBPT.
In geval van privé-gebruik, buiten een gebouw, op een openbare plaats, is geen registratie
nodig, wanneer de afstand minder dan 300 m is. Voor een afstand groter dan 300 m is
een registratie bij BIPT vereist. Voor registraties en licenties, gelieve BIPT te contacteren.
Brazil
Este equipamento opera em caráter secundário, isto é, não tem direito a proteção contra
interferência prejudicial, mesmo de estações do mesmo tipo, e não pode causar
interferência a sistemas operando em caráter primário.
Pakistan
Pakistan Telecommunication Authority (PTA) Approved
Morocco
The operation of this product in the radio channel 2 (2417 MHz) is not authorized in the
following cities: Agadir, Assa-Zag, Cabo Negro, Chaouen, Goulmima, Oujda, Tan Tan,
Taourirt, Taroudant and Taza.
The operation of this product in the radio channels 4, 5, 6 and 7 (2425 - 2442 MHz) is not
authorized in the following cities: Aéroport Mohamed V, Agadir, Aguelmous, Anza,
Benslimane, Béni Hafida, Cabo Negro, Casablanca, Fès, Lakbab, Marrakech, Merchich,
Mohammédia, Rabat, Salé, Tanger, Tan Tan, Taounate, Tit Mellil, Zag.
Japan
5 GHz 帯は室内でのみ使用のこと
Korea
당해 무선설비는 운용 중 전파혼신 가능성이 있음

112
Taiwan
第十二條
經型式認證合格之低功率射頻電機,非經許可,公司、商號或使用者均不得擅自變更頻
率、加大功率或變更原設計之特性及功能。
第十四條
低功率射頻電機之使用不得影響飛航安全及干擾合法通信 ; 經發現有干擾現象時,應立即
停用,並改善至無干擾時方得繼續使用。
前項合法通信,指依電信法規定作業之無線通信。
低功率射頻電機須忍受合法通信或工業、科學及醫療用電波輻射性電機設備之干擾。
M
ODIFIKASI PRODUK
Penandaan CE
Gateway tidak dapat dianggap bertanggung jawab atas modifikasi tidak sah pada produk
yang dilakukan oleh pengguna dan akibat dari modifikasi itu, yang mungkin mengubah
kesesuaian produk dengan Penandaan CE.
Interferensi Frekuensi Radio
Pabrikan tidak bertanggung jawab atas setiap interferensi radio atau TV yang disebabkan
oleh modifikasi pada peralatan ini.
K
ONEKSI DAN GROUND TERSENDIRI DAN JAUH DARI PERALATAN (REMOTE EARTH)
PELV (Proteksi Tegangan Ekstra Rendah)
Untuk memastikan integritas peralatan dengan voltase ekstra rendah, hanya hubungkan
peralatan dengan sirkuit listrik yang terproteksi dan kompatibel ke port eksternal.
SELV (Pengaman Tegangan Ekstra Rendah)
Setiap input dan output produk ini diklasifikasikan sebagai Pengaman Tegangan Ekstra
Rendah.

Informasi Peraturan - 113
Ground Tersendiri dan Jauh dari Peralatan (Remote Earth)
Untuk mencegah kejutan listrik, hubungkan semua komputer (masing-masing kantor) dan
peralatan pendukung komputer ke sirkuit perkabelan bangunan yang sama. Jika Anda
tidak yakin, periksa perkabelan bangunan untuk menghindari kondisi Ground Tersendiri
dan Jauh dari Peralatan.
Bahan Bangunan
Hanya hubungkan peralatan ke bahan bangunan yang sesuai dengan peraturan
perkabelan yang berlaku di negara Anda. Di Britania Raya, ini adalah peraturan IEE.
S
UMBER DAYA DAN KABEL
Sumber daya
Soket inlet dan soket outlet sumber daya (jika dilengkapi) digolongkan sebagai Tegangan
Berbahaya.
Anda harus mencabut kabel sumber daya dan melepas semua baterai untuk mencabut
peralatan dari sumber daya. Oleh karena itu, stopkontak seharusnya dipasang dekat
dengan peralatan dan mudah diakses.
Nilai input: Lihat label nilai di dasar komputer dan pastikan bahwa adaptor daya Anda
sesuai dengan nilai yang ditetapkan.
Apa pun yang terjadi pengguna dilarang keras membongkar sumber daya (power supply).
Sumber daya tidak mempunyai suku cadang yang dapat diganti pengguna. Di dalam
sumber daya terdapat tegangan tinggi yang dapat menyebabkan cidera diri parah.
Sumber daya yang rusak harus dikembalikan ke dealer Anda.
Kabel daya dan konektor
Produk ini memerlukan kabel daya dan konektor yang dibumikan (grounded). Konektor
hanya boleh dipasang ke stopkontak yang telah di-ground. Pastikan stopkontak telah
dibumikan dengan benar sebelum memasang konektor. Jangan pasang konektor ke
stopkontak yang tidak di-ground. Untuk informasi rinci, hubungi teknisi listrik Anda.

114
Panjang kabel tidak boleh lebih dari 2,5 meter. Untuk mencegah bahaya kelistrikan,
jangan melepas atau menonaktifkan kontak kabel ground pada kabel daya. Ganti kabel
daya jika rusak. Hubungi dealer Anda untuk penggantian yang tepat. Di Eropa, konektor
harus berkemampuan maksimal 250 VAC, 10 amp minimum Konektor harus mempunyai
tanda persetujuan dari badan internasional. Kabel harus cocok untuk digunakan di
negara pengguna akhir. Tanyakan pada instansi kelistrikan setempat jika Anda tidak yakin
dengan tipe kabel daya yang harus digunakan di negara Anda.
Kabel
Untuk kabel yang tidak disertakan dengan Produk dalam kemasan komputer ini:
Kinerja EMC sistem hanya dijamin jika kabel dan antarmuka menggunakan pelindung
yang efisien.
Penggunaan kabel antarmuka berpelindung diperlukan untuk USB, IEEE1394, serial,
printer, permainan (game), audio/ video analog atau digital, antena TV atau FM, dan
biasanya semua antarmuka kabel berkecepatan tinggi.
Hanya gunakan kabel yang terdaftar di UL No. 26AWG atau kabel telekomunikasi yang
besar.
Hanya kabel Ethernet LAN atau modem RTC boleh mempunyai panjang lebih dari
3 meter.
Gateway menganjurkan Anda menambah batang ferit yang dijepitkan pada setiap kabel
yang menghubungkan komputer Anda ke piranti keras yang tidak disertakan dengan
komputer Anda.
- Referensi untuk batang ferit: 28A-2029 dari Steward (dua lilitan)
Selama sertifikasi produk, Gateway menggunakan kualitas kabel berikut:
- Kabel USB2.0 Bersertifikat dari Hama 46778
- FireWire IEEE1394 berpelindung dari Hama 50011
- Kabel Audio/Video RCA-RCA berpelindung dari Thomson KHC001M, KHC012M,
KHC028M
- Kabel audio Jack Stereo berpelindung dari Hama 43330H, 42714H

Informasi Peraturan - 115
Kalor Timbul (Heat Build-up) dan Komputer Portabel
Adaptor daya dan bagian bawah komputer dapat menjadi panas setelah penggunaan
yang lama. Kontak fisik yang lama dengan adaptor dan bagian tersebut harus dihindari.
M
ELEPAS DAN MENGGANTI PENUTUP CHASIS
Sebelum melepaskan penutup chasis untuk memperbaiki atau memodifikasi peralatan,
Anda harus mencabut semua kabel daya dan modem, serta lepaskan baterai.
- Perhatian: Beberapa komponen di dalam komputer dapat menjadi panas setelah
penggunaan yang lama.
Oleh karena itu Anda harus menutup chasis sebelum Anda mencolokkan dan
menghidupkan peralatan.
P
ERNYATAAN KESESUAIAN LASER
Perangkat optik diuji dan dijamin memenuhi standar Komisi Elektronik Internasional
IEC60825-1 dan Standar Eropa EN60825-1 untuk produk Laser Kelas 1.
Produk laser Kelas 1 tidak dianggap berbahaya. Perangkat optik dirancang sedemikian
rupa sehingga tidak pernah ada akses manusia ke radiasi laser di atas tingkat Kelas 1
selama pengoperasian normal dan kondisi pemeliharaan seperti yang dianjurkan.
Perangkat optik yang dipasang pada komputer Anda dirancang hanya digunakan sebagai
komponen produk elektronik terkait dan oleh karena itu tidak memenuhi persyaratan
Kode Peraturan Federal Pasal 1040.10 dan Pasal 1040.11 untuk produk laser LENGKAP.
Karena paparan ke radiasi laser sangat berbahaya, apa pun yang terjadi pengguna
dilarang keras membongkar perangkat laser.
P
ENGEMASAN
Pengemasan produk ini sesuai dengan Pedoman Lingkungan Eropa 94/62/EC mulai dari
tanggal 20 Desember 1994 dan ekuivalennya dalam Undang-undang Prancis
berdasarkan Keputusan 98-638 mulai dari 20 Juli 1998.

116
KESESUAIAN DENGAN SERTIFIKASI PERATURAN RUSIA

Lingkungan - 117
LINGKUNGAN
KAMI TERPANGGIL UNTUK MELINDUNGI LINGKUNGAN
Lingkungan hidup merupakan bagian paling penting produk kami.
Gateway berkomitmen untuk membatasi dampak lingkungan yang disebabkan produk
selama siklus hidup produk.
Mulai dari fase desain, dengan kebijakan pengadaan yang sangat ketat, komponen
elektronik mendapatkan perhatian maksimum guna membatasi beratnya dalam hal logam
berat, seperti timah hitam, kadmium, kromium, merkuri, dan sebagainya. Pemasok
diminta untuk mematuhi semua peraturan bagi setiap suku cadang produk apa saja.
Sejauh menyangkut akhir usia produk, kami telah mengambil tindakan untuk
mengantisipasi dan memfasilitasi proses daur ulang semua produk kami. Maka, semua
suku cadang plastik yang lebih berat dari 25 gram digunakan dalam produk Gateway
yang diberi label ISO 11469. Dengan label ini, materi tersebut bisa dikenali dengan cepat
dan juga memudahkan valorisasinya. Demikian pula, komputer desktop didesain agar
bisa dibongkar dengan mudah, dengan obeng yang diganti mempergunakan klip.
P
EMBUANGAN PRODUK
Pedoman 2002/96/EC, yang disebut sebagai Waste Electrical and
Electronic Equipment (WEEE) Directive (Pedoman Limbah dari
Perangkat Listrik dan Elektronik), mempersyaratkan bahwa produk listrik
dan elektronik bekas harus dibuang secara terpisah dengan limbah ruang
tangga biasa guna mendorong penggunaan kembali, pendaurulangan
dan bentuk pemulihan lainnya serta untuk mengurangi jumlah limbah
yang akan dilenyapkan dengan maksud untuk mengurangi tumpukan
sampah dan pengabuan. Logo tempat sampah yang diberi tanda silang adalah untuk
mengingatkan Anda bahwa produk ini harus disortir secara terpisah pada saat
pembuangan. Peraturan ini berlaku bagi semua produk Gateway dan juga semua
aksesori, seperti keyboard, mouse, pengeras suara, remote control, dsb. Bila Anda harus

118
membuang produk dimaksud, pastikan bahwa produk tersebut didaur ulang dengan
benar dengan menanyakan pada lembaga berwenang setempat, atau dengan
mengembalikan perangkat lama Anda ke pengecer ketika Anda menggantinya. Untuk
informasi, kunjungi www.gateway.com/about/corp_responsibility/environment.php.
Pembuangan Baterai (bila berlaku)
Sebelum membuang perlengkapan Anda, pastikan bahwa Anda telah melepas baterai
yang mungkin terpasang dalam peralatan ini. Undang-undang Eropa menyatakan bahwa
pada saat pembuangan baterai harus dikumpulkan secara terpisah dari limbah rumah
tangga biasa. Jangan membuang baterai bekas di tempat sampah. Buang baterai bekas
melalui program pengumpulan baterai jika ada, atau tanyakan kepada distributor atau
lembaga berwenang setempat tentang infrastruktur apa yang dapat Anda gunakan.
Upaya Anda akan memungkinkan pembuangan yang aman, pendaurulangan dan
pemusnahan baterai bekas serta akan membantu melindungi lingkungan hidup dan juga
mengurangi bahaya pada kesehatan.
- Perhatian: Ada risiko ledakan jika baterai tidak diganti dengan tipe yang benar.
Buang baterai bekas sesuai dengan petunjuk.
ENERGY STAR
Produk Gateway yang memenuhi syarat ENERGY STAR menghemat
uang Anda dengan mengurangi biaya energi dan melindungi lingkungan
tanpa mengorbankan fitur dan kinerja. Gateway dengan bangga
menawarkan produk dengan simbol ENERGY STAR kepada pelanggan
kami.
Apakah ENERGY STAR itu?
Produk yang memenuhi syarat ENERGY STAR menggunakan lebih sedikit energi dan
mencegah emisi gas rumah kaca dengan memenuhi pedoman efisiensi energi yang ketat
yang ditentukan oleh Badan Perlindungan Lingkungan A.S. Gateway berkomitmen untuk
menawarkan produk dan layanan di seluruh dunia yang membantu pelanggan
menghemat uang, melestarikan energi dan memperbaiki kualitas lingkungan kita.
Semakin banyak energi yang dapat kita hemat dengan efisiensi energi yang lebih tinggi,

Lingkungan - 119
semakin banyak kita mengurangi gas rumah kaca dan risiko perubahan iklim. Untuk
informasi lebih lanjut, kunjungi www.energystar.gov atau www.energystar.gov/
powermanagement.
- Catatan: Informasi dalam bagian ini mungkin tidak berlaku bagi komputer Anda.
Produk Gateway yang memenuhi syarat ENERGY STAR:
- Menghasilkan lebih sedikit panas dan mengurangi beban pendinginan, serta iklim
yang lebih hangat.
- Secara otomatis masuk ke mode "layar tidur" dan "komputer tidur" masing-masing
setelah tidak aktif selama 10 dan 30 menit.
- Aktifkan kembali komputer dari mode tidur dengan menekan keyboard atau
menggerakkan mouse.
- Komputer akan menghemat energi lebih dari 80% pada mode "tidur".
ENERGY STAR dan merek ENERGY STAR adalah merek A.S. yang terdaftar.

120
LISENSI PIRANTI LUNAK
- Catatan: Sebagian besar aplikasi piranti lunak sudah diinstal sebelumnya pada
komputer Gateway Anda. Piranti lunak tersebut siap digunakan atau dimulai. Namun
demikian, beberapa piranti lunak memerlukan CD atau DVD untuk menjalankannya.
Anda akan menemukan disk ini dalam kemasan komputer Anda.
Gateway Perjanjian Lisensi (Produk CD dan/atau DVD). Salinan orisinal ini adalah bukti
pembelian Anda. Harap memperlakukannya sebagai milik Anda yang berharga.
Penting!
Baca dengan seksama sebelum menginstal piranti lunak.
Perjanjian Lisensi berikut berlaku bagi Anda. Ini adalah perjanjian resmi antara Anda
(mungkin sebagai perorangan atau perusahaan) dan Gateway. Dengan menginstal
piranti lunak yang dimaksud Anda setuju untuk terikat dengan syarat-syarat perjanjian ini.
Jika Anda tidak setuju dengan syarat-syarat perjanjian ini, segera kembalikan seluruh
sistem komputer Anda, paket piranti lunak yang belum dibuka, jika ada, serta semua item
yang menyertainya (termasuk materi tertulis atau wadah lainnya di tempat Anda
memperoleh barang-barang tersebut guna mendapatkan pengembalian uang Anda
secara utuh.
G
ATEWAY LISENSI PIRANTI LUNAK
1. Pemberian Lisensi
Perjanjian Lisensi (“Lisensi”) Gateway ini mengizinkan Anda untuk menggunakan satu
salinan versi PIRANTI LUNAK Gateway yang telah diidentifikasikan di atas (yang paling
tidak terdiri dari satu CD atau DVD) pada satu komputer, dengan syarat bahwa PIRANTI
LUNAK tersebut kapan pun juga hanya digunakan pada satu komputer. Bila Anda
mempunyai beberapa Lisensi untuk PIRANTI LUNAK dimaksud, maka Anda kapan saja
dapat menggunakan salinan PIRANTI LUNAK tersebut sebanyak Lisensi yang Anda
miliki. PIRANTI LUNAK “digunakan” pada sebuah komputer apabila PIRANTI LUNAK itu
dimuat ke memori temporer (yaitu RAM) atau diinstal pada memori permanen (misalnya

Lisensi Piranti lunak - 121
hard disk, CD dan/atau DVD, atau perangkat penyimpanan komputer lainnya, kecuali
bahwa satu salinan yang diinstal pada server jaringan untuk tujuan tunggal distribusi
komputer lainnya tidak “digunakan”. Jika jumlah pengguna PIRANTI LUNAK yang
diantisipasi akan melebihi jumlah Lisensi yang berlaku, maka Anda harus mempunyai
mekanisme atau proses yang rasional yang sudah disiapkan untuk memastikan bahwa
jumlah orang yang menggunakan PIRANTI LUNAK secara bersamaan tidak melebihi
jumlah Lisensi. Jika PIRANTI LUNAK diinstal secara permanen pada hard disk atau
perangkat penyimpanan komputer (selain server jaringan) dan satu orang menggunakan
komputer itu lebih dari 80% dari keseluruhan waktu komputer itu digunakan, maka orang
bersangkutan juga boleh menggunakan PIRANTI LUNAK pada komputer portabel atau
komputer rumah.
2. Hak Cipta
PIRANTI LUNAK dimiliki oleh Gateway atau pemasoknya dan dilindungi undang-undang
hak cipta Amerika Serikat serta ketentuan perjanjian internasional. Oleh karena itu, Anda
harus memperlakukan PIRANTI LUNAK ini seperti materi lainnya yang dilindungi hak
cipta (misalnya buku, atau rekaman musik) kecuali bahwa Anda boleh mentransfer
bagian disk CD dan/atau DVD PIRANTI LUNAK ini, jika ada, ke satu hard disk dengan
syarat bahwa Anda menyimpan yang asli hanya untuk cadangan. Anda tidak boleh
menyalin bagian disk CD dan/atau DVD PIRANTI LUNAK ini atau materi tertulis yang
menyertai PIRANTI LUNAK ini.
3. Larangan lain
Anda tidak boleh menyewakan PIRANTI LUNAK ini, tetapi Anda boleh mentransfer
PIRANTI LUNAK ini dan materi tertulis yang menyertai secara permanen dengan syarat
bahwa Anda tidak menyimpan salinan dan penerima setuju dengan syarat-syarat
Perjanjian ini. Anda tidak boleh melakukan rekayasa balik, mendekompilasi atau
membongkar PIRANTI LUNAK ini. Setiap transfer PIRANTI LUNAK ini harus terdiri dari
pembaruan terkini dan semua versi sebelumnya.

122
INFORMASI TENTANG PIRANTI LUNAK PIHAK KETIGA ATAU PIRANTI LUNAK GRATIS
Piranti lunak yang dimuat sebelumnya, tertanam atau jika tidak didistribusikan dengan
produk yang disediakan oleh Gateway dilengkapi dengan program piranti lunak pihak
ketiga (“Piranti lunak Gratis”), yang dilisensikan berdasarkan syarat-syarat Lisensi Publik
Umum GNU (“GPL”). Piranti lunak Gratis diberi tandai seperti itu. Penyalinan, distribusi
dan/atau modifikasi Piranti lunak Gratis tersebut harus tunduk pada syarat-syarat GPL.
Piranti lunak Gratis didistribusikan dengan harapan bahwa Piranti lunak Gratis ini akan
bermanfaat tetapi TANPA JAMINAN APA PUN; bahkan tanpa jaminan tersirat LAYAK
JUAL atau KELAYAKAN UNTUK TUJUAN TERTENTU. Ketentuan Lisensi Publik Umum
GNU akan selalu berlaku. Anda bisa mengakses http://www.gnu.org secara langsung
untuk memperoleh salinan GPL atau menulis surat ke Free Software Foundation, Inc.dan
meminta salinan. Alamat Free Software Foundation, Inc adalah: 59 Temple Place - Suite
330, Boston, MA, 02111-1307, USA.
Selama periode 3 (tiga) tahun mulai sejak Anda menerima piranti lunak ini, Anda bisa
memperoleh salinan lengkap kode sumber yang dapat dibaca oleh mesin untuk Piranti
lunak Gratis berdasarkan syarat-syarat GPL tanpa biaya kecuali untuk biaya media,
pengiriman, serta penanganan, setelah mengajukan permintaan tertulis kepada kami.
Hubungi kami jika Anda mempunyai pertanyaan lebih lanjut. Alamat surat kami adalah 8F,
88, Sec. 1, Hsin Tai Wu Rd., Hsichih, New Taipei City 221, Taiwan.

Indeks - 123
INDEKS
A
audio pemecahan masalah...................... 89
B
Baterai............................................... 118 Browser............................................... 54
C
CD-ROM
mengeluarkan secara manual
......... 90
pemecahan masalah...................... 90
D
Drive
Pembaca Kartu Memori .................. 30
DSL..................................................... 49
F
Firewall................................................ 57
G
Gateway Program Memulihkan Manajemen... 47
I
Informasi Peraturan...................... 98, 117
Interferensi......................................... 112
Internet
Firewall
.......................................... 57
Koneksi ................................... 48, 49
J
Jaminan................................................ 7 jaringan ............................................... 32
K
Kabel............................................. 9, 113
Kabel daya............................................ 9
Keamanan
Antivirus
........................................ 57

124
Pembaruan .................................... 64
kecerahan
tombol pintas ................................. 19
Keyboard
tombol pintas
................................. 20
keyboard
pemecahan masalah ...................... 90
komputer
fitur-fitur......................................... 15
indikator on.................................... 21
koneksi
jaringan
......................................... 32
Kursor ................................................. 28
L
LAN (Local Area Network) .................... 51
Lingkungan ........................................ 117
Lingkungan Komputer ............................ 8
M
Malware (program jahat)....................... 56
masalah............................................... 88
CD-ROM........................................ 90
keyboard........................................ 90
pengawalan ................................... 88
printer............................................ 90
tampilan......................................... 89
Membersihkan Komputer Anda............. 10
Mengisi daya:
memeriksa tingkat
.......................... 41
Modem .......................................... 49, 50
N
Norton Internet Security.................. 55, 59
P
panel sentuh ........................................ 28
menggunakan .......................... 28–28
Pembaca Kartu Memori ........................ 30
Pembaruan
Pembaruan Windows Otomatis
....... 64
Pembuangan baterai .......................... 118
Pemeliharaan
Manajemen Pemulihan
................... 66
Program Memulihkan Manajemen... 47
Pemulihan
Manajemen Pemulihan
................... 66
Program Memulihkan Manajemen... 47
pengeras suara
pemecahan masalah
...................... 89
tombol pintas ........................... 19, 20
Penyedia Layanan Internet (ISP) .......... 48
Perangkat media portabel..................... 32
Peranti mata-mata ............................... 56

Indeks - 125
Peringatan epilepsi............................... 14
Peringatan Kesehatan .......................... 12
Peringatan Keselamatan ....................... 8
Piranti lunak
Lisensi Piranti lunak
..................... 120
port ..................................................... 30
printer
pemecahan masalah
...................... 90
S
Sambungan Jaringan ........................... 51
T
tampak
depan
............................................ 23
kanan ............................................ 25
kiri ................................................. 23
Tampak depan ..................................... 21
Tampak kiri .......................................... 21
Tampilan
tombol pintas
................................. 18
tampilan
pemecahan masalah
...................... 89
tanya jawab ......................................... 88
TJ. Lihat tanya jawab
tombol pintas
....................................... 20
U
Unit baterai
karakteristik
................................... 37
keadaan lemah .............................. 42
melepaskan ................................... 40
memaksimalkan usia baterai........... 38
memasang..................................... 40
mengecek tingkat pengisian ........... 41
menggunakan pertama kalinya ....... 38
Mengisi daya: ................................ 40
mengoptimalkan ............................ 41
peringatan baterai hampir habis...... 42
universal serial bus .............................. 33
W
WiFi..................................................... 51
Windows
Menggunakan Windows
................. 47
Pembaruan Windows Otomatis....... 64
Ver.02.01.02


- 1
¤ÙèÁ×ͼÙéãªé
Gateway NE71B

2
ÊÒúÑ−
¡ÒÃàÃÔèÁãªé§Ò¹¤ÍÁ¾ÔÇàµÍÃì¢Í§¤Ø³ 5
¡ÒÃàª×èÍÁµèÍäÃéÊÒÂ................................................................ 5
¡ÒÃŧ·ÐàºÕ¹...................................................................... 6
¡ÒõԴµÑ駫Ϳ·ìáÇÃì ............................................................. 7
¡ÒáÙé¤×¹................................................................................ 7
ÁÕ»Ñ−ËÒ¡ÒÃãªé§Ò¹................................................................ 7
¤ÍÁ¾ÔÇàµÍÃìàº×éͧµé¹ 9
¤ÇÒÁ»ÅÍ´ÀÑÂáÅФÇÒÁÊдǡʺÒÂ.................................. 9
¢éͤÇû¯ÔºÑµÔà¾×èͤÇÒÁ»ÅÍ´ÀÑ ................................ 9
¡Òûéͧ¡Ñ¹´éÒ¹ÊØ¢ÀÒ¾............................................. 13
·Ó¤ÇÒÁÃÙé¨Ñ¡¡Ñº¤ÍÁ¾ÔÇàµÍÃì¢Í§¤Ø³ 15
ÁØÁÁͧ´éÒ¹º¹ - áÊ´§...................................................... 16
ÁØÁÁͧ´éÒ¹º¹ - ¤ÕÂìºÍÃì´................................................. 17
»ØèÁ¾ÔàÈÉ.................................................................... 18
ÁØÁÁͧ´éҹ˹éÒ.................................................................. 21
ÁØÁÁͧ´éÒ¹«éÒÂ.................................................................. 22
ÁØÁÁͧ´éÒ¹¢ÇÒ .................................................................. 24
ÁØÁÁͧ´éÒ¹ÅèÒ§................................................................... 26
·Ñªá¾´ 27
¡ÒÃãªé·Ñªá¾´àº×éͧµé¹........................................................ 27
¡ÒÃÇÒ´¹ÔéǺ¹·Ñªá¾´........................................................ 28
¡ÒÃÍѾà¡Ã´¤ÍÁ¾ÔÇàµÍÃì¢Í§¤Ø³ 29
¢ÂÒÂãËé¡ÇéÒ§ä¡Å´éǵÑÇàÅ×Í¡µèÒ§æ................................... 29
µÑÇàÅ×͡㹡ÒÃàª×èÍÁµèÍ.............................................. 29
¾ÒÇàÇÍÃì«Ñ¾¾ÅÒ 35
Íá´»àµÍÃì AC ................................................................... 35
ẵàµÍÃÕè............................................................................ 36
ÅѡɳТͧẵàµÍÃÕè................................................ 36
¡ÒÃà»ÅÕè¹ẵàµÍÃÕè.................................................. 38
¡ÒÃãÊèËÃ×ͶʹẵàµÍÃÕè........................................... 39
¡ÒêÒÃì¨áºµàµÍÃÕè.................................................... 39
¡ÒõÃǨÊͺÃдѺ¾Åѧ§Ò¹¢Í§áºµàµÍÃÕè................ 40
¡ÒÃÂ×´ÍÒÂØ¡ÒÃãªé§Ò¹áºµàµÍÃÕè................................. 40
¡ÒÃàµ×͹ẵàµÍÃÕèµèÓ................................................ 40
à¤Ã×èͧÁ×ͨѴ¡ÒþÅѧ§Ò¹ 42
¡ÒûÃÐËÂÑ´¾Åѧ§Ò¹.......................................................... 42
«Í¿µìáÇÃì 45
¡ÒÃãªé Windows áÅЫͿ·ìáÇÃì¢Í§¤Ø³............................ 45
¡ÒÃÃÑ¡ÉÒ¤ÇÒÁ»ÅÍ´ÀѺ¹ÍÔ¹àµÍÃìà¹çµ·ÕèÁÕãËé.......... 45
Gateway Recovery Management............................ 45
ÍÔ¹àµÍÃìà¹çµ 46
¢Ñ鹵͹áẹà¹çµ............................................................. 46
¡Òû¡»éͧ¤ÍÁ¾ÔÇàµÍÃì¢Í§¤Ø³................................ 46

ÊÒúÑ− - 3
àÅ×Í¡ ¼ÙéãËéºÃÔ¡ÒÃÍÔ¹àµÍÃìà¹çµ.................................... 46
¡ÒÃàª×èÍÁµèÍà¤Ã×Í¢èÒÂ................................................ 49
·èͧÍÔ¹àµÍÃìà¹çµ!....................................................... 52
¤ÇÒÁ»ÅÍ´ÀÑÂ........................................................... 53
¡ÒÃàÃÕ¡¤×¹ 63
¡ÒÃÊÃéÒ§¡ÒÃÊÓÃͧ¢éÍÁÙÅàÃÕ¡¤×¹...................................... 63
¡ÒÃÊÃéÒ§ÊÓÃͧ¢éÍÁÙÅä´ÃìàÇÍÃìáÅÐá;¾ÅÔपÑè¹................ 66
¡ÒÃàÃÕ¡¤×¹¤èÒÃкº¢Í§¤Ø³ .............................................. 69
¡ÒõԴµÑé§ä´ÃìàÇÍÃìËÃ×Íá;¾ÅÔपÑè¹ãËÁè«éÓ.............. 70
¡ÒáÅѺÊÙèʶҹÐÃкº¡è͹˹éÒ................................ 73
àÃÕ¡¤×¹Ãкº¢Í§¤Ø³ãËéà»ç¹Ê¶Ò¹Ð·ÕèµÑé§ÁÒ¨Ò¡
âç§Ò¹....................................................................... 74
¡ÒÃàÃÕ¡¤×¹Ãкº¨Ò¡ Windows............................... 75
¡ÒÃàÃÕ¡¤×¹¤×¹¨Ò¡¢éÍÁÙÅ·ÕèÊÓÃͧ
äÇéà¾×èÍ¡ÒÃàÃÕ¡¤×¹¢Í§¤Ø³ ........................................ 79
¤Ó¶ÒÁ·Õè¶Ù¡¶ÒÁºèÍ 83
à¤Åç´ÅѺáÅФÓá¹Ð¹Ó㹡ÒÃãªé Windows 8...................... 86
ÁÕÍÂÙèÊÒÁ¤Í¹à«ç»µì·Õè¤Ø³µéͧ¨ÓäÇéãËé¢Öé¹ã¨................ 86
©Ñ¹¨Ðà¢éÒ¶Ö§ charms ä´éÍÂèÒ§äÃ?.............................. 86
©Ñ¹¨Ðä»ÂѧàÁ¹Ù àÃÔèÁ ä´éÍÂèÒ§äÃ.................................. 86
©Ñ¹¨ÐÊÅѺÃÐËÇèÒ§â»Ãá¡ÃÁä´éÍÂèÒ§äÃ?.................... 87
©Ñ¹¨Ð»Ô´¤ÍÁ¾ÔÇàµÍÃì¢Í§©Ñ¹ä´éÍÂèÒ§äÃ?.................. 87
·ÓäÁ¨Ö§ÁÕÍÔ¹àµÍÃìà¿«ãËÁè?...................................... 87
©Ñ¹¨Ð»Å´Åçͤ¤ÍÁ¾ÔÇàµÍÃì¢Í§©Ñ¹ä´éÍÂèÒ§äÃ?......... 88
©Ñ¹¨Ð»ÃѺáµè§¤ÍÁ¾ÔÇàµÍÃì¢Í§©Ñ¹ä´éÍÂèÒ§äÃ?......... 88
©Ñ¹µéͧ¡Ò÷Õè¨Ðãªé Windows Ẻ·Õè©Ñ¹à¤Âãªé –
àÍÒà´Ê¡ì·çÍ»¢Í§©Ñ¹¤×¹ÁÒ! ...................................... 89
á;¾ÅÔपÑè¹µèÒ§æ ¢Í§©Ñ¹ÍÂÙè·Õèä˹?....................... 90
Microsoft ID (ºÑ−ªÕ) ¤×ÍÍÐäÃ................................... 91
©Ñ¹¨Ðà¾ÔèÁÃÒ¡ÒÃâ»Ã´Å§ä»ã¹ Internet Explorer
ä´éÍÂèÒ§äÃ?................................................................ 92
©Ñ¹¨ÐµÃǨËÒ¡ÒÃÍѾവ¢Í§ Windows ä´éÍÂè
Ò§äÃ.. 92
©Ñ¹¨ÐËÒ¢éÍÁÙÅà¾ÔèÁàµÔÁä´é·Õèä˹................................ 92

4
¢éÍÁÙÅ´éÒ¹¡ÒäǺ¤ØÁ 93
ÊÔè§áÇ´ÅéÍÁ 111
ãºÍ¹Ø−ҵ㹡ÒÃãªé«Í¿·ìáÇÃì 114
´Ñª¹ 116
ÅÔ
¢ÊÔ·¸ © 2012 ʧǹÅÔ¢ÊÔ·¸Ôì
G
ateway NE71B ¤ÙèÁ×ͼÙéãªé
àÇÍÃìªÑè¹¹Õé: 20 ¡Ã¡®Ò¤Á 2012
áÇÐä»ÂѧàÇçºä«µì registration.gateway.com à¾×èͤ鹾º»ÃÐ⪹ìÊÓËÃѺÅÙ¡¤éÒ Gateway
Ë
ÁÒÂà˵Ø: ÃÙ»ÀÒ¾·Ñé§ËÁ´ÁÕäÇéãªéÊÓËÃѺ¡ÒÃÍéÒ§ÍÔ§à·èÒ¹Ñé¹ ÃٻẺ¨ÃÔ§ÍÒ¨µèҧ仨ҡ¹Õé

¡ÒÃàÃÔèÁãªé§Ò¹¤ÍÁ¾ÔÇàµÍÃì¢Í§¤Ø³ - 5
¡ÒÃàÃÔèÁãªé§Ò¹¤ÍÁ¾ÔÇàµÍÃì¢Í§¤Ø³
¢Í¢Íº¤Ø³ÊÓËÃѺ¡Òë×éͤÍÁ¾ÔÇàµÍÃì Gateway!
¤ÙèÁ×͹Õéä´éÃѺ¡ÒÃÍ͡ẺÁÒà¾×èÍãËé¤Óá¹Ð¹Óà¡ÕèÂǡѺ¤Ø³ÊÁºÑµÔµèÒ§æ
áÅÐãËé¤ÇÒÁªèÇÂàËÅ×Í㹡ÒÃãªé§Ò¹¤ÍÁ¾ÔÇàµÍÃì¢Í§¤Ø³
ËÅѧ¨Ò¡µÑ駤èÒáÅÐàÃÔèÁµé¹ãªé§Ò¹¤ÍÁ¾ÔÇàµÍÃì µÒÁ¤Óá¹Ð¹Ó㹡ÒõÑ駤èÒ
¨ÐÁÕ¤Ó¶ÒÁ·Õè¶ÒÁà¾×èͪèÇÂàª×èÍÁµèÍÍÔ¹àµÍÃìà¹çµ
â´Â¡Ó˹´¡ÒõÑ駤èÒ«Í¿·ìáÇÃìãËé¤ÍÁ¾ÔÇàµÍÃì¢Í§¤Ø³
¡ÒÃàª×èÍÁµèÍäÃéÊÒÂ
¡ÒÃàª×èÍÁµèÍäÃéÊÒ µéͧµÃǨÊͺ¤Ø³ÊÁºÑµÔäÃéÊÒ¢ͧ¤ÍÁ¾ÔÇàµÍÃì¡è͹ÇèÒ
ÁÕ¡ÒáÓ˹´¤èÒàÃÒàµÍÃìËÃ×ÍâÁà´çÁ·Õè¤Ø³µéͧ¡ÒÃàª×èÍÁµèͶ١µéͧ
•ËÒ¡äÁèä´éà»Ô´¡ÒÃÊ×èÍÊÒÃäÃéÊÒÂäÇé ¡´»ØèÁ Windows ( ) + W, ¾ÔÁ¾ì "Wireless" áÅéǤÅÔ¡·Õè
Wireless ¤ÅÔ¡ÊÇÔµªìà»Ô´»Ô´ÀÒÂãµé Wi-Fi à¾×èÍà»Ô´ãªé§Ò¹¡ÒÃÊ×èÍÊÒÃäÃéÊÒÂ
¤ÅÔ¡ÍÕ¡¤ÃÑé§à¾×èͻԴ¡ÒÃãªé§Ò¹
•à¾×èÍàª×èÍÁµèÍà¢éҡѺà¤Ã×Í¢èÒ ¡´»ØèÁ Windows ( )+W, ¾ÔÁ¾ì "Wireless" áÅéǤÅÔ¡·Õè Connect
to a network àÅ×Í¡à¤Ã×Í¢èÒ¢ͧ¤Ø³áÅлé͹ÃËÑʼèÒ¹ËÒ¡¨Óà»ç¹
•ÍÒ¨ÁÕ¤ÇÒÁÅèÒªéÒàÅ硹éÍ¡è͹¤ÍÁ¾ÔÇàµÍÃìàª×èÍÁµè͡ѺÍÔ¹àµÍÃìà¹ç
µ
ËÒ¡µÃǨäÁ辺à¤Ã×Í¢èÒ ËÃ×ͤÍÁ¾ÔÇàµÍÃì¢Í§¤Ø³äÁèàª×èÍÁµè͡ѺÍÔ¹àµÍÃìà¹çµ
¡ÃØسҴÙàÍ¡ÊÒûÃСͺ¢Í§ ISP ËÃ×ÍàÃÒàµÍâͧ¤Ø³ì

6
ËÅѧ¨Ò¡·Õè¤Ø³à»Ô´ãªé¤ÍÁ¾ÔÇàµÍÃìáÅÐÊÒÁÒöãªé§Ò¹ä´é ãËéà»Ô´ Internet Explorer
áÅзӵÒÁ¢Ñ鹵͹
ËÃ×Íãªéà¤àºÔÅà¤Ã×Í¢èÒÂà¾×èÍàª×èÍÁµèÍâ´ÂµÃ§¡Ñº¾ÍÃìµà¤Ã×Í¢èÒÂã¹àÃÒàµÍÃì¢Í§¤Ø³
â»Ã´´Ù¢éÍÁÙŹÕéä´é¨Ò¡¤ÙèÁ×Í»ÃСͺ¢Í§ ISP ËÃ×ÍàÃÒàµÍÃì¢Í§¤Ø³
¡ÒÃŧ·ÐÀºÕ¹
àÁ×èͤسãªé¤ÍÁ¾ÔÇàµÍÃì¢Í§¤Ø³à»ç¹¤ÃÑé§áá ¢Íá¹Ð¹ÓãËé¤Ø³·Ó¡ÒÃŧ·ÐàºÕ¹
«Ö觪èÇÂãËé¤Ø³ä´éÃѺÊÔ·¸Ô»ÃÐ⪹ìµèÒ§æ àªè¹:
•ºÃÔ¡Ò÷ÕèÃÇ´àÃçǨҡµÑÇá·¹·Õèä´éÃѺ¡Òý֡ͺÃÁ¨Ò¡àÃÒ
•ÊÁҪԡ㹪ØÁª¹ Gateway: ÃѺâ»ÃâÁªÑè¹µèÒ§æ áÅÐà¢éÒÃèÇÁ㹡ÒÃÊÓÃǨ¤ÇÒÁ¤Ô´àËç¹ÅÙ¡¤éÒ
•¢èÒÇÅèÒÊØ´¨Ò¡ Gateway
ÇÔ¸Õ¡ÒÃŧ·ÐàºÕ¹
ã¹ÃÐËÇèÒ§¡ÒÃàÃÔèÁµé¹à»Ô´ãªé§Ò¹¤ÍÁ¾ÔÇàµÍÃì¢Í§¤Ø³ ¨ÐÁÕ˹éÒµèÒ§àª−ªÇ¹ãËé¤Ø³·Ó¡ÒÃŧ·ÐàºÕ¹
â»Ã´¡ÃÍ¡¢éÍÁÙÅáÅФÅÔ¡ Next (¶Ñ´ä»)
˹éÒµèÒ§·ÕèÊͧ¨Ð»ÃСͺ仴éÇ¿ÔÅ´ìµÑÇàÅ×Í¡·Õè¨ÐªèÇÂãËéàÃÒãËéºÃÔ¡Ò÷Õè´Õ¡ÇèҡѺÅÙ¡¤éÒä´é
·Ò§àÅ×Í¡Í×è¹æ
ÇÔ¸ÕÍ×è¹ã¹¡ÒÃŧ·ÐàºÕ¹¼ÅÔµÀѳ±ì Gateway ¢Í§¤Ø³¤×Í¡ÒÃáÇÐä»ÂѧàÇçºä«µì¢Í§àÃÒ·Õè
register.gateway.com àÅ×Í¡»ÃÐà·È¢Í§¤Ø³ áÅзӵÒÁ¢Ñ鹵͹µèÒ§æ
ËÅѧ¨Ò¡·Õèŧ·ÐàºÕ¹ àÃÒ¨ÐÊè§ÍÕàÁÅìáÊ´§¡ÒÃÂ×¹Âѹ¾ÃéÍÁ´éÇ¢éÍÁÙÅ·ÕèÊÓ¤Ñ−·Õè¤Ø³¤ÇùÓ
ä»à¡çºäÇéã¹·Õè·Õè»ÅÍ´ÀÑÂãËé¡Ñº¤Ø³

¡ÒÃàÃÔèÁãªé§Ò¹¤ÍÁ¾ÔÇàµÍÃì¢Í§¤Ø³ - 7
¡ÒõԴµÑ駫Ϳ·ìáÇÃì
¤ÍÁ¾ÔÇàµÍÃì¢Í§¤Ø³¨ÐµÔ´µÑ駫Ϳ·ìáÇÃìâ´ÂÍѵâ¹ÁѵÔáÅÐàµÃÕÂÁà¾×èÍãªé§Ò¹¤ÍÁ¾ÔÇàµÍÃì¢Í§¤Ø³
«Öè§ÍÒ¨ãªéàÇÅÒÊÑ¡àÅ硹éÍ ¡ÃسÒÍÂèÒ»Ô´¤ÍÁ¾ÔÇàµÍÃì¢Í§¤Ø³ ãËéÃͨ¹¡ÇèÒ¡ÒõԴµÑ駨ÐàÊÃç¨ÊÔé¹
¡ÒáÙé¤×¹
¤Ø³¤ÇÃÊÃéÒ§´ÔÊ¡ìÊÓËÃѺ¡ÒÃàÃÕ¡¤×¹ã¹·Ñ¹·Õ·Õèà»ç¹ä»ä´é ¡ÒÃàÃÕ¡¤×¹
â»Ãá¡ÃÁ¨ÐªèÇÂÊÃéÒ§´ÔÊ¡ìàÃÕ¡¤×¹áÅÐàÃÕ¡¤×¹ËÃ×Í·Ó¡ÒõԴµÑé§á;¾ÅÔपÑè¹áÅÐä´ÃìàÇÍÃìãËÁèÍÕ¡¤
ÃÑ駨ҡ Gateway
ÁÕ»Ñ−ËÒ¡ÒÃãªé§Ò¹
Gateway ÁͺµÑÇàÅ×Í¡ËÅÒ¡ËÅÒÂà¾×èÍÃͧÃѺ¡ÒÃàÅ×Í¡«×éͧ͢¤Ø³
Gateway ¡ÒÃʹѺʹع
µÃǨ´ÙãËéá¹èã¨ÇèҤسä´éà¢Õ¹«ÕàÃÕÂŹÑÁàºÍÃì ʶҹ·ÕèáÅÐÇѹ·Õè«×éÍ ª×èÍÃØè¹ «Öè§àµÃÕÂÁäÇé㹤ÙèÁ×͹Õé
à¡çºÃÑ¡ÉÒãºàÊÃç¨ÃѺà§Ô¹äÇéà»ç¹ËÅÑ¡°Ò¹ ¡è͹¤Ø³µÔ´µèÍàÃÒ
â»Ã´à¢Õ¹¢éͤÇÒÁáÊ´§¢éͼԴ¾ÅÒ´·Õèà¡ÕèÂÇ¢éͧ»Ñ−ËÒ
áÅÐÁÕ¤ÍÁ¾ÔÇàµÍÃì¢Í§¤Ø³ÍÂÙè¡Ñº¤Ø³¾ÃéÍÁ·Ñé§à»Ô´ÊÇÔµªìà¤Ã×èͧËÒ¡à»ç¹ä»ä´é
¡ÒÃÁÕÃÒ¡ÒÃàËÅèÒ¹ÕéÍÂÙè¡Ñº¤Ø³àÁ×èÍ·Ó¡ÒõԴµèÍàÃÒ
¨ÐªèÇÂãËéá¹èã¨ä´éÊÓËÃѺ¡ÒÃãËéºÃÔ¡ÒÃä´é´ÕÂÔ觢Öé¹áÅÐÃÇ´àÃçÇ¢Öé¹

8
Gateway àÇçºä«µì
àÂÕèÂÁªÁ·Õè www.gateway.com - ´Ù·ÕèÊèǹ¡ÒÃʹѺʹع«Öè§ÁÕ ¢éÍÁÙÅÍѾവ ¤ÇÒÁªèÇÂàËÅ×Í ä´ÃìàÇÍÃì
áÅдÒǹìâËÅ´
¡ÒÃÃѺ»ÃСѹáÅТéÍÁÙÅ·ÕèµÔ´µèÍ
¤Ø³ÊÒÁÒö¾º¢éÍÁÙÅà¡ÕèÂǡѺ¡ÒÃÃѺ»ÃСѹÊÓËÃѺ¤ÍÁ¾ÔÇàµÍÃì¢Í§¤Ø³
áÅÐÇÔ¸Õ¡ÒõԴµèͽèÒÂʹѺʹع·Ò§à·¤¹Ô¤ä´é㹡ÒÃÃѺ»ÃСѹ¢Í§¤ÍÁ¾ÔÇàµÍÃì¢Í§¤Ø³

¤ÍÁ¾ÔÇàµÍÃìàº×éͧµé¹ - 9
¤ÍÁ¾ÔÇàµÍÃìàº×éͧµé¹
¤ÇÒÁ»ÅÍ´ÀÑÂáÅФÇÒÁÊдǡʺÒÂ
¢éͤÇû¯ÔºÑµÔà¾×èͤÇÒÁ»ÅÍ´ÀÑÂ
â»Ã´·ÓµÒÁá¹Ç·Ò§´éÒ¹ÅèÒ§¹Õéà¾×èÍãËéÊÒÁÒöãªé§Ò¹¤ÍÁ¾ÔÇàµÍÃì¢Í§¤Ø³ä´éÍÂèÒ§ÊдǡʺÒÂáÅÐ
ËÅÕ¡àÅÕ觡ÒÃà¡Ô´»Ñ−ËÒÊØ¢ÀÒ¾
ÊÀÒ¾áÇ´ÅéÍÁ㹡ÒÃãªé¤ÍÁ¾ÔÇàµÍÃì
µÃǨ´ÙãËéá¹èã¨ÇèÒ¤ÍÁ¾ÔÇàµÍÃì:
•¶Ù¡ãªé§Ò¹º¹¾×é¹¼ÔÇ á·è¹ÇÒ§ ËÃ×ͺ¹âµêзÕèÁÕ¤ÇÒÁÁÑ蹤§
ËÒ¡¤ÍÁ¾ÔÇàµÍÃ쵡¾×é¹ÍÒ¨Ê觼ÅãËéà¡Ô´¤ÇÒÁàÊÕÂËÒÂÃéÒÂáçä´é
•ËéÒÁãªéº¹¾×é¹¼ÔÇ·ÕèÊÑè¹ËÃ×Íãªé§Ò¹ã¹¢³ÐàÅ蹡ÕÌÒ ÍÍ¡¡ÓÅѧ¡Ò ËÃ×Í¡Ô¨¡ÃÃÁÍ×è¹æ
·ÕèÁÕ¡ÒÃà¤Å×è͹äËÇ ¡ÒÃÊÑè¹ËÃ×Í¡ÒÃà¤Å×è͹äËÇÊÒÁÒö·ÓãËéµÑÇà¡ÕèÂÇËÅØ´ÍÍ¡
à¡Ô´¤ÇÒÁàÊÕÂËÒµèÍÊèǹ»ÃСͺÀÒÂã¹ áÅСÒÃÃÑèǢͧẵàµÍÃÕèä´é
•ËéÒÁ¶Ù¡áʧᴴËÃ×ÍáËÅ觡Óà¹Ô´¤ÇÒÁÃé͹â´ÂµÃ§
•ËéÒÁÍÂÙèã¡Åé¡ÑºÊ¹ÒÁáÁèàËÅç¡ËÃ×ÍÍØ»¡Ã³ì·ÕèÊÃéÒ§¡ÃÐáÊä¿¿éÒʶԵ
•µéͧà¡çºãËéÍÂÙèËèÒ§¨Ò¡â·ÃÈѾ·ìà¤Å×è͹·ÕèÍÂèÒ§¹éÍ 30 ૹµÔàÁµÃ (˹Ö觿ص)
•ËéÒÁÍÂÙ
èã¹ÊÀÒ¾áÇ´ÅéÍÁ·ÕèàµçÁä»´éǽØè¹ËÃ×Íà»Õ¡ª×é¹
•ËéÒÁãªéã¡Åé¡Ñº¹éÓ
ËéÒÁ·Ó¢Í§àËÅÇ·Ø¡»ÃÐàÀ·Ë¡Å§º¹ËÃ×Íŧ㹤ÍÁ¾ÔÇàµÍÃì¢Í§¤Ø³â´Âà´ç´¢Ò´

10
•ËéÒÁÇÒ§º¹¾ÃÁËÃ×;×é¹¼ÔÇÍ×è¹·ÕèÍÒ¨ÁÕ»ÃШØä¿¿éÒ
ËÁÒÂà˵Ø
•ÊÅç͵áÅЪèͧµèÒ§æÁÕà¾×èÍ¡ÒÃÃкÒÂÍÒ¡ÒÈà¾×èÍãËéá¹èã¨ã¹¡Ò÷ӧҹ·Õèàª×èͶ×Íä´é¢Í§¼ÅÔµÀѳ±ìáÅ
Ðà¾×èÍ»éͧ¡Ñ¹¨Ò¡¡ÒÃà¡Ô´¤ÇÒÁÃé͹à¡Ô¹¡Ó˹´ ËéÒÁ»Ô´ËÃ×Í¡Õ´¢ÇÒ§ªèͧµèÒ§æ àËÅèÒ¹Õé
ËéÒÁ»Ô´ªèͧµèÒ§æ àËÅèÒ¹Õéâ´Â¡ÒÃÇÒ§º¹àµÕ§¹Í¹, â«¿Ò, ¾ÃÁ, ËÃ×;×é¹¼ÔÇÍ×è¹·Õè¤ÅéÒ¡ѹ
ËéÒÁÇÒ§¼ÅÔµÀѳ±ìà˹×Íà¤Ã×èͧ·Ó¤ÇÒÁÃé͹ËÃ×ÍÀÒÂã¹ÇÑÊ´Ø·ÕèµÔ´µÑé§ã¹µÑÇ
àÇé¹äÇéáµèÇèÒÁÕ¡ÒÃÃкÒÂÍÒ¡ÒÈ·ÕèàËÁÒÐÊÁ
•ËéÒÁãÊèÇѵ¶Øã´æà¢éÒã¹¼ÅÔµÀѳ±ì¹Õé·Ò§ªèͧÊÅç͵à¹×èͧ¨Ò¡ÍÒ¨ÊÑÁ¼ÑʡѺ¨Ø
´ËÃ×ͪÔé¹Êèǹ·ÕèÁÕ
áç´Ñ¹ä¿¿éÒ·Õèà»ç¹ÍѹµÃÒ«Öè§ÊÒÁÒöÊ觼ÅãËéà¡Ô´ä¿äËÁéËÃ×Íä¿¿éÒªç͵ä´é ËéÒÁ·Ó¢Í§àËÅÇ
·Ø¡»ÃÐàÀ·Ë¡Å§º¹ËÃ×Íŧ㹼ÅÔµÀѳ±ìâ´Âà´ç´¢Ò´
•à¾×èÍËÅÕ¡àÅÕ觤ÇÒÁàÊÕÂËÒ¢ͧÊèǹ»ÃСͺÀÒÂã¹áÅÐà¾×èÍ»éͧ¡Ñ¹¡ÒÃÃÑèǢͧẵàµÍÃÕè
ËéÒÁÇÒ§¼ÅÔµÀѳ±ìº¹¾×é¹¼ÔÇ·ÕèÊÑè¹
•ËéÒÁãªéã¹¢³ÐàÅ蹡ÕÌÒ, ÍÍ¡¡ÓÅѧ¡ÒÂ, ËÃ×Íã¹ÊÀÒ¾áÇ´ÅéÍÁ·ÕèÊÑè¹ «Öè§ÍÒ¨·ÓãËéà¡Ô´ÍغѵÔà˵Ø
·ÕèäÁè¤Ò´½Ñ¹ä´é ËÃ×Íà¡Ô´¤ÇÒÁàÊÕÂËÒµèÍÍØ»¡Ã³ì¨Ò¹ËÁع, HDD, ä´Ãì¿Í;µÔ¤ÍÅ
áÅФÇÒÁàÊÕ觵èÍ¡ÒÃÃÐàºÔ´¢Í§áºµàµÍÃÕèÅÔà¸ÕÂÁ
ÊÒÂà¤àºÔéÅ
µÃǨ´ÙãËéá¹èã¨ÇèÒ:
• ÊÒÂà¤àºÔéÅäÁèµÖ§à¡Ô¹ä»¨¹·ÓãËéà¡Ô´¤ÇÒÁàÊÕ觵èÍ¡ÒÃà´Ô¹¢éÒÁËÃ×ÍÊдشÅéÁ¨Ò¡¼Ù餹Ãͺ¢éÒ§ä´é
•äÁèÁÕÍØ»¡Ã³ìÍ×è¹æ ÇÒ§·ÑºÊÒÂà¤àºÔéÅ
•ÊÒÂ俶١àª×èÍÁµè͡Ѻ¤ÍÁ¾ÔÇàµÍÃì¡è͹àª×èÍÁµèÍÊÒÂ信Ѻ»ÅÑê¡ä¿ AC

¤ÍÁ¾ÔÇàµÍÃìàº×éͧµé¹ - 11
•ÊÒÂ俶١¶Í´ÍÍ¡¨Ò¡»ÅÑê¡ä¿¡è͹¶Í´ÊÒÂä¿ÍÍ¡¨Ò¡¤ÍÁ¾ÔÇàµÍÃì
•ãªéÊÒÂä¿áººÊÒÁËÑǵèÍàª×èÍÁµèÍà¢éҡѺàµéÒÃѺẺµèÍÊÒ´Թ
•»ÅÑê¡ä¿ÊÒÁÒöà¢éÒ¶Ö§ä´é§èÒÂáÅеԴµÑé§ÍÂÙèã¡Åé¡Ñº¤ÍÁ¾ÔÇàµÍÃìÁÒ¡·ÕèÊØ´
(ËéÒÁµèÍÍá´»àµÍÃìà¢éҡѺÃÒ§»ÅÑê¡ä¿à¡Ô¹¡Ó˹´)
ËÒ¡¤ÍÁ¾ÔÇàµÍÃì¢Í§¤Ø³ãªéÍá´»àµÍÃì AC ÀÒ¹͡:
•ËéÒÁÇÒ§Çѵ¶ØÍ×蹤ÅØÁäÇéËÃ×ͷѺäÇ麹Íá´»àµÍÃì AC
¾ÂÒÂÒÁãËéÍá´»àµÍÃìàÂç¹ã¹ÃÐËÇèÒ§¡ÒÃãªé§Ò¹â´ÂäÁèÇÒ§äÇéã¡Åé¡ÑºÇѵ¶ØÍ×è¹
•ãªéÍá´»àµÍÃì AC ª¹Ô´·ÕèÁÒ¾ÃéÍÁ¡Ñº¤ÍÁ¾ÔÇàµÍÃì¢Í§¤Ø³à·èÒ¹Ñé¹
¡ÒÃãªéÍá´»àµÍÃìÍ×è¹·Õè¤ÅéÒ¤ÅÖ§¡Ñ¹ÍÒ¨à¡Ô´¤ÇÒÁàÊÕÂËÒµèͤÍÁ¾ÔÇàµÍÃì¢Í§¤Ø³ä´é
ËÒ¡¨Óà»ç¹µé
ͧÁÕ¡ÒÃà»ÅÕè¹·´á·¹
ãËéãªéÍÐäËÅè·Õèä´éÃѺ¡ÒÃÃѺÃͧãËéãªé¡Ñº¤ÍÁ¾ÔÇàµÍÃì¢Í§¤Ø³à·èÒ¹Ñé¹
¡Ò÷ӤÇÒÁÊÐÍÒ´¤ÍÁ¾ÔÇàµÍÃì¢Í§¤Ø³
•¶Í´ÊÒÂ俤ÍÁ¾ÔÇàµÍÃì¢Í§¤Ø³ÍÍ¡¨Ò¡»ÅÑê¡ä¿·Ø¡¤ÃÑ駡è͹·Ó¤ÇÒÁÊÐÍÒ´
•ËéÒÁãªéÊÒ÷ӤÇÒÁÊÐÍÒ´·Õèà»ç¹¢Í§àËÅÇËÃ×Íà»ç¹ÅÐÍͧ ãËéãªé¼éÒËÁÒ´á·¹
•ËéÒÁãªéÊÒ÷ӤÇÒÁÊÐÍÒ´·Õèà»ç¹ÅÐÍͧâ´ÂµÃ§º¹Ë¹éÒ¨Í
•ËÒ¡¤Ø³·Ó¢Í§àËÅÇË´ŧº¹¤ÍÁ¾ÔÇàµÍÃì ãËé»Ô´à¤Ã×èͧ·Ñ¹·Õ ¶Í´Íá´»àµÍÃì AC
¶Í´áºµàµÍÃÕèÍÍ¡áÅеÃǨ´ÙãËéá¹èã¨ÇèÒà¤Ã×èͧáËé§Ê¹Ô·´ÕáÅéÇ¡è͹à»Ô´à¤Ã×èͧãËÁè
ãËé·Ôé§äÇé¢éÒÁ¤×¹ËÒ¡¨Óà»ç¹
ËÁÒÂà˵Ø: ËÒ¡¤ÍÁ¾ÔÇàµÍÃì¢Í§¤Ø³ÁÕÊÅç͵ÊÓËÃѺàÁÁâÁÃÕè¡ÒÃì´ËÃ×ÍÍØ»¡Ã³ìàÊÃÔÁ
ÍÒ¨ÁÕ µÑÇÍÂèÒ§ ¾ÅÒʵԡµÔ´µÑé§ÍÂÙèã¹ÊÅç͵

12
¡ÒÃì´µÑÇÍÂèÒ§¹Õé¨Ð»¡»éͧÊÅç͵·ÕèäÁèä´éãªé§Ò¹¨Ò¡½Øè¹, Çѵ¶ØâÅËÐËÃ×ͪÔé¹ÊèǹÍ×è¹æ
à¡çºµÑÇÍÂèÒ§¹ÕéäÇéãªéàÁ×èÍäÁèÁÕ¡ÒÃì´ÍÂÙèã¹ÊÅç͵
¡ÒëèÍÁá«Á¤ÍÁ¾ÔÇàµÍÃì¢Í§¤Ø³
ËéÒÁ¾ÂÒÂÒÁ«èÍÁ¤ÍÁ¾ÔÇàµÍÃì¢Í§¤Ø³´éǵÑǤسàͧ
à¹×èͧ¨Ò¡¡ÒÃà»Ô´ËÃ×Ͷʹ½Ò»Ô´ÍÒ¨à¡Ô´ÍѹµÃÒ¨ҡ¨Ø´·ÕèÁÕáç´Ñ¹ä¿¿éÒËÃ×ÍÁÕ¤ÇÒÁàÊÕè§Í×è¹æ
à¡Ô´¢Ö鹡ѺµÑǤسä´é
ãËé¡ÒëèÍÁºÓÃا¼ÅÔµÀѳ±ìà»ç¹Ë¹éÒ·Õè¢Í§à¨éÒ˹éÒ·Õèá¼¹¡ãËéºÃÔ¡Ò÷ÕèÁÕ¤ÇÒÁàªÕèÂǪÒ−
¶Í´»ÅÑê¡ä¿¤ÍÁ¾ÔÇàµÍÃì¢Í§¤Ø³ÍÍ¡¨Ò¡àµéÒÃѺáÅеԴµèÍà¨éÒ˹éÒ·Õèá¼¹¡ãËéºÃÔ¡Ò÷ÕèÁÕ¤ÇÒÁàªÕèÂǪ
Ò−àÁ×èÍ:
•ÊÒÂä¿ËÃ×ÍàµéÒàÊÕºä´éÃѺ¤ÇÒÁàÊÕÂËÒ ¢Ò´ËÃ×Íà»×èÍÂÂØèÂ
•¢Í§àËÅÇˡŧ㹼ÅÔµÀѳ±ì
•¼ÅÔµÀѳ±ìµ¡Å§¹éÓËÃ×Íâ´¹½¹
•¼ÅÔµÀѳ±ìµ¡Å§¾×é¹ËÃ×͵ÑÇà¤Ã×èͧä´é
ÃѺ¤ÇÒÁàÊÕÂËÒÂ
•¼ÅÔµÀѳ±ìÁÕ¡ÒÃà»ÅÕè¹á»Å§´éÒ¹»ÃÐÊÔ·¸ÔÀÒ¾ÍÂèÒ§ªÑ´à¨¹
•¼ÅÔµÀѳ±ì·Ó§Ò¹äÁ軡µÔËÅѧ¨Ò¡·ÓµÒÁ¤Óá¹Ð¹Ó㹡ÒÃãªé§Ò¹
ËÁÒÂà˵Ø: »ÃѺáµè§¡ÒäǺ¤ØÁà·èÒ·ÕèÁÕÃÇÁÍÂÙè㹤Óá¹Ð¹Ó㹡ÒÃãªé§Ò¹à·èÒ¹Ñé¹
à¹×èͧ¨Ò¡¡ÒûÃѺáµè§¡ÒäǺ¤ØÁ·ÕèäÁèàËÁÒÐÊÁÍÒ¨Ê觼ÅãËéà¡Ô´¤ÇÒÁàÊÕÂËÒÂáÅеé
ͧ¡ÒáÒôÙáŨҡªèҧ෤¹Ô¤·ÕèÁÕ¤ÇÒÁàªÕèÂǪÒ−à¾×èÍ¡Ùé¤×¹¼ÅÔµÀѳ±ìãËé¡ÅѺÊÙèÊÀÒÇÐ
¡Ò÷ӧҹ»¡µÔ

¤ÍÁ¾ÔÇàµÍÃìàº×éͧµé¹ - 13
¡Òûéͧ¡Ñ¹´éÒ¹ÊØ¢ÀÒ¾
•¾×é¹¼ÔÇ´éÒ¹ÅèÒ§, ¾×é¹·Õèâ´ÂÃͺªèͧÃкÒÂÍÒ¡ÒÈ áÅÐÍá´»àµÍÃì AC ÁÕ¤ÇÒÁÃé͹
à¾×èÍËÅÕ¡àÅÕè§ÍÒ¡ÒúҴà¨çº ËÅÕ¡àÅÕ觡ÒÃÊÑÁ¼ÑʡѺ¼ÔÇ˹ѧËÃ×ÍÃèÒ§¡Ò¢ͧ¤Ø³
•ÍØ»¡Ã³ì¢Í§¤Ø³áÅÐÊèǹ»ÃСͺµèÒ§æ ÍÒ¨ÁÕªÔé¹Êèǹ¢¹Ò´àÅç¡
à¡çºÍØ»¡Ã³ìáÅЪÔé¹ÊèǹàËÅèÒ¹ÕéãËéËèÒ§¨Ò¡à´ç¡
•¤ÍÁ¾ÔÇàµÍÃìáÅÐÍØ»¡Ã³ìàÊÃÔÁÍÒ¨ÁÕªÔé¹Êèǹ¢¹Ò´àÅç¡
à¡çºÍØ»¡Ã³ìáÅЪÔé¹ÊèǹàËÅèÒ¹ÕéãËéËèÒ§¨Ò¡à´ç¡àÅç¡
•ËÒ¡¤Ø³·Ó§Ò¹ËÃ×ÍàÅè¹à»ç¹àÇÅÒ¹Ò¹ËÅÒªÑèÇâÁ§ ¤ÇÃËÂØ´¾Ñ¡ÍÂÙèàÊÁÍ
¾Ñ¡ÊÒµҨҡ˹éҨͤÍÁ¾ÔÇàµÍÃìà»ç¹¤ÃÑ駤ÃÒÇ ËéÒÁãªé¤ÍÁ¾ÔÇàµÍÃì¢Í§¤Ø³ËÒ¡ÃÙéÊÖ¡àÁ×èÍÂÅéÒ
•ÇÒ§¤ÍÁ¾ÔÇàµÍÃì¢Í§¤Ø³ãË
éÍÂÙèã¹µÓá˹觷Õè¤Ø³ÊÒÁÒö·Ó§Ò¹ä´éã¹·èÒ·Ò§·Õè¼è͹¤ÅÒÂáÅÐà»ç¹¸ÃÃ
ÁªÒµÔ ÇÒ§ÍØ»¡Ã³ì·Õè¤Ø³ãªéºèÍÂæäÇéã¹µÓá˹觷ÕèÊÒÁÒöà¢éÒ¶Ö§ä´é§èÒÂ
•ÇÒ§¤ÍÁ¾ÔÇàµÍÃì¢Í§¤Ø³ãËéÍÂÙèàº×éͧ˹éҤسâ´ÂµÃ§à¾×èÍà¾ÔèÁ¤ÇÒÁ»ÅÍ´ÀÑÂáÅФÇÒÁʺÒÂ
µÃǨ´ÙãËéá¹èã¨ÇèÒ¤ÕÂìºÍÃì´áÅзѪᾴÍÂÙèã¹ÃдѺ¤ÇÒÁÊÙ§·ÕèÊÒÁÒöãªé§Ò¹ä´éÍÂèҧʺÒÂ
˹éҨͤÇÃÍÂÙèËèÒ§¨Ò¡ÊÒµҢͧ¤Ø³ã¹ÃÐËÇèÒ§ 45-70 ૹµÔàÁµÃ (18-30 ¹ÔéÇ)
ËÒ¡¤Ø³ãªé¤ÍÁ¾ÔÇàµÍÃìà»ç¹ÃÐÂÐàÇÅҹҹ㹢³Ð¹Ñ觷ÕèâµêÐ
¡Òë×éͤÕÂìºÍÃì´ÀÒ¹͡à¾ÔèÁÊÒÁÒöªèÇÂà¾ÔèÁ¤ÇÒÁÊдǡʺÒÂ㹡Ò÷ӧҹä´é
•à¾×èÍ»¡»éͧ¡ÒÃÃѺ¿Ñ§¢Í§¤Ø³ àÁ×èÍãªéÅÓ⾧ËÃ×
ÍËٿѧ ãËéà¾ÔèÁÃдѺàÊÕ§ÍÂèÒ§ªéÒæ
¨¹¡ÃзÑ觤سä´éÂÔ¹àÊÕ§ªÑ´à¨¹áÅÐÃÙéÊÖ¡ÇèÒÃѺ¿Ñ§ä´éÍÂèҧʺÒÂ
ËéÒÁà¾ÔèÁÃдѺàÊÕ§ËÅѧ¨Ò¡·ÕèË٢ͧ¤Ø³ä´é»ÃѺÃдѺ¡ÒÃÃѺ¿Ñ§áÅéÇ
ËéÒÁ¿Ñ§àÊÕ§·ÕèÃдѺàÊÕ§´Ñ§à»ç¹ÃÐÂÐàÇÅÒ¹Ò¹æ
ËéÒÁà¾ÔèÁÃдѺàÊÕ§à¾×èÍ»éͧ¡Ñ¹àÊÕ§´Ñ§¨Ò¡ÊÀÒ¾áÇ´ÅéÍÁ
ãËéÅ´ÃдѺàÊÕ§ŧàÁ×èͤسäÁèÊÒÁÒöä´éÂÔ¹àÊÕ§¾Ù´¤Ø¢ͧ¼Ù餹Ãͺ¢éÒ§

14
•´éÒ¹ÅèÒ§¢Í§¤ÍÁ¾ÔÇàµÍÃì Íá´»àµÍÃì
áÅЪèͧÃкÒÂÍÒ¡ÒÈ·Õèà»Ô´ÍÂÙèÍÒ¨Ãé͹ã¹ÃÐËÇèÒ§ãªé§Ò¹
ËÅÕ¡àÅÕ觡ÒÃÊÑÁ¼ÑʡѺÃèÒ§¡ÒÂáÅÐËéÒÁÇÒ§¤ÍÁ¾ÔÇàµÍÃ캹µÑ¡¢Í§¤Ø³¢³Ðãªé§Ò¹
•µÃǨ´ÙãËéá¹èã¨ÇèÒªèͧÃкÒÂÍÒ¡ÒȢͧ¤ÍÁ¾ÔÇàµÍÃìáÅЪèͧµèÒ§æäÁè¶Ù¡»Ô´ËÃ×Í¡Õ´¢ÇÒ§
ËéÒÁÇÒ§¤ÍÁ¾ÔÇàµÍÃ캹¾×é¹¼ÔǹØèÁæ (àªè¹¾ÃÁ à¡éÒÍÕéËÃ×ÍàµÕ§¹Í¹)
·ÕèÍÒ¨¡Õ´¢ÇÒ§ªèͧÃкÒÂÍÒ¡ÒÈ
•ËéÒÁãÊèÇѵ¶Øã´æ
à¢éÒã¹¼ÅÔµÀѳ±ì¹Õé·Ò§ªèͧÊÅç͵à¹×èͧ¨Ò¡ÍÒ¨ÊÑÁ¼ÑʡѺ¨Ø´ËÃ×ͪÔé¹Êèǹ·ÕèÁÕáç´Ñ¹ä¿¿éÒ·Õèà»ç¹Íѹ
µÃÒ«Öè§ÊÒÁÒöÊ觼ÅãËéà¡Ô´ä¿äËÁéËÃ×Íä¿¿éÒªç͵ä´é
•ÍÒ¨à¡Ô´¤ÇÒÁ¼Ô´»¡µÔ¢Í§Á×
Í ¢éÍÁ×Í á¢¹ ¤Í äËÅè ¢Ò áÅÐËÅѧ
ËÃ×ÍÍÒ¡ÒüԴ»¡µÔÍ×è¹æä´é¨Ò¡¡ÒÃÍÂÙèã¹·èÒà´ÔÁà»ç¹àÇÅÒ¹Ò¹
à¾×èÍÅ´¤ÇÒÁàÊÕ觢ͧ¡ÒÃà¡Ô´¤ÇÒÁ¼Ô´»¡µÔàËÅèÒ¹Õé
ãËéãªé¤ÕÂìºÍÃì´â´ÂãËé¢éÍÁ×ͧ͢¤Ø³ÍÂÙèã¹µÓá˹觵çáÅоÔÁ¾ìâ´ÂãËéÁ×ÍáÅТéÍÁ×ͧ͢¤Ø³à¤Å×èÍ
¹äËÇÍÂÙèà˹×ͤÕÂìºÍÃì´ ËÒ¡¤Ø³ÁÕÍÒ¡ÒÃà¨çº ªÒËÃ×ÍÍÒ¡ÒÃäÁèʺÒÂÍ×è¹æ â»Ã´¾ºá¾·Âì
•àÃÒ¢Íá¹Ð¹ÓãËé¼Ù黡¤Ãͧ¤Í¤Ǻ¤ØÁ¡ÒÃàÅè¹à¡Á¢Í§à´ç¡æ
ËÒ¡·èÒ¹ËÃ×ͺصÃËÅÒ¹¢Í§·èÒ¹ÁÕÍÒ¡ÒôѧµèÍ仹Õé: àÇÕ¹ÈÕÃÉÐ µÒ¾ÃèÒÁÑÇ
µÒËÃ×Í¡ÅéÒÁà¹×éÍ¡Ãеء ËÁ´ÊµÔ ªÑ¡ ãËéËÂØ´ãªé§Ò¹áÅоºá¾·Âìâ´Â·Ñ¹·Õ
ÍÒ¡ÒÃàËÅèÒ¹ÕéÍÒ¨à¡Ô´¢Ö鹡Ѻ¼ÙéäÁèà¤ÂÁÕ»ÃÐÇѵԡÒûèÇÂà»ç
¹ âäÅÁºéÒËÁÙ

·Ó¤ÇÒÁÃÙé¨Ñ¡¡Ñº¤ÍÁ¾ÔÇàµÍÃì¢Í§¤Ø³ - 15
·Ó¤ÇÒÁÃÙé¨Ñ¡¡Ñº¤ÍÁ¾ÔÇàµÍÃì¢Í§¤Ø³
ËÅѧ¨Ò¡µÔ´µÑ駤ÍÁ¾ÔÇàµÍÃìµÒÁÀҾ㹤Óá¹Ð¹Ó¡ÒõԴµÑé§ µèÍ仹Õéà»ç¹ÇÔ¸Õ¡ÒÃãªé§Ò¹ Gateway
¤ÍÁ¾ÔÇàµÍÃì ãËÁè¢Í§¤Ø³
Gateway NE71B

16
ÁØÁÁͧ´éÒ¹º¹ - áÊ´§
# äͤ͹ ÃÒ¡Òà ¤Ó͸ԺÒÂ
1àÇçºá¤Á
¡ÅéͧàÇçºá¤ÁÊÓËÃѺÃкº¡ÒÃÊ×èÍÊÒôéÇÂÇÔ´ÕâÍ
ä¿·ÕèÍÂÙè¶Ñ´¨Ò¡àÇçºá¤ÁáÊ´§ÇèÒàÇçºá¤Á¡ÓÅѧ·Ó§Ò¹ÍÂÙè
2 äÁâ¤Ã⿹ äÁâ¤Ã⿹㹵ÑÇÊÓËÃѺ¡Òúѹ·Ö¡àÊÕ§
3¨ÍáÊ´§¼Å
ËÃ×ÍàÃÕ¡ÇèÒ¨Í Liquid-Crystal Display (LCD)
áÊ´§àÍÒ·ì¾Ø·¢Í§¤ÍÁ¾ÔÇàµÍÃì
1
2
3

·Ó¤ÇÒÁÃÙé¨Ñ¡¡Ñº¤ÍÁ¾ÔÇàµÍÃì¢Í§¤Ø³ - 17
ÁØÁÁͧ´éÒ¹º¹ - ¤ÕÂìºÍÃì´
# äͤ͹ ÃÒ¡Òà ¤Ó͸ԺÒÂ
1
»ØèÁ¾ÒÇàÇÍÃì/
µÑÇáÊ´§Ê¶Ò¹Ð
à»Ô´áÅлԴ¤ÍÁ¾ÔÇàµÍÃì ÃкØʶҹСÒÃà»Ô´ãªé§Ò¹¤ÍÁ¾ÔÇàµÍÃì
2¤ÕÂìºÍÃì´
à¾×èÍ»é͹¢éÍÁÙÅà¢éÒÊÙè¤ÍÁ¾ÔÇàµÍÃì¢Í§¤Ø³
-ÃÒÂÅÐàÍÕ´»ØèÁ¾ÔàÈÉ͸ԺÒ ã¹Ë¹éÒ 18
3·Ñªá¾ç´
ÍØ»¡Ã³ìªÕéµÓá˹è§áººÊÑÁ¼ÑÊ
«Ö觷ӧҹẺà´ÕÂǡѺàÁÒÊì¤ÍÁ¾ÔÇàµÍÃì
1
2
5
3
4

18
»ØèÁ¾ÔàÈÉ
¤ÕÂìºÍÃì´¤ÍÁ¾ÔÇàµÍÃì¢Í§¤Ø³ÁÕ»ØèÁ·Õèãªé§Ò¹ÊÓËÃѺ¿Ñ§¡ìªÑè¹¾ÔàÈÉ
¿Ñ§¡ìªÑ蹢ͧáµèÅлØèÁ¨Ð·Óà¤Ã×èͧËÁÒÂäͤ͹äÇéÍÂèÒ§ªÑ´à¨¹
4»ØèÁ¤ÅÔ¡ («éÒÂáÅТÇÒ) ¿Ñ§¡ìªÑè¹»ØèÁ·Ò§«éÒÂáÅТÇÒà»ç¹»ØèÁàÅ×Í¡«éÒÂáÅТÇÒ
5ÅÓ⾧ àÍÒ·ì¾Ø·ÊàµÍÃÔâÍ
äͤ͹ ¿Ñ§¡ìªÑè¹ ¤Ó͸ԺÒÂ
Fn
»ØèÁÎç͵¤ÕÂì
ÊÓËÃѺ¿Ñ§¡ìªÑè¹·ÕèÊͧ
ãªé§Ò¹¿Ñ§¡ìªÑè¹·ÕèÊͧ¨Ò¡»ØèÁ·Õè¡Ó˹´
àªè¹ ¡´»ØèÁ Fn à¾×èÍãªé§Ò¹»ØèÁ F1 ¶Ö§ F12
ÇÔ¸Õãªé à»Ô´àÁ¹ÙÇÔ¸Õãªé
Backup
ªèÇÂãËé¤Ø³ÊÃéÒ§ÊÓà¹Òà¾×èÍ¡ÒÃÊÓÃͧ¢éÍÁÙŤÍÁ¾ÔÇàµÍÃì¢Í§¤Ø³
ËÃ×Í੾ÒÐä¿ÅìáÅÐâ¿Åà´ÍÃì·ÕèàÅ×Í¡ä´é
ÊÃéÒ§µÒÃÒ§¡Ó˹´¡Òû¡µÔËÃ×Í·ÓÊÓà¹ÒàÁ×èͤسµéͧ¡ÒÃ
¡ÒõԴµèÍÊ×èÍÊÒà à»Ô´/»Ô´ ÍØ»¡Ã³ìÊ×èÍÊÒâͧ¤ÍÁ¾ÔÇàµÍÃì
ÊÅѺ¨ÍáÊ´§¼Å
ÊÅѺàÍÒ·ì¾Ø·¨ÍáÊ´§¼ÅÃÐËÇèҧ˹éÒ¨ÍáÊ´§¼Å,
¨ÍáÊ´§¼ÅÀÒ¹͡ (ËÒ¡àª×èÍÁµèÍÍÂÙè) áÅзÑé§Êͧª¹Ô´
˹éÒ¨ÍÇèÒ§
»Ô´ä¿¾×é¹ËÅѧ¨ÍáÊ´§¼Åà¾×èÍ»ÃÐËÂÑ´¾Åѧ§Ò¹
¡´»ØèÁã´¡ç
ä´éà¾×èÍà»Ô´Ë¹éҨ͡ÅѺÁÒÍÕ¡¤ÃÑé§
# äͤ͹ ÃÒ¡Òà ¤Ó͸ԺÒÂ

·Ó¤ÇÒÁÃÙé¨Ñ¡¡Ñº¤ÍÁ¾ÔÇàµÍÃì¢Í§¤Ø³ - 19
à»Ô´»Ô´¡ÒÃãªé§Ò¹·Ñªá¾´ à»Ô´áÅлԴ·Ñªá¾´º¹à¤Ã×èͧ
àÅè¹/ËÂØ´àÅè¹àÅè¹ËÃ×ÍËÂØ´àÅè¹ä¿ÅìÁÕà´ÕªÑèǤÃÒÇ
ËÂØ´ËÂØ´¡ÒÃàÅè¹ä¿ÅìÁÕà´ÕÂ
¡è͹˹éÒ¡ÅѺÊÙèä¿ÅìÁÕà´Õ¡è͹˹éÒ
¶Ñ´ä» ä»ÊÙèä¿ÅìÁÕà´Õ¶Ѵä»
Å´¤ÇÒÁÊÇèÒ§ Å´¤ÇÒÁÊÇèÒ§¢Í§Ë¹éÒ¨Í
à¾ÔèÁ¤ÇÒÁÊÇèÒ§ à¾ÔèÁ¤ÇÒÁÊÇèÒ§¢Í§Ë¹éÒ¨Í
à¤Ã×Í¢èÒÂÊѧ¤Á
à»Ô´á;¾ÅÔपÑè¹à¤Ã×Í¢èÒÂÊѧ¤Á
-ËÒ¡á;¾ÅÔपÑè¹¹ÕéäÁèä´éÃѺ¡ÒõԴµÑé§
»ØèÁ¹Õé¨ÐàÃÕ¡á;¾ÅÔपÑè¹¢éͤÇÒÁ´èǹ᷹
à¾ÔèÁàÊÕ§ à¾ÔèÁÃдѺàÊÕ§
Å´àÊÕ§ Å´ÃдѺàÊÕ§
à»Ô´»Ô´ÅÓ⾧ à»Ô´áÅлԴÅÓ⾧
äͤ͹ ¿Ñ§¡ìªÑè¹ ¤Ó͸ԺÒÂ

20
»ØèÁÅÑ´
¤ÍÁ¾ÔÇàµÍÃìãªéÎç͵¤ÕÂì (ÃèÇÁ¡Ñº»ØèÁÍ×è¹) à¾×èÍà¢éÒÊÙè »ØèÁ¿Ñ§¡ìªÑè¹áÅФÓÊÑ觡ÒÃãªé§Ò¹
à¾×èÍà»Ô´ãªé§Ò¹Îç͵¤ÕÂì ãËé¡´»ØèÁ Fn (´éÒ¹ÅèÒ§«éÒÂ) ¤éÒ§àÍÒäÇé¡è͹·Õè¨Ð¡´»ØèÁÍ×è¹ã¹ªØ´Îç͵¤ÕÂì
-ËÁÒÂà˵Ø: äÁè¨Óà»ç¹µéͧ¡´»ØèÁ Fn à¾×èÍãªé»ØèÁ¿Ñ§¡ìªÑè¹ F1 ¶Ö§ F12 àÁ×èÍàÃÔèÁãªé§Ò¹¤ÍÁ¾ÔÇàµÍÃìËÃ×ÍãªéÇÒ¹
BIOS
¡ÒÃÊÅѺÎç͵¤ÕÂìáÅпѧ¡ìªÑè¹¾ÔàÈɢͧ»ØèÁ F1 ¶Ö§ F12 ãËéà»ÅÕ蹡ÒõÑ駤èÒ»ØèÁ¿Ñ§¡ìªÑè¹·Õè BIOS (à»Ô´ BIOS
â´Â¡´ F2 àÁ×èÍàÃÔèÁãªé§Ò¹¤ÍÁ¾ÔÇàµÍÃì¢Í§¤Ø³ ¨Ò¡¹Ñé¹àÅ×Í¡àÁ¹ÙËÅÑ¡áÅÐà»ÅÕè¹
ÅѡɳСÒ÷ӧҹ»ØèÁ¿Ñ§¡ìªÑè¹à»ç¹ Function keys)
Îç͵¤ÕÂì ¿Ñ§¡ìªÑè¹ ¤Ó͸ԺÒÂ
Fn + »ØèÁ¾ÔàÈÉ
(â»Ã´´Ù ã¹Ë¹éÒ 18)
»ØèÁ¿Ñ§¡ìªÑè¹ãªé§Ò¹»ØèÁ F1 ¶Ö§ F12
Fn + ˹éÒËÅÑ¡äÅèÃÒ¡ÒèҡµÍ¹µé¹¢Í§àÍ¡ÊÒÃ
Fn + End äÅèÃÒ¡ÒÃ仵͹·éÒ¢ͧàÍ¡ÊÒÃ
Fn + Page Up äÅèÃÒ¡ÒÃä»Ë¹éÒº¹¢Í§àÍ¡ÊÒÃ
Fn + Page Down äÅèÃÒ¡ÒÃä»Ë¹éҶѴ仢ͧàÍ¡ÊÒÃ

·Ó¤ÇÒÁÃÙé¨Ñ¡¡Ñº¤ÍÁ¾ÔÇàµÍÃì¢Í§¤Ø³ - 21
ÁØÁÁͧ´éҹ˹éÒ
- ËÁÒÂà˵Ø: ÊÑ−Åѡɳì·Õèἧ´éҹ˹éÒÊÒÁÒöÁͧàËç¹ä´éáÁ颳лԴ½Ò¾Ñº¤ÍÁ¾ÔÇàµÍÃì
# äͤ͹ ÃÒ¡Òà ¤Ó͸ԺÒÂ
1
µÑÇáÊ´§¾Åѧ§Ò¹ ÃкØʶҹСÒÃà»Ô´ãªé§Ò¹¤ÍÁ¾ÔÇàµÍÃì
µÑÇáÊ´§ÃдѺẵàµÍÃÕè
áÊ´§¶Ö§Ê¶Ò¹ÐẵàµÍÃÕè¢Í§¤ÍÁ¾ÔÇàµÍÃì
-¡ÓÅѧªÒÃì¨:
ä¿ÊÇèÒ§à»ç¹ÊÕàËÅ×ͧÍӾѹàÁ×èÍ·Ó¡ÒêÒÃì¨áºµàµÍÃÕè
-ªÒÃì¨ä¿àµçÁ: ä¿ÊÕ¹éÓà§Ô¹µÔ´ÊÇèÒ§¢³ÐÍÂÙèã¹âËÁ´ AC
µÑÇáÊ´§Ê¶Ò¹Ð HDD áÊ´§àÁ×èÍÎÒÃì´´ÔÊ¡ìä´Ãì¿ÁÕ¡Ò÷ӧҹ
ä¿áÊ´§Ê¶Ò¹Ð¡ÒÃÊ×èÍÊÒà áÊ´§¶Ö§Ê¶Ò¹ÐÍØ»¡Ã³ìàª×èÍÁµèÍẺäÃéÊÒ¢ͧ¤ÍÁ¾ÔÇàµÍÃì
2¡ÒÃì´ÃÕ´à´ÍÃìÁÑŵÔÍÔ¹Çѹ
ÊÒÁÒöãªé§Ò¹ÃèÇÁ¡Ñº Secure Digital (SD),
MultiMediaCard (MMC), Memory Stick PRO (MS PRO),
xD-Picture Card (xD)
-¡´à¾×èͶʹ/µÔ´µÑ駡ÒÃì´ ãªé§Ò¹¡ÒÃì´ä´é¤ÃÑé§
ÅÐ˹Ö觪شà·èÒ¹Ñé¹
1 2

22
ÁØÁÁͧ´éÒ¹«éÒÂ
# äͤ͹ ÃÒ¡Òà ¤Ó͸ԺÒÂ
1
ÊÅç͵Åçͤ Kensington
àª×èÍÁµè͡ѺÃкºÅçͤ¤ÇÒÁ»ÅÍ´ÀÑÂÊÓËÃѺ¤ÍÁ¾ÔÇàµÍÃì·ÕèÁÕ¤ÇÒ
Áà¢éҡѹä´é¡Ñº Kensington
-¤ÅéͧÊÒÂÅçͤ¹ÔÃÀѹÕéà¢éҡѺÇѵ¶Ø·Õèà¤Å×è͹·ÕèäÁèä´é àªè¹âµêÐ
ËÃ×ÍÁ×ͨѺ¢Í§ÅÔ鹪ѡ·Õè´Ö§ÍÍ¡äÁèä´é
ãÊèµÑÇÅç͡ŧã¹ÃèͧºÒ¡áÅÐËÁعµÑÇÅçÍ¡ä»ÂѧµÓá˹è§ÅçÍ¡
㹺ҧÃØè¹ÍÒ¨äÁèÁÕÃкºÅçͤ¹Õé
2
ÍØ»¡Ã³ìÃкÒÂÍÒ¡ÒÈáÅоÑ
´ÅÁÃкÒ¤ÇÒÁÃé͹
ªèÇ»ÃѺãËé¤ÍÁ¾ÔÇàµÍÃìàÂç¹Å§
-ËéÒÁ»Ô´ËÃ×Í¢ÇÒ§ªèͧ·Õèà»Ô´ÍÂÙè¹Õé
3¾ÍÃìµ Ethernet (RJ-45) àª×èÍÁµèÍà¤Ã×Í¢èÒ Ethernet 10/100/1000
4
¾ÍÃ쵨ÍáÊ´§¼ÅÀÒ¹͡
(VGA)
àª×èÍÁµèÍ¡Ñ
º¨ÍáÊ´§¼Å (àªè¹ ¨ÍÀÒ¾ÀÒ¹͡, â»ÃਤàµÍÃì
LCD)
5¾ÍÃìµ HDMI ÃͧÃѺ¡ÒÃàª×èÍÁµèÍÃкºÇÔ´ÕâʹԨԵ͍ÇÒÁÅÐàÍÕ´ÊÙ§
21 3 4 56

·Ó¤ÇÒÁÃÙé¨Ñ¡¡Ñº¤ÍÁ¾ÔÇàµÍÃì¢Í§¤Ø³ - 23
¢éÍÁÙÅà¡ÕèÂǡѺ USB 3.0
•à¢éҡѹä´é¡Ñº USB 3.0 áÅÐÍØ»¡Ã³ì USB ÃØ蹡è͹˹éÒ
•à¾×èÍ»ÃÐÊÔ·¸ÔÀÒ¾ÊÙ§ÊØ´ ãªéÍØ»¡Ã³ì USB 3.0 ·Õèä´éÃѺ¡ÒÃÃѺÃͧ
• ¡Ó˹´µÒÁÁҵðҹ USB 3.0 (SuperSpeed USB)
6¾ÍÃìµ USB
µèÍÍØ»¡Ã³ì USB
-ËÒ¡¾ÍÃìµà»ç¹ÊÕ´Ó áÊ´§ÇèÒÁÕ¤ÇÒÁà¢éҡѹä´é¡Ñº USB 2.0
ËÒ¡¾ÍÃìµà»ç¹ÊÕ¹éÓà§Ô¹ áÊ´§ÇèÒÁÕ¤ÇÒÁà¢éҡѹä´é¡Ñº
USB 3.0 (´Ù´éÒ¹ÅèÒ§)
# äͤ͹ ÃÒ¡Òà ¤Ó͸ԺÒÂ

24
ÁØÁÁͧ´éÒ¹¢ÇÒ
# äͤ͹ ÃÒ¡Òà ¤Ó͸ԺÒÂ
1
á¨ç¤Ëٿѧ/ÅÓ⾧
ãªéÊÓËÃѺµèÍÍØ»¡Ã³ìàÊÕ§¢ÒÍÍ¡ (àªè¹ ÅÓ⾧ ªØ´Ëٿѧ)
-ʹѺʹعËٿѧ¾ÃéÍÁäÁâ¤Ã⿹ 3.5 ÁÁ. ·Õèà¢éҡѹä´é
(àªè¹ Ëٿѧ Acer smart handheld)
ªèͧµèÍäÁâ¤Ã⿹ ãªéÊÓËÃѺµèÍäÁâ¤Ã⿹
2¾ÍÃìµ USB
µèÍÍØ»¡Ã³ì USB
-ËÒ¡¾ÍÃìµà»ç¹ÊÕ´Ó áÊ´§ÇèÒÁÕ¤ÇÒÁà¢éҡѹä´é¡Ñº USB 2.0
ËÒ¡¾ÍÃìµà»ç¹ÊÕ¹éÓà§Ô¹ áÊ´§ÇèÒÁÕ¤ÇÒÁà¢éҡѹä´é¡Ñº
USB 3.0 (´Ù´éÒ¹ÅèÒ§)
3ä´Ãì¿Í;µÔ¤ÍÅ ä´Ãì¿Í;µÔ¤ÍÅÀÒÂã¹ ÊÓËÃѺãÊè CD ËÃ×Í DVD
4
ä¿áÊ´§¡ÒÃÍèÒ¹
Í;µÔ¤ÍÅ´ÔÊ¡ì
µÔ´ÊÇèÒ§àÁ×èÍÁÕ¡ÒÃÍèÒ¹á¼è¹Í;µÔ¤ÍÅ
5»ØèÁ´Õ´á¼è¹Í;µÔ¤ÍÅÍÍ¡ ¹Óá¼è¹Í;µÔ¤ÍÅÍÍ¡¨Ò¡ä´Ãì¿
12 3 4 5 6 7

·Ó¤ÇÒÁÃÙé¨Ñ¡¡Ñº¤ÍÁ¾ÔÇàµÍÃì¢Í§¤Ø³ - 25
¢éÍÁÙÅà¡ÕèÂǡѺ USB 3.0
•à¢éҡѹä´é¡Ñº USB 3.0 áÅÐÍØ»¡Ã³ì USB ÃØ蹡è͹˹éÒ
•à¾×èÍ»ÃÐÊÔ·¸ÔÀÒ¾ÊÙ§ÊØ´ ãªéÍØ»¡Ã³ì USB 3.0 ·Õèä´éÃѺ¡ÒÃÃѺÃͧ
• ¡Ó˹´µÒÁÁҵðҹ USB 3.0 (SuperSpeed USB)
6»ØèÁ¹Óá¼è¹ÍÍ¡©Ø¡à©Ô¹
ãªéà»Ô´¶Ò´ãÊèá¼è¹Í;µÔ¤ÍÅ¢³Ð»Ô´¤ÍÁ¾ÔÇàµÍÃì
-ãÊè¤ÅԻ˹պ¡ÃдÒÉà¢éÒ仵ç æ ÍÂèÒ§ÃÐÁÑ´ÃÐÇѧ
à¾×èÍà»Ô´¶Ò´ä´Ãì¿Í;µÔ¤ÍÅ
7á¨ç¤ DC-in àª×èÍÁµè͡ѺÍá´»àµÍÃì AC ¢Í§¤ÍÁ¾ÔÇàµÍÃì
# äͤ͹ ÃÒ¡Òà ¤Ó͸ԺÒÂ

26
ÁØÁÁͧ´éÒ¹ÅèÒ§
# äͤ͹ ÃÒ¡Òà ¤Ó͸ԺÒÂ
1ªèͧãÊèẵàµÍÃÕ ·ÕèÍÂÙè¢Í§áºµàµÍÃբͧ¤ÍÁ¾ÔÇàµÍÃì
2ÊÅÑ¡à»Ô´áºµàµÍÃÕ
à»Ô´à¾×è͹ÓẵàµÍÃÕÍÍ¡
ãÊèà¤Ã×èͧÁ×Í·ÕèàËÁÒÐÊÁáÅÐàÅ×è͹à¾×èͶʹÍÍ¡
3
ªèͧ˹èǤÇÒÁ¨Ó ·ÕèÍÂÙè¢Í§Ë¹èǤÇÒÁ¨Ó¢Í§¤ÍÁ¾ÔÇàµÍÃì
ªèͧãÊèÎÒÃì´´ÔÊ¡ì ·ÕèÍÂÙè¢Í§ÎÒÃì´´ÔÊ¡ì¢Í§¤ÍÁ¾ÔÇàµÍÃì (ÂÖ´µÔ´á¹è¹´éǹê͵)
4
ÍØ»¡Ã³ìÃкÒÂÍÒ¡ÒÈáÅоÑ
´ÅÁÃкÒ¤ÇÒÁÃé͹
ªèÇ»ÃѺãËé¤ÍÁ¾ÔÇàµÍÃìàÂç¹Å§
-ËéÒÁ»Ô´ËÃ×Í¢ÇÒ§ªèͧ·Õèà»Ô´ÍÂÙè¹Õé
1
4
2
3

·Ñªá¾´ - 27
·Ñªá¾´
¡ÒÃãªé·Ñªá¾´àº×éͧµé¹
·Ñªá¾´¤Çº¤ØÁÅÙ¡Èà (ËÃ×Í 'à¤ÍÃìà«ÍÃì') º¹Ë¹éÒ¨Í àÁ×èͤسàÅ×è͹¹ÔéÇä»ÁÒº¹·Ñªá¾´
à¤ÍÃìà«ÍÃì¨Ð¢ÂѺµÒÁ¡ÒÃà¤Å×è͹äËǢͧ¤Ø³
¡´»ØèÁ«éÒÂËÃ×Í¢ÇҢͧ»¶èÁ·ÕèÍÂÙè´éÒ¹ÅèÒ§¢Í§·Ñªá¾´à¾×èÍ·Ó¡ÒÃàÅ×Í¡áÅÐàÃÕ¡ãªé§Ò¹¿Ñ§¡ìªÑè¹
¾×é¹·ÕèÊͧ¾×é¹·Õè¹Õé¤ÅéÒ¤ÅÖ§¡Ñº»ØèÁ«éÒÂáÅлØèÁ¢ÇÒº¹àÁÒÊì
¡ÒÃáµÐº¹·Ñªá¾´à»ç¹¡Ò÷ӧҹàªè¹à´ÕÂǡѺ¡ÒäÅÔ¡«éÒº¹àÁÒÊì
ËÁÒÂà˵Ø: ·Ñªá¾´¹ÕéÁÕ¤ÇÒÁäǵèÍ¡ÒÃà¤Å×è͹äËǢͧ¹ÔéÇ ;´Ñ§¹Ñ鹡ÒÃÊÑÁ¼ÑÊà¾Õ§àºÒæ
¨ÐãËé¡Òõͺʹͧ·Õè´Õ¡ÇèÒ
â»Ã´ÃÑ¡ÉҷѪᾴ¹ÕéáÅйÔéǢͧ¤Ø³ ãËéáËé§áÅÐÊÐÍÒ´
à¤ÍÃìà«ÍÃì¨Ð¶Ù¡¤Çº¤ØÁâ´Â¡ÒÃÇÒ´¹ÔéǾ×é¹°Ò¹:
• ¡ÒÃÊäÅ´ì¹ÔéÇà´ÕÂÇ: àÅ×è͹¹ÔéǢͧ¤Ø³ä»º¹·Ñªá¾´ à¾×èÍàÅ×è͹à¤ÍÃìà«ÍÃì
• ¡ÒÃáµÐ¹ÔéÇà´ÕÂÇ: áµÐŧº¹·Ñªá¾´àºÒæ à¾×èÍ·Ó¡Òà '¤ÅÔ¡'
«Ö觨Ðà»ç¹¡ÒÃàÅ×Í¡ËÃ×ÍàÃÔèÁãªé§Ò¹ÃÒ¡Òà áµÐ«éÓàÃçÇæ à¾×èÍ·Ó¡ÒÃáµÐÊͧ¤ÃÑé§ ËÃ×Í
'´ÑºàºÔéŤÅÔ¡'
• ÅÒ¡: ¡´¤éÒ§·Õè´éÒ¹«éÒ¢ͧ»ØèÁàÅ×Í¡ ËÃ×ÍáµÐÊͧ¤ÃÑé§ã¹·Õèã´¡çä´éº¹·Ñªá¾´
áÅéÇÅÒ¡¹ÔéǺ¹·Ñªá¾´à¾×èÍàÅ×Í¡ÃÒ¡Ò÷Ñé§ËÁ´ã¹¾×é¹·Õè¹Ñé¹

28
¡ÒÃÇÒ´¹ÔéǺ¹·Ñªá¾´
Windows 8 áÅÐá;¾ÅÔपÑè¹ÁÒ¡ÁÒÂʹѺʹع¡ÒÃÇÒ´¹ÔéǺ¹·Ñªá¾´·Õèãªé¹ÔéÇ˹Ö觹ÔéÇËÃ×ÔÍÁÒ¡¡ÇèÒ
ËÁÒÂà˵Ø:
¡ÒÃʹѺʹع¡ÒÃÇÒ´¹ÔéǺ¹·Ñªá¾´¢Öé¹ÍÂÙè¡Ñºá;¾ÅÔपÑè¹·Õèà»Ô´ãªé§Ò¹ÍÂÙè
«Ö觪èÇÂãËé¤Ø³ÊÒÁÒö¤Çº¤ØÁá;¾ÅÔपÑè¹µèÒ§æ ä´é´éÇ¡ÒÃÇÒ´¹ÔéǧèÒÂæ ÊͧÊÒÁ¤ÃÑé§ àªè¹:
• ¡ÇÒ´¹ÔéǨҡ¢Íº: àÃÕ¡ãªéà¤Ã×èͧÁ×͵èÒ§æ ¢Í§ Windows
â´Â¡ÒáÇÒ´ÁÒ·ÕèÈÙ¹Âì¡ÅÒ§¢Í§·Ñªá¾´¨Ò¡´éÒ¹¢ÇÒ
´éÒ¹º¹ ËÃ×Í´éÒ¹«éÒÂ
• ¡ÇÒ´¹ÔéǨҡ¢Íº´éÒ¹¢ÇÒ: ÊÅѺãªé charms
• ¡ÇÒ´¹ÔéǨҡ¢Íº´éÒ¹º¹: à»Ô´ãªé¤ÓÊÑè§á;¾ÅÔपÑè¹
• ¡ÇÒ´¹ÔéǨҡ¢Íº´éÒ¹«éÒÂ: ÊÅѺä»Âѧá;¾ÅÔपÑ蹡è͹˹éÒ
• ¡ÒÃÊäÅ´ìÊͧ¹ÔéÇ: àÅ×è͹´ÙàÇçºà¾¨, àÍ¡ÊÒÃ,
ÃÒ¡ÒÃàÅè¹ÍÂèÒ§ÃÇ´àÃçÇâ´Â¡ÒÃÇÒ§¹ÔéÇÊͧ¹ÔéǺ¹·Ñªá¾´áÅÐàÅ×è͹·Ñé§Êͧ¹ÔéÇä»Âѧ
·ÔÈ·Ò§ã´æ ·Õèµéͧ¡ÒÃ
• ¡ÒÃÃǺ´éÇÂÊͧ¹ÔéÇ:ãªé«ÙÁ¢ÂÒÂáÅÐÂèÍÀÒ¾, á¼¹·Õè áÅÐàÍ¡ÊÒÃÍÂèÒ§ÃÇ´àÃçÇ
â´Âãªé¹ÔéÇâ»é§áÅйÔéǪÕé

¡ÒÃÍѾà¡Ã´¤ÍÁ¾ÔÇàµÍÃì¢Í§¤Ø³ - 29
¡ÒÃÍѾà¡Ã´¤ÍÁ¾ÔÇàµÍÃì¢Í§¤Ø³
¢ÂÒÂãËé¡ÇéÒ§ä¡Å´éǵÑÇàÅ×Í¡µèÒ§æ
¤ÍÁ¾ÔÇàµÍÃì¢Í§¤Ø³Áͺ»ÃÐʺ¡ÒóìËÅÒ¡ËÅÒµÑÇàÅ×͡㹡ÒÃãªé§Ò¹¤ÍÁ¾ÔÇàµÍÃìÍѹÊÁºÙóìáº
ºãËé¡Ñº¤Ø³
µÑÇàÅ×͡㹡ÒÃàª×èÍÁµèÍ
¾ÍÃ쵪èÇÂ㹡ÒÃàª×èÍÁµèÍÍØ»¡Ã³ìµè;èǧ¡Ñº¤ÍÁ¾ÔÇàµÍÃì¢Í§¤Ø³
ÊÓËÃѺ¤Óá¹Ð¹Óà¡ÕèÂǡѺÇÔ¸Õ¡ÒÃàª×èÍÁµèÍÍØ»¡Ã³ìÀÒ¹͡·ÕèᵡµèÒ§¡Ñ¹à¢éҡѺ¤ÍÁ¾ÔÇàµÍÃì¢Í§¤Ø³ã
ËéÍèÒ¹ã¹ÊèǹµèÍ仹Õé
àÁÁâÁÃÕè ¡ÒÃì´ ÃÕ´à´ÍÃì
¡ÒÃì´Ë¹èǤÇÒÁ¨Ó¶Ù¡ãªéÍÂèÒ§á¾ÃèËÅÒÂ㹡Åéͧ´Ô¨ÔµÍÅ PDA
à¤Ã×èͧàÅè¹ MP3 áÅÐâ·ÃÈѾ·ìà¤Å×è͹·Õè
¡ÒÃãÊèàÁÁâÁÃÕè¡ÒÃì´
1. ÇÒ§¡ÒÃì´ã¹á¹Ç·Õè¨Ø´¤Í¹à¹ç¡àµÍÃìµÃ§¡Ñ¹¡Ñº¾ÍÃìµ
â´ÂãËé¤Í¹à¹ç¡àµÍÃì¤ÇèÓ˹éÒŧ
2. àÅ×è͹¡ÒÃì´à¢éÒã¹¾ÍÃìµÍÂèÒ§ÃÐÁÑ´ÃÐÇѧ ËÒ¡¤Ø³¾ºÇèÒµéͧãªéáçà¾×èÍãÊè¡ÒÃì´
ãËéÅͧ¢ÂѺ¡ÒÃì´àÅ硹éÍÂ

30
3. ´Ñ¹¨¹¡ÃзÑè§ÁÕàÊÕ§¡ÃÔ꡺͡ÇèÒ¡ÒÃì´à¢éÒ·Õè ¡ÒÃì´¨ÐàËÅ×ÍÍÂÙè¹Í¡ÊÅç͵ÊͧÊÒÁÁÔÅÅÔàÁµÃ
ËÒ¡¡ÒÃì´¹Ñé¹ÁÕä¿Åì ˹éÒµèÒ§ Windows Auto Play (àÅè¹Íѵâ¹ÁѵÔ) ÍÒ¨»ÃÒ¡¯¢Öé¹
(¢Öé¹ÍÂÙè¡Ñºà¹×éÍËÒ¢éÍÁÙÅÀÒÂ㹡ÒÃì´)
áÅжÒÁÇèҤسµéͧ¡ÒÃãªéâ»Ãá¡ÃÁà¾×èÍà¢éÒ¶Ö§à¹×éÍËÒ¢éÍÁÙÅÀÒÂ㹡ÒÃì´ËÃ×ÍäÁè
àÅ×Í¡µÑÇàÅ×Í¡·Õè¹ÕèËÒ¡¨Óà»ç¹ ËÃ×ÍàÅ×Í¡ Cancel (¡àÅÔ¡) ËÒ¡¡ÒÃì´äÁèÁÕä¿Åì
ËÃ×ÍÁÕä¿Åì·ÕèäÁè·ÃÒº¤èÒ Ë¹éÒµèÒ§¨Ðà»Ô´â´ÂáÊ´§à¹×éÍËÒ¢éÍÁÙÅÀÒÂ㹡ÒÃì´
¡ÒÃì´ SD, SDHC áÅÐ SDXC
»ÃÐàÀ·¡ÒÃì´ SD ·ÕèµèÒ§¡Ñ¹¨ÐÁÕ¤ÇÒÁÊÒÁÒöµèÒ§¡Ñ¹ ¢³Ðãªé§Ò¹ÃٻẺà´ÕÂǡѹ ¡ÒÃì´ SD
ÁÕ¤ÇÒÁ¨ØÁÒ¡¶Ö§ 4 GB ¡ÒÃì´ SDHC ÁÕ¤ÇÒÁ¨ØÁÒ¡¶Ö§ 32 GB áÅСÒÃì´ SDXC ÊÒÁÒö¨Øä´é¶Ö§
2048 GB (2 TB) ¤ÍÁ¾ÔÇàµÍÃì¢Í§¤Ø³ÁÕ SDHC ËÃ×Í SDXC ¡ÒÃì´ÃÕ´à´ÍÃì·Õèãªé§Ò¹ä´é
ËÁÒÂà˵Ø: ¡ÒÃì´Ë¹èǤÇÒÁ¨Ó SDXC ÊÒÁÒöãªé§Ò¹ä´éã¹ SDXC ÃÕ´à´ÍÃì·Õèãªé§Ò¹ä´é
¡ÒÃì´ SD áÅÐ SDHC ÊÒÁÒöãªéä´éã¹·Ñé§Êͧ»ÃÐàÀ·

¡ÒÃÍѾà¡Ã´¤ÍÁ¾ÔÇàµÍÃì¢Í§¤Ø³ - 31
¡Òöʹ ¡ÒÃì´¨Ò¡àÁÁâÁÃÕè¡ÒÃì´ÃÕ´à´ÍÃì
1. ¤ÅÔ¡·Õèäͤ͹ Show hidden
ã¹¾×é¹·ÕèáÊ´§¡ÒÃá¨é§àµ×͹ (¶Ñ´¨Ò¡¹ÒÌÔ¡Ò)
2. ¤ÅÔ¡·Õèäͤ͹ Safely Remove Hardware
3. ¤ÅÔ¡º¹ Eject SD Card (¶Í´ SD Card)
(ËÃ×ͺ¹ª×èÍ ÍØ»¡Ã³ì)
4. Ãͨ¹¡ÃзÑ觢éͤÇÒÁ Safe to Remove
Hardware (»ÅÍ´ÀÑÂÊÓËÃѺ¶Í´ÎÒÃì´áÇÃì)
»ÃÒ¡¯¢Öé¹
5. ¶Í´¡ÒÃì´ÍÍ¡
à¤Ã×Í¢èÒÂã¹µÑÇ
à¤Ã×Í¢èÒ·ÕèµÔ´µÑé§äÇéã¹µÑǪèÇÂãËé¤Ø³àª×èÍÁµèͤÍÁ¾ÔÇàµÍÃì¢Í§¤Ø
³à¢éҡѺà¤Ã×Í¢èÒ¾×é¹°Ò¹ÍÕà¸ÍÃìà¹çµ
àª×èÍÁµèÍÊÒÂÍÕà¸ÍÃìà¹çµ¨Ò¡¾ÍÃìµÍÕà¸ÍÃìà¹çµ (RJ-45)
º¹áªÊ«Õ¢Í§¤ÍÁ¾ÔÇàµÍÃìà¢éҡѺá¨ç¤à¤Ã×Í¢èÒÂËÃ×ÍÎѺº¹à¤Ã×Í
¢èÒ¢ͧ¤Ø³
3
2
1

32
Universal Serial Bus (USB)
¾ÍÃìµ USB
à»ç¹«ÕàÃÕÂźÑʤÇÒÁàÃçÇÊÙ§«Öè§Í¹Ø−ÒµãËé¤Ø³àª×èÍÁµèÍÍØ»¡Ã³ìà
ÊÃÔÁ USB â´ÂäÁèµéͧãªé·ÃѾÂÒ¡ÃÃкº
ºÒ§¤ÍÁ¾ÔÇàµÍÃìÍÒ¨ÁÕ USB 3.0 ˹Öè§ËÃ×ÍÁÒ¡¡ÇèÒ ¾ÍÃìµ
«Ö觤ÅéÒ¡Ѻ¾ÍÃìµ USB Áҵðҹ
¡àÇ鹡ÒÃàª×èÍÁµèÍÀÒÂã¹à¾ÔèÁàµÔÁáÅÐÁÕÊÕ¹éÓà§Ô¹
¤Ø³ÍÒ¨ãªéÍØ»¡Ã³ì·Õèà¨éҡѹä´é¡Ñº USB 3.0
¡Ñº¾ÍÃìµàËÅèÒ¹Õéà¾×èÍ»ÃÐ⪹ì¨Ò¡¡ÒÃâ͹ÂéÒ·ÕèÁÕ¤ÇÒÁàÃçÇÊÙ
§¡ÇèÒ
¾ÍÃìµÇÕ´ÔâÍ
àª×èÍÁµèÍâÁ¹ÔàµÍÃì¡Ñº¾ÍÃìµ VGA ËÃ×Í DVI
(»ÃÐàÀ·¡ÒÃàª×èÍÁµèÍ·ÕèÃͧÃѺ¢Öé¹ÍÂÙè¡Ñº¡ÒáÓ˹´¤èҢͧ¤ÍÁ¾ÔÇàµÍÃì)
â´Â·ÑèÇä»áÅéǨÍáÊ´§¼Å¨ÐÁÒ¾ÃéÍÁ¡ÑºÊÒÂà¤àºÔéÅ·ÕèàËÁÒÐÊÁ
·ÓµÒÁ¢Ñ鹵͹µèÍ仹Õéà¾×èÍàª×èÍÁµèÍÁ͹ÔàµÍÃìà¢éҡѺ¤ÍÁ¾ÔÇàµÍÃì¢Í§¤Ø³
1. µÃǨÊͺ´ÙÇèÒ¤ÍÁ¾ÔÇàµÍÃì»Ô´ÍÂÙèËÃ×ÍäÁèáÅÐÔ»Ô´ÊÇÔµ«ìÁ͹ÔàµÍÃìÍÂÙèËÃ×ÍäÁè
2. µèÍÊÒÂà¤àºÔéÅÇÔ´ÕâÍà¢éҡѺ¾ÍÃìµÁ͹ÔàµÍÃ캹¤ÍÁ¾ÔÇàµÍÃì
¢Ñ¹µèÍÊÒÂà¤àºÔéÅãËéá¹è¹´éÇÂÊ¡ÃÙ·ÕèÁÕÁÒãËé
3. µèÍÊÒÂä¿Á͹ÔàµÍÃìáÅéÇàÊÕºà¢éҡѺ»ÅÑꡨèÒÂä¿·ÕèÁÕ¡ÒÃà´Ô¹ÊÒ´ԹäÇéÍÂèÒ§¶Ù¡µéͧ
4. ·ÓµÒÁ¤Óá¹Ð¹Ó㹡ÒõÑ
駤èÒ·ÕèÍÂÙè㹤ÙèÁ×ͼÙéãªé¢Í§Á͹ÔàµÍÃì

¡ÒÃÍѾà¡Ã´¤ÍÁ¾ÔÇàµÍÃì¢Í§¤Ø³ - 33
5. à»Ô´Á͹ÔàµÍÃì ¨Ò¡¹Ñé¹à»Ô´¤ÍÁ¾ÔÇàµÍÃì
6. µÃǨÊͺãËéá¹èã¨ÇèÒ¤èÒ¤ÇÒÁÅÐàÍÕ´áÅÐÍѵÃÒÃÕà¿Ãª¹Ñé¹äÁèà¡Ô¹¢éÍ¡Ó˹´à©¾ÒТͧÁ͹ÔàµÍÃì
ËÒ¡¨Óà»ç¹ãËéà»ÅÕ蹡ÒõÑ駤èÒ¡ÒÃáÊ´§¼Å·Õèãªé´éǤÍÁ¾ÔÇàµÍÃì
ËÁÒÂà˵Ø: à¾×èÍà¢éÒ¶Ö§¡ÒäǺ¤ØÁ¡ÒÃáÊ´§¼Å ¡´»ØèÁ Windows ( ) + W, ¾ÔÁ¾ì "Display"
áÅéǤÅÔ¡·Õè Display
High-Definition Multimedia Interface (੾ÒкҧÃØè¹à·èÒ¹Ñé¹)
HDMI (High-Definition Multimedia Interface)
¤×Í¡ÒÃàª×èÍÁ»ÃÐÊÒ¹¡Ò÷ӧҹ·ÕèÃͧÃѺÁҵðҹ
ÍصÊÒË¡ÃÃÁ, »ÃÒȨҡ¡ÒúպÍÑ´,
ÀÒ¾áÅÐàÊÕ§à»ç¹áºº´Ô¨ÔµÍÅ·Ñé§ËÁ´ HDMI
Áͺ¡ÒÃàª×èÍÁ»ÃÐÊÒ¹¡Ò÷ӧҹÃÐËÇèÒ§áËÅè§ÊÑ
−−Ò³àÊÕ§/
ÇÔ´ÕâÍẺ´Ô¨ÔµÍÅ·ÕèÊÒÁÒöãªé§Ò¹ä´é·Ø¡ª¹Ô´
àªè¹¡Åèͧà«çµ·çÍ», à¤Ã×èͧàÅè¹ DVD
áÅÐà¤Ã×èͧÃѺÊÑ−−Ò³ A/V
¡ÑºÁ͹ÔàµÍÃìàÊÕ§áÅÐ/ËÃ×ÍÇÔ´ÕâÍẺ´Ô¨ÔµÍÅ·ÕèÊÒÁÒö·Ó§Ò¹ÃèÇÁ¡Ñ¹ä´é àªè¹â·Ã·Ñȹì´Ô¨ÔµÍÅ
(DTV) ´éÇÂÊÒÂà¤àºÔéÅà¾Õ§ÊÒÂà´ÕÂÇ
ãªé¾ÍÃìµ HDMI º¹¤ÍÁ¾ÔÇàµÍÃì¢Í§¤Ø³à¾×èÍàª×èÍÁµè͡ѺÍØ»¡Ã³ìàÊÕ§áÅÐÇÔ´ÕâÍÃдѺäÎà͹´ì
¡Ò÷ӧҹ´éÇÂÊÒÂà¤àºÔéÅà¾Õ§ÊÒÂà´ÕÂǪèÇÂãËéµÔ´µÑé§ä´éÍÂèÒ§à»ç¹ÃÐàºÕºáÅÐàª×
èÍÁµèÍä´éÍÂèÒ§
ÃÇ´àÃçÇ

34
ªØ´ËٿѧáÅÐäÁâ¤Ã⿹
Êͧ¾ÍÃìµ¹ÕéÊÓËÃѺàª×èÍÁµèÍÍØ»¡Ã³ìàÊÕ§ ãªé¾ÍÃìµËٿѧà¾×èÍàÊÕº»ÅÑê¡ËٿѧÊàµÍÃÔâÍËÃ×ÍÅÓ⾧
¡ÒÃàÊÕº»ÅÑê¡ÍØ»¡Ã³ìàÊÕ§¡Ñº¾ÍÃìµËٿѧ¨Ð»Ô´ÅÓ⾧㹵ÑÇ
ãªé¾ÍÃìµäÁâ¤Ã⿹à¾×èÍàª×èÍÁµèÍäÁâ¤Ã⿹ÀÒ¹͡ÊÓËÃѺ¡Òúѹ·Ö¡àÊÕ§ẺâÁâ¹
¡ÒÃàÊÕº»ÅÑê¡äÁâ¤Ã⿹ÀÒ¹͡¨Ð»Ô´äÁâ¤Ã⿹㹵ÑÇ

¾ÒÇàÇÍÃì«Ñ¾¾ÅÒ - 35
¾ÒÇàÇÍÃì«Ñ¾¾ÅÒÂ
Íá´»àµÍÃì AC
¤ÍÁ¾ÔÇàµÍÃì¢Í§¤Ø³ÊÒÁÒöãªéÍá´»àµÍÃìÀÒ¹͡ä´é (Power Brick) à¾×èÍãªé§Ò¹´éÇÂÊÒÂä¿ AC
ÊÒÂä¿·ÕèÁÕãËé¾ÃéÍÁ¡Ñºà¤Ã×èͧ¤ÍÁ¾ÔÇàµÍÃì¹Ñé¹ÁÕ¤ÇÒÁàËÁÒÐÊÁÊÓËÃѺ»ÃÐà·È·ÕèÇÒ§¨Ó˹èÒÂ
Íá´»àµÍÃì¹ÕéãËé¾Åѧ§Ò¹ÍÂèÒ§¾Íà¾Õ§ÊÓËÃѺ¡ÒÃãªé§Ò¹¤ÍÁ¾ÔÇàµÍÃì¢Í§¤Ø³áÅСÒÃÃÕªÒÃì¨áºµàµÍ
ÃÕèã¹àÇÅÒà´ÕÂǡѹ
¢éͤÇÃÃÐÇѧ: ËéÒÁÇÒ§Çѵ¶ØÍ×蹤ÅØÁäÇéËÃ×ͷѺäÇ麹Íá´»àµÍÃì AC
¾ÂÒÂÒÁãËéÍá´»àµÍÃìàÂç¹ã¹ÃÐËÇèÒ§¡ÒÃãªé§Ò¹â´ÂäÁèÇÒ§äÇéã¡Åé¡ÑºÇѵ¶ØÍ×è¹
ãªéÍá´»àµÍÃì AC ª¹Ô´·ÕèÁÒ¾ÃéÍÁ¡Ñº¤ÍÁ¾ÔÇàµÍÃì¢Í§¤Ø³à·èÒ¹Ñé¹
¡ÒÃãªéÍá´»àµÍÃìÍ×è¹·Õè¤ÅéÒ¤ÅÖ§¡Ñ¹ÍÒ¨à¡Ô´¤ÇÒÁàÊÕÂËÒµèͤÍÁ¾ÔÇàµÍÃì¢Í§¤Ø³ä´é

36
¤Óàµ×͹: Íá´»àµÍÃì AC
áÅдéÒ¹ÅèÒ§¢Í§¤ÍÁ¾ÔÇàµÍÃìÍÒ¨ÁÕ¤ÇÒÁÃé͹ä´éËÅѧ¨Ò¡ãªé§Ò¹à»ç¹àÇÅÒ¹Ò¹
«Öè§à»ç¹àÃ×èͧ»¡µÔ áµèÍÒ¨·ÓãËéà¡Ô´¡ÒúҴà¨çºä´éËÒ¡ÊÑÁ¼Ñʶ١
ẵàµÍÃÕè
¤ÍÁ¾ÔÇàµÍÃì¹ÕéãªéẵàµÍÃÕè·ÕèÁͺÍÒÂØ¡ÒÃãªé§Ò¹ä´é¹Ò¹¢Öé¹ÃÐËÇèÒ§¡ÒêÒÃì¨áµèÅФÃÑé§
ÅѡɳТͧẵàµÍÃÕè
ẵàµÍÃÕè¹ÕéÁÕÅѡɳШÓà¾Òдѧ¹Õé:
•ä´éÁҵðҹ෤â¹âÅÂÕẵàµÍÃÕè㹻Ѩ¨ØºÑ¹
•¡ÒÃàµ×͹àÁ×èÍẵàµÍÃÕèµèÓ
ẵàµÍÃÕè¹Õé¨ÐÃÕªÒÃ쨷ء¤ÃÑ駷Õè¤Ø³µèͤÍÁ¾ÔÇàµÍÃìà¢éҡѺ Íá´»àµÍÃì AC
¤ÍÁ¾ÔÇàµÍÃì¢Í§¤Ø³Ê¹ÑºÊ¹Ø¹¡ÒêÒÃì¨ÃÐËÇèÒ§ãªé§Ò¹«Ö觪èÇÂãËé¤Ø³ÃÕªÒÃì¨áºµàµÍÃÕèä´éã¹¢³Ðãªé§Ò
¹¤ÍÁ¾ÔÇàµÍÃì ÍÂèÒ§äáçµÒÁ ¡ÒÃÃÕªÒÃì¨àÁ×èͻԴ¤ÍÁ¾ÔÇàµÍÃì¨Ð·ÓãËéàÇÅÒ㹡ÒêÒÃì¨ÃÇ´àÃçÇ¢Öé¹
ẵàµÍÃÕèÂѧà»ç¹»ÃÐ⪹ìàÁ×èͤسµéͧà´Ô¹·Ò§ËÃ×ÍàÁ×èÍà¡Ô´ä¿µ¡
¢Íá¹Ð¹ÓãËéàµÃÕÂÁẵàµÍÃÕèÊÓÃͧ·ÕèªÒÃì¨àµçÁäÇéàÊÁÍà¾×èÍà»ç¹¡ÒÃáºç¤ÍѾ
â»Ã´µÔ´µè͵ÑÇá·¹¨Ó˹èÒ¢ͧ¤Ø³ÊÓËÃѺÃÒÂÅÐàÍÕ´¡ÒÃÊÑ觫×
éÍẵàµÍÃÕèÊÓÃͧ

¾ÒÇàÇÍÃì«Ñ¾¾ÅÒ - 37
¡ÒÃà¾ÔèÁÍÒÂآͧẵàµÍÃÕèãËéãªé§Ò¹ä´éÊÙ§ÊØ´
àªè¹à´ÕÂǡѺẵàµÍÃÕèÍ×è¹æ ẵàµÍÃÕè㹤ÍÁ¾ÔÇàµÍÃì¢Í§¤Ø³¨ÐàÊ×èÍÁÊÀҾ仵ÒÁàÇÅÒ
«Öè§ËÁÒ¤ÇÒÁÇèÒ »ÃÐÊÔ·¸ÔÀÒ¾¢Í§áºµàµÍÃÕè¨ÐŴŧµÒÁÃÐÂÐàÇÅÒáÅСÒÃãªé§Ò¹
à¾×èÍà¾ÔèÁÍÒÂآͧẵàµÍÃÕèãËéãªé§Ò¹ä´éÊÙ§ÊØ´ ¢Íá¹Ð¹ÓãËé¤Ø³·ÓµÒÁ¤Óá¹Ð¹Ó´Ñ§µèÍ仹Õé
ÊÓËÃѺẵàµÍÃÕèãËÁè
¡è͹·Õè¤Ø³¨Ðãªé§Ò¹áºµàµÍÃÕèà»ç¹¤ÃÑé§áá ¹Õè¤×Í “ ¢éÍ»¯ÔºÑµÔ ” ·Õè¤Ø³¤Ç÷Ó:
1. ãÊèẵàµÍÃÕèãËÁèâ´ÂäÁèµéͧà»Ô´¤ÍÁ¾ÔÇàµÍÃì
2. µèÍÍá´»àµÍÃì AC áÅЪÒÃì¨áºµàµÍÃÕèãËéàµçÁ
3. ¶Í´Íá´»àµÍÃì AC ÍÍ¡
4. à»Ô´¤ÍÁ¾ÔÇàµÍÃìáÅзӧҹâ´ÂãªéẵàµÍÃÕè
5. ãªé§Ò¹áºµàµÍÃÕ訹ËÁ´
6. µèÍÍá´»àµÍÃì AC áÅЪÒÃì¨áºµàµÍÃÕèãËéàµçÁãËÁèÍÕ¡¤ÃÑé§
·Ó«éÓ¢Ñ鹵͹àËÅèÒ¹Õ騹¡ÇèÒẵàµÍÃÕè¨Ð¶Ù¡ªÒÃì¨áÅлÅèÍ»ÃШØä¿¿éÒÊÒÁ¤ÃÑé§
ãªé¢éÍ»¯ÔºÑµÔ¹ÕéÊÓËÃѺẵàµÍÃÕèãËÁè·Ñé§ËÁ´ ËÃ×ÍÊÓËÃѺẵàµÍÃÕè·ÕèäÁèä´éãªéà»ç¹àÇÅÒ¹Ò¹
ËÒ¡äÁèä´éãªé§Ò¹¤ÍÁ¾ÔÇàµÍÃìÁÒ¡¡ÇèÒÊͧ·ÔµÂì¢Öé¹ä»
¢Íá¹Ð¹ÓãËé¤Ø³¶Í´áºµàµÍÃÕèÍÍ¡¨Ò¡µÑÇà¤Ã×
èͧ
¤Óàµ×͹: ËéÒÁ·Ôé§áºµàµÍÃÕèäÇéã¹·ÕèÍسËÀÙÁÔµèÓ¡ÇèÒ 0°C (32°F) ËÃ×ÍÁÒ¡¡ÇèÒ
45°C (113°F) ÍسËÀÙÁÔ·ÕèÊÙ§ËÃ×͵èÓà¡Ô¹ä»ÍÒ¨·ÓãËéẵàµÍÃÕèàÊÕÂËÒÂä´é

38
â´Â¡Ò÷ӵÒÁ¢éÍ»¯ÔºÑµÔÊÓËÃѺẵàµÍÃÕè ¨Ð·ÓãËéẵàµÍÃÕè¢Í§¤Ø³ÊÒÁÒöÃѺ¡ÒêÒÃì¨ä´éÊÙ§ÊØ´
¡ÒÃäÁè·ÓµÒÁ¢éÍ»¯ÔºÑµÔ¹Õé¨Ð·ÓãËéẵàµÍÃÕè¢Í§¤Ø³äÁèÊÒÁÒöÃѺ¡ÒêÒÃì¨ä´éÊÙ§ÊØ´ áÅШÐÁÕÍÒÂØ¡ÒÃ
ãªé§Ò¹·ÕèÊÑé¹Å§
¹Í¡¨Ò¡¹Õé ÍÒÂØ¡ÒÃãªé§Ò¹¢Í§áºµàµÍÃÕèÍÒ¨ä´éÃѺ¼Å¡Ãзº¨Ò¡¡ÒÃãªé§Ò¹´Ñ§µèÍ仹Õé:
•ãªé§Ò¹¤ÍÁ¾ÔÇàµÍÃì´éÇ¡ÒÃàÊÕºÊÒÂä¿ AC ã¹¢³Ð·ÕèãÊèẵàµÍÃÕèäÇéÍÂÙèàÊÁÍ
ËÒ¡¤Ø³µéͧ¡ÒÃãªé§Ò¹¤ÍÁ¾ÔÇàµÍÃì´éÇ¡ÒÃàÊÕºÊÒÂä¿ AC ÍÂÙèàÊÁÍ
¢Íá¹Ð¹ÓãËé¤Ø³¶Í´áºµàµÍÃÕèÍÍ¡ËÅѧ¨Ò¡·ÕèªÒÃì¨áºµàµÍÃÕèàµçÁáÅéÇ
•ËéÒÁãªéẵàµÍÃÕ訹ËÁ´»ÃШØä¿¿éÒáÅéǨ֧ÃÕªÒÃ쨨¹àµçÁ´Ñ§·Õèä´é͸ԺÒÂäÇé¢éÒ§µé¹
•ãªé§Ò¹ºèÍ ÂÔ觤Ø
³ãªé§Ò¹áºµàµÍÃÕèºèÍÂæ ÍÒÂØ¡ÒÃãªé§Ò¹¢Í§áºµàµÍÃÕè¨ÐÂÔè§ÊÑé¹¢Öé¹
ẵàµÍÃÕèÁҵðҹ¢Í§¤ÍÁ¾ÔÇàµÍÃìÁÕÍÒÂØ¡ÒÃãªé§Ò¹ÊÓËÃѺ¡ÒêÒÃì¨ 300 ¤ÃÑé§
¡ÒÃà»ÅÕè¹ẵàµÍÃÕè
â¹éµºØꤹÕéãªéẵàµÍÃÕèÅÔà¸ÕÂÁ
à»ÅÕè¹ẵàµÍÃÕè´éÇÂẵàµÍÃÕè»ÃÐàÀ·à´ÕÂǡѹ·ÕèÁÒ¾ÃéÍÁ¡Ñº¼ÅÔµÀѳ±ì¢Í§¤Ø³
¡ÒÃãªéẵàµÍÃÕèÍ×è¹ÍÒ¨àÊÕ觵èÍ¡ÒÃà¡Ô´ä¿äËÁéËÃ×ÍÃÐàºÔ´
¤Óàµ×͹! ẵàµÍÃÕèÍÒ¨ÃÐàºÔ´ä´éËÒ¡¶Ù¡¨Ñ´¡ÒÃÍÂèÒ§äÁè¶Ù¡µéͧ ËéÒÁ¶Í´ËÃ×Í·Ôé§
Å§ã¹¡Í§ä¿ à¡çºãËéËèÒ§¨Ò¡à´ç¡ »¯ÔºÑµÔµÒÁ¡®¢éͺѧ¤ÑºàÁ×è͵éͧ·Ôé§áºµàµÍÃÕè
·Õèãªé§Ò¹áÅéÇ

¾ÒÇàÇÍÃì«Ñ¾¾ÅÒ - 39
¡ÒÃãÊèËÃ×ͶʹẵàµÍÃÕè
ÊÔè§ÊÓ¤Ñ−! ¡è͹¶Í´áºµàµÍÃÕèÍÍ¡¨Ò¡µÑÇà¤Ã×èͧ µéͧµèÍÍá´»àµÍÃì AC
¡è͹ËÒ¡¤Ø³µéͧ¡ÒÃãªé§Ò¹¤ÍÁ¾ÔÇàµÍÃìµèÍ ËÒ¡äÁèµéͧ¡ÒÃãªé§Ò¹µèÍ
ãËé»Ô´¤ÍÁ¾ÔÇàµÍÃì¡è͹
ÇÔ¸Õ¡ÒÃãÊèẵàµÍÃÕè:
1. ÇҧẵàµÍÃÕèµÒÁá¹ÇªèͧãÊèẵàµÍÃÕè
â´ÂàµÃÕÂÁãÊèÊèǹ·éÒ¢ͧẵàµÍÃÕè·ÕèÁըشÊÑÁ¼ÑÊ¡è͹áÅÐãËéÊèǹ¼ÔÇ˹éҢͧẵàµÍÃÕè˧Ò¢Öé¹
2. ÇҧẵàµÍÃÕèŧ㹪èͧãÊèẵàµÍÃÕèáÅдѹàºÒ樹¡ÃзÑè§áºµàµÍÃÕèÅçͤÍÂÙèã¹µÓá˹è§
ÇÔ¸Õ¡ÒöʹẵàµÍÃÕè:
1. àÅ×è͹µÑÇÅçͤẵàµÍÃÕèà¾×èͶʹẵàµÍÃÕèÍÍ¡
2. ´Ö§áºµàµÍÃÕèÍÍ¡¨Ò¡ªèͧãÊèẵàµÍÃÕè
¡ÒêÒÃì¨áºµàµÍÃÕè
ÇÔ¸Õ¡ÒêÒÃì¨áºµàµÍÃÕè Íѹ´ÑºááãËéµÃǨ´ÙÇèÒẵàµÍÃÕè¶Ù¡ãÊèÍÂèÒ§¶Ù¡µéͧ㹪èͧãÊèẵàµÍÃÕè àÊÕº
Íá´»àµÍÃì AC à¢éҡѺ¤ÍÁ¾ÔÇàµÍÃìáÅеèÍà¢éҡѺ»ÅÑê¡ä¿
¤Ø³ÊÒÁÒöãªé§Ò¹¤ÍÁ¾ÔÇàµÍÃìµèÍà¹×èͧ㹢³Ð·ÕèªÒÃì¨áºµàµÍÃÕèä´é¨Ò¡¡ÒÃàÊÕºÊÒÂä¿ AC
ÍÂèÒ§äáçµÒÁ ¡ÒêÒÃì¨áºµàµÍÃÕèàÁ×èͻԴ¤ÍÁ¾ÔÇàµÍÃì¨Ð·ÓãËéàÇÅÒ㹡ÒêÒÃì¨ÃÇ´àÃçÇ¢Öé¹
ËÁÒÂà˵Ø: ¢Íá¹Ð¹ÓãËé¤Ø³ªÒÃì¨áºµàµÍÃÕè¡è͹àÅÔ¡·Ó§Ò¹ã¹áµèÅÐÇѹ
¡ÒêÒÃì¨áºµàµÍÃÕèãËé¾ÃéÍÁ¡è͹¡ÒÃà´Ô¹·Ò§¨ÐªèÇÂãËé¤Ø³àÃÔèÁÇѹãËÁè¾ÃéÍÁ¡ÑºáºµàµÍÃÕè·ÕèªÒ
Ãì¨ÍÂèÒ§àµçÁà»ÕèÂÁ

40
¡ÒõÃǨÊͺÃдѺ¾Åѧ§Ò¹¢Í§áºµàµÍÃÕè
µÑÇÇÑ´¾Åѧ§Ò¹ ¢Í§ Windows ¨ÐáÊ´§ÃдѺ¾Åѧ§Ò¹ã¹»Ñ¨¨ØºÑ¹¢Í§áºµàµÍÃÕè
ÇÒ§à¤ÍÃìà«ÍÃìà˹×Íäͤ͹ẵàµÍÃÕè/¾ÒÇàÇÍÃ캹·ÒÊ¡ìºÒÃìà¾×èÍ´ÙÃдѺ¡ÒêÒÃ쨢ͧẵàµÍÃÕè
¡ÒÃÂ×´ÍÒÂØ¡ÒÃãªé§Ò¹áºµàµÍÃÕè
¡ÒÃÂ×´ÍÒÂØ ¡ÒÃãªé§Ò¹áºµàµÍÃÕè¨ÐªèÇÂãËé¤Ø³ä´éÃѺ¡Ò÷ӧҹÊÙ§ÊØ´¨Ò¡áºµàµÍÃÕè
ÃÇÁ¶Ö§à»ç¹¡ÒÃÂ×´ÍÒÂØ¡ÒêÒÃì¨/ÃÕªÒÃì¨ áÅЪèÇÂà¾ÔèÁ»ÃÐÊÔ·¸ÔÀҾ㹡ÒÃÃÕªÒÃì¨
¢Íá¹Ð¹ÓãËé¤Ø³·ÓµÒÁ¤Óá¹Ð¹Ó´éÒ¹ÅèÒ§¹Õé:
•¡Òë×éÍẵàµÍÃÕèàÊÃÔÁ
•ãªéÊÒÂä¿ AC àÁ×èͨÓà»ç¹áÅÐãªé§Ò¹áºµàµÍÃÕèã¹¢³Ðà´Ô¹·Ò§
•¶Í´¡ÒÃì´¾Õ«ÕÍÍ¡àÁ×èÍäÁèä´éãªé§Ò¹ à¹×èͧ¨Ò¡¡ÒÃì´¨Ðãªé¾Åѧ§Ò¹ÍÂèÒ§µèÍà¹×èͧ (ÊÓËÃѺºÒ§ÃØè¹)
•à¡çºáºµàµÍÃÕèäÇéã¹·ÕèàÂç¹áÅÐáËé§ ÍسËÀÙÁÔ·Õèá¹Ð¹Ó¤×Í 10
°C (50°F) ¶Ö§ 30°C (86°F)
ÍسËÀÙÁÔÊÙ§¨Ð·ÓãËéẵàµÍÃÕè¤Ò»ÃШØä¿¿éÒÍÂèÒ§ÃÇ´àÃçÇ
•¡ÒÃÃÕªÒÃì¨ÁÒ¡à¡Ô¹ä»¨Ðà»ç¹¡ÒÃÅ´ÍÒÂØ¡ÒÃãªé§Ò¹áºµàµÍÃÕè
•¤ÍÂÃÐÇѧÃÑ¡ÉÒÍá´»àµÍÃì AC áÅÐẵàµÍÃÕè¢Í§¤Ø³
¡ÒÃàµ×͹ẵàµÍÃÕèµèÓ
àÁ×èÍ·Ó§Ò¹â´ÂãªéẵàµÍÃÕèãËé¤Í´ٷÕè µÑÇÇÑ´¾Åѧ§Ò¹ ¢Í§ Windows
¤Óàµ×͹: µèÍÍá´»àµÍÃì AC ãËéàÃçÇ·ÕèÊØ´à·èÒ·Õè·Óä´éËÒ¡»ÃÒ¡¯¡ÒÃàµ×͹ẵàµÍÃÕèµèÓ
¢éÍÁÙÅÍÒ¨ÊÙ−ËÒÂËÒ¡ãªéẵàµÍÃÕ訹ËÁ´áÅФÍÁ¾ÔÇàµÍÃì¨Ð»Ô´¡Ò÷ӧҹ

¾ÒÇàÇÍÃì«Ñ¾¾ÅÒ - 41
àÁ×èÍ»ÃÒ¡¯¡ÒÃàµ×͹ẵàµÍÃÕèµèÓ ÇÔ¸Õ»¯ÔºÑµÔ·Õèá¹Ð¹Ó¨Ð¢Öé¹ÍÂÙè¡ÑºÊ¶Ò¹¡Òóì¢Í§¤Ø³:
ʶҹ¡ÒÃ³ì ¡ÒáÃзӷÕèá¹Ð¹Ó
ÁÕÍá´»àµÍÃì AC áÅлÅÑê¡ä¿ 1. àÊÕºÍá´»àµÍÃì AC à¢éҡѺ¤ÍÁ¾ÔÇàµÍÃìáÅеèÍà¢éҡѺ»ÅÑê¡ä¿
2. ºÑ¹·Ö¡ä¿Åì·Õèãªé§Ò¹ÍÂÙè·Ñé§ËÁ´
3. ·Ó§Ò¹µèÍ
»Ô´¤ÍÁ¾ÔÇàµÍÃìËÒ¡¤Ø³µéͧ¡ÒÃÃÕªÒÃì¨áºµàµÍÃÕèÍÂèÒ§ÃÇ´
àÃçÇ
ÁÕẵàµÍÃÕèÊÓÃͧ·ÕèªÒÃì¨àµçÁ1.ºÑ¹·Ö¡ä¿Åì·Õèãªé§Ò¹ÍÂÙè·Ñé§ËÁ´
2. »Ô´á;¾ÅÔपÑè¹·Ñé§ËÁ´
3. àÅ×Í¡»Ô´Ãкº»¯ÔºÑµÔ¡ÒÃà¾×èͻԴ¤ÍÁ¾ÔÇàµÍÃì
4. à»ÅÕè¹ẵàµÍÃÕè
5. à»Ô´¤ÍÁ¾ÔÇàµÍÃìáÅзӧҹµèÍ
ÁÕÍá´»àµÍÃì AC
ËÃ×Í»ÅÑê¡ä¿
áÅФسäÁèÁÕẵàµÍÃÕèÊÓÃͧ
1. ºÑ¹·Ö¡ä¿Åì·Õèãªé§Ò¹ÍÂÙè·Ñé§ËÁ´
2. »Ô´á;¾ÅÔपÑè¹·Ñé§ËÁ´
3. àÅ×Í¡»Ô
´Ãкº»¯ÔºÑµÔ¡ÒÃà¾×èͻԴ¤ÍÁ¾ÔÇàµÍÃì

42
à¤Ã×èͧÁ×ͨѴ¡ÒþÅѧ§Ò¹
¤ÍÁ¾ÔÇàµÍÃìà¤Ã×èͧ¹ÕéÁÕà¤Ã×èͧÁ×ͨѴ¡ÒþÅѧ§Ò¹µÔ´µÑé§äÇéã¹µÑÇ«Ö觷Ó˹éÒ·ÕèµÔ´µÒÁ¡Ô¨¡ÃÃÁ¡Ò÷ӧҹ
¢Í§Ãкº ¡Ô¨¡ÃÃÁ¡Ò÷ӧҹ¢Í§Ãкº¨ÐÍéÒ§ÍÔ§¶Ö§¡ÒáԨ¡ÃÃÁ¡Ò÷ӧҹã´æ ·Õèµéͧ
ãªé§Ò¹ÍØ»¡Ã³ìã´µèÍ仹ÕéÍØ»¡Ã³ì˹Öè§ËÃ×ÍÁÒ¡¡ÇèÒ¹Ñé¹ ¤ÕÂìºÍÃì´, àÁÒÊì, ÎÒÃì´´ÔÊ¡ì,
ÍØ»¡Ã³ìÀÒ¹͡·Õèàª×èÍÁµè͡Ѻ¤ÍÁ¾ÔÇàµÍÃì áÅÐ˹èǤÇÒÁ¨ÓÇÔ´ÕâÍ ËÒ¡äÁèÁÕ¡Ô¨¡ÃÃÁ¡Ò÷ӧҹ
ã´¶Ù¡µÃǨ¾ºã¹ªèǧàÇÅÒ˹Öè§
¤ÍÁ¾ÔÇàµÍÃì¨ÐËÂØ´ÍØ»¡Ã³ìºÒ§ªÔé¹àËÅèÒ¹ÕéËÃ×Í·Ñé§ËÁ´à¾×èÍà»ç¹¡ÒÃÃÑ¡ÉÒ¾Åѧ§Ò¹
¡ÒûÃÐËÂÑ´¾Åѧ§Ò¹
»Ô´Ãкº¡ÒÃàÃÔèÁãªé§Ò¹´èǹ
¤ÍÁ¾ÔÇàµÍÃì¢Í§¤Ø³ãªéÃкº¡ÒÃàÃÔèÁãªé§Ò¹´èǹà¾×èÍãËéàÃÔèÁà»Ô´à¤Ã×èͧãªé§Ò¹ä´éÍÂèÒ§ÃÇ´àÃçÇ
áµèÃкº¹Õéãªé¾Åѧ§Ò¹àÅ硹éÍÂà¾×èÍÃ͵ÃǨÊͺÊÑ−−ҳ㹡ÒÃàÃÔèÁãªé§Ò¹
¡ÒõÃǨÊͺ¹Õé¨Ð·ÓãËéẵàµÍÃÕè¢Í§¤ÍÁ¾ÔÇàµÍÃìŴŧÍÂèÒ§ªéÒæ
ËÒ¡¤Ø³µéͧ¡ÒÃÅ´¡ÒÃãªé¾Åѧ§Ò¹¢Í§¤ÍÁ¾ÔÇàµÍÃìáÅÐÅ´¼Å¡ÃзºµèÍÊÔè§áÇ´ÅéÍÁ
ãËé»Ô´Ãкº¡ÒÃàÃÔèÁãªé§Ò¹´èǹ:
ËÁÒÂà˵Ø: ËÒ¡Ãкº¡ÒÃàÃÔèÁãªé§Ò¹´èǹ¶Ù¡»Ô´ÍÂÙè ¤ÍÁ¾ÔÇàµÍÃì¢Í§¤Ø³¨ÐãªéàÇÅÒ¡ÅѺ¨Ò¡
âËÁ´ÊÅÕ»¹Ò¹¡ÇèÒà´ÔÁ
¤ÍÁ¾ÔÇàµÍÃì¢Í§¤Ø³¨ÐäÁèàÃÔèÁ·Ó§Ò¹ËÒ¡ä´éÃѺ¤ÓÊÑè§ãËéàÃÔèÁ·Ó§Ò¹¨Ò¡à¤Ã×Í¢èÒ (Wake on
LAN).

à¤Ã×èͧÁ×ͨѴ¡ÒþÅѧ§Ò¹ - 43
1. à»Ô´à´Ê¡ì·çÍ»
2. ¤ÅÔ¡ µÑÇàÅ×Í¡¡ÒÃãªé¾Åѧ§Ò¹ ã¹¾×é¹·Õèá¨é§àµ×͹
3. àÅ×Í¡ µÑÇàÅ×Í¡¡ÒÃãªé¾Åѧ§Ò¹à¾ÔèÁàµÔÁ
4. àÅ×Í¡ àÅ×͡˹éÒ·Õè¢Í§»ØèÁ¾ÒÇàÇÍÃì
5. à¾×èÍà¢éÒ¶Ö§¡ÒõÑ駤èÒÊÓËÃѺ¡ÒûԴà¤Ã×èͧ àÅ×Í¡ à»ÅÕ蹡ÒõÑ駤èÒ·ÕèäÁèÁÕãËéàÅ×͡㹻Ѩ¨ØºÑ¹

44
6. àÅ×è͹ŧáÅÐàÅ×Í¡»Ô´ à»Ô´Ãкº¡ÒÃàÃÔèÁãªé§Ò¹´èǹ
7. àÅ×Í¡ ºÑ¹·Ö¡¡ÒÃà»ÅÕè¹á»Å§

«Í¿µìáÇÃì - 45
«Í¿µìáÇÃì
¡ÒÃãªé Windows áÅЫͿ·ìáÇÃì¢Í§¤Ø³
Gateway ¤ÍÁ¾ÔÇàµÍÃìÁÕ«Í¿·ìáÇÃì·Õè¨ÐªèÇÂãËé¤Ø³ãªé§Ò¹¤ÍÁ¾ÔÇàµÍÃì â»Ãá¡ÃÁ
áÅÐËÁÇ´ËÁÙè¡Ò÷ӧҹµèÒ§æ ·ÕèÁÕãË麹¤ÍÁ¾ÔÇàµÍÃì¢Í§¤Ø³ â´Â¢Öé¹ÍÂÙè¡ÑºÃØè¹·Õè¤Ø³«×éÍ
¡ÒÃÃÑ¡ÉÒ¤ÇÒÁ»ÅÍ´ÀѺ¹ÍÔ¹àµÍÃìà¹çµ·ÕèÁÕãËé
à»ç¹àÃ×èͧÊÓ¤Ñ−·Õè¨Ðµéͧ»¡»éͧ¤ÍÁ¾ÔÇàµÍÃì¢Í§¤Ø³ãËé»ÅÍ´ÀѨҡäÇÃÑÊáÅÐÀѤء¤ÒÁµèÒ§æ
º¹ÍÔ¹àµÍÃìà¹çµ (´Ù·Õè¤ÇÒÁ»ÅÍ´ÀÑ º¹ã¹Ë¹éÒ 53)
ÁժشÃÑ¡ÉÒ¤ÇÒÁ»ÅÍ´ÀѺ¹ÍÔ¹àµÍÃìà¹çµÃÇÁÃÐÂÐãªé§Ò¹¿ÃÕãËé àÁ×èÍàÃÔèÁãªé§Ò¹¤ÍÁ¾ÔÇàµÍÃì¢Í§¤Ø³
¤Ø³¤ÇÃà»Ô´ãªé§Ò¹Ãкº¡Òûéͧ¡Ñ¹¹Õé¡è͹àª×èÍÁµèÍÍÔ¹àµÍÃìà¹çµ
ªØ´ÃÑ¡ÉÒ¤ÇÒÁ»ÅÍ´ÀѹÕéªèÇ»éͧ¡Ñ¹¤ÍÁ¾ÔÇàµÍÃì¢Í§¤Ø³¨Ò¡¡ÒÃãªé§Ò¹Í͹äŹìÅèÒÊØ´áÅлéͧ¡Ñ¹
¢éÍÁÙÅÊèǹµÑǢͧ¤Ø³ (àÍ¡ÊÒÃà¡ÕèÂǡѺºÑ−ªÕ¸¹Ò¤Òà ËÁÒÂàÅ¢ºÑµÃà¤Ã´Ôµ ÃËÑʼèÒ¹ áÅÐÍ×è¹ æ )
Gateway Recovery Management
à¾×èÍà»ç¹¡ÒÃàµÃÕÂÁãËé¤ÍÁ¾ÔÇàµÍÃì¢Í§¤Ø³ÊÒÁÒöãªéµÑÇàÅ×Í¡¡ÒáÙé¤×¹Ãкºä´é
¤Ø³¤ÇÃÊÃéÒ§´ÔÊ¡ìÊÓËÃѺ¡ÒáÙé¤×¹ã¹·Ñ¹·Õ·ÕèÊÒÁÒö·Óä´é ´ÙÃÒÂÅÐàÍÕ´à¾ÔèÁàµÔÁä´é·Õè ã¹Ë¹éÒ 63

46
ÍÔ¹àµÍÃìà¹çµ
¢Ñ鹵͹áẹà¹çµ
¡Òû¡»éͧ¤ÍÁ¾ÔÇàµÍÃì¢Í§¤Ø³
à»ç¹àÃ×èͧÊÓ¤Ñ−·Õè¨Ðµéͧ»¡»éͧ¤ÍÁ¾ÔÇàµÍÃì¢Í§¤Ø³ãËé»ÅÍ´ÀѨҡäÇÃÑÊáÅÐÀѤء¤ÒÁµèÒ§æ
º¹ÍÔ¹àµÍÃìà¹çµ (´Ù·Õè¡ÒÃÃÑ¡ÉÒ¤ÇÒÁ»ÅÍ´ÀѺ¹ÍÔ¹àµÍÃìà¹çµ·ÕèÁÕãËé º¹ã¹Ë¹éÒ 45
áÅФÇÒÁ»ÅÍ´ÀÑ º¹ã¹Ë¹éÒ 53)
¢Íá¹Ð¹ÓãËéãªéâ»Ãá¡ÃÁÃÑ¡ÉÒ¤ÇÒÁ»ÅÍ´ÀѺ¹ÍÔ¹àµÍÃìà¹çµ·Õèãªé¡Ñ¹ÍÂÙè·ÑèÇä»àÁ×èͤسàÃÔèÁãªé§Ò¹¤ÍÁ
¾ÔÇàµÍÃì¢Í§¤Ø³à»ç¹¤ÃÑé§áá ¤Ø³¤ÇèÐà»Ô´ãªé§Ò¹¡Òûéͧ¡Ñ¹¹Õé㹷ѹ·Õ·ÕèÊÒÁÒö·Óä´é
â´Â੾ÒÐÍÂèÒ§ÂÔ觡è͹·Õè¤Ø³¨Ðàª×èÍÁµèÍà¢éҡѺÍÔ¹àµÍÃìà¹çµ
àÅ×Í¡ ¼ÙéãËéºÃÔ¡ÒÃÍÔ¹àµÍÃìà¹çµ
¡ÒÃãªé§Ò¹ÍÔ¹àµÍÃìà¹çµ¹Ñ鹡ÅÒÂà»ç¹àÃ×èͧ»¡µÔ㹡ÒÃãªé§Ò¹¤ÍÁ¾ÔÇàµÍÃì»ÃÐ
¨ÓÇѹä»áÅéÇ ´éÇ¢Ñ鹵͹§èÒÂæ äÁè¡Õè¢Ñ鹵͹¡çÊÒÁÒöàª×èÍÁµèͤس
à¢éҡѺ¤ÇÒÁÃÙéáÅÐà¤Ã×èͧÁ×Í㹡ÒÃÊ×èÍÊÒÃÁÒ¡ÁÒÂËÅÒÂÃٻẺ
à¾×èÍ·Ó¢Ñ鹵͹àËÅèÒ¹ÕéãËéÊÓàÃ稤سµéͧàÅ×Í¡¼ÙéãËéºÃÔ¡ÒÃÍÔ¹àµÍÃìà¹çµ (ISP)
àÊÕ¡è͹ «Ö觼ÙéãËéºÃÔ¡ÒùÕé¨Ðà»ç¹¼ÙéãËéºÃÔ¡ÒáÒÃàª×èÍÁµèÍÃÐËÇèÒ§¤Ø³
¡ÑºÍÔ¹àµÍÃìà¹çµ ¤Ø³¤Ç÷ӡÒä鹤ÇéÒà¡ÕèÂǡѺ ISP ã¹·éͧ¶Ô蹢ͧ¤Ø³
â´ÂÍÂèÒÅ×Á·Õè¨Ð¾Ù´¤Ø¡Ѻà¾×è͹æ áÅФÃͺ¤ÃÑÇà¡ÕèÂǡѺ»ÃÐʺ¡Òóì㹡ÒÃ
ãªé§Ò¹ËÃ×͵ÃǨÊͺº·ÇÔ¨ÒóìáÅÐÃÒ§ҹ¡ÒÃãªé§Ò¹¢Í§ÅÙ¡¤éÒÊÓËÃÑ
º ISP à¨éÒ¹Ñé¹æ ISP

ÍÔ¹àµÍÃìà¹çµ - 47
·Õè¤Ø³àÅ×Í¡¨ÐÁͺ¤Óá¹Ð¹Óà¡ÕèÂǡѺÇÔ¸Õ¡ÒÃàª×èÍÁµèÍà¢éҡѺÍÔ¹àµÍÃìà¹çµãËé¡Ñº¤Ø³
(¤Ø³ÍÒ¨µéͧ¡ÒëͿ·ìáÇÃìËÃ×Í ‘¡Åèͧ’ ¾ÔàÈÉà¾ÔèÁàµÔÁà¾×èÍàª×èÍÁµè͡ѺÊÒÂâ·ÃÈѾ·ì¢Í§¤Ø³
»ÃÐàÀ·¡ÒÃàª×èÍÁµèÍ
¢Öé¹ÍÂÙè¡ÑºÃØ蹢ͧ¤ÍÁ¾ÔÇàµÍÃì ʶҹ·Õè áÅФÇÒÁµéͧ¡ÒÃ㹡ÒÃÊ×èÍÊÒâͧ¤Ø³
¤Ø³ÁÕËÅÒÂÇÔ¸Õ¡ÒÃ㹡ÒÃàª×èÍÁµèÍÍÔ¹àµÍÃìà¹çµ
ËÁعÊÒÂ
¤ÍÁ¾ÔÇàµÍÃìºÒ§à¤Ã×èͧÁդ͹à¹ç¡àµÍÃìÊÓËÃѺËÁعÊÒÂâ·ÃÈѾ·ì (âÁà´çÁ)
«Ö觨ЪèÇÂãËé¤Ø³ÊÒÁÒöàª×èÍÁµè͡ѺÍÔ¹àµÍÃìà¹çµâ´ÂãªéÊÒÂâ·ÃÈѾ·ì¢Í§¤Ø³
´éÇ¡ÒÃàª×èÍÁµèÍẺËÁعÊÒÂâ·ÃÈѾ·ì ¤Ø³äÁèÊÒÁÒöãªé§Ò¹âÁà´çÁáÅÐâ·ÃÈѾ·ìä´é¾ÃéÍÁæ
¡Ñ¹º¹ÊÒÂâ·ÃÈѾ·ìÊÒÂà´ÕÂÇä´é ¡ÒÃàª×èÍÁµèÍ»ÃÐàÀ·¹Õé¹Ñ鹨ТÍá¹Ð¹ÓãËéãªé੾ÒÐ
àÁ×èͤسÁÕ¡ÒÃãªé§Ò¹ÍÔ¹àµÍÃìà¹çµÍÂèÒ§¨Ó¡Ñ´à·èÒ¹Ñé¹à¹×èͧ¨Ò¡¤ÇÒÁàÃçÇ㹡ÒÃàª×èÍÁµè͹Ñé¹µèÓáÅÐâ´Â·Ñè
Çä»áÅéǨФԴ¤èÒºÃÔ¡ÒÃ㹡ÒÃàª×èÍÁµèÍà»ç¹ÃÒªÑèÇâÁ§
DSL (àªè¹ ADSL)
DSL (Digital Subscriber Line) ¤×Í¡ÒÃàª×èÍÁµèÍ·Õè ‘à»Ô´ÍÂÙèµÅÍ´àÇÅÒ’ «Ö觷ӧҹ¼èÒ¹ÊÒÂâ·ÃÈѾ·ì
à¹×èͧ¨Ò¡ DSL áÅÐâ·ÃÈѾ·ìäÁèä´éãªé¤ÇÒÁ¶Õèà´ÕÂǡѹ
¤Ø³¨Ö§ÊÒÁÒöãªéâ·ÃÈѾ·ìä´é¾ÃéÍÁ¡Ñº¡ÒÃàª×èÍÁµèÍÍÔ¹àµÍÃìà¹çµ (â´Â¨Óà»ç¹µéͧãªé ‘äÁâ¤Ã¿ÔÅàµÍÃì’
µè͡Ѻâ·ÃÈѾ·ìáµèÅÐà¤Ã×èͧà¾×èÍËÅÕ¡àÅÕ觡ÒÃú¡Ç¹) à¾×èÍãËéÊÒÁÒöãªé§Ò¹ DSL ä´é
¤Ø³µéͧÍÂÙè㹺ÃÔàdzã¡Åéà¤Õ§¡ÑºªØÁÊÒÂâ·ÃÈѾ·ì·ÕèÁÕ¡ÒõԴµÑé§ DSL äÇé
(ºÒ§¤ÃÑ駨ÐäÁèÁÕãËéºÃÔ¡ÒÃã¹¾×é¹·ÕèËèÒ§ä¡Å)
¤ÇÒÁàÃçÇ㹡ÒÃàª×èÍÁµè͹Ñé¹áµ¡µèÒ§¡Ñ¹ä»µÒÁʶҹ·Õè¢Í§¤Ø³ áµèâ´Â·ÑèÇä»áÅéÇ DSL

48
¹Ñ鹨ÐÁͺ¡ÒÃàª×èÍÁµèÍÍÔ¹àµÍÃìà¹çµ·ÕèÃÇ´àÃçÇáÅÐàª×èͶ×Íä´é
à¹×èͧ¨Ò¡¡ÒÃàª×èÍÁµè͹Ñ鹨Ðà»Ô´ÍÂÙèµÅÍ´àÇÅÒ â´Â»¡µÔáÅéǨ֧¤Ô´¤èÒºÃÔ¡ÒÃà»ç¹ÃÒÂà´×͹
ËÁÒÂà˵Ø: ¡ÒÃàª×èÍÁµèÍ DSL ¹Ñ鹨Óà»ç¹µéͧãªéâÁà´çÁ·ÕèàËÁÒÐÊÁ â´Â»¡µÔáÅéÇ ISP
¨ÐÁͺâÁà´çÁãËé¡Ñº¤Ø³àÁ×èͤس¨´·ÐàºÕ¹ãªéºÃÔ¡Òà âÁà´çÁÊèǹÁÒ¡¨ÐÁÕ ‘àÃÒ·ìàµÍÃì’
·Õè¨ÐÁͺ¡ÒÃà¢éÒãªé§Ò¹à¤Ã×Í¢èÒÂáÅÐÃкº wi-fi
à¤àºÔéÅ
¡ÒÃàª×èÍÁµèÍẺà¤àºÔéŨÐÁͺ¡ÒÃãËéºÃÔ¡ÒÃÍÔ¹àµÍÃìà¹çµ·ÕèÃÇ´àÃçÇáÅÐà»Ô´ÍÂÙèµÅÍ´àÇÅÒ¼èÒ¹·Ò§ÊÒ
Âà¤àºÔéÅâ·Ã·Ñȹì â´Â·ÑèÇ仨ÐÁÕ¡ÒÃãËéºÃÔ¡ÒùÕéã¹àÁ×ͧãË−èæ
¤Ø³ÊÒÁÒöãªéâ·ÃÈѾ·ì¢Í§¤Ø³áÅÐÃѺªÁà¤àºÔéÅ·ÕÇÕä´éã¹àÇÅÒà´ÕÂǡѹ¡Ñº·Õè¤
سàª×èÍÁµè͡ѺÍÔ¹àµÍÃìà¹çµ
3G (WWAN ËÃ×Í 'Wireless Wide-Area Network')
¡ÒÃàª×èÍÁµèÍ 3G ¨Ð͹Ø−ÒµãËé¤Ø³ãªé§Ò¹à¤Ã×Í¢èÒÂà«ÅÅÙÅèÒÃì (àªè¹·ÕèãªéÍÂÙè¡Ñºâ·ÃÈѾ·ìÁ×Ͷ×Í)
à¾×èÍàª×èÍÁµè͡ѺÍÔ¹àµÍÃìà¹çµã¹¢³Ð·Õè¤Ø³ÍÂÙè¹Í¡ºéÒ¹ ¤ÍÁ¾ÔÇàµÍÃì¢Í§¤Ø³ÍÒ¨ÁÕªèͧÊÓËÃѺãÊè SIM
¡ÒÃì´ ËÃ×ÍÍÒ¨µéͧ¡ÒÃÍØ»¡Ã³ìÀÒ¹͡ÍÂèÒ§àªè¹ âÁà´çÁ USB
ËÃ×ÍáÁé¡ÃзÑè§â·ÃÈѾ·ìÁ×Ͷ×Í·Õèä´éÃѺ¡ÒõԴµÑé§ÍØ»¡Ã³ìÍÂèÒ§¶Ù¡µéͧ
ËÁÒÂà˵Ø: ËÒ¡¤ÍÁ¾ÔÇàµÍÃì¢Í§¤Ø³ÁÕÊÅç͵ãÊè SIM ¡ÒÃì´ ¤Ø³¨Óà»ç¹µéͧÁÕ SIM
¡ÒÃì´·ÕèÊÒÁÒöãªé§Ò¹´éÇ¡ѹä´éáÅÐÊÑ−−Ò¡ÒÃãªé§Ò¹¡Ñº¼ÙéãËéºÃÔ¡ÒÃà¤Ã×Í¢èÒÂà«ÅÅÙÅèÒ
Ãì ¡è͹¡ÒÃãªé§Ò¹¤Ø³ÊÁºÑµÔ 3G
ãËéµÃǨÊͺ¡Ñº¼ÙéãËéºÃÔ¡Òâͧ¤Ø³ÇèÒÁÕ¤èÒºÃÔ¡ÒÃà¾ÔèÁàµÔÁã´æ ÍÕ¡ËÃ×ÍäÁè
â´Â੾ÒÐÍÂèÒ§ÂÔ觤èÒºÃÔ¡ÒÃ㹡ÒÃãªé§Ò¹¢éÒÁࢵ (Roaming)

ÍÔ¹àµÍÃìà¹çµ - 49
¡ÒÃàª×èÍÁµèÍà¤Ã×Í¢èÒÂ
LAN (Local Area Network) ¤×Í¡ÅØèÁ¢Í§¤ÍÁ¾ÔÇàµÍÃì
(àªè¹ ·ÕèÍÂÙèÀÒÂã¹ÍÒ¤ÒÃÊӹѡ§Ò¹ËÃ×Í·ÕèºéÒ¹)
·Õèãªé§Ò¹ÊÒÂáÅзÃѾÂÒ¡Ã㹡ÒÃÊ×èÍÊÒ÷ÑèÇä»ÃèÇÁ¡Ñ¹ àÁ×èͤسä´éµÑé§à¤Ã×Í¢èÒ¢Öé¹
¤Ø³ÊÒÁÒö¨Ðáºè§»Ñ¹ä¿Åì ÍØ»¡Ã³ìµè;èǧ (àªè¹ à¤Ã×èͧ¾ÔÁ¾ì)
áÅСÒÃàª×èÍÁµèÍÍÔ¹àµÍÃìà¹çµÃèÇÁ¡Ñ¹ä´é ¤Ø³ÊÒÁÒöµÑ駤èÒ LAN ä´éâ´Âãªéà·¤â¹âÅÂÕẺãªéÊÒÂ
(àªè¹ ÍÕà¸ÍÃìà¹çµ) ËÃ×Íà·¤â¹âÅÂÕẺäÃéÊÒ (àªè¹ WiFi ËÃ×Í Bluetooth)
à¤Ã×Í¢èÒÂäÃéÊÒÂ
LAN äÃéÊÒÂËÃ×Í WLAN ¤×Íà¤Ã×Í¢èÒÂÀÒÂã¹¾×é¹·ÕèẺäÃéÊÒÂ
«Ö觨ÐÊÒÁÒöàª×èÍÁ⧤ÍÁ¾ÔÇàµÍÃìÊͧà¤Ã×èͧËÃ×ÍÁÒ¡¡ÇèÒ¹Ñé¹à¢éÒ´éÇ¡ѹä´éâ´ÂäÁèµéͧãªéÊÒÂã´æ
¡ÒõÑ駤èÒà¤Ã×Í¢èÒÂäÃéÊÒ¹Ñ鹧èÒ´ÒÂáÅШЪèÇÂãËé¤Ø³áºè§»Ñ¹ä¿Åì ÍØ»¡Ã³ìµè;èǧ
áÅСÒÃàª×èÍÁµèÍÍÔ¹àµÍÃìà¹çµÃèÇÁ¡Ñ¹ä´é
ÍÐää×Í»ÃÐ⪹ì·Õèä´é¨Ò¡à¤Ã×Í¢èÒÂäÃéÊÒÂ?
à¤Å×è͹·Õèä´é
Ãкº LAN äÃéÊÒ¹Ñ鹪èÇÂãËé¤Ø³áÅмÙéãªé¤¹Í×è¹æ
ã¹à¤Ã×Í¢èÒÂÀÒÂ㹺éÒ¹¢Í§¤Ø³¹Ñé¹à¢éÒãªé§Ò¹ä¿ÅìáÅÐÍØ»¡Ã³ìµèÒ§æ ÃèÇÁ¡Ñ¹ä´é¼èÒ¹·Ò§à¤Ã×Í¢èÒÂ
àªè¹à¤Ã×èͧ¾ÔÁ¾ìËÃ×Íà¤Ã×èͧÊ᡹
ÍÕ¡·Ñ駤سÂѧÊÒÁÒöãªé§Ò¹¡ÒÃàª×èÍÁµèÍÍÔ¹àµÍÃìà¹çµÃèÇÁ¡Ñ¹¡Ñº¤ÍÁ¾ÔÇàµÍÃìà¤Ã×èͧÍ×è¹æ
㹺éÒ¹¢Í§¤Ø³ä´é´éÇÂ

50
¡ÒõԴµÑ駷ÕèÃÇ´àÃçÇáÅЧèÒ´ÒÂ
¡ÒõԴµÑé§Ãкº LAN äÃéÊÒ¹Ñé¹ÊÒÁÒö·Óä´éÍÂèÒ§ÃÇ´àÃçÇáÅЧèÒ´ÒÂ
áÅÐÂѧ¢¨Ñ´¤ÇÒÁÂØè§ÂÒ¡·Õèµéͧà´Ô¹ÊÒµèÒ§æ ¼èÒ¹¡ÓᾧáÅÐྴҹÍÍ¡ä»
Êèǹ»ÃСͺ¢Í§ LAN äÃéÊÒÂ
à¾×è͵Ñ駤èÒà¤Ã×Í¢èÒÂäÃéÊÒ·ÕèºéÒ¹¢Í§¤Ø³ ¤Ø³¨Óà»ç¹µéͧÁÕÊÔè§àËÅèÒ¹Õé:
¨Ø´àª×èÍÁµèÍ (àÃÒ·ìàµÍÃì)
¨Ø´àª×èÍÁµèÍ (àÃÒ·ìàµÍÃì)
¤×ÍÍØ»¡Ã³ì㹡ÒÃÃѺÊè§ÊÑ−−Ò³Êͧ·ÔÈ·Ò§·Õè¨Ðá¼è¡ÃШÒ¢éÍÁÙÅä»ÂѧºÃÔàdzâ´ÂÃͺ
¨Ø´àª×èÍÁµè͹Ñé¹·Ó§Ò¹à»ç¹µÑÇ¡ÅÒ§ÃÐËÇèÒ§à¤Ã×Í¢èÒÂẺãªéÊÒÂáÅÐẺäÃéÊÒÂ
àÃÒ·ìàµÍÃìÊèǹÁÒ¡¨ÐÁÕâÁà´çÁ DSL ã¹µÑÇ·Õè¨ÐªèÇÂãËé¤Ø³ÊÒÁÒöà¢éÒãªé§Ò¹¡ÒÃàª×èÍÁµèÍ DSL
¤ÇÒÁàÃçÇÊÙ§ä´é â´Â·ÑèÇä» ISP (¼ÙéãËéºÃÔ¡ÒÃÍÔ¹àµÍÃìà¹çµ) ·Õè¤Ø³ä´éàÅ×Í¡ãªéºÃÔ¡ÒùÑ鹨ÐÁÕâÁà´çÁ/
àÃÒ·ìàµÍÃìÁÒãËéàÁ×èÍÊÁѤÃãªéºÃÔ¡Òà ÍèÒ¹àÍ¡ÊÒ÷ÕèÁҡѺ¨Ø´àª×èÍÁµèÍ/
àÃÒ·ìàµÍÃì¢Í§¤Ø³ãËéÅÐàÍÕ´à¾×èÍ´ÙÃÒÂÅÐàÍÕ´¤Óá¹Ð¹Ó㹡ÒõԴµÑé§
ÊÒÂà¤àºÔéÅà¤Ã×Í¢èÒ (RJ45)
ÊÒÂà¤àºÔéÅà¤Ã×Í¢èÒ (ËÃ×ÍàÃÕ¡ÇèÒÊÒÂà¤àºÔéÅ RJ45)
¹Ñé¹ãªéà¾×èÍàª×èÍÁµèÍâÎʵì¤ÍÁ¾ÔÇàµÍÃìà¢éҡѺ¨Ø´àª×èÍÁµèÍ (´ÙÀÒ¾»ÃСͺ´éÒ¹ÅèÒ§)
ÊÒÂà¤àºÔéŪ¹Ô´¹Õé¹Ñé¹ÂѧÊÒÁÒöãªéà¾×èÍàª×èÍÁµè͡ѺÍØ»¡Ã³ìÀÒ¹͡à¢éҡѺ¨Ø´àª×èÍÁµèÍä´éÍÕ¡´éÇÂ

ÍÔ¹àµÍÃìà¹çµ - 51
Íá´»àµÍÃìäÃéÊÒÂ
â´Â·ÑèÇä»áÅéÇÍá´»àµÍÃìäÃéÊÒÂÀÒÂã¹¹Ñ鹨Ðä´éÃѺ¡ÒõԴµÑé§ÁÒ㹤ÍÁ¾ÔÇàµÍÃì¢Í§¤Ø³áÅéÇ
»ØèÁËÃ×͵ÑǤǺ¤ØÁã¹ Windows ¨ÐªèÇÂãËé¤Ø³à»Ô´ËÃ×ͻԴ¡ÒÃãªé§Ò¹Íá´»àµÍÃì¹Õéä´é
á¼¹ÀÒ¾¢Í§à¤Ã×Í¢èÒÂ㹡Ò÷ӧҹ
1. ¨Ø´àª×èÍÁµèÍ/àÃÒ·ìàµÍÃì
2. ¤ÍÁ¾ÔÇàµÍÃìà´Ê¡ì·çÍ»
3. âÁà´çÁ
4. à¤Ã×èͧ¾ÔÁ¾ì
5. ¤ÍÁ¾ÔÇàµÍÃìẺ¾¡¾Ò
6. PDA/ÊÁÒÃì·â¿¹
7. ÊÒÂà¤àºÔéÅà¤Ã×Í¢èÒÂ
(RJ45)
¡ÒÃà»Ô´/»Ô´¡ÒÃàª×èÍÁµèÍà¤Ã×Í¢èÒ WiFi
¤Ø³ÊÁºÑµÔ¢Í§¤ÍÁ¾ÔÇàµÍÃìÊèǹãË−èÁÕ»ØèÁ ‘WiFi’ ÊÓËÃѺà»Ô´ËÃ×ͻԴ¡ÒÃàª×èÍÁµèÍà¤Ã×Í¢èÒÂ
ËÒ¡¤ÍÁ¾ÔÇàµÍÃì¢Í§¤Ø³ÁÕÃкºäÃéÊÒ áµèäÁèÁÕ»ØèÁ
¡ÒÃÊ×èÍÊÒäس¡çÊÒÁÒöà»Ô´ËÃ×ͻԴà¤Ã×Í¢èÒÂäÃéÊÒ¢ͧ¤Ø³
1
2
3
4
5
6
7

52
ËÃ×ͤǺ¤ØÁÊÔ觷Õèãªé§Ò¹ÃèÇÁ¡Ñ¹º¹à¤Ã×Í¢èÒÂä´é´éǵÑÇàÅ×Í¡¡ÒèѴ¡ÒÃà¤Ã×Í¢èÒ ¡´»ØèÁ Windows
() + W, ¾ÔÁ¾ì "HomeGroup" áÅéǤÅÔ¡·Õè HomeGroup
¤Óàµ×͹: ËéÒÁãªéÍØ»¡Ã³ìäÃéÊÒÂã¹¢³Ð·Õè¡ÓÅѧà´Ô¹·Ò§ÍÂÙ躹à¤Ã×èͧºÔ¹
»Ô´ÊÇÔµ«ìÍØ»¡Ã³ì·Ñé§ËÁ´¡è͹·Õè¨Ð¢Öé¹à¤Ã×èͧºÔ¹
ÍØ»¡Ã³ìàËÅèÒ¹ÕéÍÒ¨à»ç¹ÍѹµÃÒµèÍ¡Ò÷ӧҹ¢Í§à¤Ã×èͧºÔ¹ ú¡Ç¹¡ÒÃÊ×èÍÊÒÃ
áÅÐÍÒ¨¼Ô´¡®ËÁÒÂ
·èͧÍÔ¹àµÍÃìà¹çµ!
à¾×èÍ·èͧÍÔ¹àµÍÃìà¹çµ
¤Ø³¨Óà»ç¹µéͧÁÕâ»Ãá¡ÃÁ·ÕèàÃÕ¡ÇèÒºÃÒÇà«ÍÃìÍÔ¹àµÍÃìà¹çµ Internet
Explorer Áͺ¡ÒÃãªé§Ò¹¡ÒÃàÃÕ¡´ÙàÇ纷Õè§èÒ´ÒÂáÅлÅÍ´ÀÑÂ
·Ñ¹·Õ·Õè¤Ø³ä´éµÔ´µÑ駡ÒÃà¢éÒãªé§Ò¹ÍÔ¹àµÍÃìà¹çµ¢Í§¤Ø³áÅФسä´éàª×èÍÁµè͡Ѻ
ÍÔ¹àµÍÃìà¹çµ ãËé¤ÅÔ¡·Õèªç͵¤Ñ· Internet Explorer ·ÕèÍÂÙ躹à´Ê¡ì·çÍ»¢Í§
Windows áÅéÇãËé»ÃÐʺ¡Òóì¡ÒÃãªé§Ò¹ÍÔ¹àµÍÃìà¹çµ¢Í§¤Ø³¡éÒÇÊÙèÍÕ¡ÃдѺ!
Gateway àÇçºä«µì
·ÓäÁ¤Ø³äÁèà¢éÒªÁàÇçºä«µì¢Í§àÃÒà¾×èÍàÃÔèÁ¡ÒÃãªé§Ò¹·Õè www.gateway.com
Gateway ¹Ñé¹ä´éÊÃéÒ§¢Öé¹ÁÒà¾×èÍÁͺ¡ÒÃʹѹʹعãËé¡Ñº¤Ø³áººÊèǹµÑÇ ´Ù·ÕèÊèǹ Support
(¡ÒÃʹѺʹع) ¢Í§àÃÒà¾×èÍ¢ÍÃѺ¤ÇÒÁªèÇÂàËÅ×Íã¹áºº·Õè¤Ø³µéͧ¡ÒÃ
www.gateway.com ¤×Í»ÃеÙÊÙè¡Ô¨¡ÃÃÁáÅкÃÔ¡Òú¹âÅ¡Í͹äŹì¢Í§¤Ø³:
à¢éÒªÁàÇçºä«µì¢Í§àÃÒÍÂÙèàÊÁÍà¾×èÍ¢éÍÁÙÅ¢èÒÇÊÒÃáÅдÒǹìâËÅ´ÅèÒÊØ´!

ÍÔ¹àµÍÃìà¹çµ - 53
¤ÇÒÁ»ÅÍ´ÀÑÂ
¤Ø³ÍÒ¨¡Ãе×ÍÃ×ÍÃé¹·Õè¨ÐÊÓÃǨ·Ø¡ÍÂèÒ§·ÕèÊÒÁÒö¾ºä´éº¹ÍÔ¹àµÍÃìà¹çµ
à¾×èÍãËé¤Ø³Í͹äŹìä´éÍÂèÒ§»ÅÍ´ÀÑ ¨Ö§ÁÕâ»Ãá¡ÃÁ·Õèä´éÃѺÃÒ§ÇÑÅÍÂèÒ§ Gateway Symantec Norton
Internet Security
™ µÔ´µÑé§äÇéÅèǧ˹éÒº¹¤ÍÁ¾ÔÇàµÍÃì¢Í§¤Ø³
Norton Internet Security ·Ó§Ò¹ÍÂÙèàº×éͧËÅѧä´éÍÂèÒ§à§ÕºàªÕºà¾×èÍ»éͧ¡Ñ¹¡Òäء¤ÒÁ·Õè«Ñº«é͹
㹻Ѩ¨ØºÑ¹áÅл¡»éͧ¡ÒÃÃкصÑǵ¹¢Í§¤Ø³ã¹¢³Ð·Õè¤Ø³àÅ×Í¡«×éÍ ·ÓÃÒ¡Òø¹Ò¤ÒÃ
ËÃ×ÍàÃÕ¡´Ùà¹×éÍËÒ¢éÍÁÙÅÍ͹äŹì
Norton Internet Security ºÅçͤ¡ÒÃâ¨Ã¡ÃÃÁ¡ÒÃÃкصÑǵ¹Í͹äŹìáÅÐźʻÒÂáÇÃì
äÇÃÑÊáÅÐ˹͹ÍÔ¹àµÍÃìà¹çµ ÃÇÁ¶Ö§»¡»éͧ¤ÍÁ¾ÔÇàµÍÃì¢Í§¤Ø³¨Ò¡áΡà¡ÍÃì
¤Ó¨Ó¡Ñ´¤ÇÒÁ
äÇÃÑʤ×ÍÍÐäÃ
«Í¿·ìáÇÃì·Õèà»ç¹ÍѹµÃÒÂËÃ×Í·ÕèàÃÕ¡ÇèÒ ‘äÇÃÑÊ’ ¤×Íâ»Ãá¡ÃÁ·Õèä´éÃѺ¡ÒÃÍ͡Ẻ
à¾×èÍá¾Ãè¡ÃШÒÂáÅзÓÅÒ¤ÍÁ¾ÔÇàµÍÃì äÇÃÑÊÊèǹãË−è¨Ð¶Ù¡Ê觼èÒ¹·Ò§ÍÔ¹àµÍÃìà¹çµ ÍÕàÁÅì
ËÃ×ÍàÇçºä«µì·Õè»ÃÐʧ¤ìÃéÒ äÇÃÑÊ·ÑèÇ仨ÐÊÃéÒ§µÑÇàͧ¢Öé¹ÁÒ«éÓ
áÅÐÊ觵ÑÇàͧ¼èÒ¹ä»Âѧ¤ÍÁ¾ÔÇàµÍÃìËÅÒÂà¤Ã×èͧâ´ÂäÁèÊÒÁÒöµÃǨ¨Ñºä´é
µÑÇÍÂèÒ§äÇÃÑÊ·ÕèÊÃéÒ§¤ÇÒÁÃÓ¤Ò− àªè¹ Trojan horses ˹͹
ËÃ×ÍÊá»Á·ÕèÊÒÁÒöµÔ´à¢éÒÁÒÂѧ¤ÍÁ¾ÔÇàµÍÃì¢Í§¤Ø³ä´éËÅÒ¡ËÅÒ·ҧ
áÅШСè͡ǹâ´Â¡ÒÃãªé·ÃѾÂÒ¡Ãà¾ÔèÁ¢Öé¹ËÃ×͢Ѵ¢ÇÒ§¡ÒÃãªéà¤Ã×Í¢èÒÂ
ËÁÒÂà˵Ø: Gateway ãËé¡ÒÃÃѺ»ÃСѹÇèÒ¤ÍÁ¾ÔÇàµÍÃì¢Í§¤Ø³¨Ð»ÅÍ´ÀѨҡäÇÃÑÊ ³
àÇÅÒ·Õè«×éÍ 100% áµèäÁè¤Ãͺ¤ÅØÁ¶Ö§¤ÇÒÁàÊÕÂËÒ·Õèà¡Ô´¨Ò¡äÇÃÑÊ

54
Ê»ÒÂáÇÃì ¤×ÍÍÐäÃ?
â´Â·ÑèÇä»áÅéÇÊ»ÒÂáÇÃìËÁÒ¶֧â»Ãá¡ÃÁäÁè¾Ö§»ÃÐʧ¤ì·Õè¶Ù¡´ÒǹìâËŴŧº¹¤ÍÁ¾ÔÇàµÍÃì¢Í§¤Ø³
¢³Ðàª×èÍÁµèÍä»ÂѧÍÔ¹àµÍÃìà¹çµ áÅкèͤÃÑé§à¡Ô´¢Öé¹â´Â·Õè¤Ø³äÁèÃÙéµÑÇ
àÁ×èÍä´é½Ñ§µÑÇà¢éÒ㹤ÍÁ¾ÔÇàµÍÃì¢Í§¤Ø³áÅéÇ Ê»ÒÂáÇÃì¨ÐÊÍ´á¹Á¡Ô¨¡ÃÃÁ¡ÒÃàÃÕ¡´ÙÊÔ觵èÒ§æ
¢Í§¤Ø³ à¡çºÃǺÃÇÁ¢éÍÁÙÅÊèǹµÑÇ
áÊ´§»éÒÂâ¦É³ÒËÃ×ÍáÁé¡ÃзÑè§à»ÅÕè¹á»Å§¡ÒõÑ駤èҢͧ¤ÍÁ¾ÔÇàµÍÃì¢Í§¤Ø³
Ê»ÒÂáÇÃì¨Ðãªé·ÃѾÂҡú¹¤ÍÁ¾ÔÇàµÍÃì¢Í§¤Ø³
áÅÐÊÒÁÒö·ÓãËé¡ÒÃàª×èÍÁµèÍÍÔ¹àµÍÃìà¹çµËÃ×ÍÃкº¤ÍÁ¾ÔÇàµÍÃì·Ñé§ËÁ´¢Í§¤Ø³ªéÒŧ
ËÃ×ÍáÁé¡ÃзÑ觷ÓãËéÃкº¢Ñ´¢éͧ
Ê»ÒÂáÇÃì㹺ҧ¤ÃÑ駨ж١ãªéâ´ÂºÃÔÉÑ··ÕèäÁèÁÕ
¨ÃÔ¸ÃÃÁ
㹡ÒõÃǨÊͺáÅеԴµÒÁàÇçºä«µì·Õè¤Ø³áÇЪÁº¹ÍÔ¹àµÍÃìà¹çµà¾×è͵ÃǨÊͺ¾ÄµÔ¡ÃÃÁ㹡Ò÷èÍ
§àÇ红ͧ¤Ø³ áÅÐáÊ´§»éÒÂâ¦É³Ò·Õè¶Ù¡¡Ó˹´äÇ麹˹éҨͧ͢¤Ø³ ÍÂèÒ§äáçµÒÁ
Ê»ÒÂáÇÃìºÒ§»ÃÐàÀ·à»ç¹ÁÒ¡¡ÇèÒ¡ÒõԴµÒÁÍÂèÒ§§èÒÂæ
â´Â¨ÐµÃǨÊͺ¨Ñ§ËÇСÒþÔÁ¾ìáÅШѺÃËÑʼèÒ¹
ÃÇÁ¶Ö§¡ÒÃãªé§Ò¹·ÕèàÊÕ觵èͤÇÒÁ»ÅÍ´ÀÑÂÍÂèÒ§ÃéÒÂáç
ÁÑÅáÇÃì¤×ÍÍÐäÃ?
«Í¿·ìáÇÃì·Õèà»ç¹ÍѹµÃÒ¹Ñé¹ÃÙé¨Ñ¡ã¹ÍÕ¡ª×èÍ˹Öè§ÇèÒ ÁÑÅáÇÃì
«Ö觡ç¤×Í«Í¿·ìáÇÃì·Õèä´éÃѺ¡ÒÃÍ͡Ẻâ´ÂÁÕਵ¹Òà¾×èÍ·ÓÃéÒ¤ÍÁ¾ÔÇàµÍÃì¢Í§¤Ø³ µÑÇÍÂèÒ§àªè¹
äÇÃÑÊ àÇÔÃìÁ áÅÐ Trojan horses Åéǹáµèà»ç¹«Í¿·ìáÇÃì·Õèà»ç¹ÍѹµÃÒÂ
à¾×èͪèÇ»¡»éͧ¤ÍÁ¾ÔÇàµÍÃì¢Í§¤Ø³¨Ò¡ÁÑÅáÇÃì
µÃǨ´ÙãËéá¹èã¨ÇèÒ¤ÍÁ¾ÔÇàµÍÃì¢Í§¤Ø³ãªé«Í¿·ìáÇÃì»éͧ¡Ñ¹äÇÃÑÊáÅлéͧ¡Ñ¹ÁÑÅáÇÃì·ÕèÍѾവ

ÍÔ¹àµÍÃìà¹çµ - 55
ä¿ÃìÇÍÅÅì ÊèǹºØ¤¤Å¤×ÍÍÐäÃ
â»Ãá¡ÃÁä¿ÃìÇÍÅÅìÊèǹºØ¤¤Å
¤×Íâ»Ãá¡ÃÁ«Í¿·ìáÇÃì·Õèä´éÃѺ¡ÒÃÍ͡ẺÁÒà¾×èÍ»éͧ¡Ñ¹¡ÒÃà¢éÒ¶Ö§·ÕèäÁèä´éÃѺ͹Ø−Òµä»ÂѧËÃ×ͨÒ
¡à¤Ã×Í¢èÒÂÊèǹµÑÇ â´Â·Ó˹éÒ·ÕèàÊÁ×͹à¡ÃÒлéͧ¡Ñ¹·Õè¤Í»éͧ¡Ñ¹¡ÒÃàª×èÍÁµèÍÍÔ¹àµÍÃìà¹çµ¢Í§
¤Ø³¨Ò¡¡ÒÃàª×èÍÁµèÍ·ÕèäÁè¾Ö§»ÃÐʧ¤ì ·ÕèÍÒ¨¾ÂÒÂÒÁà¢éҤǺ¤ØÁ¤ÍÁ¾ÔÇàµÍÃì¢Í§¤Ø³à¾×è͵ԴµÑé§
ËÃ×Íá¾Ãè¡ÃШÒÂâ»Ãá¡ÃÁäÇÃÑÊËÃ×ÍÁÑÅáÇÃì ¡ÒÃàª×èÍÁµèÍà¢éҡѺ¤ÍÁ¾ÔÇàµÍÃì¢Í§
¤Ø³·Ñé§ËÁ´¨Ð¶Ù¡µÃǨÊͺ
â»Ãá¡ÃÁ·Õè¾ÂÒÂÒÁÃѺ¢éÍÁÙÅâ´ÂäÁèä´éÃѺ͹Ø−Òµ¨Ò¡¤Ø³¨Ð¶Ù¡µÃǨ¨ÑºáÅÐä¿ÃìÇÍÅÅì¨ÐáÊ´§¡ÒÃá
¨é§àµ×͹ ¨Ò¡¹Ñ鹤سÊÒÁÒöµÑ´ÊÔ¹ã¨ä´éÇè
Ò¨Ð͹Ø−Òµ¡ÒÃàª×èÍÁµèÍËÃ×ÍäÁè
ËÒ¡¡ÒÃàª×èÍÁµè͹Ñ鹤×Íâ»Ãá¡ÃÁ·Õè¤Ø³¡ÓÅѧãªé§Ò¹ÍÂÙè¤Ø³ÍҨ͹Ø−ÒµãËéàª×èÍÁµèÍä´é
(àªè¹ ¡ÒÃàª×èÍÁµèÍä»Âѧà«ÔÃì¿àÇÍÃìà¡Á·ÕèÁÕ¼ÙéàÅè¹ËÅÒ¤¹
ËÃ×Íàª×èÍÁµèÍä»ÂѧÊÒÃҹءÃÁà¾×èÍÍѾവà¹×éÍËÒ¢éÍÁÙÅ)
ÇÔ¸Õ»¡»éͧ¤ÍÁ¾ÔÇàµÍÃì¢Í§¤Ø³
¡Òûéͧ¡Ñ¹¡ÒáèÍÍÒª−Ò¡ÃÃÁã¹âÅ¡ä«àºÍÃìÊÒÁÒö·Óä´éÍÂèÒ§µèÍà¹×èͧ
áÅÐÊÒÁÒöËÅÕ¡àÅÕ觡ÒÃâ¨ÁµÕÊèǹÁÒ¡ä´éàÁ×è͵ԴÍÒÇظ´éǤÓá¹Ð¹Ó¨Ò¡ªèҧ෤¹Ô¤áÅСÒÃãªéÊÒ
ÁÑ−ÊÓ¹Ö¡ â´Â·ÑèÇä»áÅéÇ ÍÒª−Ò¡ÃÍ͹äŹì¨Ð¾ÂÒÂÒÁËÒà§Ô¹ÍÂèÒ§ÃÇ´àÃçÇáÅЧèÒ´ÒÂÁÒ¡·ÕèÊØ´
ÂÔ觤س·ÓãËé§Ò¹¢Í§¾Ç¡à¢ÒÂÒ¡ÁÒ¡¢Öé¹à·èÒã´
¾Ç¡à¢Ò¨ÐÁÕá¹Çâ¹éÁ·Õè¨ÐÅзÔ駤سáÅÐà»ÅÕè¹ä»ËÒà»éÒËÁÒ·Õè§èÒ´Ò¡ÇèÒ
à¤Åç´ÅѺ´éÒ¹ÅèÒ§Áͺ¢éÍÁÙž×é¹°Ò¹ÊÓËÃѺÇÔ¸Õ·Õè¤Ø³ÊÒÁÒö»éͧ¡Ñ¹¡ÒééÍ⡧Í͹äŹìä´é

56
ÃÑ¡ÉÒ¤ÍÁ¾ÔÇàµÍÃì¢Í§¤Ø³ãËé·Ñ¹ÊÁÑÂà»ç¹»Ñ¨¨ØºÑ¹´éÇÂá¾·ªìáÅÐÍѾവÅèÒÊØ´
˹Öè§ã¹ÇÔ¸Õ·Õè´Õ·ÕèÊش㹡ÒÃÍÂÙèãËéËèÒ§¨Ò¡¼ÙéäÁè»ÃÐʧ¤ì´Õ¤×Í¡ÒÃãªéá¾·ªìáÅЫͿ·ìáÇÃìá¡é䢵èÒ§æ
àÁ×èÍÁÕãËéàÅ×Í¡ãªé ´éÇ¡ÒÃÍѾവ¤ÍÁ¾ÔÇàµÍÃì¢Í§¤Ø³à»ç¹»ÃШÓ
¤Ø³¨ÐÊÒÁÒöºÅçͤ¼ÙéäÁè»ÃÐʧ¤ì´Õ¨Ò¡¡ÒÃãªé»ÃÐ⪹ì¨Ò¡ªèͧâËÇè㹫Ϳ·ìáÇÃì
«Öè§à»ç¹ÊÔ觷Õè¾Ç¡à¢ÒÊÒÁÒö¨Ðãªéà¾×èͺءÃØ¡à¢éÒÁÒã¹Ãкº¢Í§¤Ø³ä´é
ã¹¢³Ð·Õè¡Ò÷ÓãËé¤ÍÁ¾ÔÇàµÍÃì¢Í§¤Ø³ÍѾവäÁèÊÒÁÒö»¡»éͧ¤Ø³¨Ò¡¡ÒÃâ¨ÁµÕ·Ø¡»ÃÐàÀ·ä´é
á¾·ªìáÅЫͿáÇÃìÊÓËÃѺá¡é䢨зÓãËéáΡà¡ÍÃìà¢éÒ¶Ö§Ãкº¢Í§¤Ø³ä´éÂÒ¡ÂÔ觢Öé¹
¨Ö§à»ç¹¡ÒúÅçͤ¡ÒÃâ¨ÁµÕ¾×é¹°Ò¹áÅСÒÃâ¨ÁµÕâ´ÂÍѵâ¹ÁѵÔÊèǹÁÒ¡ä´éÍÂèÒ§ÊÁºÙóì
áÅÐÍÒ¨¾Íà¾
Õ§µèÍ¡Ò÷ÓãËé¼ÙéäÁè»ÃÐʧ¤ì´ÕÅèҶͨҡä»ÍÂèÒ§¼Ùéá¾éáÅÐËѹä»ÁͧËÒ¤ÍÁ¾ÔÇàµÍÃì·Õè
Íè͹áÍ¡ÇèÒã¹·ÕèÍ×è¹á·¹
Microsoft Windows àÇÍÃìªÑè¹ÅèÒÊØ´áÅЫͿ·ìáÇÃì·Õèà»ç¹·Õè¹ÔÂÁÍ×è¹æ
㹻Ѩ¨ØºÑ¹ÊÒÁÒö»ÃѺµÑ駤èÒà¾×èÍ´ÒǹìâËÅ´áÅÐãªéÍѾവä´éâ´ÂÍѵâ¹ÁѵÔ
à¾×èÍãËé¤Ø³äÁèµéͧ¨´¨Óà¾×èͤ͵ÃǨÊͺ«Í¿·ìáÇÃìÅèÒÊØ´ ¡ÒÃãªé»ÃÐ⪹ì¨Ò¡¤Ø³ÊÁºÑµÔ
“ÍѾവÍѵâ¹ÁѵԔ
㹫Ϳ·ìáÇÃì¢Í§¤Ø³¤×Í¡ÒÃàÃÔèÁµé¹·Õè´ÕàÂÕèÂÁ㹡Ò÷ÓãËéµÑǤس»ÅÍ´ÀÑÂàÁ×èÍÍ͹äŹì
»¡»éͧ¤ÍÁ¾ÔÇàµÍÃì¢Í§¤Ø³´éÇ«Ϳ·ìáÇÃìÃÑ¡ÉÒ¤ÇÒÁ»ÅÍ´ÀÑÂ
«Í¿·ìáÇÃìÃÑ¡ÉÒ¤ÇÒÁ»ÅÍ´ÀÑ·ÕèÁÕÍÂÙèËÅÒ»ÃÐàÀ·¹Ñé¹à¾Õ§¾ÍÊÓËÃѺ¤ÇÒÁ»ÅÍ´ÀÑÂ㹡ÒÃÍ͹äÅ
¹ì¢Ñé¹¾×é¹°Ò¹ «Í¿·ìáÇÃìÃÑ¡ÉÒ¤ÇÒÁ»ÅÍ´ÀѹÑé¹ÁÕä¿ÃìÇÍÅÅìáÅÐâ»Ãá¡ÃÁ»éͧ¡Ñ¹äÇÃÑÊ
ä¿ÃìÇÍÅÅì¤×Í´èÒ¹áá¢Í§¤ÍÁ¾ÔÇàµÍÃì¢Í§¤Ø³ã¹¡Òûéͧ¡Ñ¹
´éÇ¡ÒäǺ¤ØÁÇèÒã¤ÃáÅÐÍÐä÷ÕèÊÒÁÒöÊ×èÍÊÒáѺ¤ÍÁ¾ÔÇàµÍÃì¢Í§¤Ø³ä´éàÁ×èͤÍÁ¾ÔÇàµÍÃì¢Í§¤Ø³
Í͹äÅ¹ì ¤Ø³ÍÒ¨Åͧ¹Ö¡¶Ö§ä¿ÃìÇÍÅÅì㹰ҹР“µÓÃǨ”

ÍÔ¹àµÍÃìà¹çµ - 57
·Õè¤Í¨ѺµÒ´Ù¢éÍÁÙÅ·Ñé§ËÁ´·Õè¾ÂÒÂÒÁ¨ÐäËÅà¢éÒáÅÐÍÍ¡¨Ò¡¤ÍÁ¾ÔÇàµÍÃì¢Í§¤Ø³ä»º¹ÍÔ¹àµÍÃìà¹çµ
͹Ø−Òµ¡ÒÃÊ×èÍÊÒ÷ÕèÃÙé¨Ñ¡ÇèÒÁÕ¤ÇÒÁ»ÅÍ´ÀÑÂáÅзӡÒúÅçͤ¡ÒÃÊ×èÍÊÒ÷Õè “äÁè´Õ” àªè¹
¡ÒÃâ¨ÁµÕ¨Ò¡ã¤Ã¡çµÒÁ·Õè¾ÂÒÂÒÁà¢éÒ¶Ö§¤ÍÁ¾ÔÇàµÍÃì¢Í§¤Ø³
¡Òûéͧ¡Ñ¹ã¹´èÒ¹¶Ñ´ÁÒ¤×Í«Í¿·ìáÇÃì»éͧ¡Ñ¹äÇÃÑʢͧ¤Ø³ ·Õè¤ÍµԴµÒÁ¡Ô¨¡ÃÃÁÍ͹äŹì·Ñé§ËÁ´
àªè¹ ¡ÒÃÃѺÊ觢éͤÇÒÁ·Ò§ÍÕàÁÅìáÅСÒÃàÃÕ¡´Ùà¹×éÍËÒ¢éÍÁÙÅàÇçº
áÅФÍ»¡»éͧ¤ÍÁ¾ÔÇàµÍÃìáµèÅÐà¤Ã×èͧ¨Ò¡äÇÃÑÊ àÇÔÃìÁ Trojan horse áÅÐâ»Ãá¡ÃÁÁÑÅáÇÃìÍ×è¹æ
«Í¿·ìáÇÃì»éͧ¡Ñ¹äÇÃÑÊáÅлéͧ¡Ñ¹Ê»ÒÂáÇÃì¢Í§¤Ø³¤ÇÃä´éÃѺ¡ÒûÃѺµÑ駤èÒà¾×èÍãËéÍѾവ´é
ǵÑÇàÍ
§ áÅФÇ÷ӡÒÃÍѾവ·Ø¡¤ÃÑ駷Õè¤Ø³àª×èÍÁµèÍÍÔ¹àµÍÃìà¹çµ
ªØ´«Í¿·ìáÇÃìÃÑ¡ÉÒ¤ÇÒÁ»ÅÍ´ÀÑ·ÕèµÔ´µÑé§ÁÒã¹µÑÇ àªè¹ Norton Internet Security
«Ö觻ÃСͺ´éÇÂä¿ÃìÇÍÅÅì ¡Òûéͧ¡Ñ¹äÇÃÑÊ ¡Òûéͧ¡Ñ¹Ê»ÒÂáÇÃì áÅФسÊÁºÑµÔÍ×è¹æ àªè¹
¡Òûéͧ¡Ñ¹Êá»ÁáÅÐ
¡ÒäǺ¤ØÁ¢Í§¼Ù黡¤Ãͧ¹Ñé¹ä´é¡ÅÒÂà»ç¹·Õè¹ÔÂÁ㹡ÒÃãªé§Ò¹à¹×èͧ¨Ò¡ÁÕ«Í¿·ìáÇÃìÃÑ¡ÉÒ¤ÇÒÁ»ÅÍ
´ÀÑ·Õè¨Óà»ç¹ÊÓËÃѺ¡Òû¡»éͧÍ͹äŹì·Ñé§ËÁ´ÍÂÙèã¹á¾ç¡à¡¨à´ÕÂÇ
¼Ù餹ÁÒ¡ÁÒ¾ºÇèÒ¡ÒÃãªéªØ´ÃÑ¡ÉÒ¤ÇÒÁ»ÅÍ´ÀѹÑé¹à»ç¹·Ò§àÅ×Í¡·Õè¹èÒʹ㨠à¹×èͧ¨Ò¡¡ÒõԴµÑé§
¡ÒáÓ˹´¤èÒáÅСÒÃÍѾവÁÕãËéàÅ×Í¡ËÅÒ¡ËÅÒµÒÁ»ÃÐàÀ·¢Í§ «Í¿·ìáÇÃì¤ÇÒÁ»ÅÍ´ÀÑÂ
àÇÍÃìªÑè¹·ÕèÊÁºÙóì¢Í§ Norton Internet Security
™ ¹Ñé¹ÁÕµÔ´µÑé§äÇéáÅéÇ㹤ÍÁ¾ÔÇàµÍÃì
Gateway ¢Í§¤Ø³ áÅÐÁÕ¡ÒÃÊÁѤÃà¾×èÍ·´Åͧãªé¿ÃÕÊÓËÃѺÍѾവ¡Òûéͧ¡Ñ¹µèÒ§æ
¤Ø³µéͧá¹èã¨ÇèÒä´éàÃÔèÁãªé§Ò¹áÅéÇ!
àÅ×Í¡ÃËÑʼèÒ¹·ÕèÁÕ¤ÇÒÁá¢ç§áçáÅÐà¡çºÃÑ¡ÉÒÍÂèÒ§»ÅÍ´ÀÑÂ
ÃËÑʼèÒ¹¤×ͤÇÒÁ¨ÃÔ§¢Í§ªÕÇÔµº¹ÍÔ¹àµÍÃìà¹çµã¹»Ñ¨¨ØºÑ¹
·ÕèàÃÒãªéÊÓËÃѺ·Ø¡ÍÂèÒ§µÑé§áµè¡ÒÃÊÑ觴͡äÁéáÅи¹Ò¤ÒÃÍ͹äŹì

58
仨¹¶Ö§¡ÒÃŧª×èÍà¢éÒãªéàÇçºä«µìÊÒ¡ÒúԹ·Õèª×蹪ͺà¾×èʹ٨ӹǹäÁÅì·ÕèÊÐÊÁ
à¤Åç´ÅѺ´éÒ¹ÅèÒ§ÊÒÁÒöªèÇÂãËé¤Ø³ä´éÃѺ»ÃÐʺ¡ÒóìÍ͹äŹì·Õè»ÅÍ´ÀÑÂ:
•¢Ñé¹áá¤×Í¡ÒÃàÅ×Í¡ÃËÑʼèÒ¹·ÕèäÁèÊÒÁÒö¤Ò´à´Òä´é§èÒÂ
áÅеèÍÁÒ¤×Í¡ÒÃà¡çºÃÑ¡ÉÒÃËÑʼèÒ¹ãËé»ÅÍ´ÀÑÂáÅÐËèÒ§ä¡Å¨Ò¡¼ÙéäÁè»ÃÐʧ¤ì´Õ
ÃËÑʼèÒ¹·Õèá¢ç§áç»ÃСͺ´éÇÂÃËÑʼèÒ¹·ÕèÁÕÍÑ¡¢ÃеÑé§áµèá»´µÑÇËÃ×ÍÁÒ¡¡ÇèÒ
áÅеéͧ»ÃСͺ´éǵÑÇÍÑ¡Éà µÑÇàÅ¢ áÅÐÊÑ−Åѡɳì (àªè¹ # $ % ! ?).
ËÅÕ¡àÅÕ觡ÒÃãªéÊÔè§àËÅèÒ¹Õéà»ç¹ÃËÑʼèÒ¹¢Í§¤Ø³: ª×èÍÅçÍ¡ÍÔ¹¢Í§¤Ø³
·Ø¡ÍÂèÒ§·ÕèÁÕ¾×é¹°Ò¹ÁÒ¨Ò¡¢é
ÍÁÙÅÊèǹµÑǢͧ¤Ø³ àªè¹ ¹ÒÁÊ¡ØÅ
áÅФӷÕèÊÒÁÒö¾ºä´é¨Ò¡¾¨¹Ò¹Ø¡ÃÁ â´Â੾ÒÐ "ÃËÑʼèÒ¹"
¾ÂÒÂÒÁàÅ×Í¡ÃËÑʼèÒ¹·ÕèÁÕ¤ÇÒÁá¢ç§áçà»ç¹¾ÔàÈÉáÅÐÁÕàÍ¡ÅѡɳìÊÓËÃѺ¡Òû¡»éͧ¡Ô¨¡ÃÃÁ·Õè
ÊÓ¤Ñ− àªè¹ ¸¹Ò¤ÒÃÍ͹äŹì
•à¡çºÃËÑʼèÒ¹¢Í§¤Ø³ã¹·Õèæ
»ÅÍ´ÀÑÂáÅÐËéÒÁãªéÃËÑʼèÒ¹à´ÔÁÊÓËÃѺºÃÔ¡Ò÷Ñé§ËÁ´·Õè¤Ø³ãªéÍ͹äŹì
•à»ÅÕè¹ÃËÑʼèÒ¹ÍÂÙèàÊÁÍ ÍÂèÒ§¹éÍ·ءæ 90 Çѹ
¡ÒáÃзӴѧ¢éÒ§µé¹ÊÒÁÒö¨Ó¡Ñ´¤ÇÒÁàÊÕÂËÒ·Õèà¡Ô´¨Ò¡ã¤ÃºÒ§¤¹·ÕèÊÒÁÒöà¢éÒ¶Ö§ºÑ−ªÕ¼Ùéãªé
¢Í§¤Ø³ä´é ËÒ¡¤Ø³ÊѧࡵÇèÒÁÕºÒ§ÊÔ觹èÒʧÊÑÂà¡ÕèÂǡѺºÑ−ªÕ¼ÙéãªéÍ͹äŹì¢Í§¤Ø³
ÊÔè§áá·Õ
è¤Ø³ÊÒÁÒö·Óä´é¤×Í¡ÒÃà»ÅÕè¹ÃËÑʼèÒ¹¢Í§¤Ø³
»¡»éͧ¢éÍÁÙÅÊèǹµÑǢͧ¤Ø³
ãªé¤ÇÒÁÃÐÁÑ´ÃÐÇѧàÁ×èÍ·Ó¡ÒÃáºè§»Ñ¹¢éÍÁÙÅÊèǹµÑÇ àªè¹ ª×èÍ ·ÕèÍÂÙè ËÁÒÂàÅ¢â·ÃÈѾ·ì
áÅзÕèÍÂÙèÍÕàÁÅì¢Í§¤Ø³Í͹äŹì à¾×èÍÃѺ»ÃÐ⪹ì¨Ò¡ºÃÔ¡ÒÃÍ͹äŹì·ÕèÁÕãËéÁÒ¡ÁÒÂ
¤Ø³¨Ö§ËÅÕ¡àÅÕè§äÁèä´é·Õè¨ÐµéͧÁͺ¢éÍÁÙÅÊèǹµÑÇà¾×èͨѴ¡ÒáѺ¤èÒãªé¨èÒÂáÅСÒèѴÊè§ÊÓËÃѺÊÔ¹¤éÒ·Õè

ÍÔ¹àµÍÃìà¹çµ - 59
«×éÍ à¹×èͧ¨Ò¡¡ÒÃäÁèà»Ô´à¼Â¤ÇÒÁÅѺ¢Í§¢éÍÁÙÅÊèǹµÑǹÑé¹ÊÒÁÒö·Óä´éÂÒ¡
ÃÒ¡ÒôéÒ¹ÅèÒ§¤×ͤÓá¹Ð¹ÓÊÓËÃѺÇÔ¸Õ¡ÒÃáºè§»Ñ¹¢éÍÁÙÅÊèǹµÑǺ¹âÅ¡Í͹äŹìä´éÍÂèÒ§»ÅÍ´ÀÑÂ:
• ÃÐÁÑ´ÃÐÇѧ¢éͤÇÒÁÍÕàÁÅì·ÕèËÅÍ¡ÅǧËÃ×ÍáͺÍéÒ§
ÊÔ觷ÕèÃкØÇèÒ¢éͤÇÒÁ¹Ñé¹ÍÒ¨à»ç¹¡ÒÃËÅÍ¡Åǧä´éá¡è ¡ÒÃÊС´¤Ó¼Ô´ ãªéäÇÂҡóìäÁè¶Ù¡µéͧ
ãªéÇÅÕäÁè¶Ù¡µéͧ ·ÕèÍÂÙèàÇçºä«µìÁÕÊèǹ¢ÂÒ·Õèá»Å¡ÍÍ¡ä»
·ÕèÍÂÙèàÇçºä«µìà»ç¹µÑÇàÅ¢·Ñé§ËÁ´«Öè§â´Â»¡µÔáÅéǵéͧà»ç¹¤Ó áÅÐÊÔè§Í×è¹æ ·Õè¼Ô´»¡µÔ ¹Í¡¨Ò¡¹Õé
¢éͤÇÒÁ¨Ò¡àÇçºä«µìÅǧÁÑ¡¨ÐºÍ¡ãËé¤Ø³ÃÕºÃÑ¡ÉÒºÑ−ªÕ¼Ùéãªé
¢Í§¤Ø³ ÍѾവ¤ÇÒÁ»ÅÍ´ÀÑÂ
ËÃ×Í¡ÃеØé¹ãËé¤Ø³Áͺ¢éÍÁÙÅâ´Â´èǹËÒ¡ÁÔàªè¹¹Ñ鹨ÐÁÕÊÔ觷ÕèàÅÇÃéÒÂà¡Ô´¢Öé¹ ÍÂèÒµ¡à»ç¹àËÂ×èÍ
• ËéÒÁµÍºÃѺ¢éͤÇÒÁÍÕàÁÅì·ÕèÃéͧ¢Í¢éÍÁÙÅÊèǹµÑÇ
ºÃÔÉÑ··Õè¶Ù¡µéͧµÒÁ¡®ËÁÒ¨ÐäÁèãªé¢éͤÇÒÁÍÕàÁÅì㹡ÒÃÃéͧ¢Í¢éÍÁÙÅÊèǹµÑǢͧ¤Ø³
ËÒ¡ÁÕ¢éÍʧÊÑ ãËéµÔ´µèͺÃÔÉÑ·¹Ñé¹æ ·Ò§â·ÃÈѾ·ì
ËÃ×Íâ´Â¡ÒþÔÁ¾ì·ÕèÍÂÙèàÇçºä«µì¢Í§ºÃÔÉÑ·ã¹àÇ纺ÃÒÇà«ÍÃì¢Í§¤Ø³
ËéÒÁ¤ÅÔ¡·ÕèÅÔ§¤ìã¹¢éͤÇÒÁàËÅèÒ¹Ñé¹ à¹×èͧ¨Ò¡ÅÔ§¤ì¨Ð¹Ó¤Ø³ä»ÂѧàÇçºä«µìËÅÍ¡Åǧ·Õè»ÃÐʧ¤ìÃéÒÂ
• ÍÂ
ÙèãËéËèÒ§¨Ò¡àÇçºä«µìÅèÍÅǧ·Õè¨éͧ¨Ð¢âÁ¢éÍÁÙÅÊèǹµÑÇ àÁ×èÍà¢éÒªÁàÇçºä«µì
ãËé¾ÔÁ¾ì·ÕèÍÂÙèàÇçº (URL) â´ÂµÃ§ã¹àÇ纺ÃÒÇà«ÍÃìá·¹¡ÒäÅÔ¡·ÕèÅÔ§¤ìã¹ÍÕàÁÅìËÃ×Í¢éͤÇÒÁ´èǹ
¹Ñ¡µéÁµØë¹ÁÑ¡¨Ð»ÅÍÁá»Å§ÅÔ§¤ìàËÅèÒ¹Õéà¾×èÍ·ÓãËé´Ù¹èÒàª×èͶ×Í
¡ÒÃàÅ×Í¡«×éÍ ¡Ò÷ӸØáÃÃÁ·Ò§¸¹Ò¤Òà ËÃ×͡ѺàÇçºä«µìÍ×è¹æ
·Õè¨Óà»ç¹µéͧãªé¢éÍÁÙÅ·ÕèÁÕ¤ÇÒÁÍè͹äËǨеéͧÁÕµÑÇÍÑ¡Éà "S" µÒÁËÅѧ "http"
(àªè¹ https://www.yourbank.com äÁèãªè http://www.yourbank.com) µÑÇÍÑ¡Éà "S"
ËÁÒ¶֧¤ÇÒÁ»ÅÍ´ÀÑ (Secure) áÅФÇÃÁÕáÊ´§ÍÂÙèàÁ×èͤسÍÂÙèã¹¾×é¹·Õè·Õèµéͧ¡ÒÃ
ãËé¤Ø³Å§ª×èÍà¢é
ÒãªéËÃ×ÍÁͺ¢éÍÁÙÅ·ÕèÁÕ¤ÇÒÁÍè͹äËÇÍ×è¹æ ÊÑ−ÅѡɳìÍ×è¹æ

60
·ÕèáÊ´§ÇèҤسÁÕ¡ÒÃàª×èÍÁµèÍ·Õè»ÅÍ´ÀѤ×Íäͤ͹¡Ø−ᨢ¹Ò´àÅç¡·Ò§´éÒ¹ÅèÒ§¢Í§àÇ纺ÃÒÇà«ÍÃì
(â´Â·ÑèÇ仨ÐÍÂÙèÁØÁÅèÒ§¢ÇÒ)
• ãËé¤ÇÒÁʹ㨡Ѻ¹âºÒ¤ÇÒÁà»ç¹ÊèǹµÑǺ¹àÇçºä«µìáÅЫͿ·ìáÇÃìµèÒ§æ
¶×Íà»ç¹ÊÔè§ÊÓ¤Ñ−㹡Ò÷ӤÇÒÁà¢éÒã¨ÇÔ¸Õ·Õèͧ¤ì¡ÃµèÒ§æ
ÍÒ¨à¡çºÃǺÃÇÁáÅÐãªé¢éÍÁÙÅÊèǹµÑǢͧ¤Ø³¡è͹·Õè¤Ø³¨Ðà¢éÒÃèÇÁãªé§Ò¹
• »¡»éͧ·ÕèÍÂÙèÍÕàÁÅì¢Í§¤Ø³ Spammer áÅÐ "Phishers"
㹺ҧ¤ÃÑ駨ÐÊ觢éͤÇÒÁËÅÒÂÅéÒ¹¢éͤÇÒÁä»Âѧ·ÕèÍÂÙèÍÕàÁÅì·ÕèÍÒ¨ÁÕËÃ×ÍäÁèÁÕÍÂÙè¨ÃÔ§â´ÂËÇѧÇèÒ¨Ðà
¨Í¼Ùé·ÕèËŧà»ç¹àËÂ×èÍ ¡Òõͺ¡ÅѺ¢éͤÇÒÁàËÅèÒ¹ÕéËÃ×ÍáÁé
áµè´ÒǹìâËÅ´
ÀÒ¾·ÓãËéá¹èã¨ä´éÇèҤسä´é¶Ù¡ÃÇÁà¢éÒã¹ÃÒª×èͧ͢¾Ç¡à¢ÒÊÓËÃѺ¡ÒÃÊ觢éͤÇÒÁã¹ÅѡɳÐà´Õ
Âǡѹ¹ÕéÍÕ¡ã¹Í¹Ò¤µ áÅФÇÃÃÐÁÑ´ÃÐÇѧàÁ×èÍ·Ó¡ÒûÃСÒÈ·Õè
ÍÂÙèÍÕàÁÅì¢Í§¤Ø³Í͹äŹì㹡ÅØèÁ¢èÒÇ ºÅçÍ¡ ËÃ×ÍÊѧ¤ÁÍ͹äŹìµèÒ§æ
Êѧ¤ÁÍ͹äŹìÁÑ¡¨ÐãËéÀÒ¾Åѡɳì·Õè´Ù´Õ¡ÇèÒ¤ÇÒÁà»ç¹¨ÃÔ§àÊÁÍ
´Ñ§àªè¹¤ÓâºÃÒ³·ÕèÇèÒ “äÁèÁբͧ¿ÃÕã¹âÅ¡” ·ÕèÂѧ¤§à»ç¹¨ÃÔ§áÁé㹻Ѩ¨ØºÑ¹ «Í¿·ìáÇÃì·Õè¤Ò´ÇèÒ¹èÒ¨ÐãËé
“¿ÃÕ” àªè¹ ÀÒ¾¾Ñ¡Ë¹éÒ¨ÍËÃ×ÍÊäÁÅÕè (Smiley) ¡ÒÃÅèÍËÅÍ¡ãËéŧ·Ø¹ÍÂèÒ§ÅѺæ
â´ÂÍéÒ§ÇèÒÊÒÁÒöà»ÅÕè¹͹Ҥµ¢Í§¤Ø³ä´éÍÂèÒ§ÁÒ¡ÁÒÂ
áÅСÒÃá¢è§¢Ñ¹·Õè¤Ø³¡ÅÒÂà»ç¹¼Ù骹Ðä´éâ´Â·ÕèäÁèä´éà¢éÒÃèÇÁ àËÅèÒ¹Õé¤×Í¡ÒÃÅèÍÅǧ¨Ò¡ºÃÔÉÑ·µèÒ§æ
à¾×èÍ´Ö§´Ù´¤ÇÒÁʹ㨢ͧ¤Ø³
ËÒ¡¤Ø³äÁèä´é¨èÒÂà§Ô¹â´ÂµÃ§ãËé¡Ñº«Í¿·ìáÇÃìËÃ×ͺÃÔ¡ÒÃ
«Í¿·ìáÇÃìËÃ×ͺÃÔ¡ÒÿÃÕ·Õè¤Ø³Ãéͧ¢ÍÍÒ¨ÁÕ«Í¿áÇÃìâ¦É³Ò (“áÍ´áÇÃì”) ÃÇÁÍÂÙè´éÇÂ
«Ö觫Ϳ·ìáÇÃì¹Õé¨ÐµÔ´µÒÁ¾ÄµÔ¡ÃÃÁ¢Í§¤Ø³áÅÐáÊ´§â¦É³Ò·Õ
èäÁè¾Ö§»ÃÐʧ¤ì
¤Ø³ÍÒ¨µéͧà»Ô´à¼Â¢éÍÁÙÅÊèǹµÑÇËÃ×Í«×éͺҧÍÂèÒ§à¾×èÍÍéÒ§ÊÔ·¸Ôì㹡ÒÃÁÕâÍ¡ÒÊà»ç¹¼Ù骹СÒÃá¢è§¢Ñ¹

ÍÔ¹àµÍÃìà¹çµ - 61
ËÒ¡¢éÍàʹ͹Ñé¹´Ù´Õà¡Ô¹¡ÇèÒ¨Ðàª×èͶ×Í ãËéÅͧ¶ÒÁ¤ÇÒÁ¤Ô´àË繨ҡ¤¹Í×è¹æ ÍèÒ¹àÍ¡ÊÒéºÑº¾ÔÁ¾ì
ËÃ×Í´Õ·ÕèÊØ´¤×Í¡ÒÃà¾Ô¡à©ÂàÊÕÂ
µÃǨÊͺÃÒ¡ÒÃà´Ô¹ºÑ−ªÕ¸¹Ò¤ÒÃáÅкѵÃà¤Ã´ÔµÍÂÙèàÊÁÍ
¼Å¡Ãзº¨Ò¡¡ÒÃâ¨Ã¡ÃÃÁÍѵÅѡɳìáÅÐÍÒª−Ò¡ÃÃÁÍ͹äŹìÊÒÁÒöŴŧä´éÍÂèÒ§ÁÒ¡ËÒ¡¤Ø³Ê
ÒÁÒöµÃǨ¨Ñºä´é·Ñ¹·ÕËÅѧ¨Ò¡·Õè¢éÍÁÙŢͧ¤Ø³¶Ù¡¢âÁ ËÃ×ÍàÁ×èÍÁÕ¡ÒþÂÒÂÒÁà¢éÒãªé¢éÍÁÙŢͧ¤Ø³
˹Öè§ã¹ÇÔ¸Õ·Õè§èÒ·ÕèÊش㹡ÒõÃǨÊͺÊÔ觼Դ»¡µÔ¤×Í¡ÒõÃǨÊͺÃÒ¡ÒÃà´Ô¹ºÑ−ªÕ¢Í§¸¹Ò¤ÒÃáÅкÑ
µÃà¤Ã´Ôµ¢Í§¤Ø³à»ç¹»ÃШӷءà´×͹
¹Í¡¨Ò¡¹Õé ¸¹Ò¤ÒÃáÅкÃÔ¡ÒõèÒ§æ
ãªéÃкº·Õè»éͧ¡Ñ¹¡ÒééÍ⡧·Õè¨Ð¡àÅÔ¡¾ÄµÔ¡ÃÃÁ¡Òë×éÍ·ÕèäÁ軡µÔ
(àªè¹ ËÒ¡¤Ø³ÍÒÈÑÂÍÂÙèã¹à·ç¡«ÑÊáÅÐà¡Ô´¡Òë×é͵ÙéàÂç¹ËÅÒÂà¤Ã×èͧæ 㹺ٴÒà»Êµì)
à¾×èÍÂ×¹Âѹ¡Òë×éÍ·ÕèäÁ軡µÔàËÅèÒ¹Õé ¸¹Ò¤ÒÃËÃ×ͼÙéãËéºÃÔ¡ÒÃÍÒ¨â·ÃÈѾ·ìËҤسáÅжÒÁà¾×
èÍÂ×¹Âѹ
ÍÂèÒ¶×ÍÇèÒ¡ÒÃÊͺ¶ÒÁàªè¹¹Õé¤×ÍàÃ×èͧ¸ÃÃÁ´Ò ¹ÕèÍÒ¨à»ç¹¡Òú觪ÕéÇèÒÁÕÍÂèÒ§ÍÂèÒ§·ÕèäÁè´Õä´éà¡Ô´¢Öé¹
áÅФس¤ÇÃãËé¤ÇÒÁʹã¨ÍÂèÒ§¨ÃÔ§¨Ñ§
»¡»éͧ¤ÍÁ¾ÔÇàµÍÃì¢Í§¤Ø³´éÇÂà¤Ã×èͧÁ×ÍÃÑ¡ÉÒ¤ÇÒÁ»ÅÍ´ÀÑ¢ͧ Windows
Windows Áͺá;¾ÅÔपÑè¹ÃÑ¡ÉÒ¤ÇÒÁ»ÅÍ´ÀÑ·ÕèËÅÒ¡ËÅÒÂ
Windows Updates
ËÒ¡¤Ø³àª×èÍÁµèÍÍÔ¹àµÍÃìà¹çµ Windows
¨ÐÊÒÁÒöµÃǨÊͺÍѾവ·ÕèÊÓ¤Ñ−ÊÓËÃѺ¤ÍÁ¾ÔÇàµÍÃì¢Í§¤Ø³áÅеԴµÑé§â´ÂÍѵâ¹ÁѵÔ

62
ÍѾവàËÅèÒ¹Õé»ÃСͺ´éÇÂá¾·ªì¡ÒÃÃÑ¡ÉÒ¤ÇÒÁ»ÅÍ´ÀÑÂáÅÐâ»Ãá¡ÃÁÍѾവ·ÕèÊÒÁÒö»ÃѺ»Ãا¡
ÒÃãªé§Ò¹¤ÍÁ¾ÔÇàµÍÃì¢Í§¤Ø³áÅЪèÇ»¡»éͧ¤ÍÁ¾ÔÇàµÍÃì¢Í§¤Ø³¨Ò¡äÇÃÑÊáÅСÒÃâ¨ÁµÕãËÁèæ
¨ÐÃÙéä´éÍÂèÒ§äÃÇèÒ¤ÍÁ¾ÔÇàµÍÃì¢Í§©Ñ¹ÁÕ¤ÇÒÁàÊÕè§?
àÁ×èÍ Action Center ÃÒ§ҹ¡ÒÃá¨é§àµ×͹ ËÃ×ͤÍÁ¾ÔÇàµÍÃì¢Í§¤Ø³·Ó§Ò¹ä´éÍÂèÒ§äÁèÊÁèÓàÊÁÍ
¢Ñ´¢éͧâ´ÂäÁèÁÕÊÒà赯 ËÃ×ͺҧâ»Ãá¡ÃÁ·Ó§Ò¹äÁè¶Ù¡µéͧ
ÊÔè§àËÅèÒ¹Õéºè§ºÍ¡ÇèÒ¤ÍÁ¾ÔÇàµÍÃì¢Í§¤Ø³ÍÒ¨µÔ´ÁÑÅáÇÃì ÍÂèÒ§äáçµÒÁ
»Ñ−ËÒ¤ÍÁ¾ÔÇàµÍÃì·Ñé§ËÁ´äÁèä´éÁÒ¨Ò¡äÇÃÑÊ! ËÒ¡¤Ø³Ê§ÊÑÂÇèÒ¤ÍÁ¾ÔÇàµÍÃì¢Í§¤Ø³µÔ´äÇÃÑÊ
ÊÔè§áá·Õè¤Ç÷Ӥ×ÍÍѾവ㹡óշÕèÂѧäÁèä´éÍѾവ
¨Ò¡¹Ñé¹ãËéÃѹ«Í¿·ìáÇÃì»éͧ¡Ñ¹äÇÃÑÊáÅлéͧ¡Ñ¹Ê»ÒÂáÇÃì

¡ÒÃàÃÕ¡¤×¹ - 63
¡ÒÃàÃÕ¡¤×¹
ËÒ¡¤Ø³ÁÕ»Ñ−ËҡѺ¤ÍÁ¾ÔÇàµÍÃìÁÕ»Ñ−ËÒ áÅФӶÒÁ·Õè¶Ù¡¶ÒÁºèÍ äÁèÊÒÁÒöªèÇÂä´é
¤Ø³ÊÒÁÒöàÃÕ¡¤×¹¤ÍÁ¾ÔÇàµÍÃì¢Í§¤Ø³ – à¾×èÍãËé¡ÅѺÊÙèʶҹзÕèà¤Âà»ç¹¡è͹˹éÒä´é
ËÑÇ¢é͹Õé͸ԺÒ¶֧à¤Ã×èͧÁ×Í㹡ÒÃàÃÕ¡¤×¹·ÕèÁÕãË麹¤ÍÁ¾ÔÇàµÍÃì¢Í§¤Ø³ Gateway ·ÕèÁÕãËé Gateway
Recovery Management ͹Ø−ÒµãËé¤Ø³ÊÃéÒ§ ¡ÒÃÊÓÃͧ¢éÍÁÙÅÊÓËÃѺàÃÕ¡¤×¹,
¡ÒÃÊÓÃͧ¢éÍÁÙÅä´ÃìàÇÍÃìáÅÐá;¾ÅÔपÑè¹, áÅÐà¾×èÍ´ÙµÑÇàÅ×Í¡¡ÒÃàÃÕ¡¤×¹ â´Âãªéà¤Ã×èͧÁ×ͧ͢
Windows ËÃ×Í¡ÒÃÊÓÃͧ¢éÍÁÙÅÊÓËÃѺ¡ÒÃàÃÕ¡¤×¹
ËÁÒÂà˵Ø: Gateway Recovery Management ÊÒÁÒöãªé§Ò¹ä´é¡ÑºÃкº»¯ÔºÑµÔ¡ÒÃ
Windows ·
ÕèµÔ´µÑé§äÇé¡è͹˹éÒ
ÊÔè§ÊÓ¤Ñ−: àÃÒ¢Íá¹Ð¹ÓãËé¤Ø³ÊÃéÒ§ ¡ÒÃÊÓÃͧ¢éÍÁÙÅÊÓËÃѺàÃÕ¡¤×¹ áÅÐ
¡ÒÃÊÓÃͧ¢éÍÁÙÅä´ÃìàÇÍÃìáÅÐá;¾ÅÔपÑè¹ ãËéàÃçÇ·ÕèÊØ´à·èÒ·Õèà»ç¹ä»ä´é
㹺ҧʶҹ¡ÒÃ³ì ¡ÒáÙé¤×¹àµçÁÃٻẺÍÒ¨¨Óà»ç¹µéͧãªé¡ÒÃÊÓÃͧ
¢éÍÁÙÅÊÓËÃѺ¡Ùé¤×¹´éÇ USB
¡ÒÃÊÃÉÒ§¡ÒÃÊÓÃͧ¢ÉÍÁÙÅÀÃÕ¡¤×¹
à¾×è͵ԴµÑé§ãËÁèâ´Âãªé¡ÒÃÊÓÃͧ¢éÍÁÙÅŧã¹ä´Ãì¿ USB ¤Ø³µéͧ¨Ñ´·Ó¢éÍÁÙÅÊÓÃͧàÃÕ¡¤×¹¡è͹
¢éÍÁÙÅÊÓÃͧàÃÕ¡¤×¹»ÃСͺ仴éÇ¢éÍÁÙÅà´ÔÁ·Ñé§ËÁ´º¹ÎÒÃì´ä´Ã쿢ͧ¤ÍÁ¾ÔÇàµÍÃì¤Ø³ ÃÇÁ¶Ö§
Windows áÅЫͿ·ìáÇÃìáÅÐä´ÃìàÇÍÃì·ÕèâËÅ´ÁÒ¨Ò¡âç§Ò¹ ¡ÒÃãªé¢éÍÁÙÅÊÓÃͧ¹Õéà»ç¹¡ÒÃ
àÃÕ¡¤×¹Ãкºä»ÂѧʶҹÐà´ÔÁ ³ àÇÅÒ·Õè¤Ø³«×éÍ áÅÐÂѧÁÕµÑÇàÅ×͡㹡Òè´¨Ó¡ÒõÑé§
¤èÒáÅТéÍÁÙÅÊèǹµÑÇ·Ñé§ËÁ´ÊÓËÃѺ¡ÒáÙé¤×¹

64
ËÁÒÂà˵Ø:
µÃǨÊͺãËéá¹èã¨ÇèҤسÁÕä´Ãì¿ USB ·ÕèÁÕ¤ÇÒÁ¨ØÍÂèÒ§¹éÍ 16 GB
1. ¨Ò¡ àÃÔèÁ, ¾ÔÁ¾ì 'Recovery' áÅéǤÅÔ¡ Gateway Recovery Management ã¹ÃÒ¡ÒÃá;¾ÅÔपÑè¹
2. ¤ÅÔ¡ Create Factory Default Backup ˹éÒµèÒ§ Recovery Drive ¨Ð¶Ù¡à»Ô´¢Öé¹

¡ÒÃàÃÕ¡¤×¹ - 65
µÃǨÊͺãËéá¹èã¨ÇèÒä´éàÅ×Í¡ Copy contents from the recovery partition to the recovery drive
áÅéÇ µÑÇàÅ×Í¡¹Õéà»ç¹¡ÒÃÊÓÃͧ¢éÍÁÙÅàÃÕ¡¤×¹·ÕèÊÁºÙóìẺáÅлÅÍ´ÀÑ·ÕèÊØ´
3. àÊÕºä´Ãì¿ USB áÅéǤÅÔ¡ Next
•µÃǨÊͺãËéá¹èã¨ÇèÒä´Ãì¿ USB ¢Í§¤Ø³ÁÕ¾×é¹·ÕèÇèÒ§¾Í¡è͹´Óà¹Ô¹¡ÒõèÍ
¢éÍÁÙÅÊÓÃͧàÃÕ¡¤×¹¹Õéµéͧãªé¾×é¹·Õèà¡çº¢éÍÁÙÅÍÂèÒ§¹éÍ 16 GB
4. ¤Ø³¨Ð¾ºË¹éҨͤÇÒÁ¤×ºË¹éÒ㹡ÒÃÊÓÃͧ¢éÍÁÙÅ»ÃÒ¡¯¢Öé¹
5. ·ÓµÒÁ¡Ãкǹ¡Ò蹡ÃзÑè§àÊÃç¨ÊÔé¹

66
6. ËÅѧ¡ÒÃÊÃéÒ§¢éÍÁÙÅÊÓÃͧàÃÕ¡¤×¹
¤Ø³ÊÒÁÒöàÅ×Í¡à¾×èÍź¢éÍÁÙÅ¡ÒÃàÃÕ¡¤×¹¹Õ麹¤ÍÁ¾ÔÇàµÍÃì¢Í§¤Ø³ä´é ËÒ¡¤Ø³Åº¢éÍÁÙŹÕé
¤Ø³¨ÐÊÒÁÒöãªé੾ÒТéÍÁÙÅÊÓÃͧàÃÕ¡¤×¹¹Õéà¾×èÍàÃÕ¡¤×¹¤ÍÁ¾ÔÇàµÍÃì ËÒ¡¤Ø³ÅºËÃ×Í·Óä´Ãì¿
USB ¹ÕéÊÙ−ËÒ ¤Ø³¨ÐäÁèÊÒÁÒö¡Ùé¤ÍÁ¾ÔÇàµÍÃì¢Í§¤Ø³ä´é
7. ¶Í´ä´Ãì¿ USB áÅзөÅÒ¡µÔ´ãËéªÑ´à¨¹
ÊÔè§ÊÓ¤Ñ−: à¢Õ¹©ÅÒ¡ãËéÁÕàÍ¡Åѡɳì áÅÐÁÕÃÒÂÅÐàÍÕ´¢Í§¡ÒÃÊÓÃͧ¢éÍÁÙÅãËé¤Ãº
àªè¹ 'Windows Recovery Backup' µÃǨÊͺãËéá¹èã¨ÇèҤسà¡çº¢éÍÁÙÅÊÓÃͧ
äÇéã¹·Õè»ÅÍ´ÀÑ«Ö觤س¨ÐÊÒÁÒö¨Óä´é
¡ÒÃÊÃÉÒ§ÊÓÃͧ¢ÉÍÁÙÅÄ´ÃÌÀÇÍÃÌÁÅÐÁ;¾ÅÔÀ¤ªÑȹ
à¾×èÍÊÃéÒ§ÊÓÃͧ¢éÍÁÙÅä´ÃìàÇÍÃìáÅÐá;¾ÅÔपÑè¹ ·Õè»ÃСͺ仴éÇÂ
«Í¿·ìáÇÃìáÅÐä´ÃìàÇÍÃì·ÕèâËÅ´ÁÒ¨Ò¡âç§Ò¹·Õè¨Óà»ç¹¡Ñºà¤Ã×èͧ¤ÍÁ¾ÔÇàµÍÃì¢Í§¤Ø³

¡ÒÃàÃÕ¡¤×¹ - 67
¤Ø³ÊÒÁÒöãªé·Ñé§ä´Ãì¿ USB ËÃ×ÍËÒ¡¤ÍÁ¾ÔÇàµÍÃì¢Í§¤Ø³ÁÕà¤Ã×èͧºÑ¹·Ö¡ DVD ÊÒÁÒöãªéá¼è¹
DVD à»ÅèÒ˹Öè§á¼è¹ËÃ×ÍÁÒ¡¡ÇèÒä´é
1. ¨Ò¡ àÃÔèÁ, ¾ÔÁ¾ì 'Recovery' áÅéǤÅÔ¡ Gateway Recovery Management ã¹ÃÒ¡ÒÃá;¾ÅÔपÑè¹
2. ¤ÅÔ¡ Create Drivers and Applications Backup
àÊÕº´ÔÊ¡ì USB ËÃ×Íá¼è¹à»ÅèÒà¢éÒä»ã¹ä´Ãì¿ DVD áÅéǤÅÔ¡ Next

68
•ËÒ¡¤Ø³ãªé§Ò¹ä´Ãì¿ USB
ãËéµÃǨÊͺãËéá¹èã¨ÇèÒ´ÔÊ¡ì¹Ñé¹ÁÕ¢¹Ò´¤ÇÒÁ¨Ø·Õèà¾Õ§¾Í¡è͹·Õè¨Ð´Óà¹Ô¹¡ÒõèÍä».
•ËÒ¡¤Ø³ãªéá¼è¹ DVD ˹éÒµèÒ§¨ÐáÊ´§¨Ó¹Ç¹¢Í§á¼è¹´ÔÊ¡ìà»ÅèÒ·Õèµéͧãªé㹡Òúѹ·Ö¡à¾×èÍ
ãËé¡ÒÃÊÃéÒ§´ÔÊ¡ì¢éÍÁÙÅÊÓÃͧàÊÃç¨ÊÁºÙÃ³ì µÃǨãËéá¹èã¨ÇèҤسÁÕá¼è¹à»ÅèÒª¹Ô´
à´ÕÂǡѹµÒÁ¨Ó¹Ç¹·Õèµéͧ¡ÒÃ

¡ÒÃàÃÕ¡¤×¹ - 69
3. ¤ÅÔ¡ Start à¾×èͤѴÅÍ¡ä¿Åì ¤Ø³ä´é¾º¤ÇÒÁ¤×ºË¹éÒ㹡ÒÃÊÓÃͧ¢éÍÁÙź¹Ë¹éÒ¨Í
4. ·ÓµÒÁ¡Ãкǹ¡Ò蹡ÃзÑè§àÊÃç¨ÊÔé¹:
•ËÒ¡¤Ø³ãªé´ÔÊ¡ìÍ;µÔ¤ÍÅä´Ã쿨Ðà»Ô´ÍÍ¡ËÅѧ¨Ò¡·ÕèàÊÃç¨ÊÔ鹡ÒÃàºÔÃì¹´ÔÊ¡ìáµèÅÐá¼è¹
àÍÒá¼è¹´ÔÊ¡ìÍÍ¡¨Ò¡ä´Ãì¿áÅзÓà¤Ã×èͧËÁÒº¹´ÔÊ¡ì´éÇ»ҡ¡Òà¤ÁÕËÁÖ¡¶ÒÇÃ
ËÒ¡µéͧãªé´ÔÊ¡ìËÅÒÂá¼è¹ ãËéãÊè´ÔÊ¡ìá¼è¹ãËÁèà¢éÒä»àÁ×èÍä´éÃѺ¡ÒÃá¨é§ ¨Ò¡¹Ñ鹤ÅÔ¡ OK
´Óà¹Ô¹¡ÒõèÍ仨¹¡ÇèÒ¡Ãкǹ¡ÒèÐàÊÃç¨ÊÔé¹
•ËÒ¡¤Ø³ãªéä´Ãì¿ USB ãËé¶Í´ä´Ãì¿ÍÍ¡áÅеԴ©ÅÒ¡ãËéªÑ´à¨¹
ÊÔè§ÊÓ¤Ñ−: à¢Õ¹©ÅÒ¡ãËéÁÕàÍ¡Åѡɳì áÅÐÁÕÃÒÂÅÐàÍÕ´¢Í§¡ÒÃÊÓÃͧ¢éÍÁÙÅãËé¤Ãº
àªè¹ 'Drivers and Applications Backup' µÃǨÊͺãËéá¹èã¨Çè
Ҥسà¡çº¢éÍÁÙÅÊÓÃͧ
äÇéã¹·Õè»ÅÍ´ÀÑ«Ö觤س¨ÐÊÒÁÒö¨Óä´é
¡ÒÃÀÃÕ¡¤×¹¤ÈÒÃкº¢Í§¤Ø³
ÇÔ¸ÕàÃÕ¡¤×¹¤èÒÃкº¢Í§¤Ø³:
1. ·Ó¡ÒëèÍÁá«ÁàÅç¡æ ¹éÍÂæ
ËÒ¡ÁÕ«Í¿·ìáÇÃìËÃ×ÍÎÒÃì´áÇÃìà¾Õ§˹Öè§ËÃ×ÍÊͧµÑÇ·Ó§Ò¹äÁè¶Ù¡µéͧ
ÍÒ¨á¡é䢻Ñ−ËÒä´éâ´Â¡ÒõԴµÑ駫Ϳ·ìáÇÃìËÃ×Íä´ÃìàÇÍÃìÍØ»¡Ã³ìãËÁè
à¾×è͵ԴµÑ駫ͿµìáÇÃìáÅÐä´ÃìàÇÍÃì·Õèä´éÃѺ¡ÒõԴµÑé§Åèǧ˹éÒ¨Ò¡âç§Ò¹«éÓ â»Ã´´Ù
"¡ÒõԴµÑé§ä´ÃìàÇÍÃìËÃ×Íá;¾ÅÔपÑè¹ãËÁè«éÓ" ã¹Ë¹éÒ 70
ÊÓËÃѺ¤Óá¹Ð¹Ó㹡ÒõԴµÑ駫Ϳ·ìáÇÃìáÅÐä´ÃìàÇÍÃì·ÕèäÁèä´éµÔ´µÑé§ÁҡѺà¤Ã×èͧ
´ÙàÍ¡ÊÒÃÊÓËÃѺ¼ÅÔµÀѳ±ì¹Ñé¹æ ËÃ×ÍàÇçºä«µì¡ÒÃʹѺʹع
2. ¡ÒÃÂé͹¡ÅѺä»ÂѧʶҹÐÃкº¡è
͹˹éÒ¹Õé
ËÒ¡¡ÒõԴµÑ駫Ϳ·ìáÇÃìáÅÐä´ÃìàÇÍÃìãËÁèäÁèÊÒÁÒöªèÇÂä´é

70
ÍÒ¨ÊÒÁÒöá¡é»Ñ−ËÒä´éâ´Â¡Òä׹ʶҹÐÃкº¢Í§¤Ø³¡ÅѺä»à»ç¹Ê¶Ò¹Ð¡è͹˹éÒ¹Õé
ã¹¢³Ð·ÕèÂѧ·Ó§Ò¹ä´éÍÂèÒ§¶Ù¡µéͧ
ÊÓËÃѺ¤Óá¹Ð¹Ó â»Ã´´Ù "¡ÒáÅѺÊÙèʶҹÐÃкº¡è͹˹éÒ" ã¹Ë¹éÒ 73
3. ¡ÒÃÃÕà«ç·Ãкº»¯ÔºÑµÔ¡Òâͧ¤Ø³
ËÒ¡äÁèÁÕÇÔ¸Õã´á¡é䢻Ñ−ËҢͧ¤Ø³ä´é áÅФسµéͧ¡ÒÃÃÕà«ç·Ãкº áµèµéͧ¡ÒÃà¡çº¢éÍÁÙżÙéãªé¢Í§
¤Ø³äÇé â»Ã´´Ù "àÃÕ¡¤×¹Ãкº¢Í§¤Ø³ãËéà»ç¹Ê¶Ò¹Ð·ÕèµÑé§ÁÒ¨Ò¡âç§Ò¹" ã¹Ë¹éÒ 74.
4. ÃÕà«ç·Ãкº¢Í§¤Ø³ãËéà»ç¹Ê¶Ò¹Ð·ÕèµÑé§ÁÒ¨Ò¡âç§Ò¹
ËÒ¡äÁèÁÕÇÔ¸Õã´ÊÒÁÒöá¡é䢻Ñ−ËÒä´éáÅФسµéͧ¡ÒÃÃÕà«ç·Ãкº¢Í§¤Ø³ãËéà»ç¹Ê¶Ò¹Ð·ÕèµÑé§ÁÒ¨Ò
¡âç§Ò¹ â»Ã´´Ù "àÃÕ¡¤×
¹Ãкº¢Í§¤Ø³ãËéà»ç¹Ê¶Ò¹Ð·ÕèµÑé§ÁÒ¨Ò¡âç§Ò¹" ã¹Ë¹éÒ 74
¡ÒõԴµÑé§ä´ÃìàÇÍÃìËÃ×Íá;¾ÅÔपÑè¹ãËÁè«éÓ
µÒÁ¢Ñ鹵͹¡ÒÃá¡é䢻Ñ−ËÒ
¤Ø³ÍÒ¨µéͧ¡ÒõԴµÑé§á;¾ÅÔपÑè¹áÅÐä´ÃìàÇÍÃì·Õèä´éÃѺ¡ÒõԴµÑé§ÁҡѺà¤Ã×èͧ¨Ò¡âç§Ò¹ã¹¤ÍÁ¾ÔÇ
àµÍÃì¢Í§¤Ø³ãËÁèÍÕ¡¤ÃÑé§ ¤Ø³ÊÒÁÒöµÔ´µÑ駫éÓâ´ÂãªéÎÒÃì´ä´Ãì¿ËÃ×Í¡ÒÃÊÓÃͧ¢éÍÁÙÅ·Õè¤Ø³ÊÃéÒ§¢Öé¹
• á;¾ÅÔपÑè¹Í×è¹ – ËÒ¡¤Ø³µéͧ¡ÒõԴµÑ駫éÓ«Í¿·ìáÇÃì·ÕèäÁèä´éÃѺ¡ÒõԴµÑé§äÇéÅèǧ˹éÒ
㹤ÍÁ¾ÔÇàµÍÃì¢Í§¤Ø³ ¤Ø³¨Óà»ç¹µéͧ·ÓµÒÁ¤Óá¹Ð¹Ó㹡ÒõԴµÑ駢ͧ«Í¿·ìáÇÃì¹Ñé¹
•ä´ÃìàÇÍÃìÍØ»¡Ã³ìãËÁè – ËÒ¡¤Ø³µéͧ¡ÒõԴµÑ駫éÓä´ÃìàÇÍÃì·ÕèäÁèä´éÃѺ¡ÒõԴµÑé§äÇéÅèǧ˹éÒ
㹤ÍÁ¾ÔÇàµÍÃì¢Í§¤Ø³ ãËé
·ÓµÒÁ¤Óá¹Ð¹Ó㹡ÒõԴµÑ駷ÕèÁÒ¾ÃéÍÁ¡ÑºÍØ»¡Ã³ì¹Ñé¹

¡ÒÃàÃÕ¡¤×¹ - 71
ËÒ¡¤Ø³¨Ð·Ó¡ÒõԴµÑ駫éÓâ´Âãªé Windows áÅТéÍÁÙÅ㹡ÒÃàÃÕ¡¤×¹·Õè¶Ù¡
à¡çºäÇ麹¤ÍÁ¾ÔÇàµÍÃì¢Í§¤Ø³:
•¨Ò¡ Start ¾ÔÁ¾ì 'Recovery' áÅéǤÅÔ¡ Gateway Recovery Management
ã¹ÃÒ¡ÒÃá;¾ÅÔपÑè¹
•¤ÅÔ¡µÔ´µÑé§ä´ÃìàÇÍÃìËÃ×Íá;¾ÅÔपÑè¹ãËÁè

72
•¤Ø³¤ÇþºËÑÇ¢éÍ Contents ã¹ Gateway Resource Center
•¤ÅÔ¡·Õèäͤ͹ µÔ´µÑé§ ÊÓËÃѺÃÒ¡Ò÷Õè¤Ø³µéͧ¡ÒõԴµÑé§
¨Ò¡¹Ñé¹·ÓµÒÁ¤Óá¹Ð¹Ó·Õè»ÃÒ¡¯¢Ö鹺¹Ë¹éÒ¨Íà¾×èÍ·Ó¡ÒõԴµÑé§ãËéàÊÃç¨ÊÁºÙóì
·Ó«éÓ¢Ñ鹵͹¹ÕéÊÓËÃѺ·Ø¡ÃÒ¡Ò÷Õè¤Ø³µéͧ¡ÒõԴµÑé§ãËÁè
ËÒ¡¤Ø³µÔ´µÑ駫éÓ¨Ò¡¡ÒÃÊÓÃͧ¢éÍÁÙÅä´ÃìàÇÍÃìáÅÐá;¾ÅÔपÑ蹺¹ DVD ËÃ×Íä´Ãì¿ USB:
1. ãÊèá¼è¹´ÔÊ¡ì Drivers and Applications Backup ŧã¹ä´Ãì¿ËÃ×Íàª×èÍÁµèÍà¢éҡѺ¾ÍÃìµ USB
·ÕèÇèÒ§ÍÂÙè
•ËÒ¡¤Ø³ãÊèá¼è¹ DVD â»Ã´ÃÍãËé Gateway Resource Center àÃÔèÁ·Ó§Ò¹
•ËÒ¡ Gateway Resource Center äÁèàÃÔèÁ·Ó§Ò¹â´ÂÍѵâ¹ÁÑµÔ ¡´»ØèÁ Windows + <E>,
áÅéǴѺàºÔ
éŤÅÔ¡º¹äͤ͹ä´Ãì¿Í;µÔ¤ÍÅ
•ËÒ¡¤Ø³ãªéä´Ãì¿ USB ¡´»ØèÁ Windows + <E>áÅéǴѺàºÔéŤÅÔ¡º¹ä´Ãì¿·ÕèÁÕ¡ÒÃÊÓÃͧ
¢éÍÁÙŹÕéÍÂÙè ´ÑºàºÔéŤÅÔ¡º¹ ResourceCenter

¡ÒÃàÃÕ¡¤×¹ - 73
2. ¤Ø³¤ÇþºËÑÇ¢éÍ Contents ã¹ Gateway Resource Center
3. ¤ÅÔ¡·Õèäͤ͹ µÔ´µÑé§ ÊÓËÃѺÃÒ¡Ò÷Õè¤Ø³µéͧ¡ÒõԴµÑé§
¨Ò¡¹Ñé¹·ÓµÒÁ¤Óá¹Ð¹Ó·Õè»ÃÒ¡¯¢Ö鹺¹Ë¹éÒ¨Íà¾×èÍ·Ó¡ÒõԴµÑé§ãËéàÊÃç¨ÊÁºÙóì
·Ó«éÓ¢Ñ鹵͹¹ÕéÊÓËÃѺ·Ø¡ÃÒ¡Ò÷Õè¤Ø³µéͧ¡ÒõԴµÑ駫éÓ
¡ÒáÅѺÊÙèʶҹÐÃкº¡è͹˹éÒ
Microsoft System Restore ¨Ð·Ó¡Òà '¶èÒÂ’ ¡ÒõÑ駤èÒÃкº¢Í§¤Ø³à»ç¹ÃÐÂÐáÅкѹ·Ö¡ÊÔè§
àËÅèÒ¹Ñé¹äÇéà»ç¹¨Ø´àÃÕ¡¤×¹ â´ÂÁÒ¡áÅéÇ㹡óշÕè¡ÒÃá¡é䢻Ñ−ËÒ«Í¿·ìáÇÃìÊÒÁÒö·Óä´éÂÒ¡
¤Ø³ÊÒÁÒö¤×¹Ê¶Ò¹ÐÃкº¡ÅѺä»Âѧ¨Ø´àÃÕ¡¤×¹Ãкºà¾×èÍãËéÃкº¢Í§¤Ø³ÊÒÁÒö·Ó§
Ò¹ä´éÍÕ¡¤ÃÑé§
Windows ¨ÐÊÃéÒ§¨Ø´àÃÕ¡¤×¹Ãкºâ´ÂÍѵâ¹ÁѵÔã¹áµèÅÐÇѹ áÅÐÃÇÁ¶Ö§·Ø¡¤ÃÑ駷Õè¤Ø³µÔ´µÑé§
«Í¿·ìáÇÃìËÃ×Íä´ÃìàÇÍÃìÍØ»¡Ã³ì

74
ËÁÒÂà˵Ø: ÊÓËÃѺ¢éÍÁØÅà¾ÔèÁàµÔÁà¡ÕèÂǡѺ¡ÒÃãªé Microsoft System Restore ¨Ò¡àÁ¹Ù
àÃÔèÁãËé¾ÔÁ¾ì 'ÇÔ¸Õãªé' ¨Ò¡¹Ñ鹤ÅÔ¡·Õè ¤ÇÒÁªèÇÂáËÅ×ÍáÅÐʹѺʹع ã¹ÃÒª×èÍá;¾ÅÔपÑè¹
¾ÔÁ¾ì 'Windows system restore' 㹡Åèͧ¤é¹ËÒ ¨Ò¡¹Ñ鹡´ Enter
ÇÔ¸Õ¡ÅѺä»Âѧ¨Ø´àÃÕ¡¤×¹Ãкº:
1. ¨Ò¡ Start¾ÔÁ¾ì 'Control Panel' áÅéǤÅÔ¡·Õè Control Panel ã¹ÃÒ¡ÒÃá;¾ÅÔपÑè¹
2. ¤ÅÔ¡ ÃкºáÅФÇÒÁ»ÅÍ´ÀÑ > ÈÙ¹Âì¡ÒáÃÐ·Ó ¨Ò¡¹Ñ鹤ÅÔ¡·Õè àÃÕ¡¤×¹ ·Õè´éÒ¹ÅèÒ§
¢Í§Ë¹éÒµèÒ§
3. ¤ÅÔ¡·Õè à»Ô´¡ÒÃàÃÕ¡¤×¹Ãкº áÅФÅÔ¡ ¶Ñ´ä»
4. ¤ÅÔ¡·Õè¨Ø´àÃÕ¡¤×¹ÅèÒÊØ´ («Öè§à»ç¹àÇÅÒ·ÕèÃкº¢Í§¤Ø³·Ó§Ò¹ä´éÍÂèÒ§¶Ù¡µéͧ)
áÅéǤÅÔ¡¶Ñ´ä»¨Ò¡¹Ñ鹤ÅÔ¡ ÊÔé¹ÊØ´
5. ˹éÒµèÒ§¡ÒÃÂ×¹Âѹ¨Ð»ÃÒ¡¯¢Öé¹ ãËé¤ÅÔ¡ ãªè Ãкº¢Í§¤Ø³¨Ð¶Ù¡àÃÕ¡¤×¹¤èÒâ´Âãªé¨Ø´
àÃÕ¡¤×¹Ãкº·Õè¤Ø³àÅ×Í¡ ¡Ãкǹ¡ÒùÕéÍÒ¨ãªéàÇÅÒ¹Ò¹ËÅÒÂ¹Ò·Õ áÅÐÍÒ¨ÃÕ
ʵÒÃì·¤
ÍÁ¾ÔÇàµÍÃì¢Í§¤Ø³
àÃÕ¡¤×¹Ãкº¢Í§¤Ø³ãËéà»ç¹Ê¶Ò¹Ð·ÕèµÑé§ÁÒ¨Ò¡âç§Ò¹
ËÒ¡¤Ø³¾ºÇèÒ¤ÍÁ¾ÔÇàµÍÃì¢Í§¤Ø³ÁÕ»Ñ−ËÒ·ÕèäÁèÊÒÁÒöàÃÕ¡¤×¹¤èÒä´é´éÇÂÇÔ¸Õ¡ÒÃÍ×è¹
¤Ø³ÍÒ¨¨Óà»ç¹µéͧµÔ´µÑ駷ءÍÂèÒ§ãËÁèà¾×èͤ׹ʶҹÐÃкº¢Í§¤Ø³ãËéà»ç¹Ê¶Ò¹Ð·ÕèµÑé§ÁÒ¨Ò¡âç§Ò¹
¤Ø³ÊÒÁÒöàÃÕ¡¤×¹¨Ò¡ÎÒÃì´ä´Ãì¿ËÃ×Í¡ÒÃÊÓÃͧ¢éÍÁÙÅ·Õè¤Ø³ÊÃéÒ§¢Öé¹
•ËÒ¡¤Ø³ÂѧÊÒÁÒöÃѹ Windows áÅÐÂѧäÁèä´éź¾ÒÃìµÔªÑè¹ÊÓËÃѺ¡ÒÃàÃÕ¡¤×¹ â»Ã´´Ù
"¡ÒÃàÃÕ¡¤×¹Ãкº¨Ò¡ Windows" ã¹Ë¹éÒ 75

¡ÒÃàÃÕ¡¤×¹ - 75
•ËÒ¡¤Ø³äÁèÊÒÁÒöãªé§Ò¹ Windows ä´éáÅÐÎÒÃì´ä´Ã쿢ͧ¤Ø³ä´é¶Ù¡¿ÍÃìáÁµàÃÕºÃéÍÂáÅéÇ
ËÃ×ͤسä´éµÔ´µÑé§ÎÒÃì´ä´Ãì¿Í×è¹·´á·¹áÅéÇ â»Ã´´Ù
"¡ÒÃàÃÕ¡¤×¹¤×¹¨Ò¡¢éÍÁÙÅ·ÕèÊÓÃͧäÇéà¾×èÍ¡ÒÃàÃÕ¡¤×¹¢Í§¤Ø³" ã¹Ë¹éÒ 79
¡ÒÃàÃÕ¡¤×¹Ãкº¨Ò¡ Windows
àÃÔèÁãªé§Ò¹ Gateway Recovery Management:
•¨Ò¡ Start¾ÔÁ¾ì 'Recovery' áÅéǤÅÔ¡ Gateway Recovery Management ã¹ÃÒ¡ÒÃá;¾ÅÔपÑè¹
ÁÕµÑÇàÅ×Í¡ÊͧµÑÇàÅ×Í¡ Restore Factory Settings (ÃÕà«çµ¾Õ«Õ¢Í§©Ñ¹) ËÃ×Í Customized Restore
(ÃÕà¿Ãª¾Õ«Õ¢Í§©Ñ¹)
Restore Factory Settings ¨Ðà»ç¹¡ÒÃź·Ø¡ÍÂèÒ§º¹ÎÒÃì´´ÔÊ¡ì¢Í§¤Ø³ ¨Ò¡¹Ñ鹨֧µÔ´µÑé§ Windows
«Í¿·ìáÇÃìáÅÐä´ÃìàÇÍÃì·Ñé§ËÁ´·Õèà¤Âä´éÃѺ¡ÒõԴµÑé§äÇéÅèǧ˹éÒº¹¤ÍÁ¾ÔÇàµÍÃì¢Í§¤Ø³
ËÒ¡¤Ø³ÊÒÁÒöà¢éÒ¶Ö§ä¿Åì·ÕèÊÓ¤Ñ−º¹ÎÒÃì´ä´Ã쿢ͧ¤Ø³ä´é ãËéÊÓÃͧ¢éÍÁÙÅäÇé â»Ã´´Ù
"¡Ùé¤×¹¤èÒàÃÔèÁµé¹¨Ò¡âç§Ò¹´éÇ Gateway Recovery Management" ã¹Ë¹éÒ 76.
Customized Restore ¨Ð¾ÂÒÂÒÁà¡çºä¿Åì (¢éÍÁÙżÙéãªé) ¢Í§¤Ø³àÍÒäÇé áµè
¨Ð·Ó¡ÒõԴµÑé§
«Í¿·ìáÇÃìáÅÐä´ÃìàÇÍÃìãËÁè·Ñé§ËÁ´ «Í¿·ìáÇÃì·ÕèµÔ´µÑé§äÇéµÑé§áµè·Õè¤Ø³«×é;իբͧ¤Ø³ÁҨж١ź
(¡àÇ鹫Ϳ·ìáÇÃì·ÕèµÔ´µÑ駨ҡ Windows Store) â»Ã´´Ù "»ÃѺáµè§¡ÒÃàÃÕ¡¤×¹´éÇ Gateway
Recovery Management" ã¹Ë¹éÒ 78.

76
¡Ùé¤×¹¤èÒàÃÔèÁµé¹¨Ò¡âç§Ò¹´éÇ Gateway Recovery Management
1. ¤ÅÔ¡ Restore Factory Settings.
¢éͤÇÃÃÐÇѧ: 'Restore Factory Settings' ¨Ðźä¿Åì·Ñé§ËÁ´º¹ÎÒÃì´ä´Ã쿢ͧ¤Ø³
2. ˹éÒµèÒ§ Reset your PC ¨Ðà»Ô´¢Öé¹
ÃÙ»ÀÒ¾ãªéà¾×èÍ¡ÒÃÍéÒ§ÍÔ§à·èÒ¹Ñé¹

¡ÒÃàÃÕ¡¤×¹ - 77
3. ¤ÅÔ¡ NextáÅéÇàÅ×Í¡ÇÔ¸Õ¡ÒÃźä¿ÅìµèÒ§æ ¢Í§¤Ø³
a. Just remove my files ¨Ðźä¿Åì·Ñé§ËÁ´ÍÂèÒ§ÃÇ´àÃçÇ¡è͹·Õè¨ÐàÃÕ¡¤×¹¤ÍÁ¾ÔÇàµÍÃì¢Í§¤Ø³
â´Â¨ÐãªéàÇÅÒ»ÃÐÁÒ³ 30 ¹Ò·Õ
b. Fully clean the drive ÅéÒ§ä´Ã쿢ͧ¤Ø³ÍÂèÒ§ÊÁºÙóìËÅѧ¨Ò¡·Õèä¿Åì¶Ù¡Åº
´Ñ駹Ñ鹨ÐäÁèÊÒÁÒö´Ùä¿Åìã´æ ä´éËÅѧ¨Ò¡¡ÒÃàÃÕ¡¤×¹ ¡ÒÃÅéÒ§ä´Ãì¿ãªéàÇÅÒ¹Ò¹¡ÇèÒÁÒ¡
ÍÒ¨ãªéàÇÅÒ¶Ö§ 5 ªÑèÇâÁ§ áµè¨Ð»ÅÍ´ÀÑ¡ÇèÒà¹×èͧ¨Ò¡ä¿Åìà¡èÒ¨¶Ù¡ÅºÍÂèÒ§ÊÔé¹àªÔ§
4. ¤ÅÔ¡ Reset
5. ¡Ãкǹ¡ÒÃàÃÕ¡¤×¹Ãкº¨ÐàÃÔèÁµé¹â´Â¡ÒÃÃÕʵÒÃì·¤ÍÁ¾ÔÇàµÍÃì¢Í§¤Ø³
¨Ò¡¹Ñ鹨зÓÊÓà¹Òä¿Åìä»ÂѧÎÒÃì´ä´Ã쿢ͧ¤Ø³
6. ËÅѧ¨Ò¡¡ÒÃàÃÕ¡¤×¹àÊÃç¨ÊÔé¹
¤Ø³ÊÒÁÒöàÃÔèÁãªé¤ÍÁ¾Ô
ÇàµÍÃì¢Í§¤Ø³ä´éâ´Â¡Ò÷ӫéÓ¢Ñ鹵͹·Õè¤Ø³àÃÔèÁ·Óáµèáá

78
»ÃѺáµè§¡ÒÃàÃÕ¡¤×¹´éÇ Gateway Recovery Management
1. ¤ÅÔ¡ Customized Restore (Retain User Data)
2. ˹éÒµèÒ§ Refresh your PC ¨Ðà»Ô´¢Öé¹
3. ¤ÅÔ¡ NextáÅéǤÅÔ¡ Refresh
4. ¡Ãкǹ¡ÒÃàÃÕ¡¤×¹Ãкº¨ÐàÃÔèÁµé¹â´Â¡ÒÃÃÕʵÒÃì·¤ÍÁ¾ÔÇàµÍÃì¢Í§¤Ø³
¨Ò¡¹Ñ鹨зÓÊÓà¹Òä¿Åìä»ÂѧÎÒÃì´ä´Ã쿢ͧ¤Ø³ ¢Ñ鹵͹¹Õé¨ÐãªéàÇÅÒ»ÃÐÁÒ³ 30 ¹Ò·Õ

¡ÒÃàÃÕ¡¤×¹ - 79
¡ÒÃàÃÕ¡¤×¹¤×¹¨Ò¡¢éÍÁÙÅ·ÕèÊÓÃͧäÇéà¾×èÍ¡ÒÃàÃÕ¡¤×¹¢Í§¤Ø³
à¾×èÍàÃÕ¡¤×¹¨Ò¡¢éÍÁÙÅ·ÕèÊÓÃͧäÇ麹ä´Ãì¿ USB:
1. ËÒ¢éÍÁÙÅÊÓÃͧÊÓËÃѺàÃÕ¡¤×¹¢Í§¤Ø³
2. àÊÕºä´Ãì¿ USB áÅÐà»Ô´¤ÍÁ¾ÔÇàµÍÃì¢Í§¤Ø³
3. ËÒ¡ÂѧäÁèà»Ô´ãªé§Ò¹ ¤Ø³ÊÒÁÒöà»Ô´ãªé§Ò¹ä´éã¹ F12 Boot Menu:
a. ¡´ <F2> àÁ×èͤÍÁ¾ÔÇàµÍÃì¢Í§¤Ø³àÃÔèÁ·Ó§Ò¹
b. ãªé»ØèÁÅÙ¡ÈëéÒÂËÃ×Í¢ÇÒà¾×èÍàÅ×Í¡àÁ¹Ù Main
c. ¡´ÅÙ¡ÈÃŧ¨¹¡ÃзÑè§ F12 Boot Menu ¶Ù¡àÅ×Í¡ ¡´ <F5> à¾×èÍà»ÅÕ蹡ÒõÑ駤èÒ¹Õéä»à»ç¹
Enabled
d. ãªé»ØèÁÅÙ¡ÈëéÒÂËÃ×Í¢ÇÒà¾×èÍàÅ×Í¡àÁ¹Ù Exit
e. ¢Öé¹ÍÂÙè¡Ñº»ÃÐàÀ·¢Í§ BIOS ·Õè¤ÍÁ¾ÔÇàµÍÃì¢Í§¤Ø³ãªé àÅ×Í¡ Save Changes and Exit ËÃ×Í
Exit Saving Changes áÅС´ Enter àÅ×Í¡ OK ËÃ×Í Yes
à¾×èÍÂ×¹Âѹ
f. ¤ÍÁ¾ÔÇàµÍÃì¢Í§¤Ø³¨ÐÃÕʵÒÃì·
4. ÃÐËÇèÒ§¡ÒÃʵÒÃì·à¤Ã×èͧ ãËé¡´ <F12> à¾×èÍà»Ô´àÁ¹Ù¡ÒúÙêµ àÁ¹Ù¡ÒúÙ굤×Í
àÁ¹Ù·ÕèªèǤسàÅ×Í¡ÍØ»¡Ã³ì㹡ÒÃʵÒÃì·à¤Ã×èͧ ãËéàÅ×Í¡ä´Ãì¿ USB
a. ãªé»ØèÁÅÙ¡ÈÃà¾×èÍàÅ×Í¡ USB Device áÅéÇ¡´ Enter
b. Windows ¨ÐàÃÔèÁ·Ó§Ò¹¨Ò¡¢éÍÁÙÅÊÓÃ᷹ͧ·Õè¨ÐàÃÔèÁ¡Ãкǹ¡ÒÃàÃÔèÁ·Ó§Ò¹µÒÁ»¡µÔ
5. àÅ×Í¡»ÃÐàÀ·¤ÕÂìºÍÃ촢ͧ¤Ø³
6. àÅ×Í¡ Troubleshoot áÅéÇàÅ×Í¡»ÃÐàÀ·¢Í§¡ÒÃàÃÕ¡¤×¹·Õè¨Ðãªé:

80
a. ¤ÅÔ¡ Advanced áÅéǤÅÔ¡ System Restore à¾×èÍàÃÔèÁãªé§Ò¹ Microsoft System Restore:
Microsoft System Restore ¨Ð·Ó¡Òà '¶èÒÂ’ ¡ÒõÑ駤èÒÃкº¢Í§¤Ø³à»ç¹ÃÐÂÐáÅкѹ·Ö¡ÊÔè§
àËÅèÒ¹Ñé¹äÇéà»ç¹¨Ø´àÃÕ¡¤×¹ â´ÂÁÒ¡áÅéÇ㹡óշÕè¡ÒÃá¡é䢻Ñ−ËÒ«Í¿·ìáÇÃìÊÒÁÒ
ö·Óä´éÂÒ¡ ¤Ø³ÊÒÁÒö¤×¹Ê¶Ò¹ÐÃкº¡ÅѺä»Âѧ¨Ø´àÃÕ¡¤×¹Ãкºà¾×èÍãËéÃкº¢Í§
¤Ø³ÊÒÁÒö·Ó§Ò¹ä´éÍÕ¡¤ÃÑé§
b. ¤ÅÔ¡ Reset your PC à¾×èÍàÃÔèÁ¡Ãкǹ¡ÒÃÃÕà«ç·:
Reset your PC¨Ðà»ç¹¡ÒÃź·Ø¡ÍÂèÒ§º¹ÎÒÃì´´ÔÊ¡ì¢Í§¤Ø³ ¨Ò¡¹Ñ鹨֧µÔ´µÑé§ Windows
«Í¿·ìáÇÃìáÅÐä´ÃìàÇÍÃì·Ñé§ËÁ´·Õèà¤Âä´éÃѺ¡ÒõԴµÑé§äÇéÅèǧ˹éÒº¹¤ÍÁ¾ÔÇàµÍÃì¢Í§¤Ø³
ËÒ¡¤Ø³ÊÒÁÒöà¢éÒ¶Ö§ä¿Åì·ÕèÊÓ¤Ñ−º¹ÎÒÃì´ä´Ã쿢ͧ¤Ø
³ä´é ãËéÊÓÃͧ¢éÍÁÙÅäÇé â»Ã´´Ù
"ÃÕà«ç·¾Õ«Õ¢Í§¤Ø³¨Ò¡¡ÒÃÊÓÃͧ¢éÍÁÙÅà¾×èÍàÃÕ¡¤×¹" ã¹Ë¹éÒ 81
c. ¤ÅÔ¡ Refresh your PC à¾×èÍàÃÔèÁ¡Ãкǹ¡ÒÃÃÕà¿Ãª:
Refresh your PC ¨Ð¾ÂÒÂÒÁà¡çºä¿Åì (¢éÍÁÙżÙéãªé) ¢Í§¤Ø³àÍÒäÇé áµè¨Ð·Ó¡ÒõԴµÑé§
«Í¿·ìáÇÃìáÅÐä´ÃìàÇÍÃìãËÁè·Ñé§ËÁ´ «Í¿·ìáÇÃì·ÕèµÔ´µÑé§äÇéµÑé§áµè·Õè¤Ø³«×é;իբͧ
¤Ø³ÁҨж١ź (¡àÇ鹫Ϳ·ìáÇÃì·ÕèµÔ´µÑ駨ҡ Windows Store) â»Ã´´Ù
"ÃÕà¿Ãª¾Õ«Õ¢Í§¤Ø³¨Ò¡¡ÒÃÊÓÃͧ¢éÍÁÙÅà¾×èÍàÃÕ¡¤×¹" ã¹Ë¹éÒ 82

¡ÒÃàÃÕ¡¤×¹ - 81
ÃÕà«ç·¾Õ«Õ¢Í§¤Ø³¨Ò¡¡ÒÃÊÓÃͧ¢éÍÁÙÅà¾×èÍàÃÕ¡¤×¹
¢éͤÇÃÃÐÇѧ: ¡ÒÃÃÕà«ç·¾Õ«Õ¨Ðà»ç¹¡ÒÃźä¿ÅìµèÒ§æ ·Ñé§ËÁ´º¹ÎÒÃì´ä´Ã쿢ͧ¤Ø³
1. ˹éÒµèÒ§ Reset your PC ¨Ðà»Ô´¢Öé¹
ÃÙ»ÀÒ¾ãªéà¾×èÍ¡ÒÃÍéÒ§ÍÔ§à·èÒ¹Ñé¹
2. ¤ÅÔ¡ Next
3. àÅ×Í¡Ãкº»¯ÔºÑµÔ¡Ò÷Õè¨Ð·Ó¡ÒÃàÃÕ¡¤×¹ (»¡µÔ¨ÐÁÕµÑÇàÅ×Í¡à¾Õ§µÑÇàÅ×Í¡à´ÕÂÇ)
4. àÅ×Í¡à¾×èÍà¡çº¡ÒÃà»ÅÕè¹á»Å§ã´æ ¡ÑºÎÒÃì´ä´Ãì¿:
a. ËÒ¡¤Ø³ä´éź¾ÒÃìµÔªÑè¹ÊÓËÃѺ¡ÒÃàÃÕ¡¤×¹ä»áÅéÇ
ËÃ×ÍÁÕ¡ÒÃà»ÅÕè¹á»Å§¡Ñº¾ÒÃìµÔªÑè¹¹Ñ鹺¹ÎÒÃì´ä´ÃìÄ áÅеéͧ¡ÒÃà¡çº¡ÒÃà»ÅÕè¹á»Å§¹ÕéäÇé
àÅ×Í¡ No
b. à¾×èÍàÃÕ¡¤×¹¡ÒõÑ駤èÒ¨Ò¡âç§Ò¹·Ñé§ËÁ´¢Í§¤ÍÁ¾ÔÇàµÍÃì àÅ×Í¡ Yes
5. àÅ×Í¡ÇÔ¸Õ¡ÒÃźä¿ÅìµèÒ§æ ¢Í§¤Ø³:
a. Just remove my files ¨Ðźä¿Åì·Ñé§ËÁ´ÍÂèÒ§ÃÇ´àÃçÇ¡è͹·Õè¨ÐàÃÕ¡¤×¹¤ÍÁ¾ÔÇàµÍÃì¢Í§¤Ø³
â´Â¨ÐãªéàÇÅÒ»ÃÐÁÒ³ 30 ¹Ò·Õ

82
b. Fully clean the drive ÅéÒ§ä´Ã쿢ͧ¤Ø³ÍÂèÒ§ÊÁºÙóìËÅѧ¨Ò¡·Õèä¿Åì¶Ù¡Åº
´Ñ駹Ñ鹨ÐäÁèÊÒÁÒö´Ùä¿Åìã´æ ä´éËÅѧ¨Ò¡¡ÒÃàÃÕ¡¤×¹ ¡ÒÃÅéÒ§ä´Ãì¿ãªéàÇÅÒ¹Ò¹¡ÇèÒÁÒ¡
ÍÒ¨ãªéàÇÅÒ¶Ö§ 5 ªÑèÇâÁ§ áµè¨Ð»ÅÍ´ÀÑ¡ÇèÒà¹×èͧ¨Ò¡ä¿Åìà¡èҨж١źÍÂèÒ§ÊÔé¹àªÔ§
6. ¤ÅÔ¡ Reset
7. ËÅѧ¨Ò¡¡ÒÃàÃÕ¡¤×¹àÊÃç¨ÊÔé¹
¤Ø³ÊÒÁÒöàÃÔèÁãªé¤ÍÁ¾ÔÇàµÍÃì¢Í§¤Ø³ä´éâ´Â¡Ò÷ӫéÓ¢Ñ鹵͹·Õè¤Ø³àÃÔèÁ·Óáµèáá
ÃÕà¿Ãª¾Õ«Õ¢Í§¤Ø³¨Ò¡¡ÒÃÊÓÃͧ¢éÍÁÙÅà¾×èÍàÃÕ¡¤×¹
1. ˹éÒµèÒ§ Refresh your PC ¨Ðà»Ô´¢Öé¹
2. ¤ÅÔ¡ Next (¶Ñ´ä»)
3. àÅ×Í¡Ãкº»¯ÔºÑµÔ¡Ò÷Õè¨Ð·Ó¡ÒÃàÃÕ¡¤×¹ (»¡µÔ¨ÐÁÕµÑÇàÅ×Í¡à¾Õ§µÑÇàÅ×Í¡à´ÕÂÇ)
4. ¤ÅÔ¡ Refresh
5. ¡Ãкǹ¡ÒÃàÃÕ¡¤×¹Ãкº¨ÐàÃÔèÁµé¹â´Â¡ÒÃÃÕʵÒÃì·¤ÍÁ¾ÔÇàµÍÃì¢Í§¤Ø³
¨Ò¡¹Ñ鹨зÓÊÓà¹Òä¿Åìä»ÂѧÎÒÃì´ä´Ã쿢ͧ¤Ø³ ¢Ñ鹵͹¹Õé¨ÐãªéàÇÅÒ»ÃÐÁÒ³ 30 ¹Ò·Õ

¤Ó¶ÒÁ·Õè¶Ù¡¶ÒÁºèÍ - 83
¤Ó¶ÒÁ·Õè¶Ù¡¶ÒÁºèÍÂ
ÅӴѺµèÍ仹Õé¤×ÍÃÒ¡Òâͧà˵ءÒóì·ÕèÍÒ¨à¡Ô´¢Öé¹ä´éã¹ÃÐËÇèÒ§¡ÒÃãªé§Ò¹¤ÍÁ¾ÔÇàµÍÃì
â´ÂÁÕÇÔ¸Õ¡ÒÃá¡é䢧èÒÂæ ÁͺãËé¡ÑºáµèÅÐà˵ءÒóì
©Ñ¹à»Ô´ÊÇÔµ«ì¾ÒÇàÇÍÃì áµè¤ÍÁ¾ÔÇàµÍÃìäÁèàÃÔèÁ·Ó§Ò¹ËÃ×ͺÙêµ
´Ù·Õèä¿áÊ´§Ê¶Ò¹Ð¾ÒÇàÇÍÃì:
• ËÒ¡ä¿äÁèµÔ´ ËÁÒ¶֧äÁèÁÕ¾Åѧ§Ò¹ä¿¿éÒ»é͹ãËé¡Ñº¤ÍÁ¾ÔÇàµÍÃì ãËéµÃǨÊͺÊÔ觵èÍ仹Õé:
•ËÒ¡¤Ø³ãªé§Ò¹´éÇÂẵàµÍÃÕè
ẵàµÍÃÕèÍÒ¨ÁÕ¾Åѧ§Ò¹µèÓáÅÐäÁèÊÒÁÒöãËé¾Åѧ§Ò¹¡Ñº¤ÍÁ¾ÔÇàµÍÃìä´é µèÍÍá´»àµÍÃì AC
à¾×èÍ·Ó¡ÒÃÃÕªÒÃì¨áºµàµÍÃÕè
•µÃǨ´ÙãËéá¹èã¨ÇèÒÍá´»àµÍÃì AC ¹Ñé¹ä´éàÊÕº»ÅÑê¡à¢éҡѺ¤ÍÁ¾ÔÇàµÍÃìáÅлÅÑꡨèÒÂä¿´ÕáÅéÇ
•Ëҡ俵Դ ãËéµÃǨÊͺ´Ñ§¹Õé:
•ÁÕá¼è¹´ÔÊ¡ìÍÂÙèã¹ä´Ãì¿Í;µÔ¤ÍÅËÃ×ÍäÁè? ¹Óá¼è¹´ÔÊ¡ìÍÍ¡áÅС´ <Ctrl> + <Alt> + <Del>
à¾×èÍÃÕʵÒÃì·à¤Ã×èͧ
•¤Ø³ÁÕÍØ»¡Ã³ìà¡çº¢éÍÁÙÅ USB (´Ô
Ê¡ì USB ËÃ×ÍÊÁÒÃì·â¿¹)
àª×èÍÁµèÍÍÂÙè¡Ñº¤ÍÁ¾ÔÇàµÍÃì¢Í§¤Ø³ËÃ×ÍäÁè? ¹Ó´ÔÊ¡ì¹ÕéÍÍ¡áÅС´ <Ctrl> + <Alt> + <Del>
à¾×èÍÃÕʵÒÃì·à¤Ã×èͧ

84
äÁèÁÕÍÐäûÃÒ¡¯¢Ö鹺¹Ë¹éÒ¨Í
Ãкº¨Ñ´¡ÒþÅѧ§Ò¹¢Í§¤ÍÁ¾ÔÇàµÍÃì¨Ð·Ó˹éÒ¨ÍãËéÇèÒ§à»ÅèÒâ´ÂÍѵâ¹ÁѵÔà¾×èÍ¡ÒûÃÐËÂÑ´¾Åѧ§Ò
¹ ¡´»ØèÁã´¡çä´éà¾×èÍà»Ô´Ë¹éÒ¨ÍãËé¡ÅѺ¤×¹ÁÒ
ËÒ¡¡´»ØèÁáÅéÇ˹éÒ¨ÍäÁèà»Ô´¡ÅѺ¤×¹ÁÒ ÍÒ¨ÁÕÊÒà˵Øä´éÊÒÁ»ÃСÒà ÊÒà˵Ø:
•ÃдѺ¤ÇÒÁÊÇèÒ§ÍÒ¨¹éÍÂà¡Ô¹ä» ¡´ (à¾ÔèÁ) à¾×èÍ»ÃѺÃдѺ¤ÇÒÁÊÇèÒ§
•ÍØ»¡Ã³ìáÊ´§¼ÅÍÒ¨¶Ù¡µÑ駤èÒãËéà»ç¹¨ÍáÊ´§¼ÅÀÒ¹͡
¡´ à¾×èÍÊÅѺ¡ÒÃáÊ´§¼Å¡ÅѺä»Âѧ¤ÍÁ¾ÔÇàµÍÃì
• ËÒ¡ä¿áÊ´§Ê¶Ò¹Ð Sleep ÊÇèÒ§ ËÁÒ¶֧¤ÍÁ¾ÔÇàµÍÃìÍÂÙèã¹âËÁ´ Sleep ¡´
»ØèÁ¾ÒÇàÇÍÃìáÅéÇ»ÅèÍÂà¾×èÍ¡ÅѺÁÒãªé§Ò¹µèÍ
äÁèä´éÂÔ¹àÊÕ§ã´æ ¨Ò¡¤ÍÁ¾ÔÇàµÍÃì
ãËéµÃǨÊͺÊÔ觵èÍ仹Õé:
•àÊÕ§ÍÒ¨¶Ù¡»Ô´ÍÂÙè ã¹ Windows ãËé´Ù·Õèäͤ͹¤Çº¤ØÁàÊÕ§ (ÅÓ⾧) º¹·ÒÊ¡ìºÒÃì
ËÒ¡ÁÕà¤Ã×èͧËÁÒ¡ҡºÒ· ãËé¤ÅÔ¡º¹äͤ͹áÅéÇ¡àÅÔ¡¡ÒÃàÅ×Í¡µÑÇàÅ×Í¡ Mute all
•ÃдѺàÊÕ§ÍÒ¨¹éÍÂà¡Ô¹ä» ã¹ Windows ãËé´Ù·Õèäͤ͹¤Çº¤ØÁàÊÕ§º¹·ÒÊ¡ìºÒÃì
¤Ø³ÂѧÊÒÁÒöãªé»ØèÁ¤Çº¤ØÁàÊÕ§à¾×èÍ»ÃѺàÊÕ§ä´éÍÕ¡´éÇÂ
•ËÒ¡ÁÕËٿѧËÃ×ÍÅÓ⾧ÀÒ¹͡µèÍÍÂÙè¡Ñº¾ÍÃìµäŹìàÍҷ캹¤ÍÁ¾ÔÇàµÍÃì
ÅÓ⾧º¹à¤Ã×èͧ¤ÍÁ¾ÔÇàµÍÃì¨Ð»Ô´¡Ò÷ӧҹâ´ÂÍѵâ¹ÁѵÔ

¤Ó¶ÒÁ·Õè¶Ù¡¶ÒÁºèÍ - 85
©Ñ¹µéͧ¡ÒÃà»Ô´¶Ò´ä´Ãì¿Í;µÔ¤ÍÅÍÍ¡â´ÂäÁèµéͧà»Ô´à¤Ã×èͧ
ÁÕªèͧ·ÕèÊÒÁÒöà»Ô´´éÇÂÁ×ÍÍÂÙ躹ä´Ãì¿Í;µÔ¤ÍÅ
§èÒÂæà¾Õ§á¤èãªéÊèǹ»ÅÒ¢ͧ»Ò¡¡ÒËÃ×ͤÅԻ˹պ¡ÃдÒÉãÊèà¢éÒä»ã¹ªèͧáÅС´à¾×èÍà»Ô´¶Ò´
¤ÕÂìºÍÃì´äÁèµÍºÊ¹Í§
ÅͧµèͤÕÂìºÍÃì´ÀÒ¹͡à¢éҡѺ¾ÍÃìµ USB º¹¤ÍÁ¾ÔÇàµÍÃì ËÒ¡ÊÒÁÒöãªé§Ò¹ä´é
ãËéµÔ´µèͼÙé¢Ò¢ͧ¤Ø³ËÃ×ÍÈÙ¹ÂìºÃÔ¡Ò÷Õèä´éÃѺ¡ÒÃáµè§µÑé§à¹×èͧ¨Ò¡ÊÒ¤ÕÂìºÍÃì´ÍÒ¨ËÅÇÁ
à¤Ã×èͧ¾ÔÁ¾ìäÁè·Ó§Ò¹
ãËéµÃǨÊͺÊÔ觵èÍ仹Õé:
•µÃǨ´ÙãËéá¹èã¨ÇèÒà¤Ã×èͧ¾ÔÁ¾ì¹Ñé¹àÊÕºà¢éҡѺ»ÅÑê¡ä¿áÅÐà»Ô´ãªé§Ò¹ÍÂÙè
•µÃǨ´ÙãËéá¹èã¨ÇèÒÊÒÂà¤Ã×èͧ¾ÔÁ¾ì¹Ñé¹àª×èÍÁµèÍà¢éҡѺ¾ÍÃìµ USB
áÅоÍÃìµ·Õè¶Ù¡µéͧ¢Í§à¤Ã×èͧ¾ÔÁ¾ìá¹è¹´ÕáÅéÇ

86
à¤Åç´ÅѺáÅФÓá¹Ð¹Ó㹡ÒÃãªé Windows 8
àÃÒ·ÃÒº´ÕÇèÒÃкº»¯ÔºÑµÔ¡ÒÃãËÁè¹Õé¨Ðµéͧãªé¤ÇÒÁ¤Øé¹à¤Â㹡ÒÃãªé§Ò¹¾ÍÊÁ¤ÇÃ
´Ñ§¹Ñé¹àÃÒ¨Ö§ä´éÊÃéÒ§¾ÍÂàµÍÃì¢Öé¹à¾×èͪèÇÂÊÃéÒ§¤ÇÒÁ¤Øé¹à¤ÂãËé¡Ñº¤Ø³
ÁÕÍÂÙèÊÒÁ¤Í¹à«ç»µì·Õè¤Ø³µéͧ¨ÓäÇéãËé¢Öé¹ã¨
1. àÃÔèÁ
»ØèÁ àÃÔèÁµé¹ äÁèÁÕãËéàÅ×Í¡ãªéÍÕ¡µèÍä» ¤Ø³ÊÒÁÒöàÃÕ¡ãªéá;¾ÅÔपÑè¹ä´é¨Ò¡Ë¹éÒ¨ÍàÃÔèÁµé¹
2. Tiles
Live tiles ¹Ñé¹à»ÃÕºàËÁ×͹¡ÑºÀÒ¾¢¹Ò´Âèͧ͢â»Ãá¡ÃÁµèÒ§æ
3. Charms
Charms ªèÇÂãËé¤Ø³ãªé¿Ñ§¡ìªÑè¹µèÒ§æ ·Õèà»ç¹»ÃÐ⪹ì àªè¹¡ÒÃáºè§»Ñ¹¢éÍÁÙÅ,
»Ô´¾Õ«ÕËÃ×Íà»ÅÕ蹡ÒõÑ駤èÒä´é
©Ñ¹¨Ðà¢éÒ¶Ö§ charms ä´éÍÂèÒ§äÃ?
àÅ×è͹à¤ÍÃìà«ÍÃìä»·ÕèÁØÁ¢ÇÒº¹ËÃ×Í¢ÇÒÅèÒ§¢Í§Ë¹éÒ¨Íà¾×èÍà»Ô´á¶º Charms ËÃ×Í¡´»ØèÁ
Windows + <C>
©Ñ¹¨Ðä»ÂѧàÁ¹Ù àÃÔèÁ ä´éÍÂèÒ§äÃ
¡´»ØèÁ Windows º¹¤ÕÂìºÍÃì´; ¡´»ØèÁ Windows + <C> áÅéǤÅÔ¡ àÃÔèÁ;
ËÃ×ÍàÅ×è͹à¤ÍÃìà«ÍÃìä»ÂѧÁØÁ«éÒÂÅèÒ§¢Í§Ë¹éÒ¨ÍáÅéǤÅÔ¡ àÃÔèÁ

¤Ó¶ÒÁ·Õè¶Ù¡¶ÒÁºèÍ - 87
©Ñ¹¨ÐÊÅѺÃÐËÇèÒ§â»Ãá¡ÃÁä´éÍÂèÒ§äÃ?
àÅ×è͹à¤ÍÃìà«ÍÃìä»ÂѧÁØÁ´éÒ¹«éÒ¢ͧ˹éÒ¨Íà¾×èÍ´ÙÀÒ¾µÑÇÍÂèÒ§¢Í§á;¾ÅÔपÑè¹·ÕèÃѹÍÂÙè㹻Ѩ¨ØºÑ¹
¤Ø³ÂѧÊÒÁÒö¡´»ØèÁ Windows + <Tab> à¾×èÍà»Ô´áÅÐàÅ×è͹´Ùá;¾ÅÔपÑè¹·ÕèÃѹÍÂÙèä´é
©Ñ¹¨Ð»Ô´¤ÍÁ¾ÔÇàµÍÃì¢Í§©Ñ¹ä´éÍÂèÒ§äÃ?
¡´»ØèÁ Windows + <C>, ¤ÅÔ¡ Settings > Power áÅÐàÅ×Í¡¡ÒôÓà¹Ô¹¡Ò÷Õè¤Ø³µéͧ¡ÒÃ
ËÃ×ÍÍÕ¡ÇÔ¸Õ˹Ö觤×Í ¨Ò¡ à´Ê¡ì·çÍ» ¤ÅÔ¡ Gateway Power Button
áÅéÇàÅ×Í¡¡ÒôÓà¹Ô¹¡Ò÷Õè¤Ø³µéͧ¡Ò÷Ó
·ÓäÁ¨Ö§ÁÕÍÔ¹àµÍÃìà¿«ãËÁè?
ÍÔ¹àµÍÃìà¿«ãËÁèÊÓËÃѺ Windows 8
ä´éÃѺ¡ÒÃÍ͡ẺÁÒà¾×èÍãËé·Ó§Ò¹ÃèÇÁ¡Ñº¡ÒÃÍÔ¹¾Ø·áººÊÑÁ¼ÑÊä´é´Õ¢Öé¹ á;¾ÅÔपÑè¹
Windows Store ¨Ðãªé˹éҨͷÑé§ËÁ´â´ÂÍѵâ¹ÁѵÔáÅÐäÁè¨Óà»ç¹µéͧ·Ó¡ÒûԴẺà´ÔÁÍÕ¡µèÍä»
á;¾ÅÔपÑè¹ Windows ¨Ð¶Ù¡áÊ´§ã¹ Start â´Âãªé¾×é¹ËÅѧ Live
’live tiles’ ¤×ÍÍÐäÃ
¾×é¹ËÅѧ Live tiles ¤ÅéÒ¡ѺÀÒ¾Âèͧ͢á;¾ÅÔपÑè¹·Õè¨Ðä´éÃѺ¡ÒÃÍѾവ¢éÍÁÙÅãËÁèæ
àÁ×èͤسä´éàª×èÍÁµè͡ѺÍÔ¹àµÍÃìà¹çµ µÑÇÍÂèÒ§àªè¹
¤Ø³ÊÒÁÒö´ÙÃÒ§ҹÊÀÒ¾ÍÒ¡ÒÈËÃ×ÍÍѾവµÅÒ´ËØé¹ä´éâ´ÂäÁè¨Óà»ç¹µéͧà»Ô´á;¾ÅÔपÑè¹

88
©Ñ¹¨Ð»Å´Åçͤ¤ÍÁ¾ÔÇàµÍÃì¢Í§©Ñ¹ä´éÍÂèÒ§äÃ?
¡´»ØèÁã´æ áÅФÅÔ¡·Õèäͤ͹ºÑ−ªÕ¼Ùéãªéà¾×èͻŴÅçͤ¤ÍÁ¾ÔÇàµÍÃì
ËÒ¡ºÑ−ªÕ¢Í§¤Ø³ÁÕ¡ÒõÑé§ÃËÑʼèÒ¹äÇé ¤Ø³¨Óà»ç¹µéͧ»é͹ÃËÑʼèÒ¹à¾×èÍ´Óà¹Ô¹¡ÒõèÍ
©Ñ¹¨Ð»ÃѺáµè§¤ÍÁ¾ÔÇàµÍÃì¢Í§©Ñ¹ä´éÍÂèÒ§äÃ?
¤Ø³ÊÒÁÒö»ÃѺáµè§ àÃÔèÁ ä´é´éÇÂÀÒ¾¾×é¹ËÅѧÍ×è¹
ËÃ×Í´éÇ¡ÒûÃѺµÓá˹è§ä·ÅìãËéàËÁÒÐÊÁ¡Ñº¤ÇÒÁµéͧ¡ÒÃÊèǹµÑǢͧ¤Ø³
à¾×èÍà»ÅÕè¹ÀÒ¾¾×é¹ËÅѧ ¡´»ØèÁ Windows + <C> áÅéǤÅÔ¡ Settings > Change PC settings >
ÊèǹµÑÇ ¤ÅÔ¡ ˹éÒ¨ÍàÃÔèÁµé¹ ·Õè´éÒ¹º¹¢Í§Ë¹éÒáÅéÇàÅ×Í¡ÊÕáÅÐÀÒ¾
©Ñ¹¨Ðà¤Å×è͹ÂéÒÂä·Åìä´éÍÂèÒ§äÃ
¤ÅÔ¡·Õèä·Åì¤éÒ§äÇéà¾×èÍàÅ×Í¡ ¨Ò¡¹Ñé¹ÅÒ¡ä»ÇÒ§º¹ àÃÔèÁ ·Õè¤Ø³µéͧ¡ÒÃãËéä·Åì¹Ñé¹»ÃÒ¡¯ ä·ÅìÍ×è¹æ
¨Ð¶Ù¡ÂéÒµÒÁä·Åì·ÕèÍÂÙèã¹µÓá˹è§ãËÁè
©Ñ¹¨Ð·ÓãËéä·ÅìÁÕ¢¹Ò´ãË−è¢Öé¹ËÃ×ÍàÅç¡Å§ä´éËÃ×ÍäÁè
¤ÅÔ¡¢ÇÒ·Õèä·Åì ¨Ò¡¹Ñé¹àÅ×Í¡ àÅç¡Å§ ËÃ×Í ´ãË−è ¨Ò¡àÁ¹Ù·Õè»ÃÒ¡¯¢Öé¹·Õè´éÒ¹ÅèÒ§¢Í§Ë¹éÒ¨Í
©Ñ¹¨Ð·Ó¡ÒûÃѺáµè§Ë¹éÒ¨ÍÅçͤä´éÍÂèÒ§äÃ
¤Ø³ÊÒÁÒö»ÃѺáµè§Ë¹éÒ¨ÍÅçͤãËéà»ç¹áºº·Õè¤Ø³µéͧ¡ÒÃä´é´éÇÂÀÒ¾µèÒ§æ
ËÃ×ÍãËéáÊ´§Ê¶Ò¹ÐáÅСÒÃá¨é§àµ×͹·ÕèàËÁÒСѺ¤ÇÒÁµéͧ¡ÒÃÊèǹµÑǢͧ¤Ø³ä´é

¤Ó¶ÒÁ·Õè¶Ù¡¶ÒÁºèÍ - 89
à¾×èÍà»ÅÕè¹ÀÒ¾¾×é¹ËÅѧ ¡´»ØèÁ Windows + <C> áÅéǤÅÔ¡ Settings > Change PC settings >
ÊèǹµÑÇ ¤ÅÔ¡ »ÃѺáµè§Ë¹éÒ¨ÍÅçͤä´é ·Õè´éÒ¹º¹¢Í§Ë¹éÒáÅéÇàÅ×Í¡ÀÒ¾áÅÐá;¾ÅÔपÑè
¹·Õè¤Ø³µéͧ¡ÒèÐàË繺¹Ë¹éÒ¨ÍÅçͤ
©Ñ¹¨Ð»Ô´á;¾ÅÔपÑè¹ä´éÍÂèÒ§äÃ?
àÅ×è͹à¤ÍÃìà«ÍÃìä»Âѧ´éÒ¹º¹¢Í§Ë¹éÒ¨ÍáÅéǤÅÔ¡áÅÐÅҡ˹éÒµèÒ§¹Ñé¹ä»´éÒ¹ÅèÒ§
à¾×èͻԴá;¾ÅÔपÑè¹
¤Ø³ÊÒÁÒö»Ô´á;¾ÅÔपÑ蹨ҡÀÒ¾ÂèÍá;¾ÅÔपÑè¹·Õè´éÒ¹«éÒ¢ͧ˹éҨ͹Õéä´éâ´Â¡ÒäÅÔ¡¢ÇÒº
¹ÀÒ¾ÂèÍáÅéÇàÅ×Í¡ Close
©Ñ¹¨Ðà»ÅÕ蹤ÇÒÁÅÐàÍÕ´¢Í§Ë¹éÒ¨Íä´éËÃ×ÍäÁè
¨Ò¡ àÃÔèÁãËé¾ÔÁ¾ì ’ἧ¤Çº¤ØÁ’ à¾×èÍà»Ô´ ¡Òäé¹ËÒ áÅÐáÊ´§¼ÅÅѾ¸ì áÅéǤÅÔ¡ ἧ¤Çº¤ØÁ >
»ÃѺÅÐàÍÕ´¢Í§Ë¹éÒ¨Í
©Ñ¹µéͧ¡Ò÷Õè¨Ðãªé Windows Ẻ·Õè©Ñ¹à¤Âãªé – àÍÒà´Ê¡ì·çÍ»¢Í§©Ñ¹¤×¹ÁÒ!
¨Ò¡ àÃÔèÁ ¤ÅÔ¡·Õèä·Åì à´Ê¡ì·ç à¾×èÍ´Ùà´Ê¡ì·çͻẺà´ÔÁ
¤Ø³ÊÒÁÒö»Ñ¡ËÁØ´á;¾ÅÔपÑè¹·Õè¤Ø³ãªéºèͺ¹·ÒÊ¡ìºÒÃìà¾×èͤÇÒÁÊдǡ㹡ÒÃà»Ô´ãªé§Ò¹
ËÒ¡¤Ø³¤ÅÔ¡·Õèá;¾ÅÔपÑè¹·ÕèäÁèãªèá;¾ÅÔपÑè¹ Windows Store Ãкº Windows
à»Ô´á;¾ÅÔपÑè¹¹Ñé¹â´Âãªé Desktop â´ÂÍѵâ¹ÁѵÔ

90
á;¾ÅÔपÑè¹µèÒ§æ ¢Í§©Ñ¹ÍÂÙè·Õèä˹?
¨Ò¡ àÃÔèÁ à¾Õ§àÃÔèÁ¾ÔÁ¾ìª×èͧ͢á;¾ÅÔपÑè¹·Õè¤Ø³µéͧ¡ÒÃà»Ô´ Ãкº ¡Òäé¹ËÒ
¨Ðà»Ô´¼Å¡Òäé¹ËÒâ´ÂÍѵâ¹ÁѵÔ
à¾×èÍ´ÙÃÒª×èͧ͢á;¾ÅÔपÑè¹·Ñé§ËÁ´ ¡´ space bar ËÃ×Í¡´ »ØèÁàÁ¹Ù áÅéǤÅÔ¡ ·Ñé§ËÁ´á;¾ÅÔà¤
©Ñ¹¨Ð·ÓãËéá;¾ÅÔपÑè¹»ÃÒ¡¯ÍÂÙ躹 Start ä´éÍÂèÒ§äÃ
ËÒ¡¤Ø³ÍÂÙèã¹ ·Ñé§ËÁ´á;¾ÅÔठáÅФسµéͧ¡Ò÷ÓãËéá;¾ÅÔपÑè¹Ë¹Ö觻ÃÒ¡¯ÍÂÙ躹 àÃÔèÁ
¤Ø³ÊÒÁÒöàÅ×Í¡á;¾ÅÔपÑè¹¹Ñé¹áÅéÇ¡´¤ÅÔ¡¢ÇÒº¹á;¾ÅÔपÑè¹ àÅ×Í¡ »Ñ¡ËÁØ´¡ÑºàÃÔèÁ
¨Ò¡àÁ¹Ù·Õè»ÃÒ¡¯·Õè´éÒ¹ÅèÒ§¢Í§Ë¹éÒ¨Í
©Ñ¹¨Ðź¾×é¹ËÅѧÍÍ¡¨Ò¡ àÃÔèÁ ä´éÍÂèÒ§äÃ?
¤ÅÔ¡¢ÇÒ·Õèä·ÅìáÅéǤÅÔ¡äÁè»Ñ¡ËÁØ´¨Ò¡àÃÔèÁ¨Ò¡àÁ¹Ù·Õè»ÃÒ¡¯·Õè´éÒ¹ÅèÒ§¢Í§Ë¹éÒ¨Í
©Ñ¹¨Ð·ÓãËéá;¾ÅÔपÑè¹»ÃÒ¡¯ÍÂÙ躹·ÒÊ¡ìºÒÃìã¹à´Ê¡ì·çÍ»ä´éÍÂèÒ§äÃ?
ËÒ¡¤Ø³ÍÂÙèã¹ ·Ñé§ËÁ´á;¾ÅÔठáÅФسµéͧ¡Ò÷ÓãËéá;¾ÅÔपÑè¹Ë¹Ö觻ÃÒ¡¯ÍÂÙ躹·ÒÊ¡ìºÒÃìã¹
à´Ê¡ì·ç ¤Ø³ÊÒÁÒöàÅ×Í¡á;¾ÅÔपÑè¹¹Ñé¹áÅéÇ¡´¤ÅÔ¡¢ÇÒº¹á;¾ÅÔपÑè¹ àÅ×Í¡
»Ñ¡ËÁØ´¡Ñº·ÒÊ¡ìºÒÃì ¨Ò¡àÁ¹Ù·Õè»ÃÒ¡¯¢Öé¹·Õè´éÒ¹ÅèÒ§¢Í§Ë¹éÒ¨Í
©Ñ¹¨ÐµÔ´µÑé§á;¾ÅÔपÑè¹ä´éÍÂèÒ§äÃ?
¤Ø³ÊÒÁÒö´ÒǹìâËÅ´á;¾ÅÔपÑè¹ Windows Store ä´é¨Ò¡ Store ¤Ø³¨ÐµéͧÁÕ Microsoft ID
à¾×èÍ«×éÍáÅдÒǹìâËÅ´á;¾ÅÔपÑ蹨ҡ Store

¤Ó¶ÒÁ·Õè¶Ù¡¶ÒÁºèÍ - 91
©Ñ¹äÁ辺á;¾ÅÔपÑè¹ÍÂèÒ§ Notepad áÅÐ Paint! â»Ãá¡ÃÁ¾Ç¡¹ÕéËÒÂä»ä˹ËÁ´
¨Ò¡ àÃÔèÁ ¤Ø³à¾Õ§á¤èàÃÔèÁ¾ÔÁ¾ìª×èͧ͢á;¾ÅÔपÑè¹·Õè¤Ø³ÁͧËÒà¾×èÍà»Ô´ãªé¡Òäé¹ËÒ
áÅдÙÃÒª×èÍ¡Òäé¹ËÒ ËÃ×Íà»Ô´ á;¾ÅÔपÑè¹·Ñé§ËÁ´ áÅéÇàÅ×è͹ÁÒÂѧ ’Windows Accessories’
à¾×èÍ´ÙÃÒª×èÍâ»Ãá¡ÃÁà¡èÒæ
Microsoft ID (ºÑ−ªÕ) ¤×ÍÍÐäÃ
ºÑ−ªÕ Microsoft ¤×Í·ÕèÍÂÙèÍÕàÁÅìáÅÐÃËÑʼèÒ¹·Õè¤Ø³ãªéà¾×èÍŧª×èÍà¢éÒãªé§Ò¹ Windows
¤Ø³ÊÒÁÒöãªé·ÕèÍÂÙèÍÕàÁÅìä´é áµè¨ÐãËé´Õ·ÕèÊØ´¤×ͤسàÅ×Í¡·ÕèÍÂÙèÍÕàÁÅì·Õè¤Ø³ãªéÊÓËÃѺµÔ´µè͡Ѻà¾×è͹æ
áÅÐãªéà¾×èÍŧª×èÍà¢éÒãªé§Ò¹àÇçºä«µì·Õè¤Ø³ª×蹪ͺ àÁ×èͤسŧª×èÍà¢éÒãªé§Ò¹¡Ñº¾Õ«Õ¢Í§¤Ø³´éǺÑ−ªÕ
Microsoft ¤Ø³¨Ð·Ó¡ÒÃàª×èÍÁµè;իբͧ¤Ø³¡Ñº¼Ù餹 ä¿Åì áÅÐÍØ»¡Ã³ì·Õè¤Ø³ãËé¤ÇÒÁÊÓ¤Ñ−
©Ñ¹µéͧÁÕºÑ−ªÕ¹ÕéËÃ×ÍäÁè
¤Ø³äÁè¨Óà»ç¹µéͧÁÕ Microsoft ID à¾×èÍãªé§Ò¹ Windows 8
áµè¡ÒÃÁÕºÑ−ªÕ¹ÕéäÇé¨Ð·ÓãËéªÕÇÔµ¤Ø³§èÒ¢Öé¹à¹×èͧ¨Ò¡¤Ø³¨ÐÊÒÁÒö«Ô§¤ì¢éÍÁÙżèÒ¹ÍØ»¡Ã³ìµèÒ§æ
·Õè¤Ø³ä´éŧª×èÍà¢éÒãªéâ´Âãªé Microsoft ID
©Ñ¹¨ÐÁÕºÑ−ªÕé¹Õéä´éÍÂèÒ§äÃ
ËÒ¡¤Ø³ä´éµÔ´µÑé§ Windows 8 áÅéÇáÅÐÂѧäÁèä´éŧª×èÍà¢éÒãªéâ´ÂãªéºÑ−ªÕ Microsoft ËÃ×ͤسäÁèÁÕºÑ−ªÕ
Microsoft áÅеéͧ¡ÒèÐÁÕºÑ−ªÕäÇéãªé§Ò¹ ¡´»ØèÁ Windows + <C> áÅéǤÅÔ¡ ¡ÒõÑ駤èÒè >
»ÅÕ蹡Òþիբͧ¤Ø³µÑ駤èҢͧ¤Ø³ > ¼Ùéãªé > ÊÅѺ价Õè Microsoft ºÑ−ªÕ
¨Ò¡¹Ñé¹·ÓµÒÁ¤Óá¹Ð¹Óº¹Ë¹éÒ¨Í

92
©Ñ¹¨Ðà¾ÔèÁÃÒ¡ÒÃâ»Ã´Å§ä»ã¹ Internet Explorer ä´éÍÂèÒ§äÃ?
Internet Explorer 10 ¨ÐäÁèÁÕÃÒ¡ÒÃâ»Ã´àËÁ×͹à¡èÒ áµè¤Ø³¨ÐÊÒÁÒö»Ñ¡ËÁØ´·Ò§ÅÑ´äÇ麹˹éÒ
àÃÔèÁ ä´éá·¹ àÁ×èͤسà»Ô´Ë¹éÒàÇçºà¾¨áÅéÇ
ãËé¤ÅÔ¡¢ÇÒº¹·Õèã´¡çä´é¢Í§àÇçºà¾¨à¾×èÍà»Ô´àÁ¹Ù·Õè´éÒ¹ÅèÒ§¢Í§Ë¹éÒ¨Í ¤ÅÔ¡ »Ñ¡ËÁØ´¡ÑºàÃÔèÁ
©Ñ¹¨ÐµÃǨËÒ¡ÒÃÍѾവ¢Í§ Windows ä´éÍÂèÒ§äÃ
¡´ »ØèÁ Windows + <C> áÅéǤÅÔ¡ ¡ÒõÑ駤èÒ > »ÅÕ蹡Òþիբͧ¤Ø³µÑ駤èҢͧ¤Ø³ > Windows
Updates ¤ÅÔ¡ µÃǨÊͺ¡ÒÃÍѾവ·Ñ¹·Õ
©Ñ¹¨ÐËÒ¢éÍÁÙÅà¾ÔèÁàµÔÁä´é·Õèä˹
ÊÓËÃѺ¢éÍÁÙÅà¾ÔèÁàµÔÁ â»Ã´áÇÐä»Âѧ:
•ÇÔ¸Õ¡ÒÃãªé§Ò¹ Windows 8: www.gateway.com/windows8-tutorial
•FAQ ¡ÒÃʹѺʹع: support.gateway.com

¢éÍÁÙÅ´éÒ¹¡ÒäǺ¤ØÁ - 93
¢éÍÁÙÅ´éÒ¹¡ÒäǺ¤ØÁ
¡Òûéͧ¡Ñ¹¡ÒÃÊÙ−àÊÕ¡ÒÃä´éÂÔ¹
-¢éͤÇÃÃÐÇѧ: ¡ÒÃÊÙ−àÊÕ¡ÒÃä´éÂÔ¹¶ÒÇÃÍÒ¨à¡Ô´¨Ò¡¡ÒÃãªéËٿѧËÃ×ÍÅÓ⾧ã¹ÃдѺàÊÕ§´Ñ§
à»ç¹ÃÐÂÐàÇÅÒ¹Ò¹
-
A pleine puissance, l’écoute prolongée du baladeur peut endommager
l’oreille de l’utilisateur.
¢éͤÇÃÃÐÇѧ¢³Ð¿Ñ§
»éͧ¡Ñ¹Ãкº¡ÒÃä´éÂÔ¹àÊÕ§ â´Â·ÓµÒÁ¢Ñ鹵͹µèÒ§æ
-à¾ÔèÁÃдѺàÊÕ§·ÕÅйéͨ¹¤Ø³ÊÒÁÒöä´éÂÔ¹ªÑ´à¨¹áÅÐʺÒÂËÙ
-ËéÒÁà¾ÔèÁÃдѺàÊÕ§ËÅѧ¨Ò¡ËÙ»ÃѺµÑÇä´éáÅéÇ
-ËéÒÁ¿Ñ§´¹µÃÕã¹ÃдѺàÊÕ§·ÕèÊÙ§à»ç¹àÇÅÒ¹Ò¹à¡Ô¹ä»
-ËéÒÁà¾ÔèÁÃдѺàÊÕ§à¾×è͡źàÊÕ§¨Ò¡ÊÀÒ¾áÇ´ÅéÍÁÀÒ¹͡
-ãËéÅ´ÃдѺàÊÕ§ŧËÒ¡¤Ø³äÁèÊÒÁÒöä´éÂÔ¹àÊÕ§¾Ù´¤Ø¢ͧ¤¹Ãͺ¢éÒ§
»ÃСÒÈá¨é§¡®ÃÐàºÕºÍØ»¡Ã³ìÇÔ·ÂØ
- ËÁÒÂà˵Ø: ¢éÍÁÙÅ¡®ÃÐàºÕºµèÍ仹Õéà»ç¹¢éÍÁÙÅÊÓËÃѺÃØè¹·ÕèÁÕ LAN ẺäÃéÊÒ áÅÐ/ËÃ×Í Bluetooth à·èÒ¹Ñé¹
ÍØ»¡Ã³ìàÊÃÔÁ·Õè·Ó§Ò¹ÃèÇÁ¡Ñ¹
ÍØ»¡Ã³ìàÊÃÔÁ·Õè·Ó§Ò¹ÃèÇÁ¡ÑºÍØ»¡Ã³ì¹Õé¤×Í: ÊÒÂÇÔ´ÕâÍËØéÁ©¹Ç¹àÁ×èÍÁÕ¡ÒÃàª×èÍÁµèÍÁ͹ÔàµÍÃìÀÒ¹͡ ÍØ»¡Ã³ì
àËÅèÒ¹Õéµéͧ¹ÓÁÒãªé§Ò¹à¾×èÍãËéà»ç¹ä»µÒÁ¡® FCC

94
−ѵµÔá¤ÅÔ¿ÍÃìà¹ÕÂ65 ¤Óàµ×͹
ÍØ»¡Ã³ì¹ÕéÁÕÊÒÃà¤ÁÕ·Õèà»ç¹·ÕèÃÙé¨Ñ¡ã¹ÃÑ°á¤ÅÔ¿ÍÃìà¹Õ«Ö觨СèÍãËéà¡Ô´ÁÐàÃç§ ¢éͺ¡¾Ãèͧáµè¡Óà¹Ô´ áÅÐ/
ËÃ×ÍÍѹµÃÒÂÍ×è¹·Õè¨Ðà¡Ô´¢Öé¹ ÊÓËÃѺ¢éÍÁÙÅà¾ÔèÁàµÔÁà¡ÕèÂǡѺ¤Óàµ×͹¢Í§¼ÅÔµÀѳ±ì¹Õé ãËéä»·Õè
www.gateway.com/prop65
日本
(−Õè»Øè¹)
本装置は、第二種情報装置(住宅地域またはその隣接した地域において使用されるべ
き情報装置)デ住宅地域での電波障害防止を目的とした情報装置等電波障害自主規制
協議会(VCCI)基準に適合しております。
しかし、本装置をラジオ、テレビジョン受信機に、近接してご使用になると、受信障
害の原因となることがあります。本書の説明にしたがって正しい取り扱いをしてくだ
さい。
W
IRELESS ADAPTER REGULATORY INFORMATION
USA — FCC and FAA
The FCC with its action in ET Docket 96-8 has adopted a safety standard for human
exposure to radio frequency (RF) electromagnetic energy emitted by FCC certified
equipment. The wireless adapter meets the Human Exposure limits found in OET Bulletin
65, supplement C, 2001, and ANSI/IEEE C95.1, 1992. Proper operation of this radio
according to the instructions found in this manual will result in exposure substantially
below the FCC’s recommended limits.
- The following safety precautions should be observed:
Do not touch or move antenna while the unit is transmitting or receiving.

¢éÍÁÙÅ´éÒ¹¡ÒäǺ¤ØÁ - 95
- Do not hold any component containing the radio such that the antenna is very close
or touching any exposed parts of the body, especially the face or eyes, while
transmitting.
- Do not operate the radio or attempt to transmit data unless the antenna is connected;
this behavior may cause damage to the radio.
Use in specific environments:
- The use of wireless adapters in hazardous locations is limited by the constraints
posed by the safety directors of such environments.
- The use of wireless adapters on airplanes is governed by the Federal Aviation
Administration (FAA).
- The use of wireless adapters in hospitals is restricted to the limits set forth by each
hospital.
Antenna Use
In order to comply with FCC RF exposure limits, low gain integrated antennas should be
located at a minimum distance of 20 cm (8 inches) or more from the body of all persons
or at a minimum distance as specified by the FCC module grant conditions. FCC grants
can be viewed from the FCC Equipment Authorization website at https://fjallfoss.fcc.gov/
oetcf/eas/reports/GenericSearch.cfm by entering the FCC ID printed on the module label.
Explosive Device Proximity Warning
Warning: Do not operate a portable transmitter (including this wireless adapter) near
unshielded blasting caps or in an explosive environment unless the transmitter has been
modified to be qualified for such use
Antenna Warnings
- Warning: To comply with the FCC and ANSI C95.1 RF exposure limits, it is
recommended that for the wireless adapter installed in a desktop or portable
computer, the antenna for this wireless adapter to be installed so as to provide a
separation distance of at least 20 cm (8 inches) from all persons or at the minimum

96
distance as specified by the module grant conditions. FCC grants can be viewed from
the FCC Equipment Authorization website at https://fjallfoss.fcc.gov/oetcf/eas/
reports/GenericSearch.cfm by entering the FCC ID printed on the module label.
- Warning: The wireless adapter is not designed for use with high-gain directional
antennas.
Use On Aircraft Caution
- Caution: Regulations of the FCC and FAA prohibit airborne operation of radio-
frequency wireless devices (wireless adapters) because their signals could interfere
with critical interfere with critical aircraft instruments.
Local Restrictions on 802.11a, 802.11b, 802.11g and 802.11n Radio Usage
- Caution: Due to the fact that the frequencies used by 802.11a, 802.11b, 802.11g and
802.11n wireless LAN devices may not yet be harmonized in all countries, 802.11a,
802.11b, 802.11g and 802.11n products are designed for use only in specific
countries, and are not allowed to be operated in countries other than those of
designated use. As a user of these products, you are responsible for ensuring that
the products are used only in the countries for which they were intended and for
verifying that they are configured with the correct selection of frequency and channel
for the country of use. Any deviation from the permissible power and frequency
settings for the country of use is an infringement of national law and may be punished
as such.
Wireless Interoperability
The wireless adapter is designed to be interoperable with other wireless LAN products
that are based on direct sequence spread spectrum (DSSS) radio technology and to
comply with the following standards:
- IEEE Std. 802.11b compliant Standard on Wireless LAN
- IEEE Std. 802.11g compliant Standard on Wireless LAN
- IEEE Std. 802.11a compliant Standard on Wireless LAN (applies to devices
supporting 802.11a)

¢éÍÁÙÅ´éÒ¹¡ÒäǺ¤ØÁ - 97
- IEEE Std. 802.11n draft 2.0 compliant on Wireless LAN
- Wireless Fidelity certification, as defined by the Wi-Fi Alliance
The Wireless Adapter and Your Health
The wireless adapter, like other radio devices, emits radio frequency electromagnetic
energy. The level of energy emitted by the wireless adapter, however, is less than the
electromagnetic energy emitted by other wireless devices such as mobile phones. The
wireless adapter operates within the guidelines found in radio frequency safety standards
and recommendations. These standards and recommendations reflect the consensus of
the scientific community and result from deliberations of panels and committees of
scientists who continually review and interpret the extensive research literature. In some
situations or environments, the use of the wireless adapter may be restricted by the
proprietor of the building or responsible representatives of the applicable organization.
Examples of such situations may include:
- Using the wireless adapter on board airplanes, or
- Using the wireless adapter in any other environment where the risk of interference
with other devices or services is perceived or identified as being harmful.
If you are uncertain of the policy that applies to the use of wireless adapters in a specific
organization or environment (an airport, for example), you are encouraged to ask for
authorization to use the adapter before you turn it on.
FCC Radio Frequency Interference Requirements (applies to device supporting
802.11a)
This device is restricted to indoor use due to its operation in the 5.15 to 5.25 GHz and
5.470 to 5.725 GHz frequency ranges. FCC requires this product to be used indoors for
the frequency ranges 5.15 to 5.25 GHz and 5.470 to 5.725 GHz to reduce the potential
for harmful interference to co-channel mobile satellite systems. High power radars are
allocated as primary users of the 5.25 to 5.35 GHz and 5.65 to 5.85 GHz bands. These
radar stations can cause interference with and /or damage this device. No configuration

98
controls are provided for this wireless adapter allowing any change in the frequency of
operations outside the FCC grant of authorization for U.S operation according to Part
15.407 of the FCC rules.
USA — Federal Communications Commission (FCC)
This device complies with Part 15 of the FCC Rules. Operation of the device is subject to
the following two conditions:
- This device may not cause harmful interference.
- This device must accept any interference that may cause undesired operation.
- Note: The radiated output power of the adapter is far below the FCC radio frequency
exposure limits. Nevertheless, the adapter should be used in such a manner that the
potential for human contact during normal operation is minimized. To avoid the
possibility of exceeding the FCC radio frequency exposure limits, you should keep a
distance of at least 20 cm between you (or any other person in the vicinity), or the
minimum separation distance as specified by the FCC grant conditions, and the
antenna that is built into the computer. Details of the authorized configurations can
be found at http://www.fcc.gov/oet/ea/
by entering the FCC ID number on the device.
Interference Statement
This wireless adapter has been tested and found to comply with the limits for a Class B
digital device, pursuant to Part 15 of the FCC Rules. These limits are designed to provide
reasonable protection against harmful interference in a residential installation. This
wireless adapter generates, uses, and can radiate radio frequency energy. If the wireless
adapter is not installed and used in accordance with the instructions, the wireless adapter
may cause harmful interference to radio communications. There is no guarantee,
however, that such interference will not occur in a particular installation. If this wireless
adapter does cause harmful interference to radio or television reception (which can be
determined by turning the equipment off and on), the user is encouraged to try to correct
the interference by taking one or more of the following measures:
- Reorient or relocate the receiving antenna of the equipment experiencing the
interference.

¢éÍÁÙÅ´éÒ¹¡ÒäǺ¤ØÁ - 99
- Increase the distance between the wireless adapter and the equipment experiencing
the interference.
- Connect the computer with the wireless adapter to an outlet on a circuit different from
that to which the equipment experiencing the interference is connected.
- Consult the dealer or an experienced radio/TV technician for help.
- Note: The adapter must be installed and used in strict accordance with the
manufacturer's instructions as described in the user documentation that comes with
the product. Any other installation or use will violate FCC Part 15 regulations.
Canada — Industry Canada (IC)
This device complies with RSS210 of Industry Canada. Cet appareil se conforme à
RSS210 de Canada d'Industrie.
- Caution: When machine supports and using IEEE 802.11a wireless LAN, this
product is restricted to indoor use due to its operation in the 5.15- to 5.25 GHz
frequency range. Industry Canada requires this product to be used indoors for the
frequency range of 5.15 GHz to 5.25 GHz to reduce the potential for harmful
interference to co-channel mobile satellite systems. High power radar is allocated as
the primary user of the 5.25 to 5.35 GHz and 5.65 to 5.85 GHz bands. These radar
stations can cause interference with and/or damage to this device. The maximum
allowed antenna gain for use with this device is 6dBi in order to comply with the
E.I.R.P limit for the 5.25 to 5.35 and 5.725 to 5.85 GHz frequency range in point-to-
point operation. To comply with RF exposure requirements all antennas should be
located at a minimum distance of 20 cm, or the minimum separation distance allowed
by the module approval, from the body of all persons.
- Attention: l’utilisation d’un réseau sans fil IEEE802.11a est réstreinte à une
utilisation en intérieur à cause du fonctionement dans la bande de fréquence 5,15 -
5,25 GHz. Industry Canada requiert que ce produit soit utilisé à l’intérieur des
bâtiments pour la bande de fréquence 5,15 - 5,25 GHz afin de réduire les possibilités
d’interférences nuisibles aux canaux co-existants des systèmes de transmission
satellites. Les radars de puissances ont fait l’objet d’une allocation primaire de

100
fréquences dans les bandes 5,25 - 5,35 GHz et 5 65 - 5 85 GHz. Ces stations radar
peuvent créer des interférences avec ce produit et/ou lui être nuisible. Le gain
d’antenne maximum permissible pour une utilisation avec ce produit est de 6 dBi afin
d’être conforme aux limites de puissance isotropique rayonnée équivalente (P.I.R.E.)
applicable dans les bandes 5,25 - 5,35 GHz et 5,725 - 5,85 GHz en fonctionement
point-à-point. Se pour conformer aux conditions d'exposition de RF toutes les
antennes devraient être localisées à une distance minimum de 20 cm, ou la distance
de séparation minimum permise par l'approbation de module, du corps de toutes les
personnes.
This Class B digital apparatus complies with Canadian ICES-003.
Cet appareil numérique de la classe B est conforme a la norme NMB-003 du Canada.
"To prevent radio interference to the licensed service, this device is intended to be
operated indoors and away from windows to provide maximum shielding. Equipment (or
its transmit antenna) that is installed outdoors is subject to licensing."
« Pour empêcher que cet appareil cause du brouillage au service faisant l'objet d'une
licence, il doit être utilisé a l'intérieur et devrait être placé loin des fenêtres afin de fournir
un écran de blindage maximal. Si le matériel (ou son antenne d'émission) est installé à
l'extérieur, il doit faire l'objet d'une licence. »
European Union
ÃÒª×èÍ»ÃÐà·È·ÕèÊÒÁÒöãªéä´é
µéͧãªé¼ÅÔµÀѳ±ì¹ÕéÍÂèÒ§à¤Ã觤ÃÑ´µÒÁ¡®¢éͺѧ¤Ñº¢Í§»ÃÐà·È·Õèãªé§Ò¹ÍÂÙè ÊÓËÃѺ¢éÍÁÙÅà¾ÔèÁàµÔÁ
â»Ã´µÔ´µèÍÊӹѡ§Ò¹·éͧ¶Ôè¹ã¹»ÃÐà·È·Õèãªé§Ò¹ÍÂÙè â»Ã´´Ù http://ec.europa.eu/enterprise/rtte/implem.htm
ÊÓËÃѺÃÒª×èÍ»ÃÐà·ÈÅèÒÊØ´

¢éÍÁÙÅ´éÒ¹¡ÒäǺ¤ØÁ - 101
ÃÒ¡ÒÃÃËÑÊ»ÃÐà·È
ÍØ»¡Ã³ì¹ÕéÊÒÁÒöãªé§Ò¹ä´éã¹»ÃÐà·ÈµèÒ§æ ´Ñ§µèÍ仹Õé:
The low band 5.15 -5.35 GHz is for indoor use only.
This equipment complies with the essential requirements of the European Union directive
1999/5/EC. See Statements of European Union Compliance, and more details refer to the
attached Declaration of Conformity.
»ÃÐà·È
ISO 3166
ÃËÑÊ 2 ËÅÑ¡
»ÃÐà·È
ISO 3166
ÃËÑÊ 2 ËÅÑ¡
»ÃÐà·È
ISO 3166
ÃËÑÊ 2 ËÅÑ¡
»ÃÐà·È
ISO 3166
ÃËÑÊ 2 ËÅÑ¡
ÍÍÊàµÃÕÂAT àÂÍÃÁѹ DE ÁÍÅµÒ MT ÊËÃÒªÍҳҨѡà GB
àºÅàÂÕèÂÁ BE ¡ÃÕ«GRà¹à¸ÍÃìᏴì NT äÍ«ìᏴì IS
ä«»ÃÑÊCYÎѧ¡ÒÃÕ HU â»áŹ´ì PL ÅԤ෹Êäµ¹ì LI
ÊÒ¸ÒóÃѰત CZ äÍÃìᏴì IE â»ÃµØà¡Ê PT ¹ÍÃàÇÂì NO
à´¹ÁÒÃì¤DK ÍÔµÒÅÕ IT ÊâÅÇÒà¡ÕÂSK ÊÇÔÊà«ÍÃìᏴì CH
àÍÊâ·à¹ÕÂEE ÅÑ·àÇÕ LV ÊâÅàÇà¹ÕÂSL ºÑÅá¡àÃÕÂBG
¿Ô¹áŹ´ì FI ÅÔ¸ÑÇà¹ÕÂLT Ê໹ ESâÃÁÒà¹ÕÂRO
½ÃÑè§àÈÊ FR ÅÑ¡à«ÁàºÔÃì¡LU ÊÇÕà´¹ SE µØÃ¡Õ TR
English
Hereby, ACER INC., declares that this devise is in
compliance with the essential requirements and other
relevant provisionns of Directive 1999/5/EC.
Česky [Czech]
ACER INC. tímto prohlašuje, že toto zařízení je ve shodě se
základními požadavky a dalšími příslušnými ustanoveními
směrnice 1999/5/ES.

102
Daansk [Danish]
Undertegnede ACER INC. erklærer herved, at følgende
udstyr overholder de væsentlige krav og øvrige relevante krav
i direktiv 1999/5/EF.
Deutsch
[German]
Hiermit erklärt ACER INC., dass sich das Gerät Radiolan in
Übereinstimmung mit den grundlegenden Anforderungen und
den übrigen einschlägigen Bestimmungen der Richtlinie
1999/5/EG befindet.
Eesti [Estonian]
Käesolevaga kinnitab ACER INC. seadme vastavust direktiivi
1999/5/EÜ põhinõuetele ja nimetatud direktiivist tulenevatele
teistele asjakohastele sätetele.
Español
[Spanish]
Por medio de la presente ACER INC. declara que el
dispositivo cumple con los requisitos esenciales y
cualesquiera otras disposiciones aplicables o exigibles de la
Directiva 1999/5/CE.
Ελληνικά
[Greek]
∆ια του παρόντος η ACER INC. δηλώνει ότι η παρούσα
συσκευή συµµορφώνεται προς τις ουσιώδεις απαιτήσεις και
τις λοιπές διατάξεις της Οδηγίας 1999/5/ ΕΚ.
Français
[French]
Par la présente ACER INC. déclare que cet appareil est
conforme aux exigences essentielles et aux autres
dispositions pertinentes de la directive 1999/5/CE.

¢éÍÁÙÅ´éÒ¹¡ÒäǺ¤ØÁ - 103
Íslenska
[Icelandic]
Hér með lýsir ACER INC. yfir því að er í samræmi við
grunnkröfur og aðrar kröfur, sem gerða r eru í tilskipun
1999/5/EC.
Itaaliano [Italian]
Con la presente ACER INC. dichiara che questo dispositivo è
conforme ai requisiti essenziali ed alle altre disposizioni
pertinenti stabilite dalla direttiva 1999/5/CE.
Latviski [Latvian]
Ar šo ACER INC. deklarē, ka šī ierīce atbilst Direktīvas
1999/5/EK būtiskajām prasībām un citiem ar to saistītajiem
noteikumiem.
Lietuvių
[Lithuanian]
Šiuo ACER INC. deklaruoja, kad šis įrenginys atitinka
esminius reikalavimus ir kitas 1999/5/EB Direktyvos
nuostatas.
Malti [Maltese]
Hawnhekk, ACER INC., jiddikjara li dan jikkonforma mal- ti
ijiet essenzjali u ma provvedimenti o rajn relevanti li he mm
fid-Dirrettiva 1999/5/EC.
Magyar
[Hungarian]
Alulírott, ACER INC. nyilatkozom, hogy a készülék megfelel a
vonatkozó alapveto követelményeknek és az 1999/5/EC
irányelv egyéb eloírásainak.
Nederlands
[Dutch]
Hierbij verklaart ACER INC. dat het toestel voldoet aan de
essentiële eisen en de andere relevante bepalingen van
richtlijn 1999/5/EG.

104
Norsk
[Norwegiann]
ACER INC. erklærer herved at utstyret er i samsvar med de
grunnleggende krav og øvrige relevante krav i direktiv
1999/5/EF.
Polski [Polish]
Niniejszym ACER INC. oświadcza, że urządzenie jest zgodne
z zasadniczymi wymogami oraz pozostałymi stosownymi
postanowieniami Dyrektywy 1999/5/EC.
Português
[Portuguese]
ACER INC. declara que este dispostivo está conforme com
os requisitos essenciais e outras disposições da Directiva
1999/5/CE.
Slovensko
[Slovenian]
ACER INC. izjavlja, da je ta naprava skladna z bistvenimi
zahtevami in ostalimi relevantnimi določili Direktive
1999/5/ES.
Slovensky
[Slovak]
ACER INC. týmto vyhlasuje, že zariadenie spĺňa základné
požiadavky a všetky príslušné ustanovenia Smernice
1999/5/ES.
Suomi [Finnish]
ACER INC. vakuuttaa täten että tämä laite on direktiivin 1999/
5/EY oleellisten vaatimusten ja sitä koskevienn direktiivin
muiden ehtojen mukainen.

¢éÍÁÙÅ´éÒ¹¡ÒäǺ¤ØÁ - 105
France
Pour la France métropolitaine :
2,400 - 2,4835 GHz (Canaux 1à 13) autorisé en usage intérieur
2,400 - 2,454 GHz (canaux 1 à 7) autorisé en usage extérieur
Pour la Guyane et la Réunion :
2,400 - 2,4835 GHz (Canaux 1à 13) autorisé en usage intérieur
2,420 - 2,4835 GHz (canaux 5 à 13) autorisé en usage extérieur
Pour tout le territoire Français :
Seulement 5,15 -5,35 GHz autorisé pour le 802.11a
L'utilisation de cet equipement (2,4 GHz WLAN) est soumise à certaines restrictions :
- La puissance maximale autorisée en intérieur est de 100 mW pour 2400 - 2483,5 MHz.
- La puissance maximale autorisée est de 100 mW en extérieur pour 2400 - 2454 MHz.
- La puissance maximale autorisée est de 10 mW en extérieur, 2454 - 2483,5 MHz.
Pour les dernières restrictions, voir http://www.art-telecom.fr.
Italy
The use of these equipments is regulated by:
1.D.L.gs 1.8.2003, n. 259, article 104 (activity subject to general authorization) for outdoor
use and article 105 (free use) for indoor use, in both cases for private use.
2.D.M. 28.5.03, for supply to public of RLAN access to networks and telecom services.
L’uso degli apparati è regolamentato da:
Svenska
[Swedish]
Härmed intygar ACER INC. att denna enhet står i
överensstämmelse med väsentliga egenskapskrav och
övriga relevanta bestämmelser som framgår av direktiv
1999/5/EG.

106
1.D.L.gs 1.8.2003, n. 259, articoli 104 (attività soggette ad autorizzazione generale) se
utilizzati al di fuori del proprio fondo e 105 (libero uso) se utilizzati entro il proprio fondo,
in entrambi i casi per uso private.
2.D.M. 28.5.03, per la fornitura al pubblico dell’accesso R-LAN alle reti e ai servizi di
telecomunicazioni.
Belgium
Dans le cas d'une utilisation privée, à l'extérieur d'un bâtiment, au-dessus d'un espace
public, aucun enregistrement n'est nécessaire pour une distance de moins de 300 m.
Pour une distance supérieure à 300 m un enregistrement auprès de l'IBPT est requise.
Pour les enregistrements et licences, veuillez contacter l'IBPT.
In geval van privé-gebruik, buiten een gebouw, op een openbare plaats, is geen registratie
nodig, wanneer de afstand minder dan 300 m is. Voor een afstand groter dan 300 m is
een registratie bij BIPT vereist. Voor registraties en licenties, gelieve BIPT te contacteren.
Brazil
Este equipamento opera em caráter secundário, isto é, não tem direito a proteção contra
interferência prejudicial, mesmo de estações do mesmo tipo, e não pode causar
interferência a sistemas operando em caráter primário.
Pakistan
Pakistan Telecommunication Authority (PTA) Approved
Morocco
The operation of this product in the radio channel 2 (2417 MHz) is not authorized in the
following cities: Agadir, Assa-Zag, Cabo Negro, Chaouen, Goulmima, Oujda, Tan Tan,
Taourirt, Taroudant and Taza.
The operation of this product in the radio channels 4, 5, 6 and 7 (2425 - 2442 MHz) is not
authorized in the following cities: Aéroport Mohamed V, Agadir, Aguelmous, Anza,
Benslimane, Béni Hafida, Cabo Negro, Casablanca, Fès, Lakbab, Marrakech, Merchich,
Mohammédia, Rabat, Salé, Tanger, Tan Tan, Taounate, Tit Mellil, Zag.

¢éÍÁÙÅ´éÒ¹¡ÒäǺ¤ØÁ - 107
Japan
5 GHz 帯は室内でのみ使用のこと
Korea
당해 무선설비는 운용 중 전파혼신 가능성이 있음
Taiwan
第十二條
經型式認證合格之低功率射頻電機,非經許可,公司、商號或使用者均不得擅自變更頻
率、加大功率或變更原設計之特性及功能。
第十四條
低功率射頻電機之使用不得影響飛航安全及干擾合法通信 ; 經發現有干擾現象時,應立即
停用,並改善至無干擾時方得繼續使用。
前項合法通信,指依電信法規定作業之無線通信。
低功率射頻電機須忍受合法通信或工業、科學及醫療用電波輻射性電機設備之干擾。
¡ÒÃá¡é䢴Ѵá»Å§¼ÅÔµÀѳ±ì
à¤Ã×èͧËÁÒ CE
Gateway äÁèÊÒÁÒö¶×ͤÇÒÁÃѺ¼Ô´ªÍºµèÍ¡ÒÃá¡é䢴Ѵá»Å§«Ö觡ÃзÓâ´Â¼ÙéãªéáÅмÙé·Õèà¡ÕèÂÇ¢éͧ
â´ÂäÁèä´éÃѺ͹Ø−Òµ «Öè§ÍÒ¨à»ç¹¡ÒÃà»ÅÕè¹á»Å§¡Òû¯ÔºÑµÔµÒÁ¢éͺѧ¤Ñº¢Í§¼ÅÔµÀѳ±ì·ÕèÁÕà¤Ã×èͧËÁÒ CE
¡ÒÃú¡Ç¹¤ÇÒÁ¶ÕèÇÔ·ÂØ
¼Ùé¼ÅÔµäÁèµéͧÃѺ¼Ô´ªÍºµèÍ¡ÒÃÃѺ¡Ç¹ÇÔ·ÂØËÃ×Íâ·Ã·Ñȹìã´æ
·Õèà¡Ô´¨Ò¡¡ÒôѴá»Å§á¡éä¢ÍØ»¡Ã³ì¹Õéâ´ÂäÁèä´éÃѺ͹Ø−ÒµÍÂèÒ§¶Ù¡µéͧ
¡ÒÃàª×èÍÁµèÍáÅÐÃÕâÁ·àÍÔÃì¸
PELV (Protected Extra Low Voltage)
à¾×èÍãËéá¹èã¨àÃ×èͧºÙóÀÒ¾áç´Ñ¹µèÓ¾ÔàÈɢͧÍØ»¡Ã³ì¹Õé
ãËéàª×èÍÁµèÍÍØ»¡Ã³ìà¢éҡѺǧ¨Ã¡ÃáÊä¿¿éÒËÅÑ¡·Õèä´éÃѺ¡Òûéͧ¡Ñ¹«Öè§à´Ô¹µè͡Ѻ¾ÍÃìµÀÒ¹͡à·èÒ¹Ñé¹

108
SELV (Safety Extra Low Voltage)
ÍÔ¹¾Ø·áÅÐàÍÒ·ì¾Ø··Ø¡ª¹Ô´¢Í§¼ÅÔµÀѳ±ì¹Õéä´éÃѺ¡ÒáÓ˹´ÃдѺãËéà»ç¹ËÁÇ´áç´Ñ¹µèÓ¾ÔàÈÉà¾×èͤÇÒÁ»ÅÍ´ÀÑÂ
ÃÕâÁ·àÍÔÃì¸
à¾×èÍ»éͧ¡Ñ¹ä¿¿éÒªç͵ ãËéàª×èÍÁµèͤÍÁ¾ÔÇàµÍÃìÀÒÂã¹ (Êӹѡ§Ò¹áµèÅÐáËè§)
áÅÐÍØ»¡Ã³ìʹѺʹع¢Í§¤ÍÁ¾ÔÇàµÍÃìà¢éҡѺǧ¨Ãä¿¿éÒà´ÕÂǡѹ¡ÑºÊÒÂ俢ͧµÑÇÍÒ¤Òà ËÒ¡¤Ø³äÁèá¹èã¨
ãËéµÃǨÊͺ¡ÒÃà´Ô¹ÊÒÂ俢ͧµÑÇÍÒ¤ÒÃà¾×èÍàËÅÕ¡àÅÕè§ÀÒÇÐÃÕâÁ·àÍÔÃì¸
áËÅ觨èÒÂä¿ÍÒ¤ÒÃ
àª×èÍÁµèÍÍØ»¡Ã³ìà¢éҡѺáËÅ觨èÒÂ俢ͧÍÒ¤Ò÷Õèà»ç¹ä»µÒÁ¢éÍ¡Ó˹´¡ÒÃà´Ô¹ä¿ã¹»ÃÐà·È¢Í§¤Ø³à·èÒ¹Ñé¹
ã¹ÊËÃÒªÍҳҨѡà ¢éÍ¡Ó˹´àËÅèÒ¹Õé¤×Í¢éÍ¡Ó˹´ IEE
¾ÒÇàÇÍÃì«Ñ¾¾ÅÒÂáÅÐÊÒÂà¤àºÔéÅ
¾ÒÇàÇÍÃì«Ñ¾¾ÅÒÂ
ªèͧ¢Òà¢éÒáÅТÒÍÍ¡¢Í§¾ÒÇàÇÍÃì«Ñ¾¾ÅÒ (ËÒ¡ÁÕ) ä´éÃѺ¡ÒáÓ˹´à»ç¹áç´Ñ¹ä¿¿éÒÍѹµÃÒÂ
¤Ø³µéͧ¶Í´»ÅÑê¡ÊÒÂ俾ÒÇàÇÍÃì«Ñ¾¾ÅÒÂáÅжʹẵàµÍÃÕèà¾×èͶʹÍØ»¡Ã³ìµèÒ§æ ÍÍ¡¨Ò¡¾ÒÇàÇÍÃì«Ñ¾¾ÅÒÂ
â´Â¡Ò÷Óàªè¹¹Ñé¹ ªèͧ¢ÒÍÍ¡µéͧ¶Ù¡µÔ´µÑé§äÇéã¡Åé¡ÑºÍØ»¡Ã³ìáÅФÇèÐà¢éÒ¶Ö§ä´é§èÒÂ
¾Ô¡Ñ´¢éÍÁÙÅ¢Òà¢éÒ: ´Ù»éÒÂáÊ´§¾Ô¡Ñ´·ÕèÍÂÙè´éÒ¹ÅèÒ§¢Í§¤ÍÁ¾ÔÇàµÍÃìáÅеÃǨÊͺÇèÒ¡Ò÷ӧ
Ò¹¢Í§Íá´»àµÍÃì¨èÒÂä¿à»ç¹ä»µÒÁµÒÁ¾Ô¡Ñ´·ÕèÃкØäÇéËÃ×ÍäÁè
¼ÙéãªéËéÒÁ·Ó¡Òöʹ¾ÒÇàÇÍÃì«Ñ¾¾ÅÒÂÍÍ¡äÁèÇèÒ㹡óÕã´æ ¡çµÒÁ ¾ÒÇàÇÍÃì«Ñ¾¾ÅÒÂäÁèãªéªÔé¹Êèǹ
·ÕèÊÒÁÒöà»ÅÕè¹ä´éâ´Â¼Ùéãªé ÀÒÂã¹¾ÒÇàÇÍÃì«Ñ¾¾ÅÒ¹Ñé¹ÁÕáç´Ñ¹ä¿¿é
ÒÍѹµÃÒ·ÕèÊÒÁÒö·ÓãËéºÒ´à¨çºÃعáçä´é
¾ÒÇàÇÍÃì«Ñ¾¾¾ÅÒ·Õ躡¾Ãèͧµéͧ¶Ù¡Ê觤׹ãËé¡Ñº¼Ùé¨Ó˹Ò¢ͧ¤Ø³
ÊÒÂä¿áÅлÅÑê¡
¼ÅÔµÀѳ±ì¹Õéµéͧ¡ÒÃÊÒÂä¿áÅлÅÑꡪ¹Ô´ÁÕÊÒ´Թ áÅÐÊÒÁÒöµèÍà¢éҡѺàµéÒÃѺẺµèÍÊÒ´Թà·èÒ¹Ñé¹
µÃǨ´ÙãËéá¹èã¨ÇèÒàµéÒÃѺµèÍÍÂÙè¡ÑºÊÒ´Թ¡è͹àÊÕº»ÅÑê¡ ËéÒÁàÊÕº»ÅÑê¡à¢éҡѺàµéÒÃѺ·ÕèÓäÁèä´éµèÍÊÒ´Թ µÔ´µèͪèÒ§
ä¿ÊÓËÃѺÃÒÂÅÐàÍÕ´

¢éÍÁÙÅ´éÒ¹¡ÒäǺ¤ØÁ - 109
¤ÇÒÁÂÒǢͧÊÒµéͧäÁèà¡Ô¹ 2.5 àÁµÃ à¾×èÍ»éͧ¡Ñ¹ÍѹµÃÒ¨ҡ俿éÒ ËéÒÁ¶Í´ËÃ×ͻԴÊÑÁ¼ÑÊÊÒ´Թº¹ÊÒÂä¿
à»ÅÕè¹ÊÒÂä¿ËÒ¡ÊÒÂä´éÃѺ¤ÇÒÁàÊÕÂËÒ µÔ´µèͼÙé¢Ò¢ͧ¤Ø³ÊÓËÃѺÍÐäËÅè·Õè¶Ù¡µéͧ ã¹ÂØâû »ÅÑê¡
俵éͧÁÕÍѵÃÒ¢Ñé¹µèÓ 250 VAC, 10 áÍÁ»ì »ÅÑ꡵éͧÁÕà¤Ã×èͧËÁÒÂÃѺÃͧ¨Ò¡µÑÇá·¹¹Ò¹ÒªÒµÔ ÊÒÂ
俵éͧàËÁÒÐÊÁÊÓËÃѺãªé§Ò¹ã¹»ÃÐà·È¢Í§¼Ùéãªé µÔ´µèͼÙé¢Ò¢ͧ¤Ø³ËÃ×Íà¨éÒ˹éÒ·Õèä¿¿éÒ·éͧ¶Ôè¹ËÒ¡¤Ø³
äÁèá¹èã¨ÇèÒÊÒÂä¿»ÃÐàÀ·ã´·ÕèãªéÍÂÙèã¹»ÃÐà·È¢Í§¤Ø³
ÊÒÂà¤àºÔéÅ
ÊÓËÃѺÊÒÂà¤àºÔéÅ·ÕèäÁèä´éÁҡѺ¼ÅÔµÀѳ±ì㹺ÃèØÀѳ±ì¢Í§¤ÍÁ¾ÔÇàµÍÃì
»ÃÐÊÔ·¸ÔÀÒ¾ EMC ¢Í§Ãкº¹Ñ鹨Ðä´éÃѺ¡ÒÃÃѺ»ÃСѹàÁ×èÍà¤àºÔéÅáÅÐÊèǹÊÑÁ¼Ñ
Êãªé©¹Ç¹·ÕèÁÕ»ÃÐÊÔ·¸ÔÀÒ¾à·èÒ¹Ñé¹
¡ÒÃãªéÊÒ·ÕèÁÕ©¹Ç¹ÊÑÁ¼ÑʹÑ鹨Óà»ç¹ÊÓËÃѺ USB IEEE1394 «ÕàÃÕÂÅ à¤Ã×èͧ¾ÔÁ¾ì à¡Á ÍÍ´ÔâÍ/
ÇÔ´ÕâÍ͹ÒÅçÍ¡ËÃ×Í´Ô¨ÔµÍÅ PS2 àÊÒÍÒ¡ÒÈ TV ËÃ×Í FM áÅÐÊÒÂÍÔ¹àµÍÃìà¿Ê¤ÇÒÁàÃçÇÊÙ§·ÑèÇä»·Ñé§ËÁ´
ãªé੾ÒзÕèÁÕÃÒª×èÍ UL No. 26AWG ËÃ×ÍÊÒÂÊ×èÍÊÒ÷ÕèÁÕ¢¹Ò´ãË−è¡ÇèÒà·èÒ¹Ñé¹
੾ÒÐÍÕà¸ÍÃìà¹çµ LAN ËÃ×ÍâÁà´çÁ RTC à·èÒ¹Ñé¹·ÕèÊÒÁÒöÂÒÇà¡Ô¹¡ÇèÒ 3 àÁµÃä´é
Gateway ¢Íá¹Ð¹ÓãËé¤Ø³à¾ÔèÁ¤ÅÔ»¡ÅÁ᡹à¿ÍÃìäõìà¢éҡѺáµèÅÐÊÒ·Õèàª×èÍÁµè͡Ѻ¤ÍÁ¾ÔÇàµÍÃì ¢Í§
¤Ø³¡ÑºÍØ»¡Ã³ìÎÒÃì´áÇÃì·ÕèäÁèÃÇÁ㹤ÍÁ¾ÔÇàµÍÃì¢Í§¤Ø³
-ÍéÒ§ÍÔ§à¿ÍÃìäõì: 28A-2029 ¨Ò¡ Steward (ÊͧÅÙ»)
㹪èǧ¡ÒÃÃѺÃͧ¼ÅÔ
µÀѳ±ì Gatewayä´éãªéÊÒÂà¤àºÔéÅ·ÕèÁդسÀÒ¾´Ñ§¹Õé:
- ÊÒÂà¤àºÔéÅ USB2.0 ·Õèä´éÃѺ¡ÒÃÃѺÃͧ¨Ò¡ Hama 46778
- IEEE1394 shielded FireWire ¨Ò¡ Hama 50011
- ÊÒÂà¤àºÔéÅÍÍ´ÔâÍ/ÇÔ´ÕâÍ RCA-RCA ËØéÁ©¹Ç¹¨Ò¡ Thomson KHC001M, KHC012M, KHC028M
- ÊÒÂà¤àºÔéÅÍÍ´ÔâÍËØéÁ©¹Ç¹áººá¨ç¤ÊàµÍÃÔâͨҡ Hama 43330H, 42714H
¡ÒÃà¡Ô´¤ÇÒÁÃé͹áÅФÍÁ¾ÔÇàµÍÃ쾡¾Ò
Íá´»àµÍÃì AC áÅдéÒ¹ÅèÒ§¢Í§¤ÍÁ¾ÔÇàµÍÃìÍÒ¨ÁÕ¤ÇÒÁÃé͹ä´éËÅѧ¨Ò¡ãªé§Ò¹à»ç¹àÇÅÒ¹Ò¹ ¤ÇÃËÅÕ¡àÅÕè§
¡ÒÃÊÑÁ¼ÑÊà»ç¹àÇÅÒ¹Ò¹¡Ñº·Ñé§ÊͧÊÔ觹Ñé¹

110
¡ÒöʹáÅÐà»ÅÕè¹½Ò¤ÃͺáªÊ«Õ
¡è͹¶Í´½Ò¤Ãͺà¤Êà¾×èͺÓÃاÃÑ¡ÉÒËÃ×Í»ÃѺ»ÃاÍØ»¡Ã³ì ¤Ø³µéͧ¶Í´ÊÒÂä¿·Ñé§ËÁ´áÅÐÊÒÂâÁà´çÁ
áÅжʹËÃ×ͻԴ¡ÒÃãªé§Ò¹áºçµàµÍÃÕè
-¢éͤÇÃÃÐÇѧ: ´éÒ¹ÅèÒ§¢Í§¤ÍÁ¾ÔÇàµÍÃì¹Ñé¹ÍÒ¨à¡Ô´¤ÇÒÁÃé͹ËÅѧ¨Ò¡¡ÒÃãªé§Ò¹à»ç¹àÇÅÒ¹Ò¹
¤Ø³µéͧ»Ô´áªÊ«Õ¡è͹·Õè¤Ø³¨ÐàÊÕº»ÅÑê¡áÅÐà»Ô´ÊÇÔµ«ìÍØ»¡Ã³ì
¤Óá¶Å§à¡ÕèÂǡѺ¢éͺѧ¤Ñº´éÒ¹àÅà«ÍÃì
ÍØ»¡Ã³ìÍ;µÔ¤ÍÅä´éÃѺ¡Ò÷´ÊͺáÅÐÃѺÃͧÇèÒà»ç¹ä»µÒÁÁҵðҹ International Electrotechnical
Commission IEC60825-1 áÅÐ European EN60825-1 ÊÓËÃѺ¼ÅÔµÀѳ±ìàÅà«ÍÃì Class 1
¼ÅÔµÀѳ±ìàÅà«ÍÃì Class 1 ¹Ñé¹äÁè¹Ñºà»ç¹ÍѹµÃÒ ÍØ»¡Ã³ìÍ;µÔ¤ÍÅä´éÃѺ¡ÒÃÍÍ¡á
ººàªè¹¹ÕéäÁèÁÕÁ¹ØÉÂìà¢éÒ¶Ö§áʧàÅà«ÍÃìà¡Ô¹Ãкº Class 1 ã¹ÃÐËÇèÒ§¡Ò÷ӧ
Ò¹»¡µÔËÃ×Í¡ÒúÓÃاÃÑ¡ÉÒ·Õèä´é¡Ó˹´äÇé
ÍØ»¡Ã³ìÍ;µÔ¤ÍÅ·ÕèµÔ´µÑé§ÍÂÙ躹¤ÍÁ¾ÔÇàµÍÃì¢Í§¤Ø³ä´éÃѺ¡ÒÃÍ͡Ẻà¾×èÍãªé੾ÒÐà¾×èÍà»ç¹Êèǹ»ÃСͺ¢Í§¼ÅÔ
µÀѳ±ìÍÔàÅç¡·Ã͹ԡÊì áÅÐäÁèä´éà»ç¹ä»µÒÁ¢éÍ¡Ó˹´¢Í§ Code of Federal Regulation Sec. 1040.10 áÅÐ Sec.
1040.11 ÊÓËÃѺ¼ÅÔµÀѳ±ìàÅà«ÍÃì·ÕèÊÁºÙóìẺ
à¹×èͧ¨Ò¡¡ÒÃÊÑÁ¼ÑʡѺáʧàÅà«ÍÃìà»ç¹ÍѹµÃÒÂÍÂèÒ§ÂÔè§ ¼Ùéãªé
ËéÒÁ·Ó¡ÒöʹÍØ»¡Ã³ìàÅà«ÍÃìäÁèÇèÒ㹡óÕã´æ ·Ñé§ÊÔé¹
ºÃèØÀѳ±ì
¡ÒúÃèØÀѳ±ì¢Í§¼ÅÔµÀѳ±ì¹Õéà»ç¹ä»µÒÁ¤ÓÊÑè§ European Environmental Directive 94/62/EC àÁ×èÍÇѹ·Õè 20
¸Ñ¹ÇÒ¤Á »Õ 1994 áÅÐÁÕ¤èÒà·èҡѺµÃÒ¡®ËÁÒ½ÃÑè§àÈʵÒÁ¤ÓÊÑè§ÈÒÅ 98-638 àÁ×èÍÇѹ·Õè 20 ¡Ã¡®Ò¤Á »Õ 1998
áÅÐÊÍ´¤Åéͧ¡ÑºãºÃѺÃͧ¢éͺѧ¤ÑºÊÓËÃѺÃÑÊà«ÕÂ

ÊÔè§áÇ´ÅéÍÁ - 111
ÊÔè§áÇ´ÅéÍÁ
¤ÇÒÁ·ØèÁà·µèÍ¡Òû¡»éͧÊÔè§áÇ´ÅéÍÁ
ÊÔè§áÇ´ÅéÍÁ¹Ñé¹à»ç¹ËÑÇã¨ËÅÑ¡¢Í§¼ÅÔµÀѳ±ì¢Í§àÃÒ
Gateway ¹Ñé¹·ØèÁà·µèÍ¡ÒèӡѴ¼Å¡Ãзº·ÕèÁÕµèÍÊÔè§áÇ´ÅéÍÁ¢Í§¼ÅÔµÀѳ±ì¢Í§ºÃÔÉÑ·ã¹µÅÍ´ÍÒÂØ¡ÒÃãªé§Ò¹¢Í§
¼ÅÔµÀѳ±ì
àÃÔèÁµé¹·Õè¢Ñ鹵͹¡ÒÃÍ͡Ẻ
´éǹâºÒ¡ÒèѴËÒÍÂèÒ§à¢éÁ§Ç´ÍÂèÒ§ÁÒ¡·ÕèãËé¤ÇÒÁʹã¨ÍÂèÒ§ÊÙ§ÊØ´µèÍÍØ»¡Ã³ìÍÔàÅç¡·Ã͹ԡÊìà¾×èÍà»ç¹¡ÒèӡÑ
´¹éÓ˹ѡ¢Í§âÅËÐ˹ѡÍÂèÒ§µÐ¡ÑèÇ á¤´àÁÕèÂÁ â¤ÃàÁÕèÂÁ »ÃÍ· ÏÅÏ
â´Â«Ñ¾¾ÅÒÂàÍÍÃì¹Ñ鹶١¢ÍãËé·ÓµÒÁ¡®¢éͺѧ¤Ñº·Ñé§ËÁ´ã¹áµèÅЪÔé¹Êèǹ¢Í§¼ÅÔµÀѳ±ìÍÂèÒ§à¤Ã觤ÃÑ´
µÃÒºà·èÒ·ÕèÂѧ¤Ó¹Ö§¶Ö§ÍÒÂØÊÔé¹ÊØ´¢Í§¼ÅÔµÀѳ±ì
¨Ö§ÁÕ¡ÒÃËÒ¤èÒà¾×
èͤҴ¡ÒóìáÅÐãªé§Ò¹¡ÒÃÃÕä«à¤ÔżÅÔµÀѳ±ì·Ñé§ËÁ´¢Í§àÃÒ ´Ñ§¹Ñé¹
ªÔé¹Êèǹ¾ÅÒʵԡ·Ñé§ËÁ´·Õè˹ѡ¡ÇèÒ 25 ¡ÃÑÁ·Õè¶Ù¡ãªéã¹¼ÅÔµÀѳ±ì Gateway ¹Ñ鹨֧ä´éÁÕà¤Ã×èͧËÁÒ ISO 11469
â´Â©ÅÒ¡à¤Ã×èͧËÁÒ¹Õé¨ÐªèÇÂãËéÊÒÁÒö¨ÓṡÇÑÊ´Øä´éÃÇ´àÃçÇ¢Öé¹áÅСÓ˹´ÃÒ¤Òä´é§èÒÂÂÔ觢Öé¹ ¹Í¡¨Ò¡¹Ñé¹
¤ÍÁ¾ÔÇàµÍÃìà´Ê¡ì·çÍ»¹Ñé¹ä´éÃѺ¡ÒÃÍ͡ẺÁÒãËé¶Í´á¡ä´é§èÒ ´éÇ¡ÒÃá·¹·ÕèÊ¡ÃÙ´éǤÅÔ»
¡ÒáӨѴ¼ÅÔµÀѳ±ì
¤ÓÊÑ觷Õè 2002/96/EC
«Öè§ÃÙé¨Ñ¡¡Ñ¹ã¹ª×èͤÓÊÑè§ÇèÒ´éÇ¢ÂÐÍÔàÅç¡·Ã͹ԡÊìáÅÐÍØ»¡Ã³ìÍÔàÅç¡·Ã͹ԡÊì (WEEE)
¡Ó˹´ãËé¼ÅÔµÀѳ±ìà¤Ã×èͧãªéä¿¿éÒáÅÐÍÔàÅç¡·Ã͹ԡÊìµéͧä´éÃѺ¡ÒáӨѴᡵèÒ§ËÒ¡¨Ò¡¢ÂÐ
·ÑèÇä»ã¹ºéÒ¹à¾×èÍà»ç¹¡ÒÃÊè§àÊÃÔÁ¡ÒùӡÅѺÁÒãªéãËÁè ¡ÒÃÃÕä«à¤ÔÅ
áÅСÒùӡÅѺÁÒã¹ÃٻẺÍ×è¹æ
áÅÐà¾×èÍÅ´»ÃÔÁÒ³¢ÂзÕè¨Ðµéͧ¡Ó¨Ñ´´éÇÂÁØÁÁͧ㹡ÒÃÅ´¡ÒáӨѴ¢ÂÐâ´Â¡ÒýѧáÅСÒÃà¼
Ò à¤Ã×èͧËÁÒ¡ҡºÒ·º¹¶Ñ§¢ÂзÕèÁÕÍÂÙè¹Ñé¹à»ç¹à¤Ã×èͧÂéÓàµ×͹ãËé¤Ø³ÃÙéÇèÒ¼ÅÔµÀѳ±ìàËÅèÒ¹Õéµéͧá¡·Ô駵èÒ§ËÒ¡

112
¡®¢éͺѧ¤Ñº¹Õéà¡ÕèÂǡѺ¼ÅÔµÀѳ±ì Gateway ·Ñé§ËÁ´¢Í§¤Ø³áÅÐÂѧà¡ÕèÂǡѺÍØ»¡Ã³ìàÊÃÔÁ·Ñé§ËÁ´ àªè¹¤ÕÂìºÍÃì´ àÁÒÊì
ÅÓ⾧ ÃÕâÁ·¤Í¹â·ÃÅ ÏÅÏ àÁ×èͤسµéͧ·Ô駼ÅÔµÀѳ±ìµèÒ§æ àËÅèÒ¹Õé
¤Ø³µéͧá¹èã¨ÇèÒÊÔè§àËÅèÒ¹Õé¨Ðä´éÃѺ¡ÒùÓä»ÃÕä«à¤ÔÅÍÂèÒ§¶Ù¡µéͧ´éÇ¡ÒõÃǨÊͺ¡ÑºË¹èǧҹ㹷éͧ¶Ô蹢ͧ¤Ø³
ËÃ×Í¡ÒÃÊ觤׹ÍØ»¡Ã³ìà¡èҢͧ¤Ø³ãËé¡ÑºÃéÒ¹¤éÒ·Õè¤Ø³·Ó¡ÒÃà»ÅÕè¹ÍØ»¡Ã³ìàËÅèÒ¹Ñé¹ ÊÓËÃѺ¢éÍÁÙÅà¾ÔèÁàµÔÁ áÇÐä»Âѧ
www.gateway.com/about/corp_responsibility/environment.php
¡ÒáӨѴẵàµÍÃÕè (àÁ×èÍÊÒÁÒö·Óä´é)
¡Ò÷Õè¨Ð·Ôé§ÍØ»¡Ã³ì¢Í§¤Ø³ ãËé´ÙãËéá¹èã¨ÇèÒ¤Ø
³ä´é¶Í´áºµàµÍÃÕèã´¡çµÒÁ·ÕèÍÒ¨µÔ´ÍÂÙè¡ÑºÍØ»¡Ã³ìÍÍ¡ËÁ´áÅéÇ
¡®ËÁÒÂÂØâû¡Ó˹´ÇèÒẵàµÍÃÕèµéͧä´éÃѺ¡ÒÃà¡çºÃǺÃÇÁà¾×èÍ¡ÒáӨѴᡵèÒ§ËÒ¡¨Ò¡¢ÂÐ㹤ÃÑÇàÃ×͹·ÑèÇä»
ÍÂèÒ·Ôé§áºµàµÍÃÕè·ÕèãªéáÅéǢͧ¤Ø³Å§¶Ñ§¢ÂÐ ·Ôé§áºµàµÍÃÕè·ÕèãªéáÅéǢͧ¤Ø³·Õèâ¤Ã§¡ÒÃà¡çºÃǺÃÇÁẵàµÍÃÕè·ÕèÁÕãËé
ËÃ×ͶÒÁµÑÇá·¹¨Ó˹èÒÂËÃ×Íà¨éÒ˹éÒ·Õè·éͧ¶Ô蹶֧ÇÔ¸Õ¡Ò÷Õè¤Ø³¨ÐÊÒÁÒö·Óä´é
¤ÇÒÁµÑé§ã¨¢Í§¤Ø³¨ÐªèÇÂãËéà¡Ô´¡ÒÃà¡çºÃǺÃÇÁ ¡ÒÃÃÕä«à¤ÔÅ áÅСÒ÷ÓÅÒÂẵàµÍÃÕèãªéáÅéÇ·Õè»ÅÍ´ÀÑÂ
áÅШЪèÇ»¡»éͧÊÔè§áÇ´ÅéÍÁáÅÐÅ´ÍѹµÃÒµèÍÊØ¢ÀҾŧä´é
- ¢éͤÇÃÃÐÇѧ: ÁÕ¤ÇÒÁàÊÕ觵èÍ¡ÒÃÃÐàºÔ´ËÒ¡à»ÅÕè¹ẵàµÍÃÕèäÁè¶Ù¡»ÃÐàÀ· ãËé·Ôé§áºµàµÍÃÕè·Õ
èäÁè
ãªé§Ò¹áÅéǵÒÁà§×è͹䢷Õè¢éÍ¡Ó˹´·ÕèÃкØäÇé
ENERGY STAR
¼ÅÔµÀѳ±ì Gateway ä´éÃѺ¡ÒÃÃѺÃͧ ENERGY STAR à¾×èÍ»ÃÐËÂÑ´à§Ô¹¢Í§¤Ø³â´Â¡ÒÃ
Å´µé¹·Ø¹áÅл¡»éͧÊÀÒ¾áÇ´ÅéÍÁâ´ÂäÁèÊÙ−àÊÕ¤سÅѡɳÐËÃ×Í»ÃÐÊÔ·¸ÔÀÒ¾ Gateway
ÀÒ¤ÀÙÁÔã¨ã¹¡ÒÃÁͺ¼ÅÔµÀѳ±ì·ÕèÁÕà¤Ã×èͧËÁÒ ENERGY STAR ãËé¡ÑºÅÙ¡¤éÒ
ENERGY STAR ¤×ÍÍÐäÃ?
¼ÅÔµÀѳ±ì·Õèä´éÃѺ ENERGY STAR ¤×ͼÅÔµÀѳ±ì·Õèãªé¾Åѧ§Ò¹µèÓáÅлéͧ¡Ñ¹¡ÒÃ
»ÅèÍ¡êÒ«àÃ×͹¡ÃШ¡â´Â¡Òû¯ÔºÑµÔµÒÁá¹Ç·Ò§¡ÒÃãªé¾Åѧ§Ò¹ÍÂèÒ§ÁÕ»ÃÐÊÔ·¸ÔÀÒ¾ÍÂèÒ§à¤Ã觤ÃÑ´«Ö觡Ó
˹´â´Âͧ¤ì¡ÒþԷѡÉÊÔè§áÇ´ÅÍÁá˧»ÃÐà·ÈÊËÃÑ°ÍàÁÃÔ¡Ò (U.S. Environmental Protection Agency) Gateway
Áվѹ¸¡Ô¨ã¹¡ÒÃÁͺ¼ÅÔµÀѳ±ìáÅкÃÔ¡Ò÷ÑèÇâÅ¡à¾×èͪèÇÂãËéÅÙ¡¤éÒÊÒÁÒö»ÃÐËÂÑ´à§Ô¹, ͹ØÃÑ¡Éì¾ÅÑ
§§Ò¹,
áÅлÃѺ»Ãا¤Ø³ÀÒ¾¢Í§ÊÀÒ¾áÇ´ÅéÍÁ¢Í§àÃÒ ÂÔè§àÃÒ͹ØÃÑ¡Éì¾Åѧ§Ò¹¼èÒ¹¡ÒÃãªé¾Åѧ§Ò¹

ÊÔè§áÇ´ÅéÍÁ - 113
ä´éÍÂèÒ§ÁÕ»ÃÐÊÔ·¸ÔÀÒ¾·ÕèÊÙ§¡ÇèÒä´éÁÒ¡à·èÒã´ à·èҡѺàÃÒä´éÅ´¡ÒûÅèÍ¡êÒ«àÃ×͹¡ÃШ¡áÅФÇÒÁàÊÕè§
㹡ÒÃà¡Ô´¤ÇÒÁà»ÅÕè¹á»Å§¢Í§ÊÀÒ¾ÍÒ¡ÒÈä´éÁÒ¡¢Öé¹à·èÒ¹Ñé¹ ÊÓËÃѺ¢éÍÁÙÅà¾ÔèÁàµÔÁ â»Ã´áÇÐä»Âѧ
www.energystar.gov ËÃ×Í www.energystar.gov/powermanagement
- ËÁÒÂà˵Ø: ¢éÍÁÙÅã¹Êèǹ¹ÕéÍÒ¨äÁèÊÒÁÒöãªéä´é¡Ñº¤ÍÁ¾ÔÇàµÍÃì¢Í§¤Ø³
¼ÅÔµÀѳ±ì Gateway ·Õèä´éÃѺ ENERGY STAR: (ÊÓËÃѺºÒ§ÃØè¹)
- ÊÃéÒ§¤ÇÒÁÃé͹¹éÍÂáÅÐÅ´¡ÒÃà¡Ô´ÊÀÒ¾ÍÒ¡ÒÈ·ÕèÃé͹ËÃ×Í˹ÒÇÍÂèÒ§Ãعáç
- à¢éÒÊÙèâËÁ´ "»Ô´Ë¹éÒ¨Í" áÅÐ âËÁ´ "¾Ñ¡à¤Ã×èͧ" ËÅѧ¨Ò¡ 10 ¶Ö§ 30 ¹Ò·Õ¼èÒ¹ä»ËÒ¡
äÁèÁÕ¡ÒÃãªé§Ò¹
- »ÅØ¡¤ÍÁ¾ÔÇàµÍÃì¨Ò¡âËÁ´ sleep â´Â¡Òá´¤ÕÂìºÍÃì´ËÃ×Í¢ÂѺàÁÒÊì
- ¤ÍÁ¾Ô
ÇàµÍÃì¨Ð»ÃÐËÂÑ´¾Åѧ§Ò¹ä´éÁÒ¡¡ÇèÒ 80% àÁ×èÍÍÂÙèã¹âËÁ´ "sleep"
ENERGY STAR áÅÐà¤Ã×èͧËÁÒ ENERGY STAR ¤×Íà¤Ã×èͧËÁÒ¨´·ÐàºÕ¹ã¹ÊËÃÑ°ÍàÁÃÔ¡Ò

114
ãºÍ¹Ø−ҵ㹡ÒÃãªé«Í¿·ìáÇÃì
- ËÁÒÂà˵Ø: á;¾ÅÔपÑ蹫Ϳ·ìáÇÃìÊèǹÁÒ¡ÁÕµÔ´µÑé§äÇé¡è͹áÅéǺ¹¤ÍÁ¾ÔÇàµÍÃì Gateway ¢Í§¤Ø³
áÅоÃéÍÁÊÓËÃѺ¡ÒÃãªé§Ò¹ËÃ×͵Ñ駤èÒ ÍÂèÒ§äáçµÒÁ «Í¿·ìáÇÃìºÒ§ÃÒ¡ÒèÓà»ç¹µéͧãªé CD ËÃ×Í DVD à¾×èÍàÃÕ¡ãªé§Ò¹
¤Ø³¨Ð¾ºá¼è¹´ÔÊ¡ìàËÅèÒ¹Õéä´é㹺ÃèØÀѳ±ì¢Í§¤ÍÁ¾ÔÇàµÍÃì¢Í§¤Ø³
¢é͵¡Å§¡ÒÃ͹Ø−Òµãªé§Ò¹ Gateway (¼ÅÔµÀѳ±ì CD áÅÐ/ ËÃ×Í DVD) ÊÓà¹Ò¢Í§µé¹©ºÑº¹Õé¤×ÍËÅÑ¡°Ò¹¡ÒÃ͹Ø−ÒµÊÓËÃѺ¤Ø³
â»Ã´à¡çºÃÑ¡ÉÒäÇéãËé´Õ
ÊÔè§ÊÓ¤Ñ−!
â»Ã´ÍèÒ¹ÍÂèÒ§ÅÐàÍÕ´¡è͹·Ó¡ÒõԴµÑ駫Ϳ·ìáÇÃì
¢é͵¡Å§¡ÒÃ͹Ø−Òµãªé§Ò¹µèÍ仹ÕéÁռźѧ¤Ñºãªé¡Ñº¤Ø³ ¹Õè¤×Í¢é͵¡Å§·ÕèÁռż١¾Ñ¹·Ò§¡®ËÁÒÂÃÐËÇèÒ§¤Ø³
(·Ñé§ã¹¹ÒÁ¢Í§ºØ¤¤Å¸ÃÃÁ´ÒËÃ×͹ԵԺؤ¤Å) áGatewayÅÐâ´Â¡ÒõԴµÑ駫Ϳ·ìáÇÃì¹Õé ¤Ø³ä´éµ¡Å§·Õè¨ÐÁվѹ¸Ð¼Ù¡¾Ñ¹µÒÁà§×è͹䢢ͧ¢é͵¡Å§¹Õé
ËÒ¡¤Ø³äÁèÂÍÁÃѺã¹à§×è͹䢢ͧ¢é͵¡Å§¹Õé â»Ã´Ê觤׹à¤Ã×èͧ¤ÍÁ¾ÔÇàµÍÃì¢Í§¤Ø³ «Í¿·ìáÇÃìá¾ç¤à¡µ·ÕèÂѧäÁè¶Ù¡à»Ô´ãªé ËÒ¡ÁÕ
â´ÂãË
éà»ç¹ä»µÒÁà§×èÍ¹ä¢ (ÃÇÁ¶Ö§ÇÑÊ´ØàÍ¡ÊÒÃËÃ×ÍËÕºËèÍÍ×è¹æ) ãËé¡ÑºÃéÒ¹¤éÒ·Õè¤Ø³«×éÍ㹷ѹ·Õà¾×èÍÃѺ¡Òä׹à§Ô¹àµçÁ¨Ó¹Ç¹
Gateway ãºÍ¹Ø−ҵ㹡ÒÃãªé«Í¿·ìáÇÃì
1. ¡ÒÃ͹Ø−Òµãªé§Ò¹
¢éGateway͵¡Å§¡ÒÃ͹Ø−Òµãªé§Ò¹ (“¡ÒÃ͹Ø−Òµ”) ¹Õé ͹Ø−ÒµãËé¤Ø³ãªéÊÓà¹Ò˹Öè§ÊÓà¹Ò¢Í§àÇÍÃìªÑè¹·ÕèÃкØGateway ¢Í§
«Í¿·ìáÇÃì·Õèä´é͸ԺÒ¢éÒ§µé¹ («Öè§ÍÒ¨ÁÕ´ÔÊ¡ì CD ËÃ×Í DVD ÍÂèÒ§¹éÍÂ˹Öè§á¼è¹) º¹¤ÍÁ¾ÔÇàµÍÃì˹Öè§à¤Ã×èͧ
ãËéÊÒÁÒöãªé«Í¿·ìáÇÃì¹Õéä´éº¹¤ÍÁ¾ÔÇàµÍÃì˹Öè§à¤Ã×èͧà·èÒ¹Ñé¹ ËÒ¡¤Ø³ä´éÃѺãºÍ¹Ø−ÒµËÅÒÂãºÊÓËÃѺ«Í¿·ìáÇÃì¹Õé
¤Ø³ÍÒ¨ÁÕÊÓà¹Ò¢Í§«Í¿·ìáÇÃì¹Õéä´éËÅÒÂÊÓà¹Òà¾×èÍãªé§Ò¹µÒÁ¨Ó¹Ç¹·Õèä´éÃѺ͹Ø−Òµ «Í¿·ìáÇÃì¹Õé “ãËéãªé”
º¹¤ÍÁ¾ÔÇàµÍÃìàÁ×èͶ١âËÅ´à¢éÒÊÙè˹èǤÇÒÁ¨ÓªÑèǤÃÒÇ (àªè¹ RAM) ËÃ×Ͷ١µÔ´µÑé§ÍÂÙèã¹Ë¹èǤÇÒÁ¨Ó¶ÒÇà (àªè
¹ ÎÒÃì´´ÔÊ¡ì, CD áÅÐ/ ËÃ×Í
DVD ËÃ×ÍÍØ»¡Ã³ìà¡çº¢éÍÁÙÅÍ×蹢ͧ¤ÍÁ¾ÔÇàµÍÃì¹Õé
àÇé¹äÇéáµèÇèÒÊÓà¹Ò·Õè¶Ù¡µÔ´µÑ駺¹à«ÔÃì¿àÇÍÃìà¤Ã×Í¢èÒ¹Ñé¹ÁÕÇѵ¶Ø»ÃÐʧ¤ì㹡ÒÃᨡ¨èÒÂÊÓËÃѺ¤ÍÁ¾ÔÇàµÍÃìÍ×è¹·ÕèäÁèä´éÃѺ͹Ø−Òµ “ãËéãªé”
ËÒ¡¨Ó¹Ç¹¼Ùéãªé·Õè¤Ò´¡ÒóìÇèÒ¨Ðãªé«Í¿·ìáÇÃìÁըӹǹà¡Ô¹¡ÇèҨӹǹ¢Í§ãºÍ¹Ø−Òµ·ÕèÁÕãËé
¤Ø³¨ÐµéͧÁÕÇÔ¸Õ¡ÒÃËÃ×Í¡Ãкǹ¡ÒÃ㹡Ò÷ÓãËéá¹èã¨ä´éÇèҨӹǹ¢Í§¼Ùé·Õè¨Ðãªé«Í¿·ìáÇÃìµéͧäÁèà¡Ô¹¡ÇèҨӹǹ¢Í§ãºÍ¹Ø−Òµ
ËÒ¡«Í¿·ìáÇÃì¹Õé¶Ù¡µÔ´µÑé§ÍÂèÒ§¶ÒÇú¹ÎÒÃì´´ÔÊ¡ìËÃ×ÍÍØ»¡Ã³ì
à¡çº¢éÍÁÙŢͧ¤ÍÁ¾ÔÇàµÍÃì (¹Í¡¨Ò¡à«ÔÃì¿àÇÍÃìà¤Ã×Í¢èÒÂ)
áÅÐÁÕ¼Ùéãªéà¾Õ§ºØ¤¤Åà´ÕÂÇãªé§Ò¹¤ÍÁ¾ÔÇàµÍÃìà¤Ã×èͧ¹Ñé¹ÁÒ¡¡ÇèÒ 80% ¢Í§àÇÅÒ·Ñé§ËÁ´·Õèà¤Ã×èͧ¶Ù¡ãªé§Ò¹
ºØ¤¤Å¹Ñé¹ÊÒÁÒöãªé«Í¿·ìáÇÃì¹Õ麹¤ÍÁ¾ÔÇàµÍÃ쾡¾ÒËÃ×ͤÍÁ¾ÔÇàµÍÃìã¹·ÕèÍÂÙèÍÒÈÑÂä´é

ãºÍ¹Ø−ҵ㹡ÒÃãªé«Í¿·ìáÇÃì - 115
2. ÅÔ¢ÊÔ·¸Ôì
«Í¿·ìáÇÃì¹Õéà»ç¹¡ÃÃÁÊÔ·¸Ôì¢Í§ GatewayËÃ×ͫѾ¾ÅÒÂàÍÍÃì¢Í§à¡µàÇÂì
áÅÐä´éÃѺ¡Òû¡»éͧâ´Â¡®ËÁÒÂÅÔ¢ÊÔ·¸Ôì¢Í§ÊËÃÑ°ÍàÁÃÔ¡ÒáÅÐʹ¸ÔÊÑ−−ÒÅÔ¢ÊÔ·¸ÔìÃÐËÇèÒ§»ÃÐà·È ´éÇÂà˵عÕé
¤Ø³µéͧãªé«Í¿·ìáÇÃì¹Õéàªè¹à´ÕÂǡѺÇÑÊ´Ø·Õ訴ÅÔ¢ÊÔ·¸ÔìÍ×è¹æ (àªè¹ ˹ѧÊ×Í ËÃ×Í ¡Òúѹ·Ö¡àÊÕ§)
àÇé¹äÇéáµèÇèҤسÍÒ¨¶èÒÂâ͹ͧ¤ì»ÃСͺ«Í¿·ìáÇÃìã¹´ÔÊ¡ì CD áÅÐ/ ËÃ×Í DVD ¹Õé ËÒ¡ÁÕ
ä»ÂѧÎÒÃì´´ÔÊ¡ìà´ÕÂÇà¾×èÍãËé¤Ø³ÊÒÁÒöà¡çºµé¹©ºÑºäÇéâ´ÂÁÕÇѵ¶Ø»ÃÐʧ¤ìà¾×èÍáºç¤ÍѾËÃ×Íà¡çº¢éÍÁÙÅà¾Õ§ÍÂèÒ§à´ÕÂÇà·è
Ò¹Ñé¹
ËéÒÁ·ÓÊÓà¹ÒÊèǹ˹Öè§Êèǹ㴢ͧ´ÔÊ¡ì CD áÅÐ/ ËÃ×Í DVD ¢Í§«Í¿·ìáÇÃì¹Õé ËÃ×ÍÇÑÊ´ØàÍ¡ÊÒÃÍ×è¹æ ·ÕèÁÒ¾ÃéÍÁ¡Ñº«Í¿·ìáÇÃì¹Õé
3. ¢éͨӡѴÍ×è¹æ
ËéÒÁÁÔãËéàªèÒ«Í¿·ìáÇÃì¹Õé áµè¤Ø³ÍÒ¨¶èÒÂâ͹«Í¿·ìáÇÃì¹ÕéáÅÐÇÑÊ´ØàÍ¡ÊÒ÷ÕèÁÒ¾ÃéÍÁ¡Ñ¹ÍÂèÒ§¶ÒÇà â´ÂËéÒÁà¡çºÊÓà¹Òã´æ
áÅмÙéÃѺä´éÂÍÁÃѺµÒÁà§×è͹䢢ͧ¢é͵¡Å§¹Õé ËéÒÁµÃǨÊͺÃٻẺâ¤Ã§ÊÃéÒ§·Ò§ÇÔÈÇ¡ÃÃÁ ËÃ×Í ·Ó¡ÒöʹÃËÑÊ«Í¿·ìáÇÃì¹Õéâ´Âà´ç´¢Ò´
¡ÒöèÒÂâ͹ã´æ ÊÓËÃѺ«Í¿·ìáÇÃì¹ÕéµéͧÃÇÁ件֧ÍѾവÅèÒÊØ´áÅÐàÇÍÃìªÑ蹡è͹˹éÒ·Ñé§ËÁ´
¢éÍÁÙÅÊÓËÃѺ«Í¿·ìáÇÃì¨Ò¡¼Ùé¼ÅÔµÃÒÂÍ×è¹ËÃ×Í¡ÒÃ͹Ø−ÒµãËéãªé«Í¿·ìáÇÃìàÊÃÕ
«Í¿·ìáÇÃì·Õè¶Ù¡âËÅ´äÇéÅèǧ˹éÒ ½Ñ§µÑÇ ËÃ×Ͷ١ᨡ¨èÒ¾ÃéÍÁ¡Ñº¼ÅÔµÀѳ±ì ÁÕãËéâ´Â Gateway
ÁÕâ»Ãá¡ÃÁ«Í¿·ìáÇÃìàÊÃÕËÃ×Í«Í¿·ìáÇÃì¨Ò¡¼Ùé¼ÅÔµÃÒÂÍ×è¹ (“«Í¿·ìáÇÃìàÊÃÕ”) ·Õèä´éÃѺ͹Ø−ÒµÀÒÂãµéà§×èÍ¹ä¢ GNU General Public License
(“GPL”) «Í¿·ìáÇÃìàÊÃըж١·Óà¤Ã×èͧËÁÒÂàªè¹¹Õé ¡Ò÷ÓÊÓà¹Ò ᨡ¨èÒ áÅÐ/ ËÃ×Í
»ÃѺ»Ãاá¡é䢫Ϳ·ìáÇÃìàÊÃÕ¹Õé¨Ðµéͧà»ç¹ä»µÒÁÇѵ¶Ø»ÃÐʧ¤ì¢Í§à§×è͹䢢ͧ GPL
«Í¿·ìáÇÃìàÊÃÕ¹Õé¶Ù¡á¨¡¨èÒÂâ´ÂÁÕ¤ÇÒÁ¤Ò´ËÇѧÇèÒ¨Ðà»ç¹»ÃÐ⪹ì áÅÐäÁèÁÕ¡ÒÃãËé¡ÒÃÃѺ»ÃСѹã´æ
ÃÇÁ¶Ö§äÁèÁÕ¡ÒÃÃѺ»ÃСѹâ´Â¹ÑÂÊÓËÃѺ¤ÇÒÁÊÒÁÒö·Ò§¡ÒäéÒ ËÃ×ͤÇÒÁàËÁÒÐÊÁ㹡ÒÃãªé§Ò¹ÊÓËÃѺÇѵ¶Ø»ÃÐʧ¤ìÊèǹµÑÇ
ãËé
¶×Í»¯ÔºÑµÔµÒÁ¢éÍ¡Ó˹´¢Í§ GNU General Public License ÍÂèÒ§à´ç´¢Ò´ ¤Ø³ÍÒ¨ä»Âѧ http://www.gnu.org â´ÂµÃ§à¾×èÍÃѺÊÓà¹Ò¢Í§ GPL
ËÃ×Íà¢Õ¹ä»ÂѧÁÙŹԸԫͿµìáÇÃìàÊÃÕà¾×èÍ¢ÍÊÓà¹Ò ä´éµÒÁ·ÕèÍÂÙè¹Õé Free Software Foundation, Inc: 59 Temple Place - Suite 330, Boston, MA,
02111-1307, USA
ÀÒÂã¹àÇÅÒÊÒÁ»Õ¹Ñº¨Ò¡Çѹ·Õèã¹ãºàÊÃç¨ÃѺà§Ô¹¢Í§¤Ø³ÊÓËÃѺ«Í¿·ìáÇÃì¹Õé
¤Ø³ÊÒÁÒöÃѺÊÓà¹Ò«ÍÃìÊâ¤é´·ÕèÊÁºÙóìÊÓËÃѺ«Í¿·ìáÇÃìàÊÃÕ·Õè¤ÍÁ¾ÔÇàµÍÃìÊÒÁÒöÍèÒ¹ä´éÀÒÂãµéà§×è͹䢢ͧ GPL â´ÂäÁèÁÕ¤èÒãªé¨èÒÂã´æ
¹Í¡¨Ò¡¤èÒãªé¨èÒÂÊÓËÃѺÁÕà´Õ ¡ÒèѴÊè§ áÅСÒèѴ¡Òà 㹡ÒÃà¢Õ¹¶Ö§àÃÒ
â»Ã´µÔ´µèÍàÃÒËÒ¡¤Ø³ÁÕ¤Ó¶ÒÁà¾ÔèÁàµÔÁÁÒ¡¡ÇèÒ¹Õé ·ÕèÍÂÙè·Ò§ä»ÃɳÕÂì¢Í§àÃÒ¤×Í 8F, 88, Sec. 1, Hsin Tai Wu Rd., Hsichih, New Taipei City
221, Taiwan

116
´Ñª¹
¢éͤÇû¯ÔºÑµÔà¾×èͤÇÒÁ»ÅÍ´ÀÑÂ................................. 9
¢éÍÁÙÅ´éÒ¹¡ÒäǺ¤ØÁ......................................... 93, 111
¨ÍáÊ´§¼Å
Îç͵¤ÕÂì..............................................................
18
¼ÙéãËéºÃÔ¡ÒÃÍÔ¹àµÍÃìà¹çµ (ISP)................................... 46
¾ÍÃìµ......................................................................... 29
¡ÒáӨѴẵàµÍÃÕè................................................... 112
¡ÒáÙé¤×¹
â»Ãá¡ÃÁ Recovery Management...................
45
¡Òûéͧ¡Ñ¹´éÒ¹ÊØ¢ÀÒ¾............................................. 13
¡Ò÷ӤÇÒÁÊÐÍÒ´¤ÍÁ¾ÔÇàµÍÃì¢Í§¤Ø³................... 11
¡ÒÃàª×èÍÁµèÍ
à¤Ã×Í¢èÒÂ............................................................
31
¡ÒÃàª×èÍÁµèÍà¤Ã×Í¢èÒ ................................................ 49
¡ÒÃàÃÕ¡¤×¹
Recovery Management....................................
63
¡ÒÃáÊ´§¼Å
¡ÒÃá¡é䢻Ñ-ËÒ..................................................
84
¡ÒÃÃѺ»ÃСѹ.............................................................. 8
¡ÒÃú¡Ç¹ ............................................................... 107
¡ÒêÒÃì¨
µÃǨÊͺÃдѺ..................................................
40
¡ÒúÓÃاÃÑ¡ÉÒ
â»Ãá¡ÃÁ Recovery Management ...................
45
Recovery Management.................................... 63
«Í¿µìáÇÃì
ãºÍ¹Ø−ҵ㹡ÒÃãªé«Í¿·ìáÇÃì.........................
114
»Ñ-ËÒ......................................................................... 83
¡ÒÃàÃÔèÁ·Ó§Ò¹ ................................................... 83
¡ÒÃáÊ´§¼Å ...................................................... 84
¤ÕÂìºÍÃì´............................................................ 85
à¤Ã×èͧ¾ÔÁ¾ì ........................................................ 85
CD-ROM.......................................................... 85
¤ÇÒÁ»ÅÍ´ÀÑÂ
â»Ãá¡ÃÁ»éͧ¡Ñ¹äÇÃÑÊ.......................................
55
ÍѾവ............................................................... 61
¤ÇÒÁÊÇèÒ§
Îç͵¤ÕÂì ..............................................................
19
¤ÍÁ¾ÔÇàµÍÃì
¤Ø³ÊÁºÑµÔ...........................................................
15
áÊ´§Ê¶Ò¹Ð¡ÒÃà»Ô´·Ó§Ò¹............................... 21
¤Ó¶ÒÁ·Õè¶Ù¡¶ÒÁºèÍ ................................................. 83
¤Óàµ×͹à¡ÕèÂǡѺâäÅÁºéÒËÁÙ.................................... 14
¤ÕÂìºÍÃì´
¡ÒÃá¡é䢻Ñ-ËÒ..................................................
85

´Ñª¹ - 117
Îç͵¤ÕÂì.............................................................. 20
·Ñªá¾´...................................................................... 27
¡ÒÃãªé.......................................................... 27–27
A
ä´Ãì¿
àÁÁâÁÃÕè¡ÒÃì´ÃÕ´à´ÍÃì.........................................
29
à¤Ã×èͧ¾ÔÁ¾ì
¡ÒÃá¡é䢻Ñ-ËÒ..................................................
85
à¤Ã×Í¢èÒÂ.................................................................... 31
à¤ÍÃìà«ÍÃì.................................................................. 27
âÁà´çÁ.................................................................. 47, 48
àÁÁâÁÃÕè¡ÒÃì´ÃÕ´à´ÍÃì................................................. 29
ÁÑÅáÇÃì....................................................................... 54
ẵàµÍÃÕè.................................................................. 112
µÃǨÊͺÃдѺ¡ÒêÒÃì¨................................... 40
¡Òöʹ............................................................. 39
¡ÒÃÂ×´ÍÒÂØ ........................................................ 40
¡ÒÃàµ×͹ẵàµÍÃÕèµèÓ........................................ 40
¡ÒÃà¾ÔèÁÍÒÂØ....................................................... 37
¡ÒÃãÊè................................................................ 39
¡ÒêÒÃì¨............................................................ 39
ãªé§Ò¹à»ç¹¤ÃÑé§áá............................................. 37
ÅѡɳШÓà¾ÒÐ ................................................. 36
ẵàµÍÃÕèµèÓ....................................................... 41
ÅÓ⾧
¡ÒÃá¡é䢻Ñ-ËÒ..................................................
84
Îç͵¤ÕÂì .............................................................. 19
ÁØÁÁͧ
´éÒ¹¢ÇÒ.............................................................
24
´éÒ¹«éÒ ............................................................ 22
´éҹ˹éÒ............................................................ 22
ÁØÁÁͧ´éÒ¹«éÒÂ......................................................... 21
ÁØÁÁͧ´éҹ˹éÒ......................................................... 21
C
CD-ROM ¡ÒÃá¡é䢻Ñ-ËÒ.................................................. 85
¡ÒÃà»Ô´ÍÍ¡´éÇÂÁ×Í........................................... 85
D
DSL........................................................................... 47

118
E
Ê»ÒÂáÇÃì................................................................... 54
ÊÀÒ¾áÇ´ÅéÍÁ.......................................................... 111
ÊÀÒ¾áÇ´ÅéÍÁ㹡ÒÃãªé¤ÍÁ¾ÔÇàµÍÃì .......................... 9
ÊÒÂä¿....................................................................... 10
ÊÒÂà¤àºÔéÅ.......................................................... 10, 108
F
FAQ ´Ù¤Ó¶ÒÁ·Õè¶Ù¡¶ÒÁºèÍÂ
Firewall......................................................................
55
G
Gateway â»Ãá¡ÃÁ Recovery Management ................... 45
I
Îç͵¤ÕÂì ...................................................................... 20
ÍÍ´ÔâÍ
¡ÒÃá¡é䢻Ñ-ËÒ..................................................
84
ÍѾവ
ÍѾവ Windows Íѵâ¹ÁÑµÔ ...............................
61
ÍÔ¹àµÍÃìà¹çµ
¡ÒÃàª×èÍÁµèÍ.................................................
46, 47
Firewall.............................................................. 55
ÍØ»¡Ã³ìÁÕà´Õ·Õè¶Í´à»ÅÕè¹ä´é.................................... 31
L
LAN (Local Area Network) ..................................... 49
N
Norton Internet Security..................................... 53, 57
O
ºÃÒÇà«ÍÃì.................................................................. 52

´Ñª¹ - 119
R
Removing hardware................................................. 31
U
Uninstalling hardware .............................................. 31 universal serial bus .................................................. 32
W
WiFi........................................................................... 49
Windows
¡ÒÃãªé Windows................................................
45
ÍѾവ Windows Íѵâ¹ÁѵÔ................................ 61
Ver.02.01.02

Transcripción de documentos
Contents English Français Español Português 繁體中文 简体中文 Bahasa Indonesia ไทย Ver.02.01.02 User’s Manual Gateway NE71B - 1 T A B LE OF C ON TENTS Starting your computer 4 Charging the battery................................. Checking the battery level........................ Optimizing battery life............................... Battery-low warning.................................. 37 37 38 38 Wireless connection ........................................... 4 Registration ........................................................ 5 Software installation ........................................... 6 Recovery ............................................................ 6 Power management 40 Having trouble? .................................................. 6 Saving power................................................... 40 Computer Basics 8 Software 43 Safety and comfort ............................................. 8 Using Windows and your software .................. 43 Safety precautions ...................................... 8 Internet security offer ............................... 43 Health precautions .................................... 11 Gateway Recovery Management............. 43 Getting to know your computer Top view - display ............................................ Top view - keyboard......................................... Special keys.............................................. Front view......................................................... Left view ........................................................... Right view......................................................... Base view......................................................... Touchpad 14 Internet 15 First steps on the net ....................................... 16 Protecting your computer ......................... 17 Choose an Internet Service Provider ....... 20 Network connections................................ 21 Surf the Net! ............................................. 23 Security .................................................... 25 26 Recovery Creating a recovery backup............................. Touchpad basics .............................................. 26 Creating a drivers and applications backup..... Touchpad gestures .......................................... 27 Recovering your system .................................. Reinstalling drivers and applications........ Upgrading your computer 28 Returning to an earlier system Expanding through options .............................. 28 snapshot................................................... Connectivity options.................................. 28 Returning your system to its factory Power supply 33 condition................................................... AC power adapter ............................................ 33 Recovering from Windows ....................... Battery pack ..................................................... 34 Recovering from a recovery backup ........ Battery pack characteristics ...................... 34 Replacing the battery pack ....................... 36 Frequently asked questions Installing or removing the battery pack ..... 36 Tips and hints for using Windows 8................. 2 - Table of Contents 44 44 44 44 46 50 50 59 59 62 65 66 69 70 71 75 79 82 Three concepts you might want to keep in mind.............................................. 82 How do I access the charms?................... 82 How do I get to Start? ............................... 82 How do I jump between apps?.................. 83 How do I turn off my computer?................ 83 Why is there a new interface?................... 83 How do I unlock my computer?................. 84 How do I personalize my computer?......... 84 I want to use Windows in the way that I'm used to - give me my desktop back!............................................ 85 Where are my apps?................................. 85 What is a Microsoft ID (account)? ............ How do I add a favorite to Internet Explorer?.................................................. How do I check for Windows updates? .................................................. Where can I get more information?.......... Regulatory information 87 87 88 88 89 Environment 107 Software license 110 Index 113 Copyright © 10/2012. All Rights Reserved. Gateway NE71B User’s Manual This revision: 5 October 2012 Visit registration.gateway.com and discover the benefits of being a customer of Gateway. Remark: All images are for reference purposes only. Actual configuration may vary. Table of Contents - 3 S T A R T I N G Y O U R COMPUTER Thank you for purchasing this Gateway computer! This guide has been designed to introduce you to the features of your computer and assist in your computing experience. After setting up and starting your computer, as shown in the setup instructions, it will ask you questions that will help you connect to the Internet. Your computer will then configure installed software. WIRELESS CONNECTION To connect to a wireless network, first check the wireless features of your computer are on, and that the router or modem you want to connect to is also correctly configured. • If wireless is not on, press the Windows key ( ) + W, type "Wireless" and then click on Wireless. Click the toggle switch under Wi-Fi to enable the wireless connection. Click again to disable. • To connect to a network, press the Windows key ( ) + W, type "Wireless" and then click on Connect to a network. Select your network and enter the password if required. • After a short delay, your computer should connect to the Internet. If your network is not detected, or your computer does not connect to the Internet, please refer to your ISP or router’s documentation. After your computer starts and you can use it, open Internet Explorer and follow the instructions. 4 - Starting your computer Alternatively, use a network cable to connect directly to a network port on your router. Please refer to your ISP or router’s guide. REGISTRATION When using your computer for the first time, it is recommended that you register it. This gives you access to some useful benefits, such as: • Faster service from our trained representatives. • Membership in the Gateway community: receive promotions and participate in customer surveys. • The latest news from Gateway. How to register During the initial startup of your computer, a window will invite you to register. Please fill in the information and click Next. The second window you'll see contains optional fields that will help us to provide you with a more personable customer service experience. Another option Another way to register your Gateway product is to visit our website at registration.gateway.com. Choose your country and follow the simple instructions. After registering, you will be sent a confirmation email with important information that you should keep in a safe place. Starting your computer - 5 SOFTWARE INSTALLATION Your computer will automatically install software and prepare your computer for use. This may take some time, please do not turn off your computer; wait until the installation has finished. RECOVERY You should create recovery discs as soon as you are able. The Gateway Recovery Management program allow you to create recovery discs and then to restore or reinstall applications and drivers provided by Gateway. HAVING TROUBLE? Gateway provides several options to support your purchase. Gateway support Make sure you write down your computer serial number, date and place of purchase and model name on the area provided in this guide; save your proof of purchase. Before you call us, please write down any error message that accompanies the problem, and have the computer in front of you and switched on if possible. Having these items to hand when contacting us will ensure better and quicker service. Gateway website Remember to visit www.gateway.com - Check out the support section for up-to-date information, help, drivers and downloads. 6 - Starting your computer Warranty and contact information You can find information about the warranty for your computer and how to contact technical support in your computer’s Warranty. Starting your computer - 7 C OMPUTER B ASICS SAFETY AND COMFORT Safety precautions Please follow the guidelines below to use your computer comfortably and to avoid health problems. Computer environment Make sure that the computer: • Is used on a stable surface, stand or table. A fall can seriously damage the computer. • Is not used on a surface that vibrates, or used when taking part in sport, exercise or other activities in a dynamic environment. Vibration or movement can loosen fastenings, damage internal components and even cause battery leakage. • Is away from direct sunlight and sources of heat. • Is away from magnetic fields or any device generating static electricity. • Is kept at least 30 centimetres (one foot) away from a mobile phone. • Is not in a dusty or damp environment. • Is not used near water. Never spill liquids of any kind on or into your computer. • Is not placed on a carpet or any other surface that may have an electrical charge. 8 - Computer Basics Please note • Slots and openings are provided for ventilation to ensure reliable operation of the product and to protect it from overheating. These openings must not be blocked or covered. The openings should never be blocked by placing the product on a bed, sofa, rug or other similar surface. This product should never be placed near or over a radiator or heat register, or in a built-in installation unless proper ventilation is provided. • Never push objects of any kind into this product through cabinet slots as they may touch dangerous voltage points or short-out parts that could result in a fire or electric shock. Never spill liquid of any kind onto or into the product. • To avoid damage of internal components and to prevent battery leakage, do not place the product on a vibrating surface. • Never use it under sporting, exercising, or any vibrating environment which will probably cause unexpected short current or damage rotor devices, HDD, optical drive, and even exposure risk from lithium battery pack. Cables Make sure that: • Cables are not strained and that there is no risk of people walking or tripping over them. • Other devices do not crush the cables. Computer Basics - 9 • The power cable is connected to the computer before connecting the power cable to the AC power outlet. • The power cable is unplugged from the power outlet before disconnecting the power cable from the computer. • Three-pin power cords are connected to a grounded power outlet. • The power outlet is easily accessible and as close to the computer as possible (do not overload it with too many adapters). If your computer uses an external AC adapter: • Do not cover or place objects on the AC adapter. Allow the adapter to cool properly during use by keeping it clear of objects. • Only use the AC adapter that is supplied with your computer. Although other adapters may look similar, using them can damage your computer. If a replacement is required, use only parts certified for use with your computer. Cleaning your computer • Always unplug your computer from the power outlet before cleaning it. • Do not use liquid or aerosol cleaners, use a damp cloth instead. • Never spray cleaning product directly on the screen. • If you spill liquid on your computer, switch it off immediately, unplug the AC adapter, remove the battery and make sure it is completely dry before switching it on again. Wait overnight if necessary. Note: If your computer includes slots for memory cards or expansion devices, plastic ’dummies’ may be installed in the card slots. Dummies 10 - Computer Basics protect unused slots from dust, metal objects or other particles. Save the dummies for use when no cards are in the slots. Servicing your computer Do not attempt to service your computer yourself, as opening or removing covers may expose you to dangerous voltage or other risks. Refer all servicing to qualified service personnel. Unplug your computer from the wall outlet and refer servicing to qualified service personnel when: • • • • • • the power cord or plug is damaged, cut or frayed, liquid was spilled into the product, the product was exposed to rain or water, the product has been dropped or the case has been damaged, the product exhibits a distinct change in performance, the product does not operate normally after following the operating instructions Note: Adjust only those controls that are covered by the operating instructions, since improper adjustment of other controls may result in damage and will often require extensive work by a qualified technician to restore the product to normal condition. Health precautions • The bottom surface, areas around ventilation openings and AC adapter may get hot. To avoid injury, ensure they do not come in contact with your skin or body. Computer Basics - 11 • Your device and its enhancements may contain small parts. Keep them out of the reach of small children. • The computer and accessories may contain small parts. Keep them out of the reach of small children. • If you work or play for hours at a time, then make sure you take regular breaks. Look away from the computer's screen once in a while. Do not use your computer if you are tired. • Arrange your computer so that you can work in a natural and relaxed position. Place items that you use frequently within easy reach. • Position your computer directly in front of you for increased safety and comfort. Ensure that your keyboard and touchpad are at a comfortable height. The screen should be about 45-70 cm (18-30 inches) from your eyes. If you use your computer for long periods while sitting at a desk, invest in an external keyboard for improved comfort. • To protect your hearing, when using speakers or headphones, increase volume gradually until you can hear clearly and comfortably; do not increase the volume level after your ears have adjusted. Do not listen to high volumes for extended periods. Do not increase the volume to block out noisy surroundings; decrease the volume if you cannot hear people speaking near you. • The computer’s underside, power adapter and the air from ventilation slots may become hot during use. Avoid continuous body contact and do not place the computer on your lap while it is operating. 12 - Computer Basics • Ensure that the computer’s ventilation slots and openings are never obstructed or covered. Do not place the computer on a soft surface (such as a carpet, chair or bed) that may block ventilation slots. • Do not push objects of any kind into ventilation or case slots as they may touch dangerous voltage points or short-out parts that may result in a fire or electric shock. • Some disorders of the hands, wrists, arms, neck, shoulders, legs and back may be associated with, or aggravated by certain repetitive actions. To reduce your risk of developing these disorders, type with your wrists straight and your hands and wrists floating above the keyboard. If you experience periods of pain, tingling, numbness or other discomfort, please contact your doctor. • We advise that parents monitor the use of games by their children. If you or your child experience any of the following symptoms: dizziness, blurred vision, eye or muscle twitches, loss of consciousness, disorientation, any involuntary movement or convulsion, IMMEDIATELY discontinue use and consult your doctor. This may happen even if the person has no medical history of epilepsy. Computer Basics - 13 G ETTING T O KNOW Y O U R C O MP UT ER After setting up your computer, as illustrated in the setup instructions, let us show you around your new Gateway computer. Gateway NE71B 14 - Getting to know your computer TOP VIEW - DISPLAY 1 2 3 # Icon Item Description 1 Webcam Web camera for video communication. A light next to the Webcam indicates that the webcam is active. 2 Microphone Internal microphone for sound recording. 3 Display screen Also called Liquid-Crystal Display (LCD), displays computer output. Getting to know your computer - 15 TOP VIEW - KEYBOARD 1 5 2 3 4 # Icon Item 1 Power button / indicator 2 Keyboard 3 Touchpad 16 - Getting to know your computer Description Turns the computer on and off. Indicates the computer's power status. For entering data into your computer. - Special keys are described on page 17. Touch-sensitive pointing device which functions like a computer mouse. # Icon Item Description 4 Click buttons (left and right) The left and right side of the button function as left and right selection buttons. 5 Speakers Deliver stereo audio output. Special keys Your computer’s keyboard includes keys that activate special functions. The function of each key is clearly marked with an icon. Icon Fn Function Description Hotkey for second function Activates a second function on certain keys. E.g. press the Fn key to activate the F1 to F12 keys. Help Opens the help menu. Backup Allows you to create backup copies of your computer; either the entire system or only selected files and folders. Create a regular schedule or make copies whenever you want. Communication Enables/disables the computer’s communication devices. Display toggle Switches display output between the display screen, external monitor (if connected) and both. Screen blank Turns the display screen backlight off to save power. Press any key to return. Getting to know your computer - 17 Icon Function Description Touchpad toggle Turns the internal touchpad on and off. Play/Pause Play or pause a selected media file. Stop Stop playing the selected media file. Previous Return to the previous media file. Next Jump to the next media file. Brightness down Decreases the screen brightness. Brightness up Increases the screen brightness. Opens the Social Networks application. Social Networking - If this application is not installed, the key will start your instant messenging application. Volume up Increases the sound volume. Volume down Decreases the sound volume. Speaker toggle Turns the speakers on and off. 18 - Getting to know your computer Hotkeys The computer uses hotkeys (key combinations) to access function keys and navigation commands. To activate hotkeys, press and hold the Fn key (bottom left) before pressing the other key in the hotkey combination. Hotkey Function Description Fn + Special keys (see page 17) Function keys Activates the F1 to F12 keys. Fn + Home Scrolls to the beginning of a document. Fn + End Scrolls to the end of a document. Fn + Page up Scrolls up a page in a document. Fn + Page Down Scrolls down a page in a document. - Note: It is not necessary to press the Fn key to use the F1 to F12 function keys when starting your computer or when using the BIOS. To swap the hotkey and special function of the F1 to F12 keys, change the function key setting in the BIOS (to open the BIOS press F2 when starting your computer, then select the Main menu and change Function key behavior to Function keys). Getting to know your computer - 19 FRONT VIEW 1 # Icon 2 Item Power indicator Description Indicates the computer's power status. Indicates the computer's battery status. Battery indicator 1 2 - Charging: The light shows amber when the battery is charging. - Fully charged: The light shows blue when in AC mode. HDD indicator Indicates when the hard disk drive is active. Communication indicator Indicates the computer’s wireless connectivity device status. Multi-in-1 card reader Accepts Secure Digital (SD), MultiMediaCard (MMC), Memory Stick PRO (MS PRO), xDPicture Card (xD). - Push to remove/install the card. Only one card can operate at any given time. - Note: The front panel indicators are visible even when the computer cover is closed. 20 - Getting to know your computer LEFT VIEW 1 # Icon 2 Item Kensington lock slot 3 4 5 6 Description Connects to a Kensington-compatible computer security lock. - Wrap the computer security lock cable around an immovable object such as a table or handle of a locked drawer. Insert the lock into the notch and turn the key to secure the lock. Some keyless models are also available. 1 Allows the computer to stay cool. 2 Ventilation and cooling fan 3 Ethernet (RJ-45) port Connects to an Ethernet 10/100/1000-based network. 4 External display (VGA) port Connects to a display device (e.g., external monitor, LCD projector). 5 HDMI port Supports high-definition digital video connections. - Do not cover or obstruct the openings. Getting to know your computer - 21 # Icon Item Description Connects to USB devices. 6 USB port - If a port is black, it is USB 2.0 compatible, if it is blue it is also USB 3.0 compatible (see below). Information on USB 3.0 • Compatible with USB 3.0 and earlier devices. • For optimal performance, use USB 3.0-certified devices. • Defined by the USB 3.0 specification (SuperSpeed USB). 22 - Getting to know your computer RIGHT VIEW 1 # 1 Icon 2 Item Headphones / speaker jack Microphone jack 3 4 56 7 Description Connects to audio line-out devices (e.g., speakers, headphones). - Supports compatible 3.5 mm headsets with built-in microphone (e.g. Acer smart handheld headsets). Accepts inputs from external microphones. Connects to USB devices. - If a port is black, it is USB 2.0 compatible, if it is blue it is also USB 3.0 compatible (see below). 2 USB ports 3 Optical drive Internal optical drive; accepts CDs or DVDs. 4 Optical disk access indicator Lights up when the optical drive is active. Getting to know your computer - 23 # 5 Icon Item Optical drive eject button 6 Emergency eject hole 7 DC-in jack Description Ejects the optical disk from the drive. Ejects the optical drive tray when the computer is turned off. - Carefully insert a straightened paper clip to eject the optical drive tray. Connects to your computer’s AC adapter. Information on USB 3.0 • Compatible with USB 3.0 and earlier devices. • For optimal performance, use USB 3.0-certified devices. • Defined by the USB 3.0 specification (SuperSpeed USB). 24 - Getting to know your computer BASE VIEW 1 2 4 3 # Icon Item Description 1 Battery bay Houses the computer's battery pack. 2 Battery release latch Releases the battery for removal. Insert a suitable tool and slide to release. Memory compartment Houses the computer's main memory. Hard disk bay Houses the computer's hard disk (secured with screws). 3 4 Ventilation and cooling fan Allows the computer to stay cool. - Do not cover or obstruct the openings. Getting to know your computer - 25 T OUCHPAD TOUCHPAD BASICS The touchpad controls the arrow (or 'cursor') on the screen. As you slide your finger across the touchpad, the cursor will follow this movement. Press the left or right side of the button located beneath the touchpad to perform selection and execution functions. These two areas are similar to the left and right buttons on a mouse. Tapping on the touchpad is the same as clicking the left side of the button. Note: The touchpad is sensitive to finger movement; the lighter the touch, the better the response. Please keep the touchpad and your fingers dry and clean. The cursor is controlled by some basic gestures: • Single-finger slide: Slide a finger across the touchpad to move the cursor. • Single-finger tap: Lightly tap the touchpad with your finger, to perform a 'click', which will select or start an item. Quickly repeat the tap to perform a double tap or 'double click'. • Drag: Press and hold the left side of the selection button, or tap twice anywhere on the touchtap, then slide a second finger across the touchpad to select all items in an area. 26 - Touchpad TOUCHPAD GESTURES Windows 8 and many applications support touchpad gestures that use one or more fingers. Note: Support for touchpad gestures depends on the active application. These allow you to control applications with a few simple gestures, such as: • Swipe in from edge: Access Windows tools by swiping into the center of the touchpad from the right, top or left. • Swipe in from right edge: Toggle the charms. • Swipe in from top edge: Toggle the app commands. • Swipe in from left edge: Switch to the previous app. • Two-finger slide: Swiftly scroll through web pages, documents and playlists by placing two fingers on the touchpad and moving both in any direction. • Two-finger pinch: Zoom in and out of photos, maps and documents with a simple finger-and-thumb gesture. Touchpad - 27 U PGRADING YOUR COMPUTER EXPANDING THROUGH OPTIONS Your computer offers you many options for a complete computing experience. Connectivity options Ports allow you to connect peripheral devices to your computer. For instructions on how to connect different external devices to the computer, read the following section. Memory card reader Memory cards are used in a wide selection of digital cameras, PDAs, MP3 players and mobile phones. Inserting a memory card 1. Align the card so that the connector points towards the port, with the connectors facing down. 2. Carefully slide the card into the port. If you find you need to use any force to insert the card, try reorientating the card slightly. 3. Push the card until it clicks into place. A few millimetres of the card will extend from beyond the slot. If the card contains some files, the Windows Auto Play window may appear (this depends on the contents of the card) and ask you if you wish 28 - Upgrading your computer to use a program to access the contents of the card. Select an option here if it is appropriate, otherwise select Cancel. If the card contains no files, or unknown files, a window will open showing the contents of the card. SD, SDHC and SDXC cards Different types of SD cards cover different capacities, while using the same overall design. SD cards contain up to 4 GB, SDHC cards contain up to 32 GB, and SDXC cards can contain up to 2048 GB (2 TB). Your computer provides an SDHC or SDXC compatible card reader. Note: SDXC memory cards can only be used in an SDXC-compatible reader; SD and SDHC cards can be used in either type. Removing a card from a memory card reader 1. Click on Show hidden icons arrow in the Notification Area (next to the clock). 2 2. Click on the Safely Remove Hardware icon. 3. Click on Eject SD Card (or the name of the device). 4. Wait until a Safe to Remove Hardware message is displayed. 5. Remove the card. 1 3 Upgrading your computer - 29 Built-in networking The built-in networking allows you to connect your computer to an Ethernet-based network. Connect an Ethernet cable from the Ethernet (RJ-45) port on the chassis of the computer to a network jack or hub on your network. Universal Serial Bus (USB) The USB port is a high-speed serial bus which allows you to connect USB peripherals without taking up system resources. Certain computers may include one or more USB 3.0 ports. These resemble standard USB ports, except they include additional internal connections and are blue. You may use USB 3.0 compatible devices with these ports to benefit from faster transfer speeds. Video port Connect to a monitor with a VGA or DVI port (the type of connection supported depends on your computer’s configuration). The appropriate 30 - Upgrading your computer cable is usually included with the monitor. Follow these steps to connect an monitor to your computer: 1. Check that the computer is powered off and the monitor power switch is turned off. 2. Attach the video cable to the monitor port on the computer. Secure the cable connection with the screws provided. 3. Connect the monitor power cable and plug it into a properly grounded wall outlet. 4. Follow any setup instructions in the monitor's user's guide. 5. Turn on power to the monitor, then the computer. 6. Make sure that the current resolution and refresh rate do not exceed the specifications of the monitor. If necessary change the display settings used by the computer. Note: To access the display controls, press the Windows key ( W, type "Display" and then click on Display. )+ Upgrading your computer - 31 High-Definition Multimedia Interface (only for certain models) HDMI (High-Definition Multimedia Interface) is an industry-supported, uncompressed, all-digital audio/video interface. HDMI provides an interface between any compatible digital audio/ video source, such as a set-top box, DVD player, and A/V receiver and a compatible digital audio and/or video monitor, such as a digital television (DTV), over a single cable. Use the HDMI port on your computer to connect with high-end audio and video equipment. Single cable implementation allows tidy setup and fast connection. Headphones and microphone These two ports allow you to connect audio devices. Use the headphone port to plug in stereo headphones or powered speakers. Plugging an audio device to the headphone port disables the built-in speakers. Use the microphone port to connect an external microphone for mono recording; plugging in an external microphone disables the built-in microphone. 32 - Upgrading your computer P OWER SUPPLY AC POWER ADAPTER Your computer can use the supplied external power adapter (a power 'brick') to run on AC power. A power cable is provided that is appropriate for the country where the computer was purchased. The power adapter provides adequate power to run your computer and recharge the battery pack at the same time. Caution: Do not cover or place objects on the AC adapter. Keeping the adapter clear of objects allows the adapter to cool properly during use. Only use the AC adapter that is supplied with your computer. Although other adapters may look similar, using them can damage your computer. Power supply - 33 Warning: The AC adapter and the underside of the computer can become hot after prolonged use. This is normal, but may cause injury with prolonged contact. BATTERY PACK The computer uses a battery pack that gives you extended use between charges. Battery pack characteristics The battery pack has the following characteristics: • Employs current battery technology standards. • Delivers a battery-low warning. The battery is recharged whenever you connect the computer to the AC adapter. Your computer supports charge-in-use, enabling you to recharge the battery while you continue to operate the computer. However, recharging with the computer turned off results in a significantly faster charge time. The battery will come in handy when you travel or during a power failure. It is advisable to have an extra fully-charged battery pack available as backup. Contact your dealer for details on ordering a spare battery pack. Maximizing the battery’s life Like all other batteries, your computer’s battery will degrade over time. This means that the battery's performance will diminish with time and use. 34 - Power supply To maximize your battery’s life, you are advised to adhere to the recommendations set out below. Conditioning a new battery pack Before you use a battery pack for the first time, there is a “conditioning” process that you should follow: 1. Insert the new battery without turning the computer on. 2. Connect the AC adapter and fully charge the battery. 3. Disconnect the AC adapter. 4. Turn on the computer and operate using battery power. 5. Fully deplete the battery. 6. Reconnect the AC adapter and fully charge the battery again. Follow these steps again until the battery has been charged and discharged three times. Use this conditioning process for all new batteries, or if a battery hasn’t been used for a long time. If the computer is to be stored for more than two weeks, you are advised to remove the battery pack from the unit. Warning: Do not expose battery packs to temperatures below 0 °C (32 °F) or above 45 °C (113 °F). Extreme temperatures may adversely affect the battery pack. By following the battery conditioning process you condition your battery to accept the maximum possible charge. Failure to follow this procedure will prevent you from obtaining the maximum battery charge, and will also shorten the effective lifespan of the battery. Power supply - 35 In addition, the useful lifespan of the battery is adversely affected by the following usage patterns: • Using the computer on constant AC power with the battery inserted. If you want to use constant AC power, you are advised to remove the battery pack after it is fully charged. • Not discharging and recharging the battery to its extremes, as described above. • Frequent use; the more you use the battery, the faster it will reach the end of its effective life. A standard computer battery has a life span of about 300 charges. Replacing the battery pack The notebook uses lithium batteries. Replace the battery with the same type as that which came bundled with your product. Use of another battery may present a risk of fire or explosion. Warning: Batteries may explode if not handled properly. Do not disassemble or dispose of them in fire. Keep them away from children. Follow local regulations when disposing of used batteries. Installing or removing the battery pack Important! Before removing the battery from the unit, connect the AC adapter if you want to continue using your computer. Otherwise, turn off the computer first. 36 - Power supply To install a battery pack: 1. Align the battery with the open battery bay; make sure that the end with the contacts will enter first, and that the top surface of the battery is facing up. 2. Slide the battery into the battery bay and gently push until the battery locks in place. To remove a battery pack: 1. Slide the battery release latch to release the battery. 2. Pull the battery from the battery bay. Charging the battery To charge the battery, first make sure that it is correctly installed in the battery bay. Plug the AC adapter into the computer, and connect to a mains power outlet. You can continue to operate your computer on AC power while your battery is charging. However, charging the battery with the computer turned off results in a significantly faster charge time. Note: You are advised to charge the battery before retiring for the day. Charging the battery overnight before traveling enables you to start the next day with a fully-charged battery. Checking the battery level The Windows power meter indicates the current battery level. Rest the cursor over the battery/power icon on the taskbar to see the battery’s present charge level. Power supply - 37 Optimizing battery life Optimizing battery life helps you get the most out of battery operation, prolonging the charge/recharge cycle and improving recharging efficiency. You are advised to follow the suggestions set out below: • Purchase an extra battery pack. • Use AC power whenever possible, reserving battery for on-the-go use. • Eject a PC Card if it is not being used, as it will continue to draw power (for selected models). • Store the battery pack in a cool, dry place. The recommended temperature is 10 °C (50 °F) to 30 °C (86 °F). Higher temperatures cause the battery to self-discharge faster. • Excessive recharging decreases the battery life. • Look after your AC adapter and battery. Battery-low warning When using battery power pay attention to the Windows power meter. Warning: Connect the AC adapter as soon as possible after the battery-low warning appears. Data will be lost if the battery to become fully depleted and the computer shuts down. 38 - Power supply When the battery-low warning appears, the recommended course of action depends on your situation: Situation The AC adapter and a power outlet are available. Recommended Action 1. Plug the AC adapter into the computer, and then connect to the mains power supply. 2. Save all necessary files. 3. Resume work. Turn off the computer if you want to recharge the battery rapidly. An extra fully charged 1. Save all necessary files. battery pack is 2. Close all applications. available. 3. Shut down the operating system to turn off the computer. 4. Replace the battery pack. The AC adapter or a power outlet is unavailable. You have no spare battery pack. 5. Turn on the computer and resume work. 1. Save all necessary files. 2. Close all applications. 3. Shut down the operating system to turn off the computer. Power supply - 39 P OWER MANAGEMENT This computer has a built-in power management unit that monitors system activity. System activity refers to any activity involving one or more of the following devices: keyboard, mouse, hard disk, peripherals connected to the computer, and video memory. If no activity is detected for a period of time, the computer stops some or all of these devices in order to conserve energy. SAVING POWER Disable Fast startup Your computer uses Fast startup to start quickly, but also uses a small amount of power to check for signals to start. These checks will slowly drain your computer’s battery. If you prefer to reduce your computer’s power requirements and environmental impact, turn off Fast startup: Note: If Fast startup is off, your computer will take longer to start from Sleep. Your computer will also not start if it receives an instruction to start over a network (Wake on LAN). 40 - Power management 1. Open the Desktop. 2. Click Power Options in the Notification area. 3. Select More Power Options. 4. Select Choose what the power buttons do. 5. To access Shutdown Settings, select Change settings that are currently unavailable. Power management - 41 6. Scroll down and disable Turn on fast startup. 7. Select Save changes. 42 - Power management S O FT WAR E USING WINDOWS AND YOUR SOFTWARE Gateway computers include software to help you use your computer; the programs and categories available on your computer depend on the model purchased. Internet security offer It is vital to protect your computer from viruses and attacks over the Internet (see Security on page 50). An comprehensive Internet security suite, including a free trial subscription period, is offered when you first start your computer. You should activate this protection before connecting to the Internet. This security suite protects your computer from the most recent online threats and protects your personal data (bank account credentials, credit card numbers, passwords, and more). Gateway Recovery Management To prepare your computer for system recovery options, you should create a set of recovery discs as soon as possible. See page 59 for more information. Software - 43 I NTERNET FIRST STEPS ON THE NET Protecting your computer It is vital to protect your computer from viruses and attacks over the Internet (see Internet security offer on page 43 and Security on page 50). A comprehensive Internet security program is offered when you first start your computer. You should activate this protection as soon as possible, certainly before you connect to the Internet. Choose an Internet Service Provider Using the Internet has become a natural part of daily computing. Just a few simple steps can connect you to a vast collection of knowledge and communication tools. To accomplish these steps you should first select an Internet Service Provider (ISP), which supplies the connection between your computer and the Internet. You should research the ISPs available in your region, not forgetting to talk to friends and family about their experiences or to check reviews and consumer reports. The ISP you select will provide instructions on how to connect to the Internet (you may need additional software or a special ‘box’ that connects to your phone line). 44 - Internet Connection types Depending on your computer model, your location and your communication needs, you have several ways to connect to the Internet. Dial-up Some computers include a telephone dial-up (‘modem’) connector. This allows you to connect to the Internet using your telephone line. With a dialup connection, you cannot use the modem and the telephone simultaneously on a single phone line. This type of connection is recommended only if you have limited use of the Internet as the connection speed is low and connection time is typically charged per hour. DSL (e.g. ADSL) DSL (Digital Subscriber Line) is an ‘always-on’ connection that runs over the phone line. As DSL and phone do not use the same frequencies, you can use your telephone at the same time you are connected to the Internet (this requires a ‘micro-filter’ on each telephone socket to avoid interference). To be eligible for DSL, you must be located near an DSLequipped phone exchange (service is sometimes unavailable in rural areas). Connection speeds vary depending on your location, but DSL generally provides very fast and reliable Internet connection. As the connection is always-on, it is generally charged at fixed monthly rates. Note: A DSL connection requires an appropriate modem. A modem is usually provided by the ISP when you register. Many of these modems include an ‘router’ that provides network and wi-fi access. Internet - 45 Cable A cable connection provides fast and always-on Internet service via a cable television line. This service is generally available in large cities. You can use your telephone and watch cable TV at the same time you are connected to the Internet. 3G (WWAN or 'Wireless Wide-Area Network') A 3G connection allows you to use cellular networks (such as those used by a mobile phone) to connect to the Internet while away from home. The socket for a SIM card may be built in to your computer, or may require an external device, such as a USB modem or even an appropriately equipped mobile phone. Note: If your computer includes a SIM card slot, you require a compatible SIM card and a contract with a cellular provider. Before using the 3G features, check with your service provider to see if any additional charges will be incurred, especially roaming charges. Network connections A LAN (Local Area Network) is a group of computers (for example, within an office building or home) that share a common communications line and resources. When you set up a network, you can share files, peripheral devices (such as a printer) and an Internet connection. You can set up a LAN using wired technologies (such as Ethernet) or wireless technologies (such as WiFi or Bluetooth). 46 - Internet Wireless networks A wireless LAN or WLAN is a wireless local area network, which may link two or more computers without using wires. Setting up a wireless network is easy and allows you to share files, peripheral devices and an Internet connection. What are benefits of a wireless network? Mobility Wireless LAN systems allow you and other users of your home network to share access to files and devices connected to the network, for example a printer or scanner. Also you can share an internet connection with other computers in your home. Installation speed and simplicity Installing a wireless LAN system can be fast and easy and eliminates the need to pull cables through walls and ceilings. Components of a wireless LAN To set up your Wireless network at home you need to have the following: Access point (router) Access points (routers) are two-way transceivers that broadcast data into the surrounding environment. Access points act as a mediator between wired and wireless network. Most routers have a built-in DSL modem that will allow you access to a high speed DSL internet connection. The ISP (Internet Service Provider) you have chosen normally supplies a modem/ Internet - 47 router with the subscription to their services. Read carefully the documentation supplied with your Access point/router for detailed setup instructions. Network cable (RJ45) A network cable (also called RJ45 cable) is used to connect the host computer to the access point (see illustration below); this type of cable may also be used to connect peripheral devices to the access point. Wireless adapter An internal wireless adapter is normally already installed in your computer. A button or controls in Windows allow you to activate or deactivate the adapter. 48 - Internet Diagram of a working network 1. Access point/router 4 2. Desktop computer 3. Modem 5 4. Printer 1 5. Portable computer 3 6. PDA/Smartphone 7. Network (RJ45) 7 cables 2 6 Turning on/off a wireless network connection Most computers feature a ‘WiFi’ button that turns the network connection on or off. If your computer has wireless access, but does not feature a Communication button, you may turn your wireless network on or off, or control what is shared over the network with the network management options. Press the Windows key ( ) + W, type "HomeGroup" and then click on HomeGroup. Warning: Using wireless devices while flying in aircraft is prohibited. Switch off all devices before boarding an aircraft; they may be dangerous to the operation of the aircraft, disrupt Internet - 49 communications, and even be illegal. Surf the Net! To surf the Internet, you need a program called an Internet browser. Internet Explorer provides an easy and secure web browsing experience. As soon as you have your Internet access installed and you are connected, from Start, click the Internet Explorer tile or the icon located on Desktop and take your Internet experience to a new level! Gateway website To get you started why not visit our website, www.gateway.com. Gateway is dedicated to provide you with on-going personalized support. Check out our Support section to get help tailored to your needs. www.gateway.com is your portal to a world of online activities and services: visit us regularly for the latest information and downloads! Security You are probably eager to explore everything the Internet has to offer. In order for you to be safe online, Gateway has pre-installed Symantec’s award-winning Norton Internet Security™ on your computer. Norton Internet Security runs quietly in the background to block today’s complex threats and protect your identity when you shop, bank, or browse online. 50 - Internet Norton Internet Security blocks online identity theft, detects and eliminates spyware, removes viruses and Internet worms, protects against hackers. Definitions What is a virus? Malicious software, typically called ‘viruses’, are programs designed to infect and damage computers. Most viruses are transmitted over the Internet, emails or malicious Web sites. A typical virus will replicate and pass itself undetected to multiple computers. Other forms of nuisance, such as Trojan horses, worms or spam can infect your computer in various ways, using up resources or clogging up a network. Note: Gateway guarantees that your computer was 100% virus free at the time of purchase and does not cover damages due to viruses. What is spyware? Spyware refers to generally unwanted programs that are downloaded onto your computer while connected to the Internet, often without you knowing it. Once it has infected your computer, it can snoop on your browsing activity, collect personal information, cause pop-up ads to appear, or even change the configuration of your computer. Spyware consumes resources on your computer; it can slow down your Internet connection or entire computer system, and even cause crashes. Spyware is sometimes used by unscrupulous companies to monitor and track the sites you visit on the Internet so as to determine your web-surfing habits and display targeted pop-up ads on your screen. However, some kinds of spyware go beyond simple tracking and actually monitor Internet - 51 keystrokes and capture passwords, posing a serious security risk. What is malware? Malicious software, also known as malware, is software designed to deliberately harm your computer. For example, viruses, worms, and Trojan horses are malicious software. To help protect your computer against malware, make sure it is using up-to-date antivirus and antimalware software. What is a personal firewall? A personal firewall is a software program designed to prevent unauthorized access to or from a private network. It acts as a shield to protect your Internet connection from unwanted connections, some of which may attempt to take control of your computer to install or redistribute viruses or malicious programs. Each connection to your computer is monitored - programs that attempt to receive information without your permission are detected and the firewall will display an alert. You can then decide if you will allow the connection, if the connection is to a program you are currently using then normally you would allow it (i.e. a game connecting to a multi-player server or an encyclopaedia making a content update). How to protect your computer Cybercrime prevention can be straight-forward - when armed with a little technical advice and common sense, many attacks can be avoided. In general, online criminals are trying to make their money as quickly and easily as possible. The more difficult you make their job, the more likely 52 - Internet they are to leave you alone and move on to an easier target. The tips below provide basic information on how you can prevent online fraud. Keep your computer current with the latest patches and updates One of the best ways to keep attackers away from your computer is to apply patches and other software fixes when they become available. By regularly updating your computer, you block attackers from being able to take advantage of software flaws (vulnerabilities) that they could otherwise use to break into your system. While keeping your computer up-to-date will not protect you from all attacks, it makes it much more difficult for hackers to gain access to your system, blocks many basic and automated attacks completely, and might be enough to discourage less-determined attackers, so they will give up and look for a more vulnerable computer elsewhere. More recent versions of Microsoft Windows and other popular software can be configured to download and apply updates automatically so that you do not have to remember to check for the latest software. Taking advantage of auto-update features in your software is a great start toward keeping yourself safe online. Protect your computer with security software Several types of security software are necessary for basic online security. Security software essentials include firewall and antivirus programs. A firewall is usually your computer's first line of defense-it controls who and what can communicate with your computer online. You could think of a firewall as a sort of "policeman" that watches all the data attempting to flow in and out of your computer on the Internet, allowing communications Internet - 53 that it knows are safe and blocking "bad" traffic such as attacks from ever reaching your computer. The next line of defense many times is your antivirus software, which monitors all online activities such as email messages and Web browsing and protects an individual from viruses, worms, Trojan horse and other types of malicious programs. Your antivirus and antispyware software should be configured to update itself, and it should do so every time you connect to the Internet. Integrated security suites such as Norton Internet Security, which combine firewall, antivirus, antispyware with other features such as antispam and parental controls, have become popular as they offer all the security software needed for online protection in a single package. Many people find using a comprehensive security suite an attractive alternative to installing, configuring and updating several different types of security software. A complete version of Norton Internet Security™ is pre-installed on your Gateway system. It includes a free trial subscription to protection updates. Make sure you Activate it! Choose strong passwords and keep them safe Passwords are a fact of life on the Internet today; we use them for everything from ordering flowers and online banking to logging into our favorite airline Web site to see how many miles we have accumulated. The following tips can help make your online experiences secure: • Selecting a password that cannot be easily guessed is the first step toward keeping passwords secure and out of the wrong hands. Strong 54 - Internet passwords have eight characters or more and use a combination of letters, numbers and symbols (e.g., # $ % ! ?). Avoid using any of the following as your password: your login name, anything based on your personal information such as your last name, and words that can be found in the dictionary, especially "password". Try to select especially strong, unique passwords for protecting activities like online banking. • Keep your passwords in a safe place and try not to use the same password for every service you use online. • Change passwords on a regular basis, at least every 90 days. This can limit the damage caused by someone who has already gained access to your account. If you notice something suspicious with one of your online accounts, one of the first steps you can take is to change your password. Protect your personal information Exercise caution when sharing personal information such as your name, home address, phone number, and email address online. To take advantage of many online services, you will inevitably have to provide personal information in order to handle billing and shipping of purchased goods. Since not divulging any personal information is rarely possible, the following list contains some advice for how to share personal information safely online: • Keep an eye out for phony email messages. Things that indicate a message may be fraudulent are misspellings, poor grammar, odd phrasing, Web site addresses with strange extensions, Web site addresses that are entirely numbers where there are normally words, Internet - 55 and anything else out of the ordinary. Additionally, phishing messages will often tell you that you have to act quickly to keep your account open, update your security, or urge you to provide information immediately or else something bad will happen. Don't take the bait. • Don't respond to email messages that ask for personal information. Legitimate companies will not use email messages to ask for your personal information. When in doubt, contact the company by phone or by typing in the company Web address into your Web browser. Don't click on the links in these messages as they make take you to fraudulent, malicious Web sites. • Steer clear of fraudulent Web sites used to steal personal information. When visiting a Web site, type the address (URL) directly into the Web browser rather than following a link within an email or instant message. Fraudsters often forge these links to make them look convincing. A shopping, banking or any other Web site where sensitive information should have an "S" after the letters "http" (i.e. https://www.yourbank.com not http://www.yourbank.com). The "s" stands for secure and should appear when you are in an area requesting you to login or provide other sensitive data. Another sign that you have a secure connection is the small lock icon in the bottom of your web browser (usually the right-hand corner). • Pay attention to privacy policies on Web sites and in software. It is important to understand how an organization might collect and use your personal information before you share it with them. 56 - Internet • Guard your email address. Spammers and "phishers" sometimes send millions of messages to email addresses that may or may not exist in hopes of finding a potential victim. Responding to these messages or even downloading images ensures you will be added to their lists for more of the same messages in the future. Also be careful when posting your email address online in newsgroups, blogs or online communities. Online offers that look too good to be true usually are The old saying "there's no such thing as a free lunch" still rings true today. Supposedly "free" software such as screen savers or smileys, secret investment tricks sure to make you untold fortunes, and contests that you've surprisingly won without entering are the enticing hooks used by companies to grab your attention. While you may not directly pay for the software or service with money, the free software or service you asked for may have been bundled with advertising software ("adware") that tracks your behavior and displays unwanted advertisements. You may have to divulge personal information or purchase something else in order to claim your supposed content winnings. If an offer looks so good it's hard to believe, ask for someone else's opinion, read the fine print, or even better, simply ignore it. Review bank and credit card statements regularly The impact of identity theft and online crimes can be greatly reduced if you can catch it shortly after your data is stolen or when the first use of your information is attempted. One of the easiest ways to get the tip-off that something has gone wrong is by reviewing the monthly statements Internet - 57 provided by your bank and credit card companies for anything out of the ordinary. Additionally, many banks and services use fraud prevention systems that call out unusual purchasing behavior (i.e. if you live in Texas and all of the sudden start buying refrigerators in Budapest). In order to confirm these out of the ordinary purchases, they might call you and ask you to confirm them. Don't take these calls lightly; this is your hint that something bad may have happened and you should take necessary action. Protect your computer with Windows security tools Windows provides a variety of protection applications. Windows Updates If you have an active Internet connection, Windows can check for important updates for your computer and install them automatically. These updates include security patches and program updates that can improve your computing experience and help protect your computer against new viruses and attacks. How do I know when my computer is at risk? If the Action Center reports an alert, or if your computer behaves erratically, crashes unexpectedly or if some of your programs do not work correctly, your computer may be infected by malicious software. However, do not blame every computer problem on a virus! If you suspect your computer is infected, the first thing to do is update, if you have not already done so, and run your antivirus and anti-spyware software. 58 - Internet R ECOVERY If you are having trouble with your computer, and the frequently asked questions (see page 79) do not help, you can 'recover' your computer - i.e. return it to an earlier state. This section describes the recovery tools available on your computer. Gateway provides Gateway Recovery Management, which allows you to create a recovery backup, a drivers and applications backup, and to start recovery options, either using Windows tools, or the recovery backup. Note: Gateway Recovery Management is only available with a preinstalled Windows operating system. Important: We recommend that you create a Recovery Backup and Drivers and Applications Backup and as soon as possible. In certain situations a full recovery will require a USB recovery backup. CREATING A RECOVERY BACKUP To reinstall from a USB storage drive, you must first create a recovery backup. The recovery backup includes the entire original contents of your computer’s hard drive, including Windows and all factory-loaded software and drivers. Using this backup will restore your computer to the same state as when you purchased it, while giving you an option to retain all settings and personal data. Note: Make sure you have a USB drive with a capacity of at least 16 GB. Recovery - 59 1. From Start, type 'Recovery' and then click Gateway Recovery Management in the list of apps. 2. Click Create Factory Default Backup. The Recovery Drive window opens. 60 - Recovery Make sure Copy contents from the recovery partition to the recovery drive is selected. This provides the most complete and safest recovery backup. 3. Plug in the USB drive then click Next. • Make sure your USB drive has enough capacity before continuing. The recovery backup requires at least 16 GB of storage 4. You will be shown the backup progress on the screen. 5. Follow the process until it completes. 6. After creating the recovery backup, you can choose to delete the recovery information on your computer. If you delete this information, you can only use the USB recovery backup to restore your computer, if you lose or erase the USB drive, you cannot restore your computer. Recovery - 61 7. Unplug the USB drive and label it clearly. Important: Write a unique, descriptive label on the backup, such as 'Windows Recovery Backup'. Make sure you keep the backup in a safe place that you will remember. CREATING A DRIVERS AND APPLICATIONS BACKUP To create a Drivers and Applications Backup, that contains the factoryloaded software and drivers needed by your computer, you may use either a USB storage drive or, if your computer features a DVD recorder, one or more blank recordable DVDs. 62 - Recovery 1. From Start, type 'Recovery' and then click Gateway Recovery Management in the list of apps. 2. Click Create Drivers and Applications Backup. Plug in the USB drive or insert a blank DVD into the optical drive, then click Next. Recovery - 63 • If you are using a USB drive, make sure your USB drive has enough capacity before continuing. • If using DVDs, it will also show the number of blank, recordable discs you will need to complete the recovery discs. Make sure that you have the required number of identical, blank discs. 64 - Recovery 3. Click Start to copy files.You will be shown the backup progress on the screen. 4. Follow the process until it completes: • If you are using optical discs, the drive ejects each disc as it completes burning it. Remove the disc from the drive and mark it with a permanent marker. If multiple discs are required, insert a new disc when prompted, then click OK. Continue until the process is complete. • If you are using a USB drive, unplug the drive and label it clearly. Important: Write a unique, descriptive label on each backup, such as 'Drivers and Applications Backup'. Make sure you keep the backup in a safe place that you will remember. RECOVERING YOUR SYSTEM To recover your system: 1. Perform minor fixes. If only one or two items of software or hardware have stopped working correctly, the problem may be solved by reinstalling the software or the device drivers. To reinstall software and drivers that were pre-installed at the factory, see "Reinstalling drivers and applications" on page 66. For instructions on reinstalling software and drivers that were not preinstalled, see that product’s documentation or support Web site. 2. Revert to a previous system condition. If reinstalling software or drivers does not help, then the problem may be Recovery - 65 solved by returning your system to a previous state when everything was working correctly. For instructions, see "Returning to an earlier system snapshot" on page 69. 3. Reset your operating system. If nothing else has solved the problem and you want to reset your system, but keep your user information, see "Returning your system to its factory condition" on page 70. 4. Reset your system to its factory condition. If nothing else has solved the problem and you want to reset your system to factory condition, see "Returning your system to its factory condition" on page 70. Reinstalling drivers and applications As a troubleshooting step, you may need to reinstall the applications and device drivers that came pre-installed on your computer from the factory. You can reinstall using either your hard drive or the backup you have created. • Other applications - If you need to reinstall software that did not come pre-installed on your computer, you need to follow that software’s installation instructions. • New device drivers - If you need to reinstall device drivers that did not come pre-installed on your computer, follow the instructions provided with the device. 66 - Recovery If you are reinstalling using Windows and the recovery information stored on your computer: • From Start, type 'Recovery' and then click Gateway Recovery Management in the list of apps. • Click Reinstall Drivers or Applications. Recovery - 67 • You should see the Contents section of the Gateway Resource Center. • Click the install icon for the item you want to install, then follow the onscreen instructions to complete the installation. Repeat this step for each item you want to reinstall. If you are reinstalling from a Drivers and Applications Backup on a DVD or USB drive: 1. Insert the Drivers and Applications Backup into the disc drive or connect it to a free USB port. • If you inserted a DVD wait for Gateway Resource Center to start. • If Gateway Resource Center does not start automatically, press the Windows key + <E>, then double-click on the optical drive icon. 68 - Recovery • If you are using a USB drive, press the Windows key + <E>, then double-click on the drive that contains the backup. Double-click on ResourceCenter. 2. You should see the Contents section of the Gateway Resource Center. 3. Click the install icon for the item you want to install, then follow the onscreen prompts to complete the installation. Repeat this step for each item you want to reinstall. Returning to an earlier system snapshot Microsoft System Restore periodically takes a 'snapshot' of your system settings and saves them as restore points. In most cases of hard-toresolve software problems, you can return to one of these restore points to get your system running again. Recovery - 69 Windows automatically creates an additional restore point each day, and also each time you install software or device drivers. Note: For more information about using Microsoft System Restore, from Start, type 'Help' and then click Help and Support in the list of apps. Type 'Windows system restore' in the Search Help box, then press Enter. Returning to a restore point 1. From Start, type 'Control Panel' and then click Control Panel in the list of apps. 2. Click System and Security > Action Center, then click Recovery at the bottom of the window. 3. Click Open System Restore, then Next. 4. Click the latest restore point (at a time when your system worked correctly), click Next, then Finish. 5. A confirmation window appears; click Yes. Your system is restored using the restore point you specified. This process may take several minutes, and may restart your computer. Returning your system to its factory condition If your computer experiences problems that are not recoverable by other methods, you may need to reinstall everything to return your system to its factory condition. You can recover from either your hard drive or the recovery backup you have created. 70 - Recovery • If you can still run Windows and have not deleted the recovery partition, see "Recovering from Windows" on page 71. • If you cannot run Windows, your original hard drive has been completely re-formatted or you have installed a replacement hard drive, see "Recovering from a recovery backup" on page 75. Recovering from Windows Start Gateway Recovery Management: • From Start, type 'Recovery' and then click Gateway Recovery Management in the list of apps. Two options are available, Restore Factory Settings (Reset my PC) or Customized Restore (Refresh my PC). Restore Factory Settings deletes everything on your hard drive, then reinstalls Windows and all software and drivers that were pre-installed on your system. If you can access important files on your hard drive, back them up now. See "Restore Factory Settings with Gateway Recovery Management" on page 72. Customized Restore will attempt to retain your files (user data) but will reinstall all software and drivers. Software installed since you purchased your PC will be removed (except software installed from the Windows Recovery - 71 Store). See "Customized Management" on page 74. Restore with Gateway Recovery Restore Factory Settings with Gateway Recovery Management 1. Click Restore Factory Settings. Caution: 'Restore Factory Settings' will erase all files on your hard drive. 2. If your computer is configured with two operating systems (only available on certain systems), a window opens with the option to restore either Windows 7 or Windows 8. If you choose Windows 7, your computer will restart and restore Windows 7. If you choose Windows 8, Reset your PC opens, as described below. Note: To fully enjoy Windows 8 features after changing from Windows 7, enter the BIOS (press <F2> when starting your computer) and 72 - Recovery change Boot Mode to UEFI. If you reinstall Windows 7, you must change Boot Mode back to Legacy before restarting your computer. 3. The Reset your PC window opens. Images for reference only. 4. Click Next, then choose how to erase your files: a. Just remove my files quickly erases all files before restoring your computer and takes about 30 minutes. b. Fully clean the drive completely cleans the drive after each file is erased, so no files can be viewed after the recovery. Cleaning the drive takes much longer, up to 5 hours, but is much more secure as old files are completely removed. 5. Click Reset. 6. The recovery process begins by restarting your computer, then continues by copying files to your hard drive. 7. After the recovery has finished, you can start using your computer by repeating the first-start process. Recovery - 73 Customized Restore with Gateway Recovery Management 1. Click Customized Restore (Retain User Data). 2. The Refresh your PC window opens. 3. Click Next, then Refresh. 4. The recovery process begins by restarting your computer, then continues by copying files to your hard drive. This process takes about 30 minutes. 74 - Recovery Recovering from a recovery backup To recover from a recovery backup on a USB drive: 1. Find your recovery backup. 2. Plug in the USB drive and turn on your computer. 3. If it is not already enabled, you must enable the F12 Boot Menu: a. Press <F2> when starting your computer. b. Use the left or right arrow keys to select the Main menu. c. Press the down key until F12 Boot Menu is selected, press <F5> to change this setting to Enabled. d. Use the left or right arrow keys to select the Exit menu. e. Depending on the type of BIOS your computer uses, select Save Changes and Exit or Exit Saving Changes and press Enter. Select OK or Yes to confirm. f. Your computer will restart. 4. During startup, press <F12> to open the boot menu. The boot menu allows you to select which device to start from, select the USB drive. a. Use your arrow keys to select USB Device, then press Enter. b. Windows starts from the recovery backup instead of the normal startup process. 5. Select your keyboard type. 6. Select Troubleshoot and then choose the type of recovery to use: Recovery - 75 a. Click Advanced then System Restore to start Microsoft System Restore: Microsoft System Restore periodically takes a 'snapshot' of your system settings and saves them as restore points. In most cases of hard-to-resolve software problems, you can return to one of these restore points to get your system running again. b. Click Reset your PC to start the reset process: Reset your PC deletes everything on your hard drive, then reinstalls Windows and all software and drivers that were pre-installed on your system. If you can access important files on your hard drive, back them up now. See "Reset your PC from the recovery backup" on page 77. c. Click Refresh your PC to start the refresh process: Refresh your PC will attempt to retain your files (user data) but will reinstall all software and drivers. Software installed since you purchased your PC will be removed (except software installed from the Windows Store). See "Refresh your PC from the recovery backup" on page 78. 76 - Recovery Reset your PC from the recovery backup Caution: Reset your PC will erase all files on your hard drive. 1. The Reset your PC window opens. Images for reference only. 2. Click Next. 3. Select the operating system to recover (normally only one option is available). 4. Choose to keep any changes to the hard drive: a. If you have deleted the recovery partition or otherwise changed the partitions on the hard drive and want to keep these changes, select No. b. To completely restore your computer to Factory Settings, select Yes. 5. Choose how to erase your files: a. Just remove my files quickly erases all files before restoring your computer and takes about 30 minutes. b. Fully clean the drive completely cleans the drive after each file is erased, so no files can be viewed after the recovery. Cleaning the drive takes much longer, up to 5 hours, but is much more secure as Recovery - 77 old files are completely removed. 6. Click Reset. 7. After the recovery has finished, you can start using your computer by repeating the first-start process. Refresh your PC from the recovery backup 1. The Refresh your PC window opens. 2. Click Next. 3. Select the operating system to recover (normally only one option is available). 4. Click Refresh. 5. The recovery process begins by restarting your computer, then continues by copying files to your hard drive. This process takes about 30 minutes. 78 - Recovery F REQUENTLY ASKED QUESTIONS The following is a list of possible situations that may arise during the use of your computer. Easy solutions are provided for each one. I turned on the power, but the computer does not start or boot up Look at the power indicator: • If it is not lit, no power is being supplied to the computer. Check the following: • If you are using on the battery, it may be low and unable to power the computer. Connect the AC adapter to recharge the battery pack. • Make sure that the AC adapter is properly plugged into the computer and to the power outlet. • If it is lit, check the following: • Is a disc in the optical drive? Remove it and press <Ctrl> + <Alt> + <Del> to restart the system. • Do you have a USB storage device (USB disk or smartphone) plugged into your computer? Unplug it and press <Ctrl> + <Alt> + <Del> to restart the system. Nothing appears on the screen The computer’s power management system automatically blanks the screen to save power. Press any key to turn the display back on. Frequently asked questions - 79 If pressing a key does not turn the display back on, three things might be the cause: • The brightness level might be too low. Press brightness level. (increase) to adjust the • The display device might be set to an external monitor. Press toggle the display back to the computer. to • If the Sleep indicator is lit, the computer is in Sleep mode. Press and release the power button to resume. No audio is heard from the computer Check the following: • The volume may be muted. In Windows, look at the volume control (speaker) icon on the taskbar. If it is crossed-out, click the icon and deselect the Mute all option. • The volume level may be too low. In Windows, look at the volume control icon on the taskbar. You can also use the volume control buttons to adjust the volume. • If headphones, earphones or external speakers are connected to the line-out port on the computer, the internal speakers automatically turn off. I want to eject the optical drive tray without turning on the power There is a mechanical eject hole on the optical drive. Simply insert the tip of a pen or paperclip into the hole and push to eject the tray. 80 - Frequently asked questions The keyboard does not respond Try attaching an external keyboard to a USB port on the computer. If it works, contact your dealer or an authorized service center as the internal keyboard cable may be loose. The printer does not work Check the following: • Make sure that the printer is connected to a power outlet and that it is turned on. • Make sure that the printer cable is connected securely to a USB port and the corresponding port on the printer. Frequently asked questions - 81 TIPS AND HINTS FOR USING WINDOWS 8 We know this is a new operating system that will take some getting used to, so we've created a few pointers to help you get started. Three concepts you might want to keep in mind 1. Start The Start button is no longer available; you can launch apps from the Start screen. 2. Tiles Live tiles are similar to thumbnails of the apps. 3. Charms Charms allow you to perform useful functions, such as sharing content, turning off your PC or changing settings. How do I access the charms? Move the cursor to the upper or lower right-hand corner of the screen to access the charms, or press the Windows key + <C>. How do I get to Start? Press the Windows key on the keyboard; press the Windows key + <C> and click Start; or move the cursor to the lower left-hand corner of the screen and click Start. 82 - Frequently asked questions How do I jump between apps? Move the cursor to the left-hand edge of the screen to view thumbnails of apps that are currently running. You may also press the Windows key + <Tab> to open and scroll through the current apps. How do I turn off my computer? Press the Windows key + <C>, click Settings > Power and select the action you'd like to take. Alternatively, from Desktop, click Gateway Power Button and select the action you'd like to take. Why is there a new interface? The new interface for Windows 8 is designed to work well with touch input. Windows Store apps will automatically use the whole screen and don't require closing in the traditional way. Windows Store apps will be displayed on Start using live-tiles. What are ’live tiles?’ Live tiles are similar to thumbnails of the apps that will be updated with new content whenever you're connected to the Internet. So, for example, you can view weather or stock updates without needing to open the app. Frequently asked questions - 83 How do I unlock my computer? Press the any key and click on a user account icon to unlock the computer. If your account has a password set, you will need to enter the password to continue. How do I personalize my computer? You can personalize Start with a different background image or by arranging the tiles to suit your personal needs. To change the background, press the Windows key + <C> and click Settings > Change PC settings > Personalize. Click Start screen at the top of the page and select a color and image. How do I move tiles? Click and hold a tile to select it, then drag it to the place on Start that you want it to appear. Other tiles will be moved to accommodate the tile in its new location. Can I make tiles bigger or smaller? Right-click on a tile, then select Smaller or Larger from the menu that appears at the bottom of the screen. How do I personalize the Lock screen? You can personalize the lock screen with a different image or to show you quick status and notifications to suit your personal needs. 84 - Frequently asked questions To change the background, press the Windows key + <C> and click Settings > Change PC settings > Personalize. Click Lock screen at the top of the page and select the image and apps you would like to see on the lock screen. So, how do I close an app? Move the cursor to the top of the screen and click and drag the window downwards to close the app. You can close apps from the thumbnails on the left-hand edge of the screen by right-clicking on a thumbnail and selecting Close. Can I change the screen resolution? From Start, start typing ’Control Panel’ to open Search and display the results; click Control Panel > Adjust screen resolution. I want to use Windows in the way that I'm used to - give me my desktop back! From Start click the Desktop tile to see a traditional desktop. You can pin apps you frequently use to the taskbar to easily open them. If you click an app that is not a Windows Store app, Windows will automatically open the app using Desktop. Where are my apps? From Start, simply start typing the name of the app you would like to open, and Search will automatically open and list results. Frequently asked questions - 85 To view the complete list of apps, press the space bar or the Menu key and click All apps. How do I make an app appear on Start? If you're in All apps and you want to make an app appear on Start, you can select the app and right-click on it. Select Pin to Start from the menu that appears at the bottom of the screen. How do I remove a tile from Start? Right-click the tile and click Unpin from Start from the menu that appears at the bottom of the screen. How do I make an app appear on my taskbar in Desktop? If you're in All apps and you want to make an app appear on the taskbar in Desktop, you can select the app and right-click on it. Select Pin to taskbar from the menu that appears at the bottom of the screen. How do I install apps? You can download Windows Store apps from Store. You will need to have a Microsoft ID to purchase and download apps from Store. I can't find apps like Notepad and Paint! Where are they? From Start you can simply start typing the name of the app you're looking for to open Search and list the results. Alternatively, open All apps and scroll to ’Windows Accessories’ to see the list of legacy programs. 86 - Frequently asked questions What is a Microsoft ID (account)? A Microsoft account is an email address and password that you use to sign in to Windows. You can use any email address, but it is best if you choose the one you already use to communicate with friends and sign in to your favorite websites. When you sign in to your PC with a Microsoft account, you'll connect your PC to the people, files, and devices you care about. Do I need one? You do not need a Microsoft ID to use Windows 8, but it makes life easier because you can sync data across different machines you sign in to using a Microsoft ID. How do I get one? If you've already installed Windows 8 and didn't sign in with a Microsoft account or you don't have a Microsoft account and want to get one, press the Windows key + <C> and click Settings > Change PC settings > Users > Switch to a Microsoft account, and follow the onscreen instructions. How do I add a favorite to Internet Explorer? Internet Explorer 10 doesn't have traditional favorites, instead you can pin shortcuts to Start. Once you have the page open, right-click anywhere on the page to open the menu at the bottom of the screen. Click Pin to Start. Frequently asked questions - 87 How do I check for Windows updates? Press the Windows key + <C> and click Settings > Change PC settings > Windows Updates. Click Check for updates now. Where can I get more information? For more information please visit: • Windows 8 tutorials: www.gateway.com/windows8-tutorial • Support FAQs: support.gateway.com 88 - Frequently asked questions R EGULATORY INFORMATION PREVENTION OF HEARING LOSS - Caution: Permanent hearing loss may occur if earphones or headphones are used at high volume for prolonged periods of time. - A pleine puissance, l’écoute prolongée du baladeur peut endommager l’oreille de l’utilisateur. CAUTION when listening: To protect your hearing, follow these instructions. - Increase the volume gradually until you can hear clearly and comfortably. - Do not increase the volume level after your ears have adjusted. - Do not listen to music at high volumes for extended periods. - Do not increase the volume to block out noisy surroundings. - Decrease the volume if you can’t hear people speaking near you. RADIO DEVICE REGULATORY NOTICE - Note: Regulatory information below is for models with wireless LAN and/or Bluetooth only. Compliance accessories The accessories associated with this equipment are: shielded video cable when an external monitor is connected. These accessories are required to be used in order to ensure compliance with FCC rules. CALIFORNIA PROPOSITION 65 WARNING This product contains chemicals known to the State of California to cause cancer, birth defects, and/or other reproductive harm. For additional information regarding this product warning, go to www.gateway.com/prop65. Regulatory information - 89 日本 (JAPAN) 本装置は、第二種情報装置(住宅地域またはその隣接した地域において使用されるべき 情報装置)デ住宅地域での電波障害防止を目的とした情報装置等電波障害自主規制協議 会 (VCCI)基準に適合しております。 しかし、本装置をラジオ、テレビジョン受信機に、近接してご使用になると、受信障害 の原因となることがあります。本書の説明にしたがって正しい取り扱いをしてくださ い。 WIRELESS ADAPTER REGULATORY INFORMATION USA — FCC and FAA The FCC with its action in ET Docket 96-8 has adopted a safety standard for human exposure to radio frequency (RF) electromagnetic energy emitted by FCC certified equipment. The wireless adapter meets the Human Exposure limits found in OET Bulletin 65, supplement C, 2001, and ANSI/IEEE C95.1, 1992. Proper operation of this radio according to the instructions found in this manual will result in exposure substantially below the FCC’s recommended limits. - The following safety precautions should be observed: Do not touch or move antenna while the unit is transmitting or receiving. - Do not hold any component containing the radio such that the antenna is very close or touching any exposed parts of the body, especially the face or eyes, while transmitting. - Do not operate the radio or attempt to transmit data unless the antenna is connected; this behavior may cause damage to the radio. Use in specific environments: - The use of wireless adapters in hazardous locations is limited by the constraints posed by the safety directors of such environments. - The use of wireless adapters on airplanes is governed by the Federal Aviation Administration (FAA). - The use of wireless adapters in hospitals is restricted to the limits set forth by each hospital. 90 - Regulatory information Antenna Use In order to comply with FCC RF exposure limits, low gain integrated antennas should be located at a minimum distance of 20 cm (8 inches) or more from the body of all persons or at a minimum distance as specified by the FCC module grant conditions. FCC grants can be viewed from the FCC Equipment Authorization website at https://fjallfoss.fcc.gov/ oetcf/eas/reports/GenericSearch.cfm by entering the FCC ID printed on the module label. Explosive Device Proximity Warning Warning: Do not operate a portable transmitter (including this wireless adapter) near unshielded blasting caps or in an explosive environment unless the transmitter has been modified to be qualified for such use Antenna Warnings - Warning: To comply with the FCC and ANSI C95.1 RF exposure limits, it is recommended that for the wireless adapter installed in a desktop or portable computer, the antenna for this wireless adapter to be installed so as to provide a separation distance of at least 20 cm (8 inches) from all persons or at the minimum distance as specified by the module grant conditions. FCC grants can be viewed from the FCC Equipment Authorization website at https://fjallfoss.fcc.gov/oetcf/eas/ reports/GenericSearch.cfm by entering the FCC ID printed on the module label. - Warning: The wireless adapter is not designed for use with high-gain directional antennas. Use On Aircraft Caution - Caution: Regulations of the FCC and FAA prohibit airborne operation of radiofrequency wireless devices (wireless adapters) because their signals could interfere with critical interfere with critical aircraft instruments. Local Restrictions on 802.11a, 802.11b, 802.11g and 802.11n Radio Usage - Caution: Due to the fact that the frequencies used by 802.11a, 802.11b, 802.11g and 802.11n wireless LAN devices may not yet be harmonized in all countries, 802.11a, 802.11b, 802.11g and 802.11n products are designed for use only in specific countries, and are not allowed to be operated in countries other than those of Regulatory information - 91 designated use. As a user of these products, you are responsible for ensuring that the products are used only in the countries for which they were intended and for verifying that they are configured with the correct selection of frequency and channel for the country of use. Any deviation from the permissible power and frequency settings for the country of use is an infringement of national law and may be punished as such. Wireless Interoperability The wireless adapter is designed to be interoperable with other wireless LAN products that are based on direct sequence spread spectrum (DSSS) radio technology and to comply with the following standards: - IEEE Std. 802.11b compliant Standard on Wireless LAN - IEEE Std. 802.11g compliant Standard on Wireless LAN - IEEE Std. 802.11a compliant Standard on Wireless LAN (applies to devices supporting 802.11a) - IEEE Std. 802.11n draft 2.0 compliant on Wireless LAN - Wireless Fidelity certification, as defined by the Wi-Fi Alliance The Wireless Adapter and Your Health The wireless adapter, like other radio devices, emits radio frequency electromagnetic energy. The level of energy emitted by the wireless adapter, however, is less than the electromagnetic energy emitted by other wireless devices such as mobile phones. The wireless adapter operates within the guidelines found in radio frequency safety standards and recommendations. These standards and recommendations reflect the consensus of the scientific community and result from deliberations of panels and committees of scientists who continually review and interpret the extensive research literature. In some situations or environments, the use of the wireless adapter may be restricted by the proprietor of the building or responsible representatives of the applicable organization. Examples of such situations may include: - Using the wireless adapter on board airplanes, or 92 - Regulatory information - Using the wireless adapter in any other environment where the risk of interference with other devices or services is perceived or identified as being harmful. If you are uncertain of the policy that applies to the use of wireless adapters in a specific organization or environment (an airport, for example), you are encouraged to ask for authorization to use the adapter before you turn it on. FCC Radio Frequency Interference Requirements (applies to device supporting 802.11a) This device is restricted to indoor use due to its operation in the 5.15 to 5.25 GHz and 5.470 to 5.725 GHz frequency ranges. FCC requires this product to be used indoors for the frequency ranges 5.15 to 5.25 GHz and 5.470 to 5.725 GHz to reduce the potential for harmful interference to co-channel mobile satellite systems. High power radars are allocated as primary users of the 5.25 to 5.35 GHz and 5.65 to 5.85 GHz bands. These radar stations can cause interference with and /or damage this device. No configuration controls are provided for this wireless adapter allowing any change in the frequency of operations outside the FCC grant of authorization for U.S operation according to Part 15.407 of the FCC rules. USA — Federal Communications Commission (FCC) This device complies with Part 15 of the FCC Rules. Operation of the device is subject to the following two conditions: - This device may not cause harmful interference. - This device must accept any interference that may cause undesired operation. - Note: The radiated output power of the adapter is far below the FCC radio frequency exposure limits. Nevertheless, the adapter should be used in such a manner that the potential for human contact during normal operation is minimized. To avoid the possibility of exceeding the FCC radio frequency exposure limits, you should keep a distance of at least 20 cm between you (or any other person in the vicinity), or the minimum separation distance as specified by the FCC grant conditions, and the antenna that is built into the computer. Details of the authorized configurations can be found at http://www.fcc.gov/oet/ea/ by entering the FCC ID number on the device. Regulatory information - 93 Interference Statement This wireless adapter has been tested and found to comply with the limits for a Class B digital device, pursuant to Part 15 of the FCC Rules. These limits are designed to provide reasonable protection against harmful interference in a residential installation. This wireless adapter generates, uses, and can radiate radio frequency energy. If the wireless adapter is not installed and used in accordance with the instructions, the wireless adapter may cause harmful interference to radio communications. There is no guarantee, however, that such interference will not occur in a particular installation. If this wireless adapter does cause harmful interference to radio or television reception (which can be determined by turning the equipment off and on), the user is encouraged to try to correct the interference by taking one or more of the following measures: - Reorient or relocate the receiving antenna of the equipment experiencing the interference. - Increase the distance between the wireless adapter and the equipment experiencing the interference. - Connect the computer with the wireless adapter to an outlet on a circuit different from that to which the equipment experiencing the interference is connected. - Consult the dealer or an experienced radio/TV technician for help. - Note: The adapter must be installed and used in strict accordance with the manufacturer's instructions as described in the user documentation that comes with the product. Any other installation or use will violate FCC Part 15 regulations. Canada — Industry Canada (IC) This device complies with RSS210 of Industry Canada. Cet appareil se conforme à RSS210 de Canada d'Industrie. - Caution: When machine supports and using IEEE 802.11a wireless LAN, this product is restricted to indoor use due to its operation in the 5.15- to 5.25 GHz frequency range. Industry Canada requires this product to be used indoors for the frequency range of 5.15 GHz to 5.25 GHz to reduce the potential for harmful interference to co-channel mobile satellite systems. High power radar is allocated as 94 - Regulatory information the primary user of the 5.25 to 5.35 GHz and 5.65 to 5.85 GHz bands. These radar stations can cause interference with and/or damage to this device. The maximum allowed antenna gain for use with this device is 6dBi in order to comply with the E.I.R.P limit for the 5.25 to 5.35 and 5.725 to 5.85 GHz frequency range in point-topoint operation. To comply with RF exposure requirements all antennas should be located at a minimum distance of 20 cm, or the minimum separation distance allowed by the module approval, from the body of all persons. - Attention: l’utilisation d’un réseau sans fil IEEE802.11a est réstreinte à une utilisation en intérieur à cause du fonctionement dans la bande de fréquence 5,15 5,25 GHz. Industry Canada requiert que ce produit soit utilisé à l’intérieur des bâtiments pour la bande de fréquence 5,15 - 5,25 GHz afin de réduire les possibilités d’interférences nuisibles aux canaux co-existants des systèmes de transmission satellites. Les radars de puissances ont fait l’objet d’une allocation primaire de fréquences dans les bandes 5,25 - 5,35 GHz et 5 65 - 5 85 GHz. Ces stations radar peuvent créer des interférences avec ce produit et/ou lui être nuisible. Le gain d’antenne maximum permissible pour une utilisation avec ce produit est de 6 dBi afin d’être conforme aux limites de puissance isotropique rayonnée équivalente (P.I.R.E.) applicable dans les bandes 5,25 - 5,35 GHz et 5,725 - 5,85 GHz en fonctionement point-à-point. Se pour conformer aux conditions d'exposition de RF toutes les antennes devraient être localisées à une distance minimum de 20 cm, ou la distance de séparation minimum permise par l'approbation de module, du corps de toutes les personnes. This Class B digital apparatus complies with Canadian ICES-003. Cet appareil numérique de la classe B est conforme a la norme NMB-003 du Canada. "To prevent radio interference to the licensed service, this device is intended to be operated indoors and away from windows to provide maximum shielding. Equipment (or its transmit antenna) that is installed outdoors is subject to licensing." Regulatory information - 95 « Pour empêcher que cet appareil cause du brouillage au service faisant l'objet d'une licence, il doit être utilisé a l'intérieur et devrait être placé loin des fenêtres afin de fournir un écran de blindage maximal. Si le matériel (ou son antenne d'émission) est installé à l'extérieur, il doit faire l'objet d'une licence. » European Union List of applicable countries This product must be used in strict accordance with the regulations and constraints in the country of use. For further information, contact the local office in the country of use. Please see http://ec.europa.eu/enterprise/rtte/implem.htm for the latest country list. List of National Codes THIS EQUIPMENT MAY BE OPERATED IN THE FOLLOWING COUNTRIES:I Country ISO 3166 2 letter code Country ISO 3166 2 letter code Country ISO 3166 2 letter code Country ISO 3166 2 letter code Austria AT Germany DE Malta MT United Kingdom GB Belgium BE Greece GR Netherlands NT Iceland IS Cyprus CY Hungary HU Poland PL Liechtenstein LI Czech Republic CZ Ireland IE Portugal PT Norway NO Denmark DK Italy IT Slovakia SK Switzerland CH Estonia EE Latvia LV Slovenia SL Bulgaria BG Finland FI Lithuania LT Spain ES Romania RO France FR Luxembourg LU Sweden SE Turkey TR 96 - Regulatory information The low band 5.15 -5.35 GHz is for indoor use only. This equipment complies with the essential requirements of the European Union directive 1999/5/EC. See Statements of European Union Compliance, and more details refer to the attached Declaration of Conformity. English Hereby, ACER INC., declares that this devise is in compliance with the essential requirements and other relevant provisionns of Directive 1999/5/EC. Česky [Czech] ACER INC. tímto prohlašuje, že toto zařízení je ve shodě se základními požadavky a dalšími příslušnými ustanoveními směrnice 1999/5/ES. Daansk [Danish] Undertegnede ACER INC. erklærer herved, at følgende udstyr overholder de væsentlige krav og øvrige relevante krav i direktiv 1999/5/EF. Deutsch [German] Hiermit erklärt ACER INC., dass sich das Gerät Radiolan in Übereinstimmung mit den grundlegenden Anforderungen und den übrigen einschlägigen Bestimmungen der Richtlinie 1999/5/EG befindet. Eesti [Estonian] Käesolevaga kinnitab ACER INC. seadme vastavust direktiivi 1999/5/EÜ põhinõuetele ja nimetatud direktiivist tulenevatele teistele asjakohastele sätetele. Regulatory information - 97 Español [Spanish] Por medio de la presente ACER INC. declara que el dispositivo cumple con los requisitos esenciales y cualesquiera otras disposiciones aplicables o exigibles de la Directiva 1999/5/CE. Ελληνικά [Greek] ∆ια του παρόντος η ACER INC. δηλώνει ότι η παρούσα συσκευή συµµορφώνεται προς τις ουσιώδεις απαιτήσεις και τις λοιπές διατάξεις της Οδηγίας 1999/5/ ΕΚ. Français [French] Par la présente ACER INC. déclare que cet appareil est conforme aux exigences essentielles et aux autres dispositions pertinentes de la directive 1999/5/CE. Íslenska [Icelandic] Hér með lýsir ACER INC. yfir því að er í samræmi við grunnkröfur og aðrar kröfur, sem gerða r eru í tilskipun 1999/5/EC. Itaaliano [Italian] Con la presente ACER INC. dichiara che questo dispositivo è conforme ai requisiti essenziali ed alle altre disposizioni pertinenti stabilite dalla direttiva 1999/5/CE. Latviski [Latvian] Ar šo ACER INC. deklarē, ka šī ierīce atbilst Direktīvas 1999/5/EK būtiskajām prasībām un citiem ar to saistītajiem noteikumiem. 98 - Regulatory information Lietuvių [Lithuanian] Šiuo ACER INC. deklaruoja, kad šis įrenginys atitinka esminius reikalavimus ir kitas 1999/5/EB Direktyvos nuostatas. Malti [Maltese] Hawnhekk, ACER INC., jiddikjara li dan jikkonforma mal- ti ijiet essenzjali u ma provvedimenti o rajn relevanti li he mm fid-Dirrettiva 1999/5/EC. Magyar [Hungarian] Alulírott, ACER INC. nyilatkozom, hogy a készülék megfelel a vonatkozó alapveto követelményeknek és az 1999/5/EC irányelv egyéb eloírásainak. Nederlands [Dutch] Hierbij verklaart ACER INC. dat het toestel voldoet aan de essentiële eisen en de andere relevante bepalingen van richtlijn 1999/5/EG. Norsk [Norwegiann] ACER INC. erklærer herved at utstyret er i samsvar med de grunnleggende krav og øvrige relevante krav i direktiv 1999/5/EF. Polski [Polish] Niniejszym ACER INC. oświadcza, że urządzenie jest zgodne z zasadniczymi wymogami oraz pozostałymi stosownymi postanowieniami Dyrektywy 1999/5/EC. Português [Portuguese] ACER INC. declara que este dispostivo está conforme com os requisitos essenciais e outras disposições da Directiva 1999/5/CE. Regulatory information - 99 Slovensko [Slovenian] ACER INC. izjavlja, da je ta naprava skladna z bistvenimi zahtevami in ostalimi relevantnimi določili Direktive 1999/5/ES. Slovensky [Slovak] ACER INC. týmto vyhlasuje, že zariadenie spĺňa základné požiadavky a všetky príslušné ustanovenia Smernice 1999/5/ES. Suomi [Finnish] ACER INC. vakuuttaa täten että tämä laite on direktiivin 1999/ 5/EY oleellisten vaatimusten ja sitä koskevienn direktiivin muiden ehtojen mukainen. Svenska [Swedish] Härmed intygar ACER INC. att denna enhet står i överensstämmelse med väsentliga egenskapskrav och övriga relevanta bestämmelser som framgår av direktiv 1999/5/EG. France Pour la France métropolitaine : 2,400 - 2,4835 GHz (Canaux 1à 13) autorisé en usage intérieur 2,400 - 2,454 GHz (canaux 1 à 7) autorisé en usage extérieur Pour la Guyane et la Réunion : 2,400 - 2,4835 GHz (Canaux 1à 13) autorisé en usage intérieur 2,420 - 2,4835 GHz (canaux 5 à 13) autorisé en usage extérieur Pour tout le territoire Français : Seulement 5,15 -5,35 GHz autorisé pour le 802.11a 100 - Regulatory information L'utilisation de cet equipement (2,4 GHz WLAN) est soumise à certaines restrictions : - La puissance maximale autorisée en intérieur est de 100 mW pour 2400 - 2483,5 MHz. - La puissance maximale autorisée est de 100 mW en extérieur pour 2400 - 2454 MHz. - La puissance maximale autorisée est de 10 mW en extérieur, 2454 - 2483,5 MHz. Pour les dernières restrictions, voir http://www.art-telecom.fr. Italy The use of these equipments is regulated by: 1.D.L.gs 1.8.2003, n. 259, article 104 (activity subject to general authorization) for outdoor use and article 105 (free use) for indoor use, in both cases for private use. 2.D.M. 28.5.03, for supply to public of RLAN access to networks and telecom services. L’uso degli apparati è regolamentato da: 1.D.L.gs 1.8.2003, n. 259, articoli 104 (attività soggette ad autorizzazione generale) se utilizzati al di fuori del proprio fondo e 105 (libero uso) se utilizzati entro il proprio fondo, in entrambi i casi per uso private. 2.D.M. 28.5.03, per la fornitura al pubblico dell’accesso R-LAN alle reti e ai servizi di telecomunicazioni. Belgium Dans le cas d'une utilisation privée, à l'extérieur d'un bâtiment, au-dessus d'un espace public, aucun enregistrement n'est nécessaire pour une distance de moins de 300 m. Pour une distance supérieure à 300 m un enregistrement auprès de l'IBPT est requise. Pour les enregistrements et licences, veuillez contacter l'IBPT. In geval van privé-gebruik, buiten een gebouw, op een openbare plaats, is geen registratie nodig, wanneer de afstand minder dan 300 m is. Voor een afstand groter dan 300 m is een registratie bij BIPT vereist. Voor registraties en licenties, gelieve BIPT te contacteren. Regulatory information - 101 Brazil Este equipamento opera em caráter secundário, isto é, não tem direito a proteção contra interferência prejudicial, mesmo de estações do mesmo tipo, e não pode causar interferência a sistemas operando em caráter primário. Pakistan Pakistan Telecommunication Authority (PTA) Approved Morocco The operation of this product in the radio channel 2 (2417 MHz) is not authorized in the following cities: Agadir, Assa-Zag, Cabo Negro, Chaouen, Goulmima, Oujda, Tan Tan, Taourirt, Taroudant and Taza. The operation of this product in the radio channels 4, 5, 6 and 7 (2425 - 2442 MHz) is not authorized in the following cities: Aéroport Mohamed V, Agadir, Aguelmous, Anza, Benslimane, Béni Hafida, Cabo Negro, Casablanca, Fès, Lakbab, Marrakech, Merchich, Mohammédia, Rabat, Salé, Tanger, Tan Tan, Taounate, Tit Mellil, Zag. Japan 5 GHz 帯は室内でのみ使用のこと Korea 당해 무선설비는 운용 중 전파혼신 가능성이 있음 Taiwan 第十二條 經型式認證合格之低功率射頻電機,非經許可,公司、商號或使用者均不得擅自變更頻 率、加大功率或變更原設計之特性及功能。 第十四條 低功率射頻電機之使用不得影響飛航安全及干擾合法通信 ; 經發現有干擾現象時,應立即 停用,並改善至無干擾時方得繼續使用。 前項合法通信,指依電信法規定作業之無線通信。 低功率射頻電機須忍受合法通信或工業、科學及醫療用電波輻射性電機設備之干擾。 102 - Regulatory information MODIFICATIONS TO THE PRODUCT CE Marking Gateway cannot be held responsible for unauthorized modifications made by the user and the consequences thereof, which may alter the conformity of the product with the CE Marking. Radio frequency interference The manufacturer is not responsible for any radio or TV interference caused by unauthorised modifications to this equipment. CONNECTIONS AND REMOTE EARTHS PELV (Protected Extra Low Voltage) To ensure the extra-low voltage integrity of the equipment, only connect equipment with mains-protected electrically-compatible circuits to the external ports. SELV (Safety Extra Low Voltage) Every input and output of this product is classified as Safety Extra Low Voltage. Remote earths To prevent electrical shock, connect all local (individual office) computers and computer support equipment to the same electrical circuit of the building wiring. If you are unsure, check the building wiring to avoid remote earth conditions. Building supply Only connect the equipment to a building supply that is in accordance with current wiring regulations in your country. In the U.K., these are the IEE regulations. POWER SUPPLY AND CABLES Power supply The power supply socket-inlet and socket-outlet (if equipped) are classified as Hazardous Voltage. Regulatory information - 103 You must unplug the power supply cord and remove the battery to disconnect the equipment from the power supply. In that aim, the socket-outlet should be installed near to the equipment and should be easily accessible. Input rating: Refer to the rating label on the bottom of the computer and ensure that your power adapter complies with the specified rating. Under no circumstances should the user attempt to disassemble the power supply. The power supply has no user-replaceable parts. Inside the power supply are hazardous voltages that can cause serious personal injury. A defective power supply must be returned to your dealer. Power cables and plug This Product requires a grounded power cord and plug. The plug only fits in a grounded power outlet. Make sure the power outlet is properly grounded before inserting the plug. Do not insert the plug into a non-grounded power outlet. Contact your electrician for details. The cord length must not exceed 2.5 metres. To prevent electrical hazards, do not remove or disable the ground contact on the power cord. Replace the power cord if it gets damaged. Contact your dealer for an exact replacement. In Europe, the plug must be rated for 250 VAC, 10 amp minimum. The plug must display an international agency approval marking. The cord must be suitable for use in the end-user country. Consult your dealer or the local electrical authorities if you are unsure of the type of power cord to use in your country. Cables For cables which are not delivered with the Product in the computer's packaging: The EMC performance of the system is guaranteed only if the cable and interface use efficient shielding. The use of shielded interface cable is required for USB, IEEE1394, serial, printer, game, analog or digital audio/ video, PS2, TV or FM antennas, and generally all high-speed cable interfaces. 104 - Regulatory information Use only UL Listed No. 26AWG or larger telecommunication cords. Only Ethernet LAN or RTC modem cable can have length exceeding 3 metres. Gateway recommends that you add a ferrite core round clip to each cable connecting your computer to a hardware device that was not included with your computer. - Ferrite reference: 28A-2029 from Steward (two loops) During product certification, Gateway used the following cable quality: - USB2.0 Certified Cables from Hama 46778 - IEEE1394 shielded FireWire from Hama 50011 - RCA-RCA shielded Audio/Video Cables from Thomson KHC001M, KHC012M, KHC028M - Stereo Jack shielded Audio cables from Hama 43330H, 42714H Heat Build-up and Portable Computers The AC adapter and the underside of the computer can become hot after prolonged use. Sustained physical contact with either should be avoided. CHASSIS COVER REMOVAL AND REPLACEMENT Before removing the chassis cover to service or modify the equipment, you must disconnect all power and modem cords, and remove or disable the battery. - Caution: Some components inside the computer can become hot after prolonged use. You then must close the chassis before you plug in and switch on the equipment. LASER COMPLIANCE STATEMENT The optical devices are tested and certified to be compliant with International Electrotechnical Commission IEC60825-1 and European EN60825-1 standards for Class 1 laser products. Class 1 laser products are not considered hazardous. The optical devices are designed such that there is never human access to laser radiation above a Class 1 level during normal operation or prescribed maintenance conditions. Regulatory information - 105 The optical devices installed in your computer are designed for use solely as components of such electronic product and therefore do not comply with the appropriate requirements of Code of Federal Regulation Sec. 1040.10 and Sec. 1040.11 for COMPLETE laser products. Because exposure to laser radiation is extremely hazardous, under no circumstances should the user attempt to disassemble the laser device. PACKAGING The packaging of this product is compliant with the European Environmental Directive 94/ 62/EC from December 20th 1994 and its equivalent in the French Legislation by the Decree 98-638 from july 20th 1998. COMPLIANT WITH RUSSIAN REGULATORY CERTIFICATION 106 - Regulatory information E NVIRONMENT OUR COMMITMENT TO ENVIRONMENTAL PROTECTION Environment has been at the heart of our products. Gateway is committed to limit the environmental impact of its products during product life cycle. Starting at design phase, with a very strict procurement policy, maximum attention is given to electronic components in order to limit their weight in heavy metals such as lead, cadmium, chromium, mercury, etc. Suppliers are asked, for each part of any product, to respect all regulations. As far as end-of-life products are concerned, measures have been taken to anticipate and facilitate the recycling of all our products. Thus, all plastic parts heavier than 25 grams used in Gateway products are labelled ISO 11469. This label allows a quick recognition of the material and eases its valorisation. Likewise, desktop computers are designed to be easily dismantled, with screws being replaced by clips. PRODUCT DISPOSAL The 2002/96/EC Directive, known as Waste Electrical and Electronic Equipment (WEEE) Directive, requires that used electrical and electronic products must be disposed of separately from normal household waste in order to promote reuse, recycling and other forms of recovery and to reduce the quantity of waste to be eliminated with a view to reducing landfill and incineration. The crossed-out dustbin logo is there to remind you that these products must be sorted separately for disposal. These rules concern all Gateway products and also all accessories, such as keyboard, mouse, speakers, remote control, etc. When you have to dispose of such products, make sure that they are correctly recycled by checking with your local authority, or by returning your old equipment to your retailer if you are replacing it. For information, visit www.gateway.com/about/corp_responsibility/environment.php. Environment - 107 Battery disposal (when applicable) Before disposing of your equipment ensure that you have removed any batteries that may be fitted in the equipment. European law states that batteries must be collected for disposal separately from household waste. Do not throw your used batteries in the dustbin. Dispose of your used batteries via a battery collection scheme where available, or ask your distributor or local authority what infrastructures you can use. Your efforts will enable the safe collection, recycling and destruction of used batteries and will help protect the environment and reduce health hazards. - Caution: Risk of explosion if battery is replaced by an incorrect type. Dispose of used batteries according to the instructions. ENERGY STAR Gateway's ENERGY STAR qualified products save your money by reducing energy cost and protecting the environment without sacrificing features or performance. Gateway is proud to offer our customers products with the ENERGY STAR mark. What is ENERGY STAR? Products that are ENERGY STAR qualified use less energy and prevent greenhouse gas emissions by meeting strict energy efficiency guidelines set by the U.S. Environmental Protection Agency. Gateway is committed to offering products and services worldwide that help customers save money, conserve energy and improve the quality of our environment. The more energy we can save through higher energy efficiency, the more we reduce greenhouse gases and the risks of climate change. More information refers to www.energystar.gov or www.energystar.gov/powermanagement. - Note: Information in this section may not apply to your computer. Gateway ENERGY STAR qualified products: - produce less heat and reduce cooling loads in warmer climates. - automatically go into "display Sleep" and "computer Sleep" mode after 10 and 30 minutes of inactivity, respectively. 108 - Environment - wake from "Sleep" mode if the keyboard is pressed or mouse is moved. - save more than 80% energy when in "Sleep" mode. ENERGY STAR and the ENERGY STAR mark are registered U.S. marks. Environment - 109 S OFTWARE LICENSE - Note: Most of the software applications are already preinstalled on your Gateway computer. They are ready to use or to set up. However, some titles require a CD or DVD to run. You will find these discs in your computer's packaging. Gateway License Agreement (CD and/or DVD Products). This copy of the original is your proof of license. Please treat it as valuable property. Important! Read carefully before installing the software. The following License Agreement applies to you. This is a legal agreement between you (either individual or an entity) and Gateway. By installing the software you are agreeing to be bound by the terms of this Agreement. If you do not agree to the terms of this Agreement, promptly return your entire computer system, the unopened software packet(s), if any, as well as the accompanying terms (including written materials or other container(s)) in the place you obtained them for a full refund. GATEWAY SOFTWARE LICENSE 1. Grant of License This Gateway License Agreement (“License”) permits you to use one copy of the specified version of the Gateway SOFTWARE identified above (which may include at least one CD or DVD disc) on any single computer, provided the SOFTWARE is in use on only one computer at any time. If you have multiple Licenses for the SOFTWARE, then at any time you may have as many copies of the SOFTWARE in use as you have Licenses. The SOFTWARE is “in use” on a computer when it is loaded into the temporary memory (i.e. RAM) or installed in the permanent memory (e.g. hard disk, CD and/or DVD, or other storage device of that computer, except that a copy installed on a network server for the sole purpose of distribution of other computer is not “in use.” If the anticipated number of users of the SOFTWARE will exceed the number of applicable Licenses, then you must have a reasonable mechanism or process in place to assure that the number of persons 110 - Software license using the SOFTWARE concurrently does no exceed the number of Licenses. If the SOFTWARE is permanently installed on the hard disk or the storage device of a computer (other than a network server) and one person uses that computer more than 80% of the time it is in use, then that person may also use the SOFTWARE on a portable or home computer. 2. Copyright The SOFTWARE is owned by Gateway or its suppliers and is protected by United States copyright laws and international treaty provision. Therefore, you must treat the SOFTWARE like any other copyrighted material (e.g. a book or musical recording) except that you may transfer the CD and/or DVD disc portion of the SOFTWARE, if any, to a single hard disk provided you keep the original solely for backup or archival purposes. You may not copy the CD and/or DVD disc portion of the SOFTWARE or the written materials accompanying the SOFTWARE. 3. Other restrictions You may not rent or lease the SOFTWARE, but you may transfer the SOFTWARE and accompanying written materials on a permanent basis provided you retain no copies and the recipient agrees to the terms of this Agreement. You may not reverse engineer, decompile or disassemble the SOFTWARE. Any transfer of the SOFTWARE must include the most recent update and all prior versions. THIRD PARTY SOFTWARE OR FREE SOFTWARE LICENSE INFORMATION Software pre-loaded, embedded or otherwise distributed with the products provided by Gateway does contain free or third party software programs (the “Free Software”), which are licensed under the terms GNU General Public License (the “GPL”). The Free Software is marked as such. Your copying, distribution and/or modification of the Free Software shall be subject to the terms of the GPL. The Free Software is distributed in the hope that, but it will be useful WITHOUT ANY WARRANTY; without even the implied warranty of MERCHANTABILITY or FITNESS FOR A PARTICULAR PURPOSE. The provisions of the GNU General Public License shall always apply. You may access http://www.gnu.org directly to obtain a copy of the Software license - 111 GPL or write to the free Software Foundation, Inc. and request a copy. The address of the Free Software Foundation, Inc is: 59 Temple Place - Suite 330, Boston, MA, 02111-1307, USA. For a period of three (3) years as commencing from your receipt of this software, you may obtain a complete machine-readable copy of the source code for the Free Software under the terms of the GPL without charge except for the cost of media, shipping, and handling, upon a written request to us. Contact us if you have any further questions. Our mailing address is 8F, 88, Sec. 1, Hsin Tai Wu Rd., Hsichih, New Taipei City 221, Taiwan. 112 - Software license I NDEX A troubleshooting .................................. 80 audio B Batteries ................................................. 108 low conditions .................................... 39 battery disposal ..................................... 108 maximizing life ................................... 34 battery pack optimizing........................................... 38 battery-low warning........................... 38 removing ............................................ 37 characteristics ................................... 34 using the first time ............................. 35 charging ............................................. 37 brightness hotkeys .............................................. 18 checking charge level ....................... 37 installing............................................. 37 Browser .................................................... 50 C Cables ................................................ 9, 103 CD-ROM ejecting manually .............................. 80 troubleshooting ................................. 80 charging checking level.................................... 37 Cleaning your computer .......................... 10 computer features .............................................. 14 on indicator ........................................ 20 Computer environment .............................. 8 connections network .............................................. 30 Cursor ....................................................... 26 D Display Drives hotkeys .............................................. 17 Memory card reader.......................... 28 display DSL ........................................................... 45 troubleshooting ................................. 79 Index - 113 E Environment ........................................... 107 Epilepsy warning ...................................... 13 F FAQ. See frequently-asked questions frequently-asked questions ..................... 79 Firewall ..................................................... 52 front view .................................................. 20 G Gateway Recovery Management ........... 43 H Health precautions .................................. 11 hotkeys ..................................................... 19 I Interference ............................................ 103 Firewall .............................................. 52 Internet Internet Service Provider (ISP) ............... 44 Connection .................................. 44, 45 K Keyboard keyboard hotkeys .............................................. 19 troubleshooting .................................. 81 L LAN (Local Area Network) ...................... 46 left view..................................................... 20 M Maintenance Memory card reader ................................ 28 Recovery Management .............. 43, 59 Modem...................................................... 45 Malware .................................................... 52 N network ..................................................... 30 Norton Internet Security .................... 50, 54 Network connections ............................... 46 114 - Index P ports ......................................................... 28 Power cords ............................................... 9 printer troubleshooting ................................. 81 problems .................................................. 79 CD-ROM ............................................ display ................................................ keyboard ............................................ printer ................................................. startup ................................................ 80 79 81 81 79 R Recovery Removable media devices ...................... 29 Recovery Management .............. 43, 59 Removing hardware ................................ 29 Regulatory Information .................... 89, 107 S Safety precautions ..................................... 8 Software License............................. 110 Security speakers Antivirus ............................................. 52 hotkey ................................................ 18 Updates ............................................. 58 troubleshooting .................................. 80 Software Spyware ................................................... 51 T touchpad .................................................. 26 using ............................................ 26–?? U Uninstalling hardware .............................. 29 Update Windows automatic updates ............ 58 universal serial bus .................................. 30 V view front .................................................... 21 left ...................................................... 21 right .................................................... 23 Index - 115 W Warranty..................................................... 7 WiFi .................................................... 46, 47 Windows 116 - Index Using Windows.................................. 43 Windows automatic updates ............ 58 Ver.02.01.02 Manuel d’utilisation Gateway NE71B - 1 SOMMAIRE Démarrer votre ordinateur 4 Charge de la pile ...................................... Vérification du niveau de la pile ............... Optimisation de l’autonomie de la pile ..... Avertissement de pile basse .................... 40 40 40 41 Connexion sans-fil.............................................. 4 Enregistrement................................................... 5 Installation des logiciels ..................................... 6 Récupération...................................................... 6 Gestion de l’alimentation 43 Vous avez des problèmes ?............................... 7 Économie d’énergie......................................... 43 Informatique de base 8 Logiciels 46 Sécurité et confort .............................................. 8 Utiliser Windows et vos logiciels...................... 46 Précautions de sécurité .............................. 8 Offre de sécurité Internet ......................... 46 Précautions de santé ................................ 12 Gateway Recovery Management............. 46 Découvrir votre ordinateur 15 Internet Vue supérieure - affichage ............................... 16 Premiers pas sur le net.................................... Vue supérieure - clavier ................................... 17 Protéger votre ordinateur ......................... Touches spéciales .................................... 18 Choisir un fournisseur de service Vue frontale...................................................... 21 Internet ..................................................... Vue gauche ...................................................... 22 Connexions réseau .................................. Vue droite......................................................... 24 Surfez sur le Net ! .................................... Vue de la base ................................................. 26 Sécurité .................................................... Pavé tactile 27 Récupération Informations de base du pavé tactile ............... 27 Créer une sauvegarde de récupération........... Gestes du pave tactile...................................... 28 Créer la sauvegarde des pilotes et des Mettre votre ordinateur à niveau 29 applications...................................................... Extension avec des options ............................. 29 Récupération de votre système....................... Réinstaller les pilotes et les Options de connectivité............................. 29 applications .............................................. Alimentation 35 Retourner à un instantané antérieur du Adaptateur c.a.................................................. 35 système.................................................... Pile ................................................................... 36 Retourner votre système à son état Caractéristiques de la pile......................... 36 d’usine...................................................... Remplacer la batterie................................ 39 Récupérer depuis Windows ..................... Installation ou retrait de la pile .................. 39 2 47 47 47 47 50 53 54 64 64 69 71 72 75 77 78 Récupérer depuis une sauvegarde de récupération .............................................. 82 Foire aux questions 86 Conseils et astuces pour utiliser Windows 8........................................................ 89 Il y a trois concepts vous pouvez vouloir garder à l’esprit.............................. 89 Comment puis-je accéder aux charms ? .. 89 Comment puis-je aller à Démarrer ?......... 89 Comment puis-je passer d’une appli à une autre ?................................................ 90 Comment puis-je éteindre mon ordinateur ?............................................... 90 Pourquoi y a-t-il une nouvelle interface ? ................................................................ 90 Comment déverrouiller mon ordinateur ? . 91 Comment personnaliser mon ordinateur ?............................................... 91 Je veux utiliser Windows comme j’en ai l’habitude. Rendez-moi mon bureau ! .. Où sont mes applis ? ............................... Qu’est-ce qu’un ID (compte) Microsoft ?.. Comment ajouter un favori à Internet Explorer ?................................................. Comment puis-je rechercher les mises à jour Windows ?...................................... Où puis-je avoir plus d’informations ? ...... Informations réglementaires 92 93 94 95 95 95 96 Environnement 115 Licence logicielle 118 Index 121 Copyright © 2012. Tous droits réservés. Manuel d’utilisation de la Gateway NE71B Cette révision : 20 juillet 2012 Visitez registration.gateway.com et découvrez les avantages des clients Gateway. Remarque : Toutes les images sont pour référence seulement. La configuration du produit peut varier. Sommaire - 3 DÉMARRER VOTRE ORDINATEUR Nous vous remercions de votre achat de cet ordinateur Gateway ! Ce guide a été conçu pour vous présenter les fonctionnalités de votre ordinateur et vous aider dans votre expérience informatique. Après avoir installé et démarré votre ordinateur, comme indiqué dans les instructions d’installation, il vous posera des questions qui vous aideront à vous connecter à Internet. Votre ordinateur configurera alors les logiciels installés. CONNEXION SANS-FIL Pour vous connecter à un réseau sans-fil, vérifiez d’abord que les fonctions sans-fil de votre ordinateur sont activées, et que le routeur ou le modem auquel vous souhaitez vous connecter est également correctement configuré. • Si la fonction sans-fil n’est pas activée, appuyez la touche Windows ( ) + W, saisissez « sans fil » puis cliquez sur Sans fil. Cliquez le commutateur sous Wi-Fi pour activer la connexion sans-fil. Cliquez à nouveau pour désactiver. • Pour vous connecter à un réseau, appuyez sur la touche Windows ( ) + W, saisissez « sans fil » puis cliquez sur Connexion à un réseau. Sélectionnez votre réseau, et entrez le mot de passe si nécessaire. • Après un court délai, votre ordinateur devrait se connecter à Internet. 4 Si votre réseau n’est pas détecté, ou si votre ordinateur ne se connecte pas à Internet, veuillez consulter votre FSI ou de la documentation du routeur. Après le démarrage de votre ordinateur et quand vous pouvez l’utiliser, ouvrez Internet Explorer et suivez les instructions. Vous pouvez également utiliser un câble réseau pour vous connecter directement à un port réseau sur votre routeur. Veuillez consulter votre FSI ou de le guide du routeur. ENREGISTREMENT Lors de la première utilisation de votre ordinateur, il est recommandé de l’enregistrer. Cela vous donne accès à des avantages utiles, tels que : • Service plus rapide de nos représentants entraînés. • Participation à la communauté Gateway : recevez des promotions et participez à nos enquêtes clients. • Les dernières actualités de Gateway. Comment s’enregistrer Pendant le démarrage initial de votre ordinateur, une fenêtre vous invitera à l’enregistrer. Veuillez remplir les informations et cliquez sur Suivant. La seconde fenêtre affichée contiendra des champs optionnels qui nous aideront à vous fournir une expérience de service client plus personnelle. Démarrer votre ordinateur - 5 Une autre option Une autre manière d’enregistrer votre produit Gateway est de visiter notre site Web sur registration.gateway.com. Choisissez votre pays et suivez les simples instructions. Après l’enregistrement, nous vous enverrons un courriel de confirmation avec les données importantes que vous devrez conserver précieusement. INSTALLATION DES LOGICIELS Votre ordinateur installera automatiquement les logiciels et préparera votre ordinateur pour l’utilisation. Cela peut prendre un certain temps, veuillez ne pas éteindre votre ordinateur. Attendez que l’installation soit terminée. RÉCUPÉRATION Créez des disques de récupération dès que possible. Le programme Récupération permet de créer des disques de récupération puis de restaurer ou de réinstaller les applications et les pilotes fournis par Gateway. 6 VOUS AVEZ DES PROBLÈMES ? Gateway fournit plusieurs options pour le support de votre achat. Support Gateway N’oubliez pas de noter le numéro de série, la date et le lieu d’achat, ainsi que le modèle de votre ordinateur dans l’espace fourni dans ce manuel ; mettez de côté de votre preuve d’achat. Avant de vous nous appelez, veuillez noter le message d’erreur qui accompagne le problème et vous installer devant votre ordinateur, ce dernier devant être si possible allumé. Ces éléments nous permettront de vous offrir un service plus rapide et de meilleure qualité. Site Web Gateway N’oubliez pas de visiter www.gateway.com - Consultez la section de support, elle contient des informations mises à jour, de l’aide, des pilotes et des téléchargements. Informations de garantie et de contact Vous pouvez trouver des informations sur la garantie de votre ordinateur et comment contacter le support technique dans la Garantie de votre ordinateur. Démarrer votre ordinateur - 7 INFORMATIQUE DE BASE SÉCURITÉ ET CONFORT Précautions de sécurité Veuillez suivre les instructions ci-dessous pour utiliser votre ordinateur confortablement et éviter les problèmes de santé. Environnement de l’ordinateur Assurez-vous que l’ordinateur : • Est utilisé sur une surface, un support ou une table stable. Une chute pourrait gravement endommager l’ordinateur. • N’est pas utilisé sur une surface qui vibre, ou utilisé en prenant part au sport, à l’exercice ou à d’autres activités dans un environnement dynamique. Les vibrations ou les mouvements peuvent desserrer les fixations, endommager les composants internes et même provoquer des fuites de la pile. • Est éloigné du soleil et des sources de chaleur. • Est éloigné de champs magnétiques ou de tout appareil qui produit de l’électricité statique. • Est maintenu à au moins 30 centimètres (un pied) de distance d’un téléphone cellulaire. • N’est-ce pas dans un environnement poussiéreux ou humide. 8 • N’est pas utilisé à proximité de l’eau. Ne renversez jamais de liquides, quels qu’ils soient, sur ou dans votre ordinateur. • N’est pas placé sur un tapis ou toute autre surface qui peut avoir une charge électrique. Remarque • Des fentes et ouvertures sont prévues pour la ventilation afin d’assurer un fonctionnement fiable de l’appareil vidéo et de le protéger d’une éventuelle surchauffe. Ces ouvertures ne doivent pas être obstruées ou couvertes. Ces ouvertures ne doivent jamais être bloquées, par exemple en posant l’appareil sur un lit, un canapé, un tapis ou toute autre surface similaire. Il ne doit jamais être placé à proximité ou au contact d’un radiateur ou d’une source de chaleur. Il ne doit pas être placé dans une installation encastrée à moins qu’une ventilation suffisante ne soit assurée. • N’insérez jamais des objets dans les ouvertures du boîtier de l’appareil car ceux-ci pourraient toucher des points à haute tension ou créer un court-circuit et poser un risque d’incendie ou d’électrocution. Ne renversez jamais de liquide sur l’appareil. • Pour réduire le risque de dommage interne et pour éviter que la batterie ne fuie, ne posez pas l’appareil sur un endroit sujet à des vibrations. • Ne l’utilisez jamais dans un environnement sportif, d’exercice ou vibrant qui pourrait probablement causer un court-circuit inopiné ou endommager les périphériques rotatifs, disque dur, lecteur optique, et même créer un risque d’exposition pour la batterie au lithium. Informatique de base - 9 Câbles Assurez-vous que : • Les câbles ne sont pas trop tendus et qu’il n’y a pas de risque de personne marchant ou trébuchant dessus. • D’autres appareils n’écrasent pas les câbles. • Le câble d’alimentation est connecté à l’ordinateur avant de connecter le câble d’alimentation à la prise électrique. • Le câble d’alimentation est débranché de la prise électrique avant de déconnecter le câble d’alimentation de l’ordinateur. • Les cordons d’alimentation à trois broches sont connectés à une prise électrique mise à la terre. • La prise électrique est facilement accessible et aussi proche que possible de l’ordinateur (ne la surchargez pas avec trop d’adaptateurs). Si votre ordinateur utilise un adaptateur c.a. externe : • Ne couvrez pas ou ne placez pas d’objets sur l’adaptateur c.a. Permettez à l’adaptateur de refroidir correctement pendant l’utilisation en l’éloignant d’autres objets. • N’utilisez que l’adaptateur c.a. qui est fourni avec votre ordinateur. Bien que d’autres adaptateurs puissent lui ressembler, les utiliser peut endommager votre ordinateur. Si un remplacement est nécessaire, utilisez uniquement les composants certifiés pour une utilisation avec votre ordinateur. 10 Nettoyer votre ordinateur • Débranchez toujours votre ordinateur de la prise électrique avant de le nettoyer. • N’utilisez pas de liquide ou d’aérosol de nettoyage, utilisez au contraire un chiffon humide. • Ne pulvérisez jamais de produit de nettoyage directement sur l’écran. • Si vous renversez un liquide sur votre ordinateur, éteignez-le immédiatement, débranchez l’adaptateur c.a., retirez la pile et assurezvous qu’il est complètement sec avant de le rallumer. Attendez la nuit si nécessaire. Remarque : Si votre ordinateur comporte des fentes pour cartes mémoire ou périphériques d’extension, des cartes factices en plastique peuvent être installées dans les fentes. Celles-ci protègent les fentes non utilisées de la poussière, des objets métalliques et d’autres particules. Conservez les cartes factices pour utilisation les fentes ne contiennent pas de carte. Réparer votre ordinateur N’essayez jamais de réparer vous-même votre ordinateur : l’ouverture ou la dépose des couvercles vous expose à divers risques, électrocution notamment. La réparation doit être confiée à un spécialiste. Débranchez votre ordinateur de la prise électrique et adressez-vous à un technicien qualifié quand : • Le cordon d’alimentation est endommagé, coupé ou dénudé. • Un liquide a été renversé dans l’appareil. Informatique de base - 11 • Le produit a été exposé à la pluie ou à de l’eau. • L’appareil est tombé ou le châssis a été endommagé. • Les performances de l’appareil deviennent irrégulières. • L’appareil ne fonctionne pas correctement après avoir respecté les consignes d’utilisation. Remarque : Effectuez uniquement les réglages indiqués dans les consignes d’utilisation ; d’autres réglages incorrects risquent de provoquer des dommages nécessitant l’intervention prolongée d’un technicien qualifié. Précautions de santé • La surface inférieure, les zones autour des ouvertures de ventilation et l’adaptateur secteur peuvent devenir chauds. Pour éviter des blessures, assurez-vous qu’ils n’entrent pas en contact avec votre peau ou votre corps. • Votre appareil ainsi que ses accessoires peuvent contenir de petites pièces. Gardez-les hors de portée des jeunes enfants. • L’ordinateur et les accessoires peuvent contenir des petits composants. Éloignez-les des jeunes enfants. • Si vous travaillez ou jouez pendant des heures, assurez-vous de faire des pauses régulières. Éloignez votre regard de l’écran de l’ordinateur de temps en temps. N’utilisez pas votre ordinateur si vous êtes fatigué. • Organisez votre ordinateur afin que vous puissiez travailler dans une position naturelle et détendue. Placez les éléments que vous utilisez souvent à portée de main. 12 • Positionnez votre ordinateur directement en face de vous pour plus de sécurité et de confort. Assurez-vous que votre clavier et pavé tactile sont à une hauteur confortable. L’écran devrait être à environ 45-70 cm (18-30 pouces) de vos yeux. Si vous utilisez votre ordinateur pendant de longues périodes, assis à un bureau, achetez un clavier externe pour un confort amélioré. • Pour protéger votre ouïe, lors de l’utilisation de haut-parleurs ou d’un casque d’écoute, augmentez le volume progressivement jusqu’à ce que vous pouvez entendre clairement et confortablement, n’augmentez pas le niveau de volume après que vos oreilles se sont habituées. N’écoutez pas à un fort volume pendant une période prolongée. N’augmentez pas le volume afin de bloquer les bruits environnants ; baissez le volume si vous n’entendez pas les personnes qui parlent près de vous. • Le dessous de l’ordinateur, l’adaptateur c.a. et l’air des fentes de ventilation peuvent devenir chauds pendant l’utilisation. Évitez le contact continu du corps et ne placez pas l’ordinateur sur vos genoux lorsqu’il est en fonctionnement. • Veillez à ce que les fentes de ventilation et les ouvertures de l’ordinateur ne soient pas obstruées ou recouvertes. Ne placez pas l’ordinateur sur une surface souple (comme un tapis, une chaise ou un lit), qui pourraient bloquer les fentes de ventilation. • N’enfoncez pas d’objets dans les fentes du châssis ou de ventilation car ils pourraient entrer en contact avec des points de voltage ou courtcircuiter des éléments, d’où un risque d’incendie ou d’électrocution. Informatique de base - 13 • Certains troubles des mains, des poignets, des bras, du cou, des épaules, des jambes et du dos peuvent être associés à, ou aggravés par certaines actions répétitives. Pour réduire votre risque de développer ces troubles, tapez avec vos poignets droits et vos mains et les poignets légèrement au-dessus du clavier. Si vous avez des périodes de douleurs, fourmillements, engourdissements ou autres gênes, veuillez contacter votre médecin. • Nous conseillons aux parents de contrôler l’utilisation des jeux par leurs enfants. Si vous ou votre enfant avez les symptômes suivants : vertiges, vision floue, tremblements des yeux ou des muscles, perte de conscience, désorientation, tout mouvement involontaire ou convulsion, cessez IMMÉDIATEMENT l’utilisation et consultez votre médecin. Cela peut se produire même si la personne n’a pas d’antécédents médicaux de l’épilepsie. 14 DÉCOUVRIR VOTRE ORDINATEUR Après avoir configuré votre ordinateur comme illustré dans les instructions d’installation, nous allons vous faire explorer votre nouvel ordinateur Gateway. Gateway NE71B Découvrir votre ordinateur - 15 VUE SUPÉRIEURE - AFFICHAGE 1 2 3 # Icône Élément Description 1 Webcaméra Webcaméra pour communication vidéo. Une lumière à côté de la webcaméra indique que la webcaméra est active. 2 Microphone Microphone interne pour l’enregistrement sonore. 3 Écran d’affichage Également appelé affichage à cristaux liquides (ACL), affiche les données de l’ordinateur. 16 VUE SUPÉRIEURE - CLAVIER 1 5 2 3 4 # 1 Icône Élément Bouton/Indicateur d’alimentation 2 Clavier 3 Pavé tactile Description Met l’ordinateur sous tension et hors tension. Indique l’état d’alimentation de l’ordinateur. Pour l’entrée des informations dans votre ordinateur. - Les touches spéciales sont décrites à la page 18. Périphérique de pointage sensible au touché qui fonctionne comme une souris. Découvrir votre ordinateur - 17 # Icône Élément Description 4 Boutons (gauche et droit) Le côté gauche et le côté droit du bouton fonctionnent comme boutons de sélection gauche et droite. 5 Haut-parleurs Produit le son stéréo. Touches spéciales Le clavier de votre ordinateur comporte des touches qui activent des fonctions spéciales. La fonction de chaque touche est clairement indiquée par une icône. Icône Fonction Fn 18 Description Touche spéciale pour la seconde fonction Active une seconde fonction sur certaines touches. P.ex., appuyez la touche Fn pour activer les touches F1 à F12. Aide Ouvre le menu de l’aide. Backup Permet de créer des copies de sauvegarde de votre ordinateur, que ce soit de l’intégralité du système ou uniquement certains fichiers et dossiers. Créez une planification régulière ou faites des copies quand vous le voulez. Communication Active/désactive les périphériques de communication de l’ordinateur. Choix de l’affichage Permet de permuter l’affichage entre l’écran d’affichage, le moniteur externe (s’il est connecté) et les deux. Icône Fonction Description Écran noir Désactive le rétroéclairage de l’écran pour économiser l’énergie. Appuyez sur une touche pour le rallumer. Pavé tactile Active et désactive le pavé tactile interne. Lecture/Pause Lisez ou effectuez une pause d’un fichier multimédia sélectionné. Arrêter Arrêtez la lecture du fichier multimédia sélectionné. Précédent Retournez au fichier multimédia précédent. Suivant Passez au fichier multimédia suivant. Luminosité - Diminue la luminosité de l’écran. Luminosité + Augmente la luminosité de l’écran. Ouvre l’application Réseaux sociaux. Réseau social - Si cette application n’est pas installée, la touche démarrera votre application messagerie instantanée. Volume + Augmente le volume sonore. Volume - Diminue le volume sonore. Haut-parleur Active et désactive les haut-parleurs. Découvrir votre ordinateur - 19 Touches spéciales L’ordinateur utilise des touches spéciales (combinaisons de touches) pour accéder aux touches de fonction et aux commandes de navigation. Pour activer les touches spéciales, appuyez et maintenez la touche Fn (en bas à gauche) avant d’appuyer sur l’autre touche dans la combinaison de la touche spéciale. Touche spéciale Fonction Description Fn + Touches spéciales (voir page 18) Touches de fonction Active les touches F1 à F12. Fn + Accueil Défile au début d’un document. Fn + Fin Défile à la fin d’un document. Fn + Page Préc Défile d’une page vers le haut dans un document. Fn + Page Suiv Défile d’une page vers le bas dans un document. - Remarque : Il n’est pas nécessaire d’appuyer sur la touche Fn pour utiliser les touches de fonction F1 à F12 lorsque vous démarrez votre ordinateur ou lorsque vous utilisez le BIOS. Pour échanger la touche spéciale et la fonction spéciale des touches F1 à F12, changez le paramètres de la touche de fonction dans le BIOS (pour ouvrir le BIOS appuyez sur F2 lors du démarrage de votre ordinateur, puis sélectionnez le menu Main (Principal) et changez Function key behavior (Comportement des touches de fonction) sur Function keys (Touches de fonction)). 20 VUE FRONTALE 1 # Icône 2 Élément Indicateur d’alimentation Description Indique l’état d’alimentation de l’ordinateur. Indique l’état de la pile de l’ordinateur. Indicateur de la pile - Charge : La lumière est orange lorsque la pile se recharge. - Pleine charge : La diode est bleue en mode c.a. 1 Indicateur du disque dur Indique l’activité du disque dur. Indicateur de communication Indique l’état du périphérique de connectivité sans fil de l’ordinateur. Découvrir votre ordinateur - 21 # Icône Élément Description Lecteur de cartes multiples en un 2 Accepte une carte mémoire Secure Digital (SD), MultiMediaCard (MMC), Memory Stick Pro (MS PRO), et xD-Picture (xD). - Poussez pour retirer/installer la carte. Seule une carte peut fonctionner à un moment donné. - Remarque : Les indicateurs du panneau avant sont visibles même lorsque l’écran ACL est fermé. VUE GAUCHE 1 # 2 Icône Élément Fente pour cadenas Kensington 1 22 3 4 5 6 Description Se connecte à un cadenas de sécurité pour ordinateur Kensington. - Enroulez le câble du cadenas de sécurité pour ordinateur autour d’une table, de la poignée d’un tiroir verrouillé, ou de tout autre objet fixe. Insérez le cadenas dans l’encoche et tournez la clef pour verrouiller le cadenas. Certains modèles ne possèdent pas de clef. # Icône Élément Description Permet à l’ordinateur de rester froid. 2 Ventilation et ventilateur de refroidissement 3 Port Ethernet RJ-45 Se connecte à un réseau Ethernet 10/100/1000 Base. 4 Port d’affichage (VGA) externe Se connecte à un périphérique d’affichage (p.ex. un moniteur externe, un projecteur ACL). 5 Port HDMI Supporte les connexions vidéo numériques à haute définition. - Ne couvrez pas et ne bloquez pas les ouvertures. Se connectent à des périphériques USB. 6 Ports USB - Si un port est noir, il est compatible USB 2.0, si un port est bleu, il est également compatible USB 3.0 (voir ci-dessous). Informations sur USB 3.0 • Compatible avec USB 3.0 et périphériques USB antérieurs. • Pour des performances optimales, utilisez des périphériques certifiés USB 3.0. • Défini par la spécification USB 3.0 (SuperSpeed USB). Découvrir votre ordinateur - 23 VUE DROITE 1 # 1 2 Icône Élément Prise haut-parleurs/ casque Prise microphone 3 4 56 7 Description Se connecte à des périphériques audio en sortie (p.ex. haut-parleurs ou un casque d’écoute stéréo). - Supporte les casques d’écoute 3,5 mm compatibles avec microphone intégré (p.ex. casques d’écoute pour téléphone intelligent Acer). Accepte les entrées de microphones externes. Se connectent à des périphériques USB. 2 Port USB 3 Lecteur optique 24 - Si un port est noir, il est compatible USB 2.0, si un port est bleu, il est également compatible USB 3.0 (voir ci-dessous). Lecteur optique interne, accepte les CD ou les DVD. # Icône Élément Description 4 Indicateur d’accès du disque optique S’allume lorsque le lecteur optique est actif. 5 Bouton d’éjection du lecteur optique Éjecte le disque optique du lecteur. 6 Trou d’éjection d’urgence 7 Prise d’entrée c.c. Éjecte le plateau du lecteur optique lorsque l’ordinateur est hors tension. - Insérez délicatement un trombone pour éjecter le plateau du lecteur optique. Se connecte à l’adaptateur c.a. de votre ordinateur. Informations sur USB 3.0 • Compatible avec les périphériques USB 3.0 et version antérieure. • Pour des performances optimales, utilisez des périphériques certifiés USB 3.0. • Défini par la spécification USB 3.0 (SuperSpeed USB). Découvrir votre ordinateur - 25 VUE DE LA BASE 1 2 4 3 # Icône Élément Description 1 Baie de la pile Contient la pile de l’ordinateur. 2 Loquet de libération de la pile Libère la pile pour le retrait. Insérez un outil approprié et faites glisser pour libérer. Compartiment mémoire Contient la mémoire principale de l’ordinateur. Baie du disque dur Contient le disque dur de l’ordinateur (fixé avec des vis). 3 4 26 Ventilation et ventilateur de refroidissement Permet à l’ordinateur de rester froid. - Ne couvrez pas et ne bloquez pas les ouvertures. PAVÉ TACTILE INFORMATIONS DE BASE DU PAVÉ TACTILE Le pavé tactile contrôle la flèche (ou ‘curseur’) sur l’écran. Lorsque vous faites glisser votre doigt sur le pavé tactile, le curseur suivra ce mouvement. Appuyez sur le côté gauche ou droit du bouton situé sur le bord du pavé tactile pour sélectionner et exécuter. Ces deux zones sont similaires au bouton gauche et au bouton droit d’une souris. Taper sur le pavé tactile est équivalent à un clic gauche du côté gauche du bouton. Remarque : Le pavé tactile est sensible aux mouvements du doigt ; la réponse est d'autant meilleure que le touché est léger. Veuillez garder le pavé tactile ainsi que vos doigts secs et propres. Le curseur est contrôlé par quelques gestes de base : • Glissé à un seul doigt : Faites glisser votre doigt sur le pavé tactile pour déplacer le curseur. • Appui à un seul doigt : Tapez légèrement sur le pavé tactile, pour effectuer un 'clic', ce qui sélectionnera ou démarrera un élément. Tapez rapidement deux fois pour effectuer un 'double clic'. • Glisser : Appuyez et maintenez sur le côté gauche du bouton de sélection ou appuyez deux fois n’importe où sur le pavé tactile, puis faites glisser un second doigt sur le pavé tactile pour sélectionner tous les éléments dans une zone. Pavé tactile - 27 GESTES DU PAVE TACTILE Windows 8 et de nombreuses applications prennent en charge les gestes du pavé tactile qui utilisent un ou plusieurs doigts. Remarque : La prise en charge des gestes du pavé tactile dépend de l'application active. Cela permet de contrôler les applications avec quelques gestes simples, tels que : • Faites glisser depuis le bord : Accédez aux outils depuis Windows en faisant glisser vers le centre du pavé tactile depuis la droite, le haut ou la gauche. • Faites glisser depuis le bord droit : Basculez les charms. • Faites glisser depuis le bord supérieur : Basculez les commandes des applis. • Faites glisser depuis le bord gauche : Passez à l'appli précédente. • Glissé à deux doigts : Faites défiler rapidement les pages Web, documents et listes de lecture en plaçant deux doigts sur le touchpad et en déplaçant les deux dans n'importe quelle direction. • Pincement de deux doigts : Faites un zoom avant et arrière sur les photos, cartes et documents avec un simple geste doigt-et-pouce. 28 METTRE VOTRE ORDINATEUR À NIVEAU EXTENSION AVEC DES OPTIONS Votre ordinateur offre informatique complète. de nombreuses options pour expérience Options de connectivité Les ports permettent de connecter des périphériques à votre ordinateur. Pour des instructions sur la connexion des différents périphériques à l’ordinateur, lisez la section suivante. Lecteur de carte mémoire Les cartes mémoire sont utilisées dans une vaste sélection d’appareils photo numériques, ANP, lecteurs MP3 et téléphones cellulaires. Insérer une carte mémoire 1. Alignez la carte de sorte que les connecteurs soient dirigés vers le port et vers le bas. 2. Faites glisser la carte doucement dans le port. Si vous trouvez que vous avez besoin de forcer pour insérer la carte, essayez de réorienter la carte légèrement. Mettre votre ordinateur à niveau - 29 3. Poussez la carte jusqu’à ce qu’elle s’enclenche en place. Quelques millimètres de la carte dépasseront de la fente. Si la carte contient des fichiers, la fenêtre de lecture automatique de Windows peut apparaître (cela dépend du contenu de la carte) et vous demandera si vous souhaitez utiliser un programme pour accéder au contenu de la carte. Sélectionnez une option ici, si cela est approprié, sinon cliquez sur Annuler. Si la carte ne contient pas de fichiers, ou des fichiers inconnus, une fenêtre s’ouvre affichant le contenu de la carte. Cartes SD, SDHC et SDXC De différents types de cartes SD recouvrent de différentes capacités, tout en utilisant la même conception globale. Les cartes SD contiennent jusqu’à 4 Go, les cartes SDHC contiennent jusqu’à 32 Go, et les cartes SDXC peuvent contenir jusqu’à 2048 Go (2 To). Votre ordinateur fournit un lecteur de carte compatible SDHC ou SDXC. Remarque : Les cartes mémoire SDXC ne peuvent être utilisées que dans un lecteur compatible SDXC. Les cartes SD et SDHC peuvent être utilisées dans les deux types. 30 Retirer une carte d’un lecteur de carte mémoire 1. Cliquez sur la flèche Afficher les icônes cachées dans la Zone de notification (à côté de l’horloge). 2 2. Cliquez sur l’icône Retirer le périphérique en toute sécurité. 3. Cliquez sur Éjecter la carte SD (ou le nom du périphérique). 4. Attendez l’affichage du message Le matériel peut être retiré en toute sécurité. 5. Retirez la carte. 1 Fonction réseau intégrée La fonction réseau intégrée permet de connecter votre ordinateur à un réseau Ethernet. 3 Connectez un câble Ethernet du port Ethernet (RJ-45) sur l’ordinateur à une prise réseau ou à un concentrateur réseau. Mettre votre ordinateur à niveau - 31 Universal Serial Bus (USB) Le port USB est un port série à haute vitesse qui permet de connecter des périphériques USB sans occuper les ressources du système. Certains ordinateurs peuvent avoir un ou plusieurs ports USB 3.0. Ils ressemblent aux ports USB standards, sauf qu’ils comprennent d’autres connexions internes et sont bleus. Vous pouvez utiliser des périphériques compatibles USB 3.0 avec ces ports pour bénéficier de vitesses de transfert plus rapides. Port vidéo Connectez à un moniteur avec un port VGA ou DVI (le type de connexion supportée dépend de la configuration de votre ordinateur). Le câble approprié est généralement fourni avec le moniteur. Procédez comme suit pour connecter un moniteur à votre ordinateur : 1. Vérifiez que l’ordinateur est hors tension et l’interrupteur d’alimentation du moniteur est éteint. 2. Branchez le câble vidéo au port du moniteur sur l’ordinateur. Fixez la connexion du câble de avec les vis fournies. 3. Connectez le câble d’alimentation du moniteur et branchez-le dans une prise électrique correctement mise à la terre. 32 4. Suivez toutes les instructions d’installation dans le manuel d’utilisation du moniteur. 5. Allumez le moniteur, puis l’ordinateur. 6. Assurez-vous que la résolution et la fréquence de rafraîchissement n’excèdent pas les spécifications du moniteur. Si nécessaire, modifiez les paramètres d’affichage utilisés par l’ordinateur. Remarque : Pour accéder aux contrôles d’affichage, appuyez la touche Windows ( ) + W, saisissez « Affichage » puis cliquez sur Affichage. Interface multimédia haute définition (seulement pour certains modèles) HDMI (interface multimédia haute définition) est une interface audio/ vidéo entièrement numérique, non comprimée, largement prise en charge. HDMI fournit une interface entre toute source audio/vidéo numérique compatible, telle qu’un décodeur, un lecteur de DVD et un récepteur A/V, et un audio numérique et/ou moniteur vidéo compatible, tel qu’un téléviseur numérique, sur un seul câble. Utilisez le port HDMI sur votre ordinateur pour connecter un équipement audio et vidéo haut de gamme. Un seul câble permet une installation propre et une connexion rapide. Mettre votre ordinateur à niveau - 33 Casque d’écoute et microphone Ces deux ports vous permettent de connecter des périphériques audio. Utilisez le port casque pour brancher un casque d’écoute stéréo ou hautparleurs alimentés. Brancher un périphérique audio au port casque désactive les éventuels haut-parleurs intégrés. Utilisez le port microphone pour connecter un microphone externe pour un enregistrement mono. Brancher un microphone externe désactive le microphone intégré. 34 ALIMENTATION ADAPTATEUR C.A. Votre ordinateur peut utiliser l’adaptateur d’alimentation externe fourni (une « brique » d’alimentation) pour fonctionner sur le courant alternatif. Le câble d’alimentation fourni est approprié pour le pays où l’ordinateur a été acheté. L’adaptateur d’alimentation fournit une alimentation suffisante pour faire fonctionner votre ordinateur et recharger la pile en même temps. Attention : Ne couvrez pas ou ne placez pas d’objets sur l’adaptateur c.a. Éloigner l’adaptateur d’autres objets lui permet de refroidir correctement pendant l’utilisation. Alimentation - 35 N’utilisez que l’adaptateur c.a. qui est fourni avec votre ordinateur. Bien que d’autres adaptateurs puissent lui ressembler, les utiliser peut endommager votre ordinateur. Avertissement : L’adaptateur c.a. et le dessous de l’ordinateur peuvent devenir chauds après une utilisation prolongée. Ceci est normal, mais peut causer des blessures en cas de contact prolongé. PILE L’ordinateur utilise une pile qui vous offre de longues durées d’utilisation entre chaque recharge. Caractéristiques de la pile La pile a les caractéristiques qui suivent : • Utilisation des standards technologiques actuels. • Émission d’un avertissement de pile basse. La pile se recharge à chaque fois que vous connectez l’adaptateur c.a. à l’ordinateur. Votre ordinateur a une fonction de charge en utilisation, permettant de recharger la pile tout en continuant à utiliser l’ordinateur. Cependant, la recharge avec l’ordinateur éteint permet un temps de charge beaucoup plus rapide. 36 La pile est pratique lorsque vous voyagez ou lors de coupures d’électricité. Il est recommandé d’avoir une pile de rechange chargée, disponible pour un éventuel remplacement. Contactez votre revendeur pour des détails sur la commande d’une pile supplémentaire. Maximalisation de la durée de vie de la pile Comme toutes les autres piles, la pile de votre ordinateur se dégrade à la longue. Cela signifie que les performances de la pile diminuent avec le temps et l’utilisation. Pour maximaliser l’autonomie de la pile, il est conseillé de respecter les recommandations ci-dessous. Conditionnement d’une nouvelle pile Avant la première utilisation d’une « conditionnement » doit d’abord être suivi : pile, un processus de 1. Insérez la nouvelle pile dans l’ordinateur. Ne mettez pas l’ordinateur sous tension. 2. Connectez l’adaptateur c.a. et chargez complètement la pile. 3. Déconnectez l’adaptateur c.a. 4. Mettez l’ordinateur sous tension et utilisez-le sur l’alimentation de la pile. 5. Videz entièrement la pile. 6. Connectez de nouveau complètement la pile. l’adaptateur c.a. et chargez encore Procédez encore ainsi jusqu’à ce que la pile se charge et se décharge trois fois. Alimentation - 37 Utilisez ce processus de conditionnement pour toutes les nouvelles piles ou si une pile n’a pas été utilisée depuis longtemps. Lorsque l’ordinateur n’est pas en utilisation pendant plus de deux semaines, il est conseillé de retirer la pile de l’unité. Avertissement : N’exposez pas les piles à des températures inférieures à 0°C (32°F) ou supérieures à 45°C (113°F). Les températures extrêmes peuvent être néfastes pour la pile. En suivant ce processus de conditionnement, vous conditionnez votre pile pour accepter la charge maximale possible. Le non-respect de cette procédure ne permet pas d’avoir la charge maximale de la pile et raccourcira également la durée de vie effective de votre pile. De plus, la durée de vie utile de la pile est affectée de manière négative par ces types d’utilisation : • Utilisation constante de l’ordinateur sur l’alimentation c.a. avec la pile insérée. Si vous souhaitez utiliser l’ordinateur constamment sur l’alimentation c.a., il est conseillé de retirer la pile de l’ordinateur une fois pleinement chargée. • Ne pas décharger/recharger la pile à ses extrêmes comme décrit cidessus. • Fréquence d’utilisation ; la pile atteindra la fin de sa vie effective d’autant plus vite que vous l’utilisez souvent. Une pile d’ordinateur standard a une durée de vie d’environ 300 charges. 38 Remplacer la batterie L’ordinateur notebook utilise des batteries au lithium. Remplacez la batterie par une batterie du même type que celle fournie avec votre appareil. Une batterie d’un autre type peut poser un risque d’incendie ou d’explosion. Avertissement : Les batteries incorrectement manipulées risquent d’exploser. Vous ne devez jamais les démonter, ni les exposer au feu. Éloignez-les des enfants. Respectez la réglementation locale pour mettre au rebut les batteries usagées. Installation ou retrait de la pile Important ! Avant de retirer la pile de l’unité, connectez l’adaptateur c.a. si vous souhaitez continuer à utiliser l’ordinateur. Dans le cas contraire, mettez d’abord l’ordinateur hors tension. Pour installer une pile : 1. Alignez la pile sur la baie de la pile ouverte. Assurez-vous que l’extrémité avec les contacts entre en premier et que la surface supérieure de la pile est dirigée vers le haut. 2. Faites glisser la pile dans sa baie et poussez la pile doucement jusqu’à ce qu’elle se verrouille en place. Pour retirer une pile : 1. Faites glisser le loquet de libération de la pile pour libérer la pile. 2. Tirez la pile de sa baie. Alimentation - 39 Charge de la pile Pour charger la pile, assurez-vous d’abord qu’elle est correctement installée dans la baie de la pile. Branchez l’adaptateur c.a. à l’ordinateur et connectez à une prise électrique. Vous pouvez continuer à utiliser votre ordinateur sur l’alimentation c.a. pendant la recharge de votre pile. Cependant, la recharge avec l’ordinateur éteint permet un temps de charge beaucoup plus rapide. Remarque : Il est recommandé de recharger la pile avant le coucher. Charger la pile la nuit avant un voyage permet de commencer la journée suivante avec une pile pleinement chargée. Vérification du niveau de la pile La jauge de la pile de Windows indique le niveau actuel de la pile. Placez le curseur sur l’icône pile/alimentation sur la barre des tâches pour voir le niveau actuel de la pile. Optimisation de l’autonomie de la pile L’optimisation de l’autonomie de la pile vous aide à obtenir le maximum des piles, prolongeant le cycle charge/recharge et améliorant l’efficacité de la recharge. Il est recommandé de suivre les suggestions ci-dessous : • Achetez une pile supplémentaire. • Utilisez l’adaptateur c.a. autant que possible, réservant la pile pour l’utilisation en déplacement. • Éjectez la Carte PC lorsqu’elle n’est pas utilisée, car elle continue à consommer de l’énergie (pour certains modèles). 40 • Conservez la pile dans un endroit frais et sec. La température recommandée est 10°C (50°F) à 30°C (86°F). Des températures conduisent la pile à s’auto-décharger plus rapidement. • Trop de recharges réduisent l’autonomie de la pile. • Prenez soin de votre adaptateur c.a. et de la pile. Avertissement de pile basse Lors de l’utilisation de l’alimentation de la pile, surveillez la jauge de la pile de Windows. Avertissement : Connectez l’adaptateur c.a. dès que possible après que l’avertissement de pile basse apparaît. Les données seront perdues si la pile se vide complètement et l’ordinateur s’éteint. Lorsque l’avertissement de pile basse apparaît, la liste des actions recommandées dépend de votre situation : Condition L’adaptateur c.a. et une prise électrique sont disponibles. Action recommandée 1. Branchez l’adaptateur c.a. à l’ordinateur, puis connectez au réseau électrique. 2. Enregistrez tous les fichiers devant l’être. 3. Remettez-vous au travail. Éteignez l’ordinateur si vous souhaitez recharger la pile rapidement. Alimentation - 41 Condition Action recommandée Une pile de rechange 1. Enregistrez tous les fichiers devant l’être. chargée est 2. Fermez toutes les applications. disponible. 3. Arrêtez le système d’exploitation pour éteindre l’ordinateur. 4. Remplacez la pile. L’adaptateur c.a. ou une prise électrique n’est pas disponible. Vous n’avez pas de pile de rechange. 42 5. Allumez l’ordinateur et remettez-vous au travail. 1. Enregistrez tous les fichiers devant l’être. 2. Fermez toutes les applications. 3. Arrêtez le système d’exploitation pour éteindre l’ordinateur. GESTION DE L’ALIMENTATION Cet ordinateur a une unité de gestion de l’alimentation intégrée qui supervise l’activité du système. L’activité du système comprend toute activité qui implique un ou plus des périphériques suivants : clavier, souris, disque dur, périphériques connectés à l’ordinateur et mémoire vidéo. Si aucune activité n’est détectée pendant une période de temps spécifiée, l’ordinateur arrête certains ou tous ces périphériques pour conserver l’énergie. ÉCONOMIE D’ÉNERGIE Désactiver le démarrage rapide Votre ordinateur utilise le Démarrage rapide pour démarrer rapidement, mais utilise également une petite quantité d’énergie pour vérifier les signaux pour démarrer. Ces vérifications déchargeront lentement la pile de votre ordinateur. Si vous préférez réduire les besoins en énergie de votre ordinateur et l’impact environnemental, désactivez le Démarrage rapide : Remarque : Si le Démarrage rapide est désactivé, votre ordinateur prendra plus de temps pour démarrer depuis la Veille. Votre ordinateur ne démarrera également pas s’il reçoit une instruction pour démarrer sur un réseau (Wake on LAN). Gestion de l’alimentation - 43 1. Ouvrez le Bureau. 2. Cliquez sur Options d’alimentation dans la Zone de notification. 3. Sélectionnez Plus d’options d’alimentation. 4. Sélectionnez Choisir l’action des boutons d’alimentation. 5. Pour accéder aux paramètres d’arrêt, sélectionnez Modifier des paramètres actuellement non disponibles. 44 6. Défilez vers le bas et désactivez Activer le démarrage rapide. 7. Sélectionnez Enregistrer les modifications. Gestion de l’alimentation - 45 LOGICIELS UTILISER WINDOWS ET VOS LOGICIELS Les ordinateurs Gateway comportent des logiciels pour vous aider à utiliser votre ordinateur ; les programmes et catégories disponibles sur votre ordinateur dépendent du modèle acheté. Offre de sécurité Internet Il est vital de protéger votre ordinateur contre les virus et les attaques sur Internet (voir Sécurité à la page 54). Un programme complet de sécurité sur Internet, y compris une période d’essai gratuite, est proposé lorsque vous démarrez votre ordinateur. Activez cette protection avant de vous connecter à Internet. Cette suite de sécurité protège votre ordinateur contre les menaces en ligne les plus récentes et protège vos données personnelles (informations d’identifiants de compte bancaire, numéro de carte de crédit, mots de passe, et plus). Gateway Recovery Management Pour préparer votre ordinateur pour les options de récupération du système, vous devez créer un ensemble de disques de récupération dès que possible. Voir page 64 pour plus d’informations. 46 INTERNET PREMIERS PAS SUR LE NET Protéger votre ordinateur Il est vital de protéger votre ordinateur contre les virus et les attaques sur Internet (voir Offre de sécurité Internet à la page 46 et Sécurité à la page 54). Un programme complet de sécurité sur Internet est offert lorsque vous démarrez votre ordinateur. Activez cette protection dès que possible, et certainement avant de vous connecter à Internet. Choisir un fournisseur de service Internet Utiliser Internet est devenu une partie naturelle de l’informatique quotidienne. Quelques étapes simples peuvent vous connecter à une vaste collection de connaissances et d’outils de communication. Pour accomplir ces étapes, vous devez d’abord sélectionner un fournisseur de service Internet (FSI), qui fournit les connexions entre votre ordinateur et Internet. Renseignez-vous sur les fournisseurs de services Internet disponibles dans votre région, sans oublier de parler à vos amis et votre famille au sujet de leurs expériences ou de consulter les enquêtes et les rapports des associations de consommateurs. Le FSI que vous choisirez fournira des instructions sur la façon de vous connecter à Internet (vous pourrez avoir besoin d’un logiciel supplémentaire ou d’un boîtier qui se connecte à votre ligne téléphonique). Internet - 47 Types de connexion En fonction de votre modèle d’ordinateur, de votre situation et de vos besoins de communication, vous pouvez vous connecter à Internet de plusieurs manières. Connexion téléphonique Certains ordinateurs comportent un connecteur téléphonique (‘modem’). Cela vous permet de vous connecter à Internet en utilisant votre ligne téléphonique. Avec une connexion téléphonique, vous ne pouvez pas utiliser le modem et le téléphone en même temps sur une seule ligne téléphonique. Ce type de connexion est recommandé uniquement si vous avez un besoin limité d’utilisation d’Internet car la vitesse de connexion est faible et le temps de connexion est généralement facturé à l’heure. Connexion DSL (p.ex. ADSL) La connexion DSL (ligne d’abonné numérique) est une connexion toujours activée qui fonctionne via la ligne téléphonique. La connexion DSL et le téléphone n’utilisant pas les mêmes fréquences, vous pouvez utiliser votre téléphone en même temps que vous êtes connecté à Internet (ce qui nécessite un ‘micro-filtre’ sur chaque prise téléphonique pour éviter les interférences). Pour pouvoir avoir une connexion DSL, vous devez être situé à proximité d’un central téléphonique équipé pour le DSL (le service est parfois inaccessible dans les zones rurales). Les vitesses de connexion varient en fonction de votre situation géographique, mais la connexion DSL fournit généralement un accès très rapide et fiable à Internet. Comme la connexion est toujours active, elle est généralement facturée avec des forfais mensuels fixes. 48 Remarque : Une connexion DSL nécessite un modem approprié. Un modem est généralement fourni par le FSI lorsque vous vous abonnez. Un grand nombre de ces modems comprennent un ‘routeur’ qui fournit un accès réseau et Wi-Fi. Câble Une connexion par câble fournit un service Internet rapide et toujours actif par l’intermédiaire d’une ligne de télévision par câble. Ce service est généralement disponible dans les grandes villes. Vous pouvez utiliser votre téléphone et regarder la télévision par câble en même temps que vous êtes connecté à Internet. 3G (réseau étendu sans-fil) Une connexion 3G permet d’utiliser les réseaux cellulaires (comme ceux utilisés par un téléphone cellulaire) pour vous connecter à Internet quand vous êtes loin de la maison. La fente d’une carte SIM peut être intégrée à votre ordinateur, ou un périphérique externe peut être nécessaire, comme un modem USB ou même un téléphone cellulaire équipé de façon appropriée. Remarque : Si votre ordinateur comporte une fente de carte SIM, une carte SIM compatible est nécessaire ainsi qu’un contrat avec un fournisseur de service cellulaire. Avant d’utiliser les fonctionnalités 3G, vérifiez auprès de votre fournisseur de service pour voir si des frais supplémentaires seront nécessaires, en particulier les frais d’itinérance. Internet - 49 Connexions réseau Un réseau local est un groupe d’ordinateurs (par exemple, dans un immeuble de bureaux ou à domicile) qui partagent une ligne de communication et des ressources en commun. Lorsque vous configurez un réseau, vous pouvez partager des fichiers, des périphériques (comme une imprimante) et une connexion Internet. Vous pouvez mettre en place un réseau local en utilisant les technologies câblées (Ethernet) ou les technologies sans-fil (comme le Wi-Fi ou Bluetooth). Réseaux sans-fil Un réseau local sans-fil peut relier deux ou plusieurs ordinateurs sans utiliser de fils. La mise en place d’un réseau sans-fil est facile et permet de partager des fichiers, des périphériques et une connexion Internet. Quels sont les avantages d’un réseau sans-fil ? Mobilité Les systèmes de réseau sans-fil vous permettent et à d’autres utilisateurs de votre réseau de partager l’accès aux fichiers et aux périphériques connectés au réseau, par exemple une imprimante ou un scanneur. Vous pouvez également partager une connexion Internet avec d’autres ordinateurs de votre domicile. Rapidité et simplicité d’installation Installer un système de réseau sans-fil peut être rapide et facile et élimine le besoin de tirer des câbles à travers les murs et les plafonds. 50 Composants d’un réseau local sans-fil Pour configurer votre réseau sans-fil à la maison, vous devez disposer des composants suivants : Point d’accès (routeur) Les points d’accès (routeurs) sont les émetteur-récepteur bidirectionnels qui diffusent des données dans l’environnement. Les points d’accès agissent comme des médiateurs entre le réseau câblé et le réseau sansfil. La plupart des routeurs ont un modem DSL intégré qui vous permettra d’accéder à une connexion Internet DSL à haute vitesse. Le FSI (fournisseur de service Internet) que vous avez choisi fournit normalement un modem/routeur avec l’abonnement à ses services. Lisez attentivement la documentation fournie avec votre point d’accès/routeur pour de plus amples instructions. Câble réseau (RJ45) Un câble réseau (aussi appelé câble RJ45) est utilisé pour connecter l’ordinateur au point d’accès (voir l’illustration ci-dessous), ce type de câble peut également être utilisé pour connecter des périphériques au point d’accès. Adaptateur sans-fil Un adaptateur sans-fil interne est normalement déjà installé dans votre ordinateur. Un bouton ou des contrôles dans Windows vous permettent d’activer ou de désactiver l’adaptateur. Internet - 51 Schéma d’un réseau fonctionnel 1. Point d’accès/routeur 2. Ordinateur bureau 4 de 5 3. Modem 1 4. Imprimante 5. Ordinateur portable 7 6. ANP/Téléphone intelligent 7. Câbles (RJ45) réseau 3 2 6 Activer/Désactiver une connexion réseau sans-fil La plupart des ordinateurs ont un bouton ‘Wi-Fi’ qui active ou désactive la connexion réseau. Si votre ordinateur a l’accès sans-fil, mais n’a pas de bouton Communication, vous pouvez activer ou désactiver votre réseau sans-fil, ou contrôler ce qui est partagé sur le réseau avec les options de gestion du réseau. Appuyez la touche Windows ( ) + W, saisissez « Groupe résidentiel » puis cliquez sur Groupe résidentiel. 52 Avertissement : L’utilisation des appareils sans-fil en vol dans un avion est interdite. Éteignez tous les appareils avant d’embarquer, ils peuvent être dangereux pour le fonctionnement de l’avion, peuvent perturber les communications et peuvent même être illégaux. Surfez sur le Net ! Pour surfer sur Internet, vous avez besoin d’un programme appelé un navigateur Internet. Internet Explorer fournit un moyen simple et sûr de navigation sur le Web. Dès que vous avez installé votre accès à Internet et que vous êtes connecté, cliquez sur le raccourci Internet Explorer sur le bureau de Windows et faites l’expérience d’Internet à un autre niveau ! Site Web Gateway Pour commencer, www.gateway.com. pourquoi ne pas visiter notre site Web, Gateway s’engage à vous fournir un support continu personnalisé. Consultez notre section de Support pour obtenir de l’aide adaptée à vos besoins. www.gateway.com est votre portail vers un monde d’activités et de services en ligne : visitez-nous régulièrement pour obtenir les dernières informations et les téléchargements ! Internet - 53 Sécurité Vous êtes sans doute impatient de découvrir tout ce qu’Internet peut offrir. Afin que vous soyez en sécurité en ligne, Gateway a préinstallé le logiciel primé Norton Internet Security™ de Symantec sur votre ordinateur. Norton Internet Security fonctionne discrètement en arrière-plan pour bloquer les menaces complexes d’aujourd’hui et protéger votre identité lorsque vous faites vos achats, visitez le site de votre banque, ou naviguez en ligne. Norton Internet Security bloque le vol d’identité en ligne, détecte et élimine les logiciels espions, supprime les virus et les vers Internet, protège contre les pirates informatiques. Définitions Qu’est-ce qu’un virus ? Les logiciels malveillants, généralement appelé « virus », sont des programmes conçus pour infecter les ordinateurs et les endommager. La plupart des virus sont transmis par Internet, courriels ou des sites Web malveillants. Un virus typique se reproduira et se transmettra inaperçu sur de nombreux ordinateurs. D’autres formes de nuisances, comme les chevaux de Troie, les vers ou les pourriels peuvent infecter votre ordinateur de diverses façons, en utilisant les ressources ou en opérant l’obstruction d’un réseau. Remarque : Gateway vous garantit que votre ordinateur était 100% sans virus au moment de l’achat et ne couvre pas les dommages dus à des virus. 54 Qu’est-ce qu’un logiciel espion ? Les logiciels espions sont généralement des programmes indésirables qui sont téléchargés sur votre ordinateur lorsqu’il est connecté à Internet, souvent sans que vous le sachiez. Une fois qu’ils ont infecté votre ordinateur, ils peuvent épier votre activité de navigation, recueillir des informations personnelles, causer l’apparition de fenêtres publicitaires, ou même changer la configuration de votre ordinateur. Un logiciel espion consomme des ressources sur votre ordinateur, il peut ralentir votre connexion Internet ou tout le système informatique, et même provoquer des plantages. Les logiciels espions sont parfois utilisés par les entreprises sans scrupules pour contrôler et surveiller les sites que vous visitez sur Internet afin de déterminer vos habitudes de navigation sur le Web et afficher des fenêtres publicitaires ciblées sur votre écran. Toutefois, certains types de logiciels espions vont au-delà du simple suivi et surveillent les frappes et capturent les mots de passe, posant un risque pour la sécurité. Qu’est-ce qu’un maliciel ? Les logiciels malveillants, également appelés maliciels, sont des logiciels conçus pour endommager délibérément votre ordinateur. Par exemple, les virus, les vers et les chevaux de Troie sont des logiciels malveillants. Pour aider à protéger votre ordinateur contre les logiciels malveillants, assurezvous qu’il utilise un logiciel anti-logiciels espions et anti-maliciels à jour. Qu’est-ce qu’un pare-feu personnel ? Un pare-feu personnel est un logiciel conçu pour empêcher tout accès non autorisé vers ou depuis un réseau privé. Il agit comme un bouclier Internet - 55 pour protéger votre connexion Internet de connexions non désirées, dont certaines peuvent essayer de prendre le contrôle de votre ordinateur pour installer ou redistribuer des virus ou des programmes malveillants. Chaque connexion à votre ordinateur est contrôlée - les programmes qui tentent de recevoir des informations sans votre autorisation sont détectés et le pare-feu affiche une alerte. Vous pouvez alors décider si vous voulez permettre la connexion, si la connexion est à un programme que vous utilisez actuellement alors normalement vous pouvez la permettre (c.-à-d. un jeu se connectant à un serveur multi-joueurs ou une encyclopédie mettant à jour le contenu). Comment protéger votre ordinateur La prévention de la cybercriminalité peut être simple, avec un peu de conseils techniques et de sens commun de nombreuses attaques peuvent être évitées. En général, les criminels en ligne essaient de gagner de l’argent aussi rapidement et facilement que possible. Plus vous rendez leur travail difficile, plus ils sont susceptibles de vous laisser tranquille et de passer à une cible plus facile. Les conseils ci-dessous fournissent des informations de base sur la façon dont vous pouvez empêcher la fraude en ligne. Gardez votre ordinateur à jour avec les derniers correctifs et mises à jour Une des meilleures façons de tenir les attaquants hors de votre ordinateur est d’appliquer les correctifs et autres mises à jour logicielles dès qu’ils sont disponibles. En mettant régulièrement à jour votre ordinateur, vous empêcherez les attaquants de pouvoir profiter des failles des logiciels (vulnérabilités) qu’ils pourraient utiliser pour pénétrer votre système. 56 Bien que garder votre ordinateur à jour ne vous protégera pas de toutes les attaques, cela rend beaucoup plus difficile pour les pirates d’accéder à votre système, bloque de nombreuses attaques simples et complètement automatisées, et peut être assez pour décourager les moins déterminés des attaquants, pour qu’ils abandonnent et recherchent alors un ordinateur plus vulnérable ailleurs. Des versions plus récentes de Microsoft Windows et d’autres logiciels populaires peuvent être configurées pour être téléchargées et pour appliquer automatiquement les mises à jour de sorte que vous n’avez pas à vous rappeler de vérifier les derniers logiciels. Profiter des fonctions de mise à jour auto de votre logiciel est un excellent point de départ pour que vous restiez en sécurité en ligne. Protégez votre ordinateur avec le logiciel de sécurité Plusieurs types de logiciels de sécurité sont nécessaires pour la sécurité en ligne de base. Les logiciels de sécurité essentiels comprennent les programmes antivirus et pare-feu. Un pare-feu est généralement la première ligne de défense de votre ordinateur, il contrôle qui et quoi peut communiquer avec votre ordinateur en ligne. On peut penser à un parefeu comme une sorte de « gendarme » qui regarde toutes les données essayant de rentrer et de sortir de votre ordinateur sur Internet, acceptant le communications dont il sait qu’elles sont sûres et bloquant le « mauvais » trafic, comme les attaques, les empêchant d’accéder à votre ordinateur. La prochaine ligne de défense est souvent votre logiciel antivirus, qui surveille toutes les activités en ligne telles que les courriels et la Internet - 57 navigation sur le Web et protège contre les virus, vers, chevaux de Troie et autres types de programmes malveillants. Votre logiciel antivirus et antilogiciels espions doit être configuré pour se mettre à jour, et il doit le faire à chaque fois que vous vous connectez à Internet. Les suites de sécurité intégrées, comme Norton Internet Security, qui combinent pare-feu, antivirus, anti-logiciels espions avec d’autres fonctionnalités telles que antipourriel et contrôle parental, sont populaires car elles offrent toute la sécurité nécessaire pour la protection en ligne dans un seul progiciel. Beaucoup de gens utilisent une suite complète de sécurité comme une alternative intéressante à l’installation et la configuration des différents types de logiciels de sécurité. Une version complète of Norton Internet Security™ est préinstallée sur votre système Gateway. Elle comprend un abonnement d’essai gratuit aux mises à jour de protection. Assurez-vous de l’activer ! Choisissez des mots de passe forts et gardez-les sécurisés Les mots de passe sont une réalité de la vie sur Internet aujourd’hui, nous les utilisons pour tout, depuis la commande de fleurs et les services bancaires en ligne à la connexion au site Web de notre compagnie aérienne préférée pour voir combien de miles que nous avons accumulés. Les conseils suivants peuvent aider à sécuriser votre expérience en ligne : • Choisir un mot de passe qui ne peut pas être facilement deviné, est la première étape vers le maintien de mots de passe sécurisés et à l’abri de mauvaises mains. Les mots de passe forts ont huit caractères ou plus et utilisent une combinaison de lettres, de chiffres et de symboles (p. ex., # $ % ! ?). Évitez d’utiliser ce qui suit comme mot de passe : 58 votre nom de connexion, tout ce qui est basé sur vos informations personnelles telles que votre nom de famille, et les mots que l’on peut trouver dans le dictionnaire, particulièrement « mot de passe ». Essayez de sélectionner des mots de passe uniques et particulièrement forts pour protéger les activités comme la banque en ligne. • Conservez votre mot de passe dans un endroit sûr et essayez de ne pas utiliser le même mot de passe pour chaque service que vous utilisez en ligne. • Changez les mots de passe de manière régulière, au moins tous les 90 jours. Cela peut limiter les dégâts causés par quelqu’un qui a déjà obtenu l’accès à votre compte. Si vous remarquez quelque chose de suspect avec un de vos comptes en ligne, l’une des premières mesures que vous pouvez faire est de changer votre mot de passe. Protégez vos informations personnelles Soyez prudent lors de l’échange d’informations personnelles tels que votre nom, votre adresse, numéro de téléphone et adresse de courriel en ligne. Pour profiter de nombreux services en ligne, vous aurez inévitablement à fournir des informations personnelles afin de gérer la facturation et l’expédition de marchandises achetées. Puisque ne divulguer aucune information personnelle est rarement possible, la liste qui suit contient quelques conseils sur la manière de partager des informations personnelles en ligne en toute sécurité : • Gardez l’œil ouvert pour les courriels de charlatans. Ce qui indique qu’un message peut être frauduleux sont les erreurs d’orthographe, la mauvaise grammaire, les tournures de phrases étranges, les adresses Internet - 59 de sites Web avec des extensions étranges, les adresses de sites Web qui sont composées entièrement de nombres là où il y a normalement des mots, et toutes autres choses qui ne semblent pas habituelles. En outre, les messages d’hameçonnage vous diront souvent que vous avez à agir rapidement afin de garder votre compte ouvert, de mettre à jour de votre sécurité, ou vous demande instamment de fournir des informations immédiatement, ou bien quelque chose de mauvais va se passer. Ne mordez pas à l’hameçon. • Ne répondez pas aux courriels qui demandent des informations personnelles. Les sociétés légitimes n’utilisent pas les courriels pour vous demander vos informations personnelles. En cas de doute, contactez la société par téléphone ou en tapant l’adresse Web de la société dans votre navigateur Web. Ne cliquez pas sur les liens dans ces messages, car ils peuvent vous emmener vers pour des sites Web frauduleux et malveillants. • Ne vous approchez pas des sites Web frauduleux utilisés pour voler des informations personnelles. Lors de la visite d’un site Web, tapez l’adresse (URL) directement dans le navigateur Web, plutôt que de suivre un lien dans un courriel ou un message instantané. Les fraudeurs falsifient souvent ces liens pour leur donner une apparence convaincante. Un site de magasinage, de service bancaire ou tout autre site Web avec des informations sensibles devraient avoir un « S » après les lettres « http » (c.-à-d. https://www.votrebanque.com et non pas http:// www.votrebanque.com). Le « s » signifie sécurisé et devrait apparaître lorsque vous êtes dans une zone vous demandant de vous connecter 60 ou de fournir d’autres données sensibles. Un autre signe que vous avez une connexion sécurisée est la petite icône de cadenas dans le bas de votre navigateur Web (généralement le coin droit). • Portez attention aux politiques de confidentialité sur les sites Web et dans les logiciels. Il est important de comprendre comment une organisation peut recueillir et utiliser vos informations personnelles avant de les partager avec eux. • Protégez votre adresse de courriel. Les polluposteurs et « hameçonneurs » envoient parfois des millions de messages à des adresses de courriel qui peuvent exister ou non dans l’espoir de trouver une victime potentielle. Répondre à ces messages, ou même télécharger des images assure que vous serez ajouté à leurs listes de plusieurs des mêmes messages à l’avenir. Aussi soyez prudent lorsque vous envoyez votre adresse de courriel en ligne, dans des groupes de discussion, des blogues ou des communautés en ligne. Les offres en ligne qui semblent trop belles pour être vraies le sont généralement Le vieil adage « il n’y a pas de repas gratuit » est toujours vrai aujourd’hui. Les logiciels prétendument « gratuits » tels que les écrans de veille ou les binettes, les astuces secrètes d’investissement qui vous rendront à coup sûr très riche, et les concours que vous avez remportés avec surprise sans y avoir participé sont les séduisants hameçons utilisés par les entreprises pour attirer votre attention. Bien que vous pouvez ne pas payer directement pour le logiciel ou le service avec de l’argent, le logiciel ou le service gratuit que vous avez Internet - 61 demandé peuvent avoir été livrés avec un logiciel publicitaire (« pubiciel ») qui permet de suivre votre comportement et affiche des publicités indésirables. Il est possible que vous deviez divulguer des informations personnelles ou acheter quelque chose d’autre en vue d’obtenir vos gains supposés. Si une offre semble tellement bonne que c’est difficile à croire, demandez l’avis de quelqu’un d’autre, lisez les lignes en petits caractères, ou encore mieux, ignorez-la simplement. Consultez vous relevés bancaires et de cartes de crédit régulièrement L’impact de l’usurpation d’identité et des crimes en ligne peut être grandement réduit si vous pouvez le constater peu de temps après que vos données sont volées ou lors de la première tentative d’utilisation de vos informations. Un des moyens les plus faciles pour obtenir l’indice que quelque chose va mal est l’examen des relevés mensuels fournis par votre banque et les sociétés de cartes de crédit pour déceler ce qui sort de l’ordinaire. En outre, de nombreuses banques et services utilisent des systèmes de prévention de la fraude qui décèlent les comportements inhabituels d’achat (c.-à-d. si vous vivez au Québec et soudainement vous commencez à acheter des réfrigérateurs à Budapest). Afin de confirmer ce qui sort de l’ordinaire dan les achats, ils peuvent vous appeler et vous demander de les confirmer. Ne prenez pas ces appels la légère, c’est le signe que quelque chose de mauvais peut avoir eu lieu et que vous devriez prendre les mesures nécessaires. 62 Protégez votre ordinateur avec les outils de sécurité Windows Windows fournit diverses applications de protection. Mises à jour de Windows Si vous avez une connexion Internet active, Windows peut rechercher les mises à jour importantes pour votre ordinateur et les installer automatiquement. Ces mises à jour comprennent des correctifs de sécurité et les mises à jour des programmes qui peuvent améliorer votre expérience informatique et vous aider à protéger votre ordinateur contre les nouveaux virus et attaques. Comment puis-je savoir si mon ordinateur fait face à un risque ? Si le Centre d’action fait état d’une alerte, ou si votre ordinateur se comporte de manière erratique, se plante de manière inattendue ou si certains de vos programmes ne fonctionnent pas correctement, votre ordinateur peut être infecté par des logiciels malveillants. Toutefois, il ne faut pas blâmer tous les problèmes de l’ordinateur sur un virus ! Si vous soupçonnez que votre ordinateur est infecté, la première chose à faire est de mettre à jour, si vous ne l’avez pas déjà fait, et lancez votre logiciel antivirus et anti-logiciels espions. Internet - 63 RÉCUPÉRATION Si vous rencontrez des problèmes avec votre ordinateur, et la foire aux questions (voir page 86) ne vous aide pas, vous pouvez ‘récupérer’ votre ordinateur – c’est-à-dire le retourner à un état antérieur. Cette section décrit les outils de récupération disponibles sur votre ordinateur. Gateway fournit Gateway Recovery Management, qui vous permet de créer une sauvegarde de récupération, une sauvegarde des pilotes et des applications, et de démarrer les options de récupération, soit en utilisant les outils de Windows, ou la sauvegarde de récupération. Remarque : Gateway Recovery Management n’est disponible qu’avec un système d’exploitation Windows préinstallé. Important : Nous vous recommandons de créer une sauvegarde de récupération et une sauvegarde des pilotes et des applications dès que possible. Dans certaines situations, une récupération complète nécessitera une sauvegarde de récupération USB. Créer une sauvegarde de récupération Pour réinstaller depuis un lecteur de stockage USB, vous devez d’abord créer une sauvegarde de récupération. La sauvegarde de récupération comprend l’ensemble du contenu original du disque dur de votre ordinateur, y compris Windows et tous les logiciels et pilotes chargés en usine. Utiliser cette sauvegarde restaurera votre ordinateur au même état que lorsque vous l’avez acheté, tout en vous donnant l’option de conserver tous les paramètres et données personnelles. 64 Remarque : Assurez-vous d’avoir un lecteur USB avec une capacité d’au moins16 Go. 1. Depuis Démarrer, saisissez ‘Recovery’ puis cliquez sur Gateway Recovery Management dans la liste des applis. Récupération - 65 2. Cliquez sur Créer une sauvegarde par défaut de l’usine. La fenêtre Lecteur de récupération s’ouvre. Assurez-vous que Copier le contenu de la partition de récupération sur le disque de récupération est sélectionné. Cela fournit la sauvegarde de récupération la plus complète et la plus sûre. 66 3. Branchez le lecteur USB, puis cliquez sur Suivant. • Assurez-vous que votre lecteur USB a une capacité suffisante avant de continuer. La sauvegarde de récupération nécessite un stockage d’au moins 16 Go. 4. La progression de la sauvegarde sera affichée à l’écran. 5. Continuez le processus jusqu’à sa fin. Récupération - 67 6. Après avoir créé la sauvegarde de récupération, vous pouvez choisir de supprimer les informations de récupération sur votre ordinateur. Si vous supprimez ces informations, vous ne pouvez utiliser que la sauvegarde de récupération USB pour restaurer votre ordinateur, si vous perdez ou effacer le lecteur USB, vous ne pouvez pas restaurer votre ordinateur. 7. Débranchez le lecteur USB et marquez-le clairement. Important : Écrivez une description unique de la sauvegarde, par exemple ‘Sauvegarde de récupération Windows’. Assurez-vous de conserver la sauvegarde dans un endroit sûr dont vous vous souviendrez. 68 Créer la sauvegarde des pilotes et des applications Pour créer une sauvegarde des pilotes et des applications, qui contient les logiciels chargés en usine et les pilotes nécessaires à votre ordinateur, vous pouvez utiliser soit un lecteur de stockage USB ou, si votre ordinateur dispose d’un graveur de DVD, un ou plusieurs DVD enregistrables vierges. 1. Depuis Démarrer, saisissez ‘Recovery’ puis cliquez sur Gateway Recovery Management dans la liste des applis. 2. Cliquez sur Créer la sauvegarde des pilotes et des applications. Branchez le lecteur USB ou insérez un DVD vierge dans le lecteur optique, puis cliquez sur Suivant. Récupération - 69 • Si vous utilisez un lecteur USB, assurez-vous que votre lecteur USB a une capacité suffisante avant de continuer. • Si vous utilisez des DVD, le nombre de disques vierges enregistrables dont vous aurez besoin pour les disques de récupération sera également affiché. Assurez-vous d’avoir le nombre de disques vierges identiques. 70 3. Cliquez sur Démarrer pour copier les fichiers. La progression de la sauvegarde sera affichée à lécran. 4. Continuez le processus jusqu’à sa fin : • Si vous utilisez des disques optiques, le lecteur éjecte chaque disque lorsqu’il a fini de le graver. Retirez le disque du lecteur et marquez-le avec un marqueur permanent. Si plusieurs disques sont nécessaires, insérez un nouveau disque à l’invite, puis cliquez sur OK. Continuer jusqu’à la fin du processus. • Si vous utilisez un lecteur USB, débranchez le lecteur et marquez-le clairement. Important : Écrivez une description unique sur chaque sauvegarde, par exemple ‘Sauvegarde des pilotes et des applications’. Assurez-vous de conserver la sauvegarde dans un endroit sûr dont vous vous souviendrez. Récupération de votre système Pour récupérer votre système : 1. Effectuez des corrections mineures. Si seulement un ou deux éléments logiciels ou matériels ont cessé de fonctionner correctement, le problème peut être résolu en réinstallant les logiciels ou les pilotes de périphériques. Pour réinstaller les logiciels et les pilotes qui ont été préinstallés à l’usine, voir « Réinstaller les pilotes et les applications » à la page 72. Récupération - 71 Pour des instructions sur la réinstallation des logiciels et des pilotes qui n’ont pas été préinstallés, voir la documentation de ce produit ou le site Web d’assistance. 2. Rétablissez à un état antérieur du système. Si la réinstallation du logiciel ou des pilotes n’aide pas, alors le problème peut être résolu en retournant votre système à un état antérieur quand tout fonctionnait correctement. Pour des instructions, voir « Retourner à un instantané antérieur du système » à la page 75. 3. Réinitialisez votre système d’exploitation. Si rien d’autre n’a résolu le problème et vous voulez réinitialiser votre système, mais garder vos informations utilisateur, voir « Retourner votre système à son état d’usine » à la page 77. 4. Réinitialisez votre système à son état d’usine. Si rien d’autre n’a résolu le problème et vous voulez réinitialiser votre système à l’état d’usine, voir « Retourner votre système à son état d’usine » à la page 77. Réinstaller les pilotes et les applications Au cours d’un dépannage, il peut être nécessaire de réinstaller les applications et les pilotes de périphériques qui ont été préinstallés sur votre ordinateur à l’usine. Vous pouvez réinstaller en utilisant soit votre disque dur ou la sauvegarde que vous avez créée. 72 • Autres applications - Si vous devez réinstaller un logiciel qui n’était pas préinstallé sur votre ordinateur, vous devez suivre les instructions d’installation de ce logiciel. • Nouveau pilotes de périphériques - Si vous devez réinstaller des pilotes de périphériques qui n’étaient pas préinstallés sur votre ordinateur, suivez les instructions fournies avec les périphériques. Si vous réinstallez à l’aide de Windows et les informations de récupération sont stockées sur votre ordinateur : • Depuis Démarrer, saisissez ‘Recovery’ puis cliquez sur Gateway Recovery Management dans la liste des applis. • Cliquez sur Réinstaller les pilotes ou les applications. Récupération - 73 • Vous devriez voir la section Contenus du Centre de ressource Gateway. • Cliquez sur l’icône installer de l’élément que vous voulez installer, puis suivez les instructions à l’écran pour terminer l’installation. Répétez cette étape pour chaque élément que vous souhaitez réinstaller. Si vous réinstallez depuis une Sauvegarde des pilotes et des applications sur un DVD ou lecteur USB : 1. Insérez Sauvegarde des pilotes et des applications dans le lecteur de disque ou connectez-la à un port USB libre. • Si vous insérez un DVD, attendez le démarrage du Centre de ressource Gateway. • Si le Centre de ressource Gateway ne démarre pas automatiquement, appuyez sur la touche Windows + <E>, puis double-cliquez sur l’icône du lecteur optique. 74 • Si vous utilisez un lecteur USB, appuyez sur la touche Windows + <E>, puis double-cliquez sur le lecteur qui contient la sauvegarde. Double-cliquez sur ResourceCenter. 2. Vous devriez voir la section Contenus du Centre de ressource Gateway. 3. Cliquez sur l’icône installer de l’élément que vous voulez installer, puis suivez les invites à l’écran pour terminer l’installation. Répétez cette étape pour chaque élément que vous souhaitez réinstaller. Retourner à un instantané antérieur du système La Restauration du système de Microsoft prend périodiquement des ‘instantanés’ de vos paramètres système et les enregistre comme points de restauration. Dans la plupart des cas de problèmes logiciels difficiles à résoudre, vous pouvez retourner à un de ces points de restauration pour faire fonctionner à nouveau votre système. Récupération - 75 Windows crée automatiquement un nouveau point de restauration chaque jour, et chaque fois que vous installez des logiciels ou des pilotes de périphériques. Remarque : Pour plus d’informations sur l’utilisation de la Restauration du système de Microsoft, depuis Démarrer, saisissez ‘Aide’ puis cliquez sur Aide et support dans la liste des applis. Saisissez ‘restauration du système Windows’ dans la zone Rechercher dans l’Aide, puis appuyez sur Entrée. Retourner à un point de restauration: 1. Depuis Démarrer, saisissez ‘Panneau de configuration’ puis cliquez sur Panneau de configuration dans la liste des applis. 2. Cliquez sur Système et sécurité > Centre d’action, puis cliquez sur Récupération en bas de la fenêtre. 3. Cliquez sur Ouverture de Restauration du système, puis sur Suivant. 4. Cliquez sur le dernier point de restauration souhaité (à un moment où votre système a fonctionné correctement), cliquez sur Suivant, puis sur Terminer. 5. Une fenêtre de confirmation apparaît. Cliquez sur Oui. Votre système est restauré à l’aide du point de restauration que vous avez spécifié. Ce processus peut prendre quelques minutes, et peut redémarrer votre ordinateur. 76 Retourner votre système à son état d’usine Si votre ordinateur rencontre des problèmes qui ne sont pas récupérables par d’autres méthodes, il peut être nécessaire de retourner tout votre système à son état d’usine. Vous pouvez récupérer depuis soit votre disque dur ou la sauvegarde de récupération que vous avez créée. • Si vous pouvez encore exécuter Windows et vous n’avez pas supprimé la partition de récupération, voir « Récupérer depuis Windows » à la page 78. • Si vous ne pouvez pas exécuter Windows, votre disque dur d’origine a été entièrement reformaté ou vous avez installé un remplacement de disque dur, voir « Récupérer depuis une sauvegarde de récupération » à la page 82. Récupération - 77 Récupérer depuis Windows Démarrez Gateway Recovery Management : • Depuis Démarrer, saisissez ‘Recovery’ puis cliquez sur Gateway Recovery Management dans la liste des applis. Deux options sont disponibles, Restaurer les paramètres d’usine (Réinitialiser mon PC) ou Restauration personnalisée (Actualiser mon PC). Restaurer les paramètres d’usine efface tout sur votre disque dur, puis réinstalle Windows et tous les logiciels et pilotes qui ont été préinstallés sur votre système. Si vous pouvez accéder aux fichiers importants sur votre disque dur, sauvegardez-les maintenant. Voir « Restaurer les paramètres d’usine avec Gateway Recovery Management » à la page 79. Restauration personnalisée essaiera de conserver vos fichiers (données de l’utilisateur), mais réinstallera tous les logiciels et les pilotes. Les logiciels installés depuis que vous avez acheté votre PC seront supprimés (à l’exception des logiciels installés à partir de Windows Store). Voir « Restauration personnalisée avec Gateway Recovery Management » à la page 81. 78 Restaurer les paramètres d’usine avec Gateway Recovery Management 1. Cliquez sur Restaurer les paramètres d’usine. Attention : ‘Restaurer les paramètres d’usine’ effacera tous les fichiers sur votre disque dur. 2. La fenêtre Réinitialiser votre PC s’ouvre. Les images sont mises uniquement à titre de référence. Récupération - 79 3. Cliquez sur Suivant, puis choisissez comment effacer vos fichiers : a. Simplement supprimer mes fichiers efface rapidement tous les fichiers avant la restauration de votre ordinateur et prend environ 30 minutes. b. Entièrement nettoyer le lecteur nettoie complètement le disque après que chaque fichier est effacé, ainsi aucun fichier ne peut être affiché après la récupération. Nettoyer le lecteur prend beaucoup plus de temps, jusqu’à 5 heures, mais c’est beaucoup plus sûr car les anciens fichiers sont complètement supprimés. 4. Cliquez sur Réinitialiser. 5. Le processus de récupération commence par le redémarrage de votre ordinateur, puis se poursuit par la copie des fichiers sur votre disque dur. 6. Après la fin de récupération, vous pouvez commencer à utiliser votre ordinateur en répétant le processus de premier démarrage. 80 Restauration personnalisée avec Gateway Recovery Management 1. Cliquez sur Restauration personnalisée (conserver les données utilisateur). 2. La fenêtre Actualiser votre PC s’ouvre. 3. Cliquez sur Suivant, puis sur Actualiser. 4. Le processus de récupération commence par le redémarrage de votre ordinateur, puis se poursuit par la copie des fichiers sur votre disque dur. Ce processus prend environ 30 minutes. Récupération - 81 Récupérer depuis une sauvegarde de récupération Pour récupérer depuis une sauvegarde de récupération sur un lecteur USB : 1. Trouvez votre sauvegarde de récupération. 2. Branchez votre lecteur USB et allumez votre ordinateur. 3. S’il n’est pas déjà activé vous devez activer le Menu de démarrage F12 : a. Appuyez sur <F2> au démarrage de votre ordinateur. b. Utilisez les touches fléchées gauche ou droite pour sélectionner le menu Main. c. Appuyez sur la touche jusqu’à ce que F12 Boot Menu soit sélectionné, appuyez sur <F5> pour changer ce paramètre sur Enabled>. d. Utilisez les touches fléchées gauche ou droite pour sélectionner le menu Exit. e. Selon le type de BIOS utilisé par votre ordinateur, sélectionnez Save Changes and Exit ou Exit Saving Changes et appuyez sur Entrée. Sélectionnez OK ou Yes pour confirmer. f. Votre ordinateur redémarrera. 4. Lors du démarrage, appuyez sur <F12> pour ouvrir le menu de démarrage. Le menu de démarrage vous permettra de sélectionner le périphérique de démarrage, sélectionnez le lecteur USB. a. Utilisez vos touches fléchées pour sélectionner USB Device, puis appuyez sur Entrée. 82 b. Windows démarre depuis la sauvegarde de récupération au lieu du processus de démarrage normal. 5. Sélectionnez votre type de clavier. 6. Sélectionnez Dépanner et choisissez le type de récupération à utiliser : a. Cliquez sur Avancé puis sur Restauration du système pour démarrer la Restauration du système de Microsoft : La Restauration du système de Microsoft prend périodiquement un ‘instantané’ de vos paramètres système et les enregistre comme points de restauration. Dans la plupart des cas de problèmes logiciels difficiles à résoudre, vous pouvez retourner à un de ces points de restauration pour faire fonctionner à nouveau votre système. b. Cliquez sur Réinitialiser votre PC pour démarrer le processus de réinitialisation : Réinitialiser votre PC efface tout sur votre disque dur, puis réinstalle Windows et tous les logiciels et pilotes qui ont été préinstallés sur votre système. Si vous pouvez accéder aux fichiers importants sur votre disque dur, sauvegardez-les maintenant. Voir « Réinitialiser votre PC depuis la sauvegarde de récupération » à la page 84. c. Cliquez sur Actualiser votre PC pour démarrer le processus d’actualisation : Actualiser votre PC essaiera de conserver vos fichiers (données de l’utilisateur), mais réinstallera tous les logiciels et les pilotes. Les logiciels installés depuis que vous avez acheté votre PC seront supprimés (à l’exception des logiciels installés à partir de Windows Store). Voir « Actualiser votre PC depuis la sauvegarde de récupération » à la page 85. Récupération - 83 Réinitialiser votre PC depuis la sauvegarde de récupération Attention : Réinitialiser votre PC effacera tous les fichiers sur votre disque dur. 1. La fenêtre Réinitialiser votre PC s’ouvre. Les images sont mises uniquement à titre de référence. 2. Cliquez sur Suivant. 3. Sélectionnez le système d’exploitation à récupérer (normalement une seule option est disponible). 4. Choisissez de conserver les modifications éventuelles sur le disque dur : a. Si vous avez supprimé la partition de récupération ou modifié les partitions d’une quelconque manière sur le disque dur et vous souhaitez conserver ces modifications, sélectionnez Non. b. Pour restaurer complètement votre ordinateur aux paramètres d’usine, sélectionnez Oui. 5. Choisir comme effacer vos fichiers : a. Simplement supprimer mes fichiers efface rapidement tous les fichiers avant la restauration de votre ordinateur et prend environ 30 minutes. 84 b. Entièrement nettoyer le lecteur nettoie complètement le disque après que chaque fichier est effacé, ainsi aucun fichier ne peut être affiché après la récupération. Nettoyer le lecteur prend beaucoup plus de temps, jusqu’à 5 heures, mais c’est beaucoup plus sûr cas les anciens fichiers sont complètement supprimés. 6. Cliquez sur Réinitialiser. 7. Après la fin de récupération, vous pouvez commencer à utiliser votre ordinateur en répétant le processus de premier démarrage. Actualiser votre PC depuis la sauvegarde de récupération 1. La fenêtre Actualiser votre PC s’ouvre. 2. Cliquez sur Suivant. 3. Sélectionnez le système d’exploitation à récupérer (normalement une seule option est disponible). 4. Cliquez sur Actualiser. 5. Le processus de récupération commence par le redémarrage de votre ordinateur, puis se poursuit par la copie des fichiers sur votre disque dur. Ce processus prend environ 30 minutes. Récupération - 85 FOIRE AUX QUESTIONS Vous trouverez ici une liste des situations qui peuvent apparaître lors de l’utilisation de l’ordinateur, ainsi que des solutions pour chacune. J’ai mis sous tension, mais l’ordinateur ne démarre pas ou ne s’initialise pas Vérifiez l’indicateur d’alimentation : • Si l’indicateur n’est pas allumé, l’ordinateur n’est pas alimenté. Vérifiez ce qui suit : • Si vous utilisez la pile, son niveau de charge peut être trop bas et ne pas pouvoir alimenter l’ordinateur. Connectez l’adaptateur c.a. pour recharger la pile. • Assurez-vous que l’adaptateur c.a. est branché de manière appropriée à l’ordinateur et à une prise électrique. • Si l’indicateur est allumé, vérifiez ce qui suit : • Le lecteur optique contient-il un disque ? Retirez-le et appuyez sur <Ctrl> + <Alt> + <Suppr> pour redémarrer le système. • Avez-vous un périphérique de stockage USB (clé USB ou un téléphone intelligent) branché à votre ordinateur ? Débranchez-le et appuyez sur <Ctrl> + <Alt> + <Suppr> pour redémarrer le système. 86 - Foire aux questions Rien n’apparaît à l’écran Le système de gestion de l’alimentation de l’ordinateur éteint l’écran automatiquement pour économiser l’énergie. Appuyez sur une touche pour rallumer l’écran. Si l’appui sur une touche ne rallume pas l’écran, il peut y avoir trois raisons : • Le niveau de la luminosité est peut-être trop bas. Appuyez sur (augmenter) pour ajuster le niveau de la luminosité. • Le périphérique d’affichage est peut-être réglé sur un moniteur externe. Appuyez sur pour retourner l’affichage à l’ordinateur. • Si l’indicateur de Sommeil est allumé, l’ordinateur est en mode de Sommeil. Appuyez et relâchez le bouton d’alimentation pour la reprise. Aucun son ne sort de l’ordinateur Vérifiez ce qui suit : • Le son est peut-être désactivé. Dans Windows, vérifiez l’icône de contrôle du son (un haut-parleur) sur la barre des tâches. Si elle est barrée, cliquez sur l’icône et désélectionnez l’option Tous muets. • Le niveau du volume est peut-être trop bas. Dans Windows, vérifiez l’icône de contrôle du son sur la barre des tâches. Vous pouvez utilisez les boutons de contrôle du volume pour ajuster le volume. • Si un casque d’écoute stéréo, des écouteurs ou des haut-parleurs externes sont connectés au port de sortie audio de l’ordinateur, les hautparleurs internes sont éteints automatiquement. Foire aux questions - 87 Je veux éjecter le plateau du lecteur optique sans mettre l’ordinateur sous tension Le lecteur optique a un trou d’éjection mécanique. Insérez tout simplement la pointe d’un stylo ou d’un trombone dans le trou et appuyez pour éjecter le plateau. Le clavier ne répond pas Essayez de connecter un clavier externe au port USB sur l’ordinateur. S’il fonctionne, contactez votre revendeur ou un centre de service agréé car le câble interne du clavier est peut-être déconnecté. L’imprimante ne fonctionne pas Vérifiez ce qui suit : • Assurez-vous que l’imprimante est branchée à une prise électrique et est sous tension. • Assurez-vous que le câble de l’imprimante est bien branché dans un port USB et dans le port correspondant de l’imprimante. 88 - Foire aux questions Conseils et astuces pour utiliser Windows 8 Nous savons que c’est un nouveau système d’exploitation et qu’un certain temps sera nécessaire pour s’y habituer, c’est pourquoi nous avons créé quelques conseils pour vous aider à commencer. Il y a trois concepts vous pouvez vouloir garder à l’esprit 1. Démarrer Le bouton Démarrer n’est plus disponible ; vous pouvez lancer les applis depuis l’écran Démarrer. 2. Tiles Les Live tiles sont similaires aux miniatures des applis. 3. Charms Les charms vous permettent d’exécuter des fonctions utiles, telles que partager le contenu, éteindre votre PC ou modifier les paramètres. Comment puis-je accéder aux charms ? Déplacez le curseur vers le coin supérieur ou inférieur droit de l’écran pour accéder aux charms, ou appuyez sur la touche Windows + <C>. Comment puis-je aller à Démarrer ? Appuyez sur la touche Windows sur le clavier, appuyez sur la touche Windows + <C> et cliquez sur Démarrer, ou déplacez le curseur vers le coin inférieur gauche de l’écran et cliquez sur Démarrer. Foire aux questions - 89 Comment puis-je passer d’une appli à une autre ? Déplacez le curseur vers le bord gauche de l’écran pour afficher les miniatures des applis qui sont actuellement exécutées. Vous pouvez également appuyer la touche Windows + <Tab> pour ouvrir et défiler dans les applis actuelles. Comment puis-je éteindre mon ordinateur ? Appuyez la touche Windows + <C>, cliquez sur Paramètres > Alimentation et sélectionnez l’action que vous voulez effectuer. Vous pouvez également depuis le Bureau cliquer sur Bouton d’alimentation Gateway et sélectionnez l’action que vous voulez effectuer. Pourquoi y a-t-il une nouvelle interface ? La nouvelle interface de Windows 8 est conçue pour fonctionner avec la saisie tactile. Les applis de Windows Store utiliseront automatiquement tout l’écran et ne nécessitent pas d’être fermées de la manière traditionnelle. Les applis de Windows Store seront affichées sur Démarrer en utilisant les Live tiles. Que sont les ‘Live tiles’ ? Les Live tiles sont similaires aux miniatures des applis qui seront mises à jour avec du nouveau contenu chaque fois que vous êtes connecté à Internet. Ainsi, par exemple, vous pouvez afficher la météo ou les mises à jour de la bourse sans avoir à ouvrir l’appli. 90 Comment déverrouiller mon ordinateur ? Appuyez sur n’importe quelle touche et cliquez sur une icône de compte utilisateur pour déverrouiller l’ordinateur. Si votre compte a un mot de passe, vous devrez entrer le mot de passe pour continuer. Comment personnaliser mon ordinateur ? Vous pouvez personnaliser Démarrer avec une image d’arrière-plan ou en organisant les vignettes pour répondre à vos besoins personnels. Pour changer l’arrière-plan, appuyez la touche Windows + <C> et cliquez sur Paramètres > Changer les paramètres du PC > Personnaliser. Cliquez sur Écran Démarrer en haut de la page et sélectionnez une couleur et une image. Comme déplacer les tiles ? Cliquez et maintenez une tile pour la sélectionner, puis faites la glisser sur l’endroit de l’écran Démarrer où vous voulez qu’elle apparaisse. D’autres tiles seront déplacées pour accommoder la tile dans son nouvel emplacement. Puis-je agrandir ou réduire les tiles ? Cliquez-droit sur une tile, puis sélectionnez Plus petite ou Plus grande dans le menu qui apparaît en bas de l’écran. Foire aux questions - 91 Comment puis-je personnaliser l’écran verrouillé ? Vous pouvez personnaliser l’écran verrouillé avec une image différente ou pour afficher votre statut rapide et les notifications pour répondre à vos besoins personnels. Pour changer l’arrière-plan, appuyez la touche Windows + <C> et cliquez sur Paramètres > Changer les paramètres du PC > Personnaliser. Cliquez sur Écran verrouillé en haut de la page et sélectionnez l’image et les applis que vous souhaitez voir sur l’écran verrouillé. Alors, comment puis-je fermer une appli ? Déplacez le curseur vers le haut de l’écran et cliquez puis faites glisser la fenêtre vers le bas pour fermer l’appli. Vous pouvez fermer des applis à partir des miniatures sur le bord gauche de l’écran en cliquant-droit sur une miniature et en sélectionnant Fermer. Puis-je changer la résolution de l’écran ? Depuis Démarrer, commencez à saisir ‘Panneau de configuration’ pour ouvrir Rechercher et afficher les résultats. Cliquez sur Panneau de configuration > Ajuster la résolution de l’écran. Je veux utiliser Windows comme j’en ai l’habitude. Rendez-moi mon bureau ! Depuis Démarrer cliquez sur la vignette du Bureau pour voir un bureau traditionnel. Vous pouvez épingler des applis que vous utilisez fréquemment sur la barre des tâches pour les ouvrir facilement. 92 Si vous cliquez sur une applis qui n’est pas une appli Windows Store, Windows ouvrira l’appli automatiquement sous Bureau. Où sont mes applis ? Depuis Démarrer, commencez simplement à saisir le nom de l’appli que vous souhaitez ouvrir, et Rechercher s’ouvrir automatiquement et listera les résultats. Pour afficher la liste complète des applis, appuyez sur la barre d’espace ou la touche Menu et cliquez sur Toutes les applis. Comment puis-je faire apparaître une appli sur Démarrer ? Si vous êtes dans Toutes les applis et vous souhaitez faire apparaître une appli sur Démarrer, vous pouvez sélectionner l’appli et cliquer-droit dessus. Sélectionnez Épingler au menu Démarrer dans le menu qui apparaît en bas de l’écran. Comment supprimer une vignette de Démarrer ? Cliquez-droit sur la vignette, puis sélectionnez Détacher du menu Démarrer dans le menu qui apparaît en bas de l’écran. Comment puis-je faire apparaître une appli sur ma barre des tâches dans le Bureau ? Si vous êtes dans Toutes les applis et vous souhaitez faire apparaître une appli sur la barre des tâches dans Bureau, vous pouvez sélectionner l’appli et cliquer-droit dessus. Sélectionnez Épingler à la barre des tâches dans le menu qui apparaît en bas de l’écran. Foire aux questions - 93 Comment puis-je installer des applis ? Vous pouvez télécharger des applis Windows Store depuis le Store. Un ID Microsoft sera nécessaire pour acheter et télécharger des applis depuis le Store. Je ne peux pas trouver des applis comme Bloc-notes et Paint ! Où sontils ? Depuis Démarrer, vous pouvez simplement commencer à saisir le nom de l’appli que vous recherchez pour ouvrir Rechercher et lister les résultats. Vous pouvez également ouvrir Toutes les applis et faites défiler jusqu’à ‘Accessoires Windows’ pour voir la liste des programmes hérités. Qu’est-ce qu’un ID (compte) Microsoft ? Un compte Microsoft est une adresse de courriel et mot de passe que vous utilisez pour vous connecter à Windows. Vous pouvez utiliser n’importe quelle adresse de courriel, mais il est préférable de choisir celle que vous utilisez déjà pour communiquer avec les amis et vous connecter à vos sites Web préférés. Lorsque vous vous connectez à votre PC avec un compte Microsoft, vous connecterez votre PC aux personnes, fichiers et appareils que vous aimez. Est-ce nécessaire ? Un ID Microsoft n’est pas nécessaire pour utiliser Windows 8, mais cela rend la vie plus facile parce que vous pouvez synchroniser les données entre différentes machines auxquelles vous vous connectez à l’aide d’un ID de Microsoft. 94 Comment puis-je en obtenir un ? Si vous avez déjà installé Windows 8 et vous ne vous êtes pas connecté avec un compte Microsoft ou vous n’avez pas de compte Microsoft et vous souhaitez en obtenir un, appuyez la touche Windows + <C> et cliquez sur Paramètres > Changer les paramètres du PC > Utilisateurs > Passer à un compte Microsoft, et suivez les instructions à l’écran. Comment ajouter un favori à Internet Explorer ? Internet Explorer 10 n’a pas les favoris traditionnels, au lieu de cela vous pouvez épingler des raccourcis à Démarrer. Une fois que la page est ouverte, cliquez-droit n’importe où sur la page pour ouvrir le menu en bas de l’écran. Cliquez sur Épingler au menu Démarrer. Comment puis-je rechercher les mises à jour Windows ? Appuyez la touche Windows + <C> et cliquez sur Paramètres > Changer les paramètres du PC > Mise à jour Windows. Cliquez sur Rechercher les mises à jour maintenant. Où puis-je avoir plus d’informations ? Pour plus d’informations, veuillez visiter : • Tutoriels de Windows 8 : www.gateway.com/windows8-tutorial • FAQ d’assistance : support.gateway.com Foire aux questions - 95 INFORMATIONS RÉGLEMENTAIRES PRÉVENTION DE PERTE AUDITIVE - Attention : Une perte permanente de l’audition peut se produire si des écouteurs ou un casque sont utilisés à un volume élevé pendant une longue période. - A pleine puissance, l’écoute prolongée du baladeur peut endommager l’oreille de l’utilisateur. Avertissement pour l’écoute Pour protéger votre ouïe, respectez ces instructions. - Augmentez le volume graduellement jusqu’à ce que vous puissiez entendre clairement et confortablement. - N’augmentez pas le volume après que votre ouïe se soit adaptée. - N’écoutez pas de musique à un fort volume pendant une période prolongée. - N’augmentez pas le volume pour ne pas entendre les environnements bruyants. - Diminuez le volume si vous ne pouvez pas entendre les gens qui parlent près de vous. AVIS RÉGLEMENTAIRE DU PÉRIPHÉRIQUE RADIO - Remarque : Les informations réglementaires ci-dessous sont pour les modèles avec réseau sans-fil et/ou Bluetooth seulement. Accessoires de conformité Les accessoires associés à cet équipement sont les suivants : un câble vidéo blindé lorsqu’un moniteur externe est branché. Ces accessoires doivent être utilisés en vue d’assurer le respect des réglementations de la FCC. 96 AVERTISSEMENT DE LA PROPOSITION 65 DE LA CALIFORNIE Ce produit contient des produits chimiques connus de l’état de Californie pour causer le cancer, des malformations congénitales et/ou d’autres anomalies de la reproduction. Pour plus d'informations sur cet avertissement, allez à www.gateway.com/prop65. 日本 (JAPON) 本装置は、第二種情報装置(住宅地域またはその隣接した地域において使用されるべき 情報装置)デ住宅地域での電波障害防止を目的とした情報装置等電波障害自主規制協議 会(VCCI)基準に適合しております。 しかし、本装置をラジオ、テレビジョン受信機に、近接してご使用になると、受信障害 の原因となることがあります。本書の説明にしたがって正しい取り扱いをしてくださ い。 INFORMATIONS RÉGLEMENTAIRES DE L’ADAPTATEUR SANS FIL USA — FCC and FAA The FCC with its action in ET Docket 96-8 has adopted a safety standard for human exposure to radio frequency (RF) electromagnetic energy emitted by FCC certified equipment. The wireless adapter meets the Human Exposure limits found in OET Bulletin 65, supplement C, 2001, and ANSI/IEEE C95.1, 1992. Proper operation of this radio according to the instructions found in this manual will result in exposure substantially below the FCC’s recommended limits. - The following safety precautions should be observed: Do not touch or move antenna while the unit is transmitting or receiving. - Do not hold any component containing the radio such that the antenna is very close or touching any exposed parts of the body, especially the face or eyes, while transmitting. Informations réglementaires - 97 - Do not operate the radio or attempt to transmit data unless the antenna is connected; this behavior may cause damage to the radio. Use in specific environments: - The use of wireless adapters in hazardous locations is limited by the constraints posed by the safety directors of such environments. - The use of wireless adapters on airplanes is governed by the Federal Aviation Administration (FAA). - The use of wireless adapters in hospitals is restricted to the limits set forth by each hospital. Antenna Use In order to comply with FCC RF exposure limits, low gain integrated antennas should be located at a minimum distance of 20 cm (8 inches) or more from the body of all persons or at a minimum distance as specified by the FCC module grant conditions. FCC grants can be viewed from the FCC Equipment Authorization website at https://fjallfoss.fcc.gov/ oetcf/eas/reports/GenericSearch.cfm by entering the FCC ID printed on the module label. Explosive Device Proximity Warning Warning: Do not operate a portable transmitter (including this wireless adapter) near unshielded blasting caps or in an explosive environment unless the transmitter has been modified to be qualified for such use Antenna Warnings - Warning: To comply with the FCC and ANSI C95.1 RF exposure limits, it is recommended that for the wireless adapter installed in a desktop or portable computer, the antenna for this wireless adapter to be installed so as to provide a separation distance of at least 20 cm (8 inches) from all persons or at the minimum distance as specified by the module grant conditions. FCC grants can be viewed from the FCC Equipment Authorization website at https://fjallfoss.fcc.gov/oetcf/eas/ reports/GenericSearch.cfm by entering the FCC ID printed on the module label. 98 - Warning: The wireless adapter is not designed for use with high-gain directional antennas. Use On Aircraft Caution - Caution: Regulations of the FCC and FAA prohibit airborne operation of radiofrequency wireless devices (wireless adapters) because their signals could interfere with critical interfere with critical aircraft instruments. Local Restrictions on 802.11a, 802.11b, 802.11g and 802.11n Radio Usage - Caution: Due to the fact that the frequencies used by 802.11a, 802.11b, 802.11g and 802.11n wireless LAN devices may not yet be harmonized in all countries, 802.11a, 802.11b, 802.11g and 802.11n products are designed for use only in specific countries, and are not allowed to be operated in countries other than those of designated use. As a user of these products, you are responsible for ensuring that the products are used only in the countries for which they were intended and for verifying that they are configured with the correct selection of frequency and channel for the country of use. Any deviation from the permissible power and frequency settings for the country of use is an infringement of national law and may be punished as such. Wireless Interoperability The wireless adapter is designed to be interoperable with other wireless LAN products that are based on direct sequence spread spectrum (DSSS) radio technology and to comply with the following standards: - IEEE Std. 802.11b compliant Standard on Wireless LAN - IEEE Std. 802.11g compliant Standard on Wireless LAN - IEEE Std. 802.11a compliant Standard on Wireless LAN (applies to devices supporting 802.11a) - IEEE Std. 802.11n draft 2.0 compliant on Wireless LAN - Wireless Fidelity certification, as defined by the Wi-Fi Alliance Informations réglementaires - 99 The Wireless Adapter and Your Health The wireless adapter, like other radio devices, emits radio frequency electromagnetic energy. The level of energy emitted by the wireless adapter, however, is less than the electromagnetic energy emitted by other wireless devices such as mobile phones. The wireless adapter operates within the guidelines found in radio frequency safety standards and recommendations. These standards and recommendations reflect the consensus of the scientific community and result from deliberations of panels and committees of scientists who continually review and interpret the extensive research literature. In some situations or environments, the use of the wireless adapter may be restricted by the proprietor of the building or responsible representatives of the applicable organization. Examples of such situations may include: - Using the wireless adapter on board airplanes, or - Using the wireless adapter in any other environment where the risk of interference with other devices or services is perceived or identified as being harmful. If you are uncertain of the policy that applies to the use of wireless adapters in a specific organization or environment (an airport, for example), you are encouraged to ask for authorization to use the adapter before you turn it on. FCC Radio Frequency Interference Requirements (applies to device supporting 802.11a) This device is restricted to indoor use due to its operation in the 5.15 to 5.25 GHz and 5.470 to 5.725 GHz frequency ranges. FCC requires this product to be used indoors for the frequency ranges 5.15 to 5.25 GHz and 5.470 to 5.725 GHz to reduce the potential for harmful interference to co-channel mobile satellite systems. High power radars are allocated as primary users of the 5.25 to 5.35 GHz and 5.65 to 5.85 GHz bands. These radar stations can cause interference with and /or damage this device. No configuration controls are provided for this wireless adapter allowing any change in the frequency of operations outside the FCC grant of authorization for U.S operation according to Part 15.407 of the FCC rules. 100 USA — Federal Communications Commission (FCC) This device complies with Part 15 of the FCC Rules. Operation of the device is subject to the following two conditions: - This device may not cause harmful interference. - This device must accept any interference that may cause undesired operation. - Note: The radiated output power of the adapter is far below the FCC radio frequency exposure limits. Nevertheless, the adapter should be used in such a manner that the potential for human contact during normal operation is minimized. To avoid the possibility of exceeding the FCC radio frequency exposure limits, you should keep a distance of at least 20 cm between you (or any other person in the vicinity), or the minimum separation distance as specified by the FCC grant conditions, and the antenna that is built into the computer. Details of the authorized configurations can be found at http://www.fcc.gov/oet/ea/ by entering the FCC ID number on the device. Interference Statement This wireless adapter has been tested and found to comply with the limits for a Class B digital device, pursuant to Part 15 of the FCC Rules. These limits are designed to provide reasonable protection against harmful interference in a residential installation. This wireless adapter generates, uses, and can radiate radio frequency energy. If the wireless adapter is not installed and used in accordance with the instructions, the wireless adapter may cause harmful interference to radio communications. There is no guarantee, however, that such interference will not occur in a particular installation. If this wireless adapter does cause harmful interference to radio or television reception (which can be determined by turning the equipment off and on), the user is encouraged to try to correct the interference by taking one or more of the following measures: - Reorient or relocate the receiving antenna of the equipment experiencing the interference. - Increase the distance between the wireless adapter and the equipment experiencing the interference. Informations réglementaires - 101 - Connect the computer with the wireless adapter to an outlet on a circuit different from that to which the equipment experiencing the interference is connected. - Consult the dealer or an experienced radio/TV technician for help. - Note: The adapter must be installed and used in strict accordance with the manufacturer's instructions as described in the user documentation that comes with the product. Any other installation or use will violate FCC Part 15 regulations. Canada — Industry Canada (IC) This device complies with RSS210 of Industry Canada. Cet appareil se conforme à RSS210 de Canada d'Industrie. - Caution: When machine supports and using IEEE 802.11a wireless LAN, this product is restricted to indoor use due to its operation in the 5.15- to 5.25 GHz frequency range. Industry Canada requires this product to be used indoors for the frequency range of 5.15 GHz to 5.25 GHz to reduce the potential for harmful interference to co-channel mobile satellite systems. High power radar is allocated as the primary user of the 5.25 to 5.35 GHz and 5.65 to 5.85 GHz bands. These radar stations can cause interference with and/or damage to this device. The maximum allowed antenna gain for use with this device is 6dBi in order to comply with the E.I.R.P limit for the 5.25 to 5.35 and 5.725 to 5.85 GHz frequency range in point-topoint operation. To comply with RF exposure requirements all antennas should be located at a minimum distance of 20 cm, or the minimum separation distance allowed by the module approval, from the body of all persons. - Attention: l’utilisation d’un réseau sans fil IEEE802.11a est réstreinte à une utilisation en intérieur à cause du fonctionement dans la bande de fréquence 5,15 5,25 GHz. Industry Canada requiert que ce produit soit utilisé à l’intérieur des bâtiments pour la bande de fréquence 5,15 - 5,25 GHz afin de réduire les possibilités d’interférences nuisibles aux canaux co-existants des systèmes de transmission satellites. Les radars de puissances ont fait l’objet d’une allocation primaire de fréquences dans les bandes 5,25 - 5,35 GHz et 5 65 - 5 85 GHz. Ces stations radar peuvent créer des interférences avec ce produit et/ou lui être nuisible. Le gain d’antenne maximum permissible pour une utilisation avec ce produit est de 6 dBi afin 102 d’être conforme aux limites de puissance isotropique rayonnée équivalente (P.I.R.E.) applicable dans les bandes 5,25 - 5,35 GHz et 5,725 - 5,85 GHz en fonctionement point-à-point. Se pour conformer aux conditions d'exposition de RF toutes les antennes devraient être localisées à une distance minimum de 20 cm, ou la distance de séparation minimum permise par l'approbation de module, du corps de toutes les personnes. This Class B digital apparatus complies with Canadian ICES-003. Cet appareil numérique de la classe B est conforme a la norme NMB-003 du Canada. "To prevent radio interference to the licensed service, this device is intended to be operated indoors and away from windows to provide maximum shielding. Equipment (or its transmit antenna) that is installed outdoors is subject to licensing." « Pour empêcher que cet appareil cause du brouillage au service faisant l'objet d'une licence, il doit être utilisé a l'intérieur et devrait être placé loin des fenêtres afin de fournir un écran de blindage maximal. Si le matériel (ou son antenne d'émission) est installé à l'extérieur, il doit faire l'objet d'une licence. » Union européenne Liste de pays concernés Ce périphérique doit être utilisé en stricte conformité avec les réglementations et les contraintes du pays d’utilisation. Pour des informations complémentaires, contactez le bureau local du pays d’utilisation. Veuillez consulter http://ec.europa.eu/enterprise/rtte/ implem.htm pour la dernière liste de pays. Liste de codes de pays Cet appareil peut être utilisé dans les pays suivants : Pays Code à 2 lettres ISO 3166 Pays Code à 2 lettres ISO 3166 Pays Code à 2 lettres ISO 3166 Pays Code à 2 lettres ISO 3166 Autriche AT Allemagne DE Malte MT Royaume-Uni GB Belgique BE Grèce GR Néerlandais NT Islande IS Informations réglementaires - 103 Pays Code à 2 lettres ISO 3166 Pays Code à 2 lettres ISO 3166 Pays Code à 2 lettres ISO 3166 Pays Code à 2 lettres ISO 3166 Chypre CY Hongrie HU Pologne PL Liechtenstein LI République Tchèque CZ Irlande IE Portugal PT Norvège NO Danemark DK Italie IT Slovaquie SK Suisse CH Estonie EE Lettonie LV Slovénie SL Bulgarie BG Finlande FI Lituanie LT Espagne ES Roumanie RO France FR Luxembourg LU Suède SE Turquie TR La bande basse 5,15 à-5,35 GHz est pour une utilisation en intérieur uniquement. Cet é est conforme aux exigences essentielles des Directives du Conseil Européen, des standards et autres documents normatifs de la directive 1999/5/EC de l’Union européenne. Voir les Déclarations de conformité de l’Union européenne, et pour plus de détails consulter la Déclaration de conformité jointe. English Hereby, ACER INC., declares that this devise is in compliance with the essential requirements and other relevant provisionns of Directive 1999/5/EC. Česky [Czech] ACER INC. tímto prohlašuje, že toto zařízení je ve shodě se základními požadavky a dalšími příslušnými ustanoveními směrnice 1999/5/ES. Daansk [Danish] Undertegnede ACER INC. erklærer herved, at følgende udstyr overholder de væsentlige krav og øvrige relevante krav i direktiv 1999/5/EF. 104 Deutsch [German] Hiermit erklärt ACER INC., dass sich das Gerät Radiolan in Übereinstimmung mit den grundlegenden Anforderungen und den übrigen einschlägigen Bestimmungen der Richtlinie 1999/5/EG befindet. Eesti [Estonian] Käesolevaga kinnitab ACER INC. seadme vastavust direktiivi 1999/5/EÜ põhinõuetele ja nimetatud direktiivist tulenevatele teistele asjakohastele sätetele. Español [Spanish] Por medio de la presente ACER INC. declara que el dispositivo cumple con los requisitos esenciales y cualesquiera otras disposiciones aplicables o exigibles de la Directiva 1999/5/CE. Ελληνικά [Greek] ∆ια του παρόντος η ACER INC. δηλώνει ότι η παρούσα συσκευή συµµορφώνεται προς τις ουσιώδεις απαιτήσεις και τις λοιπές διατάξεις της Οδηγίας 1999/5/ ΕΚ. Français [French] Par la présente ACER INC. déclare que cet appareil est conforme aux exigences essentielles et aux autres dispositions pertinentes de la directive 1999/5/CE. Íslenska [Icelandic] Hér með lýsir ACER INC. yfir því að er í samræmi við grunnkröfur og aðrar kröfur, sem gerða r eru í tilskipun 1999/5/EC. Informations réglementaires - 105 Itaaliano [Italian] Con la presente ACER INC. dichiara che questo dispositivo è conforme ai requisiti essenziali ed alle altre disposizioni pertinenti stabilite dalla direttiva 1999/5/CE. Latviski [Latvian] Ar šo ACER INC. deklarē, ka šī ierīce atbilst Direktīvas 1999/5/EK būtiskajām prasībām un citiem ar to saistītajiem noteikumiem. Lietuvių [Lithuanian] Šiuo ACER INC. deklaruoja, kad šis įrenginys atitinka esminius reikalavimus ir kitas 1999/5/EB Direktyvos nuostatas. Malti [Maltese] Hawnhekk, ACER INC., jiddikjara li dan jikkonforma mal- ti ijiet essenzjali u ma provvedimenti o rajn relevanti li he mm fid-Dirrettiva 1999/5/EC. Magyar [Hungarian] Alulírott, ACER INC. nyilatkozom, hogy a készülék megfelel a vonatkozó alapveto követelményeknek és az 1999/5/EC irányelv egyéb eloírásainak. Nederlands [Dutch] Hierbij verklaart ACER INC. dat het toestel voldoet aan de essentiële eisen en de andere relevante bepalingen van richtlijn 1999/5/EG. Norsk [Norwegiann] ACER INC. erklærer herved at utstyret er i samsvar med de grunnleggende krav og øvrige relevante krav i direktiv 1999/5/EF. 106 Polski [Polish] Niniejszym ACER INC. oświadcza, że urządzenie jest zgodne z zasadniczymi wymogami oraz pozostałymi stosownymi postanowieniami Dyrektywy 1999/5/EC. Português [Portuguese] ACER INC. declara que este dispostivo está conforme com os requisitos essenciais e outras disposições da Directiva 1999/5/CE. Slovensko [Slovenian] ACER INC. izjavlja, da je ta naprava skladna z bistvenimi zahtevami in ostalimi relevantnimi določili Direktive 1999/5/ES. Slovensky [Slovak] ACER INC. týmto vyhlasuje, že zariadenie spĺňa základné požiadavky a všetky príslušné ustanovenia Smernice 1999/5/ES. Suomi [Finnish] ACER INC. vakuuttaa täten että tämä laite on direktiivin 1999/ 5/EY oleellisten vaatimusten ja sitä koskevienn direktiivin muiden ehtojen mukainen. Svenska [Swedish] Härmed intygar ACER INC. att denna enhet står i överensstämmelse med väsentliga egenskapskrav och övriga relevanta bestämmelser som framgår av direktiv 1999/5/EG. Informations réglementaires - 107 France Pour la France métropolitaine : 2,400 - 2,4835 GHz (Canaux 1à 13) autorisé en usage intérieur 2,400 - 2,454 GHz (canaux 1 à 7) autorisé en usage extérieur Pour la Guyane et la Réunion : 2,400 - 2,4835 GHz (Canaux 1à 13) autorisé en usage intérieur 2,420 - 2,4835 GHz (canaux 5 à 13) autorisé en usage extérieur Pour tout le territoire Français : Seulement 5,15 -5,35 GHz autorisé pour le 802.11a L'utilisation de cet equipement (2,4 GHz WLAN) est soumise à certaines restrictions : - La puissance maximale autorisée en intérieur est de 100 mW pour 2400 - 2483,5 MHz. - La puissance maximale autorisée est de 100 mW en extérieur pour 2400 - 2454 MHz. - La puissance maximale autorisée est de 10 mW en extérieur, 2454 - 2483,5 MHz. Pour les dernières restrictions, voir http://www.art-telecom.fr. Italy The use of these equipments is regulated by: 1.D.L.gs 1.8.2003, n. 259, article 104 (activity subject to general authorization) for outdoor use and article 105 (free use) for indoor use, in both cases for private use. 2.D.M. 28.5.03, for supply to public of RLAN access to networks and telecom services. L’uso degli apparati è regolamentato da: 1.D.L.gs 1.8.2003, n. 259, articoli 104 (attività soggette ad autorizzazione generale) se utilizzati al di fuori del proprio fondo e 105 (libero uso) se utilizzati entro il proprio fondo, in entrambi i casi per uso private. 2.D.M. 28.5.03, per la fornitura al pubblico dell’accesso R-LAN alle reti e ai servizi di telecomunicazioni. 108 Belgium Dans le cas d'une utilisation privée, à l'extérieur d'un bâtiment, au-dessus d'un espace public, aucun enregistrement n'est nécessaire pour une distance de moins de 300 m. Pour une distance supérieure à 300 m un enregistrement auprès de l'IBPT est requise. Pour les enregistrements et licences, veuillez contacter l'IBPT. In geval van privé-gebruik, buiten een gebouw, op een openbare plaats, is geen registratie nodig, wanneer de afstand minder dan 300 m is. Voor een afstand groter dan 300 m is een registratie bij BIPT vereist. Voor registraties en licenties, gelieve BIPT te contacteren. Brazil Este equipamento opera em caráter secundário, isto é, não tem direito a proteção contra interferência prejudicial, mesmo de estações do mesmo tipo, e não pode causar interferência a sistemas operando em caráter primário. Pakistan Pakistan Telecommunication Authority (PTA) Approved Morocco The operation of this product in the radio channel 2 (2417 MHz) is not authorized in the following cities: Agadir, Assa-Zag, Cabo Negro, Chaouen, Goulmima, Oujda, Tan Tan, Taourirt, Taroudant and Taza. The operation of this product in the radio channels 4, 5, 6 and 7 (2425 - 2442 MHz) is not authorized in the following cities: Aéroport Mohamed V, Agadir, Aguelmous, Anza, Benslimane, Béni Hafida, Cabo Negro, Casablanca, Fès, Lakbab, Marrakech, Merchich, Mohammédia, Rabat, Salé, Tanger, Tan Tan, Taounate, Tit Mellil, Zag. Japan 5 GHz 帯は室内でのみ使用のこと Korea 당해 무선설비는 운용 중 전파혼신 가능성이 있음 Informations réglementaires - 109 Taiwan 第十二條 經型式認證合格之低功率射頻電機,非經許可,公司、商號或使用者均不得擅自變更頻 率、加大功率或變更原設計之特性及功能。 第十四條 低功率射頻電機之使用不得影響飛航安全及干擾合法通信 ; 經發現有干擾現象時,應立即 停用,並改善至無干擾時方得繼續使用。 前項合法通信,指依電信法規定作業之無線通信。 低功率射頻電機須忍受合法通信或工業、科學及醫療用電波輻射性電機設備之干擾。 MODIFICATIONS DU PRODUIT Marquage CE Gateway ne peut pas être tenu pour responsable des modifications non autorisées par l’utilisateur et des conséquences de celles-ci, qui peuvent modifier la conformité du produit avec le marquage CE. Interférence de fréquence radio Le fabricant n’est pas responsable des interférences radio ou télévision causées par des modifications non autorisées de cet équipement. BRANCHEMENTS ET MISE À LA TERRE DISTANTE PELV (très basse tension de protection) Pour garantir l’intégrité des tensions extra-basses de l’équipement, ne raccordez aux ports externes de ce dernier que des équipements pourvus de circuits électriques protégés. SELV (très basse tension de sécurité) Chaque entrée et sortie de ce produit est classée SELV. 110 Mise à la terre distante Pour éviter les décharges électriques, branchez tous les ordinateurs et équipements locaux (bureaux individuels) au même circuit électrique du câblage du bâtiment. En cas de doute, vérifiez le câblage du bâtiment pour éviter toute mise à la terre distante. Liaison électrique Pour que cet équipement fonctionne en toute sécurité, branchez-le uniquement sur une source d’alimentation conforme aux législations sur le câblage électrique en vigueur dans votre pays. Au Royaume-Uni, il s’agit de la norme IEE. ALIMENTATION ET CÂBLES Alimentation La prise d’alimentation d’entrée et la prise de sortie (si équipé) sont classées à tension dangereuse. Vous devez débrancher le cordon d’alimentation et retirer la pile pour débrancher l’équipement de l’alimentation électrique. Dans cet objectif, la prise électrique doit être installée à proximité de l’équipement et doit être facilement accessible. Valeur nominale en entrée : Regardez l’étiquette de valeur nominale sur le dessous de l’ordinateur et assurez-vous que votre adaptateur d’alimentation est conforme à la valeur nominale spécifiée. En aucun cas l’utilisateur ne doit tenter de démonter l’alimentation. L’alimentation n’a pas de pièces remplaçables par l’utilisateur. L’alimentation contient des tensions dangereuses qui peuvent causer des blessures graves. Une alimentation défectueuse doit être retournée à votre revendeur. Câbles d’alimentation et prise Ce produit nécessite un cordon d’alimentation et une prise mis à la terre. La prise ne peut s’insérer que dans une prise électrique mise à la terre. Assurez-vous que la prise électrique est correctement mise à la terre avant d’insérer la prise. N’insérez pas la prise dans une prise électrique non mise à la terre. Contactez votre électricien pour des détails. Informations réglementaires - 111 La longueur du cordon ne doit pas dépasser 2,5 mètres. Pour éviter les risques électriques, ne retirez pas ou ne désactivez pas le contact avec la terre sur le cordon d’alimentation. Remplacez le cordon d’alimentation s’il est endommagé. Contactez votre revendeur pour un remplacement identique. En Europe, la prise doit avoir une valeur nominale de 250 Vc.a., 10 ampères minimum. La prise doit afficher la marque d’homologation d’une agence internationale. Le cordon doit être adapté à l’usage du pays de l’utilisateur final. Consultez votre revendeur ou les autorités électriques locales si vous n’êtes pas sûr du type de cordon d’alimentation à utiliser dans votre pays. Câbles Pour les câbles qui ne sont pas livrés avec le produit dans l’emballage de l’ordinateur : La performance EMC du système n’est garantie que si le câble et l’interface utilisent un blindage efficace. L’utilisation de câbles d’interface blindés est nécessaire pour les interfaces USB, IEEE1394, série, imprimante, jeu, audio/vidéo analogique ou numérique, PS2, antennes de télévision ou FM et, plus généralement, tous les interfaces de câbles haut-débit. Utilisez uniquement des cordons de télécommunication listés UL No. 26AWG ou plus grands. Seuls les câbles réseau Ethernet LAN ou modem RTC peuvent être supérieurs à 3 mètres. Gateway vous recommande d’ajouter une perle de ferrite à chaque câble reliant votre ordinateur à un périphérique qui n’était pas fourni avec votre ordinateur. - Référence de la ferrite : 28A-2029 de Steward (deux boucles) Au cours de la certification des produits, Gateway a utilisé les qualités de câbles suivantes : - Câbles certifiés USB 2.0 de Hama 46778 - Câbles blindés FireWire IEEE1394 de Hama 50011 - Câbles audio/vidéo blindés RCA-RCA de Thomson KHC001M, KHC012M, KHC028M 112 - Câbles audio blindés à prise stéréo de Hama 43330H, 42714H Augmentation de la chaleur et ordinateurs portables L’adaptateur c.a. et le dessous de l’ordinateur peuvent devenir chauds après une utilisation prolongée. Un contact physique prolongé avec l’un ou l’autre devrait être évité. RETRAIT ET DE REMPLACEMENT DU CAPOT DU CHÂSSIS Avant de retirer le capot du châssis pour réparer ou modifier l’équipement, vous devez déconnecter tous les cordons alimentation et de modem, et retirer ou désactiver la pile. - Attention : Quelques composants à l’intérieur de l’ordinateur peuvent devenir chauds après une utilisation prolongée. Vous devez fermer le châssis avant de brancher et d’allumer l’équipement. DÉCLARATION DE CONFORMITÉ LASER Les périphériques optiques sont testés et certifiés conformes aux normes IEC60825-1 de la Commission électrotechnique internationale et EN60825-1 européenne pour les produits laser de classe 1. Les produits laser de classe 1 ne sont pas considérés comme dangereux. Les périphériques optiques sont conçus de telle façon qu’il n’y a jamais d’accès humain à un rayonnement laser au-dessus d’un niveau de classe 1 au cours du fonctionnement normal ou de la maintenance. Les périphériques optiques installés sur votre ordinateur sont conçus pour être utilisés exclusivement comme composants de ce produit électronique, et ne sont donc pas conformes aux exigences des Sec. 1040.10 et Sec. 1.040.11 du Code de réglementation fédéral pour les produits laser COMPLETS. Parce que l’exposition à un rayonnement laser est extrêmement dangereuse, en aucun cas l’utilisateur ne doit tenter de démonter l’appareil laser. EMBALLAGE L’emballage de ce produit est compatible avec directive européenne sur l’environnement 94/62/CE du 20 Décembre 1994 et son équivalent dans la législation française par le décret 98-638 du 20 juillet 1998. Informations réglementaires - 113 CONFORME À LA CERTIFICATION RÉGLEMENTAIRE RUSSE 114 ENVIRONNEMENT NOTRE ENGAGEMENT EN FAVEUR DE LA PROTECTION DE L’ENVIRONNEMENT L’environnement a toujours été au cœur de nos produits. Gateway s’est engagé à limiter l’impact environnemental de ses produits au cours du cycle de vie des produits. À partir de la phase de conception, avec une politique d’achat très stricte, un maximum d’attention est accordée aux composants électroniques en vue de limiter leur poids en métaux lourds comme le plomb, le cadmium, le chrome, le mercure, etc. Les fournisseurs sont invités, pour chaque partie d’un produit, à respecter toutes les règlementations. Pour ce qui est de la fin de vie des produits, des mesures ont été prises pour anticiper et faciliter le recyclage de tous nos produits. Ainsi, toutes les pièces de plastique de plus de 25 grammes utilisées dans les produits Gateway sont marquées ISO 11469. Ce marquage permet une reconnaissance rapide du matériau et facilite sa valorisation. De même, les ordinateurs de bureau sont conçus pour être facilement démontables, avec des vis remplacées par des fixations. ÉLIMINATION DU PRODUIT La directive 2002/96/CE, dite Directive des déchets d’équipements électriques et électroniques (DEEE), exige que les produits électriques et électroniques usagés soient éliminés séparément des ordures ménagères en vue de promouvoir la réutilisation, le recyclage et les autres formes de valorisation et de réduire la quantité de déchets à éliminer, en vue de réduire l’enfouissement et l’incinération. Le logo de poubelle rayée est là pour vous rappeler que ces produits doivent être triés séparément à l’élimination. Ces règles concernent tous vos produits Gateway et également tous les accessoires, tels que clavier, souris, haut-parleurs, télécommande, etc. Lorsque vous devez éliminer ces produits, assurez-vous qu’ils sont correctement Environnement - 115 recyclés en vérifiant auprès de votre administration locale, ou en retournant votre ancien matériel à votre revendeur si vous le remplacez. Pour des informations, visitez www.gateway.com/about/corp_responsibility/environment.php. Élimination des piles (si applicable) Avant d’éliminer votre équipement assurez-vous d’avoir retiré les piles qui peuvent être installées dans l’équipement. Le droit européen prévoit que les piles doivent être collectées pour une l’élimination séparée des déchets ménagers. Ne jetez pas vos piles usagées dans la poubelle. Éliminez vos piles usagées par un système de collecte des piles lorsqu’il est disponible, ou demandez à votre distributeur ou à l’administration locale quelles infrastructures peuvent être utilisées. Vos efforts permettront la sécurité de la collecte, le recyclage et la destruction de batteries usagées et aideront à protéger l’environnement et réduire les risques pour la santé. - Attention : Risque d’explosion si la pile est remplacée par un type incorrect. Éliminez les piles usagées en respect avec les instructions. ENERGY STAR Les produits qualifiés ENERGY STAR d'Gateway vous font économiser de l'argent en réduisant les coûts énergétiques et en protégeant l'environnement, sans compromettre les fonctionnalités ou les performances. Gateway est fier d'offrir à ses clients des produits pourvus du label ENERGY STAR. Qu'est que ENERGY STAR ? Les produits qualifiés ENERGY STAR utilisent moins d'énergie et empêchent les émissions de gaz à effet de serre en respectant des directives strictes sur l’efficacité énergétique définies par l’agence américaine de protection de l’environnement. Gateway s’engage à proposer dans le monde entier des produits et services qui aident les consommateurs à faire des économies, économiser l’énergie et améliorer la qualité de l'environnement. Plus nous pouvons économiser d'énergie en étant plus efficaces, plus 116 nous pourrons réduire les gaz à effet de serre et les risques de changement climatique. Vous trouverez plus de renseignements sur le site www.energystar.gov ou www.energystar.gov/powermanagement. - Remarque : Les informations de cette section peuvent ne pas s’appliquer votre ordinateur. Les produits qualifiés ENERGY STAR Gateway : - Produisent moins de chaleur et réduisent les charges de refroidissement, ainsi que les ambiances surchauffées. - Passent automatiquement en mode de « veille écran » et « veille ordinateur » respectivement après 10 et 30 minutes d'inactivité. - Sortez l'ordinateur du mode veille en pressant une touche du clavier ou en déplaçant la souris. - En mode « veille », les ordinateurs économisent plus de 80% d'énergie. ENERGY STAR et le label ENERGY STAR sont des marques déposées aux États-Unis. Environnement - 117 LICENCE LOGICIELLE - Remarque : La plupart des applications logicielles sont déjà préinstallées sur votre ordinateur Gateway. Elles sont prêtes à être utilisées ou configurées. Toutefois, certains titres nécessitent un CD ou un DVD pour être exécutés. Vous trouverez ces disques dans l'emballage de votre ordinateur. Accord de licence Gateway (produits sur CD et/ou DVD). Cette copie de l’original est votre preuve de licence. Veuillez la traiter comme un bien de valeur. Important ! Lisez soigneusement avant d’installer les logiciels. L’accord de licence suivant s’applique à vous. C’est un accord légal entre vous (une personne physique ou morale) et Gateway. En installant le logiciel, vous acceptez d’être lié par les termes de cet accord. Si vous n’acceptez pas les termes de cet accord, retournez immédiatement votre système informatique complet, le(s) paquet(s) logiciel(s) non ouvert(s), le cas échéant, ainsi que les termes l’accompagnant (y compris pour les documents écrits ou autre(s) emballage(s)) à l’endroit où vous les avez obtenus pour un remboursement complet. GATEWAY LICENCE LOGICIELLE 1. Concession de licence Cet accord de licence Gateway (« Licence ») vous permet d’utiliser une copie de la version spécifiée des LOGICIELS Gateway identifiés ci-dessus (qui peuvent comprendre au moins un CD ou un DVD) sur un seul ordinateur, à condition que les LOGICIELS soient utilisés sur seulement un ordinateur à tout moment. Si vous disposez de plusieurs Licences pour les LOGICIELS, alors à tout moment, vous pouvez avoir autant de copies des LOGICIELS en utilisation que vous avez de Licences. Les LOGICIELS sont « en utilisation » sur un ordinateur lorsqu’ils sont chargés dans la mémoire temporaire (c.-à-d. la mémoire vive) ou installés dans la mémoire permanente (p.ex., disque dur, CD et/ou DVD, ou autre périphérique de stockage de cet ordinateur), à l’exception d’une copie 118 installée sur un serveur de réseau dans le seul but de la distribution à d’autres ordinateurs qui n’est pas « en utilisation ». Si le nombre prévu d’utilisateurs des LOGICIELS excède le nombre de Licences applicables, vous devez disposer d’un mécanisme raisonnable ou d’un processus en place pour assurer que le nombre de personnes utilisant les LOGICIELS simultanément ne dépasse pas le nombre de Licences. Si les LOGICIELS sont installés de façon permanente sur le disque dur ou le périphérique de stockage d’un ordinateur (autre qu’un serveur de réseau) et une personne utilise l’ordinateur plus de 80% de son temps d’utilisation, alors cette personne peut également utiliser les LOGICIELS sur un ordinateur portable ou domestique. 2. Droit d’auteur Les LOGICIELS sont la propriété de Gateway ou de ses fournisseurs et sont protégés par les lois du copyright des États-Unis et les traités internationaux. Par conséquent, vous devez traiter les LOGICIELS comme tout autre matériel protégé par le droit d’auteur (par exemple un livre ou un enregistrement musical), à l’exception que vous pouvez transférer le contenu des LOGICIELS du CD et/ou DVD, le cas échéant, vers un seul disque dur à condition de conserver l’original uniquement pour des fins de sauvegarde ou d’archivage. Vous ne pouvez pas copier le CD et/ou DVD des LOGICIELS ou la documentation écrite qui accompagne les LOGICIELS. 3. Autres restrictions Vous ne pouvez pas louer les LOGICIELS, mais vous pouvez transférer les LOGICIELS et les documents écrits de manière permanente à condition de ne conserver aucune copie et que le destinataire accepte les termes de cet accord. Vous ne pouvez pas faire de l’ingénierie inverse, décompiler ou désassembler les LOGICIELS. Tout transfert des LOGICIELS doit inclure la plus récente mise à jour et toutes les versions antérieures. Licence logicielle - 119 INFORMATIONS DE LICENCE DES LOGICIELS TIERS OU LOGICIELS LIBRES Les logiciels préchargés, embarqués ou distribués avec les produits fournis par Gateway contiennent des logiciels tiers ou logiciels libres (les « Logiciel libres »), lesquels sont fournis sous licence selon les termes de la Licence publique générale GNU (la « GPL »). Les Logiciels libres sont marqués comme tels. Votre copie, distribution et/ou modification des Logiciels libres est soumise aux termes de la GPL. Les Logiciels libres sont distribués dans l’espoir qu’il seront utiles SANS AUCUNE GARANTIE ; sans même la garantie implicite de VALEUR MARCHANDE ou D’ADÉQUATION À UNE APPLICATION PARTICULIÈRE. Les dispositions de la Licence publique générale GNU seront toujours applicables. Vous pouvez accéder directement à http://www.gnu.org afin d’obtenir une copie de la GPL ou écrivez à la Free Software Foundation, Inc et demandez une copie. L’adresse de la Free Software Foundation, Inc est : 59 Temple Place - Suite 330, Boston, MA, 02111-1307, États-Unis. Pendant une période de trois (3) ans à compter de votre réception de ce logiciel, vous pouvez obtenir une copie lisible par machine du code source des Logiciels libres selon les termes de la GPL, sans frais, sauf pour le coût des supports, de l’expédition et de la manutention, sur demande écrite que vous nous adresserez. Contactez-nous si vous avez d’autres questions. Notre adresse postale est 8F, 88, Sec. 1, Hsin Tai Wu Rd., Hsichih, New Taipei City 221, Taiwan. 120 INDEX A guide de dépannage ...................... 87 Affichage touches spéciales ........................... 18 audio guide de dépannage ...................... 87 affichage C Câbles ......................................... 10, 111 CD-ROM éjection manuelle ........................... 88 guide de dépannage ....................... 88 charge vérification du niveau ...................... 40 Clavier guide de dépannage ....................... 88 touches spéciales .......................... connexions réseau ........................................... Connexions réseau .............................. Cordons d’alimentation ......................... Curseur ............................................... 20 31 50 10 27 D DSL ..................................................... 48 E Élimination des piles ........................... 116 Environnement................................... 115 Entretien Environnement de l’ordinateur ................ 8 Programme Recovery Épilepsie, avertissement ....................... 14 Management .................................. 46 F FAQ. Voir Foire aux questions Fournisseur de service Internet (FSI) .... 47 Foire aux questions .............................. 86 Index - 121 G Garantie................................................ 7 Gateway Programme Recovery Management.................................. 46 H touche spéciale .............................. 19 haut-parleurs guide de dépannage ....................... 87 I Imprimante Internet guide de dépannage ....................... 88 Connexion ............................... 47, 48 Informations réglementaires.......... 96, 115 Pare-feu ........................................ 55 Interférence ....................................... 110 L Lecteur de carte mémoire ..................... 29 Logiciels Licence logicielle .......................... 118 Lecteurs Lecteur de carte mémoire ............... 29 luminosité touches spéciales .......................... 19 Logiciel espion ..................................... 55 M Maintenance Mise à jour Recovery Management................... 64 Mises à jour automatiques de Windows........................................ 63 Maliciel ................................................ 55 Modem .......................................... 48, 49 N Navigateur ........................................... 53 Norton Internet Security.................. 54, 58 Nettoyer votre ordinateur ...................... 11 122 O indicateur d’activation ..................... 21 ordinateur fonctionnalités ................................ 15 P Pare-feu............................................... 55 pavé tactile .......................................... 27 utilisation ................................. 27–27 Périphériques de stockage amovibles ... 31 pile avertissement de pile basse............ 41 caractéristiques .............................. 36 charge ........................................... 40 conditions basses ........................... 41 installation...................................... 39 maximaliser l’autonomie ................. 37 optimisation ................................... 40 première utilisation ......................... 37 retrait ....................................... 39, 40 vérification du niveau de charge...... 40 Piles .................................................. 116 ports .................................................... 29 Précautions de santé............................ 12 Précautions de sécurité .......................... 8 Problèmes ........................................... 86 affichage........................................ 87 CD-ROM ....................................... 88 Clavier ........................................... 88 démarrage ..................................... 86 Imprimante .................................... 88 R Récupération Recovery Management .................. 64 Programme Recovery réseau ................................................. 31 Management .................................. 46 Réseau local ........................................ 50 S Sécurité Antivirus......................................... 56 Mises à jour ................................... 63 T touches spéciales ................................. 20 U universal serial bus............................... 32 Index - 123 V vue gauche .......................................... 22 avant ............................................. 22 vue frontale .......................................... 21 droite ............................................. 24 vue gauche .......................................... 21 W Wi-Fi .................................................... 50 Windows Mises à jour automatiques de Windows ........................................ 63 124 Utiliser Windows ............................ 46 Ver.02.01.02 Manual del usuario Gateway NE71B - 1 TABLA DE CONTENIDO Encendido de la computadora 4 Instalación o extracción de la batería....... Carga de la batería .................................. Comprobación del nivel de batería .......... Optimización de la vida de la batería ....... Aviso de batería baja ............................... 40 41 41 41 42 Conexión inalámbrica......................................... 4 Registro.............................................................. 5 Instalación del software...................................... 6 Recuperación ..................................................... 6 ¿Tiene problemas? ............................................ 7 Administración de energía 44 Ahorro de energía............................................ 44 Principios básicos de la computadora 8 Software 47 Seguridad y comodidad ..................................... 8 Uso de Windows y el Software........................ 47 Precauciones de seguridad ........................ 8 Oferta de seguridad para Internet ............ 47 Precauciones de salud.............................. 12 Gateway Recovery Management ............ 47 Conocimiento de la computadora 15 Internet 48 Vista superior - pantalla ................................... 16 Primeros pasos en la Red ............................... 48 Vista superior - teclado .................................... 17 Protección de la computadora ................. 48 Teclas especiales ..................................... 18 Elija un Proveedor de servicios de Vista frontal ...................................................... 21 Internet ..................................................... 48 Vista izquierda.................................................. 22 Conexiones de red ................................... 51 Vista derecha ................................................... 24 ¡Navegue por Internet! ............................. 54 Vista de base ................................................... 26 Seguridad................................................. 55 Touchpad 28 Recovery Principios básicos del touchpad....................... 28 Crear una copia de seguridad de Gestos de touchpad ......................................... 29 recuperación.................................................... Actualización de la computadora 30 Crear una copia de seguridad de aplicaciones y controladores ........................... Expansión mediante opciones ......................... 30 Recuperación del sistema ............................... Opciones de conectividad......................... 30 Reinstalar controladores y aplicaciones... Fuente de alimentación 36 Regresar a una captura de pantalla de sistema anterior................................... Adaptador de CA.............................................. 36 Restauración del sistema al estado Batería.............................................................. 37 de fábrica ................................................. Características de la batería ..................... 37 Recuperación desde Windows................. Sustitución de la batería ........................... 39 2 65 66 70 72 73 77 78 78 Recuperación desde una copia de seguridad de recuperación ....................... 83 Preguntas frecuentes 88 Consejos y sugerencias para el uso de Windows 8........................................................ 91 Deberá tener en cuenta tres conceptos.... 91 ¿Cómo accedo a los charms? .................. 91 ¿Cómo llego a Inicio? ............................... 91 ¿Cómo salto entre aplicaciones?.............. 92 ¿Cómo apago la computadora? ............... 92 ¿Por qué hay una nueva interfaz?............ 92 ¿Cómo desbloqueo la computadora?....... 93 ¿Cómo personalizo la computadora? ....... 93 Quiero usar Windows como solía hacerlo, ¡devuélvame mi escritorio! .......... 94 ¿Dónde están mis aplicaciones? ............. ¿Qué es un ID de Microsoft (cuenta)? ..... ¿Cómo agrego un favorito a Internet Explorer?.................................................. ¿Cómo busco actualizaciones de Windows?................................................. ¿Dónde puedo obtener más información?............................................. Información reglamentaria 95 96 97 97 97 98 Medioambiente 117 Licencia de Software 120 Índice 123 Copyright © 2012. Todos los derechos reservados. Manual del usuario de Gateway NE71B Esta revisión: 6 de julio de 2012 Visite registration.gateway.com y descubra los beneficios de ser cliente de Gateway. Observación: Todas las imágenes son únicamente a título de referencia. La configuración real puede variar. Tabla De Contenido - 3 ENCENDIDO DE LA COMPUTADORA ¡Gracias por comprar esta computadora Gateway! Esta guía ha sido diseñada para presentarle las funciones de la computadora y asistirlo en su nueva experiencia con la computadora. Luego de instalar y encender la computadora, como se muestra en las instrucciones de instalación, le hará preguntas que lo ayudarán a conectarse a Internet. La computadora configurará entonces el software instalado. CONEXIÓN INALÁMBRICA Para conectarse a una red inalámbrica, primero verifique que las características inalámbricas de la computadora estén activadas, y que el router o módem que desea conectar esté también correctamente configurado. • Si la función inalámbrica no está a activada, presione la tecla de Windows ( ) + W, escriba "Inalámbrico" y luego haga clic en Inalámbrico. Haga clic en el interruptor debajo de Wi-Fi para habilitar la conexión inalámbrica. Vuelva a hacer clic para deshabilitarla. • Para conectarse a una red, presione la tecla de Windows ( ) + W, ingrese "Inalámbrico" y luego haga clic en Conectar a una red. Seleccione su red e ingrese la contraseña de ser necesario. • Luego de unos segundos, la computadora debería conectarse a Internet. 4 Si no se detecta su red, o su computadora no se conecta a Internet, consulte la documentación del router o ISP. Una vez que encienda la computadora y pueda usarla, abra Internet Explorer y siga las instrucciones. Como alternativa, use un cable de red para conectarse directamente a un puerto de red en el router. Consulte la guía del router o ISP. REGISTRO Se recomienda registrar la computadora al utilizarla por primera vez. Esto le da acceso a beneficios útiles tales como: • Un servicio más rápido de parte de nuestros representantes capacitados. • Membresía en la comunidad Gateway: Promociones y participación en nuestras encuestas a clientes. • Las últimas novedades de Gateway. Cómo registrarse Durante el inicio de la computadora, una ventana lo invitará a registrarse. Complete la información y haga clic en Siguiente. La segunda ventana contendrá campos opcionales que nos ayudarán a brindarle una atención al cliente más personalizada. Encendido de la computadora - 5 Otra opción Otra manera de registrar su producto Gateway es visitar nuestro sitio Web en registration.gateway.com. Elija su país y siga las siguientes instrucciones. Luego de la registración, le enviaremos un mail de confirmación con información importante que deberá guardar en un lugar seguro. INSTALACIÓN DEL SOFTWARE Su computadora instalará automáticamente el software y se preparará para su uso. Esto puede tomar un tiempo, no apague la computadora; espere hasta que haya finalizado la instalación. RECUPERACIÓN Usted debería crear discos de recuperación tan pronto como sea posible. El programa Recovery le permite crear discos de recuperación y luego restaurar o reinstalar aplicaciones y controladores provistos por Gateway. 6 ¿TIENE PROBLEMAS? Gateway le brinda varias opciones para respaldar su compra. soporte de Gateway Asegúrese de escribir el número de serie, la fecha y el lugar de compra, y el nombre del modelo de su computadora en el área provista en esta guía; guarde el comprobante de compra. Antes de llamarnos, escriba cualquier mensaje de error que acompaña el problema, y tenga la computadora frente a usted y encendida de ser posible. Si tiene estos elementos a mano al contactarse con nosotros, podremos ofrecerle un servicio mejor y más rápido. Sitio Web de Gateway Recuerde visitar www.gateway.com - Consulte la sección Soporte para obtener información actualizada, ayuda, controladores y descargas. Información de contacto y garantía Puede encontrar información sobre la garantía de su computadora y sobre cómo contactar al soporte técnico en la Garantía de la computadora. Encendido de la computadora - 7 PRINCIPIOS BÁSICOS DE LA COMPUTADORA SEGURIDAD Y COMODIDAD Precauciones de seguridad Siga las siguientes instrucciones para usar la computadora de manera cómoda y evitar problemas de salud. Entorno de la computadora Asegúrese de que la computadora: • Sea usada en superficies estables. Si la computadora se cae puede sufrir graves daños. • No sea usada en una superficie que vibra, o mientras se practica algún deporte, o se realiza algún ejercicio u otra actividad en un entorno dinámico. La vibración o el movimiento pueden aflojar fijaciones, dañar componentes internos e incluso causar fuga de batería. • No esté expuesta a la luz del sol directa o a fuentes de calor. • Esté siempre alejada de campos magnéticos o cualquier otro dispositivo que genere electricidad estática. • Esté al menos a 30 centímetros (un pie) de teléfonos celulares. • No esté en un entorno húmedo y lleno de polvo. • No sea usada cerca del agua. No derrame ningún tipo de líquido sobre el producto. 8 • No sea colocada sobre una alfombra o cualquier otra superficie que pueda recibir una carga eléctrica. Nota • Hay ranuras y aberturas de ventilación que aseguran un funcionamiento fiable del producto y protección contra sobrecalentamiento. No bloquee ni cubra estas aberturas. Las aberturas no deben bloquearse nunca al colocar el producto encima de una cama, sofá, alfombra u otra superficie similar. Nunca coloque el producto encima de un radiador o similar, ni tampoco encima de una instalación integrada salvo que la ventilación sea apropiada. • Nunca introduzca objetos de ningún tipo en las ranuras de la caja, ya que podrían tocar puntos de tensión peligrosos o cortocircuitar piezas, y provocar un incendio o descarga eléctrica. Nunca derrame líquido de ningún tipo en el producto. • Para evitar que se produzcan daños en los componentes internos y fugas en la batería, no coloque el producto sobre una superficie vibratoria. • No lo utilice cuando haga deporte, practique ejercicio o se encuentre en un entorno vibratorio, ya que pueden producirse daños o un cortacircuito en los dispositivos rotores, en el disco duro o en la unidad óptica, e incluso la batería de litio puede quedar expuesta. Principios básicos de la computadora - 9 Cables Asegúrese de que: • Los cables no estén estrangulados y que no haya peligro de que alguien los pise o se tropiece con ellos. • Otros dispositivos no aplasten los cables. • El cable de alimentación esté conectado a la computadora antes de conectarlo a la toma de corriente de CA. • El cable de alimentación esté desenchufado de la toma de corriente antes de desconectarlo de la computadora. • Los cables de alimentación de tres clavijas estén conectados a una toma de corriente conectada a tierra. • La toma de corriente sea fácilmente accesible y esté lo más cerca posible de la computadora (no la sobrecargue con demasiados adaptadores). Si la computadora usa un adaptador de CA externo: • No cubra el adaptador de CA ni coloque objetos sobre él. Permita que el adaptador se enfríe durante el uso manteniéndolo libre de objetos. • Use únicamente el adaptador de CA suministrado con la computadora. Aunque otros adaptadores se vean similares, su uso puede dañar la computadora. Si necesita uno nuevo, use únicamente piezas que estén autorizadas para usar con la computadora. 10 Limpieza de la computadora • Siempre desconecte la computadora de la toma de corriente antes de limpiarla. • No use líquidos ni aerosoles de limpieza, en cambio use un paño húmedo. • Nunca pulverice un producto de limpieza directamente en la pantalla. • Si derrama líquido en la computadora, apáguela inmediatamente, desenchufe el adaptador de CA, quite la batería y asegúrese de que esté completamente seca antes de encenderla nuevamente. Espere toda la noche si es necesario. Nota: Si la computadora incluye ranuras para tarjetas de memoria o dispositivos de expansión, se deben instalar tarjetas ficticias de plástico en estas ranuras. Estas tarjetas protegen las ranuras no utilizadas del polvo, objetos metálicos u otras partículas. Guarde las tarjetas para utilizarlas cuando no haya tarjetas en las ranuras. Reparación de la computadora No intente reparar computadora usted mismo, ya que al abrir o quitar las tapas podría exponerse a puntos de voltaje peligrosos u otros riesgos. Derive todas las reparaciones al personal técnico calificado. Desconecte la computadora de la toma de corriente y conéctese con personal técnico calificado en las siguientes situaciones: • el cable de alimentación o el enchufe están dañados o desgastados, • se ha derramado líquido sobre el producto, • el producto fue expuesto a la lluvia o el agua, Principios básicos de la computadora - 11 • el producto se ha caído o se ha dañado la caja, • el rendimiento del producto ha cambiado, • el producto no funciona normalmente luego de haber seguido las instrucciones de funcionamiento. Nota: Ajuste sólo los controles que se describen en las instrucciones de funcionamiento, ya que el ajuste incorrecto de otros controles puede provocar daños y trabajo extra para los técnicos calificados para restaurar las condiciones normales del producto. Precauciones de salud • La superficie inferior, las áreas que rodean las aberturas de ventilación y el adaptador de CA se pueden calentar. Para evitar lesiones, asegúrese de que no entran en contacto con su piel o su cuerpo. • Este dispositivo y sus accesorios pueden contener piezas pequeñas. Manténgalos lejos del alcance de los niños pequeños. • La computadora y los accesorios pueden contener piezas pequeñas. Manténganlas fuera del alcance de los niños. • Si trabaja o juega durante horas, asegúrese de tomar descansos regulares. De vez en cuando aleje la vista de la pantalla de la computadora. No use la computadora si está cansado. • Acomode la computadora para poder trabajar en una posición natural y relajada. Coloque los elementos que utiliza con frecuencia cerca de su alcance. 12 • Coloque la computadora directamente frente a usted para una mayor seguridad y confort. Asegúrese de que el teclado y el touchpad estén a una buena altura. La pantalla debe estar a unos 45-70 cm (18-30 pulgadas) de los ojos. Si utiliza la computadora durante largos períodos desde un escritorio, invierta en un teclado externo para mayor comodidad. • Para proteger los oídos, al usar altavoces o auriculares, suba el volumen gradualmente hasta que pueda oír claramente; no suba el nivel del volumen una vez que sus oídos se hayan adaptado. No use volumen alto durante períodos prolongados. No suba el volumen para bloquear ruidos a su alrededor; baje el volumen si no puede escuchar a las personas que hablan a su alrededor. • La parte inferior de la computadora, el adaptador de alimentación y el aire de las ranuras de ventilación pueden calentarse durante el uso. Evite el contacto corporal continuo y no coloque la computadora en la falda mientras está funcionando. • Asegúrese de que las ranuras y aberturas para ventilación no estén bloqueadas ni tapadas. No coloque la computadora sobre superficies blandas (como alfombras, sillas o camas) que pueden bloquear las ranuras de ventilación. • No introduzca ningún tipo de objeto en las ranuras de ventilación, ya que podría tocar puntos de voltaje peligrosos o causar un cortocircuito en algunas piezas y provocar un incendio o una descarga eléctrica. Principios básicos de la computadora - 13 • Algunas afecciones de manos, muñecas, brazos, cuello, hombros, piernas y espalda pueden estar asociadas con ciertas acciones repetitivas o pueden verse agravadas por ellas. Para reducir el riesgo de desarrollar estas afecciones, escriba con las muñecas derechas y con las manos y muñecas flotando sobre el teclado. Si tiene períodos de dolor, cosquilleo, entumecimiento u otra molestia, consulte a su médico. • Aconsejamos que los padres controlen el uso de juegos por parte de sus hijos. Si usted o su hijo experimentan alguno de los siguientes síntomas: mareos, visión borrosa, tics en el ojo o nerviosos, pérdida de conciencia, desorientación, o cualquier convulsión o movimiento involuntario, suspenda INMEDIATAMENTE el uso y consulte a su médico. Esto puede suceder incluso si la persona no tiene historia médica de epilepsia. 14 CONOCIMIENTO DE LA COMPUTADORA Luego de instalar la computadora, como se ilustra en las instrucciones de instalación, déjenos enseñarle su nueva computadora Gateway. Gateway NE71B Conocimiento de la computadora - 15 VISTA SUPERIOR - PANTALLA 1 2 3 # Ícono Elemento Descripción 1 Cámara Web Cámara Web para comunicación de video. Una luz junto a la Webcam indica que la webcam está activa. 2 Micrófono Micrófono interno para grabaciones de sonido. 3 Pantalla del visualizador También llamada Pantalla de cristal líquido (LCD por sus siglas en inglés), visualiza la salida de la computadora. 16 VISTA SUPERIOR - TECLADO 1 5 2 3 4 # 1 Ícono Elemento Indicador/botón de encendido Descripción Activa y desactiva la computadora. Indica el estado de la energía de la computadora. Para ingresar datos en la computadora. 2 Teclado 3 Touchpad - Las teclas especiales se describen en página 18. Dispositivo señalador sensible al tacto que funciona como un ratón de computadora. Conocimiento de la computadora - 17 # Ícono Elemento Descripción 4 Hacer clic en botones (izquierdo y derecho) El lado izquierdo y derecho de la función botón como botones de selección de izquierda y derecha. 5 Altavoces Reproduce la salida de audio estéreo. Teclas especiales El teclado de la computadora incluye teclas que activan funciones especiales. La función de cada tecla está marcada claramente con un icono. Ícono Función Fn 18 Descripción Tecla de acceso directo para segunda función Activa un segunda función en determinadas teclas. Por ejemplo, presione la tecla Fn para activar las teclas F1 a F12. Ayuda Abre el menú Ayuda. Backup Le permite crear copias de seguridad de la computadora, ya sea de todo el sistema o de las carpetas y los archivos seleccionados. Cree un programa regular o haga copias cuando lo desee. Comunicación Activa/desactiva los dispositivos de comunicación de la computadora. Selección de pantalla Cambia la salida entre la pantalla, el monitor externo (si está conectado) y ambos. Ícono Función Descripción Pantalla en blanco Apaga la retroiluminación de la pantalla para conservar energía. Presione cualquier tecla para volver. Touchpad Enciende y apaga el touchpad interno. Reproducir/pausa Reproduzca o pause un archivo de medios seleccionado. Detener Detenga la reproducción del archivo de medios seleccionado. Anterior Regrese al archivo de medios anterior. Siguiente Pase al archivo de medios siguiente. Disminuir brillo Disminuye el brillo de la pantalla. Aumentar brillo Aumenta el brillo de la pantalla. Abre la aplicación Redes sociales. Redes sociales - Si esta aplicación no está instalada, la tecla iniciará la aplicación de mensajería instantánea. Subir volumen Sube el volumen del sonido. Bajar volumen Baja el volumen del sonido. Conocimiento de la computadora - 19 Ícono Función Descripción Control de parlantes Enciende y apaga los altavoces. Teclas de acceso directo La computadora utiliza teclas de acceso directo (combinaciones de teclas) para acceder a teclas de función y comandos de navegación. Para activar las teclas d acceso directo, mantenga presionada la tecla Fn (botón derecho) antes de presionar la otra tecla de la combinación. Tecla de acceso directo Función Descripción Fn + teclas especiales (consulte página 18) Teclas de función Activa las teclas F1 a F12. Fn + Inicio Va hasta el comienzo del documento. Fn + Fin Va hasta el final del documento. Fn + Re Pág Sube una página en un documento. Fn + Av Pág Baja una página en un documento. - Nota: No es necesario presionar la tecla Fn para usara las teclas de función F1 a F12 al encender la computadora o al usar el BIOS. Para intercambiar la tecla de acceso directo y la función especial de las teclas F1 a F12, cambie la configuración de la tecla en el BIOS (para abrir el BIOS presione F2 al encender la computadora, luego seleccione el menú Principal y cambie el Comportamiento de la tecla de función a Teclas de función). 20 VISTA FRONTAL 1 # Ícono 2 Elemento Indicador de energía Descripción Indica el estado de la energía de la computadora. Indica el estado de la batería de la computadora. Indicador de batería 1 2 - Cargando: La luz se vuelve amarilla cuando se está cargando la batería. - Carga completa: La luz se vuelve azul en modo CA. Indicador de unidad de disco duro Indica si el disco duro está activo. Indicador de comunicación Indica el estado del dispositivo de conectividad inalámbrico de la computadora. Lector de tarjetas todo en uno Acepta Secure Digital (SD), MultiMediaCard (MMC), Memory Stick PRO (MS PRO), xD-Picture Card (xD). - Pulse para extraer/instalar la tarjeta. Sólo puede operar una tarjeta a la vez. - Nota: Los indicadores del panel frontal son visibles incluso cuando la computadora está cerrada. Conocimiento de la computadora - 21 VISTA IZQUIERDA 1 # 2 Ícono Elemento Ranura de bloqueo Kensington 1 2 Ventilación y ventilador 3 4 5 6 Descripción Conexión para el bloqueo de seguridad de una computadora compatible con Kensington. - Coloque un cable de seguridad para computadoras alrededor de un objeto fijo, tal como una mesa o la manija de un cajón cerrado con llave. Introduzca el candado en la ranura y gire la llave. También hay modelos sin llave. Permite que la computadora se mantenga fresca. - No cubra ni obstruya las aberturas. 3 Puerto Ethernet (RJ-45) Conexión para redes basadas en Ethernet 10/100/1000. 4 Puerto de monitor externo (VGA) Conexión a un dispositivo de visualización (por ejemplo, monitor externo, proyector LCD). 22 # 5 Ícono Elemento Puerto HDMI Descripción Admite conexiones de video digital de alta definición. Conexión a dispositivos USB. 6 Puertos USB - Si un puerto es negro, significa que es compatible con USB 2.0. Si es azul, también es compatible con USB 3.0 (véase a continuación). Información sobre USB 3.0 • Compatible con dispositivos USB 3.0 y anteriores. • Para un rendimiento óptimo, utilice dispositivos con certificación USB 3.0. • Definido por la especificación USB 3.0 (SuperSpeed USB). Conocimiento de la computadora - 23 VISTA DERECHA 1 # 2 Ícono Elemento Conector de altavoz/ auriculares 1 Conector de micrófono 3 4 56 7 Descripción Conexión a dispositivos de salida de audio (por ejemplo, parlantes, auriculares). - Admite auriculares de 3,5 mm compatibles con micrófono integrado (por ejemplo, auriculares portátiles inteligentes de Acer). Acepta entradas de micrófonos externos. Conexión a dispositivos USB. 2 Puerto USB 3 Unidad óptica 24 - Si un puerto es negro, significa que es compatible con USB 2.0. Si es azul, también es compatible con USB 3.0 (véase a continuación). Unidad óptica interna; acepta CD o DVD. # Ícono Elemento Descripción 4 Indicador de acceso a la unidad óptica. Se ilumina cuando la unidad óptica se encuentra activa. 5 Botón de expulsión Expulsa el disco óptico de la unidad. 6 Orificio de expulsión de emergencia 7 Enchufe de entrada Expulsa la bandeja de la unidad óptica cuando la computadora está apagada. - Inserte con cuidado un clip de papel estirado para expulsar la bandeja de la unidad óptica. Se conecta al adaptador de CA de la computadora. Información sobre USB 3.0 • Compatible con dispositivos USB 3.0 y anteriores. • Para un rendimiento óptimo, utilice dispositivos con certificación USB 3.0. • Definido por la especificación USB 3.0 (SuperSpeed USB). Conocimiento de la computadora - 25 VISTA DE BASE 1 2 4 3 # Ícono Elemento Descripción 1 Compartimento de la batería Aloja la batería de la computadora. 2 Pestillo de liberación de la batería Libera la batería para su extracción. Introduzca una herramienta adecuada y deslícela para su liberación. 26 # Ícono Elemento Descripción Compartimento de la memoria Aloja la memoria principal de la computadora. Compartimento del disco duro Aloja el disco duro de la computadora (fijado con tornillos). 3 4 Ventilación y ventilador Permite que la computadora se mantenga fresca. - No cubra ni obstruya las aberturas. Conocimiento de la computadora - 27 TOUCHPAD PRINCIPIOS BÁSICOS DEL TOUCHPAD El touchpad controla la flecha (o 'cursor') en la pantalla. Al deslizar el dedo sobre el touchpad, el cursor seguirá este movimiento. Presione el lado izquierdo o derecho del botón ubicado debajo del touchpad para realizar funciones de selección y ejecución. Estas dos áreas son similares a los botones derecho e izquierdo de un mouse. Pulsar en el touchpad es lo mismo que hacer clic en el lado izquierdo del botón. Nota: El touchpad es sensible al movimiento del dedo; cuando más suave el movimiento, mejor será la respuesta. Mantenga el touchpad y sus dedos secos y limpios. El cursor está controlado por algunos gestos básicos: • Desplazar un solo dedo: Desplace un dedo sobre el touchpad para mover el cursor. • Pulsación con un solo dedo: Pulse ligeramente el touchpad con su dedo para realizar un 'clic', que seleccionará o iniciará un elemento. Repita rápidamente la pulsación para realizar una pulsación doble o 'doble clic'. • Arrastrar: Presione durante unos segundos la parte izquierda del botón de selección, o pulse dos veces en cualquier lugar del touchtap, luego deslice el segundo dedo sobre el touchpad para seleccionar todos los elementos en un área. 28 GESTOS DE TOUCHPAD Windows 8 y muchas aplicaciones admiten gestos de touchpad que usan uno o más dedos. Nota: La compatibilidad con gestos de touchpad depende de la activación activa. Esto le permite controlar aplicaciones con unos pocos gestos simples, tales como: • Deslizar hacia adentro desde el borde: Acceda a las herramientas de Windows deslizando el dedo hacia el centro del touchpad desde la derecha, arriba o la izquierda. • Deslizar hacia adentro desde el borde derecho: Seleccione charms. • Deslizar hacia adentro desde el borde superior: Seleccione los comandos de aplicaciones. • Deslizar hacia adentro desde el borde izquierdo: Cambe a la aplicación anterior. • Deslizar con dos dedos: Recorra rápidamente páginas web, documentos y listas de reproducción colocando dos dedos en el touchpad y moviéndolos juntos en cualquier dirección. • Sujetar con dos dedos: Amplíe y reduzca fotos, mapas y documentos con un simple gesto del índice y el pulgar. Touchpad - 29 ACTUALIZACIÓN DE LA COMPUTADORA EXPANSIÓN MEDIANTE OPCIONES Su computadora ofrece muchas opciones para una experiencia informática completa. Opciones de conectividad Los puertos le permiten conectar dispositivos periféricos a la computadora. Para obtener instrucciones sobre cómo conectar diferentes dispositivos externos a la computadora lea la próxima sección. Lector de tarjetas de memoria Se usan tarjetas de memoria en una amplia selección de cámaras digitales, PDA, reproductores de MP3 y teléfonos celulares. Inserción de una tarjeta de memoria 1. Alinee la tarjeta de manera que el conector apunte hacia el puerto, con los conectores hacia abajo. 2. Deslice con cuidado la tarjeta en el puerto. Si ve que necesita usar más fuerza para introducir la tarjeta, intente volver a orientar levemente la tarjeta. 30 3. Empuje la tarjeta hasta que haga clic. Unos pocos milímetros de la tarjeta sobresaldrán de la ranura. Si la tarjeta contiene algunos archivos, puede aparecer la ventana Reproducción automática de Windows (esto depende de los contenidos de la tarjeta) y preguntarle si desea usar el programa para acceder a los contenidos de la tarjeta. Seleccione una opción aquí si es apropiado, de lo contrario seleccione Cancelar. Si la tarjeta no contiene archivos, o contiene archivos desconocidos, se abrirá una ventana que muestra los contenidos de la tarjeta. Tarjetas SD, SDHC y SDXC Los diferentes tipos de tarjetas SD cubren diferentes capacidades, aunque usan el mismo diseño global. Las tarjetas SD contienen hasta 4 GB, las tarjetas SDHC contienen hasta 32 GB, y las tarjetas SDXC contienen hasta 2048 GB (2 TB). Su computadora contiene un lector de tarjetas compatible con SDHC o SDXC. Nota: Las tarjetas de memoria SDXC solo pueden ser utilizadas en un lector compatible con SDXC; las tarjetas SD y SDHC pueden ser utilizadas en cualquiera de los dos lectores. Actualización de la computadora - 31 Extracción de una tarjeta de un lector de tarjetas de memoria 1. Haga clic en la flecha Mostrar iconos ocultos en el Área de notificaciones (junto al reloj). 2 2. Haga clic en el icono Quitar hardware con seguridad. 3. Haga clic en Expulsar tarjeta SD (o el nombre del dispositivo). 4. Espere hasta que aparezca el mensaje Es seguro retirar el hardware. 5. Quitar la tarjeta. 1 Redes integradas Las redes integradas le permiten conectar su computadora a una red basada en Ethernet. Conecte un cable Ethernet desde el puerto Ethernet (RJ-45) en la cubierta de la computadora a un concentrador o conector de red en su red. 32 3 Bus serie universal (USB por sus siglas en inglés) El puerto USB es un bus serial de alta velocidad que le permite conectar periféricos USB sin usar recursos valiosos del sistema. Ciertas computadoras pueden incluir uno o más puertos USB 3.0. Estos puertos se asemejan a los puertos USB estándar, excepto que incluyen conexiones internas adicionales y son de color azul. Puede utilizar dispositivos compatibles con USB 3.0 con estos puertos para beneficiarse con una mayor velocidad de transferencia. Puerto de video Conecte a un monitor con un puerto VGA o DVI (el tipo de conexión admitida depende de la configuración de su computadora). Generalmente el monitor incluye el cable apropiado. Siga estos pasos para conectar un monitor a su computadora: 1. Verifique que la computadora esté apagada y que el interruptor de corriente del monitor esté apagado. 2. Conecte el cable de video al puerto del monitor en la computadora. Asegure la conexión del cable con los tornillos provistos. 3. Conecte el cable de corriente del monitor y enchúfelo a una toma conectada correctamente a tierra. Actualización de la computadora - 33 4. Siga las instrucciones de instalación en la guía del usuario del monitor. 5. Encienda el monitor, luego la computadora. 6. Asegúrese de que la resolución y la frecuencia de actualización actuales no excedan las especificaciones del monitor. De ser necesario, cambie la configuración de pantalla de la computadora. Nota: Para acceder a los controles de pantalla, presione la tecla de Windows ( ) + W, escriba "Pantalla" y luego haga clic en Pantalla. Interfaz multimedia de alta definición (sólo para determinados modelos) HDMI (Interfaz multimedia de alta definición) es una interfaz de audio/ video completamente digital, no comprimida respaldada por la industria. HDMI ofrece una interfaz entre cualquier fuente de audio/video digital compatible, como decodificadores, reproductores de DVD y receptores A/V, y un monitor de audio y/o video digital compatible, como un televisor (DTV), con un solo cable. Use el puerto HDMI en su computadora para conectar equipos de audio y video de alta gama. La implementación de un solo cable permite una instalación prolija y una conexión rápida. 34 Auriculares y micrófono Estos dos puertos le permiten conectar dispositivos de audio. Use el puerto para auriculares para conectar auriculares estéreos o altavoces. Enchufar un dispositivo al puerto para auriculares, deshabilita los altavoces integrados. Use el puerto para el micrófono para conectar un micrófono externo para mono grabación; enchufar un micrófono externo deshabilita el micrófono integrado. Actualización de la computadora - 35 FUENTE DE ALIMENTACIÓN ADAPTADOR DE CA La computadora puede usar el adaptador de corriente suministrado (una batería tipo 'brick') para funcionar con corriente AC. Se suministra un cable de alimentación apropiado para el país donde se compró la computadora. El adaptador de corriente suministra la corriente adecuada para que funcione la computadora y al mismo tiempo recarga la batería. Precaución: No cubra el adaptador de CA ni coloque objetos sobre él. Mantener el adaptador libre de objetos permitirá que este se enfríe correctamente durante el uso. 36 Use únicamente el adaptador de CA suministrado con la computadora. Aunque otros adaptadores se vean similares, su uso puede dañar la computadora. Advertencia: El adaptador de CA y la parte inferior de la computadora pueden calentarse luego del uso prolongado. Esto es normal, pero el contacto prolongado puede causar lesiones. BATERÍA La computadora usa una batería que le brida un uso prolongado entre cargas. Características de la batería La batería tiene las siguientes características: • Utiliza estándares actuales de tecnología de batería. • Envía un aviso de batería baja. La batería se recarga cuando conecta la computadora al adaptador de CA. La computadora soporta carga en uso, permitiéndole recargar la batería mientras continúa usando la computadora. Sin embargo, recargar la batería con la computadora apagada es mucho más rápido. La batería será práctica cuando viaja y durante un corte de energía. Se recomienda tener otra batería completamente cargada de reserva. Contacte a su distribuidor para obtener detalles de cómo conseguir una batería de repuesto. Fuente de alimentación - 37 Maximización de la vida de la batería Como las demás baterías, su batería se degradará con el tiempo. Esto significa que el rendimiento de la batería disminuirá con tiempo y el uso. Para maximizar la vida de la batería, se le aconseja seguir las recomendaciones que se encuentran a continuación. Preparación de una batería nueva Antes de usar una batería por primera vez, hay un proceso de “preparación” que debe seguir: 1. Introduzca la batería sin encender la computadora. 2. Conecte el adaptador de CA y cargue la batería por completo. 3. Desconecte el adaptador de CA. 4. Encienda la computadora y trabaje con la carga de la batería. 5. Descargue la batería por completo. 6. Vuelva a conectar el adaptador de CA y cargue la batería por completo nuevamente. Vuelva a seguir estos pasos hasta que la batería se haya cargado y descargado tres veces. Utilice este proceso de preparación para todas las baterías nuevas, o si una batería no ha sido utilizada durante mucho tiempo. Si la computadora permanecerá guardada durante más de dos semanas, se recomienda extraer la batería de la unidad. 38 Advertencia: No exponga la batería a temperaturas inferiores a 0°C (32°F) o superiores a 45°C (113°F). Las temperaturas extremas pueden perjudicar la batería. Al seguir el proceso de preparación, usted prepara la batería para lograr la máxima carga posible. La omisión de este procedimiento impedirá que obtenga la máxima carga y acortará la vida útil de la batería. Además, la vida útil de la batería se ve perjudicada por los siguientes patrones de uso: • Usar la computadora constantemente enchufada a la corriente alterna con la batería en su interior. Si quiere usar corriente alterna constantemente, se recomienda extraer la batería una vez que se haya cargado. • No descargar y recargar la batería al extremo, como se describe más abajo. • Uso frecuente; cuanto más use la batería, más rápido llegará al final de su vida útil. Una batería de computadora estándar tiene una vida útil de unas 300 cargas. Sustitución de la batería El portátil utiliza baterías de litio. Sustituya la batería por una del mismo tipo que la suministrada con el producto. El uso de otra batería puede comportar riego de incendio o explosión. Fuente de alimentación - 39 Advertencia: Las baterías pueden explotar si no se manejan correctamente. No las desmonte ni las arroje al fuego. Manténgalas lejos del alcance de los niños. Siga la normativa local al eliminar las baterías usadas. Instalación o extracción de la batería ¡Importante! Antes de extraer la batería de la unidad, conecte el adaptador de CA si desea seguir usando la computadora. De lo contrario, apáguela primero. Para instalar una batería: 1. Alinee la batería con la bahía de la batería abierta, asegúrese de que el extremo con los contactos ingrese primero y que la parte superior de la batería quede hacia arriba. 2. Deslice la batería dentro de la bahía de la batería y empuje con cuidado hasta que la batería se trabe. Para extraer una batería: 1. Deslice el pestillo de liberación de la batería para liberarla. 2. Extraiga la batería de la bahía de la batería. 40 Carga de la batería Para cargar la batería, asegúrese primero de que está correctamente instalada en la bahía de la batería. Enchufe el adaptador de CA en la computadora, y conéctelo a una toma de corriente principal. Puede seguir utilizando la computadora enchufada mientras se carga la batería. Sin embargo, cargar la batería con la computadora apagada es mucho más rápido. Nota: Se recomienda cargar la batería al final del día. Cargar la batería de noche antes de viajar le permite comenzar el día con una batería totalmente cargada. Comprobación del nivel de batería El medidor de energía de Windows indica el nivel actual de la batería. Apoye el cursor sobre el ícono de batería/energía en la barra de tareas para ver el nivel de carga actual de la batería. Optimización de la vida de la batería La optimización de la vida de la batería le ayuda a aprovechar al máximo la batería, prolongando el ciclo de recarga/carga y mejorando la eficiencia de la recarga. Se aconseja seguir las siguientes recomendaciones: • Compre una batería extra. • Utilice la corriente alterna siempre que sea posible, reservando la batería para cuando esté afuera. • Expulse la Tarjeta de PC si no la está usando, ya que continuará gastando energía (para modelos seleccionados). Fuente de alimentación - 41 • Guarde la batería en un lugar fresco y seco. Se recomienda una temperatura de 10°C (50°F) a 30°C (86 °F). Una mayor temperatura hará que la batería se auto descargue más rápido. • La recarga excesiva acorta la vida de la batería. • Cuide el adaptador de CA y la batería. Aviso de batería baja Cuando está usando la carga de la batería preste atención al medidor de energía de Windows. Advertencia: Conecte el adaptador de CA lo más rápido posible en cuanto aparezca el aviso de batería baja. Se perderá información si la batería se descarga por completo y la computadora se apaga. Cuando aparece el aviso de batería baja, el procedimiento a seguir recomendado depende de la situación: Situación Procedimiento recomendado El adaptador de CA y 1. Enchufe el adaptador de CA a la computadora, el cable de y luego conéctelo a la principal fuente de alimentación se energía. encuentran 2. Guarde los archivos necesarios. disponibles. 3. Reanude el trabajo. Apague la computadora si desea recargar rápidamente la batería. 42 Situación Hay otra batería totalmente cargada disponible. Procedimiento recomendado 1. Guarde los archivos necesarios. 2. Cierre todas las aplicaciones. 3. Apague el sistema operativo para apagar la computadora. 4. Reemplace la batería. 5. Encienda la computadora y reanude el trabajo. El adaptador de CA y 1. Guarde los archivos necesarios. el cable de 2. Cierre todas las aplicaciones. alimentación no se 3. Apague el sistema operativo para apagar la encuentran computadora. disponibles. No tiene una batería de repuesto. Fuente de alimentación - 43 ADMINISTRACIÓN DE ENERGÍA Esta computadora tiene una unidad de administración de energía integrada que monitorea la actividad del sistema. La actividad del sistema se refiere a cualquier actividad que involucre uno o más de los siguientes dispositivos: teclado, mouse, disco duro, periféricos conectados a la computadora y memoria de video. Si no se detecta actividad durante un período de tiempo, la computadora detiene algunos o todos estos dispositivos para conservar energía. AHORRO DE ENERGÍA Deshabilitar Inicio rápido Su computadora usa Inicio rápido para iniciarse rápidamente, pero también usa una pequeña cantidad de energía para buscar señales para el inicio. Estas verificaciones consumirán lentamente la batería de su computadora. Si prefiere reducir el impacto ambiental y los requisitos de energía de su computadora, apague Inicio rápido: Nota: Si Inicio rápido está apagado, a su computadora le llevará más tiempo salir de Suspensión. La computadora tampoco se iniciará si recibe instrucciones de iniciar en una red (Wake on LAN). 44 1. Abra el Escritorio. 2. Haga clic en Opciones de energía en el Área de notificaciones. 3. Seleccione Más opciones de energía. 4. Seleccione Elegir el comportamiento de los botones de encendido. 5. Para acceder a la Configuración de apagado, seleccione Cambiar la configuración que no está actualmente disponible. Administración de energía - 45 6. Desplácese hacia abajo y deshabilite Encender Inicio rápido. 7. Seleccione Guardar cambios. 46 SOFTWARE USO DE WINDOWS Y EL SOFTWARE Las computadoras de Gateway incluyen un software para ayudarlo a usar la computadora; los programas y categorías disponibles en la computadora dependen del modelo comprado. Oferta de seguridad para Internet Es esencial que proteja la computadora de virus y ataques en Internet (ver Seguridad en página 55). Cuando enciende la computadora por primera vez, se le ofrece un paquete integral de seguridad para Internet, que incluye un período de suscripción de prueba gratuita. Usted deberá activar esta protección antes de conectarse a Internet. Este paquete de seguridad protege la computadora de las amenazas en línea más recientes y protege su información personal (credenciales de cuenta bancaria, números de tarjeta de crédito, contraseñas, etc.). Gateway Recovery Management Para preparar la computadora para las opciones de recuperación del sistema, debe crear un conjunto de discos de recuperación lo antes posible. Consulte página 65 para más detalles. Software - 47 INTERNET PRIMEROS PASOS EN LA RED Protección de la computadora Es esencial que proteja la computadora de virus y ataques en Internet (ver Oferta de seguridad para Internet en página 47 y Seguridad en página 55). Se ofrece un programa de seguridad para Internet completo cuando inicia la computadora por primera vez. Usted debe activar esta protección lo antes posible, antes de conectarse a Internet. Elija un Proveedor de servicios de Internet El uso de Internet se ha convertido en una parte natural de la informática diaria. Unos pocos pasos simples pueden conectarlo a una vasta colección de herramientas de comunicación y conocimientos. Para realizar estos pasos primero debe seleccionar un Proveedor de servicios de Internet (PSI), que provee la conexión entre la computadora e Internet. Debe buscar el PSI disponible en su región, sin olvidar hablar con amigos y familiares sobre sus experiencias o revisar reseñas e informes de consumidores. El PSI que seleccione le brindará instrucciones sobre cómo conectar Internet (quizá necesite un software adicional o una ‘caja’ especial que se conecte a la línea telefónica). 48 Tipos de conexión Según el modelo de la computadora, la ubicación y las necesidades de comunicación, usted tiene varias maneras de conectarse a Internet. Acceso telefónico Algunas computadoras incluyen un conector de acceso telefónico (‘módem’). Esto le permite conectarse a Internet usando la línea telefónica. Con una conexión de acceso telefónico, usted no puede usar el módem y el teléfono simultáneamente en una sola línea telefónica. Se recomienda este tipo de conexión solo si tiene un uso limitado de Internet ya que la velocidad de conexión es baja y se cobra por hora el tiempo de conexión. DSL (por ejemplo, ADSL) DSL (Línea digital de abonados) es una conexión ‘permanente’ que opera en la línea telefónica. Como la DSL y el teléfono no usan las mismas frecuencias, puede usar el teléfono mientras está conectado a Internet (esto requiere un ‘microfiltro’ en cada caja de teléfono para evitar interferencia). Para poder tener DSL, usted debe estar ubicado cerca de central telefónica con DSL (algunas veces el servicio no es encuentra disponible en áreas rurales). La velocidad de la conexión varía según la ubicación, pero generalmente DSL provee una conexión de Internet muy rápida y confiable. Como la conexión es permanente, generalmente se cobra una tarifa fija mensual. Internet - 49 Nota: Una conexión DSL requiere un módem apropiado. Generalmente el PSI suministra un módem cuando pide el servicio. Muchos de estos módems incluyen un ‘router’ que provee acceso inalámbrico y a la red. Cable Una conexión de cable brinda un servicio de Internet permanente por medio de una línea de televisión por cable. Generalmente este servicio se encuentra disponible en grandes ciudades. Usted puede usar su teléfono y mirar TV por cable al mismo tiempo que está conectado a Internet. 3G (WWAN o 'Red inalámbrica de área amplia') Una conexión 3G le permite usar redes celulares (como aquellas usadas por un teléfono móvil) para conectarse a Internet cuando se encuentra lejos de casa. El enchufe para una tarjeta SIM puede estar integrado en la computadora, o quizá necesite un dispositivo externo, tal como un módem USB o incluso un teléfono móvil adecuadamente equipado. Nota: Si la computadora incluye una ranura para la tarjeta SIM, necesitará una tarjeta SIM compatible SIM y un contrato con el proveedor del servicios móviles. Antes de usar las funciones 3G, consulte con su proveedor de servicios para ver si habrá cargos adicionales, en especial gastos del servicio de roaming (itinerante). 50 Conexiones de red Una LAN (Red de área local) es un grupo de computadoras (por ejemplo, dentro de un edificio de oficinas o una casa) que comparten recursos y una línea común de comunicaciones. Cuando configure una red, puede compartir archivos, dispositivos periféricos (como una impresora) y una conexión de Internet. Usted puede configurar una LAN mediante tecnologías alámbricas (como Ethernet) o tecnología inalámbricas (como WiFi o Bluetooth). Redes inalámbricas Una LAN inalámbrica o WLAN es una red de área local inalámbrica, que puede unir dos o más computadoras sin usar cables. Configurar una red inalámbrica es fácil y le permite compartir archivos, dispositivos periféricos y una conexión de Internet. ¿Cuáles son los beneficios de una red inalámbrica? Movilidad Los sistemas de LAN inalámbricos permiten que usted y otros usuarios de su red doméstica compartan el acceso a archivos y dispositivos conectados a la red, por ejemplo, una impresora o un escáner. También puede compartir una computadoras dentro de su casa. conexión de Internet con otras Velocidad y simplicidad de instalación La instalación de un sistema de LAN inalámbrico puede ser rápido y fácil y elimina la necesidad de pasar cables por paredes y techos. Internet - 51 Componentes de una LAN inalámbrica Para configurar la red inalámbrica en casa usted debe tener lo siguiente: Punto de acceso (router) Los puntos de acceso (routers) son transceptores de dos vías que emiten datos en el próximo. Los puntos de acceso actúan como un mediador entre una red alámbrica e inalámbrica. La mayoría de los routers tienen un módem DSL integrado que le permitirá acceder a una conexión de Internet DSL de alta velocidad. El PSI (Proveedor de servicios de Internet) que usted ha elegido normalmente provee un módem/router con el abono de los servicios. Lea con cuidado los documentos suministrados con el punto de acceso/router para obtener instrucciones detalladas sobre la configuración. Cables de red (RJ45) Se usa un cable de red (también llamado cable RJ45) para conectar la computadora principal al punto de acceso (ver la ilustración a continuación); este tipo de cable también puede ser usado para conectar dispositivos periféricos al punto de acceso. Adaptador inalámbrico Normalmente la computadora tiene un adaptador inalámbrico instalado. Un botón o controles en Windows le permiten activar o desactivar el adaptador. 52 Diagrama de una red activa 1. Punto router de acceso/ 2. Computadora escritorio de 4 5 3. Módem 1 3 4. Impresora 7 5. Computadora portátil 6. PDA/Teléfono inteligente 7. Cables (RJ45) de red 2 6 Encendido/Apagado de una Conexión de red WiFi La mayoría de las computadoras ofrecen un botón ‘WiFi’ que enciende y apaga la conexión de red. Si la computadora tiene acceso inalámbrico pero no ofrece un botón de Comunicación, puede encender o apagar la red inalámbrica, o controlar lo que se está compartiendo en la red con las opciones de gestión de redes. Presione la tecla de Windows ( ) + W, escriba "HomeGroup" y luego haga clic en HomeGroup. Internet - 53 Advertencia: Está prohibido el uso de dispositivos inalámbricos al volar en aviones. Apague todos los dispositivos antes de subir a bordo de un avión; estos pueden ser peligrosos para el funcionamiento del avión, interrumpir la comunicación, e incluso pueden estar prohibidos. ¡Navegue por Internet! Para navegar por Internet, necesita un programa llamado explorador de Internet. Internet Explorer ofrece una experiencia de navegación en la web fácil y segura. En cuanto tenga instalado el acceso a Internet y esté conectado, haga clic en el acceso directo de Internet Explorer ubicado en el escritorio de Windows y ¡lleve su experiencia de Internet a otro nivel! Sitio Web de Gateway Para comenzar visite nuestro sitio web, www.gateway.com. Gateway está dedicado a brindarle soporte personalizado continuo. Consulte la sección Soporte para recibir ayuda adaptada a sus necesidades. www.gateway.com es su portal al mundo de las actividades y los servicios en línea: ¡visítenos regularmente para obtener las últimas descargas e información! 54 Seguridad Seguramente esté impaciente por explorar todo lo que Internet tiene para ofrecer. Para poder estar seguro en línea, Gateway ha preinstalado el premiado Norton Internet Security™ de Symantec en la computadora. Norton Internet Security funciona silenciosamente para bloquear las amenazas complejas actuales y proteger su identidad cuando compra, hace operaciones bancarias o navega en línea. Norton Internet Security bloquea la suplantación de identidad en línea, detecta y elimina Spyware, elimina virus y gusanos de Internet, y protege contra piratas informáticos. Definiciones ¿Qué es un virus? Los software maliciosos, llamados típicamente ‘virus’, son programas diseñados para infectar y dañar las computadoras. La mayoría de los virus se transmiten a través de Internet, correos electrónicos o sitios Web maliciosos. Un virus típico se duplicará y pasará a múltiples computadoras sin ser detectado. Otras formas de molestia, como Troyanos, gusanos o spam pueden infectar la computadora, usando recursos u obstruyendo una red. Nota: Gateway garantiza que su computadora estaba 100% libre de virus al momento de la compra y no cubre daños provocados por virus. Internet - 55 ¿Qué es un Spyware? Spyware se refiere a los programas no deseados descargados en la computadora mientras está conectado a Internet, a menudo sin que usted se de cuenta. Una vez que ha infectado la computadora, puede husmear en su actividad de exploración, recoger información personal, causar la aparición de anuncios publicitarios emergentes, o incluso cambiar la configuración de la computadora. El Spyware consume los recursos de la computadora; puede hacer más lenta la conexión de Internet o todo el sistema de la computadora, e incluso puede causar un fallo en el sistema. Algunas empresas inescrupulosas usan Spyware para monitorear y rastrear los sitios que usted visita en Internet para determinar sus hábitos de navegación y mostrar determinados anuncios publicitarios emergentes en la pantalla. Sin embargo, algunos tipos de Spyware van más allá de un simple rastreo y monitorean pulsaciones de teclas y capturan contraseñas, representando un serio peligro para la seguridad. ¿Qué es el malware? El software malicioso, también conocido como malware, es un software diseñado para dañar deliberadamente la computadora. Por ejemplo, los virus, los gusanos informáticos y los Troyanos son software maliciosos. Para ayudar a proteger la computadora contra malware, asegúrese de usar un software antivirus y anti-malware actualizado. 56 ¿Qué es un firewall personal? Un firewall personal es un programa de software diseñado para impedir el acceso no autorizado a una red privada o desde ella. Actúa como un escudo para proteger la conexión de Internet desde conexiones no deseadas, algunas de las cuales intentan controlar su computadora para instalar o redistribuir virus y programas maliciosos. Cada conexión a su computadora es monitoreada, se detectan los programas que intentan recibir información sin su permiso y el firewall mostrará una alerta. Luego puede decidir si permitirá la conexión, si la conexión es a un programa que usted está usando normalmente lo permitiría (es decir, un juego que se conecta a un servidor multijugador o una enciclopedia que hace actualización de contenido). Cómo proteger la computadora Prevenir el delito informático puede ser sencillo. Con algunos consejos técnicos y un poco de sentido común se pueden evitar muchos ataques. En general, los criminales en línea intentan ganar dinero de forma rápida y fácil. Si hace que el trabajo les resulte difícil, es probable que lo dejen tranquilo y que busquen un blanco más fácil. Los siguientes consejos brindan información básica sobre cómo evitar el fraude en línea. Internet - 57 Mantenga la computadora al día con los últimos parches y actualizaciones Una buena manera de mantener alejados a los atacantes es aplicar parches y correcciones de software cuando se encuentren disponibles. Al actualizar regularmente la computadora, usted evita que los atacantes puedan aprovecharse de los defectos del software (vulnerabilidades) que de lo contrario podrían usar para entrar al sistema. Aunque mantener la computadora actualizada no lo protegerá de todos los ataques, hace que sea mucho más difícil para los piratas informáticos acceder a su sistema. También bloquea por completo muchos ataques básicos y automatizados, y eso puede ser suficiente para desalentar a atacantes menos empeñados, para que se rindan y busquen una computadora más vulnerable. Las versiones más recientes de Microsoft Windows y otros software populares pueden ser configuradas para descargar y aplicar actualizaciones automáticamente para que usted no tenga acordarse de buscar el último software. Aprovechar la función de actualización automática en el software es un gran comienzo para mantenerse seguro en línea. 58 Proteja la computadora con software de seguridad Se necesitan muchos tipos de software de seguridad para la seguridad básica en línea. Los elementos esenciales del software de seguridad incluyen programas antivirus y firewall. Generalmente el firewall es la primera línea de defensa de la computadora, controla quién y qué puede comunicarse con su computadora en línea. Puede pensar en un firewall en términos de un “policía” que vigila toda la información que intenta fluir dentro y fuera de la computadora en Internet. El firewall permite las comunicaciones seguras y evita que tanto el tráfico "malo" como los ataques lleguen a la computadora. La siguiente línea de defensa muchas veces es el software antivirus, que monitorea todas las actividades en línea como correos electrónicos y exploración en la Web y protege contra virus, gusanos informáticos, Troyanos y otros tipos de programas maliciosos. El software antivirus y antispyware debe estar configurado para actualizarse solo, y debe hacerlo cada vez que usted se conecta a Internet. Los conjuntos de herramientas de seguridad integrados tales como el Norton Internet Security, que combinan firewall, antivirus, antispyware con otras características como antispam y controles para padres, se han vuelto muy populares ya que ofrecen todo el software de seguridad necesario para la protección en línea en un solo paquete. Para muchas personas, usar un paquete de seguridad integral es una alternativa atractiva en lugar de instalar, configurar y actualizar diferentes tipos de software de seguridad. Internet - 59 Una versión completa de Norton Internet Security™ está preinstalada en el sistema de Gateway. Incluye una suscripción de prueba gratuita para las actualizaciones de protección. ¡Asegúrese de Activarlo! Elija contraseñas fuertes y manténgalas en un lugar seguro Las contraseñas son una realidad en Internet hoy en día. Las usamos para todo, para pedir flores y usar la banca electrónica e incluso para ingresar al sitio Web de nuestra línea aérea favorita para ver cuantas millas hemos acumulado. Los siguientes consejos pueden ayudarlo a que sus experiencias en líneas sean seguras: • La selección de una contraseña que no pueda ser adivinada fácilmente es el primer paso para mantener las contraseñas seguras y lejos de las manos equivocadas. Las contraseñas fuertes tienen ocho o más caracteres y usan una combinación de letras, números y símbolos (por ejemplo, # $ % ! ?). Evite usar lo siguiente como contraseña: el nombre de usuario, cualquier cosa que se base en información personal como el apellido, y palabras que puedan ser encontradas en el diccionario, especialmente “contraseña”. En especial, trate de seleccionar contraseñas fuertes y únicas para proteger actividades como la banca electrónica. • Guarde las contraseñas en un lugar seguro e intente no usar la misma contraseña para todos los servicios que usa en línea. • Cambie las contraseñas regularmente, al menos cada 90 días. Esto puede limitar el daño causado por alguien que haya obtenido acceso a su cuenta. Si nota algo sospechoso con alguna de sus cuentas en línea, lo primero que debe hacer es cambiar la contraseña. 60 Proteja la información personal Tenga cuidado al compartir información personal como nombre, dirección, número de teléfono y dirección de correo electrónico en línea. Para aprovechar muchos servicios en línea, inevitablemente debe suministrar información personal para manejar la facturación y el envío de productos comprados. Como es casi imposible no divulgar información personal, la siguiente lista contiene algunos consejos sobre cómo compartir información personal en línea de forma segura: • Esté atento a mensajes de correo electrónicos falsos. Las faltas de ortografía, los errores gramaticales, la redacción extraña, las direcciones de sitios Web con extensiones raras, las direcciones de sitios que contienen solo números cuando por lo general tienen palabras, o cualquier otra cosa fuera de lo común indican que un mensaje puede ser fraudulento. Además, los mensajes de fraude electrónico a menudo le dirán que tiene que actuar rápidamente para mantener la cuenta abierta, actualizar la seguridad o insistirán en que brinde información inmediatamente o de lo contrario algo malo sucederá. No muerda el anzuelo. • No responda a mensajes de correo electrónico que solicitan información personal. Las empresas legítimas no usarán mensajes de correo electrónico para solicitar información personal. Si tiene dudas, contacte a la empresa telefónicamente o escribiendo a la dirección Web de la empresa en el explorador. No haga clic en los enlaces que se encuentran dentro de estos mensajes ya que pueden llevarlo a sitios Web maliciosos y fraudulentos. Internet - 61 • Manténgase alejado de sitios Web fraudulentos utilizados para robar información personal. Cuando visite un sitio Web, escriba la dirección (URL) directamente en el explorador en lugar de seguir un enlace dentro de un correo electrónico o mensaje instantáneo. Los defraudadores a menudo falsifican estos enlaces para que se vean convincentes. Un sitio Web de tiendas, bancos o cualquier otro sitio Web con información confidencial debe tener una "S" luego de las letras "http" (por ejemplo, https://www.subanco.com no http://www.subanco.com ). La "s" es sinónimo de seguro y debe aparecer cuando se encuentra en un área que le solicita ingresar y suministrar datos confidenciales. Otra señal de que tiene una conexión segura es el ícono del pequeño candado en la parte inferior del explorador (generalmente en la esquina derecha). • Preste atención a las políticas de privacidad en los sitios Web y en el software. Es importante entender cómo una organización puede recolectar y usar su información personal antes de compartirla con ellos. • Proteja la dirección de correo electrónico. Los spammers y “estafadores” a veces envían millones de mensajes a direcciones de correo electrónico que pueden o no existir con la esperanza de encontrar alguna víctima. Responder a estos mensajes o incluso descargar imágenes asegura que usted será agregado a sus listas para más mensajes similares en el futuro. También tenga cuidado al publicar su dirección de correo electrónico en línea en grupos de noticias, blogs o comunidades en línea. 62 Las ofertas en línea que parecen demasiado buenas para ser verdad generalmente lo son El viejo dicho: “nada es gratis en la vida” sigue siendo verdad en la actualidad. Los software supuestamente "gratis" como protectores de pantalla o smileys, trucos de inversión secretos que le harán ganar fortunas y concursos que sorprendentemente ha ganado sin siquiera haber entrado son anzuelos atractivos usados por las empresas para llamar su atención. Aunque quizá usted no paga el software o servicio directamente con dinero, el software o servicio gratis que pidió puede haber incluido software de publicidad ("adware") que rastrea su comportamiento y muestra avisos no deseados. Quizá deba divulgar información personal o comprar algo más para poder reclamar lo que supuestamente ha ganado. Si una oferta parece tan buena que es difícil de creer, pida otra opinión, lea la letra pequeña, o mejor aún, simplemente ignórela. Revise regularmente los extractos de cuenta y de tarjeta de crédito Puede reducir el impacto de la suplantación de identidad y de los crímenes en línea si puede descubrirlos poco después de que la información haya sido robada o cuando se intente por primera vez usar la información. Una forma fácil de tener un indicio claro de que hay algo malo es revisar los extractos mensuales entregados por el banco y las empresas de tarjetas de crédito para ver si hay algo fuera de lo normal. Además, muchos bancos y servicios usan sistemas de prevención del fraude que reconocen comportamientos de compras inusuales (por ejemplo, si usted vive en Texas y de repente comienza a comprar neveras Internet - 63 en Budapest). Para confirmar estas compras fuera de lo común, quizá lo llamen para que las confirme. No tome estás llamadas a la ligera; este es un indicio de que algo malo puede haber sucedido y debe tomar las medidas necesarias. Proteja la computadora con herramientas de seguridad de Windows Windows le brinda una variedad de aplicaciones de seguridad. Windows Actualizaciones Si usted tiene una conexión a Internet activa, Windows puede buscar actualizaciones importantes para la computadora e instalarlas automáticamente. Estas actualizaciones incluyen actualizaciones de programas y parches de seguridad que pueden mejorar la experiencia informática y proteger la computadora de nuevos virus y ataques. ¿Cómo sé si la computadora se encuentra en peligro? Si el Centro de actividades informa una alerta, o si la computadora se comporta de manera irregular, falla inesperadamente o si alguno de los programas no funcionan correctamente, la computadora puede estar infectada por un software malicioso. Sin embargo, ¡no culpe a un virus de todos los problemas de la computadora! Si sospecha que la computadora está infectada, lo primero que debe hacer es actualizar, si es que aún no lo ha hecho, y ejecutar el software antivirus y antispyware. 64 RECOVERY Si tiene problemas con su computadora, y las preguntas frecuentes (consultar página 88) no lo ayudan, puede 'recuperar' su computadora, es decir, regresarla a un estado anterior. Esta sección describe las herramientas de recuperación disponibles en su computadora. Gateway suministra Gateway Recovery Management, que le permite crear una copia de seguridad de recuperación, una copias de seguridad de aplicaciones y controladores, e iniciar opciones de recuperación, ya sea mediante herramientas de Windows o la copia de seguridad de recuperación. Nota: Gateway Recovery Management solo está disponible con un sistema operativo Windows preinstalado. Importante: Se recomienda la creación de una Copia de seguridad de recuperación y Copia de seguridad de aplicaciones y controladores lo antes posible. En ciertas situaciones, una recuperación total necesitará una copia de seguridad de recuperación USB. Recovery - 65 Crear una copia de seguridad de recuperación Para reinstalar desde una unidad de almacenamiento USB, primero deberá crear una copia de seguridad de recuperación. La copia de seguridad de recuperación incluye todo el contenido original del disco duro de su computadora, incluyendo Windows y los softwares y controladores de fábrica. Con esta copia de seguridad se restaurará la computadora al mismo estado que tenía cuando la compró, brindándole, al mismo tiempo, una opción para conservar todas las configuraciones y datos personales. Nota: Asegúrese de tener una unidad USB con una capacidad de al menos 16 GB. 1. Desde Inicio, escriba 'Recuperación' y luego haga clic en Gateway Recovery Management en la lista de aplicaciones. 66 2. Haga clic en Crear copia de seguridad de los valores predeterminados de fábrica. Se abrirá la ventana Unidad de recuperación . Asegúrese de que la opción Copiar los contenidos de la partición de recuperación a la unidad de recuperación esté seleccionada. Esto brindará la copia de seguridad de recuperación más completa y segura. Recovery - 67 3. Conecte la unidad USB y haga clic en Siguiente. • Asegúrese de que la unidad USB tenga la capacidad suficiente antes de continuar. La copia de seguridad de recuperación requiere un almacenamiento de por lo menos 16 GB 4. El progreso de la copia de seguridad aparecerá en la pantalla. 5. Siga el proceso hasta que haya terminado. 68 6. Luego de crear la copia de seguridad de recuperación, usted puede elegir eliminar la información de recuperación en su computadora. Si elimina esta información, solo podrá usar la copia de seguridad de recuperación USB para restaurar su computadora, si pierde o borra la unidad USB, no podrá restaurar su computadora. 7. Desconecte la unidad USB y etiquétela claramente. Importante: Escriba una etiqueta única y descriptiva en la copia de seguridad, como 'Copia de seguridad de recuperación de Windows'. Asegúrese de guardar la copia de seguridad en un lugar seguro que vaya a recordar. Recovery - 69 Crear una copia de seguridad de aplicaciones y controladores Para crear una Copia de seguridad de aplicaciones y controladores , que contenga los softwares y controladores de fábrica que su computadora necesita, puede utilizar una unidad de almacenamiento USB o, si su computadora tiene una grabadora de DVD, uno o más DVD vírgenes regrabables. 1. Desde Inicio, escriba 'Recuperación' y luego haga clic en Gateway Recovery Management en la lista de aplicaciones. 2. Haga clic en Crear copias de seguridad de aplicaciones y controladores. Enchufe la unidad USB o inserte un DVD virgen en la unidad óptica, luego haga clic en Siguiente. 70 • Si está usando una unidad USB, asegúrese de que su unidad USB tenga capacidad suficiente antes de continuar. • Si utiliza DVD, también aparecerá el número de discos vírgenes grabables que necesitará para completar los discos de recuperación. Asegúrese de tener el número requerido de discos vírgenes idénticos. Recovery - 71 3. Haga clic en Inicio para copiar archivos. El progreso de la copia de seguridad aparecerá en la pantalla. 4. Siga el proceso hasta que haya terminado: • Si utiliza discos ópticos, la unidad expulsará cada disco a medida que termina de grabarlo. Quite el disco de la unidad y márquelo con un marcador permanente. Si se requieren discos múltiples, introduzca un nuevo disco cuando se lo soliciten, luego haga clic en OK. Continúe hasta que el proceso haya terminado. • Si está usando una unidad USB, desconecte la unidad y etiquétela claramente. Importante: Escriba una etiqueta única y descriptiva en cada copia de seguridad, como 'Copia de seguridad de aplicaciones y controladores'. Asegúrese de guardar la copia de seguridad en un lugar seguro que vaya a recordar. Recuperación del sistema Para recuperar el sistema: 1. Realice arreglos menores. Si solo uno o dos elementos de software o hardware han dejado de funcionar correctamente, se puede resolver el problema mediante la reinstalación de los controladores del dispositivo o del software. Para reinstalar software y controladores que fueron preinstalados en fábrica, consulte "Reinstalar controladores y aplicaciones" en página 73. 72 Para obtener instrucciones sobre la reinstalación de software y controladores que no fueron preinstalados, consulte el sitio Web de soporte o la documentación de ese producto. 2. Volver a un estado anterior del sistema. Si reinstalar el software o los controladores no es de ayuda, entonces se puede resolver el problema volviendo el sistema a un estado anterior cuando todo funcionaba correctamente. Para obtener instrucciones, consulte "Regresar a una captura de pantalla de sistema anterior" en página 77. 3. Reinicie su sistema operativo. Si nada más ha solucionado el problema y usted quiere volver al estado de fábrica del sistema, pero manteniendo su información de usuario, consulte "Restauración del sistema al estado de fábrica" en página 78. 4. Volver al estado original de fábrica del sistema. Si nada más ha solucionado el problema y usted quiere volver al estado de fábrica del sistema, consulte "Restauración del sistema al estado de fábrica" en página 78. Reinstalar controladores y aplicaciones Como un paso para la solución de problemas, quizá necesite reinstalar las aplicaciones y los controladores del dispositivo que estaban preinstalados en la computadora de fábrica. Usted puede realizar la reinstalación usando el disco duro o la copia de seguridad que ha creado. Recovery - 73 • Otras aplicaciones – Si necesita reinstalar un software que no vino preinstalado en la computadora, debe seguir las instrucciones de instalación de ese software. • Nuevos controladores de dispositivo – Si necesita reinstalar controladores de dispositivo que no estaban preinstalados en la computadora, siga las instrucciones provistas con el dispositivo. Si está realizando la reinstalación utilizando Windows y la información de recuperación almacenada en su computadora: • Desde Inicio, escriba 'Recuperación' y luego haga clic en Gateway Recovery Management en la lista de aplicaciones. • Haga clic en Reinstalar controladores o aplicaciones. 74 • Debe consultar la sección Contenidos del Gateway Centro de recursos. • Haga clic en el icono instalar del elemento que desea instalar, luego siga las instrucciones en la pantalla para completar la instalación. Repita este paso para cada elemento que desea reinstalar. Si está realizando la reinstalación desde una Copia de seguridad de aplicaciones y controladores en un DVD o unidad USB: 1. Inserte la Copia de seguridad de aplicaciones y controladores en la unidad de disco o conéctela a un puerto USB libre. • Si insertó un DVD, espere a que se inicie el Gateway Centro de recursos. Recovery - 75 • Si el Gateway Centro de recursos no se inicia automáticamente, presione la tecla de Windows + <E>, luego haga doble clic en el icono de la unidad óptica. • Si está usando una unidad USB, presione la tecla de Windows + <E>, haga doble clic en la unidad que contiene la copia de seguridad. Haga doble clic en Centro de recursos. 2. Debe consultar la sección Contenidos del Gateway Centro de recursos. 3. Haga clic en el icono instalar del elemento que desea instalar, luego siga las indicaciones en la pantalla para completar la instalación. Repita este paso para cada elemento que desea reinstalar. 76 Regresar a una captura de pantalla de sistema anterior Restauración del sistema de Microsoft toma periódicamente una ‘captura de pantalla’ de la configuraciones del sistema y las guarda como puntos de restauración. En la mayoría de los casos de problemas de software difíciles de resolver, puede volver a uno de estos puntos de recuperación para que el sistema vuelva a funcionar. Windows crea automáticamente un punto de restauración adicional todos los días, y también cada vez que usted instala controladores de dispositivos o software. Nota: Para mayor información sobre el uso de la Restauración del sistema de Microsoft, desde Inicio, escriba 'Ayuda' y luego haga clic en Ayuda y soporte en la lista de aplicaciones. Escriba 'Restauración del sistema de Windows' en el cuadro Buscar ayuda, luego presione Intro. Volver a un punto de restauración 1. Desde Inicio, escriba 'Panel de control' y luego haga clic en Panel de control en la lista de aplicaciones. 2. Haga clic en Sistema y seguridad > Centro de actividades, luego haga clic en Recuperación en la parte inferior de la ventana. 3. Haga clic en Abrir Restaurar sistema, luego Siguiente. 4. Haga clic en el último punto de restauración (en un momento en el que el sistema funcionaba correctamente), haga clic en Siguiente, luego Terminar. Recovery - 77 5. Aparecerá una ventana de confirmación; haga clic en Sí. Se restaura el sistema mediante el uso del punto de restauración especificado. Este proceso puede tardar varios minutos, y usted puede reiniciar la computadora. Restauración del sistema al estado de fábrica Si la computadora tiene problemas no recuperables por otro método, quizá deba reinstalar todo para restaurar el sistema al estado de fábrica. Usted puede realizar la recuperación desde el disco duro o la copia de seguridad de recuperación que ha creado. • Si aún puede ejecutar Windows y no ha eliminado la partición de recuperación, consulte "Recuperación desde Windows" en página 78. • Si no puede ejecutar Windows y su disco duro original ha sido totalmente reformateado o usted ha instalado un disco duro nuevo, consulte "Recuperación desde una copia de seguridad de recuperación" en página 83. Recuperación desde Windows Iniciar Gateway Recovery Management: • Desde Inicio, escriba 'Recuperación' y luego haga clic en Gateway Recovery Management en la lista de aplicaciones. 78 Hay dos opciones disponibles, Restaurar la configuración de fábrica (Reiniciar mi PC) o Restauración personalizada (Actualizar mi PC). Restaurar la configuración de fábrica elimina todo del disco duro, luego reinstala Windows y todos los software y controladores que estaban preinstalados en el sistema. Si puede acceder a archivos importantes en el disco duro, haga una copia de seguridad de ellos ahora. Consulte "Restaurar la configuración de fábrica con Gateway Recovery Management" en página 80. Restauración personalizada intentará conservar sus archivos (datos de usuario) pero reinstalará el software y los controladores. El software instalado desde que compró la computadora será eliminado (salvo el software instalado desde Windows Store). Consulte "Restauración personalizada con Gateway Recovery Management" en página 82. Recovery - 79 Restaurar la configuración de fábrica con Gateway Recovery Management 1. Haga clic en Restaurar la configuración de fábrica. Precaución: 'Restaurar la configuración de fábrica' eliminará todos los archivos del disco duro. 2. Se abrirá la ventana Reinicie su PC. Imágenes sólo como referencia. 80 3. Haga clic en Siguiente, luego elija cómo borrar sus archivos: a. Solo eliminar mis archivos borra rápidamente todos los archivos antes de restaurar su computadora y toma unos 30 minutos. b. Limpiar totalmente la unidad limpia completamente la unidad luego de la eliminación de cada archivo, por lo que no se verán archivos luego de la recuperación. Limpiar la unidad toma mucho más tiempo, hasta 5 horas, pero es mucho más seguro ya que se eliminan completamente los archivos antiguos. 4. Haga clic en Reiniciar. 5. El proceso de recuperación comienza reiniciando la computadora, luego continúa con el copiado de los archivos al disco duro. 6. Cuando haya finalizado la recuperación, puede comenzar a usar su computadora repitiendo el proceso de inicio por primera vez. Recovery - 81 Restauración personalizada con Gateway Recovery Management 1. Haga clic en Restauración personalizada (Conservar datos del usuario). 2. Se abrirá la ventana Actualice su PC. 3. Haga clic en Siguiente, luego Actualizar. 82 4. El proceso de recuperación comienza reiniciando la computadora, luego continúa con el copiado de los archivos al disco duro. Este proceso tomará unos 30 minutos. Recuperación desde una copia de seguridad de recuperación Para realizar una recuperación desde una copia de seguridad de recuperación en una unidad USB: 1. Encuentre su copia de seguridad de recuperación. 2. Enchufe la unidad USB y encienda su computadora. 3. Si no está habilitado, deberá habilitar el F12 Boot Menu: a. Presione <F2> al iniciar la computadora. b. Use las teclas de flecha izquierda o derecha para seleccionar el menú Main. c. Presione la tecla abajo hasta que se seleccione F12 Boot Menu, presione <F5> para cambiar esta configuración a Enabled. d. Use las teclas de flecha izquierda o derecha para seleccionar el menú Exit. e. Según el tipo de BIOS que utilice su computadora, seleccione Guardar cambios y salir o Guardar cambios al salir y presione Intro. Seleccione Aceptar o Sí para confirmar. f. Se reiniciará la computadora. Recovery - 83 4. Durante el inicio, presione <F12> para abrir el menú de arranque. El menú de arranque le permite seleccionar desde qué dispositivo desea realizar el inicio, seleccione la unidad USB. a. Use las teclas de flechas para seleccionar Unidad USB, luego presione Intro. b. Windows se inicia de la copia de seguridad de recuperación en lugar del proceso de inicio normal. 5. Seleccione su tipo de teclado. 6. Seleccione Solucionar problemas y luego elija el tipo de recuperación que desea usar: a. Haga clic en Avanzada luego Restaurar sistema para iniciar Restaurar sistema de Microsoft: Restauración del sistema de Microsoft toma periódicamente una ' captura de pantalla' de la configuraciones del sistema y las guarda como puntos de restauración. En la mayoría de los casos de problemas de software difíciles de resolver, puede volver a uno de estos puntos de recuperación para que el sistema vuelva a funcionar. b. Haga clic en Reinicie su PC para comenzar el proceso de reinicio: Reinicie su PC elimina todo del disco duro, luego reinstala Windows y todos los software y controladores que estaban preinstalados en el sistema. Si puede acceder a archivos importantes en el disco duro, haga una copia de seguridad de ellos ahora. Consulte "Reinicie su PC desde la copia de seguridad de recuperación" en página 85. 84 c. Haga clic en Actualice su PC para comenzar el proceso de actualización: Actualice su PC intentará conservar sus archivos (datos de usuario) pero reinstalará el software y los controladores. El software instalado desde que compró la computadora será eliminado (salvo el software instalado desde Windows Store). Consulte "Actualice su PC desde la copia de seguridad de recuperación" en página 87. Reinicie su PC desde la copia de seguridad de recuperación Precaución: Reinicie su PC borrará todos los archivos en el disco duro. 1. Se abrirá la ventana Reinicie su PC. Imágenes sólo como referencia. 2. Haga clic en Siguiente. 3. Seleccione el sistema operativo para realizar la recuperación (normalmente solo una opción está disponible). Recovery - 85 4. Elija conservar cambios en el disco duro: a. Si eliminó la partición de recuperación o cambió las particiones en el disco duro y quiere conservar estos cambios, seleccione No. b. Para restaurar completamente su computadora a la configuración de fábrica, seleccione Sí. 5. Elija cómo eliminar sus archivos: a. Solo eliminar mis archivos borra rápidamente todos los archivos antes de restaurar su computadora y toma unos 30 minutos. b. Limpiar totalmente la unidad limpia completamente la unidad luego de la eliminación de cada archivo, por lo que no se verán archivos luego de la recuperación. Limpiar la unidad toma mucho más tiempo, hasta 5 horas, pero es mucho más seguro ya que se eliminan completamente los archivos antiguos. 6. Haga clic en Reiniciar. 7. Cuando haya finalizado la recuperación, puede comenzar a usar su computadora repitiendo el proceso de inicio por primera vez. 86 Actualice su PC desde la copia de seguridad de recuperación 1. Se abrirá la ventana Actualice su PC. 2. Haga clic en Siguiente. 3. Seleccione el sistema operativo para realizar la recuperación (normalmente solo una opción está disponible). 4. Haga clic en Actualizar. 5. El proceso de recuperación comienza reiniciando la computadora, luego continúa con el copiado de los archivos al disco duro. Este proceso tomará unos 30 minutos. Recovery - 87 PREGUNTAS FRECUENTES La siguiente es una lista de posibles situaciones que pueden surgir durante el uso de la computadora. Se suministran soluciones fáciles para cada una de ellas. Encendí la computadora, pero no se inicia ni arranca Mire el indicador de energía: • Si no está encendido, la computadora no está recibiendo energía. Compruebe lo siguiente: • Si está usando la batería, es posible que esté baja y no pueda encender la computadora. Conecte el adaptador de CA para recargar la batería. • Asegúrese de que el adaptador de CA esté correctamente enchufado a la computadora y a la toma de corriente. • Si está encendido, compruebe lo siguiente: • ¿Hay un disco en la unidad óptica? Quítelo y presione <Ctrl> + <Alt> + <Supr> para reiniciar el sistema. • ¿Hay un dispositivo de almacenamiento USB (disco USB o teléfono inteligente) enchufado a la computadora? Desenchúfelo y presione <Ctrl> + <Alt> + <Supr> para reiniciar el sistema. 88 - Preguntas frecuentes No aparece nada en la pantalla. El sistema de administración de energía de la computadora pone automáticamente la pantalla en blanco para ahorrar energía. Presione cualquier tecla para volver a activar la pantalla. Si presionar una tecla no activa la pantalla, tres cosas pueden ser la causa: • Puede que el nivel de brillo esté demasiado bajo. Presione (aumentar) para ajustar el nivel de brillo. • El dispositivo de visualización puede estar conectado a un monitor externo. Presione para regresar la pantalla a la computadora. • Si el indicador de Suspensión está encendido, la computadora está en modo Suspender. Presione y suelte el botón de encendido para reanudar. No se escucha audio de la computadora Compruebe lo siguiente: • El volumen puede estar en modo silencio. En Windows, mire el icono de control de volumen (parlante) en la barra de tareas. Si está tachado, haga clic en el icono y desmarque la opción Silenciar todo. • Puede que el nivel de volumen esté demasiado bajo. En Windows, mire el icono de control de volumen en la barra de tareas. También puede usar los botones de control de volumen para ajustar el volumen. • Si se conectan auriculares, audífonos o parlantes externos al puerto de salida en la computadora, los parlantes internos se apagan automáticamente. Preguntas frecuentes - 89 Quiero expulsar la bandeja de la unidad óptica sin encender la computadora Hay un orificio de expulsión mecánica en la unidad óptica. Simplemente inserte la punta de un bolígrafo o un clip en el orificio y empuje para expulsar la bandeja. El teclado no responde Intente conectar un teclado externo a un puerto USB en la computadora. Si funciona, contacte a su distribuidor o a un centro de servicio autorizado ya que puede estar suelto el cable del teclado interno. La impresora no funciona Compruebe lo siguiente: • Asegúrese de que la impresora esté conectada a una toma de corriente y esté encendida. • Asegúrese de que el cable de la impresora esté bien conectado a un puerto USB y al puerto correspondiente en la impresora. 90 - Preguntas frecuentes Consejos y sugerencias para el uso de Windows 8 Sabemos que este es un nuevo sistema operativo al que habrá que acostumbrarse, así que hemos creado algunas sugerencias para ayudarle a dar los primeros pasos. Deberá tener en cuenta tres conceptos 1. Inicio El botón de Inicio ya no está disponible; podrá iniciar aplicaciones desde la pantalla Inicio. 2. Tiles Los Live tiles son similares a las miniaturas de las aplicaciones. 3. Charms Charms le permite realizar funciones útiles, como compartir contenido, apagar su PC o cambiar la configuración. ¿Cómo accedo a los charms? Mueva el cursor hacia la esquina derecha superior o inferior de la pantalla para acceder a los charms, o presione la tecla de Windows + <C>. ¿Cómo llego a Inicio? Presione la Tecla de Windows en el teclado; presione la Tecla de Windows + <C> y haga clic en Inicio; o mueva el cursor hacia la esquina izquierda inferior de la pantalla y haga clic en Inicio. Preguntas frecuentes - 91 ¿Cómo salto entre aplicaciones? Mueva el cursor hacia el borde izquierdo de la pantalla para ver miniaturas de aplicaciones que se están ejecutando actualmente. También puede presionar la tecla de Windows + <Tab> para abrir y recorrer los aplicaciones actuales. ¿Cómo apago la computadora? Presione la Tecla de Windows + <C>, haga clic en Configuración > Encendido y seleccione la acción que desea realizar. Como alternativa, desde Escritorio, haga clic en Gateway Botón de encendido y seleccione la acción que desea realizar. ¿Por qué hay una nueva interfaz? La nueva interfaz para Windows 8 está diseñada para funcionar bien con la entrada táctil. Las aplicaciones de la Tienda de Windows usarán automáticamente toda la pantalla y no requerirán un cierre de la manera tradicional. Las aplicaciones de la Tienda de Windows aparecerán en Inicio mediante live-tiles. ¿Qué son los ‘live tiles’? Los Live tiles son similares a las miniaturas de las aplicaciones que serán actualizadas con nuevo contenido cada vez que usted se conecta a Internet. Entonces, por ejemplo, podrá ver actualizaciones de tiempo o acciones sin la necesidad de abrir la aplicación. 92 ¿Cómo desbloqueo la computadora? Presione cualquier tecla y haga clic en el icono de una cuenta de usuario para desbloquear la computadora. Si su cuenta tiene una contraseña establecida, deberá ingresarla para continuar. ¿Cómo personalizo la computadora? Puede personalizar Inicio con una imagen de fondo diferente u organizando los mosaicos según sus propias necesidades. Para cambiar el fondo, presione la tecla de Windows + <C> y haga clic en Configuración > Cambiar configuración de PC > Personalizar. Haga clic en Pantalla Inicio en la parte superior de la página y seleccione un color y una imagen. ¿Cómo muevo los mosaicos? Haga clic durante unos segundos en un mosaico para seleccionarlo, luego arrástrelo al lugar en Inicio donde usted quiera que aparezca. Se moverán otros mosaicos para acomodar el mosaico en su nueva ubicación. ¿Puedo agrandar o achicar los mosaicos? Haga clic con el botón derecho en un mosaico, luego seleccione Más pequeño o Más grande desde el menú que aparece en la parte inferior de la pantalla. Preguntas frecuentes - 93 ¿Cómo personalizo la pantalla de Bloqueo? Puede personalizar la pantalla de bloqueo con una imagen diferente o para que muestre rápidamente el estado y notificaciones según sus propias necesidades. Para cambiar el fondo, presione la tecla de Windows + <C> y haga clic en Configuración > Cambiar configuración de PC > Personalizar. Haga clic en Pantalla de bloqueo en la parte superior de la página y seleccione la imagen y las aplicaciones que desea ver en la pantalla de bloqueo. Entonces, ¿cómo cierro una aplicación? Mueva el cursor hacia la parte superior de la pantalla y haga clic y arrastre la ventana hacia abajo para cerrar la aplicación. Puede cerrar aplicaciones desde las miniaturas en el borde izquierdo de la pantalla haciendo clic con el botón derecho en una miniatura y seleccionando Cerrar. ¿Puedo cambiar la resolución de la pantalla? Desde Inicio, comience a escribir ‘Panel de control’ para abrir Buscar y que aparezcan los resultados; haga clic en Panel de control > Ajustar resolución de pantalla. Quiero usar Windows como solía hacerlo, ¡devuélvame mi escritorio! Desde Inicio haga clic en el mosaico Escritorio para ver un escritorio tradicional. Puede anclar aplicaciones de uso frecuente a la barra de tareas para abrirlos con facilidad. 94 Si hace clic en una aplicación que no es una aplicación de la Tienda de Windows, Windows la abrirá automáticamente mediante Escritorio. ¿Dónde están mis aplicaciones? Desde Inicio, simplemente comience a escribir el nombre de una aplicación que desea abrir y Buscar se abrirá automáticamente y mostrará los resultados en una lista. Para ver la lista completa de aplicaciones, presione la barra espaciadora o la Tecla de menú y haga clic en Todas las aplicaciones. ¿Cómo hago para que mi aplicación aparezca en Inicio? Si está en Todas las aplicaciones y quiere que aparezca una aplicación en Inicio, puede seleccionar la aplicación y hacer clic con el botón derecho en ella. Seleccione Anclar a Inicio desde el menú que aparece en la parte inferior de la pantalla. ¿Cómo elimino un mosaico de Inicio? Haga clic con el botón derecho en el mosaico y haga clic en Desanclar de Inicio desde el menú que aparece en la parte inferior de la pantalla. ¿Cómo hago para que mi aplicación aparezca en mi barra de tareas en Escritorio? Si está en Todas las aplicaciones y quiere que aparezca una aplicación en la barra de tareas en Escritorio, puede seleccionar la aplicación y hacer clic con el botón derecho en ella. Seleccione Anclar a barra de tareas desde el menú que aparece en la parte inferior de la pantalla. Preguntas frecuentes - 95 ¿Cómo instalo aplicaciones? Puede descargar aplicaciones de la Tienda de Windows desde Tienda. Deberá tener un ID de Microsoft para comprar y descargar aplicaciones desde Tienda. ¡No puedo encontrar aplicaciones como Notepad y Paint! ¿Dónde están? Desde Inicio simplemente puede comenzar a escribir el nombre de la aplicación que está buscando para abrir Buscar y que aparezcan los resultados en una lista. Como alternativa, abra Todas las aplicaciones y desplácese hasta ‘Accesorios de Windows’ para ver la lista de los programas heredados. ¿Qué es un ID de Microsoft (cuenta)? Una cuenta Microsoft es una dirección de correo electrónico y una contraseña que se utiliza para iniciar sesión en Windows. Puede usar cualquier dirección de correo electrónico, pero es mejor si elije la que usa para comunicarse con amigos e iniciar sesión en sus sitios Web favoritos. Cuando inicia sesión en su PC con una cuenta de Microsoft, conectará su PC a las personas, los archivos y los dispositivos que a usted le interesan. ¿Necesito uno? No necesita un ID de Microsoft para usar Windows 8, pero facilita las cosas porque usted puede sincronizar sus datos en diferentes máquinas en las que inicia sesión mediante el ID de Microsoft. 96 ¿Cómo lo obtengo? Si ya instaló Windows 8 y no inició sesión con una cuenta de Microsoft o no tiene una cuenta de Microsoft y quiere obtener una, presione la tecla de Windows + <C> y haga clic en Configuración > Cambiar configuración de PC > Usuarios > Cambiar a una cuenta de Microsoft, y siga las instrucciones en la pantalla. ¿Cómo agrego un favorito a Internet Explorer? Internet Explorer 10 no tiene favoritos tradicionales, pero usted puede anclar accesos directos a Inicio. Una vez que la página está abierta, haga clic con el botón derecho en la página para abrir el menú en la parte inferior de la pantalla. Haga clic en Anclar a Inicio. ¿Cómo busco actualizaciones de Windows? Presione la tecla de Windows + <C> y haga clic en Configuración > Cambiar configuración de PC > Actualizaciones de Windows. Haga clic en Buscar actualizaciones ahora. ¿Dónde puedo obtener más información? Para obtener más información, visite: • Tutoriales de Windows 8: www.gateway.com/windows8-tutorial • Preguntas frecuentes de soporte: support.gateway.com Preguntas frecuentes - 97 INFORMACIÓN REGLAMENTARIA PREVENCIÓN DE LA PÉRDIDA DE LA AUDICIÓN - Precaución: Puede producirse una pérdida de audición permanente si se utilizan audífonos o auriculares a alto volumen durante períodos de tiempo prolongados. - A pleine puissance, l’écoute prolongée du baladeur peut endommager l’oreille de l’utilisateur. PRECAUCIÓN al escuchar Para proteger su audición siga las siguientes instrucciones. - Aumente el volumen gradualmente hasta que pueda oír de manera clara y cómoda. - No aumente el nivel de volumen una vez que sus oídos se han adaptado. - No escuche música a un volumen alto durante períodos prolongados. - No aumente el volumen para bloquear un entorno ruidoso. - Disminuya el volumen si no puede oír a las personas que hablan cerca de usted. NORMAS REGLAMENTARIAS SOBRE DISPOSITIVOS DE RADIO - Nota: La siguiente información reglamentaria es únicamente para modelos con Bluetooth y/o LAN inalámbrica. Accesorios de conformidad Los accesorios asociados con este equipo son: un cable blindado para video cuando se conecta un monitor externo. Se deben utilizar estos accesorios con el fin de garantizar el cumplimiento de las normas de la FCC. 98 ADVERTENCIA DE LA PROPUESTA 65 DE CALIFORNIA Este producto contiene productos químicos reconocidos por el Estado de California como causantes de cáncer, defectos de nacimiento y/u otros daños reproductivos. Para obtener información adicional con respecto a esta advertencia sobre el producto, vaya a www.gateway.com/prop65. 日本 (JAPÓN) 本装置は、第二種情報装置(住宅地域またはその隣接した地域において使用されるべき 情報装置)デ住宅地域での電波障害防止を目的とした情報装置等電波障害自主規制協議 会(VCCI)基準に適合しております。 しかし、本装置をラジオ、テレビジョン受信機に、近接してご使用になると、受信障害 の原因となることがあります。本書の説明にしたがって正しい取り扱いをしてくださ い。 NFORMACIÓN SOBRE LA NORMATIVA APLICABLE AL ADAPTADOR INALÁMBRICO USA — FCC and FAA The FCC with its action in ET Docket 96-8 has adopted a safety standard for human exposure to radio frequency (RF) electromagnetic energy emitted by FCC certified equipment. The wireless adapter meets the Human Exposure limits found in OET Bulletin 65, supplement C, 2001, and ANSI/IEEE C95.1, 1992. Proper operation of this radio according to the instructions found in this manual will result in exposure substantially below the FCC’s recommended limits. - The following safety precautions should be observed: Do not touch or move antenna while the unit is transmitting or receiving. - Do not hold any component containing the radio such that the antenna is very close or touching any exposed parts of the body, especially the face or eyes, while transmitting. Información reglamentaria - 99 - Do not operate the radio or attempt to transmit data unless the antenna is connected; this behavior may cause damage to the radio. Use in specific environments: - The use of wireless adapters in hazardous locations is limited by the constraints posed by the safety directors of such environments. - The use of wireless adapters on airplanes is governed by the Federal Aviation Administration (FAA). - The use of wireless adapters in hospitals is restricted to the limits set forth by each hospital. Antenna Use In order to comply with FCC RF exposure limits, low gain integrated antennas should be located at a minimum distance of 20 cm (8 inches) or more from the body of all persons or at a minimum distance as specified by the FCC module grant conditions. FCC grants can be viewed from the FCC Equipment Authorization website at https://fjallfoss.fcc.gov/ oetcf/eas/reports/GenericSearch.cfm by entering the FCC ID printed on the module label. Explosive Device Proximity Warning Warning: Do not operate a portable transmitter (including this wireless adapter) near unshielded blasting caps or in an explosive environment unless the transmitter has been modified to be qualified for such use Antenna Warnings - Warning: To comply with the FCC and ANSI C95.1 RF exposure limits, it is recommended that for the wireless adapter installed in a desktop or portable computer, the antenna for this wireless adapter to be installed so as to provide a separation distance of at least 20 cm (8 inches) from all persons or at the minimum distance as specified by the module grant conditions. FCC grants can be viewed from the FCC Equipment Authorization website at https://fjallfoss.fcc.gov/oetcf/eas/ reports/GenericSearch.cfm by entering the FCC ID printed on the module label. 100 - Warning: The wireless adapter is not designed for use with high-gain directional antennas. Use On Aircraft Caution - Caution: Regulations of the FCC and FAA prohibit airborne operation of radiofrequency wireless devices (wireless adapters) because their signals could interfere with critical interfere with critical aircraft instruments. Local Restrictions on 802.11a, 802.11b, 802.11g and 802.11n Radio Usage - Caution: Due to the fact that the frequencies used by 802.11a, 802.11b, 802.11g and 802.11n wireless LAN devices may not yet be harmonized in all countries, 802.11a, 802.11b, 802.11g and 802.11n products are designed for use only in specific countries, and are not allowed to be operated in countries other than those of designated use. As a user of these products, you are responsible for ensuring that the products are used only in the countries for which they were intended and for verifying that they are configured with the correct selection of frequency and channel for the country of use. Any deviation from the permissible power and frequency settings for the country of use is an infringement of national law and may be punished as such. Wireless Interoperability The wireless adapter is designed to be interoperable with other wireless LAN products that are based on direct sequence spread spectrum (DSSS) radio technology and to comply with the following standards: - IEEE Std. 802.11b compliant Standard on Wireless LAN - IEEE Std. 802.11g compliant Standard on Wireless LAN - IEEE Std. 802.11a compliant Standard on Wireless LAN (applies to devices supporting 802.11a) - IEEE Std. 802.11n draft 2.0 compliant on Wireless LAN - Wireless Fidelity certification, as defined by the Wi-Fi Alliance Información reglamentaria - 101 The Wireless Adapter and Your Health The wireless adapter, like other radio devices, emits radio frequency electromagnetic energy. The level of energy emitted by the wireless adapter, however, is less than the electromagnetic energy emitted by other wireless devices such as mobile phones. The wireless adapter operates within the guidelines found in radio frequency safety standards and recommendations. These standards and recommendations reflect the consensus of the scientific community and result from deliberations of panels and committees of scientists who continually review and interpret the extensive research literature. In some situations or environments, the use of the wireless adapter may be restricted by the proprietor of the building or responsible representatives of the applicable organization. Examples of such situations may include: - Using the wireless adapter on board airplanes, or - Using the wireless adapter in any other environment where the risk of interference with other devices or services is perceived or identified as being harmful. If you are uncertain of the policy that applies to the use of wireless adapters in a specific organization or environment (an airport, for example), you are encouraged to ask for authorization to use the adapter before you turn it on. FCC Radio Frequency Interference Requirements (applies to device supporting 802.11a) This device is restricted to indoor use due to its operation in the 5.15 to 5.25 GHz and 5.470 to 5.725 GHz frequency ranges. FCC requires this product to be used indoors for the frequency ranges 5.15 to 5.25 GHz and 5.470 to 5.725 GHz to reduce the potential for harmful interference to co-channel mobile satellite systems. High power radars are allocated as primary users of the 5.25 to 5.35 GHz and 5.65 to 5.85 GHz bands. These radar stations can cause interference with and /or damage this device. No configuration controls are provided for this wireless adapter allowing any change in the frequency of operations outside the FCC grant of authorization for U.S operation according to Part 15.407 of the FCC rules. 102 USA — Federal Communications Commission (FCC) This device complies with Part 15 of the FCC Rules. Operation of the device is subject to the following two conditions: - This device may not cause harmful interference. - This device must accept any interference that may cause undesired operation. - Note: The radiated output power of the adapter is far below the FCC radio frequency exposure limits. Nevertheless, the adapter should be used in such a manner that the potential for human contact during normal operation is minimized. To avoid the possibility of exceeding the FCC radio frequency exposure limits, you should keep a distance of at least 20 cm between you (or any other person in the vicinity), or the minimum separation distance as specified by the FCC grant conditions, and the antenna that is built into the computer. Details of the authorized configurations can be found at http://www.fcc.gov/oet/ea/ by entering the FCC ID number on the device. Interference Statement This wireless adapter has been tested and found to comply with the limits for a Class B digital device, pursuant to Part 15 of the FCC Rules. These limits are designed to provide reasonable protection against harmful interference in a residential installation. This wireless adapter generates, uses, and can radiate radio frequency energy. If the wireless adapter is not installed and used in accordance with the instructions, the wireless adapter may cause harmful interference to radio communications. There is no guarantee, however, that such interference will not occur in a particular installation. If this wireless adapter does cause harmful interference to radio or television reception (which can be determined by turning the equipment off and on), the user is encouraged to try to correct the interference by taking one or more of the following measures: - Reorient or relocate the receiving antenna of the equipment experiencing the interference. - Increase the distance between the wireless adapter and the equipment experiencing the interference. Información reglamentaria - 103 - Connect the computer with the wireless adapter to an outlet on a circuit different from that to which the equipment experiencing the interference is connected. - Consult the dealer or an experienced radio/TV technician for help. - Note: The adapter must be installed and used in strict accordance with the manufacturer's instructions as described in the user documentation that comes with the product. Any other installation or use will violate FCC Part 15 regulations. Canada — Industry Canada (IC) This device complies with RSS210 of Industry Canada. Cet appareil se conforme à RSS210 de Canada d'Industrie. - Caution: When machine supports and using IEEE 802.11a wireless LAN, this product is restricted to indoor use due to its operation in the 5.15- to 5.25 GHz frequency range. Industry Canada requires this product to be used indoors for the frequency range of 5.15 GHz to 5.25 GHz to reduce the potential for harmful interference to co-channel mobile satellite systems. High power radar is allocated as the primary user of the 5.25 to 5.35 GHz and 5.65 to 5.85 GHz bands. These radar stations can cause interference with and/or damage to this device. The maximum allowed antenna gain for use with this device is 6dBi in order to comply with the E.I.R.P limit for the 5.25 to 5.35 and 5.725 to 5.85 GHz frequency range in point-topoint operation. To comply with RF exposure requirements all antennas should be located at a minimum distance of 20 cm, or the minimum separation distance allowed by the module approval, from the body of all persons. - Attention: l’utilisation d’un réseau sans fil IEEE802.11a est réstreinte à une utilisation en intérieur à cause du fonctionement dans la bande de fréquence 5,15 5,25 GHz. Industry Canada requiert que ce produit soit utilisé à l’intérieur des bâtiments pour la bande de fréquence 5,15 - 5,25 GHz afin de réduire les possibilités d’interférences nuisibles aux canaux co-existants des systèmes de transmission satellites. Les radars de puissances ont fait l’objet d’une allocation primaire de fréquences dans les bandes 5,25 - 5,35 GHz et 5 65 - 5 85 GHz. Ces stations radar peuvent créer des interférences avec ce produit et/ou lui être nuisible. Le gain d’antenne maximum permissible pour une utilisation avec ce produit est de 6 dBi afin 104 d’être conforme aux limites de puissance isotropique rayonnée équivalente (P.I.R.E.) applicable dans les bandes 5,25 - 5,35 GHz et 5,725 - 5,85 GHz en fonctionement point-à-point. Se pour conformer aux conditions d'exposition de RF toutes les antennes devraient être localisées à une distance minimum de 20 cm, ou la distance de séparation minimum permise par l'approbation de module, du corps de toutes les personnes. This Class B digital apparatus complies with Canadian ICES-003. Cet appareil numérique de la classe B est conforme a la norme NMB-003 du Canada. "To prevent radio interference to the licensed service, this device is intended to be operated indoors and away from windows to provide maximum shielding. Equipment (or its transmit antenna) that is installed outdoors is subject to licensing." « Pour empêcher que cet appareil cause du brouillage au service faisant l'objet d'une licence, il doit être utilisé a l'intérieur et devrait être placé loin des fenêtres afin de fournir un écran de blindage maximal. Si le matériel (ou son antenne d'émission) est installé à l'extérieur, il doit faire l'objet d'une licence. » Union Europea Lista de países aplicables Este producto dispositivo debe usarse de acuerdo con las normas y restricciones del país de uso. Para más información, comuníquese con el organismo regulador del país de uso. Consulte http://ec.europa.eu/enterprise/rtte/implem.htm para la última lista de países. Lista de Códigos nacionales Este equipo puede ser operado en los siguientes países: País ISO 3166 código de 2 letras AT Alemania BE Grecia País ISO 3166 código de 2 letras Austria Bélgica País ISO 3166 código de 2 letras País ISO 3166 código de 2 letras DE Malta MT Reino Unido GB GR Países bajos NT Islandia IS Información reglamentaria - 105 País ISO 3166 código de 2 letras País ISO 3166 código de 2 letras País ISO 3166 código de 2 letras CY Hungría HU Polonia PL Liechtenstein LI República Checa CZ Irlanda IE Portugal PT Noruega NO Dinamarca DK Italia IT Eslovaquia SK Suiza CH Estonia EE Letonia LV Eslovenia SL Bulgaria BG Finlandia FI Lituania LT España ES Rumania RO Francia FR Luxemburgo LU Suecia SE Turquía TR País ISO 3166 código de 2 letras Chipre La banda baja 5,15 -5,35 GHz está destinada únicamente al uso en interiores. Este equipo cumple con los principales requisitos de la directiva 1999/5/EC de la Unión Europea. Consulte las Declaraciones sobre el cumplimiento normativo en la Unión Europea y más información disponible en la Declaración de Conformidad adjunta. English Hereby, ACER INC., declares that this devise is in compliance with the essential requirements and other relevant provisionns of Directive 1999/5/EC. Česky [Czech] ACER INC. tímto prohlašuje, že toto zařízení je ve shodě se základními požadavky a dalšími příslušnými ustanoveními směrnice 1999/5/ES. Daansk [Danish] Undertegnede ACER INC. erklærer herved, at følgende udstyr overholder de væsentlige krav og øvrige relevante krav i direktiv 1999/5/EF. 106 Deutsch [German] Hiermit erklärt ACER INC., dass sich das Gerät Radiolan in Übereinstimmung mit den grundlegenden Anforderungen und den übrigen einschlägigen Bestimmungen der Richtlinie 1999/5/EG befindet. Eesti [Estonian] Käesolevaga kinnitab ACER INC. seadme vastavust direktiivi 1999/5/EÜ põhinõuetele ja nimetatud direktiivist tulenevatele teistele asjakohastele sätetele. Español [Spanish] Por medio de la presente ACER INC. declara que el dispositivo cumple con los requisitos esenciales y cualesquiera otras disposiciones aplicables o exigibles de la Directiva 1999/5/CE. Ελληνικά [Greek] ∆ια του παρόντος η ACER INC. δηλώνει ότι η παρούσα συσκευή συµµορφώνεται προς τις ουσιώδεις απαιτήσεις και τις λοιπές διατάξεις της Οδηγίας 1999/5/ ΕΚ. Français [French] Par la présente ACER INC. déclare que cet appareil est conforme aux exigences essentielles et aux autres dispositions pertinentes de la directive 1999/5/CE. Íslenska [Icelandic] Hér með lýsir ACER INC. yfir því að er í samræmi við grunnkröfur og aðrar kröfur, sem gerða r eru í tilskipun 1999/5/EC. Información reglamentaria - 107 Itaaliano [Italian] Con la presente ACER INC. dichiara che questo dispositivo è conforme ai requisiti essenziali ed alle altre disposizioni pertinenti stabilite dalla direttiva 1999/5/CE. Latviski [Latvian] Ar šo ACER INC. deklarē, ka šī ierīce atbilst Direktīvas 1999/5/EK būtiskajām prasībām un citiem ar to saistītajiem noteikumiem. Lietuvių [Lithuanian] Šiuo ACER INC. deklaruoja, kad šis įrenginys atitinka esminius reikalavimus ir kitas 1999/5/EB Direktyvos nuostatas. Malti [Maltese] Hawnhekk, ACER INC., jiddikjara li dan jikkonforma mal- ti ijiet essenzjali u ma provvedimenti o rajn relevanti li he mm fid-Dirrettiva 1999/5/EC. Magyar [Hungarian] Alulírott, ACER INC. nyilatkozom, hogy a készülék megfelel a vonatkozó alapveto követelményeknek és az 1999/5/EC irányelv egyéb eloírásainak. Nederlands [Dutch] Hierbij verklaart ACER INC. dat het toestel voldoet aan de essentiële eisen en de andere relevante bepalingen van richtlijn 1999/5/EG. Norsk [Norwegiann] ACER INC. erklærer herved at utstyret er i samsvar med de grunnleggende krav og øvrige relevante krav i direktiv 1999/5/EF. 108 Polski [Polish] Niniejszym ACER INC. oświadcza, że urządzenie jest zgodne z zasadniczymi wymogami oraz pozostałymi stosownymi postanowieniami Dyrektywy 1999/5/EC. Português [Portuguese] ACER INC. declara que este dispostivo está conforme com os requisitos essenciais e outras disposições da Directiva 1999/5/CE. Slovensko [Slovenian] ACER INC. izjavlja, da je ta naprava skladna z bistvenimi zahtevami in ostalimi relevantnimi določili Direktive 1999/5/ES. Slovensky [Slovak] ACER INC. týmto vyhlasuje, že zariadenie spĺňa základné požiadavky a všetky príslušné ustanovenia Smernice 1999/5/ES. Suomi [Finnish] ACER INC. vakuuttaa täten että tämä laite on direktiivin 1999/ 5/EY oleellisten vaatimusten ja sitä koskevienn direktiivin muiden ehtojen mukainen. Svenska [Swedish] Härmed intygar ACER INC. att denna enhet står i överensstämmelse med väsentliga egenskapskrav och övriga relevanta bestämmelser som framgår av direktiv 1999/5/EG. Información reglamentaria - 109 France Pour la France métropolitaine : 2,400 - 2,4835 GHz (Canaux 1à 13) autorisé en usage intérieur 2,400 - 2,454 GHz (canaux 1 à 7) autorisé en usage extérieur Pour la Guyane et la Réunion : 2,400 - 2,4835 GHz (Canaux 1à 13) autorisé en usage intérieur 2,420 - 2,4835 GHz (canaux 5 à 13) autorisé en usage extérieur Pour tout le territoire Français : Seulement 5,15 -5,35 GHz autorisé pour le 802.11a L'utilisation de cet equipement (2,4 GHz WLAN) est soumise à certaines restrictions : - La puissance maximale autorisée en intérieur est de 100 mW pour 2400 - 2483,5 MHz. - La puissance maximale autorisée est de 100 mW en extérieur pour 2400 - 2454 MHz. - La puissance maximale autorisée est de 10 mW en extérieur, 2454 - 2483,5 MHz. Pour les dernières restrictions, voir http://www.art-telecom.fr. Italy The use of these equipments is regulated by: 1.D.L.gs 1.8.2003, n. 259, article 104 (activity subject to general authorization) for outdoor use and article 105 (free use) for indoor use, in both cases for private use. 2.D.M. 28.5.03, for supply to public of RLAN access to networks and telecom services. L’uso degli apparati è regolamentato da: 1.D.L.gs 1.8.2003, n. 259, articoli 104 (attività soggette ad autorizzazione generale) se utilizzati al di fuori del proprio fondo e 105 (libero uso) se utilizzati entro il proprio fondo, in entrambi i casi per uso private. 2.D.M. 28.5.03, per la fornitura al pubblico dell’accesso R-LAN alle reti e ai servizi di telecomunicazioni. 110 Belgium Dans le cas d'une utilisation privée, à l'extérieur d'un bâtiment, au-dessus d'un espace public, aucun enregistrement n'est nécessaire pour une distance de moins de 300 m. Pour une distance supérieure à 300 m un enregistrement auprès de l'IBPT est requise. Pour les enregistrements et licences, veuillez contacter l'IBPT. In geval van privé-gebruik, buiten een gebouw, op een openbare plaats, is geen registratie nodig, wanneer de afstand minder dan 300 m is. Voor een afstand groter dan 300 m is een registratie bij BIPT vereist. Voor registraties en licenties, gelieve BIPT te contacteren. Brazil Este equipamento opera em caráter secundário, isto é, não tem direito a proteção contra interferência prejudicial, mesmo de estações do mesmo tipo, e não pode causar interferência a sistemas operando em caráter primário. Pakistan Pakistan Telecommunication Authority (PTA) Approved Morocco The operation of this product in the radio channel 2 (2417 MHz) is not authorized in the following cities: Agadir, Assa-Zag, Cabo Negro, Chaouen, Goulmima, Oujda, Tan Tan, Taourirt, Taroudant and Taza. The operation of this product in the radio channels 4, 5, 6 and 7 (2425 - 2442 MHz) is not authorized in the following cities: Aéroport Mohamed V, Agadir, Aguelmous, Anza, Benslimane, Béni Hafida, Cabo Negro, Casablanca, Fès, Lakbab, Marrakech, Merchich, Mohammédia, Rabat, Salé, Tanger, Tan Tan, Taounate, Tit Mellil, Zag. Japan 5 GHz 帯は室内でのみ使用のこと Korea 당해 무선설비는 운용 중 전파혼신 가능성이 있음 Información reglamentaria - 111 Taiwan 第十二條 經型式認證合格之低功率射頻電機,非經許可,公司、商號或使用者均不得擅自變更頻 率、加大功率或變更原設計之特性及功能。 第十四條 低功率射頻電機之使用不得影響飛航安全及干擾合法通信 ; 經發現有干擾現象時,應立即 停用,並改善至無干擾時方得繼續使用。 前項合法通信,指依電信法規定作業之無線通信。 低功率射頻電機須忍受合法通信或工業、科學及醫療用電波輻射性電機設備之干擾。 MODIFICACIONES AL PRODUCTO Marca CE Gateway no será responsable de las modificaciones no autorizadas realizadas por el usuario y sus consecuencias, que puedan alterar la conformidad del producto con la marca CE. Interferenciade radiofrecuencia El fabricante no es responsable de cualquier interferencia de radio o TV causada por las modificaciones no autorizadas a este equipo. CONEXIONES Y TIERRA REMOTAS Tensión extra-baja de protección (PELV por sus siglas en inglés) Para asegurar la integridad de tensión extra-baja del equipo, conecte únicamente equipos con circuitos eléctricamente compatibles y protegidos contra la corriente a los puertos externos. Tensión extra-baja de seguridad (SELV por sus siglas en inglés) Toda entrada y salida de este producto está clasificada como Tensión extra-baja de seguridad. 112 Tierras remotas Para evitar descargas eléctricas, conecte todas las computadoras locales (oficina individual) y el equipo de soporte informático al mismo circuito eléctrico del cableado del edificio. Si no está seguro, verifique el cableado del edificio para evitar condiciones de tierra remota. Suministro del edificio Conecte los equipos al suministro de un edificio únicamente si este está de acuerdo con las normas de instalación eléctrica de su país. En el Reino Unido, estas son las normas IEE. FUENTE DE ALIMENTACIÓN Y CABLES Fuente de alimentación Los enchufes de entrada y salida (si está incluido) de la fuente de alimentación están clasificados como Voltaje peligroso. Debe desenchufar el cable de alimentación y quitar la batería para desconectar el equipo de la fuente de alimentación. Para eso, el enchufe debe instalarse cerca del equipo y debe ser de fácil acceso. Potencia nominal de entrada: Verifique la etiqueta de potencia en la parte inferior de la computadora para asegurarse de que el adaptador cumple con la potencia nominal especificada. El usuario no debe, bajo ninguna circunstancia, intentar desarmar la fuente de alimentación. La fuente de alimentación no tiene partes que puedan ser reemplazadas por el usuario. Dentro de la fuente de alimentación hay voltajes peligrosos que pueden causar serias lesiones. Debe devolver una fuente de alimentación defectuosa a su distribuidor. Información reglamentaria - 113 Enchufe y cables de alimentación Este producto requiere un enchufe y un cable de alimentación conectados a tierra. El enchufe sólo encaja en una toma de corriente con conexión a tierra. Asegúrese de que esta toma está conectada a tierra correctamente antes de insertar el enchufe. No introduzca el enchufe en una toma que no esté conectada a tierra. Consulte a su electricista para más detalles. El cable no debe superar los 2,5 metros de largo. Para evitar riesgos eléctricos, no quite ni inhabilite la conexión a tierra del cable de alimentación. Reemplace el cable de alimentación si está dañado. Contacte a su distribuidor para conseguir uno nuevo que sea igual. En Europa, el enchufe debe ser para 250 VAC, 10 amperios mínimo. El enchufe debe tener una marca de aprobación de un organismo internacional. El cable debe ser apropiado para el uso en el país del usuario final. Consulte a su distribuidor o a las autoridades eléctricas locales si no está seguro del tipo de cable que se debe usar en su país. Cables Para cables que no son entregados con el producto en el empaque de la computadora: El rendimiento EMC del sistema está garantizado únicamente si el cable y la interfaz usan blindaje suficiente. Se requiere el uso de cable de interfaz blindado para antenas de FM o TV, USB, IEEE1394, series, impresoras, juegos, audio/video analógico o digital, PS2, y generalmente todas las interfaces de cable de alta velocidad. Use únicamente cables de telecomunicación 26AWG certificados por UL o más grandes. Únicamente el cable módem Ethernet LAN o RTC puede superar los 3 metros de largo. Gateway recomienda que le agregue un clic redondo con núcleo de ferrita a cada cable que conecte la computadora a un dispositivo hardware que no ha sido entregado con la computadora. - Referencia de ferrita: 28A-2029 de Steward (dos lazos) 114 Durante la certificación del producto, Gateway utilizó la siguiente calidad de cables: - Cables USB 2.0 certificados de Hama 46778 - FireWire blindados IEEE1394 de Hama 50011 - Cables de Audio/Video blindados RCA-RCA de Thomson KHC001M, KHC012M, KHC028M - Cables de Audio blindados estéreo de Hama 43330H, 42714H Acumulación de calor y computadoras portátiles El adaptador de CA y la parte inferior de la computadora pueden calentarse luego de un uso prolongado. Se debe evitar el contacto físico prolongado con cualquiera de los dos. EXTRACCIÓN Y REEMPLAZO DE LA TAPA DEL CHASIS Antes de retirar la tapa del chasis para hacer el mantenimiento del equipo o modificarlo, debe desconectar todos los cables de alimentación y del módem, y quitar o deshabilitar la batería. - Precaución: Algunos componentes dentro de la computadora pueden calentarse luego del uso prolongado. Luego debe cerrar el chasis antes de enchufar o encender el equipo. DECLARACIÓN DE CONFORMIDAD PARA PRODUCTOS LÁSER Los dispositivos ópticos están probados y certificados para cumplir con las normas de la Comisión Electrotécnica Internacional IEC60825-1 y europea EN60825-1 para productos láser clase 1. Los productos láser clase 1 no son considerados peligrosos. Los dispositivos ópticos están diseñados de manera tal que nunca haya acceso humano a la radiación láser por encima del nivel Clase 1 durante condiciones de funcionamiento normal o de mantenimiento recomendado. Los dispositivos ópticos instalados en la computadora están diseñados para ser usados únicamente como componentes de ese tipo de producto electrónico y, por lo tanto, no cumplen con los requerimientos apropiados del Código de regulación federal Sec. 1040.10 y Sec. 1040.11 para productos láser COMPLETOS. Información reglamentaria - 115 Debido a que la exposición a la radiación láser es extremadamente peligrosa, el usuario no debe, bajo ninguna circunstancia, intentar desarmar el dispositivo láser. EMPAQUE El empaque de este producto cumple con la Directiva medioambiental europea 94/62/EC desde el 20 de diciembre de 1994 y su equivalente en la Legislación francesa por el Decreto 98-638 desde el 20 de julio de 1998. CONFORME A LA CERTIFICACIÓN NORMATIVA DE RUSIA 116 MEDIOAMBIENTE NUESTRO COMPROMISO CON LA PROTECCIÓN MEDIOAMBIENTAL El medioambiente ha sido el centro de nuestros productos. Gateway se compromete a limitar el impacto ambiental de sus productos durante la vida útil del producto. Comienza en la fase de diseño, con una política muy estricta de adquisición, se le da máxima atención a los componentes electrónicos para limitar el peso en metales pesados tales como plomo, cadmio, cromo, mercurio, etc. Se les solicita a todos proveedores que respeten todas las normas, para cada parte de los productos. En cuanto a los productos fuera de uso, se han tomado medidas para anticipar y facilitar el reciclado de todos nuestros productos. De este modo, todas las partes plásticas de más de 25 gramos utilizadas en productos Gateway son etiquetadas como ISO 11469. Esta etiqueta permite un rápido reconocimiento del material y reduce su valoración. Así mismo, se diseñan las computadoras de escritorio para que puedan ser fácilmente desmanteladas, y los tornillos son reemplazados por clips. DESECHO DEL PRODUCTO La directiva 2002/96/EC, conocida como Directiva sobre residuos de equipos eléctricos y electrónicos (WEEE), exige que los productos eléctricos y electrónicos sean desechados aparte de los residuos domésticos. El objetivo es promover la reutilización, el reciclado y otras formas de recuperación y reducir la cantidad de residuos para disminuir el relleno sanitario y la incineración. El logo del bote de basura tachado está para recordarle que estos productos deben ser clasificados para su disposición. Estas normas se aplican a todos los productos Gateway y a todos los accesorios, como el teclado, el ratón, los altavoces, el control remoto, etc. Cuando deba desechar esos productos, asegúrese de que sean reciclados correctamente Medioambiente - 117 consultándolo con la autoridad local, o devolviendo el equipo viejo a su proveedor si lo está reemplazando. Para mayor información, visite www.gateway.com/about/ corp_responsibility/environment.php. Desecho de la batería (cuando corresponda) Antes de desechar su equipo, asegúrese de haber quitado las baterías que puedan estar en el equipo. Las leyes europeas establecen que las baterías no deben ser desechadas junto a los residuos domésticos. No arroje las baterías usadas en el bote de basura. Deseche las baterías usadas a través de un esquema de recogida de baterías cuando sea posible, o pregúntele a su distribuidor o a la autoridad local acerca de las infraestructuras que puede usar. Su esfuerzo posibilitará la recogida, el reciclado y la destrucción seguros de baterías usadas y ayudará a proteger el medioambiente y a reducir los riesgos para la salud. - Precaución: El uso de una batería incorrecta puede provocar riesgo de explosión. Deseche las baterías gastadas de acuerdo a las instrucciones. ENERGY STAR Los productos calificados con la ENERGY STAR de Gateway le permiten ahorrar dinero reduciendo el coste de la energía y protegiendo el medio ambiente sin afectar a las funciones o al rendimiento. En Gateway estamos orgullosos de ofrecer a nuestros clientes productos con la marca ENERGY STAR. ¿Qué es ENERGY STAR? Los productos calificados con la ENERGY STAR consumen menos energía y evitan las emisiones de gas de efecto invernadero cumpliendo unos estrictos requisitos de uso eficiente de la energía establecidos por la agencia de protección medioambiental de EE.UU. Gateway se compromete a ofrecer productos y servicios en todo el mundo que ayuden a los clientes a ahorrar dinero, conservar la energía y mejorar la calidad de nuestro medio ambiente. Cuanta más energía podamos ahorrar mediante un uso más 118 eficiente de la energía, más reduciremos los gases de efecto invernadero y los riesgos de que cambie el clima. Para más información, consulte www.energystar.gov o www.energystar.gov/powermanagement. - Nota: Puede que la información de esta sección no se aplique a su equipo. Los productos calificados con la ENERGY STAR de Gateway: - Producen menos calor, y reducen las cargas de refrigeración y el recalentamiento. - Entran automáticamente en el modo de "suspensión de la pantalla" y "suspensión del ordenador" tras 10-30 minutos de inactividad respectivamente. - Desactive el modo de suspensión pulsando el teclado o moviendo el ratón. - En el modo de "suspensión", los ordenadores ahorrarán más del 80% de energía. ENERGY STAR y la marca de ENERGY STAR son marcas registradas en EE.UU. Medioambiente - 119 LICENCIA DE SOFTWARE - Nota: La mayoría de las aplicaciones de software ya están preinstaladas en la computadora Gateway. Están listas para ser usadas o configuradas. Sin embargo, algunos títulos requieren un CD o DVD para ejecutarse. Encontrará estos discos en el embalaje de la computadora. Contrato de licencia (Productos CD y/o DVD) de Gateway. Esta copia del original es la prueba de licencia para usted. Trátelo como algo valioso. ¡Importante! Lea cuidadosamente antes de instalar el software. El siguiente Contrato de licencia se aplica a usted. Este es un contrato legal entre usted (ya sea un individuo o una entidad) y Gateway. Al instalar el software usted está aceptando los términos de este Contrato. Si usted no acepta los términos de este Contrato, devuelva inmediatamente todo el sistema informático, el paquete de software cerrado, si corresponde, como así también los términos adjuntos (incluyendo material escrito u otros recipientes) en el lugar que los obtuvo para que le devuelvan el importe total. GATEWAY LICENCIA DE SOFTWARE 1. Otorgamiento de licencia Este contrato de licencia (“Licencia”) de Gateway le permite usar una copia de la versión especificada del SOFTWARE de Gateway antes identificado (que puede incluir al menos un disco de CD o DVD) en una sola computadora, siempre que el SOFTWARE esté en uso en una sola computadora en cualquier momento. Si usted tiene Licencias múltiples para el SOFTWARE, entonces en cualquier momento puede tener en uso tantas copias del SOFTWARE como Licencias. El SOFTWARE está “en uso” en una computadora cuando está cargada en la memoria temporal (es decir, RAM) o instalada en la memoria permanente (por ejemplo, disco duro, CD y/o DVD), u en otro dispositivo de almacenamiento de la computadora, excepto que una copia instalada en un servidor de 120 red con el solo propósito de distribución a otra computadora no está “en uso”. Si el número de usuarios anticipado del SOFTWARE excederá el número de Licencias aplicables, entonces debe tener un mecanismo o proceso razonable para asegurar que el número de personas que usan el SOFTWARE simultáneamente no exceda el número de Licencias. Si el SOFTWARE está instalado de forma permanente en el disco duro o en el dispositivo de almacenamiento de una computadora (que no sea un servidor de red) y una persona usa esa computadora más del 80% del tiempo que está en uso, entonces esa persona también puede usar el SOFTWARE en una computadora portátil o doméstica. 2. Copyright El SOFTWARE es propiedad de Gateway o de sus proveedores y está protegido por la disposición del tratado internacional y las leyes de copyright de los Estados Unidos. Por lo tanto, debe tratar el SOFTWARE como cualquier otro material con derechos de autor (por ejemplo, un libro o una grabación musical) excepto que transfiera la porción del SOFTWARE del CD y/o DVD, si aplica, a un solo disco duro siempre y cuando usted guarde el original únicamente con fines de archivo o como copia de seguridad. No puede copiar la porción del CD y/o DVD del SOFTWARE o el material escrito que lo acompaña. 3. Otras restricciones No puede alquilar o arrendar el SOFTWARE, pero puede transferir el SOFTWARE y el material escrito que lo acompaña de forma permanente siempre y cuando usted no se quede con copias y el destinatario acepte los términos de este Contrato. No se puede realizar una ingeniería inversa del SOFTWARE, ni tampoco descompilarlo o desmontarlo. Cualquier transferencia del SOFTWARE debe incluir la actualización más reciente y todas las versiones previas. Licencia de Software - 121 INFORMACIÓN SOBRE LICENCIAS DE SOFTWARE GRATUITOS O SOFTWARE DE OTROS FABRICANTES El software precargado, grabado o distribuido con los productos provistos por Gateway contienen programas de software gratuitos o de otros fabricantes (el “Software gratuito”), que están autorizados de acuerdo con los términos de la Licencia Pública General (la “GPL”) de GNU. El Software gratuito está marcado como tal. El copiado, la distribución y/ o modificación del Software gratuito estarán sujetos a los términos de la GPL. El Software gratuito se distribuye con el fin de que pueda ser de utilidad para los usuarios, pero no se ofrece NINGUNA GARANTÍA, ni siquiera la garantía implícita de COMERCIABILIDAD o IDONEIDAD PARA UN FIN DETERMINADO. Siempre se aplicarán las disposiciones de la Licencia General Pública de GNU. Puede ingresar directamente a http://www.gnu.org para obtener una copia de la GPL o escribir a la Free Software Foundation, Inc. (Fundación para el software gratuito) y pedir una copia. La dirección de la Free Software Foundation, Inc es: 59 Temple Place - Suite 330, Boston, MA, 02111-1307, USA. Durante un período de (3) años comenzando desde la fecha en que recibe este software, usted puede obtener una copia completa legible por máquina del código fuente para el software gratuito de acuerdo con los términos de la GPL sin cargo alguno, salvo los gastos del soporte, el envío y la entrega, por un pedido hecho a nosotros. Contáctenos si tiene alguna pregunta. Nuestra dirección de correo es 8F, 88, Sec. 1, Hsin Tai Wu Rd., Hsichih, New Taipei City 221, Taiwán. 122 ÍNDICE A Actualizar Advertencia de epilepsia ...................... 14 Actualizaciones automáticas de audio Resolución de problemas ............... 89 Windows ........................................ 64 B batería malas condiciones ......................... 42 aviso de batería baja ...................... 42 maximización de la vida ................. 38 características ................................ 37 optimización................................... 41 carga ............................................. 41 primer uso ..................................... 38 comprobación del nivel de carga ..... 41 Baterías ............................................. 118 extracción ................................ 40, 41 brillo teclas de acceso directo ................. 19 instalación...................................... 40 bus serie universal ............................... 33 C Cables ......................................... 10, 113 Cables de alimentación ........................ 10 carga comprobación del nivel ................... 41 CD-ROM expulsar manualmente ................... 90 Resolución de problemas ............... 90 computadora características................................ en indicador ................................... conexiones red ................................................ Conexiones de red ............................... Cursor ................................................. 15 21 32 51 28 D desecho de la batería ......................... 118 DSL ..................................................... 49 Dispositivos de medios extraíbles ......... 32 E Entorno de la computadora .................... 8 Explorador ........................................... 54 Índice - 123 F Firewall ................................................ 57 G Garantía ............................................... 7 Gateway Programa Recovery Management... 47 I impresora Internet Resolución de problemas ............... 90 Conexión ................................. 48, 49 Información reglamentaria ............ 98, 117 Firewall .......................................... 57 Interferencia ....................................... 112 L LAN (Red de área local) ....................... 51 Limpieza de la computadora ................. 11 Lector de tarjetas de memoria............... 30 M Malware ............................................... 56 Recovery Management .................. 65 Mantenimiento Medioambiente .................................. 117 Programa Recovery Management ... 47 Módem .......................................... 49, 50 N Norton Internet Security .................. 55, 60 P Pantalla teclas de acceso directo ................. 18 pantalla Resolución de problemas ............... 89 parlantes Resolución de problemas ............... 89 tecla de acceso directo ............. 19, 20 Precauciones de salud ......................... 12 124 Precauciones de seguridad .................... 8 preguntas frecuentes............................ 88 Preguntas frecuentes. Ver preguntas frecuentes problemas............................................ 88 CD-ROM ....................................... 90 impresora ...................................... 90 inicio .............................................. 88 pantalla .......................................... 89 Proveedor de servicios de Internet teclado ........................................... 90 (PSI) .................................................... 48 puertos ................................................ 30 R Recuperación Recovery Management .................. 65 Programa Recovery Management ... 47 red ...................................................... 32 S Seguridad Software Actualizaciones .............................. 64 Licencia de Software .................... 120 Antivirus......................................... 57 Spyware .............................................. 56 T Teclado teclas de acceso directo ....................... 20 teclas de acceso directo ................. 20 touchpad ............................................. 28 usando .................................... 28–28 teclado Resolución de problemas ............... 90 U Unidades Lector de tarjetas de memoria......... 30 V vista izquierdo........................................ 22 derecha ......................................... 24 vista frontal .......................................... 21 frontal ............................................ 22 vista izquierda ...................................... 21 W WiFi ..................................................... 51 Windows Actualizaciones automáticas de Windows ........................................ 64 Ver.02.01.02 Uso de Windows ............................ 47 Índice - 125 Manual do Usuário Gateway NE71B - 1 CONTEÚDO Iniciar o seu computador 4 Carga da bateria ...................................... Verificação da carga da bateria ............... Optimização da vida da bateria................ Advertência de baixa carga da bateria..... 39 40 40 40 Ligação sem fios ................................................ 4 Registo ............................................................... 5 Instalação de software ....................................... 6 Recovery ............................................................ 6 Gestão de energia 42 Tem problemas? ................................................ 6 Poupar energia ................................................ 42 Básicos do computador 8 Software 45 Segurança e conforto......................................... 8 Utilização do Windows e Software .................. 45 Precauções de segurança .......................... 8 Oferta de Segurança da Internet.............. 45 Precauções de saúde ............................... 12 Gateway Recovery Management............. 45 Conhecer o seu computador 15 Internet Vista de topo - ecrã .......................................... 16 Primeiros passos na Internet........................... Vista de topo – teclado..................................... 17 Proteger o seu computador...................... Teclas especiais ....................................... 18 Escolha um Fornecedor de Servios Vista frontal ...................................................... 21 Internet ..................................................... Vista esquerda ................................................. 22 Ligações de rede...................................... Vista direita ...................................................... 24 Navegar na Net! ....................................... Visão da base .................................................. 26 Segurança................................................ Teclado táctil 27 Recuperação Princípios fundamentais do teclado táctil......... 27 Criar uma cópia de segurança de Gestos do teclado táctil.................................... 28 recuperação..................................................... Actualizar o seu computador 29 Criar cópia de segurança de controladores Expandir através de opções............................. 29 e de aplicações................................................ Opções de conectividade.......................... 29 Recuperar o sistema ....................................... Reinstalar controladores e aplicações ..... Fonte de alimentação 35 Regressar a uma captura de sistema Transformador CA............................................ 35 anterior ..................................................... Bateria.............................................................. 36 Repor o sistema para o estado de Características da Bateria......................... 36 fábrica ...................................................... Substituição da bateria ............................. 38 Recuperar a partir do Windows................ Instalação e remoção da bateria............... 39 2 46 46 46 46 48 52 52 62 63 67 69 70 73 75 75 Recuperar a partir da cópia de segurança de recuperação ....................... 79 Perguntas frequentes Onde estão as minhas aplicações? ......... O que é um ID Microsoft (conta)? ............ Como adiciono um favorito ao Internet Explorer?.................................................. Como verifico a existência de atualizações Windows?............................ Onde posso obter mais informações? ..... 83 Dicas e sugestões para usar o Windows 8........................................................ 86 Existem três conceitos que deverá ter em mente .................................................. 86 Como acedo a charms?............................ 86 Como acedo a Iniciar? .............................. 86 Como salto entre aplicações?................... 87 Como desligo o meu computador? ........... 87 Porque existe uma nova interface? .......... 87 Como desbloqueio o meu computador? ... 88 Como personalizo o meu computador? .... 88 Quero usar o Windows da forma que estava habituado - quer o ambiente de trabalho de volta! ................................. 89 Informação regulatória 90 91 92 92 92 93 Ambiente 112 Licença de software 115 Índice Remissivo 118 Copyright © 2012.Todos os direitos reservados. Manual do Usuário Gateway NE71B Esta revisão: 20 julho 2012 Visite registration.gateway.com e descubra os benefícios de ser um cliente Gateway. Nota: Todas as imagens servem apenas como referência. A configuração efectiva poderá variar. Conteúdo - 3 INICIAR O SEU COMPUTADOR Obrigado por ter adquirido este computador Gateway! Este manual foi concebido para apresentar as características do seu computador e para o auxiliar na sua experiência de trabalho com o mesmo. Depois de instalar e iniciar o seu computador, como indicado nas instruções de instalação, deverá responder a algumas perguntas que o irão ajudar a ligar-se à Internet. O seu computador irá então configurar o software instalado. LIGAÇÃO SEM FIOS Para ligar a uma rede sem fios, primeiro verifique se as funcionalidades sem fios do seu computador estão ligadas, e que o router ou modem ao qual deseja ligar também está devidamente configurado. • Se não tiver ligada a função sem fios, prima a tecla Windows ( ) + W, digite "Wireless" e depois clique em Sem fios. Clique no interruptor em Wi-Fipara ativar a ligação sem fios. Clique novamente para desativar. • Para ligar a uma rede, prima a tecla Windows ( ) + W, digite "Wireless" e depois clique em Ligar a uma rede. Selecione a sua rede e introduza a palavra-passe se necessário. • Após um breve momento, o seu computador deverá ligar-se à Internet. 4 Caso a sua rede não seja detectada, ou caso o seu computador não se ligue à Internet, consulte a documentação do seu ISP ou router. Depois de iniciar, pode utilizar o computador, abra o Internet Explorer e siga as instruções. Como alternativa, utilize um cabo de rede para ligar directamente a uma porta de rede no seu router. Consulte o guia do seu ISP ou router. REGISTO Quando utiliza o seu computador pela primeira vez, é recomendado que o registe. Tal irá permitir-lhe usufruir de alguns benefícios, como: • Serviço mais rápido, prestado pelos nossos representantes. • Registo na comunidade Gateway: recepção de promoções e participação em inquéritos ao cliente. • As últimas notícias da Gateway. Como se Registar Durante o arranque iniciar do seu portátil ou computador de secretária, uma janela irá convidá-lo(a) a registar-se. Preencha a informação e clique em Seguinte. A segunda janela que verá contém campos opcionais que nos ajudarão a dar-lhe uma experiência mais pessoal de apoio ao cliente. Outra opção Outra forma de registar o seu produto Gateway é visitar o nosso site em registration.gateway.com. Escolha o seu país e siga as simples instruções. Iniciar o seu computador - 5 Depois de registar, ser-lhe-á enviado um correio electrónico de confirmação, com informações importantes que deverá guardar em local seguro. INSTALAÇÃO DE SOFTWARE O seu computador irá instalar automaticamente o software e preparar o seu computador para utilização. Poderá demorar algum tempo, não desligue o seu computador; aguarde até que a instalação tenha terminado. RECOVERY Deverá criar discos de recuperação assim que possível. O programa Recuperação permite-lhe criar discos de recuperação e restaurar ou reinstalar aplicações e controladores fornecidos pela Gateway. TEM PROBLEMAS? Gateway apresenta várias opções para o auxiliar com a sua compra. assistência Gateway Não se esqueça de anotar o número de série do seu computador, data e local de compra e o nome do modelo na área para o efeito, neste guia; guarde a sua prova de compra. Antes de nos contactar, anote qualquer mensagem de erro que acompanhe o problema, e tenha o computador à sua frente e ligado, caso seja possível. Tendo estes elementos à mão garante, quando nos contactar, uma assistência melhor e mais rápida. 6 Website da Gateway Não se esqueça de visitar gateway.com – Veja a secção de suporte para informações actualizadas, ajuda, controladores e transferências. Informação de Garantia e de Contacto Pode encontrar a informação sobre a garantia do seu computador e como contactar o suporte técnico na Garantia do seu computador. Iniciar o seu computador - 7 BÁSICOS DO COMPUTADOR SEGURANÇA E CONFORTO Precauções de segurança Siga as linhas de orientação abaixo, para utilizar o seu computador confortavelmente e para evitar problemas de saúde. Ambiente do computador Certifique-se que o computador: • É utilizado numa superfície, suporte ou mesa estável. Uma queda poderá danificar seriamente o computador. • Não é utilizado numa superfície que vibra, nem utilizado quando pratica desporto, exercício ou outras actividades num ambiente dinâmico. A vibração ou movimento pode soltar apertos, danificar componentes internos e até causar fugas na bateria. • Está afastado da luz solar directa e de fontes de calor. • Está afastado de campos magnéticos ou dispositivos geradores de electricidade estática. • Está afastado pelo menos 30 centímetros (um pé) de um telemóvel. • Não está num ambiente com poeira nem humidade. • Não é utilizado perto de água. Nunca entorne líquidos de nenhum tipo sobre ou no produto. 8 • Não é colocado sobre um tapete ou qualquer outra superfície que possa ter carga eléctrica. Nota • As ranhuras e aberturas existentes servem para ventilação; para assegurar o bom funcionamento do produto e para evitar o seu sobreaquecimento. Estas aberturas não devem ser bloqueadas ou cobertas. As aberturas nunca devem ser bloqueadas pela colocação do produto sobre uma cama, um sofá, um tapete ou sobre qualquer outra superfície do género. Este produto nunca deve ser colocado perto ou sobre um radiador ou saída de ar quente, ou numa instalação embutida a não ser que seja fornecida a ventilação adequada. • Nunca introduza qualquer tipo de objectos neste produto através das ranhuras da caixa, uma vez que poderão tocar em pontos de voltagem perigosos ou provocar curto circuitos que podem resultar em incêndio ou em choques eléctricos. Nunca derrame qualquer tipo de líquido sobre o produto. • Para evitar danos ao nível dos componentes internos e para evitar a fuga de líquido da bateria, não coloque o produto sobre superfícies que vibrem. • Nunca use em condições esportivas, de exercício ou vibratórias, o que provavelmente causará curtos-circuitos inesperados ou danos aos dispositivos do rotor, HDD, unidade óptica e até mesmo exposição ao risco da bateria de lítio. Básicos do computador - 9 Cabos Certifique-se que: • Os cabos não estão esticados e que não há risco de alguém tropeçar nos mesmos. • Outros dispositivos não estão a esmagar os cabos. • O cabo de alimentação é ligado ao computador antes de ligar o cabo de alimentação à tomada de alimentação CA. • O cabo de alimentação é desligado da tomada antes de desligar o cabo de alimentação do computador. • Cabos de alimentação de três pinos estão ligados a uma tomada eléctrica ligada à terra. • A tomada eléctrica é de fácil acesso e tão próxima do computador quanto possível (não sobrecarregue com muitos transformadores). Se o seu computador utiliza um adaptador CA externo: • Não tape nem coloque objectos sobre o adaptador CA. Deixe o adaptador arrefecer devidamente durante a utilização, mantendo-o afastado de objectos. • Utilize apenas o transformador CA fornecido com o seu computador. Embora outros transformadores possam parecer semelhantes, utilizálos pode danificar o seu computador. Se for necessária uma substituição, utilize apenas peças certificadas para utilização com o seu computador. 10 Limpar o seu computador • Desligue sempre o computador da tomada eléctrica antes de o limpar. • Não utilize produtos de limpeza em líquido ou aerossol, utilize antes um pano humedecido. • Nunca utilize produtos de limpeza em spray directamente sobre o ecrã. • Se entornar líquidos no seu computador, desligue-o imediatamente, desligue o adaptador CA, remova a bateria e certifique-se que está totalmente seca antes de voltar a ligar. Espere uma noite, se necessário. Nota: Se o seu computador incluir ranhuras para cartões de memória ou dispositivos de expansão, pode ser que estejam instalada protecções plásticas nas mesmas. Elas protegem as ranhuras não usadas contra poeira, objectos metálicos e outras partículas. Guarde as protecções para usar quando não houver cartões nas ranhuras. Reparar o seu Computador Não tente reparar o computador por si próprio, pois a abertura ou a remoção das tampas podem expô-lo a voltagens perigosas ou outros riscos. Todos os serviços de assistência devem ser prestados por pessoal técnico qualificado. Desligue o computador da tomada eléctrica e entregue-o a pessoal de assistência qualificado, nas seguintes condições: • quando o cabo ou ficha de alimentação estiver danificado ou descarnado, • se algum líquido for derramado no produto, Básicos do computador - 11 • se o produto for exposto à chuva ou água, • se o produto cair ou o seu exterior tiver sido danificado, • se o produto demonstrar uma perda de desempenho, • se o produto não funcionar normalmente quando as instruções de utilização forem seguidas Nota: Ajuste apenas os controlos que estão descritos nas instruções de utilização, uma vez que o ajuste incorrecto de outros controlos pode provocar danos que exijam trabalho especializado por parte de um técnico qualificado para restaurar a condição normal do produto. Precauções de saúde • A superfície inferior, as áreas em torno das aberturas de ventilação e o adaptador CA podem aquecer. Para evitar danos pessoais, certifiquese que não entram em contacto com a sua pele ou corpo. • O seu dispositivo e respectivos acessórios podem conter componentes pequenos. Mantenha-os fora do alcance de crianças pequenas. • O computador e acessórios podem conter peças pequenas. Mantenhaas fora do alcance de crianças pequenas. • Se trabalhar ou jogar muitas horas seguidas, não se esqueça de fazer pausas regulares. Descanse a vista, não olhando para o ecrã do computador de vez em quando. Não utilize o computador se estiver cansado. • Prepare o seu computador de modo a poder trabalhar numa posição natural e relaxada. Coloque os itens que usa frequentemente ao alcance. 12 • Posicione o computador directamente em frente de si para maior segurança e conforto. Certifique-se que o teclado e painel táctil estão a uma altura confortável. O ecrã deverá estar a cerca de 45-70 cm (1830 polegadas) dos seus olhos. Se utilizar o seu computador durante longos períodos de tempo sentado a uma secretária, invista num teclado externo para conforto adicional. • Para proteger a sua audição, quando utiliza altifalantes ou auscultadores, aumente o volume de forma gradual até ouvir de forma clara e confortável; não aumente o nível de volume depois de os seus ouvidos se terem ajustado. Não utilize volumes altos durante períodos de tempo alargados. Não aumente o volume para bloquear ambientes ruidosos; diminua o volume se não conseguir ouvir pessoas a falar perto de si. • A base do computador, adaptador de energia e o ar das ranhuras de ventilação poderão aquecer durante a utilização. Evite contacto contínuo com o corpo e não coloque o computador no seu colo enquanto está ligado. • Certifique-se que as ranhuras de ventilação e aberturas do computador não estão obstruídas nem tapadas. Não coloque o computador numa superfície mole (como carpete, cadeira ou cama) que possa bloquear as ranhuras de ventilação. • Não introduza objectos de nenhum tipo na ventilação ou ranhuras da caixa, pois podem tocar pontos de tensão perigosa ou colocar as peças em curto-circuito, o que pode provocar um incêndio ou choque eléctrico. Básicos do computador - 13 • Alguns problemas com as mãos, pulsos, braços, pescoço, ombros, pernas e costas podem estar associados com, ou agravados por certas acções repetitivas. Para reduzir o risco de desenvolver tais problemas, escreva com os pulsos direitos e as mãos e pulsos posicionados acima do teclado. Se sentir dores, formigueiro, dormência ou qualquer outro desconforto, contacte o seu médico. • Recomendamos que os pais monitorizem o uso de jogos pelas crianças. Se sentir ou a sua criança sentir qualquer dos seguintes sintomas: tonturas, visão desfocada, tiques oculares ou musculares, perda de consciência, desorientação, qualquer movimento involuntário ou convulsões, pare IMEDIATAMENTE de utilizar o computador e consulte o seu médico. Poderá acontecer até em pessoas sem antecedentes médicos de epilepsia. 14 CONHECER O SEU COMPUTADOR Depois de montar o computador tal como indicado nas instruções, deixenos mostrar-lhe o seu novo Gateway computador. Gateway NE71B Conhecer o seu computador - 15 VISTA DE TOPO - ECRà 1 2 3 # Ícone Item Descrição 1 Webcam Câmara web para comunicações vídeo. Uma luz junto da Webcam indica que a webcam está ativa. 2 Microfone Microfone interno para gravação de som. Ecrã Também chamado ecrã de cristais líquidos (LCD), permite visualizar a informação do computador. 3 16 VISTA DE TOPO – TECLADO 1 5 2 3 4 # 1 Ícone Item Indicador/Botão de alimentação 2 Teclado 3 Teclado táctil Descrição Liga e desliga o computador. Indica o estado da alimentação do computador. Para introduzir informações no seu computador. - As teclas especiais estão descritas na página 18. Dispositivo apontador sensível ao toque, que funciona como um rato de computador. Conhecer o seu computador - 17 # Ícone Item Descrição 4 Botões de clique (esquerdo e direito) O lado esquerdo e direito do botão funciona como os botões de selecção esquerdo e direito. 5 Altifalantes Obtenha saída de áudio em estéreo. Teclas especiais O teclado do seu computador inclui teclas que activam funções especiais. A função de cada tecla está marcada com um ícone. Ícone Função Fn 18 Descrição Tecla de atalho para função secundária Activa uma segunda função em certas teclas. Por ex., prima a tecla Fn para activar as teclas F1 a F12. Ajuda Abre o menu de ajuda. Backup Permite-lhe criar cópias de segurança de todo o seu sistema, ou apenas de ficheiros ou pastas seleccionados. Crie um agendamento regular ou realize cópias sempre que o desejar. Comunicação Activa/desactiva os dispositivos de comunicação do computador. Comutação de visualização Alterna a saída entre o ecrã de visualização, o monitor externo (se está ligado) e ambos. Ícone Função Descrição Ecrã em branco Desliga a luz de fundo do ecrã de visualização para economizar energia. Prima qualquer tecla para retomar a actividade. Comutação de teclado táctil Liga e desliga o teclado táctil interno. Reproduzir/ Pausar Reproduz ou pausa um ficheiro multimédia seleccionado. Parar Para a reprodução do ficheiro multimédia seleccionado. Anterior Retorna ao ficheiro multimédia anterior. Seguinte Avança até ao ficheiro multimédia seguinte. Reduzir luminosidade Reduz a luminosidade do ecrã. Aumentar luminosidade Aumenta a luminosidade do ecrã. Abre a aplicação de Redes Sociais. Rede social - Se esta aplicação não estiver instalada, a tecla irá iniciar a aplicação de mensagens instantâneas. Aumentar volume Aumenta o volume de som. Diminuir volume Diminui o volume de som. Conhecer o seu computador - 19 Ícone Função Comutação de altifalante Descrição Liga e desliga os altifalantes. Teclas de atalho O computador utiliza teclas de atalho (combinação de teclas) para aceder a teclas de função e comandos de navegação. Para activar as teclas de atalho, prima e mantenha premida a tecla Fn (canto inferior esquerdo) antes de premir a outra tecla na combinação de teclas de atalho. Tecla de atalho Função Descrição Fn + Teclas especiais (ver página 18) Teclas de funções Activa as teclas F1 a F12. Fn + Home Desloca até ao início de um documento. Fn + End Desloca até ao final de um documento. Fn + Page Up Desloca uma página para cima num documento. Fn + Page Down Desloca uma página para baixo num documento. - Nota: Não é necessário premir a tecla Fn para utilizar as teclas de função F1 a F12 quando inicia o seu computador, nem quando utiliza a BIOS. Para trocar a tecla de atalho e função especial das teclas F1 a F12, altere a definição da tecla de função na BIOS (para abrir a BIOS prima F2 quando inicia o computador, e depois seleccione o menu Main (Principal) e altere o Comportamento das teclas de função para Teclas de função). 20 VISTA FRONTAL 1 # 2 Ícone Item Indicador de alimentação Descrição Indica o estado da alimentação do computador. Indica o estado da bateria do computador. Indicador da bateria 1 2 - A carregar: A luz é âmbar quando a bateria está a carregar. - Carga completa: A luz é azul no modo CA. Indicador HDD Indica quando o disco rígido está activo. Indicador de comunicação Indica o estado do dispositivo de ligação sem fios do computador. Leitor de cartões vários-em-um Aceita cartões Secure Digital (SD), MultiMediaCard (MMC), Memory Stick PRO (MS PRO), xD-Picture Card (xD). - Empurre para remover/instalar o cartão. Apenas pode ser utilizado um cartão de cada vez. - Nota: Os indicadores no painel dianteiro são visíveis mesmo com a tampa do monitor fechada. Conhecer o seu computador - 21 VISTA ESQUERDA 1 # 2 Ícone Item Ranhura para fecho Kensington 1 3 4 5 6 Descrição Liga a um cadeado de segurança Kensington (ou compatível). - Enrole o cabo de bloqueio de segurança do computador em torno de um objecto imóvel, como por exemplo uma mesa ou o puxador de uma gaveta fechada. Introduza o cabo de segurança na ranhura e rode a chave para proteger o bloqueio. Também estão disponíveis modelos sem chave. 2 Ventilação e ventoinha de arrefecimento Permite ao computador manter-se fresco. 3 Porta Ethernet (RJ-45) Liga a uma rede Ethernet de base 10/100/1000. 4 Ligação a ecrã externo (VGA) Liga a um dispositivo de visualização (por exemplo, monitor externo, projector LCD). 22 - Não tape nem obstrua as aberturas. # 5 Ícone Item Porto HDMI Descrição Suporta ligações de vídeo digital de alta definição. Liga a dispositivos USB. 6 Portas USB - Se uma porta for preta é compatível com USB 2.0, se for azul é também compatível com USB 3.0 (ver abaixo). Informações sobre USB 3.0 • Compatível com dispositivos USB 3.0 e anteriores. • Para melhor desempenho, utilize dispositivos com certificação USB 3.0. • Definido pela especificação USB 3.0 (USB SuperSpeed). Conhecer o seu computador - 23 VISTA DIREITA 1 # 1 2 Ícone Item Tomada de auscultadores/ altifalante Tomada para microfone 3 4 56 7 Descrição Liga a dispositivos de saída de áudio (por exemplo, altifalantes, auscultadores). - Suporta auscultadores 3,5 mm compatíveis, com microfone integrado (por exemplo, auscultadores Acer smart handheld). Aceita entradas de microfones externos. Liga a dispositivos USB. - Se uma porta for preta é compatível com USB 2.0, se for azul é também compatível com USB 3.0 (ver abaixo). 2 Porta USB 3 Unidade óptica Unidade óptica interna; aceita CDs ou DVDs. 4 Indicador de acesso do disco óptico Acende quando a unidade óptica está activa. 24 # 5 Ícone Item Botão de ejecção da unidade óptica 6 Furo de ejecção de emergência 7 Tomada de entrada CC Descrição Ejecta o disco óptico da unidade. Ejecta o tabuleiro da unidade óptica quando o computador está desligado. - Introduza, com cuidado, um clip endireitado para ejectar o tabuleiro da unidade óptica. Liga ao transformador CA do seu computador. Informações sobre USB 3.0 • Compatível com dispositivos USB 3.0 e anteriores. • Para melhor desempenho, utilize dispositivos com certificação USB 3.0. • Definido pela especificação USB 3.0 (USB SuperSpeed). Conhecer o seu computador - 25 VISÃO DA BASE 1 2 4 3 # Ícone Item Descrição 1 Baía da bateria Contém a bateria do computador. 2 Patilha de libertação da bateria Liberta a bateria para remoção. Introduza uma ferramenta adequada e deslize para libertar. Compartimento da memória Aloja a memória principal do computador. Compartimento do disco rígido Aloja o disco rígido do computador (seguro por parafusos). 3 4 26 Ventilação e ventoinha de arrefecimento Permite ao computador manter-se fresco. - Não tape nem obstrua as aberturas. TECLADO TÁCTIL PRINCÍPIOS FUNDAMENTAIS DO TECLADO TÁCTIL O painel táctil controla a seta (ou ‘cursor’) no ecrã. À medida que arrasta o dedo no painel táctil, o cursor segue este movimento. Prima os botões esquerdo o direito, situados na extremidade do teclado táctil, para efectuar funções de selecção e de execução. Estas duas áreas são semelhantes aos botões esquerdo e direito de um rato. Tocar no teclado táctil equivale a clicar com o botão esquerdo. Nota: O teclado táctil é sensível aos movimentos dos dedos.Assim, quanto mais leve for o toque, melhor será a resposta. Mantenha o teclado táctil e os seus dedos secos e limpos. O cursor é controlado por alguns gestos básicos: • Deslocar um dedo: Desloque um dedo pela superfície do teclado táctil para movimentar o cursor. • Toque com um dedo: Dê um só toque no teclado táctil com o seu dedo para executar um clique, que irá seleccionar ou iniciar um item. Rapidamente, toque novamente para realizar dois toques ou "duplo toque". • Arrastar: Mantenha premido o lado esquerdo do botão de selecção ou toque duas vezes em qualquer área do painel táctil, quando deslizar um segundo dedo pelo painel táctil, selecciona todos os itens na área. Teclado táctil - 27 GESTOS DO TECLADO TÁCTIL O Windows 8 e muitas aplicações são compatíveis com gestos do teclado táctil com um ou mais dedos. Nota: A compatibilidade com gestos do teclado táctil depende da aplicação activa. Isto permite-lhe controlar as aplicações com uns simples gestos, como: • Deslizar o dedo a partir de um canto: Aceda às ferramentas Windows deslizando a partir da direita, centro ou esquerda do teclado táctil para o centro. • Deslizar o dedo a partir do canto direito: Comutar charms. • Deslizar o dedo a partir do canto superior: Comutar comandos de aplicações. • Deslizar o dedo a partir do canto esquerdo: Activar a aplicação anterior. • Deslocar dois dedo: Percorra rapidamente páginas web, documentos e listas de reprodução com dois dedos no teclado táctil e movendo ambos os dedos em qualquer direcção. • Apertar dois dedo: Aumente e diminua o zoom de fotos, mapas e documentos com simples gestos com o indicador e polegar. 28 ACTUALIZAR O SEU COMPUTADOR EXPANDIR ATRAVÉS DE OPÇÕES O seu computador apresentam muitas opções para uma completa experiência de computação. Opções de conectividade As portas permitem-lhe ligar dispositivos periféricos ao seu computador. Para instruções sobre como ligar diferentes dispositivos externos ao computador, leia a secção seguinte. Leitor de cartões de memória Os cartões de memória são utilizados em muitas câmaras digitais, PDA, leitores MP3 e telemóveis. Inserir um cartão de memória 1. Alinhe o cartão de modo a que o conector fique virado para a porta, com os conectores virados para baixo. 2. Com cuidado, deslize o cartão para dentro da porta. Se sentir necessidade de usar mais força para inserir o cartão, tente reorientá-lo ligeiramente. 3. Empurre o cartão até encaixar com um clique. Ficarão para fora da ranhura alguns milímetros do cartão. Se o cartão contiver alguns ficheiros, a janela de Reprodução Automática do Windows poderá aparecer (consoante o conteúdo do Actualizar o seu computador - 29 cartão), e ser-lhe-á perguntado se deseja utilizar um programa para aceder ao conteúdo do cartão. Seleccione aqui uma opção que seja adequada, caso contrário, seleccione Cancelar. Se o cartão não contiver quaisquer ficheiros ou ficheiros desconhecidos, uma janela será aberta, com o conteúdo do cartão. Cartões SD, SDHC e SDXC Diferentes tipos de cartões SD possuem diferentes capacidades, mantendo o mesmo design global. Cartões SD podem conter até 4 GB, cartões SDHC conter até 32 GB, e cartões SDXC conter até 2048 GB (2 TB). O seu computador fornece um leitor de cartões compatível com SDHC ou SDXC. Nota: Os cartões de memória SDXC apenas podem ser usados num leitor compatível com SDXC; Cartões SD e SDHC podem ser usados em qualquer tipo. 30 Remover um cartão de um leitor de cartões de memória 1. Clique na seta Mostrar ícones ocultos na Área de Notificações (junto do relógio). 2 2. Clique no ícone Remover Hardware em Segurança. 3. Clique em Ejectar Cartão SD (ou no nome do dispositivo). 4. Aguarde até a mensagem É seguro remover o hardware. 5. Remova o cartão. 1 Armazenamento incorporado A função de rede incorporada permite-lhe ligar o seu computador a uma rede de base Ethernet. 3 Ligue um cabo de Ethernet desde a porta de rede Ethernet (RJ-45) que se encontra no chassis do computador, a uma tomada de rede ou ao hub da rede local. Actualizar o seu computador - 31 Universal Serial Bus (USB) A porta Universal Serial Bus (USB) 2.0 é um bus série de alta velocidade que permite ligar periféricos USB sem ter de consumir recursos do sistema. Certos computadores podem incluir uma ou mais portas USB 3.0. São parecidas com as portas USB normais, mas incluem ligações internas adicionais e são azuis. Pode utilizar dispositivos compatíveis com USB 3.0 com estas portas, para usufruir de velocidades de transferência mais rápidas. Porta vídeo Ligue a um monitor com porta VGA ou DVI (o tipo de ligação suportado depende da configuração do seu computador). O cabo adequado é normalmente incluído com o monitor. Siga estes passos para ligar um monitor ao seu computador: 1. Verifique se o computador está desligado e o interruptor de alimentação do monitor está desligado. 2. Ligue o cabo vídeo à porta monitor do computador. Prenda a ligação cabo com os parafusos fornecidos. 3. Ligue o cabo de alimentação do monitor e ligue-o a uma tomada eléctrica com ligação terra. 4. Siga as instruções de configuração no manual do utilizador do monitor. 32 5. Ligue a energia do monitor, e depois o computador. 6. Certifique-se que a resolução actual e taxa de actualização não excedem as especificações do monitor. Caso seja necessário, altere as definições de imagem utilizadas pelo computador. Nota: Para aceder aos controlos do ecrã, prima a tecla Windows ( ) + W, digite "Display" e depois clique em Ecrã. Interface multimédia de alta definição(apenas para determinados modelos) A HDMI (interface multimédia de alta definição) é uma interface áudio/ vídeo totalmente digital, sem compressão, reconhecida pela indústria. A HDMI proporciona, com um cabo único, uma interface entre a fonte de áudio/vídeo digital compatível, como por exemplo uma caixa de configuração (set-top box), leitor de DVD ou receptor A/V, e um monitor de áudio/vídeo digital compatível, como por exemplo uma televisão digital (DTV). Use a porta HDMI do seu computador para ligar a equipamentos sofisticados de áudio e vídeo. A implementação de cabo único permite efectuar a instalação e a ligação com rapidez e facilidade. Actualizar o seu computador - 33 Auscultadores e microfone Estas duas portas permitem-lhe ligar dispositivos áudio. Utilize a porta de auscultadores para ligar auscultadores estéreo ou altifalentes com corrente. Ligar um dispositivo áudio à porta auscultador desactiva os altifalantes integrados. Utilize a porta microfone para ligar um microfone externo para gravação mono; ligar um microfone externo desactiva o microfone integrado. 34 FONTE DE ALIMENTAÇÃO TRANSFORMADOR CA O seu computador pode utilizar o transformador externo (um “bloco” de alimentação) para usar energia CA. É fornecido um cabo de alimentação que serve para o país onde foi adquirido o computador. O transformador fornece energia adequada a correr o computador e recarregar a bateria ao mesmo tempo. Precaução: Não tape nem coloque objectos sobre o adaptador CA. Manter o transformador livre de objectos ajuda-o a arrefecer devidamente durante a utilização. Fonte de alimentação - 35 Utilize apenas o transformador CA fornecido com o seu computador. Embora outros transformadores possam parecer semelhantes, utilizá-los pode danificar o seu computador. Aviso: O adaptador CA e a parte debaixo do computador podem ficar quentes após uma utilização prolongada. É normal, mas poderá causar danos devido ao contacto prolongado. BATERIA O computador utiliza uma bateria que proporciona uma utilização duradoura entre carregamentos. Características da Bateria A bateria possui as seguintes características: • Utiliza os padrões tecnológicos atuais para baterias. • Emite uma advertência de baixa carga. A bateria é recarregada sempre que o computador é ligado ao transformador CA. Seu computador permite recarregar a bateria enquanto continuar a utilizá-lo. Entretanto, a recarga é significativamente mais rápida quando o computador está desligado. A bateria é útil ao utilizar o computador numa viagem ou durante uma queda de energia eléctrica. Recomendamos que tenha, como reserva, uma bateria adicional totalmente carregada. Entre em contacto com seu revendedor para solicitar uma bateria adicional. 36 Maximização da vida da bateria Assim como todas as baterias, a do seu computador também se degrada com o tempo. Isto significa que o desempenho da bateria diminuirá com o tempo e o uso. Para maximizar a duração da sua bateria, siga as recomendações abaixo. Condicionamento de uma bateria nova Antes de usar a bateria pela primeira vez, há um processo de "condicionamento" que deve ser seguido: 1. Introduza a nova bateria no computador. Não ligue o computador. 2. Ligue o adaptador CA e carregue a bateria totalmente. 3. Desligue o adaptador de corrente alternada. 4. Ligue o computador e utilize-o com a alimentação da bateria. 5. Esvazie a bateria totalmente. 6. Volte a ligar o adaptador CA e recarregue a bateria totalmente. Repita estes passos até que a bateria tenha sido carregada e descarregada três vezes. Use este processo de condicionamento para todas as baterias novas, ou se a bateria não foi usada por muito tempo. Se o computador for ficar guardado por mais de duas semanas, recomenda-se remover a bateria do mesmo. Aviso: Não exponha as baterias a temperaturas inferiores a 0ºC (32ºF) ou superiores a 45ºC (113ºF). Temperaturas extremas podem prejudicar a bateria. Fonte de alimentação - 37 Seguindo o processo de condicionamento da bateria, ela poderá aceitar a máxima carga possível. O não seguimento deste procedimento impedirá que obtenha a máxima carga da bateria, além de encurtar sua vida-útil. Além disto, a vida-útil da bateria é prejudicada pelos seguintes padrões de utilização: • Usar o computador constantemente com a bateria instalada e a alimentação CA ligada. Se desejar usar a alimentação CA, recomendase remover a bateria depois que esteja totalmente carregada. • Não descarregue nem recarregue a bateria aos seus extremos, como descrito abaixo. • Uso frequente; quanto mais a bateria for usada, mais rápido ela chegará ao fim da vida-útil. Uma bateria normal de computador tem uma durabilidade de aproximadamente 300 ciclos de carga. Substituição da bateria A série de computadores portáteis utiliza baterias de lítio. Substitua a bateria por uma outra de tipo equivalente à fornecida juntamente com o produto. A utilização de uma bateria de tipo diferente poderá resultar em incêndio ou explosão. Atenção: As baterias podem explodir se não forem manuseadas adequadamente. Não as desmonte nem as deite no fogo. Mantenha fora do alcance das crianças. Deite fora as baterias usadas cumprindo as regulamentações locais. 38 Instalação e remoção da bateria Importante! Antes de remover a bateria do computador, ligue o adaptador CA se deseja continuar utilizando-o. Caso contrário, desligue o computador primeiro. Para instalar a bateria: 1. Alinhe a bateria com o compartimento; certifique-se de que a extremidade com contactos entre primeiro e que a parte superior da bateria esteja voltada para cima. 2. Deslize a bateria para dentro do compartimento e empurreasuavemente até que fique travada na posição correcta. Para remover a bateria: 1. Deslize a trava para liberar a bateria. 2. Puxe a bateria para fora do compartimento. Carga da bateria Para carregar a bateria, primeiro certifique-se de que esteja instalada correctamente no seu compartimento. Ligue o adaptador CA no computador e na tomada de energia eléctrica. É possível continuar a utilizar o computador com alimentação CA enquanto a bateria é carregada. Entretanto, a recarga é significativamente mais rápida quando a bateria com o computador está desligado. Nota: Recomenda-se carregar a bateria após parar de trabalhar. Recarregar a bateria durante a noite antes de viajar permite-lhe começar o dia seguinte com a bateria totalmente carregada. Fonte de alimentação - 39 Verificação da carga da bateria O indicador de energia do Windows indica o nível de carga actual da bateria. Deixe o cursor sobre o ícone de bateria/alimentação na barra de tarefas para saber o nível de carga actual da bateria. Optimização da vida da bateria Optimizar a vida da bateria ajuda a obter o máximo da sua capacidade, aumentando o ciclo de carga/descarga e melhorando a eficiência de recarga. Recomenda-se seguir as sugestões abaixo: • Adquira uma bateria adicional. • Use a alimentação CA sempre que possível, reservando a bateria para utilização em viagens. • Ejecte a Placa PC quando não estiver em uso, pois ela consome energia (para modelos seleccionados). • Guarde a bateria num local frio e seco. A temperatura recomendada é de 10°C (50°F) a 30°C (86°F). Temperaturas mais altas aceleram a autodescarga da bateria. • Recarga excessiva diminui a vida da bateria. • Cuide do adaptador CA e da bateria Advertência de baixa carga da bateria Ao usar a energia da bateria, observe o indicador de energia do Windows. Atenção: Ligue o adaptador CA logo que possível quando aparecer a advertência de baixa carga da bateria. Pode haver perda de dados se a bateria se esgotar completamente e o computador desligar. 40 Quando aparecer a advertência de baixa carga da bateria, a atitude a tomar dependerá da sua situação: Situação Acção Recomendada 1. Ligue o adaptador CA no computador e na O adaptador CA e tomada de energia eléctrica. uma tomada eléctrica estão disponíveis. 2. Guarde todos os ficheiros necessários. 3. Retorne ao trabalho. Desligue o computador se desejar recarregar a bateria rapidamente. Uma bateria adicional 1. Guarde todos os ficheiros necessários. totalmente carregada 2. Feche todas as aplicações. está disponível. 3. Encerre o sistema operacional e desligue o computador. 4. Substitua a bateria. 5. Ligue o computador e retorne ao trabalho. 1. Guarde todos os ficheiros necessários. O adaptador CA ou uma tomada eléctrica 2. Feche todas as aplicações. não estão 3. Encerre o sistema operacional e desligue o disponíveis. computador. Não há qualquer bateria reserva. Fonte de alimentação - 41 GESTÃO DE ENERGIA Este computador tem uma unidade incorporada para gestão de energia que monitoriza a atividade do sistema. A atividade do sistema envolve qualquer um, ou mais, dos seguintes dispositivos: teclado, rato, disco rígido, periféricos ligados às computador e memória de vídeo. Caso não seja detectada qualquer actividade durante um determinado período de tempo, o computador pára alguns ou todos estes dispositivos para poupar energia. POUPAR ENERGIA Desactive o arranque rápido O seu computador usa uma funcionalidade de arranque rápido para iniciar rapidamente mas também usa uma pequena quantidade de energia para procurar sinais para iniciar. Estas verificações drenam lentamente a bateria do computador. Se preferir reduzir os requisitos de energia e o impacto ambiental do seu computador, desactive o arranque rápido: Nota: Se desactivar o arranque rápido, o seu computador demora mais tempo a iniciar a partir do modo de suspensão. O seu computador não iniciará se receber instruções para iniciar através de uma rede (Wake on LAN). 42 1. Abra o ambiente de trabalho. 2. Clique em Opções de energia na área de notificações. 3. Seleccione Mais Opções de Energia. 4. Seleccione Escolha o que fazem os botões. 5. Para aceder às definições de encerramento, seleccione Alterar as definições que estão actualmente não disponíveis. Gestão de energia - 43 6. Percorra para baixo e desactive Activar arranque rápido. 7. Seleccione Guardar alterações. 44 SOFTWARE UTILIZAÇÃO DO WINDOWS E SOFTWARE Os computadores Gateway incluem software para o ajudar a utilizar o seu computador; os programas e categorias disponíveis no seu computador dependem do modelo adquirido. Oferta de Segurança da Internet É importante proteger o seu computador contra vírus e ataques pela Internet (consulte Segurança na página 52). Um pacote exaustivo de segurança de Internet, que inclui um período de subscrição gratuita, oferecido quando primeiro inicia o seu computador. Deve activar esta protecção antes de ligar à Internet. Este pacote de segurança protege o seu computador contra as mais recentes ameaças online e protege os seus dados pessoais (credenciais de contas bancárias, números de cartão de crédito, palavras-passe e muito mais). Gateway Recovery Management Para preparar o computador para opções de recuperação do sistema, deve criar um conjunto de discos de recuperação assim que for possível. Consulte página 62 para mais informações. Software - 45 INTERNET PRIMEIROS PASSOS NA INTERNET Proteger o seu computador É importante proteger o seu computador contra vírus e ataques pela Internet (consulte Oferta de Segurança da Internet na página 45 e Segurança na página 52). É oferecido um programa de segurança da Internet abrangente quando primeiro inicia o seu computador. Deverá activar esta protecção quanto antes, sobretudo antes de se ligar à Internet. Escolha um Fornecedor de Servios Internet Utilizar a Internet faz parte de forma natural da utilização diária do computador. Em poucos passos pode ficar ligado a uma vasta colecção de conhecimentos e ferramentas de comunicação. Para efectuar estes passos, tem de seleccionar primeiro um Fornecedor de Serviços de Internet (ISP), que estabelece a ligação entre o computador e a Internet. Deve procurar Fornecedores de Internet disponíveis na sua região, sem se esquecer de falar com amigos e familiares sobre as suas experiências bem como consultar análises e relatórios de consumidores. O Fornecedor de Internet ir fornecer as instruções sobre como estabelecer a ligação à Internet (pode precisar de software adicional ou uma ‘caixa’ especial para a ligação à linha telefónica). 46 Tipos de ligações Em função do seu modelo de computador, localização e necessidades de comunicação, existem vários modos de ligação à Internet. Dial-Up (por acesso telefónico) Alguns computadores incluem um conector de telefone dial-up (´modem´). Isto permite-lhe ligar à Internet através da sua linha telefónica. Com a ligação por linha telefónica, não pode utilizar um modem e o telefone simultaneamente na mesma linha. Este tipo de ligação é recomendado unicamente se tiver uma utilização reduzida de Internet dado que a velocidade de ligação é baixa e o tempo de ligação é normalmente cobrado à hora. DSL (por ex., ADSL) A DSL (Digital Subscriber Line) é uma ligação "contínua" efectuada através da linha telefónica. Dado que a DSL e o telefone não utilizam as mesmas frequências, pode utilizar o seu telefone ao mesmo tempo que está ligado à Internet. Parra poder utilizar a DSL, deve estar situado próximo de uma central do fornecedor da linha telefónica (este serviço pode não estar disponível em zonas rurais). As velocidades da ligação variam consoante a sua localização, mas a DSL fornece normalmente uma ligação à Internet muito rápida e fiável. Dado que a ligação é contínua, é normalmente cobrada uma tarifa mensal fixa. Nota: Uma ligação DSL requer um modem adequado. O modem é geralmente fornecido pelo ISP quando se regista. Muitos destes modems incluem um ‘router’ que fornece acesso à rede e wi-fi. Internet - 47 Cabo A ligação por cabo permite um acesso Internet rápido e contínuo através da linha do cabo de televisão. Este serviço está normalmente disponível nas grandes cidades. Pode utilizar o telefone e ver televisão por cabo enquanto está ligado à Internet. 3G (WWAN ou 'Wireless Wide-Area Network') Uma ligação 3G permite-lhe utilizar as redes celulares (como as utilizadas por um telemóvel) para ligar à Internet quando fora de casa. A ranhura para o cartão SIM poderá estar embutida no seu computador, ou poderá requerer um dispositivo externo, como um modem USB ou mesmo um telemóvel devidamente equipado. Nota: Se o seu computador incluir uma ranhura para cartões SIM, será necessário um cartão SIM compatível e um contrato com um fornecedor de serviços móveis. Antes de utilizar as funcionalidades 3G, contacte o seu fornecedor de serviços para saber se existem custos adicionais, em especial taxas de roaming. Ligações de rede A LAN (Rede de área local) é formada por um grupo de computadores (por exemplo, dentro de um escritório ou uma residência) que partilham uma linha de comunicações e recursos comuns. Ao configurar uma rede, pode partilhar ficheiros, dispositivos periféricos (como, por exemplo, uma impressora.) e até mesmo uma ligação à Internet. Pode configurar uma LAN utilizando tecnologias por fios (como a Ethernet) ou sem fios (como a Wi-Fi ou Bluetooth). 48 Redes sem fios Uma LAN ou WLAN é uma rede de área local sem fios, que está ligada a dois computadores ou mais sem utilizar cabos. A configuração de uma rede Wi-Fi é fácil e permite partilhar ficheiros, dispositivos periféricos e uma ligação à Internet. Quais são os benefícios de uma rede sem fios? Mobilidade Os sistema LAN sem fios permitem-lhe o acesso partilhado, ou de outros utilizadores da sua rede doméstica, a ficheiros e dispositivos ligados à rede, por exemplo, uma impressora ou scanner. É também possível partilhar uma ligação à Internet com outros computadores em sua casa. Velocidade e simplicidade de instalação Instalar um sistema LAN sem fios pode ser rápido e fácil e acaba com a necessidade de colocar cabos através de paredes e tectos. Internet - 49 Componentes de uma LAN sem fios Para configurar uma rede sem fios em casa, é necessário o seguinte: Ponto de acesso (router) Os pontos de acesso (routers) são transceptores de duas vias que transmitem dados para um ambiente circundante. Os pontos de acesso são uma espécie de mediadores entre redes ligadas e redes sem fios. A maioria dos routers tem um modem DSL incorporado que permite aceder a uma ligação de Internet DSL de alta velocidade. Normalmente, quando subscreve os serviços de um ISP (fornecedor de serviços Internet) é-lhe fornecido um modem/router. Leia cuidadosamente a documentação fornecida com o seu ponto de acesso/router para obter instruções de instalação detalhadas. Cabo de rede (RJ45) Um cabo de rede (também chamado RJ45) é utilizado para ligar o computador anfitrião ao ponto de acesso (ver ilustração abaixo); este tipo de cabo é também utilizado para ligar dispositivos periféricos ao ponto de acesso. Adaptador sem fios Normalmente, já existe um adaptador sem fios interno instalado no computador. Um botão ou controlos no Windows permitem-lhe activar ou desactivar o adaptador. 50 Diagrama de uma rede em funcionamento 1. Ponto de acesso/ router 2. Computadores de secretária 3. Modem 4. Impressora 5. Computador portátil 6. PDA/Webpad 7. Cabos de rede (RJ45) 4 5 1 3 7 2 6 Ligar/desligar uma Ligação de rede sem fios A maior parte dos computadores tem um botão ‘WiFi’ que liga e desliga a ligação de rede. Se o seu computador tiver acesso sem fios, mas não tiver um botão Comunicação, poderá ligar ou desligar a sua rede sem fios, ou controlar o que é partilhado pela rede, nas opções de gestão de rede. Prima a tecla Windows ( ) + W, digite "HomeGroup" e depois clique em HomeGroup. Atenção: É proibido o uso de dispositivos sem fios quando voa numa aeronave. Desligue todos os dispositivos antes de embarcar; podem prejudicar o funcionamento da aeronave, perturbar comunicações e até mesmo ser ilegais. Internet - 51 Navegar na Net! Para navegar na Internet, necessita de um programa denominado navegador de Internet. O Internet Explorer proporciona uma experiência mais fácil e mais segura de navegação pela Internet. Logo que tenha o seu acesso Internet instalado e estiver ligado, clique no atalho do Internet Explorer situado no seu ambiente de trabalho e torne a sua experiência da Internet num nível superior! Website da Gateway Pode começar por visitar o nosso website www.gateway.com! A Gateway está empenhada em fornecer-lhe um apoio contínuo e personalizado. Consulte a nossa secção Support (Apoio) para obter um apoio adequado às suas necessidades. www.gateway.com constitui o portal para um mundo de actividades e serviços on-line: visite-nos regularmente para ter acesso às informações e downloads mais recentes! Segurança Deve estar desejoso de explorar todas as possibilidades oferecidas pela Internet. Para garantir a sua segurança on-line, a Gateway pré-instalou o programa premiado, Norton Internet Security™ no seu computador. O novo Norton Internet Security funciona discretamente em Segundo plano para bloquear as ameaças complexas actuais e proteger a sua identidade quando efectua compras, transacções bancárias ou navega on-line. 52 O Norton Internet Security impede o roubo de identidade on-line, detecta e elimina spyware, remove vírus e Internet worms, protege contra hackers. Definições O que é um vírus? Os softwares perigosos, geralmente denominados “vírus”, são programas concebidos para infectar e danificar os computadores. A maioria dos vírus são transmitidos via Internet, e-mails ou websites perigosos. Um vírus comum replicar-se-á e passará sem ser detectado por vários computadores. Outras formas de prejuízo, como os cavalos de Tróia, worms ou spam podem infectar o seu computador de várias formas, utilizando recursos ou entupindo a rede. Nota: Gateway garante que o seu computador está 100% livre de vírus na data de aquisição do produto e não cobre os danos provocados por vírus. O que é um Spyware? Spyware refere-se a programas geralmente indesejados que são transferidos para o seu computador enquanto está ligado à Internet, muitas vezes sem o seu conhecimento. Uma vez o computador infectado, pode vigiar a sua actividade de navegação, recolher informações pessoais, fazer com que apareçam janela com publicidade ou mesmo alterar a configuração do seu computador. O spyware consome recursos do seu computador, pode abrandar a sua ligação à Internet ou de todo o sistema do computador e mesmo provocar avarias. Internet - 53 O spyware é por vezes utilizado por empresas sem escrúpulos para controlar e identificar os sites que visita na Internet para determinar os seus hábitos de utilização da Internet e apresentar janelas de publicidade específicas no seu ecrã. No entanto, alguns tipos de spyware vão além da simples identificação e controlo mesmo as batidas no teclado e recolhem palavras-chaves o que constitui um grande risco de segurança. O que é um malware? O software perigoso, também conhecido como malware, é um software concebido para prejudicar deliberadamente o seu computador. Por exemplo, vírus, worms e cavalos de Tróia são softwares perigosos. Para ajudar a proteger o seu computador contra malware, certifique-se de que está a utilizar software antivírus e anti-malware actualizado. O que é uma firewall pessoal? Uma firewall pessoal é um software concebido para evitar o acesso não autorizado ou para realizar uma rede privada. Funciona como um escudo para proteger a ligação à Internet de ligações indesejadas, algumas das quais podem tentar tomar controlo do seu computador para instalar ou redistribuir vírus ou programas nocivos. Cada ligação ao seu computador é controlada; os programas que tentem receber informações sem a sua autorização são detectados e a firewall apresenta um alerta. Pode então decidir permitir a ligação, se esta for de um programa que está a utilizar então normalmente deveria autorizá-lo (por ex., um jogo ligando para um servidor com vários jogadores ou uma enciclopédia efectuando uma actualização de conteúdos). 54 Como proteger o computador A prevenção do cibercrime pode ser muito simples – quando armado com alguns conselhos técnicos e senso comum, muitos ataques podem ser evitados. Regra geral, os criminosos online estão a tentar ganhar dinheiro o mais rápido e facilmente possível. Quando mais lhes dificultar a tarefa, mais provável é que o deixem em paz e avancem para um alvo mais fácil. As dicas em baixo oferecem informações básicas sobre como prevenir a fraude online. Mantenha o computador actualizado com os mais recentes patches e actualizações. Uma das melhores formas de manter os atacantes afastados do seu computador é a aplicação de patches e outras correcções de software quando são disponibilizados. Ao actualizar o seu computador regularmente, impede que os atacantes se aproveitem das falhas no software (vulnerabilidades), que de outra forma poderiam utilizar para aceder ao seu sistema. Embora manter o computador actualizado não o proteja de todos os ataques, dificulta muito o acesso dos piratas informáticos ao seu sistema, bloqueia completamente muitos ataques básicos e automáticos e pode ser o suficiente para desencorajar o atacante menos determinado para que desista e vá procurar um computador mais vulnerável noutro local. As versões mais recentes do Microsoft Windows e de outros softwares populares podem ser configuradas para transferir e aplicar as actualizações automaticamente, para que não se tenha de lembrar de procurar o software mais recente. Aproveitar as funções de actualização automática do seu software é um óptimo começo para se manter seguro online. Internet - 55 Proteja o computador com software de segurança São necessários vários tipos de software de segurança para ter a segurança básica online. Os softwares de segurança essenciais incluem programas firewall e antivírus. Um firewall é geralmente a primeira linha de defesa do seu computador – controla quem e o que pode comunicar com o computador online. Pode pensar no firewall como uma espécie de "polícia" que observa os dados que tentam entrar e sair do computador pela Internet, permitindo as comunicações que sabe serem seguras e bloqueando o "mau" tráfego, como os ataques, impedindo-os de sequer chegarem ao computador. A linha de defesa seguinte muitas vezes é o software antivírus, que monitoriza todas as actividades online, como as mensagens de e-mail e a navegação na Internet, e protege um indivíduo de vírus, worms, cavalos de Tróia e outros tipos de programas maliciosos. O seu software antivírus e antispyware deve ser configurado para se actualizar automaticamente e deve fazê-lo sempre que se ligar à Internet. Os conjuntos de segurança integrados, como o Norton Internet Security, que combinam firewall, antivírus e antispyware com outras funções como antispam e controlo parental, tornaram-se muito populares por oferecerem todo o software de segurança necessário para protecção online num único pacote. Muitos consideram a utilização de um pacote abrangente de segurança uma boa alternativa à instalação, configuração e actualização de vários tipos de software de segurança. O seu sistema da tem uma versão completa do Norton Internet Security™ pré-instaladaGateway. Inclui uma subscrição gratuita de teste para actualizações de protecção. Não se esqueça de o Activar! 56 Escolha palavras-passe fortes e mantenha-as em segurança As palavras-passe são um facto na Internet de hoje; utilizamo-las para tudo, desde encomendar flores e realizar actividades bancárias online, até entrar no website da nossa companhia aérea preferida para ver quantas milhas acumulámos. As dicas seguintes podem ajudar a tornar as suas experiências online seguras: • Seleccionar uma palavra-passe que não possa ser facilmente adivinhada é o primeiro passo para manter as palavras-passe em segurança e longe das mãos erradas. As palavras-passe fortes têm oito caracteres ou mais e utilizam uma combinação de letras, números e símbolos (por exemplo, # $ % ! ?). Evite a utilização de qualquer um dos seguintes elementos como palavra-passe: o seu nome de início de sessão, qualquer coisa baseada nas suas informações pessoais, como o seu apelido, e palavras que se podem encontrar no dicionário, em especial “palavra-passe”. Tentar seleccionar palavras-passe especialmente fortes e únicas para proteger actividades como operações bancária online. • Mantenha as suas palavras-passe num local seguro e não utilize a mesma palavra-passe para todos os serviços online. • Altere as palavras-passe regularmente, pelo menos a cada 90 dias. Isto pode limitar os danos provocados por alguém que já tenha obtido acesso à sua conta. Se notar algo de suspeito numa das suas contas online, um dos primeiros passos que pode tomar é alterar a palavrapasse. Internet - 57 Proteja as suas informações pessoais Tenha cuidado quando partilhar informações pessoais online, como o seu nome, endereço de casa, número de telefone e endereço de e-mail. Para beneficiar de muitos serviços online, terá inevitavelmente de dar informações pessoais para poder tratar da facturação e do envio dos bens comprados. Como é raro não ter de divulgar informações pessoais, a seguinte lista contém alguns conselhos sobre como partilhar informações pessoais online em segurança: • Esteja atento a mensagens de e-mail falsas. As coisas que indicam que uma mensagem pode ser fraudulenta são erros ortográficos, gramática incorrecta, expressões estranhas, endereços da Internet com extensões estranhas, endereços da Internet compostos totalmente por números quando normalmente existem palavras e qualquer outra coisa invulgar. Para além disso, as mensagens de phishing muitas vezes dizem que tem que agir rapidamente para manter a sua conta aberta, actualizar a segurança ou insistem para que forneça informações imediatamente senão algo mau pode acontecer. Não morda o isco. • Não responda a mensagens de e-mail que pedem informações pessoais. As empresas legítimas não utilizam mensagens de e-mail para lhe pedir informações pessoais. Em caso de dúvida, contacte a empresa por telefone ou digite o endereço da Internet da empresa no web browser. Não clique nas hiperligações destas mensagens, pois podem levá-lo para websites fraudulentos e maliciosos. 58 • Mantenha-se afastado de websites utilizados para roubar informações pessoais. Quando visitar um website, digite o endereço (URL) directamente no web browser, em vez de seguir uma hiperligação num e-mail ou mensagem instantânea. As pessoas que cometem a fraude muitas vezes forjam as hiperligações para que pareçam convincentes. Um sítio da Internet onde se faça compras, actividades bancárias ou em que se partilhem informações confidenciais deve ter um "S" depois das letras "http" (ou seja https://www.yourbank.com não http:// www.yourbank.com). O "s" quer dizer seguro e deve aparecer quando está numa área em que se pede para iniciar uma sessão ou dar outros dados confidenciais. Outro sinal de que tem uma ligação segura é o pequeno ícone de um cadeado na parte inferior do seu web browser (geralmente no canto direito). • Preste atenção às políticas de privacidade nos websites e no software. É importante compreender como uma organização poderá recolher e utilizar as suas informações pessoais antes de as partilhar com eles. • Proteja o seu endereço de e-mail. Por vezes, os spammers e os “phishers” enviam milhões de mensagens para endereços de e-mail que podem ou não existir com esperança de encontrarem uma potencial vítima. Responder a estas mensagens, ou mesmo transferir imagens, garante que será adicionado às listas deles para receber mais mensagens iguais no futuro. Tenha cuidado também ao publicar o seu endereço de e-mail online em grupos de notícias, blogues ou comunidades online. Internet - 59 As ofertas online que parecem demasiado boas para serem verdade, geralmente são O velho ditado "nada é de graça" ainda hoje é verdade. O software supostamente "gratuito", como protecções de ecrã ou smileys, truques de investimento secretos que lhe garantem fortunas fantásticas e concursos que surpreendentemente ganhou sem se ter inscrito são iscos atraentes que as empresas utilizam para conseguir a sua atenção. Embora possa não pagar directamente pelo software ou serviço em dinheiro, o software ou serviço grátis que pediu pode estar agrupado com software publicitário ("adware") que "espia" o seu comportamento e apresenta anúncios não desejados. Pode ter que divulgar informações pessoais ou comprar outra coisa para reclamar o seu suposto prémio. Se uma oferta parecer demasiado boa para ser verdade, pergunte a opinião de outra pessoa, leia as letras pequenas ou, melhor ainda, simplesmente ignore. Analise regularmente os extractos bancários e dos cartões de crédito O impacto do roubo de identidade e dos crimes online pode ser bastante reduzido se os conseguir detectar pouco depois dos seus dados serem roubados ou aquando da primeira tentativa de utilização das suas informações. Uma das formas mais fáceis de ver se algo correu mal é analisando os extractos mensais fornecidos pelo banco e pelas empresas dos cartões de crédito e ver se existe algo de anormal. Adicionalmente, muitos bancos e serviços utilizam sistemas de prevenção de fraude que detectam comportamentos estranhos ao fazer as compras (ou seja, se viver no Texas e de repente começar a comprar frigoríficos 60 em Budapeste). Para confirmar essas compras fora do normal, podem-lhe telefonar e pedir para as confirmar. Leve estas chamadas a sério, são a sua dica de que pode ter acontecido algum ataque e que deve tomar as acções necessárias. Proteja o seu computador com as ferramentas de segurança do Windows O Windows oferece várias aplicações de protecção. Actualizações do Windows Se tiver uma ligação de Internet activa, o Windows pode procurar actualizações importantes para o seu computador e instalá-las automaticamente. Estas actualizações incluem patches de segurança e actualizações de programas que podem melhorar a sua experiência de trabalho com o computador e ajudar a proteger o seu computador contra novos vírus e ataques. Como é que sei quando o meu computador está em risco? Se o Centro de Acções comunicar um alerta ou se o seu computador tiver um comportamento anormal, se se fechar sem razão ou se algum dos seus programas não funcionar correctamente, o seu computador pode esta infectado por um software perigoso. No entanto, não atribua as culpas de qualquer problema do computador a um vírus! Se suspeitar que o seu computador está infectado, a primeira coisa a fazer é actualizá-lo (caso ainda o não o tenha feito) e executar o software antivírus e antispyware. Internet - 61 RECUPERAÇÃO Se tiver problemas com o seu computador e as perguntas mais frequentes não o ajudarem, pode 'recuperar' o seu computador – ou seca, repô-lo o estado anterior. Esta secção descreve as ferramentas de recuperação no seu computador. Gateway oferece Gateway Recovery Management, que lhe permitir criar uma cópia de segurança para recuperação, uma cópia de segurança de controladores e aplicações e para iniciar as opções de recuperação, usando as ferramentas do Windows ou a cópia de segurança de recuperação. Nota: Gateway Recovery Management está apenas disponível num sistema operativo Windows pré-instalado. Importante: Recomendamos que crie uma Cópia de Segurança de Recuperação e Cópia de Segurança de Controladores e de Aplicações e assim que possível. Em algumas situações, uma recuperação total requer uma cópia de segurança de recuperação em USB. 62 CRIAR UMA CÓPIA DE SEGURANÇA DE RECUPERAÇÃO Para reinstalar a partir de uma unidade de armazenamento USB, tem primeiro de criar a cópia de segurança de recuperação. A cópia de segurança de recuperação inclui todo o conteúdo original do disco rígido do seu computador, incluindo Windows e todo o software e controladores carregados em fábrica. Com esta cópia de segurança restaurará o computador para o mesmo estado em que o adquiriu, enquanto lhe confere a opção de manter todas as definições e dados pessoais para uma recuperação posterior. Nota: Certifique-se de que tem uma unidade USB com capacidade de, pelo menos, de 16 GB. 1. A partir de Iniciar, introduza "Recovery" e depois clique em Gateway Recovery Management na lista de aplicações. Recuperação - 63 2. Clique em Criar Cópia de Segurança de Predefinições de Fábrica. A janela da Unidade de Recuperação abre-se. Certifique-se de que selecciona Copiar conteúdo das partições de recuperação para a unidade de recuperação. Isto garante a cópia de segurança de recuperação mais completa e mais segura. 64 3. Ligue a unidade USB e clique em Seguinte. • Certifique-se de que a unidade USB tem capacidade suficiente antes de continuar. A cópia de segurança de recuperação requer pelo menos 16 GB de armazenamento 4. Irá aparecer no ecrã o progresso de cópia de segurança. 5. Siga o processo até que esteja concluído. Recuperação - 65 6. Depois de criar a cópia de segurança de recuperação, pode optar por eliminar a informação de recuperação do seu computador. Se eliminar esta informação, só pode usar a cópia de segurança de recuperação USB para restaurar o seu computador, se perder ou eliminar a unidade USB, não pode restaurar o seu computador. 7. Desligue a unidade USB e identifique-a claramente. Importante: Escreva uma identificação única, descritiva da cópia de segurança como ‘Cópia de segurança de recuperação do Windows’. Certifique-se que mantém a cópia de segurança em local seguro, e onde não se esqueça. 66 CRIAR CÓPIA DE SEGURANÇA DE CONTROLADORES E DE APLICAÇÕES Para criar uma cópia de segurança de controladores e de aplicações, que contenha o software e carregadores carregados na fábrica exigidos pelo seu computador, pode usar uma unidade de armazenamento USB ou, se o seu computador estiver equipado com gravador de DVD, um ou mais DVDs vazios graváveis. 1. A partir de Iniciar, introduza "Recovery" e depois clique em Gateway Recovery Management na lista de aplicações. 2. Clique em Criar Cópia de Segurança de Controladores e Aplicações. Ligue a unidade USB ou insira um DVD vazio na unidade ótica, e depois clique em Seguinte. Recuperação - 67 • Se utilizar uma unidade USB, certifique-se de que a unidade USB tem capacidade suficiente antes de continuar. • Se utilizar DVDs, será mostrado o número de discos vazios e graváveis que irá necessitar para concluir os discos de recuperação. Certifique-se de que dispõe do número necessário de discos em branco. 68 3. Clique em Iniciar para copiar ficheiros. Será mostrado o progresso da cópia de segurança no ecrã. 4. Siga o processo até que esteja concluído: • Se usar discos ópticos, a unidade ejecta cada disco após a gravação. Retire o disco da unidade e identifique-o com um marcador de tinta permanente. Se forem necessários vários discos, insira um disco novo quando solicitado e clique em OK. Continue até que o processo esteja concluído. • Se usar uma unidade USB, desligue a unidade e identifique-a claramente. Importante: Escreva uma identificação única, descritiva em cada cópia de segurança como ‘Cópia de segurança de controladores e de aplicações’. Certifique-se que mantém a cópia de segurança em local seguro, e onde não se esqueça. RECUPERAR O SISTEMA Para recuperar o seu sistema: 1. Realize pequenas correcções. Se apenas um ou dois itens de software ou hardware tiverem deixado de funcionar correctamente, o problema poderá ser resolvido através da reinstalação do software ou controladores do dispositivo. Para reinstalar o software e controladores pré-instalados de fábrica, consulte "Reinstalar controladores e aplicações" na página 70. Recuperação - 69 Para instruções sobre como reinstalar software ou controladores não pré-instalados, consulte a documentação desse produto ou o website de suporte. 2. Reverter para um estado de sistema anterior. Se reinstalar o software ou controladores não ajudar, então o problema poderá ser solucionado revertendo o seu sistema a um estado anterior, quando tudo estava a funcionar correctamente. Para instruções, consulte "Regressar a uma captura de sistema anterior" na página 73. 3. Reinicie o seu sistema operativo. Caso nada tenha resolvido o seu problema, e desejar repor o seu sistema para o estado de fábrica, mas manter a informação de utilizador, consulte "Repor o sistema para o estado de fábrica" na página 75. 4. Repor o sistema para o estado de fábrica. Caso nada tenha solucionado o seu problema, e desejar repor o seu sistema para o estado de fábrica, consulte "Repor o sistema para o estado de fábrica" na página 75. Reinstalar controladores e aplicações Como passo intermédio de resolução de problemas, poderá ter de reinstalar as aplicações e os controladores do dispositivos que vieram pré-instalados com o seu computador. Pode reinstalar utilizando ou o seu disco rígido ou a cópia de segurança que criou. 70 • Outras aplicações – Caso tenha de reinstalar o software não préinstalado no seu computador, terá de seguir as instruções de instalação desse software. • Novos controladores de dispositivo – Caso tenha de reinstalar controladores de dispositivos não pré-instalados no seu computador, terá de seguir as instruções que acompanham o dispositivo. Se reinstalar com o Windows e a informação de recuperação armazenada no seu computador: • A partir de Iniciar, introduza "Recovery" e depois clique em Gateway Recovery Management na lista de aplicações. • Clique em Reinstalar Aplicações ou Controladores. Recuperação - 71 • Deverá ver a secção Conteúdo do Gateway Centro de Recursos. • Clique no ícone instalar para o item que deseja instalar, e depois siga as instruções no ecrã para concluir a instalação. Repita este passo para cada item que deseja reinstalar. Se reinstalar a partir de uma cópia de segurança de controladores e de aplicações num DVD ou unidade USB: 1. Insira a Cópia de segurança de controladores e de aplicações na unidade do disco ou ligue-a a uma porta USB livre. • Se inserir um DVD, aguarde até o Gateway Centro de Recursos iniciar. • Se o Gateway Centro de Recursos não iniciar automaticamente, prima a tecla Windows + <E>, e depois clique duas vezes no ícone da unidade óptica. 72 • Se usar uma unidade USB, prima a tecla Windows + <E>, depois clique duas vezes na unidade que contém a cópia de segurança. Clique duas vezes no Centro de Recursos. 2. Deverá ver a secção Conteúdo do Gateway Centro de Recursos. 3. Clique no ícone instalar para o item que deseja instalar, e depois siga as instruções no ecrã para concluir a instalação. Repita este passo para cada item que deseja reinstalar. Regressar a uma captura de sistema anterior O Restauro do Sistema da Microsoft tira um ‘instantâneo’ das definições do seu sistema e guarda-os como pontos de restauro. Na maior parte dos casos mais complicados de problemas de software, pode reverter para um desses pontos de restauro para voltar a ter o sistema a funcionar. Recuperação - 73 O Windows cria automaticamente um ponto de restauro adicional todos os dias, e também sempre que instala software ou controladores de dispositivo. Nota: Para mais informações acerca do Restauro de Sistema Microsoft, a partir de Iniciar, introduza ‘Ajuda’ e depois clique em Ajuda e Suporte na lista de aplicações. Introduza 'Restauro do sistema windows’ na caixa de Pesquisa de Ajuda, e depois prima Enter. Retomar um ponto de restauro 1. A partir de Iniciar, introduza ’Painel de Controlo’ e depois clique em Painel de Controlo na lista de aplicações. 2. Clique em Sistema e Segurança > Centro de Acção, depois clique em Recuperação no fundo da janela. 3. Clique em Abrir Restauro do Sistema e depois Seguinte. 4. Clique no último ponto de restauro ( numa altura em que o seu sistema esteja a funcionar corretamente), clique em Seguinte, depois em Concluir. 5. Aparece uma janela de confirmação; clique em Sim. O seu sistema será restaurado utilizando o ponto de restauro especificado. Este processo poderá demorar vários minutos e reiniciar o seu computador. 74 Repor o sistema para o estado de fábrica Caso o seu computador tenha problemas não recuperáveis através de outros métodos, poderá ter de reinstalar tudo para repor o sistema para o estado de fábrica. Pode recuperar utilizando ou o seu disco rígido ou a cópia de segurança de recuperação que criou. • Se ainda conseguir executar o Windows e não eliminou a partição de recuperação, consulte "Recuperar a partir do Windows" na página 75. • Caso não consiga utilizar o Windows e o seu disco rígido original tenha sido totalmente reformatado ou tiver instalado um disco rígido de substituição, consulte "Recuperar a partir da cópia de segurança de recuperação" na página 79. Recuperar a partir do Windows Inicie GatewayRecovery Management: • A partir de Iniciar, introduza ’Recovery’ e depois clique em Gateway Recovery Management na lista de aplicações. Estão disponíveis duas opções, Restaurar Definições de Fábrica (Repor o meu PC) ou Restauro Personalizado (Actualizar o meu PC). Recuperação - 75 Restaurar Definições de Fábrica elimina tudo no seu disco rígido, depois reinstala o Windows e todo o software e controladores préinstalados no seu sistema. Caso consiga aceder a ficheiros importantes no seu disco rígido, faça agora uma cópia de segurança dos mesmos. Consulte "Restaurar Definições de Fábrica com Gateway Recovery Management" na página 76. Restauro Personalizado irá tentar reter os seus ficheiros (dados de utilizador) mas irá reinstalar todo o software e controladores. O software instalado desde que comprou o seu PC será removido (excepto software instalado a partir da Windows Store). Consulte "Restauro personalizado com Gateway Recovery Management" na página 78. Restaurar Definições de Fábrica com Gateway Recovery Management 1. Clique em Restaurar Definições de Fábrica. 76 Precaução: 'Restaurar Definições de Fábrica' eliminará todos os ficheiros no seu disco rígido. 2. Abre-se a janela Repor o seu PC. Imagens apenas para referência. 3. Clique em Seguinte, depois escolha como eliminar os seus ficheiros: a. Remover apenas os meus ficheiros elimina rapidamente todos os ficheiros antes de restaurar o seu computador e demora cerca de 30 minutos. b. Limpar completamente a unidade limpa completamente a unidade depois de cada ficheiros ser eliminado, por isso não é possível visualizar ficheiros depois da recuperação. A limpeza da unidade demora muito mais, até 5 horas, mas é muito mais segura porque os ficheiros antigos são completamente removidos. 4. Clique em Repor. 5. O processo de recuperação começa por reiniciar o seu computador, e depois continua a copiar ficheiros para o seu disco rígido. 6. Depois de terminar a recuperação, pode começar a usar o seu computador, repetindo o processo de primeiro arranque. Recuperação - 77 Restauro personalizado com Gateway Recovery Management 1. Clique em Restauro Personalizado (Manter Dados do Utilizador). 2. Abre-se a janela Actualizar o seu PC. 3. Clique em Seguinte, depois em Actualizar. 4. O processo de recuperação começa por reiniciar o seu computador, e depois continua a copiar ficheiros para o seu disco rígido. Este processo demora cerca de 30 minutos. 78 Recuperar a partir da cópia de segurança de recuperação Para recuperar a partir de uma cópia de segurança de recuperação numa unidade USB: 1. Encontre a sua cópia de segurança. 2. Ligue uma unidade USB e ligue o seu computador. 3. Se ainda não estiver activado, tem de activar o Menu de Arranque F12 (F12 Boot Menu): a. Prima <F2> quando inicia o seu computador. b. Utilize as setas esquerda e direita para seleccionar o menu Principal. c. Prima a tecla baixo até que esteja seleccionado Menu de Arranque F12, prima <F5> para alterar esta definição para Enabled>. d. Utilize as setas esquerda ou direita para seleccionar o menu Exit. e. Dependendo do tipo de BIOS do seu computador, seleccione Save Changes and Exit ou Exit Saving Changes e prima Enter. Seleccione OK ou Yes para confirmar. f. O seu computador irá reiniciar. 4. Durante o arranque, prima <F12> para abrir o menu de arranque. O menu de arranque permite-lhe seleccionar qual o dispositivo do qual iniciar, seleccione a unidade USB. a. Utilize as teclas de seta para seleccionar USB Device, e depois prima Enter. Recuperação - 79 b. O Windows inicia a partir da cópia de segurança em vez do processo de arranque normal. 5. Seleccione o tipo do seu teclado. 6. Seleccione Troubleshoot e depois seleccione o tipo de recuperação a usar: a. Clique em Advanced depois em System Restore para iniciar o Restauro do Sistema Microsoft: O Restauro do Sistema da Microsoft tira periodicamente um ‘instantâneo’ das definições do seu sistema e guarda-os como pontos de restauro. Na maior parte dos casos mais complicados de problemas de software, pode reverter para um desses pontos de restauro para voltar a ter o sistema a funcionar. b. Clique em Reset your PC para iniciar o processo de reposição: Reset your PC elimina tudo no seu disco rígido, depois reinstala o Windows e todo o software e controladores pré-instalados no seu sistema. Caso consiga aceder a ficheiros importantes no seu disco rígido, faça agora uma cópia de segurança dos mesmos. Consulte "Repor o seu PC a partir da cópia de segurança de recuperação" na página 81. c. Clique em Refresh your PC para iniciar o processo de actualização: Refresh your PC irá tentar reter os seus ficheiros (dados de utilizador) mas irá reinstalar todo o software e controladores. O software instalado desde que comprou o seu PC será removido (exceto software instalado a partir da Windows Store). Consulte "Actualizar o seu PC a partir da cópia de segurança de recuperação" na página 82. 80 Repor o seu PC a partir da cópia de segurança de recuperação Precaução: Repor o seu PC eliminará todos os ficheiros no seu disco rígido. 1. Abre-se a janela Repor o seu PC. Imagens apenas para referência. 2. Clique em Seguinte. 3. Seleccione o sistema operativo para recuperar (normalmente só está disponível uma opção). 4. Seleccione se pretende manter as alterações no disco rígido: a. Se eliminou a partição de recuperação ou, de outro modo, alterou as partições no disco rígido e quer manter essas alterações, seleccione Não. b. Para restaurar completamente as Definições da Fábrica no seu computador, seleccione Sim. 5. Escolha como eliminar os seus ficheiros: a. Remover apenas os meus ficheiros elimina rapidamente todos os ficheiros antes de restaurar o seu computador e demora cerca de 30 minutos. Recuperação - 81 b. Limpar completamente a unidade limpa completamente a unidade depois de cada ficheiros ser eliminado, por isso não é possível visualizar ficheiros depois da recuperação. A limpeza da unidade demora muito mais, até 5 horas, mas é muito mais segura porque os ficheiros antigos são completamente removidos. 6. Clique em Repor. 7. Depois de terminar a recuperação, pode começar a usar o seu computador, repetindo o processo de primeiro arranque. Actualizar o seu PC a partir da cópia de segurança de recuperação 1. Abre-se a janela Actualizar o seu PC. 2. Clique em Seguinte. 3. Seleccione o sistema operativo para recuperar (normalmente só está disponível uma opção). 4. Clique em Actualizar. 5. O processo de recuperação começa por reiniciar o seu computador, e depois continua a copiar ficheiros para o seu disco rígido. Este processo demora cerca de 30 minutos. 82 PERGUNTAS FREQUENTES A lista que se segue é relativa a situações que podem ocorrer durante a utilização do computador. São fornecidas soluções fáceis para cada uma das situações. Liguei a alimentação, mas o computador não arranca nem inicializa Observe o indicador de alimentação: • Se não estiver aceso, o computador está sem alimentação. Verifique o seguinte: • Se o computador estiver a funcionar através da bateria, esta poderá estar fraca e não ser capaz de alimentar o computador. Ligue o adaptador de corrente alternada para recarregar a bateria. • Certifique-se de que o adaptador de corrente alternada está bem ligado ao computador e à tomada eléctrica. • Se estiver aceso, verifique o seguinte: • Está um disco na unidade óptica? Remova-o e prima <Ctrl> + <Alt> + <Del> para reiniciar o sistema. • Tem um dispositivo de armazenamento USB (disco ou smartphone USB) ligado ao seu computador? Retire-o e prima <Ctrl> + <Alt> + <Del> para reiniciar o sistema. Perguntas frequentes - 83 Não aparece nada no ecrã O sistema de gestão de energia do computador apaga automaticamente o ecrã para poupar energia. Prima uma tecla qualquer para ligar novamente o ecrã. Se ao premir uma tecla o ecrã não voltar ao normal, isso poderá dever-se a uma destas três causas: • O nível de brilho pode estar demasiado baixo. Prima para ajustar o nível de brilho. (aumentar) • O dispositivo de visualização poderá estar ajustado para um monitor externo. Prima para regressar à imagem do computador. • Se o indicador de Suspensão estiver aceso, o computador está no modo de Suspensão. Prima e solte o botão de alimentação para retomar. Não há saída de áudio do computador Verifique o seguinte: • O som pode estar desligado. Observe o ícone de controlo de volume (altifalante) na barra de tarefas do Windows. Se estiver marcado, clique no ícone e anule a selecção da opção Tudo sem som. • O nível de volume pode estar demasiado baixo. Observe o ícone do controlo de volume na barra de tarefas do Windows. Pode igualmente utilizar os botões de controlo do volume para regular o volume. • Se auscultadores, auriculares ou altifalantes externos estiverem ligados à porta de saída do computador, os altifalantes internos são desligados automaticamente. 84 - Perguntas frequentes Pretendo ejectar o tabuleiro da unidade óptica sem ligar a alimentação Existe um orifício para ejecção mecânica na unidade óptica. Basta introduzir a ponta de uma esferográfica ou clip no orifício e empurrar para ejectar o tabuleiro. O teclado não responde Experimente ligar um teclado externo a uma porta USB do computador. Se funcionar, contacte o seu revendedor ou um centro de assistência técnica autorizado, uma vez que o cabo do teclado interno poderá estar solto. A impressora não funciona Verifique o seguinte: • Certifique-se de que a impressora está conectada a uma tomada eléctrica e que está ligada (On). • Certifique-se que o cabo da impressora está bem ligado a uma porta USB e à porta correspondente na impressora. Perguntas frequentes - 85 Dicas e sugestões para usar o Windows 8 Sabemos que é um novo sistema operativo, e que é necessário algum treino, por isso criámos algumas dicas para o ajudar a começar. Existem três conceitos que deverá ter em mente 1. Iniciar O botão Iniciar já não está disponível; pode abrir aplicações a partir do ecrã Iniciar. 2. Tiles Live tiles são idênticos às miniaturas das aplicações. 3. Charms Charms permite-lhe executados funções úteis, como partilha de conteúdo, desligar o seu PC ou alterar definições. Como acedo a charms? Desloque o cursor até ao canto superior ou inferior direito do ecrã para aceder a charms ou prima a tecla Windows + <C>. Como acedo a Iniciar? Prima a tecla Windows no teclado; prima a tecla Windows + <C> e clique em Iniciar ou mova o cursor para o canto inferior esquerd do ecrã e clique em Iniciar. 86 Como salto entre aplicações? Desloque o cursor até à margem esquerda do ecrã para ver miniaturas das aplicações em execução. Pode também premir a tecla Windows + <Tab> para abrir e percorrer as aplicações actuais. Como desligo o meu computador? Prima a tecla Windows + <C>, clique em Definições > Energia e seleccione a acção que gostaria de executar. Alternativamente, no ambiente de trabalho, clique no Botão Energia Gateway e seleccione a acção a executar. Porque existe uma nova interface? A nova interface para Windows 8 foi criada para funcionar correctamente com toques. As aplicações Windows Store utilizam automaticamente todo o ecrã e não necessitam de ser encerrados da forma tradicional. As aplicações Windows Store serão apresentadas em Iniciar usando livetiles. O que são ‘live tiles’? Live tiles são semelhantes às miniaturas das aplicações que serão actualizadas com novos conteúdos sempre que se ligar à Internet. Por exemplo, pode ver atualizações meteorológicas ou de ações sem ter de abrir a aplicação. Perguntas frequentes - 87 Como desbloqueio o meu computador? Prima qualquer tecla e clique num ícone de conta de utilizador para desbloquear o computador. Se a sua conta tiver uma palavra-passe configurada, terá de introduzir a palavra-passe para continuar. Como personalizo o meu computador? Pode personalizar Iniciar com uma imagem de fundo diferente ou reordenando os mosaicos para se adaptar às suas necessidades. Para alterar o fundo, prima a tecla Windows + <C> e clique em Definições > Alterar definições do PC > Personalizar. Clique em Ecrã iniciar no topo da página e selecione uma cor e imagem. Como movo tiles? Clique longamente um tile para o selecionar, e depois arraste-o até ao local em Iniciar onde deseja que fique. Os outros tiles serão movidos para acomodar o tile na nova localização. Posso tornar os tiles maiores ou menores? Clique num tile com o botão direito, e depois selecione Menor ou Maior do menu que aparece no fundo do ecrã. Como personalizo o ecrã de Bloqueio? Pode personalizar o ecrã de bloqueio com uma imagem diferente ou mostrar o seu estado rápido e notificações para se adaptar às suas necessidades. 88 Para alterar o fundo, prima a tecla Windows + <C> e clique em Definições > Alterar definições do PC > Personalizar. Clique em Ecrã de bloqueio no topo da página e selecione a imagem e aplicações que deseja ver no ecrã de bloqueio. Então, como fecho uma aplicação? Mova o cursor até ao topo do ecrã e clique e arraste a janela para baixo, para encerrar a aplicação. Pode encerrar aplicações a partir das miniaturas na margem esquerda do ecrã, clicando com o botão direito numa miniatura e seleccionando Encerrar. Posso alterar a resolução do ecrã? Em Iniciar, comece a introduzir "Painel de Controlo" para abrir Pesquisar e mostrar os resultados; clique em Painel de Controlo > Ajustar resolução do ecrã. Quero usar o Windows da forma que estava habituado - quer o ambiente de trabalho de volta! A partir de Iniciar clique no tile Ambiente de trabalho para ver o tradicional ambiente de trabalho. Pode afixar aplicações que usa frequentemente à barra de tarefas para os abrir facilmente. Se clicar numa aplicação que não seja uma aplicação Windows Store, o Windows abre automaticamente a aplicação utilizando o ambiente de trabalho. Perguntas frequentes - 89 Onde estão as minhas aplicações? A partir de Iniciar, basta começar a introduzir o nome da aplicação que deseja abrir, e Pesquisarirá abrir automaticamente abrir e apresentar os resultados. Para ver a lista completa de aplicações, prima a barra de espaços ou a tecla Menu e clique em Todas as aplicações. Como faço aparecer uma aplicação em Iniciar? Se estiver em Todas as aplicações e quiser que uma aplicação apareça em Iniciar, pode seleccionar a aplicação e clicar nele com o botão direito. Selecione Afixar em Iniciar a partir do menu que aparece no fundo do ecrã. Como removo um tile de Iniciar? Clique no tile com o botão direito e clique em Remover de Iniciar no menu que aparece no fundo do ecrã. Como faço aparecer uma aplicação na minha barra de tarefas no Ambiente de trabalho? Se estiver em Todas as aplicações e quiser que uma aplicação apareça na barra de tarefas de Ambiente de trabalho, pode seleccionar a aplicação e clicar nele com o botão direito. Selecione Afixar à barra de tarefas a partir do menu que aparece no fundo do ecrã. 90 Como instalo aplicações? Pode transferir aplicações Windows Store de Store. Precisará de um ID Microsoft para comprar e transferir aplicações de Store. Não encontro aplicações como Bloco de Notas e Paint! Onde estão? A partir de Iniciar pode simplesmente começar a introduzir o nome da aplicação que procura para abrir Pesquisar e apresentar os resultados. Alternativamente, abra Todas as aplicações e percorra até ‘Acessórios Windows’ para ver a lista de programas antigos. O que é um ID Microsoft (conta)? Uma conta Microsoft é um endereço de correio eletrónico e palavra-passe que usa para iniciar a sessão no Windows. Pode usar qualquer endereço de email, mas é melhor se escolher aquele que utiliza para comunicar com amigos e iniciar a sessão nos seus sites favoritos. Quando inicia a sessão no seu PC com uma conta Microsoft, estará a ligar o seu PC às pessoas, ficheiros e dispositivos que lhe interessam. Necessito de um? Não necessita de um ID Microsoft para usar o Windows 8, mas torna mais fácil a sua vida porque pode sincronizar dados por diferentes máquinas em que inicia a sessão com um ID Microsoft. Perguntas frequentes - 91 Como obtenho um? Se já instalou o Windows 8 e ainda não iniciou a sessão com uma conta Microsoft ou não tem uma conta Microsoft e quiser uma, prima a tecla Windows + <C> e clique em Definições > Alterar definições do PC > Utilizadores > Mudar para uma conta Microsoft e siga as instrções no ecrã. Como adiciono um favorito ao Internet Explorer? O Internet Explorer não tem os tradicionais favoritos, em vez disso pode afixar atalhos a Iniciar. Uma vez aberta a página, clique com o botão direito em qualquer parte da página para abrir o menu no fundo do ecrã. Clique em Afixar a Iniciar. Como verifico a existência de atualizações Windows? Prima a tecla Windows + <C> e clique em Definições > Alterar definições do PC > Actualizações do Windows. Clique em Verificar agora atualizações. Onde posso obter mais informações? Para mais informações, visite: • Tutoriais Windows 8: www.gateway.com/windows8-tutorial • FAQs de suporte: suporte.gateway.com 92 INFORMAÇÃO REGULATÓRIA PREVENÇÃO DE PERDAS DE AUDIÇÃO - Precaução: Poderá ocorrer perda permantente de audição caso sejam usados auscultadores ou auriculares num volume elevado durante longos períodos de tempo. - A pleine puissance, l’écoute prolongée du baladeur peut endommager l’oreille de l’utilisateur. PRECAUÇÕES enquanto ouve Para proteger os seus ouvidos, siga as instruções em baixo. - Aumente o volume gradualmente até obter um nível de som claro e confortável. - Não aumente o nível de volume quando já tiver obtido um nível confortável. - Não ouça música muito alta por longos períodos de tempo. - Não aumente o volume de som de forma a disfarçar o ruído ambiente. - Reduza o volume se não conseguir ouvir o que as pessoas próximo de si estão a dizer. AVISO RELATIVO AOS DISPOSITIVOS RÁDIO - Nota: A informação que se segue destina-se apenas aos modelos com LAN sem fios e/ou Bluetooth. Acessórios compatíveis Os acessórios associados a este equipamento são: Cabo vídeo blindado quando um monitor externo se encontra ligado. Estes acessórios devem ser utilizados para garantir a conformidade com as normas FCC. Informação regulatória - 93 AVISO DA CALIFORNIA PROPOSITION 65 (PROPOSIÇÃO CALIFORNIANA 65) Este produto contém químicos reconhecidos pelo Estado da Califórnia como causadores de cancro, defeitos no feto e/ou outros danos reprodutivos. Para informação adicional sobre o aviso deste produto, aceder a www.gateway.com/prop65. 日本 (JAPAN) 本装置は、第二種情報装置(住宅地域またはその隣接した地域において使用されるべき 情報装置)デ住宅地域での電波障害防止を目的とした情報装置等電波障害自主規制協議 会(VCCI)基準に適合しております。 しかし、本装置をラジオ、テレビジョン受信機に、近接してご使用になると、受信障害 の原因となることがあります。本書の説明にしたがって正しい取り扱いをしてくだ さい。 WIRELESS ADAPTER REGULATORY INFORMATION USA — FCC and FAA The FCC with its action in ET Docket 96-8 has adopted a safety standard for human exposure to radio frequency (RF) electromagnetic energy emitted by FCC certified equipment. The wireless adapter meets the Human Exposure limits found in OET Bulletin 65, supplement C, 2001, and ANSI/IEEE C95.1, 1992. Proper operation of this radio according to the instructions found in this manual will result in exposure substantially below the FCC’s recommended limits. - The following safety precautions should be observed: Do not touch or move antenna while the unit is transmitting or receiving. - Do not hold any component containing the radio such that the antenna is very close or touching any exposed parts of the body, especially the face or eyes, while transmitting. 94 - Do not operate the radio or attempt to transmit data unless the antenna is connected; this behavior may cause damage to the radio. Use in specific environments: - The use of wireless adapters in hazardous locations is limited by the constraints posed by the safety directors of such environments. - The use of wireless adapters on airplanes is governed by the Federal Aviation Administration (FAA). - The use of wireless adapters in hospitals is restricted to the limits set forth by each hospital. Antenna Use In order to comply with FCC RF exposure limits, low gain integrated antennas should be located at a minimum distance of 20 cm (8 inches) or more from the body of all persons or at a minimum distance as specified by the FCC module grant conditions. FCC grants can be viewed from the FCC Equipment Authorization website at https://fjallfoss.fcc.gov/ oetcf/eas/reports/GenericSearch.cfm by entering the FCC ID printed on the module label. Explosive Device Proximity Warning Warning: Do not operate a portable transmitter (including this wireless adapter) near unshielded blasting caps or in an explosive environment unless the transmitter has been modified to be qualified for such use Antenna Warnings - Warning: To comply with the FCC and ANSI C95.1 RF exposure limits, it is recommended that for the wireless adapter installed in a desktop or portable computer, the antenna for this wireless adapter to be installed so as to provide a separation distance of at least 20 cm (8 inches) from all persons or at the minimum distance as specified by the module grant conditions. FCC grants can be viewed from the FCC Equipment Authorization website at https://fjallfoss.fcc.gov/oetcf/eas/ reports/GenericSearch.cfm by entering the FCC ID printed on the module label. Informação regulatória - 95 - Warning: The wireless adapter is not designed for use with high-gain directional antennas. Use On Aircraft Caution - Caution: Regulations of the FCC and FAA prohibit airborne operation of radiofrequency wireless devices (wireless adapters) because their signals could interfere with critical interfere with critical aircraft instruments. Local Restrictions on 802.11a, 802.11b, 802.11g and 802.11n Radio Usage - Caution: Due to the fact that the frequencies used by 802.11a, 802.11b, 802.11g and 802.11n wireless LAN devices may not yet be harmonized in all countries, 802.11a, 802.11b, 802.11g and 802.11n products are designed for use only in specific countries, and are not allowed to be operated in countries other than those of designated use. As a user of these products, you are responsible for ensuring that the products are used only in the countries for which they were intended and for verifying that they are configured with the correct selection of frequency and channel for the country of use. Any deviation from the permissible power and frequency settings for the country of use is an infringement of national law and may be punished as such. Wireless Interoperability The wireless adapter is designed to be interoperable with other wireless LAN products that are based on direct sequence spread spectrum (DSSS) radio technology and to comply with the following standards: - IEEE Std. 802.11b compliant Standard on Wireless LAN - IEEE Std. 802.11g compliant Standard on Wireless LAN - IEEE Std. 802.11a compliant Standard on Wireless LAN (applies to devices supporting 802.11a) - IEEE Std. 802.11n draft 2.0 compliant on Wireless LAN - Wireless Fidelity certification, as defined by the Wi-Fi Alliance 96 The Wireless Adapter and Your Health The wireless adapter, like other radio devices, emits radio frequency electromagnetic energy. The level of energy emitted by the wireless adapter, however, is less than the electromagnetic energy emitted by other wireless devices such as mobile phones. The wireless adapter operates within the guidelines found in radio frequency safety standards and recommendations. These standards and recommendations reflect the consensus of the scientific community and result from deliberations of panels and committees of scientists who continually review and interpret the extensive research literature. In some situations or environments, the use of the wireless adapter may be restricted by the proprietor of the building or responsible representatives of the applicable organization. Examples of such situations may include: - Using the wireless adapter on board airplanes, or - Using the wireless adapter in any other environment where the risk of interference with other devices or services is perceived or identified as being harmful. If you are uncertain of the policy that applies to the use of wireless adapters in a specific organization or environment (an airport, for example), you are encouraged to ask for authorization to use the adapter before you turn it on. FCC Radio Frequency Interference Requirements (applies to device supporting 802.11a) This device is restricted to indoor use due to its operation in the 5,15 to 5,25 GHz and 5,470 to 5,725 GHz frequency ranges. FCC requires this product to be used indoors for the frequency ranges 5,15 to 5,25 GHz and 5,470 to 5,725 GHz to reduce the potential for harmful interference to co-channel mobile satellite systems. High power radars are allocated as primary users of the 5,25 to 5,35 GHz and 5,65 to 5,85 GHz bands. These radar stations can cause interference with and /or damage this device. No configuration controls are provided for this wireless adapter allowing any change in the frequency of operations outside the FCC grant of authorization for U.S operation according to Part 15,407 of the FCC rules. Informação regulatória - 97 USA — Federal Communications Commission (FCC) This device complies with Part 15 of the FCC Rules. Operation of the device is subject to the following two conditions: - This device may not cause harmful interference. - This device must accept any interference that may cause undesired operation. - Note: The radiated output power of the adapter is far below the FCC radio frequency exposure limits. Nevertheless, the adapter should be used in such a manner that the potential for human contact during normal operation is minimized. To avoid the possibility of exceeding the FCC radio frequency exposure limits, you should keep a distance of at least 20 cm between you (or any other person in the vicinity), or the minimum separation distance as specified by the FCC grant conditions, and the antenna that is built into the computer. Details of the authorized configurations can be found at http://www.fcc.gov/oet/ea/ by entering the FCC ID number on the device. Interference Statement This wireless adapter has been tested and found to comply with the limits for a Class B digital device, pursuant to Part 15 of the FCC Rules. These limits are designed to provide reasonable protection against harmful interference in a residential installation. This wireless adapter generates, uses, and can radiate radio frequency energy. If the wireless adapter is not installed and used in accordance with the instructions, the wireless adapter may cause harmful interference to radio communications. There is no guarantee, however, that such interference will not occur in a particular installation. If this wireless adapter does cause harmful interference to radio or television reception (which can be determined by turning the equipment off and on), the user is encouraged to try to correct the interference by taking one or more of the following measures: - Reorient or relocate the receiving antenna of the equipment experiencing the interference. - Increase the distance between the wireless adapter and the equipment experiencing the interference. 98 - Connect the computer with the wireless adapter to an outlet on a circuit different from that to which the equipment experiencing the interference is connected. - Consult the dealer or an experienced radio/TV technician for help. - Note: The adapter must be installed and used in strict accordance with the manufacturer's instructions as described in the user documentation that comes with the product. Any other installation or use will violate FCC Part 15 regulations. Canada — Industry Canada (IC) This device complies with RSS210 of Industry Canada. Cet appareil se conforme à RSS210 de Canada d'Industrie. - Caution: When machine supports and using IEEE 802.11a wireless LAN, this product is restricted to indoor use due to its operation in the 5,15- to 5,25 GHz frequency range. Industry Canada requires this product to be used indoors for the frequency range of 5,15 GHz to 5,25 GHz to reduce the potential for harmful interference to co-channel mobile satellite systems. High power radar is allocated as the primary user of the 5,25 to 5,35 GHz and 5,65 to 5,85 GHz bands. These radar stations can cause interference with and/or damage to this device. The maximum allowed antenna gain for use with this device is 6dBi in order to comply with the E.I.R.P limit for the 5,25 to 5.35 and 5,725 to 5,85 GHz frequency range in point-topoint operation. To comply with RF exposure requirements all antennas should be located at a minimum distance of 20 cm, or the minimum separation distance allowed by the module approval, from the body of all persons. - Attention: l’utilisation d’un réseau sans fil IEEE802.11a est réstreinte à une utilisation en intérieur à cause du fonctionement dans la bande de fréquence 5,15 5,25 GHz. Industry Canada requiert que ce produit soit utilisé à l’intérieur des bâtiments pour la bande de fréquence 5,15 - 5,25 GHz afin de réduire les possibilités d’interférences nuisibles aux canaux co-existants des systèmes de transmission satellites. Les radars de puissances ont fait l’objet d’une allocation primaire de fréquences dans les bandes 5,25 - 5,35 GHz et 5 65 - 5,85 GHz. Ces stations radar peuvent créer des interférences avec ce produit et/ou lui être nuisible. Le gain d’antenne maximum permissible pour une utilisation avec ce produit est de 6 dBi afin Informação regulatória - 99 d’être conforme aux limites de puissance isotropique rayonnée équivalente (P.I.R.E.) applicable dans les bandes 5,25 - 5,35 GHz et 5,725 - 5,85 GHz en fonctionement point-à-point. Se pour conformer aux conditions d'exposition de RF toutes les antennes devraient être localisées à une distance minimum de 20 cm, ou la distance de séparation minimum permise par l'approbation de module, du corps de toutes les personnes. This Class B digital apparatus complies with Canadian ICES-003. Cet appareil numérique de la classe B est conforme a la norme NMB-003 du Canada. "To prevent radio interference to the licensed service, this device is intended to be operated indoors and away from windows to provide maximum shielding. Equipment (or its transmit antenna) that is installed outdoors is subject to licensing." « Pour empêcher que cet appareil cause du brouillage au service faisant l'objet d'une licence, il doit être utilisé a l'intérieur et devrait être placé loin des fenêtres afin de fournir un écran de blindage maximal. Si le matériel (ou son antenne d'émission) est installé à l'extérieur, il doit faire l'objet d'une licence. » European Union Lista de países aplicáveis Este produto deve ser usado em conformidade com as leis e restrições do país de uso. Para mais informações, entre em contacto com o órgão regulador no país de uso. Consulte http://ec.europa.eu/enterprise/rtte/implem.htm para a lista de países mais actual. Lista de Códigos Nacionais Este equipamento pode ser utilizado nos seguintes países: País Código ISO 3166 de duas letras Áustria Bélgica 100 País Código ISO 3166 de duas letras País Código ISO 3166 de duas letras País Código ISO 3166 de duas letras AT Alemanha DE Malta MT Reino Unido GB BE Grécia GR Holanda NT Islândia IS Chipre CY Hungria HU Polónia PL Liechtenstein LI República Checa CZ Irlanda IE Portugal PT Noruega NO Dinamarca DK Itália IT Eslováquia SK Suíça CH Estónia EE Letónia LV Eslovénia SL Bulgária BG Finlândia FI Lituânia LT Espanha ES Roménia RO França FR Luxemburgo LU Suécia SE Turquia TR The low band 5,15 -5,35 GHz is for indoor use only. This equipment complies with the essential requirements of the European Union directive 1999/5/EC. See Statements of European Union Compliance, and more details refer to the attached Declaration of Conformity. English Hereby, ACER INC., declares that this devise is in compliance with the essential requirements and other relevant provisionns of Directive 1999/5/EC. Česky [Czech] ACER INC. tímto prohlašuje, že toto zařízení je ve shodě se základními požadavky a dalšími příslušnými ustanoveními směrnice 1999/5/ES. Daansk [Danish] Undertegnede ACER INC. erklærer herved, at følgende udstyr overholder de væsentlige krav og øvrige relevante krav i direktiv 1999/5/EF. Informação regulatória - 101 Deutsch [German] Hiermit erklärt ACER INC., dass sich das Gerät Radiolan in Übereinstimmung mit den grundlegenden Anforderungen und den übrigen einschlägigen Bestimmungen der Richtlinie 1999/5/EG befindet. Eesti [Estonian] Käesolevaga kinnitab ACER INC. seadme vastavust direktiivi 1999/5/EÜ põhinõuetele ja nimetatud direktiivist tulenevatele teistele asjakohastele sätetele. Español [Spanish] Por medio de la presente ACER INC. declara que el dispositivo cumple con los requisitos esenciales y cualesquiera otras disposiciones aplicables o exigibles de la Directiva 1999/5/CE. Ελληνικά [Greek] ∆ια του παρόντος η ACER INC. δηλώνει ότι η παρούσα συσκευή συµµορφώνεται προς τις ουσιώδεις απαιτήσεις και τις λοιπές διατάξεις της Οδηγίας 1999/5/ ΕΚ. Français [French] Par la présente ACER INC. déclare que cet appareil est conforme aux exigences essentielles et aux autres dispositions pertinentes de la directive 1999/5/CE. Íslenska [Icelandic] Hér með lýsir ACER INC. yfir því að er í samræmi við grunnkröfur og aðrar kröfur, sem gerða r eru í tilskipun 1999/5/EC. 102 Itaaliano [Italian] Con la presente ACER INC. dichiara che questo dispositivo è conforme ai requisiti essenziali ed alle altre disposizioni pertinenti stabilite dalla direttiva 1999/5/CE. Latviski [Latvian] Ar šo ACER INC. deklarē, ka šī ierīce atbilst Direktīvas 1999/5/EK būtiskajām prasībām un citiem ar to saistītajiem noteikumiem. Lietuvių [Lithuanian] Šiuo ACER INC. deklaruoja, kad šis įrenginys atitinka esminius reikalavimus ir kitas 1999/5/EB Direktyvos nuostatas. Malti [Maltese] Hawnhekk, ACER INC., jiddikjara li dan jikkonforma mal- ti ijiet essenzjali u ma provvedimenti o rajn relevanti li he mm fid-Dirrettiva 1999/5/EC. Magyar [Hungarian] Alulírott, ACER INC. nyilatkozom, hogy a készülék megfelel a vonatkozó alapveto követelményeknek és az 1999/5/EC irányelv egyéb eloírásainak. Nederlands [Dutch] Hierbij verklaart ACER INC. dat het toestel voldoet aan de essentiële eisen en de andere relevante bepalingen van richtlijn 1999/5/EG. Norsk [Norwegiann] ACER INC. erklærer herved at utstyret er i samsvar med de grunnleggende krav og øvrige relevante krav i direktiv 1999/5/EF. Informação regulatória - 103 Polski [Polish] Niniejszym ACER INC. oświadcza, że urządzenie jest zgodne z zasadniczymi wymogami oraz pozostałymi stosownymi postanowieniami Dyrektywy 1999/5/EC. Português [Portuguese] ACER INC. declara que este dispostivo está conforme com os requisitos essenciais e outras disposições da Directiva 1999/5/CE. Slovensko [Slovenian] ACER INC. izjavlja, da je ta naprava skladna z bistvenimi zahtevami in ostalimi relevantnimi določili Direktive 1999/5/ES. Slovensky [Slovak] ACER INC. týmto vyhlasuje, že zariadenie spĺňa základné požiadavky a všetky príslušné ustanovenia Smernice 1999/5/ES. Suomi [Finnish] ACER INC. vakuuttaa täten että tämä laite on direktiivin 1999/ 5/EY oleellisten vaatimusten ja sitä koskevienn direktiivin muiden ehtojen mukainen. Svenska [Swedish] Härmed intygar ACER INC. att denna enhet står i överensstämmelse med väsentliga egenskapskrav och övriga relevanta bestämmelser som framgår av direktiv 1999/5/EG. 104 France Pour la France métropolitaine : 2,400 - 2,4835 GHz (Canaux 1à 13) autorisé en usage intérieur 2,400 - 2,454 GHz (canaux 1 à 7) autorisé en usage extérieur Pour la Guyane et la Réunion : 2,400 - 2,4835 GHz (Canaux 1à 13) autorisé en usage intérieur 2,420 - 2,4835 GHz (canaux 5 à 13) autorisé en usage extérieur Pour tout le territoire Français : Seulement 5,15 -5,35 GHz autorisé pour le 802.11a L'utilisation de cet equipement (2,4 GHz WLAN) est soumise à certaines restrictions : - La puissance maximale autorisée en intérieur est de 100 mW pour 2400 - 2483,5 MHz. - La puissance maximale autorisée est de 100 mW en extérieur pour 2400 - 2454 MHz. - La puissance maximale autorisée est de 10 mW en extérieur, 2454 - 2483,5 MHz. Pour les dernières restrictions, voir http://www.art-telecom.fr. Italy The use of these equipments is regulated by: 1.D.L.gs 1.8.2003, n. 259, article 104 (activity subject to general authorization) for outdoor use and article 105 (free use) for indoor use, in both cases for private use. 2.D.M. 28.5.03, for supply to public of RLAN access to networks and telecom services. L’uso degli apparati è regolamentato da: 1.D.L.gs 1.8.2003, n. 259, articoli 104 (attività soggette ad autorizzazione generale) se utilizzati al di fuori del proprio fondo e 105 (libero uso) se utilizzati entro il proprio fondo, in entrambi i casi per uso private. 2.D.M. 28.5.03, per la fornitura al pubblico dell’accesso R-LAN alle reti e ai servizi di telecomunicazioni. Informação regulatória - 105 Belgium Dans le cas d'une utilisation privée, à l'extérieur d'un bâtiment, au-dessus d'un espace public, aucun enregistrement n'est nécessaire pour une distance de moins de 300 m. Pour une distance supérieure à 300 m un enregistrement auprès de l'IBPT est requise. Pour les enregistrements et licences, veuillez contacter l'IBPT. In geval van privé-gebruik, buiten een gebouw, op een openbare plaats, is geen registratie nodig, wanneer de afstand minder dan 300 m is. Voor een afstand groter dan 300 m is een registratie bij BIPT vereist. Voor registraties en licenties, gelieve BIPT te contacteren. Brazil Este equipamento opera em caráter secundário, isto é, não tem direito a proteção contra interferência prejudicial, mesmo de estações do mesmo tipo, e não pode causar interferência a sistemas operando em caráter primário. Pakistan Pakistan Telecommunication Authority (PTA) Approved Morocco The operation of this product in the radio channel 2 (2417 MHz) is not authorized in the following cities: Agadir, Assa-Zag, Cabo Negro, Chaouen, Goulmima, Oujda, Tan Tan, Taourirt, Taroudant and Taza. The operation of this product in the radio channels 4, 5, 6 and 7 (2425 - 2442 MHz) is not authorized in the following cities: Aéroport Mohamed V, Agadir, Aguelmous, Anza, Benslimane, Béni Hafida, Cabo Negro, Casablanca, Fès, Lakbab, Marrakech, Merchich, Mohammédia, Rabat, Salé, Tanger, Tan Tan, Taounate, Tit Mellil, Zag. Japan 5 GHz 帯は室内でのみ使用のこと Korea 당해 무선설비는 운용 중 전파혼신 가능성이 있음 106 Taiwan 第十二條 經型式認證合格之低功率射頻電機,非經許可,公司、商號或使用者均不得擅自變更頻 率、加大功率或變更原設計之特性及功能。 第十四條 低功率射頻電機之使用不得影響飛航安全及干擾合法通信 ; 經發現有干擾現象時,應立即 停用,並改善至無干擾時方得繼續使用。 前項合法通信,指依電信法規定作業之無線通信。 低功率射頻電機須忍受合法通信或工業、科學及醫療用電波輻射性電機設備之干擾。 ALTERAÇÕES REALIZADAS NO PRODUTO Marca CE Gateway não pode ser considerada responsável por alterações não autorizadas feitas pelo utilizador e respectivas consequências, que podem alterar a conformidade do produto com as certificações da marca CE. Interferência da frequência de rádio O fabricante não se responsabiliza por quaisquer interferências na recepção de televisão ou rádio provocadas por modificações não autorizadas neste equipamento. CONEXÕES E LIGAÇÕES À TERRA REMOTAS PELV (tensão muito baixa protegida) Para garantir a integridade de tensão muito baixa do aparelho, ligue-o às portas externas apenas com circuitos eléctricos compatíveis e protecção da rede. SELV (tensão muito baixa de segurança) Cada entrada e saída deste produto está classificada como tensão muito baixa de segurança. Informação regulatória - 107 Ligações à terra remotas Para prevenir choques eléctricos, ligue todos os computadores locais (escritório individual) e equipamento de apoio de computadores ao mesmo circuito eléctrico das ligações eléctricas do edifício. Se não tiver a certeza, verifique as ligações eléctricas do edifício para evitar situações de ligação à terra remotas. Corrente eléctrica do edifício Ligue apenas o equipamento a uma corrente que esteja em conformidade com as regulamentações de ligações eléctricas em vigor no seu país. No Reino Unido, as normas IEE são as seguintes. FONTE DE ALIMENTAÇÃO E CABOS Fonte de alimentação As tomadas de entrada e de saída da fonte de alimentação (quando equipadas) são classificadas como tensão perigosa. Deve desligar o cabo de alimentação eléctrica e remover a bateria para desligar o equipamento da corrente eléctrica. Neste sentido, a tomada de saída deve ser instalada junto ao equipamento e deve ser de fácil acesso. Voltagem de entrada: Consulte a etiqueta de voltagem no fundo do computador e certifique-se que o seu transformador cumpre a voltagem especificada. O utilizador nunca deverá tentar desmontar a fonte de alimentação. A fonte de alimentação não contém componentes que possam ser substituídas pelo utilizador. A própria fonte de alimentação contém tensões perigosas que podem provocar ferimentos físicos graves. Se a fonte de alimentação apresentar defeitos, deve devolvê-la ao revendedor. Cabos e ficha de alimentação Este produto requer um cabo e ficha de alimentação com ligação terra. A ficha encaixa apenas em tomadas de electricidade ligadas à terra. Certifique-se que a tomada eléctrica está devidamente ligada à terra antes de introduzir a ficha. Não insira a ficha numa tomada de electricidade não ligada à terra. Consulte o seu electricista para obter informações mais detalhadas. 108 O comprimento do cabo não deve exceder os 2,5 metros. Para evitar a ocorrência de choques eléctricos, não retire nem desactive o contacto com a terra do cabo de alimentação. Se o cabo de alimentação for danificado, substitua-o. Contacte o revendedor de modo a efectuar uma substituição correcta. Na Europa, a ficha tem que estar classificada para 250 V CA, no mínimo de 10 amperes. A ficha tem que apresentar uma marca de homologação duma instituição internacional. O cabo deve ser adequado ao país do utilizador final. Contacte o revendedor ou as autoridades locais para a electricidade, se não tiver a certeza do tipo de cabo de alimentação que deve utilizar no país onde reside. Cabos Em relação aos cabos que não são fornecidos com o Produto na embalagem do computador: A compatibilidade electromagnética do sistema só é garantida se o cabo e a interface tiverem uma blindagem eficiente. É necessária a utilização de um cabo com interface blindado para USB, IEEE1394, série, impressora, jogos, áudio/vídeo analógico ou digital, Ethernet LAN, PS2, antenas de TV ou FM e, em geral, todas as interfaces de cabos de alta velocidade. Utilize apenas cabos de telecomunicações com a marca UL n.º 26AWG ou maiores. Apenas o cabo da Ethernet LAN ou do modem RTC pode ter um comprimento superior a 3 metros. Gateway recomenda que adicione um grampo redondo de núcleo de ferrite a cada cabo ligando o seu computador a um dispositivo de hardware que não foi fornecido com o seu computador. - Referência da ferrite: 28A-2029 da Steward (dois ganchos) Durante a certificação do produto, a Gateway utilizou as seguintes qualidades de cabo: - Cabos certificados USB2.0 da Hama 46778 - FireWire blindada IEEE1394 da Hama 50011 Informação regulatória - 109 - Cabos de áudio/vídeo blindados RCA-RCA da Thomson KHC001M, KHC012M, KHC028M - Cabo áudio blindado da ficha estéreo da Hama 43330H, 42714H Computadores portáteis e aquecimento interno O adaptador CA e a parte debaixo do computador podem ficar quentes após uma utilização prolongada. Deverá ser evitado o contacto físico com ambas as partes. REMOÇÃO E SUBSTITUIÇÃO DA TAMPA DO CHASSIS Antes de remover a tampa do chassis para prestar assistência ou modificar o equipamento, é necessário desligar todos os cabos de alimentação e do modem e retirar ou desactivar a bateria. - Cuidado: Alguns componentes no interior do computador pode ficar quentes após uma utilização prolongada. Depois, tem de fechar o chassis antes de inserir os cabos e ligar o equipamento. DECLARAÇÃO DE CONFORMIDADE LASER Os dispositivos ópticos são testados e certificados para estarem em conformidade com as normas da Comissão Electrotécnica Internacional IEC60825-1 e EN60825-1 europeias para produtos laser de Classe 1. Os produtos a laser da classe 1 não são considerados perigosos. Os dispositivos ópticos foram concebidos de forma a evitar qualquer exposição a radiações laser acima do nível da classe 1, durante o funcionamento normal ou nas condições de manutenção indicadas. Os dispositivos ópticos instalados no seu computador foram concebidos para uso exclusivo enquanto componentes de tais produtos electrónicos e, logo, não estão em conformidade com os requisitos específicos do código de normas federais Sec. 1040.10 e Sec. 1040.11 para produtos a laser COMPLETOS. Uma vez que a exposição à radiação laser é extremamente perigosa, o utilizador não deverá nunca, sob quaisquer circunstâncias, tentar desmontar o dispositivo a laser. 110 ACONDICIONAMENTO O acondicionamento deste produto está em conformidade com a Directiva ambiental europeia 94/62/CE de 20 de Dezembro de 1994 e com a sua equivalente na legislação francesa pelo Decreto 98-638 de 20 de Julho de 1998. EM CONFORMIDADE COM A CERTIFICAÇÃO REGULAMENTAR RUSSA Informação regulatória - 111 AMBIENTE O NOSSO COMPRIMISSO COM A PROTECÇÃO AMBIENTAL O ambiente tem tido um papel importante na criação dos nossos produtos. Gateway está empenhada em limitar o impacto ambiental dos seus produtos durante o respectivo ciclo de vida. Começando pela fase de concepção, com uma política de aquisição muito restrita, é dado o máximo de atenção aos componentes electrónicos para limitar o seu peso em metais pesados, como chumbo, cádmio, crómio, mercúrio, etc. Pede-se aos fornecedores, de cada peça de qualquer produto, que respeitem todos os regulamentos. No que diz respeito aos produtos no final da vida útil, foram tomadas medidas para antecipar e facilitar a reciclagem de todos os nossos produtos. Por isso, todas as peças de plástico utilizadas nos produtos da Gateway que pesam mais de 25 gramas têm a etiqueta ISO 11469. Esta etiqueta permite o reconhecimento rápido do material e facilita a sua valorização. Da mesma forma, os computadores de secretária são concebidos para serem facilmente desmontados, substituindo-se os parafusos por clips. ELIMINAÇÃO DO PRODUTO A directiva 2002/96/CE, conhecida como directiva de resíduos de equipamentos eléctricos e electrónicos (REEE), exige que os produtos electrónicos e eléctricos usados sejam eliminados em separado dos resíduos domésticos para promover a reutilização, reciclagem e outras formas de recuperação e reduzir a quantidade de detritos a eliminar, tendo em vista a redução de aterros sanitários e incineração. O símbolo do balde do lixo riscado destina-se a lembrá-lo que estes produtos devem ser eliminados em separado. Estes regulamentos aplicam-se a todos os produtos Gateway e a todos os acessórios, como teclados, ratos, colunas, telecomandos, etc. Quando eliminar este tipo de produtos, consulte a autoridade local ou devolva o equipamento usado ao seu revendedor, caso o vá substituir, de modo a se certificar de que é correctamente reciclado. Para mais informações, visit www.gateway.com/about/ corp_responsibility/environment.php. 112 Eliminação de bateria (se for aplicável) Antes de deitar fora o seu equipamento, certifique-se que retirou todas as baterias que possam estar dentro do equipamento. A legislação europeia declara que as baterias têm de ser recolhidas para serem eliminadas em separado do lixo doméstico. Não coloque as baterias usadas no balde do lixo. Coloque as baterias usadas num ponto de recolha específico, quando disponível, ou consulte o seu distribuidor ou autoridade local para saber que infra-estruturas pode usar. A sua colaboração permitirá a recolha, reciclagem e destruição seguras das baterias usadas, ajudando a proteger o ambiente e a reduzir o risco para a saúde. - Precaução: Risco de explosão caso a bateria seja substituída por uma de tipo incorrecto. Elimine as baterias usadas de acordo com as instruções. ENERGY STAR Os produtos Gateway com ENERGY STAR poupam-lhe dinheiro ao reduzir o custo de energia e protegendo o ambiente sem sacrificar funcionalidades ou desempenho. A Gateway orgulha-se de oferecer aos nossos clients produtos com a marca ENERGY STAR. O que é a ENERGY STAR? Produtos com ENERGY STAR utilizam menos energia e evitam emissões de gases com efeito estufa ao cumprir rigorosas orientações de eficiência energética definidas pela Agência de Protecção Ambiental dos E.U.A. A Gateway está empenhada em oferecer produtos e serviços a nível mundial que ajudem os clientes a poupar dinheiro, a poupar energia e a melhorar a qualidade do ambiente. Quanto mais energia pudermos poupar com mais eficiência energética, mais conseguiremos reduzir a emissão de gases com efeito estufa e o risco de alterações climáticas. Para mais informações consulte www.energystar.gov ou www.energystar.gov/powermanagement. - Nota: As informações desta secção podem não aplicar-se ao seu computador. Produtos Gateway com ENERGY STAR: - Produzem menos calor e reduzem cargas de arrefecimento e climas quentes. Ambiente - 113 - Passam automaticamente para os modos “suspensão de ecrã” e “suspensão do computador” após 10 e 30 minuots de inactividade, respectivamente. - Desperte o computador do modo suspensão premindo o teclado ou mexendo no rato. - Os computadores pouparão mais de 80% da energia no modo “suspensão”. A ENERGY STAR e a marca ENERGY STAR são marcas registadas dos E.U.A. 114 LICENÇA DE SOFTWARE - Nota: A maioria dos softwares já está pré-instalada no seu computador Gateway. Estão prontos para ser utilizados e configurados. Contudo, alguns requerem a introdução de um CD ou DVD. Estes discos encontram-se na embalagem do computador. Acordo de licença Gateway(produtos de CD e/ou DVD). Esta cópia do original constitui a sua prova de licença. Conserve-a como uma propriedade valiosa. Importante! Ler com atenção antes de instalar o software O Acordo de licença seguinte aplica-se a si. Trata-se de um acordo legal entre si (quer individualmente quer como entidade) e a Gateway. Ao instalar o software comprometese a obedecer aos termos deste Acordo. Caso o cliente não concorde com os termos deste Acordo, deverá devolver o computador, o(s) pacote(s) de software não aberto(s) e, se existirem, os termos que o acompanham (incluindo materiais escritos e arquivos ou outro(s) recipiente(s)) ao local de aquisição para um reembolso total. GATEWAY LICENÇA DE SOFTWARE 1. Concessão de licença Este Acordo de licença da Gateway (“Licença”) permite-lhe utilizar uma cópia da versão específica do SOFTWARE da Gateway identificado acima (que pode incluir pelo menos um disco CD ou DVD) num único computador, sob condição do SOFTWARE ser apenas utilizado num único computador a qualquer momento. Se o cliente dispuser de diversas licenças para o SOFTWARE, então poderá utilizar em qualquer momento tantas cópias do SOFTWARE quantas licenças possuir. O SOFTWARE está “a ser utilizado” num computador quando é carregado na memória temporária (isto é, a RAM) ou instalado na memória permanente (por exemplo, disco rígido, CD e/ou DVD-ROM ou noutro suporte de armazenamento desse computador), exceptuando o caso em que uma cópia é instalada num servidor de rede, com fins exclusivamente de distribuição, de outro Licença de software - 115 computador, caso em que o SOFTWARE não está “a ser utilizado”. Se o número antecipado de utilizadores do SOFTWARE exceder o número de licenças aplicáveis, então o cliente terá que dispor de um mecanismo ou processo razoável para assegurar que o número de pessoas que utilizam o SOFTWARE simultaneamente não exceda o número de licenças. Se o SOFTWARE estiver instalado de forma permanente no disco rígido ou num dispositivo de armazenamento de um computador (que não um servidor de rede) e se uma pessoa utilizar esse computador durante mais de 80% do tempo em que este está a ser utilizado, então essa pessoa poderá também utilizar o SOFTWARE num computador portátil ou doméstico. 2. Direitos de autor O SOFTWARE é propriedade da Gateway ou dos fornecedores e encontra-se protegido pelas leis de direitos de autores dos Estados Unidos da América e pela disposição do tratado internacional. Por conseguinte, deve tratar o SOFTWARE como qualquer outro material protegido pelos direitos de autor (por ex. livro ou gravação musical) excepto que pode transferir a parte do disco CD e/ou DVD do SOFTWARE, se existir, para um único disco rígido, sob condição de guardar o original apenas para fins de cópia de segurança e arquivo. O cliente não pode copiar parte do disco CD e/ou DVD do SOFTWARE ou os materiais escritos que acompanham o SOFTWARE. 3. Outras restrições O cliente não pode alugar ou efectuar leasing do SOFTWARE, mas pode transferir o SOFTWARE e os materiais escritos que o acompanham numa base permanente desde que não retenha quaisquer cópias e desde que o destinatário concorde com os termos deste contrato. O cliente não pode alterar a engenharia, decompor ou desmontar o SOFTWARE. Qualquer transferência do SOFTWARE terá que incluir a actualização mais recente e todas as versões anteriores. 116 INFORMÇÃO SOBRE LICENÇA DE SOFTWARE DE TERCEIROS E SOFTWARE DE LICENÇA LIVRE O software pré-carregado, integrado ou distribuído de qualquer outra forma com os produtos fornecidos pela Gateway no contém programas de software de terceiros ou livres (o Software Livre), que são licenciados ao abrigo dos termos da Licença Pública Geral GNU (a GPL). O Software Livre é identificado como tal. As cópias, distribuição e/ ou alterações que fizer do Software Livre estão sujeitas aos termos da GPL. O software Livre é distribuído na esperança de que seja útil, mas SEM QUALQUER GARANTIA; nem mesmo com a garantia implícita de COMERCIABILIDADE ou ADEQUAÇÃO PARA UM FIM ESPECÍFICO. As provisões da Licença Pública Geral GNU devem ser sempre aplicadas. Pode aceder directamente a http://www.gnu.org para obter uma cópia da GPL ou escrever à Free Software Foundation, Inc. e solicitar uma cópia. A morada da Free Software Foundation, Inc é: 59 Temple Place - Suite 330, Boston, MA, 02111-1307, USA. Durante um período de três (3) anos com início na recepção por si deste software, pode obter um exemplar legível por uma máquina do código-fonte do Software Livre ao abrigo dos termos da GPL sem qualquer custo excepto o custo do suporte, porte e processamento, através de pedido escrito dirigido a nós. Agradecemos que nos contacte se tiver mais questões. A nossa morada para correspondência 8F, 88, Sec. 1, Hsin Tai Wu Rd., Hsichih, New Taipei City 221, Taiwan. Licença de software - 117 ÍNDICE REMISSIVO A Actualizar tecla de atalho ......................... 19, 20 Actualizações automáticas do Ambiente ........................................... 112 Windows ........................................ 61 Ambiente do computador........................ 8 áudio altifalantes resolução de problemas ................. 84 resolução de problemas ................. 84 Aviso de epilepsia ................................ 14 B bateria advertência de baixa carga da bateria ........................................... características ................................ carregar ......................................... condições baixas............................ instalar ........................................... 40 36 39 41 39 maximizar a duração ...................... 37 optimizar........................................ 40 remover ......................................... 39 utilizar pela primeira vez ................. 37 verificar o nível de carga ................ 40 Baterias ............................................. 113 Browser ............................................... 52 C Cabo de alimentação............................ 10 resolução de problemas ................. Cabos .......................................... 10, 108 computador carregar funcionalidades .............................. verificar o nível ............................... 40 indicador de ligado ......................... CD-ROM Cursor ................................................. ejectar manualmente ...................... 85 85 15 21 27 D Dispositivos multimédia amovíveis ........ 31 DSL ..................................................... 47 118 E Ecrã ecrã teclas de atalho .............................. 18 resolução de problemas ................. 84 Eliminação de bateria ......................... 113 F FAQ. Consulte perguntas frequentes Fornecedor de Servios Internet (ISP) .... 46 Firewall ................................................ 54 G Garantia................................................ 7 Gateway Programa Recovery Management... 45 I impressora Internet resolução de problemas ................. 85 Firewall .......................................... 54 INFORMAÇÃO REGULATÓRIA ... 93, 112 Ligação ................................... 46, 47 Interferência ....................................... 107 L LAN (Rede de Área Local) .................... 48 Ligações de rede ................................. 48 Leitor de cartões de memória ............... 29 Limpar o seu computador ..................... 11 ligações luminosidade rede ............................................... 31 teclas de atalho .............................. 19 M Malware ............................................... 54 Recovery Management .................. 62 Manutenção Modem ................................................ 47 Programa Recovery Management ... 45 N Norton Internet Security .................. 52, 56 P perguntas frequentes............................ 83 portas .................................................. 29 Índice Remissivo - 119 Precauções de saúde ........................... 12 Precauções de segurança ..................... 8 problemas ............................................ 83 arranque ........................................ 83 CD-ROM ....................................... ecrã ............................................... impressora..................................... teclado .......................................... 85 84 85 85 R Recovery Recuperação Programa Recovery Management ... 45 Recovery Management .................. 62 rede..................................................... 31 S Segurança Software Actualizações ................................. 61 Licença de software ..................... 115 Antivírus ........................................ 55 Spyware .............................................. 53 T Teclado teclado táctil......................................... 27 utilizar...................................... 27–27 teclas de atalho .............................. 20 teclado teclas de atalho .................................... 20 resolução de problemas ................. 85 U Unidades universal serial bus .............................. 32 Leitor de cartões de memória ......... 29 V vista frente ............................................. 22 direita ............................................ 24 vista esquerda ..................................... 21 esquerda ....................................... 22 vista frontal .......................................... 21 W WiFi ............................................... 48, 49 Windows Actualizações automáticas do Windows ........................................ 61 120 Utilizar o Windows ......................... 45 Ver.: 02.01.02 使用手冊 Gateway NE71B - 1 目錄 啟動您的電腦 4 無線連線............................................................. 註冊 .................................................................... 軟體安裝............................................................. 復原 .................................................................... 遇到問題嗎?...................................................... 4 5 5 6 電源管理 36 6 省電 ................................................................. 36 電腦基本知識 7 電池充電................................................... 檢查電池電量............................................ 最佳化電池使用壽命................................. 低電量警告 ............................................... 33 34 34 34 軟體 38 12 網際網路 39 復原 51 安全及使用舒適性 .............................................. 7 使用 Windows 和您的軟體............................... 38 安全守則 ..................................................... 7 網際網路安全防護 .................................... 38 健康守則 ................................................... 10 Gateway Recovery Management............. 38 認識您的電腦 上視圖 - 顯示器 ................................................ 上視圖 - 鍵盤 .................................................... 特殊按鍵 ................................................... 前視圖 .............................................................. 左視圖 .............................................................. 右視圖 .............................................................. 底視圖 .............................................................. 觸控板 13 上網的必要工作 ............................................... 39 14 保護電腦................................................... 39 15 選擇網際網路服務提供者.......................... 39 18 網路連線................................................... 41 19 瀏覽網路! ............................................... 44 20 安全性 ...................................................... 44 22 23 建立復原備份 ................................................... 觸控板基本操作 ................................................ 23 建立磁碟機和應用程式備份 ............................. 觸控板手勢 ....................................................... 24 復原您的系統 ................................................... 重新安裝驅動程式和應用程式 .................. 升級電腦 25 回到先前的系統快照................................. 透過選購品擴充 ................................................ 25 將系統回到出廠預設狀態.......................... 連線用選購項目......................................... 25 從 Windows 復原...................................... 電源供應器 30 從復原備份中復原 .................................... AC 電源轉接器 ................................................. 30 電池組 .............................................................. 31 常見問題 電池組特性 ................................................ 31 使用 Windows 8 的秘訣和提示 ........................ 有三個要記住的觀念................................. 更換電池組 ................................................ 33 如何存取 Charms?.................................. 安裝或取下電池組 ..................................... 33 2 51 54 57 57 60 61 61 65 69 71 71 71 如何進入開始功能表? .............................. 71 如何將我的最愛新增到 我要如何在應用程式間進行切換? ............ 71 Internet Explorer? ................................... 如何關閉我的電腦? ................................. 72 如何檢查 Windows Update? ................... 為什麼要使用新介面? .............................. 72 哪裡可獲得更多資訊? ............................. 如何將我的電腦解除鎖定?....................... 72 如何個人化我的電腦? .............................. 72 法規資訊 我想要以我習慣的方式來使用 Windows。 環境 還我桌面! ................................................ 74 我的應用程式在哪裡? .............................. 74 軟體授權 何謂 Microsoft ID ( 帳戶 )?....................... 75 索引 76 76 76 77 94 96 98 著作權 © 2012 版權所有 Gateway NE71B 使用手冊 本修訂版本:2012 年 7 月 20 日 Gateway 歡迎您點進 registration.gateway.com 來看看加入會員的優惠好康! 備註:所有圖片僅供參考。實際組態可能有所不同。 目錄 - 3 啟動您的電腦 感謝您購買 Gateway 電腦! 本手冊的設計用意在於介紹電腦的功能並協助提升您的電腦使用體驗。 在設定並啟動電腦之後,如設定指示中所示,畫面上將會出現各種問題, 以協助您連上網際網路。接著電腦會設定所安裝的軟體。 無線連線 若要連線到無線網路,請先檢查電腦的無線功能是否開啟,且所要連線的路 由器或數據機是否設定正確。 • 若無線網路未開啟,按下 Windows 鍵 ( ) + W,輸入 「無線網路」然後 按一下 「無線網路」。 按一下 Wi-Fi 下的切換開關,以啟用無線連線。 再 按一次則可停用。 • 若要連線至網路,按下 Windows 鍵 ( ) + W,輸入 「無線網路」,然後 按一下連線至網路。 選取網路,輸入密碼 ( 如果需要的話 )。 • 過一段時間後,電腦應該即可連上網際網路。 如果未偵測到您的網路,或電腦未連線到網際網路,請參閱 ISP 或路由器的 說明文件。在電腦啟動並可開始使用後,開啟 Internet Explorer,然後依照 指示進行。 或者,也可以使用網路線直接連接到路由器上的網路埠。請洽詢您的 ISP 或參閱路由器的使用指南。 4 註冊 建議您在第一次使用電腦時立刻為產品進行註冊。註冊可以讓您獲得一些好 處,包括: • 由專業的代表人員提供快速服務。 • 獲得 Gateway 社群成員資格:可以收到我們的促銷資訊,並參加客戶調 查活動。 • 收到來自 Gateway 的最新消息。 註冊方式 一開始啟動電腦時,會出現一個視窗,邀請您完成註冊。請填入相關資訊, 然後按一下 「下一步」。接下來出現的視窗則包含選擇性的欄位,這些資訊 可幫助我們為您提供更個人化的客戶服務體驗。 其他選項 另一個註冊 Gateway 產 品 的 方 式,就 是 造 訪 我 們 的 網 站: registration.gateway.com。選擇您所在的國家 / 地區,依照出現的簡易指 示進行。 完成註冊後,我們會寄給您一封確認的電子郵件,當中含有一些重要資訊, 請您務必妥善保管。 軟體安裝 電腦會自動安裝軟體並準備電腦,供您開始使用。這可能需要一段時間, 此時請勿關閉電腦;並靜候電腦完成安裝。 啟動您的電腦 - 5 復原 您應該在允許時立即建立復原光碟。復原程式可讓您建立復原光碟,還能接 著還原或重新安裝 Gateway 提供的應用程式及驅動程式。 遇到問題嗎? Gateway 提供多種購買支援選項。 Gateway 支援 務必記下您電腦的序號、購買日期和地點,以及本手冊上的型號名稱;同時 請保留購買證明。打電話給我們之前,請寫下引發問題時顯示的任何錯誤訊 息,再將電腦備妥在身旁,然後開啟電源 ( 如果可行的話 )。若能在連絡我 們之前先準備好這些事項,將有助於改善並加速我們的服務流程。 Gateway 網站 別忘了造訪 www.gateway.com,查看我們的 「支援」區段,取得最新的資 訊、說明、驅動程式和下載。 保固和連絡資訊 您可以在電腦的保固中找到電腦的保固資訊,以及如何聯絡技術支援服務的 資訊。 6 電腦基本知識 安全及使用舒適性 安全守則 請遵循以下的電腦使用指南,以確保使用舒適性及避免健康上的問題。 電腦環境 請確認電腦的使用環境: • 放在穩固的檯面、支架或桌面上使用。若讓電腦掉落,可能嚴重毀損。 • 請勿在震動的檯面上使用,或在運動、健身或其他動態環境的活動期間使 用。震動或移動會讓固定機制鬆脫、損傷內部元件,甚至造成電池漏液。 • 遠離陽光直射及熱源。 • 遠離磁場或任何會產生靜電的裝置。 • 遠離行動電話至少 30 公分 (1 英呎 )。 • 非處於充滿灰塵或潮濕的環境。 • 請勿在靠近水邊處使用。切勿將任何液體灑潑在電腦上或內部。 • 請勿放在地毯或其他會產生靜電的表面上使用。 注意 • 產品上的縫隙及開口有通風功效,可確保產品穩定運作並避免過熱。因此 請勿擋住或蓋住開口,亦請勿放在床鋪、沙發、地毯及其他相似表面上。 除非有適當的通風,否則絕對不要將本產品放在靠近電暖爐或導熱器的地 方,或置放於密閉空間中。 電腦基本知識 - 7 • 請勿將任何種類的物體塞入本產品的縫隙中,以免接觸到危險的高壓點或 短路部分,而造成火災或電擊。請勿潑灑任何種類的液體於本產品的上方 或內部。 • 為避免損壞內部零件及造成電池漏電,請勿將本產品置於震動的表面上。 • 請勿在參加體育活動、運動,或任何會造成意外短路或損壞轉動裝置、 硬碟、光碟機,以及可能讓鋰電池暴露在危險下的震動環境中使用本產品。 連接線 請確定下列事項: • 請勿讓電源線呈現繃緊狀態,且不要讓其他人有機會踩踏或纏繞在電源 線上。 • 請勿讓其他裝置壓在電源線上。 • 先將電源線連接至電腦,然後再插入 AC 電源插座。 • 在將電源線從電腦拔出之前,先從電源插座中拔出。 • 三針腳電源線需接到接地的電源插座。 • 電源插座應在方便取得的位置,並盡可能靠近電腦 ( 請勿插入太多電源轉 接器,讓電壓過載 )。 如果電腦使用外接式 AC 電源轉接器: • 請勿將物品覆蓋或放置在 AC 電源轉接器上。清除所有物品,讓電源轉接 器在使用期間獲得適當冷卻。 • 只能使用電腦隨附的 AC 電源轉接器。使用外觀類似的其他電源轉接器可 能讓電腦毀損。如果需要更換元件,只能使用通過電腦使用認證的元件。 8 清理您的筆記型電腦 • • • • 請先將電腦電源線從電源插座中拔出,再進行清潔工作。 請勿使用液體或氣體的清潔劑,以濕布清潔即可。 請勿直接在螢幕上噴灑清潔產品。 如果不慎將液體灑在電腦上,請立即關機、拔出 AC 電源轉接器、取出電 池,並確定完全乾燥後再開機使用。必要時需等至隔日。 注意:電腦若附有記憶卡插槽或其它延伸裝置,可能會有防塵待機卡 安裝於記憶卡插槽中。防塵待機卡可保護未使用的插槽,避免灰塵、金 屬物體或其他小雜物的掉入。當插槽內未放入介面卡時,請使用防塵 待機卡。 維修電腦 請勿嘗試自行維修電腦,打開或移除外蓋可能引發觸電或其他危險。請由專 業人員進行維修。 若發生下列情形,請自牆壁插座拔除電腦電源,並由專業人員進行維修: • • • • • • 電源線或插頭已損壞、斷裂或磨損時, 液體灑入產品內部時, 產品暴露於雨水或水分時, 產品掉落或外殼受損時, 產品出現明顯的效能異常, 在遵循操作指示的情況下,產品仍無法正確操作。 注意:您只能調整操作指示中提及的控制項,未正確調整其他控制項 可能會造成電腦毀損,且需要由合格的維修人員進行經常性的維修,才 能讓產品恢復正常狀態。 電腦基本知識 - 9 健康守則 • 筆記型電腦底部表面、通風孔周圍及 AC 電源轉換器可能會過熱。為了 避免造成傷害,請務必勿讓皮膚或身體碰觸到這些裝置和裝置周圍。 • 您的裝置與其配件可能含有小零件,請放置在兒童無法拿取之處。 • 本電腦和配件含有小型零件,請放置在兒童無法拿取之處。 • 不論是長時間工作或娛樂,請安排適當的休息時間。應每隔一段時間將眼 睛看向電腦螢幕以外的地方。勞累時請停止使用電腦。 • 請將電腦放在適當的位置,讓您能夠自然、舒適地進行工作。請將經常使 用的物品放在方便拿取的位置。 • 請將電腦放在正前方,以提高安全和使用舒適性。確定鍵盤和觸控板放在 適當的高度。螢幕應與您的眼睛保持 45 至 70 公分 (18 至 30 英吋)的 距離。 如果要長時間坐在書桌前使用電腦,建議您購買一組外接式鍵盤,以提高 使用電腦時的舒適性。 • 為保護您的聽力,在使用喇叭或耳機時,請慢慢將音量提高到清楚且舒適 的程度;您的耳朵適應後就不要再提高音量。請勿長時間使用高音量。 請勿提高音量來蓋過週遭的噪音;當無法聽到身旁人的談話時,表示需要 降低音量。 • 電腦底部、電源轉接器,以及從散熱孔排出的空氣,在使用 時可能會變熱。避免長時間接觸,且請勿將運作中的電腦放 在腿上。 • 確定電腦的散熱孔和孔槽未被阻塞或擋住。請勿將電腦放在 柔軟的表面上 ( 例如地毯、椅子或床墊 ),因為這樣會阻塞散熱孔。 • 請勿將任何物體插入散熱孔或機殼插槽中,以免接觸到危險的電壓接點或 造成零件短路,因而引發火災或觸電。 10 • 有些重複性的動作可能引發或造成手掌、手腕、頸部、肩膀、腿部和後背 出現某些不適。為避免這些不適情形的發生,輸入文字時請伸直手腕,並 將手掌和手腕放在鍵盤上方。如果您感受到痛感、刺痛、麻痺或其他不舒 服的感覺,請尋求醫療協助。 • 建議父母應注意子女所玩的遊戲。如果您或您的子女出現下列徵狀:暈 眩、視線模糊、眼睛或肌肉抽蓄、意識不清、失去方向感、任何不自主的 運動或痙攣,請立即停止使用並尋求醫療協助。無癲癇病史的正常人也可 能出現上述情形。 電腦基本知識 - 11 認識您的電腦 在依照設定指示中所提及的說明完成電腦的設定之後,就讓我們為您展示一 下全新 Gateway 電腦的各項功能吧! Gateway NE71B 12 上視圖 - 顯示器 1 2 3 # 圖示 項目 說明 1 網路攝影機 網路攝影機,用於進行視訊通訊。 網路攝影機旁的燈號顯示已啟用網路攝影機。 2 麥克風 內建的麥克風,用於錄音。 3 顯示螢幕 亦稱為液晶顯示器 (Liquid-Crystal Display, LCD),可用於顯示電腦的輸出資訊。 認識您的電腦 - 13 上視圖 - 鍵盤 1 5 2 3 4 # 圖示 項目 1 電源按鈕 / 指示燈 2 鍵盤 說明 開啟和關閉電腦。 表示電腦的電源狀態。 可用來將資料輸入電腦。 - 特殊按鍵說明於第 15 頁。 3 14 觸控板 觸控感應式移動游標裝置,功能等同於電腦的 滑鼠。 # 圖示 項目 說明 4 點選鍵 ( 左和右 ) 左及右按鈕的功能就跟左選取鍵與右選取鍵 相同。 5 喇叭 傳送立體聲音效輸出。 特殊按鍵 電腦的鍵盤包含可啟動特殊功能的按鍵。每個按鍵的功能都以圖示清楚 標示。 圖示 功能 Fn 說明 第二功能的快速鍵 可啟動某些按鍵上的第二功能。 例如,按下 Fn 鍵可啟動 F1 至 F12 鍵。 說明 開啟說明功能表。 Backup 可讓您為電腦,或整個系統,或選取的檔案和資料夾建 立備份副本, 您還可以根據排程或隨時視需要執行 備份。 通訊 啟用 / 停用電腦的通訊裝置。 螢幕顯示切換 在螢幕及外接顯示器 ( 如有連接 ) 之間切換,或同時 顯示。 螢幕空白 關閉顯示螢幕背光,以節省電力。 按下任意鍵即可 返回。 認識您的電腦 - 15 圖示 功能 說明 觸控板切換鈕 開啟和關閉內建的觸控板。 播放 / 暫停 播放或暫停選取的媒體檔。 停止 停止播放選取的媒體檔。 上一個 返回上一個媒體檔。 下一個 跳到下一個媒體檔。 調低亮度 調低螢幕亮度。 調高亮度 調高螢幕亮度。 開啟社交網路應用程式。 社交網路 - 假如未安裝該應用程式,則按鍵會改為啟動即時通訊 應用程式。 16 提高音量 提高喇叭音量。 降低音量 降低喇叭音量。 喇叭切換鈕 開啟和關閉喇叭。 快速鍵 電腦使用快速鍵 ( 組合鍵 ) 來存取功能鍵及導覽指令。 若要使用快速鍵,請先按住 Fn 鍵 ( 左下角 ),再按下組合鍵的另一按鍵。 快速鍵 功能 說明 Fn + 特殊鍵 ( 請參閱第 15 頁 ) 功能鍵 啟動 F1 至 F12 鍵。 Fn + 首頁 捲動到文件開始處。 Fn + End 捲動到文件結尾處。 Fn + Page Up 在文件中向上捲動一頁。 Fn + Page Down 在文件中向下捲動一頁。 - 注意: 若要在啟動電腦或使用 BIOS 時使用 F1 至 F12 功能鍵,不需要按下 Fn 鍵。 若要切換 F1 至 F12 鍵的快速鍵及特殊功能,請在 BIOS 中變更功能鍵設定 ( 若要開 啟 BIOS,請在電腦啟動時按下 F2,接著選取 「Main」 ( 主要 ) 功能表,然後將 「Function key behavior」 ( 功能鍵行為 ) 變更為 「Function keys」 ( 功能鍵 ))。 認識您的電腦 - 17 前視圖 1 # 圖示 2 項目 電源指示燈 說明 表示電腦的電源狀態。 表示電腦的電池狀態。 電池指示燈 - 充電完畢: 當使用 AC 電源模式時,指示燈 1 2 - 充電中:當電池充電時,指示燈會亮琥珀色。 會亮藍色。 硬碟指示燈 當存取硬碟時,指示燈會亮起。 通訊指示燈 表示電腦無線連線能力的狀態。 多合一讀卡機 可支援 Secure Digital (SD)、MultiMediaCard (MMC)、Memory Stick PRO (MS PRO)、 xD-Picture Card (xD)。 - 推一下即可取出 / 安裝記憶卡。無論何時皆只 能使用一張卡片。 - 注意:即使在電腦螢幕闔上時,您依然可看見位於前面板的狀態指示燈。 18 左視圖 1 # 圖示 2 項目 Kensington 安全鎖 插槽 3 4 5 6 說明 連接到與 Kensington 相容的電腦安全鎖。 - 將電腦安全鎖電纜線繞著無法移動的物品打 個圈,例如,桌子或鎖住的抽屜把手。 再將鎖插入鎖孔中,並轉動鑰匙以便上鎖。 此外,還有些無鑰匙安全鎖的型號可供使用 者選擇。 1 2 散熱孔和冷卻風扇 讓電腦保持冷卻狀態。 - 請勿阻塞或擋住開口。 3 乙太網路 (RJ-45) 連接埠 連接到以 10/100/1000 為基礎的乙太網路。 4 外接顯示螢幕 (VGA) 連接埠 連接到顯示器裝置 ( 例如:外接式顯示器、 LCD 投影機 )。 5 HDMI 連接埠 支援高清晰度數位視訊連線。 認識您的電腦 - 19 # 圖示 項目 說明 連接到 USB 裝置。 6 USB 埠 - 如果連接埠為黑色,表示為 USB 2.0 相容; 如果為藍色,則可同時相容 USB 3.0 ( 請參閱 下方 )。 USB 3.0 資訊 • 相容於 USB 3.0 和較舊的 USB 裝置。 • 如需達到最佳效能,請使用具 USB 3.0 認證的裝置。 • 使用 USB 3.0 規格 (SuperSpeed USB)。 右視圖 1 # 1 圖示 2 項目 耳機 / 喇叭插孔 麥克風插孔 20 3 4 56 7 說明 連接外接音訊輸出裝置的插孔 ( 例如:喇叭、 耳機 )。 - 支援內建麥克風相容的 3.5 mm 耳機 ( 例如: Acer 智慧型手持裝置的耳機 )。 接受從外接麥克風所輸入的聲音。 # 圖示 項目 說明 連接到 USB 裝置。 - 如果連接埠為黑色,表示為 USB 2.0 相容; 如果為藍色,則可同時相容 USB 3.0 ( 請參閱 下方 )。 2 USB 埠 3 光碟機 內部光碟機,可放入 CD 或 DVD。 4 光碟存取指示燈 當正在存取光碟時,指示燈會亮起。 5 光碟退出按鈕 可將光碟從光碟機中退出。 6 緊急退出孔 可在電腦關機狀態下退出光碟機托盤。 - 小心將扳直的迴紋針插入,退出光碟機托盤。 7 DC 輸入插孔 連接到電腦的 AC 變壓器。 USB 3.0 資訊 • 相容於 USB 3.0 和較舊的 USB 裝置。 • 如需達到最佳效能,請使用具 USB 3.0 認證的裝置。 • 使用 USB 3.0 規格 (SuperSpeed USB)。 認識您的電腦 - 21 底視圖 1 2 4 3 # 圖示 項目 說明 1 電池槽 用於安裝電腦的電池組。 2 電池卸除卡榫 用於卸下電池組。 用適當的工具插入,然後推 開,將其卸除。 記憶體槽 用於安裝電腦的主記憶體。 硬碟槽 用於安裝電腦的硬碟 ( 以螺絲鎖定 )。 3 4 散熱孔和冷卻風扇 讓電腦保持冷卻狀態。 - 請勿阻塞或擋住開口。 22 觸控板 觸控板基本操作 觸控板控制螢幕上的箭頭 ( 或 「游標」 )。 當您在觸控板上滑動手指時, 游標會隨之移動。 按觸控板邊緣的左邊或右邊按鈕,可以進行選取及執行的功能。 這兩個區域 的效果,相當於滑鼠的左右按鍵。 輕輕地在觸控板上點幾下,效果與滑鼠的 左按鍵相同。 注意:觸控板對手指移動相當敏感。因此,碰觸的動作愈輕,則回應 效果愈佳。 請保持觸控板和手指的乾燥與清潔。 游標由某些基本手勢控制: • 單指滑動:手指在觸控板上任意滑動,感覺螢幕游標隨著手指 的動作而移動。 • 單指點選: 輕點觸控板可執行點擊滑鼠左鍵的功能,以選取或 啟動項目。 快速重複點擊可執行雙點擊,或點擊滑鼠左鍵兩下 的功能。 • 拖拉:按住選取按鈕左下角不放,或在觸控板任何位置點兩下,然後將第 二隻手指滑過觸控板來選取區域中的所有項目。 觸控板 - 23 觸控板手勢 Windows 8 和許多應用程式支援使用一或多隻手指的觸控板手勢。 注意:依作用中的應用程式支援觸控板手勢。 您可以使用幾個簡單的觸控動作來控制應用程式,例如: • 從邊緣向內滑動: 從右側、上面或左側滑向觸 控板中央,可存取 Windows 工具。 • 從右側邊緣向內滑動:切換 Charms。 • 從上面邊緣向內滑動:切換應用程式指令。 • 從左側邊緣向內滑動:切換至先前的應用程式。 • 雙指滑動:將兩根手指放在觸控板上,並向任何方向移動,即 可在網頁、文件或播放清單中捲動。 • 以兩根手指縮放:透過簡易的食指及大拇指觸碰,可放大及縮 小相片、地圖和文件。 24 升級電腦 透過選購品擴充 本電腦提供許多不同的選購品,能帶給您最完整的運算體驗。 連線用選購項目 連接埠可讓您將週邊裝置和電腦互相連接,有關如何將其它外接裝置連接到 電腦的詳細說明,請參閱下列章節,以獲取更詳細資訊。 讀卡機 記憶卡被廣泛應用於各種數位相機、PDA、MP3 播放器 和行動電話中。 插入記憶卡 1. 將記憶卡接點部分朝下,接點對齊插槽。 2. 小心將記憶卡插入插槽。如果需要一些力氣才能插入記憶卡,請嘗試稍微 調整記憶卡的插入位置。 3. 用力壓下記憶卡,直到聽到喀嚓聲。記憶卡會有一些部分突出插槽之外。 如果記憶卡內含有部分檔案,就會出現 「Windows 自動播放」視窗 ( 視記憶卡中的內容而定 ),並詢問您是否要使用程式存取記憶卡中的內 容。請選取適用選項,或選取 「取消」。如果記憶卡內沒有檔案,或包含 未知的檔案,則會直接開啟瀏覽視窗,顯示記憶卡中的內容。 升級電腦 - 25 SD、SDHC 和 SDXC 記憶卡 不同類型的 SD 記憶卡,雖然整體設計相同,但容量卻不相同。 SD 記憶卡 可容納最多 4 GB,SDHC 記憶卡可容納最多 32 GB,而 SDXC 記憶卡則可 容納最多 2048 GB (2 TB)。 本電腦包含 SDHC 或 SDXC 記憶卡相容的 讀卡機。 注意:SDXC 記憶卡只能用在 SDXC 相容的讀卡機;SD 和 SDHC 記 憶卡則可用在任何一種讀卡機。 移除讀卡機中的記憶卡 1. 按一下通知區域 ( 在時鐘旁 ) 中的 2 「顯示隱藏圖示」箭頭。 2. 按一下 「安全移除硬體」圖示。 3. 按一下 「退出 SD 卡」 ( 或裝置 名稱 )。 4. 等待「安全地移除硬體」訊息出現。 5. 移除記憶卡。 1 26 3 內建網路功能 內建網路功能,可讓電腦連接至乙太網路架構的 區域網路。 將乙太網路連接線從電腦機身的乙太網路 (RJ-45) 埠,連接到網路的網路插孔或集線器。 通用序列匯流排 (USB) USB 2.0 埠為讓您串接其他 USB 周邊裝置, 且不需要佔用珍貴系統資源的高速序列匯 流排。 有些電腦可能提供一或多個 USB 3.0 埠。這些 連接埠與標準的 USB 埠類似,但還包含額外 的內部接頭,且為藍色。您可以在這些埠上使 用相容的 USB 3.0 裝置,得到更快的傳輸 速度。 升級電腦 - 27 影像埠 連接具備 VGA 或 DVI 埠的顯示器 ( 支援的連線類型視電腦組態而定 )。 顯示器通常會隨附適用的連接線。 請依下列步驟將顯示器連接至電腦: 1. 確定電腦已關機,且顯示器電源也已關閉。 2. 將視訊連接線接到電腦的顯示器埠。使用隨附螺絲將連接線接頭固定。 3. 將顯示器電源線重新接上,另一端插入可用的接地電源插座。 4. 請依照顯示器使用手冊中任何的安裝指示進行。 5. 先啟動顯示器電源,接著啟動電腦。 6. 確定目前的解析度和更新頻率未超出顯示器的規格。必要時變更電腦使用 的顯示設定。 注意:使用顯示控制的方式:按下 Windows 鍵 ( 「顯示器」然後按一下 「顯示器」。 高畫質多媒體介面 ( 僅適用於特定機型 ) HDMI ( 高畫質多媒體介面 ) 是一種業 界支援、無壓縮、之全數位影音介面。 HDMI 是以一條訊號線作為相容數位 影音來源 ( 例如機上盒、DVD 放影機 和 A/V 接收器 ) 和相容數位音樂 和 / 或視訊播放器 ( 例如數位電視 (DTV)) 之間的介面。 28 ) + W,輸入 使用您電腦上的 HDMI 連接埠來連接高級影音設備。利用單一訊號線做快速 連接,並且減少雜亂過多的纜線。 耳機和麥克風 這兩個連接埠可讓您連接音訊裝置。耳機連接埠可用來插入立體聲耳機或主 動式喇叭。只要將音訊裝置插入耳機連接埠,內建喇叭便會停用。麥克風連 接埠可用來連接外接式麥克風,以進行單聲道錄音;插入外接式麥克風時, 內建麥克風便會停用。 升級電腦 - 29 電源供應器 AC 電源轉接器 本電腦可以使用隨附的外接式電源轉接器 ( 電源「供應盒」),以接上 AC 電 源使用。 電源線會依購買電腦的所在國家提供適用的規格。 電源轉接器可提供電腦運作所需要的適當電力,並同時為電池組充電。 注意: 請勿將物品覆蓋或放置在 AC 電源轉接器上。 清除轉接器上的 所有物品,讓電源轉接器在使用期間獲得適當冷卻。 只能使用電腦隨附的 AC 電源轉接器。 使用外觀類似的其他電源轉接器可能 讓電腦毀損。 30 警告:AC 電源轉接器和電腦底部在長時間使用後可能會變熱, 此為正 常情形,但長時間與人體接觸仍會造成傷害。 電池組 本電腦使用的電池組只要充飽電,即可讓您使用電腦一段很長的時間。 電池組特性 本電腦採用的電池組具備下列特性: • 採用最新電池技術標準。 • 低電量警告功能。 只要您將電腦連接到 AC 電源轉接器,電池就會開始充電。 本電腦支援充電 時使用功能,因此您可以一邊充電,一邊繼續使用電腦。 但是,如果在關機 狀態下充電,則會大大縮短充電時間。 在您旅行或斷電時,電池組是隨時可以派上用場的得力幫手。 因此我們建議 您可以另外再準備一顆完全充電的電池組,以作為不時之需。 如需購買電池 組,請與當地經銷商聯絡。 最大化電池使用壽命 筆記型電腦的電池與一般電池相同,都是消耗品。 表示都有一定的使用時 間,其性能會隨著使用時間的越長而逐漸降低。 為最大化電池使用壽命,請參閱下列建議設定。 電源供應器 - 31 調整新的電池組 當第一次使用電池組之前,您應依下列步驟為其進行調整動作: 1. 請先不要開機,將新電池組插入電腦中。 2. 將 AC 電源轉接器接上電腦與電源,將電池完全充滿電。 3. 拔掉 AC 電源轉接器。 4. 使用電池電源打開電腦,並開始使用。 5. 讓電池完全放電。 6. 重新接上 AC 電源轉接器,並再次對電池進行完全充電。 重複上述步驟,直至電池完全充放電三次。 對於所有新電池組,或長時間未使用的電池,我們建議您務必執行此步驟。 如果電腦會閒置不用達兩週以上,建議您務必先將電池組取出。 警告: 切勿將電池組擺置於攝氏 0 度以下,或 45 度以上的溫度。否則 異常溫度會影響電池組的使用效能。 在進行電池調整後,您的電池就可以接受最大化充電作業。 如果未執行這個 調整動作,電池即使充滿電,也可能不是最大充電量,更會縮短電池使用 壽命。 此外,在下列情況中使用電池,也會影響電池使用壽命: • 當電池置於電腦內時,卻仍持續使用 AC 電源。 如果您要使用 AC 電源, 建議您先取出完全充電後的電池組。 • 未依新電池組使用限制中的方式進行完全放電和充電。 • 經常使用電腦。使用電池時間越長,當然其使用壽命也會更短。 標準電池 組約可充放電 300 次。 32 更換電池組 筆記型電腦是使用鋰電池組。更換與隨附電池相同型號的電池,若使用其他 型號的電池可能會發生火災或爆炸。 警告:未正確處理電池可能會爆炸。請勿拆解電池或將電池丟棄到火 中。請將電池放在孩童拿不到的地方。請根據當地法規棄置用過的 電池。 安裝或取下電池組 重要! 在移除電池組之前,如果您還想繼續使用電腦,請接上 AC 電 源轉接器。 否則,請先關機。 安裝電池組: 1. 請將電池組對準電池槽前緣,要確定先插入的是有接頭的一端,並且電池 的頂面要朝上。 2. 將電池輕輕地推入電池槽內,直至電池固定位置為止。 移除電池組: 1. 滑動電池釋放開關。 2. 從電池槽中取出電池組。 電池充電 若要對電池充電時,請先確定電池是否已正確安裝至電池槽中。再將 AC 電 源轉接器連接至電腦,並將另一端連接到牆壁上的主電源插座。當電池充電 時,您仍然可以繼續以 AC 電源操作電腦。 但是,如果在關機狀態下充電, 則會大大縮短充電時間。 電源供應器 - 33 注意: 我們建議您在使用的前一天對電池充電。 在您旅行前整晚對電 池充電,好讓您第二天出門可以攜帶完全充滿電的電池組。 檢查電池電量 Windows 電源計量器顯示目前剩餘電池電量。 只要將游標指向工具列上的 電池 / 電源計量器圖示,就可以看到目前電池的剩餘電量。 最佳化電池使用壽命 最佳化電池使用壽命可以讓您充分利用電池效能,以延長充電週期,提高充 電效率。 以下是我們的建議事項: • 另外選購一組電池組。 • 盡可能使用 AC 電源轉換器,以保留電池電力,供旅行之需。 • 如果未使用 PC 卡,請將其退出,因為會耗電 ( 視型號而定 )。 • 請將電池置放在涼爽、乾燥的地方。 建議的溫度為攝氏 10 度 ( 華氏 50 度 ) 到 30 度 ( 華氏 86 度 )。太高的溫度會加速電池自放電過程。 • 過度充電也會縮短電池使用壽命。 • 請隨時檢查您的 AC 電源轉接器並注意電池使用情況。 低電量警告 在使用電池電源時,請隨時注意 Windows 工具列上的電源計量器情況。 警告: 當出現低電量警告訊息後,請儘速接上 AC 電源轉接器。 如果 電池電量完全用盡,電腦就會關機,屆時所有未儲存的重要資料都會 遺失。 34 下表列出當出現低電量警告訊息時的因應之道: 狀況 可使用 AC 電源轉接 器與電源插座。 因應之道 1. 請將 AC 電源轉接器連接到電腦,再將另一端連 接到主電源。 2. 儲存所有需要的檔案。 可使用另一個已完全 充電的電池組。 3. 繼續剛剛的工作。 如果想快速充電,請先關閉電腦。 1. 儲存所有需要的檔案。 2. 關閉所有應用程式。 3. 關閉作業系統並關閉電腦電源。 4. 更換電池組。 沒有 AC 電源轉接器 和電源插座可使用。 並且也沒有備用的電 池組。 5. 重新啟動電腦,並繼續剛剛的工作。 1. 儲存所有需要的檔案。 2. 關閉所有應用程式。 3. 關閉作業系統並關閉電腦電源。 電源供應器 - 35 電源管理 本電腦內建一個電源管理單元,可監視系統活動。所謂系統活動是指牽涉下 列一個或多個裝置的任何執行動作, 包括鍵盤、滑鼠、硬碟、連接至電腦的 周邊設備及視訊記憶體。 若在指定的一段時間內,系統偵測不到任何動作, 系統將會暫停一個或所有裝置的活動,以節省電力。 省電 停用快速開機 為了加快開機速度,您的電腦有使用快速開機功能。但是,其也會使用少量 電力來檢查開機訊號。 不過,這些檢查僅會緩慢消耗電腦的電池電力。 如果想要降低電腦電力的用量和對於環境的衝擊,請關閉快速開機: 注意:如果關閉快速開機,電腦將會花費較長的時間從睡眠模式中 喚醒。 如果電腦接收到網路開機指示 (Wake on LAN,網路喚醒 ),其也不會 啟動。 1. 開啟桌面。 2. 在通知區域中,按一下電源選項。 3. 選取更多電源選項。 36 4. 選取選擇按下電源按鈕時的行為。 5. 若要存取關閉設定值,請選取變更目前無法使用的設定值。 6. 向下捲動並停用啟動快速開機。 7. 選取儲存變更。 電源管理 - 37 軟體 使用 WINDOWS 和您的軟體 Gateway 電腦包含可輔助您使用電腦的軟體;您電腦上可用的程式和類別將 依購買的機型而定。 網際網路安全防護 網際網路上充斥著各種病毒和攻擊,因此一定要懂得如何保護您的電腦 ( 請參閱第 44 頁的<安全性> )。在您初次啟動電腦時,畫面上會出現完整 功能的網際網路安全套裝軟體,包含免費試用期。您應該在連上網際網路之 前啟動此防護功能。此安全套裝軟體可保護電腦抵抗最新的線上威脅,並保 護您的個人資料 ( 銀行帳戶憑證、信用卡卡號、密碼等 )。 Gateway Recovery Management 為了讓電腦針對系統復原選項進行準備作業,您應該立即建立一套復原光 碟。請參閱第 51 頁,以瞭解詳細資訊。 38 網際網路 上網的必要工作 保護電腦 網際網路上充斥著各種病毒和攻擊,因此一定要懂得如何保護您的電腦 ( 請參閱第 38 頁的<網際網路安全防護>和第 44 頁的<安全性> )。在您 初次啟動電腦時,畫面上會出現擁有完整功能的網際網路安全程式,您應該 在連上網際網路之前盡快啟動此防護功能。 選擇網際網路服務提供者 瀏覽網際網路已成為每日不可或缺的電腦使用行為。只要 幾個簡單的步驟,就可以馬上取得各式各樣的知識和通訊 工具。若要完成這些步驟,您應該先選取網際網路服務提 供者 (ISP),這樣才能在電腦和網際網路之間建立連線。 您應該先瞭解所在區域有哪些可用的 ISP,另外也別忘了 詢問親朋好友的使用經驗,或查看雜誌上的調查或消費者 使用報告。您所選取的 ISP 會提供如何連上網際網路的相 關指示 ( 可能需要額外軟體,或專用的 「電話盒」以連接電話線 )。 連線類型 根據您的電腦機型、所在位置和通訊需求,您有多種連上網際網路的方式可供 選擇。 網際網路 - 39 撥接 部分電腦會提供電話撥號 ( 「數據機」 ) 接頭,此接頭可讓您使用電話線連 上網際網路。透過撥號連線,您就可以同時在同一條電話線上使用數據機和 電話。此連線類型只建議在不需要長時間存取網際網路時使用,因為此連線 速度較慢,而且連線時間是以小時計費。 DSL ( 例如 ADSL) DSL ( 數位用戶線路 ) 是一種 「永不中斷」的連線,透過電話線傳輸。由於 DSL 和電話使用不同的頻率,因此可以在連上網際網路的同時使用電話 ( 各電話插槽必須安裝 「濾波器」,以減少干擾 )。若要使用 DSL,您必須 位在具備 DSL 設備的電話交換機附近 ( 郊區通常不提供此服務 )。連線速度 會依位置而不同,但 DSL 一般可以提供較快且較可靠的網際網路連線。 由於連線永不中斷,所以通常是以月付制收費。 注意:DSL 連線需要使用適當的數據機,此數據機一般會在您申請服務 時由 ISP 提供。許多的數據機都會包含 「路由器」功能,以提供網路 和 Wi-Fi 存取。 纜線 纜線連線提供高速且永不中斷的網際網路服務,透過有線電視線路傳輸, 但通常只有大城市才會提供此服務。您可以在連上網際網路的同時,邊使用 電話,邊觀看有線電視。 3G (WWAN 或 「無線廣域網路」 ) 3G 連線可讓您在戶外使用行動電話網路 ( 與行動電話所使用的相同 ) 連上 網際網路。若要使用此連線,您的電腦必須內建 SIM 卡插槽或使用外接式 裝置,例如 USB 數據機或具備適當設備的行動電話。 40 注意:如果您的電腦已內建 SIM 卡插槽,就需要有相容的 SIM 卡, 以及與行動電話提供者簽署的電信合約。 使用 3G 功能之前,請洽詢您的服務供應者,瞭解使用 3G 是否會產生 其他費用,尤其是否會有漫遊費。 網路連線 LAN (區域網路) 是由一群電腦組成 (例如在辦公大樓或住家內),這些電腦可 以共用常用的通訊線路和資源。在設定網路時,您可以設成共用檔案、週邊 裝置 ( 例如印表機 ) 和網際網路連線。您可以將 LAN 設定成使用有線技術 ( 例如乙太網路 ) 或無線技術 ( 例如 WiFi 或藍牙 )。 無線網路 無線 LAN 或 WLAN 就是無線區域網路,不需使用線路即可連結兩台以上的 電腦。無線網路的設定程序很簡單,而且也可以讓您共用檔案、週邊裝置和 網際網路連線。 無線網路有哪些優點? 高行動力生活 無線 LAN 系統可讓位在住家網路內的您和其他使用者來共用檔案和網路連 線裝置 ( 例如印表機或掃描器 ) 的存取權。 此外,您也可以與住家內的其他電腦共用網際網路連線。 安裝快速又方便 安裝無線 LAN 系統不需要太多時間、程序方便,而且又不需要在牆壁和天 花板上牽線。 網際網路 - 41 無線 LAN 的使用元件 在住家設定無線網路需要下列元件: 存取點 ( 路由器 ) 存取點 ( 路由器 ) 是一種雙向的收發器,可以將資料向四周廣播。存取點可 做為有線和無線網路之間的中介器。大部分的路由器都已內建 DSL 數據機, 可讓您存取高速的 DSL 網際網路連線。您選擇的 ISP ( 網際網路服務 提供者 ) 一般會在您申購服務後提供數據機 / 路由器。如需詳細的設定指示, 請詳讀存取點 / 路由器隨附的說明文件。 網路線 (RJ45) 網路線 ( 亦稱為 RJ45 連接線 ) 可用來將電腦主機連接至存取點 ( 請見 下圖 );此類型的連接線也可以用來連接週邊裝置與存取點。 無線網路卡 您的電腦 正常來說應該 已經安裝內建 的無線網路卡。您可以 使用 Windows 內的按鈕或控制來啟動或停用無線網路卡。 42 運作中網路的圖解 1. 存取點 / 路由器 4 2. 桌上型電腦 3. 數據機 4. 印表機 5 1 5. 可攜式電腦 6. PDA/ 智慧型手機 3 7 7. 網路線 (RJ45) 2 6 開啟 / 關閉 WiFi 網路連線 大部分的電腦都有 「WiFi」按鈕,可用來開啟或關閉網路連線。如果您的電 腦具備無線存取功能,但未擁有通訊按鈕,您可以透過網路管理選項來開啟 或關閉無線網路,或控制要在網路上共用哪些資料。按下 Windows 鍵 ( ) + W,輸入 「HomeGroup」然後按一下 「HomeGroup」。 警告:禁止在搭乘飛機飛行時使用無線裝置。登機前請先關閉所有裝 置,因其可能會在飛航時造成危害或干擾相關通訊設備,並且有觸犯 相關法令的風險。 網際網路 - 43 瀏覽網路! 若要瀏覽網際網路,您需要安裝一種稱為網際網路瀏覽器 的程式。Internet Explorer 可以讓您輕鬆且安全地瀏覽網 頁。安 裝 好 網 際 網 路 存 取 並 連 上 網 路 之 後,請 按 一 下 Windows 桌面上的 Internet Explorer 捷徑,然後就可以開 始享受全新的網路瀏覽體驗! Gateway 網站 若要開始使用,別忘了造訪我們的網站:www.gateway.com。 Gateway 努力提供您個人專屬的持續支援。請查看我們的支援區段,以取得 滿足您個人需求的協助。 www.gateway.com 是您進入豐富的線上活動及服務的入口。請定期造訪我 們的網站,以取得最新資訊及下載! 安全性 您可能迫不及待地想探索網路上的一切事物,但為了保護您的上網安全, Gateway 已 在 您 的 電 腦 上 預 先 安 裝 了 Symantec 廣 受 好 評 的 Norton Internet Security™。 Norton Internet Security 可在背景中安靜執行,不只能封鎖當下複雜的安全 威脅,還能在您使用線上購物、網路銀行和瀏覽網路時保護您的身分資料。 Norton Internet Security 可以封鎖線上的個人資訊竊取情形、偵測並消除間 諜程式、移除病毒和網際網路蠕蟲,以及抵抗駭客的攻擊。 44 定義 何謂病毒? 惡意軟體 ( 一般稱為 「病毒」 ) 是一種設計來感染電腦並造成損失的程式, 且大部分的病毒都是透過網際網路、電子郵件或惡意網站傳送。一般的病毒 都會自行複製,並在不被偵測到的情況下傳送到多台電腦上。其他形式的侵 害,包括特洛伊木馬程式、蠕蟲或垃圾郵件,則會透過各種方式來感染您的 電腦,像是耗盡資源或讓網路癱瘓等。 注意:Gateway 保證您的電腦在購買時絕無感染病毒,但對於日後因病 毒所造成的損失則不負任何責任。 何謂間諜程式? 間諜程式泛指一般不想要的程式,這些程式會在您連上網路時下載到電腦, 且通常在您不知情的情況下進行。一旦電腦受到感染後,程式便會窺探電腦 的瀏覽活動、收集個人資訊、顯示彈出式廣告,甚至變更電腦設定。間諜程 式會耗盡電腦資源,讓網路瀏覽速度或整個電腦系統速度變慢,甚至造成 當機。 有些惡意公司還會利用間諜程式來監控並追蹤您在網際網路上造訪的網站, 據以判斷您的網路瀏覽行為,然後再將目標的彈出式廣告顯示在您的螢幕 上。有些間諜程式不只會追蹤行為,甚至還會監控使用者的輸入內容並擷取 密碼,引發嚴重的安全風險。 何謂惡意軟體? 惡意軟體 ( 亦稱為 Malware) 是一種蓄意設計來傷害您電腦的軟體,包括病 毒、蠕蟲和特洛伊木馬程式都算是惡意軟體。若要保護您的電腦不受惡意軟 體的侵擾,請確定電腦使用的是最新的防毒軟體和防惡意軟體。 網際網路 - 45 何謂個人防火牆? 個人防火牆是一種軟體程式,專門設計來防止未經授權的使用者存取私有網 路。個人防火牆可以做為屏障,防止您的網際網路連線中出現非必要的連 線,因為這些連線會嘗試控制您的電腦,然後在電腦上安裝病毒或惡意程 式,或是繼續向外散佈。防火牆會監控您電腦的所有連線,偵測嘗試在未經 您授權下接收資訊的程式,然後顯示警示。接著您可以決定是否要允許連 線,或者先決定連線是否連至目前使用中的程式,然後再允許該連線 ( 例如: 連到多重玩家伺服器的遊戲程式,或正在更新內容的百科全書程式 )。 如何保護您的電腦 網路犯罪的遏止不需要太複雜的程序,只要擁有一些技術建議和常識就可以 避免掉許多攻擊。網路犯罪一般只求在最短的時間內、以最輕鬆的方式賺取 金錢。一旦要花的時間變長,這些罪犯就會改變目標,轉向較輕鬆的目標下 手。下面的小秘訣提供如何避免線上詐欺的基本資訊。 讓電腦隨時安裝最新的修補程式和更新軟體 要讓電腦抵抗攻擊最好的其中一種方法,就是在廠商提供修補程式和其他的 軟體修正時,馬上套用這些程式。藉由定期更新電腦,您就可以阻止攻擊者 利用軟體的瑕疵 ( 弱點 ),否則他們可能會使用這些弱點來入侵您的系統。 雖然更新電腦也不見得能抵抗所有的攻擊,但卻能讓攻擊者難以進入您的系 統,能完全封鎖許多的基本攻擊和自動攻擊,而且也能讓三心二意的攻擊者 放棄,並轉向攻擊弱點更多的別台電腦。 較新版本的 Microsoft Windows 和其他常見軟體可以設定為自動下載並套 用更新,這樣您就不用費心檢查更新的軟體。若要開始強化您的上網安全, 請多加利用軟體的 「自動更新」功能。 46 利用安全性軟體保護您的電腦 要保護您基本的線上安全,會需要用到許多類型的安全性軟體。安全性軟體 基本上包含防火牆和防毒程式。防火牆通常是電腦的第一道防線,它可以控 制與您電腦進行通訊的對象及內容。您可以將防火牆當成 「警察」,這位警 察監控著網路上嘗試進出您電腦的所有資料流量,只有安全的通訊可以進 出,至於攻擊等 「惡意」流量則會被封鎖,無法進入您的電腦。 第二道防線一般是防毒軟體,它可以監控電子郵件訊息和網頁瀏覽等所有的 線上活動,並保護個人不受病毒、蠕蟲、特洛伊木馬程式和其他類型之惡意 程式的侵擾。您應該將防毒軟體和防間諜軟體設定成自動更新,而且每次連 上網路時都應執行更新。 像 Norton Internet Security 這類的整合式安全性套裝軟體,包含了防火牆、 防毒軟體、防間諜軟體,以及防垃圾郵件和家長控管等其他功能,將線上防 護所需要的所有安全性軟體整合在單一套件中,受到廣泛使用。很多人也發 現,使用完整的安全性套裝軟體要比個別安裝、設定及更新各種安全性軟體 要輕鬆得多。 您的 Gateway 系統上已預先安裝了完整版的 Norton Internet Security™, 其包含免費試用的防護更新訂閱。別忘了啟動其功能! 選擇強性密碼並妥善保管 密碼是現代網路生活中不可或缺的要素;不管任何的網路行為都需要密碼, 包括線上訂花、使用網路銀行,以及登入最愛的航空公司網站檢視累計哩程 等等。以下的小秘訣有助於提升您網路使用體驗的安全; • 保護密碼安全及避免他人使用的第一步,便是設定一組不容易被猜出的密 碼。強性密碼由八個以上的字元組成,可使用字母、數字和符號 ( 例如: #、$、%、!、?)。 但請避免在密碼中使用下列資料:您的登入名稱、以個 人資訊為基礎的任何內容 ( 例如姓氏 ),以及字典中查得到的文字 ( 尤其 網際網路 - 47 是 「password」 )。請嘗試選取強度較高、獨一無二的密碼來保護網路銀 行等活動。 • 將您的密碼妥善保管,並試著不要讓所有的線上服務都使用相同的密碼。 • 至少每隔 90 天定期變更密碼。當已有其他人能夠存取您的帳戶時,這可 以降低可能造成的損害。如果您發現其中一個線上帳號出現可疑情事, 該做的第一件事就是馬上變更密碼。 保護您的個人資訊 當您在線上分享姓名、住家地址、電話號碼和電子郵件地址等個人資訊時, 務必小心謹慎。在利用各種線上服務時,您不可避免地需要提供個人資訊, 才能處理購買物品時的付費和運送問題。要想不洩露任何個人資訊幾乎是不 可能,因此我們針對如何在線上安全地分享個人資訊,提出了下列的建議 清單: • 留意偽造的電子郵件訊息。有幾個地方可以辨識訊息是否為假造的,包括 拼字錯誤、文法錯誤、用字遣詞不正常、網站位址含有奇怪的延伸、網站 位址全部由數字組成 ( 一般由文字組成 ),以及任何的異常情形。此外, 網路釣魚訊息一般會要求您趕快執行動作,以保持帳號開通、更新安全 性,或是催促您馬上提供資訊,否則就會發生不好的後果。但您可千萬不 要上當! • 不要理會要求您輸入個人資訊的電子郵件訊息。只要是合法的公司,就不 會利用電子郵件訊息來詢問您的個人資訊。當有任何疑問時,請直接以電 話連絡該公司,或在網頁瀏覽器中輸入該公司的網址。請勿按下訊息中的 連結,因為您可能會被帶往詐騙的惡意網站。 • 避開會竊取個人資訊的詐騙網站。當要造訪網站時,請不要按電子郵件或 即時通訊中的連結,而是直接在網頁瀏覽器中輸入位址 (URL)。詐欺犯通 常會偽造這些連結,讓它們看似合法。 48 當購物、銀行或任何其他網站需要輸入機密資訊時,其 「http」字母後方 應加上 「S」 ( 例如 https://www.yourbank.com,而不是 http://www.yourbank.com)。這個 「s」是安全 (Secure) 的意思,當您被 要求登入或提供其他機密資料時就會出現。如果是安全連線,網頁瀏覽器 底部 ( 通常在右下角 ) 還會出現一個小型的鎖頭圖示。 • 注意網站和軟體中的隱私權政策。在與組織分享您的個人資訊時,應該先 瞭解組織是如何收集及使用這些資訊。 • 保護您的電子郵件地址。垃圾郵件寄件者和 「網路釣魚者」常常會寄出 數百萬封的訊息,不論收件的電子郵件地址是否存在,用隨機的方式來尋 找可能的受害者。一旦您回應這些訊息或下載影像,您就會被加入他們的 清單,日後就會收到更多他們所寄的訊息。此外,在新聞群組、部落格或 線上社群中張貼您的電子郵件地址時,也必須小心。 過於美好的線上優惠通常不會是真的 有句俗話說:「天下沒有白吃的午餐」,同樣適用於網路世界。像是螢幕保 護程式和表情符號等 「免費」軟體、保證賺錢的神奇投資術,以及未報名卻 意外贏得的比賽,都是公司用來吸引您注意力的誘餌。 雖然您不一定直接付費使用軟體或服務,但您要求的免費軟體或服務卻可能 隨附廣告軟體 ( 「Adware」 ),追蹤您的行為並顯示不想要的廣告。您可能 需要透露個人資訊或購買其他物品,才能取得所謂的獎品。如果獎品看起來 過於美好,讓人難以置信,請尋求他人的意見、詳讀其細則,或甚至完全忽 略該訊息 ( 這是最好的作法 )。 定期檢閱銀行和信用卡公司的對帳單 如果您能在資料失竊後或有人初次嘗試使用您的資訊時,馬上發現此類情 形,就能有效降低身分資料遭竊和線上犯罪的影響程度。其中一個可以輕鬆 網際網路 - 49 找出異常情形的方式,就是檢閱銀行和信用卡公司每個月寄送的對帳單中是 否有任何可疑項目。 此外,許多的銀行和服務都使用防詐騙系統,會在出現異常的購買行為時通 知用戶 ( 例如:您住在台北,但卻在美國購買許多的冰箱 )。為了確認是否 為異常購物,這些公司可能會打電話給您,要求您確認。千萬不要忽視這些 電話;因為這可能表示有犯罪正在進行中,而您需要採取必要動作。 利用 Windows 安全性工具保護您的電腦 Windows 提供許多的防護應用程式。 Windows Updates 如果您有可用的網際網路連線,Windows 就可以檢查電腦是否有重要更新, 並自動安裝這些更新。這些更新包含安全性修補程式及程式更新,可以改善 電腦的使用體驗,並協助電腦抵抗新興的病毒和攻擊。 要如何得知我的電腦存在風險? 如果 「行動作業中心」回報警示,或電腦行為不穩定、意外當機,或某些程 式無法正常運作,即表示您的電腦可能已被惡意軟體感染。不過,並非所有 的電腦問題皆起因於病毒!如果您懷疑電腦可能遭到感染,請先進行更新 ( 若尚未更新 ),然後執行防毒軟體和防間諜軟體。 50 復原 如果電腦發生問題,且常見問題 ( 請參閱第 69 頁 ) 無法協助您解決時,可 試著 「復原」電腦 ( 例如回到先前的狀態 )。 此 小 節 說 明 了 電 腦 上 可 用 的 復 原 工 具。Gateway 所 提 供 的 Gateway Recovery Management 除了可讓您建立復原備份、驅動程式和應用程式備 份外,還可讓您使用 Windows 工具或復原備份開始進行復原。 注意: Gateway Recovery Management 僅適用於預先安裝的 Windows 作業系統。 重要:我們建議您立即建立復原備份和驅動程式和應用程式備份。 在某些情況下,完整的復原程序將會需要 USB 復原備份。 建立復原備份 若要從 USB 儲存裝置重新安裝,您必須先建立復原備份。 復原備份包括整 個電腦硬碟的原始內容,包括 Windows 和所有出廠時預設載入的軟體和驅 動程式。 使用此備份可將您的電腦還原至購買當時的狀態,同時讓您選擇保 留所有的設定及個人資料。 注意:請確認您的 USB 磁碟機有至少 16 GB 的容量。 復原 - 51 1. 從開始處,輸入 「Recovery」,然後在應用程式清單中按一下 Gateway Recovery Management。 2. 按一下建立原廠預設備份。 接著,會開啟復原磁碟機視窗。 52 請確認已選取將復原分割區的內容複製到復原磁碟機。 此選項會最完整 且安全的復原備份。 3. 插入 USB 磁碟機,然後按一下下一步。 • 請確認 USB 磁碟機空間是否足夠,然後再繼續。 復原備份需要至少 16 GB 儲存空間 4. 接著畫面上會出現備份進度。 5. 依照流程將其完成。 復原 - 53 6. 建立復原備份後,您可選擇刪除電腦上的復原資訊。 如果刪除此資訊,您 僅可使用 USB 復原備份來還原電腦。如果遺失或清除 USB 磁碟機,您 便無法還原電腦。 7. 拔出 USB 磁碟機並將其清楚標示。 重要: 在備份上寫入獨一無二的說明標籤,例如 「Windows 復原備 份」。 務必將備份媒體放在安全好記的位置。 建立磁碟機和應用程式備份 您可使用 USB 儲存磁碟機;或者,如果電腦備有 DVD 燒錄機、一或多張可 燒錄 DVD,您亦可建立磁碟機和應用程式備份 ( 包含電腦所需之出廠時預設 載入的軟體和驅動程式 )。 54 1. 從開始處,輸入 「Recovery」,然後在應用程式清單中按一下 Gateway Recovery Management。 2. 按一下建立驅動程式和應用程式備份。 插入 USB 磁碟機,或將空白 DVD 放入光碟機,然後按一下下一步。 • 若您使用 USB 磁碟機,請確認其空間是否足夠,然後再繼續。 復原 - 55 • 如果使用 DVD,此對話方塊會顯示完成回復光碟所需要使用的空白可 燒錄光碟數目。 確認您已備妥所需數目的相同空白光碟。 3. 按一下開始即可複製檔案。接著畫面上會出現備份進度。 4. 依照流程將其完成: • 如果使用光碟,光碟機會在完成每片光碟的燒錄後退出光碟。 從光碟機 中取出光碟,然後使用油性筆加以標示。 若需要使用多張光碟,請在出現提示時放入新的光碟,然後按一下「確 定」。 繼續直到完成所有流程。 • 如果使用 USB 磁碟機,請將其拔出並清楚標示。 重要: 在每個備份上寫入獨一無二的說明標籤,例如 「驅動程式和應 用程式備份」。 務必將備份媒體放在安全好記的位置。 56 復原您的系統 回復您的系統: 1. 執行次要修正。若僅有一或兩個軟體或硬體項目停止正常運作,則只要重 新安裝軟體或裝置驅動程式,即可解決此問題。 若要重新安裝出廠時預先安裝的硬體和驅動程式,請參閱第 57 頁的 「重 新安裝驅動程式和應用程式」 。 如需關於將未預先安裝之軟體和驅動程式重新安裝的指示,請參閱該產品 的文件,或是支援網站。 2. 轉換至先前的系統狀態。 若重新安裝軟體或驅動程式沒有任何助益,則可將系統復原至先前所有運 作皆正常無誤的狀態。 如需相關指示,請參閱第 60 頁的 「回到先前的系統快照」 。 3. 重設作業系統。 如果問題無解需要重設系統,但是要保留使用者資訊時,請參閱第 61 頁 的 「將系統回到出廠預設狀態」 。 4. 將系統重設為出廠預設狀態。 若其他方法皆未能解決問題,且您想要將系統回復到出廠狀態,請參閱第 61 頁的 「將系統回到出廠預設狀態」 。 重新安裝驅動程式和應用程式 您可能需要重新安裝在出廠時已預先安裝在電腦上的應用程式和裝置驅動 程式,此為疑難排解步驟的一部分。您可以使用硬碟或已建立的備份來重新 安裝。 復原 - 57 • 其它應用程式 - 若您需要重新安裝電腦未預先安裝的軟體,則必須遵循軟 體的安裝指示。 • 新增裝置驅動程式 - 若您需要重新安裝電腦未預先安裝的裝置驅動程式, 請遵循裝置隨附的指示。 如果要使用 Windows 和電腦上儲存的復原資訊進行重新安裝: • 從開始處,輸入「Recovery」,然後在應用程式清單中按一下 Gateway Recovery Management。 • 按一下重新安裝驅動程式或應用程式。 58 • 您可參閱 Gateway 資源中心的內容區塊。 • 針對要安裝的項目按一下安裝圖示,然後遵循螢幕指示完成安裝。 針對要安裝的每個項目重複執行此步驟。 如果要從 DVD 或 USB 磁碟機的驅動程式和應用程式備份中重新安裝: 1. 將驅動程式和應用程式復原放入光碟機,或將其連接到可用的 USB 連接埠。 • 如果已放入 DVD,請等待 Gateway 資源中心啟動。 • 如果 Gateway 資源中心沒有自動開啟,請按下 Windows 鍵 + <E>, 然後在光碟機圖示上按兩下。 • 如果使用 USB 磁碟機,請按下 Windows 鍵 + <E>,然後在包含備份 的磁碟機上按兩下。 在 ResourceCenter 上按兩下。 復原 - 59 2. 您可參閱 Gateway 資源中心的內容區塊。 3. 針對要安裝的項目按一下安裝圖示,然後遵循螢幕指示完成安裝。 針對要安裝的每個項目重複執行此步驟。 回到先前的系統快照 Microsoft 系統還原會定期為系統設定執行 「快照」,並將這些快照儲存為 還原點。 您可以針對大部分難以解決的軟體問題,選擇回到其中一個還原點 以便重新執行系統。 Windows 會定期在每天,或每次安裝軟體或裝置驅動程式時,建立一個額 外的還原點。 注意:如需關於使用 Microsoft 系統還原的詳細資訊,請從開始處輸入 「說明」,然後在應用程式清單中按一下說明及支援。 在 「搜尋說明」 方塊中,輸入 「Windows 系統還原」,然後按下 Enter。 60 回到還原點 1. 從開始處,輸入 「控制台」,然後在應用程式清單中按一下控制台。 2. 按一下系統及安全性 > 行動作業中心,然後按一下視窗底部的復原。 3. 按一下開啟系統復原,然後再按一下下一步。 4. 按一下最新的還原點 ( 系統正常運作的時間點 ),再按一下下一步,然後 按一下完成。 5. 顯示確認視窗;按一下是。 使用指定的還原點還原系統。 此程序可能需要 花上幾分鐘,並重新啟動電腦。 將系統回到出廠預設狀態 若電腦遇到其他方法無法回復的問題,則您可能需要重新安裝所有項目,以 便使系統回到出廠預設狀況。 您可以從硬碟或已建立的復原備份來進行 復原。 • 若您仍可執行 Windows,且尚未刪除復原分割區,請參閱第 61 頁的「從 Windows 復原」。 • 若您無法執行 Windows,且原始硬碟已經過重新格式化,或是已安裝替 換硬碟,請參閱第 65 頁的 「從復原備份中復原」 。 從 Windows 復原 開啟 Gateway Recovery Management: • 從開始處,輸入 「Recovery」,然後在應用程式清單中按一下 Gateway Recovery Management。 復原 - 61 有兩個可用的選項 - 還原為原廠預設值 ( 重設我的電腦 ) 或自訂還原 ( 重新 整理我的電腦 )。 還原為原廠預設值會刪除硬碟中的所有內容,然後重新安裝 Windows 和系 統預先安裝的所有軟體與驅動程式。 若您可以存取硬碟中的重要檔案,請立 即予以備份。 請參閱第 63 頁的 「利用 Gateway Recovery Management 還原為原廠預設值」。 自訂還原將會嘗試保留您的檔案 ( 使用者資料 ),但會重新安裝所有的軟體 和驅動程式。 購買電腦時所安裝的軟體將會被移除 ( 除了從 Windows 市集 安裝的軟體 )。請參閱第 64 頁的「利用 Gateway Recovery Management 自訂復原」 。 62 利用 Gateway Recovery Management 還原為原廠預設值 1. 按一下還原為原廠預設值。 警告: 「還原為原廠預設值」將會刪除所有硬碟上的檔案。 2. 重設電腦視窗會開啟。 影像僅供參考。 復原 - 63 3. 按一下下一步,然後選擇刪除檔案的方式: a. 僅移除我的檔案會在復原電腦前快速刪除所有檔案,所需時間約為 30 分鐘。 b. 完全清除磁碟機會在刪除每個檔案後完全清除磁碟機;也就是說,復原 後會看不到任何檔案。清除磁碟機會花費較久時間 (5 小時左右 ),但是 由於舊的檔案皆已完全移除,所以安全性上也較沒疑慮。 4. 按一下重設。 5. 將電腦重新啟動即會開始執行復原程序,接著則會將檔案複製到硬碟中以 繼續作業。 6. 復原結束後,您可重複首次使用程序開始使用電腦。 利用 Gateway Recovery Management 自訂復原 1. 按一下自訂還原 ( 保留使用者資料 )。 64 2. 重新整理電腦視窗會開啟。 3. 按一下下一步,然後按一下重新整理。 4. 將電腦重新啟動即會開始執行復原程序,接著則會將檔案複製到硬碟中以 繼續作業。此程序會花費約 30 分鐘。 從復原備份中復原 若要從 USB 磁碟機的復原備份中復原: 1. 尋找復原備份。 2. 插入 USB 磁碟機,然後啟動電腦。 3. 如果該功能尚未啟用,則您必須啟用 F12 Boot Menu: a. 啟動電腦時按下 <F2>。 b. 使用向左或向右方向鍵選取 「主要」功能表。 c. 按向下鍵,直到選取 F12 Boot Menu,再按下 <F5>,將此設定變更為 Enabled。 d. 使用向左或向右方向鍵選取 Exit 功能表。 e. 根據電腦使用的 BIOS 類型,選取 Save Changes and Exit 或 Exit Saving Changes,然後按下 Enter。 選取 OK 或 Yes 以確認。 f. 這樣即會重新啟動電腦。 復原 - 65 4. 在開機期間,按下 <F12> 即可開啟開機功能表。 您可以在開機功能表中 選取開機裝置,例如 USB 磁碟機。 a. 使用方向鍵選取 USB 裝置,然後按下 Enter。 b. Windows 便會從復原備份啟動,而不會執行正常的啟動程序。 5. 選取鍵盤類型。 6. 選取疑難排解,然後選擇要使用的復原類型: a. 按一下進階,然後按一下系統還原,以啟動 Microsoft 系統還原: Microsoft 系統還原會定期為系統設定執行 「快照」,並將這些快照儲 存為還原點。您可以針對大部分難以解決的軟體問題,選擇回到其中一 個還原點以便重新執行系統。 b. 按一下重設電腦,以啟動重設程序: 重設電腦會刪除硬碟中的所有內容,然後重新安裝 Windows 和系統預 先安裝的所有軟體與驅動程式。 若您可以存取硬碟中的重要檔案,請立 即予以備份。 請參閱第 67 頁的 「從復原備份重設電腦」。 c. 按一下重新整理電腦,以啟動重新整理程序: 重新整理電腦將會嘗試保留您的檔案 ( 使用者資料 ),但會重新安裝所 有的軟體和驅動程式。 購買電腦時所安裝的軟體將會被移除 ( 除了從 Windows 市集安裝的軟體 )。 請參閱第 68 頁的「從復原備份重新整理 電腦」 。 66 從復原備份重設電腦 Caution: 重設電腦將會刪除所有硬碟上的檔案。 1. 重設電腦視窗會開啟。 影像僅供參考。 2. 按一下下一步。 3. 選取要復原的作業系統 ( 通常僅有一個選項可選擇 )。 4. 選擇以將任何變更保留到硬碟: a. 如果您已刪除復原分割區或已變更硬碟上的分割區,並想要保留這些變 更,請選取否。 b. 若要將電腦完全還原為原廠預設值,請選取是。 5. 選擇刪除檔案的方式: a. 僅移除我的檔案會在復原電腦前快速刪除所有檔案,所需時間約為 30 分鐘。 b. 完全清除磁碟機會在刪除每個檔案後完全清除磁碟機;也就是說,復原 後會看不到任何檔案。清除磁碟機會花費較久時間 (5 小時左右 ),但是 由於舊的檔案皆已完全移除,所以安全性上也較沒疑慮。 6. 按一下重設。 7. 復原結束後,您可重複首次使用程序開始使用電腦。 復原 - 67 從復原備份重新整理電腦 1. 重新整理電腦視窗會開啟。 2. 按一下 「下一步」。 3. 選取要復原的作業系統 ( 通常僅有一個選項可選擇 )。 4. 按一下重新整理。 5. 將電腦重新啟動即會開始執行復原程序,接著則會將檔案複製到硬碟中以 繼續作業。此程序會花費約 30 分鐘。 68 常見問題 以下列出使用本電腦時,可能會發生的情況,並提供簡單的解決方法。 我按下電源按鈕,電腦卻未啟動或開機 檢查電源指示燈: • 如果指示燈沒亮,表示電腦沒有接上電源。請依下列逐項檢查: • 若您是使用電池組,有可能是電量不足,導致無法正常供電給電腦。這 時,請接上 AC 電源轉接器,讓電池組開始重新充電。 • 若您是使用 AC 電源轉接器,請檢查 AC 電源轉接器兩端是否有鬆脫, 是否正確連接到電腦及電源插座。 • 如果指示燈亮著,請檢查: • 光碟機是否放入了光碟? 取出光碟,接著按下 <Ctrl> + <Alt> + <Del> 重新開機。 • 電腦是否插入了 USB 儲存裝置 (USB 隨身碟或智慧型手機 )? 拔出裝 置,接著按下 <Ctrl> + <Alt> + <Del> 重新開機。 顯示幕上沒有出現任何影像 本電腦的電源管理系統,為了節省電力,會將螢幕自動變暗。只要按下任何 按鍵即可回復正常的螢幕顯示。 如果按下任何按鍵仍無法回復正常螢幕,有可能是下列情況: • 螢幕亮度調得太低。按一下 <Fn> + < > ( 增加 ) 以調整螢幕亮度。 • 螢幕顯示輸出可能設定為外接顯示器。按一下 電腦。 ,將顯示螢幕切換回 常見問題 - 69 • 若睡眠指示燈亮著,表示本電腦正處於睡眠模式。按一下電源按鈕後放開 即可喚醒電腦。 電腦音效沒有作用 請依下列逐項檢查: • 音量可能設為靜音。請檢查 Windows 工作列上的音量控制圖示。如果該 圖示被畫上橫線,點選該圖示,並取消 「靜音」選項。 • 音量可能調得太低。請檢查 Windows 工作列上的音量控制圖示。或是使 用電腦上的音量控制鍵來調高音量。 • 如果耳機或是外接喇叭連接到電腦的音訊輸出插孔,則內建喇叭將會自動 關閉。 我想要在不開機的情況下,退出光碟機托盤 在光碟機上有一個手動的緊急退出孔。只要將迴紋針或筆尖插入該退出孔並 向內推,即可退出光碟機托盤。 鍵盤沒有回應 試著把外接式鍵盤連接到電腦的 USB 2.0 埠。如果可使用,請與您的經銷商 或是授權服務中心連繫,讓他們檢查內部鍵盤連接線是否脫落。 印表機無法正常工作 請依下列逐項檢查: • 請確認印表機是否有連接電源插座,且印表機電源已開啟。 • 請確認是否穩固地將印表機纜線連接到 USB 連接埠及印表機上對應的連 接埠。 70 使用 Windows 8 的秘訣和提示 我們了解這是需要習慣的新作業系統,因而建立了一些指標來幫助您快速 入門。 有三個要記住的觀念 1. 開始 不再有開始按鈕;您可從 「開始」畫面啟動應用程式。 2. 動態磚 動態磚類似於應用程式的縮圖。 3. Charms Charms 可讓您執行一些有用的功能,例如分享內容、將電腦關機或變更 設定。 如何存取 Charms? 將游標移至螢幕的右上或右下角以存取 Charms,或者按下 Windows 鍵 + <C>。 如何進入開始功能表? 按下鍵盤的 Windows 鍵;按下 Windows 鍵 + <C> 並按一下開始;或將游 標移至畫面左下角並按一下開始。 我要如何在應用程式間進行切換? 將游標移到螢幕的左側邊緣,以檢視目前執行中之應用程式的縮圖。 常見問題 - 71 您也可以按下 Windows 鍵 + <Tab>,來開啟和捲動目前的應用程式。 如何關閉我的電腦? 按一下 Windows 鍵 + <C>,然後按一下設定 > 電源並選取您要進行的動作。 或者,在桌面按一下 Gateway Power Button,然後選取您要進行的動作。 為什麼要使用新介面? Windows 8 的新介面是專為方便觸控輸入而設計。 Windows 市集的應用程 式將會自動使用全螢幕,且不需要以傳統方式將其關閉。 Windows 市集的 應用程式將會以動態磚模式顯示在開始畫面上。 何謂 「動態磚」? 動態磚類似於應用程式的縮圖,每當連線到網際網路時內容便會更新。 所 以,舉例來說,您不需要開啟應用程式即可檢視天氣或股票更新。 如何將我的電腦解除鎖定? 按下任意鍵,並按一下使用者帳戶圖示,以解除鎖定電腦。 如果帳戶有設定 密碼,請輸入密碼以繼續。 如何個人化我的電腦? 您可使用不同的背景影像或重排動態磚來個人化開始畫面,以便符合個人需 求。 若要變更背景,請按下 Windows 鍵 + <C>,並按一下設定 > 變更電腦 設定 > 個人化。 按一下頁面上方的開始畫面,並選取顏色和影像。 72 如何移動動態磚? 按住動態磚以選取,然後將其拖曳到開始畫面上想要放置的地方。 其它動態 磚將會移動,以讓該磚能夠塞入其新位置。 如何讓動態磚放大或縮小? 在動態磚上按一下滑鼠右鍵,然後從顯示在畫面下方的功能表中選取縮小或 放大。 如何個人化鎖定畫面? 您可使用不同的影像,或以顯示快速狀態和通知的方式來個人化鎖定畫面, 以便符合個人需求。 若要變更背景,請按下 Windows 鍵 + <C>,並按一下設定 > 變更電腦 設定 > 個人化。 按一下頁面上方的鎖定畫面,並選取想要顯示在鎖定畫面上 的影像和應用程式。 那麼,如何關閉應用程式? 將游標移到畫面上方,然後將視窗按住並向下拖曳即可關閉應用程式。 您可從畫面左手邊的縮圖來關閉應用程式,方法是在縮圖上按一下滑鼠右 鍵,並選取關閉。 是否可變更畫面解析度? 從開始處輸入 「控制台」,以開啟搜尋並顯示結果;按一下控制台 > 調整螢 幕解析度。 常見問題 - 73 我想要以我習慣的方式來使用 Windows。還我桌面! 從開始,按一下桌面磚以顯示傳統的桌面模式。 您可將常用應用程式釘選到 工作列,以方便將其開啟。 若您按一下非 Windows 市集的應用程式,Windows 將會自動在桌面模式下 開啟應用程式。 我的應用程式在哪裡? 從開始處,簡單輸入想要開啟之應用程式的名稱,搜尋功能便會自動開啟並 列出結果。 若要檢視應用程式的完整清單,請按下空格鍵或功能表鍵,然後按一下所有 應用程式。 如何讓應用程式顯示在開始上? 如果是在所有應用程式中,且想要讓某個應用程式顯示在開始上,您可選取 該應用程式,並在上面按一下滑鼠右鍵。 從顯示在畫面下方的功能表中選取 釘選到開始畫面。 如何從 「開始」移除動態磚? 在磚上按一下滑鼠右鍵,再從顯示在畫面下方的功能表中按一下從開始畫面 取消釘選。 如何讓應用程式顯示在桌面的工作列上? 如果是在所有應用程式中,且想要讓某個應用程式顯示在桌面的工作列上, 您可選取該應用程式,並在上面按一下滑鼠右鍵。從顯示在畫面下方的功能 表中選取釘選到工作列。 74 如何安裝應用程式? 您可從市集下載 Windows 市集應用程式。 您必須要有 Microsoft ID,以便從 市集購買並下載應用程式。 我找不到像是記事本或小畫家的應用程式! 它們到哪裡去了? 從開始處,簡單輸入正在尋找之應用程式的名稱,以開啟搜尋功能並列出結 果。 或者,開啟所有應用程式,然後捲動到 「Windows 附屬應用程式」,以 顯示舊版程式的清單。 何謂 Microsoft ID ( 帳戶 )? Microsoft 帳戶是一個用來登入 Windows 的電子郵件地址和密碼。 您可使用 任何的電子郵件地址,但建議選擇已使用的電子郵件地址,來與朋友聯繫並 登入我的最愛網站。 當使用 Microsoft 帳戶登入電腦時,電腦將會與您所關 心的連絡人、檔案和裝置連線。 我需要嗎? 並非要有 Microsoft ID 才能使用 Windows 8。不過,您可使用 Microsoft ID 在不同且已登入的機器上同步資料,讓生活更加便利。 如何取得? 若您已安裝 Windows 8 且尚未使用 Microsoft 帳戶登入,或您沒有 Microsoft 帳戶且想要申請一個,請按下 Windows 鍵 + <C> 並按一下設定 > 變更電腦 設定 > 使用者 > 切換至 Microsoft 帳戶,然後遵循螢幕上的指示進行。 常見問題 - 75 如何將我的最愛新增到 Internet Explorer? Internet Explorer 10 沒有舊式的我的最愛,而是讓您將捷徑釘選到開始。 當 頁面開啟時,在頁面上的任何地方按一下滑鼠右鍵,畫面下方的功能表便會 開啟。按一下釘選到開始畫面。 如何檢查 Windows Update? 按 下 Windows 鍵 + <C> 並 按 一 下 設 定 > 變 更 電 腦 設 定 > Windows Updates。 按一下立即檢查更新。 哪裡可獲得更多資訊? 如需詳細資訊,請造訪: • Windows 8 教學課程: www.gateway.com/windows8-tutorial • 支援常見問題: support.gateway.com 76 法規資訊 預防聽力喪失 - 注意:長時間以高音量使用耳機,可能造成聽力永久喪失。 - A pleine puissance, l’écoute prolongée du baladeur peut endommager l’oreille de l’utilisateur. 聆聽時的注意事項 為保護您的聽力,請遵守以下指示。 - 逐漸增加音量,直到您能清晰舒適地聆聽音樂。 - 勿在耳朵已習慣後又增加音量。 - 勿長時間以高音量聆聽音樂。 - 勿為阻絕吵雜的環境而增加音量。 - 若您無法聽見他人對您說的話,請降低音量。 無線電裝置法規注意事項 - 注意:以下法規資訊僅適用於無線網路及 ( 或 ) 藍牙裝置。 相容配件 本設備的相關配件如下: 連接外接螢幕的屏蔽視訊連接線。 必須使用這些配件,以確保遵 循 FCC 規定。 美國加州第 65 號法案警告事項 本產品內含在美國加利福尼亞州已確知會引發癌症、先天缺陷和 / 或其他生育障礙的化學 物質。 如需關於本產品警告內容的詳細資訊,請移至 www.gateway.com/prop65。 法規資訊 - 77 日本 (JAPAN) 本装置は、第二種情報装置(住宅地域またはその隣接した地域において使用されるべき 情報装置)デ住宅地域での電波障害防止を目的とした情報装置等電波障害自主規制協議 会(VCCI)基準に適合しております。 しかし、本装置をラジオ、テレビジョン受信機に、近接してご使用になると、受信障害 の原因となることがあります。本書の説明にしたがって正しい取り扱いをしてくだ さい。 WIRELESS ADAPTER REGULATORY INFORMATION USA — FCC and FAA The FCC with its action in ET Docket 96-8 has adopted a safety standard for human exposure to radio frequency (RF) electromagnetic energy emitted by FCC certified equipment. The wireless adapter meets the Human Exposure limits found in OET Bulletin 65, supplement C, 2001, and ANSI/IEEE C95.1, 1992. Proper operation of this radio according to the instructions found in this manual will result in exposure substantially below the FCC’s recommended limits. - The following safety precautions should be observed: Do not touch or move antenna while the unit is transmitting or receiving. - Do not hold any component containing the radio such that the antenna is very close or touching any exposed parts of the body, especially the face or eyes, while transmitting. - Do not operate the radio or attempt to transmit data unless the antenna is connected; this behavior may cause damage to the radio. Use in specific environments: - The use of wireless adapters in hazardous locations is limited by the constraints posed by the safety directors of such environments. - The use of wireless adapters on airplanes is governed by the Federal Aviation Administration (FAA). - The use of wireless adapters in hospitals is restricted to the limits set forth by each hospital. 78 Antenna Use In order to comply with FCC RF exposure limits, low gain integrated antennas should be located at a minimum distance of 20 cm (8 inches) or more from the body of all persons or at a minimum distance as specified by the FCC module grant conditions. FCC grants can be viewed from the FCC Equipment Authorization website at https://fjallfoss.fcc.gov/ oetcf/eas/reports/GenericSearch.cfm by entering the FCC ID printed on the module label. Explosive Device Proximity Warning Warning: Do not operate a portable transmitter (including this wireless adapter) near unshielded blasting caps or in an explosive environment unless the transmitter has been modified to be qualified for such use Antenna Warnings - Warning: To comply with the FCC and ANSI C95.1 RF exposure limits, it is recommended that for the wireless adapter installed in a desktop or portable computer, the antenna for this wireless adapter to be installed so as to provide a separation distance of at least 20 cm (8 inches) from all persons or at the minimum distance as specified by the module grant conditions. FCC grants can be viewed from the FCC Equipment Authorization website at https://fjallfoss.fcc.gov/oetcf/eas/ reports/GenericSearch.cfm by entering the FCC ID printed on the module label. - Warning: The wireless adapter is not designed for use with high-gain directional antennas. Use On Aircraft Caution - Caution: Regulations of the FCC and FAA prohibit airborne operation of radiofrequency wireless devices (wireless adapters) because their signals could interfere with critical interfere with critical aircraft instruments. Local Restrictions on 802.11a, 802.11b, 802.11g and 802.11n Radio Usage - Caution: Due to the fact that the frequencies used by 802.11a, 802.11b, 802.11g and 802.11n wireless LAN devices may not yet be harmonized in all countries, 802.11a, 802.11b, 802.11g and 802.11n products are designed for use only in specific countries, and are not allowed to be operated in countries other than those of 法規資訊 - 79 designated use. As a user of these products, you are responsible for ensuring that the products are used only in the countries for which they were intended and for verifying that they are configured with the correct selection of frequency and channel for the country of use. Any deviation from the permissible power and frequency settings for the country of use is an infringement of national law and may be punished as such. Wireless Interoperability The wireless adapter is designed to be interoperable with other wireless LAN products that are based on direct sequence spread spectrum (DSSS) radio technology and to comply with the following standards: - IEEE Std. 802.11b compliant Standard on Wireless LAN - IEEE Std. 802.11g compliant Standard on Wireless LAN - IEEE Std. 802.11a compliant Standard on Wireless LAN (applies to devices supporting 802.11a) - IEEE Std. 802.11n draft 2.0 compliant on Wireless LAN - Wireless Fidelity certification, as defined by the Wi-Fi Alliance The Wireless Adapter and Your Health The wireless adapter, like other radio devices, emits radio frequency electromagnetic energy. The level of energy emitted by the wireless adapter, however, is less than the electromagnetic energy emitted by other wireless devices such as mobile phones. The wireless adapter operates within the guidelines found in radio frequency safety standards and recommendations. These standards and recommendations reflect the consensus of the scientific community and result from deliberations of panels and committees of scientists who continually review and interpret the extensive research literature. In some situations or environments, the use of the wireless adapter may be restricted by the proprietor of the building or responsible representatives of the applicable organization. Examples of such situations may include: - Using the wireless adapter on board airplanes, or 80 - Using the wireless adapter in any other environment where the risk of interference with other devices or services is perceived or identified as being harmful. If you are uncertain of the policy that applies to the use of wireless adapters in a specific organization or environment (an airport, for example), you are encouraged to ask for authorization to use the adapter before you turn it on. FCC Radio Frequency Interference Requirements (applies to device supporting 802.11a) This device is restricted to indoor use due to its operation in the 5.15 to 5.25 GHz and 5.470 to 5.725 GHz frequency ranges. FCC requires this product to be used indoors for the frequency ranges 5.15 to 5.25 GHz and 5.470 to 5.725 GHz to reduce the potential for harmful interference to co-channel mobile satellite systems. High power radars are allocated as primary users of the 5.25 to 5.35 GHz and 5.65 to 5.85 GHz bands. These radar stations can cause interference with and /or damage this device. No configuration controls are provided for this wireless adapter allowing any change in the frequency of operations outside the FCC grant of authorization for U.S operation according to Part 15.407 of the FCC rules. USA — Federal Communications Commission (FCC) This device complies with Part 15 of the FCC Rules. Operation of the device is subject to the following two conditions: - This device may not cause harmful interference. - This device must accept any interference that may cause undesired operation. - Note: The radiated output power of the adapter is far below the FCC radio frequency exposure limits. Nevertheless, the adapter should be used in such a manner that the potential for human contact during normal operation is minimized. To avoid the possibility of exceeding the FCC radio frequency exposure limits, you should keep a distance of at least 20 cm between you (or any other person in the vicinity), or the minimum separation distance as specified by the FCC grant conditions, and the antenna that is built into the computer. Details of the authorized configurations can be found at http://www.fcc.gov/oet/ea/ by entering the FCC ID number on the device. 法規資訊 - 81 Interference Statement This wireless adapter has been tested and found to comply with the limits for a Class B digital device, pursuant to Part 15 of the FCC Rules. These limits are designed to provide reasonable protection against harmful interference in a residential installation. This wireless adapter generates, uses, and can radiate radio frequency energy. If the wireless adapter is not installed and used in accordance with the instructions, the wireless adapter may cause harmful interference to radio communications. There is no guarantee, however, that such interference will not occur in a particular installation. If this wireless adapter does cause harmful interference to radio or television reception (which can be determined by turning the equipment off and on), the user is encouraged to try to correct the interference by taking one or more of the following measures: - Reorient or relocate the receiving antenna of the equipment experiencing the interference. - Increase the distance between the wireless adapter and the equipment experiencing the interference. - Connect the computer with the wireless adapter to an outlet on a circuit different from that to which the equipment experiencing the interference is connected. - Consult the dealer or an experienced radio/TV technician for help. - Note: The adapter must be installed and used in strict accordance with the manufacturer's instructions as described in the user documentation that comes with the product. Any other installation or use will violate FCC Part 15 regulations. Canada — Industry Canada (IC) This device complies with RSS210 of Industry Canada. Cet appareil se conforme à RSS210 de Canada d'Industrie. - Caution: When machine supports and using IEEE 802.11a wireless LAN, this product is restricted to indoor use due to its operation in the 5.15- to 5.25 GHz frequency range. Industry Canada requires this product to be used indoors for the frequency range of 5.15 GHz to 5.25 GHz to reduce the potential for harmful interference to co-channel mobile satellite systems. High power radar is allocated as 82 the primary user of the 5.25 to 5.35 GHz and 5.65 to 5.85 GHz bands. These radar stations can cause interference with and/or damage to this device. The maximum allowed antenna gain for use with this device is 6dBi in order to comply with the E.I.R.P limit for the 5.25 to 5.35 and 5.725 to 5.85 GHz frequency range in point-topoint operation. To comply with RF exposure requirements all antennas should be located at a minimum distance of 20 cm, or the minimum separation distance allowed by the module approval, from the body of all persons. - Attention: l’utilisation d’un réseau sans fil IEEE802.11a est réstreinte à une utilisation en intérieur à cause du fonctionement dans la bande de fréquence 5.15 5.25 GHz. Industry Canada requiert que ce produit soit utilisé à l’intérieur des bâtiments pour la bande de fréquence 5.15 - 5.25 GHz afin de réduire les possibilités d’interférences nuisibles aux canaux co-existants des systèmes de transmission satellites. Les radars de puissances ont fait l’objet d’une allocation primaire de fréquences dans les bandes 5.25 - 5.35 GHz et 5.65 - 5.85 GHz. Ces stations radar peuvent créer des interférences avec ce produit et/ou lui être nuisible. Le gain d’antenne maximum permissible pour une utilisation avec ce produit est de 6 dBi afin d’être conforme aux limites de puissance isotropique rayonnée équivalente (P.I.R.E.) applicable dans les bandes 5.25 - 5.35 GHz et 5.725 - 5.85 GHz en fonctionement point-à-point. Se pour conformer aux conditions d'exposition de RF toutes les antennes devraient être localisées à une distance minimum de 20 cm, ou la distance de séparation minimum permise par l'approbation de module, du corps de toutes les personnes. This Class B digital apparatus complies with Canadian ICES-003. Cet appareil numérique de la classe B est conforme a la norme NMB-003 du Canada. "To prevent radio interference to the licensed service, this device is intended to be operated indoors and away from windows to provide maximum shielding. Equipment (or its transmit antenna) that is installed outdoors is subject to licensing." 法規資訊 - 83 « Pour empêcher que cet appareil cause du brouillage au service faisant l'objet d'une licence, il doit être utilisé a l'intérieur et devrait être placé loin des fenêtres afin de fournir un écran de blindage maximal. Si le matériel (ou son antenne d'émission) est installé à l'extérieur, il doit faire l'objet d'une licence. » European Union 適用國家清單 本產品的使用應嚴格遵守產品使用國家的法規及限制。 如需詳細資訊,請聯絡產品使用國 家當地的辦公室。 請參閱 http://ec.europa.eu/enterprise/rtte/implem.htm,以瞭解最新的 國家清單。 國碼清單 本設備可在下列國家中操作: 國家 ISO 3166 2 字碼 國家 ISO 3166 2 字碼 國家 ISO 3166 2 字碼 國家 ISO 3166 2 字碼 奧地利 AT 德國 DE 馬爾他 MT 英國 GB 比利時 BE 希臘 GR 荷蘭 NT 冰島 IS 塞浦路斯 CY 匈牙利 HU 波蘭 PL 列支敦斯登 LI 捷克共和國 CZ 愛爾蘭 IE 葡萄牙 PT 挪威 NO 丹麥 DK 義大利 IT 斯洛伐克 SK 瑞士 CH 愛沙尼亞 EE 拉脫維亞 LV 斯洛維尼亞 SL 保加利亞 BG 芬蘭 FI 立陶宛 LT 西班牙 ES 羅馬尼亞 RO 法國 FR 盧森堡 LU 瑞典 SE 土耳其 TR The low band 5.15 -5.35 GHz is for indoor use only. This equipment complies with the essential requirements of the European Union directive 1999/5/EC. See Statements of European Union Compliance, and more details refer to the attached Declaration of Conformity. 84 English Hereby, ACER INC., declares that this devise is in compliance with the essential requirements and other relevant provisionns of Directive 1999/5/EC. Česky [Czech] ACER INC. tímto prohlašuje, že toto zařízení je ve shodě se základními požadavky a dalšími příslušnými ustanoveními směrnice 1999/5/ES. Daansk [Danish] Undertegnede ACER INC. erklærer herved, at følgende udstyr overholder de væsentlige krav og øvrige relevante krav i direktiv 1999/5/EF. Deutsch [German] Hiermit erklärt ACER INC., dass sich das Gerät Radiolan in Übereinstimmung mit den grundlegenden Anforderungen und den übrigen einschlägigen Bestimmungen der Richtlinie 1999/5/EG befindet. Eesti [Estonian] Käesolevaga kinnitab ACER INC. seadme vastavust direktiivi 1999/5/EÜ põhinõuetele ja nimetatud direktiivist tulenevatele teistele asjakohastele sätetele. Español [Spanish] Por medio de la presente ACER INC. declara que el dispositivo cumple con los requisitos esenciales y cualesquiera otras disposiciones aplicables o exigibles de la Directiva 1999/5/CE. 法規資訊 - 85 Ελληνικά [Greek] ∆ια του παρόντος η ACER INC. δηλώνει ότι η παρούσα συσκευή συµµορφώνεται προς τις ουσιώδεις απαιτήσεις και τις λοιπές διατάξεις της Οδηγίας 1999/5/ ΕΚ. Français [French] Par la présente ACER INC. déclare que cet appareil est conforme aux exigences essentielles et aux autres dispositions pertinentes de la directive 1999/5/CE. Íslenska [Icelandic] Hér með lýsir ACER INC. yfir því að er í samræmi við grunnkröfur og aðrar kröfur, sem gerða r eru í tilskipun 1999/5/EC. Itaaliano [Italian] Con la presente ACER INC. dichiara che questo dispositivo è conforme ai requisiti essenziali ed alle altre disposizioni pertinenti stabilite dalla direttiva 1999/5/CE. Latviski [Latvian] Ar šo ACER INC. deklarē, ka šī ierīce atbilst Direktīvas 1999/5/EK būtiskajām prasībām un citiem ar to saistītajiem noteikumiem. Lietuvių [Lithuanian] Šiuo ACER INC. deklaruoja, kad šis įrenginys atitinka esminius reikalavimus ir kitas 1999/5/EB Direktyvos nuostatas. Malti [Maltese] Hawnhekk, ACER INC., jiddikjara li dan jikkonforma mal- ti ijiet essenzjali u ma provvedimenti o rajn relevanti li he mm fid-Dirrettiva 1999/5/EC. 86 Magyar [Hungarian] Alulírott, ACER INC. nyilatkozom, hogy a készülék megfelel a vonatkozó alapveto követelményeknek és az 1999/5/EC irányelv egyéb eloírásainak. Nederlands [Dutch] Hierbij verklaart ACER INC. dat het toestel voldoet aan de essentiële eisen en de andere relevante bepalingen van richtlijn 1999/5/EG. Norsk [Norwegiann] ACER INC. erklærer herved at utstyret er i samsvar med de grunnleggende krav og øvrige relevante krav i direktiv 1999/5/EF. Polski [Polish] Niniejszym ACER INC. oświadcza, że urządzenie jest zgodne z zasadniczymi wymogami oraz pozostałymi stosownymi postanowieniami Dyrektywy 1999/5/EC. Português [Portuguese] ACER INC. declara que este dispostivo está conforme com os requisitos essenciais e outras disposições da Directiva 1999/5/CE. Slovensko [Slovenian] ACER INC. izjavlja, da je ta naprava skladna z bistvenimi zahtevami in ostalimi relevantnimi določili Direktive 1999/5/ES. Slovensky [Slovak] ACER INC. týmto vyhlasuje, že zariadenie spĺňa základné požiadavky a všetky príslušné ustanovenia Smernice 1999/5/ES. 法規資訊 - 87 Suomi [Finnish] ACER INC. vakuuttaa täten että tämä laite on direktiivin 1999/ 5/EY oleellisten vaatimusten ja sitä koskevienn direktiivin muiden ehtojen mukainen. Svenska [Swedish] Härmed intygar ACER INC. att denna enhet står i överensstämmelse med väsentliga egenskapskrav och övriga relevanta bestämmelser som framgår av direktiv 1999/5/EG. France Pour la France métropolitaine : 2.400 - 2.4835 GHz (Canaux 1à 13) autorisé en usage intérieur 2.400 - 2.454 GHz (canaux 1 à 7) autorisé en usage extérieur Pour la Guyane et la Réunion : 2.400 - 2.4835 GHz (Canaux 1à 13) autorisé en usage intérieur 2.420 - 2.4835 GHz (canaux 5 à 13) autorisé en usage extérieur Pour tout le territoire Français : Seulement 5.15 -5.35 GHz autorisé pour le 802.11a L'utilisation de cet equipement (2.4 GHz WLAN) est soumise à certaines restrictions : - La puissance maximale autorisée en intérieur est de 100 mW pour 2400 - 2483.5 MHz. - La puissance maximale autorisée est de 100 mW en extérieur pour 2400 - 2454 MHz. - La puissance maximale autorisée est de 10 mW en extérieur, 2454 - 2483.5 MHz. Pour les dernières restrictions, voir http://www.art-telecom.fr. Italy The use of these equipments is regulated by: 88 1.D.L.gs 1.8.2003, n. 259, article 104 (activity subject to general authorization) for outdoor use and article 105 (free use) for indoor use, in both cases for private use. 2.D.M. 28.5.03, for supply to public of RLAN access to networks and telecom services. L’uso degli apparati è regolamentato da: 1.D.L.gs 1.8.2003, n. 259, articoli 104 (attività soggette ad autorizzazione generale) se utilizzati al di fuori del proprio fondo e 105 (libero uso) se utilizzati entro il proprio fondo, in entrambi i casi per uso private. 2.D.M. 28.5.03, per la fornitura al pubblico dell’accesso R-LAN alle reti e ai servizi di telecomunicazioni. Belgium Dans le cas d'une utilisation privée, à l'extérieur d'un bâtiment, au-dessus d'un espace public, aucun enregistrement n'est nécessaire pour une distance de moins de 300 m. Pour une distance supérieure à 300 m un enregistrement auprès de l'IBPT est requise. Pour les enregistrements et licences, veuillez contacter l'IBPT. In geval van privé-gebruik, buiten een gebouw, op een openbare plaats, is geen registratie nodig, wanneer de afstand minder dan 300 m is. Voor een afstand groter dan 300 m is een registratie bij BIPT vereist. Voor registraties en licenties, gelieve BIPT te contacteren. Brazil Este equipamento opera em caráter secundário, isto é, não tem direito a proteção contra interferência prejudicial, mesmo de estações do mesmo tipo, e não pode causar interferência a sistemas operando em caráter primário. Pakistan Pakistan Telecommunication Authority (PTA) Approved Morocco The operation of this product in the radio channel 2 (2417 MHz) is not authorized in the following cities: Agadir, Assa-Zag, Cabo Negro, Chaouen, Goulmima, Oujda, Tan Tan, Taourirt, Taroudant and Taza. 法規資訊 - 89 The operation of this product in the radio channels 4, 5, 6 and 7 (2425 - 2442 MHz) is not authorized in the following cities: Aéroport Mohamed V, Agadir, Aguelmous, Anza, Benslimane, Béni Hafida, Cabo Negro, Casablanca, Fès, Lakbab, Marrakech, Merchich, Mohammédia, Rabat, Salé, Tanger, Tan Tan, Taounate, Tit Mellil, Zag. Japan 5 GHz 帯は室内でのみ使用のこと Korea 당해 무선설비는 운용 중 전파혼신 가능성이 있음 Taiwan 第十二條 經型式認證合格之低功率射頻電機,非經許可,公司、商號或使用者均不得擅自變更頻率、 加大功率或變更原設計之特性及功能。 第十四條 低功率射頻電機之使用不得影響飛航安全及干擾合法通信 ; 經發現有干擾現象時,應立即 停用,並改善至無干擾時方得繼續使用。 前項合法通信,指依電信法規定作業之無線通信。 低功率射頻電機須忍受合法通信或工業、科學及醫療用電波輻射性電機設備之干擾。 產品修改 CE 標示 Gateway 對於使用者在未經授權下對產品進行的任何修改及後續結果概不負責,此類修改 將讓產品不再符合 CE 標示的規定。 無線電頻率干擾 在未經授權下對此設備進行任何修改,因而造成的任何無線電或電視干擾,製造商概不 負責。 90 連線和遠端接地 PELV ( 防護超低電壓 ) 為確保設備超低電壓的完整性,您只能將具有防護插頭相容電子電路的設備連接至外接式 連接埠。 SELV ( 安全超低電壓 ) 本產品所有的輸入和輸出都歸類為 「安全超低電壓」。 遠端接地 為避免電擊,請將所有的本機 ( 各辦公室 ) 電腦和電腦支援設備連接到建築佈線的同一電 路。 如果不確定是否安全,請檢查建築的佈線線路,以避免遠端接地的情形。 建築供電 本設備只能連接到符合您國內最新佈線法規的建築供電線路。 若在英國,則應符合 IEE 法規。 電源供應器和電源線 電源供應器 電源供應器的母插座和公插座 ( 如果有的話 ) 已歸類為 「危險電壓」。 您必須拔除電源供應器的電源線並取出電池,以中斷設備的電源。 公插座應安裝在設備附 近,且需方便插入。 額定輸入: 請參閱電腦底部的額定值標籤,並確定您的電源轉接器符合指定的額定值。 使用者不論在任何情況下均不得嘗試拆解電源供應器, 電源供應器並無可供使用者替換的 零件。 電源供應器內部具有足以造成嚴重人身傷害的危險電壓。 您應該將有瑕疵的電源供應器退回給經銷商。 電源線和電源插頭 本產品需使用接地電源線和電源插頭。 此插頭僅適合用於與接地插座連接。 請在插入插頭 前,確認該插座已接地。 請勿將插頭插入一個非接地式的插座。 如需詳細資訊,請與電氣 技師洽詢。 法規資訊 - 91 電源線長度不得超過 2.5 公尺。 為避免電擊,請勿拆除或隔絕電源線上的接地接點。 若發 現電源線毀損,請立即更換。 如需更換相同品,請連絡您的經銷商。 如在歐洲,請使用額 定 250 VAC,10 安培 ( 最少 ) 的插頭。 插頭上必須有國際機構的審核標示。 必須使用適用 於使用者所在國家的電源線。 如果您不確定國內可以使用何種類型的電源線,請洽詢您的 經銷商或當地的授權電力機關。 連接線 針對未在電腦包裝箱中連同產品一併提供的連接線: 只有在連接線和介面具有有效的屏蔽時,才能確保系統的 EMC 效能。 必須使用屏蔽的介面連接線包括:USB、IEEE1394、序列、印表機、遊戲、類比或數位 音訊 / 視訊、PS2、電視或 FM 天線,以及所有通用的高速連接線介面。 只能使用 UL Listed No. 26AWG 或更大的電信線路。 只有乙太網路 LAN 或 RTC 數據機連接線的長度可以超過 3 公尺。 Gateway 建議您在連接電腦與非電腦隨附之硬體裝置的每條連接線上加上一個鐵酸鹽心 圓形夾。 - 鐵酸鹽夾參考型號: Steward 28A-2029 ( 雙圈 ) 在取得產品憑證期間,Gateway 使用下列的連接線品質: - 通過 USB2.0 認證的連接線,型號:Hama 46778 - IEEE1394 屏蔽的 FireWire 連接線,型號:Hama 50011 - RCA-RCA 屏蔽的音訊 / 視訊連接線,型號:Thomson KHC001M、KHC012M、 KHC028M - 立體聲插孔屏蔽音訊連接線,型號:Hama 43330H、42714H 熱生成及可攜式電腦 AC 電源轉接器和電腦底部在長時間使用後可能會變熱。 應避免讓身體長時間接觸這兩個 設備。 機殼蓋的移除及更換 在移除機殼蓋,對設備進行維修或修改之前,您必須先拔除所有的電源線和數據機連接線, 並取出或停用電池。 92 - 小心: 電腦內的部分元件在長時間使用後可能會變熱。 完成工作後,您必須先關上機殼,才能接上電源線並啟動設備。 雷射遵循聲明 此光學裝置已經過測試及認證,符合第 1 級雷射產品的國際電工委員會 IEC60825-1 和歐 盟 EN60825-1 標準。 第 1 級雷射產品不屬於危險等級。 在正常操作或依規定維護下,此光學裝置的設計絕不會 讓人體接觸到第 1 級以上的雷射光。 電腦內安裝的光學裝置設計僅可作為此電子產品的元件使用,因此未符合美國聯邦條例中 完整雷射產品第 1040.10 節和第 1040.11 節的適用需求。 但暴露於雷射光仍具有相當的危險性,因此使用者不論在任何情況下均不得嘗試拆解雷射 裝置。 包裝 本產品的包裝符合歐盟在 1994 年 12 月 29 日發佈的 94/62/EC 環保指令,同時符合法國 在 1998 年 7 月 20 日發佈的 98-638 法規。 符合於俄羅斯法規認證 法規資訊 - 93 環境 我們對環保的承諾 我們的產品一向以環保為出發點。 Gateway 致力於讓我們的產品不會在使用壽命期間對環境造成任何影響。 從設計階段開始,我們便對電子元件採行嚴格的採購政策,以減少鉛、鎘、鉻、水銀等重 金屬的重量。而且全部產品中各項元件的供應商均需遵從所有法規。 對於所有使用壽命已屆的產品,我們也採取必要措施,以進行並加速所有產品的回收工作。 Gateway 產品中使用的所有重量超過 25 公克的塑膠零件都貼有 ISO 11469 標示,有助於 快速辨識材質並簡化定價。同樣地,桌上型電腦也設計成以扣片取代螺絲,方便拆解。 產品棄置 2002/96/EC 指令,亦稱為廢棄電子電機設備 (WEEE) 指令,規定廢棄的 電子電機產品必須與一般的家庭廢棄物分開處理,以推廣再利用、回收及 其他形式的再製,並減少廢棄物的數量,以減少垃圾掩埋及焚化處理。 貼有畫著 X 的垃圾筒標誌,意在提醒您這些產品必須分類處理。這些規則 適用於所有的 Gateway 產品,以及鍵盤、滑鼠、喇叭、遙控器等所有配 件。當您要棄置這些產品時,請洽詢您當地的授權機關以瞭解正確的回收 方式,如果是要更換舊設備,則請送返經銷商。如需詳細資訊,請造訪 www.gateway.com/about/corp_responsibility/environment.php。 電池棄置 ( 在適用情況下 ) 在棄置設備之前,請務必先移除設備中安裝的電池。歐盟法律中規定,電池不得與其他家 庭廢棄物一併處理。請勿將廢棄電池丟進垃圾筒。請透過電池收集計畫處理您的廢棄電池, 或是向經銷商或當地的授權機關詢問有哪些途徑可供利用。您所付出的心力有助於廢棄電 池的安全收集、回收及拆解,為環保盡一份心力,並減少對健康的危害。 - 注意:若未正確更換電池,則會有爆炸的危險。請依據相關指示處理廢棄電池。 94 ENERGY STAR ( 能源之星 ) Gateway 的 ENERGY STAR ( 能源之星 ) 合格產品不止可以降低能源費用, 幫您節省開支,還能兼顧環保與效能。Gateway 很榮幸為客戶提供貼有 ENERGY STAR ( 能源之星 ) 標章的產品。 何謂 ENERGY STAR ( 能源之星 ) ? 通過 ENERGY STAR ( 能源之星 ) 規範的產品不只低耗電,且必須符合由美 國環保署 (US Environmental Protection Agency,EPA) 所訂定的嚴格能源規範,不能產 生對溫室效應有害的氣體。Gateway 一向致力於在全球各地提供能夠協助客戶節省開支、 節能省電且改善環境品質的產品和服務。透過更高的節能效率,我們就能節省更多能源, 也更能減少溫室氣體的排放並降低氣候變異的風險。如需詳細資訊,請造訪: www.energystar.gov 或 www.energystar.gov/powermanagement 網站。 - 注意: 本章的資訊不一定適用於您的電腦。 Gateway 的 ENERGY STAR ( 能源之星 ) 合格產品具備下列特點: - 可產生更少的熱氣並減少散熱負荷,同時避免溫室效應。 - 顯示器和電腦可在閒置達 10 和 30 分鐘後分別自動進入 「顯示器睡眠」和 「電腦 睡眠」模式。 - 按下鍵盤按鍵或移動滑鼠即可喚醒處於睡眠模式中的電腦。 - 「睡眠」模式下的電腦可節省 80% 以上的能源。 ENERGY STAR 和 ENERGY STAR 標章是經過註冊的美國標章。 環境 - 95 軟體授權 - 注意:大部分的軟體應用程式都已預先安裝在您的 Gateway 電腦上,您現在就可以 開始使用或設定這些程式。不過,有些程式需要插入 CD 或 DVD 才能執行,這些光 碟可在電腦的包裝中找到。 Gateway 授權合約 (CD 和 / 或 DVD 產品 )。這份原始資料的影本可作為購買證明。請將 其視為個人資產,妥善保管。 重要! 安裝軟體之前請先詳閱本合約。 以下授權合約的授權對象為您。本合約載明您 ( 個人或個體 ) 與 Gateway 之間的法律關 係。安裝本軟體之後,即表示您同意受到本合約中條款之約束。如果您不同意本合約中的 條款,請立即將整個電腦系統、未打開的軟體套件 ( 如果有的話 ),以及隨附的項目 ( 包括 書面資料或其他包裝 ) 退回當初購買的地方,以取回全部款項。 GATEWAY 軟體授權 1. 授權之授予 本 Gateway 授權合約 (「以下稱「授權」」 允許您在任何一台電腦上使用一份上述指定版 本的 Gateway 軟體副本 ( 包括至少一份 CD 或 DVD 光碟 ),且本軟體不論何時都只能在 一台電腦上使用。如果您擁有軟體的多份授權,則可以使用與授權數相同份數的軟體副本。 軟體在電腦上的 「使用中」狀況,包括載入暫存記憶體 ( 例如:RAM),或安裝於永久性 記憶體 ( 例如:硬碟、CD 和 / 或 DVD,或電腦上其他的儲存裝置 ),但不含為了散佈到其 他電腦而安裝在網路伺服器上的非 「使用中」副本。如果預期的軟體使用者數量超過可用 的授權份數,則您應該建立一個適當的機制或程序,以確保同時間使用軟體的人數不會超 過授權份數。如果軟體是永久安裝於電腦的硬碟或儲存裝置 ( 而非網路伺服器 ) 上,且某 一使用者使用電腦的時間超過該電腦總使用時間的 80%,則這位使用者也可以將軟體安裝 在可攜式電腦或家用電腦上使用。 96 2. 版權 本軟體擁有者為 Gateway 或其供應商,且受到美國版權法及國際條約條款的保護。本軟 體等同任何其他受版權保護之資料 ( 例如:書籍或音樂錄音 ),此外您也可以將 CD 和 / 或 DVD 光碟上的軟體部分 ( 如果有的話 ) 轉移到單一硬碟,以作為備份或封存之用,但前提 是您必須擁有光碟正本。但您不得複製 CD 和 / 或 DVD 光碟上的軟體部分或軟體隨附的書 面資料。 3. 其他限制 您不得出租或租賃軟體,但可以永久轉移軟體和隨附的書面資料,前提是您不可保留任何 副本,且接收人必須同意本合約之條款。您不得對軟體進行還原工程、解編或反向組譯。 不論在任何情況下轉移軟體,均必須包含最新的更新和所有先前版本。 協力廠商軟體或自由軟體授權資訊 Gateway 提供之產品所預先載入、內建或散佈的軟體中包含自由軟體或協力廠商的軟體程 式 ( 以下稱 「自由軟體」 ),這些程式依 GNU 通用公共授權 ( 以下稱 「GPL」 ) 之條款進 行授權。本程式為「自由軟體」。您可依 GPL 條款對「自由軟體」進行複製、散佈和 / 或修改。 「自由軟體」是基於使用目的而散佈,但不提供任何保固;且不對適售性或特殊用途之合 適性提供默示保固。GNU 通用公共授權之條款應永遠適用。您可以直接進入 http://www.gnu.org 取得 GPL 的副本,或寫信給 「自由軟體基金會」以索取副本。「自由 軟體基金會」的地址如下:59 Temple Place - Suite 330, Boston, MA, 02111-1307, USA。 您可在收到本軟體起的三 (3) 年內向我們提出書面申請,依 GPL 條款您會免費收到一份電 腦可讀取的 「自由軟體」原始碼副本,而您只需要支付媒體、寄送和處理費。 如果您有任何進一步的問題,請與我們連絡。我們的郵寄地址:221 新北市汐止區新台五 路一段 88 號 8 樓。 軟體授權 - 97 索引 C CD-ROM ejecting manually ......................................... 70 疑難排解 ........................................................... 70 D DSL ............................................................................. 40 F FAQ. 請參閱常見問題 L LAN ( 區域網路 ) ................................................... 41 N Norton Internet Security .............................. 44, 47 P ports ............................................................................ 25 W WiFi ............................................................................. 41 Windows Windows 自動更新 ...................................... 50 三畫 干擾 ............................................................................. 90 98 使用 Windows ............................................... 38 五畫 充電 檢查電量 ........................................................... 34 左視圖 ........................................................................ 18 六畫 印表機 安全性 疑難排解 ........................................................... 70 更新 .................................................................... 50 安全守則 ..................................................................... 7 防毒軟體 ........................................................... 46 七畫 快速鍵 ........................................................................ 17 防火牆 ........................................................................ 46 更新 Windows 自動更新 ...................................... 50 八畫 卸除式媒體裝置 ..................................................... 26 法規資訊 .............................................................. 77, 94 九畫 亮度 前視圖 ........................................................................ 18 快速鍵 ................................................................ 16 音訊 疑難排解 ........................................................... 70 保固 ............................................................................... 6 十一畫 健康守則 ................................................................... 10 問題 ............................................................................. 69 CD-ROM .......................................................... 70 印表機 ................................................................ 70 開機..................................................................... 69 鍵盤..................................................................... 70 顯示器 ................................................................ 69 常見問題 ................................................................... 69 清潔電腦 ..................................................................... 9 軟體 軟體授權 ........................................................... 96 通用序列匯流排 ..................................................... 27 連接線 ..................................................................... 8, 91 連線 網路 .................................................................... 27 索引 - 99 十二畫 喇叭 游標 ............................................................................. 23 快速鍵 ................................................................ 16 視圖 右 ......................................................................... 20 疑難排解 ........................................................... 70 復原 左 ......................................................................... 19 Recovery Management ............................ 51 前 ......................................................................... 19 復原管理程式 ................................................. 38 間諜程式 ................................................................... 45 惡意軟體 ................................................................... 45 十三畫 閘道 移除 .................................................................... 33 復原管理程式 ................................................. 38 第一次使用 ...................................................... 32 電池 ............................................................................. 94 最大化使用壽命 ............................................ 31 電池棄置 ................................................................... 94 最佳化 ............................................................... 34 電池組 檢查充電量 ...................................................... 34 充電..................................................................... 33 電源線 .......................................................................... 8 安裝..................................................................... 33 電腦 功能 .................................................................... 12 低電量 ................................................................ 35 低電量警告 ...................................................... 34 指示燈 ............................................................... 18 特性..................................................................... 31 電腦環境 ..................................................................... 7 十四畫 磁碟機 連線 .................................................................... 讀卡機 ................................................................ 25 網際網路服務提供者 (ISP)............................... 網路 ............................................................................. 27 維護 Recovery Management ............................ 網路連線 ................................................................... 41 網際網路 維護權限 防火牆 ................................................................ 46 復原管理程式 ................................................. 十五畫 數據機 ........................................................................ 40 100 39 39 51 38 十七畫 環境 ............................................................................. 94 鍵盤 快速鍵 ................................................................ 17 疑難排解 ........................................................... 70 十八畫 瀏覽器 ........................................................................ 44 二十畫 觸控板 ........................................................................ 23 使用 .................................................................... 23 二十二畫 讀卡機 ........................................................................ 25 二十三畫 顯示器 快速鍵 ................................................................ 15 疑難排解 ........................................................... 69 二十四畫 癲癇警告 ................................................................... 11 Ver.: 02.01.02 索引 - 101 用户手册 Gateway NE71B - 1 目录 启动计算机 4 无线连接............................................................. 注册 .................................................................... 软件安装............................................................. 恢复 .................................................................... 遇到问题? ......................................................... 4 5 5 6 电源管理 36 6 节能 ................................................................. 36 计算机基础 7 给电池充电 ............................................... 检查电池电量............................................ 优化电池寿命............................................ 电量不足警告............................................ 软件 33 34 34 34 38 安全和舒适 ......................................................... 7 使用 Windows 和您的软件............................... 38 安全防范 ..................................................... 7 提供 Internet 安全..................................... 38 健康防范 ................................................... 10 Gateway Recovery Management............. 38 了解您的电脑 俯视图 - 显示器 ................................................ 俯视图 - 键盘 .................................................... 特殊键 ....................................................... 前视图 .............................................................. 左视图 .............................................................. 右视图 .............................................................. 底视图 .............................................................. 触控板 12 互联网 13 上网的第一步 ................................................... 14 保护计算机 ............................................... 15 选择一家 “Internet 服务提供商”............ 18 网络连接................................................... 19 网上冲浪! ............................................... 21 安全 .......................................................... 23 24 还原 创建还原备份 ................................................... 触控板的基本操作 ............................................ 24 创建驱动程序和应用程序备份.......................... 触控板手势 ....................................................... 24 还原系统 .......................................................... 重新安装驱动程序和应用程序 .................. 升级您的计算机 26 返回之前的系统快照................................. 使用选项扩展性能 ............................................ 26 将系统恢复到出厂时的状态 ...................... 连接选项 ................................................... 26 从 Windows 还原...................................... 电源 30 从还原备份进行还原................................. AC 适配器 ........................................................ 30 电池组 .............................................................. 31 常见问题 电池组特点 ................................................ 31 对使用 Windows 8 的建议和提示 .................... 有三大概念您需要记住 ............................. 更换电池组 ................................................ 33 我如何访问 Charms? .............................. 安装或卸下电池组 ..................................... 33 2 39 39 39 39 41 44 44 51 51 54 57 57 60 61 61 65 69 71 71 71 如何进入开始?......................................... 如何在应用程序之间切换?....................... 如何关闭我的电脑? ................................. 为什么有新的界面? ................................. 如何解锁我的电脑? ................................. 如何个性化我的电脑? .............................. 我要以习惯的方式使用 Windows 还回我的桌面!......................................... 我的应用程序在哪里? .............................. 什么是 Microsoft ID ( 帐户 )? ................... 我如何将收藏夹添加到 Internet Explorer?.................................... 71 如何检查 Windows 更新? ....................... 71 我在哪里可获得更多信息? ...................... 72 72 规范信息 72 环境 72 软件使用许可 73 74 索引 75 75 76 77 94 96 98 75 版权所有 © 2012 保留所有权利。 Gateway NE71B 用户手册 本次修订:2012 年 7 月 20 日 Gateway 欢迎您点进 registration.gateway.com 来看看注册会员的多重优惠。 备注:所有图解仅用于参考目的。实际配置可能有所不同。 目录 - 3 启动计算机 感谢您购买 Gateway 计算机! 本指南旨在向您介绍您计算机的功能并对您的运算体验提供支持。 设置并启动计算机后 ( 如设置说明中所示 ),将问您一些问题,这些问题有 助于连接到 Internet。 然后计算机将对安装的软件进行配置。 无线连接 要连接到无线网络,先检查计算机的无线功能是否开启以及要连接的路由器 或调制解调器是否正确配置。 • 如果无线未打开,按 Windows 键 ( ) + W,输入“Wireless”(无线), 然后单击无线。 单击 Wi-Fi 下方的切换开关可启用无线连接。 再次单击 可禁用。 • 要连接到网络,按 Windows 键 ( )+W,输入 “Wireless”(无线),然 后单击连接到网络。 如需要,选择您的网络并输入密码。 • 短暂延迟后,计算机应连接到 Internet。 如果未检测到您的网络,或者如果您的计算机未连接到 Internet,请参见 ISP 或路由器使用手册。计算机启动后,打开 Internet Explorer 并按说明进 行操作。 或者使用网线直接连接到路由器的网络端口。 请参见 ISP 或路由器的 用户指南。 4 注册 当首次使用您的计算机时,建议您进行注册。 这可给您带来有用的好处, 例如: • 享受专业代表提供的快捷服务。 • Gateway 社区中的成员: 获得促销信息,并参加客户调查。 • 来自 Gateway 的最新新闻。 如何注册 首次启动计算机时,将出现一个窗口,邀请您注册。 请填写信息并单击下一 步。 您将看到的第二个窗口含有可选的字段,这有助我们向您提供更多个性 化的客户服务体验。 另一个选项 注册 Gateway 产品的另一个方式是访问我们的网站: register.gateway.com。选择您所在国家,再按照简单提示进行操作。 注册后,将向您发送一封确认电子邮件以及您应保存在安全地方的重要 资料。 软件安装 您的计算机将自动安装软件并准备让您使用。 这可能需要一些时间,请勿关 闭计算机;等待安装完成。 启动计算机 - 5 恢复 您应尽快创建还原光盘。 还原程序可让您创建还原光盘,然后可还原或重新 安装 Gateway 提供的应用程序和驱动程序。 遇到问题? Gateway 为您的购买提供多个选项支持。 Gateway 支持 确保您写下计算机的序列号、购买日期和地点以及本指南中提供的型号名 称;保存购买本产品的凭证。 如果您给我们打电话,请写下随问题出现的任 何错误信息,如可能,请将计算机置于您面前并打开。 联系我们时将这些项 目置于旁边能够确保您获得更好和更快的服务。 Gateway 网站 记得访问 www.gateway.com!查看“支持”部分以获得最新的信息、帮助、 驱动程序和下载。 保修和联系信息 您可在 “保修”中查看有关计算机保修和如何联系技术支持的信息。 6 计算机基础 安全和舒适 安全防范 请按以下指南使用计算机这样能够让您在舒适地使用计算机的同时避免人 身伤害问题。 计算机环境 确保计算机: • 在稳固的表面、工作台和桌子上使用。掉在地上会严重损坏计算机。 • 不要在振动的表面上使用,或在运动、锻练或在动态环境下的其它活动时 使用。 振动或运动会松开扣件、损坏内部元件甚至造成电池漏电。 • 不要受到阳光直晒并远离热源。 • 远离磁场或任何产生静电的设备。 • 离手机至少 30 厘米 ( 一英尺 )。 • 不要在灰尘较多或潮湿的环境下使用。 • 不要在近水的位置使用。不要让任何液体溅落到 ( 进 ) 电脑。 • 不要放在地毯或任何可能有电荷的表面上。 计算机基础 - 7 注意 • 开槽和开口用于通风目的,以确保产品稳定运行和防止过热。切勿堵塞或 盖住这些开口。切勿将本产品放置在床、沙发、地毯或其它类似表面上, 以免堵塞开口。切勿将本产品放置在散热器或热调节器附近或上方;除 非能提供良好通风,否则也不要放置在内部空间中。 • 切勿将任何物品从机壳上的开槽塞入本产品内,以免误触高压或造成部 件短路,引起火灾或电击。切勿使任何液体溅到本产品表面或内部。 • 切勿将本产品放置在震动表面上,以免内部组件受损和电池漏液。 • 请勿在进行体育运动时或在震动环境中使用本产品,否则可能导致短路 意外或损坏转子装置、硬盘驱动器、光驱,甚至存在锂电池组爆炸的 危险。 线缆 确保: • • • • • • 不要让线缆拉紧且没有人踩在线缆上或被绊的风险。 不要让其它设备压到线缆。 在将电源线连接到交流电插座之前,将电源线连接到计算机。 在将电源线与计算机断开连接之前,将电源线从电源插座拔出。 三芯电源线要连接到接地电源插座。 电源插座能够轻松地够到,并尽量靠近计算机 ( 切勿超负荷连接过多的适 配器 )。 如果您的计算机使用外接交流适配器: • 切勿在交流适配器上覆盖或放置物体。保持适配器上没有其它物体,可让 适配器在使用时适当冷却。 8 • 仅使用随机配套的 AC 适配器。虽然其它适配器似乎类似,但使用这些适 配器可能会损坏您的计算机。如需更换,仅使用通过鉴定可用于您的计算 机的部件。 清洁计算机 • • • • 清洁前始终将计算机的电源线从电源插座上拔下。 切勿使用液体或气雾洗涤剂,应使用湿布。 切勿将清洁产品直接喷到屏幕上。 如果有液体溅到计算机上,请立即关闭电源,拔下交流适配器,取出电 池,确认已完全干燥后再重新开机。 如有必要,请等待一晚。 注:如果计算机配有存储卡或扩展设备插槽,可在插槽中安装塑料防 尘待机卡。 防尘待机卡可防止灰尘、金属物体或其他杂质进入未使用 的插槽。 如果插槽中未安装板卡,请保留防尘待机卡。 维修计算机 切勿尝试自行维修您的计算机,打开或卸下护盖可能会使您遭到危险电压的 电击或其它风险。 一切维修服务应由专业维修人士提供。 在以下情况下,将计算机的电源线从壁装电源插座上拔下并请有资质的维修 人员进行维修: • • • • • • 电源线或插头损坏或磨损 液体溅入本产品 有雨水或水溅到本产品 产品不小心掉落到地面或外壳有损伤 该设备性能明显改变 若依照说明书进行操作而本产品仍然无法正常运作 计算机基础 - 9 注:您只能调整说明书中所提及的控制因为如果调整不当可能导致设 备受损。而这通常需要专业技术人员进行额外的维修才能将设备恢复 到原来的状态。 健康防范 • 底面、通风口周围的区域以及交流电适配器可能会产生热。为避免受到伤 害,请确保不要让您的皮肤或身体碰到这些区域。 • 您的设备及其增强组件可能包含小配件。请将它们放置在儿童拿不到的 地方。 • 计算机和附件可能含有小配件。请将它们放置在儿童够不到的地方。 • 如果您一次工作或玩数小时,请确保有正常的休息时间。一段时间后,将 视线离开计算机屏幕。 如果觉得疲劳,切勿使用计算机。 • 合理摆放计算机,使您能够在一个自然和轻松的位置上工作。 将经常使 用的物品放在容易够到的位置。 • 将计算机置于正前方,以提高安全性和舒适性。 确保键盘和触控板在舒 适的高度上。 屏幕应离眼睛约 45-75 厘米 (18-30 英寸 ) 的位置。如果您 长时间使用计算机建议使用外接键盘以提高舒适度。 • 为保护您的听力在使用指示器和耳机时慢慢提高音量直到您能够清晰舒 服地听到切勿在耳朵适应后提高音量。 切勿听高音量的时间过长。 切勿 提高音量来阻止周围的噪音;如果您无法听到附近的说话声,请降低音 量。 • 使用过程中,计算机的底部、电源适配器和来自通风槽的空气 可能会变热。 避免身体持续接触,且切勿将运行中的计算机置 于膝上。 10 • 确保计算机的通风槽和通风孔没有被堵塞或盖住。 切勿将计算机置于柔 软的表面上 ( 地毯、椅子或床上 ),这样会堵住通风槽。 • 切勿将任何物品插入该设备的通风槽或机箱槽内,以免误触高压或造成 部件短路,引起火灾或电击。 • 在手、手腕、臂、颈、肩、腿和背部可能会出现与某些重复运作相关的不 适或症状加重。 为降低这些不适症状加重的风险,用手腕直击并使手和 手腕浮在键盘上。 如果您经历了一段时间的疼痛、麻刺、麻木或其它不 适,请联系医生。 • 我们建议父母对孩子玩电子游戏进行监督。 如果您或孩子有以下任何症 状: 头晕、视力模糊、眼睛或肌肉痉挛、意识不清、定向障碍、任何不自 觉的运动或抽搐,立即停止使用计算机并咨询医生。 一个人即使没有癫 痫的病史,也可能发生这一症状。 计算机基础 - 11 了解您的电脑 当您按照安装说明中的示例安装完电脑后,就让我们一起来熟悉您新购的 Gateway 电脑吧。 Gateway NE71B 12 俯视图 - 显示器 1 2 3 # 图标 项目 说明 1 摄像头 网络相机,用于视频通信。 网络摄像头旁边的灯表示网络摄像头已激活。 2 麦克风 用于录音的内置麦克风。 3 显示屏 也称为液晶显示屏 (LCD),显示电脑输出的 内容。 了解您的电脑 - 13 俯视图 - 键盘 1 5 2 3 4 # 图标 项目 1 电源按钮 / 指示灯 2 键盘 说明 用于打开和关闭电脑电源。 根据亮灯情况可检 视目前电脑电源的状态。 将数据输入到电脑中。 - 特殊键见第 15 页的说明。 3 触控板 触摸式定位设备,功能和电脑鼠标相同。 4 单击按钮 ( 左和右 ) 该按钮左侧和右侧起到左选和右选按钮功能的 作用。 5 扬声器 提供立体声音频输出。 14 特殊键 您电脑的键盘包含激活特殊功能的键。 各键的功能均有图标明确标示。 图标 功能 Fn 说明 第二功能热键 激活某些键的第二功能。 例如,按 Fn 键可激活 F1 至 F12 键。 帮助 打开帮助菜单。 Backup 让您创建电脑的备份,或者备份整个系统,或者仅备份 所选的文件和文件夹。 随时可创建正常时间表或制作 备份。 通信 启用 / 禁用电脑的通信设备。 显示屏幕切换 可以在以下三种显示方式间切换:只使用显示屏、 只使用已连接的外部显示器、同时使用显示屏和外部 显示器。 屏幕空白 关闭显示屏背光以节省电量。 按任意键将恢复正常 显示。 触控板切换 用于打开和关闭内置触控板。 播放 / 暂停 播放或暂停选定的媒体文件。 停止 停止播放选定的媒体文件。 了解您的电脑 - 15 图标 功能 说明 上一个 返回上一个媒体文件。 下一个 跳至下一个媒体文件。 调低亮度 调低屏幕亮度。 调高亮度 调高屏幕亮度。 打开社交网络应用程序。 社交网络 - 如果未安装此应用程序,则该键会启动您的即时消息 应用程序。 16 调高音量 调高扬声器音量。 调低音量 调低扬声器音量。 扬声器切换 打开或关闭扬声器。 热键 电脑使用热键 ( 组合键 ) 来操作 功能键和执行导航命令。 要激活热键,先按住 Fn 键 ( 左下角 ),然后再按热键组合中的另一个键。 热键 功能 说明 Fn + 特殊键 ( 请参见第 15 页 ) 功能键 激活 F1 至 F12 键。 Fn + 主画面 滚动到文档开始位置。 Fn + 结束 滚动到文档结尾位置。 Fn + 上一页 在文档中向上滚动一页。 Fn + 下一页 在文档中向下滚动一页。 - 注: 当启动电脑或使用 BIOS 时无需按 Fn 键来使用 F1 至 F12 功能键。 要更换热键和 F1 至 F12 键的特殊功能,在 BIOS 中更改功能键设置 ( 要打开 BIOS, 在启动电脑时按 F2,然后选择 Main 菜单并将功能键行为更改至功能键 )。 了解您的电脑 - 17 前视图 1 # 图标 2 项目 电源指示灯 说明 根据亮灯情况可检视目前电脑电源的状态。 根据亮灯情况可检视目前电脑电池的状态。 电池指示灯 1 2 - 正在充电: 当电池在充电时,指示灯显示琥 珀色。 - 完全充电: 当处在 AC 模式时,指示灯显示 蓝色。 硬盘指示灯 硬盘活动时,该指示灯亮。 通信指示灯 表示电脑的无线连接设备状态。 多合一读卡器 可支持安全数码卡 (SD)、多媒体卡 (MMC)、 PRO 记忆棒 (MS PRO) 及 xD-Picture 卡 (xD)。 - 轻推取下 / 安装存储卡。任何时候,仅支持读 取一张卡。 - 注:即使在 LCD 显示屏关阖上也能看到前面板处的状态指示灯。 18 左视图 1 # 图标 2 项目 Kensington 安全锁 插槽 4 5 6 说明 连接 Kensington 兼容电脑安全锁。 - 您可以将电脑锁链与不可移动的物体相连, 1 2 3 例如桌子或者上锁的抽屉手柄。 将锁插入锁孔中,然后旋转钥匙便可上锁。 您也可以选购不配钥匙的型号。 通风和冷却风扇 让电脑保持冷却。 - 切勿遮挡槽口。 3 以太网络 (RJ-45) 端口 连接 10/100/1000 以太网。 4 外部显示器 (VGA) 端口 连接显示设备 ( 例如:外接显示器、 LCD 投影机 )。 5 HDMI 端口 支持高清数字视频连接。 了解您的电脑 - 19 # 图标 项目 说明 连接 USB 装置。 6 USB 端口 - 如果端口为黑色,则兼容 USB 2.0,如果端口 为蓝色,则兼容 USB 3.0 (参见下文)。 有关 USB 3.0 的信息 • 与 USB 3.0 和较早设备兼容。 • 用 USB 3.0 认可设备获得最优性能。 • 符合 USB 3.0 (SuperSpeed USB) 技术规范。 20 右视图 1 # 图标 2 项目 3 4 56 7 说明 连接音频输出设备 ( 例如:扬声器、耳机 )。 耳机 / 扬声器插孔 1 麦克风插口 - 支持带内置麦克风的 3.5 mm 兼容耳机 ( 例如 Acer 智能手持耳机 )。 连接外接麦克风。 连接 USB 装置。 2 USB 端口 3 光驱 内置光驱,可支持读取 CD 或 DVD。 4 光驱访问指示灯 当光驱被激活时指示灯会亮起。 5 光驱弹出按钮 按下此按钮可弹出光驱。 6 紧急弹出孔 - 如果端口为黑色,则兼容 USB 2.0,如果端 口为蓝色,则兼容 USB 3.0 (参见下文)。 当电脑关闭时,可弹出光驱托盘。 - 小心插入拉直的回形针可退出光驱托盘。 了解您的电脑 - 21 # 图标 7 项目 直流电源输入插孔 说明 连接到电脑的 AC 适配器。 有关 USB 3.0 的信息 • 与 USB 3.0 和较早设备兼容。 • 用 USB 3.0 认可设备获得最优性能。 • 符合 USB 3.0 (SuperSpeed USB) 技术规范。 22 底视图 1 2 4 3 # 图标 项目 说明 1 电池槽 安装电池组。 2 电池释放闩锁 释放电池闩锁可取下电池组。 插入适用的工具 并滑动可释放闩锁。 内存槽 安装电脑主内存的位置。 硬盘槽 安装电脑硬盘的位置 ( 用螺丝紧固 )。 3 4 通风和冷却风扇 让电脑保持冷却。 - 切勿遮挡槽口。 了解您的电脑 - 23 触控板 触控板的基本操作 触控板能够控制屏幕上的箭头 (或 “光标”)。当手指滑过触控板时,光 标将随之移动。 使用位于触控板下方的左右按钮可以完成选择和执行操作。 这两个区域相 当于普通鼠标的左键和右键。 轻击触摸板与单击鼠标左键的效果相同。 注:触控板对手指的移动十分敏感;您点触动作越轻,响应越好。 请保持触控板和手指 的干燥和清洁。 光标由一些基本手势控制。 • 单指滑动:在触控板 上移动手指就可以移动光标。 • 单指点按: 用手指轻击触控板可执行 “单击”操作,该操作将 选择或启动一个项目。 快速重复点按可执行点按两下或 “双 击”。 • 拖动:按住触控板的左侧选择按钮,或点按触控板的任意位置两次,然后 在触控板上滑动手指可选择区域中的所有项目。 触控板手势 Windows 8 和许多应用程序支持触控板手势,手势使用一个或多个手指。 注:支持触控板手势,取决于活动的应用程序。 这样,您就能够通过几个简单的手势来控制应用程序,例如: 24 • 从边缘向内滑动:从触控板的右侧、顶部或左 侧向中心滑动可访问 Windows 工具。 • 从右侧向内滑动:切换 Charms。 • 从顶部向内滑动:切换应用程序命令。 • 从左侧向内滑动:切换到上一个应用程序。 • 双指滑动:将两个手指放在触控板上并向任意方向移动可快速 在网页、文档和播放列表上滚动。 • 双指收放:利用拇指加食指的简单手势放大或缩小照片、地图 和文档。 触控板 - 25 升级您的计算机 使用选项扩展性能 计算机提供了许多选项,为您带来完整的计算体验。 连接选项 端口可让您将外设连接到您的计算机。 有关如何将各种外设连接到本计算 机的说明,请阅读以下章节以了解详情。 存储卡读卡器 存储卡读卡器用于范围广泛的数码相机、PDA、MP3 播 放器和手机。 插入存储卡 1. 将卡的接口向下对准端口。 2. 小心将卡插入端口。 如果感觉插卡时比较费力,请稍微调整卡的方向。 3. 轻推存储卡,使其卡定到位。 存储卡会有几厘米伸出卡槽外。 如果卡上包含文件,可能会显示 Windows 自动播放窗口 ( 取决于卡上的 内容 ),询问您是否要使用某程序访问卡上的内容。 在此处选择相应选项 或选择取消。 如果卡上没有文件,或包含未知文件,将打开显示卡上内容 的窗口。 26 SD、 SDHC 和 SDXC 卡 不同类型的 SD 卡有不同的容量,但其整体设计相同。 SD 卡最高容量可达 4 GB,SDHC 卡为 32 GB,SDXC 卡为 2048 GB (2 TB)。 您的计算机提供 SDHC 或 SDXC 兼容读卡器。 注: SDXC 存储卡只可在 SDXC 兼容读卡器中使用,而 SD 和 SDHC 卡在这两种读卡器中均可使用。 将存储卡从存储卡读卡器上拔下 1. 单击通知区域 (时钟旁边) 的显示隐 2 藏图标箭头。 2. 单击安全删除硬件图标。 3. 单击退出 SD 卡 ( 或设备的名称 )。 4. 稍候直到显示安全移除硬件信息。 5. 移除存储卡。 1 3 升级您的计算机 - 27 内置网络 您可以通过内置网络连接以太网络。 请使用以太网络线将计算机外部的以太网络端 口 (RJ-45) 与提供网络接入服务的网络接口或 集线器相连接。 通用串行总线 (USB) 通过高速通用串行总线 (USB 2.0) 端口,您可 以连接各种 USB 外设,而不占用系统资源。 某些计算机可能含有一个或多个 USB 3.0 端 口。 这些类似的标准 USB 端口为蓝色 ( 除非 它们包含其它的内部连接 )。 您可通过这些端 口使用 USB 3.0 兼容设备以受益于更快的传 输速度。 视频端口 通过 VGA 或 DVI 端口连接到显示器 ( 支持的 连接类型取决于计算机的配置 )。 显示器通常 含有适用的线缆。 请按以下步骤将显示器连接到计算机上: 1. 检查计算机和显示器电源是否均已关闭。 2. 将视频线连接到计算机的显示器端口。用配套螺丝固定连线。 28 3. 将显示器电源线插入接地的墙面插座。 4. 按显示器用户指南中的安装说明进行操作。 5. 打开显示器电源,然后启动计算机。 6. 确认当前分辨率和刷新率没有超过显示器规格。如有必要,可更改计算机 使用的显示设置。 注:要访问显示控制,按 Windows 键 ( 示),然后单击显示。 ) + W,输入“Display”(显 高清晰度多媒体接口 ( 仅限部分型号 ) HDMI ( 高清晰度多媒体接口 ) 是一种 业界通用、未压缩、全数字音频 / 视频 接口。HDMI 能够通过一根信号线,在 任何兼容数字音频/视频源(如机顶盒、 DVD 播放机和 A/V 接收器 ) 和兼容数 字音频和 / 或视频显示器 ( 如数字电视 (DTV)) 之间提供一个接口。 使用电脑上的 HDMI 端口与高端音频 和视频设备连接。 信号线的敷设能够 进行整齐的装配和快速连接。 耳机和麦克风 这两个端口让您连接音频设备。 使用耳机端口可插入立体声耳机或有源扬 声器。 将音频设备插入耳机端口将禁用内置扬声器。 使用麦克风端口可连 接外接麦克风以进行单声道录音;插入外接麦克风将禁用内置麦克风。 升级您的计算机 - 29 电源 AC 适配器 您的电脑可用随机提供的外接电源适配器 ( 笔记本电源 ) 以交流电供电运 行。 提供的电源线适用于电脑的购买所在国家。 电源适配器提供足够的电源来运行电脑并为电池组充电。 注意: 切勿在交流适配器上覆盖或放置物体。 保持适配器上没有其它 物体,可让适配器在使用时适当冷却。 仅使用随机配套的 AC 适配器。虽然其它适配器似乎类似,但使用这些适配 器可能会损坏您的电脑。 30 警告: 在长时间使用后,交流适配器和电脑的底部会变热。 这是正常 现象,但长时间接触可能会造成伤害。 电池组 本电脑使用的电池组,可以在电池组充电后,持续长时间使用。 电池组特点 该电池组具有以下特点: • 采用最新电池技术标准。 • 具有电量不足警告功能。 只要您将电脑连接到 AC 适配器,电池就会开始充电。 此款电脑支持充电时 使用,可以让您在充电过程中继续使用电脑。但是,在关机情况下充电,会 大大缩短充电时间。 在您旅行或断电时,电池随时可供使用。 建议您多备一个完全充电的电池 组,作为备用。 请联络经销商以了解订购备用电池组的详细信息。 最大限度延长电池的寿命 与其它所有电池一样,此款电脑中的电池用久了也会退化。 也就是电池的性 能会随着使用时间的延长而逐渐降低。 为最大限度延长电池的寿命,建议您遵循以下建议。 电源 - 31 精调新电池组状态 在首次使用电池组之前,您应执行一个 “精调”过程: 1. 将新电池插入电脑。不要开机。 2. 连接 AC 适配器并对电池完全充电。 3. 断开 AC 适配器。 4. 打开电脑,使用电池电源运行。 5. 电池完全耗尽。 6. 重新连接 AC 适配器并再次对电池完全充电。 再次执行这些步骤,直至电池被充电和放电三次。 对所有新电池,或长期不使用的电池,执行这一精调过程。 如果电脑要存放 两周以上,建议您从装置中取出电池组。 警告:请勿将将电池组置于 0°C (32°F) 以下或 45°C (113°F) 以上的温 度下。异常温度会影响电池组的性能。 执行电池精调过程之后,电池就可以接受最大可能的充电。 如果未执行这个 过程,您将无法获得最大的电池充电,并且也会缩短电池的使用寿命。 另外,如果在以下情况下使用电池,也会影响电池的使用寿命: • 插入电池的状态下,电脑一直使用交流电。如果您一直使用交流电,建议 您在完全充电后取出电池组。 • 没有如上所述完全放电和充电。 • 经常使用。使用电池的时间越长,其使用寿命缩短的也就越快。 标准电脑 电池的寿命大约为 300 次充电 32 更换电池组 本笔记本电脑系列使用锂电池维修时。更换时请使用与本产品配套电池类型 相同的电池。使用其他电池可能会引起火灾或爆炸。 警告:若电池使用不当,会发生爆炸。请勿擅自拆散电池或将电池置 于火中。将电池放在远离儿童的地方。依当地规定处理废弃电池。 安装或卸下电池组 重要!如果要继续使用电脑,在取出电池之前连接 AC 适配器。或者, 先关闭电脑。 安装电池组: 1. 将电池对准插入到空置的电池槽,确定先插入的是有接点的一头,并且电 池的顶面朝上。 2. 将电池推入电池槽,轻轻推直至电池锁定到位。 卸下电池组: 1. 推动电池释放销以释放电池。 2. 从电池槽中取出电池。 给电池充电 要给电池充电,首先要确定电池已正确安装到电池槽中。将 AC 适配器接插 到电脑,再连接到主电源插座。 电池充电时,您仍然可以继续靠交流电使用 电脑。但是,在关机情况下充电,会大大缩短充电时间。 注意: 建议您在一天工作结束之后对电池充电。 在您旅行前整晚对电 池充电,让您第二天出行时带上完全充电的电池。 电源 - 33 检查电池电量 Windows 电源表指示当前的电池电量。 将光标放到工具栏上的电池 / 电源 图标上可以看到电池现在的充电电量。 优化电池寿命 优化电池寿命可以让您充分利用电池的电能,延长充电周期,提高充电效 率。 建议您遵循以下建议: • 购买另外的电池组。 • 只要可能就使用交流电,留着电池在路上时使用。 • 如果未使用 PC 卡,请将其退出,因为它会耗电 ( 仅指定型号 )。 • 将电池组保存在阴凉干燥的地方。建议温度为 10°C (50°F) 至 30°C (86°F)。温度较高会使电池自放电过程加快。 • 过分充电会缩短电池的寿命。 • 监视 AC 适配器和电池情况。 电量不足警告 使用电池电源时,请留心 Windows 的电源表。 警告: 出现电量不足警告信息后,请尽快连接上 AC 适配器。 如果电 池电量完全用完,电脑就会关闭,数据将会丢失。 34 出现电量不足警告信息后,根据当时情况建议采取以下措施: 情况 备有 AC 适配器和电 源插座。 备有另外一个完全充 电的电池。 建议的操作 1. 将适配器接插到电脑,然后连接到主电源。 2. 保存所有需要的文件。 3. 继续工作。 如果您想快速充电,请关闭电脑。 1. 保存所有需要的文件。 2. 关闭所有应用程序。 3. 关闭操作系统以关闭电脑。 4. 更换电池组。 没有 AC 适配器和电 源插座。 您没有备用电池组。 5. 打开电脑,继续工作。 1. 保存所有需要的文件。 2. 关闭所有应用程序。 3. 关闭操作系统以关闭电脑。 电源 - 35 电源管理 本款电脑拥有内置电源管理单元,可监控系统活动。 系统活动是指涉及以下 一个或多个设备的活动: 键盘、鼠标、硬盘、外设以及视频内存。 如果在一 段时间之后没有检测到任何活动,电脑会停止这些部分或所有设备以节省 能源。 节能 禁用快速启动 您的电脑使用“快速启动”可加快启动速度,但也会使用少量的电能来检查 启动信号。 这些检查会慢慢消耗电脑的电池。 如果您要降低电脑的功耗和对环境的影响,请关闭 “快速启动”: 注: 如果快速启动被关闭,您的电脑将需要更长的时间从睡眠模式中 启动。 如果您的电脑收到通过网络启动 ( 局域网唤醒 ) 的指令,它也不会 启动。 1. 打开桌面。 2. 单击通知区域中的电源选项。 3. 选择更多电源选项。 36 4. 选择选择电源按钮的功能。 5. 要访问 “关闭设置”,选择更改当前无法使用的设置。 6. 向下滚动并禁用打开快速启动。 7. 选择保存更改。 电源管理 - 37 软件 使用 WINDOWS 和您的软件 Gateway 计算机包括帮助您使用计算机的软件;计算机上的可用程序和类 别取决于您购买的型号。 提供 Internet 安全 保护您的计算机不受 Internet 上的病毒危害和攻击至关重要 ( 请参见第 44 页的安全 )。当您首次启动计算机时,会提供一个综合的 Internet 安全套件, 包括一个免费试用期。 您应在连接到 Internet 之前激活此保护。 此安全套 件能够保护您的计算机免受最新的网上威胁并保护您的个人数据 ( 包括银行 帐户证书、信用卡号码和密码等 )。 Gateway Recovery Management 要为计算机准备系统还原选项,您应尽快创建一套还原光盘。 详情请参见第 51 页。 38 互联网 上网的第一步 保护计算机 保护您的计算机不受 Internet 上的病毒危害和攻击至关重要 ( 请参见第 38 页的提供 Internet 安全 和第 44 页的安全 )。 建议在您首次启动计算机时, 使用一款全面的 Internet 安全程序。 您在连接到 Internet 之前,应尽快激活 此保护。 选择一家 “Internet 服务提供商” 使用 Internet 已成为日常计算机的自然属性。 只需数个简 单的步骤就能够将您连接到海量的知识和通信工具上。 要 完成这些步骤,您首先应选择一家 Internet 服务提供商 (ISP),它提供了计算机和 Internet 之间的连接。 您应搜索 一下您所在地区的 ISP 提供商,不要忘了与朋友和家人谈 谈他们的经验或查看一下评论和消费者的报导。 您选择的 ISP 将提供有关如何连接到 Internet 的指导 ( 您可能需要 其它软件或特殊的 “盒子”来连接到电话线 )。 连接类型 根 据 您 的 计 算 机 型 号、所 在 的 位 置 和 通 信 需 求,您 有 多 种 方 式 可 连 接 到 Internet。 互联网 - 39 拨号 某些计算机含有电话拨号 ( “调制解调器” ) 连接器。 这让您能够通过电话 线连接到 Internet。 通过拨号连接,您不能在同一根电话线上同时使用调制 解调器和电话。 此类连接仅在您使用 Internet 有限的情况下推荐,因为此种 连接的速度慢,且一般是按小时收费的。 DSL ( 如 ADSL) DSL ( 数字用户线 ) 是一种 “始终联机”的连接,它通过电话线传输。DSL 和电话使用不同的频率,您可在连接到 Internet 的同时使用电话 ( 每个电话 插孔上需要一个 “分频器”以避免干扰 )。 要符合 DSL 的使用条件,您必 须位于配备 DSL 电话交换机的附近 ( 有时此服务在农村地区不提供 )。连接 速度在很大程度上取决于您的位置,但 DSL 一般能够提供非常快的速度和 可靠的 Internet 连接。 由于连接是始终保持的,因此它一般是按每月固定费 率收取的。 注: DSL 连接需要适当的调制解调器。 调制解调器通常由您登记的 ISP 提供。这些调制解调器多数包括一个 “路由器”,它提供网络和 wi-fi 接入。 线缆 有线连接通过有线电视线,提供快速和“始终联机”的 Internet 服务。此服 务一般在大城市中提供。 您可在连接到 Internet 的同时,使用电话和观看有 线电视。 3G (WWAN 或 “无线广域网络” ) 利用 3G 连接,即使出门在外,也可使用蜂窝网络 ( 例如手机使用的网络 ) 连接到 Internet。您的计算机可能已内建 SIM 卡的插槽,否则可能需要一个 外接设备,如 USB 调制解调器或甚至是有适当配备的手机。 40 注:如果您的计算机含有 SIM 卡槽,您需要兼容的 SIM 卡以及与手机 提供商的合同。 使用 3G 功能前,请咨询服务提供商是否会收取额外费用,特别是漫游 费。 网络连接 LAN ( 局域网 ) 是一组共享一根公共通信线和资源的计算机 ( 例如,在办公楼 或家中 )。 当您设置网络时,可共享文件、外设 ( 如打印机 ) 和 Internet 连 接。 您可使用有线技术 ( 如以太网 ) 或无线技术 ( 如 WiFi 或蓝牙 ) 建立 LAN。 无线网络 无线 LAN 或 WLAN 是无线局域网,它无需通过网线即可连接两台或更多的 计算机。 设置无线网络非常方便,并可让您共享文件、外设和 Internet 连 接。 无线网络有何好处? 移动性 无线 LAN 系统可让您和您家庭网络中的其他用户共享对文件和连接到联网 设备的访问,例如打印机或扫描仪。 您还可与家中的其它计算机共享 Internet 连接。 安装快速简便 安装无线 LAN 系统快速简便,无需在墙上和天花板上拉网线。 互联网 - 41 无线 LAN 的构成 要在家中设置无线网络,需要以下条件 : 接入点 ( 路由器 ) 接入点 ( 路由器 ) 是双向收发器,它将数据播送到周围的环境。 接入点起到 有线和无线网线之间传递器的作用。 多数路由器有内置的 DSL 调制解调 器,可让您接入高速 DSL Internet 连接。 您选择的 ISP (Internet 服务提供 商 ) 一般在申请他们的服务时都提供调制解调器 / 路由器。 仔细阅读随接入 点 / 路由器提供的文件,以了解详细的设置说明。 网线 (RJ45) 网线 ( 也称为 RJ45 线缆 ) 用于将主机连接到接入点 ( 见以下图解 ) ;此类线 缆也可用于将外设连接到接入点。 无线适配器 内置式无线适配器一般已安装在您的计算机中。Windows 中的按钮或 控件,可激活或禁用适配器。 42 工作网络图 1. 接入点 / 路由器 4 2. 台式计算机 3. 调制解调器 5 4. 打印机 1 5. 便携式计算机 6. PDA/Smartphone 3 7 7. 网线 (RJ45) 2 6 打开 / 关闭无线网络连接 多数计算机有“WiFi”按钮,可打开或关闭网络连接。 如果您的计算机有无 线接入,但没有通信按钮,可通过网络管理选项来打开或关闭无线网络或控 制网络上共享的内容。 按 Windows 键 ( ) + W,输入“HomeGroup”(家 庭组),然后单击 HomeGroup。 警告:乘坐飞机时严禁使用无线设备。 登机前请关闭所有的设备;这 些设备可能会对飞机的操作造成危险和中断通信,甚至是违法的。 互联网 - 43 网上冲浪! 要 在 网 上 冲 浪,您 需 要 称 为 Internet 浏 览 器 的 程 序。 Internet Explorer 提供了简便安全的网络浏览体验。 一旦 您安装了 Internet 接入并连接,单击 Windows 桌面上的 Internet Explorer 快捷方式,即可使您的 Internet 体验提 高到新的水平! Gateway 网站 要开始享受,请立即访问我们的网站:www.gateway.com。 Gateway 致力于向您提供不断完善的个性化支持。 请查看我们的 支持 部 分,有助于满足您的需要。 www.gateway.com 是您进入在线活动和服务世界的大门: 定期访问我们 以获得最新的信息并进行下载! 安全 您 可 能 热 衷 于 搜 索 Internet 提 供 的 各 种 内 容。 为 确 保 您 的 在 线 安 全, Gateway 在 您 的 计 算 机 上 预 安 装 了 Symantec 获 奖 的 Norton Internet Security™。 Norton Internet Security 能够安静地在后台阻止各种威胁,并在您进行网上 购物、使用网上银行或在线浏览时,保护您的身份。 Norton Internet Security 能够阻止在线身份盗窃、检测和消除间谍软件、删 除病毒和 Internet 蠕虫病毒,以及保护计算机免受黑客攻击。 44 定义 什么是病毒? 恶意软件,一般称为揬多数病毒通过 Internet、电子邮件或恶意网站进行传 播。 典型的病毒会复制并在未被检测到的情况下自行传播到多台计算机。 损害计算机的其它方式,如木马、蠕虫或垃圾广告会以不同的方式感染您的 计算机、耗尽资源或堵塞网络。 注: Gateway 我们保证您的计算机在购买时 100% 没有病毒,且因病 毒而造成的损坏不属保修范围。 什么是间谍软件? 间谍软件一般是指在您的计算机连接到 Internet 时,在您不知道的情况下下 载的有害程序。 一旦它感染到您的计算机,它就会窥探您浏览活动、收集个 人信息、造成弹出广告,甚至更改计算机的配置。间谍软件会消耗计算机的 资源;使 Internet 连接或整个计算机系统的速度下降,甚至会造成计算机崩 溃。 间谍软件有时会被不道德的公司用于监视和跟踪您在 Internet 上访问的站 点,以确定您网上冲浪的爱好,并在您的屏幕上显示有针对性的弹出式广 告。 但是,某些类型的间谍软件的行为远远超出了简单的跟踪,实际上监视 了键击并捕捉密码,这造成了严重的安全风险。 什么是恶意软件? 恶意的软件,也称为恶意软件,是专门设计用于故意损坏您计算机的软件。 例如,病毒、蠕虫和木马就是恶意软件。 为保护计算机不受恶意软件的侵 扰,确保使用更新的防病毒软件和防恶意软件。 互联网 - 45 什么是个人防火墙? 个人防火墙是经专门设计用于防止未经授权的访问或私人网络的软件。 它 起到防护罩的作用,可保护您的 Internet 连接免受有害连接,这些连接中有 部分会尝试控制您的计算机,以安装或散布病毒或恶意程序。 与您计算机的 每个连接都是受到监控 - 能够检测出试图未经您的允许接收信息的程序,而 防火墙将显示报警。然后您可决定是否允许连接,如果要连接到您正在使用 的程序,您一般会允许 ( 如:连接多个玩家服务器的游戏或内容更新的百科 全书 )。 如何保护您的计算机 网络犯罪的预防可以是非常直接的 - 如果获得一些技术建议并有一定的常 识,许多攻击都可得到避免。 一般而言,网上罪犯都会尝试尽快和尽量轻松 地赚钱。 您让他们的工作变得越困难,他们就会越快地离开您并转到另一个 更容易的目标。 以下技巧提供了如何防止网上欺诈的基本信息。 使您的计算机有最新的补丁程序和更新 让攻击者远离您计算机的最好方法之一是,只要可能,就要应用补丁程序和 其它软件补丁。 通过定期更新计算机,您就能够使攻击者无法利用软件流程 的优势 ( 弱点 ),否则他们就能利用这一点进入您的系统。 虽然保持计算机的更新不能免受所有的攻击,但它能够使黑客进入您系统的 攻击变得更加困难,完全阻止许多初级和自动的攻击,可能足以阻止并不坚 决的攻击者,转而寻找其它更有价值的计算机。 较新版本的 Microsoft Windows 和其它流行软件都能自动下载和更新,因此 您无需记得检查最新的软件。 利用软件中的自动更新功能,是让您安全在线 的良好开端。 46 用安全软件保护您的计算机 有必要用几类安全软件来实现基本的在线安全。 安全软件主要包括防火墙 和防病毒程序。 防火墙通常是您计算机的第一道防线 - 它对谁和什幺能够 与您的计算机在线通信进行控制。您可以认为防火墙是一类 “警察”,他看 护着所有试图通过 Internet 流入和流出您计算机的数据,允许它认为安全的 通信,并阻止 “坏”的通信量 ( 如攻击 ) 无法进入您的计算机。 在许多情况下,第二道防线是防病毒软件,它能够监视所有的在线活动,如 电子邮件信息和网上浏览,并保护个人免受病毒、蠕虫、木马和其它类型的 恶意程序的侵害。 您的防病毒软件和防间谍软件的软件应配置成自动更新, 应每次连接到 Internet 时都更新一次。 集成的安全套件 ( 如:Norton Internet Security) 整合了防火墙、防病毒、防 间谍软件以及其它功能 ( 如:反垃圾邮件和家长控制 ) 已经非常流行,因为 它们在一个软件包中提供了在线保护所需的所有安全软件。 许多人发现使 用综合安全套件是安装、配置和更新多种安全软件的有吸引力的替代方案。 完整版 Norton Internet Security™ 已预安装在您的 Gateway 系统中。 包 括一个免费的试用版来保护更新。确认处于激活状态! 选择强密码并安全保存 在当今的 Internet 中,密码是一个无法更改的事实;从订花和使用在线银行 业务,到登录我们收藏的航空公司网站以查看累积的英里数,我们每件事都 要使用密码。以下技巧能帮助您获得安全的在线体验: • 选择无法轻易猜到的密码是保护密码安全且不落到坏人手中的第一步。 强密码有八个或更多字符,并使用字母、数字和符号的组合 ( 如 , # $ % ! ?)。避免使用任何以下内容作为密码: 您的登录名、任何基于您个人信息 的内容,如您的姓和可在字典中查到的字,特别是“密码”。尝试选择特 别强和唯一的密码,以保护诸如在线银行业务等活动。 互联网 - 47 • 将密码保存在安全的地方,并尝试在使用每个在线服务时,不使用相同的 密码。 • 定期更改密码,至少每 90 天一次。 这样做会限制某些已获得您帐户密码 的人造成损害。 如果您注意到有个在线帐户出现令人怀疑的情况,您要 做的第一步就是更改密码。 保护您的个人信息 在线共享诸如您的名字、家庭地址、电话号码和电子邮件地址等个人信息时 要警惕。 为使用许多在线服务时,您不可避免地必须提供个人信息,以处理 帐单和购物运送事宜。 由于不泄露任何个人信息几乎是不可能的,因此以下 列表包含了一些有关如何在线安全分享个人信息的建议: • 警惕假冒的邮件地址。一些情况显示信息可能是欺诈性的,这些情况包 括:拼写错误、语法错误百出、措词奇怪、网站地址特别长、一般应该是 文字的地方却都是数字以及任何不正常的情况。 此外,钓鱼信息会经常 告诉您必须赶紧打开帐户,更新安全性,或敦促您立即提供信息,否则会 有其它不测。 不要上钩。 • 切勿回复询问个人信息的电子邮件。合法的公司不会使用电子邮件信息 来询问您的个人信息。 如有疑问,请电话联系该公司或在浏览器中输入 该公司的网址。 切勿单击这些信息中的链接,因为这些链接会让您进入 欺诈、恶意的网站。 • 避开用于盗取个人信息的欺诈网站。当访问网站时,直接将地址 (URL) 输 入到浏览器,而不要用电子邮件或即时消息中的链接。 欺诈者经常伪造 这些链接,使之看上去令人信服。 在购物、银行或任何有敏感信息的其它网站上,在字母 http 后面应有一 个 “S” ( 即 https://www.yourbank.com 而不是 http:// www.yourbank.com)。“s”表示安全,并且在您被要求登录或提供其它 48 敏感资料时应出现此字母。 您有安全链接的另一个记号是网站浏览器按 钮中的一个小锁图标 ( 通常是右角上 )。 • 注意网站和软件中的隐私政策。在您与一个组织分享您的个人信息之前, 了解该组织是如何收集和使用这些信息是非常重要的。 • 保护您的电子邮件地址。垃圾邮件发送者和 “钓鱼者”有时会发送数以 百万计的信息到可能存在或可能不存在的邮件地址,希望能从中找到可 能的牺牲者。 对这些信息作出回应或者甚至下载图像,肯定会使您被加 到他们今后发送更多相同信息的列表中。 将电子邮件地址在线张贴到新 闻组、博客或在线通信时也是要注意的。 通常在线提供的信息看上去好得令人无法相信 “没有免费的午餐”这句老话在今天仍然正确。想象中的 “免费”软件 ( 如 屏保或笑脸 )、肯定会让您获得数不清财富的秘密投资骗局,以及您意外赢 得未参加的竞赛,是某些公司吸引您的注意力而采用的引您上当的诱饵。 虽然您可能不会直接付钱给软件或服务,但您寻找的免费软件或服务已与广 告软件 ( “adware” ) 捆绑,它会跟踪您的行为并显示无用广告。 您可能不 得不透露个人信息或购买其它东西以获取您信以为真的令人满足的获奖。 如果出现的机会之好令人不敢相信,请询问他人的意见,阅读具体要求,或 者最好不理睬它。 互联网 - 49 定期核对银行的信用卡对帐单 如果您能够在数据被盗后或者您的信息被首次尝试使用后很快就发现,则盗 用身份和网络犯罪带来的冲击就会大大降低。 要获得出现问题警告的最便 捷方法之一,是查看您的银行或信用卡公司每月就有关不正常事件提供的声 明。 此外,许多银行和机构使用防欺诈系统,会对异常的购买行为发出警告 ( 即 如果您住在德克萨斯州,却突然在布达佩斯购买几台冰箱这样的行为 )。 为 了确认这些异常的购买行为,他们可能会打电话给您并请您确认这些行为。 切勿轻视这些电话,这是给您的提示,即有不好的事情可能已经发生,您应 采取必要的行动。 用 Windows 安全软件保护您的计算机 Windows 提供了各种保护应用程序。 Windows Updates 如果您已有有效的 Internet 连接, Windows 能够检查计算机的更新并自动 进行安装。 这些更新包括安全补丁和程序更新,这些能够提高运算性能并有 助于保护计算机免受新病毒的侵害和攻击。 我如何知道我的计算机存在风险? 如果 操作中心 报警,或计算机工作不正常、意外崩溃或部分程序运行不正 常,表明您的计算机可能被恶意软件感染。但切勿将任何计算机的问题都指 责为病毒!如果您怀疑计算机被感染,首先要做的是更新,如果您没这样 做,则运行杀毒软件和防间谍软件的软件。 50 还原 如果您的计算机出现故障,且常见问题解答 ( 参见第 69 页 ) 无法提供帮助, 您可以 “还原”计算机 - 即返回之前的状态。 本章节描述本计算机可用的还原工具。Gateway 提供了 Gateway Recovery Management,可让您创建还原备份、驱动程序和应用程序备份以及启动恢 复选项,并可使用 Windows 工具或还原备份。 注: Gateway Recovery Management 只有在安装 Windows 操作系统 的情况下方可使用。 重要:我们建议您尽快创建还原备份和驱动程序和应用程序备份。 在某些情形中,全面恢复需要 USB 还原备份。 创建还原备份 要从 U 盘重新安装,您必须先创建还原备份。 还原备份包含计算机硬盘中 的整个原始内容,包括 Windows 和出厂加载的所有软件和驱动程序。 使用 此备份可将您的计算机还原到您购买时的状态,同时让您选择保留所有设置 和个人数据。 注:请确认 U 盘容量至少为 16 GB。 还原 - 51 1. 从开始,输入 “还原”然后单击应用程序列表中的 Gateway Recovery Management。 2. 单击创建默认出厂设置备份。 还原驱动器窗口将打开。 52 请确认选择了将还原分区的内容复制到还原驱动器。 此功能提供了最完 整和最安全的还原备份。 3. 插入 U 盘,然后单击下一步。 • 继续前确认 U 盘有足够的空间。还原备份需要至少有 16 GB 的存储 空间 4. 您将在屏幕上看到备份进程。 5. 继续此进程直至完成。 还原 - 53 6. 创建还原备份后,您可以选择删除计算机中的还原信息。 如果选择删除 此信息,您只能使用 USB 还原备份来恢复计算机,如果丢失或擦除 U 盘,您就无法恢复计算机。 7. 拔出 U 盘并明确标示。 重要: 写下唯一的描述性标签,如 “Windows 还原备份”。 确保将备 份放在您记得的安全地方。 创建驱动程序和应用程序备份 要创建驱动程序和应用程序备份 ( 包含计算机所需的工厂加载的软件和驱动 程序 ),您可使用 U 盘,或者如果计算机配备了 DVD 刻录机,还需要一张 或多张空白的可刻录 DVD 光盘。 54 1. 从开始,输入 “还原”然后单击应用程序列表中的 Gateway Recovery Management。 2. 单击创建驱动程序和应用程序备份。 插入 U 盘或将空白 DVD 光盘插入光驱,然后单击 下一步。 • 如果使用 U 盘,继续前请确认有足够的容量。 还原 - 55 • 如果使用光盘,它还将告诉您完成还原光盘所需的空白、可刻录光盘的 数量。 确认您已准备好所需数量、相同的空白光盘。 3. 单击开始复制文件。您将在屏幕上看到备份进程。 4. 继续此进程直至完成: • 如果使用光盘,驱动器完成刻录后将退出光盘。 从驱动器中取出光盘, 然后用记号笔标注。 如果需要多张光盘,按照提示插入新光盘,然后单击确定。继续该过程 直至完成。 • 如果您使用 U 盘,拔出 U 盘并清楚标示。 重要: 写下唯一的描述性标签,如 “驱动程序和应用程序备份”。 确 保将备份放在您记得的安全地方。 56 还原系统 还原系统: 1. 实施小修复。 如果只有一或二个软件项目或硬件无法正常工作,可以通过重新安装该 软件或设备驱动程序来解决问题。 要重新安装工厂预装的软件或驱动程序,请参见第 57 页的 “重新安装驱 动程序和应用程序”。 有关重新安装非工厂预装软件和驱动程序的说明,请参见该产品的文档 或技术支持网站。 2. 还原到之前的系统状态。 如果重新安装软件或驱动程序无法解决问题,可通过将系统还原到之前 一切都正常的状态来解决问题。 有关说明,请参见第 60 页的 “返回之前的系统快照”。 3. 重新启动操作系统。如果未解决问题而且您希望将系统恢复到出厂时的 状态,但需保留用户信息,请参见第 61 页的 “将系统恢复到出厂时的状 态”。 4. 将系统恢复到出厂时的状态。 如果未解决问题而且您希望将系统恢复到出厂时的状态,请参见第 61 页 的 “将系统恢复到出厂时的状态”。 重新安装驱动程序和应用程序 作为故障排除的步骤,您可能需要重新安装工厂预装的应用程序和设备驱动 程序。您可以使用您创建的硬盘或备份来重新安装。 还原 - 57 • 其它应用程序 - 如果您需要重新安装非工厂预安装的软件,则需按照该软 件的安装说明进行操作。 • 新设备驱动程序 - 如果您需要重新安装非工厂预安装的设备驱动程序,则 需按照随设备提供的说明书进行操作。 如果使用 Windows 重新安装并将还原信息存储在计算机中: • 从开始,输入“还原”然后单击应用程序列表中的 Gateway Recovery Management。 • 单击重新安装驱动程序或应用程序。 58 • 您会看到 Gateway 资源中心的内容部分。 • 单击您要安装项目的安装图标,然后按照屏幕提示完成安装。 重 复上述步骤重新安装您需要的其它项目。 如果您从 DVD 光盘或 U 盘的 “驱动程序和应用程序备份”中重新安装: 1. 将驱动程序和应用程序备份插入光驱或连接到可用的 USB 端口。 • 如果您插入 DVD 光盘,请等待 Gateway 资源中心启动。 • 如果 Gateway 资源中心未自动启动,按 Windows 键 + <E>,然后 双击光驱图标。 • 如果您使用 U 盘,按 Windows 键 + <E>,然后双击含有备份内容的驱 动器。 双击资源中心。 还原 - 59 2. 您会看到 Gateway 资源中心的内容部分。 3. 单击您要安装项目的安装图标,然后按照屏幕提示完成安装。 重复 上述步骤重新安装您需要的其它项目。 返回之前的系统快照 Microsoft System Restore 将定期对系统设置进行 “快照”并保存为还原 点。 在遇到多数难以解决的软件问题时,您可还原到这些还原点之一,以使 系统再度正常运行。 Windows 将每天自动创建一个额外的还原点,也会在您安装软件或设备驱 动程序时创建一个还原点。 注:要了解更多有关 Microsoft System Restore 的信息,从入开始,输 入 “帮助”然后单击应用程序列表中的帮助和支持。 在 “搜索帮助” 框 内 输 入 Windows system restore( Windows 系 统 恢 复 ),然 后 按 Enter。 60 恢复到还原点 1. 从开始,输入 “控制面板”,然后单击应用程序列表中的控制面板。 2. 单击系统和安全 > 操作中心,然后单击屏幕底部的还原。 3. 单击打开系统还原,然后单击下一步。 4. 单击最近还原点 ( 系统正常工作的那一次 ),单击下一步,然后单击 完成。 5. 将显示确认窗口;单击是。 您的系统使用您指定的还原点进行还原。 该 过程可能需要几分钟时间并可能重启计算机。 将系统恢复到出厂时的状态 如果用其它办法都无法解决计算机遇到的问题,您可能需要重装所有软件以 使系统恢复到出厂时的状态。 您可以从您创建的硬盘或还原备份来还原。 • 如果您仍可运行 Windows 且尚未删除还原分区,请参见第 61 页的 “从 Windows 还原”。 • 如果您无法运行 Windows 而原始硬盘已经被完全重新格式化,或者您已 经安装替代硬盘,请参见第 65 页的 “从还原备份进行还原”。 从 Windows 还原 启动 Gateway Recovery Management: • 从开始,输入“还原”,然后单击应用程序列表中的 Gateway Recovery Management。 还原 - 61 有两个选项可供选择:恢复出厂设置 ( 重置我的计算机 ) 或自定义还原 ( 刷 新我的计算机 )。 恢复出厂设置会删除硬盘中的所有内容,然后重新安装系统中预安装的 Windows、所有的软件和驱动程序。 如果您可以访问硬盘中的重要文件,请 立即备份。 请参见第 63 页的 “用 Gateway Recovery Management 恢复 出厂设置”。 自定义恢复将试图保留您的文件 ( 用户数据 ),但仍将重新安装所有的软件 和驱动程序。 自您购买计算机之日起安装的软件将被删除 ( 从 Windows Store 安 装 的 除 外 )。 请 参 见 第 64 页 的 “用 Gateway Recovery Management 自定义还原”。 62 用 Gateway Recovery Management 恢复出厂设置 1. 单击恢复出厂设置。 注意: “恢复出厂设置 “会擦除硬盘中的所有文件。 2. 重置您的计算机窗口将打开。 图片仅供参考。 还原 - 63 3. 单击下一步,然后选择擦除文件的方式: a. 只删除我的文件可在恢复计算机前快速擦除所有文件,需约 30 分钟。 b. 全面清理硬盘可在擦除所有文件后清理硬盘,因此还原后无法看到任 何文件。 清理硬盘所需时间长得多,最长可达 5 小时,但因旧文件被 彻底删除而安全得多。 4. 单击重置。 5. 重启计算机开始还原进程,然后继续将文件复制到硬盘。 6. 还原完成后,重复首次启动过程开始使用计算机。 用 Gateway Recovery Management 自定义还原 1. 单击自定义还原 ( 保留用户数据 )。 64 2. 刷新计算机窗口将打开。 3. 单击下一步,然后单击刷新。 4. 重启计算机开始还原进程,然后继续将文件复制到硬盘。 此进程需约 30 分钟。 从还原备份进行还原 从 U 盘中的还原备份进行还原: 1. 找到还原备份。 2. 插入 U 盘并开启计算机。 3. 如果未启用,必须启用 F12 启动菜单: a. 启动计算机时,按 <F2>。 b. 使用左右箭头键选择主菜单。 c. 按向下箭头键,直到 F12 启动菜单被选中,按 <F5> 可将此设置更改 为启用。 d. 使用左右箭头键选择退出菜单。 e. 根据计算机使用的 BIOS 类型,选择 Save Changes and Exit 或 Exit Saving Changes,然后按 Enter。选择 OK 或 Yes 以确认。 f. 计算机将重新启动。 还原 - 65 4. 启动过程中,按 <F12> 打开引导菜单。 您可在引导菜单中选择开始启动 的设备,例如 U 盘。 a. 使用箭头键选择 USB 设备,然后按 Enter。 b. 从还原备份而非常规的启动程序启动 Windows。 5. 选择键盘类型。 6. 选择故障排除,然后要使用的还原类型: a. 单击高级,然后按系统还原可开始 Microsoft System Restore: Microsoft System Restore 将定期对系统设置进行“快照”并保存为还 原点。 在遇到多数难以解决的软件问题时,您可还原到这些还原点之 一,以使系统再度正常运行。 b. 单击重置计算机开始进行重置: 重置计算机会删除硬盘中的所有内容,然后重新安装系统中预安装的 Windows、所有的软件和驱动程序。 如果您可以访问硬盘中的重要文 件,请立即备份。参见第 67 页的 “从还原备份重置计算机”。 c. 单击刷新计算机以开始刷新: 刷新计算机将试图保留您的文件 ( 用户数据 ),但仍将重新安装所有的 软件和驱动程序。 自您购买计算机之日起安装的软件将被删除 ( 从 Windows 商店安装的除外 )。 参见第 68 页的 “从还原备份刷新计算 机”。 66 从还原备份重置计算机 注意:重置计算机会擦除硬盘中的所有文件。 1. 重置您的计算机窗口将打开。 图片仅供参考。 2. 单击下一步 3. 选择要还原的操作系统 ( 一般只有一个可用选项 )。 4. 选择保留对硬盘的任何更改: a. 如果在硬盘上有已删除的还原分区,或有已更改的分区且要保留这些 更改,请选择否。 b. 要将计算机完全恢复至出厂设置,请选择是。 5. 选择擦除文件的方式: a. 只删除我的文件可在恢复计算机前快速擦除所有文件,需约 30 分钟。 b. 全面清理硬盘可在擦除所有文件后清理硬盘,因此还原后无法看到任 何文件。 清理硬盘所需时间长得多,最长可达 5 小时,但因旧文件被 彻底删除而安全得多。 6. 单击重置。 7. 还原完成后,重复首次启动过程开始使用计算机。 还原 - 67 从还原备份刷新计算机 1. 刷新计算机窗口将打开。 2. 单击下一步。 3. 选择要还原的操作系统 ( 一般只有一个可用选项 )。 4. 单击刷新。 5. 重启计算机开始还原进程,然后继续将文件复制到硬盘。 此进程需约 30 分钟。 68 常见问题 以下是在您的日常电脑操作过程中可能会出现的问题。我们针对这些问题提 供了简单的解决方案。 我打开了电源,但是电脑未启动或开机 检查电源指示灯。 • 如果电源指示灯未亮,表明电源未接通。请检查以下方面: • 如果您使用电池组供电,很可能是电力不足,无法为电脑的操作提供足 够的电源。请连接 AC 适配器为电池组充电。 • 请确保 AC 适配器已经正确连接到电脑和电源插座。 • 如果电源指示灯亮着,请检查以下项目: • 光驱里是否装有光盘?取出光盘并按 <Ctrl> + <Alt> + <Del>,重启 系统。 • 电脑上是否插有 USB 存储设备 (USB 盘或智能手机 )? 拔出该设备并 按 <Ctrl> + <Alt> + <Del>,重启系统。 屏幕上什么也没有 可能是笔记本电脑的电源管理系统自动关闭显示屏电源以节省电能。请按任 意键以恢复正常显示。 如果按任意键仍未恢复正常显示,可能是下列三种原因: • 显示屏亮度等级太低。按 <Fn> + < > ( 调高 ) 来调节亮度等级。 常见问题 - 69 • 显示设备被设置为外部显示器。按 将显示切换回笔记本电脑显 示屏。 • 若睡眠指示灯亮着,说明电脑处于睡眠模式。按下电源按钮并释放即可将 电脑唤醒。 电脑没有声音 请检查以下项目: • 音量可能被设置为静音。在 Windows 中,检查任务栏上的音量控制图 标。如果图标被标示横线,请单击该图标,然后取消选择全部静音选项。 • 音量可能设的太低。在 Windows 中,任务栏上的音量控制图标,或使用 音量控制按鍵來調整音量。 • 如果电脑的音频输出插孔中已经连接了头戴式耳机、耳机或外部扬声器, 则内建扬声器将自动关闭。 我要在电脑关闭时弹出光驱托盘 在光驱上有一个紧急弹出孔。您只需将钢笔或大头针的尖端插入紧急弹出孔 即可弹出光驱托盘。 键盘无响应 尝试将外置式键盘连接到电脑的 USB 端口。如通过该键盘可进行输入,可 能内置键盘的连线松了。请联系销售商或联络授权服务中心寻求协助。 打印机无法打印 请检查以下项目: • 请确认打印机已经连接到电源,并且已经打开电源。 • 确认打印机线缆已安全连接到 USB 端口和打印机的相应端口。 70 对使用 Windows 8 的建议和提示 我们知道这是一个新的操作系统,需要加以熟悉,因此我们创建了一些指针 来帮助您开始了解。 有三大概念您需要记住 1. 开始 “开始”按钮不会再有;您可从 “开始”屏幕来启动应用程序。 2. Tiles (瓷砖) Live tiles 类似于应用程序的缩略图。 3. Charms Charms 可让您执行实用的功能,如共享内容、关闭电脑或更改设置。 我如何访问 Charms? 将光标移动到屏幕的右上角或右下角可访问 Charms,或按 Windows 键 + <C>。 如何进入开始? 按键盘上的 Windows 键;按 Windows 键 + <C> 并单击开始;或将光标移 动到屏幕的左下角并单击开始。 如何在应用程序之间切换? 将光标移动到屏幕的左侧可查看当前运行的应用程序缩略图。 您还可以按 Windows 键 + <Tab> 以打开并在当前应用程序之间滚动。 常见问题 - 71 如何关闭我的电脑? 按 Windows 键 + <C>,单击设置 > 电源并选择要进行的操作。 或从桌面, 单击 Gateway 电源按钮并选择要进行的操作。 为什么有新的界面? Windows 8 的新界面是专门配合触摸输入设计的。 Windows Stor 应用程序 会自动使用整个屏幕且无需以传统方式关闭。 Windows Store 应用程序将 使用 live-tiles 显示在 “开始”屏幕上。 什么是 “Live tiles”? “Live tiles”类似于应用程序的缩略图,只要您连接到 Internet,它们就会更 新新内容。 例如,您可以查看天气或股票的最新动态而无需打开应用程序。 如何解锁我的电脑? 按任意键,然后单击用户帐户图标可解锁计算机。 如果您的帐户设置了密 码,则需输入密码以继续。 如何个性化我的电脑? 您可用不同的背景图像或安排瓷砖来个性化开始以适应您的个人需要。 要更改背景,按 Windows 键 + <C> 并单击设置 > 更改计算机设 > 个性化。 单击页面顶部的开始屏幕并选择颜色和图像。 如何移动瓷砖? 按住瓷砖或选择它,然后将其拖动到您要在开始中放置的位置。其它瓷砖将 会移动,以让该瓷砖能够塞入其新位置。 72 我能否让瓷砖变得更大或更小? 右键单击瓷砖,然后从屏幕底部出现的菜单中选择更小或更大。 我如何个性化搣锁定攠屏幕? 您可用不同的图像,或以显示快速状态和通知的方式来个性化锁定屏幕,以 适应您的个人需要。 要更改背景,按 Windows 键 + <C> 并单击设置 > 更改计算机设 > 个性化。 单击页面顶部的锁定屏幕并选择您要在锁定屏幕上看到的图像和应用程序。 如何关闭应用程序? 将光标移动到屏幕顶部,然后单击并拖动该窗口可关闭此应用程序。 您可从屏幕左侧的缩略图中关闭应用程序,方法是右键单击缩略图并选择 关闭。 我能否更改屏幕分辨率? 从开始,开始输入 “控制面板”可打开搜索并显示结果;单击控制面板 > 调整屏幕分辨率。 我要以习惯的方式使用 Windows - 还回我的桌面! 从开始单击桌面瓷砖可看到传统的桌面。 您可将常用的应用程序锁定到任 务栏以方便打开这些程序。 如果您单击不是 Windows Store 应用程序的程序, Windows 将自动在桌面 下打开该应用程序。 常见问题 - 73 我的应用程序在哪里? 从开始,只需开始输入要打开的应用程序名称,搜索将自动打开并列出 结果。 要查看应用程序的完整列表,按空格键或菜单键并单击所有应用程序。 我如何让应用程序出现在 “开始”上? 如果您在所有应用程序中且要让应用程序出现在开始中,您可选择应用程序 并右键单击该程序。从屏幕底部出现的菜单中选择锁定到开始。 如何从搣开始攠删除瓷砖? 右键单击瓷砖,然后从屏幕出现的菜单中单击从 “开始”解锁。 我如何让应用程序出现在桌面的任务栏上? 如果您在所有应用程序中且要让应用程序出现在桌面的任务栏中,您可选择 应用程序并右键单击该程序。 从屏幕底部出现的菜单中选择锁定到任务栏。 如何安装应用程序? 您可从 商店 下载 Windows Store 应用程序。 您需要 Microsoft ID 才能购买 并从商店下载应用程序。 我无法找到诸如 “记事本”或 “画图”等应用程序! 它们在哪里? 从 开始,只需输入要找到并打开的应用程序名称,即可打开 搜索 并列出结 果。 或者,打开所有应用程序并滚动到 “Windows Accessories”可看到旧 系统的程序列表。 74 什么是 Microsoft ID ( 帐户 )? Microsoft 帐户是您用于登录到 Windows 的电子邮件地址和密码。 您可使 用任何电子邮件地址,但建议选择已使用的电子邮件地址,来与好友通信和 登录到收藏网站。 当您用 Microsoft 帐户登录到计算机时,计算机将连接到 您关心的人、文件和设备。 我需要一个吗? 并非要有 Microsoft ID 才能使用 Windows 8,但 Microsoft ID 会让生活变得 更轻松,因为您可使用 Microsoft ID 同步登录的不同设备的数据。 如何获得? 如 果 您 已 安 装 Windows 8 但 未 用 Microsoft 帐 户 登 录,或 者 您 没 有 Microsoft 帐户并要一个,按 Windows 键 + <C> 并单击设置 > 更改计算机 设置 > 用户 > 切换到 Microsoft 帐户,然后按屏幕说明操作。 我如何将收藏夹添加到 Internet Explorer? Internet Explorer 10 没有传统的收藏夹,取而代之的是您可以将快捷方式锁 定到开始。 打开该页面后,右键单击页面上的任何位置可打开屏幕底部的菜 单。 单击锁定到开始。 如何检查 Windows 更新? 按 Windows 键 + <C> 并单击设置 > 更改计算机设置 > Windows 更新。单 击立即检查更新。 常见问题 - 75 我在哪里可获得更多信息? 详情请访问: • Windows 8 教程:www.gateway.com/windows8-tutorial • 支持常见问题: support.gateway.com 76 规范信息 预防听力损失 - 注意:如果长时间以高音量使用耳机,可能会造成永久性听力丧失。 - A pleine puissance, l’écoute prolongée du baladeur peut endommager l’oreille de l’utilisateur. 听音乐时的注意事项 为保护听力,请遵循下列注意事项。 - 逐渐调高音量,直至能够清楚舒适地收听。 - 听觉适应后不要再调高音量。 - 不要长时间以高音量收听音乐。 - 不要通过调高音量来掩盖周围噪音。 - 若听不到周围人的讲话,应调低音量。 无线设备规范声明 - 注:以下规范信息仅适用于具备 WLAN 和 / 或蓝牙功能的型号。 符合规则的附件 本设备配备的附件为:连接外接显示器的屏蔽视频线缆。需使用这些附件以确保符合 FCC 规则。 加州提案 65 警告 本产品含有加州当局已知可导致癌症、出生缺陷和 / 或生殖系统受损的化学品。 有关本产 品警告的其它信息,请访问 www.gateway.com/prop65。 规范信息 - 77 日本 (JAPAN) 本装置は、第二種情報装置(住宅地域またはその隣接した地域において使用されるべき 情報装置)デ住宅地域での電波障害防止を目的とした情報装置等電波障害自主規制協議 会(VCCI)基準に適合しております。 しかし、本装置をラジオ、テレビジョン受信機に、近接してご使用になると、受信障害 の原因となることがあります。本書の説明にしたがって正しい取り扱いをしてくださ い。 WIRELESS ADAPTER REGULATORY INFORMATION USA — FCC and FAA The FCC with its action in ET Docket 96-8 has adopted a safety standard for human exposure to radio frequency (RF) electromagnetic energy emitted by FCC certified equipment. The wireless adapter meets the Human Exposure limits found in OET Bulletin 65, supplement C, 2001, and ANSI/IEEE C95.1, 1992. Proper operation of this radio according to the instructions found in this manual will result in exposure substantially below the FCC’s recommended limits. - The following safety precautions should be observed: Do not touch or move antenna while the unit is transmitting or receiving. - Do not hold any component containing the radio such that the antenna is very close or touching any exposed parts of the body, especially the face or eyes, while transmitting. - Do not operate the radio or attempt to transmit data unless the antenna is connected; this behavior may cause damage to the radio. Use in specific environments: - The use of wireless adapters in hazardous locations is limited by the constraints posed by the safety directors of such environments. - The use of wireless adapters on airplanes is governed by the Federal Aviation Administration (FAA). 78 - The use of wireless adapters in hospitals is restricted to the limits set forth by each hospital. Antenna Use In order to comply with FCC RF exposure limits, low gain integrated antennas should be located at a minimum distance of 20 cm (8 inches) or more from the body of all persons or at a minimum distance as specified by the FCC module grant conditions. FCC grants can be viewed from the FCC Equipment Authorization website at https://fjallfoss.fcc.gov/ oetcf/eas/reports/GenericSearch.cfm by entering the FCC ID printed on the module label. Explosive Device Proximity Warning Warning: Do not operate a portable transmitter (including this wireless adapter) near unshielded blasting caps or in an explosive environment unless the transmitter has been modified to be qualified for such use Antenna Warnings - Warning: To comply with the FCC and ANSI C95.1 RF exposure limits, it is recommended that for the wireless adapter installed in a desktop or portable computer, the antenna for this wireless adapter to be installed so as to provide a separation distance of at least 20 cm (8 inches) from all persons or at the minimum distance as specified by the module grant conditions. FCC grants can be viewed from the FCC Equipment Authorization website at https://fjallfoss.fcc.gov/oetcf/eas/ reports/GenericSearch.cfm by entering the FCC ID printed on the module label. - Warning: The wireless adapter is not designed for use with high-gain directional antennas. Use On Aircraft Caution - Caution: Regulations of the FCC and FAA prohibit airborne operation of radiofrequency wireless devices (wireless adapters) because their signals could interfere with critical interfere with critical aircraft instruments. Local Restrictions on 802.11a, 802.11b, 802.11g and 802.11n Radio Usage 规范信息 - 79 - Caution: Due to the fact that the frequencies used by 802.11a, 802.11b, 802.11g and 802.11n wireless LAN devices may not yet be harmonized in all countries, 802.11a, 802.11b, 802.11g and 802.11n products are designed for use only in specific countries, and are not allowed to be operated in countries other than those of designated use. As a user of these products, you are responsible for ensuring that the products are used only in the countries for which they were intended and for verifying that they are configured with the correct selection of frequency and channel for the country of use. Any deviation from the permissible power and frequency settings for the country of use is an infringement of national law and may be punished as such. Wireless Interoperability The wireless adapter is designed to be interoperable with other wireless LAN products that are based on direct sequence spread spectrum (DSSS) radio technology and to comply with the following standards: - IEEE Std. 802.11b compliant Standard on Wireless LAN - IEEE Std. 802.11g compliant Standard on Wireless LAN - IEEE Std. 802.11a compliant Standard on Wireless LAN (applies to devices supporting 802.11a) - IEEE Std. 802.11n draft 2.0 compliant on Wireless LAN - Wireless Fidelity certification, as defined by the Wi-Fi Alliance The Wireless Adapter and Your Health The wireless adapter, like other radio devices, emits radio frequency electromagnetic energy. The level of energy emitted by the wireless adapter, however, is less than the electromagnetic energy emitted by other wireless devices such as mobile phones. The wireless adapter operates within the guidelines found in radio frequency safety standards and recommendations. These standards and recommendations reflect the consensus of the scientific community and result from deliberations of panels and committees of scientists who continually review and interpret the extensive research literature. In some 80 situations or environments, the use of the wireless adapter may be restricted by the proprietor of the building or responsible representatives of the applicable organization. Examples of such situations may include: - Using the wireless adapter on board airplanes, or - Using the wireless adapter in any other environment where the risk of interference with other devices or services is perceived or identified as being harmful. If you are uncertain of the policy that applies to the use of wireless adapters in a specific organization or environment (an airport, for example), you are encouraged to ask for authorization to use the adapter before you turn it on. FCC Radio Frequency Interference Requirements (applies to device supporting 802.11a) This device is restricted to indoor use due to its operation in the 5.15 to 5.25 GHz and 5.470 to 5.725 GHz frequency ranges. FCC requires this product to be used indoors for the frequency ranges 5.15 to 5.25 GHz and 5.470 to 5.725 GHz to reduce the potential for harmful interference to co-channel mobile satellite systems. High power radars are allocated as primary users of the 5.25 to 5.35 GHz and 5.65 to 5.85 GHz bands. These radar stations can cause interference with and /or damage this device. No configuration controls are provided for this wireless adapter allowing any change in the frequency of operations outside the FCC grant of authorization for U.S operation according to Part 15.407 of the FCC rules. USA — Federal Communications Commission (FCC) This device complies with Part 15 of the FCC Rules. Operation of the device is subject to the following two conditions: - This device may not cause harmful interference. - This device must accept any interference that may cause undesired operation. - Note: The radiated output power of the adapter is far below the FCC radio frequency exposure limits. Nevertheless, the adapter should be used in such a manner that the potential for human contact during normal operation is minimized. To avoid the possibility of exceeding the FCC radio frequency exposure limits, you should keep a 规范信息 - 81 distance of at least 20 cm between you (or any other person in the vicinity), or the minimum separation distance as specified by the FCC grant conditions, and the antenna that is built into the computer. Details of the authorized configurations can be found at http://www.fcc.gov/oet/ea/ by entering the FCC ID number on the device. Interference Statement This wireless adapter has been tested and found to comply with the limits for a Class B digital device, pursuant to Part 15 of the FCC Rules. These limits are designed to provide reasonable protection against harmful interference in a residential installation. This wireless adapter generates, uses, and can radiate radio frequency energy. If the wireless adapter is not installed and used in accordance with the instructions, the wireless adapter may cause harmful interference to radio communications. There is no guarantee, however, that such interference will not occur in a particular installation. If this wireless adapter does cause harmful interference to radio or television reception (which can be determined by turning the equipment off and on), the user is encouraged to try to correct the interference by taking one or more of the following measures: - Reorient or relocate the receiving antenna of the equipment experiencing the interference. - Increase the distance between the wireless adapter and the equipment experiencing the interference. - Connect the computer with the wireless adapter to an outlet on a circuit different from that to which the equipment experiencing the interference is connected. - Consult the dealer or an experienced radio/TV technician for help. - Note: The adapter must be installed and used in strict accordance with the manufacturer's instructions as described in the user documentation that comes with the product. Any other installation or use will violate FCC Part 15 regulations. Canada — Industry Canada (IC) This device complies with RSS210 of Industry Canada. Cet appareil se conforme à RSS210 de Canada d'Industrie. 82 - Caution: When machine supports and using IEEE 802.11a wireless LAN, this product is restricted to indoor use due to its operation in the 5.15- to 5.25 GHz frequency range. Industry Canada requires this product to be used indoors for the frequency range of 5.15 GHz to 5.25 GHz to reduce the potential for harmful interference to co-channel mobile satellite systems. High power radar is allocated as the primary user of the 5.25 to 5.35 GHz and 5.65 to 5.85 GHz bands. These radar stations can cause interference with and/or damage to this device. The maximum allowed antenna gain for use with this device is 6dBi in order to comply with the E.I.R.P limit for the 5.25 to 5.35 and 5.725 to 5.85 GHz frequency range in point-topoint operation. To comply with RF exposure requirements all antennas should be located at a minimum distance of 20 cm, or the minimum separation distance allowed by the module approval, from the body of all persons. - Attention: l’utilisation d’un réseau sans fil IEEE802.11a est réstreinte à une utilisation en intérieur à cause du fonctionement dans la bande de fréquence 5,15 5,25 GHz. Industry Canada requiert que ce produit soit utilisé à l’intérieur des bâtiments pour la bande de fréquence 5,15 - 5,25 GHz afin de réduire les possibilités d’interférences nuisibles aux canaux co-existants des systèmes de transmission satellites. Les radars de puissances ont fait l’objet d’une allocation primaire de fréquences dans les bandes 5,25 - 5,35 GHz et 5 65 - 5 85 GHz. Ces stations radar peuvent créer des interférences avec ce produit et/ou lui être nuisible. Le gain d’antenne maximum permissible pour une utilisation avec ce produit est de 6 dBi afin d’être conforme aux limites de puissance isotropique rayonnée équivalente (P.I.R.E.) applicable dans les bandes 5,25 - 5,35 GHz et 5,725 - 5,85 GHz en fonctionement point-à-point. Se pour conformer aux conditions d'exposition de RF toutes les antennes devraient être localisées à une distance minimum de 20 cm, ou la distance de séparation minimum permise par l'approbation de module, du corps de toutes les personnes. This Class B digital apparatus complies with Canadian ICES-003. Cet appareil numérique de la classe B est conforme a la norme NMB-003 du Canada. 规范信息 - 83 "To prevent radio interference to the licensed service, this device is intended to be operated indoors and away from windows to provide maximum shielding. Equipment (or its transmit antenna) that is installed outdoors is subject to licensing." « Pour empêcher que cet appareil cause du brouillage au service faisant l'objet d'une licence, il doit être utilisé a l'intérieur et devrait être placé loin des fenêtres afin de fournir un écran de blindage maximal. Si le matériel (ou son antenne d'émission) est installé à l'extérieur, il doit faire l'objet d'une licence. » European Union 适用国家列表 本产品的使用必须严格遵守使用国的规定和限制。 要了解更多信息,请联系使用国的当地 办事处。 请参见 http://ec.europa.eu/enterprise/rtte/implem.htm 以了解最新的国家列表。 国家代码列表 本设备可在以下国家中运行: 国家 ISO 3166 国家 2 字母代码 ISO 3166 国家 2 字母代码 ISO 3166 国家 2 字母代码 ISO 3166 2 字母代码 奥地利 AT 德国 DE 马耳他 MT 英国 GB 比利时 BE 希腊 GR 荷兰 NT 冰岛 IS 塞浦路斯 CY 匈牙利 HU 波兰 PL 列支敦士登 LI 捷克共和国 CZ 爱尔兰 IE 葡萄牙 PT 挪威 NO 丹麦 DK 意大利 IT 斯洛伐克 SK 瑞士 CH 爱沙尼亚 EE 拉脱维亚 LV 斯洛文尼亚 SL 保加利亚 BG 芬兰 FI 立陶宛 LT 西班牙 ES 罗马尼亚 RO 法国 FR 卢森堡 LU 瑞典 SE 土耳其 TR The low band 5.15 -5.35 GHz is for indoor use only. This equipment complies with the essential requirements of the European Union directive 1999/5/EC. See Statements of European Union Compliance, and more details refer to the attached Declaration of Conformity. 84 English Hereby, ACER INC., declares that this devise is in compliance with the essential requirements and other relevant provisionns of Directive 1999/5/EC. Česky [Czech] ACER INC. tímto prohlašuje, že toto zařízení je ve shodě se základními požadavky a dalšími příslušnými ustanoveními směrnice 1999/5/ES. Daansk [Danish] Undertegnede ACER INC. erklærer herved, at følgende udstyr overholder de væsentlige krav og øvrige relevante krav i direktiv 1999/5/EF. Deutsch [German] Hiermit erklärt ACER INC., dass sich das Gerät Radiolan in Übereinstimmung mit den grundlegenden Anforderungen und den übrigen einschlägigen Bestimmungen der Richtlinie 1999/5/EG befindet. Eesti [Estonian] Käesolevaga kinnitab ACER INC. seadme vastavust direktiivi 1999/5/EÜ põhinõuetele ja nimetatud direktiivist tulenevatele teistele asjakohastele sätetele. Español [Spanish] Por medio de la presente ACER INC. declara que el dispositivo cumple con los requisitos esenciales y cualesquiera otras disposiciones aplicables o exigibles de la Directiva 1999/5/CE. 规范信息 - 85 Ελληνικά [Greek] ∆ια του παρόντος η ACER INC. δηλώνει ότι η παρούσα συσκευή συµµορφώνεται προς τις ουσιώδεις απαιτήσεις και τις λοιπές διατάξεις της Οδηγίας 1999/5/ ΕΚ. Français [French] Par la présente ACER INC. déclare que cet appareil est conforme aux exigences essentielles et aux autres dispositions pertinentes de la directive 1999/5/CE. Íslenska [Icelandic] Hér með lýsir ACER INC. yfir því að er í samræmi við grunnkröfur og aðrar kröfur, sem gerða r eru í tilskipun 1999/5/EC. Itaaliano [Italian] Con la presente ACER INC. dichiara che questo dispositivo è conforme ai requisiti essenziali ed alle altre disposizioni pertinenti stabilite dalla direttiva 1999/5/CE. Latviski [Latvian] Ar šo ACER INC. deklarē, ka šī ierīce atbilst Direktīvas 1999/5/EK būtiskajām prasībām un citiem ar to saistītajiem noteikumiem. Lietuvių [Lithuanian] Šiuo ACER INC. deklaruoja, kad šis įrenginys atitinka esminius reikalavimus ir kitas 1999/5/EB Direktyvos nuostatas. Malti [Maltese] Hawnhekk, ACER INC., jiddikjara li dan jikkonforma mal- ti ijiet essenzjali u ma provvedimenti o rajn relevanti li he mm fid-Dirrettiva 1999/5/EC. 86 Magyar [Hungarian] Alulírott, ACER INC. nyilatkozom, hogy a készülék megfelel a vonatkozó alapveto követelményeknek és az 1999/5/EC irányelv egyéb eloírásainak. Nederlands [Dutch] Hierbij verklaart ACER INC. dat het toestel voldoet aan de essentiële eisen en de andere relevante bepalingen van richtlijn 1999/5/EG. Norsk [Norwegiann] ACER INC. erklærer herved at utstyret er i samsvar med de grunnleggende krav og øvrige relevante krav i direktiv 1999/5/EF. Polski [Polish] Niniejszym ACER INC. oświadcza, że urządzenie jest zgodne z zasadniczymi wymogami oraz pozostałymi stosownymi postanowieniami Dyrektywy 1999/5/EC. Português [Portuguese] ACER INC. declara que este dispostivo está conforme com os requisitos essenciais e outras disposições da Directiva 1999/5/CE. Slovensko [Slovenian] ACER INC. izjavlja, da je ta naprava skladna z bistvenimi zahtevami in ostalimi relevantnimi določili Direktive 1999/5/ES. Slovensky [Slovak] ACER INC. týmto vyhlasuje, že zariadenie spĺňa základné požiadavky a všetky príslušné ustanovenia Smernice 1999/5/ES. 规范信息 - 87 Suomi [Finnish] ACER INC. vakuuttaa täten että tämä laite on direktiivin 1999/ 5/EY oleellisten vaatimusten ja sitä koskevienn direktiivin muiden ehtojen mukainen. Svenska [Swedish] Härmed intygar ACER INC. att denna enhet står i överensstämmelse med väsentliga egenskapskrav och övriga relevanta bestämmelser som framgår av direktiv 1999/5/EG. France Pour la France métropolitaine : 2,400 - 2,4835 GHz (Canaux 1à 13) autorisé en usage intérieur 2,400 - 2,454 GHz (canaux 1 à 7) autorisé en usage extérieur Pour la Guyane et la Réunion : 2,400 - 2,4835 GHz (Canaux 1à 13) autorisé en usage intérieur 2,420 - 2,4835 GHz (canaux 5 à 13) autorisé en usage extérieur Pour tout le territoire Français : Seulement 5,15 -5,35 GHz autorisé pour le 802.11a L'utilisation de cet equipement (2,4 GHz WLAN) est soumise à certaines restrictions : - La puissance maximale autorisée en intérieur est de 100 mW pour 2400 - 2483,5 MHz. - La puissance maximale autorisée est de 100 mW en extérieur pour 2400 - 2454 MHz. - La puissance maximale autorisée est de 10 mW en extérieur, 2454 - 2483,5 MHz. Pour les dernières restrictions, voir http://www.art-telecom.fr. Italy The use of these equipments is regulated by: 88 1.D.L.gs 1.8.2003, n. 259, article 104 (activity subject to general authorization) for outdoor use and article 105 (free use) for indoor use, in both cases for private use. 2.D.M. 28.5.03, for supply to public of RLAN access to networks and telecom services. L’uso degli apparati è regolamentato da: 1.D.L.gs 1.8.2003, n. 259, articoli 104 (attività soggette ad autorizzazione generale) se utilizzati al di fuori del proprio fondo e 105 (libero uso) se utilizzati entro il proprio fondo, in entrambi i casi per uso private. 2.D.M. 28.5.03, per la fornitura al pubblico dell’accesso R-LAN alle reti e ai servizi di telecomunicazioni. Belgium Dans le cas d'une utilisation privée, à l'extérieur d'un bâtiment, au-dessus d'un espace public, aucun enregistrement n'est nécessaire pour une distance de moins de 300 m. Pour une distance supérieure à 300 m un enregistrement auprès de l'IBPT est requise. Pour les enregistrements et licences, veuillez contacter l'IBPT. In geval van privé-gebruik, buiten een gebouw, op een openbare plaats, is geen registratie nodig, wanneer de afstand minder dan 300 m is. Voor een afstand groter dan 300 m is een registratie bij BIPT vereist. Voor registraties en licenties, gelieve BIPT te contacteren. Brazil Este equipamento opera em caráter secundário, isto é, não tem direito a proteção contra interferência prejudicial, mesmo de estações do mesmo tipo, e não pode causar interferência a sistemas operando em caráter primário. Pakistan Pakistan Telecommunication Authority (PTA) Approved Morocco The operation of this product in the radio channel 2 (2417 MHz) is not authorized in the following cities: Agadir, Assa-Zag, Cabo Negro, Chaouen, Goulmima, Oujda, Tan Tan, Taourirt, Taroudant and Taza. 规范信息 - 89 The operation of this product in the radio channels 4, 5, 6 and 7 (2425 - 2442 MHz) is not authorized in the following cities: Aéroport Mohamed V, Agadir, Aguelmous, Anza, Benslimane, Béni Hafida, Cabo Negro, Casablanca, Fès, Lakbab, Marrakech, Merchich, Mohammédia, Rabat, Salé, Tanger, Tan Tan, Taounate, Tit Mellil, Zag. Japan 5 GHz 帯は室内でのみ使用のこと Korea 당해 무선설비는 운용 중 전파혼신 가능성이 있음 Taiwan 第十二條 經型式認證合格之低功率射頻電機,非經許可,公司、商號或使用者均不得擅自變更頻 率、加大功率或變更原設計之特性及功能。 第十四條 低功率射頻電機之使用不得影響飛航安全及干擾合法通信 ; 經發現有干擾現象時,應立即 停用,並改善至無干擾時方得繼續使用。 前項合法通信,指依電信法規定作業之無線通信。 低功率射頻電機須忍受合法通信或工業、科學及醫療用電波輻射性電機設備之干擾。 对产品的改动 CE 标志 Gateway 对于用户未经授权的可能改变有 CE 标志产品符合性的改动和由此造成的后果, 不承担责任。 无线频率接口 对于任何由未经授权对本设备的改动而造成的无线电或电视干扰,厂家不承担责任。 90 连接和远程接地 PELV ( 有保护的特低电压 ) 为确保设备特低电压的完整性,只能将有电源保护的电磁兼容电路的设备连接到外部端 口。 SELV ( 安全的特低电压 ) 本产品的输入和输出均为安全的特低电压。 远程接地 为防止电击,将所有的本地 ( 个人办公室 ) 计算机和计算机支持的设备连接到建筑布线的 相同的电路上。 如果您不确定,请检查建筑布线以避免远程接地的麻烦。 建筑物电源 仅将设备连接到符合所在国当前布线规则的建筑物电源。 在英国,是 IEE 规则。 电源和线缆 电源 电源插头和插座 ( 如配备 ) 被定级为 “危险电压”。 您必须将电源线拔出并将电池取出以断开设备与电源的连接。 为达到此目的,插座应安装 在设备附近,并易够到。 输入额定电流: 参见计算机底部的额定电流标签,以确保您的适配器符合特定的额定电 流。 在任何情况下,用户均不得尝试拆卸电源。 电源没有用户可更换的部件。 在电源内有危险 电压,会造成严重的人身伤害。 有缺陷的电源必须退还给经销商。 电源线和插头 本产品需要一条接地电源线和插头。 插头仅适用于接地的电源插座。 插上插头前,请确认 电源插座已正确接地。 切勿将插头插入未接地的电源插座。 详情请联系您的电工。 规范信息 - 91 电线长度不得超过 2.5 米。 为防止电击危险,切勿去除或废除电源线的接地接触器。 如果 电源线损坏,应更换 电源线。 请联 系经销商按原样更 换。 在欧洲,插头必须额 定为 250 VAC,最低 10 amp。 插头必须显示国际机构的认证标志。 线缆必须适用于最终用户 的国家。 如果您不确定要在所在国使用的电源线类型,请咨询经锁商或当地的电力机构。 线缆 对于计算机包装中非随本产品提供的线缆: 系统的 EMC 性能只有在线缆和接口采用有效屏蔽的情况下才有保证。 以下情况需使用屏蔽接口的线缆:USB、 IEEE1394、串行、打印机、游戏、模拟或数字 音频 / 视频、 PS2、电视或 FM 天线,以及一般所有的高速线缆接口。 仅使用有 UL 认证的 No. 26AWG 或更大型号电信线缆。 仅有以太局域网或 RTC 调制解调器线缆的长度可超过 3 米。 Gateway 建议对连接计算机与非随机提供的硬件设备的线缆添加一个铁氧体磁芯环绕夹。 - 铁氧体参照: Steward 28A-2029 ( 双线圈 ) 在产品认证过程中, Gateway 采用以下线缆质量: - Hama 46778 的 USB2.0 认证线缆 - Hama 50011 的 IEEE1394 屏蔽火线 - Thomson KHC001M、 KHC012M、 KHC028M 的 RCA-RCA 屏蔽音频 / 视频线 - Hama 43330H、 42714H 插口屏蔽式立体声音频线 生热和便携式计算机 在长时间使用后, AC 适配器和计算机的底部会变热。 应避免身体持续接触发热的位置。 机箱盖的卸下和更换 卸下机箱盖进行维护和维修之前,必须断开所有电源和调制解调器线缆的连接,并取出或 禁用电池。 - 注意: 长时间使用后,计算机内的某些部件会发热。 在您插入电源并打开设备之前,必须关闭机箱。 92 激光产品符合性声明 光学设备经过测试和认证,符合国际电工委员会 IEC60825-1 和欧洲 EN60825-1 的 1 级 激光产品的标准。 1 级激光产品被认为没有危险。 此光学设备的设计使用环境为:在正常操作过程中或规定 的维护环境下,任何人都不会接触到 1 级以上激光幅射。 安装在您计算机中的光学设备经过专门设计,仅作为此类电子产品的组件使用,因此不符 合美国联邦法规 Sec. 1040.10 和 Sec. 1040.11 有关 “完整的”激活产品的适当要求。 由于接触激光幅射非常危险,在任何情况下,用户都不得尝试拆卸激光设备。 包装 本产品的包装符合 1994 年 12 月 20 日发布的欧洲环保指令 94/62/EC,相当于 1998 年 7 月 20 日发布的法国立法 Decree 98-638。 符合俄国认证 规范信息 - 93 环境 我们对环保的承诺 环境是我们产品的核心。 Gateway 承诺限制产品在其使用寿命中对环境的影响。 从设计阶段开始,通过非常严格的采购政策,对电子元件投以最大的关注以限制重金属的 重量,如铅、镉、铬、汞等。对于任何产品的任何部分,都要求供应商遵守所有的规定。 至于寿命终止产品,已采取措施来预先和促进我们所有产品的循环利用。 因此,所有使用 Gateway 的产品并重于 25 g 的塑料部件都有 ISO 11469 的标签。通过此标签,可快速识 别材料并放松其限价措施。 同样,台式计算机经专门设计,可轻松拆卸,螺丝被卡夹所 替代。 产品处置 2002/96/ 欧盟指令,即电子电器设备废弃物 (WEEE) 指令,要求废旧电子 和电器产品必须与一般的家庭生活垃圾分开处理,以推动重复利用、循环 利用和其它形式的回收利用,并降低要填埋和焚化的废弃物数量。 打叉的 垃圾箱标志是提醒您这些产品必须加以分类处置。 这些规则涉及您所有的 Gateway 产品和所有附件 ( 例如键盘、鼠标、扬声器、遥控器等 )。当您 必须对此类产品进行处理时,请咨询当地部门,确保进行正确回收,如果 要更换产品,请将旧设备退还给零售商。详情请访问 www.gateway.com/about/corp_responsibility/environment.php。 电池处置 ( 如适用 ) 处置您的设备之前,确保您已取出了任何可能放在设备中的电池。 欧洲法律规定,电池必 须从生活垃圾中收集出来,以进行分别处置。 切勿将废弃电池扔进垃圾箱。 通过电池收集 方案 ( 在适用的场合 ),或询问经销商或您所用公共设施的当地机构,对废弃电池进行处 置。 您的努力将能够对废弃电池进行安全的收集、循环利用和销毁,并将有助于环保和降 低健康危害。 - 注意:如果更换类型不正确的电池会有爆炸的危险。 依照规定处理废弃电池。 94 能源之星 Gateway 有“能源之星”认证的产品能够降低能源成本并具有环保效果而 无需牺牲功能或性能,从而为您省钱。Gateway 很自豪能够向客户提供带 “能源之星”标志的产品。 什么是 “能源之星”? 具备 “能源之星”认证的产品符合美国环保署制定的严格的节能方针,消 耗较少的能源并能够防止温室气体的排放。Gateway 承诺在全球提供的产品和服务能够帮 助客户省钱、节能和提高环境质量。我们通过较高的能效而节约更多的能源,就能更多地 降 低温 室 气体 的 排放 和 气候 变 化的 风 险。详 情 请参 见 网站 www.energystar.gov 或 www.energystar.gov/powermanagement。 - 注: 本节信息可能不适用于您的电脑。 Gateway 能源之星认证产品: - 产生较少的热量并降低冷却负荷和减轻气候变暖。 - 停止活动 10 和 30 分钟后,自动进入 “显示睡眠”和 “电脑睡眠”模式。 - 按下键盘或移动鼠标可将电脑从睡眠模式中唤醒。 - 在 “睡眠”模式下,电脑将节省 80% 以上的能源。 “能源之星”和 “能源之星”的标志是经注册的美国标志。 环境 - 95 软件使用许可 - 注:多数软件应用程序已预安装在您的 Gateway 计算机中。 它们已可使用或设置。 但是,某些则需要 CD 或 DVD 来运行。 您可以在计算机的包装中找到这些光盘。 Gateway 使用许可协议 (CD 和 / 或 DVD 产品 )。 此份原件是您使用许可的凭证。 请将其 按有价值的财产处理。 重要 ! 安装软件之前请仔细阅读。 以下使用许可协议适用于您。这是您 ( 个人或实体 ) 和 Gateway 之间签订的协议,在安装 软件后,表明您已同意受本协议中条款的约束。 如果您不同意本协议中的条款,请立即将 您在购买时为其支付全部款项的整个电脑系统、未打开的软件包 ( 如有 ) 以及随货提供的 其它物品 ( 包括书面资料或其它包装物 ) 返还。 GATEWAY 软件使用许可 1. 使用许可的授予 本 Gateway 使用许可协议 ( 以下简称“协议”) 允许您在任何一台计算机使用上述确认的 一份指定版本的 Gateway 软件 ( 可能包括至少一张 CD 或 DVD 光盘 ),前提是该软件在 任何时候只能在一台计算机上使用。 如果您有该软件的多个使用许可,则在任何时候都可 使用与所拥有的使用许可数量相同的该软件备份。 当该软件加载到临时存储器 ( 即 RAM)、永久性存储器 ( 如硬盘、 CD 和 / 或 DVD) 或该计算机的其它存储设备时,就表明 该软件 “在使用”,但将该软件安装在网络服务器中,其唯一的目的是分发给其它不 “在 使用”的计算机的情况除外。 如果预计使用该软件的用户数将超出适用的使用许可数,则 您必须有合适的机制或流程,确保目前使用该软件的人数不超过使用许可的数量。 如果该 软件为永久性安装在一台计算机的硬盘存储设备中 ( 除网络服务器外 ),一个人员使用该计 算机 80% 以上的时间,然后该人员也可以在便携式或家用计算机上使用该软件。 96 2. 著作权 该软件由 Gateway 或其供应商拥有,受美国版权法和国际条约规定的保护。 因此,您必 须将该软件按任何其它有版权的资料 ( 如书或音乐唱片 ) 处理,如果您将原始光盘仅用作 备份或归档目的,可将该软件的 CD 和 / 或 DVD 光盘部分传输 ( 如有 ) 到一个硬盘。 您不 可复制该软件的 CD 和 / 或 DVD 光盘部分或随软件提供的书面材料。 3. 其它限制 您不可出租或租赁该软件,但您可以永久性转让该软件和所附的书面材料,前提是您没有 保留拷贝以及受让人同意本协议的条款。 您不可对本软件进行反向工程、反编译或反汇 编。 本软件的任何转让必须包括最新更新和之前的所有版本。 第三方软件或自由软件使用许可信息 Gateway 预加载、嵌入在产品中或随产品提供的软件含有自由软件或第三方软件程序 ( 以 下简称 “自由软件” ),这些软件都获得 GNU 通用公共许可证 ( 以下简称 “GPL” ) 的使 用许可。” 自由软件有此标识。 您对自由软件的复制、分发和 ( 或 ) 修改应遵守 GPL 的条 款。 自由软件的分发是希望该软件得以使用,但没有任何保证;也没有任何商销性或特殊用途 适用性的暗示保证。GNU 通用公共许可证中的规定应始终得到遵守。您可直接访问 http:/ /www.gnu.org 以获得 GPL 或写信给 Free Software Foundation, Inc. 要求获得此文件。 Free Software Foundation, Inc 的地址:59 Temple Place - Suite 330, Boston, MA, 021111307, USA。 从您接受此软件开始的三年内,您书面通知我们即可免费获得一份 GPL 项下自由软件的 完整可机读源代码,但媒体、运输和处理的费用除外。 如果您有任何其它问题,请联系我们。 我们的邮寄地址是:台湾新北市汐止区新台五路 一段 88 号 8 楼。 软件使用许可 - 97 索引 A 安全防范 ............................................... 7 安全性 更新.............................................. 50 杀毒软件 ....................................... 46 C CD-ROM 充电 故障排除 ....................................... 70 检查电量 ....................................... 34 手动弹出 ....................................... 70 触控板 ................................................ 24 使用........................................ 24–24 常见问题 ............................................. 69 常见问题 请参见常见问题 存储卡读卡器 ...................................... 26 D DSL .................................................... 打印机 故障排除 ....................................... 电池 .................................................... 电池处置 ............................................. 电池组 安装 .............................................. 充电 .............................................. 电量不足 ....................................... 电量不足警告 ................................ 检查充电电量 ................................ 首次使用 ....................................... 40 70 94 94 33 33 35 34 34 32 特点.............................................. 31 卸下.............................................. 33 优化.............................................. 34 最大限度延长寿命 ......................... 31 电脑 特性.............................................. 12 指示灯 .......................................... 18 癫痫警告 ............................................. 11 电源线 .................................................. 8 调制解调器 ......................................... 40 端口.................................................... 26 E 恶意软件 ............................................. 45 98 F 防火墙 ................................................ 46 G 干扰 .................................................... 90 光标.................................................... 24 更新 规范信息 ....................................... 77, 94 Windows 自动更新 ........................ 50 H 还原 连线.............................................. 39 还原管理程序 ................................ 38 环境.................................................... 94 Recovery Management.................. 51 互联网 防火墙 .......................................... 46 J Internet 服务提供商 (ISP)..................... 39 键盘 故障排除 ....................................... 70 计算机环境 ............................................ 7 间谍软件 ............................................. 45 热键.............................................. 17 健康防范 ............................................. 10 K 可移动存储装置 ................................... 27 L LAN ( 局域网 ) ..................................... 41 亮度 热键.............................................. 16 连接 网络 .............................................. 28 浏览器 ................................................ 44 N Norton Internet Security ................. 44, 47 索引 - 99 Q 前视图 ................................................ 18 驱动器 存储卡读卡器 ................................ 26 清洁计算机 ............................................ 9 R 热键 .................................................... 17 软件 软件使用许可 ................................ 96 S 右 ................................................. 21 左 ................................................. 19 视图 前 ................................................. 19 W WiFi .................................................... Windows 使用 Windows ............................... Windows 自动更新 ........................ universal serial bus.............................. 网关 还原管理程序 ................................ 网络 .................................................... 网络连接 ............................................. 41 维护 38 50 28 38 28 41 还原管理程序 ................................ Recovery Management ................. 问题.................................................... CD-ROM ...................................... 打印机 .......................................... 键盘.............................................. 启动.............................................. 显示器 .......................................... 38 51 69 70 70 70 69 69 X 线缆 ................................................ 8, 91 显示器 故障排除 ....................................... 69 热键.............................................. 15 Y 扬声器 音频 故障排除 ....................................... 70 故障排除 ....................................... 70 热键 ........................................ 15, 16 Z 质保 ...................................................... 6 左视图 ................................................ 18 100 Ver.: 02.01.02 Manual Pengguna Gateway NE71B - 1 DAFTAR ISI Menghidupkan komputer 4 Memeriksa tingkat daya baterai ............... 41 Mengoptimalkan masa pakai baterai ....... 41 Peringatan baterai hampir habis .............. 42 Koneksi nirkabel................................................. 4 Pendaftaran........................................................ 5 Pemasangan piranti lunak.................................. 6 Manajemen daya 44 Pemulihan .......................................................... 6 Menyimpan daya ............................................. 44 Punya masalah? ................................................ 7 Dasar Komputer 8 Piranti lunak 47 Menggunakan Windows dan Piranti Lunak Keselamatan dan Kenyamanan ......................... 8 Anda ................................................................ 47 Peringatan Keselamatan............................. 8 Tawaran Keamanan Internet.................... 47 Peringatan Kesehatan .............................. 12 Gateway Recovery Management............. 47 Mengenal komputer Anda 15 Internet Pandangan atas ............................................... 16 Langkah pertama di Internet............................ Pandangan atas ............................................... 17 Melindungi komputer Anda ...................... Tombol khusus.......................................... 18 Pilih ‘Internet Service Provider Tampak depan ................................................. 21 (Penyedia Layanan Internet)’ ................... Tampak kiri....................................................... 23 Sambungan Jaringan ............................... Tampak kanan ................................................. 25 Jelajahi Internet!....................................... Tampak bawah................................................. 27 Keamanan................................................ Panel sentuh 28 Pemulihan Dasar-dasar panel sentuh................................ 28 Membuat cadangan pemulihan ....................... Gestur panel sentuh......................................... 29 Membuat driver dan cadangan aplikasi........... Memutakhirkan komputer Anda 30 Memulihkan sistem Anda ................................ Menginstal ulang driver dan Aplikasi........ Berekspansi melalui pilihan.............................. 30 Mengembalikan ke potret sistem Pilihan konektivitas ................................... 30 sebelumnya.............................................. Sumber daya 36 Mengembalikan sistem Anda ke kondisi Adaptor Daya AC ............................................. 36 pabrik ....................................................... Unit baterai....................................................... 37 Memulihkan dari dalam Windows ............ Karakteristik unit baterai ........................... 37 Memulihkan dari cadangan pemulihan Mengganti unit baterai .............................. 39 Anda......................................................... Memasang dan melepaskan unit baterai .. 40 Mengisi daya baterai................................. 40 2 48 48 48 48 51 54 55 66 67 70 73 74 77 79 80 84 Tanya jawab 88 Tip dan petunjuk untuk menggunakan Windows 8........................................................ 91 Ada tiga konsep yang mungkin perlu Anda ingat................................................. 91 Bagaimana saya dapat mengakses charms? .................................................... 91 Bagaimana cara Mulai? ............................ 91 Bagaimana cara melompat di antara aplikasi? .................................................... 92 Bagaimana cara mematikan komputer? ... 92 Mengapa ada antarmuka baru?................ 92 Bagaimana cara membuka komputer? ..... 93 Bagaimana cara memersonalisasi komputer? ................................................. 93 Saya ingin menggunakan Windows dengan cara yang sudah biasa bagi saya – kembalikan desktop saya! ............. 94 Di mana aplikasi saya? ............................ Apakah (akun) Microsoft ID itu?............... Bagaimana cara menambahkan favorit ke Internet Explorer?................................ Bagaimana cara memeriksa ketersediaan pemutakhiran Windows? .... Di mana terdapat informasi selengkapnya? ......................................... Informasi Peraturan 94 96 96 97 97 98 Lingkungan 117 Lisensi Piranti lunak 120 Indeks 123 Hak cipta © 2012. Hak cipta dilindungi undang-undang. Gateway NE71B Manual Pengguna Revisi ini: 20 Juli 2012 Kunjungi registration.gateway.com untuk mendapat manfaat sebagai seorang pelanggan Gateway. Pendapat: Semua diagram hanya digunakan sebagai referensi. Desain sesungguhnya mungkin berbeda. Daftar Isi - 3 MENGHIDUPKAN KOMPUTER Terima kasih Anda telah membeli komputer ini Gateway! Panduan ini dibuat untuk memperkenalkan Anda dengan fitur komputer dan membantu Anda dalam pengalaman berkomputer. Setelah mempersiapkan dan menghidupkan komputer Anda seperti diperlihatkan pada petunjuk persiapan, maka Anda ditanya yang akan membantu Anda menyambung dengan Internet. Kemudian komputer Anda akan mengkonfigurasikan piranti lunak terpasang. KONEKSI NIRKABEL Untuk menyambung ke jaringan nirkabel, pertama cek fitur nirkabel pada komputer Anda yang harus aktif, dan router atau modem yang ingin Anda sambungkan juga telah dikonfigurasi dengan benar. • Jika nirkabel tidak aktif, tekan tombol Windows ( ) + W, ketik “Nirkabel” lalu klik Nirkabel. Klik sakelar tombol pada Wi-Fi untuk mengaktifkan sambungan nirkabel. Klik lagi untuk menonaktifkan. • Untuk menyambungkan ke jaringan, tekan tombol Windows ( ) + W, ketik "Nirkabel" lalu klik Sambungkan ke jaringan. Pilih jaringan Anda dan masukkan sandi jika diminta. • Setelah sedikit kelambatan, komputer Anda seharusnya dapat menyambung dengan Internet. 4 Jika jaringan Anda belum terdeteksi atau komputer Anda belum menyambung dengan Internet, harap rujuk dokumen ISP atau router Anda. Setelah komputer Anda hidup dan Anda bisa menggunakannya, buka Internet Explorer dan ikuti petunjuknya. Cara lain, gunakan kabel jaringan untuk menyambung langsung dengan port jaringan di router Anda. Harap rujuk dengan panduan ISP atau router Anda. PENDAFTARAN Ketika Anda menggunakan komputer untuk pertama kalinya, Anda dianjurkan untuk segera meregistrasikan komputer. Dengan registrasi ini Anda akan memperoleh keuntungan yang bermanfaat, seperti: • Layanan lebih cepat dari perwakilan kami yang terlatih. • Keanggotaan dalam komunitas Gateway: menerima promosi dan berpartisipasi dalam survei pelanggan. • Berita terbaru dari Gateway. Cara Mendaftar Selama pengawalan (startup) komputer untuk pertama kalinya, sebuah jendela muncul mengundang Anda untuk melakukan registrasi. Harap isi informasi yang diperlukan dan klik Berikut. Jendela kedua yang akan Anda lihat berisi ruas opsional yang akan membantu kami memberi Anda pengalaman layanan pelanggan yang lebih menyenangkan. Menghidupkan komputer - 5 Opsi Lain Cara lain untuk meregistrasikan produk Gateway Anda adalah dengan mengunjungi situs web kami di register.gateway.com. Pilih negara Anda dan ikuti petunjuknya yang sederhana. Setelah kami menerima registrasi produk Anda, email konfirmasi yang berisi data penting akan dikirimkan kepada Anda. Simpan data tersebut di tempat aman. PEMASANGAN PIRANTI LUNAK Komputer Anda akan otomatis menginstal piranti lunak dan mempersiapkan komputer untuk digunakan. Hal ini butuh waktu beberapa lama, harap jangan mematikan komputer, tunggu sampai instalasi selesai. PEMULIHAN Anda secepatnya bila mungkin harus membuat disk pemulihan. Program Gateway Recovery Management tersedia untuk membuat disk pemulihan dan kemudian dapat memperbaiki atau menginstal ulang aplikasi dan driver diberikan oleh Gateway. 6 PUNYA MASALAH? Gateway berikan beberapa pilihan untuk membantu pembelian Anda. Gateway dukungan Pastikan Anda menulis nomor seri, tanggal dan tempat pembelian serta nama model komputer Anda di sampul panduan ini; simpan bukti pembelian Anda. Jika Anda menghubungi kami, tulis setiap pesan kesalahan yang menyebabkan masalah, dan tempatkan komputer di depan Anda serta aktifkan jika mungkin. Dengan menyiapkan item ini ketika menghubungi kami akan memastikan layanan yang lebih cepat dan lebih baik. Gateway situs web Ingatlah untuk mengunjungi www.gateway.com - Tandai bagian dukungan untuk mendapatkan informasi terbaru, bantuan, driver dan unduhan. Jaminan dan informasi kontak Anda dapat menemukan informasi tentang jaminan komputer Anda dan cara menghubungi dukungan teknis pada Jaminan komputer Anda. Menghidupkan komputer - 7 DASAR KOMPUTER KESELAMATAN DAN KENYAMANAN Peringatan Keselamatan Ikuti panduan di bawah ini untuk menggunakan komputer Anda dengan nyaman dan menghindari masalah kesehatan. Lingkungan Komputer Pastikan bahwa komputer: • Digunakan pada permukaan, penyangga atau meja yang stabil. Jika jatuh, komputer dapat menjadi rusak berat. • Tidak digunakan di atas permukaan yang bergetar, atau digunakan ketika berolahraga, senam atau aktivitas lainnya dalam lingkungan yang dinamis. Getaran atau gerakan dapat melonggarkan pengencang, merusak komponen internal dan bahkan menyebabkan baterai bocor. • Jauh dari sinar matahari langsung dan sumber panas. • Jauh dari medan magnet atau perangkat yang menghasilkan listrik statis. • Berjarak setidaknya 30 sentimeter (satu kaki) dari ponsel. • Tidak berada di lingkungan berdebu atau lembab. • Tidak digunakan di dekat air. Jangan sekali-kali menumpahkan cairan apapun pada komputer Anda. • Tidak diletakkan di atas karpet atau permukaan lainnya yang mempunyai muatan listrik. 8 Catatan • Slot dan rongga tersedia sebagai ventilasi untuk menjamin keandalan pengoperasian dan melindungi produk dari panas yang berlebihan. Rongga tersebut tidak boleh tertutup atau terhalang. Rongga tidak boleh terhalang dengan meletakkan produk ini di atas kasur, sofa, matras, atau permukaan lainnya yang sejenis. Produk ini tidak boleh diletakkan di dekat atau di atas radiator maupun sumber panas, atau instalasi terpasang, kecuali jika terdapat ventilasi yang memadai. • Jangan masukkan benda apapun ke dalam produk ini melalui slot kabinet karena dapat menyentuh titik tegangan berbahaya atau menyebabkan hubungan arus pendek yang akan menimbulkan kebakaran atau sengatan arus listrik. Jangan tumpahkan cairan apapun pada atau ke dalam produk. • Untuk menghindari kerusakan komponen internal dan mencegah kebocoran baterai, jangan letakkan produk ini di atas permukaan yang bergetar. • Jangan gunakan produk ini di area yang menimbulkan guncangan, hentakan, atau getaran, karena dapat menyebabkan hubungan singkat atau kerusakan perangkat rotor, HDD, Drive optik, bahkan bahaya kontak luar dari unit baterai lithium. Kabel Pastikan bahwa: • Kabel tidak tegang dan bahwa tidak ada risiko orang akan berjalan di atas atau tersandung kabel. Dasar Komputer - 9 • Perangkat lain tidak menggencet kabel. • Kabel daya tersambung ke komputer sebelum menyambungkan kabel daya ke stopkontak listrik. • Kabel daya dicabut dari stopkontak sebelum mencabut kabel daya dari komputer. • Kabel daya dengan tiga kaki disambungkan ke stopkontak yang diardekan. • Stopkontak mudah diakses dan berada sedekat mungkin dengan komputer (jangan memberi muatan berlebih dengan terlalu banyak adaptor). Jika komputer Anda menggunakan adaptor listrik eksternal: • Jangan menutupi atau menempatkan benda di atas adaptor listrik. Biarkan adaptor mendingin dengan baik selama penggunaan dengan menjauhkannya dari benda lain. • Hanya gunakan adaptor listrik yang disertakan dengan komputer Anda. Kendati adaptor lain mungkin kelihatan serupa, menggunakan adaptor lain dapat merusak komputer Anda. Jika diperlukan penggantian, hanya gunakan suku cadang yang disetujui untuk digunakan pada komputer Anda. Membersihkan Komputer Anda • Selalu cabut komputer Anda membersihkannya. dari stopkontak sebelum • Jangan menggunakan pembersih cairan atau aerosol, gunakan kain lembab. 10 • Jangan sekali-kali menyemprotkan produk pembersih langsung ke layar. • Jika Anda menumpahkan cairan ke komputer Anda, segera matikan komputer, cabut adaptor listriknya, lepaskan baterai dan pastikan komputer benar-benar kering sebelum Anda menghidupkannya lagi. Tunggu selama semalam jika perlu. Catatan: Jika komputer Anda dilengkapi dengan slot untuk kartu memori atau perangkat ekspansi, slot kartu tersebut mungkin diisi dengan kartu tiruan dari plastik (kartu dummy). Kartu tiruan ini akan melindungi slot yang tidak digunakan dari debu, benda logam, atau partikel lainnya. Simpan kartu tiruan tersebut untuk dipasang lagi saat tidak ada kartu dalam slot. Menyervis Komputer Anda Jangan mencoba memperbaiki sendiri komputer Anda, karena membuka atau menutup penutupnya, bisa membuat Anda terpapar tegangan berbahaya atau risiko lainnya. Serahkan seluruh perbaikan kepada teknisi servis ahli. Cabut konektor komputer ini dari stopkontak, kemudian bawa ke teknisi servis ahli bila: • kabel daya atau konektor rusak, terpotong, atau terkelupas, • cairan tertumpah ke produk, • produk terkena hujan atau air, • produk terjatuh atau casing rusak, • performa produk menunjukkan perubahan nyata, Dasar Komputer - 11 • produk tidak berfungsi seperti biasa setelah menjalankan petunjuk pengoperasian. Catatan: Atur hanya kontrol yang tertera pada petunjuk pengoperasian, karena pengaturan kontrol lainnya yang tidak sesuai dapat menyebabkan kerusakan dan sering kali menyulitkan teknisi ahli untuk mengembalikan produk ke kondisi normal. Peringatan Kesehatan • Permukaan bagian bawah, daerah di sekitar celah ventilasi dan adaptor AC mungkin menjadi panas. Guna menghindari cedera, pastikan kulit atau tubuh Anda jangan sampai tersentuh bagian tersebut. • Perangkat ini beserta perangkat tambahannya mungkin dilengkapi dengan beberapa komponen kecil. Jauhkan dari jangkauan anak-anak. • Komputer dan aksesori mungkin terdiri dari suku cadang kecil. Jauhkan dari jangkauan anak-anak. • Jika Anda bekerja atau bermain selama berjam-jam, pastikan Anda beristirahat secara teratur. Sesekali waktu palingkan penglihatan dari layar komputer. Jangan menggunakan komputer jika Anda lelah. • Atur komputer Anda sehingga Anda dapat bekerja dengan posisi alami dan relaks. Letakkan benda yang sering Anda gunakan di tempat yang mudah dijangkau. • Letakkan komputer langsung di depan Anda untuk keselamatan dan kenyamanan yang lebih baik. Patikan kenyamanan ketinggian keyboard dan panel sentuh. Layar hendaknya sekitar 45-70 cm (18-30 inci) dari mata Anda. 12 Sambil duduk, ketika Anda menggunakan komputer Anda yang berada di meja dalam jangka waktu lama, demi kenyamanan bisa lebih baik, belilah keyboard eksternal. • Untuk melindungi pendengaran Anda, ketika menggunakan pengeras suara atau headphone, naikkan volume secara perlahan-lahan sampai Anda dapat mendengar dengan jelas dan nyaman, jangan menaikkan volume yang telah dirasa sesuai oleh telinga Anda. Hindari mendengarkan dengan volume tinggi dalam waktu lama. Jangan menaikkan volume untuk menghilangkan suara bising sekitar Anda, kurangi volume jika Anda tidak dapat mendengar orang yang berbicara di dekat Anda. • Bagian bawah komputer, adaptor daya, dan udara dari slot ventilasi mungkin menjadi panas selama penggunaan. Hindari kontak fisik yang terus menerus dan jangan letakkan komputer di atas pangkuan Anda saat komputer digunakan. • Pastikan slot dan rongga ventilasi tidak pernah terhalang atau tertutup. Jangan meletakkan komputer di atas permukaan lembut (seperti karpet, kursi atau tempat tidur) yang bisa menghalangi slot ventilasi. • Jangan masukkan benda apapun ke dalam ventilasi melalui slot casing karena benda tersebut dapat menyentuh titik tegangan berbahaya atau menyebabkan hubungan arus pendek yang akan menimbulkan kebakaran atau sengatan arus listrik. Dasar Komputer - 13 • Beberapa gangguan tangan, pergelangan tangan, leher, bahu, kaki dan punggung mungkin terkait, atau diperparah, oleh tindakan yang berulang-ulang. Untuk mengurangi risiko mengalami gangguan ini, ketik dengan pergelangan tangan lurus lalu tangan dan pergelangan tangan Anda mengambang di atas keyboard. Jika Anda merasa nyeri, geli, kesemutan atau ketidaknyamanan lainnya, hubungi dokter Anda. • Kami menasihati orang tua agar memantau penggunaan permainan komputer oleh anak-anak mereka. Jika anak Anda mengalami gejala berikut: pusing, pandangan kabur, mata atau otot berkedut, hilang kesadaran, bingung, gerakan atau kejang tak sadar, SEGERA hentikan penggunaan dan konsultasikan ke dokter. Ini mungkin terjadi sekalipun orang yang bersangkutan tidak mempunyai riwayat medis epilepsi. 14 MENGENAL KOMPUTER ANDA Setelah mempersiapkan komputer seperti pada gambar dalam petunjuk, kami akan menunjukkan bagian-bagian komputer Gateway baru Anda. Gateway NE71B Mengenal komputer Anda - 15 PANDANGAN ATAS 1 2 3 # Ikon Item Keterangan 1 Kamera web Webcam untuk komunikasi video. Lampu di sebelah Kamera web menunjukkan bahwa kamera aktif. 2 Mikrofon Mikrofon internal untuk perekaman suara. 3 Layar tampilan Juga disebut Liquid-Crystal Display (LCD), menampilkan keluaran komputer. 16 PANDANGAN ATAS 1 5 2 3 4 # 1 Ikon Item Indikator/tombol daya Keterangan Menghidupkan/mematikan komputer. Menunjukkan status daya komputer. Untuk memasukkan data ke komputer. 2 Keyboard 3 Panel sentuh - Tombol khusus halaman 18. dijelaskan pada Perangkat penunjuk sensitif sentuhan yang berfungsi seperti mouse komputer. Mengenal komputer Anda - 17 # Ikon Item Keterangan 4 Tombol klik (kiri dan kanan) Sisi kiri dan kanan fungsi tombol seperti tombol pemilihan kiri dan kanan. 5 Pengeras suara Menghasilkan keluaran audio stereo. Tombol khusus Keyboard komputer Anda terdapat tombol yang mengaktifkan fungsi khusus. Fungsi setiap tombol dengan jelas diberi tanda dengan suatu ikon. Ikon Fn 18 Fungsi Keterangan Tombol pintas sebagai fungsi tambahan Aktifkan fungsi tambahan pada tombol tertentu. Mis, tekan tombol Fn untuk mengaktifkan tombol F1 sampai F12. Bantuan Buka menu Bantuan. Cadangan Dengan alat ini Anda dapat membuat salinan cadangan seluruh sistem Anda, atau hanya file dan folder tertentu. Buat jadwal teratur atau buat salinan bila Anda inginkan. Komunikasi Mengaktifkan/menonaktifkan perangkat komunikasi komputer. Tombol layar Mengalihkan output tampilan antara layar tampilan, monitor eksternal (jika dipasang), dan keduanya. Ikon Fungsi Keterangan Layar kosong Menonaktifkan cahaya latar layar tampilan untuk menghemat daya. Tekan tombol apa saja untuk kembali. Tombol panel sentuh Mengaktifkan dan menonaktifkan panel sentuh internal. Putar/Jeda Memutar atau menjeda file media yang dipilih. Berhenti Menghentikan pemutaran file media yang dipilih. Sebelumnya Kembali ke file media sebelumnya. Berikutnya Lompat ke file media berikutnya. Kecerahan berkurang Mengurangi kecerahan layar. Kecerahan meningkat Meningkatkan kecerahan layar. Buka aplikasi Jejaring Sosial. Jejaring Sosial Volume naik - Jika aplikasi ini tidak diinstal, tombol tersebut akan memulai aplikasi perpesanan instan Anda. Menaikkan volume suara. Mengenal komputer Anda - 19 Ikon Fungsi Keterangan Volume turun Menurunkan volume suara. Tombol pengeras suara Mengaktifkan dan menonaktifkan pengeras suara. Tombol pintas Komputer menggunakan tombol pintas (kombinasi tombol) untuk mengakses tombol fungsi dan perintah navigasi. Untuk mengaktifkan tombol pintas, tekan terus tombol Fn (kiri bawah) sebelum menekan tombol lain pada kombinasi tombol pintas. Tombol pintas Fungsi Keterangan Fn + Tombol khusus (lihat halaman 18) Tombol Fungsi Mengaktifkan tombol F1 sampai F12. Fn + Beranda Gulir mulai awal dokumen. Fn + Akhir Gulir pada akhir dokumen. Fn + Page Up Gulir ke atas halaman pada suatu dokumen. Fn + Page Down Gulir ke bawah halaman pada suatu dokumen. - Catatan: Tidak perlu menekan tombol Fn untuk menggunakan tombol fungsi F1 sampai F12 ketika memulai komputer atau ketika menggunakan BIOS. Untuk menukar tombol pintas dan fungsi khusus tombol F1 sampai F12, ganti 20 setelan tombol fungsi di BIOS (untuk membuka BIOS tekan F2 ketika memulai komputer Anda, kemudian pilih menu Utama dan ganti reaksi tombol Fungsi menjadi tombol Fungsi). TAMPAK DEPAN 1 # Ikon 2 Item Indikator daya Keterangan Menunjukkan status daya komputer. Menunjukkan status baterai komputer. Indikator baterai 1 - Mengisi daya: Lampu menyala kuning kecokelatan bila daya baterai sedang diisi. - Daya terisi penuh: Lampu menyala biru bila dalam mode AC. Indikator HDD Menunjukkan bila hard disk drive aktif. Indikator komunikasi Menunjukkan status perangkat konektivitas nirkabel komputer. Mengenal komputer Anda - 21 # 2 22 Ikon Item Pembaca kartu Multi-in-1 Keterangan Menerima Secure Digital (SD), MultiMediaCard (MMC), Memory Stick PRO (MS PRO), xD-Picture Card (xD). - Tekan untuk melepas/memasang kartu. Hanya satu kartu yang bisa beroperasi saat Anda menggunakannya. - Catatan: Indikator panel depan akan terlihat meskipun penutup komputer dalam keadaan tertutup. TAMPAK KIRI 1 # Ikon 2 Item Slot kunci Kensington 1 3 4 5 6 Keterangan Menghubungkan ke kunci keamanan komputer yang kompatibel dengan kunci Kensington. - Lilitkan kabel kunci keamanan komputer ke benda sekitar yang tidak dapat bergerak, misalnya, meja atau gagang laci yang terkunci. Masukkan kunci ke dalam lubang, kemudian putar kunci untuk menguncinya. Juga tersedia beberapa model tanpa kunci. Biarkan komputer tetap dingin. 2 Slot ventilasi dan kipas pendingin 3 Port ethernet (RJ-45) Menghubungkan ke jaringan berbasis Ethernet 10/100/1000. 4 Port tampilan (VGA) eksternal Menghubungkan perangkat tampilan (mis., monitor eksternal, proyektor LCD). - Jangan tutup atau halangi lubangnya. Mengenal komputer Anda - 23 # 5 Ikon Item Port HDMI Keterangan Mendukung koneksi video digital definisi tinggi. Menghubungkan ke perangkat USB. 6 Port USB - Jika sebuah port berwarna hitam, port itu kompatibel dengan USB 2.0, jika port itu berwarna biru, port itu juga kompatibel dengan USB 3.0 (lihat di bawah). Informasi mengenai USB 3.0 • Kompatibel dengan USB 3.0 dan perangkat sebelumnya. • Untuk kinerja optimal, gunakan perangkat USB 3.0 besertifikat. • Ditentukan oleh spesifikasi USB 3.0 (SuperSpeed USB). 24 TAMPAK KANAN 1 # Ikon 2 Item 3 4 56 7 Keterangan Menghubungkan ke perangkat line-out audio (mis. pengeras suara, headphone). 1 Jack headphone/ pengeras suara Jack mikrofon - Mendukung headset 3,5 mm yang kompatibel dengan mikrofon terintegrasi (misalnya, headset perangkat genggam cerdas Acer). Menerima input dari mikrofon eksternal. Menghubungkan ke perangkat USB. - Jika sebuah port berwarna hitam, port itu kompatibel dengan USB 2.0, jika port itu berwarna biru, port itu juga kompatibel dengan USB 3.0 (lihat di bawah). 2 Port USB 3 Drive optik Drive optik internal; menerima CD atau DVD. 4 Indikator akses disk optik Menyala saat drive optik aktif. Mengenal komputer Anda - 25 # 5 Ikon Item Tombol pengeluaran drive optik 6 Lubang pengeluaran darurat 7 Jack DC-in Keterangan Mengeluarkan disk optik dari drive. Mengeluarkan nampan drive optik saat komputer mati. - Dengan cermat masukkan klip kertas lurus untuk mengeluarkan nampan drive optik. Sambungkan adaptor AC komputer Anda. Informasi mengenai USB 3.0 • Kompatibel dengan USB 3.0 dan perangkat sebelumnya. • Untuk kinerja optimal, gunakan perangkat USB 3.0 besertifikat. • Ditentukan oleh spesifikasi USB 3.0 (SuperSpeed USB). 26 TAMPAK BAWAH 1 2 4 3 # Ikon Item Keterangan 1 Tempat baterai Tempat unit baterai komputer. 2 Penutup pelepas baterai Untuk melepaskan baterai. Masukkan alat yang sesuai lalu seret untuk melepaskannya. Kompartemen memori Untuk memasang memori utama komputer. Bay hard disk Untuk memasang hard disk komputer (dipasang dengan sekrup). 3 4 Slot ventilasi dan kipas pendingin Biarkan komputer tetap dingin. - Jangan tutup atau halangi lubangnya. Mengenal komputer Anda - 27 PANEL SENTUH DASAR-DASAR PANEL SENTUH Panel sentuh mengontrol panah (atau 'kursor') pada layar. Ketika Anda menggeser jari Anda di seluruh panel sentuh, kursor akan mengikuti gerakan ini. Tekan tombol kiri atau kanan yang terdapat di bawah panel sentuh untuk memilih dan menjalankan fungsi eksekusi. Kedua area tersebut serupa dengan tombol kiri dan kanan pada mouse. Mengetuk panel sentuh sama dengan mengklik sisi kiri tombol. Catatan: Panel sentuh peka terhadap gerakan jari; semakin ringan sentuhan, semakin peka. Jaga panel sentuh dan jari Anda tetap kering dan bersih. Kursor dikontrol dengan beberapa gestur dasar: • Geseran satu jari: Geser jari Anda pada panel sentuh untuk menggerakkan kursor. • Ketukan satu jari: Ketuk ringan panel sentuh dengan jari, untuk melakukan sebuah ‘klik’, yang akan memilih atau menjalankan sebuah item. Ulangi mengetuk dengan cepat untuk melakukan ketukan dua kali atau 'klik dua kali'. • Menarik: Tekan dan tahan sisi kiri tombol pemilihan, atau ketuk dua kali di mana saja di panel sentuh, kemudian gesekkan satu jari pada panel sentuh untuk memilih di suatu area. 28 GESTUR PANEL SENTUH Windows 8 dan banyak aplikasi mendukung gestur panel sentuh yang menggunakan satu atau beberapa jari. Catatan: Dukungan untuk gestur panel sentuh bergantung pada aplikasi aktif. Dengan begitu memungkinkan Anda mengendalikan aplikasi dengan beberapa gestur sederhana, seperti: • Geser masuk dari tepi: Akses alat-alat Windows dengan menggeser ke bagian tengah panel sentuh dari kanan, atas atau kiri. • Geser masuk dari tepi kanan: Mengubah charms. • Geser masuk dari tepi atas: Mengubah perintah aplikasi. • Geser masuk dari tepi kiri: Mengalihkan ke aplikasi sebelumnya. • Geseran dua jari: Bergulir di antara halaman web, dokumen dan daftar putar dengan cepat, dengan meletakkan dua jari pada panel sentuh dan menggerakkan kedua dua jari tersebut ke arah mana saja. • Geseran dua jari: Memperbesar dan memperkecil foto, peta dan dokumen dengan gerakan jari dan jempol yang sederhana. Panel sentuh - 29 MEMUTAKHIRKAN ANDA KOMPUTER BEREKSPANSI MELALUI PILIHAN Komputer Anda ini memberikan banyak opsi pengalaman berkomputer yang lengkap. Pilihan konektivitas Melalui sejumlah port yang tersedia, Anda dapat menyambungkan perangkat periferal ke komputer Anda. Untuk petunjuk tentang cara menyambungkan perangkat eksternal lainnya ke komputer, bacalah bagian berikut ini. Pembaca kartu memori Kartu memori digunakan dalam beragam pilihan kamera digital, PDA, pemutar MP3 dan ponsel. Memasukkan kartu memori 1. Luruskan kartu sehingga konektor mengarah ke port, dengan konektor menghadap ke bawah. 2. Dorong kartu dengan hati-hati ke dalam port. Jika Anda merasa perlu menggunakan sedikit tenaga untuk memasukkan kartu tersebut, coba sedikit arahkan kembali kartu tersebut. 30 3. Dorong kartu tersebut hingga terpasang dengan benar hingga terdengar suara klik. Kartu menonjol beberapa milimeter dari slotnya. Jika kartu berisi beberapa file, jendela Windows Auto Play akan muncul (ini bergantung pada isi kartu) dan meminta Anda apakah Anda ingin menggunakan sebuah program untuk mengakses isi kartu tersebut. Pilih sebuah opsi di sini jika opsi tersebut sesuai, jika tidak pilih Batal. Jika kartu tidak berisi file, atau file yang tidak dikenal, jendela akan terbuka menunjukkan isi kartu tersebut. Kartu SD, SDHC dan SDXC Dengan menggunakan desain keseluruhan yang sama pada tipe kartu SD yang berbeda, terdapat kapasitas yang berlainan. Kartu SD dapat menampung hingga 4 GB, kartu SDHC dapat menampung hingga 32 GB, sedangkan kartu SDXC dapat menampung hingga 2048 GB (2TB). Komputer Anda dapat memberikan pembaca kartu yang kompatibel dengan SDHC atau SDXC. Catatan: Kartu memori SDXC hanya dapat digunakan pada pembaca yang kompatibel dengan SDXC; sedangkan kartu SD dan SDHC bisa digunakan pada salah satu diantara kedua tipe tersebut. Memutakhirkan komputer Anda - 31 Melepas kartu dari pembaca kartu memori 1. Klik panah Tampilkan ikon tersembunyi di Area Notifikasi (di sebelah jam). 2 2. Klik ikon Copot Peranti Keras Dengan Aman. 3. Klik Keluarkan Kartu SD (atau nama perangkat). 4. Tunggu sampai muncul pesan Aman untuk Mencopot Piranti Keras. 5. Lepaskan kartu. 1 Jaringan terpasang Fitur jaringan terpasang tersedia untuk menghubungkan komputer ke jaringan berbasis Ethernet. Untuk menggunakan fitur jaringan, pasang kabel Ethernet dari port Ethernet (RJ-45) pada chassis komputer ke konektor jaringan atau hub di jaringan Anda. 32 3 USB (Universal Serial Bus) Port USB 2.0 adalah serial bus berkecepatan tinggi untuk menyambungkan periferal USB tanpa mengambil sumber daya sistem yang lebih penting. Ada komputer tertentu dilengkapi dengan lebih dari satu port USB 3.0. Port USB 3.0 mirip dengan port USB standar, kecuali port USB 3.0 dilengkapi dengan koneksi internal tambahan yang berwarna biru. Anda bisa menggunakan perangkat kompatibel USB 3.0 untuk memperoleh manfaat dengan kecepatan transfer yang lebih cepat. Port video Hubungkan ke monitor dengan port VGA atau DVI (tipe koneksi yang didukung tergantung pada konfigurasi komputer Anda). Kabel yang sesuai bisanya disertakan dengan monitor. Ikuti langkah ini untuk menghubungkan monitor ke komputer Anda: 1. Periksa bahwa komputer telah dimatikan dan sakelar daya monitor dimatikan. 2. Pasang kabel video ke port monitor pada komputer. Kencangkan koneksi kabel dengan sekrup yang diberikan. 3. Hubungkan kabel daya monitor dan colokkan kabel daya ke stopkontak yang dibumikan dengan benar. Memutakhirkan komputer Anda - 33 4. Ikuti setiap petunjuk pengaturan pada panduan pengguna monitor. 5. Hidupkan monitor, kemudian hidupkan komputer. 6. Pastikan bahwa resolusi dan refresh rate aktif tidak melebihi spesifikasi monitor. Jika perlu, ubah pengaturan tampilan yang digunakan oleh komputer. Catatan: Untuk mengakses kontrol tampilan, tekan tombol Windows ( ) + W, ketik “Tampilan” lalu klik Tampilan. High-Definition Multimedia Interface (hanya untuk model tertentu) Antarmuka Multimedia Definisi Tinggi (HDMI) adalah sebuah antarmuka yang didukung industri, tidak dimampatkan, audio/video serba digital. HDMI memberi antarmuka di antara segala sumber audio/video digital yang kompatibel, seperti settop box, pemutar DVD, dan penerima A/V serta audio digital dan/atau monitor video yang kompatibel, seperti televisi digital (DTV), melalui satu buah kabel. Gunakan port HDMI pada komputer Anda untuk melakukan koneksi dengan peralatan audio dan video mutakhir. Dengan penggunaan kabel tunggal bisa tercipta pengaturan yang rapi dan koneksi yang cepat. 34 Headphone dan mikrofon Dengan dua port ini dapat menyambung dengan perangkat audio. Gunakan port headphone untuk dicolokkan dengan headphone stereo atau pengeras suara aktif. Dengan mencolokkan perangkat audio pada port headphone akan menonaktifkan pengeras suara internal. Gunakan port mikrofon untuk menyambungnya dengan mikrofon eksternal untuk perekaman mono; dengan mencolokkan mikrofon eksternal akan menonaktifkan mikrofon internal. Memutakhirkan komputer Anda - 35 SUMBER DAYA ADAPTOR DAYA AC Komputer Anda dapat menggunakan adaptor daya (power 'brick') eksternal yang disertakan untuk berjalan pada daya AC. Kabel daya yang disediakan sesuai dengan negara tempat pembelian komputer. Adaptor daya memberi daya yang memadai untuk menjalankan komputer Anda dan pada saat yang sama mengisi ulang daya baterai kemasan. Perhatian: Jangan menutupi atau menempatkan benda di atas adaptor AC. Jauhkan adaptor dari benda lain memungkinkan adaptor mendingin dengan baik selama penggunaan. 36 Hanya gunakan adaptor AC yang disertakan dengan komputer Anda. Kendati adaptor lain mungkin kelihatan serupa, menggunakan adaptor lain dapat merusak komputer Anda. Peringatan: Adaptor daya dan bagian bawah komputer dapat menjadi panas selama penggunaan yang lama. Hal ini adalah normal, tetapi dapat menyebabkan cedera karena kontak yang lama. UNIT BATERAI Komputer menggunakan unit baterai yang penggunaan lama sebelum daya diisi kembali. memberikan waktu Karakteristik unit baterai Berikut adalah karakteristik unit baterai: • Menggunakan standar teknologi baterai saat ini. • Memberikan peringatan baterai hampir habis. Baterai akan terisi ulang setiap kali Anda menghubungkan komputer ke adaptor AC. Komputer Anda mendukung pengisian daya saat digunakan, sehingga Anda dapat mengisi ulang daya baterai sewaktu mengoperasikan komputer. Namun, pengisian ulang daya baterai saat komputer dimatikan akan sangat mempersingkat waktu pengisian daya. Baterai akan bermanfaat bila Anda bepergian atau saat listrik mati. Sebaiknya miliki unit baterai yang terisi penuh daya sebagai cadangan. Untuk informasi lengkap tentang pemesanan unit baterai cadangan, hubungi dealer Anda. Sumber daya - 37 Memaksimalkan masa pakai baterai Sama seperti semua baterai lainnya, performa bateraikomputer Anda akan menurun seiring waktu. Artinya, performa baterai akan menurun akibat waktu dan penggunaan. Untuk memaksimalkan masa pakaibaterai, sebaiknya ikuti saran yang dijelaskan di bawah ini. Mempersiapkan unit baterai baru Sebelum menggunakan unit baterai untuk pertama kalinya, Andaharus mengikuti proses “persiapan”: 1. Pasang baterai baru tanpa menghidupkan komputer. 2. Sambungkan adaptor AC, lalu isi penuh daya baterai. 3. Lepaskan sambungan adaptor AC. 4. Hidupkan komputer, lalu operasikan komputer menggunakan daya baterai. 5. Habiskan daya baterai. 6. Sambungkan kembali adaptor AC, lalu isi penuh daya baterai. Ulangi langkah-langkah tersebut hingga daya baterai terisi dan habis sebanyak tiga kali. Gunakan proses persiapan ini untuk semua baterai baru atau jika baterai telah lama tidak digunakan. Jika komputer akan disimpan selama lebih dari dua minggu, sebaiknya lepaskan unit baterai dari komputer. 38 Peringatan: Jangan biarkan unit baterai berada dalam suhu di bawah 0°C (32°F) atau di atas 45°C (113°F). Suhu berlebihan dapat berdampak buruk bagi unit baterai. Dengan mengikuti proses persiapan baterai berarti Anda mempersiapkan baterai untuk menerima pengisian daya semaksimal mungkin. Jika Anda tidak mengikuti prosedur tersebut, maka pengisian daya baterai tidak akan maksimal dan akan mempersingkat efektivitas masa pakai baterai. Berikut adalah pola penggunaan yang akan berdampak buruk terhadap masa pakai baterai: • Menggunakan komputer dengan daya AC tetap dan baterai terpasang. Jika Anda ingin menggunakan daya AC tetap, sebaiknya lepaskan unit baterai setelah daya baterai terisi penuh. • Jangan habiskan daya dan isi ulang daya baterai secara berlebihan, seperti dijelaskan di atas. • Penggunaan rutin; semakin sering menggunakan baterai, maka akan semakin cepat efektivitas masa pakai berakhir. Masa pakai baterai komputer standar adalah sekitar 300 kali pengisian daya. Mengganti unit baterai Notebook ini menggunakan baterai lithium. Ganti baterai dengan tipe sama yang dikirim bersama produk Anda. Bila menggunakan baterai lain maka ada kemungkinan terjadi bahaya kebakaran atau timbul ledakan. Sumber daya - 39 Peringatan: Baterai dapat meledak jika tidak ditangani dengan benar. Jangan bongkar atau buang baterai ke dalam api. Jauhkan dari jangkauan anak-anak. Patuhi peraturan setempat bila akan membuang baterai bekas. Memasang dan melepaskan unit baterai Penting! Sebelum melepaskan baterai dari unit, sambungkan adaptor AC jika Anda ingin terus menggunakan komputer. Jika tidak, matikan komputer lebih dulu. Untuk memasang unit baterai: 1. Sejajarkan baterai dengan tempatnya yang terbuka; pastikan bagian tepi dengan bidang kontak masuk lebih dulu dan permukaan atas baterai menghadap ke atas. 2. Dorong baterai ke dalam tempatnya, lalu dorong secara perlahan hingga baterai terkunci dengan benar. Untuk melepaskan unit baterai: 1. Geser kunci pelepas baterai untuk melepaskan baterai. 2. Tarik baterai dari tempatnya. Mengisi daya baterai Untuk mengisi daya baterai, pastikan dulu baterai terpasang dengan benar pada tempatnya. Pasang adaptor AC ke komputer, lalu sambungkan ke stopkontak. Anda dapat terus mengoperasikan komputer dengan daya AC sementara daya baterai diisi. Namun, pengisian daya 40 saat komputer dimatikan akan sangat mempersingkat waktu pengisian daya. Catatan: Sebaiknya isi daya baterai sebelum selesai menggunakan komputer. Sebaiknya isi daya baterai sepanjang malam sebelum bepergian agar Anda dapat menggunakan komputer dengan baterai terisi penuh pada keesokan harinya. Memeriksa tingkat daya baterai Indikator daya Windows menunjukkan tingkat baterai aktual. Arahkan kursor pada ikon baterai/daya di baris tugas untuk melihat tingkat daya baterai yang tersedia. Mengoptimalkan masa pakai baterai Mengoptimalkan masa pakai baterai akan membantu Anda memaksimalkan penggunaan baterai, memperpanjang siklus pengisian/ pengisian ulang daya, dan meningkatkan efisiensi pengisian ulang daya. Sebaiknya ikuti saran yang dijelaskan di bawah ini: • Beli unit baterai tambahan. • Gunakan daya AC bila memungkinkan, menghemat daya baterai untuk digunakan saat bepergian. • Keluarkan Kartu PC jika tidak digunakan karena kartu tersebut akan terus akan menggunakan daya (untuk model tertentu). • Simpan unit baterai di tempat yang sejuk dan kering. Suhu yang disarankan adalah 10°C (50°F) hingga 30°C (86°F). Suhu yang lebih tinggi mengakibatkan daya baterai lebih cepat habis. Sumber daya - 41 • Pengisian ulang daya yang berlebihan akan mengurangi masa pakai baterai. • Rawat adaptor AC dan baterai Anda. Peringatan baterai hampir habis Bila menggunakan daya baterai, perhatikan indikator daya Windows. Peringatan: Sambungkan adaptor AC segera setelah peringatan daya baterai hampir habis muncul di layar. Data akan hilang jika daya baterai benar-benar habis dan komputer mati. Bila peringatan daya baterai hampir habis muncul, tindakan yang disarankan akan tergantung pada kondisi Anda: Kondisi Tindakan yang disarankan Tersedia adaptor AC 1. Pasang adaptor AC ke dan catu daya. sambungkan ke stopkontak. komputer, lalu 2. Simpan semua file yang diperlukan. 3. Lanjutkan tugas Anda. Matikan komputer jika Anda ingin mengisi ulang daya baterai dengan cepat. 42 Kondisi Tindakan yang disarankan Tersedia unit baterai 1. Simpan semua file yang diperlukan. tambahan yang terisi 2. Tutup semua aplikasi. penuh daya. 3. Matikan sistem operasi untuk mematikan komputer. 4. Ganti unit baterai. 5. Hidupkan komputer, kemudian lanjutkan tugas Anda. 1. Simpan semua file yang diperlukan. Tidak tersedia adaptor AC dan catu 2. Tutup semua aplikasi. daya. 3. Matikan sistem operasi Anda tidak memiliki komputer. unit baterai cadangan. untuk mematikan Sumber daya - 43 MANAJEMEN DAYA Komputer ini mempunyai unit manajemen daya internal yang memonitor aktivitas sistem. Aktivitas sistem merujuk pada setiap aktivitas yang melibatkan satu atau beberapa perangkat berikut: keyboard, mouse, hard disk, periferal yang tersambung ke komputer, dan memori video. Jika tidak ada aktivitas yang terdeteksi selama beberapa saat, komputer menghentikan sebagian atau semua perangkat ini untuk menghemat energi. MENYIMPAN DAYA Menonaktifkan Pengawalan cepat Komputer Anda menggunakan Pengawalan cepat untuk memulai dengan cepat, tapi juga menggunakan sedikit daya untuk memeriksa sinyal untuk memulai. Pemeriksaan ini lambat laut akan menghabiskan baterai. Jika Anda memilih untuk mengurangi kebutuhan daya komputer dan dampak lingkungan, nonaktifkan Pengawalan cepat. Catatan: Jika Pengawalan cepat tidak aktif, komputer Anda perlu waktu lebih lama untuk memulai dari mode Tidur. Komputer Anda juga tidak akan memulai jika menerima instruksi untuk memulai melalui jaringan (Wake on LAN). 44 1. Buka Desktop. 2. Klik Opsi Daya di area Notifikasi. 3. Pilih Opsi Daya Lainnya. 4. Pilih Memilih apa yang dilakukan oleh tombol daya. 5. Untuk mengakses Pengaturan Mematikan, pilih Ubah setelan yang saat ini tidak tersedia. Manajemen daya - 45 6. Gulir ke bawah dan nonaktifkan Aktifkan pengawalan cepat. 7. Pilih Simpan perubahan. 46 PIRANTI LUNAK MENGGUNAKAN WINDOWS DAN PIRANTI LUNAK ANDA Gateway Komputer dilengkapi dengan piranti lunak guna membantu Anda menggunakan komputer; pprogram dan kategori yang tersedia di komputer Anda bergantung pada model yang dibeli. Tawaran Keamanan Internet Penting sekali bagi Anda untuk melindungi komputer dari virus dan serangan melalui Internet (lihat Keamanan di halaman 55). Anda akan menerima usulan program keamanan Internet yang komprehensif ketika Anda pertama kali memulai komputer Anda. Anda seharusnya mengaktifkan perlindungan ini sesegera mungkin, tentu saja sebelum Anda terhubung ke Internet. Satu set kemanan ini melindungi komputer Anda dari ancaman online paling terakhir dan melindungi data pribadi Anda (surat kepercayaan akun bank, nomor kartu kredit, kata sandi dan banyak lagi yang lain). Gateway Recovery Management Untuk mempersiapkan komputer Anda bagi opsi pemulihan sistem, Anda seharusnya sesegera mungkin membuat satu set disk pemulihan. Mencari halaman 66 informasi selengkapnya. Piranti lunak - 47 INTERNET LANGKAH PERTAMA DI INTERNET Melindungi komputer Anda Penting sekali bagi Anda untuk melindungi komputer dari virus dan serangan melalui Internet (lihat Tawaran Keamanan Internet di halaman 47 dan Keamanan di halaman 55). Anda akan menerima usulan program keamanan Internet yang komprehensif ketika Anda pertama kali memulai komputer Anda. Anda seharusnya mengaktifkan perlindungan ini sesegera mungkin, tentu saja sebelum Anda terhubung ke Internet. Pilih ‘Internet Service Provider (Penyedia Layanan Internet)’ Menggunakan Internet telah menjadi bagian yang wajar dalam berkomputer sehari-hari. Dengan beberapa langkah sederhana saja Anda dapat terhubung dengan banyak pengetahuan dan alat komunikasi yang sangat besar. Untuk melaksanakan langkah ini, pertama kali Anda harus memilih Internet Service Provider (ISP), yang memberi koneksi antara komputer dan Internet. Anda harus meneliti ISP yang tersedia di wilayah Anda, jangan lupa berbicara dengan teman dan keluarga tentang pengalaman mereka atau membaca ulasan dan laporan konsumen. ISP yang Anda pilih akan memberi petunjuk tentang cara terhubung ke Internet (Anda mungkin memerlukan piranti lunak tambahan atau ‘kotak’ khusus yang menghubungkan Anda ke saluran telepon Anda). 48 Jenis Sambungan Anda mempunyai beberapa cara untuk tersambung ke Internet, bergantung pada model komputer, lokasi dan kebutuhan Anda. Dial-Up Beberapa komputer dilengkapi dengan konektor telepon (‘modem’) dialup. Ini memungkinkan Anda terhubung ke Internet menggunakan saluran telepon. Dengan sambungan dial-up, Anda tidak dapat menggunakan modem dan telepon secara bersamaan pada satu saluran telepon. Jenis sambungan ini hanya disarankan jika Anda menggunakan Internet secara terbatas, karena kecepatan sambungan ini lambat dan biasanya dikenakan beban biaya sambungan per jam. DSL (misalnya ADSL) DSL (Digital Subscriber Line) adalah sambungan yang ‘selalu tersambung’ yang berjalan melalui saluran telepon. Karena DSL dan telepon tidak menggunakan frekuensi yang sama, Anda dapat menggunakan telepon pada saat yang sama Anda terhubung ke Internet (ini memerlukan ‘filter mikro’ pada setiap soket telepon guna menghindari interferensi.) Untuk bisa mendapatkan sambungan DSL, lokasi Anda harus berada di dekat sentral telepon yang dilengkapi dengan DSL (kadang-kadang layanan ini tidak tersedia di daerah pedesaan). Kecepatan sambungan bervariasi bergantung pada lokasi Anda, tetapi DSL pada umumnya memberi sambungan Internet yang sangat cepat dan tepercaya. Karena sambungan ini selalu tersambung, biasanya sambungan ini dikenakan tarif tetap per bulan. Internet - 49 Catatan: Sambungan ADSL memerlukan modem yang tepat. Modem biasanya disediakan oleh ISP ketika Anda mendaftar. Kebanyakan modem ini dilengkapi dengan ‘router’ yang memberi akses jaringan dan wi-fi. Kabel Sambungan kabel memberi layanan Internet yang ‘selalu tersambung’ dan cepat melalui saluran televisi kabel. Layanan ini biasanya tersedia di kota besar. Anda dapat menggunakan telepon dan menonton TV kabel pada saat yang sama ketika terhubung dengan Internet. 3G (WWAN atau 'Jaringan Area Luas Nirkabel') Dengan sambungan 3G Anda bisa menggunakan jaringan seluler (seperti jaringan yang digunakan pada ponsel) untuk terhubung dengan Internet pada saat jauh dari rumah. Soket untuk kartu SIM mungkin terintegrasi dengan komputer Anda, atau mungkin memerlukan perangkat eksternal, seperti modem USB atau bahkan ponsel dilengkapi dengan fitur yang sesuai. Catatan: Jika komputer Anda dilengkapi dengan slot kartu SIM, Anda memerlukan kartu SIM yang kompatibel dan sudah membuat perjanjian sambungan dengan provider seluler. Sebelum Anda menggunakan fitur 3G, tanyakan kepada penyedia layanan untuk mengetahui apakah akan ada beban tambahan yang timbul, khususnya biaya roaming (berkelana). 50 Sambungan Jaringan LAN (Local Area Network (Jaringan Area Lokal)) adalah sekelompok komputer (misalnya, di kantor atau di rumah) yang berbagi saluran komunikasi dan sumber daya bersama. Bila Anda membuat jaringan, Anda dapat berbagi file, perangkat periferal (misalnya printer) dan sambungan Internet. Anda dapat membuat LAN menggunakan teknologi yang menggunakan kabel (misalnya Ethernet) atau teknologi nirkabel (misalnya WiFi atau Bluetooth). Jaringan nirkabel LAN atau WLAN nirkabel adalah jaringan area lokal nirkabel, yang bisa menghubungkan lebih dari dua komputer tanpa menggunakan kabel. Membuat jaringan nirkabel mudah dilakukan dan memungkinkan Anda berbagi file, perangkat periferal dan sambungan Internet. Apakah keuntungan jaringan nirkabel? Mobilitas Dengan sistem LAN nirkabel memungkinkan Anda dan pengguna lain jaringan rumah Anda untuk berbagi akses ke file dan perangkat yang tersambung ke Internet, misalnya printer atau scanner. Anda juga dapat berbagi sambungan Internet dengan komputer lain di rumah Anda. Kecepatan dan Kemudahan Instalasi Menginstal sistem LAN nirkabel bisa cepat dan mudah serta tidak harus menarik kabel melalui dinding dan langit-langit. Internet - 51 Komponen LAN Nirkabel Untuk membuat jaringan nirkabel di rumah, Anda perlu mempunyai item berikut: Titik akses (router) Titik akses (router) adalah transceiver dua arah yang memancarkan data ke lingkungan sekitar. Titik akses bertindak sebagai mediator antara jaringan berkabel dan nirkabel. Kebanyakan router mempunyai modem DSL terintegrasi yang memungkinkan Anda mengakses sambungan Internet DSL kecepatan tinggi. ISP (Internet Service Provider) yang telah Anda pilih biasanya memberi modem/router dengan berlangganan untuk memperoleh layanannya. Baca dengan seksama dokumentasi yang disertakan tentang Titik akses/router untuk petunjuk penyiapan (setup) yang rinci. Kabel jaringan (RJ45) Kabel jaringan (juga disebut kabel RJ45) digunakan untuk menghubungkan komputer induk ke titik akses (lihat ilustrasi di bawah); jenis kabel ini bisa juga digunakan untuk menghubungkan perangkat periferal ke titik akses. Adaptor nirkabel Adaptor nirkabel internal biasanya diinstal di komputer Anda. Tombol atau alat kontrol pada Windows memungkinkan Anda mengaktifkan atau menonaktifkan adaptor. 52 Diagram jaringan kerja 1. Titik akses/router 4 2. Komputer desktop 3. Modem 5 4. Printer 1 5. Komputer portabel 6. PDA/Smartphone 7. Jaringan (RJ45) 3 7 kabel 2 6 Mengaktifkan/menonaktifkan sambungan jaringan nirkabel Sebagian besar komputer dilengkapi dengan tombol ‘WiFi’ yang mengaktifkan atau menonaktifkan sambungan jaringan. Jika komputer Anda mempunyai akses nirkabel, tetapi tidak dilengkapi tombol Komunikasi, Anda bisa mengaktifkan atau menonaktifkan jaringan nirkabel, atau mengendalikan apa yang bisa dibagi-pakai melalui jaringan tersebut dengan opsi manajemen jaringan. Tekan tombol Windows ( ) + W, ketik “GrupRumah” lalu klik GrupRumah. Internet - 53 Peringatan: Dilarang menggunakan perangkat nirkabel pada saat berada di pesawat terbang. Matikan semua perangkat sebelum Anda naik pesawat terbang; perangkat tersebut bisa berbahaya bagi pengoperasian pesawat, mengganggu komunikasi, dan bahkan bisa dianggap ilegal. Jelajahi Internet! Untuk menjelajahi Internet, Anda memerlukan program yang disebut browser internet. Internet Explorer memberi pengalaman menelusuri web yang mudah dan aman. Segera setelah akses Internet Anda diinstal dan sudah tersambung, klik pintasan Internet Explorer yang terletak di desktop Windows dan tingkatkan pengalaman ber-Internet Anda. Gateway situs web Untuk memulai, kunjungi saja situs web kami, www.gateway.com. Gateway dibuat khusus untuk memberi dukungan pribadi yang terus menerus kepada Anda. Lihat bagian Dukungan untuk mendapatkan bantuan yang disesuaikan bagi kebutuhan Anda. www.gateway.com adalah pintu gerbang Anda menuju dunia aktivitas dan layanan online: kunjungi kami secara berkala untuk mendapatkan informasi dan unduhan terbaru! 54 Keamanan Anda mungkin sangat antusias untuk menjelajahi segala hal yang ditawarkan Internet. Agar Anda selalu aman saat online, Gateway sebelumnya telah menginstal Norton Internet Security™ dari Symantec yang telah memperoleh penghargaan pada komputer Anda. Norton Internet Security™ dengan baik dapat berjalan di latar belakang untuk memblokir ancaman yang kompleks dewasa ini serta melindungi identitas Anda ketika berbelanja, melakukan transaksi bank, atau melakukan penjelajahan secara online. Norton Internet Security memblokir pencurian identitas online, mendeteksi dan melenyapkan peranti mata-mata, menghapus virus dan cacing Internet, serta melindungi komputer dari peretas. Definisi Apakah Virus itu? Piranti lunak jahat, biasanya disebut ‘virus’, adalah program yang didesain untuk menginfeksi dan merusak komputer. Kebanyakan virus ditransmisikan melalui Internet, email atau situs web jahat. Virus normal akan menduplikasikan dan lewat tanpa terdeteksi ke beberapa komputer. Bentuk gangguan lainnya, seperti Trojan horse (kuda Troyan), cacing, atau spam dapat menginfeksi komputer dengan berbagai cara, menghabiskan sumber daya atau menyumbat jaringan. Catatan: Gateway jamin komputer Anda 100% bebas virus pada saat pembelian dan tidak rusak disebabkan virus. Internet - 55 Apakah peranti mata-mata itu? Peranti mata-mata mengacu pada program yang tidak diinginkan yang diunduh ke komputer Anda ketika terhubung ke internet, sering kali tanpa Anda ketahui. Setelah peranti mata-mata menginfeksi komputer Anda, peranti mata-mata dapat mengintai aktivitas penjelajahan (browsing) Anda, mengumpulkan informasi pribadi Anda, menyebabkan munculnya sembul, atau bahkan mengubah konfigurasi komputer Anda. Peranti mata-mata memakan sumber daya pada komputer Anda dan dapat memperlambat sambungan Internet atau keseluruhan sistem, bahkan dapat menyebabkan lumpuhnya komputer. Peranti mata-mata kadang-kadang digunakan oleh perusahaan yang tidak bertanggung jawab untuk memantau dan melacak situs yang Anda kunjungi di Internet guna menentukan kebiasaan Anda berselancar di Internet serta menampilkan iklan sembul di layar Anda. Namun demikian, beberapa jenis peranti mata-mata lebih dari sekadar melacak dan sebenarnya memantau ketukan tombol serta mengambil kata sandi dan juga fungsi lainnya yang menimbulkan risiko keamanan yang sudah pasti. Apakah program jahat itu? Peranti lunak jahat, juga dikenal dengan malware, adalah peranti lunak yang dengan sengaja dibuat untuk membahayakan komputer Anda. Misalnya, virus, cacing, dan kuda Troyan adalah peranti lunak jahat. Untuk membantu melindungi komputer Anda dari malware, pastikan komputer Anda menggunakan peranti lunak antivirus dan peranti lunak anti-malware terbaru. 56 Apakah firewall (tembok api) pribadi itu? Firewall pribadi adalah program peranti lunak yang dibuat untuk mencegah akses tanpa izin ke atau dari jaringan perseorangan. Firewall pribadi bertindak sebagai perisai untuk melindungi sambungan Internet Anda dari sambungan yang tidak diinginkan, sebagian sambungan tersebut berusaha menguasai komputer Anda untuk menginstal atau mendistribusikan ulang virus atau program jahat. Setiap sambungan ke komputer Anda dipantau – program yang berusaha menerima informasi tanpa izin Anda dideteksi dan firewall akan menampilkan suatu peringatan. Anda kemudian dapat memutuskan apakah mengizinkan sambungan itu, jika sambungan tersebut adalah ke program yang sedang Anda gunakan sekarang ini maka biasanya Anda akan izinkan (misalnya permainan yang terhubung ke server multi-pemain atau ensiklopedia yang membuat pembaruan konten). Cara melindungi komputer Anda Pencegahan Cybercrime dapat dilakukan dengan mudah – apabila diberi dengan sedikit nasihat teknis dan akal sehat, maka banyak serangan dapat dihindari. Pada umumnya, penjahat online berusaha mencari uang secepat dan semudah mungkin. Semakin Anda menyulitkan pekerjaan mereka, semakin besar mereka membiarkan Anda dan pindah ke sasaran yang lebih mudah. Tip di bawah ini memberi informasi dasar tentang cara Anda dapat mencegah penipuan online. Internet - 57 Selalu perbarui komputer Anda dengan perbaikan dan pembaruan (update) terkini. Salah satu cara terbaik menjauhkan penyerang dari komputer Anda adalah dengan menerapkan perbaikan dan membetulkan piranti lunak bila kesemuanya tersedia. Dengan memperbarui komputer Anda secara berkala, maka Anda dapat memblokir penyerang sehingga mereka tidak bisa memanfaatkan cacat (kerentanan) peranti lunak yang dapat mereka gunakan untuk menerobos sistem Anda. Kendati senantiasa memperbarui komputer Anda tidak akan melindungi Anda dari semua serangan, namun cara ini dapat membuat peretas (hacker) sulit mengakses sistem Anda, memblokir menyeluruh banyak serangan dasar dan otomatis, serta mungkin cukup untuk mematahkan penyerang yang tekatnya kurang sehingga mencari komputer yang lebih rentan di lain tempat. Versi yang lebih baru Microsoft Windows dan peranti lunak populer lainnya dapat dikonfigurasi untuk mengunduh dan menerapkan pembaruan secara otomatis sehingga Anda tidak harus mengingat untuk mengontrol ketersediaan perangkat lunak terkini. Dengan memanfaatkan fitur “pembaruan otomatis” dalam peranti lunak Anda adalah langkah awal yang sangat bagus untuk menjaga keamanan saat online. Lindungi komputer Anda dengan peranti lunak keamanan. Beberapa jenis piranti lunak keamanan perlu bagi keamanan online dasar. Piranti lunak yang sangat perlu terdiri dari program firewall dan antivirus. Firewall biasanya merupakan pertahanan garis depan komputer Anda – firewall mengendalikan siapa yang menyampaikan dan apa yang dapat 58 disampaikan pada komputer Anda secara online. Anda dapat menganggap firewall seperti “polisi” guna mengawasi semua data yang berusaha masuk kedalam dan keluar dari komputer Anda melalui Internet, yang mengizinkan informasi yang diketahui tetap aman dan memblokir lalu lintas “jelek” seperti serangan agar jangan sampai menerobos komputer Anda. Sering kali pertahanan garis kedua adalah piranti lunak antivirus Anda, yang memantau semua aktivitas online seperti pesan email, dan penelusuran Web serta melindungi komputer dari virus, worm, kuda Troyan dan jenis program jahat lainnya. Piranti lunak antivirus dan anti mata-mata Anda seharusnya dikonfigurasi untuk memperbarui secara otomatis, dan program itu seharusnya bisa melakukan pembaruan otomatis setiap saat Anda terhubung ke Internet. Satu set keamanan terpadu seperti Norton Internet Security mengombinasikan firewall, antivirus, antispyware dengan fitur lainnya seperti antispam dan pengawasan orangtua telah menjadi populer karena program itu menawarkan semua piranti lunak keamanan yang diperlukan untuk perlindungan online dalam satu paket sederhana. Banyak orang berpendapat bahwa menggunakan satu set keamanan sebagai alternatif untuk menginstal, mengonfigurasi dan memperbarui beberapa jenis piranti lunak keamanan yang berbeda. Satu versi lengkap Norton Internet Security™ telah diinstal sebelumnya pada Gateway sistem Anda. Versi ini berisi langganan gratis untuk pembaruan perlindungan selama masa percobaan. Pastikan Anda Mengaktifkannya! Internet - 59 Pilih kata sandi yang kuat dan amankan sandi itu. Kata sandi merupakan fakta kehidupan di Internet dewasa ini; kita menggunakan kata sandi untuk segala hal mulai dari memesan bunga dan perbankan online sampai masuk ke situs Web maskapai penerbangan favorit kita guna melihat berapa biaya perjalanan yang telah kita kumpulkan. Tip berikut ini dapat membantu mengamankan pengalaman online Anda: • Memilih kata sandi yang tidak dapat ditebak dengan mudah merupakan langkah pertama untuk mengamankan kata sandi dan menjauhkan dari jangkauan pelanggar hukum. Kata sandi yang kuat memiliki lebih dari delapan karakter dan menggunakan kombinasi huruf, angka serta simbol (misalnya, # $ % ! ?). Hindari menggunakan berikut ini sebagai kata sandi Anda: nama login Anda, sesuatu yang berdasarkan pada informasi pribadi seperti nama belakang Anda, dan kata yang dapat ditemukan di kamus, khususnya "kata sandi". Coba untuk memilih kata sandi yang unik dan kuat guna melindungi aktivitas seperti perbankan online. • Simpan kata sandi Anda di tempat yang aman dan coba jangan menggunakan kata sandi yang sama untuk setiap layanan online yang Anda gunakan. • Ubah kata sandi secara berkala, setidaknya setiap 90 hari. Hal ini dapat membatasi kerugian yang disebabkan oleh seseorang yang telah memperoleh akses ke akun Anda. Jika Anda melihat ada sesuatu yang mencurigakan pada salah satu akun online, salah satu langkah pertama yang dapat dilakukan adalah mengganti kata sandi. 60 Lindungi informasi pribadi Anda. Berhati-hatilah ketika memberi informasi pribadi seperti nama, alamat rumah, nomor telepon, dan alamat email Anda saat online. Untuk memanfaatkan banyak layanan online, Anda tentu saja harus memberi informasi pribadi guna menangani penagihan dan pengiriman barang yang dibeli. Karena jarang sekali diminta, Anda tidak perlu mengungkapkan informasi pribadi, daftar berikut ini berisi beberapa nasihat bagaimana memberi informasi pribadi secara aman saat online: • Waspada terhadap pesan email palsu. Hal-hal yang menandakan bahwa sebuah pesan mungkin palsu adalah ejaan salah, tata bahasa buruk, penyampaian yang aneh, alamat situs Web dengan ekstensi aneh, alamat situs Web yang seluruhnya angka di mana biasanya adalah kata, serta hal-hal lain yang janggal. Selain itu, pesan pengelabuan seringkali akan memberi tahu bahwa Anda harus bertindak cepat terhadap akun Anda yang tetap terbuka, memperbarui keamanan, atau mendesak Anda untuk segera memberi informasi, jika tidak maka sesuatu yang buruk akan terjadi. Jangan ikuti bujukan itu! • Jangan merespons pesan email yang meminta informasi pribadi. Perusahaan yang sah tidak akan menggunakan pesan email untuk meminta informasi Anda. Bila ragu, hubungi perusahaan tersebut lewat telepon atau ketikkan alamat Web perusahaan ke browser Web Anda. Jangan mengklik tautan pesan ini karena tautan tersebut akan membawa Anda ke situs Web jahat. Internet - 61 • Hindari situs Web penipuan yang digunakan untuk mencuri informasi pribadi Anda. Ketika mengunjungi situs Web, ketik alamat (URL) langsung di browser Web dan tidak mengikuti tautan dalam email atau pesan instan. Penipu biasanya memalsukan tautan ini untuk membuatnya kelihatan meyakinkan. Situs web belanja, perbankan atau lainnya di mana terdapat informasi sensitif seharusnya mengandung huruf “S” setelah "http" (misalnya https://www.yourbank.com bukan http://www.yourbank.com). Huruf “s” singkatan dari secure (aman) dan seharusnya tampak ketika Anda berada di area yang meminta Anda untuk login (masuk) atau memberi data sensitif lainnya. Tanda lain bahwa Anda mempunyai sambungan yang aman adalah ikon gembok kecil di dasar browser Web Anda (biasanya di sudut kanan). • Perhatikan kebijakan privasi mengenai situs Web dan piranti lunak. Anda perlu memahami cara perusahaan mengumpulkan informasi dan menggunakan informasi pribadi Anda sebelum Anda memberi informasi pribadi kepada mereka. • Lindungi alamat email Anda. Pengirim pesan spam dan "pengelabu" kadang-kadang mengirim jutaan pesan ke alamat email yang mungkin ada atau mungkin tidak ada dengan harapan menemukan korban potensial. Merespons pesan ini atau bahkan mengunduh gambarnya dapat dipastikan Anda akan ditambahkan ke dalam daftar mereka untuk mendapatkan pesan yang sama di kemudian hari. Berhati-hatilah juga ketika Anda mengeposkan alamat email Anda secara online di newsgroup, blog atau komunitas online. 62 Penawaran online yang sulit dipercaya biasanya memang tidak dapat dipercaya. Pepatah lama “tidak ada makan siang gratis” masih berlaku hingga saat ini. Piranti lunak yang tampaknya “gratis” seperti screen saver (pengaman layar) atau smiley (tersenyum), adalah trik investasi rahasia yang pasti dapat membuat Anda sangat beruntung, dan kontes yang anehnya telah Anda menangkan tanpa terpikat bujukan yang menggiurkan digunakan oleh perusahaan untuk menarik perhatian Anda. Meskipun Anda mungkin tidak membayar piranti lunak atau layanan tersebut dengan uang secara langsung, namun piranti lunak atau layanan gratis yang Anda minta mungkin telah disertai dengan piranti lunak pengiklanan (“peranti iklan") yang melacak perilaku Anda dengan menampilkan iklan yang tidak diinginkan. Anda mungkin harus mengungkapkan informasi pribadi atau membeli sesuatu yang lain untuk menagih sesuatu yang sepertinya Anda menangkan. Jika sebuah tawaran tampak begitu bagus dan sulit untuk dipercaya, mintalah pendapat orang lain, dengan membaca cetakan yang begitu bagus atau yang lebih baik lagi, abaikan saja. Kaji ulang laporan bank dan kartu kredit secara berkala. Dampak pencurian identitas dan kejahatan online bisa sangat dikurangi jika Anda dapat menangkap segera setelah data Anda dicuri atau ketika informasi pribadi Anda dicoba digunakan untuk pertama kalinya. Salah satu cara termudah mendapatkan petunjuk bahwa telah terjadi sesuatu yang tidak benar adalah dengan mengkaji ulang laporan bulanan yang Internet - 63 diberikan oleh bank atau perusahaan kartu kredit Anda guna mengetahui adanya sesuatu yang tidak lazim. Di samping itu, banyak bank dan layanan menggunakan sistem pencegahan penipuan yang melaporkan perilaku pembelian yang tidak wajar (misalnya, jika Anda tinggal di Texas dan tiba-tiba mulai membeli lemari es di Budapest). Untuk mengonfirmasi pembelian yang tidak wajar ini, mereka mungkin menelepon Anda dan meminta Anda mengonfirmasikan pembelian itu. Jangan menganggap ringan telepon ini, ini adalah isyarat bahwa ada hal buruk yang telah menimpa Anda dan Anda seharusnya segera mengambil tindakan yang diperlukan. Lindungi komputer Anda dengan alat keamanan Windows Windows memberi Anda beragam aplikasi perlindungan. Pembaruan Windows Jika Anda mempunyai sambungan Internet aktif, Windows dapat memeriksa pembaruan yang penting bagi komputer Anda dan menginstalnya secara otomatis. Pembaruan ini terdiri dari perbaikan keamanan dan pembaruan program yang dapat menyempurnakan pengalaman berkomputer Anda dan membantu melindungi komputer Anda dari virus dan serangan baru. Bagaimana saya mengetahui bahwa komputer saya berada dalam bahaya? Jika Pusat Aksi memberi peringatan, atau jika komputer Anda menjadi tidak menentu, tiba-tiba crash (lumpuh) atau jika beberapa program Anda tidak berjalan dengan benar, maka komputer Anda mungkin terinfeksi oleh 64 piranti lunak jahat. Namun, jangan menyalahkan setiap masalah komputer pada virus! Jika Anda mencurigai komputer Anda terinfeksi, hal pertama yang harus dilakukan adalah memperbarui piranti lunak antivirus dan antispyware – jika Anda belum memperbaruinya, lalu jalankan. Internet - 65 PEMULIHAN Jika Anda punya masalah dengan komputer, sedangkan pertanyaan Tanya Jawab (lihat halaman 88) tidak membantu, Anda dapat memulihkan komputer - misalnya, mengembalikannya ke keadaan awal. Bagian ini menjelaskan alat pemulihan yang dapat digunakan di komputer Anda. Gateway yang menyediakan Gateway Recovery Management, sehingga memungkinkan Anda membuat cadangan pemulihan, pengandar dan cadangan aplikasi, dan memulai opsi pemulihan, menggunakan alat Windows, atau cadangan pemulihan. Catatan: Gateway Recovery Management hanya ada bersama dengan sistem pengoperasian Windows yang sudah diinstal sebelumnya. Penting: Kami menyarankan Anda sesegera mungkin membuat Cadangan Pemulihan dan Pengandar serta Cadangan Aplikasi. Dalam keadaan tertentu pemulihan lengkap akan membutuhkan cadangan pemulihan USB. 66 Membuat cadangan pemulihan Untuk menginstal ulang dari kandar penyimpanan USB, sebelumnya Anda harus membuat cadangan pemulihan. Cadangan pemulihan dilengkapi seluruh konten orisinal kandar keras komputer, termasuk Windows dan semua perangkat lunak dan pengandar yang diinstal dari pabrik. Dengan menggunakan cadangan Ini akan memulihkan komputer Anda ke keadaan yang sama dengan ketika Anda membelinya, pada saat yang sama juga memberi Anda opsi untuk mempertahankan semua setelan dan data pribadi. Catatan: Pastikan Anda memiliki drive USB dengan kapasitas setidaknya 16 GB. 1. Dari Mulai, ketik 'Pemulihan' lalu klik Gateway Recovery Management di dalam daftar aplikasi. Pemulihan - 67 2. Klik Buat Cadangan Default Pabrik. Jendela Drive Pemulihan akan terbuka. Pastikan konten Salin dari partisi pemulihan ke drive pemulihan dipilih. Dengan begitu akan memberikan cadangan pemulihan terlengkap dan teraman. 68 3. Colokkan drive USB, kemudian klik Berikutnya. • Pastikan drive USB Anda punya kapasitas yang cukup sebelum melanjutkan. Cadangan pemulihan membutuhkan setidaknya penyimpanan 16 GB 4. Anda akan diperlihatkan dengan jalannya pembuatan cadangan di layar. 5. Ikuti proses tersebut sampai selesai: 6. Setelah membuat cadangan pemulihan, Anda dapat memilih untuk menghapus informasi pemulihan di komputer Anda. Jika Anda hapus informasi ini, Anda hanya dapat menggunakan cadangan pemulihan USB untuk memulihkan komputer Anda, jika Anda kehilangan atau menghapus drive USB tersebut, maka Anda tidak dapat memulihkan komputer Anda. Pemulihan - 69 7. Cabut drive USB dan labelnya dengan jelas. Penting: Tulis label keterangan yang khas pada cadangan, misalnya ‘Cadangan Pemulihan Windows' Pastikan cadangan tetap aman di tempatnya yang selalu Anda ingat. Membuat driver dan cadangan aplikasi Untuk membuat Driver dan Cadangan Aplikasi, yang berisi driver dan perangkat lunak yang diinstal dari pabrik yang diperlukan oleh komputer Anda, Anda mungkin dapat menggunakan drive penyimpanan USB, jika komputer Anda dilengkapi perekam DVD, lebih dari satu DVD yang dapat merekam. 70 1. Dari Mulai, ketik 'Pemulihan' lalu klik Gateway Recovery Management di dalam daftar aplikasi. 2. Klik Buat Driver dan Cadangan Aplikasi. Colokkan drive USB atau masukkan DVD kosong ke dalam drive optik, lalu klik Berikutnya. Pemulihan - 71 • Jika Anda menggunakan drive mencukupi sebelum melanjutkan. USB, pastikan kapasitasnya • Jika menggunakan DVD, kotak dialog juga akan memberi tahu Anda jumlah cakram kosong yang dapat ditulisi yang akan Anda perlukan untuk membuat cakram pemulihan. Pastikan Anda mempunyai cakram kosong dan identik sejumlah yang diperlukan. 72 3. Klik Mulai untuk menyalin file. Anda akan diperlihatkan dengan jalannya pembuatan cadangan di layar. 4. Ikuti proses tersebut sampai selesai: • Jika Anda menggunakan disk optik, drive akan mengeluarkan setiap disk setelah selesai membakarnya. Keluarkan disk dari drive dan tandai dengan spidol permanen. Jika diperlukan beberapa disk, masukkan disk baru ketika diminta, kemudian klik OK. Lanjutkan merekam disk sampai proses selesai. • Jika Anda menggunakan drive USB, cabut drive-nya dan labelnya dengan jelas. Penting: Tulis label keterangan yang khas pada setiap cadangan, misalnya ‘Driver dan Cadangan Aplikasi'. Pastikan cadangan tetap aman di tempatnya yang selalu Anda ingat. Memulihkan sistem Anda Untuk memulihkan sistem Anda: 1. Lakukan perbaikan kecil. Jika hanya satu atau dua piranti lunak atau perangkat keras yang tidak lagi berjalan dengan benar, masalah tersebut bisa diselesaikan dengan menginstal ulang piranti lunak atau driver perangkat. Untuk memulihkan perangkat lunak dan driver yang telah diinstal sebelumnya di pabrik, lihat "Menginstal ulang driver dan Aplikasi" pada halaman 74. Untuk petunjuk mengenai penginstalan ulang piranti lunak dan driver yang tidak diinstal sebelumnya, lihat situs Web dokumentasi produk atau dukungan teknis. Pemulihan - 73 2. Kembalikan ke kondisi sistem sebelumnya. Jika penginstalan ulang perangkat lunak atau driver tidak membantu, maka problem tersebut bisa dipecahkan dengan mengembalikan sistem Anda ke keadaan sebelumnya ketika segala sesuatunya bekerja dengan benar. Untuk petunjuknya, lihat "Mengembalikan ke potret sistem sebelumnya" pada halaman 77. 3. Reset sistem operasi Anda. Jika tidak ada cara lain lagi yang dapat memecahkan masalah tersebut dan Anda ingin mereset sistem Anda ke kondisi pabrik dengan mempertahankan informasi pengguna, lihat "Mengembalikan sistem Anda ke kondisi pabrik" pada halaman 79 4. Reset sistem Anda ke kondisi pabrik. Jika tidak ada cara lain lagi yang dapat memecahkan masalah tersebut dan Anda ingin mereset sistem Anda ke kondisi pabrik, lihat "Mengembalikan sistem Anda ke kondisi pabrik" pada halaman 79. Menginstal ulang driver dan Aplikasi Sebagai langkah pemecahan ulang, Anda mungkin perlu menginstal ulang aplikasi dan driver yang diinstal sebelumnya pada komputer Anda dari pabrik. Anda dapat melakukan pemulihan mungkin menggunakan hard drive atau mungkin dengan disk cadangan yang telah Anda buat. • Piranti lunak baru - Jika Anda perlu memulihkan piranti lunak yang tidak diinstal sebelumnya pada komputer Anda, maka Anda perlu mengikuti petunjuk instalasi piranti lunak itu. 74 • Driver perangkat baru - Jika Anda perlu memulihkan driver perangkat yang tidak diinstal sebelumnya pada komputer Anda, ikuti petunjuk yang diberikan bersama perangkat itu. Jika Anda melakukan pemulihan menggunakan Windows dan informasi pemulihan yang tersimpan di komputer: • Dari Mulai, ketik 'Pemulihan' lalu klik Gateway Recovery Management di dalam daftar aplikasi. • Klik Instal ulang Driver atau Aplikasi. Pemulihan - 75 • Anda sebaiknya melihat bagian Konten pada Gateway Pusat Sumber Daya. • Klik ikon instal untuk item yang ingin Anda instal, kemudian ikuti petunjuk pada layar guna melakukan instalasi. Ulangi langkah ini untuk setiap item yang ingin Anda instal ulang. Jika Anda memulihkan dari Driver dan Cadangan Aplikasi yang ada di DVD atau drive USB: 1. Masukkan Driver dan Cadangan Aplikasi ke dalam disk drive atau sambungkan ke port USB bebas. • Jika Anda sudah memasukkan DVD tunggu Gateway Pusat Sumber Daya untuk mulai. • Jika Gateway Pusat Sumber Daya belum mulai otomatis, tekan tombol Windows + <E>, kemudian klik dua kali pada ikon drive optik. 76 • Jika Anda menggunakan drive USB, tekan tombol Windows + <E>, kemudian klik dua kali pada drive yang berisi cadangan. Klik dua kali pada Pusat Sumber Daya. 2. Anda sebaiknya melihat bagian Konten pada Gateway Pusat Sumber Daya. 3. Klik ikon instal untuk item yang ingin Anda instal, kemudian ikuti petunjuk pada layar guna melakukan instalasi. Ulangi langkah ini untuk setiap item yang ingin Anda instal ulang. Mengembalikan ke potret sistem sebelumnya Pemulihan Sistem Microsoft secara berkala ‘memotret’ setelan sistem Anda dan menyimpannya sebagai titik pemulihan. Pada kebanyakan permasalahan piranti lunak yang sulit dipecahkan, Anda dapat kembali ke salah satu titik pemulihan ini agar sistem Anda berjalan lagi. Pemulihan - 77 Windows secara otomatis membuat titik pemulihan tambahan setiap hari, dan juga setiap saat Anda menginstal piranti lunak atau driver perangkat. Catatan: Untuk informasi selengkapnya tentang menggunakan Pemulihan Sistem Microsoft, dari Mulai, ketik ‘Bantuan’ lalu klik Bantuan dan Dukungandalam daftar aplikasi. Ketik ‘Pemulihan sistem Windows’ dalam kotak Bantuan Pencarian, kemudian tekan Enter. Untuk kembali ke titik pemulihan: 1. Dari Mulai, ketik'Panel Kontrol' dan kemudian klik Panel Kontrol dalam daftar aplikasi. 2. Klik Sistem dan Keamanan > Pusat Aksi, kemudian klik Pemulihan di bagian dasar jendela. 3. Klik Buka Pemulihan Sistem, lalu Berikutnya. 4. Klik titik pemulihan terbaru (pada saat sistem Anda bekerja dengan benar), klik Berikutnya, kemudian Selesai. 5. Jendela konfirmasi muncul; klik Ya. Sistem Anda sudah dipulihkan menggunakan titik pemulihan yang Anda tetapkan. Proses ini mungkin berlangsung selama beberapa menit, dan mungkin harus menghidupkan ulang komputer Anda. 78 Mengembalikan sistem Anda ke kondisi pabrik Jika komputer Anda mengalami masalah yang tidak dapat dipulihkan dengan metode lain, mungkin Anda perlu menginstal ulang semuanya guna mengembalikan sistem Anda ke kondisi pabrik. Anda dapat melakukan pemulihan mungkin menggunakan hard drive atau mungkin dengan cadangan pemulihan yang telah Anda buat. • Jika Anda masih menjalankan Windows dan telah menghapus partisi pemulihan, lihat "Memulihkan dari dalam Windows" pada halaman 80. • Jika Anda tidak dapat menjalankan Windows, hard drive orisinal Anda telah diformat ulang atau Anda telah menginstal hard drive pengganti, lihat "Memulihkan dari cadangan pemulihan Anda" pada halaman 84. Pemulihan - 79 Memulihkan dari dalam Windows Mulai Gateway Recovery Management: • Dari Mulai, ketik 'Pemulihan' lalu klik Gateway Recovery Management di dalam daftar aplikasi. Tersedia dua pilihan, Pulihkan Setelan Pabrik (Reset PC saya) atau Pemulihan Disesuaikan (Segarkan PC saya). Pulihkan Setelan Pabrik menghapus apa saja pada hard drive Anda, kemudian menginstal ulang Windows dan semua perangkat lunak serta driver yang telah diinstal sebelumnya pada sistem Anda. Jika Anda dapat mengakses file penting pada hard drive, buat cadangannya sekarang. Lihat "Pulihkan Setelan Pabrik dengan Gateway Recovery Management" pada halaman 81. Pemulihan Disesuaikan akan berusaha menyimpan file Anda (data pengguna) tapi akan menginstal ulang semua perangkat lunak dan driver. Perangkat lunak yang diinstal sejak Anda membeli PC akan dihapus (kecuali perangkat lunak yang diinstal dari Windows Store). Lihat "Pemulihan Disesuaikan dengan Gateway Recovery Management" pada halaman 83. 80 Pulihkan Setelan Pabrik dengan Gateway Recovery Management 1. Klik Pulihkan Setelan Pabrik. Perhatian: 'Pulihkan Setelan Pabrik' akan menghapus semua file di hard drive Anda. 2. Jendela Reset PC Anda akan terbuka. Ilustrasi hanya untuk referensi. Pemulihan - 81 3. Klik Berikutnya, kemudian pilih cara menghapus file Anda: a. Hanya dengan membuang file saya dengan cepat menghapus semua file sebelum memulihkan komputer Anda yang membutuhkan waktu kira-kira 30 menit. b. Membersihkan dengan benar hard drive akan benar-benar dapat membersihkan hard drive setelah setiap file dihapus, sehingga tidak ada lagi file dapat dilihat setelah pemulihan. Membersihkan hard drive memerlukan waktu hingga 5 jam, namun lebih aman karena file lama benar-benar dibuang. 4. Klik Reset. 5. Proses pemulihan mulai dengan menghidupkan ulang komputer Anda, kemudian lanjutkan dengan menyalin file ke hard drive Anda. 6. Setelah pemulihan selesai, Anda dapat mulai menggunakan komputer Anda dengan mengulangi proses pertama kali mulai. 82 Pemulihan Disesuaikan dengan Gateway Recovery Management 1. Klik Pemulihan Disesuaikan (Simpan Data pengguna). 2. Jendela Segarkan PC Anda akan terbuka. 3. Klik Berikutnya, kemudian Segarkan. 4. Proses pemulihan mulai dengan menghidupkan ulang komputer Anda, kemudian lanjutkan dengan menyalin file ke hard drive Anda. Proses ini membutuhkan waktu kira-kira 30 menit. Pemulihan - 83 Memulihkan dari cadangan pemulihan Anda Untuk memulihkan dari cadangan pemulihan pafa drive USB: 1. Cari cadangan pemulihan Anda: 2. Colokkan drive USB dan hidupkan komputer Anda. 3. Jika ini belum diaktifkan, Anda harus mengaktifkan Menu Boot F12: a. Tekan <F2> ketika mulai menghidupkan komputer. b. Gunakan tombol panah kanan atau kiri untuk memilih menu Main. c. Tekan tombol tersebut sampai F12 Boot Menu dipilih, tekan <F5> untuk mengubah pengaturan ini ke Enabled. d. Gunakan tombol panah kanan atau kiri untuk memilih menu Exit. e. Bergantung pada jenis BIOS komputer Anda gunakan, pilih Save Changes and Exit atau Exit Saving Changes dan tekan Enter. Pilih OK atau Yes untuk mengonfirmasi. f. Komputer akan melakukan start ulang. 4. Selama permulaan, tekan <F12> untuk membuka menu boot. Menu boot memungkinkan Anda untuk memilih dari perangkat mana akan memulai, pilih drive USB. a. Gunakan tombol panah untuk memilih USB Device, kemudian tekan Enter. b. Windows mulai dari cadangan pemulihan alih-alih dari proses pengawalan normal. 5. Pilih tipe keyboard. 84 6. Pilih Troubleshoot dan kemudian pilih tipe pemulihan yang digunakan: a. Klik Advanced kemudian System Restore untuk mulai Pemulihan Sistem Microsoft: Pemulihan Sistem Microsoft secara berkala ‘memotret’ setelan sistem Anda dan menyimpannya sebagai titik pemulihan. Pada kebanyakan permasalahan piranti lunak yang sulit dipecahkan, Anda dapat kembali ke salah satu titik pemulihan ini agar sistem Anda berjalan lagi. b. Klik Reset your PC untuk mulai proses reset: Reset your PC menghapus apa saja pada hard drive Anda, kemudian menginstal ulang Windows dan semua piranti lunak serta driver yang telah diinstal sebelumnya pada sistem Anda. Jika Anda dapat mengakses file penting pada hard drive, buat cadangannya sekarang. Lihat "Reset PC Anda dari cadangan pemulihan" pada halaman 86. c. Klik Refresh your PC untuk mulai proses segarkan: Refresh your PC akan berusaha menyimpan file Anda (data pengguna) tapi akan menginstal ulang semua perangkat lunak dan driver. Perangkat lunak yang diinstal sejak Anda membeli PC akan dihapus (kecuali perangkat lunak yang diinstal dari Windows Store). Lihat "Segarkan PC Anda dari cadangan pemulihan" pada halaman 87. Pemulihan - 85 Reset PC Anda dari cadangan pemulihan Perhatian: Reset PC Anda akan menghapus semua file di hard drive Anda. 1. Jendela Reset PC Anda akan terbuka. Ilustrasi hanya untuk referensi. 2. Klik Berikutnya. 3. Pilih sistem operasi untuk memulihkan (biasanya hanya satu pilihan yang tersedia). 4. Pilih untuk menyimpan perubahan apa pun ke hard drive. a. Jika Anda telah menghapus partisi pemulihan atau jika tidak merubahnya pada hard drive dan ingin menyimpan perubahan tersebut, pilih Tidak. b. Untuk benar-benar memulihkan komputer Anda menjadi Setelan Pabrik, pilih Ya. 5. Pilih cara menghapus file Anda: a. Hanya dengan membuang file saya dengan cepat menghapus semua file sebelum memulihkan komputer Anda yang membutuhkan waktu kira-kira 30 menit. 86 b. Membersihkan dengan benar hard drive akan benar-benar dapat membersihkan hard drive setelah setiap file dihapus, sehingga tidak ada lagi file dapat dilihat setelah pemulihan. Membersihkan hard drive memerlukan waktu hingga 5 jam, namun lebih aman karena file lama benar-benar dibuang. 6. Klik Reset. 7. Setelah pemulihan selesai, Anda dapat mulai menggunakan komputer Anda dengan mengulangi proses pertama kali mulai. Segarkan PC Anda dari cadangan pemulihan 1. Jendela Segarkan PC Anda akan terbuka. 2. Klik Berikutnya. 3. Pilih sistem operasi untuk memulihkan (biasanya hanya satu pilihan yang tersedia). 4. Klik Segarkan. 5. Proses pemulihan mulai dengan menghidupkan ulang komputer Anda, kemudian lanjutkan dengan menyalin file ke hard drive Anda. Proses ini membutuhkan waktu kira-kira 30 menit. Pemulihan - 87 TANYA JAWAB Berikut adalah daftar kemungkinan kondisi yang dapat terjadi saat Anda menggunakan komputer. Tersedia solusi mudah untuk setiap kondisi. Saya menyalakan daya, tapi komputer tidak start atau melakukan boot Lihat indikator daya: • Jika tidak menyala, berarti daya tidak mengalir ke komputer. Periksa kondisi di bawah ini: • Jika Anda menggunakan baterai, mungkin daya baterai lemah sehingga tidak dapat menghidupkan komputer. Pasang adaptor AC untuk mengisi ulang daya unit baterai. • Pastikan adaptor AC terpasang dengan benar ke komputer dan stopkontak. • Jika menyala, periksa kondisi di bawah ini: • Apakah ada cakram di dalam cakram optik? Ambil cakram tersebut dan tekan <Ctrl> + <Alt> + <Del> untuk menghidupkan ulang sistem. • Apakah Anda mempunyai perangkat penyimpanan USB (disk USB atau ponsel cerdas) yang dicolokkan ke komputer? Cabut cakram tersebut dan tekan <Ctrl> + <Alt> + <Del> untuk menghidupkan ulang sistem. 88 - Tanya jawab Tidak ada tampilan apapun pada layar Sistem manajemen daya komputer akan secara otomatis menonaktifkan layar untuk menghemat daya. Tekan tombol apa saja untuk mengaktifkan kembali layar. Jika layar tidak aktif saat tombol ditekan, tiga kemungkinan penyebabnya adalah: • Tingkat kecerahan mungkin terlalu rendah. Tekan mengatur tingkat kecerahan. (meningkat) untuk • Perangkat layar mungkin diatur ke monitor eksternal. Tekan mengganti tampilan kembali ke komputer. untuk • Jika indikator Tidur menyala, berarti komputer berada dalam mode Tidur. Tekan dan lepas tombol daya untuk melanjutkan. Tidak terdengar suara dari komputer Periksa kondisi di bawah ini: • Volume suara mungkin dinonaktifkan. Di Windows, lihat ikon kontrol volume (speaker) pada baris tugas. Jika bertanda silang, klik ikon tersebut, kemudian batalkan pilihan Mute all. • Tingkat volume suara mungkin terlalu rendah. Di Windows, lihat ikon kontrol volume pada baris tugas. Anda juga dapat menggunakan tombol kontrol volume untuk mengatur volume suara. • Jika headphone, earphone, atau speaker eksternal tersambung ke port keluaran komputer, maka speaker internal akan secara otomatis dinonaktifkan. Tanya jawab - 89 Saya ingin melepas tempat drive optik tanpa menghidupkan komputer Lubang pelepas mekanik terdapat pada drive optik. Cukup masukkan ujung pena atau penjepit kertas ke dalam lubang tersebut, kemudian dorong untuk melepaskan tempat drive optik tersebut. Keyboard tidak merespons Coba pasang keyboard eksternal ke port USB pada komputer. Jika berfungsi, hubungi dealer atau pusat layanan resmi karena kabel keyboard internal mungkin longgar. Printer tidak berfungsi Periksa kondisi di bawah ini: • Pastikan printer telah tersambung ke stopkontak dan dihidupkan. • Pastikan bahwa kabel printer terhubung erat ke port USB dan port yang sesuai pada printer. 90 - Tanya jawab Tip dan petunjuk untuk menggunakan Windows 8 Kami tahu ini adalah sistem operasi baru yang memerlukan waktu untuk mengenalinya dengan baik, oleh karena itu kami membuat beberapa petunjuk bagi Anda untuk memulai. Ada tiga konsep yang mungkin perlu Anda ingat 1. Mulai Tombol Mulai tidak lagi tersedia; Anda dapat meluncurkan aplikasi dari layar Mulai. 2. Tiles Live tiles mirip dengan gambar kecil aplikasi. 3. Charms Charms memungkinkan Anda melakukan fungsi berguna, misalnya berbagi konten, mematikan PC Anda atau mengganti setelan. Bagaimana saya dapat mengakses charms? Gerakkan kursor ke sudut kanan atas atau bawah layar untuk mengakses Charms, atau tekan tombol Windows + <C>. Bagaimana cara Mulai? Tekan tombol Windows pada keyboard; tekan tombol Windows + <C> dan klik Mulai; atau gerakkan kursor ke sudut kiri bawah layar dan klik Mulai. Tanya jawab - 91 Bagaimana cara melompat di antara aplikasi? Gerakkan kursor ke tepi kiri layar untuk menampilkan gambar kecil aplikasi yang saat ini sedang berjalan. Anda juga dapat menekan tombol Windows + <Tab> untuk membuka dan bergulir di antara aplikasi aktif. Bagaimana cara mematikan komputer? Tekan tombol Windows + <C>, klik Pengaturan > Daya dan pilih tindakan yang ingin Anda lakukan. Atau, dari Desktop, klik Gateway Tombol Daya dan pilih tindakan yang ingin Anda lakukan. Mengapa ada antarmuka baru? Antarmuka baru untuk Windows 8 ini didesain untuk berfungsi dengan baik menggunakan input sentuhan. Aplikasi Windows Store secara otomatis akan menggunakan seluruh layar dan tidak perlu ditutup dengan cara tradisional. Aplikasi Windows Store akan ditampilkan pada menu Mulai menggunakan live-tiles. Apakah ‘live-tiles’ itu? Live-tiles mirip dengan gambar kecil aplikasi yang akan diperbarui dengan konten baru apabila Anda terhubung ke Internet. Jadi, misalnya, Anda dapat menampilkan pembaruan cuaca atau saham tanpa perlu membuka aplikasi tersebut. 92 Bagaimana cara membuka komputer? Tekan sembarang tombol dan klik akun pengguna untuk membuka komputer. Jika sandi pada akun Anda telah diatur, Anda perlu memasukkan sandi tersebut untuk melanjutkan. Bagaimana cara memersonalisasi komputer? Anda dapat memersonalisasi Mulai dengan gambar latar belakang berbeda atau dengan menyusun ubin untuk menyesuaikan dengan kebutuhan Anda pribadi. Untuk mengganti latar belakang, tekan tombol Windows + <C> dan klik Pengaturan > Ubah Pengaturan PC > Personalisasi. Klik layar Mulai di bagian atas halaman dan pilih warna dan gambar. Bagaimana cara memindahkan tiles? Klik dan tahan untuk memilihnya, kemudian seret ke tempat pada Mulai di mana Anda ingin menampilkannya. Tiles lain akan dipindah untuk mengakomodasi tile dalam lokasi baru. Dapatkah tiles diperbesar atau diperkecil? Klik kanan tile, kemudian pilih Lebih kecil atau Lebih besar dari menu yang muncul di bagian dasar layar. Bagaimana cara memersonalisasikan Layar penguncian? Anda dapat memersonalisasikan layar penguncian dengan gambar berbeda atau menampilkan status dan pembaruan cepat yang sesuai dengan kebutuhan Anda. Tanya jawab - 93 Untuk mengganti latar belakang, tekan tombol Windows + <C> dan klik Pengaturan > Ubah Pengaturan PC > Personalisasi. Klik Layar penguncian di bagian atas halaman dan pilih gambar dan aplikasi yang ingin Anda tampilkan pada layar penguncian. Jadi, bagaimana saya menutup aplikasi? Gerakkan kursor ke bagian atas layar dan klik lalu seret jendela tersebut turun untuk menutup aplikasi. Anda dapat menutup aplikasi dari gambar kecil di tepi kiri layar dengan mengklik kanan gambar kecil dan memilih Tutup. Dapatkah resolusi layar diganti? Dari Mulai, mulai ketik ‘Panel Kontrol’ untuk membuka Cari dan menampilkan hasil; klik Panel Kontrol > Sesuaikan resolusi layar. Saya ingin menggunakan Windows dengan cara yang sudah biasa bagi saya – kembalikan desktop saya! Dari Mulai klik ubin Desktop untuk menampilkan desktop tradisional. Anda dapat menyematkan aplikasi yang sering Anda gunakan ke bilah tugas agar mudah membukanya. Jika Anda klik aplikasi yang bukan aplikasi Windows Store, Windows secara otomatis akan membuka aplikasi menggunakan Desktop. Di mana aplikasi saya? Dari Mulai, cukup mulai ketik nama aplikasi yang ingin Anda buka, dan Cari secara otomatis membuka daftar hasil. 94 Untuk melihat daftar aplikasi lengkap, tekan bilah spasi atau tombol Menu dan klik Semua aplikasi. Bagaimana cara menampilkan aplikasi pada Mulai? Jika Anda berada di Semua aplikasi dan ingin menampilkan aplikasi di Mulai, Anda dapat memilih aplikasi dan mengklik kanan Mulai. Pilih Sematkan ke Mulai dari menu yang muncul di bagian dasar layar. Bagaimana cara menghapus tile dari Mulai? Klik kanan ubin dan klik Lepaskan dari menu Mulai dari menu yang muncul di bagian dasar layar. Bagaimana cara menampilkan aplikasi pada bilah tugas di Desktop? Jika Anda berada di Semua aplikasi dan ingin menampilkan aplikasi pada bilah tugas di Desktop, Anda dapat memilih aplikasi dan mengklik kanan Mulai. Pilih Sematkan pada bilah tugas dari menu yang muncul di bagian dasar layar. Bagaimana cara menginstal aplikasi? Anda dapat mengunduh aplikasi Windows Store dari Store. Anda perlu memiliki Microsoft ID untuk membeli dan mengunduh aplikasi dari Store. Saya tidak dapat menemukan aplikasi seperti Notepad and Paint! Di mana aplikasi tersebut? Dari Mulai Anda dapat mulai mengetik nama aplikasi yang Anda cari untuk membuka Cari dan membuat daftar hasilnya. Atau, buka Semua aplikasi dan gulir ke ‘Aksesori Windows’ untuk menampilkan daftar program lama. Tanya jawab - 95 Apakah (akun) Microsoft ID itu? Akun Microsoft adalah alamat email dan sandi yang Anda gunakan untuk masuk ke Windows. Anda dapat menggunakan alamat email apa saja, tapi yang terbaik adalah jika memilih alamat email yang sudah digunakan untuk berkomunikasi dengan teman dan masuk situs web favorit Anda. Ketika masuk ke PC dengan akun Microsoft, Anda akan menghubungkan PC dengan orang, file, dan perangkat yang Anda perhatikan. Apakah saya memerlukan akun itu? Anda tidak memerlukan Microsoft ID untuk menggunakan Windows 8, tapi akun itu memudahkan Anda menyinkronkan data di seluruh komputer yang menggunakan Microsoft ID untuk masuk. Bagaimana cara mendapatkannya? Jika Anda sudah menginstal Windows 8 dan tidak masuk dengan akun Microsoft atau tidak memiliki akun Microsoft dan ingin mendapatkannya, ketuk tombol Windows + <C> dan klik Pengaturan > Ubah Pengaturan PC > Pengguna > Alihkan ke akun Microsoft, dan ikuti petunjuk pada layar. Bagaimana cara menambahkan favorit ke Internet Explorer? Internet Explorer 10 tidak memiliki favorit tradisional, sebagai gantinya Anda dapat menyematkan pintasan ke Mulai. Setelah halaman terbuka, klik kanan di mana saja di halaman itu untuk membuka menu di bagian dasar layar. Klik Sematkan ke Mulai. 96 Bagaimana cara memeriksa ketersediaan pemutakhiran Windows? Tekan tombol Windows + <C> dan klik Pengaturan > Ubah Pengaturan PC > Pemutakhiran Windows. Klik Periksa pemutakhiran sekarang. Di mana terdapat informasi selengkapnya? Untuk Informasi lebih lanjut, kunjungi: • Tutorial Windows 8: www.gateway.com/windows8-tutorial • Mendukung FAQ: support.gateway.com Tanya jawab - 97 INFORMASI PERATURAN MENCEGAH HILANGNYA PENDENGARAN - Perhatian: Hilangnya pendengaran secara tetap kemungkinan terjadi jika earphone atau headphone digunakan dengan besar volume sangat tinggi dalam waktu lama. - A pleine puissance, l’écoute prolongée du baladeur peut endommager l’oreille de l’utilisateur. PERHATIAN ketika mendengarkan Untuk melindungi pendengaran Anda, ikuti petunjuk dibawah ini. - Besarkan bertahap volume sampai Anda dapat mendengar dengan jelas dan nyaman. - Jangan besarkan tinggi volume setelah kuping Anda sudah sesuai mendengarkannya. - Jangan mendengarkan musik dengan volume tinggi untuk waktu yang lama. - Jangan besarkan volume saat membatasi bising di sekeliling. - Turunkan besar volume jika tidak dapat mendengarkan orang berbicara dekat Anda. PERHATIAN PERATURAN PERANGKAT RADIO - Catatan: Informasi peraturan dibawah adalah untuk model dengan LAN dan/atau Bluetooth nirkabel saja. Aksesori yang sesuai Aksesori yang berhubungan dengan perlengkapan ini adalah: kabel video berpelindung apabila dihubungkan dengan monitor eksternal. Aksesori ini harus digunakan untuk memastikan kepatuhan terhadap peraturan FCC. 98 PERINGATAN CALIFORNIA PROPOSISI 65 Produk ini mengandung bahan kimia yang di Negara Bagian California dianggap menyebabkan kanker, cacat kelahiran, dan/atau bahaya reproduksi lainnya. Untuk informasi tambahan terkait dengan peringatan produk ini, lihat www.gateway.com/prop65. 日本 (JAPAN) 本装置は、第二種情報装置(住宅地域またはその隣接した地域において使用されるべき 情報装置)デ住宅地域での電波障害防止を目的とした情報装置等電波障害自主規制協議 会(VCCI)基準に適合しております。 しかし、本装置をラジオ、テレビジョン受信機に、近接してご使用になると、受信障害 の原因となることがあります。本書の説明にしたがって正しい取り扱いをしてくださ い。 WIRELESS ADAPTER REGULATORY INFORMATION USA — FCC and FAA The FCC with its action in ET Docket 96-8 has adopted a safety standard for human exposure to radio frequency (RF) electromagnetic energy emitted by FCC certified equipment. The wireless adapter meets the Human Exposure limits found in OET Bulletin 65, supplement C, 2001, and ANSI/IEEE C95.1, 1992. Proper operation of this radio according to the instructions found in this manual will result in exposure substantially below the FCC’s recommended limits. - The following safety precautions should be observed: Do not touch or move antenna while the unit is transmitting or receiving. - Do not hold any component containing the radio such that the antenna is very close or touching any exposed parts of the body, especially the face or eyes, while transmitting. Informasi Peraturan - 99 - Do not operate the radio or attempt to transmit data unless the antenna is connected; this behavior may cause damage to the radio. Use in specific environments: - The use of wireless adapters in hazardous locations is limited by the constraints posed by the safety directors of such environments. - The use of wireless adapters on airplanes is governed by the Federal Aviation Administration (FAA). - The use of wireless adapters in hospitals is restricted to the limits set forth by each hospital. Antenna Use In order to comply with FCC RF exposure limits, low gain integrated antennas should be located at a minimum distance of 20 cm (8 inches) or more from the body of all persons or at a minimum distance as specified by the FCC module grant conditions. FCC grants can be viewed from the FCC Equipment Authorization website at https://fjallfoss.fcc.gov/ oetcf/eas/reports/GenericSearch.cfm by entering the FCC ID printed on the module label. Explosive Device Proximity Warning Warning: Do not operate a portable transmitter (including this wireless adapter) near unshielded blasting caps or in an explosive environment unless the transmitter has been modified to be qualified for such use Antenna Warnings - Warning: To comply with the FCC and ANSI C95.1 RF exposure limits, it is recommended that for the wireless adapter installed in a desktop or portable computer, the antenna for this wireless adapter to be installed so as to provide a separation distance of at least 20 cm (8 inches) from all persons or at the minimum distance as specified by the module grant conditions. FCC grants can be viewed from the FCC Equipment Authorization website at https://fjallfoss.fcc.gov/oetcf/eas/ reports/GenericSearch.cfm by entering the FCC ID printed on the module label. 100 - Warning: The wireless adapter is not designed for use with high-gain directional antennas. Use On Aircraft Caution - Caution: Regulations of the FCC and FAA prohibit airborne operation of radiofrequency wireless devices (wireless adapters) because their signals could interfere with critical interfere with critical aircraft instruments. Local Restrictions on 802.11a, 802.11b, 802.11g and 802.11n Radio Usage - Caution: Due to the fact that the frequencies used by 802.11a, 802.11b, 802.11g and 802.11n wireless LAN devices may not yet be harmonized in all countries, 802.11a, 802.11b, 802.11g and 802.11n products are designed for use only in specific countries, and are not allowed to be operated in countries other than those of designated use. As a user of these products, you are responsible for ensuring that the products are used only in the countries for which they were intended and for verifying that they are configured with the correct selection of frequency and channel for the country of use. Any deviation from the permissible power and frequency settings for the country of use is an infringement of national law and may be punished as such. Wireless Interoperability The wireless adapter is designed to be interoperable with other wireless LAN products that are based on direct sequence spread spectrum (DSSS) radio technology and to comply with the following standards: - IEEE Std. 802.11b compliant Standard on Wireless LAN - IEEE Std. 802.11g compliant Standard on Wireless LAN - IEEE Std. 802.11a compliant Standard on Wireless LAN (applies to devices supporting 802.11a) - IEEE Std. 802.11n draft 2.0 compliant on Wireless LAN - Wireless Fidelity certification, as defined by the Wi-Fi Alliance Informasi Peraturan - 101 The Wireless Adapter and Your Health The wireless adapter, like other radio devices, emits radio frequency electromagnetic energy. The level of energy emitted by the wireless adapter, however, is less than the electromagnetic energy emitted by other wireless devices such as mobile phones. The wireless adapter operates within the guidelines found in radio frequency safety standards and recommendations. These standards and recommendations reflect the consensus of the scientific community and result from deliberations of panels and committees of scientists who continually review and interpret the extensive research literature. In some situations or environments, the use of the wireless adapter may be restricted by the proprietor of the building or responsible representatives of the applicable organization. Examples of such situations may include: - Using the wireless adapter on board airplanes, or - Using the wireless adapter in any other environment where the risk of interference with other devices or services is perceived or identified as being harmful. If you are uncertain of the policy that applies to the use of wireless adapters in a specific organization or environment (an airport, for example), you are encouraged to ask for authorization to use the adapter before you turn it on. FCC Radio Frequency Interference Requirements (applies to device supporting 802.11a) This device is restricted to indoor use due to its operation in the 5.15 to 5.25 GHz and 5.470 to 5.725 GHz frequency ranges. FCC requires this product to be used indoors for the frequency ranges 5.15 to 5.25 GHz and 5.470 to 5.725 GHz to reduce the potential for harmful interference to co-channel mobile satellite systems. High power radars are allocated as primary users of the 5.25 to 5.35 GHz and 5.65 to 5.85 GHz bands. These radar stations can cause interference with and /or damage this device. No configuration controls are provided for this wireless adapter allowing any change in the frequency of operations outside the FCC grant of authorization for U.S operation according to Part 15.407 of the FCC rules. 102 USA — Federal Communications Commission (FCC) This device complies with Part 15 of the FCC Rules. Operation of the device is subject to the following two conditions: - This device may not cause harmful interference. - This device must accept any interference that may cause undesired operation. - Note: The radiated output power of the adapter is far below the FCC radio frequency exposure limits. Nevertheless, the adapter should be used in such a manner that the potential for human contact during normal operation is minimized. To avoid the possibility of exceeding the FCC radio frequency exposure limits, you should keep a distance of at least 20 cm between you (or any other person in the vicinity), or the minimum separation distance as specified by the FCC grant conditions, and the antenna that is built into the computer. Details of the authorized configurations can be found at http://www.fcc.gov/oet/ea/ by entering the FCC ID number on the device. Interference Statement This wireless adapter has been tested and found to comply with the limits for a Class B digital device, pursuant to Part 15 of the FCC Rules. These limits are designed to provide reasonable protection against harmful interference in a residential installation. This wireless adapter generates, uses, and can radiate radio frequency energy. If the wireless adapter is not installed and used in accordance with the instructions, the wireless adapter may cause harmful interference to radio communications. There is no guarantee, however, that such interference will not occur in a particular installation. If this wireless adapter does cause harmful interference to radio or television reception (which can be determined by turning the equipment off and on), the user is encouraged to try to correct the interference by taking one or more of the following measures: - Reorient or relocate the receiving antenna of the equipment experiencing the interference. - Increase the distance between the wireless adapter and the equipment experiencing the interference. Informasi Peraturan - 103 - Connect the computer with the wireless adapter to an outlet on a circuit different from that to which the equipment experiencing the interference is connected. - Consult the dealer or an experienced radio/TV technician for help. - Note: The adapter must be installed and used in strict accordance with the manufacturer's instructions as described in the user documentation that comes with the product. Any other installation or use will violate FCC Part 15 regulations. Canada — Industry Canada (IC) This device complies with RSS210 of Industry Canada. Cet appareil se conforme à RSS210 de Canada d'Industrie. - Caution: When machine supports and using IEEE 802.11a wireless LAN, this product is restricted to indoor use due to its operation in the 5.15- to 5.25 GHz frequency range. Industry Canada requires this product to be used indoors for the frequency range of 5.15 GHz to 5.25 GHz to reduce the potential for harmful interference to co-channel mobile satellite systems. High power radar is allocated as the primary user of the 5.25 to 5.35 GHz and 5.65 to 5.85 GHz bands. These radar stations can cause interference with and/or damage to this device. The maximum allowed antenna gain for use with this device is 6dBi in order to comply with the E.I.R.P limit for the 5.25 to 5.35 and 5.725 to 5.85 GHz frequency range in point-topoint operation. To comply with RF exposure requirements all antennas should be located at a minimum distance of 20 cm, or the minimum separation distance allowed by the module approval, from the body of all persons. - Attention: l’utilisation d’un réseau sans fil IEEE802.11a est réstreinte à une utilisation en intérieur à cause du fonctionement dans la bande de fréquence 5,15 5,25 GHz. Industry Canada requiert que ce produit soit utilisé à l’intérieur des bâtiments pour la bande de fréquence 5,15 - 5,25 GHz afin de réduire les possibilités d’interférences nuisibles aux canaux co-existants des systèmes de transmission satellites. Les radars de puissances ont fait l’objet d’une allocation primaire de fréquences dans les bandes 5,25 - 5,35 GHz et 5 65 - 5 85 GHz. Ces stations radar peuvent créer des interférences avec ce produit et/ou lui être nuisible. Le gain d’antenne maximum permissible pour une utilisation avec ce produit est de 6 dBi afin 104 d’être conforme aux limites de puissance isotropique rayonnée équivalente (P.I.R.E.) applicable dans les bandes 5,25 - 5,35 GHz et 5,725 - 5,85 GHz en fonctionement point-à-point. Se pour conformer aux conditions d'exposition de RF toutes les antennes devraient être localisées à une distance minimum de 20 cm, ou la distance de séparation minimum permise par l'approbation de module, du corps de toutes les personnes. This Class B digital apparatus complies with Canadian ICES-003. Cet appareil numérique de la classe B est conforme a la norme NMB-003 du Canada. "To prevent radio interference to the licensed service, this device is intended to be operated indoors and away from windows to provide maximum shielding. Equipment (or its transmit antenna) that is installed outdoors is subject to licensing." « Pour empêcher que cet appareil cause du brouillage au service faisant l'objet d'une licence, il doit être utilisé a l'intérieur et devrait être placé loin des fenêtres afin de fournir un écran de blindage maximal. Si le matériel (ou son antenne d'émission) est installé à l'extérieur, il doit faire l'objet d'une licence. » European Union Daftar negara yang relevan Produk ini harus digunakan dengan benar-benar mematuhi peraturan dan batasan yang berlaku di negara tempat perangkat digunakan. Untuk informasi lebih lanjut, hubungi kantor setempat di negara perangkat ini digunakan. Harap lihat http://ec.europa.eu/ enterprise/rtte/implem.htm untuk mengetahui daftar negara terbaru. Daftar Kode Nasional Peralatan ini dapat dioperasikan di negara-negara berikut: Negara ISO 3166 Negara 2 kode huruf ISO 3166 Negara 2 kode huruf ISO 3166 Negara 2 kode huruf ISO 3166 2 kode huruf Austria AT Jerman DE Malta MT Inggris GB Belgia BE Yunani GR Belanda NT Islandia IS Siprus CY Hungaria HU Polandia PL Liechtenstein LI Informasi Peraturan - 105 Negara ISO 3166 Negara 2 kode huruf ISO 3166 Negara 2 kode huruf ISO 3166 Negara 2 kode huruf ISO 3166 2 kode huruf Rep. Ceko CZ Irlandia IE Portugal PT Norwegia NO Denmark DK Italia IT Slowakia SK Swiss CH Estonia EE Latvia LV Slovenia SL Bulgaria BG Finlandia FI Lithuania LT Spanyol ES Romania RO Prancis FR Luksemburg LU Swedia SE Turki TR The low band 5.15 -5.35 GHz is for indoor use only. This equipment complies with the essential requirements of the European Union directive 1999/5/EC. See Statements of European Union Compliance, and more details refer to the attached Declaration of Conformity. English Hereby, ACER INC., declares that this devise is in compliance with the essential requirements and other relevant provisionns of Directive 1999/5/EC. Česky [Czech] ACER INC. tímto prohlašuje, že toto zařízení je ve shodě se základními požadavky a dalšími příslušnými ustanoveními směrnice 1999/5/ES. Daansk [Danish] Undertegnede ACER INC. erklærer herved, at følgende udstyr overholder de væsentlige krav og øvrige relevante krav i direktiv 1999/5/EF. 106 Deutsch [German] Hiermit erklärt ACER INC., dass sich das Gerät Radiolan in Übereinstimmung mit den grundlegenden Anforderungen und den übrigen einschlägigen Bestimmungen der Richtlinie 1999/5/EG befindet. Eesti [Estonian] Käesolevaga kinnitab ACER INC. seadme vastavust direktiivi 1999/5/EÜ põhinõuetele ja nimetatud direktiivist tulenevatele teistele asjakohastele sätetele. Español [Spanish] Por medio de la presente ACER INC. declara que el dispositivo cumple con los requisitos esenciales y cualesquiera otras disposiciones aplicables o exigibles de la Directiva 1999/5/CE. Ελληνικά [Greek] ∆ια του παρόντος η ACER INC. δηλώνει ότι η παρούσα συσκευή συµµορφώνεται προς τις ουσιώδεις απαιτήσεις και τις λοιπές διατάξεις της Οδηγίας 1999/5/ ΕΚ. Français [French] Par la présente ACER INC. déclare que cet appareil est conforme aux exigences essentielles et aux autres dispositions pertinentes de la directive 1999/5/CE. Íslenska [Icelandic] Hér með lýsir ACER INC. yfir því að er í samræmi við grunnkröfur og aðrar kröfur, sem gerða r eru í tilskipun 1999/5/EC. Informasi Peraturan - 107 Itaaliano [Italian] Con la presente ACER INC. dichiara che questo dispositivo è conforme ai requisiti essenziali ed alle altre disposizioni pertinenti stabilite dalla direttiva 1999/5/CE. Latviski [Latvian] Ar šo ACER INC. deklarē, ka šī ierīce atbilst Direktīvas 1999/5/EK būtiskajām prasībām un citiem ar to saistītajiem noteikumiem. Lietuvių [Lithuanian] Šiuo ACER INC. deklaruoja, kad šis įrenginys atitinka esminius reikalavimus ir kitas 1999/5/EB Direktyvos nuostatas. Malti [Maltese] Hawnhekk, ACER INC., jiddikjara li dan jikkonforma mal- ti ijiet essenzjali u ma provvedimenti o rajn relevanti li he mm fid-Dirrettiva 1999/5/EC. Magyar [Hungarian] Alulírott, ACER INC. nyilatkozom, hogy a készülék megfelel a vonatkozó alapveto követelményeknek és az 1999/5/EC irányelv egyéb eloírásainak. Nederlands [Dutch] Hierbij verklaart ACER INC. dat het toestel voldoet aan de essentiële eisen en de andere relevante bepalingen van richtlijn 1999/5/EG. Norsk [Norwegiann] ACER INC. erklærer herved at utstyret er i samsvar med de grunnleggende krav og øvrige relevante krav i direktiv 1999/5/EF. 108 Polski [Polish] Niniejszym ACER INC. oświadcza, że urządzenie jest zgodne z zasadniczymi wymogami oraz pozostałymi stosownymi postanowieniami Dyrektywy 1999/5/EC. Português [Portuguese] ACER INC. declara que este dispostivo está conforme com os requisitos essenciais e outras disposições da Directiva 1999/5/CE. Slovensko [Slovenian] ACER INC. izjavlja, da je ta naprava skladna z bistvenimi zahtevami in ostalimi relevantnimi določili Direktive 1999/5/ES. Slovensky [Slovak] ACER INC. týmto vyhlasuje, že zariadenie spĺňa základné požiadavky a všetky príslušné ustanovenia Smernice 1999/5/ES. Suomi [Finnish] ACER INC. vakuuttaa täten että tämä laite on direktiivin 1999/ 5/EY oleellisten vaatimusten ja sitä koskevienn direktiivin muiden ehtojen mukainen. Svenska [Swedish] Härmed intygar ACER INC. att denna enhet står i överensstämmelse med väsentliga egenskapskrav och övriga relevanta bestämmelser som framgår av direktiv 1999/5/EG. Informasi Peraturan - 109 France Pour la France métropolitaine : 2,400 - 2,4835 GHz (Canaux 1à 13) autorisé en usage intérieur 2,400 - 2,454 GHz (canaux 1 à 7) autorisé en usage extérieur Pour la Guyane et la Réunion : 2,400 - 2,4835 GHz (Canaux 1à 13) autorisé en usage intérieur 2,420 - 2,4835 GHz (canaux 5 à 13) autorisé en usage extérieur Pour tout le territoire Français : Seulement 5,15 -5,35 GHz autorisé pour le 802.11a L'utilisation de cet equipement (2,4 GHz WLAN) est soumise à certaines restrictions : - La puissance maximale autorisée en intérieur est de 100 mW pour 2400 - 2483,5 MHz. - La puissance maximale autorisée est de 100 mW en extérieur pour 2400 - 2454 MHz. - La puissance maximale autorisée est de 10 mW en extérieur, 2454 - 2483,5 MHz. Pour les dernières restrictions, voir http://www.art-telecom.fr. Italy The use of these equipments is regulated by: 1.D.L.gs 1.8.2003, n. 259, article 104 (activity subject to general authorization) for outdoor use and article 105 (free use) for indoor use, in both cases for private use. 2.D.M. 28.5.03, for supply to public of RLAN access to networks and telecom services. L’uso degli apparati è regolamentato da: 1.D.L.gs 1.8.2003, n. 259, articoli 104 (attività soggette ad autorizzazione generale) se utilizzati al di fuori del proprio fondo e 105 (libero uso) se utilizzati entro il proprio fondo, in entrambi i casi per uso private. 2.D.M. 28.5.03, per la fornitura al pubblico dell’accesso R-LAN alle reti e ai servizi di telecomunicazioni. 110 Belgium Dans le cas d'une utilisation privée, à l'extérieur d'un bâtiment, au-dessus d'un espace public, aucun enregistrement n'est nécessaire pour une distance de moins de 300 m. Pour une distance supérieure à 300 m un enregistrement auprès de l'IBPT est requise. Pour les enregistrements et licences, veuillez contacter l'IBPT. In geval van privé-gebruik, buiten een gebouw, op een openbare plaats, is geen registratie nodig, wanneer de afstand minder dan 300 m is. Voor een afstand groter dan 300 m is een registratie bij BIPT vereist. Voor registraties en licenties, gelieve BIPT te contacteren. Brazil Este equipamento opera em caráter secundário, isto é, não tem direito a proteção contra interferência prejudicial, mesmo de estações do mesmo tipo, e não pode causar interferência a sistemas operando em caráter primário. Pakistan Pakistan Telecommunication Authority (PTA) Approved Morocco The operation of this product in the radio channel 2 (2417 MHz) is not authorized in the following cities: Agadir, Assa-Zag, Cabo Negro, Chaouen, Goulmima, Oujda, Tan Tan, Taourirt, Taroudant and Taza. The operation of this product in the radio channels 4, 5, 6 and 7 (2425 - 2442 MHz) is not authorized in the following cities: Aéroport Mohamed V, Agadir, Aguelmous, Anza, Benslimane, Béni Hafida, Cabo Negro, Casablanca, Fès, Lakbab, Marrakech, Merchich, Mohammédia, Rabat, Salé, Tanger, Tan Tan, Taounate, Tit Mellil, Zag. Japan 5 GHz 帯は室内でのみ使用のこと Korea 당해 무선설비는 운용 중 전파혼신 가능성이 있음 Informasi Peraturan - 111 Taiwan 第十二條 經型式認證合格之低功率射頻電機,非經許可,公司、商號或使用者均不得擅自變更頻 率、加大功率或變更原設計之特性及功能。 第十四條 低功率射頻電機之使用不得影響飛航安全及干擾合法通信 ; 經發現有干擾現象時,應立即 停用,並改善至無干擾時方得繼續使用。 前項合法通信,指依電信法規定作業之無線通信。 低功率射頻電機須忍受合法通信或工業、科學及醫療用電波輻射性電機設備之干擾。 MODIFIKASI PRODUK Penandaan CE Gateway tidak dapat dianggap bertanggung jawab atas modifikasi tidak sah pada produk yang dilakukan oleh pengguna dan akibat dari modifikasi itu, yang mungkin mengubah kesesuaian produk dengan Penandaan CE. Interferensi Frekuensi Radio Pabrikan tidak bertanggung jawab atas setiap interferensi radio atau TV yang disebabkan oleh modifikasi pada peralatan ini. KONEKSI DAN GROUND TERSENDIRI DAN JAUH DARI PERALATAN (REMOTE EARTH) PELV (Proteksi Tegangan Ekstra Rendah) Untuk memastikan integritas peralatan dengan voltase ekstra rendah, hanya hubungkan peralatan dengan sirkuit listrik yang terproteksi dan kompatibel ke port eksternal. SELV (Pengaman Tegangan Ekstra Rendah) Setiap input dan output produk ini diklasifikasikan sebagai Pengaman Tegangan Ekstra Rendah. 112 Ground Tersendiri dan Jauh dari Peralatan (Remote Earth) Untuk mencegah kejutan listrik, hubungkan semua komputer (masing-masing kantor) dan peralatan pendukung komputer ke sirkuit perkabelan bangunan yang sama. Jika Anda tidak yakin, periksa perkabelan bangunan untuk menghindari kondisi Ground Tersendiri dan Jauh dari Peralatan. Bahan Bangunan Hanya hubungkan peralatan ke bahan bangunan yang sesuai dengan peraturan perkabelan yang berlaku di negara Anda. Di Britania Raya, ini adalah peraturan IEE. SUMBER DAYA DAN KABEL Sumber daya Soket inlet dan soket outlet sumber daya (jika dilengkapi) digolongkan sebagai Tegangan Berbahaya. Anda harus mencabut kabel sumber daya dan melepas semua baterai untuk mencabut peralatan dari sumber daya. Oleh karena itu, stopkontak seharusnya dipasang dekat dengan peralatan dan mudah diakses. Nilai input: Lihat label nilai di dasar komputer dan pastikan bahwa adaptor daya Anda sesuai dengan nilai yang ditetapkan. Apa pun yang terjadi pengguna dilarang keras membongkar sumber daya (power supply). Sumber daya tidak mempunyai suku cadang yang dapat diganti pengguna. Di dalam sumber daya terdapat tegangan tinggi yang dapat menyebabkan cidera diri parah. Sumber daya yang rusak harus dikembalikan ke dealer Anda. Kabel daya dan konektor Produk ini memerlukan kabel daya dan konektor yang dibumikan (grounded). Konektor hanya boleh dipasang ke stopkontak yang telah di-ground. Pastikan stopkontak telah dibumikan dengan benar sebelum memasang konektor. Jangan pasang konektor ke stopkontak yang tidak di-ground. Untuk informasi rinci, hubungi teknisi listrik Anda. Informasi Peraturan - 113 Panjang kabel tidak boleh lebih dari 2,5 meter. Untuk mencegah bahaya kelistrikan, jangan melepas atau menonaktifkan kontak kabel ground pada kabel daya. Ganti kabel daya jika rusak. Hubungi dealer Anda untuk penggantian yang tepat. Di Eropa, konektor harus berkemampuan maksimal 250 VAC, 10 amp minimum Konektor harus mempunyai tanda persetujuan dari badan internasional. Kabel harus cocok untuk digunakan di negara pengguna akhir. Tanyakan pada instansi kelistrikan setempat jika Anda tidak yakin dengan tipe kabel daya yang harus digunakan di negara Anda. Kabel Untuk kabel yang tidak disertakan dengan Produk dalam kemasan komputer ini: Kinerja EMC sistem hanya dijamin jika kabel dan antarmuka menggunakan pelindung yang efisien. Penggunaan kabel antarmuka berpelindung diperlukan untuk USB, IEEE1394, serial, printer, permainan (game), audio/ video analog atau digital, antena TV atau FM, dan biasanya semua antarmuka kabel berkecepatan tinggi. Hanya gunakan kabel yang terdaftar di UL No. 26AWG atau kabel telekomunikasi yang besar. Hanya kabel Ethernet LAN atau modem RTC boleh mempunyai panjang lebih dari 3 meter. Gateway menganjurkan Anda menambah batang ferit yang dijepitkan pada setiap kabel yang menghubungkan komputer Anda ke piranti keras yang tidak disertakan dengan komputer Anda. - Referensi untuk batang ferit: 28A-2029 dari Steward (dua lilitan) Selama sertifikasi produk, Gateway menggunakan kualitas kabel berikut: - Kabel USB2.0 Bersertifikat dari Hama 46778 - FireWire IEEE1394 berpelindung dari Hama 50011 - Kabel Audio/Video RCA-RCA berpelindung dari Thomson KHC001M, KHC012M, KHC028M - Kabel audio Jack Stereo berpelindung dari Hama 43330H, 42714H 114 Kalor Timbul (Heat Build-up) dan Komputer Portabel Adaptor daya dan bagian bawah komputer dapat menjadi panas setelah penggunaan yang lama. Kontak fisik yang lama dengan adaptor dan bagian tersebut harus dihindari. MELEPAS DAN MENGGANTI PENUTUP CHASIS Sebelum melepaskan penutup chasis untuk memperbaiki atau memodifikasi peralatan, Anda harus mencabut semua kabel daya dan modem, serta lepaskan baterai. - Perhatian: Beberapa komponen di dalam komputer dapat menjadi panas setelah penggunaan yang lama. Oleh karena itu Anda harus menutup chasis sebelum Anda mencolokkan dan menghidupkan peralatan. PERNYATAAN KESESUAIAN LASER Perangkat optik diuji dan dijamin memenuhi standar Komisi Elektronik Internasional IEC60825-1 dan Standar Eropa EN60825-1 untuk produk Laser Kelas 1. Produk laser Kelas 1 tidak dianggap berbahaya. Perangkat optik dirancang sedemikian rupa sehingga tidak pernah ada akses manusia ke radiasi laser di atas tingkat Kelas 1 selama pengoperasian normal dan kondisi pemeliharaan seperti yang dianjurkan. Perangkat optik yang dipasang pada komputer Anda dirancang hanya digunakan sebagai komponen produk elektronik terkait dan oleh karena itu tidak memenuhi persyaratan Kode Peraturan Federal Pasal 1040.10 dan Pasal 1040.11 untuk produk laser LENGKAP. Karena paparan ke radiasi laser sangat berbahaya, apa pun yang terjadi pengguna dilarang keras membongkar perangkat laser. PENGEMASAN Pengemasan produk ini sesuai dengan Pedoman Lingkungan Eropa 94/62/EC mulai dari tanggal 20 Desember 1994 dan ekuivalennya dalam Undang-undang Prancis berdasarkan Keputusan 98-638 mulai dari 20 Juli 1998. Informasi Peraturan - 115 KESESUAIAN DENGAN SERTIFIKASI PERATURAN RUSIA 116 LINGKUNGAN KAMI TERPANGGIL UNTUK MELINDUNGI LINGKUNGAN Lingkungan hidup merupakan bagian paling penting produk kami. Gateway berkomitmen untuk membatasi dampak lingkungan yang disebabkan produk selama siklus hidup produk. Mulai dari fase desain, dengan kebijakan pengadaan yang sangat ketat, komponen elektronik mendapatkan perhatian maksimum guna membatasi beratnya dalam hal logam berat, seperti timah hitam, kadmium, kromium, merkuri, dan sebagainya. Pemasok diminta untuk mematuhi semua peraturan bagi setiap suku cadang produk apa saja. Sejauh menyangkut akhir usia produk, kami telah mengambil tindakan untuk mengantisipasi dan memfasilitasi proses daur ulang semua produk kami. Maka, semua suku cadang plastik yang lebih berat dari 25 gram digunakan dalam produk Gateway yang diberi label ISO 11469. Dengan label ini, materi tersebut bisa dikenali dengan cepat dan juga memudahkan valorisasinya. Demikian pula, komputer desktop didesain agar bisa dibongkar dengan mudah, dengan obeng yang diganti mempergunakan klip. PEMBUANGAN PRODUK Pedoman 2002/96/EC, yang disebut sebagai Waste Electrical and Electronic Equipment (WEEE) Directive (Pedoman Limbah dari Perangkat Listrik dan Elektronik), mempersyaratkan bahwa produk listrik dan elektronik bekas harus dibuang secara terpisah dengan limbah ruang tangga biasa guna mendorong penggunaan kembali, pendaurulangan dan bentuk pemulihan lainnya serta untuk mengurangi jumlah limbah yang akan dilenyapkan dengan maksud untuk mengurangi tumpukan sampah dan pengabuan. Logo tempat sampah yang diberi tanda silang adalah untuk mengingatkan Anda bahwa produk ini harus disortir secara terpisah pada saat pembuangan. Peraturan ini berlaku bagi semua produk Gateway dan juga semua aksesori, seperti keyboard, mouse, pengeras suara, remote control, dsb. Bila Anda harus Lingkungan - 117 membuang produk dimaksud, pastikan bahwa produk tersebut didaur ulang dengan benar dengan menanyakan pada lembaga berwenang setempat, atau dengan mengembalikan perangkat lama Anda ke pengecer ketika Anda menggantinya. Untuk informasi, kunjungi www.gateway.com/about/corp_responsibility/environment.php. Pembuangan Baterai (bila berlaku) Sebelum membuang perlengkapan Anda, pastikan bahwa Anda telah melepas baterai yang mungkin terpasang dalam peralatan ini. Undang-undang Eropa menyatakan bahwa pada saat pembuangan baterai harus dikumpulkan secara terpisah dari limbah rumah tangga biasa. Jangan membuang baterai bekas di tempat sampah. Buang baterai bekas melalui program pengumpulan baterai jika ada, atau tanyakan kepada distributor atau lembaga berwenang setempat tentang infrastruktur apa yang dapat Anda gunakan. Upaya Anda akan memungkinkan pembuangan yang aman, pendaurulangan dan pemusnahan baterai bekas serta akan membantu melindungi lingkungan hidup dan juga mengurangi bahaya pada kesehatan. - Perhatian: Ada risiko ledakan jika baterai tidak diganti dengan tipe yang benar. Buang baterai bekas sesuai dengan petunjuk. ENERGY STAR Produk Gateway yang memenuhi syarat ENERGY STAR menghemat uang Anda dengan mengurangi biaya energi dan melindungi lingkungan tanpa mengorbankan fitur dan kinerja. Gateway dengan bangga menawarkan produk dengan simbol ENERGY STAR kepada pelanggan kami. Apakah ENERGY STAR itu? Produk yang memenuhi syarat ENERGY STAR menggunakan lebih sedikit energi dan mencegah emisi gas rumah kaca dengan memenuhi pedoman efisiensi energi yang ketat yang ditentukan oleh Badan Perlindungan Lingkungan A.S. Gateway berkomitmen untuk menawarkan produk dan layanan di seluruh dunia yang membantu pelanggan menghemat uang, melestarikan energi dan memperbaiki kualitas lingkungan kita. Semakin banyak energi yang dapat kita hemat dengan efisiensi energi yang lebih tinggi, 118 semakin banyak kita mengurangi gas rumah kaca dan risiko perubahan iklim. Untuk informasi lebih lanjut, kunjungi www.energystar.gov atau www.energystar.gov/ powermanagement. - Catatan: Informasi dalam bagian ini mungkin tidak berlaku bagi komputer Anda. Produk Gateway yang memenuhi syarat ENERGY STAR: - Menghasilkan lebih sedikit panas dan mengurangi beban pendinginan, serta iklim yang lebih hangat. - Secara otomatis masuk ke mode "layar tidur" dan "komputer tidur" masing-masing setelah tidak aktif selama 10 dan 30 menit. - Aktifkan kembali komputer dari mode tidur dengan menekan keyboard atau menggerakkan mouse. - Komputer akan menghemat energi lebih dari 80% pada mode "tidur". ENERGY STAR dan merek ENERGY STAR adalah merek A.S. yang terdaftar. Lingkungan - 119 LISENSI PIRANTI LUNAK - Catatan: Sebagian besar aplikasi piranti lunak sudah diinstal sebelumnya pada komputer Gateway Anda. Piranti lunak tersebut siap digunakan atau dimulai. Namun demikian, beberapa piranti lunak memerlukan CD atau DVD untuk menjalankannya. Anda akan menemukan disk ini dalam kemasan komputer Anda. Gateway Perjanjian Lisensi (Produk CD dan/atau DVD). Salinan orisinal ini adalah bukti pembelian Anda. Harap memperlakukannya sebagai milik Anda yang berharga. Penting! Baca dengan seksama sebelum menginstal piranti lunak. Perjanjian Lisensi berikut berlaku bagi Anda. Ini adalah perjanjian resmi antara Anda (mungkin sebagai perorangan atau perusahaan) dan Gateway. Dengan menginstal piranti lunak yang dimaksud Anda setuju untuk terikat dengan syarat-syarat perjanjian ini. Jika Anda tidak setuju dengan syarat-syarat perjanjian ini, segera kembalikan seluruh sistem komputer Anda, paket piranti lunak yang belum dibuka, jika ada, serta semua item yang menyertainya (termasuk materi tertulis atau wadah lainnya di tempat Anda memperoleh barang-barang tersebut guna mendapatkan pengembalian uang Anda secara utuh. GATEWAY LISENSI PIRANTI LUNAK 1. Pemberian Lisensi Perjanjian Lisensi (“Lisensi”) Gateway ini mengizinkan Anda untuk menggunakan satu salinan versi PIRANTI LUNAK Gateway yang telah diidentifikasikan di atas (yang paling tidak terdiri dari satu CD atau DVD) pada satu komputer, dengan syarat bahwa PIRANTI LUNAK tersebut kapan pun juga hanya digunakan pada satu komputer. Bila Anda mempunyai beberapa Lisensi untuk PIRANTI LUNAK dimaksud, maka Anda kapan saja dapat menggunakan salinan PIRANTI LUNAK tersebut sebanyak Lisensi yang Anda miliki. PIRANTI LUNAK “digunakan” pada sebuah komputer apabila PIRANTI LUNAK itu dimuat ke memori temporer (yaitu RAM) atau diinstal pada memori permanen (misalnya 120 hard disk, CD dan/atau DVD, atau perangkat penyimpanan komputer lainnya, kecuali bahwa satu salinan yang diinstal pada server jaringan untuk tujuan tunggal distribusi komputer lainnya tidak “digunakan”. Jika jumlah pengguna PIRANTI LUNAK yang diantisipasi akan melebihi jumlah Lisensi yang berlaku, maka Anda harus mempunyai mekanisme atau proses yang rasional yang sudah disiapkan untuk memastikan bahwa jumlah orang yang menggunakan PIRANTI LUNAK secara bersamaan tidak melebihi jumlah Lisensi. Jika PIRANTI LUNAK diinstal secara permanen pada hard disk atau perangkat penyimpanan komputer (selain server jaringan) dan satu orang menggunakan komputer itu lebih dari 80% dari keseluruhan waktu komputer itu digunakan, maka orang bersangkutan juga boleh menggunakan PIRANTI LUNAK pada komputer portabel atau komputer rumah. 2. Hak Cipta PIRANTI LUNAK dimiliki oleh Gateway atau pemasoknya dan dilindungi undang-undang hak cipta Amerika Serikat serta ketentuan perjanjian internasional. Oleh karena itu, Anda harus memperlakukan PIRANTI LUNAK ini seperti materi lainnya yang dilindungi hak cipta (misalnya buku, atau rekaman musik) kecuali bahwa Anda boleh mentransfer bagian disk CD dan/atau DVD PIRANTI LUNAK ini, jika ada, ke satu hard disk dengan syarat bahwa Anda menyimpan yang asli hanya untuk cadangan. Anda tidak boleh menyalin bagian disk CD dan/atau DVD PIRANTI LUNAK ini atau materi tertulis yang menyertai PIRANTI LUNAK ini. 3. Larangan lain Anda tidak boleh menyewakan PIRANTI LUNAK ini, tetapi Anda boleh mentransfer PIRANTI LUNAK ini dan materi tertulis yang menyertai secara permanen dengan syarat bahwa Anda tidak menyimpan salinan dan penerima setuju dengan syarat-syarat Perjanjian ini. Anda tidak boleh melakukan rekayasa balik, mendekompilasi atau membongkar PIRANTI LUNAK ini. Setiap transfer PIRANTI LUNAK ini harus terdiri dari pembaruan terkini dan semua versi sebelumnya. Lisensi Piranti lunak - 121 INFORMASI TENTANG PIRANTI LUNAK PIHAK KETIGA ATAU PIRANTI LUNAK GRATIS Piranti lunak yang dimuat sebelumnya, tertanam atau jika tidak didistribusikan dengan produk yang disediakan oleh Gateway dilengkapi dengan program piranti lunak pihak ketiga (“Piranti lunak Gratis”), yang dilisensikan berdasarkan syarat-syarat Lisensi Publik Umum GNU (“GPL”). Piranti lunak Gratis diberi tandai seperti itu. Penyalinan, distribusi dan/atau modifikasi Piranti lunak Gratis tersebut harus tunduk pada syarat-syarat GPL. Piranti lunak Gratis didistribusikan dengan harapan bahwa Piranti lunak Gratis ini akan bermanfaat tetapi TANPA JAMINAN APA PUN; bahkan tanpa jaminan tersirat LAYAK JUAL atau KELAYAKAN UNTUK TUJUAN TERTENTU. Ketentuan Lisensi Publik Umum GNU akan selalu berlaku. Anda bisa mengakses http://www.gnu.org secara langsung untuk memperoleh salinan GPL atau menulis surat ke Free Software Foundation, Inc.dan meminta salinan. Alamat Free Software Foundation, Inc adalah: 59 Temple Place - Suite 330, Boston, MA, 02111-1307, USA. Selama periode 3 (tiga) tahun mulai sejak Anda menerima piranti lunak ini, Anda bisa memperoleh salinan lengkap kode sumber yang dapat dibaca oleh mesin untuk Piranti lunak Gratis berdasarkan syarat-syarat GPL tanpa biaya kecuali untuk biaya media, pengiriman, serta penanganan, setelah mengajukan permintaan tertulis kepada kami. Hubungi kami jika Anda mempunyai pertanyaan lebih lanjut. Alamat surat kami adalah 8F, 88, Sec. 1, Hsin Tai Wu Rd., Hsichih, New Taipei City 221, Taiwan. 122 INDEKS A pemecahan masalah ...................... 89 audio B Baterai ............................................... 118 Browser ............................................... 54 C pemecahan masalah ...................... 90 CD-ROM mengeluarkan secara manual ......... 90 D Drive DSL ..................................................... 49 Pembaca Kartu Memori .................. 30 F Firewall ................................................ 57 G Program Memulihkan Manajemen... 47 Gateway I Informasi Peraturan ...................... 98, 117 Internet Firewall .......................................... 57 Interferensi......................................... 112 Koneksi ................................... 48, 49 J Jaminan ................................................ 7 jaringan ............................................... 32 K Kabel ............................................. 9, 113 Keamanan Antivirus ........................................ 57 Kabel daya............................................ 9 Indeks - 123 Pembaruan .................................... kecerahan tombol pintas ................................. Keyboard tombol pintas ................................. keyboard pemecahan masalah ...................... 64 komputer fitur-fitur ......................................... 19 indikator on .................................... koneksi jaringan ......................................... 20 Kursor ................................................. 90 15 21 32 28 L LAN (Local Area Network) .................... 51 Lingkungan Komputer ............................ 8 Lingkungan ........................................ 117 M Malware (program jahat) ....................... masalah ............................................... CD-ROM ........................................ keyboard ........................................ pengawalan ................................... printer ............................................ 56 tampilan......................................... 89 88 Membersihkan Komputer Anda ............. 10 90 Mengisi daya: memeriksa tingkat .......................... 41 90 88 Modem .......................................... 49, 50 90 N Norton Internet Security .................. 55, 59 P panel sentuh ........................................ 28 menggunakan .......................... 28–28 Pembaca Kartu Memori ........................ 30 Pembaruan Pembaruan Windows Otomatis ....... 64 Pembuangan baterai .......................... 118 Pemeliharaan Manajemen Pemulihan ................... 66 Program Memulihkan Manajemen ... 47 124 Pemulihan Manajemen Pemulihan ................... 66 Program Memulihkan Manajemen... 47 pengeras suara pemecahan masalah ...................... 89 tombol pintas ........................... 19, 20 Penyedia Layanan Internet (ISP) .......... 48 Perangkat media portabel..................... 32 Peranti mata-mata ............................... 56 Peringatan epilepsi ............................... 14 Lisensi Piranti lunak ..................... 120 Peringatan Kesehatan .......................... 12 port ..................................................... 30 Peringatan Keselamatan ....................... 8 printer Piranti lunak pemecahan masalah ...................... 90 S Sambungan Jaringan ........................... 51 T tampak depan ............................................ kanan ............................................ kiri ................................................. Tampak depan ..................................... Tampak kiri .......................................... Tampilan 23 25 23 21 21 tombol pintas ................................. tampilan pemecahan masalah ...................... tanya jawab ......................................... TJ. Lihat tanya jawab tombol pintas ....................................... 18 89 88 20 U Unit baterai karakteristik ................................... keadaan lemah .............................. melepaskan ................................... memaksimalkan usia baterai ........... memasang ..................................... 37 42 40 38 40 mengecek tingkat pengisian ........... menggunakan pertama kalinya ....... Mengisi daya: ................................ mengoptimalkan ............................ peringatan baterai hampir habis ...... universal serial bus .............................. 41 38 40 41 42 33 W WiFi ..................................................... 51 Windows Ver.02.01.02 Menggunakan Windows ................. 47 Pembaruan Windows Otomatis ....... 64 Indeks - 125 ¤ÙèÁ×ͼÙéãªé Gateway NE71B - 1 ÊÒúÑ− ¡ÒÃàÃÔèÁãªé§Ò¹¤ÍÁ¾ÔÇàµÍÃì¢Í§¤Ø³ ¡ÒÃàª×èÍÁµèÍäÃéÊÒÂ................................................................ ¡ÒÃŧ·ÐàºÕ¹...................................................................... ¡ÒõԴµÑ駫Ϳ·ìáÇÃì ............................................................. ¡ÒáÙé¤×¹ ................................................................................ ÁÕ»Ñ−ËÒ¡ÒÃãªé§Ò¹................................................................ 5 ¡ÒÃÍѾà¡Ã´¤ÍÁ¾ÔÇàµÍÃì¢Í§¤Ø³ 29 5 ¢ÂÒÂãËé¡ÇéÒ§ä¡Å´éǵÑÇàÅ×Í¡µèÒ§æ................................... 29 6 µÑÇàÅ×͡㹡ÒÃàª×èÍÁµèÍ .............................................. 29 7 ¾ÒÇàÇÍÃì«Ñ¾¾ÅÒ 35 7 Íá´»àµÍÃì AC ................................................................... 35 7 ẵàµÍÃÕè ............................................................................ 36 ¤ÍÁ¾ÔÇàµÍÃìàº×éͧµé¹ 9 ÅѡɳТͧẵàµÍÃÕè................................................ 36 ¤ÇÒÁ»ÅÍ´ÀÑÂáÅФÇÒÁÊдǡʺÒ .................................. 9 ¡ÒÃà»ÅÕè¹ẵàµÍÃÕè.................................................. 38 ¢éͤÇû¯ÔºÑµÔà¾×èͤÇÒÁ»ÅÍ´ÀÑ ................................ 9 ¡ÒÃãÊèËÃ×ͶʹẵàµÍÃÕè ........................................... 39 ¡Òûéͧ¡Ñ¹´éÒ¹ÊØ¢ÀÒ¾ ............................................. 13 ¡ÒêÒÃì¨áºµàµÍÃÕè .................................................... 39 ¡ÒõÃǨÊͺÃдѺ¾Åѧ§Ò¹¢Í§áºµàµÍÃÕè ................ 40 ·Ó¤ÇÒÁÃÙé¨Ñ¡¡Ñº¤ÍÁ¾ÔÇàµÍÃì¢Í§¤Ø³ 15 ¡ÒÃÂ×´ÍÒÂØ¡ÒÃãªé§Ò¹áºµàµÍÃÕè ................................. 40 ÁØÁÁͧ´éÒ¹º¹ - áÊ´§...................................................... 16 ¡ÒÃàµ×͹ẵàµÍÃÕèµèÓ................................................ 40 ÁØÁÁͧ´éÒ¹º¹ - ¤ÕÂìºÍÃì´ ................................................. 17 42 »ØèÁ¾ÔàÈÉ.................................................................... 18 à¤Ã×èͧÁ×ͨѴ¡ÒþÅѧ§Ò¹ ÁØÁÁͧ´éҹ˹éÒ.................................................................. 21 ¡ÒûÃÐËÂÑ´¾Åѧ§Ò¹.......................................................... 42 ÁØÁÁͧ´éÒ¹«éÒÂ.................................................................. 22 «Í¿µìáÇÃì 45 ÁØÁÁͧ´éÒ¹¢ÇÒ .................................................................. 24 ¡ÒÃãªé Windows áÅЫͿ·ìáÇÃì¢Í§¤Ø³ ............................ 45 ÁØÁÁͧ´éÒ¹ÅèÒ§................................................................... 26 ¡ÒÃÃÑ¡ÉÒ¤ÇÒÁ»ÅÍ´ÀѺ¹ÍÔ¹àµÍÃìà¹çµ·ÕèÁÕãËé.......... 45 ·Ñªá¾´ 27 Gateway Recovery Management............................ 45 ¡ÒÃãªé·Ñªá¾´àº×éͧµé¹........................................................ 27 ÍÔ¹àµÍÃìà¹çµ 46 ¡ÒÃÇÒ´¹ÔéǺ¹·Ñªá¾´ ........................................................ 28 ¢Ñ鹵͹áẹà¹çµ ............................................................. 46 ¡Òû¡»éͧ¤ÍÁ¾ÔÇàµÍÃì¢Í§¤Ø³................................ 46 2 àÅ×Í¡ ¼ÙéãËéºÃÔ¡ÒÃÍÔ¹àµÍÃìà¹çµ .................................... 46 ¡ÒÃàª×èÍÁµèÍà¤Ã×Í¢èÒ ................................................ 49 ·èͧÍÔ¹àµÍÃìà¹çµ!....................................................... 52 ¤ÇÒÁ»ÅÍ´ÀÑÂ........................................................... 53 ¡ÒÃàÃÕ¡¤×¹ 63 ¡ÒÃÊÃéÒ§¡ÒÃÊÓÃͧ¢éÍÁÙÅàÃÕ¡¤×¹ ...................................... 63 ¡ÒÃÊÃéÒ§ÊÓÃͧ¢éÍÁÙÅä´ÃìàÇÍÃìáÅÐá;¾ÅÔपÑè¹ ................ 66 ¡ÒÃàÃÕ¡¤×¹¤èÒÃкº¢Í§¤Ø³ .............................................. 69 ¡ÒõԴµÑé§ä´ÃìàÇÍÃìËÃ×Íá;¾ÅÔपÑè¹ãËÁè«éÓ .............. 70 ¡ÒáÅѺÊÙèʶҹÐÃкº¡è͹˹éÒ ................................ 73 àÃÕ¡¤×¹Ãкº¢Í§¤Ø³ãËéà»ç¹Ê¶Ò¹Ð·ÕèµÑé§ÁÒ¨Ò¡ âç§Ò¹....................................................................... 74 ¡ÒÃàÃÕ¡¤×¹Ãкº¨Ò¡ Windows ............................... 75 ¡ÒÃàÃÕ¡¤×¹¤×¹¨Ò¡¢éÍÁÙÅ·ÕèÊÓÃͧ äÇéà¾×èÍ¡ÒÃàÃÕ¡¤×¹¢Í§¤Ø³ ........................................ 79 ¤Ó¶ÒÁ·Õè¶Ù¡¶ÒÁºèÍ ÁÕÍÂÙèÊÒÁ¤Í¹à«ç»µì·Õè¤Ø³µéͧ¨ÓäÇéãËé¢Öé¹ã¨ ................ 86 ©Ñ¹¨Ðà¢éÒ¶Ö§ charms ä´éÍÂèÒ§äÃ?.............................. 86 ©Ñ¹¨Ðä»ÂѧàÁ¹Ù àÃÔèÁ ä´éÍÂèÒ§äÃ.................................. 86 ©Ñ¹¨ÐÊÅѺÃÐËÇèÒ§â»Ãá¡ÃÁä´éÍÂèÒ§äÃ?.................... 87 ©Ñ¹¨Ð»Ô´¤ÍÁ¾ÔÇàµÍÃì¢Í§©Ñ¹ä´éÍÂèÒ§äÃ?.................. 87 ·ÓäÁ¨Ö§ÁÕÍÔ¹àµÍÃìà¿«ãËÁè? ...................................... 87 ©Ñ¹¨Ð»Å´Åçͤ¤ÍÁ¾ÔÇàµÍÃì¢Í§©Ñ¹ä´éÍÂèÒ§äÃ?......... 88 ©Ñ¹¨Ð»ÃѺáµè§¤ÍÁ¾ÔÇàµÍÃì¢Í§©Ñ¹ä´éÍÂèÒ§äÃ?......... 88 ©Ñ¹µéͧ¡Ò÷Õè¨Ðãªé Windows Ẻ·Õè©Ñ¹à¤Âãªé – àÍÒà´Ê¡ì·çÍ»¢Í§©Ñ¹¤×¹ÁÒ! ...................................... 89 á;¾ÅÔपÑè¹µèÒ§æ ¢Í§©Ñ¹ÍÂÙè·Õèä˹?....................... 90 Microsoft ID (ºÑ−ªÕ) ¤×ÍÍÐäà ................................... 91 ©Ñ¹¨Ðà¾ÔèÁÃÒ¡ÒÃâ»Ã´Å§ä»ã¹ Internet Explorer ä´éÍÂèÒ§äÃ?................................................................ 92 ©Ñ¹¨ÐµÃǨËÒ¡ÒÃÍѾവ¢Í§ Windows ä´éÍÂèÒ§äÃ.. 92 ©Ñ¹¨ÐËÒ¢éÍÁÙÅà¾ÔèÁàµÔÁä´é·Õèä˹ ................................ 92 83 à¤Åç´ÅѺáÅФÓá¹Ð¹Ó㹡ÒÃãªé Windows 8...................... 86 ÊÒúÑ− - 3 ¢éÍÁÙÅ´éÒ¹¡ÒäǺ¤ØÁ 93 ÊÔè§áÇ´ÅéÍÁ 111 ãºÍ¹Ø−ҵ㹡ÒÃãªé«Í¿·ìáÇÃì 114 ´Ñª¹ 116 ÅÔ¢ÊÔ·¸ © 2012 ʧǹÅÔ¢ÊÔ·¸Ôì Gateway NE71B ¤ÙèÁ×ͼÙéãªé àÇÍÃìªÑè¹¹Õé: 20 ¡Ã¡®Ò¤Á 2012 áÇÐä»ÂѧàÇçºä«µì registration.gateway.com à¾×èͤ鹾º»ÃÐ⪹ìÊÓËÃѺÅÙ¡¤éÒ Gateway ËÁÒÂà˵Ø: ÃÙ»ÀÒ¾·Ñé§ËÁ´ÁÕäÇéãªéÊÓËÃѺ¡ÒÃÍéÒ§ÍÔ§à·èÒ¹Ñé¹ ÃٻẺ¨ÃÔ§ÍÒ¨µèҧ仨ҡ¹Õé 4 ¡ÒÃàÃÔèÁãªé§Ò¹¤ÍÁ¾ÔÇàµÍÃì¢Í§¤Ø³ ¢Í¢Íº¤Ø³ÊÓËÃѺ¡Òë×éͤÍÁ¾ÔÇàµÍÃì Gateway! ¤ÙèÁ×͹Õéä´éÃѺ¡ÒÃÍ͡ẺÁÒà¾×èÍãËé¤Óá¹Ð¹Óà¡ÕèÂǡѺ¤Ø³ÊÁºÑµÔµèÒ§æ áÅÐãËé¤ÇÒÁªèÇÂàËÅ×Í㹡ÒÃãªé§Ò¹¤ÍÁ¾ÔÇàµÍÃì¢Í§¤Ø³ ËÅѧ¨Ò¡µÑ駤èÒáÅÐàÃÔèÁµé¹ãªé§Ò¹¤ÍÁ¾ÔÇàµÍÃì µÒÁ¤Óá¹Ð¹Ó㹡ÒõÑ駤èÒ ¨ÐÁÕ¤Ó¶ÒÁ·Õè¶ÒÁà¾×èͪèÇÂàª×èÍÁµèÍÍÔ¹àµÍÃìà¹çµ â´Â¡Ó˹´¡ÒõÑ駤èÒ«Í¿·ìáÇÃìãËé¤ÍÁ¾ÔÇàµÍÃì¢Í§¤Ø³ ¡ÒÃàª×èÍÁµèÍäÃéÊÒ ¡ÒÃàª×èÍÁµèÍäÃéÊÒ µéͧµÃǨÊͺ¤Ø³ÊÁºÑµÔäÃéÊÒ¢ͧ¤ÍÁ¾ÔÇàµÍÃì¡è͹ÇèÒ ÁÕ¡ÒáÓ˹´¤èÒàÃÒàµÍÃìËÃ×ÍâÁà´çÁ·Õè¤Ø³µéͧ¡ÒÃàª×èÍÁµèͶ١µéͧ • ËÒ¡äÁèä´éà»Ô´¡ÒÃÊ×èÍÊÒÃäÃéÊÒÂäÇé ¡´»ØèÁ Windows ( ) + W, ¾ÔÁ¾ì "Wireless" áÅéǤÅÔ¡·Õè Wireless ¤ÅÔ¡ÊÇÔµªìà»Ô´»Ô´ÀÒÂãµé Wi-Fi à¾×èÍà»Ô´ãªé§Ò¹¡ÒÃÊ×èÍÊÒÃäÃéÊÒ ¤ÅÔ¡ÍÕ¡¤ÃÑé§à¾×èͻԴ¡ÒÃãªé§Ò¹ • à¾×èÍàª×èÍÁµèÍà¢éҡѺà¤Ã×Í¢èÒ ¡´»ØèÁ Windows ( )+W, ¾ÔÁ¾ì "Wireless" áÅéǤÅÔ¡·Õè Connect to a network àÅ×Í¡à¤Ã×Í¢èÒ¢ͧ¤Ø³áÅлé͹ÃËÑʼèÒ¹ËÒ¡¨Óà»ç¹ • ÍÒ¨ÁÕ¤ÇÒÁÅèÒªéÒàÅ硹éÍ¡è͹¤ÍÁ¾ÔÇàµÍÃìàª×èÍÁµè͡ѺÍÔ¹àµÍÃìà¹çµ ËÒ¡µÃǨäÁ辺à¤Ã×Í¢èÒ ËÃ×ͤÍÁ¾ÔÇàµÍÃì¢Í§¤Ø³äÁèàª×èÍÁµè͡ѺÍÔ¹àµÍÃìà¹çµ ¡ÃØسҴÙàÍ¡ÊÒûÃСͺ¢Í§ ISP ËÃ×ÍàÃÒàµÍâͧ¤Ø³ì ¡ÒÃàÃÔèÁãªé§Ò¹¤ÍÁ¾ÔÇàµÍÃì¢Í§¤Ø³ - 5 ËÅѧ¨Ò¡·Õè¤Ø³à»Ô´ãªé¤ÍÁ¾ÔÇàµÍÃìáÅÐÊÒÁÒöãªé§Ò¹ä´é ãËéà»Ô´ Internet Explorer áÅзӵÒÁ¢Ñ鹵͹ ËÃ×Íãªéà¤àºÔÅà¤Ã×Í¢èÒÂà¾×èÍàª×èÍÁµèÍâ´ÂµÃ§¡Ñº¾ÍÃìµà¤Ã×Í¢èÒÂã¹àÃÒàµÍÃì¢Í§¤Ø³ â»Ã´´Ù¢éÍÁÙŹÕéä´é¨Ò¡¤ÙèÁ×Í»ÃСͺ¢Í§ ISP ËÃ×ÍàÃÒàµÍÃì¢Í§¤Ø³ ¡ÒÃŧ·ÐÀºÕ¹ àÁ×èͤسãªé¤ÍÁ¾ÔÇàµÍÃì¢Í§¤Ø³à»ç¹¤ÃÑé§áá ¢Íá¹Ð¹ÓãËé¤Ø³·Ó¡ÒÃŧ·ÐàºÕ¹ «Ö觪èÇÂãËé¤Ø³ä´éÃѺÊÔ·¸Ô»ÃÐ⪹ìµèÒ§æ àªè¹: • ºÃÔ¡Ò÷ÕèÃÇ´àÃçǨҡµÑÇá·¹·Õèä´éÃѺ¡Òý֡ͺÃÁ¨Ò¡àÃÒ • ÊÁҪԡ㹪ØÁª¹ Gateway: ÃѺâ»ÃâÁªÑè¹µèÒ§æ áÅÐà¢éÒÃèÇÁ㹡ÒÃÊÓÃǨ¤ÇÒÁ¤Ô´àËç¹ÅÙ¡¤éÒ • ¢èÒÇÅèÒÊØ´¨Ò¡ Gateway ÇÔ¸Õ¡ÒÃŧ·ÐàºÕ¹ ã¹ÃÐËÇèÒ§¡ÒÃàÃÔèÁµé¹à»Ô´ãªé§Ò¹¤ÍÁ¾ÔÇàµÍÃì¢Í§¤Ø³ ¨ÐÁÕ˹éÒµèÒ§àª−ªÇ¹ãËé¤Ø³·Ó¡ÒÃŧ·ÐàºÕ¹ â»Ã´¡ÃÍ¡¢éÍÁÙÅáÅФÅÔ¡ Next (¶Ñ´ä») ˹éÒµèÒ§·ÕèÊͧ¨Ð»ÃСͺ仴éÇ¿ÔÅ´ìµÑÇàÅ×Í¡·Õè¨ÐªèÇÂãËéàÃÒãËéºÃÔ¡Ò÷Õè´Õ¡ÇèҡѺÅÙ¡¤éÒä´é ·Ò§àÅ×Í¡Í×è¹æ ÇÔ¸ÕÍ×è¹ã¹¡ÒÃŧ·ÐàºÕ¹¼ÅÔµÀѳ±ì Gateway ¢Í§¤Ø³¤×Í¡ÒÃáÇÐä»ÂѧàÇçºä«µì¢Í§àÃÒ·Õè register.gateway.com àÅ×Í¡»ÃÐà·È¢Í§¤Ø³ áÅзӵÒÁ¢Ñ鹵͹µèÒ§æ ËÅѧ¨Ò¡·Õèŧ·ÐàºÕ¹ àÃÒ¨ÐÊè§ÍÕàÁÅìáÊ´§¡ÒÃÂ×¹Âѹ¾ÃéÍÁ´éÇ¢éÍÁÙÅ·ÕèÊÓ¤Ñ−·Õè¤Ø³¤ÇÃ¹Ó ä»à¡çºäÇéã¹·Õè·Õè»ÅÍ´ÀÑÂãËé¡Ñº¤Ø³ 6 ¡ÒõԴµÑ駫Ϳ·ìáÇÃì ¤ÍÁ¾ÔÇàµÍÃì¢Í§¤Ø³¨ÐµÔ´µÑ駫Ϳ·ìáÇÃìâ´ÂÍѵâ¹ÁѵÔáÅÐàµÃÕÂÁà¾×èÍãªé§Ò¹¤ÍÁ¾ÔÇàµÍÃì¢Í§¤Ø³ «Öè§ÍÒ¨ãªéàÇÅÒÊÑ¡àÅ硹éÍ ¡ÃسÒÍÂèÒ»Ô´¤ÍÁ¾ÔÇàµÍÃì¢Í§¤Ø³ ãËéÃͨ¹¡ÇèÒ¡ÒõԴµÑ駨ÐàÊÃç¨ÊÔé¹ ¡ÒáÙé¤×¹ ¤Ø³¤ÇÃÊÃéÒ§´ÔÊ¡ìÊÓËÃѺ¡ÒÃàÃÕ¡¤×¹ã¹·Ñ¹·Õ·Õèà»ç¹ä»ä´é ¡ÒÃàÃÕ¡¤×¹ â»Ãá¡ÃÁ¨ÐªèÇÂÊÃéÒ§´ÔÊ¡ìàÃÕ¡¤×¹áÅÐàÃÕ¡¤×¹ËÃ×Í·Ó¡ÒõԴµÑé§á;¾ÅÔपÑè¹áÅÐä´ÃìàÇÍÃìãËÁèÍÕ¡¤ ÃÑ駨ҡ Gateway ÁÕ»Ñ−ËÒ¡ÒÃãªé§Ò¹ Gateway ÁͺµÑÇàÅ×Í¡ËÅÒ¡ËÅÒÂà¾×èÍÃͧÃѺ¡ÒÃàÅ×Í¡«×éͧ͢¤Ø³ Gateway ¡ÒÃʹѺʹع µÃǨ´ÙãËéá¹èã¨ÇèҤسä´éà¢Õ¹«ÕàÃÕÂŹÑÁàºÍÃì ʶҹ·ÕèáÅÐÇѹ·Õè«×éÍ ª×èÍÃØè¹ «Öè§àµÃÕÂÁäÇé㹤ÙèÁ×͹Õé à¡çºÃÑ¡ÉÒãºàÊÃç¨ÃѺà§Ô¹äÇéà»ç¹ËÅÑ¡°Ò¹ ¡è͹¤Ø³µÔ´µèÍàÃÒ â»Ã´à¢Õ¹¢éͤÇÒÁáÊ´§¢éͼԴ¾ÅÒ´·Õèà¡ÕèÂÇ¢éͧ»Ñ−ËÒ áÅÐÁÕ¤ÍÁ¾ÔÇàµÍÃì¢Í§¤Ø³ÍÂÙè¡Ñº¤Ø³¾ÃéÍÁ·Ñé§à»Ô´ÊÇÔµªìà¤Ã×èͧËÒ¡à»ç¹ä»ä´é ¡ÒÃÁÕÃÒ¡ÒÃàËÅèÒ¹ÕéÍÂÙè¡Ñº¤Ø³àÁ×èÍ·Ó¡ÒõԴµèÍàÃÒ ¨ÐªèÇÂãËéá¹èã¨ä´éÊÓËÃѺ¡ÒÃãËéºÃÔ¡ÒÃä´é´ÕÂÔ觢Öé¹áÅÐÃÇ´àÃçÇ¢Öé¹ ¡ÒÃàÃÔèÁãªé§Ò¹¤ÍÁ¾ÔÇàµÍÃì¢Í§¤Ø³ - 7 Gateway àÇçºä«µì àÂÕèÂÁªÁ·Õè www.gateway.com - ´Ù·ÕèÊèǹ¡ÒÃʹѺʹع«Öè§ÁÕ ¢éÍÁÙÅÍѾവ ¤ÇÒÁªèÇÂàËÅ×Í ä´ÃìàÇÍÃì áÅдÒǹìâËÅ´ ¡ÒÃÃѺ»ÃСѹáÅТéÍÁÙÅ·ÕèµÔ´µèÍ ¤Ø³ÊÒÁÒö¾º¢éÍÁÙÅà¡ÕèÂǡѺ¡ÒÃÃѺ»ÃСѹÊÓËÃѺ¤ÍÁ¾ÔÇàµÍÃì¢Í§¤Ø³ áÅÐÇÔ¸Õ¡ÒõԴµèͽèÒÂʹѺʹع·Ò§à·¤¹Ô¤ä´é㹡ÒÃÃѺ»ÃСѹ¢Í§¤ÍÁ¾ÔÇàµÍÃì¢Í§¤Ø³ 8 ¤ÍÁ¾ÔÇàµÍÃìàº×éͧµé¹ ¤ÇÒÁ»ÅÍ´ÀÑÂáÅФÇÒÁÊдǡʺÒ ¢éͤÇû¯ÔºÑµÔà¾×èͤÇÒÁ»ÅÍ´ÀÑ â»Ã´·ÓµÒÁá¹Ç·Ò§´éÒ¹ÅèÒ§¹Õéà¾×èÍãËéÊÒÁÒöãªé§Ò¹¤ÍÁ¾ÔÇàµÍÃì¢Í§¤Ø³ä´éÍÂèÒ§ÊдǡʺÒÂáÅÐ ËÅÕ¡àÅÕ觡ÒÃà¡Ô´»Ñ−ËÒÊØ¢ÀÒ¾ ÊÀÒ¾áÇ´ÅéÍÁ㹡ÒÃãªé¤ÍÁ¾ÔÇàµÍÃì µÃǨ´ÙãËéá¹èã¨ÇèÒ¤ÍÁ¾ÔÇàµÍÃì: • ¶Ù¡ãªé§Ò¹º¹¾×é¹¼ÔÇ á·è¹ÇÒ§ ËÃ×ͺ¹âµêзÕèÁÕ¤ÇÒÁÁÑ蹤§ ËÒ¡¤ÍÁ¾ÔÇàµÍÃ쵡¾×é¹ÍÒ¨Ê觼ÅãËéà¡Ô´¤ÇÒÁàÊÕÂËÒÂÃéÒÂáçä´é • ËéÒÁãªéº¹¾×é¹¼ÔÇ·ÕèÊÑè¹ËÃ×Íãªé§Ò¹ã¹¢³ÐàÅ蹡ÕÌÒ ÍÍ¡¡ÓÅѧ¡Ò ËÃ×Í¡Ô¨¡ÃÃÁÍ×è¹æ ·ÕèÁÕ¡ÒÃà¤Å×è͹äËÇ ¡ÒÃÊÑè¹ËÃ×Í¡ÒÃà¤Å×è͹äËÇÊÒÁÒö·ÓãËéµÑÇà¡ÕèÂÇËÅØ´ÍÍ¡ à¡Ô´¤ÇÒÁàÊÕÂËÒµèÍÊèǹ»ÃСͺÀÒÂã¹ áÅСÒÃÃÑèǢͧẵàµÍÃÕèä´é • ËéÒÁ¶Ù¡áʧᴴËÃ×ÍáËÅ觡Óà¹Ô´¤ÇÒÁÃé͹â´ÂµÃ§ • ËéÒÁÍÂÙèã¡Åé¡ÑºÊ¹ÒÁáÁèàËÅç¡ËÃ×ÍÍØ»¡Ã³ì·ÕèÊÃéÒ§¡ÃÐáÊä¿¿éÒʶԵ • µéͧà¡çºãËéÍÂÙèËèÒ§¨Ò¡â·ÃÈѾ·ìà¤Å×è͹·ÕèÍÂèÒ§¹éÍ 30 ૹµÔàÁµÃ (˹Ö觿ص) • ËéÒÁÍÂÙèã¹ÊÀÒ¾áÇ´ÅéÍÁ·ÕèàµçÁä»´éǽØè¹ËÃ×Íà»Õ¡ª×é¹ • ËéÒÁãªéã¡Åé¡Ñº¹éÓ ËéÒÁ·Ó¢Í§àËÅÇ·Ø¡»ÃÐàÀ·Ë¡Å§º¹ËÃ×Íŧ㹤ÍÁ¾ÔÇàµÍÃì¢Í§¤Ø³â´Âà´ç´¢Ò´ ¤ÍÁ¾ÔÇàµÍÃìàº×éͧµé¹ - 9 • ËéÒÁÇÒ§º¹¾ÃÁËÃ×;×é¹¼ÔÇÍ×è¹·ÕèÍÒ¨ÁÕ»ÃШØä¿¿éÒ ËÁÒÂà赯 • ÊÅç͵áÅЪèͧµèÒ§æÁÕà¾×Íè ¡ÒÃÃкÒÂÍÒ¡ÒÈà¾×èÍãËéá¹èã¨ã¹¡Ò÷ӧҹ·Õàè ª×Íè ¶×Íä´é¢Í§¼ÅÔµÀѳ±ìáÅ Ðà¾×èÍ»éͧ¡Ñ¹¨Ò¡¡ÒÃà¡Ô´¤ÇÒÁÃé͹à¡Ô¹¡Ó˹´ ËéÒÁ»Ô´ËÃ×Í¡Õ´¢ÇÒ§ªèͧµèÒ§æ àËÅèÒ¹Õé ËéÒÁ»Ô´ªèͧµèÒ§æ àËÅèÒ¹Õéâ´Â¡ÒÃÇÒ§º¹àµÕ§¹Í¹, â«¿Ò, ¾ÃÁ, ËÃ×;×é¹¼ÔÇÍ×è¹·Õè¤ÅéÒ¡ѹ ËéÒÁÇÒ§¼ÅÔµÀѳ±ìà˹×Íà¤Ã×èͧ·Ó¤ÇÒÁÃé͹ËÃ×ÍÀÒÂã¹ÇÑÊ´Ø·ÕèµÔ´µÑé§ã¹µÑÇ àÇé¹äÇéáµèÇèÒÁÕ¡ÒÃÃкÒÂÍÒ¡ÒÈ·ÕèàËÁÒÐÊÁ • ËéÒÁãÊèÇѵ¶Øã´æà¢éÒã¹¼ÅÔµÀѳ±ì¹Õé·Ò§ªèͧÊÅç͵à¹×èͧ¨Ò¡ÍÒ¨ÊÑÁ¼ÑʡѺ¨Ø´ËÃ×ͪÔé¹Êèǹ·ÕèÁÕ áç´Ñ¹ä¿¿éÒ·Õèà»ç¹ÍѹµÃÒ«Öè§ÊÒÁÒöÊ觼ÅãËéà¡Ô´ä¿äËÁéËÃ×Íä¿¿éÒªç͵ä´é ËéÒÁ·Ó¢Í§àËÅÇ ·Ø¡»ÃÐàÀ·Ë¡Å§º¹ËÃ×Íŧ㹼ÅÔµÀѳ±ìâ´Âà´ç´¢Ò´ • à¾×èÍËÅÕ¡àÅÕ觤ÇÒÁàÊÕÂËÒ¢ͧÊèǹ»ÃСͺÀÒÂã¹áÅÐà¾×èÍ»éͧ¡Ñ¹¡ÒÃÃÑèǢͧẵàµÍÃÕè ËéÒÁÇÒ§¼ÅÔµÀѳ±ìº¹¾×é¹¼ÔÇ·ÕèÊÑè¹ • ËéÒÁãªéã¹¢³ÐàÅ蹡ÕÌÒ, ÍÍ¡¡ÓÅѧ¡ÒÂ, ËÃ×Íã¹ÊÀÒ¾áÇ´ÅéÍÁ·ÕèÊÑè¹ «Öè§ÍÒ¨·ÓãËéà¡Ô´ÍغѵÔà赯 ·ÕèäÁè¤Ò´½Ñ¹ä´é ËÃ×Íà¡Ô´¤ÇÒÁàÊÕÂËÒµèÍÍØ»¡Ã³ì¨Ò¹ËÁع, HDD, ä´Ãì¿Í;µÔ¤ÍÅ áÅФÇÒÁàÊÕ觵èÍ¡ÒÃÃÐàºÔ´¢Í§áºµàµÍÃÕèÅÔà¸ÕÂÁ ÊÒÂà¤àºÔéÅ µÃǨ´ÙãËéá¹èã¨ÇèÒ: • ÊÒÂà¤àºÔéÅäÁèµÖ§à¡Ô¹ä»¨¹·ÓãËéà¡Ô´¤ÇÒÁàÊÕ觵èÍ¡ÒÃà´Ô¹¢éÒÁËÃ×ÍÊдشÅéÁ¨Ò¡¼Ù餹Ãͺ¢éÒ§ä´é • äÁèÁÕÍØ»¡Ã³ìÍ×è¹æ ÇÒ§·ÑºÊÒÂà¤àºÔéÅ • ÊÒÂ俶١àª×èÍÁµè͡Ѻ¤ÍÁ¾ÔÇàµÍÃì¡è͹àª×èÍÁµèÍÊÒÂ信Ѻ»ÅÑê¡ä¿ AC 10 • ÊÒÂ俶١¶Í´ÍÍ¡¨Ò¡»ÅÑê¡ä¿¡è͹¶Í´ÊÒÂä¿ÍÍ¡¨Ò¡¤ÍÁ¾ÔÇàµÍÃì • ãªéÊÒÂä¿áººÊÒÁËÑǵèÍàª×èÍÁµèÍà¢éҡѺàµéÒÃѺẺµèÍÊÒ´Թ • »ÅÑê¡ä¿ÊÒÁÒöà¢éÒ¶Ö§ä´é§èÒÂáÅеԴµÑé§ÍÂÙèã¡Åé¡Ñº¤ÍÁ¾ÔÇàµÍÃìÁÒ¡·ÕèÊØ´ (ËéÒÁµèÍÍá´»àµÍÃìà¢éҡѺÃÒ§»ÅÑê¡ä¿à¡Ô¹¡Ó˹´) ËÒ¡¤ÍÁ¾ÔÇàµÍÃì¢Í§¤Ø³ãªéÍá´»àµÍÃì AC ÀÒ¹͡: • ËéÒÁÇÒ§Çѵ¶ØÍ×蹤ÅØÁäÇéËÃ×ͷѺäÇ麹Íá´»àµÍÃì AC ¾ÂÒÂÒÁãËéÍá´»àµÍÃìàÂç¹ã¹ÃÐËÇèÒ§¡ÒÃãªé§Ò¹â´ÂäÁèÇÒ§äÇéã¡Åé¡ÑºÇѵ¶ØÍ×è¹ • ãªéÍá´»àµÍÃì AC ª¹Ô´·ÕèÁÒ¾ÃéÍÁ¡Ñº¤ÍÁ¾ÔÇàµÍÃì¢Í§¤Ø³à·èÒ¹Ñé¹ ¡ÒÃãªéÍá´»àµÍÃìÍ×è¹·Õè¤ÅéÒ¤ÅÖ§¡Ñ¹ÍÒ¨à¡Ô´¤ÇÒÁàÊÕÂËÒµèͤÍÁ¾ÔÇàµÍÃì¢Í§¤Ø³ä´é ËÒ¡¨Óà»ç¹µéͧÁÕ¡ÒÃà»ÅÕè¹·´á·¹ ãËéãªéÍÐäËÅè·Õèä´éÃѺ¡ÒÃÃѺÃͧãËéãªé¡Ñº¤ÍÁ¾ÔÇàµÍÃì¢Í§¤Ø³à·èÒ¹Ñé¹ ¡Ò÷ӤÇÒÁÊÐÍÒ´¤ÍÁ¾ÔÇàµÍÃì¢Í§¤Ø³ • ¶Í´ÊÒÂ俤ÍÁ¾ÔÇàµÍÃì¢Í§¤Ø³ÍÍ¡¨Ò¡»ÅÑê¡ä¿·Ø¡¤ÃÑ駡è͹·Ó¤ÇÒÁÊÐÍÒ´ • ËéÒÁãªéÊÒ÷ӤÇÒÁÊÐÍÒ´·Õèà»ç¹¢Í§àËÅÇËÃ×Íà»ç¹ÅÐÍͧ ãËéãªé¼éÒËÁÒ´á·¹ • ËéÒÁãªéÊÒ÷ӤÇÒÁÊÐÍÒ´·Õèà»ç¹ÅÐÍͧâ´ÂµÃ§º¹Ë¹éÒ¨Í • ËÒ¡¤Ø³·Ó¢Í§àËÅÇË´ŧº¹¤ÍÁ¾ÔÇàµÍÃì ãËé»Ô´à¤Ã×èͧ·Ñ¹·Õ ¶Í´Íá´»àµÍÃì AC ¶Í´áºµàµÍÃÕèÍÍ¡áÅеÃǨ´ÙãËéá¹èã¨ÇèÒà¤Ã×èͧáËé§Ê¹Ô·´ÕáÅéÇ¡è͹à»Ô´à¤Ã×èͧãËÁè ãËé·Ôé§äÇé¢éÒÁ¤×¹ËÒ¡¨Óà»ç¹ ËÁÒÂà˵Ø: ËÒ¡¤ÍÁ¾ÔÇàµÍÃì¢Í§¤Ø³ÁÕÊÅç͵ÊÓËÃѺàÁÁâÁÃÕè¡ÒÃì´ËÃ×ÍÍØ»¡Ã³ìàÊÃÔÁ ÍÒ¨ÁÕ µÑÇÍÂèÒ§ ¾ÅÒʵԡµÔ´µÑé§ÍÂÙèã¹ÊÅç͵ ¤ÍÁ¾ÔÇàµÍÃìàº×éͧµé¹ - 11 ¡ÒÃì´µÑÇÍÂèÒ§¹Õé¨Ð»¡»éͧÊÅç͵·ÕèäÁèä´éãªé§Ò¹¨Ò¡½Øè¹, Çѵ¶ØâÅËÐËÃ×ͪÔé¹ÊèǹÍ×è¹æ à¡çºµÑÇÍÂèÒ§¹ÕéäÇéãªéàÁ×èÍäÁèÁÕ¡ÒÃì´ÍÂÙèã¹ÊÅç͵ ¡ÒëèÍÁá«Á¤ÍÁ¾ÔÇàµÍÃì¢Í§¤Ø³ ËéÒÁ¾ÂÒÂÒÁ«èÍÁ¤ÍÁ¾ÔÇàµÍÃì¢Í§¤Ø³´éǵÑǤسàͧ à¹×èͧ¨Ò¡¡ÒÃà»Ô´ËÃ×Ͷʹ½Ò»Ô´ÍÒ¨à¡Ô´ÍѹµÃÒ¨ҡ¨Ø´·ÕèÁÕáç´Ñ¹ä¿¿éÒËÃ×ÍÁÕ¤ÇÒÁàÊÕè§Í×è¹æ à¡Ô´¢Ö鹡ѺµÑǤسä´é ãËé¡ÒëèÍÁºÓÃا¼ÅÔµÀѳ±ìà»ç¹Ë¹éÒ·Õè¢Í§à¨éÒ˹éÒ·Õèá¼¹¡ãËéºÃÔ¡Ò÷ÕèÁÕ¤ÇÒÁàªÕèÂǪÒ− ¶Í´»ÅÑê¡ä¿¤ÍÁ¾ÔÇàµÍÃì¢Í§¤Ø³ÍÍ¡¨Ò¡àµéÒÃѺáÅеԴµèÍà¨éÒ˹éÒ·Õèá¼¹¡ãËéºÃÔ¡Ò÷ÕèÁÕ¤ÇÒÁàªÕèÂǪ Ò−àÁ×èÍ: • ÊÒÂä¿ËÃ×ÍàµéÒàÊÕºä´éÃѺ¤ÇÒÁàÊÕÂËÒ ¢Ò´ËÃ×Íà»×èÍÂÂØè • ¢Í§àËÅÇˡŧ㹼ÅÔµÀѳ±ì • ¼ÅÔµÀѳ±ìµ¡Å§¹éÓËÃ×Íâ´¹½¹ • ¼ÅÔµÀѳ±ìµ¡Å§¾×é¹ËÃ×͵ÑÇà¤Ã×èͧä´éÃѺ¤ÇÒÁàÊÕÂËÒ • ¼ÅÔµÀѳ±ìÁÕ¡ÒÃà»ÅÕè¹á»Å§´éÒ¹»ÃÐÊÔ·¸ÔÀÒ¾ÍÂèÒ§ªÑ´à¨¹ • ¼ÅÔµÀѳ±ì·Ó§Ò¹äÁ軡µÔËÅѧ¨Ò¡·ÓµÒÁ¤Óá¹Ð¹Ó㹡ÒÃãªé§Ò¹ ËÁÒÂà˵Ø: »ÃѺáµè§¡ÒäǺ¤ØÁà·èÒ·ÕèÁÕÃÇÁÍÂÙè㹤Óá¹Ð¹Ó㹡ÒÃãªé§Ò¹à·èÒ¹Ñé¹ à¹×èͧ¨Ò¡¡ÒûÃѺáµè§¡ÒäǺ¤ØÁ·ÕèäÁèàËÁÒÐÊÁÍÒ¨Ê觼ÅãËéà¡Ô´¤ÇÒÁàÊÕÂËÒÂáÅеé ͧ¡ÒáÒôÙáŨҡªèҧ෤¹Ô¤·ÕèÁÕ¤ÇÒÁàªÕèÂǪÒ−à¾×èÍ¡Ùé¤×¹¼ÅÔµÀѳ±ìãËé¡ÅѺÊÙèÊÀÒÇÐ ¡Ò÷ӧҹ»¡µÔ 12 ¡Òûéͧ¡Ñ¹´éÒ¹ÊØ¢ÀÒ¾ • ¾×é¹¼ÔÇ´éÒ¹ÅèÒ§, ¾×é¹·Õèâ´ÂÃͺªèͧÃкÒÂÍÒ¡ÒÈ áÅÐÍá´»àµÍÃì AC ÁÕ¤ÇÒÁÃé͹ à¾×èÍËÅÕ¡àÅÕè§ÍÒ¡ÒúҴà¨çº ËÅÕ¡àÅÕ觡ÒÃÊÑÁ¼ÑʡѺ¼ÔÇ˹ѧËÃ×ÍÃèÒ§¡Ò¢ͧ¤Ø³ • ÍØ»¡Ã³ì¢Í§¤Ø³áÅÐÊèǹ»ÃСͺµèÒ§æ ÍÒ¨ÁÕªÔé¹Êèǹ¢¹Ò´àÅç¡ à¡çºÍØ»¡Ã³ìáÅЪÔé¹ÊèǹàËÅèÒ¹ÕéãËéËèÒ§¨Ò¡à´ç¡ • ¤ÍÁ¾ÔÇàµÍÃìáÅÐÍØ»¡Ã³ìàÊÃÔÁÍÒ¨ÁÕªÔé¹Êèǹ¢¹Ò´àÅç¡ à¡çºÍØ»¡Ã³ìáÅЪÔé¹ÊèǹàËÅèÒ¹ÕéãËéËèÒ§¨Ò¡à´ç¡àÅç¡ • ËÒ¡¤Ø³·Ó§Ò¹ËÃ×ÍàÅè¹à»ç¹àÇÅÒ¹Ò¹ËÅÒªÑèÇâÁ§ ¤ÇÃËÂØ´¾Ñ¡ÍÂÙèàÊÁÍ ¾Ñ¡ÊÒµҨҡ˹éҨͤÍÁ¾ÔÇàµÍÃìà»ç¹¤ÃÑ駤ÃÒÇ ËéÒÁãªé¤ÍÁ¾ÔÇàµÍÃì¢Í§¤Ø³ËÒ¡ÃÙéÊÖ¡àÁ×èÍÂÅéÒ • ÇÒ§¤ÍÁ¾ÔÇàµÍÃì¢Í§¤Ø³ãËéÍÂÙãè ¹µÓáË¹è§·Õ¤è ³ Ø ÊÒÁÒö·Ó§Ò¹ä´éã¹·èÒ·Ò§·Õ¼è Íè ¹¤ÅÒÂáÅÐà»ç¹¸Ãà ÁªÒµÔ ÇÒ§ÍØ»¡Ã³ì·Õè¤Ø³ãªéºèÍÂæäÇéã¹µÓá˹觷ÕèÊÒÁÒöà¢éÒ¶Ö§ä´é§èÒ • ÇÒ§¤ÍÁ¾ÔÇàµÍÃì¢Í§¤Ø³ãËéÍÂÙèàº×éͧ˹éҤسâ´ÂµÃ§à¾×èÍà¾ÔèÁ¤ÇÒÁ»ÅÍ´ÀÑÂáÅФÇÒÁʺÒ µÃǨ´ÙãËéá¹èã¨ÇèÒ¤ÕÂìºÍÃì´áÅзѪᾴÍÂÙèã¹ÃдѺ¤ÇÒÁÊÙ§·ÕèÊÒÁÒöãªé§Ò¹ä´éÍÂèҧʺÒ ˹éҨͤÇÃÍÂÙèËèÒ§¨Ò¡ÊÒµҢͧ¤Ø³ã¹ÃÐËÇèÒ§ 45-70 ૹµÔàÁµÃ (18-30 ¹ÔéÇ) ËÒ¡¤Ø³ãªé¤ÍÁ¾ÔÇàµÍÃìà»ç¹ÃÐÂÐàÇÅҹҹ㹢³Ð¹Ñ觷ÕèâµêÐ ¡Òë×éͤÕÂìºÍÃì´ÀÒ¹͡à¾ÔèÁÊÒÁÒöªèÇÂà¾ÔèÁ¤ÇÒÁÊдǡʺÒÂ㹡Ò÷ӧҹä´é • à¾×èÍ»¡»éͧ¡ÒÃÃѺ¿Ñ§¢Í§¤Ø³ àÁ×èÍãªéÅÓ⾧ËÃ×ÍËٿѧ ãËéà¾ÔèÁÃдѺàÊÕ§ÍÂèÒ§ªéÒæ ¨¹¡ÃзÑ觤سä´éÂÔ¹àÊÕ§ªÑ´à¨¹áÅÐÃÙéÊÖ¡ÇèÒÃѺ¿Ñ§ä´éÍÂèҧʺÒ ËéÒÁà¾ÔèÁÃдѺàÊÕ§ËÅѧ¨Ò¡·ÕèË٢ͧ¤Ø³ä´é»ÃѺÃдѺ¡ÒÃÃѺ¿Ñ§áÅéÇ ËéÒÁ¿Ñ§àÊÕ§·ÕèÃдѺàÊÕ§´Ñ§à»ç¹ÃÐÂÐàÇÅÒ¹Ò¹æ ËéÒÁà¾ÔèÁÃдѺàÊÕ§à¾×èÍ»éͧ¡Ñ¹àÊÕ§´Ñ§¨Ò¡ÊÀÒ¾áÇ´ÅéÍÁ ãËéÅ´ÃдѺàÊÕ§ŧàÁ×èͤسäÁèÊÒÁÒöä´éÂÔ¹àÊÕ§¾Ù´¤Ø¢ͧ¼Ù餹Ãͺ¢éÒ§ ¤ÍÁ¾ÔÇàµÍÃìàº×éͧµé¹ - 13 • ´éÒ¹ÅèÒ§¢Í§¤ÍÁ¾ÔÇàµÍÃì Íá´»àµÍÃì áÅЪèͧÃкÒÂÍÒ¡ÒÈ·Õèà»Ô´ÍÂÙèÍÒ¨Ãé͹ã¹ÃÐËÇèÒ§ãªé§Ò¹ ËÅÕ¡àÅÕ觡ÒÃÊÑÁ¼ÑʡѺÃèÒ§¡ÒÂáÅÐËéÒÁÇÒ§¤ÍÁ¾ÔÇàµÍÃ캹µÑ¡¢Í§¤Ø³¢³Ðãªé§Ò¹ • µÃǨ´ÙãËéá¹èã¨ÇèÒªèͧÃкÒÂÍÒ¡ÒȢͧ¤ÍÁ¾ÔÇàµÍÃìáÅЪèͧµèÒ§æäÁè¶Ù¡»Ô´ËÃ×Í¡Õ´¢ÇÒ§ ËéÒÁÇÒ§¤ÍÁ¾ÔÇàµÍÃ캹¾×é¹¼ÔǹØèÁæ (àªè¹¾ÃÁ à¡éÒÍÕéËÃ×ÍàµÕ§¹Í¹) ·ÕèÍÒ¨¡Õ´¢ÇÒ§ªèͧÃкÒÂÍÒ¡ÒÈ • ËéÒÁãÊèÇѵ¶Øã´æ à¢éÒã¹¼ÅÔµÀѳ±ì¹Õé·Ò§ªèͧÊÅç͵à¹×èͧ¨Ò¡ÍÒ¨ÊÑÁ¼ÑʡѺ¨Ø´ËÃ×ͪÔé¹Êèǹ·ÕèÁÕáç´Ñ¹ä¿¿éÒ·Õèà»ç¹Íѹ µÃÒ«Öè§ÊÒÁÒöÊ觼ÅãËéà¡Ô´ä¿äËÁéËÃ×Íä¿¿éÒªç͵ä´é • ÍÒ¨à¡Ô´¤ÇÒÁ¼Ô´»¡µÔ¢Í§Á×Í ¢éÍÁ×Í á¢¹ ¤Í äËÅè ¢Ò áÅÐËÅѧ ËÃ×ÍÍÒ¡ÒüԴ»¡µÔÍ×è¹æä´é¨Ò¡¡ÒÃÍÂÙèã¹·èÒà´ÔÁà»ç¹àÇÅÒ¹Ò¹ à¾×èÍÅ´¤ÇÒÁàÊÕ觢ͧ¡ÒÃà¡Ô´¤ÇÒÁ¼Ô´»¡µÔàËÅèÒ¹Õé ãËéãªé¤ÕÂìºÍÃì´â´ÂãËé¢éÍÁ×ͧ͢¤Ø³ÍÂÙèã¹µÓá˹觵çáÅоÔÁ¾ìâ´ÂãËéÁ×ÍáÅТéÍÁ×ͧ͢¤Ø³à¤Å×èÍ ¹äËÇÍÂÙèà˹×ͤÕÂìºÍÃì´ ËÒ¡¤Ø³ÁÕÍÒ¡ÒÃà¨çº ªÒËÃ×ÍÍÒ¡ÒÃäÁèʺÒÂÍ×è¹æ â»Ã´¾ºá¾·Âì • àÃÒ¢Íá¹Ð¹ÓãËé¼Ù黡¤Ãͧ¤Í¤Ǻ¤ØÁ¡ÒÃàÅè¹à¡Á¢Í§à´ç¡æ ËÒ¡·èÒ¹ËÃ×ͺصÃËÅÒ¹¢Í§·èÒ¹ÁÕÍÒ¡ÒôѧµèÍ仹Õé: àÇÕ¹ÈÕÃÉÐ µÒ¾ÃèÒÁÑÇ µÒËÃ×Í¡ÅéÒÁà¹×éÍ¡Ãеء ËÁ´ÊµÔ ªÑ¡ ãËéËÂØ´ãªé§Ò¹áÅоºá¾·Âìâ´Â·Ñ¹·Õ ÍÒ¡ÒÃàËÅèÒ¹ÕéÍÒ¨à¡Ô´¢Ö鹡Ѻ¼ÙéäÁèà¤ÂÁÕ»ÃÐÇѵԡÒûèÇÂà»ç¹ âäÅÁºéÒËÁÙ 14 ·Ó¤ÇÒÁÃÙé¨Ñ¡¡Ñº¤ÍÁ¾ÔÇàµÍÃì¢Í§¤Ø³ ËÅѧ¨Ò¡µÔ´µÑ駤ÍÁ¾ÔÇàµÍÃìµÒÁÀҾ㹤Óá¹Ð¹Ó¡ÒõԴµÑé§ µèÍ仹Õéà»ç¹ÇÔ¸Õ¡ÒÃãªé§Ò¹ Gateway ¤ÍÁ¾ÔÇàµÍÃì ãËÁè¢Í§¤Ø³ Gateway NE71B ·Ó¤ÇÒÁÃÙé¨Ñ¡¡Ñº¤ÍÁ¾ÔÇàµÍÃì¢Í§¤Ø³ - 15 ÁØÁÁͧ´éÒ¹º¹ - áÊ´§ 1 2 3 # äͤ͹ ÃÒ¡Òà ¤Ó͸ԺÒ 1 àÇçºá¤Á ¡ÅéͧàÇçºá¤ÁÊÓËÃѺÃкº¡ÒÃÊ×èÍÊÒôéÇÂÇÔ´ÕâÍ ä¿·ÕèÍÂÙè¶Ñ´¨Ò¡àÇçºá¤ÁáÊ´§ÇèÒàÇçºá¤Á¡ÓÅѧ·Ó§Ò¹ÍÂÙè 2 äÁâ¤Ã⿹ äÁâ¤Ã⿹㹵ÑÇÊÓËÃѺ¡Òúѹ·Ö¡àÊÕ§ 3 ¨ÍáÊ´§¼Å ËÃ×ÍàÃÕ¡ÇèÒ¨Í Liquid-Crystal Display (LCD) áÊ´§àÍÒ·ì¾Ø·¢Í§¤ÍÁ¾ÔÇàµÍÃì 16 ÁØÁÁͧ´éÒ¹º¹ - ¤ÕÂìºÍÃì´ 1 5 2 3 4 # äͤ͹ ÃÒ¡Òà 1 »ØèÁ¾ÒÇàÇÍÃì/ µÑÇáÊ´§Ê¶Ò¹Ð 2 ¤ÕÂìºÍÃì´ ¤Ó͸ԺÒ à»Ô´áÅлԴ¤ÍÁ¾ÔÇàµÍÃì ÃкØʶҹСÒÃà»Ô´ãªé§Ò¹¤ÍÁ¾ÔÇàµÍÃì à¾×èÍ»é͹¢éÍÁÙÅà¢éÒÊÙè¤ÍÁ¾ÔÇàµÍÃì¢Í§¤Ø³ - ÃÒÂÅÐàÍÕ´»ØèÁ¾ÔàÈÉ͸ԺÒ ã¹Ë¹éÒ 18 3 ·Ñªá¾ç´ ÍØ»¡Ã³ìªÕéµÓá˹è§áººÊÑÁ¼ÑÊ «Ö觷ӧҹẺà´ÕÂǡѺàÁÒÊì¤ÍÁ¾ÔÇàµÍÃì ·Ó¤ÇÒÁÃÙé¨Ñ¡¡Ñº¤ÍÁ¾ÔÇàµÍÃì¢Í§¤Ø³ - 17 # äͤ͹ ÃÒ¡Òà ¤Ó͸ԺÒ 4 »ØèÁ¤ÅÔ¡ («éÒÂáÅТÇÒ) ¿Ñ§¡ìªÑè¹»ØèÁ·Ò§«éÒÂáÅТÇÒà»ç¹»ØèÁàÅ×Í¡«éÒÂáÅТÇÒ 5 ÅÓ⾧ àÍÒ·ì¾Ø·ÊàµÍÃÔâÍ »ØèÁ¾ÔàÈÉ ¤ÕÂìºÍÃì´¤ÍÁ¾ÔÇàµÍÃì¢Í§¤Ø³ÁÕ»ØèÁ·Õèãªé§Ò¹ÊÓËÃѺ¿Ñ§¡ìªÑè¹¾ÔàÈÉ ¿Ñ§¡ìªÑ蹢ͧáµèÅлØèÁ¨Ð·Óà¤Ã×èͧËÁÒÂäͤ͹äÇéÍÂèÒ§ªÑ´à¨¹ äͤ͹ ¿Ñ§¡ìªÑè¹ Fn 18 ¤Ó͸ԺÒ »ØèÁÎç͵¤ÕÂì ÊÓËÃѺ¿Ñ§¡ìªÑè¹·ÕèÊͧ ãªé§Ò¹¿Ñ§¡ìªÑè¹·ÕèÊͧ¨Ò¡»ØèÁ·Õè¡Ó˹´ àªè¹ ¡´»ØèÁ Fn à¾×èÍãªé§Ò¹»ØèÁ F1 ¶Ö§ F12 ÇÔ¸Õãªé à»Ô´àÁ¹ÙÇÔ¸Õãªé Backup ªèÇÂãËé¤Ø³ÊÃéÒ§ÊÓà¹Òà¾×èÍ¡ÒÃÊÓÃͧ¢éÍÁÙŤÍÁ¾ÔÇàµÍÃì¢Í§¤Ø³ ËÃ×Í੾ÒÐä¿ÅìáÅÐâ¿Åà´ÍÃì·ÕèàÅ×Í¡ä´é ÊÃéÒ§µÒÃÒ§¡Ó˹´¡Òû¡µÔËÃ×Í·ÓÊÓà¹ÒàÁ×èͤسµéͧ¡Òà ¡ÒõԴµèÍÊ×èÍÊÒà à»Ô´/»Ô´ ÍØ»¡Ã³ìÊ×èÍÊÒâͧ¤ÍÁ¾ÔÇàµÍÃì ÊÅѺ¨ÍáÊ´§¼Å ÊÅѺàÍÒ·ì¾Ø·¨ÍáÊ´§¼ÅÃÐËÇèҧ˹éÒ¨ÍáÊ´§¼Å, ¨ÍáÊ´§¼ÅÀÒ¹͡ (ËÒ¡àª×èÍÁµèÍÍÂÙè) áÅзÑé§Êͧª¹Ô´ ˹éÒ¨ÍÇèÒ§ »Ô´ä¿¾×é¹ËÅѧ¨ÍáÊ´§¼Åà¾×èÍ»ÃÐËÂÑ´¾Åѧ§Ò¹ ¡´»ØèÁã´¡çä´éà¾×èÍà»Ô´Ë¹éҨ͡ÅѺÁÒÍÕ¡¤ÃÑé§ äͤ͹ ¿Ñ§¡ìªÑè¹ ¤Ó͸ԺÒ à»Ô´»Ô´¡ÒÃãªé§Ò¹·Ñªá¾´ à»Ô´áÅлԴ·Ñªá¾´º¹à¤Ã×èͧ àÅè¹/ËÂØ´àÅè¹ àÅè¹ËÃ×ÍËÂØ´àÅè¹ä¿ÅìÁÕà´ÕªÑèǤÃÒÇ ËÂØ´ ËÂØ´¡ÒÃàÅè¹ä¿ÅìÁÕà´Õ ¡è͹˹éÒ ¡ÅѺÊÙèä¿ÅìÁÕà´Õ¡è͹˹éÒ ¶Ñ´ä» ä»ÊÙèä¿ÅìÁÕà´ÕÂ¶Ñ´ä» Å´¤ÇÒÁÊÇèÒ§ Å´¤ÇÒÁÊÇèÒ§¢Í§Ë¹éÒ¨Í à¾ÔèÁ¤ÇÒÁÊÇèÒ§ à¾ÔèÁ¤ÇÒÁÊÇèÒ§¢Í§Ë¹éÒ¨Í à»Ô´á;¾ÅÔपÑè¹à¤Ã×Í¢èÒÂÊѧ¤Á à¤Ã×Í¢èÒÂÊѧ¤Á - ËÒ¡á;¾ÅÔपÑè¹¹ÕéäÁèä´éÃѺ¡ÒõԴµÑé§ »ØèÁ¹Õé¨ÐàÃÕ¡á;¾ÅÔपÑè¹¢éͤÇÒÁ´èǹ᷹ à¾ÔèÁàÊÕ§ à¾ÔèÁÃдѺàÊÕ§ Å´àÊÕ§ Å´ÃдѺàÊÕ§ à»Ô´»Ô´ÅÓ⾧ à»Ô´áÅлԴÅÓ⾧ ·Ó¤ÇÒÁÃÙé¨Ñ¡¡Ñº¤ÍÁ¾ÔÇàµÍÃì¢Í§¤Ø³ - 19 »ØèÁÅÑ´ ¤ÍÁ¾ÔÇàµÍÃìãªéÎç͵¤ÕÂì (ÃèÇÁ¡Ñº»ØèÁÍ×è¹) à¾×èÍà¢éÒÊÙè »ØèÁ¿Ñ§¡ìªÑè¹áÅФÓÊÑ觡ÒÃãªé§Ò¹ à¾×èÍà»Ô´ãªé§Ò¹Îç͵¤ÕÂì ãËé¡´»ØèÁ Fn (´éÒ¹ÅèÒ§«éÒÂ) ¤éÒ§àÍÒäÇé¡è͹·Õè¨Ð¡´»ØèÁÍ×è¹ã¹ªØ´Îç͵¤ÕÂì Îç͵¤ÕÂì ¿Ñ§¡ìªÑè¹ ¤Ó͸ԺÒ Fn + »ØèÁ¾ÔàÈÉ (â»Ã´´Ù ã¹Ë¹éÒ 18) »ØèÁ¿Ñ§¡ìªÑè¹ ãªé§Ò¹»ØèÁ F1 ¶Ö§ F12 Fn + ˹éÒËÅÑ¡ äÅèÃÒ¡ÒèҡµÍ¹µé¹¢Í§àÍ¡ÊÒà Fn + End äÅèÃÒ¡ÒÃ仵͹·éÒ¢ͧàÍ¡ÊÒà Fn + Page Up äÅèÃÒ¡ÒÃä»Ë¹éÒº¹¢Í§àÍ¡ÊÒà Fn + Page Down äÅèÃÒ¡ÒÃä»Ë¹éҶѴ仢ͧàÍ¡ÊÒà - ËÁÒÂà˵Ø: äÁè¨Óà»ç¹µéͧ¡´»ØèÁ Fn à¾×èÍãªé»ØèÁ¿Ñ§¡ìªÑè¹ F1 ¶Ö§ F12 àÁ×èÍàÃÔèÁãªé§Ò¹¤ÍÁ¾ÔÇàµÍÃìËÃ×ÍãªéÇÒ¹ BIOS ¡ÒÃÊÅѺÎç͵¤ÕÂìáÅпѧ¡ìªÑè¹¾ÔàÈɢͧ»ØèÁ F1 ¶Ö§ F12 ãËéà»ÅÕ蹡ÒõÑ駤èÒ»ØèÁ¿Ñ§¡ìªÑè¹·Õè BIOS (à»Ô´ BIOS â´Â¡´ F2 àÁ×èÍàÃÔèÁãªé§Ò¹¤ÍÁ¾ÔÇàµÍÃì¢Í§¤Ø³ ¨Ò¡¹Ñé¹àÅ×Í¡àÁ¹ÙËÅÑ¡áÅÐà»ÅÕè¹ ÅѡɳСÒ÷ӧҹ»ØèÁ¿Ñ§¡ìªÑè¹à»ç¹ Function keys) 20 ÁØÁÁͧ´éҹ˹éÒ 1 # 2 äͤ͹ ÃÒ¡Òà µÑÇáÊ´§¾Åѧ§Ò¹ ¤Ó͸ԺÒ ÃкØʶҹСÒÃà»Ô´ãªé§Ò¹¤ÍÁ¾ÔÇàµÍÃì áÊ´§¶Ö§Ê¶Ò¹ÐẵàµÍÃÕè¢Í§¤ÍÁ¾ÔÇàµÍÃì µÑÇáÊ´§ÃдѺẵàµÍÃÕè 1 2 - ¡ÓÅѧªÒÃì¨: ä¿ÊÇèÒ§à»ç¹ÊÕàËÅ×ͧÍӾѹàÁ×èÍ·Ó¡ÒêÒÃì¨áºµàµÍÃÕè - ªÒÃì¨ä¿àµçÁ: ä¿ÊÕ¹éÓà§Ô¹µÔ´ÊÇèÒ§¢³ÐÍÂÙèã¹âËÁ´ AC µÑÇáÊ´§Ê¶Ò¹Ð HDD áÊ´§àÁ×èÍÎÒÃì´´ÔÊ¡ìä´Ãì¿ÁÕ¡Ò÷ӧҹ ä¿áÊ´§Ê¶Ò¹Ð¡ÒÃÊ×èÍÊÒà áÊ´§¶Ö§Ê¶Ò¹ÐÍØ»¡Ã³ìàª×èÍÁµèÍẺäÃéÊÒ¢ͧ¤ÍÁ¾ÔÇàµÍÃì ¡ÒÃì´ÃÕ´à´ÍÃìÁÑŵÔÍÔ¹Çѹ ÊÒÁÒöãªé§Ò¹ÃèÇÁ¡Ñº Secure Digital (SD), MultiMediaCard (MMC), Memory Stick PRO (MS PRO), xD-Picture Card (xD) - ¡´à¾×èͶʹ/µÔ´µÑ駡ÒÃì´ ãªé§Ò¹¡ÒÃì´ä´é¤ÃÑé§ ÅÐ˹Ö觪شà·èÒ¹Ñé¹ - ËÁÒÂà˵Ø: ÊÑ−Åѡɳì·Õèἧ´éҹ˹éÒÊÒÁÒöÁͧàËç¹ä´éáÁ颳лԴ½Ò¾Ñº¤ÍÁ¾ÔÇàµÍÃì ·Ó¤ÇÒÁÃÙé¨Ñ¡¡Ñº¤ÍÁ¾ÔÇàµÍÃì¢Í§¤Ø³ - 21 ÁØÁÁͧ´éÒ¹«éÒ 1 2 # äͤ͹ ÃÒ¡Òà ÊÅç͵Åçͤ Kensington 3 4 5 6 ¤Ó͸ԺÒ àª×èÍÁµè͡ѺÃкºÅçͤ¤ÇÒÁ»ÅÍ´ÀÑÂÊÓËÃѺ¤ÍÁ¾ÔÇàµÍÃì·ÕèÁÕ¤ÇÒ Áà¢éҡѹä´é¡Ñº Kensington - ¤ÅéͧÊÒÂÅçͤ¹ÔÃÀѹÕéà¢éҡѺÇѵ¶Ø·Õèà¤Å×è͹·ÕèäÁèä´é àªè¹âµêÐ ËÃ×ÍÁ×ͨѺ¢Í§ÅÔ鹪ѡ·Õè´Ö§ÍÍ¡äÁèä´é ãÊèµÑÇÅç͡ŧã¹ÃèͧºÒ¡áÅÐËÁعµÑÇÅçÍ¡ä»ÂѧµÓá˹è§ÅçÍ¡ 㹺ҧÃØè¹ÍÒ¨äÁèÁÕÃкºÅçͤ¹Õé 1 2 ÍØ»¡Ã³ìÃкÒÂÍÒ¡ÒÈáÅÐ¾Ñ ªèÇ»ÃѺãËé¤ÍÁ¾ÔÇàµÍÃìàÂç¹Å§ ´ÅÁÃкÒ¤ÇÒÁÃé͹ - ËéÒÁ»Ô´ËÃ×Í¢ÇÒ§ªèͧ·Õèà»Ô´ÍÂÙè¹Õé 3 ¾ÍÃìµ Ethernet (RJ-45) àª×èÍÁµèÍà¤Ã×Í¢èÒ Ethernet 10/100/1000 4 ¾ÍÃ쵨ÍáÊ´§¼ÅÀÒ¹͡ (VGA) àª×èÍÁµè͡Ѻ¨ÍáÊ´§¼Å (àªè¹ ¨ÍÀÒ¾ÀÒ¹͡, â»ÃਤàµÍÃì LCD) 5 ¾ÍÃìµ HDMI ÃͧÃѺ¡ÒÃàª×èÍÁµèÍÃкºÇÔ´ÕâʹԨԵ͍ÇÒÁÅÐàÍÕ´ÊÙ§ 22 # äͤ͹ ÃÒ¡Òà ¤Ó͸ԺÒ µèÍÍØ»¡Ã³ì USB 6 ¾ÍÃìµ USB - ËÒ¡¾ÍÃìµà»ç¹ÊÕ´Ó áÊ´§ÇèÒÁÕ¤ÇÒÁà¢éҡѹä´é¡Ñº USB 2.0 ËÒ¡¾ÍÃìµà»ç¹ÊÕ¹éÓà§Ô¹ áÊ´§ÇèÒÁÕ¤ÇÒÁà¢éҡѹä´é¡Ñº USB 3.0 (´Ù´éÒ¹ÅèÒ§) ¢éÍÁÙÅà¡ÕèÂǡѺ USB 3.0 • à¢éҡѹä´é¡Ñº USB 3.0 áÅÐÍØ»¡Ã³ì USB ÃØ蹡è͹˹éÒ • à¾×èÍ»ÃÐÊÔ·¸ÔÀÒ¾ÊÙ§ÊØ´ ãªéÍØ»¡Ã³ì USB 3.0 ·Õèä´éÃѺ¡ÒÃÃѺÃͧ • ¡Ó˹´µÒÁÁҵðҹ USB 3.0 (SuperSpeed USB) ·Ó¤ÇÒÁÃÙé¨Ñ¡¡Ñº¤ÍÁ¾ÔÇàµÍÃì¢Í§¤Ø³ - 23 ÁØÁÁͧ´éÒ¹¢ÇÒ 1 2 # äͤ͹ ÃÒ¡Òà 3 4 56 7 ¤Ó͸ԺÒ ãªéÊÓËÃѺµèÍÍØ»¡Ã³ìàÊÕ§¢ÒÍÍ¡ (àªè¹ ÅÓ⾧ ªØ´Ëٿѧ) á¨ç¤Ëٿѧ/ÅÓ⾧ 1 ªèͧµèÍäÁâ¤Ã⿹ - ʹѺʹعËٿѧ¾ÃéÍÁäÁâ¤Ã⿹ 3.5 ÁÁ. ·Õèà¢éҡѹä´é (àªè¹ Ëٿѧ Acer smart handheld) ãªéÊÓËÃѺµèÍäÁâ¤Ã⿹ µèÍÍØ»¡Ã³ì USB - ËÒ¡¾ÍÃìµà»ç¹ÊÕ´Ó áÊ´§ÇèÒÁÕ¤ÇÒÁà¢éҡѹä´é¡Ñº USB 2.0 ËÒ¡¾ÍÃìµà»ç¹ÊÕ¹éÓà§Ô¹ áÊ´§ÇèÒÁÕ¤ÇÒÁà¢éҡѹä´é¡Ñº USB 3.0 (´Ù´éÒ¹ÅèÒ§) 2 ¾ÍÃìµ USB 3 ä´Ãì¿Í;µÔ¤ÍÅ ä´Ãì¿Í;µÔ¤ÍÅÀÒÂã¹ ÊÓËÃѺãÊè CD ËÃ×Í DVD 4 ä¿áÊ´§¡ÒÃÍèÒ¹ Í;µÔ¤ÍÅ´ÔÊ¡ì µÔ´ÊÇèÒ§àÁ×èÍÁÕ¡ÒÃÍèÒ¹á¼è¹Í;µÔ¤ÍÅ 5 »ØèÁ´Õ´á¼è¹Í;µÔ¤ÍÅÍÍ¡ ¹Óá¼è¹Í;µÔ¤ÍÅÍÍ¡¨Ò¡ä´Ãì¿ 24 # äͤ͹ ÃÒ¡Òà ¤Ó͸ԺÒ ãªéà»Ô´¶Ò´ãÊèá¼è¹Í;µÔ¤ÍÅ¢³Ð»Ô´¤ÍÁ¾ÔÇàµÍÃì 6 »ØèÁ¹Óá¼è¹ÍÍ¡©Ø¡à©Ô¹ 7 á¨ç¤ DC-in - ãÊè¤ÅԻ˹պ¡ÃдÒÉà¢éÒ仵ç æ ÍÂèÒ§ÃÐÁÑ´ÃÐÇѧ à¾×èÍà»Ô´¶Ò´ä´Ãì¿Í;µÔ¤ÍÅ àª×èÍÁµè͡ѺÍá´»àµÍÃì AC ¢Í§¤ÍÁ¾ÔÇàµÍÃì ¢éÍÁÙÅà¡ÕèÂǡѺ USB 3.0 • à¢éҡѹä´é¡Ñº USB 3.0 áÅÐÍØ»¡Ã³ì USB ÃØ蹡è͹˹éÒ • à¾×èÍ»ÃÐÊÔ·¸ÔÀÒ¾ÊÙ§ÊØ´ ãªéÍØ»¡Ã³ì USB 3.0 ·Õèä´éÃѺ¡ÒÃÃѺÃͧ • ¡Ó˹´µÒÁÁҵðҹ USB 3.0 (SuperSpeed USB) ·Ó¤ÇÒÁÃÙé¨Ñ¡¡Ñº¤ÍÁ¾ÔÇàµÍÃì¢Í§¤Ø³ - 25 ÁØÁÁͧ´éÒ¹ÅèÒ§ 1 2 4 3 # äͤ͹ ÃÒ¡Òà ¤Ó͸ԺÒ 1 ªèͧãÊèẵàµÍÃÕ ·ÕèÍÂÙè¢Í§áºµàµÍÃբͧ¤ÍÁ¾ÔÇàµÍÃì 2 ÊÅÑ¡à»Ô´áºµàµÍÃÕ à»Ô´à¾×è͹ÓẵàµÍÃÕÍÍ¡ ãÊèà¤Ã×èͧÁ×Í·ÕèàËÁÒÐÊÁáÅÐàÅ×è͹à¾×èͶʹÍÍ¡ ªèͧ˹èǤÇÒÁ¨Ó ·ÕèÍÂÙè¢Í§Ë¹èǤÇÒÁ¨Ó¢Í§¤ÍÁ¾ÔÇàµÍÃì ªèͧãÊèÎÒÃì´´ÔÊ¡ì ·ÕèÍÂÙè¢Í§ÎÒÃì´´ÔÊ¡ì¢Í§¤ÍÁ¾ÔÇàµÍÃì (ÂÖ´µÔ´á¹è¹´éǹê͵) 3 4 26 ÍØ»¡Ã³ìÃкÒÂÍÒ¡ÒÈáÅÐ¾Ñ ªèÇ»ÃѺãËé¤ÍÁ¾ÔÇàµÍÃìàÂç¹Å§ ´ÅÁÃкÒ¤ÇÒÁÃé͹ - ËéÒÁ»Ô´ËÃ×Í¢ÇÒ§ªèͧ·Õèà»Ô´ÍÂÙè¹Õé ·Ñªá¾´ ¡ÒÃãªé·Ñªá¾´àº×éͧµé¹ ·Ñªá¾´¤Çº¤ØÁÅÙ¡Èà (ËÃ×Í 'à¤ÍÃìà«ÍÃì') º¹Ë¹éÒ¨Í àÁ×èͤسàÅ×è͹¹ÔéÇä»ÁÒº¹·Ñªá¾´ à¤ÍÃìà«ÍÃì¨Ð¢ÂѺµÒÁ¡ÒÃà¤Å×è͹äËǢͧ¤Ø³ ¡´»ØèÁ«éÒÂËÃ×Í¢ÇҢͧ»¶èÁ·ÕèÍÂÙè´éÒ¹ÅèÒ§¢Í§·Ñªá¾´à¾×èÍ·Ó¡ÒÃàÅ×Í¡áÅÐàÃÕ¡ãªé§Ò¹¿Ñ§¡ìªÑè¹ ¾×é¹·ÕèÊͧ¾×é¹·Õè¹Õé¤ÅéÒ¤ÅÖ§¡Ñº»ØèÁ«éÒÂáÅлØèÁ¢ÇÒº¹àÁÒÊì ¡ÒÃáµÐº¹·Ñªá¾´à»ç¹¡Ò÷ӧҹàªè¹à´ÕÂǡѺ¡ÒäÅÔ¡«éÒº¹àÁÒÊì ËÁÒÂà˵Ø: ·Ñªá¾´¹ÕéÁÕ¤ÇÒÁäǵèÍ¡ÒÃà¤Å×è͹äËǢͧ¹ÔéÇ ¨ÐãËé¡Òõͺʹͧ·Õè´Õ¡ÇèÒ â»Ã´ÃÑ¡ÉҷѪᾴ¹ÕéáÅйÔéǢͧ¤Ø³ ãËéáËé§áÅÐÊÐÍÒ´ ;´Ñ§¹Ñ鹡ÒÃÊÑÁ¼ÑÊà¾Õ§àºÒæ à¤ÍÃìà«ÍÃì¨Ð¶Ù¡¤Çº¤ØÁâ´Â¡ÒÃÇÒ´¹ÔéǾ×é¹°Ò¹: • ¡ÒÃÊäÅ´ì¹ÔéÇà´ÕÂÇ: àÅ×è͹¹ÔéǢͧ¤Ø³ä»º¹·Ñªá¾´ à¾×èÍàÅ×è͹à¤ÍÃìà«ÍÃì • ¡ÒÃáµÐ¹ÔéÇà´ÕÂÇ: áµÐŧº¹·Ñªá¾´àºÒæ à¾×èÍ·Ó¡Òà '¤ÅÔ¡' «Ö觨Ðà»ç¹¡ÒÃàÅ×Í¡ËÃ×ÍàÃÔèÁãªé§Ò¹ÃÒ¡Òà áµÐ«éÓàÃçÇæ à¾×èÍ·Ó¡ÒÃáµÐÊͧ¤ÃÑé§ ËÃ×Í '´ÑºàºÔéŤÅÔ¡' • ÅÒ¡: ¡´¤éÒ§·Õè´éÒ¹«éÒ¢ͧ»ØèÁàÅ×Í¡ ËÃ×ÍáµÐÊͧ¤ÃÑé§ã¹·Õèã´¡çä´éº¹·Ñªá¾´ áÅéÇÅÒ¡¹ÔéǺ¹·Ñªá¾´à¾×èÍàÅ×Í¡ÃÒ¡Ò÷Ñé§ËÁ´ã¹¾×é¹·Õè¹Ñé¹ ·Ñªá¾´ - 27 ¡ÒÃÇÒ´¹ÔéǺ¹·Ñªá¾´ Windows 8 áÅÐá;¾ÅÔपÑè¹ÁÒ¡ÁÒÂʹѺʹع¡ÒÃÇÒ´¹ÔéǺ¹·Ñªá¾´·Õèãªé¹ÔéÇ˹Ö觹ÔéÇËÃ×ÔÍÁÒ¡¡ÇèÒ ËÁÒÂà˵Ø: ¡ÒÃʹѺʹع¡ÒÃÇÒ´¹ÔéǺ¹·Ñªá¾´¢Öé¹ÍÂÙè¡Ñºá;¾ÅÔपÑè¹·Õèà»Ô´ãªé§Ò¹ÍÂÙè «Ö觪èÇÂãËé¤Ø³ÊÒÁÒö¤Çº¤ØÁá;¾ÅÔपÑè¹µèÒ§æ ä´é´éÇ¡ÒÃÇÒ´¹ÔéǧèÒÂæ ÊͧÊÒÁ¤ÃÑé§ àªè¹: • ¡ÇÒ´¹ÔéǨҡ¢Íº: àÃÕ¡ãªéà¤Ã×èͧÁ×͵èÒ§æ ¢Í§ Windows â´Â¡ÒáÇÒ´ÁÒ·ÕèÈÙ¹Âì¡ÅÒ§¢Í§·Ñªá¾´¨Ò¡´éÒ¹¢ÇÒ ´éÒ¹º¹ ËÃ×Í´éÒ¹«éÒ • ¡ÇÒ´¹ÔéǨҡ¢Íº´éÒ¹¢ÇÒ: ÊÅѺãªé charms • ¡ÇÒ´¹ÔéǨҡ¢Íº´éÒ¹º¹: à»Ô´ãªé¤ÓÊÑè§á;¾ÅÔपÑè¹ • ¡ÇÒ´¹ÔéǨҡ¢Íº´éÒ¹«éÒÂ: ÊÅѺä»Âѧá;¾ÅÔपÑ蹡è͹˹éÒ • ¡ÒÃÊäÅ´ìÊͧ¹ÔéÇ: àÅ×è͹´ÙàÇçºà¾¨, àÍ¡ÊÒÃ, ÃÒ¡ÒÃàÅè¹ÍÂèÒ§ÃÇ´àÃçÇâ´Â¡ÒÃÇÒ§¹ÔéÇÊͧ¹ÔéǺ¹·Ñªá¾´áÅÐàÅ×è͹·Ñé§Êͧ¹ÔéÇä»Âѧ ·ÔÈ·Ò§ã´æ ·Õèµéͧ¡Òà • ¡ÒÃÃǺ´éÇÂÊͧ¹ÔéÇ:ãªé«ÙÁ¢ÂÒÂáÅÐÂèÍÀÒ¾, á¼¹·Õè áÅÐàÍ¡ÊÒÃÍÂèÒ§ÃÇ´àÃçÇ â´Âãªé¹ÔéÇâ»é§áÅйÔéǪÕé 28 ¡ÒÃÍѾà¡Ã´¤ÍÁ¾ÔÇàµÍÃì¢Í§¤Ø³ ¢ÂÒÂãËé¡ÇéÒ§ä¡Å´éǵÑÇàÅ×Í¡µèÒ§æ ¤ÍÁ¾ÔÇàµÍÃì¢Í§¤Ø³Áͺ»ÃÐʺ¡ÒóìËÅÒ¡ËÅÒµÑÇàÅ×͡㹡ÒÃãªé§Ò¹¤ÍÁ¾ÔÇàµÍÃìÍѹÊÁºÙóìẠºãËé¡Ñº¤Ø³ µÑÇàÅ×͡㹡ÒÃàª×èÍÁµèÍ ¾ÍÃ쵪èÇÂ㹡ÒÃàª×èÍÁµèÍÍØ»¡Ã³ìµè;èǧ¡Ñº¤ÍÁ¾ÔÇàµÍÃì¢Í§¤Ø³ ÊÓËÃѺ¤Óá¹Ð¹Óà¡ÕèÂǡѺÇÔ¸Õ¡ÒÃàª×èÍÁµèÍÍØ»¡Ã³ìÀÒ¹͡·ÕèᵡµèÒ§¡Ñ¹à¢éҡѺ¤ÍÁ¾ÔÇàµÍÃì¢Í§¤Ø³ã ËéÍèÒ¹ã¹ÊèǹµèÍ仹Õé àÁÁâÁÃÕè ¡ÒÃì´ ÃÕ´à´ÍÃì ¡ÒÃì´Ë¹èǤÇÒÁ¨Ó¶Ù¡ãªéÍÂèÒ§á¾ÃèËÅÒÂ㹡Åéͧ´Ô¨ÔµÍÅ PDA à¤Ã×èͧàÅè¹ MP3 áÅÐâ·ÃÈѾ·ìà¤Å×è͹·Õè ¡ÒÃãÊèàÁÁâÁÃÕè¡ÒÃì´ 1. ÇÒ§¡ÒÃì´ã¹á¹Ç·Õè¨Ø´¤Í¹à¹ç¡àµÍÃìµÃ§¡Ñ¹¡Ñº¾ÍÃìµ â´ÂãËé¤Í¹à¹ç¡àµÍÃì¤ÇèÓ˹éÒŧ 2. àÅ×è͹¡ÒÃì´à¢éÒã¹¾ÍÃìµÍÂèÒ§ÃÐÁÑ´ÃÐÇѧ ËÒ¡¤Ø³¾ºÇèÒµéͧãªéáçà¾×èÍãÊè¡ÒÃì´ ãËéÅͧ¢ÂѺ¡ÒÃì´àÅ硹éÍ ¡ÒÃÍѾà¡Ã´¤ÍÁ¾ÔÇàµÍÃì¢Í§¤Ø³ - 29 3. ´Ñ¹¨¹¡ÃзÑè§ÁÕàÊÕ§¡ÃÔ꡺͡ÇèÒ¡ÒÃì´à¢éÒ·Õè ¡ÒÃì´¨ÐàËÅ×ÍÍÂÙè¹Í¡ÊÅç͵ÊͧÊÒÁÁÔÅÅÔàÁµÃ ËÒ¡¡ÒÃì´¹Ñé¹ÁÕä¿Åì ˹éÒµèÒ§ Windows Auto Play (àÅè¹Íѵâ¹ÁѵÔ) ÍÒ¨»ÃÒ¡¯¢Öé¹ (¢Öé¹ÍÂÙè¡Ñºà¹×éÍËÒ¢éÍÁÙÅÀÒÂ㹡ÒÃì´) áÅжÒÁÇèҤسµéͧ¡ÒÃãªéâ»Ãá¡ÃÁà¾×èÍà¢éÒ¶Ö§à¹×éÍËÒ¢éÍÁÙÅÀÒÂ㹡ÒÃì´ËÃ×ÍäÁè àÅ×Í¡µÑÇàÅ×Í¡·Õè¹ÕèËÒ¡¨Óà»ç¹ ËÃ×ÍàÅ×Í¡ Cancel (¡àÅÔ¡) ËÒ¡¡ÒÃì´äÁèÁÕä¿Åì ËÃ×ÍÁÕä¿Åì·ÕèäÁè·ÃÒº¤èÒ Ë¹éÒµèÒ§¨Ðà»Ô´â´ÂáÊ´§à¹×éÍËÒ¢éÍÁÙÅÀÒÂ㹡ÒÃì´ ¡ÒÃì´ SD, SDHC áÅÐ SDXC »ÃÐàÀ·¡ÒÃì´ SD ·ÕèµèÒ§¡Ñ¹¨ÐÁÕ¤ÇÒÁÊÒÁÒöµèÒ§¡Ñ¹ ¢³Ðãªé§Ò¹ÃٻẺà´ÕÂǡѹ ¡ÒÃì´ SD ÁÕ¤ÇÒÁ¨ØÁÒ¡¶Ö§ 4 GB ¡ÒÃì´ SDHC ÁÕ¤ÇÒÁ¨ØÁÒ¡¶Ö§ 32 GB áÅСÒÃì´ SDXC ÊÒÁÒö¨Øä´é¶Ö§ 2048 GB (2 TB) ¤ÍÁ¾ÔÇàµÍÃì¢Í§¤Ø³ÁÕ SDHC ËÃ×Í SDXC ¡ÒÃì´ÃÕ´à´ÍÃì·Õèãªé§Ò¹ä´é ËÁÒÂà˵Ø: ¡ÒÃì´Ë¹èǤÇÒÁ¨Ó SDXC ÊÒÁÒöãªé§Ò¹ä´éã¹ SDXC ÃÕ´à´ÍÃì·Õèãªé§Ò¹ä´é ¡ÒÃì´ SD áÅÐ SDHC ÊÒÁÒöãªéä´éã¹·Ñé§Êͧ»ÃÐàÀ· 30 1. 2. 3. 4. 5. ¡Òöʹ ¡ÒÃì´¨Ò¡àÁÁâÁÃÕè¡ÒÃì´ÃÕ´à´ÍÃì ¤ÅÔ¡·Õèäͤ͹ Show hidden ã¹¾×é¹·ÕèáÊ´§¡ÒÃá¨é§àµ×͹ (¶Ñ´¨Ò¡¹ÒÌÔ¡Ò) ¤ÅÔ¡·Õèäͤ͹ Safely Remove Hardware ¤ÅÔ¡º¹ Eject SD Card (¶Í´ SD Card) (ËÃ×ͺ¹ª×èÍ ÍØ»¡Ã³ì) Ãͨ¹¡ÃзÑ觢éͤÇÒÁ Safe to Remove Hardware (»ÅÍ´ÀÑÂÊÓËÃѺ¶Í´ÎÒÃì´áÇÃì) »ÃÒ¡¯¢Öé¹ ¶Í´¡ÒÃì´ÍÍ¡ 2 3 1 à¤Ã×Í¢èÒÂã¹µÑÇ à¤Ã×Í¢èÒ·ÕèµÔ´µÑé§äÇéã¹µÑǪèÇÂãËé¤Ø³àª×èÍÁµèͤÍÁ¾ÔÇàµÍÃì¢Í§¤Ø ³à¢éҡѺà¤Ã×Í¢èÒ¾×é¹°Ò¹ÍÕà¸ÍÃìà¹çµ àª×èÍÁµèÍÊÒÂÍÕà¸ÍÃìà¹çµ¨Ò¡¾ÍÃìµÍÕà¸ÍÃìà¹çµ (RJ-45) º¹áªÊ«Õ¢Í§¤ÍÁ¾ÔÇàµÍÃìà¢éҡѺá¨ç¤à¤Ã×Í¢èÒÂËÃ×ÍÎѺº¹à¤Ã×Í ¢èÒ¢ͧ¤Ø³ ¡ÒÃÍѾà¡Ã´¤ÍÁ¾ÔÇàµÍÃì¢Í§¤Ø³ - 31 Universal Serial Bus (USB) ¾ÍÃìµ USB à»ç¹«ÕàÃÕÂźÑʤÇÒÁàÃçÇÊÙ§«Öè§Í¹Ø−ÒµãËé¤Ø³àª×èÍÁµèÍÍØ»¡Ã³ìà ÊÃÔÁ USB â´ÂäÁèµéͧãªé·ÃѾÂÒ¡ÃÃкº ºÒ§¤ÍÁ¾ÔÇàµÍÃìÍÒ¨ÁÕ USB 3.0 ˹Öè§ËÃ×ÍÁÒ¡¡ÇèÒ ¾ÍÃìµ «Ö觤ÅéÒ¡Ѻ¾ÍÃìµ USB Áҵðҹ ¡àÇ鹡ÒÃàª×èÍÁµèÍÀÒÂã¹à¾ÔèÁàµÔÁáÅÐÁÕÊÕ¹éÓà§Ô¹ ¤Ø³ÍÒ¨ãªéÍØ»¡Ã³ì·Õèà¨éҡѹä´é¡Ñº USB 3.0 ¡Ñº¾ÍÃìµàËÅèÒ¹Õéà¾×èÍ»ÃÐ⪹ì¨Ò¡¡ÒÃâ͹ÂéÒ·ÕèÁÕ¤ÇÒÁàÃçÇÊÙ §¡ÇèÒ ¾ÍÃìµÇÕ´ÔâÍ àª×èÍÁµèÍâÁ¹ÔàµÍÃì¡Ñº¾ÍÃìµ VGA ËÃ×Í DVI (»ÃÐàÀ·¡ÒÃàª×èÍÁµèÍ·ÕèÃͧÃѺ¢Öé¹ÍÂÙè¡Ñº¡ÒáÓ˹´¤èҢͧ¤ÍÁ¾ÔÇàµÍÃì) â´Â·ÑèÇä»áÅéǨÍáÊ´§¼Å¨ÐÁÒ¾ÃéÍÁ¡ÑºÊÒÂà¤àºÔéÅ·ÕèàËÁÒÐÊÁ ·ÓµÒÁ¢Ñ鹵͹µèÍ仹Õéà¾×èÍàª×èÍÁµèÍÁ͹ÔàµÍÃìà¢éҡѺ¤ÍÁ¾ÔÇàµÍÃì¢Í§¤Ø³ 1. µÃǨÊͺ´ÙÇèÒ¤ÍÁ¾ÔÇàµÍÃì»Ô´ÍÂÙèËÃ×ÍäÁèáÅÐÔ»Ô´ÊÇÔµ«ìÁ͹ÔàµÍÃìÍÂÙèËÃ×ÍäÁè 2. µèÍÊÒÂà¤àºÔéÅÇÔ´ÕâÍà¢éҡѺ¾ÍÃìµÁ͹ÔàµÍÃ캹¤ÍÁ¾ÔÇàµÍÃì ¢Ñ¹µèÍÊÒÂà¤àºÔéÅãËéá¹è¹´éÇÂÊ¡ÃÙ·ÕèÁÕÁÒãËé 3. µèÍÊÒÂä¿Á͹ÔàµÍÃìáÅéÇàÊÕºà¢éҡѺ»ÅÑꡨèÒÂä¿·ÕèÁÕ¡ÒÃà´Ô¹ÊÒ´ԹäÇéÍÂèÒ§¶Ù¡µéͧ 4. ·ÓµÒÁ¤Óá¹Ð¹Ó㹡ÒõÑ駤èÒ·ÕèÍÂÙè㹤ÙèÁ×ͼÙéãªé¢Í§Á͹ÔàµÍÃì 32 5. à»Ô´Á͹ÔàµÍÃì ¨Ò¡¹Ñé¹à»Ô´¤ÍÁ¾ÔÇàµÍÃì 6. µÃǨÊͺãËéá¹èã¨ÇèÒ¤èÒ¤ÇÒÁÅÐàÍÕ´áÅÐÍѵÃÒÃÕà¿Ãª¹Ñé¹äÁèà¡Ô¹¢éÍ¡Ó˹´à©¾ÒТͧÁ͹ÔàµÍÃì ËÒ¡¨Óà»ç¹ãËéà»ÅÕ蹡ÒõÑ駤èÒ¡ÒÃáÊ´§¼Å·Õèãªé´éǤÍÁ¾ÔÇàµÍÃì ËÁÒÂà˵Ø: à¾×èÍà¢éÒ¶Ö§¡ÒäǺ¤ØÁ¡ÒÃáÊ´§¼Å ¡´»ØèÁ Windows ( ) + W, ¾ÔÁ¾ì "Display" áÅéǤÅÔ¡·Õè Display High-Definition Multimedia Interface (੾ÒкҧÃØè¹à·èÒ¹Ñé¹) HDMI (High-Definition Multimedia Interface) ¤×Í¡ÒÃàª×èÍÁ»ÃÐÊÒ¹¡Ò÷ӧҹ·ÕèÃͧÃѺÁҵðҹ ÍصÊÒË¡ÃÃÁ, »ÃÒȨҡ¡ÒúպÍÑ´, ÀÒ¾áÅÐàÊÕ§à»ç¹áºº´Ô¨ÔµÍÅ·Ñé§ËÁ´ HDMI Áͺ¡ÒÃàª×èÍÁ»ÃÐÊÒ¹¡Ò÷ӧҹÃÐËÇèÒ§áËÅè§ÊÑ −−Ò³àÊÕ§/ ÇÔ´ÕâÍẺ´Ô¨ÔµÍÅ·ÕèÊÒÁÒöãªé§Ò¹ä´é·Ø¡ª¹Ô´ àªè¹¡Åèͧà«çµ·çÍ», à¤Ã×èͧàÅè¹ DVD áÅÐà¤Ã×èͧÃѺÊÑ−−Ò³ A/V ¡ÑºÁ͹ÔàµÍÃìàÊÕ§áÅÐ/ËÃ×ÍÇÔ´ÕâÍẺ´Ô¨ÔµÍÅ·ÕèÊÒÁÒö·Ó§Ò¹ÃèÇÁ¡Ñ¹ä´é àªè¹â·Ã·Ñȹì´Ô¨ÔµÍÅ (DTV) ´éÇÂÊÒÂà¤àºÔéÅà¾Õ§ÊÒÂà´ÕÂÇ ãªé¾ÍÃìµ HDMI º¹¤ÍÁ¾ÔÇàµÍÃì¢Í§¤Ø³à¾×èÍàª×èÍÁµè͡ѺÍØ»¡Ã³ìàÊÕ§áÅÐÇÔ´ÕâÍÃдѺäÎà͹´ì ¡Ò÷ӧҹ´éÇÂÊÒÂà¤àºÔéÅà¾Õ§ÊÒÂà´ÕÂǪèÇÂãËéµÔ´µÑé§ä´éÍÂèÒ§à»ç¹ÃÐàºÕºáÅÐàª×èÍÁµèÍä´éÍÂèÒ§ ÃÇ´àÃçÇ ¡ÒÃÍѾà¡Ã´¤ÍÁ¾ÔÇàµÍÃì¢Í§¤Ø³ - 33 ªØ´ËٿѧáÅÐäÁâ¤Ã⿹ Êͧ¾ÍÃìµ¹ÕéÊÓËÃѺàª×èÍÁµèÍÍØ»¡Ã³ìàÊÕ§ ãªé¾ÍÃìµËٿѧà¾×èÍàÊÕº»ÅÑê¡ËٿѧÊàµÍÃÔâÍËÃ×ÍÅÓ⾧ ¡ÒÃàÊÕº»ÅÑê¡ÍØ»¡Ã³ìàÊÕ§¡Ñº¾ÍÃìµËٿѧ¨Ð»Ô´ÅÓ⾧㹵ÑÇ ãªé¾ÍÃìµäÁâ¤Ã⿹à¾×èÍàª×èÍÁµèÍäÁâ¤Ã⿹ÀÒ¹͡ÊÓËÃѺ¡Òúѹ·Ö¡àÊÕ§ẺâÁâ¹ ¡ÒÃàÊÕº»ÅÑê¡äÁâ¤Ã⿹ÀÒ¹͡¨Ð»Ô´äÁâ¤Ã⿹㹵ÑÇ 34 ¾ÒÇàÇÍÃì«Ñ¾¾ÅÒ Íá´»àµÍÃì AC ¤ÍÁ¾ÔÇàµÍÃì¢Í§¤Ø³ÊÒÁÒöãªéÍá´»àµÍÃìÀÒ¹͡ä´é (Power Brick) à¾×èÍãªé§Ò¹´éÇÂÊÒÂä¿ AC ÊÒÂä¿·ÕèÁÕãËé¾ÃéÍÁ¡Ñºà¤Ã×èͧ¤ÍÁ¾ÔÇàµÍÃì¹Ñé¹ÁÕ¤ÇÒÁàËÁÒÐÊÁÊÓËÃѺ»ÃÐà·È·ÕèÇÒ§¨Ó˹èÒ Íá´»àµÍÃì¹ÕéãËé¾Åѧ§Ò¹ÍÂèÒ§¾Íà¾Õ§ÊÓËÃѺ¡ÒÃãªé§Ò¹¤ÍÁ¾ÔÇàµÍÃì¢Í§¤Ø³áÅСÒÃÃÕªÒÃì¨áºµàµÍ ÃÕèã¹àÇÅÒà´ÕÂǡѹ ¢éͤÇÃÃÐÇѧ: ËéÒÁÇÒ§Çѵ¶ØÍ×蹤ÅØÁäÇéËÃ×ͷѺäÇ麹Íá´»àµÍÃì AC ¾ÂÒÂÒÁãËéÍá´»àµÍÃìàÂç¹ã¹ÃÐËÇèÒ§¡ÒÃãªé§Ò¹â´ÂäÁèÇÒ§äÇéã¡Åé¡ÑºÇѵ¶ØÍ×è¹ ãªéÍá´»àµÍÃì AC ª¹Ô´·ÕèÁÒ¾ÃéÍÁ¡Ñº¤ÍÁ¾ÔÇàµÍÃì¢Í§¤Ø³à·èÒ¹Ñé¹ ¡ÒÃãªéÍá´»àµÍÃìÍ×è¹·Õè¤ÅéÒ¤ÅÖ§¡Ñ¹ÍÒ¨à¡Ô´¤ÇÒÁàÊÕÂËÒµèͤÍÁ¾ÔÇàµÍÃì¢Í§¤Ø³ä´é ¾ÒÇàÇÍÃì«Ñ¾¾ÅÒ - 35 ¤Óàµ×͹: Íá´»àµÍÃì AC áÅдéÒ¹ÅèÒ§¢Í§¤ÍÁ¾ÔÇàµÍÃìÍÒ¨ÁÕ¤ÇÒÁÃé͹ä´éËÅѧ¨Ò¡ãªé§Ò¹à»ç¹àÇÅÒ¹Ò¹ «Öè§à»ç¹àÃ×èͧ»¡µÔ áµèÍÒ¨·ÓãËéà¡Ô´¡ÒúҴà¨çºä´éËÒ¡ÊÑÁ¼Ñʶ١ ẵàµÍÃÕè ¤ÍÁ¾ÔÇàµÍÃì¹ÕéãªéẵàµÍÃÕè·ÕèÁͺÍÒÂØ¡ÒÃãªé§Ò¹ä´é¹Ò¹¢Öé¹ÃÐËÇèÒ§¡ÒêÒÃì¨áµèÅФÃÑé§ ÅѡɳТͧẵàµÍÃÕè ẵàµÍÃÕè¹ÕéÁÕÅѡɳШÓà¾Òдѧ¹Õé: • ä´éÁҵðҹ෤â¹âÅÂÕẵàµÍÃÕè㹻Ѩ¨ØºÑ¹ • ¡ÒÃàµ×͹àÁ×èÍẵàµÍÃÕèµèÓ áºµàµÍÃÕè¹Õé¨ÐÃÕªÒÃ쨷ء¤ÃÑ駷Õè¤Ø³µèͤÍÁ¾ÔÇàµÍÃìà¢éҡѺ Íá´»àµÍÃì AC ¤ÍÁ¾ÔÇàµÍÃì¢Í§¤Ø³Ê¹ÑºÊ¹Ø¹¡ÒêÒÃì¨ÃÐËÇèÒ§ãªé§Ò¹«Ö觪èÇÂãËé¤Ø³ÃÕªÒÃì¨áºµàµÍÃÕèä´éã¹¢³Ðãªé§Ò ¹¤ÍÁ¾ÔÇàµÍÃì ÍÂèÒ§äáçµÒÁ ¡ÒÃÃÕªÒÃì¨àÁ×èͻԴ¤ÍÁ¾ÔÇàµÍÃì¨Ð·ÓãËéàÇÅÒ㹡ÒêÒÃì¨ÃÇ´àÃçÇ¢Öé¹ áºµàµÍÃÕèÂѧà»ç¹»ÃÐ⪹ìàÁ×èͤسµéͧà´Ô¹·Ò§ËÃ×ÍàÁ×èÍà¡Ô´ä¿µ¡ ¢Íá¹Ð¹ÓãËéàµÃÕÂÁẵàµÍÃÕèÊÓÃͧ·ÕèªÒÃì¨àµçÁäÇéàÊÁÍà¾×èÍà»ç¹¡ÒÃáºç¤ÍѾ â»Ã´µÔ´µè͵ÑÇá·¹¨Ó˹èÒ¢ͧ¤Ø³ÊÓËÃѺÃÒÂÅÐàÍÕ´¡ÒÃÊÑ觫×éÍẵàµÍÃÕèÊÓÃͧ 36 ¡ÒÃà¾ÔèÁÍÒÂآͧẵàµÍÃÕèãËéãªé§Ò¹ä´éÊÙ§ÊØ´ àªè¹à´ÕÂǡѺẵàµÍÃÕèÍ×è¹æ ẵàµÍÃÕè㹤ÍÁ¾ÔÇàµÍÃì¢Í§¤Ø³¨ÐàÊ×èÍÁÊÀҾ仵ÒÁàÇÅÒ «Öè§ËÁÒ¤ÇÒÁÇèÒ »ÃÐÊÔ·¸ÔÀÒ¾¢Í§áºµàµÍÃÕè¨ÐŴŧµÒÁÃÐÂÐàÇÅÒáÅСÒÃãªé§Ò¹ à¾×èÍà¾ÔèÁÍÒÂآͧẵàµÍÃÕèãËéãªé§Ò¹ä´éÊÙ§ÊØ´ ¢Íá¹Ð¹ÓãËé¤Ø³·ÓµÒÁ¤Óá¹Ð¹Ó´Ñ§µèÍ仹Õé ÊÓËÃѺẵàµÍÃÕèãËÁè ¡è͹·Õè¤Ø³¨Ðãªé§Ò¹áºµàµÍÃÕèà»ç¹¤ÃÑé§áá ¹Õè¤×Í “ ¢éÍ»¯ÔºÑµÔ ” ·Õè¤Ø³¤Ç÷Ó: 1. ãÊèẵàµÍÃÕèãËÁèâ´ÂäÁèµéͧà»Ô´¤ÍÁ¾ÔÇàµÍÃì 2. µèÍÍá´»àµÍÃì AC áÅЪÒÃì¨áºµàµÍÃÕèãËéàµçÁ 3. ¶Í´Íá´»àµÍÃì AC ÍÍ¡ 4. à»Ô´¤ÍÁ¾ÔÇàµÍÃìáÅзӧҹâ´ÂãªéẵàµÍÃÕè 5. ãªé§Ò¹áºµàµÍÃÕ訹ËÁ´ 6. µèÍÍá´»àµÍÃì AC áÅЪÒÃì¨áºµàµÍÃÕèãËéàµçÁãËÁèÍÕ¡¤ÃÑé§ ·Ó«éÓ¢Ñ鹵͹àËÅèÒ¹Õ騹¡ÇèÒẵàµÍÃÕè¨Ð¶Ù¡ªÒÃì¨áÅлÅèÍ»ÃШØä¿¿éÒÊÒÁ¤ÃÑé§ ãªé¢éÍ»¯ÔºÑµÔ¹ÕéÊÓËÃѺẵàµÍÃÕèãËÁè·Ñé§ËÁ´ ËÃ×ÍÊÓËÃѺẵàµÍÃÕè·ÕèäÁèä´éãªéà»ç¹àÇÅÒ¹Ò¹ ËÒ¡äÁèä´éãªé§Ò¹¤ÍÁ¾ÔÇàµÍÃìÁÒ¡¡ÇèÒÊͧ·ÔµÂì¢Öé¹ä» ¢Íá¹Ð¹ÓãËé¤Ø³¶Í´áºµàµÍÃÕèÍÍ¡¨Ò¡µÑÇà¤Ã×èͧ ¤Óàµ×͹: ËéÒÁ·Ôé§áºµàµÍÃÕèäÇéã¹·ÕèÍسËÀÙÁÔµèÓ¡ÇèÒ 0°C (32°F) ËÃ×ÍÁÒ¡¡ÇèÒ 45°C (113°F) ÍسËÀÙÁÔ·ÕèÊÙ§ËÃ×͵èÓà¡Ô¹ä»ÍÒ¨·ÓãËéẵàµÍÃÕèàÊÕÂËÒÂä´é ¾ÒÇàÇÍÃì«Ñ¾¾ÅÒ - 37 â´Â¡Ò÷ӵÒÁ¢éÍ»¯ÔºÑµÔÊÓËÃѺẵàµÍÃÕè ¨Ð·ÓãËéẵàµÍÃÕè¢Í§¤Ø³ÊÒÁÒöÃѺ¡ÒêÒÃì¨ä´éÊÙ§ÊØ´ ¡ÒÃäÁè·ÓµÒÁ¢éÍ»¯ÔºÑµÔ¹Õé¨Ð·ÓãËéẵàµÍÃÕè¢Í§¤Ø³äÁèÊÒÁÒöÃѺ¡ÒêÒÃì¨ä´éÊÙ§ÊØ´ áÅШÐÁÕÍÒÂØ¡Òà ãªé§Ò¹·ÕèÊÑé¹Å§ ¹Í¡¨Ò¡¹Õé ÍÒÂØ¡ÒÃãªé§Ò¹¢Í§áºµàµÍÃÕèÍÒ¨ä´éÃѺ¼Å¡Ãзº¨Ò¡¡ÒÃãªé§Ò¹´Ñ§µèÍ仹Õé: • ãªé§Ò¹¤ÍÁ¾ÔÇàµÍÃì´éÇ¡ÒÃàÊÕºÊÒÂä¿ AC ã¹¢³Ð·ÕèãÊèẵàµÍÃÕèäÇéÍÂÙèàÊÁÍ ËÒ¡¤Ø³µéͧ¡ÒÃãªé§Ò¹¤ÍÁ¾ÔÇàµÍÃì´éÇ¡ÒÃàÊÕºÊÒÂä¿ AC ÍÂÙèàÊÁÍ ¢Íá¹Ð¹ÓãËé¤Ø³¶Í´áºµàµÍÃÕèÍÍ¡ËÅѧ¨Ò¡·ÕèªÒÃì¨áºµàµÍÃÕèàµçÁáÅéÇ • ËéÒÁãªéẵàµÍÃÕ訹ËÁ´»ÃШØä¿¿éÒáÅéǨ֧ÃÕªÒÃ쨨¹àµçÁ´Ñ§·Õèä´é͸ԺÒÂäÇé¢éÒ§µé¹ • ãªé§Ò¹ºèÍ ÂÔ觤سãªé§Ò¹áºµàµÍÃÕèºèÍÂæ ÍÒÂØ¡ÒÃãªé§Ò¹¢Í§áºµàµÍÃÕè¨ÐÂÔè§ÊÑé¹¢Öé¹ áºµàµÍÃÕèÁҵðҹ¢Í§¤ÍÁ¾ÔÇàµÍÃìÁÕÍÒÂØ¡ÒÃãªé§Ò¹ÊÓËÃѺ¡ÒêÒÃì¨ 300 ¤ÃÑé§ ¡ÒÃà»ÅÕè¹ẵàµÍÃÕè â¹éµºØꤹÕéãªéẵàµÍÃÕèÅÔà¸ÕÂÁ à»ÅÕè¹ẵàµÍÃÕè´éÇÂẵàµÍÃÕè»ÃÐàÀ·à´ÕÂǡѹ·ÕèÁÒ¾ÃéÍÁ¡Ñº¼ÅÔµÀѳ±ì¢Í§¤Ø³ ¡ÒÃãªéẵàµÍÃÕèÍ×è¹ÍÒ¨àÊÕ觵èÍ¡ÒÃà¡Ô´ä¿äËÁéËÃ×ÍÃÐàºÔ´ ¤Óàµ×͹! ẵàµÍÃÕèÍÒ¨ÃÐàºÔ´ä´éËÒ¡¶Ù¡¨Ñ´¡ÒÃÍÂèÒ§äÁè¶Ù¡µéͧ ËéÒÁ¶Í´ËÃ×Í·Ôé§ Å§ã¹¡Í§ä¿ à¡çºãËéËèÒ§¨Ò¡à´ç¡ »¯ÔºÑµÔµÒÁ¡®¢éͺѧ¤ÑºàÁ×è͵éͧ·Ôé§áºµàµÍÃÕè ·Õèãªé§Ò¹áÅéÇ 38 ¡ÒÃãÊèËÃ×ͶʹẵàµÍÃÕè ÊÔè§ÊÓ¤Ñ−! ¡è͹¶Í´áºµàµÍÃÕèÍÍ¡¨Ò¡µÑÇà¤Ã×èͧ µéͧµèÍÍá´»àµÍÃì AC ¡è͹ËÒ¡¤Ø³µéͧ¡ÒÃãªé§Ò¹¤ÍÁ¾ÔÇàµÍÃìµèÍ ËÒ¡äÁèµéͧ¡ÒÃãªé§Ò¹µèÍ ãËé»Ô´¤ÍÁ¾ÔÇàµÍÃì¡è͹ ÇÔ¸Õ¡ÒÃãÊèẵàµÍÃÕè: 1. ÇҧẵàµÍÃÕèµÒÁá¹ÇªèͧãÊèẵàµÍÃÕè â´ÂàµÃÕÂÁãÊèÊèǹ·éÒ¢ͧẵàµÍÃÕè·ÕèÁըشÊÑÁ¼ÑÊ¡è͹áÅÐãËéÊèǹ¼ÔÇ˹éҢͧẵàµÍÃÕè˧Ò¢Öé¹ 2. ÇҧẵàµÍÃÕèŧ㹪èͧãÊèẵàµÍÃÕèáÅдѹàºÒ樹¡ÃзÑè§áºµàµÍÃÕèÅçͤÍÂÙèã¹µÓáË¹è§ ÇÔ¸Õ¡ÒöʹẵàµÍÃÕè: 1. àÅ×è͹µÑÇÅçͤẵàµÍÃÕèà¾×èͶʹẵàµÍÃÕèÍÍ¡ 2. ´Ö§áºµàµÍÃÕèÍÍ¡¨Ò¡ªèͧãÊèẵàµÍÃÕè ¡ÒêÒÃì¨áºµàµÍÃÕè ÇÔ¸Õ¡ÒêÒÃì¨áºµàµÍÃÕè Íѹ´ÑºááãËéµÃǨ´ÙÇèÒẵàµÍÃÕè¶Ù¡ãÊèÍÂèÒ§¶Ù¡µéͧ㹪èͧãÊèẵàµÍÃÕè àÊÕº Íá´»àµÍÃì AC à¢éҡѺ¤ÍÁ¾ÔÇàµÍÃìáÅеèÍà¢éҡѺ»ÅÑê¡ä¿ ¤Ø³ÊÒÁÒöãªé§Ò¹¤ÍÁ¾ÔÇàµÍÃìµèÍà¹×èͧ㹢³Ð·ÕèªÒÃì¨áºµàµÍÃÕèä´é¨Ò¡¡ÒÃàÊÕºÊÒÂä¿ AC ÍÂèÒ§äáçµÒÁ ¡ÒêÒÃì¨áºµàµÍÃÕèàÁ×èͻԴ¤ÍÁ¾ÔÇàµÍÃì¨Ð·ÓãËéàÇÅÒ㹡ÒêÒÃì¨ÃÇ´àÃçÇ¢Öé¹ ËÁÒÂà˵Ø: ¢Íá¹Ð¹ÓãËé¤Ø³ªÒÃì¨áºµàµÍÃÕè¡è͹àÅÔ¡·Ó§Ò¹ã¹áµèÅÐÇѹ ¡ÒêÒÃì¨áºµàµÍÃÕèãËé¾ÃéÍÁ¡è͹¡ÒÃà´Ô¹·Ò§¨ÐªèÇÂãËé¤Ø³àÃÔèÁÇѹãËÁè¾ÃéÍÁ¡ÑºáºµàµÍÃÕè·ÕèªÒ Ãì¨ÍÂèÒ§àµçÁà»ÕèÂÁ ¾ÒÇàÇÍÃì«Ñ¾¾ÅÒ - 39 ¡ÒõÃǨÊͺÃдѺ¾Åѧ§Ò¹¢Í§áºµàµÍÃÕè µÑÇÇÑ´¾Åѧ§Ò¹ ¢Í§ Windows ¨ÐáÊ´§ÃдѺ¾Åѧ§Ò¹ã¹»Ñ¨¨ØºÑ¹¢Í§áºµàµÍÃÕè ÇÒ§à¤ÍÃìà«ÍÃìà˹×Íäͤ͹ẵàµÍÃÕè/¾ÒÇàÇÍÃ캹·ÒÊ¡ìºÒÃìà¾×èÍ´ÙÃдѺ¡ÒêÒÃ쨢ͧẵàµÍÃÕè ¡ÒÃÂ×´ÍÒÂØ¡ÒÃãªé§Ò¹áºµàµÍÃÕè ¡ÒÃÂ×´ÍÒÂØ ¡ÒÃãªé§Ò¹áºµàµÍÃÕè¨ÐªèÇÂãËé¤Ø³ä´éÃѺ¡Ò÷ӧҹÊÙ§ÊØ´¨Ò¡áºµàµÍÃÕè ÃÇÁ¶Ö§à»ç¹¡ÒÃÂ×´ÍÒÂØ¡ÒêÒÃì¨/ÃÕªÒÃì¨ áÅЪèÇÂà¾ÔèÁ»ÃÐÊÔ·¸ÔÀҾ㹡ÒÃÃÕªÒÃì¨ ¢Íá¹Ð¹ÓãËé¤Ø³·ÓµÒÁ¤Óá¹Ð¹Ó´éÒ¹ÅèÒ§¹Õé: • ¡Òë×éÍẵàµÍÃÕèàÊÃÔÁ • ãªéÊÒÂä¿ AC àÁ×èͨÓà»ç¹áÅÐãªé§Ò¹áºµàµÍÃÕèã¹¢³Ðà´Ô¹·Ò§ • ¶Í´¡ÒÃì´¾Õ«ÕÍÍ¡àÁ×èÍäÁèä´éãªé§Ò¹ à¹×èͧ¨Ò¡¡ÒÃì´¨Ðãªé¾Åѧ§Ò¹ÍÂèÒ§µèÍà¹×èͧ (ÊÓËÃѺºÒ§ÃØè¹) • à¡çºáºµàµÍÃÕèäÇéã¹·ÕèàÂç¹áÅÐáËé§ ÍسËÀÙÁÔ·Õèá¹Ð¹Ó¤×Í 10°C (50°F) ¶Ö§ 30°C (86°F) ÍسËÀÙÁÔÊÙ§¨Ð·ÓãËéẵàµÍÃÕè¤Ò»ÃШØä¿¿éÒÍÂèÒ§ÃÇ´àÃçÇ • ¡ÒÃÃÕªÒÃì¨ÁÒ¡à¡Ô¹ä»¨Ðà»ç¹¡ÒÃÅ´ÍÒÂØ¡ÒÃãªé§Ò¹áºµàµÍÃÕè • ¤ÍÂÃÐÇѧÃÑ¡ÉÒÍá´»àµÍÃì AC áÅÐẵàµÍÃÕè¢Í§¤Ø³ ¡ÒÃàµ×͹ẵàµÍÃÕèµèÓ àÁ×èÍ·Ó§Ò¹â´ÂãªéẵàµÍÃÕèãËé¤Í´ٷÕè µÑÇÇÑ´¾Åѧ§Ò¹ ¢Í§ Windows ¤Óàµ×͹: µèÍÍá´»àµÍÃì AC ãËéàÃçÇ·ÕèÊØ´à·èÒ·Õè·Óä´éËÒ¡»ÃÒ¡¯¡ÒÃàµ×͹ẵàµÍÃÕèµèÓ ¢éÍÁÙÅÍÒ¨ÊÙ−ËÒÂËÒ¡ãªéẵàµÍÃÕ訹ËÁ´áÅФÍÁ¾ÔÇàµÍÃì¨Ð»Ô´¡Ò÷ӧҹ 40 àÁ×èÍ»ÃÒ¡¯¡ÒÃàµ×͹ẵàµÍÃÕèµèÓ ÇÔ¸Õ»¯ÔºÑµÔ·Õèá¹Ð¹Ó¨Ð¢Öé¹ÍÂÙè¡ÑºÊ¶Ò¹¡Òóì¢Í§¤Ø³: ʶҹ¡ÒÃ³ì ¡ÒáÃзӷÕèá¹Ð¹Ó ÁÕÍá´»àµÍÃì AC áÅлÅÑê¡ä¿ 1. àÊÕºÍá´»àµÍÃì AC à¢éҡѺ¤ÍÁ¾ÔÇàµÍÃìáÅеèÍà¢éҡѺ»ÅÑê¡ä¿ 2. ºÑ¹·Ö¡ä¿Åì·Õèãªé§Ò¹ÍÂÙè·Ñé§ËÁ´ 3. ·Ó§Ò¹µèÍ »Ô´¤ÍÁ¾ÔÇàµÍÃìËÒ¡¤Ø³µéͧ¡ÒÃÃÕªÒÃì¨áºµàµÍÃÕèÍÂèÒ§ÃÇ´ àÃçÇ ÁÕẵàµÍÃÕèÊÓÃͧ·ÕèªÒÃì¨àµçÁ 1. ºÑ¹·Ö¡ä¿Åì·Õèãªé§Ò¹ÍÂÙè·Ñé§ËÁ´ 2. »Ô´á;¾ÅÔपÑè¹·Ñé§ËÁ´ 3. àÅ×Í¡»Ô´Ãкº»¯ÔºÑµÔ¡ÒÃà¾×èͻԴ¤ÍÁ¾ÔÇàµÍÃì 4. à»ÅÕè¹ẵàµÍÃÕè 5. à»Ô´¤ÍÁ¾ÔÇàµÍÃìáÅзӧҹµèÍ 1. ºÑ¹·Ö¡ä¿Åì·Õèãªé§Ò¹ÍÂÙè·Ñé§ËÁ´ ÁÕÍá´»àµÍÃì AC ËÃ×Í»ÅÑê¡ä¿ 2. »Ô´á;¾ÅÔपÑè¹·Ñé§ËÁ´ áÅФسäÁèÁÕẵàµÍÃÕèÊÓÃͧ 3. àÅ×Í¡»Ô´Ãкº»¯ÔºÑµÔ¡ÒÃà¾×èͻԴ¤ÍÁ¾ÔÇàµÍÃì ¾ÒÇàÇÍÃì«Ñ¾¾ÅÒ - 41 à ¤ Ã × è Í §Á × Í ¨Ñ ´ ¡ Ò Ã ¾ ÅÑ § § Ò ¹ ¤ÍÁ¾ÔÇàµÍÃìà¤Ã×èͧ¹ÕéÁÕà¤Ã×èͧÁ×ͨѴ¡ÒþÅѧ§Ò¹µÔ´µÑé§äÇéã¹µÑÇ«Ö觷Ó˹éÒ·ÕèµÔ´µÒÁ¡Ô¨¡ÃÃÁ¡Ò÷ӧҹ ¢Í§Ãкº ¡Ô¨¡ÃÃÁ¡Ò÷ӧҹ¢Í§Ãкº¨ÐÍéÒ§ÍÔ§¶Ö§¡ÒáԨ¡ÃÃÁ¡Ò÷ӧҹã´æ ·Õèµéͧ ãªé§Ò¹ÍØ»¡Ã³ìã´µèÍ仹ÕéÍØ»¡Ã³ì˹Öè§ËÃ×ÍÁÒ¡¡ÇèÒ¹Ñé¹ ¤ÕÂìºÍÃì´, àÁÒÊì, ÎÒÃì´´ÔÊ¡ì, ÍØ»¡Ã³ìÀÒ¹͡·Õèàª×èÍÁµè͡Ѻ¤ÍÁ¾ÔÇàµÍÃì áÅÐ˹èǤÇÒÁ¨ÓÇÔ´ÕâÍ ËÒ¡äÁèÁÕ¡Ô¨¡ÃÃÁ¡Ò÷ӧҹ ã´¶Ù¡µÃǨ¾ºã¹ªèǧàÇÅÒ˹Öè§ ¤ÍÁ¾ÔÇàµÍÃì¨ÐËÂØ´ÍØ»¡Ã³ìºÒ§ªÔé¹àËÅèÒ¹ÕéËÃ×Í·Ñé§ËÁ´à¾×èÍà»ç¹¡ÒÃÃÑ¡ÉÒ¾Åѧ§Ò¹ ¡ÒûÃÐËÂÑ´¾Åѧ§Ò¹ »Ô´Ãкº¡ÒÃàÃÔèÁãªé§Ò¹´èǹ ¤ÍÁ¾ÔÇàµÍÃì¢Í§¤Ø³ãªéÃкº¡ÒÃàÃÔèÁãªé§Ò¹´èǹà¾×èÍãËéàÃÔèÁà»Ô´à¤Ã×èͧãªé§Ò¹ä´éÍÂèÒ§ÃÇ´àÃçÇ áµèÃкº¹Õéãªé¾Åѧ§Ò¹àÅ硹éÍÂà¾×èÍÃ͵ÃǨÊͺÊÑ−−ҳ㹡ÒÃàÃÔèÁãªé§Ò¹ ¡ÒõÃǨÊͺ¹Õé¨Ð·ÓãËéẵàµÍÃÕè¢Í§¤ÍÁ¾ÔÇàµÍÃìŴŧÍÂèÒ§ªéÒæ ËÒ¡¤Ø³µéͧ¡ÒÃÅ´¡ÒÃãªé¾Åѧ§Ò¹¢Í§¤ÍÁ¾ÔÇàµÍÃìáÅÐÅ´¼Å¡ÃзºµèÍÊÔè§áÇ´ÅéÍÁ ãËé»Ô´Ãкº¡ÒÃàÃÔèÁãªé§Ò¹´èǹ: ËÁÒÂà˵Ø: ËÒ¡Ãкº¡ÒÃàÃÔèÁãªé§Ò¹´èǹ¶Ù¡»Ô´ÍÂÙè ¤ÍÁ¾ÔÇàµÍÃì¢Í§¤Ø³¨ÐãªéàÇÅÒ¡ÅѺ¨Ò¡ âËÁ´ÊÅÕ»¹Ò¹¡ÇèÒà´ÔÁ ¤ÍÁ¾ÔÇàµÍÃì¢Í§¤Ø³¨ÐäÁèàÃÔèÁ·Ó§Ò¹ËÒ¡ä´éÃѺ¤ÓÊÑè§ãËéàÃÔèÁ·Ó§Ò¹¨Ò¡à¤Ã×Í¢èÒ (Wake on LAN). 42 1. à»Ô´à´Ê¡ì·çÍ» 2. ¤ÅÔ¡ µÑÇàÅ×Í¡¡ÒÃãªé¾Åѧ§Ò¹ ã¹¾×é¹·Õèá¨é§àµ×͹ 3. àÅ×Í¡ µÑÇàÅ×Í¡¡ÒÃãªé¾Åѧ§Ò¹à¾ÔèÁàµÔÁ 4. àÅ×Í¡ àÅ×͡˹éÒ·Õè¢Í§»ØèÁ¾ÒÇàÇÍÃì 5. à¾×Íè à¢éÒ¶Ö§¡ÒõÑ駤èÒÊÓËÃѺ¡ÒûԴà¤Ã×èͧ àÅ×Í¡ à»ÅÕ蹡ÒõÑ駤èÒ·ÕèäÁèÁÕãËéàÅ×͡㹻Ѩ¨ØºÑ¹ à¤Ã×èͧÁ×ͨѴ¡ÒþÅѧ§Ò¹ - 43 6. àÅ×è͹ŧáÅÐàÅ×Í¡»Ô´ à»Ô´Ãкº¡ÒÃàÃÔèÁãªé§Ò¹´èǹ 7. àÅ×Í¡ ºÑ¹·Ö¡¡ÒÃà»ÅÕè¹á»Å§ 44 «Í¿µìáÇÃì ¡ÒÃãªé Windows áÅЫͿ·ìáÇÃì¢Í§¤Ø³ Gateway ¤ÍÁ¾ÔÇàµÍÃìÁÕ«Í¿·ìáÇÃì·Õè¨ÐªèÇÂãËé¤Ø³ãªé§Ò¹¤ÍÁ¾ÔÇàµÍÃì â»Ãá¡ÃÁ áÅÐËÁÇ´ËÁÙè¡Ò÷ӧҹµèÒ§æ ·ÕèÁÕãË麹¤ÍÁ¾ÔÇàµÍÃì¢Í§¤Ø³ â´Â¢Öé¹ÍÂÙè¡ÑºÃØè¹·Õè¤Ø³«×éÍ ¡ÒÃÃÑ¡ÉÒ¤ÇÒÁ»ÅÍ´ÀѺ¹ÍÔ¹àµÍÃìà¹çµ·ÕèÁÕãËé à»ç¹àÃ×èͧÊÓ¤Ñ−·Õè¨Ðµéͧ»¡»éͧ¤ÍÁ¾ÔÇàµÍÃì¢Í§¤Ø³ãËé»ÅÍ´ÀѨҡäÇÃÑÊáÅÐÀѤء¤ÒÁµèÒ§æ º¹ÍÔ¹àµÍÃìà¹çµ (´Ù·Õè¤ÇÒÁ»ÅÍ´ÀÑ º¹ã¹Ë¹éÒ 53) ÁժشÃÑ¡ÉÒ¤ÇÒÁ»ÅÍ´ÀѺ¹ÍÔ¹àµÍÃìà¹çµÃÇÁÃÐÂÐãªé§Ò¹¿ÃÕãËé àÁ×èÍàÃÔèÁãªé§Ò¹¤ÍÁ¾ÔÇàµÍÃì¢Í§¤Ø³ ¤Ø³¤ÇÃà»Ô´ãªé§Ò¹Ãкº¡Òûéͧ¡Ñ¹¹Õé¡è͹àª×èÍÁµèÍÍÔ¹àµÍÃìà¹çµ ªØ´ÃÑ¡ÉÒ¤ÇÒÁ»ÅÍ´ÀѹÕéªèÇ»éͧ¡Ñ¹¤ÍÁ¾ÔÇàµÍÃì¢Í§¤Ø³¨Ò¡¡ÒÃãªé§Ò¹Í͹äŹìÅèÒÊØ´áÅлéͧ¡Ñ¹ ¢éÍÁÙÅÊèǹµÑǢͧ¤Ø³ (àÍ¡ÊÒÃà¡ÕèÂǡѺºÑ−ªÕ¸¹Ò¤Òà ËÁÒÂàÅ¢ºÑµÃà¤Ã´Ôµ ÃËÑʼèÒ¹ áÅÐÍ×è¹ æ ) Gateway Recovery Management à¾×èÍà»ç¹¡ÒÃàµÃÕÂÁãËé¤ÍÁ¾ÔÇàµÍÃì¢Í§¤Ø³ÊÒÁÒöãªéµÑÇàÅ×Í¡¡ÒáÙé¤×¹Ãкºä´é ¤Ø³¤ÇÃÊÃéÒ§´ÔÊ¡ìÊÓËÃѺ¡ÒáÙé¤×¹ã¹·Ñ¹·Õ·ÕèÊÒÁÒö·Óä´é ´ÙÃÒÂÅÐàÍÕ´à¾ÔèÁàµÔÁä´é·Õè ã¹Ë¹éÒ 63 «Í¿µìáÇÃì - 45 ÍÔ¹àµÍÃìà¹çµ ¢Ñ鹵͹áẹà¹çµ ¡Òû¡»éͧ¤ÍÁ¾ÔÇàµÍÃì¢Í§¤Ø³ à»ç¹àÃ×èͧÊÓ¤Ñ−·Õè¨Ðµéͧ»¡»éͧ¤ÍÁ¾ÔÇàµÍÃì¢Í§¤Ø³ãËé»ÅÍ´ÀѨҡäÇÃÑÊáÅÐÀѤء¤ÒÁµèÒ§æ º¹ÍÔ¹àµÍÃìà¹çµ (´Ù·Õè¡ÒÃÃÑ¡ÉÒ¤ÇÒÁ»ÅÍ´ÀѺ¹ÍÔ¹àµÍÃìà¹çµ·ÕèÁÕãËé º¹ã¹Ë¹éÒ 45 áÅФÇÒÁ»ÅÍ´ÀÑ º¹ã¹Ë¹éÒ 53) ¢Íá¹Ð¹ÓãËéãªéâ»Ãá¡ÃÁÃÑ¡ÉÒ¤ÇÒÁ»ÅÍ´ÀѺ¹ÍÔ¹àµÍÃìà¹çµ·Õèãªé¡Ñ¹ÍÂÙè·ÑèÇä»àÁ×èͤسàÃÔèÁãªé§Ò¹¤ÍÁ ¾ÔÇàµÍÃì¢Í§¤Ø³à»ç¹¤ÃÑé§áá ¤Ø³¤ÇèÐà»Ô´ãªé§Ò¹¡Òûéͧ¡Ñ¹¹Õé㹷ѹ·Õ·ÕèÊÒÁÒö·Óä´é â´Â੾ÒÐÍÂèÒ§ÂÔ觡è͹·Õè¤Ø³¨Ðàª×èÍÁµèÍà¢éҡѺÍÔ¹àµÍÃìà¹çµ àÅ×Í¡ ¼ÙéãËéºÃÔ¡ÒÃÍÔ¹àµÍÃìà¹çµ ¡ÒÃãªé§Ò¹ÍÔ¹àµÍÃìà¹çµ¹Ñ鹡ÅÒÂà»ç¹àÃ×èͧ»¡µÔ㹡ÒÃãªé§Ò¹¤ÍÁ¾ÔÇàµÍÃì»ÃÐ ¨ÓÇѹä»áÅéÇ ´éÇ¢Ñ鹵͹§èÒÂæ äÁè¡Õè¢Ñ鹵͹¡çÊÒÁÒöàª×èÍÁµèͤس à¢éҡѺ¤ÇÒÁÃÙéáÅÐà¤Ã×èͧÁ×Í㹡ÒÃÊ×èÍÊÒÃÁÒ¡ÁÒÂËÅÒÂÃٻẺ à¾×èÍ·Ó¢Ñ鹵͹àËÅèÒ¹ÕéãËéÊÓàÃ稤سµéͧàÅ×Í¡¼ÙéãËéºÃÔ¡ÒÃÍÔ¹àµÍÃìà¹çµ (ISP) àÊÕ¡è͹ «Ö觼ÙéãËéºÃÔ¡ÒùÕé¨Ðà»ç¹¼ÙéãËéºÃÔ¡ÒáÒÃàª×èÍÁµèÍÃÐËÇèÒ§¤Ø³ ¡ÑºÍÔ¹àµÍÃìà¹çµ ¤Ø³¤Ç÷ӡÒä鹤ÇéÒà¡ÕèÂǡѺ ISP ã¹·éͧ¶Ô蹢ͧ¤Ø³ â´ÂÍÂèÒÅ×Á·Õè¨Ð¾Ù´¤Ø¡Ѻà¾×è͹æ áÅФÃͺ¤ÃÑÇà¡ÕèÂǡѺ»ÃÐʺ¡Òóì㹡Òà ãªé§Ò¹ËÃ×͵ÃǨÊͺº·ÇÔ¨ÒóìáÅÐÃÒ§ҹ¡ÒÃãªé§Ò¹¢Í§ÅÙ¡¤éÒÊÓËÃѺ ISP à¨éÒ¹Ñé¹æ ISP 46 ·Õè¤Ø³àÅ×Í¡¨ÐÁͺ¤Óá¹Ð¹Óà¡ÕèÂǡѺÇÔ¸Õ¡ÒÃàª×èÍÁµèÍà¢éҡѺÍÔ¹àµÍÃìà¹çµãËé¡Ñº¤Ø³ (¤Ø³ÍÒ¨µéͧ¡ÒëͿ·ìáÇÃìËÃ×Í ‘¡Åèͧ’ ¾ÔàÈÉà¾ÔèÁàµÔÁà¾×èÍàª×èÍÁµè͡ѺÊÒÂâ·ÃÈѾ·ì¢Í§¤Ø³ »ÃÐàÀ·¡ÒÃàª×èÍÁµèÍ ¢Öé¹ÍÂÙè¡ÑºÃØ蹢ͧ¤ÍÁ¾ÔÇàµÍÃì ʶҹ·Õè áÅФÇÒÁµéͧ¡ÒÃ㹡ÒÃÊ×èÍÊÒâͧ¤Ø³ ¤Ø³ÁÕËÅÒÂÇÔ¸Õ¡ÒÃ㹡ÒÃàª×èÍÁµèÍÍÔ¹àµÍÃìà¹çµ ËÁعÊÒ ¤ÍÁ¾ÔÇàµÍÃìºÒ§à¤Ã×èͧÁդ͹à¹ç¡àµÍÃìÊÓËÃѺËÁعÊÒÂâ·ÃÈѾ·ì (âÁà´çÁ) «Ö觨ЪèÇÂãËé¤Ø³ÊÒÁÒöàª×èÍÁµè͡ѺÍÔ¹àµÍÃìà¹çµâ´ÂãªéÊÒÂâ·ÃÈѾ·ì¢Í§¤Ø³ ´éÇ¡ÒÃàª×èÍÁµèÍẺËÁعÊÒÂâ·ÃÈѾ·ì ¤Ø³äÁèÊÒÁÒöãªé§Ò¹âÁà´çÁáÅÐâ·ÃÈѾ·ìä´é¾ÃéÍÁæ ¡Ñ¹º¹ÊÒÂâ·ÃÈѾ·ìÊÒÂà´ÕÂÇä´é ¡ÒÃàª×èÍÁµèÍ»ÃÐàÀ·¹Õé¹Ñ鹨ТÍá¹Ð¹ÓãËéãªé੾ÒÐ àÁ×èͤسÁÕ¡ÒÃãªé§Ò¹ÍÔ¹àµÍÃìà¹çµÍÂèÒ§¨Ó¡Ñ´à·èÒ¹Ñé¹à¹×èͧ¨Ò¡¤ÇÒÁàÃçÇ㹡ÒÃàª×èÍÁµè͹Ñé¹µèÓáÅÐâ´Â·Ñè Çä»áÅéǨФԴ¤èÒºÃÔ¡ÒÃ㹡ÒÃàª×èÍÁµèÍà»ç¹ÃÒªÑèÇâÁ§ DSL (àªè¹ ADSL) DSL (Digital Subscriber Line) ¤×Í¡ÒÃàª×èÍÁµèÍ·Õè ‘à»Ô´ÍÂÙèµÅÍ´àÇÅÒ’ «Ö觷ӧҹ¼èÒ¹ÊÒÂâ·ÃÈѾ·ì à¹×èͧ¨Ò¡ DSL áÅÐâ·ÃÈѾ·ìäÁèä´éãªé¤ÇÒÁ¶Õèà´ÕÂǡѹ ¤Ø³¨Ö§ÊÒÁÒöãªéâ·ÃÈѾ·ìä´é¾ÃéÍÁ¡Ñº¡ÒÃàª×èÍÁµèÍÍÔ¹àµÍÃìà¹çµ (â´Â¨Óà»ç¹µéͧãªé ‘äÁâ¤Ã¿ÔÅàµÍÃì’ µè͡Ѻâ·ÃÈѾ·ìáµèÅÐà¤Ã×èͧà¾×èÍËÅÕ¡àÅÕ觡ÒÃú¡Ç¹) à¾×èÍãËéÊÒÁÒöãªé§Ò¹ DSL ä´é ¤Ø³µéͧÍÂÙè㹺ÃÔàdzã¡Åéà¤Õ§¡ÑºªØÁÊÒÂâ·ÃÈѾ·ì·ÕèÁÕ¡ÒõԴµÑé§ DSL äÇé (ºÒ§¤ÃÑ駨ÐäÁèÁÕãËéºÃÔ¡ÒÃã¹¾×é¹·ÕèËèÒ§ä¡Å) ¤ÇÒÁàÃçÇ㹡ÒÃàª×èÍÁµè͹Ñé¹áµ¡µèÒ§¡Ñ¹ä»µÒÁʶҹ·Õè¢Í§¤Ø³ áµèâ´Â·ÑèÇä»áÅéÇ DSL ÍÔ¹àµÍÃìà¹çµ - 47 ¹Ñ鹨ÐÁͺ¡ÒÃàª×èÍÁµèÍÍÔ¹àµÍÃìà¹çµ·ÕèÃÇ´àÃçÇáÅÐàª×èͶ×Íä´é à¹×èͧ¨Ò¡¡ÒÃàª×èÍÁµè͹Ñ鹨Ðà»Ô´ÍÂÙèµÅÍ´àÇÅÒ â´Â»¡µÔáÅéǨ֧¤Ô´¤èÒºÃÔ¡ÒÃà»ç¹ÃÒÂà´×͹ ËÁÒÂà˵Ø: ¡ÒÃàª×èÍÁµèÍ DSL ¹Ñ鹨Óà»ç¹µéͧãªéâÁà´çÁ·ÕèàËÁÒÐÊÁ â´Â»¡µÔáÅéÇ ISP ¨ÐÁͺâÁà´çÁãËé¡Ñº¤Ø³àÁ×èͤس¨´·ÐàºÕ¹ãªéºÃÔ¡Òà âÁà´çÁÊèǹÁÒ¡¨ÐÁÕ ‘àÃÒ·ìàµÍÃì’ ·Õè¨ÐÁͺ¡ÒÃà¢éÒãªé§Ò¹à¤Ã×Í¢èÒÂáÅÐÃкº wi-fi à¤àºÔéÅ ¡ÒÃàª×èÍÁµèÍẺà¤àºÔéŨÐÁͺ¡ÒÃãËéºÃÔ¡ÒÃÍÔ¹àµÍÃìà¹çµ·ÕèÃÇ´àÃçÇáÅÐà»Ô´ÍÂÙèµÅÍ´àÇÅÒ¼èÒ¹·Ò§ÊÒ Âà¤àºÔéÅâ·Ã·Ñȹì â´Â·ÑèÇ仨ÐÁÕ¡ÒÃãËéºÃÔ¡ÒùÕéã¹àÁ×ͧãË−èæ ¤Ø³ÊÒÁÒöãªéâ·ÃÈѾ·ì¢Í§¤Ø³áÅÐÃѺªÁà¤àºÔéÅ·ÕÇÕä´éã¹àÇÅÒà´ÕÂǡѹ¡Ñº·Õè¤ Ø³àª×èÍÁµè͡ѺÍÔ¹àµÍÃìà¹çµ 3G (WWAN ËÃ×Í 'Wireless Wide-Area Network') ¡ÒÃàª×èÍÁµèÍ 3G ¨Ð͹Ø−ÒµãËé¤Ø³ãªé§Ò¹à¤Ã×Í¢èÒÂà«ÅÅÙÅèÒÃì (àªè¹·ÕèãªéÍÂÙè¡Ñºâ·ÃÈѾ·ìÁ×Ͷ×Í) à¾×èÍàª×èÍÁµè͡ѺÍÔ¹àµÍÃìà¹çµã¹¢³Ð·Õè¤Ø³ÍÂÙè¹Í¡ºéÒ¹ ¤ÍÁ¾ÔÇàµÍÃì¢Í§¤Ø³ÍÒ¨ÁÕªèͧÊÓËÃѺãÊè SIM ¡ÒÃì´ ËÃ×ÍÍÒ¨µéͧ¡ÒÃÍØ»¡Ã³ìÀÒ¹͡ÍÂèÒ§àªè¹ âÁà´çÁ USB ËÃ×ÍáÁé¡ÃзÑè§â·ÃÈѾ·ìÁ×Ͷ×Í·Õèä´éÃѺ¡ÒõԴµÑé§ÍØ»¡Ã³ìÍÂèÒ§¶Ù¡µéͧ ËÁÒÂà˵Ø: ËÒ¡¤ÍÁ¾ÔÇàµÍÃì¢Í§¤Ø³ÁÕÊÅç͵ãÊè SIM ¡ÒÃì´ ¤Ø³¨Óà»ç¹µéͧÁÕ SIM ¡ÒÃì´·ÕèÊÒÁÒöãªé§Ò¹´éÇ¡ѹä´éáÅÐÊÑ−−Ò¡ÒÃãªé§Ò¹¡Ñº¼ÙéãËéºÃÔ¡ÒÃà¤Ã×Í¢èÒÂà«ÅÅÙÅèÒ Ãì ¡è͹¡ÒÃãªé§Ò¹¤Ø³ÊÁºÑµÔ 3G ãËéµÃǨÊͺ¡Ñº¼ÙéãËéºÃÔ¡Òâͧ¤Ø³ÇèÒÁÕ¤èÒºÃÔ¡ÒÃà¾ÔèÁàµÔÁã´æ ÍÕ¡ËÃ×ÍäÁè â´Â੾ÒÐÍÂèÒ§ÂÔ觤èÒºÃÔ¡ÒÃ㹡ÒÃãªé§Ò¹¢éÒÁࢵ (Roaming) 48 ¡ÒÃàª×èÍÁµèÍà¤Ã×Í¢èÒ LAN (Local Area Network) ¤×Í¡ÅØèÁ¢Í§¤ÍÁ¾ÔÇàµÍÃì (àªè¹ ·ÕèÍÂÙèÀÒÂã¹ÍÒ¤ÒÃÊӹѡ§Ò¹ËÃ×Í·ÕèºéÒ¹) ·Õèãªé§Ò¹ÊÒÂáÅзÃѾÂÒ¡Ã㹡ÒÃÊ×èÍÊÒ÷ÑèÇä»ÃèÇÁ¡Ñ¹ àÁ×èͤسä´éµÑé§à¤Ã×Í¢èÒ¢Öé¹ ¤Ø³ÊÒÁÒö¨Ðáºè§»Ñ¹ä¿Åì ÍØ»¡Ã³ìµè;èǧ (àªè¹ à¤Ã×èͧ¾ÔÁ¾ì) áÅСÒÃàª×èÍÁµèÍÍÔ¹àµÍÃìà¹çµÃèÇÁ¡Ñ¹ä´é ¤Ø³ÊÒÁÒöµÑ駤èÒ LAN ä´éâ´Âãªéà·¤â¹âÅÂÕẺãªéÊÒ (àªè¹ ÍÕà¸ÍÃìà¹çµ) ËÃ×Íà·¤â¹âÅÂÕẺäÃéÊÒ (àªè¹ WiFi ËÃ×Í Bluetooth) à¤Ã×Í¢èÒÂäÃéÊÒ LAN äÃéÊÒÂËÃ×Í WLAN ¤×Íà¤Ã×Í¢èÒÂÀÒÂã¹¾×é¹·ÕèẺäÃéÊÒ «Ö觨ÐÊÒÁÒöàª×èÍÁ⧤ÍÁ¾ÔÇàµÍÃìÊͧà¤Ã×èͧËÃ×ÍÁÒ¡¡ÇèÒ¹Ñé¹à¢éÒ´éÇ¡ѹä´éâ´ÂäÁèµéͧãªéÊÒÂã´æ ¡ÒõÑ駤èÒà¤Ã×Í¢èÒÂäÃéÊÒ¹Ñ鹧èÒ´ÒÂáÅШЪèÇÂãËé¤Ø³áºè§»Ñ¹ä¿Åì ÍØ»¡Ã³ìµè;èǧ áÅСÒÃàª×èÍÁµèÍÍÔ¹àµÍÃìà¹çµÃèÇÁ¡Ñ¹ä´é ÍÐää×Í»ÃÐ⪹ì·Õèä´é¨Ò¡à¤Ã×Í¢èÒÂäÃéÊÒÂ? à¤Å×è͹·Õèä´é Ãкº LAN äÃéÊÒ¹Ñ鹪èÇÂãËé¤Ø³áÅмÙéãªé¤¹Í×è¹æ ã¹à¤Ã×Í¢èÒÂÀÒÂ㹺éÒ¹¢Í§¤Ø³¹Ñé¹à¢éÒãªé§Ò¹ä¿ÅìáÅÐÍØ»¡Ã³ìµèÒ§æ ÃèÇÁ¡Ñ¹ä´é¼èÒ¹·Ò§à¤Ã×Í¢èÒ àªè¹à¤Ã×èͧ¾ÔÁ¾ìËÃ×Íà¤Ã×èͧÊ᡹ ÍÕ¡·Ñ駤سÂѧÊÒÁÒöãªé§Ò¹¡ÒÃàª×èÍÁµèÍÍÔ¹àµÍÃìà¹çµÃèÇÁ¡Ñ¹¡Ñº¤ÍÁ¾ÔÇàµÍÃìà¤Ã×èͧÍ×è¹æ 㹺éÒ¹¢Í§¤Ø³ä´é´éÇ ÍÔ¹àµÍÃìà¹çµ - 49 ¡ÒõԴµÑ駷ÕèÃÇ´àÃçÇáÅЧèÒ´Ò ¡ÒõԴµÑé§Ãкº LAN äÃéÊÒ¹Ñé¹ÊÒÁÒö·Óä´éÍÂèÒ§ÃÇ´àÃçÇáÅЧèÒ´Ò áÅÐÂѧ¢¨Ñ´¤ÇÒÁÂØè§ÂÒ¡·Õèµéͧà´Ô¹ÊÒµèÒ§æ ¼èÒ¹¡ÓᾧáÅÐྴҹÍÍ¡ä» Êèǹ»ÃСͺ¢Í§ LAN äÃéÊÒ à¾×è͵Ñ駤èÒà¤Ã×Í¢èÒÂäÃéÊÒ·ÕèºéÒ¹¢Í§¤Ø³ ¤Ø³¨Óà»ç¹µéͧÁÕÊÔè§àËÅèÒ¹Õé: ¨Ø´àª×èÍÁµèÍ (àÃÒ·ìàµÍÃì) ¨Ø´àª×èÍÁµèÍ (àÃÒ·ìàµÍÃì) ¤×ÍÍØ»¡Ã³ì㹡ÒÃÃѺÊè§ÊÑ−−Ò³Êͧ·ÔÈ·Ò§·Õè¨Ðá¼è¡ÃШÒ¢éÍÁÙÅä»ÂѧºÃÔàdzâ´ÂÃͺ ¨Ø´àª×èÍÁµè͹Ñé¹·Ó§Ò¹à»ç¹µÑÇ¡ÅÒ§ÃÐËÇèÒ§à¤Ã×Í¢èÒÂẺãªéÊÒÂáÅÐẺäÃéÊÒ àÃÒ·ìàµÍÃìÊèǹÁÒ¡¨ÐÁÕâÁà´çÁ DSL ã¹µÑÇ·Õè¨ÐªèÇÂãËé¤Ø³ÊÒÁÒöà¢éÒãªé§Ò¹¡ÒÃàª×èÍÁµèÍ DSL ¤ÇÒÁàÃçÇÊÙ§ä´é â´Â·ÑèÇä» ISP (¼ÙéãËéºÃÔ¡ÒÃÍÔ¹àµÍÃìà¹çµ) ·Õè¤Ø³ä´éàÅ×Í¡ãªéºÃÔ¡ÒùÑ鹨ÐÁÕâÁà´çÁ/ àÃÒ·ìàµÍÃìÁÒãËéàÁ×èÍÊÁѤÃãªéºÃÔ¡Òà ÍèÒ¹àÍ¡ÊÒ÷ÕèÁҡѺ¨Ø´àª×èÍÁµèÍ/ àÃÒ·ìàµÍÃì¢Í§¤Ø³ãËéÅÐàÍÕ´à¾×èÍ´ÙÃÒÂÅÐàÍÕ´¤Óá¹Ð¹Ó㹡ÒõԴµÑé§ ÊÒÂà¤àºÔéÅà¤Ã×Í¢èÒ (RJ45) ÊÒÂà¤àºÔéÅà¤Ã×Í¢èÒ (ËÃ×ÍàÃÕ¡ÇèÒÊÒÂà¤àºÔéÅ RJ45) ¹Ñé¹ãªéà¾×èÍàª×èÍÁµèÍâÎʵì¤ÍÁ¾ÔÇàµÍÃìà¢éҡѺ¨Ø´àª×èÍÁµèÍ (´ÙÀÒ¾»ÃСͺ´éÒ¹ÅèÒ§) ÊÒÂà¤àºÔéŪ¹Ô´¹Õé¹Ñé¹ÂѧÊÒÁÒöãªéà¾×èÍàª×èÍÁµè͡ѺÍØ»¡Ã³ìÀÒ¹͡à¢éҡѺ¨Ø´àª×èÍÁµèÍä´éÍÕ¡´éÇ 50 Íá´»àµÍÃìäÃéÊÒ â´Â·ÑèÇä»áÅéÇÍá´»àµÍÃìäÃéÊÒÂÀÒÂã¹¹Ñ鹨Ðä´éÃѺ¡ÒõԴµÑé§ÁÒ㹤ÍÁ¾ÔÇàµÍÃì¢Í§¤Ø³áÅéÇ »ØèÁËÃ×͵ÑǤǺ¤ØÁã¹ Windows ¨ÐªèÇÂãËé¤Ø³à»Ô´ËÃ×ͻԴ¡ÒÃãªé§Ò¹Íá´»àµÍÃì¹Õéä´é 1. 2. 3. 4. 5. 6. 7. á¼¹ÀÒ¾¢Í§à¤Ã×Í¢èÒÂ㹡Ò÷ӧҹ ¨Ø´àª×èÍÁµèÍ/àÃÒ·ìàµÍÃì ¤ÍÁ¾ÔÇàµÍÃìà´Ê¡ì·çÍ» 5 âÁà´çÁ à¤Ã×èͧ¾ÔÁ¾ì ¤ÍÁ¾ÔÇàµÍÃìẺ¾¡¾Ò PDA/ÊÁÒÃì·â¿¹ ÊÒÂà¤àºÔéÅà¤Ã×Í¢èÒ (RJ45) 4 1 3 7 2 6 ¡ÒÃà»Ô´/»Ô´¡ÒÃàª×èÍÁµèÍà¤Ã×Í¢èÒ WiFi ¤Ø³ÊÁºÑµÔ¢Í§¤ÍÁ¾ÔÇàµÍÃìÊèǹãË−èÁÕ»ØèÁ ‘WiFi’ ÊÓËÃѺà»Ô´ËÃ×ͻԴ¡ÒÃàª×èÍÁµèÍà¤Ã×Í¢èÒ ËÒ¡¤ÍÁ¾ÔÇàµÍÃì¢Í§¤Ø³ÁÕÃкºäÃéÊÒ áµèäÁèÁÕ»ØèÁ ¡ÒÃÊ×èÍÊÒäس¡çÊÒÁÒöà»Ô´ËÃ×ͻԴà¤Ã×Í¢èÒÂäÃéÊÒ¢ͧ¤Ø³ ÍÔ¹àµÍÃìà¹çµ - 51 ËÃ×ͤǺ¤ØÁÊÔ觷Õèãªé§Ò¹ÃèÇÁ¡Ñ¹º¹à¤Ã×Í¢èÒÂä´é´éǵÑÇàÅ×Í¡¡ÒèѴ¡ÒÃà¤Ã×Í¢èÒ ¡´»ØèÁ Windows ( ) + W, ¾ÔÁ¾ì "HomeGroup" áÅéǤÅÔ¡·Õè HomeGroup ¤Óàµ×͹: ËéÒÁãªéÍØ»¡Ã³ìäÃéÊÒÂã¹¢³Ð·Õè¡ÓÅѧà´Ô¹·Ò§ÍÂÙ躹à¤Ã×èͧºÔ¹ »Ô´ÊÇÔµ«ìÍØ»¡Ã³ì·Ñé§ËÁ´¡è͹·Õè¨Ð¢Öé¹à¤Ã×èͧºÔ¹ ÍØ»¡Ã³ìàËÅèÒ¹ÕéÍÒ¨à»ç¹ÍѹµÃÒµèÍ¡Ò÷ӧҹ¢Í§à¤Ã×èͧºÔ¹ ú¡Ç¹¡ÒÃÊ×èÍÊÒà áÅÐÍÒ¨¼Ô´¡®ËÁÒ ·èͧÍÔ¹àµÍÃìà¹çµ! à¾×èÍ·èͧÍÔ¹àµÍÃìà¹çµ ¤Ø³¨Óà»ç¹µéͧÁÕâ»Ãá¡ÃÁ·ÕèàÃÕ¡ÇèÒºÃÒÇà«ÍÃìÍÔ¹àµÍÃìà¹çµ Internet Explorer Áͺ¡ÒÃãªé§Ò¹¡ÒÃàÃÕ¡´ÙàÇ纷Õè§èÒ´ÒÂáÅлÅÍ´ÀÑ ·Ñ¹·Õ·Õè¤Ø³ä´éµÔ´µÑ駡ÒÃà¢éÒãªé§Ò¹ÍÔ¹àµÍÃìà¹çµ¢Í§¤Ø³áÅФسä´éàª×èÍÁµè͡Ѻ ÍÔ¹àµÍÃìà¹çµ ãËé¤ÅÔ¡·Õèªç͵¤Ñ· Internet Explorer ·ÕèÍÂÙ躹à´Ê¡ì·çÍ»¢Í§ Windows áÅéÇãËé»ÃÐʺ¡Òóì¡ÒÃãªé§Ò¹ÍÔ¹àµÍÃìà¹çµ¢Í§¤Ø³¡éÒÇÊÙèÍÕ¡ÃдѺ! Gateway àÇçºä«µì ·ÓäÁ¤Ø³äÁèà¢éÒªÁàÇçºä«µì¢Í§àÃÒà¾×èÍàÃÔèÁ¡ÒÃãªé§Ò¹·Õè www.gateway.com Gateway ¹Ñé¹ä´éÊÃéÒ§¢Öé¹ÁÒà¾×èÍÁͺ¡ÒÃʹѹʹعãËé¡Ñº¤Ø³áººÊèǹµÑÇ ´Ù·ÕèÊèǹ Support (¡ÒÃʹѺʹع) ¢Í§àÃÒà¾×èÍ¢ÍÃѺ¤ÇÒÁªèÇÂàËÅ×Íã¹áºº·Õè¤Ø³µéͧ¡Òà www.gateway.com ¤×Í»ÃеÙÊÙè¡Ô¨¡ÃÃÁáÅкÃÔ¡Òú¹âÅ¡Í͹äŹì¢Í§¤Ø³: à¢éÒªÁàÇçºä«µì¢Í§àÃÒÍÂÙèàÊÁÍà¾×èÍ¢éÍÁÙÅ¢èÒÇÊÒÃáÅдÒǹìâËÅ´ÅèÒÊØ´! 52 ¤ÇÒÁ»ÅÍ´ÀÑ ¤Ø³ÍÒ¨¡Ãе×ÍÃ×ÍÃé¹·Õè¨ÐÊÓÃǨ·Ø¡ÍÂèÒ§·ÕèÊÒÁÒö¾ºä´éº¹ÍÔ¹àµÍÃìà¹çµ à¾×èÍãËé¤Ø³Í͹äŹìä´éÍÂèÒ§»ÅÍ´ÀÑ ¨Ö§ÁÕâ»Ãá¡ÃÁ·Õèä´éÃѺÃÒ§ÇÑÅÍÂèÒ§ Gateway Symantec Norton Internet Security™ µÔ´µÑé§äÇéÅèǧ˹éÒº¹¤ÍÁ¾ÔÇàµÍÃì¢Í§¤Ø³ Norton Internet Security ·Ó§Ò¹ÍÂÙèàº×éͧËÅѧä´éÍÂèÒ§à§ÕºàªÕºà¾×èÍ»éͧ¡Ñ¹¡Òäء¤ÒÁ·Õè«Ñº«é͹ 㹻Ѩ¨ØºÑ¹áÅл¡»éͧ¡ÒÃÃкصÑǵ¹¢Í§¤Ø³ã¹¢³Ð·Õè¤Ø³àÅ×Í¡«×éÍ ·ÓÃÒ¡Òø¹Ò¤Òà ËÃ×ÍàÃÕ¡´Ùà¹×éÍËÒ¢éÍÁÙÅÍ͹äŹì Norton Internet Security ºÅçͤ¡ÒÃâ¨Ã¡ÃÃÁ¡ÒÃÃкصÑǵ¹Í͹äŹìáÅÐźʻÒÂáÇÃì äÇÃÑÊáÅÐ˹͹ÍÔ¹àµÍÃìà¹çµ ÃÇÁ¶Ö§»¡»éͧ¤ÍÁ¾ÔÇàµÍÃì¢Í§¤Ø³¨Ò¡áΡà¡ÍÃì ¤Ó¨Ó¡Ñ´¤ÇÒÁ äÇÃÑʤ×ÍÍÐäà «Í¿·ìáÇÃì·Õèà»ç¹ÍѹµÃÒÂËÃ×Í·ÕèàÃÕ¡ÇèÒ ‘äÇÃÑÊ’ ¤×Íâ»Ãá¡ÃÁ·Õèä´éÃѺ¡ÒÃÍ͡Ẻ à¾×èÍá¾Ãè¡ÃШÒÂáÅзÓÅÒ¤ÍÁ¾ÔÇàµÍÃì äÇÃÑÊÊèǹãË−è¨Ð¶Ù¡Ê觼èÒ¹·Ò§ÍÔ¹àµÍÃìà¹çµ ÍÕàÁÅì ËÃ×ÍàÇçºä«µì·Õè»ÃÐʧ¤ìÃéÒ äÇÃÑÊ·ÑèÇ仨ÐÊÃéÒ§µÑÇàͧ¢Öé¹ÁÒ«éÓ áÅÐÊ觵ÑÇàͧ¼èÒ¹ä»Âѧ¤ÍÁ¾ÔÇàµÍÃìËÅÒÂà¤Ã×èͧâ´ÂäÁèÊÒÁÒöµÃǨ¨Ñºä´é µÑÇÍÂèÒ§äÇÃÑÊ·ÕèÊÃéÒ§¤ÇÒÁÃÓ¤Ò− àªè¹ Trojan horses ˹͹ ËÃ×ÍÊá»Á·ÕèÊÒÁÒöµÔ´à¢éÒÁÒÂѧ¤ÍÁ¾ÔÇàµÍÃì¢Í§¤Ø³ä´éËÅÒ¡ËÅÒ·ҧ áÅШСè͡ǹâ´Â¡ÒÃãªé·ÃѾÂÒ¡Ãà¾ÔèÁ¢Öé¹ËÃ×͢Ѵ¢ÇÒ§¡ÒÃãªéà¤Ã×Í¢èÒ ËÁÒÂà˵Ø: Gateway ãËé¡ÒÃÃѺ»ÃСѹÇèÒ¤ÍÁ¾ÔÇàµÍÃì¢Í§¤Ø³¨Ð»ÅÍ´ÀѨҡäÇÃÑÊ ³ àÇÅÒ·Õè«×éÍ 100% áµèäÁè¤Ãͺ¤ÅØÁ¶Ö§¤ÇÒÁàÊÕÂËÒ·Õèà¡Ô´¨Ò¡äÇÃÑÊ ÍÔ¹àµÍÃìà¹çµ - 53 Ê»ÒÂáÇÃì ¤×ÍÍÐäÃ? â´Â·ÑèÇä»áÅéÇÊ»ÒÂáÇÃìËÁÒ¶֧â»Ãá¡ÃÁäÁè¾Ö§»ÃÐʧ¤ì·Õè¶Ù¡´ÒǹìâËŴŧº¹¤ÍÁ¾ÔÇàµÍÃì¢Í§¤Ø³ ¢³Ðàª×èÍÁµèÍä»ÂѧÍÔ¹àµÍÃìà¹çµ áÅкèͤÃÑé§à¡Ô´¢Öé¹â´Â·Õè¤Ø³äÁèÃÙéµÑÇ àÁ×èÍä´é½Ñ§µÑÇà¢éÒ㹤ÍÁ¾ÔÇàµÍÃì¢Í§¤Ø³áÅéÇ Ê»ÒÂáÇÃì¨ÐÊÍ´á¹Á¡Ô¨¡ÃÃÁ¡ÒÃàÃÕ¡´ÙÊÔ觵èÒ§æ ¢Í§¤Ø³ à¡çºÃǺÃÇÁ¢éÍÁÙÅÊèǹµÑÇ áÊ´§»éÒÂâ¦É³ÒËÃ×ÍáÁé¡ÃзÑè§à»ÅÕè¹á»Å§¡ÒõÑ駤èҢͧ¤ÍÁ¾ÔÇàµÍÃì¢Í§¤Ø³ Ê»ÒÂáÇÃì¨Ðãªé·ÃѾÂҡú¹¤ÍÁ¾ÔÇàµÍÃì¢Í§¤Ø³ áÅÐÊÒÁÒö·ÓãËé¡ÒÃàª×èÍÁµèÍÍÔ¹àµÍÃìà¹çµËÃ×ÍÃкº¤ÍÁ¾ÔÇàµÍÃì·Ñé§ËÁ´¢Í§¤Ø³ªéÒŧ ËÃ×ÍáÁé¡ÃзÑ觷ÓãËéÃкº¢Ñ´¢éͧ Ê»ÒÂáÇÃì㹺ҧ¤ÃÑ駨ж١ãªéâ´ÂºÃÔÉÑ··ÕèäÁèÁÕ¨ÃÔ¸ÃÃÁ 㹡ÒõÃǨÊͺáÅеԴµÒÁàÇçºä«µì·Õè¤Ø³áÇЪÁº¹ÍÔ¹àµÍÃìà¹çµà¾×è͵ÃǨÊͺ¾ÄµÔ¡ÃÃÁ㹡Ò÷èÍ §àÇ红ͧ¤Ø³ áÅÐáÊ´§»éÒÂâ¦É³Ò·Õè¶Ù¡¡Ó˹´äÇ麹˹éҨͧ͢¤Ø³ ÍÂèÒ§äáçµÒÁ Ê»ÒÂáÇÃìºÒ§»ÃÐàÀ·à»ç¹ÁÒ¡¡ÇèÒ¡ÒõԴµÒÁÍÂèÒ§§èÒÂæ â´Â¨ÐµÃǨÊͺ¨Ñ§ËÇСÒþÔÁ¾ìáÅШѺÃËÑʼèÒ¹ ÃÇÁ¶Ö§¡ÒÃãªé§Ò¹·ÕèàÊÕ觵èͤÇÒÁ»ÅÍ´ÀÑÂÍÂèÒ§ÃéÒÂáç ÁÑÅáÇÃì¤×ÍÍÐäÃ? «Í¿·ìáÇÃì·Õèà»ç¹ÍѹµÃÒ¹Ñé¹ÃÙé¨Ñ¡ã¹ÍÕ¡ª×èÍ˹Öè§ÇèÒ ÁÑÅáÇÃì «Ö觡ç¤×Í«Í¿·ìáÇÃì·Õèä´éÃѺ¡ÒÃÍ͡Ẻâ´ÂÁÕਵ¹Òà¾×èÍ·ÓÃéÒ¤ÍÁ¾ÔÇàµÍÃì¢Í§¤Ø³ µÑÇÍÂèÒ§àªè¹ äÇÃÑÊ àÇÔÃìÁ áÅÐ Trojan horses Åéǹáµèà»ç¹«Í¿·ìáÇÃì·Õèà»ç¹ÍѹµÃÒ à¾×èͪèÇ»¡»éͧ¤ÍÁ¾ÔÇàµÍÃì¢Í§¤Ø³¨Ò¡ÁÑÅáÇÃì µÃǨ´ÙãËéá¹èã¨ÇèÒ¤ÍÁ¾ÔÇàµÍÃì¢Í§¤Ø³ãªé«Í¿·ìáÇÃì»éͧ¡Ñ¹äÇÃÑÊáÅлéͧ¡Ñ¹ÁÑÅáÇÃì·ÕèÍѾവ 54 ä¿ÃìÇÍÅÅì ÊèǹºØ¤¤Å¤×ÍÍÐäà â»Ãá¡ÃÁä¿ÃìÇÍÅÅìÊèǹºØ¤¤Å ¤×Íâ»Ãá¡ÃÁ«Í¿·ìáÇÃì·Õèä´éÃѺ¡ÒÃÍ͡ẺÁÒà¾×èÍ»éͧ¡Ñ¹¡ÒÃà¢éÒ¶Ö§·ÕèäÁèä´éÃѺ͹Ø−Òµä»ÂѧËÃ×Í¨Ò ¡à¤Ã×Í¢èÒÂÊèǹµÑÇ â´Â·Ó˹éÒ·ÕèàÊÁ×͹à¡ÃÒлéͧ¡Ñ¹·Õè¤Í»éͧ¡Ñ¹¡ÒÃàª×èÍÁµèÍÍÔ¹àµÍÃìà¹çµ¢Í§ ¤Ø³¨Ò¡¡ÒÃàª×èÍÁµèÍ·ÕèäÁè¾Ö§»ÃÐʧ¤ì ·ÕèÍÒ¨¾ÂÒÂÒÁà¢éҤǺ¤ØÁ¤ÍÁ¾ÔÇàµÍÃì¢Í§¤Ø³à¾×è͵ԴµÑé§ ËÃ×Íá¾Ãè¡ÃШÒÂâ»Ãá¡ÃÁäÇÃÑÊËÃ×ÍÁÑÅáÇÃì ¡ÒÃàª×èÍÁµèÍà¢éҡѺ¤ÍÁ¾ÔÇàµÍÃì¢Í§ ¤Ø³·Ñé§ËÁ´¨Ð¶Ù¡µÃǨÊͺ â»Ãá¡ÃÁ·Õè¾ÂÒÂÒÁÃѺ¢éÍÁÙÅâ´ÂäÁèä´éÃѺ͹Ø−Òµ¨Ò¡¤Ø³¨Ð¶Ù¡µÃǨ¨ÑºáÅÐä¿ÃìÇÍÅÅì¨ÐáÊ´§¡ÒÃá ¨é§àµ×͹ ¨Ò¡¹Ñ鹤سÊÒÁÒöµÑ´ÊÔ¹ã¨ä´éÇèÒ¨Ð͹Ø−Òµ¡ÒÃàª×èÍÁµèÍËÃ×ÍäÁè ËÒ¡¡ÒÃàª×èÍÁµè͹Ñ鹤×Íâ»Ãá¡ÃÁ·Õè¤Ø³¡ÓÅѧãªé§Ò¹ÍÂÙè¤Ø³ÍҨ͹Ø−ÒµãËéàª×èÍÁµèÍä´é (àªè¹ ¡ÒÃàª×èÍÁµèÍä»Âѧà«ÔÃì¿àÇÍÃìà¡Á·ÕèÁÕ¼ÙéàÅè¹ËÅÒ¤¹ ËÃ×Íàª×èÍÁµèÍä»ÂѧÊÒÃҹءÃÁà¾×èÍÍѾവà¹×éÍËÒ¢éÍÁÙÅ) ÇÔ¸Õ»¡»éͧ¤ÍÁ¾ÔÇàµÍÃì¢Í§¤Ø³ ¡Òûéͧ¡Ñ¹¡ÒáèÍÍÒª−Ò¡ÃÃÁã¹âÅ¡ä«àºÍÃìÊÒÁÒö·Óä´éÍÂèÒ§µèÍà¹×èͧ áÅÐÊÒÁÒöËÅÕ¡àÅÕ觡ÒÃâ¨ÁµÕÊèǹÁÒ¡ä´éàÁ×è͵ԴÍÒÇظ´éǤÓá¹Ð¹Ó¨Ò¡ªèҧ෤¹Ô¤áÅСÒÃãªéÊÒ ÁÑ−ÊÓ¹Ö¡ â´Â·ÑèÇä»áÅéÇ ÍÒª−Ò¡ÃÍ͹äŹì¨Ð¾ÂÒÂÒÁËÒà§Ô¹ÍÂèÒ§ÃÇ´àÃçÇáÅЧèÒ´ÒÂÁÒ¡·ÕèÊØ´ ÂÔ觤س·ÓãËé§Ò¹¢Í§¾Ç¡à¢ÒÂÒ¡ÁÒ¡¢Öé¹à·èÒã´ ¾Ç¡à¢Ò¨ÐÁÕá¹Çâ¹éÁ·Õè¨ÐÅзÔ駤سáÅÐà»ÅÕè¹ä»ËÒà»éÒËÁÒ·Õè§èÒ´Ò¡ÇèÒ à¤Åç´ÅѺ´éÒ¹ÅèÒ§Áͺ¢éÍÁÙž×é¹°Ò¹ÊÓËÃѺÇÔ¸Õ·Õè¤Ø³ÊÒÁÒö»éͧ¡Ñ¹¡ÒééÍ⡧Í͹äŹìä´é ÍÔ¹àµÍÃìà¹çµ - 55 ÃÑ¡ÉÒ¤ÍÁ¾ÔÇàµÍÃì¢Í§¤Ø³ãËé·Ñ¹ÊÁÑÂà»ç¹»Ñ¨¨ØºÑ¹´éÇÂá¾·ªìáÅÐÍѾവÅèÒÊØ´ ˹Öè§ã¹ÇÔ¸Õ·Õè´Õ·ÕèÊش㹡ÒÃÍÂÙèãËéËèÒ§¨Ò¡¼ÙéäÁè»ÃÐʧ¤ì´Õ¤×Í¡ÒÃãªéá¾·ªìáÅЫͿ·ìáÇÃìá¡é䢵èÒ§æ àÁ×èÍÁÕãËéàÅ×Í¡ãªé ´éÇ¡ÒÃÍѾവ¤ÍÁ¾ÔÇàµÍÃì¢Í§¤Ø³à»ç¹»ÃÐ¨Ó ¤Ø³¨ÐÊÒÁÒöºÅçͤ¼ÙéäÁè»ÃÐʧ¤ì´Õ¨Ò¡¡ÒÃãªé»ÃÐ⪹ì¨Ò¡ªèͧâËÇè㹫Ϳ·ìáÇÃì «Öè§à»ç¹ÊÔ觷Õè¾Ç¡à¢ÒÊÒÁÒö¨Ðãªéà¾×èͺءÃØ¡à¢éÒÁÒã¹Ãкº¢Í§¤Ø³ä´é ã¹¢³Ð·Õè¡Ò÷ÓãËé¤ÍÁ¾ÔÇàµÍÃì¢Í§¤Ø³ÍѾവäÁèÊÒÁÒö»¡»éͧ¤Ø³¨Ò¡¡ÒÃâ¨ÁµÕ·Ø¡»ÃÐàÀ·ä´é á¾·ªìáÅЫͿáÇÃìÊÓËÃѺá¡é䢨зÓãËéáΡà¡ÍÃìà¢éÒ¶Ö§Ãкº¢Í§¤Ø³ä´éÂÒ¡ÂÔ觢Öé¹ ¨Ö§à»ç¹¡ÒúÅçͤ¡ÒÃâ¨ÁµÕ¾×é¹°Ò¹áÅСÒÃâ¨ÁµÕâ´ÂÍѵâ¹ÁѵÔÊèǹÁÒ¡ä´éÍÂèÒ§ÊÁºÙóì áÅÐÍÒ¨¾Íà¾Õ§µèÍ¡Ò÷ÓãËé¼ÙéäÁè»ÃÐʧ¤ì´ÕÅèҶͨҡä»ÍÂèÒ§¼Ùéá¾éáÅÐËѹä»ÁͧËÒ¤ÍÁ¾ÔÇàµÍÃì·Õè Íè͹áÍ¡ÇèÒã¹·ÕèÍ×è¹á·¹ Microsoft Windows àÇÍÃìªÑè¹ÅèÒÊØ´áÅЫͿ·ìáÇÃì·Õèà»ç¹·Õè¹ÔÂÁÍ×è¹æ 㹻Ѩ¨ØºÑ¹ÊÒÁÒö»ÃѺµÑ駤èÒà¾×èÍ´ÒǹìâËÅ´áÅÐãªéÍѾവä´éâ´ÂÍѵâ¹ÁÑµÔ à¾×èÍãËé¤Ø³äÁèµéͧ¨´¨Óà¾×èͤ͵ÃǨÊͺ«Í¿·ìáÇÃìÅèÒÊØ´ ¡ÒÃãªé»ÃÐ⪹ì¨Ò¡¤Ø³ÊÁºÑµÔ “ÍѾവÍѵâ¹ÁѵԔ 㹫Ϳ·ìáÇÃì¢Í§¤Ø³¤×Í¡ÒÃàÃÔèÁµé¹·Õè´ÕàÂÕèÂÁ㹡Ò÷ÓãËéµÑǤس»ÅÍ´ÀÑÂàÁ×èÍÍ͹äÅ¹ì »¡»éͧ¤ÍÁ¾ÔÇàµÍÃì¢Í§¤Ø³´éÇ«Ϳ·ìáÇÃìÃÑ¡ÉÒ¤ÇÒÁ»ÅÍ´ÀÑ «Í¿·ìáÇÃìÃÑ¡ÉÒ¤ÇÒÁ»ÅÍ´ÀÑ·ÕèÁÕÍÂÙèËÅÒ»ÃÐàÀ·¹Ñé¹à¾Õ§¾ÍÊÓËÃѺ¤ÇÒÁ»ÅÍ´ÀÑÂ㹡ÒÃÍ͹äÅ ¹ì¢Ñé¹¾×é¹°Ò¹ «Í¿·ìáÇÃìÃÑ¡ÉÒ¤ÇÒÁ»ÅÍ´ÀѹÑé¹ÁÕä¿ÃìÇÍÅÅìáÅÐâ»Ãá¡ÃÁ»éͧ¡Ñ¹äÇÃÑÊ ä¿ÃìÇÍÅÅì¤×Í´èÒ¹áá¢Í§¤ÍÁ¾ÔÇàµÍÃì¢Í§¤Ø³ã¹¡Òûéͧ¡Ñ¹ ´éÇ¡ÒäǺ¤ØÁÇèÒã¤ÃáÅÐÍÐä÷ÕèÊÒÁÒöÊ×èÍÊÒáѺ¤ÍÁ¾ÔÇàµÍÃì¢Í§¤Ø³ä´éàÁ×èͤÍÁ¾ÔÇàµÍÃì¢Í§¤Ø³ Í͹äÅ¹ì ¤Ø³ÍÒ¨Åͧ¹Ö¡¶Ö§ä¿ÃìÇÍÅÅì㹰ҹР“µÓÃǨ” 56 ·Õè¤Í¨ѺµÒ´Ù¢éÍÁÙÅ·Ñé§ËÁ´·Õè¾ÂÒÂÒÁ¨ÐäËÅà¢éÒáÅÐÍÍ¡¨Ò¡¤ÍÁ¾ÔÇàµÍÃì¢Í§¤Ø³ä»º¹ÍÔ¹àµÍÃìà¹çµ ͹Ø−Òµ¡ÒÃÊ×èÍÊÒ÷ÕèÃÙé¨Ñ¡ÇèÒÁÕ¤ÇÒÁ»ÅÍ´ÀÑÂáÅзӡÒúÅçͤ¡ÒÃÊ×èÍÊÒ÷Õè “äÁè´Õ” àªè¹ ¡ÒÃâ¨ÁµÕ¨Ò¡ã¤Ã¡çµÒÁ·Õè¾ÂÒÂÒÁà¢éÒ¶Ö§¤ÍÁ¾ÔÇàµÍÃì¢Í§¤Ø³ ¡Òûéͧ¡Ñ¹ã¹´èÒ¹¶Ñ´ÁÒ¤×Í«Í¿·ìáÇÃì»éͧ¡Ñ¹äÇÃÑʢͧ¤Ø³ ·Õè¤ÍµԴµÒÁ¡Ô¨¡ÃÃÁÍ͹äŹì·Ñé§ËÁ´ àªè¹ ¡ÒÃÃѺÊ觢éͤÇÒÁ·Ò§ÍÕàÁÅìáÅСÒÃàÃÕ¡´Ùà¹×éÍËÒ¢éÍÁÙÅàÇçº áÅФÍ»¡»éͧ¤ÍÁ¾ÔÇàµÍÃìáµèÅÐà¤Ã×èͧ¨Ò¡äÇÃÑÊ àÇÔÃìÁ Trojan horse áÅÐâ»Ãá¡ÃÁÁÑÅáÇÃìÍ×è¹æ «Í¿·ìáÇÃì»éͧ¡Ñ¹äÇÃÑÊáÅлéͧ¡Ñ¹Ê»ÒÂáÇÃì¢Í§¤Ø³¤ÇÃä´éÃѺ¡ÒûÃѺµÑ駤èÒà¾×èÍãËéÍѾവ´éǵÑÇàÍ § áÅФÇ÷ӡÒÃÍѾവ·Ø¡¤ÃÑ駷Õè¤Ø³àª×èÍÁµèÍÍÔ¹àµÍÃìà¹çµ ªØ´«Í¿·ìáÇÃìÃÑ¡ÉÒ¤ÇÒÁ»ÅÍ´ÀÑ·ÕèµÔ´µÑé§ÁÒã¹µÑÇ àªè¹ Norton Internet Security «Ö觻ÃСͺ´éÇÂä¿ÃìÇÍÅÅì ¡Òûéͧ¡Ñ¹äÇÃÑÊ ¡Òûéͧ¡Ñ¹Ê»ÒÂáÇÃì áÅФسÊÁºÑµÔÍ×è¹æ àªè¹ ¡Òûéͧ¡Ñ¹Êá»ÁáÅÐ ¡ÒäǺ¤ØÁ¢Í§¼Ù黡¤Ãͧ¹Ñé¹ä´é¡ÅÒÂà»ç¹·Õè¹ÔÂÁ㹡ÒÃãªé§Ò¹à¹×èͧ¨Ò¡ÁÕ«Í¿·ìáÇÃìÃÑ¡ÉÒ¤ÇÒÁ»ÅÍ ´ÀÑ·Õè¨Óà»ç¹ÊÓËÃѺ¡Òû¡»éͧÍ͹äŹì·Ñé§ËÁ´ÍÂÙèã¹á¾ç¡à¡¨à´ÕÂÇ ¼Ù餹ÁÒ¡ÁÒ¾ºÇèÒ¡ÒÃãªéªØ´ÃÑ¡ÉÒ¤ÇÒÁ»ÅÍ´ÀѹÑé¹à»ç¹·Ò§àÅ×Í¡·Õè¹èÒʹ㨠à¹×èͧ¨Ò¡¡ÒõԴµÑé§ ¡ÒáÓ˹´¤èÒáÅСÒÃÍѾവÁÕãËéàÅ×Í¡ËÅÒ¡ËÅÒµÒÁ»ÃÐàÀ·¢Í§ «Í¿·ìáÇÃì¤ÇÒÁ»ÅÍ´ÀÑ àÇÍÃìªÑè¹·ÕèÊÁºÙóì¢Í§ Norton Internet Security™ ¹Ñé¹ÁÕµÔ´µÑé§äÇéáÅéÇ㹤ÍÁ¾ÔÇàµÍÃì Gateway ¢Í§¤Ø³ áÅÐÁÕ¡ÒÃÊÁѤÃà¾×èÍ·´Åͧãªé¿ÃÕÊÓËÃѺÍѾവ¡Òûéͧ¡Ñ¹µèÒ§æ ¤Ø³µéͧá¹èã¨ÇèÒä´éàÃÔèÁãªé§Ò¹áÅéÇ! àÅ×Í¡ÃËÑʼèÒ¹·ÕèÁÕ¤ÇÒÁá¢ç§áçáÅÐà¡çºÃÑ¡ÉÒÍÂèÒ§»ÅÍ´ÀÑ ÃËÑʼèÒ¹¤×ͤÇÒÁ¨ÃÔ§¢Í§ªÕÇÔµº¹ÍÔ¹àµÍÃìà¹çµã¹»Ñ¨¨ØºÑ¹ ·ÕèàÃÒãªéÊÓËÃѺ·Ø¡ÍÂèÒ§µÑé§áµè¡ÒÃÊÑ觴͡äÁéáÅи¹Ò¤ÒÃÍ͹äŹì ÍÔ¹àµÍÃìà¹çµ - 57 仨¹¶Ö§¡ÒÃŧª×èÍà¢éÒãªéàÇçºä«µìÊÒ¡ÒúԹ·Õèª×蹪ͺà¾×èʹ٨ӹǹäÁÅì·ÕèÊÐÊÁ à¤Åç´ÅѺ´éÒ¹ÅèÒ§ÊÒÁÒöªèÇÂãËé¤Ø³ä´éÃѺ»ÃÐʺ¡ÒóìÍ͹äŹì·Õè»ÅÍ´ÀÑÂ: • ¢Ñé¹áá¤×Í¡ÒÃàÅ×Í¡ÃËÑʼèÒ¹·ÕèäÁèÊÒÁÒö¤Ò´à´Òä´é§èÒ áÅеèÍÁÒ¤×Í¡ÒÃà¡çºÃÑ¡ÉÒÃËÑʼèÒ¹ãËé»ÅÍ´ÀÑÂáÅÐËèÒ§ä¡Å¨Ò¡¼ÙéäÁè»ÃÐʧ¤ì´Õ ÃËÑʼèÒ¹·Õèá¢ç§áç»ÃСͺ´éÇÂÃËÑʼèÒ¹·ÕèÁÕÍÑ¡¢ÃеÑé§áµèá»´µÑÇËÃ×ÍÁÒ¡¡ÇèÒ áÅеéͧ»ÃСͺ´éǵÑÇÍÑ¡Éà µÑÇàÅ¢ áÅÐÊÑ−Åѡɳì (àªè¹ # $ % ! ?). ËÅÕ¡àÅÕ觡ÒÃãªéÊÔè§àËÅèÒ¹Õéà»ç¹ÃËÑʼèÒ¹¢Í§¤Ø³: ª×èÍÅçÍ¡ÍÔ¹¢Í§¤Ø³ ·Ø¡ÍÂèÒ§·ÕèÁÕ¾×é¹°Ò¹ÁÒ¨Ò¡¢éÍÁÙÅÊèǹµÑǢͧ¤Ø³ àªè¹ ¹ÒÁÊ¡ØÅ áÅФӷÕèÊÒÁÒö¾ºä´é¨Ò¡¾¨¹Ò¹Ø¡ÃÁ â´Â੾ÒÐ "ÃËÑʼèÒ¹" ¾ÂÒÂÒÁàÅ×Í¡ÃËÑʼèÒ¹·ÕèÁÕ¤ÇÒÁá¢ç§áçà»ç¹¾ÔàÈÉáÅÐÁÕàÍ¡ÅѡɳìÊÓËÃѺ¡Òû¡»éͧ¡Ô¨¡ÃÃÁ·Õè ÊÓ¤Ñ− àªè¹ ¸¹Ò¤ÒÃÍ͹äÅ¹ì • à¡çºÃËÑʼèÒ¹¢Í§¤Ø³ã¹·Õèæ »ÅÍ´ÀÑÂáÅÐËéÒÁãªéÃËÑʼèÒ¹à´ÔÁÊÓËÃѺºÃÔ¡Ò÷Ñé§ËÁ´·Õè¤Ø³ãªéÍ͹äÅ¹ì • à»ÅÕè¹ÃËÑʼèÒ¹ÍÂÙèàÊÁÍ ÍÂèÒ§¹éÍ·ءæ 90 Çѹ ¡ÒáÃзӴѧ¢éÒ§µé¹ÊÒÁÒö¨Ó¡Ñ´¤ÇÒÁàÊÕÂËÒ·Õèà¡Ô´¨Ò¡ã¤ÃºÒ§¤¹·ÕèÊÒÁÒöà¢éÒ¶Ö§ºÑ−ªÕ¼Ùéãªé ¢Í§¤Ø³ä´é ËÒ¡¤Ø³ÊѧࡵÇèÒÁÕºÒ§ÊÔ觹èÒʧÊÑÂà¡ÕèÂǡѺºÑ−ªÕ¼ÙéãªéÍ͹äŹì¢Í§¤Ø³ ÊÔè§áá·Õè¤Ø³ÊÒÁÒö·Óä´é¤×Í¡ÒÃà»ÅÕè¹ÃËÑʼèÒ¹¢Í§¤Ø³ »¡»éͧ¢éÍÁÙÅÊèǹµÑǢͧ¤Ø³ ãªé¤ÇÒÁÃÐÁÑ´ÃÐÇѧàÁ×èÍ·Ó¡ÒÃáºè§»Ñ¹¢éÍÁÙÅÊèǹµÑÇ àªè¹ ª×èÍ ·ÕèÍÂÙè ËÁÒÂàÅ¢â·ÃÈѾ·ì áÅзÕèÍÂÙèÍÕàÁÅì¢Í§¤Ø³Í͹äŹì à¾×èÍÃѺ»ÃÐ⪹ì¨Ò¡ºÃÔ¡ÒÃÍ͹äŹì·ÕèÁÕãËéÁÒ¡ÁÒ ¤Ø³¨Ö§ËÅÕ¡àÅÕè§äÁèä´é·Õè¨ÐµéͧÁͺ¢éÍÁÙÅÊèǹµÑÇà¾×èͨѴ¡ÒáѺ¤èÒãªé¨èÒÂáÅСÒèѴÊè§ÊÓËÃѺÊÔ¹¤éÒ·Õè 58 «×éÍ à¹×èͧ¨Ò¡¡ÒÃäÁèà»Ô´à¼Â¤ÇÒÁÅѺ¢Í§¢éÍÁÙÅÊèǹµÑǹÑé¹ÊÒÁÒö·Óä´éÂÒ¡ ÃÒ¡ÒôéÒ¹ÅèÒ§¤×ͤÓá¹Ð¹ÓÊÓËÃѺÇÔ¸Õ¡ÒÃáºè§»Ñ¹¢éÍÁÙÅÊèǹµÑǺ¹âÅ¡Í͹äŹìä´éÍÂèÒ§»ÅÍ´ÀÑÂ: • ÃÐÁÑ´ÃÐÇѧ¢éͤÇÒÁÍÕàÁÅì·ÕèËÅÍ¡ÅǧËÃ×ÍáͺÍéÒ§ ÊÔ觷ÕèÃкØÇèÒ¢éͤÇÒÁ¹Ñé¹ÍÒ¨à»ç¹¡ÒÃËÅÍ¡Åǧä´éá¡è ¡ÒÃÊС´¤Ó¼Ô´ ãªéäÇÂҡóìäÁè¶Ù¡µéͧ ãªéÇÅÕäÁè¶Ù¡µéͧ ·ÕèÍÂÙèàÇçºä«µìÁÕÊèǹ¢ÂÒ·Õèá»Å¡ÍÍ¡ä» ·ÕèÍÂÙèàÇçºä«µìà»ç¹µÑÇàÅ¢·Ñé§ËÁ´«Öè§â´Â»¡µÔáÅéǵéͧà»ç¹¤Ó áÅÐÊÔè§Í×è¹æ ·Õè¼Ô´»¡µÔ ¹Í¡¨Ò¡¹Õé ¢éͤÇÒÁ¨Ò¡àÇçºä«µìÅǧÁÑ¡¨ÐºÍ¡ãËé¤Ø³ÃÕºÃÑ¡ÉÒºÑ−ªÕ¼Ùéãªé¢Í§¤Ø³ ÍѾവ¤ÇÒÁ»ÅÍ´ÀÑ ËÃ×Í¡ÃеØé¹ãËé¤Ø³Áͺ¢éÍÁÙÅâ´Â´èǹËÒ¡ÁÔàªè¹¹Ñ鹨ÐÁÕÊÔ觷ÕèàÅÇÃéÒÂà¡Ô´¢Öé¹ ÍÂèÒµ¡à»ç¹àËÂ×èÍ • ËéÒÁµÍºÃѺ¢éͤÇÒÁÍÕàÁÅì·ÕèÃéͧ¢Í¢éÍÁÙÅÊèǹµÑÇ ºÃÔÉÑ··Õè¶Ù¡µéͧµÒÁ¡®ËÁÒ¨ÐäÁèãªé¢éͤÇÒÁÍÕàÁÅì㹡ÒÃÃéͧ¢Í¢éÍÁÙÅÊèǹµÑǢͧ¤Ø³ ËÒ¡ÁÕ¢éÍʧÊÑ ãËéµÔ´µèͺÃÔÉÑ·¹Ñé¹æ ·Ò§â·ÃÈѾ·ì ËÃ×Íâ´Â¡ÒþÔÁ¾ì·ÕèÍÂÙèàÇçºä«µì¢Í§ºÃÔÉÑ·ã¹àÇ纺ÃÒÇà«ÍÃì¢Í§¤Ø³ ËéÒÁ¤ÅÔ¡·ÕèÅÔ§¤ìã¹¢éͤÇÒÁàËÅèÒ¹Ñé¹ à¹×èͧ¨Ò¡ÅÔ§¤ì¨Ð¹Ó¤Ø³ä»ÂѧàÇçºä«µìËÅÍ¡Åǧ·Õè»ÃÐʧ¤ìÃéÒ • ÍÂÙèãËéËèÒ§¨Ò¡àÇçºä«µìÅèÍÅǧ·Õè¨éͧ¨Ð¢âÁ¢éÍÁÙÅÊèǹµÑÇ àÁ×èÍà¢éÒªÁàÇçºä«µì ãËé¾ÔÁ¾ì·ÕèÍÂÙèàÇçº (URL) â´ÂµÃ§ã¹àÇ纺ÃÒÇà«ÍÃìá·¹¡ÒäÅÔ¡·ÕèÅÔ§¤ìã¹ÍÕàÁÅìËÃ×Í¢éͤÇÒÁ´èǹ ¹Ñ¡µéÁµØë¹ÁÑ¡¨Ð»ÅÍÁá»Å§ÅÔ§¤ìàËÅèÒ¹Õéà¾×èÍ·ÓãËé´Ù¹èÒàª×èͶ×Í ¡ÒÃàÅ×Í¡«×éÍ ¡Ò÷ӸØáÃÃÁ·Ò§¸¹Ò¤Òà ËÃ×͡ѺàÇçºä«µìÍ×è¹æ ·Õè¨Óà»ç¹µéͧãªé¢éÍÁÙÅ·ÕèÁÕ¤ÇÒÁÍè͹äËǨеéͧÁÕµÑÇÍÑ¡Éà "S" µÒÁËÅѧ "http" (àªè¹ https://www.yourbank.com äÁèãªè http://www.yourbank.com) µÑÇÍÑ¡Éà "S" ËÁÒ¶֧¤ÇÒÁ»ÅÍ´ÀÑ (Secure) áÅФÇÃÁÕáÊ´§ÍÂÙèàÁ×èͤسÍÂÙèã¹¾×é¹·Õè·Õèµéͧ¡Òà ãËé¤Ø³Å§ª×èÍà¢éÒãªéËÃ×ÍÁͺ¢éÍÁÙÅ·ÕèÁÕ¤ÇÒÁÍè͹äËÇÍ×è¹æ ÊÑ−ÅѡɳìÍ×è¹æ ÍÔ¹àµÍÃìà¹çµ - 59 ·ÕèáÊ´§ÇèҤسÁÕ¡ÒÃàª×èÍÁµèÍ·Õè»ÅÍ´ÀѤ×Íäͤ͹¡Ø−ᨢ¹Ò´àÅç¡·Ò§´éÒ¹ÅèÒ§¢Í§àÇ纺ÃÒÇà«ÍÃì (â´Â·ÑèÇ仨ÐÍÂÙèÁØÁÅèÒ§¢ÇÒ) • ãËé¤ÇÒÁʹ㨡Ѻ¹âºÒ¤ÇÒÁà»ç¹ÊèǹµÑǺ¹àÇçºä«µìáÅЫͿ·ìáÇÃìµèÒ§æ ¶×Íà»ç¹ÊÔè§ÊÓ¤Ñ−㹡Ò÷ӤÇÒÁà¢éÒã¨ÇÔ¸Õ·Õèͧ¤ì¡ÃµèÒ§æ ÍÒ¨à¡çºÃǺÃÇÁáÅÐãªé¢éÍÁÙÅÊèǹµÑǢͧ¤Ø³¡è͹·Õè¤Ø³¨Ðà¢éÒÃèÇÁãªé§Ò¹ • »¡»éͧ·ÕèÍÂÙèÍÕàÁÅì¢Í§¤Ø³ Spammer áÅÐ "Phishers" 㹺ҧ¤ÃÑ駨ÐÊ觢éͤÇÒÁËÅÒÂÅéÒ¹¢éͤÇÒÁä»Âѧ·ÕèÍÂÙèÍÕàÁÅì·ÕèÍÒ¨ÁÕËÃ×ÍäÁèÁÕÍÂÙè¨ÃÔ§â´ÂËÇѧÇèÒ¨Ðà ¨Í¼Ùé·ÕèËŧà»ç¹àËÂ×èÍ ¡Òõͺ¡ÅѺ¢éͤÇÒÁàËÅèÒ¹ÕéËÃ×ÍáÁéáµè´ÒǹìâËÅ´ ÀÒ¾·ÓãËéá¹èã¨ä´éÇèҤسä´é¶Ù¡ÃÇÁà¢éÒã¹ÃÒª×èͧ͢¾Ç¡à¢ÒÊÓËÃѺ¡ÒÃÊ觢éͤÇÒÁã¹ÅѡɳÐà´Õ Âǡѹ¹ÕéÍÕ¡ã¹Í¹Ò¤µ áÅФÇÃÃÐÁÑ´ÃÐÇѧàÁ×èÍ·Ó¡ÒûÃСÒÈ·Õè ÍÂÙèÍÕàÁÅì¢Í§¤Ø³Í͹äŹì㹡ÅØèÁ¢èÒÇ ºÅçÍ¡ ËÃ×ÍÊѧ¤ÁÍ͹äŹìµèÒ§æ Êѧ¤ÁÍ͹äŹìÁÑ¡¨ÐãËéÀÒ¾Åѡɳì·Õè´Ù´Õ¡ÇèÒ¤ÇÒÁà»ç¹¨ÃÔ§àÊÁÍ ´Ñ§àªè¹¤ÓâºÃÒ³·ÕèÇèÒ “äÁèÁբͧ¿ÃÕã¹âÅ¡” ·ÕèÂѧ¤§à»ç¹¨ÃÔ§áÁé㹻Ѩ¨ØºÑ¹ «Í¿·ìáÇÃì·Õè¤Ò´ÇèÒ¹èÒ¨ÐãËé “¿ÃÕ” àªè¹ ÀÒ¾¾Ñ¡Ë¹éÒ¨ÍËÃ×ÍÊäÁÅÕè (Smiley) ¡ÒÃÅèÍËÅÍ¡ãËéŧ·Ø¹ÍÂèÒ§ÅѺæ â´ÂÍéÒ§ÇèÒÊÒÁÒöà»ÅÕè¹͹Ҥµ¢Í§¤Ø³ä´éÍÂèÒ§ÁÒ¡ÁÒ áÅСÒÃá¢è§¢Ñ¹·Õè¤Ø³¡ÅÒÂà»ç¹¼Ù骹Ðä´éâ´Â·ÕèäÁèä´éà¢éÒÃèÇÁ àËÅèÒ¹Õé¤×Í¡ÒÃÅèÍÅǧ¨Ò¡ºÃÔÉÑ·µèÒ§æ à¾×èÍ´Ö§´Ù´¤ÇÒÁʹ㨢ͧ¤Ø³ ËÒ¡¤Ø³äÁèä´é¨èÒÂà§Ô¹â´ÂµÃ§ãËé¡Ñº«Í¿·ìáÇÃìËÃ×ͺÃÔ¡Òà «Í¿·ìáÇÃìËÃ×ͺÃÔ¡ÒÿÃÕ·Õè¤Ø³Ãéͧ¢ÍÍÒ¨ÁÕ«Í¿áÇÃìâ¦É³Ò (“áÍ´áÇÃì”) ÃÇÁÍÂÙè´éÇ «Ö觫Ϳ·ìáÇÃì¹Õé¨ÐµÔ´µÒÁ¾ÄµÔ¡ÃÃÁ¢Í§¤Ø³áÅÐáÊ´§â¦É³Ò·ÕèäÁè¾Ö§»ÃÐʧ¤ì ¤Ø³ÍÒ¨µéͧà»Ô´à¼Â¢éÍÁÙÅÊèǹµÑÇËÃ×Í«×éͺҧÍÂèÒ§à¾×èÍÍéÒ§ÊÔ·¸Ôì㹡ÒÃÁÕâÍ¡ÒÊà»ç¹¼Ù骹СÒÃá¢è§¢Ñ¹ 60 ËÒ¡¢éÍàʹ͹Ñé¹´Ù´Õà¡Ô¹¡ÇèÒ¨Ðàª×èͶ×Í ãËéÅͧ¶ÒÁ¤ÇÒÁ¤Ô´àË繨ҡ¤¹Í×è¹æ ÍèÒ¹àÍ¡ÊÒéºÑº¾ÔÁ¾ì ËÃ×Í´Õ·ÕèÊØ´¤×Í¡ÒÃà¾Ô¡à©ÂàÊÕ µÃǨÊͺÃÒ¡ÒÃà´Ô¹ºÑ−ªÕ¸¹Ò¤ÒÃáÅкѵÃà¤Ã´ÔµÍÂÙèàÊÁÍ ¼Å¡Ãзº¨Ò¡¡ÒÃâ¨Ã¡ÃÃÁÍѵÅѡɳìáÅÐÍÒª−Ò¡ÃÃÁÍ͹äŹìÊÒÁÒöŴŧä´éÍÂèÒ§ÁÒ¡ËÒ¡¤Ø³Ê ÒÁÒöµÃǨ¨Ñºä´é·Ñ¹·ÕËÅѧ¨Ò¡·Õè¢éÍÁÙŢͧ¤Ø³¶Ù¡¢âÁ ËÃ×ÍàÁ×èÍÁÕ¡ÒþÂÒÂÒÁà¢éÒãªé¢éÍÁÙŢͧ¤Ø³ ˹Öè§ã¹ÇÔ¸Õ·Õè§èÒ·ÕèÊش㹡ÒõÃǨÊͺÊÔ觼Դ»¡µÔ¤×Í¡ÒõÃǨÊͺÃÒ¡ÒÃà´Ô¹ºÑ−ªÕ¢Í§¸¹Ò¤ÒÃáÅÐºÑ µÃà¤Ã´Ôµ¢Í§¤Ø³à»ç¹»ÃШӷءà´×͹ ¹Í¡¨Ò¡¹Õé ¸¹Ò¤ÒÃáÅкÃÔ¡ÒõèÒ§æ ãªéÃкº·Õè»éͧ¡Ñ¹¡ÒééÍ⡧·Õè¨Ð¡àÅÔ¡¾ÄµÔ¡ÃÃÁ¡Òë×éÍ·ÕèäÁ軡µÔ (àªè¹ ËÒ¡¤Ø³ÍÒÈÑÂÍÂÙèã¹à·ç¡«ÑÊáÅÐà¡Ô´¡Òë×é͵ÙéàÂç¹ËÅÒÂà¤Ã×èͧæ 㹺ٴÒà»Êµì) à¾×èÍÂ×¹Âѹ¡Òë×éÍ·ÕèäÁ軡µÔàËÅèÒ¹Õé ¸¹Ò¤ÒÃËÃ×ͼÙéãËéºÃÔ¡ÒÃÍÒ¨â·ÃÈѾ·ìËҤسáÅжÒÁà¾×èÍÂ×¹Âѹ ÍÂèÒ¶×ÍÇèÒ¡ÒÃÊͺ¶ÒÁàªè¹¹Õé¤×ÍàÃ×èͧ¸ÃÃÁ´Ò ¹ÕèÍÒ¨à»ç¹¡Òú觪ÕéÇèÒÁÕÍÂèÒ§ÍÂèÒ§·ÕèäÁè´Õä´éà¡Ô´¢Öé¹ áÅФس¤ÇÃãËé¤ÇÒÁʹã¨ÍÂèÒ§¨ÃÔ§¨Ñ§ »¡»éͧ¤ÍÁ¾ÔÇàµÍÃì¢Í§¤Ø³´éÇÂà¤Ã×èͧÁ×ÍÃÑ¡ÉÒ¤ÇÒÁ»ÅÍ´ÀÑ¢ͧ Windows Windows Áͺá;¾ÅÔपÑè¹ÃÑ¡ÉÒ¤ÇÒÁ»ÅÍ´ÀÑ·ÕèËÅÒ¡ËÅÒ Windows Updates ËÒ¡¤Ø³àª×èÍÁµèÍÍÔ¹àµÍÃìà¹çµ Windows ¨ÐÊÒÁÒöµÃǨÊͺÍѾവ·ÕèÊÓ¤Ñ−ÊÓËÃѺ¤ÍÁ¾ÔÇàµÍÃì¢Í§¤Ø³áÅеԴµÑé§â´ÂÍѵâ¹ÁÑµÔ ÍÔ¹àµÍÃìà¹çµ - 61 ÍѾവàËÅèÒ¹Õé»ÃСͺ´éÇÂá¾·ªì¡ÒÃÃÑ¡ÉÒ¤ÇÒÁ»ÅÍ´ÀÑÂáÅÐâ»Ãá¡ÃÁÍѾവ·ÕèÊÒÁÒö»ÃѺ»Ãا¡ ÒÃãªé§Ò¹¤ÍÁ¾ÔÇàµÍÃì¢Í§¤Ø³áÅЪèÇ»¡»éͧ¤ÍÁ¾ÔÇàµÍÃì¢Í§¤Ø³¨Ò¡äÇÃÑÊáÅСÒÃâ¨ÁµÕãËÁèæ ¨ÐÃÙéä´éÍÂèÒ§äÃÇèÒ¤ÍÁ¾ÔÇàµÍÃì¢Í§©Ñ¹ÁÕ¤ÇÒÁàÊÕè§? àÁ×èÍ Action Center ÃÒ§ҹ¡ÒÃá¨é§àµ×͹ ËÃ×ͤÍÁ¾ÔÇàµÍÃì¢Í§¤Ø³·Ó§Ò¹ä´éÍÂèÒ§äÁèÊÁèÓàÊÁÍ ¢Ñ´¢éͧâ´ÂäÁèÁÕÊÒà赯 ËÃ×ͺҧâ»Ãá¡ÃÁ·Ó§Ò¹äÁè¶Ù¡µéͧ ÊÔè§àËÅèÒ¹Õéºè§ºÍ¡ÇèÒ¤ÍÁ¾ÔÇàµÍÃì¢Í§¤Ø³ÍÒ¨µÔ´ÁÑÅáÇÃì ÍÂèÒ§äáçµÒÁ »Ñ−ËÒ¤ÍÁ¾ÔÇàµÍÃì·Ñé§ËÁ´äÁèä´éÁÒ¨Ò¡äÇÃÑÊ! ËÒ¡¤Ø³Ê§ÊÑÂÇèÒ¤ÍÁ¾ÔÇàµÍÃì¢Í§¤Ø³µÔ´äÇÃÑÊ ÊÔè§áá·Õè¤Ç÷Ӥ×ÍÍѾവ㹡óշÕèÂѧäÁèä´éÍѾവ ¨Ò¡¹Ñé¹ãËéÃѹ«Í¿·ìáÇÃì»éͧ¡Ñ¹äÇÃÑÊáÅлéͧ¡Ñ¹Ê»ÒÂáÇÃì 62 ¡ Ò Ã à Ã Õ Â ¡ ¤× ¹ ËÒ¡¤Ø³ÁÕ»Ñ−ËҡѺ¤ÍÁ¾ÔÇàµÍÃìÁÕ»Ñ−ËÒ áÅФӶÒÁ·Õè¶Ù¡¶ÒÁºèÍ äÁèÊÒÁÒöªèÇÂä´é ¤Ø³ÊÒÁÒöàÃÕ¡¤×¹¤ÍÁ¾ÔÇàµÍÃì¢Í§¤Ø³ – à¾×èÍãËé¡ÅѺÊÙèʶҹзÕèà¤Âà»ç¹¡è͹˹éÒä´é ËÑÇ¢é͹Õé͸ԺÒ¶֧à¤Ã×èͧÁ×Í㹡ÒÃàÃÕ¡¤×¹·ÕèÁÕãË麹¤ÍÁ¾ÔÇàµÍÃì¢Í§¤Ø³ Gateway ·ÕèÁÕãËé Gateway Recovery Management ͹Ø−ÒµãËé¤Ø³ÊÃéÒ§ ¡ÒÃÊÓÃͧ¢éÍÁÙÅÊÓËÃѺàÃÕ¡¤×¹, ¡ÒÃÊÓÃͧ¢éÍÁÙÅä´ÃìàÇÍÃìáÅÐá;¾ÅÔपÑè¹, áÅÐà¾×èÍ´ÙµÑÇàÅ×Í¡¡ÒÃàÃÕ¡¤×¹ â´Âãªéà¤Ã×èͧÁ×ͧ͢ Windows ËÃ×Í¡ÒÃÊÓÃͧ¢éÍÁÙÅÊÓËÃѺ¡ÒÃàÃÕ¡¤×¹ ËÁÒÂà˵Ø: Gateway Recovery Management ÊÒÁÒöãªé§Ò¹ä´é¡ÑºÃкº»¯ÔºÑµÔ¡Òà Windows ·ÕèµÔ´µÑé§äÇé¡è͹˹éÒ ÊÔè§ÊÓ¤Ñ−: àÃÒ¢Íá¹Ð¹ÓãËé¤Ø³ÊÃéÒ§ ¡ÒÃÊÓÃͧ¢éÍÁÙÅÊÓËÃѺàÃÕ¡¤×¹ áÅÐ ¡ÒÃÊÓÃͧ¢éÍÁÙÅä´ÃìàÇÍÃìáÅÐá;¾ÅÔपÑè¹ ãËéàÃçÇ·ÕèÊØ´à·èÒ·Õèà»ç¹ä»ä´é 㹺ҧʶҹ¡ÒÃ³ì ¡ÒáÙé¤×¹àµçÁÃٻẺÍÒ¨¨Óà»ç¹µéͧãªé¡ÒÃÊÓÃͧ ¢éÍÁÙÅÊÓËÃѺ¡Ùé¤×¹´éÇ USB ¡ÒÃÊÃÉÒ§¡ÒÃÊÓÃͧ¢ÉÍÁÙÅÀÃÕ¡¤×¹ à¾×è͵ԴµÑé§ãËÁèâ´Âãªé¡ÒÃÊÓÃͧ¢éÍÁÙÅŧã¹ä´Ãì¿ USB ¤Ø³µéͧ¨Ñ´·Ó¢éÍÁÙÅÊÓÃͧàÃÕ¡¤×¹¡è͹ ¢éÍÁÙÅÊÓÃͧàÃÕ¡¤×¹»ÃСͺ仴éÇ¢éÍÁÙÅà´ÔÁ·Ñé§ËÁ´º¹ÎÒÃì´ä´Ã쿢ͧ¤ÍÁ¾ÔÇàµÍÃì¤Ø³ ÃÇÁ¶Ö§ Windows áÅЫͿ·ìáÇÃìáÅÐä´ÃìàÇÍÃì·ÕèâËÅ´ÁÒ¨Ò¡âç§Ò¹ ¡ÒÃãªé¢éÍÁÙÅÊÓÃͧ¹Õéà»ç¹¡Òà àÃÕ¡¤×¹Ãкºä»ÂѧʶҹÐà´ÔÁ ³ àÇÅÒ·Õè¤Ø³«×éÍ áÅÐÂѧÁÕµÑÇàÅ×͡㹡Òè´¨Ó¡ÒõÑé§ ¤èÒáÅТéÍÁÙÅÊèǹµÑÇ·Ñé§ËÁ´ÊÓËÃѺ¡ÒáÙé¤×¹ ¡ÒÃàÃÕ¡¤×¹ - 63 ËÁÒÂà˵Ø: µÃǨÊͺãËéá¹èã¨ÇèҤسÁÕä´Ãì¿ USB ·ÕèÁÕ¤ÇÒÁ¨ØÍÂèÒ§¹éÍ 16 GB 1. ¨Ò¡ àÃÔèÁ, ¾ÔÁ¾ì 'Recovery' áÅéǤÅÔ¡ Gateway Recovery Management ã¹ÃÒ¡ÒÃá;¾ÅÔपÑè¹ 2. ¤ÅÔ¡ Create Factory Default Backup ˹éÒµèÒ§ Recovery Drive ¨Ð¶Ù¡à»Ô´¢Öé¹ 64 µÃǨÊͺãËéá¹èã¨ÇèÒä´éàÅ×Í¡ Copy contents from the recovery partition to the recovery drive áÅéÇ µÑÇàÅ×Í¡¹Õéà»ç¹¡ÒÃÊÓÃͧ¢éÍÁÙÅàÃÕ¡¤×¹·ÕèÊÁºÙóìẺáÅлÅÍ´ÀÑ·ÕèÊØ´ 3. àÊÕºä´Ãì¿ USB áÅéǤÅÔ¡ Next • µÃǨÊͺãËéá¹èã¨ÇèÒä´Ãì¿ USB ¢Í§¤Ø³ÁÕ¾×é¹·ÕèÇèÒ§¾Í¡è͹´Óà¹Ô¹¡ÒõèÍ ¢éÍÁÙÅÊÓÃͧàÃÕ¡¤×¹¹Õéµéͧãªé¾×é¹·Õèà¡çº¢éÍÁÙÅÍÂèÒ§¹éÍ 16 GB 4. ¤Ø³¨Ð¾ºË¹éҨͤÇÒÁ¤×ºË¹éÒ㹡ÒÃÊÓÃͧ¢éÍÁÙÅ»ÃÒ¡¯¢Öé¹ 5. ·ÓµÒÁ¡Ãкǹ¡Ò蹡ÃзÑè§àÊÃç¨ÊÔé¹ ¡ÒÃàÃÕ¡¤×¹ - 65 6. ËÅѧ¡ÒÃÊÃéÒ§¢éÍÁÙÅÊÓÃͧàÃÕ¡¤×¹ ¤Ø³ÊÒÁÒöàÅ×Í¡à¾×èÍź¢éÍÁÙÅ¡ÒÃàÃÕ¡¤×¹¹Õ麹¤ÍÁ¾ÔÇàµÍÃì¢Í§¤Ø³ä´é ËÒ¡¤Ø³Åº¢éÍÁÙŹÕé ¤Ø³¨ÐÊÒÁÒöãªé੾ÒТéÍÁÙÅÊÓÃͧàÃÕ¡¤×¹¹Õéà¾×èÍàÃÕ¡¤×¹¤ÍÁ¾ÔÇàµÍÃì ËÒ¡¤Ø³ÅºËÃ×Í·Óä´Ãì¿ USB ¹ÕéÊÙ−ËÒ ¤Ø³¨ÐäÁèÊÒÁÒö¡Ùé¤ÍÁ¾ÔÇàµÍÃì¢Í§¤Ø³ä´é 7. ¶Í´ä´Ãì¿ USB áÅзөÅÒ¡µÔ´ãËéªÑ´à¨¹ ÊÔè§ÊÓ¤Ñ−: à¢Õ¹©ÅÒ¡ãËéÁÕàÍ¡Åѡɳì áÅÐÁÕÃÒÂÅÐàÍÕ´¢Í§¡ÒÃÊÓÃͧ¢éÍÁÙÅãËé¤Ãº àªè¹ 'Windows Recovery Backup' µÃǨÊͺãËéá¹èã¨ÇèҤسà¡çº¢éÍÁÙÅÊÓÃͧ äÇéã¹·Õè»ÅÍ´ÀÑ«Ö觤س¨ÐÊÒÁÒö¨Óä´é ¡ÒÃÊÃÉÒ§ÊÓÃͧ¢ÉÍÁÙÅÄ´ÃÌÀÇÍÃÌÁÅÐÁ;¾ÅÔÀ¤ªÑȹ à¾×èÍÊÃéÒ§ÊÓÃͧ¢éÍÁÙÅä´ÃìàÇÍÃìáÅÐá;¾ÅÔपÑè¹ ·Õè»ÃСͺ仴éÇ «Í¿·ìáÇÃìáÅÐä´ÃìàÇÍÃì·ÕèâËÅ´ÁÒ¨Ò¡âç§Ò¹·Õè¨Óà»ç¹¡Ñºà¤Ã×èͧ¤ÍÁ¾ÔÇàµÍÃì¢Í§¤Ø³ 66 ¤Ø³ÊÒÁÒöãªé·Ñé§ä´Ãì¿ USB ËÃ×ÍËÒ¡¤ÍÁ¾ÔÇàµÍÃì¢Í§¤Ø³ÁÕà¤Ã×èͧºÑ¹·Ö¡ DVD ÊÒÁÒöãªéá¼è¹ DVD à»ÅèÒ˹Öè§á¼è¹ËÃ×ÍÁÒ¡¡ÇèÒä´é 1. ¨Ò¡ àÃÔèÁ, ¾ÔÁ¾ì 'Recovery' áÅéǤÅÔ¡ Gateway Recovery Management ã¹ÃÒ¡ÒÃá;¾ÅÔपÑè¹ 2. ¤ÅÔ¡ Create Drivers and Applications Backup àÊÕº´ÔÊ¡ì USB ËÃ×Íá¼è¹à»ÅèÒà¢éÒä»ã¹ä´Ãì¿ DVD áÅéǤÅÔ¡ Next ¡ÒÃàÃÕ¡¤×¹ - 67 • ËÒ¡¤Ø³ãªé§Ò¹ä´Ãì¿ ãËéµÃǨÊͺãËéá¹èã¨ÇèÒ´ÔÊ¡ì¹Ñé¹ÁÕ¢¹Ò´¤ÇÒÁ¨Ø·Õèà¾Õ§¾Í¡è͹·Õè¨Ð´Óà¹Ô¹¡ÒõèÍä». USB • ËÒ¡¤Ø³ãªéá¼è¹ DVD ˹éÒµèÒ§¨ÐáÊ´§¨Ó¹Ç¹¢Í§á¼è¹´ÔÊ¡ìà»ÅèÒ·Õèµéͧãªé㹡Òúѹ·Ö¡à¾×èÍ ãËé¡ÒÃÊÃéÒ§´ÔÊ¡ì¢éÍÁÙÅÊÓÃͧàÊÃç¨ÊÁºÙÃ³ì µÃǨãËéá¹èã¨ÇèҤسÁÕá¼è¹à»ÅèÒª¹Ô´ à´ÕÂǡѹµÒÁ¨Ó¹Ç¹·Õèµéͧ¡Òà 68 3. ¤ÅÔ¡ Start à¾×èͤѴÅÍ¡ä¿Åì ¤Ø³ä´é¾º¤ÇÒÁ¤×ºË¹éÒ㹡ÒÃÊÓÃͧ¢éÍÁÙź¹Ë¹éÒ¨Í 4. ·ÓµÒÁ¡Ãкǹ¡Ò蹡ÃзÑè§àÊÃç¨ÊÔé¹: • ËÒ¡¤Ø³ãªé´ÔÊ¡ìÍ;µÔ¤ÍÅä´Ã쿨Ðà»Ô´ÍÍ¡ËÅѧ¨Ò¡·ÕèàÊÃç¨ÊÔ鹡ÒÃàºÔÃì¹´ÔÊ¡ìáµèÅÐá¼è¹ àÍÒá¼è¹´ÔÊ¡ìÍÍ¡¨Ò¡ä´Ãì¿áÅзÓà¤Ã×èͧËÁÒº¹´ÔÊ¡ì´éÇ»ҡ¡Òà¤ÁÕËÁÖ¡¶ÒÇà ËÒ¡µéͧãªé´ÔÊ¡ìËÅÒÂá¼è¹ ãËéãÊè´ÔÊ¡ìá¼è¹ãËÁèà¢éÒä»àÁ×èÍä´éÃѺ¡ÒÃá¨é§ ¨Ò¡¹Ñ鹤ÅÔ¡ OK ´Óà¹Ô¹¡ÒõèÍ仨¹¡ÇèÒ¡Ãкǹ¡ÒèÐàÊÃç¨ÊÔé¹ • ËÒ¡¤Ø³ãªéä´Ãì¿ USB ãËé¶Í´ä´Ãì¿ÍÍ¡áÅеԴ©ÅÒ¡ãËéªÑ´à¨¹ ÊÔè§ÊÓ¤Ñ−: à¢Õ¹©ÅÒ¡ãËéÁÕàÍ¡Åѡɳì áÅÐÁÕÃÒÂÅÐàÍÕ´¢Í§¡ÒÃÊÓÃͧ¢éÍÁÙÅãËé¤Ãº àªè¹ 'Drivers and Applications Backup' µÃǨÊͺãËéá¹èã¨ÇèҤسà¡çº¢éÍÁÙÅÊÓÃͧ äÇéã¹·Õè»ÅÍ´ÀÑ«Ö觤س¨ÐÊÒÁÒö¨Óä´é ¡ÒÃÀÃÕ¡¤×¹¤ÈÒÃкº¢Í§¤Ø³ ÇÔ¸ÕàÃÕ¡¤×¹¤èÒÃкº¢Í§¤Ø³: 1. ·Ó¡ÒëèÍÁá«ÁàÅç¡æ ¹éÍÂæ ËÒ¡ÁÕ«Í¿·ìáÇÃìËÃ×ÍÎÒÃì´áÇÃìà¾Õ§˹Öè§ËÃ×ÍÊͧµÑÇ·Ó§Ò¹äÁè¶Ù¡µéͧ ÍÒ¨á¡é䢻Ñ−ËÒä´éâ´Â¡ÒõԴµÑ駫Ϳ·ìáÇÃìËÃ×Íä´ÃìàÇÍÃìÍØ»¡Ã³ìãËÁè à¾×è͵ԴµÑ駫ͿµìáÇÃìáÅÐä´ÃìàÇÍÃì·Õèä´éÃѺ¡ÒõԴµÑé§Åèǧ˹éÒ¨Ò¡âç§Ò¹«éÓ "¡ÒõԴµÑé§ä´ÃìàÇÍÃìËÃ×Íá;¾ÅÔपÑè¹ãËÁè«éÓ" ã¹Ë¹éÒ 70 ÊÓËÃѺ¤Óá¹Ð¹Ó㹡ÒõԴµÑ駫Ϳ·ìáÇÃìáÅÐä´ÃìàÇÍÃì·ÕèäÁèä´éµÔ´µÑé§ÁҡѺà¤Ã×èͧ ´ÙàÍ¡ÊÒÃÊÓËÃѺ¼ÅÔµÀѳ±ì¹Ñé¹æ ËÃ×ÍàÇçºä«µì¡ÒÃʹѺʹع 2. ¡ÒÃÂé͹¡ÅѺä»ÂѧʶҹÐÃкº¡è͹˹éÒ¹Õé ËÒ¡¡ÒõԴµÑ駫Ϳ·ìáÇÃìáÅÐä´ÃìàÇÍÃìãËÁèäÁèÊÒÁÒöªèÇÂä´é â»Ã´´Ù ¡ÒÃàÃÕ¡¤×¹ - 69 ÍÒ¨ÊÒÁÒöá¡é»Ñ−ËÒä´éâ´Â¡Òä׹ʶҹÐÃкº¢Í§¤Ø³¡ÅѺä»à»ç¹Ê¶Ò¹Ð¡è͹˹éÒ¹Õé ã¹¢³Ð·ÕèÂѧ·Ó§Ò¹ä´éÍÂèÒ§¶Ù¡µéͧ ÊÓËÃѺ¤Óá¹Ð¹Ó â»Ã´´Ù "¡ÒáÅѺÊÙèʶҹÐÃкº¡è͹˹éÒ" ã¹Ë¹éÒ 73 3. ¡ÒÃÃÕà«ç·Ãкº»¯ÔºÑµÔ¡Òâͧ¤Ø³ ËÒ¡äÁèÁÕÇÔ¸Õã´á¡é䢻Ñ−ËҢͧ¤Ø³ä´é áÅФسµéͧ¡ÒÃÃÕà«ç·Ãкº áµèµéͧ¡ÒÃà¡çº¢éÍÁÙżÙéãªé¢Í§ ¤Ø³äÇé â»Ã´´Ù "àÃÕ¡¤×¹Ãкº¢Í§¤Ø³ãËéà»ç¹Ê¶Ò¹Ð·ÕèµÑé§ÁÒ¨Ò¡âç§Ò¹" ã¹Ë¹éÒ 74. 4. ÃÕà«ç·Ãкº¢Í§¤Ø³ãËéà»ç¹Ê¶Ò¹Ð·ÕèµÑé§ÁÒ¨Ò¡âç§Ò¹ ËÒ¡äÁèÁÕÇÔ¸Õã´ÊÒÁÒöá¡é䢻Ñ−ËÒä´éáÅФسµéͧ¡ÒÃÃÕà«ç·Ãкº¢Í§¤Ø³ãËéà»ç¹Ê¶Ò¹Ð·ÕèµÑé§ÁÒ¨Ò ¡âç§Ò¹ â»Ã´´Ù "àÃÕ¡¤×¹Ãкº¢Í§¤Ø³ãËéà»ç¹Ê¶Ò¹Ð·ÕèµÑé§ÁÒ¨Ò¡âç§Ò¹" ã¹Ë¹éÒ 74 ¡ÒõԴµÑé§ä´ÃìàÇÍÃìËÃ×Íá;¾ÅÔपÑè¹ãËÁè«éÓ µÒÁ¢Ñ鹵͹¡ÒÃá¡é䢻Ñ−ËÒ ¤Ø³ÍÒ¨µéͧ¡ÒõԴµÑé§á;¾ÅÔपÑè¹áÅÐä´ÃìàÇÍÃì·Õèä´éÃѺ¡ÒõԴµÑé§ÁҡѺà¤Ã×èͧ¨Ò¡âç§Ò¹ã¹¤ÍÁ¾ÔÇ àµÍÃì¢Í§¤Ø³ãËÁèÍÕ¡¤ÃÑé§ ¤Ø³ÊÒÁÒöµÔ´µÑ駫éÓâ´ÂãªéÎÒÃì´ä´Ãì¿ËÃ×Í¡ÒÃÊÓÃͧ¢éÍÁÙÅ·Õè¤Ø³ÊÃéÒ§¢Öé¹ • á;¾ÅÔपÑè¹Í×è¹ – ËÒ¡¤Ø³µéͧ¡ÒõԴµÑ駫éÓ«Í¿·ìáÇÃì·ÕèäÁèä´éÃѺ¡ÒõԴµÑé§äÇéÅèǧ˹éÒ ã¹¤ÍÁ¾ÔÇàµÍÃì¢Í§¤Ø³ ¤Ø³¨Óà»ç¹µéͧ·ÓµÒÁ¤Óá¹Ð¹Ó㹡ÒõԴµÑ駢ͧ«Í¿·ìáÇÃì¹Ñé¹ • ä´ÃìàÇÍÃìÍØ»¡Ã³ìãËÁè – ËÒ¡¤Ø³µéͧ¡ÒõԴµÑ駫éÓä´ÃìàÇÍÃì·ÕèäÁèä´éÃѺ¡ÒõԴµÑé§äÇéÅèǧ˹éÒ ã¹¤ÍÁ¾ÔÇàµÍÃì¢Í§¤Ø³ ãËé·ÓµÒÁ¤Óá¹Ð¹Ó㹡ÒõԴµÑ駷ÕèÁÒ¾ÃéÍÁ¡ÑºÍØ»¡Ã³ì¹Ñé¹ 70 ËÒ¡¤Ø³¨Ð·Ó¡ÒõԴµÑ駫éÓâ´Âãªé Windows áÅТéÍÁÙÅ㹡ÒÃàÃÕ¡¤×¹·Õè¶Ù¡ à¡çºäÇ麹¤ÍÁ¾ÔÇàµÍÃì¢Í§¤Ø³: • ¨Ò¡ Start ¾ÔÁ¾ì 'Recovery' áÅéǤÅÔ¡ Gateway Recovery ã¹ÃÒ¡ÒÃá;¾ÅÔपÑè¹ Management • ¤ÅÔ¡µÔ´µÑé§ä´ÃìàÇÍÃìËÃ×Íá;¾ÅÔपÑè¹ãËÁè ¡ÒÃàÃÕ¡¤×¹ - 71 • ¤Ø³¤ÇþºËÑÇ¢éÍ Contents ã¹ Gateway Resource Center • ¤ÅÔ¡·Õèäͤ͹ µÔ´µÑé§ ÊÓËÃѺÃÒ¡Ò÷Õè¤Ø³µéͧ¡ÒõԴµÑé§ ¨Ò¡¹Ñé¹·ÓµÒÁ¤Óá¹Ð¹Ó·Õè»ÃÒ¡¯¢Ö鹺¹Ë¹éÒ¨Íà¾×èÍ·Ó¡ÒõԴµÑé§ãËéàÊÃç¨ÊÁºÙÃ³ì ·Ó«éÓ¢Ñ鹵͹¹ÕéÊÓËÃѺ·Ø¡ÃÒ¡Ò÷Õè¤Ø³µéͧ¡ÒõԴµÑé§ãËÁè ËÒ¡¤Ø³µÔ´µÑ駫éÓ¨Ò¡¡ÒÃÊÓÃͧ¢éÍÁÙÅä´ÃìàÇÍÃìáÅÐá;¾ÅÔपÑ蹺¹ DVD ËÃ×Íä´Ãì¿ USB: 1. ãÊèá¼è¹´ÔÊ¡ì Drivers and Applications Backup ŧã¹ä´Ãì¿ËÃ×Íàª×èÍÁµèÍà¢éҡѺ¾ÍÃìµ USB ·ÕèÇèÒ§ÍÂÙè • ËÒ¡¤Ø³ãÊèá¼è¹ DVD â»Ã´ÃÍãËé Gateway Resource Center àÃÔèÁ·Ó§Ò¹ • ËÒ¡ Gateway Resource Center äÁèàÃÔèÁ·Ó§Ò¹â´ÂÍѵâ¹ÁÑµÔ ¡´»ØèÁ Windows + <E>, áÅéǴѺàºÔéŤÅÔ¡º¹äͤ͹ä´Ãì¿Í;µÔ¤ÍÅ • ËÒ¡¤Ø³ãªéä´Ãì¿ USB ¡´»ØèÁ Windows + <E>áÅéǴѺàºÔéŤÅÔ¡º¹ä´Ãì¿·ÕèÁÕ¡ÒÃÊÓÃͧ ¢éÍÁÙŹÕéÍÂÙè ´ÑºàºÔéŤÅÔ¡º¹ ResourceCenter 72 2. ¤Ø³¤ÇþºËÑÇ¢éÍ Contents ã¹ Gateway Resource Center 3. ¤ÅÔ¡·Õèäͤ͹ µÔ´µÑé§ ÊÓËÃѺÃÒ¡Ò÷Õè¤Ø³µéͧ¡ÒõԴµÑé§ ¨Ò¡¹Ñé¹·ÓµÒÁ¤Óá¹Ð¹Ó·Õè»ÃÒ¡¯¢Ö鹺¹Ë¹éÒ¨Íà¾×èÍ·Ó¡ÒõԴµÑé§ãËéàÊÃç¨ÊÁºÙÃ³ì ·Ó«éÓ¢Ñ鹵͹¹ÕéÊÓËÃѺ·Ø¡ÃÒ¡Ò÷Õè¤Ø³µéͧ¡ÒõԴµÑ駫éÓ ¡ÒáÅѺÊÙèʶҹÐÃкº¡è͹˹éÒ Microsoft System Restore ¨Ð·Ó¡Òà '¶èÒÂ’ ¡ÒõÑ駤èÒÃкº¢Í§¤Ø³à»ç¹ÃÐÂÐáÅкѹ·Ö¡ÊÔè§ àËÅèÒ¹Ñé¹äÇéà»ç¹¨Ø´àÃÕ¡¤×¹ â´ÂÁÒ¡áÅéÇ㹡óշÕè¡ÒÃá¡é䢻Ñ−ËÒ«Í¿·ìáÇÃìÊÒÁÒö·Óä´éÂÒ¡ ¤Ø³ÊÒÁÒö¤×¹Ê¶Ò¹ÐÃкº¡ÅѺä»Âѧ¨Ø´àÃÕ¡¤×¹Ãкºà¾×èÍãËéÃкº¢Í§¤Ø³ÊÒÁÒö·Ó§ Ò¹ä´éÍÕ¡¤ÃÑé§ Windows ¨ÐÊÃéÒ§¨Ø´àÃÕ¡¤×¹Ãкºâ´ÂÍѵâ¹ÁѵÔã¹áµèÅÐÇѹ áÅÐÃÇÁ¶Ö§·Ø¡¤ÃÑ駷Õè¤Ø³µÔ´µÑé§ «Í¿·ìáÇÃìËÃ×Íä´ÃìàÇÍÃìÍØ»¡Ã³ì ¡ÒÃàÃÕ¡¤×¹ - 73 ËÁÒÂà˵Ø: ÊÓËÃѺ¢éÍÁØÅà¾ÔèÁàµÔÁà¡ÕèÂǡѺ¡ÒÃãªé Microsoft System Restore ¨Ò¡àÁ¹Ù àÃÔèÁãËé¾ÔÁ¾ì 'ÇÔ¸Õãªé' ¨Ò¡¹Ñ鹤ÅÔ¡·Õè ¤ÇÒÁªèÇÂáËÅ×ÍáÅÐʹѺʹع ã¹ÃÒª×èÍá;¾ÅÔपÑè¹ ¾ÔÁ¾ì 'Windows system restore' 㹡Åèͧ¤é¹ËÒ ¨Ò¡¹Ñ鹡´ Enter 1. 2. 3. 4. 5. ÇÔ¸Õ¡ÅѺä»Âѧ¨Ø´àÃÕ¡¤×¹Ãкº: ¨Ò¡ Start¾ÔÁ¾ì 'Control Panel' áÅéǤÅÔ¡·Õè Control Panel ã¹ÃÒ¡ÒÃá;¾ÅÔपÑè¹ ¤ÅÔ¡ ÃкºáÅФÇÒÁ»ÅÍ´ÀÑ > ÈÙ¹Âì¡ÒáÃÐ·Ó ¨Ò¡¹Ñ鹤ÅÔ¡·Õè àÃÕ¡¤×¹ ·Õè´éÒ¹ÅèÒ§ ¢Í§Ë¹éÒµèÒ§ ¤ÅÔ¡·Õè à»Ô´¡ÒÃàÃÕ¡¤×¹Ãкº áÅФÅÔ¡ ¶Ñ´ä» ¤ÅÔ¡·Õè¨Ø´àÃÕ¡¤×¹ÅèÒÊØ´ («Öè§à»ç¹àÇÅÒ·ÕèÃкº¢Í§¤Ø³·Ó§Ò¹ä´éÍÂèÒ§¶Ù¡µéͧ) áÅéǤÅÔ¡¶Ñ´ä»¨Ò¡¹Ñ鹤ÅÔ¡ ÊÔé¹ÊØ´ ˹éÒµèÒ§¡ÒÃÂ×¹Âѹ¨Ð»ÃÒ¡¯¢Öé¹ ãËé¤ÅÔ¡ ãªè Ãкº¢Í§¤Ø³¨Ð¶Ù¡àÃÕ¡¤×¹¤èÒâ´Âãªé¨Ø´ àÃÕ¡¤×¹Ãкº·Õè¤Ø³àÅ×Í¡ ¡Ãкǹ¡ÒùÕéÍÒ¨ãªéàÇÅÒ¹Ò¹ËÅÒÂ¹Ò·Õ áÅÐÍÒ¨ÃÕʵÒÃì·¤ ÍÁ¾ÔÇàµÍÃì¢Í§¤Ø³ àÃÕ¡¤×¹Ãкº¢Í§¤Ø³ãËéà»ç¹Ê¶Ò¹Ð·ÕèµÑé§ÁÒ¨Ò¡âç§Ò¹ ËÒ¡¤Ø³¾ºÇèÒ¤ÍÁ¾ÔÇàµÍÃì¢Í§¤Ø³ÁÕ»Ñ−ËÒ·ÕèäÁèÊÒÁÒöàÃÕ¡¤×¹¤èÒä´é´éÇÂÇÔ¸Õ¡ÒÃÍ×è¹ ¤Ø³ÍÒ¨¨Óà»ç¹µéͧµÔ´µÑ駷ءÍÂèÒ§ãËÁèà¾×èͤ׹ʶҹÐÃкº¢Í§¤Ø³ãËéà»ç¹Ê¶Ò¹Ð·ÕèµÑé§ÁÒ¨Ò¡âç§Ò¹ ¤Ø³ÊÒÁÒöàÃÕ¡¤×¹¨Ò¡ÎÒÃì´ä´Ãì¿ËÃ×Í¡ÒÃÊÓÃͧ¢éÍÁÙÅ·Õè¤Ø³ÊÃéÒ§¢Öé¹ • ËÒ¡¤Ø³ÂѧÊÒÁÒöÃѹ Windows áÅÐÂѧäÁèä´éź¾ÒÃìµÔªÑè¹ÊÓËÃѺ¡ÒÃàÃÕ¡¤×¹ â»Ã´´Ù "¡ÒÃàÃÕ¡¤×¹Ãкº¨Ò¡ Windows" ã¹Ë¹éÒ 75 74 • ËÒ¡¤Ø³äÁèÊÒÁÒöãªé§Ò¹ Windows ä´éáÅÐÎÒÃì´ä´Ã쿢ͧ¤Ø³ä´é¶Ù¡¿ÍÃìáÁµàÃÕºÃéÍÂáÅéÇ ËÃ×ͤسä´éµÔ´µÑé§ÎÒÃì´ä´Ãì¿Í×è¹·´á·¹áÅéÇ â»Ã´´Ù "¡ÒÃàÃÕ¡¤×¹¤×¹¨Ò¡¢éÍÁÙÅ·ÕèÊÓÃͧäÇéà¾×èÍ¡ÒÃàÃÕ¡¤×¹¢Í§¤Ø³" ã¹Ë¹éÒ 79 ¡ÒÃàÃÕ¡¤×¹Ãкº¨Ò¡ Windows àÃÔèÁãªé§Ò¹ Gateway Recovery Management: • ¨Ò¡ Start¾ÔÁ¾ì 'Recovery' áÅéǤÅÔ¡ Gateway Recovery Management ã¹ÃÒ¡ÒÃá;¾ÅÔपÑè¹ ÁÕµÑÇàÅ×Í¡ÊͧµÑÇàÅ×Í¡ Restore Factory Settings (ÃÕà«çµ¾Õ«Õ¢Í§©Ñ¹) ËÃ×Í Customized Restore (ÃÕà¿Ãª¾Õ«Õ¢Í§©Ñ¹) Restore Factory Settings ¨Ðà»ç¹¡ÒÃź·Ø¡ÍÂèÒ§º¹ÎÒÃì´´ÔÊ¡ì¢Í§¤Ø³ ¨Ò¡¹Ñ鹨֧µÔ´µÑé§ Windows «Í¿·ìáÇÃìáÅÐä´ÃìàÇÍÃì·Ñé§ËÁ´·Õèà¤Âä´éÃѺ¡ÒõԴµÑé§äÇéÅèǧ˹éÒº¹¤ÍÁ¾ÔÇàµÍÃì¢Í§¤Ø³ ËÒ¡¤Ø³ÊÒÁÒöà¢éÒ¶Ö§ä¿Åì·ÕèÊÓ¤Ñ−º¹ÎÒÃì´ä´Ã쿢ͧ¤Ø³ä´é ãËéÊÓÃͧ¢éÍÁÙÅäÇé â»Ã´´Ù "¡Ùé¤×¹¤èÒàÃÔèÁµé¹¨Ò¡âç§Ò¹´éÇ Gateway Recovery Management" ã¹Ë¹éÒ 76. Customized Restore ¨Ð¾ÂÒÂÒÁà¡çºä¿Åì (¢éÍÁÙżÙéãªé) ¢Í§¤Ø³àÍÒäÇé áµè¨Ð·Ó¡ÒõԴµÑé§ «Í¿·ìáÇÃìáÅÐä´ÃìàÇÍÃìãËÁè·Ñé§ËÁ´ «Í¿·ìáÇÃì·ÕèµÔ´µÑé§äÇéµÑé§áµè·Õè¤Ø³«×é;իբͧ¤Ø³ÁҨж١ź (¡àÇ鹫Ϳ·ìáÇÃì·ÕèµÔ´µÑ駨ҡ Windows Store) â»Ã´´Ù "»ÃѺáµè§¡ÒÃàÃÕ¡¤×¹´éÇ Gateway Recovery Management" ã¹Ë¹éÒ 78. ¡ÒÃàÃÕ¡¤×¹ - 75 ¡Ùé¤×¹¤èÒàÃÔèÁµé¹¨Ò¡âç§Ò¹´éÇ Gateway Recovery Management 1. ¤ÅÔ¡ Restore Factory Settings. ¢éͤÇÃÃÐÇѧ: 'Restore Factory Settings' ¨Ðźä¿Åì·Ñé§ËÁ´º¹ÎÒÃì´ä´Ã쿢ͧ¤Ø³ 2. ˹éÒµèÒ§ Reset your PC ¨Ðà»Ô´¢Öé¹ ÃÙ»ÀÒ¾ãªéà¾×èÍ¡ÒÃÍéÒ§ÍÔ§à·èÒ¹Ñé¹ 76 3. ¤ÅÔ¡ NextáÅéÇàÅ×Í¡ÇÔ¸Õ¡ÒÃźä¿ÅìµèÒ§æ ¢Í§¤Ø³ a. Just remove my files ¨Ðźä¿Åì·Ñé§ËÁ´ÍÂèÒ§ÃÇ´àÃçÇ¡è͹·Õè¨ÐàÃÕ¡¤×¹¤ÍÁ¾ÔÇàµÍÃì¢Í§¤Ø³ â´Â¨ÐãªéàÇÅÒ»ÃÐÁÒ³ 30 ¹Ò·Õ b. Fully clean the drive ÅéÒ§ä´Ã쿢ͧ¤Ø³ÍÂèÒ§ÊÁºÙóìËÅѧ¨Ò¡·Õèä¿Åì¶Ù¡Åº ´Ñ駹Ñ鹨ÐäÁèÊÒÁÒö´Ùä¿Åìã´æ ä´éËÅѧ¨Ò¡¡ÒÃàÃÕ¡¤×¹ ¡ÒÃÅéÒ§ä´Ãì¿ãªéàÇÅÒ¹Ò¹¡ÇèÒÁÒ¡ ÍÒ¨ãªéàÇÅÒ¶Ö§ 5 ªÑèÇâÁ§ áµè¨Ð»ÅÍ´ÀÑ¡ÇèÒà¹×èͧ¨Ò¡ä¿Åìà¡èÒ¨¶Ù¡ÅºÍÂèÒ§ÊÔé¹àªÔ§ 4. ¤ÅÔ¡ Reset 5. ¡Ãкǹ¡ÒÃàÃÕ¡¤×¹Ãкº¨ÐàÃÔèÁµé¹â´Â¡ÒÃÃÕʵÒÃì·¤ÍÁ¾ÔÇàµÍÃì¢Í§¤Ø³ ¨Ò¡¹Ñ鹨зÓÊÓà¹Òä¿Åìä»ÂѧÎÒÃì´ä´Ã쿢ͧ¤Ø³ 6. ËÅѧ¨Ò¡¡ÒÃàÃÕ¡¤×¹àÊÃç¨ÊÔé¹ ¤Ø³ÊÒÁÒöàÃÔèÁãªé¤ÍÁ¾ÔÇàµÍÃì¢Í§¤Ø³ä´éâ´Â¡Ò÷ӫéÓ¢Ñ鹵͹·Õè¤Ø³àÃÔèÁ·Óáµèáá ¡ÒÃàÃÕ¡¤×¹ - 77 »ÃѺáµè§¡ÒÃàÃÕ¡¤×¹´éÇ Gateway Recovery Management 1. ¤ÅÔ¡ Customized Restore (Retain User Data) 2. ˹éÒµèÒ§ Refresh your PC ¨Ðà»Ô´¢Öé¹ 3. ¤ÅÔ¡ NextáÅéǤÅÔ¡ Refresh 4. ¡Ãкǹ¡ÒÃàÃÕ¡¤×¹Ãкº¨ÐàÃÔèÁµé¹â´Â¡ÒÃÃÕʵÒÃì·¤ÍÁ¾ÔÇàµÍÃì¢Í§¤Ø³ ¨Ò¡¹Ñ鹨зÓÊÓà¹Òä¿Åìä»ÂѧÎÒÃì´ä´Ã쿢ͧ¤Ø³ ¢Ñ鹵͹¹Õé¨ÐãªéàÇÅÒ»ÃÐÁÒ³ 30 ¹Ò·Õ 78 ¡ÒÃàÃÕ¡¤×¹¤×¹¨Ò¡¢éÍÁÙÅ·ÕèÊÓÃͧäÇéà¾×èÍ¡ÒÃàÃÕ¡¤×¹¢Í§¤Ø³ à¾×èÍàÃÕ¡¤×¹¨Ò¡¢éÍÁÙÅ·ÕèÊÓÃͧäÇ麹ä´Ãì¿ USB: 1. ËÒ¢éÍÁÙÅÊÓÃͧÊÓËÃѺàÃÕ¡¤×¹¢Í§¤Ø³ 2. àÊÕºä´Ãì¿ USB áÅÐà»Ô´¤ÍÁ¾ÔÇàµÍÃì¢Í§¤Ø³ 3. ËÒ¡ÂѧäÁèà»Ô´ãªé§Ò¹ ¤Ø³ÊÒÁÒöà»Ô´ãªé§Ò¹ä´éã¹ F12 Boot Menu: a. ¡´ <F2> àÁ×èͤÍÁ¾ÔÇàµÍÃì¢Í§¤Ø³àÃÔèÁ·Ó§Ò¹ b. ãªé»ØèÁÅÙ¡ÈëéÒÂËÃ×Í¢ÇÒà¾×èÍàÅ×Í¡àÁ¹Ù Main c. ¡´ÅÙ¡ÈÃŧ¨¹¡ÃзÑè§ F12 Boot Menu ¶Ù¡àÅ×Í¡ ¡´ <F5> à¾×èÍà»ÅÕ蹡ÒõÑ駤èÒ¹Õéä»à»ç¹ Enabled d. ãªé»ØèÁÅÙ¡ÈëéÒÂËÃ×Í¢ÇÒà¾×èÍàÅ×Í¡àÁ¹Ù Exit e. ¢Öé¹ÍÂÙè¡Ñº»ÃÐàÀ·¢Í§ BIOS ·Õè¤ÍÁ¾ÔÇàµÍÃì¢Í§¤Ø³ãªé àÅ×Í¡ Save Changes and Exit ËÃ×Í Exit Saving Changes áÅС´ Enter àÅ×Í¡ OK ËÃ×Í Yes à¾×èÍÂ×¹Âѹ f. ¤ÍÁ¾ÔÇàµÍÃì¢Í§¤Ø³¨ÐÃÕʵÒÃì· 4. ÃÐËÇèÒ§¡ÒÃʵÒÃì·à¤Ã×èͧ ãËé¡´ <F12> à¾×èÍà»Ô´àÁ¹Ù¡ÒúÙêµ àÁ¹Ù¡ÒúÙ굤×Í àÁ¹Ù·ÕèªèǤسàÅ×Í¡ÍØ»¡Ã³ì㹡ÒÃʵÒÃì·à¤Ã×èͧ ãËéàÅ×Í¡ä´Ãì¿ USB a. ãªé»ØèÁÅÙ¡ÈÃà¾×èÍàÅ×Í¡ USB Device áÅéÇ¡´ Enter b. Windows ¨ÐàÃÔèÁ·Ó§Ò¹¨Ò¡¢éÍÁÙÅÊÓÃ᷹ͧ·Õè¨ÐàÃÔèÁ¡Ãкǹ¡ÒÃàÃÔèÁ·Ó§Ò¹µÒÁ»¡µÔ 5. àÅ×Í¡»ÃÐàÀ·¤ÕÂìºÍÃ촢ͧ¤Ø³ 6. àÅ×Í¡ Troubleshoot áÅéÇàÅ×Í¡»ÃÐàÀ·¢Í§¡ÒÃàÃÕ¡¤×¹·Õè¨Ðãªé: ¡ÒÃàÃÕ¡¤×¹ - 79 a. ¤ÅÔ¡ Advanced áÅéǤÅÔ¡ System Restore à¾×èÍàÃÔèÁãªé§Ò¹ Microsoft System Restore: Microsoft System Restore ¨Ð·Ó¡Òà '¶èÒÂ’ ¡ÒõÑ駤èÒÃкº¢Í§¤Ø³à»ç¹ÃÐÂÐáÅкѹ·Ö¡ÊÔè§ àËÅèÒ¹Ñé¹äÇéà»ç¹¨Ø´àÃÕ¡¤×¹ â´ÂÁÒ¡áÅéÇ㹡óշÕè¡ÒÃá¡é䢻Ñ−ËÒ«Í¿·ìáÇÃìÊÒÁÒ Ã¶·Óä´éÂÒ¡ ¤Ø³ÊÒÁÒö¤×¹Ê¶Ò¹ÐÃкº¡ÅѺä»Âѧ¨Ø´àÃÕ¡¤×¹Ãкºà¾×èÍãËéÃкº¢Í§ ¤Ø³ÊÒÁÒö·Ó§Ò¹ä´éÍÕ¡¤ÃÑé§ b. ¤ÅÔ¡ Reset your PC à¾×èÍàÃÔèÁ¡Ãкǹ¡ÒÃÃÕà«ç·: Reset your PC¨Ðà»ç¹¡ÒÃź·Ø¡ÍÂèÒ§º¹ÎÒÃì´´ÔÊ¡ì¢Í§¤Ø³ ¨Ò¡¹Ñ鹨֧µÔ´µÑé§ Windows «Í¿·ìáÇÃìáÅÐä´ÃìàÇÍÃì·Ñé§ËÁ´·Õèà¤Âä´éÃѺ¡ÒõԴµÑé§äÇéÅèǧ˹éÒº¹¤ÍÁ¾ÔÇàµÍÃì¢Í§¤Ø³ ËÒ¡¤Ø³ÊÒÁÒöà¢éÒ¶Ö§ä¿Åì·ÕèÊÓ¤Ñ−º¹ÎÒÃì´ä´Ã쿢ͧ¤Ø³ä´é ãËéÊÓÃͧ¢éÍÁÙÅäÇé â»Ã´´Ù "ÃÕà«ç·¾Õ«Õ¢Í§¤Ø³¨Ò¡¡ÒÃÊÓÃͧ¢éÍÁÙÅà¾×èÍàÃÕ¡¤×¹" ã¹Ë¹éÒ 81 c. ¤ÅÔ¡ Refresh your PC à¾×èÍàÃÔèÁ¡Ãкǹ¡ÒÃÃÕà¿Ãª: Refresh your PC ¨Ð¾ÂÒÂÒÁà¡çºä¿Åì (¢éÍÁÙżÙéãªé) ¢Í§¤Ø³àÍÒäÇé áµè¨Ð·Ó¡ÒõԴµÑé§ «Í¿·ìáÇÃìáÅÐä´ÃìàÇÍÃìãËÁè·Ñé§ËÁ´ «Í¿·ìáÇÃì·ÕèµÔ´µÑé§äÇéµÑé§áµè·Õè¤Ø³«×é;իբͧ ¤Ø³ÁҨж١ź (¡àÇ鹫Ϳ·ìáÇÃì·ÕèµÔ´µÑ駨ҡ Windows Store) â»Ã´´Ù "ÃÕà¿Ãª¾Õ«Õ¢Í§¤Ø³¨Ò¡¡ÒÃÊÓÃͧ¢éÍÁÙÅà¾×èÍàÃÕ¡¤×¹" ã¹Ë¹éÒ 82 80 ÃÕà«ç·¾Õ«Õ¢Í§¤Ø³¨Ò¡¡ÒÃÊÓÃͧ¢éÍÁÙÅà¾×èÍàÃÕ¡¤×¹ ¢éͤÇÃÃÐÇѧ: ¡ÒÃÃÕà«ç·¾Õ«Õ¨Ðà»ç¹¡ÒÃźä¿ÅìµèÒ§æ ·Ñé§ËÁ´º¹ÎÒÃì´ä´Ã쿢ͧ¤Ø³ 1. ˹éÒµèÒ§ Reset your PC ¨Ðà»Ô´¢Öé¹ ÃÙ»ÀÒ¾ãªéà¾×èÍ¡ÒÃÍéÒ§ÍÔ§à·èÒ¹Ñé¹ 2. ¤ÅÔ¡ Next 3. àÅ×Í¡Ãкº»¯ÔºÑµÔ¡Ò÷Õè¨Ð·Ó¡ÒÃàÃÕ¡¤×¹ (»¡µÔ¨ÐÁÕµÑÇàÅ×Í¡à¾Õ§µÑÇàÅ×Í¡à´ÕÂÇ) 4. àÅ×Í¡à¾×èÍà¡çº¡ÒÃà»ÅÕè¹á»Å§ã´æ ¡ÑºÎÒÃì´ä´Ãì¿: a. ËÒ¡¤Ø³ä´éź¾ÒÃìµÔªÑè¹ÊÓËÃѺ¡ÒÃàÃÕ¡¤×¹ä»áÅéÇ ËÃ×ÍÁÕ¡ÒÃà»ÅÕè¹á»Å§¡Ñº¾ÒÃìµÔªÑè¹¹Ñ鹺¹ÎÒÃì´ä´ÃìÄ áÅеéͧ¡ÒÃà¡çº¡ÒÃà»ÅÕè¹á»Å§¹ÕéäÇé àÅ×Í¡ No b. à¾×èÍàÃÕ¡¤×¹¡ÒõÑ駤èÒ¨Ò¡âç§Ò¹·Ñé§ËÁ´¢Í§¤ÍÁ¾ÔÇàµÍÃì àÅ×Í¡ Yes 5. àÅ×Í¡ÇÔ¸Õ¡ÒÃźä¿ÅìµèÒ§æ ¢Í§¤Ø³: a. Just remove my files ¨Ðźä¿Åì·Ñé§ËÁ´ÍÂèÒ§ÃÇ´àÃçÇ¡è͹·Õè¨ÐàÃÕ¡¤×¹¤ÍÁ¾ÔÇàµÍÃì¢Í§¤Ø³ â´Â¨ÐãªéàÇÅÒ»ÃÐÁÒ³ 30 ¹Ò·Õ ¡ÒÃàÃÕ¡¤×¹ - 81 b. Fully clean the drive ÅéÒ§ä´Ã쿢ͧ¤Ø³ÍÂèÒ§ÊÁºÙóìËÅѧ¨Ò¡·Õèä¿Åì¶Ù¡Åº ´Ñ駹Ñ鹨ÐäÁèÊÒÁÒö´Ùä¿Åìã´æ ä´éËÅѧ¨Ò¡¡ÒÃàÃÕ¡¤×¹ ¡ÒÃÅéÒ§ä´Ãì¿ãªéàÇÅÒ¹Ò¹¡ÇèÒÁÒ¡ ÍÒ¨ãªéàÇÅÒ¶Ö§ 5 ªÑèÇâÁ§ áµè¨Ð»ÅÍ´ÀÑ¡ÇèÒà¹×èͧ¨Ò¡ä¿Åìà¡èҨж١źÍÂèÒ§ÊÔé¹àªÔ§ 6. ¤ÅÔ¡ Reset 7. ËÅѧ¨Ò¡¡ÒÃàÃÕ¡¤×¹àÊÃç¨ÊÔé¹ ¤Ø³ÊÒÁÒöàÃÔèÁãªé¤ÍÁ¾ÔÇàµÍÃì¢Í§¤Ø³ä´éâ´Â¡Ò÷ӫéÓ¢Ñ鹵͹·Õè¤Ø³àÃÔèÁ·Óáµèáá ÃÕà¿Ãª¾Õ«Õ¢Í§¤Ø³¨Ò¡¡ÒÃÊÓÃͧ¢éÍÁÙÅà¾×èÍàÃÕ¡¤×¹ 1. ˹éÒµèÒ§ Refresh your PC ¨Ðà»Ô´¢Öé¹ 2. 3. 4. 5. ¤ÅÔ¡ Next (¶Ñ´ä») àÅ×Í¡Ãкº»¯ÔºÑµÔ¡Ò÷Õè¨Ð·Ó¡ÒÃàÃÕ¡¤×¹ (»¡µÔ¨ÐÁÕµÑÇàÅ×Í¡à¾Õ§µÑÇàÅ×Í¡à´ÕÂÇ) ¤ÅÔ¡ Refresh ¡Ãкǹ¡ÒÃàÃÕ¡¤×¹Ãкº¨ÐàÃÔèÁµé¹â´Â¡ÒÃÃÕʵÒÃì·¤ÍÁ¾ÔÇàµÍÃì¢Í§¤Ø³ ¨Ò¡¹Ñ鹨зÓÊÓà¹Òä¿Åìä»ÂѧÎÒÃì´ä´Ã쿢ͧ¤Ø³ ¢Ñ鹵͹¹Õé¨ÐãªéàÇÅÒ»ÃÐÁÒ³ 30 ¹Ò·Õ 82 ¤Ó¶ÒÁ·Õè¶Ù¡¶ÒÁºèÍ ÅӴѺµèÍ仹Õé¤×ÍÃÒ¡Òâͧà˵ءÒóì·ÕèÍÒ¨à¡Ô´¢Öé¹ä´éã¹ÃÐËÇèÒ§¡ÒÃãªé§Ò¹¤ÍÁ¾ÔÇàµÍÃì â´ÂÁÕÇÔ¸Õ¡ÒÃá¡é䢧èÒÂæ ÁͺãËé¡ÑºáµèÅÐà˵ءÒÃ³ì ©Ñ¹à»Ô´ÊÇÔµ«ì¾ÒÇàÇÍÃì áµè¤ÍÁ¾ÔÇàµÍÃìäÁèàÃÔèÁ·Ó§Ò¹ËÃ×ͺÙêµ ´Ù·Õèä¿áÊ´§Ê¶Ò¹Ð¾ÒÇàÇÍÃì: • ËÒ¡ä¿äÁèµÔ´ ËÁÒ¶֧äÁèÁÕ¾Åѧ§Ò¹ä¿¿éÒ»é͹ãËé¡Ñº¤ÍÁ¾ÔÇàµÍÃì ãËéµÃǨÊͺÊÔ觵èÍ仹Õé: • ËÒ¡¤Ø³ãªé§Ò¹´éÇÂẵàµÍÃÕè ẵàµÍÃÕèÍÒ¨ÁÕ¾Åѧ§Ò¹µèÓáÅÐäÁèÊÒÁÒöãËé¾Åѧ§Ò¹¡Ñº¤ÍÁ¾ÔÇàµÍÃìä´é µèÍÍá´»àµÍÃì AC à¾×èÍ·Ó¡ÒÃÃÕªÒÃì¨áºµàµÍÃÕè • µÃǨ´ÙãËéá¹èã¨ÇèÒÍá´»àµÍÃì AC ¹Ñé¹ä´éàÊÕº»ÅÑê¡à¢éҡѺ¤ÍÁ¾ÔÇàµÍÃìáÅлÅÑꡨèÒÂä¿´ÕáÅéÇ • Ëҡ俵Դ ãËéµÃǨÊͺ´Ñ§¹Õé: • ÁÕá¼è¹´ÔÊ¡ìÍÂÙèã¹ä´Ãì¿Í;µÔ¤ÍÅËÃ×ÍäÁè? ¹Óá¼è¹´ÔÊ¡ìÍÍ¡áÅС´ <Ctrl> + <Alt> + <Del> à¾×èÍÃÕʵÒÃì·à¤Ã×èͧ • ¤Ø³ÁÕÍØ»¡Ã³ìà¡çº¢éÍÁÙÅ USB (´ÔÊ¡ì USB ËÃ×ÍÊÁÒÃì·â¿¹) àª×èÍÁµèÍÍÂÙè¡Ñº¤ÍÁ¾ÔÇàµÍÃì¢Í§¤Ø³ËÃ×ÍäÁè? ¹Ó´ÔÊ¡ì¹ÕéÍÍ¡áÅС´ <Ctrl> + <Alt> + <Del> à¾×èÍÃÕʵÒÃì·à¤Ã×èͧ ¤Ó¶ÒÁ·Õè¶Ù¡¶ÒÁºèÍ - 83 äÁèÁÕÍÐäûÃÒ¡¯¢Ö鹺¹Ë¹éÒ¨Í Ãкº¨Ñ´¡ÒþÅѧ§Ò¹¢Í§¤ÍÁ¾ÔÇàµÍÃì¨Ð·Ó˹éÒ¨ÍãËéÇèÒ§à»ÅèÒâ´ÂÍѵâ¹ÁѵÔà¾×èÍ¡ÒûÃÐËÂÑ´¾Åѧ§Ò ¹ ¡´»ØèÁã´¡çä´éà¾×èÍà»Ô´Ë¹éÒ¨ÍãËé¡ÅѺ¤×¹ÁÒ ËÒ¡¡´»ØèÁáÅéÇ˹éÒ¨ÍäÁèà»Ô´¡ÅѺ¤×¹ÁÒ ÍÒ¨ÁÕÊÒà˵Øä´éÊÒÁ»ÃСÒà ÊÒà˵Ø: • ÃдѺ¤ÇÒÁÊÇèÒ§ÍÒ¨¹éÍÂà¡Ô¹ä» ¡´ (à¾ÔèÁ) à¾×èÍ»ÃѺÃдѺ¤ÇÒÁÊÇèÒ§ • ÍØ»¡Ã³ìáÊ´§¼ÅÍÒ¨¶Ù¡µÑ駤èÒãËéà»ç¹¨ÍáÊ´§¼ÅÀÒ¹͡ ¡´ à¾×èÍÊÅѺ¡ÒÃáÊ´§¼Å¡ÅѺä»Âѧ¤ÍÁ¾ÔÇàµÍÃì • ËÒ¡ä¿áÊ´§Ê¶Ò¹Ð Sleep ÊÇèÒ§ ËÁÒ¶֧¤ÍÁ¾ÔÇàµÍÃìÍÂÙèã¹âËÁ´ Sleep ¡´ »ØèÁ¾ÒÇàÇÍÃìáÅéÇ»ÅèÍÂà¾×èÍ¡ÅѺÁÒãªé§Ò¹µèÍ äÁèä´éÂÔ¹àÊÕ§ã´æ ¨Ò¡¤ÍÁ¾ÔÇàµÍÃì ãËéµÃǨÊͺÊÔ觵èÍ仹Õé: • àÊÕ§ÍÒ¨¶Ù¡»Ô´ÍÂÙè ã¹ Windows ãËé´Ù·Õèäͤ͹¤Çº¤ØÁàÊÕ§ (ÅÓ⾧) º¹·ÒÊ¡ìºÒÃì ËÒ¡ÁÕà¤Ã×èͧËÁÒ¡ҡºÒ· ãËé¤ÅÔ¡º¹äͤ͹áÅéÇ¡àÅÔ¡¡ÒÃàÅ×Í¡µÑÇàÅ×Í¡ Mute all • ÃдѺàÊÕ§ÍÒ¨¹éÍÂà¡Ô¹ä» ã¹ Windows ãËé´Ù·Õèäͤ͹¤Çº¤ØÁàÊÕ§º¹·ÒÊ¡ìºÒÃì ¤Ø³ÂѧÊÒÁÒöãªé»ØèÁ¤Çº¤ØÁàÊÕ§à¾×èÍ»ÃѺàÊÕ§ä´éÍÕ¡´éÇ • ËÒ¡ÁÕËٿѧËÃ×ÍÅÓ⾧ÀÒ¹͡µèÍÍÂÙè¡Ñº¾ÍÃìµäŹìàÍҷ캹¤ÍÁ¾ÔÇàµÍÃì ÅÓ⾧º¹à¤Ã×èͧ¤ÍÁ¾ÔÇàµÍÃì¨Ð»Ô´¡Ò÷ӧҹâ´ÂÍѵâ¹ÁÑµÔ 84 ©Ñ¹µéͧ¡ÒÃà»Ô´¶Ò´ä´Ãì¿Í;µÔ¤ÍÅÍÍ¡â´ÂäÁèµéͧà»Ô´à¤Ã×èͧ ÁÕªèͧ·ÕèÊÒÁÒöà»Ô´´éÇÂÁ×ÍÍÂÙ躹ä´Ãì¿Í;µÔ¤ÍÅ §èÒÂæà¾Õ§á¤èãªéÊèǹ»ÅÒ¢ͧ»Ò¡¡ÒËÃ×ͤÅԻ˹պ¡ÃдÒÉãÊèà¢éÒä»ã¹ªèͧáÅС´à¾×èÍà»Ô´¶Ò´ ¤ÕÂìºÍÃì´äÁèµÍºÊ¹Í§ ÅͧµèͤÕÂìºÍÃì´ÀÒ¹͡à¢éҡѺ¾ÍÃìµ USB º¹¤ÍÁ¾ÔÇàµÍÃì ËÒ¡ÊÒÁÒöãªé§Ò¹ä´é ãËéµÔ´µèͼÙé¢Ò¢ͧ¤Ø³ËÃ×ÍÈÙ¹ÂìºÃÔ¡Ò÷Õèä´éÃѺ¡ÒÃáµè§µÑé§à¹×èͧ¨Ò¡ÊÒ¤ÕÂìºÍÃì´ÍÒ¨ËÅÇÁ à¤Ã×èͧ¾ÔÁ¾ìäÁè·Ó§Ò¹ ãËéµÃǨÊͺÊÔ觵èÍ仹Õé: • µÃǨ´ÙãËéá¹èã¨ÇèÒà¤Ã×èͧ¾ÔÁ¾ì¹Ñé¹àÊÕºà¢éҡѺ»ÅÑê¡ä¿áÅÐà»Ô´ãªé§Ò¹ÍÂÙè • µÃǨ´ÙãËéá¹èã¨ÇèÒÊÒÂà¤Ã×èͧ¾ÔÁ¾ì¹Ñé¹àª×èÍÁµèÍà¢éҡѺ¾ÍÃìµ USB áÅоÍÃìµ·Õè¶Ù¡µéͧ¢Í§à¤Ã×èͧ¾ÔÁ¾ìá¹è¹´ÕáÅéÇ ¤Ó¶ÒÁ·Õè¶Ù¡¶ÒÁºèÍ - 85 à¤Åç´ÅѺáÅФÓá¹Ð¹Ó㹡ÒÃãªé Windows 8 àÃÒ·ÃÒº´ÕÇèÒÃкº»¯ÔºÑµÔ¡ÒÃãËÁè¹Õé¨Ðµéͧãªé¤ÇÒÁ¤Øé¹à¤Â㹡ÒÃãªé§Ò¹¾ÍÊÁ¤Çà ´Ñ§¹Ñé¹àÃÒ¨Ö§ä´éÊÃéÒ§¾ÍÂàµÍÃì¢Öé¹à¾×èͪèÇÂÊÃéÒ§¤ÇÒÁ¤Øé¹à¤ÂãËé¡Ñº¤Ø³ ÁÕÍÂÙèÊÒÁ¤Í¹à«ç»µì·Õè¤Ø³µéͧ¨ÓäÇéãËé¢Öé¹ã¨ 1. àÃÔèÁ »ØèÁ àÃÔèÁµé¹ äÁèÁÕãËéàÅ×Í¡ãªéÍÕ¡µèÍä» ¤Ø³ÊÒÁÒöàÃÕ¡ãªéá;¾ÅÔपÑè¹ä´é¨Ò¡Ë¹éÒ¨ÍàÃÔèÁµé¹ 2. Tiles Live tiles ¹Ñé¹à»ÃÕºàËÁ×͹¡ÑºÀÒ¾¢¹Ò´Âèͧ͢â»Ãá¡ÃÁµèÒ§æ 3. Charms Charms ªèÇÂãËé¤Ø³ãªé¿Ñ§¡ìªÑè¹µèÒ§æ ·Õèà»ç¹»ÃÐ⪹ì àªè¹¡ÒÃáºè§»Ñ¹¢éÍÁÙÅ, »Ô´¾Õ«ÕËÃ×Íà»ÅÕ蹡ÒõÑ駤èÒä´é ©Ñ¹¨Ðà¢éÒ¶Ö§ charms ä´éÍÂèÒ§äÃ? àÅ×è͹à¤ÍÃìà«ÍÃìä»·ÕèÁØÁ¢ÇÒº¹ËÃ×Í¢ÇÒÅèÒ§¢Í§Ë¹éÒ¨Íà¾×èÍà»Ô´á¶º Charms ËÃ×Í¡´»ØèÁ Windows + <C> ©Ñ¹¨Ðä»ÂѧàÁ¹Ù àÃÔèÁ ä´éÍÂèÒ§äà ¡´»ØèÁ Windows º¹¤ÕÂìºÍÃì´; ¡´»ØèÁ Windows + <C> áÅéǤÅÔ¡ àÃÔèÁ; ËÃ×ÍàÅ×è͹à¤ÍÃìà«ÍÃìä»ÂѧÁØÁ«éÒÂÅèÒ§¢Í§Ë¹éÒ¨ÍáÅéǤÅÔ¡ àÃÔèÁ 86 ©Ñ¹¨ÐÊÅѺÃÐËÇèÒ§â»Ãá¡ÃÁä´éÍÂèÒ§äÃ? àÅ×è͹à¤ÍÃìà«ÍÃìä»ÂѧÁØÁ´éÒ¹«éÒ¢ͧ˹éÒ¨Íà¾×èÍ´ÙÀÒ¾µÑÇÍÂèÒ§¢Í§á;¾ÅÔपÑè¹·ÕèÃѹÍÂÙè㹻Ѩ¨ØºÑ¹ ¤Ø³ÂѧÊÒÁÒö¡´»ØèÁ Windows + <Tab> à¾×èÍà»Ô´áÅÐàÅ×è͹´Ùá;¾ÅÔपÑè¹·ÕèÃѹÍÂÙèä´é ©Ñ¹¨Ð»Ô´¤ÍÁ¾ÔÇàµÍÃì¢Í§©Ñ¹ä´éÍÂèÒ§äÃ? ¡´»ØèÁ Windows + <C>, ¤ÅÔ¡ Settings > Power áÅÐàÅ×Í¡¡ÒôÓà¹Ô¹¡Ò÷Õè¤Ø³µéͧ¡Òà ËÃ×ÍÍÕ¡ÇÔ¸Õ˹Ö觤×Í ¨Ò¡ à´Ê¡ì·çÍ» ¤ÅÔ¡ Gateway Power Button áÅéÇàÅ×Í¡¡ÒôÓà¹Ô¹¡Ò÷Õè¤Ø³µéͧ¡ÒÃ·Ó ·ÓäÁ¨Ö§ÁÕÍÔ¹àµÍÃìà¿«ãËÁè? ÍÔ¹àµÍÃìà¿«ãËÁèÊÓËÃѺ Windows 8 ä´éÃѺ¡ÒÃÍ͡ẺÁÒà¾×èÍãËé·Ó§Ò¹ÃèÇÁ¡Ñº¡ÒÃÍÔ¹¾Ø·áººÊÑÁ¼ÑÊä´é´Õ¢Öé¹ á;¾ÅÔपÑè¹ Windows Store ¨Ðãªé˹éҨͷÑé§ËÁ´â´ÂÍѵâ¹ÁѵÔáÅÐäÁè¨Óà»ç¹µéͧ·Ó¡ÒûԴẺà´ÔÁÍÕ¡µèÍä» á;¾ÅÔपÑè¹ Windows ¨Ð¶Ù¡áÊ´§ã¹ Start â´Âãªé¾×é¹ËÅѧ Live ’live tiles’ ¤×ÍÍÐäà ¾×é¹ËÅѧ Live tiles ¤ÅéÒ¡ѺÀÒ¾Âèͧ͢á;¾ÅÔपÑè¹·Õè¨Ðä´éÃѺ¡ÒÃÍѾവ¢éÍÁÙÅãËÁèæ àÁ×èͤسä´éàª×èÍÁµè͡ѺÍÔ¹àµÍÃìà¹çµ µÑÇÍÂèÒ§àªè¹ ¤Ø³ÊÒÁÒö´ÙÃÒ§ҹÊÀÒ¾ÍÒ¡ÒÈËÃ×ÍÍѾവµÅÒ´ËØé¹ä´éâ´ÂäÁè¨Óà»ç¹µéͧà»Ô´á;¾ÅÔपÑè¹ ¤Ó¶ÒÁ·Õè¶Ù¡¶ÒÁºèÍ - 87 ©Ñ¹¨Ð»Å´Åçͤ¤ÍÁ¾ÔÇàµÍÃì¢Í§©Ñ¹ä´éÍÂèÒ§äÃ? ¡´»ØèÁã´æ áÅФÅÔ¡·Õèäͤ͹ºÑ−ªÕ¼Ùéãªéà¾×èͻŴÅçͤ¤ÍÁ¾ÔÇàµÍÃì ËÒ¡ºÑ−ªÕ¢Í§¤Ø³ÁÕ¡ÒõÑé§ÃËÑʼèÒ¹äÇé ¤Ø³¨Óà»ç¹µéͧ»é͹ÃËÑʼèÒ¹à¾×èÍ´Óà¹Ô¹¡ÒõèÍ ©Ñ¹¨Ð»ÃѺáµè§¤ÍÁ¾ÔÇàµÍÃì¢Í§©Ñ¹ä´éÍÂèÒ§äÃ? ¤Ø³ÊÒÁÒö»ÃѺáµè§ àÃÔèÁ ä´é´éÇÂÀÒ¾¾×é¹ËÅѧÍ×è¹ ËÃ×Í´éÇ¡ÒûÃѺµÓá˹è§ä·ÅìãËéàËÁÒÐÊÁ¡Ñº¤ÇÒÁµéͧ¡ÒÃÊèǹµÑǢͧ¤Ø³ à¾×èÍà»ÅÕè¹ÀÒ¾¾×é¹ËÅѧ ¡´»ØèÁ Windows + <C> áÅéǤÅÔ¡ Settings > Change PC settings > ÊèǹµÑÇ ¤ÅÔ¡ ˹éÒ¨ÍàÃÔèÁµé¹ ·Õè´éÒ¹º¹¢Í§Ë¹éÒáÅéÇàÅ×Í¡ÊÕáÅÐÀÒ¾ ©Ñ¹¨Ðà¤Å×è͹ÂéÒÂä·Åìä´éÍÂèÒ§äà ¤ÅÔ¡·Õèä·Åì¤éÒ§äÇéà¾×èÍàÅ×Í¡ ¨Ò¡¹Ñé¹ÅÒ¡ä»ÇÒ§º¹ àÃÔèÁ ·Õè¤Ø³µéͧ¡ÒÃãËéä·Åì¹Ñé¹»ÃÒ¡¯ ä·ÅìÍ×è¹æ ¨Ð¶Ù¡ÂéÒµÒÁä·Åì·ÕèÍÂÙèã¹µÓá˹è§ãËÁè ©Ñ¹¨Ð·ÓãËéä·ÅìÁÕ¢¹Ò´ãË−è¢Öé¹ËÃ×ÍàÅç¡Å§ä´éËÃ×ÍäÁè ¤ÅÔ¡¢ÇÒ·Õèä·Åì ¨Ò¡¹Ñé¹àÅ×Í¡ àÅç¡Å§ ËÃ×Í ´ãË−è ¨Ò¡àÁ¹Ù·Õè»ÃÒ¡¯¢Öé¹·Õè´éÒ¹ÅèÒ§¢Í§Ë¹éÒ¨Í ©Ñ¹¨Ð·Ó¡ÒûÃѺáµè§Ë¹éÒ¨ÍÅçͤä´éÍÂèÒ§äà ¤Ø³ÊÒÁÒö»ÃѺáµè§Ë¹éÒ¨ÍÅçͤãËéà»ç¹áºº·Õè¤Ø³µéͧ¡ÒÃä´é´éÇÂÀÒ¾µèÒ§æ ËÃ×ÍãËéáÊ´§Ê¶Ò¹ÐáÅСÒÃá¨é§àµ×͹·ÕèàËÁÒСѺ¤ÇÒÁµéͧ¡ÒÃÊèǹµÑǢͧ¤Ø³ä´é 88 à¾×èÍà»ÅÕè¹ÀÒ¾¾×é¹ËÅѧ ¡´»ØèÁ Windows + <C> áÅéǤÅÔ¡ Settings > Change PC settings > ÊèǹµÑÇ ¤ÅÔ¡ »ÃѺáµè§Ë¹éÒ¨ÍÅçͤä´é ·Õè´éÒ¹º¹¢Í§Ë¹éÒáÅéÇàÅ×Í¡ÀÒ¾áÅÐá;¾ÅÔपÑè ¹·Õè¤Ø³µéͧ¡ÒèÐàË繺¹Ë¹éÒ¨ÍÅçͤ ©Ñ¹¨Ð»Ô´á;¾ÅÔपÑè¹ä´éÍÂèÒ§äÃ? àÅ×è͹à¤ÍÃìà«ÍÃìä»Âѧ´éÒ¹º¹¢Í§Ë¹éÒ¨ÍáÅéǤÅÔ¡áÅÐÅҡ˹éÒµèÒ§¹Ñé¹ä»´éÒ¹ÅèÒ§ à¾×èͻԴá;¾ÅÔपÑè¹ ¤Ø³ÊÒÁÒö»Ô´á;¾ÅÔपÑ蹨ҡÀÒ¾ÂèÍá;¾ÅÔपÑè¹·Õè´éÒ¹«éÒ¢ͧ˹éҨ͹Õéä´éâ´Â¡ÒäÅÔ¡¢ÇÒº ¹ÀÒ¾ÂèÍáÅéÇàÅ×Í¡ Close ©Ñ¹¨Ðà»ÅÕ蹤ÇÒÁÅÐàÍÕ´¢Í§Ë¹éÒ¨Íä´éËÃ×ÍäÁè ¨Ò¡ àÃÔèÁãËé¾ÔÁ¾ì ’ἧ¤Çº¤ØÁ’ à¾×èÍà»Ô´ ¡Òäé¹ËÒ áÅÐáÊ´§¼ÅÅѾ¸ì áÅéǤÅÔ¡ ἧ¤Çº¤ØÁ > »ÃѺÅÐàÍÕ´¢Í§Ë¹éÒ¨Í ©Ñ¹µéͧ¡Ò÷Õè¨Ðãªé Windows Ẻ·Õè©Ñ¹à¤Âãªé – àÍÒà´Ê¡ì·çÍ»¢Í§©Ñ¹¤×¹ÁÒ! ¨Ò¡ àÃÔèÁ ¤ÅÔ¡·Õèä·Åì à´Ê¡ì·ç à¾×èÍ´Ùà´Ê¡ì·çͻẺà´ÔÁ ¤Ø³ÊÒÁÒö»Ñ¡ËÁØ´á;¾ÅÔपÑè¹·Õè¤Ø³ãªéºèͺ¹·ÒÊ¡ìºÒÃìà¾×èͤÇÒÁÊдǡ㹡ÒÃà»Ô´ãªé§Ò¹ ËÒ¡¤Ø³¤ÅÔ¡·Õèá;¾ÅÔपÑè¹·ÕèäÁèãªèá;¾ÅÔपÑè¹ Windows Store Ãкº Windows à»Ô´á;¾ÅÔपÑè¹¹Ñé¹â´Âãªé Desktop â´ÂÍѵâ¹ÁÑµÔ ¤Ó¶ÒÁ·Õè¶Ù¡¶ÒÁºèÍ - 89 á;¾ÅÔपÑè¹µèÒ§æ ¢Í§©Ñ¹ÍÂÙè·Õèä˹? ¨Ò¡ àÃÔèÁ à¾Õ§àÃÔèÁ¾ÔÁ¾ìª×èͧ͢á;¾ÅÔपÑè¹·Õè¤Ø³µéͧ¡ÒÃà»Ô´ Ãкº ¡Òäé¹ËÒ ¨Ðà»Ô´¼Å¡Òäé¹ËÒâ´ÂÍѵâ¹ÁÑµÔ à¾×èÍ´ÙÃÒª×èͧ͢á;¾ÅÔपÑè¹·Ñé§ËÁ´ ¡´ space bar ËÃ×Í¡´ »ØèÁàÁ¹Ù áÅéǤÅÔ¡ ·Ñé§ËÁ´á;¾ÅÔठ©Ñ¹¨Ð·ÓãËéá;¾ÅÔपÑè¹»ÃÒ¡¯ÍÂÙ躹 Start ä´éÍÂèÒ§äà ËÒ¡¤Ø³ÍÂÙèã¹ ·Ñé§ËÁ´á;¾ÅÔठáÅФسµéͧ¡Ò÷ÓãËéá;¾ÅÔपÑè¹Ë¹Ö觻ÃÒ¡¯ÍÂÙ躹 àÃÔèÁ ¤Ø³ÊÒÁÒöàÅ×Í¡á;¾ÅÔपÑè¹¹Ñé¹áÅéÇ¡´¤ÅÔ¡¢ÇÒº¹á;¾ÅÔपÑè¹ àÅ×Í¡ »Ñ¡ËÁØ´¡ÑºàÃÔèÁ ¨Ò¡àÁ¹Ù·Õè»ÃÒ¡¯·Õè´éÒ¹ÅèÒ§¢Í§Ë¹éÒ¨Í ©Ñ¹¨Ðź¾×é¹ËÅѧÍÍ¡¨Ò¡ àÃÔèÁ ä´éÍÂèÒ§äÃ? ¤ÅÔ¡¢ÇÒ·Õèä·ÅìáÅéǤÅÔ¡äÁè»Ñ¡ËÁØ´¨Ò¡àÃÔèÁ¨Ò¡àÁ¹Ù·Õè»ÃÒ¡¯·Õè´éÒ¹ÅèÒ§¢Í§Ë¹éÒ¨Í ©Ñ¹¨Ð·ÓãËéá;¾ÅÔपÑè¹»ÃÒ¡¯ÍÂÙ躹·ÒÊ¡ìºÒÃìã¹à´Ê¡ì·çÍ»ä´éÍÂèÒ§äÃ? ËÒ¡¤Ø³ÍÂÙèã¹ ·Ñé§ËÁ´á;¾ÅÔठáÅФسµéͧ¡Ò÷ÓãËéá;¾ÅÔपÑè¹Ë¹Ö觻ÃÒ¡¯ÍÂÙ躹·ÒÊ¡ìºÒÃìã¹ à´Ê¡ì·ç ¤Ø³ÊÒÁÒöàÅ×Í¡á;¾ÅÔपÑè¹¹Ñé¹áÅéÇ¡´¤ÅÔ¡¢ÇÒº¹á;¾ÅÔपÑè¹ àÅ×Í¡ »Ñ¡ËÁØ´¡Ñº·ÒÊ¡ìºÒÃì ¨Ò¡àÁ¹Ù·Õè»ÃÒ¡¯¢Öé¹·Õè´éÒ¹ÅèÒ§¢Í§Ë¹éÒ¨Í ©Ñ¹¨ÐµÔ´µÑé§á;¾ÅÔपÑè¹ä´éÍÂèÒ§äÃ? ¤Ø³ÊÒÁÒö´ÒǹìâËÅ´á;¾ÅÔपÑè¹ Windows Store ä´é¨Ò¡ Store ¤Ø³¨ÐµéͧÁÕ Microsoft ID à¾×èÍ«×éÍáÅдÒǹìâËÅ´á;¾ÅÔपÑ蹨ҡ Store 90 ©Ñ¹äÁ辺á;¾ÅÔपÑè¹ÍÂèÒ§ Notepad áÅÐ Paint! â»Ãá¡ÃÁ¾Ç¡¹ÕéËÒÂä»ä˹ËÁ´ ¨Ò¡ àÃÔèÁ ¤Ø³à¾Õ§á¤èàÃÔèÁ¾ÔÁ¾ìª×èͧ͢á;¾ÅÔपÑè¹·Õè¤Ø³ÁͧËÒà¾×èÍà»Ô´ãªé¡Òäé¹ËÒ áÅдÙÃÒª×èÍ¡Òäé¹ËÒ ËÃ×Íà»Ô´ á;¾ÅÔपÑè¹·Ñé§ËÁ´ áÅéÇàÅ×è͹ÁÒÂѧ ’Windows Accessories’ à¾×èÍ´ÙÃÒª×èÍâ»Ãá¡ÃÁà¡èÒæ Microsoft ID (ºÑ−ªÕ) ¤×ÍÍÐäà ºÑ−ªÕ Microsoft ¤×Í·ÕèÍÂÙèÍÕàÁÅìáÅÐÃËÑʼèÒ¹·Õè¤Ø³ãªéà¾×èÍŧª×èÍà¢éÒãªé§Ò¹ Windows ¤Ø³ÊÒÁÒöãªé·ÕèÍÂÙèÍÕàÁÅìä´é áµè¨ÐãËé´Õ·ÕèÊØ´¤×ͤسàÅ×Í¡·ÕèÍÂÙèÍÕàÁÅì·Õè¤Ø³ãªéÊÓËÃѺµÔ´µè͡Ѻà¾×è͹æ áÅÐãªéà¾×èÍŧª×èÍà¢éÒãªé§Ò¹àÇçºä«µì·Õè¤Ø³ª×蹪ͺ àÁ×èͤسŧª×èÍà¢éÒãªé§Ò¹¡Ñº¾Õ«Õ¢Í§¤Ø³´éǺÑ−ªÕ Microsoft ¤Ø³¨Ð·Ó¡ÒÃàª×èÍÁµè;իբͧ¤Ø³¡Ñº¼Ù餹 ä¿Åì áÅÐÍØ»¡Ã³ì·Õè¤Ø³ãËé¤ÇÒÁÊÓ¤Ñ− ©Ñ¹µéͧÁÕºÑ−ªÕ¹ÕéËÃ×ÍäÁè ¤Ø³äÁè¨Óà»ç¹µéͧÁÕ Microsoft ID à¾×èÍãªé§Ò¹ Windows 8 áµè¡ÒÃÁÕºÑ−ªÕ¹ÕéäÇé¨Ð·ÓãËéªÕÇÔµ¤Ø³§èÒ¢Öé¹à¹×èͧ¨Ò¡¤Ø³¨ÐÊÒÁÒö«Ô§¤ì¢éÍÁÙżèÒ¹ÍØ»¡Ã³ìµèÒ§æ ·Õè¤Ø³ä´éŧª×èÍà¢éÒãªéâ´Âãªé Microsoft ID ©Ñ¹¨ÐÁÕºÑ−ªÕé¹Õéä´éÍÂèÒ§äà ËÒ¡¤Ø³ä´éµÔ´µÑé§ Windows 8 áÅéÇáÅÐÂѧäÁèä´éŧª×èÍà¢éÒãªéâ´ÂãªéºÑ−ªÕ Microsoft ËÃ×ͤسäÁèÁÕºÑ−ªÕ Microsoft áÅеéͧ¡ÒèÐÁÕºÑ−ªÕäÇéãªé§Ò¹ ¡´»ØèÁ Windows + <C> áÅéǤÅÔ¡ ¡ÒõÑ駤èÒè > »ÅÕ蹡Òþիբͧ¤Ø³µÑ駤èҢͧ¤Ø³ > ¼Ùéãªé > ÊÅѺ价Õè Microsoft ºÑ−ªÕ ¨Ò¡¹Ñé¹·ÓµÒÁ¤Óá¹Ð¹Óº¹Ë¹éÒ¨Í ¤Ó¶ÒÁ·Õè¶Ù¡¶ÒÁºèÍ - 91 ©Ñ¹¨Ðà¾ÔèÁÃÒ¡ÒÃâ»Ã´Å§ä»ã¹ Internet Explorer ä´éÍÂèÒ§äÃ? Internet Explorer 10 ¨ÐäÁèÁÕÃÒ¡ÒÃâ»Ã´àËÁ×͹à¡èÒ áµè¤Ø³¨ÐÊÒÁÒö»Ñ¡ËÁØ´·Ò§ÅÑ´äÇ麹˹éÒ àÃÔèÁ ä´éá·¹ àÁ×èͤسà»Ô´Ë¹éÒàÇçºà¾¨áÅéÇ ãËé¤ÅÔ¡¢ÇÒº¹·Õèã´¡çä´é¢Í§àÇçºà¾¨à¾×èÍà»Ô´àÁ¹Ù·Õè´éÒ¹ÅèÒ§¢Í§Ë¹éÒ¨Í ¤ÅÔ¡ »Ñ¡ËÁØ´¡ÑºàÃÔèÁ ©Ñ¹¨ÐµÃǨËÒ¡ÒÃÍѾവ¢Í§ Windows ä´éÍÂèÒ§äà ¡´ »ØèÁ Windows + <C> áÅéǤÅÔ¡ ¡ÒõÑ駤èÒ > »ÅÕ蹡Òþիբͧ¤Ø³µÑ駤èҢͧ¤Ø³ > Windows Updates ¤ÅÔ¡ µÃǨÊͺ¡ÒÃÍѾവ·Ñ¹·Õ ©Ñ¹¨ÐËÒ¢éÍÁÙÅà¾ÔèÁàµÔÁä´é·Õèä˹ ÊÓËÃѺ¢éÍÁÙÅà¾ÔèÁàµÔÁ â»Ã´áÇÐä»Âѧ: • ÇÔ¸Õ¡ÒÃãªé§Ò¹ Windows 8: www.gateway.com/windows8-tutorial • FAQ ¡ÒÃʹѺʹع: support.gateway.com 92 ¢éÍÁÙÅ´éÒ¹¡ÒäǺ¤ØÁ ¡Òûéͧ¡Ñ¹¡ÒÃÊÙ−àÊÕ¡ÒÃä´éÂÔ¹ - ¢éͤÇÃÃÐÇѧ: ¡ÒÃÊÙ−àÊÕ¡ÒÃä´éÂÔ¹¶ÒÇÃÍÒ¨à¡Ô´¨Ò¡¡ÒÃãªéËٿѧËÃ×ÍÅÓ⾧ã¹ÃдѺàÊÕ§´Ñ§ à»ç¹ÃÐÂÐàÇÅÒ¹Ò¹ - A pleine puissance, l’écoute prolongée du baladeur peut endommager l’oreille de l’utilisateur. ¢éͤÇÃÃÐÇѧ¢³Ð¿Ñ§ »éͧ¡Ñ¹Ãкº¡ÒÃä´éÂÔ¹àÊÕ§ â´Â·ÓµÒÁ¢Ñ鹵͹µèÒ§æ - à¾ÔèÁÃдѺàÊÕ§·ÕÅйéͨ¹¤Ø³ÊÒÁÒöä´éÂÔ¹ªÑ´à¨¹áÅÐʺÒÂËÙ - ËéÒÁà¾ÔèÁÃдѺàÊÕ§ËÅѧ¨Ò¡ËÙ»ÃѺµÑÇä´éáÅéÇ - ËéÒÁ¿Ñ§´¹µÃÕã¹ÃдѺàÊÕ§·ÕèÊÙ§à»ç¹àÇÅÒ¹Ò¹à¡Ô¹ä» - ËéÒÁà¾ÔèÁÃдѺàÊÕ§à¾×è͡źàÊÕ§¨Ò¡ÊÀÒ¾áÇ´ÅéÍÁÀÒ¹͡ - ãËéÅ´ÃдѺàÊÕ§ŧËÒ¡¤Ø³äÁèÊÒÁÒöä´éÂÔ¹àÊÕ§¾Ù´¤Ø¢ͧ¤¹Ãͺ¢éÒ§ »ÃСÒÈá¨é§¡®ÃÐàºÕºÍØ»¡Ã³ìÇÔ·ÂØ - ËÁÒÂà˵Ø: ¢éÍÁÙÅ¡®ÃÐàºÕºµèÍ仹Õéà»ç¹¢éÍÁÙÅÊÓËÃѺÃØè¹·ÕèÁÕ LAN ẺäÃéÊÒ áÅÐ/ËÃ×Í Bluetooth à·èÒ¹Ñé¹ ÍØ»¡Ã³ìàÊÃÔÁ·Õè·Ó§Ò¹ÃèÇÁ¡Ñ¹ ÍØ»¡Ã³ìàÊÃÔÁ·Õè·Ó§Ò¹ÃèÇÁ¡ÑºÍØ»¡Ã³ì¹Õé¤×Í: ÊÒÂÇÔ´ÕâÍËØéÁ©¹Ç¹àÁ×èÍÁÕ¡ÒÃàª×èÍÁµèÍÁ͹ÔàµÍÃìÀÒ¹͡ ÍØ»¡Ã³ì àËÅèÒ¹Õéµéͧ¹ÓÁÒãªé§Ò¹à¾×èÍãËéà»ç¹ä»µÒÁ¡® FCC ¢éÍÁÙÅ´éÒ¹¡ÒäǺ¤ØÁ - 93 −ѵµÔá¤ÅÔ¿ÍÃìà¹Õ 65 ¤Óàµ×͹ ÍØ»¡Ã³ì¹ÕéÁÕÊÒÃà¤ÁÕ·Õèà»ç¹·ÕèÃÙé¨Ñ¡ã¹ÃÑ°á¤ÅÔ¿ÍÃìà¹Õ«Ö觨СèÍãËéà¡Ô´ÁÐàÃç§ ¢éͺ¡¾Ãèͧáµè¡Óà¹Ô´ áÅÐ/ ËÃ×ÍÍѹµÃÒÂÍ×è¹·Õè¨Ðà¡Ô´¢Öé¹ ÊÓËÃѺ¢éÍÁÙÅà¾ÔèÁàµÔÁà¡ÕèÂǡѺ¤Óàµ×͹¢Í§¼ÅÔµÀѳ±ì¹Õé ãËéä»·Õè www.gateway.com/prop65 日本 (−Õè»Øè¹) 本装置は、第二種情報装置(住宅地域またはその隣接した地域において使用されるべ き情報装置)デ住宅地域での電波障害防止を目的とした情報装置等電波障害自主規制 協議会(VCCI)基準に適合しております。 しかし、本装置をラジオ、テレビジョン受信機に、近接してご使用になると、受信障 害の原因となることがあります。本書の説明にしたがって正しい取り扱いをしてくだ さい。 WIRELESS ADAPTER REGULATORY INFORMATION USA — FCC and FAA The FCC with its action in ET Docket 96-8 has adopted a safety standard for human exposure to radio frequency (RF) electromagnetic energy emitted by FCC certified equipment. The wireless adapter meets the Human Exposure limits found in OET Bulletin 65, supplement C, 2001, and ANSI/IEEE C95.1, 1992. Proper operation of this radio according to the instructions found in this manual will result in exposure substantially below the FCC’s recommended limits. - The following safety precautions should be observed: Do not touch or move antenna while the unit is transmitting or receiving. 94 - Do not hold any component containing the radio such that the antenna is very close or touching any exposed parts of the body, especially the face or eyes, while transmitting. - Do not operate the radio or attempt to transmit data unless the antenna is connected; this behavior may cause damage to the radio. Use in specific environments: - The use of wireless adapters in hazardous locations is limited by the constraints posed by the safety directors of such environments. - The use of wireless adapters on airplanes is governed by the Federal Aviation Administration (FAA). - The use of wireless adapters in hospitals is restricted to the limits set forth by each hospital. Antenna Use In order to comply with FCC RF exposure limits, low gain integrated antennas should be located at a minimum distance of 20 cm (8 inches) or more from the body of all persons or at a minimum distance as specified by the FCC module grant conditions. FCC grants can be viewed from the FCC Equipment Authorization website at https://fjallfoss.fcc.gov/ oetcf/eas/reports/GenericSearch.cfm by entering the FCC ID printed on the module label. Explosive Device Proximity Warning Warning: Do not operate a portable transmitter (including this wireless adapter) near unshielded blasting caps or in an explosive environment unless the transmitter has been modified to be qualified for such use Antenna Warnings - Warning: To comply with the FCC and ANSI C95.1 RF exposure limits, it is recommended that for the wireless adapter installed in a desktop or portable computer, the antenna for this wireless adapter to be installed so as to provide a separation distance of at least 20 cm (8 inches) from all persons or at the minimum ¢éÍÁÙÅ´éÒ¹¡ÒäǺ¤ØÁ - 95 distance as specified by the module grant conditions. FCC grants can be viewed from the FCC Equipment Authorization website at https://fjallfoss.fcc.gov/oetcf/eas/ reports/GenericSearch.cfm by entering the FCC ID printed on the module label. - Warning: The wireless adapter is not designed for use with high-gain directional antennas. Use On Aircraft Caution - Caution: Regulations of the FCC and FAA prohibit airborne operation of radiofrequency wireless devices (wireless adapters) because their signals could interfere with critical interfere with critical aircraft instruments. Local Restrictions on 802.11a, 802.11b, 802.11g and 802.11n Radio Usage - Caution: Due to the fact that the frequencies used by 802.11a, 802.11b, 802.11g and 802.11n wireless LAN devices may not yet be harmonized in all countries, 802.11a, 802.11b, 802.11g and 802.11n products are designed for use only in specific countries, and are not allowed to be operated in countries other than those of designated use. As a user of these products, you are responsible for ensuring that the products are used only in the countries for which they were intended and for verifying that they are configured with the correct selection of frequency and channel for the country of use. Any deviation from the permissible power and frequency settings for the country of use is an infringement of national law and may be punished as such. Wireless Interoperability The wireless adapter is designed to be interoperable with other wireless LAN products that are based on direct sequence spread spectrum (DSSS) radio technology and to comply with the following standards: - IEEE Std. 802.11b compliant Standard on Wireless LAN - IEEE Std. 802.11g compliant Standard on Wireless LAN - IEEE Std. 802.11a compliant Standard on Wireless LAN (applies to devices supporting 802.11a) 96 - IEEE Std. 802.11n draft 2.0 compliant on Wireless LAN - Wireless Fidelity certification, as defined by the Wi-Fi Alliance The Wireless Adapter and Your Health The wireless adapter, like other radio devices, emits radio frequency electromagnetic energy. The level of energy emitted by the wireless adapter, however, is less than the electromagnetic energy emitted by other wireless devices such as mobile phones. The wireless adapter operates within the guidelines found in radio frequency safety standards and recommendations. These standards and recommendations reflect the consensus of the scientific community and result from deliberations of panels and committees of scientists who continually review and interpret the extensive research literature. In some situations or environments, the use of the wireless adapter may be restricted by the proprietor of the building or responsible representatives of the applicable organization. Examples of such situations may include: - Using the wireless adapter on board airplanes, or - Using the wireless adapter in any other environment where the risk of interference with other devices or services is perceived or identified as being harmful. If you are uncertain of the policy that applies to the use of wireless adapters in a specific organization or environment (an airport, for example), you are encouraged to ask for authorization to use the adapter before you turn it on. FCC Radio Frequency Interference Requirements (applies to device supporting 802.11a) This device is restricted to indoor use due to its operation in the 5.15 to 5.25 GHz and 5.470 to 5.725 GHz frequency ranges. FCC requires this product to be used indoors for the frequency ranges 5.15 to 5.25 GHz and 5.470 to 5.725 GHz to reduce the potential for harmful interference to co-channel mobile satellite systems. High power radars are allocated as primary users of the 5.25 to 5.35 GHz and 5.65 to 5.85 GHz bands. These radar stations can cause interference with and /or damage this device. No configuration ¢éÍÁÙÅ´éÒ¹¡ÒäǺ¤ØÁ - 97 controls are provided for this wireless adapter allowing any change in the frequency of operations outside the FCC grant of authorization for U.S operation according to Part 15.407 of the FCC rules. USA — Federal Communications Commission (FCC) This device complies with Part 15 of the FCC Rules. Operation of the device is subject to the following two conditions: - This device may not cause harmful interference. - This device must accept any interference that may cause undesired operation. - Note: The radiated output power of the adapter is far below the FCC radio frequency exposure limits. Nevertheless, the adapter should be used in such a manner that the potential for human contact during normal operation is minimized. To avoid the possibility of exceeding the FCC radio frequency exposure limits, you should keep a distance of at least 20 cm between you (or any other person in the vicinity), or the minimum separation distance as specified by the FCC grant conditions, and the antenna that is built into the computer. Details of the authorized configurations can be found at http://www.fcc.gov/oet/ea/ by entering the FCC ID number on the device. Interference Statement This wireless adapter has been tested and found to comply with the limits for a Class B digital device, pursuant to Part 15 of the FCC Rules. These limits are designed to provide reasonable protection against harmful interference in a residential installation. This wireless adapter generates, uses, and can radiate radio frequency energy. If the wireless adapter is not installed and used in accordance with the instructions, the wireless adapter may cause harmful interference to radio communications. There is no guarantee, however, that such interference will not occur in a particular installation. If this wireless adapter does cause harmful interference to radio or television reception (which can be determined by turning the equipment off and on), the user is encouraged to try to correct the interference by taking one or more of the following measures: - Reorient or relocate the receiving antenna of the equipment experiencing the interference. 98 - Increase the distance between the wireless adapter and the equipment experiencing the interference. - Connect the computer with the wireless adapter to an outlet on a circuit different from that to which the equipment experiencing the interference is connected. - Consult the dealer or an experienced radio/TV technician for help. - Note: The adapter must be installed and used in strict accordance with the manufacturer's instructions as described in the user documentation that comes with the product. Any other installation or use will violate FCC Part 15 regulations. Canada — Industry Canada (IC) This device complies with RSS210 of Industry Canada. Cet appareil se conforme à RSS210 de Canada d'Industrie. - Caution: When machine supports and using IEEE 802.11a wireless LAN, this product is restricted to indoor use due to its operation in the 5.15- to 5.25 GHz frequency range. Industry Canada requires this product to be used indoors for the frequency range of 5.15 GHz to 5.25 GHz to reduce the potential for harmful interference to co-channel mobile satellite systems. High power radar is allocated as the primary user of the 5.25 to 5.35 GHz and 5.65 to 5.85 GHz bands. These radar stations can cause interference with and/or damage to this device. The maximum allowed antenna gain for use with this device is 6dBi in order to comply with the E.I.R.P limit for the 5.25 to 5.35 and 5.725 to 5.85 GHz frequency range in point-topoint operation. To comply with RF exposure requirements all antennas should be located at a minimum distance of 20 cm, or the minimum separation distance allowed by the module approval, from the body of all persons. - Attention: l’utilisation d’un réseau sans fil IEEE802.11a est réstreinte à une utilisation en intérieur à cause du fonctionement dans la bande de fréquence 5,15 5,25 GHz. Industry Canada requiert que ce produit soit utilisé à l’intérieur des bâtiments pour la bande de fréquence 5,15 - 5,25 GHz afin de réduire les possibilités d’interférences nuisibles aux canaux co-existants des systèmes de transmission satellites. Les radars de puissances ont fait l’objet d’une allocation primaire de ¢éÍÁÙÅ´éÒ¹¡ÒäǺ¤ØÁ - 99 fréquences dans les bandes 5,25 - 5,35 GHz et 5 65 - 5 85 GHz. Ces stations radar peuvent créer des interférences avec ce produit et/ou lui être nuisible. Le gain d’antenne maximum permissible pour une utilisation avec ce produit est de 6 dBi afin d’être conforme aux limites de puissance isotropique rayonnée équivalente (P.I.R.E.) applicable dans les bandes 5,25 - 5,35 GHz et 5,725 - 5,85 GHz en fonctionement point-à-point. Se pour conformer aux conditions d'exposition de RF toutes les antennes devraient être localisées à une distance minimum de 20 cm, ou la distance de séparation minimum permise par l'approbation de module, du corps de toutes les personnes. This Class B digital apparatus complies with Canadian ICES-003. Cet appareil numérique de la classe B est conforme a la norme NMB-003 du Canada. "To prevent radio interference to the licensed service, this device is intended to be operated indoors and away from windows to provide maximum shielding. Equipment (or its transmit antenna) that is installed outdoors is subject to licensing." « Pour empêcher que cet appareil cause du brouillage au service faisant l'objet d'une licence, il doit être utilisé a l'intérieur et devrait être placé loin des fenêtres afin de fournir un écran de blindage maximal. Si le matériel (ou son antenne d'émission) est installé à l'extérieur, il doit faire l'objet d'une licence. » European Union ÃÒª×èÍ»ÃÐà·È·ÕèÊÒÁÒöãªéä´é µéͧãªé¼ÅÔµÀѳ±ì¹ÕéÍÂèÒ§à¤Ã觤ÃÑ´µÒÁ¡®¢éͺѧ¤Ñº¢Í§»ÃÐà·È·Õèãªé§Ò¹ÍÂÙè ÊÓËÃѺ¢éÍÁÙÅà¾ÔèÁàµÔÁ â»Ã´µÔ´µèÍÊӹѡ§Ò¹·éͧ¶Ôè¹ã¹»ÃÐà·È·Õèãªé§Ò¹ÍÂÙè â»Ã´´Ù http://ec.europa.eu/enterprise/rtte/implem.htm ÊÓËÃѺÃÒª×èÍ»ÃÐà·ÈÅèÒÊØ´ 100 ÃÒ¡ÒÃÃËÑÊ»ÃÐà·È ÍØ»¡Ã³ì¹ÕéÊÒÁÒöãªé§Ò¹ä´éã¹»ÃÐà·ÈµèÒ§æ ´Ñ§µèÍ仹Õé: »ÃÐà·È ISO 3166 ÃËÑÊ 2 ËÅÑ¡ »ÃÐà·È ISO 3166 ÃËÑÊ 2 ËÅÑ¡ »ÃÐà·È ISO 3166 ÃËÑÊ 2 ËÅÑ¡ »ÃÐà·È ISO 3166 ÃËÑÊ 2 ËÅÑ¡ ÍÍÊàµÃÕ AT àÂÍÃÁѹ DE ÁÍÅµÒ MT ÊËÃÒªÍҳҨѡà GB àºÅàÂÕèÂÁ BE ¡ÃÕ« GR à¹à¸ÍÃìᏴì NT äÍ«ìᏴì IS ä«»ÃÑÊ CY Îѧ¡ÒÃÕ HU â»áŹ´ì PL ÅԤ෹Êäµ¹ì LI ÊÒ¸ÒóÃѰત CZ äÍÃìᏴì IE â»ÃµØà¡Ê PT ¹ÍÃàÇÂì NO à´¹ÁÒÃì¤ DK ÍÔµÒÅÕ IT ÊâÅÇÒà¡Õ SK ÊÇÔÊà«ÍÃìᏴì CH àÍÊâ·à¹Õ EE ÅÑ·àÇÕ LV ÊâÅàÇà¹Õ SL ºÑÅá¡àÃÕ BG ¿Ô¹áŹ´ì FI ÅÔ¸ÑÇà¹Õ LT Ê໹ ES âÃÁÒà¹Õ RO ½ÃÑè§àÈÊ FR ÅÑ¡à«ÁàºÔÃì¡ LU ÊÇÕà´¹ SE µØÃ¡Õ TR The low band 5.15 -5.35 GHz is for indoor use only. This equipment complies with the essential requirements of the European Union directive 1999/5/EC. See Statements of European Union Compliance, and more details refer to the attached Declaration of Conformity. English Hereby, ACER INC., declares that this devise is in compliance with the essential requirements and other relevant provisionns of Directive 1999/5/EC. Česky [Czech] ACER INC. tímto prohlašuje, že toto zařízení je ve shodě se základními požadavky a dalšími příslušnými ustanoveními směrnice 1999/5/ES. ¢éÍÁÙÅ´éÒ¹¡ÒäǺ¤ØÁ - 101 Daansk [Danish] Undertegnede ACER INC. erklærer herved, at følgende udstyr overholder de væsentlige krav og øvrige relevante krav i direktiv 1999/5/EF. Deutsch [German] Hiermit erklärt ACER INC., dass sich das Gerät Radiolan in Übereinstimmung mit den grundlegenden Anforderungen und den übrigen einschlägigen Bestimmungen der Richtlinie 1999/5/EG befindet. Eesti [Estonian] Käesolevaga kinnitab ACER INC. seadme vastavust direktiivi 1999/5/EÜ põhinõuetele ja nimetatud direktiivist tulenevatele teistele asjakohastele sätetele. Español [Spanish] Por medio de la presente ACER INC. declara que el dispositivo cumple con los requisitos esenciales y cualesquiera otras disposiciones aplicables o exigibles de la Directiva 1999/5/CE. Ελληνικά [Greek] ∆ια του παρόντος η ACER INC. δηλώνει ότι η παρούσα συσκευή συµµορφώνεται προς τις ουσιώδεις απαιτήσεις και τις λοιπές διατάξεις της Οδηγίας 1999/5/ ΕΚ. Français [French] Par la présente ACER INC. déclare que cet appareil est conforme aux exigences essentielles et aux autres dispositions pertinentes de la directive 1999/5/CE. 102 Íslenska [Icelandic] Hér með lýsir ACER INC. yfir því að er í samræmi við grunnkröfur og aðrar kröfur, sem gerða r eru í tilskipun 1999/5/EC. Itaaliano [Italian] Con la presente ACER INC. dichiara che questo dispositivo è conforme ai requisiti essenziali ed alle altre disposizioni pertinenti stabilite dalla direttiva 1999/5/CE. Latviski [Latvian] Ar šo ACER INC. deklarē, ka šī ierīce atbilst Direktīvas 1999/5/EK būtiskajām prasībām un citiem ar to saistītajiem noteikumiem. Lietuvių [Lithuanian] Šiuo ACER INC. deklaruoja, kad šis įrenginys atitinka esminius reikalavimus ir kitas 1999/5/EB Direktyvos nuostatas. Malti [Maltese] Hawnhekk, ACER INC., jiddikjara li dan jikkonforma mal- ti ijiet essenzjali u ma provvedimenti o rajn relevanti li he mm fid-Dirrettiva 1999/5/EC. Magyar [Hungarian] Alulírott, ACER INC. nyilatkozom, hogy a készülék megfelel a vonatkozó alapveto követelményeknek és az 1999/5/EC irányelv egyéb eloírásainak. Nederlands [Dutch] Hierbij verklaart ACER INC. dat het toestel voldoet aan de essentiële eisen en de andere relevante bepalingen van richtlijn 1999/5/EG. ¢éÍÁÙÅ´éÒ¹¡ÒäǺ¤ØÁ - 103 Norsk [Norwegiann] ACER INC. erklærer herved at utstyret er i samsvar med de grunnleggende krav og øvrige relevante krav i direktiv 1999/5/EF. Polski [Polish] Niniejszym ACER INC. oświadcza, że urządzenie jest zgodne z zasadniczymi wymogami oraz pozostałymi stosownymi postanowieniami Dyrektywy 1999/5/EC. Português [Portuguese] ACER INC. declara que este dispostivo está conforme com os requisitos essenciais e outras disposições da Directiva 1999/5/CE. Slovensko [Slovenian] ACER INC. izjavlja, da je ta naprava skladna z bistvenimi zahtevami in ostalimi relevantnimi določili Direktive 1999/5/ES. Slovensky [Slovak] ACER INC. týmto vyhlasuje, že zariadenie spĺňa základné požiadavky a všetky príslušné ustanovenia Smernice 1999/5/ES. Suomi [Finnish] ACER INC. vakuuttaa täten että tämä laite on direktiivin 1999/ 5/EY oleellisten vaatimusten ja sitä koskevienn direktiivin muiden ehtojen mukainen. 104 Svenska [Swedish] Härmed intygar ACER INC. att denna enhet står i överensstämmelse med väsentliga egenskapskrav och övriga relevanta bestämmelser som framgår av direktiv 1999/5/EG. France Pour la France métropolitaine : 2,400 - 2,4835 GHz (Canaux 1à 13) autorisé en usage intérieur 2,400 - 2,454 GHz (canaux 1 à 7) autorisé en usage extérieur Pour la Guyane et la Réunion : 2,400 - 2,4835 GHz (Canaux 1à 13) autorisé en usage intérieur 2,420 - 2,4835 GHz (canaux 5 à 13) autorisé en usage extérieur Pour tout le territoire Français : Seulement 5,15 -5,35 GHz autorisé pour le 802.11a L'utilisation de cet equipement (2,4 GHz WLAN) est soumise à certaines restrictions : - La puissance maximale autorisée en intérieur est de 100 mW pour 2400 - 2483,5 MHz. - La puissance maximale autorisée est de 100 mW en extérieur pour 2400 - 2454 MHz. - La puissance maximale autorisée est de 10 mW en extérieur, 2454 - 2483,5 MHz. Pour les dernières restrictions, voir http://www.art-telecom.fr. Italy The use of these equipments is regulated by: 1.D.L.gs 1.8.2003, n. 259, article 104 (activity subject to general authorization) for outdoor use and article 105 (free use) for indoor use, in both cases for private use. 2.D.M. 28.5.03, for supply to public of RLAN access to networks and telecom services. L’uso degli apparati è regolamentato da: ¢éÍÁÙÅ´éÒ¹¡ÒäǺ¤ØÁ - 105 1.D.L.gs 1.8.2003, n. 259, articoli 104 (attività soggette ad autorizzazione generale) se utilizzati al di fuori del proprio fondo e 105 (libero uso) se utilizzati entro il proprio fondo, in entrambi i casi per uso private. 2.D.M. 28.5.03, per la fornitura al pubblico dell’accesso R-LAN alle reti e ai servizi di telecomunicazioni. Belgium Dans le cas d'une utilisation privée, à l'extérieur d'un bâtiment, au-dessus d'un espace public, aucun enregistrement n'est nécessaire pour une distance de moins de 300 m. Pour une distance supérieure à 300 m un enregistrement auprès de l'IBPT est requise. Pour les enregistrements et licences, veuillez contacter l'IBPT. In geval van privé-gebruik, buiten een gebouw, op een openbare plaats, is geen registratie nodig, wanneer de afstand minder dan 300 m is. Voor een afstand groter dan 300 m is een registratie bij BIPT vereist. Voor registraties en licenties, gelieve BIPT te contacteren. Brazil Este equipamento opera em caráter secundário, isto é, não tem direito a proteção contra interferência prejudicial, mesmo de estações do mesmo tipo, e não pode causar interferência a sistemas operando em caráter primário. Pakistan Pakistan Telecommunication Authority (PTA) Approved Morocco The operation of this product in the radio channel 2 (2417 MHz) is not authorized in the following cities: Agadir, Assa-Zag, Cabo Negro, Chaouen, Goulmima, Oujda, Tan Tan, Taourirt, Taroudant and Taza. The operation of this product in the radio channels 4, 5, 6 and 7 (2425 - 2442 MHz) is not authorized in the following cities: Aéroport Mohamed V, Agadir, Aguelmous, Anza, Benslimane, Béni Hafida, Cabo Negro, Casablanca, Fès, Lakbab, Marrakech, Merchich, Mohammédia, Rabat, Salé, Tanger, Tan Tan, Taounate, Tit Mellil, Zag. 106 Japan 5 GHz 帯は室内でのみ使用のこと Korea 당해 무선설비는 운용 중 전파혼신 가능성이 있음 Taiwan 第十二條 經型式認證合格之低功率射頻電機,非經許可,公司、商號或使用者均不得擅自變更頻 率、加大功率或變更原設計之特性及功能。 第十四條 低功率射頻電機之使用不得影響飛航安全及干擾合法通信 ; 經發現有干擾現象時,應立即 停用,並改善至無干擾時方得繼續使用。 前項合法通信,指依電信法規定作業之無線通信。 低功率射頻電機須忍受合法通信或工業、科學及醫療用電波輻射性電機設備之干擾。 ¡ÒÃá¡é䢴Ѵá»Å§¼ÅÔµÀѳ±ì à¤Ã×èͧËÁÒ CE Gateway äÁèÊÒÁÒö¶×ͤÇÒÁÃѺ¼Ô´ªÍºµèÍ¡ÒÃá¡é䢴Ѵá»Å§«Ö觡ÃзÓâ´Â¼ÙéãªéáÅмÙé·Õèà¡ÕèÂÇ¢éͧ â´ÂäÁèä´éÃѺ͹Ø−Òµ «Öè§ÍÒ¨à»ç¹¡ÒÃà»ÅÕè¹á»Å§¡Òû¯ÔºÑµÔµÒÁ¢éͺѧ¤Ñº¢Í§¼ÅÔµÀѳ±ì·ÕèÁÕà¤Ã×èͧËÁÒ CE ¡ÒÃú¡Ç¹¤ÇÒÁ¶ÕèÇÔ·ÂØ ¼Ùé¼ÅÔµäÁèµéͧÃѺ¼Ô´ªÍºµèÍ¡ÒÃÃѺ¡Ç¹ÇÔ·ÂØËÃ×Íâ·Ã·Ñȹìã´æ ·Õèà¡Ô´¨Ò¡¡ÒôѴá»Å§á¡éä¢ÍØ»¡Ã³ì¹Õéâ´ÂäÁèä´éÃѺ͹Ø−ÒµÍÂèÒ§¶Ù¡µéͧ ¡ÒÃàª×èÍÁµèÍáÅÐÃÕâÁ·àÍÔÃì¸ PELV (Protected Extra Low Voltage) à¾×èÍãËéá¹èã¨àÃ×èͧºÙóÀÒ¾áç´Ñ¹µèÓ¾ÔàÈɢͧÍØ»¡Ã³ì¹Õé ãËéàª×èÍÁµèÍÍØ»¡Ã³ìà¢éҡѺǧ¨Ã¡ÃáÊä¿¿éÒËÅÑ¡·Õèä´éÃѺ¡Òûéͧ¡Ñ¹«Öè§à´Ô¹µè͡Ѻ¾ÍÃìµÀÒ¹͡à·èÒ¹Ñé¹ ¢éÍÁÙÅ´éÒ¹¡ÒäǺ¤ØÁ - 107 SELV (Safety Extra Low Voltage) ÍÔ¹¾Ø·áÅÐàÍÒ·ì¾Ø··Ø¡ª¹Ô´¢Í§¼ÅÔµÀѳ±ì¹Õéä´éÃѺ¡ÒáÓ˹´ÃдѺãËéà»ç¹ËÁÇ´áç´Ñ¹µèÓ¾ÔàÈÉà¾×èͤÇÒÁ»ÅÍ´ÀÑ ÃÕâÁ·àÍÔÃì¸ à¾×èÍ»éͧ¡Ñ¹ä¿¿éÒªç͵ ãËéàª×èÍÁµèͤÍÁ¾ÔÇàµÍÃìÀÒÂã¹ (Êӹѡ§Ò¹áµèÅÐáËè§) áÅÐÍØ»¡Ã³ìʹѺʹع¢Í§¤ÍÁ¾ÔÇàµÍÃìà¢éҡѺǧ¨Ãä¿¿éÒà´ÕÂǡѹ¡ÑºÊÒÂ俢ͧµÑÇÍÒ¤Òà ËÒ¡¤Ø³äÁèá¹è㨠ãËéµÃǨÊͺ¡ÒÃà´Ô¹ÊÒÂ俢ͧµÑÇÍÒ¤ÒÃà¾×èÍàËÅÕ¡àÅÕè§ÀÒÇÐÃÕâÁ·àÍÔÃì¸ áËÅ觨èÒÂä¿ÍÒ¤Òà àª×èÍÁµèÍÍØ»¡Ã³ìà¢éҡѺáËÅ觨èÒÂ俢ͧÍÒ¤Ò÷Õèà»ç¹ä»µÒÁ¢éÍ¡Ó˹´¡ÒÃà´Ô¹ä¿ã¹»ÃÐà·È¢Í§¤Ø³à·èÒ¹Ñé¹ ã¹ÊËÃÒªÍҳҨѡà ¢éÍ¡Ó˹´àËÅèÒ¹Õé¤×Í¢éÍ¡Ó˹´ IEE ¾ÒÇàÇÍÃì«Ñ¾¾ÅÒÂáÅÐÊÒÂà¤àºÔéÅ ¾ÒÇàÇÍÃì«Ñ¾¾ÅÒ ªèͧ¢Òà¢éÒáÅТÒÍÍ¡¢Í§¾ÒÇàÇÍÃì«Ñ¾¾ÅÒ (ËÒ¡ÁÕ) ä´éÃѺ¡ÒáÓ˹´à»ç¹áç´Ñ¹ä¿¿éÒÍѹµÃÒ ¤Ø³µéͧ¶Í´»ÅÑê¡ÊÒÂ俾ÒÇàÇÍÃì«Ñ¾¾ÅÒÂáÅжʹẵàµÍÃÕèà¾×èͶʹÍØ»¡Ã³ìµèÒ§æ ÍÍ¡¨Ò¡¾ÒÇàÇÍÃì«Ñ¾¾ÅÒ â´Â¡Ò÷Óàªè¹¹Ñé¹ ªèͧ¢ÒÍÍ¡µéͧ¶Ù¡µÔ´µÑé§äÇéã¡Åé¡ÑºÍØ»¡Ã³ìáÅФÇèÐà¢éÒ¶Ö§ä´é§èÒ ¾Ô¡Ñ´¢éÍÁÙÅ¢Òà¢éÒ: ´Ù»éÒÂáÊ´§¾Ô¡Ñ´·ÕèÍÂÙè´éÒ¹ÅèÒ§¢Í§¤ÍÁ¾ÔÇàµÍÃìáÅеÃǨÊͺÇèÒ¡Ò÷ӧ Ò¹¢Í§Íá´»àµÍÃì¨èÒÂä¿à»ç¹ä»µÒÁµÒÁ¾Ô¡Ñ´·ÕèÃкØäÇéËÃ×ÍäÁè ¼ÙéãªéËéÒÁ·Ó¡Òöʹ¾ÒÇàÇÍÃì«Ñ¾¾ÅÒÂÍÍ¡äÁèÇèÒ㹡óÕã´æ ¡çµÒÁ ¾ÒÇàÇÍÃì«Ñ¾¾ÅÒÂäÁèãªéªÔé¹Êèǹ ·ÕèÊÒÁÒöà»ÅÕè¹ä´éâ´Â¼Ùéãªé ÀÒÂã¹¾ÒÇàÇÍÃì«Ñ¾¾ÅÒ¹Ñé¹ÁÕáç´Ñ¹ä¿¿éÒÍѹµÃÒ·ÕèÊÒÁÒö·ÓãËéºÒ´à¨çºÃعáçä´é ¾ÒÇàÇÍÃì«Ñ¾¾¾ÅÒ·Õ躡¾Ãèͧµéͧ¶Ù¡Ê觤׹ãËé¡Ñº¼Ùé¨Ó˹Ò¢ͧ¤Ø³ ÊÒÂä¿áÅлÅÑê¡ ¼ÅÔµÀѳ±ì¹Õéµéͧ¡ÒÃÊÒÂä¿áÅлÅÑꡪ¹Ô´ÁÕÊÒ´Թ áÅÐÊÒÁÒöµèÍà¢éҡѺàµéÒÃѺẺµèÍÊÒ´Թà·èÒ¹Ñé¹ µÃǨ´ÙãËéá¹èã¨ÇèÒàµéÒÃѺµèÍÍÂÙè¡ÑºÊÒ´Թ¡è͹àÊÕº»ÅÑê¡ ËéÒÁàÊÕº»ÅÑê¡à¢éҡѺàµéÒÃѺ·ÕèÓäÁèä´éµèÍÊÒ´Թ µÔ´µèͪèÒ§ ä¿ÊÓËÃѺÃÒÂÅÐàÍÕ´ 108 ¤ÇÒÁÂÒǢͧÊÒµéͧäÁèà¡Ô¹ 2.5 àÁµÃ à¾×èÍ»éͧ¡Ñ¹ÍѹµÃÒ¨ҡ俿éÒ ËéÒÁ¶Í´ËÃ×ͻԴÊÑÁ¼ÑÊÊÒ´Թº¹ÊÒÂä¿ à»ÅÕè¹ÊÒÂä¿ËÒ¡ÊÒÂä´éÃѺ¤ÇÒÁàÊÕÂËÒ µÔ´µèͼÙé¢Ò¢ͧ¤Ø³ÊÓËÃѺÍÐäËÅè·Õè¶Ù¡µéͧ ã¹ÂØâû »ÅÑê¡ ä¿µéͧÁÕÍѵÃÒ¢Ñé¹µèÓ 250 VAC, 10 áÍÁ»ì »ÅÑ꡵éͧÁÕà¤Ã×èͧËÁÒÂÃѺÃͧ¨Ò¡µÑÇá·¹¹Ò¹ÒªÒµÔ ÊÒ 俵éͧàËÁÒÐÊÁÊÓËÃѺãªé§Ò¹ã¹»ÃÐà·È¢Í§¼Ùéãªé µÔ´µèͼÙé¢Ò¢ͧ¤Ø³ËÃ×Íà¨éÒ˹éÒ·Õèä¿¿éÒ·éͧ¶Ôè¹ËÒ¡¤Ø³ äÁèá¹èã¨ÇèÒÊÒÂä¿»ÃÐàÀ·ã´·ÕèãªéÍÂÙèã¹»ÃÐà·È¢Í§¤Ø³ ÊÒÂà¤àºÔéÅ ÊÓËÃѺÊÒÂà¤àºÔéÅ·ÕèäÁèä´éÁҡѺ¼ÅÔµÀѳ±ì㹺ÃèØÀѳ±ì¢Í§¤ÍÁ¾ÔÇàµÍÃì »ÃÐÊÔ·¸ÔÀÒ¾ EMC ¢Í§Ãкº¹Ñ鹨Ðä´éÃѺ¡ÒÃÃѺ»ÃСѹàÁ×èÍà¤àºÔéÅáÅÐÊèǹÊÑÁ¼ÑÊãªé©¹Ç¹·ÕèÁÕ»ÃÐÊÔ·¸ÔÀÒ¾à·èÒ¹Ñé¹ ¡ÒÃãªéÊÒ·ÕèÁÕ©¹Ç¹ÊÑÁ¼ÑʹÑ鹨Óà»ç¹ÊÓËÃѺ USB IEEE1394 «ÕàÃÕÂÅ à¤Ã×èͧ¾ÔÁ¾ì à¡Á ÍÍ´ÔâÍ/ ÇÔ´ÕâÍ͹ÒÅçÍ¡ËÃ×Í´Ô¨ÔµÍÅ PS2 àÊÒÍÒ¡ÒÈ TV ËÃ×Í FM áÅÐÊÒÂÍÔ¹àµÍÃìà¿Ê¤ÇÒÁàÃçÇÊÙ§·ÑèÇä»·Ñé§ËÁ´ ãªé੾ÒзÕèÁÕÃÒª×èÍ UL No. 26AWG ËÃ×ÍÊÒÂÊ×èÍÊÒ÷ÕèÁÕ¢¹Ò´ãË−è¡ÇèÒà·èÒ¹Ñé¹ à©¾ÒÐÍÕà¸ÍÃìà¹çµ LAN ËÃ×ÍâÁà´çÁ RTC à·èÒ¹Ñé¹·ÕèÊÒÁÒöÂÒÇà¡Ô¹¡ÇèÒ 3 àÁµÃä´é Gateway ¢Íá¹Ð¹ÓãËé¤Ø³à¾ÔèÁ¤ÅÔ»¡ÅÁ᡹à¿ÍÃìäõìà¢éҡѺáµèÅÐÊÒ·Õèàª×èÍÁµè͡Ѻ¤ÍÁ¾ÔÇàµÍÃì ¢Í§ ¤Ø³¡ÑºÍØ»¡Ã³ìÎÒÃì´áÇÃì·ÕèäÁèÃÇÁ㹤ÍÁ¾ÔÇàµÍÃì¢Í§¤Ø³ - ÍéÒ§ÍÔ§à¿ÍÃìäõì: 28A-2029 ¨Ò¡ Steward (ÊͧÅÙ») 㹪èǧ¡ÒÃÃѺÃͧ¼ÅÔµÀѳ±ì Gatewayä´éãªéÊÒÂà¤àºÔéÅ·ÕèÁդسÀÒ¾´Ñ§¹Õé: - ÊÒÂà¤àºÔéÅ USB2.0 ·Õèä´éÃѺ¡ÒÃÃѺÃͧ¨Ò¡ Hama 46778 - IEEE1394 shielded FireWire ¨Ò¡ Hama 50011 - ÊÒÂà¤àºÔéÅÍÍ´ÔâÍ/ÇÔ´ÕâÍ RCA-RCA ËØéÁ©¹Ç¹¨Ò¡ Thomson KHC001M, KHC012M, KHC028M - ÊÒÂà¤àºÔéÅÍÍ´ÔâÍËØéÁ©¹Ç¹áººá¨ç¤ÊàµÍÃÔâͨҡ Hama 43330H, 42714H ¡ÒÃà¡Ô´¤ÇÒÁÃé͹áÅФÍÁ¾ÔÇàµÍÃ쾡¾Ò Íá´»àµÍÃì AC áÅдéÒ¹ÅèÒ§¢Í§¤ÍÁ¾ÔÇàµÍÃìÍÒ¨ÁÕ¤ÇÒÁÃé͹ä´éËÅѧ¨Ò¡ãªé§Ò¹à»ç¹àÇÅÒ¹Ò¹ ¤ÇÃËÅÕ¡àÅÕè§ ¡ÒÃÊÑÁ¼ÑÊà»ç¹àÇÅÒ¹Ò¹¡Ñº·Ñé§ÊͧÊÔ觹Ñé¹ ¢éÍÁÙÅ´éÒ¹¡ÒäǺ¤ØÁ - 109 ¡ÒöʹáÅÐà»ÅÕè¹½Ò¤ÃͺáªÊ«Õ ¡è͹¶Í´½Ò¤Ãͺà¤Êà¾×èͺÓÃاÃÑ¡ÉÒËÃ×Í»ÃѺ»ÃاÍØ»¡Ã³ì ¤Ø³µéͧ¶Í´ÊÒÂä¿·Ñé§ËÁ´áÅÐÊÒÂâÁà´çÁ áÅжʹËÃ×ͻԴ¡ÒÃãªé§Ò¹áºçµàµÍÃÕè - ¢éͤÇÃÃÐÇѧ: ´éÒ¹ÅèÒ§¢Í§¤ÍÁ¾ÔÇàµÍÃì¹Ñé¹ÍÒ¨à¡Ô´¤ÇÒÁÃé͹ËÅѧ¨Ò¡¡ÒÃãªé§Ò¹à»ç¹àÇÅÒ¹Ò¹ ¤Ø³µéͧ»Ô´áªÊ«Õ¡è͹·Õè¤Ø³¨ÐàÊÕº»ÅÑê¡áÅÐà»Ô´ÊÇÔµ«ìÍØ»¡Ã³ì ¤Óá¶Å§à¡ÕèÂǡѺ¢éͺѧ¤Ñº´éÒ¹àÅà«ÍÃì ÍØ»¡Ã³ìÍ;µÔ¤ÍÅä´éÃѺ¡Ò÷´ÊͺáÅÐÃѺÃͧÇèÒà»ç¹ä»µÒÁÁҵðҹ International Electrotechnical Commission IEC60825-1 áÅÐ European EN60825-1 ÊÓËÃѺ¼ÅÔµÀѳ±ìàÅà«ÍÃì Class 1 ¼ÅÔµÀѳ±ìàÅà«ÍÃì Class 1 ¹Ñé¹äÁè¹Ñºà»ç¹ÍѹµÃÒ ÍØ»¡Ã³ìÍ;µÔ¤ÍÅä´éÃѺ¡ÒÃÍÍ¡á ººàªè¹¹ÕéäÁèÁÕÁ¹ØÉÂìà¢éÒ¶Ö§áʧàÅà«ÍÃìà¡Ô¹Ãкº Class 1 ã¹ÃÐËÇèÒ§¡Ò÷ӧ Ò¹»¡µÔËÃ×Í¡ÒúÓÃاÃÑ¡ÉÒ·Õèä´é¡Ó˹´äÇé ÍØ»¡Ã³ìÍ;µÔ¤ÍÅ·ÕèµÔ´µÑé§ÍÂÙ躹¤ÍÁ¾ÔÇàµÍÃì¢Í§¤Ø³ä´éÃѺ¡ÒÃÍ͡Ẻà¾×èÍãªé੾ÒÐà¾×èÍà»ç¹Êèǹ»ÃСͺ¢Í§¼ÅÔ µÀѳ±ìÍÔàÅç¡·Ã͹ԡÊì áÅÐäÁèä´éà»ç¹ä»µÒÁ¢éÍ¡Ó˹´¢Í§ Code of Federal Regulation Sec. 1040.10 áÅÐ Sec. 1040.11 ÊÓËÃѺ¼ÅÔµÀѳ±ìàÅà«ÍÃì·ÕèÊÁºÙóìẺ à¹×èͧ¨Ò¡¡ÒÃÊÑÁ¼ÑʡѺáʧàÅà«ÍÃìà»ç¹ÍѹµÃÒÂÍÂèÒ§ÂÔè§ ¼ÙéãªéËéÒÁ·Ó¡ÒöʹÍØ»¡Ã³ìàÅà«ÍÃìäÁèÇèÒ㹡óÕã´æ ·Ñé§ÊÔé¹ ºÃèØÀѳ±ì ¡ÒúÃèØÀѳ±ì¢Í§¼ÅÔµÀѳ±ì¹Õéà»ç¹ä»µÒÁ¤ÓÊÑè§ European Environmental Directive 94/62/EC àÁ×èÍÇѹ·Õè 20 ¸Ñ¹ÇÒ¤Á »Õ 1994 áÅÐÁÕ¤èÒà·èҡѺµÃÒ¡®ËÁÒ½ÃÑè§àÈʵÒÁ¤ÓÊÑè§ÈÒÅ 98-638 àÁ×èÍÇѹ·Õè 20 ¡Ã¡®Ò¤Á »Õ 1998 áÅÐÊÍ´¤Åéͧ¡ÑºãºÃѺÃͧ¢éͺѧ¤ÑºÊÓËÃѺÃÑÊà«Õ 110 ÊÔè§áÇ´ÅéÍÁ ¤ÇÒÁ·ØèÁà·µèÍ¡Òû¡»éͧÊÔè§áÇ´ÅéÍÁ ÊÔè§áÇ´ÅéÍÁ¹Ñé¹à»ç¹ËÑÇã¨ËÅÑ¡¢Í§¼ÅÔµÀѳ±ì¢Í§àÃÒ Gateway ¹Ñé¹·ØèÁà·µèÍ¡ÒèӡѴ¼Å¡Ãзº·ÕèÁÕµèÍÊÔè§áÇ´ÅéÍÁ¢Í§¼ÅÔµÀѳ±ì¢Í§ºÃÔÉÑ·ã¹µÅÍ´ÍÒÂØ¡ÒÃãªé§Ò¹¢Í§ ¼ÅÔµÀѳ±ì àÃÔèÁµé¹·Õè¢Ñ鹵͹¡ÒÃÍ͡Ẻ ´éǹâºÒ¡ÒèѴËÒÍÂèÒ§à¢éÁ§Ç´ÍÂèÒ§ÁÒ¡·ÕèãËé¤ÇÒÁʹã¨ÍÂèÒ§ÊÙ§ÊØ´µèÍÍØ»¡Ã³ìÍÔàÅç¡·Ã͹ԡÊìà¾×èÍà»ç¹¡ÒÃ¨Ó¡Ñ ´¹éÓ˹ѡ¢Í§âÅËÐ˹ѡÍÂèÒ§µÐ¡ÑèÇ á¤´àÁÕèÂÁ â¤ÃàÁÕèÂÁ »ÃÍ· ÏÅÏ â´Â«Ñ¾¾ÅÒÂàÍÍÃì¹Ñ鹶١¢ÍãËé·ÓµÒÁ¡®¢éͺѧ¤Ñº·Ñé§ËÁ´ã¹áµèÅЪÔé¹Êèǹ¢Í§¼ÅÔµÀѳ±ìÍÂèÒ§à¤Ã觤ÃÑ´ µÃÒºà·èÒ·ÕèÂѧ¤Ó¹Ö§¶Ö§ÍÒÂØÊÔé¹ÊØ´¢Í§¼ÅÔµÀѳ±ì ¨Ö§ÁÕ¡ÒÃËÒ¤èÒà¾×èͤҴ¡ÒóìáÅÐãªé§Ò¹¡ÒÃÃÕä«à¤ÔżÅÔµÀѳ±ì·Ñé§ËÁ´¢Í§àÃÒ ´Ñ§¹Ñé¹ ªÔé¹Êèǹ¾ÅÒʵԡ·Ñé§ËÁ´·Õè˹ѡ¡ÇèÒ 25 ¡ÃÑÁ·Õè¶Ù¡ãªéã¹¼ÅÔµÀѳ±ì Gateway ¹Ñ鹨֧ä´éÁÕà¤Ã×èͧËÁÒ ISO 11469 â´Â©ÅÒ¡à¤Ã×èͧËÁÒ¹Õé¨ÐªèÇÂãËéÊÒÁÒö¨ÓṡÇÑÊ´Øä´éÃÇ´àÃçÇ¢Öé¹áÅСÓ˹´ÃÒ¤Òä´é§èÒÂÂÔ觢Öé¹ ¹Í¡¨Ò¡¹Ñé¹ ¤ÍÁ¾ÔÇàµÍÃìà´Ê¡ì·çÍ»¹Ñé¹ä´éÃѺ¡ÒÃÍ͡ẺÁÒãËé¶Í´á¡ä´é§èÒ ´éÇ¡ÒÃá·¹·ÕèÊ¡ÃÙ´éǤÅÔ» ¡ÒáӨѴ¼ÅÔµÀѳ±ì ¤ÓÊÑ觷Õè 2002/96/EC «Öè§ÃÙé¨Ñ¡¡Ñ¹ã¹ª×èͤÓÊÑè§ÇèÒ´éÇ¢ÂÐÍÔàÅç¡·Ã͹ԡÊìáÅÐÍØ»¡Ã³ìÍÔàÅç¡·Ã͹ԡÊì (WEEE) ¡Ó˹´ãËé¼ÅÔµÀѳ±ìà¤Ã×èͧãªéä¿¿éÒáÅÐÍÔàÅç¡·Ã͹ԡÊìµéͧä´éÃѺ¡ÒáӨѴᡵèÒ§ËÒ¡¨Ò¡¢ÂÐ ·ÑèÇä»ã¹ºéÒ¹à¾×èÍà»ç¹¡ÒÃÊè§àÊÃÔÁ¡ÒùӡÅѺÁÒãªéãËÁè ¡ÒÃÃÕä«à¤ÔÅ áÅСÒùӡÅѺÁÒã¹ÃٻẺÍ×è¹æ áÅÐà¾×èÍÅ´»ÃÔÁÒ³¢ÂзÕè¨Ðµéͧ¡Ó¨Ñ´´éÇÂÁØÁÁͧ㹡ÒÃÅ´¡ÒáӨѴ¢ÂÐâ´Â¡ÒýѧáÅСÒÃà¼ Ò à¤Ã×èͧËÁÒ¡ҡºÒ·º¹¶Ñ§¢ÂзÕèÁÕÍÂÙè¹Ñé¹à»ç¹à¤Ã×èͧÂéÓàµ×͹ãËé¤Ø³ÃÙéÇèÒ¼ÅÔµÀѳ±ìàËÅèÒ¹Õéµéͧá¡·Ô駵èÒ§ËÒ¡ ÊÔè§áÇ´ÅéÍÁ - 111 ¡®¢éͺѧ¤Ñº¹Õéà¡ÕèÂǡѺ¼ÅÔµÀѳ±ì Gateway ·Ñé§ËÁ´¢Í§¤Ø³áÅÐÂѧà¡ÕèÂǡѺÍØ»¡Ã³ìàÊÃÔÁ·Ñé§ËÁ´ àªè¹¤ÕÂìºÍÃì´ àÁÒÊì ÅÓ⾧ ÃÕâÁ·¤Í¹â·ÃÅ ÏÅÏ àÁ×èͤسµéͧ·Ô駼ÅÔµÀѳ±ìµèÒ§æ àËÅèÒ¹Õé ¤Ø³µéͧá¹èã¨ÇèÒÊÔè§àËÅèÒ¹Õé¨Ðä´éÃѺ¡ÒùÓä»ÃÕä«à¤ÔÅÍÂèÒ§¶Ù¡µéͧ´éÇ¡ÒõÃǨÊͺ¡ÑºË¹èǧҹ㹷éͧ¶Ô蹢ͧ¤Ø³ ËÃ×Í¡ÒÃÊ觤׹ÍØ»¡Ã³ìà¡èҢͧ¤Ø³ãËé¡ÑºÃéÒ¹¤éÒ·Õè¤Ø³·Ó¡ÒÃà»ÅÕè¹ÍØ»¡Ã³ìàËÅèÒ¹Ñé¹ ÊÓËÃѺ¢éÍÁÙÅà¾ÔèÁàµÔÁ áÇÐä»Âѧ www.gateway.com/about/corp_responsibility/environment.php ¡ÒáӨѴẵàµÍÃÕè (àÁ×èÍÊÒÁÒö·Óä´é) ¡Ò÷Õè¨Ð·Ôé§ÍØ»¡Ã³ì¢Í§¤Ø³ ãËé´ÙãËéá¹èã¨ÇèҤسä´é¶Í´áºµàµÍÃÕèã´¡çµÒÁ·ÕèÍÒ¨µÔ´ÍÂÙè¡ÑºÍØ»¡Ã³ìÍÍ¡ËÁ´áÅéÇ ¡®ËÁÒÂÂØâû¡Ó˹´ÇèÒẵàµÍÃÕèµéͧä´éÃѺ¡ÒÃà¡çºÃǺÃÇÁà¾×èÍ¡ÒáӨѴᡵèÒ§ËÒ¡¨Ò¡¢ÂÐ㹤ÃÑÇàÃ×͹·ÑèÇä» ÍÂèÒ·Ôé§áºµàµÍÃÕè·ÕèãªéáÅéǢͧ¤Ø³Å§¶Ñ§¢ÂÐ ·Ôé§áºµàµÍÃÕè·ÕèãªéáÅéǢͧ¤Ø³·Õèâ¤Ã§¡ÒÃà¡çºÃǺÃÇÁẵàµÍÃÕè·ÕèÁÕãËé ËÃ×ͶÒÁµÑÇá·¹¨Ó˹èÒÂËÃ×Íà¨éÒ˹éÒ·Õè·éͧ¶Ô蹶֧ÇÔ¸Õ¡Ò÷Õè¤Ø³¨ÐÊÒÁÒö·Óä´é ¤ÇÒÁµÑé§ã¨¢Í§¤Ø³¨ÐªèÇÂãËéà¡Ô´¡ÒÃà¡çºÃǺÃÇÁ ¡ÒÃÃÕä«à¤ÔÅ áÅСÒ÷ÓÅÒÂẵàµÍÃÕèãªéáÅéÇ·Õè»ÅÍ´ÀÑ áÅШЪèÇ»¡»éͧÊÔè§áÇ´ÅéÍÁáÅÐÅ´ÍѹµÃÒµèÍÊØ¢ÀҾŧä´é - ¢éͤÇÃÃÐÇѧ: ÁÕ¤ÇÒÁàÊÕ觵èÍ¡ÒÃÃÐàºÔ´ËÒ¡à»ÅÕè¹ẵàµÍÃÕèäÁè¶Ù¡»ÃÐàÀ· ãËé·Ôé§áºµàµÍÃÕè·èäÕ Áè ãªé§Ò¹áÅéǵÒÁà§×è͹䢷Õè¢éÍ¡Ó˹´·ÕèÃкØäÇé ENERGY STAR ¼ÅÔµÀѳ±ì Gateway ä´éÃѺ¡ÒÃÃѺÃͧ ENERGY STAR à¾×èÍ»ÃÐËÂÑ´à§Ô¹¢Í§¤Ø³â´Â¡Òà Ŵµé¹·Ø¹áÅл¡»éͧÊÀÒ¾áÇ´ÅéÍÁâ´ÂäÁèÊÙ−àÊÕ¤سÅѡɳÐËÃ×Í»ÃÐÊÔ·¸ÔÀÒ¾ Gateway ÀÒ¤ÀÙÁÔã¨ã¹¡ÒÃÁͺ¼ÅÔµÀѳ±ì·ÕèÁÕà¤Ã×èͧËÁÒ ENERGY STAR ãËé¡ÑºÅÙ¡¤éÒ ENERGY STAR ¤×ÍÍÐäÃ? ¼ÅÔµÀѳ±ì·Õèä´éÃѺ ENERGY STAR ¤×ͼÅÔµÀѳ±ì·Õèãªé¾Åѧ§Ò¹µèÓáÅлéͧ¡Ñ¹¡Òà »ÅèÍ¡êÒ«àÃ×͹¡ÃШ¡â´Â¡Òû¯ÔºÑµÔµÒÁá¹Ç·Ò§¡ÒÃãªé¾Åѧ§Ò¹ÍÂèÒ§ÁÕ»ÃÐÊÔ·¸ÔÀÒ¾ÍÂèÒ§à¤Ã觤ÃÑ´«Öè§¡Ó Ë¹´â´Âͧ¤ì¡ÒþԷѡÉÊÔè§áÇ´ÅÍÁá˧»ÃÐà·ÈÊËÃÑ°ÍàÁÃÔ¡Ò (U.S. Environmental Protection Agency) Gateway Áվѹ¸¡Ô¨ã¹¡ÒÃÁͺ¼ÅÔµÀѳ±ìáÅкÃÔ¡Ò÷ÑèÇâÅ¡à¾×èͪèÇÂãËéÅÙ¡¤éÒÊÒÁÒö»ÃÐËÂÑ´à§Ô¹, ͹ØÃÑ¡Éì¾Åѧ§Ò¹, áÅлÃѺ»Ãا¤Ø³ÀÒ¾¢Í§ÊÀÒ¾áÇ´ÅéÍÁ¢Í§àÃÒ ÂÔè§àÃÒ͹ØÃÑ¡Éì¾Åѧ§Ò¹¼èÒ¹¡ÒÃãªé¾Åѧ§Ò¹ 112 ä´éÍÂèÒ§ÁÕ»ÃÐÊÔ·¸ÔÀÒ¾·ÕèÊÙ§¡ÇèÒä´éÁÒ¡à·èÒã´ à·èҡѺàÃÒä´éÅ´¡ÒûÅèÍ¡êÒ«àÃ×͹¡ÃШ¡áÅФÇÒÁàÊÕè§ 㹡ÒÃà¡Ô´¤ÇÒÁà»ÅÕè¹á»Å§¢Í§ÊÀÒ¾ÍÒ¡ÒÈä´éÁÒ¡¢Öé¹à·èÒ¹Ñé¹ ÊÓËÃѺ¢éÍÁÙÅà¾ÔèÁàµÔÁ â»Ã´áÇÐä»Âѧ www.energystar.gov ËÃ×Í www.energystar.gov/powermanagement - ËÁÒÂà˵Ø: ¢éÍÁÙÅã¹Êèǹ¹ÕéÍÒ¨äÁèÊÒÁÒöãªéä´é¡Ñº¤ÍÁ¾ÔÇàµÍÃì¢Í§¤Ø³ ¼ÅÔµÀѳ±ì Gateway ·Õèä´éÃѺ ENERGY STAR: (ÊÓËÃѺºÒ§ÃØè¹) - ÊÃéÒ§¤ÇÒÁÃé͹¹éÍÂáÅÐÅ´¡ÒÃà¡Ô´ÊÀÒ¾ÍÒ¡ÒÈ·ÕèÃé͹ËÃ×Í˹ÒÇÍÂèÒ§Ãعáç - à¢éÒÊÙèâËÁ´ "»Ô´Ë¹éÒ¨Í" áÅÐ âËÁ´ "¾Ñ¡à¤Ã×èͧ" ËÅѧ¨Ò¡ 10 ¶Ö§ 30 ¹Ò·Õ¼èÒ¹ä»ËÒ¡ äÁèÁÕ¡ÒÃãªé§Ò¹ - »ÅØ¡¤ÍÁ¾ÔÇàµÍÃì¨Ò¡âËÁ´ sleep â´Â¡Òá´¤ÕÂìºÍÃì´ËÃ×Í¢ÂѺàÁÒÊì - ¤ÍÁ¾ÔÇàµÍÃì¨Ð»ÃÐËÂÑ´¾Åѧ§Ò¹ä´éÁÒ¡¡ÇèÒ 80% àÁ×èÍÍÂÙèã¹âËÁ´ "sleep" ENERGY STAR áÅÐà¤Ã×èͧËÁÒ ENERGY STAR ¤×Íà¤Ã×èͧËÁÒ¨´·ÐàºÕ¹ã¹ÊËÃÑ°ÍàÁÃÔ¡Ò ÊÔè§áÇ´ÅéÍÁ - 113 ãºÍ¹Ø−ҵ㹡ÒÃãªé«Í¿·ìáÇÃì - ËÁÒÂà˵Ø: á;¾ÅÔपÑ蹫Ϳ·ìáÇÃìÊèǹÁÒ¡ÁÕµÔ´µÑé§äÇé¡è͹áÅéǺ¹¤ÍÁ¾ÔÇàµÍÃì Gateway ¢Í§¤Ø³ áÅоÃéÍÁÊÓËÃѺ¡ÒÃãªé§Ò¹ËÃ×͵Ñ駤èÒ ÍÂèÒ§äáçµÒÁ «Í¿·ìáÇÃìºÒ§ÃÒ¡ÒèÓà»ç¹µéͧãªé CD ËÃ×Í DVD à¾×èÍàÃÕ¡ãªé§Ò¹ ¤Ø³¨Ð¾ºá¼è¹´ÔÊ¡ìàËÅèÒ¹Õéä´é㹺ÃèØÀѳ±ì¢Í§¤ÍÁ¾ÔÇàµÍÃì¢Í§¤Ø³ ¢é͵¡Å§¡ÒÃ͹Ø−Òµãªé§Ò¹ Gateway (¼ÅÔµÀѳ±ì CD áÅÐ/ ËÃ×Í DVD) ÊÓà¹Ò¢Í§µé¹©ºÑº¹Õé¤×ÍËÅÑ¡°Ò¹¡ÒÃ͹Ø−ÒµÊÓËÃѺ¤Ø³ â»Ã´à¡çºÃÑ¡ÉÒäÇéãËé´Õ ÊÔè§ÊÓ¤Ñ−! â»Ã´ÍèÒ¹ÍÂèÒ§ÅÐàÍÕ´¡è͹·Ó¡ÒõԴµÑ駫Ϳ·ìáÇÃì ¢é͵¡Å§¡ÒÃ͹Ø−Òµãªé§Ò¹µèÍ仹ÕéÁռźѧ¤Ñºãªé¡Ñº¤Ø³ ¹Õè¤×Í¢é͵¡Å§·ÕèÁռż١¾Ñ¹·Ò§¡®ËÁÒÂÃÐËÇèÒ§¤Ø³ (·Ñé§ã¹¹ÒÁ¢Í§ºØ¤¤Å¸ÃÃÁ´ÒËÃ×͹ԵԺؤ¤Å) áGatewayÅÐâ´Â¡ÒõԴµÑ駫Ϳ·ìáÇÃì¹Õé ¤Ø³ä´éµ¡Å§·Õè¨ÐÁվѹ¸Ð¼Ù¡¾Ñ¹µÒÁà§×è͹䢢ͧ¢é͵¡Å§¹Õé ËÒ¡¤Ø³äÁèÂÍÁÃѺã¹à§×è͹䢢ͧ¢é͵¡Å§¹Õé â»Ã´Ê觤׹à¤Ã×èͧ¤ÍÁ¾ÔÇàµÍÃì¢Í§¤Ø³ «Í¿·ìáÇÃìá¾ç¤à¡µ·ÕèÂѧäÁè¶Ù¡à»Ô´ãªé ËÒ¡ÁÕ â´ÂãËéà»ç¹ä»µÒÁà§×èÍ¹ä¢ (ÃÇÁ¶Ö§ÇÑÊ´ØàÍ¡ÊÒÃËÃ×ÍËÕºËèÍÍ×è¹æ) ãËé¡ÑºÃéÒ¹¤éÒ·Õè¤Ø³«×éÍ㹷ѹ·Õà¾×èÍÃѺ¡Òä׹à§Ô¹àµçÁ¨Ó¹Ç¹ Gateway ãºÍ¹Ø−ҵ㹡ÒÃãªé«Í¿·ìáÇÃì 1. ¡ÒÃ͹Ø−Òµãªé§Ò¹ ¢éGateway͵¡Å§¡ÒÃ͹Ø−Òµãªé§Ò¹ (“¡ÒÃ͹Ø−Òµ”) ¹Õé ͹Ø−ÒµãËé¤Ø³ãªéÊÓà¹Ò˹Öè§ÊÓà¹Ò¢Í§àÇÍÃìªÑè¹·ÕèÃкØGateway ¢Í§ «Í¿·ìáÇÃì·Õèä´é͸ԺÒ¢éÒ§µé¹ («Öè§ÍÒ¨ÁÕ´ÔÊ¡ì CD ËÃ×Í DVD ÍÂèÒ§¹éÍÂ˹Öè§á¼è¹) º¹¤ÍÁ¾ÔÇàµÍÃì˹Öè§à¤Ã×èͧ ãËéÊÒÁÒöãªé«Í¿·ìáÇÃì¹Õéä´éº¹¤ÍÁ¾ÔÇàµÍÃì˹Öè§à¤Ã×èͧà·èÒ¹Ñé¹ ËÒ¡¤Ø³ä´éÃѺãºÍ¹Ø−ÒµËÅÒÂãºÊÓËÃѺ«Í¿·ìáÇÃì¹Õé ¤Ø³ÍÒ¨ÁÕÊÓà¹Ò¢Í§«Í¿·ìáÇÃì¹Õéä´éËÅÒÂÊÓà¹Òà¾×èÍãªé§Ò¹µÒÁ¨Ó¹Ç¹·Õèä´éÃѺ͹Ø−Òµ «Í¿·ìáÇÃì¹Õé “ãËéãªé” º¹¤ÍÁ¾ÔÇàµÍÃìàÁ×èͶ١âËÅ´à¢éÒÊÙè˹èǤÇÒÁ¨ÓªÑèǤÃÒÇ (àªè¹ RAM) ËÃ×Ͷ١µÔ´µÑé§ÍÂÙèã¹Ë¹èǤÇÒÁ¨Ó¶ÒÇà (àªè¹ ÎÒÃì´´ÔÊ¡ì, CD áÅÐ/ ËÃ×Í DVD ËÃ×ÍÍØ»¡Ã³ìà¡çº¢éÍÁÙÅÍ×蹢ͧ¤ÍÁ¾ÔÇàµÍÃì¹Õé àÇé¹äÇéáµèÇèÒÊÓà¹Ò·Õè¶Ù¡µÔ´µÑ駺¹à«ÔÃì¿àÇÍÃìà¤Ã×Í¢èÒ¹Ñé¹ÁÕÇѵ¶Ø»ÃÐʧ¤ì㹡ÒÃᨡ¨èÒÂÊÓËÃѺ¤ÍÁ¾ÔÇàµÍÃìÍ×è¹·ÕèäÁèä´éÃѺ͹Ø−Òµ “ãËéãªé” ËÒ¡¨Ó¹Ç¹¼Ùéãªé·Õè¤Ò´¡ÒóìÇèÒ¨Ðãªé«Í¿·ìáÇÃìÁըӹǹà¡Ô¹¡ÇèҨӹǹ¢Í§ãºÍ¹Ø−Òµ·ÕèÁÕãËé ¤Ø³¨ÐµéͧÁÕÇÔ¸Õ¡ÒÃËÃ×Í¡Ãкǹ¡ÒÃ㹡Ò÷ÓãËéá¹èã¨ä´éÇèҨӹǹ¢Í§¼Ùé·Õè¨Ðãªé«Í¿·ìáÇÃìµéͧäÁèà¡Ô¹¡ÇèҨӹǹ¢Í§ãºÍ¹Ø−Òµ ËÒ¡«Í¿·ìáÇÃì¹Õé¶Ù¡µÔ´µÑé§ÍÂèÒ§¶ÒÇú¹ÎÒÃì´´ÔÊ¡ìËÃ×ÍÍØ»¡Ã³ìà¡çº¢éÍÁÙŢͧ¤ÍÁ¾ÔÇàµÍÃì (¹Í¡¨Ò¡à«ÔÃì¿àÇÍÃìà¤Ã×Í¢èÒÂ) áÅÐÁÕ¼Ùéãªéà¾Õ§ºØ¤¤Åà´ÕÂÇãªé§Ò¹¤ÍÁ¾ÔÇàµÍÃìà¤Ã×èͧ¹Ñé¹ÁÒ¡¡ÇèÒ 80% ¢Í§àÇÅÒ·Ñé§ËÁ´·Õèà¤Ã×èͧ¶Ù¡ãªé§Ò¹ ºØ¤¤Å¹Ñé¹ÊÒÁÒöãªé«Í¿·ìáÇÃì¹Õ麹¤ÍÁ¾ÔÇàµÍÃ쾡¾ÒËÃ×ͤÍÁ¾ÔÇàµÍÃìã¹·ÕèÍÂÙèÍÒÈÑÂä´é 114 2. ÅÔ¢ÊÔ·¸Ôì «Í¿·ìáÇÃì¹Õéà»ç¹¡ÃÃÁÊÔ·¸Ôì¢Í§ GatewayËÃ×ͫѾ¾ÅÒÂàÍÍÃì¢Í§à¡µàÇÂì áÅÐä´éÃѺ¡Òû¡»éͧâ´Â¡®ËÁÒÂÅÔ¢ÊÔ·¸Ôì¢Í§ÊËÃÑ°ÍàÁÃÔ¡ÒáÅÐʹ¸ÔÊÑ−−ÒÅÔ¢ÊÔ·¸ÔìÃÐËÇèÒ§»ÃÐà·È ´éÇÂà˵عÕé ¤Ø³µéͧãªé«Í¿·ìáÇÃì¹Õéàªè¹à´ÕÂǡѺÇÑÊ´Ø·Õ訴ÅÔ¢ÊÔ·¸ÔìÍ×è¹æ (àªè¹ ˹ѧÊ×Í ËÃ×Í ¡Òúѹ·Ö¡àÊÕ§) àÇé¹äÇéáµèÇèҤسÍÒ¨¶èÒÂâ͹ͧ¤ì»ÃСͺ«Í¿·ìáÇÃìã¹´ÔÊ¡ì CD áÅÐ/ ËÃ×Í DVD ¹Õé ËÒ¡ÁÕ ä»ÂѧÎÒÃì´´ÔÊ¡ìà´ÕÂÇà¾×èÍãËé¤Ø³ÊÒÁÒöà¡çºµé¹©ºÑºäÇéâ´ÂÁÕÇѵ¶Ø»ÃÐʧ¤ìà¾×èÍáºç¤ÍѾËÃ×Íà¡çº¢éÍÁÙÅà¾Õ§ÍÂèÒ§à´ÕÂÇà·èÒ¹Ñé¹ ËéÒÁ·ÓÊÓà¹ÒÊèǹ˹Öè§Êèǹ㴢ͧ´ÔÊ¡ì CD áÅÐ/ ËÃ×Í DVD ¢Í§«Í¿·ìáÇÃì¹Õé ËÃ×ÍÇÑÊ´ØàÍ¡ÊÒÃÍ×è¹æ ·ÕèÁÒ¾ÃéÍÁ¡Ñº«Í¿·ìáÇÃì¹Õé 3. ¢éͨӡѴÍ×è¹æ ËéÒÁÁÔãËéàªèÒ«Í¿·ìáÇÃì¹Õé áµè¤Ø³ÍÒ¨¶èÒÂâ͹«Í¿·ìáÇÃì¹ÕéáÅÐÇÑÊ´ØàÍ¡ÊÒ÷ÕèÁÒ¾ÃéÍÁ¡Ñ¹ÍÂèÒ§¶ÒÇà â´ÂËéÒÁà¡çºÊÓà¹Òã´æ áÅмÙéÃѺä´éÂÍÁÃѺµÒÁà§×è͹䢢ͧ¢é͵¡Å§¹Õé ËéÒÁµÃǨÊͺÃٻẺâ¤Ã§ÊÃéÒ§·Ò§ÇÔÈÇ¡ÃÃÁ ËÃ×Í ·Ó¡ÒöʹÃËÑÊ«Í¿·ìáÇÃì¹Õéâ´Âà´ç´¢Ò´ ¡ÒöèÒÂâ͹ã´æ ÊÓËÃѺ«Í¿·ìáÇÃì¹ÕéµéͧÃÇÁ件֧ÍѾവÅèÒÊØ´áÅÐàÇÍÃìªÑ蹡è͹˹éÒ·Ñé§ËÁ´ ¢éÍÁÙÅÊÓËÃѺ«Í¿·ìáÇÃì¨Ò¡¼Ùé¼ÅÔµÃÒÂÍ×è¹ËÃ×Í¡ÒÃ͹Ø−ÒµãËéãªé«Í¿·ìáÇÃìàÊÃÕ «Í¿·ìáÇÃì·Õè¶Ù¡âËÅ´äÇéÅèǧ˹éÒ ½Ñ§µÑÇ ËÃ×Ͷ١ᨡ¨èÒ¾ÃéÍÁ¡Ñº¼ÅÔµÀѳ±ì ÁÕãËéâ´Â Gateway ÁÕâ»Ãá¡ÃÁ«Í¿·ìáÇÃìàÊÃÕËÃ×Í«Í¿·ìáÇÃì¨Ò¡¼Ùé¼ÅÔµÃÒÂÍ×è¹ (“«Í¿·ìáÇÃìàÊÃÕ”) ·Õèä´éÃѺ͹Ø−ÒµÀÒÂãµéà§×èÍ¹ä¢ GNU General Public License (“GPL”) «Í¿·ìáÇÃìàÊÃըж١·Óà¤Ã×èͧËÁÒÂàªè¹¹Õé ¡Ò÷ÓÊÓà¹Ò ᨡ¨èÒ áÅÐ/ ËÃ×Í »ÃѺ»Ãاá¡é䢫Ϳ·ìáÇÃìàÊÃÕ¹Õé¨Ðµéͧà»ç¹ä»µÒÁÇѵ¶Ø»ÃÐʧ¤ì¢Í§à§×è͹䢢ͧ GPL «Í¿·ìáÇÃìàÊÃÕ¹Õé¶Ù¡á¨¡¨èÒÂâ´ÂÁÕ¤ÇÒÁ¤Ò´ËÇѧÇèÒ¨Ðà»ç¹»ÃÐ⪹ì áÅÐäÁèÁÕ¡ÒÃãËé¡ÒÃÃѺ»ÃСѹã´æ ÃÇÁ¶Ö§äÁèÁÕ¡ÒÃÃѺ»ÃСѹâ´Â¹ÑÂÊÓËÃѺ¤ÇÒÁÊÒÁÒö·Ò§¡ÒäéÒ ËÃ×ͤÇÒÁàËÁÒÐÊÁ㹡ÒÃãªé§Ò¹ÊÓËÃѺÇѵ¶Ø»ÃÐʧ¤ìÊèǹµÑÇ ãËé¶×Í»¯ÔºÑµÔµÒÁ¢éÍ¡Ó˹´¢Í§ GNU General Public License ÍÂèÒ§à´ç´¢Ò´ ¤Ø³ÍÒ¨ä»Âѧ http://www.gnu.org â´ÂµÃ§à¾×èÍÃѺÊÓà¹Ò¢Í§ GPL ËÃ×Íà¢Õ¹ä»ÂѧÁÙŹԸԫͿµìáÇÃìàÊÃÕà¾×èÍ¢ÍÊÓà¹Ò ä´éµÒÁ·ÕèÍÂÙè¹Õé Free Software Foundation, Inc: 59 Temple Place - Suite 330, Boston, MA, 02111-1307, USA ÀÒÂã¹àÇÅÒÊÒÁ»Õ¹Ñº¨Ò¡Çѹ·Õèã¹ãºàÊÃç¨ÃѺà§Ô¹¢Í§¤Ø³ÊÓËÃѺ«Í¿·ìáÇÃì¹Õé ¤Ø³ÊÒÁÒöÃѺÊÓà¹Ò«ÍÃìÊâ¤é´·ÕèÊÁºÙóìÊÓËÃѺ«Í¿·ìáÇÃìàÊÃÕ·Õè¤ÍÁ¾ÔÇàµÍÃìÊÒÁÒöÍèÒ¹ä´éÀÒÂãµéà§×è͹䢢ͧ GPL â´ÂäÁèÁÕ¤èÒãªé¨èÒÂã´æ ¹Í¡¨Ò¡¤èÒãªé¨èÒÂÊÓËÃѺÁÕà´Õ ¡ÒèѴÊè§ áÅСÒèѴ¡Òà 㹡ÒÃà¢Õ¹¶Ö§àÃÒ â»Ã´µÔ´µèÍàÃÒËÒ¡¤Ø³ÁÕ¤Ó¶ÒÁà¾ÔèÁàµÔÁÁÒ¡¡ÇèÒ¹Õé ·ÕèÍÂÙè·Ò§ä»ÃɳÕÂì¢Í§àÃÒ¤×Í 8F, 88, Sec. 1, Hsin Tai Wu Rd., Hsichih, New Taipei City 221, Taiwan ãºÍ¹Ø−ҵ㹡ÒÃãªé«Í¿·ìáÇÃì - 115 ´Ñª¹ ¢éͤÇû¯ÔºÑµÔà¾×èͤÇÒÁ»ÅÍ´ÀÑ ................................. 9 ¢éÍÁÙÅ´éÒ¹¡ÒäǺ¤ØÁ ......................................... 93, 111 ¨ÍáÊ´§¼Å Îç͵¤ÕÂì .............................................................. 18 ¼ÙéãËéºÃÔ¡ÒÃÍÔ¹àµÍÃìà¹çµ (ISP)................................... 46 ¾ÍÃìµ ......................................................................... 29 ¡ÒáӨѴẵàµÍÃÕè ................................................... 112 ¡ÒáÙé¤×¹ â»Ãá¡ÃÁ Recovery Management ................... 45 ¡Òûéͧ¡Ñ¹´éÒ¹ÊØ¢ÀÒ¾ ............................................. 13 ¡Ò÷ӤÇÒÁÊÐÍÒ´¤ÍÁ¾ÔÇàµÍÃì¢Í§¤Ø³ ................... 11 ¡ÒÃàª×èÍÁµèÍ à¤Ã×Í¢èÒÂ............................................................ 31 ¡ÒÃàª×èÍÁµèÍà¤Ã×Í¢èÒ ................................................ 49 ¡ÒÃàÃÕ¡¤×¹ Recovery Management.................................... 63 ¡ÒÃáÊ´§¼Å ¡ÒÃá¡é䢻Ñ-ËÒ.................................................. 84 ¡ÒÃÃѺ»ÃСѹ .............................................................. 8 ¡ÒÃú¡Ç¹ ............................................................... 107 ¡ÒêÒÃì¨ µÃǨÊͺÃдѺ.................................................. 40 116 ¡ÒúÓÃاÃÑ¡ÉÒ â»Ãá¡ÃÁ Recovery Management ................... 45 Recovery Management.................................... 63 «Í¿µìáÇÃì ãºÍ¹Ø−ҵ㹡ÒÃãªé«Í¿·ìáÇÃì ......................... 114 »Ñ-ËÒ......................................................................... 83 ¡ÒÃàÃÔèÁ·Ó§Ò¹ ................................................... 83 ¡ÒÃáÊ´§¼Å ...................................................... 84 ¤ÕÂìºÍÃì´ ............................................................ 85 à¤Ã×èͧ¾ÔÁ¾ì ........................................................ 85 CD-ROM.......................................................... 85 ¤ÇÒÁ»ÅÍ´ÀÑ â»Ãá¡ÃÁ»éͧ¡Ñ¹äÇÃÑÊ ....................................... 55 ÍѾവ............................................................... 61 ¤ÇÒÁÊÇèÒ§ Îç͵¤ÕÂì .............................................................. 19 ¤ÍÁ¾ÔÇàµÍÃì ¤Ø³ÊÁºÑµÔ........................................................... 15 áÊ´§Ê¶Ò¹Ð¡ÒÃà»Ô´·Ó§Ò¹............................... 21 ¤Ó¶ÒÁ·Õè¶Ù¡¶ÒÁºèÍ ................................................. 83 ¤Óàµ×͹à¡ÕèÂǡѺâäÅÁºéÒËÁÙ .................................... 14 ¤ÕÂìºÍÃì´ ¡ÒÃá¡é䢻Ñ-ËÒ.................................................. 85 Îç͵¤ÕÂì .............................................................. 20 ·Ñªá¾´...................................................................... 27 ¡ÒÃãªé .......................................................... 27–27 A ä´Ãì¿ àÁÁâÁÃÕè¡ÒÃì´ÃÕ´à´ÍÃì ......................................... 29 à¤Ã×èͧ¾ÔÁ¾ì ¡ÒÃá¡é䢻Ñ-ËÒ.................................................. 85 à¤Ã×Í¢èÒÂ.................................................................... 31 à¤ÍÃìà«ÍÃì .................................................................. 27 âÁà´çÁ .................................................................. 47, 48 àÁÁâÁÃÕè¡ÒÃì´ÃÕ´à´ÍÃì ................................................. 29 ÁÑÅáÇÃì ....................................................................... 54 ẵàµÍÃÕè .................................................................. 112 µÃǨÊͺÃдѺ¡ÒêÒÃì¨ ................................... 40 ¡Òöʹ............................................................. 39 ¡ÒÃÂ×´ÍÒÂØ ........................................................ 40 ¡ÒÃàµ×͹ẵàµÍÃÕèµèÓ........................................ 40 ¡ÒÃà¾ÔèÁÍÒÂØ....................................................... 37 ¡ÒÃãÊè ................................................................ ¡ÒêÒÃì¨ ............................................................ ãªé§Ò¹à»ç¹¤ÃÑé§áá............................................. ÅѡɳШÓà¾ÒÐ ................................................. ẵàµÍÃÕèµèÓ....................................................... ÅÓ⾧ ¡ÒÃá¡é䢻Ñ-ËÒ.................................................. Îç͵¤ÕÂì .............................................................. ÁØÁÁͧ ´éÒ¹¢ÇÒ............................................................. ´éÒ¹«éÒ ............................................................ ´éҹ˹éÒ ............................................................ ÁØÁÁͧ´éÒ¹«éÒÂ......................................................... ÁØÁÁͧ´éҹ˹éÒ ......................................................... 39 39 37 36 41 84 19 24 22 22 21 21 C ¡ÒÃá¡é䢻Ñ-ËÒ.................................................. 85 ¡ÒÃà»Ô´ÍÍ¡´éÇÂÁ×Í ........................................... 85 CD-ROM D DSL ........................................................................... 47 ´Ñª¹ - 117 E Ê»ÒÂáÇÃì ................................................................... 54 ÊÒÂä¿ ....................................................................... 10 ÊÀÒ¾áÇ´ÅéÍÁ.......................................................... 111 ÊÒÂà¤àºÔÅé .......................................................... 10, 108 ÊÀÒ¾áÇ´ÅéÍÁ㹡ÒÃãªé¤ÍÁ¾ÔÇàµÍÃì .......................... 9 F FAQ ´Ù¤Ó¶ÒÁ·Õè¶Ù¡¶ÒÁºèÍ Firewall...................................................................... 55 G â»Ãá¡ÃÁ Recovery Management ................... 45 Gateway I Îç͵¤ÕÂì ...................................................................... 20 ÍÔ¹àµÍÃìà¹çµ ¡ÒÃàª×èÍÁµèÍ ................................................. 46, 47 ÍÍ´ÔâÍ Firewall.............................................................. 55 ¡ÒÃá¡é䢻Ñ-ËÒ.................................................. 84 ÍØ»¡Ã³ìÁÕà´Õ·Õè¶Í´à»ÅÕè¹ä´é .................................... 31 ÍѾവ ÍѾവ Windows Íѵâ¹ÁÑµÔ ............................... 61 L LAN (Local Area Network) ..................................... 49 N Norton Internet Security..................................... 53, 57 O ºÃÒÇà«ÍÃì .................................................................. 52 118 R Removing hardware................................................. 31 U Uninstalling hardware .............................................. 31 universal serial bus .................................................. 32 W WiFi........................................................................... 49 Windows ¡ÒÃãªé Windows................................................ 45 Ver.02.01.02 ÍѾവ Windows Íѵâ¹ÁѵÔ................................ 61 ´Ñª¹ - 119-
 1
1
-
 2
2
-
 3
3
-
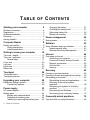 4
4
-
 5
5
-
 6
6
-
 7
7
-
 8
8
-
 9
9
-
 10
10
-
 11
11
-
 12
12
-
 13
13
-
 14
14
-
 15
15
-
 16
16
-
 17
17
-
 18
18
-
 19
19
-
 20
20
-
 21
21
-
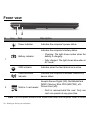 22
22
-
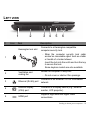 23
23
-
 24
24
-
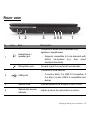 25
25
-
 26
26
-
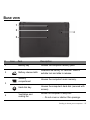 27
27
-
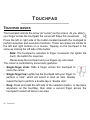 28
28
-
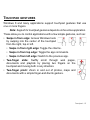 29
29
-
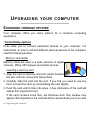 30
30
-
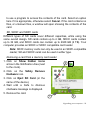 31
31
-
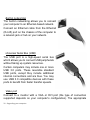 32
32
-
 33
33
-
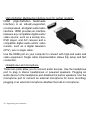 34
34
-
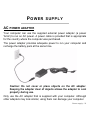 35
35
-
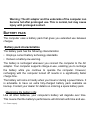 36
36
-
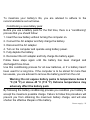 37
37
-
 38
38
-
 39
39
-
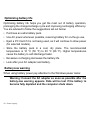 40
40
-
 41
41
-
 42
42
-
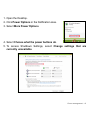 43
43
-
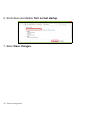 44
44
-
 45
45
-
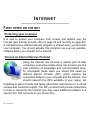 46
46
-
 47
47
-
 48
48
-
 49
49
-
 50
50
-
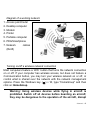 51
51
-
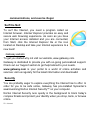 52
52
-
 53
53
-
 54
54
-
 55
55
-
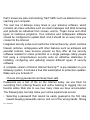 56
56
-
 57
57
-
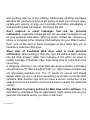 58
58
-
 59
59
-
 60
60
-
 61
61
-
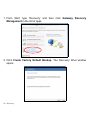 62
62
-
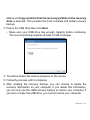 63
63
-
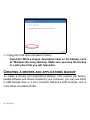 64
64
-
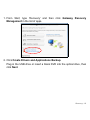 65
65
-
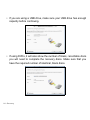 66
66
-
 67
67
-
 68
68
-
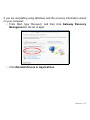 69
69
-
 70
70
-
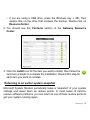 71
71
-
 72
72
-
 73
73
-
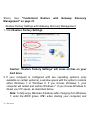 74
74
-
 75
75
-
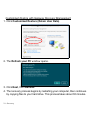 76
76
-
 77
77
-
 78
78
-
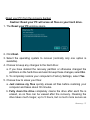 79
79
-
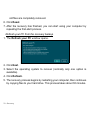 80
80
-
 81
81
-
 82
82
-
 83
83
-
 84
84
-
 85
85
-
 86
86
-
 87
87
-
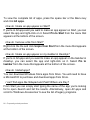 88
88
-
 89
89
-
 90
90
-
 91
91
-
 92
92
-
 93
93
-
 94
94
-
 95
95
-
 96
96
-
 97
97
-
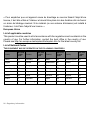 98
98
-
 99
99
-
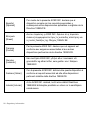 100
100
-
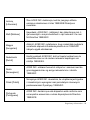 101
101
-
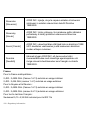 102
102
-
 103
103
-
 104
104
-
 105
105
-
 106
106
-
 107
107
-
 108
108
-
 109
109
-
 110
110
-
 111
111
-
 112
112
-
 113
113
-
 114
114
-
 115
115
-
 116
116
-
 117
117
-
 118
118
-
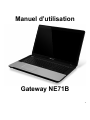 119
119
-
 120
120
-
 121
121
-
 122
122
-
 123
123
-
 124
124
-
 125
125
-
 126
126
-
 127
127
-
 128
128
-
 129
129
-
 130
130
-
 131
131
-
 132
132
-
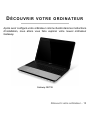 133
133
-
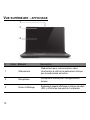 134
134
-
 135
135
-
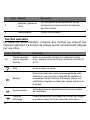 136
136
-
 137
137
-
 138
138
-
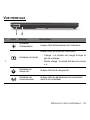 139
139
-
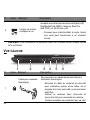 140
140
-
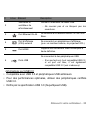 141
141
-
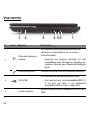 142
142
-
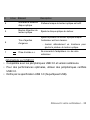 143
143
-
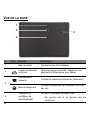 144
144
-
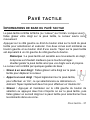 145
145
-
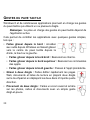 146
146
-
 147
147
-
 148
148
-
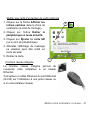 149
149
-
 150
150
-
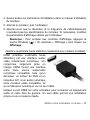 151
151
-
 152
152
-
 153
153
-
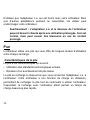 154
154
-
 155
155
-
 156
156
-
 157
157
-
 158
158
-
 159
159
-
 160
160
-
 161
161
-
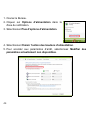 162
162
-
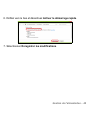 163
163
-
 164
164
-
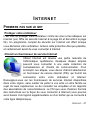 165
165
-
 166
166
-
 167
167
-
 168
168
-
 169
169
-
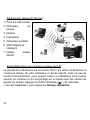 170
170
-
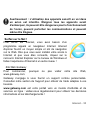 171
171
-
 172
172
-
 173
173
-
 174
174
-
 175
175
-
 176
176
-
 177
177
-
 178
178
-
 179
179
-
 180
180
-
 181
181
-
 182
182
-
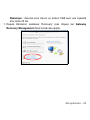 183
183
-
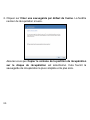 184
184
-
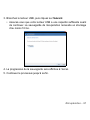 185
185
-
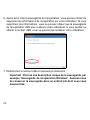 186
186
-
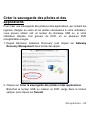 187
187
-
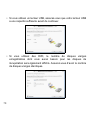 188
188
-
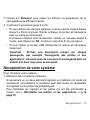 189
189
-
 190
190
-
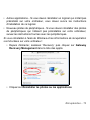 191
191
-
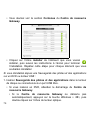 192
192
-
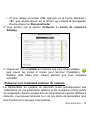 193
193
-
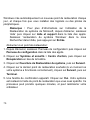 194
194
-
 195
195
-
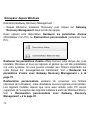 196
196
-
 197
197
-
 198
198
-
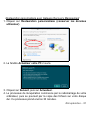 199
199
-
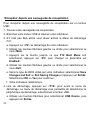 200
200
-
 201
201
-
 202
202
-
 203
203
-
 204
204
-
 205
205
-
 206
206
-
 207
207
-
 208
208
-
 209
209
-
 210
210
-
 211
211
-
 212
212
-
 213
213
-
 214
214
-
 215
215
-
 216
216
-
 217
217
-
 218
218
-
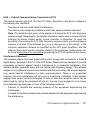 219
219
-
 220
220
-
 221
221
-
 222
222
-
 223
223
-
 224
224
-
 225
225
-
 226
226
-
 227
227
-
 228
228
-
 229
229
-
 230
230
-
 231
231
-
 232
232
-
 233
233
-
 234
234
-
 235
235
-
 236
236
-
 237
237
-
 238
238
-
 239
239
-
 240
240
-
 241
241
-
 242
242
-
 243
243
-
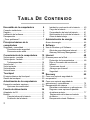 244
244
-
 245
245
-
 246
246
-
 247
247
-
 248
248
-
 249
249
-
 250
250
-
 251
251
-
 252
252
-
 253
253
-
 254
254
-
 255
255
-
 256
256
-
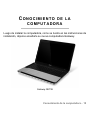 257
257
-
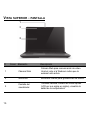 258
258
-
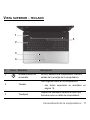 259
259
-
 260
260
-
 261
261
-
 262
262
-
 263
263
-
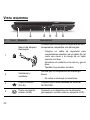 264
264
-
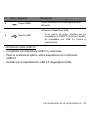 265
265
-
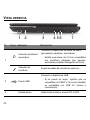 266
266
-
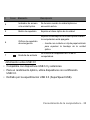 267
267
-
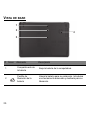 268
268
-
 269
269
-
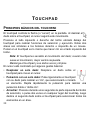 270
270
-
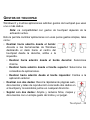 271
271
-
 272
272
-
 273
273
-
 274
274
-
 275
275
-
 276
276
-
 277
277
-
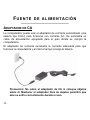 278
278
-
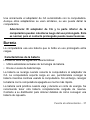 279
279
-
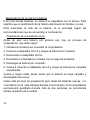 280
280
-
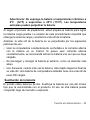 281
281
-
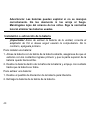 282
282
-
 283
283
-
 284
284
-
 285
285
-
 286
286
-
 287
287
-
 288
288
-
 289
289
-
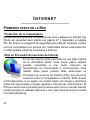 290
290
-
 291
291
-
 292
292
-
 293
293
-
 294
294
-
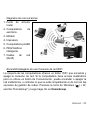 295
295
-
 296
296
-
 297
297
-
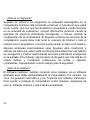 298
298
-
 299
299
-
 300
300
-
 301
301
-
 302
302
-
 303
303
-
 304
304
-
 305
305
-
 306
306
-
 307
307
-
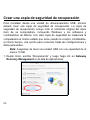 308
308
-
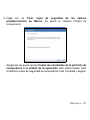 309
309
-
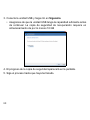 310
310
-
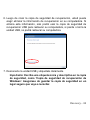 311
311
-
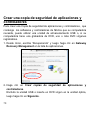 312
312
-
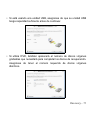 313
313
-
 314
314
-
 315
315
-
 316
316
-
 317
317
-
 318
318
-
 319
319
-
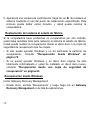 320
320
-
 321
321
-
 322
322
-
 323
323
-
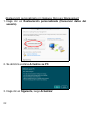 324
324
-
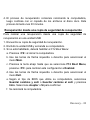 325
325
-
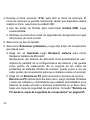 326
326
-
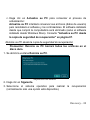 327
327
-
 328
328
-
 329
329
-
 330
330
-
 331
331
-
 332
332
-
 333
333
-
 334
334
-
 335
335
-
 336
336
-
 337
337
-
 338
338
-
 339
339
-
 340
340
-
 341
341
-
 342
342
-
 343
343
-
 344
344
-
 345
345
-
 346
346
-
 347
347
-
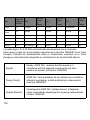 348
348
-
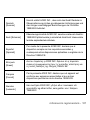 349
349
-
 350
350
-
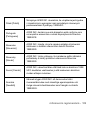 351
351
-
 352
352
-
 353
353
-
 354
354
-
 355
355
-
 356
356
-
 357
357
-
 358
358
-
 359
359
-
 360
360
-
 361
361
-
 362
362
-
 363
363
-
 364
364
-
 365
365
-
 366
366
-
 367
367
-
 368
368
-
 369
369
-
 370
370
-
 371
371
-
 372
372
-
 373
373
-
 374
374
-
 375
375
-
 376
376
-
 377
377
-
 378
378
-
 379
379
-
 380
380
-
 381
381
-
 382
382
-
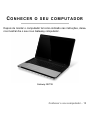 383
383
-
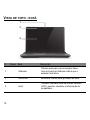 384
384
-
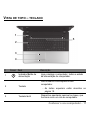 385
385
-
 386
386
-
 387
387
-
 388
388
-
 389
389
-
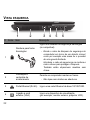 390
390
-
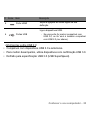 391
391
-
 392
392
-
 393
393
-
 394
394
-
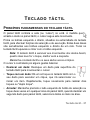 395
395
-
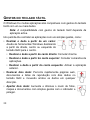 396
396
-
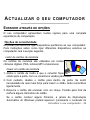 397
397
-
 398
398
-
 399
399
-
 400
400
-
 401
401
-
 402
402
-
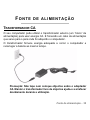 403
403
-
 404
404
-
 405
405
-
 406
406
-
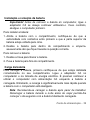 407
407
-
 408
408
-
 409
409
-
 410
410
-
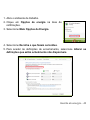 411
411
-
 412
412
-
 413
413
-
 414
414
-
 415
415
-
 416
416
-
 417
417
-
 418
418
-
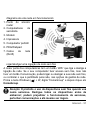 419
419
-
 420
420
-
 421
421
-
 422
422
-
 423
423
-
 424
424
-
 425
425
-
 426
426
-
 427
427
-
 428
428
-
 429
429
-
 430
430
-
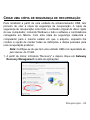 431
431
-
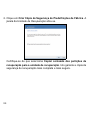 432
432
-
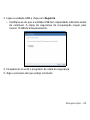 433
433
-
 434
434
-
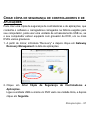 435
435
-
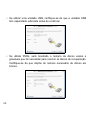 436
436
-
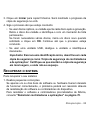 437
437
-
 438
438
-
 439
439
-
 440
440
-
 441
441
-
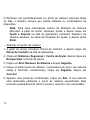 442
442
-
 443
443
-
 444
444
-
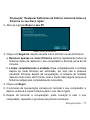 445
445
-
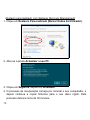 446
446
-
 447
447
-
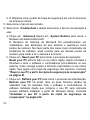 448
448
-
 449
449
-
 450
450
-
 451
451
-
 452
452
-
 453
453
-
 454
454
-
 455
455
-
 456
456
-
 457
457
-
 458
458
-
 459
459
-
 460
460
-
 461
461
-
 462
462
-
 463
463
-
 464
464
-
 465
465
-
 466
466
-
 467
467
-
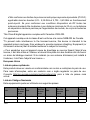 468
468
-
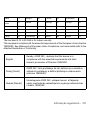 469
469
-
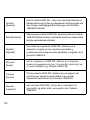 470
470
-
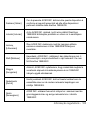 471
471
-
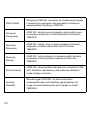 472
472
-
 473
473
-
 474
474
-
 475
475
-
 476
476
-
 477
477
-
 478
478
-
 479
479
-
 480
480
-
 481
481
-
 482
482
-
 483
483
-
 484
484
-
 485
485
-
 486
486
-
 487
487
-
 488
488
-
 489
489
-
 490
490
-
 491
491
-
 492
492
-
 493
493
-
 494
494
-
 495
495
-
 496
496
-
 497
497
-
 498
498
-
 499
499
-
 500
500
-
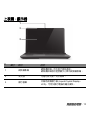 501
501
-
 502
502
-
 503
503
-
 504
504
-
 505
505
-
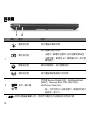 506
506
-
 507
507
-
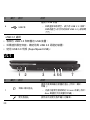 508
508
-
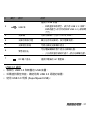 509
509
-
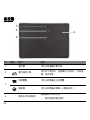 510
510
-
 511
511
-
 512
512
-
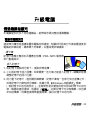 513
513
-
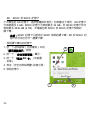 514
514
-
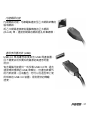 515
515
-
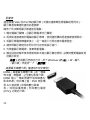 516
516
-
 517
517
-
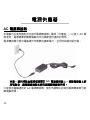 518
518
-
 519
519
-
 520
520
-
 521
521
-
 522
522
-
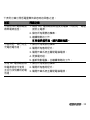 523
523
-
 524
524
-
 525
525
-
 526
526
-
 527
527
-
 528
528
-
 529
529
-
 530
530
-
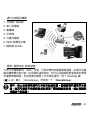 531
531
-
 532
532
-
 533
533
-
 534
534
-
 535
535
-
 536
536
-
 537
537
-
 538
538
-
 539
539
-
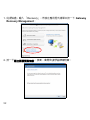 540
540
-
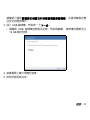 541
541
-
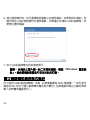 542
542
-
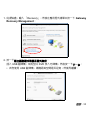 543
543
-
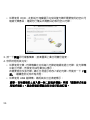 544
544
-
 545
545
-
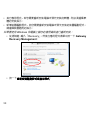 546
546
-
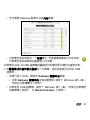 547
547
-
 548
548
-
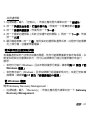 549
549
-
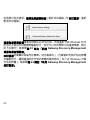 550
550
-
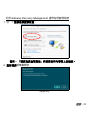 551
551
-
 552
552
-
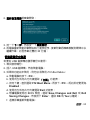 553
553
-
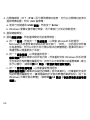 554
554
-
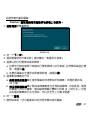 555
555
-
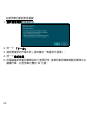 556
556
-
 557
557
-
 558
558
-
 559
559
-
 560
560
-
 561
561
-
 562
562
-
 563
563
-
 564
564
-
 565
565
-
 566
566
-
 567
567
-
 568
568
-
 569
569
-
 570
570
-
 571
571
-
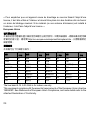 572
572
-
 573
573
-
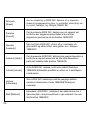 574
574
-
 575
575
-
 576
576
-
 577
577
-
 578
578
-
 579
579
-
 580
580
-
 581
581
-
 582
582
-
 583
583
-
 584
584
-
 585
585
-
 586
586
-
 587
587
-
 588
588
-
 589
589
-
 590
590
-
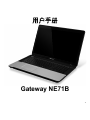 591
591
-
 592
592
-
 593
593
-
 594
594
-
 595
595
-
 596
596
-
 597
597
-
 598
598
-
 599
599
-
 600
600
-
 601
601
-
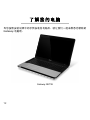 602
602
-
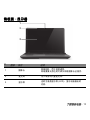 603
603
-
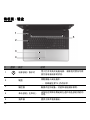 604
604
-
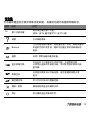 605
605
-
 606
606
-
 607
607
-
 608
608
-
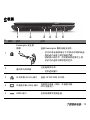 609
609
-
 610
610
-
 611
611
-
 612
612
-
 613
613
-
 614
614
-
 615
615
-
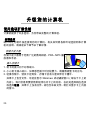 616
616
-
 617
617
-
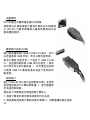 618
618
-
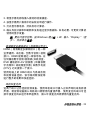 619
619
-
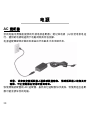 620
620
-
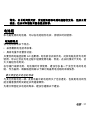 621
621
-
 622
622
-
 623
623
-
 624
624
-
 625
625
-
 626
626
-
 627
627
-
 628
628
-
 629
629
-
 630
630
-
 631
631
-
 632
632
-
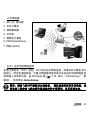 633
633
-
 634
634
-
 635
635
-
 636
636
-
 637
637
-
 638
638
-
 639
639
-
 640
640
-
 641
641
-
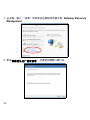 642
642
-
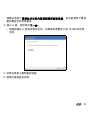 643
643
-
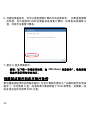 644
644
-
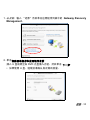 645
645
-
 646
646
-
 647
647
-
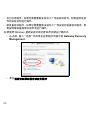 648
648
-
 649
649
-
 650
650
-
 651
651
-
 652
652
-
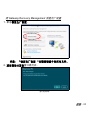 653
653
-
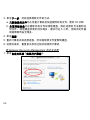 654
654
-
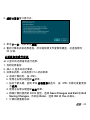 655
655
-
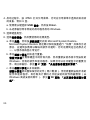 656
656
-
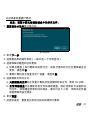 657
657
-
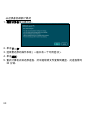 658
658
-
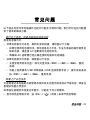 659
659
-
 660
660
-
 661
661
-
 662
662
-
 663
663
-
 664
664
-
 665
665
-
 666
666
-
 667
667
-
 668
668
-
 669
669
-
 670
670
-
 671
671
-
 672
672
-
 673
673
-
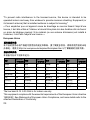 674
674
-
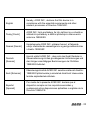 675
675
-
 676
676
-
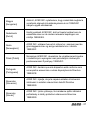 677
677
-
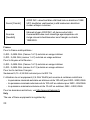 678
678
-
 679
679
-
 680
680
-
 681
681
-
 682
682
-
 683
683
-
 684
684
-
 685
685
-
 686
686
-
 687
687
-
 688
688
-
 689
689
-
 690
690
-
 691
691
-
 692
692
-
 693
693
-
 694
694
-
 695
695
-
 696
696
-
 697
697
-
 698
698
-
 699
699
-
 700
700
-
 701
701
-
 702
702
-
 703
703
-
 704
704
-
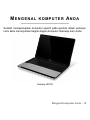 705
705
-
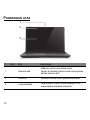 706
706
-
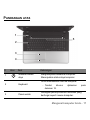 707
707
-
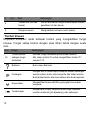 708
708
-
 709
709
-
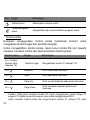 710
710
-
 711
711
-
 712
712
-
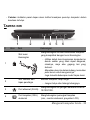 713
713
-
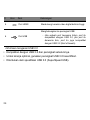 714
714
-
 715
715
-
 716
716
-
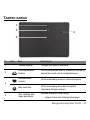 717
717
-
 718
718
-
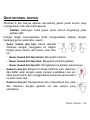 719
719
-
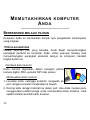 720
720
-
 721
721
-
 722
722
-
 723
723
-
 724
724
-
 725
725
-
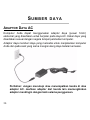 726
726
-
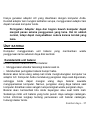 727
727
-
 728
728
-
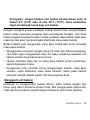 729
729
-
 730
730
-
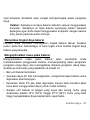 731
731
-
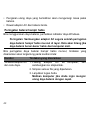 732
732
-
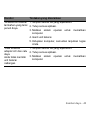 733
733
-
 734
734
-
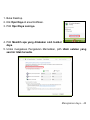 735
735
-
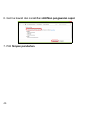 736
736
-
 737
737
-
 738
738
-
 739
739
-
 740
740
-
 741
741
-
 742
742
-
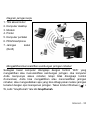 743
743
-
 744
744
-
 745
745
-
 746
746
-
 747
747
-
 748
748
-
 749
749
-
 750
750
-
 751
751
-
 752
752
-
 753
753
-
 754
754
-
 755
755
-
 756
756
-
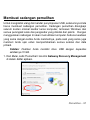 757
757
-
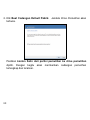 758
758
-
 759
759
-
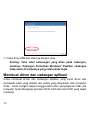 760
760
-
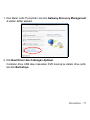 761
761
-
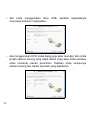 762
762
-
 763
763
-
 764
764
-
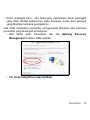 765
765
-
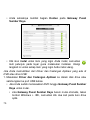 766
766
-
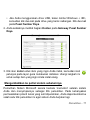 767
767
-
 768
768
-
 769
769
-
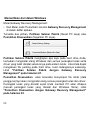 770
770
-
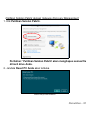 771
771
-
 772
772
-
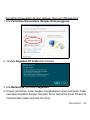 773
773
-
 774
774
-
 775
775
-
 776
776
-
 777
777
-
 778
778
-
 779
779
-
 780
780
-
 781
781
-
 782
782
-
 783
783
-
 784
784
-
 785
785
-
 786
786
-
 787
787
-
 788
788
-
 789
789
-
 790
790
-
 791
791
-
 792
792
-
 793
793
-
 794
794
-
 795
795
-
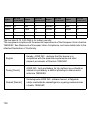 796
796
-
 797
797
-
 798
798
-
 799
799
-
 800
800
-
 801
801
-
 802
802
-
 803
803
-
 804
804
-
 805
805
-
 806
806
-
 807
807
-
 808
808
-
 809
809
-
 810
810
-
 811
811
-
 812
812
-
 813
813
-
 814
814
-
 815
815
-
 816
816
-
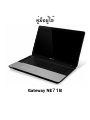 817
817
-
 818
818
-
 819
819
-
 820
820
-
 821
821
-
 822
822
-
 823
823
-
 824
824
-
 825
825
-
 826
826
-
 827
827
-
 828
828
-
 829
829
-
 830
830
-
 831
831
-
 832
832
-
 833
833
-
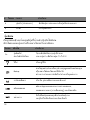 834
834
-
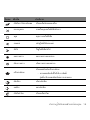 835
835
-
 836
836
-
 837
837
-
 838
838
-
 839
839
-
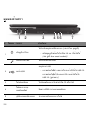 840
840
-
 841
841
-
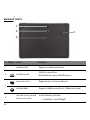 842
842
-
 843
843
-
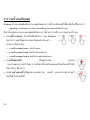 844
844
-
 845
845
-
 846
846
-
 847
847
-
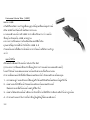 848
848
-
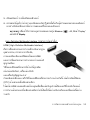 849
849
-
 850
850
-
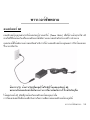 851
851
-
 852
852
-
 853
853
-
 854
854
-
 855
855
-
 856
856
-
 857
857
-
 858
858
-
 859
859
-
 860
860
-
 861
861
-
 862
862
-
 863
863
-
 864
864
-
 865
865
-
 866
866
-
 867
867
-
 868
868
-
 869
869
-
 870
870
-
 871
871
-
 872
872
-
 873
873
-
 874
874
-
 875
875
-
 876
876
-
 877
877
-
 878
878
-
 879
879
-
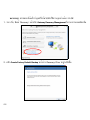 880
880
-
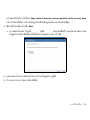 881
881
-
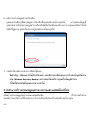 882
882
-
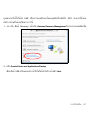 883
883
-
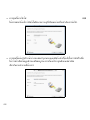 884
884
-
 885
885
-
 886
886
-
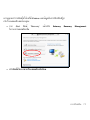 887
887
-
 888
888
-
 889
889
-
 890
890
-
 891
891
-
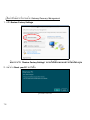 892
892
-
 893
893
-
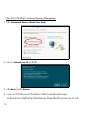 894
894
-
 895
895
-
 896
896
-
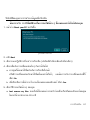 897
897
-
 898
898
-
 899
899
-
 900
900
-
 901
901
-
 902
902
-
 903
903
-
 904
904
-
 905
905
-
 906
906
-
 907
907
-
 908
908
-
 909
909
-
 910
910
-
 911
911
-
 912
912
-
 913
913
-
 914
914
-
 915
915
-
 916
916
-
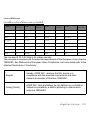 917
917
-
 918
918
-
 919
919
-
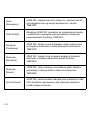 920
920
-
 921
921
-
 922
922
-
 923
923
-
 924
924
-
 925
925
-
 926
926
-
 927
927
-
 928
928
-
 929
929
-
 930
930
-
 931
931
-
 932
932
-
 933
933
-
 934
934
-
 935
935
-
 936
936


en otros idiomas
- français: Gateway NE71B Manuel utilisateur
- English: Gateway NE71B User manual
- português: Gateway NE71B Manual do usuário
Artículos relacionados
Otros documentos
-
Acer Aspire S5-391 Manual de usuario
-
Packard Bell dot sc Manual de usuario
-
Acer Aspire E1-451G Manual de usuario
-
EUROCOM Scorpius 3D2 Manual de usuario
-
-
Dell Latitude 5300 2-in-1 Chromebook Enterprise El manual del propietario
-
-
-
-
AIRIS Portatil Praxis N1102 Manual de usuario