
1
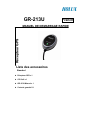
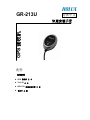
GR-213U
English
QUICK GUIDE
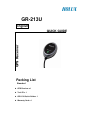
Packing List
Standard
z GPS Receiver x 1
z Tool CD x 1
z GR-213U Quick Guide x 1
z Warranty Card x 1
GPS Receiver

2
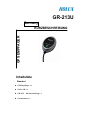
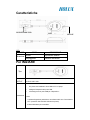
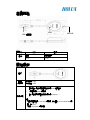
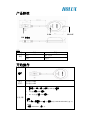
Unit Features
LED
COLOR STATUS DESCRIPTION
Light on Acquiring Satellites
ORANGE
Blinking Position Fixed
Getting STARTED
Type
OUTPUT
Connector
POWER SUPPLY: USB
DATA OUTPUT: USB
Installation
1. Install USB driver in PC or Laptop first.
2. Connect device to USB port.
3. PC will designate comport for device.*
* Note:
1.Please go to device manager “Com & Lpt port”,to find out the “HOLUX
GPS USB device (Com#)”
2.Use GPSViewer to test it.
USB Connector
LED
GR-213U

3
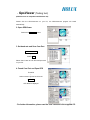
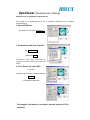
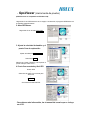
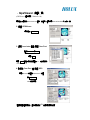
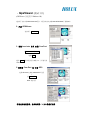
• GpsViewer (Testing tool)
(GPSViewer.exe is compatible with Windows OS)
Double click the GPSViewer.exe on your PC, the GPSViewer.exe program will install
automatically.
2. Open GPSViewer
Double click GPSViewer button
3. Set baud rate and Scan Com Port
Set Baudrate:4800
↓
Select Scan
Select 'Scan' button to scan the COM port used
on your PC.
4. Found Com Port and Open GPS
Find GPS
↓
Select correct Com Port for GR-213U
↓
Open GPS
↓
GPS Status is displayed
- For further information, please read the user’s manual in the supplied CD.

1
GR-213U
Germany
KURZBESCHREIBUNG
Inhaltsliste
Standard
z GPS Empfänger x 1
z Geräte CD x 1
z GR-213U Kurzbeschreibung x 1
z Garantiekarte x 1
GPS EMPFÄGER

2
Gerätemerkmale
Leuchtdiode
FARBE STATUS BESCHREIBUNG
Licht an Satellitensuche
Orange
Blinklicht Satellit gefunden
Inbetriebnahme
Type
AUSGANG-
STECKER
STROMVERSORGUNG: USB
DATENAUSGANG: USB
Einrichten
1. Installieren Sie zuerst den USB-Treiber auf dem PC oder Laptop.
2. Schließen Sie das Gerät an den USB-Anschluss an.
3. Der PC wird dem Gerät einen COM-Anschluss zuweisen.*
* Hinweis:
1. Wechseln Sie im Geräte-Manager zu “COM & LPT-Anschluss” und
prüfen Sie, ob das “HOLUX GPS USB-Gerät (Com#)” vorhanden ist
2. Testen Sie es mit GPSViewer.
USB Stecke
GR-213U
Leuchtdiode

3
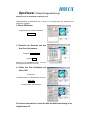
• GpsViewer (Überprüfungswerkzeug)
(GPSViewer.exe ist kompatibel mit Windows OS)
Doppelmausklick auf GPSViewer.exe an Ihrem PC, das GPSViewer.exe Programm wird
automatisch installiert.
2. Öffnen GPSViewer
Doppelklicken Sie auf die Schaltfläche
GPSViewer
3. Einstellen der Baudrate und des
Scan Com Steckplatzes
Einstellen Baudrate:4800
↓
Auswahl Scan
Wählen Sie die Schaltfläche 'Scan', um nach
dem COM-Port Ihres PCs zu suchen.
4. Finden des Com Steckplatz und
öffnen GPS
Finden GPS
↓
Auswahlkorrektur Com Steckplatz für GR-213U
↓
Open GPS
↓
Der GPS-Status wird angezeigt
Für weitere Informationen, lessen Sie bitte die Bedienanweisung in der
mitgelieferten CD.

1
GR-213U
Italian
GUIDA RAPIDA
Contenuto della confezione
Standard
z Ricevitore GPS
z CD strumenti
z Guida rapida per GR-213U
z Scheda di garanzia
Ricevitore GPS

2
Caratteristiche
LED
COLORE STATO DESCRIZIONE
Acceso Acquisizione satellite
Arancione
Lampeggiante Posizione individuata
Per INIZIARE
Tipo
Connettore
OUTPUT
ALIMENTAZIONE: USB
OUTPUT DATI: USB
Installazione
1. Per prima cosa installare il driver USB sul PC o Laptop.
2. Collegare il dispositivo alla porta USB.
3. Il PC designerà una porta COM per il dispositivo.*
* Nota:
1.Andare alla gestione periferiche e controllare se alla voce “Porte COM e
LPT” è presente “HOLUX GPS USB device (Com#).
2.Usare GPSViewer per controllarlo.
CONNETTORE USB
LED
GR-213U

3
• GpsViewer (Strumento per il Testing)
(GPSViewer.exe è compatibile con Windows OS)
Fare doppio clic su GPSViewer.exe sul PC, il programma GPSViewer.exe si installerà
automaticamente.
2. Aprire GPSViewer
Fare doppio clic sul pulsante GPSViewer
3. Set baud rate and Scan Com Port
Set Baudrate:4800
↓
Selezionare Scan
Selezionare il tasto "Scan" (Scansione) per
eseguire la scansione della porta COM usata
dal PC.
4. Trova Porta Com e Apri GPS
Trova GPS
↓
Selezionare la Porta Com corretta per GR-213U
↓
Open GPS
↓
È visualizzato lo Stato GPS
- Per maggiori informazioni, consultare il manuale utente nel CD in
dotazione.

1
GR-213U Spanish
GUÍA RÁPIDA
Lista de componentes
Estándar
z Receptor GPS
z CD de herramientas
z Guía rápida de GR-213U
z Tarjeta de garantía
RECEPTOR GPS

2
Características de la unidad
LED
COLOR ESTADO DESCRIPCIÓN
Luz encendida Adquiriendo satélites
naranja
Parpadeando Posición fijada
INTRODUCCIÓN
Tipo
Conector
de SALIDA
FUENTE DE ALIMENTACIÓN: USB
SALIDA DE DATOS: USB
Installazione
1. En primer lugar, instale el controlador USB en el ordenador o portátil.
2. Conecte el dispositivo al puerto USB.
3. El ordenador asignará el puerto COM del dispositivo.*
*Nota:
1. Diríjase al administrador de dispositivos “Puerto com y de impresora”,
compruebe si aparece el dispositivo “HOLUX GPS USB (COM x)”
2.Use GPSViewer para probarlo.
CONECTOR USB
LED
GR-213U

3
• GpsViewer (Herramienta de prueba)
(GPSViewer.exe es compatible con Windows OS)
Haga doble clic en GPSViewer.exe en su equipo, a continuación, el programa GPSViewer.exe
se instalará automáticamente.
2. Abra GPSViewer
Haga doble clic en el botón Visor GPS
3. Ajuste la velocidad de baudios y el
puerto Com de exploración
Ajustar velocidad de Baudrate:4800
↓
Seleccionar Scan
Seleccione el botón "Explorar" para explorar el
puerto COM que utiliza su PC.
4. Puerto Com encontrado y Abrir GPS
Buscar GPS
↓
Seleccione el puerto Com correcto para
GR-213U
↓
Open GPS
↓
Se muestra el estado del GPS
- Para obtener más información, lea el manual del usuario que se incluye
en el CD.

4
GR-213U French
MANUEL DE DEMARRAGE RAPIDE
Liste des accessoires
Standard
z Récepteur GPS x 1
z CD Outil x 1
z GR-213U Manuel x 1
z Carte de garantie X 1
Récepteur GPS

5
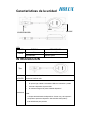
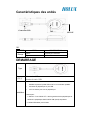
Caractéristiques des unités
DEL
COULEUR ETAT SIGNIFICATION
Allumé Recherche des satellites
Orange
Clignotant Position fixée
DEMARRAGE
Type
Connecteur
de Sortie
Alimentation: USB
Données de sortie: USB
Installation
1. Installez en premier le pilote USB sur le PC ou l'ordinateur portable.
2. Connectez le périphérique au port USB.
3. Le PC choisira le port com du périphérique.*
* Remarques :
1. Allez sur « Port COM & LPT » dans le gestionnaire de périphériques et
vérifiez si le périphérique HOLUX GPS USB (Com#) est présent.
2. Utilisez GPSViewer pour le tester.
Connecteur USB
DEL
GR-213U

6
• GpsViewer ( Outil de test)
(GPSViewer.exe est compatible avec Windows OS)
Double cliquez sur le GPSViewer.exe installé sur le PC, alors le programme GPSViewer.exe
démarre aussitôt.
2. Ouvrir GPSViewer
Double-cliquez sur le bouton GPSViewer
3. Configurer le baudrate et le port
Scan Com
Configurer Baudrate: 4800
↓
Choisir Scan
A
ppuyez sur le bouton 'Scan' (Détecter) pour
détecter le port COM utilisé par votre ANP
(Assistant Numérique Personnel)
4. Retrouver le Port Com et ouvrir
GPS
Retrouver GPS
↓
Choisir le correct Port Com du GR-213U
↓
Open GPS
↓
Le statut GPS est affiché
- Pour plus d’informations, veuillez vous référer au Manuel d’utilisateur
fourni ensemble avec le CD d’installation.

7
GR-213U 繁體中文
快速安裝手冊
配件
標準配件
z GPS 接收機 乙 個
z Tool CD 乙 片
z GR-213U 快速安裝手冊 乙 份
z 保證卡 乙 張
GPS 接收機

8
產品特性
LED
顏色 狀態 描述
亮燈 搜尋衛星中
橘色
閃爍 已定位
開始操作
型式
輸出
連接頭
電源供應: USB
資料輸出: USB
安裝步驟
1. 請先在個人電腦或筆記型電腦中安裝 USB 驅動程式。
2. 將裝置連接到 USB 連接埠。
3. 個人電腦會顯示裝置所使用的串列埠 (comport)。*
* 註:
1.請到裝置管理員「Com & Lpt 連接埠」中, 確認「HOLUX GPS USB 裝
置」的 Com#。
2.使用 GPSViewer 進行測試。
USB 連接頭
LED
GR-213U

9
• GpsViewer (測試工具)
(GPSViewer 僅適用於 Windows OS)
連按兩下光碟中的GPSViewer.exe程式,此程式將自動安裝Hulox GPSViewer於您的PC中.
2. 開啟 GPSViewer
連按兩下 GPSViewer
3. 設定 baud rate 並且 掃描 Com Port
設定 Baudrate 為 4800
↓
選擇 Scan
選擇 Scan 按鈕以便執行掃瞄您 PC 上所使用的
COM Port
4. 找尋到 Com Port 且 開啟 GPS
選擇 GR-213U 正確的 COM PORT 位置
↓
按 Open GPS
↓
GPS 狀態顯示
-若需更詳細的資料,請參閱所附 CD 片中的使用手冊.

10
GR-213U 简体中文
快速安装手册
配件
标准配件
z GPS 接收机 乙 个
z Tool CD 乙 片
z GR-213U 快速安装手册 乙 份
z 保证卡 乙 张
GPS 接收机

11
产品特性
LED
颜色 状态 描述
亮灯 搜寻卫星中
橘色
闪烁 已定位
开始操作
型式
输出
连接头
电源供应: USB
资料输出: USB
安装步骤
1. 首先在 PC 或笔记本电脑中安装 USB 驱动程序。
2. 将设备连接到 USB 端口。
3. PC 将为设备分配 COM 端口。*
* 注意:
1.请转到设备管理器“Com 和 Lpt 端口”,确认“HOLUX GPS USB 设备” 的
Com#。
2.使用 GPSViewer 进行测试。
USB 连接头
LED
GR-213U

12
• GpsViewer (测试工具)
(GPSViewer 仅适用于 Windows OS)
连按两下光盘中的GPSViewer.exe程序,此程序将自动安装Hulox GPSViewer于您的PC中.
2. 开启 GPSViewer
连按两下 GPSViewer
3. 设定 baud rate 并且 扫描 Com Port
设定 Baudrate 为 4800
↓
选择 Scan
选择 Scan 按钮以便执行扫瞄您 PC 上所使用的
COM Port
5. 找寻到 Com Port 且 开启 GPS
选择 GR-213U 正确的 COM PORT 位置
↓
按 Open GPS
↓
GPS 状态显示
-若需更详细的资料,请参阅所附 CD 片中的使用手册.

Transcripción de documentos
GR-213U English GPS Receiver QUICK GUIDE Packing List Standard z GPS Receiver x 1 z Tool CD x 1 z GR-213U Quick Guide x 1 z Warranty Card x 1 1 Unit Features GR-213U LED USB Connector LED COLOR ORANGE STATUS DESCRIPTION Light on Acquiring Satellites Blinking Position Fixed Getting STARTED Type OUTPUT POWER SUPPLY: USB Connector DATA OUTPUT: USB 1. Install USB driver in PC or Laptop first. 2. Connect device to USB port. 3. PC will designate comport for device.* Installation * Note: 1.Please go to device manager “Com & Lpt port”,to find out the “HOLUX GPS USB device (Com#)” 2.Use GPSViewer to test it. 2 • GpsViewer (Testing tool) (GPSViewer.exe is compatible with Windows OS) Double click the GPSViewer.exe on your PC, the GPSViewer.exe program will install automatically. 2. Open GPSViewer Double click GPSViewer button 3. Set baud rate and Scan Com Port Set Baudrate:4800 ↓ Select Scan Select 'Scan' button to scan the COM port used on your PC. 4. Found Com Port and Open GPS Find GPS ↓ Select correct Com Port for GR-213U ↓ Open GPS ↓ GPS Status is displayed - For further information, please read the user’s manual in the supplied CD. 3 GR-213U Germany GPS EMPFÄGER KURZBESCHREIBUNG Inhaltsliste Standard z GPS Empfänger x 1 z Geräte CD x 1 z GR-213U Kurzbeschreibung x 1 z Garantiekarte x 1 1 Gerätemerkmale GR-213U Leuchtdiode USB Stecke Leuchtdiode FARBE Orange STATUS BESCHREIBUNG Licht an Satellitensuche Blinklicht Satellit gefunden Inbetriebnahme Type AUSGANG- STROMVERSORGUNG: USB STECKER DATENAUSGANG: USB Einrichten 1. Installieren Sie zuerst den USB-Treiber auf dem PC oder Laptop. 2. Schließen Sie das Gerät an den USB-Anschluss an. 3. Der PC wird dem Gerät einen COM-Anschluss zuweisen.* * Hinweis: 1. Wechseln Sie im Geräte-Manager zu “COM & LPT-Anschluss” und prüfen Sie, ob das “HOLUX GPS USB-Gerät (Com#)” vorhanden ist 2. Testen Sie es mit GPSViewer. 2 • GpsViewer (Überprüfungswerkzeug) (GPSViewer.exe ist kompatibel mit Windows OS) Doppelmausklick auf GPSViewer.exe an Ihrem PC, das GPSViewer.exe Programm wird automatisch installiert. 2. Öffnen GPSViewer Doppelklicken Sie auf die Schaltfläche GPSViewer 3. Einstellen der Baudrate und des Scan Com Steckplatzes Einstellen Baudrate:4800 ↓ Auswahl Scan Wählen Sie die Schaltfläche 'Scan', um nach dem COM-Port Ihres PCs zu suchen. 4. Finden des Com Steckplatz und öffnen GPS Finden GPS ↓ Auswahlkorrektur Com Steckplatz für GR-213U ↓ Open GPS ↓ Der GPS-Status wird angezeigt Für weitere Informationen, lessen Sie bitte die Bedienanweisung in der mitgelieferten CD. 3 GR-213U Italian Ricevitore GPS GUIDA RAPIDA Contenuto della confezione Standard z Ricevitore GPS z CD strumenti z Guida rapida per GR-213U z Scheda di garanzia 1 Caratteristiche CONNETTORE USB LED GR-213U LED COLORE Arancione STATO DESCRIZIONE Acceso Acquisizione satellite Lampeggiante Posizione individuata Per INIZIARE Tipo Connettore ALIMENTAZIONE: USB OUTPUT OUTPUT DATI: USB 1. Per prima cosa installare il driver USB sul PC o Laptop. 2. Collegare il dispositivo alla porta USB. 3. Il PC designerà una porta COM per il dispositivo.* Installazione * Nota: 1.Andare alla gestione periferiche e controllare se alla voce “Porte COM e LPT” è presente “HOLUX GPS USB device (Com#). 2.Usare GPSViewer per controllarlo. 2 • GpsViewer (Strumento per il Testing) (GPSViewer.exe è compatibile con Windows OS) Fare doppio clic su GPSViewer.exe sul PC, il programma GPSViewer.exe si installerà automaticamente. 2. Aprire GPSViewer Fare doppio clic sul pulsante GPSViewer 3. Set baud rate and Scan Com Port Set Baudrate:4800 ↓ Selezionare Scan Selezionare il tasto "Scan" (Scansione) per eseguire la scansione della porta COM usata dal PC. 4. Trova Porta Com e Apri GPS Trova GPS ↓ Selezionare la Porta Com corretta per GR-213U ↓ Open GPS ↓ È visualizzato lo Stato GPS - Per maggiori informazioni, consultare il manuale utente nel CD in dotazione. 3 GR-213U Spanish RECEPTOR GPS GUÍA RÁPIDA Lista de componentes Estándar z Receptor GPS z CD de herramientas z Guía rápida de GR-213U z Tarjeta de garantía 1 Características de la unidad LED GR-213U CONECTOR USB LED COLOR naranja ESTADO DESCRIPCIÓN Luz encendida Adquiriendo satélites Parpadeando Posición fijada INTRODUCCIÓN Tipo Conector de SALIDA FUENTE DE ALIMENTACIÓN: USB SALIDA DE DATOS: USB 1. En primer lugar, instale el controlador USB en el ordenador o portátil. 2. Conecte el dispositivo al puerto USB. 3. El ordenador asignará el puerto COM del dispositivo.* Installazione *Nota: 1. Diríjase al administrador de dispositivos “Puerto com y de impresora”, compruebe si aparece el dispositivo “HOLUX GPS USB (COM x)” 2.Use GPSViewer para probarlo. 2 • GpsViewer (Herramienta de prueba) (GPSViewer.exe es compatible con Windows OS) Haga doble clic en GPSViewer.exe en su equipo, a continuación, el programa GPSViewer.exe se instalará automáticamente. 2. Abra GPSViewer Haga doble clic en el botón Visor GPS 3. Ajuste la velocidad de baudios y el puerto Com de exploración Ajustar velocidad de Baudrate:4800 ↓ Seleccionar Scan Seleccione el botón "Explorar" para explorar el puerto COM que utiliza su PC. 4. Puerto Com encontrado y Abrir GPS Buscar GPS ↓ Seleccione el puerto Com correcto para GR-213U ↓ Open GPS ↓ Se muestra el estado del GPS - Para obtener más información, lea el manual del usuario que se incluye en el CD. 3 GR-213U French Récepteur GPS MANUEL DE DEMARRAGE RAPIDE Liste des accessoires Standard z Récepteur GPS x 1 z CD Outil x 1 z GR-213U Manuel x 1 z Carte de garantie X 1 4 Caractéristiques des unités Connecteur USB DEL GR-213U DEL COULEUR Orange ETAT SIGNIFICATION Allumé Recherche des satellites Clignotant Position fixée DEMARRAGE Type Connecteur de Sortie Installation Alimentation: USB Données de sortie: USB 1. Installez en premier le pilote USB sur le PC ou l'ordinateur portable. 2. Connectez le périphérique au port USB. 3. Le PC choisira le port com du périphérique.* * Remarques : 1. Allez sur « Port COM & LPT » dans le gestionnaire de périphériques et vérifiez si le périphérique HOLUX GPS USB (Com#) est présent. 2. Utilisez GPSViewer pour le tester. 5 • GpsViewer ( Outil de test) (GPSViewer.exe est compatible avec Windows OS) Double cliquez sur le GPSViewer.exe installé sur le PC, alors le programme GPSViewer.exe démarre aussitôt. 2. Ouvrir GPSViewer Double-cliquez sur le bouton GPSViewer 3. Configurer le baudrate et le port Scan Com Configurer Baudrate: 4800 ↓ Choisir Scan Appuyez sur le bouton 'Scan' (Détecter) pour détecter le port COM utilisé par votre ANP (Assistant Numérique Personnel) 4. Retrouver le Port Com et ouvrir GPS Retrouver GPS ↓ Choisir le correct Port Com du GR-213U ↓ Open GPS ↓ Le statut GPS est affiché - Pour plus d’informations, veuillez vous référer au Manuel d’utilisateur fourni ensemble avec le CD d’installation. 6 GR-213U 繁體中文 GPS 接收機 快速安裝手冊 配件 標準配件 z GPS 接收機 乙 個 z Tool CD 乙 片 z GR-213U 快速安裝手冊 乙 份 z 保證卡 乙 張 7 產品特性 LED GR-213U USB 連接頭 LED 顏色 橘色 狀態 描述 亮燈 搜尋衛星中 閃爍 已定位 開始操作 型式 輸出 連接頭 電源供應: USB 資料輸出: USB 1. 請先在個人電腦或筆記型電腦中安裝 USB 驅動程式。 2. 將裝置連接到 USB 連接埠。 3. 個人電腦會顯示裝置所使用的串列埠 (comport)。* 安裝步驟 * 註: 1.請到裝置管理員「Com & Lpt 連接埠」中, 確認「HOLUX GPS USB 裝 置」的 Com#。 2.使用 GPSViewer 進行測試。 8 • GpsViewer (測試工具) (GPSViewer 僅適用於 Windows OS) 連按兩下光碟中的GPSViewer.exe程式,此程式將自動安裝Hulox GPSViewer於您的PC中. 2. 開啟 GPSViewer 連按兩下 GPSViewer 3. 設定 baud rate 並且 掃描 Com Port 設定 Baudrate 為 4800 ↓ 選擇 Scan 選擇 Scan 按鈕以便執行掃瞄您 PC 上所使用的 COM Port 4. 找尋到 Com Port 且 開啟 GPS 選擇 GR-213U 正確的 COM PORT 位置 ↓ 按 Open GPS ↓ GPS 狀態顯示 -若需更詳細的資料,請參閱所附 CD 片中的使用手冊. 9 GR-213U 简体中文 GPS 接收机 快速安装手册 配件 标准配件 z GPS 接收机 乙 个 z Tool CD 乙 片 z GR-213U 快速安装手册 乙 份 z 保证卡 乙 张 10 产品特性 LED GR-213U USB 连接头 LED 颜色 橘色 状态 描述 亮灯 搜寻卫星中 闪烁 已定位 开始操作 型式 输出 连接头 电源供应: USB 资料输出: USB 1. 首先在 PC 或笔记本电脑中安装 USB 驱动程序。 2. 将设备连接到 USB 端口。 3. PC 将为设备分配 COM 端口。* 安装步骤 * 注意: 1.请转到设备管理器“Com 和 Lpt 端口”,确认“HOLUX GPS USB 设备” 的 Com#。 2.使用 GPSViewer 进行测试。 11 • GpsViewer (测试工具) (GPSViewer 仅适用于 Windows OS) 连按两下光盘中的GPSViewer.exe程序,此程序将自动安装Hulox GPSViewer于您的PC中. 2. 开启 GPSViewer 连按两下 GPSViewer 3. 设定 baud rate 并且 扫描 Com Port 设定 Baudrate 为 4800 ↓ 选择 Scan 选择 Scan 按钮以便执行扫瞄您 PC 上所使用的 COM Port 5. 找寻到 Com Port 且 开启 GPS 选择 GR-213U 正确的 COM PORT 位置 ↓ 按 Open GPS ↓ GPS 状态显示 -若需更详细的资料,请参阅所附 CD 片中的使用手册. 12 www.holux.com [email protected] 13-
 1
1
-
 2
2
-
 3
3
-
 4
4
-
 5
5
-
 6
6
-
 7
7
-
 8
8
-
 9
9
-
 10
10
-
 11
11
-
 12
12
-
 13
13
-
 14
14
-
 15
15
-
 16
16
-
 17
17
-
 18
18
-
 19
19
-
 20
20
-
 21
21
-
 22
22


Holux GR 213U Quick Manual
- Tipo
- Quick Manual
- Este manual también es adecuado para
En otros idiomas
- français: Holux GR 213U
- italiano: Holux GR 213U
- English: Holux GR 213U
- Deutsch: Holux GR 213U