Yamaha NX-N500 El manual del propietario
- Categoría
- Bocinas portables
- Tipo
- El manual del propietario

Network Powered Speaker
OWNER’S MANUAL
MANUAL DE INSTRUCCIONES
LV
© 2015 Yamaha Corporation Printed in Indonesia ZS39850
Indicaciones durante la reproducción
Indicaciones relacionadas con el sistema
Indicaciones en caso de error
Tabla de condiciones del indicador de estado
Color Condición Estado
Consulte
la página
Verde
Encendido La entrada de red está seleccionada. p.18, 20, 21
Parpadeando Se está configurando una conexión de red. p.12
Parpadeando
lento
No se establece la conexión con la red. p.12
Desvaneciéndose
cada 3 segundos
Se recibe audio desde MusicCast CONTROLLER. p.18, 20, 21
Rosa
Encendido La unidad está conectada a un dispositivo iOS (AirPlay). p.23
Parpadeando
lento
Se están compartiendo los ajustes del dispositivo iOS y se
ha establecido una conexión de forma inalámbrica
(Wireless Accessory Configuration).
p.15
Azul
Encendido La entrada Bluetooth está seleccionada.
p.24
Parpadeando
lento
No se puede emparejar Bluetooth.
Azul cielo
Encendido La entrada USB está seleccionada.
p.26
Parpadeando
lento
No hay ningún PC conectado a la toma USB.
Púrpura
Encendido La entrada digital óptica está seleccionada.
p.27
Parpadeando
lento
No hay ningún dispositivo conectado a la toma OPTICAL.
Blanco
Encendido La entrada AUX está seleccionada. p.27
Todos los
colores
incluidos
anteriormente
Parpadeando
(ejemplo)
Se cambia el ajuste de volumen. —
Desvaneciéndose
cada 2 segundos
(ejemplo)
Se silencia la salida de los altavoces. —
Color Condición Estado
Consulte
la página
Naranja
Encendido La unidad está en modo en espera. —
Amarillo
Encendido La unidad está en modo de red en espera. p.11
Blanco
Parpadeando Hay disponible una nueva actualización de firmware.
p.28
Parpadeando
lento
El firmware se está actualizando.
Desvaneciéndose
cada 3 segundos
El firmware se ha actualizado correctamente.
Color Condición Estado
Consulte
la página
Naranja
Parpadeando
lento
Compruebe las conexiones del altavoz derecho. p.9
Rojo
Parpadea dos
veces
No se ha registrado ninguna presintonía. p.22
Parpadeando
lento
El cable de alimentación de CA no está firmemente
conectado a la toma de CA de la pared. Conecte
firmemente el cable de alimentación de CA a la toma de
CA de la pared.
p.10
Se ha activado el circuito de protección. Apague la
unidad, desconecte el cable de alimentación de CA y
póngase en contacto con el distribuidor autorizado de
Yamaha o centro de servicio técnico más cercano.
p.33
Parpadea de
forma repetida
dos veces
No se puede encontrar la descarga de firmware.
Compruebe que esta unidad está conectada a la red.
p.28
Parpadea de
forma repetida
tres veces
Se ha producido un error durante la actualización de
firmware. Para reiniciar la actualización, pulse WIRELESS
DIRECT en el panel trasero.
Español
1 segundo 1 segundo
3 segundos 3 segundos
1 segundo 1 segundo
1 segundo 1 segundo
1 segundo 1 segundo
1 segundo 1 segundo
2 segundos 2 segundos
1 segundo 1 segundo
3 segundos 3 segundos
1 segundo 1 segundo
1 segundo 1 segundo
1 segundo
1 segundo

En i
English
1 To assure the finest performance, please read this manual carefully.
Keep it in a safe place for future reference.
2 Install this sound system in a well ventilated, cool, dry, clean place -
away from direct sunlight, heat sources, vibration, dust, moisture, and/
or cold. For proper ventilation, allow the following minimum
clearances.
Top: 30 cm, Rear: 30 cm
3 Locate this unit away from other electrical appliances, motors, or
transformers to avoid humming sounds.
4 Do not expose this unit to sudden temperature changes from cold to hot,
and do not locate this unit in an environment with high humidity (i.e. a
room with a humidifier) to prevent condensation inside this unit, which
may cause an electrical shock, fire, damage to this unit, and/or personal
injury.
5 Avoid installing this unit where foreign object may fall onto this unit
and/or this unit may be exposed to liquid dripping or splashing. On the
top of this unit, do not place:
– Other components, as they may cause damage and/or discoloration
on the surface of this unit.
– Burning objects (i.e. candles), as they may cause fire, damage to this
unit, and/or personal injury.
– Containers with liquid in them, as they may fall and liquid may cause
electrical shock to the user and/or damage to this unit.
6 Do not cover this unit with a newspaper, tablecloth, curtain, etc. in order
not to obstruct heat radiation. If the temperature inside this unit rises, it
may cause fire, damage to this unit, and/or personal injury.
7 Do not plug in this unit to a wall outlet until all connections are
complete.
8 Do not operate this unit upside-down. It may overheat, possibly causing
damage.
9 Do not use force on switches, knobs and/or cords.
10 When disconnecting the power cable from the wall outlet, grasp the
plug; do not pull the cable.
11 Do not clean this unit with chemical solvents; this might damage the
finish. Use a clean, dry cloth.
12 Only voltage specified on this unit must be used. Using this unit with a
higher voltage than specified is dangerous and may cause fire, damage
to this unit, and/or personal injury. Yamaha will not be held responsible
for any damage resulting from use of this unit with a voltage other than
specified.
13 To prevent damage by lightning, keep the power cable and outdoor
antennas disconnected from a wall outlet or this unit during a lightning
storm.
14 Do not attempt to modify or fix this unit. Contact qualified Yamaha
service personnel when any service is needed. The cabinet should never
be opened for any reasons.
15 When not planning to use this unit for long periods of time (i.e.
vacation), disconnect the AC power plug from the wall outlet.
16 Be sure to refer to the “Troubleshooting” section of the Owner’s
Manual for common operating errors before concluding that this unit is
faulty.
17 Before moving this unit, press
A (power) to set it to standby mode and
disconnect the AC power plug from the wall outlet.
18 Condensation will form when the surrounding temperature changes
suddenly. Disconnect the power cable from the outlet, then leave this
unit alone.
19 When using this unit for a long time, this unit may become warm. Turn
the power off, then leave this unit alone for cooling.
20 Install this unit near the AC outlet and where the AC power plug can be
reached easily.
21 The batteries shall not be exposed to excessive heat such as sunshine,
fire or the like. When you dispose of batteries, follow your regional
regulations.
22 Excessive sound pressure from earphones and headphones can cause
hearing loss.
■ Notes on remote controls and batteries
• Do not spill water or other liquids on the remote control.
• Do not drop the remote control.
• Do not leave or store the remote control in the following conditions:
– places of high humidity, such as near a bath
– places of high temperatures, such as near a heater or stove
– places of extremely low temperatures
– dusty places
• Insert the battery according to the polarity markings (+ and -).
• Change all batteries if you notice the following conditions:
– the operation range of the remote control narrows
– the transmit indicator does not flash or is dim
• If the batteries run out, immediately remove them from the remote control
to prevent an explosion or acid leak.
• If you find leaking batteries, discard the batteries immediately, taking
care not to touch the leaked material. If the leaked material comes into
contact with your skin or gets into your eyes or mouth, rinse it away
immediately and consult a doctor. Clean the battery compartment
thoroughly before installing new batteries.
• Do not use old batteries together with new ones. This may shorten the life
of the new batteries or cause old batteries to leak.
• Do not use different types of batteries (such as alkaline and manganese
batteries) together. Specification of batteries may be different even
though they look the same.
• Before inserting new batteries, wipe the compartment clean.
• Dispose of batteries according to your regional regulations.
• Keep batteries away from children. If a battery is accidentally swallowed,
contact your doctor immediately.
• When not planning to use the remote control for long periods of time,
remove the batteries from the remote control.
• Do not charge or disassemble the supplied batteries.
CAUTION: READ THIS BEFORE OPERATING YOUR UNIT.
WARNING
TO REDUCE THE RISK OF FIRE OR ELECTRIC SHOCK, DO
NOT EXPOSE THIS UNIT TO RAIN OR MOISTURE.
This unit is not disconnected from the AC power source as long as it
is connected to the wall outlet, even if this unit itself is turned off by
A. This state is called the standby mode. In this state, this unit is
designed to consume a very small quantity of power.
Radio waves may affect electro-medical devices. Do not use this unit
near medical devices or inside medical facilities.
Do not use this unit within 22 cm (9 inches) of persons with a heart
pacemaker implant or defibrillator implant.
There is a chance that placing this unit too close to a CRT-based
(Braun tube) TV set might impair picture color. Should this happen,
move this unit away from the TV set.

ii En
■ Bluetooth
Bluetooth is a technology for wireless communication between devices
within an area of about 10 meters (33 ft) employing the 2.4 GHz frequency
band, a band which can be used without a license.
■ Handling Bluetooth communications
• The 2.4 GHz band used by Bluetooth compatible devices is a radio band
shared by many types of equipment. While Bluetooth compatible devices
use a technology minimizing the influence of other components using the
same radio band, such influence may reduce the speed or distance of
communications and in some cases interrupt communications.
• The speed of signal transfer and the distance at which communication is
possible differs according to the distance between the communicating
devices, the presence of obstacles, radio wave conditions and the type of
equipment.
• Yamaha does not guarantee all wireless connections between this unit and
devices compatible with Bluetooth function.

En 3
FEATURES
PREPARATIONS
PLAYBACK
CONFIGURATIONS
APPENDIX
English
Supplied accessories....................................... 4
FEATURES 5
What you can do with this unit ..................... 5
Mastering useful apps (MusicCast CONTROLLER)................5
Sources that can be played back on this unit........................5
Part names....................................................... 6
Front panel ................................................................................6
Rear panel..................................................................................7
Remote control..........................................................................8
PREPARATIONS 9
PREPARATIONS................................................ 9
1 Connecting the left and right speakers ............................9
2 Connecting the playback devices.......................................9
3 Connecting the network cables ...................................... 10
4 Preparing a wireless antenna ......................................... 10
5 Connecting the power cable............................................ 10
6 Positioning the speakers.................................................. 11
Turning on the main power.................................................. 11
Connecting to network ................................ 12
Connecting with the MusicCast CONTROLLER................... 12
Connecting without the MusicCast CONTROLLER............. 14
PLAYBACK 18
Playing back music stored on media servers
(PCs/NAS)........................................................ 18
Setting the media sharing of music files ............................ 18
Playback of PC music contents............................................. 19
Playing back music on mobile devices
(Music Play).................................................... 20
Playback of mobile device music contents ......................... 20
Listening to Internet radio .......................... 21
Selecting an Internet radio station...................................... 21
Registering favorite Internet radio stations
(bookmarks)........................................................................ 21
Registering songs stations being played
back (Preset function) .................................. 22
Registering a song/station by remote control................... 22
Recalling a registered song/station by remote control .... 22
Playing back iPod/iTunes music via a
network (AirPlay) .......................................... 23
Playback of iPod/iTunes music contents ............................ 23
Playing back music via Bluetooth ................ 24
Registering a Bluetooth device with the unit (pairing)....... 24
Playing back audio from a Bluetooth device on the unit... 25
Disconnecting Bluetooth connection ................................... 25
Playing back music on a PC (USB DAC) ....... 26
Installing the dedicated driver (Windows only) ................. 26
Playing back music on a PC .................................................. 26
Listening to music from a playback
device ............................................................. 27
Playback from devices with an optical digital audio
output.................................................................................. 27
Playback from devices with an analog audio output ........ 27
CONFIGURATIONS 28
Updating the unit’s firmware via the
network.......................................................... 28
Updating with MusicCast CONTROLLER ............................. 28
Updating from this unit ........................................................ 28
Specifying unit settings with a web
browser .......................................................... 29
Configuring with Windows
(using a specified web browser)....................................... 29
Configuring with Mac OS ...................................................... 29
Displaying/changing settings............................................... 30
Restoring the default settings .................... 32
Restoring the default settings (Factory reset).................... 32
Restoring the default network settings .............................. 32
APPENDIX 33
Troubleshooting............................................ 33
General.................................................................................... 33
Bluetooth.................................................................................. 34
Remote control....................................................................... 34
Network................................................................................... 35
Supported devices and file formats............ 36
Supported devices ................................................................. 36
File formats............................................................................. 36
Specifications ................................................ 37
Trademarks.................................................... 38
CONTENTS

4 En
Check that the following accessories are supplied with the product.
* Remove the insulation sheet of the remote control before using.
Supplied accessories
☐ Remote control ☐ Power cable x 2 ☐ MusicCast Setup Guide
☐ Balance cable
(3 m) x 1
☐
STP network cable (CAT-5 straight cable)
(for connecting the speakers)
(3 m) x 1
Insulation sheet *
About this manual
• In this manual, iOS and Android mobile devices are collectively referred to as “mobile devices”. The specific type of mobile device is noted in
explanations as needed.
• indicates precautions for use of the unit and its feature limitations.
• indicates supplementary explanations for better use.
• Updates offering improved functionality of the dedicated “MusicCast CONTROLLER” app for mobile devices may become available without prior notice.

En 5
FEATURES
English
FEATURES
Mastering useful apps (MusicCast CONTROLLER)
You can operate and program the unit, or play streaming services via this unit, by installing the free dedicated MusicCast
CONTROLLER app on a mobile device. For details, search for “MusicCast CONTROLLER” on the App Store or Google Play.
• “MusicCast CONTROLLER” supports the following mobile devices.
– iOS version 7.1 or later
– Android version 4.1 or later
MusicCast CONTROLLER capabilities
Various content and streaming services can be played.
• Play songs stored on computers (servers)
• Play music stored on mobile devices (Music Play)
• Select an Internet radio station
• Play music on streaming service
• Distribute and receive audio between the unit and other
Yamaha MusicCast supported devices
• Select the input source, and adjust the volume or mute
• Adjust the tone and L/R balance, and set a sleep timer
See MusicCast Setup Guide for details.
Sources that can be played back on this unit
* You need a commercially available wireless router (access point) when you use a mobile device.
a
Play back the Internet radio (p.21)
b
Play back the streaming service
(see the supplement for each service.)
c
Play back music files stored on your PC (p.18)
d
Play back music files stored on your NAS (p.18)
e
Play back music on mobile devices (Music Play)
(p.20)
f
Play back music files stored on your iPod/iTunes
with AirPlay (p.23)
g
Play back audio content from
Bluetooth
devices
(p.24)
h
Play back audio on the PC (p.26)
i
Play back digital audio (p.27)
j
Play back analog audio (p.27)
• In order to play back from all audio sources, a mobile device installed with the dedicated “MusicCast CONTROLLER” app for mobile devices is necessary.
What you can do with this unit
a Internet
b Streaming service
c PC
f AirPlay (iTunes)
d NAS e Music Play
f AirPlay
g Bluetooth
h PC (USB DAC) i TV/CD player etc.
(Optical)
Modem
Router*
j Portable music
player etc.
(Analog)

6 En
FEATURES
Front panel
a
Status indicator (left speaker only)
Indicates the selected input source and unit status
depending on its color and whether it is lit or flashing. For
details, refer to the “Table of status indicator conditions”
at the back of this manual.
• If no network connection has been set up when the main power is
turned on, the indicator flashing in pink, and the unit automatically
searches for an iOS device (iPhone or iPod touch). For details on
network connections with iOS devices, see “Sharing the iOS device
setting” (p.15).
b
Remote control sensor (left speaker only)
Receives infrared signals from the remote control (p.8).
• When using multiple units in the same room, turning off reception
of the remote control signal with the web browser can prevent
interference from other remote controls (p.29).
Part names
a
b
Orange Standby
Yellow Network standby
Green Selecting the network input or setting up a
network connection
Pink Selecting the AirPlay input or standing by for
an iOS device connection
Blue Bluetooth input
Sky blue USB input
Purple Optical digital input
White Selecting the AUX input or updating the
firmware
Red Error occurred

En 7
FEATURES
English
Rear panel
a
Wireless antenna
For connecting to a network device and Bluetooth device
wirelessly (p.10).
b
NETWORK jack
For connecting to a network with a network cable (p.10).
c
USB jack
For connecting to a PC with a USB cable (p.26).
d
OPTICAL jack
For connecting to audio components equipped with
optical digital output (p.27).
e
L-R LINK jack
For sending control information to the right speaker with
the supplied network cable (p.9).
f
AUX IN jack
For connecting to audio components equipped with an
analog output with a stereo mini plug cable (p.27).
g
R CH AUDIO OUT jack / R CH AUDIO IN jack
For sending audio to the right speaker with the supplied
balance cable (p.9).
h
AC IN jack
For connecting the supplied power cable (p.10).
i
WIRELESS switch
Turns on/off wireless communications (wireless
connection and Bluetooth).
• When the unit is turned on, the wireless connection enters standby
mode. If a wireless connection will not be used, set the WIRELESS switch
to “OFF”.
j
CONNECT
Lets you operate the unit with the dedicated “MusicCast
CONTROLLER” app for mobile devices (p.12).
k
WIRELESS DIRECT
Establishes a wireless connection directly with a mobile
device or Wi-Fi-capable PC (p.17).
l
SOURCE
Selects the input source. Each press of this button
switches the input source. The selected input source is
indicated by the status indicator on the front panel (p.6).
m
z
(power) switch
Turns on/off the main power.
n
GAIN knob
Sets the maximum volume that the speakers can output.
Adjust the maximum volume according to the playback
device.
• When adjusting the maximum volume, play the audio from the playback
device at its maximum volume, and then adjust the GAIN knob to play
back at the desired volume.
L
NETWORK
USB
OPTICAL
L-R
LINK
AUX IN
R CH
AUDIO OUT
AUTO
OFF
WIRELESS
CONNECT
SOURCE
GAIN
AC IN
MAXMIN
WIRELESS
DIRECT
R
L-R
LINK
R CH
AUDIO IN
AC IN
a
b
c
d
e
f
g
h
e
g
h
i
m
n
l
k
j
Right speaker Left speaker
AUTO Enables wireless communications.
OFF Disables wireless communications. Make a wired
connection to connect to the network.

8 En
FEATURES
Remote control
a
Input source selection keys
Select the input source for playback. The selected input
source is indicated by the status indicator on the front
panel (p.6).
• To select network content, use the dedicated “MusicCast CONTROLLER”
app for mobile devices. When NET is pressed, the previously played
network content will be played back.
b
Volume adjustment keys
• To set the maximum volume, adjust the GAIN knob on the rear panel
(p.7).
c
PRESET
Registers (presets) PC/NAS albums or songs, Internet
radio stations and streaming stations on this unit. After a
song/station is registered, it can be played back by simply
pressing this key (p.22).
d
WPS
Sets up a wireless connection to the network (p.16).
• In order to connect to the network using WPS, a wireless router (or
access point) with the WPS function is required.
e
z
(power)
Turns on/off (standby) the unit.
• To turn the main power on/off, use the z (power) switch on the rear
panel (p.7).
f
CONNECT
Lets you operate the unit with the dedicated “MusicCast
CONTROLLER” app for mobile devices (p.12).
■ Operating by remote control
Use the remote control by directing it toward the remote
control sensor on the left speaker.
■ Replacing the battery
• Check the “+” of the battery and insert it the correct way
around.
• While pushing the release tab in direction Ⓐ, slide out the
battery holder in direction Ⓑ.
a
b
c
d f
e
(Bluetooth)
Bluetooth input
NET Network input
USB USB jack
OPT OPTICAL jack
AUX AUX jack
+/– Adjust the volume for playback.
(mute)
Mutes the speaker output.
Approximately
6 m (20 ft)
CR2025 type
lithium battery

En 9
PREPARATIONS
English
PREPARATIONS
Use the supplied cables to connect the left and right speakers.
• If the left and right speakers are not connected, they will not function.
• Do not use any cable other than those supplied.
PREPARATIONS
1
Connecting the left and right speakers
2
Connecting the playback devices
L
NETWORK
USB
OPTICAL
L-R
LINK
AUX IN
R CH
AUDIO OUT
AUTO
OFF
WIRELESS
CONNECT
SOURCE
GAIN
AC IN
MAXMIN
WIRELESS
DIRECT
R
L-R
LINK
R CH
AUDIO IN
AC IN
L-R
LINK
L-R
LINK
R CH
AUDIO IN
R CH
AUDIO OUT
Right speaker
Left speaker
Connect with the supplied
network cable.
Connect with the supplied
balance cable.
L
NETWORK
USB
OPTICAL
L-R
LINK
AUX IN
R CH
AUDIO OUT
AUTO
OFF
WIRELESS
CONNECT
SOURCE
GAIN
AC IN
MAXMIN
WIRELESS
DIRECT
PC
TV/CD player etc.
Portable music player etc.
USB cable
Optical cable
Stereo mini plug cable
Left speaker

10 En
PREPARATIONS
Connect the unit to your router with a commercially-available STP network cable (CAT-5 or higher straight cable).
Select whether to use a wired network connection or a wireless network connection, depending on your network environment.
For details, refer to “Connecting to network” (p.12).
Raise the wireless antenna on the back of the left speaker.
• Do not apply excessive force on the antenna. Doing so may damage it.
• Be sure to check the direction in which the antenna moves, and angle it
in the proper direction.
• Do not remove the antenna.
Connect the supplied power cable to the AC IN jack on the
rear panel, and then insert the power plug into an AC wall
outlet.
3
Connecting the network cables
L
NETWORK
USB
OPTICAL
L-R
LINK
AUX IN
R CH
AUDIO OUT
AUTO
OFF
WIRELESS
CONNECT
SOURCE
GAIN
AC IN
MAXMIN
WIRELESS
DIRECT
NETWORK
LAN
WAN
Internet
Modem
Mobile device
(such as iPhone)
Router
Network Attached
Storage (NAS)
PC
Left speaker
4
Preparing a wireless antenna
Hold the base of the
antenna while raising it to
its upright position.
5
Connecting the power cable
L
NETWORK
USB
OPTICAL
L-R
LINK
AUX IN
R CH
AUDIO OUT
AUTO
OFF
WIRELESS
CONNECT
SOURCE
GAIN
AC IN
MAXMIN
WIRELESS
DIRECT
R
L-R
LINK
R CH
AUDIO IN
AC IN
Right speaker Left speaker
To an AC wall outlet To an AC wall outlet

En 11
PREPARATIONS
English
• Place each speaker on a sturdy and stable surface.
• When connecting to a TV, place the speakers to the left and
right of the TV.
• The ideal stereo effect will be obtained by slightly angling
the front panels in toward the listener.
• When used near a CRT TV, separate the speakers from the TV if color
distortions or noise occur.
Turning on the main power
After all cables have been connected, press the z (power)
switch on the rear panel to turn on the main power of the
unit.
• If no network connection has been set up when the main power is
turned on, the indicator flashing in pink, and the unit automatically
searches for an iOS device (iPhone or iPod touch). For details on network
connections with iOS devices, see “Sharing the iOS device setting” (p.15).
After the main power for the unit has been turned on, the
unit can be turned on or switched to standby by using z
(power) on the remote control.
To turn on/off the unit with the MusicCast CONTROLLER, the
network function must be enabled, even when the unit is in
standby mode (network standby).
For details on network standby, refer to the following section.
■ Network standby
The network function can be enabled, even when the unit is
in standby mode (network standby).
If network standby is turned off, the unit can enter standby
mode using the minimum standby power (eco standby).
Use the web browser on the PC to change the network
standby setting (p.29).
• As a default, network standby is set to “On”. If you set it to “Auto,” when
the unit has been disconnected from the network for 8 hours while it is in
network standby mode, it switches to eco standby mode.
■ Auto power standby
If no operation is performed or nothing is played back, the
unit will automatically enter standby mode (auto power
standby).
MusicCast CONTROLLER can be used to change the auto
power standby setting.
Standby time with no operation
Standby time with no playback
Default setting : Off
6
Positioning the speakers
Right speakerLeft speaker
R CH
AUDIO OUT
AUTO
OFF
WIRELESS
CONNECT
SOURCE
GAIN
MAXMIN
WIRELESS
DIRECT
Left speaker (rear panel) Left speaker (front panel)
z (power) switch Pink
All inputs: 8 hours
Network, Bluetooth and USB: 20 minutes

12 En
PREPARATIONS
• Some security software installed on your PC or the firewall settings of network devices (such as a router) may block the access of the unit to the network
devices or the Internet. In these cases, configure the security software or firewall settings appropriately.
• A connection cannot be established if the MAC address filter is enabled on the router. Check the router settings.
• Each server must be connected to the same subnet as the unit.
• To use the service via the Internet, broadband connection is strongly recommended.
Connecting with the MusicCast CONTROLLER
In order to use a mobile device installed with the dedicated
“MusicCast CONTROLLER” app, simply follow the instructions
in the MusicCast CONTROLLER screen to specify the network
settings.
• Connect the mobile device in which the “MusicCast CONTROLLER” app
has been installed to the wireless router (access point) in advance.
• If this unit will not be connected to the Internet, streaming services such
as Internet radio cannot be used. To use streaming services, connect the
unit to a Internet with a wired router or wireless router (access point).
1
Perform the setup according to the network
connection method (wired or wireless).
When connecting to the network using a cable:
Make sure that the unit is connected to the router with a
cable.
When connecting to the network wirelessly:
If a wired connection has already been established,
disconnect the network cable from the unit.
2
Set the WIRELESS switch on the rear panel to
“AUTO”.
3
Start up the MusicCast CONTROLLER app on the
mobile device, and then tap “Setup”.
If you have already connected a another MusicCast
compatible device to the network, tap “Settings” and
then “Add New Device”.
4
Follow the procedure in the MusicCast
CONTROLLER screen to turn on the unit.
While the connection is being set up, the status indicator
on the front panel flashes in green.
5
Hold down CONNECT on the remote control (or
CONNECT on the rear panel) for at least 3
seconds.
Connecting to network
When playing a high-resolution audio source via the network, we
recommend connecting with a wired router for stable playback.
R CH
AUDIO OUT
AUTO
OFF
WIRELESS
CONNECT
SOURCE
GAIN
AC IN
MAXMIN
WIRELESS
DIRECT
Left speaker (rear panel)
WIRELESS switch
Green (flashing)
Left speaker (front panel)
CONNECT
Remote control
R CH
AUDIO OUT
AUTO
OFF
WIRELESS
CONNECT
SOURCE
GAIN
AC IN
MAXMIN
WIRELESS
DIRECT
Left speaker (rear panel)
CONNECT

En 13
PREPARATIONS
English
6
Follow the procedure in the MusicCast
CONTROLLER screen to complete the network
connection.
When the network connection is established, the status
indicator on the front panel changes to lit.
• If the input source is changed or this unit enters standby mode, the
setup operation is canceled.
Green (lit)
Left speaker (front panel)

14 En
PREPARATIONS
Connecting without the MusicCast CONTROLLER
To play back without using the MusicCast CONTROLLER, connect to the network with the method that corresponds to your
environment.
■ Connecting with the wired router
■ Connecting with a wireless router (access point)
Connect to the network with the method listed below that corresponds to your environment.
■ Connecting without a wired router or wireless router (access point)
• When the unit is connected to the network with Wireless Direct, it cannot connect to any other wireless router (access point). To play back contents from
the Internet, connect this unit to a network with a wired router or wireless router (access point).
When playing a high-resolution audio source via the network, we recommend connecting with a wired router for stable playback.
Connecting using the DHCP server function of the router
You can connect to the
network by simply making a
wired connection (p.15)
Connecting using the Wi-Fi setting of the iOS device
(iPhone/iPod touch)
Share the Wi-Fi setting of the
iOS device (p.15)
Connecting using WPS push button configuration on the
wireless router (access point)
Use the WPS push button
configuration (p.16)
Connecting with a wireless router (access point) without
WPS push button configuration
Connect wirelessly with
Wireless Direct (p.17) and set
the connection setting using
a web browser on the PC
(p.29)
Connecting wirelessly to a mobile device (Wireless Direct)
Connect wirelessly with
Wireless Direct (p.17)

En 15
PREPARATIONS
English
■ Connecting to the network using a
cable
As a default, this unit will automatically make a network
connection when it is connected to a wired router and turned
on.
• When connecting to the network using a cable, a network connection will
be established regardless of whether the WIRELESS switch on the rear
panel is set to “AUTO” or “OFF”.
• If a wireless connection has already been established with this unit, the
WIRELESS switch on the unit must first be set to “OFF”. After turning off
the unit and connecting the network cable, set the WIRELESS switch to
“OFF”, and then turn the unit on again. In order to use Bluetooth, turn on
the unit before setting the WIRELESS switch to “AUTO”.
1
Make sure that this unit is connected to the
router with a cable.
2
Press z (power) on the remote control to turn
on the unit.
The network settings are automatically specified. While
the settings are being specified, the status indicator on
the front panel flashes in green.
When the connection is established, the status indicator
on the front panel changes to lit.
■ Sharing the iOS device setting
You can easily setup a wireless connection by applying the
connection settings on iOS devices (iPhone/iPod touch).
Before proceeding, confirm that your iOS device is connected
to a wireless router (access point).
• In order to share Wi-Fi settings, the iOS device must be installed with iOS
7 or later.
• Following the procedure below will reset specified account information
and registered preset settings.
• If network settings have already been specified, reset the network
connection, and then follow the procedure below.
• If a wired connection has already been established with this unit, the
WIRELESS switch on the unit must first be set to “OFF” while the unit is
on. After disconnecting the network cable, set the WIRELESS switch to
“AUTO”.
1
Set the WIRELESS switch on the rear panel to
“AUTO”.
2
Press z (power) on the remote control to turn
on the unit.
The status indicator on the front panel flashes in pink.
When this unit detects an iOS device, a connection
confirmation message appears.
3
Tap “Allow” in the iOS device screen.
When the connection is established, the status indicator
on the front panel lights up in green.
Green (flashing)
Left speaker (front panel)
Green (lit)
Left speaker (front panel)
R CH
AUDIO OUT
AUTO
OFF
WIRELESS
CONNECT
SOURCE
GAIN
AC IN
MAXMIN
WIRELESS
DIRECT
Left speaker (rear panel)
WIRELESS switch
Pink (flashing)
Left speaker (front panel)
Green (lit)
Left speaker (front panel)

16 En
PREPARATIONS
■ Using the WPS push button
configuration
You can easily set up a wireless connection with one push of
the WPS button.
1
Set the WIRELESS switch on the rear panel to
“AUTO”.
• If a wired connection has already been established with this unit, the
WIRELESS switch on the unit must first be set to “OFF” while the unit is
on. After disconnecting the network cable, set the WIRELESS switch to
“AUTO”.
2
Press z (power) on the remote control to turn
on the unit.
The status indicator on the front panel flashes in green.
• If no network connection has been set up when the main power is
turned on, the indicator lights up in pink, and the unit automatically
searches for an iOS device (iPhone or iPod touch). For details on network
connections with iOS devices, see “Sharing the iOS device setting” (p.15).
3
Hold down WPS on the remote control for 3
seconds.
The status indicator on the front panel flashes in green.
• If the input source is changed or this unit enters standby mode, the
setup operation is canceled.
4
Press the WPS button on the wireless router
(access point).
The WPS button on the wireless router (access point)
must be pressed within 2 minutes after completing step
3. After 2 minutes have passed, the setup operation is
canceled.
When the connection is established, the status indicator
on the front panel lights up in green.
R CH
AUDIO OUT
AUTO
OFF
WIRELESS
CONNECT
SOURCE
GAIN
AC IN
MAXMIN
WIRELESS
DIRECT
Left speaker (rear panel)
WIRELESS switch
Green (flashing)
Left speaker (front panel)
About WPS
WPS (Wi-Fi Protected Setup) is a standard established by the Wi-Fi
Alliance, which allows easy establishment of a wireless home network.
WPS
Green (lit)
Left speaker (front panel)

En 17
PREPARATIONS
English
■ Connecting a mobile device to the unit
directly (Wireless Direct)
Using Wireless Direct, this unit can operate as a wireless
network access point that mobile devices can directly
connect to.
• When the unit is connected to the network with Wireless Direct, it cannot
connect to any other wireless router (access point). To play back contents
from the Internet, connect this unit to a network with a wired router or
wireless router (access point).
• If a wired connection has already been established with this unit, the
WIRELESS switch on the unit must first be set to “OFF” while the unit is
on. After disconnecting the network cable, set the WIRELESS switch to
“AUTO”.
• If you do not have either a wired router or a wireless router (access
point), you can specify the unit settings from a web browser by
connecting your PC with Wireless Direct (p.29). Specify the same settings
described below for mobile devices.
1
Set the WIRELESS switch on the rear panel to
“AUTO”.
2
Hold down WIRELESS DIRECT on the rear panel
for at least 3 seconds.
When the button is pressed, the status indicator on the
front panel flashes in green. When the network settings
begin to be specified, the status indicator changes to lit.
• To cancel the connection, hold down the WIRELESS DIRECT on the rear
panel for at least 3 seconds. When the connection is canceled, the status
indicator on the front panel flashes.
• If this unit had been connected to the network with any method other
than those described above, canceling the connection returns the unit to
the previous network connection.
3
Configure the Wi-Fi settings of a mobile device.
For details on settings of your mobile device, refer to the
instruction manual of the mobile device.
a Enable the Wi-Fi function on the mobile device.
b Select the SSID of this unit from the list of available
access points.
The SSID for this unit appears as “NX-N500 xxxxxx
(Wireless Direct)” (where “xxxxxx” represents the
unique alphanumerics).
c If you are prompted for a password, enter “NX-
N500password”.
• If you want to change another network connection, set the WIRELESS
switch on the rear panel to “OFF” and then “AUTO” to disconnect the
Wireless Direct connection. After disconnecting, set the another network
connection.
– If you want to connect the network with MusicCast CONTROLLER, refer
to “Connecting with the MusicCast CONTROLLER” (p.12) for details.
– If you want to connect the network using this unit only, refer to
“Connecting without the MusicCast CONTROLLER” (p.14) for details.
R CH
AUDIO OUT
AUTO
OFF
WIRELESS
CONNECT
SOURCE
GAIN
AC IN
MAXMIN
WIRELESS
DIRECT
Left speaker (rear panel)
WIRELESS switch
R CH
AUDIO OUT
AUTO
OFF
WIRELESS
CONNECT
SOURCE
GAIN
AC IN
MAXMIN
WIRELESS
DIRECT
WIRELESS DIRECT
Left speaker (rear panel)
Green (lit)
Left speaker (front panel)

18 En
PLAYBACK
PLAYBACK
You can play back music files stored on your PC or DLNA-compatible NAS on the unit.
• To use this function, the unit and your PC/NAS must be connected to the same router (p.10).
• To play back music files, the server software installed on the PC/NAS must support the music file formats that you want to play back.
• For details on playable file formats, see “Supported devices and file formats” (p. 36).
• You can connect up to 16 media servers to this unit.
Setting the media sharing of music
files
To play back music files in your PC with this unit, you need to
make the media sharing setting between the unit and PC
(Windows Media Player 11 or later). In here, setting with
Windows Media Player in Windows 7 is taken as an example.
■ When using Windows Media Player 12
1
Start Windows Media Player 12 on your PC.
2
Select “Stream”, then “Turn on media
streaming...”.
The control panel window of your PC appears.
3
Click “Turn on media streaming”.
4
Select “Allowed” from the drop-down list next
to the unit’s model name.
5
Click “OK” to exit.
■ When using Windows Media Player 11
1
Start Windows Media Player 11 on your PC.
2
Select “Library” then “Media Sharing”.
3
Check the “Share my media to” box, select the
unit’s icon, then click “Allow”.
4
Click “OK” to exit.
■ When using a PC or a NAS with other
DLNA server software installed
Refer to the instruction manual for the device or software
and configure the media sharing settings.
Playing back music stored on media servers (PCs/NAS)
(Example of English version)

En 19
PLAYBACK
English
Playback of PC music contents
1
Start up the MusicCast CONTROLLER app on the
mobile device.
2
In the MusicCast CONTROLLER screen, select
the room name that was specified for this unit.
3
Select “Server” in the MusicCast CONTROLLER
screen.
4
In the MusicCast CONTROLLER screen, select
the music file to be played back.

20 En
PLAYBACK
Using a mobile device installed with MusicCast CONTROLLER, you can play back music files stored on your mobile device from
this unit.
• For details on the music files compatible with this unit, see “Supported devices and file formats” (p. 36).
Playback of mobile device music
contents
1
Start up the MusicCast CONTROLLER app on the
mobile device.
2
In the MusicCast CONTROLLER screen, select
the room name that was specified for this unit.
3
Select “This Phone” or “This Tablet” in the
MusicCast CONTROLLER screen.
The displayed name differs depending on the mobile
device being used.
4
In the MusicCast CONTROLLER screen, select
the music file to be played back.
Playing back music on mobile devices (Music Play)

En 21
PLAYBACK
English
You can listen to Internet radio stations from all over the world.
• You may not be able to receive some Internet radio stations.
• The unit uses the vTuner Internet radio station database service.
• This service may be discontinued without notice.
Selecting an Internet radio station
1
Start up the MusicCast CONTROLLER app on the
mobile device.
2
In the MusicCast CONTROLLER screen, select
the room name that was specified for this unit.
3
Select “Net Radio” in the MusicCast
CONTROLLER screen.
4
In the MusicCast CONTROLLER screen, select
the radio station to be tuned into.
• Up to 40 radio stations can be registered (preset) (p.22).
Registering favorite Internet radio
stations (bookmarks)
By registering your favorite Internet radio stations to
“Bookmarks”, you can quickly access to them from
“Bookmarks”.
1
Select any of Internet radio stations on the unit.
This operation is necessary to register the radio station
for the first time.
2
Check the vTuner ID of the unit.
You can find the vTuner ID (MAC address of the unit) with
the MusicCast CONTROLLER app.
3
Access the vTuner website
(http://yradio.vtuner.com/) with the web
browser on your PC and enter the vTuner ID.
• To use this feature, you need to create your personal account.
Create your account using your e-mail address.
4
Register your favorite radio stations.
Click the “Add” icon (❤+) next to the station name.
• To remove the station from the “Bookmarks” folder, select
“Bookmarks” in the Home screen, and then click the “Remove” icon
(❤–) next to the station name.
Listening to Internet radio
You can switch the language.
Enter the vTuner ID in this area.

22 En
PLAYBACK
Up to 40 albums or songs stored on the PC/NAS , Internet radio stations and streaming stations can be registered on this unit
and easily recalled at any time (when using the MusicCast CONTROLLER).
The first 6 presets can be registered/recalled by using this unit’s remote control.
• For details on the procedures to register/recall with MusicCast CONTROLLER, refer to the app’s instructions.
Registering a song/station by
remote control
1
Play the song/station to be registered.
2
Hold down any of PRESET 1 to 6 on the remote
control for 5 seconds.
When the registration is finished, the status indicator on
the front panel flashes twice in green.
• If the status indicator flashes twice in red, the selected song/station
cannot be registered. Try with a different song/station.
• If PRESET where a song/station has already been registered is held
down for 5 seconds, the previous setting is overwritten.
Recalling a registered song/station
by remote control
1
On the remote control, press PRESET where the
song/station is registered.
• If the registered PRESET is pressed while the unit is in standby
mode, the unit automatically turns on, and the registered song/
station is played.
Registering songs stations being played back (Preset function)
PRESET 1 to 6
Green
(flashing twice)
Left speaker (rear panel)

En 23
PLAYBACK
English
The AirPlay function allows you to play back iPod/iTunes music on the unit via network.
• For details on supported iPod devices, see “Supported devices and file formats” (p. 36).
Playback of iPod/iTunes music contents
Follow the procedure below to play back iPod/iTunes music contents on the unit.
1
Turn on the unit, and start iTunes on the PC or
display the playback screen on the iPod.
If the iPod/iTunes recognizes the unit, the AirPlay icon
( ) appears.
• For iPods using iOS 7/8, AirPlay icon is displayed in Control Center.
To access Control Center, swipe up from the bottom of the screen.
example
• If the icon does not appear, check whether the unit and PC/iPod are
connected to the router properly.
2
On the iPod/iTunes, click (tap) the AirPlay icon
and select the unit (network name of the unit)
as the audio output device.
example
3
Select a song and start playback.
The unit automatically selects “AirPlay” as the input
source and starts playback.
• If network standby is turned on “Network standby” (p. 11), this unit
automatically turns on when playback on iTunes/iPod is started.
• The network name for this unit that appears in iTunes/iPod can be
changed using the web browser on the PC (p.29).
• You can adjust the unit’s volume from the iPod/iTunes during
playback.
Playing back iPod/iTunes music via a network (AirPlay)
Caution
• When you use iPod/iTunes controls to adjust volume, the volume may be unexpectedly loud. This could result in damage to the unit or speakers. If the
volume suddenly increases during playback, stop playback on the iPod/iTunes immediately.
iTunes
iPod
Router
PC
The unit
(wired or wireless)
(wired or wireless)
iTunes iPod iOS6
iPod iOS7/iOS8
iTunes iPod
Network name of the unit

24 En
PLAYBACK
You can play back music files stored on a Bluetooth device (such as mobile device) on the unit.
• When you playing the Bluetooth device, set the WIRELESS switch on the rear panel to “AUTO” (p.7).
Registering a
Bluetooth
device with the unit (pairing)
1
Press (Bluetooth) on the remote control.
If no Bluetooth device has been registered yet, the status
indicator on the front panel flashes in blue.
2
Turn on the Bluetooth function on the Bluetooth
device.
The operation varies depending on the device. Refer to
the instruction manual supplied with the device.
3
Select “NX-N500 XXXXXX Bluetooth” in the
Bluetooth device list on the device.
Where “xxxxxx” represents the unique alphanumerics.
• If this unit has been registered with the MusicCast CONTROLLER,
the room name entered during registration appears.
If or a connection completed message appears on the
paired device, pairing is finished.
When pairing is finished, the status indicator changes to
lit.
4
Playback a song on the Bluetooth device.
• Perform pairing with the Bluetooth device and unit within 10 m (33 ft) of
each other.
• This unit can be paired with a maximum total of 20 Bluetooth devices for
reception and transmission. When the 21st device is registered, the least
frequently used pairing information is deleted.
•If a Bluetooth device has been connected before, the unit will connect to
the last connected device when (Bluetooh) is pressed with step 1.
Disconnect this connection to pair a new device (p.25).
• Refer to “Bluetooth” (p. 34) in “Troubleshooting” if paring is not possible.
Playing back music via Bluetooth
(Bluetooth)
Blue (flashing)
NX-N500 XXXXXX Bluetooth
Blue (lit)

En 25
PLAYBACK
English
Playing back audio from a
Bluetooth
device on the unit
1
Press (Bluetooth) on the remote control.
The input source switches to Bluetooth.
2
Turn on the Bluetooth function on the Bluetooth
device.
3
Play back a song on the Bluetooth device.
•Perform Bluetooth connection with the device and unit within 10 m (33 ft)
of each other.
• If necessary, select this unit again from the Bluetooth device list on the
paired device. Depending on your device, it may be necessary to select
this unit as the audio output.
•Adjust Bluetooth device volume as needed.
•If a Bluetooth device has been connected before, the unit will connect to
the last connected device when (Bluetooh) is pressed with step 1.
Disconnect this connection to pair a new device (p.25).
Disconnecting
Bluetooth
connection
Bluetooth connection is disconnected in the following cases.
When the connection is disconnected, the status indicator on
the front panel of this unit flashes in blue.
• The connection is disconnected from the Bluetooth device,
or the Bluetooth device is turned off.
•(Bluetooth) on the remote control is held down for at
least 5 seconds.
• The unit is turned off.
Blue (flashing)
Specifying connection setting
Connection
established
Blue (lit)

26 En
PLAYBACK
When a PC is connected to the USB jack of the unit, the unit
functions as a USB DAC, enabling audio output on the PC to
be played.
For details on supported operating systems and sampling
formats, see “Supported devices and file formats” (p. 36).
• When using Mac OS, it is not necessary to install a driver. The audio
driver of Mac OS is available for playback.
• Operations may not be executed correctly if the PC is connected to this
unit before the driver is installed.
Installing the dedicated driver
(Windows only)
Before connecting a PC to the unit, installing the dedicated
driver on the PC.
1
Access the following URL, download the
dedicated driver “Yamaha HiFi USB Driver,”
then extract and execute the file.
2
Install the downloaded “Yamaha HiFi USB
driver” on the PC.
For details, refer to the Installation Guide supplied with
the downloaded driver.
3
When installation is complete, quit all running
applications.
• The “Yamaha HiFi USB Driver” is subject to change without prior notice.
For details and the latest information, refer to the downloading page for
the driver.
Playing back music on a PC
1
Connect the PC to the unit, using USB cable.
2
Turn on the PC.
3
Press z (power) on the remote control to turn
on the unit.
4
Press USB on the remote control.
The status indicator on the front panel lights up in sky
blue.
5
Set the audio output destination of the PC to
“Yamaha NX-N500”.
With Windows OS:
Control panel → Hardware and sound → Sound →
[Playback] tab
With Mac OS:
System Preferences → Sound → [Output] tab
The setting may vary, depending in the operating system.
For details, consult the manufacture of your PC.
6
Operate the PC to start playback of music files.
■ Adjusting the sound volume
To obtain higher sound quality, set the sound volume at the PC
to the maximum, and gradually increase the volume at the
unit from the minimum to your desired level.
• Do not disconnect the USB cable, turn of the unit, or change the input
while playback on a PC connected via the USB cable is in progress. Doing
so may cause a malfunction.
• To mute operation sounds of the PC during music playback, change the
setting on the PC.
• If music files cannot be played correctly, restart the PC and perform the
mentioned procedure again.
Playing back music on a PC (USB DAC)
Website for downloading the exclusive driver
URL: http://download.yamaha.com/
L
NETWORK
USB
OPTICAL
L-R
LINK
AUX IN
R CH
AUDIO OUT
AUTO
OFF
WIRELESS
CONNECT
SOURCE
GAIN
AC IN
MAXMIN
WIRELESS
DIRECT
USB
Left speaker
(rear panel)
USB cable
(Type B)
PC
z (power)
USB
Sky blue (lit)

En 27
PLAYBACK
English
Music from a playback device can be enjoyed from this unit by connecting the playback device to the OPTICAL jack or AUX jack of
this unit.
Playback from devices with an
optical digital audio output
• The optical digital input of this unit is compatible only with PCM. If the
optical digital output of the playback device is AAC, such as on a TV,
switch it to PCM.
1
Connect this unit and the playback device using
an optical digital cable.
2
Press z (power) on the remote control to turn
on the unit.
3
Press OPT on the remote control.
The status indicator on the front panel lights up in
purple.
4
Play back the music from the playback device.
Playback from devices with an
analog audio output
1
Connect this unit and the playback device using
a stereo mini plug cable.
2
Press z (power) on the remote control to turn
on the unit.
3
Press AUX on the remote control.
The status indicator on the front panel lights up in white.
4
Play back the music from the playback device.
■ Adjusting the sound volume
To obtain higher sound quality, set the sound volume at the
playback device to the maximum, and gradually increase the
volume at the unit from the minimum to your desired level.
Listening to music from a playback device
L
NETWORK
USB
OPTICAL
L-R
LINK
AUX IN
R CH
AUDIO OUT
AUTO
OFF
WIRELESS
CONNECT
SOURCE
GAIN
AC IN
MAXMIN
WIRELESS
DIRECT
OPTICAL
Rear panel
Optical cable
TV/CD player etc.
z (power)
OPT
Purple (lit)
L
NETWORK
USB
OPTICAL
L-R
LINK
AUX IN
R CH
AUDIO OUT
AUTO
OFF
WIRELESS
CONNECT
SOURCE
GAIN
AC IN
MAXMIN
WIRELESS
DIRECT
AUX IN
Rear panel
Stereo mini plug cable
Portable music player etc.
z (power)
AUX
White (lit)

28 En
CONFIGURATIONS
CONFIGURATIONS
New firmware that provides additional features or product improvements will be released as needed. If the unit is connected to
the Internet, you can download the firmware via the network and update it.
The firmware can be updated using any of the following procedures.
• Updating from a mobile device installed with the dedicated “MusicCast CONTROLLER” app for mobile devices
• Updating from this unit
• Updating from a web browser, for example, on a PC (p.29)
• The firmware can also be updated from a web browser on a PC (p.29).
Updating with MusicCast
CONTROLLER
When a new firmware update is available, a message
prompting you to update appears in the MusicCast
CONTROLLER screen.
Follow the procedure in the MusicCast CONTROLLER screen
to update the firmware.
After the update is finished, turn the unit off, then on again,
as instructed in the screen.
Updating from this unit
When a new firmware update is available, the status
indicator on the front panel flashes in white when the unit is
turned on.
Follow the procedure below to update the firmware.
1
Turn off the unit.
2
While holding down SOURCE on the rear panel,
press the z (power) switch to turn on the unit.
The firmware update starts.
• If an error occurred during firmware updating, the status indicator will
repeatedly flash three times in red. To restart updating, press WIRELESS
DIRECT on the rear panel.
• If the firmware download cannot be found, the status indicator will
repeatedly flash twice in red. Check that this unit is connected to the
network.
3
Turn the unit off, then on again.
Updating the unit’s firmware via the network
Caution
• Do not operate the unit or disconnect the power cable or network cable during firmware update. Firmware update takes about 20 minutes or more
(depending on your Internet connection speed).
• If the unit is connected to the wireless network, network update may not be possible depending on the condition of the wireless connection. In this
case, take the time to try updating the firmware.
• For details on update, visit the Yamaha website.
White (Flashing)
AUTO
OFF
WIRELESS
CONNECT
SOURCE
GAIN
AC IN
MAXMIN
WIRELESS
DIRECT
Left speaker (Rear panel)
SOURCE
z (power) switch
White
(slow flashing)
Updating
Complete
White
(fading every 3
seconds)

En 29
CONFIGURATIONS
English
A web browser on a PC can be used to display or specify the various unit settings as well as the network connection settings.
Perform the following operations with the unit connected to the network wirelessly or using a cable, or connected directly to the
PC with Wireless Direct (p.17).
• Some security software installed on your PC may block access by the unit. In that case, configure the security software appropriately.
• This feature is compatible with operating systems of the following versions.
– Windows 7 or later
– Mac OS 10.7.x or later
• We recommend using a web browser of the following versions.
– Internet Explorer 9/10/11
–Safari 8
Configuring with Windows
(using a specified web browser)
1
Open the “Network” folder.
2
Double-click this unit, which appears below
“Other Devices” or “Media Devices”.
Start up the specified web browser. The configuration
window for the unit appears.
Configuring with Mac OS
1
Start up Safari, and then click “Preferences”,
then “Advanced”.
2
Select all check boxes for Bonjour.
Select this unit from the Bookmarks menu list.
The configuration window for the unit appears.
Specifying unit settings with a web browser

30 En
CONFIGURATIONS
Displaying/changing settings
Settings for the following parameters can be displayed or changed.
■ Network Name
Edits the unit’s name that appears on the network.
■ Network Setup
Specifies the network settings.
• Some of the following parameters may not appear (or their settings
cannot be changed), depending on the selected network connection
method.
When connecting with a wireless router (access point) using a
WPS PIN code, follow the procedure below to specify the
settings.
1
Set “Connection Select” to “Wireless LAN”, and
then click “APPLY”.
2
Select the “WPS PIN” check box, and then click
“APPLY”.
The PIN code appears at the message window.
3
Enter the PIN code for the unit into the wireless
router (access point).
■ AirPlay Password
Specifies the password for AirPlay playback.
■ Firmware Update
Updates the firmware of this unit.
■ Standby
Switches network standby setting.
■ MAC Filter
Sets the MAC addresses to limit the network devices that can
access the unit.
• If the MAC address filter is enabled, be sure to specify the MAC address
of the PC used for setup. If “APPLY” is clicked without the address
specified, this unit will be inaccessible. If this unit becomes inaccessible,
reset its network settings (p.32).
Network Name Enter the unit’s name that will appear on the
network. If this unit has been registered with
the MusicCast CONTROLLER, the room name
entered during registration appears.
APPLY
Click to apply the new name.
Connection
Info
Displays the currently specified network connection
method.
MusicCast
Network
Displays the MusicCast network status. If “Ready”
appears, the MusicCast CONTROLLER can be used.
Connection
Select
Select the network connection method (Wired LAN/
Wireless LAN/Wireless Direct/MusicCast Wireless).
With
Wireless
LAN
WPS PIN Displays the WPS PIN code.
SSID Enter the SSID for the
wireless router (access point).
With
Wireless
LAN/
Wireless
Direct
Security Select the security method
when connecting with a
wireless router (access point)
or Wireless Direct.
Security
Key
Enter the security key when
connecting with a wireless
router (access point) or
Wireless Direct.
DHCP Switches on/off the DHCP function. When turned off,
some settings, such as the IP address and subnet
mask, can be specified manually.
IP Address Displays the IP address for this unit.
Subnet Mask Displays the subnet mask for this unit.
Default
Gateway
Displays the default gateway for this unit.
DNS Server
(P)
Displays the address of the primary DNS server.
DNS Server
(S)
Displays the address of the secondary DNS server.
APPLY Click to apply the currently specified settings.
Mode
Switches on/off the password function. When
turned on, a password can be specified.
Password
Enter the password to be specified.
APPLY
Click to apply the specified settings.
Current Firmware
Version
Displays the version of the current firmware.
START Starts firmware updating. Perform the update
operation according to the on-screen
instructions.
Network Standby Switches network standby setting (On/Off/Auto).
For details on the settings, see “Network
standby” (p.11).
Off
Disables the MAC address filter.
On
Enables the MAC address filter. Only the
network devices with the MAC addresses
specified in “MAC Address 1” to “MAC Address
10” will be able to access the unit.
APPLY
Click to apply the specified settings.
MAC Address 1-10
Specify the MAC addresses of network devices
(up to 10) that can access the unit.

En 31
CONFIGURATIONS
English
■ Licenses
Displays the license information for the software used with
this unit.
■ Other Setup
Specifies other settings.
Remote Sensor Switches on/off reception of the remote control
signal. Even when turned off, operations other
than with the remote control (such as from the
MusicCast CONTROLLER or unit’s rear panel) can
be performed.

32 En
CONFIGURATIONS
All unit settings or only network settings can be restored.
Restoring the default settings
(Factory reset)
1
Turn off the unit.
2
While holding down CONNECT on the rear
panel, press the z (power) switch to turn on
the unit.
Restoring the default network
settings
The following parameters are returned to their default
settings.
• Network connection settings
• All registered presets
• Wireless LAN and Wireless Direct connection log
1
Turn off the unit.
2
While holding down WIRELESS DIRECT on the
rear panel, press the z (power) switch to turn
on the unit.
When initialization is finished, the unit is turned on.
Restoring the default settings

En 33
APPENDIX
English
APPENDIX
Refer to the chart below when this unit does not function properly. If the problem you are experiencing is not listed below or if
the instruction below does not help, turn off the unit, disconnect the AC power supply cable, and contact the nearest authorized
Yamaha dealer or service center.
General
Troubleshooting
Problem Cause Remedy
See
page
This unit does not operate
properly.
The internal microPC has been frozen by an
external electric shock (such as lightning or
excessive static electricity) or by a power supply
with low voltage.
Disconnect the AC power supply cable from the
outlet and plug it again in after 30 seconds.
—
This unit fails to turn on
when z (power) is pressed
(the STATUS indicator
flashes red), or the unit is
turned off soon after the
power has been turned on.
The AC power supply cable is not firmly connected
to the AC wall outlet.
Connect the AC power supply cable firmly to the
AC wall outlet.
10
The internal microPC has been frozen by an
external electric shock (such as lightning or
excessive static electricity) or by a power supply
with low voltage.
Disconnect the AC power supply cable from the
outlet and plug it again in after 30 seconds.
—
This unit is suddenly turned
off.
The internal temperature becomes too high and
the overheat protection circuitry has been
activated.
Wait for about 1 hour for this unit to cool down,
turn it back on after confirming an adequate
amount of ventilation space and not to cover this
unit with a cloth.
11
When the Auto Power Standby function is enabled,
this unit turns off automatically in any of the
following situations:
– Audio is coming from the selected input source.
However, no operations have been performed
for 8 hours or more.
– Bluetooth or NET is selected as the input source,
but no audio has been input to the unit or no
operations have been performed with the unit
for more than 20 minutes.
Turn on the power of the unit and play back the
source again. If the Auto Power Standby function
is not used, set “Auto Power Standby” to “Off”.
No sound. Incorrect input or output cable connections. Connect the cable properly. 9
No appropriate input source has been selected. Select an appropriate input source with the input
selector keys.
8
The volume is turned down. Turn up the volume. —
The sound is muted. Press (mute) or +/- (volume) to resume audio
output and adjust the volume level.
—
A digital or high-frequency
equipment produces noises.
The unit may be placed close to digital equipment
or high-frequency equipment.
Move the equipment away from the unit.
—

34 En
APPENDIX
Bluetooth
Remote control
Problem Cause Remedy
See
page
Cannot make the unit paired
with the Bluetooth device.
Wireless switch is set to “OFF”. Set it to “AUTO”. 7
The device does not support A2DP. Perform paring operations with a device which
supports A2DP.
—
The unit and device are too far apart. Position the Bluetooth device so that it is less than
10 m (33 ft) from this unit and pair the device with
this unit.
—
There is a device (microwave oven, wireless LAN,
etc.) outputs signals in the 2.4 GHz frequency band
nearby.
Move this unit away from the device that is
emitting radio frequency signals. —
Another Bluetooth device is connected. Disconnect current Bluetooth connection, and
perform pairing with the new device.
25
Bluetooth is not selected as the input source. Select Bluetooth as the input source. 8
A Bluetooth adaptor, etc. that you want to pair with
the unit has a password other than “0000”.
Use a Bluetooth adaptor, etc. whose password is
“0000”.
24
Cannot make a Bluetooth
connection.
Wireless switch is set to “OFF”. Set it to “AUTO”. 7
Another Bluetooth device is connected. The unit cannot make multiple Bluetooth
connections. Disconnect current Bluetooth
connection, and make connection for the desired
device.
25
More than 20 devices are paired and the oldest
pairing information is deleted.
Perform pairing again. This unit can be paired with
a maximum total of 20 Bluetooth devices for
reception and transmission. When the 21st device
is registered, the least frequently used pairing
information is deleted.
24
No sound is produced or the
sound is intermittent during
playback.
The Bluetooth connection of the unit with the
device is disconnected.
Perform Bluetooth connection operations again.
24
The unit and device are too far apart. Move the Bluetooth device so that it is less than
10 m (33 ft) from this unit.
—
There is a device (microwave oven, wireless LAN,
etc.) outputs signals in the 2.4 GHz frequency band
nearby.
Move this unit away from the device that is
emitting radio frequency signals. —
The device’s Bluetooth function is off. Enable the Bluetooth function of the device. —
The device’s volume is set to minimum. Turn up the volume level on the device. —
Problem Cause Remedy
See
page
The remote control does not
work and/or function
properly.
The wrong distance or angle. The remote control functions within a maximum
range of 6 m (20 ft) and no more than 30 degrees
off-axis from the front panel.
8
Direct sunlight or lighting (from an inverter type of
fluorescent lamp, etc.) is striking the remote
control sensor of this unit.
Reposition this unit.
—
The batteries are weak. Replace all batteries. 8

En 35
APPENDIX
English
Network
Problem Cause Remedy
See
page
The network feature does
not function.
The network parameters (IP address) have not
been obtained properly.
Enable the DHCP server function on your router
and set “DHCP” to “On” on the unit. If you want to
configure the network parameters manually,
check that you are using an IP address which is not
used by other network devices in your network.
29
Unable to connect to
wireless router (access
point).
The wireless router’s MAC address filter is enabled. A connection cannot be established if the wireless
router’s MAC address filter is enabled. Change the
wireless router (access point) settings and try
connecting again.
—
Playback stops
unexpectedly and files
cannot be played
continuously.
The folder contains some files that cannot be
played via the unit.
Delete or move files (including video or hidden
files) that cannot be played via the unit from the
folder.
—
The unit does not detect the
PC.
The media sharing setting is not correct. Configure the sharing setting and select the unit
as a device to which music contents are shared.
—
Some security software installed on your PC is
blocking the access of the unit to your PC.
Check the settings of security software installed on
your PC.
—
The unit and PC are not in the same network. Check the network connections and your router
settings, and then connect the unit and the PC to
the same network.
—
The files in the PC cannot be
viewed or played back.
The files are not supported by the unit or the
media server.
Use the file format supported by both the unit and
the media server.
36
The Internet radio cannot be
played.
The selected Internet radio station is currently not
available.
There may be a network problem at the radio
station, or the service may have been stopped. Try
the station later or select another station.
—
The selected Internet radio station is currently
broadcasting silence.
Some Internet radio stations broadcast silence at
certain of times of the day. Try the station later or
select another station.
—
Access to the network is restricted by the firewall
settings of your network devices (such as the
router).
Check the firewall settings of your network
devices. The Internet radio can be played only
when it passes through the port designated by
each radio station. The port number varies
depending on the radio station.
—
The dedicated apps for
mobile device does not
detect the unit.
The unit and mobile device are not in the same
network.
Check the network connections and your router
settings, and then connect the unit and mobile
device to the same network.
—
Firmware update via the
network fails.
It may not be possible depending on the condition
of the network.
Check that this unit is connected to the network,
and try again a few minutes after.
28
The iPod does not recognize
the unit when using AirPlay.
The unit is connected to a multiple SSID router. Access to the unit might be restricted by the
network separation function on the router.
Connect the iPod to the SSID which can access the
unit.
—
The unit cannot connect to
the Internet via a wireless
router (access point).
The wireless router (access point) is turned off. Turn on the wireless router (access point). —
The unit and the wireless router (access point) are
too far apart.
Place the unit and the wireless router (access
point) closer to each other.
—
There is an obstacle between the unit and the
wireless router (access point).
Move the unit and the wireless router (access
point) in a location where there are no obstacles
between them.
—
Wireless network is not
found.
There is a device (microwave oven, wireless LAN,
etc.) outputs signals in the 2.4 GHz frequency band
nearby.
Move this unit away from the device that is
emitting radio frequency signals. —
Access to the network is restricted by the firewall
settings of the wireless router (access point).
Check the firewall setting of the wireless router
(access point).
—

36 En
APPENDIX
Supported devices
■ DLNA
• PC installed with “Windows Media Player 11” or “Windows
Media Player 12”
• DLNA (ver. 1.5) compatible NAS
■ AirPlay
AirPlay works with iPhone, iPad, and iPod touch with iOS
4.3.3 or later, Mac with OS X Mountain Lion or later, and Mac
and PC with iTunes 10.2.2 or later.
(as of August 2015)
■ Bluetooth
• The unit supports A2DP.
■ USB DAC
The unit supports following operating systems.
• Windows 7 (32/64bit)
• Windows 8 (32/64bit)
• Mac OS X 10.6.4 or later
• Operations may be disabled even with the above-mentioned operating
systems, depending on the configuration or environment of the PC.
File formats
■ DLNA
■ USB DAC
■ OPTICAL
Supported devices and file formats
Format Sampling frequency (kHz) Quantization
bitrate (bit)
WAV
Up to 192kHz 16/24AIFF
FLAC
ALAC Up to 96kHz 16/24
MP3
Up to 48kHz 16WMA
AAC
DSD 2.8MHz/5.6MHz
Format Sampling frequency (kHz) Quantization
bitrate (bit)
PCM 44.1kHz/48kHz/88.2kHz/96kHz/
176.4kHz/192kHz/352.8kHz/
384kHz
16/24/32
DSD 2.8MHz/5.6MHz
Format Sampling frequency (kHz) Quantization
bitrate (bit)
S/PDIF 32kHz/44.1kHz/48kHz/64kHz/
88.2kHz/96kHz/176.4kHz/192kHz
16/24

En 37
APPENDIX
English
Input
•Network
100BASE-TX/10BASE-T x 1
• Digital inputs
USB (USB 2.0 Type B) x 1
OPTICAL x 1
• Analog input
Stereo mini (AUX IN) x 1
Network
• Wi-Fi function
- Wireless network standard: IEEE 802.11 b/g/n
- Radio frequency band: 2.4GHz
- Available security method: WEP, WPA2-PSK (AES), Mixed Mode
- Capable of WPS by PIN method and push-button-method
- Capable of sharing with iOS devices by wireless connection
- Capable of direct connection with mobile device
Bluetooth
• Bluetooth version......................................................... Ver2.1+EDR
• Supported profile................................................................... A2DP
• Supported codec..............................................................SBC, AAC
•Wireless output................. .................................... Bluetooth Class 2
• Maximum communication distance
....................................................10m (33 ft) without interference
Speaker
• Frequency range (-10 dB).....................................54 Hz to 40 kHz
•Conponents
LF...........................................................................................5" cone
HF........................................................................................1" dome
• Crossover................................................................................ 2 kHz
Amplifier
• Minimum RMS output power
(LF 1 kHz 0.01% THD, 4Ω)....................................................... 24 W
(HF 20 kHz 0.02% THD, 6Ω).................................................... 20 W
[Asia model]
(LF 1 kHz 0.01% THD, 4Ω)....................................................... 20 W
(HF 20 kHz 0.02% THD, 6Ω).................................................... 16 W
• Dynamic power per channel
(Total) ....................................................................................... 75 W
(LF 1 kHz 10% THD, 4Ω).......................................................... 45 W
(HF 20 kHz 10% THD, 6Ω)....................................................... 30 W
[Asia model]
(Total) ....................................................................................... 65 W
(LF 1 kHz 10% THD, 4Ω).......................................................... 40 W
(HF 20 kHz 10% THD, 6Ω)....................................................... 25 W
• Input sensitivity / input impedance
AUX IN.......................................................615 mV (-2 dBu) /25 kΩ
• Maximum input signal
AUX IN.......................................................................................2.4 V
• Signal to noise ratio (IHF-A Network)
(LF 1 kHz 0 dBFS FS44.1 kHz).............................100 dB or higher
(HF 20 kHz 0 dBFS FS44.1kHz)...........................100 dB or higher
•Dynamic range
(LF 1 kHz 0 dBFS FS44.1 kHz).............................100 dB or higher
(HF 20 kHz 0 dBFS FS44.1kHz)...........................100 dB or higher
• Residual noise (IHF-A Network) ........................................... 40 μV
• Tone control characteristics*
BASS (boost/cut) .................................................... ±10 dB, 100 Hz
TREBLE (boost/cut) ................................................ ±10 dB, 20 kHz
General
• Power supply
[U.S.A. and Canada models]................................AC 120 V, 60 Hz
[China model]........................................................ AC 220 V, 50 Hz
[Korea model] .......................................................AC 220 V, 60 Hz
[Australia model] .................................................. AC 240 V, 50 Hz
[U.K. and Europe models].................................... AC 230 V, 50 Hz
[Asia model]..............................................AC 220-240 V, 50/60 Hz
[Taiwan model] .....................................................AC 110 V, 60 Hz
• Power consumption ...................................................45 W + 45 W
• Standby power consumption
Eco Standby............................................................................ 0.2 W
Network Standby (Wired) ..................................................... 1.8 W
Network Standby (Wi-Fi/Wireless Direct)................. 2.0 W/2.0 W
•Dimensions (W x H x D)
Left.............. 170 x 285 x 238.6 mm (6-11/16" x 11-1/4" x 9-3/8")
Right .............. 170 x 285 x 232 mm (6-11/16" x 11-1/4" x 9-1/8")
•Weight
Left..........................................................................6.2 kg (13.8 lbs)
Right .......................................................................5.7 kg (12.6 lbs)
*Tone Control can be operated from MusicCast CONTROLLER app only.
Specifications
Specifications are subject to change without notice.

38 En
APPENDIX
AirPlay, iPhone, iPod, iPod nano, iPod touch and iTunes are
trademarks of Apple Inc., registered in the U.S. and other countries.
DLNA™ and DLNA CERTIFIED™ are trademarks or registered
trademarks of Digital Living Network Alliance. All rights reserved.
Unauthorized use is strictly prohibited.
Windows™
Windows is a registered trademark of Microsoft Corporation in the
United States and other countries.
Internet Explorer, Windows Media Audio and Windows Media Player
are either registered trademarks or trademarks of Microsoft
Corporation in the United States and/or other countries.
Android™
Android and Google Play are trademarks of Google, Inc.
The Wi-Fi CERTIFIED Logo is a certification mark of the Wi-Fi Alliance.
The Wi-Fi Protected Setup Identifier Mark is a mark of the Wi-Fi
Alliance.
Wi-Fi, Wi-Fi Alliance, Wi-Fi CERTIFIED, Wi-Fi Protected Setup, WPA and
WPA2 are trademark or registeredrademark of Wi-Fi Alliance.
The Bluetooth
®
word mark and logos are registered trademarks
owned by Bluetooth SIG, Inc. and any use of such marks by Yamaha
Corporation is under license.
Bluetooth protocol stack (Blue SDK)
Copyright 1999-2014 OpenSynergy GmbH
All rights reserved. All unpublished rights reserved.
Explanations regarding GPL
This product utilizes GPL/LGPL open-source software in some
sections. You have the right to obtain, duplicate, modify, and
redistribute this open-source code only. For information on GPL/LGPL
open source software, how to obtain it, and the GPL/LGPL license,
refer to the Yamaha Corporation website
(http://download.yamaha.com/sourcecodes/musiccast/).
MusicCast is a trademark or registered trademark of Yamaha
Corporation.
Trademarks

Es i
Español
1 Para asegurar el mejor rendimiento de este aparato, lea atentamente este
manual. Y luego guárdelo en un lugar seguro para poder consultarlo en
el futuro en caso de ser necesario.
2 Instale este sistema de sonido en un lugar bien ventilado, fresco, seco y
limpio, alejado de la luz solar directa, fuentes de calor, vibración, polvo,
humedad y/o frío. Para una adecuada ventilación, permita que el equipo
tenga el siguiente espacio libre mínimo:
Arriba: 30 cm, Atrás: 30 cm
3 Coloque este aparato lejos de otros aparatos eléctricos, motores o
transformadores, para evitar así los ruidos de zumbido.
4 No exponga este aparato a cambios bruscos de temperaturas, del frío al
calor, ni lo coloque en lugares muy húmedos (una habitación con
deshumidificador, por ejemplo), para impedir así que se forme
condensación en su interior, lo que podría causar una descarga eléctrica,
un incendio, daños en el aparato y/o lesiones a las personas.
5 Evite instalar este aparato en un lugar donde puedan caerle encima
objetos extraños o donde quede expuesto al goteo o a la salpicadura de
líquidos. Encima de este aparato no ponga:
– Otros componentes, porque pueden causar daños y/o decoloración en
la superficie de este aparato.
– Objetos con fuego (velas, por ejemplo), porque pueden causar un
incendio, daños en el aparato y/o lesiones a las personas.
– Recipientes con líquidos, porque pueden caerse y derramar el líquido,
causando descargas eléctricas al usuario y/o dañando el aparato.
6 No tape este aparato con un periódico, mantel, cortina, etc. para no
impedir el escape del calor. Si aumenta la temperatura en el interior del
aparato, esto puede causar un incendio, daños en el aparato y/o lesiones
a las personas.
7 No enchufe este aparato a una toma de corriente hasta después de haber
terminado todas las conexiones.
8 No ponga el aparato al revés. Podría recalentarse y posiblemente causar
daños.
9 No utilice una fuerza excesiva con los conmutadores, los controles y/o
los cables.
10 Cuando desconecte el cable de la alimentación de la toma de corriente,
sujete la clavija y tire de ella; no tire del propio cable.
11 No limpie este aparato con disolventes químicos porque podría estropear
el acabado. Utilice un paño limpio y seco para limpiar el aparato.
12 Utilice solamente la tensión especificada en este aparato. Utilizar el
aparato con una tensión superior a la especificada resulta peligroso y
puede producir un incendio, daños en el aparato y/o lesiones a las
personas. Yamaha no se hará responsable de ningún daño debido al uso
de este aparato con una tensión diferente de la especificada.
13 Para evitar daños debidos a rayos, durante una tormenta eléctrica,
mantenga el cable de alimentación desconectado de la toma de corriente
de la pared o de la unidad.
14 No intente modificar ni arreglar este aparato. Póngase en contacto con
el personal de servicio Yamaha cualificado cuando necesite realizar
alguna reparación. La caja no deberá abrirse nunca por ninguna razón.
15 Cuando no piense utilizar este aparato durante mucho tiempo
(es decir, cuando se ausente de casa por vacaciones, etc.) desconecte el
cable de alimentación de la toma de corriente.
16 Asegúrese de leer la sección “Resolución de problemas” del manual del
usuario sobre los errores comunes de operación antes de dar por
concluido que su aparato está averiado.
17 Antes de trasladar este aparato, pulse A hacia abajo para desconectar la
alimentación del mismo, y luego desconecte el cable de alimentación de
CA de la toma de corriente de CA.
18 La condensación se formará cuando cambie de repente la temperatura
ambiental. Desconecte en este caso el cable de alimentación de la toma
de corriente y no utilice el aparato.
19 El aparato se calentará cuando la utilice durante mucho tiempo.
Desactive el sistema y, a continuación, no utilice la unidad para dejar
que se enfríe.
20 Instale este aparato cerca de la toma de CA y donde se pueda alcanzar
fácilmente la clavija de alimentación.
21 Las baterías no deberán exponerse a
un cal
or excesivo como, por
ejemplo, el que producen los rayos del sol, el fuego y similares. Cuando
deseche las baterías, por favor cumpla las regulaciones de su región.
22 La presión acústica excesiva de los auriculares puede causar pérdida
auditiva.
■ Observaciones sobre los mandos a distancia y
las pilas
• No derrame agua u otros líquidos en el mando a distancia.
• No deje que el mando a distancia se caiga.
• No deje ni guarde el mando a distancia en uno de las siguientes lugares:
– lugares con alta humedad, por ejemplo, cerca de un baño
– lugares con temperaturas elevadas, por ejemplo, cerca de una
calefacción o estufa
– lugares con temperaturas muy bajas
– lugares polvorientos
• Inserte la batería respetando las marcas de polaridad (+ y –).
• Cambie todas las pilas si observa alguna de las siguientes condiciones:
– el radio de acción del mando a distancia se reduce
– el indicador de transmisión no parpadea o está atenuado.
• Para impedir explosiones o pérdidas de ácido, retire inmediatamente las
pilas del mando a distancia cuando se hayan gastado.
• Si encuentra pilas con fugas, deséchelas inmediatamente, procurando no
tocar el material que sale de las pilas. Si el material que sale de las pilas
entra en contacto con su piel o entra en sus ojos o boca, lávese
inmediatamente y acuda a un médico. Limpie a fondo el compartimiento
de las pilas antes de instalar otras nuevas.
• No utilice conjuntamente pilas viejas y pilas nuevas. Esto puede acortar la
vida de las pilas nuevas o hacer que las pilas viejas tengan fugas.
• No utilice conjuntamente pilas de diferentes tipos (por ejemplo, alcalinas y de
manganeso). La especificación de las pilas puede ser diferente aunque parezca
la misma. Se podría provocar explosiones si se emplean pilas erróneas.
• Limpie el compartimiento de las pilas antes de introducir las nuevas.
• Siga la reglamentación local para deshacerse de las pilas.
•
Mantenga las pilas fuera del alcance de los niños. En caso tragar
accidentalmente una pila, póngase inmediatamente en contacto con un médico.
• Si no tiene previsto utilizar el mando a distancia durante periodos de
tiempo prolongados, saque las pilas del mando a distancia.
• No cargue ni desmonte las pilas que se suministran.
PRECAUCIÓN: LEA LAS INDICACIONES SIGUIENTES ANTES DE UTILIZAR
ESTE APARATO.
ADVERTENCIA
PARA REDUCIR EL RIESGO DE INCENDIO O DESCARGA
ELÉCTRICA, NO EXPONGA ESTE APARATO A LA LLUVIA NI
A LA HUMEDAD.
Este aparato no se desconecta de la fuente de alimentación de CA si
está conectada a una toma de corriente, aunque la propia aparato esté
apagada con A. A este estado se le llama modo de espera. En este
estado, este aparato ha sido diseñada para que consuma un cantidad
de corriente muy pequeña.
Las ondas de radio pueden afectar a los dispositivos médicos
electrónicos. No utilice esta unidad cerca de dispositivos médicos o
en el interior de instalaciones médicas.
No utilice la unidad a menos de 22 cm de personas que tengan
implantado un marcapasos o un desfribiliador.
Si se instala la unidad demasiado cerca de un televisor con tubo de
rayos catódicos, la calidad del color podría verse perjudicada. En este
caso, aleje el sistema del televisor.

ii Es
■ Bluetooth
Bluetooth es una tecnología para comunicación inalámbrica entre
dispositivos dentro de un área aproximada de 10 metros a través de la
banda de frecuencia de 2,4 GHz, una banda que se puede usar sin necesidad
de licencia.
■ Gestión de las comunicaciones Bluetooth
• La banda de 2,4 GHz utilizada por los dispositivos compatibles con
Bluetooth es una banda de radio que muchos otros equipos también
utilizan. Aunque los dispositivos compatibles con Bluetooth utilizan una
tecnología que reduce al mínimo la influencia de otros componentes que
puedan estar usando la misma banda de radio, esta influencia
inevitablemente puede reducir la velocidad o la distancia de las
comunicaciones y, en algunos casos, interrumpir la comunicación.
• La velocidad de transferencia de la señal y la distancia a la que es posible
la comunicación varía en función de la distancia entre los dispositivos
comunicantes, la presencia de obstáculos, las condiciones de las ondas de
radio y el tipo de equipo.
• Yamaha no garantiza el funcionamiento de todas las conexiones
inalámbricas entre esta unidad y otros dispositivos compatibles con la
función Bluetooth.

Es 3
CARACTERÍSTICAS
PREPARATIVOS
REPRODUCCIÓN
CONFIGURACIONES
APÉNDICE
Español
Accesorios suministrados .............................. 4
CARACTERÍSTICAS 5
Qué puede hacer con esta unidad ................ 5
Dominio de aplicaciones útiles (MusicCast
CONTROLLER)........................................................................5
Fuentes que pueden reproducirse en esta unidad ..............5
Nombres de las piezas.................................... 6
Panel frontal ..............................................................................6
Panel trasero .............................................................................7
Mando a distancia.....................................................................8
PREPARATIVOS 9
PREPARACIÓN.................................................. 9
1 Conexión de los altavoces izquierdo y derecho...............9
2 Conexión de los dispositivos de reproducción ................9
3 Conexión de los cables de red ........................................ 10
4 Preparación de una antena inalámbrica........................ 10
5 Conexión del cable de alimentación............................... 10
6 Colocación de los altavoces............................................. 11
Conexión de la toma principal ............................................. 11
Conexión a red............................................... 12
Conexión con MusicCast CONTROLLER .............................. 12
Conexión sin MusicCast CONTROLLER................................ 14
REPRODUCCIÓN 18
Reproducción de la música almacenada
en servidores multimedia (PC/NAS)............ 18
Ajuste del uso compartido de medios de archivos de
música ................................................................................. 18
Reproducción de contenidos musicales del PC ................. 19
Reproducción de música en dispositivos
móviles (Music Play) ..................................... 20
Reproducción de contenidos musicales del dispositivo
móvil .................................................................................... 20
Escucha de radio por Internet..................... 21
Selección de una emisora de radio de Internet................. 21
Registro de emisoras de radio de Internet favoritas
(bookmarks)........................................................................ 21
Registro de canciones/emisoras en
reproducción (función de presintonía) ...... 22
Registro de una canción/emisora con el mando a
distancia .............................................................................. 22
Recuperación de una canción/emisora registrada con el
mando a distancia.............................................................. 22
Reproducción de música de iPod/iTunes a
través de la red (AirPlay).............................. 23
Reproducción de contenidos musicales de iPod/iTunes .. 23
Reproducción de música con Bluetooth ..... 24
Registro de un dispositivo Bluetooth con la unidad
(emparejamiento) .............................................................. 24
Reproducción de audio de un dispositivo Bluetooth en la
unidad.................................................................................. 25
Desconexión de una conexión Bluetooth ..............................25
Reproducción de música en un PC
(USB DAC) ....................................................... 26
Instalación del controlador dedicado (solo Windows)...... 26
Reproducción de música en un PC ...................................... 26
Escucha de música desde un dispositivo
de reproducción ............................................ 27
Reproducción desde dispositivos con una salida de
audio digital óptica ............................................................ 27
Reproducción desde dispositivos con una salida de
audio analógica .................................................................. 27
CONFIGURACIONES 28
Actualización del firmware de la unidad a
través de la red ............................................. 28
Actualización con MusicCast CONTROLLER........................ 28
Actualización desde esta unidad.......................................... 28
Especificación de ajustes de unidad con un
navegador de Internet................................. 29
Configuración con Windows
(utilizando un navegador de Internet especificado)...... 29
Configuración con Mac OS ................................................... 29
Visualización/Cambio de ajustes.......................................... 30
Restauración de los ajustes
predeterminados .......................................... 32
Restauración de los ajustes predeterminados
(restablecimiento de fábrica)............................................ 32
Restauración de los ajustes de red predeterminados ...... 32
APÉNDICE 33
Resolución de problemas............................. 33
General.................................................................................... 33
Bluetooth.................................................................................. 34
Mando a distancia.................................................................. 34
Red........................................................................................... 35
Dispositivos compatibles y formatos de
archivos.......................................................... 36
Dispositivos compatibles ...................................................... 36
Formatos de archivos............................................................ 36
Especificaciones ............................................ 37
Marcas comerciales ...................................... 38
CONTENIDO

4 Es
Compruebe que se suministran los siguientes accesorios con el producto.
* Quite la película aislante del mando a distancia antes de usarlo.
Accesorios suministrados
☐ Mando a distancia ☐ Cable de alimentación x 2 ☐ Guía de instalación de MusicCast
☐ Cable de balance
(3 m) x 1
☐
Cable de red STP (cable recto CAT-5)
(para conectar los altavoces)
(3 m) x 1
Película aislante *
Acerca de este manual
• En este manual, los dispositivos móviles iOS y Android se denominan de forma colectiva “dispositivos móviles”. El tipo específico de dispositivo móvil se
indica en las explicaciones según sea necesario.
• indica precauciones de uso de la unidad y sus limitaciones.
• indica explicaciones complementarias para mejorar el uso.
• Es posible que se pongan a disposición sin previo aviso actualizaciones que ofrezcan funciones mejoradas de la aplicación “MusicCast CONTROLLER”
dedicada para dispositivos móviles.

Es 5
CARACTERÍSTICAS
Español
CARACTERÍSTICAS
Dominio de aplicaciones útiles (MusicCast CONTROLLER)
Puede utilizar y programar la unidad, o bien reproducir servicios de transmisión a través de esta unidad, instalando la aplicación
MusicCast CONTROLLER dedicada y gratuita en un dispositivo móvil. Para ver información detallada, busque “MusicCast
CONTROLLER” en el App Store o Google Play.
• “MusicCast CONTROLLER” es compatible con los siguientes dispositivos móviles.
– iOS versión 7.1 o posterior
– Android versión 4.1 o posterior
Funciones de MusicCast CONTROLLER
Se pueden reproducir diversos servicios de transmisión y contenido.
• Reproducción de canciones guardadas en ordenadores
(servidores)
• Reproducción de música guardada en dispositivos móviles
(Music Play)
• Selección de una emisora de radio de Internet
• Reproducción de música en servicio de transmisión
• Distribución y recepción de audio entre la unidad y otros
dispositivos compatibles con MusicCast de Yamaha
• Selección de la fuente de entrada y ajuste del volumen o
silencio
• Ajuste del tono y el balance L/R, y ajuste de un
temporizador para dormir
Consulte Guía de instalación de MusicCast para ver información detallada.
Fuentes que pueden reproducirse en esta unidad
* Necesitará un enrutador inalámbrico de venta en el mercado (punto de acceso) si utiliza un dispositivo móvil.
a
Reproducción de la radio por Internet (p.21)
b
Reproducción del servicio de transmisión
(consulte el suplemento de cada servicio.)
c
Reproducción de archivos de música guardados
en su PC (p.18)
d
Reproducción de archivos de música guardados
en su NAS (p.18)
e
Reproducción de música en dispositivos móviles
(Music Play)
(p.20)
f
Reproducción de archivos de música guardados
en su iPod/iTunes con AirPlay (p.23)
g
Reproducción de contenido de audio desde
dispositivos
Bluetooth
(p.24)
h
Reproducción de audio en el PC (p.26)
i
Reproducción de audio digital (p.27)
j
Reproducción de audio analógico (p.27)
• Para reproducir desde todas las fuentes de audio, se necesita un dispositivo móvil con la aplicación “MusicCast CONTROLLER” dedicada para dispositivos
móviles instalada.
Qué puede hacer con esta unidad
a Internet
b Servicio de transmisión
c PC
f AirPlay (iTunes)
d NAS e Music Play
f AirPlay
g Bluetooth
h PC (USB DAC) i Televisor/Reproductor
de CD, etc. (óptica)
Módem
Enrutador*
j Reproductor de
música portátil,
etc. (analógica)

6 Es
CARACTERÍSTICAS
Panel frontal
a
Indicador de estado (solo altavoz izquierdo)
Indica la fuente de entrada seleccionada y el estado de la
unidad en función de su color y de si está encendido o
parpadeando. Para ver información detallada, consulte la
“Tabla de condiciones del indicador de estado” al final de
este manual.
• Si no se ha configurado una conexión de red cuando la toma
principal está conectada, el indicador parpadea en rosa y la unidad
busca automáticamente un dispositivo iOS (iPhone o iPod touch).
Para obtener más información sobre las conexiones de red con
dispositivos iOS, consulte “Uso compartido del ajuste del dispositivo
iOS” (p.15).
b
Sensor del mando a distancia
(solo altavoz izquierdo)
Recibe señales infrarrojas del mando a distancia (p.8).
• Cuando utilice varias unidades en la misma sala, apagar la
recepción de la señal del mando a distancia con el navegador de
Internet puede evitar interferencias de otros mandos a distancia
(p.29).
Nombres de las piezas
a
b
Naranja Espera
Amarillo Red en standby
Verde Selección de la entrada de red o configuración
de una conexión de red
Rosa Selección de la entrada AirPlay o modo en
espera para la conexión de un dispositivo iOS
Azul Entrada Bluetooth
Azul cielo Entrada USB
Púrpura Entrada digital óptica
Blanco Selección de la entrada AUX o actualización del
firmware
Rojo Error

Es 7
CARACTERÍSTICAS
Español
Panel trasero
a
Antena inalámbrica
Para conectarse a un dispositivo de red y un dispositivo
Bluetooth de forma inalámbrica (p.10).
b
Toma NETWORK
Para conectarse a una red con un cable de red (p.10).
c
Toma USB
Para conectarse a un PC con un cable USB (p.26).
d
Toma OPTICAL
Para conectarse a componentes de audio equipados con
salida digital óptica (p.27).
e
Toma L-R LINK
Para enviar información de control al altavoz derecho con
el cable de red suministrado (p.9).
f
Toma AUX IN
Para conectarse a componentes de audio equipados con
una salida analógica con un cable de mini toma estéreo
(p.27).
g
Toma R CH AUDIO OUT jack / R CH AUDIO IN
Para enviar audio al altavoz derecho con el cable de
balance suministrado (p.9).
h
Toma AC IN
Para conectar el cable de alimentación suministrado (p.10).
i
Conmutador WIRELESS
Activa o desactiva las comunicaciones inalámbricas
(conexión inalámbrica y Bluetooth).
• Cuando la unidad se enciende, la conexión inalámbrica pasa al modo en
espera. Si no se va a utilizar una conexión inalámbrica, ajuste el
conmutador WIRELESS en “OFF”.
j
CONNECT
Le permite utilizar la unidad con la aplicación “MusicCast
CONTROLLER” dedicada para dispositivos móviles (p.12).
k
WIRELESS DIRECT
Establece una conexión inalámbrica directamente con un
dispositivo móvil o un PC compatible con Wi-Fi (p.17).
l
SOURCE
Selecciona la fuente de entrada. Cada pulsación de este
botón cambia la fuente de entrada. La fuente de entrada
seleccionada se indica mediante el indicador de estado
del panel frontal (p.6).
m
Conmutador
z
(alimentación)
Conecta o desconecta la toma principal.
n
Mando GAIN
Ajusta el volumen máximo que los altavoces pueden
emitir. Ajuste el volumen máximo en función del
dispositivo de reproducción.
• Al ajustar el volumen máximo, reproduzca el audio desde el dispositivo
de reproducción a su volumen máximo y, a continuación, ajuste el
mando GAIN para reproducir con el volumen deseado.
L
NETWORK
USB
OPTICAL
L-R
LINK
AUX IN
R CH
AUDIO OUT
AUTO
OFF
WIRELESS
CONNECT
SOURCE
GAIN
AC IN
MAXMIN
WIRELESS
DIRECT
R
L-R
LINK
R CH
AUDIO IN
AC IN
a
b
c
d
e
f
g
h
e
g
h
i
m
n
l
k
j
Altavoz derecho Altavoz izquierdo
AUTO Activa las comunicaciones inalámbricas.
OFF Desactiva las comunicaciones inalámbricas. Realice
una conexión por cable para conectarse a la red.

8 Es
CARACTERÍSTICAS
Mando a distancia
a
Teclas de selección de fuente de entrada
Permiten seleccionar la fuente de entrada para su
reproducción. La fuente de entrada seleccionada se indica
mediante el indicador de estado del panel frontal (p.6).
• Para seleccionar contenido de red, utilice la aplicación “MusicCast
CONTROLLER” dedicada para dispositivos móviles. Al pulsar NET, se
reproducirá el contenido de red reproducido anteriormente.
b
Teclas de ajuste de volumen
• Para ajustar el volumen máximo, ajuste el mando GAIN en el panel
trasero (p.7).
c
PRESET
Registra (presintoniza) álbumes o canciones de PC/NAS,
emisoras de radio de Internet y emisoras de transmisión
en esta unidad. Una vez registrada una canción/emisora,
basta con pulsar esta tecla para reproducirla (p.22).
d
WPS
Configura una conexión inalámbrica en la red (p.16).
• Para conectarse a la red mediante WPS, se necesita un enrutador
inalámbrico (o punto de acceso) con la función WPS.
e
z
(alimentación)
Enciende y apaga (espera) la unidad.
• Para conectar o desconectar la toma principal, utilice el conmutador z
(alimentación) del panel trasero (p.7).
f
CONNECT
Le permite utilizar la unidad con la aplicación “MusicCast
CONTROLLER” dedicada para dispositivos móviles (p.12).
■ Funcionamiento con el mando a
distancia
Utilice el mando a distancia apuntándolo directamente
hacia el sensor del mando a distancia del altavoz
izquierdo.
■ Sustitución de la pila
• Compruebe la marca “+” de la pila e introdúzcala en la
dirección correcta.
• Mientras presiona la pestaña de liberación en la dirección
Ⓐ, deslice el soporte de la pila en la dirección Ⓑ.
a
b
c
d f
e
(Bluetooth)
Entrada Bluetooth
NET Entrada de red
USB Toma USB
OPT Toma OPTICAL
AUX Toma AUX
+/– Ajustan el volumen de la reproducción.
(silencio)
Silencia la salida del altavoz.
Aproximada-
mente
6 m
Pila de litio tipo
CR2025

Es 9
PREPARATIVOS
Español
PREPARATIVOS
Utilice los cables suministrados para conectar los altavoces izquierdo y derecho.
• Si los altavoces izquierdo y derecho no están conectados, no funcionarán.
• Utilice exclusivamente los cables suministrados.
PREPARACIÓN
1
Conexión de los altavoces izquierdo y derecho
2
Conexión de los dispositivos de reproducción
L
NETWORK
USB
OPTICAL
L-R
LINK
AUX IN
R CH
AUDIO OUT
AUTO
OFF
WIRELESS
CONNECT
SOURCE
GAIN
AC IN
MAXMIN
WIRELESS
DIRECT
R
L-R
LINK
R CH
AUDIO IN
AC IN
L-R
LINK
L-R
LINK
R CH
AUDIO IN
R CH
AUDIO OUT
Altavoz derecho
Altavoz izquierdo
Realice la conexión con el cable de
red suministrado.
Realice la conexión con el cable de
balance suministrado.
L
NETWORK
USB
OPTICAL
L-R
LINK
AUX IN
R CH
AUDIO OUT
AUTO
OFF
WIRELESS
CONNECT
SOURCE
GAIN
AC IN
MAXMIN
WIRELESS
DIRECT
PC
Televisor/Reproductor de CD,
etc.
Reproductor de música portátil, etc.
Cable USB
Cable óptico
Cable de mini toma estéreo
Altavoz izquierdo

10 Es
PREPARATIVOS
Conecte la unidad al enrutador con un cable de red STP disponible en el mercado (cable recto CAT-5 o superior).
Seleccione si utilizar una conexión de red por cable o una conexión de red inalámbrica, en función de su entorno de red. Para
obtener más información, consulte “Conexión a red” (p.12).
Levante la antena inalámbrica situada en la parte trasera del
altavoz izquierdo.
• No emplee demasiada fuerza en la antena, ya que podría dañarla.
• Compruebe en qué dirección se mueve la antena y dóblela en la
dirección adecuada.
• No retire la antena.
Conecte el cable de alimentación suministrado a la toma AC
IN en el panel trasero y, a continuación, inserte el enchufe de
alimentación en una toma de CA.
3
Conexión de los cables de red
L
NETWORK
USB
OPTICAL
L-R
LINK
AUX IN
R CH
AUDIO OUT
AUTO
OFF
WIRELESS
CONNECT
SOURCE
GAIN
AC IN
MAXMIN
WIRELESS
DIRECT
NETWORK
LAN
WAN
Internet
Módem
Dispositivo móvil
(como un iPhone)
Enrutador
Network Attached
Storage (NAS)
PC
Altavoz izquierdo
4
Preparación de una antena
inalámbrica
Sujete la base de la antena
mientras la eleva hasta la
posición vertical.
5
Conexión del cable de
alimentación
L
NETWORK
USB
OPTICAL
L-R
LINK
AUX IN
R CH
AUDIO OUT
AUTO
OFF
WIRELESS
CONNECT
SOURCE
GAIN
AC IN
MAXMIN
WIRELESS
DIRECT
R
L-R
LINK
R CH
AUDIO IN
AC IN
Altavoz derecho Altavoz izquierdo
A una toma de CA A una toma de CA

Es 11
PREPARATIVOS
Español
• Coloque cada altavoz en una superficie resistente y estable.
• Al conectar a un televisor, coloque los altavoces a izquierda
y derecha del televisor.
• Se logrará el efecto estéreo idóneo colocando los paneles
frontales ligeramente en ángulo interno hacia el oyente.
• Durante el uso cerca de un televisor CRT, separe los altavoces del
televisor si se producen distorsiones de color o ruido.
Conexión de la toma principal
Una vez conectados todos los cables, pulse el conmutador z
(alimentación) del panel trasero para conectar la toma
principal de la unidad.
• Si no se ha configurado una conexión de red cuando la toma principal
está conectada, el indicador parpadea en rosa y la unidad busca
automáticamente un dispositivo iOS (iPhone o iPod touch). Para obtener
más información sobre las conexiones de red con dispositivos iOS,
consulte “Uso compartido del ajuste del dispositivo iOS” (p.15).
Una vez conectada la toma principal para la unidad, esta se
puede encender o cambiar al modo de espera con el botón
z (alimentación) del mando a distancia.
Para encender o apagar la unidad con MusicCast
CONTROLLER, la función de red debe estar activada, aunque
la unidad esté en modo de espera (red en espera).
Para obtener más información sobre la red en espera,
consulte la siguiente sección.
■ Red en espera
La función de red se puede activar, aunque la unidad esté en
modo de espera (red en espera).
Si la red en espera está apagada, la unidad puede pasar al
modo de espera utilizando la alimentación en espera mínima
(eco en espera).
Utilice el navegador de Internet en el PC para cambiar el
ajuste de red en espera (p.29).
• De forma predeterminada, la red en espera está ajustada en “Off”. Si la
ajusta en “Auto” cuando la unidad se ha desconectado de la red durante
8 horas mientras se encuentra en modo de red en espera, cambia al
modo de eco en espera.
■ Standby Automático
Si no se realiza ninguna operación ni se reproduce nada, la
unidad pasará automáticamente al modo en espera (Standby
Automático).
Se pueden usar MusicCast CONTROLLER para cambiar el
ajuste de Standby Automático.
Tiempo en espera sin funcionamiento
Tiempo en espera sin reproducción
Ajuste predeterminado: Off
6
Colocación de los altavoces
Altavoz derechoAltavoz izquierdo
R CH
AUDIO OUT
AUTO
OFF
WIRELESS
CONNECT
SOURCE
GAIN
MAXMIN
WIRELESS
DIRECT
Altavoz izquierdo
(panel trasero)
Altavoz izquierdo
(panel frontal)
Conmutador z
(alimentación)
Rosa
Todas las entradas: 8 horas
Red, Bluetooth y USB: 20 minutos

12 Es
PREPARATIVOS
• Cierto software de seguridad instalado en el equipo o la configuración del firewall de los dispositivos de red (como un enrutador), podrían impedir el
acceso de la unidad a los dispositivos de red o a Internet. En tales casos, configure adecuadamente el software de seguridad o el firewall.
• No se puede establecer una conexión si el filtro de direcciones MAC está activado en el enrutador. Compruebe los ajustes del enrutador.
• Todos los servidores deben estar conectados a la misma subred que la unidad.
• Para usar el servicio por Internet, es muy recomendable disponer de una conexión de banda ancha.
Conexión con MusicCast CONTROLLER
Para utilizar un dispositivo móvil con la aplicación “MusicCast
CONTROLLER” dedicada instalada, solo tiene que seguir las
instrucciones de la pantalla de MusicCast CONTROLLER para
especificar los ajustes de red.
• Conecte el dispositivo móvil en el que se ha instalado la aplicación
“MusicCast CONTROLLER” al enrutador inalámbrico (punto de acceso) de
antemano.
• Si esta unidad no se va a conectar a Internet, no se pueden utilizar los
servicios de transmisión como la radio por Internet. Para utilizar
servicios de transmisión, conecte la unidad a Internet con un enrutador
por cable o enrutador inalámbrico (punto de acceso).
1
Realice la configuración siguiendo el método de
conexión de red (por cable o inalámbrica).
Al conectarse a la red con un cable:
Asegúrese de que la unidad está conectada al enrutador
con un cable.
Al conectarse a la red de forma inalámbrica:
Si ya se ha establecido una conexión por cable,
desconecte el cable de red de la unidad.
2
Ajuste el conmutador WIRELESS del panel
trasero en “AUTO”.
3
Inicie la aplicación MusicCast CONTROLLER en
el dispositivo móvil y toque “Configuración”.
Si ya ha conectado otro dispositivo compatible con
MusicCast a la red, toque “Ajustes” y después “Añadir
dispositivo nuevo”.
4
Siga el procedimiento descrito en la pantalla de
MusicCast CONTROLLER para encender la
unidad.
Mientras se configura la conexión, el indicador de estado
del panel frontal parpadea en verde.
5
Mantenga pulsado CONNECT en el mando a
distancia (o CONNECT en el panel trasero)
durante al menos 3 segundos.
Conexión a red
Al reproducir una fuente de audio de alta resolución a través de la red,
se recomienda realizar la conexión con un enrutador por cable para
que la reproducción sea estable.
R CH
AUDIO OUT
AUTO
OFF
WIRELESS
CONNECT
SOURCE
GAIN
AC IN
MAXMIN
WIRELESS
DIRECT
Altavoz izquierdo (panel trasero)
Conmutador
WIRELESS
Verde
(parpadeando)
Altavoz izquierdo (panel frontal)
CONNECT
Mando a distancia
R CH
AUDIO OUT
AUTO
OFF
WIRELESS
CONNECT
SOURCE
GAIN
AC IN
MAXMIN
WIRELESS
DIRECT
Altavoz izquierdo (panel trasero)
CONNECT

Es 13
PREPARATIVOS
Español
6
Siga el procedimiento descrito en la pantalla de
MusicCast CONTROLLER para finalizar la
conexión de red.
Una vez establecida la conexión de red, el indicador de
estado del panel frontal cambia a encendido.
• Si la fuente de entrada se cambia o si esta unidad pasa al modo en
espera, la operación de configuración se cancela.
Verde (encendido)
Altavoz izquierdo (panel frontal)

14 Es
PREPARATIVOS
Conexión sin MusicCast CONTROLLER
Para reproducir sin utilizar MusicCast CONTROLLER, conéctese a la red con el método que se corresponda con su entorno.
■ Conexión con el enrutador por cable
■ Conexión con un enrutador inalámbrico (punto de acceso)
Conéctese a la red con el método especificado a continuación que se corresponda con su entorno.
■ Conexión sin un enrutador por cable o enrutador inalámbrico (punto de acceso)
• Cuando la unidad se conecta a la red con Wireless Direct, no se puede conectar a ningún otro enrutador inalámbrico (punto de acceso). Para reproducir
contenido desde Internet, conecte esta unidad a una red con un enrutador por cable o enrutador inalámbrico (punto de acceso).
Al reproducir una fuente de audio de alta resolución a través de la red, se recomienda realizar la conexión con un enrutador por cable para que la
reproducción sea estable.
Conexión con la función del servidor DHCP del enrutador
Puede conectarse a la red
simplemente realizando una
conexión por cable (p.15)
Conexión con el ajuste de Wi-Fi del dispositivo iOS
(iPhone/iPod touch)
Comparta el ajuste de Wi-Fi
del dispositivo iOS (p.15)
Conexión con la configuración del botón pulsador WPS
en el enrutador inalámbrico (o punto de acceso)
Utilice la configuración del
botón pulsador WPS (p.16)
Conexión con un enrutador inalámbrico (punto de
acceso) sin configuración del botón pulsador WPS
Conéctese de forma
inalámbrica con Wireless
Direct (p.17) y establezca el
ajuste de conexión utilizando
un navegador de Internet en
el PC (p.29)
Conexión inalámbrica con un dispositivo móvil
(Wireless Direct)
Conéctese de forma
inalámbrica con Wireless
Direct (p.17)

Es 15
PREPARATIVOS
Español
■ Conexión a la red con un cable
De forma predeterminada, esta unidad realizará
automáticamente una conexión de red cuando esté
conectada a un enrutador por cable y encendida.
• Al conectarse a la red con un cable, se establecerá una conexión de red
sin importar si el conmutador WIRELESS del panel trasero está ajustado
en “AUTO” o “OFF”.
• Si ya se ha establecido una conexión inalámbrica con esta unidad, el
conmutador WIRELESS de la unidad debe establecerse primero en “OFF”.
Después de apagar la unidad y conectar el cable de red, ajuste el
conmutador WIRELESS en “OFF” y después vuelva a encender la unidad.
Para utilizar Bluetooth, encienda la unidad antes de ajustar el
conmutador WIRELESS en “AUTO”.
1
Asegúrese de que esta unidad está conectada al
enrutador con un cable.
2
Pulse z (alimentación) en el mando a distancia
para encender la unidad.
Los ajustes de red se especifican automáticamente.
Mientras se especifican los ajustes, el indicador de
estado del panel frontal parpadea en verde.
Una vez establecida la conexión, el indicador de estado
del panel frontal cambia a encendido.
■ Uso compartido del ajuste del
dispositivo iOS
Puede configurar con facilidad una conexión inalámbrica
aplicando los ajustes de conexión en dispositivos OS (iPhone/
iPod touch).
Antes de continuar, confirme que su dispositivo iOS está
conectado a un enrutador inalámbrico (punto de acceso).
• Para compartir los ajustes de Wi-Fi, el dispositivo iOS debe tener
instalado iOS 7 o posterior.
• Al seguir el procedimiento siguiente se restablecerán la información de
cuenta especificada y los ajustes predefinidos registrados.
• Si ya se han especificado ajustes de red, restablezca la conexión de red y
siga el procedimiento siguiente.
• Si ya se ha establecido una conexión por cable con esta unidad, el
conmutador WIRELESS de la unidad debe establecerse primero en “OFF”
con la unidad encendida. Tras desconectar el cable de red, ajuste el
conmutador WIRELESS en “AUTO”.
1
Ajuste el conmutador WIRELESS del panel
trasero en “AUTO”.
2
Pulse z (alimentación) en el mando a distancia
para encender la unidad.
El indicador de estado del panel frontal parpadea en
rosa.
Cuando esta unidad detecta un dispositivo iOS, aparece
un mensaje de confirmación de conexión.
Verde
(parpadeando)
Altavoz izquierdo (panel frontal)
Verde (encendido)
Altavoz izquierdo (panel frontal)
R CH
AUDIO OUT
AUTO
OFF
WIRELESS
CONNECT
SOURCE
GAIN
AC IN
MAXMIN
WIRELESS
DIRECT
Altavoz izquierdo (panel trasero)
Conmutador
WIRELESS
Rosa
(parpadeando)
Altavoz izquierdo (panel frontal)

16 Es
PREPARATIVOS
3
Toque “Allow” en la pantalla del dispositivo iOS.
Una vez establecida la conexión, el indicador de estado
del panel frontal se enciende en verde.
■ Uso de la configuración con el botón
WPS
Se puede establecer una conexión inalámbrica fácilmente
con solo pulsar el botón WPS.
1
Ajuste el conmutador WIRELESS del panel
trasero en “AUTO”.
• Si ya se ha establecido una conexión por cable con esta unidad, el
conmutador WIRELESS de la unidad debe establecerse primero en “OFF”
con la unidad encendida. Tras desconectar el cable de red, ajuste el
conmutador WIRELESS en “AUTO”.
2
Pulse z (alimentación) en el mando a distancia
para encender la unidad.
El indicador de estado del panel frontal parpadea en
verde.
• Si no se ha configurado una conexión de red cuando la toma principal
está conectada, el indicador se enciende en rosa y la unidad busca
automáticamente un dispositivo iOS (iPhone o iPod touch). Para obtener
más información sobre las conexiones de red con dispositivos iOS,
consulte “Uso compartido del ajuste del dispositivo iOS” (p.15).
3
Mantenga pulsado WPS en el mando a distancia
durante 3 segundos.
El indicador de estado del panel frontal parpadea en
verde.
• Si la fuente de entrada se cambia o si esta unidad pasa al modo en
espera, la operación de configuración se cancela.
4
Pulse el botón WPS del enrutador inalámbrico
(punto de acceso).
El botón WPS del enrutador inalámbrico (punto de
acceso) se debe pulsar en los 2 minutos siguientes a la
finalización del paso 3. Una vez transcurridos 2 minutos,
la operación de configuración se cancela.
Una vez establecida la conexión, el indicador de estado
del panel frontal se enciende en verde.
Verde (encendido)
Altavoz izquierdo (panel frontal)
R CH
AUDIO OUT
AUTO
OFF
WIRELESS
CONNECT
SOURCE
GAIN
AC IN
MAXMIN
WIRELESS
DIRECT
Altavoz izquierdo (panel trasero)
Conmutador
WIRELESS
Verde
(parpadeando)
Altavoz izquierdo (panel frontal)
Acerca de WPS
WPS (configuración Wi-Fi protegida) es un estándar establecido por la
Alianza Wi-Fi que permite establecer redes inalámbricas domésticas
fácilmente.
WPS
Verde (encendido)
Altavoz izquierdo (panel frontal)

Es 17
PREPARATIVOS
Español
■ Conexión de un dispositivo móvil
directamente a la unidad
(Wireless Direct)
Mediante Wireless Direct, esta unidad puede funcionar como
un punto de acceso de red inalámbrica al que pueden
conectarse directamente los dispositivos móviles.
• Cuando la unidad se conecta a la red con Wireless Direct, no se puede
conectar a ningún otro enrutador inalámbrico (punto de acceso). Para
reproducir contenido desde Internet, conecte esta unidad a una red con
un enrutador por cable o enrutador inalámbrico (punto de acceso).
• Si ya se ha establecido una conexión por cable con esta unidad, el
conmutador WIRELESS de la unidad debe establecerse primero en “OFF”
con la unidad encendida. Tras desconectar el cable de red, ajuste el
conmutador WIRELESS en “AUTO”.
• Si no dispone de un enrutador por cable ni de un enrutador inalámbrico
(punto de acceso), puede especificar los ajustes de unidad desde un
navegador de Internet conectando su PC con Wireless Direct (p.29).
Especifique los mismos ajustes descritos a continuación para
dispositivos móviles.
1
Ajuste el conmutador WIRELESS del panel
trasero en “AUTO”.
2
Mantenga pulsado WIRELESS DIRECT en el panel
trasero durante al menos 3 segundos.
Al pulsar el botón, el indicador de estado del panel
frontal parpadea en verde. Cuando se empiezan a
especificar los ajustes de red, el indicador de estado
cambia a encendido.
• Para cancelar la conexión, mantenga pulsado WIRELESS DIRECT en el
panel trasero durante al menos 3 segundos. Una vez cancelada la
conexión, el indicador de estado del panel frontal parpadea.
• Si esta unidad se había conectado a la red con un método distinto de los
descritos anteriormente, la cancelación de la conexión devuelve la
unidad a la conexión de red anterior.
3
Configure los ajustes de Wi-Fi de un dispositivo
móvil.
Para ver información detallada sobre los ajustes del
dispositivo móvil, consulte el manual de instrucciones
del dispositivo móvil.
a Active la función Wi-Fi en el dispositivo móvil.
b Seleccione el SSID de esta unidad de la lista de puntos
de acceso disponibles.
El SSID de esta unidad aparece como “NX-N500 xxxxxx
(Wireless Direct)” (donde “xxxxxx” representa los
caracteres alfanuméricos únicos).
c Si se le solicita una contraseña, escriba “NX-
N500password”.
• Si desea cambiar otra conexión de red, ajuste el conmutador WIRELESS
del panel trasero en “OFF” y luego en “AUTO” para desconectar la
conexión de Wireless Direct. Tras la desconexión, ajuste la otra conexión
de red.
– Si desea conectar la red con MusicCast CONTROLLER, consulte
“Conexión con MusicCast CONTROLLER” (p.12) para obtener más
información.
– Si desea conectar la red utilizando solo esta unidad, consulte
“Conexión sin MusicCast CONTROLLER” (p.14) para obtener más
información.
R CH
AUDIO OUT
AUTO
OFF
WIRELESS
CONNECT
SOURCE
GAIN
AC IN
MAXMIN
WIRELESS
DIRECT
Altavoz izquierdo (panel trasero)
Conmutador
WIRELESS
R CH
AUDIO OUT
AUTO
OFF
WIRELESS
CONNECT
SOURCE
GAIN
AC IN
MAXMIN
WIRELESS
DIRECT
WIRELESS DIRECT
Altavoz izquierdo (panel trasero)
Verde (encendido)
Altavoz izquierdo (panel frontal)

18 Es
REPRODUCCIÓN
REPRODUCCIÓN
En la unidad puede reproducir los archivos de música almacenados en un PC o NAS (Network Attached Storage) compatible con
DLNA.
• Para usar esta función, la unidad y el PC/NAS deben estar conectados al mismo enrutador (p.10).
• Para reproducir archivos de música, el software de servidor instalado en el PC/NAS debe ser compatible con los formatos de archivos de música que desea
reproducir.
• Para obtener más información sobre los formatos de archivos reproducibles, consulte “Dispositivos compatibles y formatos de archivos” (p.36).
• Puede conectar hasta 16 servidores multimedia a esta unidad.
Ajuste del uso compartido de medios
de archivos de música
Para reproducir archivos de música en el PC con esta unidad,
debe aplicar el ajuste de uso compartido de medios entre la
unidad y el PC (Windows Media Player 11 o una versión más
reciente). En este caso, se utiliza como ejemplo el ajuste con
Windows Media Player en Windows 7.
■ Si se utiliza Windows Media Player 12
1
Inicie Windows Media Player 12 en el PC.
2
Seleccione “Stream” y luego “Turn on media
streaming...”.
Aparecerá la ventana de panel de control del PC.
3
Haga clic en “Turn on media streaming”.
4
Seleccione “Allowed” en la lista desplegable
situada junto al nombre de modelo de la
unidad.
5
Haga clic en “OK” para salir.
■ Si se utiliza Windows Media Player 11
1
Inicie Windows Media Player 11 en el PC.
2
Seleccione “Library” y luego “Media Sharing”.
3
Active la casilla “Share my media to”, seleccione
el icono de la unidad y haga clic en “Allow”.
4
Haga clic en “OK” para salir.
■ Si se utiliza un PC o NAS con otro
software de servidor DLNA instalado
Consulte el manual de instrucciones del dispositivo o
software y configure los ajustes de uso compartido de
medios.
Reproducción de la música almacenada en servidores
multimedia (PC/NAS)
(Ejemplo de versión en inglés)

Es 19
REPRODUCCIÓN
Español
Reproducción de contenidos
musicales del PC
1
Inicie la aplicación MusicCast CONTROLLER en
el dispositivo móvil.
2
En la pantalla de MusicCast CONTROLLER,
seleccione el nombre de la sala que se ha
especificado para esta unidad.
3
Seleccione “Server” en la pantalla de MusicCast
CONTROLLER.
4
En la pantalla de MusicCast CONTROLLER,
seleccione el archivo de música que se va a
reproducir.

20 Es
REPRODUCCIÓN
Mediante un dispositivo móvil con la aplicación MusicCast CONTROLLER instalada, puede reproducir archivos de música
guardados en su dispositivo móvil desde esta unidad.
• Para obtener más información sobre los archivos de música compatibles con esta unidad, consulte “Dispositivos compatibles y formatos de archivos”
(p.36).
Reproducción de contenidos
musicales del dispositivo móvil
1
Inicie la aplicación MusicCast CONTROLLER en
el dispositivo móvil.
2
En la pantalla de MusicCast CONTROLLER,
seleccione el nombre de la sala que se ha
especificado para esta unidad.
3
Seleccione “Este teléfono” o “Esta tableta” en la
pantalla de MusicCast CONTROLLER.
El nombre mostrado varía en función del dispositivo
móvil que se utiliza.
4
En la pantalla de MusicCast CONTROLLER,
seleccione el archivo de música que se va a
reproducir.
Reproducción de música en dispositivos móviles (Music Play)

Es 21
REPRODUCCIÓN
Español
Puede escuchar emisoras de radio de Internet de todo el mundo.
• Es posible que no pueda recibir algunas emisoras de radio de Internet.
• La unidad utiliza el servicio de base de datos de emisoras de radio de Internet vTuner.
• Este servicio puede suspenderse sin previo aviso.
Selección de una emisora de radio de
Internet
1
Inicie la aplicación MusicCast CONTROLLER en
el dispositivo móvil.
2
En la pantalla de MusicCast CONTROLLER,
seleccione el nombre de la sala que se ha
especificado para esta unidad.
3
Seleccione “Net Radio” en la pantalla de
MusicCast CONTROLLER.
4
En la pantalla de MusicCast CONTROLLER,
seleccione la emisora de radio que se va a
sintonizar.
• Se puede registrar (presintonizar) un máximo de 40 emisoras de
radio (p.22).
Registro de emisoras de radio de
Internet favoritas (bookmarks)
Al registrar sus emisoras de radio de Internet favoritas en
“Bookmarks”, puede acceder a ellas rápidamente desde la
“Bookmarks”.
1
Seleccione cualquiera de las emisoras de radio
de Internet en la unidad.
Esta operación es necesaria para registrar la emisora de
radio por primera vez.
2
Compruebe el ID de vTuner de la unidad.
Puede encontrar el ID de vTuner (dirección MAC de la
unidad) con la aplicación MusicCast CONTROLLER.
3
Acceda al sitio web de vTuner
(http://yradio.vtuner.com/) con el navegador de
Internet del PC y escriba el ID de vTuner.
• Para utilizar esta función, debe crear su cuenta personal. Cree la
cuenta utilizando su dirección de correo electrónico.
4
Registre sus emisoras de radio favoritas.
Haga clic en el icono “Add” (❤+) situado junto al nombre
de la emisora.
• Para eliminar la emisora de la carpeta “Bookmarks”, seleccione
“Bookmarks” en la pantalla de inicio y haga clic en el icono
“Remove” (❤–) situado junto al nombre de la emisora.
Escucha de radio por Internet
Puede cambiar el idioma.
Introduzca el ID de vTuner en esta área.

22 Es
REPRODUCCIÓN
Se puede registrar un máximo de 40 álbumes o canciones guardados en el PC/NAS, emisoras de radio de Internet y emisoras de
transmisión en esta unidad, que se pueden recuperar con facilidad en cualquier momento (cuando se utiliza MusicCast
CONTROLLER).
Las primeras 6 presintonías se pueden registrar/recuperar utilizando el mando a distancia de esta unidad.
• Para obtener más información sobre los procedimientos de registro/recuperación con MusicCast CONTROLLER, consulte las instrucciones de la aplicación.
Registro de una canción/emisora
con el mando a distancia
1
Reproduzca la canción/emisora que se va a
registrar.
2
Mantenga pulsado cualquiera de los botones
PRESET 1 a 6 en el mando a distancia durante 5
segundos.
Al finalizar el registro, el indicador de estado del panel
frontal parpadea dos veces en verde.
• Si el indicador de estado parpadea dos veces en rojo, no se puede
registrar la canción/emisora seleccionada. Pruebe con una canción/
emisora distinta.
• Si se mantiene pulsado durante 5 segundos el botón PRESET en el
que ya se ha registrado una canción/emisora, se sobrescribe el
ajuste anterior.
Recuperación de una canción/
emisora registrada con el mando a
distancia
1
En el mando a distancia, pulse el botón PRESET
en el que se ha registrado la canción/emisora.
• Si se pulsa el botón PRESET registrado cuando la unidad está en
modo en espera, esta se enciende automáticamente y se reproduce
la canción/emisora registrada.
Registro de canciones/emisoras en reproducción
(función de presintonía)
PRESET 1 a 6
Verde
(parpadeando dos
veces)
Altavoz izquierdo (panel trasero)

Es 23
REPRODUCCIÓN
Español
La función AirPlay le permite reproducir música de iPod/iTunes en la unidad a través de la red.
• Para obtener más información sobre los dispositivos iPod compatibles, consulte “Dispositivos compatibles y formatos de archivos” (p.36).
Reproducción de contenidos musicales de iPod/iTunes
Realice el procedimiento siguiente para reproducir el contenido de música de iPod/iTunes en la unidad.
1
Encienda la unidad e inicie iTunes en el PC o
muestre la pantalla de reproducción en el iPod.
Si iPod/iTunes reconoce la unidad, aparece el icono
AirPlay ( ).
• Para los iPod con iOS 7/8, el icono AirPlay se muestra en Control
Center. Para acceder a Control Center, deslice el dedo hacia arriba
desde la parte inferior de la pantalla.
ejemplo
• Si el icono no aparece, compruebe si la unidad y el PC/iPod están
correctamente conectados al enrutador.
2
En iPod/iTunes, haga clic en (toque) el icono
AirPlay y seleccione la unidad (nombre de red
de la unidad) como dispositivo de salida de
audio.
ejemplo
3
Seleccione una canción e inicie la reproducción.
La unidad selecciona automáticamente “AirPlay” como
fuente de entrada e inicia la reproducción.
• Si la red en espera está ajustada en “Red en espera” (p.11), esta
unidad se enciende automáticamente cuando se inicia la
reproducción en iTunes/iPod.
• El nombre de red para esta unidad que aparece en iTunes/iPod se
puede cambiar con el navegador de Internet en el PC (p.29).
• Puede ajustar el volumen de la unidad desde iPod/iTunes durante
la reproducción.
Reproducción de música de iPod/iTunes a través de la red
(AirPlay)
Precaución
• Cuando se utilizan los controles de iPod/iTunes para ajustar el volumen, el volumen puede estar más alto de lo normal. Esto podría causar daños en la
unidad o en los altavoces. Si el volumen aumenta repentinamente durante la reproducción, detenga inmediatamente la reproducción en iPod/iTunes.
iTunes
iPod
Enrutador
PC
La unidad
(alámbrico o inalámbrico)
(alámbrico o inalámbrico)
iTunes iPod iOS6
iPod iOS7/iOS8
iTunes iPod
Nombre de red de la unidad

24 Es
REPRODUCCIÓN
En la unidad puede reproducir los archivos de música guardados en un dispositivo Bluetooth (como dispositivos móviles).
• Al reproducir el dispositivo Bluetooth, ajuste el conmutador WIRELESS del panel trasero en “AUTO” (p.7).
Registro de un dispositivo
Bluetooth
con la unidad (emparejamiento)
1
Pulse (Bluetooth) en el mando a distancia.
Si aún no se ha registrado un dispositivo Bluetooth, el
indicador de estado del panel frontal parpadea en azul.
2
Active la función Bluetooth en el dispositivo
Bluetooth.
La operación varía en función del dispositivo. Consulte el
manual de instrucciones del dispositivo.
3
Seleccione “NX-N500 XXXXXX Bluetooth” en la
lista de dispositivos Bluetooth del dispositivo.
Donde “xxxxxx” representa los caracteres alfanuméricos
únicos.
• Si esta unidad se ha registrado con MusicCast CONTROLLER,
aparece el nombre de sala introducido durante el registro.
Si aparece o un mensaje de conexión finalizada en el
dispositivo emparejado, el emparejamiento ha
finalizado.
Una vez finalizado el emparejamiento, el indicador de
estado cambia a encendido.
4
Reproduzca una canción en el dispositivo
Bluetooth.
• Realice el emparejamiento entre el dispositivo Bluetooth y la unidad a
una distancia máxima de 10 m entre sí.
• Esta unidad se puede emparejar con un total máximo de 20 dispositivos
Bluetooth para la recepción y la transmisión. Al registrar el dispositivo 21,
se elimina la información de emparejado utilizada con menos frecuencia.
• Si se ha conectado antes un dispositivo Bluetooth, la unidad se conectará
al último dispositivo conectado al pulsar (Bluetooh) durante el paso
1. Desconecte esta conexión para emparejar un nuevo dispositivo (p.25).
• Consulte “Bluetooth” (p.34) en “Resolución de problemas” si no es
posible realizar el emparejamiento.
Reproducción de música con Bluetooth
(Bluetooth)
Azul (parpadeando)
NX-N500 XXXXXX Bluetooth
Azul (encendido)

Es 25
REPRODUCCIÓN
Español
Reproducción de audio de un
dispositivo
Bluetooth
en la unidad
1
Pulse (Bluetooth) en el mando a distancia.
La fuente de entrada cambia a Bluetooth.
2
Active la función Bluetooth en el dispositivo
Bluetooth.
3
Reproduzca una canción en el dispositivo
Bluetooth.
• Realice la conexión Bluetooth entre el dispositivo y la unidad a una
distancia máxima de 10 m entre sí.
• En caso necesario, vuelva a seleccionar esta unidad desde las lista de
dispositivos Bluetooth en el dispositivo emparejado. En función de su
dispositivo, puede que sea necesario seleccionar esta unidad como la
salida de audio.
• Ajuste el volumen del dispositivo Bluetooth según sea necesario.
• Si se ha conectado antes un dispositivo Bluetooth, la unidad se conectará
al último dispositivo conectado al pulsar (Bluetooh) durante el paso
1. Desconecte esta conexión para emparejar un nuevo dispositivo (p.25).
Desconexión de una conexión
Bluetooth
La conexión Bluetooth se desconecta en los siguientes casos.
Cuando la conexión se desconecta, el indicador de estado del
panel frontal de esta unidad parpadea en azul.
• Se desconecta la conexión desde el dispositivo Bluetooth, o
el dispositivo Bluetooth se apaga.
•(Bluetooth) en el mando a distancia se mantiene
pulsado al menos 5 segundos.
• La unidad se apaga.
Azul (parpadeando)
Especificación del ajuste de conexión
Conexión
establecida
Azul (encendido)

26 Es
REPRODUCCIÓN
Cuando se conecta un PC a la toma USB de la unidad, esta
funciona como un USB DAC, que permite la reproducción de
la salida de audio en el PC.
Para obtener más información sobre los sistemas operativos
y los formatos de muestreo compatibles, consulte
“Dispositivos compatibles y formatos de archivos” (p.36).
• Si se utiliza un SO Mac, no es necesario instalar un controlador. El
controlador de audio de Mac OS está disponible para la reproducción.
• Es posible que las operaciones no se ejecuten correctamente si el PC se
conecta a esta unidad antes de instalar el controlador.
Instalación del controlador dedicado
(solo Windows)
Antes de conectar un PC a la unidad, debe instalar el
controlador dedicado en el PC.
1
Acceda a la siguiente URL, descargue el
controlador dedicado “Yamaha HiFi USB Driver”
y, a continuación, descomprima y ejecute el
archivo.
2
Instale el “Yamaha HiFi USB driver” descargado
en el PC.
Para obtener más información, consulte la guía de
instalación incluida con el controlador descargado.
3
Una vez finalizada la instalación, cierre todas
las aplicaciones en ejecución.
• El “Yamaha HiFi USB Driver” está sujeto a cambios sin previo aviso. Para
obtener la información más reciente, consulte la página de descarga del
controlador.
Reproducción de música en un PC
1
Conecte el PC a la unidad con el cable USB.
2
Encienda el PC.
3
Pulse z (alimentación) en el mando a distancia
para encender la unidad.
4
Pulse USB en el mando a distancia.
El indicador de estado del panel frontal se enciende en
azul cielo.
5
Ajuste el destino de salida de audio del PC en
“Yamaha NX-N500”.
Con SO Windows:
Control panel → Hardware and sound → Sound →
Pestaña [Playback]
Con SO Mac:
System Preferences → Sound → Pestaña [Output]
El ajuste puede variar en función del sistema operativo.
Para obtener más información, consulte con el fabricante
del PC.
6
Utilice el PC para iniciar la reproducción de
archivos de música.
■ Ajuste del volumen de sonido
Para obtener una calidad de sonido superior, ajuste el
volumen de sonido en el PC en el máximo y aumente
gradualmente el volumen en la unidad desde el mínimo al
nivel deseado.
• No desconecte el cable USB, apague la unidad ni cambie la entrada
mientras la reproducción en un PC conectado a través del cable USB está
en curso. Si lo hace, se puede producir un fallo de funcionamiento.
• Para silenciar los sonidos de funcionamiento del PC durante la
reproducción de música, cambie el ajuste en el PC.
• Si los archivos de música no se pueden reproducir correctamente,
reinicie el PC y vuelva a realizar el procedimiento mencionado.
Reproducción de música en un PC (USB DAC)
Sitio web para descargar el controlador exclusivo
URL: http://download.yamaha.com/
L
NETWORK
USB
OPTICAL
L-R
LINK
AUX IN
R CH
AUDIO OUT
AUTO
OFF
WIRELESS
CONNECT
SOURCE
GAIN
AC IN
MAXMIN
WIRELESS
DIRECT
USB
Altavoz izquierdo
(panel trasero)
Cable USB
(tipo B)
PC
z (alimentación)
Dispositivo
Azul cielo
(encendido)

Es 27
REPRODUCCIÓN
Español
Esta unidad le permite disfrutar de música procedente de un dispositivo de reproducción conectando dicho dispositivo a la toma
OPTICAL o a la toma AUX de esta unidad.
Reproducción desde dispositivos con
una salida de audio digital óptica
• La entrada digital óptica de esta unidad solo es compatible con PCM. Si la
salida digital óptica del dispositivo de reproducción es AAC, como en un
televisor, cámbiela a PCM.
1
Conecte esta unidad y el dispositivo de
reproducción con un cable digital óptico.
2
Pulse z (alimentación) en el mando a distancia
para encender la unidad.
3
Pulse OPT en el mando a distancia.
El indicador de estado del panel frontal se enciende en
púrpura.
4
Reproduzca la música desde el dispositivo de
reproducción.
Reproducción desde dispositivos con
una salida de audio analógica
1
Conecte esta unidad y el dispositivo de
reproducción con un cable de mini toma
estéreo.
2
Pulse z (alimentación) en el mando a distancia
para encender la unidad.
3
Pulse AUX en el mando a distancia.
El indicador de estado del panel frontal se enciende en
blanco.
4
Reproduzca la música desde el dispositivo de
reproducción.
■ Ajuste del volumen de sonido
Para obtener una calidad de sonido superior, ajuste el
volumen de sonido en el dispositivo de reproducción en el
máximo y aumente gradualmente el volumen en la unidad
desde el mínimo al nivel deseado.
Escucha de música desde un dispositivo de reproducción
L
NETWORK
USB
OPTICAL
L-R
LINK
AUX IN
R CH
AUDIO OUT
AUTO
OFF
WIRELESS
CONNECT
SOURCE
GAIN
AC IN
MAXMIN
WIRELESS
DIRECT
OPTICAL
Panel trasero
Cable óptico
Televisor/Reproductor de
CD, etc.
z (alimentación)
OPT
Púrpura
(encendido)
L
NETWORK
USB
OPTICAL
L-R
LINK
AUX IN
R CH
AUDIO OUT
AUTO
OFF
WIRELESS
CONNECT
SOURCE
GAIN
AC IN
MAXMIN
WIRELESS
DIRECT
AUX IN
Panel trasero
Cable de mini toma estéreo
Reproductor de
música portátil, etc.
z (alimentación)
AUX
Blanco (encendido)

28 Es
CONFIGURACIONES
CONFIGURACIONES
Se lanzará nuevo firmware con funciones adicionales o mejoras de productos, según sea necesario. Si la unidad está conectada
a Internet, puede descargar el firmware a través de la red y actualizarlo.
El firmware se puede actualizar usando cualquiera de los procedimientos siguientes.
• Actualización desde un dispositivo móvil con la aplicación “MusicCast CONTROLLER” dedicada para dispositivos móviles
instalada
• Actualización desde esta unidad
• Actualización desde un navegador de Internet, por ejemplo, en un PC (p.29)
• El firmware también se puede actualizar desde un navegador de Internet en un PC (p.29).
Actualización con MusicCast
CONTROLLER
Cuando hay disponible una nueva actualización de firmware,
aparece un mensaje pidiéndole que actualice en la pantalla
de MusicCast CONTROLLER.
Siga el procedimiento descrito en la pantalla de MusicCast
CONTROLLER para actualizar el firmware.
Una vez finalizada la actualización, apague la unidad y vuelva
a encenderla, siguiendo las instrucciones en la pantalla.
Actualización desde esta unidad
Cuando hay disponible una nueva actualización de firmware,
el indicador de estado del panel frontal parpadea en blanco
cuando la unidad está encendida.
Siga el procedimiento siguiente para actualizar el firmware.
1
Apague la unidad.
2
Mientras mantiene pulsado SOURCE en el panel
trasero, pulse el conmutador z (alimentación)
para encender la unidad.
Comienza la actualización de firmware.
• Si se produce un error durante la actualización de firmware, el indicador
de estado parpadeará de forma repetida tres veces en rojo. Para
reiniciar la actualización, pulse WIRELESS DIRECT en el panel trasero.
• Si no se puede encontrar la descarga de firmware, el indicador de estado
parpadeará de forma repetida dos veces en rojo. Compruebe que esta
unidad está conectada a la red.
3
Apague la unidad y vuelva a encenderla.
Actualización del firmware de la unidad a través de la red
Precaución
• No utilice la unidad ni desconecte el cable de alimentación o el cable de red durante la actualización del firmware. La actualización de firmware tarda
unos 20 minutos o más (dependiendo de la velocidad de conexión de Internet).
• Si la unidad está conectada a la red inalámbrica, es posible que no se pueda actualizar la red dependiendo del estado de la conexión inalámbrica. En
este caso, dedique el tiempo necesario a intentar actualizar el firmware.
• Para obtener más información sobre la actualización, visite el sitio web de Yamaha.
Blanco
(parpadeando)
AUTO
OFF
WIRELESS
CONNECT
SOURCE
GAIN
AC IN
MAXMIN
WIRELESS
DIRECT
Altavoz izquierdo (panel trasero)
SOURCE
Conmutador z
(alimentación)
Blanco
(parpadeando lento)
Actualizando
Finalizada
Blanco
(desvaneciéndose
cada 3 segundos)

Es 29
CONFIGURACIONES
Español
Se puede utilizar un navegador de Internet en un PC para visualizar o especificar los diversos ajustes de unidad así como los
ajustes de conexión de red.
Realice las siguientes operaciones con la unidad conectada a la red de forma inalámbrica o usando un cable, o conectada
directamente al PC con Wireless Direct (p.17).
• Algunos programas de seguridad instalados en el PC pueden bloquear el acceso de la unidad. En ese caso, configure adecuadamente el software de
seguridad.
• Esta función es compatible con los sistemas operativos de las versiones siguientes.
–Windows 7 o posterior
– Mac OS 10.7.x o posterior
• Se recomienda el uso de un navegador de Internet de las siguientes versiones.
– Internet Explorer 9/10/11
–Safari 8
Configuración con Windows
(utilizando un navegador de
Internet especificado)
1
Abra la carpeta “Network”.
2
Haga doble clic en esta unidad, que aparece
debajo de “Other Devices” o “Media Devices”.
Inicie el navegador de Internet especificado. Aparece la
ventana de configuración para la unidad.
Configuración con Mac OS
1
Inicie Safari y haga clic en “Preferences” y en
“Advanced”.
2
Seleccione todas las casillas para Bonjour.
Seleccione esta unidad en la lista del menú Bookmarks.
Aparece la ventana de configuración para la unidad.
Especificación de ajustes de unidad con un navegador de
Internet

30 Es
CONFIGURACIONES
Visualización/Cambio de ajustes
Es posible visualizar o cambiar los ajustes para los siguientes parámetros.
■ Network Name
Edita el nombre de la unidad que aparece en la red.
■ Network Setup
Especifica los ajustes de red.
• Es posible que algunos de los siguientes parámetros no aparezcan (o
que no se puedan cambiar sus ajustes), en función del método de
conexión de red seleccionado.
Al conectar con un enrutador inalámbrico (punto de acceso)
utilizando un código PIN de WPS, siga el procedimiento siguiente
para especificar los ajustes.
1
Ajuste “Connection Select” en “Wireless LAN” y
haga clic en “APPLY”.
2
Seleccione la casilla “WPS PIN” y haga clic en
“APPLY”.
El código PIN aparece en la ventana de mensaje.
3
Introduzca el código PIN para la unidad en el
enrutador inalámbrico (punto de acceso).
■ AirPlay Password
Especifica la contraseña para la reproducción de AirPlay.
■ Firmware Update
Actualiza el firmware de esta unidad.
■ Standby
Cambia el ajuste de red en espera.
■ MAC Filter
Ajusta las direcciones MAC para limitar los dispositivos de red
que pueden acceder a la unidad.
• Si el filtro de direcciones MAC está activado, asegúrese de especificar la
dirección MAC del PC utilizado para la configuración. Si se hace clic en
“APPLY” sin la dirección especificada, no se podrá acceder a esta unidad.
Si no se puede acceder a esta unidad, restablezca sus ajustes de red
(p.32).
Network Name Introduzca el nombre de la unidad que
aparecerá en la red. Si esta unidad se ha
registrado con MusicCast CONTROLLER,
aparece el nombre de sala introducido durante
el registro.
APPLY
Haga clic para aplicar el nuevo nombre.
Connection
Info
Muestra el método de conexión de red especificado
actualmente.
MusicCast
Network
Muestra el estado de red MusicCast. Si aparece
“Ready”, se puede utilizar MusicCast CONTROLLER.
Connection
Select
Seleccione el método de conexión de red (LAN por
cable/LAN inalámbrica/Wireless Direct/MusicCast
inalámbrica).
Con LAN
inalámbrica
WPS PIN Muestra el código PIN de
WPS.
SSID Introduzca el SSID para el
enrutador inalámbrico (punto
de acceso).
Con LAN
inalámbrica
/Wireless
Direct
Security Seleccione el método de
seguridad al conectar con un
enrutador inalámbrico (punto
de acceso) o Wireless Direct.
Security
Key
Introduzca la clave de
seguridad al conectar con un
enrutador inalámbrico (punto
de acceso) o Wireless Direct.
DHCP Activa o desactiva la función DHCP. Cuando se
desactiva, algunos ajustes, como la dirección IP y la
máscara de subred, se pueden especificar
manualmente.
IP Address Muestra la dirección IP para esta unidad.
Subnet Mask Muestra la máscara de subred para esta unidad.
Default
Gateway
Muestra la puerta de enlace predeterminada para
esta unidad.
DNS Server
(P)
Muestra la dirección del servidor DNS primario.
DNS Server
(S)
Muestra la dirección del servidor DNS secundario.
APPLY Haga clic para aplicar los ajustes especificados
actualmente.
Mode
Activa o desactiva la función de contraseña.
Cuando está activada, se puede especificar una
contraseña.
Password
Introduzca la contraseña que se va a especificar.
APPLY
Haga clic para aplicar los ajustes especificados.
Current Firmware
Version
Muestra la versión del firmware actual.
START Inicia la actualización de firmware. Realice la
operación de actualización siguiendo las
instrucciones en pantalla.
Network Standby Cambia el ajuste de red en espera (On/Off/
Auto). Para obtener más información sobre los
ajustes, consulte “Red en espera” (p.11).
Off
Desactiva el filtro de direcciones MAC.
On
Activa el filtro de direcciones MAC. Únicamente
los dispositivos de red con las direcciones MAC
especificadas en “MAC Address 1” como “MAC
Address 10” podrán acceder a la unidad.
APPLY
Haga clic para aplicar los ajustes especificados.
MAC Address 1-10
Especifique las direcciones MAC de dispositivos
de red (10 como máximo) que pueden acceder a
la unidad.

Es 31
CONFIGURACIONES
Español
■ Licenses
Muestra la información de licencias para el software utilizado
con esta unidad.
■ Other Setup
Especifica otros ajustes.
Remote Sensor Activa o desactiva la recepción de la señal del
mando a distancia. Aunque esté desactivada, se
pueden realizar operaciones sin el mando a
distancia (como por ejemplo desde MusicCast
CONTROLLER o el panel trasero de la unidad).

32 Es
CONFIGURACIONES
Se pueden restaurar todos los ajustes de la unidad o solo los ajustes de red.
Restauración de los ajustes
predeterminados
(restablecimiento de fábrica)
1
Apague la unidad.
2
Mientras mantiene pulsado CONNECT en el
panel trasero, pulse el conmutador z
(alimentación) para encender la unidad.
Restauración de los ajustes de red
predeterminados
Los parámetros siguientes recuperan sus ajustes
predeterminados.
• Ajustes de conexión de red
• Todas las presintonías registradas
• Registro de conexiones de LAN inalámbrica y Wireless
Direct
1
Apague la unidad.
2
Mientras mantiene pulsado WIRELESS DIRECT
en el panel trasero, pulse el conmutador z
(alimentación) para encender la unidad.
Una vez finalizada la inicialización, la unidad se enciende.
Restauración de los ajustes predeterminados

Es 33
APÉNDICE
Español
APÉNDICE
Consulte la tabla de abajo cuando esta unidad no funcione correctamente. Si el problema que usted tiene no está en la lista de
abajo o las instrucciones de abajo no sirven de ayuda, apague la unidad, desconecte el cable de alimentación de CA y póngase en
contacto con el centro de servicio o concesionario Yamaha autorizado.
General
Resolución de problemas
Problema Causa Solución
Consulte
la
página
Esta unidad no funciona
correctamente.
El microPC interno se ha bloqueado debido a una
descarga eléctrica externa (como un rayo o
electricidad estática excesiva) o a una alimentación
de baja tensión.
Desconecte el cable de CA de la toma de corriente
y vuelva a enchufarlo después de 30 segundos.
—
Esta unidad no se enciende
al pulsar z (alimentación)
(el indicador STATUS
parpadea en rojo), o la
unidad se apaga poco
después de haberla
encendido.
El cable de alimentación de CA no está firmemente
conectado a la toma de CA de la pared.
Conecte firmemente el cable de alimentación de
CA a la toma de CA de la pared.
10
El microPC interno se ha bloqueado debido a una
descarga eléctrica externa (como un rayo o
electricidad estática excesiva) o a una alimentación
de baja tensión.
Desconecte el cable de CA de la toma de corriente
y vuelva a enchufarlo después de 30 segundos.
—
Esta unidad se apaga de
repente.
La temperatura interna aumenta demasiado y se
activa el circuito protector contra recalentamiento.
Espere aproximadamente una hora para que se
enfríe la unidad, vuelva a encenderla cuando haya
comprobado que hay suficiente espacio para la
ventilación y no cubra la unidad de forma alguna.
11
Cuando se activa la función En espera automático,
esta unidad se apaga automáticamente en
cualquiera de las siguientes circunstancias.
– El audio procede de la fuente de entrada
seleccionada. Sin embargo, no se ha realizado
ninguna operación durante 8 horas o más.
– Se ha seleccionado Bluetooth o NET como fuente
de entrada, pero no se ha introducido audio en
la unidad o no se ha realizado ninguna
operación en la unidad durante más de 20
minutos.
Encienda la unidad y reproduzca de nuevo la
fuente. Si no se utiliza la función Standby
Automático, ajuste “Auto Power Standby” en “Off”.
No hay sonido. Conexión incorrecta de cables de salida o de
entrada.
Conecte correctamente el cable.
9
No se ha seleccionado una fuente de entrada
apropiada.
Seleccione una fuente de entrada apropiada con
los botones de selección de entrada.
8
El volumen está bajo. Suba el volumen. —
El sonido está silenciado. Pulse (silencio) o +/- (volumen) para reanudar
la salida de audio y ajustar el nivel del volumen.
—
Un dispositivo digital o de
alta frecuencia genera
ruido.
Puede que la unidad esté colocada cerca de un
dispositivo digital o un dispositivo de alta
frecuencia.
Aleje el dispositivo de la unidad.
—

34 Es
APÉNDICE
Bluetooth
Mando a distancia
Problema Causa Solución
Consulte
la
página
No es posible emparejar la
unidad con el dispositivo
Bluetooth.
El conmutador Wireless está ajustado en “OFF”. Ajústelo en “AUTO”. 7
El dispositivo no es compatible con A2DP. Realice la operación de emparejamiento con un
dispositivo que sea compatible con A2DP.
—
La unidad y el dispositivo están demasiado
apartados.
Coloque el dispositivo Bluetooth a una distancia
inferior a 10 m de la unidad y empareje el
dispositivo con esta unidad.
—
Hay un dispositivo cercano (horno microondas,
LAN inalámbrica, etc.) que transmite señales en la
banda de frecuencia de 2,4 GHz.
Aleje la unidad del dispositivo que está emitiendo
señales de frecuencia de radio. —
Hay otro dispositivo Bluetooth conectado. Desconecte la conexión Bluetooth actual y lleve a
cabo el emparejamiento con el nuevo dispositivo.
25
Bluetooth no se ha seleccionado como la fuente de
entrada.
Seleccione Bluetooth como la fuente de entrada.
8
Un adaptador Bluetooth, etc. que desea emparejar
con la unidad tiene una contraseña distinta de
“0000”.
Utilice un adaptador Bluetooth, etc. cuya
contraseña sea “0000”. 24
No es posible establecer una
conexión Bluetooth.
El conmutador Wireless está ajustado en “OFF”. Ajústelo en “AUTO”. 7
Hay otro dispositivo Bluetooth conectado. La unidad no puede realizar varias conexiones
Bluetooth. Desconecte la conexión Bluetooth actual
y realice la conexión del dispositivo deseado.
25
Hay más de 20 dispositivos emparejados y se ha
eliminado la información de emparejamiento más
antigua.
Vuelva a realizar el emparejamiento. Esta unidad
se puede emparejar con un total máximo de 20
dispositivos Bluetooth para la recepción y la
transmisión. Al registrar el dispositivo 21, se
elimina la información de emparejado utilizada
con menos frecuencia.
24
No se emite ningún sonido o
el sonido es intermitente
durante la reproducción.
Se ha desconectado la conexión Bluetooth de la
unidad con el dispositivo.
Realice de nuevo las operaciones de conexión
Bluetooth.
24
La unidad y el dispositivo están demasiado
apartados.
Desplace el dispositivo Bluetooth a una distancia
inferior a 10 m de esta unidad.
—
Hay un dispositivo cercano (horno microondas,
LAN inalámbrica, etc.) que transmite señales en la
banda de frecuencia de 2,4 GHz.
Aleje la unidad del dispositivo que está emitiendo
señales de frecuencia de radio. —
La función Bluetooth del dispositivo está
desactivada.
Active la función Bluetooth del dispositivo.
—
El volumen del dispositivo está establecido al
mínimo.
Suba el volumen del dispositivo.
—
Problema Causa Solución
Consulte
la
página
El mando a distancia no
funciona o funciona mal.
Distancia o ángulo equivocados. El mando a distancia funciona dentro de una
distancia máxima de 6 m y sin superar un ángulo
de 30 grados a partir del eje central del panel
frontal.
8
El sensor del mando a distancia de esta unidad
está sometido a la luz solar directa o a iluminación
intensa (lámpara fluorescente de tipo inverso, por
ejemplo).
Coloque la unidad en otro lugar.
—
Las pilas están casi agotadas. Sustituya las pilas. 8

Es 35
APÉNDICE
Español
Red
Problema Causa Solución
Consulte
la
página
La función de red no
funciona.
Los parámetros de red (dirección IP) no se han
obtenido debidamente.
Active la función de servidor DHCP en el enrutador
y ajuste “DHCP” en “On” en la unidad. Si desea
configurar los parámetros de red manualmente,
asegúrese de que utiliza una dirección IP distinta
de la que usan otros dispositivos conectados a su
red.
29
No se puede conectar un
enrutador inalámbrico
(punto de acceso).
El filtro de direcciones MAC del enrutador
inalámbrico está activado.
No se puede establecer una conexión si el filtro de
direcciones MAC del enrutador inalámbrico está
activado. Cambie los ajustes del enrutador
inalámbrico (punto de acceso) e intente conectarse
de nuevo.
—
La reproducción se detiene
inesperadamente y los
archivos no pueden
reproducirse de forma
continua.
La carpeta contiene archivos que no pueden
reproducirse a través de la unidad.
Elimine o mueva los archivos (incluidos vídeos o
archivos ocultos) de la carpeta que no pueden
reproducirse a través de la unidad. —
La unidad no detecta el PC. El ajuste de uso compartido de contenidos
multimedia no es correcto.
Configure el ajuste de uso compartido y seleccione
la unidad como dispositivo en el que se comparte
contenido musical.
—
Algunos programas de seguridad instalados en el
PC bloquean el acceso de la unidad al PC.
Compruebe los ajustes del programa de seguridad
instalado en el PC.
—
La unidad y el PC no se encuentran en la misma
red.
Compruebe las conexiones de red y los ajustes del
enrutador y, a continuación, conecte la unidad y el
PC a la misma red.
—
Los archivos del PC no
pueden visualizarse o
reproducirse.
Los archivos no son compatibles con la unidad o el
servidor multimedia.
Utilice el formato de archivo admitido por la
unidad y por el servidor multimedia. 36
No se puede reproducir la
radio por Internet.
En este momento la emisora de radio por Internet
seleccionada no está disponible.
Es posible que se haya producido un problema de
red con la emisora de radio o que se haya
interrumpido el servicio. Pruebe ese emisora en
otro momento o seleccione otra emisora.
—
En estos momentos, la emisora de radio por
Internet seleccionada emite silencio.
Algunas emisoras de radio por Internet emiten
silencio durante algunos momentos del día.
Pruebe ese emisora en otro momento o seleccione
otra emisora.
—
El acceso a esta red está restringido por los ajustes
de firewall de los dispositivos de red (como, por
ejemplo, el enrutador).
Compruebe los ajustes de firewall de los
dispositivos de red. La radio por Internet solo
puede reproducirse cuando pasa por el puerto
asignado por cada emisora de radio. El número de
puerto varía en función de la emisora de radio.
—
La aplicación dedicada para
el dispositivo móvil no
detecta la unidad.
La unidad y el dispositivo móvil no están en la
misma red.
Compruebe las conexiones de red y la
configuración del enrutador, y luego conecte la
unidad y el dispositivo móvil a la misma red.
—
No se logra actualizar el
firmware a través de la red.
Es posible que no se pueda realizar en función del
estado de la red.
Compruebe que esta unidad está conectada a la
red y vuelva a intentarlo al cabo de unos minutos.
28
El iPod no reconoce la
unidad cuando se utiliza
AirPlay.
La unidad está conectada a un enrutador de SSID
múltiple.
El acceso a la unidad puede estar restringido por la
función de separación de red en el enrutador.
Conecte el iPod al SSID que pueda acceder a la
unidad.
—
La unidad no se puede
conectar a Internet a través
de un enrutador inalámbrico
(punto de acceso).
El enrutador inalámbrico (punto de acceso) está
desactivado.
Active el enrutador inalámbrico (punto de acceso).
—
La unidad y el enrutador inalámbrico (punto de
acceso) están demasiado alejados.
Acerque la unidad al enrutador inalámbrico (punto
de acceso).
—
Existe un obstáculo entre la unidad y el enrutador
inalámbrico (punto de acceso).
Mueva la unidad y el enrutador inalámbrico (punto
de acceso) a una ubicación en la que no haya
obstáculos entre ellos.
—
No se encuentra la red
inalámbrica.
Hay un dispositivo cercano (horno microondas,
LAN inalámbrica, etc.) que transmite señales en la
banda de frecuencia de 2,4 GHz.
Aleje la unidad del dispositivo que está emitiendo
señales de frecuencia de radio. —
El acceso a esta red está restringido por los ajustes
de firewall del enrutador inalámbrico (punto de
acceso).
Compruebe el ajuste de firewall del enrutador
inalámbrico (punto de acceso). —

36 Es
APÉNDICE
Dispositivos compatibles
■ DLNA
• PC instalado con “Windows Media Player 11” o “Windows
Media Player 12”
• NAS compatible con DLNA (ver. 1.5)
■ AirPlay
AirPlay funciona con los iPhone, iPad y iPod touch con iOS
4.3.3 o posterior, Mac con OS X Mountain Lion o posterior, y
Mac y PC con iTunes 10.2.2 o posterior.
(en agosto de 2015)
■ Bluetooth
• La unidad es compatible con A2DP.
■ USB DAC
La unidad es compatible con los siguientes sistemas
operativos.
• Windows 7 (32/64 bits)
• Windows 8 (32/64 bits)
• Mac OS X 10.6.4 o posterior
• Es posible que las operaciones se desactiven incluso con los sistemas
operativos mencionados anteriormente, en función de la configuración
o el entorno del PC.
Formatos de archivos
■ DLNA
■ USB DAC
■ ÓPTICO
Dispositivos compatibles y formatos de archivos
Formato Frecuencia de muestreo (kHz) Tasa de bits
cuantizada (bit)
WAV
Hasta 192kHz 16/24AIFF
FLAC
ALAC Hasta 96kHz 16/24
MP3
Hasta 48kHz 16WMA
AAC
DSD 2,8 MHz/5,6 MHz
Formato Frecuencia de muestreo (kHz) Tasa de bits
cuantizada (bit)
PCM 44,1kHz/48kHz/88,2kHz/96kHz/
176,4 kHz/192 kHz/352,8 kHz/
384 kHz
16/24/32
DSD 2,8 MHz/5,6 MHz
Formato Frecuencia de muestreo (kHz) Tasa de bits
cuantizada (bit)
S/PDIF 32 kHz/44,1 kHz/48 kHz/64 kHz/
88,2 kHz/96 kHz/176,4 kHz/
192 kHz
16/24

Es 37
APÉNDICE
Español
Entrada
•Red
100BASE-TX/10BASE-T x 1
• Entradas digitales
USB (USB 2.0 tipo B) x 1
OPTICAL x 1
• Entrada analógica
Estéreo mini (AUX IN) x 1
Red
• Función Wi-Fi
- Estándar de red inalámbrica: IEEE 802.11 b/g/n
- Banda de frecuencia de radio: 2,4 GHz
- Método de seguridad disponible: WEP, WPA2-PSK (AES), modo
mixto
- Capacidad para WPS por método de PIN y método de botón
pulsador
- Capacidad para uso compartido con dispositivos iOS
mediante conexión inalámbrica
- Capacidad para conexión directa con dispositivo móvil
Bluetooth
•Versión de Bluetooth ................................................. Ver. 2.1+EDR
• Perfil compatible.................................................................... A2DP
• Códec compatible ............................................................SBC, AAC
• Salida inalámbrica ................................................ Bluetooth Clase 2
• Distancia de comunicación máxima........10 m sin interferencia
Altavoz
• Intervalo de frecuencia (-10 dB)........................... 54 Hz a 40 kHz
•Componentes
LF.....................................................................................Cono de 5”
HF.................................................................................Cúpula de 1”
• Transición................................................................................ 2 kHz
Amplificador
• Potencia de salida RMS mínima
(LF 1 kHz 0,01% THD, 4 Ω)...................................................... 24 W
(HF 20 kHz 0,02% THD, 6 Ω)................................................... 20 W
[Modelo de Asia]
(LF 1 kHz 0,01% THD, 4Ω)....................................................... 20 W
(HF 20 kHz 0,02% THD, 6Ω).................................................... 16 W
• Potencia dinámica por canal
(Total) ....................................................................................... 75 W
(LF 1 kHz 10% THD, 4 Ω)......................................................... 45 W
(HF 20 kHz 10% THD, 6 Ω)...................................................... 30 W
[Modelo de Asia]
(Total) ....................................................................................... 65 W
(LF 1 kHz 10% THD, 4Ω).......................................................... 40 W
(HF 20 kHz 10% THD, 6Ω)....................................................... 25 W
• Sensibilidad de entrada/impedancia de entrada
AUX IN.......................................................615 mV (-2 dBu) /25 kΩ
• Señal de entrada máxima
AUX IN.......................................................................................2,4 V
• Relación señal a ruido (red IHF-A)
(LF 1 kHz 0 dBFS FS44,1 kHz)........................... 100 dB o superior
(HF 20 kHz 0 dBFS FS44,1kHz).........................100 dB o superior
• Rango dinámico
(LF 1 kHz 0 dBFS FS44,1 kHz)........................... 100 dB o superior
(HF 20 kHz 0 dBFS FS44,1kHz).........................100 dB o superior
• Ruido residual (red IHF-A) .................................................... 40 μV
• Características de control de tono*
BASS (refuerzo/corte)............................................ ±10 dB, 100 Hz
TREBLE (refuerzo/corte)........................................ ±10 dB, 20 kHz
General
•Fuente de alimentación
[Modelos de EE. UU. y Canadá]...........................120 V CA, 60 Hz
[Modelo de China] ................................................ 220 V CA, 50 Hz
[Modelo de Corea]................................................ 220 V CA, 60 Hz
[Modelo de Australia]...........................................240 V CA, 50 Hz
[Modelos de Reino Unido y Europa]...................230 V CA, 50 Hz
[Modelo de Asia]......................................220-240 V CA, 50/60 Hz
[Modelo de Taiwán].............................................. 110 V CA, 60 Hz
• Consumo de energía..................................................45 W + 45 W
• Consumo de energía en espera
Eco en espera......................................................................... 0,2 W
Red en espera (por cable)..................................................... 1,8 W
Red en espera (Wi-Fi/Wireless Direct)...................... 2,0 W/2,0 W
• Dimensiones (An. x Al. x Pr.)
Izquierda.....................................................170 x 285 x 238,6 mm
Derecha.......................................................... 170 x 285 x 232 mm
•Peso
Izquierda.................................................................................6,2 kg
Derecha...................................................................................5,7 kg
* El control de tono solo se puede controlar desde la aplicación MusicCast
CONTROLLER.
Especificaciones
Las especificaciones están sujetas a cambios sin previo aviso.

38 Es
APÉNDICE
AirPlay, iPhone, iPod, iPod nano, iPod touch y iTunes son marcas
comerciales de Apple Inc., registradas en los EE. UU. y en otros
países.
DLNA™ y DLNA CERTIFIED™ son marcas comerciales o marcas
registradas de Digital Living Network Alliance. Todos los derechos
reservados. El uso no autorizado está estrictamente prohibido.
Windows™
Windows es una marca comercial registrada de Microsoft
Corporation en los EE. UU. y en otros países.
Internet Explorer, Windows Media Audio y Windows Media Player son
marcas comerciales o marcas comerciales Microsoft Corporation en
los Estados Unidos y/o en otros países.
Android™
Android y Google Play son marcas comerciales de Google, Inc.
El logotipo Wi-Fi CERTIFIED es una marca de certificación de la Wi-Fi
Alliance.
La marca identificadora Wi-Fi Protected Setup es una marca de la Wi-
Fi Alliance.
Wi-Fi, Wi-Fi Alliance, Wi-Fi CERTIFIED, Wi-Fi Protected Setup, WPA y
WPA2 son marcas comerciales o marcas registradas de la Wi-Fi
Alliance.
La marca denominativa Bluetooth
®
y los logotipos son marcas
registradas propiedad de Bluetooth SIG, Inc. y cualquier uso de
dichas marcas por parte de Yamaha Corporation se realiza bajo
licencia.
Bluetooth protocol stack (Blue SDK)
Copyright 1999-2014 OpenSynergy GmbH
Todos los derechos reservados. Todos los derechos sin publicar
reservados.
Explicaciones acerca de GPL
Este producto utiliza el software de código abierto GPL/LGPL en
algunas secciones. Tiene el derecho de obtener, duplicar, modificar y
redistribuir solo este código abierto. Para obtener información sobre
el software de código abierto GPL/LGPL, cómo obtenerlo y la licencia
de GPL/LGPL, consulte el sitio web de Yamaha Corporation
(http://download.yamaha.com/sourcecodes/musiccast/).
MusicCast es una marca comercial o una marca registrada de
Yamaha Corporation.
Marcas comerciales

Indications during playback
Indications concerning the system
Indications when the error occurred
Table of status indicator conditions
Color Condition Status See page
Green
Lit The network input is selected. p.18, 20, 21
Flashing A network connection is being set up. p.12
Slow flashing No connection is established with the network. p.12
Fading every 3
seconds
Audio is being received from the MusicCast CONTROLLER. p.18, 20, 21
Pink
Lit The unit is connected to an iOS device (AirPlay). p.23
Slow flashing
The iOS device settings are being shared and a connection
has been established wirelessly (Wireless Accessory
Configuration).
p.15
Blue
Lit The Bluetooth input is selected.
p.24
Slow flashing Bluetooth cannot be paired.
Sky blue
Lit The USB input is selected.
p.26
Slow flashing No PC is connected to the USB jack.
Purple
Lit The optical digital input is selected.
p.27
Slow flashing No device is connected to the OPTICAL jack.
White
Lit The AUX input is selected. p.27
All colors
listed above
Flashing
(example)
The volume setting is changed. —
Fading every 2
seconds
(example)
Speaker output is muted. —
Color Condition Status
See page
Orange
Lit The unit is in standby mode. —
Yellow
Lit The unit is in network standby mode. p.11
White
Flashing A new firmware update is available.
p.28Slow flashing The firmware is being updated.
Fading every 3
seconds
The firmware has been successfully updated.
Color Condition Status
See page
Orange
Slow flashing Check the connections of the right speaker. p.9
Red
Flashes twice No presets have been registered. p.22
Slow flashing
The AC power supply cable is not firmly connected to the
AC wall outlet. Connect the AC power supply cable firmly to
the AC wall outlet.
p.10
The protection circuitry has been activated. Turn off the
unit, disconnect the AC power supply cable, and contact
the nearest authorized Yamaha dealer or service center.
p.33
Repeatedly
flashes twice
The firmware download cannot be found. Check that this
unit is connected to the network.
p.28
Repeated
flashes three
times
An error occurred during firmware updating. To restart
updating, press WIRELESS DIRECT on the rear panel.
English
1 second 1 second
3 second 3 second
1 second 1 second
1 second 1 second
1 second 1 second
1 second 1 second
2 second 2 second
1 second 1 second
3 second 3 second
1 second 1 second
1 second 1 second
1 second
1 second

Indicaciones durante la reproducción
Indicaciones relacionadas con el sistema
Indicaciones en caso de error
Tabla de condiciones del indicador de estado
Color Condición Estado
Consulte
la página
Verde
Encendido La entrada de red está seleccionada. p.18, 20, 21
Parpadeando Se está configurando una conexión de red. p.12
Parpadeando
lento
No se establece la conexión con la red. p.12
Desvaneciéndose
cada 3 segundos
Se recibe audio desde MusicCast CONTROLLER. p.18, 20, 21
Rosa
Encendido La unidad está conectada a un dispositivo iOS (AirPlay). p.23
Parpadeando
lento
Se están compartiendo los ajustes del dispositivo iOS y se
ha establecido una conexión de forma inalámbrica
(Wireless Accessory Configuration).
p.15
Azul
Encendido La entrada Bluetooth está seleccionada.
p.24
Parpadeando
lento
No se puede emparejar Bluetooth.
Azul cielo
Encendido La entrada USB está seleccionada.
p.26
Parpadeando
lento
No hay ningún PC conectado a la toma USB.
Púrpura
Encendido La entrada digital óptica está seleccionada.
p.27
Parpadeando
lento
No hay ningún dispositivo conectado a la toma OPTICAL.
Blanco
Encendido La entrada AUX está seleccionada. p.27
Todos los
colores
incluidos
anteriormente
Parpadeando
(ejemplo)
Se cambia el ajuste de volumen. —
Desvaneciéndose
cada 2 segundos
(ejemplo)
Se silencia la salida de los altavoces. —
Color Condición Estado
Consulte
la página
Naranja
Encendido La unidad está en modo en espera. —
Amarillo
Encendido La unidad está en modo de red en espera. p.11
Blanco
Parpadeando Hay disponible una nueva actualización de firmware.
p.28
Parpadeando
lento
El firmware se está actualizando.
Desvaneciéndose
cada 3 segundos
El firmware se ha actualizado correctamente.
Color Condición Estado
Consulte
la página
Naranja
Parpadeando
lento
Compruebe las conexiones del altavoz derecho. p.9
Rojo
Parpadea dos
veces
No se ha registrado ninguna presintonía. p.22
Parpadeando
lento
El cable de alimentación de CA no está firmemente
conectado a la toma de CA de la pared. Conecte
firmemente el cable de alimentación de CA a la toma de
CA de la pared.
p.10
Se ha activado el circuito de protección. Apague la
unidad, desconecte el cable de alimentación de CA y
póngase en contacto con el distribuidor autorizado de
Yamaha o centro de servicio técnico más cercano.
p.33
Parpadea de
forma repetida
dos veces
No se puede encontrar la descarga de firmware.
Compruebe que esta unidad está conectada a la red.
p.28
Parpadea de
forma repetida
tres veces
Se ha producido un error durante la actualización de
firmware. Para reiniciar la actualización, pulse WIRELESS
DIRECT en el panel trasero.
Español
1 segundo 1 segundo
3 segundos 3 segundos
1 segundo 1 segundo
1 segundo 1 segundo
1 segundo 1 segundo
1 segundo 1 segundo
2 segundos 2 segundos
1 segundo 1 segundo
3 segundos 3 segundos
1 segundo 1 segundo
1 segundo 1 segundo
1 segundo
1 segundo

Network Powered Speaker
OWNER’S MANUAL
MANUAL DE INSTRUCCIONES
LV
© 2015 Yamaha Corporation Printed in Indonesia ZS39850
Indicaciones durante la reproducción
Indicaciones relacionadas con el sistema
Indicaciones en caso de error
Tabla de condiciones del indicador de estado
Color Condición Estado
Consulte
la página
Verde
Encendido La entrada de red está seleccionada. p.18, 20, 21
Parpadeando Se está configurando una conexión de red. p.12
Parpadeando
lento
No se establece la conexión con la red. p.12
Desvaneciéndose
cada 3 segundos
Se recibe audio desde MusicCast CONTROLLER. p.18, 20, 21
Rosa
Encendido La unidad está conectada a un dispositivo iOS (AirPlay). p.23
Parpadeando
lento
Se están compartiendo los ajustes del dispositivo iOS y se
ha establecido una conexión de forma inalámbrica
(Wireless Accessory Configuration).
p.15
Azul
Encendido La entrada Bluetooth está seleccionada.
p.24
Parpadeando
lento
No se puede emparejar Bluetooth.
Azul cielo
Encendido La entrada USB está seleccionada.
p.26
Parpadeando
lento
No hay ningún PC conectado a la toma USB.
Púrpura
Encendido La entrada digital óptica está seleccionada.
p.27
Parpadeando
lento
No hay ningún dispositivo conectado a la toma OPTICAL.
Blanco
Encendido La entrada AUX está seleccionada. p.27
Todos los
colores
incluidos
anteriormente
Parpadeando
(ejemplo)
Se cambia el ajuste de volumen. —
Desvaneciéndose
cada 2 segundos
(ejemplo)
Se silencia la salida de los altavoces. —
Color Condición Estado
Consulte
la página
Naranja
Encendido La unidad está en modo en espera. —
Amarillo
Encendido La unidad está en modo de red en espera. p.11
Blanco
Parpadeando Hay disponible una nueva actualización de firmware.
p.28
Parpadeando
lento
El firmware se está actualizando.
Desvaneciéndose
cada 3 segundos
El firmware se ha actualizado correctamente.
Color Condición Estado
Consulte
la página
Naranja
Parpadeando
lento
Compruebe las conexiones del altavoz derecho. p.9
Rojo
Parpadea dos
veces
No se ha registrado ninguna presintonía. p.22
Parpadeando
lento
El cable de alimentación de CA no está firmemente
conectado a la toma de CA de la pared. Conecte
firmemente el cable de alimentación de CA a la toma de
CA de la pared.
p.10
Se ha activado el circuito de protección. Apague la
unidad, desconecte el cable de alimentación de CA y
póngase en contacto con el distribuidor autorizado de
Yamaha o centro de servicio técnico más cercano.
p.33
Parpadea de
forma repetida
dos veces
No se puede encontrar la descarga de firmware.
Compruebe que esta unidad está conectada a la red.
p.28
Parpadea de
forma repetida
tres veces
Se ha producido un error durante la actualización de
firmware. Para reiniciar la actualización, pulse WIRELESS
DIRECT en el panel trasero.
Español
1 segundo 1 segundo
3 segundos 3 segundos
1 segundo 1 segundo
1 segundo 1 segundo
1 segundo 1 segundo
1 segundo 1 segundo
2 segundos 2 segundos
1 segundo 1 segundo
3 segundos 3 segundos
1 segundo 1 segundo
1 segundo 1 segundo
1 segundo
1 segundo
-
 1
1
-
 2
2
-
 3
3
-
 4
4
-
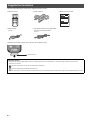 5
5
-
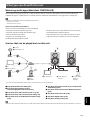 6
6
-
 7
7
-
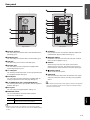 8
8
-
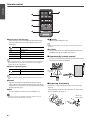 9
9
-
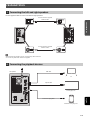 10
10
-
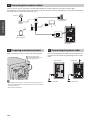 11
11
-
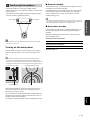 12
12
-
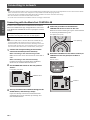 13
13
-
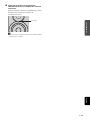 14
14
-
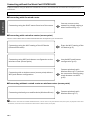 15
15
-
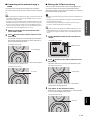 16
16
-
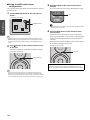 17
17
-
 18
18
-
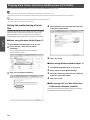 19
19
-
 20
20
-
 21
21
-
 22
22
-
 23
23
-
 24
24
-
 25
25
-
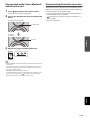 26
26
-
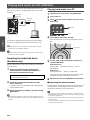 27
27
-
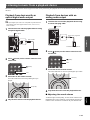 28
28
-
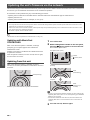 29
29
-
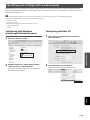 30
30
-
 31
31
-
 32
32
-
 33
33
-
 34
34
-
 35
35
-
 36
36
-
 37
37
-
 38
38
-
 39
39
-
 40
40
-
 41
41
-
 42
42
-
 43
43
-
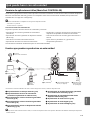 44
44
-
 45
45
-
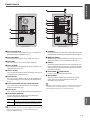 46
46
-
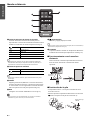 47
47
-
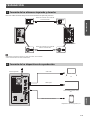 48
48
-
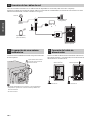 49
49
-
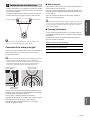 50
50
-
 51
51
-
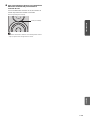 52
52
-
 53
53
-
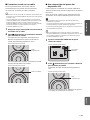 54
54
-
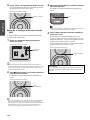 55
55
-
 56
56
-
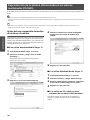 57
57
-
 58
58
-
 59
59
-
 60
60
-
 61
61
-
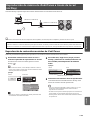 62
62
-
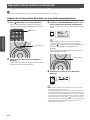 63
63
-
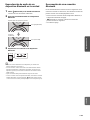 64
64
-
 65
65
-
 66
66
-
 67
67
-
 68
68
-
 69
69
-
 70
70
-
 71
71
-
 72
72
-
 73
73
-
 74
74
-
 75
75
-
 76
76
-
 77
77
-
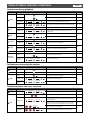 78
78
-
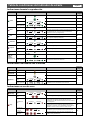 79
79
-
 80
80


Yamaha NX-N500 El manual del propietario
- Categoría
- Bocinas portables
- Tipo
- El manual del propietario
en otros idiomas
- English: Yamaha NX-N500 Owner's manual
Artículos relacionados
-
Yamaha Wireless Streaming Amplifire WXA-50 Manual de usuario
-
Yamaha CD-N500 Silver Manual de usuario
-
-
Yamaha MusicCast WX-030 El manual del propietario
-
Yamaha WX-030 El manual del propietario
-
Yamaha YSP-2700 El manual del propietario
-
-
Yamaha ISX-80 El manual del propietario
-
Yamaha RX-V4A Guía del usuario
-
Yamaha RX-A1080 El manual del propietario