GE JKP90BM4BB El manual del propietario
- Categoría
- Microondas
- Tipo
- El manual del propietario

GEAppliances.com
©
°_,.q
Safety Instructions. .......... 2-9
Operating Instructions
Microwave Control Panel ..... 10, 11
Microwave Oven Controls .... 10-21
i,ower Oven Control Panel ...22, 23
Lower Oven Controls ........ 22-34
Lower Oven Thermostat ........ 28
Sabbath Feature ............ 33, 34
Self Cleaning Lower Oven ... 29, 30
Sensor Controls ............. 16, 17
Care and Cleaning
Door ......................... 36
Light Bulb .................... 37
Microwave Oven ............... 35
Racks ........................ 38
Troubleshooting Tips ...... 39-41
Accessories ................... 42
Consumer Support
Consumer Support ............ 44
Warranty ..................... 43
...........................................................................................................................................................iiiiiiiiiiiiiiiiiiiiiiiiiiiiiiiiiiiiiiiiiiiiiiiiiiiiiiiiiiiiiiiiiiiiiiiiiiiiiiiiiiiiiiiiiiiiiiiiiiiiiiiiiiiiiiiiiiiiiiiiiiiiiiiiiiiiiiiiiiiiiiiiiiiiiiiiiiii
,]KP90-2 7" Double Wall Ove'n
,liP90-30" Double Wall Ove'n
I Themicrowave oven in this I
cooking center is 1000watts.
0
0
Write the model and serial
numbers here:
Model #
Serial #
You can find them on a label inside
the upper oven on the left side.
Printed inthe United States 49-80579 04-09 JR

IMPORTANTSAFETYINSTRUCTIONS.
READALLINSTRUCTIONSBEFOREUSING.
WARNING!
For your safety, the information in this manual must be followed to minimize the risk of fire or
explosion, electric shock, or to prevent property damage, personal injury, or loss of life.
PRECAUtiONSTOAVOIDPOSSIBLEEXPOSURETOEXCESSIVE
MICROWAVEENERGY
iiiiiiiiiiiii!
Do not attempt m operate this oven with
the door open, since open-door operation
can result in harm[ul exposure to
microwave energy. It isimportantnot to
defeat or tamper with thesafety interlocks.
Do not place any ob,ject between the oven
flont fhce and the door, or allow soil or
cleaner residue to accumulate on sealing
surfaces.
The oven should not be adjusted or
repaired by anyone except properly
qualified ser\,ice personnel.
Do not operam the oven if it is damaged.
It is particularly important that the oven
door close properly and that there is no
damage to the:
[] door (bent),
[] hinges and latches (broken or
loosened),
_] door seals and sealing surfaces.
IMPORTANTSAFETYNOtiCE
The California Safe Drinking Water and Toxic Enforcement Act requires the Governor of California to
publish a list of substances known to the state to cause cancer, birth defects or other reproductive
harm, and requires businesses to warn customers of potential exposure to such substances.
The fiberglass insulation in self-clean ovens gives off a very small amount of carbon monoxide during
the cleaning cycle. Exposure can be minimized by venting with an open window or using a ventilation
fan or hood.
2 SAVE THESEINSTRUCTIONS

IMPORTANT SAFETY INSTRUCTIONS.
READ ALL INSTRUCTIONS BEFORE USING.
GEAppliances.com
SAFETYPRECAUTIONS
When using electrical appliances, basic safety precautions should be followed, including the following:
WARNING Grounding
Instructions:This appliance must be
connected to a _ounded, metallic,
permanent winng system, or an equipment
grounding conductor should be mn with the
circuit conductors and connecmd
m the equipment grounding
mrminal or lead on the appliance.
WARNING Tored.cetheriskof
bums, electric shock, fire, injury topersons or
exposure to excessive microwave energy:
Use this appliance only fbr its intended
use as described in this manual. Do not
use corrosive chemicals or vapors in
this appliance. This cooking center is
specifically designed to heat or cook
fbod, and is not intended for laborato U
or industrial use.
Be sure your appliance is properly
installed and grounded by a qualified
technician in accordance xdth the
prox,ided Installation Instructions.
Have the installer show you the location of
the circuit breaker or fuse. Mark it for easy
reference.
Be sure the cooking center is securely
installed in a cabinet that is firmly attached
to the house structure. Weight on the oven
door could cause the oven m tip and
result in in,juU. Never allow anyone to
climb, sit or hang on the oven door:
iiiiiiiiiiiii!
This appliance should be ser\,iced only
by qualified ser\,ice personnel. Contact
nearest authorized serx,ice facility for
examination, repair or adjustment. Do not
repair or replace any part of this appliance
unless specifically recommended in this
manual. All other ser\,icing should be
referred m a qualified mchnician.
Do not store this appliance outdoors.
Do not use this product near wamr--fbr
example, in a wet basement, or near a
swimming pool.
Before performing any ser\,ice, disconnect
the cooking center power supply at the
household distribution panel by removing
the fuse or switching off the circuit
breaker.
Do not operate this appliance if it has a
damaged cord or plug, if it is not working
properly, or if it has been damaged or
dropped.
Do not leave children alone---children
should not be left alone or unattended in
an area where appliance is in use. They
should never be allowed to sit or stand on
any part of the appliance.
Don't allow anyone to climb, stand or
hang on the door. They could damage
the cooking cenmr and cause severe
personal inju U.
SAVE THESEINSTRUCTIONS 3

IMPORTANTSAFETYINSTRUCTIONS.
READALLINSTRUCTIONSBEFOREUSING.
WARNING!
SAFETYPRECAUTIONS
Do not use water on grease fires. Never pick up a flaming pan. Smother flaming pan by covering
pan completely with well-fitting lid, cookie sheet or flat tray. Flaming grease outside a pan can be
put out by covering with baking soda or, if available, a multi-purpose dry chemical or foam-type
fire extinguisher.
Do not cover or block any openings
It CAUTION:,ter.s of interest to on the appliance.
children should not be stored in cabinets
above an oven; children climbing on the
oven to reach items could be seriously
injured.
Teach children not to play xdth the
controls or any other part of the
cooking center
i,arge scratches or impacts to glass door
carl lead to broken or shattered glass.
Wear proper clothing. Loose-fitting or
han_ng garments should never be worn
while using the appliance. Hammable
material could be i_dted if brought in
contact with hot heating elements and
may cause severe bums.
Use only dU pot holders--moist or damp
pot holders on hot surfaces may result in
burns flom steam. Do not let pot holders
much hot heating elements. Do not use a
rowel or other bulky cloth. Such cloths carl
catch fire on a hot element.
Always keep dish towels, dishcloths, pot
holders and other linens a s_e distance
flom your oven.
Always keep wooden spoons and plastic
utensils and canned food a s_e distance
m_,ayflom your oven.
Always keep combustible wall coverings,
curtains or drapes a s_e distance from
your overl.
Do not store flammable material in an
oven or near the cooking center
For your s_ety, never use your appliance
fk_rwamdng or heating the room.
Do not leave paper products, cooking
utensils or fk)od in the oven when not
in use.
Do not store or use combustible materials,
gasoline or other flammable vapors and
liquids in the x,icinity of this or any other
appliance.
Do not let cooking _ease or other
flammable materials accumulate in or
near the cooking center
Do not touch heating elements or inmfior
surf`ace of the oven. These surfaces may be
hot enough to burn even though they are
dark in color- During and _ter use, do not
touch, or let clothing or other flammable
materials contact any interior area of the
oven; allow sutticient time f_r cooling first.
Potentially hot surf`aces include oven vent
openings, surf`aces near the openings, and
crex,ices around the oven door:
iiiiiiiiiiiii!
REMEMBER:The inside surf`ace of the
oven may be hot when the door is opened.
Never place cooking umnsils or any other
items on the oven floor. There is a heating
element beneath the oven floor- Placing
items on the oven floor may cause the
oven to overheat, resulting in damage
m the oven and risk of damage or fire
to cabinets.
COOKMEATANDPOULTRYTHOROUGHLY...
Cookmeat andpoultry thoreughly--meat toat least anINTERNALtemperatureof 160°Fandpoultry
toat leastan INTERNALtemperatureof 180°ECookingtothese temperaturesusua//yprotectsagainst
foodbomeillness.
4 SAVE THESEINSTRUCTIONS

IMPORTANT SAFETY INSTRUCTIONS.
READ ALL INSTRUCTIONS BEFORE USING.
GEAppliances.com
MICflOWAVEOVEN
Read and follow the specific "Precautions to Avoid Possible Exposure to Excessive Microwave
Energy" section in this manual.
Toreduce therisk offire in the ovencavity:
Do not overcook food. (_arefully attend
appliance if papel, plastic or other
combustible materials are placed inside
the oven m facilitate cooking.
Remove xdre twist-ties fl_om paper or
.plastic containers before placing bags
In ovell.
Do not use your microwave oven to d_T
newspapers.
Do not pop popcorn in your microwave
oven unless in a special microwave
popcorn accesso U or unless you use
popcorn labeled for use in microwave
ovens.
Do not overcook potatoes. They could
dehydrate and catch fire, causing damage
to your ovell.
Do not operate the oven while empty m
avoid damage m the oven and the danger
of fire. If by accident the oven should mn
empty a minute or two, no harm is done.
However; tU m avoid operating the oven
empty at any time--it saves eneEw and
prolongs the life of the oven.
Do not use the oven for storage purposes.
Do not leave paper products, cooking
utensils or food in the oven when not
ill use.
K materials inside the oven should ignite,
keep oven door closed, turn oven off[;
and shut off[ power at the fuse or circuit
breaker panel. If the door is opened, the
fire may spread.
This microwave oven is not approved or
tested for marine use.
Some products such as whole eggs and
sealed containers--for example, closed
,jarsmwill explode and should not be
heated in this microwave oven. Such use
of the microwave oven could result in
injury.
Do not operate the microwave oven
without the turntable and support in
place.
Avoid heating baby fbod in glass jars, even
with the lid off[,Make sure all in[mlt fbod
is thoroughly cooked. Stir fbod to
distribute the heat evenly. Be careful m
prevent scalding when warming fbrmula
or breast milk. The container may feel
cooler than the milk really is. Always rest
the milk befbre feeding the baby.
iiiiiiiiiiiii!
Do not boil eggs in a microwave oven.
Pressure will build up inside the egg
yolk and will cause it m burst, possibly
resulting in in,ju U.
Foods with unbroken tutor "skin" such
as potatoes, sausages, tomatoes, apples,
egg yolks, chicken livers and other _blets
should be pierced to allow smam to escape
during cooking.
Don't defrost Dozen beverages in narrow-
necked bottles (especially carbonated
beverages). Even if the container is
opened, pressure can build up. This can
cause the container m burst, possibly
resulting in in,ju U.
Hot foods and smam can cause burns.
Be careful when opening any containers
of hot fbod, including popcorn bags,
cooking pouches and boxes. To prevent
possible in,juU, direct smam away flom
hands and face.
As with any appliance, close super\,ision is
necessa U when used by children.
SAVE THESEINSTRUCTIONS 5

IMPORTANTSAFETYINSTRUCTIONS.
READALLINSTRUCTIONSBEFOREUSING.
WARNING!
MICROWAVE-SAFECOOKWARE
Make sure all cookware used in your microwave oven is suitable for microwaving. Most glass
casseroles, cooking dishes, measuring cups, custard cups, pottery or china dinnerware which does
not have metallic trim or glaze with a metallic sheen can be used. Some cookware is labeled
"suitable for microwaving."
ff you are not sure if a dish is microwave-
safe, use this test: Place ill the oven both
the dish you are testing and a glass
measuring cup filled xdth 1 cup of water--
set the measuring cup either ill or next to
the dish. Microwave 35-45 seconds at high.
If the dish heats, it should not be used
for microwm,ing.
If the dish remains cool and only the
water ill the cup heats, then the dish is
microwave-safe.
If you use a meat thermometer while
cooking, make sure it is safe for use ill
microwave ovens.
Do not use recycled paper products.
Recycled paper towels, napkins and
waxed paper may contain metal flecks
which could cause arcing or ignite.
Paper products containing nylon or
nylon filaments should be avoided,
since they may also i_lite.
Some Styrofoam trays (like those that
meat is packaged on) have a thin strip
of metal embedded ill the bottom. When
microwaved, the metal Call burn the floor
of the oven or i_lite a paper towel.
Not all plastic wrap is suitable for use ill
microwave ovens. Check the package for
proper use.
Paper towels, waxed paper and plastic
wrap Call be used to cover dishes ill order
to retain moisture and prevent spattering.
Be sure to vent plastic wrap so steam
Call escape.
Oversized fbod or oversized metal
cookware should not be used ill a
microwave oven. Electrical shock or
fire could occui:
While paper plates may be used for timed
cooking and deflosting, do not use them
with Auto Sensor cooking. Use microwave-
safe plains or bowls for reheating. Cover
with plastic wrap.
Cookware may become hot because
of heat transferred flom the heated
food. Pot holders may be needed to
handle the cookware.
"Boilable" cooking pouches and tightly
closed plastic bags should be slit, pierced
or vented as directed by package. If they
are not, plastic could burst during or
immediately 'after cooking, possibly
resulting ill injui T. Also, plastic storage
containers should be at least partially
uncovered because they form a tight seal.
When cooking xdth containers tightly
covered _dth plastic wrap, remove
covering carefully and direct steam
ms,ay flom hands and face.
Use foil only as directed ill this manual.
TV dinners may be microwaved ill foil
trays less than 3/4" high; remove the top
foil cover and return the tray to the box.
When using foil ill the microwave oven,
keep the foil at least 1 inch ms,ay flom the
sides of the oven.
G SAVE THESEINSTRUCTIONS

IMPORTANTSAFETYINSTRUCTIONS.
READALLINSTRUCTIONSBEFOREUSING.
GEAppliances.com
Plastic cookware - Plastic cookware
desi_md It_r microwave cooking is veU
useful, but should be used carefully. _]
Even microwave-safe plastic may not
be as tolerant of overcooking conditions
as are glass or ceramic materials and
may soften or char if sub,jected to short _]
periods of overcooking. In longer
exposures to overcooking, the food _]
and cookware could i_dte.
Follow theseguidelines:
Use microwave-safe plastics only and
use them in strict compliance xdth
the cookware manufacturer's
recommendations.
Do not microwave empty containers.
Do not permit children to use
plastic cookware xdthout complete
super_,ision.
ARCING
If you see arcing, press the CLEAR/OFFpad and correct the problem.
Arcing is themicrowave term forsparks in the
oven.Arcing is caused by:
Metal or foil touching the side of the oven.
Foil not molded to Ik_od (upturned edges
act like anmnnas).
Metal, such as twist-ties, poult_T pins or
gold-rimmed dishes, in the microwave.
Recycled paper towels containing small
metal pieces being used in the microwave.
SUPERHEATEDWATER
Microwaved water and other liquids do not always bubble when they reach the boiling point.
They can actually get superheated and not bubble at all.
Superheated liquid xdll bubble up out of the
cup when it is moved or when something
like a spoon or tea bag is put into it.
To prevent this flom happening and causing
in,jury, do not heat any liquid fk_rmore than
9 minutes per cup.
After heating, let the cup stand in the
microwave for 30 seconds befk_re mox,ing it
or putting anything into it.
Spontaneousboiling
Under certain special circumstances, liquids
may start to boil during or shortly after removal
from the microwave oven.
To prevent burns flom splashing liquid, we
recommend the f_llo_dng bef_re remox,ing
the container from the oven:
Allow the container to stand in the oven
for 30 to 40 seconds _ter the oven has
shut ore
Do not boil liquids in narrow-necked
containers such as soft drink bottles, wine
flasks and especially narrow-necked cot_ee
cups. Even if the container is opened,
excessive steam can build up and cause it
to burst or overflow.
SAVE THESEINSTRUCTIONS 7

IMPORTANTSAFETYINSTRUCTIONS.
READALLINSTRUCTIONSBEFOREUSING.
ALLTHESETHINGSARENORMALWITHYOURMICROWAVE
iiiiiiiiiiiii!
Steam or vapor escaping from around
the door
i,ight reflection around the door or the
outer case.
Dimming of the oven light and change
in the blower sound may occur while
operating at power levels other than high.
The microwave fan may operate xdth both
ovens ore It is cooling the control and xdll
turn itself ot_,
Some TV-radio interference might be
noticed while using your microwave oven.
It's similar to the interference caused by
other small appliances and does not
indicate a problem xdth your oven.
A dull thumping sound while the oven
is operating.
MICROWAVETERMSANDDEFINITIONS
Aw_
Arcingisthemicrowavetermforsparksin theoven.
Arcingiscausedby:
metalorfoiltouchingthesideoftheoven.
foilthatisnotmoldedtofood(upturnededgesact
likeantennas).
_,metalsuchastwist-ties,poultrypins,go/d-rimmed
dishes.
recycledpapertowelscontainingsmallmetalpieces.
Covering
Coversholdb moisture,allowformoreevenheatbgand
reducecookingtime.Ventingplasticwraporcoverbgwith
waxpaperallowsexcesssteamtoescape.
Shielding
Ina regularoven,youshieldchickenbreastsorbaked
foodstopreventoverbrewnbgWhenmicrowaving,you
usesmallstripsoffoiltoshieldthinparts,suchasthetips
ofwingsandlegsonpoultry,whichwouldcookbefore
largerparts.
Standingtime
Whenyoucookwithregularovens,foodssuchasroasts
orcakesareallowedtostandtofinishcookingorto
set.Standingtimeisespeciallyimportantinmicrowave
cooking.Notethata microwavedcakeisnotplacedon
acoolingrack.
Venting
Aftercoveringa dishwithplasticwrap,youventthe
plasticwrapbytumbgbackonecomersoexcesssteam
canescape.
PACEMAKERS
Most pacemakers are shielded flom
interference from electronic products,
including microwaves. However, patients with
pacemakers may wish to consult their
physicians if they have concerns.
8 SAVE THESEINSTRUCTIONS

IMPORTANTSAFETYINSTRUCTIONS.
READALLINSTRUCTIONSBEFOREUSING.
GEAppliances.com
WARNING!
SELF-CLEANINGLOWEROVEN
Do not use aluminum foil to line oven bottoms, except as suggested in this manual Improper
installation of aluminum foil may result in a risk of electric shock or fire.
Stand m_,ayffonl the oven when opening iiiiiiiii
the oven door. Hot air or steam which
escapes can cause burns to hands, face ii!!_i!
and/or eyes.
Do not heat unopened food containers.
Pressure could build up and the container
could burst, causing an in,juiT.
Keep the oven vent unobstructed.
Keep the oven flee flom #ease buildup.
Keep the cooking center clean and flee
of accumulations of grease or spillovers,
which may ignite.
Never leave the oven door open when you
are not watching the cooking center
Place the oven rack in the desired position
while the oven is cool. If racks must be
hail(fled when hot, do not let pot holder
contact the heating element.
When using cooking or roasting bags
in the oven, follow the manufacturer's
directions.
Pulling out the rack to the stop-lock is a
convenience in lifting hem,y foods. It is
also a precaution against bums flom
touching hot surfaces of the door or
oven walls.
Do llot use the ovell _(()r a storage area.
Items stored in an oven can i_lite.
Do not leave paper products, cooking
utensils or food in the oven when not
in use.
Do not use the oven to dIT newspapers.
If overheated, they can catch oll fire.
Never leave,jars or cans of fht drippings
ill or Ileal" your oven.
Clean only parts listed in this Owner's
Manual.
Do not clean the door gasket. The door
gasket is essential for a good seal. Care
should be taken not m rob, damage or
move the gasket.
Do llOt use ovell clea_lers. No commercial
oven cleaner or oven liner protective
coating of any kind should be used in or
around any part of the oven. Residue flom
oven cleaners will damage the inside of
the oven when the self clean cycle is used.
Before self cleaning the oven, remove
the probe, broiler pail, _id and other
cookware.
Be sure to xdpe up excess spillage before
starting a self cleaning cycle.
If the self cleaning mode malfhncfions,
turn the oven off and disconnect the
power supply. Have it ser\,iced by a
qualified technician.
i,isten for a fhn--a fan noise should be
heard sometime during the cleaning
cycle. If not, call for ser\@e before
self cleaning again.
After broiling, always take any broiler
pall out of the oven and clean it. Leftover
grease in a broiler pall can catch fire next
time you use the oven.
READANDFOLLOWTHISSAFETYINFORMATIONCAREFULLY.
SAVETHESEINSTRUCTIONS
9

Usingthemicrowave ovencontrols.
Throughout this manual, features and appearance may vary from your model. Your model may have one of the
following controls.
Microwave Oven
@
Sensor Cooking Convenience Cooking
o ! ,®
,,_e,_o_,Lr_u'°_Glr_o+O_ _ _ _ _ 0'_0_++_uo_eu-_
Express Express Express Express Express
l_'___¢%moq ¢-Powe;q
L coo,j L Leve! J 6 7 8 9 0 _'-Kitchen_ _"+OelaY+_
............................... L_Timer_ j L_Start_
Guide BehindDoor
Microwave Oven
f-
© L
Guide Behind Door
Sensor Cooking Convenience Cooking
Express Express Express Express Express
6 7 8
Express Bound On/Off
....... I
_F Aotoq r-+,meq
_Loe+_o_ Loefro_
___--Ti me_'_ _Power_
OOkJ [ Leve!J
e I
9
i
o ¢_+eaq--O
D,,p_._o°/offL_Off_) t_I
I
;tchen_ KDeJoYq
+m+_L_storU
I0

GEAppliances.com
MicrowaveOvenControlFeaturesandSettings
Display
Displays the time during cooking
flmcfions, tlle power level being used,
tile Aura (;odes, the Aura Defrost food
weights, the cooking mode and
insmlcfions.
NOTE:Thetimeonthemicrowavedisp/ay
isshowninminutesandseconds(1:30isone
minute,30seconds).Onthe/oweroven,time
isshowninhoursandminutes(1:30isonehour,
30mbutes).
0
Auto Sensor and Convenience Controls
The top row of pads lists specific items
you may choose to heat or cook.
PowerLevel
Press to choose die power level you want
m set. Watch the display while pressing
this pad m select the power level you want
m set. You will also see a defrost level. This
setting will allow you to choose your own
defrost power level by using the number
pads.
Number Pads
Aider pressing a flmcfion pad, press die
number pads to set the exact amount of
time you want to cook. For example, if
you press the 1,2 and 5 pads, you have
set 1 minum and 25 seconds.
Popcorn
Use to pop popcorn.
Reheat
Use when foods need a quick warm up.
Potato
Use when cooking whole potatoes.
Beverage
Use to heat a cup of coffee or odler
beverage.
Clear/Off
O
Pressing the Clear/Offpad cancels all
microwave cooking flmctions. It does not
cancel tile Kitchen TimeL
Start
Aider all selections are made, press dfis
pad to start die oven. The Startpad must
be pressed to turn on any flmcdon.
@
@
0
Snacks
Use to warm a variety of snack foods.
Cook
Use to automatically set the cooking
times and power levels for a variety
of foods.
Time Defrost
Use Time Defrost for most odler foods.
Auto Defrost
Use Auto Defrost for meat, poultry
and fish.
Time Cook
Allows you to microwave for any time up
to 99 minutes and 59 seconds.
@
0
0
0
Kitchen limer Min/Sec
Press to set the timer up m 99 minutes
and 59 seconds. Press the number pads
m set the time. Press the Kitchen timer
Min/Sec pad again to start. Press the
Kitchen timer Min/Sec pad a,vice m
clear the display.
Doesnot turn onmicrowaveenergy.
Delay Start
Allows you to set the microwave to
delay cooking up to 12 hours.
Add 30 Sec
Each time you press dfis pad tile set
time is incre_tsed 30 seconds.
Clock
Press dfis pad before setting tile clock.
11

Changingthemicrowave power level.
Thepower level may be entered or changed immediately after entering the feature time for time Cook,
time Defrost or Express Cook. Thepower level may also be changed during time countdown.
1 2 3 4 5
_-xDress Exores_ Exoress E_oress Exoress
To change the power level...
[_ Press the _me Cook pad or the Time
Defrost pad.
Herearesome examplesofusesfor
variouspowerlevels:
6 7 8 9 0 [_ Enter cooking or deflosfing time.
Express So_n_O.lOrr O,sp_yO_lOr_
Power
__Sta@ 141 Select desired power level 1-10.
[-_ Press the Startpad.
Variablepowerlevelsaddflexibilitytomicrowave
cookbg Thepowerlevelsonthemicrowaveoven
canbecomparedtothesurfaceunitsonarange.
Eachpowerlevelgivesyoumicrowaveenergya
certabpercentofthetime.
Powerlevel 7 is microwave energy 70%
of the 6me.
Highl& Fish, bacon, vegetables,
boiling liquids.
Med-High7."Gentle cooking of meat
and poultry; baking casseroles and
reheating.
Medium 5: Slow cooking and
tendexJzing for stews and less tender
cuts of meat.
Low2 or3".Deflosting; simmexing;
delicate sauces.
Warm1: Keeping food warn1; softening
butteL
Powerlevel 3 is energy, 30% of the
time.
Most cooking will be done on High
(powerleve110)which gives you 100%
powex. Power level 10 will cook fasmr
but food mW need more flequent
stirring, rotating or turning ovex.
A lower setting will cook more evenly
and need less sfi_xing or rotating of the
food. Some foods mW have better flavox,
mxture or appearance if one of the lower
settings is used. Use a lower power level
when cooking foods that have a tendency
m boil ove_; such as scalloped potatoes.
Rest periods (when the microwave
energy cycles off) give dine for the food
m "equalize" or mmsfer heat m the inside
of the food. An example of this is shown
wkh power level 3itbe deflost cycle.
If microwave energy did not cycle off,
the outside of the food would cook
before the inside was deflosmd.
12

Usingthe timedmicrowave features. OEAppli..eeseom
Time
1 2 3 4 5
Expmss Exoress Express £x_mss £xDmss
Time CookI
Allowsyoutomicrowaveforanytimeupto99
mbutesand59seconds.
6 7 8 9 0
Ex_ms_ soundO_Off OisolovC110//
Power level 10(High) is automatically set,
but you may change it for more flexibilib:
%
Press the 77meCookpad.
Enter cooking time. Fox example,
press 1, 5, 0 and 0 for 15 minutes.
Change power level if you don't
want fldl poweL (Press the Power
Level pad. Select a desired power
level 1-10.)
[_] Press tile Startpad.
You may open tile door during Time
Cook to check tile food. Close tile
door and press tile Start pad to
resume cooking.
Time Cook II
Letsyouchangepowerlevelsautomatically
durbgcooking.Here'showtodoit.
%
[]
%
Press file 7Tme Cook pad.
Enmr cooking time.
Change power level if you don't
want fl]ll poweL (Press tile Power
Level pad. Select a desired power
level 1-10.)
Press tile 77meCookpad again.
%
%
Enter tile second cook time.
Change tile power level if you don't
want fldl poweL (Press tile Power
Levelpad. Select a desired power
level 1-10.)
[_ Press the Start pad.
At tile end of Time Cook I, Time Cook II
counts down.
1 2 3
4 51 6
Express Express Express
ExpressCook
Thisis a quickway toset cookingtime for
1-6 minutes.
Press one of the Expresspads (flom I to
6) for 1to 6 minums of cooking at power
level 10.For example, pressthe 2 pad for
2 minutes of cooking time.
Tile power level can be changed as time
is counting down. Press tile Power Level
pad and enter 1-10.
Add 30Seconds
YoucanuseDis featuretwo ways.
It will add 30 seconds to tile time
counting down each time tile pad is
pressed.
, It can be used as a quick way to set
30 seconds of cooking time. No need
m press the Startpad; the oven will
start immediamly:
13

Usingthe timedmicrowave features.
Cooking Guide For Time Cook. Use power level High (10) unless otherwise noted.
Asparagus
(freshspears(
(frozenspears,,
1lb. 7to 10min.
Med-High(7)
lO-oz,package 5to 8min.
Beans
(freshgreen) 1lb._;utinhalf 12to 17min.
(frozengreen! 10-oz.package 6to 9rain.
ffrozenlima, 10-oz.package 6to 9min.
In1½-qt.casserole,place1/4 cupwater.
In1-qt.casserole.
In1½-qt.casserole,place1/2cupwater.
In1-qt.casserole,place2tablespoonswater.
In1-qt.casserole,place1/4 cupwater.
Beets
ffresh,whole1 1bunch 18to 25min. In2-qt._;asserole,place1/2 _;upwater.
Broccoli
(freshcurl 1bunch(11/4to 1V2Ibs.) 7to 10min. In2-qt._;asserole,place1/2 _;upwater.
(freshspearsJ 1bunch(I_Ato 1V2Ibs.) 9to 13min. In2-qt.casserole,place1/4 cupwater.
ffrozen,chopped( l O-oz.package 5 to 8 min. In1-qt.casserole.
(frozenspears,, l O-oz.package 5 to 8 min. In1-qt.casserole,place3tablespoonswater.
Cabbage
(fresh( 1mediumhead(about2 Ibs.) 8to 11min.
(wedgesJ 7to 10min.
Carrots
ffresh,sliced; 1lb. 6to 9min.
(frozenJ 10-oz.package 5to 8min.
Cauliflower
(fiowerets) 1mediumhead gto 14min.
(fresh,whole) 1mediumhead 9to 17min.
ffrozenJ l O-oz.package 5½to 8 min.
In1½-or 2-qt.casserole,place1/4 cupwater.
In2- or3-qt. casserole,place1/4 cupwater.
In1½-qt.casserole,place1/4cupwater.
In1-qt.casserole,place2tablespoonswater.
In2-qt.casserole,place1/2 cupwater.
In2-qt.casserole,place1/2 cupwater.
In1-qt.casserole,place2tablespoonswater.
Corn
(frozenkerne,', lO-oz,package 4to 8min. In1-qt.casserole,place2tablespoonswater.
Cornonthe cob
(fresh) 1to 3ears 3to 5min.
perear
(frozen) 1 ear 5 to 7 min.
2 to 3 ears 2 to 4 rain.
per ear
In2-qt.glassbakingdish,placecorn.Ifcornis in husk,
usenowater;if cornhasbeenhusked,add1/4 cup
water.Rearrangeafter half oftime.
Placein aroundglassbakingdish.Coverwithvented
plasticwrap.Rearrangeafter halfof time.
Mixed vegetables
(frozenJ l O-oz.package 4 to 8 min. In1-qt.casserole,place3tablespoonswater.
Peas
ffresh,shelled) 2Ibs.unshelled 9to 12min. In1-qt.casserole,place1/4 cupwater.
(frozenJ l O-oz.package 4 to 8 min. In1-qt.casserole,place2tablespoonswater.
Potatoes
ffresh,cubed,white1
rfresh,whole,sweet
orwhiteJ
4potatoes(6to 8oz.each) 11to 14min.
1(6to 8 oz.) 2to 5min.
Peelandcut into1-inchcubes.Placein 2-qt. casserole
with 1/2 cupwater.Stirafter half of time.
Piercewith cookingfork.Placeinthe oven,1 inchapart,
in circulararrangement.Letstand5 minutes.
Spinach
(fresh) 10to 16oz. 5to 8min. In2-qt.casserole,placewashedspinach.
(frozen,choppedandleah lO-oz,package 5 to 8 min. In1-qt.casserole,place3tablespoonswater.
Squash
ffresh,summerandyellow/ 1 lb.sliced 4to 7min.
(winter,acornorbutternutJ 1squash 7to 11min.
(about1lb.each)
In1½-qt.casserole,place1/4 cupwater.
Cutin half andremovefibrousmembranes.In2-qt.
glassbakingdish,placesquashcut-side-down.
Turncut-side-upafter4 minutes.
14

GEApplianees.com
A dull thumping noise may be heard during defrosting. This is normal when oven is not operating at High power
Time Defrost
Enpress Express Express Express Express
67890
Expres_ soundon/off O_s_yOnlOff
At onehalfofselecteddefrosting
time,theovensignalsTURN.
At thistime,turnfoodoverand
breakapartorrearrangepieces
formoreevendefrosting.Shield
anywarmareaswithsmallpieces
offoil.
Allowsyoutodefrostfora selectedlengthof
time.SeetheDefrostingGuideforsuggested
times.(AutoDefrostexplabedin theAboutthe
autofeaturesection.)
[_ Press the 77meDefrost pad twice.
_] Enter deflosfing time.
[-_ Press the Start pad.
[_] Turn. food over when the oven
slgmals.
_] Press the Start pad.
Power level is automatically set at 3, but
can be changed. You can deflost small
items quickly by raising the power level
after entering the time. Powerlevel7
cuts the total defrosting time in about
half; powerleve110 cuts the total dine to
approximately 1/3. HoweveI; food will
need more flequent attention than usual.
Defrostingtips
, Foodsfrozenb paperorplasticcanbe
defrostedin thepackage.Closedpackages
shouldbesilt,piercedorventedAFTERfood
haspartiallydefrosted.Plasticstorage
contabersshouldbepartiallyuncovered.
Family-size,prepackagedfrozendinners
canbedefrostedandmicrowaved,ff the
foodisb afoilcontainer,transferit toa
microwave-safedish.
Foodsthatspoileasilyshouldnotbe
allowedtosit outformorethanonehour
afterdefrosting.Roomtemperaturepromotes
thegrowthofharmfulbacteria.
Formoreevendefrostingoflargerfoods,
suchasroasts,useAutoDefrost.Besure
largemeatsarecompletelydefrosted
beforecookbg
Whendefrosted,foodshouldbecoolbut
softenedb aftareas,ffstill slightlyicy,return
tothemicrowaveverybriefly,orletitstanda
fewminutes.
Defrosting Guide
Time Comments
Breads,Cakes
Bread,bunsor rollst! piece) 1/2 min.
Sweetrollslapprox. 12oz. 3to 6min. Rearrangeafterhalf thetime.
Fishand Seafood
Fillets,frozen(! lb.! 9to 12rain.
SITellfish,smallpieces(1 ib.) 3to 7min. Placeblockin casserole.Turnoverand breakupafter halfthe time.
Fruit
Plasticpouch- 1or 2/lO-oz.package., 3to 7min.
Meat
Bacon/l lb., 3to 6min.
Franks(! lb.) 3to 6min.
Ground meat 1! lb.1
Roast: beef, lamb, veal, pork
Steaks. chops and cutlets
5 to 8 min. per lb.
11 to 16 min. per lb.
5 to 10 min. per lb.
Placeunopenedpackagein oven.Letstand5 minutesafterdefrosting.
Placeunopenedpackagein oven.Microwavejust untilfrankscanbe
separated.Letstand5minutes,if necessary,to completedefrosting.
Turnmeatoverafterfirst halfof time.
Usepower level 1.
Placeunwrappedmeatin cookingdish.Turnoverafter first half oftime and
shieldwarmareaswith foil. After secondhalfof time,separatepieceswith
tableknife.Letstandto completedefrosting.
Poultry
Chicken,broiler-fryer,cu[ up
/2½to3 Ibs.)
&icken. whole(2_ to3/bs.)
Cornishhen
Turkeybreast/4 to 6Ibs.,
15to 22rain.
20 to 28 rain.
9 to 16 min. per lb.
5 to 10 min. per lb.
Placewrappedchickenindish.Unwrapandturn overafterfirst half oftime.
Aftersecondhalfoftime, separatepiecesandplaceincookingdish.Microwave
2to4 minutesmore,if necessary.Let standafew minutestofinishdefrosting.
Placewrappedchickenindish.After halfthe time,unwrapandturnchicken
over.Shieldwarmareaswith foil. Tocompletedefrosting,runcoldwater in
thecavity untilgibletscanbe removed.
Placeunwrappedhen inthe ovenbreast-side-up.Turnoverafter first half of
time.Runcoolwater inthe cavity untilgibletscanberemoved.
Placeunwrappedbreastin microwave-safedishbreast-side-down.After first
half oftime,turnbreast-side-upandshieldwarmareaswith foil. Defrostfor
secondhalfoftime.Letstand1to 2hoursinrefrigeratorto completedefrosting.
15

Usingthemicrowave sensorcookingfeatures.
The Sensor Features detect the increasing humidity released during cooking. The oven automatically adjusts the
cooking time to various types and amounts of food.
Sensor Cooking
The proper comainers and cove_s are
Covered
Vented
essential for best sensor cooking.
Always use microwave-sJe containers
and cover them wifll lids or vented
plastic wrap. Never use fight sealing
plastic containers--they can prevent
swam flom escaping and cause food
m overcook.
Be sure the outside of the cooking
containers and the inside of the
microwave oven are d_T before
placing food in the oven. Beads
of moisture turning into steam
can mislead the sensoL
Dryoffdishes so theydon_mislead
the sensoc
(Issstirne) (moretime)
Use only with prepackaged
microwave popcorn weighing
1.75to 3.5ounces.
Popcorn
TousethePopcornfeature:
[]
Follow package instructions, using
Time Cook if the package is less
than 11.75ounces or larger than
3.5 ounces. Place the package
of popcorn in the center of
the microwave.
[_ Press the Popcornpad. The oven
starts immediatel):
If youopenthedoorwhilePOPisdisplayed,
ERRORwillappearClosethedoor,pressthe
Clear/Offpadandbeginagain.
How toAdjustthePopcornProgramto
Providea ShorterorLongerCooktime:
If you find that the brand of popcorn you
use underpops or overcooks consistently,
you can add or subuact 20-30 seconds m
the automatic popping time.
Toaddtime:
AfYer pressing file Popcorn pad, press
file 9 pad immediately after file oven
starts for an extra 20 seconds. Press the
9 pad again m add another 10 seconds
(total 30 seconds additional time).
Tosubtract time:
At_er pressing die Popcornpad, press
file I pad immediately after file oven
starts for 20 seconds less cooking time.
Press the 1 pad again m reduce cooking
time another 10 seconds (total 30
seconds less time).
16

GEAppliances.com
(lesstime)(more time)
Reheat
TheReheatfeaturereheatssingleservingsof
previouslycookedfoodsoraplateofleftovers.
[_ Place covered food in the oven.
Press the Reheat pad. The oven
starts immediately.
[_ The oven sigmals when steam is
sensed and the time remaining
begins counting down.
Do not open file oven door until time is
counting down. If file door is opened,
close it and press die Start pad
immediately.
Afterremovingfoodfromtheoven,stir,if
possible,toevenoutthetemperature.If thefood
isnothotenough,usetimeCooktoreheatfor
moretime.Reheatedfoodsmayhavewide
variationsb temperature.Someareasmaybe
extremelyhot.
Somefoodsnotrecommendedforusewith
Reheat--it isbesttouse77meCookfor
thesefoods:
Bread products.
Foods that must be reheated
tin coveI'ed.
Foods that need to be stirred or
rotated.
Foods calling for a dry look or crisp
surface after reheating.
How to Change the Automatic Settings:
Toreduce time by 10%:
Press file 1 pad after file feature pad.
Toadd 10%to cooking time:
Press file 9 pad _ffter file feature pad.
!i: ii!iji!i il iii iiiii iiii iii
Express
(lesstirne)(morntirne)
Potato
ThePotatofeaturecooks1/2-2Ibs.ofpotatoes.
Pierce skin with fork and place
potatoes on the turntable. If cooking
three or more potatoes, ammge in a
star pattern.
Press the Potato pad. The oven
starts immediately. The oven signals
when steam is sensed and the time
remaining begins counting down.
Do not open file oven door until time is
counting down. If file door is opened,
close it and press file Start pad
immediately.
If foodis not doneenough,use time Cookto cook
formore time.
17

Usingthemicrowave conveniencecookingfeatures.
Drinks heated with the Beverage feature may be very hot. Remove the container with care.
Beverage
Press the Beverage pad to heat a cup of
coffee or other beve_ge.
Express sound #_/o_ O_sp!ay On/Off
Snacks
TheSnacksfeatureautomaticallysetsthe
microwavbgtimesandpowerlevelstowarma
varietyofsnackfoods.
B3
[]
Press the Snackspad.
Select snack type 1l-6 (see the
Snacks Guide).
[-_ Enter the number of items or the
food weight in ounces.
[_] Press the Startpad.
Hint:YoucanpressandholdtheSnackspad
durbgcookingtodisplaytheremaining
microwavingtime.
SnacksGuide
Food Type Quantity or Weight
1 Bread, roils, muffins 1 to 4
2 Sandwiches 1 to 2
3 Pizza (leftover slices) 1 to 4
4 Dessert toppings 1 to 4
5 Soup 8 to 40 oz.
6 Cheese dip 4 to 16 oz.
Express sound Orgoff Oispl_y On/of[
!/j(i(Ga j(iii ¸
Cook
TheCookfeature automaticallysets the cooking
timesand power levels for a varietyof foods.
[y] Press the Cook pad.
[_ Select food type 1-9 (see the Cook
Guide below).
[-_ Enter weight in ounces.
[_ Press the Startpad.
Hint:PressandholdtheCookpadduringcooking
todisplaytheremainingcooktime.
18
CookGuide
FoodType Weight Comments
1CannedVegetables 4to 20oz. Usemicrowave-safecasseroleor bowl.Coverwith lid orvented
plasticwrap.
2 FrozenVegetables 4to 16oz. Usemicrowave-safecasseroleorbowl.Followpackageinstructions
for addingwater.Coverwith lid orventedplasticwrap.
3 FreshVegetables 4to 16oz. Usemicrowave-safecasseroleor bowl.Add2 tablespoonswater
for eachserving.Coverwith lid orventedplasticwrap.
4 Potatoes 8to 40oz. Pierceskinwith fork.Placepotatoesonthe turntable.
5 Fish 4to 16oz. Useoblong,squareor rounddish.Coverwith ventedplasticwrap.
6 ChickenPieces 4to 40oz. Useoblong,squareor rounddish.Coverwith ventedplasticwrap
or wax paper.
7GroundMeat 8to 48oz. Useroundcasseroledish.Crumblemeatintodish.Coverwith lid
(beef,pork,turkey) or ventedplasticwrap.
8 Bacon 2to 10oz. Layerstripson aplate,4to a layer.Covereachlayerwith apaper
towel.
9Pizza (frozen, 4to 16oz. Followpackageinstructionsto preparepizzafor microwaving.
microwaveable)

Usingthemicrowave autofeature. OEApp,a.oeseom
The Defrost Auto/77mefeature gives you two ways to defrost frozen foods. Press Auto Defrost once for Auto Defrost
or twice for time Defrost.
Auto
1 2 3 4 5
ExPress EXpress Express ExPress Express
E£, 7 ....8.....9 .....o0o_
Auto Defrost
UseAutoDefrostformeat,poultryandfishup
to6pounds.UseTimeDefrostformostother
frozenfoods.
Aura Defrost automaficMly sets tile
defrosting times and power levels to give
even defrosting results for meats, poult_ y
and fish.
%
[]
Press tile Auto De[rostpad once.
Using tile Conversion Guide at
right, enter food weight. For
example, press pads I and 2 for
11.2pounds (1 pound, 3 ounces).
_] Press Start.
Time Defrost is explained ill the Using the
timed microwave features section.
Remove meat flom package and place
on microwave-safe dish.
Twice during defrost, file oven signals
TURN. At each TURN signal, mm tile
food OVeLRemove deflosted meat or
shield waml areas with smaU pieces
of foil.
AtYerdefrosting, most meats need
to stand 5 minums to complem
deflosfing. Large roasts should
stand for about 30 minutes.
ConversionGuide
ff tile weight of food is stated in pounds
and ounces, tile ounces must be
converted to tenths (.1) of a pound.
WeightofFood EnterFoodWeight
in Ounces (tenthsofa pound)
1-2 .1
3 .2
4-5 .3
6-7 .4
8 .5
9-10 .6
11 .7
12-13 .8
14-15 .9
19

Usingthe othermicrowave features.
Cooking Complete Reminder: Toremind you that you have food in the oven, the oven will beep once a minute
until you either open the oven door or press the Clear/Off pad.
Clock
Presstoenterthetimeofdayortocheckthetime
ofdaywhilemicrowaving.
77 Press the Clock pad.
[_ Enter time of day:
[_ Press the Start pad or the
Clock pad.
ii i i _ i Display On/Off
To unn the clock display on or off; press
and hold the 0 pad for about 3 seconds.
The DisplW On/Off feature cannot be
used while a cooking feature is in use.
_i _ _ i _ ii _i i
Stert_
Reminder
1 2 3 4 s
Express Express Express Express Express
_tort_ ..........
Delay Start
Delay Start allows you to set the
microwave to delay cooking tap to
12 hours.
%
Press the DelayStartpad.
Enter the time you want the oven to
start. (Be sure the microwave clock
shows the correct time of day:)
[_ Select your desired cooking
program.
[_ Press the Startpad.
The Delay Start time will be displayed.
The oven will automatically start at the
delayed time.
The time of day may be displayed by
pressing the Clockpad.
NOTE:YoucannotuseDelayStartwith
PopcornorReheat.
ii¸ : (:
Sound On/Off
Sound On/Off
To turn the beeper sound on or off, press
and hold the 8 pad for about 3 seconds.
2O

GEApplianees.com
i i _ _ i iii ii
LOft_)
ChildLockout
Youmaylockthecontrolpaneltopreventthe
microwavefrombeingaccidentallystartedor
usedbychildren.
To lock or unlock the controls, press
and hold the Clear/Off pad for about
3 seconds.
x4qmn the control panel is locked, an L
will be displayed to the extreme right.
E_pr_,_ _o_d o./orr oi_r_oyon/err
Kitchen
_mer
MJn/S_
Kitchen timer
KitchenTimeroperatesasa minutetimerand
canbeusedatanytime,evenwhentheovenis
operatbg
Howtouseasa minutetimer:
[77 Press the Kitchen 77merMin/Sec pad.
[_ Enter time you want to count down.
1_] Press the Kitchen timer Min/Sec pad.
When time is up, die oven will sigmal.
To turn off die timer sigmal, press die
Kitchentimer Min/Sec pad.
NOTE:Thetimerindicatorwillbelit whilethe
timerisoperating.
To cancel the timer during the
countdown, press the Kitchen timer
Min/Secpad.
k_stQ_t_)
Reminder
E_pres_ E_pres_ Express Enpress Express
6 7 8 9 0
Expres_ SoundOnlOf¢ O_s;p_yo.lorf [_
Remh_der
Thefleminderfeaturecanbeusedlikeanalarm
clock,andcanbeusedatanytime,evenwhen
theovenisoperating.Theflembdertimecanbe
setupto 12hourslater
Press the Delay Start pad.
Enter the time you want the oven to
remind you. (Be sure the microwave
clock shows the correct time of day.)
[-_ Press. the Start pad. X_qlen Reminder
signal occms, press the Delay Start
pad to turn it off: The Reminder
time may be displayed by pressing
the Delay Start pad.
NOTE:flEM will remain onthe display toshow
that the flembder is set until the flembder time is
reachedand the dooris openedor Clear/Off
ispressed.
21

Usingthe lower ovencontrols.
Throughout this manual, features and appearance may vary from your model. Your model may have one of the
following controls.
Lower Oven
O Oven Coati, is Ti+e ControJs e
_)_Boke_ C_ Broi _ 1 2 3 4 5 C__Cl°ck_ _C°°king_[.TirneJ _'
Hi/Lo
_L_r Self _'_ _'-Ovenq _-_ 7 _1_ Q n _Kitchen_ _'-Delay_
[ Cleon J _ Light_/ ..... L Tirner ,) __Stort ]_111_
o./ofr _./oi_ o,,/off
Lower Oven
e [
f4icrowove Fan Nay Operate While Lower Oven Is In Use.
0
@
0
22

GEAppliances.com
LowerOvenControl,Clockand TimerFeaturesandSettings
Display 0
Shows the time of day, oven temperature,
whether the oven is in the bake, broil or
self-cleaning mode and tile times set for
the timer or automatic oven operations.
,V
NOTE:Thetimeonthebwerovendisplayis
shownin hoursandminutes(1:30isonehour,
30minutes).Onthemicrowaveoven,timeis
shownin minutesandseconds(1:30isone
minute,30seconds).
If "F- andanumberorletter"flashin the
displayandtheovencontrolsignals,this
indicatesa functionerrorcode.Pressthe
Clear/Offpad.Allowtheoventocoolforone
hourPuttheovenbackintooperation.If the
functionerrorcoderepeats,disconnectthepower
totheovenandcallforservice.
0
@
Clear/Off Pad
Press to cancel ALLoven operations
except file clock and fimeL
Start Pad
Must be pressed to start ally cooking or
cleaning fimcdon.
Kitchen 7TruerOn/Off Pad
Press to select tile timer feature.
Delay Start Pad
Use along with Cookingtimeor SeffClean
pads to set tile oven to start and stop
atKomatically at a time you set.
@
@
ffyourovenwasset fora timedoven j_,
operationandapoweroutageoccurred,the
clockandall programmedfunctionsmustbereset.
Thetimeof day(maybeincorrect)willflash
in thedisplaywhenthetherehasbeena
poweroutage.
Broil Hi/Lo Pad
Press to select tile broil fimcfion.
Bake Pad
Press to select tile bake fimcfion.
0
Cooking 77mePad
Press and fllen press file number pads
to set tile amount of time you want your
food m cook. Tile oven will shut off"
aumnlafically when tile cooking time
has run out, tailless tile Cook and Hold
feature was set.
Clock Pad
Press before setting tile clock.
0
Serf Clean Pad
Press to select tile self-cleaning flmction.
See tile Usingtheself-cleaninglower oven
section.
OvenLight Pad
Press to turn tile oven light on or off:
Number Pads
Use to set ally flmcfion requiling
numbers such as file time of day on file
clock, tile fimeI; the oven mmperature,
tile start time and length of operation for
timed baking and self-cleaning.
23

Using the lower oven.
Toavoid possible bum,. place the racks in the desired position before you turn the oven on.
Before you begin...
The racks have stop-locks, so dlat when
placed correcdy on die supports, the.?,will
stop before coming complemly out, and
will not flit.
When placing and removing cookware,
pull the rack out to tile bump on tile
rack support.
Toremovea rack, pull it toward you,
tilt tile flont end up and pull it out.
Toreplace,place die end of the rack
(stoI>locks) on die support, flit up
the front and push the rack in.
NOTE:Theovenhas7rackpositions.
it CAUTION:Never lacecooking
utensilsoranyotheritemsontheovenfloorThereis
aheatingelementbeneaththeovenfloorPlacingitems
ontheovenfloormaycausetheoventooverheat,
resultingindamagetotheovenandriskofdamage
orfiretocabinets.
NOTE: A cooling fan may
automatically turn on and aftra
cool internal parts. This is normal,
and the fan may continue to run
even after the oven is turned off.
How to Set the Oven for Baking or Roasting
Press the Bake pad.
[_ Press the number pads to set tile
desired temperature.
[-_ Press the Start pad.
F_ Check food for doneness at
minimum time on recipe. Cook
longer if necessmT:
[_ Press the Clear/Offpad when
cooking is complete.
Rack Position
Type of Food 27" Oven 30" Oven
Frozenpies BorC CorD
(oncookiesheet)
Angelfoodcake A AorB
Bundtorpoundcakes A AorB
Biscuits,muffins, BorC CorU
brownies,cookies,
cupcakes,layer
cakes,pies
Casseroles BorC CorU
For2l" Ovens: If baking four cake layeIs
at die same time, place two layers on rack
A and two 1we_s on rack C.
ForJO" Ovens:If baking four cake layeis
at the same time, place two 1we_s on rack
B and two 1we_s on rack D.
Stagger pans on tile rock so one is not
direcdy above tile odler.
Topreheat, set the oven at the
correct temperature. Thecontrol
will beep when the oven is
preheated and the display wifl show
your set temperature. This may take
approximately 10minutes.
Preheating and Pan Placement
Preheat the oven if die recipe cMls for it.
Preheating is necessary for good results
when baking cakes, cookies, pastry and
breads.
Baking results will be better if baking
pans are centered in tile oven as mucll
as possible. Pans should not touch each
odler or die waUs of file oven. If you
need to use two racks, stagger tl_e pans
so one is not direcdy above the othei;
and leave approximately 1½" between
pans, flom the flont, back and sides
of the waU.
24
Aluminum Foil
Donotusealuminumfoilonthebottomof
theoven.
Never enflrely cover a rack Mtb
Muminum foil. This Mll disturb flae heat
circulaflon and result in poor baking.
A sm_dler sheet of foil may be used to
catch a spillover by placing it on a lower
rock several inches below the food.

GEAppliances.com
iiiii
z
/
[
Closethedoor.Alwaysbroil with
the doorclosed.
If youroven is connected to 208
volts, rare steaks maybe broiled by
preheating thebroiler andpositioning
the ovenrack one position higher.
Broiling Guide
How to Set the Oven for Broiling
Close d_e(lo(m Alwaysbroilwiththedoor
closed.
[77 Place the meat or fish on a broiler
grid in a broiler pan.
[_ Follow suggested rack positions in
the Broiling Guide.
Thesize,weight,thickness,startingtemperature
andyourpreferencefordonenesswill affect
broilbgtimes.Thisguideisbasedonmeats
atrefrigeratortemperature.
%
[]
Press the BroilHi/to pad once for
HIBroil.
To change to LOBroil, press the
BroilHi/to pad again.
Press the Start pad.
[_ x4qlen broiling is finished, press
the Clear/Offpad.
27" Ovens 27" Ovens 27" Ovens 30" Ovens 30" Ovens 30" Ovens
Quantity and/ Rack First Side Second Side Rack First Side Second Side
Food or Thickness Position Time (rain.) Time(rain.) Position Time(rain.) Time (rain.) Comments
GroundBeef 1 lb.(4 patties) C 10 7 Eor F 10 7 Spaceevenly.Up
Wetl Done 1/2to 3/4" thick C 10 9 Eor F 10 9 to8 patties take
aboutthe same
time.
Beef Steaks
Raret
Medium
Wetl Done
Raref
Medium
Wetl Done
Chicken
LoBroil
LoBroil
LobsterTails
LoBroil
FishFillets
Hi Broil
LoBroil
1" thick
1to 1Z Ibs.
1Z" thick
2to 21ZIbs.
1whole
2to 21ZIbs.,
splitlengthwise
Pieces
Boneless
24
6to 8 oz.each
1/4to 1/2" thick
C
C
C
C
C
C
A
AorB
AorB
B
C
6
8
12
10
15
25
35
25-35
15 20
18-20
18-25
5
6
11
7-8
14 16
2025
10 15
15-20
10 15
Donot
turn over.
N/A
E
E
E
E
E
E
C
BorC
BorC
C
D
8
10
12
10
15
25
25
25-35
15 20
18-20
18-25
6
8
10
8
1_16
20-25
10
15-20
10 15
Donot
turn over.
N/A
Ham Slices 1" thick B 8 8 D 8 8
(precooked)
Pork Chops 2(1/2" thick) C 10 10 E 10 10
Well Done 2(1"thick)about1lb. B 13 13 D 15 15
LambChops
Medium 2(1" thick)about 10 C 10 g E 10 g Slashfat.
Wetl Done to 12oz. C 12 10 E 12 10
Medium 2(1Z" thick)about1lb. C 14 12 E 14 12
Well Done B 17 12 14 E 17 12 14
Garlic Bread C 3 N/A E 3 N/A
LoBroil
Steakslessthan
1" thickcook
throughbefore
browning.
Panfrying is
recommended.
Slashfat.
Reducetimeabou
5to 10minutes
persideforcut-up
chicken.Brush
eachsidewith
meltedbutter.
Broilskin-side-
downfirst.
Cutthroughbacko
shell.Spreadoper
Brushwith mette{
butterbefore
broilingandafter
half of broiling
time.
Handleandturn
verycarefully.
Brushwith lemon
butterbeforeand
duringcooking,if
desired.Preheat
broilerto increas_
browning.
Increasetime5to
10minutesper
sidefor 1Z" thick
orhome-curedhalt
Slashfat.
i 77.+[/,& l)e/)arlmenl (?/'Ag'ric*dl*m_sa._s'!Rareheq/is po/mla_; h*d 3ou sho*dd know lhal cooking"il _oon(3 140 F mean,s some fi_od/)oisoning"
o,v,,,i,.,s.,(o ,<,dSooh. K,c/,,., 'SDA 9S5.) 25

Usingthelower ovenclock and timer.
Make sure the clock is set to the
correct time of day:
To Set the Clock
The clock must be set to file COlTect
dine of day for file aummadc oven
timing flmcfions m work properl): The
6me of dW cannot be changed du,ing a
timed baking or self-cleaning cycle.
[7] Press tile Clockpad.
[_ Press the number pads.
[] Press tile Start pad until tile time of
day shows in tile display:
On/off
The timer is a minute timer only.
The timer does not control oven
operations. Themaximum setting on
the timer is 9 hours and 59minutes.
To Set the timer
%
[]
Press the Kitchen timer On/Off pad.
Piess die number pads undl die
amount of time you want shows in
tile displW. For example, m set 2
hours and 45 minums, press 2, 4
and 5 in that ordeL Maximum time
that can be enmred in minutes is 59.
Cooking times moie dlan 59
minums should be changed m
hou,s and minums. For example,
enmi 90 minums as 1 hL 30
minums. If you make a mistake,
wess the Kitchen timer On/Off pad
and begin again.
_] Press tile Startpad.
After pressing the Start pad, SET
disappeais; dfls tells you file time
is counting down, although the
displ W does not change until one
minum has passed. Seconds will
not be shown in the displ W until
the last minum is counting down.
[_ x_qlen tlle fimei reaches :00,tile
control will beep 3 times followed
by one beep evexy 6 seconds until
the Kitchen timer On/Off pad is
pressed.
The6-secondtonecanbecanceledbyfollowing
thestepsb theSpecialfeaturesofyourlower
ovencontrolsectionunderTonesat theEndof
a timedCycle.
To Reset the timer
If die display is still showing die time
remaining, you may change it by pressing
tile Kitchen timer On/Off pad, dlen press
tile numbei pads until tile time you want
appears in the display.
If the remaining time is not in the display
(clock, delay start oI cooking time are in
the display), _ecaU the remaining time by
pressing the Kitchen timer On/Off pad and
then pIessing the number pads to enter
the new time you want.
To Cancel the timer
Pressthe KitchentimerOn/Offpad twice.
26

Usingthe lower oven
timedbaking andmastingfeatures.Consomemodels)
GEAppliances.com
NOTE:Foods that spoil easily-such as milk, eggs, fish, stuffings, poultry and pork-should not be allowed to sit for
more than 1hour before or after cooking. Room temperature promotes the growth of harmful bacteria. Be sure that
the oven light is off because heat from the bulb will speed harmful bacteria growth.
12 3 4 5
67890
How to Set an Immediate Start and Automatic Stop
Theovenwillturnonimmediatelyandcookfora
selectedlengthoftime.At theendof thecooking
time,theovenwillturnoffautomatically.
Make sure the clock shows the correct
ume of day:
[_ Press tile Bakepad.
[_ Using the number pads, enter the
desired temperature.
[_ Press tile Cookingtime pad.
to hours and minutes. Fox
example, enmr 90 minums _ks1 hr.
30 minums. The oven tempex_ture
and the cooking time that you
entered will be displwed.
[_ Press the Startpad.
The display shows die oven mmpemmre
that you set and the cooking time
countdown. The displ W starts changing
once the mmpemmre reaches 100°E
NOTE:If yourreciperequirespreheating,youmay
needtoaddadditionaltimetothelengthof the
cookbgtime.
[]
Using the number pads, enter tile
desired baking time. Maximum time
that can be entered in minutes is 59.
Cooking times more than 59
minutes should be changed
The oven Mll continue to cook for file
programmed amount of time, fllen shut
off"automatically, unless the Cook and
Hold feature was set. See the Special
featuresofyourlowerovencontrolsecuon.
Press tile Clear/Offpad to clear tile
display:
1 2 3 4 5
6 7 8 9 0
ime )
3 4 51 2
6 7
I
6
8 9 0
tart)
On/Off
2 3 4 5
7 8 9 0
How to Set a Delayed Start and Automatic Stop
Youcansettheovencontroltodelay-startthe
oven,cookfora specificlengthoftimeandthen
turnoffautomatically.
Make sure the clock shows the correct
time of day:
[77 Press tile Bakepad.
[_ Using the number pads, enter the
desired temperature.
[_ Press tile Cookingtime pad.
NOTE:If yourreciperequirespreheating,youmay
needtoaddadditionaltimetothelengthof the
cookbgtime.
Using the number pads, enter tile
desired baking time. Maximum time
that can be entered in minums is 59.
Cooking times more than 59
minutes should be changed to hours
and minums. Fox example, enmr 90
minutes as 1 hL 30 minums. The
oven mmpemture and tile cooking
time that you enmred will be
displwed.
[_] Press tile DelayStartpad.
_] Using the number pads, enter the
time of day you want tile oven to
turn on and start cooking.
[77 Press the Startpad.
NOTE:Anattentiontonewillsoundifyouare
usingtimedbakbganddonotpresstheStartpad
afterenterbgthebakbgtemperature.
If you would like m check the umes you
have set, press die DelayStartpad m
check the start time you have set or press
the Cooking lJme pad m check the length
of cooking time you have set.
X_qlen the oven turns on at file time of
day you have set, die display Mll show the
changing temperature (starting at IO0°F)
and the cooking time countdown. The
display starts changing once die
temperature reaches IO0°E
The oven Mll continue to cook for file
programmed amount of time, dlen shut
off"automatically, unless the Cook and
Hold feature was set. See the Special
featuresofyourlowerovencontrolsecuon.
Press tile Clear/Offpad to clear tile
display:
27

Adjustthelower oventhermostat--Do ityourself!
Youmay find that your new oven cooks differently than the one it replaced. Use your new oven for a few
weeks to become more familiar with it. If you still think your new oven is too hot or too cold, you can adjust
the thermostat yourself.
Do not use thermometers, such as those found in grocery stores, to check the temperature setting of your oven.
These thermometers may vary 2040 degrees.
NOTE: Thisadjustment will only affect baking and roasting temperatures; it does not affect broiling or self-cleaning
temperatures. The adjustment will be retained in memory after a power failure.
Coo,el+ff,o,,
Hi/Lo
oo,0
1 2 3 4 5
To Adjust the Thermostat
[_ Press the Bake and Broil Hi/Lo
pads at the £mle time for 3 seconds
until the display shows SF.
6 7 8 9 0
Press the Bake pad. A two digdt
number shows in the display:
Press Bake once to decrease
(-) the oven temperautre, or
twice to increase (+).
The oven temperature can be
adjusted tap to (+) 35°F hotter
or (-) 35°F cooler. Press the number
pads the _mm wayyou read them.
For example, m change the oven
mmpet_mtre 15°K press 1and 5.
x_qlen you have made the
adjusunent, press the Start
pad to go back to the dine of
day display:Useyour oven as
you would normalb;
Thetypeofmargarine will affectbakingperformance!
Most recipes for baking have been developed using high-fat products such as butter or margarine (80% fat). If you
decrease the fat, the recipe may not give the same results as with a higher-fat product.
Recipe failure can result if cakes, pies, pastries, cookies or candies are made with low-fat spreads. The lower the fat
content of a spread product, the more noticeable these differences become.
FedetM standards require products labeled "margarine" m contain at least 80% fat by weight. I,ow-fat spreads, on file
other hand, contain less fat and more wamt. The high moisture conmnt of these spreads aff)ct the texture and flavor
of baked goods. For best results with your old favotim recipes, use margarine, butter or sock spreads containing at least
70% vegetable oil.
28

Usingtheself-cleaning lower oven. OEApp,ia,oesoom
The oven door must be closed and all controls must be set correctly for the cycle to work properly.
Before a Clean Cycle
We recommend venting your
kitchen with an open window or
using a ventilation fan or hood
during file first self-clean cycle.
Remove any broiler pan, broiler gMd, all
cookware and any aluminum foil flom
the oven.
Wipe up heavy soil on the oven
bottom.
The oven racks can be self-cleaned,
but they will darken, lose their luster and
become hard to slide.
Do not use abrasives or oven cleaneis.
Glean the top, sides and outside of the
oven door widl soap and wateL
Make sure tile oven light bulb cover
(on some models) is in place and tile
oven light is off:
IMPORTANT'. The healfll of some birds
is exuemely sensitive to die flmles gNen
off during the self<:leaning cycle of any
oven. Move birds to another well
ventilated room.
A CAUTION:Never lacecooking
utensilsoranyotheritemsontheovenfloor
Thereisaheatingelementbeneaththeoven
floorPlacingitemsontheovenfloormaycause
theoventooverheat,resultingb damageto
theovenandriskofdamageorfiretocabinets.
1 2
6 7
Self_'_
lean J
3 4 5
How to Set the Oven for Cleaning
[_ Press tile SeffCleanpad.
[_ Using tile number pads, enter tile
desired clean time, if a time odler
dlan 4 hours is needed.
Glean cycle time is nomlally 4 houis. You
can change the clean time to any time
between 3 hours and 5 hours, depending
on how dirty your oven is.
_] Press the Startpad.
The door locks automatically: The display
will show die clean time remaining. It will
not be possible to open die oven door
until die temperature drops below the
lock temperature and die LOCKEDor
LOCKED DOOR light goes off:
x_qlen tile LOCKEDor LOCKEDDOORlight
goes off; you will be able to open the
dooI:
The word LOCKEDor LOCKEDDOORwill
flash and die oven conuol Mll sigmM if
you set die clean cycle and forget to
close die oven dooL
To stop a clean cycle, press die
Clear/Offpad.When die LOCKEDor
LOCKEDDOORlight goes off; indica6ng
die oven has cooled below file locking
temperature, you Mll be able to open
the dooL
29

Usingtheself-cleaning lower oven.
The oven door must be closed and all controls must be set correctly for the cycle to work properly.
Self q
lean_)
1 2 3 4 5
6 7 8 9 0
tart }
On/Off
1 2 3 4 5
How to Belay the Start of Cleaning (availableonJKP86modelsonly)
[_ Press the Self Clean pad.
[_ Using the number pads, enter tile
desired clean time.
[_ Press tlle Delay Start pad. The
earliest start 6me you can set will
appear in tile display:
[_] Using the number pads, enter tile
time of day you want tile clean cycle
to start.
The door locks automatically. The display
will show file start time. It will not be
possible m open the oven door until
the temperature drops below the lock
temperature and the LOCKEDor LOCKED
DOORlight goes off:
_i_qlenthe LOCKEDor LOCKEDDOORlight
goes off; you will be able to open tile
dooI:
6 7 8 9 0
&q
[_] Press tile Startpad.
After a Clean Cycle
You may notice some white ash in the
oven. Wipe it up with a damp clod1 after
tile oven cools.
If whitespotsremab,removethemwith a
soap-filledsteelwoolpadandrinsethoroughly
witha vinegarandwatermixture.
These deposits are usually a salt
residue tllat cannot be removed by
tile clean cycle.
If tile oven is not clean mCterone clean
cycle, repeat tile cycle.
You cannot set tile oven for cooking
until the oven is cool enough for tile
door to unlock.
While die oven is self-cleaning, you
can press the Clockpad m display
tile time of day. To return m the
clean countdown, press the Cooking
17mepad.
If die racks become hard m slide,
apply a small amount of vegetable oil
or cooking oil m a paper towel and
wipe the edges of the racks with tile
paper towel.
3O

Special featuresofyourlower ovencontrol GEApplianees.com
Yournew touch pad control has additional features that you may choose to use. Thefollowing are the features and
how you may activate them.
Thespecial feature modes can only be activated while the display is showing the time of day. They remain in the
control's memory until the steps are repeated.
When the display shows your choice, press the Startpad. Thespecial features will remain in memory after a
power failure.
12-Hour Shutoff
on/off
Withthisfeature,shouldyouforgetandleavethe
ovenon,thecontrolwill automaticallyturnoff the
ovenafter 12hoursduringbakingfunctionsor
after3 hoursduringabroilfunction.
If you wish to mrn OFFthisfeature, follow
the steps below.
[] Press the Bake and Broil Hi/Lopads
at the same time for 3 seconds until
the display shows SE
[]
%
Press the DelayStartpad until
noshdn(no shutoff) appems in the
display.
Press the Start pad to activate the no
shutoff and leave the control set in
this special features mode.
Fahrenheit or Centigrade Temperature Selection
YourovencontrolissettousetheFahrenheit
temperatureselections,butyoumaychangethis
tousetheCentigradeselections.
[_ Press the Bake and Broil Hi/Lopads
at the same time for 3 seconds until
the display shows SE
[_ Press the Broil Hi/Lo pad again. The
display will show C (Centigrade).
[_ Press the Start pad.
Press the Broil Hi/Lo pad. The display
will show F (Fahrenheit).
Control Lockout
Yourcontrolwillallowyoutolockdownthetouch
padssotheycannotbeactivatedwhenpressed.
[_ Press the Bake and Broil Hi/Lo pads
at the same time for 3 seconds until
the display shows SE
[_] Press the Self Clean pad. The display
will show LOCOFF.
%
Press the SeffClean pad again.
The display will show LOCON.
Press the Start pad to activate
the control lockout feature and
leave the control set in this special
features mode.
x_qlen this feature is on and the touch
pads are pressed, the display will show
LOC.
To unlock the control, repeat steps 1 and
2. Press the Startpad when the display
shows LOCOFF.
NOTE:Thecontrollockoutmodewill notaffect
theClock,Kitchen timer On/OffandOven
Lighttouchpads.
3/

Special featuresofyourlower ovencontrol
OnlOff
Tones at the End of a Timed Cycle
At theendofa timedcycle,3 shortbeepswill
soundfollowedbyonebeepevery6 seconds
untiltheClear/Offpadispressed.This
continuous6-secondbeepmaybecanceled.
To cancel the &second beep:
[77 Press the Bake and Broil Hi/Lopads
at the same time for 3 seconds until
the display shows SE
[]
Press the Kitchen timerOn/Off
pad. The display shows CONBEEP
(continuous beep). Pressthe Kitchen
timerOn/Offpad again.
The display showsBEEP.(This
cancels the one beep every
6 seconds.)
[_ Press the Startpad.
12-Hour,2#-Hour or Clock Blackout
Yourcontrolissettousea 12-hourclock.
If you would prefer to have a 24-hour
milimD, time clock oi black out the clock
display, follow the steps below.
[77 Press the Bake and Broil Hi/Lopads
at the same time for 3 seconds until
the display shows SE
Press the Clockpad once. The
display will show 12hr.If this is
the choice )1o/1want, press the
Startpad.
Press rite Clockpad again m change
m the 24-hour military time clock. The
displW will show 24 hr. If this is the
choice you want, press the Start pad.
Press the Clock pad again to black out
rite clock display: The display will show
OFF.If rids is rite choice you want, press
rite Start pad.
NOTE: If theclock is in theblack-outmode,you
will not be able to usethe DelayStart function.
Cook and Hold
Yournewcontrolhasacookandholdfeaturethat
keepscookedfoodswarmforupto3 hoursafter
TimedBakbgorRoastbgisfinished.
NOTE:Thisfeaturecanonlybeprogrammedto
workwith TimedBakingorRoasting.(Seethe
Usingtheloweroventimedbakingandroasting
featuressection.)After TimedBakingorRoasting
hasautomaticallystopped,theprogrammedCook
andHoldwillautomaticallystart.
To activate this feature for use meter
Timed Baking oi Roasting, follow the
steps below.
[_ Press the Bake and Broil Hi/Lopads
at the same time for 3 seconds until
the display shows SE
[_ Press the Cooking time pad.
The display will show Hid OFF.
%
Press the Cooking time pad again
to activate the feature. The display
will show Hid ON.
Press the Startpad to activate
tim cook and hold feaulre and
leave the control set in this special
feaulres mode.
32

Usingthe SabbathFeature.
(Designed for use on the Jewish Sabbath and Holidays.) (on some models) GEApplianees.com
The Sabbath feature can be used for baking/roasting only. It cannot be used for broiling, self-cleaning
or Delay Start cooking.
NOTE: The oven light comes on automatically (on some models) when the door is opened and goes off when the door
is closed. Thebulb maybe removed. See the Oven Light Replacement section. Onmodels with a light switch on the
control panel, the oven light may be turned on and left on.
1
6
@oO÷@ro
N_/LO
KDoIoT"I
L startj
OnlOff
2 3 4 5
7 8 9 0
When the display shows D the oven
is set in Sabbath. When the display
shows D C the oven is
baking/roasting.
How to Set Sabbath Feature for Regular Baking/Roas_g
NOTE: Tounderstandhow the oven
control works,practice usingregularbaking
(non-Sabbath)beforeenteringSabbathmode.
Makesure the dock shows the correct time
of day.
[_ Press and 11o1(1both the Bake and
Broil Hi/Lo pads, at thesame time,
until the display shows SE
NOTE:If bake or broil appears in
file display, file Bake and BroilHi/Lo
pads were not pressed at the same
time. Press the Clear/Offpad and
begin again.
[_ Tap the Delay Start pad until
SAb bAtH appears in the display.
[_] Press the Start pad and D will appear
in the display:
[_ Press the Bake pad. No sigmal will
be given.
f_ Press the number pads in order to
set the desired temperature.
No signal or temperature will be
gNen.
Press the Start pad.
%
[]
AtYera random delay period of
approximately 30 seconds to 1
minum, D C will appear in the
displW indicating that the oven is
baking/roasting. If D c does not
appear in the displw, start again at
stop 4.
To adjust the oven temperature, press file
Bakepad and enmr the new mmpemu]re
using the number pads
Press the Startpad.
NOTE:The Clear/Offand Cooking77me
pads are active during the Sabbath
feature.
33

UsingtheSabbathFeature.
(Designed for use on the Jewish Sabbath and Holidays.) (on some models)
mile
Delay
G+O
0n/0#
@oki0_
imeJ
1 2 3 4 5
6 7 8 9 0
_tart_
When the display shows D the oven
is set in Sabbath. When the display
shows D m the oven is
baking/Teasting.
How to Set Sabbath Feature for Timed Baking/Roasting - Immediate Start
and Automatic Stop
NOTE: Tounderstandhow the ovencontrol
works,practice using regular(non-Sabbath)
ImmediateStart andAutomatic Stopbefore
entering the Sabbathmode.
Make sure thedock showsthe correcttime
of day.
[_ Press and hold both the Bake and
Broil Hi/Lo pads, at the same time,
until the display shows SE
NOTE:If bake or broil appears in
the display, the Bake and Broil Hi/to
pads were not pressed at the same
time. Press the Clear/Off pad and
begin again.
[_ Tap the Delay Start pad until SAb
bAtHappeats in the display.
[_ Press the Start pad and m will appear
in the display:
[_ Press the Cooking time pad.
Aider a random delay period of
approximately 30 seconds to 1
minute, m m will appear in the
display indicating that the oven is
baking/roasting. If m m does not
appear in the display, start again
at step 7.
To adjust the oven temperaune, press the
Bake pad and enmr the new mmpetature
using the number pads.
Press the Startpad.
When cooking is finished, the displ W
will change flom m m to m and 0:00will
appear; indicating that the oven has
utrned OFFbut is still set in Sabbath.
Remove the cooked food.
%
%
%
Press the numt)er pads to set
the desired length of cooking time
between 1 minute and 9 hours and
99 minutes.
The cooking time that you entered
will be displayed.
Press the Start pad.
Press the Bake pad. No sigmal will
be given.
Press the number pads in order to
set the desired temperature.
No sigmal or tempemune will be
griven.
Press the Start pad.
8ake_ Bro0
++
34
How to Exit the Sabbath Feature
Press the Clear/Off pad.
[_ If the oven is cooking, wait
for a tandem delay period of
approximately 30 seconds to 1
minute, until only m is in the display.
[_ Press and hold both the Bake and
BroilHi/to pads, at the same time,
until the display shows SF.
[_ Tap the Delay Start pad until 12shdn
or noshdn appears in the display. 12
shdnindicates that the oven will
%
atttomatically utrn off after 12 hotn5.
noshdnindicates that the oven will
not atttomafically turn off:
Press the Start pad.
NOTE."ff a power outage occurred while
the oven was in Sabbath mode, the oven
will atttomafically utrn off and the oven
control must be reset.

Careand cleaning ofthe cookingcenter. OEApplianoes.eom
WARNING:Besureelectrical mower is off and all surfaces are cool before cleaning any part
of the cooking center.
How to Remove Protective Shipping Film and Packaging Tape
Careflllly gIasp a corner of file protective
shipping film with your finge_s and slowly
peel it flom die appliance surface. Do
not use any shmp items to remove file
film. Remove aU of the film before using
the appliance for the fiIst 6me.
To assure no damage is done m die
finish of file product, file sJest way to
remove the adhesNe flom packaging tape
on new appliances is an application of a
household liquid dishwashing demrgent.
Apply with a soft cloth and allow m soak.
NOTE:Theadhesivemustberemovedfromall
parts.It cannotberemovedifit isbakedon.
Microwave Oven
Donotusea commercialovencleaneronanypart
ofyourmicrowaveoven.
RemovableTurntableand TurntableSupport
To pievent breakage, do not place the
tu_ntable into wamrj ust after cooking.
Wash it careflflly in warm, sudsy wamr or
in the dishwasheL
The turntable and suppoIt can be
broken if dropped. Remember, do not
opeiam the microwave oven without the
turntable and support in place.
To _eplace the suppo_t, place its center
post in the hole. Turn the support
around until it seats into place.
Inside
Keep file microwave oven clean and
sweet-smelling. Opening the oven door a
few minums Jter cooking helps air out
the interioL An occasional thorough
wiping with a solution of baking soda
and water keeps the inmxJor flesh.
Spills and spattexs are easy to iemove
flom walls and floor if they are wiped
up soon aftei the food is iemoved.
Some spatters wipe up with a paper towel,
some may iequire a damp cloth. Remove
greasy spatters with a sudW cloth, then
rinse and dx>
Donotcleanwithmetalscouringpads.Piecescan
breakoff thepad,causbgelectricalshock.
X_qpe up spatters on die window on
die inside of die door daily. When die
window is soiled, wash it with a damp
cloth. Rinse thoroughly and d_>
Wipe metal and plastic parts on die
inside of the door flequently: Use a damp
cloth to remove all soil.
Donotuseabrasives,suchascleanbgpowders
orsteelandplasticpads.Theymaymarthe
surface.
Outside
Glean die outside of die microwave oven
with soap and a damp cloth, then dnse
with a damp cloth and dD,.Wipe the
window clean with a damp cloth. Chrome
is best wiped with a damp cloth and then
with a dxy towel.
DoorSurface
When cleaning surfaces of door and oven
that come together on closing the dooh
use only mild, non-abn_sive soaps or
demIgents applied with a sponge or
soft cloth.
35

Careand cleaning ofthecookingcenter.
Slot
Pull hinge locks clown to unlock
Removal _osifion
Lift-Off Oven Door
Thedoorisveryheavy.Becarefulwhen
removingandliftingthedoor.
Donotlift thedoorbythehandle.
Toremovethedoor:
[_] Fully open the doo_.
[_ Pull the hinge locks down toward
the door flame, to the unlocked
position. A tool, such as a small fiat-
blade screwdriver; mW be required.
[_ Firmly grasp both sides of the door
at the top.
[_ Close door to the door removal
position (see illusuadon).
[_ I,ift door up and out until the hinge
arm is clear of the slot.
Toreplacethedoor:
[77 Firmly grasp both sides of the door
at the top.
[]
I
X&qththe Bottom _earm
door at the edge
same angle as ofst0t
the removal
position, seat die
indentation of
the hinge arm Indentation
into die bottom
edge of the binge slot. The notch in
die hinge arm must be fully seated
into the bottom of the slot.
%
Fully open the dooL If the door will
not flllly open, the indentation is
not seated correctly in the bottom
edge of the slot.
Push the hinge locks up against the
flont flame of the oven cavit); to the
locked )oslfion.
arm _--Ji__
Hinge_
Push hinge locks up to lock
[_ Close the oven dooL
Donotrubor cleanthedoorgasket--
it has anextremelylowresistanceto
abrasion.
If younotice thegasketbecomingworn,
frayedor damagedin anyway orif ithas
becomedisplacedonthedoor,youshould
haveit replaced,
Tocleantheinsideofthedoor:
iiiiii{iii_iiii_
iiiiiiiiiii_
Because the area inside the gasket is
cleaned during the self-clean cycle, you
do not need to clean this by hand.
The area outside die gasket and
the door liner can be cleaned Mill a
soal>filled or plastic scouring pad,
hot wamr and demrgent. Rinse well
with a vinegar and wamr solution.
Tocleantheoutside ofthedoor:
Use soap and water m thoroughly
clean file top, sides and flont of die
oven doo_. Rinse well. You may also
use a glass cleaner to clean the glass
on the outside of the doo_. Do not let
wamr drip into the vent openings.
ff any stain on the door vent trim is
persistent, use a soft abrasive cleaner
and a sponge-,scrubber for best results.
Spillage of marinades, fluitjuices,
mmam sauces and basting mamrials
containing acids mW cause
discoloration and should be wiped
up immediately. When surface is cool,
clean and rinse.
Do not use oven cleaners, cleaning
powders or harsh abrasives on the
outside of the dooL
36

GEApplianees.com
I I SHOCKORBURNHAZARD.Before replacing ovenlight bulb, disconnect the electrical
A__WARNING Iyer totheovenatthemainfuseorcircuitbreakerpanelFailuretodosomayresult
in electric shockor burn.
I I BURNHAZARD.Theglass coverand bulb shouldbe removedwhen cool. Touchinghot glass
CAUTION withbarehandsoradampclothcancauseburns
F{eceotacte ,SOCKet
Oven Light Replacement
_ G6.35Bulb
on some modets
Receotacle SOCKeI
_GgBulb
Glasscover
(onsomemodels)
Toremove:
[77 Turn the glass cover
counterclockwise 1/4 turn until
the tabs of the glass cover clear the
grooves of the socket. Wearing latex
gloves may offer a better g_ip.
_-] Using gloves or a dry cloth, remove
the bulb by pulling it straight out.
Toreplace:
[77 Use a new 120/130wolt halogen
bulb, not to exceed 50 watts.
Replace the bulb with the same
type of bulb that was removed. Your
model will have one of the two types
shown on the left. To detemdne the
conect replacement bulb, check the
bulb temdnals. Bulbs with 2 suaight
pin mmfinals are G6.35 bulbs. Bulbs
with 2 looped mmdnals are G9
bulbs. (Do not interchange.) Be sure
the replacement bulb is rated 120
volts or 130 volts (NOT 12 volts).
Using gloves or a dD,clod1, remove
tile bulb flom its packaging. Do not
touch the bulb with bare fingei_. Oil
flom skin will damage the bulb and
shorten its life.
Push the bulb straight into the
receptacle all the way.
Place tile tabs of tile ,glasscover into
the grooves of the socket. Tmn the
glass cover clockwise :l/4 turn.
For improved lighting inside
file oven, clean file glass cover
fiequendy using a wet cloth. This
should be done when die oven is
completely cool.
[_ Reconnect electrical power to
the oven.
_ii!! ¸¸¸¸
, , kt
|
Glasscover
Lower Oven Light Bulb (onsomemodels)
Toremove:
Turn the ,glasscover counterclockwise
1/4 mm until the tabs of the glass cover
clear the grooves of the socket. Remove
the bulb.
Toreplace:
Put in a new 40-watt appliance bulb.
Place the tabs of the glass cover into the
grooves of the socket. Tmn the glass
cover clockwise 1/4 ram.
NOTES:
_,A40-wattappliancebulbissmallerthan
astandard40-watthouseholdbulb.
Installandtightenthecoverclockwise.
Reconnectelectricalpowertotheoven.
, Forimprovedlightingbsidetheoven,clean
theglasscoverfrequentlyusinga wetcloth.
Thisshouldbedonewhentheovenis
completelycool.
37

Careand cleaning ofthecookingcenter.
NOTE:Theoven racks maybe
cleaned in theself-cleaning oven.
However,the racks will darken in
color, losetheir luster and become
hard to slide ffcleaned during the
self-cleaning cycle.
Oven Racks (loweroven)
Clean the oven racks Mill an abrasive
cleanser or steel wool. After cleaning,
rinse file racks Mth clean water and
d_Twith a clean cloth.
To make file racks slide more easily,
apply a small amount of vegetable oil or
cooking oil m a paper towel and wipe the
edges of the oven rocks with the paper
towel.
Control Panel
It's a good idea m wipe file conUol panel
after each use. Clean Mill mild soap and
wamr or vinegar and water; rinse with
clean water and polish d_T with a soft
cloflL When cleaning, the conuol panel
should be at room mmpemmre and not
in direct sunlight.
Do not use abrasive cleansers, strong
liquid cleansers, plastic scouring pads or
oven cleaneis on the connol panel--they
will damage the finish. A 50/50 solution
of vinegar and hot wamr works well.
38

Before YouCall ForService...
Troubleshooting tips
Save time and money! Review the charts on the following
pages first and you may not need to call for service.
GEAppliances.com
Possible Causes What ToDo
Controlpanel on You forgot to press the • Press the Start pad.
microwave oven Start pad.
will not operate Door not securely closed. • Make sure the microwave oven door is closed.
Another function was pressed. • Press file Clear/Off pad twice to cancel it and begfin
again.
The Clear/Offpad was • Begfin again.
pressed accidentally.
Oven controls • While using Time Defrost, numbers not entered after
improperly set. pressing the Auto Defrost pad.
"SENSOR ERROR" During a sensor • The microwave oven door should not be opened
appearsin the function the microwave before the finle begins to coilnt down ill the display.
microwave oven oven door was opened
display too soon.
Microwave oven light Light bulb is loose • Call for service.
does not work or defective.
Foodsovercooked or Varying density and amount • Varying density and amount sometimes require more
undercookedinthe of foods being cooked, cooking filne.
microwave oven
Food not turned or stirred • Turn or stir food and begfin again.
as called for in the recipe.
Too many dishes in the • Do not overload your microwave oven.
oven at the same time.
Food not thoroughly defrosted. • See the Using the microwave sensor controls secdon.
Improper cookware or • See the Microwave safe cookware section of the
coverings being used. Important Safety Instructions secdon.
Humidity or moisture in • Make sure tile inside of tile oven and tile outside of
the oven will lessen the the containe_ are dry.
Sensor cooldng time.
Food not allowed to stand. • Some standing time is recommended for certain
vegetables cooked with the Sensor Gontrols.
Clockand timer A fuse in your home may be • Replace the fl_se or reset the circuit breakeL
do not work or blown or the circuit breaker
display goes blank tripped.
Controls improperly set. • See tile Using the clock and lower oven timer section
for tile lower oven clock.
• See file Display On/Offsection for die microwave oven
dock.
The clock is in the
black-out mode.
• See the Special features of your loweroven control
section for the lower oven clock.
• See file Display On/Offsection for die microwave oven
dock.
39

Before YouCallForService...
Troubleshooting tips
Possible Causes What ToDo
• Press the Clear/Offpad. Allow the oven to cool for one
houL Put the oven back into ope_fion.
"F and a number or You have a function
letter" flash in the error code.
lower oven display If the function code • Disconnect all power to the cooking center for at
repeats, least 30 seconds and then reconnect power. If the
flmction error code repeats, call for service.
Display flashes Power failure. • Reset the lower oven clock.
Unable to get the Oven control pads were • The Bake and Broil Hi/Lo pads must be pressed
lower oven display not pressed properly, at the same time and held for 3 seconds.
to show "SF"
Lower oven temperature Oven thermostat needs • See the Adjust the lower oven thermostat--Do it
too hot or too cold adjustment, yourselfl section.
Loweroven will A fuse in your home may • Replace the fi_se or reset the circuit breakeL
not work be blown or the circuit
breaker tripped.
Oven controls improperly set. • See the Using the lower oven section.
Lower oven control You forgot to enter • Press the Bake pad and desired temperature or the
signals after entering a bake temperature Self-Clean pad and desired clean time.
cooking time or or cleaning time.
delay start
Food doesnotbake or Oven controls improperly set. • See the Using the lower oven section.
roast properly in the
lower oven Rack position is incorrect • See the Using the lower oven section.
or the rack is not level.
Oven thermostat needs • See the Adjust the lower oven thermostat--Do it
adjustment, yourselfl section.
Food does not broil Oven door is open. • Close the tool This model is designed for closed door
properlyin the broiling only. Ah,vays broil with the door closed.
lower oven
Oven controls improperly set. • Make sure you press the Broil Hi/Lo pad.
Improper rack position • See the Broiling Guide.
being used.
Cool<ware not suited • For best results, use a pan designed for broiling.
for broiling.
In some areas the power
(voltage) may be low.
• Preheat the broil element for 10 minutes.
• Broil for the longest period of time recommended
in the Broiling Guide.
4O

GEAppliances.com
Possible Causes What ToDo
Lower oven light does Light bulb is loose or defective. • Tighten or replace the bulb.
not work Pad operating light is broken. • Call for service.
Lower oven will Oven controls • See the Using the self-cleaning lower oven section.
not self-clean improperly set.
The oven temperature is • Allow the oven to cool and reset the controls.
too high to set a self-clean
operation.
This is the sotmd of the metal • This is normal.
"popping" sound heating and cooling during
in the lower oven both the cooking and
cleaning functions.
Excessive smoking in Excessive soil. • Press the Clear/Off pad. Open the windows to rid
the lower oven during the room of smoke. Wait until the LOCKED or LOCKED
DOORlight goes off. Wipe up the excess soil and reset
the clean cycle.
Lower oven door will Oven too hot. • Allow the oven to cool below locking temperature.
not open after a
clean cycle
Lower oven not clean Oven controls improperly set. • See the Using the self-cleaning lower oven section.
after a clean cycle
Oven was heavily soiled. • (;lean up hea_ T spillovers before starting the clean
cycle. Heavily soiled ovens may need to self-clean
again or for a longer period of time.
"LOCKED" or "LOCKED The self-clean cycle has been • (;lose the oven doo_:
DOOR" flashes in the selected but the door is not
lower oven display closed.
"LOCKED" or "LOCKED The oven door is locked • Press the Clear/Off pad. Allow the oven to cool.
DOOR" light is on when because the temperature
you want to cook in the inside the oven has not
lower oven dropped below the locking
temperature.
Power outage, Power outage or surge.
clock flashes
• Reset the clock. If the oven was in use, you must reset
it t)y pressing the Clear/Off pad, setting the clock
and resetting any cooking fimction.
"Burning" or "oily"
odor emitting from
oven ventwhen using
thelower oven
This is normal in a new oven
and will disappear in time.
• To speed the process, set a self-clean cycle for a
minimum of 3 hours. See the Using the self-
cleaning lower ovensection.
Strongodorin the
lower oven
An odor from the insulation
around the inside of the
oven is normal for the first
few times the oven is used.
• This is temporary.
Fannoisewhen using
thelower oven
A cooling fan may
automatically turn on.
• This is normal. The cooling fan will utrn on
to cool internal parts. It may run for up to
1-1/2 hours in 30" models and tap to 2 hours
in 27" models after the oven is turned off:
41

Accessories.
Looking For Something More ?
You can find these accessories and many more at GEAppfiances.com (U.S.) or
www.GEAppfiances.ca (Canada), or call 800.626.2002 (U.S.) or 800.661.1616
(Canada) (during normal business hours). Have your model number ready.
Grates Surface Burner Headsand Caps Surface Elements andDrip Pans Knobs
_i!_I ii i_/i_J_i_iiiiiii:iii_Liilli_
OvenElements
OvenRacks Light Bulbs
Experience these othergreat productsto keep yourkitchen looking great!
l_ Ceramic Cooktop _ Ceramic Cooktop _ Stainless Steel
CleaningKit: Cleaning Wipes Appliance Polish
Includes cleaner, Wipes
scraper and pad
WXIOX117GCS WXlOX305 WXIOXIO001
Get themostout ofyourBroiler Pan! (Not for use with Broiler Drawer models.)
Use your pan and g_id cover to broil hamburgers, seafood, steaks, vegetables,
bacon, chops and so much more! The pan below catches the excess fats and oils.
• Genuine GE Part
• Easy To Glean
• One-Year Warranty
Limited time Offe!! Free Shipping!
When you order your broiler pan within 30daysof purchasing your GE cooking product.
Small
U.S.Part # WB48XIO055
Canada Part # 222D2097GO01
Dimensions 8-3/4" W x 1-1/4"H x 13-1/2"D
Price US$10.50'
1-Plusapplicablestate sales tax (PST/HSTandGST)
* Thelarge (standard)broilpan doesnotfitin 20"/24"ranges.
Large*
WB48XI0056
222D2097GO02
12-3/4"Wx 1-1/4"Hx 16-1/2"D
US$14.50_
** TheXLpan does notfit in 24"wall ovens,27"drop-ins or 20"/24"ranges.
Stainless Steel
Appliance
Cleaner
PMlOX311
WB48X IO057
N/A
17"Wx 1-1/4"Hx 19-1/4"D
US$16.75'
Toplace your order,carl800.626.2002(U.S.),800.661.1616(Canada)or mail thisform to:
In the U.S.:GEParts,PO.Box 221027,Memphis, TN38122-1027.In Canada:GEParts,1FactoryLane,Moncton,N,B. EIC9M3
Broiler Pan Order Form
Quantity PartNumber
42
Model Number
FirstName
Address
City
Phone
CreditCard
Visa
Exp.Date:Month
SerialNumber Brand Dateof Purchase
LastName
State ZipCode
E-Mail
Check __ Money Order
MasterCard Discover AmEx Credit Card #
Year Signature:

GEBuilt-In Microwave CookingCenterWarranty.
Aft warranty service provided by our Factory Service Centers,
or an authorized Customer Care® technician. Toschedule
service, visit us on-line at GEAppliances.com, or call
800.GE.CARES (800.432.2737).Please have serial number
and model number available when calling for service.
Staple your receipt here.
Proof of the original purchase
date is needed to obtain service
under the warranty.
Fromthe dateof the
originalpurchase
GE Will Replace:
Anypartof file microwave cooking center which fails due to a defect in materiMs
or workmanship. During flds limited one-year warranty, GE Mll Mso provide,
free of charge, M1 labor and in-home sexMce to replace file defective part.
Service trips to your home to teach you how to use
the product.
Improper installation, delivery or maintenance.
Failure of the product if it is abused, misused, or
used for other than the intended purpose or used
commercially.
Replacement of house fuses or resetting of
circuit breakers.
Damage to the product caused by accident, fire,
floods or acts of God.
Incidental or consequential damage caused
by possible defects with this appliance.
Damage caused after delivery.
Product not accessible to provide required service.
EXCLUSIONOFIMPLIED WARRANTIES--Your sole and exclusive remedy is productrepair as provided in this Limited
Warranty.Any implied warranties, including the implied warranties of merchantability or fitness fora particular purpose,
are limited toone year or the shortestperiod allowed by law.
This warranty is extended to the original purchaser and any succeeding owner for products purchased for
home use within the USA. If theproduct is located in an area where service by a GEAuthorized Servicer is not
available, you may be responsible for a trip charge or you may be required to bring the product to an Authorized GE
Service location for service. In Alaska, the warranty excludes the cost of shipping or service calls to your home.
Some states do not allow the exclusion or limitation of incidental or consequential damages. This warranty
gives you specific legal rights, and you may also have other rights which vary from state to state. Toknow
what your legal rights are, consult your local or state consumer affairs office or your state's Attorney General
Warrantor: GeneralElectric Company.Louisville, I(Y 40225
43

ConsumerSupport.
GEAppliancesWebsite GEAppliances.com
Have a question or need assistance with your appliance? Try the GE Appliances _Vebsite 24 hours a day,
any day of the year! For g_eater convenience and faster se_ice, you can now download Owner's Manuals,
order parts or even schedule service on-line.
ScheduleService GEAppliances.com
Expert GE repair seI_ice is only one step away from your dooL Get on-line and schedule your service at
your convenience any day of the year! Or call 800.GE.CARES (800.432.2737) during nomml business horns.
RealLifeDesignStudio GEAppliances.com
GE supports the Universal Design concept--products, services and environments dlat can be used by
people of all ages, sizes and capabilities. We recognize the need m desigm for a wide range of physical
and mental abilities and impairments. For details of GE's Universal Design applications, including kitchen
design ideas for people with disabilities, check out our Websim today. For the hearing impaired, please call
800.TDD.GEAC (800.833.4322).
ExtendedWarranties
GEAppliances.com
Purchase a GE extended warranty and learn about special discounts that are axailable while your warranly
is still in effbct. You can purchase it on-line anytime, or call 800.626.2224 during normal business hours.
GE Consumer Home Services will still be there after your wanmlly expires.
PartsandAccessories
GEAppliances.com
Individuals qualified to service their own appliances can have parts or accessories sent directly to their
homes (VISA, MasterCard and Discover cards are accepted). Order on-line today, 24 hours every day or
by phone at 800.626.2002 dining nomml business horns.
Instructionscontainedin thismanualcoverprocedurestobeperformedbyanyuser.Otherservicinggenerally
should bereferredtoqualifiedservice personnel.Cautionmustbeexercised,since improperservicing maycause
unsafeoperation.
ContactUs
GEAppliances.com
If you are not satisfied with the se_Mce you receive flom GE, contact us on our Websim wit1 all the details
including your phone numbe_, or write m: General Manage_, Customer Relations
GE Appliances, Appliance Park
Louisville, KY40225
RegisterYourAppliance
GEAppliances.com
Register your new appliance on-line--at yore" convenience! Timely product registration will allow for
enhanced communication and prompt service under the terms of your warranty, should the need arise.
You may also mail in the preprinted registration card included in the packing material.

GEPpp/iances.com
Instrucdones de seguridad ......... 2-9
Instrucdones de operad6n
Autolimpieza del homo inferior ..... 29, 30
Controles del homo inferior ....... 22-34
Controles del homo microondas ..... 10-21
Controles del sensor .............. 16, 17
Funci6n Sabbath ................. 33, 34
Panel de control del homo inferior ...22, 23
Panel de control del microondas .... 10, l l
Termostato del homo inferior ......... 28
Cuidado y limpieza
gombilla de alumbrado ................. 37
Horn() microondas .................. 35
Parrillas ............................ 38
Puerta ............................. 36
Consejos para la resoluci6n
de problemas ................... 39-41
Accesorios ......................... 42
Soporte al consumidor
Garantfa ........................... 43
Soporte al consumidor ............... 44
,]KPgO-Horno de doble pared de 2 7"
,fl_90--H(mw de doble pared de 30"
i
El homo microondas en este centro
de cocina es de 1000vafios.
i
0
b
Escriba los n#mems de modelo y
serie aquk
N° de modelo
N° de serie
Puede encontrmlos en
una edqueta dentro del homo
superior en el lado izquierdo.
Impreso en los Estados Unidos 49-80579 04-09 JR

INSTRUCC/ONESIMPORTANTESBESEGURIDAD.
tEA TOBAStAS INSTRUCCIONESANTESBEUSAR.
&iADVERTENCIA!
Si no se sigue exactamente /a infoFmacion de este manual, puede OCUFFiFun incendio, una e_losi6n
o un cortocircuito #ue podda causar dafios a/a propiedad,/esiones personales o/a muerte.
PRECAUCIONESPARAEVITARLAPOSIBLEEXPOSICIONA UNA
/
ENE.RGIADEMICROONDASEXCESIVA
iiiil}i
iii}i}}li_
iii}i}}li_
No intente operar este homo con
la puerta abierta ya que la operaci6n
con la puerta abierta puede resultar en
una exposici6n nociva a la ener_a de
microond&s. ESimportante no anu/aro
alterar los interbloqueosde seguridad.
No coloque ningdn objeto entre la parte
flontal del horno y la puerta ni permita
que se acumulen residuos sobre las
superficies de sellado.
Nadie debe ajustar o reparar el homo
a excepci6n del personal de ser_,icio
adecuadamente calificado.
}}No opere el homo si esta daf_ado.
Es pardcularmente importante que la
puerta del homo cierre apropiadamente
y que no existan daflos a:
[] la puerta (dobladura),
[] las bisag,as y aldabas (rotas o flo,jas),
[] los sellos de la puerta y superficies de
sellado.
AVISOIMPORTANTEDESEGURIDAD
La Ley de t&icos y agua potable segura de California (California Safe Drinking Water and Toxic
Enforcement Act) exige al gobemador de California publicar unalista de las sustancias conocidas
en el estado que causan c#ncer, defectos de nacimiento u otros dafios, y exige alas empresas que
alerten a los cfientes sobre la exposiciSn potencial a dichas sustancias,
El aislamiento de fibra de vidrio en los homos de autofimpieza emite una pequefia canfidad de
mon&ido de carbono durante el ciclo de limpieza. Puede minimizarse la exposici6n permitiendo
la ventilaciSn con una ventana abierta o utilizando un ventilador,
2 GUARBEESTASINSTRUCC/ONES

INSTRUCC/ONES IMPORTANTES BESEGURIDAO.
tEA TOOASLASINSTRUCCIONESANTESBEUSAR.
GEPpp/iance&corn
PRECAUCIONESDESEGURIDAD
Cuandose utilizan aparatos el#ctricos, se deben seguir lasprecauciones deseguridad b4sicas,
incluyendo las siguientes:
ABVEftTENCIA-I,,t,.ooio, ,
deconexi6na tierra:este aparato debe estar
conectado a un sistema de cableado
permanent< metalico, conectado a derra
o se debe tender un conductor de conexi6n
a tierra del equipo con los conductores del
circuito y estar conectado a la terminal de
conexi6n a derra del equipo o puesto sobre
el aparato.
ABVERTENCIA-p ,
el riesgo de quemaduras,cortocircuito&
incendio, lesiones a personas oexposici6n
a un exceso de energia de micmondas:
}}Use este aparato dnicamente para los
fines descritos en este manual. No udlice
qufmicos o vapores com)sivos en este
aparato. Este centro de cocina esta
dise_ado especificamente para calentar
o cocinar alimentos, y no debe utilizarse
para uso industrial o en laboratorios.
iii}i}i
AsegYlrese de que su aparato est_ instalado
apropiadamente y sea conectado a tierra
pot un t_cnico calificado segdn las
instmcciones de instalaci6n suministradas.
iii}i}i
iii}i}}li_
Pida al instalador que le muestre la
ubicaci6n del cortacircuitos o fusible.
Marquelo para obtener referencia tacil.
Asegdrese de que el centro de cocina
est_ instalado de una manera segura en
un gabinete y que est_ f!jado firmemente
a la estmcmra de la casa. E1peso sobre
la puerta del homo podrfa causar que
el homo se incline y produzca una lesi6n.
Nunca permita que nadie se suba,
se siente o se cuelgue sobre la puerta
del homo.
iii}i}i
Esm aparato debe set reparado
dnicamenm pot el personal de ser_,icio
calificado. Contacm a la planta de ser_,icio
autorizada mas cercana para la inspecci6n,
reparaci6n o ajuste. No repare o
reemplace ninguna parte de este aparato
a menos que est_ espec_ficamente
recomendado en este manual. Todas las
demas reparaciones deben set referidas
a un t_cnico calificado.
::_No almacene este aparato a la intemperie.
No udlice esm producto cerca del agua,
como pot ejemplo en un s6tano homed(),
o cerca de una piscina.
::_M_ms de realizar cualquier reparaci6n,
desconecm el suministro de corriente
del centro de cocina en el panel de
distribuci6n de la casa quitando el fi_sible
o apagando el cortacircuims.
}}No opere este aparato si tiene un cable o
enchufe dafiado, si no esta funcionando
apropiadamente, si ha sido dafiado o
se ha cafdo.
::_No deje a los nifios sin super_,isi6n;
los nifios no deben estar solos o sin
super_,isi6n en un area en la que un
aparato esta en uso. No se les debe
permitir sentarse o pararse sobre ninguna
de las partes del aparato.
No permita que nadie se suba, se siente
o se cuelgue sobre la puerta. Esto podrfa
da_ar el centro de cocina y causar una
lesi6n personal grave.
PRECAUCION:nosedeben
guardar artfculos de interns para los nifios
en los gabinetes ubicados encima de
un homo; los nifios que suban al homo
para alcanzar cosas podrfan resultar
gravemenm heridos.
}}Ensefie a los nifios a no,jugar con
los conm)les o con cualquier otra parte
del centro de cocina.
}}Los rayones o impactos severos sobre
la cubierta de cristal podrfan romper
o destrozar el x,idrio.
::_Udlice ropa apropiada. Nunca debe
vestir ropa suelta u holgada mientras
est_ udlizando el aparato. Los mamriales
inflamables pueden encenderse si entran
en contacto con elementos calientes y
pueden causar quema&lras g,aves.
GUARBEESTASINSTRUCCIONES 3

INSTRUCC/ONESIMPORTANTESBESEGURIDAD.
LEATOBASLASINSTRUCCIONESANTESBEUSAR.
iAOVERTENCIA!
PRECAUC/ONESDESEGUR/DAD
No use agua para apagar incendios causados por grasa. Nunca agarre una cacerola que se est6
quemando. Sofoque las cacerolas que se est6n quemando cubrifindolas coropletaroente con una
tapa bien ajustada, una bandeja para homear o una bandeja plana. La grasa que se est6 queroando
fuera de una cacerola puede sofocarse con bicarbonato de sodio o, si est# disponible, un extintor
de incendios multipropdsito depolvo seco o de espuma.
}}Use dnicamente guantes para cacerolas
que est_n secos, i,os guantes hdmedos
o mo.jados sobre superficies calientes
podrfan causar quemaduras debido a|
vapor. No permita que los guantes entren
en contacto con los elementos de la
superficie caliente. No use una toalla u
otto upo de tela voluminosa. Este fipo de
tela puede encenderse sobre un elemento
de superficie caliente.
}}Siempre mantenga las toallas para platos,
guantes para cacerolas y otros ob.jetos de
tela a una distancia segura de su horno.
}}Siempre mantenga los utensilios de madera
y pl&sfico,ad como alimentos enlatados, a
una distancia segura de su homo.
}}Siempre mantenga tapices, coronas
o patios combustibles a una distancia
segura de su horno.
}}No almacene materiales inflamables
dentro del horno o cerca del centro
de cocina.
iii}i}i
iii}i}}li_
iii}i}}li_
No cubra ni bloquee ninguna de las
apermras del aparato.
Por su seg_lridad, nunca use su aparato
para calentar la habitaciOn.
No deje ob,jetos hechos de papel,
utensilios de cocina o alimentos sobre
el horno mientras no est_ en uso.
iii}i}i
iii}i}}li_
iii}i}}li_
No permita que la grasa de cocina u otros
materiales inflamables se acumulen dentro
o cerca del centro de cocina.
No toque los elementos de
calentamiento o la superficie inte.rior
del horno. Estas superficies podrfan estar
lo suficientemenm calienms como para
quemar aun si estan oscuras. Durante y
despud.s del uso, no toque ni permita que
la ropa u otros mamriales inflamables
entrenen contacto con cualquier area
inmrior del horno; permita el Oempo
suficiente para que primero se enfrfe.
Las superficies pomncia|mente calientes
incluyen las apermras de venfilaci6n del
homo, la superficie cerca alas apermras
y las hendiduras alrededor de la puerta
del homo.
RECUERBE:la superficie interna
del homo puede estar caliente cuando
se abre la puerta.
Nunca coloque los utensilios de cocina
ni otros artfculos sobre el piso del horn().
Existe un elemento de calentamiento
debajo del piso del homo. Colocar
artfculos sobre el piso del homo puede
causar que el homo se sobrecaliente,
resultando en daflos para el horno
yen riesgo de da_os o incendio en
los gabinems.
iii}i}iNo almacene ni udlice materiales
combustibles, gasolina u otros vapores
inflamables cerca de dste o de cualquier
otro aparato.
CUEZALASCARNESYELPOLLOCOMPLETAMENTE...
Cuezalacame roja yde avepot completo.la cameroja aunatemperaturaINTERNAdeal menos160°Fy la de
aveauna temperaturaINTERNAde al menos180°£La cocci6na estastemperaturasofreceprotecci6ncontra
enfermedadesdetransmisi6npot alimentos.
4 GUARBEESTASINSTRUCC/ONES

INSTRUCC/ONES IMPORTANTES BE SEGURIDAD.
tEA TODAS LAS INSTRUCCIONES ANTES BE USAR.
GEPppliances.com
HORNOM/C{ OONOAS
Lea y siga la secciSn especffica "precauciones para evitar una posible exposiciSn a una enerqfa de
microondas excesiva" en este manual
Parareducirel riesgodeincendio
en/a cavidadde/homo:
: No permita que los alimentos se sobrecocinen.
Est4 atento si se encuentm papel, pl_sdco u
otros matefiales combustibles en el interior
del apamto para facilimr la coccidn.
: Remueva las tirillas de papel-alambre de los
recipientes de papel o plfistico antes de colocar
las bolsas en el horno.
No ufilice su horno microondas pare secar
periddicos.
No codne palomitas de mafz en su homo
microon( 'tas a menos que se en(:uentren en
tin accesorio de palomitas de mafz especial
para microondas o a menos que udlice unas
palomitas de mafz hechas pare set cocinadas
en hornos microondas.
No sobrecocine las papas, t_stas podrfan
deshidmtarse y encenderse, causando dafios
al homo.
Para e_4tardaflos al homo yel peligro de un
incendio, no opere el homo mienn'as estd _cfo.
Si el homo fimdona _,acfodurante tin mimito o
dos pot accidente, no hay ningSn peligro. Sin
embaNo, esimportante que e_4tela operacidn
del homo vacfo en todo momento: esto ahorm
eneNfa y prolonKa la _.it'ta(idl del homo.
No utilice el homo pare propdsitos de
almacenamiento. No deje objetos hechos de
papel, utensilios de cocina o alimentos sobre
el homo mientras no estd en uso.
: Si se encienden los materiales que
se encuentmn dentro del homo, mantenga
la puerta del homo cermda, apague el homo
y desconecte la corriente en el flisible o en
el panel de cortacircuitos. Si la puerta abierta,
se puede extender el fliego.
: Este homo de microondas no estfiaprobado
ni comprobado pare el uso marfdmo.
Alg_nos productos como los huevos en el
cascardn v_los contenedores sellados--por
ejemplo,jarras cerradas--explotarfin yno
deben calentarse en este homo microon( 'tas.
Tal uso del homo microondas podrfa resulmr
en lesiones.
No opere el homo microondas si no
se encuentran colocados la plataforma _mtoria
y el apoyo.
Ex4te calentar alimentos pare beb4s enjarras
de _4drio, induso sin la tapa. Aseg_rese de que
todos los alimentos para nifios se cocinen por
completo. Agite los alimentos pare distribuir el
calor unifbm_emente. Cuando caliente la leche
de f&mula o la leche matema sea cuidadoso
pare evitar que hierva. E1recipiente puede
sentirse mils flfo de lo que estfi la leche.
Siempre pruebe la temperamra de la leche
antes de alimentar al beb_.
No hiel_a huevos en un homo microondas, ia
presidn se acumularfi denuo de huevo y causmfi
que dste explore, resultando en posibles lesiones.
[.os alimentos con una "cfiscarao piel" intacta
como las papas, embutidos, tomates, manzanas,
huevos, hfgados de pollo y otras memidencias
deben set ag_jereados pare permidr que el
vapor escape durante la cocci6n.
No descongele bebidas congeladas en botellas
con un cuello estrecho (espedalmente Ins
bebi(_s carbonatadas). Aunque el recipiente
est_ abierto, puede acumularse la presi6n. Esto
puede causar que el recipiente explote,
resultando en posibles lesiones.
Los alimentos calientes y el vapor pueden
cmlsar quemaduras. Tenga cuidado cuando
abra cualquier recipiente con comida caliente,
incluyendo las bolsas de palomitas de mafz,
bolsas y cajas de cocci6n. Para prevenir posibles
lesiones, dir!ja el vapor lejos de las manos y
el rostro.
Como con cualquier aparato, se necesita una
super_4sidn cercana cuando sea udlizado pot
nifios.
GUARBEESTASINSTRUCCIONES 5

INSTRUCC/ONESIMPORTANTESBESEGURIDAD.
LEATODASLASINSTRUCCIONESANTESBEUSAR.
iAOVERTENCIA!
UTENS/L/OSDECOC/NASEGUROSPARAM/CROONDAS
Aseg(lresedequetodoslosutensiliosdecocinautilizadosensuhomodemicroondasseanadecuadosparacocinar
conmicroondas.Puedenutilizarselamayorbdecacerolasdevidrio,platosparacocinar,tazonesdemediciSn,tazones
paracremas,cer#micaovajilladeporcelanaquenotengaadomosmet#licoso est#bamizadaconunlustremet#lico.
Algunosutensiliosdecocinaestfinetiquetadoscomo"aptosparacocinarconmicroondas"
Sino esd segumsiun platoessegumpacacocinar
conmicroon(hs,hagaestaprueba:coloqueen el
homo el platoqueestfiprobandoy un taz6nde
medici6nde.vidriollenadoconuna tazadeagua;
coloqueel taz6nde medici6nsobreo alladodel
plato.Encien(hel hornomicroon(hsdurante35a45
segundosenaho.Sielplatose calienta,nodebeser
udlizadoparacocinarconmicroon(hs.
Sielplatopermanecefifovs61osecalienta
elaguaenlataza,enmnceselplatoesseguro
paracocinarconmicroondas.
g Siudlizaun term6metropara carnedumnte
lacocci6n,asegfirese& que8steseaseguro
paraudlizarseen hornosmicroon(hs.
g No udliceproducmsde papelreciclado.Lasmalla_s,
servilletasypapelpacafinadode papelreciclado
puedenconteneruoa)smetfilicosquepueden causar
un arcoelOctricoo laignici6n.Debenevitarse
losproducmsdepapelquecontengannailono
filamenmsdel nailon> quetambiOnpueden
encenderse.
AJgunasbandejasde poliesdreno(comoen la_sque
seencuentraempacadalacarne) denenunacinta
delga(hde metalincrusta(hen laparte inferior.
Cuandoest_ bandeja_ssoncalentada_s,el metalpuede
quemarelpisodelhorno o encenderunamalla
depap&
g Nomdaslasenvoltumsplasdcassonadecuadaspara
elusoen hornosmicroondas.Reviseel paquetepara
obtenerinsuuccionesdeusoapropiado.
g Lasmall>de pap&el papelparafinadoy
lasenvolmmsplasdcaspuedenudlizarsepacacubrir
losplainsconel finde retenerla hume(hdy prevenir
lassalpicadums.Asegfiresedevenularlaenvoltum
pl£dca pacaqueelvaporpue(hescapar.
g Lacomidaolosutensiliosmet_licosdecocina
demasiadogmndesno debenser udlizadosen
un hornomicroondas.Podrfapre.sentarse
un cormcircuimoincendio.
Aunquelosplainsde papelpuedenudlizarsepara
lacocci6ncronometm(hy eldescongelamienm,
no losutilicepacalacocci6nconAuraSensor.
Pararecalentar,udliceplainso tazonessegurospara
cocinarconmicroondas.Cubmconunaenvoltura
pl£dca.
Losu_ensiliosde cocina pueden calentarse debido
a la uansferencia de calor a pardr de losalimenms
calientes.Es posible que se necesiren agarraderas
para manipular los utensiliosde cocina.
g Lasbolsasde cocci6n "hervibles"vlas bolsas
plgticas estrechamente cerm(hs {lebenser
cortachs, perforadas o ventiladas de acuerdo
con las instrucciones del paquete. De no hacerlo,
elpl_dco podrfa explotar duranm o inmediatamenm
despu& de lacocci6n, msultando en posibles lesiones.
Tambidn,losrecipienms plfisdcosde almacenamienm
del_n estar pot lo menos parcialmenm destapados
yaque forman un selloherm&ico. Cuando cocine
con recipienmscerrados hermdticamenm con
una envolmra pl_dca, remueva cui(hdosamenm
lacubierta ydir!ja elvapor leiosde lasmanos y
elrosuo.
Udliceel papelaluminiofinicamentede acuerdo
conlasinstmccionesenestemanual.Losalimenms
preparadosenporcioneslistasparacalentaryservir
(TVDinners)puedencocinarseconmicroondasen
bandejasdepapelaluminiode unaalturamenora
3/4";remuevala cubiertasuperiorde aluminiov
vuelvaacolocarlabandejaenlacaja.Cuandou{ilice
papelaluminioenel homo microondas,mamenga
elpapelaluminioaunadistanciadealmenos
1pulgadadelosladosdelhomo.
g UIensiliosde cocinaplasdcos:losutensiliosdecocina
pl£dcosdisefiadosparalacocci6ncon microondas
sonmuvOdles,perodeben udlizarsecui(_dosamente.
Incluso'elplfisticoseguroparemicroondaspuedeno
set tan mleramealas condicionesdesobmcocci6n
comolo sonvidrioo losma_erialescerdmicos,ypuede
ablan(hrseo quemarsesiessomeddoa pefiodos
cormsdesobrecocci6n.Enexposicionesprolonga(_s
alasobrecocci6n,losalimenmsvlosutensiliosde
cocinapuedenencenderse.
Siga/assiguientesdirectrices:
[_ UtilicesdloplAdcosse#lrosparamicroon('las
yutilfcelosen estrictocumplimientoconlas
recomendacionesdelfabficanmdelosumnsilios
decocina.
[_ Nocalienteconmicroon(hslosrecipientes
VaC1OS.
_] No permitaquelosnifiosutilicenutensiliosde
cocinaplfisticossintotalsupervisi6n.
6 GUARBEESTASINSTRUCC/ONES

/NSTBUCC/ONES/MPORTANTESDESEGUR/DAD.
tEA TODAS/.AS/NSTflUCC/ONESANTES DEUSAR.
GEApp/iances.com
ARCOELECTRICO
Si observa un arco el#ctrico, presione el bot6n CLEAR/OFFy corrija el problem&
El arco e/ectrico es el t&mino demicmondas
para definir /as chispas dentro de/homo.
El arco electrico es causado pot:
_ Metal o papel aluminio que est_ en
contacto con el lad() del horn().
}}E1 papel aluminio no esta amoldado a
los alimentos (los bordes colocados hacia
arriba actdan como antenas).
}}Metal, como tirillas para torcer, alfileres
para rareso platos con adornos dorados
en el microondas.
}}Se estan utilizando toallas de papel
reciclado en el horno microondas que
contienen pequeflas piezas metalicas.
AGUASOBRECALENTADA
El agua y otros liquidos que son sometidos alas microondas no siempre forman burbujas cuando
alcanzan el punto de ebuflici6n. Ciertamente pueden estar sobrecalentados y no mostrar ninguna
burbuja.
i.os lfquidos sobrecalentados burbu.jeaffm
tuera de la taza cuando &ta se mueva o
cuando algo como una cuchara o una bolsa
de t4 se coloquen en ella.
Para prevenir que esto suceda y cause
lesiones, no caliente ningSn lfquido por mas
de 2 minutos por taza.
DespuF.s de calentaL permita que la taza
permanezca en el horno microondas
durante 3() segundos antes de moverla o
colocar algo denm) de ella.
Ebu/lici6n espontanea
Bajo ciertas circunstancias especiales, los
liquidos pueden comenzar a hervir durante
o poco despu#s de ser quitados del homo
microondas.
Para prevenir quemaduras por las
salpicaduras del liquido, ante.s de quitar
el recipiente del horno recomendamos
It) siguienm:
iii}i}i
iii}i}}li_
Permita que el recipiente permanezca
en el homo durante 30 a 40 seg_undos
despu& que el horno se haya apagado.
No permita la ebullici6n de l/quidos en
recipientes con un cuello estrecho como
las bomllas de gaseosas, bomllas de vino y
especialmente las tazas de c_F. con cuello
esuecho. Incluso si el recipiente esta
abieru), puede acumularse un exceso
de vapor y cmlsar que &re explore
o se rebose.
GUARDEESTAS/NSTRUCCIONES 7

INSTRUCC/ONESIMPORTANTESDESEGURIDAD.
tEA TODASLASINSTRUCCIONESANTESDEUSAR.
TODOSLOSSIGUIENTESASPECTOSSONNORMALESCON
SUHORNOMICROONDAS
} Vapor escapando alrededor de la puerta.
}} Reflejo de luz alrededor de la puerta o de
la carcasa extema.
iii}i}i
iii}i}}li_
Puede presentarse una p_rdida de
intensidad de la luz del homo y un
cambio en el sonido del soplador cuando
se opera a niveles de corriente interiores.
E1venfilador del microondas puede
operar con ambos homos apagados. Una
vez se entife el control se apagarfi solo.
iii}i}i
iii}i}}li_
Mientras est_ udlizando su homo
microondas es posible que note algo de
interferencia en la TV o radio. Es similar a
la interferencia causada pot otros aparatos
pequefios y no indica un problema con
Stl homo.
Un golpeteo amordguado mientras estd
fimcionando el homo.
TERMINOSYDEFINICIONESDEMICROONDAS
Arco electrico Resguardar
Elarcoeldctricoesel tdrminodemicroondaspara
definir/aschispasdentrodelhomo.Elarcoeldctrico
escausadopot:
Metalopapelaluminioencontactoconel/ado
delhomo.
Papelaluminionoamoldadoalacomida(losbordes
haciaarribaactElancomoantenas).
Metal,comotiri//asparatorcer,a/fileresparapo//oo
platosconadomosdorados.
Lastoallasdepapelrecicladocontienenpequefiaspiezas
metdlicas.
Cubiertas
Lascubiertasmantienenlahumedad,permitiendoun
calentamientorodsuniforme}/reducenel tiempode
cocci6n.Lasenvolturasdepldsticoconrespiraderoso
/ascubiertasdepapelparafinadopermitenqueel exceso
de vaporescape.
Enunhomo regular,ustedcubre/aspechugasde polio
o losalimentos homeadospara evitarque sedoren
demasiado.Cuandoutilizaelhomo microondas,utiliza
pequefias tirasde papelaluminiopara cubrirpartes
delgadas,como/aspuntasde/as alasy patasde/as aves,
/ascualessecocinarfanantesde/as partes rodsgrandes.
Tiempoderepose
Cuandococinaconhomosregulares,alosalimentoscomo
lacameasadao lospastelesselespermitereposarpara
terminarlacocci6noparaqueseendurezcan.Eltiempo
dereposoesespecialmenteimportanteenla coccidncon
microondas.Tengaencuentaqueunpastelcocinadocon
microondasnoescolocadoenunaparrilladeenfriamiento.
Ventilacion
Despudsdecubrirunplatoconunaenvolturapldstica,
ustedventilala envolturapldsticavolteandounaesquina
detalformaqueelexcesodevaporpuedaescapar
AVISO:MARCAPASOS
La mayoda de los marcapasos se encuenuan microondas. Sin embargo, los pacientes que
prote_dos contra la intefferencia de tengan marcapasos deberfan consukar a sus
productos elecu6nicos, incluyendo m,fidicos si uenen a|guna duda.
8 GUARDEESTASINSTRUCC/ONES

INSTRUCCIONES IMPORTANTES BE SEGURIDAD.
tEA TODAS LAS INSTRUCCIONES ANTES BE USAR.
GEPpp/iance&com
iABVER' I
AUTOL/MP/£ZAD£LHORNO/NF£R/OR
No utilice papel aluminio para recubrir la parte inferior del homo, excepto como se sugiere en este
manual La instalaciSn inapropiada del papel aluminio podrfa resultar en un riesgo de cortocircuito
o fuego.
: Permanezca alejado del horno cuando abm
la puerta del horno. E1aire caliente o el vapor
clue escapa puede causar quemaduras en
las manos, rostro y/u qjos.
No caliente los recipientes de comida
que no estOn abiertos. La presi6n puede
acumularse y el recipiente podrfa explotm;
causando lesiones.
Mantenga la vendlaci6n del horno sin
obstmcciones.
Mantenga el homo libre de acumulaciones
de grasa.
Mantenga el centro de cocina limpio y libre de
acumulaciones de grasa o derrames, los cuales
pueden encenderse.
Nunca deje la puerta del homo abierta cuando
no estd observando el centro de cocina.
Coloque la parrilla del homo en la posicidn
deseada mientras el homo estd flfo. Sise deben
manipular las pardllas cuando el horno esd
caliente, no permita que la agarradera de
la olla entre en contacto con el elemento de
calentamiento.
Cuando udlice bolsas de coccidn o asado en
el homo, siga las instmcciones del fhbricante.
Extmer la parfilla al seguro de parada es
conveniente pare levantar alimemos pesados.
TambKn es una precmlcidn contm quemaduras
producidas al tocar superficies calientes de
la puerta o de las paredes del homo.
No udlice el homo como un firea de
almacenamiento, l.os artfculos almacenados
en un homo pueden encenderse.
No deje productos de papel, utensilios de
cocina o alimentos en el homo cuando no est_
en uso.
: Despuds de asar a la parrilla, siempre saque
del horno una cacerola pare asar y lfmpiela.
ia grasa remanente en una cacerola para asar
puede encenderse la siguiente vez que udlice
el homo.
No utilice el homo para secar pefiddicos.
Sison sobrecalentados, pueden encenderse.
Nunca deje fiascos o latas con grasa derramada
sobre o cerca de su homo.
[)nicamente limpie las partes emm_era_ 'tasen
este Manual del propietario.
No limpie el empaque de la puerta.
E1empaque de la puerta es esencial para
tin buen cierre. Debe tenerse cuidado de
no desgastan dafiar o mover el empaque.
: No ufilice limpiadores. Ningain limpiador
comerdal para hornos ni ninguna cubierta
protectora pare hornos debe udlizarse dentro o
alrededor de las partes del homo. Los residuos
de los limpiadores de hornos dafiarfin
el interior del horno cuando se utilice
el ciclo de mltolimpieza.
Antes de la autolimpieza del homo, remueva
la son_'ta, cualquier cacerola para asm; parrilla
y otros utensilios de cocina.
Antes de comenzar un cido de autolimpieza,
asegOrese de limpiar con tin trapo los
derrames.
: Si el modo de autolimpieza no flmciona bien,
apague el homo y desconecte el suministro
de corriente. Haga que tin tdcnico calificado
realice la repamcidn.
: Est4 atento al vendlador: en alg_in momento
dumnte el cido de limpieza debe escucharse
el mido de tin vendlador. Si no sucede esto,
llame para que el homo reciba mantenimiento
antes de una nueva autolimpieza.
LEAYSIGAESTAINFORMACIONDESEGURIDAD
CUIDADOSAMENTE.
GUARBEESTASINSTRUCCIONES 9

Usode loscontro/esde/homo microondas.
A Io largo de este manual, las caracterfsticas y apariencia pueden variar con los de su mode/o. Esposib/e que
su modelo tonga uno de los siguientes controles.
Microwave Oven
@
Sensor Cooking Convenience Cooking
Add _
1 2 3 4 5 I C _30 Sec_'-_
Express Express Express Express Express
___¢-T,mo-_ ¢-Powe;q FK,.c.onqCDo,oY_...._
L_Cook .j L Leve! J 6 7 8 9 0 L_Timer J __Start_ I[_
Express SoundOn/Off Display On/Off
o J ,eor ..........
Microwave Oven
Guide Behind Door
Sensor Cooking Convenience Cooking
Express Express Express Express Express
6 7 8
e Express %c und On/Off
_('_ Auto q _ Time q
_r==Loef_o_ Loefro_
==_Ti me_'_ _Power_
OOkJ [ Leve!J
e 1
9
i
o _J__aq---O
o,,p,o_on/offL_Off__) _)
¢ L 30Sec_
I(?

GEPpp/iance&com
Caracterfsficasyconfiguracionesdecontrolde/homomicroondas
Pantalla 0
Mueswael tiempo ducante lasflmciones de
cocci6n, el nix_l de potencia que es/_ siendo
ufilizado, los cddigos autom_ficos, los pesos
de los alimentos pare autodescongelamiento,
el modo de cocci6n y lasinstrucciones.
NOTA:eltiempoen/apanta//ade/microondas A
semuestraenminutesysegundos(1:30esunminute,
30segundos).Enelhomoinferior,eltiemposemuestra
enhorasyminutos(1.30esunahera,30minutes).
Controlesdesensorautomdticoy
deregulaciCnmanual A
[;t iliasuperior de botones enume_>_artfculos
especfficosque puede elegir paca calentar o
cocinal:
0
0
Popcorn(Palomitasde mafz)
Ufilfcelo paca prepacar las palomitas de mafz.
Reheat(Recalentar)
Ufilfcelo cuando los alimentos necesiten un
calentamiento cApido.
Potato(Papas)
Llfilfcelo cuando cocine papas entecas.
Beverage(Bebidas)
Llfilfcelo paca calentar una taza de caf_ u otcas
bebidas.
Snacks(Refrigerios)
Se ufilizapaca calentar varies fipos de
refligefios.
Cook(CocciCn)
Se ufilizapaca detemfinar en fbm]a autom_fica
losfiempos de cocci6n y losnivelesde pomncia
paca variesfipos de alimentos.
TimeDefrost(7Tempodedescongelamiento)
Se udliza pare la ma}v)rfade losalimentos.
AutoDefrost(Oescongelamientoautom#tico)
LlfiliceAuto Defiost paca descongelar came
rc_a,de axeypescado.
TimeCool((-fiempode cocciSn)
Le pemfi/e ufilizar el microondas has/a par
99 minutes y59 segundos.
PowerLevel(Niveldepotencia)
Presi6nelo para elegir el nivelde potencia que
desea esmblece_:Obser\v la panmlla mienwas
presiona esm bot6n paca seleccionar el nivelde
pomncia que desea esmbleceLTambi_n xvc_ un
hi;el de descongelamiento. Esmconfigmvmi6n
le pemfific,_escoger su propio hi,el de pomncia
de descongelamiento ufilizando los botones
hum&ices.
@
0
0
0
Botones num#ricos
Despu& de presionar un bot6n de flmci6n,
presione los botones nunl_ficos pare esmblecer
la cantidad exacm de fiempo que desea cocinm:
Par ejemplo, si presiona los botones 1,2y 5,
esmblece 1 minute y 25 segundos.
Clear/Off (Borrar/Apagar)
Presionar C/ear/Offcancela/odaslas fimciones
de cocci6n del homo microondas. Es/o no
borca el Kitchen Timer (Tempofizador de
Cocina).
Start(Inicio)
Despu& de efectuar todas las selecciones,
presione esm ahnohadilla paca encender
el homo. Debe presionm_e el bot6n Start
pare encender cualquier flmci6n.
Kitchen timer Min/Sec
(Temporizador de cocina)
Presione paca establecer el tempofizador hasta
99 minutes y 59 segundos. Presione los botones
nmn&Jcos pare esmblecer el/iempo. Presione
el bot6n KitchenTimerMin/Sec nuevamenm
pare inicia_: Presione el bot6n KitchenTimer
Min/Sec(los veces paca borcar la pantalla.
Noenciendelaenergfademicroondas.
DelayStart (Inicioretardado)
Le pemfite configucar el homo microondas
pare que demote la cocci6n hasm par 12 hams.
Add 30Sec(Adicionar30segundos)
Cada _z que presione este bot6n, el tiempo
es/ablecido aumenta en 30 segundos.
Clock(Reloj)
Presione es/e bot6n antes de configm'ar
el tel@
11

Cambiode/nivei depotenciade/microondas.
El nivel de potencia puede ingresarse o cambiarse inmediatamente despufis de ingresar el fiempo para time Cook,
time Defrost o Express Cook. El nivel de potencia tambifin puede cambiarse durante la cuenta regresiva del tiempo.
Lo_f_o_tj
6 7 8 9 0
Express Sound o_l/off 91spl_y On/Oil
Powo;q
Level J
Para cambiar el nivei de potencia...
%
Presione el botdn TimeCooko #me
Befrost
Ingrese el tiempo de cocci(m o de
descongelamiento.
Presione el bot6n Power Level
Seleccione el nivel de potencia
deseado 1 a 10.
[_] Presione el botdn Start.
Losdistintosnivelesdepotenciaa_aden
flexibilidadalacoccidnconroicroondas.Los
nivelesdepotenciaenelhomoroicroondas
puedencoropararsecon/asunidadesde
superficiesobreunacocina.Cadanivelde
potencialebrindaasuhomomicroondas
energfaunciertoporcentajede/tieropo.
E1 niveldepoteneia7es energfa de
microondas el 70% del fiempo.
E1 niveidepoteneia3 es eneigfa el 30%
de] tempo.
1_ mayori',_ de la coccidn se haiti
en A#o (nivel de potencia 10)lo que
]e da 100% de la potencia. E1 nivel de
potencia 10 cocinarfi rods r_pido pete
es posible que los Mimentos necesiten
un movhniento, rotacidn o giro m_s
fiecuenm.
Una configuracidn rods b_ia cocinard rods
unifk>rmemente y se necesitmd menos
movimiento o romcidn de los aUmentos.
Algunos afimentos pueden toner un
meier sabcm texmra o apariencia si
se udliza una de los configuraciones
infedores. Udlice un nNe] de potencia
infetq_or cuando cocine a/imentos que
mngan tendencia a he_M_, como
las papas gradnadas.
Pemfim plazos de descanso (cuando
los ciclos de energ6a de microondas
se apaguen) para que los afimentos
"ba/anceen" o uansfieran el cMor a su
interior Un ejemplo de esto se Inuesm_
con el niveldepotencia 3: el ciclo de
descongelamiento. Si el ciclo de energfa
de microondas no se apaga, el exm_ior
de los a/imentos se cocinarfi antes de
que el inmfior se descongele.
Pquisepresentanalounosejemp/osdelos
usesparalosdistintosnive/esdepotencia:
Alto 10:pescado, tocino, verduras,
hervir lfquidos.
Medioa Alto 7."cocci6n suave de came
rc_jay de ave; cacerolas para hornear y
reca/enmr
Medio5: cocci6n lento y
ablandamiento para estofados y cortes
menos blandos de came.
Ba]o2 #3".escongelmniento; hervir
a fhego lento; salsas delicadas.
}}:_Calentar 1:mantener la comida
caliente; ablandar la mantequiila.
/2

Usede/as caracteristicas
cronometradasde/microondas.
GEPpp/iances.com
1 2 3 4 5
Express EMDFeS_ ExDreS_ Express Express
6 7 8 9 0
Express sou._o_/o_r D,_p_ovOnleff
Power
Time Cook / (Tiempo de coccion /)
teperm/te utilizer elm/croondashasteper
99 minutes g59 segundos.
Elhive/de potencia 10(Alto) seesmbiece
autom_ticamente, pete usted puede
cambiarlo pare m_is flexibilidad.
77 Presione el bot6n lime Cook.
[_ Ingrese el tiempo de cocci6n° Per
ejemplo, presione 1, 5, Oy 0 para
15 minutes.
%
Cambie el nivel de potencia si no
desea toda la potencia. (Presione
el bot6n PowerLever Seleccione el
nivel de potencia deseado 1 a 10).
[_ Presione el botdn Start.
Usted puede abrir la puerto durante
Time Cook para revisar la comida. Cierre
la puerto y presione el botdn Start para
continuar la coccidn.
Time Cook//(Tiempo de coccion //)
te permitecambiarlosnivelesdepotencia
automdticamentedurantelacoccidn.Aquf
seindicacomehaceflo:
[_ Presione el botdn limeCook.
[_ Ingrese el tiempo de coccidn.
[_ Cambie el nivel de potencia si no
desea toda la potencia. (Presione
el botdn Power Level. Seleccione
el nivel de potencia deseado 1 a 10.)
Presione nuevamente el botdn
lime Cook.
[_ Ingrese el segtmdo dempo
de coccidn.
%
Cambie el nivel de potencia si no
desea toda la potencia. (Presione
el botdn Power Level. Seleccione
el nivel de potencia deseado 1 a 10).
Presione el botdn Start.
A1 final de Time Cook I, Time Cook II
enciende la cuenm regresiva.
Express Express Express
ExpressCook (Coccionexpres)
Estaesunaformar@idadeestablecerel tiempo
decoccidnentreI g6 minutes.
Presione uno de los botones Express
(de I a 6) pare 1 a 6 minutos de coccidn
a un nivel de potencia 10. Pot ejemplo,
presione el botdn 2 pare 2 minutes de
dempo de cocci6n.
E1 nivel de pomncia puede cambia_e
cuando el fiempo est(} en cuenm
regresiva. Presione el bot6n Power Level
e ingrese 1 a 10.
Add 30Seconds(a_adir 30segundos)
Ustedpuedeutilizerestacaracteffsticadedos
maneras:
AaSadir,i 30 segundos a la cuenm
regresi_a del dempo cada vez que
pr_ione el bot6n.
Puede udliause como una manem r,ipida
de establecer 30 segundos de dempo de
cocddn. No necesim preskmar el bot6n
Sta_ el homo se encender_
inmediatamenm.
13

Uso de/as caracteristicas cronometradas de/microondas.
Guia de cocina para el tiempo de cocci6n. Ufifice el nivel de potencia Alto (10)a menos que se indique Io contrario.
Cantidad fiempo Comentarios
Arvejas
/frescas,descascaradas 2Ibconlacascara 9a 12min Enunacacerolade1cuarto,cotoque1/4detazadeago&
fcongelada, paquetede10oz 4a8 min Enunacacerotade1cuarto,cotoque2cucharadasdeagua.
Br6coli
/cortefresco; 1racimo(114a1½ib) 7a10min Enunacacerolade
/talfesfrescos 1racimo(11Aa1½Ib) 9a13min Enunacacerotade
(congdado,picado) paquetede10oz 5a8min Enunacacerotade
_[altoscengefades paquetede10oz 5a8min Enunacacerotade
Ca/abaza
/fresca,de#araneyamar/ffa, 1Ibenrodajas 4a7 min
fdebderne,beltetaemarrem 1calabaza 7a 11min
(aproximadamente1Ibcadauna)
2cuartos,cotoque1/2tazadeagua.
2cuartos,cotoque1/4detazadeagua.
1cuarto.
1cuarto,cotoque3cucharadasdeagua.
tcenge!ada) 1espiga 5a7min
2a3espigas 2a4min
porespiga
Enunacacerolade11½cuartos,coloque1/4detazadeagua.
Corteenmitadesyquitetasmembranasfibrosas.Enun
recipientedevidriode2cuartos,coloqueelcortedelacalabaza
haciaabajo.Votteeelcortehaciaarribadespu_sde4minutos.
Coliflor
zfferescencia) 1cabezamediana 9a14min Enunacacerotade2cuartos,cotoque1/2tazadeagua.
(fresca.enrera, 1cabezamediana 9a17min Enunacacerotade2cuartos,coloque1/2tazadeagua.
lcengefada, paquetede10oz 5½a8 min Enunacacerotade1cuarto,cotoque2cucharadasdeagua.
Esp_rragos
,ratiosfrescos 1Ib 7a 10min Enunacacerotade1½cuartos,coloque1/4detazadeagua.
MedioaAlto(7)
,[a//oscongefados paquetede10oz 5a8min Enunacacerotade1cuarto.
Espinacas
#rescam 10a16oz 5a8 min Enunacacerolade2cuartos,coloqueJaespinacalavada.
(congefada,picadayenhejas) paquetede10oz 5a8min Enunacacerotade1cuarto,cotoque3cucharadasdeagua.
Frijo/es
/erdesfrescos) 1Ibcorteenmitades 12a 17min Enunacacerolade11½cuartos,coloque1/2tazadeagua.
/erdescenge/adesJ paquetede10oz 6a9min Enunacacerotade1cuarto,cotoque2cucharadasdeagua.
(limacongdada; paquetede10oz 6a9min Enunacacerotade1cuarto,cotoque1/4detazadeagua.
Maiz
lgranecengeJade, paquetede10oz 4a8 rain Enunacacerotade1cuarto,cotoque2cucharadasdeagua.
Mazorcademaiz
/frescaj 1a3 espigas 3a5n% Cotoqueelmaizenunrecipientedevidrioparahornearde
peresptga 2cuartos.Sietporespigamaizest_enlacascaritla,noutilice
agua;sietmaizhasidedescascarillado,a_ada1/4detazade
agua.Reacomodedespu_sdelamitaddeltiempo.
Coloqueenunplatodevidrioparahornear.Cubraconuna
envolturapl_sticaventitada.Reacomodedespu_sdelamitad
dettiempo.
_as
/frescas,b/ancas,encubom 4papas(6a8 ozcadauna) 11a 14min
/frescas,enreras,dulces 1(6a8oz.) 2a5min
eblanca_
Peteycorteencubesde1puigada.Coloqueenunacacerotade
2cuartoscon1/2tazadeagua.Agitedespu_sdelamitaddet
tiempo.
Perforeconuntenedordecocina.Coloqueenethomo,1pulgada
aparte,enunadisposici6ncircular.Permitaquerepose5minutos.
Remolachas
frescas,enteras_ 1racimo 18a 25min Enunacacerotade2cuartos,cotoque1/2tazadeagua.
Repo//o
(frescoj 1cabezamediana(aproximadamente2 Ib) 8a 11min Enunacacerotade11½62cuartos,coloque1/4detazadeagua.
lrrezosgrandes. 7a 10min Enunacacerotade2 63cuartos,cotoque1/4detazadeagua.
Verdurasmezc/adas
{congefada, paquetede10oz 4a8 n% Enunacacerotade1cuarto,cotoque3cucharadasdeago&
Zanahorias
(frescas,enreflajas 1Ib 6a9 rain
icongetadas paquetede10oz 5a8 min
14
I
Enunacacerolade1½cuartos,coloque1/4detazadeagua.
Enunacacerotade1cuarto,cotoque2cucharadasdeagua.

GEPpp/iance&com
Duranteel descongelamientopuedeescucharseungolpeteoamortiguado.Estoesnormalcuandoelhomonoest#funcionandoenAlto.
TimeDefrost (77empode descongelamiento)
1 2 3 4 5
6 7 8 9 0
Exp_ss _nd OnlOrf o_pl_yOnlOfr
Enlamitaddel tiempode
descongelamientoseleccionado,
elhomosefialaTURN.Entonces,
volteelacomidaysepareo
reorganicelostrozosparedarun
descongelamientomdsuniforme.
Protejalasdreascalientescon
pequefiostrozosdepapel
aluminio.
Guia de descongelamiento
Lepermitedescongdarduranteunperiododetbmpo
sdeccionado.VealaGufadedescongelambntoparelos
tbmpossugeridos.(Lafuncbndedescongdambnto
autom#ticoseexp/icaen/aseccbnUsede/ascaracteffsticas
autom#ticasde/microondas).
-77 P_esione el bot6n TimeDefrost.
[_ IIlg_*eseel tiempo de descoIlgelamiemo.
__ P_esione el bot6n Start.
Volae los alimemos cuando el homo d5
la serial.
P_esione el bot6n Start.
E1nivel de pote_lcia est,1 establecido
autom_ticameme e_l 3, peIo puede cambiaIse.
Usted puede descongelaI aItfculos pequefios
__pidameme aument_mdo el nivel de poteHcia
despuSs de ingresaI el tiempo. Alive/depotenda1
aco_ el tiempo toted de descoHgelamiemo e_l
at)_oxhnadameme la mitred; nivdde potenda10
aco_t:_ el tiempo toted a ap_oximadameme 1/3.
Sin embaigo, los alime_ltos necesiaI_n mla
ate_lci6n m_s flecueme que lo usual.
Consejosdedescongebmiento
_Losafimentoscongdadosenpapelopbsticopuedenset
desconge/adosdentrode/paquete.Laspaquetescer,rados
debensetcortados,perforadosovenfiladosDESPUESde
quelosafimentoshayansidedescongdadosparcblmente.
Losrecipientespbsticosdealmacenamientodebenester
parcialmentedestapados.
_Lascenascongeladaspreempacadasdetamafiofamiliar,
puedendescongdarseycocinarseenelmicroondas.
Silacomidaseencuentraenunrecipientedepapal
aluminio,transfi#ralaaunplatoseguroparemicroondas.
_Losalimentosqueseechanaperderfdcilmente
nodebendejarsefueraperrodsdeunaheradespu#sde/
descongdamiento.Latemperatureambientepromueve
elcrecimientodebacteriaspdigrosas.
_Pareundescongdamientorodsuniformedecomidas
grandes,comeasados,utiliceAutoDefrostAntesde
/acocci(_n,aseg(Jresedeque/ascamesgrandesest#n
completamentedescongdadas.
_,Cuandoestddescongelada,lacomidadebeesterfife
peteblandaentodas/asareas.Sitodavfaest#unpace
congdada,regr#sdaunmementoalhomomicroondas,
od#jelareposarduranteunospacesminutes.
Came
Comentarios
Bistec.chutetaycostiffas
Cameasada:res,cordero,temera,cerdo
Camemo//da(I/f:,
SafchichasdeFrankfurt11tb)
5a lOminperlb.
11a 16minperlb.
5a8 rainperlb.
3a6min
Tocbo(1tbl 3a6min
Cametieave
GaffinaCornish
Pechugadepave(4a6tb)
9a 16minperlb.
5a lOminperlb.
Coloquetacamedesempacadaenunptatodecocci6n.Votteedespu_sdelaprimeramitad
deitiempoyprotejalas_reascalientesconpapetaluminio.Uespu_sdeiasegundamitad
dettiempo,separelospedazosconuncuchillodemesa.Uejereposarparacompleter
eldescongeiamiento.
Utiliceetniveldepotencb1.
Volteelacamedespu_sdeiaprimeramitaddeltiempo.
Coloqueelpaquetesinabrirdentrodeihorno.Calienteenetmicroondashasta
quelassalchichaspuedansepararse.Uejereposar5 minutes,siesnecesario,para
completerdetdescongetamiento.
Cotoqueeipaquetesinabrirdentrodeihorno.Uejereposar5minutesdespu_sdei
descongeiamiento.
1
Polio,entero(2_a3tb) 20a28min
Polio,poliopareasar/frefr,coraoo 15a 22min
(2_a3tb)
Coloquelagallinadesempacadaenelhomoconlapechugahaciaarriba.Volteedespu_sde
laprimeramitaddettiempo.Uejecorreraguafr{aenlacavidadhastequesepuedanquitar
lasmenudencias.
Coloquelapechugadesempacadaenunplatoseguroparemicroondasconlapechugahacia
abajo.Uespu_sdeiaprimeramitaddeltiempo,volteelapechugahaciaarribayprotejaias
_reascalientesconpapetaluminio.Uescongeledurantelasegundamitaddeltiempo.Ueje
reposar1a2haresenelrefrigeradorparacompleteretdescongetamiento.
Cotoqueelpolioempacadoenunplate.Despu_sdelaprimeramitaddettiempo,
desenvuetvayvotteeeipolio.Protejalas_reascatientesconpapeialuminio.Parecompletar
eldescongelamiento,dejecorreraguafriaenlacavidadhastaqueseremuevaelmenudo.
Coloqueetpolioempacadoenunplate.Desenvuelvayvolteedespu_sdelaprimeramitad
deltiempo.Despu_sdelasegundamitaddeltiempo,separelospedazosycol6quetosenun
platodecocci6n.Horneeenetmicroondas2a4minutesm_s,siesnecesario.Uejereposar
unospacesminutespareterminaretdescongetamiento.
Frgta$
Bofsaplbstica- 152lpaquetesde10oz 3a7min
Pan,pasteles
Par,paneci//oso relies/1ee_azo_ 1/2min
Roffosdedufcelaproz12oz_ 3a6 min Reorganicedespu_sdelamitaddettiempo.
Pescatioymarisces
Crustbceos,pedazuspequefios1Itb) 3a7min
Fifetes.congefados(1tb,, 9a12min
Cotoqueeibloqueenlafuente.Votteeyseparedespu_sdelamitaddeitiempo.
15

Usode/as caracteristicasde/sensordecoccionde/homo
microondas.
La caracterisfica Sensor detecta el aumento de la humedad liberada durante la cocciSn, El homo ajusta
autom#ticamente el tiempo de cocciSn a varios tipos y cantidades de alimentos,
Sensor de coccion
Cubierto
Venti/aflo
Los recipientes y cubierms
apropiados son esenciales para el buen
fimcionamiento del sensor de coccidn.
Siempre udlice recipientes seguros
para microondas y cfibra/os con topos
o envolumLs pldsficas venfiladas. Nunca
ufilice recipientes pldsficos de cierre
hermSfico: estos recipientes pueden
evimr que el vapor escape y causan
que los alimentos es sobrecocinen.
Antes de colocar los a[imentos en
el homo, asegfirese de que la parte
exmrna de los recipienms de cocci6n y
el interior del homo microond_ks est(_n
secos. I,as gores de humedad que se
conviermn en vapor pueden confimdir
_t1 selIsoI:
Seque los platos de tal forma que no
confundan al sensor,
ps
(rnenostiemPo) (m&stiempo)
Utilice sSIocon palomitas de mafz
preempacadas para microondas
que pesen entre 1,75y3,5onzas,
Popcorn(Palom#as de maiz)
Parausarlacaracteristica Popcorn:
%
Siga las instrucciones del paquete,
udlizando Time Cook si el paquete
es menor de 1,75 onzas o mayor
que 3,5 onzas. Coloque el paquete
de palomims de mafz en el centro
del microondas.
_] Presione el botdn Popcorn.
E1 homo arranca inmediammente.
Siabrelapuertamientrasest#POPCORNen
lapantalla,aparecer#ERROR.Cierrelapuerta,
presioneelbot6nC/ear/Offycomiencedenuevo.
Comoajustar elprogramaPopcornpara
proporcionarun tiempodecocci6n mas
corto oroaslargo:
Si sucede que la marca de pa|omitas
de mafz que ufiliza no revienm
completamente o se sobrecocina
consistentemente, usted puede afiadir
o susUaer 20 a 30 segundos a[ dempo
de coccidn automfifico.
Paraa_adirtiempo:
DespuSs de presionar el botdn Popcorn,
presione el botdn 9inmediatamente
despu& de que arranque el homo pare
un extra de 20 segundos. Presione el
botdn 9 nuevamenm pare afiadir 10
segundos adiciona|es (total de 30
segundos de dempo adiciona/).
Paradisminuirtiempo:
Despu& de presionar el botdn Popcorn,
presione el botdn 1inmediammenm
despu& que armnca el homo para
permidr 20 segundos menos de fiernpo
de coccidn. Presione el botdn 1
nuevamenm pare restar otros
10 segundos a/dempo de coccidn
(total de 30 segundos menos de fiempo).
16

GEPpp/iances.com
(/ :L¸ (/( :
Express
(menostempo) {roSst emp0)
Reheat (Recalentar)
LacaracterfsticaReheatrecalientaporciones
individualesdealimentospreviamentecocinados
o unplatodesobrantes.
[7] Coloque la comida cubierm en
el homo. Presione el bot6n Reheat.
E1 homo ananca inmediammente.
[_ E1 homo indica cuando se detecm
vapor y el tiempo resmnte comienza
la cuenm regresiva.
No abra la puerto del homo hasm que
el fiempo est& en cuenm regresiva. Si la
puerta estfi abierta, ci6rrela y presione
inmediatamente el bot6n Start
Despudsdequitarlosalimentosdelhomo,
agftelos,siesposible,parehomogenizer
la temperature.Silacomidanoest9
suficientementecaliente,utiliceTime
Cookparerecalentarpormgstiempo.Las
comidasrecalentadaspuedentenergrandes
variacionesdetemperature.Algunas9reas
puedenestersumamentecalientes.
Plgunosa/imentosnosenrecemendados
para utilizarse conReheat;paraestos
a/imentesesmejorutilizarTimeCook."
} Productos de pan.
Alimentos que deben set recalentados
sin esmr cubiertos.
}_Alimentos que necesimn set agimdos
o Io[ados.
}_A|imentos que necesimn un aspecto
seco o una superficie crt{jiente despu&
del recalenmmiento.
Comecambiar /ascenfiguraciones
automaticas:
Para reducir el fiempo en 10%:
presione el bot6n I despu& el bot6n de
]a caracterfstica.
Paraafiadir un 10%alfiempode coccidn.
presione el bot6n 9 despu& el bot6n de
la caracterfstica.
(menostiempo)(ragstiempo)
Potato(Papas)
LacaracterfsticaPotatococina1/2a2 Ib
depapas.
%
Perfore la c4scara con un tenedor y
coloque laspapasen la plamfbrma
giratoria. Si estfi cocinando tres o
m4s papas, acom6delas fbmlando
un patrdn de estrella.
Presione el bot6n Potato. E1homo
arranca inmediata/mente. E1homo
indica cuando se detecm vapor y el
fiempo resmnm comienza la cuenm
regresiva.
No abra la puerto del homo hasm que
el fiempo est6 en cuenm regresiva. Sila
puerto est_iabierm, ci@Tela y presione
el bot6n Startinmediatamenm.
Silosalimentosnoestgnlistostodavfa,utilice
Time@okparecocinarporragstiempo.
17

L/sode losfuncionesde/microondas para coccion faci/.
Las bebidas calentadas con la caracterfsfica Beverage pueden estar muy cafientes. Retire el recipiente con cuidado.
Beverage (Bebidas)
una taza de caf_ u otra bebida.
.6..i 7 :ook.9 i,9.
!%¸¸¸i; Gto
Snacks(refrigerios)
LafuncidnSnacksdeterminaenformaautomdtica
el tiempoy lapotenciaparacalentarvariestipos
derefrigerios.
Presione el botdn Snacks.
[_ Seleccione el tipo de refligerio
de 1 a 6 (constflte la Gufa de
refligerios).
[_ Ingrese la cantidad de alimentos
o el peso ell o,lzas.
[_ Presione el bot6n Start(Inicio).
Consejo:Puedepresionarelbot6nSnacksy
mantenerlopresionadodurantelacocci6npara
verel tiemporestante.
Guia derefrigerios
ripe de alimento Cantidado peso
1Pan,resquilias, de1a4
pasteliflos
2Sandwiches de1a2
3Pizza (percienesque de1a4
sehraron)
4 Ceberturaspara de1 a4
pestres
5Sopas de8 a40 oz.
6Sa/sas de queso de4 a 16oz.
........... Cook(coccion)
6 7 8 9;0
Express soundon/off _s#e_, O.lO_
Lafunci6nCookdeterminaenformaautomdtica
losfiemposdecocci6ny losnivelesdepotencia
paralosdistintostiposdealimentos.
[-_ Presione el botdn Cook.
Seleccione el tipo de alimento de
1 a 9 (constflte la Gu/a de coccidn
a confinuacidn).
[_ Ingrese el peso en onzas.
Presione el botdn Start.
Consejo:Presioneel bot_nCookymant_ngalo
presionadodurantelacocci6nparaverel fiempo
quetesta.
Guiade cocci#n
Tipede a/imente Peso Cementarios
1Vegeta/es en/atados de4a 20oz. Utiliceunaella ounbol paramicroondas.Cubra('onunatapa
o unenvoltoriode pl_sticoconventilaci6n.
2 Vegeta/es de4a 16oz. Utiliceunaellaounbolparamicroondas.Sigalosinstrucciones
conge/ades delenvaseparaagregaragua.Cubraconunatapaounenvoltorio
depl_sticoconorificiosdeventilaci6n.
3 Vegeta/es frescos de4 a 16oz. Utiliceunaellaounbol paramicroondas.Agreguedos
cucharadasdeaguapercodaporci6n.Cubraconunatapao
unenvoltoriode pl_sticoconventilaci6n.
4 Papas de8a40 oz. Perforelapiel conuntenedor.Coloquelospapasenla bandeja
giratoria.
5 Pescado de4a 16oz. Utiliceunplatorectangular,cuadradoo redondo.Cubracon
unenvoltoriode pl_sticoconventilaci6n.
6Porciones depolio de4 a40 oz. Utiliceunplato rectangular,cuadradoo redondo.Cubracon
unenvoltoriode pl_sticoconventilaci6no papelencerado.
7Camepicada de8 a48 oz. Utiliceunaellaredonda.Desmenucela camedentrode la ella.
(res, cerde,pave) Cubraconunatapao unenvoltoriodepl_sticoconventilaci6n.
8 Tecine de2 a 10oz. Coloquetiros encapassobreunplato,4percapa.Cubracoda
capaconpapeldecocina.
9Pizza (cenge/ada, de4a 16oz. Sigalos instruccionesdelenvaseparacocinarla pizzaen
/istapara eecinar el microondas.
en el microondas)
18

Uso de/as caracteristicas automaticas de/microondas. CEApp ,o .oo
La funcidn Defrost Auto/77me (Descongelamiento autom#tico/-fiempo de descongelamiento) ofrece dos formas para
descongelar alimentos. Presione Auto Defrost una sola vezpara Auto Defrost o dos veces para lime Defrost.
Auto
1 2 3 4 5
Express Express £_press E_#ress Express
6 7 8 9 0
ExPress So_ndO_/Off _spl_j On/oft
Auto Defrost (Oescongelamiento automatico)
UtiliceAutoDefrostparacameroja,avesy
pescadohasta6 libras.UtilicetimeDefrost
paralosotrosalimentoscongelados.
Auto Deflost establece
automfidcamente los fiempos de
descongelamiento y los niveles de
potencia para obtener resulmdos de
descongelamiento m_s unifbmles
paia carnes rojas, ayes y pescado.
Presione el botdn Auto Defrost
Udlizando la Oufa de conversi6n
a la derecha, ingrese el peso de
la comida. Por ejemplo, presione
los botones 1y 2paia 1,2 libras
(1 libIa, 3 onzas).
[_ Presione Start/Pause (Inicio/Pausa).
Guiadeconversion
Si el peso de la comida est_i esmblecido
ell libras y onzas, las onzas deben
converdrse a dScimas (0,1) de una libra.
/ngresee/peso
Pesode/a comida de/a comida
ononzas (d#cimasde una/ibra)
1a2 0,1
3 0,2
4a5 0,3
6a 7 0,4
8 0,5
9a 10 0,6
11 0,7
12a 13 0,8
14a 15 0,9
Time Deflost est_i explicado en
la seccidn del Uso de las caracterfsticas
cronometradas del microondas.
Remueva la came del paquete )
coldquela ell un plat(} seguro para
microondas.
Dos veces durante
el descongelamiento, el horno
indica TURN.Ell cada serial TURN,
voltee la comida. Remueva la carrie
descongelada o prote]a las _ireas
calienms con pequefios trozos
de papel Numinio.
Despu& de descongelarse,
la mayorfa de las carries necesimn
reposar 5 minutos paia complemr
el descongelamiento. L_Ls(ames asadas
grandes deben reposar dmante
aproximadamenm 30 minutos.
19

Uso de/as otras caracte#sticas de/microondas.
Recordador de cocciSn terminada: para recordarle qua tiene comida en el homo, el homo sonar# una alarma una
vezpor minuto hasta que abra la puerta del homo o presione el botSn Clear/Off
iii&, &i% A,i ,%
Clock(Re/oj)
Pres/onepara/ngresar/ahorade/dfaorev/sar
/ahorade/dfambntrascodnaconelhomo
microondas.
[77 Presione el bot6n Clock.
[_ Ingrese la hora del dfa.
[_ Presione el bot6n Start
o el bot6n Clock.
¸¸;4¸¸¸ /
#!S,olayon/off
DisplayOn/Off(Pantal/aOn/Off)
Para encender o apagar la panmHa
del reloj, presione y mantenga sostenido
el bot6n 0 durante aproximadamente
3 segundos, i_ caracterfstica Display
On/Off no puede udlizarse mientras est_
en uso una caracterfstica de cocci6n.
Reminder
_pr s pre xp _p e _p
Delay Start(/nicio mtardado)
Delay Start le pemlite esmblecer
qua el homo microondas demote
la cocci6n hasm pot 12 horas.
Presione el bot6n Delay Start.
Ingrese la hora en la cuN desea
que el homo inicie. (Asegtirese de
que el reloj del homo microondas
muesue la hora correcm del dfa).
[_ Seleccione el programa de cocci6n
que desee.
Presione el botdn Start.
E1 fiempo de Delay Start se mostrar_i
en la panmlla. E1 homo arrancar_i
autom_ificamente en la hora poste_gada.
Es posible vet la hora del dfa a/presionar
el control Clock (Reloj).
Nora:Nosepuedeufilizarla funcidnDelayStart
(Inicioretardado)conpalom#asdemaiz
o/a fund#nReheat(Reca/entar)
Sound On/Off
Sound On/Off(SonidoOn/Off)
Para encender o apagar el sonido de
la alerta sonora, presione y mantenga
sostenido el botdn 8durante
aproximadamente 3 segundos.
20

GEPpp/iances.com
i i i _ i
_Jear-'l
LOffJ
Child Lockout (B/oqueode m.qos)
Listedpuede bloquearel panelde controlpara
e/tar queel homomicroondassea iniciado
accidentalmenteoufilizadoper nifios.
Para bloquear o desbloquear los
controles, presione y mantenga
sostenido el botdn C/ear/Offdurante
aproximadamenm 3 segm_dos.
Cuando el panel de control est5
bloqueado, aparecerg una ten
el extreme derecho de la panmlla.
i¸ _"_,_
Express E_press Exp,_ss ExOresS _,p,'_ss
_xpre_s so_,,d en/off eisplo_, OslOff
MinlSec
Kitchen77met(Temperizadordecocina)
Kitchen Timerfunciona comeun temporizadorde Cuando se acabe el tiempo, el homo
minutesgpuede utilizarseen cualquiermemento,
inclusocuandoel homoestd funcionando.
Come utilizarlo come un temperizader de
minutos:
[7] Presione el botdn Kitchentimer
iI i
Min/Sec.
_] Ingrese el tiempo que desea conmr
regresivamente.
emidr;i la serial. Para apagar la serial
del teInporizad(m presione el botdn
Kitchen timer Min/Sec.
NOTA:elindicadordeltemporizador
estardencendidomientrasestdfuncionando
el temporizador
Para cancelar el temporizador durante
la cuenm regresixa, presione el botdn
Kitchen timer Min/Sec.
[-_ Presione el botdn Kitchentimer
Min/Sec.
R_raJnder
1 2:3 4 5
Express gxpres_ Express E_press Express
J:i
Reminder(Recordatorio)
LacaracteffsticaReminderpuedeserutilizada
comerelojdespertador,ypuedeserutilizada
encualquiermemento,inclusocuandoelhomo
estdfuncionando.Elrecordatoriopuedeser
configuradohasta12horasdespuds.
Presione el botdn DelayStart.
Ingrese la hera que usted desea que
el homo le recuerde. (Aseg/irese de
que el rel(_j del homo microondas
muestre la hera correcm del dfa).
%
Presione el botdn Start. Cuando
se presente la serial del Reminder;
presione el botdn Delay Start para
apag_ula. La hem del Reminder
puede observa_e en la panm/la
presionando el botdn Delay Start.
NOTA:LasletrasREMpermanecerdnen
lapantallaparaindicarquelafuncidnReminder
(Also)estardactivadahastaquesecumpla
el tiempoyseabralapuertadelmicroondas
osepresioneelcontrolClear/Off
(Borrar/Apagar).
2/

Us@de los contro/esde/homo inferior.
A Io largo de este manual, las caracterfsticas y apariencia pueden variar con los de su mode/o. Esposib/e que
su modelo posea uno de los siguientes controles.
Lower Oven
0 Oven Cont_o,s Tir_e Contro,s e
_-'_Bake_ __Sroi_ 1 2 3 4 5 C__Cl°ck_ _c°°king___Time) 5[Lp
Hi/LO
Lower Oven
_4icrowove Fan Noy Operate While Lower Oven Is In Use.
e
@
0
6 7 8
9 0 _Clear-'_..___
LoffJ _"
Time Controls
.... _T_m%) _
I Gitchen_ _f-Delayq
I L Timer_ LoSt:: /
22

GEPpp/iance&com
Controldelhomoinferior,caracterfsticasyconfiguracionesdelreloj
(Clock)ydeltemporizador(Timer)
o antalla
Muestra la horn del dfa, la tempeiamra del homo,
si el homo estfi en el modo de horneado, de asar a
la parrilla o de autolimpieza y las horas establecidas
para el temporiz_ldor o las operaciones antomfiticas
del homo.
NORA: Lahoraen/apanta//ac/elhomoinferiormuestrahorasy
minutos(1.30es unahora,30minutos).Enel homomicroondas,
el tiemposemuestraenminutosy segundos(1.30es unminuto,
@
O
0
Bot(m Clear/Off
Presione para cancelm TODASlas operaciones
del homo excepto el relfii } el temporizado_:
Bot6n Start (Inicio)
Debe piesionalse pma iniciar cualquie_ ftmcidn
de coccidn o limpieza.
Bot6nKitchenTimerOn/Off
(Temporizadordecocinaencender/apagar)
30segundog.
N una "F- y unnfimero oletra'parpadean en/a pantalla
y/as se_a/es decontrolde/homo, esto indica enc6digo
de error de lafunci6n.Presioneelbot6nC/ear/O_ Permita
queel homoseenfrfeduranteunahora.Pongael homo
nuevamenteenoperaci6n.S/elcb@o deerrorde/a func/6n
serepite,desconecteel cabledecorrientec/elhomoy
comunfqueseconel serv/c/odemanten/m/ento.
Sisuhomorueconfigurado parauna operaci6n
cronometradadelhomo yse present6unainterrupci6n
en el fluidoe/ectrico,el relojy todas/asfenciones
programadasdebenrestablecerse.
Laheradel dia (puedeserineorrecta) parpadear#
en lapanta//a cuandose hayapresentado
una interrupci6n enel f/uidoe/ectrico.
o Bot6nBroilHi/Lo(AsaralaParrillaAlto/Bajo)
Plesione para seleccionar la ftmcidn asar a la parrilla.
Presione para seleccionar la caracterfstica del
temt) ori,,_ldor.
O Botdn Delay Start (Inicio postergado)
Utilice,itmto con los botones Cooking Time o Sell Clean
pare configurar el homo para que inicie y se detenga
allt()illatiCalilell[e el1 el illOlilell[o que usted programe,
Bot(mCooking,Time(Tiempode coccidn)
0 Presione yluego presione los botones mmld_ic-os
para esmblecei la cantidad de tiempo que desea
cocinar sus alimentos. E1homo se apagar;i
antomfiticamente cuando se hav_l agotado el tiempo
de coccidn, a menos que la flmcidn Cook and Hold
(Cocinar y mantener la temperature) est_ actimda.
O Bot6nClock(Reloj)
Presione antes de confi#_rar el leh!i.
O Bot6n Bake (Homeado)
Plesione pma seleccionar la ftmcidn horneado.
O Bot6n SelfClean(autofimpieza)
Plesione para seleccionar la flmcidn de autolimt)ie/_l.
Consulte la seccidn Usode/a autolimpiezadelhomo
inferior.
Bot6nOvenLight(Luzdelhomo)
0 Plesione para encende_ o apagm" la luz del homo.
O Botones numOricos
Utilice para configurar cualquier flmcidn que
necesite ndmeros como la hora del dfa en el tel@
el temt)oriz_ldoi; la tempemmra del homo,
la hora de inicio v la dmucidn de la ot)eracidn para
el homeado cronometrado y la autolimpiem.
23

Usode/homoinferior.
Parsprevenirposiblesquemaduras,coloque/asparrillas enlaposiciSndeseadaantesdeencenderelhomo.
Antes de eomenzar...
I1
i;ts parfillas denen cierres de tope,
de fbmm tal que cuando se encnentren
colocados correctamente en los soportes,
se detendc,_n antes de salir completamente y
no se inclinac_n.
Cuando se encuentre colocando o quimndo
utensilk)s de cocina, fire de la parfilla bacia
aflm_>t has/a la prombemncia en el apoyo de
la parfilla.
Para quitar unaparrilla, tffela hacia usted,
incline el ffente hacia arfiba y tire la parfilla
hacia aft/era.
Para reemplazar,,coloque el extreme
de la parrilla (topes de cierre) en el apoyo,
incline el ffente y empt_e de la parrilla hacia
adentro.
NOT,4:Elhomotiene7parrillasenposicidn.
PRECAUCION:
/osuten$i/iosdeco(insniotrosartfcu/ossobred piso
de/homo.Existeunelementodecalentambntodebajo
delpisodelhomo.Colocarartfculossobreelpisodel
homopuedecausarqueelhomosesobrecaliente,
resultandoendafiosparselhomoyel riesgodedams
oincendioenlosgabinetes.
NOTA:es posible quese encienda
autom#ficamenteunventilador de
enfriamientopars refrigerar las
partes intemas. Estoes normal,y el
ventiladorpuede continuarandando
inclusodespubs deapagar el homo.
Comoconfigurar el homo para homear o asar
[_ Presione el bot6n Bake.
[_ Presione los botones num&icos pare
establecer la tempecamca deseada.
[_] Presione el bot6n Start.
Revise los alimentos para el punto de
cocci6n al mfnimo tiempo en la receta.
Cocine (hmmte m_s tiempo si es
necesario.
[_] Presione el bot6n Clear/O#cuando est4
completa la cocci6n.
Posiciondelaparrilla
"fipodecomida Homode27"Homode30"
Pastelescongelado BoC Co D
(sobreunabandejaparshornear)
Tortsligera(angelcake) A A o B
TartsdelibraoBundt A AoB
Bizcochos,muffins, BoC Co D
brownies,galletas,
pastelesindividuales
encaps,bizcochos,pasteles
Guise Bo C CoD
ttomos de 27": Si homea cuatro capas de
pastel al mismo tiempo, coloque (los capas
en la parfilla A y (los capas en la parfilla C
Homosde30": Si bornea cuatro capas
de pastel al mismo tiempo, coloque (los capas
en la parrilla B y (los capas en la parrilla D.
Ubique las cacerolas en la parfilla de tal
fbnna que una no est_ colocada directamente
sobre la otto.
Pars preca/entar, configure
el homo ala temperatura correct&
Elcontrol pitar# cuando el homoest#
precalentaflo ylapantalla mostrarb
su temperatura configurada.Esto
puede tomaraproximaflamente
10minutos.
Preealentamiento y ubieaci6n de la cacerola
Precaliente el homo si la re(era asf lo indica.
E1precalenmmiento es necesafio pare
obmner buenos resulmdos cuando hornee
tetras, dulces, pastelitos y panes.
Los resulmdos del horneado son mejores
si las sarmnes de bomear est_in centmdas en
el homo mnto come sea posible. [as sarmnes
no se (leben tocar entre sf ni (leben to(at
las paredes del homo. Si necesim usar (los
parfillas, coloque las sarmnes de fbmm que
una no quede inmediammenm encima de
la otto, y deje aproximadamenm 11/2" entre
cada sart4n, desde el flenm, desde awSs y
desde los cosm(bs.
24
Papel aluminio
Nuncacubrael fondodelhomoconpapeldealuminio.
Nunca cubca per complete una parrilla con
pai)el aluminio. Esto obstruica la circulaci6n
del calory obten(h'A un asado deficiente.
Puede ufilizat_euna pequefia bc_ade papel
aluminio paca awapar den'ames colocfindola
en uno de las parrillasinferiores vacias
pulgadas per deb@) del alimento.

GEPpp/iance&com
/5
Cierre la puerto.$iempmase a
/aparri//a con/a puertocerrada.
Sisuhomoest#conectadoa208voltios,
losfiletespocococidospuedenasarse
alaparrillaprecalentandolaparrillaY
posicionandolapardlladelhomo
enunaposiciSnm#salto.
Comoconfigurar el homo para asar a la parrilla
Cierrel_ puerto.Siempreasea/aparrillacon
/apuertacerrada.
[_ Coloque la came o el pescado sobre
una rejilla pa_ asar en una bandeja pa_
_IS:4I',
[_ Siga las posiciones en la pardlla
sugeddas en la Gufapara asar a la parrilla.
Eltamafio,peso,grosor,temperaturainicia/y su
preferencbsobreelpuntodecocci#ndelosalimentos
afectaranlostiemposdecocci#n.Estagufaesta
basadaencomesa temperaturaderefrigerador
[_ Presione el bot6n Broil Hi/Louna vez
pa_ asar a la parrillaHI (Alto).
Pa_'a cambiar a _k_ara la parrilla LO
(B_jo), presione el bot6n Broil Hi/LO
nue_u_ente.
[_ Presione el bot6n Start.
[_ Cu_ndo el _s_Mo _ la parrill_t
est,. teuninado, presione el bot6n
¢lear/O_
Guia para asar a/a parri//a
Homesde27" Homosde27" Homoode27" ltomosde38" Homoode30" Homosde30"
Cantidndy/ PooioiSn PrimerIndo SegnndoIndo PooioiSn Primerlado Segnndolado
Aiimento ogrosor deInParrilla Tiempo(rain) Tiempo(rain) deInParrilla Tiempo(rain) Tiempo(rain) Comentarioo
Camemelida 1]b(4croquetas) C 10 7 EoF 10 7 Distribuyaanformemente
Biencocido 1/2a3/4"deespesor C 10 9 EoF 10 9 Hasta8croquetas
romanaproximadamente
elmismotiempo
Fileteodeoame
Pocococidot
Medio
Biencocido
Pocococido$
Medio
Biencocido
Polio
LoBroil
LoBroil
Colnode
langostn
LoBroil
Filetesde
pesoado
HiBroil
LoBroil
1"deespesor
lal_lb
1½"deespesor
2a2½1b
1completo
2a2½1b,
@ididoIongitadinalmente
Presas
Deshuesado
2a4
6a 8 ozcadauna
1/4a1/2"deespesor
C
C
C
C
C
C
AoB
AoB
B
C
6
8
12
lO
15
25
25a35
15a20
18a20
18a25
5
6
11
7a8
14a16
20a25
lOa15
15a20
lOa15
Novoltee
elcaparaz6n
N/A
E
E
E
E
E
E
BoC
BoC
C
D
8
10
12
lO
15
25
25a35
15a20
18a20
18a25
6
8
10
8
14a16
20a25
15a20
lOa15
Novoltee
elcaparaz6n
N/A
Rodnjasde 1"deespesor B 8 8 D 8 8
inmon
(precocido)
Chnletnsdeoerdo 2(1/2"deespesor) C 10 10 E 10 10
Biencocido 2(1"deespesor)aprox1Ib B 13 13 D 15 15
ChnJetas
deoordero
'_.4edio 2(1"deespesor) C 10 9 E 10 9 Cortelagrasa
Biencocido aproximadamente10a12oz C 12 10 E 12 10
'_.4edio 2(lYz"deespesor) C 14 12 E 14 12
Biencocido aproximadamente1Ib B 17 12a14 E 17 12a14
Pandenjo B 3 N/A E 3 N/A
LoBroil
Losfi]etesdemenos
de1pulgadadeespesor
secocinanpor
completoantes
dedorarse
Recomendamos
frefrenelsart@
Cortelagrasa
Reduzcaeltiempoen
aproximadamente5
a10minatospotlado
parapoliodespresado
Untecadaladocon
mantequiflade_etida
Aseprimerocon
lapielhaciaabajo
Corteatray&de
lapareposterior
delcaparaz6nDeje
lascolasbienseparadas
Unteconmantequifla
derretidaantesde
asarydespu_sde
lamitaddeltiempo
decocci6n
Manipuleyvoltee
concuidadoUntecon
mantequilladelim6n
antesydurantela
cocci6n,siIo@sea
Recalienteelasador
paraaumentarel
dorado
Aumenteeltiempo
de5a10minutospot
ladoparalY/'de
espesorojam6n
curadoencasa
Cortelagrasa
tEl DepartamentodeAgricultura deEEUU,indica que: "la came a poco cocida espopular,pero usted debesaber quecocinada a solamente 140°F
significa quealgunos organismos venenosospodrfansobrevivir" (Fuente:Safe FoodBook. YourKitchen Guide,USDARev,Junio 1985.)
25

Usede/reloj y el temporizadorde/homo inferior.
Asegdrese fie que el reloj sea
ajustado en lahora correcta del d[a.
Para ajustar el re/oj
E1 relqj debe set _)ustado en la hera
correcm del dfa para que las flmciones
aLltolIlaficas cronolIletradas del homo
flmcionen apropiadameme. La hera del
dfa no puede cambim_e durante un ciclo
de horneado cionoI-tle{/_-tdo o
autolimpieza.
[_ Presione el bot6n Clock.
[_ Presione los botones nmn&icos.
[_ Presione el bot6n Start hasm queen
la panta[la aparezca la hera del dfa.
ii i i ii I _i_ i_ _ ii i
_itch£_
L_T!me_
On/Off
El tempor/zador es dnicamente un
tempor/zador de m/nutos.
El tempor/zador no controla
las operac/ones del homo,
La configuraci6n m_x/ma
en el tempor/zador es de
9 horasy 59 m/nutos.
Pare ajustar el temporizador
[_ Presione el bot6n Kitchentimer
On/Off.
Presione los botones num_ricos
hasm queen la panmlla aparezca
la canfidad de fiempo deseada. Per
ejemplo, pare establecer 2 bores y
45 minutes, presione 2, 4 y 5en
dicho orden. E1 dempo mdximo que
puede ingresarse en minutes es de
59. Los fiempos de cocci6n mwores
a 59 minutes deben cambiaI_e a
horasy minutes. Per ejemplo,
ingrese 90 minutes come 1 hera
y 30 minutes. Si comem un err(n;
presione el bot(m Kitchen Timer
On/Offy comience nuevamente.
%
Presione el bot6n Start°
Despu& de presionar el botdn Start,
SETdesaparece; esto le indica que
el fiempo est_ en cuenm regresiva,
mmque la pantalla no cambie
h_sm que haya pasado un minute.
En la panudla no se mostrmfin
los segtmdos hasm que el dlfimo
minute est6 en cuenm regresiva.
[]
Cuando el tempofizador alcance
:00, el control pimr_i 3 veces seguidas
per tm pitido cada 6 segundos hasm
que se presione el botdn Kitchen
timer On/Off.
Eltonode6 segundospuedecancelarse
siguiendolospasosen/ascaracterfsticas
especialesdesusecci6ndecontroldelhomo
inferiorbajola secci6ntonosal finaldeunciclo
cronometrado.
Para re&iciar el temporizador
Si la panmUa todavfa est_imosmmdo
el fiempo resmnte, puede cambiafla
presionando el bot6n Kitchentimer
Oil/Off,luego presione los botones
num_ficos hasm que en la pantalla
aparezca el dempo que desea.
Si el dempo resmnte no est;i en
la panmlla (en la panmlla est_i reloj,
inicio postergado o fiempo de coccidn)
recuerde el dempo resmnm presionando
el bot(m Kitchen TimerOn/Off y luego
presionando los botones num_.ficos hasm
ingresar el nuevo fiempo que desea.
Para cancelar el temporizador
Presione el bot6n Kitchentimer On/Off
dos veces.
26

Usode ias caracteristicascronometradasde homeado
yasadoa la parri//a de/homo inferior. GEAppliances.com
NOTA:nodebepermifirsequelosafimentosqueseechanaperderf#cilmente--comoleche,huevos,pescado,rellenos,ayesycerdo--
reposenporm#sde I horaanteso despu#sdela cocci6n.Latemperaturaambientepromueveelcrecimientodebacteriaspeligrosas.
AsegOresedequelaluzdelhomoestfiapagadayaqueelcalordelabombiflaacelerarfaelcrecimientodebacteriaspeligrosas.
Comb conf_gurar un /nicio inmediato y una Parada automMica
z 8 9 o
Elhomoseencenderainmediatamenteycocinara
duranteeltiemposeleccionado.A/finalde/tiempo
decocci#n,el homoseapagaraautomaticamente.
Asegdrese de que el rek_ nmestre la boca
correcta del (tfa.
[77 Presione el botdn Bake.
1_ Utilizando los botones num_.ficos,
ingrese la ten_pe_'atm'a deseada.
_] Presione el botdn Cooki#g Time.
NOTA:sisurecetarequieredeprecalentamiento,es
posiblequenecesitearia&mastiempoal tiempode
cocci#n.
Utilizando losbotones de los nfimeros,
ingrese el tiempo de borneado deseado.
E1tiempo m(bximoque puede ingresm_e
en minutos es de 59. Los tiempos de
cocci6n mayores a 59 minutos (leben
cambim_ea hocasy minutos. Pot
ejemplo, ingrese 90 minmos como
1boca y 30 minmos. En panmlla
semostcac_la romper,mint del homo y
el fiempo (D cocci6n que usmd ing,es6.
[_ Presione el bot6n Start.
[_ pantalla muestlvt la/empe_vtmca
del homo que us/ed configm5 yla cuenm
regresivadel tiempo de cocci6n, i:a panmlla
comienza a cambiar una _ezla mmpecamca
alcanza los 100 °E
E1homo confinuavAcocinando dumnte
lacanfidad de fiempo progcamach, luego
seapag,mt autom_ficamenm, a menos que
es/("configucada la cacacmrfsficaCook and
Hold. Wa la secci6n de &racterfsticasesoecia/es
decontroldesuhomoinferior.
Presione el botdn Clear/Offpacaborcar
la pantalla.
6 7 8 9 0
imeJ
1 2 3 4 5
6 7 8 9 0
Foo,o q
L _°_U
On/Off
2 3 4 5
6
Combconfigurar un /nicio postergado y una Parada automatica
Ustedpuedeconfigurarelcontroldelhomopara
quepostergueelinic/o,cocineduranteunperiodo
especfficodetiempo_/luegoseapague
automaticamente.
%
Utilizando losbotones num&_icos,
ingrese la boca del dfa en lacual desea
que el homo seencienda e inicie
la cocci6n.
Asegfiresede que el rel(o nmestre la boca
correcta del dfa.
[_ Presione el bot6n Bake.
_] Utilizando losbotones num&Jcos,
ingrese la tempecatuca deseada.
[_ Presione el bot6n CookingTime.
NOTA:sisurecetarequiemdeprecalentamiento,
esposib/equenecesiteafiadirmastiempoaltiempode
cocci6n.
[77 Presione el bot6n Start.
NOTA:untonodeatenci6nsonarasiestauti/izando
el homeadocronometradoy nopresionael bot6nStart
despu_sdeingresar/atemperaturadehomeado.
Si desea _ecificar el fiempo que ha
configm'ado, presione el botdn DelayStart
paca _cificar la boca de inicio que ha
configumdo o presione el botdn Cooking Time
pare _fificar la dumci6n del tiempo de
cocci6n que ha configumdo.
Utilizando los botones de los nfimeros,
ingrese el tiempo de horneado deseado.
E1tiempo m(tximo que puede ingresm_e
en minutos es de 59. i,os tiempos de
cocci6n mayores a 59 minutos (leben
cambim_e a bores y minutos. Pot
ejemplo, ingrese 90 minutos como
1 horn y 30 minutos. En panmlla
se mostmc_ la mmpemtum del homo y
el tiempo de cocci6n que usmd ingresd.
[_ Presione el botdn DelayStart.
Cuando el homo se encienda a
la horn del dfa que us/ed baya esmblecido,
lapanmlla mostmc,i elcambio de mmpemtum
(comenzando a 100 °F)y la cuenm regresiva
del fiempo de cocci6n, i,a panmlla comienza
a cambiar una _ezla mmpecamca alcanza
los100 °E
E1homo confinuav,_ cocinando dumnte
la cantidad de tiempo progmmada, luego
se apagam autom_ticamenm, a menos que
es/("configumda la camcteffstica Cook and
Hold. Wa la seccidn de Caracterfsticasespecia/es
decontroldesuhomoinferior.
Presione el botdn glear/Offpam bormr
la pantalla. 2 7

Ajustede/termostatode/homoinferior:iHaga/oustedmismo!
Usted se puede percatar que su homo nuevo cocina distinto al que reemplaz& Use su homo nuevo par varias
semanas para familiarizarse con #L Si adnpiensa que su homo nuevo es demasiado caliente o demasiado frio, usted
puede ajustar el termostato usted mismo.
No use termSmetros, coma los que se venden en tiendas de aprovisionamiento para inspeccionar la temperatura
de su homo. Estos termdmetros poddan variar de 20 a 40 grades.
NOTA:este ajuste sSIo afectar# la temperatura de homeado y asado; no afecta las temperaturas de asado
a la parrilla o autolimpieza. El ajuste se almacenar# en la memoria despufis de una falla el#ctrica.
_8ake_+ Broil_
_IHi/L 5
€/oo O
Para ajustar el termostato
[]
z 3 4 s
6 7 8 9 0
_tart_
Presione los botones Bakey Broil
Hi/£eal mismo dempo durante
,_ segundos hasm que la panmlla
muestre SK
%
Presione el bot6n Bake.En
la panmlla se muestra un ntlmero
de dos d/gitos.
Presione una vez Bakepara disminuir
(-) la temperamra del homo, o dos
veces para aumenmrla (+).
l{a temperatura del homo pueda
_lusm,_e hasm (+) 35 °F rods ca/iente
o (-) 35 °F rods f_fa. Presione los
botones num_icos en el mismo
senddo que aparecen. Pot ejemplo,
para cambiar la temperatura del
homo a 15 °E presione I y 5.
Cuando haya realizado el _j uste,
presione el bot6n Start para volver
a la panmlla de la hora del dfa.
Ufilice su homo como lo harfa
normalmente.
iE! tipo demargarinaafectarael desempe#ode/homeado!
La mayorfa de las recetas para homear se han desarroflado usando productos de alto contenido en grasa coma
mantequilla o margarina (80%de grasa). Si disminuye la grasa, esposible que la receta no tenga los mismos
resultados que con un producto de mayor contenido de grasa.
Los recetas pueden fallar si las tortas, pasteles, gafietas o dulces se preparan con productos bajos en grasa.
Mientras menos sea el contenido de grasa de un producto tipo mantequilla, m#s se notar#n estas diferencias.
Los est_indares federa/es exigen que los productos marcados como mmga,inas, contengan pot lo menos un 80%
de grasa pot peso. Pot otto parm, los prodt_ctos fipo manmquilla b_{jos en grasa confienen menos grasa y m_s agua.
E1 ako conmnido de humedad de estos productos afecm la textura y el sabot de los a/imentos horneados. Para mejores
resulmdos con sus vieias recetas fhvo_itas, use margmina, manmquilla u otros productos que conmngan pot lo menos
un 70% de aceim vegetal.
28

tlso de la auto/impiezade/homo inferior. CEA..liance .com
La puerta de/homo flebe estar cerrada y todos los contro/es deben estar configuraflos correctamente para
que e/ciclo funcione apropiadamente.
Limpie el suelo pesaflo sobre
la parte inferior flel homo,
Antes de un cicio de limpieza
Recomendamos vendlar su cocina
deiando una ventana abierm o ufilizando
un vendlador o campana extractora
dumnm el primer ciclo de autolimpieza.
Remueva del homo cua/quier bandeia
pare parrilla, reiilla pare parrilla, todos
los umnsilios de cocina y cua/quier
residuo de papel a/uminio.
Las parrilkks del homo pueden
autolimpiarse, pero se oscurecerfin,
perder_in su bfillo y se volver_n difTciles
de deslizar
No udlice abrasivos o limpiadores de
hornos. Limpie la parm supericm lados y
parm exmrior de la puerto del homo con
jabdn y agua.
Asegfirese de que est4 puesm la cubierm
de la bombilla e14ctrica (en algunos
modek_s) y que la ]uz est_ apagada.
IMPORTANTE: la sa/ud de a/gmms
ayes es extremadamente sensible alas
emanaciones nocivas despedidas dmanm
el ciclo de autolimpieza de cua/quier
]loIno. Mueva las ayes a otro cuarto bien
vendlado.
A PRECAUC/b/V:
nuncacoloque losutensiliosde cocinani otros
artfculos sobreel piso delhomo. Existeun
elemento decalentamientodebajo delpiso del
homo. Colocarartfculossobreel piso del homo
puede causarque el homo sesobrecaliente,
resultandoendafios parael homo yel riesgo
de dafioso incendioen los gabinetes.
1 2
6 7
-cSelf-_
lean) [77
3 4 5 121
8 9 0
GtarO
Cored ajustar el homo para limpieza
Preskme el botdn Serf Clean.
Medianm los botones
nmn&icos, ingrese el fiempo
deseado de limpieza, si fimra
necesario un lapso de fiempo
In_t.yoi 0 Inenoi de 4 ]lOI'_t.S.
Generahnenm, el fiempo del ciclo
de limpieza es de 4 horas. Usmd
puede cambiar el fiempo de
limpieza en cua/quier momento entre
3 y 5 horas, dependiendo de qu_ mn
sucio es[_ su horp.o.
[_] Presione el botdn Start.
La puerto se bloquea autom5ficamente.
La panm/la mosmu_i el fieInpo resmnte
de limpieza. No ser_i posible abfir
la puerto del homo hasm que
la temperamra sea inferior a
la teInperamra de bloqueo y se apague
la luz LOCKEDo LOCKEDDOOR.
Cuando se apague la luz LOCKEDo
LOCKED DOOR, podr_i abrir la puerto
del homo.
iii_i_a pa/abra LOCKEDo LOCKEDDOOR
parpadearfi y el control del homo
indicarfi si configur6 el ciclo de
limpieza y olvid6 cermr la puerto
del homo.
iii_Para demner un cido de limpieza,
presione el botdn Clear/Off. Cuando
se apague la luz LOCKEDo LOCKED
DOOR, indicando que el homo se ha
enfliado a una mmpemmra inferior a
la de bloqueo, podrd abfir la puerto
del homo.
29

Uso de la autofimpiezade/homo inferior.
La puerta del homo debe estar cerrada y todos los contro/es deben estar configuraflos correctamente para
que el ciclo funcione apropiadamente.
1
C#mo posponer el inicio de la limpieza (disponibleenmodelos JKP86 dnicamente)
_'_
171
z 3 4 5
6 7 8 9 0
tart_
OnlOff
1 2 3 4 5
6 7 8 9 0
(Start_
%
Presione el bot6n Serf Clean.
Mediante los botones num_ricos,
mgrese el dempo de limpieza
deseado.
Presione el bot6n Delay Start.
E1 primer tiempo de inicio que
puede activar aparecer_ en la
panm/la.
Udlizando los botones hum&ices,
mgrese la hera del dfa a la cual
desea que comience el ciclo de
limpieza.
i,a puerto se bloquea autom_ificamenm.
l,a panm/la mostrar_i la hera de inicio.
No serd posible abrir la puerto del homo
hasm que la mmpemmra sea inferior a
la temperamra de bloqueo y se apague
la luz LOCKEDo LOCKEDDOOR.
Cuando se apague la luz LOCKEDo
LOCKEDDOOR, podrfi abfir la puerto
del homo.
[_ Presione el botdn Start.
Bespu#s de un cicio de limpieza
Es posible que observe a/grams cenizas
blancas en el homo. iffmpielas con un
patio hdmedo despu& de que el homo
se enflfe.
Si/asmanchasblancaspermanecen,remudvalas
conunestropajodeaceroIlenodejab6ny
enjuaguegenemsamenteconunamezcla
devinagreyagua.
Estos depdsitos son usualmente residues
de sal que el ciclo de limpieza no puede
elimina_:
Si el homo no queda limpio despu& de
un ciclo de limpieza, repim el ciclo.
iii}i}iiii_
iii}i}}ii_
iii}i}}ii_
Usmd no puede configurar el homo
para coccidn hasm que el homo est6
lo suficientemenm flfo come para que
la puerto se desbloquee.
Mientras el homo est_ en
autolimpieza, usted puede presionar
el botdn Clock para mesaat en
panta/la la hera del dia. Pare velvet
a la cuenm regresiva de limpieza,
presione el bot6n Cookingtime.
Sise dificulm el deslizamiento
de las parrillas, aplique una pequefia
canfidad de aceite vegetal o de cocina
en una toa/la de papel y limpie
los bordes de la parrilla con
la toa/la de papel.
3O

Caracteristicasespecia/esde centre/
de suhomo inferior.
GEApp/iances.com
Su nuevo control con botones sensibles fiene caracterfsficas adicionales que puede elegir utilizar, A continuaciSn
se describen las caractedsticas y cSmo puede activarlas.
Los modes de caractedsfica especial sSIo pueden acfivarse mientras la pantalla est# mostrando la hera del dfa.
Dichos modes permanecen en la memoria del control hasta que los pasos sean repefidos.
Cuando la pantalla muestre su elecci6n, presione el bot6n Start.Las caracterfsficas especiales permanecer#n
en la memoria despu6s de una fafla en el suministro de electricidad,
On lOff
Apagado despu#s de 12horas
Conesta caracterfstica,si seolvida y deja
el homo encendido,el control apagardel homo
despudsde 12horasautomdticamentedurante
/asfuncionesde homeadoo despudsde 3horas
duranteuna funcidnde asadoa laparrilla.
Si desea apagar esta caracterfsfica, siga los
pasos a confinuaci6n.
Presione los botones Bakey Broil
Hi/to al mismo dempo durante
3 segundos hasm que la panmlla
muestre S_
%
Presione el bot6n BelayStarthasm
que noapaoado(noshdn)aparezca
en la panmlla.
Presione el bot6n Startpara
acdvar "no apagado" y dejar la
configmaci6n del control en este
mode de caracterfsdca especial.
Hi/Lo
Selection de temperature en grades Fahrenheit o Centigrades
Sucontroldelhomoestdconfiguradopara
utilizar/asseleccionesdetemperaturaengrades
Fahrenheit,peresepuedecambiarutilizando
/asseleccionesengradesCentfgrados.
Presione los botones Bakey
BroilHi/to al mismo tiempo durante
3 segundos, hasm que la panta/la
muestre SF.
%
[]
Presione el bot6n Broil Hi/to
mmvamente. La panm[la mostrar_i
C (Centigrade).
Presione el bot6n Start.
[_ Presione el bot6n BroilHi/to.
l,a panmlla mostrar5 F (Fahrenheit).
Hi/Lo
Centre/de Lockout (Bloqueo)
Lepermitirdbloquearloscontrelesdigitales
paraquenoseactivenalpresionarlos.
Presione los botones Bake y
Broil Hi/to al mismo tiempo durante
3 segundos, hasm que la pantaUa
muestre SF.
_] Presione el bot6n SeffClean.
En la panmlla aparecer_ tOg OFF
(gloqueo desactivado).
Presione nuevamente el bot6n Saff
glean. En la panmlla aparecer5 t0C
0N (Bloqueo activado).
%
Presione el bot6n Start para acfivar
la flmci6n del control de bloqueo y
deje el control acfivado en este
modo de flmci6n especial.
Cuando esm flmcidn est_ acfivada y
se presionen los paneles digimles, en
la panmlla aparecer_i tOg.
Para dest)loquear el control, repim
los pasos 1 y 2. Presione el botdn Start
cuando en la panmlla aparezca tOg OFF.
NOTA:Nmodebloqueonoafectard
loscontrelesdig#alesClock,Kitchentimer
On/Off(Encendido/apagadodelTemporizador
decocina)ni OvenLight(Luzdelhomo).
31

Caracteristicasespecia/esde controlde su homoinferior.
Tones ai final de un cicio cmnometrado
AI final deun ciclocronometrado,sonardn [_
3pitidos cortesseguidosperunpitido cada
6segundoshastaquesepresioneel botdn
Clear/Off Estepitido continue cada6 segundos
puede cancelarse.
Hill
Pma cancelar el pkido cada 6 segundos:
Hi/to al mismo fiempo durante
3 segundos hasm que la panmfla
muestre SF.
%
Presione el boton Kitchen Timer On/Off.
i,a pantaHa muesua CON BEEP
(piddo condnuo). Presione
nuevamente el botdn Kitchen Timer
On/O_. La panta/la nuestra BEEP.
(Esto canceIa el pifido cada
6 segundos).
Presione el botdn Start.
Hi/Lo
Reloj de 12hems, 24 heras o supmsi6n dei reioj
Sucontrolestdconfiguradoparautilizarunreloj _]
de 12horas.
Si usted preferirfa tenet un reloi de
24 betas o supfimir el relQj de la panmlla,
siga los p_sos a continuacidn.
Presione los botones Bake y Broil
Hi/to al mismo fiempo durante
3 segundos hasm que la panmlla
muestre $_
Presione una vez el botdn Clock.
La panmlla mostrar_i 12 hr. Si &m
es la eleccidn que desea, presione
el botdn Start.
Presione nuevamente el botdn Clock
pare cambiar a/relQj de
24 horas, i_a panm/la mostmr_i 24 hr.
Si 6sm es la eleccidn que desea,
presione el botdn Start.
Presione nuevamenm el botdn Clock
pare suprimir el reloj de la panm/la.
La panta/la mostrar_ OFF.Si &m es
la eleccidn que desea, presione el
botdn Start.
NOTA:sielrelojestdenelmodesuprimido,
nopodrdutilizarlafencidnDelayStart.
32
Ceccion Ymantenimiento
Sunuevocontrolposeeunafuncidn"cookand
hold"quemantienelosalimentoscocidos
calientesduranteunmdximode3horasluegode
quefinaliceel asadouhomeadocronometrado.
NOTAtEstafuncidnsalepuedeprogramarse
conelasadouhomeadocronometrado.
(Consultela seccidnUsedelascaracterfstfcas
cronometradasdehomeadoyasadoa laparrilla
delhomoinferior).Unavezqueel asado
u homeadocronometradohayafinalizado
automdticamente,lafuncidn"cookandhold"
programadaseiniciardautomdticamente.
Para activar esm flmcidn a fin de
usarla luego del asado u horneado
cronometmdo, siga los pasos que figman
a confinuacidn.
%
Presione los botones Bake y Broil
Hi/to al mismo fiempo durante
3 segundos hasm que la panmlla
muestre SF.
[_ Presione el botdn Cooking Time.
La pantafla mostrar_i Hid OFF.
%
Presione el botdn Cooking Time
nuevamente para activar la fimcidn.
La panta/la mostrar_i Hid ON.
Presione el botdn Start para acfivar
la flmcidn "cook and heM" y deje
el control configurado en este mode
de fimciones especiales.

Use de/a caracteristica Sabbath.
(Oise_adaparautilizarseenel Sabbathjudfo y dfasfestivos),fen algunosmodelos) GEPpp/iances.com
LacaracterfsticaSabbathpuede utilizarsednicamenteparahomeado/asado.Nopuede utilizarsepara asadoalaparrilla,
autolimpiezaoDelayStart.
NOTA:la luzdel homose enciendeautom#ficamente(en algunosmodelos)cuandolapuerta esabiertayse apagacuando
la puertaescerrada. Sepuedequitarla bombi//a.Consultela seccirn Reemplazode la luzdelhomo. Enlos modeloscon
uninterrupter deluzen elpanel decontrol,la luzdel homopuedeencendersey dejarseencendida.
_i/Lo
Deloy-"_
Stertj)
on/off
1 2 3 14 5
6 7 8 9 0
_St0rt_
Cuanflo la pantalla muestra D
el homo est# configuraflo en
Sabbath, Cuanflo la pantafla
muestra D C el homo est#
homeanflo/asanflo,
C6me confLgurarel hemeado/asado regular
NOTA:Paraentendercrmo funciona []
el controldel homo,practique usando
el homeadonormal(noen funcionamiento
para Sabbat)antesde ingresaren elmode
de funcionamientoparaSabbat.
Aseg#resedequeelrelojmuestrelahoracorrecta []
deldfayqueelhomoestdapagado. [_
[Z] Presione y mantenga sostenidos
los botones Bakey Broil Hi/to,
almismotiempo,hasta que
la panudla muesue SF.
NOTA:si en la panmlla aparece bake
o broil,losbotones Bake y Broil Hi/to
no fheron presionados a/mismo
fiempo. Presione el bot6n Clear/Off
y comience de nuevo.
[_ Presione el botdn DelayStart
hasm que SRb bAtHaparezca
en la panmlla.
[_ Presione el bot6n Start},D aparecer_
en la panta/la.
Presione los botones num&icos para
determinar la temperatura deseada.
No se darg ninguna serial o
temperamra.
Presione el bot6n Start.
Despu& de un pefiodo aleatofio
de espera de aproximadamente
30 segtmdos a 1 minute, aparecer_
en la panta/la D c indicando que
el homo est_i homeando/asando.
Si no aparece D Cen la pantalla,
comience de nuevo en el Paso 4.
Para _}iusmr la temperamra del homo,
presione el botdn Bake e ingrese la nueva
tempemtma ufilizando los botones
hum&ices.
Presione el bot6n Start.
NOTA:los botones Clear/Offy Cooking time
est;hl acfivos durante la caracteristica
Sabbath.
[_ P_.esione el bot6n Bake.No se dard
nlngtma serial.
33

Usode/a caracteristicaSabbath.
(Oisefiadapar° utilizarseenel Sabbathjudfo ydfasfestivos).(onalgunosmodelos)
Stort
Onl Off
ime_
1 2 3 4 5
6 7 8 9 0
[Star0
Cuando la pant°Ha muestra D
el homo estb configurado en
Sabbath, Cuando la pantalla
muestra D C el homo estb
homeando/asando.
C6mo configurar un home°do/as°do cronometrado: Inicio inmediato
y Parada automatica
NOTA:Par°entenderc6mofuncionaelcontroldel
homo,practiqueusandoImmediateStart(Inicio
inmediato)yAutomaticStop(Paradaautombtica)
normales(noenfuncionamientopar°Sabbat)
antesdeingresarenelmododefuncionamiento
par°Sabbat.
Aseg#resedequeel relojmuestrela horacorrecta
deldfayqueelhomoestdapagado.
%
[]
%
77 Presione y mantenga sostenidos
los botones Bake y Broil Hi/to, al
mismo tiempo, hasm que la panmlla
muesue SF.
NOTAtsi en la pan[alia aparece Bake
o Broil, los botones Bakey BroilHi/to
no fheron presionados a/mismo
dempo. Presione el botdn Clear/Off
y comience de nuevo.
[_ Presione el bot6n DelayStart
hasm que SAb bAtHaparezca
en la panm/la.
Presione el bot6n Starty D apareceM
en la panudla.
Presione el bot6n CookingTime.
Presione los botones num&icos
par° configurar el dempo de
coccidn deseado entre 1 minuto
y 9 horas y 99 minutos.
E1Oempo de coccidn que ingres6
aparecerd en la panta/la.
[-_ Presione el bot6n Start.
Presione el botdn Bake.No sedard
nlngmm serial.
Presione los controles num&icos
par° determinar la temper°mr°
deseada.
%
No se da,5 ninguna serial o
temperamra.
Presione el bot6n Start.
Despu& de un periodo aleatodo
de espera de aproximadamente
30 segtmdos a 1 minuto, aparecer_
en la panm/la D c indicando que
el homo est_ihorneando/asando.
Si no aparece D C en la panmlla,
comience de nuevo en el Paso 7.
Para _jusmr la temperamra del homo,
presione el botdn Bakee ingrese la nueva
temper°tara ufilizando los botones
num&icos.
Presione el bot6n Start.
Cuando la coccidn est6 terIninada,
la pmmdla cmnbiar_i de D c a D y
aparecer;i 0:00, indicando que el homo
se ha apagado pero rod°via est_i
configurado en Sabbath. Remueva
la comida cocinada.
)i(: ¸
Hi/to
C6mo salir de la caracteristica Sabbath
[_ Presione el botdn Clear/Off
Siel homo est_icocinando, espere
durante un periodo °lear(roD de
aproximadamenm 30 segmMos a
1 minuto, hasm que solo D est_ en
la pantMla.
Presione ysostenga los botones Bake
y Broil Hi/to, almismotiempo, hasm
que la panudla muestre SF.
[_ Presione el botdn DelayStarthasm
que aparezca en la panta/la 12shdn o
noshdn. 12shdnindica que el homo
se apagar_i autom_idcamenm
despu& de 12 horas, n0 shdn
indica que el homo no
se apagard autom_idcamenm.
[_ Presione el botdn Start.
NOTA: si se present6 un corte en
el suminisuo el_.cuico mienuas el homo
esmba en Sabbath, el homo se apagaM
automfificamente y el control del homo
debe set reiniciado.
34

Cuidadoy limpiezade/centro de cocina. CEApp. .oe .oo
iABVERTENC/A!.Antes de limpiar cualquier parte del centro de cocina, asegdrese de que el
summtstro el#ctrico est# desconectado y todas las superficies est#n fr/as,
Como mtirar la pelicu/a pmtectora y la cinta adhesiva de empaque
Tome cuidadosameme una esquina
de la pelfcula protec[ora y despSguela
lenmmente de la superficie del aparato.
No use ningfin ol))eto puntiag/_do para
refitar la pelfcula. Retire toda la pelfcula
anms de usar el aparato pot p_Jmem vez.
Pare asegma,_e de no dafiar el acabado
del producto, la manem rods segum
de redmr el adhesivo de la cinm de
empaque sobre apamtos nuevos es
la aplicacidn de un demrgenm dom_sfico
lfquido pare lavar platos. Aplique con
un patio suave y mqje.
NOTA:Deberetirareladhesivodetodas
/aspartes.Nopuederetirarsesisequema.
Homo micmondas
No utilice un Iimpiadordehomos comercialsobre
ningunaparte de suhomo microondas.
Plataforma giratoria removiflle y apoyo
de la p/ataforma giratoria
Para evimr rupmras, no coloque
la plamfbmm gimmda en el agua
justo despu_s de cocinm: iAvela
cuidadosamente en agua ca/ienm
y espumosa o en el lavaplatos.
La platafbmm giratoria y el apoyo
puede romperse si se deian caet: No
opere el homo microondas sin que
est_n colocados la platafbrma gimtoria
y el apoyo.
Pare reemplazar el apoyo, coloque su
poste central en el hoyo. Gire el apoyo
sobre su centro hasm que se ubique
en su luga_;
interior
Mamenga el homo microondas limpio y
con buen olo_: Abrir la puerto del homo
unos pocos mimm_s despu_s de cocinar
ayuda a que el aire circule. Una limpieza
minuciosa ocasionN con una solucidn
de bica_5onato de sodio y agua ayuda
a mantener el inmrior flesco.
Los derrames y sa/picaduras son
f_iciles de quimr de las paredes y el piso
si se limpian poco despuSs de remover
los a/imentos. A/gtmas sa/picaduras se
pueden limpiar con una toaUa de papel,
a/gmms pueden necesimr tm patio
hfimedo. Remueva las sa/picaduras
de grasa con un pafiojabonoso,
luego e_i uague y seque.
Nolimpieconalmohadiflasmetgicaserosivas.
Laspiezaspuedendespedazarlaalmohadills
causandocortocircuitos.
Limpie diadamente las salpicaduras
en la venmna de la parm inmrna de
la puerto. Cuando la venmna est6 sucla,
l_vela con un patio hdmedo. E_i uague
complemmenm y seque.
Limpie flecuentemente las partes
metfi/icas y plfisdcas de la parte interna
de la puerto. Ufilice un patio hdmedo
pare eliminar todas l_s manchas.
Noutiliceabrasivos,comopolvosdeIimpiezao
almohadillasmetdlicasgpldsticas.Estospueden
dafiarlasuperficie.
Exterior
Limpie el exterior del homo microondas
conjabdn y un patio hdmedo, luego
enjuague con un pafio hdmedo y seque.
Limpie la venmna con un patio hdmedo.
Se limpia meior el cromo con an patio
hdmedo y luego con una toa/la seca.
Superfioie de la puerta
Cuando limpie las superficies de
la puerto y el homo que entmn en
conmcto a[ cenar la puerto, ufilice
finicamenmjabones suaves y no
abrasivos o detergenms, aplic_indolos
con una espo_ia o un patio suave.
35

Cuidadoy limpieza de/centro de cocina.
Ranura
_-)
Cerrojodela bisagra
Jale hacia abajo los cerrojos
dela bisagra para flesbloquear
PosiciSn de remociSn
Bespegue de la puerta de/homo
Lapuertaesmuypesada.Tengaouidado
alquitary levantarla puerta.
Nolevantelapuertaporlaagarradera.
Paraqu#ar la puerta:
%
%
%
Abra complemmente la puerto.
,]ale los cerrojos de la bisagra hacia
ab_jo del marco de la puerto, a la
posicidn desbloqueada. Es posible
que se necesite una herramienm
como un destornillador de pala.
Sujete firmemente ambos lados
de la puerto en la parte superior
Cierre la puerto en la posici6n
para quimr de la puerto
(yea la ilustraci6n).
Levante la puerto y s_iquela hasm
que el brazo de la bisagra est5 flmra
de la ranma.
Paramemplazarla puerta:
[_ Sujete firInemente ambos lados de
la puerto en la parte superior
Con Borde
[] la puerto inferior
en el mismo dela.
_ngulo de ranura
la posicidn
para quitaI; sitde
la indenmcidn del
brazo de la bisagra
en el borde inferior de la ranum
de la bisagm. La muesca en
el brazo de la bisag_a debe esmr
completamenm asenmda dentro
de la parte inferior de la ranma.
I_] Abra complemmente la puerto.
Si la puerto no esmviese tomhnente
abierm, la indenmcidn no
se asenmrfa correctamente en
el borde infb.,Jor de la ranma.
I I
Brazedela bisagra
[ndentaci6n
Empuje los cerroios de
la bisagra hacia arriba contra
el marco fionml de la cavidad del
homo, a la posicidn bloqueada.
Brazede
labisagra
Cerrojo
de la
bisagra
%
Jale hacia arriba los cerrojos
de la bisagra para bloquear
Cierre la puerta del homo.
Nofroteni limpieel empaquedela
puerta:el empaquetiene unaresistencia
extremadamentebaja ala abrasiSn,
Sisepercata queel empaqueseest#
desgastando,est# deshilachadoodafiado
dealgunaformayse hadesplazadosobre
lapuerta,debehacer quesea
reemplazado,
36
Paralimpiarelinteriorde/homo:
que el _ireadentro del
empaque se/impia dumnte el cido
de autolinlpieza, no necesim limpiarla
a Illano.
}_E1_ireafi_eradel empaque y
el recubtimiento de la puerto pueden
limpim_e con una a/moh_ulilla pare
refie_u p/Sksticao embebida dejabdn,
agua calienm y demrgenm. Enjuague
bien con una so/uddn de vinagre
yagua.
Paralimpiarlaparteextemadelapuerta:
Udlicejabdn y agua pare limpiar
minudosamenm la parte supeIJoI; lados
yflenm de la puerto del homo. Enjuague
bien. Tdmbi_n puede ulilizm"un
limpiador de viddos pare limpiar
elvidno en/a Dute extema de la puerto.
No pemfim que el agua gome denuo de
l_LsmntmLsde vendlacidn.
iii}i}iiii_
iii}i}}ii_
iii}i}}ii_
Si se encuenua alglma mancha
petsistenm sobre d adomo dd
rmpimdero de la puerto, ud|ice
un [impiador ab,vksivo suave y una
esponja-fiegadom Dua obmner mejores
rmultados.
Los derm:mm de condimentos,
jugos de fhmks, salsa de tomate y
mate_Jalm de los rellenos de todno
confienen dcidos que pueden causm
dec(flomcidn, pot lo tanto deben
limpku_e inmediatamenm. Cuando
la superfide est6 fl;a, [impie y e_0uague.
No udlice [impiadores para homo, polvos
de limpieza o abr_ksivos fi_ertes sobre
la parte exmma de la puerto.

GEPpp/iance&com
ADVERTENCIA
J
de/uz de/horn& desconecte /a conexi6ne/_ctrica de/homo de/fusib/e principa/
o del panel del disyuntoL Si esto no se cumple se podr_ producir una descarga
el_ctrica o quemadura.
I PRECAUClthN 1R' sG°D ,NC ND,O..
,_ ,,!1 cuandoest_n frfas. Tocarel vidrio caliente sinprotecci6n en las manos o con
I
un trapoMmedo puedeocasionar quemaduras.
Receutaculo Portalamuara
mnamJnasmodeloa
ReceDt_culo PortalarnDara
_ Bombilla
deG9
Retirar la bombilla electrica de/homo (ona/gunosmodelos)
Para retirar:
[] ;ire ]a cubierta de vidrio en sentkto
contcario alas manecillas del reloj l/4
de vueha hasta que las lengiie/as de
la cubier/a de vidrio liberen los surcos
del portal_imparas. Colocarse guanms
de l_imx puede brindar un mejor aKarre.
Utilizando guantes o un patio sect),
remuex_ la boml)illajal_h_dola en lfnea
YeC[;l.
reemplazar:
Utilice una m/ex_ l)oml)illa hal6gena
de ] 20/130 _oltios, no exceda 50 x_tios.
Reemplace la l_hnpm-a de luz con el
raising tipo de l_impam que se refit6.
En su modelo corresponder, i uno de
los dos fipos que figm',m a la izquierda.
Para demrminar emil es la l_hnpara
correc/a, controle las terminales de la
l_impara. Las l_imparas con 2 mrminales
con clav!ias rectas son 15mparas de
G6.35. Las l_imparas con 2 terminales
con claviias con curxas son l_impams
de (;9. (No Ins intercambie.) Asegfirese
al reemplazar la l_impaca que sea de
120 vohs o 13(} vohs (NO de 12 vohs).
Utilizando guantes o m_ patio sect),
remuex_ la bombilla de su paquete.
No/oque la bombilla con los dedos
desnudos. E1 acei/e pare piel dafiac, i
la l_impam y acortar_i su fiempo
de duracidn.
_] Empq]e la lx)mbilla en lfnea recta
dentro del recept:iculo hasta el tope.
_] oloque las lengi]etas de la cubierta
de vidvio dentvo de los smcos del
i)ortal_impams. Give la cubievta de vidvio
en sentido de las manecillas del relt._]
1/4 de vueha.
Para una me:jor iluminacidn dentro
del hovno, limpie fl'ecuentemente la
cubier/a de vidrio ufilizando un patio
h6medo. Es/o deberfa hacerse cuando
el horno est;i completamente frfo.
_] onecte nuexamente el smninistro
el_ctrico al }xwno.
tenaigunasmodetos)
!
[oniitud (" - ,,_
m_xlma \\ J
CubiertadeVidrio
Lampara de luz de/homo inferior (onalgunosmodelos)
PaN retirar:
Give la cubierm de vidrio 1/4 de vuelm en
sentido opuesto alas agujas del reloj hasm
que las lengfiems de la cubierm de vidrio se
liberen de las ramuas del port;d_mpaas.
Retire la l_mpara.
Para volveracolocar.
Cok)que una nueva 15mpara de 40 ratios
para electrodom&ticos. Coloque las
lengfiems de la cubierm de vidrio en
las mmuas del pormlfmparas. Gire
la cubierm de vidfio 1/4 de vuelm
en el sentido de las ag_{ias del rek)j.
NOTES:
, UnaIdmparaparaelectrodom#sticosde
40vatiosesrodspequetiaqueunaIdmpara
estdndarparausodom#sticode40vatios.
, Instaleyajustelacubiertaenelsentido
de/asagujasdelreloj.
Vuelvaaconectarlaenergfael#ctricaalhomo.
, Paratenerunamejoriluminacidndentrodelhomo,
limpielacubiertadevidrioconunpatiohEm?edode
manerafrecuente.Estodeberfarea#zarsecuando
elhomoest#completamentefifo.
37

Cuidadoy fimpieza de/centro de cocina.
NOTA: las parrillas flel homo
pueflen fimpiarse en la autofimpieza
flel homo, Sin embargo, los pardllas
se oscurecer_n, perder_n su lustre
y se volver_n flificiles fie fleslizar
si se limpian flurante el ciclo fie
autolimpieza,
Parnl/as de homo (homoinferior)
l,impie las parrillas del homo con un
]impiador abrasivo o estrop_jo de acero.
Despu& de limpia_; e_juague las parrillas
con agua ]impia y seque con un patio
limpio.
Pare hacer que las parrillas se deslicen
m_is fiicilmente, aplique tma pequefla
canfidad de aceim vegetal o aceite de
cocina a una toa/la de papel y limpie
los bordes de las parrill_s de] homo
con la toa/la de papeL
Panel de control
Es buena idea limpiar el panel de control
despu& de cada uso. Limpie conjabdn
suave y agua o con una solucidn de
vinagre y agua, e_j uague con agua ]impia
y lustre en seco con un patio suave.
Cuando haga ]a limpieza, el panel
de control debe esmr a mmperatura
ambiente y no b_jo ]a ]uz solar direcm.
No ufilice limpiadores abrasivos,
limpiadores lfquidos flmrms, almohadillas
pbisdc_ks pare resuegar o limpiadores
para hornos sobre el panel de control:
estos productos dafiar_in el acabado.
U na solucidn 50/50 de vinagre y agua
ca/lento flmciona bien.
38

Antesde llamarpare so/icitar
un servicio de mantenirniento...
iLos consejos para resoluci6n de problemas ahorran fiempo y dinero/
Revise primero las gr#ficas en las siguientes p@inas yes posible que
no tenga que Ilamar para soficitar servicio de mantenimiento.
GEApp/iance&com
Causes posibles Qu# hacer
Elpanel de control en Olvid6joresionar el = Preskme el bot6n Start.
el homo microondas bot6n Start.
no funciona
La puerta no estfi cerrada * Asegdrese de que |a puerta del homo microondas est_
firmemente, ce rrada.
Otra fund6n fue presionada. • Preskm dos veces el bot6n Clear/O#para cancelar
y comience de nuevo.
El bot6n Clear/O# fue • Comience de nuevo.
presionado accidentalmente.
Controles • Mientras utilizaba Time Defrost, los ndmeros
del horno configurados no se ingresaron despu_s de presionar el botdn
inadecuadamente. Auto Defrost.
"SENSOR ERROR" Durante una funcidn • l,a puerto del homo microondas no debe
aparece en la pantalla del sensor, la puerta set abierta antes de que comience la cuenta regresiva
dei homo microondas del horno microondas en la panm|la.
rue abierta demasiado pronto.
£a luz del homo La bombilla de luz estfi floja • lAame pare solicitor servicio de mantenimiento.
microondas o defectuosa.
no funciona
LOSalimentos Variaci6n en la densidad = \4uiaci6n en la densidad y la canddad algum_ veces
se recocieron 0 y la canfidad de los alimentos reqmeren m_is fiempo de coccidn.
faltabancoccion estSn siendo cocinados.
en el homo microondas
Alimentos no volteados = Vo/tee o agite los alimentos y comience nuevamente.
o agitados come estfi indicado
en la receta.
Demasiados plates en • No sobreca_gue su homo microondas.
el horno al mismo fiempo.
Los alimentos no • Consu/te la secddn Use de los caracteristicas del sensor
se descongelan completamente, del microondas.
Los utensilios de cocina o • Consu/te [a seccidn Utensilios de cocina seguros para
las cubiertas que se estfin microondas de |as instrucciones de seguridad importantes.
ufilizando.
La hurnedad en el horno • Asegdrese de que el interior del homo y el exterior de
harfi que el sensor disminuya recipientes est_n secos.
el fiempo de coccidn.
No se permite que • Se recomienda a/go de tiempo de repose para cierms
los alimentos reposen, verduras cocinadas con los controles del sensor.
EIrelojyel temporizador Un fusible en su case • Reemplace el fi_sible o reinicie el disyuntor
no funcionan o puede estar fundido o
la pantaila queda el disytmtor activado.
en blanco
Controles configurados = Consu|te/a seccidn Uso gel reloj y temporizador del homo
inadecuadamente, inferior pma el relqi del homo inferior
• Consulm |a seccidn Pantalla On/Offpara el relqi del homo
lnic/oond_k%
E1 reloj estfi en el mode
suprimido (black-out).
• Consulte la seccidn Caracteristicas especiales de control
de su homo inferior pare el reloj del homo inferior
• Consulte la seccidn PantallaOn/Offpara el reloj del homo
IIlicroond_k%
39

Antesde llamarpare so/icitar
un servicio de mantemmiento...
Los consejos pare resolucidn de problemas
Causas posibles Qu# hacer
"F-- yun n#mereo Tiene un c6digo de = Presione el bot6n Clear/Off.Pemlim (pie el homo se
letra'parpadean en error de la funci6n, entire durante una hora. Ponga el homo mmvamente la
pantalladelhomo en operaci6n.
inferior
Si el c6digo de la funci6n * Desconecte la corriente del centro de cocina durante
se repke. 30 segundos y conecte nuevamente |a corriente.
Si el fimci6n se repite, llame para solicitm servicio
de mantenimiento.
tapantallaparpadea Falla en el suministro * Reinicie el reloj del homo infcri(,:
de eleetriddad.
ImposibleIograr Los botones de control del * l,)s botones Bakey BroilHi/Lodeben set
la pantalla de/homo horno no fueron presionados preskmados que a| mismo dempo y sostenidos
infedornluestre "SF" apropiadamente, durante 3 segundos.
ta temperature E1 termostato del horno • Consulte/a seccidn Ajuste gel termostatodel homoinferior.
delhomoinferior necesita un ajuste, ill@ale ustedmismo!
esdemasiadealta
o demasiadobaja
Elhomo inferior Un fusible en su casa puede • Reemplace el fhsible o reinicie el disyunto_:
no funciona estar dafiado o el disyuntor
acfivado.
Los controles del horno estfin • Consulte la secci6n Use gel homo inferior.
configurados inadecuadamente.
Olvid6 ingresar una
temperamra de horneado o
el tiempo de limpieza.
• Presione el bot6n Bakey la temperatura deseada o
el botdn Self Clean y el dempo de limpieza deseado.
Sefalesdecontrol
delhomoinferior
despuesdeingresar
eltiempodecoccion
oDelay Start
(/niciepostergado)
Losalimentos no Controles del horno no • Consu|te/a seccidn Use del homo inferior.
sohomeano configurados apropiadamente.
asanapropiadamente
enelhomo inferior £a posid6n de la parrilla es • Consuke/a seccidn Use gel homo inferior.
incorrecta o la parrilla no
estfi nivelado.
El termostato del horno • Consulte |a secci6n Ajuste del termostatodel homoinferior.
necesita ajuste, ill@ale ustedmismo!.
Los alimentos no La puerta del horno estfi • Cierre la puerta. Este modelo est_i disefiado para un
SOasana laparrilla abierta. _Lsadodnicamente con la puerto cerrada. Siempre ase
apropiadamenteon a la parrilla con la puerto cerrada.
el homoinferior
Los controles del horno estim # Asegqirese de presionar el botdn Broil Hi/Lo.
configurados inadecuadamente.
Se estfiufilizando una posici6n • Consu/te/a Guiapare asara laparrilla.
inadeeuada de la parrilla.
Los uteusilios de cocina • Para mejores resulmdos, udlice una bandeja disefiada
no son adecuados para asar para asar a la parfilla.
a la parNlla.
En algunas fireas • Preca/iente el elemento de asado a la parHlla durante
d voltaje puede ser balD. 10 minutes.
• Ase a la parrilla durante un periodo m_is prolongado
que el recomendado en la GtlfOpara asar ala parrilla.
40

GEPpp/iances.com
Causas posibles Qu# hacer
ta/uz de/homo inferior La bombffia estfi floja o defectuosa. =Apriete o reemplace |a bombflla.
no fenciona
E1 bot6n de operaci6n = IJame para solicitor servicio de mamenimiemo.
de la bombilla estfi rote.
Elhomo inferior Los controles del horrid estan • Consuke/a seccidn Use do la autolimpieza do/homo
no so auto iim_ara configurados inadecuadamente, inferior.
La temperatura del horno es • Permim que el homo se enflfe y reinicie los
demasiado alta para establecer comroles.
una operacidn de autolimpieza.
Soescuchaun"crujido" Este es el sonido del metal • Esto es normal
o "estallido"on calentandose y enfrifindose
el homo inferior durante las ftmciones de
coccidn y limpieza.
Humo exoesivo on Exceso de mugre. • Presione el bot6n Cfear/Otf Abra las venmnas pain
elhomo inferior dejar sa/ir el lmrno de/a habimcidn. Espere hasm que
durante el ciclo la luz LOCKEDo tocggo DOORse apague. Limpie
delimpieza el exceso de mugre y reinicie el tide de limpieza.
£a puerta de/homo El horno estfi demasiado • Permim que el homo se enflfe per deb;_jo de la
inferior no so abrirgi caliente, mmperatma de bloqueo.
despuesde un efefe
de limpieza
Elhomo inferior no esM Los controles del horno estfin = Consuke/a seccidn Use do la autolimpieza dol homo
limpio despuOs de configurados inadecuadamente, inferior.
un cicfe de limpieza El borne tiene mug're dificil • Limpie |as sobras pesadas antes de comenzar el ciclo
de eliminar, de limpieza. Es posible que los homes que fienen
una mugre muy pesada necesiten de aua_limpieza
mmvamenm o dmante un pe_Jodo m_s prokmgado.
"LOCKED" O Se ha selecdonado el ciclo • Cierre la puerto del homo.
"LOCKEDDOOR" autolimpieza pero la puerta
parpadea en la pantalfe no estfi cerrada.
de/homo inferior
La luz "LOCKED'o La puerta del horno * Presione el botdn Cfear/Off Deie enfliar el homo.
"LOCKEDDOOR" esM estfi bloqueada porque
engendidacuando la temperatura en el horno
desea eoeinar en inferior dentro del horno
elhomo inferior no ha caido por debajo de
la temperatura de bloqueo.
Corteenelsuministro
eleotrieo,elrefej
parpadea
Ofera "quemado"o
"aceitoso" saliendo
de/respiraderode/
homocuandose usa
de/homoinferior
Olorfeerte
enelhomoinferior
Suenaun ventilador
Pico o corte del suministro
el6ctrico.
Esto es normal en un horno
nuevo y desaparecerfi con
el tiempo.
* Reinicie el reloi. Si el homo estaba en use,
debe reiniciarlo presionando el bot6n Clear/Off
configmando el relq) y reesmbleciendo cua/quier
flmcidn de coccidn.
* Para acelemr el proceso, configme un dale de
autolimpieza dmanm un mfnimo de 3 betas.
Consuke la seccidn Use de la autolimpieza dolhomo
inferior.
Un olor del aislamiento
al rededor del interior del
horno es normal las primeras
veces que se ufiliza el borne.
• Esto es temporal
Un ventilador de enfriamiento
puede encenderse
autom_ficamente.
• Esto es normal. E1 vendlador de enfliamiento
se encenderd pare refiigemr las parms inmrnas.
Puede flmcionar dumnm 1-1/2 horas en modelos
de 30" et dmanm 2 horas en modelos de 27" despu_s
que el homo estd apag_do.
4/

Accesodos.
gBesea aigo mas?
Usted puede encontrar estos accesorios y muchos m_s en GEAppliances.com, o
flame a1800.626.2002 (en horario de trabajo normal). Tenga listo el nElmero de modelo.
[ii(i( iiiiil/iI
! il
i i iiiiiiiiiiill i//
!iI!I i ii!iii! i i
Rejillas Cabezaleso tapasde
quemaflores desuperficie
i i_ii i i i i i
Bandejas tel homo
Elementosde superficie y Perillas
bandejas colectoras
Elementos tel homo Bombillas de luz
iPmebe estos otros excelentes pmductos para que su cocina se yea estupenda!
l_ Kit de limpieza _ T°allitas _ T°allitas para _
de anafes de limpieza pulir artefactos de
vitrocerbmicos: de anafes acero
lncluye limpiador, vitrocerbmicos inoxiflable
rasqueta y patio
WXIOX117GCS WXIOX305 WXIOXIO001
Limpiador
deartefactos
deacero
inoxiflable
PM10X311
iApmveche ai maximo su bandeja para asar! (No para usar con modelos de cajon asador.)
;Utilice su bandeia y tapa de reiilla para _ksar hambmgues_k% flutos de real filetes, vegetales, panceta,
cosfillas y mucho m_s! La bandeja inferior retiene el exceso de grasas y aceites.
* Pieza GE genuina
* Fdci] de limpiar
* Garantia de un aflo
iOferta de tiempo tim#ad!! iEnvio sin cargo!
Cuando solicite la bandeja para asar dentro de los 30 dias de haber adquiddo su producto de cocina GE.
Pequefa Grande* Extrawande**
N° depieza WB48X10055 WB48X10056 WB48X10057
Oimensienes 8-3/4"Ax 1-1/4"Ax 13-1/2"P 12-3/4"Ax 1-1/4"Ax 16-1/2"P 17"Ax 1-1/4"Ax 19-1/4"P
Precio LIS$10.50_ USSf4.50_ USSf6.7Y
t M_simpuestosaplicablesdeventaestatales(PST/HSTandGST)
• Labandejaparaasargrande(est#ndar)noentraencocinasde20/24pu/gadas,
•* Labandejaextragrandenoentraenhomosdeparedesde24pu/gadas,empotradasde27pu/gadasococinasde20/24pu/gadas,
L/amea1800.626.2002o uti/ice este formulariopara enviar su solicitud per correo:
GEParts, RO,Box 221027,Memphis, TN38122-102Z
Cantidad
Formulario de solicitud de la bandeja para asar
Nhmerodepieza
42
Numero demodelo
Nombre
Oireccion
Ciudad
Telefono
Tarjetade credito__
Visa MasterCard
Fechadevencimiente: Mes
Check
Nhmerodeserie Marca
Apellido
Es_do C6digoPos_l
Correo eleotronioo
Giropostal
Discover AmEx N°de TarjetadeCred#o
Afio Firma:
Fechade compra

Garantiade GEpara su centrode cocina microondasempotrado.
Todos los servicios de garantia los proporcionan nuestros Centros
de Reparaci6n de F#brica o nuestros t#cnicos Customer Care®
autorizados. Para concertar una cita de reparaci6n, visftenos
en Ifnea en GEAppliances.com, o flame al SOO.GECARES
(800,432,2737).Cuando flame para soficitar servicio, pot favor
tenga a mano el nElmero de serie y el nElmero de modelo.
Pegue aqui su recibo.
Se requiere facilitar prueba
de la fecha de compra original
para obtener un servicio
bajo la garantfa.
GEreemp/azara:
tinale
A partir dela fecha
dela compraoriginal
Cualquierparte del centro de cocina microondas que fidle debido a defectos en
los matefiales o en la fhbdcaci6n. Dinante este garantia/imitada de un a#o, (;E tmnbi_n
proporcion_, sin costo a/gltno, toda la mano de obra y los servicios imemos para reemplazar
pmtes defectuosas.
Viajes de servicio a su casa para ensefiarle c6mo usar
el producto.
} Instalaci6n, entrega o rnantenimiento inapropiadao
FaUas del producto si hay abuso, mall uso, o uso para
otros prop6sitos que los propuestos, o uso para fines
comerdales.
Reernplazo de fusibles de su casa o reajuste de
interruptores de drcuito.
Dafio al producto causado por accidente, fuego,
inundaciones o actos de Dios.
Dafio incidental o consecuencial causado por posibles
defectos con el aparato.
Dafio causado despu&s de la entrega.
Producto no accesible para facilitar el servicio
requerido.
EXCLUS/ON BE GARANTiAS /MPLiCITAS--Su #nice y exclusive dereche es la reparacion dei producto,
tai y come se indica en esta Garantia limitada. Cualquier garantia implicita, incluyendo las garantias
implicitas de comereiabilidad oadecuaci6n para un fin determinado, estan limitadas a un a#o o el
periodo de tiempo mas breve permitido per la ley.
Esta garantfa so extiende al comprador original y cualquier comprador posterior de productos comprados para
uso residencial dentro des Estados Unidos. Si el producto est# situado en un #rea que no dispone de servicio por
parte de un proveedor de servicio autorizado de GE,podria tener que hacerse cargo de los costes de envfo obien
podria solicit#rsele que fleve el producto a un centro de servicio de GEautorizado para reafizar la reparaci6n. En
Alaska, la garantia excluye el costo de envio o las visitas de servicio a su casa.
Algunos estados no permiten la exclusiSn o las limitaciones de dafios incidentales o consecuenciales, Estagarantia
da derechos legales especificos, y usted podria tener otros derechos que variar#n de estado a estado. Para saber
curies son sus derechos legales, consulte a la oficina de asuntos del consumidor local o la oficina del Prucurador
(Attorney General) en su Iocalidad,
Garante:General Electric Company.Louisvi//e, KY40225
43

Soportea/ consumidor..
P_ginaWebdeGEAppliances
GEPpp/iances.com
dTiene alguna pregunta sobre su electrodom_sdco? iPmebe la Digina Web de GE Appliances 24 horns a/
dfa, cualquier dfa del aflo! Para mayor conveniencia y servicio m_s r_pido, ya puede descargar los Manua/es
de los Propiem_ios, pedir piezas o incluso hacer una cim en lfnea para que vengan a rea/izar una
reparaci6n.
Soliciteunareparacidn GEPpp/iances.com
E1servicio de expertos GE est_ia mn s61o un paso de su puerto, iEntre en lfnea y solicite su reparaci6n
cuando le venga bien al d/a cualquier d/a del aflo! O llame al 800.GE.CARES (800.432.2737) durante horas
normales de oficina.
ilealLifeDesignStudo(Estudodedisefioparalavidareal)
GEPpp/iances.com
(;E apoya el concepto de Disefio Universa/--productos, servicios yambientes que pueden usar genre de
to&ks 1asedades, tamaflos ycapacidades. Reconocemos la necesidad de diseflar para una gran gama de
habilidades y dificulmdes fYsicasy menta/es. Para rods deta/les cobre las aplicaciones de (;E Diseflo Universal,
incluyendo ideas de diseflo para la cocina para pex_onas con discapacidades, mire nuesua pdgina Web hoy
mismo. Para persom_s con dificulmdes auditivas, fl_vorde llmnar a/800.TDD.GEAC (800.833.4322).
garantfasamplbdas
GEPpp/iances.com
Compre una garantfa ampliada y obtenga demlles sobre descuentos especiales disponibles mientras su
garantfa estfi aOn acfiva. Puede comprarla en lfnea en cualquier momento, o llamar al 800.626.2224
durante horas normales de oficina. GE Consumer Home Services esmrd adn ahf cuando su garantfa temflne.
Piezasyaccesorios
GEPpp/iances.com
Aquellos individuos con la ca/ificaci6n necesaria para reparar sus propios elecuodom4sficos pueden
pedir que se les manden las piez_s o accesorios direcmmente a sus hogares (acepmmos las m_jetas
\qSA, MasterCard y Discover). Haga su pedido en lfnea hoy, 24 horas cada dfa o llamar pot ml4fbno
a/ 800.626.2002 durante hoi_ks normales de oficina.
tas instmccionesdescritasenestemanualcubrenlospmcedimientosa seguirper cualquierusuario.Cualquier
etrareparaciondeberia,per reglageneral,referirse a personalca/ificadoautorizade.Bebe ejereerseprecaucion
ya que/asreparacienesincorrectaspuedencausarcondicienesdefuncienamientoinseguras.
Pdngaseencontactoconnosotros
GEApp/iances.com
Si no est_isatisfecho con el servicio que recibe de GE, p6ngase en conmcto con nosotros en nuestra pdgina
Web indicando todos los demlles asf cored su ndmero de tel_fbno o escrfbanos a:
General Manage_, Customer Relations
GE Appliances, Appliance Park
Louisville, KY40225
Registresuelectrodom_stico GEApp/iances.com
iRegistre su nuevo dectrodom6stico en linea---cuando usted prefiera! E1 registrar su producto a fiempo le
proporcionar_, si smgiera la necesidad, una mejor comunicacidn y un servicio m_s r_pido b_jo los t_mlinos
de su garantfa. _mlbi&_ puede enviar su mrjem de regisuo preqmpresa que se incluye en el mamria/
de emba/_je.
-
 1
1
-
 2
2
-
 3
3
-
 4
4
-
 5
5
-
 6
6
-
 7
7
-
 8
8
-
 9
9
-
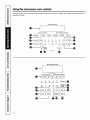 10
10
-
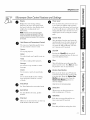 11
11
-
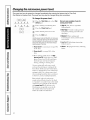 12
12
-
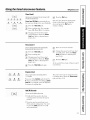 13
13
-
 14
14
-
 15
15
-
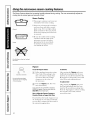 16
16
-
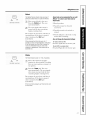 17
17
-
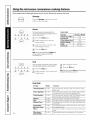 18
18
-
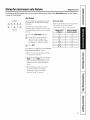 19
19
-
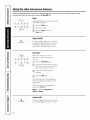 20
20
-
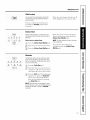 21
21
-
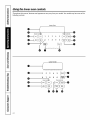 22
22
-
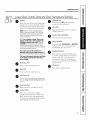 23
23
-
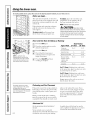 24
24
-
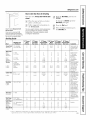 25
25
-
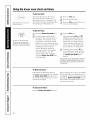 26
26
-
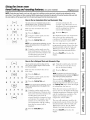 27
27
-
 28
28
-
 29
29
-
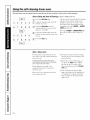 30
30
-
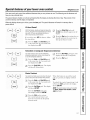 31
31
-
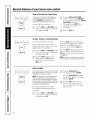 32
32
-
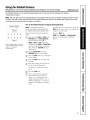 33
33
-
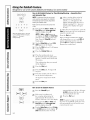 34
34
-
 35
35
-
 36
36
-
 37
37
-
 38
38
-
 39
39
-
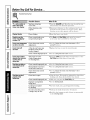 40
40
-
 41
41
-
 42
42
-
 43
43
-
 44
44
-
 45
45
-
 46
46
-
 47
47
-
 48
48
-
 49
49
-
 50
50
-
 51
51
-
 52
52
-
 53
53
-
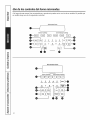 54
54
-
 55
55
-
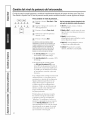 56
56
-
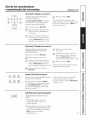 57
57
-
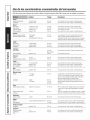 58
58
-
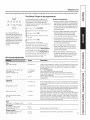 59
59
-
 60
60
-
 61
61
-
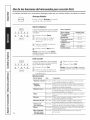 62
62
-
 63
63
-
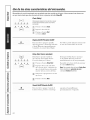 64
64
-
 65
65
-
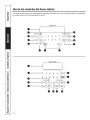 66
66
-
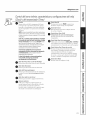 67
67
-
 68
68
-
 69
69
-
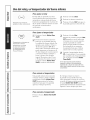 70
70
-
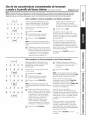 71
71
-
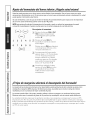 72
72
-
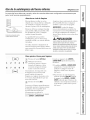 73
73
-
 74
74
-
 75
75
-
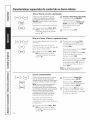 76
76
-
 77
77
-
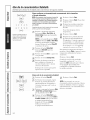 78
78
-
 79
79
-
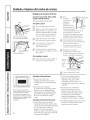 80
80
-
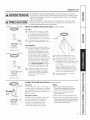 81
81
-
 82
82
-
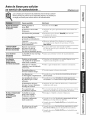 83
83
-
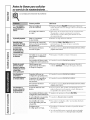 84
84
-
 85
85
-
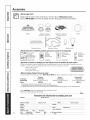 86
86
-
 87
87
-
 88
88


GE JKP90BM4BB El manual del propietario
- Categoría
- Microondas
- Tipo
- El manual del propietario
en otros idiomas
- English: GE JKP90BM4BB Owner's manual
Artículos relacionados
-
GE PT970WM1WW El manual del propietario
-
-
-
-
General Electric JES1651 El manual del propietario
-
-
GE PVM1970DRCC Manual de usuario
-
GE Appliances JES1460DSWW El manual del propietario
-
GE JVM1950SRSS Manual de usuario
-
GE JVM3670WF09 El manual del propietario