HP Photosmart Premium Fax All-in-One Printer series - C309 Guía de instalación
- Categoría
- Enrutadores
- Tipo
- Guía de instalación

HP Photosmart Premium Fax All-in-One Series–C309
2
1
3
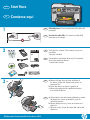
Usuarios de cable USB : No conecte el cable USB
hasta que se le indique.
Compruebe el contenido de la caja. El contenido
de la caja puede ser distinto.
*Puede estar incluido
Comience aquí
Quite toda la cinta de la parte delantera y trasera
del dispositivo. Ajuste la pantalla y quite la
película protectora.
Abra el dispositivo tal y como se muestra en el
gráfi co b.
Quite la cinta y el tope de cartón del interior del
dispositivo.
a.
b.
c.
USB cable users : Do not connect the USB cable until
prompted.
Verify the box contents. The contents of your box
may differ.
*May be included
Start Here
Remove all tape from the front and back of
the device. Adjust the display and remove its
protective fi lm.
Open the device as shown in graphic b.
Remove the tape and the cardboard restraint
from inside the device.
a.
b.
c.
* *
b
c
EN
EN
ES
ES
EN
ES
EN
ES

2 • HP Photosmart Premium Fax All-in-One Series–C309
4
5
6
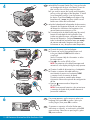
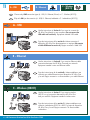
Conecte el cable de alimentación y el adaptador.
Conecte un extremo del cable telefónico
suministrado al puerto con la etiqueta 1-LINE
y conecte el otro al conector de pared.
Consulte la ayuda en pantalla para obtener
información sobre otras opciones de confi guración
del fax.
Presione para encender el dispositivo
HP All-in-One.
NOTA: Preste especial atención a las animaciones
y mensajes de ayuda de la pantalla durante el
proceso de instalación.
a.
b.
c.
Si aparece un mensaje, utilice las fl echas para
seleccionar su idioma y, a continuación, pulse OK
para confi rmar. Seleccione su país/región y pulse
OK para confi rmar.
Instale la bandeja del alimentador de documentos,
alineando las lengüetas del borde con las ranuras
del dispositivo. Introduzca las lengüetas en las
ranuras hasta que encajen en su sitio.
Si necesita retirar la plantilla del panel de control,
levante el borde derecho de la plantilla. Para
instalar una plantilla nueva, colóquela sobre los
botones del dispositivo. Presione fi rmemente sobre
todos los bordes de la plantilla hasta que encaje
de manera adecuada. Asegúrese de que todos
los botones se ven y de que no están bloqueados.
a.
b.
Connect the power cord and adapter.
Connect one end of the supplied phone cord
to the port labelled 1-LINE and the other to
a wall jack.
See the Onscreen Help for information on other
fax setup options.
Press
to turn on the HP All-in-One.
NOTE: Pay attention to the helpful messages and
animations in the display during the setup process.
a.
b.
c.
Install the Document Feeder Tray, lining up the tabs
on the edge with the slots in the device. Insert the
tabs into the slots until they snap into place.
If you need to remove the control panel faceplate,
pull up on the right edge of the faceplate. To install
a new faceplate, position it over the buttons on
the device. Press down fi rmly on all edges of the
faceplate until it snaps into place. Make sure all
buttons are visible and not blocked.
a.
b.
If a prompt appears, use the arrows to select your
language, then press OK to confi rm. Select your
country/region, then press OK to confi rm.
b
c
a
b
a
ES
EN
ES
ES
EN
EN

HP Photosmart Premium Fax All-in-One Series–C309 • 3
7
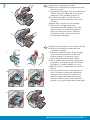
Abra la puerta de acceso a los cartuchos de tinta.
Quite el tope de plástico naranja del carro
y deséchelo o recíclelo.
Prepare los cartuchos de tinta. En primer lugar,
quite el envoltorio de plástico tirando de la
lengüeta naranja. A continuación, gire el
tapón naranja del cartucho para retirarlo.
Gire el cartucho de tinta, deslícelo a la ranura
apropiada y, a continuación, presiónelo hasta
que haga clic y quede encajado en su sitio.
Repita los pasos c y d para todos los cartuchos
de tinta.
Cierre la puerta de acceso a los cartuchos de
tintas. Comienza el proceso de inicialización,
que durará varios minutos. Es normal que el
dispositivo haga ruido durante este proceso.
Mientras continúa el proceso de inicialización,
proceda con el siguiente paso para cargar papel.
a.
b.
c.
d.
e.
f.
Open the ink cartridge access door.
Remove the orange plastic carriage restraint and
discard or recycle.
Prepare the ink cartridges. First, remove the plastic
wrap by pulling the orange tab. Then twist the
orange cap on the cartridge to snap it off.
Turn the ink cartridge over, slide it into the
appropriate slot, then press down until it clicks
into place.
Repeat steps c and d for all ink cartridges.
Close the ink cartridge access door.
The initialization process begins, which takes
several minutes. It is normal for the device to
make noise during this process. While the
initialization process continues, proceed to
the next step to load paper.
a.
b.
c.
d.
e.
f.
a
c
d
f
b
e
ES
EN

4 • HP Photosmart Premium Fax All-in-One Series–C309
8
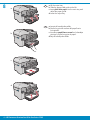
Levante la bandeja de salida.
Deslice la guía de anchura del papel hacia
la izquierda.
Introduzca papel blanco normal en la bandeja
principal y ajuste las guías de papel.
Baje la bandeja de salida.
a.
b.
c.
d.
Lift the output tray.
Slide the paper-width guide to the left.
Insert plain white paper into the main tray and
adjust the paper guide.
Lower the output tray.
a.
b.
c.
d.
a
b
c
d
EN
ES

HP Photosmart Premium Fax All-in-One Series–C309 • 5
9
10
Presione el botón OK tras haber cargado el
papel en la bandeja y, a continuación, espere
unos minutos mientras se imprime la página
de alineación.
Una vez impresa esta página, el proceso de
alineación habrá fi nalizado. Presione el botón
OK . Deseche o recicle la página de alineación.
a.
b.
Si tiene papel fotográfi co, cárguelo en la bandeja
de fotografías.
Levante la tapa de la bandeja de fotografías.
Coloque el papel fotográfi co con la cara
brillante orientada hacia abajo en la bandeja
de fotografías. Deslice la guía del papel hacia
el papel fotográfi co.
Baje la tapa de la bandeja de fotografías.
Tire del extensor de la bandeja y levante el tope
del papel.
a.
b.
c.
d.
If you have photo paper, load it into the photo tray.
Lift the photo tray lid.
Load photo paper with the glossy side down in
the photo tray. Slide the paper guide against the
photo paper.
Lower the photo tray lid.
Pull out the tray extender and lift up the
paper catch.
a.
b.
c.
d.
After you have loaded paper, press the OK button,
then wait a few minutes while the alignment page
is printed.
After the alignment page is printed, alignment is
complete. Press the OK button. Discard or recycle
the alignment page.
a.
b.
a
b
d
EN
ES
ES
EN

6 • HP Photosmart Premium Fax All-in-One Series–C309
11
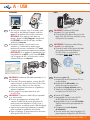
Elija sólo UN tipo de conexión (A - USB, B - Ethernet/cableada o C - Inalámbrica [802.11])
Siga las instrucciones de la sección A si desea conectar el
dispositivo HP All-in-One directamente a un equipo. (No conecte
el cable USB hasta la sección A) . Equipo necesario: cable USB.
Siga las instrucciones de la sección B si desea establecer una
conexión por cable Ethernet entre el dispositivo HP All-in-One
y la red. Equipo necesario: un direccionador y un cable Ethernet.
Siga las instrucciones de la sección C si desea establecer una
conexión inalámbrica (802.11 b u 802.11 g) entre el dispositivo
HP All-in-One y la red. Equipo necesario: un direccionador
inalámbrico.
Choose only ONE connection type (A - USB, B - Ethernet/Wired, or C - Wireless (802.11))
Use the instructions in Section A if you want to connect the
HP All-in-One directly to one computer. (Do not connect the
USB cable until section A) . Equipment needed: USB cable.
Use the instructions in Section B if you want an Ethernet cable
connection between the HP All-in-One and your network.
Equipment needed: router and Ethernet cable.
Use the instructions in Section C if you want a wireless
(802.11 b or g) connection between the HP All-in-One
and your network. Equipment needed: wireless router.
A - USB B - Ethernet
C - Wireless
(802.11)
A - USB
B - Ethernet
C - Wireless (802.11)
EN
ES
EN
ES
EN
ES
EN
ES

Mac: Windows:
A - USB
HP Photosmart Premium Fax All-in-One Series–C309 • 7
Encienda el equipo, inicie la sesión si es
necesario y, a continuación, espere a que
aparezca el escritorio. Introduzca el CD verde
y siga las instrucciones que aparecen en pantalla.
IMPORTANTE : Si no aparece la pantalla de inicio,
haga doble clic en Mi PC y en el icono CD-ROM
con el logotipo de HP y, a continuación, vuelva
a hacer doble clic en setup.exe .
a. IMPORTANTE : Compre un cable USB por
separado si no está incluido.
Conecte el cable USB al puerto ubicado
en la parte posterior del dispositivo
HP All-in-One y, a continuación,
a cualquier puerto USB del equipo.
a.
Inserte el CD verde .
Haga doble clic en el icono del CD
de HP Photosmart del escritorio.
Haga doble clic en el icono HP Installer .
Siga las instrucciones que aparecen en
pantalla.
Complete la pantalla Asistente
de instalación .
Una vez hecho esto, vaya a la página 15
para examinar el dispositivo HP All-in-One.
b.
c.
d.
e.
f.
IMPORTANTE: Compre un cable USB por separado
si no está incluido.
Una vez que aparezca el indicador USB,
conecte el cable USB al puerto ubicado en la
parte posterior del dispositivo HP All-in-One y,
a continuación, a cualquier puerto USB del equipo.
Siga las instrucciones que aparecen en pantalla
para completar la instalación del software.
Vaya a la página 15 para examinar las funciones
del dispositivo HP All-in-One.
b.
c.
d.
IMPORTANT : Purchase a USB cable
separately if it is not included.
Connect the USB cable to the port on the
back of the HP All-in-One, and then to any
USB port on the computer.
a.
Turn on your computer, login if necessary, and
then wait for the desktop to appear. Insert the
green CD and follow the onscreen instructions.
IMPORTANT : If the startup screen does not
appear, double-click My Computer , double-click
the CD-ROM icon with the HP logo, and then
double-click setup.exe .
a.
Insert the green CD.
Double-click the HP Photosmart CD icon
on the desktop.
Double-click the HP Installer icon.
Follow the onscreen instructions.
Complete the Setup Assistant screen.
When you are fi nished, go to page 15
to explore your HP All-in-One.
b.
c.
d.
e.
f.
IMPORTANT: Purchase a USB cable separately if it is
not included.
Once the USB prompt appears, connect the USB
cable to the port on the back of the HP All-in-One,
and then to any USB port on the computer.
Follow the onscreen instructions to complete the
software installation.
Go to page 15 to explore features of your
HP All-in-One.
b.
c.
d.
EN EN
ES ES
EN EN
ES ES

8 • HP Photosmart Premium Fax All-in-One Series–C309
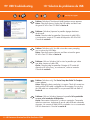
Solución de problemas de USB
Problema: (Windows) Aparece la pantalla Agregar hardware
de Microsoft.
Acción: Cancele todas las pantallas. Desconecte el cable USB y,
a continuación, inserte el CD verde del dispositivo HP All-in-One.
Consulte la sección A .
Problema: (Sólo en Windows) No ha visto la pantalla que indica
que debe conectar el cable USB.
Acción: Cancele todas las pantallas. Extraiga el CD verde del
dispositivo HP All-in-One y, a continuación, vuelva a insertarlo.
Consulte la sección A .
Problema: (Sólo en Windows) Aparece la pantalla Se ha producido
un error en la instalación del dispositivo .
Acción: Desconecte el dispositivo y vuelva a conectarlo. Compruebe
todas las conexiones. Asegúrese de que el cable USB está conectado
al equipo. No conecte el cable USB a un teclado ni a un concentrador
USB sin alimentación. Consulte la sección A .
Problem: (Windows) The Microsoft Add Hardware screen appears.
Action: Cancel all screens. Unplug the USB cable, and then insert
the green HP All-in-One CD. Refer to Section A .
USB Troubleshooting
Problem: (Windows only) You did not see the screen prompting
you to connect the USB cable.
Action: Cancel all screens. Remove, and then re-insert the green
HP All-in-One CD. Refer to Section A .
Problem: (Windows only) The Device Setup Has Failed To Complete
screen appears.
Action: Unplug the device and plug it in again. Check all connections.
Make sure the USB cable is plugged into the computer. Do not plug
the USB cable into a keyboard or a non-powered USB hub. Refer to
Section A .
www.hp.com/support
EN
ES
EN ES
EN
ES
EN
ES

HP Photosmart Premium Fax All-in-One Series–C309 • 9
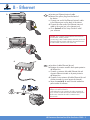
Localice el cable Ethernet/de red.
Extraiga el conector amarillo de la parte posterior
del dispositivo.
Conecte un extremo del cable Ethernet/de red
al puerto Ethernet situado en la parte posterior
del dispositivo.
Conecte el otro extremo del cable Ethernet/de red
al direccionador (no en el puerto de Internet).
Vaya a la sección D de esta Guía de instalación
para instalar el software.
a.
b.
c.
d.
e.
Importante: Su equipo y el dispositivo HP All-in-One deben
trabajar en la misma red activa.
Si está utilizando un DSL o módem de cable, asegúrese de
que no conecta el cable Ethernet/de red desde el dispositivo
HP All-in-One al módem de cable. Conéctelo sólo al
direccionador.
Locate your Ethernet/network cable.
Remove the yellow plug from the back of
the device.
Connect one end of the Ethernet/network cable
to the Ethernet port on the back of the device.
Connect the other end of the Ethernet/network
cable to the router (not in the Internet port).
Go to Section D of this Setup Guide to install
your software.
a.
b.
c.
d.
e.
Important: Your computer and the HP All-in-One must be on
the same active, working network.
If you are using a DSL or cable modem, make sure you do not
connect the Ethernet/network cable from the HP All-in-One to
the cable modem. Connect it to the router only.
d
c
b
B - Ethernet
EN
ES

10 • HP Photosmart Premium Fax All-in-One Series–C309
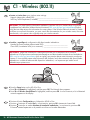
Localice y especifi que la confi guración del direccionador inalámbrico:
Nombre de la red (también denominada SSID): _____________________________
Clave WEP/contraseña WPA (si es necesario): ______________________________
a.
IMPORTANTE : Tenga esta información a mano para continuar con la instalación de la conexión
inalámbrica. HP proporciona una herramienta basada en red denominada Asistente de red inalámbrica
(URL: www.hp.com/go/networksetup [sólo en inglés]) que permite obtener esta información en algunos
sistemas. Si no es posible extraer esta información del asistente, lea la documentación del direccionador
inalámbrico o consulte al fabricante del dispositivo inalámbrico, o a la persona que instaló la red
inalámbrica por primera vez.
Presione el botón Confi guración en el dispositivo HP All-in-One.
Presione
hasta que se resalte Red y, a continuación, presione OK . Aparecerá el menú Red.
Presione hasta que se resalte Asistente de instalación inalámbrica y, a continuación, presione OK .
En breves instantes aparecerá en la pantalla una lista con las redes detectadas.
b.
c.
d.
Locate and write down your wireless router settings:
Network Name (also called SSID): _________________________________________
WEP key/WPA Passphrase (if needed): _____________________________________
a.
IMPORTANT : You must have this information available to continue with your wireless setup. HP provides
a web-based tool called the Wireless Network Assistant [URL: www.hp.com/go/networksetup (English
only)] that can help retrieve this information for some systems. If the Wireless Network Assistant is unable
to retrieve your network information, you must consult the documentation for your wireless router, the router
manufacturer, or the person who originally setup your wireless network.
Press the Setup button on the HP All-in-One.
Press
until Network is highlighted, and then press OK . The Network Menu appears.
Press until Wireless Setup Wizard is highlighted, and then press OK . In a few moments, a list of detected
networks appears on the display.
b.
c.
d.
C1 - Wireless (802.11)
EN
ES
EN
ES

HP Photosmart Premium Fax All-in-One Series–C309 • 11
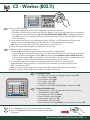
Realice una de las siguientes acciones:
Presione para resaltar el nombre de la red que escribió con anterioridad.
Si el nombre de la red indicado no aparece en la lista, presione la fl echa a la derecha para actualizar
la lista o escríbalo manualmente. Presione hasta que se resalte Introducir nuevo nombre de la red y,
a continuación, presione OK . A continuación, utilice el teclado visual para escribir el nombre de la red.
Si es necesario, lea los consejos del teclado visual que aparecen a continuación.
Si la red utiliza seguridad, aparecerá un mensaje para la clave WEP o la contraseña WPA.
Ambas distinguen entre mayúsculas y minúsculas. Utilice el teclado visual para escribir la clave
WEP o la contraseña WPA.
Nota : Si el direccionador proporciona cuatro claves WEP, asegúrese de que utiliza la primera.
Siga los mensajes de la pantalla para fi nalizar la instalación de la red.
e.
•
•
f.
g.
Consejos del teclado visual:
Para seleccionar: utilice las teclas de dirección para resaltar y,
a continuación, presione OK .
Si se equivoca: seleccione Borrar .
Para minúsculas: seleccione abc .
Para números: seleccione 123 .
Para símbolos: seleccione .@!
Una vez hecho esto: Resalte Hecho y, a continuación, presione OK .
•
•
•
•
•
•
Vaya a la sección D de esta Guía de instalación para instalar
el software.
h.
Do one of the following:
Press
to highlight the name of the network that you wrote down earlier.
If the network name that you wrote down does not appear in the list, press the right arrow to refresh the
list or enter the name manually. Press until Enter New Network Name (SSID) is highlighted, and then
press OK . Then use the visual keyboard to enter the network name. Use the Visual Keyboard Tips that
follow if necessary.
If your network uses security, a prompt appears for the WEP key or WPA passphrase. Both are case
sensitive. Use the visual keyboard to enter the WEP key or WPA passphrase, as requested.
Note : If your router provides 4 WEP keys, make sure you use the fi rst one.
Follow the prompts on the display to complete the network setup.
e.
•
•
f.
g.
Visual keyboard tips:
To Select: use Arrow keys to highlight, and then press OK .
For mistakes: Select Clear .
For lowercase: Select abc
For numbers: Select 123
For symbols: Select .@!
When you are fi nished: Highlight Done , and then press OK .
•
•
•
•
•
•
Go to Section D of this Setup Guide to install your software. h.
C2 - Wireless (802.11)
EN
ES
EN
ES
EN
ES

12 • HP Photosmart Premium Fax All-in-One Series–C309
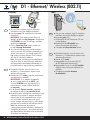
Encienda el equipo, inicie la sesión si es
necesario y, a continuación, espere a que
aparezca el escritorio.
Inserte el CD verde .
Haga doble clic en el icono del CD
de HP Photosmart del escritorio.
Haga doble clic en el icono HP Installer .
Siga las instrucciones que aparecen en
pantalla.
Complete la pantalla Asistente
de instalación .
a.
b.
c.
d.
e.
Encienda el equipo, inicie la sesión si es
necesario y, a continuación, espere a que
aparezca el escritorio.
Introduzca el CD verde y siga las instrucciones
que aparecen en pantalla.
IMPORTANTE: Si no aparece la pantalla
de inicio, haga doble clic en Mi PC y en
el icono CD-ROM con el logotipo de HP y,
a continuación, vuelva a hacer doble clic
en setup.exe .
En la pantalla Tipo de conexión , asegúrese
de realizar la selección a través de la red .
Es posible que el software del cortafuegos envíe
mensajes en los que se le advierte de que el
software de HP está intentando tener acceso
a su red. Debe responder de modo que el
acceso siempre esté permitido. A continuación,
prosiga con la instalación del software de HP.
Nota : Las aplicaciones de antivirus
y antispyware pueden ralentizar o bloquear la
instalación del software y es posible que haya
que desactivarlas. Recuerde volver a activarlas
al fi nalizar la instalación.
a.
b.
c.
d.
Turn on your computer, login if necessary,
and then wait for the desktop to appear.
Insert the green CD and follow the onscreen
instructions.
IMPORTANT: If the startup screen does not
appear, double-click My Computer , double-click
the CD-ROM icon with the HP logo, and then
double-click setup.exe .
On the Connection Type screen, make sure
to select through the network .
Your fi rewall software may provide prompts
warning you that HP software is attempting to
access your network. You should respond so
that access is always allowed. Then continue
with the HP software installation.
Note : Anti-virus and anti-spyware applications
may slow down or block software installation
and may need to be disabled. Remember to
turn them back on again following installation.
a.
b.
c.
d.
Turn on your computer, login if necessary,
and then wait for the desktop to appear.
Insert the green CD.
Double-click the HP Photosmart CD icon
on the desktop.
Double-click the HP Installer icon.
Follow the onscreen instructions.
Complete the Setup Assistant Screen.
a.
b.
c.
d.
e.
/
D1 - Ethernet/ Wireless (802.11)
Windows: Mac:
EN
ES
EN
ES

HP Photosmart Premium Fax All-in-One Series–C309 • 13
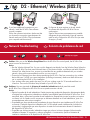
Si dispone de otros equipos en la red, instale
el software del dispositivo HP All-in-One en
cada equipo.
Siga las instrucciones que aparecen en pantalla.
Asegúrese de que selecciona el tipo de conexión
entre la red y el dispositivo HP All-in-One (no entre
el equipo y la red).
Solución de problemas de red
Problema: Una vez ejecutado el Asistente de instalación inalámbrica desde el panel de control
de HP All-in-One, el dispositivo HP All-in-One no se puede conectar a la red.
Acción:
Ejecute la prueba de la red inalámbrica. Puede ejecutar esta prueba de diagnóstico directamente desde
el asistente de confi guración inalámbrica o desde el menú Red del panel frontal de HP All-in-One. En el
menú Red, baje y seleccione la prueba de red inalámbrica. Después de ejecutar la prueba, se imprime
un informe con un listado con los errores que se hubieran detectado en la red inalámbrica, junto con
recomendaciones sobre cómo corregirlos.
Es probable que haya interferencias procedentes de otros dispositivos que impidan que HP All-in-One
se conecte. Cualquier dispositivo inalámbrico de 2,4 GHz puede causar interferencias (incluidos los
microondas). Asegúrese de que estos dispositivos no estén en funcionamiento durante la instalación
del dispositivo HP All-in-One.
Es posible que el direccionador inalámbrico tenga que volver a iniciarse. Apague el direccionador
inalámbrico durante 30 segundos y vuelva a encenderlo. A continuación, ejecute el Asistente de
instalación inalámbrica en el dispositivo HP All-in-One.
•
•
•
If you have additional computers on your
network, install the HP All-in-One software
on each computer.
Follow the onscreen instructions. Make sure that
you choose the connection types between the
network and your HP All-in-One (not between
your computer and the network).
Network Troubleshooting
Problem: After you run the Wireless Setup Wizard from the HP All-in-One control panel, the HP All-in-One
cannot connect to the network.
Action:
Run the Wireless Network Test. You can run this diagnostic test directly from the Wireless Setup Wizard or
from the HP All-in-One front panel Network Menu. In the Network Menu, scroll down and select Wireless
Network Test. After the test runs, a report is printed that lists any problems detected with your wireless
network, along with recommendations on how you can correct it.
There may be inference from other devices preventing the HP All in One from connecting. Any wireless
device that uses 2.4GHZ can cause interference (including microwaves). Make sure these devices are
not in use during the HP All in One installation.
Your wireless router may need to be reset. Turn off your wireless router for 30 seconds and then turn
it back on. Then run the Wireless Setup Wizard on your HP All in One.
•
•
•
D2 - Ethernet/ Wireless (802.11)
/
www.hp.com/support
EN ES
EN ES
EN
ES

14 • HP Photosmart Premium Fax All-in-One Series–C309
Problema: Mientras se instala el software HP All-in-One, aparece el mensaje de error Impresora
no encontrada .
Acción:
Es posible que el dispositivo HP All-in-One no esté conectado a la red. Para una conexión inalámbrica,
asegúrese de que ejecuta el Asistente de instalación inalámbrica desde el panel delantero de
HP All-in-One antes de proseguir con la instalación del software. También puede ejecutar la prueba de
red inalámbrica desde el panel frontal de HP All-in-One para verifi car la conexión inalámbrica entre el
dispositivo HP All-in-One y la red inalámbrica. A ambos se accede desde el menú Red del panel frontal.
Para una conexión Ethernet cableada, compruebe las conexiones de los cables entre el dispositivo
HP All-in-One, el direccionador y el equipo.
Pruebe a deshabilitar temporalmente los programas de cortafuegos, software antispyware, o antivirus
que se estén ejecutando actualmente en el equipo.
Consulte la ayuda en pantalla del dispositivo HP All-in-One para obtener más ayuda sobre la solución
de problemas de red.
•
•
•
•
Problem: While you install the HP All-in-One software, you see the error message Printer Not Found .
Action:
The HP All in One may not be connected to your network. For a wireless connection, make sure you have
run the Wireless Setup Wizard from the HP All-in-One front panel before continuing with the software
installation. You can also run the Wireless Network Test from the HP All-in-One front panel to verify the
wireless connection between your HP All-in-One and your wireless network. Both are accessed from the
front panel Network Menu.
For a wired Ethernet connection, check all cable connections between the HP All in One, the router,
and your computer.
Try temporarily disabling any fi rewall, anti-spyware, or anti-virus software you may be currently running
on your computer.
Refer to the Onscreen Help for your HP All-in-One for additional network troubleshooting help.
•
•
•
•
www.hp.com/support
EN
ES

HP Photosmart Premium Fax All-in-One Series–C309 • 15
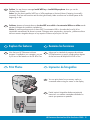
Examine las funciones
Ahora que ha instalado el programa de software
HP Photosmart en su equipo, puede probar algunas
de las funciones del dispositivo HP All-in-One.
Impresión de fotografías
Puede imprimir fotografías desde una tarjeta de
memoria o una cámara conectadas utilizando los
menús que aparecen en pantalla.
Problema: Aparece el mensaje de error La clave WEP no es válida o La contraseña WPA no es válida cuando
ejecuta el Asistente de instalación inalámbrica.
Acción: Es posible que haya escrito la clave WEP, la contraseña WPA o el nombre de la red (si lo ha
introducido manualmente) de forma incorrecta. Distinguen entre mayúsculas y minúsculas, y deben escribirse
de forma exacta. Asegúrese de que no hay espacio en blanco al principio o al fi nal.
Explore the features
Now that your HP Photosmart software
program is installed on your computer, you can
try out one of the features on the HP All-in-One.
Print Photos
You can print photos from a memory card or a
connected camera using the menus on the display.
Problem: You see the error message Invalid WEP key or Invalid WPA passphrase when you run the
Wireless Setup Wizard.
Action: You may have typed the WEP key or WPA passphrase or Network Name (if entering it manually)
incorrectly. They are case sensitive and must be typed exactly. Make sure there are no blank spaces at the
beginning or end.
EN ES
EN ES
EN
ES
EN ES
ES
EN

© 2008 Hewlett-Packard Development Company, L.P.
*CC334-90118*
*CC334-90118*
*CC334-90118*
Printed in () Printed in ()
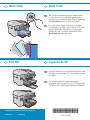
Quick Forms
La función Quick Forms le da acceso inmediato
a formularios muy útiles, como listas de verifi cación,
papel milimetrado, calendarios e incluso papel
de bloc de notas. Comience pulsando el botón
Quick Forms del panel de control.
Impresión de CD
Con el software de HP, puede personalizar
fotografías o texto e imprimirlo en un CD imprimible.
Consulte la Guía básica para obtener más detalles.
Quick Forms
The Quick Forms feature gives you instant access
to useful forms such as checklists, graph paper,
calendars, even notebook paper. Begin by pressing
the Quick Forms button on the control panel.
Print CDs
Using HP software, you can customize photos or text
and print onto a printable CD. See the Basics Guide
for details.
EN
ES
EN ES
EN
ES
EN ES
-
 1
1
-
 2
2
-
 3
3
-
 4
4
-
 5
5
-
 6
6
-
 7
7
-
 8
8
-
 9
9
-
 10
10
-
 11
11
-
 12
12
-
 13
13
-
 14
14
-
 15
15
-
 16
16


HP Photosmart Premium Fax All-in-One Printer series - C309 Guía de instalación
- Categoría
- Enrutadores
- Tipo
- Guía de instalación
en otros idiomas
Artículos relacionados
-
HP Photosmart C5100 All-in-One Printer series Guía de instalación
-
-
-
HP Photosmart Premium All-in-One Printer series - C309 El manual del propietario
-
HP Photosmart C8100 All-in-One Printer series Guía de instalación
-
-
-
-
HP Photosmart C4380 All-in-One Printer series Guía de instalación
-