Haier DWL3525DBBB Manual de usuario
- Categoría
- Lavaplatos
- Tipo
- Manual de usuario
Este manual también es adecuado para

24 _
24 ,°
24 ,°
Built°In Dishwasher
Lave°Vaisselme In¢orpere
Lavavaiilmas Empofraao
Part # DW-9999-19
User Manual
Guide de I'Utilisateur
Manual del Usuario Modelo
DWL7075DBWW * DWL7075DBBB * DWL7075MBSS

iiiiiiiiiiiiiiiiiiiiiiiiiiiiiiiiiiiiiiiiiiiiiiiiiiii i iii ! ! ! ! !i!i i!! i ! i! ! i!i!i!i!i!i!i!i!i!i!i!i!i!i!i!i!i!i!i!i!i!i!i!i!i! ! i ! !
SAF Y P CAUTIONS
Warning! - To reduce the risk of fire, electric shock, or injury to
persons, always exercise basic safety precautions, including the
following:
1. Read all instructions before using the appliance.
.
3.
.
.
Use the dishwasher only for its intended function.
Use only detergents or rinse agents recommended for use in a
dishwasher, and keep them out of the reach of children.
When loading items to be washed:
1) Locate sharp itemsso that they are not likely to damage the door seal;
2) Load sharp knives with the handles up to reduce the risk of cut-type
injuries.
Do not wash plastic items unless they are marked "dishwasher safe" or
the equivalent. For plastic items not so marked, check the manufacturer's
recommendations.
6. Do not touch the heating element during or immediately after use.
7. Do not operate the dishwasher unless all enclosure panels are properly
in place.
8. Do not tamper with controls.
9. Do not abuse, sit on, or stand on the door, lid, or dish racks of the
dishwasher.
10.
11.
12.
To reduce the risk of injury, do not allow children to play in or on the
dishwasher.
Under certain conditions, hydrogen gas may be produced in a hot
water systemthat has not been used for two weeks or more.
HYDROGEN GAS IS EXPLOSIVE.If the hot water system has not been
used for such a period, before using the dishwasher turn on all hot
water faucets and let the water flow from each for several minutes,
This will release any accumulated hydrogen gas. As the gas is
flammable, do not smoke or use an open flame during this time.
Removethe door or lid to the washing compartment when removing
an old dishwasher from service or discarding it.
SAVE THESE

Thank you for purchasing our Haier
product. This easy-to-use manual
will guide you in getting the best
performance from your Haier
dishwasher.
Remember to record the model and
serial number. They are on a label
in the dishwasher.
Model number
Serial number
Date of purchase
Staple your receipt to your manual. You will need it to obtain
warranty service.

iiiiiiiiiiiiiiiiiiiiiiiiiiiiiiiiiiiiiiiiiiiiiiiiiiii i iii ! ! ! ! !i!i i!! i ! i! ! i!i!i!i!i!i!i!i!i!i!i!i!i!i!i!i!i!i!i!i!i!i!i!i!i! ! i ! !
Table Of Contents
PAGE
Safety Precautions ...................................................................... 1-2
Before Using Your Dishwasher .............................................................. 4
Parts and Features ........................................................................ 6
Parts and Features ............................................................................... 6
Start-up Guide ................................................................................. 7
Using Your New Dishwasher ................................................................ 7
Dishwasher Loading .................................................................. 8-13
Loading Suggestions ............................................................................ 8
Loading Top Rack ........................................................................... 9-10
Loading Bottom Rack .................................................................... 11-12
Loading Silverware Basket .................................................................. 13
Dishwasher Use ....................................................................... 13-23
Proper Use of Detergent ..................................................................... 14
Detergent Dispenser ...................................................................... 14-16
RinseAid Dispenser............................................................................ 17
Cycle Selection Charts .................................................................. 18-19
Canceling a Cycle.............................................................................. 20
Changing a Cycle or Setting .............................................................. 20
Adding Items During a Cycle .............................................................. 21
Option Selections ......................................................................... 21-22
Cycle Status Indicators........................................................................ 23
Wash System..................................................................................... 23
Drying System ................................................................................... 24
Overfill Protection Float ...................................................................... 24
Washing Special Items ............................................................ 25-26
Dishwasher Care ..................................................................... 26-27
Cleaning ..................................................................................... 26-27
Drain Air Gap ................................................................................... 27
Storing.............................................................................................. 27
Troubleshooting ....................................................................... 28-31
Assistance or Service ..................................................................... 32
Warranty ....................................................................................... 33
3

Before Using Your Dishwasher
Tip Over Hazard
• Do not use dishwasher until completely installed.
• Do not push down on open door, doing so can
result in serious injury or cuts.
Electrical Shock Hazard
• Electrically ground dishwasher.
• Connect ground wire to green ground connector in
terminal box.
• Do not use an extension cord.
• Failure to follow these instructions can result in
death, fire, or electrical shock.
• Install where dishwasher is protected from the elements. Protect against
freezing to avoid possible rupture of fill valve. Such ruptures are not covered
by the warranty. See "Storing" in the "Dishwasher Care" section for winter
storage information.
• Install and level dishwasher on a floor that will hold the weight and in an area
suitable for its size and use.
• Remove all shipping plugs from hoses and connectors (such as the cap on
the drain outlet) before installing. See Installation Instructions for complete
information.
4

iiiiiiiiiiiiiiiiiiiiiiiiiiiiiiiiiiiiiiiiiiiiiiiiiiii i iii ! ! ! ! !i!i i!! i ! i! ! i!i!i!i!i!i!i!i!i!i!i!i!i!i!i!i!i!i!i!i!i!i!i!i!i! ! i ! !
GROUNDING INSTRUCTIONS
For a grounded, cord-connected dishwasher:
The dishwasher must be grounded. In the event of a malfunction or
breakdown, grounding will reduce the risk of electric shock by providing a
path of least resistance for electric current. The dishwasher is equipped with a
cord having an equipment- grounding conductor and a grounding plug. The
plug must be plugged into an appropriate outlet that is installed and grounded
in accordance with all local codes and ordinances.
WARN I NG:
Improper connection of the equipment-grounding conductor can result in a risk
of electric shock. Check with a qualified electrician or service representative if
you are in doubt whether the dishwasher is properly grounded. Do not modify
the plug provided with the dishwasher; if it will not fit the outlet, have a proper
outlet installed by a qualified electrician.
For a permanently connected dishwasher:
The dishwasher must be connected to a grounded metal, permanent wiring
system, or an equipment- grounding conductor must be run with the circuit
conductors and connected to the equipment- grounding terminal or lead on the
dishwasher.
5

Partsand Features
©
®
®
®
®
®
®
©
®
1. Upper Spray Arm
2. Top Rack Track
3. Water Inlet Opening (in tub wall)
4. Lower Spray Arm
5. Bottom Rack
6. Vent System
7. Adjustable Upper Rack
8. Middle Spray Arm
9. Removable Silverware Basket
10. Overfill Protection Float
11. Heating Element
12. Detergent and Rinse Aid
Dispenser
13. Cup Shelf with Stem Guard (4)
6

iiiiiiiiiiiiiiiiiiiiiiiiiiiiiiiiiiiiiiiiiiiiiiiiiiii i iii ! ! ! ! !i!i i!! i ! i! ! i!i!i!i!i!i!i!i!i!i!i!i!i!i!i!i!i!i!i!i!i!i!i!i!i! ! i ! !
Start-up Guide
Before using your dishwasher, remove all packaging materials. Read this entire
Use and Care Guide. You will find important safety information and useful
operating tips.
USING YOUR NEW DISHWASHER
1. Rinse aid is essential for good drying. Be sure to fill
the dispenser before you use your new dishwasher.
Each filling will last about 1 to 3 months depending
on your usage.
2. Scrape leftover food and hard items ( toothpicks or
bones ) from dishes. You do not need to pre-rinse
your dishes.
3. Properly load the dishwasher. ( See" Dishwasher Loading" ) Load dishes with
space in between so water will reach the soiled surfaces. Make sure nothing
prevents the spray arm(s) from spinning freely..
4. Add detergent. Always use a quality brand detergent. (See "Dishwasher Use")
5. Close the door. J_
6. Pressthe desired cycle and option selections. The dishwasher starts filling
when you press any cycle selection. You can select options as the machine
fills. (See "Dishwasher Use")
7

Dishwasher Loading
LOADING SUGGESTIONS
• Remove leftover food, bones, toothpicks and other hard items from the dishes
To conserve water and energy and save time, it is not necessary to rinse
dishes before putting them into the dishwasher. The wash system is designed
to remove food particles from the water. The wash system includes a chopping
device which will reduce size of food items.
NOTE: If hard items such as fruit seeds, nuts, and eggshells enter the wash
module, you might hear chopping, grinding, crunching, or buzzing
sounds. These sounds are normal when hard items enter the module.
Do not let metallic items (such as pot handle screws) get into the
wash module. Damage can occur.
• It is important for the water spray to reach all soiled surfaces.
• Load dishes so they are not stacked or overlapping if possible. For best drying
results, water must be able to drain from all surfaces.
• Load heavy pots and pans carefully. Heavy items can dent the stainless steel
interior of the door if they are dropped or bumped.
• Make sure pot lids and handles, pizza pans, cookie sheets, etc., do not
interfere with the spray arm rotation.
• Conserve water, energy and save time spent hand-rinsing by running a rinse
cycle to keep dishes moist if you do not plan to wash them soon. Foods such as
eggs, rice, pasta, spinach and cooked cereals may be hard to remove if they
are left to dry over a period of time.
QUIET OPERATING TIPS
To avoid thumping/clattering noises during operation:
• Make sure lightweight load items are secured in the racks.
• Make sure pot lids and handles, pizza pans, cookie sheets, etc., do not touch
interior walls or interfere with the rotation of the spray arm.
• Load dishes so they do not touch one another.
NOTE: For built-in models, keep sink drain plugs closed during dishwasher
operation to prevent noise transfer through drains.

iiiiiiiiiiiiiiiiiiiiiiiiiiiiiiiiiiiiiiiiiiiiiiiiiiii i iii ! ! ! ! !i!i i!! i ! i! ! i!i!i!i!i!i!i!i!i!i!i!i!i!i!i!i!i!i!i!i!i!i!i!i!i! ! i ! !
LOADING TOP RACK
The top rack is designed for cups, glasses and smaller items, Many items, up to
9 in. ( 22 cm ), fit in the top rack. ( See recommended loading patterns shown )
NOTI:: The features on your dishwasher rack may vary from the drawings
shown.
• Place items so open ends face down for cleaning and draining.
• Load glasses and cups in top rack only. The bottom rack is not designed for
glasses and cups. Damage can occur.
• Place cups and glasses in the rows beh,veen tines. Placing them over the tines
can lead to breakage and water spots.
• To avoid chipping, do not let stemware touch other items. Small bowls, pans
and other utensils can be placed in the top rack. Load bowls in the center
section for best stability.
9

• China, crystal and other delicate items must not touch each other during
dishwasher operation. Damage may occur.
• Load plastic items in the top rack only. Only plastic items marked
"dishwashe safe" are recommended.
• Load plastic items so the force of the spray does not move them during the cycle.
CUP SHELF WITH STEM GUARD
Fold down the extra shelf on the left or right side of the top rack to hold additional
cups, stemware or long items such as utensils and spatulas.
10

LOADINGBOTTOMRACK
The bottom rack is designed for plates, pans, casseroles, and utensils. Many
items, up to 12.2 in. (31 cm) tall, fit in the bottom rack. (See recommended
loading patterns shown)
NOTE: Thefeatureson your dishwasherrack may vary from thedrawings
shown.
• Do not load glasses, cups, or plastic items in the bottom rack. Load small items
in the bottom rack only if they are secured in place.
• Load plates, soup bowls, etc. between tines.
• Overlap the edges of plates for large loads.
• Load soup, cereal, and serving bows in the rack in a variety of ways depending
upon their size and shape. Load bowls securely between the rows of tines. Do
not nest bowls because the spray will not reach all surfaces.
• Load cookie sheets, cake pans, and other large items at the sides and back.
Loading such items in front can keep the water spray from reaching the
detergent dispenser
11

• Secure heavily soiled cookware face down in the rack.
• Make sure pot handles and other items do not stop rotation of the spray arm(s).
The spray arm(s) must move freely.
• Do not load items belween the bottom rack and the side of the dishwasher tub
because they might block the water inlet opening.
NOTE: Spin the spray arms. Be sure items in the basket do not stop the rotation
of the spray arms.
Fold-Down Rack
You can fold down two rows of tines at the back of the bottom rack.
1. Grasp the tip of the tine that is in the tine holder.
2. Gently pull the tine out of the tine holder.
3. Lay the row of tines down in the rack to make room for larger dishes, bowls,
pots, pans or roasters.
12

iiiiiiiiiiiiiiiiiiiiiiiiiiiiiiiiiiiiiiiiiiiiiiiiiiii i iii ! ! ! ! !i!i i!! i ! i! ! i!i!i!i!i!i!i!i!i!i!i!i!i!i!i!i!i!i!i!i!i!i!i!i!i! ! i ! !
LOADING SILVERWARE BASKET
Load the silverware basket while it is in the bottom rack or remove the basket
and place on a counter or table for loading. (See recommended loading pattern
shown)
NOTE: Unload or remove the basket before unloading the racks to avoid water
drops from falling on the silverware.
• Load items with covers down, using the separators to prevent silverware
nesting.
• Place small items such as baby bottle caps, jar lids, corncob holders, etc. in the
section(s) with hinged cover(s). Close the cover to hold small items in place.
• When covers are up, mix items in each section of the basket with some
pointing up and some down to avoid nesting. Spray cannot reach nested items.
IMPORTANT: Always load sharp items (knives, skewers, etc.) pointing down.
Be sure that nothing protrudes through bottom of the basket or rack that may
block the wash arm.
NOTES:
• Do not load silver or silver-plated silverware with stainless steel. These metals
can be damaged by contact with each other during washing.
• Some foods (such as salt, vinegar, milk products, fruit juices, etc.), can pit or
corrode silverware. Run a rinse cycle if you do not have a full load to wash
immediately.
13

Dishwasher Use
PROPER USE OF DETERGENT
Use only detergent specifically made for use in dishwasher. Cascade, Cascade
Complete and Electrasol Automatic Dishwashing Detergents have been approved
for use in all Haier dishwashers. Keep your detergent fresh and dry. Don't put
powder detergent into the dispenser until you're ready to wash dishes.
All wash cycles except RINSE ONLY require detergent in the main and pre-wash
cup.
Detergent Dispenser
The detergent dispenser has 2 sections. The small Pre-Wash section empties
detergent into dishwasher when you close the door.
1
2
1. Cover latch
2. Main Wash section
3. Pre-Wash section
4. Cover
The larger Main wash section automatically empties detergent into the
dishwasher during the wash (See the "cycle Selection Charts")
• Use automatic dishwashing detergent only. Other detergents can produce
excessive suds that can overflow out of the dishwasher and reduce washing
performance.
• Add detergent just before starting a cycle.
• Store tightly closed detergent in a cool, dry place. Fresh automatic dishwasher
detergent results in better cleaning.
NOTE: Do not use detergent with a rinse cycle.
Filling the dispenser
1. If thedispensercover is closed open the cover by pushingthe cover latch.
14

iiiiiiiiiiiiiiiiiiiiiiiiiiiiiiiiiiiiiiiiiiiiiiiiiiii i iii ! ! ! ! !i!i i!! i ! i! ! i!i!i!i!i!i!i!i!i!i!i!i!i!i!i!i!i!i!i!i!i!i!i!i!i! ! i ! !
2. Fill the Main Wash section with detergent. See "How much detergent to use."
3. Fill the Pre-Wash section, if needed.
4. Close the dispenser cover.
It is normal for the cover to open partially when dispensing detergent.
i_lO'rl:: Use both sections for cycles with 2 washes. Use only the main wash
section for cycles with 1 wash, See the "Cycle Selection Charts" for more
details.
How much detergent to use
• The amount of detergent to use depends on the hardness of your water and the
type of detergent. If you use too little, dishes won't be clean . If you use too
much in soft water, glassware will etch.
• Different brands of dishwasher detergent have different amounts of
phosphorous for softening water. If you have hard water and use a detergent
with a phosphorous content of less than 8.7%, you might need to use more
detergent, or use a detergent with a phosphorous content higher than 8.7%.
15

Water Hardness
Amount of Detergent
Soft to Medium Hard Water
0 to 6 grains per gallon
For normally soiled loads
• Partially fill the Main Wash
section with 4 tsp.
• Completely fill the Pre-Wash
section
NOTE: Fill the Pre-Wash section
halfi,vay if dishes are
pre-rinsed or the water is
very soft (0 to 3.2/12 2
grains per gallon)
For heavily soiled loads
• Partially fill the Main Wash section
with 6 tsp.
• Completely fill the Pre-Wash section
Medium to hard water
7 to 12 grains per gallon
For normal and heavily soiled loads
• Partially fill the Main Wash section
with 6 tsp.
• Completely fill the Pre-Wash section
Very Hard Water
13 grains per gallon and above
NOTE: It might be necessary to use
the Pots and Pans, or a normal cycle
with Hi-Temp Scrub, for best wash
performance with very hand water.
For normally and heavily soiled loads
• Completely fill the main wash
section
• Completely fill the Pre-Wash section
• Turn the rinse aid dispenser to
a higher setting. See "Rinse Aid
Dispenser" later in this section
NOTE: Fill amounts shown are for standard powdered detergent. Amounts may
vary if you use liquid or concentrated powdered detergent. Follow instruction on
the package when using liquid dishwasher detergent or concentrated powdered
detergent.
If you use detergent tablets, use one whole tablet in the Main Wash section only
for all loads and water hardness levels.
16

iiiiiiiiiiiiiiiiiiiiiiiiiiiiiiiiiiiiiiiiiiiiiiiiiiii i iii ! ! ! ! !i!i i!! i ! i! ! i!i!i!i!i!i!i!i!i!i!i!i!i!i!i!i!i!i!i!i!i!i!i!i!i! ! i ! !
RINSE AID DISPENSER
Rinse aids prevent water from forming droplets that can dry as spots or streaks.
They also improve drying by allowing water to drain off of the dishes during the
final rinse by releasing a small amount of the rinse aid into the rinse water. Your
dishwasher is designed to use a liquid rinse aid. Do not use a solid or bar-type.
FILLING THE DISPENSER
The rinse aid dispenser holds 4.8 oz ( 145ml ) of rinse aid. Under normal condi-
tions, this will last for about three months. Rinseaid is released through an open-
ing in the dispenser. You do not need to wait until the dispenser is empty to refill
it. Try to keep it full, but be careful not to overfill it.
1. Make sure the dishwasher door is fully open.
2. Open the dispenser by pushing the cover latch.
c
3. Add rinse aid until the indicator window looks full.
4. Clean up any spilled rinse aid with a damp cloth.
5. Close the cover.
RINSE AID SETTING
The amount of rinse aid released into the final wash can be adjusted. The factory
setting is at 2. For most water conditions, set the adjuster to 2 or 3. If there are
rings or calcium ( hard water ) spots on dishes, try a higher setting.
TO ADJUST THE SETTING
Open the dispenser cover. Turn the adjuster inside the dispenser to the desired
setting.
17

CYCLE SELECTION CHARTS
Select the wash cycle and options desired. The dishwasher starts filling once the
door is closed and you press a cycle, unless you select a delay wash. After fill-
ing, and a brief wash period, the machine will pause for a 5 minute energy sav-
ing soak interval. During this time, dried and baked on soil is softened for easier
removal later in the cycle. You can select options as the machine is filling.
A "o" shows what steps are in each cycle. Temperatures indicate where extra
heat is added. Water usage is shown in U.S. gallons/liters.
This model meets the ENERGY STAR@guidelines for energy efficiency.
Cycle time does not include dry time. An asterisk (*) by the cycle time indicates
the cycle time might be longer depending on the temperature of the water enter-
ing the dishwasher.
A_[O
WA;/
Use for all soil types and dish
loads. This cycle has additional
checks for soil in the water to give
added wash action time. The wash
action will pause several times U_@ b@t,h
throughout the cycle, for up to 70
seconds, to check the soil level in
the wash water. _e¢_r_
.........._iii ................................ .................
• • t •
ii 13oF
.................................................._i_i I
w _
_iilii
PANS
<_,ake<t,e
iiil;i
_/OUMAL
...............................$................................
18

iiiiiiiiiiiiiiiiiiiiiiiiiiiiiiiiiiiiiiiiiiiiiiiiiiii i iii ! ! ! ! !i!i i!! i ! i! ! i!i!i!i!i!i!i!i!i!i!i!i!i!i!i!i!i!i!i!i!i!i!i!i!i! ! i ! !
;.,_: d_ may_ _ _,¢_Om
I
.........................................................¢;?_,_...........
I
iii 37* iiil _I_
iOLO
U_e thi__e cyei_ ...............
_la:_ses 8_3d ............
si_ver_a_e tha_:'_41 _o_:
_e washed tight De _1o__e
d_etge_! _h
awa,2 t:hl_ ¢y¢_e,.
.
i
• If the incoming water temperature is less than the recommended temperature or
food soils are heavy, the cycle will automatically compensate by adding time,
heat and water as needed.
19

CANCELLING A CYCLE
Anytime during a cycle, press
_ES_T
Your dishwasher will start a 2-minute drain (if needed). Letthe dishwasher drain
completely. The light turns off after 2 minutes.
NOTE: If your dishwasher does not need draining, press START/RESET again to
turn the light turns off. Select a new cycle and options.
To stop the drain
You can press START/RESETagain to stop the drain immediately. Remember to
drain the dishwasher before starting a new cycle.
To clear the indicators
PressSTART/RESETbefore startingthe dishwasherto clear all options and cycles.
CHANGING A CYCLE OR SETTING
During the first fill of a cycle
1. Pressa new cycle and/or options.
2. Check the detergent dispensers.They must be filled properly for the new cycle.
After the first fill of a cycle
1. Press _:_/,,u
Your dishwasher will start a 2-minute drain (if needed). Letthe dishwasher drain
completely. The light turns off after 2 minutes.
NOTE: If your dishwasher does not need draining,press START/RESET again to
turn the light off.
1. Check the detergent dispensers. They must be filled properly for the new cycle.
2. Pressa new cycle and/or options.
20

ADDING ITEMS DURING A CYCLE
You can add an item anytime before the main wash starts. Open the door and
check the detergent dispenser If the cover is still closed, you can add items.
To add items
1. Open the door slightly. Wait for the spraying action to stop before opening
the door completely.
2. Open the door. If the detergent dispenser cover is still closed, add the item.
3. Close the door firmly until it latches. The dishwasher resumes the cycle after
about a 10 second pause.
OPTION SELECTIONS
You can customize your cycles by pressing an option. If you change your mind,
press the option again to turn the option off.
Select a different option if desired.
You can change an option anytime before selected option begins. For example,
you can press an unheated drying option anytime before drying begins.
Hi-Temp Wash
Select this option to heat the water during parts of the cycle. Higher water
temperatures helps clean tough soils. Hi-Temp Wash, with the Pots & Pans or
Normal cycles, raises the water temperature in the main wash.
This option adds heat, water and wash time to a cycle.
©
,/,_%::!,_
NOTE: Hi-Temp Wash is an option with the Pots & Pans and Normal cycles.
Always use Hi-Temp Wash if you have hard water.
Sanitize Rinse Option
Select this option to raise the water temperature in the final rinse to approximate-
ly 160 F ( 71°C ). The Sanitize Rinse Option adds heat and time to the cycle.
This high temperature rinse sanitizes your dishes and glassware in accordance
With NSF/ANSI standard 184 for Residential dishwasher. Certified residential
dishwasher are not intended for licensed food establishments.
©
NOTE: Sanitize Rinse is an option with the Pots & Pans and Normal cycle. Only
these sanitization cycles have been designed to meet the NSF/ANSI
21 requirements.

HEATED DRY
Selectthisoption to dry disheswith heat.
_v
Not selecting heated dry skips the drying period. If the heated drying period is
not selected the dishes take longer to dry and some spotting can occur. For best
drying, always use a liquid rinse aid. Some items (such as plastics) may need
towel drying.
NOTE: Heated Dry is an option with Pots and Pans Wash, Normal and China/
Crystal cycles. For faster air drying, you can open the door a couple of
inches after the final rinse is complete.
STEAM OPTION
Use for all dish loads, including extra large loads. Steam is generated early in
the cycle to help wet baked on soils from dish load and soften it for easier remov-
al by the wash system. The steam cycle raises the temperature in the final rinse to
150°F (66°C).
NOTE: This option can be used with all cycles except Rinse and Hold and Speed
cycle.
DELAY HOURS
Select this option to run your dishwasher at a later time or during off-peak hours.
You can add items to the load anytime during the delay countdown. After adding
items, close the door firmly until it latches.
©_LAY
You can delay the start of a cycle up to 9 hours in 3 hour increments (3, 6, or 9 Hr)
To delay the start
1. Open the door
2. Repeatedly press "Delay Hours until you see the desired hours of delay lighted
in LEDindicator on the left. When the delay reaches 9 hours, the delay turns
off. Press "Delay Hours" again to select a new number of delay hours.
3. Select a wash cycle and options
4. Close the door
NOTE: To cancel the delay and cycle, press Cancel. To Cancel the delay and
start the cycle immediately, press Delay Start until there is no light in any
of LEDindicators on the left. 22

iiiiiiiiiiiiiiiiiiiiiiiiiiiiiiiiiiiiiiiiiiiiiiiiiiii i iii ! ! ! ! !i!i i!! i ! i! ! i!i!i!i!i!i!i!i!i!i!i!i!i!i!i!i!i!i!i!i!i!i!i!i!i! ! i ! !
Wash System
An energy saving soak interval is used for most cycles shortly after the initial
water fill. During the 5 minutes of soaking, dried and baked on food is loosened
without using energy. Later in the cycle the robust wash action removes the
softened food more efficiently. The six-level wash system provides excellent
cleaning results. Three levels of filtration and a soil collector system filter the wash
water and prevent food particles from redepositing on the clean dishes.
• The wash water continuously flows through the filter, trapping food particles.
• Two water jets, located under the spray arm, remove the food particles from
the filter.
• A coarse strainer prevents bones, pits, and other large objects from entering
the pump system.
NOTI:: Periodically check the bottom of the tub and remove any objects on the
strainer.
Drying .System
During drying, you can see hot vapor escaping through the vent at the upper left
corner of the door.This is normal as the heat dries your dishes.
IMPORTANT: The vapor is hot. Do not touch the vent.
23

Overfill Protection Float
The overfill protection float (in the front right corner of the dishwasher tub) keeps
the dishwasher from overfilling. It must be in place for the dishwasher to operate.
Check under thefloat for objectsthat may keep the protectorfrom moving up or
down
24

iiiiiiiiiiiiiiiiiiiiiiiiiiiiiiiiiiiiiiiiiiiiiiiiiiii i iii ! ! ! ! !i!i i!! i ! i! ! i!i!i!i!i!i!i!i!i!i!i!i!i!i!i!i!i!i!i!i!i!i!i!i!i! ! i ! !
Washing Special Items
If you have doubts about washing a particular item, check with the manufacturer
to see if it is dishwasher safe.
Material
Aluminum
Dishwasher Safe / Comments
Yes
High water temperature and detergents can
affect finish of anodized aluminum.
Disposable Aluminum
No
Do not wash disposable aluminum pans in the
dishwasher These might shift during washing and
transfer black marks to dishes and other items.
Bottles and cans No
Wash bottles and cans by hand. Labels
attached with glue can loosen and clog the spray
arms or pump and reduce washing performance.
Cast Iron No
Seasoning will be removed and iron will rust.
China / Stoneware Yes
Always check manufacturer's recommendations
before washing. Antique, hand-painted, or
over-the-glaze patterns may fade, gold leaf can
discolor or fade.
Crystal
Yes
Check manufacturer's recommendations before
washing. Some types of leaded crystal can etch
with repeated washing.
Gold
No
Gold-colored flatware will discolor
Glass
Yes
Milk glass yellows with repeated dishwasher
washing.
Hollow-Handle Knives
No
Handles of some knives are attached to the blade
with adhesives which can loosen if washed in the
dishwasher.
Pewter Brass, Bronze
25
No
High water temperatures and detergent can
discolor or pit the finish.

Material
DisposablePlastics
Plastics
Stainless Steel
Dishwasher Safe / Comments
No
Cannot withstand high water temperatures and
detergents.
Yes
Always check manufacturer's recommendations
before washing. Plastics vary in their capacity to
withstand high temperatures and detergents.
Load plastics in top rack only.
Yes
Runa rinse cycle if not washing immediately.
Prolonged contact with food containing salt,
vinegar, milk products, or fruit juice can damage
finish.
Sterling Silver or Silver Plate Yes
Runa rinse cycle if not washing immediately.
Prolonged contact with food containing salt, acid,
or sulfide (eggs, mayonnaise, and seafood) can
damage finish.
Tin No
Can rust.
Wooden Ware No
Wash by hand. Always check manufacturer's
instructions before washing. Untreated wood can
warp, crack, or lose its finish.
DISHWASHER CARE
Cleaning
Cleaning the exterior
In mostcases, regular useof a soft, damp cloth or spongeand a mild detergent
is all that is necessaryto keeptheoutside of your dishwasherlooking nice and
clean.
Cleaning the interior
Hard water minerals can cause a white film to build up on the inside surfaces,
especially just beneath the door area.
Do not clean the dishwasher interior until it has cooled. Wear rubber gloves.
Do not use any type of cleanser other than dishwasher detergent because it may
cause foaming or create suds.
26

iiiiiiiiiiiiiiiiiiiiiiiiiiiiiiiiiiiiiiiiiiiiiiiiiiii i iii ! ! ! ! !i!i i!! i ! i! ! i!i!i!i!i!i!i!i!i!i!i!i!i!i!i!i!i!i!i!i!i!i!i!i!i! ! i ! !
To clean interior
Make a paste with powdered dishwasher detergent on a damp sponge and
clean.
OR
Use liquid automatic dishwasher detergent and clean with a damp sponge.
OR
See the wnegar rinse procedure in "spotting and filming on dishes" in
"Troubleshooting."
NOTE: Run a Normal cycle with detergent after cleaning the interior.
DRAIN AIR GAP
Check the drain air gap anytime your dishwasher isn't draining well. Some state
or local plumbing codes require the addition of a drain air gap between a built-
in dishwasher and the home drain system. If a drain is clogged, the drain air
gap protects your dishwasher from water backing up into it.
The drain air gap is usually located on top of the sink or countertop near the
dishwasher.
NOTE: The drain air gap is an external plumbing device that is not part of your
dishwasher. The warranty provided with your dishwasher does not cover service
costs directly associated with the cleaning or repair of the external drain air gap.
To clean the drain air gap
Clean the drain air gap periodically to ensure proper drainage of your
dishwasher. Follow the cleaning instructions provided by the manufacturer. With
most types: Lift off the chrome cover. Unscrew the plastic cap. Check for any soil
buildup. Clean if necessary.
STORING
Storing for the Summer
Protect your dishwasher during the summer months by turning off the water
supply and power supply to the dishwasher.
Winterizing your dishwasher
Protect your dishwasher and home against water damage caused by freezing
water lines. If your dishwasher is left in a seasonal dwelling or could be exposed
to near freezing temperatures, have your dishwasher winterized by authorized
service personnel.
27

Troubleshooting
Try the solutions suggested here first and possibly avoid the cost of a service call...
DISHWASHER IS NOT OPERATING PROPERLY
• Dishwasher does not run or stops during a cycle
It is normal for most cycles to pause for 5 minutes near the start of a cycle to let the
dishes soak. This reduces energy required to clean the dishes.
Is the door closed tightly and latched?
Is the right cycle selected? Refer to the Cycle Selection charts.
Is there power to the dishwasher? Has a household fuse blown or circuit
breaker tripped?
Has the motor stopped due to an overload? The motor automatically resets
itself within a few minutes. If it does not restart, call for service.
Is the water shut-off valve (If installed) turned on?
Is it normal for certain cycles to repeatedly pause for 15 to 65 seconds during
the main wash.
° Dishwasher will not fill
Isthe overfill protection float able to move up and down freely? Pressdown to release.
° Dishwasher seems to run too long
Is the water supplied to the dishwasher hot enough? The dishwasher runs
longer while heating water Refer to the "Dishwasher Performance Tips" section.
A delay automatically occurs in some wash and rinse cycles until the water
reaches the proper temperature.
• Water remains in the dishwasher
Is the cycle complete and not in a pause?
It is normal to have a small amount of clean water around the outlet in the bottom of the
tub, to keep the water seal lubricated.
If the drain hose is connected to a food waste disposer, make sure the dispenser is
empty.
Make sure the knockout plug has been removed from the food waste disposer.
Check to see if the drain hose is kinked.
° Detergent remains in the covered section of the dispenser
Is the cycle complete?
Is the detergent lump-free? Replace detergent if necessary.
Was a dish item blocking the dispenser?
° Water residue on the front of the access panel
Was too much detergent used? Refer to the "Detergent Dispenser" section.
Is the brand of detergent making excess foam? Try a different brand to reduce
foaming and eliminate buildup.
• Odor in the dishwasher
Are dishes washed only every 2 or 3 days? Run a rinse cycle once or twice a
day until you have a full load.
Does the dishwasher have an unpleasant smell? Run a vinegar rinse as described in
"Spottingand filming on dishes" later in this troubleshooting guide.
° Condensation on the kitchen counter (built-in models)
Is the dishwasher aligned with the countertop? Moisture from the vent in the dishwasher
console can form on the counter. Refer to the Installation Instructions for more information.
28

iiiiiiiiiiiiiiiiiiiiiiiiiiiiiiiiiiiiiiiiiiiiiiiiiiii i iii ! ! ! ! !i!i i!! i ! i! ! i!i!i!i!i!i!i!i!i!i!i!i!i!i!i!i!i!i!i!i!i!i!i!i!i! ! i ! !
Dishes are not completely clean
• Food soil left on the dishes
Is the dishwasher loaded correctly? Refer to the "Dishwasher Loading" section.
Did you choose the cycle that describes the most difficult soil in your
dishwasher? If you have some items with heavier soils, use a heavier cycle.
Is the water temperature too low? For best dishwashing results, water should
be 120% (49 °C) as it enters the dishwasher. Refer to the "Dishwasher
Performance Tips" section.
Did you use the correct amount of fresh detergent? Use recommended
dishwasher detergents only. Refer to the "Detergent Dispenser " section. Never
use less than 1 tb (15g) per load. Detergent must be fresh to be effective.
Store detergent in a cool, dry area Heavy soil and/or hard water generaily
require extra detergent.
Is detergent caked in dispenser? Use fresh detergent only. Do not allow
detergent to sit for several hours in a wet dispenser. Clean dispenser when
caked detergent is present.
Is the pump or spray arm clogged by labels from bottles and cans? If you
wash bottles and cans in your dishwasher, check for labels clogging the pump
or spray arm.
Is the home water pressure high enough for proper dishwasher filling? Home
water pressure should be 20 to 120 psi (138 to 828 kPa) for proper
dishwasher fill. A booster pump on the water supply can be added if pressure
is too low.
Are high suds slowing the wash arm? Never use soap or laundry detergents.
Use recommended dishwasher detergents only.
SPOTS AND STAINS ON DISHES
Spotting and filming on dishes
Is your water hard or is there a high mineral content in your water?
Conditioning the final rinse water with a liquid rinse aid helps eliminate
spotting and filming. Keep the rinse aid dispenser filled. Always use a
high-temp option. If your water hardness is 13 grains or above, it is strongly
recommended that you install a home water softener if you do not wish to
drink softened water, have the softener installed onto your hot water supply.
Is the water temperature too low? For best dishwashing results, water should
be 120% (49°C) as it enters the dishwasher. Refer to the "Dishwasher
Performance Tips" section.
Did you use the correct amount of effective detergent? Use recommended
dishwasher detergents only. Refer to the "Detergent Dispenser" section. Never
Use less than 1 tb (15g) per load. Detergent must be fresh to be effective.
Store detergent in a cool, dry area. Heavy soil and/or hard water generally
require extra detergent.
29

Is the home water pressure high enough for proper dishwasher filling? Home water
pressure should be 20 to 120 psi ( 138 to 828 kpa ) for proper dishwasher fill. A
booster pump on the water supply can be added if pressure is too low.
NOTE: To remove spots and film from dishes, try a white vinegar rinse. This
procedure is intended for occasional use only vinegar is an acid and using it too
often could damage your dishwasher.
1. Wash and rinse dishes. Use an air-dry or an energy saving dry option.
Remove all silverware or metal items.
2. Put 2 cups ( 500 mL ) white vinegar in a glass or dishwasher-safe measuring
cup on the bottom rack.
3. Run the dishwasher through a complete washing cycle using an air-dry or an
energy saving dry option. Do not use detergent. Vinegar will mix with the
wash water.
• Silica film or etching (silica film is a milky, rainbow-colored
deposit; etching is a cloudy film)
Sometimes there is a water/chemical reaction with certain types of glassware.
This is usually caused by some combination of soft or softened water, alkaline
washing solutions, insufficient rinsing, overloading the dishwasher, and the
heat of drying. It might not be possible to prevent the problem, except by hand
washing.
To slow this process use a minimum amount of detergent but not less than 1
tb (15 g) per load. Use a liquid rinse aid and under load the dishwasher to
allow thorough rinsing. Silica film and etching are permanent and cannot be
removed. Do not use heated drying.
• White spots on cookware with non-stick finish
Has the dishwasher detergent removed cookware seasoning? Reseason cook-
ware after washing in the dishwasher.
• Brown stains on dishes and dishwasher interior
Does your water have high iron content? Rewash dishes Using 1 - 3 tsp
(5-15 ml) of citric acid crystals added to the covered section of the detergent
dispenser .Do not use detergent. Follow with a Normal wash cycle with
detergent. If treatment is needed more often than every other month, the
Installation of an iron removal unit is recommended.
• Black or gray marks on dishes
Are aluminum items rubbing dishes during washing? Disposable aluminum
items can break down in the dishwasher and cause marking, Hand wash these
items. Remove aluminum markings by using a mild abrasive cleaner.
• Orange stains on plastic dishes or dishwasher interior
Are large amounts of tomato-based foods on dishes placed in the dishwasher?
It may be necessary to use a stain removal product to remove stains from your
dishwasher.Stains will not affect dishwasher performance.
30

iiiiiiiiiiiiiiiiiiiiiiiiiiiiiiiiiiiiiiiiiiiiiiiiiiii i iii ! ! ! ! !i!i i!! i ! i! ! i!i!i!i!i!i!i!i!i!i!i!i!i!i!i!i!i!i!i!i!i!i!i!i!i! ! i ! !
DISHES DO NOT DRY COMPLETELY
• Dishes are not dry
Did you load your dishwasher to allow proper water drainage?
Do not overload. Refer to the "Dishwasher Loading" section. Use a liquid rinse
aid to speed drying.
Are the plastics wet? Plastics often need towel drying.
Is the rinse aid dispenser empty? Refer to the "Rinse Aid Dispenser" section.
Did you use an air-dry or energy-saving dry option? Use a heated drying
option for dryer dishes.
DISHES ARE DAMAGED DURING A CYCLE
• Chipping of dishes
Did you load the dishwasher properly? Load the dishes and glasses so they are
stable and do not strike together from washing action. Minimize chipping by
moving the rack in and out slowly.
NOTE: Antiques, feather-edged crystal, and similar types of china and glassware
might be too delicate for automatic dishwashing. Wash by hand.
NOISES
• Grinding, grating, crunching or buzzing sounds
A hard object or powder detergent granulates have entered the wash module.
When the object is ground up, the sound should stop.
31

Assistance or Service
Before calling for assistance or service, please check "Troubleshooting". It may
save you the cost of a service call. If you still need help follow the instructions
below.
When calling, please have the purchase date and the complete model and serial
number of your appliance. This information will help us to better respond to your
request.
If you need replacement parts
If you need to order replacement parts, we recommend that you only use factory
specified parts. These parts will fit right and work right. To locate factory speci-
fied replacement parts in your area, call our Customer Interaction Center tele-
phone number ( 1-877-337-3639 ) or your nearest designated service center
32

Limited Warranty
In-Home Service
1 Year Warranty
For 12 months from the date of original
retail purchase, Haler will repair or replace
any part free of charge that fails due to a
defect in materials or workmanship,
including labor.
3 Years Limited Warranty
(Parts Only)
For 36 months from the date of original
retail purchase, Haler will provide a
replacement part free of charge for any part
which fails due to manufacturing defect.
Stainless Steel Tub and Door Liner
The Stainless steel tub and door liner are
warranted for the life of the dishwasher for
rust through.
NOTE: Associated external inlet water and
drain plumbing parts are not
covered by this warranty.
Exceptions: Commercial or Rental
Use Warranty
90 days labor from date of original
purchase
90 days parts from date of original
purchase No other warranty applies
For Warranty Service
Contact your nearest authorized service
center. All service must be performed by a
Haler authorized service center. For the
name and telephone number of the nearest
authorized service center please call
1-877-337-3639.
Before calling, please have the
following information available:
Model number and serial number of your
appliance (found on the left side of door
opening). The name and address of the
dealer you purchased the unit from and
the date of purchase. A clear description
of the problem. A proof of purchase (sales
receipt).
This warranty covers appliances
within the continental United States,
Puerto Rico and Canada. What is
not covered by this warranty:
Replacement or repair of household fuses,
circuit breakers, wiring or plumbing. A
product whose original serial number has
been removed or altered. Any service
charges not specifically identified as
normal such as normal service area or
hours. Damage to dishware. Damage
incurred in shipping. Damage caused
by improper installation or maintenance.
Damage from misuse, abuse accident, fire,
flood, or acts of nature. Damage from
service other than an authorized Haler
dealer or service center. Damage from
incorrect electrical current, voltage or
supply. Damage resulting from any
product modification, alteration or
adjustment not authorized by Haler.
Adjustment of consumer operated controls
as identified in the owners manual. Hoses,
knobs and all attachments, accessories and
disposable parts. Labor, service transporta-
tion, and shipping charges for the removal
and replacement of defective parts beyond
the initial 12-month period. Damage from
anything other than normal household use.
Any transportation and shipping charges.
THIS LIMITED WARRANTY IS GIVEN
IN LIEUOF ALL OTHER WARRANTIES,
EXPRESSEDOR, INCLUDING THE
WARRANTIES OF MERCHANTABILITY AND
FITNESS FOR A PARTICULAR PURPOSE
The remedy provided in this warranty is
exclusive and is granted in lieu of all other
remedies. This warranty does not cover
incidental or consequential damages, so
the above limitations may not apply to you.
Some states do not allow limitations on
how long an implied warranty lasts, so the
above limitations may not apply to you. This
warranty gives you specific legal rights, and
you may have other rights, which vary, from
state to state.
Haier America
New York, NY 10018
33

PR£¢AU¢ION DE SEGURIDAD
iAdvertencia! - Para reducir el riesgo de incendio, descarga el6ctrica
o lesiones a las personas, siempre ponga en pr6ctica las precauciones de
seguridad b6sicas, incluyendo las siguientes:
1. Lea todas las instrucciones antes de usar el artefacto.
2. Use el lavavajillas s61opara su funci6n especifica.
3. Use s61odetergentes o agentes de enjuague recomendados para el uso
en lavavajillas y mant6ngalos lejos del alcance de los nifios.
4. Cuando cargue los objetos para lavar:
1) Ubique los objetos cortantes de manera tal que no sea probable que
darien el sistema de cierre de la puerta;
2) Ubique los cuchillos filosos con los mangos hacia arriba para reducir
el riesgo de cortes.
5. No lave objetos plc_sticosa menos que tengan la indicaci6n "para uso
en lavavajillas" o frase equivalente. En el caso de los objetos de plc_stico
que no cuenten con esta indicaci6n, revise las recomendaciones del fab-
ricante.
6. No toque el elemento calentador durante el uso o inmediatamente
despu6s del uso.
7. No ponga en funcionamiento el lavavajillas a menos que todos los pan-
eles de cerrado est6n correctamente en su lugar.
8. No manipule indebidamente los controles.
9. No realice un mal uso ni se siente ni se pare sobre la puerta, la tapa o
las rejillas para vajilla del lavavajillas.
10. Para reducir el riesgo de lesiones, no permita que los nifios jueguen con
el lavavajillas.
11. En ciertas condiciones, se puede producir gas hidr6geno en un sistema
de agua caliente que no ha sido usado durante dos semanas o mc_s.EL
GAS HIDROGENO ESEXPLOSIVO. Si el sistema de agua caliente no
ha sido usado durante un periodo de esa magnitud, antes de usar el
lavavajillas abra los grifos de agua caliente y deje que fluya el agua de
cada una de elias durante varios minutos. De esta manera se liberar6
el gas hidr6geno que pueda estar acumulado. Debido a que el gas es
inflamable, no fume ni use una llama abierta durante este periodo.
12. Quite la puerta o la tapa del compartimiento de lavado cuando retire
un lavavajillas viejo o Io descarte.
SAVE THESE
'1

Graciasporsucompradeeste
proctuctoHaier.Estemanual
def_cilconsultaIoguiar_para
obtenerelmejorserviciodesu
lavaplatos.Recuercteregistraraqui
losnOmerosdeseriey modelo
delam_quina.Losencontrar_en
unaetiquetaenelrespaldodel
lavaplatos.
Modelo #
Serie #
Fecha de Compra
Adjunte aqui su recibe de compra. Lo necesitara para obtener
servicio de garantia.

i'NDICE DE CONTENIDOS
PAGE
PRECAUCIONES DE SEGURIDAD .................................................. 1-2
Antes de usar su lavavajillas .................................................................. 4
PIEZAS Y CARACTERJSTICAS .......................................................... 6
Panel de control .................................................................................. 6
GUJA PARA LA PUESTA EN FUNCIONAMIENTO ............................ 7
C6mo usar su nuevo lavavajillas ........................................................... 7
CARGA DEL LAVAVAJILLAS .......................................................... 8-13
Sugerencias para la carga .................................................................... 8
Carga de la rejilla superior .................................................................. 9
Carga de la rejilla inferior .................................................................. 11
Carga de la canasta de los cubiertos ................................................... 13
USO DEL LAVAVAJILLAS............................................................. 14-25
Uso correcto del detergente .................................................................. 14
Compartimiento para el detergente ...................................................... 14
Compartimiento para eJagente de enjuague ........................................ 17
Tablas de selecci6n de ciclos .............................................................. 18
C6mo cancelar un ciclo ....................................................................... 20
C6mo cambiar un ciclo o una configuraci6n ......................................... 20
C6mo agregar objetos durante un ciclo ................................................ 21
Selecci6n de las opciones ................................................................... 21
C6mo utilizar el Calentador de Platos .................................................. 23
Incticadoresdel estado del ciclo .......................................................... 24
Sistema de Javacto............................................................................... 25
Sistema de secacto ............................................................................. 25
FJotantede Protecci6n ......................................................................... 26
COMO LAVAR OBJETOS ESPECIALES ........................................ 25-26
CUIDADO DEL LAVAVAJILLAS ................................................... 26-27
Limpieza ........................................................................................... 26
Respiradero del Desagi.ie..................................................................... 27
Cuidado del lavavajillasen verano e invierno ....................................... 27
VERIFICAClON DE PROBLEMAS ................................................ 28-31
ASISTENClA O REPARAClON .......................................................... 31
GARANTiA ...................................................................................... 32
3

DE USAR SU LAVAVAdlLLAS
Consejo en cuanto al peligro
• No use el lavavajillas hasta que no est_
completamente instalado.
• No empuje hacia abajo sobre la puerta abierta, si
Io hace se expone a lesiones o cortes graves.
Peligro de descarga el_ctrica
• Lavavajillas con puesta a tierra el_ctrica.
• Conecte el cable de puesta a tierra con el conector
de puesta a tierra verde en la caja terminal.
• No use un cable de prolongaci6n.
• Si no se cumple con estas instrucciones se corre
riesgo de muerte, incendio o descarga el_ctrica.
• Instale el lavavajillas en un lugar donde est_ protegido del ambiente. Prot_jalo
del congelamiento para evitar la posible rotura de la v61vula de Ilenado.
Dichas roturas no est6n cubiertas por la garantia. Consulte "C6mo cuidar el
lavavajillas en verano e invierno" en la secci6n "Cuidado del lavavajillas"
para obtener informaci6n sobre el cuidado en invierno.
• Instale y nivele el lavavajillas sobre una superficie que sostenga el peso yen
una zona que sea adecuada para su tamaBo y uso.
• Quite todos los tapones de embalaje de las mangueras y los conectores ( tales
como la tapa en la salida del desagiJe ) antes de la instalaci6n. Consulte las
Instrucciones de Instalaci6n para obtener la informaci6n completa.
4

INSTRUCCIONES DE PUESTA A TIERRA
Para un lavavajillas conectado con cables, con puesta a tierra:
El lavavajillas debe tener conexi6n a tierra. En caso de mal funcionamiento
o rotura, la conexi6n a tierra reducir6 el riesgo de descarga el_ctrica al
proporcionar un paso de menor resistencia para la corriente el_ctrica. El
lavavajillas est6 equipado con un cable que tiene un conductor a tierra del
equipo y un enchufe a tierra. El enchufe debe enchufarse en un tomacorriente
apropiado que est_ instalado y conectado a tierra conforme a todos los
c6digos y reglamentaciones locales.
ADVERTENCIA:
La conexi6n incorrecta del conductor a tierra del equipo puede
ocasionar un riesgo de descarga el_ctrica. Haga que un electricista calificado
o un representante de servicios de mantenimiento realice un control si tiene
dudas acerca de si el lavavajillas tiene una conexi6n a tierra apropiada. No
modifique el enchufe que viene con el lavavajillas; si no se puede introducir en
el tomacorriente, haga que un electricista calificado instale un tomacorriente
apropiado.
Para un lavavajillas permanentemente canectada:
El lavavajillas debe estar conectado con un sistema de instalaci6n el_ctrica
permanente de metal con conexi6n a tierra o un conductor a tierra del equipo
debe funcionar con los conductores del circuito y estar conectado a la terminal
a tierra del equipo o al punto de conexi6n a tierra del lavavajillas.
CONSERVE ESTAS INSTRUCCIONES
5

PIEZASY CARACTERiSTICAS
©
®
®
®
®
®
®
©
®
1. Brazo rociador superior
2. Bandeja porta vajilla superior
3. Paso de entrada de agua (desde
tuberia de la pared)
4. Brazo rociador inferior
5. Bandeja inferior
6. Sistema de aire
7. Bandeja superior ajustable
8. Tubo rociador medio
9. Canasto removible de vajilla
10. Flotador de protecci6n de Ilenado
11. Calentador
12. Dispensador de detergente y
agente de enjuague
13. Estante de la taza con el guardia
del tronco (4)
6

GUiA PARA LA PUESTA EN
FUNCIONAMIENTO
Antes de usar su lavavajillas, quite todos los materiales de empaquetado. Lea
esta Guia para Uso y Cuidado completamente. Usted encontrar6 informaci6n
importante sobre seguridad y consejos 0tiles para la puesta en funcionamiento.
COMO USAR SU NUEVO LAVAVAJILLAS
1. El agente de enjuague es esencial para un buen sec-
ado. Aseg0rese de que el compartimiento est_ Ileno
antes de usar su nuevo lavavajillas. Cada vez que Io
Ilene le durar6 entre 1 y 3 meses, dependiendo de
SU USO.
2. Raspe los restos de comida y los objetos duros (palil-
los o huesos) de los platos. No es necesario enjuagar
previamente los platos.
3. Cargue el lavavajillas correctamente. ( Consulte Carga del Lavavajillas" )
Introduzca la vajilla con espacio entre un objeto y otro de forma tal que el
agua Ilegue alas superficies sucias. AsegOrese de que nada evite que los bra-
zos rociadores se muevan con libertad.
4. Agregue detergente. Use siempre un detergente de marca de calidad
( Consulte "Uso del Lavavajillas" )
5. Cierre la puerta.
6. Presione el ciclo deseado y la selecci6n de opciones. El lavavajillas comienza
a Ilenarse cuando usted presiona un ciclo. Puede elegir opciones mientras se
Ilena la m6quina. (Consulte "Uso del Lavavajillas".)
7

DELLAVAVAdJLLAS
SUGERENCIAS PARA LA CARGA
• Quite los restos de comida, huesos, palillos y dem6s objetos duros de la vajil-
la. Para ahorrar agua, energia y tiempo, no es necesario enjuagar los platos y
las fuentes antes de ponerlos en el lavavajillas. El sistema del lavado se diseBa
c_ara quitar particulas de la comida del agua. El sistema del lavado incluye un
ispositivo que taja que reduzca la talla de los alimentos.
NOTA: Si objetos duros, tales como semillas de frutas, nueces y c6scaras den
huevo, entran en el m6dulo de lavado, es probable que oiga sonidos
ocasionados por el corte y el triturado, crujidos y zumbidos. Estos soni-
dos son normales si ingresan objetos duros en el m6dulo. No permita
que elementos met61icos ( tales como los tornillos de las manijas de las
ollas ) entren al m6dulo de lavado. Se pueden producir daBos.
• Es importante que el rociador de agua Ilegue a todas las superficies sucias.
• Ubique los platos de manera tal que no est_n apilados o superpuestos siempre
que sea posible. Para obtener los mejores resultados en el secado, el agua
debe poder escurrirse de todas las superficies.
• Ubique las ollas y cacerolas pesadas con cuidado. Los objetos pesados
pueden abollar el interior de acero inoxidable de la puerta si se dejan caer o
se golpean.
• Aseg0rese de que las tapas y las manijas de las ollas, fuentes para pizzas,
bandejas para hornear, etc., no interfieran en la rotaci6n del brazo rociador.
• Ahorre el agua, la energia y el tiempo que se pierde enjuagando a mano
haciendo funcionar un ciclo de enjuague para que la vajilla se mantenga
h0meda si no planea lavarla a la brevedad. Alimentos tales como los huevos,
el arroz, la pasta, las espinacas y los cereales cocidos pueden ser dificiles de
quitar si se los deja secar durante un tiempo.
CONSEJOS PARA EL FUNCIONAMIENTO SILENCIOSO
Para evitar los ruidos sordos o estruendosos durante el funcionamiento:
• Aseg0rese de que los objetos livianos est_n asegurados a las rejillas.
• AsegOrese de que las tapas y las manijas de las ollas, fuentes para pizzas,
bandejas para hornear, etc., no toquen las paredes internas ni interfieran en la
rotaci6n del brazo rociador.
• Coloque la vajilla de forma tal que no se toque entre si.
NOTA: Para los modelos empotrados, mantenga los tapones de desag0e del
fregadero cerrados durante el funcionamiento del lavavajillas para evitar
que el ruido se propague por la tuberia

CARGA DE LA REJILLA SUPERIOR
La rejilla superior est_ dise_ada para las tazas, vasos y objetos m6s peque-
_os. Muchos objetos, hasta 9 pulgadas ( 22cm ), caben en la rejilla superior.
(Consulte los modelos recomendados de carga que se muestran )
NOTA: Las caracteristicas de la rejilla de su lavavajillas puede variar con
respecto a los dibujos que se muestran.
• Ubique los objetos de forma tal que los extremos abiertos miren hacia abajo
para la limpieza y el escurrimiento.
• Coloque los vasos y las tazas s61o en la rejilla de arriba. La rejilla inferior no
est6 dise_ada para vasos y tazas. Se pueden producir da_os.
• Ubique las tazas y los vasos en las hileras entre las puntas. Si los coloca sobre
las puntas se pueden producir roturas y manchas de agua.
• Para evitar que se cachen, no permita que las copas toquen otros objetos. Los
recipientes peque_os, cacerolas peque_as y dem6s utensilios pueden ubicarse
en la rejilla superior. Coloque los recipientes en la secci6n central para Iograr
mayor estabilidad, section for best stability.
9

• La porcelana, el cristal y dem6s objetos delicados no deben tocarse entre si
durante el funcionamiento del lavavajillas. Se pueden producir da_os.
• Coloque los objetos de pl6stico s61oen la rejilla superior. Es recomendable
que se laven s61o los objetos de pl6stico que tengan la indicaci6n "para uso en
lavavajillas".
• Coloque los objetos de pl6stico de forma tal que la fuerza del rociador no los
mueva durante el ciclo.
ESTANTE DE LA TAZA CON EL GUARDIA DEL TRONCO
Baje el estante extra que est6 en el lado izquierdo o derecho de la rejilla superior
para ubicar m6s tazas, copas u objetos largos tales como cubiertos y esp6tulas.
10

CARGA DE LA REJILLA INFERIOR
La rejilla inferior est6 diseiada para platos, fuentes, cacerolas y cubiertos.
Muchos objetos, hasta 12,2 pulgadas ( 3 1 cm ) de alto caben en la rejilla
inferior. (Consulte los modelos recomendados de carga que se muestran)
NOTA: Las caracteristicas de la rejilla de su lavavajillas puede variar con
respecto a los dibujos que se muestran.
• No coloque vasos, tazas u objetos de pl6stico en la rejilla inferior. Coloque
objetos pequeios en la rejilla inferior s61osi est6n asegurados en su lugar.
• Ubique los platos, soperas, etc. entre las puntas.
• Superponga los bordes de los platos para cargas grandes.
• Coloque los platos, soperas y tazones para cereales en la rejilla de varias
maneras distintas, de acuerdo con su tamaio y forma. Coloque los recipientes
asegurados entre las hileras de puntas. No superponga los recipientes ya que
el rociador no Ilegar6 a todas las superficies.
• Coloque las bandejas para hornear, molde para pastel y otros objetos grandes
en los costados y atr6s. Si ubica estos objetos en la parte de adelante se
obstaculiza la Ilegada del rociador de agua al compartimiento de detergente.
11

• Asegure los utensilios de cocina que est_n muy sucios boca abajo en la rejilla.
• AsegOrese de que las manijas de las ollas y dem6s objetos no obstruyan la
rotaci6n de los brazos rociadores. Los brazos rociadores deben moverse con
libertad.
• No ubique objetos entre la rejilla inferior y el costado de la tina del lavavajil-
las ya que pueden bloquear la abertura de ingreso del agua.
NOTA: Haga girar los brazos rociadores. Aseg0rese de que los objetos en la
canasta no detengan la rotaci6n de los brazos rociadores.
Rejilla plegable
Puede desplegar dos hileras de puntas en la parte de atr6s de la rejilla inferior.
1. Tome el extremo de la punta que est6 en el soporte de las puntas.
2. Con suavidad saque la punta del soporte de las puntas.
3. Baje la hilera de puntas en la rejilla para hacer lugar para la vajilla m6s
grande, recipientes, ollas, cacerolas o asaderas.
12

CARGA DE LA CANASTA DE CUBIERTOS
Cargue la canasta de los cubiertos mientras est6 en la rejilla inferior o quite la
canasta y p6ngala sobre una encimera o mesa para cargarla. (Consulte el mod-
elo recomendado de carga que se muestra)
NOTA: Descargue o quite la canasta antes de desocupar las rejillas para evitar
que caigan gotitas de agua sobre los cubiertos.
• Coloque los objetos con las cubiertas hacia abajo, usando los separadores
para evitar que se superpongan los cubiertos.
• Ubique los objetos peque_os, tales como tetinas de mamaderas, tapas de tar-
ros, sujetadores para mazorca de maiz, etc. en las 6reas con cubiertas con
bisagras. Cierre las cubiertas para que los objetos peque_os se mantengan en
su lugar.
• Cuando las cubiertas est6n abiertas, mezcle los objetos en cada 6rea de la
canasta con algunos hacia abajo y algunos hacia arriba para evitar que se
superpongan. El rociador no puede alcanzar los objetos superpuestos.
IMPORTANTE: Siempre coloque los objetos con filo (cuchillos, pinchos, etc.)
hacia abajo.
NOTAS:
• No coloque cubiertos de plata o revestidos con plata junto con acero inox-
idable. Estos metales pueden da_arse si entran en contacto unos con otros
durante el lavado.
• Algunos alimentos ( como la sal, el vinagre, los productos 16cteos, los jugos
de fruta, etc. ), pueden dejar marcas o corroer los cubiertos. Inicie un ciclo de
enjuague si no tiene una carga completa que lavar inmediatamente.
13

DEL LAVAVAJJLLAS
USO CORRECTO DEL DETERGENTE
Use only detergent specifically made for use in dishwasher. Cascade, Cascade
Complete and Electrasol Automatic Dishwashing Detergents have been approved
for use in all haier dishwasher. Keep your detergent fresh and dry. Don't put
powder detergent into the dispenser until you're ready to wash dishes.
All wash cycles except RINSE ONLY require detergent in the main and pre-wash
cup.
Compartimiento para el detergente
El compartimiento para detergente tiene 2 secciones. La secci6n pequeBa de
Prelavado libera el detergente en el lavavajillas cuando usted cierra la puerta.
1
2
1. Traba de la tapa
2. Secci6n de Lavado
Principal
3. Secci6n de Prelavado
4. Tapa
La secci6n m6s grande de Lavado Principal libera el detergente autom6ticamente
en el lavavajillas durante el lavado (Consulte las "Tablas de Selecci6n de Ciclo")
• Use detergente para lavado en lavavajillas autom6tico solamente. Los otros
detergentes pueden producir espuma excesiva que puede rebalsar el lavavajil-
las y reducir el rendimiento del lavado.
• Agregue detergente s61oantes de comenzar un ciclo.
• Almacene el detergente bien cerrado en un lugar fresco y seco. Si el deter-
gente autom6tico est6 fresco, se obtendr6 una mayor limpieza.
NOTA: No usedetergente para un ciclo de enjuague.
C6mo Ilenar el compartimiento
1. Si la tapa del compartimiento est6 cerrada, 6brala empujando la traba de la
tapa.
14

2. Llenela secci6nde Lavado Principalcon detergente.Consulte"Cu6nto deter-
gente usar".
3. Llene la secci6n de Prelavado de ser necesario.
4. Cierre la tapa del compartimiento.
Es normal que la tapa se abra parcialmente cuando se est6 distribuyendo
detergente.
NOTA: Use las dos secciones para los ciclos con 2 lavados. Use s61ola secci6n
de lavado principal para los ciclos con 1 lavado, consulte las "Tablas
de Selecci6n de Ciclo" para obtener m6s detalles.
Cuanto detergente usar
• La cantidad de detergente que debe usarse depende de la dureza del agua y
del tipo de detergente. Si usa muy poco, la vajilla no quedar6 limpia. Si usa
demasiado con agua blanda los utensilios de vidrio se marcar6n.
• Lasdistintas marcas de detergentes para lavavajillas tienen diferentes canti-
dades de f6sforo para ablandar el agua. Si usted tiene agua dura y usa un
detergente con contenido de f6sforo de menos del 8,7%, es probable que sea
necesario usar m6s detergente o usar un detergente con contenido de f6sforo
superior al 8.7%.
15

Dureza del agua
Blanda a media Agua dura
De 0 a 6 granos por gal6n
Cantidad de detergente
Para cargas con suciedad normal
• Llene parcialmente la secci6n de Lavado
Principal hasta la marca 20 gramos
• Llene completamente la secci6n de Prelavado
NOTA: Llene la secci6n de Prelavado por la
mitad si la vajilla fue enjuagada previamente o
si el agua es muy blanda (de 0 a 2 granos por
gal6n)
Para cargas con mucha suciedad
• Llene parcialmente la secci6n de Lavado
Principal hasta la marca 30 gramos
• Llene completamente la secci6n de Prelavado
Agua media a dura
De 7 a 12 granos por gal6n
Para cargas con suciedad normal y mucha
suciedad
• Llene parcialmente la secci6n de Lavado
Principal hasta la marca 30 gramos
• Llene completamente la secci6n de Prelavado
Agua muy dura 13 granos por
gal6n o m6s
NOTA: Puede ser necesario
usar el ciclo Utensilios usa-
dos para Asar o un ciclo
normal con Limpieza a Alta
Temperatura para obtener un
mejor lavado cuando el agua
es muy dura.
Para cargas con suciedad normal y mucha
suciedad
• Llene completamente la secci6n de Lavado
Principal
• Llene completamente la secci6n de Prelavado
• Gire el compartimiento del agente de
enjuague a una configuraci6n m6s alta.
Consulte "Compartimiento del Agente de
Enjuague" m6s adelante en esta secci6n
NOTA: Las cantidades de Ilenado que se muestran son para detergente en polvo
normal. Las cantidades pueden variar si usted usa detergente liquido o detergente
concentrado en polvo. Siga las instrucciones del envase cuando use detergente
para lavavajillas liquido o detergente en polvo concentrado. Si usa detergente
en pastillas, use solamente una pastilla entera en la secci6n de Lavado Principal
para todas las cargas y niveles de dureza del agua.
16

COMPARTIMIENTO PARA EL AGENTE DE ENJUAGUE
Los agentes de enjuague evitan que el agua forme gotitas que cuando se secan
dejan manchas o vetas. Tambi_n mejoran el secado ya que permiten que el
agua se escurra de la vajilla durante el enjuague final liberando una pequeta
cantidad del agente de enjuague en el agua del enjuague. Su lavavajillas est6
disetado para usar un agente de enjuague liquido. No use el que es s61ido o en
barra.
COMO LLENAR EL COMPARTIMIENTO
El compartimiento del agente de enjuague tiene una capacidad de 4,8 onzas
(145ml) de agente de enjuague. En condiciones normales, esta cantidad le dura-
r6 aproximadamente tres meses. El agente de enjuague se libera por una aber-
tura en el compartimiento. No es necesario esperar hasta que el compartimiento
est_ vacio para volver a Ilenarlo. Intente mantenerlo Ileno, pero tenga cuidado
de no Ilenarlo demasiado.
1. Aseg6rese de que la puerta del lavavajillas est_ completamente abierta.
2. Abra el compartimiento empujando la traba de la tapa.
3. Agregue agentede enjuague hasta que sevea Ilenoen la ventanaindica-
dora.
4. Limpie los restos de agente de enjuague que puedan haberse derramado con
un patio h6medo.
5. Cierre la tapa.
CONFIGURACION DEL AGENTE DE ENJUAGUE
Puede cambiarse la cantidad de agente de enjuague liberado en el lavado final.
La configuraci6n de f6brica es de 2. Para la mayoria de tipos de agua, config-
ure el regulador en 2 o 3. Si hay anillos o manchas de calcio (agua dura ) en
la vajilla, intente con una configuraci6n m6s alta.
17

TABleS DESELECCION DECICLOS
Seleccione el ciclo de lavado y la opci6n deseada. El lavavajillas comienza a Ile-
narse una vez que cierre la puerta y haya seleccionado un ciclo, a menos que elija
un lavado demorado. Luego del Ilenado y un breve periodo de lavado, la m6quina
har6 una pausa de 5 rain., para ahorrar energia durante el intervalo de remojo.
Durante este periodo, la suciedad seca o resistenteser6 ablandada para facilitar el
lavado m6s adelante en el ciclo. Puedeseleccionar las opciones mientras la m6qui-
na se est6 Ilenando.
Un "*" muestra los pasos que se incluyen en cada ciclo. Lastemperaturas indican
cu6ndo seaumenta la temperatura. El uso de agua se muestra en galones esta-
dounidenses/litros.
Este modelo cumple con las pautas de ENERGY STAR® en cuanto a la eficiencia
energ_tica.
La duraci6n de ciclo no incluye tiempo seco. Un asterisco (*) al lado del tiempo del
ciclo indica que el tiempo del ciclo puede ser mayor de acuerdo con la temperatura
del agua que ingresa al lavavajillas.
@
WASH
Se utiliza para todo tipo de suciedad
y cargas de vajifla. Este cJclo tJene
controles adJcJonales de sucJedad
en el agua para proporcionar m_s
tJempo de accJ6n de lavado sJ es
necesarJo. La accJ6n de lavado
se pausa varias veces durante el __
cido, hasta por 70 segundos, para __
controlar el nJvel de sucJedad en
el agua.
'18

Use este ciclo para ta
porcelana y el cristat.
...................... Esfe cicto usa un tavado y
.... un secado suaves. Durante Use la seccion del
_Ji_;_ J_ el secado con calor, el €ompartimienta
elemento caJentador se de detergente
enciende y se apaga, principal.
i....................
Prelavado Lavado Enua ue E_!juague Uso de
/ Principal ] g Final con Secado Tiempo ! Agua
Calor Minima
CYCL/_
UtiJice este cicJo para una
colada pesada. Este clclo
ufiliza un rato m6s Jargo
de la colada y una aclaraci6n Use la seccion del
adicionaI de timpiar platos campartimienta
teaviJy manchados, de detergente
principal.
Pre_avado Lavado Eniuague
Eniuague
Principal Fnal con Secacio
Calor
Use este cicJo de eniuague
para enjuagar vajilta, vasos ...................................
y cublertos que no ser6n
]0_8 lavados immediatamente. No use detergente
para este cicla.
• Si la temperatura clel agua que ingresa es menor que la temperatura recomen-
clacla o si la sucieclacl de la comicla es clificil, el ciclo se compensar_ autom@i-
camente agreganclo tiempo, calor y agua segOn sea necesario.
19

COMO CANCELAR UN ClCLO
En cuaJquier momento del ciclo, presione
!_TART
Su lavavajillas comenzar6 un desag0e de 2 minutos (si fuera necesario). Permita
que el lavavajillas desag0e completamente. La luz se apagar6 al cabo de 2 a
minutos.
NO'rA: Si no es necesario desaguar el lavavajillas, presione COMIENZO/
REAJUSTADO nuevamente para apagar la luz. Seleccione un nuevo
ciclo y las opciones.
Para detener el desagiJe
Puede presionar COMIENZO/REAJUSTADO nuevamente para detener el
desag0e inmediatamente. Recuerde desaguar el lavavajillas antes de dar comien-
zo a un nuevo ciclo.
Para borrar los indicadores
Presione COMIENZO/REAJUSTADO antes de poner en funcionamiento el
lavavajillas para borrar todas las opciones y los ciclos.
COMO CAMBIAR UN ClCLO O UNA CONFIGURAClON
Durante el primer Ilenado de un ciclo
1. Seleccione un nuevo ciclo y las opciones.
2. Revise los compartimientos del detergente. Debe Ilenarlos correctamente para
comenzar el nuevo ciclo.
Durante el primer Ilenado de un ciclo
1. Presione
Su lavavajillas comenzar6 un desag0e de 2 minutos (si fuera necesario). Permita
que el lavavajillas desag0e completamente. La luz se apagar6 al cabo de 2
minutos.
NOTA: Si no es necesario desaguar el lavavajillas, presione
CANCELARCOMIENZO/REAJUSTADO
1. Revise los compartimientos del detergente. Debe Ilenarlos correctamente para
comenzar un nuevo ciclo.
2. Seleccione un nuevo ciclo y las opciones.
2O

COMO AGREGAR OBJETOS DURANTE UN CICLO
Se puede agregar un objeto en cualquier momento antes de que comience el
lavado principal. Abra la puerta y revise el compartimiento del detergente. Si la
tapa aOn est6 cerrada, puede agregar objetos.
Para agregar objetos
1. Levante la traba de la puerta para detener el ciclo. Espere a que la acci6n de
rociado se detenga antes de abrir la puerta.
2. Abra la puerta. Si la tapa del compartimiento del detergente aOn est6 cer-
rada, agregue el objeto.
3. Cierre la puerta firmemente hasta que se trabe. El lavavajillas reanuda el ciclo
despu_s de una pausa de alrededor de 10 segundos.
SELECCION DE LAS OPCIONES
Usted puede elegir los ciclos presionando una opci6n. Si cambia de idea,
presione la opci6n nuevamente para anularla. Seleccione una opci6n distinta si
Io desea. Usted puede cambiar una opci6n en cualquier momento antes de que
la opci6n seleccionada comience. Por ejemplo, puede presionar la opci6n de
secado sin calor en cualquier momento antes de que comience el secado.
Lavado a Alta Temperatura
Seleccione esta opci6n para calentar el agua durante partes del ciclo. Una tem-
peratura mayor del agua ayuda a remover la suciedad m6s resistente. El lavado
a alta temperatura (Hi-Temp Wash) junto con Ollas y Cacerolas (Pots & Pans)
o ciclos normales (Normal Cycles) eleva la temperatura del agua en el lavado
principal.
Esta opci6n agrega tiempo de calor, agua y lavado al ciclo.
VJA_:_
NOTA: El Lavado a Alta Temperatura es una opci6n de losciclos Ollas y
Cacerolas y Normal. Utilice siempre el Lavado a Aha Temperatura si el
agua es dura.
Opci6n de Eniuague Desinfectante
Seleccione esta opci6n para aumentar la temperatura del agua en el enjuague
final a aproximadamente 160° F ( 71 ° C ). La opci6n de Enjuague Desinfectante
agrega calory tiempo al ciclo. Este enjuague de alta temperatura desinfecta su
vajilla y objetos de vidrio de acuerdo con la norma 184 para lavavajillas
hogare_os de la Fundaci6n Nacional para la Ciencia ( NSF, por sus siglas en
ingles) y el Instituto Nacional de Normas de los Estados Unidos ( ANSI, por sus
siglas en ingles ). El lavavajillas hogare_o certificado no es adecuado para esta-
blecimientos autorizados de alimentos.
NOTA: Secado con calor (Heated dry) es una opci6n para el lavado de Ollas y
Cacerolas (Pots& PansWash) y ciclos normales y r6pidos.
21

SECADO CON CALOR
SeJeccione esta opci6n para secar la vajilla con calor.
)iT'_
La vajilla tarda m6s tiempo en secar y pueden aparecer manchas. Para un mejor
secado, utilice siempre un enjuague liquido. Algunos objetos (como los pl6sticos)
pueden necesitar secado con toalla.
NOTA" El Secado con Calor es una opci6n de los ciclos Lavado Anti-Bacterial,
Lavado de Ollas y Cacerolas, Normal y China/cristal. Para una seque-
dad m6s r6pida del aire, usted puede abrir la puerta unas par de pulga-
das despu_s de que la aclaraci6n final sea completa.
OPCION DE VAPOR
Se utiliza para todas las cargas de vajilla, incluso para las cargas extra
grandes. Se genera vapor al principio del ciclo para ayudar a humedecer la
suciedad adherida de la carga de vajilla y ablandarla para que sea m6s f6cil
quitarla mediante el sistema de lavado. El ciclo de vapor eleva la temperatura
del enjuague final a 150°F (66°C).
NOTA: Puede utilizarse esta opci6n con todos los ciclos excepto con Aclaraci6n
y asimiento y Ciclo de la velocidad.
HORAS DE DEMORA
Seleccione esta opci6n para que su lavavajillas se ponga en funcionamiento en
otro momento o durante las horas en las que el consumo no est6 en su pico. Puede
agregar objetos a la carga en cualquier momento durante el lapso de la demora.
Despu_s de cargar los objetos, cierre la puerta con firmeza hasta que trabe.
Puede demorar el comienzo de un ciclo hasta 9 horas en opciones que aumen-
tan de a 3 horas (3, 6 o 9 horas).
Para demorar el comienzo
1. Abra la puerta
2. Presione varias veces "Delay Hours" (Horas de demora) hasta que vea las
horas deseadas de demora iluminadas en el indicador de la izquierda.
Cuando la demora Ilega a 9 horas, se apaga. Presione nuevamente "Delay
Hours" (Horas de demora) para seleccionar una cantidad de horas de demo-
ra nueva.
3. Seleccione el ciclo de lavado y las opciones
4. Cierre la puerta
NOTA: Para cancelar la demora y el ciclo, presione Cancel (Cancelar). Para
cancelar la demora y comenzar el ciclo de inmediato, presione Delay
Start (Comienzo demorado) hasta que no haya luz en ninguno de los
indicadores de la izquierda. 22

SistemadeLavado
Los intervalos de remojo y ahorro de energia suceden en la mayoria de los
ciclos poco despu_s del Ilenado inicial de agua. Durante los 5 minutos de
remojo, la suciedad seca o la comida pegada se despenden sin utilizar energia.
M6s adelante en el ciclo, la efectiva acci6n del lavado remueve la suciedad
restante m6s eficientemente. El sistema de seis niveles de lavado proporciona
excelentes resultados de limpieza. Los tres niveles de filtro y el sistema recolector
de suciedad filtran el agua del lavado y evitan que las particulas de alimento se
redepositen en la vajilla limpia.
• El agua del lavado fluye continuamente a trav_s del filtro, reteniendo las
particulas de comida.
• Dos chorros de agua, ubicados debajo del brazo rociador, eliminan las
particulas de comida depositadas en el filtro.
• Un filtro grueso impide que ingresen al sistema de bomba huesos, carozos y
otros objetos grandes.
NOTA: Revise peri6dicamente el filtro grueso y elimine cualquier objeto del
mismo.
SISTEMA DE SECADO
Durante el secado, se puede observar el vapor que escapa por la salida de aire
en el extremo superior izquierdo de la puerta. Esto es normal ya que la vajilla se
seca con calor.
IMPORTANTE: El vapor est6 caliente. No toque la salida de aire.
23

FLOTANTE DE PROTECCION
El flotante de protecci6n ( en el extremo frontal izquierdo de la tina del lavavajil-
las ) evita que el lavavajillas se Ilene en exceso. Debe estar en su lugar para que
el lavavajillas funcione.
Verifique si hay objetos debajo del flotante que puedan impedir que el protector
se mueva hacia arriba y hacia abajo.
24

C©MO LAVAR OBJETOS ESPECIALES
Si tiene dudas acerca del lavado de un objeto en particular, consuhe al
fabricante para saber si es apto para lavavajillas.
Material sEs apto para lavavajillas?/Comentarios
Aluminio Si
La temperatura elevada del agua y los
detergentes pueden afectar el acabado del
aluminio anodizado.
Aluminio desechable No
No lave bandejas de aluminio desechable en el
lavavajillas. Pueden alterarse durante el lavado y
dejar marcas negras en la vajilla u otros objetos.
Botellas y latas No
Lave las botellas y las latas a mano. Las etiquetas
adheridas con cola pueden despegarse y obstruir
los brazos rociadores o la bombay reducir el
rendimiento del lavado.
Hierro fundido No
Se perder6 la curaci6n y el hierro se oxidar6.
Porcelana/Cer6mica de gres Si
Leasiempre las recomendaciones del fabricante
antes del lavado. LosdiseBos antiguos, pintados a
mano, o pintados sobre esmalte pueden
desteBirse, las 16minas doradas pueden
decolorarse o desteBirse.
Cristal Si
Lea las recomendaciones del fabricante antes del
lavado. Algunos tipos de cristal emplomado pueden
marcarse con repetidos lavados.
Dorado No
Loscubiertos dorados pierden el color.
Glass
Cuchillos de mango hueco
Si
El vidrio opalino setorna amarillento con
repetidos lavados en lavavajillas.
No
Losmangos de algunos cuchillos est6n unidos a
la ho a con adhesivos que pueden aflojarse si se
avan en avavaji as.
Pehre,Bronce
25
No
Lasahas temperaturas del agua y el detergente
pueden decolorar o dejar orificios en el acabado

Material
Pehre,Bronce
PI6sticos desechables
PI6sticos
_Es apto para lavavajillas?/Comentarios
No
Lasaltas temperaturas del agua y el detergente
pueden decolorar o dejar orificios en el acabado
Acero inoxidable
Plata fina o baBo de plata
No
No toleran las altas temperaturas del agua ni los
detergentes.
Si
Lea siempre las recomendaciones del fabricante
antes del lavado. Los pl6sticos varian en su
capacidad para resistir las ahas temperaturas del
agua y los detergentes. Coloque los pl6sticos en
la rejilla superior solamente.
Si
Inicie un ciclo de enjuague si no Io lavar6
inmediatamente. El contacto prolongado con
alimentos que contienen sal, vinagre, productos
16cteoso jugos de fruta puede daBar el acabado.
Si
Inicie un ciclo de enjuague si no la lavar6
inmediatamente. El contacto prolongado con
alimentos que contienen sal, 6cido o sulfuro
(huevos, mayonesa y mariscos) puede daBar el
acabado.
Hojalata No
Puede oxidarse.
Utensilios de madera No
L6velos a mano. Lea siempre las instrucciones del
fabricante antes del lavado. La madera que no
ha sido tratada puede torcerse, partirse o perder
su acabado.
CUIDADO DEL LAVAVAJILLAS
Limpieza
Limpieza del exterior
En la mayoria de los casos, el uso frecuente de un paso suave y h0medo o de una
esponja y un detergente suave es todo Io que se necesita para mantener limpio el
exterior de su lavavajillas.
Limpieza del interior
Los minerales del aqua dura pueden provocar la formaci6n de una pelicula
blanca en las superficies internas, esDecialmente debajo de la zona de la puerta.
No limpie el interior del lavavajilJas hasta que se haya enfriado. Use guantes de
goma. No utilice otro limpiador que no sea el detergente de lavavajillas ya que
se podria producir espuma. 26

Para limpiar el interior
Haga una _.ast.acon el detergente de lavavajillas en polvo en una esponja
hOmeda y ,mple.
0
Utilice detergente liquido autom6tico de lavavajillas y limpie con una esponja
hOmeda.
0
Lea el procedimiento para enjuague con vinagre en "Formaci6n de manchas o
peliculas en la vajilla" en "Detecci6n y soluci6n de problemas".
NOTA: Inicie un cicIo Normal con detergente despu_s de limpiar el interior
RESPIRADERO DEL DESAGOE
Revise el respiradero del desagOe toda vez que su lavavajillas no desagOe
correctamente. Algunas reglamentaciones locales o estatales sobre tuberias
exigen que se agregue un respiradero de desagOe entre un lavavajillas
empotrado y el sistema de desagOe de la casa. Si el desagOe se tapa, el
respiradero del desagOe impide que el agua vuelva e ingrese en su lavavajillas.
El respiradero del desagOe est6 normalmente ubicado arriba del fregadero o
encimera cerca del lavavajillas.
NOTA: El respiradero del desagOe es un dispositivo externo de la tuberia que no
es parte de su lavavajillas. La garantia proporcionada con su lavavajillas
no cubre los costos del servicio asociados directamente con la limpieza o
reparaci6n del respiradero del desagOe externo.
Para limpiar el respiradero del desagi.ie
Limpie el respiradero del desagOe peri6dicamente para asegurarse que el
lavavajillas desagOe correctamente. Siga las instrucciones de limpieza provis-
tas por el fabricante. Con la mayoria de los tipos: Retire la cubierta de cromo.
Desenrosque la tapa de pl6stico. Revise si hay suciedad acumulada. Limpie si es
necesarJo.
CUIDADO DEL LAVAVAJILLAS EN VERANO E INVIERNO
C6mo cuidar el lavavajillas en verano
Protect your dishwasher during the summer months by turning off the water sup-
ply and power supply to the dishwasher.
C6mo acondicionar su lavavajillas para el invierno
Proteja su lavavajillas y su hogar ante los posibles da_os causados por el conge-
lamiento del suministro de agua. Si fuera necesario dejar su lavavajillas en una
vivienda de temporada o si el mismo estuviera expuesto a temperaturas bajo
cero, haga acondicionar su lavavajillas por personal de mantenimiento
autorizado.
27

Verificaci6n de Problemas
° El lavavajillas no se detiene o para durante el ciclo
Esnormal que se realice una pausa de 5 minutosen los ciclos, cerca del comienzo de los ciclos,
para permitir el remojado de la vajilla. Estoreduce la cantidad de energia requerida para lim-
piar la vajilla.
_Est4bien cerrada y trabada la puerta?
_Se ha seleccionado el ciclo correcto? RefiSraseal cuadro de selecci6n de ciclos.
_Hay energia para que el lavavajillas funcione? _Seha saltado un tap6n de la casa, o se ha
cortado la energia?
_Se ha detenido el motor debido a una sobrecarga? El motor se resetea autom@ticamentea los
pocos minutos. Si no vuelve a arrancar, Ilame al servicio.
_Est4abierta la v41vuladel agua (sies que est4 instalada)?
_Esnormal que haya pausas repetidas de 15 a 65 segundos en algunos ciclos.
• El lavavajillas no se Ilena
_Puede el flotante de Ilenado moverse libremente de arriba abajo? Presi6nelo para liberarlo
• El lavavajillas parece no detenerse.
_Estd el agua que entra en el lavava illas Io suficientemente caliente? El lavava illas fun-
ciona durante m6s tiempo mientras calienta el agua. Vea la secci6n Conse os sobre el
DesempeBo del Lavavajillas.
Autom6ticamente el lavava illas se demorara en al_lunos ciclos de lavado yen uague
basra que el agua alcance la temperatura aprop acta
° Permanece agua en el lavavajillas
_Se ha completado el ciclo y no esta pausado?
Es normal que haya una pequeBa cantidad de agua limpia alrededor del desagLie en el
fondo de la cuba, para mantener el sello de agua lubricado.
Si la manguera del drenaje est6 conectada a un balde de desperdicios, asegOrese de
que el recipiente este vacio.
AsegOrese de que el tap6n haya sido removido del dispensador de desperdicios.
Verifique que la manguera de drenaje no est_ doblada.
• Queda detergente en la parte cubierta del €ompartimiento
_Ha finalizado el ciclo?
_EI detergente tiene grumos? Cambie el detergente si es necesario
° Hay agua en el frente del panel de acceso
_Se utiliz6 demasiado detergente? Consulte la secci6n "Compartimiento del detergente".
_La marca de detergente hace demasiada espuma? Pruebe una marca distinta para
reducir la espuma y eliminar la acumulaci6n.
• El lavavajillas tiene olor
_La vajilla se lava solo cada 2 o 3 dias? Inicie un ciclo de enjuague una o dos veces al
dia basra tenet una carga completa.
_EI lavavajillas tiene olor a pldstico nuevo? Realice un enjuague con vinagre tal como se
describe en "Formaci6n de manchas o peliculas en la vajilla" de la guia para detecci6n
y soluci6n de problemas detallada mds adelante.
• Condensaci6n en la encimera de la €ocina (modelos empotrados)
_EI lavavajillas est6 alineado con la encimera? Se puede format humedad en la mesada
que proviene de la salida de aire de la consola del lavavajillas.
Para mayor informaci6n, consulte las Instrucciones para la Instalaci6n.
28

LA VAJILLA NO ESTA COMPLETAMENTE LIMPIA
• Quedan restos de comida en la vajilla
8Se ha Ilenado correctamente el lavavajillas? Consulte la secci6n "C6mo cargar el
lavavajillas".
_Ha elegido el ciclo que describe la suciedad m6s dificil en su lavavajillas? Si tiene
objetos con suciedad m6s dificil de eliminar, utilice un ciclo m6s intensivo.
_Latemperatura del agua es demasiado baja? Para obtener mejores resultados de
lavado, el agua deberia estar a 12° F (49 oC ) cuando ingresa al lavavajillas.
Consulte la secci6n "Consejos para el rendimiento del lavavajillas".
_Utiliz6 la cantidad correcta de detergente fresco? Utilice s61odetergentes recomen-
dados para lavavajillas. Consulte la secci6n "Compartimiento del detergente". Nunca
utilice menos de 1 cucharada ( 15g ) por carga. Para que sea eficaz, el detergente
debe estar fresco. Conserve el detergente en un lugar fresco y seco. Lasuciedad difi-
cily el agua dura generalmente exigen m6s detergente.
_Se ha endurecido el detergente dentro del compartimiento? Utilice s61odetergente
fresco. Evite que el detergente permanezca en un compartimiento h0medo durante
varias horas. Limpie el compartimiento cuando haya detergente endurecido.
_Se han tapado la bomba o el brazo rociador con etiquetas de botellas y latas?
Si lava botellas o latas en sulavavajillas, compruebe que las etiquetas no tapen la
bomba o el brazo rociador.
8Lapresi6n de agua en el hogar es Io suficientemente alta para permitir que el
lavavajillas seIlene correctamente? La presi6n de agua en el hogar debe ser de 20
a 120 libras por pulgada cuadrada (138 a 828 kilopascales) para permitir que
el lavavajillas se Ilene correctamente. Se puede agregar una bomba elevadora de
presi6n al suministrode agua si la presi6n es demasiado baja.
_Laespuma aha hace m6s lenta la actividad del brazo de lavado? Nunca utilice
jab6n o detergentes para la ropa. Utilice s61odetergentes recomendados para
lavavajillas.
MANCHAS EN LA VAJILLA
• Formaci6n de manchas o peliculas en la vajilla
EElagua es dura o existe un alto contenido de minerales en el agua? Elacondi-
cionamiento del agua utilizada para el enjuague final con un agente liquido
de enjuague ayuda a eliminar manchas y peliculas. Mantenga Ileno el com-
partimiento del agente de enjuague. Utilice siempre la opci6n de temperatura
alta. Si la dureza del agua es de 13 granos o m6s, serecomienda que instale un
ablandador de agua hogareho. Si no desea beber agua ablandada, instale el
ablandador en el suministro de agua caliente.
_La temperatura del agua es demasiado baja? Para obtener mejores resultados
de lavado, el agua debe estar a 120 ° F ( 49 ° C ) cuando ingresa al lavavajillas.
Consulte la secci6n "Consejos para el rendimiento del lavavajillas"
_Utiliz6 la cantidad correcta de un detergente efectivo? Utilice s61odetergentes
recomendados para lavavajillas. Consulte la secci6n "Compartimiento del deter-
gente". Nunca utilice menos de 1 cucharada ( 15 g ) por carga. Para que sea
eficaz, el detergente debe estar fresco. Conserve el detergente en un lugar fresco
y seco. La suciedad dificil y el agua dura en general exigen m6s detergente.
29

_La presi6n de agua en el hogar es Io suficientemente alta para permitir que el
lavavajillas se Ilene correctamente? La presi6n de agua en el hogar debe ser de
20 a 120 libras por pulgada cuadrada ( 138 a 828 kilopascales ) para permitir
que el lavavajillas se Ilene correctamente. Se puede agregar una bomba elevadora
de presi6n al suministro de agua si la presi6n es demasiado baja.
NOTA: Para eliminar manchas y peliculas de la vajilla, intente con un enjuague
de vinagre blanco. Este procedimiento debe utilizarse s61o ocasionalmente ya
que el vinagre es un 6cido y utilizarlo con demasiada frecuencia podria da_ar
su lavavajillas.
1. Lavado y enjuague de la vajilla. Utilice la opci6n de secado con aire o con
ahorro de energia. Retire todos los cubiertos u objetos de metal.
2. Coloque 2 tazas ( 500 ml ) de vinagre blanco en un vaso o en una taza
medidora apta para lavavajillas en la rejilla de abajo.
3. Inicie un ciclo completo de lavado en el lavavajillas utilizando la opci6n de
secado al aire o con ahorro de energia. No utilice detergente. El vinagre se
mezclar6 con el agua del lavado.
• Pelicula de silice o grabado (la pelicula de silice es un dep6sito
opalino multicolor, el grabado es una pelicula semi-opaca)
A veces se produce una reacci6n con el agua o una reacci6n quimica en
ciertos tipos de vajilla de cristal. Esto est6 normalmente causado por alguna
combinaci6n de agua blanda o ablandada, soluciones limpiadoras alcalinas,
enjuague insuficiente, sobrecarga del lavavajillas y el calor del secado. Puede
que sea imposible evitar el problema, salvo con el lavado manual.
Para hacer m6s lento este proceso utilice una cantidad minima de deter-
c_]entepero no menos de 1 cucharada ( 15g ) por carga. Utilice un agente
e enjuague liquido y disminuya la carga del lavavajillas para permitir un
enjuague completo. La pelicula de silice y el grabado son permanentes y no
pueden eliminarse. No utilice secado con calor.
• Manchas blancas en utensilios de cocina con acabado antiadherente
EEldetergente ha eliminado la curaci6n de los utensilios de cocina? Vuelva a
curar los utensilios de cocina despu_s de lavarlos en el lavavajillas.
• Manchas marrones en la vajilla y en el interior del lavavajillas
8Tiene el agua alto contenido de hierro? Lave nuevamente la vajilla utilizando
entre 1 y 3 cucharaditas ( 5-15 ml ) de cristales de 6cido citrico agregados
a la parte cubierta del compartimiento del detergente. No use detergente.
ContinOe con un ciclo normal de lavado con detergente. Si necesita tratamien-
to m6s frecuente que mes por medio, se recomienda la instalaci6n de un dis-
positivo de remoci6n de hierro.
• Marcas negras o grises en la vajilla
8Hay objetos de aluminio que rozan la vajilla durante el lavado? Los objetos
desechables de aluminio pueden romperse en el lavavajillas y dejar marcas.
Lave a mano estos objetos. Elimine las marcas del aluminio utilizando un lim-
piador abrasivo suave.
• Manchas anaranjadas en la vajilla de plastico o en el interior del
lavavajillas
_Hay grandes cantidadesde comida a basede tomateen la vajilla que se
30

coloca en el lavavajillas? Puede ser necesario utilizar un producto quitamanchas
para eliminar las manchas de su lavavajillas. Las manchas no afectar6n el ren-
dimiento del lavavajillas
LA VAJILLA NO SE SECA COMPLETAMENTE
• La vajilla no esta seca
8Carg6 el lavavajillas de manera de permitir un correcto escurrimiento del
agua? No Io sobrecargue. Consulte la secci6n "C6mo cargar el lavavajillas".
Utilice un agente de enjuague liquido para acelerar el secado.
8Lospl6sticos est6n h0medos? A menudo es necesario secar los pl6sticos con toalla.
EElcompartimiento del agente de enjuague est6 vacio? Consulte la secci6n
"Compartimiento del agente de enjuague".
8Utiliz6 la opci6n de secado al aire o con ahorro de energia? Utilice la
opci6n secado con calor para una vajilla m6s seca.
LA VAJILLA SE DAI_IA DURANTE ALGUNO DE LOS CICLOS
• La vajilla se cacha
_Carg6 correctamenteel lavavajillas? Coloque la vajilla y losvasosde man-
era que queden establesy no segolpeen con la acci6n del lavado. Eviteque
la vajilla secache introduciendoy retirando las rejillas lentamente.
NOTA: Las antig0edades, el cristal de filo fino y tipos similares de porcelana y
vajilla de cristal pueden ser demasiado delicados para el lavado autom6tico.
L6velos a mano.
RUIDOS
• Chirridos, crujidos o zumbidos
Un objeto duro ha ingresado en el m6dulo de lavado (en algunos modelos).
Cuando se retira el objeto, el sonido deberia detenerse.
ASISTENCIA 0 REPARACI©N
Antes de Ilamar para solicitar asistencia o servicio t_cnico, por favor consulte
"Detecci6n y soluci6n de problemas". Puede ahorrarle una Ilamada al servicio t_c-
nico. Si a0n necesita ayuda, siga las instrucciones que se detallan a continuaci6n.
Cuando Ilame, tenga a mano la fecha de compra y los n0meros de modelo y de
serie completos del artefacto. Esta informaci6n nos ayudar6 a responder mejor a
su solicitud.
Si necesita repuestos
Si necesita encargar repuestos, le recomendamos que utilice s61o los repuestos
especificados por la f6brica. Estos repuestos se adaptar6n bien y funcionar6n
bien. Para ubicar los repuestos especificados por la f6brica en su 6rea, Ilame a
nuestro Centro de Atenci6n al Cliente al n0mero 1-877-337-3639 o al centro de
servicio t_cnico designado m6s cercano.
31

Garantfa Limitada
Servicios en el hogar
1 afio de garantia
Durante 12 meses a partir de la fecha de
la compra original, Haler reparard o cam-
biard sin cargo cualquier pieza que falle
debido a un defecto en los materiales o en
la realizaci6n, incluyendo la mano de obra.
3 a_os de garantia limitada
(s61o las piezas)
Durante 36 meses a partir de la fecha de
la compra original, Haler cambiard sin
cargo cualquier pieza que falle debido a
un defecto en la fabricaci6n.
Tina de acero inoxidable y
revestimiento interior de la puerta
La tina de acero inoxidable y el revestimien-
to interior de la puerta tienen garantia pot
el periodo que dure el lavavajillas en el
caso de oxidaci6n.
NOTA: La entrada externa de agua y las
partes de los tubos de drenaje no
estdn cubiertos pot esta garantia.
Excepciones: Garantia en uso
€omercial o de alquiler
90 dias desde la fecha original de compra
para mano de obra
90 dias desde la fecha original de compra
para piezas. No se aplica ninguna otra
garantia.
Para servicios de garantia
P6ngase en contacto con el centro de
reparaciones autorizado mds cercano.
Todos los servicios deben set realizados
pot el centro de reparaciones autorizado
de Haler. Para saber el nombre y telSfono
del centro de reparaciones autorizado mds
cercano Ilame al: 1-877-337-3639.
Antes de Ilamar, por favor tenga la
siguiente informaci6n disponible:
N0mero de modelo y serie de su electrodo-
m_stico (se encuentra en la parte izquierda
del marco de la puerta) El nombre y direc-
ci6n de la tienda donde compr6 la unidad
y la fecha de compra. Una descripci6n
clara del problema. Un comprobante de
compra (recibo de venta).
Esta garantia cubre artefactos den-
tro de los Estados Unidos, Canada y
Puerto Rico. No se encuentran cubi-
ertos por esta garantia:
Cambio o reparaci6n de fusibles, inter-
ruptores automdticos, cableado o tuberias
del hogar. Un producto cuyo nOmero de
serie haya sido quitado o modificado. Los
gastos pot servicios que no se identifican
especificamente como normales, tales como
la zona normal de servicio o las horas
normales. Los da_os al lavavajillas. Los
dahos ocurridos durante el envio. DaBos
causados pot instalaci6n y mantenimiento
incorrectos. DaBos pot mal uso, abuso,
accidente, incendio, inundaci6n o casos
de fuerza mayor. DaBos causados pot otra
reparaci6n que no sea la brindada pot un
centro de reparaciones o vendedor autor-
izado de Haler. DaBos causados pot corri-
ente, voltaje o suministro el_ctricos incorrec-
tos. DaBos provocados pot modificaciones,
alteraciones o ajustes al producto no
autorizados pot Haler. Ajustes o controles
operados pot el propietario tal como se
identifica en el manual del propietario. Las
mangueras, perillas, y todos los complemen-
tos, accesorios y piezas descartables. Los
gastos de mano de obra, transporte para la
reparaci6n y gastos de envio para la remo-
ci6n y el reemplazo de piezas defectuosas
despu_s del periodo inicial de 12 meses.
DaBo pot cualquier otra cosa que no sea
uso dom_stico normal. Cualquier gasto de
transporte o envio.
ESTA GARANTOA LIMITADA SE OTORGA
EN LUGAR DE CUALQUIER OTRA
GARANTJA, EXPRESADA O IMPLJCITA
INCLUYENDO LAS GARANTJAS DE
COMERCIABILIDAD E IDONEIDAD PARA
UN FIN DETERMINADO
El recurso provisto en esta garantia es
exclusivo y otorgado en lugar de cualquier
otto recurso. Esta garantia no cubre dahos
fortuitos o consecuentes, de modo que las
limitaciones descritas anteriormente pueden
no aplicarse a su caso. Algunos estados
no permiten limitaciones en cuanto a la
duraci6n de una garantia implicita, de
modo que las limitaciones descritas anterior-
mente pueden no aplicarse a su caso Esta
garantia le concede derechos legales espe-
cificos, y usted puede tenet otros derechos,
que varian de un estado a otto.
Haier America
New York, NY 10018
32

IMPORTANT
Do Not Return This Product To The Store
If you have a problem with this product, please contact the
"Customer Satisfaction Center" at 1-877-337-3639.
DATED PROOF OF PURCHASE REQUIRED FOR WARRANTY SERVICE
IMPORTANT
Ne pas R_exp_dier ce Produit au Magasin
Pour tout probl_me concernant ce produit, veuillez contacter le service des
consommateurs "Customer Satisfaction Center' au 1-877-337-3639.
UNE PREUVE D'ACHAT DATEE EST REQUISE POUR BENEFICIER DE LA GARANTIE.
IMPORTANTE
No regrese este producto a la tienda
Si tiene alg_n problema con este producto, por favor contacte el "Centro de Servicio al
Consumidor" al 1-877-337-3639 (V_lido solo en E.U.A).
NECESITA UNA PRUEBA DE COMPRA FECHADA PARA EL SERVICIO DE LA GARANTIA
120V, 60Hz
Made in China
Fabriqu& en Chine
Hecho en China
Haie
Haier
New York, NY 10018
Printed in China
vl: Issued September 2009
v2: Issued June 2010
DWL7075
© 2010 Haier America Trading, LLC. All Rights Reserved. 101093
-
 1
1
-
 2
2
-
 3
3
-
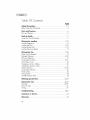 4
4
-
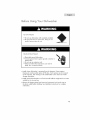 5
5
-
 6
6
-
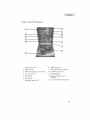 7
7
-
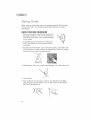 8
8
-
 9
9
-
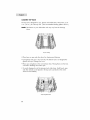 10
10
-
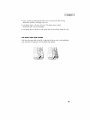 11
11
-
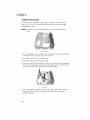 12
12
-
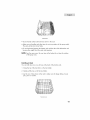 13
13
-
 14
14
-
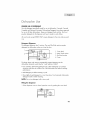 15
15
-
 16
16
-
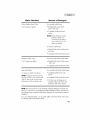 17
17
-
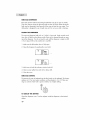 18
18
-
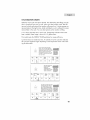 19
19
-
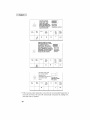 20
20
-
 21
21
-
 22
22
-
 23
23
-
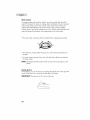 24
24
-
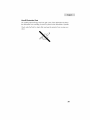 25
25
-
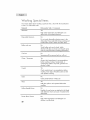 26
26
-
 27
27
-
 28
28
-
 29
29
-
 30
30
-
 31
31
-
 32
32
-
 33
33
-
 34
34
-
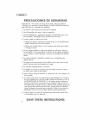 35
35
-
 36
36
-
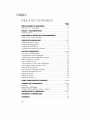 37
37
-
 38
38
-
 39
39
-
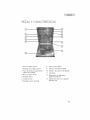 40
40
-
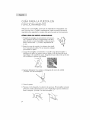 41
41
-
 42
42
-
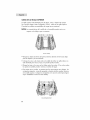 43
43
-
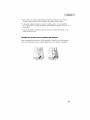 44
44
-
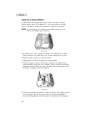 45
45
-
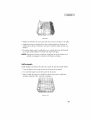 46
46
-
 47
47
-
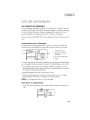 48
48
-
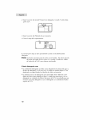 49
49
-
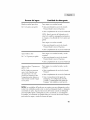 50
50
-
 51
51
-
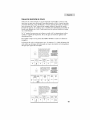 52
52
-
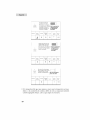 53
53
-
 54
54
-
 55
55
-
 56
56
-
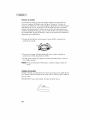 57
57
-
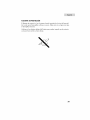 58
58
-
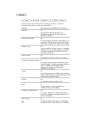 59
59
-
 60
60
-
 61
61
-
 62
62
-
 63
63
-
 64
64
-
 65
65
-
 66
66
-
 67
67


Haier DWL3525DBBB Manual de usuario
- Categoría
- Lavaplatos
- Tipo
- Manual de usuario
- Este manual también es adecuado para
en otros idiomas
- English: Haier DWL3525DBBB User manual
