

About this Document
This document includes instructions for installing the
AXIS P33-VE Series Pendant Kit.
Equipment Modifications
This equipment must be installed and used in strict
accordance with the instructions given in the user
documentation.
Liability
Every care has been taken in the preparation of this
document. Please inform your local Axis office of any
inaccuracies or omissions. Axis Communications AB
cannot be held responsible for any technical or
typographical errors and reserves the right to make
changes to the product and documentation without
prior notice. Axis Communications AB makes no
warranty of any kind with regard to the material
contained within this document, including, but not
limited to, the implied warranties of merchantability
and fitness for a particular purpose. Axis
Communications AB shall not be liable nor responsible
for incidental or consequential damages in connection
with the furnishing, performance or use of this material.
Support
Should you require any technical assistance, please
contact your Axis reseller. If your questions cannot be
answered immediately, your reseller will forward your
queries through the appropriate channels to ensure a
rapid response. If you are connected to the Internet, you
can:
• find answers to resolved problems in the FAQ database.
Search by product, category, or phrases
• report problems to Axis support by logging in to your
private support area.

Pendant Kit Installation Guide Page 3
ENGLISH
Pendant Kit Installation Guide
This installation guide provides instructions for installing the Pendant Kit for the AXIS P3343-VE,
AXIS P3344-VE, and AXIS P3346-VE. The Pendant Kit is designed to be installed with the mounting
of your choice; for details about the types of mounting go to Accessories at www.axis.com
Please read through the entire guide before proceeding with the installation. For all other aspects
of using the Axis network camera, please see the Installation Guide and User’s Manual, available
from www.axis.com/techsup
Installation steps
• Check the package contents against
the list on page 4.
• Installation instructions. See page 5.
Important!
This product must be used in
compliance with local laws and
regulations.


Pendant Kit Installation Guide Page 5
ENGLISH
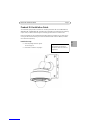
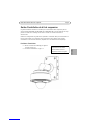
Install pendant kit
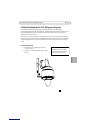
1. Install the mount of your choice according to the instructions included with the mounting kit.
Use the network cable included with the network camera, or follow the instructions for prepar-
ing a network cable in the camera’s installation guide.
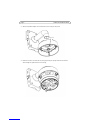
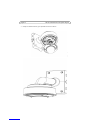
2. Attach the weather shield (optional) to the pendant adapter with the 4 M4x8 screws included
with this kit. The weather shield is optional and protects against direct sunlight and rain.


Pendant Kit Installation Guide Page 7
ENGLISH
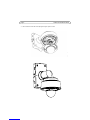
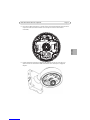
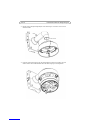
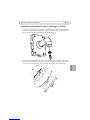
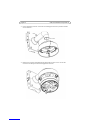
5. Attach all the necessary cables to the camera unit. Pull aside the springs in the unit casing and
click the camera unit in place.
6. Insert the unit casing/camera into the pendant adapter and attach by tightening the captive
screws. Follow the instructions in the camera’s Installation Guide for adjusting the lens.


Guide d’installation du kit de suspension Page 9
FRANÇAIS
Guide d’installation du kit de suspension
Ce guide d’installation fournit des instructions pour l’installation du kit de suspension pour les
caméras réseau AXIS P3343-VE, AXIS P3344-VE, et AXIS P3346-VE. Le kit de suspension est conçu
pour être installé avec le montage de votre choix : accédez à la section Accessoires sur
www.axis.com
Veuillez lire l’intégralité de ce guide avant de procéder à l’installation. Pour plus d’informations sur
tous les autres aspects liés à l’utilisation de la caméra réseau Axis, reportez-vous au guide
d’installation et au manuel de l’utilisateur, disponible sur le site web www.axis.com/techsup
Procédure d’installation
• Vérifiez le contenu de l’emballage par rapport à
la liste de la page 10.
• Instructions d’installation. Cf. page 11.
Important !
Ce produit doit être utilisé
conformément aux lois et
dispositions locales en vigueur.


Guide d’installation du kit de suspension Page 11
FRANÇAIS
Installation du kit de suspension
1. Installez le montage de votre choix conformément aux instructions incluses avec le kit de
montage. Utilisez le câble réseau inclus avec la caméra réseau ou suivez les instructions pour la
préparation d’un câble réseau dans le guide d’installation de la caméra.
2. Fixez la protection étanche (facultatif) à l’adaptateur de suspension à l’aide des 4 vis M4x8
incluses dans ce kit. La protection étanche facultative assure la protection contre une
exposition directe aux rayons du soleil et à la pluie.

Page 12 Guide d’installation du kit de suspension
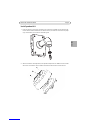
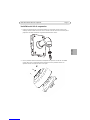
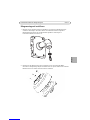
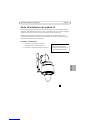
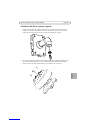
3. Fixez l’adaptateur de suspension au support de montage et attachez-le en utilisant la vis de
butée.
4. Retirez la caméra du boîtier de l’unité en écartant les ressorts. Faites passer le câble réseau dans
le trou du joint du boîtier de l’unité.
vis de butée

Guide d’installation du kit de suspension Page 13
FRANÇAIS
5. Fixez tous les câbles nécessaires à la caméra. Écartez les ressorts du boîtier de l’unité et mettez
en place la caméra (vous devez entendre un clic lorsque la caméra est correctement
enclenchée).
6. Insérez le boîtier/la caméra dans l’adaptateur de suspension et fixez-le en serrant les vis
captives. Suivez les instructions du Guide d’installation de la caméra pour le réglage de
l’objectif.


Installationshandbuch für Hängemontageset Seite 15
DEUTSCH
Installationshandbuch für Hängemontageset
Dieses Handbuchbeschreibt die Anbringung des Hängemontagesets für die Netzwerk-
Kameramodelle AXIS P3343-VE, AXIS P3344-VE, und AXIS P3346-VE. Das Hängemontageset ist für
verschiedene Montagehalterungen geeignet. Weitere Informationen hierzu finden Sie unter
"Zubehör" unter "www.axis.com".
Bitte lesen Sie zunächst das Handbuch vollständig durch, bevor Sie mit der Installation beginnen.
Weiteren Hinweise zur Verwendung der Axis Netzwerk-Kamera finden Sie im Installationshandbuch
und im Benutzerhandbuch, die auf unserer Website unter www.axis.com/techsup zur Verfügung
stehen.
Installationsschritte
• Überprüfen Sie den Paketinhalt anhand der
Liste auf Seite 16.
• Folgen Sie den Installationsanweisungen. Siehe
Seite 17.
Wichtig!
Verwenden Sie dieses Produkt
unter Beachtung der geltenden
rechtlichen Bestimmungen.


Installationshandbuch für Hängemontageset Seite 17
DEUTSCH
Hängemontageset installieren
1. Montieren Sie die gewünschte Halterung gemäß den im Lieferumfang des Montagesatzes
enthaltenen Anweisungen. Verwenden Sie das mit der Netzwerk-Kamera mitgelieferte
Netzwerkkabel oder bereiten Sie ein Netzwerkkabel gemäß den Anweisungen im
Installationshandbuch Ihrer Kamera vor.
2. Befestigen Sie den Wetterschutz (separat erhältlich) mit den vier beiliegenden M4x8-
Schrauben am Hängemontage-Adapter. Der Wetterschutz ist separat erhältlich und schützt die
Netzwerk-Kamera vor direkter Sonneneinstrahlung und Regen.

Seite 18 Installationshandbuch für Hängemontageset
3. Bringen Sie den Hängemontage-Adapter an der Halterung an und sichern Sie ihn mit der
Arretierschraube.
4. Entfernen Sie die Kameraeinheit aus dem Kameragehäuse, indem Sie die Federn zur Seite
drücken. Ziehen Sie das Netzwerkkabel durch den Dichtungsring im Kameragehäuse.
Arretierschraube

Installationshandbuch für Hängemontageset Seite 19
DEUTSCH
5. Schließen Sie alle erforderlichen Kabel an der Kameraeinheit an. Ziehen Sie die Federn im
Kameragehäuse zur Seite und setzen Sie die Kameraeinheit so ein, dass sie einrastet.
6. Setzen Sie das Kameragehäuse bzw. die Kamera in den Hängemontageset-Adapter ein und
befestigen Sie es/sie, indem Sie die unverlierbaren Schrauben anziehen. Stellen Sie das Objektiv
gemäß den Anweisungen im Installationshandbuch Ihrer Kamera ein.


Guida all'installazione del pendant kit Pagina 21
ITALIANO
Guida all'installazione del pendant kit
Questa guida spiega come installare il pendant kit per le telecamere di rete AXIS P3343-VE, AXIS
P3344-VE, e AXIS P3346-VE. Il kit può essere usato in combinazione con gli accessori di montaggio
desiderati, elencati nella sezione relativa agli accessori del sito web www.axis.com.
Leggere tutta la guida prima di procedere con l'installazione. Per altre informazioni relative
all'utilizzo delle telecamere di rete di Axis, vedere la Guida all'installazione e la Guida per l'utente
disponibili sul sito web www.axis.com/techsup.
Procedura di installazione
• Controllare il contenuto della confezione
utilizzando l'elenco riportato a Pagina 22.
• Istruzioni per l'installazione. Vedere la Pagina 23.
Importante!
Questo prodotto deve essere
utilizzato in conformità alle leggi
e alle regolamentazioni locali.

Pagina 22 Guida all'installazione del pendant kit
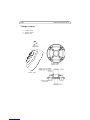
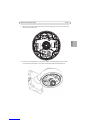
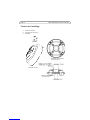
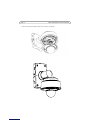
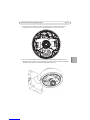
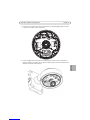
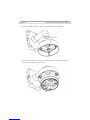
Contenuto della confezione
• 1 schermo per la protezione dagli agenti atmosferici
• 1 adattatore per soffitti
•4 viti M4x8
Schermo per la protezione
Adattatore per soffitti
Viti M4x8
(vista inferiore)
Adattatore per soffitti
(vista laterale)
dagli agenti atmosferici

Guida all'installazione del pendant kit Pagina 23
ITALIANO
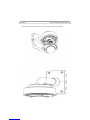
Installazione del pendant kit per il montaggio su soffitti
1. Installare l'accessorio desiderato seguendo le istruzioni riportate nel kit di montaggio. Utilizzare
il cavo di rete fornito con la telecamera di rete oppure seguire le istruzioni per la preparazione
del cavo di rete fornite nella Guida all'installazione della telecamera.
2. Fissare lo schermo di protezione dagli agenti atmosferici (opzionale) all'adattatore per soffitti
utilizzando le 4 viti M4x8 fornite con il kit. Lo schermo di protezione dagli agenti atmosferici è
opzionale e serve per proteggere la telecamera dalla luce diretta del sole e dalla pioggia.

Pagina 24 Guida all'installazione del pendant kit
3. Fissare l'adattatore per soffitti all'accessorio di montaggio e bloccarlo in posizione mediante
una vite di blocco.
4. Rimuovere la telecamera dall'alloggiamento allontanando le molle. Tirare il cavo di rete e
infilarlo nel foro della guarnizione sull'alloggiamento dell'unità.
Vite di blocco

Guida all'installazione del pendant kit Pagina 25
ITALIANO
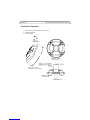
5. Fissare tutti i cavi necessari alla telecamera. Allontanare le molle dell'alloggiamento e installare
la telecamera facendola scattare in posizione.
6. Inserire l'alloggiamento della telecamera nell'adattatore per soffitti e fissare i componenti in
posizione serrando le viti prigioniere. Per regolare l'obiettivo, seguire le istruzioni riportate nella
Guida all'installazione della telecamera.


Guía de instalación del kit de soporte colgante Página 27
ESPAÑOL
Guía de instalación del kit de soporte colgante
Esta guía de instalación incluye las instrucciones necesarias para instalar el kit de soporte colgante
de las cámaras de red AXIS P3343-VE, AXIS P3344-VE, y AXIS P3346-VE. Este kit está diseñado para
instalarse con el montaje de su elección. Para consultar una lista de los montajes disponibles vaya a
Accesorios, en www.axis.com.
Lea detenidamente toda la guía antes de iniciar la instalación. Para cualquier otra cuestión relativa
al uso de la cámara de red Axis, consulte la Guía de instalación y el Manual del usuario, disponibles
en www.axis.com/techsup.
Pasos para la instalación
• Verifique el contenido del paquete con
la lista de la página 28.
• Instrucciones de instalación. Consulte la página 29.
¡Importante!
Este producto debe utilizarse de
conformidad con la legislación y
normativas locales.


Guía de instalación del kit de soporte colgante Página 29
ESPAÑOL
Instalación del kit de soporte colgante
1. Instale el montaje que haya elegido de acuerdo con las instrucciones incluidas con el kit de
montaje. Use el cable de red incluido con la cámara de red, o bien siga las instrucciones de
preparación de un cable de red incluidas en la guía de instalación de la cámara.
2. Fije el revestimiento para condiciones meteorológicas (opcional) al adaptador colgante con los
cuatro tornillos M4x8 incluidos en el kit. El revestimiento para condiciones meteorológicas
opcional evita que la cámara quede expuesta a la luz directa del sol y a la lluvia.

Página 30 Guía de instalación del kit de soporte colgante
3. Inserte el adaptador colgante en el montaje y fíjelo mediante el tornillo de retención.
4. Aparte los muelles para retirar la cámara de la carcasa de la unidad. Pase el cable de red por el
orificio de la junta de la carcasa de la unidad.
tornillo de retención

Guía de instalación del kit de soporte colgante Página 31
ESPAÑOL
5. Conecte todos los cables necesarios a la unidad de la cámara. Retire los muelles de la carcasa y
encaje la cámara hasta que escuche un clic.
6. Inserte la carcasa de la unidad/cámara en el adaptador colgante y acóplela apretando los
tornillos cautivos. Siga las instrucciones que se incluyen en la Guía de instalación de la cámara
para ajustar el objetivo.


-
 1
1
-
 2
2
-
 3
3
-
 4
4
-
 5
5
-
 6
6
-
 7
7
-
 8
8
-
 9
9
-
 10
10
-
 11
11
-
 12
12
-
 13
13
-
 14
14
-
 15
15
-
 16
16
-
 17
17
-
 18
18
-
 19
19
-
 20
20
-
 21
21
-
 22
22
-
 23
23
-
 24
24
-
 25
25
-
 26
26
-
 27
27
-
 28
28
-
 29
29
-
 30
30
-
 31
31
-
 32
32
-
 33
33
-
 34
34


Axis P3343-VE Manual de usuario
- Tipo
- Manual de usuario
- Este manual también es adecuado para
en otros idiomas
- français: Axis P3343-VE Manuel utilisateur
- italiano: Axis P3343-VE Manuale utente
- English: Axis P3343-VE User manual
- Deutsch: Axis P3343-VE Benutzerhandbuch