koban KPHD-NFC-ASTRO3 El manual del propietario
- Tipo
- El manual del propietario

Interruptor astronómico NFC KPHD-NFC-ASTRO3
Código
Temper:
0767668
Manual de instrucciones
Características
técnicas
Temper Internacional, SL
Polígono Industrial de Granda, Nave 18
E-33199 Granda-Siero (Asturias), España
www.grupotemper.com
Tensión
de
alimentación,
V
24...264
16
AC-1 /
250V
Corriente
de
carga
máxima,
А
Tipo de Batería
Error de frecuencia de reloj
durante
el
día,
s,
no
más
de
El
consumo
de
energía,
W
Corrección
rango
de
salida
del
sol
puestas
de
sol,
minutos
± 240
Duración
máxima
de
la
noche
break,
hh:
mm
Número
de
programas
anuales
Función
El
relé
horario
programable
cíclico
está
diseñado
para
encender/apagar
la
iluminación
al
atardecer
y
al
amanecer,
dependiendo
de
las
coordenadas
geográficas
del
terreno
y/o encender
según
el
programa
semanal.
Descanso nocturno Número
de
programas
semanales
Discreción
de
instalación
de
programas,
minutos
Contactos
1-5
(2-7) Duración de la batería de respaldo
horas
de
tiempo
real,
años
5
Rango
de
temperatura
de
funcionamiento,°С -
25...+50
Grado
de
protección
IР20
Durabilidad
de
conmutación,
ciclos >
105
Grado de contaminación 2
Categoría
de
sobrevoltaje
III
Dimensiones
(An.
x
Al.
x
Pr.),
mm
35x90x65
Conexión Abrazaderas de
tornillo
2,5
mm²
Tipo de carcasa
2S
Peso (g)
144
Montaje
Carril
DIN
de
35
mm
Par
de
apriete
de
la
conexión
por
tornillo,
Nm
0,5
Descripción
de
las
funciones
de
los
botones
Menú:
-
entrar
en
el
menú
de
programación;
-
volver
al
menú
anterior,
salir
al
modo
principal.
+
[más]:
-
cambiar
el
ajuste
a
+1
en
la
posición
de
programación
seleccionada
(manteniendo
pulsado
el
botón
se
produce
un
cambio
cíclico
constante
de
la
posición
en
+1);
-
en
modo
manual:
contacto
transversal
[ON]
o
[OFF]
del
primer
canal.
-
en
modo
automático:
a)
habilitar
o
deshabilitar
el
modo semiautomático;
b)
como
esfuerzo
y
mantenimiento
durante
más
de
2
segundos:visualización
de
la
hora
de
salida,
puesta
del
sol,
teniendo
en
cuenta
lacorrección
para
el
canal
1
(cuando
se
utiliza
el
canal
en
astronómico).
-
[menos]:
-
cambiar
el
ajuste
a
-1
en
la
posición
de
programación
seleccionada
(manteniendo
pulsado
el
botón
se
produce
un
cambio
cíclico
constantede
la
posición
en
-1);
-
en
modo
manual:
contacto
transversal
[ON]
o
[OFF]
del
2ºcanal.
-
en
modo
automático:
a)
robo
a
corto
plazo:
habilitar
o
deshabilitar
el
modosemiautomático;
b)
como
un
esfuerzo
y
manteniendo
durante
más
de
2
segundos:
visualización
de
la
hora
de
salida,
puesta
del
sol,
teniendo
en
cuenta
la
corrección
para
el
canal
2
(cuando
se
utiliza
el
canal
en
astronómico).
Encendido
de
Apagado
de
software
programas
POFF
PON
El
principio
de
funcionamiento
El
relé
de
tiempo
programable
cíclico
puede
usar
cualquier
canal
en
uno
de
los
modos
(el
relé
puede
estar
en
tal
modo
que
un
canal
funcione
en
modo
astronómico
y
el
segundo
en
el
modo
de
temporizador
semanal):
Astronómico- se
basa
en
la
información
actual
sobre
las
coordenadas
geográficas
del
terreno,
forma
puntos
de
programa
para
encender
y
apagar
la
iluminación.
La
hora
exacta
de
encendido
y
apagado
se
determina
en
función
delcálculo
de
la
posición
del
sol
en
relación
con
el
horizonte.
Se
puede
establecer
un
descanso
nocturno
entre
los
puntos
de
encendido
y
apagado
programados,
desconectando
temporalmente
la
carga
para
ahorrar
energía.
Temporizador
semanal- encender
y
apagar
dispositivos
o
circuitos
a
una
hora
determinada
en
ciclos:
diarios,
semanales,
laborables
o
fines
de
semana.
El
panel
de
control
y
la
indicación
Día
de
la
semana/
Lu Ma Mi Ju Vi Sá Do
s1EN
DEs2EN
APAGADO
Ciclo
de
la
operación
Alarma/Estado
de
La
fecha
y
la
hora /
La
entrada
del
programa
El
modo
de
funcionamiento
indicador/
Operación
automática
F
KPHD-NFC-ASTRO3
contactos
El
microbotón
de
operación
MENÚ +OK
Lu – lunes; Ma – martes;
Mi
– miércoles; Ju
– jueves;
Vi – viernes; Sа – sábado; Do – domingo.
Conjunto
completo
de
entrega
Relé
de
tiempo…..................................................................1
pieza
Manual
de
instrucciones….................................................1
pieza
Embalaje…............................................................................1
pieza
Potencia de carga máxima Tabla 2
Contactos 2NO/NC (2 contactos de conmutación)
CR2032
1
1,5
23:59
10
100
1

Descripción
de
los
contactos
Fuente
de
alimentación:
fuente
de
alimentación
de
relé
de
3-4
tiempos;
Canal
1:
1-5
posición
«normalmente
abierta»;
1-6
posición
«normalmente
cerrado»;
Canal
2:
2-7
posición
«normalmente
abierta»;
2-8
posición
«normalmente
cerrada».
Diagramas
de
conexión
Esquema
de
conexión
del
producto
y
la
carga
a
la
red
de
230V.
¡ATENCIÓN!
En
modo
semiautomático,
la
posición
de
los
contactos
del
relé
será
opuesta
al
programa
en
ejecución.
El
modo
semiautomático
está
activo
solo
hasta
el
final
del
ciclo
actual
de
funcionamiento
automático,
por
ejemplo,
al
ingresar
al
modo
semiautomático
durante
el
día,
se
encenderá
la
luz
hasta
que
llegue
la
hora
de
inicio,
según
el
programa
astronómico.
Luego,
el
producto
vuelve
al
modo
automático
y
la
iluminación
permanece
encendida
hasta
el
apagado
de
la
mañana).
El
modo
se
activa
o
desactiva
utilizando
los
botones
«+/–» (para
el
primer
y
segundo
canal,
respectivamente)
en
el
modo
de
visualización
del
reloj
(modo
principal).
Modo
manual:
[ON]
-
El
contacto
está
permanentemente
cerrado,
o
[OFF]
-
el
contacto
está
permanentemente
abierto.
Cuando
el
modo
automático
está
desactivado
(no
hay
icono
en
el
indicador).
Amanecer
y
atardecer
astronómicos:
Son
los
momentos
en
que
elcentro
del
disco
solar
toca
el
horizonte.
Puntos
de
encendido
y
apagado
programados:
Horarios
de
encendido
y
apagado
de
los
contactos,
asignados
según
salida/puesta
del
solastronómica,
descansos
nocturnos
o
programa
semanal.
descansonocturnoes
un
apagado
temporal
definido
por
el
usuario
entre
lospuntos
de
encendido
y
apagado
del
software.
Localización
(ubicación):
Coordenadas
geográficas
y
zona
horariadel
asentamiento
donde
está
instalado
el
relé.
Puede
ingresar
supropia
ubicación
geográfica
y
las
coordenadas
de
la
zona
horaria
(UTC)
o
usar
códigos
de
ciudad.
Códigos
de
ciudad:
Para
facilitar
el
ingreso
de
información,
se
hanasignado
códigos
a
algunas
localidades
(las
coordenadas
y
códigos
sedan
en
la
Tabla
1).
Corrección-aceleración
o
desaceleración
del
encendido/apagado
en
relación
con
lashoras
astronómicas
de
salida
y
puesta
del
sol:
±
240
minutos
-
corrección
del
tiempo
de encendido/apagado
en
relación
con
la
hora
de
salida/puesta
del
sol.
Cambio
de
hora
automático:
Cambio
de
horario
de
invierno
averano
y
viceversa.
Hay
opciones
para
trabajar
con
transiciónautomática
o
sin
ella.
El
relé
de
tiempo
tiene
la
función
devincularse
a
la
zona
horaria,
por
lo
que
la
transición
se
producirá
enrelación
con
la
hora
local.
L
1234
R1 R2
5678
Diagrama de cableado utilizando un contactor, corriente de carga superior a 16A.
L
1234
R1 R2
k k
5678
Diagrama de conexión para dispositivos y cargas alimentados por diferentes
fuentes.
norte
L
24-264V
AC/DC
1234
R2 R1
5678
R1, R2 - cargas conectadas;
К – la bobina del contactor.
Conexión
1.
Desconecte
la
fuente
de
alimentación.
3.
Conecte
los
cables
de
alimentación
de
acuerdo
con
el
diagrama.
2.
Monte
el
relé
en
un
riel
DIN
en
el
gabinete.
4.
Conecte
la
carga
de
acuerdo
con
el
diagrama.
5.
Suministro
de
energía.
Descripción
de
los
modos
de
funcionamiento
y
funciones
Modo
automatico- funcionamiento
automático
mediante
puntos
de
encendido
y
apagado
programados
[icono
de
reloj
en
el
indicador
del
canal
correspondiente].
Modo
semiautomático- la
capacidad
de
encender /
apagar
manualmente
los
contactos
del
relé
durante
la
operación
en
modo
automático.
El
cambio
permanecerá
vigente
hasta
el
próximo
encendido/apagado
basado
en
el
ciclo
automático
[icono
de
reloj
parpadeante
del
canal
correspondiente].
2
N
N

Programación
START
Conecte
la
fuente
de
alimentación.
Instale
el
programa
de
relé
de
tiempo
requerido
usando
elpanel
de
control.
El
relé
de
tiempo
cambiará
al
modo
de
funcionamiento,
eltiempo
establecido
aparecerá
en
el
indicador.
Si
no
hay
ningún
registro
de
programa,
el
reléde
tiempo
se
iniciará
automáticamente
en modo
manual.
Si
el
relé
de
tiempo
contiene
entradas
realizadas
anteriormente,
comenzaráa
funcionar
de
acuerdo
con
ellas.
1. INSTALACIÓN DEL DATE- dAtE
Pulsa
MENÚ.
Utilizar
el+/–botones
para
seleccionar
«fecha"
modo
de
ajustes.
El
relé
horario
pasará
al
menú
de
programación. Mo TtuWmiTHFRSAStu
07
s1EN
APAGADO2EN
APAGADO
Confirmar
con OK.
Utilizar
el+/–botones
para
configurar
los
parámetros;
cambiar
al
parámetro
siguiente
pulsando
la
teclaOK
botón.
Regrese
al
menú
principal
sin
guardar
los
cambios,
presionando
el
botón MENÚ.
El
relé
horario
procederá
a
configurar
los
siguientes
parámetros:
año,
mes
y
día.
El
relé
horario
saldrá
automáticamente
de
la
función
de
programación
de
la
fecha
e
irá
al
menú
de
programación.La
selección
de
la
fecha
indica
simultáneamente
la
hora
actual:
invierno
o
verano.
Mo TtuWmiTHFRSAStu
s1EN
APAGADO 2EN
APAGADO
Ingrese
la
fecha
ingresada
con
el OK.
Mo TtuWmiTHFRSAStu
¡ATENCIÓN!
Posibilidad de desactivar el cambio automático de horario de invierno a verano (ver punto
6 «Configuración del sistema»). s1EN
APAGADO2EN
APAGADO
2. AJUSTE DE LA HORA ACTUAL - hora
Pulsa MENÚ.El
relé
de
tiempo
cambia
al
menú
de programación.
Utilizar
el+/–botones
para
seleccionar
el
modo
de
instalación
hora
«hora».
El
relé
horario
procederá
a
configurar
los
siguientes
parámetros:
horas,
minutos.
Utilizar
el+/-botones
para
configurar
los
parámetros;
pasar
al
siguiente
parámetro
presionando
el
botón
OK.
Regrese
a
la
posición
anterior presionando
el
MENÚ
botón.
Confirme
la
hora
ingresada
con
el
OK.
Confirme
la
zona
horaria
ingresada
con
el botón OK.
El
relé
de
tiempo
cambiará
a
la
selección
de
zona
horaria.
La
zona
horaria
de
Bielorrusia
es
+3.
Utilizar
el+/–Botones
para
ajustar
el
cinturón.
El
relé
de
tiempo
saldrá
automáticamente
de
la
función
de
programación
de
tiempo
e
irá
almenú
de
programación.
3
Operaciones Resultado Indicación de pantalla
Mo TUWETHFRSASU
ş
1
ON
OFF
12:3807
2
ON
OFF
Mo TUWETHFRSASU
ş
1
ON
OFF
20 19:07
2
ON
OFF

3. LOCALIZACIÓN (LOCATION) - Loc
Pulsa MENÚ.
Utilizar
el+/–botones
para
seleccionar
«ubicación»
Modo
de
ajuste
de
fecha.
El
relé
de
tiempo
cambiará
al
menú
de
programación.
El
relé
de
tiempo
se
ubicará
sobre
el
menú
de
configuración
de
posición
(CodE
-
nE).
nE-ajuste
manual
de
la
posición geográfica
del
consumidor.
CodE-seleccione
una
ubicación
de
la
tabla
de
códigos
de
coordenadas./
3.1. Códigos de coordenadas - CodE
El
relé
cambiará
para
seleccionar
el
código
de
país.
Confirmar
con
OK.
Para
configurar
la
localización
utilizando
la
tablade
códigos de
país
y
ciudad
(Tabla
1).
Utilizar
el
+/-
para
seleccionar
el
país.
Confirmar
con OK.
Utilizar
el+/-botones seleccionar ciudad.
El
relé
de
tiempo
irá
al
menú
de
selección
de
código
de
área.
Pulsa OK para
confirmar
el
código
de
área
ingresado.
El
relé
de
tiempo
cambia
al
menú
de
programación.
3.2. Ubicación geográfica - NE
Confirmar OK.
Utilizar
el+/–botones
para
configurar
los
grados
de
valor.
El
relé
de
tiempo
cambiará
para
configurar
los
grados
de
latitud
norte.
Confirmar OK.
Utilice
los
botones
+/–
para
establecer
el
valor
de
los
minutos.
El
relé
de
tiempo
cambiará
para
configurar
los
minutos
de
latitud
norte.
Confirmar OK.
Utilizar
el+/–botones
para
configurar
los
grados
de
valor.
El
relé
de
tiempo
cambiará
para
configurar
los
grados
de
longitud
este.
Confirmar OK.
Utilice
los
botones
+/–
para
establecer
el
valor
de
los
minutos.
El relé de tiempo cambiará para configurar los minutos
de longitud este.
Utilizar
el OK para
confirmar
las
coordenadas
introducidas. El
relé
de
tiempo
cambia
al
menú
de
programación.
4
Operaciones Resultado Indicación de pantalla

EL CANAL ES UN NÚMERO DE CANAL SELECCIONADO Y CONFIGURACIÓN DE SUS PARÁMETROS - Chn1 (Chn2)
Pulsa MENÚ.
Use
los
botones
+/–
para
seleccionar
el
canal deseado
«Canal 1»
o
«Canal
2».
Seleccione
el
canal
1
o
2
y
confirme
con OK.
Utilizar
el +/–
para
seleccionar
el
parámetro
requerido.
Para introducir
el
parámetro
requerido,
presione OK.
Regrese al menú
principal
presionando
MENÚ.
El
relé
horario
pasará
al
menú
deprogramación.
Los
siguientes
parámetros
están
disponiblessegún
el
tipo
de
canal
establecido:
-
Astronómico- modo
de
funcionamiento,
descanso
nocturno,
corrección
de
amanecer/atardecer,
programas
anuales.
- Semanal- modo
de
trabajo,
agregar
unprograma,
editar
un
programa,
eliminar
un programa.
¡ATENCIÓN!
Antes
de
continuar
con
la
configuración,
configure
el
tipo
de
cada
canal
(consulte
la
sección
6 AJUSTES
DEL
SISTEMA).
4. CONFIGURACIÓN DEL CANAL 1 EN MODO «PROGRAMA ASTRONÓMICO»
4.1. Modo de funcionamiento - mod
En
el
menú
para
configurar
los
parámetros
del
canal,
use
el
+/–botones
para
seleccionar
«modificación»
Modo
de
ajuste
de
modo.
Confirmar OK.El
relé
de
tiempo
cambia
al
menú
de
modos de
funcionamiento.
MANUAL
DE OPERACIÓN
-
"mano",
OPERACIÓN AUTOMÁTICA
-
"auto».
El
relé
de
tiempo
saldrá
automáticamente
de
la
función
de
configuración
de
los
modos
de
funcionamiento
y
cambiará
al
menú
de programación
de
canales.
Confirmar OK.
Pulsa MENÚ, de
nuevo
volverá
al
menú principal.
¡ATENCIÓN!
El cambio de posición de los contactos en el modo FUNCIONAMIENTO MANUAL se realiza con los
botones «+» (para el primer canal) y «-» (para el segundo canal) en la posición principal (modo reloj).
Si el canal es semanal, en ausencia de registros de programa, el relé de tiempo cambiará automáticamente al
modo de FUNCIONAMIENTO MANUAL (no hay posibilidad de establecer el modo de FUNCIONAMIENTO
AUTOMÁTICO).
* FUNCIONAMIENTO SEMIAUTOMÁTICO - el modo se activa o desactiva mediante los botones «+» (para
el primer canal) y «-» (para el segundo canal) en la posición principal (modo reloj).
4.2.
Ajuste
de
corrección
de
la
hora
de
salida
y
puesta
del
sol
-
Corr
Es necesario ajustar la hora de salida y puesta del sol para cambiar el tiempo de encendido/apagado de la iluminación requerido para ajustarse a un área
específica (altura, densidad del edificio y otros parámetros que afectan la iluminación).
Por ejemplo:
Si, de acuerdo con el programa astronómico, la salida del sol se produce a las 5:00 y la puesta del sol a las 22:00, entonces, al usar la corrección de la salida del sol
en +30 minutos y la puesta del sol en -20 minutos, la iluminación se apagará a las 5:00 + 30 = 5: 30, y se encenderá 22: 00-20 = 21: 40. Cada día de la semana tiene
su propia celda de memoria que almacena la corrección establecida.
En
el
menú
para
configurar
los
parámetros
del
canal,
use
el+/–botones
para
seleccionar
el
modo
de
configuración
de
la
corrección
de
la
hora
de
salida
y
puesta
del
sol
«corr.».
Confirme
la
selección
con
elOKbotón.
Utilizar
el+/–
botones
para
seleccionar
el
día
para
el
que
se
va
a
configurar
la
corrección.
Confirmar
con OK.
Use
los
botones
+/-
para
establecer
el
valor
requerido.
5
Operaciones Resultado Indicación de pantalla
Mo TUWETHFRSASU
El
relé
de
tiempo
cambia
a
la
selección
del
día
para
el
que
desea
configurar
la corrección:
-
Solo
dias
de
la
semana:
Lu;
Ma; Mi;
Ju; Vi;
Sa
o
Do;
- Días
laborables: Lu; Ma; Mi; Ju; Vi;
-
Días de descanso: Sol
-
A diario:
Lu; Ma; Mi; Ju; Vi; Sol
El
relé
de
tiempo
cambiará
para
configurar
la
hora
de
inicio
del
amanecer.

El
relé
cambiará
automáticamente
para
ajustar
el
tiempo
de
entrada.
Confirmar OK.
Utilizar
el botón +/-
para
establecer
el
valor
deseado.
Confirmar OK.
Para
pasar
al
menú
de
programación,
debeesperar
30
segundos
o
pulsarMENÚ.
4.3.
Configuración
del
tiempo
de
descanso
nocturno
-
niGh
La función de descanso nocturno está diseñada para apagar la iluminación a una hora establecida durante el tiempo requerido.
Por ejemplo: es necesario en el período de 2:00 a 6:00 de lunes a viernes se apagó, luego puede configurar un descanso nocturno de lunes a viernes a las 2:00
durante 4 horas y durante este período la iluminación se apagará. Cada día de la semana tiene su propia celda de memoria que almacena el descanso nocturno
establecido.
En
el
menú
de
configuración
de
los
parámetros
del
canal,
use
el+/–
botones
para
seleccionar
«cerca»
modo
de
configuración
del
tiempo
de
descanso
nocturno.
Confirme
la
selección
con
el OK.
Utilizar
el +/– para
seleccionar
el
día
en
el
que
se
establece
el
descanso
nocturno.
Utilizar
el +/- para
seleccionar
los
días
deseados (día)
y
confirmar
con
el botón OK.
Utilizar
el +/-
para
configurar MINUTOS,
pulsa OK,
luego
HORAS.
El
relé
de
tiempo
cambia
a
la
selección
del
día
para
el
que
desea
configurar
el
descanso
nocturno:
-
Solo
dias
de
la
semana:
Lu;
Ma; Mi;
Ju; Vi;
Sa
o
Do;
-
Días
laborables: Lu; Ma; Mi; Ju; Vi;
-
Días de descanso: Sol
-
A diario:
Lu; Ma; Mi; Ju; Vi; Sol
El
relé
de
tiempo
cambiará
para
configurar
la
hora
de
inicio
del
descanso
nocturno.
Utilizar
el+/-botones
para
configurar MINUTOS,
pulsa OK,
luego HORAS.
Pulsa OK.
Para
completar
la
configuración
y
salir
al
menú
de
programación,
presione MENÚ.
El
relé
de
tiempo
cambiará
para
configurar
la
duración
del
descanso
nocturno,
primero
minutos,
luego
horas.
El
relé
de
tiempo
sugerirá
establecer
un
descanso
nocturno
para
el
día
siguiente.
4.4.
Programa
Anual
-
ProG
El programa anual está diseñado para forzar el encendido/apagado de la iluminación en una fecha específica, tiene prioridad sobre el programa astronómico y de
descanso nocturno, se ejecuta independientemente del estado actual del relé.
Adición
de
un
programa
anual
En
el
menú
de
configuración
de
los
parámetros
del
canal,
use
el+/–botones
para
seleccionar
«PROG»
Modo
de
configuración
del
programa
anual.
Confirmar
con OK.El
indicador
mostrará
el
modo
de
agregar programas
«Agregar».
Confirmar
con OK.
Utilizar
el+/–botones
para
establecer
el
valor
deseado.
A
continuación,
el
relé
de
tiempo
ofrecerá
seleccionar
una
celda
de
entre
las
libres
para
grabar
un
nuevo
programa.
6
Operaciones Resultado Indicación de pantalla
OFF
ON
OFF
ON
Mo TUWETHFRSASU
Mo
OFF
Mo
Mo
OFF
Mo

Confirmar
con
OK.
Utilizar
el
+/–
para
establecer
el
valor
deseado.
Confirmar
con
OK.
Utilizar
el
+/–
para
establecer
el
valor
deseado.
El
relé
de
tiempo
cambiará
a
la
selección
de
fecha:
primero
mes,
luego
día.
El
relé
de
tiempo
pasará
a
configurar
la
hora
de
inicio
del
programa:
primero
horas,
luego
minutos.
Confirmar
con OK.
Utilizar
el +/–
para
establecer
el
valor
deseado.
El
relé
de
tiempo
pasará
a
configurar
la
hora
de inicio
del
programa:
primero
horas,
luego minutos.
Pulse
OK
y
seleccione
el
estado
del
relé
para
este
período.
ON-activado
OFF-desactivado
Confirmar
con
OK.
Para
salir
al
menú
de
configuración
del
programa
anual,
pulse
MENÚ,
para
salir
al
modo
principal,
presione
MENÚ
otra
vez.
Se
creará
el
programa,
el
producto
ofrecerá
crear
el
próximo
programa.
Edición
del
programa
anual
pulsa
MENÚ.
Utilizar
el+/–
para
seleccionar
«PROG»
Modo
de configuración
del
programa
anual.
Confirmar
con
OK.
Confirmar
con
OK.
El
relé
horario
pasará
al
menú
de
programación.
El
indicador
mostrará
el
Modo
de
edición
para
programas.
El
relé
de
tiempo
ofrecerá
seleccionar
una
celda
de
las
programadas
para
editar
el
programa.
Confirmar
con
OK.
Además,
similar
al
párrafo
«Agregar
un
programa
anual».
7
Operaciones Resultado Indicación de pantalla

El
relé
horario
pasará
al
menú
de
programación.
El
indicador
mostrará
el
modo
de
eliminación
de
programas
«DEL».
Eliminación
de
un
programa anual
pulsa MENÚ.
Utilizar
el +/–
para
seleccionar
«PROG».
Modo
de configuración
del
programa
anual.
Confirmar
con OK.
Confirmar
con OK.El
relé
de
tiempo
le
ofrecerá
seleccionar
una
celda
de
las
programadas
para
borrar
el
programa.
El
número
de
programa
comenzará
a
parpadear.
Confirmar
con OK.
Utilizar
el +/-
para
seleccionar
el
programa
a borrar.
Confirmar
con OK.
Luego
el
producto
sugerirá
borrar
el
siguiente
programa
programado.
La
aparición
de
la
indicación
«PAGS
---»
en
el
indicador
indica
que
todos
los
programas
han
sido
borrados
y
en
un
segundo
el
relé
de
tiempo
irá
al
menú
para
configurar
el
programa
anual.
Para
salir
al
modo
principal
presione MENÚ.
5. CONFIGURACIÓN DEL CANAL 2 EN EL MODO «PROGRAMA SEMANAL»
5.1. Modo de funcionamiento - mod
En
el
menú
para
configurar
los
parámetros
del
canal,
use
el+/–
para
seleccionar
el
modo
de
configuración
de
los
modos
«modificación».
ConfirmarOK.El
relé
de
tiempo
cambia
al
menú
de
modosde
funcionamiento.
MANUAL
DEOPERACIÓN
-
"mano",
OPERACIÓN AUTOMÁTICA
-
"auto».
El
relé
de
tiempo
saldrá
automáticamente
de
la función
de
configuración
de
los
modos
de funcionamiento
y
cambiará
al
menú
de programación
de
canales.
Confirmar OK.
Prensado MENÚ de
nuevo
volverá
al
menú
principal.
¡ATENCIÓN!
El cambio de posición de los contactos en el modo FUNCIONAMIENTO MANUAL se realiza con los
botones «+» (para el primer canal) y "-" (para el segundo canal) en la posición principal (modo reloj).
Si el canal es semanal, en ausencia de registros de programa, el relé de tiempo cambiará automáticamente al
modo de FUNCIONAMIENTO MANUAL (no hay posibilidad de establecer el modo de FUNCIONAMIENTO
AUTOMÁTICO).
* FUNCIONAMIENTO SEMIAUTOMÁTICO - el modo se activa o desactiva mediante los botones «+» (para
el primer canal) y «-» (para el segundo canal) en la posición principal (modo reloj).
5.2.
Añadir
programa
on-off
-
Añadir
-
En
el
menú
de
configuración
de
los
parámetros
del
canal,
use
los
botones +/–
para
seleccionar
el
modo
de
configuración
del
programa
de
encendido/apagado
“Agregar”.
Confirmar OK.
Selecciona el programa libe utilizando los
botones
+/-.
El
relé
cambia
al
modo
de
selección
del
número
de
celda
de
memoria.
El
número
de
la
primera
ubicación
de
memoria
libre
se
muestra
automáticamente.
8
Operaciones Resultado Indicación de pantalla

Confirmar
con OK.
Horas
y
minutos
Confirmar
con OK.
Utilizar
el +/-
para
establecer
los
valores
requeridos.
Cancele
la
creación
del
programa
pulsando MENÚ.
El
relé
de
tiempo
cambia
para
configurar
los
parámetrosdel
programa
de
encendido /
apagado
único.
El
relé
de
tiempo
entrará
en
el
modo
deconfiguración
delos
siguientes
parámetros:
horas
y
minutos.
Ciclo
de
trabajo
Utilizar
el +/- para
configurar
el
CICLO
DE
FUNCIONAMIENTO.
Presione
el «-»
para
activar
el
programa,
presione
el
botón
«+»
para
cambiar
al
día
siguiente.
El
ciclo
de
desplazamiento
se
repite.
Confirme
con
Aceptar.
El
símbolo
encendido
del
día
de
la
semana
en
la
línea
superior
significa
que
el
programa
esta
activo
en
ese
día.
MoTuWeTHFRSAStu
¡ATENCIÓN!
Si
no
se
selecciona
ningún
día
de
la
semana,
el
programa
no
se
creará.
Para
cancelar
la
adición
de
un
programa
durante
su
configuración,
presione
MENÚ
Acción
(activar/desactivar)
Utilizar
el
+/-
para
configurar
la
función
adicional ON
o
OFF.
El
relé
de
tiempo
cambia
al
modo
de
configuración
del
tipo
de programa
[ENCENDIDO]
o
[APAGADO].
/
Confirmar
con OK.El
relé
de
tiempo
cambiará
automáticamente
al
modo
de
grabación
del
próximo
programa
semanal.
¡ATENCIÓN!
Los
programas
insertados
no
crean
pares
permanentes
para
encender
y
apagar
el
contacto.
Se
perciben
como
órdenes
únicas
y
se
ejecutan
según
la
cronología
de
un
tiempo
determinado.
Los
casos
de
superposición
de
tiempos de
conmutación
de
contactos
de
dos
pares
de
programas
ON-OFF,
o
comandos
individuales
se
muestran
en
los
diagramas:
Programa 1
Programa 2
Contacto
El tiempo de encendido de los contactos, establecido por un par de programas, puede ser más de 24 horas, lo que significa que el programa. El ON
[ON] se puede configurar para cualquier día de la semana (
por ejemplo martes 13.45
), y el programa OFF [OFF] para cualquier otro día de la semana
(
por ejemplo jueves 17.05
).
5.3.
Edición
del
programa
de
encendido
y
apagado
-
Editar
En
el
menú
para
configurar
los
parámetros
del
canal,
use
el +/-
para
seleccionar
el
modo
de
edición
del
programa
on-off
«Editar».
Confirmar
con
OK.El relé cambia al modo de selección del número de
celda de memoria. El número de la primera
ubicación de memoria utilizada se muestra
automáticamente.
Seleccione
el
número
de
celda
para
editar
usando
el
+/-.
Confirme
su
selección
con
el
OK.
Edite de
la
misma
manera
que
en
el
párrafo
10.
El relé de tiempo pasará a editar los parámetros del
programa único de encendido/apagado.
9
Programa 1
Programa 2
Contacto
Programa 1
Programa 2
Contacto
Programa 1
Programa 2
Contacto
Programa 1
Programa 2
Contacto
OFF1
ON2
ON1
OFF2
ON2
ON1
OFF2
OFF1
OFF2
ON1 OFF1
ON2
ON1 OFF1
OFF1
ON1
Operaciones Resultado deIndicación pantalla

5.4.
Eliminación
del
programa
de
encendido
y
apagado
-
dEL
En
el
menú
para
configurar
los
parámetros
del
canal,
use
el +/–
para
seleccionar
el
modo
de
borrado
del
programa
on-off
«DEL».
Confirmar
con OK.
Seleccione
la
celda
para
eliminar
programas
y
confirme
con OK.
Confirmar
con OK.
Pulsando MENÚ mientras
el
número
parpadea
cancelará
la
eliminación.
El
relé
cambia
al
modo
de
selección
del
número
de
celda
de
memoria.
El
número
de
la
primera
ubicación
de
memoria
utilizada
se
muestra
automáticamente.
El
relé
de
tiempo
entrará
en
modo
de
espera
para
confirmar
la
eliminación.
Señalizado
por
el
parpadeo
constante
del
número
de
celda
seleccionado.
La
celda
será
eliminada.
El
relé
de
tiempo
encenderá
el
siguiente
número
de
la
celda
programada.
Después
de
borrar
todas
las
celdas
programadas,
el
indicador
mostrará
tres
líneas
horizontales.
6. AJUSTES DEL SISTEMA - SYSt
-
Pulsa MENÚ.
Utilizar
el+/–botones
para
seleccionar
«SISt»
modo
de
configuración
del
sistema.
Confirmar OK.
Utilizar
el+/-para
seleccionar
los
ajustes
y
confirmar
con OK.
Pulsar MENÚ cambiará
al
nivel
más
alto.
El
programador
horario
pasa
al
menú
de
programación.
El
programador
de
tiempo
cambia
al
submenú
de
configuración
del
sistema
(chr1
–
chr2
–
dSt
–
CAL
–
LCd
–
CLEA–
info).
6.1. Selección del modo de funcionamiento del canal 1 - chr1
Confirmar OK.
Utilizar
el+/-
para
seleccionar
el
modo
de
funcionamiento
del
canal.
AStr-el
canal
está
configurado
para
funcionar
en
el
modo
de
retransmisión
astronómica.
TREL-el
canal
está
configurado
para
funcionar
en
el
modo
de
temporizador
semanal.
6.2. Selección del modo de funcionamiento del canal 2 - chr2
Confirmar OK.
Utilizar
el +/-
para
seleccionar
el
modo de
funcionamiento
del
canal.
AStr-el
canal
está
configurado
para
funcionar
en
el
modo
de
retransmisión
astronómica.
TREL-el
canal
está
configurado
para
funcionar
en
el
modo
de
temporizador
semanal.
6.3. Cambio de hora automático - dSt
Confirmar OK.
Pulsa +/- para
seleccionar
el
modo:
*
con
CAMBIO
DE
HORA
AUTOMATICO
-
«auto»;
*
sin
CAMBIO
HORARIO
AUTOMATICO
-
«apagado».
El
relé
de
tiempo
cambiará
al
menú
del
modo
de
apagado
automático
para
modificar
el
tiempo
(apagado
automático).
10
Operaciones Resultado Indicación
de
pantalla

Operaciones Resultado Indicación
de
pantalla
6.4. Ajuste horario del reloj del sistema - CAL
El ajuste de tiempo es el valor de los segundos con los que se calibra el reloj del sistema en la escala
semanal. Rango de ajuste: +/- 99 seg.
Por ejemplo: si el reloj se adelanta 4 segundos por semana, entonces se debe configurar el valor del parámetro
4, si se atrasa, menos 4.
Confirmar OK.
Utilizar
el+/-
para
establecer
el
número
de
segundos
para
la
corrección
de
tiempo.
Confirmar OK.
El relé de tiempo mostrará el valor actual de la
corrección de tiempo.
6.5. INDICADOR DE CONTRASTE - LCD
Confirmar OK.
Utilizar
el +/-
para
establecer
el
valor
de
contraste
deseado:
posición:
-3
(más
bajo),
+3
(más
alto).
Confirmar OK.
El
relé
de
tiempo
mostrará
el
valor
actual
del
contraste
del
indicador.
6.6. ELIMINAR TODOS LOS PROGRAMAS - CLEA
El
texto
en
la
pantalla
parpadeará
continuamente esperando
la
confirmación
de
eliminación.
Confirmar OK.
Presione
el OK
para
confirmar.
Para volver
sin
borrar
-
presione MENÚ.
6.7. INFORMACIÓN DEL SISTEMA - inFo
Confirmar OK.
Confirmar OK.El
relé
de
tiempo
mostrará
la
información
de
la
versión
del
sistema.
11

Dimensiones Condiciones
de
realización
y
enajenación
Los
productos
se
venden
a
través
de
la
red
de
distribuidores
de
la
empresa.
Desechar
como
equipo
electrónico.
30
Tabla
1
Potencia de carga
Relé
contacto
corriente
7мкФ
15
Energía-
eficiente
lámparas,
Lámparas LED
con el
electrónico
inicio
dispositivo
Incandescente,
halógeno,
eléctrico
calentadores
Luminiscente
lamparas
Compensado
fluorescente
lamparas
35 20
16A 2000W 1000W 750W 500W
Categoría
de
aplicación
АC-1 АC-3 АC-15 DC-1
230V
24V
Activo
carga
Eléctrico
motores
contactor
Bobinas
No inductivo
carga de CC
16A 4000VA 0,9kW 750VA 16A 0,35A
Servicio
Se
deben
respetar
las
“Normas
de
Seguridad
y
Operación
Técnica
de
las
Instalaciones
Eléctricas
de
Consumo”
en
el
servicio
del
producto. Si
se
detectan
daños
externos
visibles
en
el
producto,
se
prohibirála
operación
posterior.
El
servicio
de
garantía
lo
realiza
el
fabricante
del
producto.
El
servicio
posventa
del
producto
es
realizado
por
el
fabricante
alas
tarifas
vigentes.
El
producto
debe
embalarse
en
su
embalaje
original
o
en
otro, excluyendo
daños
mecánicos
antes
de
enviarlo
a
reparar.
Requisito
de
seguridad
El
producto
debe
operarse
de
acuerdo
con
los
requisitose stablecidos
en
el
manual
de
instrucciones. Antes
de
la
instalación,
asegúrese
de
que
no
haya
daños externos
en
el
dispositivo.
No
se
debe
utilizar
un
producto
que
presente
daños
mecánicos
externos.
No
instale
relés
sin
protección
en
lugares
donde
haya
agua
o
luz
solar.
Los
relés
deben
ser
instalados
y
reparados
por
personal
calificado.Debe
seguir
el
diagrama
de
cableado
para
conectar
un
relé.
Garantía
El
período
de
garantía
del
producto
es
36
meses
desde
la
fecha
de venta.
La
vida
útil
es
10
años.
El
período
de
garantía
se
calcula
a
partir
de
la
fecha
de
fabricación
enausencia
de
una
fecha
de
venta.
El
productor
garantiza
la
reparación
o
sustitución
de
un
productoaveriado
sujeto
a
las
normas
de
funcionamiento
y
la
ausencia
dedaños
mecánicos.
Los
siguientes
casos
no
se
aceptan
para
reparaciones
en
garantía:
-
productos
presentados
sin
pasaporte
de
empresa;
-
productos
que
estaban
en
garantía;
-
productos
con
daños
mecánicos;
-
productos
que
tengan
daños
en
la
etiqueta
holográfica.
La
empresa
fabricante
se
reserva
el
derecho
de
realizarcambios
estructurales
sin
avisar
al
consumidor
con
el
fin
demejorar
la
calidad
y
no
afectar
las
características
técnicas
y
elfuncionamiento
del
producto.
Condiciones
de
transporte
y
almacenamiento.
El
transporte
de
producto
puede
ser
realizado
por
cualquier
tipo
detransporte
cerrado,
asegurando
la
preservación
de
los
productosenvasados
de
las
precipitaciones
mecánicas
y
atmosféricas.
Elalmacenamiento
del
producto
debe
realizarse
en
el
embalaje
delfabricante
en
habitaciones
cerradas
con
ventilación
natural
a
unatemperatura
ambiente
de
menos
50°
a
más
50°C
y
una
humedad
relativa
de
no
más
del
80%
a
una
temperatura
de
+25°
C.
12
45
62
90
65

Tabla 1. Códigos de países y ciudades
Código Ciudad
código Código Ciudad
código
País Mostrar Ciudad País Mostrar Ciudad
España ESP 1
2
3
4
5
6
7
8
9
10
11
12
13
14
15
17
18
19
20
21
22
23
24
25
26
27
28
29
30
31
32
33
34
35
36
37
38
39
40
41
42
43
44
45
46
47
48
49
50
51
52
53
54
55
56
57
58
59
60
61
62
63
64
66
67
68
69
70
71
72
73
74
75
76
77
78
79
80
81
82
83
84
A coruña
Alicante
Albacete
Alcalá de Henares
Alcobendas
Alcorcón
Algeciras
Algeciras
Almería
Avilés
Badajoz
Badalona
Baracaldo
Barcelona
Bilbao
Burgos
Cáceres
Cádiz
Cartagena
Castellón
Ceuta
Córdoba
Cornellá
Coslada
Donostia
Dos Hermanas
El Puerto de Santa María
Elche
Ferrol
Fuenlabrada
Getafe
Getxo
Gijón
Gerona
Granada
guadalajara
Huelva
Jaén
Jerez
Las Palmas
Las Rozas de Madrid
Leganés
León
L'hospitalet
de llobregat
Lleida
Logroño
Lorca
Lugo
Madrid
Málaga
Marbella
Mataró
Móstoles
Murcia
Ourense
Oviedo
Palencia
Palma
Pamplona
Parla
Pontevendra
Pozuelo de Alarcón
Reus
Sabadell
Salamanca
San Cristóbal de Laguna
San Fernando
San Sebastián de Los R.
Sant Boi de Ilobregat
Santa Col. de Grabanet
Santa Cruz de Tenerife
Santander
Santiago de Compostela
Sevilla
Talavera de la Reina
Tarragona
Telde
Terrassa
Torrejón de Ardoz
Valencia
Valladolid
Vigo
Vitoria
Zaragoza
Francia FRA 1
2
3
4
5
6
7
8
9
10
11
12
13
14
15
17
18
19
20
21
22
23
24
25
26
27
28
29
30
31
32
33
34
35
36
37
38
39
40
41
42
43
44
45
46
47
48
49
50
51
52
53
54
55
56
57
58
59
60
61
62
63
64
66
67
68
69
70
71
72
73
74
75
76
77
78
79
80
81
82
83
84
85
86
87
88
89
90
Aix-en-Provence
Amiens
Angers
Antibes
Antony
Argenteuil
Asnières-sur-Seine
Aubervillers
Aulnay-sous-bois
Aviñón
Beauvais
Besançon
Béziers
Burdeos
Boulogne-Billancourt
Bourges
Brest
Caen
Calais
Cannes
Cergy
Chambéry
Champigny-sur-Marne
Charleville-Mezieres
Cholet
Clermont-Ferrand
Colmar
Colombes
Courbevoie
Créteil
Dijon
Drancy
Dunkerque
Grenoble
Issy-Les-Moulineaux
La Rochelle
La Seyne-sur-Mer
El Havre
le Mans
Levallois-Perret
Lille
Limoges
Lorient
lyon
Marsella
Mérignac
Metz
Montpellier
Montreuil
Mulhouse
Nancy
Nanterre
Nantes
Neuilly-sur-Seine
Nîmes
Niort
Ruidoso-le-Grand
Orleáns
París
Pau
Perpiñán
pessac
poitiers
Quimper
Reims
Rennes
Roubaix
Ruan
Rueil-Malmaison
San Dionisio
Santo Etienne
Saint-Malo
Saint-Maur-des-Fosses
San Nazario
San Quintín
Sarcelles
Estrasburgo
Tolón
tolosa
turismo
Excursiones
Troyes
Valencia
Vannes
Venissieux
Versalles
Villeneuve-d'Ascq
villeurbanne
Vitry-sur-Seine
13
16 16
65 65
Nice

Portugal PRT 1
2
3
4
5
6
7
8
9
10
11
12
13
14
15
17
18
19
20
21
22
23
24
25
26
27
28
29
30
31
32
33
34
Agualva-cacém
Alcabideche
Algueirão-mem Martins
Almada
Amadora
Amorá
Aveiro
Barreiro
Braga
Cámara de Lobos
Cascais
Castelo Blanco
Coímbra
Corroios
Ermesinda
Évora
Faraón
Funchal
Guimarães
Leiria
Lisboa
Loures
Maia
Odivelas
Oeiras S. Juliao da Barra
Portimão
Oporto
Queluz
Río
de mouro
Río Tinto
São Domingos de Rana
Sesimbra
Setúbal
Vila Nova de Gaia
14
16

Menú de programación
1
2
3
4
5
6
MENÚ
KPHD-NFC-ASTRO3
Fecha
Hora
Localización
Canal
1
Canal
2
Ajustes
del
sistema
Algoritmo de programación:
Configuración de la fecha y la hora (1-2)
+ 1 + 1 + 1
1
MENÚ
Fecha
OK
Año
-
1OK
Mes
-
1OK
Día
-
1OK
+ 1
-
1 OK
+ 1
-
1 OK
+ 1
-
1 OK
2Hora OK Horas Minutos Zona horaria
MENÚ
Configurar la localización (3)
MENÚ
+ 1
- 1
+ 1
33.1
Localización OK Tabla
de códigos OK Código de país OK Código de ciudad - 1 OK
+ 1
- 1OK
+ 1
- 1OK
+ 1
- 1OK
+ 1
- 1
3.2
Geogr. localizar OK Latitud grados Latitud mín. Grado de longitud Longitud mín. OK
MENÚ
15

Configuración del canal 1 en el modo de retransmisión astronómica (4)
MENÚ
4Canal 1 OK 4.1 Modificación. de opera OK Auto OK
Manual OK
+ 1 + 1
- 1OK
+ 1
- 1OK
4.2
Ajustamiento OK Elección de días - 1OK
Editando otros días
sol ajuste de tiempo Soles. ajuste de tiempo
MENÚ
+ 1 + 1 + 1 + 1 + 1
4.3
descanso nocturno OK Elección de días - 1OK
Editando otros días
Tiempo (min) - 1OK Tiempo (horas) - 1OK Duración (min) - 1OK Duración (horas) - 1 OK
MENÚ
MENÚ
+ 1
- 1OK
+ 1
- 1OK
+ 1
- 1OK
+ 1
- 1OK
4.4 prog. anual OK Agregar OK prog. núm. Mes Fecha Tiempo (horas)
MENÚ + 1
- 1OK
+ 1
- 1OK
+ 1
- 1OK
+ 1
- 1
Tiempo (min) Duración (horas) Duración (min) Estado OK
Agregar otros programas
MENÚ
+ 1
- 1OK
+ 1
- 1OK
+ 1
- 1OK
+ 1
- 1OK
Edición OK prog. núm. Mes Fecha Tiempo (horas)
+ 1
- 1OK
+ 1
- 1OK
+ 1
- 1OK
+ 1
- 1OK
Tiempo (min) Duración (horas) Duración (min) Estado
Editar otros programas
MENÚ
+ 1 + 1
- 1OK
prog. eliminar OK prog. núm. - 1OK
Eliminar otros programas
prog. núm.
MENÚ
MENÚ
16

17
Configuración del canal 2 en el modo de temporizador semanal (5)
MENÚ
5Canal 2 OK 5.1 Modo de oper. OK Auto OK
Manual OK
+ 1
- 1OK
+ 1
- 1OK
+ 1
- 1OK
5.2 Agregar OK prog. núm. Mes Fecha
+ 1
- 1OK
+ 1
- 1OK
+ 1
- 1
Tiempo (horas) Elección de días Estado OK
Agregar otros programas
MENÚ
MENÚ
+ 1
- 1OK
+ 1
- 1OK
+ 1
- 1OK
5.3 Edición OK prog. núm. Mes Fecha
+ 1
- 1OK
+ 1
- 1OK
+ 1
- 1
Tiempo (horas) Elección de días Estado OK
Editar otros programas
MENÚ
+ 1 + 1
- 1OK
5.4
prog. eliminar OK prog. núm. - 1OK
Eliminar otros programas
prog. núm.
MENÚ
MENÚ

Configuración del sistema (6)
MENÚ
6Ajuste sistema OK 6.1 OK OK
MENÚ OK
6.2 Camb. modo OK Astronómico OK
Timer OK
6.3 Hora
de
verano OK Encendido OK
Apagado OK
+ 1
- 1OK
6.4 Ajuste de tiempo OK Corr.
+ 1
- 1OK
6.5 Relación de contraste OK Valor de contraste
+ 1
- 1OK
6.6 Reiniciar OK Restablecer S/N
6.7
Sist. información
nOK Versión de software OK
MENÚ
18
Camb. modo Astronómico
Timer

Notas
19

¡No
deseche
este
dispositivo
con
otros
residuos!
De
acuerdo
con
la
ley
de
aparatos
usados,
los
residuos
eléctricos
domésticos
pueden
ser
trasladados
gratuitamente
y
en
cualquier
cantidad
a
un
punto
de
recogida
especial.
Los
desechos
electrónicos
en
vertederos
o
abandonados
en
la
naturaleza
representan
una
amenaza
para
el
medio
ambiente
y
la
salud
humana.
Sello
de
control
técnico Fecha
de
lanzamiento Fecha
de
venta
¡Sin metales preciosos!

Function
The cyclic programmable time relay is designed to turn on / off
the lighting at sunset and sunrise, depending on the
geographical coordinates of the terrain and / or turn on
according to the weekly program.
The control panel and indication
The operation principle
The cyclic programmable time relay can use any channel in one
of the modes (the relay can be in such a mode that one channel
will work in astronomical mode, and the second one in the
weekly timer mode):
Astronomical - relies on the current information about the
geographic coordinates of the terrain, forms program points to
turn on and off lighting.
The exact on and off time is determined based on the
calculation of the position of the sun relative to the horizon. A
night break can be set between the programmed on and off
points, thereby temporarily disconnecting the load in order to
save energy.
Weekly timer - turning on and off devices or circuits at a
specified time in cycles: daily, weekly, workdays or weekends.
The cyclic programmable time relay KPHD-NFC-ASTRO3
Temper's code: 0767668
The operating manual
Supply voltage, V
Max load current, А
Max load power
Contacts
Battery type
Clock rate error
during the day, s, no more than
The power consumption, W
Correction Range of sunrise -
sunsets, minutes
Maximum duration of the night
break, hh: mm
Number of annual programs
Number of weekly programs
Discreteness of installation of programs, minutes
Battery backup life
hours of real time, years
Operating temperature range,°С
Degree of protection
Switching durability, cycles
Pollution degree
Overvoltage category
Dimensions (WxHxD), mm
Connection
Enclosure type
Weight, g
Mounting
Tightening torque of the screw connection, Nm
24...264 AC/DC
16 AC-1 / 250V
The table 2
2NO/NC (2 contacts of changeover)
СR2032
±1
1,5
± 240
23:59
10
100
1
5
-25...+50
IР20
5
>10
2
III
35х90х65
screw clamps 2,5 mm²
2S
144
on 35mm DIN rail
0,5
The technical characteristics
Mo – Monday; Tu – Tuesday; We – Wednesday; Th – Thursday;
Fr – Friday; Sа – Saturday; Su – Sunday.
Description of button functions
Menu:
- entering the programming menu;
- return to the previous menu, exit to the main mode.
+ [plus]:
- changing the setting to +1 in the selected programming
position (holding the button leads to a constant cyclical change
of the position by +1);
- in manual mode: transverse [ON] or [OFF] contact of the 1st
channel.
- in automatic mode:
a) short-term stealing: enabling or disabling the semi-automatic
mode;
b) as effort and holding for more than 2 seconds: display of the
time of sunrise, sunset, taking into account the correction for
channel 1 (when using the channel in astronomical).
- [minus]:
- changing the setting to -1 in the selected programming position
(holding the button leads to a constant cyclical change of the
position by -1);
- in manual mode: transverse [ON] or [OFF] contact of the 2nd
channel.
- in automatic mode:
a) short-term stealing: enabling or disabling the semi-automatic
mode;
b) as an effort and holding for more than 2 seconds: display of
the time of sunrise, sunset, taking into account the correction for
channel 2 (when using the channel in astronomical).
Complete set of delivery
Time relay….................................................................1 piece
The operating manual…...............................................1 piece
The packaging…..........................................................1 piece
Contacts
1-5 (2-7)
Software switch-on
point
POFF
Night break
Software shutdown
point
PON
Temper International, S.L.
Industrial Poligono de Granda, Nave 18
E-33199 Granda-Siero (Asturias), Spain
www.grupotemper.com
MоTu We Th Fr Sa Su
ş ş
12
ON ON
OFF OFF
The date and time /
The program input
The operating mode
indicator/
The automatic
operation
Day of the week/
Cycle of the operation
MENU
OK
+
Alarm/ Status of
contacts
The micro button
of operation
KPHD-NFC-ASTRO3

Description of contacts
Power supply: 3-4 time relay power supply;
Channel 1: 1-5 «normally open» position;
1-6 position «normally closed»;
Channel 2: 2-7 position «normally open»;
2-8 position «normally closed».
Connection diagrams
Connection diagram of the product and the load to the 230V
network.
Wiring diagram using a contactor, load current more than 16A.
Connection diagram for devices and loads powered by different
sources.
Rн1, Rн2 - connected loads;
К – the coil of the contactor.
Connection
1. Disconnect the power supply.
3. Connect the power wires according to the diagram.
2. Mount the relay on a DIN rail in the enclosure.
4. Connect the load according to the diagram.
5. Supply power.
Description of operating modes and
functions
Automatic mode - automatic operation by programmed
switch-on and switch-off points [clock icon on the indicator of
the corresponding channel].
Semi-automatic mode - the ability to manually turn on / off the
relay contacts during operation in automatic mode. The change
will remain in effect until the next on / off based on the auto cycle
[flashing clock icon of the corresponding channel].
2
1234
5678
N
L
Rн1 Rн2
1234
5678
L
Rн1
Rн2
N24-264V
AC/DC
ATTENTION!
In semi-automatic mode, the position of the relay contacts will be
opposite to the running program. Semi-automatic mode is active
only until the end of the current cycle of automatic operation, for
example, entering the semi-automatic mode during the day will turn
on the light until the start time comes, based on the astronomical
program. Then the product returns to automatic mode, and the
lighting remains on until the morning shutdown). The mode is
switched on or off using the «+/–» buttons (for the first and second
channels, respectively) in the clock display mode (main mode).
Manual mode: [ON] - contact is permanently closed, or [OFF] -
contact is permanently open. When automatic mode is off
(there is no icon on the indicator).
Astronomical sunrise and sunset are the moments when the
center of the solar disk touches the horizon.
Programmed switch-on and switch-off points - contact
switch-on and switch-off times, assigned according to
astronomical sunrise / sunset, night breaks or weekly program.
Night Break is a user-defined, temporary shutdown between
software on and off points.
Localization (location) - geographic coordinates and time
zone of the settlement where the relay is installed. You can
enter your own geographic location and time zone (UTC)
coordinates, or use city codes.
City codes - to facilitate the entry of information, some
localities have been assigned codes (coordinates and codes
are given in Table 1).
Correction - acceleration or deceleration of on / off in relation
to astronomical sunrise and sunset times: ± 240 minutes - on /
off time correction relative to sunrise / sunset time.
Automatic time change - change from winter to summer time
and back. There are options for working with automatic
transition, or without it. The time relay is in the function of
binding to the time zone, so the transition will occur relative to
local time.
1234
5678
N
L
Rн1 Rн2
K K

3
Programming
Operations
Result provides buttons
Display indication
START
Connect power supply.
Install the required time relay program using the
control panel.
The time relay will switch to operating mode,
the set time will appear on the indicator.
If there are no any program records, the time
relay will automatically start in manual mode.
If the time relay contains entries made
earlier, then it will start working in
accordance with them.
1. INSTALLATION OF THE DATE- dAtE
Press MENU.
Use the +/– buttons to select the «date» setting
mode.
Confirm with OK.
Use the +/– buttons to set the parameters;
switch-over to the next parameter by pressing
the OK button. Return to the main menu without
saving changes - by pressing the button MENU.
Enter the entered date with the OK button.
The time relay will go to the programming
menu.
The time relay will proceed to setting the next
parameters: year, month and day.
The time relay will automatically exit the date
programming function and go to the
programming menu.
The selection of the date simultaneously
indicates the current time: winter or summer.
ATTENTION!
Ability to disable the automatic changeover from winter to summer time
(see item 6 «System settings»).
2. SETTING THE CURRENT TIME - hour
Press MENU.
Use the +/– buttons to select the installation
mode time «hour».
Confirm the entered time with the OK button.
Confirm the entered time zone with the OK
button.
The time relay switch-over to the
programming menu.
The time relay will proceed to setting the next
parameters: hours, minutes.
Use the +/- buttons to set the parameters;
move to the next parameter by pressing the
OK button. Return to the previous position by
pressing the MENU button.
The time relay will switch to time zone
selection. The time zone for Belarus is +3.
Use the +/– buttons to set the belt.
The time relay will automatically exit the time
programming function and go to the
programming menu.
Mo TUWETHFRSASU
ş
1
ON
OFF
12:3807
2
ON
OFF
Mo TUWETHFRSASU
ş
1
ON
OFF
12:3807
2
ON
OFF
Mo TUWETHFRSASU
ş
1
ON
OFF
20 19:07
2
ON
OFF
Mo TUWETHFRSASU
ş
1
ON
OFF
2
ON
OFF
Mo TUWETHFRSASU
ş
1
ON
OFF
2
ON
OFF

4
Operations
Result provides buttons
Display indication
3. LOCALIZATION (LOCATION) - Loc
Press MENU.
Use the +/– buttons to select the «loc» date
setting mode.
The time relay will switch over to the
programming menu.
The time relay will sitch over the position
setting menu (CodE - n-E).
n-E - manual setting of the consumer's
geographic position.
CodE - select a location from the coordinate
code table.
3.1. Coordinate codes - CodE
Confirm with OK.
To configure localization using the country and
city code table (Table 1).
Use the +/- buttons to select country.
Confirm with OK.
Use the +/- buttons to select a city.
Press OK to confirm the entered area code.
The relay will switch to selecting the country
code.
The time relay will go to the area code
selection menu.
The time relay switches to the programming
menu.
3.2. Geographical location - n-E
Confirm OK.
Use the +/– buttons to set the value degrees.
Confirm OK.
Use the +/– buttons to set the minutes value.
Confirm OK.
Use the +/– buttons to set the value degrees.
Confirm OK.
Use the +/– buttons to set the minutes value.
Use the OK button to confirm the entered
coordinates.
The time relay will switch to setting the
degrees of north latitude.
The time relay will switch to setting the
minutes of north latitude.
The time relay will switch to setting the
degrees of east longitude
The time relay will switch to setting minutes
of east longitude
The time relay switches to the programming
menu.
/

5
Operations
Result provides buttons
Display indication
CHANNEL IS A SELECTING CHANNEL NUMBER AND SETTING ITS PARAMETERS - Chn1 (Chn2)
Press MENU.
Use the +/– buttons to select the desired
channel «Chn 1» or «Chn 2».
Use the +/– buttons to select the required
parameter. To enter the required parameter,
press OK. Return to main menu by pressing
MENU.
Select channel 1 or 2 and confirm with OK.
The time relay will go to the programming
menu.
The following parameters are available
depending on the set channel type:
- for astronomical - operating mode, night
break, sunrise/sunset correction, annual
programs.
- for weekly - working mode, adding a
program, editing a program, deleting a
program.
ATTENTION!
Before further configuration, configure the type of each channel (see section 6 SYSTEM SETTINGS).
4. CONFIGURATION OF CHANNEL 1 IN THE «ASTRONOMIC PROGRAM» MODE
4.1. Mode of operation - mod
In the menu for setting the channel parameters,
use the +/– buttons to select the «mod» mode
setting mode.
Confirm OK.
Confirm OK.
Pressing MENU again will return to the main
menu.
The time relay switches over to the operating
modes menu. MANUAL OPERATION -
«hAnd», AUTOMATIC OPERATION -
«auto».
The time relay will automatically exit the
function of setting the operating modes and
switch over to the channel programming
menu.
ATTENTION!
Changing the position of the contacts in the MANUAL OPERATION mode is carried out with the
«+» (for the first channel) and «-» (for the second channel) buttons in the main position (clock
mode).
If the channel is weekly, then in the absence of program records, the time relay will automatically
switch over to the MANUAL OPERATION mode (there is no possibility to set the AUTOMATIC
OPERATION mode).
* SEMI-AUTOMATIC OPERATION - the mode is switched on or off using the «+» (for the first
channel) and «-» (for the second channel) buttons in the main position (clock mode).
4.2. Sunrise-sunset time correction setting - Corr
Adjusting the sunrise-sunset time is necessary to shift the lighting on / off time required to adjust to a specific area (height,
building density, and other parameters that affect the illumination.
For example:
If, according to the astronomical program, sunrise occurs at 5:00, and sunset at 22:00, then when using the sunrise correction
by +30 minutes, and the sunset by -20 minutes, the lighting will turn off at 5: 00 + 30 = 5: 30, and will turn on 22: 00-20 = 21: 40.
Each day of the week has its own memory cell that stores the set correction.
In the menu for setting the channel parameters,
use the +/– buttons to select the mode of setting
the correction of the sunrise-sunset time
«Corr».
Confirm the selection with the OK button.
Use the +/– buttons to select the day for which
the correction is to be set.
Confirm with OK.
Use the +/- buttons to set the required value.
The time relay switches to the selection of
the day for which the correction needs to be
made:
- single days of the week: Mon; Tue; Wed;
Thurs; Fri; Sat or Sun;
- working days: Mon; Tue; Wed; Thu; Fri
(Monday to Friday);
- weekend: Sat; Sun (Saturday and
Sunday);
- daily: Mon; Tue; Wed; Thu; Fri; Sat; Sun
(Monday to Sunday).
The time relay will switch to adjusting the
sunrise time.
Mo TUWETHFRSASU

6
Operations
Result provides buttons
Display indication
Confirm OK. Use the +/- buttons to set the
desired value.
Confirm OK.
To switch over to the programming menu, you
must wait 30 seconds or press MENU.
The relay will automatically switch to
adjusting the entry time.
4.3. Setting the night break time - niGh
The night break function is designed to turn off the lighting at a set time for the required duration.
For example: it is necessary in the period from 2:00 to 6:00 on weekdays it was turned off, then you can set a night break on
weekdays at 2:00 for 4 hours and for this period the lighting will be turned off. Each day of the week has its own memory cell that
stores the set night break.
In the channel parameters setting menu, use
the +/– buttons to select the «niGh» night break
time setting mode.
Confirm the selection with the OK button.
Use the +/– buttons to select the day for which
the night break is set.
Use the +/- buttons to select the required days
(day) and confirm with the OK button.
Use the +/- buttons to set MINUTES, press OK,
then HOURS.
Use the +/- buttons to set MINUTES, press OK,
then HOURS.
Press OK. To complete the setup and exit to the
programming menu, press MENU.
The time relay switches to the selection of
the day for which you want to set the night
break:
- single days of the week: Mon; Tue; Wed;
Thu; Fri; Sat or Sun;
- working days: Mon; Tue; Wed; Thu; Fri;
- days off: Sat; Sun;
- daily: Mon; Tue; Wed; Thu; Fri; Sat; Sun/
The time relay will switch to setting the night
break start time.
The time relay will switch to setting the
duration of the night break, first minutes, then
hours.
The time relay will suggest setting a night
break for the next day.
4.4. Annual Program - ProG
The annual program is designed to forcibly turn on / off the lighting on a specific date, has priority over the astronomical and night
break program, it is executed regardless of the current state of the relay.
Adding an annual program
In the channel parameters setting menu, use
the +/– buttons to select the «ProG» annual
program setting mode.
Confirm with OK.
Confirm with OK.
Use the +/– buttons to set the desired value.
The indicator will display the mode of adding
programs «Add».
Next, the time relay will offer to select a cell
from among the free ones for recording a
new program.
Mo TUWETHFRSASU
OFF
ON
OFF
ON
Mo
OFF
Mo
Mo
OFF
Mo

7
Operations
Result provides buttons
Display indication
Confirm with OK.
Use the +/– buttons to set the desired value.
Confirm with OK.
Use the +/– buttons to set the desired value.
Confirm with OK.
Use the +/– buttons to set the desired value.
Press OK and select the relay state for this
period.
Confirm with OK.
To exit to the menu for setting the annual
program, press MENU, to exit to the main
mode, press MENU again.
The time relay will switch to date selection:
first month, then day.
The time relay will move to setting the start
time of the program: first hours, then
minutes.
The time relay will move to setting the start
time of the program: first hours, then
minutes.
ON - enabled
OFF - disabled
The program will be created, the product will
offer to create the next program.
Editing the annual program
Press MENU.
Use the +/– buttons to select the «ProG»
annual program setting mode.
Confirm with OK.
Confirm with OK.
Confirm with OK.
Further, similar to the paragraph «Adding an
annual program».
The time relay will go to the programming
menu.
The indicator will display the Edit mode for
programs.
The time relay will offer to select a cell from
the programmed ones for editing the
program.

8
Operations
Result provides buttons
Display indication
Deleting an annual program
Press MENU.
Use the +/– buttons to select the «ProG»
annual program setting mode.
Confirm with OK.
Confirm with OK.
Confirm with OK.
Use the +/– buttons to select the program to be
deleted.
Confirm with OK.
To exit to the main mode press MENU.
The time relay will go to the programming
menu.
The indicator will show the mode of deleting
programs «dEL».
The time relay will offer you to select a cell
from the programmed ones to delete the
program.
The program number will start flashing.
Then the product will suggest deleting the
next programmed program. The appearance
of the indication «P ---» on the indicator
indicates that all programs have been
deleted and in a second the time relay will go
to the menu for setting the annual program.
5. SETTING CHANNEL 2 IN THE «WEEKLY PROGRAM» MODE
5.1. Mode of operation - mod
In the menu for setting channel parameters, use
the +/– buttons to select the mode of setting the
modes «mod».
Confirm OK.
Confirm OK.
Pressing MENU again will return to the main
menu.
The time relay switches to the operating
modes menu. MANUAL OPERATION -
«hAnd», AUTOMATIC OPERATION -
«auto».
The time relay will automatically exit the
function of setting the operating modes and
switch over to the channel programming
menu.
ATTENTION!
Changing the position of the contacts in the MANUAL OPERATION mode is carried out with the
«+» (for the first channel) and "-" (for the second channel) buttons in the main position (clock
mode).
If the channel is weekly, then in the absence of program records, the time relay will automatically
switch over to the MANUAL OPERATION mode (there is no possibility to set the AUTOMATIC
OPERATION mode).
* SEMI-AUTOMATIC OPERATION - the mode is switched on or off using the «+» (for the first
channel) and «-» (for the second channel) buttons in the main position (clock mode).
5.2. Add on-off program - Add
- In the channel parameters setting menu, use
the +/– buttons to select the “Add” on-off
program setting mode.
Confirm OK.
Select the cell number from the number of free
ones using the +/- buttons.
The relay switches to the mode of selecting
the memory cell number. The number of the
first free memory location is automatically
displayed.

9
Operations
Result provides buttons
Display indication
Confirm with OK.
Hours and minutes
Confirm with OK.
Use the +/- buttons to set the required values.
Cancel program creation by pressing
MENU button.
The time relay switches to setting the
parameters of the single on / off program.
The time relay will go into the mode of setting
the next parameters: hours and minutes.
Work cycle
Use the +/- buttons to set the OPERATION
CYCLE.
Press the «-» button to activate the program,
press the «+» button to switch over to the next
day.
The scrolling cycle is repeated.
Confirm with OK.
Lit symbol of the day of the week in the top
line means that the program is active on
that day.
ATTENTION!
If no day of the week is selected, the program will not be created. To cancel adding a program during its setup, press MENU
Action (enable / disable)
Use the +/- buttons to set the additional function
ON or OFF.
Confirm with OK.
The time relay switches to the program type
setting mode ON [ON] or OFF [OFF].
The time relay will automatically switch to the
recording mode of the next weekly program.
ATTENTION!
Inserted programs do not create permanent pairs to turn the contact on and off.
They are perceived as single commands and are executed according to the chronology of a given time. The cases of
overlapping switching times of contacts of two pairs of programs ON-OFF, or single commands are shown in the diagrams:
The time of switching on the contacts, set by a pair of programs, can be more than 24 hours, which means that the program.
The ON [ON] can be set for any day of the week (for example Tuesday 13.45), and the program OFF [OFF] for any other day of
the week ( for example Thursday 17.05).
5.3. Editing the on-off program - Edit
In the menu for setting the channel parameters,
use the +/- buttons to select the edit mode of the
on-off program «Edit».
Confirm with OK.
Select the cell number to edit using the +/-
buttons.
Confirm your selection with the OK button.
Edit in the same way as in paragraph 10.
The relay switches to the mode of selecting
the memory cell number. The number of the
first used memory location is automatically
displayed.
The time relay will go on to edit the
parameters of the single on/off program.
Mo TUWETHFRSASU
ON1
Contact
Prog 1
OFF1
ON2OFF2
Prog 2
Contact
Prog 1
Prog 2
ON1OFF1
ON2
/
ON1OFF1
ON2
Contact
Prog 1
Prog 2
ON1OFF1
OFF2
Contact
Prog 1
Prog 2
ON1OFF2
OFF1
Contact
Prog 1
Prog 2

10
Operations
Result provides buttons
Display indication
5.4. Removing the on-off program - dEL
In the menu for setting channel parameters, use
the +/– buttons to select the mode of deleting
the on-off program «dEL».
Confirm with OK.
Select the cell to remove programs and confirm
with OK.
Confirm with OK.
Pressing MENU while the number is flashing
will cancel the deletion.
The relay switches to the mode of selecting
the memory cell number. The number of the
first used memory location is automatically
displayed.
The time relay will go into standby mode to
confirm deletion.
Signaled by constant flashing of the selected
cell number.
The cell will be deleted. The time relay will
light up the next number of the programmed
cell. After deleting all programmed cells, the
indicator will display three horizontal lines.
6. SYSTEM SETTINGS - SYSt
- Press MENU.
Use the +/– buttons to select the «SYSt»
system setting mode.
Confirm OK.
Use the +/- buttons to select the settings and
confirm with OK. Pressing MENU will switch to
the highest level.
The time relay goes to the programming
menu.
The time relay switches to the system
settings submenu (chr1 – chr2 – dSt –
CAL – LCd – CLEA – inFo).
6.1. Selecting the operating mode of channel 1 - chr1
Confirm OK. Use the +/- buttons to select the
channel operation mode.
AStr - the channel is configured to work in
the astronomical relay mode.
trEL - the channel is configured to work in the
weekly timer mode.
6.2. Selecting the operating mode of channel 2 - chr2
Confirm OK. Use the +/- buttons to select the
channel operation mode.
AStr - the channel is configured to work in
the astronomical relay mode.
trEL - the channel is configured to work in the
weekly timer mode.
6.3. Automatic time change - dSt
Confirm OK. Press +/- to select mode:
* with AUTOMATIC TIME CHANGE - «auto»;
* without AUTOMATIC TIME CHANGE - «off».
The time relay will switch to the auto-off
mode menu of altering time (auto – off).

11
Operations
Result provides buttons
Display indication
6.4. Time adjustment of the system clock - CAL
Time adjustment is the value of the seconds by which the system clock is calibrated in the weekly
scale. Adjustment range: +/- 99 sec.
For example: if the clock is ahead by 4 seconds per week, then the value of parameter 4 must be
set, if it is behind - minus 4.
Confirm OK.
Use the +/- buttons to set the number of
seconds for the time correction.
Confirm OK.
The time relay will show the current value of
the time correction.
6.5. INDICATOR CONTRAST - LCd
Confirm OK.
Use the +/- buttons to set the required contrast
value: position: -3 (lowest), +3 (highest).
Confirm OK.
The time relay will show the current value of
the indicator contrast.
6.6. REMOVING ALL PROGRAMS - CLEA
Confirm OK.
Press the OK button to confirm. To return
without deleting - press MENU.
The text on the screen will flash continuously
awaiting confirmation of deletion.
6.7. SYSTEM INFORMATION - inFo
Confirm OK.
Confirm OK.
Time relay will display system version
information.

12
65
30
15
35
90
62
45
20
Case Dimensions
Service
It
must
be
respected
«Safety
Rules
and
Technical
Operation
of
Consumer
Electrical
Installations»
in
servicing
the
product.
If
visible
external
damage
to
the
product
is
detected,
further
operation
will
be
prohibited.
Warranty
service
is
performed
by
the
manufacturer
of
the
product.
After-sales
service
of
the
product
is
performed
by
the
manufacturer
at
current
rates.
The
product
must
be
packed
in
its
original
or
other
packaging,
excluding
mechanical
damage
before
sending
for
repair.
Safety
requirement
The
product
must
be
operated
in
accordance
with
the
requirements
set
forth
in
the
instruction
manual.
Before
installation,
make
sure
that
there
are
no
external
damages
to
the
device.
A
product
that
has
external
mechanical
damage
must
not
be
used.
Do
not
install
relays
without
protection
in
places
where
water
or
sunshine
is
possible.
Relays
must
be
installed
and
serviced
by
qualified
personnel.
You
must
follow
the
wiring
diagram
in
connecting
a
relay.
Warranty
The
warranty
period
of
the
product
is
36
months
from
the
date
of
sale.
Service
life
is
10
years.
The
warranty
period
is
calculated
from
the
date
of
manufacture
in
the
absence
of
a
sale
date.
Producer
guarantees
the
repair
or
replacement
of
a
failed
product
subject
to
operating
rules
and
the
absence
of
mechanical
damage.
The
following
cases
are
not
accepted
for
warranty
repairs:
-
products
presented
without
an
enterprise
passport;
-
products
that
were
under
warranty;
-
products
with
mechanical
damage;
-
products
having
damage
to
the
holographic
sticker.
The
manufacturer
company
reserves
the
right
to
make
structural
changes
without
notifying
the
consumer
in
order
to
improve
quality
and
do
not
affect
the
technical
characteristics
and
operation
of
the
product.
Transportation
and
storage
conditions
The
transport
of
product
can
be
carried
out
by
any
type
of
closed
transport,
ensuring
the
preservation
of
packaged
products
from
mechanical
and
atmospheric
precipitation. The
storage
of
the
product
should
be
carried
out
in
the
manufacturer's
packaging
in
closed
rooms
with
the
natural
ventilation
at
an
ambient
temperature
of
minus
50°
to
plus
50°C
and
a
relative
humidity
of
not
more
than
80%
at
a
temperature
of
+25°C.
Realization and disposal conditions
The products are sold through the dealer network of the
enterprise.
Dispose of as electronic equipment.
Load power
Relay
contact
current
Application category
DC-1АC-15АC-3
Incandescent,
halogen,
electric
heaters
Luminescent
lamps
Compensated
fluorescent
lamps
Energy-
efficient
lamps,
LED lamps
with the
electronic
starter
device
Electric
motors
Contactor
Coils
Non-inductive
DC load
24V 230V
АC-1
Active
load
7мкФ
0,35А
750VA
2000W1000W 750W 500W
0,9kW
16A
16A 16А
4000VA
Table 1

13
Table 1. Сountry and city codes
Coutry
Country
code
Display
City
code
City
Spain
ESP
1
2
3
4
5
6
7
8
9
10
11
12
13
14
15
16
17
18
19
20
21
22
23
24
25
26
27
28
29
30
31
32
33
34
35
36
37
38
39
40
41
42
43
44
45
46
47
48
49
50
51
52
53
54
55
56
57
58
59
60
61
62
63
64
65
66
67
68
69
70
71
72
73
74
75
76
77
78
79
80
81
82
83
84
A coruna
Alacant
Albacete
Alcala de Henares
Alcobendas
Alcorcon
Algeciras
Algeciras
Almeria
Aviles
Badajoz
Badalona
Barakaldo
Barcelona
Bilbao
Burgos
Caceres
Cadiz
Cartagena
Castello
Ceuta
Cordoba
Cornella
Coslada
Donostia
Dos Hermanas
El Puerto de St. Maria
Elx
Ferrol
Fuenlabrada
Getafe
Getxo
Gijon
Girona
Granada
Guadalajara
Huelva
Jaen
Jerez
Las Palmas
Las Rozas de Madrid
Leganes
Leon
L'hospitalet de llobregat
Lleida
Logrono
Lorca
Lugo
Madrid
Malaga
Marbella
Mataro
Mostoles
Murcia
Ourense
Oviedo
Palencia
Palma
Pamplona
Parla
Pontevendra
Pozuelo de Alarcon
Reus
Sabadell
Salamanca
San Cristobal de Laguna
San Fernando
San Sebastian de Los R.
Sant Boi de Ilobregat
Santa Col. de Grabanet
Santa Cruz de Tenerife
Santander
Santiago de Compostela
Sevilla
Talavera de la Reina
Tarragona
Telde
Terrassa
Torrejon de Ardoz
Valencia
Valladolid
Vigo
Vitoria
Zaragoza
Coutry
Country
code
Display
City
code
City
France
FRA
1
2
3
4
5
6
7
8
9
10
11
12
13
14
15
16
17
18
19
20
21
22
23
24
25
26
27
28
29
30
31
32
33
34
35
36
37
38
39
40
41
42
43
44
45
46
47
48
49
50
51
52
53
54
55
56
57
58
59
60
61
62
63
64
65
66
67
68
69
70
71
72
73
74
75
76
77
78
79
80
81
82
83
84
85
86
87
88
89
90
Aix-en-provence
Amiens
Angers
Antibes
Antony
Argenteuil
Asnieres-sur-seine
Aubervillers
Aulnay-sous-bois
Avignon
Beauvais
Besancon
Beziers
Bordeaux
Boulogne-Billancourt
Bourges
Brest
Caen
Calais
Cannes
Cergy
Chambery
Champigny-sur-marne
Charleville-Mezieres
Cholet
Clermont-Ferrand
Colmar
Colombes
Courbevoie
Creteil
Dijon
Drancy
Dunkerque
Grenoble
Issy-Les-Moulineaux
La Rochelle
La Seyne-sur-Mer
Le Havre
Le Mans
Levallois-Perret
Lille
Limoges
Lorient
Lyon
Marseille
Merignac
Metz
Montpellier
Montreuil
Mulhouse
Nancy
Nanterre
Nantes
Neuilly-sur-Seine
Nice
Nimes
Niort
Noisy-le-Grand
Orleans
PAris
Pau
Perpignan
Pessac
Poitiers
Quimper
Reims
Rennes
Roubaix
Rouen
Rueil-Malmaison
Saint-Denis
Saint-Etienne
Saint-Malo
Saint-Maur-des-Fosses
Saint Nazaire
Saint-Quentin
Sarcelles
Strasbourg
Toulon
Toulouse
Tourcoing
Tours
Troyes
Valence
Vannes
Venissieux
Versailles
Villeneuve-d'Ascq
Villleurbanne
Vitry-sur-Seine

14
Portugal
PRT
1
2
3
4
5
6
7
8
9
10
11
12
13
14
15
16
17
18
19
20
21
22
23
24
25
26
27
28
29
30
31
32
33
34
Agualva-cacem
Alcabideche
Algueirao-mem Martins
Almada
Amadora
Amora
Aveiro
Barreiro
Braga
Camara de Lobos
Cascais
Castelo Branco
Coimbra
Corroios
Ermesinde
Evora
Faro
Funchal
Guimaraes
Leiria
Lisboa
Loures
Maia
Odivelas
Oeiras S. Juliao da Barra
Portimao
Porto
Queluz
Rio de mouro
Rio Tinto
Sao Domingos de Rana
Sesimbra
Setubal
Vila Nova de Gaia

15
Programming menu
Programming algorithm:
Setting the date and time (1-2)
Setting up localization (3)
ОК
ОК
ОК
ОК ОК ОК
ОК ОК
Date Year Month Day
+1
-1
+1
-1
+1
-1
+1
-1
+1
-1
+1
-1
Time
1
2Hours Minutes Time zone
MENU
MENU
+1
-1
+1
-1
+1
-1
+1
-1
+1
-1
+1
-1
ОК ОК ОК ОК
ОК ОК ОК ОК ОК
Localization Сode table Country code City code
Latitude deg.Laitude min. Longitude deg. Longitude min.Geogr. locat.
3.1
3.2
MENU
MENU
3
Date
Time
Localization
Channel 1
1
2
3
4
5Channel 2
System settings
6
MENU
KPHD-NFC-ASTRO3

16
Setting up channel 1 in Astronomical relay mode (4)
MENU
MENU
ОК ОК
Channel 1 ОК
ОК
Mod. of oper. Auto
Manual
4.1
MENU
+1
-1
+1
-1
+1
-1
+1
-1
ОК
ОК ОК
+1
-1 ОК
+1
-1 ОК
+1
-1 ОК
+1
-1 ОК
ОК ОК ОК
Adjustment
Time (min) Time (hrs) Duration (min) Duration (hrs)Night break
Choice of days
Choice of days
Suns. time adj.
Sunr. time adj.
Editing other days
Editing other days
Add other programs
Edit other programs
4.2
4.3
MENU
MENU
MENU
ОК
Annual prog. ОК
Add
ОК
Editing
+1
-1
+1
-1
ОК
ОК
Prog. num.
Prog. num.
+1
-1 ОК
Month
+1
-1 ОК
Month
+1
-1
+1
-1
+1
-1
+1
-1
ОК
ОК
ОК
ОК
Time (hrs)
Time (hrs)
+1
-1 ОК
Time (min)
+1
-1 ОК ОК
Duration (min)
+1
-1
Status
+1
-1 ОК
Duration (hrs)
+1
-1 ОК
Time (min)
+1
-1 ОК
Duration (min)
+1
-1 ОК
Status
+1
-1 ОК
Duration (hrs)
Date
Date
Remove other programs
MENU
ОК
Prog. remov.
+1
-1
+1
-1
ОК ОК
Prog. num. Prog. num.
4.4
MENU
MENU
4

17
Setting up Channel 2 in weekly timer mode (5)
MENU
Status
ОК ОК ОК
ОК
Channel 2 Mode of oper. Auto
Manual
5.1
5.2
5.4
Add other programs
MENU
ОК
Add
+1
-1 ОК
Prog. num.
+1
-1 ОК
Month
+1
-1
+1
-1
+1
-1
+1
-1
ОК ОК ОК
ОК
Time (hours)
Date
Remove other programs
MENU
ОК
Prog. remov.
+1
-1
+1
-1
ОК ОК
Prog. num. Prog. num.
Choice of days
5.3
MENU
ОК
Editing Prog. num.
+1
-1 ОК
+1
-1 ОК
Month
+1
-1 ОК
Date
MENU
MENU
5
Edit other programs
Status
+1
-1
+1
-1
+1
-1
ОК ОК ОК
Time (hours) Choice of days

18
System settings (6)
+1
-1
ОК ОК
Syst. set.ОК
ОК
Chan. mode Astronomical
Timer
6.1
ОК ОК
ОК
Astronomical
Timer
6.2 Chan. mode
ОК ОК
ОК
On
Off
6.3 Summer time
ОК ОК
Corr. value
6.4 Time adjust.
+1
-1
ОК ОК
Сontrast val.
6.5 Сontrast ratio
+1
-1
ОК ОК
Reset Y/N
6.6 Reset
ОК ОК
Software ver.
6.7
Syst. info
MENU
MENU
MENU
6

19
Notes

Do not dispose of this device with other waste!
In accordance with the law on used equipment, household electrical waste can be transferred free of charge and in any
quantity to a special collection point. E-waste disposed of in landfills or abandoned in nature poses a threat to the
environment and human health.
Date of sale
Release date
No precious metals!
Technical control stamp
-
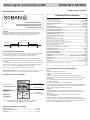 1
1
-
 2
2
-
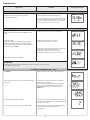 3
3
-
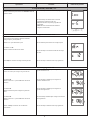 4
4
-
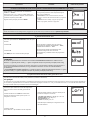 5
5
-
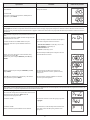 6
6
-
 7
7
-
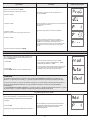 8
8
-
 9
9
-
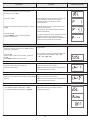 10
10
-
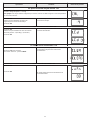 11
11
-
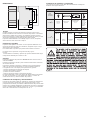 12
12
-
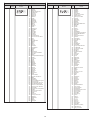 13
13
-
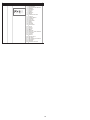 14
14
-
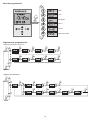 15
15
-
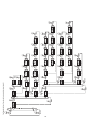 16
16
-
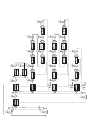 17
17
-
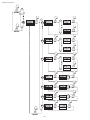 18
18
-
 19
19
-
 20
20
-
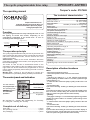 21
21
-
 22
22
-
 23
23
-
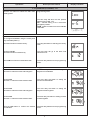 24
24
-
 25
25
-
 26
26
-
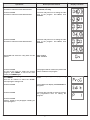 27
27
-
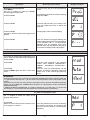 28
28
-
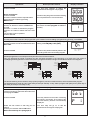 29
29
-
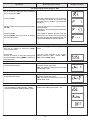 30
30
-
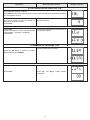 31
31
-
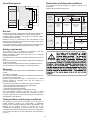 32
32
-
 33
33
-
 34
34
-
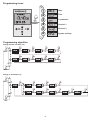 35
35
-
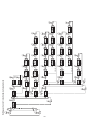 36
36
-
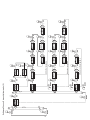 37
37
-
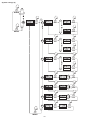 38
38
-
 39
39
-
 40
40


koban KPHD-NFC-ASTRO3 El manual del propietario
- Tipo
- El manual del propietario
en otros idiomas
- English: koban KPHD-NFC-ASTRO3 Owner's manual
Artículos relacionados
Otros documentos
-
KPS KPS-IH-DIGI1ASTRO El manual del propietario
-
LG LE5016D-NH Manual de usuario
-
LG LE4008D-NH Manual de usuario
-
Vicon Valerus VMS Guía del usuario
-
-
Endres+Hauser BA Liquiline CM44P Instrucciones de operación
-
Munters Platinum Touch Rotem One Manual de usuario
-
Dedicated Micros DV-IP Express Installation & Operation Guide
-
Vemer Simply AST Manual de usuario
-