Electrolux EN3881AOX Manual de usuario
- Categoría
- Congeladores
- Tipo
- Manual de usuario

EN3881AOW
EN3881AOX
................................................ .............................................
EN FRIDGE FREEZER USER MANUAL 2
EL ΨΥΓΕΙΟΚΑΤΑΨΎΚΤΗΣ ΟΔΗΓΊΕΣ ΧΡΉΣΗΣ 26
ES FRIGORÍFICO-
CONGELADOR
MANUAL DE
INSTRUCCIONES
51

CONTENTS
1. SAFETY INFORMATION . . . . . . . . . . . . . . . . . . . . . . . . . . . . . . . . . . . . . . . . . . . . . . . . . . . 3
2. PRODUCT DESCRIPTION . . . . . . . . . . . . . . . . . . . . . . . . . . . . . . . . . . . . . . . . . . . . . . . . . 5
3. CONTROL PANEL . . . . . . . . . . . . . . . . . . . . . . . . . . . . . . . . . . . . . . . . . . . . . . . . . . . . . . . 6
4. DAILY USE . . . . . . . . . . . . . . . . . . . . . . . . . . . . . . . . . . . . . . . . . . . . . . . . . . . . . . . . . . . . . 9
5. HELPFUL HINTS AND TIPS . . . . . . . . . . . . . . . . . . . . . . . . . . . . . . . . . . . . . . . . . . . . . . . 14
6. CARE AND CLEANING . . . . . . . . . . . . . . . . . . . . . . . . . . . . . . . . . . . . . . . . . . . . . . . . . . . 16
7. WHAT TO DO IF… . . . . . . . . . . . . . . . . . . . . . . . . . . . . . . . . . . . . . . . . . . . . . . . . . . . . . . 17
8.
INSTALLATION . . . . . . . . . . . . . . . . . . . . . . . . . . . . . . . . . . . . . . . . . . . . . . . . . . . . . . . . . 19
9. NOISES . . . . . . . . . . . . . . . . . . . . . . . . . . . . . . . . . . . . . . . . . . . . . . . . . . . . . . . . . . . . . . 23
10.
TECHNICAL DATA . . . . . . . . . . . . . . . . . . . . . . . . . . . . . . . . . . . . . . . . . . . . . . . . . . . . . . 24
11. ENVIRONMENT CONCERNS . . . . . . . . . . . . . . . . . . . . . . . . . . . . . . . . . . . . . . . . . . . . . . 25
WE’RE THINKING OF YOU
Thank you for purchasing an Electrolux appliance. You’ve chosen a product that brings with it
decades of professional experience and innovation. Ingenious and stylish, it has been designed
with you in mind. So whenever you use it, you can be safe in the knowledge that you’ll get great
results every time.
Welcome to Electrolux.
Visit our website for:
Get usage advice, brochures, trouble shooter, service information:
www.electrolux.com
Register your product for better service:
www.electrolux.com/productregistration
Buy Accessories, Consumables and Original spare parts for your appliance:
www.electrolux.com/shop
CUSTOMER CARE AND SERVICE
We recommend the use of original spare parts.
When contacting Service, ensure that you have the following data available.
The information can be found on the rating plate. Model, PNC, Serial Number.
Warning / Caution-Safety information
General information and tips
Environmental information
Subject to change without notice.
2
www.electrolux.com

1.
SAFETY INFORMATION
In the interest of your safety and to ensure
the correct use, before installing and first
using the appliance, read this user manual
carefully, including its hints and warnings.
To avoid unnecessary mistakes and acci-
dents, it is important to ensure that all
people using the appliance are thoroughly
familiar with its operation and safety fea-
tures. Save these instructions and make
sure that they remain with the appliance if
it is moved or sold, so that everyone using
it through its life will be properly informed
on appliance use and safety.
For the safety of life and property keep
the precautions of these user's instruc-
tions as the manufacturer is not responsi-
ble for damages caused by omission.
1.1 Children and vulnerable
people safety
• This appliance is not intended for use
by persons (including children) with re-
duced physical, sensory or mental ca-
pabilities, or lack of experience and
knowledge, unless they have been giv-
en supervision or instruction concerning
use of the appliance by a person re-
sponsible for their safety.
Children should be supervised to en-
sure that they do not play with the ap-
pliance.
• Keep all packaging well away from chil-
dren. There is risk of suffocation.
• If you are discarding the appliance pull
the plug out of the socket, cut the con-
nection cable (as close to the appliance
as you can) and remove the door to
prevent playing children to suffer elec-
tric shock or to close themselves into it.
• If this appliance featuring magnetic
door seals is to replace an older appli-
ance having a spring lock (latch) on the
door or lid, be sure to make that spring
lock unusable before you discard the
old appliance. This will prevent it from
becoming a death trap for a child.
1.2 General safety
WARNING!
Keep ventilation openings, in the appli-
ance enclosure or in the built-in structure,
clear of obstruction.
• The appliance is intended for keeping
foodstuff and/or beverages in a normal
household as explained in this instruc-
tion booklet.
• Do not use a mechanical device or any
artificial means to speed up the thawing
process.
• Do not use other electrical appliances
(such as ice cream makers) inside of re-
frigerating appliances, unless they are
approved for this purpose by the manu-
facturer.
• Do not damage the refrigerant circuit.
• The refrigerant isobutane (R600a) is
contained within the refrigerant circuit of
the appliance, a natural gas with a high
level of environmental compatibility,
which is nevertheless flammable.
During transportation and installation of
the appliance, be certain that none of
the components of the refrigerant cir-
cuit become damaged.
If the refrigerant circuit should become
damaged:
– avoid open flames and sources of ig-
nition
– thoroughly ventilate the room in
which the appliance is situated
• It is dangerous to alter the specifica-
tions or modify this product in any way.
Any damage to the cord may cause a
short-circuit, fire and/or electric shock.
WARNING!
Any electrical component (power
cord, plug, compressor) must be
replaced by a certified service
agent or qualified service person-
nel to avoid hazard.
1.
Power cord must not be length-
ened.
2.
Make sure that the power plug is
not squashed or damaged by the
back of the appliance. A squashed
or damaged power plug may over-
heat and cause a fire.
3.
Make sure that you can come to
the mains plug of the appliance.
ENGLISH 3

4.
Do not pull the mains cable.
5.
If the power plug socket is loose,
do not insert the power plug. There
is a risk of electric shock or fire.
6.
You must not operate the appli-
ance without the lamp cover (if
foreseen) of interior lighting.
• This appliance is heavy. Care should be
taken when moving it.
• Do not remove nor touch items from
the freezer compartment if your hands
are damp/wet, as this could cause skin
abrasions or frost/freezer burns.
• Avoid prolonged exposure of the appli-
ance to direct sunlight.
• Bulb lamps (if foreseen) used in this ap-
pliance are special purpose lamps se-
lected for household appliances use
only. They are not suitable for house-
hold room illumination.
1.3 Daily Use
• Do not put hot pot on the plastic parts
in the appliance.
• Do not store flammable gas and liquid
in the appliance, because they may ex-
plode.
• Do not place food products directly
against the air outlet on the rear wall. (If
the appliance is Frost Free)
• Frozen food must not be re-frozen once
it has been thawed out.
• Store pre-packed frozen food in ac-
cordance with the frozen food manu-
facturer's instructions.
• Appliance's manufacturers storage rec-
ommendations should be strictly ad-
hered to. Refer to relevant instructions.
• Do not place carbonated or fizzy drinks
in the freezer compartment as it creates
pressure on the container, which may
cause it to explode, resulting in damage
to the appliance.
• Ice lollies can cause frost burns if con-
sumed straight from the appliance.
1.4 Care and cleaning
• Before maintenance, switch off the ap-
pliance and disconnect the mains plug
from the mains socket.
• Do not clean the appliance with metal
objects.
• Do not use sharp objects to remove
frost from the appliance. Use a plastic
scraper.
• Regularly examine the drain in the re-
frigerator for defrosted water. If neces-
sary, clean the drain. If the drain is
blocked, water will collect in the bottom
of the appliance.
1.5 Installation
For electrical connection carefully
follow the instructions given in
specific paragraphs.
• Unpack the appliance and check if
there are damages on it. Do not con-
nect the appliance if it is damaged. Re-
port possible damages immediately to
the place you bought it. In that case re-
tain packing.
• It is advisable to wait at least four hours
before connecting the appliance to al-
low the oil to flow back in the compres-
sor.
• Adequate air circulation should be
around the appliance, lacking this leads
to overheating. To achieve sufficient
ventilation follow the instructions rele-
vant to installation.
• Wherever possible the back of the
product should be against a wall to
avoid touching or catching warm parts
(compressor, condenser) to prevent
possible burn.
• The appliance must not be located
close to radiators or cookers.
• Make sure that the mains plug is acces-
sible after the installation of the appli-
ance.
• Connect to potable water supply only (If
a water connection is foreseen).
1.6 Service
• Any electrical work required to do the
servicing of the appliance should be
carried out by a qualified electrician or
competent person.
• This product must be serviced by an
authorized Service Centre, and only
genuine spare parts must be used.
4
www.electrolux.com

1.7 Environment Protection
This appliance does not contain
gasses which could damage the
ozone layer, in either its refrigerant
circuit or insulation materials. The
appliance shall not be discarded
together with the urban refuse and
rubbish. The insulation foam con-
tains flammable gases: the appli-
ance shall be disposed according
to the applicable regulations to
obtain from your local authorities.
Avoid damaging the cooling unit,
especially at the rear near the heat
exchanger. The materials used on
this appliance marked by the sym-
bol
are recyclable.
2. PRODUCT DESCRIPTION
2 64 8 1110
13
1
12
3 975
1
CrispFresh drawer
2
Freshzone drawer
3
Glass shelves
4
Dynamic Air Cooling
5
Humidity control
6
Bottle rack
7
Control panel
8
Butter shelf
9
Door shelves
10
Half shelf
11
Bottle shelf
12
Freezer baskets
13
Rating plate
ENGLISH 5

3. CONTROL PANEL
1
27
6
5
3
4
1
Display
2
Temperature regulator
Plus button
3
Temperature regulator
Minus button
4
Mode button
5
DrinksChill button and ON/OFF but-
ton
6
Freezer compartment button
7
Fridge compartment button
It is possible to change predefined sound
of buttons to a loudly one by pressing to-
gether Mode button and Minus button for
some seconds. Change is reversible.
3.1 Display
AC
D
E
G
P
Q
R
B
O
N
L
M
F
I
K
J
H
• A. Demo function
• B. Fridge temperature indicator
• C. Holiday function
• D. FridgeEco Mode function
• E. FreeStore function
• F. Extra Humidity function
•G. Shopping function
• H. Water filter
• I. Drinks Chill function
•J. Time
• K. Freezer temperature indicator
• L. Action Freeze function
• M. Freezer OFF mode
•N. Air filter
• O. FreezerEco Mode function
• P. Alarm indicator
• Q. Child lock function
• R. Fridge OFF mode
3.2 Switching on
To switch on the appliance do these
steps:
1.
Connect the mains plug to the power
socket.
2.
Press the ON/OFF button if the dis-
play is off.
3.
If "dEMo" appears on the display, the
appliance is in demonstration mode.
Refer to "What to do if...".
4.
The temperature indicators show the
set default temperature.
To select a different set temperature refer
to "Temperature regulation".
If the door remains open for some
minutes, the light will turn off auto-
matically. The light is reset by
closing and opening the door it-
self.
3.3 Switching off
To switch off the appliance do these
steps:
1.
Press the ON/OFF button for 5 sec-
onds.
2.
The display switches off.
3.
To disconnect the appliance from the
power disconnect the mains plug
from the power socket.
3.4 Switching on the fridge
To switch on the fridge:
1.
Press the fridge temperature regula-
tor.
Or:
6
www.electrolux.com

1.
Press the Mode button until the cor-
responding icon appears.
The Fridge Off indicator flashes.
2.
Press the OK button to confirm.
3.
The fridge Off indicator goes off.
To select a different set temperature refer
to "Temperature regulation".
3.5 Switching off the fridge or
freezer
To switch off the fridge or freezer:
1.
Press the Mode button until the cor-
responding icon appears.
The fridge or freezer Off indicator
flashes.
The fridge or freezer temperature indi-
cator shows dashes.
2.
Press the OK button to confirm.
3.
The fridge or freezer Off indicator is
shown.
3.6 Holiday function
This function allows you to keep the re-
frigerator closed and empty during a long
holiday period without the formation of a
bad smell.
The fridge compartment must be
empty with holiday function on.
To switch on the function:
1.
Press the Mode button until the cor-
responding icon appears.
The Holiday indicator flashes.
The fridge temperature indicator
shows the set temperature.
2.
Press the OK button to confirm.
The Holiday indicator is shown.
To switch off the function:
1.
Press the Mode button until the Holi-
day indicator flashes.
2.
Press the OK button to confirm.
3.
The Holiday indicator goes off.
The function switches off by se-
lecting a different fridge set tem-
perature.
3.7 High temperature alarm
An increase in the temperature in the
freezer compartment (for example due to
an earlier power failure) is indicated by:
• flashing the alarm and freezer tempera-
ture indicators
• sounding of buzzer.
To reset the alarm:
1.
Press any button.
2.
The buzzer switches off.
3.
The freezer temperature indicator
shows the highest temperature
reached for a few seconds. Then
show again the set temperature.
4.
The alarm indicator continue to flash
until the normal conditions are re-
stored.
When the alarm has returned the alarm in-
dicator goes off.
3.8 Eco Mode function
For optimal food storage select the Eco
Mode function.
To switch on the function:
1.
Press the Mode button until the cor-
responding icon appears.
The Eco Mode indicator flashes.
The temperature indicator shows the
set temperature for a few seconds:
– for the fridge: +5°C
– for the freezer: -18°C
2.
Press the OK button to confirm.
The Eco Mode indicator is shown.
To switch off the function:
1.
Press the Mode button until the Eco
Mode indicator flashes.
2.
Press the OK button to confirm.
3.
The Eco Mode indicator goes off.
The function switches off by se-
lecting a different set temperature.
3.9 Drinks Chill function
The Drinks Chill function is to be used as
a safety warning when placing bottles in
the freezer compartment.
To switch on the function:
1.
Press the Mode button until the cor-
responding icon appears.
The Drinks Chill indicator flashes.
ENGLISH 7

The Timer shows the set value (30 mi-
nutes) for a few seconds.
2.
Press the Timer regulator button to
change the Timer set value from 1 to
90 minutes.
3.
Press the OK button to confirm.
The Drinks Chill indicator is shown.
The Timer start to flash.
At the end of the countdown the Drinks
Chill indicator flashes and an audible
alarm sounds:
1.
Remove the drinks contained in the
freezer compartment.
2.
Switch off the function.
To switch off the function:
1.
Press the Mode button until the
Drinks Chill indicator flashes.
2.
Press the OK button to confirm.
3.
The Drinks Chill indicator goes off.
It is possible to deactivate the function at
any time.
3.10 Action Freeze function
To switch on the function:
1.
Press the Mode button until the cor-
responding icon appears.
The Action Freeze indicator flashes.
The freezer temperature indicator
shows
symbol for a few seconds.
2.
Press the OK button to confirm.
The Action Freeze indicator is shown.
An animation starts.
This function stops automatically after 52
hours.
To switch off the function before its auto-
matic end:
1.
Press the Mode button until the Ac-
tion Freeze indicator flashes.
2.
Press the OK button to confirm.
3.
The Action Freeze indicator goes off.
4.
The Eco Mode function is restored if it
has been previously selected.
The function switches off by se-
lecting a different freezer set tem-
perature.
3.11 Extra Humidity function
If you need to increase the humidity in the
refrigerator, we suggest activating the Ex-
tra Humidity function.
To switch on the function:
1.
Press the Mode button until the cor-
responding icon appears.
The Extra Humidity indicator flashes.
2.
Press the OK button to confirm.
The Extra Humidity indicator is
shown.
To switch off the function:
1.
Press the Mode button until the Extra
Humidity indicator flashes.
2.
Press the OK button to confirm.
3.
The Extra Humidity indicator goes off.
3.12 Shopping function
If you need to insert a large amount of
warm food, for example after doing the
grocery shopping, we suggest activating
the Shopping function to chill the prod-
ucts more rapidly and to avoid warming
the other food which is already in the re-
frigerator.
To switch on the function:
1.
Press the Mode button until the cor-
responding icon appears.
The Shopping indicator flashes.
The fridge temperature indicator
shows the set temperature for a few
seconds.
2.
Press the OK button to confirm.
The Shopping indicator is shown.
The Shopping function shuts off automati-
cally after approximately 6 hours.
To switch off the function before its auto-
matic end:
1.
Press the Mode button until the
Shopping indicator flashes.
2.
Press the OK button to confirm.
3.
The Shopping indicator goes off.
4.
The Eco Mode function is restored if it
has been previously selected.
The function switches off by se-
lecting a different fridge set tem-
perature.
3.13 Child Lock function
To lock any possible operation through
the buttons select the Child Lock function.
To switch on the function:
1.
Press the Mode button until the cor-
responding icon appears.
8
www.electrolux.com

2.
The Child Lock indicator flashes.
3.
Press the OK button to confirm.
The Child Lock indicator is shown.
To switch off the function:
1.
Press the Mode button until the Child
Lock indicator flashes.
2.
Press the OK button to confirm.
3.
The Child Lock indicator goes off.
4. DAILY USE
4.1 Thawing
Deep-frozen or frozen food, prior to being
used, can be thawed in the refrigerator
compartment or at room temperature, de-
pending on the time available for this op-
eration.
Small pieces may even be cooked still fro-
zen, directly from the freezer: in this case,
cooking will take longer.
4.2 Storage of frozen food
When first starting-up or after a period out
of use, before putting the products in the
compartment let the appliance run at least
2 hours on the higher settings.
In the event of accidental defrost-
ing, for example due to a power
failure, if the power has been off
for longer than the value shown in
the technical characteristics chart
under "rising time", the defrosted
food must be consumed quickly
or cooked immediately and then
re-frozen (after cooling).
4.3 Freezing fresh food
The freezer compartments (indicated with
graphics) are suitable for freezing fresh
food and storing frozen and deep-frozen
food for a long time.
To freeze fresh food activate the Action
Freeze function.
The maximum amount of food that can be
frozen in 24 hours is specified on the rat-
ing plate, a label located on the inside of
the appliance.
The freezing process lasts 24 hours: dur-
ing this period do not add other food to
be frozen.
ENGLISH 9

4.4 Temperature indicator
Thermostat requires adjustment
Correct temperature
OK
To assist you in controlling your appliance
correctly we have fitted a temperature in-
dicator to your refrigerator.
The symbol at the side indicates the cold-
est area in the refrigerator.
The coldest area goes from the glass
shelf of the fruit and vegetable drawer to
the symbol or to the shelf positioned at
the same height of the symbol.
For proper storage of the food, ensure
that the temperature indicator is display-
ing the “OK” message.
If “OK” is not displayed adjust the temper-
ature controller to a colder setting and
wait 12 hours before checking the tem-
perature indicator again.
After putting fresh food into the appliance
or after opening the door repeatedly for a
long period, it is normal for the “OK” mes-
sage to disappear.
4.5 Movable shelves
The walls of the refrigerator are equipped
with a series of runners so that the
shelves can be positioned as desired.
4.6 Bottle rack
Place the bottles (with the opening facing
front) in the pre-positioned shelf.
If the shelf is positioned horizontally, place
only closed bottles.
This bottle holder shelf can be tilted in or-
der to store previously opened bottles. To
obtain this result, pull the shelf up so it
can rotate upwards and be placed on the
next higher level.
10
www.electrolux.com

4.7 Air cooling
The ClimaTech technology let food cool
quickly and a more uniform temperature
in the compartment.
This device allows for rapid cooling of
foods and a more uniform temperature in
the compartment.
4.8 Carbon Air Filter
Your appliance is equipped with a carbon
filter behind a flap in the rear wall of the air
distributing box.
The filter purifies the air from unwanted
odours in the fridge compartment mean-
ing that the storage quality will be further
improved.
4.9 Positioning the door shelves
To permit storage of food packages of
various sizes, the door shelves can be
placed at different heights.
To make these adjustments proceed as
follows:
Gradually pull the shelf in the direction of
the arrows until it comes free, then reposi-
tion as required.
Do not move the big lower door
shelf to ensure correct air circula-
tion.
ENGLISH 11

4.10 Humidity Control
When storing vegetables and fruits in the
refrigerator it is good practise to place the
produce in the drawer. The refrigerator
makes sure that the temperature is kept
low, thus slowing down the aging. In nor-
mal conditions, when the vegetable draw-
er is not fully loaded, and contains a mix
of vegetables and fruits, the humidity con-
trol should be placed in the high humidity
position illustrated by the large drop. This
means that the top grill is closed high hu-
midity is maintained inside the drawer.
This should be the standard setting.
Sometimes when the drawer is tightly
packed there is a risk that the produce is
cooled less effectively it is then good
practise to open the vents of the grill to-
wards the small droplet. Vegetables nor-
mally cool themselves by evaporating wa-
ter, and in the case of closed vents, there
is risk of a build up of drops and pools of
water inside. Produce that may drive large
quantities include lettuces, mushrooms,
broccoli and carrots. In cases where the
mix contains apples and fruits, it may be a
good idea to keep the vents a little open
in case there is a risk of ethylene accumu-
lation inside. Ethylene is a growth hor-
mone released by some fruits and vegeta-
bles, that may harm some, and speed up
aging of others.
4.11 FreshZone Mode
If the compartment is not needed as Na-
turaFresh, the settings can be changed in
order to have it just as a low temperature
drawer.
12
www.electrolux.com

To switch on the function:
• Slide upward the flap as shown in the
figure.
To switch off the function:
1.
Slide down the flap.
4.12 NaturaFresh drawer
This device allows rapid cooling of foods
and more uniform temperature in the
drawer.
To switch on the function:
1.
Switch on the Shopping function.
2.
The Shopping indicator comes on.
3.
Slide upward the flap as shown in the
figure.
To switch off the function:
1.
Slide down the flap.
2.
Switch off the Shopping function.
3.
The Shopping indicator goes off.
The function switches off auto-
matically after few hours.
ENGLISH 13

4.13 QuickChill of Drinks
This function allows rapid cooling of
drinks.
To switch on the function:
1.
Remove or place upward the Natura-
Fresh drawer and put the bottle rack
in front of the QuickChill slots as
shown in the figure.
2.
Switch on the Shopping function.
3.
The Shopping indicator comes on.
4.
Slide upward the flap as shown in the
figure.
To switch off the function:
1.
Slide down the flap.
2.
Switch off the Shopping function.
3.
The Shopping indicator goes off.
The function switches off auto-
matically after few hours.
4.14 Removal of freezing baskets from the freezer
2
1
The freezing baskets have a limit stop to
prevent their accidental removal or falling
out. At the time of its removal from the
freezer, pull the basket towards yourself
and, upon reaching the end point, remove
the basket by tilting its front upwards.
At the time of putting it back, slightly lift
the front of the basket to insert it into the
freezer. Once you are over the end points,
push the baskets back in their position.
5. HELPFUL HINTS AND TIPS
5.1 Normal Operating Sounds
• You may hear a faint gurgling and a
bubbling sound when the refrigerant is
pumped through the coils or tubing.
This is correct.
• When the compressor is on, the refrig-
erant is being pumped around and you
will hear a whirring sound and a pulsat-
ing noise from the compressor. This is
correct.
• The thermic dilatation might cause a
sudden cracking noise. It is natural, not
dangerous physical phenomenon. This
is correct.
5.2 Hints for energy saving
• Do not open the door frequently or
leave it open longer than absolutely
necessary.
• If the ambient temperature is high and
the Temperature Regulator is set to low
14
www.electrolux.com

temperature and the appliance is fully
loaded, the compressor may run con-
tinuously, causing frost or ice on the
evaporator. If this happens, set the
Temperature Regulator toward warmer
settings to allow automatic defrosting
and so a saving in electricity consump-
tion.
5.3 Hints for fresh food
refrigeration
To obtain the best performance:
• do not store warm food or evaporating
liquids in the refrigerator
• do cover or wrap the food, particularly if
it has a strong flavour
• position food so that air can circulate
freely around it
5.4 Hints for refrigeration
Useful hints:
Meat (all types) : wrap in polythene bags
and place on the glass shelf above the
vegetable drawer.
For safety, store in this way only one or
two days at the most.
Cooked foods, cold dishes, etc..: these
should be covered and may be placed on
any shelf.
Fruit and vegetables: these should be
thoroughly cleaned and placed in the spe-
cial drawer(s) provided.
Butter and cheese: these should be
placed in special airtight containers or
wrapped in aluminium foil or polythene
bags to exclude as much air as possible.
Milk bottles: these should have a cap and
should be stored in the bottle rack on the
door.
Bananas, potatoes, onions and garlic, if
not packed, must not be kept in the re-
frigerator.
5.5 Hints for freezing
To help you make the most of the freezing
process, here are some important hints:
• the maximum quantity of food which
can be frozen in 24 hrs. is shown on
the rating plate;
• the freezing process takes 24 hours.
No further food to be frozen should be
added during this period;
• only freeze top quality, fresh and thor-
oughly cleaned, foodstuffs;
• prepare food in small portions to enable
it to be rapidly and completely frozen
and to make it possible subsequently to
thaw only the quantity required;
• wrap up the food in aluminium foil or
polythene and make sure that the
packages are airtight;
• do not allow fresh, unfrozen food to
touch food which is already frozen, thus
avoiding a rise in temperature of the lat-
ter;
• lean foods store better and longer than
fatty ones; salt reduces the storage life
of food;
• water ices, if consumed immediately af-
ter removal from the freezer compart-
ment, can possibly cause the skin to be
freeze burnt;
• it is advisable to show the freezing in
date on each individual pack to enable
you to keep tab of the storage time.
5.6 Hints for storage of frozen
food
To obtain the best performance from this
appliance, you should:
• make sure that the commercially frozen
foodstuffs were adequately stored by
the retailer;
• be sure that frozen foodstuffs are trans-
ferred from the foodstore to the freezer
in the shortest possible time;
• not open the door frequently or leave it
open longer than absolutely necessary;
• once defrosted, food deteriorates rap-
idly and cannot be refrozen;
• do not exceed the storage period indi-
cated by the food manufacturer.
ENGLISH 15

6. CARE AND CLEANING
6.1 Cleaning the interior
Before using the appliance for the first
time, wash the interior and all internal ac-
cessories with lukewarm water and some
neutral soap so as to remove the typical
smell of a brand-new product, then dry
thoroughly.
Do not use detergents or abrasive
powders, as these will damage
the finish.
CAUTION!
Unplug the appliance before car-
rying out any maintenance opera-
tion.
This appliance contains hydrocar-
bons in its cooling unit; mainte-
nance and recharging must there-
fore only be carried out by author-
ized technicians.
6.2 Periodic cleaning
The equipment has to be cleaned regular-
ly:
• clean the inside and accessories with
lukewarm water and some neutral
soap.
• regularly check the door seals and wipe
clean to ensure they are clean and free
from debris.
• rinse and dry thoroughly.
Do not pull, move or damage any
pipes and/or cables inside the
cabinet.
Never use detergents, abrasive
powders, highly perfumed clean-
ing products or wax polishes to
clean the interior as this will dam-
age the surface and leave a
strong odour.
Clean the condenser (black grill) and the
compressor at the back of the appliance
with a brush. This operation will improve
the performance of the appliance and
save electricity consumption.
Take care of not to damage the
cooling system.
Many proprietary kitchen surface cleaners
contain chemicals that can attack/dam-
age the plastics used in this appliance.
For this reason it is recommended that
the outer casing of this appliance is only
cleaned with warm water with a little
washing-up liquid added.
After cleaning, reconnect the equipment
to the mains supply.
6.3 Replacing the carbon air
filter
To get the best performance the carbon
air filter should be changed once every six
months.
New active air filters can be purchased
from your local dealer.
Refer to "Installation of the carbon air fil-
ter" for the instructions.
16
www.electrolux.com

6.4 Defrosting the refrigerator
Frost is automatically eliminated from the
evaporator of the refrigerator compart-
ment every time the motor compressor
stops, during normal use. The defrost wa-
ter drains out through a drain hole into a
special container at the back of the appli-
ance, over the motor compressor, where
it evaporates.
It is important to periodically clean the de-
frost water drain hole in the middle of the
refrigerator compartment channel to pre-
vent the water overflowing and dripping
onto the food inside.
Use the special cleaner provided, which
you will find already inserted into the drain
hole.
6.5 Defrosting of the freezer
The freezer compartment of this model,
on the other hand, is a "no frost" type.
This means that there is no buildup of
frost when it is in operation, neither on the
internal walls nor on the foods.
The absence of frost is due to the contin-
uous circulation of cold air inside the
compartment, driven by an automatically
controlled fan.
7. WHAT TO DO IF…
CAUTION!
Before troubleshooting, discon-
nect the power supply.
Only a qualified electrician or com-
petent person must do the trou-
bleshooting that is not in this man-
ual.
There are some sounds during
normal use (compressor, refriger-
ant circulation).
Problem Possible cause Solution
The appliance is
noisy.
The appliance is not sup-
ported properly.
Check if the appliance
stands stable (all the four
feet should be on the floor).
The compressor op-
erates continually.
The Temperature regulator
may be set incorrectly.
Set a warmer temperature.
The door is not closed
correctly.
Refer to "Closing the door".
The door has been
opened too frequently.
Do not keep the door open
longer than necessary.
The product temperature
is too high.
Let the product tempera-
ture decrease to room tem-
perature before storage.
ENGLISH 17

Problem Possible cause Solution
The room temperature is
too high.
Decrease the room temper-
ature.
The Action Freeze function
is switched on.
Refer to "Action Freeze
function".
Water flows on the
rear plate of the re-
frigerator.
During the automatic de-
frosting process, frost de-
frosts on the rear plate.
This is correct.
Water flows into the
refrigerator.
The water outlet is clog-
ged.
Clean the water outlet.
Products prevent that wa-
ter flows into the water
collector.
Make sure that products do
not touch the rear plate.
Water flows on the
ground.
The melting water outlet
does not flow in the evap-
orative tray above the
compressor.
Attach the melting water
outlet to the evaporative
tray.
There is too much
frost and ice.
Products are not wrapped
properly.
Wrap the products better.
The door is not closed
correctly.
Refer to "Closing the door".
The Temperature regulator
may be set incorrectly.
Set a higher temperature.
The temperature in
the appliance is too
high.
The door is not closed
correctly.
Refer to "Closing the door".
The product temperature
is too high.
Let the product tempera-
ture decrease to room tem-
perature before storage.
Many products are stored
at the same time.
Store less products at the
same time.
The temperature in
the refrigeration is
too high.
There is no cold air circu-
lation in the appliance.
Make sure that there is cold
air circulation in the appli-
ance.
The temperature in
the freezer is too
high.
Products are too near to
each other.
Store products so that
there is cold air circulation.
The appliance does
not operate.
The appliance is switched
off.
Switch on the appliance.
The mains plug is not con-
nected to the mains sock-
et correctly.
Connect the mains plug to
the mains socket correctly.
18
www.electrolux.com

Problem Possible cause Solution
The appliance has no
power. There is no voltage
in the mains socket.
Connect a different electri-
cal appliance to the mains
socket. Contact a qualified
electrician.
The lamp does not
work.
The lamp is in stand-by. Close and open the door.
As much as the advice does not lead to result, call the nearest brand-mark service.
7.1 Closing the door
1.
Clean the door gaskets.
2.
If necessary, adjust the door. Refer to
"Installation".
3.
If necessary, replace the defective
door gaskets. Contact the Service
Center.
8. INSTALLATION
8.1 Location
A
B
100 mm
min
20 mm
The appliance should be installed well
away from sources of heat such as radia-
tors, boilers, direct sunlight etc. Ensure
that air can circulate freely around the
back of the cabinet. To ensure best per-
formance, if the appliance is positioned
below an overhanging wall unit, the mini-
mum distance between the top of the
cabinet and the wall unit must be at least
100 mm . Ideally, however, the appliance
should not be positioned below overhang-
ing wall units. Accurate levelling is ensur-
ed by one or more adjustable feet at the
base of the cabinet.
WARNING!
It must be possible to disconnect
the appliance from the mains
power supply; the plug must
therefore be easily accessible after
installation.
ENGLISH 19

8.2 Rear spacers
2
4
3
1
You can find the two spacers in the bag
with documentation.
Do these steps to install the spacers:
1.
Release the screw.
2.
Engage the spacer below the screw.
3.
Turn the spacer to the right position.
4.
Tighten again the screws.
8.3 Levelling
When placing the appliance ensure that it
stands level. This can be achieved by two
adjustable feet at the bottom in front.
8.4 Installation of the CleanAir Control filter
The CleanAir Control filter is an active car-
bon filter which absorbs bad odours and
permits to maintain the best flavour and
aroma for all foodstuffs without risk of
odour cross contamination
On delivery the carbon filter is in a plastic
bag to maintain it’s duration and charac-
teristics. The filter should be placed be-
hind the flap before the appliance is
turned on.
1.
Open the flap cover.
2.
Remove the filter from the plastic bag.
3.
Insert the filter in the slot found in the
back of the flap cover.
4.
Close the flap cover.
The filter should be handled care-
fully so fragments do not loosen
from the surface. The filter should
change once every six months.
8.5 Electrical connection
Before plugging in, ensure that the volt-
age and frequency shown on the rating
plate correspond to your domestic power
supply.
The appliance must be earthed. The pow-
er supply cable plug is provided with a
20
www.electrolux.com

contact for this purpose. If the domestic
power supply socket is not earthed, con-
nect the appliance to a separate earth in
compliance with current regulations, con-
sulting a qualified electrician.
The manufacturer declines all responsibili-
ty if the above safety precautions are not
observed.
This appliance complies with the E.E.C.
Directives.
8.6 Door reversibility
2
1
WARNING!
Before carrying out any opera-
tions, remove the plug from the
power socket.
WARNING!
Make sure that the appliance is
electrically not powered.
To carry out the following opera-
tions, we suggest that this be
made with another person that will
keep a firm hold on the doors of
the appliance during the opera-
tions.
• Remove the upper hinge cover with a
screwdriver.
• Open the door and remove the door
end cap cover.
• Remove the top front covers on both
sides. (1)
• Unplug the cable connector of the dis-
play. (2)
• Unscrew the hinges and remove the
door.
E
F
A
B
DC
• Remove the plugs of the middle cross-
beam.
• Remove the cover wit the help of a tool.
(A).
• Unscrew the lower hinge pivot (B) and
the spacer (C) and place them on the
opposite side.
• Re-insert the cover (A) on the opposite
side.
• Place the door on the lower hinge.
ENGLISH 21

1
2
• Take out the cable form the door end
cap cover and place it into the upper
hinge.
• Re- screw the hinge.
• Connect the cable to the connecting
point in the front panel.
• Put back the top front covers on both
sides (2)
• Place the display cable, which is cur-
rently disconnected, into the cable
holder in the door end cap then put
back the door end cap cover.
A
A
C
C
B
B
• Remove the covers (B). Remove the
cover pins (A).
• Unscrew the handles (C) and fix them
on the opposite side. Place the upper
handle to the lower door and the lower
handle to the upper door
• Re-insert the cover pins (A) on the op-
posite side.
Do a final check to make sure that:
• All screws are tightened.
• The magnetic seal adheres to the cabi-
net.
• The door opens and closes correctly.
If the ambient temperature is cold (i.e. in
Winter), the gasket may not fit perfectly to
the cabinet. In that case, wait for the nat-
ural fitting of the gasket.
In case you do not want to carry out the
above mentioned operations, contact the
nearest After Sales Service Force. The Af-
ter Sales Service specialist will carry out
the reversibility of the doors at your cost.
22
www.electrolux.com

9. NOISES
There are some sounds during normal
running (compressor, refrigerant circula-
tion).
BRRR!
HISSS!
CLICK!
BLUBB!
CRACK!
SSSRRR!
OK
CLICK!
CLICK!
BRRR!
BRRR!
BLUBB!
BLUBB!
ENGLISH 23

HISSS!
HISSS!
SSSRRR!
SSSRRR!
CRACK!
CRACK!
10. TECHNICAL DATA
Dimension of the recess
Height 2010 mm
Width 595 mm
Depth 658 mm
Rising Time 18 h
Voltage 230 - 240 V
Frequency 50 Hz
24
www.electrolux.com

The technical information are situated in
the rating plate on the internal left side of
the appliance and in the energy label.
11. ENVIRONMENT CONCERNS
Recycle the materials with the symbol
. Put the packaging in applicable
containers to recycle it.
Help protect the environment and human
health and to recycle waste of electrical
and electronic appliances. Do not dispose
appliances marked with the symbol
with the household waste. Return the
product to your local recycling facility or
contact your municipal office.
ENGLISH 25

ΠΕΡΙΕΧΌΜΕΝΑ
1. ΠΛΗΡΟΦΟΡΊΕΣ ΑΣΦΑΛΕΊΑΣ . . . . . . . . . . . . . . . . . . . . . . . . . . . . . . . . . . . . . . . . . . . . . . . . . . . . . . . . . . . 27
2. ΠΕΡΙΓΡΑΦΉ ΠΡΟΪΌΝΤΟΣ . . . . . . . . . . . . . . . . . . . . . . . . . . . . . . . . . . . . . . . . . . . . . . . . . . . . . . . . . . . . . . 29
3. ΠΊΝΑΚΑΣ ΧΕΙΡΙΣΤΗΡΊΩΝ . . . . . . . . . . . . . . . . . . . . . . . . . . . . . . . . . . . . . . . . . . . . . . . . . . . . . . . . . . . . . . 30
4. ΚΑΘΗΜΕΡΙΝΉ ΧΡΉΣΗ . . . . . . . . . . . . . . . . . . . . . . . . . . . . . . . . . . . . . . . . . . . . . . . . . . . . . . . . . . . . . . . . 33
5. ΧΡΉΣΙΜΕΣ ΣΥΜΒΟΥΛΈΣ . . . . . . . . . . . . . . . . . . . . . . . . . . . . . . . . . . . . . . . . . . . . . . . . . . . . . . . . . . . . . . . 38
6. ΦΡΟΝΤΊΔΑ ΚΑΙ ΚΑΘΆΡΙΣΜΑ . . . . . . . . . . . . . . . . . . . . . . . . . . . . . . . . . . . . . . . . . . . . . . . . . . . . . . . . . . . 40
7. ΤΙ ΝΑ ΚΆΝΕΤΕ ΑΝ... . . . . . . . . . . . . . . . . . . . . . . . . . . . . . . . . . . . . . . . . . . . . . . . . . . . . . . . . . . . . . . . . . . 41
8. ΕΓΚΑΤΆΣΤΑΣΗ . . . . . . . . . . . . . . . . . . . . . . . . . . . . . . . . . . . . . . . . . . . . . . . . . . . . . . . . . . . . . . . . . . . . . . . 43
9. ΘΌΡΥΒΟΙ . . . . . . . . . . . . . . . . . . . . . . . . . . . . . . . . . . . . . . . . . . . . . . . . . . . . . . . . . . . . . . . . . . . . . . . . . . . 47
10. ΤΕΧΝΙΚΆ ΧΑΡΑΚΤΗΡΙΣΤΙΚΆ . . . . . . . . . . . . . . . . . . . . . . . . . . . . . . . . . . . . . . . . . . . . . . . . . . . . . . . . . . . . 49
11. ΠΕΡΙΒΑΛΛΟΝΤΙΚΆ ΘΈΜΑΤΑ . . . . . . . . . . . . . . . . . . . . . . . . . . . . . . . . . . . . . . . . . . . . . . . . . . . . . . . . . . . 49
ΜΕ ΓΝΩΜΟΝΑ ΤΙΣ ΑΝΑΓΚΕΣ ΣΑΣ
Σας ευχαριστούμε που αγοράσατε μια συσκευή της Electrolux. Έχετε επιλέξει ένα προϊόν το οποίο συνοδεύεται
από δεκαετίες επαγγελματικής εμπειρίας και καινοτομίας. Εύχρηστο και κομψό, έχει σχεδιαστεί με γνώμονα τις
ανάγκες σας. Επομένως, όποτε το χρησιμοποιείτε, μπορείτε να αισθάνεστε ασφαλείς γνωρίζοντας ότι θα έχετε
τέλεια αποτελέσματα κάθε φορά.
Καλώς ορίσατε στην Electrolux.
Επισκεφθείτε την ιστοσελίδα μας για να:
βρείτε υποδείξεις χρήσης, φυλλάδια, συμβουλές για την επίλυση προβλημάτων, πληροφορίες
συντήρησης:
www.electrolux.com
καταχωρήσετε το προϊόν σας, ώστε να έχετε καλύτερο σέρβις:
www.electrolux.com/productregistration
αγοράσετε εξαρτήματα, αναλώσιμα και γνήσια ανταλλακτικά για τη συσκευή σας:
www.electrolux.com/shop
ΥΠΟΣΤΗΡΙΞΗ ΠΕΛΑΤΩΝ ΚΑΙ ΣΕΡΒΙΣ
Συνιστάται η χρήση γνήσιων ανταλλακτικών.
Όταν επικοινωνείτε με το σέρβις, βεβαιωθείτε ότι έχετε διαθέσιμα τα ακόλουθα στοιχεία.
Τα στοιχεία αυτά θα τα βρείτε στην πινακίδα τεχνικών χαρακτηριστικών. Μοντέλο, Κωδ. προϊόντος (PNC), Αριθμός
σειράς.
Προειδοποίηση / Προσοχή - Πληροφορίες ασφαλείας.
Γενικές πληροφορίες και συμβουλές
Περιβαλλοντικές πληροφορίες
Υπόκειται αε αλλαγές χωρίς προειδποίηση.
26
www.electrolux.com

1.
ΠΛΗΡΟΦΟΡΊΕΣ ΑΣΦΑΛΕΊΑΣ
Χάρη της ασφάλειάς σας και για να εξασφαλιστεί
η σωστή χρήση, πριν την εγκατάσταση και την
πρώτη χρήση της συσκευής, διαβάστε προσεκτι‐
κά αυτό το εγχειρίδιο χρήστη, συμπεριλαμβανο‐
μένων των συμβουλών και των προειδοποιήσεών
του. Για την αποφυγή περιττών λαθών και ατυχη‐
μάτων, είναι σημαντικό να εξασφαλίσετε ότι όλα
τα άτομα που χρησιμοποιούν τη συσκευή γνωρί‐
ζουν καλά τη λειτουργία της και τα χαρακτηριστι‐
κά ασφαλείας της. Φυλάξτε τις οδηγίες αυτές και
βεβαιωθείτε ότι παραμένουν με τη συσκευή εάν
μετακινηθεί ή πωληθεί, έτσι ώστε οποιοσδήποτε
τη χρησιμοποιήσει κατά τη διάρκεια της ζωής της
να είναι σωστά ενημερωμένος για τη συσκευή και
την ασφάλεια.
Για την ασφάλεια της ζωής και της περιουσίας,
φυλάξτε τις προφυλάξεις αυτών των οδηγιών
χρήσης επειδή ο κατασκευαστής δεν φέρει ευθύ‐
νη για ζημιές που θα προκληθούν από παραλεί‐
ψεις.
1.1 Ασφάλεια παιδιών και ευπαθών
ατόμων
• Η συσκευή αυτή δεν προορίζεται για χρήση
από άτομα (συμπεριλαμβανομένων των παι‐
διών) με μειωμένη σωματική ή πνευματική ικα‐
νότητα ή έλλειψη εμπειρίας και γνώσης, εκτός
και εάν επιβλέπονται ή έχουν λάβει οδηγίες
σχετικά με τη χρήση της συσκευής από άτομο
υπεύθυνο για την ασφάλειά τους.
Τα παιδιά πρέπει να εποπτεύονται ώστε να
εξασφαλίζεται ότι δεν παίζουν με τη συσκευή.
• Κρατήστε όλα τα υλικά της συσκευασίας μα‐
κριά από τα παιδιά. Υπάρχει κίνδυνος ασφυ‐
ξίας.
• Εάν απορρίψετε τη συσκευή, βγάλτε το φις του
ηλεκτρικού καλωδίου από την πρίζα, κόψτε το
καλώδιο σύνδεσης (όσο μπορείτε πιο κοντά
στη συσκευή) και αφαιρέστε την πόρτα για να
την αποφυγή ηλεκτροπληξίας ή παγίδευσης
μέσα στη συσκευή παιδιών που παίζουν.
• Εάν η συσκευή, η οποία διαθέτει μαγνητικά
λάστιχα πόρτας, θα αντικαταστήσει μια πα‐
λαιότερη συσκευή με μάνδαλο στην πόρτα ή
το καπάκι, μην παραλείψετε να καταστρέψετε
το μάνδαλο προτού απορρίψετε την παλαιά
συσκευή. Με αυτό τον τρόπο θα αποτρέψετε
τη μετατροπή του ψυγείου σε θανάσιμη παγί‐
δα για παιδιά.
1.2 Γενικές πληροφορίες για την
ασφάλεια
ΠΡΟΕΙΔΟΠΟΙΗΣΗ
Διατηρείτε ελεύθερα από εμπόδια όλα τα ανοίγ‐
ματα αερισμού στο περίβλημα της συσκευής ή
την εντοιχισμένη κατασκευή.
• Η συσκευή προορίζεται για τη φύλαξη τροφί‐
μων ή/και αναψυκτικών ενός συνηθισμένου
νοικοκυριού, όπως εξηγείται στο παρόν φυλ‐
λάδιο οδηγιών.
• Μη χρησιμοποιείτε μηχανικές συσκευές ή άλλα
τεχνητά μέσα για την επιτάχυνση της διαδικα‐
σίας ξεπαγώματος.
• Μη χρησιμοποιείτε άλλες ηλεκτρικές συσκευές
(όπως παγωτομηχανές) στο εσωτερικό ψυκτι‐
κών συσκευών, εκτός αν είναι εγκεκριμένες για
το σκοπό αυτό από τον κατασκευαστή.
• Μην προκαλείτε ζημιά στο κύκλωμα ψυκτικού
υγρού.
• Το ψυκτικό ισοβουτάνιο (R600a) που περιέχε‐
ται στο κύκλωμα ψυκτικού υγρού της συ‐
σκευής, είναι ένα φυσικό αέριο με υψηλό επί‐
πεδο περιβαλλοντικής συμβατότητας, το
οποίο, ωστόσο, είναι εύφλεκτο.
Κατά τη μεταφορά και εγκατάσταση της συ‐
σκευής, βεβαιωθείτε ότι δεν προκαλείται ζημιά
σε κανένα εξάρτημα του κυκλώματος ψυκτικού
υγρού.
Εάν προκληθεί ζημιά στο κύκλωμα ψυκτικού
υγρού:
– αποφύγετε τις γυμνές φλόγες και τις πηγές
ανάφλεξης
– εξαερίστε καλά το χώρο στον οποίο βρίσκε‐
ται η συσκευή
• Η οποιαδήποτε αλλαγή των τεχνικών χαρακτη‐
ριστικών ή η τροποποίηση αυτού του προϊό‐
ντος είναι επικίνδυνη. Εάν το καλώδιο υποστεί
οποιαδήποτε ζημιά, μπορεί να προκληθεί βρα‐
χυκύκλωμα, πυρκαγιά ή/και ηλεκτροπληξία.
ΠΡΟΕΙΔΟΠΟΙΗΣΗ
Για την αποφυγή κινδύνων, η αντικατά‐
σταση των ηλεκτρικών εξαρτημάτων
(καλώδιο τροφοδοσίας, φις, συμπιε‐
στής) πρέπει να γίνεται από πιστοποιη‐
μένο αντιπρόσωπο ή από καταρτισμένο
προσωπικό σέρβις.
ΕΛΛΗΝΙΚΑ 27

1.
Το καλώδιο τροφοδοσίας δεν πρέπει να
επιμηκύνεται.
2.
Προσέξτε να μη συνθλιβεί ή να μην υπο‐
στεί ζημιά το φις τροφοδοσίας στο πίσω
μέρος της συσκευής. Εάν το φις τροφοδο‐
σίας συνθλιβεί ή υποστεί ζημιά, ενδέχεται
να υπερθερμανθεί και να προκαλέσει
πυρκαγιά.
3.
Βεβαιωθείτε ότι έχετε πρόσβαση στο φις
τροφοδοσίας της συσκευής.
4.
Μην τραβάτε το καλώδιο τροφοδοσίας.
5.
Εάν η ηλεκτρική πρίζα είναι χαλαρή, μην
εισαγάγετε το φις. Υπάρχει κίνδυνος
ηλεκτροπληξίας ή πρόκλησης πυρκαγιάς.
6.
Η συσκευή δεν πρέπει να χρησιμοποιείται
χωρίς το κάλυμμα του λαμπτήρα (εάν
προβλέπεται) του εσωτερικού φωτισμού.
• Η συσκευή αυτή είναι βαριά. Απαιτείται προ‐
σοχή κατά τη μεταφορά της.
• Μην αφαιρείτε και μην αγγίζετε αντικείμενα στο
θάλαμο της κατάψυξης αν τα χέρια σας είναι
νωπά/βρεγμένα, καθότι μπορεί να προκλη‐
θούν εκδορές στο δέρμα ή κρυοπαγήματα.
• Αποφεύγετε την παρατεταμένη έκθεση της συ‐
σκευής στο άμεσο ηλιακό φως.
• Οι λαμπτήρες (εάν προβλέπονται) που χρησι‐
μοποιούνται σε αυτήν τη συσκευή είναι λαμ‐
πτήρες ειδικού σκοπού, επιλεγμένοι για χρήση
μόνο σε οικιακές συσκευές. Δεν είναι κατάλλη‐
λοι για φωτισμό οικιακών χώρων.
1.3 Καθημερινή χρήση
• Μην τοποθετείτε ζεστές κατσαρόλες στα πλα‐
στικά μέρη της συσκευής.
• Μην φυλάσσετε εύφλεκτα αέρια και υγρά στη
συσκευή επειδή μπορεί να εκραγούν.
• Μην τοποθετείτε τρόφιμα απευθείας σε επαφή
με την έξοδο αέρα στο πίσω τοίχωμα. (Εάν η
συσκευή είναι Frost Free.)
• Τα κατεψυγμένα τρόφιμα δεν πρέπει να κατα‐
ψύχονται και πάλι αφού αποψυχθούν.
• Αποθηκεύετε τα προσυσκευασμένα κατεψυγ‐
μένα τρόφιμα σύμφωνα με τις οδηγίες του κα‐
τασκευαστή για κατεψυγμένα τρόφιμα.
• Θα πρέπει να τηρούνται αυστηρά οι συστάσεις
αποθήκευσης των παρασκευαστών της συ‐
σκευής. Ανατρέξτε στις σχετικές οδηγίες.
• Μην τοποθετείτε ανθρακούχα ποτά στον κατα‐
ψύκτη εφόσον δημιουργείται πίεση στο δοχείο,
το οποίο μπορεί να εκραγεί, προκαλώντας ζη‐
μιές στη συσκευή.
• Τα παγωτά τύπου ξυλάκι γρανίτα μπορεί να
προκαλέσουν εγκαύματα από πάγο εάν κατα‐
ναλωθούν απευθείας από τη συσκευή.
1.4 Φροντίδα και καθαρισμός
• Πριν από τη συντήρηση, απενεργοποιήστε τη
συσκευή και αποσυνδέστε το φις τροφοδοσίας
από την πρίζα.
• Μην καθαρίζετε τη συσκευή με μεταλλικά αντι‐
κείμενα.
• Μη χρησιμοποιείτε αιχμηρά αντικείμενα για να
αφαιρείτε τον πάγο από τη συσκευή. Χρησιμο‐
ποιείτε πλαστική ξύστρα.
• Ελέγχετε τακτικά την αποστράγγιση του ψυ‐
γείου για νερό απόψυξης. Εάν χρειαστεί, κα‐
θαρίστε την αποστράγγιση. Εάν η αποστράγ‐
γιση είναι φραγμένη, θα συσσωρεύεται νερό
στο κάτω μέρος της συσκευής.
1.5 Εγκατάσταση
Για τη σύνδεση του ηλεκτρικού ακολου‐
θήστε προσεκτικά τις οδηγίες που δίνο‐
νται στις αντίστοιχες παραγράφους.
• Αποσυσκευάστε τη συσκευή και ελέγξτε αν
έχει υποστεί ζημιές. Μη συνδέετε τη συσκευή
εάν έχει υποστεί ζημιά. Αναφέρετε αμέσως εν‐
δεχόμενες ζημιές στο μέρος όπου αγοράσατε
τη συσκευή. Σε αυτή την περίπτωση, φυλάξτε
τη συσκευασία.
• Είναι σκόπιμο να περιμένετε τουλάχιστον δύο
ώρες προτού συνδέσετε τη συσκευή, ώστε το
έλαιο να επιστρέψει και πάλι στο συμπιεστή.
• Θα πρέπει να υπάρχει επαρκή κυκλοφορία
του αέρα γύρω από τη συσκευή. Διαφορετικά
θα προκληθεί υπερθέρμανση. Για την επίτευξη
επαρκούς κυκλοφορίας αέρα ακολουθήστε τις
σχετικές οδηγίες της εγκατάστασης.
• Όποτε είναι δυνατό, η πλάτη της συσκευής
πρέπει να βρίσκεται κοντά σε τοίχο για την
αποφυγή επαφής ή πιασίματος με ζεστά μέρη
(συμπιεστής, συμπυκνωτής) και της πιθανότη‐
τας εγκαύματος.
• Η συσκευή δεν πρέπει να τοποθετείται κοντά
σε σώματα καλοριφέρ ή φούρνους.
• Βεβαιωθείτε ότι υπάρχει εύκολη πρόσβαση
στο φις τροφοδοσίας μετά την εγκατάσταση
της συσκευής.
• Συνδέετε τη συσκευή μόνο σε παροχή πόσι‐
μου νερού (εάν προβλέπεται σύνδεση νερού).
28
www.electrolux.com

1.6 Σέρβις
• Οι ηλεκτρολογικές εργασίες που απαιτούνται
για το σέρβις της συσκευής θα πρέπει να εκτε‐
λούνται από επαγγελματία ηλεκτρολόγο ή άλ‐
λο ειδικό.
• Το προϊόν αυτό θα πρέπει να επισκευάζεται
από εξουσιοδοτημένα Κέντρα Σέρβις, ενώ θα
πρέπει να χρησιμοποιούνται μόνο γνήσια
ανταλλακτικά.
1.7 Προστασία του περιβάλλοντος
Η συσκευή αυτή δεν περιέχει αέρια τα
οποία μπορούν να προκαλέσουν ζημιά
στο στρώμα του όζοντος, είτε στο κύ‐
κλωμα ψυκτικού υγρού ή στα μονωτικά
υλικά της. Η συσκευή δε θα πρέπει να
απορρίπτεται μαζί με τα οικιακά απορ‐
ρίμματα. Ο αφρός μόνωσης περιέχει εύ‐
φλεκτα αέρια: Η συσκευή θα πρέπει να
απορρίπτεται σύμφωνα με τους ισχύο‐
ντες κανονισμούς που θα λάβετε από τις
τοπικές αρχές. Αποφύγετε να προκαλέ‐
σετε ζημιά στην ψυκτική μονάδα, ειδικά
στο πίσω μέρος κοντά στον εναλλάκτη
θερμότητας. Τα υλικά που χρησιμο‐
ποιούνται σε αυτή τη συσκευή και ση‐
μειώνονται με το σύμβολο
είναι ανα‐
κυκλώσιμα.
2. ΠΕΡΙΓΡΑΦΉ ΠΡΟΪΌΝΤΟΣ
2 64 8 1110
13
1
12
3 975
1
Συρτάρι CrispFresh
2
Συρτάρι Freshzone
3
Γυάλινα ράφια
4
Δυναμική ψύξη αέρα
5
Χειριστήριο υγρασίας
6
Σχάρα μπουκαλιών
7
Χειριστήριο
8
Ράφι βουτύρου
ΕΛΛΗΝΙΚΑ 29

9
Ράφια της πόρτας
10
Ράφι μισού μήκους
11
Ράφι μπουκαλιών
12
Καλάθια καταψύκτη
13
Πινακίδα τεχνικών χαρακτηριστικών
3. ΠΊΝΑΚΑΣ ΧΕΙΡΙΣΤΗΡΊΩΝ
1
27
6
5
3
4
1
Οθόνη
2
Κουμπί ρυθμιστή
αύξησης θερμοκρασίας
3
Κουμπί ρυθμιστή
μείωσης θερμοκρασίας
4
Κουμπί Mode
5
Κουμπί DrinksChill και κουμπί ON/OFF
6
Κουμπί θαλάμου καταψύκτη
7
Κουμπί θαλάμου ψυγείου
Μπορείτε να αλλάξετε τον προκαθορισμένο ήχο
των κουμπιών σε έναν πιο ηχηρό, πατώντας μαζί
το κουμπί Mode και το κουμπί μείωσης θερμο‐
κρασίας για μερικά δευτερόλεπτα. Η αλλαγή είναι
αναστρέψιμη.
3.1 Οθόνη
AC
D
E
G
P
Q
R
B
O
N
L
M
F
I
K
J
H
• A. Λειτουργία επίδειξης
• B. Ένδειξη θερμοκρασίας ψυγείου
• C. Λειτουργία διακοπών
• D. Λειτουργία FridgeEco Mode
• E. Λειτουργία FreeStore
• F. Λειτουργία επιπλέον υγρασίας
• G. Λειτουργία νέων προμηθειών
• H. Φίλτρο νερού
• I. Λειτουργία Drinks Chill
• J. Χρόνος
• K. Ένδειξη θερμοκρασίας καταψύκτη
• L. Λειτουργία Action Freeze
• M. Κατάσταση ΑΠΕΝΕΡΓΟΠΟΙΗΣΗΣ καταψύ‐
κτη
• N. Φίλτρο αέρα
• O. Λειτουργία FreezerEco Mode
• P. Ένδειξη συναγερμού
• Q. Λειτουργία κλειδώματος ασφαλείας για παι‐
διά
• R. Κατάσταση ΑΠΕΝΕΡΓΟΠΟΙΗΣΗΣ ψυγείου
3.2 Ενεργοποίηση της συσκευής
Για να ενεργοποιήσετε τη συσκευή, ακολουθήστε
τα παρακάτω βήματα:
1.
Συνδέστε το φις τροφοδοσίας στην πρίζα.
2.
Πιέστε το κουμπί ON/OFF, εάν η οθόνη είναι
σβηστή.
3.
Εάν εμφανιστεί η ένδειξη "dEMo" στην οθό‐
νη, η συσκευή βρίσκεται σε κατάσταση επί‐
δειξης. Ανατρέξτε στην ενότητα «Τι να κάνε‐
τε αν...».
4.
Οι ενδείξεις θερμοκρασίας εμφανίζουν την
προεπιλεγμένη θερμοκρασία.
Για να επιλέξετε διαφορετική θερμοκρασία, ανα‐
τρέξτε στην ενότητα «Ρύθμιση θερμοκρασίας».
Εάν η πόρτα παραμείνει ανοιχτή για με‐
ρικά λεπτά, ο εσωτερικός φωτισμός
σβήνει αυτόματα. Ο φωτισμός επανέρ‐
χεται αν κλείσετε και ανοίξετε ξανά την
πόρτα.
30
www.electrolux.com

3.3 Απενεργοποίηση
Για να απενεργοποιήσετε τη συσκευή, ακολουθή‐
στε τα παρακάτω βήματα:
1.
Πιέστε το κουμπί ON/OFF για 5 δευτερόλε‐
πτα.
2.
Η οθόνη θα σβήσει.
3.
Για να αποσυνδέσετε τη συσκευή από το
ρεύμα, αποσυνδέστε το φις τροφοδοσίας
από την πρίζα.
3.4 Ενεργοποίηση του ψυγείου
Για να ενεργοποιήσετε το ψυγείο:
1.
Πιέστε το ρυθμιστή θερμοκρασίας ψυγείου.
Ή:
1.
Πιέστε το κουμπί Mode έως ότου εμφανιστεί
το σχετικό εικονίδιο.
Αναβοσβήνει η ένδειξη απενεργοποίησης
ψυγείου.
2.
Πιέστε το κουμπί OK για επιβεβαίωση.
3.
Η ένδειξη απενεργοποίησης ψυγείου σβήνει.
Για να επιλέξετε διαφορετική θερμοκρασία, ανα‐
τρέξτε στην ενότητα «Ρύθμιση θερμοκρασίας».
3.5 Απενεργοποίηση του ψυγείου ή
του καταψύκτη
Για να απενεργοποιήσετε το ψυγείο ή τον κατα‐
ψύκτη:
1.
Πιέστε το κουμπί Mode, έως ότου εμφανιστεί
το σχετικό εικονίδιο.
Αναβοσβήνει η ένδειξη απενεργοποίησης
του ψυγείου ή του καταψύκτη.
Στην ένδειξη θερμοκρασίας του ψυγείου ή
του καταψύκτη εμφανίζονται παύλες.
2.
Πιέστε το κουμπί OK για επιβεβαίωση.
3.
Εμφανίζεται η ένδειξη απενεργοποίησης του
ψυγείου ή του καταψύκτη.
3.6 Λειτουργία διακοπών
Αυτή η λειτουργία σάς επιτρέπει να διατηρείτε
κλειστό και άδειο το ψυγείο όταν απουσιάζετε σε
διακοπές για μεγάλο διάστημα, χωρίς να σχηματί‐
ζονται δυσάρεστες οσμές.
Όταν είναι ενεργοποιημένη η λειτουργία
διακοπών, ο θάλαμος του ψυγείου πρέ‐
πει να είναι άδειος.
Για να ενεργοποιήσετε τη λειτουργία:
1.
Πιέστε το κουμπί Mode, έως ότου εμφανιστεί
το σχετικό εικονίδιο.
Αναβοσβήνει η ένδειξη διακοπών.
Η ένδειξη θερμοκρασίας του ψυγείου εμφα‐
νίζει την καθορισμένη θερμοκρασία.
2.
Πιέστε το κουμπί OK για επιβεβαίωση.
Εμφανίζεται η ένδειξη διακοπών.
Για να απενεργοποιήσετε τη λειτουργία:
1.
Πιέστε το κουμπί Mode, έως ότου αρχίσει να
αναβοσβήνει η ένδειξη διακοπών.
2.
Πιέστε το κουμπί OK για επιβεβαίωση.
3.
Η ένδειξη διακοπών σβήνει.
Η λειτουργία απενεργοποιείται επιλέγο‐
ντας διαφορετική θερμοκρασία για το
ψυγείο.
3.7 Συναγερμός υψηλής
θερμοκρασίας
Τυχόν αύξηση στη θερμοκρασία του θαλάμου κα‐
τάψυξης (π.χ. λόγω προηγούμενης διακοπής
ρεύματος) υποδηλώνεται από τα εξής:
• αναβοσβήνουν οι ενδείξεις συναγερμού και
θερμοκρασίας καταψύκτη
• ενεργοποιείται ο ηχητικός συναγερμός.
Για τη σίγαση του συναγερμού:
1.
Πιέστε οποιοδήποτε κουμπί.
2.
Ο ηχητικός συναγερμός απενεργοποιείται.
3.
Η ένδειξη θερμοκρασίας του καταψύκτη εμ‐
φανίζει για λίγα δευτερόλεπτα τη μέγιστη
θερμοκρασία που επιτεύχθηκε. Στη συν‐
έχεια, εμφανίζεται ξανά η καθορισμένη θερ‐
μοκρασία.
4.
Η ένδειξη συναγερμού συνεχίζει να αναβο‐
σβήνει, έως ότου επανέλθουν οι φυσιολογι‐
κές συνθήκες.
Μετά τη σίγαση του συναγερμού, η ένδειξη συν‐
αγερμού απενεργοποιείται.
3.8 Λειτουργία Eco Mode
Για τις καλύτερες δυνατές συνθήκες αποθήκευ‐
σης των τροφίμων, επιλέξτε τη λειτουργία Eco
Mode.
Για να ενεργοποιήσετε τη λειτουργία:
1.
Πιέστε το κουμπί Mode έως ότου εμφανιστεί
το σχετικό εικονίδιο.
Αναβοσβήνει η ένδειξη Eco Mode.
Η ένδειξη θερμοκρασίας εμφανίζει την καθο‐
ρισμένη θερμοκρασία για λίγα δευτερόλε‐
πτα:
– για το ψυγείο: +5°C
– για τον καταψύκτη: -18°C
2.
Πιέστε το κουμπί OK για επιβεβαίωση.
ΕΛΛΗΝΙΚΑ 31

Εμφανίζεται η ένδειξη Eco Mode.
Για να απενεργοποιήσετε τη λειτουργία:
1.
Πιέστε το κουμπί Mode έως ότου αρχίσει να
αναβοσβήνει η ένδειξη Eco Mode.
2.
Πιέστε το κουμπί OK για επιβεβαίωση.
3.
Η ένδειξη Eco Mode σβήνει.
Η λειτουργία απενεργοποιείται όταν επι‐
λέγετε διαφορετική θερμοκρασία.
3.9 Λειτουργία Drinks Chill
Η λειτουργία Drinks Chill χρησιμοποιείται ως
προειδοποίηση ασφαλείας όταν τοποθετείτε
μπουκάλια στο θάλαμο του καταψύκτη.
Για να ενεργοποιήσετε τη λειτουργία:
1.
Πιέστε το κουμπί Mode, έως ότου εμφανιστεί
το σχετικό εικονίδιο.
Αναβοσβήνει η ένδειξη Drinks Chill.
Στο χρονοδιακόπτη εμφανίζεται ο καθορι‐
σμένος χρόνος (30 λεπτά) για λίγα δευτερό‐
λεπτα.
2.
Πιέστε το κουμπί ρύθμισης του χρονοδιακό‐
πτη για να αλλάξετε τον καθορισμένο χρόνο
από 1 έως 90 λεπτά.
3.
Πιέστε το κουμπί OK για επιβεβαίωση.
Εμφανίζεται η ένδειξη Drinks Chill.
Ο χρονοδιακόπτης αρχίζει να αναβοσβήνει.
Στο τέλος της αντίστροφης μέτρησης αναβοσβή‐
νει η ένδειξη Drinks Chill και ακούγεται ένας ήχος
ειδοποίησης:
1.
Αφαιρέστε τα μπουκάλια που βρίσκονται
στο θάλαμο του καταψύκτη.
2.
Απενεργοποιήστε τη λειτουργία.
Για να απενεργοποιήσετε τη λειτουργία:
1.
Πιέστε το κουμπί Mode, έως ότου αρχίσει να
αναβοσβήνει η ένδειξη Drinks Chill.
2.
Πιέστε το κουμπί OK για επιβεβαίωση.
3.
Η ένδειξη Drinks Chill σβήνει.
Μπορείτε να απενεργοποιήσετε τη λειτουργία
ανά πάσα στιγμή.
3.10 Λειτουργία Action Freeze
Για να ενεργοποιήσετε τη λειτουργία:
1.
Πιέστε το κουμπί Mode έως ότου εμφανιστεί
το σχετικό εικονίδιο.
Αναβοσβήνει η ένδειξη Action Freeze.
Η ένδειξη θερμοκρασίας του καταψύκτη εμ‐
φανίζει το σύμβολο
για λίγα δευτερόλε‐
πτα.
2.
Πιέστε το κουμπί OK για επιβεβαίωση.
Εμφανίζεται η ένδειξη Action Freeze.
Ξεκινά μια απεικόνιση σε κινούμενα σχέδια.
Αυτή η λειτουργία διακόπτεται αυτόματα μετά
από 52 ώρες.
Για να απενεργοποιήσετε τη λειτουργία πριν από
την αυτόματη διακοπή της:
1.
Πιέστε το κουμπί Mode έως ότου αρχίσει να
αναβοσβήνει η ένδειξη Action Freeze.
2.
Πιέστε το κουμπί OK για επιβεβαίωση.
3.
Η ένδειξη Action Freeze σβήνει.
4.
Γίνεται επαναφορά της λειτουργίας Eco
Mode, εάν ήταν η προηγούμενα επιλεγμένη
λειτουργία.
Η λειτουργία απενεργοποιείται όταν επι‐
λέγετε διαφορετική θερμοκρασία για τον
καταψύκτη.
3.11 Λειτουργία επιπλέον υγρασίας
Εάν θέλετε να αυξήσετε την υγρασία στο ψυγείο,
συνιστάται η ενεργοποίηση της λειτουργίας επι‐
πλέον υγρασίας.
Για να ενεργοποιήσετε τη λειτουργία:
1.
Πιέστε το κουμπί Mode, έως ότου εμφανιστεί
το σχετικό εικονίδιο.
Η ένδειξη επιπλέον υγρασίας αναβοσβήνει.
2.
Πιέστε το κουμπί OK για επιβεβαίωση.
Εμφανίζεται η ένδειξη επιπλέον υγρασίας.
Για να απενεργοποιήσετε τη λειτουργία:
1.
Πιέστε το κουμπί Mode, έως ότου αρχίσει να
αναβοσβήνει η ένδειξη επιπλέον υγρασίας.
2.
Πιέστε το κουμπί OK για επιβεβαίωση.
3.
Η ένδειξη επιπλέον υγρασίας σβήνει.
3.12 Λειτουργία νέων προμηθειών
Εάν θέλετε να τοποθετήσετε στο ψυγείο μια μεγά‐
λη ποσότητα θερμών τροφίμων, για παράδειγμα
μετά από επίσκεψη στο σούπερ μάρκετ, συνιστά‐
ται η ενεργοποίηση της λειτουργίας νέων προμη‐
θειών για την πιο γρήγορη ψύξη των προϊόντων
και την αποφυγή τυχόν θέρμανσης των υπόλοι‐
πων τροφίμων που βρίσκονται ήδη στο ψυγείο.
Για να ενεργοποιήσετε τη λειτουργία:
1.
Πιέστε το κουμπί Mode έως ότου εμφανιστεί
το σχετικό εικονίδιο.
Αναβοσβήνει η ένδειξη νέων προμηθειών.
Η ένδειξη θερμοκρασίας του ψυγείου εμφα‐
νίζει την καθορισμένη θερμοκρασία για λίγα
δευτερόλεπτα.
2.
Πιέστε το κουμπί OK για επιβεβαίωση.
Εμφανίζεται η ένδειξη νέων προμηθειών.
32
www.electrolux.com

Η λειτουργία νέων προμηθειών απενεργοποιείται
αυτόματα μετά από περίπου 6 ώρες.
Για να απενεργοποιήσετε τη λειτουργία πριν από
την αυτόματη διακοπή της:
1.
Πιέστε το κουμπί Mode έως ότου αρχίσει να
αναβοσβήνει η ένδειξη νέων προμηθειών.
2.
Πιέστε το κουμπί OK για επιβεβαίωση.
3.
Η ένδειξη νέων προμηθειών σβήνει.
4.
Γίνεται επαναφορά της λειτουργίας Eco
Mode, εάν ήταν η προηγούμενα επιλεγμένη
λειτουργία.
Η λειτουργία απενεργοποιείται όταν επι‐
λέγετε διαφορετική θερμοκρασία για το
ψυγείο.
3.13 Λειτουργία κλειδώματος
ασφαλείας
Για να κλειδώσετε κάθε δυνατότητα χειρισμού μέ‐
σω των κουμπιών, επιλέξτε τη Λειτουργία κλειδώ‐
ματος ασφαλείας.
Για να ενεργοποιήσετε τη λειτουργία:
1.
Πιέστε το κουμπί Mode έως ότου εμφανιστεί
το σχετικό εικονίδιο.
2.
Αναβοσβήνει η ένδειξη κλειδώματος ασφα‐
λείας.
3.
Πιέστε το κουμπί OK για επιβεβαίωση.
Εμφανίζεται η ένδειξη κλειδώματος ασφα‐
λείας.
Για να απενεργοποιήσετε τη λειτουργία:
1.
Πιέστε το κουμπί Mode έως ότου αρχίσει να
αναβοσβήνει η ένδειξη κλειδώματος ασφα‐
λείας.
2.
Πιέστε το κουμπί OK για επιβεβαίωση.
3.
Η ένδειξη κλειδώματος ασφαλείας σβήνει.
4. ΚΑΘΗΜΕΡΙΝΉ ΧΡΉΣΗ
4.1 Ξεπάγωμα
Τα τρόφιμα βαθιάς ή μη κατάψυξης, πριν τη χρή‐
ση τους, μπορούν να ξεπαγώνονται στο θάλαμο
ψύξης ή σε θερμοκρασία δωματίου, ανάλογα το
διαθέσιμο χρόνο ξεπαγώματος.
Τα μικρά τεμάχια μπορούν να μαγειρεύονται ακό‐
μη και κατεψυγμένα, απευθείας από τον καταψύ‐
κτη: σε αυτή την περίπτωση, το μαγείρεμα διαρ‐
κεί περισσότερο.
4.2 Κατάψυξη φρέσκων τροφίμων
Ο θάλαμος του καταψύκτη είναι κατάλληλος για
την κατάψυξη φρέσκων τροφίμων και τη μακρο‐
χρόνια αποθήκευση κατεψυγμένων τροφίμων και
προϊόντων βαθιάς κατάψυξης.
Σε περίπτωση κατά λάθος απόψυξης,
για παράδειγμα σε περίπτωση διακοπής
ρεύματος, εάν το ρεύμα ήταν κομμένο
για περισσότερο από την τιμή που ανα‐
γράφεται στον πίνακα τεχνικών χαρα‐
κτηριστικών στην ενότητα "χρόνος ανό‐
δου", τα αποψυγμένα τρόφιμα πρέπει
να καταναλωθούν σύντομα ή να μαγει‐
ρευτούν αμέσως και στη συνέχεια να
καταψυχθούν και πάλι (μετά την ψύξη).
4.3 Κατάψυξη φρέσκων τροφίμων
Οι θάλαμοι του καταψύκτη (υποδεικνύονται με
γραφικά) είναι κατάλληλοι για την κατάψυξη φρέ‐
σκων τροφίμων και τη μακροχρόνια αποθήκευση
κατεψυγμένων και βαθιά κατεψυγμένων τροφί‐
μων.
Για να καταψύξετε φρέσκα τρόφιμα, ενεργοποιή‐
στε τη λειτουργία Action Freeze.
Η μέγιστη ποσότητα τροφίμων που μπορεί να κα‐
ταψυχθεί σε 24 ώρες καθορίζεται στην πινακίδα
τεχνικών χαρακτηριστικών, μια ετικέτα που βρί‐
σκεται στο εσωτερικό της συσκευής.
Η διαδικασία της κατάψυξης διαρκεί 24 ώρες:
διάστημα κατά το οποίο δεν πρέπει να προσθέ‐
σετε άλλα τρόφιμα προς κατάψυξη.
ΕΛΛΗΝΙΚΑ 33

4.4 Ένδειξη θερμοκρασίας
Ο θερμοστάτης χρειάζεται ρύθμιση
Σωστή θερμοκρασία
OK
Για την εξυπηρέτησή σας στο σωστό χειρισμό της
συσκευής, έχουμε τοποθετήσει μια ένδειξη θερ‐
μοκρασίας στο ψυγείο σας.
Το σύμβολο στο πλάι υποδεικνύει την ψυχρότερη
περιοχή του ψυγείου.
Η ψυχρότερη περιοχή βρίσκεται από το γυάλινο
ράφι του συρταριού φρούτων και λαχανικών μέ‐
χρι το σύμβολο ή μέχρι το ράφι που βρίσκεται
στο ίδιο ύψος με το σύμβολο.
Για τη σωστή αποθήκευση των τροφίμων, βε‐
βαιωθείτε ότι η ένδειξη θερμοκρασίας εμφανίζει
το μήνυμα «OK».
Εάν δεν εμφανίζεται το «OK», τοποθετήστε το
ρυθμιστή θερμοκρασίας σε μια χαμηλότερη θερ‐
μοκρασία και περιμένετε 12 ώρες πριν ελέγξετε
ξανά την ένδειξη θερμοκρασίας.
Μετά την τοποθέτηση νωπών τροφίμων στη συ‐
σκευή ή μετά από επαναλαμβανόμενο άνοιγμα
της πόρτας για μεγάλο διάστημα, είναι φυσιολογι‐
κό να εξαφανιστεί το μήνυμα «OK».
4.5 Μετακινούμενα ράφια
Τα τοιχώματα του ψυγείου είναι εφοδιασμένα με
μια σειρά αυλακώσεων, ώστε να είναι δυνατή η
κατ’ επιλογή τοποθέτηση των ραφιών.
4.6 Σχάρα μπουκαλιών
Τοποθετήστε τα μπουκάλια (με το άνοιγμα προς
τα εμπρός) στο ήδη τοποθετημένο ράφι.
Αν το ράφι είναι τοποθετημένο οριζόντια, τοποθε‐
τήστε μόνο σφραγισμένα μπουκάλια.
Το ράφι με τη σχάρα μπουκαλιών μπορεί να πά‐
ρει κλίση για την αποθήκευση ανοιγμένων μπου‐
καλιών. Για να κάνετε κάτι τέτοιο, τραβήξτε το ρά‐
φι προς τα πάνω μέχρι να μπορεί να περιστραφεί
και να τοποθετηθεί στο αμέσως υψηλότερο επί‐
πεδο.
34
www.electrolux.com

4.7 Ψύξη αέρα
Η τεχνολογία ClimaTech επιτυγχάνει την ταχεία
ψύξη των τροφίμων και μια πιο ομοιόμορφη θερ‐
μοκρασία μέσα στο θάλαμο.
Αυτή η διάταξη επιτρέπει τη γρήγορη ψύξη των
τροφίμων και τη διατήρηση μιας πιο ομοιόμορφης
θερμοκρασίας μέσα στο θάλαμο.
4.8 Φίλτρο αέρα από άνθρακα
Η συσκευή σας είναι εξοπλισμένη με ένα φίλτρο
άνθρακα πίσω από ένα κάλυμμα στο πίσω τοί‐
χωμα του κυτίου κατανομής αέρα.
Το φίλτρο καθαρίζει τον αέρα από τις ανεπιθύμη‐
τες οσμές στο θάλαμο του ψυγείου, πράγμα που
σημαίνει ότι η ποιότητα της αποθήκευσης βελτιώ‐
νεται περαιτέρω.
4.9 Τοποθέτηση των ραφιών της πόρτας
Για να είναι δυνατή η αποθήκευση συσκευασιών
τροφίμων διαφόρων μεγεθών, τα ράφια της πόρ‐
τας μπορούν να τοποθετούνται σε διαφορετικά
ύψη.
Για να πραγματοποιήσετε αυτές τις προσαρμο‐
γές, κάντε τα εξής:
Τραβήξτε σταδιακά το ράφι προς την κατεύθυνση
των βελών μέχρι να απελευθερωθεί και στη συν‐
έχεια τοποθετήστε το και πάλι όπως θέλετε.
Για τη διασφάλιση της σωστής κυκλοφο‐
ρίας του αέρα, μη μετακινείτε το μεγάλο
κάτω ράφι της πόρτας.
ΕΛΛΗΝΙΚΑ 35

4.10 Humidity Control
Όταν διατηρείτε λαχανικά και φρούτα στο ψυγείο,
είναι καλό να τοποθετείτε τα προϊόντα αυτά στο
συρτάρι. Το ψυγείο διασφαλίζει ότι η θερμοκρα‐
σία διατηρείται χαμηλά, επιβραδύνοντας έτσι την
ωρίμανση. Σε κανονικές συνθήκες, όταν το συρ‐
τάρι λαχανικών δεν είναι πλήρως φορτωμένο και
περιέχει ένα μείγμα από φρούτα και λαχανικά, το
χειριστήριο υγρασίας πρέπει να τοποθετείται στη
θέση υψηλής υγρασίας, που απεικονίζεται με τη
μεγάλη σταγόνα. Αυτό σημαίνει ότι η επάνω γρί‐
λια είναι κλειστή και στο εσωτερικό του συρτα‐
ριού διατηρείται υψηλή υγρασία. Αυτή θα πρέπει
να είναι η κανονική ρύθμιση. Μερικές φορές, όταν
το συρτάρι είναι υπερφορτωμένο, υπάρχει κίνδυ‐
νος η ψύξη των προϊόντων να είναι λιγότερο
αποτελεσματική και, στην περίπτωση αυτή, καλό
είναι τα ανοίγματα της γρίλιας να τοποθετούνται
προς τη μικρή σταγόνα. Τα λαχανικά συνήθως
ψύχονται μέσω εξάτμισης του νερού και στην πε‐
ρίπτωση που τα ανοίγματα είναι κλειστά, υπάρχει
κίνδυνος συσσώρευσης σταγονιδίων και νερού
στο εσωτερικό. Τα γεωργικά προϊόντα που ενδέ‐
χεται να αποβάλλουν μεγάλες ποσότητες νερού
περιλαμβάνουν μαρούλια, μανιτάρια, μπρόκολα
και καρότα. Σε περιπτώσεις όπου το μείγμα πε‐
ριέχει μήλα και άλλα φρούτα, ίσως να είναι σκό‐
πιμο τα ανοίγματα να διατηρούνται ελαφρώς
ανοιχτά, ώστε να μειωθεί ο κίνδυνος συσσώρευ‐
σης αιθυλενίου στο εσωτερικό. Το αιθυλένιο είναι
μια φυτορμόνη που αποδεσμεύεται από κάποια
φρούτα και λαχανικά, και το οποίο μπορεί να
βλάψει κάποια, αλλά και να επιταχύνει την ωρί‐
μανση κάποιων άλλων.
4.11 Λειτουργία FreshZone
Εάν ο θάλαμος δεν χρειάζεται να λειτουργεί ως
NaturaFresh, οι ρυθμίσεις μπορούν να αλλάξουν,
ώστε να λειτουργεί απλά ως συρτάρι χαμηλής
θερμοκρασίας.
36
www.electrolux.com

Για να ενεργοποιήσετε τη λειτουργία:
• Σύρετε προς τα πάνω τη γλωττίδα επιλογής,
όπως φαίνεται στο σχήμα.
Για να απενεργοποιήσετε τη λειτουργία:
1.
Σύρετε προς τα κάτω τη γλωττίδα επιλογής.
4.12 Συρτάρι NaturaFresh
Αυτή η διάταξη επιτυγχάνει την ταχεία ψύξη των
τροφίμων και μια πιο ομοιόμορφη θερμοκρασία
μέσα στο συρτάρι.
Για να ενεργοποιήσετε τη λειτουργία:
1.
Ενεργοποιήστε τη λειτουργία νέων προμη‐
θειών.
2.
Ανάβει η ένδειξη νέων προμηθειών.
3.
Σύρετε προς τα πάνω τη γλωττίδα επιλογής,
όπως φαίνεται στο σχήμα.
Για να απενεργοποιήσετε τη λειτουργία:
1.
Σύρετε προς τα κάτω τη γλωττίδα επιλογής.
2.
Απενεργοποιήστε τη λειτουργία νέων προ‐
μηθειών.
3.
Η ένδειξη νέων προμηθειών σβήνει.
Η λειτουργία απενεργοποιείται αυτόματα
μετά από μερικές ώρες.
ΕΛΛΗΝΙΚΑ 37

4.13 Λειτουργία QuickChill για ποτά
Αυτή η λειτουργία επιτυγχάνει την ταχεία ψύξη
ποτών.
Για να ενεργοποιήσετε τη λειτουργία:
1.
Αφαιρέστε ή ανασηκώστε το συρτάρι
NaturaFresh και τοποθετήστε τη σχάρα
μπουκαλιών μπροστά από τις υποδοχές
QuickChill, όπως φαίνεται στο σχήμα.
2.
Ενεργοποιήστε τη λειτουργία νέων προμη‐
θειών.
3.
Ανάβει η ένδειξη νέων προμηθειών.
4.
Σύρετε προς τα πάνω τη γλωττίδα επιλογής,
όπως φαίνεται στο σχήμα.
Για να απενεργοποιήσετε τη λειτουργία:
1.
Σύρετε προς τα κάτω τη γλωττίδα επιλογής.
2.
Απενεργοποιήστε τη λειτουργία νέων προ‐
μηθειών.
3.
Η ένδειξη νέων προμηθειών σβήνει.
Η λειτουργία απενεργοποιείται αυτόματα
μετά από μερικές ώρες.
4.14 Αφαίρεση των καλαθιών κατάψυξης από τον καταψύκτη
2
1
Τα καλάθια κατάψυξης διαθέτουν αναστολέα,
ώστε να αποτρέπεται η τυχαία αφαίρεση ή πτώ‐
ση τους. Εάν θέλετε να αφαιρέσετε ένα καλάθι
από τον καταψύκτη, τραβήξτε το προς το μέρος
σας και μόλις φτάσετε στο τελικό σημείο της δια‐
δρομής του, σηκώστε το μπροστινό του μέρος
προς τα πάνω για να το αφαιρέσετε.
Για να τοποθετήσετε το καλάθι ξανά πίσω, σηκώ‐
στε ελαφρά το μπροστινό του μέρος και εισαγά‐
γετέ το στον καταψύκτη. Όταν ξεπεράσετε τα τελι‐
κά σημεία της διαδρομής τους, σπρώξτε τα καλά‐
θια να επιστρέψουν στη θέση τους.
5. ΧΡΉΣΙΜΕΣ ΣΥΜΒΟΥΛΈΣ
5.1 Κανονικοί ήχοι λειτουργίας
• Μπορεί να ακούσετε ήπιους ήχους μουρμου‐
ρητών ή φυσαλίδων όταν το ψυκτικό αντλείται
μέσω των πηνίων ή σωληνώσεων. Αυτό είναι
φυσιολογικό.
• Όταν ο συμπιεστής είναι ενεργοποιημένος, το
ψυκτικό αντλείται κυκλικά και ακούγεται ένας
ήχος στροβιλισμού ή ένας παλλόμενος θόρυ‐
βο από το συμπιεστή. Αυτό είναι φυσιολογικό.
• Η θερμική διαστολή μπορεί να προκαλέσει ένα
ξαφνικό οξύ κρότο. Είναι ένα φυσικό, μη επι‐
κίνδυνο φαινόμενο. Αυτό είναι φυσιολογικό.
5.2 Συμβουλές εξοικονόμησης
ενέργειας
• Μην ανοίγετε την πόρτα συχνά και μην την
αφήνετε ανοικτή για περισσότερο από ότι είναι
απολύτως απαραίτητο.
38
www.electrolux.com

• Εάν η θερμοκρασία περιβάλλοντος είναι υψη‐
λή, ο ρυθμιστής θερμοκρασίας βρίσκεται στην
υψηλότερη ρύθμιση και η συσκευή είναι εντε‐
λώς φορτωμένη, ο συμπιεστής ίσως λειτουργεί
συνεχώς δημιουργώντας πάγο στον εξατμιστή‐
ρα. Εάν προκύψει αυτό, περιστρέψτε το ρυθμι‐
στή θερμοκρασίας προς τις χαμηλότερες ρυθ‐
μίσεις ώστε να είναι δυνατή η αυτόματη από‐
ψυξη κι επομένως η εξοικονόμηση ηλεκτρικής
ενέργειας.
5.3 Συμβουλές ψύξης φρέσκων
τροφίμων
Για να έχετε τα καλύτερα αποτελέσματα:
• μην αποθηκεύετε στο ψυγείο ζεστά τρόφιμα ή
υγρά που εξατμίζονται
• μην καλύπτετε ή τυλίγετε τα τρόφιμα, ιδιαίτερα
εάν μυρίζουν έντονα
• τοποθετείτε τα τρόφιμα με τέτοιο τρόπο ώστε ο
αέρας να κυκλοφορεί ελεύθερα γύρω τους
5.4 Συμβουλές ψύξης
Χρήσιμες συμβουλές:
Κρέας (όλοι οι τύποι) τυλίξτε σε πλαστικές σακού‐
λες και τοποθετήστε το στο γυάλινο ράφι επάνω
από το συρτάρι των λαχανικών.
Για λόγους ασφαλείας, αποθηκεύστε με αυτό τον
τρόπο μόνο για μια ή δύο ημέρες το πολύ.
Μαγειρεμένα τρόφιμα, κρύα πιάτα, κλπ: αυτά θα
πρέπει να καλύπτονται και μπορούν να τοποθε‐
τούνται σε οποιοδήποτε ράφι.
Φρούτα και λαχανικά: αυτά θα πρέπει να πλένο‐
νται καλά και να τοποθετούνται στο(α) ειδικό(ά)
συρτάρι(α) που παρέχεται(ονται).
Βούτυρο και τυρί: αυτά θα πρέπει να τοποθετού‐
νται σε ειδικά αεροστεγή δοχεία ή να τυλίγονται
με αλουμινόχαρτο ή σε πλαστικές σακούλες
αφαιρώντας όσο το δυνατόν περισσότερο τον αέ‐
ρα.
Μπουκάλια γάλακτος: αυτά θα πρέπει να είναι
ταπωμένα και θα πρέπει να αποθηκεύονται στη
σχάρα μπουκαλιών στην πόρτα.
Οι μπανάνες, οι πατάτες, τα κρεμμύδια και το
σκόρδο, εάν δεν είναι συσκευασμένα, πρέπει να
διατηρούνται στο ψυγείο.
5.5 Συμβουλές κατάψυξης
Για να σας βοηθήσουμε να εκμεταλλεύεστε στο
έπακρο τη διαδικασία κατάψυξης, ακολουθούν
ορισμένες σημαντικές συμβουλές:
• η μέγιστη ποσότητα τροφίμων που μπορεί να
καταψυχθεί σε 24 ώρες. αναγράφεται στην πι‐
νακίδα τεχνικών στοιχείων;
• η διαδικασία κατάψυξης διαρκεί 24 ώρες. Κατά
τη διάρκεια αυτής της περιόδου δε θα πρέπει
να προστίθενται άλλα τρόφιμα για κατάψυξη;
• καταψύχετε μόνο πρώτης ποιότητας, φρέσκα
και καλά καθαρισμένα τρόφιμα;
• αποθηκεύετε τα τρόφιμα σε μικρές μερίδες
ώστε να είναι δυνατή η γρήγορη και πλήρης
κατάψυξή του και το μεταγενέστερο ξεπάγωμα
μόνο της απαιτούμενης ποσότητας;
• τυλίγετε τα τρόφιμα σε αλουμινόχαρτο ή πλα‐
στικές σακούλες και εξασφαλίζετε ότι οι συ‐
σκευασίες είναι αεροστεγείς;
• μην αφήνετε φρέσκα, μη κατεψυγμένα τρόφιμα
να έρχονται σε επαφή με ήδη κατεψυγμένα
τρόφιμα, ώστε να αποτρέπεται η αύξηση της
θερμοκρασίας των δεύτερων;
• τα άπαχα τρόφιμα αποθηκεύονται καλύτερα
και για μεγαλύτερο διάστημα από τα λιπαρά;
το αλάτι μειώνει τη δυνατή διάρκεια αποθήκευ‐
σης των τροφίμων;
• οι γρανίτες, εάν καταναλωθούν αμέσως μετά
την έξοδό τους από την κατάψυξη, μπορούν
να προκαλέσουν στο δέρμα εγκαύματα από
πάγο;
• είναι σκόπιμο να γράφετε την ημερομηνία κα‐
τάψυξης σε κάθε συσκευασία ώστε να μπορεί‐
τε να συνάγετε το χρόνο αποθήκευσης;
5.6 Συμβουλές για την αποθήκευση
κατεψυγμένων τροφίμων
Για να έχετε την καλύτερη δυνατή απόδοση της
συσκευής αυτής:
• ελέγχετε ότι οι συνθήκες διατήρησης των κατε‐
ψυγμένων τροφίμων του εμπορίου ήταν κα‐
τάλληλες στο κατάστημα αγοράς τους,
• εξασφαλίζετε την ταχύτερη δυνατή μεταφορά
των κατεψυγμένων τροφίμων από το κατάστη‐
μα αγοράς τους στον καταψύκτη,
• μην ανοίγετε την πόρτα συχνά και μην την
αφήνετε ανοιχτή για περισσότερο από ό,τι εί‐
ναι απολύτως απαραίτητο,
• μετά το ξεπάγωμα, τα τρόφιμα αλλοιώνονται
γρήγορα και δεν μπορούν να καταψυχθούν
ξανά,
• μην υπερβαίνετε το χρόνο αποθήκευσης που
υποδεικνύεται από τους παρασκευαστές των
τροφίμων.
ΕΛΛΗΝΙΚΑ 39

6. ΦΡΟΝΤΊΔΑ ΚΑΙ ΚΑΘΆΡΙΣΜΑ
6.1 Καθάρισμα του εσωτερικού
Προτού χρησιμοποιήσετε τη συσκευή για πρώτη
φορά, πλύντε το εσωτερικό και όλα τα εσωτερικά
εξαρτήματα με χλιαρό νερό και λίγο ουδέτερο σα‐
πούνι για να αφαιρέσετε την τυπική μυρωδιά των
καινούριων προϊόντων και στη συνέχεια στεγνώ‐
στε καλά.
Μη χρησιμοποιείτε απορρυπαντικά ή
σκόνες που χαράσσουν, διότι καταστρέ‐
φουν το φινίρισμα.
ΠΡΟΣΟΧΗ
Πριν από οποιαδήποτε εργασία συντή‐
ρησης αποσυνδέετε τη συσκευή από
την πρίζα.
Η συσκευή αυτή περιέχει υδρογονάν‐
θρακες στην ψυκτική μονάδα της; Οι ερ‐
γασίες συντήρησης και επαναφόρτισης
θα πρέπει επομένως να πραγματο‐
ποιούνται μόνο από εξουσιοδοτημένους
τεχνικούς.
6.2 Τακτικό καθάρισμα
Η συσκευή πρέπει να καθαρίζεται τακτικά:
• Καθαρίστε το εσωτερικό και τα εξαρτήματα με
χλιαρό νερό και λίγο φυσικό σαπούνι.
• Ελέγχετε τακτικά τα λάστιχα της πόρτας και
σκουπίστε τα για να εξασφαλίσετε ότι είναι κα‐
θαρά και δεν φέρουν ακαθαρσίες.
• Ξεπλύντε και στεγνώστε καλά.
Μην τραβάτε, μετακινείτε ή προκαλείτε
ζημιά σε σωλήνες ή/και καλώδια που
βρίσκονται στο εσωτερικό του θαλάμου.
Ποτέ μη χρησιμοποιείτε απορρυπαντικά,
σκόνες που χαράζουν, καθαριστικά με
πολύ άρωμα ή γυαλιστικό κερί για να
καθαρίσετε το εσωτερικό, διότι αυτά τα
υλικά φθείρουν την επιφάνεια και αφή‐
νουν έντονη οσμή.
Καθαρίστε το συμπυκνωτή (μαύρη γρίλια) και το
συμπιεστή στο πίσω μέρος της συσκευής με μια
βούρτσα. Η διαδικασία αυτή βελτιώνει την από‐
δοση της συσκευής και εξοικονομεί κατανάλωση
ρεύματος.
Προσέχετε ώστε να μην προκληθεί ζη‐
μιά στο ψυκτικό σύστημα.
Πολλά ιδιοσκευάσματα καθαρισμού για την κουζί‐
να περιέχουν χημικά που μπορούν να προσβάλ‐
λουν/ καταστρέψουν τα πλαστικά που χρησιμο‐
ποιούνται σε αυτή τη συσκευή. Για το λόγο αυτό
συστήνεται το εξωτερικό περίβλημα της συ‐
σκευής να καθαρίζεται μόνο με χλιαρό νερό αφού
προσθέσετε και λίγο υγρό για τα πιάτα.
Μετά τον καθαρισμό, συνδέστε ξανά τον εξοπλι‐
σμό στην κεντρική παροχή.
6.3 Αντικατάσταση του φίλτρου αέρα
από άνθρακα
Για να έχετε τη βέλτιστη απόδοση, πρέπει να αλ‐
λάζετε το φίλτρο αέρα από άνθρακα κάθε έξι μή‐
νες.
Μπορείτε να προμηθευτείτε καινούργια ενεργά
φίλτρα αέρα από τον τοπικό σας αντιπρόσωπο.
Ανατρέξτε στην ενότητα "Τοποθέτηση του φίλ‐
τρου αέρα από άνθρακα" για οδηγίες.
40
www.electrolux.com

6.4 Απόψυξη του ψυγείου
Ο πάγος διαλύεται αυτόματα από τον εξατμιστή‐
ρα του θαλάμου ψύξης κάθε φορά που σταματά
ο συμπιεστής κατά τη διάρκεια της κανονικής
χρήσης. Το νερό από την απόψυξη αποστραγγί‐
ζεται μέσω μιας οπής σε ένα ειδικό δοχείο στο πί‐
σω μέρος της συσκευής, επάνω από το συμπιε‐
στή του κινητήρα, όπου και εξατμίζεται.
Είναι σημαντικό να καθαρίζεται τακτικά η οπή
αποστράγγισης του νερού της απόψυξης στο μέ‐
σον του αγωγού του θαλάμου ψύξης, έτσι ώστε
να αποτρέπεται η υπερχείλιση και το στάξιμο νε‐
ρού στα τρόφιμα στο εσωτερικό του θαλάμου.
Χρησιμοποιείτε τον ειδικό καθαριστήρα που πα‐
ρέχεται, τον οποίο θα βρείτε ήδη τοποθετημένο
μέσα στην οπή αποστράγγισης.
6.5 Απόψυξη της κατάψυξης
Ο θάλαμος κατάψυξης αυτού του μοντέλου, είναι
"no frost". Αυτό σημαίνει ότι δεν υπάρχει συσσώ‐
ρευση πάγου όταν λειτουργεί, ούτε στα εσωτερι‐
κά τοιχώματα ούτε στα τρόφιμα.
Η απουσία του πάγου οφείλεται στη συνεχή κυ‐
κλοφορία κρύου αέρα στο εσωτερικό του θαλά‐
μου, η οποία παράγεται από έναν αυτόματα ελεγ‐
χόμενο ανεμιστήρα.
7. ΤΙ ΝΑ ΚΆΝΕΤΕ ΑΝ...
ΠΡΟΣΟΧΗ
Πριν από την αντιμετώπιση προβλημά‐
των, αποσυνδέστε το φις τροφοδοσίας
από την πρίζα.
Η αντιμετώπιση προβλημάτων που δεν
αναφέρονται στο παρόν εγχειρίδιο πρέ‐
πει να διεξάγεται μόνο από επαγγελμα‐
τία ηλεκτρολόγο ή άλλο κατάλληλα κα‐
ταρτισμένο άτομο.
Κατά τη διάρκεια της κανονικής χρήσης,
ακούγονται κάποιοι ήχοι (συμπιεστής,
κυκλοφορία ψυκτικού).
Πρόβλημα Πιθανή αιτία Επίλυση
Η συσκευή κάνει θόρυβο. Η συσκευή δεν στηρίζεται σω‐
στά.
Βεβαιωθείτε ότι η συσκευή είναι
σταθερή (και τα τέσσερα πόδια
πρέπει να ακουμπούν στο δάπε‐
δο).
Ο συμπιεστής λειτουργεί
συνεχώς.
Ο ρυθμιστής θερμοκρασίας
μπορεί να βρίσκεται σε λάθος
θέση.
Ρυθμίστε υψηλότερη θερμοκρα‐
σία.
Δεν έχει κλείσει σωστά η πόρ‐
τα.
Ανατρέξτε στην ενότητα «Κλείσι‐
μο της πόρτας».
Ανοίγετε την πόρτα πολύ συ‐
χνά.
Μην κρατάτε την πόρτα ανοιχτή
περισσότερο από όσο χρειάζε‐
ται.
ΕΛΛΗΝΙΚΑ 41

Πρόβλημα Πιθανή αιτία Επίλυση
Η θερμοκρασία των προϊόντων
είναι πολύ υψηλή.
Περιμένετε έως ότου τα προϊό‐
ντα αποκτήσουν θερμοκρασία
δωματίου πριν από την αποθή‐
κευση.
Η θερμοκρασία δωματίου είναι
πολύ υψηλή.
Μειώστε τη θερμοκρασία δωμα‐
τίου.
Η λειτουργία ταχείας κατάψυ‐
ξης είναι ενεργοποιημένη.
Ανατρέξτε στην ενότητα «Λει‐
τουργία ταχείας κατάψυξης».
Υπάρχει ροή νερού στην
πίσω πλάκα του ψυγείου.
Κατά τη διάρκεια της αυτόμα‐
της διαδικασίας απόψυξης, ο
πάγος αποψύχεται στην πίσω
πλάκα.
Αυτό είναι φυσιολογικό.
Υπάρχει ροή νερού στο
εσωτερικό του ψυγείου.
Η έξοδος νερού είναι φραγμέ‐
νη.
Καθαρίστε την έξοδο νερού.
Υπάρχουν προϊόντα που εμπο‐
δίζουν τη ροή του νερού στο
συλλέκτη νερού.
Βεβαιωθείτε ότι τα προϊόντα δεν
έρχονται σε επαφή με την πίσω
πλάκα.
Υπάρχει ροή νερού στο
δάπεδο.
Η έξοδος του νερού απόψυξης
δεν καταλήγει στο δίσκο εξάτμι‐
σης πάνω από το συμπιεστή.
Τοποθετήστε την έξοδο του νε‐
ρού απόψυξης μέσα στο δίσκο
εξάτμισης.
Έχει σχηματιστεί υπερβο‐
λικός πάγος.
Τα προϊόντα δεν είναι συ‐
σκευασμένα σωστά.
Συσκευάστε σωστά τα προϊόντα.
Δεν έχει κλείσει σωστά η πόρ‐
τα.
Ανατρέξτε στην ενότητα «Κλείσι‐
μο της πόρτας».
Ο ρυθμιστής θερμοκρασίας
μπορεί να βρίσκεται σε λάθος
θέση.
Ρυθμίστε υψηλότερη θερμοκρα‐
σία.
Η θερμοκρασία στη συ‐
σκευή είναι πολύ υψηλή.
Δεν έχει κλείσει σωστά η πόρ‐
τα.
Ανατρέξτε στην ενότητα «Κλείσι‐
μο της πόρτας».
Η θερμοκρασία των προϊόντων
είναι πολύ υψηλή.
Περιμένετε έως ότου τα προϊό‐
ντα αποκτήσουν θερμοκρασία
δωματίου πριν από την αποθή‐
κευση.
Αποθηκεύετε ταυτόχρονα μεγά‐
λο αριθμό προϊόντων.
Αποθηκεύστε λιγότερα προϊόντα
ταυτόχρονα.
Η θερμοκρασία στον κατα‐
ψύκτη είναι πολύ υψηλή.
Δεν υπάρχει καθόλου κυκλο‐
φορία κρύου αέρα στη συ‐
σκευή.
Βεβαιωθείτε ότι υπάρχει κυκλο‐
φορία κρύου αέρα στη συσκευή.
Η θερμοκρασία στον κατα‐
ψύκτη είναι πολύ υψηλή.
Τα προϊόντα είναι τοποθετημέ‐
να πολύ κοντά μεταξύ τους.
Αποθηκεύστε τα προϊόντα με
τρόπο που να διασφαλίζει την
κυκλοφορία κρύου αέρα.
Η συσκευή δεν λειτουργεί. Η συσκευή είναι απενεργο‐
ποιημένη.
Ενεργοποιήστε τη συσκευή.
42
www.electrolux.com

Πρόβλημα Πιθανή αιτία Επίλυση
Δεν έχει συνδεθεί σωστά το φις
τροφοδοσίας στην πρίζα.
Συνδέστε σωστά το φις στην
πρίζα.
Η συσκευή δεν τροφοδοτείται
με ρεύμα. Δεν υπάρχει τάση
ρεύματος στην πρίζα.
Συνδέστε μια άλλη ηλεκτρική συ‐
σκευή στην πρίζα. Επικοινωνή‐
στε με πιστοποιημένο ηλεκτρο‐
λόγο.
Δεν λειτουργεί ο λαμπτή‐
ρας.
Ο λαμπτήρας βρίσκεται σε κα‐
τάσταση αναμονής.
Κλείστε και ανοίξτε την πόρτα.
Εάν το πρόβλημα δεν αποκατασταθεί, επικοινωνήστε με το πλησιέστερο κέντρο σέρβις.
7.1 Κλείσιμο της πόρτας
1.
Καθαρίστε τα στεγανοποιητικά λάστιχα της
πόρτας.
2.
Εάν χρειαστεί, προσαρμόστε την πόρτα.
Ανατρέξτε στην ενότητα «Εγκατάσταση».
3.
Εάν χρειαστεί, αντικαταστήστε τα ελαττωμα‐
τικά στεγανοποιητικά λάστιχα της πόρτας.
Επικοινωνήστε με το κέντρο σέρβις.
8. ΕΓΚΑΤΆΣΤΑΣΗ
8.1 Θέση
A
B
100 mm
min
20 mm
Η συσκευή πρέπει να εγκαθίσταται μακριά από
πηγές θερμότητας, όπως σώματα καλοριφέρ, λέ‐
βητες, άμεσο ηλιακό φως, κ.λπ. Βεβαιωθείτε ότι ο
αέρας μπορεί να κυκλοφορεί ελεύθερα πίσω από
το θάλαμο. Για να εξασφαλίσετε τη βέλτιστη από‐
δοση, εάν η συσκευή έχει τοποθετηθεί κάτω από
κρεμαστό ντουλάπι, η ελάχιστη απόσταση μεταξύ
του επάνω μέρους του θαλάμου και του ντουλα‐
πιού πρέπει να είναι τουλάχιστον 100 mm. Ιδανι‐
κά, ωστόσο, η συσκευή δεν πρέπει να τοποθετεί‐
ται κάτω από κρεμαστά ντουλάπια. Η ακριβής
οριζοντίωση εξασφαλίζεται από ένα ή περισσότε‐
ρα ρυθμιζόμενα πόδια στη βάση του θαλάμου.
ΠΡΟΕΙΔΟΠΟΙΗΣΗ
Πρέπει να είναι δυνατή η αποσύνδεση
της συσκευής από την ηλεκτρική παρο‐
χή και, επομένως, η πρόσβαση στο φις
πρέπει να είναι εύκολη μετά την εγκατά‐
σταση.
ΕΛΛΗΝΙΚΑ 43

8.2 Πίσω αποστάτες
2
4
3
1
Οι δύο αποστάτες βρίσκονται στη συσκευασία με
το έντυπο υλικό.
Ακολουθήστε τα παρακάτω βήματα για να τοπο‐
θετήσετε τους αποστάτες:
1.
Χαλαρώστε τη βίδα.
2.
Τοποθετήστε τον αποστάτη κάτω από τη βί‐
δα.
3.
Στρέψτε τον αποστάτη στη σωστή θέση.
4.
Σφίξτε ξανά τη βίδα.
8.3 Οριζοντίωση
Όταν τοποθετείτε τη συσκευή στη θέση της, βε‐
βαιωθείτε πως είναι επίπεδη. Αυτό μπορεί να επι‐
τευχθεί με δύο ρυθμιζόμενα πόδια που βρίσκο‐
νται μπροστά στο κάτω μέρος.
8.4 Τοποθέτηση του φίλτρου CleanAir Control
Το φίλτρο CleanAir Control είναι ένα φίλτρο ενερ‐
γού άνθρακα που απορροφά τις δυσάρεστες
οσμές και επιτρέπει να διατηρείται αναλλοίωτη η
γεύση και το άρωμα όλων των τροφίμων, χωρίς
ανάμιξη οσμών.
Κατά την παράδοση, το φίλτρο άνθρακα βρίσκε‐
ται σε μια πλαστική σακούλα για να διατηρηθεί η
διάρκεια και τα χαρακτηριστικά του. Το φίλτρο
πρέπει να τοποθετηθεί πίσω από το κάλυμμα
πριν ενεργοποιηθεί η συσκευή.
1.
Ανοίξτε το κάλυμμα.
2.
Αφαιρέστε το φίλτρο από την πλαστική σα‐
κούλα.
3.
Εισαγάγετε το φίλτρο στην εγκοπή που βρί‐
σκεται στο πίσω μέρος του καλύμματος.
4.
Κλείστε το κάλυμμα.
Ο χειρισμός του φίλτρου πρέπει να γίνε‐
ται με προσοχή, ώστε να μην αποδε‐
σμεύονται τεμαχίδια από την επιφάνειά
του. Το φίλτρο πρέπει να αντικαθίσταται
κάθε έξι μήνες.
44
www.electrolux.com

8.5 Ηλεκτρική σύνδεση
Πριν από τη σύνδεση, επαληθεύστε ότι η τάση
και η συχνότητα που αναγράφονται στην πινακί‐
δα τεχνικών χαρακτηριστικών αντιστοιχούν στα
χαρακτηριστικά της παροχής σας.
Η συσκευή πρέπει να γειώνεται. Το φις του κα‐
λωδίου τροφοδοσίας διαθέτει μια επαφή γι' αυτό
το σκοπό. Εάν η πρίζα δεν είναι γειωμένη, συν‐
δέστε τη συσκευή σε μια μεμονωμένη γείωση
σύμφωνα με τους τρέχοντες κανονισμούς, αφού
συμβουλευθείτε έναν επαγγελματία ηλεκτρολόγο.
Σε περίπτωση μη τήρησης των παραπάνω προ‐
φυλάξεων ασφαλείας, ο κατασκευαστής δε φέρει
καμία ευθύνη.
Αυτή η συσκευή είναι σύμφωνη με τις ακόλουθες
Οδηγίες της. ΕΟΚ.
8.6 Δυνατότητα αντιστροφής της πόρτας
2
1
ΠΡΟΕΙΔΟΠΟΙΗΣΗ
Πριν πραγματοποιήσετε οποιαδήποτε
ενέργεια, αποσυνδέστε το φις από την
πρίζα.
ΠΡΟΕΙΔΟΠΟΙΗΣΗ
Βεβαιωθείτε ότι η συσκευή δεν τροφο‐
δοτείται με ρεύμα.
Για να πραγματοποιήσετε τις ακόλουθες
ενέργειες, συνιστάται να έχετε τη βοή‐
θεια ενός ακόμα ατόμου, το οποίο θα
συγκρατεί καλά τις πόρτες της συσκευής
κατά τη διάρκεια των εργασιών.
• Αφαιρέστε το κάλυμμα του επάνω μεντεσέ με
ένα κατσαβίδι.
• Ανοίξτε την πόρτα και αφαιρέστε το κάλυμμα
του καπακιού του άκρου της πόρτας.
• Αφαιρέστε τα επάνω μπροστινά καλύμματα και
στις δύο πλευρές. (1)
• Αποσυνδέστε το σύνδεσμο του καλωδίου της
οθόνης. (2)
• Ξεβιδώστε τους μεντεσέδες και αφαιρέστε την
πόρτα.
E
F
A
B
DC
• Αφαιρέστε τις τάπες της μεσαίας διαδοκίδας.
• Αφαιρέστε το κάλυμμα με τη βοήθεια εργα‐
λείου. (A).
• Ξεβιδώστε τον άξονα (B) και τον αποστάτη (C)
του κάτω μεντεσέ και τοποθετήστε τα στην
αντίθετη πλευρά.
• Εισαγάγετε ξανά το κάλυμμα (A) στην αντίθετη
πλευρά.
• Τοποθετήστε την πόρτα στον κάτω μεντεσέ.
ΕΛΛΗΝΙΚΑ 45

1
2
• Αφαιρέστε το καλώδιο από το κάλυμμα του κα‐
πακιού του άκρου της πόρτας και τοποθετήστε
το μέσα στον επάνω μεντεσέ.
• Βιδώστε ξανά το μεντεσέ.
• Συνδέστε το καλώδιο στο σημείο σύνδεσης
στον μπροστινό πίνακα.
• Επαναφέρετε τα επάνω μπροστινά καλύμματα
στη θέση τους και στις δύο πλευρές (2).
• Τοποθετήστε το καλώδιο οθόνης, το οποίο εί‐
ναι αποσυνδεδεμένο προς το παρόν, μέσα στη
βάση καλωδίου στο καπάκι του άκρου της
πόρτας και στη συνέχεια τοποθετήστε στη θέ‐
ση του το κάλυμμα του καπακιού του άκρου
της πόρτας.
46
www.electrolux.com

A
A
C
C
B
B
• Αφαιρέστε τα καλύμματα (B). Αφαιρέστε τους
πείρους καλύμματος (A).
• Ξεβιδώστε τις λαβές (C) και τοποθετήστε τις
στην αντίθετη πλευρά. Τοποθετήστε την επά‐
νω λαβή στην κάτω πόρτα και την κάτω λαβή
στην επάνω πόρτα.
• Εισαγάγετε ξανά τους πείρους καλύμματος (A)
στην αντίθετη πλευρά.
Κάντε ένα τελικό έλεγχο για να βεβαιωθείτε ότι:
• Όλες οι βίδες είναι σφιγμένες.
• Το μαγνητικό λάστιχο είναι προσκολλημένο
στο θάλαμο.
• Η πόρτα ανοίγει και κλείνει σωστά.
Εάν η θερμοκρασία περιβάλλοντος είναι χαμηλή
(δηλ. το χειμώνα), το λάστιχο μπορεί να μην
εφαρμόζει απόλυτα στο θάλαμο. Στην περίπτωση
αυτή, περιμένετε μέχρι το λάστιχο να εφαρμόσει
με φυσικό τρόπο.
Εάν δεν θέλετε να εκτελέσετε εσείς οι ίδιοι τις δια‐
δικασίες που περιγράφονται παραπάνω, επικοι‐
νωνήστε με το πλησιέστερο κέντρο σέρβις. Ο τε‐
χνικός του κέντρου σέρβις θα αντιστρέψει τις
πόρτες με δική σας χρέωση.
9. ΘΌΡΥΒΟΙ
Ακούγονται κάποιοι ήχοι κατά τη διάρκεια της κα‐
νονικής λειτουργίας (συμπιεστής, κυκλοφορία
ψυκτικού υγρού).
BRRR!
HISSS!
CLICK!
BLUBB!
CRACK!
SSSRRR!
OK
ΕΛΛΗΝΙΚΑ 47

CLICK!
CLICK!
BRRR!
BRRR!
BLUBB!
BLUBB!
HISSS!
HISSS!
48
www.electrolux.com

SSSRRR!
SSSRRR!
CRACK!
CRACK!
10. ΤΕΧΝΙΚΆ ΧΑΡΑΚΤΗΡΙΣΤΙΚΆ
Διαστάσεις εσοχής
Ύψος 2010 mm
Πλάτος 595 mm
Βάθος 658 mm
Χρόνος ανόδου 18 ώρες
Τάση 230 - 240 V
Συχνότητα 50 Hz
Τα τεχνικά στοιχεία αναγράφονται στην πινακίδα
τεχνικών χαρακτηριστικών στην εσωτερική αρι‐
στερή πλευρά της συσκευής, καθώς και στην ετι‐
κέτα ενεργειακής κατανάλωσης.
11. ΠΕΡΙΒΑΛΛΟΝΤΙΚΆ ΘΈΜΑΤΑ
Ανακυκλώστε τα υλικά που φέρουν το σύμβολο
. Τοποθετήστε τα υλικά συσκευασίας σε
κατάλληλα δοχεία για ανακύκλωση.
Συμβάλλετε στην προστασία του περιβάλλοντος
και της ανθρώπινης υγείας ανακυκλώνοντας τις
άχρηστες ηλεκτρικές και ηλεκτρονικές συσκευές.
Μην απορρίπτετε με τα οικιακά απορρίμματα
συσκευές που φέρουν το σύμβολο
.
Επιστρέψτε το προϊόν στην τοπική σας μονάδα
ΕΛΛΗΝΙΚΑ 49

ανακύκλωσης ή επικοινωνήστε με τη δημοτική
αρχή.
50
www.electrolux.com

ÍNDICE DE MATERIAS
1. INFORMACIÓN SOBRE SEGURIDAD . . . . . . . . . . . . . . . . . . . . . . . . . . . . . . . . . . . . . . . . 52
2. DESCRIPCIÓN DEL PRODUCTO . . . . . . . . . . . . . . . . . . . . . . . . . . . . . . . . . . . . . . . . . . . 54
3. PANEL DE MANDOS . . . . . . . . . . . . . . . . . . . . . . . . . . . . . . . . . . . . . . . . . . . . . . . . . . . . 55
4. USO DIARIO . . . . . . . . . . . . . . . . . . . . . . . . . . . . . . . . . . . . . . . . . . . . . . . . . . . . . . . . . . . 58
5. CONSEJOS ÚTILES . . . . . . . . . . . . . . . . . . . . . . . . . . . . . . . . . . . . . . . . . . . . . . . . . . . . . 63
6. MANTENIMIENTO Y LIMPIEZA . . . . . . . . . . . . . . . . . . . . . . . . . . . . . . . . . . . . . . . . . . . . . 65
7. QUÉ HACER SI… . . . . . . . . . . . . . . . . . . . . . . . . . . . . . . . . . . . . . . . . . . . . . . . . . . . . . . . 66
8.
INSTALACIÓN . . . . . . . . . . . . . . . . . . . . . . . . . . . . . . . . . . . . . . . . . . . . . . . . . . . . . . . . . 69
9. RUIDOS . . . . . . . . . . . . . . . . . . . . . . . . . . . . . . . . . . . . . . . . . . . . . . . . . . . . . . . . . . . . . . 73
10.
DATOS TÉCNICOS . . . . . . . . . . . . . . . . . . . . . . . . . . . . . . . . . . . . . . . . . . . . . . . . . . . . . . 75
11. ASPECTOS MEDIOAMBIENTALES . . . . . . . . . . . . . . . . . . . . . . . . . . . . . . . . . . . . . . . . . . 75
PENSAMOS EN USTED
Gracias por adquirir un producto Electrolux. Ha escogido un producto que contiene décadas de
experiencia e innovación profesionales. Ingenioso y elegante, se ha diseñado pensando en usted.
Así que, siempre que lo utilice puede tener la seguridad de que conseguirá excelentes resultados.
Bienvenido a Electrolux.
Visite nuestro sitio web para:
Obtener consejos, folletos, soluciones a problemas e información de servicio:
www.electrolux.com
Registrar su producto para recibir un mejor servicio:
www.electrolux.com/productregistration
Adquirir accesorios, artículos de consumo y recambios originales para su aparato:
www.electrolux.com/shop
ATENCIÓN Y SERVICIO AL CLIENTE
Le recomendamos que utilice recambios originales.
Al contactar con el Servicio, cerciórese de tener la siguiente información a mano.
La información se puede encontrar en la placa de características. Modelo, PNC, Número de
serie.
Advertencia - Precaución-Información sobre seguridad.
Datos y recomendaciones generales
Información medioambiental
Salvo modificaciones.
ESPAÑOL 51

1.
INFORMACIÓN SOBRE SEGURIDAD
Por su seguridad y para garantizar el fun-
cionamiento correcto del aparato, antes
de instalarlo y utilizarlo por primera vez lea
atentamente este manual del usuario, in-
cluidos los consejos y advertencias. Para
evitar errores y accidentes, es importante
que todas las personas que utilicen el
aparato estén perfectamente al tanto de
su funcionamiento y de las características
de seguridad. Conserve estas instruccio-
nes y no olvide mantenerlas junto al apa-
rato en caso de su desplazamiento o ven-
ta para que quienes lo utilicen a lo largo
de su vida útil dispongan siempre de la in-
formación adecuada sobre el uso y la se-
guridad.
Por la seguridad de personas y bienes, si-
ga las normas de seguridad indicadas en
estas instrucciones, ya que el fabricante
no se hace responsable de daños provo-
cados por omisiones.
1.1 Seguridad de niños y
personas vulnerables
• Este electrodoméstico no está diseña-
do para que lo usen personas (incluidos
niños) con discapacidad física, senso-
rial o mental, o con experiencia y cono-
cimiento insuficientes, a menos que
una persona responsable de su seguri-
dad les supervise o instruya en el uso
del electrodoméstico.
No permita que los niños jueguen con
el electrodoméstico.
• Mantenga los materiales de embalaje
alejados de los niños. Existe riesgo de
asfixia.
• Si va a desechar el aparato, extraiga el
enchufe de la toma, corte el cable de
conexión (tan cerca del aparato como
pueda) y retire la puerta para impedir
que los niños al jugar puedan sufrir
descargas eléctricas o quedar atrapa-
dos en su interior.
• Si este aparato, que cuenta con juntas
de puerta magnéticas, sustituirá a un
aparato más antiguo con cierre de
muelle (pestillo) en la puerta, cerciórese
de inutilizar el cierre de muelle antes de
desechar el aparato antiguo. Evitará así
que se convierta en una trampa mortal
para niños.
1.2 Instrucciones generales de
seguridad
ADVERTENCIA
Mantenga libres de obstrucciones las
aberturas de ventilación del alojamiento
del aparato o de la estructura empotrada
• El aparato está diseñado para conser-
var los alimentos y bebidas de una vi-
vienda normal, como se explica en este
folleto de instrucciones.
• No utilice dispositivos mecánicos ni
medios artificiales para acelerar el pro-
ceso de descongelación.
• No utilice otros aparatos eléctricos (co-
mo máquinas para hacer helados) den-
tro de los aparatos de refrigeración, a
menos que el fabricante haya autoriza-
do su utilización para estos fines.
• No dañe el circuito del refrigerante.
• El circuito del refrigerante del aparato
contiene isobutano (R600a). Se trata de
un gas natural con un alto nivel de
compatibilidad medioambiental, aunque
es inflamable.
Durante el transporte y la instalación del
aparato, cerciórese de no provocar da-
ños en el circuito de refrigeración.
Si el circuito de refrigeración se daña:
– mantenga el aparato alejado de las
llamas y de cualquier fuente de en-
cendido
– ventile bien la habitación en la que se
encuentra el aparato
• Es peligroso alterar las especificaciones
o modificar este producto en modo al-
guno. Cualquier daño en el cable de ali-
mentación puede provocar un cortocir-
cuito, un incendio o una descarga eléc-
trica.
ADVERTENCIA
Los componentes eléctricos (ca-
ble de alimentación, enchufe,
compresor) debe sustituirlos un
técnico autorizado o personal de
reparaciones profesional a fin de
evitar riesgos.
52
www.electrolux.com

1.
El cable de alimentación no se de-
be prolongar.
2.
Compruebe que la parte posterior
del aparato no aplaste ni dañe el
enchufe. Un enchufe aplastado o
dañado puede recalentarse y pro-
vocar un incendio.
3.
Cerciórese de que tiene acceso al
enchufe del aparato.
4.
No tire del cable de alimentación.
5.
Si la toma de red está floja, no in-
troduzca el enchufe. Existe riesgo
de descarga eléctrica o incendio.
6.
No utilice el aparato sin la tapa de
la bombilla (si está provisto de ella)
de iluminación interior.
• Este aparato es pesado. Debe tener
precauciones durante su desplaza-
miento.
• No retire ni toque elementos del com-
partimento congelador con las manos
húmedas o mojadas, ya que podría su-
frir abrasión de la piel o quemaduras
por congelación.
• Evite la exposición prolongada del apa-
rato a la luz solar directa.
• Las bombillas que se utilizan en este
aparato (si está provisto de ellas) son
especiales, y se han seleccionado ex-
clusivamente para uso en aparatos do-
mésticos. No pueden utilizarse para la
iluminación de la vivienda.
1.3 Uso diario
• No coloque recipientes calientes sobre
las piezas plásticas del aparato.
• No almacene gas ni líquido inflamable
en el aparato, ya que podrían estallar.
• No coloque alimentos directamente
contra la salida de aire de la pared pos-
terior. (Si el aparato es No Frost, es de-
cir, no acumula escarcha.)
• Los alimentos que se descongelen no
deben volver a congelarse.
• Guarde los alimentos congelados, que
se adquieren ya envasados, siguiendo
las instrucciones del fabricante.
• Se deben seguir estrictamente las reco-
mendaciones del fabricante del aparato
sobre el almacenamiento. Consulte las
instrucciones correspondientes.
• No coloque bebidas carbonatadas o
con gas en el congelador, ya que se
genera presión en el recipiente, que po-
dría estallar y dañar el aparato.
• Si se consumen polos helados retira-
dos directamente del aparato, se pue-
den sufrir quemaduras causadas por el
hielo.
1.4 Cuidado y limpieza
• Antes de realizar tareas de manteni-
miento, apague el aparato y desconec-
te el enchufe de la toma de red.
• No limpie el aparato con objetos metáli-
cos.
• No utilice objetos afilados para eliminar
el hielo del aparato. Utilice un raspador
plástico.
• Inspeccione habitualmente el desagüe
del agua descongelada del frigorífico. Si
es necesario, limpie el desagüe. Si el
desagüe se bloquea, el agua se acu-
mulará en la base del aparato.
1.5 Instalación
Para realizar la conexión eléctrica,
siga atentamente las instrucciones
de los párrafos correspondientes.
• Desembale el aparato y compruebe
que no tiene daños. No conecte el apa-
rato si está dañado. Informe de los po-
sibles daños de inmediato a la tienda
donde lo adquirió. En ese caso, con-
serve el material de embalaje.
• Es recomendable esperar al menos dos
horas antes de conectar el aparato, pa-
ra permitir que el aceite regrese al com-
presor.
• El aparato debe contar con circulación
de aire adecuada alrededor, ya que de
lo contrario se produce recalentamien-
to. Para conseguir una ventilación sufi-
ciente, siga las instrucciones corres-
pondientes a la instalación.
• Siempre que sea posible, la parte pos-
terior del producto debe estar contra
una pared, para evitar que se toquen
las partes calientes (compresor, con-
densador) y se produzcan quemaduras.
• El aparato no debe colocarse cerca de
radiadores ni de hornillas de cocina.
• Asegúrese de que es posible acceder
al enchufe después de instalar el elec-
trodoméstico.
ESPAÑOL 53

• Realice la conexión sólo a un suministro
de agua potable (si está prevista una
conexión de agua).
1.6 Servicio técnico
• Un electricista homologado deberá rea-
lizar las tareas que se requieran para
ejecutar el servicio o mantenimiento de
este electrodoméstico.
• Las reparaciones de este aparato debe
realizarlas un centro de servicio técnico
autorizado y sólo se deben utilizar re-
cambios originales.
1.7 Protección del medio
ambiente
Este aparato no contiene gases
perjudiciales para la capa de ozo-
no, ni en el circuito de refrigerante
ni en los materiales aislantes. El
aparato no se debe desechar jun-
to con los residuos urbanos. La
espuma aislante contiene gases
inflamables: el aparato se debe
desechar de acuerdo con la nor-
mativa vigente, que puede solici-
tar a las autoridades locales. No
dañe la unidad de refrigeración,
en especial la parte trasera, cerca
del intercambiador de calor. Los
materiales de este aparato marca-
dos con el símbolo
son reci-
clables.
2. DESCRIPCIÓN DEL PRODUCTO
2 64 8 1110
13
1
12
3 975
54
www.electrolux.com

1
Cajón CrispFresh
2
Cajón Freshzone
3
Estantes de cristal
4
Refrigeración de aire dinámico
5
Control de humedad
6
Estante botellero
7
Panel de control
8
Estante para mantequilla
9
Estantes de la puerta
10
Estante pequeño
11
Estante para botellas
12
Cestos para congelación
13
Placa de características
3. PANEL DE MANDOS
1
27
6
5
3
4
1
Pantalla
2
Regulador de temperatura
Tecla más
3
Regulador de temperatura
Tecla menos
4
Tecla Mode
5
Tecla DrinksChill y tecla ON/OFF
6
Tecla del compartimento congelador
7
Tecla del compartimento frigorífico
Es posible cambiar el sonido predefinido
de las teclas a otro más fuerte mantenien-
do pulsados a la vez los botones Mode y
Menos unos segundos. El cambio es re-
versible.
3.1 Pantalla
AC
D
E
G
P
Q
R
B
O
N
L
M
F
I
K
J
H
• A. Función Demo
• B. Indicador de temperatura del frigorífi-
co
• C. Función Vacaciones
• D. Función frigorífico Eco Mode
• E. Función FreeStore
• F. Función de humedad extra
• G. Función Compra
• H. Filtro de agua
• I. Función Drinks Chill
•J. Hora
• K. Indicador de temperatura del conge-
lador
• L. Función Action Freeze
• M. Modo de congelador apagado (OFF)
• N. Filtro de aire
• O. Función congelador Eco Mode
• P. Indicador de alarma
• Q. Función de bloqueo contra la mani-
pulación por niños
• R. Modo de frigorífico apagado (OFF)
ESPAÑOL 55

3.2 Encendido
Para encender el aparato realice los si-
guientes pasos:
1.
Conecte el enchufe a la toma de co-
rriente.
2.
Pulse la tecla ON/OFF si la pantalla
está apagada.
3.
Si "dEMo" aparece en la pantalla, el
aparato está en el modo de demos-
tración. Consulte la sección "Qué ha-
cer si..."
4.
Los indicadores de temperatura
muestran la temperatura predetermi-
nada programada.
Para programar otra temperatura, consul-
te la sección "Regulación de la tempera-
tura".
Si se deja la puerta abierta duran-
te unos minutos, la luz se apagará
automáticamente. La luz se vuelve
a encender al cerrar y abrir la
puerta.
3.3 Apagado
Para apagar el aparato:
1.
Pulse la tecla ON/OFF durante 5 se-
gundos.
2.
La pantalla se apaga.
3.
Para desconectar el aparato de la co-
rriente, desconecte el enchufe de la
toma de corriente.
3.4 Encendido del frigorífico
Para encender el frigorífico:
1.
Pulse el regulador de temperatura del
frigorífico.
O:
1.
Pulse la tecla Mode hasta que apa-
rezca el icono correspondiente.
El indicador Apagado del frigorífico
parpadea.
2.
Pulse la tecla OK para confirmar.
3.
Se apaga el indicador Apagado del
frigorífico.
Para programar otra temperatura, consul-
te la sección "Regulación de la tempera-
tura".
3.5 Apagado del frigorífico o
congelador
Para apagar el frigorífico o el congelador:
1.
Pulse la tecla Mode hasta que apa-
rezca el icono correspondiente.
El indicador de apagado del frigorífico
o el congelador parpadea.
El indicador del frigorífico o congela-
dor muestra unos guiones.
2.
Pulse la tecla OK para confirmar.
3.
Se muestra el indicador de apagado
del frigorífico o congelador.
3.6 Función Vacaciones
Esta función permite mantener el frigorífi-
co vacío y cerrado durante periodos lar-
gos de tiempo sin que se formen malos
olores.
El compartimento del frigorífico
debe estar vacío mientras la fun-
ción esté activada.
Para activar la función:
1.
Pulse la tecla Mode hasta que apa-
rezca el icono correspondiente.
El indicador Vacaciones parpadea.
El indicador de temperatura del frigo-
rífico muestra la temperatura progra-
mada.
2.
Pulse la tecla OK para confirmar.
Aparece el indicador Vacaciones.
Para desactivar la función:
1.
Pulse la tecla Mode hasta que parpa-
dee el indicador Vacaciones.
2.
Pulse la tecla OK para confirmar.
3.
El indicador Vacaciones se apaga.
La función se apaga seleccionan-
do una temperatura programada
diferente.
3.7 Alarma de temperatura alta
Un aumento de la temperatura del com-
partimento congelador (por ejemplo, por
falta de energía eléctrica) se indicará me-
diante:
• indicadores de temperatura del conge-
lador y alarma intermitentes
• emisión de una señal acústica.
Para reiniciar la alarma:
56
www.electrolux.com

1.
Pulse cualquier tecla.
2.
El avisador acústico se apaga.
3.
El indicador de temperatura del con-
gelador muestra la temperatura más
alta alcanzada durante unos segun-
dos. A continuación vuelve a mostrar
la temperatura programada.
4.
El indicador de alarma sigue parpa-
deando hasta que se restablecen las
condiciones normales.
Cuando la alarma vuelve, el indicador se
apaga.
3.8 Función Eco Mode
Para una temperatura óptima de almace-
namiento de alimentos, seleccione la fun-
ción Eco Mode.
Para activar la función:
1.
Pulse la tecla Mode hasta que apa-
rezca el icono correspondiente.
El indicador Eco Mode parpadea.
El indicador de temperatura muestra
durante unos segundos la temperatu-
ra programada.
– para el frigorífico: +5°C
– para el congelador: -18°C
2.
Pulse la tecla OK para confirmar.
Aparece el indicador Eco Mode.
Para desactivar la función:
1.
Pulse la tecla Mode hasta que parpa-
dee el indicador Eco Mode.
2.
Pulse la tecla OK para confirmar.
3.
El indicador Eco Mode se apaga.
Para desactivar la función, selec-
cione una temperatura diferente.
3.9 Función Drinks Chill
Utilice la función Drinks Chill como adver-
tencia de seguridad cuando coloque bo-
tellas en el compartimento congelador.
Para activar la función:
1.
Pulse la tecla Mode hasta que apa-
rezca el icono correspondiente.
El indicador Drinks Chill parpadea.
El Temporizador muestra el valor se-
leccionado (30 minutos) durante unos
segundos.
2.
Pulse la tecla del temporizador para
ajustar el valor entre 1 y 90 minutos.
3.
Pulse la tecla OK para confirmar.
Aparece el indicador Drinks Chill.
El Temporizador empieza a parpa-
dear.
Al terminar la cuenta atrás, el indicador
Drinks Chill parpadea y suena la alarma:
1.
Saque las bebidas del compartimento
congelador.
2.
Desactive la función.
Para apagar la función:
1.
Pulse la tecla Mode hasta que parpa-
dee el indicador Drinks Chill.
2.
Pulse la tecla OK para confirmar.
3.
El indicador Drinks Chill se apaga.
La función se puede desactivar en cual-
quier momento.
3.10 Función Action Freeze
Para activar la función:
1.
Pulse la tecla Mode hasta que apa-
rezca el icono correspondiente.
El indicador Action Freeze parpadea.
El indicador de temperatura del frigo-
rífico muestra durante unos segundos
el símbolo
.
2.
Pulse la tecla OK para confirmar.
Aparece el indicador Action Freeze.
Empieza una animación.
La función se para automáticamente des-
pués de 52 horas.
Para desactivar la función antes del final
automático:
1.
Pulse la tecla Mode hasta que parpa-
dee el indicador Action Freeze.
2.
Pulse la tecla OK para confirmar.
3.
El indicador Action Freeze se apaga.
4.
La función Eco Mode se restaura si
se ha seleccionado previamente.
Para desactivar la función, selec-
cione una temperatura diferente
para el congelador.
3.11 Función de humedad extra
Si debe aumentar la humedad del refrige-
rador, le recomendamos activar la función
de humedad extra.
Para activar la función:
1.
Pulse la tecla Mode hasta que apa-
rezca el icono correspondiente.
El indicador Humedad extra parpa-
dea.
ESPAÑOL 57

2.
Pulse la tecla OK para confirmar.
Aparece el indicador Humedad extra.
Para desactivar la función:
1.
Pulse la tecla Mode hasta que parpa-
dee el indicador Humedad extra.
2.
Pulse la tecla OK para confirmar.
3.
Se apaga el indicador Humedad ex-
tra.
3.12 Función Compra
Si necesita introducir una gran cantidad
de alimentos calientes, por ejemplo des-
pués de hacer la compra, se aconseja ac-
tivar esta función para enfriarlos más rápi-
damente y evitar que suba la temperatura
de los que ya están almacenados.
Para activar la función:
1.
Pulse la tecla Mode hasta que apa-
rezca el icono correspondiente.
El indicador Compra parpadea.
El indicador de temperatura del frigo-
rífico muestra durante unos segundos
la temperatura programada.
2.
Pulse la tecla OK para confirmar.
Aparece el indicador Compra.
La función se desactiva automáticamente
después de unas 6 horas.
Para desactivar la función antes del final
automático:
1.
Pulse la tecla Mode hasta que parpa-
dee el indicador Compra.
2.
Pulse la tecla OK para confirmar.
3.
El indicador Compra se apaga.
4.
La función Eco Mode se restaura si
se ha seleccionado previamente.
Para desactivar la función, selec-
cione una temperatura diferente
para el frigorífico.
3.13 Función de bloqueo para
niños
Para bloquear cualquier posible manipula-
ción mediante las teclas, seleccione la
función de bloqueo para niños.
Para activar la función:
1.
Pulse la tecla Mode hasta que apa-
rezca el icono correspondiente.
2.
El indicador Bloqueo para niños par-
padea.
3.
Pulse la tecla OK para confirmar.
Aparece el indicador Apagado del fri-
gorífico.
Para desactivar la función:
1.
Pulse la tecla Mode hasta que parpa-
dee el indicador Bloqueo para niños.
2.
Pulse la tecla OK para confirmar.
3.
Se apaga el indicador Bloqueo para
niños.
4. USO DIARIO
4.1 Descongelación
Los alimentos ultracongelados o congela-
dos, antes de utilizarlos, se pueden des-
congelar en el compartimento frigorífico o
a temperatura ambiente, dependiendo del
tiempo de que se disponga.
Es posible incluso cocinar piezas peque-
ñas congeladas, tomadas directamente
del congelador; en tal caso, el tiempo de
cocción será más prolongado.
4.2 Almacenamiento de
alimentos congelados
Al poner en marcha el aparato por prime-
ra vez o después de un periodo sin uso,
déjelo en marcha al menos durante 2 ho-
ras con un ajuste alto antes de colocar los
productos en el compartimento.
En caso de producirse una des-
congelación accidental, por ejem-
plo, por un corte del suministro
eléctrico, si la interrupción ha sido
más prolongada que el valor indi-
cado en la tabla de características
técnicas bajo "tiempo de eleva-
ción", los alimentos descongela-
dos deben consumirse cuanto an-
tes o cocinarlos de inmediato y
volverlos a congelar (después de
que se hayan enfriado).
58
www.electrolux.com

4.3 Congelación de alimentos
frescos
Los compartimentos del congelador (indi-
cados con gráficos) son adecuados para
congelar alimentos frescos y conservar a
largo plazo los alimentos congelados y ul-
tracongelados.
Para congelar alimentos frescos, active la
función Action Freeze.
La cantidad máxima de alimentos que
puede congelarse en 24 horas se indica
en la placa de características, una eti-
queta situada en el interior del aparato.
El proceso de congelación dura 24 horas:
durante ese tiempo no deben añadirse
otros alimentos para congelar.
4.4 Indicador de temperatura
El termostato debe ajustarse
Temperatura correcta
OK
Para ayudarle a controlar correctamente
su aparato, hemos instalado un indicador
de temperatura en el frigorífico.
El símbolo lateral indica el área más fría
del frigorífico.
El área más fría va desde el estante de
cristal del cajón para frutas y verduras
hasta el símbolo o hasta el estante situa-
do a la misma altura que el símbolo.
Para almacenar correctamente los ali-
mentos, asegúrese de que el indicador de
temperatura muestra el mensaje “OK”.
Si no muestra “OK”, ajuste el controlador
de temperatura en más frío y espere 12
horas antes de volver a comprobar el indi-
cador de temperatura.
Tras introducir alimentos frescos en el
aparato o abrir varias veces la puerta du-
rante un periodo prolongado, es normal
que desaparezca el mensaje “OK”.
4.5 Estantes móviles
Las paredes del frigorífico cuentan con
una serie de guías para colocar los estan-
tes del modo que se prefiera.
ESPAÑOL 59

4.6 Estante botellero
Coloque las botellas (con la parte del ta-
pón hacia fuera) en el estante botellero
provisto al efecto.
Si coloca el botellero en posición horizon-
tal, úselo sólo para botellas cerradas.
El estante botellero puede inclinarse para
guardar botellas previamente abiertas.
Para inclinarlo, tire del estante hacia arriba
de forma que pueda girarlo y colocarlo en
el nivel más alto siguiente.
4.7 Enfriamiento por aire
La tecnología ClimaTech permite enfriar
los alimentos con rapidez y mantener una
temperatura más uniforme dentro del
compartimento.
Este dispositivo permite enfriar los alimen-
tos con más rapidez y mantener una tem-
peratura más uniforme dentro del com-
partimento.
4.8 Filtro de carbón
El aparato lleva un filtro de carbón situado
en el interior de una compuerta ubicada
en la parte posterior del conducto de dis-
tribución de aire.
El filtro purifica el aire, elimina los malos
olores del compartimento frigorífico y me-
jora la calidad de conservación de los ali-
mentos.
60
www.electrolux.com

4.9 Colocación de los estantes de la puerta
Para poder guardar alimentos de distintos
tamaños, los estantes de la puerta se
pueden colocar a diferentes alturas.
Para cambiar la posición de los estantes:
Eleve paulatinamente el estante en la di-
rección de las flechas hasta retirarlo del
soporte y colóquelo en la posición que
prefiera.
No mueva el estante grande de la
puerta inferior para garantizar una
correcta circulación del aire.
4.10 Control de humedad
Cuando guarde frutas y verduras en el fri-
gorífico, se recomienda colocar los pro-
ductos en el cajón. El frigorífico garantiza
que la temperatura se mantenga baja pa-
ra aumentar la conservación. En condicio-
nes normales, cuando el cajón de verdu-
ras no está completamente lleno y contie-
ne una mezcla de frutas y verduras, el
control de humedad se debe situar en la
posición de humedad alta indicada con la
marca de la gota grande. Esto significa
que la rejilla superior está cerrada y que
se conserva una humedad elevada en el
interior del cajón. Éste debe ser el ajuste
estándar. En ocasiones, cuando el cajón
está muy lleno, existe el riesgo de que los
productos se refrigeren con menos efica-
cia; en tal caso, se recomienda abrir las
ventilaciones de la rejilla hacia la marca de
la gota pequeña. Las verduras normal-
mente se enfrían solas evaporando el
agua y, si las ventilaciones están cerra-
das, existe el riesgo de que se formen go-
tas y charcos de agua en el interior. Los
productos que generan grandes cantida-
des son las lechugas, los champiñones, el
brécol y las zanahorias. En los casos en
los que la mezcla incluye manzanas y fru-
tas en general, se recomienda mantener
las ventilaciones ligeramente abiertas en
caso de que exista el riesgo de acumula-
ción de etileno en el interior. El etileno es
una hormona de crecimiento que liberan
algunas frutas y verduras y que puede da-
ñar y estropear otras.
ESPAÑOL 61

4.11 Modo FreshZone
Si no necesita utilizar el compartimiento
como NaturaFresh, puede cambiar los
ajustes para usarlo como cajón de baja
temperatura.
Para activar la función:
• Deslice hacia arriba la compuerta como
se indica en la figura.
Para desactivar la función:
1.
Deslice hacia abajo la compuerta.
4.12 Cajón NaturaFresh
Este dispositivo permite enfriar los alimen-
tos con rapidez y mantener una tempera-
tura más uniforme dentro del cajón.
Para activar la función:
1.
Active la función Compra.
2.
Se enciende el indicador Compra.
3.
Deslice hacia arriba la compuerta co-
mo se indica en la figura.
Para desactivar la función:
1.
Deslice hacia abajo la compuerta.
2.
Desactive la función Compra.
3.
El indicador de compra se apaga.
La función se apaga automática-
mente después de unas horas.
62
www.electrolux.com

4.13 QuickChill de bebidas
Esta función permite enfriar bebidas rápi-
damente.
Para activar la función:
1.
Retire o coloque hacia arriba el cajón
NaturaFresh y coloque el estante para
botellas frente a las ranuras QuickChill
como se indica en la figura.
2.
Active la función Compra.
3.
Se enciende el indicador Compra.
4.
Deslice hacia arriba la compuerta co-
mo se indica en la figura.
Para desactivar la función:
1.
Deslice hacia abajo la compuerta.
2.
Desactive la función Compra.
3.
El indicador de compra se apaga.
La función se apaga automática-
mente después de unas horas.
4.14 Extracción de los cestos de congelados del congelador
2
1
Los cestos de congelados llevan un tope
para impedir que se salgan de las guías o
se caigan. Para extraer un cesto del con-
gelador, tire de él hacia fuera y, cuando
llegue al tope, retírelo tirando suavemente
de su parte delantera hacia arriba.
Para volver a colocarlo en su lugar, levan-
te ligeramente la parte delantera del cesto
e insértelo en el congelador. Cuando haya
superado los topes, empuje los cestos
hasta el fondo.
5. CONSEJOS ÚTILES
5.1 Sonidos de funcionamiento
normal
• Es posible que oiga un gorgoteo o un
burbujeo cuando el refrigerante se
bombea por el serpentín o los tubos.
Esto es correcto.
• Cuando está en marcha, el compresor
bombea el refrigerante a través de todo
el circuito y emite un zumbido o un so-
nido intermitente. Esto es correcto.
• La dilatación térmica puede causar una
serie de crujidos repentinos. Se trata de
un fenómeno físico natural y no peligro-
so. Esto es correcto.
5.2 Consejos para ahorrar
energía
• No abra la puerta con frecuencia ni la
deje abierta más tiempo del estricta-
mente necesario.
ESPAÑOL 63

• Si la temperatura ambiente es elevada,
la temperatura del aparato se ha ajusta-
do en los valores más altos y está total-
mente lleno, el compresor podría fun-
cionar de manera continua, provocan-
do la formación de escarcha o hielo en
el evaporador. Si esto sucede, gire el
regulador de temperatura a valores in-
feriores para permitir la descongelación
automática y ahorrar en el consumo
eléctrico.
5.3 Consejos para la
refrigeración de alimentos
frescos
Para obtener los mejores resultados:
• no guarde en el frigorífico alimentos ca-
lientes ni líquidos en evaporación;
• cubra o envuelva los alimentos, en es-
pecial si tienen sabores fuertes;
• coloque los alimentos de modo que el
aire pueda circular libremente entre
ellos.
5.4 Consejos para la
refrigeración
Consejos útiles:
Carne (de todo tipo): guárdela en bolsas
de plástico y colóquela en el estante de
vidrio, sobre el cajón de las verduras.
Por razones de seguridad, guárdela de
ese modo durante uno o dos días, como
máximo.
Alimentos cocinados, platos fríos, etc..:
los debe cubrir y puede colocarlos en
cualquiera de los estantes.
Frutas y verduras: se deben limpiar a con-
ciencia y colocar en los cajones especia-
les suministrados a tal efecto.
Mantequilla y queso: colóquelos en reci-
pientes herméticos especiales o envueltos
en papel de aluminio o en bolsas de plás-
tico, para excluir tanto aire como sea po-
sible.
Botellas de leche: deben tener tapa y se
colocarán en el estante para botellas de la
puerta.
Los plátanos, las patatas, las cebollas y
los ajos, si no están empaquetados, no
deben guardarse en el frigorífico.
5.5 Consejos sobre la
congelación
Estos consejos son importantes para po-
der aprovechar al máximo el proceso de
congelación:
• la cantidad máxima de alimentos que
puede congelarse en 24 horas se
muestra en la placa de datos técnicos;
• el proceso de congelación requiere 24
horas. Durante ese periodo no deben
añadirse otros alimentos para congela-
ción;
• congele sólo productos alimenticios de
máxima calidad, frescos y perfecta-
mente limpios;
• prepare los alimentos en porciones pe-
queñas para que se congelen de ma-
nera rápida y total, así como para po-
der descongelar posteriormente sólo
las cantidades necesarias;
• envuelva los alimentos en papel de alu-
minio o polietileno y compruebe que los
envoltorios quedan herméticamente ce-
rrados;
• no permita que alimentos frescos y sin
congelar entren en contacto con ali-
mentos ya congelados, para evitar el
aumento de temperatura de los segun-
dos;
• los alimentos magros se congelan me-
jor que los grasos; la sal reduce el tiem-
po de almacenamiento de los alimen-
tos;
• el hielo, si se consume inmediatamente
después de retirarlo del compartimento
congelador, puede provocar quemadu-
ras por congelación en la piel;
• es recomendable etiquetar cada pa-
quete con la fecha de congelación para
controlar el tiempo que permanecen al-
macenados.
5.6 Consejos para el
almacenamiento de alimentos
congelados
Para obtener el máximo rendimiento de
este aparato, deberá:
• comprobar que el comerciante ha man-
tenido los productos congelados co-
rrectamente almacenados;
64
www.electrolux.com

• procurar que los alimentos congelados
pasen de la tienda al congelador en el
menor tiempo posible;
• evitar la apertura frecuente de la puerta
o dejarla abierta más del tiempo estric-
tamente necesario;
• los alimentos descongelados se dete-
rioran con rapidez y no pueden conge-
larse de nuevo;
• no supere el tiempo de almacenamien-
to indicado por el fabricante de los ali-
mentos.
6. MANTENIMIENTO Y LIMPIEZA
6.1 Limpieza de las partes
internas
Antes del empleo limpiar todas las partes
internas con agua tibia y jabón neutro, a
fin de eliminar el característico olor de
nuevo y secarlas luego cuidadosamente.
No utilice detergentes ni polvos
abrasivos, ya que podrían dañar el
acabado
PRECAUCIÓN
Antes de realizar tareas de mante-
nimiento, desenchufe el aparato.
Este equipo contiene hidrocarbu-
ros en la unidad de refrigeración;
por tanto, el mantenimiento y la
recarga deben estar a cargo ex-
clusivamente de técnicos autori-
zados.
6.2 Limpieza periódica
El equipo debe limpiarse de manera habi-
tual:
• Limpie el interior y los accesorios con
agua templada y un jabón neutro.
• Revise y limpie periódicamente las jun-
tas de la puerta para mantenerlas lim-
pias y sin restos.
• Aclare y seque a fondo.
No mueva, dañe ni tire de los con-
ductos o cables del interior del ar-
mario.
No utilice detergentes, polvos
abrasivos, productos de limpieza
perfumados ni cera para limpiar el
interior, ya que dañarán la superfi-
cie y dejarán un fuerte olor.
Limpie el condensador (rejilla negra) y el
compresor de la parte posterior del apa-
rato con un cepillo. Esa operación mejo-
rará el rendimiento del aparato y reducirá
el consumo eléctrico.
Tenga cuidado para no dañar el
sistema de refrigeración.
Muchas marcas de limpiadores de super-
ficies de cocina contienen químicos que
pueden atacar o dañar los plásticos del
aparato. Por tal razón, se recomienda que
el exterior del aparato se limpie sólo con
agua templada a la que se añadirá un po-
co de líquido lavavajillas.
Después de la limpieza, vuelva a conectar
el aparato a la toma de red.
6.3 Cambio del filtro de aire de
carbón
Para garantizar un rendimiento óptimo se
recomienda cambiar el filtro de carbón
cada seis meses.
En la red de servicio técnico local puede
adquirir filtros de aire activo nuevos.
Consulte el apartado "Instalación del filtro
de aire de carbón" para obtener las ins-
trucciones.
ESPAÑOL 65

6.4 Descongelación del frigorífico
La escarcha se elimina automáticamente
del evaporador del frigorífico cada vez
que se detiene el compresor, durante el
funcionamiento normal. El agua de la des-
congelación se descarga a través de un
orificio hacia un recipiente especial situa-
do en la parte posterior del aparato, sobre
el motor compresor, donde se evapora.
Es importante limpiar periódicamente el
orificio de salida del agua de descongela-
ción situado en la mitad del canal del
compartimento frigorífico para evitar que
el agua se desborde y caiga sobre los ali-
mentos del interior.
Utilice el limpiador especial suministrado,
que hallará ya colocado en el orificio de
desagüe.
6.5 Descongelación del
congelador
El compartimento congelador de este
modelo es de tipo "no frost" y no produce
escarcha. Esto significa que, durante el
funcionamiento, no se forma escarcha ni
en las paredes internas del aparato ni so-
bre los alimentos.
La ausencia de escarcha se debe a la
continua circulación del aire frío en el inte-
rior del compartimento impulsado por un
ventilador controlado automáticamente.
7. QUÉ HACER SI…
PRECAUCIÓN
Desenchufe el aparato antes de
realizar cualquier reparación.
Las medidas de resolución de
problemas que no se indican en
este manual deben dejarse en
manos de un electricista o profe-
sional cualificado y competente.
Se oyen sonidos durante el fun-
cionamiento normal (compresor,
circulación de refrigerante).
Problema Causa probable Solución
El aparato hace rui-
do.
El aparato no está correc-
tamente apoyado en el
suelo.
Compruebe que los sopor-
tes del aparato descansan
sobre una superficie estable
(las cuatro patas deben es-
tar bien apoyadas en el
suelo)
El compresor fun-
ciona continuamen-
te.
Puede que el ajuste del
mando de temperatura
sea incorrecto.
Seleccione una temperatu-
ra más alta.
La puerta no está bien ce-
rrada.
Consulte la sección "Cierre
de la puerta".
66
www.electrolux.com

Problema Causa probable Solución
La puerta se ha abierto
con excesiva frecuencia.
No mantenga la puerta
abierta más tiempo del ne-
cesario.
La temperatura de los pro-
ductos es demasiado alta.
Deje que la temperatura de
los alimentos descienda a
la temperatura ambiente
antes de guardarlos.
La temperatura ambiente
es demasiado alta.
Reduzca la temperatura
ambiente.
La función Congelación
rápida está activada.
Consulte la sección "Fun-
ción Congelación rápida".
El agua fluye por la
placa posterior del
frigorífico.
Durante el proceso de
descongelación automáti-
ca, el hielo se descongela
en la placa posterior.
Esto es normal.
El agua fluye al inte-
rior del frigorífico.
La salida de agua está
obstruida.
Limpie la salida de agua.
Los productos impiden
que el agua fluya al colec-
tor de agua.
Asegúrese de que los ali-
mentos no entran en con-
tacto con la placa posterior.
Gotea agua al suelo.
El agua de la descongela-
ción no fluye hacia la ban-
deja de evaporación situa-
da sobre el compresor.
Fije la salida de agua de
descongelación a la bande-
ja de evaporación.
Hay demasiada es-
carcha.
Los productos no están
bien envueltos.
Envuelva mejor los produc-
tos.
La puerta no está bien ce-
rrada.
Consulte la sección "Cierre
de la puerta".
Puede que el ajuste del
mando de temperatura
sea incorrecto.
Seleccione una temperatu-
ra más alta.
La temperatura del
aparato es demasia-
do alta.
La puerta no está bien ce-
rrada.
Consulte la sección "Cierre
de la puerta".
La temperatura de los pro-
ductos es demasiado alta.
Deje que la temperatura de
los alimentos descienda a
la temperatura ambiente
antes de guardarlos.
Se han guardado muchos
productos al mismo tiem-
po.
Guarde menos productos
al mismo tiempo.
La temperatura del
frigorífico es dema-
siado alta.
No hay circulación de aire
frío en el aparato.
Compruebe que el aire frío
circula libremente en el
aparato.
ESPAÑOL 67

Problema Causa probable Solución
La temperatura del
congelador es de-
masiado alta.
El armario del congelador
está atestado de produc-
tos.
Disponga los productos de
modo que el aire frío pueda
circular entre ellos.
El aparato no fun-
ciona.
El aparato está apagado. Encienda el aparato.
El aparato no está correc-
tamente enchufado a la
toma de corriente.
Enchufe el aparato correc-
tamente a la toma de co-
rriente.
El aparato no recibe co-
rriente. No hay tensión en
la toma de corriente.
Enchufe otro aparato eléc-
trico a la toma de corriente.
Llame a un electricista cua-
lificado.
La bombilla no fun-
ciona.
La bombilla está en espe-
ra.
Cierre y abra la puerta.
Si los consejos anteriores no ofrecen resultados, llame al centro de servicio técnico
más cercano.
7.1 Cierre de la puerta
1.
Limpie las juntas de la puerta.
2.
Si es necesario, ajuste la puerta. Con-
sulte "Instalación".
3.
Si es necesario, cambie las juntas de-
fectuosas. Póngase en contacto con
el servicio técnico.
68
www.electrolux.com

8. INSTALACIÓN
8.1 Ubicación
A
B
100 mm
min
20 mm
Instale el aparato alejado de fuentes de
calor, como radiadores, calderas, luz so-
lar directa, etc. Asegúrese también de
que el aire pueda circular sin obstáculos
por la parte trasera del aparato. Para ga-
rantizar un rendimiento óptimo, si el apa-
rato se coloca debajo de un mueble de
cocina instalado en la pared, deje una dis-
tancia mínima de 100 mm entre la parte
superior del aparato y el mueble de pa-
red. No obstante, lo ideal sería que el
aparato no se colocara debajo de ningún
mueble instalado en la pared. La base del
aparato está provista de una o varias pa-
tas ajustables para garantizar un nivelado
correcto del mismo.
ADVERTENCIA
Puede que en algún momento sea
necesario desenchufar el aparato
de la toma de corriente; por lo
tanto, el enchufe debe ser fácil-
mente accesible tras la instalación
del aparato.
8.2 Separadores traseros
2
4
3
1
Encontrará los dos separadores en la bol-
sa que contiene la documentación.
Siga estos pasos para colocar los separa-
dores:
1.
Afloje el tornillo.
2.
Encaje el separador debajo del torni-
llo.
3.
Gire el separador a la posición dere-
cha.
4.
Apriete de nuevo los tornillos.
ESPAÑOL 69

8.3 Nivelación
Al colocar el aparato compruebe que
queda nivelado. Esto se puede conseguir
utilizando las dos patas ajustables de la
parte inferior delantera.
8.4 Instalación del filtro CleanAir Control
El filtro de carbón activo CleanAir Control
absorbe los malos olores, conserva el sa-
bor y el aroma de los alimentos en condi-
ciones de mantenimiento óptimas y evita
la contaminación cruzada de olores.
El filtro de carbón se suministra en una
bolsa de plástico que garantiza su dura-
ción e integridad. El filtro se debe colocar
detrás de la compuerta antes de poner en
marcha el aparato.
1.
Abra la compuerta.
2.
Saque el filtro de la bolsa de plástico.
3.
Introduzca el filtro en la ranura que
hay en el reverso de la compuerta.
4.
Cierre la compuerta.
Manipule el filtro con cuidado para
que no se desprendan fragmen-
tos de su superficie. El filtro se de-
be cambiar cada seis meses.
8.5 Conexión eléctrica
Antes de conectar el aparato, compruebe
que el voltaje y la frecuencia que apare-
cen en la placa de datos técnicos se co-
rresponden con el suministro de la vivien-
da.
El aparato debe tener conexión a tierra. El
enchufe del cable de alimentación se su-
ministra con un contacto para tal fin. Si la
toma de red de la vivienda carece de co-
nexión a tierra, conecte el aparato a una
toma de tierra conforme con la normativa,
después de consultar a un electricista
profesional.
El fabricante rechaza toda responsabili-
dad si no se toman las precauciones an-
tes indicadas.
Este aparato es conforme con las directi-
vas de la CEE.
70
www.electrolux.com

8.6 Cambio del sentido de apertura de la puerta
2
1
ADVERTENCIA
Desenchufe siempre el aparato
antes de llevar a cabo cualquier
operación.
ADVERTENCIA
Asegúrese de que el aparato no
recibe electricidad.
Los procedimientos que se indi-
can a continuación requieren la
ayuda de otra persona que sujete
bien las puertas del aparato du-
rante todo el proceso.
• Quite la tapa de la bisagra superior con
un destornillador.
• Abra la puerta y retire la tapa lateral de
la puerta.
• Quite las cubiertas frontales superiores
de ambos lados. (1)
• Desenchufe el conector de cable de la
pantalla. (2)
• Desatornille las bisagras y quite la puer-
ta.
E
F
A
B
DC
• Retire los tapones de la traviesa media.
• Quite la cubierta con ayuda de una he-
rramienta. (A).
• Desatornille el pivote de la bisagra infe-
rior (B) y el separador (C), y colóquelos
en el lado contrario.
• Vuelva a introducir la cubierta (A) en el
lado contrario.
• Coloque la puerta en la bisagra inferior.
ESPAÑOL 71

1
2
• Extraiga el cable de la tapa lateral de la
puerta y colóquelo en la bisagra supe-
rior.
• Vuelva a atornillar la bisagra.
• Conecte el cable al punto de conexión
del panel frontal.
• Vuelva a colocar las cubiertas frontales
superiores a ambos lados (2).
• Coloque el cable de la pantalla, que es-
tá ahora desconectado, en el soporte
de cables de la tapa lateral de la puerta
y vuelva a colocar la tapa lateral de la
puerta.
72
www.electrolux.com

A
A
C
C
B
B
• Extraiga las tapas (B). Retire los pasa-
dores de las tapas (A).
• Desatornille las manillas (C) y fíjelas en
el lado contrario. Coloque el asa supe-
rior en la puerta inferior y el asa inferior
en la puerta superior.
• Vuelva a introducir los pasadores de las
tapas (A) en el lado contrario.
Finalmente, compruebe que:
• Todos los tornillos están apretados.
• La junta magnética se adhiere al mue-
ble.
• La puerta abre y cierra correctamente.
Es posible que la junta no encaje a la per-
fección en el mueble si la temperatura
ambiente es baja (es decir, en invierno).
En tal caso, espere hasta que la junta se
fije al mueble de forma natural.
Si prefiere no realizar los procedimientos
anteriores, póngase en contacto con el
centro de servicio técnico más próximo.
El personal del centro de servicio técnico
cambiará el sentido de apertura de las
puertas con gastos a su cargo.
9. RUIDOS
Durante el funcionamiento normal del
aparato suelen producirse ciertos ruidos
(compresor, circulación del refrigerante).
BRRR!
HISSS!
CLICK!
BLUBB!
CRACK!
SSSRRR!
OK
ESPAÑOL 73

CLICK!
CLICK!
BRRR!
BRRR!
BLUBB!
BLUBB!
HISSS!
HISSS!
74
www.electrolux.com

SSSRRR!
SSSRRR!
CRACK!
CRACK!
10. DATOS TÉCNICOS
Medidas de la cavidad
Altura 2010 mm
Ancho 595 mm
Profundidad 658 mm
Tiempo de estabilización 18 h
Tensión 230 - 240 V
Frecuencia 50 Hz
La información técnica se encuentra en la
placa de características, situada en el la-
do interior izquierdo del aparato, y en la
etiqueta de consumo energético.
11. ASPECTOS MEDIOAMBIENTALES
Recicle los materiales con el símbolo
.
Coloque el material de embalaje en los
contenedores adecuados para su
reciclaje.
Ayude a proteger el medio ambiente y la
salud pública, así como a reciclar
residuos de aparatos eléctricos y
electrónicos. No deseche los aparatos
marcados con el símbolo
junto con los
ESPAÑOL 75

residuos domésticos. Lleve el producto a
su centro de reciclaje local o póngase en
contacto con su oficina municipal.
76
www.electrolux.com

ESPAÑOL 77

78
www.electrolux.com

ESPAÑOL 79

www.electrolux.com/shop
280150396-A-162012
-
 1
1
-
 2
2
-
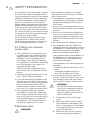 3
3
-
 4
4
-
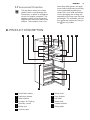 5
5
-
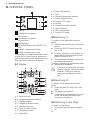 6
6
-
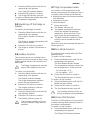 7
7
-
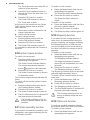 8
8
-
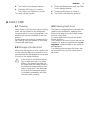 9
9
-
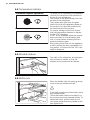 10
10
-
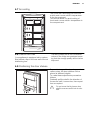 11
11
-
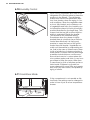 12
12
-
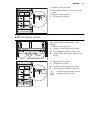 13
13
-
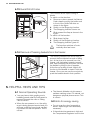 14
14
-
 15
15
-
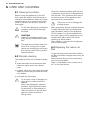 16
16
-
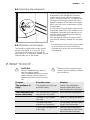 17
17
-
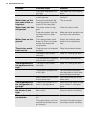 18
18
-
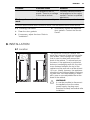 19
19
-
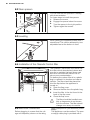 20
20
-
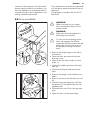 21
21
-
 22
22
-
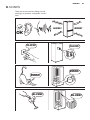 23
23
-
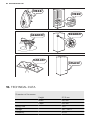 24
24
-
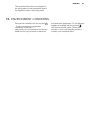 25
25
-
 26
26
-
 27
27
-
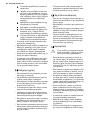 28
28
-
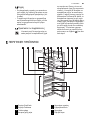 29
29
-
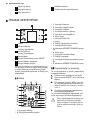 30
30
-
 31
31
-
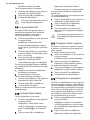 32
32
-
 33
33
-
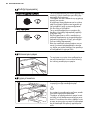 34
34
-
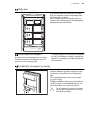 35
35
-
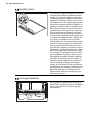 36
36
-
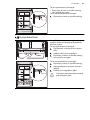 37
37
-
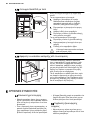 38
38
-
 39
39
-
 40
40
-
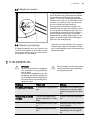 41
41
-
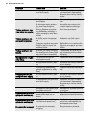 42
42
-
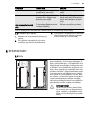 43
43
-
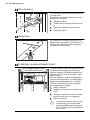 44
44
-
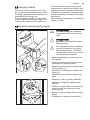 45
45
-
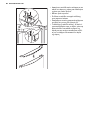 46
46
-
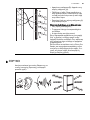 47
47
-
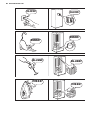 48
48
-
 49
49
-
 50
50
-
 51
51
-
 52
52
-
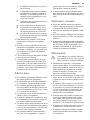 53
53
-
 54
54
-
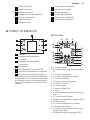 55
55
-
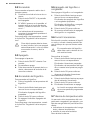 56
56
-
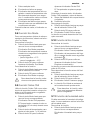 57
57
-
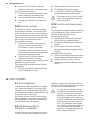 58
58
-
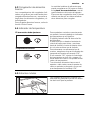 59
59
-
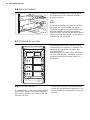 60
60
-
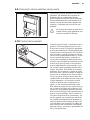 61
61
-
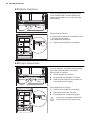 62
62
-
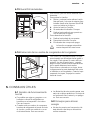 63
63
-
 64
64
-
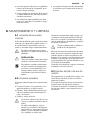 65
65
-
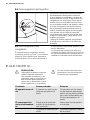 66
66
-
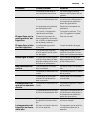 67
67
-
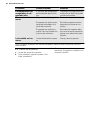 68
68
-
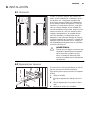 69
69
-
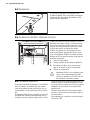 70
70
-
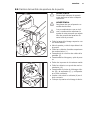 71
71
-
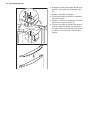 72
72
-
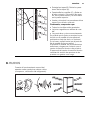 73
73
-
 74
74
-
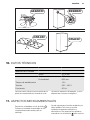 75
75
-
 76
76
-
 77
77
-
 78
78
-
 79
79
-
 80
80


Electrolux EN3881AOX Manual de usuario
- Categoría
- Congeladores
- Tipo
- Manual de usuario
en otros idiomas
- English: Electrolux EN3881AOX User manual
Artículos relacionados
-
Electrolux ENB43399W Manual de usuario
-
Electrolux ENB43499W Manual de usuario
-
-
Electrolux EN3450COX Manual de usuario
-
-
-
Electrolux ENN3153AOW Manual de usuario
-
-
Electrolux EN3881AOX Manual de usuario
-
Otros documentos
-
Aeg-Electrolux ENN2903COW El manual del propietario
-
Rex-Electrolux FI23/11NDV Manual de usuario
-
Aeg-Electrolux S94400CTX0 Manual de usuario
-
Zanussi ZRB934TX Guía del usuario
-
-
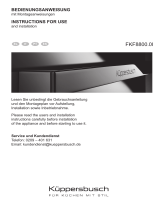 Küppersbusch FKF8800.0I Manual de usuario
-
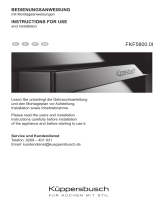 Küppersbusch FKF5800.0I Manual de usuario
-
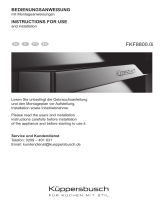 Küppersbusch FKF8800.0I Manual de usuario
-
 Küppersbusch FKF4800.0I Manual de usuario
-
Küppersbusch IKEF3084Z3 Manual de usuario


