Timex World Time Guía del usuario
- Categoría
- Relojes
- Tipo
- Guía del usuario

W273 NA 355-095016
Perpetual Calendar • Fly-back Chronograph
• Fly-back Chrono Compass • Linear Chronograph • World Time
• Compass • Tide Temp and Compass • Altimeter • Depth
• Yacht Racer • Yacht Racer Pro • Chrono Timer • 3GMT
Calendrier Perpétuel • Chronographe avec Fly-back
• Boussole Chrono avec Fly-back • Chronographe Linéaire
• Heure Mondiale • Boussole • Marée Température et Boussole
• Altimètre • Profondeur • Yacht Racer • Yacht Racer Pro
• Minuterie Chrono • 3 GMT
Calendario Perpetuo • Cronógrafo Fly-back
• Brújula y Cronógrafo Fly-back • Cronógrafo lineal
• Hora mundial • Brújula • Marea temperatura y brújula
• Altímetro • Profundidad • Yacht Racer • Yacht Racer
• Cronógrafo temporizador • 3GMT
™

English .............................. Page 1
Français ............................ page 125
Español ............................. página 259

1
TIMEX
®
WATCHES
Congratulations on purchasing your TIMEX
®
INTELLIGENT
QUARTZ
™
watch. Please read these instructions carefully
to understand how to operate your Timex watch.
Your watch may not have all of the features described in
this booklet.
For more information, and to register your
product please visit:
www.timex.com

2
3
TABLE OF CONTENTS
How to Start Your Watch ................................................... 5
Water and Shock Resistance ............................................. 6
Indiglo
®
Night-Light ............................................................ 8
Date and Time Setting ........................................................ 9
Perpetual Calendar .......................................................... 11
Fly-Back Chronograph ...................................................... 14
Fly-back Chronograph Compass ...................................... 20
Linear Chronograph ........................................................ 32
World time ....................................................................... 38
Compass........................................................................... 45
Tide Temp and Compass.................................................. 52
Altimeter .......................................................................... 61
Depth ................................................................................ 69
Yacht Racer ...................................................................... 74
Chrono Timer ................................................................... 85
3GMT .............................................................................. 101
Tachymeter Function ..................................................... 108
Slide-Rule Bezel Function .............................................. 109
How to Adjust Bracelet .................................................. 114
Bracelet Link Removal .................................................... 116
Battery ............................................................................ 117
Warranty ......................................................................... 119

4
5
HOW TO START YOUR WATCH
(Does not apply to Perpetual Calendar models.) To start
your watch remove the plastic guard from under the
crown, then press the crown in against the case.
Some watches require the setting crown to be screwed
in. If your watch case has a protrusion with screw
threads, the crown must be screwed in after setting the
watch.
To screw in, push the crown firmly against the threaded
protrusion and hold in while turning the crown clockwise.
Continue to screw in the crown until it is tight. You will
need to unscrew the crown (counter-clockwise) before
pulling it out the next time you want to set your watch.
Welcome to the world of Timex
®
watches with
Intelligent Quartz
™
technology, the future of quartz
analogue technology. Intelligent Quartz technology
brings the power of a micro-processor to the reliability
and accuracy of quartz analogue timekeeping. With Timex
Intelligent Quartz watches, the technology is written into
the design, delivering a new level of dial complication.
Uses up to three additional independent hands to display
an array of information, normally only available in digital
watches, in a traditional analogue format.

6
7
WARNING: TO MAINTAIN WATER-RESISTANCE, DO
NOT PRESS ANY BUTTONS UNDER WATER UNLESS
YOUR WATCH IS INDICATED AS 200 METER WATER-
RESISTANT. NEVER PULL OUT THE CROWN WHILE
UNDER WATER.
1. Watch is water-resistant only as long as crystal, crown
and case remain intact.
2. Watch is not a certified Diver’s watch.
3. Rinse watch with fresh water after exposure to salt
water.
4. Shock-resistance will be indicated on the watch face
or caseback. Watches are designed to pass ISO test for
shock-resistance. However, care should be taken to
avoid damaging the crystal.
WATER AND SHOCK RESISTANCE
If your watch is water-resistant, meter marking (WR_M)
is indicated.
Water-Resistance Depth p.s.i.a.* Water Pressure
Below Surface
30m/98ft 60
50m/164ft 86
100m/328ft 160
200m/656ft 284

8
9
DATE AND TIME SETTING
NOTE: The watch crown has three positions: closed,
middle and outer. To familiarize yourself with the
difference between the various positions extend the
crown to its outer position and then push the crown very
lightly until you feel it click into the middle position.
To set the date and time:
Time
Pull the crown to its outer position and turn it until the
correct time is shown. Ensure AM/PM setting is correct by
verifying that the date changes at midnight, not noon.
Date (Does not apply to Perpetual Calendar)
Pull the crown to its middle position and turn it until the
correct date appears in the date window. Note: The date
changes between 10 pm and 2 am. Do not change the
INDIGLO
®
NIGHT-LIGHT
Press button or crown to activate light.
Electroluminescent technology used in the INDIGLO
®
night-light illuminates the watch face at night and in low
light conditions.
OR

10
11
date during this timeframe. Doing so could damage the
watch movement.
Push crown to closed position after setting date/time. The
second hand will begin moving.
NOTE: For months with fewer than 31 days, the date will
need to be adjusted.
PERPETUAL CALENDAR
OVERVIEW
A
B
1 2
3
1 2
3
HOUR HAND
DAY HAND
DATE HAND
SECOND HAND
MINUTE HAND
CROWN
MONTH HAND
BUTTON A
(RECESSED)
BUTTON B
(RECESSED)
CLOSED
POSITION
MIDDLE
POSITION
OUTER
POSITION

12
13
LEAP YEAR OFFSET
To maintain the correct date, the watch includes a setting
for the current leap year offset. This setting is made at the
Timex factory or after battery replacement and cannot be
changed, only viewed.
To view the offset, pull the crown to its middle position.
The date hand shows the offset: 1 = 1 year after leap
year; 2 = 2 years after leap year; 3 = 3 years after leap
year; 4 = leap year. Push the crown in when done and
the hands resume their normal display of day, month,
and date.
INTRODUCTION
With your watch’s perpetual calendar feature, the
date does not need adjustment until 2100. The watch
automatically accounts for short months and leap years,
always showing the correct day and date. The day and date
were preset at the Timex factory. You only need to adjust
the time. The watch has two recessed push buttons for
use by Timex Service Center to set the day and date after
battery replacement. They have no use otherwise.

14
15
4TH CENTER HAND ADJUSTMENT
To readjust a misaligned 4th center hand:
1. Pull the crown to its outer position. The upper and
lower hands reset to the ends of their sweeps
automatically.
2. 4th center hand should point to 12 o’clock. If within
5 seconds of pulling the crown to its outer position the
4th center hand does not point to 12 o’clock, press
Button A or B to move the hand counterclockwise or
clockwise until it points to 12 o’clock.
3. Push crown to closed position when finished.
FLY-BACK CHRONOGRAPH
OVERVIEW
AA
B
23
1 2
3
1 2
3
UPPER HAND
CHRONO HOURS
2ND TIME ZONE
4TH CENTER HAND
SECOND HAND
DATE WINDOW
CROWN
CHRONO MINUTES SCALE
LOWER HAND
BUTTON A
BUTTON B
MINUTE HAND
HOUR HAND
CLOSED
POSITION
MIDDLE
POSITION
OUTER
POSITION

16
17
TO SET THE SECOND TIME ZONE:
1. Pull crown to its middle position. The upper hand
shows the second time zone time and the 4th center
hand shows the minutes.
2. Assuming that the second time zone time has the
same minutes value as the first time zone, the 4th
center hand should be aligned with the minute hand.
If the hands are not aligned, or if your second time
zone is a different minute within the hour, press
Button B to move the 4th center hand forward until
it is in the desired position.
3. Press Button A to move the upper hand forward in
one-hour increments until it reaches desired second
time zone hour. To move the hand quickly, press and
hold Button A.
4. Push the crown in when finished.
SECOND TIME ZONE
The upper hand shows the time for the second time
zone. Note that the scale is 24-hours, with midnight at
either end and noon in
the middle. Most often,
time zones differ in hour
increments. In such
cases, the minute value
of the second time zone
will be the same as that
displayed by the watch’s
minute hand.
AA
B
23
1 2
3
1 2
3

18
19
4. To reset the fly-back chronograph to zero position,
press Button B (FLY-BACK/RESET).
When the chronograph is reset, all hands move to
zero position. After another eight seconds, the watch
resumes normal display of the second time zone.
5. To reset and/or restart the fly-back chronograph while
it is running, press and hold Button B (FLY-BACK/
RESET). Release it when you wish to restart.
FLY-BACK CHRONOGRAPH
The watch provides a 4-hour fly-back chronograph.
1. To start, press Button A (START/STOP).
The 4th center hand shows the seconds with 1/5
second resolution. The lower hand shows the last
digit of the minutes, counting up to ten and repeating.
The upper hand shows the total time, including hours
and minutes, with divisions every ten minutes. The
chronograph counts up to four hours before stopping
automatically.
2. To stop, press Button A (START/STOP) again. All hands
stop moving.
3. To resume, press Button A (START/STOP) again.

20
21
INDICATOR HAND (4TH CENTER HAND) ADJUSTMENT
To readjust a misaligned indicator hand:
1. Pull the crown to its outer position. The upper and
lower hands reset to the ends of their sweeps
automatically.
2. The 4th center hand should point to 12 o’clock. If it
does not within 5 seconds of pulling the crown to
its outer position, press A or B to move the hand
counterclockwise or clockwise, respectively, until it
points to 12 o’clock.
3. Push the crown in when done.
FLY-BACK CHRONOGRAPH COMPASS
OVERVIEW
A
C
B
1 2
3
1 2
3
UPPER HAND
CHRONO HOURS
2ND TIME ZONE
4TH CENTER HAND
SECOND HAND
DATE WINDOW
CROWN
CHRONO MINUTES SCALE
LOWER HAND
BUTTON A
BUTTON B
HOUR HAND
MINUTE HAND
CLOSED
POSITION
MIDDLE
POSITION
OUTER
POSITION
BUTTON C

22
23
2. Press B to move the 4th center hand forward. Hold the
button to move the hand quickly. The upper and 4th
center hands move together; as the 4th center hand
makes one revolution, the upper hand moves one
hour. Assuming that the second time zone time has
the same minutes value as your first time zone, the
4th center and minute hands should be aligned.
3. Press A to move the upper hand forward in one-hour
increments. Hold the button to move the hand quickly.
4. Push the crown in when finished.
The second time zone time can alternatively be used to
display your home time on a 24-hour format, if you prefer.
When setting the second time in this manner, ensure
that the hour/minute display corresponds to the 24-hour
display by verifying that the date changes at midnight,
not noon.
SECOND TIME ZONE
The upper hand normally shows the time for the second
time zone. Note that the scale is 24 hours, with midnight
at either end and noon in the middle.
To set the second time zone time:
1. Pull the crown to its
middle position. The
upper hand shows
the second time zone
time in military hours
and the 4th center
hand shows the
minutes.
A
C
B
1 2
3
1 2
3

24
25
2. To stop, press A again (START/STOP). All hands freeze.
3. To resume, press A (START/STOP) again, or to reset the
chronograph to zero, press B (FLY-BACK/RESET).
When the chronograph is reset, all hands move to
zero. After eight seconds, the watch resumes the
normal display of the second time zone time.
4. You may also reset and/or restart the chronograph
while it is running. To do so, press and hold B (FLY-
BACK/RESET) to zero the chronograph and release it
when you wish to restart. You do not have to wait for
all hands to reach zero before releasing the button;
the timing will start internally from the button release.
This “fly-back” feature allows you to measure lap time.
The compass may be used while the chronograph is
running without interfering with its operation. See
COMPASS OPERATION.
FLY-BACK CHRONOGRAPH
The watch provides a 4-hour fly-back chronograph.
1. To start, press A (START/STOP). The 4th center hand
shows the seconds with 1/5-second resolution and
the lower hand shows
the last digit of the
minutes, counting up
to ten and repeating.
The upper hand shows
the total time, includ-
ing hours and minutes,
with divisions every
ten minutes. The chro-
nograph counts up
to four hours before
stopping automatically.
A
C
B
1 2
3
1 2
3

26
27
COMPASS CALIBRATION
Before use, the compass must be calibrated.
Since a compass uses the earth’s magnetic field, you
must be aware of large metallic objects, such as vehicles
or bridges, or objects that give off electromagnetic
radiation, such as televisions or computers, which
could affect the magnetic field around the watch. If the
compass is calibrated near such objects, it will only
work properly in that same location. If the compass
is calibrated away from such objects, it will not work
properly near them. For best results, calibrate in the area
of intended use.
In calibrating and taking headings, it is important, as with
all compasses, to keep the compass level. Calibrating or
taking a heading when the watch is not level can result
in large errors. Also avoid areas that may exhibit higher
than normal concentrations of hard and soft iron, as they
may cause inaccurate headings. Whenever a heading is
suspect, recalibrate.
Do not store the watch near any source of magnetism,
such as a computer, appliance, or television, as the
watch can take on a magnetic charge, yielding inaccurate
headings. Typical accuracy of wrist-worn instruments is
within +/- 10 degrees.
To calibrate the compass:
1. Pull the crown to its middle position and wait for the
indicator hands to stop moving.
2. Keep the watch level or place it on a level surface (if
the band interferes, place the watch on an inverted
cup). The watch may be face down, but take care to
protect the watch face.

28
29
5. If you do not wish to set the magnetic declination,
push the crown in. Otherwise, to have watch
automatically compensate for the declination angle,
turn the compass ring until north is at 12 o’clock.
6. Press A or B to move the 4th center hand west (-)
or east (+), respectively, to point to your location’s
declination angle using the declination scale. Hold a
button to move the hand quickly. See the figure below
for an example.
7. Push the crown in when done.
A
B
Magnetic declination set to -14° (14°W)
3. Press C (COMPASS) to begin. The 4th center hand
rotates two revolutions to remind you to rotate the
watch. While level, SLOWLY rotate the watch two
revolutions, taking at least 15 seconds per revolution.
4. When done, press C (COMPASS), keeping the watch
level. The 4th center hand moves back and forth to
acknowledge the end of calibration and then moves to
the current magnetic declination setting.

30
31
available through buttons A (START/STOP) and B (FLY-
BACK/RESET).
NOTE: During compass operation, the second hand
moves in two-second increments. Also, when the
compass is activated, the upper and lower hands may
shift position slightly, returning to their proper positions
when the compass is deactivated. This operation is
normal and yields the most accurate compass reading.
COMPASS OPERATION
Normally, the compass is inactive, with the 4th center
hand pointing to 12 o’clock or showing the chronograph
seconds.
While holding the watch level, press C (COMPASS) to
activate the compass. The compass hand moves to
point north. If the watch is turned, the 4th center hand
will continue to move, always pointing north. After 20
seconds, the compass will automatically turn off and the
4th center hand will return to its normal operation. This
conserves battery life. Press C (COMPASS) at any time to
keep the compass on for another 20 seconds.
The compass may be activated while the chronograph is
in use. The 4th center hand merely switches operation
temporarily. The upper and lower hands continue to show
the chronograph time and all chronograph functions are

32
33
LINEAR CHRONOGRAPH
OVERVIEW
LINEAR AND 4TH CENTER HAND ADJUSTMENT
To readjust a misaligned 4th center hand:
1. Pull the crown to its outer position. The lower hand
resets to the end of its sweep automatically.
2. 4th center hand should point to 12 o’clock. If within
5 seconds of pulling the crown to its outer position the
4th center hand does not point to 12 o’clock, press
Button A to move the hand clockwise until it points to
12 o’clock.
3. If the chronograph has been reset and the linear hand
is not pointing to zero, press and hold Button B for
5 seconds to engage a full calibration of the linear
indicator, which will take up to 32 seconds to perform.
4. Push crown to closed position when finished.
SECOND HAND
DATE WINDOW
CROWN
LOWER HAND
BUTTON A
BUTTON B
4TH CENTER HAND
HOUR HAND
LINEAR
HAND
MINUTE
HAND
A
B
1
2
3

34
35
SECOND TIME ZONE
The lower hand
shows the time for
the second time zone.
Note that the scale
is 24-hours, with
midnight at either
end and noon in the
middle. Most often,
time zones differ in
hour increments.
In such cases, the
minute value of the second time zone will be the same as
that displayed by the watch’s minute hand.
TO SET THE SECOND TIME ZONE:
1. Pull crown to its middle position. The lower hand
shows the second time zone time and the 4th center
hand shows the minutes.
2. Assuming that the second time zone time has the
same minutes value as the first time zone, the 4th
center hand should be aligned with the minute hand. If
the hands are not aligned, or if your second time zone
is a different minute within the hour, press Button B
to move the 4th center hand forward until it is in the
desired position.
3. Press Button A to move the lower hand forward in
one-hour increments until it reaches desired second
time zone hour. To move the hand quickly, press and
hold Button A.
4. Push the crown in when finished.
A
B
1
2
3

36
37
LINEAR CHRONOGRAPH
The watch provides a 4-hour split chronograph.
1. To start, press Button A (START/STOP). The 4th center
hand shows the seconds with 1/5 second resolution.
The linear hand shows the minutes, counting up to
thirty and repeating. The lower hand shows the total
time, including hours and minutes, with divisions every
ten minutes. The chronograph counts up to four hours
before stopping automatically.
2. To stop, press Button A (START/STOP) again. All hands
stop moving.
3. To reset the chronograph to zero position, press But-
ton B (SPLIT/RESET).
When the chronograph is reset, all hands move to zero
position. After another eight seconds, the watch resumes
normal display of the second time zone. While the
chronograph is running, you may take a split time. Press
Button B (SPLIT/RESET) and all hands will stop while the
chronograph continues to run. Press Button B (SPLIT/
RESET) again to resume the display of the running
chronograph elapsed time.

38
39
TO SET THE WORLD TIME:
1. Pull the crown to its middle position. The center hand
shows the world time zone city and the upper hand
shows the time in that city.
A
B
C
1 2 3
WORLD TIME
OVERVIEW
A
B
C
1 2
3
corrected 3.3.11 with Paulo’s new cities
24 CITIES
WORLD TIME
SCALE
SECOND HAND
DATE WINDOW
CROWN
LOWER HAND
BUTTON A
BUTTON B
BUTTON C
4TH CENTER HAND
SEASON SCALE
UPPER HAND
HOUR HAND
MINUTE HAND
CLOSED
POSITION
MIDDLE
POSITION
OUTER
POSITION

40
41
2. Press A or B to move the center hand to the city that
represents your home time zone. Hold a button to
move the hand quickly. Any city may be used.
3. Pull the crown to its outer position. The city selector
hand will revert back to the 12:00 position as indicated
in INDICATOR HAND ADJUSTMENT. After a five second
pause, the upper hand will show the world time (the
time in the city selected in previous step), the center
hand shows the minutes of the world time, and the
lower hand shows the season (see SEASON SETTING).
IMPORTANT: Do not manipulate any of the pushers
or the crown until the center hand has completed its
adjustment. (Approximately 10 seconds after crown is
pulled to its outer position).
4. If the displayed season is not correct for the home
time zone, press C to change it. If the home time zone
observes daylight savings time, the upper hand will
move by one hour.
5. Press A or B to move the time backward or forward,
respectively, to set the world time zone to be the
same as the home time zone. Hold a button to change
the time quickly. The hands move together; as the
center hand makes one revolution, the upper hand
moves one hour. After setting, the center and minute
hands should be aligned.
6. Push the crown in when finished.

42
43
INDICATOR HAND (4TH CENTER HAND) ADJUSTMENT
To readjust a misaligned indicator hand:
1. Pull the crown to its outer position. The upper and
lower hands reset to the ends of their sweeps,
automatically.
2. The 4th center hand should point to 12 o’clock. If it
does not within 5 seconds of pulling the crown to
its outer position, press A or B to move the hand
counterclockwise or clockwise, respectively, until it
points to 12 o’clock.
3. Push the crown in when finished.
NOTE: If no button is pressed for five seconds after the
hands stop, the watch proceeds to the world time setting
operation (see WORLD TIME SETTING).
CITY TIME DISPLAY
A
B
C
1 2 3
Press A or B to
move the center
hand backward or
forward, respec-
tively, and select
a city. The upper
hand moves to
show the time in
the selected city.
Note that the scale is 24 hours, with midnight at either
end and noon in the middle.
SEASON SETTING
The season setting allows the watch to compensate for
daylight savings time (also called “summer time”).

44
45
COMPASS
OVERVIEW
I
I
14
CENTER
CROWN
MIDDLE
SET DATE
I
I
14
OUT
SET TIME
CROWN
B
A (COMPASS)
DECLINATION SCALE
COMPASS HAND
(NORTH END IS RED
POINTED/LONGER)
The watch provides one setting to represent the two peri-
ods all cities that observe daylight savings time have. For
the watch, the period of daylight savings time is SUMMER
and the period of standard time is WINTER.
When the season in one city is set to SUMMER, all cities in
the same hemisphere are automatically set to SUMMER,
while all cities in the other hemisphere are automatically
set to WINTER. The watch knows which cities are in each
hemisphere.
Press C to change the season in the selected city.

46
47
COMPASS HAND ADJUSTMENT
Pull CROWN all the way out. Compass hand should point
to 12 o’clock. If it does not, press either A or B to move
compass hand until it points to 12 o’clock. Hold button to
move hand fast. Push CENTER CROWN in when done and
recalibrate compass.
COMPASS CALIBRATION
Before use, the compass must be calibrated.
Since a compass uses the earth’s magnetic field, you
must be aware of large metallic objects, such as vehicles
or bridges, or objects that give off electromagnetic
radiation, such as televisions or computers, which
could affect the magnetic field around the watch. If the
compass is calibrated near such objects, it will only
work properly in that same location. If the compass
is calibrated away from such objects, it will not work
properly near them. For best results, calibrate in the area
of intended use.
In calibrating and taking headings, it is important, as with
all compasses, to keep the compass level. Calibrating or
taking a heading when the watch is not level can result
in large errors. Also avoid areas that may exhibit higher
than normal concentrations of hard and soft iron, as they
may cause inaccurate headings. Whenever a heading is
suspect, recalibrate.
Do not store the watch near any source of magnetism,
such as a computer, appliance, or television, as the
watch can take on a magnetic charge, yielding inaccurate
headings. Typical accuracy of wrist-worn instruments is
within +/- 10 degrees.

48
49
To calibrate the compass:
1. Pull the crown to its middle position and wait for the
indicator hands to stop moving.
2. Keep the watch level or place it on a level surface (if
the band interferes, place the watch on an inverted
cup). The watch may be face down, but take care to
protect the watch face.
3. Press A or B to begin. The 4th center hand rotates two
revolutions to remind you to rotate the watch. While
level, SLOWLY rotate the watch two revolutions, taking
at least 15 seconds per revolution.
4. When done, press A or B, keeping the watch level. The
4th center hand moves back and forth to acknowledge
the end of calibration and then moves to the current
magnetic declination setting.
5. If you do not wish to set the magnetic declination,
push the crown in. Otherwise, to have watch
automatically compensate for the declination angle,
turn the compass ring until north is at 12 o’clock.
6. Press A or B to move the 4th center hand west (-)
or east (+), respectively, to point to your location’s
declination angle using the declination scale. Hold a
button to move the hand quickly. See the figure on
next page for an example.
7. Push the crown in when done.

50
51
A
B
Magnetic declination set to -14° (14°W)
COMPASS OPERATION
Normally, the compass is inactive, with the 4th center
hand pointing to 12 o’clock or showing the chronograph
seconds.
While holding the watch level, press A or B to activate
the compass. The compass hand moves to point north.
If the watch is turned, the 4th center hand will continue
to move, always pointing north. After 20 seconds, the
compass will automatically turn off and the 4th center
hand will return to its normal operation. This conserves
battery life. Press A or B at any time to keep the compass
on for another 20 seconds.
NOTE: During compass operation, the second hand
moves in two-second increments.

52
53
TIDE TEMP AND COMPASS
OVERVIEW
INDICATOR HAND ADJUSTMENT
Pull crown all the way out. Indicator hand should point
to 12 o’clock. If it does not, press either TIDE or TEMP
push button to move hand until it points to 12 o’clock.
TIDE and TEMP push buttons move hand clockwise and
counterclockwise, respectively. Hold push button to move
hand fast. Push crown in when done.
TIDE/TEMPERATURE SELECTION
Indicator hand shows either tide or temperature constant-
ly. When temperature is shown, press TIDE push button
to select tide clock. Hand moves to low tide and then to
current tide. When tide is shown, press TEMP push button
to select thermometer. Hand moves to beginning of ther-
mometer scale and then to current temperature.
OUTER-SET TIME
DECLINATION
SCALE
INDICATOR
HAND
C (COMPASS)
B (TIDE)
A (TEMP)
CROWN
TURNING
COMPASS
RING
DATE
TIDE SCALE
TEMPERATURE SCALE
MIDDLE-SET DATE

54
55
THERMOMETER
When worn on wrist, thermometer reading is affected by
body heat. For more accurate readings, remove watch
and put in shade for at least several minutes.
Watch can measure water temperature also, if sub-
merged. Be sure to select temperature display before
placing watch in water, as buttons should not be pressed
when watch is underwater.
Thermometer readings are taken every minute, more
frequently, if temperature is changing.
TIDE CLOCK
For tide clock, indicator hand always rotates clockwise, so
tide is rising when hand is pointing left and falling when
pointing right. Number of hours to next high/low tide is
shown on tide scale.
Tides are influenced by sun position and shape of shore-
line, so tide clock cannot precisely give times of high and
low tides. Periodic adjustment may be necessary.
To set tide clock, pull crown to MIDDLE position. Press either
TIDE or TEMP push button to move hand to current tide. TIDE
and TEMP push buttons move hand clockwise and counter-
clockwise, respectively. Push crown in when done.
COMPASS CALIBRATION
Before use, the compass must be calibrated.
Since a compass uses the earth’s magnetic field, you
must be aware of large metallic objects, such as vehicles
or bridges, or objects that give off electromagnetic
radiation, such as televisions or computers, which
could affect the magnetic field around the watch. If the
compass is calibrated near such objects, it will only

56
57
work properly in that same location. If the compass
is calibrated away from such objects, it will not work
properly near them. For best results, calibrate in the area
of intended use.
In calibrating and taking headings, it is important, as with
all compasses, to keep the compass level. Calibrating or
taking a heading when the watch is not level can result
in large errors. Also avoid areas that may exhibit higher
than normal concentrations of hard and soft iron, as they
may cause inaccurate headings. Whenever a heading is
suspect, recalibrate.
Do not store the watch near any source of magnetism,
such as a computer, appliance, or television, as the
watch can take on a magnetic charge, yielding inaccurate
headings. Typical accuracy of wrist-worn instruments is
within +/- 10 degrees.
To calibrate the compass:
1. Pull the crown to its middle position and wait for the
indicator hands to stop moving.
2. Keep the watch level or place it on a level surface (if
the band interferes, place the watch on an inverted
cup). The watch may be face down, but take care to
protect the watch face.
3. Press C (COMPASS) to begin. The 4th center hand
rotates two revolutions to remind you to rotate the
watch. While level, SLOWLY rotate the watch two
revolutions, taking at least 15 seconds per revolution.

58
59
4. When done, press C (COMPASS), keeping the watch
level. The 4th center hand moves back and forth to
acknowledge the end of calibration and then moves to
the current magnetic declination setting.
5. If you do not wish to set the magnetic declination,
push the crown in. Otherwise, to have watch
automatically compensate for the declination angle,
turn the compass ring until north is at 12 o’clock.
6. Press A or B to move the 4th center hand west (-)
or east (+), respectively, to point to your location’s
declination angle using the declination scale. Hold a
button to move the hand quickly. See the figure on
next page for an example.
7. Push the crown in when done.
A
B
Magnetic declination set to -14° (14°W)
COMPASS OPERATION
Normally, the compass is inactive, with the 4th center
hand pointing to 12 o’clock or showing the chronograph
seconds.
While holding the watch level, press C (COMPASS) to
activate the compass. The compass hand moves to
point north. If the watch is turned, the 4th center hand
will continue to move, always pointing north. After 20

60
61
seconds, the compass will automatically turn off and the
4th center hand will return to its normal operation. This
conserves battery life. Press C (COMPASS) at any time to
keep the compass on for another 20 seconds.
NOTE: During compass operation, the second hand
moves in two-second increments.
ALTIMETER
OVERVIEW
ALIMETER
SCALE
(HUNDREDS)
UPPER
RETROGRADE
(THOUSANDS)
BUTTON C
(UNITS)
BUTTON A
(MAXIMUM
ALTITUDE)
BUTTON B
(MINIMUM ALTITUDE)
LOWER RETROGRADE
(UNITS)
CROWN

62
63
INDICATOR HAND (4TH CENTER HAND) ADJUSTMENT
Pull crown all the way out. The upper and lower retro-
grade hands reset to the start of their scales automati-
cally. Indicator hand (4th center hand) should point to 12
o’clock. If it does not, press either A and/or B button to
move hand until it points to 12 o’clock. A and B buttons
move hand clockwise and counterclockwise, respectively.
Hold button to move hand fast. Push crown in when done.
ALTIMETER CALIBRATION
Before use, the altimeter must be calibrated.
Since an altimeter uses pressure to determine the altitude
and pressure varies from place to place, it is important to
set the altimeter to a known reference altitude value, or
to a standard reference altitude of a given place. Sudden
changes in pressure due to changes in weather can cause
your altimeter reading to be off by +-100m (328 ft), even
if your location has not changed. Recalibrate to a known
altitude when drastic pressure changes occur.
To calibrate the altimeter:
1. Pull the crown to its middle position and wait for the
indicator hands to stop moving.
2. If the altimeter was OFF at the moment of crown
pulling, the lower retrograde hand will point to the unit
selected the last time the altimeter was used, other-
wise the lower retrograde hand points to the current
selected unit in altitude display. The 4th center hand
and upper retrograde hand should point to the current
altitude.
3. Press A or B to move the 4th center hand counter-
clockwise or clockwise, respectively, until it points
to the desired calibration altitude. Holding A or B

64
65
will move the center hand more rapidly. The upper
retrograde hand moves relative to the altitude value
displayed by the 4th center hand.
4. Push crown in when done.
ALTIMETER ON/OFF
To turn the altimeter on, press C. The lower retrograde
hand points to METERS. Using the markings on the top
ring, the 4th center hand shows the current altitude’s
hundreds and tens value with divisions every ten
METERS/FEET. The upper retrograde hand shows the cur-
rent altitude’s thousands value with divisions every one
thousand METERS/FEET.
To change the unit from METERS to FEET, press C a
second time. To change the unit from FEET to METERS,
press C twice (altimeter is turned off first then turned
back on with the unit in METERS).
Example : Altitude=2310 m Example : Altitude=7580 ft

66
67
To turn the altimeter off with the current unit set to
FEET, press C. To turn the altimeter off with the unit set
to METERS, press C twice (lower hand goes to FEET first
before going to the OFF position).
The watch will automatically turn the altimeter off
60 minutes after activation.
ALTIMETER MIN/MAX ALTITUDE RECALL
To view the maximum recorded altitude, press A. The
lower retrograde hand shows the unit of measure that
the maximum altitude was recorded in if the altimeter
was OFF at the moment of button press, otherwise
it will show the maximum altitude using the current
selected unit. The 4th center hand shows the maximum
altitude’s hundreds and tens value with divisions every
ten METERS/FEET. The upper retrograde hand shows the
maximum altitude’s thousands value with divisions every
one thousand METERS/FEET.
The maximum recorded altitude is displayed for ten
seconds. To extend the display duration for another ten
seconds, press A before the previous ten second duration
expires.
To change the unit from METERS to FEET or FEET to
METERS, press C.
To view the minimum recorded altitude, press B. The
lower retrograde hand shows the unit of measure that
the minimum altitude was recorded in if the altimeter
was OFF at the moment of button press, otherwise
it will show the minimum altitude using the current
selected unit. The 4th center hand shows the minimum
altitude’s hundreds and tens value with divisions every

68
69
ten METERS/FEET. The upper retrograde hand shows the
minimum altitude’s thousands value with divisions every
one thousand METERS/FEET.
The minimum recorded altitude is displayed for ten
seconds. To extend the display duration for another ten
seconds, press B before the previous ten second duration
expires To change the unit from METERS to FEET or FEET
to METERS, press C.
DEPTH
OVERVIEW
3
AA
B
1
2
3
2
3
2
3
CENTER HAND
OFF INDICATOR
BUTTON A
BUTTON B
LOWER HAND
CROWN
Note: The center and lower hands will automatically
calibrate when you move the crown to position 3 to set
the time.

70
71
TEMPERATURE
The temperature sensor is always on and will take a
reading at least once every 60 seconds. The temperature
is indicated by the lower hand and accompanying scale.
When worn on wrist, temperature reading is affected by
body heat. For more accurate readings, remove watch
from wrist.
DEPTH SENSOR ON/OFF
The sensor is normally off, and must be turned on
manually prior to submersion. Push and release button B
to turn the sensor on. The 4th center hand will move from
the OFF (6 o’clock) position to the 12 o’clock position and
begin to take readings at least once every 5 seconds. As
the depth increases, the 4th center hand will point to
the actual depth as indicated on the depth scale. If the
readings remain in the range of 0 to 2 meters (0-6 feet)
for 5 minutes, the sensor will automatically turn off. To
turn the sensor off manually, press and hold button B
for 2 seconds. The 4th center hand will move to the OFF
(6 o’clock) position.
RECALL MAXIMUM DEPTH/MINIMUM TEMPERATURE
After coming to the surface, unscrew the crown and
pull to the middle position. The center and lower hands
will move to display the maximum depth value and the
minimum temperature value, respectively, recorded dur-
ing the most recent descent. When the depth sensor is
activated again, the memory will be cleared.
If the watch has not yet been used, then the center and
lower hands shall move to display 0 meters/feet and
0ºC/32 ºF, respectively. The crown must be screwed back
in prior to use/submersion.

72
73
BATTERY LEVEL DETECTION
The watch determines the battery level status and
provides the user with a visual indication corresponding
to the current battery level. The battery level status is
classified as Normal Level, Battery Low Level, and Replace
Battery Level, with each level indicated by the movement
of the second hand.
For the Normal Level status, the second hand shall move one
hand position every one second, which is its normal operation.
When the watch is in Battery Low Level status, the second
hand shall only move at 2-second intervals and shall
move by two hand positions. It is recommended that the
user replace the battery when the watch is at Battery Low
Level status.
When the watch is in Replace Battery Level status, the
second hand shall only move at 5-second intervals and
shall move by five hand positions. At this point, depth
sensor cannot be activated, and the user must replace
the battery immediately.

74
75
PERFECT DATE
With your watch’s Perfect Date
™
feature, the date does
not need adjustment until 2060. The watch automatically
accounts for short months and leap years, and will always
display the correct date upon demand. The date was
preset at the Timex factory. When initially starting your
new watch, if the date displays the date before or behind
the date in your location, you will need to revise the date
for your local date. Pull the crown out to the outer posi-
tion. The 4th center hand will rotate around the dial one
revolution, will stop at 12:00 o’clock position for about 5
seconds and then move to the date at which the watch
is currently set. Rotate the crown forward to increase
the time to the current date (backward to decrease the
time to the current date). Each time you pass midnight
the date will change by one day. After you have set the
YACHT RACER
2 31
A
B
C
SECOND HAND
4TH
CENTER
HAND
UPPER
HAND
PERFECT DATE
™
SCALE
HOUR HAND
CROWN
LOWER HAND
MINUTE HAND

76
77
date to your local date, continue rotating the crown to
position the hands to the current local time, being mindful
of am/pm. Once the time is set, push the crown back in
to the closed position. In normal operation the 4th center
hand will display the date when the crown is pushed.
The hand will travel to the position of the current date as
shown on the top ring of the case. The hand will pause
for you to be able to read the date and then return back
to the 12 o’clock resting position. Please note that the
Perfect Date
™
function will only operate in the Time
mode. When the battery is depleted and is replaced, the
Perfect Date function must be recalibrated. When the
battery requires replacement, it is highly recommended
the watch be sent to a Timex service center, where the
battery will be replaced and the Perfect Date function will
be recalibrated to the current date for the location where
the watch is to be returned.
4TH CENTER HAND ADJUSTMENT
To readjust a misaligned 4th center hand:
1. Pull the crown out to position 3. The upper and lower
hands reset to the ends of their sweeps automatically.
2. Within 10 seconds of pulling the crown to position 3,
the 4th center hand should point to 12 o’clock, if it
does not point to 12 o’clock, press button A or B to
move the hand counterclockwise or clockwise until
it points to 12 o’clock. Pressing and holding button A
or B will make the hand move at a fast rate. Please
note: after 5 seconds without action with the crown
in position 3, the 4th center hand will move to display
the current date.
3. Push crown in to position 1 when finished.

78
79
MODE SELECTION
Press button C to advance the upper hand to the desired
function.
TIME:
Displays the current time only (Perfect Date function will
operate only in the Time mode).
YACHT RACE TIMER 5:
The countdown timer will start at 5 minutes and begin the
chronograph once it reaches zero.
YACHT RACE TIMER 3:
The countdown timer will start at 3 minutes and begin the
chronograph once it reaches zero.
YACHT RACE TIMER 1:
The countdown timer will start at 1 minute and begin the
chronograph once it reaches zero.
CHRONO:
The chronograph will operate without the countdown
timer.
YACHT RACE TIMER OPERATION
The watch provides a 5, 3 or 1 minute countdown timer.
Once the countdown timer reaches zero a one hour
chronograph will automatically start.
1. Press button C until the upper hand displays the
desired 5, 3, or 1 minute Yacht Race Timer mode.
2. To start, press button A (START/STOP). The 4th center
hand displays the seconds counting down and the
lower hand shows the minutes, counting down.
(Please note: buttons B and C are disabled while the
countdown timer is in operation).
3. To stop, press button A (START/STOP) which will stop

80
81
the countdown process. (Please note: button C is
disabled until the countdown timer is reset).
4. To reset, press and hold button B (SPLIT/RESET) for
2 seconds, which will reset the countdown timer back
to the originally selected 5, 3 or 1 minute duration.
In the normal operation of the Yacht Race Timer, once
the countdown timer has reached zero, the chronograph
will automatically start. There is also an audible alert as
the countdown timer reaches each minute mark as well
as when the final minute reaches the last 5 seconds and
begins the chronograph function. The chronograph will
cycle through the 30-minute sequence twice, for a total
maximum time of one hour.
CHRONOGRAPH OPERATION
The watch provides a one hour chronograph which may
be operated independently from the Yacht Race Timer.
1. Press button C until the upper hand is at the beginning
of the 30-minute chronograph scale.
2. To start, press button A (START/STOP). The 4th center
hand displays the seconds counting up; the lower
hand shows the minutes, counting up in a 5-minute
scale and the upper hand shows the half hour count-
ing up in a 30-minute scale. Each time the lower hand
reaches the five minute mark, it will return to the zero
position while the upper hand will continue to advance
through the 30 minute scale. (Please note: button C is
disabled while the chronograph is in operation).

82
83
3. To take a split time, press button B (SPLIT/RESET).
The upper, lower, and 4th center hands will hold their
positions for you to note the split (lap) time. The chro-
nograph is still maintaining the timing sequence while
the hands are stopped. To release the hands, press
button B (SPLIT/RESET) and the hands will quickly
catch up to display the total elapsed time.
4. To stop, press button A (START/STOP) which will stop
the chronograph. (Please note: button C is disabled
while the chronograph is stopped until the chrono-
graph is reset).
5. To reset, press and hold button B (SPLIT/RESET) for
3 seconds, which will reset the chronograph back to
the beginning of the 30-minute scale.
In normal operation the Chronograph will cycle through
the 30-minute sequence twice for a total maximum of
one hour. Once this hour has elapsed, the upper hand
will remain on the 30 minute marker and the lower hand
will return to zero. The chronograph function will need
to be reset prior to using the chronograph function again
or before changing to a different mode. (Please note:
button A is disabled when the maximum one hour time
has elapsed and will not function until the chronograph
has been reset by pressing and holding button B for
3 seconds).

84
85
INDIGLO
®
NIGHT-LIGHT (PRO VERSION ONLY)
Yacht Racer PRO includes the addition of the INDIGLO
®
night-light feature. During low or no-light conditions the
dial can easily be read by activating the INDIGLO
®
night-
light function by pressing in the crown. The Yacht Racer
PRO uses a special luminescent material on the dial which
will glow and create an illumination bright enough to be
able to read the dial, but ensures that your night vision is
not reduced once the light has been extinguished.
CHRONO TIMER
SECOND HAND
4TH
CENTER
HAND
UPPER
HAND
PERFECT DATE
™
SCALE
MINUTE HAND
HOUR HAND
CROWN
LOWER HAND
2 31
A
B
C

86
87
PERFECT DATE
With your watch’s Perfect Date
™
feature, the date does
not need adjustment until 2060. The watch automatically
accounts for short months and leap years, and will always
display the correct date upon demand. The date was
preset at the Timex factory. When initially starting your
new watch, if the date displays the date before or behind
the date in your location, you will need to revise the date
for your local date. Pull the crown out to the outer position.
The 4th center hand will rotate around the dial one revolu-
tion, will stop at 12:00 o’clock position for about 5 seconds
and then move to the date at which the watch is currently
set. Rotate the crown forward to increase the time to the
current date (backward to decrease the time to the current
date). Each time you pass midnight the date will change
by one day. After you have set the date to your local date,
continue rotating the crown to position the hands to the
current local time, being mindful of am/pm. Once the time
is set, push the crown back in to the closed position. In
normal operation the 4th center hand will display the date
when the crown is pushed. The hand will travel to the
position of the current date as shown on the top ring of
the case. The hand will pause for you to be able to read
the date and then return back to the 12 o’clock resting
position. Please note that the Perfect Date
™
function
will only operate in the Time mode. When the battery is
depleted and is replaced, the Perfect Date function must
be recalibrated. When the battery requires replacement,
it is highly recommended the watch be sent to a Timex
service center, where the battery will be replaced and the
Perfect Date function will be recalibrated to the current
date for the location where the watch is to be returned.

88
89
4TH CENTER HAND ADJUSTMENT
To readjust a misaligned 4th center hand:
1. Pull the crown out to position 3. The upper and lower
hands reset to the ends of their sweeps automatically.
2. When it stops moving, the 4th center hand should
point to 12 o’clock, if it does not point to 12 o’clock,
press button A or B to move the hand counterclock-
wise or clockwise until it points to 12 o’clock. Pressing
and holding button A or B will make the hand move at
a fast rate. Please note: after 5 seconds without action
with the crown in position 3, the 4th center hand will
move to display the current date.
3. Push crown in to position 1 when finished.
MODE SELECTION
Press button C to advance the upper hand to the desired
function.
TIME:
Displays the current time only (Perfect Date
™
function will
operate only in the Time mode).
CHRONOGRAPH OPERATION
The watch provides a four hour chronograph. At the end
of the four hour period the Chronograph will automati-
cally turn off. This will save the battery in the event of an
accidental activation of the Chronograph.
1. Press button C until the upper hand is at the beginning
of the upper hand chronograph scale, the lower hand
to 0 on the lower scale.

90
91
2. To start, press button A (START/STOP). The 4th center
hand displays the seconds counting up; the lower
hand shows the minutes, counting up in a 30-minute
scale and the upper hand shows the hour counting up
on the 4-hour scale. Each time the lower hand reaches
the 30 minute mark, it will return to the zero position
to begin the next 30 minute period, while the upper
hand will continue to advance through the 4-hour
scale. (Please note: button C is disabled while the
chronograph is in operation).
3. To take a split time, press button B (SPLIT/RESET).
The upper, lower, and 4th center hands will hold their
positions for you to note the split (lap) time. The chro-
nograph is still maintaining the timing sequence while
the hands are stopped. To release the hands, press
button B (SPLIT/RESET) and the hands will quickly
catch up to display the total elapsed time.
4. To stop, press button A (START/STOP) which will stop
the chronograph. (Please note: button C is disabled
while the chronograph is stopped until the chrono-
graph is reset).
5. To reset the chronograph after it is stopped, press but-
ton B (SPLIT/RESET), which will reset the chronograph
back to the beginning of the 30-minute and 4-hour
scales on the two sub-dials.
In normal operation the Chronograph will cycle through
the 30-minute sequence 8 times for a total maximum of
four hours. Once this four hour period has elapsed, the
upper hand will remain on the four hour marker and the
lower hand will return to zero. The chronograph function

92
93
will need to be reset prior to using the chronograph func-
tion again or before changing to a different mode. (Please
note: button A is disabled when the maximum four hour
time has elapsed and will not function until the chrono-
graph has been reset by pressing button B).
COUNT-DOWN TIMER
The watch provides a count-down timer function.
Special note: The upper hand, lower hand, and 4th
center hand are united during steps 3, 4 and 5 below. As
you move the minute and second hands forward/back-
ward, you will see all three hands reacting to the addition
or subtraction to the length of time for the countdown
timer duration. After pulling the crown out to the middle
position, pressing button C will advance you through the
cycle of hand engagement as follows: Upper hand (press
button C) - Lower hand (press button C) - 4th Center hand
(press button C) back to Upper hand….this allows you to
advance through the cycle to engage the hands you need
to adjust to achieve setting the desired length of time to
count down. Pressing the crown in will end the setting
procedure and confirms the values set so far at any point
in this cycle.
SETTING THE COUNTDOWN TIMER
The countdown timer may only be set when the count-
down timer function is not in operation. If the countdown
timer was previously used, it will need to be reset. If the
timer is currently in operation, it must be stopped and
reset in order to set the countdown timer.
1. Press button C until the upper hand is at some point
on the Timer scale. If the Timer has previously been

94
95
set, the hand will point to the time previously set. If
this is the first time the timer is being set, it will point
to the 0 on the timer scale.
2. Pull the crown out to the middle position.
3. To set the desired number of hours in half hour incre-
ments (up to the maximum time of 4:00:00), press
button A to move the upper hand counterclockwise
(pressing button B will move this hand clockwise),
until the desired number of hours has been selected.
Please note that you are selecting the number of
hours in the closest half-hour increment to the total
desired time (example: for a total desired countdown
time of 2:53:30, you will select 3 hours). Once you
have completed setting the number of hours, press
button C to confirm your selection.
4. Now you may set the desired number of minutes in
one minute increments by pressing button A to move
the lower hand counterclockwise (pressing button
B will move this hand clockwise), until the desired
number of minutes has been selected. Please note
that you are adjusting the number minutes forward
or backwards to get to the desired time (example: for
a total desired countdown time of 2:53:30, you will
press button A seven times which will move the total
countdown time from 3 hours to 2:53:00). You will no-
tice the hour hand will move slightly backwards from
the 3 hour marker towards the 2.5 hour marker. Once
you have adjusted the time to the correct number of
minutes, press button C to confirm your selection.
5. Now you may set the desired number of seconds in
one second increments by pressing button A to move

96
97
the fourth hand counterclockwise (pressing button B
will move this hand clockwise), until the desired num-
ber of seconds has been selected. Please note that
you are adding or subtracting the number seconds to
complete the total desired time (example: for a total
desired countdown time of 2:53:30, you will push
button B 30 times to select 30 seconds). Once you
have completed setting the number of seconds, push
the crown in to position 1 to confirm your complete
countdown timer value selection.
COUNTDOWN TIMER OPERATION
Once you have set the countdown timer to the desired
length of time to count down, you can now operate the
countdown timer.
Starting the countdown sequence: Press button A to
start the countdown timer. The fourth center hand and
the lower hand will begin to move counterclockwise. The
upper hand will move clockwise. The hands will continue
to indicate the remaining time left in the countdown
sequence until the length of time you have set the count-
down timer has passed and the value of remaining time
reaches zero. When the remaining time in the sequence
reaches zero, the chime will sound signaling to you the
countdown sequence has completed.

98
99
Interrupting the countdown sequence: If you wish
to stop the countdown sequence prior to the sequence
reaching zero, you may do so by pressing button A (the
fourth center hand as well as the upper and lower hands
will stop moving). If you wish to later begin the sequence
from the point at which you stopped the countdown, sim-
ply press button A again (the fourth center hand as well
as the upper and lower hands will resume moving).
Resetting the countdown sequence: Once the count-
down sequence has reached zero and the chime has
sounded, you may reset the countdown timer to the set
value by pressing button B (the fourth center hand as well
as the upper and lower hands will move to indicate the
value of time you set prior to using the countdown timer
function).
Clearing the countdown timer value: If desired, you
may clear the value of the countdown timer to zero.
This can only be done if the countdown timer is not in
operation and has been reset. If the countdown timer is
running, you must first stop the countdown sequence by
pressing button A, followed by pressing button B. This
will stop and reset the countdown timer to the currently
selected time value. To clear the countdown timer value
to zero, push and hold button B for two seconds. You
should now follow the instructions to set the countdown
timer value to the new desired length of time.

100
101
Split time function: While the countdown timer is in
operation, you may employ the split function to note the
remaining time in the countdown sequence.
To use the split time function, press button B, which will
make the upper, lower and 4th center hands freeze in
place. The countdown function will continue to operate
internally while the hands are frozen.
To resume the movement of the upper, lower and 4th
center hands, press button B again and the hands will
reposition themselves in proper placement to show the
current time within the countdown sequence.
3GMT
SECOND
HAND
CROWN
ROTATING TOP RING
(24-HOUR FORMAT)
4TH CENTER HAND
MINUTE
HAND
HOUR HAND
INNER RING /
NUMERALS
(24-HOUR FORMAT)
A
2 31

102
103
3 TIME ZONE FUNCTION
Your watch has the ability to display three time zones:
1. Hour and Minute hands: Displays the time in a stan-
dard 12 hour format. Please note: The date displayed
in the date window is linked to the time displayed by
these two hands.
2. 4th center hand and inner ring: Displays the time in a
24-hour format.
3. 4th center hand and case rotating top ring: Displays
the time in a 24-hour format.
4TH CENTER HAND ADJUSTMENT
To readjust a misaligned 4th center hand:
1. Pull the crown out to position 3.
2. 4th center hand should point to 12 o’clock. If within
5 seconds of pulling the crown to position 3 the 4th
center hand does not point to 12 o’clock, press button
A to move the hand clockwise until it points to 12
o’clock. Pressing and holding button A will make the
hand move at a fast rate.
3. Push crown in to position 1 when finished.

104
105
4TH CENTER HAND CALIBRATION
The 4th center hand is calibrated at the Timex factory to
reflect the standard minutes within the hour as defined
by Universal Time Coordinated. Globally a majority of
locations use the standard minutes. If the location you are
using for the 2nd and 3rd time zone uses the standard
minutes, the 4th center hand does not require recalibra-
tion. Only if you wish to have the second and third time
zones to reflect locations that do not follow the standard
minute, the instructions to recalibrate the 4th center hand
are as follows:
1. Pull the crown out to position 3. The 4th center hand
will point to 12 o’clock.
2. Rotate the crown to position the minute hand in the
correct position within the hour required for the loca-
tion you are wishing to use for the 2nd and 3rd time
zones.
3. Push the crown in to position 2. The 4th center hand
will point to its currently calibrated position of the
minutes within the hour.
4. Push button A to move the 4th center hand clockwise
until it aligns with the minute hand. Pressing and hold-
ing button A will make the hand move at a fast rate.
5. Pull the crown out to position 3. The 4th center hand
will point to 12 o’clock.
6. Rotate the crown to position hour and minute hands
to the correct time.

106
107
7. Push crown in to position 1 when finished.
Please note: The 4th center hand will track the time using
the current calibration of the minutes within the hour.
Time zones 2 and 3 both utilize the 4th center hand and
therefore the locations being tracked in time zones 2 and
3 must both utilize the same minutes within the hour for
these time zones to be displayed properly.
SETTING THE 4TH CENTER HAND (TIME ZONE II)
Note the current time in the location you wish to track
as the 2nd time zone. Press button A until the 4th center
hand is pointing to that time on the inner ring. (Please
note: this scale is a 24-hour format). The 4th center hand
will advance 30 minutes each time button A is pressed.
Pressing and holding button A will make the hand move at
a fast rate. This will set the 2nd time zone on the watch.
SETTING THE CASE ROTATING TOP RING
(TIME ZONE III)
The 3rd time zone is set by using the existing setting of
the 4th center hand and adjusting the case rotating top
ring to the desired time of the 3rd time zone. (Please note:
this scale is a 24-hour format). The top ring has 72 posi-
tions. To advance the top ring one hour you will advance
it three positions (3 “clicks”). Note the current time in the
location you wish to track as the 3rd time zone. Rotate
the case top ring counter clockwise to position the cor-
rect hour marker for that time with the 4th center hand.

108
109
TACHYMETER FUNCTION
(not all models)
The tachymeter will only determine speeds greater than
60 units per hour using this method; slower speeds can
be measured by decreasing the unit of measurement.
The function performed by a tachymeter is independent
of the unit of distance (e.g. statute miles, nautical miles,
kilometers, meters etc.) as long as the same unit of length
is used for all calculations.
1. Determine the start and finish markers for your
pre-determined distance.
2. Start the chronograph once the target for speed
measurement passes the start marker.
3. Stop the chronograph once the target for speed
measurement passes the finish marker.
4. The chronograph second hand is compared to the
tachymeter markings to determine the target’s speed.
SLIDE-RULE BEZEL FUNCTION
The slide rule function of the top ring operates by rotating
the outer ring. The inner ring does not move. The outer
ring is always related to “distance” or “speed”, or any
data that varies with time. The inner ring only notes units
of time.
Outer Ring
On the outer ring, the figure “10” represents factors or
multiples of 10, such as 0.1, 1.0, 10, or 100.

110
111
Inner Ring
On the inner ring, “MPH” (mile per hour) refers to “speed in-
dex”. This index is used to calculate the speed involving any
data per hour. On the inner ring, “STAT” (statute miles) and
“NAUT” (nautical miles) are for conversion of distance units.
OUTER RING
INNER RING
The following examples serve as a guide of how to use
the slide rule.
SPEED CALCULATION:
What speed is required to go 10 nautical miles in
15 minutes?
Known Factors: Distance: 10 nautical miles Time:
15 minutes
• Align “10” arrow on the outer ring with “15” on the
inner ring.
• The speed required can be found directly above the
“MPH” marking on the inner ring.
The answer: 40 nautical miles per hour
Time Calculation: How long will it take to go 10 nauti-
cal miles at a speed of 40 miles per hour?

112
113
Known Factors: Speed: 40 miles per hour Distance:
10 nautical miles
• Align “40” on the outer ring with the mark “MPH”
marking on the inner ring.
• The time required can be found directly below the “10”
arrow on the outer ring, which is “15” on the inner ring.
The answer: 15 minutes
DISTANCE CALCULATION:
How far can you travel at 40 miles per hour for
15 minutes?
Known Factors: Speed: 40 nautical miles per hour Time:
15 minutes
• Align “40” on the outer ring directly above the mark
“MPH” on the inner ring.
• The distance travelled can be obtained above the “15”
marker on the inner ring. The number indicated on the
outer ring is “10”.
The answer: The distance travelled is 10 nautical
miles.
UNIT CONVERSION:
To convert distance from nautical miles to statute miles
and kilometers.
Known Factor: Distance to convert is 10 nautical miles
• Align the “10” arrow on the outer ring above the
“NAUT” on the inner ring. The conversion in statute
miles (11.5) is found above the inner ring “STAT” mark-
ing, and the conversion to kilometers (18.5) is found
above the inner ring “MPH” marking.

114
115
HOW TO ADJUST BRACELET
(Variations of the following bracelet sections apply to all
watch models).
SLIDING CLASP BRACELET
1. Open locking plate.
2. Move clasp to desired
bracelet length.
3. Exert pressure while
holding locking plate and
slide clasp back and forth until it engages in grooves
on underside of bracelet.
4. Press locking plate down until it snaps closed. Clasp
can be damaged if excessive force is used.
FOLDOVER CLASP BRACELET
1. Find spring bar that connects bracelet to clasp.
2. Using a pointed tool, push in spring bar and gently
twist bracelet to disengage.
3. Determine wrist size, then insert spring bar in correct
bottom hole.
4. Push down on spring bar, align with top hole and
release to lock in place.

116
117
BRACELET LINK REMOVAL
REMOVING LINKS:
1. Place bracelet upright and insert pointed tool in
opening of link.
2. Push pin forcefully in direction of arrow until link is
detached (pins are designed to be difficult to remove).
3. Repeat until desired number of links are removed.
RE-ASSEMBLY:
1. Rejoin bracelet parts.
2. Push pin back into link in opposite direction of arrow.
3. Press pin down securely into bracelet until it is flush.
BATTERY
The battery should provide 4-6 years of normal watch use.
The actual battery life may vary depending on actual use.
When the battery needs to be changed, we recommend
that only TIMEX replace it. Your watch will need to be
recalibrated to correct time and date after changing the
battery. To return your watch to Timex use a pre-paid
shipper. To obtain a pre-paid shipper please call 1-800-
448-4639 or visit the retailer where you purchased your
watch or go to www.Timex.com. Please include the
following with your watch to cover postage and handling
(this is not a repair charge); a U.S.$8.00 check or money
order in the U.S.; a CAN$12.00 cheque or money order
in Canada; In other countries Timex will charge you for
postage and handling.

118
119
NEVER INCLUDE A SPECIAL WATCHBAND OR ANY
OTHER ARTICLE OF PERSONAL VALUE IN YOUR
SHIPMENT.
DO NOT DISPOSE OF BATTERY IN FIRE. DO NOT
RECHARGE. KEEP LOOSE BATTERIES AWAY FROM
CHILDREN.
TIMEX INTERNATIONAL WARRANTY
Your TIMEX
®
watch is warranted against manufacturing
defects by Timex Group USA, Inc. for a period of ONE
YEAR from the original purchase date. Timex and its
worldwide affiliates will honor this International Warranty.
Please note that Timex may, at its option, repair your
watch by installing new or thoroughly reconditioned and
inspected components or replace it with an identical or
similar model. IMPORTANT — PLEASE NOTE THAT THIS
WARRANTY DOES NOT COVER DEFECTS OR DAMAGES
TO YOUR WATCH:
1. after the warranty period expires;
2. if the watch was not originally purchased from an
authorized Timex retailer;

120
121
3. from repair services not performed by Timex;
4. from accidents, tampering or abuse; and
5. lens or crystal, strap or band, watch case, attachments
or battery. Timex may charge you for replacing any of
these parts.
THIS WARRANTY AND THE REMEDIES CONTAINED HEREIN
ARE EXCLUSIVE AND IN LIEU OF ALL OTHER WARRANTIES,
EXPRESS OR IMPLIED, INCLUDING ANY IMPLIED
WARRANTY OF MERCHANTABILITY OR FITNESS FOR
PARTICULAR PURPOSE. TIMEX IS NOT LIABLE FOR ANY
SPECIAL, INCIDENTAL OR CONSEQUENTIAL DAMAGES.
Some countries and states do not allow limitations
on implied warranties and do not allow exclusions or
limitations on damages, so these limitations may not
apply to you. This warranty gives you specific legal rights
and you may also have other rights, which vary from
country to country and state to state.
To obtain warranty service, please return your watch to
Timex, one of its affiliates or the Timex retailer where the
watch was purchased, together with a completed original
Watch Repair Coupon or, in the U.S. and Canada only, the
completed original Watch Repair Coupon or a written
statement identifying your name, address, telephone
number and date and place of purchase. Please include
the following with your watch to cover postage and
handling (this is not a repair charge): a US$ 8.00 check or
money order in the U.S.; a CAN$12.00 cheque or money
order in Canada; and a UK£3.50 cheque or money order
in the U.K. In other countries, Timex will charge you
for postage and handling. NEVER INCLUDE A SPECIAL
WATCHBAND OR ANY OTHER ARTICLE OF PERSONAL

122
123
VALUE IN YOUR SHIPMENT.
For the U.S., please call 1-800-448-4639 for additional
warranty information. For Canada, call 1-800-263-0981.
For Brazil, call +11 2664 1001. For Mexico, call 01-800-
01-060-00. For Central America, the Caribbean, Bermuda
and the Bahamas, call (501) 370-5775 (U.S.). For Asia,
call 852-2815-0091. For the U.K., call 44 020 8687 9620.
For France, call 33 3 81 63 42 51. For Germany/Austria,
call +43 662 889 2130. For other areas, please contact
your local Timex retailer or Timex distributor for warranty
information.
If your Timex
®
watch should ever need servicing, send it
to Timex as set forth in the Timex International Warranty
or addressed to: TG SERVICE CENTER, P.O. Box 2740,
Little Rock, AR 72203. For service questions, call 1-800-
328-2677 or [email protected]
EXTENDED WARRANTY
Available in U.S. only. Extend your warranty for an ad-
ditional 4 years from date of purchase for $5. You can
pay with AMEX, Discover, Visa or MasterCard by calling
1 800-448-4639 during normal business hours. Payment
must be made within 30 days of purchase. Name, ad-
dress, telephone number, purchase date, and 5-digit
model number required. You can also mail a check for $5
to: Timex Extended Warranty, P.O. Box 1676, Dept. EF, Little
Rock, AR 72203.
©2015 Timex Group USA, Inc. TIMEX, INDIGLO, PERFECT DATE and
INTELLIGENT QUARTZ are trademarks of Timex Group B.V. and its
subsidiaries.

125
MONTRES TIMEX
®
Félicitations pour votre achat d’une montre Timex
®
INTELLIGENT QUARTZ
™
. Lire les instructions attentive-
ment pour bien comprendre le fonctionnement de votre
montre Timex.
Il est possible que ce modèle ne présente pas toutes les
fonctions décrites dans le dépliant.
Pour de plus amples renseignements et pour enregistrer
le produit, visiter le site :
www.timex.com

126
127
SOMMAIRE
Comment mettre la montre en marche ........................ 129
Résistance aux chocs et à l’eau .................................... 130
Veilleuse Indiglo
®
.......................................................... 132
Réglage de la date et de l’heure .................................... 133
Calendrier perpétuel ...................................................... 135
Chronographe avec Fly-Back ......................................... 138
Boussole chrono avec Fly-Back ..................................... 144
Chronographe Linéaire................................................... 158
Heure mondiale ............................................................. 164
Boussole ......................................................................... 171
Marée Température et Boussole ................................... 178
Altimètre ........................................................................ 188
Profondeur ..................................................................... 197
Yacht Racer .................................................................... 202
Minuterie Chrono ........................................................... 214
3GMT .............................................................................. 232
Fonction Tachymètre ..................................................... 239
Fonction Règle à Calcul de la Bague d’Encadrement .... 241
Comment ajuster le bracelet ......................................... 247
Démontage de maillons du bracelet .............................. 249
Pile .................................................................................. 250
Garantie .......................................................................... 252

128
129
COMMENT METTRE LA MONTRE
EN MARCHE
(Ne concerne pas les modèles à calendrier perpétuel.)
Pour mettre la montre en marche, retirer la bague de
protection en plastique située sous la couronne, puis
enfoncer la couronne vers le boîtier.
Si le boîtier présente un bouton fileté, la couronne doit
être vissée après le réglage de la montre.
Pour visser, enfoncer fermement la couronne sur le
bouton fileté et la maintenir enfoncée tout en la faisant
tourner dans le sens horaire. Continuer à visser la
couronne jusqu’à ce qu’elle soit bien serrée. Il faudra
dévisser la couronne (dans le sens anti-horaire) avant de
la tirer la prochaine fois que la montre doit être réglée.
Bienvenue dans l’univers des montres Timex
®
avec
la technologie Intelligent Quartz
™
, la technologie à
quartz du futur. La technologie Timex Intelligent Quartz
combine la puissance d’un microprocesseur à la fiabilité
et la précision des montres à quartz analogiques. Avec
les montres Timex Intelligent Quartz, la technologie est
inscrite dans le design, offrant un degré de complexité du
cadran sans précédent. Jusqu’à trois aiguilles indépen-
dantes additionnelles sont utilisées pour afficher, sous
un format analogique traditionnel, tout un ensemble de
données habituellement disponibles uniquement sur les
montres numériques.

130
131
ATTENTION : POUR PRÉSERVER L’ÉTANCHÉITÉ, NE
PAS ENFONCER LES BOUTONS SOUS L’EAU, SAUF SUR
LES MODÈLES ÉTANCHES JUSQU’À 200 MÈTRES. NE
JAMAIS TIRER LA COURONNE ALORS QUE LA MONTRE
EST SOUS L’EAU.
1. La montre est étanche aussi longtemps que le verre,
les couronnes et le boîtier sont intacts.
2. La montre n’est pas conçue pour la plongée.
3. Rincer à l’eau douce après tout contact avec l’eau
de mer.
4. La résistance aux chocs est indiquée sur la face de la
montre ou le dos du boîtier. Les montres sont conçues
pour se conformer à l’essai de choc ISO. Toutefois,
prendre garde à éviter d’endommager le verre.
RÉSISTANCE AUX CHOCS ET À L’EAU
Si la montre est étanche, la profondeur maximale (WR_M)
est indiquée.
Profondeur d’étanchéité p.s.i.a.* Pression de l’eau
sous la surface
30m/98pi 60
50m/164pi 86
100m/328pi 160
200m/656pi 284

132
133
RÉGLAGE DE LA DATE ET DE L’HEURE
REMARQUE : La couronne de montre possède
3 positions : enfoncée, intermédiaire et extrême. Pour
vous familiariser avec les différentes positions, tirez la
couronne en position extrême et poussez-la doucement
jusqu’à ce qu’elle se place en position intermédiaire par
un clic.
Pour régler la date et l’heure :
Heure
Tirez complètement la couronne et tournez jusqu’à
afficher l’heure exacte. Assurez-vous que le réglage
matin/soir (AM/PM) est correct en vérifiant que la date
change à minuit et non à midi.
VEILLEUSE INDIGLO
®
Appuyez sur le bouton ou la couronne pour activer
l’éclairage. La technologie électroluminescente utilisée
dans la veilleuse INDIGLO
®
permet d’illuminer le cadran
de la montre la nuit et dans des conditions de faible
éclairage.
OU

134
135
Date (Ne concerne pas les modèles
à calendrier perpétuel)
Tirez la couronne en position intermédiaire puis tournez
jusqu’à apparition de la date courante dans le dateur.
Remarque : La date change entre 10 pm (22h00) et 2 am
(2h00). Ne changez pas la date pendant ce laps de temps.
Ceci aurait pour effet d’endommager le mouvement de
la montre.
Enfoncez la couronne après avoir réglé l’heure. L’aiguille
des secondes commencera à se déplacer.
REMARQUE : Pour les mois de moins de 31 jours, la date
devra être modifiée.
CALENDRIER PERPÉTUEL
VUE D’ENSEMBLE
A
B
1 2
3
1 2
3
AIGUILLE
DES HEURES
AIGUILLE
DES JOURS
AIGUILLE DE LA DATE
AIGUILLE
DES SECONDES
AIGUILLE
DES MINUTES
COURONNE
AIGUILLE DES MOIS
BOUTON A
(ENCASTRÉ)
BOUTON B
(ENCASTRÉ)
POSITION
ENFONCÉE
POSITION
INTER-
MÉDIAIRE
POSITION
EXTRÊME

136
137
PRISE EN COMPTE DES ANNÉES BISSEXTILES
Afin de se maintenir à la bonne date, la montre comprend
un réglage permettant de tenir compte de l’année bissex-
tile courante. Ce réglage est effectué à l’usine Timex ou
après le remplacement de la pile et ne peut être modifié
mais seulement affiché.
Pour l’afficher, tirez la couronne en position intermédiaire.
L’aiguille de date affiche le réglage : 1 = 1 an après une
année bissextile; 2 = 2 ans après une année bissextile;
3 = 3 ans après une année bissextile; 4 = l’année bissextile.
Enfoncer la couronne pour valider ; les aiguilles retournent
à leur affichage habituel du jour, du mois et de la date.
INTRODUCTION
Grâce au calendrier perpétuel, la date ne nécessite aucun
réglage jusqu’en 2100. La montre tient automatique-
ment compte des mois courts et des années bissextiles
et affiche toujours le jour et la date corrects. Le jour
et la date ont été préréglés à l’usine Timex. Il ne reste
qu’à régler l’heure. La montre possède également deux
boutons poussoirs encastrés permettant au centre
de services Timex de régler le jour et la date après
remplacement de la pile. Autrement ils ne servent à rien.

138
139
RÉGLAGE DE LA 4ÈME AIGUILLE CENTRALE
Pour réaligner la 4ème aiguille centrale :
1. Tirez complètement la couronne. Les aiguilles
supérieure et inférieure se règlent automatiquement
en allant se placer en bout de trajectoire.
2. La 4ème aiguille centrale doit indiquer 12 heures. Si
ça n’est pas le cas au bout de 5 secondes, appuyez
sur A ou B pour faire avancer l’aiguille respectivement
dans le sens anti-horaire ou dans le sens horaire
jusqu’à ce qu’elle indique 12 heures.
3. Enfoncez la couronne pour valider.
CHRONOGRAPHE AVEC FLY-BACK
VUE D’ENSEMBLE
AA
B
23
1 2
3
1 2
3
AIGUILLE
SUPÉRIEURE
HEURES CHRONO
DEUXIÈME FUSEAU
HORAIRE
4ÈME AIGUILLE
CENTRALE
AIGUILLE
DES SECONDES
DATEUR
COURONNE
MINUTES DU
CHRONOGRAPHE
AIGUILLE INFÉRIEURE
BOUTON A
BOUTON B
AIGUILLE
DES MINUTES
AIGUILLE DES HEURES
POSITION
ENFONCÉE
POSITION
INTER-
MÉDIAIRE
POSITION
EXTRÊME

140
141
POUR RÉGLER LE SECOND FUSEAU HORAIRE :
1. Tirez la couronne en position intermédiaire. L’aiguille
supérieure indique l’heure du second fuseau horaire et
la 4ème aiguille centrale indique les minutes.
2. Si la valeur des minutes du second fuseau horaire est
indentique à celle de votre fuseau horaire, l’aiguille
des minutes et la 4ème aiguille centrale doivent être
alignées. Si les aiguilles ne sont pas alignées, ou si
le second fuseau horaire diffère en minute, appuyez
sur le bouton B pour faire avancer la 4ème aiguille
centrale à la position désirée.
3. Appuyez sur le bouton A pour faire avancer l’aiguille
supérieure par intervalles d’une heure jusqu’à ce
qu’elle atteigne l’heure désirée dans le second fuseau
horaire. Pour faire avancer l’aiguille rapidement,
appuyez et tenez enfoncé le bouton A.
SECOND FUSEAU HORAIRE
L’aiguille supérieure indique l’heure pour le second fuseau
horaire. Notez qu’il s’agit d’une échelle sur 24 heures,
minuit se situant à cha-
cune de ses extrémités
et midi au milieu. Le plus
souvent, les fuseaux
horaires varient par
intervalles d’heure. Dans
ce cas, la valeur des
minutes correspondra à
celle affichée par l’aiguille
des minutes de la montre.
AA
B
23
1 2
3
1 2
3

142
143
2. Pour l’arrêter, appuyez de nouveau sur le bouton A
(START/STOP [Démarrage/Arrêt]). Toutes les aiguilles
s’arrêtent.
3. Pour redémarrer, appuyez de nouveau sur le bouton A
(START/STOP [Démarrage/Arrêt]).
4. Pour remettre à zéro la fonction fly-back du
chronographe, appuyez sur le bouton B (FLY-BACK/
RESET [Remise à zéro]).
Lors de la remise à zéro du chronographe, toutes les
aiguilles se placent sur zéro. Après huit secondes, la
montre reprend l’affichage normal du second fuseau
horaire.
5. Pour remettre à zéro et/ou redémarrer le chronographe
avec fonction fly-back, appuyez sur le bouton B
(FLY-BACK/RESET [Remise à zéro]). Relâchez-le quand
vous voulez redémarrer.
4. Enfoncez la couronne pour valider.
CHRONOGRAPHE AVEC FLY-BACK OU RETOUR
À LA VOLÉE
La montre comporte un chronographe avec fly-back ou
retour à la volée de 4 heures.
1. Pour démarrer, appuyez sur le bouton A
(START/STOP [Démarrage/Arrêt]).
La 4ème aiguille centrale indique les secondes
avec une résolution d’1/5 de seconde. L’aiguille
inférieure indique le dernier chiffre des minutes,
en comptant jusqu’à 10 et en répétant l’opération.
L’aiguille supérieure indique le temps total, heures et
minutes, avec des divisions toutes les dix minutes. Le
chronographe fonctionne jusqu’à quatre heures avant
de s’arrêter automatiquement.

144
145
RÉGLAGE DE L’AIGUILLE INDICATRICE
(4ÈME AIGUILLE CENTRALE)
POUR RÉALIGNER UNE AIGUILLE INDICATRICE :
1. Tirez complètement la couronne. Les aiguilles
supérieure et inférieure se règlent automatiquement
en allant se placer en bout de trajectoire.
2. La 4ème aiguille centrale doit indiquer 12 heures. Si ce
n’est pas le cas au bout de 5 secondes, appuyez sur A
ou B pour faire avancer l’aiguille respectivement dans
le sens anti-horaire ou dans le sens horaire jusqu’à ce
qu’elle indique 12 heures.
3. Enfoncez la couronne pour valider.
BOUSSOLE CHRONO AVEC FLY-BACK
VUE D’ENSEMBLE
A
C
B
1 2
3
1 2
3
AIGUILLE
SUPÉRIEURE
CHRONO HEURES
DEUXIÈME FUSEAU
HORAIRE
4ÈME AIGUILLE
CENTRALE
AIGUILLE
DES SECONDES
DATEUR
COURONNE
MINUTES DU
CHRONOGRAPHE
AIGUILLE
INFÉRIEURE
BOUTON A
BOUTON B
AIGUILLE
DES HEURES
AIGUILLE DES MINUTES
POSITION
ENFONCÉE
POSITION
INTERMÉDI-
AIRE
POSITION
EXTRÊME
BOUTON C

146
147
2. Appuyez sur B pour faire avancer la 4ème aiguille
centrale. Maintenez le bouton enfoncé pour déplacer
l’aiguille rapidement. L’aiguille supérieure et la 4ème
aiguille centrale se déplacent ensemble, l’aiguille
supérieure se déplaçant d’une heure lorsque la 4ème
aiguille centrale effectue un tour. Si la valeur des
minutes du second fuseau horaire est indentique à
votre fuseau horaire, l’aiguille des minutes et la 4ème
aiguille centrale doivent être alignées.
3. Appuyez sur A pour déplacer l’aiguille supérieure
vers l’avant par intervalles d’une heure. Maintenez le
bouton enfoncé pour déplacer l’aiguille rapidement.
4. Enfoncez la couronne pour valider.
Il est tout à fait possible d’utiliser alternativement le
second fuseau horaire pour indiquer l’heure de votre
fuseau horaire sur une échelle de 24 heures. Si vous
SECOND FUSEAU HORAIRE
L’aiguille supérieure indique normalement l’heure pour le
second fuseau horaire. Noter qu’il s’agit d’une échelle sur
24 heures, minuit se situant à chacune de ses extrémités
et midi au milieu.
Pour régler le second fuseau horaire :
1. Tirez la couronne en
position intermé-
diaire. L’aiguille
supérieure indique
l’heure du second
fuseau horaire et la
4ème aiguille centrale
indique les minutes.
A
C
B
1 2
3
1 2
3

148
149
dernier chiffre des minutes, en comptant jusqu’à dix
puis en répétant l’opération. L’aiguille supérieure
indique le temps total, heures et minutes, avec des
divisions toutes les dix minutes. Le chronographe
fonctionne jusqu’à quatre heures avant de s’arrêter
automatiquement.
2. Pour arrêter, appuyez à nouveau sur A (START/STOP
[Démarrage/Arrêt]). Toutes les aiguilles s’arrêtent
alors.
3. Pour reprendre le chronométrage, appuyez à nouveau
sur A (START/STOP [Démarrage/Arrêt]), ou, pour
remettre le chronographe à zéro, appuyez sur B (FLY-
BACK/RESET OU RETOUR À LA VOLÉE/RESET). Lors de
la remise à zéro du chronographe, toutes les aiguilles
se placent sur zéro. Après huit secondes, la montre
reprend l’affichage normal du second fuseau horaire.
utilisez le second fuseau horaire de cette manière,
assurez-vous que l’affichage heure/minute correspond
bien à l’affichage sur 24 heures en vérifiant que la date
change à minuit et non à midi.
CHRONOGRAPHE AVEC FLY-BACK
OU RETOUR À LA VOLÉE
La montre comporte un chronographe avec fly-back ou re-
tour à la volée de 4 heures.
1. Pour démarrer, ap-
puyez sur A (START/
STOP [Démarrage/Ar-
rêt]). L’aiguille centrale
indique les secondes
avec une résolution de
1/5 seconde et l’aiguille
inférieure indique le
A
C
B
1 2
3
1 2
3

150
151
4. Vous pouvez également remettre à zéro et/ou
redémarrer le chronographe lorsqu’il est en marche.
Pour cela, appuyez et maintenez enfoncé le bouton
B (FLY-BACK/RESET OU RETOUR À LA VOLÉE/RESET)
pour remettre le chronographe à zéro et relâchez-
le lorsque vous désirez redémarrer. Il n’est pas
nécessaire d’attendre que toutes les aiguilles aient
atteint la position zéro avant de relâcher le bouton ;
le chronométrage commence de manière interne dès
que le bouton est relâché. Cette fonction « fly-back »
(rattrapante) vous permet de mesurer un temps
intermédiaire.
Il est possible d’utiliser la boussole en même temps
que le chronographe sans affecter le fonctionnement
de ce dernier. Se reporter à FONCTIONNEMENT DE LA
BOUSSOLE.
ÉTALONNAGE DE LA BOUSSOLE
La boussole doit être étalonnée avant utilisation.
Une boussole utilise le champ magnétique terrestre ;
par conséquent, il importe d’éviter d’être à proximité de
grands objets métalliques (automobiles, ponts, etc.) ou
autres objets produisant un rayonnement électromag-
nétique, tels que téléviseurs ou ordinateurs, susceptible
d’affecter le champ magnétique autour de la montre. Si
la boussole est étalonnée à proximité de tels objets, elle
ne fonctionnera correctement qu’à cet endroit. Si la bous-
sole est étalonnée loin de tels objets, elle ne fonctionnera
pas correctement près d’eux. Pour de meilleurs résultats,
étalonner à l’endroit où elle sera utilisée.
Lors de l’étalonnage et des relevés d’orientation,
il importe, comme avec toutes les boussoles, de
maintenir la montre dans un plan horizontal. Procéder

152
153
2. Tenez la montre en position horizontale ou posez-la
sur une surface plane (si le bracelet gêne, poser la
montre sur une tasse retournée). La montre peut être
posée à l’envers à condition d’en protéger le cadran.
3. Appuyez sur C (COMPASS [Boussole]) pour commenc-
er. L’aiguille centrale effectue deux tours complets
pour vous rappeler de faire pivoter la montre. Tenir
la montre à plat et effectuer LENTEMENT deux tours
complets, en comptant 15 secondes environ par tour.
à l’étalonnage ou à des relevés d’orientation alors que
la montre n’est pas en position horizontale peut aboutir
à d’importantes erreurs. Veillez également à éviter les
endroits susceptibles de présenter des concentrations
de fer de roche ou industriel supérieures à la normale,
dont l’effet pourrait produire des mesures inexactes. En
présence de toute mesure suspecte, effectuer un nouvel
étalonnage.
Veiller à ne pas ranger la montre à proximité d’une
quelconque source magnétique (ordinateurs, appareils
électriques, téléviseurs) car cela pourrait l’aimanter et
fausser les mesures ultérieures. La précision typique des
montres-boussoles est de +/- 10 degrés.
Pour étalonner la boussole :
1. Tirez la couronne en position intermédiaire et attendez
l’arrêt des aiguilles indicatrices.

154
155
7. Enfoncer la couronne pour valider.
A
B
Déclinaison magnétique réglée sur -14° (14°W)
FONCTIONNEMENT DE LA BOUSSOLE
Normalement, la boussole est inactive et l’aiguille
centrale pointe sur 12 heures ou indique les secondes du
chronographe.
Tout en maintenant la montre en position horizontale,
appuyez sur C (COMPASS [Boussole]) pour activer la bous-
sole. L’aiguille se déplace et pointe vers le nord. Si on
tourne la montre, l’aiguille centrale se déplace, pointant
toujours vers le nord. Après 20 secondes, la boussole
4. Ensuite, appuyez sur C (COMPASS [Boussole]),
en maintenant la montre en position horizon-
tale. L’aiguille centrale oscille pour confirmer que
l’étalonnage est terminé et se déplace ensuite pour le
réglage de la déclinaison magnétique du moment.
5. Si vous ne désirez pas régler l’angle de déclinaison,
enfoncer la couronne. Dans le cas contraire, pour que
la boussole compense automatiquement l’angle de
déclinaison, faire tourner la lunette de la boussole
jusqu’à ce que le nord soit à 12 heures.
6. Appuyez sur A ou B pour déplacer l’aiguille centrale
respectivement vers l’ouest (-) ou vers l’est (+) afin
d’indiquer l’angle de déclinaison de l’endroit où vous
vous trouvez à l’aide de l’échelle de déclinaison.
Maintenir le bouton enfoncé pour déplacer l’aiguille
rapidement. Voir l’exemple sur la figure ci-dessous.

156
157
s’arrête automatiquement et l’aiguille centrale reprend
son fonctionnement habituel. Ceci permet de prolonger
la durée de vie de la pile. Appuyez sur C (COMPASS
[Boussole]) à tout moment pour maintenir la boussole
activée pendant 20 secondes de plus.
Il est possible d’activer la boussole alors que le
chronographe est en train de fonctionner. Le
fonctionnement de la 4ème aiguille centrale s’en trouve
alors simplement modifié de manière temporaire. Les
aiguilles supérieure et inférieure continuent d’indiquer
le temps chronométré et toutes les fonctions du
chronographe restent accessibles à l’aide des boutons A
(START/STOP [Démarrage/Arrêt]) et B (FLY-BACK/RESET
OU RETOUR À LA VOLÉE/RESET).
REMARQUE : Au cours de l’utilisation de la boussole, la
trotteuse se déplace par intervalles de deux secondes.
Lorsque la boussole est activée, il se peut aussi que les
aiguilles inférieure et supérieure changent légèrement
de position pour revenir en position initiale après
désactivation de la boussole. Ceci est normal et permet
d’obtenir les meilleurs relevés d’orientation.

158
159
CHRONOGRAPHE LINÉAIRE
VUE D’ENSEMBLE
RÉGLAGE DE L’AIGUILLE LINÉAIRE ET DE LA 4ÈME
AIGUILLE CENTRALE
Pour réaligner la 4ème aiguille centrale :
1. Tirez complètement la couronne. L’aiguille inférieure
se règle automatiquement en allant se placer en bout
de trajectoire.
2. La 4ème aiguille centrale doit indiquer 12 heures. Si ça
n’est pas le cas au bout de 5 secondes, appuyez sur
A pour faire avancer l’aiguille respectivement dans le
sens horaire jusqu’à ce qu’elle indique 12 heures.
3. Si le chronographe a été réinitialisé et que l’aiguille
linéaire n’indique pas zéro, appuyez sur le bouton B
et maintenez-le enfoncé pour lancer un étalonnage
complet de l’indicateur linéaire, ce qui prendra jusqu’à
32 secondes à exécuter.
4. Enfoncez la couronne pour valider.
AIGUILLE DES
SECONDES
DATEUR
COURONNE
AIGUILLE INFÉRIEURE
BOUTON A
BOUTON B
4ÈME AIGUILLE
CENTRALE
AIGUILLES DES HEURES
AIGUILLE
LINÉAIRE
AIGUILLE DES
MINUTES
A
B
1
2
3

160
161
SECOND FUSEAU HORAIRE
L’aiguille inférieure
indique l’heure pour
le second fuseau
horaire. Notez qu’il
s’agit d’une échelle
sur 24 heures, minuit
se situant à chacune
de ses extrémités et
midi au milieu. Le plus
souvent, les fuseaux
horaires varient par
intervalles d’heure.
Dans ce cas, la valeur des minutes correspondra à celle
affichée par l’aiguille des minutes de la montre.
RÉGLAGE DU SECOND FUSEAU HORAIRE :
1. Tirez la couronne en position intermédiaire. L’aiguille
inférieure indique l’heure du second fuseau horaire et
la 4ème aiguille centrale indique les minutes.
2. Si la valeur des minutes du second fuseau horaire est
identique à celle de votre fuseau horaire, l’aiguille
des minutes et la 4ème aiguille centrale doivent être
alignées. Si les aiguilles ne sont pas alignées, ou si
le second fuseau horaire diffère en minute, appuyez
sur le bouton B pour faire avancer la 4ème aiguille
centrale à la position désirée.
3. Appuyez sur le bouton A pour faire avancer l’aiguille
inférieure par intervalles d’une heure jusqu’à ce
qu’elle atteigne l’heure désirée dans le second fuseau
horaire. Pour faire avancer l’aiguille rapidement,
appuyez et tenez enfoncé le bouton A.
A
B
1
2
3

162
163
4. Enfoncez la couronne pour valider.
CHRONOGRAPHE LINÉAIRE
La montre comporte un chronographe multi-cadrans avec
indicateur 4 heures.
1. Pour démarrer, appuyez sur le bouton A (START/STOP
[Démarrage/Arrêt]). La 4ème aiguille centrale indique
les secondes avec une résolution d’1/5 de seconde.
L’aiguille linéaire indique les minutes, en comptant
jusqu’à trente et en recommençant. L’aiguille inféri-
eure indique le temps total, heures et minutes, avec
des divisions toutes les dix minutes. Le chronographe
fonctionne jusqu’à quatre heures avant de s’arrêter
automatiquement.
2. Pour l’arrêter, appuyez de nouveau sur le bouton A
(START/STOP [Démarrage/Arrêt]). Toutes les aiguilles
s’arrêtent.
3. Pour remettre le chronographe à zéro, appuyez sur le
bouton B (SPLIT/RESET [Temps intermédiaire/Remise à
zéro]).
Lors de la remise à zéro du chronographe, toutes les
aiguilles se placent sur zéro. Après huit secondes, la
montre reprend l’affichage normal du second fuseau
horaire. Pendant que le chronographe fonctionne, il est
possible de prendre un temps intermédiaire. Appuyez
sur le Bouton B (SPLIT/RESET [Temps intermédiaire/
Remise à zéro]) et toutes les aiguilles s’arrêteront
tandis que le chronographe continue de fonctionner.
Appuyez à nouveau sur le Bouton B (SPLIT/RESET [Temps
intermédiaire/Remise à zéro]) pour reprendre l’affichage
du temps écoulé sur le chronographe en marche.

164
165
HEURE MONDIALE
VUE D’ENSEMBLE
POUR RÉGLER L’HEURE MONDIALE :
1. Tirez la couronne en position intermédiaire. L’aiguille
centrale indique la ville située dans le fuseau horaire
mondial et l’aiguille supérieure indique l’heure dans
cette ville.
A
B
C
1 2
3
corrected 3.3.11 with Paulo’s new cities
24 VILLES
HEURE
MONDIALE
AIGUILLE
DES SECONDES
DATEUR
COURONNE
AIGUILLE INFÉRIEURE
BOUTON A
BOUTON B
BOUTON C
4ÈME AIGUILLE
CENTRALE
SAISONS
AIGUILLE
SUPÉRIEURE
AIGUILLE DES HEURES
AIGUILLE
DES MINUTES
POSITION
ENFONCÉE
POSITION
INTER-
MÉDIAIRE
POSITION
EXTRÊME
A
B
C
1 2 3

166
167
2. Appuyez sur A ou B pour déplacer l’aiguille centrale et
indiquer la ville correspondant à votre fuseau horaire.
Maintenez le bouton enfoncé pour déplacer l’aiguille
rapidement. N’importe quelle ville peut être choisie.
3. Tirer complètement la couronne. L’aiguille centrale
retournera à la position 12h00, comme indiqué dans
RÉGLAGE DES AIGUILLES INDICATRICES. Après cinq
secondes, l’aiguille supérieure indique l’heure locale
(c’est à dire l’heure qu’il est dans la ville sélectionnée
à l’étape précédente), l’aiguille centrale indique les
minutes de l’heure locale et l’aiguille inférieure indique
la saison (voir RÉGLAGE DES SAISONS). IMPORTANT :
Ne pas manipuler les boutons-poussoirs ou la cou-
ronne jusqu’à ce que l’aiguille centrale ait complété
son ajustement. (Environ 10 secondes après avoir
complètement tiré la couronne.)
4. Si la saison affichée n’est pas celle correspondant au
fuseau horaire local, appuyez sur C pour la modifier.
Si le fuseau horaire local observe le passage à l’heure
d’été, l’aiguille supérieure se déplacera d’une heure.
5. Appuyez sur A ou B pour respectivement reculer ou
avancer l’heure afin de régler l’heure dans le fuseau
horaire local. Maintenir le bouton enfoncé pour régler
l’heure rapidement. Les aiguilles se déplacent en-
semble ; l’aiguille supérieure se déplace d’une heure
lorsque l’aiguille centrale effectue un tour. Après le
réglage, l’aiguille centrale et l’aiguille des minutes
doivent être alignées.
6. Enfoncez la couronne pour valider.

168
169
L’HEURE DANS UNE VILLE SÉLECTIONNÉE
Appuyez sur A ou B pour
déplacer l’aiguille centrale
respectivement vers
l’arrière ou vers l’avant
et sélectionner une ville.
L’aiguille supérieure se
déplace pour indiquer
l’heure dans la ville
sélectionnée. Noter qu’il
s’agit d’une échelle sur
24 heures, minuit se situant à chacune de ses extrémités
et midi au milieu.
RÉGLAGE DES SAISONS
Le réglage des saisons permet à la montre de tenir
compte du passage à l’heure d’été.
RÉGLAGE DE L’AIGUILLE INDICATRICE
(4ÈME AIGUILLE CENTRALE)
Pour réaligner une aiguille indicatrice :
1. Tirez complètement la couronne. Les aiguilles supéri-
eure et inférieure se règlent automatiquement en
allant se placer en bout de trajectoire.
2. La 4ème aiguille centrale doit indiquer 12 heures. Si ce
n’est pas le cas au bout de 5 secondes, appuyez sur A
ou B pour faire avancer l’aiguille respectivement dans
le sens anti-horaire ou dans le sens horaire jusqu’à ce
qu’elle indique 12 heures.
3. Enfoncez la couronne pour valider.
REMARQUE : Si aucun bouton n’est enfoncé dans les
cinq secondes suivant l’arrêt des aiguilles, la montre
procède au réglage du temps mondial (se reporter à
RÉGLAGE DE L’HEURE MONDIALE).
A
B
C
1 2 3

170
171
La montre gère cela à l’aide d’un réglage signalant les
deux périodes concernées par le changement d’heure
dans toutes les villes. Pour la montre, la période
correspondant à l’heure d’été est SUMMER et la période
correspondant à l’heure d’hiver est WINTER.
Lorsque, pour une ville, la saison est réglée sur
SUMMER (été), toutes les villes se trouvant dans le
même hémisphère sont automatiquement réglées sur
SUMMER tandis que toutes les villes situées dans l’autre
hémisphère sont automatiquement réglées sur WINTER
(hiver). La montre connaît la situation des villes dans
chaque hémisphère.
Appuyez sur C pour changer de saison.
BOUSSOLE
VUE D’ENSEMBLE
I
I
14
COURONNE
CENTRALE
CENTRE
RÉGLAGE
DE LA DATE
I
I
14
EXTRÉMITÉ
RÉGLAGE
DE L’HEURE
COURONNE
B
B (COMPASS
[BOUSSOLE])
ÉCHELLE DE DÉCLINAISON
AIGUILLE DE LA
BOUSSOLE
(L’EXTRÉMITÉ NORD
EST ROUGE
POINTUE / PLUS
LONGUE)

172
173
RÉGLAGE DE L’AIGUILLE DE LA BOUSSOLE
Tirez la COURONNE complètement. L’aiguille de la bous-
sole devrait indiquer 12 heures. Sinon, appuyez sur A ou
B pour faire avancer l’aiguille jusqu’à ce qu’elle indique
12 heures. Tenez le bouton enfoncé pour la faire avancer
rapidement. Enfoncez la COURONNE CENTRALE pour
valider et refaire l’étalonnage.
ÉTALONNAGE DE LA BOUSSOLE
La boussole doit être étalonnée avant utilisation.
Une boussole utilise le champ magnétique terrestre ;
par conséquent, il importe d’éviter d’être à proximité de
grands objets métalliques (automobiles, ponts, etc.) ou
autres objets produisant un rayonnement électromag-
nétique, tels que téléviseurs ou ordinateurs, susceptible
d’affecter le champ magnétique autour de la montre. Si
la boussole est étalonnée à proximité de tels objets, elle
ne fonctionnera correctement qu’à cet endroit. Si la bous-
sole est étalonnée loin de tels objets, elle ne fonctionnera
pas correctement près d’eux. Pour de meilleurs résultats,
étalonner à l’endroit où elle sera utilisée.
Lors de l’étalonnage et des relevés d’orientation, il im-
porte, comme avec toutes les boussoles, de maintenir la
montre dans un plan horizontal. Procéder à l’étalonnage
ou à des relevés d’orientation alors que la montre n’est
pas en position horizontale peut aboutir à d’importantes
erreurs. Veiller également à éviter les endroits suscep-
tibles de présenter des concentrations de fer de roche ou
industriel supérieures à la normale, dont l’effet pourrait
produire des mesures inexactes. En présence de toute
mesure suspecte, effectuer un nouvel étalonnage.
Veiller à ne pas ranger la montre à proximité d’une
quelconque source magnétique (ordinateurs, appareils

174
175
4. Ensuite, appuyez sur A ou B, en maintenant la montre
en position horizontale. La 4ème aiguille centrale
oscille pour confirmer que l’étalonnage est terminé et
se déplace ensuite pour le réglage de la déclinaison
magnétique du moment.
5. Si vous ne désirez pas régler l’angle de déclinaison,
enfoncez la couronne. Dans le cas contraire, pour que
la boussole compense automatiquement l’angle de
déclinaison, faites tourner la lunette de la boussole
jusqu’à ce que le nord soit à 12 heures.
électriques, téléviseurs) car cela pourrait l’aimanter et
fausser les mesures ultérieures. La précision typique des
montres-boussoles est de +/- 10 degrés.
Pour étalonner la boussole :
1. Tirez la couronne en position intermédiaire et attendez
l’arrêt des aiguilles indicatrices.
2. Tenez la montre en position horizontale ou posez-la
sur une surface plane (si le bracelet gêne, poser la
montre sur une tasse retournée). La montre peut être
posée à l’envers à condition d’en protéger le cadran.
3. Appuyez sur A ou B pour commencer. La 4ème aiguille
centrale effectue deux tours complets pour vous
rappeler de faire pivoter la montre. Tenir la montre à
plat et effectuer LENTEMENT deux tours complets, en
comptant au moins 15 secondes par tour.

176
177
6. Appuyez sur A ou B pour déplacer la 4ème aiguille
centrale respectivement vers l’ouest (-) ou vers l’est
(+) afin d’indiquer l’angle de déclinaison de l’endroit où
vous vous trouvez à l’aide de l’échelle de déclinaison.
Maintenez le bouton enfoncé pour déplacer l’aiguille
rapidement. Voir l’exemple sur la figure à la page
suivante.
7. Enfoncez la couronne pour valider.
A
B
Déclinaison magnétique réglée sur -14° (14°W)
FONCTIONNEMENT DE LA BOUSSOLE
Normalement, la boussole est inactive et la 4ème aiguille
centrale pointe sur 12 heures ou indique les secondes du
chronographe.
Tout en maintenant la montre en position horizontale, ap-
puyez sur A ou B pour activer la boussole. L’aiguille se dé-
place et pointe vers le nord. Si on tourne la montre, la 4ème
aiguille centrale se déplace, pointant toujours vers le nord.
Après 20 secondes, la boussole s’arrête automatiquement
et la 4ème aiguille centrale reprend son fonctionnement
habituel. Ceci permet de prolonger la durée de vie de la
pile. Appuyez sur A ou B à tout moment pour maintenir la
boussole activée pendant 20 secondes de plus.
REMARQUE : Au cours de l’utilisation de la boussole, la
trotteuse se déplace par intervalles de deux secondes.

178
179
MARÉE TEMPÉRATURE ET BOUSSOLE
VUE D’ENSEMBLE
RÉGLAGE DE L’AIGUILLE DE L’INDICATEUR
Tirez la couronne complètement. L’aiguille indicatrice
devrait indiquer 12 heures. Sinon, appuyez sur le bouton
poussoir MARÉE ou TEMPÉRATURE pour faire avancer
l’aiguille jusqu’à ce qu’elle indique 12 heures. Les boutons
poussoirs pour MARÉE et TEMPÉRATURE font avancer
respectivement l’aiguille dans le sens des aiguilles d’une
montre et inversement. Tenir le bouton poussoir enfoncé
pour la faire avancer rapidement. Enfoncez la couronne
pour valider.
SÉLECTIONNER MARÉE/TEMPÉRATURE
L’aiguille de l’indicateur montre en permanence soit la
marée, soit la température. Lorsque la température est
indiquée, appuyez sur le bouton poussoir MARÉE pour sé-
lectionner l’heure des marées. L’aiguille indique d’abord
la marée basse puis la marée actuelle. Lorsque la marée
SORTIE-
RÉGLAGE
DE L’HEURE
ÉCHELLE DE
DÉCLINAISON
AIGUILLE DE
L’INDICATEUR
C (COMPASS
[BOUSSOLE])
B (MARÉE)
A (TEMPÉRATURE)
COURONNE
BAGUE ROTATIVE
DE LA BOUSSOLE
DATE
ÉCHELLE DES
MARÉES
ÉCHELLE DE
TEMPÉRATURE
CENTRE-RÉGLAGE
DE LA DATE

180
181
est indiquée, appuyez sur le bouton poussoir TEMPÉRA-
TURE pour sélectionner le thermomètre. L’aiguille se
place au début de l’échelle des températures et indique
ensuite la température courante.
THERMOMÈTRE
Lorsque la montre est portée au poignet, la mesure par
le thermomètre est influencée par la chaleur corporelle.
Pour obtenir des mesures plus précises, enlever la mon-
tre et la placer à l’ombre pendant quelques minutes.
La montre peut également mesurer la température de
l’eau si elle y est plongée. Veiller à sélectionner l’affichage
de la température avant de placer la montre dans l’eau car
les boutons ne doivent pas être enfoncés sous l’eau.
Les mesures par le thermomètre sont prises toutes les
minutes, et plus fréquemment encore si la température
est en train de changer.
HEURE DES MARÉES
Dans ce mode, l’aiguille de l’indicateur se déplace
toujours dans le sens des aiguilles d’une montre. Ainsi,
la marée est montante lorsque l’aiguille pointe vers la
gauche et descendante lorsque l’aiguille pointe vers la
droite. Le nombre d’heures jusqu’à la prochaine marée
haute/basse est indiqué sur l’échelle des marées.
Les marées étant aussi influencées par la position du so-
leil et la forme du littoral, la montre peut ne pas indiquer
les heures exactes des marées hautes et basses. Des
ajustements périodiques peuvent être nécessaires.
Pour étalonner le mode heure des marées, tirer la
couronne en position CENTRE. Appuyez sur le bouton
poussoir MARÉE ou TEMPÉRATURE pour placer l’aiguille
sur la marée actuelle. Les boutons poussoirs pour MARÉE
et TEMPÉRATURE font avancer respectivement l’aiguille

182
183
dans le sens des aiguilles d’une montre et inversement.
Enfoncez la couronne pour valider.
ÉTALONNAGE DE LA BOUSSOLE
La boussole doit être étalonnée avant utilisation.
Une boussole utilise le champ magnétique terrestre ;
par conséquent, il importe d’éviter d’être à proximité de
grands objets métalliques (automobiles, ponts, etc.) ou
autres objets produisant un rayonnement électromag-
nétique, tels que téléviseurs ou ordinateurs, susceptible
d’affecter le champ magnétique autour de la montre. Si
la boussole est étalonnée à proximité de tels objets, elle
ne fonctionnera correctement qu’à cet endroit. Si la bous-
sole est étalonnée loin de tels objets, elle ne fonctionnera
pas correctement près d’eux. Pour de meilleurs résultats,
étalonner à l’endroit où elle sera utilisée.
Lors de l’étalonnage et des relevés d’orientation, il im-
porte, comme avec toutes les boussoles, de maintenir la
montre dans un plan horizontal. Procéder à l’étalonnage
ou à des relevés d’orientation alors que la montre n’est
pas en position horizontale peut aboutir à d’importantes
erreurs. Veillez également à éviter les endroits suscep-
tibles de présenter des concentrations de fer de roche ou
industriel supérieures à la normale, dont l’effet pourrait
produire des mesures inexactes. En présence de toute
mesure suspecte, effectuer un nouvel étalonnage.
Veiller à ne pas ranger la montre à proximité d’une
quelconque source magnétique (ordinateurs, appareils
électriques, téléviseurs) car cela pourrait l’aimanter et
fausser les mesures ultérieures. La précision typique des
montres-boussoles est de +/- 10 degrés.

184
185
Pour étalonner la boussole :
1. Tirez la couronne en position intermédiaire et attendez
l’arrêt des aiguilles indicatrices.
2. Tenez la montre en position horizontale ou posez-la
sur une surface plane (si le bracelet gêne, poser la
montre sur une tasse retournée). La montre peut être
posée à l’envers à condition d’en protéger le cadran.
3. Appuyez sur C (COMPASS [Boussole]) pour com-
mencer. La 4ème aiguille centrale effectue deux
tours complets pour vous rappeler de faire pivoter
la montre. Tenir la montre à plat et effectuer LENTE-
MENT deux tours complets, en comptant au moins 15
secondes par tour.
4. Ensuite, appuyez sur C (COMPASS [Boussole]), en
maintenant la montre en position horizontale. La
4ème aiguille centrale oscille pour confirmer que
l’étalonnage est terminé et se déplace ensuite pour le
réglage de la déclinaison magnétique du moment.
5. Si vous ne désirez pas régler l’angle de déclinaison,
enfoncez la couronne. Dans le cas contraire, pour que
la boussole compense automatiquement l’angle de
déclinaison, faites tourner la lunette de la boussole
jusqu’à ce que le nord soit à 12 heures.

186
187
6. Appuyez sur A ou B pour déplacer la 4ème aiguille
centrale respectivement vers l’ouest (-) ou vers l’est
(+) afin d’indiquer l’angle de déclinaison de l’endroit où
vous vous trouvez à l’aide de l’échelle de déclinaison.
Maintenez le bouton enfoncé pour déplacer l’aiguille
rapidement. Voir l’exemple sur la figure à la page
suivante.
7. Enfoncez la couronne pour valider.
A
B
Déclinaison magnétique réglée sur -14° (14°W)
FONCTIONNEMENT DE LA BOUSSOLE
Normalement, la boussole est inactive et la 4ème aiguille
centrale pointe sur 12 heures ou indique les secondes du
chronographe.
Tout en maintenant la montre en position horizontale,
appuyez sur C (COMPASS [Boussole]) pour activer la
boussole. L’aiguille se déplace et pointe vers le nord. Si
on tourne la montre, la 4ème aiguille centrale se déplace,
pointant toujours vers le nord. Après 20 secondes, la
boussole s’arrête automatiquement et la 4ème aiguille
centrale reprend son fonctionnement habituel. Ceci per-
met de prolonger la durée de vie de la pile. Appuyez sur
C (COMPASS [Boussole]) à tout moment pour maintenir la
boussole activée pendant 20 secondes de plus.
REMARQUE : Au cours de l’utilisation de la boussole, la
trotteuse se déplace par intervalles de deux secondes.

188
189
ALTIMÈTRE
VUE D’ENSEMBLE
RÉGLAGE DE L’AIGUILLE INDICATRICE
(4ÈME AIGUILLE CENTRALE)
Tirez la couronne complètement. Les aiguilles rétrogrades
supérieure et inférieure se règlent automatiquement en
allant se placer en début de trajectoire. L’aiguille indi-
catrice (4ème aiguille centrale) doit indiquer 12 heures.
Sinon, appuyez sur les boutons A et ou B pour faire
avancer l’aiguille jusqu’à ce qu’elle indique 12 heures.
Les boutons A et B font avancer respectivement l’aiguille
dans le sens horaire et inversement. Tenez le bouton
enfoncé pour la faire avancer rapidement. Enfoncez la
couronne pour valider.
ÉTALONNAGE DE L’ALTIMÈTRE
L’altimètre doit être étalonné avant son utilisation.
Sachant qu’un altimètre se base sur la pression atmo-
sphérique pour déterminer l’altitude et que la pression
ÉCHELLE
D’ALTIMÈTRE
(CENTAINES)
AIGUILLE
RÉTROGRADE
SUPÉRIEURE
(MILLIERS)
BOUTON C
(UNITÉS)
BOUTON A
(ALTITUDE MAXIMALE)
BOUTON B
(ALTITUDE MINIMALE)
AIGUILLE
RÉTROGRADE
INFÉRIEURE (UNITÉS)
COURONNE

190
191
atmosphérique varie d’un point à un autre, il est très
important de régler l’altimètre par rapport à une valeur
d’altitude de référence connue ou par rapport à l’altitude
de référence standard d’un point donné. Les brusques
changements de la pression atmosphérique peuvent
fausser les informations de votre altimètre de + ou
- 100 m (328 pieds) même si vous êtes resté au même
endroit. Si possible, étalonnez à nouveau sur une altitude
connue quand un changement radical a eu lieu.
Étalonnage de l’altimètre :
1. Tirez la couronne en position intermédiaire et attendez
l’arrêt des aiguilles indicatrices.
2. Si l’altimètre était désactivé au moment où vous
avez tiré la couronne, l’aiguille rétrograde inférieure
indiquera l’unité sélectionnée la dernière fois que
l’altimètre a été utilisé. Autrement, l’aiguille rétrograde
inférieure indiquera l’unité sélectionnée dans le mode
d’affichage de l’altitude. La 4ème aiguille centrale
et l’aiguille rétrograde supérieure devraient indiquer
l’altitude exacte.
3. Appuyez sur A ou B pour faire avancer l’aiguille
respectivement dans le sens anti-horaire ou inverse-
ment, jusqu’à ce qu’elle indique la bonne altitude à
étalonner. Tenez enfoncé A ou B pour faire avancer
l’aiguille centrale plus rapidement. L’aiguille rétrograde
supérieure se déplace par rapport à la valeur de
l’altitude affichée par la 4ème aiguille centrale.
4. Enfoncez la couronne pour valider.

192
193
ACTIVATION/DÉSACTIVATION DE L’ALTIMÈTRE
Pour activer l’altimètre, appuyez sur C. L’aiguille
rétrograde inférieure indique MÈTRES. La 4ème aiguille
centrale indique sur l’anneau externe les valeurs de
l’altitude courante en centaines et en dizaines avec des
divisions tous les dix MÈTRES/PIEDS. L’aiguille rétrograde
supérieure indique les valeurs de l’altitude courante en
milliers avec des divisions tous les mille MÈTRES/PIEDS.
Pour changer les unités et passer des MÈTRES aux PIEDS,
appuyez sur C une deuxième fois. Pour passer des PIEDS
aux MÈTRES, appuyez deux fois sur C (l’altimètre est tout
d’abord désactivé, puis activé avec les unités affichées
en MÈTRES).
Pour désactiver l’altimètre avec les unités réglées sur
PIEDS, appuyez sur C. Pour désactiver l’altimètre avec
les unités réglées sur MÈTRES, appuyez deux fois sur C
(l’aiguille inférieure indique tout d’abord PIEDS avant la
désactivation).
Exemple : Altitude = 2310 m Exemple : Altitude = 7580 pieds

194
195
La montre désactive automatiquement l’altimètre au bout
de 60 minutes.
RAPPEL DES ALTITUDES MIN/MAX
Pour afficher l’altitude maximale enregistrée, appuyez
sur A. L’aiguille rétrograde inférieure indique l’unité de
mesure dans laquelle l’altitude maximale a été enregis-
trée si l’altimètre était désactivé au moment où le bouton
est enfoncé. Autrement, l’altitude maximale sera indiquée
dans l’unité de mesure courante sélectionnée. La 4ème
aiguille centrale indique les valeurs de l’altitude maximale
en centaines et en dizaines avec des divisions tous les dix
MÈTRES/PIEDS. L’aiguille rétrograde supérieure indique
les valeurs de l’altitude maximale en milliers avec des
divisions tous les mille MÈTRES/PIEDS.
L’altitude maximale enregistrée s’affiche pendant dix
secondes. Pour prolonger l’affichage de dix secondes,
appuyez sur A avant l’expiration des dix premières
secondes.
Pour changer les unités et passer des MÈTRES aux PIEDS,
ou des PIEDS aux MÈTRES, appuyez sur C.
Pour afficher l’altitude minimale enregistrée, appuyez
sur B. L’aiguille rétrograde inférieure indique l’unité de
mesure dans laquelle l’altitude minimale a été enregistrée
si l’altimètre était désactivé au moment où le bouton
est pressé. Autrement, l’altitude minimale sera indiquée
dans l’unité de mesure courante sélectionnée. La 4ème
aiguille centrale indique les valeurs de l’altitude minimale
en centaines et en dizaines avec des divisions tous les dix
MÈTRES/PIEDS. L’aiguille rétrograde supérieure indique
les valeurs de l’altitude minimale en milliers avec des
divisions tous les mille MÈTRES/PIEDS.

196
197
L’altitude minimale enregistrée s’affiche pendant dix
secondes. Pour prolonger l’affichage de dix secondes,
appuyez sur B avant l’expiration des dix premières sec-
ondes. Pour changer les unités et passer des MÈTRES aux
PIEDS ou des PIEDS aux MÈTRES, appuyez sur C.
PROFONDEUR
VUE D’ENSEMBLE
Remarque : Les aiguilles centrale et inférieure
s’étalonnent automatiquement lorsque la couronne est
placée en position 3 pour le réglage de l’heure.
3
AA
B
1
2
3
2
3
2
3
AIGUILLE
CENTRALE
INDICATEUR OFF
BOUTON A
BOUTON B
AIGUILLE INFÉRIEURE
COURONNE

198
199
TEMPÉRATURE
Le capteur de température est toujours en marche et
prendra la température au moins une fois toutes les
60 secondes. La température est indiquée par l’aiguille
inférieure et l’échelle qui l’accompagne.
Lorsque la montre est portée au poignet, la mesure de
température est influencée par la chaleur corporelle. Pour
obtenir des mesures plus précises, retirez la montre de
votre poignet.
MARCHE/ARRÊT DU CAPTEUR DE PROFONDEUR
Le capteur est normalement à l’arrêt et doit être mis en
marche manuellement avant la submersion. Appuyez et
relâchez le bouton B pour mettre en marche le capteur.
La 4ème aiguille centrale passera de la position OFF (6
heures) à la position 12 heures et commencera à prendre
des mesures au moins une fois toutes les 5 secondes.
En augmentant la profondeur, la 4ème aiguille centrale
indiquera la profondeur actuelle comme indiqué sur
l’échelle de profondeur. Si la lecture reste dans les limites
de 0 à 2 mètres (0-6 pieds) pendant 5 minutes, le capteur
s’arrêtera automatiquement. Pour arrêter le capteur
manuellement, appuyez et tenez enfoncé le bouton B
pendant 2 secondes. La 4ème aiguille centrale passera en
position OFF (6 heures).
RAPPEL DE PROFONDEUR MAXIMALE / TEMPÉRATURE
MINIMALE
Après être remonté à la surface, dévissez la couronne et
mettez-la en position intermédiaire. Les aiguilles centrales
et inférieures se déplaceront pour indiquer respective-
ment la valeur maximale de profondeur et la valeur
minimale de température enregistrées durant la descente

200
201
la plus récente. Lorsque le capteur de profondeur est
réactivé, la mémoire sera effacée.
Si la montre n’a jamais été utilisée auparavant, les
aiguilles centrales et inférieures indiqueront respective-
ment 0 mètre / pied et 0º C / 32 ºF. La couronne doit être
revissée avant l’utilisation / submersion.
DÉTECTION DU NIVEAU DE PILE
La montre détermine le niveau de pile et propose à
l’utilisateur un indicateur visuel correspond au niveau
de pile actuel. L’état du niveau de pile est classifié en
niveau normal, niveau de décharge de la pile et niveau de
remplacement de la pile, avec chaque niveau indiqué par
le mouvement de la seconde aiguille.
Pour l’état de niveau normal, la seconde aiguille se
déplace d’une seconde à chaque mouvement correspon-
dant à un fonctionnement normal.
Lorsque la montre est en état de niveau de décharge de
la pile, la seconde aiguille se déplace à intervalles de
2 secondes, et se déplace de 2 secondes à chaque
mouvement. Il est recommandé de remplacer la pile
lorsque la montre est en état de niveau de décharge de
la pile.
Lorsque la montre indique que la pile doit être remplacée,
la seconde aiguille se déplace à intervalles de 5 secondes,
et se déplace de 5 secondes à chaque mouvement. À
ce stade, le mode plongée ne peut pas être activé et
l’utilisateur doit remplacer la pile immédiatement.

202
203
YACHT RACER
AIGUILLE
DES HEURES
AIGUILLE
DES SECONDES
4ÈME
AIGUILLE
CENTRALE
COURONNE
AIGUILLE
SUPÉR-
IEUR(E)
ÉCHELLE
PERFECT
DATE
™
AIGUILLE INFÉRIEURE
AIGUILLE
DES MINUTES
2 31
A
B
C
PERFECT DATE
Si votre montre est équipée de la fonction Perfect Date
™
,
la date n’aura pas besoin d’être ajustée jusqu’en 2060.
La montre prend automatiquement en compte les mois
les plus courts et les années bissextiles, et affichera
toujours la date correcte lorsque vous le demanderez.
La date a été préréglée à l’usine Timex. Lorsque vous
réglez votre nouvelle montre pour la première fois, vous
devez réviser la date si celle-ci ne correspond pas à la
date réelle là ou vous habitez. Tirez le bouton-poussoir
de la couronne pour le mettre en position extérieure. La
4e aiguille centrale fait un tour du cadran, puis s’arrête
en position 12h00 pendant environ 5 secondes avant de
passer à la date à laquelle la montre est actuellement
réglée. Faites tourner la couronne pour faire avancer
jusqu’à la date actuelle (ou vers l’arrière pour faire reculer

204
205
jusqu’à la date actuelle). À chaque fois que vous passez
minuit, la date change d’un jour. Après avoir réglé la date
sur votre date locale, continuez à tourner la couronne
pour positionner les aiguilles sur l’heure locale actuelle,
en faisant attention au réglage matin/après-midi. Une fois
l’heure réglée, enfoncez le bouton-poussoir en position
fermée. En mode de fonctionnement normal, la 4e aiguille
centrale affiche la date lorsque vous appuyez sur le
bouton-poussoir. L’aiguille se déplace sur la position de
la date actuelle comme indiqué sur l’anneau supérieur du
cadran. L’aiguille s’arrête pour vous permettre de lire la
date puis retourne en position de repos (12h00). Veuillez
noter que la fonction Perfect Date
™
ne fonctionne
qu’en mode Heure. Si la pile est déchargée et qu’elle
doit être remplacée, la fonction Perfect Date doit être
à nouveau calibrée. Si la pile doit être remplacée, il est
vivement conseillé d’envoyer la montre à un centre de
maintenance Timex, où la pile sera remplacée et la fonc-
tion Perfect Date à nouveau calibrée (sur la date actuelle
pour l’emplacement où la montre va être renvoyée).
RÉGLAGE DE LA 4ÈME AIGUILLE CENTRALE
Pour réaligner la 4ème aiguille centrale :
1. Tirez la couronne en position 3. Les aiguilles supé-
rieure et inférieure se règlent automatiquement en
allant se placer en bout de trajectoire.
2. Au bout de 10 secondes après avoir tiré la couronne
en position 3, la 4ème aiguille centrale devrait indiquer
12 heures. Si cela n’est pas le cas, appuyez sur le
bouton A ou B pour faire avancer l’aiguille respective-
ment dans le sens anti-horaire ou dans le sens horaire
jusqu’à ce qu’elle indique 12 heures. Maintenez le

206
207
bouton A ou B enfoncé afin de faire avancer l’aiguille
plus vite. À noter qu’au bout de 5 secondes d’inac-
tivité lorsque la couronne est en position 3, la 4ème
aiguille centrale se repositionnera de façon à afficher
la date en cours.
3. Après avoir terminé, enfoncez la couronne en position 1.
SÉLECTION DU MODE
Enfoncez le bouton C pour faire avancer l’aiguille supé-
rieure jusqu’à la fonction souhaitée.
HEURE :
Affiche uniquement l’heure en cours (la fonction Date
Parfaite ne marche qu’en mode Heure).
COURSE DE YACHT MINUTERIE 5:
Le compte à rebours commencera à 5 minutes et enclen-
chera le chronographe lorsqu’il atteint zéro.
COURSE DE YACHT MINUTERIE 3:
Le compte à rebours commencera à 3 minutes et enclen-
chera le chronographe lorsqu’il atteint zéro.
COURSE DE YACHT MINUTERIE 1:
Le compte à rebours commencera à 1 minute et enclen-
chera le chronographe lorsqu’il atteint zéro.
CHRONO :
Le chronographe se mettra en marche sans le compte
à rebours.

208
209
UTILISATION DE LA MINUTERIE COURSE DE YACHT
Cette montre met à votre disposition des comptes à
rebours de 5, 3 ou 1 minute. Lorsque le compte à rebours
atteint zéro un chronographe d’une heure s’enclenche
automatiquement.
1. Maintenez le bouton C enfoncé jusqu’à ce que
l’aiguille supérieure affiche un compte à rebours
de 5, 3 ou 1 minute en mode Minuterie pour Course
de Yacht.
2. Pour démarrer, appuyez sur le bouton A (START/STOP
[Démarrage/Arrêt]). La 4ème aiguille centrale affiche
le compte à rebours en terme de secondes, tandis
que l’aiguille inférieure l’affiche en terme de minutes.
(À noter que les boutons B et C restent désactivés
lorsque le compte à rebours est enclenché.)
3. Pour arrêter le compte à rebours, appuyez le bouton
A (START/STOP [Démarrage/Arrêt]). (À noter que le
bouton C reste désactivé lorsque le compte à rebours
est enclenché.)
4. Pour enclencher le compte à rebours à nouveau,
enfoncez le bouton B (SPLIT/RESET [Temps
intermédiaire/Réinitialisation]) pendant 3 secondes,
ce qui renvoie au compte à rebours de 5, 3 ou
1 minute sélectionné au préalable.
Au cours d’une utilisation normale de la Minuterie Course
de Yacht, lorsque le compte à rebours atteint zéro, le
chronographe s’enclenche automatiquement. On entend
également une sonnerie toutes les minutes ainsi que
lorsqu’il reste 5 secondes à la dernière minute du compte
à rebours précédant l’enclenchement de la fonction
chronographe. Le chronographe effectue la séquence

210
211
de 30 minutes deux fois, pour une durée totale et
maximum d’une heure.
L’UTILISATION DU CHRONOGRAPHE
Cette montre est dotée d’un chronographe d’une heure
dont il est possible de se servir indépendamment de la
Minuterie Course de Yacht.
1. Enfoncez le bouton C jusqu’à ce que l’aiguille
supérieure se positionne au début de l’échelle
tachymétrique de 30 minutes du chronographe.
2. Pour démarrer, appuyez sur le bouton A (START/STOP
[Démarrage/Arrêt]). La 4ème aiguille centrale affiche le
décompte des secondes; l’aiguille inférieure affiche le
décompte des minutes sur une échelle de 5 minutes
et l’aiguille supérieure affiche le décompte des demi-
heures sur une échelle de 30 minutes. Toutes les cinq
minutes, l’aiguille inférieure retourne à la position zéro
tandis que l’aiguille supérieure continue d’avancer
sur une échelle de 30 minutes. (À noter que le bouton
C reste désactivé lorsque le compte à rebours est
enclenché.)
3. Pour consulter un temps intermédiaire, appuyez sur
le bouton B (SPLIT/RESET [Temps intermédiaire/Réini-
tialisation]). Les aiguilles supérieure et inférieure ainsi
que la 4ème aiguille centrale restent figées le temps
que vous notiez le temps intermédiaire. Le compte
à rebours du chronographe continue même lorsque
les aiguilles sont figées. Pour remettre les aiguilles en
marche, appuyez le bouton B (SPLIT/RESET [Temps
intermédiaire/Réinitialisation]). Les aiguilles rattrapent
leur retard rapidement pour afficher le temps total
écoulé.

212
213
4. Pour arrêter le chronographe, appuyez le bouton
A (START/STOP [Démarrage/Arrêt]). (À noter que le
bouton C reste désactivé lorsque le chronographe
est arrêté, et se réactive lorsque le chronographe est
réinitialisé.)
5. Pour réinitialiser, enfoncez le bouton B (SPLIT/RESET
[Temps intermédiaire/Réinitialisation]) pendant
3 secondes, ce qui renvoie au compte à rebours
de 30 minutes.
Au cours d’une utilisation normale, le chronographe
effectue cette séquence de 30 minutes deux fois, pour
une durée totale et maximum d’une heure. Lorsque cette
période d’une heure s’est découlée, l’aiguille supérieure
reste sur le repère 30 minutes tandis que l’aiguille
inférieure retourne à zéro. La fonction chronographe doit
être réinitialisée avant de l’utiliser à nouveau ou avant de
changer de mode. (À noter que le bouton A est désactivé
lorsque la période maximale d’une heure s’est découlée,
et ne fonctionnera plus tant que le chronographe n’ait
pas été réinitialisé en enfonçant le bouton B pendant
3 secondes.)
VEILLEUSE INDIGLO
®
(VERSION PRO UNIQUEMENT)
La montre Yacht Racer PRO est équipée d’une veilleuse
nocturne INDIGLO
®
. Si la luminosité ambiante est faible
ou s’il fait sombre, vous pouvez lire le cadran grâce à la
veilleuse INDIGLO
®
en appuyant sur le bouton-poussoir.
La montre Yacht Racer PRO utilise sur le cadran un
matériau luminescent spécialement conçu, qui brille
et permet d’illuminer suffisamment votre montre pour
lire les informations du cadran, sans que votre vision
nocturne soit affectée une fois la lumière éteinte.

214
215
MINUTERIE CHRONO
AIGUILLE DES
SECONDES
4E
AIGUILLE
CENTRALE
SUPÉRIEURE
AIGUILLE
PERFECT DATE
™
ÉCHELLE
AIGUILLE DES
MINUTES
AIGUILLE DES
HEURES
COURONNE
AIGUILLE
INFÉRIEURE
2 31
A
B
C
PERFECT DATE
Si votre montre est équipée de la fonction Perfect Date
™
,
la date n’aura pas besoin d’être ajustée jusqu’en 2060.
La montre prend automatiquement en compte les mois
les plus courts et les années bissextiles, et affichera
toujours la date correcte lorsque vous le demanderez.
La date a été préréglée à l’usine Timex. Lorsque vous
réglez votre nouvelle montre pour la première fois, vous
devez réviser la date si celle-ci ne correspond pas à la
date réelle là ou vous habitez. Tirez le bouton-poussoir
de la couronne pour le mettre en position extérieure. La
4e aiguille centrale fait un tour du cadran, puis s’arrête
en position 12h00 pendant environ 5 secondes avant de
passer à la date à laquelle la montre est actuellement
réglée. Faites tourner la couronne pour faire avancer
jusqu’à la date actuelle (ou vers l’arrière pour faire reculer

216
217
jusqu’à la date actuelle). À chaque fois que vous passez
minuit, la date change d’un jour. Après avoir réglé la date
sur votre date locale, continuez à tourner la couronne
pour positionner les aiguilles sur l’heure locale actuelle,
en faisant attention au réglage matin/après-midi. Une fois
l’heure réglée, enfoncez le bouton-poussoir en position
fermée. En mode de fonctionnement normal, la 4e aiguille
centrale affiche la date lorsque vous appuyez sur le
bouton-poussoir. L’aiguille se déplace sur la position de
la date actuelle comme indiqué sur l’anneau supérieur du
cadran. L’aiguille s’arrête pour vous permettre de lire la
date puis retourne en position de repos (12h00). Veuillez
noter que la fonction Perfect Date
™
ne fonctionne
qu’en mode Heure. Si la pile est déchargée et qu’elle
doit être remplacée, la fonction Perfect Date doit être
à nouveau calibrée. Si la pile doit être remplacée, il est
vivement conseillé d’envoyer la montre à un centre
de maintenance Timex, où la pile sera remplacée et la
fonction Perfect Date à nouveau calibrée (sur la date
actuelle pour l’emplacement où la montre va être
renvoyée).
RÉGLAGE DE LA 4E AIGUILLE CENTRALE
Pour réaligner la 4ème aiguille centrale :
1. Tirez la couronne en position 3. Les aiguilles supérieure
et inférieure se règlent automatiquement en allant se
placer en bout de trajectoire.
2. Lorsqu’elles s’arrêtent, la 4e aiguille centrale devrait
indiquer 12 heures. Si ce n’est pas le cas, appuyez
sur le bouton A ou B pour déplacer l’aiguille dans le
sens ou le sens inverse des aiguilles d’une montre
jusqu’à ce qu’elle indique 12 heures. Appuyez sur

218
219
le bouton A ou B et maintenez-le enfoncé pour faire
avancer l’aiguille plus rapidement. Remarque : au bout
de 5 secondes sans action avec le bouton-poussoir
en position 3, la 4e aiguille centrale se déplace pour
afficher la date actuelle.
3. Enfoncez le bouton-poussoir en position 1 pour valider.
SÉLECTION DU MODE
Appuyez sur le bouton C pour avancer l’aiguille
supérieure sur la fonction voulue.
HEURE:
Affiche l’heure actuelle uniquement (la fonction Perfect
Date
™
ne fonctionne qu’en mode Heure).
FONCTIONNEMENT DU CHRONOGRAPHE
La montre comporte un chronographe avec indicateur
4 heures. À la fin de la période de quatre heures, le
chronographe s’arrête automatiquement. Ceci permet
d’économiser la pile en cas d’activation accidentelle du
chronographe.
1. Appuyez sur le bouton C jusqu’à ce que l’aiguille
supérieure soit au début de l’échelle supérieure du
chronographe, avec l’aiguille inférieure sur 0 sur
l’échelle inférieure.
2. Pour démarrer, appuyez sur le bouton A (START/
STOP). La 4e aiguille centrale affiche le décompte des
secondes, l’aiguille inférieure les minutes, sur une
échelle de 30 minutes, l’aiguille supérieure indiquant
l’heure sur une échelle de 4 heures. À chaque fois que

220
221
l’aiguille inférieure atteint la marque des 30 minutes,
elle retourne en position zéro pour commencer la
période de 30 minutes suivante, tandis que l’aiguille
supérieure continue à avancer sur l’échelle de 4
heures. (Remarque : le bouton C est désactivé si le
chronographe est en train d’être utilisé).
3. Pour avoir un temps intermédiaire, appuyez sur le
bouton B (SPLIT/RESET). L’aiguille supérieure, l’aiguille
inférieure et la 4e aiguille centrale restent en position
pour vous permettre de noter le temps intermédiaire
(tour). Le chronographe conserve cette mesure horaire
tant que les aiguilles sont arrêtées. Pour relâcher les
aiguilles, appuyez sur le bouton B (SPLIT/RESET) et les
aiguilles se remettront rapidement en position pour
afficher la durée totale de temps écoulé.
4. Pour les arrêter, appuyez sur le bouton A (START/
STOP) de façon à arrêter le chronographe. (Remarque :
le bouton C est désactivé pendant que le chrono-
graphe est arrêté jusqu’à ce que le chronographe soit
réinitialisé).
5. Pour réinitialiser le chronographe après l’avoir arrêté,
appuyez sur le bouton B (SPLIT/RESET), ce qui va
réinitialiser le chronographe au début des échelles de
30 minutes et 4 heures sur les deux petites aiguilles.
En mode de fonctionnement normal, le chronographe
va faire défiler la séquence de 30 minutes 8 fois pour un
maximum total de quatre heures. Une fois cette période
de quatre heures terminées, l’aiguille supérieure va rester
sur le marqueur 4 heures et l’aiguille inférieure va revenir
à 0. La fonction chronographe devra être réinitialisée
avant d’être réutilisée ou avant de passer à un autre

222
223
mode. (Remarque : le bouton A est désactivé lorsque
la durée maximum de quatre heures est passée. Il ne
fonctionnera plus tant que le chronographe n’aura pas
été réinitialisé en appuyant sur le bouton B).
MINUTERIE AVEC COMPTE À REBOURS
La montre fournit une fonction minuterie avec compte à
rebours.
Remarque particulière : L’aiguille supérieure, l’aiguille
inférieure et la 4e aiguille centrale sont unies pendant les
étapes 3, 4 et 5 ci-dessous. En avançant ou en reculant
les aiguilles des minutes et des secondes, vous verrez les
trois aiguilles réagir à l’addition ou à la soustraction de la
durée de temps pour la durée du minuteur avec compte
à rebours. Après avoir tiré le bouton-poussoir en position
intermédiaire, appuyez sur le bouton C pour faire défiler
le cycle de sélection des aiguilles de la façon suivante :
Aiguille supérieure (appuyez sur le bouton C) - Aiguille
inférieure (appuyez sur le bouton C) - 4e aiguille centrale
(appuyez sur le bouton C) retour à l’aiguille supérieure….
ceci vous permet de faire défiler le cycle pour utiliser les
aiguilles dont vous avez besoin pour régler la durée de
temps voulu pour le compte à rebours. Appuyez sur le
bouton-poussoir à la fin de la procédure de réglage pour
valider les réglages effectués jusque-là dans le cycle.
RÉGLAGE DE LA MINUTERIE AVEC COMPTE À REBOURS
La minuterie avec compte à rebours ne peut être réglée
que lorsque la fonction de minuterie avec compte à
rebours n’est pas utilisée. Si la minuterie avec compte à
rebours a déjà été utilisée, elle devra être réinitialisée.
Si la minuterie est en train d’être utilisée, elle doit être
arrêtée et réinitialisée de façon à régler la minuterie avec
compte à rebours.

224
225
1. Appuyez sur le bouton C jusqu’à ce que l’aiguille supé-
rieure soit à un endroit précis de l’échelle Minuterie.
Si la minuterie a déjà été réglée, l’aiguille va pointer
sur l’heure déjà réglée. Si c’est la première fois que la
minuterie est réglée, elle va pointer sur 0 sur l’échelle
de la minuterie.
2. Tirez le bouton-poussoir de la couronne pour le mettre
en position intermédiaire.
3. Pour régler le nombre d’heures voulu par palier de
demi-heures (jusqu’à une durée maximum de 4:00:00),
appuyez sur le bouton A pour déplacer l’aiguille supé-
rieure dans le sens inverse des aiguilles d’une montre
(appuyez sur le bouton pour la déplacer dans le sens
des aiguilles d’une montre), jusqu’à ce que le nombre
d’heures voulu soit sélectionné. Veuillez noter que
vous sélectionnez le nombre d’heures dans le palier
de demi-heures le plus proche de l’heure totale voulue
(par exemple, pour un décompte total de 2:53:30,
vous sélectionnerez 3 heures). Après avoir terminé le
réglage du nombre d’heures, appuyez sur le bouton C
pour valider votre sélection.
4. Vous pouvez désormais régler le nombre de minutes
voulu par paliers d’une minute en appuyant sur le
bouton A pour déplacer l’aiguille supérieure dans le
sens inverse des aiguilles d’une montre (appuyez sur
le bouton B pour la déplacer dans le sens des aiguilles
d’une montre), jusqu’à ce que le nombre des minutes
voulu soit sélectionné. Veuillez noter que vous ajustez
le nombre des minutes vers l’avant ou vers l’arrière
pour obtenir l’heure voulue (par exemple : pour une
durée de minuterie avec compte à rebours total de
2:53:30, vous appuierez sept fois sur le bouton A ce

226
227
qui déplacera le total de la minuterie avec compte à
rebours de 3 heures à 2:53:00). Vous remarquerez que
l’aiguille des heures va se déplacer légèrement vers
l’arrière du marqueur des 3 heures au marqueur des
2,5 heures. Après avoir ajusté l’heure sur le nombre
correct de minutes, appuyez sur le bouton C pour
valider votre sélection.
5. Vous pouvez désormais régler le nombre de secondes
voulu par palier d’une seconde en appuyant sur le
bouton A pour déplacer la 4e aiguille dans le sens in-
verse des aiguilles d’une montre (appuyez sur le bou-
ton B pour la déplacer dans le sens des aiguilles d’une
montre), jusqu’à ce que le nombre des secondes
voulu soit sélectionné. Veuillez noter que vous ajoutez
ou soustrayez le nombre de secondes pour obtenir
l’heure voulue (par exemple : pour une durée de mi-
nuterie avec compte à rebours totale de 2:53:30, vous
appuierez 30 fois sur le bouton B pour sélectionner 30
secondes). Après avoir réglé le nombre de secondes,
appuyez sur le bouton-poussoir pour le mettre en
position 1 et confirmer que vous avez terminé votre
sélection de la minuterie avec compte à rebours.
UTILISATION DE LA MINUTERIE AVEC COMPTE
À REBOURS
Après avoir réglé la minuterie avec compte à rebours sur
la durée de temps voulue à décompter, vous pouvez alors
utiliser la minuterie avec compte à rebours.
Lancer la séquence de compte à rebours : Appuyez
sur le bouton A pour démarrer la minuterie avec compte
à rebours. La 4e aiguille centrale et l’aiguille inférieure
commencent à tourner dans le sens inverse des aiguilles

228
229
d’une montre. L’aiguille supérieure va tourner dans
le sens des aiguilles d’une montre. Les aiguilles vont
continuer à indiquer le temps restant dans la séquence
de compte à rebours jusqu’à ce que la durée de temps ré-
glée pour la minuterie avec compte à rebours soit passée
et que la valeur de temps restant atteigne zéro. Lorsque
le temps restant dans la séquence atteint zéro, le carillon
sonne pour vous indiquer que la séquence de compte à
rebours est terminée.
Interrompre la séquence de compte à rebours :
Si vous désirez interrompre la séquence de compte à
rebours avant qu’elle n’atteigne zéro, vous pouvez le faire
en appuyant sur le bouton A (la 4e aiguille centrale ainsi
que l’aiguille supérieure et inférieure s’arrêteront). Si vous
voulez commencer la séquence de compte à rebours
ultérieurement après avoir arrêté le compte à rebours,
il vous suffit d’appuyer à nouveau sur le bouton A (la 4e
aiguille centrale ainsi que l’aiguille supérieure et inférieure
recommenceront à tourner).
Réinitialiser la séquence de compte à rebours :
Lorsque la séquence de compte à rebours a atteint zéro
et que le carillon a sonné, vous pouvez réinitialiser la
minuterie avec compte à rebours sur la valeur définie
en appuyant sur le bouton B (la 4e aiguille centrale ainsi
que l’aiguille supérieure et inférieure vont tourner pour
indiquer la valeur de l’heure que vous avez définie avant
d’utiliser la fonction de minuterie avec compte à rebours).
Effacer la valeur de la minuterie avec compte à
rebours : Si vous le souhaitez, vous pouvez effacer la
valeur de la minuterie avec compte à rebours pour la
remettre à zéro. Ceci n’est possible que si la minuterie
avec compte à rebours n’est pas en cours d’utilisation

230
231
et qu’elle a été réinitialisée. Si la minuterie avec compte
à rebours est en cours d’utilisation, vous devez d’abord
arrêter la séquence de compte à rebours en appuyant
sur le bouton A, puis sur le bouton B. Ceci va arrêter
et réinitialiser la minuterie avec compte à rebours à la
valeur horaire actuellement sélectionnée. Pour remettre
la valeur de la minuterie avec compte à rebours sur
zéro, appuyez sur le bouton B et maintenez-le enfoncé
pendant deux secondes. Vous devriez désormais suivre
les instructions pour régler la valeur de la minuterie avec
compte à rebours sur la nouvelle durée désirée.
Fonction Temps intermédiaire : Si la minuterie avec
compte à rebours est en cours d’utilisation, vous pouvez
utiliser la fonction Temps intermédiaire (Split) pour noter
le temps restant dans la séquence de compte à rebours.
Pour utiliser la fonction Temps intermédiaire, appuyez sur
le bouton B, ce qui arrêtera l’aiguille supérieure, l’aiguille
inférieure et la 4e aiguille centrale. La fonction de compte
à rebours continuera à fonctionner en interne pendant
que les aiguilles sont arrêtées.
Pour relancer le mouvement de l’aiguille supérieure,
de l’aiguille inférieure et de la 4e aiguille centrale,
appuyez à nouveau sur le bouton B et les aiguilles se
repositionneront pour indiquer l’heure actuelle au sein
de la séquence de compte à rebours.

232
233
3GMT
AIGUILLE
DES
SECONDES
COURONNE
BAGUE SUPÉRIEURE
À ROTATION
(FORMAT 24 HEURES)
4ÈME AIGUILLE CENTRALE
AIGUILLE
DES
MINUTES
AIGUILLE DES
HEURES
BAGUE INFÉRIEURE/
CHIFFRES
(FORMAT 24 HEURES)
A
2 31
FONCTION 3 FUSEAUX HORAIRES
Votre montre peut indiquer l’heure dans trois fuseaux
horaires :
1. Les aiguilles des heures et des minutes : Affichage de
l’heure en format normal de 12 heures. Remarque :
La date affichée dans la fenêtre de date est liée à
l’heure indiquée par ces deux aiguilles.
2. La 4ème aiguille centrale et la bague intérieure :
Affichage de l’heure en format 24 heures.
3. La 4ème aiguille centrale et la bague supérieure à
rotation : Affichage de l’heure en format 24 heures.

234
235
RÉGLAGE DE LA 4ÈME AIGUILLE CENTRALE
Pour ajuster la 4ème aiguille centrale lorsqu’elle
est mal alignée :
1. Tirez la couronne en position 3.
2. La 4ème aiguille centrale doit indiquer 12 heures. Si
au bout de 5 secondes après avoir mis la couronne en
position 3 la 4ème aiguille centrale n’indique pas 12
heures, appuyez sur le bouton A pour faire avancer
l’aiguille dans le sens horaire jusqu’à ce qu’elle indique
12 heures. Maintenez le bouton A enfoncé afin de faire
avancer l’aiguille plus vite.
3. Après avoir terminé, enfoncez la couronne en posi-
tion 1.
RÉGLAGE DE LA 4ÈME AIGUILLE CENTRALE
La 4ème aiguille centrale est réglée à l’usine Timex selon
les normes gouvernant le nombre de minutes dans une
heure telles qu’elles ont été établies en fonction du
Temps Universel Coordonné. Ces normes sont respectées
mondialement dans la plupart des endroits. Tant que les
lieux utilisés pour les 2ème et 3ème fuseaux horaires
respectent ces normes, il n’est pas nécessaire de régler
la 4ème aiguille centrale. Le réglage de la 4ème aiguille
centrale pour les 2ème et 3ème fuseaux horaires est
nécessaire uniquement lorsque les lieux choisis ne res-
pectent pas ces normes, auquel cas il suffit de la régler
en suivant les instructions ci-dessous :
1. Tirez la couronne en position 3. La 4ème aiguille
centrale indiquera 12 heures.

236
237
2. Tournez la couronne jusqu’à ce que l’aiguille minute
ait atteint le positionnement correcte dans l’heure des
lieux souhaités pour les 2ème et 3ème fuseaux horaires.
3. Enfoncez la couronne en position 2. La 4ème aiguille
centrale indiquera le réglage en cours par rapport au
nombre de minutes par heure.
4. Poussez le bouton A afin de faire tourner la 4ème
aiguille centrale dans le sens horaire jusqu’à ce qu’elle
s’aligne avec l’aiguille minute. Maintenez le bouton A
enfoncé afin de faire avancer l’aiguille plus vite.
5. Tirez la couronne en position 3. La 4ème aiguille
centrale indiquera 12 heures.
6. Faites tourner la couronne pour positionner les
aiguilles afin d’indiquer l’heure correcte.
7. Après avoir terminé, enfoncez la couronne en position 1.
Remarque : La 4ème aiguille centrale indiquera le réglage
en cours par rapport au nombre de minutes par heure.
Les fuseaux horaires 2 et 3 sont tous les deux indiqués par
le biais de la 4ème aiguille centrale, ainsi les lieux choisis
pour les représenter doivent respecter les mêmes normes
concernant le nombre de minutes dans une heure afin que
l’heure dans ces fuseaux s’affiche correctement.
RÉGLAGE DE LA 4ÈME AIGUILLE CENTRALE
(FUSEAU HORAIRE II)
Notez l’heure actuelle dans le lieu que vous souhaitez
inscrire en tant que Fuseau Horaire II. Enfoncez le bouton
A jusqu’à ce que la 4ème aiguille centrale indique l’heure
souhaitée dans la bague intérieure. (À noter que celle-ci
sera indiquée en format 24 heures). La 4ème aiguille cen-
trale avancera de 30 minutes chaque fois que le bouton A
est appuyé. Maintenez le bouton A enfoncé afin de faire

238
239
avancer l’aiguille plus vite. Cette démarche réglera l’heure
du 2ème fuseau horaire sur votre montre.
RÉGLAGE DE LA ROTATION DU COUVERT PAR BAGUE
SUPÉRIEURE (FUSEAU HORAIRE III)
Le 3ème fuseau horaire est réglé en utilisant le réglage
en cours de la 4ème aiguille centrale et en ajustant la
rotation du couvert par bague supérieure jusqu’à ce que
l’heure souhaitée pour le 3ème fuseau horaire soit indi-
quée. (À noter qu’elle sera indiquée en format 24 heures).
Le couvert est doté de 72 positions. Pour le faire avancer
d’une heure il suffit de le faire avancer de trois positions
(3 « cliques »). Notez l’heure actuelle dans le lieu que vous
souhaitez inscrire en tant que Fuseau Horaire III. Réglez
la rotation du couvert par bague supérieure dans le sens
anti-horaire jusqu’à ce que le repère heure souhaité est
indiqué par la 4ème aiguille centrale.
FONCTION TACHYMÈTRE
(certains modèles)
En utilisant cette méthode, le tachymètre déterminera
uniquement les vitesses supérieures à 60 unités par
heure. Les vitesses plus lentes peuvent être mesurées en
diminuant l’unité de mesure. La fonction réalisée par un
tachymètre est indépendante de l’unité de distance (par
exemple : mille terrestre, mille marin, kilomètre, mètre,
etc.) tant que la même unité de longueur est utilisée pour
tous les calculs.
1. Déterminer les marqueurs de début et de fin pour
toutes vos distances prédéterminées.
2. Démarrer le chronographe une fois que la cible de la
mesure de vitesse dépasse le marqueur de départ.

240
241
3. Arrêter le chronographe une fois que la cible de la
mesure de vitesse dépasse le marqueur de fin.
4. L’aiguille des secondes du chronographe indique sur
l’échelle tachymétrique la vitesse de la cible.
FONCTION RÈGLE À CALCUL DE LA BAGUE
D’ENCADREMENT
La fonction règle à calcul du cercle supérieur fonctionne
en faisant pivoter l’anneau externe. L’anneau interne ne
bouge pas. L’anneau externe est toujours lié à la « dis-
tance » ou à la « vitesse », ou de toute donnée variant
avec le temps. L’anneau interne ne note que les unités
de temps.
Anneau externe
Sur l’anneau externe, le chiffre « 10 » représente les
facteurs ou multiples de 10, tels que 0,1, 1,0, 10 ou 100.
Anneau interne
Sur l’anneau interne, « MPH » (mille/heure) renvoie à
« l’indice de vitesse ». Cet indice sert à calculer la vitesse
mettant en jeu toutes les données à l’heure. Sur l’anneau

242
243
interne, « STAT » (mille terrestre) et « NAUT » (mille marin)
servent à la conversion des unités de distance.
ANNEAU EXTERNE
ANNEAU INTERNE
Les exemples suivants servent de guide sur la manière
d’utiliser la règle à calculer.
CALCUL DE LA VITESSE :
Quelle vitesse est requise pour faire 10 milles marins
en 15 minutes ?
Facteurs connus : Distance : 10 milles marins Temps :
15 minutes
• Alignez la flèche « 10 » sur l’anneau externe avec
« 15 » sur l’anneau interne.
• La vitesse requise figure directement au-dessus du
marquage « MPH » sur l’anneau interne.
La réponse : 40 milles marins/heure
Calcul de temps : Combien temps faudra-t-l pour
parcourir 10 milles marins à une vitesse de 40 milles/
heure ?

244
245
Facteurs connus : Vitesse : 40 milles/heure Distance :
10 milles marins
• Alignez « 40 » sur l’anneau externe avec le marquage
« MPH » sur l’anneau interne.
• Le temps requis figure directement sous la flèche
« 10 » sur l’anneau externe, qui est « 15 » sur l’anneau
interne.
La réponse : 15 minutes
CALCUL DE DISTANCE :
Quelle distance pouvez-vous parcourir à 40 milles/
heure pendant 15 minutes ?
Facteurs connus : Vitesse : 40 milles marins/heure
Temps : 15 minutes
• Alignez « 40 » sur l’anneau externe directement
au-dessus du marquage « MPH » sur l’anneau interne.
• La distance parcourue peut être obtenue au-dessus
du marquage « 15 » sur l’anneau interne. Le chiffre
indiqué sur l’anneau externe est « 10 ».
La réponse : la distance parcourue est de 10 milles
marins.

246
247
CONVERSION D’UNITÉ :
Pour convertir des milles marins en milles terrestres et
kilomètres.
Facteur connu : La distance à convertir est de 10 milles
marins
• Alignez la flèche « 10 » sur l’anneau externe au-dessus
de « NAUT » sur l’anneau interne. La conversion en
milles terrestres (11,5) figure au-dessus du marquage
« STAT » de l’anneau interne, et la conversion en
kilomètres (18,5) se trouve au-dessus du marquage
« MPH » de l’anneau interne.
COMMENT AJUSTER LE BRACELET
(Les sections suivantes s’appliquent aux bracelets de tous
les modèles de montre.)
BRACELET À FERMOIR COULISSANT
1. Ouvrez la plaquette de
blocage.
2. Glissez le fermoir jusqu’à
la longueur de bracelet
souhaitée.
3. Appuyez tout en tenant
la plaquette de blocage et glissez le fermoir d’avant en
arrière jusqu’à ce qu’il s’engage dans les rainures sur
la face inférieure du bracelet.
4. Appuyez sur la plaquette de blocage jusqu’au déclic.
Une force excessive peut endommager le fermoir.

248
249
BRACELET À FERMOIR DÉPLIANT
1. Trouvez la barrette à ressort qui attache le bracelet au
fermoir.
2. À l’aide d’un outil pointu, enfoncez la barrette et
pivotez délicatement le bracelet pour le dégager.
3. Déterminer la taille du poignet puis introduire la bar-
rette à ressort dans l’orifice inférieur correspondant.
4. Enfoncez la barrette, alignez-la sur l’orifice supérieur
puis la relâcher pour la mettre en place.
DÉMONTAGE DE MAILLONS DU BRACELET
DÉMONTAGE DE MAILLONS :
1. Placez le bracelet verticalement et introduisez un outil
pointu dans l’ouverture du maillon.
2. Poussez fortement la goupille dans le sens de la flèche
jusqu’à détacher le maillon (les goupilles sont conçues
pour résister à l’extraction).
3. Répétez l’opération jusqu’à ce que le nombre souhaité
de maillons soit démonté.
RÉASSEMBLAGE :
1. Mettez les pièces du bracelet en place.
2. Poussez la goupille dans le maillon dans le sens
opposé à la flèche.
3. Enfoncez la goupille jusqu’à ce qu’elle ne dépasse plus
du bracelet.

250
251
PILE
La pile doit permettre à la montre de fonctionner pendant
4 à 6 ans dans des conditions normales d’utilisation.
L’autonomie réelle de la pile peut varier en fonction de
l’utilisation qui est faite de la montre.
Si la pile doit être changée, nous recommandons que seul
TIMEX s’en charge. La montre devra être étalonnée de
nouveau pour régler l’heure et la date après le change-
ment de la pile. Lorsque la montre est renvoyée à Timex,
les frais de port doivent être prépayés. Pour obtenir
un emballage pré-affranchi, composer le 1-800-448-
4639, consulter le détaillant chez lequel la montre a été
achetée ou visiter www.TIMEX.com. Inclure le montant
suivant avec la montre pour couvrir les frais de port et
de manutention (ce ne sont pas des frais de réparation) :
un chèque ou mandat-poste de 8,00 $ US aux É.-U. ou de
12,00 $ CAN au Canada. Dans les autres pays, les frais de
port et de manutention seront facturés par Timex.
N’INCLUEZ JAMAIS DANS VOTRE ENVOI UN BRACELET
SPÉCIAL OU TOUT AUTRE ARTICLE AYANT UNE VAL-
EUR PERSONNELLE.
NE PAS JETER LA PILE AU FEU. NE PAS RECHARGER
LA PILE. GARDER LES PILES HORS DE LA PORTÉE DES
ENFANTS.

252
253
GARANTIE INTERNATIONALE TIMEX
Votre montre TIMEX
®
est garantie contre les défauts de
fabrication par Timex Group USA, Inc. pour une période
d’UN AN, à compter de la date d’achat. Timex ainsi que
ses filiales du monde entier honoreront cette Garantie
Internationale. Timex se réserve le droit de réparer votre
montre en y installant des composants neufs ou révisés,
ou bien de la remplacer par un modèle identique ou
similaire. IMPORTANT — CETTE GARANTIE NE COUVRE
PAS VOTRE MONTRE :
1. après l’expiration de la période de garantie,
2. si la montre n’a pas été achetée initialement chez un
revendeur Timex agréé ;
3. si la réparation n’a pas été effectuée par Timex ;
4. suite à un accident, une falsification ou un emploi
abusif,
5. s’il s’agit du verre ou crystal, du bracelet ou
brassard, du boîtier, des accessoires ou de la pile. Le
remplacement de ces pièces peut vous être facturé
par Timex.
CETTE GARANTIE ET LES RECOURS AUX PRÉSENTES SONT
EXCLUSIFS ET REMPLACENT TOUTE AUTRE GARANTIE,
EXPRESSE OU IMPLICITE, Y COMPRIS TOUTE GARANTIE
IMPLICITE DE QUALITÉ MARCHANDE OU D’ADAPTATION
À UN USAGE PARTICULIER. TIMEX N’EST RESPONSABLE
D’AUCUN DOMMAGE PARTICULIER, ACCESSOIRE OU
INDIRECT. Certains pays ou états n’autorisent pas les
limitations de garanties implicites et n’autorisent pas les
exclusions ou limitations pour des dommages, auquel
cas lesdites limitations pourraient ne pas vous concerner.

254
255
Cette garantie vous confère des droits légaux précis. Il se
peut que vous bénéficiez d’autres droits, lesquels varient
d’un pays à un autre ou d’un état à un autre.
Pour obtenir le service de garantie, veuillez retourner
votre montre à Timex, à une de ses filiales ou au
détaillant Timex où la montre a été achetée. Inclure un
coupon de réparation original dûment rempli ou, aux
É-U. et au Canada seulement, le coupon original dûment
complété ou une déclaration écrite comprenant votre
nom, adresse, numéro de téléphone ainsi que la date
et le lieu d’achat. Veuillez inclure la somme suivante
avec votre montre pour couvrir les frais de port et de
manutention (ce ne sont pas des frais de réparation) : un
chèque ou mandat de 8,00 $ US. aux États-Unis, de 12,00
$ CAN au Canada et de 3,50 £ au Royaume-Uni. Dans les
autres pays, Timex vous facturera les frais d’envoi et de
manutention. N’INCLUEZ JAMAIS DANS VOTRE ENVOI UN
BRACELET SPÉCIAL OU TOUT AUTRE ARTICLE AYANT UNE
VALEUR PERSONNELLE.
Aux États-Unis, veuillez composer le 1-800-448-4639
pour plus de renseignements sur la garantie. Au
Canada, appelez le 1-800-263-0981. Au Brésil, appelez le
+11 2664 1001. Au Mexique, appelez le 01-800-01-060-00.
Pour l’Amérique centrale, les Caraïbes, les Bermudes et
les Bahamas, composez le (501) 370-5775 (É.-U.). En Asie,
appelez le 852-2815-0091. Au Royaume-Uni, appelez le
44 020 8687 9620. En France, appelez le 33 3 81 63 42 51.
En Allemagne/Autriche, composez le +43 662 889 2130.
Dans les autres régions, veuillez contacter votre détaillant
ou distributeur Timex local pour des renseignements sur
la garantie.

256
257
Si votre montre Timex
®
doit être réparée, envoyez-la
à Timex conformément aux dispositions de la Garantie
internationale Timex ou adressez-le à : TG SERVICE
CENTER, P.O. Box 2740, Little Rock, AR 72203. Pour toute
question concernant les réparations, appelez le 1-800-
328-2677 ou envoyez un courriel à [email protected]
GARANTIE ÉTENDUE
Disponible aux É.-U. exclusivement. La garantie peut
être prolongée pour une période additionnelle de 4 ans à
compter de la date d’achat pour la somme de 5 $. Vous
pouvez effectuer ce paiement avec AMEX, Discover, Visa
ou MasterCard en composant le 1 800-800-448-4639
durant les heures normales d’ouverture. Le paiement
doit être effectué dans les 30 jours qui suivent l’achat.
Indiquer les nom, adresse, numéro de téléphone, date
d’achat et numéro de modèle à 5 chiffres. Il est égale-
ment possible d’envoyer un chèque de 5 $ US par courrier
à : Timex Extended Warranty, P.O. Box 1676, Dept. EF,
Little Rock, AR 72203.
©2015 Timex Group USA, Inc. TIMEX, INDIGLO, et INTELLIGENT
QUARTZ sont des marques déposées de Timex Group B.V. et de ses
filiales.

259
RELOJES TIMEX
®
Felicitaciones por la compra de su reloj TIMEX
®
INTELLIGENT QUARTZ
™
. Por favor lea atentamente las
instrucciones para saber cómo funciona su reloj Timex.
Es posible que su reloj no tenga todas las características
descritas en este folleto.
Para obtener más información
y registrar su producto, visite:
www.timex.com

260
261
ÍNDICE DE CONTENIDOS
Cómo inicializar su reloj ................................................. 263
Resistencia al agua y a golpes ....................................... 264
Luz nocturna Indiglo
®
.................................................... 266
Programación de fecha y hora ....................................... 267
Calendario Perpetuo ...................................................... 269
Cronógrafo Fly-back ....................................................... 272
Brújula y Cronógrafo Fly-back ........................................ 278
Cronógrafo Lineal .......................................................... 291
Hora mundial ................................................................. 298
Brújula ............................................................................ 305
Marea temperatura y brújula ......................................... 312
Altímetro ........................................................................ 322
Profundidad .................................................................... 331
Yacht Racer .................................................................... 336
Cronógrafo temporizador .............................................. 348
3GMT (Hora de Greenwich) ............................................ 365
Función taquímetro........................................................ 372
Función de Regla Deslizante ......................................... 374
Cómo ajustar la pulsera ................................................. 380
Remoción de eslabones de la pulsera ........................... 382
Pila .................................................................................. 383
Garantía .......................................................................... 384

262
263
CÓMO INICIALIZAR SU RELOJ
(No se aplica a los modelos de calendario perpetuo.) Para
inicializar su reloj retire el protector plástico de abajo de
la corona y luego presione la corona contra la caja.
Algunos relojes requieren ajustar la corona para ser
atornillada. Si la caja de su reloj tiene una protuberancia
roscada, la corona debe atornillarse después de ajustar
el reloj.
Para atornillarla, empuje la corona con firmeza contra la
protuberancia roscada y mantenga la presión mientras
gira la corona en sentido horario. Continúe atornillando
la corona hasta que esté firme. Necesitará desatornillar
la corona (en sentido antihorario) antes de tirarla hacia
afuera la próxima vez que quiera ajustar su reloj.
Bienvenido al mundo de relojes Timex
®
con
tecnología inteligente Quartz
™
, el futuro de la
tecnología análoga de cuarzo. La tecnología de
cuarzo inteligente de Timex brinda el poder de un
microprocesador con la eficiencia y exactitud del
medidor de tiempo análogo de cuarzo. Con los relojes
Timex de cuarzo inteligentes, la tecnología se inscribe
dentro del diseño, entregando un nuevo nivel de
complejidad en la esfera. Usa hasta tres manecillas
adicionales independientes para presentar más variedad
de información, normalmente disponible sólo en relojes
digitales en un formato análogo tradicional.

264
265
ADVERTENCIA: PARA MANTENER LA RESISTENCIA
AL AGUA, NO APRIETE NINGÚN BOTÓN DEBAJO DEL
AGUA A MENOS QUE SU RELOJ ESTÉ INDICADO PARA
UNA RESISTENCIA AL AGUA DE 200 METROS. JAMÁS
TIRE DE LA CORONA MIENTRAS ESTÉ BAJO EL AGUA.
1. El reloj es resistente al agua solamente mientras el
cristal, la corona y la caja estén intactos.
2. El reloj no está certificado para buceo.
3. Enjuague el reloj con agua dulce después de haber
estado expuesto al agua salada.
4. La resistencia a los golpes estará indicada en la esfera
del reloj o en la parte de atrás de la caja. Los relojes
están diseñados para pasar la prueba ISO de resisten-
cia a los golpes. Sin embargo, se debe tener cuidado
para evitar dañar el cristal.
RESISTENCIA AL AGUA Y A GOLPES
Si su reloj es resistente al agua, se indicarán los metros
(WR_M).
Profundidad de
resistencia al agua en
p.s.i.a.* Presión del agua
bajo la superficie
30m/98pies 60
50m/164pies 86
100m/328pies 160
200m/656pies 284

266
267
PROGRAMACIÓN DE FECHA Y HORA
NOTA: La corona tiene tres posiciones: cerrada, media y
externa. Para que se acostumbre a la diferencia entre las
distintas posiciones, extienda la corona hasta la posición
más externa y luego pulse ligeramente la corona hasta
que sienta un clic en la posición media.
Para fijar la fecha y la hora:
Hora
Jale la corona hasta su posición externa y gírela hasta
que se muestre la hora correcta. Asegure el parámetro
correcto de AM/PM (mañana/tarde) verificando que la
fecha cambie a la medianoche y no al mediodía.
Fecha (no se aplica al calendario perpetuo)
Jale la corona hasta su posición media y gírela hasta que
aparezca la fecha correcta en la ventanilla de la fecha.
LUZ NOCTURNA INDIGLO
®
Pulse el botón o la corona para activar la luz. La
tecnología electroluminiscente utilizada en la luz nocturna
INDIGLO
®
ilumina toda la esfera del reloj por la noche y en
condiciones de poca luz.
O

268
269
Nota: La fecha cambia entre las 10 pm y las 2 am. No
cambie la fecha durante este período. Al hacerlo, podría
dañar el movimiento del reloj.
Pulse la corona a la posición cerrada después de fijar la
fecha u hora. El segundero se pondrá en movimiento.
NOTA: Se requerirá ajustar la fecha en los meses que
tengan menos de 31 días.
CALENDARIO PERPETUO
DESCRIPCIÓN GENERAL
A
B
1 2
3
1 2
3
MANECILLA
HORARIA
MANECILLA
DEL DÍA
MANECILLA DE LA
FECHA
SEGUNDERO
MANECILLA
DE MINUTOS
CORONA
MANECILLA DE MES
BOTÓN A
(EMPOTRADO)
BOTÓN B
(EMPOTRADO)
POSICIÓN
CERRADA
POSICIÓN
MEDIA
POSICIÓN
EXTERNA

270
271
COMPENSACIÓN DEL AÑO BISIESTO
Para mantener la fecha correcta, el reloj incluye una
configuración para la compensación del año bisiesto en
curso. Esta configuración es hecha en la fábrica de Timex
o después del reemplazo de la pila y no se puede cambiar,
sólo observar.
Para ver la compensación, jale la corona hasta su posición
media. La manecilla de fecha muestra la compensación:
1 = 1 año después del año bisiesto; 2 = 2 años después
del año bisiesto; 3 = 3 años después del año bisiesto;
4 = año bisiesto. Pulse la corona hacia dentro cuando
termine y las manecillas vuelven a mostrar normalmente
día, mes y fecha.
INTRODUCCIÓN
Con su reloj de calendario perpetuo, la fecha nunca
necesita ajuste hasta el 2100. El reloj toma en cuenta
automáticamente los meses cortos y los años bisiestos,
presentando siempre fecha y día correctos. El día y la
fecha fueron programados en la fábrica de Timex. Sólo
necesita ajustar la hora. El reloj tiene dos botones de
activación empotrados para uso del Centro de servicio
de Timex para ajustar la fecha y el día después del
reemplazo de la pila. Fuera de lo mencionado no tienen
otro uso.

272
273
AJUSTE DE LA 4TA MANECILLA CENTRAL
Para reajustar una 4ta manecilla central desalineada:
1. Jale la corona hasta su posición externa. Las
manecillas superior e inferior se mueven hasta el final
de sus ciclos, auto-ajustándose en forma automática.
2. La 4ta manecilla central debe señalar las 12 en punto.
Si en los 5 segundos posteriores de haber pulsado
la corona a la posición más externa la 4ta manecilla
central no señala las 12 en punto, pulse los botones A
o B para mover la manecilla en sentido antihorario u
horario hasta que señale las 12 en punto.
3. Pulse la corona a la posición cerrada cuando acabe.
CRONÓGRAFO FLY-BACK
DESCRIPCIÓN GENERAL
AA
B
23
1 2
3
1 2
3
MANECILLA
SUPERIOR
2A ZONA
HORARIA
CUARTA MANECILLA
CENTRAL
SEGUNDERO
VENTANILLA
DE FECHA
CORONA
ESCALA DE MINUTOS
DEL CRONÓGRAFO
MANECILLA
INFERIOR
BOTÓN A
BOTÓN B
MANECILLA
DE MINUTOS
MANECILLA HORARIA
POSICIÓN
CERRADA
POSICIÓN
MEDIA
POSICIÓN
EXTERNA

274
275
PARA AJUSTAR LA SEGUNDA ZONA HORARIA:
1. Jale la corona hasta su posición media. La manecilla
superior muestra la hora de la segunda zona horaria
y la 4ta. manecilla central muestra los minutos.
2. Suponiendo que la segunda zona horaria tiene el
mismo valor de minutos como su hora, la 4ta mane-
cilla central y el minutero deben estar alineados. Si las
manecillas no están alineadas, o si la segunda zona
horaria difiere por minutos dentro de la hora, pulse el
botón B para mover la 4ta manecilla central hasta que
esté en la posición deseada.
3. Pulse el botón A para mover la manecilla superior
hacia adelante, en incrementos de una hora, hasta
que llegue a la hora deseada de la segunda zona
horaria. Para mover la manecilla rápidamente, pulse
y sostenga el botón A.
SEGUNDA ZONA HORARIA
La manecilla supe-
rior muestra la hora
para la segunda zona
horaria. Observe que la
escala es de 24 horas, con
medianoche a cualquier
extremo y mediodía en la
mitad. Lo más común es
que las zonas horarias di-
fieran en incrementos de
una hora. En tales casos,
el valor de minutos de la segunda zona horaria será el
mismo que el indicado por el minutero del reloj.
AA
B
23
1 2
3
1 2
3

276
277
3. Para reanudar, pulse el botón A (START/STOP)
nuevamente.
4. Para reiniciar el cronógrafo fly-back desde cero, pulse
el botón B (FLY-BACK/RESET).
Cuando se reinicia el cronógrafo, todas las manecillas
se ponen a la posición cero. Después de otros ocho
segundos, el reloj continúa mostrando normalmente la
segunda zona horaria.
5. Para reiniciar y/o poner en cero el cronógrafo fly-back
mientras está funcionando, pulse y sostenga el botón
B (FLY-BACK/RESET). Suéltelo cuando desee reiniciar.
4. Pulse la corona hacia adentro cuando termine.
CRONÓGRAFO FLY-BACK
El reloj tiene un cronógrafo “fly-back” (que revisa
marcajes anteriores) de 4 horas.
1. Para comenzar, pulse el botón A (START/STOP).
La 4ta manecilla central muestra los segundos con una
resolución de 1/5 de segundo. La manecilla inferior
muestra el último dígito de los minutos, contando
hasta diez y repitiendo. La manecilla superior muestra
el tiempo total, incluyendo horas y minutos, con divi-
siones a cada diez minutos. El cronógrafo cuenta hasta
4 horas antes de detenerse automáticamente.
2. Para detener, pulse el botón A (START/STOP)
nuevamente. Todas las manecillas se detienen.

278
279
AJUSTE DE LA MANECILLA INDICADORA
(4TA MANECILLA CENTRAL)
Para reajustar una manecilla desalineada:
1. Jale la corona hasta su posición externa. Las maneci-
llas superior e inferior se mueven hasta el final de sus
ciclos, auto-ajustándose en forma automática.
2. La 4ta manecilla central debe señalar las 12 en punto.
Si no lo hace en los 5 segundos posteriores de haber
pulsado la corona a la posición más externa, pulse A
o B para mover la manecilla en sentido antihorario u
horario, respectivamente, hasta que señale las 12 en
punto.
3. Pulse la corona hacia adentro cuando termine.
BRÚJULA Y CRONÓGRAFO FLY-BACK
DESCRIPCIÓN GENERAL
A
C
B
1 2
3
1 2
3
MANECILLA
SUPERIOR
2A ZONA
HORARIA
CUARTA MANECILLA
CENTRAL
SEGUNDERO
VENTANILLA
DE FECHA
CORONA
ESCALA DE MINUTOS
DEL CRONÓGRAFO
MANECILLA INFERIOR
BOTÓN A
BOTÓN B
MANECILLA
HORARIA
MANECILLA DE MINUTOS
POSICIÓN
CERRADA
POSICIÓN
MEDIA
POSICIÓN
EXTERNA
BOTÓN C

280
281
2. Pulse B para mover hacia delante la 4ta manecilla
central. Sostenga el botón para mover con rapidez
la manecilla. Las manecillas superior y 4ta manecilla
central se mueven a la vez; mientras la 4ta manecilla
central da una vuelta, la manecilla superior se mueve
una hora. Suponiendo que la segunda zona horaria
tiene el mismo valor de minutos como su hora, la 4ta
manecilla central y de minutos deben estar alineadas.
3. Pulse A para mover la manecilla superior en incremen-
tos de una hora. Sostenga el botón para mover con
rapidez la manecilla.
4. Pulse la corona hacia adentro cuando termine.
La hora de la segunda zona horaria puede ser usada alter-
nativamente para representar su hora en una escala de
24 horas, si lo prefiere. Cuando se ajusta la segunda zona
horaria de esta manera, asegúrese que la visualización
SEGUNDA ZONA HORARIA
La manecilla superior normalmente muestra la hora
para la segunda zona horaria. Observe que la escala
es de 24 horas, con medianoche a cualquier extremo y
mediodía en la mitad.
Para ajustar la segunda zona horaria:
1. Jale la corona hasta
su posición media.
La manecilla superior
muestra la hora de la
segunda zona horaria
en tiempo militar y la
4ta manecilla central
muestra los minutos.
A
C
B
1 2
3
1 2
3

282
283
muestra el tiempo total, incluyendo horas y minutos,
con divisiones a cada diez minutos. El cronógrafo
cuenta hasta 4 horas antes de detenerse automática-
mente.
2. Para detener, pulse A nuevamente (START/STOP).
Todas las manecillas se inmovilizan.
3. Para reanudar, pulse A (START/STOP) de nuevo, o para
reiniciar (desde cero) el cronógrafo, pulse B (FLY-BACK/
RESET).
Cuando se reinicia el cronógrafo, todas las manecillas
se ponen en cero. Después de otros ocho segundos, el
reloj continúa mostrando normalmente la hora de la
segunda zona horaria.
4. También puede volver a poner a cero o reiniciar el
cronógrafo mientras está en uso. Para hacerlo, pulse
de horas y minutos corresponda con la de las 24 horas,
al verificar que la fecha cambie a medianoche y no al
mediodía.
CRONÓGRAFO FLY-BACK
El reloj tiene un cronógrafo ‘fly-back” (que revisa marcajes
anteriores) de 4 horas.
1. Para comenzar, pulse A (START/STOP). La 4ta mane-
cilla central muestra
los segundos con
resolución de 1/5 de
segundo y la mane-
cilla inferior muestra
el último dígito de los
minutos, contando
hasta diez y repitiendo.
La manecilla superior
A
C
B
1 2
3
1 2
3

284
285
y sostenga B (FLY-BACK/RESET) para poner a cero el
cronógrafo y suéltelo cuando desee reiniciarlo. No
tiene que esperar a que todas las manecillas lleguen
a cero antes de soltar el botón; el conteo comenzará
internamente cuando suelte el botón. Esta función
“fly-back” le permite medir el tiempo de vuelta.
La brújula puede ser usada mientras el cronógrafo
está en marcha sin que interfiera con su funciona-
miento. Ver FUNCIONAMIENTO DE LA BRÚJULA.
CALIBRACIÓN DE LA BRÚJULA
Hay que calibrar la brújula, antes de usarse.
Dado que la brújula usa el campo magnético de la
Tierra, usted debe tener cuidado de objetos metálicos
grandes tales como vehículos o puentes, u objetos que
emitan radiación electromagnética como televisores
y computadoras, porque podrían afectar el campo
magnético alrededor del reloj. Si la brújula se calibra
cerca de tales objetos, sólo funcionará apropiadamente
en ese mismo lugar. Si la brújula se calibra lejos de tales
objetos, no funcionará apropiadamente en la cercanía de
ellos. Para resultados óptimos, realice la calibración en el
área donde va a ser usada.
Al calibrar y tomar rumbos es importante, como con
todas las brújulas, mantener la brújula a nivel. Calibrar
y tomar un rumbo cuando el reloj no está a nivel puede
resultar en errores grandes. Hay que evitar también áreas
que pudieran exhibir concentraciones de hierro duro y
suave más elevadas de lo normal, pues pueden ocasionar
rumbos incorrectos. Cuando un rumbo no infunda con-
fianza, vuelva a calibrar.

286
287
LENTAMENTE, tomando aproximadamente 15 segun-
dos por rotación.
4. Cuando haya acabado, pulse C (BRÚJULA), mante-
niendo el reloj a nivel. La 4ta manecilla central se
mueve hacia atrás y adelante indicando el final de la
calibración y después se mueve a la configuración
actual de declinación magnética.
5. Si usted no desea ajustar la declinación magnética,
pulse la corona hacia adentro. De otro modo, para
No guarde el reloj cerca de alguna fuente de magnetismo
como computadoras, electrodomésticos o televisores,
pues el reloj puede recoger la carga magnética y conducir
a rumbos inexactos. La exactitud típica de los instrumen-
tos de uso en la muñeca es de +/- 10 grados.
Para calibrar la brújula:
1. Jale la corona a su posición media y espere a que las
manecillas indicadoras se detengan.
2. Mantenga el reloj a nivel o colóquelo sobre una super-
ficie horizontal (si la pulsera interfiere, coloque el reloj
sobre un vaso invertido). El reloj puede estar bocabajo,
pero tome precauciones para proteger el cristal.
3. Pulse C (BRÚJULA) para comenzar. La 4ta manecilla
central gira dos vueltas para recordarle a usted rotar
el reloj. Todavía a nivel, dé dos rotaciones al reloj

288
289
FUNCIONAMIENTO DE LA BRÚJULA
Normalmente, la brújula está apagada y la 4ta manecilla
central apunta a las 12 en punto o muestra los segundos
del cronógrafo.
Mientras mantiene el reloj a nivel, pulse C (BRÚJULA)
para activar la brújula. La aguja de la brújula se mueve y
apunta hacia el Norte. Si se gira el reloj, la 4ta manecilla
central continuará moviéndose, apuntando siempre al
Norte. Después de 20 segundos, la brújula se apagará
automáticamente y la 4ta manecilla central retornará a su
operación normal. Esto alarga la duración de la pila. Pulse
C (BRÚJULA) en cualquier momento para mantener la
brújula encendida durante otros 20 segundos.
La brújula puede ser activada mientras está operando el
cronógrafo. La 4ta manecilla central cambia de opera-
ciones temporalmente. Las manecillas superior e inferior
hacer que el reloj compense automáticamente el
ángulo de declinación, mueva el anillo giratorio de la
brújula hasta que el Norte esté a las 12 en punto.
6. Pulse A o B para mover la 4ta manecilla central hacia
el Oeste (-) o Este (+), respectivamente, y apuntar ha-
cia el ángulo de declinación de su posición usando la
escala de declinación. Sostenga un botón para mover
con rapidez la manecilla. Observe la figura de abajo
como ejemplo.
7. Pulse la corona hacia adentro cuando termine.
A
B
Declinación magnética establecida a -14° (14°W)

290
291
continúan mostrando la hora en el cronógrafo y todas las
funciones del cronógrafo están disponibles mediante los
botones A (START/STOP) y B (FLY-BACK/RESET).
NOTA: Mientras se usa la brújula, el segundero se mueve
en incrementos de dos segundos. De igual modo, cuando
la brújula está activada, la manecilla superior e inferior
pueden cambiar de posición ligeramente, volviendo a sus
posiciones habituales cuando la brújula es desactivada.
Este funcionamiento es normal y da una lectura más
exacta de la brújula.
CRONÓGRAFO LINEAL
DESCRIPCIÓN GENERAL
MANECILLA
DE SEGUNDOS
VENTANILLA
DE FECHA
CORONA
MANECILLA INFERIOR
BOTÓN A
BOTÓN B
4TA MANECILLA
CENTRAL
MANECILLA HORARIA
MANECILLA
LINEAL
MANECILLA
DE MINUTOS
A
B
1
2
3

292
293
AJUSTE DE LA MANECILLA LINEAL
Y 4TA MANECILLA CENTRAL
Para reajustar una 4ta manecilla central desalineada:
1. Jale la corona hasta su posición externa. La manecilla
inferior se mueve hasta el final de su barrido con
ajuste automático.
2. La 4ta manecilla central debe señalar las 12 en punto.
Si en los 5 segundos posteriores de haber pulsado
la corona a la posición más externa la 4ta manecilla
central no señala las 12 en punto, pulse el botón A
para mover la manecilla en sentido antihorario hasta
que señale las 12 en punto.
3. Si el cronógrafo es reiniciado y la manecilla lineal
no está en 0, pulse y sostenga el botón B durante
5 segundos para hacer una calibración completa del
indicador lineal, lo cual demorará hasta 32 segundos
en completarse.
4. Pulse la corona a la posición cerrada cuando acabe.

294
295
SEGUNDA ZONA HORARIA
La manecilla inferior
muestra la hora para la
segunda zona horaria.
Observe que la escala
es de 24 horas, con
medianoche a cual-
quier extremo y me-
diodía en la mitad. Lo
más común es que las
zonas horarias difieran
en incrementos de una
hora. En tales casos,
el valor de minutos de la segunda zona horaria será el
mismo que el indicado por el minutero del reloj.
PARA FIJAR LA SEGUNDA ZONA HORARIA:
1. Jale la corona hasta su posición media. La manecilla
inferior muestra la hora de la segunda zona horaria y
la 4ta. manecilla central muestra los minutos.
2. Suponiendo que la segunda zona horaria tiene el
mismo valor de minutos como la primera zona horaria,
la 4ta manecilla central y el minutero deben estar
alineados. Si las manecillas no están alineadas, o si la
segunda zona horaria difiere por minutos dentro de
la hora, pulse el botón B para mover la 4ta manecilla
central hasta que esté en la posición deseada.
3. Pulse el botón A para mover la manecilla inferior
hacia adelante, en incrementos de una hora, hasta
que llegue a la hora deseada de la segunda zona
horaria. Para mover la manecilla rápidamente, pulse y
sostenga el botón A.
A
B
1
2
3

296
297
4. Pulse la corona hacia adentro cuando termine.
CRONÓGRAFO LINEAL
El reloj tiene un cronógrafo interválico de 4 horas.
1. Para comenzar, pulse el botón A (START/STOP). La 4ta
manecilla central muestra los segundos con una reso-
lución de 1/5 de segundo. La manecilla lineal muestra
los minutos, contando hasta treinta y repitiendo. La
manecilla inferior muestra el tiempo total, incluyendo
horas y minutos, con divisiones a cada diez minutos. El
cronógrafo cuenta hasta 4 horas antes de detenerse
automáticamente.
2. Para detener, pulse el botón A (START/STOP) nueva-
mente. Todas las manecillas se detienen.
3. Para reiniciar el cronógrafo a la posición cero, pulse el
botón B (SPLIT/RESET).
Cuando se reinicia el cronógrafo, todas las manecillas se
mueven a la posición cero. Después de otros ocho segun-
dos, el reloj continúa mostrando normalmente la segunda
zona horaria. Mientras el cronógrafo está en marcha, se
puede tomar un intervalo. Pulse el botón B (SPLIT/RESET)
y todas las manecillas se detendrán mientras el cronó-
grafo sigue andando. Pulse B (SPLIT/RESET) nuevamente
para seguir viendo el tiempo transcurrido del cronógrafo
en marcha.

298
299
HORA MUNDIAL
DESCRIPCIÓN GENERAL
A
B
C
1 2
3
corrected 3.3.11 with Paulo’s new cities
24 CIUDADES
ESCALA DE
HORA MUNDIAL
SEGUNDERO
VENTANILLA
DE FECHA
CORONA
MANECILLA INFERIOR
BOTÓN A
BOTÓN B
BOTÓN C
CUARTA MANECILLA
CENTRAL
ESCALA
DE ESTACIÓN
MANECILLA
SUPERIOR
MANECILLA HORARIA
MANECILLA
DE MINUTOS
POSICIÓN
CERRADA
POSICIÓN
MEDIA
POSICIÓN
EXTERNA
PARA FIJAR LA HORA MUNDIAL:
1. Jale la corona hasta su posición media. La manecilla
central muestra la hora mundial de la ciudad y la
manecilla superior muestra la hora de dicha ciudad.
2. Pulse A o B para seleccionar la ciudad que representa
su zona horaria local. Sostenga un botón para mover
A
B
C
1 2 3

300
301
con rapidez la manecilla. Se puede utilizar cualquier
ciudad.
3. Jale la corona hasta su posición externa. La manecilla
de selección de la ciudad se reajustará a la posición de
las 12:00 como lo indica el AJUSTE DE LA MANECILLA
INDICADORA. Después de una pausa de cinco segun-
dos, la manecilla superior mostrará la hora mundial
(la hora en la ciudad seleccionada en el paso previo),
la manecilla central muestra los minutos de la hora
mundial y la manecilla inferior muestra la estación
(ver AJUSTE DE ESTACIÓN). IMPORTANTE: No manipule
ninguno de los pulsores hasta que la manecilla
central de la corona se haya ajustado completamente.
(Aproximadamente 10 segundos después que se haya
jalado la corona a la posición más externa).
4. Si la estación presentada no es la correcta para la
zona horaria local, presione C para cambiarla. Si la
zona horaria local observa el horario de verano, la
manecilla superior se moverá una hora.
5. Pulse A o B para adelantar o atrasar la hora respectiva-
mente, para fijar la hora mundial de tal manera que
sea la misma que la de la zona horaria local. Sostenga
un botón para cambiar rápidamente la hora. Las
manecillas se mueven a la vez; mientras la manecilla
central da una vuelta, la manecilla superior se mueve
una hora. Después del ajuste, la manecilla central y el
minutero deberían estar alineados.
6. Pulse la corona hacia adentro cuando termine.

302
303
AJUSTE DE LA MANECILLA INDICADORA
(4TA MANECILLA CENTRAL)
Para reajustar una manecilla desalineada:
1. Jale la corona hasta su posición externa. Las maneci-
llas superior e inferior se mueven hasta el final de sus
ciclos, auto-ajustándose en forma automática.
2. La 4ta manecilla central debe señalar las 12 en punto.
Si no lo hace en los 5 segundos posteriores de haber
pulsado la corona a la posición más externa, pulse A o B
para mover la manecilla en sentido antihorario u horario,
respectivamente, hasta que señale las 12 en punto.
3. Pulse la corona hacia adentro cuando termine.
NOTA: Si no se pulsa botón alguno durante cinco segun-
dos después que se detienen las manecillas, el reloj pasa
a realizar el ajuste de hora mundial (ver AJUSTE DE HORA
MUNDIAL)
VISUALIZACIÓN DE LA HORA DE LA CIUDAD
Pulse A o B para mover
la manecilla central hacia
atrás o hacia adelante
respectivamente, y
seleccionar una ciudad.
La manecilla superior se
mueve para mostrar la
hora en la ciudad selec-
cionada. Observe que la
escala es de 24 horas, con
medianoche a cualquier extremo y mediodía en la mitad.
AJUSTE DE ESTACIÓN
El ajuste de estación permite al reloj compensar por la
hora de aprovechamiento de luz solar (también llamada
“hora de verano”).
A
B
C
1 2 3

304
305
El reloj se encarga de esto dando una configuración
para representar los dos periodos que tienen todas las
ciudades que observan la hora de verano. Para el reloj,
el periodo de hora de verano es VERANO y el periodo de
hora estándar es INVIERNO.
Cuando la estación de una ciudad se establece en
VERANO, todas las ciudades en el mismo hemisferio son
programadas automáticamente a VERANO, mientras que
las ciudades en el otro hemisferio son programadas au-
tomáticamente a INVIERNO. El reloj sabe cuáles ciudades
están dentro de cada hemisferio.
Pulse C para cambiar la estación en la ciudad seleccionada.
BRÚJULA
DESCRIPCIÓN GENERAL
I
I
14
CORONA
CENTRAL
MEDIO
FIJAR LA FECHA
I
I
14
AFUERA
FIJAR LA
HORA
CORONA
B
A (BRÚJULA)
ESCALA DE DECLINACIÓN
AGUJA DE LA
BRÚJULA
(EL EXTREMO NORTE
ES ROJO PUNTI-
AGUDO/ALARGADO)

306
307
AJUSTE DE LA AGUJA DE LA BRÚJULA
Jale la CORONA totalmente hacia afuera. La aguja de la
brújula debe señalar las 12 en punto. Si no las señala,
oprima ya sea A o B para mover la aguja de la brújula
hasta las 12 en punto. Sostenga el botón de activación
para mover la aguja con rapidez. Pulse la CORONA CEN-
TRAL hacia adentro cuando termine y vuelva a calibrar
la brújula.
CALIBRACIÓN DE LA BRÚJULA
Hay que calibrar la brújula, antes de usarse.
Dado que la brújula usa el campo magnético de la Tierra,
usted debe tener cuidado de objetos metálicos grandes
tales como vehículos o puentes, u objetos que emitan
radiación electromagnética como televisores y com-
putadoras, porque podrían afectar el campo magnético
alrededor del reloj. Si la brújula se calibra cerca de tales
objetos, sólo funcionará apropiadamente en ese mismo
lugar. Si la brújula se calibra lejos de tales objetos, no
funcionará apropiadamente en la cercanía de ellos. Para
resultados óptimos, realice la calibración en el área donde
va a ser usada.
Al calibrar y tomar rumbos es importante, como con
todas las brújulas, mantener la brújula a nivel. Calibrar
y tomar un rumbo cuando el reloj no está a nivel puede
resultar en errores grandes. Hay que evitar también áreas
que pudieran exhibir concentraciones de hierro duro y
suave más elevadas de lo normal, pues pueden ocasionar
rumbos incorrectos. Cuando un rumbo no infunda con-
fianza, vuelva a calibrar.
No guarde el reloj cerca de alguna fuente de magnetismo
como computadoras, electrodomésticos o televisores,
pues el reloj puede recoger la carga magnética y conducir

308
309
a rumbos inexactos. La exactitud típica de los instrumen-
tos de uso en la muñeca es de +/- 10 grados.
Para calibrar la brújula:
1. Jale la corona a su posición media y espere a que las
manecillas indicadoras se detengan.
2. Mantenga el reloj a nivel o colóquelo sobre una super-
ficie horizontal (si la pulsera interfiere, coloque el reloj
sobre un vaso invertido). El reloj puede estar bocabajo,
pero tome precauciones para proteger el cristal.
3. Pulse A o B para comenzar. La 4ta manecilla central
gira dos vueltas para recordarle a usted rotar el reloj.
Todavía a nivel, dé dos rotaciones al reloj LENTAMENTE,
tomando aproximadamente 15 segundos por rotación.
4. Cuando haya acabado, pulse A o B, manteniendo el
reloj a nivel. La 4ta manecilla central se mueve hacia
atrás y adelante indicando el final de la calibración
y después se mueve a la configuración actual de
declinación magnética.
5. Si usted no desea ajustar la declinación magnética,
pulse la corona hacia adentro. De otro modo, para
hacer que el reloj compense automáticamente el

310
311
ángulo de declinación, mueva el anillo giratorio de la
brújula hasta que el Norte esté a las 12 en punto.
6. Pulse A o B para mover la 4ta manecilla central hacia
el Oeste (-) o Este (+), respectivamente, y apuntar
hacia el ángulo de declinación de su posición usando
la escala de declinación. Sostenga un botón para
mover con rapidez la manecilla. Observe la figura en la
siguiente página como ejemplo.
7. Pulse la corona hacia adentro cuando termine.
Declinación magnética establecida a -14° (14°W)
A
B
FUNCIONAMIENTO DE LA BRÚJULA
Normalmente, la brújula está apagada y la 4ta manecilla
central apunta a las 12 en punto o muestra los segundos
del cronógrafo.
Mientras mantiene el reloj a nivel, pulse A o B para activar
la brújula. La aguja de la brújula se mueve y apunta hacia
el Norte. Si se gira el reloj, la 4ta manecilla central conti-
nuará moviéndose, apuntando siempre al Norte. Después
de 20 segundos, la brújula se apagará automáticamente y
la 4ta manecilla central retornará a su operación normal.
Esto alarga la duración de la pila. Pulse A o B en cualquier
momento para mantener la brújula encendida durante
otros 20 segundos.
NOTA: Mientras se usa la brújula, el segundero se mueve
en incrementos de dos segundos.

312
313
MAREA TEMPERATURA Y BRÚJULA
DESCRIPCIÓN GENERAL
EXTERNA-FIJAR
LA HORA
ESCALA DE
DECLINACIÓN
AGUJA
INDICADORA
C (BRÚJULA)
B (MAREA)
A (TEMP)
CORONA
ANILLO GIRATORIO
DE BRÚJULA
FECHA
ESCALA DE MAREA
ESCALA DE
TEMPERATURA
MEDIO-FIJAR LA FECHA
AJUSTANDO LA AGUJA INDICADORA
Jale la corona totalmente hacia afuera. La aguja indica-
dora debe señalar las 12 en punto. Si no las señala, pulse
cualquiera de los botones MAREA o TEMPERATURA
hasta que la aguja marque las 12 en punto. Los botones
MAREA y TEMPERATURA mueven la aguja en el sentido
de las manecillas del reloj y a la inversa, respectivamente.
Sostenga el botón de activación para mover la aguja con
rapidez. Pulse la corona hacia adentro cuando termine.
SELECCIÓN DE MAREA/TEMPERATURA
La aguja indicadora muestra de continuo tanto la marea
como la temperatura. Cuando se muestra la temperatura,
pulse el botón MAREA para seleccionar el reloj de marea.
La aguja se mueve a marea baja y luego a la marea actual.
Cuando se muestra la marea, pulse el botón TEMPERATU-
RA para seleccionar el termómetro. La aguja se mueve al

314
315
comienzo del termómetro y luego a la temperatura actual.
TERMÓMETRO
Cuando se lleva puesto en la muñeca, la lectura del
termómetro es afectada por el calor corporal. Para lograr
una lectura más exacta, quítese el reloj y déjelo a la
sombra durante unos minutos.
El reloj puede medir también la temperatura del agua si
está sumergido. Recuerde seleccionar la pantalla para
temperatura antes de introducir el reloj en el agua, puesto
que los botones no deben pulsarse mientras el reloj esté
sumergido.
Las lecturas del termómetro se toman a cada minuto, y
con más frecuencia si la temperatura está cambiando.
RELOJ DE MAREA
Para el reloj de marea, la aguja indicadora siempre rota
en el sentido de las manecillas del reloj, de modo que la
marea va subiendo cuando la aguja señala a la izquierda y
bajando cuando señala a la derecha. El número de horas
para la siguiente marea alta/baja se muestra en la escala
de marea.
Las mareas también están influenciadas por la posición
del sol y la forma del contorno de la costa, por consi-
guiente el reloj de marea no puede dar con precisión las
horas de las mareas altas y bajas. Se pudieran necesitar
ajustes periódicos.
Para calibrar el reloj de marea, jale la corona hacia el ME-
DIO. Pulse cualquiera de los botones MAREA o TEMPERA-
TURA para mover la aguja a la marea actual. Los botones
MAREA y TEMPERATURA mueven la aguja en el sentido
de las manecillas del reloj y a la inversa, respectivamente.
Pulse la corona hacia adentro cuando termine.

316
317
CALIBRACIÓN DE LA BRÚJULA
Se debe calibrar la brújula, antes de usarse.
Dado que la brújula usa el campo magnético de la Tierra,
usted debe tener cuidado de objetos metálicos grandes
tales como vehículos o puentes, u objetos que emitan
radiación electromagnética como televisores y compu-
tadoras, porque podrían afectar el campo magnético
alrededor del reloj. Si la brújula se calibra cerca de tales
objetos, sólo funcionará apropiadamente en ese mismo
lugar. Si la brújula se calibra lejos de tales objetos, no
funcionará apropiadamente en la cercanía de ellos. Para
resultados óptimos, realice la calibración en el área donde
va a ser usada.
Al calibrar y tomar rumbos es importante, como con
todas las brújulas, mantener la brújula a nivel. Calibrar
y tomar un rumbo cuando el reloj no está a nivel puede
resultar en errores grandes. Hay que evitar también áreas
que pudieran exhibir concentraciones de hierro duro y
suave más elevadas de lo normal, pues pueden ocasionar
rumbos incorrectos. Cuando un rumbo no infunda con-
fianza, vuelva a calibrar.
No guarde el reloj cerca de alguna fuente de magnetismo
como computadoras, electrodomésticos o televisores,
pues el reloj puede recoger la carga magnética y conducir
a rumbos inexactos. La exactitud típica de los instrumen-
tos de uso en la muñeca es de +/- 10 grados.
Para calibrar la brújula:
1. Jale la corona a su posición media y espere a que las
manecillas indicadoras se detengan.
2. Mantenga el reloj a nivel o colóquelo sobre una super-
ficie horizontal (si la pulsera interfiere, coloque el reloj

318
319
sobre un vaso invertido). El reloj puede estar bocabajo,
pero tome precauciones para proteger el cristal.
3. Pulse C (BRÚJULA) para comenzar. La 4ta manecilla
central gira dos vueltas para recordarle a usted rotar
el reloj. Todavía a nivel, dé dos rotaciones al reloj
LENTAMENTE, tomando aproximadamente 15 segun-
dos por rotación.
4. Cuando haya acabado, pulse C (BRÚJULA), mante-
niendo el reloj a nivel. La 4ta manecilla central se
mueve hacia atrás y adelante indicando el final de la
calibración y después se mueve a la configuración
actual de declinación magnética.
5. Si usted no desea ajustar la declinación magnética,
pulse la corona hacia adentro. De otro modo, para
hacer que el reloj compense automáticamente el
ángulo de declinación, mueva el anillo giratorio de la
brújula hasta que el Norte esté a las 12 en punto.
6. Pulse A o B para mover la 4ta manecilla central hacia
el Oeste (-) o Este (+), respectivamente, y apuntar ha-
cia el ángulo de declinación de su posición usando la
escala de declinación. Sostenga un botón para mover
con rapidez la manecilla. Observe la figura en la página
siguiente como ejemplo.

320
321
7. Pulse la corona hacia adentro cuando termine.
Declinación magnética establecida a -14° (14°W)
FUNCIONAMIENTO DE LA BRÚJULA
Normalmente, la brújula está apagada y la 4ta manecilla
central apunta a las 12 en punto o muestra los segundos
del cronógrafo.
Mientras mantiene el reloj a nivel, pulse C (BRÚJULA)
para activar la brújula. La aguja de la brújula se mueve y
apunta hacia el Norte. Si se gira el reloj, la 4ta manecilla
central continuará moviéndose, apuntando siempre al
A
B
Norte. Después de 20 segundos, la brújula se apagará
automáticamente y la 4ta manecilla central retornará a su
operación normal. Esto alarga la duración de la pila. Pulse
C (BRÚJULA) en cualquier momento para mantener la
brújula encendida durante otros 20 segundos.
NOTA: Mientras se usa la brújula, el segundero se mueve
en incrementos de dos segundos.

322
323
AJUSTE DE LA MANECILLA INDICADORA
(4TA MANECILLA CENTRAL)
Jale la corona totalmente hacia afuera. Las manecil-
las retrógradas superior e inferior se reinician hasta el
comienzo de sus escalas automáticamente. La manecilla
indicadora (4ta manecilla central) debe señalar las 12 en
punto. Si no las señala, pulse cualquiera de los botones
A o B para mover la aguja hasta que marque las 12 en
punto. Los botones A y B mueven la aguja en el sentido
de las manecillas del reloj y a la inversa, respectivamente.
Sostenga el botón para mover la aguja con rapidez. Pulse
la corona hacia adentro cuando termine.
CALIBRACIÓN DEL ALTÍMETRO
Se debe calibrar el altímetro, antes de usarse.
Puesto que el altímetro utiliza la presión para determinar
la altitud y la presión varía de lugar a lugar, es importante
ALTÍMETRO
DESCRIPCIÓN GENERAL
ESCALA DE
ALTÍMETRO
(CENTENAS)
RETRÓGRADA
SUPERIOR
(MILES)
BOTÓN C
(UNIDADES)
BOTÓN A
(ALTITUD MÁXIMA)
BOTÓN B
(ALTITUD MÍNIMA)
RETRÓGRADA
INFERIOR
(UNIDADES)
CORONA

324
325
en la pantalla de altitud. La 4ta manecilla central y la
retrógrada superior deben apuntar a la altitud actual.
3. Pulse A o B para mover la 4ta manecilla central en
sentido antihorario u horario, respectivamente, hasta
que apunte a la altitud deseada de calibración. Sos-
tener A o B moverá la manecilla central más rápido.
La manecilla retrógrada superior se mueve relativa al
valor de altitud señalado por la 4ta manecilla central.
4. Pulse la corona hacia adentro cuando termine.
programar el altímetro a una altitud de referencia
conocida, o a una referencia de altitud estándar de un
determinado lugar. Cambios repentinos en presión debido
a cambios en el clima pueden hacer que la lectura del
altímetro esté desfasada por +-100m (328 ft), incluso si su
ubicación no ha cambiado. Vuelva a calibrar a una altitud
conocida cuando ocurran cambios drásticos de presión.
Para calibrar el altímetro:
1. Jale la corona a su posición media y espere a que las
manecillas indicadoras se detengan.
2. Si el altímetro estaba APAGADO en el momento
de jalar la corona, la manecilla retrógrada inferior
apuntará a la unidad seleccionada la última vez que se
usó el altímetro; de otro modo la manecilla retrógrada
inferior apunta hacia la unidad seleccionada presente

326
327
Para apagar el altímetro con la unidad ajustada en PIES,
pulse C. Para apagar el altímetro con la unidad ajustada
en METROS, pulse C dos veces (la manecilla inferior se va
a PIES primero antes de ir a la posición APAGADO).
Ejemplo: Altitud=2310 m Ejemplo: Altitud=7580 pies
ALTÍMETRO ENCENDIDO/APAGADO
Para encender el altímetro pulse C. La manecilla
retrógrada inferior apunta a METROS. Usando las marcas
en el anillo superior, la 4ta manecilla central muestra las
decenas y centenas del valor de la altitud actual con di-
visiones cada diez METROS/PIES. La manecilla retrógrada
superior muestra los miles del valor de la altitud actual
con divisiones cada mil METROS/PIES.
Para cambiar la unidad de METROS a PIES, pulse C una
segunda vez. Para cambiar la unidad de PIES a METROS,
pulse C dos veces (el altímetro se apaga primero, luego se
vuelve a encender con la unidad en METROS).

328
329
La máxima altitud grabada aparece durante diez segun-
dos. Para extender la duración de la pantalla durante
otros diez segundos, pulse A antes de que termine la
duración previa de diez segundos.
Para cambiar la unidad de METROS a PIES o de PIES a
METROS, pulse C.
Para ver la altitud mínima registrada, pulse B. La manecilla
retrógrada inferior muestra la unidad de medida en la
que la altitud mínima fue grabada si el altímetro estaba
apagado en el momento de oprimir el botón; de otro
modo ésta mostrará la altitud mínima usando la actual
unidad seleccionada. La 4ta manecilla central muestra el
valor de la mínima altitud en centenas y decenas con di-
visiones cada diez METROS/PIES. La manecilla retrógrada
superior muestra la altitud mínima actual en miles con
divisiones cada mil METROS/PIES.
El reloj apagará el altímetro automáticamente después de
60 minutos desde la activación.
MEMORIA DE ALTITUD MÍNIMA/MÁXIMA
Para ver la altitud máxima registrada, pulse A. La mane-
cilla retrógrada inferior muestra la unidad de medida en
la que la altitud máxima fue grabada si el altímetro estaba
apagado en el momento de oprimir el botón; de otro
modo ésta mostrará la altitud máxima usando la actual
unidad seleccionada. La 4ta manecilla central muestra
el valor de la máxima altitud en centenas y decenas
con divisiones cada diez METROS/PIES. La manecilla
retrógrada superior muestra la altitud máxima en miles
con divisiones cada mil METROS/PIES.

330
331
PROFUNDIDAD
DESCRIPCIÓN GENERAL
Nota: La manecilla central y la inferior calibrarán
automáticamente cuando se mueve la corona a la
posición 3 para fijar la hora.
3
AA
B
1
2
3
2
3
2
3
MANECILLA
CENTRAL
INDICADOR
APAGADO
BOTÓN A
BOTÓN B
MANECILLA INFERIOR
CORONA
La altitud mínima grabada aparece durante diez segun-
dos. Para extender la duración de la pantalla durante
otros diez segundos, pulse B antes de que termine la
duración previa de diez segundos. Para cambiar la unidad
de METROS a PIES o de PIES a METROS, pulse C.

332
333
apuntará a la profundidad del momento como se indica
en la escala de profundidad. Si la lectura permanece en
el rango de 0 a 2 metros (0 a 6 pies) durante 5 minutos,
el sensor se apagará automaticamente. Para apagar el
sensor manualmente, pulse y sostenga el botón B durante
2 segundos. La 4ta manecilla central se moverá a la
posición APAGADO (6 en punto).
MEMORIA DE TEMPERATURA MÁXIMA/MÍNIMA
Y PROFUNDIDAD.
Después de llegar a la superficie, desenrosque la
corona y tírela hasta la posición media. La manecilla
inferior y la central se moverán para mostrar el valor de
profundidad máxima y el valor de temperatura mínima,
respectivamente, grabados durante el descenso más
reciente. Cuando el sensor de profundidad se active
nuevamente, se limpiará la memoria.
TEMPERATURA
El sensor de temperatura está siempre activado y tomará
una lectura al menos cada 60 segundos. La tempera-
tura está indicada por la manecilla inferior y la escala
correspondiente.
Cuando está puesto en la muñeca, la lectura de la tem-
peratura es afectada por el calor corporal. Para lecturas
más certeras, quítese el reloj de la muñeca.
SENSOR DE PROFUNDIDAD ENCENDIDO/APAGADO
El sensor está normalmente apagado y se debe encender
manualmente antes de la inmersión. Pulse y suelte el
botón B antes de encender el sensor. La 4ta manecilla
central se moverá de la posición APAGADO (las 6 en
punto) a la posición de las 12 en punto y empieza a tomar
lecturas al menos una vez cada 5 segundos. A medida
que aumenta la profundidad, la 4ta manecilla central

334
335
2 segundos en desplazamientos de dos posiciones de
manecilla. Se recomienda que el usuario reemplace la pila
cuando el nivel de la bateria es bajo.
Cuando el reloj esté en estado de reemplazar la pila, el
segundero deberá moverse solamente a intervalos de
5 segundos en desplazamientos de cinco posiciones de
manecilla. En este punto, el sensor de profundidad no
puede activarse y el usuario deberá reemplazar la pila
inmediatamente.
Si el reloj no ha sido usado todavía, las manecillas central
e inferior mostrarán en la pantalla 0 metros/pies y 0ºC/32
ºF, respectivamente. La corona se debe enroscar nueva-
mente antes del uso o la inmersión.
NIVEL DE LA PILA
El reloj determina el nivel actual de la pila y le da al usu-
ario una indicación visual sobre el nivel de la pila en ese
momento. El nivel del estado de la pila se clasifica como
Normal, Bajo y Reemplazar pila, con cada nivel indicado
por el movimiento del segundero.
Para el estatus de Normal, el segundero deberá moverse
una posición de manecilla a cada segundo, lo cual es la
operación normal.
Cuando el estatus del reloj indica Nivel de pila bajo, el
segundero deberá moverse solamente a intervalos de

336
337
YACHT RACER
2 31
A
B
C
PERFECT DATE (FECHA PERFECTA)
Con la función Perfect Date
™
la fecha no necesita
ajustarse hasta el 2060. El reloj tiene en cuenta los
meses cortos y los años bisiestos automáticamente,
y siempre mostrará la fecha correcta a pedido. La
fecha fue programada en la fábrica de Timex. Cuando
inicie su reloj por primera vez, si la fecha mostrada no
corresponde con la fecha en su ubicación, necesitará
reajustar la fecha a la fecha local. Tire de la corona hacia
afuera hasta la posición externa. La 4a manecilla central
girará una revolución en la esfera, se detendrá en la
posición de 12:00 en punto unos 5 segundos y después
se moverá a la fecha a la cual está ajustado el reloj. Gire
la corona hacia adelante para aumentar la hora hasta la
fecha actual (o hacia atrás para disminuir la hora hasta
la fecha actual). Cada vez que pase la medianoche la
MANECILLA
HORARIA
SEGUNDERO
4TA
MANE CILLA
CENTRAL
CORONA
MANECILLA
SUPERIOR
ESCALA DE
PERFECT
DATE
™
MANECILLA
INFERIOR
MINUTERO

338
339
fecha cambiará un día. Después de ajustar la fecha a la
fecha local, continúe girando la corona para ubicar las
manecillas en la hora local, fijándose si está en am o pm.
Una vez ajustada la hora, empuje la corona de vuelta a
la posición cerrada. En el funcionamiento normal la 4a
manecilla central mostrará la fecha cuando se presiona
la corona. La manecilla se desplazará hasta la fecha
actual como se muestra en el anillo superior en la caja.
La manecilla hará la pausa para permitirle leer la fecha
y retornar a la posición de reposo de las 12 en punto.
Tenga en cuenta que la función Perfect Date
™
sólo
será operativa en el modo horario. Cuando la pila está
agotada y se reemplaza, la función Perfect Date debe
ser calibrada de nuevo. Cuando la pila deba cambiarse,
se recomienda enfáticamente enviar el reloj al centro de
servicio Timex donde la pila será reemplazada y la función
Perfect Date será calibrada nuevamente a la fecha actual
para el sitio a donde el reloj será retornado.
AJUSTE DE LA 4TA MANECILLA CENTRAL
Para reajustar una 4ta manecilla central desalineada:
1. Tire de la corona, hacia afuera hasta la posición 3. Las
manecillas superior e inferior se mueven hasta el final
de sus ciclos, auto-ajustándose en forma automática.
2. En los 10 segundos posteriores de haber tirado la
corona a la posición 3, la 4ta manecilla central debe
señalar a las 12 en punto, y si no lo hace, pulse los
botones A o B para mover la manecilla en sentido
antihorario u horario hasta que señale las 12 en punto.
Pulsar y sostener el botón A o B hará que la manecilla
se mueva más rápido. Tenga en cuenta: después de
5 segundos sin actividad con la corona en la posición

340
341
3, la 4ta manecilla central se moverá a mostrar la
fecha actual.
3. Empuje la corona adentro a la posición 1 cuando
termine.
SELECCIÓN DE MODO
Pulse el botón C para mover la manecilla superior a la
función deseada.
HORA:
Muestra la hora actual únicamente (la función Perfect Date
[Fecha perfecta] sólo será operativa en modo horario).
TEMPORIZADOR 5 YACHT RACE:
El contador regresivo comenzará a los 5 minutos e inicia
el cronógrafo cuando éste llega a cero.
TEMPORIZADOR 3 YACHT RACE:
El contador regresivo comenzará a los 3 minutos e inicia
el cronógrafo cuando éste llega a cero.
TEMPORIZADOR 1 YACHT RACE:
El contador regresivo comenzará al 1er minuto e inicia el
cronógrafo cuando éste llega a cero.
CRONÓGRAFO:
El cronógrafo funcionará sin el temporizador de cuenta
regresiva.
CÓMO FUNCIONA EL TEMPORIZADOR YACHT RACE:
El reloj dispone de un temporizador de conteo regresivo
de 5, 3 y 1 minutos. Una vez que el contador llega a cero
arrancará automáticamente el cronógrafo de 1 hora.
1. Pulse el botón C hasta que la manecilla superior
muestre el modo deseado de 5, 3 o 1 minutos del
temporizador Yacht Race

342
343
2. Para comenzar, pulse el botón A (START/STOP). La 4ta
manecilla central muestra los segundos de conteo
regresivo y la manecilla inferior muestra los minutos,
en conteo regresivo. (Tenga en cuenta: los botones B
y C quedan inoperativos mientras está funcionando el
contador regresivo).
3. Para interrumpir, pulse el botón A (START/STOP) lo
que detendrá el proceso de conteo regresivo. (Tenga
en cuenta: el botón C queda inoperativo hasta que el
temporizador se reinicie).
4. Para reiniciar, pulse y sostenga el botón B (SPLIT/
RESET) durante 3 segundos, lo que reiniciará el
contador regresivo hasta la duración originalmente
seleccionada de 5, 3 o 1 minutos.
En operación normal del temporizador Yacht Race,
cuando el contador regresivo llega a cero el cronógrafo
arrancará automáticamente. Igualmente, hay una alerta
acústica que marca cada vez que el contador pasa por
cada minuto, que también sonará faltando 5 segundos
para completar el último minuto y comience la función
cronógrafo. El cronógrafo circulará por una secuencia de
30 minutos dos veces, para un tiempo total máximo de
1 hora.
CÓMO FUNCIONA EL CRONÓGRAFO
El reloj dispone de un cronógrafo de una hora que puede
funcionar independientemente del temporizador Yacht
Race.
1. Pulse el botón C hasta que la manecilla superior esté
al comienzo de la escala de 30 minutos del cronógrafo
2. Para comenzar, pulse el botón A (START/STOP). La 4ta

344
345
manecilla central muestra los segundos ascendentes;
la manecilla inferior muestra los minutos ascendentes
en una escala de 5 minutos y la manecilla superior
muestra la media hora contando ascendentemente
en escala de 30 minutos. Cada vez que la manecilla
inferior llega a la marca de 5 minutos, se devolverá
a la posición cero mientras la manecilla superior
continuará avanzando en la escala de 30 minutos.
(Tenga en cuenta: el botón C queda inoperativo
mientras el cronógrafo está funcionando).
3. Para tomar un tiempo fraccionario, pulse el botón
B (SPLIT/RESET). La manecilla superior, la inferior y
la 4ta conservarán sus posiciones para que usted
observe el tiempo fraccionario (vuelta). El cronógrafo
sigue todavía manteniendo la secuencia de conteo
mientras las manecillas están detenidas. Para soltar
las manecillas, pulse el botón B (SPLIT/RESET) y éstas
rápidamente se moverán para mostrar el tiempo
transcurrido total.
4. Para interrumpir, pulse el botón A (START/STOP), lo que
detendrá al cronógrafo. (Tenga en cuenta: el botón C
queda inoperativo mientras el cronógrafo está parado
hasta que éste sea reiniciado).
5. Para reiniciar, pulse y sostenga el botón B (SPLIT/
RESET) durante 3 segundos, lo cual reiniciará al
cronógrafo hasta el comienzo de la escala de 30
minutos.

346
347
En funcionamiento normal el cronógrafo circulará por
una secuencia de 30 minutos dos veces, hasta el máximo
total de 1 hora. Una vez haya transcurrido esa hora,
la manecilla superior permanecerá en la marca de 30
minutos y la manecilla inferior se devolverá a cero. La
función cronógrafo necesitará ser reiniciada antes de
ser usada nuevamente o antes de cambiar a una función
diferente. (Tenga en cuenta: el botón A queda inoperable
cuando el tiempo máximo de 1 hora ha transcurrido y no
funcionará sino hasta que el cronógrafo sea reiniciado
pulsando y sosteniendo el botón B durante 3 segundos).
LUZ NOCTURNA INDIGLO
®
(ÚNICAMENTE EN LA VERSIÓN PRO)
Yacht Racer PRO incluye la adición de la función de luz
nocturna INDIGLO
®
. Cuando hay poca o ninguna luz la
esfera se puede leer fácilmente activando la función de
luz nocturna INDIGLO
®
presionando la corona. El Yacht
Racer PRO usa un material luminiscente especial en la
esfera que brillará y creará una iluminación suficiente-
mente brillante para leer la esfera, pero asegura que su
visión nocturna no se reduzca una vez que la luz se haya
extinguido.

348
349
CRONÓGRAFO TEMPORIZADOR
SEGUNDERO
4TA
MANECILLA
CENTRAL
MANECILLA
SUPERIOR
PERFECT DATE
™
ESCALA
MINUTERO
MANECILLA
HORARIA
CORONA
MANECILLA
INFERIOR
2 31
A
B
C
PERFECT DATE (FECHA PERFECTA)
Con la función Perfect Date
™
de su reloj, la fecha no
necesita ajustarse hasta 2060. El reloj tiene en cuenta
los meses cortos y los años bisiestos automáticamente,
y siempre mostrará la fecha correcta a pedido. La
fecha fue programada en la fábrica de Timex. Cuando
inicie su reloj por primera vez, si la fecha mostrada no
corresponde con la fecha en su ubicación, necesitará
reajustar la fecha a fecha local. Tire de la corona hacia
afuera hasta la posición externa. La 4a manecilla central
girará una revolución en la esfera, se detendrá en la
posición de 12:00 en punto unos 5 segundos y después
se moverá a la fecha a la cual está ajustado el reloj. Gire
la corona hacia adelante para aumentar la hora hasta la
fecha actual (o hacia atrás para disminuir la hora hasta
la fecha actual). Cada vez que pase la medianoche la

350
351
fecha cambiará un día. Después de ajustar la fecha a la
fecha local, continúe girando la corona para ubicar las
manecillas en la hora local, fijándose si está en am o pm.
Una vez ajustada la hora, empuje la corona de vuelta a
la posición cerrada. En el funcionamiento normal la 4a
manecilla central mostrará la fecha cuando se presiona
la corona. La manecilla se desplazará hasta la fecha
actual como se muestra en el anillo superior de la caja.
La manecilla hará una pausa para permitirle leer la fecha
y retornar a la posición de reposo de las 12 en punto.
Tenga en cuenta que la función Perfect Date
™
sólo
funcionará en el modo horario. Cuando la pila está
agotada y se reemplaza, la función Perfect Date debe
ser calibrada de nuevo. Cuando la pila deba cambiarse,
se recomienda enfáticamente enviar el reloj al centro
de servicio Timex donde la pila será reemplazada y la
función Perfect Date (Fecha perfecta) será calibrada
nuevamente a la fecha actual para el sitio a donde el reloj
será retornado.
AJUSTE DE LA 4A MANECILLA CENTRAL
Para reajustar una 4a manecilla central desalineada:
1. Tire de la corona, hacia afuera hasta la posición 3. Las
manecillas superior e inferior se mueven hasta el final
de sus ciclos, ajustándose en forma automática.
2. Cuando deje de moverse, la 4ta manecilla central
debe señalar a las 12 en punto, y si no lo hace, pulse
los botones A o B para mover la manecilla en sentido
antihorario u horario hasta que señale las 12 en punto.
Pulsar y sostener el botón A o B hará que la manecilla
se mueva más rápido. Tenga en cuenta: después de
5 segundos sin actividad con la corona en la posición

352
353
3, la 4ta manecilla central se moverá para mostrar la
fecha actual.
3. Empuje la corona a la posición 1 cuando termine.
SELECCIÓN DE MODO
Pulse el botón C para mover la manecilla superior a la
función deseada.
HORA
Muestra la hora actual únicamente (la función Perfect
Date
™
sólo será operativa en modo horario).
FUNCIONAMIENTO DEL CRONÓGRAFO
El reloj tiene un cronógrafo de cuatro horas. Al final
del periodo de cuatro horas el cronógrafo se apagará
automáticamente. Esto ahorrará pila en el caso de una
activación accidental del cronógrafo.
1. Pulse el botón C hasta que la manecilla superior
esté al inicio de la escala superior del cronógrafo, la
manecilla inferior en 0 en la escala inferior.
2. Para comenzar, pulse el botón A (START/STOP). La 4a
manecilla central muestra los segundos ascendentes;
la manecilla inferior muestra los minutos ascendentes
en una escala de 30 minutos y la manecilla superior
muestra las horas contando ascendentemente en
una escala de 4 horas. Cada vez que la manecilla
inferior llega a la marca de 30 minutos, volverá a la
posición cero para comenzar el siguiente periodo de
30 minutos, mientras la manecilla superior continuará
avanzando en la escala de 4 horas. (Tenga en cuenta:
el botón C está desactivado mientras el cronógrafo
está funcionando)

354
355
desde el inicio de las escalas de 30 minutos y 4 horas
en las dos esferas.
En el funcionamiento normal, el cronógrafo circulará por
una secuencia de 30 minutos 8 veces, hasta el máximo
total de cuatro horas. Una vez que haya transcurrido
ese periodo de cuatro horas, la manecilla superior
permanecerá en la marca de cuatro horas y la manecilla
inferior volverá a cero. La función cronógrafo necesitará
ser reiniciada antes de ser usada nuevamente o antes de
cambiar a una función diferente. (Tenga en cuenta: el bo-
tón A queda inactivo cuando el tiempo máximo de cuatro
horas ha transcurrido y no funcionará sino hasta que el
cronógrafo sea reiniciado pulsando el botón B).
3. Para tomar un tiempo fraccionario, pulse el botón
B (SPLIT/RESET). La manecilla superior, la inferior
y la 4a conservarán sus posiciones para que usted
observe el tiempo fraccionario (vuelta). El cronógrafo
sigue todavía manteniendo la secuencia de conteo
mientras las manecillas están detenidas. Para soltar
las manecillas, pulse el botón B (SPLIT/RESET) y estas
rápidamente se moverán para mostrar el tiempo
transcurrido total.
4. Para parar, pulse el botón A (START/STOP), lo que
detendrá al cronógrafo. (Tenga en cuenta: el botón C
está desactivado mientras el cronógrafo está parado
hasta que este sea reiniciado)
5. Para reiniciar el cronógrafo después de pararlo, pulse
el botón B (SPLIT/RESET), que reiniciará el cronógrafo

356
357
para lograr el periodo de tiempo deseado para la cuenta
regresiva. Presionar la corona terminará el procedimiento
de ajuste y confirma los valores establecidos hasta ese
momento en cualquier punto del ciclo.
AJUSTE DEL TEMPORIZADOR REGRESIVO
El temporizador regresivo sólo puede ajustarse cuando la
función de temporizador regresivo no está funcionando.
Si el contador regresivo se usó previamente, necesita
reiniciarse. Si el temporizador está en funcionamiento,
hay que pararlo y reiniciarlo para poder ajustarlo.
1. Pulse el botón C hasta que la manecilla superior esté
en algún punto en la escala del temporizador. Si el
temporizador se ajustó previamente, la manecilla
apuntará a donde se ajustó previamente. Si es la
primera vez que se ajusta el temporizador, apuntará al
0 en la escala del temporizador.
TEMPORIZADOR REGRESIVO
El reloj cuenta con una función de temporizador
regresivo.
Nota especial: La manecilla superior, la manecilla inferior
y la 4a manecilla central se unen durante los pasos 3, 4
y 5 a continuación. A medida que mueve las manecillas
de minutos y segundos hacia adelante/atrás, verá que las
tres manecillas reaccionan a la suma o resta del periodo
de tiempo que dura la cuenta regresiva. Después de
tirar de la corona hacia afuera a la posición intermedia,
pulsar el botón C lo hará avanzar a través del siguiente
ciclo de conexión con las manecillas: Manecilla superior
(pulse el botón C) - Manecilla inferior (pulse el botón C)
- 4a manecilla central (pulse el botón C) de regreso a la
manecilla superior….esto le permite avanzar en el ciclo
para conectar con las manecillas que necesite ajustar

358
359
(pulsar el botón B moverá la manecilla en sentido
horario), hasta que haya seleccionado el número
deseado de minutos. Tenga en cuenta que está
ajustando el número de minutos hacia adelante o
hacia atrás para tener el tiempo deseado (por ejemplo:
para un tiempo total deseado de 2:53:30 deberá pulsar
el botón A siete veces lo que moverá el tiempo total
de 3 horas hasta 2:53:00). Notará que la manecilla
de la hora se moverá ligeramente hacia atrás desde
el marcador de las 3 horas hacia el marcador de las
2.5 horas. Cuando haya ajustado el tiempo al número
correcto de minutos, pulse el botón C para confirmar
su selección.
5. Ahora puede ajustar el número deseado de segundos
en incrementos de un segundo pulsando el botón A
para mover la cuarta manecilla inferior en sentido
2. Tire de la corona hacia afuera hasta la posición media.
3. Para ajustar el número deseado de horas en
incrementos de media hora (hasta un tiempo máximo
de 4:00:00) pulse el botón A para mover la manecilla
superior en sentido antihorario (pulsar el botón B
moverá la manecilla en sentido horario), hasta que
haya seleccionado el número deseado de horas. Tenga
en cuenta que está seleccionando el número de horas
con el incremento de medias horas más cercano al
tiempo total deseado (por ejemplo: para un tiempo
total deseado de 2:53:30, seleccione 3 horas). Cuando
haya completado el ajuste del número de horas, pulse
el botón C para confirmar su selección.
4. Ahora puede ajustar el número deseado de minutos
en incrementos de un minuto pulsando el botón A
para mover la manecilla inferior en sentido antihorario

360
361
FUNCIONAMIENTO DEL TEMPORIZADOR REGRESIVO
Cuando haya ajustado el temporizador regresivo al
tiempo deseado, puede poner a funcionar la cuenta
regresiva.
Inicio de la secuencia regresiva: Pulse el botón A
para iniciar una cuenta regresiva. La cuarta manecilla
central y la manecilla inferior comenzarán a moverse
en sentido antihorario. La manecilla superior se moverá
en sentido horario. Las manecillas seguirán indicando
el tiempo restante en la secuencia regresiva hasta que
transcurra el tiempo que se haya ajustado y el valor del
tiempo restante llegue a cero. Cuando el valor del tiempo
restante llegue a cero, sonará una campana indicando
que se ha completado la secuencia regresiva.
antihorario (pulsar el botón B moverá la manecilla
en sentido horario), hasta que haya seleccionado el
número deseado de segundos. Tenga en cuenta que
está sumando o restando el número de segundos
para completar el tiempo deseado (por ejemplo: para
un tiempo total deseado de 2:53:30 deberá pulsar
el botón B 30 veces para seleccionar 30 segundos).
Cuando haya terminado de ajustar el número de
segundos, empuje la corona a la posición 1 para
confirmar la selección del valor para el temporizador
regresivo.

362
363
Borrado del valor del temporizador regresivo: Si lo
desea, puede borrar el valor del temporizador a cero.
Esto sólo puede hacerse si el temporizador regresivo no
está funcionando y se ha reiniciado. Si el temporizador
está corriendo, primero debe parar la secuencia
regresiva pulsando el botón A y después pulsar el botón
B. Esto detendrá el contador regresivo hasta el valor
de tiempo seleccionado previamente. Para borrar el
valor del temporizador a cero, pulse y mantenga el
botón B durante dos segundos. Ahora deberá seguir las
instrucciones para ajustar el valor del contador regresivo
al nuevo tiempo deseado.
Función de tiempo parcial: Mientras el contador
regresivo está corriendo, puede usar la función de tiempo
parcial para saber cuánto tiempo queda en la secuencia
regresiva:
Interrupción de secuencia regresiva: Si desea interrum-
pir la secuencia regresiva antes que llegue a cero, puede
hacerlo pulsando el botón A (la cuarta manecilla central
así como la superior e inferior dejarán de moverse). Si
desea retomar la secuencia regresiva en el punto en que
la detuvo, simplemente pulse el botón A nuevamente (la
cuarta manecilla central así como la superior e inferior
volverán a moverse).
Reinicio de la secuencia regresiva: Cuando la secuencia
regresiva haya llegado a cero y la campana haya sonado,
puede reiniciar el temporizador regresivo al valor
ajustado pulsando el botón B (la cuarta manecilla central
así como la superior y la inferior se moverán para indicar
el valor del tiempo que se ajustó antes de usar la función
del temporizador regresivo).

364
365
3GMT (HORA DE GREENWICH)
SEGUNDERO
CORONA
ANILLO SUPERIOR
GIRATORIO
(FORMATO DE 24 HORAS)
4TA MANECILLA CENTRAL
MINUTERO
MANECILLA
HORARIA
ANILLO INTERNO/
NUMERALES
(FORMATO
DE 24 HORAS)
A
2 31
Para usar la función de tiempo parcial, pulse el botón B, lo
que hará que las manecillas superior, inferior y cuarta se
congelen en su posición. La cuenta regresiva continuará
funcionando internamente mientras las manecillas están
congeladas.
Para retomar el movimiento de las manecillas superior,
inferior y cuarta, pulse el botón B nuevamente y las
manecillas se reubicarán en el lugar correcto para
mostrar el tiempo actual dentro de la secuencia regresiva.

366
367
punto. Si en los 5 segundos después de haber tirado
la corona a la posición 3 la 4ta manecilla central no
señala las 12 en punto, pulse el botón A para mover
la manecilla en sentido horario hasta que señale las
12 en punto. Pulsar y sostener el botón A hará que la
manecilla se mueva más rápido.
3. Empuje la corona adentro a la posición 1 cuando
termine.
AJUSTE DE LA 4TA MANECILLA CENTRAL
La 4ta manecilla central tiene calibración de fábrica por
Timex para reflejar los minutos estándar dentro de la
hora como lo define el Tiempo Universal Coodinado.
Globalmente, la mayoría de ubicaciones usan minutos
estándar. Si la ubicación que se está usando para la
2da y 3ra zona horaria utiliza los minutos estándar, la
4ta manecilla central no requiere nueva calibración.
3 ZONAS HORARIAS
El reloj puede mostrar tres zonas horarias:
1. Manecillas de hora y minutos: muestra la hora en
formato estándar de 12 horas. Tenga en cuenta: La
fecha mostrada en la ventanilla de fecha está ligada a
la hora mostrada por estas dos manecillas.
2. 4ta manecilla central y anillo interno: muestra la hora
en formato de 24 horas.
3. 4ta manecilla central y anillo superior giratorio:
muestra la hora en formato de 24 horas.
AJUSTE DE LA 4TA MANECILLA CENTRAL
Para reajustar una 4ta manecilla central desalineada:
1. Tire de la corona, hacia afuera hasta la posición 3.
2. La 4ta manecilla central debe señalar las 12 en

368
369
Pulsar y sostener el botón A hará que la manecilla se
mueva más rápido.
5. Tire de la corona, hacia afuera hasta la posición 3. La
4ta manecilla central apuntará a las 12 en punto.
6. Gire la corona para colocar la manecilla horaria y el
minutero en la hora correcta.
7. Empuje la corona adentro a la posición 1 cuando
termine.
Tenga en cuenta: La 4ta manecilla central registrará el
tiempo usando la calibración actual de los minutos dentro
de la hora. Ambas zonas horarias, 2 y 3, utilizan la 4ta
manecilla central, y por tanto las ubicaciones siendo
rastreadas en las zonas horarias 2 y 3 deben utilizar
igualmente los mismos minutos dentro de la hora, para
que estas zonas horarias se muestren adecuadamente.
Solamente si usted desea hacer que la segunda y tercera
zona horaria reflejen las ubicaciones que no siguen los
minutos estándar, las instrucciones para recalibrar la 4ta
manecilla central están a continuación:
1. Tire de la corona, hacia afuera hasta la posición 3. La
4ta manecilla central debe señalar las 12 en punto.
2. Gire la corona hasta colocar al minutero en la posición
correcta dentro de la hora requerida para la ubicación
que se desea usar para la 2da y 3ra zonas horarias.
3. Empuje la corona hacia adentro, a la posición 2. La
4ta manecilla central apuntará a su actual posición
calibrada de los minutos dentro de la hora.
4. Pulse el botón A para mover la 4ta manecilla central
en sentido horario hasta que se alinee con el minutero.

370
CONFIGURACIÓN DE LA 4TA MANECILLA CENTRAL
(ZONA HORARIA II)
Observe la hora actual en la ubicación que desea rastrear
como 2da zona horaria. Pulse el botón A hasta que la 4ta
manecilla central esté apuntando a esa hora en el anillo
interno. (Tenga en cuenta: esta escala está en formato de
24 horas). La 4ta manecilla central avanzará 30 minutos
cada vez que se oprime el botón A. Pulsar y sostener el
botón A hará que la manecilla se mueva más rápido. Esto
programará la 2da zona horaria en el reloj.
CONFIGURACIÓN DEL ANILLO SUPERIOR GIRATORIO
DE LA CAJA (ZONA HORARIA III)
La 3ra zona horaria se programa usando la existente
configuración de la 4ta manecilla central y ajustando
el anillo superior giratorio de la caja a la hora deseada
de la 3ra zona horaria. (Tenga en cuenta: esta escala
está en formato de 24 horas). El anillo superior tiene 72
posiciones. Para avanzar al anillo superior en una hora,
se lo avanzará tres posiciones (3 clics). Observe la hora
actual en la ubicación que desea rastrear como 3ra
zona horaria. Gire el anillo superior de la caja en sentido
antihorario para colocar la marca de hora correcta para
esa hora con la 4ta manecilla central.

372
373
FUNCIÓN TAQUÍMETRO
(no todos los modelos)
El taquímetro sólo determina velocidades que sean
mayores a 60 unidades por hora usando este método;
velocidades más bajas pueden medirse disminuyendo
la unidad de medida. La función desempeñada por un
taquímetro es independiente de la unidad de distancia
(p.ej.millas terrestres, millas náuticas, kilómetros, metros,
etc.) en tanto se use la misma unidad de longitud para
todos los cálculos.
1. Determine el punto inicial y el final de la distancia
preestablecida.
2. Inicie el cronógrafo una vez el objetivo para la medida
de velocidad pase por el punto inicial.
3. Detenga el cronógrafo cuando el objetivo para la
medida de velocidad pase por el punto final.
4. El segundero del cronógrafo es comparable con
los marcadores del taquímetro para determinar la
velocidad del objetivo.

374
375
FUNCIÓN DE REGLA DESLIZANTE
La función de regla deslizante integrada al anillo giratorio
superior se utiliza rotando el aro. El anillo interno no se
mueve. El aro siempre se refiere a distancia o velocidad,
o a cualquier dato que varíe con tiempo. El anillo interno
solo anota unidades de tiempo.
Aro
En el aro (anillo externo), la figura “10” representa facto-
res o múltiplos de 10, tales como 0.1, 1.0, 10, ó 100.
Anillo interno
En el anillo interno, “MPH” (millas por hora) se refiere al
“índice de velocidad”. Este índice se usa para calcular la
velocidad que conlleve cualquier dato por hora. En el aro,
“STAT” (millas terrestres) y “NAUT” (millas náuticas) son
para conversión de unidades de distancia.
ARO
ANILLO INTERNO

376
377
Los siguientes ejemplos sirven de guía para el uso de la
regla deslizante.
CÁLCULO DE VELOCIDAD:
¿Cuál velocidad se requiere para ir a 10 millas náuti-
cas en 15 minutos?
Factores conocidos: Distancia: Tiempo para 10 millas
náuticas: 15 minutos
• Alinear la flecha “10” sobre el aro con el “15” en el
anillo interno.
• La velocidad requerida se puede encontrar directa-
mente encima de la marca “MPH” en el anillo interno.
Respuesta: 40 millas náuticas por hora.
Cálculo de tiempo: ¿En cuánto tiempo se harán 10
millas náuticas a una velocidad de 40 millas por hora?
Factores conocidos: Velocidad: 40 millas por hora
Distancia: 10 millas náuticas
• Alinear “40” sobre el aro con la marca “MPH” en el
anillo interno.
• El tiempo requerido se puede encontrar directamente
debajo de la flecha “10” en el aro, que es “15” en el
anillo interno.
Respuesta: 15 Minutos

378
379
CÁLCULO DE DISTANCIA:
¿A qué distancia se puede viajar a 40 millas por hora
durante 15 minutos?
Factores conocidos: Velocidad: 40 millas náuticas por
hora Tiempo: 15 minutos
• Alinear “40” sobre el aro directamente encima de la
marca “MPH” en el anillo interno.
• La distancia recorrida se puede obtener encima del
marcador “15” en el anillo interno. El número indicado
en el aro es “10”.
Respuesta: la distancia recorrida es 10 millas
náuticas.
CONVERSIÓN DE UNIDADES:
Para convertir distancia de millas náuticas a millas
terrestres y kilómetros:
Factor conocido: Distancia a convertir es 10 millas
náuticas
• Alinear la flecha “10” sobre el aro encima de “NAUT”
en el anillo interno. La conversión a millas terrestres
(11.5) se encuentra encima de la marca“STAT” del
anillo interno, y la conversión a kilómetros (18.5)
se encuentra encima de la marca“MPH” del anillo
interno.

380
381
CÓMO AJUSTAR LA PULSERA
(Las variaciones de las siguientes secciones de pulseras
se aplican a todos los modelos de relojes).
PULSERA CON BROCHE DESLIZANTE
1. Abra la chapa de cierre.
2. Mueva el broche hasta
lograr la longitud de
pulsera deseada.
3. Ejerza presión mientras
sostiene la chapa de
cierre y deslice el broche
hacia atrás y hacia adelante hasta que se acople en
las ranuras situadas en la parte de abajo de la pulsera.
4. Presione hacia abajo la chapa de cierre hasta que se
acople a presión y quede cerrada. El broche puede
dañarse si se usa una fuerza excesiva.
PULSERA CON BROCHE PLEGABLE
1. Localice la barra de resorte que conecta la pulsera al
broche.
2. Utilizando una herramienta puntiaguda, empuje el
perno de resorte hacia adentro y gire suavemente la
pulsera para desacoplarla.
3. Determine el tamaño de la muñeca y después
introduzca el perno de resorte en el agujero inferior
correcto.
4. Empuje el perno hacia abajo, alinéelo con el agujero
superior y suéltelo para que encaje en su sitio.

382
383
REMOCIÓN DE ESLABONES DE LA PULSERA
CÓMO QUITAR LOS ESLABONES:
1. Coloque la pulsera en posición vertical e introduzca la
herramienta puntiaguda en la abertura del eslabón.
2. Empuje el pasador con fuerza en el sentido de la
flecha hasta que el eslabón se suelte (los pasadores
están diseñados para ser difíciles de quitar).
3. Repita el procedimiento hasta que se haya quitado el
número de eslabones deseado.
REENSAMBLE:
1. Vuelva a unir las piezas de la pulsera.
2. Empuje el perno nuevamente al interior del eslabón en
sentido contrario al indicado por la flecha.
3. Presione hacia abajo el pasador hasta que se acople
firmemente en la pulsera y quede al ras.
PILA
La pila debe durar 4 a 6 años con uso normal del reloj. La
vida real de la pila puede variar según el uso que tenga.
Si necesita cambiar la pila, recomendamos que sólo
TIMEX la reemplace. Su reloj necesitará ser calibrado a
la hora y fecha correctas después del cambio de pila.
Para devolver su reloj a Timex use un envío de prepago.
Para obtener un envío prepago llame al 1-800-448-4639
o visite el comercio donde adquirió su reloj o visite www.
TIMEX.com. Incluya lo siguiente con su reloj para cubrir el
franqueo y el manejo (este no es el costo de reparación):
En EUA, un cheque o giro por valor de US $ 8,00 (dólares
estadounidenses); en Canadá, un cheque o giro por valor
de CAN $12,00 (dólares canadienses). En otros países,
Timex le cobrará el franqueo y el manejo.

384
385
NO INCLUIR CON EL ENVÍO UNA PULSERA ESPECIAL NI
NINGÚN OTRO ARTÍCULO DE VALOR PERSONAL.
NO TIRE LA PILA AL FUEGO. NO LA RECARGUE. MAN-
TENGA LAS PILAS SUELTAS FUERA DEL ALCANCE DE
LOS NIÑOS.
GARANTÍA INTERNACIONAL DE TIMEX
Timex Group USA, Inc garantiza el reloj TIMEX
®
contra
defectos de fabricación durante un periodo de UN AÑO
a partir de la fecha de compra original. Timex y sus
sucursales en todo el mundo respaldarán esta garantía
internacional.
Cabe aclarar que Timex tiene la libertad de optar por
reparar el reloj con componentes nuevos o reacondi-
cionados e inspeccionados, y también podría optar por
reemplazarlo por un modelo idéntico o similar. IMPOR-
TANTE: POR FAVOR ADVIERTA QUE ESTA GARANTÍA
NO CUBRE DEFECTOS O DAÑOS A SU RELOJ:
1. después de vencido el plazo de la garantía;
2. si el reloj inicialmente no se compró a un distribuidor
autorizado por Timex;
3. si las reparaciones efectuadas no las hizo Timex;
4. si son consecuencia de accidentes, manipulación no
autorizada o abuso, y
5. en el cristal, la correa o pulsera, la caja, los accesorios
o la pila. Timex podría cobrarle por el reemplazo de
cualquiera de estas piezas.
ESTA GARANTÍA SE OFRECE EN FORMA EXCLUSIVA Y EN
LUGAR DE CUALQUIER OTRA GARANTÍA, SEA EXPRESA
O IMPLÍCITA, INCLUSIVE TODA GARANTÍA IMPLÍCITA
PARA FINES COMERCIALES O DE ADECUACIÓN A FINES

386
387
PARTICULARES. TIMEX NO SE HARÁ RESPONSABLE POR
CUALQUIER DAÑO ESPECIAL, SECUNDARIO O A CONSE-
CUENCIA. En ciertos países y estados no se permiten
limitaciones de las garantías implícitas ni exclusiones o
limitaciones de daños, por lo cual puede que estas limita-
ciones no sean de aplicación en su caso particular. Esta
garantía le concede derechos legales específicos; usted
también podría estar amparado por otros derechos, que
varían según el país y el estado donde viva.
Para solicitar los servicios incluidos en la garantía,
devuelva el reloj a Timex a una de sus sucursales o al
comercio minorista adonde se compró el reloj junto
con el cupón de reparación del reloj original o, en EUA
y Canadá únicamente, el cupón de reparación del
reloj original o una nota en la que figure su nombre,
domicilio, número de teléfono y fecha y lugar de compra.
Para cubrir el costo de envío, por favor adjunte el
siguiente importe (este importe no es para el pago de la
reparación): En EUA, un cheque o giro por valor de US $
8,00 (dólares estadounidenses); en Canadá, un cheque o
giro por valor de CAN $12,00 (dólares canadienses); en
el Reino Unido, un cheque o giro por valor de UK £ 3,50
(libras). En otros países, Timex se encargará de cobrarle
el importe por el franqueo y el manejo. NUNCA INCLUYA
CON EL RELOJ UNA PULSERA ESPECIAL NI NINGÚN OTRO
ARTÍCULO DE VALOR PERSONAL.
En EUA puede llamar al número 1-800-448-4639 para
obtener información adicional sobre la garantía. En
Canadá, llame al 1-800-263-0981. En Brasil, llame al
+11 2664 1001. En México, llame al 01-800-01-060-00. En
América Central, el Caribe, Bermudas y Bahamas, llame
al (501) 370-5775 (EUA). En Asia, llame al 852-2815-0091.

388
389
En el Reino Unido, llame al 44 020 8687 9620. En Francia,
llame al 33 3 81 63 42 51. En Alemania/Austria, llame al
+43 662 889 2130. En otras regiones, comuníquese con
su minorista local de Timex o el distribuidor de Timex
para obtener información sobre la garantía.
Si su reloj Timex
®
tuviera que ser reparado, envíelo a
Timex según lo indicado en la Garantía Internacional de
Timex o bien envíelo a: TG SERVICE CENTER, P.O. Box
2740, Little Rock, AR 72203. Si tiene consultas sobre el
servicio, llame al 1-800-328-2677 o [email protected]
GARANTÍA EXTENDIDA
Sólo disponible en EUA. Extienda su garantía por 4 años
más a partir de la fecha de compra por $5. Puede pagar
con AMEX, Discover, Visa o MasterCard llamando al 1 800-
448-4639 en horas normales de oficina. El pago deberá
efectuarse dentro de los 30 días siguientes a la fecha
de compra. Indique el nombre, dirección, número de
teléfono, fecha de compra y número de modelo
(5 dígitos). También puede enviar un cheque de $5 por
correo a: Timex Extended Warranty, P.O. Box 1676, Dept.
EF, Little Rock, AR 72203.
©2015 Timex Group USA, Inc. TIMEX, INDIGLO, PERFECT DATE
e INTELLIGENT QUARTZ son marcas registradas de Timex Group B.V.
y sus afiliados.

W273 EU1 355-095017
Perpetual Calendar • Fly-back Chronograph
• Fly-back Chrono Compass • Linear Chronograph • World Time
• Compass • Tide Temp and Compass Altimeter • Depth
• Yacht Racer • Yacht Racer Pro • Chrono Timer • 3GMT
Calendrier Perpétuel • Chronographe avec Fly-back
• Boussole Chrono avec Fly-back • Chronographe linéaire
• Heure Mondiale • Boussole • Marée Température et Boussole
• Altimètre • Profondeur • Yacht Racer • Yacht Racer Pro
• Minuterie Chrono • 3 GMT
Eeuwige kalender • Fly-back chronograaf
• Fly-back chronograaf kompas • Lineaire chronograaf • Wereldtijd
• Kompas • Getij Temp en Kompas • Hoogtemeter • Diepte
• Yacht Racer • Yacht Racer Pro • Chrono Timer • 3GMT
Calendario perpetuo • Cronografo fly-back
• Bussola del cronografo fly-back • Cronografo Lineare
• Ora mondiale • Bussola • Marea temperatura e bussola • Altimetro
• Profondità • Orologio da regata • Orologio da regata Pro
• Timer del cronografo • 3 GMT
®

English .............................. Page 1
Français ............................ page 125
Nederlands ...................... pagina 259
Italiano ............................. pagina 391

1
TIMEX
®
WATCHES
Congratulations on purchasing your TIMEX
®
INTELLIGENT
QUARTZ
™
watch. Please read these instructions carefully
to understand how to operate your Timex watch.
Your watch may not have all of the features described in
this booklet.
For more information, and to register your
product please visit:
www.timex.com

2
3
TABLE OF CONTENTS
How to Start Your Watch .................................................... 5
Water and Shock Resistance ............................................. 6
Indiglo
®
Night-Light ............................................................ 8
Date and Time Setting ........................................................ 9
Perpetual Calendar .......................................................... 11
Fly-Back Chronograph ...................................................... 14
Fly-back Chronograph Compass ...................................... 20
Linear Chronograph ........................................................ 32
World time ....................................................................... 38
Compass........................................................................... 45
Tide Temp and Compass .................................................. 52
Altimeter .......................................................................... 61
Depth ................................................................................ 69
Yacht Racer ...................................................................... 74
Chrono Timer.................................................................... 85
3GMT .............................................................................. 101
Tachymeter Function ..................................................... 108
Slide-Rule Bezel Function .............................................. 109
How to Adjust Bracelet .................................................. 114
Bracelet Link Removal .................................................... 116
Battery ............................................................................ 117
Warranty ......................................................................... 119

4
5
HOW TO START YOUR WATCH
(Does not apply to Perpetual Calendar models.) To start
your watch remove the plastic guard from under the
crown, then press the crown in against the case.
Some watches require the setting crown to be screwed
in. If your watch case has a protrusion with screw
threads, the crown must be screwed in after setting the
watch.
To screw in, push the crown firmly against the threaded
protrusion and hold in while turning the crown clockwise.
Continue to screw in the crown until it is tight. You will
need to unscrew the crown (counter-clockwise) before
pulling it out the next time you want to set your watch.
Welcome to the world of Timex
®
watches with
Intelligent Quartz
™
technology, the future of quartz
analogue technology. Intelligent Quartz technology
brings the power of a micro-processor to the reliability
and accuracy of quartz analogue timekeeping. With Timex
Intelligent Quartz watches, the technology is written into
the design, delivering a new level of dial complication.
Uses up to three additional independent hands to display
an array of information, normally only available in digital
watches, in a traditional analogue format.

6
7
WARNING: TO MAINTAIN WATER-RESISTANCE, DO
NOT PRESS ANY BUTTONS UNDER WATER UNLESS
YOUR WATCH IS INDICATED AS 200 METER WATER-
RESISTANT. NEVER PULL OUT THE CROWN WHILE
UNDER WATER.
1. Watch is water-resistant only as long as crystal, crown
and case remain intact.
2. Watch is not a certified Diver’s watch.
3. Rinse watch with fresh water after exposure to salt
water.
4. Shock-resistance will be indicated on the watch face
or caseback. Watches are designed to pass ISO test for
shock-resistance. However, care should be taken to
avoid damaging the crystal.
WATER AND SHOCK RESISTANCE
If your watch is water-resistant, meter marking (WR_M)
is indicated.
Water-Resistance Depth p.s.i.a.* Water Pressure
Below Surface
30m/98ft 60
50m/164ft 86
100m/328ft 160
200m/656ft 284

8
9
DATE AND TIME SETTING
NOTE: The watch crown has three positions: closed,
middle and outer. To familiarize yourself with the
difference between the various positions extend the
crown to its outer position and then push the crown very
lightly until you feel it click into the middle position.
To set the date and time:
Time
Pull the crown to its outer position and turn it until the
correct time is shown. Ensure AM/PM setting is correct by
verifying that the date changes at midnight, not noon.
Date (Does not apply to Perpetual Calendar)
Pull the crown to its middle position and turn it until the
correct date appears in the date window. Note: The date
changes between 10 pm and 2 am. Do not change the
INDIGLO
®
NIGHT-LIGHT
Press button or crown to activate light.
Electroluminescent technology used in the INDIGLO
®
night-light illuminates the watch face at night and in low
light conditions.
OR

10
11
date during this timeframe. Doing so could damage the
watch movement.
Push crown to closed position after setting date/time. The
second hand will begin moving.
NOTE: For months with fewer than 31 days, the date will
need to be adjusted.
PERPETUAL CALENDAR
OVERVIEW
A
B
1 2
3
1 2
3
HOUR HAND
DAY HAND
DATE HAND
SECOND HAND
MINUTE HAND
CROWN
MONTH HAND
BUTTON A
(RECESSED)
BUTTON B
(RECESSED)
CLOSED
POSITION
MIDDLE
POSITION
OUTER
POSITION

12
13
LEAP YEAR OFFSET
To maintain the correct date, the watch includes a setting
for the current leap year offset. This setting is made at the
Timex factory or after battery replacement and cannot be
changed, only viewed.
To view the offset, pull the crown to its middle position.
The date hand shows the offset: 1 = 1 year after leap year;
2 = 2 years after leap year; 3 = 3 years after leap year; 4
= leap year. Push the crown in when done and the hands
resume their normal display of day, month, and date.
INTRODUCTION
With your watch’s perpetual calendar feature, the
date does not need adjustment until 2100. The watch
automatically accounts for short months and leap years,
always showing the correct day and date. The day and date
were preset at the Timex factory. You only need to adjust
the time. The watch has two recessed push buttons for
use by Timex Service Center to set the day and date after
battery replacement. They have no use otherwise.

14
15
4TH CENTER HAND ADJUSTMENT
To readjust a misaligned 4th center hand:
1. Pull the crown to its outer position. The upper and
lower hands reset to the ends of their sweeps
automatically.
2. 4th center hand should point to 12 o’clock. If within
5 seconds of pulling the crown to its outer position the
4th center hand does not point to 12 o’clock, press
Button A or B to move the hand counterclockwise or
clockwise until it points to 12 o’clock.
3. Push crown to closed position when finished.
FLY-BACK CHRONOGRAPH
OVERVIEW
AA
B
23
1 2
3
1 2
3
UPPER HAND
CHRONO HOURS
2ND TIME ZONE
4TH CENTER HAND
SECOND HAND
DATE WINDOW
CROWN
CHRONO MINUTES SCALE
LOWER HAND
BUTTON A
BUTTON B
MINUTE HAND
HOUR HAND
CLOSED
POSITION
MIDDLE
POSITION
OUTER
POSITION

16
17
TO SET THE SECOND TIME ZONE:
1. Pull crown to its middle position. The upper hand
shows the second time zone time and the 4th center
hand shows the minutes.
2. Assuming that the second time zone time has the
same minutes value as the first time zone, the 4th
center hand should be aligned with the minute hand.
If the hands are not aligned, or if your second time
zone is a different minute within the hour, press
Button B to move the 4th center hand forward until
it is in the desired position.
3. Press Button A to move the upper hand forward in
one-hour increments until it reaches desired second
time zone hour. To move the hand quickly, press and
hold Button A.
4. Push the crown in when finished.
SECOND TIME ZONE
The upper hand shows the time for the second time
zone. Note that the scale is 24-hours, with midnight at
either end and noon in
the middle. Most often,
time zones differ in hour
increments. In such
cases, the minute value
of the second time zone
will be the same as that
displayed by the watch’s
minute hand.
AA
B
23
1 2
3
1 2
3

18
19
4. To reset the fly-back chronograph to zero position,
press Button B (FLY-BACK/RESET).
When the chronograph is reset, all hands move to
zero position. After another eight seconds, the watch
resumes normal display of the second time zone.
5. To reset and/or restart the fly-back chronograph while
it is running, press and hold Button B (FLY-BACK/
RESET). Release it when you wish to restart.
FLY-BACK CHRONOGRAPH
The watch provides a 4-hour fly-back chronograph.
1. To start, press Button A (START/STOP).
The 4th center hand shows the seconds with 1/5
second resolution. The lower hand shows the last
digit of the minutes, counting up to ten and repeating.
The upper hand shows the total time, including hours
and minutes, with divisions every ten minutes. The
chronograph counts up to four hours before stopping
automatically.
2. To stop, press Button A (START/STOP) again. All hands
stop moving.
3. To resume, press Button A (START/STOP) again.

20
21
INDICATOR HAND (4TH CENTER HAND) ADJUSTMENT
To readjust a misaligned indicator hand:
1. Pull the crown to its outer position. The upper and
lower hands reset to the ends of their sweeps
automatically.
2. The 4th center hand should point to 12 o’clock. If it
does not within 5 seconds of pulling the crown to
its outer position, press A or B to move the hand
counterclockwise or clockwise, respectively, until it
points to 12 o’clock.
3. Push the crown in when done.
FLY-BACK CHRONOGRAPH COMPASS
OVERVIEW
A
C
B
1 2
3
1 2
3
UPPER HAND
CHRONO HOURS
2ND TIME ZONE
4TH CENTER HAND
SECOND HAND
DATE WINDOW
CROWN
CHRONO MINUTES SCALE
LOWER HAND
BUTTON A
BUTTON B
HOUR HAND
MINUTE HAND
CLOSED
POSITION
MIDDLE
POSITION
OUTER
POSITION
BUTTON C

22
23
2. Press B to move the 4th center hand forward. Hold the
button to move the hand quickly. The upper and 4th
center hands move together; as the 4th center hand
makes one revolution, the upper hand moves one
hour. Assuming that the second time zone time has
the same minutes value as your first time zone, the
4th center and minute hands should be aligned.
3. Press A to move the upper hand forward in one-hour
increments. Hold the button to move the hand quickly.
4. Push the crown in when finished.
The second time zone time can alternatively be used to
display your home time on a 24-hour format, if you prefer.
When setting the second time in this manner, ensure
that the hour/minute display corresponds to the 24-hour
display by verifying that the date changes at midnight,
not noon.
SECOND TIME ZONE
The upper hand normally shows the time for the second
time zone. Note that the scale is 24 hours, with midnight
at either end and noon in the middle.
To set the second time zone time:
1. Pull the crown to its
middle position. The
upper hand shows
the second time zone
time in military hours
and the 4th center
hand shows the
minutes.
A
C
B
1 2
3
1 2
3

24
25
2. To stop, press A again (START/STOP). All hands freeze.
3. To resume, press A (START/STOP) again, or to reset the
chronograph to zero, press B (FLY-BACK/RESET).
When the chronograph is reset, all hands move to
zero. After eight seconds, the watch resumes the
normal display of the second time zone time.
4. You may also reset and/or restart the chronograph
while it is running. To do so, press and hold B (FLY-
BACK/RESET) to zero the chronograph and release it
when you wish to restart. You do not have to wait for
all hands to reach zero before releasing the button;
the timing will start internally from the button release.
This “fly-back” feature allows you to measure lap time.
The compass may be used while the chronograph is
running without interfering with its operation. See
COMPASS OPERATION.
FLY-BACK CHRONOGRAPH
The watch provides a 4-hour fly-back chronograph.
1. To start, press A (START/STOP). The 4th center hand
shows the seconds with 1/5-second resolution and
the lower hand shows
the last digit of the
minutes, counting up
to ten and repeating.
The upper hand shows
the total time, includ-
ing hours and minutes,
with divisions every
ten minutes. The chro-
nograph counts up
to four hours before
stopping automatically.
A
C
B
1 2
3
1 2
3

26
27
COMPASS CALIBRATION
Before use, the compass must be calibrated.
Since a compass uses the earth’s magnetic field, you
must be aware of large metallic objects, such as vehicles
or bridges, or objects that give off electromagnetic
radiation, such as televisions or computers, which
could affect the magnetic field around the watch. If the
compass is calibrated near such objects, it will only
work properly in that same location. If the compass
is calibrated away from such objects, it will not work
properly near them. For best results, calibrate in the area
of intended use.
In calibrating and taking headings, it is important, as with
all compasses, to keep the compass level. Calibrating or
taking a heading when the watch is not level can result
in large errors. Also avoid areas that may exhibit higher
than normal concentrations of hard and soft iron, as they
may cause inaccurate headings. Whenever a heading is
suspect, recalibrate.
Do not store the watch near any source of magnetism,
such as a computer, appliance, or television, as the
watch can take on a magnetic charge, yielding inaccurate
headings. Typical accuracy of wrist-worn instruments is
within +/- 10 degrees.
To calibrate the compass:
1. Pull the crown to its middle position and wait for the
indicator hands to stop moving.
2. Keep the watch level or place it on a level surface (if
the band interferes, place the watch on an inverted
cup). The watch may be face down, but take care to
protect the watch face.

28
29
5. If you do not wish to set the magnetic declination,
push the crown in. Otherwise, to have watch
automatically compensate for the declination angle,
turn the compass ring until north is at 12 o’clock.
6. Press A or B to move the 4th center hand west (-)
or east (+), respectively, to point to your location’s
declination angle using the declination scale. Hold a
button to move the hand quickly. See the figure below
for an example.
7. Push the crown in when done.
A
B
Magnetic declination set to -14° (14°W)
3. Press C (COMPASS) to begin. The 4th center hand
rotates two revolutions to remind you to rotate the
watch. While level, SLOWLY rotate the watch two
revolutions, taking at least 15 seconds per revolution.
4. When done, press C (COMPASS), keeping the watch
level. The 4th center hand moves back and forth to
acknowledge the end of calibration and then moves to
the current magnetic declination setting.

30
31
available through buttons A (START/STOP) and B (FLY-
BACK/RESET).
NOTE: During compass operation, the second hand
moves in two-second increments. Also, when the
compass is activated, the upper and lower hands may
shift position slightly, returning to their proper positions
when the compass is deactivated. This operation is
normal and yields the most accurate compass reading.
COMPASS OPERATION
Normally, the compass is inactive, with the 4th center
hand pointing to 12 o’clock or showing the chronograph
seconds.
While holding the watch level, press C (COMPASS) to
activate the compass. The compass hand moves to
point north. If the watch is turned, the 4th center hand
will continue to move, always pointing north. After 20
seconds, the compass will automatically turn off and the
4th center hand will return to its normal operation. This
conserves battery life. Press C (COMPASS) at any time to
keep the compass on for another 20 seconds.
The compass may be activated while the chronograph is
in use. The 4th center hand merely switches operation
temporarily. The upper and lower hands continue to show
the chronograph time and all chronograph functions are

32
33
LINEAR CHRONOGRAPH
OVERVIEW
LINEAR AND 4TH CENTER HAND ADJUSTMENT
To readjust a misaligned 4th center hand:
1. Pull the crown to its outer position. The lower hand
resets to the end of its sweep automatically.
2. 4th center hand should point to 12 o’clock. If within
5 seconds of pulling the crown to its outer position the
4th center hand does not point to 12 o’clock, press
Button A to move the hand clockwise until it points to
12 o’clock.
3. If the chronograph has been reset and the linear hand
is not pointing to zero, press and hold Button B for
5 seconds to engage a full calibration of the linear
indicator, which will take up to 32 seconds to perform.
4. Push crown to closed position when finished.
SECOND HAND
DATE WINDOW
CROWN
LOWER HAND
BUTTON A
BUTTON B
4TH CENTER HAND
HOUR HAND
LINEAR
HAND
MINUTE
HAND
A
B
1
2
3

34
35
SECOND TIME ZONE
The lower hand
shows the time for
the second time zone.
Note that the scale
is 24-hours, with
midnight at either
end and noon in the
middle. Most often,
time zones differ in
hour increments.
In such cases, the
minute value of the second time zone will be the same as
that displayed by the watch’s minute hand.
TO SET THE SECOND TIME ZONE:
1. Pull crown to its middle position. The lower hand
shows the second time zone time and the 4th center
hand shows the minutes.
2. Assuming that the second time zone time has the
same minutes value as the first time zone, the 4th
center hand should be aligned with the minute hand. If
the hands are not aligned, or if your second time zone
is a different minute within the hour, press Button B
to move the 4th center hand forward until it is in the
desired position.
3. Press Button A to move the lower hand forward in
one-hour increments until it reaches desired second
time zone hour. To move the hand quickly, press and
hold Button A.
4. Push the crown in when finished.
A
B
1
2
3

36
37
LINEAR CHRONOGRAPH
The watch provides a 4-hour split chronograph.
1. To start, press Button A (START/STOP). The 4th center
hand shows the seconds with 1/5 second resolution.
The linear hand shows the minutes, counting up to
thirty and repeating. The lower hand shows the total
time, including hours and minutes, with divisions every
ten minutes. The chronograph counts up to four hours
before stopping automatically.
2. To stop, press Button A (START/STOP) again. All hands
stop moving.
3. To reset the chronograph to zero position, press But-
ton B (SPLIT/RESET).
When the chronograph is reset, all hands move to zero
position. After another eight seconds, the watch resumes
normal display of the second time zone. While the
chronograph is running, you may take a split time. Press
Button B (SPLIT/RESET) and all hands will stop while the
chronograph continues to run. Press Button B (SPLIT/
RESET) again to resume the display of the running
chronograph elapsed time.

38
39
TO SET THE WORLD TIME:
1. Pull the crown to its middle position. The center hand
shows the world time zone city and the upper hand
shows the time in that city.
A
B
C
1 2 3
WORLD TIME
OVERVIEW
A
B
C
1 2
3
corrected 3.3.11 with Paulo’s new cities
24 CITIES
WORLD TIME
SCALE
SECOND HAND
DATE WINDOW
CROWN
LOWER HAND
BUTTON A
BUTTON B
BUTTON C
4TH CENTER HAND
SEASON SCALE
UPPER HAND
HOUR HAND
MINUTE HAND
CLOSED
POSITION
MIDDLE
POSITION
OUTER
POSITION

40
41
2. Press A or B to move the center hand to the city that
represents your home time zone. Hold a button to
move the hand quickly. Any city may be used.
3. Pull the crown to its outer position. The city selector
hand will revert back to the 12:00 position as indicated
in INDICATOR HAND ADJUSTMENT. After a five second
pause, the upper hand will show the world time (the
time in the city selected in previous step), the center
hand shows the minutes of the world time, and the
lower hand shows the season (see SEASON SETTING).
IMPORTANT: Do not manipulate any of the pushers
or the crown until the center hand has completed its
adjustment. (Approximately 10 seconds after crown is
pulled to its outer position).
4. If the displayed season is not correct for the home
time zone, press C to change it. If the home time zone
observes daylight savings time, the upper hand will
move by one hour.
5. Press A or B to move the time backward or forward,
respectively, to set the world time zone to be the
same as the home time zone. Hold a button to change
the time quickly. The hands move together; as the
center hand makes one revolution, the upper hand
moves one hour. After setting, the center and minute
hands should be aligned.
6. Push the crown in when finished.

42
43
INDICATOR HAND (4TH CENTER HAND) ADJUSTMENT
To readjust a misaligned indicator hand:
1. Pull the crown to its outer position. The upper and
lower hands reset to the ends of their sweeps,
automatically.
2. The 4th center hand should point to 12 o’clock. If it
does not within 5 seconds of pulling the crown to
its outer position, press A or B to move the hand
counterclockwise or clockwise, respectively, until it
points to 12 o’clock.
3. Push the crown in when finished.
NOTE: If no button is pressed for five seconds after the
hands stop, the watch proceeds to the world time setting
operation (see WORLD TIME SETTING).
CITY TIME DISPLAY
A
B
C
1 2 3
Press A or B to
move the center
hand backward or
forward, respec-
tively, and select a
city. The upper hand
moves to show the
time in the selected
city. Note that the
scale is 24 hours, with midnight at either end and noon
in the middle.
SEASON SETTING
The season setting allows the watch to compensate for
daylight savings time (also called “summer time”).

44
45
COMPASS
OVERVIEW
I
I
14
CENTER
CROWN
MIDDLE
SET DATE
I
I
14
OUT
SET TIME
CROWN
B
A (COMPASS)
DECLINATION SCALE
COMPASS HAND
(NORTH END IS RED
POINTED/LONGER)
The watch provides one setting to represent the two peri-
ods all cities that observe daylight savings time have. For
the watch, the period of daylight savings time is SUMMER
and the period of standard time is WINTER.
When the season in one city is set to SUMMER, all cities in
the same hemisphere are automatically set to SUMMER,
while all cities in the other hemisphere are automatically
set to WINTER. The watch knows which cities are in each
hemisphere.
Press C to change the season in the selected city.

46
47
COMPASS HAND ADJUSTMENT
Pull CROWN all the way out. Compass hand should point
to 12 o’clock. If it does not, press either A or B to move
compass hand until it points to 12 o’clock. Hold button to
move hand fast. Push CENTER CROWN in when done and
recalibrate compass.
COMPASS CALIBRATION
Before use, the compass must be calibrated.
Since a compass uses the earth’s magnetic field, you
must be aware of large metallic objects, such as vehicles
or bridges, or objects that give off electromagnetic
radiation, such as televisions or computers, which
could affect the magnetic field around the watch. If the
compass is calibrated near such objects, it will only
work properly in that same location. If the compass
is calibrated away from such objects, it will not work
properly near them. For best results, calibrate in the area
of intended use.
In calibrating and taking headings, it is important, as with
all compasses, to keep the compass level. Calibrating or
taking a heading when the watch is not level can result
in large errors. Also avoid areas that may exhibit higher
than normal concentrations of hard and soft iron, as they
may cause inaccurate headings. Whenever a heading is
suspect, recalibrate.
Do not store the watch near any source of magnetism,
such as a computer, appliance, or television, as the
watch can take on a magnetic charge, yielding inaccurate
headings. Typical accuracy of wrist-worn instruments is
within +/- 10 degrees.

48
49
To calibrate the compass:
1. Pull the crown to its middle position and wait for the
indicator hands to stop moving.
2. Keep the watch level or place it on a level surface (if
the band interferes, place the watch on an inverted
cup). The watch may be face down, but take care to
protect the watch face.
3. Press A or B to begin. The 4th center hand rotates two
revolutions to remind you to rotate the watch. While
level, SLOWLY rotate the watch two revolutions, taking
at least 15 seconds per revolution.
4. When done, press A or B, keeping the watch level. The
4th center hand moves back and forth to acknowledge
the end of calibration and then moves to the current
magnetic declination setting.
5. If you do not wish to set the magnetic declination,
push the crown in. Otherwise, to have watch
automatically compensate for the declination angle,
turn the compass ring until north is at 12 o’clock.
6. Press A or B to move the 4th center hand west (-)
or east (+), respectively, to point to your location’s
declination angle using the declination scale. Hold a
button to move the hand quickly. See the figure on
next page for an example.
7. Push the crown in when done.

50
51
A
B
Magnetic declination set to -14° (14°W)
COMPASS OPERATION
Normally, the compass is inactive, with the 4th center
hand pointing to 12 o’clock or showing the chronograph
seconds.
While holding the watch level, press A or B to activate
the compass. The compass hand moves to point north.
If the watch is turned, the 4th center hand will continue
to move, always pointing north. After 20 seconds, the
compass will automatically turn off and the 4th center
hand will return to its normal operation. This conserves
battery life. Press A or B at any time to keep the compass
on for another 20 seconds.
NOTE: During compass operation, the second hand
moves in two-second increments.

52
53
TIDE TEMP AND COMPASS
OVERVIEW
INDICATOR HAND ADJUSTMENT
Pull crown all the way out. Indicator hand should point
to 12 o’clock. If it does not, press either TIDE or TEMP
push button to move hand until it points to 12 o’clock.
TIDE and TEMP push buttons move hand clockwise and
counterclockwise, respectively. Hold push button to move
hand fast. Push crown in when done.
TIDE/TEMPERATURE SELECTION
Indicator hand shows either tide or temperature constant-
ly. When temperature is shown, press TIDE push button
to select tide clock. Hand moves to low tide and then to
current tide. When tide is shown, press TEMP push button
to select thermometer. Hand moves to beginning of ther-
mometer scale and then to current temperature.
OUTER-SET TIME
DECLINATION
SCALE
INDICATOR
HAND
C (COMPASS)
B (TIDE)
A (TEMP)
CROWN
TURNING
COMPASS
RING
DATE
TIDE SCALE
TEMPERATURE SCALE
MIDDLE-SET DATE

54
55
THERMOMETER
When worn on wrist, thermometer reading is affected by
body heat. For more accurate readings, remove watch
and put in shade for at least several minutes.
Watch can measure water temperature also, if sub-
merged. Be sure to select temperature display before
placing watch in water, as buttons should not be pressed
when watch is underwater.
Thermometer readings are taken every minute, more
frequently, if temperature is changing.
TIDE CLOCK
For tide clock, indicator hand always rotates clockwise, so
tide is rising when hand is pointing left and falling when
pointing right. Number of hours to next high/low tide is
shown on tide scale.
Tides are influenced by sun position and shape of shore-
line, so tide clock cannot precisely give times of high and
low tides. Periodic adjustment may be necessary.
To set tide clock, pull crown to MIDDLE position. Press either
TIDE or TEMP push button to move hand to current tide. TIDE
and TEMP push buttons move hand clockwise and counter-
clockwise, respectively. Push crown in when done.
COMPASS CALIBRATION
Before use, the compass must be calibrated.
Since a compass uses the earth’s magnetic field, you
must be aware of large metallic objects, such as vehicles
or bridges, or objects that give off electromagnetic
radiation, such as televisions or computers, which
could affect the magnetic field around the watch. If the
compass is calibrated near such objects, it will only

56
57
work properly in that same location. If the compass
is calibrated away from such objects, it will not work
properly near them. For best results, calibrate in the area
of intended use.
In calibrating and taking headings, it is important, as with
all compasses, to keep the compass level. Calibrating or
taking a heading when the watch is not level can result
in large errors. Also avoid areas that may exhibit higher
than normal concentrations of hard and soft iron, as they
may cause inaccurate headings. Whenever a heading is
suspect, recalibrate.
Do not store the watch near any source of magnetism,
such as a computer, appliance, or television, as the
watch can take on a magnetic charge, yielding inaccurate
headings. Typical accuracy of wrist-worn instruments is
within +/- 10 degrees.
To calibrate the compass:
1. Pull the crown to its middle position and wait for the
indicator hands to stop moving.
2. Keep the watch level or place it on a level surface (if
the band interferes, place the watch on an inverted
cup). The watch may be face down, but take care to
protect the watch face.
3. Press C (COMPASS) to begin. The 4th center hand
rotates two revolutions to remind you to rotate the
watch. While level, SLOWLY rotate the watch two
revolutions, taking at least 15 seconds per revolution.

58
59
4. When done, press C (COMPASS), keeping the watch
level. The 4th center hand moves back and forth to
acknowledge the end of calibration and then moves to
the current magnetic declination setting.
5. If you do not wish to set the magnetic declination,
push the crown in. Otherwise, to have watch
automatically compensate for the declination angle,
turn the compass ring until north is at 12 o’clock.
6. Press A or B to move the 4th center hand west (-)
or east (+), respectively, to point to your location’s
declination angle using the declination scale. Hold a
button to move the hand quickly. See the figure on
next page for an example.
7. Push the crown in when done.
A
B
Magnetic declination set to -14° (14°W)
COMPASS OPERATION
Normally, the compass is inactive, with the 4th center
hand pointing to 12 o’clock or showing the chronograph
seconds.
While holding the watch level, press C (COMPASS) to
activate the compass. The compass hand moves to
point north. If the watch is turned, the 4th center hand
will continue to move, always pointing north. After 20

60
61
seconds, the compass will automatically turn off and the
4th center hand will return to its normal operation. This
conserves battery life. Press C (COMPASS) at any time to
keep the compass on for another 20 seconds.
NOTE: During compass operation, the second hand
moves in two-second increments.
ALTIMETER
OVERVIEW
ALIMETER
SCALE
(HUNDREDS)
UPPER
RETROGRADE
(THOUSANDS)
BUTTON C
(UNITS)
BUTTON A
(MAXIMUM
ALTITUDE)
BUTTON B
(MINIMUM ALTITUDE)
LOWER RETROGRADE
(UNITS)
CROWN

62
63
INDICATOR HAND (4TH CENTER HAND) ADJUSTMENT
Pull crown all the way out. The upper and lower retro-
grade hands reset to the start of their scales automati-
cally. Indicator hand (4th center hand) should point to 12
o’clock. If it does not, press either A and/or B button to
move hand until it points to 12 o’clock. A and B buttons
move hand clockwise and counterclockwise, respectively.
Hold button to move hand fast. Push crown in when done.
ALTIMETER CALIBRATION
Before use, the altimeter must be calibrated.
Since an altimeter uses pressure to determine the altitude
and pressure varies from place to place, it is important to
set the altimeter to a known reference altitude value, or
to a standard reference altitude of a given place. Sudden
changes in pressure due to changes in weather can cause
your altimeter reading to be off by +-100m (328 ft), even
if your location has not changed. Recalibrate to a known
altitude when drastic pressure changes occur.
To calibrate the altimeter:
1. Pull the crown to its middle position and wait for the
indicator hands to stop moving.
2. If the altimeter was OFF at the moment of crown
pulling, the lower retrograde hand will point to the unit
selected the last time the altimeter was used, other-
wise the lower retrograde hand points to the current
selected unit in altitude display. The 4th center hand
and upper retrograde hand should point to the current
altitude.
3. Press A or B to move the 4th center hand counter-
clockwise or clockwise, respectively, until it points
to the desired calibration altitude. Holding A or B

64
65
will move the center hand more rapidly. The upper
retrograde hand moves relative to the altitude value
displayed by the 4th center hand.
4. Push crown in when done.
ALTIMETER ON/OFF
To turn the altimeter on, press C. The lower retrograde
hand points to METERS. Using the markings on the top
ring, the 4th center hand shows the current altitude’s
hundreds and tens value with divisions every ten
METERS/FEET. The upper retrograde hand shows the cur-
rent altitude’s thousands value with divisions every one
thousand METERS/FEET.
To change the unit from METERS to FEET, press C a
second time. To change the unit from FEET to METERS,
press C twice (altimeter is turned off first then turned
back on with the unit in METERS).
Example : Altitude=2310 m Example : Altitude=7580 ft

66
67
To turn the altimeter off with the current unit set to
FEET, press C. To turn the altimeter off with the unit set
to METERS, press C twice (lower hand goes to FEET first
before going to the OFF position).
The watch will automatically turn the altimeter off
60 minutes after activation.
ALTIMETER MIN/MAX ALTITUDE RECALL
To view the maximum recorded altitude, press A. The
lower retrograde hand shows the unit of measure that
the maximum altitude was recorded in if the altimeter
was OFF at the moment of button press, otherwise
it will show the maximum altitude using the current
selected unit. The 4th center hand shows the maximum
altitude’s hundreds and tens value with divisions every
ten METERS/FEET. The upper retrograde hand shows the
maximum altitude’s thousands value with divisions every
one thousand METERS/FEET.
The maximum recorded altitude is displayed for ten
seconds. To extend the display duration for another ten
seconds, press A before the previous ten second duration
expires.
To change the unit from METERS to FEET or FEET to
METERS, press C.
To view the minimum recorded altitude, press B. The
lower retrograde hand shows the unit of measure that
the minimum altitude was recorded in if the altimeter
was OFF at the moment of button press, otherwise
it will show the minimum altitude using the current
selected unit. The 4th center hand shows the minimum
altitude’s hundreds and tens value with divisions every

68
69
ten METERS/FEET. The upper retrograde hand shows the
minimum altitude’s thousands value with divisions every
one thousand METERS/FEET.
The minimum recorded altitude is displayed for ten
seconds. To extend the display duration for another ten
seconds, press B before the previous ten second duration
expires To change the unit from METERS to FEET or FEET
to METERS, press C.
DEPTH
OVERVIEW
3
AA
B
1
2
3
2
3
2
3
CENTER HAND
OFF INDICATOR
BUTTON A
BUTTON B
LOWER HAND
CROWN
Note: The center and lower hands will automatically
calibrate when you move the crown to position 3 to set
the time.

70
71
TEMPERATURE
The temperature sensor is always on and will take a
reading at least once every 60 seconds. The temperature
is indicated by the lower hand and accompanying scale.
When worn on wrist, temperature reading is affected by
body heat. For more accurate readings, remove watch
from wrist.
DEPTH SENSOR ON/OFF
The sensor is normally off, and must be turned on
manually prior to submersion. Push and release button B
to turn the sensor on. The 4th center hand will move from
the OFF (6 o’clock) position to the 12 o’clock position
and begin to take readings at least once every 5 seconds.
As the depth increases, the 4th center hand will point to
the actual depth as indicated on the depth scale. If the
readings remain in the range of 0 to 2 meters (0-6 feet)
for 5 minutes, the sensor will automatically turn off. To
turn the sensor off manually, press and hold button B
for 2 seconds. The 4th center hand will move to the OFF
(6 o’clock) position.
RECALL MAXIMUM DEPTH/MINIMUM TEMPERATURE
After coming to the surface, unscrew the crown and pull
to the middle position. The center and lower hands will
move to display the maximum depth value and the mini-
mum temperature value, respectively, recorded during the
most recent descent. When the depth sensor is activated
again, the memory will be cleared.
If the watch has not yet been used, then the center and
lower hands shall move to display 0 meters/feet and
0ºC/32 ºF, respectively. The crown must be screwed back
in prior to use/submersion.

72
73
BATTERY LEVEL DETECTION
The watch determines the battery level status and
provides the user with a visual indication corresponding
to the current battery level. The battery level status is
classified as Normal Level, Battery Low Level, and Replace
Battery Level, with each level indicated by the movement
of the second hand.
For the Normal Level status, the second hand shall move one
hand position every one second, which is its normal operation.
When the watch is in Battery Low Level status, the second
hand shall only move at 2-second intervals and shall
move by two hand positions. It is recommended that the
user replace the battery when the watch is at Battery Low
Level status.
When the watch is in Replace Battery Level status, the
second hand shall only move at 5-second intervals and
shall move by five hand positions. At this point, depth
sensor cannot be activated, and the user must replace
the battery immediately.

74
75
PERFECT DATE
With your watch’s Perfect Date
™
feature, the date does
not need adjustment until 2060. The watch automatically
accounts for short months and leap years, and will always
display the correct date upon demand. The date was
preset at the Timex factory. When initially starting your
new watch, if the date displays the date before or behind
the date in your location, you will need to revise the date
for your local date. Pull the crown out to the outer posi-
tion. The 4th center hand will rotate around the dial one
revolution, will stop at 12:00 o’clock position for about 5
seconds and then move to the date at which the watch
is currently set. Rotate the crown forward to increase
the time to the current date (backward to decrease the
time to the current date). Each time you pass midnight
the date will change by one day. After you have set the
YACHT RACER
2 31
A
B
C
SECOND HAND
4TH
CENTER
HAND
UPPER
HAND
PERFECT DATE
™
SCALE
HOUR HAND
CROWN
LOWER HAND
MINUTE HAND

76
77
date to your local date, continue rotating the crown to
position the hands to the current local time, being mindful
of am/pm. Once the time is set, push the crown back in
to the closed position. In normal operation the 4th center
hand will display the date when the crown is pushed.
The hand will travel to the position of the current date as
shown on the top ring of the case. The hand will pause
for you to be able to read the date and then return back
to the 12 o’clock resting position. Please note that the
Perfect Date
™
function will only operate in the Time
mode. When the battery is depleted and is replaced, the
Perfect Date function must be recalibrated. When the
battery requires replacement, it is highly recommended
the watch be sent to a Timex service center, where the
battery will be replaced and the Perfect Date function will
be recalibrated to the current date for the location where
the watch is to be returned.
4TH CENTER HAND ADJUSTMENT
To readjust a misaligned 4th center hand:
1. Pull the crown out to position 3. The upper and lower
hands reset to the ends of their sweeps automatically.
2. Within 10 seconds of pulling the crown to position 3,
the 4th center hand should point to 12 o’clock, if it
does not point to 12 o’clock, press button A or B to
move the hand counterclockwise or clockwise until
it points to 12 o’clock. Pressing and holding button A
or B will make the hand move at a fast rate. Please
note: after 5 seconds without action with the crown
in position 3, the 4th center hand will move to display
the current date.
3. Push crown in to position 1 when finished.

78
79
MODE SELECTION
Press button C to advance the upper hand to the desired
function.
TIME:
Displays the current time only (Perfect Date function will
operate only in the Time mode).
YACHT RACE TIMER 5:
The countdown timer will start at 5 minutes and begin the
chronograph once it reaches zero.
YACHT RACE TIMER 3:
The countdown timer will start at 3 minutes and begin the
chronograph once it reaches zero.
YACHT RACE TIMER 1:
The countdown timer will start at 1 minute and begin the
chronograph once it reaches zero.
CHRONO:
The chronograph will operate without the countdown
timer.
YACHT RACE TIMER OPERATION
The watch provides a 5, 3 or 1 minute countdown timer.
Once the countdown timer reaches zero a one hour
chronograph will automatically start.
1. Press button C until the upper hand displays the
desired 5, 3, or 1 minute Yacht Race Timer mode.
2. To start, press button A (START/STOP). The 4th center
hand displays the seconds counting down and the
lower hand shows the minutes, counting down.
(Please note: buttons B and C are disabled while the
countdown timer is in operation).
3. To stop, press button A (START/STOP) which will stop

80
81
the countdown process. (Please note: button C is
disabled until the countdown timer is reset).
4. To reset, press and hold button B (SPLIT/RESET) for
2 seconds, which will reset the countdown timer back
to the originally selected 5, 3 or 1 minute duration.
In the normal operation of the Yacht Race Timer, once
the countdown timer has reached zero, the chronograph
will automatically start. There is also an audible alert as
the countdown timer reaches each minute mark as well
as when the final minute reaches the last 5 seconds and
begins the chronograph function. The chronograph will
cycle through the 30-minute sequence twice, for a total
maximum time of one hour.
CHRONOGRAPH OPERATION
The watch provides a one hour chronograph which may
be operated independently from the Yacht Race Timer.
1. Press button C until the upper hand is at the beginning
of the 30-minute chronograph scale.
2. To start, press button A (START/STOP). The 4th center
hand displays the seconds counting up; the lower
hand shows the minutes, counting up in a 5-minute
scale and the upper hand shows the half hour count-
ing up in a 30-minute scale. Each time the lower hand
reaches the five minute mark, it will return to the zero
position while the upper hand will continue to advance
through the 30 minute scale. (Please note: button C is
disabled while the chronograph is in operation).

82
83
3. To take a split time, press button B (SPLIT/RESET).
The upper, lower, and 4th center hands will hold their
positions for you to note the split (lap) time. The chro-
nograph is still maintaining the timing sequence while
the hands are stopped. To release the hands, press
button B (SPLIT/RESET) and the hands will quickly
catch up to display the total elapsed time.
4. To stop, press button A (START/STOP) which will stop
the chronograph. (Please note: button C is disabled
while the chronograph is stopped until the chrono-
graph is reset).
5. To reset, press and hold button B (SPLIT/RESET) for
3 seconds, which will reset the chronograph back to
the beginning of the 30-minute scale.
In normal operation the Chronograph will cycle through
the 30-minute sequence twice for a total maximum of
one hour. Once this hour has elapsed, the upper hand
will remain on the 30 minute marker and the lower hand
will return to zero. The chronograph function will need
to be reset prior to using the chronograph function again
or before changing to a different mode. (Please note:
button A is disabled when the maximum one hour time
has elapsed and will not function until the chronograph
has been reset by pressing and holding button B for
3 seconds).

84
85
INDIGLO
®
NIGHT-LIGHT (PRO VERSION ONLY)
Yacht Racer PRO includes the addition of the INDIGLO
®
night-light feature. During low or no-light conditions the
dial can easily be read by activating the INDIGLO
®
night-
light function by pressing in the crown. The Yacht Racer
PRO uses a special luminescent material on the dial which
will glow and create an illumination bright enough to be
able to read the dial, but ensures that your night vision is
not reduced once the light has been extinguished.
CHRONO TIMER
SECOND HAND
4TH
CENTER
HAND
UPPER
HAND
PERFECT DATE
™
SCALE
MINUTE HAND
HOUR HAND
CROWN
LOWER HAND
2 31
A
B
C

86
87
PERFECT DATE
With your watch’s Perfect Date
™
feature, the date does
not need adjustment until 2060. The watch automatically
accounts for short months and leap years, and will always
display the correct date upon demand. The date was
preset at the Timex factory. When initially starting your new
watch, if the date displays the date before or behind the
date in your location, you will need to revise the date for
your local date. Pull the crown out to the outer position.
The 4th center hand will rotate around the dial one revolu-
tion, will stop at 12:00 o’clock position for about 5 seconds
and then move to the date at which the watch is currently
set. Rotate the crown forward to increase the time to the
current date (backward to decrease the time to the current
date). Each time you pass midnight the date will change
by one day. After you have set the date to your local date,
continue rotating the crown to position the hands to the
current local time, being mindful of am/pm. Once the time
is set, push the crown back in to the closed position. In
normal operation the 4th center hand will display the date
when the crown is pushed. The hand will travel to the
position of the current date as shown on the top ring of
the case. The hand will pause for you to be able to read
the date and then return back to the 12 o’clock resting
position. Please note that the Perfect Date
™
function
will only operate in the Time mode. When the battery is
depleted and is replaced, the Perfect Date function must
be recalibrated. When the battery requires replacement,
it is highly recommended the watch be sent to a Timex
service center, where the battery will be replaced and the
Perfect Date function will be recalibrated to the current
date for the location where the watch is to be returned.

88
89
4TH CENTER HAND ADJUSTMENT
To readjust a misaligned 4th center hand:
1. Pull the crown out to position 3. The upper and lower
hands reset to the ends of their sweeps automatically.
2. When it stops moving, the 4th center hand should
point to 12 o’clock, if it does not point to 12 o’clock,
press button A or B to move the hand counterclock-
wise or clockwise until it points to 12 o’clock. Pressing
and holding button A or B will make the hand move at
a fast rate. Please note: after 5 seconds without action
with the crown in position 3, the 4th center hand will
move to display the current date.
3. Push crown in to position 1 when finished.
MODE SELECTION
Press button C to advance the upper hand to the desired
function.
TIME:
Displays the current time only (Perfect Date
™
function will
operate only in the Time mode).
CHRONOGRAPH OPERATION
The watch provides a four hour chronograph. At the end
of the four hour period the Chronograph will automati-
cally turn off. This will save the battery in the event of an
accidental activation of the Chronograph.
1. Press button C until the upper hand is at the beginning
of the upper hand chronograph scale, the lower hand
to 0 on the lower scale.

90
91
2. To start, press button A (START/STOP). The 4th center
hand displays the seconds counting up; the lower
hand shows the minutes, counting up in a 30-minute
scale and the upper hand shows the hour counting up
on the 4-hour scale. Each time the lower hand reaches
the 30 minute mark, it will return to the zero position
to begin the next 30 minute period, while the upper
hand will continue to advance through the 4-hour
scale. (Please note: button C is disabled while the
chronograph is in operation).
3. To take a split time, press button B (SPLIT/RESET).
The upper, lower, and 4th center hands will hold their
positions for you to note the split (lap) time. The chro-
nograph is still maintaining the timing sequence while
the hands are stopped. To release the hands, press
button B (SPLIT/RESET) and the hands will quickly
catch up to display the total elapsed time.
4. To stop, press button A (START/STOP) which will stop
the chronograph. (Please note: button C is disabled
while the chronograph is stopped until the chrono-
graph is reset).
5. To reset the chronograph after it is stopped, press but-
ton B (SPLIT/RESET), which will reset the chronograph
back to the beginning of the 30-minute and 4-hour
scales on the two sub-dials.
In normal operation the Chronograph will cycle through
the 30-minute sequence 8 times for a total maximum of
four hours. Once this four hour period has elapsed, the
upper hand will remain on the four hour marker and the
lower hand will return to zero. The chronograph function

92
93
will need to be reset prior to using the chronograph func-
tion again or before changing to a different mode. (Please
note: button A is disabled when the maximum four hour
time has elapsed and will not function until the chrono-
graph has been reset by pressing button B).
COUNT-DOWN TIMER
The watch provides a count-down timer function.
Special note: The upper hand, lower hand, and 4th
center hand are united during steps 3, 4 and 5 below. As
you move the minute and second hands forward/back-
ward, you will see all three hands reacting to the addition
or subtraction to the length of time for the countdown
timer duration. After pulling the crown out to the middle
position, pressing button C will advance you through the
cycle of hand engagement as follows: Upper hand (press
button C) - Lower hand (press button C) - 4th Center hand
(press button C) back to Upper hand….this allows you to
advance through the cycle to engage the hands you need
to adjust to achieve setting the desired length of time to
count down. Pressing the crown in will end the setting
procedure and confirms the values set so far at any point
in this cycle.
SETTING THE COUNTDOWN TIMER
The countdown timer may only be set when the count-
down timer function is not in operation. If the countdown
timer was previously used, it will need to be reset. If the
timer is currently in operation, it must be stopped and
reset in order to set the countdown timer.
1. Press button C until the upper hand is at some point
on the Timer scale. If the Timer has previously been

94
95
set, the hand will point to the time previously set. If
this is the first time the timer is being set, it will point
to the 0 on the timer scale.
2. Pull the crown out to the middle position.
3. To set the desired number of hours in half hour incre-
ments (up to the maximum time of 4:00:00), press
button A to move the upper hand counterclockwise
(pressing button B will move this hand clockwise),
until the desired number of hours has been selected.
Please note that you are selecting the number of
hours in the closest half-hour increment to the total
desired time (example: for a total desired countdown
time of 2:53:30, you will select 3 hours). Once you
have completed setting the number of hours, press
button C to confirm your selection.
4. Now you may set the desired number of minutes in
one minute increments by pressing button A to move
the lower hand counterclockwise (pressing button
B will move this hand clockwise), until the desired
number of minutes has been selected. Please note
that you are adjusting the number minutes forward
or backwards to get to the desired time (example: for
a total desired countdown time of 2:53:30, you will
press button A seven times which will move the total
countdown time from 3 hours to 2:53:00). You will no-
tice the hour hand will move slightly backwards from
the 3 hour marker towards the 2.5 hour marker. Once
you have adjusted the time to the correct number of
minutes, press button C to confirm your selection.
5. Now you may set the desired number of seconds in
one second increments by pressing button A to move

96
97
the fourth hand counterclockwise (pressing button B
will move this hand clockwise), until the desired num-
ber of seconds has been selected. Please note that
you are adding or subtracting the number seconds to
complete the total desired time (example: for a total
desired countdown time of 2:53:30, you will push
button B 30 times to select 30 seconds). Once you
have completed setting the number of seconds, push
the crown in to position 1 to confirm your complete
countdown timer value selection.
COUNTDOWN TIMER OPERATION
Once you have set the countdown timer to the desired
length of time to count down, you can now operate the
countdown timer.
Starting the countdown sequence: Press button A to
start the countdown timer. The fourth center hand and
the lower hand will begin to move counterclockwise. The
upper hand will move clockwise. The hands will continue
to indicate the remaining time left in the countdown
sequence until the length of time you have set the count-
down timer has passed and the value of remaining time
reaches zero. When the remaining time in the sequence
reaches zero, the chime will sound signaling to you the
countdown sequence has completed.

98
99
Interrupting the countdown sequence: If you wish
to stop the countdown sequence prior to the sequence
reaching zero, you may do so by pressing button A (the
fourth center hand as well as the upper and lower hands
will stop moving). If you wish to later begin the sequence
from the point at which you stopped the countdown, sim-
ply press button A again (the fourth center hand as well
as the upper and lower hands will resume moving).
Resetting the countdown sequence: Once the count-
down sequence has reached zero and the chime has
sounded, you may reset the countdown timer to the set
value by pressing button B (the fourth center hand as well
as the upper and lower hands will move to indicate the
value of time you set prior to using the countdown timer
function).
Clearing the countdown timer value: If desired, you
may clear the value of the countdown timer to zero.
This can only be done if the countdown timer is not in
operation and has been reset. If the countdown timer is
running, you must first stop the countdown sequence
by pressing button A, followed by pressing button B. This
will stop and reset the countdown timer to the currently
selected time value. To clear the countdown timer value
to zero, push and hold button B for two seconds. You
should now follow the instructions to set the countdown
timer value to the new desired length of time.

100
101
Split time function: While the countdown timer is in
operation, you may employ the split function to note the
remaining time in the countdown sequence.
To use the split time function, press button B, which will
make the upper, lower and 4th center hands freeze in
place. The countdown function will continue to operate
internally while the hands are frozen.
To resume the movement of the upper, lower and 4th
center hands, press button B again and the hands will
reposition themselves in proper placement to show the
current time within the countdown sequence.
3GMT
SECOND
HAND
CROWN
ROTATING TOP RING
(24-HOUR FORMAT)
4TH CENTER HAND
MINUTE
HAND
HOUR HAND
INNER RING /
NUMERALS
(24-HOUR FORMAT)
A
2 31

102
103
3 TIME ZONE FUNCTION
Your watch has the ability to display three time zones:
1. Hour and Minute hands: Displays the time in a stan-
dard 12 hour format. Please note: The date displayed
in the date window is linked to the time displayed by
these two hands.
2. 4th center hand and inner ring: Displays the time in a
24-hour format.
3. 4th center hand and case rotating top ring: Displays
the time in a 24-hour format.
4TH CENTER HAND ADJUSTMENT
To readjust a misaligned 4th center hand:
1. Pull the crown out to position 3.
2. 4th center hand should point to 12 o’clock. If within
5 seconds of pulling the crown to position 3 the 4th
center hand does not point to 12 o’clock, press button
A to move the hand clockwise until it points to 12
o’clock. Pressing and holding button A will make the
hand move at a fast rate.
3. Push crown in to position 1 when finished.

104
105
4TH CENTER HAND CALIBRATION
The 4th center hand is calibrated at the Timex factory to
reflect the standard minutes within the hour as defined
by Universal Time Coordinated. Globally a majority of
locations use the standard minutes. If the location you are
using for the 2nd and 3rd time zone uses the standard
minutes, the 4th center hand does not require recalibra-
tion. Only if you wish to have the second and third time
zones to reflect locations that do not follow the standard
minute, the instructions to recalibrate the 4th center hand
are as follows:
1. Pull the crown out to position 3. The 4th center hand
will point to 12 o’clock.
2. Rotate the crown to position the minute hand in the
correct position within the hour required for the loca-
tion you are wishing to use for the 2nd and 3rd time
zones.
3. Push the crown in to position 2. The 4th center hand
will point to its currently calibrated position of the
minutes within the hour.
4. Push button A to move the 4th center hand clockwise
until it aligns with the minute hand. Pressing and hold-
ing button A will make the hand move at a fast rate.
5. Pull the crown out to position 3. The 4th center hand
will point to 12 o’clock.
6. Rotate the crown to position hour and minute hands
to the correct time.

106
107
7. Push crown in to position 1 when finished.
Please note: The 4th center hand will track the time using
the current calibration of the minutes within the hour.
Time zones 2 and 3 both utilize the 4th center hand and
therefore the locations being tracked in time zones 2 and
3 must both utilize the same minutes within the hour for
these time zones to be displayed properly.
SETTING THE 4TH CENTER HAND (TIME ZONE II)
Note the current time in the location you wish to track
as the 2nd time zone. Press button A until the 4th center
hand is pointing to that time on the inner ring. (Please
note: this scale is a 24-hour format). The 4th center hand
will advance 30 minutes each time button A is pressed.
Pressing and holding button A will make the hand move at
a fast rate. This will set the 2nd time zone on the watch.
SETTING THE CASE ROTATING TOP RING
(TIME ZONE III)
The 3rd time zone is set by using the existing setting of
the 4th center hand and adjusting the case rotating top
ring to the desired time of the 3rd time zone. (Please note:
this scale is a 24-hour format). The top ring has 72 posi-
tions. To advance the top ring one hour you will advance
it three positions (3 “clicks”). Note the current time in the
location you wish to track as the 3rd time zone. Rotate
the case top ring counter clockwise to position the cor-
rect hour marker for that time with the 4th center hand.

108
109
TACHYMETER FUNCTION
(not all models)
The tachymeter will only determine speeds greater than
60 units per hour using this method; slower speeds can
be measured by decreasing the unit of measurement.
The function performed by a tachymeter is independent
of the unit of distance (e.g. statute miles, nautical miles,
kilometers, meters etc.) as long as the same unit of length
is used for all calculations.
1. Determine the start and finish markers for your
pre-determined distance.
2. Start the chronograph once the target for speed
measurement passes the start marker.
3. Stop the chronograph once the target for speed
measurement passes the finish marker.
4. The chronograph second hand is compared to the
tachymeter markings to determine the target’s speed.
SLIDE-RULE BEZEL FUNCTION
The slide rule function of the top ring operates by rotating
the outer ring. The inner ring does not move. The outer
ring is always related to “distance” or “speed”, or any
data that varies with time. The inner ring only notes units
of time.
Outer Ring
On the outer ring, the figure “10” represents factors or
multiples of 10, such as 0.1, 1.0, 10, or 100.

110
111
Inner Ring
On the inner ring, “MPH” (mile per hour) refers to “speed in-
dex”. This index is used to calculate the speed involving any
data per hour
. On the inner ring, “STAT” (statute miles) and
“NAUT” (nautical miles) are for conversion of distance units.
OUTER RING
INNER RING
The following examples serve as a guide of how to use
the slide rule.
SPEED CALCULATION:
What speed is required to go 10 nautical miles in
15 minutes?
Known Factors: Distance: 10 nautical miles Time:
15 minutes
• Align “10” arrow on the outer ring with “15” on the
inner ring.
• The speed required can be found directly above the
“MPH” marking on the inner ring.
The answer: 40 nautical miles per hour
Time Calculation: How long will it take to go 10 nauti-
cal miles at a speed of 40 miles per hour?

112
113
Known Factors: Speed: 40 miles per hour Distance:
10 nautical miles
• Align “40” on the outer ring with the mark “MPH”
marking on the inner ring.
• The time required can be found directly below the “10”
arrow on the outer ring, which is “15” on the inner ring.
The answer: 15 minutes
DISTANCE CALCULATION:
How far can you travel at 40 miles per hour for
15 minutes?
Known Factors: Speed: 40 nautical miles per hour Time:
15 minutes
• Align “40” on the outer ring directly above the mark
“MPH” on the inner ring.
• The distance travelled can be obtained above the “15”
marker on the inner ring. The number indicated on the
outer ring is “10”.
The answer: The distance travelled is 10 nautical
miles.
UNIT CONVERSION:
To convert distance from nautical miles to statute miles
and kilometers.
Known Factor: Distance to convert is 10 nautical miles
• Align the “10” arrow on the outer ring above the
“NAUT” on the inner ring. The conversion in statute
miles (11.5) is found above the inner ring “STAT” mark-
ing, and the conversion to kilometers (18.5) is found
above the inner ring “MPH” marking.

114
115
HOW TO ADJUST BRACELET
(Variations of the following bracelet sections apply to all
watch models).
SLIDING CLASP BRACELET
1. Open locking plate.
2. Move clasp to desired
bracelet length.
3. Exert pressure while
holding locking plate and
slide clasp back and forth until it engages in grooves
on underside of bracelet.
4. Press locking plate down until it snaps closed. Clasp
can be damaged if excessive force is used.
FOLDOVER CLASP BRACELET
1. Find spring bar that connects bracelet to clasp.
2. Using a pointed tool, push in spring bar and gently
twist bracelet to disengage.
3. Determine wrist size, then insert spring bar in correct
bottom hole.
4. Push down on spring bar, align with top hole and
release to lock in place.

116
117
BRACELET LINK REMOVAL
REMOVING LINKS:
1. Place bracelet upright and insert pointed tool in
opening of link.
2. Push pin forcefully in direction of arrow until link is
detached (pins are designed to be difficult to remove).
3. Repeat until desired number of links are removed.
RE-ASSEMBLY:
1. Rejoin bracelet parts.
2. Push pin back into link in opposite direction of arrow.
3. Press pin down securely into bracelet until it is flush.
BATTERY
The battery should provide 4-6 years of normal watch use.
The actual battery life may vary depending on actual use.
When the battery needs to be changed, we recommend
that only TIMEX replace it. Your watch will need to be
recalibrated to correct time and date after changing the
battery. To return your watch to Timex use a pre-paid
shipper. To obtain a pre-paid shipper please call 1-800-
448-4639 or visit the retailer where you purchased your
watch or go to www.Timex.com. Please include the
following with your watch to cover postage and handling
(this is not a repair charge); a U.S.$8.00 check or money
order in the U.S.; a CAN$12.00 cheque or money order
in Canada; In other countries Timex will charge you for
postage and handling.

118
119
NEVER INCLUDE A SPECIAL WATCHBAND OR ANY
OTHER ARTICLE OF PERSONAL VALUE IN YOUR
SHIPMENT.
DO NOT DISPOSE OF BATTERY IN FIRE. DO NOT
RECHARGE. KEEP LOOSE BATTERIES AWAY FROM
CHILDREN.
TIMEX INTERNATIONAL WARRANTY
Your TIMEX
®
watch is warranted against manufacturing
defects by Timex Group USA, Inc. for a period of ONE
YEAR from the original purchase date. Timex and its
worldwide affiliates will honor this International Warranty.
Please note that Timex may, at its option, repair your
watch by installing new or thoroughly reconditioned and
inspected components or replace it with an identical or
similar model. IMPORTANT — PLEASE NOTE THAT THIS
WARRANTY DOES NOT COVER DEFECTS OR DAMAGES
TO YOUR WATCH:
1. after the warranty period expires;
2. if the watch was not originally purchased from an
authorized Timex retailer;

120
121
3. from repair services not performed by Timex;
4. from accidents, tampering or abuse; and
5. lens or crystal, strap or band, watch case, attachments
or battery. Timex may charge you for replacing any of
these parts.
THIS WARRANTY AND THE REMEDIES CONTAINED HEREIN
ARE EXCLUSIVE AND IN LIEU OF ALL OTHER WARRANTIES,
EXPRESS OR IMPLIED, INCLUDING ANY IMPLIED
WARRANTY OF MERCHANTABILITY OR FITNESS FOR
PARTICULAR PURPOSE. TIMEX IS NOT LIABLE FOR ANY
SPECIAL, INCIDENTAL OR CONSEQUENTIAL DAMAGES.
Some countries and states do not allow limitations
on implied warranties and do not allow exclusions or
limitations on damages, so these limitations may not
apply to you. This warranty gives you specific legal rights
and you may also have other rights, which vary from
country to country and state to state.
To obtain warranty service, please return your watch to
Timex, one of its affiliates or the Timex retailer where the
watch was purchased, together with a completed original
Watch Repair Coupon or, in the U.S. and Canada only, the
completed original Watch Repair Coupon or a written
statement identifying your name, address, telephone
number and date and place of purchase. Please include
the following with your watch to cover postage and
handling (this is not a repair charge): a US$ 8.00 check or
money order in the U.S.; a CAN$12.00 cheque or money
order in Canada; and a UK£3.50 cheque or money order
in the U.K. In other countries, Timex will charge you
for postage and handling. NEVER INCLUDE A SPECIAL

122
123
WATCHBAND OR ANY OTHER ARTICLE OF PERSONAL
VALUE IN YOUR SHIPMENT.
For the U.S., please call 1-800-448-4639 for additional
warranty information. For Canada, call 1-800-263-0981.
For Brazil, call +11 2664 1001. For Mexico, call 01-800-
01-060-00. For Central America, the Caribbean, Bermuda
and the Bahamas, call (501) 370-5775 (U.S.). For Asia, call
852-2815-0091. For the U.K., call 44 020 8687 9620. For
France, call 33 3 81 63 42 51. For Germany/Austria, call
+43 662 889 2130. For other areas, please contact your
local Timex retailer or Timex distributor for warranty
information.
If your Timex
®
watch should ever need servicing, send it
to Timex as set forth in the Timex International Warranty
or addressed to: TG SERVICE CENTER, P.O. Box 2740, Little
Rock, AR 72203. For service questions, call 1-800-328-
2677 or [email protected]
EXTENDED WARRANTY
Available in U.S. only. Extend your warranty for an ad-
ditional 4 years from date of purchase for $5. You can
pay with AMEX, Discover, Visa or MasterCard by calling
1 800-448-4639 during normal business hours. Payment
must be made within 30 days of purchase. Name, ad-
dress, telephone number, purchase date, and 5-digit
model number required. You can also mail a check for $5
to: Timex Extended Warranty, P.O. Box 1676, Dept. EF, Little
Rock, AR 72203.
©2015 Timex Group USA, Inc. TIMEX, INDIGLO, PERFECT DATE and
INTELLIGENT QUARTZ are trademarks of Timex Group B.V. and its
subsidiaries.

125
MONTRES TIMEX
®
Félicitations pour votre achat d’une montre Timex
®
INTELLIGENT QUARTZ
™
. Lire les instructions attentive-
ment pour bien comprendre le fonctionnement de votre
montre Timex.
Il est possible que ce modèle ne présente pas toutes les
fonctions décrites dans le dépliant.
Pour de plus amples renseignements et pour enregistrer
le produit, visiter le site :
www.timex.com

126
127
SOMMAIRE
Comment mettre la montre en marche ........................ 129
Résistance aux chocs et à l’eau .................................... 130
Veilleuse Indiglo
®
.......................................................... 132
Réglage de la date et de l’heure .................................... 133
Calendrier perpétuel ...................................................... 135
Chronographe avec Fly-Back ......................................... 138
Boussole chrono avec Fly-Back ..................................... 144
Chronographe Linéaire................................................... 158
Heure mondiale ............................................................. 164
Boussole ......................................................................... 171
Marée Température et Boussole ................................... 178
Altimètre ........................................................................ 188
Profondeur ..................................................................... 197
Yacht Racer .................................................................... 202
Minuterie Chrono ........................................................... 214
3GMT .............................................................................. 232
Fonction Tachymètre ..................................................... 239
Fonction Règle à Calcul de la Bague d’Encadrement .... 241
Comment ajuster le bracelet ......................................... 247
Démontage de maillons du bracelet .............................. 249
Pile .................................................................................. 250
Garantie .......................................................................... 252

128
129
COMMENT METTRE LA MONTRE
EN MARCHE
(Ne concerne pas les modèles à calendrier perpétuel.)
Pour mettre la montre en marche, retirer la bague de
protection en plastique située sous la couronne, puis
enfoncer la couronne vers le boîtier.
Si le boîtier présente un bouton fileté, la couronne doit
être vissée après le réglage de la montre.
Pour visser, enfoncer fermement la couronne sur le
bouton fileté et la maintenir enfoncée tout en la faisant
tourner dans le sens horaire. Continuer à visser la
couronne jusqu’à ce qu’elle soit bien serrée. Il faudra
dévisser la couronne (dans le sens anti-horaire) avant de
la tirer la prochaine fois que la montre doit être réglée.
Bienvenue dans l’univers des montres Timex
®
avec
la technologie Intelligent Quartz
™
, la technologie à
quartz du futur. La technologie Timex Intelligent Quartz
combine la puissance d’un microprocesseur à la fiabilité
et la précision des montres à quartz analogiques. Avec
les montres Timex Intelligent Quartz, la technologie est
inscrite dans le design, offrant un degré de complexité du
cadran sans précédent. Jusqu’à trois aiguilles indépen-
dantes additionnelles sont utilisées pour afficher, sous
un format analogique traditionnel, tout un ensemble de
données habituellement disponibles uniquement sur les
montres numériques.

130
131
ATTENTION : POUR PRÉSERVER L’ÉTANCHÉITÉ, NE
PAS ENFONCER LES BOUTONS SOUS L’EAU, SAUF SUR
LES MODÈLES ÉTANCHES JUSQU’À 200 MÈTRES. NE
JAMAIS TIRER LA COURONNE ALORS QUE LA MONTRE
EST SOUS L’EAU.
1. La montre est étanche aussi longtemps que le verre,
les couronnes et le boîtier sont intacts.
2. La montre n’est pas conçue pour la plongée.
3. Rincer à l’eau douce après tout contact avec l’eau
de mer.
4. La résistance aux chocs est indiquée sur la face de la
montre ou le dos du boîtier. Les montres sont conçues
pour se conformer à l’essai de choc ISO. Toutefois,
prendre garde à éviter d’endommager le verre.
RÉSISTANCE AUX CHOCS ET À L’EAU
Si la montre est étanche, la profondeur maximale (WR_M)
est indiquée.
Profondeur d’étanchéité p.s.i.a.* Pression de l’eau
sous la surface
30m/98pi 60
50m/164pi 86
100m/328pi 160
200m/656pi 284

132
133
RÉGLAGE DE LA DATE ET DE L’HEURE
REMARQUE : La couronne de montre possède
3 positions : enfoncée, intermédiaire et extrême. Pour
vous familiariser avec les différentes positions, tirez la
couronne en position extrême et poussez-la doucement
jusqu’à ce qu’elle se place en position intermédiaire par
un clic.
Pour régler la date et l’heure :
Heure
Tirez complètement la couronne et tournez jusqu’à
afficher l’heure exacte. Assurez-vous que le réglage
matin/soir (AM/PM) est correct en vérifiant que la date
change à minuit et non à midi.
VEILLEUSE INDIGLO
®
Appuyez sur le bouton ou la couronne pour activer
l’éclairage. La technologie électroluminescente utilisée
dans la veilleuse INDIGLO
®
permet d’illuminer le cadran
de la montre la nuit et dans des conditions de faible
éclairage.
OU

134
135
Date (Ne concerne pas les modèles
à calendrier perpétuel)
Tirez la couronne en position intermédiaire puis tournez
jusqu’à apparition de la date courante dans le dateur.
Remarque : La date change entre 10 pm (22h00) et 2 am
(2h00). Ne changez pas la date pendant ce laps de temps.
Ceci aurait pour effet d’endommager le mouvement de
la montre.
Enfoncez la couronne après avoir réglé l’heure. L’aiguille
des secondes commencera à se déplacer.
REMARQUE : Pour les mois de moins de 31 jours, la date
devra être modifiée.
CALENDRIER PERPÉTUEL
VUE D’ENSEMBLE
A
B
1 2
3
1 2
3
AIGUILLE
DES HEURES
AIGUILLE
DES JOURS
AIGUILLE DE LA DATE
AIGUILLE
DES SECONDES
AIGUILLE
DES MINUTES
COURONNE
AIGUILLE DES MOIS
BOUTON A
(ENCASTRÉ)
BOUTON B
(ENCASTRÉ)
POSITION
ENFONCÉE
POSITION
INTER-
MÉDIAIRE
POSITION
EXTRÊME

136
137
PRISE EN COMPTE DES ANNÉES BISSEXTILES
Afin de se maintenir à la bonne date, la montre comprend
un réglage permettant de tenir compte de l’année bissex-
tile courante. Ce réglage est effectué à l’usine Timex ou
après le remplacement de la pile et ne peut être modifié
mais seulement affiché.
Pour l’afficher, tirez la couronne en position intermédiaire.
L’aiguille de date affiche le réglage : 1 = 1 an après une
année bissextile; 2 = 2 ans après une année bissextile;
3 = 3 ans après une année bissextile; 4 = l’année bissextile.
Enfoncer la couronne pour valider ; les aiguilles retournent
à leur affichage habituel du jour, du mois et de la date.
INTRODUCTION
Grâce au calendrier perpétuel, la date ne nécessite aucun
réglage jusqu’en 2100. La montre tient automatique-
ment compte des mois courts et des années bissextiles
et affiche toujours le jour et la date corrects. Le jour
et la date ont été préréglés à l’usine Timex. Il ne reste
qu’à régler l’heure. La montre possède également deux
boutons poussoirs encastrés permettant au centre
de services Timex de régler le jour et la date après
remplacement de la pile. Autrement ils ne servent à rien.

138
139
RÉGLAGE DE LA 4ÈME AIGUILLE CENTRALE
Pour réaligner la 4ème aiguille centrale :
1. Tirez complètement la couronne. Les aiguilles
supérieure et inférieure se règlent automatiquement
en allant se placer en bout de trajectoire.
2. La 4ème aiguille centrale doit indiquer 12 heures. Si
ça n’est pas le cas au bout de 5 secondes, appuyez
sur A ou B pour faire avancer l’aiguille respectivement
dans le sens anti-horaire ou dans le sens horaire
jusqu’à ce qu’elle indique 12 heures.
3. Enfoncez la couronne pour valider.
CHRONOGRAPHE AVEC FLY-BACK
VUE D’ENSEMBLE
AA
B
23
1 2
3
1 2
3
AIGUILLE
SUPÉRIEURE
HEURES CHRONO
DEUXIÈME FUSEAU
HORAIRE
4ÈME AIGUILLE
CENTRALE
AIGUILLE
DES SECONDES
DATEUR
COURONNE
MINUTES DU
CHRONOGRAPHE
AIGUILLE INFÉRIEURE
BOUTON A
BOUTON B
AIGUILLE
DES MINUTES
AIGUILLE DES HEURES
POSITION
ENFONCÉE
POSITION
INTER-
MÉDIAIRE
POSITION
EXTRÊME

140
141
POUR RÉGLER LE SECOND FUSEAU HORAIRE :
1. Tirez la couronne en position intermédiaire. L’aiguille
supérieure indique l’heure du second fuseau horaire et
la 4ème aiguille centrale indique les minutes.
2. Si la valeur des minutes du second fuseau horaire est
indentique à celle de votre fuseau horaire, l’aiguille
des minutes et la 4ème aiguille centrale doivent être
alignées. Si les aiguilles ne sont pas alignées, ou si
le second fuseau horaire diffère en minute, appuyez
sur le bouton B pour faire avancer la 4ème aiguille
centrale à la position désirée.
3. Appuyez sur le bouton A pour faire avancer l’aiguille
supérieure par intervalles d’une heure jusqu’à ce
qu’elle atteigne l’heure désirée dans le second fuseau
horaire. Pour faire avancer l’aiguille rapidement,
appuyez et tenez enfoncé le bouton A.
SECOND FUSEAU HORAIRE
L’aiguille supérieure indique l’heure pour le second fuseau
horaire. Notez qu’il s’agit d’une échelle sur 24 heures,
minuit se situant à cha-
cune de ses extrémités
et midi au milieu. Le plus
souvent, les fuseaux
horaires varient par
intervalles d’heure. Dans
ce cas, la valeur des
minutes correspondra à
celle affichée par l’aiguille
des minutes de la montre.
AA
B
23
1 2
3
1 2
3

142
143
2. Pour l’arrêter, appuyez de nouveau sur le bouton A
(START/STOP [Démarrage/Arrêt]). Toutes les aiguilles
s’arrêtent.
3. Pour redémarrer, appuyez de nouveau sur le bouton A
(START/STOP [Démarrage/Arrêt]).
4. Pour remettre à zéro la fonction fly-back du
chronographe, appuyez sur le bouton B (FLY-BACK/
RESET [Remise à zéro]).
Lors de la remise à zéro du chronographe, toutes les
aiguilles se placent sur zéro. Après huit secondes, la
montre reprend l’affichage normal du second fuseau
horaire.
5. Pour remettre à zéro et/ou redémarrer le chronographe
avec fonction fly-back, appuyez sur le bouton B
(FLY-BACK/RESET [Remise à zéro]). Relâchez-le quand
vous voulez redémarrer.
4. Enfoncez la couronne pour valider.
CHRONOGRAPHE AVEC FLY-BACK OU RETOUR
À LA VOLÉE
La montre comporte un chronographe avec fly-back ou
retour à la volée de 4 heures.
1. Pour démarrer, appuyez sur le bouton A
(START/STOP [Démarrage/Arrêt]).
La 4ème aiguille centrale indique les secondes
avec une résolution d’1/5 de seconde. L’aiguille
inférieure indique le dernier chiffre des minutes,
en comptant jusqu’à 10 et en répétant l’opération.
L’aiguille supérieure indique le temps total, heures et
minutes, avec des divisions toutes les dix minutes. Le
chronographe fonctionne jusqu’à quatre heures avant
de s’arrêter automatiquement.

144
145
RÉGLAGE DE L’AIGUILLE INDICATRICE
(4ÈME AIGUILLE CENTRALE)
POUR RÉALIGNER UNE AIGUILLE INDICATRICE :
1. Tirez complètement la couronne. Les aiguilles
supérieure et inférieure se règlent automatiquement
en allant se placer en bout de trajectoire.
2. La 4ème aiguille centrale doit indiquer 12 heures. Si ce
n’est pas le cas au bout de 5 secondes, appuyez sur A
ou B pour faire avancer l’aiguille respectivement dans
le sens anti-horaire ou dans le sens horaire jusqu’à ce
qu’elle indique 12 heures.
3. Enfoncez la couronne pour valider.
BOUSSOLE CHRONO AVEC FLY-BACK
VUE D’ENSEMBLE
A
C
B
1 2
3
1 2
3
AIGUILLE
SUPÉRIEURE
CHRONO HEURES
DEUXIÈME FUSEAU
HORAIRE
4ÈME AIGUILLE
CENTRALE
AIGUILLE
DES SECONDES
DATEUR
COURONNE
MINUTES DU
CHRONOGRAPHE
AIGUILLE
INFÉRIEURE
BOUTON A
BOUTON B
AIGUILLE
DES HEURES
AIGUILLE DES MINUTES
POSITION
ENFONCÉE
POSITION
INTERMÉDI-
AIRE
POSITION
EXTRÊME
BOUTON C

146
147
2. Appuyez sur B pour faire avancer la 4ème aiguille
centrale. Maintenez le bouton enfoncé pour déplacer
l’aiguille rapidement. L’aiguille supérieure et la 4ème
aiguille centrale se déplacent ensemble, l’aiguille
supérieure se déplaçant d’une heure lorsque la 4ème
aiguille centrale effectue un tour. Si la valeur des
minutes du second fuseau horaire est indentique à
votre fuseau horaire, l’aiguille des minutes et la 4ème
aiguille centrale doivent être alignées.
3. Appuyez sur A pour déplacer l’aiguille supérieure
vers l’avant par intervalles d’une heure. Maintenez le
bouton enfoncé pour déplacer l’aiguille rapidement.
4. Enfoncez la couronne pour valider.
Il est tout à fait possible d’utiliser alternativement le
second fuseau horaire pour indiquer l’heure de votre
fuseau horaire sur une échelle de 24 heures. Si vous
SECOND FUSEAU HORAIRE
L’aiguille supérieure indique normalement l’heure pour le
second fuseau horaire. Noter qu’il s’agit d’une échelle sur
24 heures, minuit se situant à chacune de ses extrémités
et midi au milieu.
Pour régler le second fuseau horaire :
1. Tirez la couronne en
position intermé-
diaire. L’aiguille
supérieure indique
l’heure du second
fuseau horaire et la
4ème aiguille centrale
indique les minutes.
A
C
B
1 2
3
1 2
3

148
149
dernier chiffre des minutes, en comptant jusqu’à dix
puis en répétant l’opération. L’aiguille supérieure
indique le temps total, heures et minutes, avec des
divisions toutes les dix minutes. Le chronographe
fonctionne jusqu’à quatre heures avant de s’arrêter
automatiquement.
2. Pour arrêter, appuyez à nouveau sur A (START/STOP
[Démarrage/Arrêt]). Toutes les aiguilles s’arrêtent
alors.
3. Pour reprendre le chronométrage, appuyez à nouveau
sur A (START/STOP [Démarrage/Arrêt]), ou, pour
remettre le chronographe à zéro, appuyez sur B (FLY-
BACK/RESET OU RETOUR À LA VOLÉE/RESET). Lors de
la remise à zéro du chronographe, toutes les aiguilles
se placent sur zéro. Après huit secondes, la montre
reprend l’affichage normal du second fuseau horaire.
utilisez le second fuseau horaire de cette manière,
assurez-vous que l’affichage heure/minute correspond
bien à l’affichage sur 24 heures en vérifiant que la date
change à minuit et non à midi.
CHRONOGRAPHE AVEC FLY-BACK
OU RETOUR À LA VOLÉE
La montre comporte un chronographe avec fly-back ou re-
tour à la volée de 4 heures.
1. Pour démarrer, ap-
puyez sur A (START/
STOP [Démarrage/Ar-
rêt]). L’aiguille centrale
indique les secondes
avec une résolution de
1/5 seconde et l’aiguille
inférieure indique le
A
C
B
1 2
3
1 2
3

150
151
4. Vous pouvez également remettre à zéro et/ou
redémarrer le chronographe lorsqu’il est en marche.
Pour cela, appuyez et maintenez enfoncé le bouton
B (FLY-BACK/RESET OU RETOUR À LA VOLÉE/RESET)
pour remettre le chronographe à zéro et relâchez-
le lorsque vous désirez redémarrer. Il n’est pas
nécessaire d’attendre que toutes les aiguilles aient
atteint la position zéro avant de relâcher le bouton ;
le chronométrage commence de manière interne dès
que le bouton est relâché. Cette fonction « fly-back »
(rattrapante) vous permet de mesurer un temps
intermédiaire.
Il est possible d’utiliser la boussole en même temps
que le chronographe sans affecter le fonctionnement
de ce dernier. Se reporter à FONCTIONNEMENT DE LA
BOUSSOLE.
ÉTALONNAGE DE LA BOUSSOLE
La boussole doit être étalonnée avant utilisation.
Une boussole utilise le champ magnétique terrestre ;
par conséquent, il importe d’éviter d’être à proximité de
grands objets métalliques (automobiles, ponts, etc.) ou
autres objets produisant un rayonnement électromag-
nétique, tels que téléviseurs ou ordinateurs, susceptible
d’affecter le champ magnétique autour de la montre. Si
la boussole est étalonnée à proximité de tels objets, elle
ne fonctionnera correctement qu’à cet endroit. Si la bous-
sole est étalonnée loin de tels objets, elle ne fonctionnera
pas correctement près d’eux. Pour de meilleurs résultats,
étalonner à l’endroit où elle sera utilisée.
Lors de l’étalonnage et des relevés d’orientation,
il importe, comme avec toutes les boussoles, de
maintenir la montre dans un plan horizontal. Procéder

152
153
2. Tenez la montre en position horizontale ou posez-la
sur une surface plane (si le bracelet gêne, poser la
montre sur une tasse retournée). La montre peut être
posée à l’envers à condition d’en protéger le cadran.
3. Appuyez sur C (COMPASS [Boussole]) pour commenc-
er. L’aiguille centrale effectue deux tours complets
pour vous rappeler de faire pivoter la montre. Tenir
la montre à plat et effectuer LENTEMENT deux tours
complets, en comptant 15 secondes environ par tour.
à l’étalonnage ou à des relevés d’orientation alors que
la montre n’est pas en position horizontale peut aboutir
à d’importantes erreurs. Veillez également à éviter les
endroits susceptibles de présenter des concentrations
de fer de roche ou industriel supérieures à la normale,
dont l’effet pourrait produire des mesures inexactes. En
présence de toute mesure suspecte, effectuer un nouvel
étalonnage.
Veiller à ne pas ranger la montre à proximité d’une
quelconque source magnétique (ordinateurs, appareils
électriques, téléviseurs) car cela pourrait l’aimanter et
fausser les mesures ultérieures. La précision typique des
montres-boussoles est de +/- 10 degrés.
Pour étalonner la boussole :
1. Tirez la couronne en position intermédiaire et attendez
l’arrêt des aiguilles indicatrices.

154
155
7. Enfoncer la couronne pour valider.
A
B
Déclinaison magnétique réglée sur -14° (14°W)
FONCTIONNEMENT DE LA BOUSSOLE
Normalement, la boussole est inactive et l’aiguille
centrale pointe sur 12 heures ou indique les secondes du
chronographe.
Tout en maintenant la montre en position horizontale,
appuyez sur C (COMPASS [Boussole]) pour activer la bous-
sole. L’aiguille se déplace et pointe vers le nord. Si on
tourne la montre, l’aiguille centrale se déplace, pointant
toujours vers le nord. Après 20 secondes, la boussole
4. Ensuite, appuyez sur C (COMPASS [Boussole]),
en maintenant la montre en position horizon-
tale. L’aiguille centrale oscille pour confirmer que
l’étalonnage est terminé et se déplace ensuite pour le
réglage de la déclinaison magnétique du moment.
5. Si vous ne désirez pas régler l’angle de déclinaison,
enfoncer la couronne. Dans le cas contraire, pour que
la boussole compense automatiquement l’angle de
déclinaison, faire tourner la lunette de la boussole
jusqu’à ce que le nord soit à 12 heures.
6. Appuyez sur A ou B pour déplacer l’aiguille centrale
respectivement vers l’ouest (-) ou vers l’est (+) afin
d’indiquer l’angle de déclinaison de l’endroit où vous
vous trouvez à l’aide de l’échelle de déclinaison.
Maintenir le bouton enfoncé pour déplacer l’aiguille
rapidement. Voir l’exemple sur la figure ci-dessous.

156
157
s’arrête automatiquement et l’aiguille centrale reprend
son fonctionnement habituel. Ceci permet de prolonger
la durée de vie de la pile. Appuyez sur C (COMPASS
[Boussole]) à tout moment pour maintenir la boussole
activée pendant 20 secondes de plus.
Il est possible d’activer la boussole alors que le
chronographe est en train de fonctionner. Le
fonctionnement de la 4ème aiguille centrale s’en trouve
alors simplement modifié de manière temporaire. Les
aiguilles supérieure et inférieure continuent d’indiquer
le temps chronométré et toutes les fonctions du
chronographe restent accessibles à l’aide des boutons A
(START/STOP [Démarrage/Arrêt]) et B (FLY-BACK/RESET
OU RETOUR À LA VOLÉE/RESET).
REMARQUE : Au cours de l’utilisation de la boussole, la
trotteuse se déplace par intervalles de deux secondes.
Lorsque la boussole est activée, il se peut aussi que les
aiguilles inférieure et supérieure changent légèrement
de position pour revenir en position initiale après
désactivation de la boussole. Ceci est normal et permet
d’obtenir les meilleurs relevés d’orientation.

158
159
CHRONOGRAPHE LINÉAIRE
VUE D’ENSEMBLE
RÉGLAGE DE L’AIGUILLE LINÉAIRE ET DE LA 4ÈME
AIGUILLE CENTRALE
Pour réaligner la 4ème aiguille centrale :
1. Tirez complètement la couronne. L’aiguille inférieure
se règle automatiquement en allant se placer en bout
de trajectoire.
2. La 4ème aiguille centrale doit indiquer 12 heures. Si ça
n’est pas le cas au bout de 5 secondes, appuyez sur
A pour faire avancer l’aiguille respectivement dans le
sens horaire jusqu’à ce qu’elle indique 12 heures.
3. Si le chronographe a été réinitialisé et que l’aiguille
linéaire n’indique pas zéro, appuyez sur le bouton B
et maintenez-le enfoncé pour lancer un étalonnage
complet de l’indicateur linéaire, ce qui prendra jusqu’à
32 secondes à exécuter.
4. Enfoncez la couronne pour valider.
AIGUILLE DES
SECONDES
DATEUR
COURONNE
AIGUILLE INFÉRIEURE
BOUTON A
BOUTON B
4ÈME AIGUILLE
CENTRALE
AIGUILLES DES HEURES
AIGUILLE
LINÉAIRE
AIGUILLE DES
MINUTES
A
B
1
2
3

160
161
SECOND FUSEAU HORAIRE
L’aiguille inférieure
indique l’heure pour
le second fuseau
horaire. Notez qu’il
s’agit d’une échelle
sur 24 heures, minuit
se situant à chacune
de ses extrémités et
midi au milieu. Le plus
souvent, les fuseaux
horaires varient par
intervalles d’heure.
Dans ce cas, la valeur des minutes correspondra à celle
affichée par l’aiguille des minutes de la montre.
RÉGLAGE DU SECOND FUSEAU HORAIRE :
1. Tirez la couronne en position intermédiaire. L’aiguille
inférieure indique l’heure du second fuseau horaire et
la 4ème aiguille centrale indique les minutes.
2. Si la valeur des minutes du second fuseau horaire est
identique à celle de votre fuseau horaire, l’aiguille
des minutes et la 4ème aiguille centrale doivent être
alignées. Si les aiguilles ne sont pas alignées, ou si
le second fuseau horaire diffère en minute, appuyez
sur le bouton B pour faire avancer la 4ème aiguille
centrale à la position désirée.
3. Appuyez sur le bouton A pour faire avancer l’aiguille
inférieure par intervalles d’une heure jusqu’à ce
qu’elle atteigne l’heure désirée dans le second fuseau
horaire. Pour faire avancer l’aiguille rapidement,
appuyez et tenez enfoncé le bouton A.
A
B
1
2
3

162
163
4. Enfoncez la couronne pour valider.
CHRONOGRAPHE LINÉAIRE
La montre comporte un chronographe multi-cadrans avec
indicateur 4 heures.
1. Pour démarrer, appuyez sur le bouton A (START/STOP
[Démarrage/Arrêt]). La 4ème aiguille centrale indique
les secondes avec une résolution d’1/5 de seconde.
L’aiguille linéaire indique les minutes, en comptant
jusqu’à trente et en recommençant. L’aiguille inféri-
eure indique le temps total, heures et minutes, avec
des divisions toutes les dix minutes. Le chronographe
fonctionne jusqu’à quatre heures avant de s’arrêter
automatiquement.
2. Pour l’arrêter, appuyez de nouveau sur le bouton A
(START/STOP [Démarrage/Arrêt]). Toutes les aiguilles
s’arrêtent.
3. Pour remettre le chronographe à zéro, appuyez sur le
bouton B (SPLIT/RESET [Temps intermédiaire/Remise à
zéro]).
Lors de la remise à zéro du chronographe, toutes les
aiguilles se placent sur zéro. Après huit secondes, la
montre reprend l’affichage normal du second fuseau
horaire. Pendant que le chronographe fonctionne, il est
possible de prendre un temps intermédiaire. Appuyez
sur le Bouton B (SPLIT/RESET [Temps intermédiaire/
Remise à zéro]) et toutes les aiguilles s’arrêteront
tandis que le chronographe continue de fonctionner.
Appuyez à nouveau sur le Bouton B (SPLIT/RESET [Temps
intermédiaire/Remise à zéro]) pour reprendre l’affichage
du temps écoulé sur le chronographe en marche.

164
165
HEURE MONDIALE
VUE D’ENSEMBLE
POUR RÉGLER L’HEURE MONDIALE :
1. Tirez la couronne en position intermédiaire. L’aiguille
centrale indique la ville située dans le fuseau horaire
mondial et l’aiguille supérieure indique l’heure dans
cette ville.
A
B
C
1 2
3
corrected 3.3.11 with Paulo’s new cities
24 VILLES
HEURE
MONDIALE
AIGUILLE
DES SECONDES
DATEUR
COURONNE
AIGUILLE INFÉRIEURE
BOUTON A
BOUTON B
BOUTON C
4ÈME AIGUILLE
CENTRALE
SAISONS
AIGUILLE
SUPÉRIEURE
AIGUILLE DES HEURES
AIGUILLE
DES MINUTES
POSITION
ENFONCÉE
POSITION
INTER-
MÉDIAIRE
POSITION
EXTRÊME
A
B
C
1 2 3

166
167
2. Appuyez sur A ou B pour déplacer l’aiguille centrale et
indiquer la ville correspondant à votre fuseau horaire.
Maintenez le bouton enfoncé pour déplacer l’aiguille
rapidement. N’importe quelle ville peut être choisie.
3. Tirer complètement la couronne. L’aiguille centrale
retournera à la position 12h00, comme indiqué dans
RÉGLAGE DES AIGUILLES INDICATRICES. Après cinq
secondes, l’aiguille supérieure indique l’heure locale
(c’est à dire l’heure qu’il est dans la ville sélectionnée
à l’étape précédente), l’aiguille centrale indique les
minutes de l’heure locale et l’aiguille inférieure indique
la saison (voir RÉGLAGE DES SAISONS). IMPORTANT :
Ne pas manipuler les boutons-poussoirs ou la cou-
ronne jusqu’à ce que l’aiguille centrale ait complété
son ajustement. (Environ 10 secondes après avoir
complètement tiré la couronne.)
4. Si la saison affichée n’est pas celle correspondant au
fuseau horaire local, appuyez sur C pour la modifier.
Si le fuseau horaire local observe le passage à l’heure
d’été, l’aiguille supérieure se déplacera d’une heure.
5. Appuyez sur A ou B pour respectivement reculer ou
avancer l’heure afin de régler l’heure dans le fuseau
horaire local. Maintenir le bouton enfoncé pour régler
l’heure rapidement. Les aiguilles se déplacent en-
semble ; l’aiguille supérieure se déplace d’une heure
lorsque l’aiguille centrale effectue un tour. Après le
réglage, l’aiguille centrale et l’aiguille des minutes
doivent être alignées.
6. Enfoncez la couronne pour valider.

168
169
L’HEURE DANS UNE VILLE SÉLECTIONNÉE
Appuyez sur A ou B pour
déplacer l’aiguille centrale
respectivement vers
l’arrière ou vers l’avant
et sélectionner une ville.
L’aiguille supérieure se
déplace pour indiquer
l’heure dans la ville
sélectionnée. Noter qu’il
s’agit d’une échelle sur
24 heures, minuit se situant à chacune de ses extrémités
et midi au milieu.
RÉGLAGE DES SAISONS
Le réglage des saisons permet à la montre de tenir
compte du passage à l’heure d’été.
RÉGLAGE DE L’AIGUILLE INDICATRICE
(4ÈME AIGUILLE CENTRALE)
Pour réaligner une aiguille indicatrice :
1. Tirez complètement la couronne. Les aiguilles supéri-
eure et inférieure se règlent automatiquement en
allant se placer en bout de trajectoire.
2. La 4ème aiguille centrale doit indiquer 12 heures. Si ce
n’est pas le cas au bout de 5 secondes, appuyez sur A
ou B pour faire avancer l’aiguille respectivement dans
le sens anti-horaire ou dans le sens horaire jusqu’à ce
qu’elle indique 12 heures.
3. Enfoncez la couronne pour valider.
REMARQUE : Si aucun bouton n’est enfoncé dans les
cinq secondes suivant l’arrêt des aiguilles, la montre
procède au réglage du temps mondial (se reporter à
RÉGLAGE DE L’HEURE MONDIALE).
A
B
C
1 2 3

170
171
La montre gère cela à l’aide d’un réglage signalant les
deux périodes concernées par le changement d’heure
dans toutes les villes. Pour la montre, la période
correspondant à l’heure d’été est SUMMER et la période
correspondant à l’heure d’hiver est WINTER.
Lorsque, pour une ville, la saison est réglée sur
SUMMER (été), toutes les villes se trouvant dans le
même hémisphère sont automatiquement réglées sur
SUMMER tandis que toutes les villes situées dans l’autre
hémisphère sont automatiquement réglées sur WINTER
(hiver). La montre connaît la situation des villes dans
chaque hémisphère.
Appuyez sur C pour changer de saison.
BOUSSOLE
VUE D’ENSEMBLE
I
I
14
COURONNE
CENTRALE
CENTRE
RÉGLAGE
DE LA DATE
I
I
14
EXTRÉMITÉ
RÉGLAGE
DE L’HEURE
COURONNE
B
B (COMPASS
[BOUSSOLE])
ÉCHELLE DE DÉCLINAISON
AIGUILLE DE LA
BOUSSOLE
(L’EXTRÉMITÉ NORD
EST ROUGE
POINTUE / PLUS
LONGUE)

172
173
RÉGLAGE DE L’AIGUILLE DE LA BOUSSOLE
Tirez la COURONNE complètement. L’aiguille de la bous-
sole devrait indiquer 12 heures. Sinon, appuyez sur A ou
B pour faire avancer l’aiguille jusqu’à ce qu’elle indique
12 heures. Tenez le bouton enfoncé pour la faire avancer
rapidement. Enfoncez la COURONNE CENTRALE pour
valider et refaire l’étalonnage.
ÉTALONNAGE DE LA BOUSSOLE
La boussole doit être étalonnée avant utilisation.
Une boussole utilise le champ magnétique terrestre ;
par conséquent, il importe d’éviter d’être à proximité de
grands objets métalliques (automobiles, ponts, etc.) ou
autres objets produisant un rayonnement électromag-
nétique, tels que téléviseurs ou ordinateurs, susceptible
d’affecter le champ magnétique autour de la montre. Si
la boussole est étalonnée à proximité de tels objets, elle
ne fonctionnera correctement qu’à cet endroit. Si la bous-
sole est étalonnée loin de tels objets, elle ne fonctionnera
pas correctement près d’eux. Pour de meilleurs résultats,
étalonner à l’endroit où elle sera utilisée.
Lors de l’étalonnage et des relevés d’orientation, il im-
porte, comme avec toutes les boussoles, de maintenir la
montre dans un plan horizontal. Procéder à l’étalonnage
ou à des relevés d’orientation alors que la montre n’est
pas en position horizontale peut aboutir à d’importantes
erreurs. Veiller également à éviter les endroits suscep-
tibles de présenter des concentrations de fer de roche ou
industriel supérieures à la normale, dont l’effet pourrait
produire des mesures inexactes. En présence de toute
mesure suspecte, effectuer un nouvel étalonnage.
Veiller à ne pas ranger la montre à proximité d’une
quelconque source magnétique (ordinateurs, appareils

174
175
4. Ensuite, appuyez sur A ou B, en maintenant la montre
en position horizontale. La 4ème aiguille centrale
oscille pour confirmer que l’étalonnage est terminé et
se déplace ensuite pour le réglage de la déclinaison
magnétique du moment.
5. Si vous ne désirez pas régler l’angle de déclinaison,
enfoncez la couronne. Dans le cas contraire, pour que
la boussole compense automatiquement l’angle de
déclinaison, faites tourner la lunette de la boussole
jusqu’à ce que le nord soit à 12 heures.
électriques, téléviseurs) car cela pourrait l’aimanter et
fausser les mesures ultérieures. La précision typique des
montres-boussoles est de +/- 10 degrés.
Pour étalonner la boussole :
1. Tirez la couronne en position intermédiaire et attendez
l’arrêt des aiguilles indicatrices.
2. Tenez la montre en position horizontale ou posez-la
sur une surface plane (si le bracelet gêne, poser la
montre sur une tasse retournée). La montre peut être
posée à l’envers à condition d’en protéger le cadran.
3. Appuyez sur A ou B pour commencer. La 4ème aiguille
centrale effectue deux tours complets pour vous
rappeler de faire pivoter la montre. Tenir la montre à
plat et effectuer LENTEMENT deux tours complets, en
comptant au moins 15 secondes par tour.

176
177
6. Appuyez sur A ou B pour déplacer la 4ème aiguille
centrale respectivement vers l’ouest (-) ou vers l’est
(+) afin d’indiquer l’angle de déclinaison de l’endroit où
vous vous trouvez à l’aide de l’échelle de déclinaison.
Maintenez le bouton enfoncé pour déplacer l’aiguille
rapidement. Voir l’exemple sur la figure à la page
suivante.
7. Enfoncez la couronne pour valider.
A
B
Déclinaison magnétique réglée sur -14° (14°W)
FONCTIONNEMENT DE LA BOUSSOLE
Normalement, la boussole est inactive et la 4ème aiguille
centrale pointe sur 12 heures ou indique les secondes du
chronographe.
Tout en maintenant la montre en position horizontale, ap-
puyez sur A ou B pour activer la boussole. L’aiguille se dé-
place et pointe vers le nord. Si on tourne la montre, la 4ème
aiguille centrale se déplace, pointant toujours vers le nord.
Après 20 secondes, la boussole s’arrête automatiquement
et la 4ème aiguille centrale reprend son fonctionnement
habituel. Ceci permet de prolonger la durée de vie de la
pile. Appuyez sur A ou B à tout moment pour maintenir la
boussole activée pendant 20 secondes de plus.
REMARQUE : Au cours de l’utilisation de la boussole, la
trotteuse se déplace par intervalles de deux secondes.

178
179
MARÉE TEMPÉRATURE ET BOUSSOLE
VUE D’ENSEMBLE
RÉGLAGE DE L’AIGUILLE DE L’INDICATEUR
Tirez la couronne complètement. L’aiguille indicatrice
devrait indiquer 12 heures. Sinon, appuyez sur le bouton
poussoir MARÉE ou TEMPÉRATURE pour faire avancer
l’aiguille jusqu’à ce qu’elle indique 12 heures. Les boutons
poussoirs pour MARÉE et TEMPÉRATURE font avancer
respectivement l’aiguille dans le sens des aiguilles d’une
montre et inversement. Tenir le bouton poussoir enfoncé
pour la faire avancer rapidement. Enfoncez la couronne
pour valider.
SÉLECTIONNER MARÉE/TEMPÉRATURE
L’aiguille de l’indicateur montre en permanence soit la
marée, soit la température. Lorsque la température est
indiquée, appuyez sur le bouton poussoir MARÉE pour sé-
lectionner l’heure des marées. L’aiguille indique d’abord
la marée basse puis la marée actuelle. Lorsque la marée
SORTIE-
RÉGLAGE
DE L’HEURE
ÉCHELLE DE
DÉCLINAISON
AIGUILLE DE
L’INDICATEUR
C (COMPASS
[BOUSSOLE])
B (MARÉE)
A (TEMPÉRATURE)
COURONNE
BAGUE ROTATIVE
DE LA BOUSSOLE
DATE
ÉCHELLE DES
MARÉES
ÉCHELLE DE
TEMPÉRATURE
CENTRE-RÉGLAGE
DE LA DATE

180
181
est indiquée, appuyez sur le bouton poussoir TEMPÉRA-
TURE pour sélectionner le thermomètre. L’aiguille se
place au début de l’échelle des températures et indique
ensuite la température courante.
THERMOMÈTRE
Lorsque la montre est portée au poignet, la mesure par
le thermomètre est influencée par la chaleur corporelle.
Pour obtenir des mesures plus précises, enlever la mon-
tre et la placer à l’ombre pendant quelques minutes.
La montre peut également mesurer la température de
l’eau si elle y est plongée. Veiller à sélectionner l’affichage
de la température avant de placer la montre dans l’eau car
les boutons ne doivent pas être enfoncés sous l’eau.
Les mesures par le thermomètre sont prises toutes les
minutes, et plus fréquemment encore si la température
est en train de changer.
HEURE DES MARÉES
Dans ce mode, l’aiguille de l’indicateur se déplace
toujours dans le sens des aiguilles d’une montre. Ainsi,
la marée est montante lorsque l’aiguille pointe vers la
gauche et descendante lorsque l’aiguille pointe vers la
droite. Le nombre d’heures jusqu’à la prochaine marée
haute/basse est indiqué sur l’échelle des marées.
Les marées étant aussi influencées par la position du so-
leil et la forme du littoral, la montre peut ne pas indiquer
les heures exactes des marées hautes et basses. Des
ajustements périodiques peuvent être nécessaires.
Pour étalonner le mode heure des marées, tirer la
couronne en position CENTRE. Appuyez sur le bouton
poussoir MARÉE ou TEMPÉRATURE pour placer l’aiguille
sur la marée actuelle. Les boutons poussoirs pour MARÉE
et TEMPÉRATURE font avancer respectivement l’aiguille

182
183
dans le sens des aiguilles d’une montre et inversement.
Enfoncez la couronne pour valider.
ÉTALONNAGE DE LA BOUSSOLE
La boussole doit être étalonnée avant utilisation.
Une boussole utilise le champ magnétique terrestre ;
par conséquent, il importe d’éviter d’être à proximité de
grands objets métalliques (automobiles, ponts, etc.) ou
autres objets produisant un rayonnement électromag-
nétique, tels que téléviseurs ou ordinateurs, susceptible
d’affecter le champ magnétique autour de la montre. Si
la boussole est étalonnée à proximité de tels objets, elle
ne fonctionnera correctement qu’à cet endroit. Si la bous-
sole est étalonnée loin de tels objets, elle ne fonctionnera
pas correctement près d’eux. Pour de meilleurs résultats,
étalonner à l’endroit où elle sera utilisée.
Lors de l’étalonnage et des relevés d’orientation, il im-
porte, comme avec toutes les boussoles, de maintenir la
montre dans un plan horizontal. Procéder à l’étalonnage
ou à des relevés d’orientation alors que la montre n’est
pas en position horizontale peut aboutir à d’importantes
erreurs. Veillez également à éviter les endroits suscep-
tibles de présenter des concentrations de fer de roche ou
industriel supérieures à la normale, dont l’effet pourrait
produire des mesures inexactes. En présence de toute
mesure suspecte, effectuer un nouvel étalonnage.
Veiller à ne pas ranger la montre à proximité d’une
quelconque source magnétique (ordinateurs, appareils
électriques, téléviseurs) car cela pourrait l’aimanter et
fausser les mesures ultérieures. La précision typique des
montres-boussoles est de +/- 10 degrés.

184
185
Pour étalonner la boussole :
1. Tirez la couronne en position intermédiaire et attendez
l’arrêt des aiguilles indicatrices.
2. Tenez la montre en position horizontale ou posez-la
sur une surface plane (si le bracelet gêne, poser la
montre sur une tasse retournée). La montre peut être
posée à l’envers à condition d’en protéger le cadran.
3. Appuyez sur C (COMPASS [Boussole]) pour com-
mencer. La 4ème aiguille centrale effectue deux
tours complets pour vous rappeler de faire pivoter
la montre. Tenir la montre à plat et effectuer LENTE-
MENT deux tours complets, en comptant au moins 15
secondes par tour.
4. Ensuite, appuyez sur C (COMPASS [Boussole]), en
maintenant la montre en position horizontale. La
4ème aiguille centrale oscille pour confirmer que
l’étalonnage est terminé et se déplace ensuite pour le
réglage de la déclinaison magnétique du moment.
5. Si vous ne désirez pas régler l’angle de déclinaison,
enfoncez la couronne. Dans le cas contraire, pour que
la boussole compense automatiquement l’angle de
déclinaison, faites tourner la lunette de la boussole
jusqu’à ce que le nord soit à 12 heures.

186
187
6. Appuyez sur A ou B pour déplacer la 4ème aiguille
centrale respectivement vers l’ouest (-) ou vers l’est
(+) afin d’indiquer l’angle de déclinaison de l’endroit où
vous vous trouvez à l’aide de l’échelle de déclinaison.
Maintenez le bouton enfoncé pour déplacer l’aiguille
rapidement. Voir l’exemple sur la figure à la page
suivante.
7. Enfoncez la couronne pour valider.
A
B
Déclinaison magnétique réglée sur -14° (14°W)
FONCTIONNEMENT DE LA BOUSSOLE
Normalement, la boussole est inactive et la 4ème aiguille
centrale pointe sur 12 heures ou indique les secondes du
chronographe.
Tout en maintenant la montre en position horizontale,
appuyez sur C (COMPASS [Boussole]) pour activer la
boussole. L’aiguille se déplace et pointe vers le nord. Si
on tourne la montre, la 4ème aiguille centrale se déplace,
pointant toujours vers le nord. Après 20 secondes, la
boussole s’arrête automatiquement et la 4ème aiguille
centrale reprend son fonctionnement habituel. Ceci per-
met de prolonger la durée de vie de la pile. Appuyez sur
C (COMPASS [Boussole]) à tout moment pour maintenir la
boussole activée pendant 20 secondes de plus.
REMARQUE : Au cours de l’utilisation de la boussole, la
trotteuse se déplace par intervalles de deux secondes.

188
189
ALTIMÈTRE
VUE D’ENSEMBLE
RÉGLAGE DE L’AIGUILLE INDICATRICE
(4ÈME AIGUILLE CENTRALE)
Tirez la couronne complètement. Les aiguilles rétrogrades
supérieure et inférieure se règlent automatiquement en
allant se placer en début de trajectoire. L’aiguille indi-
catrice (4ème aiguille centrale) doit indiquer 12 heures.
Sinon, appuyez sur les boutons A et ou B pour faire
avancer l’aiguille jusqu’à ce qu’elle indique 12 heures.
Les boutons A et B font avancer respectivement l’aiguille
dans le sens horaire et inversement. Tenez le bouton
enfoncé pour la faire avancer rapidement. Enfoncez la
couronne pour valider.
ÉTALONNAGE DE L’ALTIMÈTRE
L’altimètre doit être étalonné avant son utilisation.
Sachant qu’un altimètre se base sur la pression atmo-
sphérique pour déterminer l’altitude et que la pression
ÉCHELLE
D’ALTIMÈTRE
(CENTAINES)
AIGUILLE
RÉTROGRADE
SUPÉRIEURE
(MILLIERS)
BOUTON C
(UNITÉS)
BOUTON A
(ALTITUDE MAXIMALE)
BOUTON B
(ALTITUDE MINIMALE)
AIGUILLE
RÉTROGRADE
INFÉRIEURE (UNITÉS)
COURONNE

190
191
atmosphérique varie d’un point à un autre, il est très
important de régler l’altimètre par rapport à une valeur
d’altitude de référence connue ou par rapport à l’altitude
de référence standard d’un point donné. Les brusques
changements de la pression atmosphérique peuvent
fausser les informations de votre altimètre de + ou
- 100 m (328 pieds) même si vous êtes resté au même
endroit. Si possible, étalonnez à nouveau sur une altitude
connue quand un changement radical a eu lieu.
Étalonnage de l’altimètre :
1. Tirez la couronne en position intermédiaire et attendez
l’arrêt des aiguilles indicatrices.
2. Si l’altimètre était désactivé au moment où vous
avez tiré la couronne, l’aiguille rétrograde inférieure
indiquera l’unité sélectionnée la dernière fois que
l’altimètre a été utilisé. Autrement, l’aiguille rétrograde
inférieure indiquera l’unité sélectionnée dans le mode
d’affichage de l’altitude. La 4ème aiguille centrale
et l’aiguille rétrograde supérieure devraient indiquer
l’altitude exacte.
3. Appuyez sur A ou B pour faire avancer l’aiguille
respectivement dans le sens anti-horaire ou inverse-
ment, jusqu’à ce qu’elle indique la bonne altitude à
étalonner. Tenez enfoncé A ou B pour faire avancer
l’aiguille centrale plus rapidement. L’aiguille rétrograde
supérieure se déplace par rapport à la valeur de
l’altitude affichée par la 4ème aiguille centrale.
4. Enfoncez la couronne pour valider.

192
193
ACTIVATION/DÉSACTIVATION DE L’ALTIMÈTRE
Pour activer l’altimètre, appuyez sur C. L’aiguille
rétrograde inférieure indique MÈTRES. La 4ème aiguille
centrale indique sur l’anneau externe les valeurs de
l’altitude courante en centaines et en dizaines avec des
divisions tous les dix MÈTRES/PIEDS. L’aiguille rétrograde
supérieure indique les valeurs de l’altitude courante en
milliers avec des divisions tous les mille MÈTRES/PIEDS.
Pour changer les unités et passer des MÈTRES aux PIEDS,
appuyez sur C une deuxième fois. Pour passer des PIEDS
aux MÈTRES, appuyez deux fois sur C (l’altimètre est tout
d’abord désactivé, puis activé avec les unités affichées
en MÈTRES).
Pour désactiver l’altimètre avec les unités réglées sur
PIEDS, appuyez sur C. Pour désactiver l’altimètre avec
les unités réglées sur MÈTRES, appuyez deux fois sur C
(l’aiguille inférieure indique tout d’abord PIEDS avant la
désactivation).
Exemple : Altitude = 2310 m Exemple : Altitude = 7580 pieds

194
195
La montre désactive automatiquement l’altimètre au bout
de 60 minutes.
RAPPEL DES ALTITUDES MIN/MAX
Pour afficher l’altitude maximale enregistrée, appuyez
sur A. L’aiguille rétrograde inférieure indique l’unité de
mesure dans laquelle l’altitude maximale a été enregis-
trée si l’altimètre était désactivé au moment où le bouton
est enfoncé. Autrement, l’altitude maximale sera indiquée
dans l’unité de mesure courante sélectionnée. La 4ème
aiguille centrale indique les valeurs de l’altitude maximale
en centaines et en dizaines avec des divisions tous les dix
MÈTRES/PIEDS. L’aiguille rétrograde supérieure indique
les valeurs de l’altitude maximale en milliers avec des
divisions tous les mille MÈTRES/PIEDS.
L’altitude maximale enregistrée s’affiche pendant dix
secondes. Pour prolonger l’affichage de dix secondes,
appuyez sur A avant l’expiration des dix premières
secondes.
Pour changer les unités et passer des MÈTRES aux PIEDS,
ou des PIEDS aux MÈTRES, appuyez sur C.
Pour afficher l’altitude minimale enregistrée, appuyez
sur B. L’aiguille rétrograde inférieure indique l’unité de
mesure dans laquelle l’altitude minimale a été enregistrée
si l’altimètre était désactivé au moment où le bouton
est pressé. Autrement, l’altitude minimale sera indiquée
dans l’unité de mesure courante sélectionnée. La 4ème
aiguille centrale indique les valeurs de l’altitude minimale
en centaines et en dizaines avec des divisions tous les dix
MÈTRES/PIEDS. L’aiguille rétrograde supérieure indique
les valeurs de l’altitude minimale en milliers avec des
divisions tous les mille MÈTRES/PIEDS.

196
197
L’altitude minimale enregistrée s’affiche pendant dix
secondes. Pour prolonger l’affichage de dix secondes,
appuyez sur B avant l’expiration des dix premières sec-
ondes. Pour changer les unités et passer des MÈTRES aux
PIEDS ou des PIEDS aux MÈTRES, appuyez sur C.
PROFONDEUR
VUE D’ENSEMBLE
Remarque : Les aiguilles centrale et inférieure
s’étalonnent automatiquement lorsque la couronne est
placée en position 3 pour le réglage de l’heure.
3
AA
B
1
2
3
2
3
2
3
AIGUILLE
CENTRALE
INDICATEUR OFF
BOUTON A
BOUTON B
AIGUILLE INFÉRIEURE
COURONNE

198
199
TEMPÉRATURE
Le capteur de température est toujours en marche et
prendra la température au moins une fois toutes les
60 secondes. La température est indiquée par l’aiguille
inférieure et l’échelle qui l’accompagne.
Lorsque la montre est portée au poignet, la mesure de
température est influencée par la chaleur corporelle. Pour
obtenir des mesures plus précises, retirez la montre de
votre poignet.
MARCHE/ARRÊT DU CAPTEUR DE PROFONDEUR
Le capteur est normalement à l’arrêt et doit être mis en
marche manuellement avant la submersion. Appuyez et
relâchez le bouton B pour mettre en marche le capteur.
La 4ème aiguille centrale passera de la position OFF (6
heures) à la position 12 heures et commencera à prendre
des mesures au moins une fois toutes les 5 secondes.
En augmentant la profondeur, la 4ème aiguille centrale
indiquera la profondeur actuelle comme indiqué sur
l’échelle de profondeur. Si la lecture reste dans les limites
de 0 à 2 mètres (0-6 pieds) pendant 5 minutes, le capteur
s’arrêtera automatiquement. Pour arrêter le capteur
manuellement, appuyez et tenez enfoncé le bouton B
pendant 2 secondes. La 4ème aiguille centrale passera en
position OFF (6 heures).
RAPPEL DE PROFONDEUR MAXIMALE / TEMPÉRATURE
MINIMALE
Après être remonté à la surface, dévissez la couronne et
mettez-la en position intermédiaire. Les aiguilles centrales
et inférieures se déplaceront pour indiquer respective-
ment la valeur maximale de profondeur et la valeur
minimale de température enregistrées durant la descente

200
201
la plus récente. Lorsque le capteur de profondeur est
réactivé, la mémoire sera effacée.
Si la montre n’a jamais été utilisée auparavant, les
aiguilles centrales et inférieures indiqueront respective-
ment 0 mètre / pied et 0º C / 32 ºF. La couronne doit être
revissée avant l’utilisation / submersion.
DÉTECTION DU NIVEAU DE PILE
La montre détermine le niveau de pile et propose à
l’utilisateur un indicateur visuel correspond au niveau
de pile actuel. L’état du niveau de pile est classifié en
niveau normal, niveau de décharge de la pile et niveau de
remplacement de la pile, avec chaque niveau indiqué par
le mouvement de la seconde aiguille.
Pour l’état de niveau normal, la seconde aiguille se
déplace d’une seconde à chaque mouvement correspon-
dant à un fonctionnement normal.
Lorsque la montre est en état de niveau de décharge de
la pile, la seconde aiguille se déplace à intervalles de
2 secondes, et se déplace de 2 secondes à chaque
mouvement. Il est recommandé de remplacer la pile
lorsque la montre est en état de niveau de décharge de
la pile.
Lorsque la montre indique que la pile doit être remplacée,
la seconde aiguille se déplace à intervalles de 5 secondes,
et se déplace de 5 secondes à chaque mouvement. À
ce stade, le mode plongée ne peut pas être activé et
l’utilisateur doit remplacer la pile immédiatement.

202
203
YACHT RACER
AIGUILLE
DES HEURES
AIGUILLE
DES SECONDES
4ÈME
AIGUILLE
CENTRALE
COURONNE
AIGUILLE
SUPÉR-
IEUR(E)
ÉCHELLE
PERFECT
DATE
™
AIGUILLE INFÉRIEURE
AIGUILLE
DES MINUTES
2 31
A
B
C
PERFECT DATE
Si votre montre est équipée de la fonction Perfect Date
™
,
la date n’aura pas besoin d’être ajustée jusqu’en 2060.
La montre prend automatiquement en compte les mois
les plus courts et les années bissextiles, et affichera
toujours la date correcte lorsque vous le demanderez.
La date a été préréglée à l’usine Timex. Lorsque vous
réglez votre nouvelle montre pour la première fois, vous
devez réviser la date si celle-ci ne correspond pas à la
date réelle là ou vous habitez. Tirez le bouton-poussoir
de la couronne pour le mettre en position extérieure. La
4e aiguille centrale fait un tour du cadran, puis s’arrête
en position 12h00 pendant environ 5 secondes avant de
passer à la date à laquelle la montre est actuellement
réglée. Faites tourner la couronne pour faire avancer
jusqu’à la date actuelle (ou vers l’arrière pour faire reculer

204
205
jusqu’à la date actuelle). À chaque fois que vous passez
minuit, la date change d’un jour. Après avoir réglé la date
sur votre date locale, continuez à tourner la couronne
pour positionner les aiguilles sur l’heure locale actuelle,
en faisant attention au réglage matin/après-midi. Une fois
l’heure réglée, enfoncez le bouton-poussoir en position
fermée. En mode de fonctionnement normal, la 4e aiguille
centrale affiche la date lorsque vous appuyez sur le
bouton-poussoir. L’aiguille se déplace sur la position de
la date actuelle comme indiqué sur l’anneau supérieur du
cadran. L’aiguille s’arrête pour vous permettre de lire la
date puis retourne en position de repos (12h00). Veuillez
noter que la fonction Perfect Date
™
ne fonctionne
qu’en mode Heure. Si la pile est déchargée et qu’elle
doit être remplacée, la fonction Perfect Date doit être
à nouveau calibrée. Si la pile doit être remplacée, il est
vivement conseillé d’envoyer la montre à un centre de
maintenance Timex, où la pile sera remplacée et la fonc-
tion Perfect Date à nouveau calibrée (sur la date actuelle
pour l’emplacement où la montre va être renvoyée).
RÉGLAGE DE LA 4ÈME AIGUILLE CENTRALE
Pour réaligner la 4ème aiguille centrale :
1. Tirez la couronne en position 3. Les aiguilles supé-
rieure et inférieure se règlent automatiquement en
allant se placer en bout de trajectoire.
2. Au bout de 10 secondes après avoir tiré la couronne
en position 3, la 4ème aiguille centrale devrait indiquer
12 heures. Si cela n’est pas le cas, appuyez sur le
bouton A ou B pour faire avancer l’aiguille respective-
ment dans le sens anti-horaire ou dans le sens horaire
jusqu’à ce qu’elle indique 12 heures. Maintenez le

206
207
bouton A ou B enfoncé afin de faire avancer l’aiguille
plus vite. À noter qu’au bout de 5 secondes d’inac-
tivité lorsque la couronne est en position 3, la 4ème
aiguille centrale se repositionnera de façon à afficher
la date en cours.
3. Après avoir terminé, enfoncez la couronne en position 1.
SÉLECTION DU MODE
Enfoncez le bouton C pour faire avancer l’aiguille supé-
rieure jusqu’à la fonction souhaitée.
HEURE :
Affiche uniquement l’heure en cours (la fonction Date
Parfaite ne marche qu’en mode Heure).
COURSE DE YACHT MINUTERIE 5:
Le compte à rebours commencera à 5 minutes et enclen-
chera le chronographe lorsqu’il atteint zéro.
COURSE DE YACHT MINUTERIE 3:
Le compte à rebours commencera à 3 minutes et enclen-
chera le chronographe lorsqu’il atteint zéro.
COURSE DE YACHT MINUTERIE 1:
Le compte à rebours commencera à 1 minute et enclen-
chera le chronographe lorsqu’il atteint zéro.
CHRONO :
Le chronographe se mettra en marche sans le compte
à rebours.

208
209
UTILISATION DE LA MINUTERIE COURSE DE YACHT
Cette montre met à votre disposition des comptes à
rebours de 5, 3 ou 1 minute. Lorsque le compte à rebours
atteint zéro un chronographe d’une heure s’enclenche
automatiquement.
1. Maintenez le bouton C enfoncé jusqu’à ce que
l’aiguille supérieure affiche un compte à rebours
de 5, 3 ou 1 minute en mode Minuterie pour Course
de Yacht.
2. Pour démarrer, appuyez sur le bouton A (START/STOP
[Démarrage/Arrêt]). La 4ème aiguille centrale affiche
le compte à rebours en terme de secondes, tandis
que l’aiguille inférieure l’affiche en terme de minutes.
(À noter que les boutons B et C restent désactivés
lorsque le compte à rebours est enclenché.)
3. Pour arrêter le compte à rebours, appuyez le bouton
A (START/STOP [Démarrage/Arrêt]). (À noter que le
bouton C reste désactivé lorsque le compte à rebours
est enclenché.)
4. Pour enclencher le compte à rebours à nouveau,
enfoncez le bouton B (SPLIT/RESET [Temps
intermédiaire/Réinitialisation]) pendant 3 secondes,
ce qui renvoie au compte à rebours de 5, 3 ou
1 minute sélectionné au préalable.
Au cours d’une utilisation normale de la Minuterie Course
de Yacht, lorsque le compte à rebours atteint zéro, le
chronographe s’enclenche automatiquement. On entend
également une sonnerie toutes les minutes ainsi que
lorsqu’il reste 5 secondes à la dernière minute du compte
à rebours précédant l’enclenchement de la fonction
chronographe. Le chronographe effectue la séquence

210
211
de 30 minutes deux fois, pour une durée totale et
maximum d’une heure.
L’UTILISATION DU CHRONOGRAPHE
Cette montre est dotée d’un chronographe d’une heure
dont il est possible de se servir indépendamment de la
Minuterie Course de Yacht.
1. Enfoncez le bouton C jusqu’à ce que l’aiguille
supérieure se positionne au début de l’échelle
tachymétrique de 30 minutes du chronographe.
2. Pour démarrer, appuyez sur le bouton A (START/STOP
[Démarrage/Arrêt]). La 4ème aiguille centrale affiche le
décompte des secondes; l’aiguille inférieure affiche le
décompte des minutes sur une échelle de 5 minutes
et l’aiguille supérieure affiche le décompte des demi-
heures sur une échelle de 30 minutes. Toutes les cinq
minutes, l’aiguille inférieure retourne à la position zéro
tandis que l’aiguille supérieure continue d’avancer
sur une échelle de 30 minutes. (À noter que le bouton
C reste désactivé lorsque le compte à rebours est
enclenché.)
3. Pour consulter un temps intermédiaire, appuyez sur
le bouton B (SPLIT/RESET [Temps intermédiaire/Réini-
tialisation]). Les aiguilles supérieure et inférieure ainsi
que la 4ème aiguille centrale restent figées le temps
que vous notiez le temps intermédiaire. Le compte
à rebours du chronographe continue même lorsque
les aiguilles sont figées. Pour remettre les aiguilles en
marche, appuyez le bouton B (SPLIT/RESET [Temps
intermédiaire/Réinitialisation]). Les aiguilles rattrapent
leur retard rapidement pour afficher le temps total
écoulé.

212
213
4. Pour arrêter le chronographe, appuyez le bouton
A (START/STOP [Démarrage/Arrêt]). (À noter que le
bouton C reste désactivé lorsque le chronographe
est arrêté, et se réactive lorsque le chronographe est
réinitialisé.)
5. Pour réinitialiser, enfoncez le bouton B (SPLIT/RESET
[Temps intermédiaire/Réinitialisation]) pendant
3 secondes, ce qui renvoie au compte à rebours
de 30 minutes.
Au cours d’une utilisation normale, le chronographe
effectue cette séquence de 30 minutes deux fois, pour
une durée totale et maximum d’une heure. Lorsque cette
période d’une heure s’est découlée, l’aiguille supérieure
reste sur le repère 30 minutes tandis que l’aiguille
inférieure retourne à zéro. La fonction chronographe doit
être réinitialisée avant de l’utiliser à nouveau ou avant de
changer de mode. (À noter que le bouton A est désactivé
lorsque la période maximale d’une heure s’est découlée,
et ne fonctionnera plus tant que le chronographe n’ait
pas été réinitialisé en enfonçant le bouton B pendant
3 secondes.)
VEILLEUSE INDIGLO
®
(VERSION PRO UNIQUEMENT)
La montre Yacht Racer PRO est équipée d’une veilleuse
nocturne INDIGLO
®
. Si la luminosité ambiante est faible
ou s’il fait sombre, vous pouvez lire le cadran grâce à la
veilleuse INDIGLO
®
en appuyant sur le bouton-poussoir.
La montre Yacht Racer PRO utilise sur le cadran un
matériau luminescent spécialement conçu, qui brille
et permet d’illuminer suffisamment votre montre pour
lire les informations du cadran, sans que votre vision
nocturne soit affectée une fois la lumière éteinte.

214
215
MINUTERIE CHRONO
AIGUILLE DES
SECONDES
4E
AIGUILLE
CENTRALE
SUPÉRIEURE
AIGUILLE
PERFECT DATE
™
ÉCHELLE
AIGUILLE DES
MINUTES
AIGUILLE DES
HEURES
COURONNE
AIGUILLE
INFÉRIEURE
2 31
A
B
C
PERFECT DATE
Si votre montre est équipée de la fonction Perfect Date
™
,
la date n’aura pas besoin d’être ajustée jusqu’en 2060.
La montre prend automatiquement en compte les mois
les plus courts et les années bissextiles, et affichera
toujours la date correcte lorsque vous le demanderez.
La date a été préréglée à l’usine Timex. Lorsque vous
réglez votre nouvelle montre pour la première fois, vous
devez réviser la date si celle-ci ne correspond pas à la
date réelle là ou vous habitez. Tirez le bouton-poussoir
de la couronne pour le mettre en position extérieure. La
4e aiguille centrale fait un tour du cadran, puis s’arrête
en position 12h00 pendant environ 5 secondes avant de
passer à la date à laquelle la montre est actuellement
réglée. Faites tourner la couronne pour faire avancer
jusqu’à la date actuelle (ou vers l’arrière pour faire reculer

216
217
jusqu’à la date actuelle). À chaque fois que vous passez
minuit, la date change d’un jour. Après avoir réglé la date
sur votre date locale, continuez à tourner la couronne
pour positionner les aiguilles sur l’heure locale actuelle,
en faisant attention au réglage matin/après-midi. Une fois
l’heure réglée, enfoncez le bouton-poussoir en position
fermée. En mode de fonctionnement normal, la 4e aiguille
centrale affiche la date lorsque vous appuyez sur le
bouton-poussoir. L’aiguille se déplace sur la position de
la date actuelle comme indiqué sur l’anneau supérieur du
cadran. L’aiguille s’arrête pour vous permettre de lire la
date puis retourne en position de repos (12h00). Veuillez
noter que la fonction Perfect Date
™
ne fonctionne
qu’en mode Heure. Si la pile est déchargée et qu’elle
doit être remplacée, la fonction Perfect Date doit être
à nouveau calibrée. Si la pile doit être remplacée, il est
vivement conseillé d’envoyer la montre à un centre
de maintenance Timex, où la pile sera remplacée et la
fonction Perfect Date à nouveau calibrée (sur la date
actuelle pour l’emplacement où la montre va être
renvoyée).
RÉGLAGE DE LA 4E AIGUILLE CENTRALE
Pour réaligner la 4ème aiguille centrale :
1. Tirez la couronne en position 3. Les aiguilles supérieure
et inférieure se règlent automatiquement en allant se
placer en bout de trajectoire.
2. Lorsqu’elles s’arrêtent, la 4e aiguille centrale devrait
indiquer 12 heures. Si ce n’est pas le cas, appuyez
sur le bouton A ou B pour déplacer l’aiguille dans le
sens ou le sens inverse des aiguilles d’une montre
jusqu’à ce qu’elle indique 12 heures. Appuyez sur

218
219
le bouton A ou B et maintenez-le enfoncé pour faire
avancer l’aiguille plus rapidement. Remarque : au bout
de 5 secondes sans action avec le bouton-poussoir
en position 3, la 4e aiguille centrale se déplace pour
afficher la date actuelle.
3. Enfoncez le bouton-poussoir en position 1 pour valider.
SÉLECTION DU MODE
Appuyez sur le bouton C pour avancer l’aiguille
supérieure sur la fonction voulue.
HEURE:
Affiche l’heure actuelle uniquement (la fonction Perfect
Date
™
ne fonctionne qu’en mode Heure).
FONCTIONNEMENT DU CHRONOGRAPHE
La montre comporte un chronographe avec indicateur
4 heures. À la fin de la période de quatre heures, le
chronographe s’arrête automatiquement. Ceci permet
d’économiser la pile en cas d’activation accidentelle du
chronographe.
1. Appuyez sur le bouton C jusqu’à ce que l’aiguille
supérieure soit au début de l’échelle supérieure du
chronographe, avec l’aiguille inférieure sur 0 sur
l’échelle inférieure.
2. Pour démarrer, appuyez sur le bouton A (START/
STOP). La 4e aiguille centrale affiche le décompte des
secondes, l’aiguille inférieure les minutes, sur une
échelle de 30 minutes, l’aiguille supérieure indiquant
l’heure sur une échelle de 4 heures. À chaque fois que

220
221
l’aiguille inférieure atteint la marque des 30 minutes,
elle retourne en position zéro pour commencer la
période de 30 minutes suivante, tandis que l’aiguille
supérieure continue à avancer sur l’échelle de 4
heures. (Remarque : le bouton C est désactivé si le
chronographe est en train d’être utilisé).
3. Pour avoir un temps intermédiaire, appuyez sur le
bouton B (SPLIT/RESET). L’aiguille supérieure, l’aiguille
inférieure et la 4e aiguille centrale restent en position
pour vous permettre de noter le temps intermédiaire
(tour). Le chronographe conserve cette mesure horaire
tant que les aiguilles sont arrêtées. Pour relâcher les
aiguilles, appuyez sur le bouton B (SPLIT/RESET) et les
aiguilles se remettront rapidement en position pour
afficher la durée totale de temps écoulé.
4. Pour les arrêter, appuyez sur le bouton A (START/
STOP) de façon à arrêter le chronographe. (Remarque :
le bouton C est désactivé pendant que le chrono-
graphe est arrêté jusqu’à ce que le chronographe soit
réinitialisé).
5. Pour réinitialiser le chronographe après l’avoir arrêté,
appuyez sur le bouton B (SPLIT/RESET), ce qui va
réinitialiser le chronographe au début des échelles de
30 minutes et 4 heures sur les deux petites aiguilles.
En mode de fonctionnement normal, le chronographe
va faire défiler la séquence de 30 minutes 8 fois pour un
maximum total de quatre heures. Une fois cette période
de quatre heures terminées, l’aiguille supérieure va rester
sur le marqueur 4 heures et l’aiguille inférieure va revenir
à 0. La fonction chronographe devra être réinitialisée
avant d’être réutilisée ou avant de passer à un autre

222
223
mode. (Remarque : le bouton A est désactivé lorsque
la durée maximum de quatre heures est passée. Il ne
fonctionnera plus tant que le chronographe n’aura pas
été réinitialisé en appuyant sur le bouton B).
MINUTERIE AVEC COMPTE À REBOURS
La montre fournit une fonction minuterie avec compte à
rebours.
Remarque particulière : L’aiguille supérieure, l’aiguille
inférieure et la 4e aiguille centrale sont unies pendant les
étapes 3, 4 et 5 ci-dessous. En avançant ou en reculant
les aiguilles des minutes et des secondes, vous verrez les
trois aiguilles réagir à l’addition ou à la soustraction de la
durée de temps pour la durée du minuteur avec compte
à rebours. Après avoir tiré le bouton-poussoir en position
intermédiaire, appuyez sur le bouton C pour faire défiler
le cycle de sélection des aiguilles de la façon suivante :
Aiguille supérieure (appuyez sur le bouton C) - Aiguille
inférieure (appuyez sur le bouton C) - 4e aiguille centrale
(appuyez sur le bouton C) retour à l’aiguille supérieure….
ceci vous permet de faire défiler le cycle pour utiliser les
aiguilles dont vous avez besoin pour régler la durée de
temps voulu pour le compte à rebours. Appuyez sur le
bouton-poussoir à la fin de la procédure de réglage pour
valider les réglages effectués jusque-là dans le cycle.
RÉGLAGE DE LA MINUTERIE AVEC COMPTE À REBOURS
La minuterie avec compte à rebours ne peut être réglée
que lorsque la fonction de minuterie avec compte à
rebours n’est pas utilisée. Si la minuterie avec compte à
rebours a déjà été utilisée, elle devra être réinitialisée.
Si la minuterie est en train d’être utilisée, elle doit être
arrêtée et réinitialisée de façon à régler la minuterie avec
compte à rebours.

224
225
1. Appuyez sur le bouton C jusqu’à ce que l’aiguille supé-
rieure soit à un endroit précis de l’échelle Minuterie.
Si la minuterie a déjà été réglée, l’aiguille va pointer
sur l’heure déjà réglée. Si c’est la première fois que la
minuterie est réglée, elle va pointer sur 0 sur l’échelle
de la minuterie.
2. Tirez le bouton-poussoir de la couronne pour le mettre
en position intermédiaire.
3. Pour régler le nombre d’heures voulu par palier de
demi-heures (jusqu’à une durée maximum de 4:00:00),
appuyez sur le bouton A pour déplacer l’aiguille supé-
rieure dans le sens inverse des aiguilles d’une montre
(appuyez sur le bouton pour la déplacer dans le sens
des aiguilles d’une montre), jusqu’à ce que le nombre
d’heures voulu soit sélectionné. Veuillez noter que
vous sélectionnez le nombre d’heures dans le palier
de demi-heures le plus proche de l’heure totale voulue
(par exemple, pour un décompte total de 2:53:30,
vous sélectionnerez 3 heures). Après avoir terminé le
réglage du nombre d’heures, appuyez sur le bouton C
pour valider votre sélection.
4. Vous pouvez désormais régler le nombre de minutes
voulu par paliers d’une minute en appuyant sur le
bouton A pour déplacer l’aiguille supérieure dans le
sens inverse des aiguilles d’une montre (appuyez sur
le bouton B pour la déplacer dans le sens des aiguilles
d’une montre), jusqu’à ce que le nombre des minutes
voulu soit sélectionné. Veuillez noter que vous ajustez
le nombre des minutes vers l’avant ou vers l’arrière
pour obtenir l’heure voulue (par exemple : pour une
durée de minuterie avec compte à rebours total de
2:53:30, vous appuierez sept fois sur le bouton A ce

226
227
qui déplacera le total de la minuterie avec compte à
rebours de 3 heures à 2:53:00). Vous remarquerez que
l’aiguille des heures va se déplacer légèrement vers
l’arrière du marqueur des 3 heures au marqueur des
2,5 heures. Après avoir ajusté l’heure sur le nombre
correct de minutes, appuyez sur le bouton C pour
valider votre sélection.
5. Vous pouvez désormais régler le nombre de secondes
voulu par palier d’une seconde en appuyant sur le
bouton A pour déplacer la 4e aiguille dans le sens in-
verse des aiguilles d’une montre (appuyez sur le bou-
ton B pour la déplacer dans le sens des aiguilles d’une
montre), jusqu’à ce que le nombre des secondes
voulu soit sélectionné. Veuillez noter que vous ajoutez
ou soustrayez le nombre de secondes pour obtenir
l’heure voulue (par exemple : pour une durée de mi-
nuterie avec compte à rebours totale de 2:53:30, vous
appuierez 30 fois sur le bouton B pour sélectionner 30
secondes). Après avoir réglé le nombre de secondes,
appuyez sur le bouton-poussoir pour le mettre en
position 1 et confirmer que vous avez terminé votre
sélection de la minuterie avec compte à rebours.
UTILISATION DE LA MINUTERIE AVEC COMPTE
À REBOURS
Après avoir réglé la minuterie avec compte à rebours sur
la durée de temps voulue à décompter, vous pouvez alors
utiliser la minuterie avec compte à rebours.
Lancer la séquence de compte à rebours : Appuyez
sur le bouton A pour démarrer la minuterie avec compte
à rebours. La 4e aiguille centrale et l’aiguille inférieure
commencent à tourner dans le sens inverse des aiguilles

228
229
d’une montre. L’aiguille supérieure va tourner dans
le sens des aiguilles d’une montre. Les aiguilles vont
continuer à indiquer le temps restant dans la séquence
de compte à rebours jusqu’à ce que la durée de temps ré-
glée pour la minuterie avec compte à rebours soit passée
et que la valeur de temps restant atteigne zéro. Lorsque
le temps restant dans la séquence atteint zéro, le carillon
sonne pour vous indiquer que la séquence de compte à
rebours est terminée.
Interrompre la séquence de compte à rebours :
Si vous désirez interrompre la séquence de compte à
rebours avant qu’elle n’atteigne zéro, vous pouvez le faire
en appuyant sur le bouton A (la 4e aiguille centrale ainsi
que l’aiguille supérieure et inférieure s’arrêteront). Si vous
voulez commencer la séquence de compte à rebours
ultérieurement après avoir arrêté le compte à rebours,
il vous suffit d’appuyer à nouveau sur le bouton A (la 4e
aiguille centrale ainsi que l’aiguille supérieure et inférieure
recommenceront à tourner).
Réinitialiser la séquence de compte à rebours :
Lorsque la séquence de compte à rebours a atteint zéro
et que le carillon a sonné, vous pouvez réinitialiser la
minuterie avec compte à rebours sur la valeur définie
en appuyant sur le bouton B (la 4e aiguille centrale ainsi
que l’aiguille supérieure et inférieure vont tourner pour
indiquer la valeur de l’heure que vous avez définie avant
d’utiliser la fonction de minuterie avec compte à rebours).
Effacer la valeur de la minuterie avec compte à
rebours : Si vous le souhaitez, vous pouvez effacer la
valeur de la minuterie avec compte à rebours pour la
remettre à zéro. Ceci n’est possible que si la minuterie
avec compte à rebours n’est pas en cours d’utilisation

230
231
et qu’elle a été réinitialisée. Si la minuterie avec compte
à rebours est en cours d’utilisation, vous devez d’abord
arrêter la séquence de compte à rebours en appuyant
sur le bouton A, puis sur le bouton B. Ceci va arrêter
et réinitialiser la minuterie avec compte à rebours à la
valeur horaire actuellement sélectionnée. Pour remettre
la valeur de la minuterie avec compte à rebours sur
zéro, appuyez sur le bouton B et maintenez-le enfoncé
pendant deux secondes. Vous devriez désormais suivre
les instructions pour régler la valeur de la minuterie avec
compte à rebours sur la nouvelle durée désirée.
Fonction Temps intermédiaire : Si la minuterie avec
compte à rebours est en cours d’utilisation, vous pouvez
utiliser la fonction Temps intermédiaire (Split) pour noter
le temps restant dans la séquence de compte à rebours.
Pour utiliser la fonction Temps intermédiaire, appuyez sur
le bouton B, ce qui arrêtera l’aiguille supérieure, l’aiguille
inférieure et la 4e aiguille centrale. La fonction de compte
à rebours continuera à fonctionner en interne pendant
que les aiguilles sont arrêtées.
Pour relancer le mouvement de l’aiguille supérieure,
de l’aiguille inférieure et de la 4e aiguille centrale,
appuyez à nouveau sur le bouton B et les aiguilles se
repositionneront pour indiquer l’heure actuelle au sein
de la séquence de compte à rebours.

232
233
3GMT
AIGUILLE
DES
SECONDES
COURONNE
BAGUE SUPÉRIEURE
À ROTATION
(FORMAT 24 HEURES)
4ÈME AIGUILLE CENTRALE
AIGUILLE
DES
MINUTES
AIGUILLE DES
HEURES
BAGUE INFÉRIEURE/
CHIFFRES
(FORMAT 24 HEURES)
A
2 31
FONCTION 3 FUSEAUX HORAIRES
Votre montre peut indiquer l’heure dans trois fuseaux
horaires :
1. Les aiguilles des heures et des minutes : Affichage de
l’heure en format normal de 12 heures. Remarque :
La date affichée dans la fenêtre de date est liée à
l’heure indiquée par ces deux aiguilles.
2. La 4ème aiguille centrale et la bague intérieure :
Affichage de l’heure en format 24 heures.
3. La 4ème aiguille centrale et la bague supérieure à
rotation : Affichage de l’heure en format 24 heures.

234
235
RÉGLAGE DE LA 4ÈME AIGUILLE CENTRALE
Pour ajuster la 4ème aiguille centrale lorsqu’elle
est mal alignée :
1. Tirez la couronne en position 3.
2. La 4ème aiguille centrale doit indiquer 12 heures. Si
au bout de 5 secondes après avoir mis la couronne en
position 3 la 4ème aiguille centrale n’indique pas 12
heures, appuyez sur le bouton A pour faire avancer
l’aiguille dans le sens horaire jusqu’à ce qu’elle indique
12 heures. Maintenez le bouton A enfoncé afin de faire
avancer l’aiguille plus vite.
3. Après avoir terminé, enfoncez la couronne en posi-
tion 1.
RÉGLAGE DE LA 4ÈME AIGUILLE CENTRALE
La 4ème aiguille centrale est réglée à l’usine Timex selon
les normes gouvernant le nombre de minutes dans une
heure telles qu’elles ont été établies en fonction du
Temps Universel Coordonné. Ces normes sont respectées
mondialement dans la plupart des endroits. Tant que les
lieux utilisés pour les 2ème et 3ème fuseaux horaires
respectent ces normes, il n’est pas nécessaire de régler
la 4ème aiguille centrale. Le réglage de la 4ème aiguille
centrale pour les 2ème et 3ème fuseaux horaires est
nécessaire uniquement lorsque les lieux choisis ne res-
pectent pas ces normes, auquel cas il suffit de la régler
en suivant les instructions ci-dessous :
1. Tirez la couronne en position 3. La 4ème aiguille
centrale indiquera 12 heures.

236
237
2. Tournez la couronne jusqu’à ce que l’aiguille minute
ait atteint le positionnement correcte dans l’heure des
lieux souhaités pour les 2ème et 3ème fuseaux horaires.
3. Enfoncez la couronne en position 2. La 4ème aiguille
centrale indiquera le réglage en cours par rapport au
nombre de minutes par heure.
4. Poussez le bouton A afin de faire tourner la 4ème
aiguille centrale dans le sens horaire jusqu’à ce qu’elle
s’aligne avec l’aiguille minute. Maintenez le bouton A
enfoncé afin de faire avancer l’aiguille plus vite.
5. Tirez la couronne en position 3. La 4ème aiguille
centrale indiquera 12 heures.
6. Faites tourner la couronne pour positionner les
aiguilles afin d’indiquer l’heure correcte.
7. Après avoir terminé, enfoncez la couronne en position 1.
Remarque : La 4ème aiguille centrale indiquera le réglage
en cours par rapport au nombre de minutes par heure.
Les fuseaux horaires 2 et 3 sont tous les deux indiqués par
le biais de la 4ème aiguille centrale, ainsi les lieux choisis
pour les représenter doivent respecter les mêmes normes
concernant le nombre de minutes dans une heure afin que
l’heure dans ces fuseaux s’affiche correctement.
RÉGLAGE DE LA 4ÈME AIGUILLE CENTRALE
(FUSEAU HORAIRE II)
Notez l’heure actuelle dans le lieu que vous souhaitez
inscrire en tant que Fuseau Horaire II. Enfoncez le bouton
A jusqu’à ce que la 4ème aiguille centrale indique l’heure
souhaitée dans la bague intérieure. (À noter que celle-ci
sera indiquée en format 24 heures). La 4ème aiguille cen-
trale avancera de 30 minutes chaque fois que le bouton A
est appuyé. Maintenez le bouton A enfoncé afin de faire

238
239
avancer l’aiguille plus vite. Cette démarche réglera l’heure
du 2ème fuseau horaire sur votre montre.
RÉGLAGE DE LA ROTATION DU COUVERT PAR BAGUE
SUPÉRIEURE (FUSEAU HORAIRE III)
Le 3ème fuseau horaire est réglé en utilisant le réglage
en cours de la 4ème aiguille centrale et en ajustant la
rotation du couvert par bague supérieure jusqu’à ce que
l’heure souhaitée pour le 3ème fuseau horaire soit indi-
quée. (À noter qu’elle sera indiquée en format 24 heures).
Le couvert est doté de 72 positions. Pour le faire avancer
d’une heure il suffit de le faire avancer de trois positions
(3 « cliques »). Notez l’heure actuelle dans le lieu que vous
souhaitez inscrire en tant que Fuseau Horaire III. Réglez
la rotation du couvert par bague supérieure dans le sens
anti-horaire jusqu’à ce que le repère heure souhaité est
indiqué par la 4ème aiguille centrale.
FONCTION TACHYMÈTRE
(certains modèles)
En utilisant cette méthode, le tachymètre déterminera
uniquement les vitesses supérieures à 60 unités par
heure. Les vitesses plus lentes peuvent être mesurées en
diminuant l’unité de mesure. La fonction réalisée par un
tachymètre est indépendante de l’unité de distance (par
exemple : mille terrestre, mille marin, kilomètre, mètre,
etc.) tant que la même unité de longueur est utilisée pour
tous les calculs.
1. Déterminer les marqueurs de début et de fin pour
toutes vos distances prédéterminées.
2. Démarrer le chronographe une fois que la cible de la
mesure de vitesse dépasse le marqueur de départ.

240
241
3. Arrêter le chronographe une fois que la cible de la
mesure de vitesse dépasse le marqueur de fin.
4. L’aiguille des secondes du chronographe indique sur
l’échelle tachymétrique la vitesse de la cible.
FONCTION RÈGLE À CALCUL DE LA BAGUE
D’ENCADREMENT
La fonction règle à calcul du cercle supérieur fonctionne
en faisant pivoter l’anneau externe. L’anneau interne ne
bouge pas. L’anneau externe est toujours lié à la « dis-
tance » ou à la « vitesse », ou de toute donnée variant
avec le temps. L’anneau interne ne note que les unités
de temps.
Anneau externe
Sur l’anneau externe, le chiffre « 10 » représente les
facteurs ou multiples de 10, tels que 0,1, 1,0, 10 ou 100.
Anneau interne
Sur l’anneau interne, « MPH » (mille/heure) renvoie à
« l’indice de vitesse ». Cet indice sert à calculer la vitesse
mettant en jeu toutes les données à l’heure. Sur l’anneau

242
243
interne, « STAT » (mille terrestre) et « NAUT » (mille marin)
servent à la conversion des unités de distance.
ANNEAU EXTERNE
ANNEAU INTERNE
Les exemples suivants servent de guide sur la manière
d’utiliser la règle à calculer.
CALCUL DE LA VITESSE :
Quelle vitesse est requise pour faire 10 milles marins
en 15 minutes ?
Facteurs connus : Distance : 10 milles marins Temps :
15 minutes
• Alignez la flèche « 10 » sur l’anneau externe avec
« 15 » sur l’anneau interne.
• La vitesse requise figure directement au-dessus du
marquage « MPH » sur l’anneau interne.
La réponse : 40 milles marins/heure
Calcul de temps : Combien temps faudra-t-l pour
parcourir 10 milles marins à une vitesse de 40 milles/
heure ?

244
245
Facteurs connus : Vitesse : 40 milles/heure Distance :
10 milles marins
• Alignez « 40 » sur l’anneau externe avec le marquage
« MPH » sur l’anneau interne.
• Le temps requis figure directement sous la flèche
« 10 » sur l’anneau externe, qui est « 15 » sur l’anneau
interne.
La réponse : 15 minutes
CALCUL DE DISTANCE :
Quelle distance pouvez-vous parcourir à 40 milles/
heure pendant 15 minutes ?
Facteurs connus : Vitesse : 40 milles marins/heure
Temps : 15 minutes
• Alignez « 40 » sur l’anneau externe directement
au-dessus du marquage « MPH » sur l’anneau interne.
• La distance parcourue peut être obtenue au-dessus
du marquage « 15 » sur l’anneau interne. Le chiffre
indiqué sur l’anneau externe est « 10 ».
La réponse : la distance parcourue est de 10 milles
marins.

246
247
CONVERSION D’UNITÉ :
Pour convertir des milles marins en milles terrestres et
kilomètres.
Facteur connu : La distance à convertir est de 10 milles
marins
• Alignez la flèche « 10 » sur l’anneau externe au-dessus
de « NAUT » sur l’anneau interne. La conversion en
milles terrestres (11,5) figure au-dessus du marquage
« STAT » de l’anneau interne, et la conversion en
kilomètres (18,5) se trouve au-dessus du marquage
« MPH » de l’anneau interne.
COMMENT AJUSTER LE BRACELET
(Les sections suivantes s’appliquent aux bracelets de tous
les modèles de montre.)
BRACELET À FERMOIR COULISSANT
1. Ouvrez la plaquette de
blocage.
2. Glissez le fermoir jusqu’à
la longueur de bracelet
souhaitée.
3. Appuyez tout en tenant
la plaquette de blocage et glissez le fermoir d’avant en
arrière jusqu’à ce qu’il s’engage dans les rainures sur
la face inférieure du bracelet.
4. Appuyez sur la plaquette de blocage jusqu’au déclic.
Une force excessive peut endommager le fermoir.

248
249
BRACELET À FERMOIR DÉPLIANT
1. Trouvez la barrette à ressort qui attache le bracelet au
fermoir.
2. À l’aide d’un outil pointu, enfoncez la barrette et
pivotez délicatement le bracelet pour le dégager.
3. Déterminer la taille du poignet puis introduire la bar-
rette à ressort dans l’orifice inférieur correspondant.
4. Enfoncez la barrette, alignez-la sur l’orifice supérieur
puis la relâcher pour la mettre en place.
DÉMONTAGE DE MAILLONS DU BRACELET
DÉMONTAGE DE MAILLONS :
1. Placez le bracelet verticalement et introduisez un outil
pointu dans l’ouverture du maillon.
2. Poussez fortement la goupille dans le sens de la flèche
jusqu’à détacher le maillon (les goupilles sont conçues
pour résister à l’extraction).
3. Répétez l’opération jusqu’à ce que le nombre souhaité
de maillons soit démonté.
RÉASSEMBLAGE :
1. Mettez les pièces du bracelet en place.
2. Poussez la goupille dans le maillon dans le sens
opposé à la flèche.
3. Enfoncez la goupille jusqu’à ce qu’elle ne dépasse plus
du bracelet.

250
251
PILE
La pile doit permettre à la montre de fonctionner pendant
4 à 6 ans dans des conditions normales d’utilisation.
L’autonomie réelle de la pile peut varier en fonction de
l’utilisation qui est faite de la montre.
Si la pile doit être changée, nous recommandons que seul
TIMEX s’en charge. La montre devra être étalonnée de
nouveau pour régler l’heure et la date après le change-
ment de la pile. Lorsque la montre est renvoyée à Timex,
les frais de port doivent être prépayés. Pour obtenir
un emballage pré-affranchi, composer le 1-800-448-
4639, consulter le détaillant chez lequel la montre a été
achetée ou visiter www.TIMEX.com. Inclure le montant
suivant avec la montre pour couvrir les frais de port et
de manutention (ce ne sont pas des frais de réparation) :
un chèque ou mandat-poste de 8,00 $ US aux É.-U. ou de
12,00 $ CAN au Canada. Dans les autres pays, les frais de
port et de manutention seront facturés par Timex.
N’INCLUEZ JAMAIS DANS VOTRE ENVOI UN BRACELET
SPÉCIAL OU TOUT AUTRE ARTICLE AYANT UNE VAL-
EUR PERSONNELLE.
NE PAS JETER LA PILE AU FEU. NE PAS RECHARGER
LA PILE. GARDER LES PILES HORS DE LA PORTÉE DES
ENFANTS.

252
253
GARANTIE INTERNATIONALE TIMEX
Votre montre TIMEX
®
est garantie contre les défauts de
fabrication par Timex Group USA, Inc. pour une période
d’UN AN, à compter de la date d’achat. Timex ainsi que
ses filiales du monde entier honoreront cette Garantie
Internationale. Timex se réserve le droit de réparer votre
montre en y installant des composants neufs ou révisés,
ou bien de la remplacer par un modèle identique ou
similaire. IMPORTANT — CETTE GARANTIE NE COUVRE
PAS VOTRE MONTRE :
1. après l’expiration de la période de garantie,
2. si la montre n’a pas été achetée initialement chez un
revendeur Timex agréé ;
3. si la réparation n’a pas été effectuée par Timex ;
4. suite à un accident, une falsification ou un emploi
abusif,
5. s’il s’agit du verre ou crystal, du bracelet ou
brassard, du boîtier, des accessoires ou de la pile. Le
remplacement de ces pièces peut vous être facturé
par Timex.
CETTE GARANTIE ET LES RECOURS AUX PRÉSENTES SONT
EXCLUSIFS ET REMPLACENT TOUTE AUTRE GARANTIE,
EXPRESSE OU IMPLICITE, Y COMPRIS TOUTE GARANTIE
IMPLICITE DE QUALITÉ MARCHANDE OU D’ADAPTATION
À UN USAGE PARTICULIER. TIMEX N’EST RESPONSABLE
D’AUCUN DOMMAGE PARTICULIER, ACCESSOIRE OU
INDIRECT. Certains pays ou états n’autorisent pas les
limitations de garanties implicites et n’autorisent pas les
exclusions ou limitations pour des dommages, auquel
cas lesdites limitations pourraient ne pas vous concerner.

254
255
Cette garantie vous confère des droits légaux précis. Il se
peut que vous bénéficiez d’autres droits, lesquels varient
d’un pays à un autre ou d’un état à un autre.
Pour obtenir le service de garantie, veuillez retourner
votre montre à Timex, à une de ses filiales ou au
détaillant Timex où la montre a été achetée. Inclure un
coupon de réparation original dûment rempli ou, aux
É-U. et au Canada seulement, le coupon original dûment
complété ou une déclaration écrite comprenant votre
nom, adresse, numéro de téléphone ainsi que la date
et le lieu d’achat. Veuillez inclure la somme suivante
avec votre montre pour couvrir les frais de port et de
manutention (ce ne sont pas des frais de réparation) : un
chèque ou mandat de 8,00 $ US. aux États-Unis, de 12,00
$ CAN au Canada et de 3,50 £ au Royaume-Uni. Dans les
autres pays, Timex vous facturera les frais d’envoi et de
manutention. N’INCLUEZ JAMAIS DANS VOTRE ENVOI UN
BRACELET SPÉCIAL OU TOUT AUTRE ARTICLE AYANT UNE
VALEUR PERSONNELLE.
Aux États-Unis, veuillez composer le 1-800-448-4639
pour plus de renseignements sur la garantie. Au
Canada, appelez le 1-800-263-0981. Au Brésil, appelez le
+11 2664 1001. Au Mexique, appelez le 01-800-01-060-00.
Pour l’Amérique centrale, les Caraïbes, les Bermudes et
les Bahamas, composez le (501) 370-5775 (É.-U.). En Asie,
appelez le 852-2815-0091. Au Royaume-Uni, appelez le
44 020 8687 9620. En France, appelez le 33 3 81 63 42 51.
En Allemagne/Autriche, composez le +43 662 889 2130.
Dans les autres régions, veuillez contacter votre détaillant
ou distributeur Timex local pour des renseignements sur
la garantie.

256
257
Si votre montre Timex
®
doit être réparée, envoyez-la
à Timex conformément aux dispositions de la Garantie
internationale Timex ou adressez-le à : TG SERVICE
CENTER, P.O. Box 2740, Little Rock, AR 72203. Pour toute
question concernant les réparations, appelez le 1-800-
328-2677 ou envoyez un courriel à [email protected]
GARANTIE ÉTENDUE
Disponible aux É.-U. exclusivement. La garantie peut
être prolongée pour une période additionnelle de 4 ans à
compter de la date d’achat pour la somme de 5 $. Vous
pouvez effectuer ce paiement avec AMEX, Discover, Visa
ou MasterCard en composant le 1 800-800-448-4639
durant les heures normales d’ouverture. Le paiement
doit être effectué dans les 30 jours qui suivent l’achat.
Indiquer les nom, adresse, numéro de téléphone, date
d’achat et numéro de modèle à 5 chiffres. Il est égale-
ment possible d’envoyer un chèque de 5 $ US par courrier
à : Timex Extended Warranty, P.O. Box 1676, Dept. EF,
Little Rock, AR 72203.
©2015 Timex Group USA, Inc. TIMEX, INDIGLO, et INTELLIGENT
QUARTZ sont des marques déposées de Timex Group B.V. et de ses
filiales.

259
TIMEX
®
HORLOGES
Gefeliciteerd met de aankoop van uw TIMEX
®
INTELLIGENT QUARTZ™ horloge. Lees de instructies
goed door zodat u weet hoe u uw Timex horloge moet
bedienen.
Het is mogelijk dat uw horloge niet alle functies heeft die
in dit boekje worden beschreven.
Bezoek voor meer informatie en om uw
product te registreren:
www.timex.com

260
261
INHOUDSOPGAVE
Uw horloge starten ........................................................ 263
Waterbestendigheid en schokvastheid ......................... 264
Indiglo
®
nachtverlichting ................................................ 266
Tijd en datum instellen ................................................... 267
Eeuwige kalender ........................................................... 269
Fly-back chronograaf ..................................................... 272
Fly-back chronograaf/kompas ....................................... 278
Lineaire Chronograaf ...................................................... 292
Wereldtijd ...................................................................... 298
Kompas ......................................................................... 305
Getij Temp en Kompas ................................................... 313
Hoogtemeter .................................................................. 324
Diepte ............................................................................. 333
Yacht Racer .................................................................... 338
Chrono timer .................................................................. 350
3GMT .............................................................................. 366
Tachymeterfunctie ......................................................... 373
Rekenliniaalfunctie ......................................................... 374
Armband afstellen .......................................................... 379
Armbandschakels verwijderen ...................................... 381
Batterij ............................................................................ 382
Garantie .......................................................................... 384

262
263
UW HORLOGE STARTEN
(Niet van toepassing op modellen met eeuwige kalender.)
Om uw horloge te starten, haalt u de plastic bescherming
onder de kroon weg en drukt u de kroon vervolgens tegen
de kast aan.
Bij sommige horloges moet de instelkroon naar binnen
worden gedraaid. Als de horlogekast een uitsteeksel met
schroefdraad heeft, moet de kroon naar binnen worden
gedraaid nadat het horloge is ingesteld.
Om de kroon naar binnen te draaien, houdt u hem stevig
tegen het uitsteeksel met schroefdraad aan gedrukt
terwijl u de kroon met de klok mee draait. Blijf de kroon
vastdraaien totdat hij stevig vastzit. U moet de kroon
losdraaien (tegen de klok in) voordat u hem eruit trekt
wanneer u uw horloge weer wilt instellen.
Welkom in de wereld van Timex
®
horloges met
Intelligent Quartz™ technologie, de toekomst
van quartz-analoog technologie. Timex Intelligent
Quartz technologie combineert het vermogen van
een microprocessor met de betrouwbaarheid en
nauwkeurigheid van quartz-analoog uurwerken. Bij
Timex Intelligent Quartz horloges is de technologie in
het ontwerp ingebouwd en biedt de wijzerplaat een
nieuw niveau van complexiteit. Maximaal drie extra,
onafhankelijke wijzers tonen in een traditionele analoge
indeling uitgebreide informatie die normaal alleen bij
digitale horloges verkrijgbaar is.

264
265
WAARSCHUWING: OM HET HORLOGE WATERBESTEN-
DIGHEID TE HOUDEN MAG U ONDER WATER OP GEEN
ENKELE KNOP DRUKKEN TENZIJ IS AANGEGEVEN DAT
UW HORLOGE TOT 200 METER WATERBESTENDIG IS.
TREK DE KROON NOOIT UIT ONDER WATER.
1. Het horloge is alleen waterbestendig zolang het
horlogeglas, de kroon en de kast intact blijven.
2. Het horloge is geen gecertificeerd duikershorloge.
3. Spoel het horloge met zoet water af nadat het aan
zout water is blootgesteld.
4. De schokvastheid wordt op de wijzerplaat of de
achterkant van de behuizing aangegeven. De horloges
zijn zodanig ontworpen dat ze aan de ISO-test voor
schokvastheid voldoen. Beschadiging van het
horlogeglas moet echter worden vermeden.
WATERBESTENDIGHEID EN SCHOKVASTHEID
Als het horloge waterbestendig is, wordt de metermarke-
ring (WR_M) aangegeven.
Waterbestendige diepte p.s.i.a.* Waterdruk
onder oppervlak
30 m/98 ft 60
50 m/164 ft 86
100 m/328 ft 160
200 m/656 ft 284

266
267
TIJD EN DATUM INSTELLEN
OPMERKING: De kroon van het horloge heeft drie
standen: gesloten, middelste en buitenste. Om bekend te
raken met het verschil tussen de verschillende standen,
trekt u de kroon naar de buitenste stand en drukt u
vervolgens lichtjes op de kroon totdat u hem in de
middelste stand voelt klikken.
De datum en tijd instellen:
Tijd
Trek de kroon naar de buitenste stand en draai hem
totdat de juiste tijd wordt weergegeven. Verzeker u ervan
dat de instelling voor AM/PM juist is door te controleren
of de datum om middernacht en niet om twaalf uur
‘s middags verandert.
INDIGLO
®
NACHTVERLICHTING
Druk op de knop of kroon om het licht in te schakelen.
De in de INDIGLO
®
nachtverlichting gebruikte
elektroluminescentietechnologie verlicht de wijzerplaat
van het horloge ‘s nachts en wanneer er weinig licht is.
OF

268
269
Datum (niet van toepassing op modellen met
eeuwige kalender)
Trek de kroon tot de middelste stand en draai hem totdat
de juiste datum in het datumvenster verschijnt. Opmer-
king: De datum verandert tussen 22 en 2 uur. Verander de
datum niet tijdens deze tijd. Anders raakt het mechaniek
van het horloge beschadigd.
Druk de kroon naar de gesloten stand nadat de datum/tijd
is ingesteld. De secondewijzer begint nu te bewegen.
OPMERKING: Voor maanden met minder dan 31 dagen
moet de datum worden bijgesteld.
EEUWIGE KALENDER
OVERZICHT
A
B
1 2
3
1 2
3
UURWIJZER
DAGWIJZER
DATUMWIJZER
SECOND EWIJZER
MINUUTWIJZER
KROON
MAANDWIJZER
KNOP A
(VERZONKEN)
KNOP B
(VERZONKEN)
GESLOTEN
STAND
MIDDELSTE
STAND
BUITENSTE
STAND

270
271
VERSTELLEN VOOR SCHRIKKELJAAR
Om de juiste datum te behouden heeft het horloge een
instelling voor de verstelling van het huidige schrikkeljaar.
Deze instelling wordt in de Timex-fabriek of nadat de
batterij is vervangen, uitgevoerd en kan niet worden
veranderd, alleen bekeken.
Voor het bekijken van de verstelling trekt u de kroon naar
de middelste stand. De datumwijzer toont de verstelling:
1 = 1 jaar na schrikkeljaar; 2 = 2 jaar na schrikkeljaar;
3 = 3 jaar na schrikkeljaar; 4 = schrikkeljaar. Druk de kroon
naar binnen wanneer u klaar bent en de wijzers geven
dan weer de normale weergave van de dag, maand en
datum aan.
INLEIDING
Dankzij de eeuwige kalender van het horloge hoeft u
de datum tot 2100 niet bij te stellen. Het horloge voert
automatisch bijstellingen uit voor korte maanden en
schrikkeljaren en toont daardoor altijd de juiste dag
en datum. De dag en datum zijn in de Timex-fabriek
vooringesteld. U hoeft alleen de tijd af te stellen. Het
horloge heeft twee verzonken drukknoppen voor gebruik
door een Timex servicecentrum om de dag en datum na
het vervangen van de batterij in te stellen. Verder hebben
ze geen nut.

272
273
4E MIDDELSTE WIJZER AFSTELLEN
Een verkeerd ingestelde 4e middelste wijzer bijstellen:
1. Trek de kroon naar de buitenste stand. De bovenste en
onderste wijzer gaan automatisch naar het einde van
hun traject.
2. De 4e middelste wijzer hoort naar 12 uur te wijzen.
Als de 4e middelste wijzer niet binnen 5 seconden
nadat de kroon naar de buitenste stand is getrokken,
naar 12 uur wijst, drukt u op knop A of B om de wijzer
tegen de klok in of met de klok mee te draaien totdat
hij naar 12 uur wijst.
3. Druk de kroon naar de gesloten stand wanneer u
klaar bent.
FLY-BACK CHRONOGRAAF
OVERZICHT
AA
B
23
1 2
3
1 2
3
BOVENSTE
WIJZER
2E TIJDZONE
CHRONOGRAAFUREN
4E MIDDELSTE
WIJZER
SECONDEWIJZER
DATUMVENSTER
KROON
ONDERSTE WIJZER
KNOP A
KNOP B
MINUUTWIJZER
UURWIJZER
GESLOTEN
STAND
MIDDELSTE
STAND
BUITENSTE
STAND
MINUUTSCHAAL VAN
CHRONOGRAAF

274
275
wijzer toont de tweede tijdzone en de 4e middelste
wijzer toont de minuten.
2. Als we aannemen dat de tijd van de tweede tijdzone
dezelfde minuten heeft als de eerste tijdzone,
hoort de 4e middelste wijzer in lijn te liggen met de
minuutwijzer. Als de wijzers niet in lijn liggen of uw
tweede tijdzone een andere minuut binnen het uur is,
drukt u op knop B om de 4e middelste wijzer vooruit
te draaien tot deze in de gewenste stand is.
3. Druk op knop A om de bovenste wijzer in stappen van
één uur vooruit te draaien totdat deze het gewenste
uur van de tweede tijdzone bereikt. Houd knop A
ingedrukt om de wijzer snel te draaien.
4. Druk de kroon naar binnen wanneer u klaar bent.
TWEEDE TIJDZONE
De bovenste wijzer toont de tijd voor de tweede tijdzone.
U kunt zien dat de
schaal 24 uur heeft met
middernacht aan beide
einden en 12 uur ‘s
middags in het midden.
Meestal verschillen de
tijdzones in stappen van
uren. In dergelijke gevallen
is de minuutwaarde
van de tweede tijdzone
hetzelfde als wat de
minuutwijzer van het horloge aangeeft.
DE TWEEDE TIJDZONE INSTELLEN:
1. Trek de kroon naar de middelste stand. De bovenste
AA
B
23
1 2
3
1 2
3

276
277
4. Druk op knop B (FLY-BACK/RESET) om de fly-back
chronograaf op nul terug te stellen.
Wanneer de chronograaf wordt teruggesteld, gaan
alle wijzer naar nul. Na acht seconden verschijnt de
gewone weergave van de tweede tijdzone weer.
5. Houd knop B (Fly-back/Reset) ingedrukt om de fly-back
chronograaf terug te stellen en/of opnieuw te starten
terwijl hij loopt. Laat hem los wanneer u opnieuw
wilt starten.
FLY-BACK CHRONOGRAAF
Het horloge heeft een fly-back chronograaf van 4 uur.
1. Druk op knop A (START/STOP) om te beginnen.
De 4e middelste wijzer toont de seconden met een
resolutie van 1/5 seconde. De onderste wijzer toont
het laatste cijfer van de minuten, oplopend tot tien en
herhaalt zich dan. De bovenste wijzer toont de totale
tijd, inclusief uren en minuten, met een verdeling om
de tien minuten. De chronograaf loopt tot vier uur
voordat hij automatisch stopt.
2. Druk nogmaals op knop A (START/STOP) om te
stoppen. Alle wijzers stoppen met draaien.
3. Druk nogmaals op knop A (START/STOP) om te
hervatten.

278
279
RODE WIJZER (4E MIDDELSTE WIJZER) AFSTELLEN
Een verkeerd ingestelde rode wijzer bijstellen:
1. Trek de kroon naar de buitenste stand. De bovenste en
onderste wijzer gaan automatisch naar het einde van
hun traject.
2. De 4e middelste wijzer hoort naar 12 uur te wijzen.
Als dit niet binnen 5 seconden nadat de kroon naar de
buitenste stand is getrokken, gebeurt, drukt u op A of
B om de wijzer respectievelijk tegen de klok in of met
de klok mee te draaien totdat hij naar 12 uur wijst.
3. Druk de kroon naar binnen wanneer u klaar bent.
FLY-BACK CHRONOGRAAF/KOMPAS
OVERZICHT
A
C
B
1 2
3
1 2
3
BOVENSTE
WIJZER
2E TIJDZONE
CHRONOGRAAF/
UREN
4E MIDDELSTE
WIJZER
SECONDEWIJZER
DATUMVENSTER
KROON
MINUUTSCHAAL VAN
CHRONOGRAAF
ONDERSTE WIJZER
KNOP A
KNOP B
UURWIJZER
MINUUTWIJZER
GESLOTEN
STAND
MIDDELSTE
STAND
BUITENSTE
STAND
KNOP C

280
281
2. Druk op B om de 4e middelste wijzer vooruit te
draaien. Houd de knop ingedrukt om de wijzer snel te
draaien. De bovenste en 4e middelste wijzer draaien
tegelijk; terwijl de 4e middelste wijzer eenmaal
ronddraait, draait de bovenste wijzer één uur verder.
Als we aannemen dat de tweede tijdzone dezelfde
minuten heeft als uw eerste tijdzone, hoort de 4e
middelste wijzer in lijn te liggen met de minuutwijzer.
3. Druk op A om de bovenste wijzer in stappen van één
uur vooruit te draaien. Houd de knop ingedrukt om de
wijzer snel te draaien.
4. Druk de kroon naar binnen wanneer u klaar bent.
De tijd van de tweede tijdzone kan ook worden gebruikt
om de tijd thuis in een 24-uurs indeling weer te geven, als
u daar de voorkeur aan geeft. Wanneer u de tweede tijd
op deze manier instelt, verzeker u er dan van dat de uur/
TWEEDE TIJDZONE
De bovenste wijzer toont normaliter de tijd voor de
tweede tijdzone. U kunt zien dat de schaal 24 uur heeft
met middernacht aan beide einden en 12 uur ‘s middags
in het midden.
De tijd van de tweede tijdzone instellen:
1. Trek de kroon naar de
middelste stand. De
bovenste wijzer toont
de tweede tijdzone
in militaire tijd en de
4e middelste wijzer
toont de minuten.
A
C
B
1 2
3
1 2
3

282
283
verdeling om de tien minuten. De chronograaf loopt
tot vier uur voordat hij automatisch stopt.
2. Druk nogmaals op A (START/STOP) om te stoppen. Alle
wijzers stoppen.
3. Druk nogmaals op A (START/STOP) om te hervatten
of op B (FLY-BACK/RESET) om de chronograaf op nul
terug te stellen.
Wanneer de chronograaf wordt teruggesteld, gaan alle
wijzer naar nul. Na acht seconden verschijnt de gewone
weergave van de tijd van de tweede tijdzone weer.
4. U kunt de chronograaf ook terugstellen en/of opnieuw
starten terwijl hij loopt. Hiervoor houdt u B (FLY-BACK/
RESET) ingedrukt om de chronograaf op nul te stellen
en laat u B los wanneer u opnieuw wilt starten. U hoeft
niet te wachten tot alle wijzers op nul staan voordat u
minutenweergave met de 24-uurs weergave overeenkomt
door te controleren of de datum om middernacht en niet
om 12 uur ‘s middags verandert.
FLY-BACK CHRONOGRAAF
Het horloge heeft een fly-back chronograaf van 4 uur.
1. Druk op A (START/STOP) om te beginnen. De 4e
middelste wijzer toont de seconden met een resolutie
van 1/5 seconde en
de onderste wijzer
toont het laatste
cijfer van de minuten,
tellend tot tien en dan
opnieuw. De bovenste
wijzer toont de totale
tijd, inclusief uren en
minuten, met een
A
C
B
1 2
3
1 2
3

284
285
de knop loslaat; het opnemen van de tijd begint intern
vanaf het moment dat u de knop loslaat. Met deze
“fly-back” functie kunt u een rondetijd meten.
Het kompas kan worden gebruikt terwijl de chrono-
graaf loopt zonder hierbij te storen. Zie WERKING
VAN KOMPAS.
KOMPAS KALIBREREN
Het kompas moet worden gekalibreerd voordat u
het gebruikt.
Omdat een kompas gebruik maakt van het magnetische
veld van de aarde, moet u zich bewust zijn van grote
metalen voorwerpen zoals auto’s en bruggen, of
voorwerpen die elektromagnetische straling afgeven zoals
televisies en computers die op het magnetische veld rond
het horloge van invloed kunnen zijn. Als het kompas in
de buurt van dergelijke voorwerpen wordt gekalibreerd,
werkt het alleen naar behoren op diezelfde plek. Als het
kompas uit de buurt van dergelijke voorwerpen wordt
gekalibreerd, werkt het niet naar behoren nabij deze
voorwerpen. Voor de beste resultaten kalibreert u het
kompas nabij de plek van beoogd gebruik.
Bij het kalibreren en het aflezen van de koers is het
belangrijk, zoals bij alle kompassen, om het kompas
horizontaal te houden. Het kalibreren of het aflezen
van de koers terwijl het horloge niet horizontaal is, kan
grote fouten tot gevolg hebben. Vermijd ook plaatsen
die hogere dan normale concentraties hard en zacht
ijzer hebben omdat ze onnauwkeurige koersen kunnen
veroorzaken. Steeds wanneer een koers twijfelachtig is,
moet u opnieuw kalibreren.

286
287
3. Druk op C (KOMPAS) om te beginnen. De 4e middelste
wijzer draait tweemaal rond om u eraan te herinneren
het horloge te draaien. Terwijl het horloge horizontaal
is, draait u het LANGZAAM tweemaal rond waarbij u
er elke keer minstens 15 seconden over doet om het
rond te draaien.
Berg het horloge niet op nabij een bron van magnetisme
zoals een computer, huishoudelijke apparaten of een
televisie omdat het horloge een magnetische lading
kan krijgen met als gevolg onnauwkeurige koersen. De
nauwkeurigheid van om de pols gedragen instrumenten
ligt gewoonlijk binnen +/- 10 graden.
Het kompas kalibreren:
1. Trek de kroon naar de middelste stand en wacht tot de
wijzers niet meer draaien.
2. Houd het horloge horizontaal of plaats het op een
horizontaal oppervlak (als het bandje in de weg zit,
plaatst u het horloge op een omgekeerd kopje). De
wijzerplaat mag naar beneden gericht zijn maar
bescherm hem wel goed.

288
289
7. Druk de kroon naar binnen wanneer u klaar bent.
A
B
Magnetische miswijzing ingesteld op -14° (14°W)
4. Wanneer u klaar bent, houdt u het horloge horizontaal
en drukt u op C (kompas). De 4e middelste wijzer
beweegt heen en weer om het einde van het
kalibreren aan te geven en beweegt vervolgens naar
de huidige magnetische miswijzingsinstelling.
5. Als u de magnetische miswijzing niet wilt instellen,
drukt u op de kroon. Anders, als u wilt dat het horloge
automatisch de miswijzing compenseert, draait u de
kompasring tot het noorden bij 12 uur is.
6. Druk op A of B om de 4e middelste wijzer respectie-
velijk naar het westen (-) of oosten (+) te verplaatsen
zodat hij naar de miswijzing van uw locatie wijst
met behulp van de miswijzingsschaal. Houd de knop
ingedrukt om de wijzer snel te draaien. Zie de figuur
hieronder voor een voorbeeld.

290
291
WERKING VAN KOMPAS
Gewoonlijk wordt het kompas niet gebruikt; de 4e
middelste wijzer wijst dan naar 12 uur of toont de
seconden van de chronograaf.
Terwijl u het horloge horizontaal houdt, drukt u op C
(KOMPAS) om het kompas te activeren. De kompasnaald
draait tot hij naar het noorden wijst. Als het horloge wordt
gedraaid, blijft de 4e middelste wijzer draaien en wijst
hij steeds naar het noorden. Na 20 seconden gaat het
kompas automatisch uit en keert de 4e middelste wijzer
naar de normale stand terug. Hierdoor gaat de batterij
langer mee. Druk op elk gewenst moment op C (KOMPAS)
om het kompas nog 20 seconden aan te laten staan.
Het kompas kan worden geactiveerd terwijl de chrono-
graaf in gebruik is. De werking van de 4e middelste wijzer
wordt alleen maar tijdelijk omgeschakeld. De bovenste en
onderste wijzer blijven de chronograaftijd tonen en alle
chronograaffuncties zijn beschikbaar via knop A (START/
STOP) en B (FLY-BACK/RESET).
OPMERKING: Terwijl het kompas werkt, draait de
secondewijzer in stappen van twee seconden. Wanneer
het kompas geactiveerd is, kunnen de bovenste en
onderste wijzer zich ook een klein beetje verplaatsen;
ze keren naar de juiste stand terug wanneer het kompas
wordt gedeactiveerd. Dit is normaal en levert de meest
nauwkeurige kompaswaarden.

292
293
LINEAIRE CHRONOGRAAF
OVERZICHT
LINEAIRE EN 4E MIDDELSTE WIJZER AFSTELLEN
Een verkeerd ingestelde 4e middelste wijzer bijstellen:
1. Trek de kroon naar de buitenste stand. De onderste
wijzer wordt automatisch naar het einde van het
traject gereset.
2. De 4e middelste wijzer hoort naar 12 uur te wijzen. Als
de 4e middelste wijzer niet binnen 5 seconden nadat
de kroon naar de buitenste stand is getrokken, naar 12
uur wijst, drukt u op knop A om de wijzer met de klok
mee te draaien totdat hij naar 12 uur wijst.
3. Als de chronograaf is teruggesteld en de lineaire wijzer
niet naar nul wijst, houdt u knop B gedurende 5 seconden
ingedrukt om een volledige kalibratie van de lineaire
wijzer uit te voeren. Dit duurt maximaal 32 seconden.
4. Druk de kroon naar de gesloten stand wanneer u klaar
bent.
SECONDEWIJZER
DATUMVENSTER
KROON
ONDERSTE WIJZER
KNOP A
KNOP B
4E MIDDELSTE
WIJZER
UURWIJZER
LINEAIRE
WIJZER
MINUUTWIJZER
A
B
1
2
3

294
295
TWEEDE TIJDZONE
De onderste wijzer
toont de tijd voor
de tweede tijdzone.
U kunt zien dat de
schaal 24 uur heeft
met middernacht
aan beide einden en
12 uur ‘s middags in
het midden. Meestal
verschillen de
tijdzones in stappen
van uren. In dergelijke
gevallen is de minuutwaarde van de tweede tijdzone
hetzelfde als wat de minuutwijzer van het horloge
aangeeft.
DE TWEEDE TIJDZONE INSTELLEN:
1. Trek de kroon naar de middelste stand. De onderste
wijzer toont de tijd van de tweede tijdzone en de 4e
middelste wijzer toont de minuten.
2. Als we aannemen dat de tijd van de tweede tijdzone
dezelfde minuten heeft als de eerste tijdzone,
hoort de 4e middelste wijzer in lijn te liggen met de
minuutwijzer. Als de wijzers niet in lijn liggen of uw
tweede tijdzone een andere minuut binnen het uur is,
drukt u op knop B om de 4e middelste wijzer vooruit
te draaien tot deze in de gewenste stand is.
3. Druk op knop A om de onderste wijzer in stappen van
één uur vooruit te draaien totdat deze het gewenste
uur van de tweede tijdzone bereikt. Houd knop A
ingedrukt om de wijzer snel te draaien.
4. Druk de kroon naar binnen wanneer u klaar bent.
A
B
1
2
3

296
297
LINEAIRE CHRONOGRAAF
Het horloge heeft een chronograaf van 4 uur met tussentijd.
1. Druk op knop A (Start/Stop) om te beginnen. De 4e
middelste wijzer toont de seconden met een resolutie
van 1/5 seconde. De lineaire wijzer toont de minuten,
oplopend tot dertig en herhaalt zich dan. De onderste
wijzer toont de totale tijd, inclusief uren en minuten,
met een verdeling om de tien minuten. De chronograaf
loopt tot vier uur voordat hij automatisch stopt.
2. Druk nogmaals op knop A (Start/Stop) om te stoppen.
Alle wijzers stoppen met draaien.
3. Druk op knop B (Split/Reset) om de chronograaf op nul
terug te stellen.
Wanneer de chronograaf wordt teruggesteld, gaan
alle wijzers naar nul. Na acht seconden verschijnt het
gewone display van de tweede tijdzone weer. Terwijl de
chronograaf loopt, kunt u een tussentijd opnemen. Druk
op knop B (Split/Reset) en alle wijzers stoppen terwijl
de chronograaf blijft lopen. Druk nogmaals op knop B
(Split/Reset) om het display van de verstreken tijd van de
lopende chronograaf weer te zien.

298
299
WERELDTIJD
OVERZICHT
DE WERELDTIJD INSTELLEN:
1. Trek de kroon naar de middelste stand. De middelste
wijzer toont de stad in de wereldtijdzone en de
bovenste wijzer toont de tijd in die stad.
A
B
C
1 2 3
2. Druk op A of B om de middelste wijzer naar de stad te
draaien die uw thuistijdzone vertegenwoordigt. Houd
A
B
C
1 2
3
corrected 3.3.11 with Paulo’s new cities
24 STEDEN
WERELDTIJDSCHAAL
SECONDEWIJZER
DATUMVENSTER
KROON
ONDERSTE WIJZER
KNOP A
KNOP B
KNOP C
4E MIDDELSTE WIJZER
SEIZOENSCHAAL
BOVENSTE WIJZER
UURWIJZER
MINUUTWIJZER
GESLOTEN
STAND
MIDDELSTE
STAND
BUITENSTE
STAND

300
301
de knop ingedrukt om de wijzer snel te draaien. Elke
stad kan worden gebruikt.
3. Trek de kroon naar de buitenste stand. De
stadkeuzewijzer keert terug naar de stand 12 uur
zoals aangegeven in RODE WIJZER AFSTELLEN. Na een
pauze van vijf seconden toont de bovenste wijzer de
wereldtijd (de tijd in de stad die u in de vorige stap
hebt geselec teerd), de middelste wijzer toont de
minuten van de wereldtijd en de onderste wijzer toont
het seizoen (zie SEIZOEN INSTELLEN). BELANGRIJK:
Raak geen van de drukknoppen of de kroon aan
voordat de middelste wijzer de afstelling heeft
voltooid. (Ongeveer 10 seconden nadat de kroon naar
de buitenste stand
is getrokken.)
4. Als het weergegeven seizoen niet juist is voor de
thuistijdzone, drukt u op C om het te veranderen. Als
de thuistijdzone zomertijd heeft, draait de bovenste
wijzer één uur verder.
5. Druk op A of B om de tijd respectievelijk voor- of
achteruit te zetten, om de wereldtijdzone hetzelfde
in te stellen als de thuistijdzone. Houd een knop
ingedrukt om de tijd snel te veranderen. De wijzers
draaien tegelijk; terwijl de middelste wijzer eenmaal
ronddraait, draait de bovenste wijzer één uur verder.
Na de instelling moeten de middelste en minuutwijzer
uitgelijnd zijn.
6. Druk de kroon naar binnen wanneer u klaar bent.

302
303
WEERGAVE VAN STAD EN TIJD
Druk op A of B om
de middelste wijzer
respectievelijk achter- of
vooruit te draaien en
selecteer een stad. De
bovenste wijzer draait om
de tijd in de gekozen stad
te tonen. U kunt zien dat
de schaal 24 uur heeft
met middernacht aan
beide einden en 12 uur ‘s
middags in het midden.
RODE WIJZER (4E MIDDELSTE WIJZER) AFSTELLEN
Een verkeerd ingestelde rode wijzer bijstellen:
1. Trek de kroon naar de buitenste stand. De bovenste en
onderste wijzer gaan automatisch naar het einde van
hun traject.
2. De 4e middelste wijzer hoort naar 12 uur te wijzen.
Als dit niet binnen 5 seconden nadat de kroon naar de
buitenste stand is getrokken, gebeurt, drukt u op A of
B om de wijzer respectievelijk tegen de klok in of met
de klok mee te draaien totdat hij naar 12 uur wijst.
3. Druk de kroon naar binnen wanneer u klaar bent.
OPMERKING: Als vijf seconden lang nadat de wijzers
zijn gestopt, geen knop wordt ingedrukt, gaat het
horloge verder naar het instellen van de wereldtijd (zie
WERELDTIJD INSTELLEN).
A
B
C
1 2 3

304
305
SEIZOEN INSTELLEN
Met de seizoeninstelling kan het horloge zomertijd
compenseren.
Het horloge heeft één instelling die de twee perioden
vertegenwoordigt die alle steden met zomertijd hebben.
Voor het horloge is de periode van zomertijd ZOMER
(SUMMER) en de periode van standaardtijd WINTER.
Wanneer het seizoen in één stad op ZOMER is ingesteld,
worden alle steden in hetzelfde halfrond automatisch
op ZOMER ingesteld, terwijl alle steden in het andere
halfrond automatisch op WINTER worden ingesteld. Het
horloge weet welke steden in elk halfrond zijn.
Druk op C om het seizoen in de geselecteerde stad te
veranderen.
KOMPAS
OVERZICHT
I
I
14
MIDDEL STE
KROON
MIDDEN
DATUM
INSTELLEN
I
I
14
NAAR BUITEN
TIJD
INSTELLEN
KROON
B
A (KOMPAS)
MISWIJZINGSSCHAAL
KOMPASNAALD
(HET NOORDEN
IS ROOD PUNTIG/
LANGER)

306
307
KOMPASNAALD AFSTELLEN
Trek de KROON helemaal naar buiten. De kompasnaald
hoort naar 12 uur te wijzen. Als dat niet het geval is, drukt
u op A of B om de kompasnaald te verplaatsen totdat
deze naar 12 uur wijst. Houd de knop ingedrukt om de
wijzer snel te draaien. Druk op de MIDDELSTE KROON
wanneer u klaar bent en kalibreer het kompas opnieuw.
KOMPAS KALIBREREN
Het kompas moet worden gekalibreerd voordat u het
gebruikt.
Omdat een kompas gebruik maakt van het magnetische
veld van de aarde, moet u zich bewust zijn van grote
metalen voorwerpen zoals auto’s en bruggen, of
voorwerpen die elektromagnetische straling afgeven zoals
televisies en computers die op het magnetische veld rond
het horloge van invloed kunnen zijn. Als het kompas in
de buurt van dergelijke voorwerpen wordt gekalibreerd,
werkt het alleen naar behoren op diezelfde plek. Als het
kompas uit de buurt van dergelijke voorwerpen wordt
gekalibreerd, werkt het niet naar behoren nabij deze
voorwerpen. Voor de beste resultaten kalibreert u het
kompas nabij de plek van beoogd gebruik.
Bij het kalibreren en het aflezen van de koers is het
belangrijk, zoals bij alle kompassen, om het kompas
horizontaal te houden. Het kalibreren of het aflezen
van de koers terwijl het horloge niet horizontaal is, kan
grote fouten tot gevolg hebben. Vermijd ook plaatsen
die hogere dan normale concentraties hard en zacht
ijzer hebben omdat ze onnauwkeurige koersen kunnen
veroorzaken. Steeds wanneer een koers twijfelachtig is,
moet u opnieuw kalibreren.

308
309
3. Druk op A of B om te beginnen. De 4e middelste wijzer
draait tweemaal rond om u eraan te herinneren het
horloge te draaien. Terwijl het horloge horizontaal is,
draait u het LANGZAAM tweemaal rond waarbij u er
elke keer minstens 15 seconden over doet om het
rond te draaien.
Berg het horloge niet op nabij een bron van magnetisme
zoals een computer, huishoudelijke apparaten of een
televisie omdat het horloge een magnetische lading
kan krijgen met als gevolg onnauwkeurige koersen. De
nauwkeurigheid van om de pols gedragen instrumenten
ligt gewoonlijk binnen +/- 10 graden.
Het kompas kalibreren:
1. Trek de kroon naar de middelste stand en wacht tot de
wijzers niet meer draaien.
2. Houd het horloge horizontaal of plaats het op een
horizontaal oppervlak (als het bandje in de weg zit,
plaatst u het horloge op een omgekeerd kopje). De
wijzerplaat mag naar beneden gericht zijn maar
bescherm hem wel goed.

310
311
4. Wanneer u klaar bent, houdt u het horloge horizontaal
en drukt u op A of B. De 4e middelste wijzer beweegt
heen en weer om het einde van het kalibreren aan
te geven en beweegt vervolgens naar de huidige
magnetische miswijzingsinstelling.
5. Als u de magnetische miswijzing niet wilt instellen,
drukt u op de kroon. Anders, als u wilt dat het horloge
automatisch de miswijzing compenseert, draait u de
kompasring tot het noorden bij 12 uur is.
6. Druk op A of B om de 4e middelste wijzer
respectievelijk naar het westen (-) of oosten (+) te
verplaatsen zodat hij naar de miswijzing van uw
locatie wijst met behulp van de miswijzingsschaal.
Houd een knop ingedrukt om de wijzer snel te
draaien. Zie de figuur op de volgende pagina voor een
voorbeeld.
7. Druk de kroon naar binnen wanneer u klaar bent.
A
B
Magnetische miswijzing ingesteld op -14° (14°W)
WERKING VAN KOMPAS
Gewoonlijk wordt het kompas niet gebruikt; de 4e
middelste wijzer wijst dan naar 12 uur of toont de
seconden van de chronograaf.
Terwijl u het horloge horizontaal houdt, drukt u op A of B
om het kompas te activeren. De kompasnaald draait tot
hij naar het noorden wijst. Als het horloge wordt gedraaid,
blijft de 4e middelste wijzer draaien en wijst hij steeds

312
313
naar het noorden. Na 20 seconden gaat het kompas
automatisch uit en keert de 4e middelste wijzer naar de
normale stand terug. Hierdoor gaat de batterij langer mee.
Druk op elk gewenst moment op A of B om het kompas
nog 20 seconden aan te laten staan.
OPMERKING: Terwijl het kompas werkt, draait de
secondewijzer in stappen van twee seconden.
GETIJ TEMP EN KOMPAS
OVERZICHT
UIT - TIJD
INSTELLEN
MISWIJZINGSSCHAAL
RODE WIJZER
C (KOMPAS)
B (GETIJ)
A (TEMP)
KROON
DRAAIBARE
KOMPASRING
DATUM
GETIJSCHAAL
TEMPERATUURSCHAAL
MIDDEN - DATUM
INSTELLEN

314
315
RODE WIJZER AFSTELLEN
Trek de kroon helemaal naar buiten. De rode wijzer hoort
naar 12 uur te wijzen. Als dat niet het geval is, drukt u
op de drukknop GETIJ of TEMP om de wijzer te draaien
totdat deze naar 12 uur wijst. De drukknoppen GETIJ
en TEMP draaien de wijzer respectievelijk met de klok
mee en tegen de klok in. Houd de drukknop ingedrukt
om de wijzer snel te draaien. Druk de kroon naar binnen
wanneer u klaar bent.
GETIJ/TEMPERATUUR SELECTEREN
De rode wijzer toont continu het getij of de temperatuur.
Wanneer de temperatuur wordt getoond, drukt u op de
drukknop GETIJ om de getijklok te selecteren. De wijzer
draait naar eb en dan naar het huidige getij. Wanneer het
getij wordt getoond, drukt u op de drukknop TEMP om
de thermometer te selecteren. De wijzer draait naar het
begin van de thermometerschaal en dan naar de huidige
temperatuur.
THERMOMETER
Wanneer het horloge om de pols wordt gedragen,
wordt de temperatuur die door de thermometer wordt
aangewezen, door lichaamswarmte beïnvloed. Voor
nauwkeurigere waarden doet u het horloge af en legt u
het minstens enkele minuten in de schaduw.
Het horloge kan ook de watertemperatuur meten als het
ondergedompeld wordt. Zorg dat u het temperatuurdisplay
selecteert voordat u het horloge in het water plaatst,
omdat de knoppen onder water niet mogen worden
ingedrukt.
De temperatuur wordt elke minuut genomen, vaker als de
temperatuur verandert.

316
317
GETIJKLOK
Voor de getijklok draait de rode wijzer altijd met de klok
mee zodat het vloed wordt wanneer de wijzer naar links
wijst en het eb wordt wanneer de wijzer naar rechts
wijst. Het aantal uren tot volgende vloed/eb wordt op de
getijschaal getoond.
De getijden worden door de stand van zon en de vorm
van de kustlijn beïnvloed, zodat de getijklok niet precies
de tijd van eb en vloed kan geven. Periodieke bijstelling
kan nodig zijn.
Voor het instellen van de getijklok trekt u de kroon
naar de MIDDELSTE stand. Druk op de drukknop GETIJ
of TEMP om de wijzer naar het huidige getij te draaien.
De drukknoppen GETIJ en TEMP draaien de wijzer
respectievelijk met de klok mee en tegen de klok in. Druk
de kroon naar binnen wanneer u klaar bent.
KOMPAS KALIBREREN
Het kompas moet worden gekalibreerd voordat u het
gebruikt.
Omdat een kompas gebruik maakt van het magnetische
veld van de aarde, moet u zich bewust zijn van grote
metalen voorwerpen zoals auto’s en bruggen, of
voorwerpen die elektromagnetische straling afgeven zoals
televisies en computers die op het magnetische veld rond
het horloge van invloed kunnen zijn. Als het kompas in
de buurt van dergelijke voorwerpen wordt gekalibreerd,
werkt het alleen naar behoren op diezelfde plek. Als het
kompas uit de buurt van dergelijke voorwerpen wordt
gekalibreerd, werkt het niet naar behoren nabij deze
voorwerpen. Voor de beste resultaten kalibreert u het
kompas nabij de plek van beoogd gebruik.

318
319
Bij het kalibreren en het aflezen van de koers is het
belangrijk, zoals bij alle kompassen, om het kompas
horizontaal te houden. Het kalibreren of het aflezen
van de koers terwijl het horloge niet horizontaal is, kan
grote fouten tot gevolg hebben. Vermijd ook plaatsen
die hogere dan normale concentraties hard en zacht
ijzer hebben omdat ze onnauwkeurige koersen kunnen
veroorzaken. Steeds wanneer een koers twijfelachtig is,
moet u opnieuw kalibreren.
Berg het horloge niet op nabij een bron van magnetisme
zoals een computer, huishoudelijke apparaten of een
televisie omdat het horloge een magnetische lading
kan krijgen met als gevolg onnauwkeurige koersen. De
nauwkeurigheid van om de pols gedragen instrumenten
ligt gewoonlijk binnen +/- 10 graden.
Het kompas kalibreren:
1. Trek de kroon naar de middelste stand en wacht tot de
wijzers niet meer draaien.
2. Houd het horloge horizontaal of plaats het op een
horizontaal oppervlak (als het bandje in de weg zit,
plaatst u het horloge op een omgekeerd kopje). De
wijzerplaat mag naar beneden gericht zijn maar
bescherm hem wel goed.

320
321
3. Druk op C (KOMPAS) om te beginnen. De 4e middelste
wijzer draait tweemaal rond om u eraan te herinneren
het horloge te draaien. Terwijl het horloge horizontaal
is, draait u het LANGZAAM tweemaal rond waarbij u
er elke keer minstens 15 seconden over doet om het
rond te draaien.
4. Wanneer u klaar bent, houdt u het horloge horizontaal
en drukt u op C (kompas). De 4e middelste wijzer
beweegt heen en weer om het einde van het
kalibreren aan te geven en beweegt vervolgens naar
de huidige magnetische miswijzingsinstelling.
5. Als u de magnetische miswijzing niet wilt instellen,
drukt u op de kroon. Anders, als u wilt dat het horloge
automatisch de miswijzing compenseert, draait u de
kompasring tot het noorden bij 12 uur is.
6. Druk op A of B om de 4e middelste wijzer
respectievelijk naar het westen (-) of oosten (+) te
verplaatsen zodat hij naar de miswijzing van uw
locatie wijst met behulp van de miswijzingsschaal.
Houd een knop ingedrukt om de wijzer snel te
draaien. Zie de figuur op de volgende pagina voor
een voorbeeld.
7. Druk de kroon naar binnen wanneer u klaar bent.

322
323
A
B
Magnetische miswijzing ingesteld op -14° (14°W)
WERKING VAN KOMPAS
Gewoonlijk wordt het kompas niet gebruikt; de 4e
middelste wijzer wijst dan naar 12 uur of toont de
seconden van de chronograaf.
Terwijl u het horloge horizontaal houdt, drukt u op C
(KOMPAS) om het kompas te activeren. De kompasnaald
draait tot hij naar het noorden wijst. Als het horloge wordt
gedraaid, blijft de 4e middelste wijzer draaien en wijst
hij steeds naar het noorden. Na 20 seconden gaat het
kompas automatisch uit en keert de 4e middelste wijzer
naar de normale stand terug. Hierdoor gaat de batterij
langer mee. Druk op elk gewenst moment op C (KOMPAS)
om het kompas nog 20 seconden aan te laten staan.
OPMERKING: Terwijl het kompas werkt, draait de
secondewijzer in stappen van twee seconden.

324
325
HOOGTEMETER
OVERZICHT
RODE WIJZER (4E MIDDELSTE WIJZER) AFSTELLEN
Trek de kroon helemaal naar buiten. De bovenste en
onderste teruglopende wijzer worden automatisch
teruggesteld naar het begin van hun schaal. De (4e
middelste) wijzer hoort naar 12 uur te wijzen. Als dat
niet het geval is, drukt u op knop A en/of B om de wijzer
te draaien totdat deze naar 12 uur wijst. Knop A en B
draaien de wijzer respectievelijk met de klok mee en
tegen de klok in. Houd de knop ingedrukt om de wijzer
snel te draaien. Druk de kroon naar binnen wanneer u
klaar bent.
HOOGTEMETER KALIBREREN
De hoogtemeter moet worden gekalibreerd voordat u
hem gebruikt.
Omdat een hoogtemeter gebruik maakt van druk om
de hoogte te bepalen en de druk van plaats tot plaats
HOOGTEMETERSCHAAL
(HONDERDTALLEN)
TERUGLOPEND
BOVENSTE
(DUIZENDTALLEN)
KNOP C
(EENHEDEN)
KNOP A
(MAXIMALE HOOGTE)
KNOP B
(MINIMALE HOOGTE)
TERUGLOPEND
ONDERSTE
(EENHEDEN)
KROON

326
327
verschilt, is het belangrijk om de hoogtemeter op een
bekende referentiehoogtewaarde of een standaard
referentiehoogte van een bepaalde plaats in te stellen.
Plotselinge veranderingen in druk vanwege weersver-
an deringen kunnen de waarde op uw hoogtemeter
+/-100 m (328 ft) doen afwijken, zelfs als uw locatie niet
is veranderd. Opnieuw op een bekende hoogte kalibreren
wanneer drastische veranderingen in druk zich voordoen.
De hoogtemeter kalibreren:
1. Trek de kroon naar de middelste stand en wacht tot de
wijzers niet meer draaien.
2. Als de hoogtemeter UIT was toen u de kroon naar
buiten trok, wijst de onderste teruglopende wijzer naar
de eenheid die was geselecteerd toen de hoogtemeter
voor het laatst werd gebruikt; anders wijst de onderste
teruglopende wijzer naar de momenteel geselecteerde
eenheid in het hoogtedisplay. De 4e middelste wijzer
en de bovenste teruglopende wijzer horen naar de
huidige hoogte te wijzen.
3. Druk op A of B om de 4e middelste wijzer respectie-
v elijk tegen de klok in of met de klok mee te draaien
totdat deze naar de gewenste kalibratiehoogte wijst.
Als u A of B ingedrukt houdt, beweegt de middelste
wijzer sneller. De bovenste teruglopende wijzer
draait al naargelang de hoogtewaarde die door de 4e
middelste wijzer wordt weergegeven.
4. Druk de kroon naar binnen wanneer u klaar bent.

328
329
HOOGTEMETER AAN/UIT
Druk op C om de hoogtemeter aan te zetten. De onderste
teruglopende wijzer wijst naar METERS. Aan de hand
van de markeringen op de bovenste ring toont de 4e
middelste wijzer de waarde van de huidige hoogte in
honderd- en tientallen met een verdeling om de tien
METER/FT. De bovenste teruglopende wijzer toont de
waarde van de huidige hoogte in duizendtallen met een
verdeling om de duizend METER/FT.
Druk nogmaals op C om de eenheid van METERS in FEET
te veranderen. Druk tweemaal op C om de eenheid van
FEET in METERS te veranderen (de hoogtemeter wordt
eerst uit- en daarna weer aangezet met de eenheid in
METERS).
Druk op C om de hoogtemeter uit te zetten met de
huidige eenheid ingesteld op FEET. Druk tweemaal op
C om de hoogtemeter uit te zetten met de eenheid
ingesteld op METERS (de onderste wijzer gaat eerst naar
FEET voordat hij naar de stand UIT gaat).
Voorbeeld: Hoogte=2310 m Voorbeeld: Hoogte=7580 ft

330
331
Het horloge zet de hoogtemeter automatisch 60 minuten
na activering uit.
MIN/MAX HOOGTE VAN HOOGTEMETER TERUGROEPEN
Druk op A om de maximale geregistreerde hoogte te
bekijken. De onderste teruglopende wijzer toont de
maateenheid waarin de maximale hoogte is geregistreerd
als de hoogtemeter UIT was toen de knop werd
ingedrukt; anders toont deze de maximale hoogte met
de momenteel geselecteerde eenheid. De 4e middelste
wijzer toont de waarde van de maximale hoogte in
honderd- en tientallen met een verdeling om de tien
METER/FT. De bovenste teruglopende wijzer toont de
waarde van de maximale hoogte in duizendtallen met een
verdeling om de duizend METER/FT.
De maximale geregistreerde hoogte wordt tien seconden
weergegeven. Om het display nog tien seconden weer
te geven drukt u op A voordat de vorige tien seconden
verstreken zijn.
Druk op C om de eenheid van METERS in FEET of van
FEET in METERS te veranderen.
Druk op B om de minimale geregistreerde hoogte te
bekijken. De onderste teruglopende wijzer toont de
maateenheid waarin de minimale hoogte is geregistreerd
als de hoogtemeter UIT was toen de knop werd ingedrukt;
anders toont deze de minimale hoogte met de momenteel
geselecteerde eenheid. De 4e middelste wijzer toont de
waarde van de minimale hoogte in honderd- en tientallen
met een verdeling om de tien METER/FT. De bovenste
teruglopende wijzer toont de waarde van de minimale
hoogte in duizendtallen met een verdeling om de duizend
METER/FT.

332
333
De minimale geregistreerde hoogte wordt tien seconden
weergegeven. Om het display nog tien seconden weer
te geven drukt u op B voordat de vorige tien seconden
verstreken zijn. Druk op C om de eenheid van METERS in
FEET of van FEET in METERS te veranderen.
DIEPTE
OVERZICHT
Opmerking – De middelste en onderste wijzer worden
automatisch gekalibreerd wanneer u de kroon naar stand
3 brengt om de tijd in te stellen.
3
AA
B
1
2
3
2
3
2
3
MIDDELSTE WIJZER
UIT-INDICATOR
KNOP A
KNOP B
ONDERSTE WIJZER
KROON

334
335
TEMPERATUUR
De temperatuursensor is altijd aan en leest de tempe-
ratuur minstens eenmaal per 60 seconden af. De
temperatuur wordt aangegeven door de onderste wijzer
en bijbehorende schaal.
Wanneer het horloge om de pols wordt gedragen,
wordt de afgelezen temperatuur door lichaamswarmte
beïnvloed. Voor nauwkeurigere waarden kunt u het
horloge van de pols verwijderen.
DIEPTESENSOR AAN/UIT
De sensor is normaliter uit en moet vóór onderdompe-
ling handmatig aangezet worden. Druk op knop B en laat
hem los om de sensor aan te zetten. De 4e middelste
wijzer gaat van de stand UIT (6 uur ) naar de stand
12 uur en begint minstens eenmaal per 5 seconden
de diepte te meten. Naarmate de diepte toeneemt,
wijst de 4e middelste wijzer naar de werkelijke diepte
zoals aangegeven op de diepteschaal. Als de waarden
gedurende 5 minuten binnen het bereik van 0 tot 2
meter (0-6 ft) blij ven, gaat de sensor automatisch uit.
Om de sensor handmatig uit te zetten, houdt u knop B 2
seconden ingedrukt. De 4e middelste wijzer gaat naar de
stand UIT (6 uur).
MAXIMALE DIEPTE/MINIMALE TEMPERATUUR
TERUGROEPEN
Nadat u boven bent gekomen, schroeft u de kroon los en
trekt u hem naar de middelste stand. De middelste en
onderste wijzers bewegen om respectievelijk de maximale
dieptewaarde en de minimale temperatuurwaarde weer
te geven, die tijdens de meest recente afdaling zijn
geregistreerd. Wanneer de dieptesensor weer wordt
geactiveerd, wordt het geheugen gewist.

336
337
Als het horloge nog niet gebruikt is, dan bewegen de
middelste en onderste wijzers en geven respectievelijk
0 meter/ft en 0 ºC/32 ºF weer. De kroon moet weer erin
geschroefd worden vóór gebruik/onderdompeling.
DETECTIE VAN BATTERIJNIVEAU
Het horloge bepaalt de status van het batterijniveau en
geeft de gebruiker een visuele indicatie van het huidige
batterijniveau. De status van het batterijniveau wordt
geclassificeerd als Normaal, Batterij bijna leeg en Batterij
vervangen, waarbij elk niveau wordt aangeduid door de
beweging van de secondewijzer.
Voor de status Normaal beweegt de secondewijzer
elke seconde één stand van de wijzer, wat de normale
werking is.
Wanneer het horloge de status Batterij bijna leeg heeft,
beweegt de secondewijzer alleen met tussenpozen van
2 seconden en wel twee wijzerstanden. De gebruiker
wordt aangeraden om de batterij te vervangen wanneer
het horloge de status Batterij bijna leeg heeft.
Wanneer het horloge de status Batterij vervangen heeft,
beweegt de secondewijzer alleen met tussenpozen
van 5 seconden en wel vijf wijzerstanden. Nu kan de
dieptesensor niet worden geactiveerd en moet de
gebruiker de batterij onmiddellijk vervangen.

338
339
YACHT RACER
2 31
A
B
C
PERFECTE DATUM
Met de functie Perfect Date
™
van het horloge hoeft de
datum niet te worden bijgesteld tot 2060. Het horloge
houdt automatisch rekening met korte maanden
en schrikkeljaren en geeft altijd de correcte datum
op verzoek weer. De datum is in de Timex-fabriek
vooringesteld. Als de datum een datum voor of na de
datum op uw locatie weergeeft wanneer u uw nieuwe
horloge voor het eerst start, moet u de datum voor uw
lokale datum corrigeren. Trek de kroon naar buiten naar
de buitenste stand. De 4e middelste wijzer draait eenmaal
rond de wijzerplaat, stopt ongeveer 5 seconden bij de
stand 12:00 uur en gaat dan naar de datum waarop
het horloge momenteel is ingesteld. Draai de kroon
vooruit om de tijd tot de huidige datum vooruit te zetten
(achteruit om de tijd tot de huidige datum achteruit
UURWIJZER
SECONDEWIJZER
4E
MIDDELSTE
WIJZER
KROON
BOVENSTE
WIJZER
SCHAAL
PERFECT
DATE
™
ONDERSTE
WIJZER
MINUUTWIJZER

340
341
te zetten). Steeds wanneer u middernacht passeert,
verandert de datum met één dag. Nadat u de datum op
uw lokale datum heeft ingesteld, blijft u de kroon draaien
om de wijzers op de huidige lokale tijd te plaatsen. Let
daarbij op am/pm. Druk de kroon terug naar de gesloten
stand zodra de tijd is ingesteld. Bij normale werking
geeft 4e middelste wijzer de datum weer wanneer de
kroon ingedrukt wordt. De wijzer draait naar de stand
van de huidige datum zoals afgebeeld op de bovenste
ring van de kast. De wijzer stopt zodat u de datum
kunt aflezen en keert dan terug naar de ruststand van
12 uur. Opmerking: de functie Perfect Date
™
werkt
alleen in de tijdmodus. Wanneer de batterij leeg is en
wordt vervangen, moet de functie Perfect Date opnieuw
worden gekalibreerd. Wanneer de batterij vervangen
moet worden, wordt ten zeerste aanbevolen om het
horloge naar een Timex-servicecentrum te zenden, waar
de batterij wordt vervangen en de functie Perfect Date
opnieuw op de huidige datum wordt gekalibreerd voor de
plaats waarnaar het horloge wordt geretourneerd.
4E MIDDELSTE WIJZER AFSTELLEN
Een verkeerd ingestelde 4e middelste wijzer bijstellen:
1. Trek de kroon naar stand 3. De bovenste en onderste
wijzer gaan automatisch naar het einde van hun
traject.
2. Binnen 10 seconden nadat de kroon naar stand 3 is
getrokken, hoort de 4e middelste wijzer naar 12 uur
te wijzen. Als de wijzer niet naar 12 uur wijst, drukt u
op knop A of B om de wijzer tegen de klok in of met
de klok mee te draaien totdat hij naar 12 uur wijst. Als
u knop A of B ingedrukt houdt, draait de wijzer snel.

342
343
Opmerking: na 5 seconden zonder actie met de kroon
in stand 3 beweegt de 4e middelste wijzer om de
huidige datum weer te geven.
3. Druk op de kroon tot deze in stand 1 is wanneer u
klaar bent.
MODUSSELECTIE
Druk op knop C om de bovenste wijzer naar de gewenste
functie te brengen.
TIJD:
Geeft alleen de huidige tijd weer (de functie Perfecte
datum werkt alleen in de tijdmodus).
YACHT RACE TIMER 5:
De countdown-timer begint bij 5 minuten en start de
chronograaf wanneer de timer nul bereikt.
YACHT RACE TIMER 3:
De countdown-timer begint bij 3 minuten en start de
chronograaf wanneer de timer nul bereikt.
YACHT RACE TIMER 1:
De countdown-timer begint bij 1 minuut en start de
chronograaf wanneer de timer nul bereikt.
CHRONOGRAAF:
De chronograaf werkt zonder de countdown-timer.
WERKING VAN YACHT RACE TIMER
Het horloge heeft een countdown-timer van 5, 3 of 1
minuut. Wanneer de countdown-timer nul bereikt, start
een chronograaf van één uur automatisch.
1. Druk op knop C totdat de bovenste wijzer de
gewenste modus van de Yacht Race timer van 5, 3
of 1 minuut weergeeft.

344
345
2. Druk op knop A (START/STOP) om te beginnen. De 4e
middelste wijzer geeft het aftellen van de seconden
weer en de onderste wijzer toont het aftellen van de
minuten. (Opmerking: knop B en C werken niet terwijl
de countdown-timer in werking is).
3. Druk op knop A (START/STOP) om te stoppen,
waardoor het aftellen stopt. (Opmerking: knop C werkt
pas weer als de countdown-timer is teruggesteld).
4. Om terug te stellen houdt u knop B (TUSSENTIJD/
RESET) 3 seconden ingedrukt, waardoor de
countdown-timer wordt teruggesteld op de
oorspronkelijk geselecteerde duur van 5, 3 of
1 minuut.
Bij de normale werking van de Yacht Race timer start
de chronograaf automatisch zodra de countdown-timer
nul heeft bereikt. Er is ook een hoorbare waarschuwing
wanneer de countdown-timer elke minuutmarkering
bereikt alsook wanneer de laatste minuut de laatste 5
seconden bereikt en de chronograaffunctie start. De
chronograaf doorloopt tweemaal de reeks van 30 minuten
voor een totale maximale tijd van één uur.
WERKING VAN DE CHRONOGRAAF
Het horloge heeft een chronograaf van één uur die
onafhankelijk van de Yacht Race timer kan worden
gebruikt.
1. Druk op knop C totdat de bovenste wijzer bij het begin
van de chronograafschaal van 30 minuten is.
2. Druk op knop A (START/STOP) om te beginnen. De

346
347
4e middelste wijzer geeft de seconden weer die
toenemen; de onderste wijzer toont de minuten,
die toenemen op een schaal van 5 minuten en de
bovenste wijzer toont het halve uur dat toeneemt
op een schaal van 30 minuten. Steeds wanneer de
onderste wijzer de markering van vijf minuten bereikt,
keert deze naar de nulstand terug terwijl de bovenste
wijzer door blijft lopen over de schaal van 30 minuten.
(Opmerking: knop C werkt niet terwijl de chronograaf
in werking is).
3. Druk op knop B (TUSSENTIJD/RESET) om een
tussentijd te nemen. De bovenste, onderste en 4e
middelste wijzer blijven op hun plaats zodat u de
tussen(ronde)tijd kunt noteren. De chronograaf
houdt de tijdopnamereeks in stand terwijl de wijzers
stilstaan. Om de wijzers vrij te geven drukt u op knop
B (TUSSENTIJD/RESET) en de wijzers lopen snel in om
de totale verstreken tijd weer te geven.
4. Druk op knop A (START/STOP) om te stoppen,
waardoor de chronograaf stopt. (Opmerking: knop C
werkt niet terwijl de chronograaf stilstaat totdat de
chronograaf is teruggesteld).
5. Om terug te stellen houdt u knop B (TUSSENTIJD/
RESET) 3 seconden ingedrukt, waardoor de
chronograaf wordt teruggesteld op het begin van de
schaal van 30 minuten.
Bij normale werking doorloopt de chronograaf tweemaal
de reeks van 30 minuten voor een totaal maximum van
één uur. Nadat dit uur is verstreken, blijft de bovenste
wijzer op de markering voor 30 minuten en keert de
onderste wijzer naar nul terug. De chronograaffunctie

348
349
moet teruggesteld worden voordat de chronograaffunctie
weer wordt gebruikt of voordat naar een andere modus
wordt overgegaan. (Opmerking: knop A werkt niet
wanneer de maximale tijd van één uur is verstreken en
werkt pas weer wanneer de chronograaf is teruggesteld
door knop B 3 seconden ingedrukt te houden).
INDIGLO
®
NACHTVERLICHTING
(ALLEEN DE PRO-VERSIE)
Aan Yacht Racer PRO is de functie INDIGLO
®
nachtverlichting toegevoegd. Wanneer er weinig of geen
licht is, kan de wijzerplaat makkelijk worden afgelezen
door de functie INDIGLO
®
nachtverlichting te activeren
door de kroon in te drukken. De Yacht Racer PRO
maakt gebruik van speciaal lichtgevend materiaal op de
wijzerplaat dat gloeit en verlichting creëert die helder
genoeg is om de wijzerplaat te kunnen lezen, maar zorgt
dat uw nachtzicht niet minder wordt nadat de verlichting
is uitgegaan.

350
351
CHRONO TIMER
SECONDEWIJZER
4E
MIDDELSTE
WIJZER
BOVENSTE
WIJZER
PERFECT DATE
™
SCHAAL
MINUTENWIJZER
UURWIJZER
KROON
ONDERSTE
WIJZER
2 31
A
B
C
PERFECTE DATUM
Met de functie Perfect Date
™
van uw horloge hoeft de
datum niet te worden bijgesteld tot 2060. Het horloge
houdt automatisch rekening met korte maanden
en schrikkeljaren en geeft altijd de correcte datum
op verzoek weer. De datum is in de Timex-fabriek
vooringesteld. Als de datum een datum voor of na de
datum op uw locatie weergeeft wanneer u uw nieuwe
horloge voor het eerst start, moet u de datum voor uw
lokale datum corrigeren. Trek de kroon naar buiten naar
de buitenste stand. De 4e middelste wijzer draait eenmaal
rond de wijzerplaat, stopt ongeveer 5 seconden bij de
stand 12:00 uur en gaat dan naar de datum waarop
het horloge momenteel is ingesteld. Draai de kroon
vooruit om de tijd tot de huidige datum vooruit te zetten
(achteruit om de tijd tot de huidige datum achteruit

352
353
te zetten). Steeds wanneer u middernacht passeert,
verandert de datum met één dag. Nadat u de datum op
uw lokale datum heeft ingesteld, blijft u de kroon draaien
om de wijzers op de huidige lokale tijd te plaatsen. Let
daarbij op am/pm. Druk de kroon terug naar de gesloten
stand zodra de tijd is ingesteld. Bij normale werking
geeft 4e middelste wijzer de datum weer wanneer de
kroon ingedrukt wordt. De wijzer draait naar de stand
van de huidige datum zoals afgebeeld op de bovenste
ring van de kast. De wijzer stopt zodat u de datum
kunt aflezen en keert dan terug naar de ruststand van
12 uur. Opmerking: de functie Perfect Date
™
werkt
alleen in de tijdmodus. Wanneer de batterij leeg is en
wordt vervangen, moet de functie Perfect Date opnieuw
worden gekalibreerd. Wanneer de batterij vervangen
moet worden, wordt ten zeerste aanbevolen om het
horloge naar een Timex-servicecentrum te zenden, waar
de batterij wordt vervangen en de functie Perfect Date
opnieuw op de huidige datum wordt gekalibreerd voor de
plaats waarnaar het horloge wordt geretourneerd.
4E MIDDELSTE WIJZER AFSTELLEN
Een verkeerd ingestelde 4e middelste wijzer bijstellen:
1.
Trek de kroon naar stand 3. De bovenste en onderste
wijzer gaan automatisch naar het einde van hun traject.
2. Wanneer de 4e middelste wijzer niet meer beweegt,
hoort deze naar 12 uur te wijzen. Als de wijzer niet
naar 12 uur wijst, drukt u op knop A of B om de wijzer
tegen de klok in of met de klok mee te draaien totdat
hij naar 12 uur wijst. Als u knop A of B ingedrukt houdt,
draait de wijzer snel. Opmerking: na 5 seconden

354
355
zonder actie met de kroon in stand 3 beweegt de 4e
middelste wijzer om de huidige datum weer te geven.
3. Druk op de kroon tot deze in stand 1 is wanneer u
klaar bent.
MODUSSELECTIE
Druk op knop C om de bovenste wijzer naar de gewenste
functie te brengen.
TIJD.
Geeft alleen de huidige tijd weer (de functie Perfect Date
™
werkt alleen in de tijdmodus).
WERKING VAN DE CHRONOGRAAF
Het horloge heeft een chronograaf van vier uur. Aan het
einde van de periode van vier uur wordt de chronograaf
automatisch uitgeschakeld. Hierdoor gaat de batterij
langer mee in geval van onverhoedse activering van de
chronograaf.
1. Druk op knop C tot de bovenste wijzer aan het begin
van de chronograafschaal van de bovenste wijzer is en
de onderste wijzer op 0 op de onderste schaal.
2. Druk op knop A (START/STOP) om te beginnen. De
4e middelste wijzer geeft de seconden weer die
toenemen; de onderste wijzer toont de minuten,
die toenemen op een schaal van 30 minuten en de
bovenste wijzer toont het uur dat toeneemt op een
schaal van 4 uur. Steeds wanneer de onderste wijzer
de markering van 30 minuten bereikt, keert deze naar
de nulstand terug om met de volgende periode van 30
minuten te beginnen terwijl de bovenste wijzer door
blijft lopen over de schaal van 4 uur. (Opmerking: knop
C werkt niet terwijl de chronograaf loopt.)

356
357
3.
Druk op knop B (SPLIT/RESET) om een tussentijd te
nemen. De bovenste, onderste en 4e middelste wijzer
blijven op hun plaats zodat u de tussen(ronde)tijd kunt
noteren. De chronograaf houdt de tijdopnamereeks in
stand terwijl de wijzers stilstaan. Om de wijzers vrij te
geven drukt u op knop B (SPLIT/RESET) en de wijzers
lopen snel in om de totale verstreken tijd weer te geven.
4. Druk op knop A (START/STOP) om te stoppen,
waardoor de chronograaf stopt. (Opmerking: knop C
werkt niet terwijl de chronograaf stilstaat totdat de
chronograaf is gereset.)
5. Om de chronograaf te resetten nadat deze is
gestopt, drukt u op knop B (SPLIT/RESET), waardoor
de chronograaf wordt gereset naar het begin van
de schaal van 30 minuten en van 4 uur op de
subwijzerplaten.
Bij normale werking doorloopt de chronograaf 8 maal de
reeks van 30 minuten voor een totaal maximum van vier
uur. Nadat deze periode van vier uur is verstreken, blijft
de bovenste wijzer op de markering voor vier uur en keert
de onderste wijzer naar nul terug. De chronograaffunctie
moet gereset worden voordat de chronograaffunctie weer
wordt gebruikt of voordat naar een andere modus wordt
overgegaan. (Opmerking: knop A werkt niet wanneer de
maximale tijd van vier uur is verstreken en werkt pas
weer wanneer de chronograaf is gereset door knop B in
te drukken.)
COUNTDOWN-TIMER
Het horloge heeft een countdown-timerfunctie
Speciale opmerking: De bovenste wijzer, onderste wijzer
en 4e middelste wijzer werken samen tijdens stap 3, 4 en

358
359
5 hieronder. Naarmate u de minuten- en secondewijzer
voor- of achteruit draait, ziet u dat alle drie wijzers
reageren op het verhogen of verlagen van de tijdsduur
voor de countdown-timerfunctie. Nadat de kroon naar
buiten is getrokken tot de middelste stand, doorloopt u
als volgt de cyclus van de wijzerinschakeling, wanneer
u op knop C drukt: Bovenste wijzer (knop C indrukken) -
Onderste wijzer (knop C indrukken) - 4e middelste wijzer
(knop C indrukken) terug naar Bovenste wijzer....zo kunt
u de cyclus doorlopen om de wijzers in te schakelen die
u moet bijstellen om de gewenste tijdsduur voor het
aftellen in te stellen. Als u op de kroon drukt, wordt de
instellingsprocedure beëindigd en worden de waarden
bevestigd die tot dusverre op elk willekeurig punt in deze
cyclus zijn ingesteld.
DE COUNTDOWN-TIMER INSTELLEN
De countdown-timer mag alleen worden ingesteld
wanneer de countdown-timerfunctie niet in werking is.
Als de countdown-timer al eerder is gebruikt, moet deze
gereset worden. Als de timer momenteel loopt, moet
deze worden gestopt en gereset om de countdown-timer
in te stellen.
1. Druk op knop C totdat de bovenste wijzer op een punt
op de timerschaal is. Als de timer eerder ingesteld
was, wijst de wijzer naar de eerder ingestelde tijd. Als
dit de eerste keer is dat de timer wordt ingesteld, wijst
hij naar de 0 op de timerschaal.
2. Trek de kroon naar buiten naar de middelste stand.
3. Om het gewenste aantal uren in stappen van een
half uur in te stellen (maximale tijd 4:00:00) drukt u

360
361
op knop A om de bovenste wijzer tegen de klok in
te draaien (als u op knop B drukt, draait de wijzer
met de klok mee), totdat het gewenste aantal uren is
geselecteerd. Opmerking: u selecteert het aantal uren
in een stap van het dichtstbijzijnde halve uur t.o.v.
de totale gewenste tijd (bijvoorbeeld: voor een totaal
gewenste afteltijd van 2:53:30 selecteert u 3 uur).
Nadat u het aantal uren heeft ingesteld, drukt u op
knop C om uw keuze te bevestigen.
4. Nu kunt u het gewenste aantal minuten in stappen
van één minuut instellen door op knop A te drukken
om de onderste wijzer tegen de klok in te draaien
(als u op knop B drukt, draait de wijzer met de
klok mee), totdat het gewenste aantal minuten is
geselecteerd. Opmerking: u stelt het aantal minuten
voor- of achteruit om tot de gewenste tijd te komen
(bijvoorbeeld: voor een totale gewenste afteltijd van
2:53:30 drukt u zeven keer op knop A, wat de totale
afteltijd van 3 uur op 2:53:00 brengt). U ziet dat de
uurwijzer een klein beetje achteruit beweegt van de
markering voor 3 uur vandaan de markering het teken
voor 2,5 uur toe. Nadat u de tijd op het juiste aantal
minuten heeft bijgesteld, drukt u op knop C om uw
keuze te bevestigen.
5. Nu kunt u het gewenste aantal seconden in stappen
van één seconde instellen door op knop A te drukken
om de vierde wijzer tegen de klok in te draaien (als u
op knop B drukt, draait de wijzer met de klok mee),
totdat het gewenste aantal seconden is geselecteerd.
Opmerking: u verhoogt of verlaagt het aantal seconden
om de totale gewenste tijd te voltooien (bijvoorbeeld:
voor een totale gewenste afteltijd van 2:53:30 drukt

362
363
u 30 keer op knop B om 30 seconden te selecteren).
Nadat u het aantal seconden heeft ingedrukt, drukt u
de kroon naar binnen naar stand 1 om de keuze van
de waarde voor de countdown-timer te bevestigen.
BEDIENING VAN COUNTDOWN-TIMER
Nadat u de countdown-timer op de gewenste tijdsduur
heeft ingesteld, kunt u nu de countdown-timer gebruiken.
De aftelreeks starten: Druk op knop A om de countdown-
timer te starten. De vierde middelste wijzer en de onderste
wijzer beginnen tegen de klok in te draaien. De bovenste
wijzer draait met de klok mee. De wijzers blijven de in de
aftelreeks resterende tijd aangeven totdat de tijdsduur
waarvoor u de countdown-timer heeft ingesteld, verstreken
is en de waarde van de resterende tijd nul heeft bereikt.
Wanneer de resterende tijd in de reeks nul bereikt, gaat het
signaal af dat aangeeft dat de aftelreeks is voltooid.
De aftelreeks onderbreken: Als u de aftelreeks wilt
stoppen voordat de reeks nul bereikt, kunt u dat doen
door op knop A te drukken (de vierde middelste wijzer
alsook de bovenste en onderste wijzer stoppen). Als u
de reeks later wilt beginnen vanaf het punt waarop het
aftellen gestopt was, drukt u weer op knop A (de vierde
middelste wijzer alsook de bovenste en onderste wijzer
gaan weer draaien).
De aftelreeks resetten: Nadat de aftelreeks nul heeft
bereikt en het signaal is afgegaan, kunt u de countdown-
timer resetten op de ingestelde waarde door op knop B te
drukken (de vierde middelste wijzer alsook de bovenste
en onderste wijzer draaien om de tijdwaarde die u
vóór het gebruik van de countdown-timerfunctie heeft
ingesteld, aan te geven).

364
365
De countdown-timerwaarde wissen: Desgewenst
kunt u de waarde van de countdown-timer op nul
stellen. Dit kan worden gedaan als de countdown-
timer niet loopt en gereset is. Als de countdown-timer
loopt, moet u de aftelreeks eerst stoppen door op
knop A te drukken, gevolgd door knop B indrukken.
De countdown-timer stopt nu en wordt gereset op de
momenteel geselecteerde tijdwaarde. Om de countdown-
timerwaarde op nul te stellen houdt u knop B twee
seconden ingedrukt. U dient nu de instructies te volgen
om de countdown-timerwaarde op de nieuwe gewenste
tijdsduur in te stellen.
Tussentijdfunctie: Terwijl de countdown-timer loopt,
kunt u de tussentijdfunctie gebruiken om de resterende
tijd in de aftelreeks te zien.
Om de tussentijdfunctie te gebruiken drukt u op knop B
waardoor de bovenste, onderste en 4e middelste wijzer
stoppen. De aftelfunctie blijft intern doorlopen terwijl de
wijzers gestopt zijn.
Om het draaien van de bovenste, onderste en 4e
middelste wijzer te hervatten drukt u weer op knop B en
de wijzers gaan weer naar de juiste plaats om de huidige
tijd binnen de aftelreeks te tonen.

366
367
3GMT
A
2 31
FUNCTIE VOOR 3 TIJDZONES
Uw horloge kan drie tijdzones weergeven:
1. Uur- en minuutwijzer: geeft de tijd in een standaard
12-uurs indeling weer. Opmerking: de datum die in het
datumvenstertje wordt weergegeven, is gekoppeld
aan de tijd die door deze twee wijzers wordt
weergegeven.
2. 4e middelste wijzer en binnenste ring: geeft de tijd in
een 24-uurs indeling weer.
3. 4e middelste wijzer en bovenste draairing van kast:
geeft de tijd in een 24-uurs indeling weer.
4E MIDDELSTE WIJZER AFSTELLEN
Een verkeerd ingestelde 4e middelste wijzer bijstellen:
1. Trek de kroon naar stand 3.
2. De 4e middelste wijzer hoort naar 12 uur te wijzen.
SECONDEWIJZER
KROON
BOVENSTE
DRAAIRING
(24-UURS INDELING)
4E MIDDELSTE WIJZER
MINUUT-
WIJZER
UURWIJZER
BINNENSTE RING
/CIJFERS
(24-UURS INDELING)

368
369
de tweede en derde tijdzone locaties weergeven die de
standaard minuten niet volgen, zijn de instructies om de
4e middelste wijzer opnieuw te kalibreren als volgt:
1. Trek de kroon naar stand 3. De 4e middelste wijzer
wijst nu naar 12 uur.
2. Draai de kroon zodat de minuutwijzer in de juiste
stand is binnen het uur dat vereist is voor de locatie
die u wilt gebruiken voor de 2e en 3e tijdzone.
3. Druk de kroon naar stand 2. De 4e middelste wijzer
wijst naar de momenteel gekalibreerde stand van de
minuten binnen het uur.
4. Druk op knop A om de 4e middelste wijzer met de
klok mee te draaien totdat deze in lijn is met de
minuutwijzer. Als u knop A ingedrukt houdt, draait de
wijzer snel.
Als de 4e middelste wijzer niet binnen 5 seconden
nadat de kroon naar stand 3 is getrokken, naar 12 uur
wijst, drukt u op knop A om de wijzer met de klok mee
te draaien totdat hij naar 12 uur wijst. Als u knop A
ingedrukt houdt, draait de wijzer snel.
3. Druk op de kroon tot deze in stand 1 is wanneer u
klaar bent.
4E MIDDELSTE WIJZER KALIBREREN
De 4e middelste wijzer is in de Timex-fabriek
gekalibreerd om de standaard minuten binnen het
uur te weerspiegelen zoals bepaald door Universal
Time Coordinated (standaardtijd). Over de hele wereld
gebruiken de meeste locaties de standaard minuten.
Als de locatie die u voor de 2e en 3e tijdzone gebruikt,
de standaard minuten gebruikt, hoeft de 4e middelste
wijzer niet te worden gekalibreerd. Alleen als u wilt dat

370
371
5. Trek de kroon naar stand 3. De 4e middelste wijzer
wijst nu naar 12 uur.
6. Draai de kroon om de uur- en minuutwijzer op de
juiste tijd te stellen.
7. Druk op de kroon tot deze in stand 1 is wanneer u
klaar bent.
Opmerking: de 4e middelste wijzer volgt de tijd aan de
hand van de huidige kalibratie van de minuten binnen het
uur. Tijdzones 2 en 3 gebruiken allebei de 4e middelste
wijzer en daarom moeten de locaties die in tijdzone 2 en
3 worden gevolgd, allebei dezelfde minuten binnen het
uur gebruiken; anders worden deze tijdzones niet naar
behoren weergegeven.
DE 4E MIDDELSTE WIJZER (TIJDZONE II) INSTELLEN
Zie de huidige tijd op de locatie die u als de 2e tijdzone
wilt volgen. Druk op knop A totdat de 4e middelste wijzer
naar die tijd wijst op de binnenste ring. (Opmerking:
deze schaal heeft een 24-uurs indeling). De 4e middelste
wijzer gaat steeds 30 minuten verder als knop A wordt
ingedrukt. Als u knop A ingedrukt houdt, draait de wijzer
snel. Hierdoor wordt de 2e tijdzone op het horloge
ingesteld.

372
373
DE BOVENSTE DRAAIRING VAN DE KAST INSTELLEN
(TIJDZONE III)
De 3e tijdzone wordt ingesteld met behulp van de
bestaande instelling van de 4e middelste wijzer en door
de bovenste draairing van de kast naar de gewenste tijd
van de 3e tijdzone te draaien. (Opmerking: deze schaal
heeft een 24-uurs indeling). De bovenste ring heeft 72
standen. Als u de bovenste ring één uur vooruit wilt
stellen, draait u hem drie standen (3 klikjes) verder. Zie
de huidige tijd op de locatie die u als de 3e tijdzone wilt
volgen. Draai de bovenste ring van de kast tegen de klok
in om de juiste uurmarkering voor die tijd met de 4e
middelste wijzer op zijn plaats te brengen.
TACHYMETERFUNCTIE
(niet alle modellen)
De tachymeter bepaalt alleen snelheden hoger dan 60
eenheden per uur met behulp van deze methode; lagere
snelheden kunnen worden gemeten door de maateenheid
te verlagen. De door een tachymeter uitgevoerde functie
is onafhankelijk van de afstandseenheid (bv. wettelijke
mijl, zeemijl, kilometer, meter enz.) zolang dezelfde
lengte-eenheid voor alle berekeningen wordt gebruikt.
1. Bepaal de begin- en eindmarkeringen voor uw vooraf
bepaalde afstand.
2. Start de chronograaf zodra het doel voor
snelheidsmeting de beginmarkering passeert.
3. Stop de chronograaf zodra het doel voor
snelheidsmeting de eindmarkering passeert.

374
375
4. De secondewijzer van de chronograaf wordt
vergeleken met de tachymetermarkeringen om de
snelheid van het doel te bepalen.
REKENLINIAALFUNCTIE
De rekenliniaalfunctie van de bovenste ring werkt door
de buitenste ring te draaien. De binnenste ring draait niet.
De buitenste ring heeft altijd betrekking op “afstand” of
“snelheid” of gegevens die afhankelijk van tijd variëren.
De binnenste ring vermeldt alleen tijdeenheden.
Buitenste ring
Op de buitenste ring geeft het getal “10” factoren of
meervouden van 10 weer zoals 0,1, 1,0, 10 of 100.
Binnenste ring
Op de binnenste ring verwijst “MPH” (mijl per uur) naar
“snelheidsindex”. Deze index wordt gebruikt om de
snelheid van gegevens per uur te berekenen. Op de
binnenste ring zijn “STAT” (wettelijke mijlen) en “NAUT”
(zeemijlen) voor het omzetten van afstandseenheden.
BUITENSTE
RING
BINNENSTE
RING

376
377
De volgende voorbeelden dienen als leidraad voor het
gebruik van de rekenliniaal.
SNELHEID BEREKENEN:
Welke snelheid is nodig om 10 zeemijl in 15 minuten
af te leggen?
Bekende factoren: Afstand: 10 zeemijl Tijd: 15 minuten
• Lijn de pijl “10” op de buitenste ring uit met “15” op de
binnenste ring.
• De vereiste snelheid vindt u vlak boven het merkteken
“MPH” op de binnenste ring.
Het antwoord: 40 zeemijl per uur
Tijd berekenen: Hoe lang duurt het om 10 zeemijl af
te leggen met een snelheid van 40 mijl per uur?
Bekende factoren: Snelheid: 40 mijl per uur Afstand:
10 zeemijl
• Lijn “40” op de buitenste ring uit met het merkteken
“MPH” op de binnenste ring.
• De vereiste tijd vindt u vlak onder de pijl “10” op de
buitenste ring. Dit is “15” op de binnenste ring.
Het antwoord: 15 minuten
AFSTAND BEREKENEN:
Welke afstand kunt u in 15 minuten afleggen bij een
snelheid van 40 mijl per uur?
Bekende factoren: Snelheid: 40 zeemijl per uur Tijd:
15 minuten
• Lijn “40” op de buitenste ring uit vlak boven het
merkteken “MPH” op de binnenste ring.

378
379
• De afgelegde afstand vindt u boven het merkteken
“15” op de binnenste ring. Het getal op de buitenste
ring is “10”.
Het antwoord: de afgelegde afstand is 10 zeemijl.
EENHEID OMZETTEN:
De afstand van zeemijl omzetten in wettelijke mijl en
kilometer.
Bekende factor: De om te zetten afstand is 10 zeemijl.
• Lijn de pijl “10” op de buitenste ring uit boven “NAUT”
op de binnenste ring. De omzetting in wettelijke mijl
(11,5) vindt u boven het merkteken “STAT” op de
binnenste ring en de omzetting in kilometer (18,5) vindt
u boven het merkteken “MPH” op de binnenste ring.
ARMBAND AFSTELLEN
(Variaties van de volgende gedeelten over de armband
gelden voor alle horlogemodellen.)
ARMBAND MET CLIPSLUITING
1. Open het borgplaatje.
2. Breng de sluiting naar de
gewenste lengte voor de
armband.
3. Oefen druk uit terwijl u
het borgplaatje vasthoudt
en de sluiting heen en weer schuift totdat hij in de
groeven aan de onderkant van de armband grijpt.
4. Druk het borgplaatje naar beneden totdat het dicht
klikt. De sluiting kan beschadigd raken als te veel
kracht wordt uitgeoefend.

380
381
ARMBAND MET KLAPSLUITING
1. Zoek het veerstaafje op waarmee de armband aan de
sluiting vastzit.
2. Druk het veerstaafje met een puntig stuk gereedschap
naar binnen en draai de armband voorzichtig los.
3. Meet de pols en steek het veerstaafje in het juiste
onderste gat.
4. Druk het veerstaafje naar beneden, breng het in lijn
met het bovenste gat en laat het los zodat het vast
komt te zitten.
ARMBANDSCHAKELS VERWIJDEREN
SCHAKELS VERWIJDEREN:
1. Zet de armband rechtop en steek een puntig stuk
gereedschap in de opening van de schakel.
2. Duw de pen krachtig in de richting van de pijl totdat
de schakel los is (de pennen zijn met opzet moeilijk te
verwijderen).
3. Herhaal dit tot het gewenste aantal schakels
verwijderd is.
WEER IN ELKAAR ZETTEN:
1. Maak de onderdelen van de armband weer aan elkaar
vast.
2. Duw de pen terug in de schakel in de richting
tegengesteld aan de pijl.

382
383
3. Druk de pen stevig naar beneden in de armband totdat
de pen er niet meer uitsteekt.
BATTERIJ
De batterij hoort bij normaal gebruik 4-6 jaar mee te
gaan. De werkelijke levensduur van de batterij varieert al
naargelang het werkelijke gebruik.
Wanneer de batterij vervangen moet worden, raden wij
aan dat dit uitsluitend door TIMEX wordt gedaan. Uw
horloge moet opnieuw op de juiste tijd en datum worden
gekalibreerd nadat de batterij is vervangen. Stuur uw
horloge in een gefrankeerde enveloppe naar Timex. Voor
een gefrankeerde enveloppe belt u 1-800-448-4639 of
gaat u naar de winkelier waar u uw horloge hebt gekocht
of gaat u naar www.TIMEX.com. Wilt u het volgende met
uw horloge sturen voor port en behandeling (dit zijn geen
reparatiekosten): een cheque of postwissel voor US$ 8,00
in de VS.; een cheque of postwissel voor CAN$ 12,00 in
Canada; en in andere landen zal Timex port en behande-
ling in rekening brengen.
STUUR NOOIT EEN SPECIAAL HORLOGEBANDJE OF
ENIG ANDER ARTIKEL VAN PERSOONLIJKE WAARDE
MEE.
DE BATTERIJ NIET IN HET VUUR WEGGOOIEN. NIET
OPLADEN. LOSSE BATTERIJEN UIT DE BUURT VAN
KINDEREN HOUDEN.

384
385
INTERNATIONALE GARANTIE VAN TIMEX
Het TIMEX
®
horloge heeft een garantie van de Timex
Group USA, Inc. voor gebreken in fabricage gedurende
een periode van EEN JAAR vanaf de oorspronkelijke
aankoopdatum. Timex en gelieerde ondernemingen over
de hele wereld erkennen deze internationale garantie.
Timex mag, naar eigen keuze, het horloge repareren
door nieuwe of grondig gereviseerde en geïnspecteerde
componenten te installeren of het vervangen door een
identiek of gelijksoortig model. BELANGRIJK — DEZE
GARANTIE DEKT GEEN GEBREKEN OF SCHADE AAN
HET HORLOGE:
1. nadat de garantietermijn is verlopen;
2. als het horloge oorspronkelijk niet bij een erkende
Timex-winkelier is gekocht;
3. als gevolg van reparaties die niet door Timex zijn
uitgevoerd;
4. als gevolg van ongelukken, knoeien of misbruik en
5. het glas, de band, de kast, de accessoires of de
batterij. Timex kan het vervangen van deze onderdelen
in rekening brengen.
DEZE GARANTIE EN HET HIERIN UITEENGEZETTE
VERHAAL ZIJN EXCLUSIEF EN KOMEN IN DE PLAATS
VAN ALLE ANDERE GARANTIES, UITDRUKKELIJK OF
IMPLICIET, MET INBEGRIP VAN IMPLICIETE GARANTIE
VAN VERKOOPBAARHEID OF GESCHIKTHEID VOOR
EEN BEPAALD DOEL. TIMEX IS NIET AANSPRAKELIJK
VOOR SPECIALE, INCIDENTELE OF GEVOLGSCHADE.
Sommige landen en staten staan geen beperkingen
toe met betrekking tot impliciete garanties en staan

386
387
geen uitsluitingen of beperkingen met betrekking tot
schade toe, zodat deze beperkingen wellicht niet voor
u van toepassing zijn. Deze garantie geeft u specifieke
wettelijke rechten en u kunt ook andere rechten hebben
die van land tot land en van staat tot staat verschillen.
Voor het verkrijgen van service onder de garantie
dient u uw horloge naar Timex, een van de gelieerde
ondernemingen of de Timex-winkelier waar het horloge
gekocht is, te retourneren, samen met een ingevulde,
originele reparatiebon van het horloge of, alleen in de
VS en Canada, de ingevulde originele reparatiebon
van het horloge of een schriftelijke verklaring waarin
uw naam, adres, telefoonnummer en datum en plaats
van aankoop worden vermeld. Wilt u het volgende
met uw horloge sturen voor port en behandeling (dit
zijn geen reparatiekosten): een cheque of postwissel
voor US$ 8,00 in de VS; een cheque of postwissel voor
CAN$ 12,00 in Canada; en een cheque of postwissel
voor UK£ 3,50 in het VK. In andere landen zal Timex port
en behandeling in rekening brengen. STUUR NOOIT EEN
SPECIAAL HORLOGEBANDJE OF ENIG ANDER ARTIKEL VAN
PERSOONLIJKE WAARDE MEE.
Voor de VS kunt u 1-800-448-4639 bellen voor meer
informatie over de garantie. Voor Canada belt u 1-800-263-
0981. Voor Brazilië +11 2664 1001 Voor Mexico 01-800-
01-060-00. Voor Midden-Amerika, het Caribisch gebied,
Bermuda en de Bahama’s (501) 370-5775 (V.S.). Voor
Azië 852-2815-0091. Voor Groot-Brittannië 44 020 8687
9620. Voor Frankrijk 33 3 81 63 42 51. Voor Duitsland/
Oostenrijk +43 662 889 2130. Voor andere gebieden kunt
u contact opnemen met uw plaatselijke Timex-winkelier of
-distributeur voor informatie over de garantie.

388
389
Mocht uw Timex
®
horloge ooit gerepareerd moeten
worden, stuur het dan naar Timex zoals uiteengezet in
de internationale garantie van Timex of geadresseerd aan,
TG SERVICE CENTER, P.O. Box 2740, Little Rock, AR 72203.
VS. Voor vragen over service: 1-800-328-2677 of
VERLENGDE GARANTIE
Alleen verkrijgbaar in de VS. Verleng uw garantie met
4 jaar vanaf de datum van aankoop voor $5. U kunt
betalen met AMEX, Discover, Visa of MasterCard door
tijdens de gewone werktijden 1 800-448-4639 te bellen.
De beta ling moet binnen 30 dagen na aankoop worden
gedaan. Naam, adres, telefoonnummer, aankoopdatum
en het uit 5 tekens bestaande modelnummer zijn vereist.
U kunt ook een cheque voor $5 sturen naar: Timex
Extended Warranty, P.O. Box 1676, Dept. EF, Little Rock,
AR 72203 VS.
©2015 Timex Group USA, Inc. TIMEX, INDIGLO, PERFECT DATE en
INTELLIGENT QUARTZ zijn handelsmerken van Timex Group B.V.
en zijn dochterondernemingen.

391
OROLOGI TIMEX
®
Congratulazioni per l’acquisto di un orologio TIMEX
®
INTELLIGENT QUARTZ
™
. Si prega di leggere attentamente
le istruzioni per capire come usare l’orologio Timex
®
.
L’orologio in dotazione potrebbe non disporre di tutte le
funzioni descritte in questo opuscolo.
Per ulteriori informazioni, e per registrare il
prodotto, si prega di visitare il sito:
www.timex.com

392
393
INDICE ANALITICO
Come avviare l’orologio ................................................. 395
Resistenza all’acqua e agli urti ...................................... 396
Illuminazione del quadrante Indiglo
®
............................ 398
Impostazione di data e ora ............................................ 399
Calendario perpetuo ...................................................... 401
Cronografo fly-back (con ritorno indietro) ..................... 404
Bussola del cronografo fly-back..................................... 410
Cronografo lineare ......................................................... 423
Ora mondiale ................................................................. 430
Bussola ........................................................................... 437
Marea temperatura e bussola ....................................... 444
Altimetro ........................................................................ 454
Profondità ....................................................................... 463
Orologio da regata ......................................................... 468
Timer del cronografo ...................................................... 480
3 GMT ............................................................................. 498
Funzione di tachimetro .................................................. 505
Funzione di regolo a scorrimento della lunetta ............. 507
Come regolare il bracciale ............................................. 513
Rimozione delle maglie del bracciale ............................ 515
Batteria ........................................................................... 516
Garanzia ......................................................................... 518

394
395
COME AVVIARE L’OROLOGIO
(Non pertiene ai modelli con calendario perpetuo.) Per
avviare l’orologio, rimuovere dalla corona la protezione
di plastica e premere la corona in dentro, contro la cassa.
Alcuni orologi richiedono l’avvitamento in dentro della
corona di impostazione. Se la cassa dell’orologio in dota-
zione presenta una sporgenza con filettature, la corona
deve essere avvitata dopo aver impostato l’orologio.
Per farlo, spingere fermamente la corona contro la
s porgenza filettata e tenerla in posizione mentre la si
gira in senso orario. Continuare ad avvitare la corona
finché non rimane ben fissa. Occorrerà svitare la corona
(girandola in senso anti-orario) prima di poterla estrarre la
prossima volta che si vorrà impostare l’orologio.
Benvenuti nel mondo degli orologi Timex
®
dotati
di tecnologia Intelligent Quartz
™
, il futuro della
tecnologia analogica al quarzo. La tecnologia
Intelligent Quartz unisce il potere di un microprocessore
all’affidabilità e all’accuratezza della misurazione del
tempo analogica al quarzo. Negli orologi Timex Intelligent
Quartz, la tecnologia è incorporata nel design, offrendo
un nuovo livello di complessità al quadrante. Gli orologi
impiegano fino a tre ulteriori lancette indipendenti per
visualizzare in un tradizionale formato analogico una
quantità di informazioni disponibili di solito soltanto negli
orologi digitali.

396
397
AVVERTENZA: PER SALVAGUARDARE LA RESISTENZA
ALL’ACQUA DELL’OROLOGIO, NON PREMERE ALCUN
PULSANTE SOTT’ACQUA, A MENO CHE NON SIA
INDICATO CHE L’OROLOGIO È IMPERMEABILE FINO A
200 METRI. NON ESTRARRE MAI LA CORONA MENTRE
CI SI TROVA SOTT’ACQUA.
1. L’orologio è resistente all’acqua solo se la lente, la
corona e la cassa restano intatti.
2. L’orologio non è un orologio per immersioni certificato.
3. Sciacquare l’orologio con acqua dolce dopo
l’esposizione all’acqua marina.
4. La resistenza agli urti verrà indicata sul quadrante o sul
retro della cassa dell’orologio. Gli orologi sono proget-
tati in modo da superare il test ISO di resistenza agli
urti. Occorre tuttavia prestare attenzione per evitare
di danneggiare il cristallo dell’orologio.
RESISTENZA ALL’ACQUA E AGLI URTI
Se l’orologio in dotazione è resistente all’acqua, riporta
una dicitura in metri di profondità (WR_M).
Profondità di immersione p.s.i.a.*Pressione
dell’acqua sotto
la superficie
30 m/98 piedi 60
50 m/164 piedi 86
100 m/328 piedi 160
200 m/656 piedi 284

398
399
IMPOSTAZIONE DI DATA E ORA
NOTA: la corona dell’orologio presenta tre posizioni:
chiusa, intermedia ed esterna. Per faniliarizzarsi con
la differenza fra le varie posizioni, estendere la corona
alla sua posizione più esterna, e poi spingerla molto
leggermente finché non la si sente scattare nella
posizione intermedia.
Per impostare la data e l’ora
Ora
Estrarre la corona nella sua posizione esterna e girarla
finché non viene mostrata l’ora giusta. Controllare la
corretta impostazione di AM/PM (mattina/pomeriggio)
verificando che la data cambi alla mezzanotte, e non
a mezzogiorno.
ILLUMINAZIONE DEL QUADRANTE INDIGLO
®
Premere un pulsante o la corona per attivare l’illumina-
zione del quadrante. La tecnologia elettroluminescente
impiegata nell’illuminazione del quadrante INDIGLO
®
illumina l’intero quadrante dell’orologio di notte e in
condizioni di scarsa luminosità.
OPPURE

400
401
Data (non pertiene ai modelli con Calendario perpetuo)
Estrarre la corona nella sua posizione intermedia e girarla
finché nella finestrella della data non appare la data
giusta. Nota: la data cambia fra le 10 di sera e le 2 del
mattino. Non cambiarla manualmente durante questo
periodo, onde evitare di danneggiare il movimento
dell’orologio.
Dopo aver impostato data/ora, spingere la corona sulla
posizione di chiusura. La lancetta dei secondi inizierà a
muoversi.
NOTA: per i mesi che hanno meno di 31 giorni, la data
dovrà essere regolata.
CALENDARIO PERPETUO
PANORAMICA
A
B
1 2
3
1 2
3
LANCETTA
DELLE ORE
LANCETTA
DEL GIORNO
LANCETTA DELLA DATA
LANCETTA
DEI SECONDI
LANCETTA
DEI MINUTI
CORONA
LANCETTA
DEL MESE
PULSANTE A
(INCASSATO)
PULSANTE B
(INCASSATO)
POSIZIONE
CHIUSA
POSIZIONE
INTERMEDIA
POSIZIONE
ESTERNA

402
403
COMPENSAZIONE PER L’ANNO BISESTILE
Per mantenere corretta la data, l’orologio include
un’impostazione per la compensazione dell’anno bisestile
corrente. Questa impostazione viene eseguita presso la
fabbrica Timex oppure dopo la sostituzione della batteria,
e non può essere cambiata, ma solo visualizzata.
Per visualizzare la compensazione, estrarre la corona
nella sua posizione intermedia. La lancetta della data
mostra la compensazione: 1 = 1 anno dopo l’anno
bisestile; 2 = 2 anni dopo l’anno bisestile; 3 = 3 anni dopo
l’anno bisestile; 4 = anno bisestile. Al termine, spingere in
dentro la corona, e le lancette riprendono la loro normale
indicazione di giorno, mese e data.
INTRODUZIONE
Grazie alla funzione di calendario perpetuo dell’orologio,
la data non ha bisogno di essere regolata fino al 2100.
L’orologio tiene automaticamente conto dei mesi brevi
e degli anni bisestili, mostrando sempre il giorno e la
data giusti. Il giorno e la data sono stati impostati presso
la fabbrica Timex: occorre solo regolare l’ora. L’orologio
presenta due pulsanti incassati per l’uso esclusivo da
parte del Timex Service Center per impostare il giorno e
la data dopo la sostituzione della batteria. Questi pulsanti
non hanno altro uso.

404
405
REGOLAZIONE DELLA QUARTA LANCETTA CENTRALE
Per regolare di nuovo una quarta lancetta centrale
allineata erroneamente
1. Estrarre la corona nella sua posizione esterna.
Le lancette superiore e inferiore si ripristinano
automaticamente al termine della loro rivoluzione.
2. La quarta lancetta centrale deve puntare sulle ore 12.
Se entro 5 secondi da quando si è estratta la corona
nella sua posizione esterna la quarta lancetta centrale
non punta sulle ore 12, premere il Pulsante A o B per
spostare la lancetta in senso antiorario o in senso
orario finché non punta sulle ore 12.
3. Al completamento della regolazione, spingere la
corona sulla posizione di chiusura.
CRONOGRAFO FLY-BACK
(CON RITORNO INDIETRO)
PANORAMICA
AA
B
23
1 2
3
1 2
3
LANCETTA
SUPERIORE
ORE CRONOGRAFO
2O FUSO ORARIO
4A LANCETTA
CENTRALE
LANCETTA
DEI SECONDI
FINESTRELLA
DELLA DATA
CORONA
SCALA DEI MINUTI
DEL CRONOGRAFO
LANCETTA INFERIORE
PULSANTE A
PULSANTE B
LANCETTA
DEI MINUTI
LANCETTA DELLE ORE
POSIZIONE
CHIUSA
POSIZIONE
INTERMEDIA
POSIZIONE
ESTERNA

406
407
COME IMPOSTARE IL SECONDO FUSO ORARIO
1. Estrarre la corona nella sua posizione intermedia.
La lancetta superiore mostra l’ora del secondo fuso
orario, mentre la 4a lancetta centrale indica i minuti.
2. Presumendo che l’ora del secondo fuso orario coin-
cida per il valore dei minuti con l’ora del fuso orario
primario, la quarta lancetta centrale e la lancetta dei
minuti dovrebbero essere allineate. Se le lancette non
sono allineate, o se i minuti del secondo fuso orario
sono diversi all’interno dell’ora, premere il Pulsante
B per spostare in avanti la quarta lancetta centrale
finché non arriva alla posizione desiderata.
3. Premere il Pulsante A per spostare in avanti la lancetta
superiore in incrementi di un’ora finché non raggiunge
l’ora desiderata del secondo fuso orario. Per spostare
SECONDO FUSO ORARIO
La lancetta superiore indica l’ora per il secondo fuso
orario. Tenere presente
che la scala è di 24 ore,
con la mezzanotte ad
entrambe le estremità e il
mezzogiorno nel mezzo.
Nella maggior parte dei
casi, i fusi orari differiscono
in incrementi di un’ora. In
tali casi, il valore dei minuti
del secondo fuso orario
sarà quello visualizzato
dalla lancetta dei minuti dell’orologio.
AA
B
23
1 2
3
1 2
3

408
409
2. Per fermare il cronografo, premere di nuovo il Pulsante
A (START [Avvio]/STOP). Tutte le lancette si fermano.
3. Per riprendere, premere di nuovo il Pulsante A
(START [Avvio]/STOP).
4. Per azzerare il cronografo fly-back, premere
il Pulsante B (FLY-BACK/RESET [Ripristina]).
Quando il cronografo è ripristinato, tutte le lancette
passano sullo zero. Dopo altri otto secondi, l’orologio
riprende il normale display del secondo fuso orario.
5. Per ripristinare e/o riavviare il cronografo fly-back
mentre sta scorrendo, premere e tenere premuto il
Pulsante B (Fly-back/Reset [Ripristina]). Rilasciarlo
quando si desidera riavviarlo.
rapidamente la lancetta, premere e tenere premuto
il Pulsante A.
4. Spingere in dentro la corona quando si finisce.
CRONOGRAFO FLY-BACK
L’orologio è dotato di un cronografo fly-back di 4 ore.
1. Per avviare il cronografo, premere il Pulsante A
(START [Avvio]/STOP).
La quarta lancetta centrale mostra i secondi con una
risoluzione di 1/5 di secondo. La lancetta inferiore
mostra l’ultima cifra dei minuti, contando fino a dieci
e ripetendo. La lancetta superiore indica il tempo
totale, incluse le ore ed i minuti, con divisioni ogni
dieci minuti. Il cronografo conta fino a quattro ore
prima di fermarsi automaticamente.

410
411
REGOLAZIONE DELLA LANCETTA INDICATRICE
(4A LANCETTA CENTRALE)
Per regolare di nuovo una lancetta indicatrice allineata
erroneamente
1. Estrarre la corona nella sua posizione esterna. Le
lancette superiore e inferiore si ripristinano automati-
camente al termine della loro rivoluzione.
2. La quarta lancetta centrale deve puntare sulle ore 12.
Se non lo fa entro 5 secondi da quando si è estratta
la corona alla sua posizione esterna, premere A o
B per spostare la lancetta rispettivamente in senso
antiorario od orario, finché non punta sulle ore 12.
3. Al termine, spingere in dentro la corona.
BUSSOLA DEL CRONOGRAFO FLY-BACK
PANORAMICA
A
C
B
1 2
3
1 2
3
LANCETTA
SUPERIORE
ORE/CRONO GRAFO
2O FUSO ORARIO
4A LANCETTA
CENTRALE
LANCETTA
DEI SECONDI
FINESTRELLA
DELLA DATA
CORONA
SCALA DEI MINUTI
DEL CRONOGRAFO
LANCETTA INFERIORE
PULSANTE A
PULSANTE B
LANCETTA
DELLE ORE
LANCETTA DEI MINUTI
POSIZIONE
CHIUSA
POSIZIONE
INTERMEDIA
POSIZIONE
ESTERNA
PULSANTE C

412
413
2. Premere B per spostare in avanti la 4a lancetta
centrale. Tenere premuto il pulsante per spostare
la lancetta rapidamente. Le lancette superiore e 4a
centrale si spostano insieme; mentre la 4a lancetta
centrale compie un giro completo, la lancetta
superiore si sposta di un’ora. Presumendo che l’ora
del secondo fuso orario coincida per il valore dei
minuti con l’ora del fuso orario principale, la 4a
lancetta centrale e la lancetta dei minuti dovrebbero
essere allineate.
3. Premere A per spostare la lancetta superiore in avanti
in incrementi di un’ora. Tenere premuto il pulsante per
spostare la lancetta rapidamente.
4. Spingere in dentro la corona quando si finisce.
Volendo, l’ora del secondo fuso orario può essere usata
per visualizzare la propria ora di casa in un formato a
SECONDO FUSO ORARIO
La lancetta superiore indica normalmente l’ora per il
secondo fuso orario. Tenere presente che la scala è di
24 ore, con la mezzanotte ad entrambe le estremità e il
mezzogiorno nel mezzo.
Come impostare l’ora del
secondo fuso orario
1. Estrarre la corona
nella sua posizione
intermedia. La
lancetta superiore
mostra l’ora del
secondo fuso orario
in formato a 24 ore,
mentre la 4a lancetta
centrale indica i minuti.
A
C
B
1 2
3
1 2
3

414
415
superiore indica il tempo totale, incluse le ore ed i
minuti, con divisioni ogni dieci minuti. Il cronografo
conta fino a quattro ore prima di fermarsi automatica-
mente.
2. Per fermare il cronografo, premere di nuovo A
(START [AVVIO]/STOP). Tutte le lancette si fermano.
3. Per riavviare, premere di nuovo A (START [AVVIO]/
STOP), oppure per ripristinare (azzerare) il cronografo,
premere B (FLY-BACK/RESET [RIPRISTINA]).
Quando il cronografo è ripristinato, tutte le lancette
passano sullo zero. Dopo altri otto secondi, l’orologio
riprende il normale display dell’ora del secondo
fuso orario.
4. Si può anche ripristinare e/o riavviare il cronografo
mentre sta scorrendo. Per farlo, premere e tenere
24 ore. Quando si imposta in questo modo il secondo
fuso orario, assicurarsi che la visualizzazione di ore/minuti
corrisponda alla visualizzazione a 24 ore, verificando che
la data cambi alla mezzanotte, e non a mezzogiorno.
CRONOGRAFO FLY-BACK
L’orologio è dotato di un cronografo fly-back di 4 ore.
1. Per avviare il cronografo, premere A (START [AVVIO]/
STOP). La 4a lancetta
centrale indica i secondi
con una risoluzione di
un quinto di secondo
e la lancetta inferiore
indica l’ultima cifra
dei minuti, contando
verso l’alto fino a dieci
e ripetendo. La lancetta
A
C
B
1 2
3
1 2
3

416
417
premuto B (FLY-BACK/RESET [RIPRISTINA]) per
azzerare il cronografo e rilasciarlo quando si desidera
riavviarlo. Non occorre attendere che tutte le lancette
raggiungano lo zero prima di rilasciare il pulsante; il
cronometraggio inizierà internamente dal momento
in cui viene rilasciato il pulsante. Questa funzione “fly-
back” permette all’utente di misurare il tempo di giro.
La bussola può essere usata mentre il cronografo sta
scorrendo senza interferire con il suo funzionamento.
Vedere FUNZIONAMENTO DELLA BUSSOLA.
CALIBRAZIONE DELLA BUSSOLA
La bussola deve essere calibrata prima dell’uso.
Poiché una bussola utilizza il campo magnetico della
Terra, si deve essere consapevoli della presenza di grandi
oggetti metallici, come automobili o ponti, o di oggetti che
emettono radiazioni elettromagnetiche, come televisori o
computer, che potrebbero influenzare il campo magnetico
che circonda l’orologio. Se la bussola viene calibrata in
prossimità di tali oggetti, funzionerà adeguatamente solo
nello stesso luogo. Se la bussola viene calibrata lontano
da tali oggetti, non funzionerà adeguatamente in loro
prossimità. Per ottenere i risultati migliori, calibrare la
bussola nella zona in cui si desidera utilizzarla.
Nel calibrare e nell’usare la bussola per le letture, è
importante, come nel caso di tutte le bussole, mantenerla
a livello. In caso contrario, si può incorrere in gravi errori
di lettura. Evitare inoltre, per non ottenere letture inaccu-
rate, zone in cui potrebbero essere presenti concentrazio-
ni superiori al normale di ferro dolce o magnetizzazione
permanente. Se una lettura appare sospetta, va eseguita
una nuova calibrazione.

418
419
4a lancetta centrale ruota di due giri per ricordare
all’utente di ruotare l’orologio. Mentre l’orologio
è livellato, LENTAMENTE fargli eseguire due giri,
impiegando per ogni giro almeno 15 secondi.
4. Al termine, premere C (compass), tenendo l’orologio
livellato. La 4a lancetta centrale si muove avanti e
indietro per segnalare la fine della calibrazione, e poi
si sposta sull’attuale impostazione di declinazione
magnetica.
Non conservare l’orologio in prossimità di qualsiasi fonte
di magnetismo, come un computer, un elettrodomestico
o un televisore, in quanto l’orologio può assumere una
carica magnetica e dare letture inaccurate. L’accuratezza
tipica di strumenti indossati al polso rientra in +/- 10 gradi.
Per calibrare la bussola
1. Estrarre la corona nella sua posizione intermedia
e attendere che le lancette indicatrici smettano di
muoversi.
2. Tenere l’orologio a livello o posarlo su una superficie
a livello (se il cinturino interferisce, mettere l’orologio
sopra una tazza capovolta). L’orologio può essere
appoggiato sul quadrante, ma fare attenzione a
proteggere il quadrante stesso.
3. Per iniziare, premere C (COMPASS/BUSSOLA). La

420
421
A
B
Declinazione magnetica impostata su -14° (14° O)
FUNZIONAMENTO DELLA BUSSOLA
Di solito, la bussola è inattiva, con la 4a lancetta centrale
che punta sulle ore 12 o indica i secondi del cronografo.
Tenendo l’orologio a livello, premere C (COMPASS/
BUSSOLA) per attivare la bussola. L’ago della bussola
si sposta per puntare a nord. Se l’orologio viene girato,
la 4a lancetta centrale continuerà a spostarsi sempre
puntando verso nord. Dopo 20 secondi, la bussola si
spegne automaticamente e la lancetta centrale ritorna al
suo funzionamento normale. In questo modo si risparmia
5. Se non si desidera impostare la declinazione
magnetica, spingere in dentro la corona. Altrimenti,
perché l’orologio esegua la compensazione auto -
matica per l’angolo di declinazione, girare l’anello della
bussola finché il nord non si trova in corrispondenza
delle ore 12.
6. Premere A o B per spostare la 4a lancetta centrale
rispettivamente verso ovest (-) o verso est (+), per
puntare sull’angolo di declinazione della propria
ubicazione (vedere la tabella sotto) usando la scala di
declinazione. Tenere premuto un pulsante per spostare
la lancetta rapidamente. Per un esempio, vedere la
figura sotto.
7. Al termine, spingere in dentro la corona.

422
423
il consumo della batteria. Per riattivare la bussola per altri
20 secondi, premere di nuovo il pulsante C (COMPASS/
BUSSOLA) in qualsiasi momento.
La bussola può essere attivata mentre il cronografo è in
uso. La 4a lancetta centrale si limita a cambiare tempo-
raneamente funzione. Le lancette superiore e inferiore
continuano a mostrare il tempo del cronografo e tutte le
funzioni del cronografo sono disponibili agendo sui pulsanti
A (START [AVVIO]/STOP) e B (FLY-BACK/RESET [RIPRISTINA]).
NOTA: durante il funzionamento della bussola, la lancetta
dei secondi si sposta a incrementi di due secondi. Inoltre,
quando la bussola è attivata, le lancette superiore e
inferiore potrebbero cambiare leggermente posizione,
ritornando alle loro giuste posizioni una volta disattivata
la bussola. Questo funzionamento è normale e offre la
lettura più accurata della bussola.
CRONOGRAFO LINEARE
PANORAMICA
LANCETTA
DEI SECONDI
FINESTRELLA
DELLA DATA
CORONA
LANCETTA INFERIORE
PULSANTE A
PULSANTE B
QUARTA LANCETTA
CENTRALE
LANCETTA DELLE ORE
LANCETTA
LINEARE
LANCETTA
DEI MINUTI
A
B
1
2
3

424
425
REGOLAZIONE DELLA LANCETTA LINEARE
E DELLA QUARTA LANCETTA CENTRALE
Come regolare di nuovo una quarta lancetta centrale
allineata erroneamente
1. Estrarre la corona nella sua posizione esterna. La
lancetta inferiore viene ripristinata automaticamente
al termine del suo movimento.
2. La quarta lancetta centrale deve puntare sulle ore 12.
Se entro 5 secondi da quando si è estratta la corona
nella sua posizione esterna la quarta lancetta centrale
non punta sulle ore 12, premere il Pulsante A per
spostare la lancetta in senso orario finché non punta
sulle ore 12.
3. Se il cronografo è stato ripristinato e la lancetta
lineare non punta sullo zero, premere e tenere
premuto il Pulsante B per 5 secondi, per innestare
una calibrazione completa dell’indicatore lineare che
richiederà un massimo di 32 secondi.
4. Al completamento della regolazione, spingere la
corona sulla posizione di chiusura.

426
427
SECONDO FUSO ORARIO
La lancetta inferiore
indica l’ora per il
secondo fuso orario.
Tenere presente che
la scala è di 24 ore,
con la mezzanotte ad
entrambe le estremità
e il mezzogiorno nel
mezzo. Nella maggior
parte dei casi, i fusi
orari differiscono
in incrementi di
un’ora. In tali casi, il valore dei minuti del secondo fuso
orario sarà quello visualizzato dalla lancetta dei minuti
dell’orologio.
COME IMPOSTARE IL SECONDO FUSO ORARIO
1. Estrarre la corona nella sua posizione intermedia. La
lancetta inferiore mostra l’ora del secondo fuso orario,
mentre la quarta lancetta centrale indica i minuti.
2. Presumendo che l’ora del secondo fuso orario coincida
per il valore dei minuti con l’ora del fuso orario
primario, la quarta lancetta centrale e la lancetta dei
minuti dovrebbero essere allineate. Se le lancette non
sono allineate, o se i minuti del secondo fuso orario
sono diversi all’interno dell’ora, premere il Pulsante
B per spostare in avanti la quarta lancetta centrale
finché non arriva alla posizione desiderata.
3. Premere il Pulsante A per spostare in avanti la lancetta
inferiore in incrementi di un’ora finché non raggiunge
l’ora desiderata del secondo fuso orario. Per spostare
A
B
1
2
3

428
429
rapidamente la lancetta, premere e tenere premuto
il Pulsante A.
4 Spingere in dentro la corona quando si finisce.
CRONOGRAFO LINEARE
L’orologio è dotato di un cronografo diviso in 4 ore.
1. Per avviare il cronografo, premere il Pulsante A (Avvio/
Stop). La quarta lancetta centrale mostra i secondi con
una risoluzione di 1/5 di secondo. La lancetta lineare
indica i minuti, contando fino a trenta e ripetendo.
La lancetta inferiore indica il tempo totale, incluse
le ore ed i minuti, con divisioni ogni dieci minuti. Il
cronografo conta fino a quattro ore prima di fermarsi
automaticamente.
2. Per fermare il cronografo, premere di nuovo il
Pulsante A (Avvio/Stop). Tutte le lancette si fermano.
3. Per azzerare il cronografo, premere il Pulsante B
(Tempo intermedio/Ripristina).
Quando il cronografo è ripristinato, tutte le lancette
passano sullo zero. Dopo altri otto secondi, l’orologio
riprende il normale display del secondo fuso orario.
Mentre il cronografo sta scorrendo, si può registrare
un tempo intermedio. Premere il Pulsante B (Tempo
intermedio/Ripristina), e tutte le lancette si fermano
mentre il cronografo continua a scorrere. Premere di
nuovo il Pulsante B (Tempo intermedio/Ripristina) per
riavviare la visualizzazione del tempo trascorso del
cronografo che scorre.

430
431
ORA MONDIALE
PANORAMICA
A
B
C
1 2
3
corrected 3.3.11 with Paulo’s new cities
24 CITTÀ
SCALA DELL’ORA
MONDIALE
LANCETTA
DEI SECONDI
FINESTRELLA
DELLA DATA
CORONA
LANCETTA INFERIORE
PULSANTE A
PULSANTE B
PULSANTE C
4A LANCETTA
CENTRALE
SCALA DELLA
STAGIONE
LANCETTA
SUPERIORE
LANCETTA DELLE ORE
LANCETTA
DEI MINUTI
POSIZIONE
CHIUSA
POSIZIONE
INTERMEDIA
POSIZIONE
ESTERNA
PER IMPOSTARE L’ORA MONDIALE
1. Estrarre la corona nella sua posizione intermedia.
La lancetta centrale indica la città del fuso orario
mondiale, mentre la lancetta superiore indica l’ora in
quella città.
A
B
C
1 2 3

432
433
2. Premere A o B per spostare la lancetta centrale sulla
città che rappresenta il proprio fuso orario locale.
Tenere premuto un pulsante per spostare la lancetta
rapidamente. Si può usare qualsiasi città.
3. Estrarre la corona nella sua posizione esterna. La
lancetta selettrice della città ritornerà sulla posizione
delle ore 12:00, come indicato nella sezione COME
REGOLARE LA LANCETTA INDICATRICE. Dopo una
pausa di cinque secondi, la lancetta superiore
mostrerà l’ora mondiale (l’ora della città selezionata
al procedimento precedente), la lancetta centrale
mostrerà i minuti dell’ora mondiale e quella inferiore
mostrerà la stagione (vedere la sezione IMPOSTA ZIONE
DELLA STAGIONE). IMPORTANTE: non manipolare
nessun pulsante né la corona finché la lancetta
centrale non ha completato la sua regolazione.
(Circa 10 secondi dopo che la corona viene estratta
nella sua posizione esterna.)
4. Se la stagione visualizzata non è quella giusta per il
fuso orario locale, premere C per cambiarla. Se il fuso
orario locale osserva l’ora legale, la lancetta superiore
si sposta di un’ora.
5. Premere A o B per spostare l’ora indietro o avanti,
rispettivamente, per impostare il fuso orario mondiale
in modo che corrisponda al fuso orario locale. Tenere
premuto un pulsante per cambiare l’ora rapidamente.
Le lancette si spostano insieme; mentre la lancetta
centrale compie una rivoluzione, la lancetta superiore
si sposta di un’ora. Dopo l’impostazione, le lancette
centrale e dei minuti dovrebbero essere allineate.
6. Spingere in dentro la corona quando si finisce.

434
435
REGOLAZIONE DELLA LANCETTA INDICATRICE
(4A LANCETTA CENTRALE)
Per regolare di nuovo una lancetta indicatrice allineata
erroneamente
1. Estrarre la corona nella sua posizione esterna. Le
lancette superiore e inferiore si ripristinano automati-
camente al termine della loro rivoluzione.
2. La quarta lancetta centrale deve puntare sulle ore 12.
Se non lo fa entro 5 secondi da quando si è estratta
la corona alla sua posizione esterna, premere A o
B per spostare la lancetta rispettivamente in senso
antiorario od orario, finché non punta sulle ore 12.
3. Spingere in dentro la corona quando si finisce.
NOTA: se non viene premuto alcun pulsante per cinque
secondi dopo che le lancette si fermano, l’orologio passa
all’impostazione dell’ora mondiale (vedere IMPOSTAZIONE
DELL’ORA MONDIALE).
VISUALIZZAZIONE DELL’ORA DELLE CITTÀ
Premere A o B per spostare
la lancetta centrale rispet-
tivamente all’indietro o in
avanti e selezionare una
città. La lancetta superiore
si sposta per mostrare
l’ora nella città selezionata.
Tenere presente che la
scala è di 24 ore, con la
mezzanotte ad entrambe le
estremità e il mezzogiorno nel mezzo.
IMPOSTAZIONE DELLA STAGIONE
L’impostazione della stagione permette all’orologio di
compensare per l’ora legale (detta anche “ora estiva”).
A
B
C
1 2 3

436
437
L’orologio offre un’impostazione per rappresentare i due
periodi che hanno tutte le città che osservano l’ora legale.
Per l’orologio, il periodo dell’ora legale è L’ESTATE ed il
periodo dell’ora solare è L’INVERNO.
Quando la stagione in una città è impostata su ESTATE,
tutte le città nello stesso emisfero sono impostate auto-
maticamente su ESTATE, mentre tutte le città nell’altro
emisfero sono impostate automaticamente su INVERNO.
L’orologio sa quali città si trovano in ciascun emisfero.
Premere C per cambiare la stagione nella città selezionata.
BUSSOLA
PANORAMICA
I
I
14
CORONA
CENTRALE
POSIZIONE
INTERMEDIA
IMPOSTAZIONE
DELLA DATA
I
I
14
IN FUORI
IMPOSTAZIONE
DELL’ORA
CORONA
B
A (COMPASS/
BUSSOLA)
SCALA DI DECLINAZIONE
AGO DELLA BUSSOLA
(L’ESTREMITÀ
DEL NORD HA LA
PUNTA ROSSA/ È PIÙ
LUNGA)

438
439
REGOLAZIONE DELL’AGO DELLA BUSSOLA
Estrarre completamente la CORONA. L’ago della bussola
deve puntare sulle ore 12. In caso contrario, premere il
pulsante A o B per spostare l’ago della bussola in modo
che punti in tale direzione. Tenere premuto il pulsante per
far spostare la lancetta rapidamente. Spingere in dentro
la CORONA CENTRALE quando si finisce ed eseguire una
nuova calibrazione della bussola.
CALIBRAZIONE DELLA BUSSOLA
La bussola deve essere calibrata prima dell’uso.
Poiché una bussola utilizza il campo magnetico della
Terra, si deve essere consapevoli della presenza di grandi
oggetti metallici, come automobili o ponti, o di oggetti che
emettono radiazioni elettromagnetiche, come televisori o
computer, che potrebbero influenzare il campo magnetico
che circonda l’orologio. Se la bussola viene calibrata in
prossimità di tali oggetti, funzionerà adeguatamente solo
nello stesso luogo. Se la bussola viene calibrata lontano
da tali oggetti, non funzionerà adeguatamente in loro
prossimità. Per ottenere i risultati migliori, calibrare la
bussola nella zona in cui si desidera utilizzarla.
Nel calibrare e nell’usare la bussola per le letture, è
importante, come nel caso di tutte le bussole, mantenerla
a livello. In caso contrario, si può incorrere in gravi errori
di lettura. Evitare inoltre, per non ottenere letture inaccu-
rate, zone in cui potrebbero essere presenti concentrazio-
ni superiori al normale di ferro dolce o magnetizzazione
permanente. Se una lettura appare sospetta, va eseguita
una nuova calibrazione.
Non conservare l’orologio in prossimità di qualsiasi fonte
di magnetismo, come un computer, un elettrodomestico
o un televisore, in quanto l’orologio può assumere una

440
441
carica magnetica e dare letture inaccurate. L’accuratezza
tipica di strumenti indossati al polso rientra in +/- 10 gradi.
Per calibrare la bussola
1. Estrarre la corona nella sua posizione intermedia
e attendere che le lancette indicatrici smettano di
muoversi.
2. Tenere l’orologio a livello o posarlo su una superficie
a livello (se il cinturino interferisce, mettere l’orologio
sopra una tazza capovolta). L’orologio può essere
appoggiato sul quadrante, ma fare attenzione a
proteggere il quadrante stesso.
3. Per iniziare, premere il pulsante A o B. La 4a lancetta
centrale ruota di due giri per ricordare all’utente di
ruotare l’orologio. Mentre l’orologio è livellato, LENTA-
MENTE fargli eseguire due giri, impiegando per ogni
giro almeno 15 secondi.
4. Al termine, premere A o B, tenendo l’orologio livellato.
La 4a lancetta centrale si muove avanti e indietro per
segnalare la fine della calibrazione, e poi si sposta
sull’attuale impostazione di declinazione magnetica.
5. Se non si desidera impostare la declinazione
magnetica, spingere in dentro la corona. Altrimenti,
perché l’orologio esegua la compensazione
automatica per l’angolo di declinazione, girare
l’anello della bussola finché il nord non si trova in
corrispondenza delle ore 12.

442
443
6. Premere A o B per spostare la quarta lancetta
centrale rispettivamente verso ovest (-) o verso est
(+), per puntare sull’angolo di declinazione della
propria ubicazione usando la scala di declinazione.
Tenere premuto un pulsante per spostare la lancetta
rapidamente. Per un esempio, vedere la figura alla
pagina successiva.
7. Al termine, spingere in dentro la corona.
A
B
Declinazione magnetica impostata su -14° (14° O)
FUNZIONAMENTO DELLA BUSSOLA
Di solito, la bussola è inattiva, con la 4a lancetta centrale
che punta sulle ore 12 o indica i secondi del cronografo.
Tenendo l’orologio a livello, premere A o B per attivare
la bussola. L’ago della bussola si sposta per puntare a
nord. Se l’orologio viene girato, la 4a lancetta centrale
continuerà a spostarsi sempre puntando verso nord. Dopo
20 secondi, la bussola si spegne automaticamente e la
lancetta centrale ritorna al suo funzionamento normale.
In questo modo si risparmia il consumo della batteria. Per
riattivare la bussola per altri 20 secondi, premere A o B in
qualsiasi momento.
NOTA: durante il funzionamento della bussola, la lancetta
dei secondi si sposta a incrementi di due secondi.

444
445
MAREA TEMPERATURA E BUSSOLA
PANORAMICA
IN FUORI -
IMPOSTA ORA
SCALA DI
DECLINAZIONE
LANCETTA
INDICATRICE
C (COMPASS/
BUSSOLA)
B (TIDE/MAREA)
A (TEMP)
CORONA
ANELLO GIREVOLE
BUSSOLA
DATA
SCALA MAREA
SCALA TEMPERATURA
INTERMEDIO -
IMPOSTA DATA
COME REGOLARE LA LANCETTA INDICATRICE
Estrarre completamente la corona. L’ago della lancetta
deve puntare sulle ore 12. In caso contrario, premere il
pulsante TIDE (MAREA) o TEMP per spostare la lancetta
in modo che punti in tale direzione. I pulsanti MAREA e
TEMP spostano rispettivamente la lancetta in senso orario
e antiorario. Tenere premuto il pulsante per far spostare
la lancetta rapidamente. Spingere in dentro la corona
quando si finisce.
SELEZIONE DI MAREA/TEMPERATURA
La lancetta indicatrice mostra costantemente la marea o
la temperatura. Quando viene mostrata la temperatura,
premere il pulsante MAREA per selezionare l’orologio
della marea. La lancetta si sposta sulla bassa marea e poi
sulla marea corrente. Quando viene mostrata la marea,
premere il pulsante TEMP per selezionare il termometro.

446
447
La lancetta si sposta all’inizio della scala del termometro
e poi sulla temperatura corrente.
TERMOMETRO
Quando il termometro viene indossato al polso, la sua
lettura viene influenzata dal calore corporeo. Per letture
più accurate, togliersi l’orologio e metterlo all’ombra per
svariati minuti.
L’orologio è in grado di misurare anche la temperatura
dell’acqua, se sommerso. Assicurarsi di selezionare il
display della temperatura prima di mettere l’orologio
nell’acqua, in quanto non si deve premere alcun pulsante
mentre l’orologio si trova sott’acqua.
Le letture del termometro vengono registrate ogni minuto,
e con più frequenza se la temperatura sta cambiando.
OROLOGIO DELLA MAREA
Per l’orologio della marea, la lancetta indicatrice ruota
sempre in senso orario, quindi la marea si sta alzando
quando la lancetta punta a sinistra e sta calando quando
la lancetta punta a destra. Il numero di ore che mancano
alla prossima alta/bassa marea è indicato sulla scala della
marea.
Le maree sono influenzate dalla posizione del sole e dalla
forma della linea costiera, quindi l’orologio della marea
non può dare un orario preciso dell’alta e della bassa
marea. Potrebbe essere necessario regolare periodica-
mente l’orologio della marea.
Per impostare l’orologio della marea, estrarre la corona
nella posizione INTERMEDIA. Premere il pulsante TIDE
(MAREA) o TEMP per spostare la lancetta sulla marea
corrente. I pulsanti MAREA e TEMP spostano rispettiva-

448
449
mente la lancetta in senso orario e antiorario. Spingere in
dentro la corona quando si finisce.
CALIBRAZIONE DELLA BUSSOLA
La bussola deve essere calibrata prima dell’uso.
Poiché una bussola utilizza il campo magnetico della
Terra, si deve essere consapevoli della presenza di grandi
oggetti metallici, come automobili o ponti, o di oggetti che
emettono radiazioni elettromagnetiche, come televisori o
computer, che potrebbero influenzare il campo magnetico
che circonda l’orologio. Se la bussola viene calibrata in
prossimità di tali oggetti, funzionerà adeguatamente solo
nello stesso luogo. Se la bussola viene calibrata lontano
da tali oggetti, non funzionerà adeguatamente in loro
prossimità. Per ottenere i risultati migliori, calibrare la
bussola nella zona in cui si desidera utilizzarla.
Nel calibrare e nell’usare la bussola per le letture, è
importante, come nel caso di tutte le bussole, mantenerla
a livello. In caso contrario, si può incorrere in gravi errori
di lettura. Evitare inoltre, per non ottenere letture inaccu-
rate, zone in cui potrebbero essere presenti concentrazio-
ni superiori al normale di ferro dolce o magnetizzazione
permanente. Se una lettura appare sospetta, va eseguita
una nuova calibrazione.
Non conservare l’orologio in prossimità di qualsiasi fonte
di magnetismo, come un computer, un elettrodomestico
o un televisore, in quanto l’orologio può assumere una
carica magnetica e dare letture inaccurate. L’accuratezza
tipica di strumenti indossati al polso rientra in +/- 10 gradi.

450
451
Per calibrare la bussola
1. Estrarre la corona nella sua posizione intermedia
e attendere che le lancette indicatrici smettano di
muoversi.
2. Tenere l’orologio a livello o posarlo su una superficie
a livello (se il cinturino interferisce, mettere l’orologio
sopra una tazza capovolta). L’orologio può essere ap-
poggiato sul quadrante, ma fare attenzione a proteg-
gere il quadrante stesso.
3. Per iniziare, premere C (COMPASS/BUSSOLA). La
4a lancetta centrale ruota di due giri per ricordare
all’utente di ruotare l’orologio. Mentre l’orologio
è livellato, LENTAMENTE fargli eseguire due giri,
impiegando per ogni giro almeno 15 secondi.
4. Al termine, premere C (compass/bussola), tenendo
l’orologio livellato. La 4a lancetta centrale si
muove avanti e indietro per segnalare la fine della
calibrazione, e poi si sposta sull’attuale impostazione
di declinazione magnetica.
5. Se non si desidera impostare la declinazione magne-
ti ca, spingere in dentro la corona. Altrimenti, perché
l’orologio esegua la compensazione automatica per
l’angolo di declinazione, girare l’anello della bussola
finché il nord non si trova in corrispondenza delle ore 12.

452
453
6. Premere A o B per spostare la quarta lancetta
centrale rispettivamente verso ovest (-) o verso est
(+), per puntare sull’angolo di declinazione della
propria ubicazione usando la scala di declinazione.
Tenere premuto un pulsante per spostare la lancetta
rapidamente. Per un esempio, vedere la figura alla
pagina successiva.
7. Al termine, spingere in dentro la corona.
A
B
Declinazione magnetica impostata su -14° (14° O)
FUNZIONAMENTO DELLA BUSSOLA
Di solito, la bussola è inattiva, con la 4a lancetta centrale
che punta sulle ore 12 o indica i secondi del cronografo.
Tenendo l’orologio a livello, premere C (COMPASS/
BUSSOLA) per attivare la bussola. L’ago della bussola
si sposta per puntare a nord. Se l’orologio viene girato,
la 4a lancetta centrale continuerà a spostarsi sempre
puntando verso nord. Dopo 20 secondi, la bussola si
spegne automaticamente e la lancetta centrale ritorna al
suo funzionamento normale. In questo modo si risparmia
il consumo della batteria. Per riattivare la bussola per altri
20 secondi, premere di nuovo il pulsante C (COMPASS/
BUSSOLA) in qualsiasi momento.
NOTA: durante il funzionamento della bussola, la lancetta
dei secondi si sposta a incrementi di due secondi.

454
455
REGOLAZIONE DELLA LANCETTA INDICATRICE
(4A LANCETTA CENTRALE)
Estrarre completamente la corona. Le lancette del
retrogrado superiore e inferiore si azzerano automatica-
mente all’inizio delle loro scale. La lancetta indicatrice
(quarta lancetta centrale) deve puntare sulle ore 12. In
caso contrario, premere il pulsante A e/o B per spostare
la lancetta in modo che punti in tale direzione. I pulsanti
A e B spostano rispettivamente la lancetta in senso orario
e antiorario. Tenere premuto il pulsante per far spostare
la lancetta rapidamente. Spingere in dentro la corona
quando si finisce.
CALIBRAZIONE DELL’ALTIMETRO
L’altimetro deve essere calibrato prima dell’uso.
Poiché un altimetro usa la pressione per determinare
l’altitudine, e la pressione varia a seconda della località,
ALTIMETRO
PANORAMICA
SCALA ALTIMETRO
(CENTINAIA)
RETROGRADO
SUPERIORE
(MIGLIAIA)
PULSANTE C
(UNITÀ)
PULSANTE A
(ALTITUDINE MASSIMA)
PULSANTE B
(ALTITUDINE MINIMA)
RETROGRADO
INFERIORE (UNITÀ)
CORONA

456
457
punta all’unità selezionata l’ultima volta che l’altimetro
è stato usato; altrimenti, la lancetta del retrogrado
inferiore punta sull’unità attualmente selezionata
nel display dell’altitudine. La 4a lancetta centrale e la
lancetta del retrogrado superiore dovrebbero puntare
sull’altitudine attuale.
3. Premere A o B per spostare la 4a lancetta centrale
rispettivamente in senso antiorario od orario, finché
non punta sull’altitudine di calibrazione desiderata.
Tenendo premuti i pulsanti A o B si sposta la lancetta
centrale più rapidamente. La lancetta del retrogrado
superiore si sposta in relazione al valore di altitudine
visualizzato dalla 4a lancetta centrale.
4. Spingere in dentro la corona quando si finisce.
è importante impostare l’altimetro su un valore di alti-
tudine noto di riferimento, oppure su un’altitudine di riferi-
mento standard di un determinato luogo. Cambiamenti di
pressione improvvisi, dovuti a cambiamenti atmosferici,
possono causare un’inesattezza della lettura dell’alti-
metro pari a +-100 m (328 piedi), anche se la località in
cui ci si trova non è cambiata. Ricalibrare l’altimetro su
un’altitudine nota quando si verificano cambiamenti di
pressione drastici.
Per calibrare l’altimetro
1. Estrarre la corona nella sua posizione intermedia
e attendere che le lancette indicatrici smettano di
muoversi.
2. Se l’altimetro era spento (OFF) nel momento in cui si è
estratta la corona, la lancetta del retrogrado inferiore

458
459
Per spegnere l’altimetro con le unità correnti impostate
sui PIEDI, premere C. Per spegnere l’altimetro con le unità
impostate sui METRI, premere C due volte (la lancetta
inferiore va su PIEDI prima di andare sulla posizione di
spegnimento OFF).
Esempio: altitudine = 2310 m Esempio: altitudine = 7580 piedi
ACCENSIONE/SPEGNIMENTO DELL’ALTIMETRO
Per accendere l’altimetro, premere C. La lancetta del
retrogrado inferiore punta sui METRI (METERS). Usando i
contrassegni sull’anello superiore, la 4a lancetta centrale
indica il valore delle centinaia e delle decine relative
all’altitudine attuale con divisioni ogni dieci METRI/PIEDI.
La lancetta del retrogrado superiore mostra il valore delle
migliaia dell’attuale altitudine con divisioni ogni mille
METRI/PIEDI.
Per cambiare le unità da METRI a PIEDI, premere C una
seconda volta. Per cambiare le unità da PIEDI a METRI,
premere C due volte (l’altimetro viene dapprima spento e
poi riacceso con le unità in METRI).

460
461
L’altitudine massima registrata viene visualizzata per dieci
secondi. Per estendere la durata di visualizzazione per
altri dieci secondi, premere A prima che scada il periodo
di durata precedente di dieci secondi.
Per cambiare le unità da METRI a PIEDI o da PIEDI a
METRI, premere C.
Per visualizzare l’altitudine minima registrata, premere
B. La lancetta del retrogrado inferiore mostra l’unità di
misura in cui l’altitudine minima è stata registrata se
l’altimetro è spento (OFF) al momento della pressione del
pulsante; altrimenti, mostra l’altitudine minima usando
l’unità di misura selezionata attualmente. La 4a lancetta
centrale mostra il valore delle centinaia e delle decine
dell’altitudine minima con divisioni ogni dieci METRI/PIEDI.
L’orologio spegne automaticamente l’altimetro dopo
60 minuti dall’attivazione.
RICHIAMO DELL’ALTITUDINE MIN/MAX DELL’ALTIMETRO
Per visualizzare l’altitudine massima registrata, premere
A. La lancetta del retrogrado inferiore mostra l’unità di
misura in cui l’altitudine massima è stata registrata se
l’altimetro è spento (OFF) al momento della pressione del
pulsante; altrimenti, mostra l’altitudine massima usando
l’unità di misura selezionata attualmente. La 4a lancetta
centrale mostra il valore delle centinaia e delle decine
dell’altitudine massima con divisioni ogni dieci METRI/
PIEDI. La lancetta del retrogrado superiore mostra il valore
delle migliaia dell’altitudine massima con divisioni ogni
mille METRI/PIEDI.

462
463
PROFONDITÀ
PANORAMICA
Nota: Le lancette centrale e inferiore vengono calibrate
automaticamente quando si sposta la corona sulla
posizione 3 per impostare l’ora.
3
AA
B
1
2
3
2
3
2
3
LANCETTA
CENTRALE
INDICATORE SPENTO
PULSANTE A
PULSANTE B
LANCETTA INFERIORE
CORONA
La lancetta del retrogrado superiore mostra il valore delle
migliaia dell’altitudine minima con divisioni ogni mille
METRI/PIEDI.
L’altitudine minima registrata viene visualizzata per dieci
secondi. Per estendere la durata di visualizzazione per
altri dieci secondi, premere B prima che scada il periodo
di durata precedente di dieci secondi. Per cambiare le
unità da METRI a PIEDI o da PIEDI a METRI, premere C.

464
465
la 4a lancetta centrale punta sulla profondità effettiva, che
viene indicata sulla scala della profondità. Se le letture
restano nell’intervallo compreso fra 0 e 2 metri (0-6 piedi)
per 5 minuti, il sensore si spegne automaticamente. Per
spegnere il sensore manualmente, premere e tenere pre-
muto il pulsante B per 2 secondi. La 4a lancetta centrale
passa alla posizione di SPENTO (ore 6).
RICHIAMO DELLA PROFONDITÀ MASSIMA/
TEMPERATURA MINIMA
Dopo la risalita in superficie, svitare la corona ed estrarla
nella posizione intermedia. Le lancette centrale e inferiore
si spostano per visualizzare, rispettivamente, il valore della
massima profondità e il valore della minima temperatura
registrati durante l’immersione più recente. Quando
il sensore della profondità viene di nuovo attivato, la
memoria viene cancellata.
TEMPERATURA
Il sensore della temperatura è sempre abilitato e
registra una lettura almeno una volta ogni 60 secondi.
La temperatura è indicata dalla lancetta inferiore e dalla
scala relativa.
Quando il lettore viene indossato al polso, la sua lettura
della temperatura viene influenzata dal calore corporeo.
Per letture più accurate, togliere l’orologio dal polso.
ACCENSIONE/SPEGNIMENTO DEL SENSORE
DELLA PROFONDITÀ
Il sensore è normalmente spento e deve essere acceso
manualmente prima di un’immersione. Premere e rilasci-
are il pulsante B per accendere il sensore. La 4a lancetta
centrale si sposta dalla posizione SPENTO (ore 6) alla
posizione delle ore 12 e inizia a registrare letture almeno
una volta ogni 5 secondi. Con l’aumentare della profondità,

466
467
Quando l’orologio presenta uno stato di Livello batteria
bassa, la lancetta dei secondi si sposta solo ad intervalli di
2 secondi, e si sposta di due posizioni alla volta. Si racco-
manda all’utente di sostituire la batteria quando l’orologio
si trova in questo stato Livello batteria bassa.
Quando l’orologio presenta uno stato di “Livello sosti-
tuire batteria”, la lancetta dei secondi si sposta solo ad
intervalli di 5 secondi, e si sposta di cinque posizioni alla
volta. A questo punto, il sensore della profondità non può
essere attivato, e l’utente deve sostituire immediatamen-
te la batteria.
Se l’orologio non è ancora stato usato, le lancette centrale
e inferiore si spostano per visualizzare rispettivamente
0 metri/piedi e 0 ºC/32 ºF. Prima dell’uso/immersione, la
corona deve essere riavvitata all’interno.
RILEVAMENTO DEL LIVELLO DI CARICA
DELLA BATTERIA
L’orologio determina lo stato del livello di carica
della batteria e offre all’utente un’indicazione visiva
corrispondente a tale livello. Lo stato del livello di carica
della batteria viene classificato come Livello normale,
Livello batteria bassa e Livello sostituire batteria, con
ciascun livello indicato dal movimento della lancetta dei
secondi.
Per lo stato Livello normale, la lancetta dei secondi si
sposta di una posizione ogni secondo, ovvero segue il suo
funzionamento normale.

468
469
OROLOGIO DA REGATA
2 31
A
B
C
PERFECT DATE
Con la funzione Perfect Date
™
dell’orologio, la data
non ha bisogno di essere regolata fino all’anno 2060.
L’orologio si regola automaticamente per i mesi brevi
e gli anni bisestili, e visualizza sempre, su richiesta, la
data giusta. La data è stata impostata presso la fabbrica
Timex. Quando si inizia a indossare l’orologio nuovo, se
la data visualizzata precede o segue la data della propria
località, occorre modificarla appropriatamente. Estrarre
la corona nella posizione esterna. La 4a lancetta centrale
esegue una rivoluzione attorno al quadrante, si ferma in
corrispondenza delle ore 12:00 per circa 5 secondi e poi
si sposta sulla data sulla quale l’orologio è attualmente
impostato. Ruotare la corona in avanti per far scorrere le
ore in avanti fino alla data attuale (o all’indietro per farle
scorrere indietro fino alla data attuale). Ogni volta che
LANCETTA
DELLE ORE
LANCETTA
DEI SECONDI
QUARTA
LANCETTA
CENTRALE
CORONA
LANCETTA
SUPERIORE
SCALA DELLA
PERFECT
DATE
™
LANCETTA INFERIORE
LANCETTA
DEI MINUTI

470
471
si attraversa la mezzanotte, la data cambia di un giorno.
Dopo aver impostato la data sulla propria data locale,
continuare a ruotare la corona per posizionare le lancette
sull’ora locale, tenendo conto che l’ora può essere
antimeridiana o post-meridiana. Una volta impostata l’ora,
spingere di nuovo in dentro la corona sulla posizione
di chiusura. Durante il funzionamento normale, la 4a
lancetta centrale visualizza la data quando viene premuta
la corona. La lancetta si sposta sulla posizione della data
corrente, indicata sull’anello superiore della cassa. La
lancetta si sofferma sulla data, in modo che l’utente sia
in grado di leggerla, e poi ritorna nella posizione di riposo,
sulle ore 12. Si noti che la funzione Perfect Date
™
funziona solo nella modalità Ora. Quando la batteria
è scarica e viene sostituita, la funzione Perfect Date
deve essere ricalibrata. Quando la batteria deve essere
sostituita, si raccomanda caldamente di inviare l’orologio
ad un centro di assistenza Timex, dove la batteria sarà
sostituita e la funzione Perfect Date sarà ricalibrata
sulla data odierna per la località in cui l’orologio viene
restituito.
REGOLAZIONE DELLA QUARTA LANCETTA CENTRALE
Come regolare di nuovo una quarta lancetta centrale
allineata erroneamente
1. Estrarre la corona nella posizione 3. Le lancette
superiore e inferiore si ripristinano automaticamente
al termine della loro rivoluzione.
2. Entro 10 secondi da quando si è estratta la corona
sulla posizione 3, la quarta lancetta centrale dovrebbe
puntare sulle ore 12; se non punta sulle ore 12,
premere il pulsante A o B per spostare la lancetta in

472
473
senso antiorario o in senso orario finché non punta
sulle ore 12. Se il pulsante A o il pulsante B vengono
tenuti premuti, la lancetta si muove rapidamente.
Nota bene: dopo 5 secondi di inattività con la corona
sulla posizione 3, la quarta lancetta centrale si sposta
in modo da visualizzare la data corrente.
3. Al termine, spingere la corona nella posizione 1.
SELEZIONE DELLA MODALITÀ
Premere il pulsante C per fare avanzare la lancetta
superiore sulla funzione desiderata.
ORA:
visualizza solo l’ora corrente (la funzione Data perfetta
funziona solo nella modalità Ora).
TIMER REGATA 5:
il timer per conto alla rovescia inizia a 5 minuti e avvia il
cronografo una volta raggiunto lo zero.
TIMER REGATA 3:
il timer per conto alla rovescia inizia a 3 minuti e avvia il
cronografo una volta raggiunto lo zero.
TIMER REGATA 1:
il timer per conto alla rovescia inizia a 1 minuto e avvia il
cronografo una volta raggiunto lo zero.
CRONOGRAFO:
il cronografo funziona senza il timer per conto alla
rovescia.
FUNZIONAMENTO DEL TIMER REGATA
L’orologio presenta un timer per conto alla rovescia da
5, 3 o 1 minuto. Quando il timer per conto alla rovescia
raggiunge lo zero, viene automaticamente avviato un
cronografo di un’ora.

474
475
1. Premere il pulsante C fino a quando la lancetta
superiore visualizza la modalità desiderata del Timer
regata da 5, 3 o 1 minuto.
2. Per avviare, premere il pulsante A (AVVIO/STOP). La
quarta lancetta centrale visualizza i secondi contando
alla rovescia, e la lancetta inferiore mostra i minuti
contando alla rovescia. (Nota bene: i pulsanti B e C
sono disabilitati mentre è in funzione il timer per conto
alla rovescia.)
3. Per fermare, premere il pulsante A (AVVIO/STOP),
interrompendo in questo modo il processo di conto
alla rovescia. (Nota bene: il pulsante C è disabilitato
finché il timer per conto alla rovescia non viene
ripristinato.)
4. Per ripristinare, premere e tenere premuto il pulsante
B (TEMPO INTERMEDIO/RIPRISTINA) per 3 secondi,
ripristinando in questo modo il timer per conto alla
rovescia sulla durata selezionata originariamente di 5,
3 o 1 minuto.
Durante il normale funzionamento del Timer regata, una
volta che il timer per conto alla rovescia ha raggiunto
lo zero, viene avviato automaticamente il cronografo. Si
sente anche un’allerta sonora quando il timer per conto
alla rovescia raggiunge il contrassegno di ciascun minuto,
oltre che quando il minuto finale raggiunge gli ultimi
5 secondi e viene avviata la funzione di cronografo. Il
cronografo passa due volte in rassegna la sequenza di 30
minuti, per un tempo totale massimo di un’ora.

476
477
FUNZIONAMENTO DEL CRONOGRAFO
L’orologio presenta un cronografo di un’ora che può
essere usato indipendentemente dal Timer regata.
1. Premere il pulsante C finché la lancetta superiore non
si trova all’inizio della scala del cronografo da 30 minuti.
2. Per avviare, premere il pulsante A (AVVIO/STOP). La
quarta lancetta centrale visualizza i secondi contando
in avanti; la lancetta inferiore mostra i minuti contando
in avanti in una scala da 5 minuti, e la lancetta
superiore mostra la mezz’ora contando in avanti in
una scala da 30 minuti. Ogni volta che la lancetta
inferiore raggiunge il contrassegno di cinque minuti,
ritorna alla posizione dello zero, mentre la lancetta
superiore continua ad avanzare attraverso la scala
da 30 minuti. (Nota bene: il pulsante C è disabilitato
mentre il cronografo è in funzione.)
3. Per registrare un tempo intermedio, premere il
pulsante B (TEMPO INTERMEDIO/RIPRISTINA). Le
lancette superiore, inferiore e quarta centrale restano
nelle loro posizioni in modo da permettere all’utente
di notare il tempo intermedio (giro). Il cronografo
mantiene comunque la sequenza di cronometraggio
mentre le lancette sono ferme. Per rilasciare le
lancette, premere il pulsante B (TEMPO INTERMEDIO/
RIPRISTINA) e le lancette recuperano velocemente le
loro posizioni per visualizzare il tempo totale trascorso.
4. Per fermare, premere il pulsante A (AVVIO/STOP),
interrompendo in questo modo il cronografo. (Nota
bene: il pulsante C è disabilitato mentre il cronografo è
interrotto, fino a quando non viene ripristinato.)

478
479
5. Per ripristinare, premere e tenere premuto il pulsante
B (TEMPO INTERMEDIO/RIPRISTINA) per 3 secondi,
ripristinando in questo modo il cronografo all’inizio
della scala da 30 minuti.
Durante il normale funzionamento, il cronografo passa
due volte in rassegna la sequenza di 30 minuti, per un
tempo totale massimo di un’ora. Una volta trascorsa
quest’ora, la lancetta superiore resta sul contrassegno dei
30 minuti e quella inferiore ritorna sullo zero. La funzione
di cronografo deve essere ripristinata prima di usarla
di nuovo o prima di passare ad una modalità diversa.
(Nota bene: il pulsante A è disabilitato quando il periodo
massimo di un’ora è trascorso e non funziona fino a
quando il cronografo non viene ripristinato premendo e
tenendo premuto il pulsante B per 3 secondi.)
ILLUMINAZIONE DEL QUADRANTE INDIGLO
®
(SOLO VERSIONE PRO)
Lo Yacht Racer PRO include l’aggiunta della funzione
di illuminazione del quadrante INDIGLO
®
. In condizioni
di illuminazione bassa o nulla, il quadrante può essere
letto facilmente attivando la funzione di illuminazione
del quadrante INDIGLO
®
premendo verso l’interno la
corona. Lo Yacht Racer PRO impiega sul quadrante uno
speciale materiale luminescente che emana chiarore e
crea un’illuminazione abbastanza forte da permettere
all’utente di leggere il quadrante, ma assicura che la
sua visione notturna non venga ridotta una volta spenta
l’illuminazione.

480
481
TIMER DEL CRONOGRAFO
LANCETTA DEI
SECONDI
4A
LANCETTA
CENTRALE
LANCETTA
SUPERIORE
SCALA PERFECT
DATE
™
LANCETTA
DEI MINUTI
LANCETTA
DELLE ORE
CORONA
LANCETTA
INFERIORE
2 31
A
B
C
PERFECT DATE
Con la funzione Perfect Date
™
dell’orologio, la data
non ha bisogno di essere regolata fino all’anno 2060.
L’orologio si regola automaticamente per i mesi brevi
e gli anni bisestili, e visualizza sempre, su richiesta, la
data giusta. La data è stata impostata presso la fabbrica
Timex. Quando si inizia a indossare l’orologio nuovo, se
la data visualizzata precede o segue la data della propria
località, occorre modificarla appropriatamente. Estrarre
la corona nella posizione esterna. La 4a lancetta centrale
esegue una rivoluzione attorno al quadrante, si ferma in
corrispondenza delle ore 12:00 per circa 5 secondi e poi
si sposta sulla data sulla quale l’orologio è attualmente
impostato. Ruotare la corona in avanti per far scorrere le
ore in avanti fino alla data attuale (o all’indietro per farle
scorrere indietro fino alla data attuale). Ogni volta che

482
483
si attraversa la mezzanotte, la data cambia di un giorno.
Dopo aver impostato la data sulla propria data locale,
continuare a ruotare la corona per posizionare le lancette
sull’ora locale, tenendo conto che l’ora può essere
antimeridiana o post-meridiana. Una volta impostata l’ora,
spingere di nuovo in dentro la corona sulla posizione
di chiusura. Durante il funzionamento normale, la 4a
lancetta centrale visualizza la data quando viene premuta
la corona. La lancetta si sposta sulla posizione della data
corrente, indicata sull’anello superiore della cassa. La
lancetta si sofferma sulla data, in modo che l’utente sia
in grado di leggerla, e poi ritorna nella posizione di riposo,
sulle ore 12. Si noti che la funzione Perfect Date
™
funziona solo nella modalità Ora. Quando la batteria
è scarica e viene sostituita, la funzione Perfect Date
deve essere ricalibrata. Quando la batteria deve essere
sostituita, si raccomanda caldamente di inviare l’orologio
ad un centro di assistenza Timex, dove la batteria sarà
sostituita e la funzione Perfect Date sarà ricalibrata sulla
data odierna nella località in cui l’orologio viene inviato.
REGOLAZIONE DELLA QUARTA LANCETTA CENTRALE
Per regolare di nuovo una quarta lancetta centrale
allineata erroneamente, fare quanto segue.
1. Estrarre la corona nella posizione 3. Le lancette
superiore e inferiore si ripristinano automaticamente
al termine della loro rivoluzione.
2. Quando smette di muoversi, la quarta lancetta
centrale dovrebbe puntare sulle ore 12; se non punta
sulle ore 12, premere il pulsante A o B per spostare la
lancetta in senso antiorario o in senso orario finché
non punta sulle ore 12. Se il pulsante A o il pulsante

484
485
B vengono tenuti premuti, la lancetta si muove
rapidamente. Nota bene: dopo 5 secondi di inattività
con la corona sulla posizione 3, la quarta lancetta
centrale si sposta in modo da visualizzare la data
corrente.
3. Al termine, spingere la corona nella posizione 1.
SELEZIONE DELLA MODALITÀ
Premere il pulsante C per fare avanzare la lancetta
superiore sulla funzione desiderata.
ORA
Visualizza solo l’ora corrente (la funzione Perfect Date
™
funziona solo nella modalità Ora).
FUNZIONAMENTO DEL CRONOGRAFO
L’orologio è dotato di un cronografo da quattro ore. Al
termine del periodo di quattro ore il cronografo si spegne
automaticamente. In questo modo la batteria viene
preservata nel caso di un’attivazione accidentale del
cronografo.
1. Premere il pulsante C fino a quando la lancetta
superiore si trova all’inizio della scala del cronografo
della lancetta superiore, e la lancetta inferiore si trova
sullo 0 sulla scala inferiore.
2. Per avviare, premere il pulsante A (AVVIO/STOP). La
quarta lancetta centrale visualizza i secondi contando
in avanti; la lancetta inferiore mostra i minuti contando
in avanti in una scala da 30 minuti, e la lancetta
superiore mostra l’ora contando in avanti sulla scala

486
487
loro posizioni per visualizzare il tempo totale trascorso.
4. Per fermare, premere il pulsante A (AVVIO/STOP),
interrompendo in questo modo il cronografo. (Nota
bene: il pulsante C è disabilitato mentre il cronografo è
interrotto, fino a quando non viene ripristinato.)
5. Per ripristinare il cronografo dopo che è stato
interrotto, premere il pulsante B (TEMPO INTERMEDIO/
RIPRISTINA), ripristinando in questo modo il cronografo
all’inizio delle scale da 30 minuti e da 4 ore sui due
quadranti secondari.
Durante il normale funzionamento, il cronografo passa 8
volte attraverso la sequenza di 30 minuti, per un tempo
totale massimo di quattro ore. Una volta trascorso
questo periodo di quattro ore, la lancetta superiore resta
sul contrassegno delle quattro ore e quella inferiore
da 4 ore. Ogni volta che la lancetta inferiore raggiunge
il contrassegno di 30 minuti, ritorna alla posizione
dello zero per ricominciare il successivo periodo di
30 minuti, mentre la lancetta superiore continua ad
avanzare attraverso la scala da 4 ore. (Nota bene: il
pulsante C è disabilitato mentre il cronografo è in
funzione.)
3. Per registrare un tempo intermedio, premere il
pulsante B (TEMPO INTERMEDIO/RIPRISTINA). Le
lancette superiore, inferiore e quarta centrale restano
nelle loro posizioni in modo da permettere all’utente
di notare il tempo intermedio (giro). Il cronografo
mantiene comunque la sequenza di cronometraggio
mentre le lancette sono ferme. Per rilasciare le
lancette, premere il pulsante B (TEMPO INTERMEDIO/
RIPRISTINA) e le lancette recuperano velocemente le

488
489
per conto alla rovescia Dopo aver estratto la corona nella
posizione intermedia, se si preme il pulsante C si avanza
attraverso il ciclo di spostamento delle lancette come
segue: lancetta superiore (premere pulsante C) - lancetta
inferiore (premere pulsante C) - 4a lancetta centrale
(premere pulsante C) ritorno alla lancetta superiore….
Questo permette all’utente di avanzare attraverso il ciclo
per spostare le lancette che deve regolare per ottenere
l’impostazione del periodo di tempo di conto alla rovescia
desiderato. Premendo in dentro la corona si termina
la procedura di impostazione e si confermano i valori
impostati fino a quel momento, in qualsiasi punto di
questo ciclo.
ritorna sullo zero. La funzione di cronografo deve essere
ripristinata prima di usarla di nuovo o prima di passare
ad una modalità diversa. (Nota bene: il pulsante A è
disabilitato quando il periodo massimo di quattro ore è
trascorso e non funziona fino a quando il cronografo non
viene ripristinato premendo il pulsante B.)
TIMER PER CONTO ALLA ROVESCIA
L’orologio offre una funzione di timer per conto alla
rovescia.
Nota particolare: la lancetta superiore, la lancetta
inferiore e la quarta lancetta centrale sono unite durante
i procedimenti 3, 4 e 5 di cui sotto. Mentre si spostano
le lancette dei minuti e dei secondi in avanti/indietro, si
vedono tutte e tre le lancette reagire all’addizione o alla
sottrazione del periodo di tempo per la durata del timer

490
491
incrementi di mezz’ora (fino ad un tempo massimo
di 4:00:00), premere il pulsante A per spostare in
senso antiorario la lancetta superiore (se si preme il
pulsante B la si sposta in senso orario), fino a quando
non viene selezionato il numero di ore desiderato.
Si prega di notare che si sta selezionando il numero
delle ore nell’incremento di mezz’ora più vicino al
tempo totale desiderato (per esempio: per un tempo
totale desiderato di conto alla rovescia di 2:53:30,
si selezionano 3 ore). Al termine dell’impostazione
del numero delle ore, premere il pulsante C per
confermare la selezione.
4. Ora si può impostare il numero di minuti desiderato
in incrementi di un minuto premendo il pulsante A
per spostare in senso antiorario la lancetta inferiore
(se si preme il pulsante B la si sposta in senso orario),
IMPOSTAZIONE DEL TIMER PER CONTO ALLA ROVESCIA
Il timer per conto alla rovescia può essere impostato solo
quando la funzione di timer per conto alla rovescia non
è in uso. Se il timer per conto alla rovescia è stato usato
precedentemente, dovrà essere ripristinato. Se il timer è
attualmente in uso, deve essere fermato e ripristinato per
poterlo impostare.
1. Premere il pulsante C finché la lancetta superiore non
si trova in un punto qualsiasi della scala del timer.
Se il timer era stato impostato precedentemente, la
lancetta punta sul tempo impostato precedentemente.
Se questa è la prima volta che il timer viene impostato,
la lancetta punta sullo 0 della scala del timer.
2. Estrarre la corona nella posizione intermedia.
3. Per impostare il numero di ore desiderato in

492
493
5. Ora si può impostare il numero di secondi desiderato,
in incrementi di un secondo, premendo il pulsante A
per spostare in senso antiorario la quarta lancetta (se
si preme il pulsante B la si sposta in senso orario), fino
a quando non viene selezionato il numero di secondi
desiderato. Si noti che si sta aggiungendo o sottraendo
il numero di secondi necessari per completare il
tempo desiderato totale (per esempio: per un tempo
totale di conto alla rovescia desiderato di 2:53:30,
si spinge il pulsante B 30 volte per selezionare 30
secondi). Al termine dell’impostazione del numero di
secondi, premere in dentro la corona, sulla posizione
1, per confermare la selezione completa del valore del
timer per conto alla rovescia.
fino a quando non viene selezionato il numero di
minuti desiderato. Si noti che si sta regolando in
avanti o indietro il numero dei minuti necessari per
arrivare al tempo desiderato (per esempio: per un
tempo totale di conto alla rovescia desiderato di
2:53:30, si preme il pulsante A sette volte, spostando
così il tempo totale di conto alla rovescia da 3 ore a
2:53:00). Si noterà che la lancetta delle ore si sposterà
leggermente indietro rispetto al contrassegno delle
3 ore, verso il contrassegno delle 2,5 ore. Al termine
dell’impostazione del tempo sul corretto numero
di minuti, premere il pulsante C per confermare la
selezione.

494
495
Come interrompere la sequenza di conto alla rovescia
Se si desidera interrompere la sequenza di conto alla
rovescia prima che essa raggiunga lo zero, lo si può fare
premendo il pulsante A (la quarta lancetta centrale, come
pure la lancetta superiore e quella inferiore, smetteranno
di muoversi). Se si desidera riprendere successivamente
la sequenza di conto alla rovescia dal punto in cui era
stata interrotta, lo si può fare semplicemente premendo
di nuovo il pulsante A (la quarta lancetta centrale,
come pure la lancetta superiore e quella inferiore,
riprenderanno a muoversi).
Come ripristinare la sequenza di conto alla rovescia
Una volta che la sequenza di conto alla rovescia ha
raggiunto lo zero ed è stato emesso il segnale acustico,
si può ripristinare il timer per conto alla rovescia al valore
impostato premendo il pulsante B (la quarta lancetta
FUNZIONAMENTO DEL TIMER PER CONTO ALLA ROVESCIA
Una volta impostato il timer per conto alla rovescia sul
periodo di tempo desiderato da cui contare alla rovescia,
si può iniziare a usare il timer.
Come avviare la sequenza di conto alla rovescia
Premere il pulsante A per avviare il timer per conto alla
rovescia. La quarta lancetta centrale e la lancetta inferiore
iniziano a spostarsi in senso antiorario. La lancetta
superiore si sposta in senso orario. Le lancette continuano
ad indicare il tempo rimasto nella sequenza di conto alla
rovescia fino a quando il periodo di tempo impostato nel
timer per conto alla rovescia non è trascorso e il valore
del tempo restante raggiunge lo zero. Quando il tempo
restante nella sequenza raggiunge lo zero, viene emesso
un segnale acustico per avvertire l’utente che la sequenza
di conto alla rovescia è stata completata.

496
497
impostare il valore del timer per conto alla rovescia sul
nuovo periodo di tempo desiderato.
Funzione di tempo intermedio Mentre è in uso il timer
per conto alla rovescia, l’utente può usare la funzione
di tempo intermedio per notare il tempo restante nella
sequenza di conto alla rovescia.
Per usare la funzione di tempo intermedio, premere il
pulsante B: così facendo, la lancetta superiore, quella
inferiore e la quarta centrale si congelano in posizione.
La funzione di conto alla rovescia continua a scorrere
internamente mentre le lancette sono congelate.
Per riprendere lo spostamento di lancetta superiore,
inferiore e quarta centrale, premere di nuovo il pulsante B
e le lancette si riposizioneranno nelle posizioni adeguate
per mostrare il tempo corrente all’interno della sequenza
di conto alla rovescia.
centrale, come pure la lancetta superiore e quella
inferiore, si sposteranno ad indicare il valore di tempo
impostato dall’utente prima di usare la funzione di timer
per conto alla rovescia).
Come azzerare il valore del timer per conto alla
rovescia Se lo si desidera, si può azzerare il valore del
timer per conto alla rovescia. Lo si può fare solo se il
timer per conto alla rovescia non è in funzione ed è
stato ripristinato. Se il timer per conto alla rovescia sta
scorrendo, occorre prima interrompere la sequenza di
conto alla rovescia premendo il pulsante A, e poi quello
B. In questo modo si interrompe e ripristina il timer per
conto alla rovescia sul valore di tempo attualmente
selezionato. Per azzerare il valore del timer per conto
alla rovescia, premere e tenere premuto per due secondi
il pulsante B. Si devono ora seguire le istruzioni per

498
499
FUNZIONE 3 FUSI ORARI
L’orologio è in grado di visualizzare tre fusi orari.
1. Lancette delle ore e dei minuti: visualizzano l’ora
nel formato standard a 12 ore. Nota bene: la data
visualizzata nella finestrella della data è collegata
all’ora visualizzata da queste due lancette.
2. Quarta lancetta centrale e anello interno: visualizzano
l’ora nel formato a 24 ore.
3. Quarta lancetta centrale e anello superiore rotante
sulla cassa: visualizzano l’ora nel formato a 24 ore.
REGOLAZIONE DELLA QUARTA LANCETTA CENTRALE
Come regolare di nuovo una quarta lancetta centrale
allineata erroneamente
1. Estrarre la corona nella posizione 3.
3 GMT
LANCETTA DEI
SECONDI
CORONA
ANELLO SUPERIORE
ROTANTE
(FORMATO A 24 ORE)
QUARTA LANCETTA
CENTRALE
LANCETTA
DEI MINUTI
LANCETTA
DELLE ORE
ANELLO INTERNO/
NUMERALI
(FORMATO A 24 ORE)
A
2 31

500
501
essere ricalibrata. Solo se si desidera che il secondo e
il terzo fuso orario riflettano località che non seguono
i minuti standard occorre ricalibrare la quarta lancetta
centrale, seguendo le istruzioni qui sotto.
1. Estrarre la corona nella posizione 3. La quarta lancetta
centrale punta sulle ore 12.
2. Ruotare la corona in modo da posizionare la lancetta
dei minuti sulla posizione corretta, all’interno dell’ora,
richiesta per la località che si desidera usare per il
secondo e il terzo fuso orario.
3. Spingere la corona nella posizione 2. La quarta
lancetta centrale punta sulla posizione attualmente
calibrata dei minuti all’interno dell’ora.
4. Premere il pulsante A per spostare la quarta lancetta
centrale in senso orario finché non resta allineata
2. La quarta lancetta centrale deve puntare sulle ore 12.
Se entro 5 secondi da quando si è estratta la corona
nella posizione 3 la quarta lancetta centrale non punta
sulle ore 12, premere il pulsante A per spostare la
lancetta in senso orario finché non punta sulle ore 12.
Se il pulsante A viene tenuto premuto, la lancetta si
muove rapidamente.
3. Al termine, spingere la corona nella posizione 1.
CALIBRAZIONE DELLA QUARTA LANCETTA CENTRALE
La quarta lancetta centrale viene calibrata presso la
fabbrica Timex in modo che rifletta i minuti standard
all’interno dell’ora definiti dall’Ora universale coordinata
(UTC). A livello globale, la maggior parte delle località
impiega i minuti standard. Se la località che si sta usando
per il secondo e il terzo fuso orario impiega i minuti
standard, la quarta lancetta centrale non richiede di

502
503
alla lancetta dei minuti. Se il pulsante A viene tenuto
premuto, la lancetta si muove rapidamente.
5. Estrarre la corona nella posizione 3. La quarta lancetta
centrale punta sulle ore 12.
6. Ruotare la corona per posizionare le lancette delle ore
e dei minuti sull’ora corretta.
7. Al termine, spingere la corona nella posizione 1.
Nota bene: la quarta lancetta centrale tiene traccia
dell’ora usando la calibrazione corrente dei minuti
all’interno dell’ora. I fusi orari 2 e 3 utilizzano entrambi la
quarta lancetta centrale, e quindi le località di cui si tiene
traccia nei fusi orari 2 e 3 devono entrambe utilizzare
gli stessi minuti all’interno dell’ora per visualizzare
correttamente questi fusi orari.
IMPOSTAZIONE DELLA QUARTA LANCETTA CENTRALE
(FUSO ORARIO II)
Annotare l’ora corrente nella località per la quale si
desidera tenere traccia dell’ora come secondo fuso orario.
Premere il pulsante A fino a quando la quarta lancetta
centrale punta su quell’ora sull’anello interno. (Nota bene:
questa scala è in formato a 24 ore.) La quarta lancetta
centrale avanza di 30 minuti ogni volta che si preme
il pulsante A. Se il pulsante A viene tenuto premuto,
la lancetta si muove rapidamente. In questo modo si
imposta il secondo fuso orario sull’orologio.

504
505
IMPOSTAZIONE DELL’ANELLO SUPERIORE ROTANTE
SULLA CASSA (FUSO ORARIO III)
Il terzo fuso orario viene impostato usando l’impostazione
esistente della quarta lancetta centrale e regolando
l’anello superiore rotante sulla cassa sull’ora desiderata
del terzo fuso orario. (Nota bene: questa scala è in
formato a 24 ore.) L’anello superiore ha 72 posizioni. Per
fare avanzare l’anello superiore di un’ora, lo si fa avanzare
di tre posizioni (3 scatti). Annotare l’ora corrente nella
località per la quale si desidera tenere traccia dell’ora
come terzo fuso orario. Ruotare l’anello superiore sulla
cassa in senso antiorario per posizionare il corretto
contrassegno delle ore per quell’ora con la quarta
lancetta centrale.
FUNZIONE DI TACHIMETRO
(non tutti i modelli)
Il tachimetro determina solo le velocità superiori a 60
unità orarie, usando questo metodo; le velocità inferiori
possono essere misurate diminuendo l’unità di misura. La
funzione svolta da un tachimetro è indipendente dall’unità
di distanza (per es. miglia terrestri, miglia nautiche, chi-
lometri, metri ecc.) purché venga usata per tutti i calcoli la
stessa unità di lunghezza.
1. Determinare i marcatori di inizio e di fine per la
distanza predeterminata.
2. Avviare il cronografo una volta che l’obiettivo della
misurazione di velocità supera il marcatore di inizio.

506
507
3. Fermare il cronografo una volta che l’obiettivo della
misurazione di velocità supera il marcatore di fine.
4. La lancetta dei secondi del cronografo viene confron-
tata con i marcatori del tachimetro per determinare la
velocità dell’obiettivo.
FUNZIONE DI REGOLO A SCORRIMENTO
DELLA LUNETTA
La funzione di regolo a scorrimento dell’anello superiore
funziona ruotando l’anello esterno. L’anello interno non si
muove. L’anello esterno si riferisce sempre alla “distanza”
o alla “velocità”, o a qualsiasi dato che varia con il passare
del tempo. L’anello interno indica solo le unità di tempo.
Anello esterno
Sull’anello esterno, la cifra “10” rappresenta fattori o
multipli di 10, come ad esempio 0,1, 1,0, 10 o 100.
Anello interno
Sull’anello interno, “MPH” (miglia all’ora) si riferisce
all’“indice di velocità”. Questo indice viene usato per
calcolare la velocità che interessa qualsiasi dato all’ora.
Sull’anello interno, “STAT” (miglia terrestri) e “NAUT”

508
509
(miglia nautiche) servono per la conversione delle unità
di distanza.
ANELLO ESTERNO
ANELLO INTERNO
Gli esempi che seguono vogliono fungere da guida su
come usare il regolo a scorrimento.
CALCOLO DELLA VELOCITÀ
Quale velocità si richiede per percorrere 10 miglia
nautiche in 15 minuti?
Fattori noti: distanza: 10 miglia nautiche; tempo:
15 minuti
• Allineare la freccia “10” sull’anello esterno con il “15”
sull’anello interno.
• La velocità richiesta si trova direttamente sopra il
contrassegno “MPH” sull’anello interno.
Risposta: 40 miglia nautiche all’ora
Calcolo di tempo: quanto tempo occorre per
percorrere 10 miglia nautiche ad una velocità
di 40 miglia all’ora?

510
511
Fattori noti: velocità: 40 miglia all’ora; distanza: 10 miglia
nautiche
• Allineare “40” sull’anello esterno con il contrassegno
“MPH” sull’anello interno.
• Il tempo richiesto si trova subito sotto la freccia “10”
sull’anello esterno, che corrisponde a “15” sull’anello
interno.
Risposta: 15 minuti
CALCOLO DELLA DISTANZA
Quale distanza si percorre andando a 40 miglia all’ora
per 15 minuti?
Fattori noti: velocità: 40 miglia nautiche all’ora; tempo:
15 minuti
• Allineare “40” sull’anello esterno direttamente sopra il
contrassegno “MPH” sull’anello interno.
• La distanza percorsa si ottiene guardando sopra il con-
trassegno “15” sull’anello interno. Il numero indicato
sull’anello esterno è “10”.
Risposta: la distanza percorsa è di 10 miglia nautiche.

512
513
CONVERSIONE DI UNITÀ DI MISURA
Come convertire la distanza da miglia nautiche a miglia
terrestri e chilometri.
Fattore noto: la distanza da convertire è di 10 miglia
nautiche
• Allineare la freccia “10” sull’anello esterno sopra
il contrassegno “NAUT” sull’anello interno. La
conversione in miglia terrestri (11,5) si trova sopra
il contrassegno “STAT” sull’anello interno, e la
conversione in chilometri (18,5) si trova sopra il
contrassegno “MPH” sull’anello interno.
COME REGOLARE IL BRACCIALE
(Variazioni delle seguenti sezioni sul bracciale sono
applicabili a tutti i modelli di orologio.)
BRACCIALE CON FERMAGLIO REGOLABILE
1. Aprire la piastrina di chiusura.
2. Spostare il fermaglio alla
lunghezza desiderata per il
bracciale.
3. Tenendo la piastrina di
chiusura, esercitare pressione su di essa e far scorrere
avanti e indietro il fermaglio finché non si innesta nelle
scanalature presenti nella parte inferiore del bracciale.
4. Premere verso il basso la piastrina di chiusura finché
non scatta. Non premere eccessivamente, per evitare
di danneggiare il fermaglio.

514
515
BRACCIALE CON FERMAGLIO RIPIEGABILE
1. Individuare la barretta a molla che collega il bracciale
al fermaglio.
2. Servendosi di un attrezzo appuntito, spingere in dentro
la barretta a molla e torcere delicatamente il bracciale
per staccarlo.
3. Determinare la misura del polso, quindi inserire la
barretta a molla nel corrispondente foro inferiore.
4. Premere la barretta a molla, allinearla con il foro
superiore, quindi rilasciarla per bloccare il bracciale in
posizione.
RIMOZIONE DELLE MAGLIE DEL BRACCIALE
RIMOZIONE DELLE MAGLIE
1. Mettere in piedi il bracciale ed inserire un attrezzo
a punta nell’apertura della maglia.
2. Spingere con forza lo spillo in direzione della freccia
finché la maglia non si stacca (gli spilli sono difficili
da rimuovere).
3. Ripetere l’operazione finché non si è rimosso
il numero desiderato di maglie.
RIASSEMBLAGGIO
1. Riunire le parti del bracciale.
2. Spingere di nuovo lo spillo nella maglia, in direzione
opposta alla freccia.
3. Premere con fermezza lo spillo nel bracciale finché non
resta a filo con esso.

516
517
BATTERIA
La batteria dovrebbe durare per 4 anni di uso normale
dell’orologio. La durata effettiva della batteria potrebbe
variare a seconda dell’uso effettivo.
Quando la batteria necessita di sostituzione, raccoman-
diamo di farla sostituire solo dalla TIMEX. L’orologio deve
essere ricalibrato sull’ora e sulla data giuste dopo aver
sostituito la batteria. Per restituire l’orologio alla Timex,
usare una busta con spedizione prepagata. Per ottenere
una busta con spedizione prepagata, chiamare il numero
1-800-448-4639, recarsi dal dettagliante presso il quale
si è acquistato l’orologio, oppure andare al sito
www.Timex.com. Per coprire le spese di spedizione
e gestione (non si tratta di addebiti per la riparazione)
si prega di allegare quanto segue all’orologio: un assegno
o un vaglia da US $8,00 negli U.S.A.; un assegno o vaglia
da CAN $12,00 in Canada. Negli altri Paesi, la Timex
addebiterà il cliente per le spese di spedizione e gestione.
NON ALLEGARE MAI ALLA SPEDIZIONE UN CINTURINO
SPECIALE O QUALSIASI ALTRO ARTICOLO DI VALORE
PERSONALE.
NON SMALTIRE LE BATTERIE INCENDIANDOLE. NON
RICARICARLE. MANTENERE LE BATTERIE SFUSE FUORI
DALLA PORTATA DEI BAMBINI.

518
519
GARANZIA INTERNAZIONALE TIMEX
L’orologio TIMEX
®
è garantito contro difetti di produzione
dalla Timex Group USA, Inc. per un periodo di UN ANNO
dalla data di acquisto originaria. Timex e le sue affiliate di
tutto il mondo onoreranno questa Garanzia Internazionale.
Si prega di notare che la Timex potrà, a sua discrezione,
riparare l’orologio installando componenti nuovi o
accuratamente ricondizionati e ispezionati, oppure
sostituirlo con un modello identico o simile. IMPORTANTE
– SI PREGA DI NOTARE CHE QUESTA GARANZIA NON
COPRE I DIFETTI O I DANNI ALL’OROLOGIO:
1. dopo la scadenza del periodo di garanzia;
2. se l’orologio non era stato acquistato originariamente
presso un dettagliante autorizzato Timex;
3. causati da servizi di riparazione non eseguiti da Timex;
4. causati da incidenti, manomissione o abuso; e
5. a lente o cristallo, cinturino in pelle o a catena, cassa
dell’orologio, periferiche o batteria. Timex potrebbe
addebitare al cliente la sostituzione di una qualsiasi
di queste parti.
QUESTA GARANZIA ED I RIMEDI IN ESSA CONTENUTI SONO
ESCLUSIVI E SOSTITUISCONO TUTTE LE ALTRE GARANZIE,
ESPRESSE O IMPLICITE, INCLUSA QUALSIASI GARANZIA
IMPLICITA DI COMMERCIABILITA’ O IDONEITA’ AD UN USO
PARTICOLARE. TIMEX NON È RESPONSABILE DI NESSUN
DANNO SPECIALE, INCIDENTALE O CONSEQUENZIALE.
Alcuni Paesi e Stati non permettono limitazioni su
garanzie implicite e non permettono esclusioni o
limitazioni sui danni; pertanto queste limitazioni

520
521
potrebbero non pertenere al cliente. Questa garanzia dà
al cliente diritti legali specifici, e il cliente potrebbe avere
anche altri diritti, che variano da Paese a Paese e da Stato
a Stato.
Per ottenere il servizio sotto garanzia, si prega di
restituire l’orologio alla Timex, ad una delle sue affiliate
o al rivenditore Timex dove è stato acquistato l’orologio,
insieme al Buono di riparazione originale compilato o, solo
negli U.S.A. e nel Canada, insieme al Buono di riparazione
compilato o una dichiarazione scritta indicante nome,
indirizzo, numero di telefono e data e luogo dell’acquisto.
Si prega di includere quanto segue con l’orologio al fine di
coprire le spese di spedizione e gestione (non si tratta di
addebiti per la riparazione): un assegno o un vaglia da US$
8,00 negli U.S.A.; un assegno o vaglia da CAN$ 12,00 in
Canada; un assegno o vaglia da UK£ 3,50 nel Regno Unito.
Negli altri Paesi, la Timex addebiterà il cliente per le spese
di spedizione e la gestione. NON ALLEGARE MAI ALLA
SPEDIZIONE UN CINTURINO SPECIALE O QUALSIASI ALTRO
ARTICOLO DI VALORE PERSONALE.
Per gli U.S.A., si prega di chiamare il numero 1-800-
448-4639 per ulteriori informazioni sulla garanzia. Per
il Canada, chiamare il numero 1-800-263-0981. Per il
Brasile, chiamare il numero +11 2664 1001. Per il Messico,
chiamare il numero 01-800-01-060-00. Per America
Centrale, Caraibi, Bermuda e Bahamas, chiamare il
numero (501) 370-5775 (U.S.A.). Per l’Asia, chiamare il
numero 852-2815-0091. Per il Regno Unito, chiamare il
numero 44 020 8687 9620. Per la Francia, chiamare il
numero 33 3 81 63 42 51. Per la Germania e l’Austria,
chiamare il numero +43 662 889 2130. Per altre zone,

522
523
contattare il proprio dettagliante o distributore Timex di
zona per informazioni sulla garanzia.
Se l’orologio Timex
®
dovesse mai aver bisogno di
riparazioni, inviarlo a Timex come indicato nella Garanzia
Internazionale Timex o indirizzandolo a: TG SERVICE
CENTER, P.O. Box 2740, Little Rock, AR 72203, USA. Per
informazioni sull’assistenza, chiamare il numero 1-800-
328-2677 o inviare un messaggio a [email protected]
GARANZIA ESTESA
Disponibile sono negli Stati Uniti. Estende la garanzia per
un ulteriore periodo di 4 anni dalla data dell’acquisto per
$5. Si può pagare con AMEX, Discover, Visa o MasterCard
chiamando il numero 1 800-448-4639 durante il normale
orario lavorativo. Il pagamento va effettuato entro 30
giorni dalla data di acquisto. E’ necessario indicare nome,
indirizzo, numero di telefono, data di acquisto e le 5 cifre
del numero di modello dell’orologio. Si può anche inviare
per posta un assegno di 5 dollari USA a: Timex Extended
Warranty, P.O. Box 1676, Dept. EF, Little Rock, AR 72203,
USA.
©2015 Timex Group USA, Inc. TIMEX, INDIGLO, PERFECT DATE ed
INTELLIGENT QUARTZ sono marchi commerciali del Timex Group B.V.
e delle sue sussidiarie.

W273 EU2 355-095018
Perpetual Calendar • Fly-back Chronograph
• Fly-back Chrono Compass • Linear Chronograph • World Time
• Compass • Tide Temp and Compass Altimeter • Depth
• Yacht Racer • Yacht Racer Pro • Chrono Timer • 3GMT
Ewiger Kalender • Fly-back-Chronograph • Fly-back-Chrono-Kompass
• Linearchronograph • Weltzeit • Kompass
• Gezeiten Temperatur und Kompass • Höhenmesser • Tiefe
• Yacht Racer • Yacht Racer Pro • Chrono Timer • 3GMT
Calendario Perpetuo • Cronógrafo Fly-back
• Brújula y Cronógrafo Fly-back • Cronógrafo lineal • Hora mundial
• Brújula • Marea temperatura y brújula • Altímetro • Profundidad
• Yacht Racer • Yacht Racer Pro • Cronógrafo temporizador • 3GMT
Calendário Perpétuo • Cronógrafo Fly-back
• Bússola e cronógrafo Fly-back • Cronógrafo Linear • Horário mundial
• Bússola • Maré Temperatura e Bússola • Altímetro • Profundidade
• Corrida de iate • Corrida de iate profissional
• Timer de cronógrafo • 3GMT
®

English .............................. Page 1
Deutsch ............................ Seite 125
Español ............................. página 259
Português ......................... página 391

1
TIMEX
®
WATCHES
Congratulations on purchasing your TIMEX
®
INTELLIGENT
QUARTZ
™
watch. Please read these instructions carefully
to understand how to operate your Timex watch.
Your watch may not have all of the features described in
this booklet.
For more information, and to register your
product please visit:
www.timex.com

2
3
TABLE OF CONTENTS
How to Start Your Watch .................................................... 5
Water and Shock Resistance ............................................. 6
Indiglo
®
Night-Light ............................................................ 8
Date and Time Setting ........................................................ 9
Perpetual Calendar .......................................................... 11
Fly-Back Chronograph ...................................................... 14
Fly-back Chronograph Compass ...................................... 20
Linear Chronograph ........................................................ 32
World time ....................................................................... 38
Compass........................................................................... 45
Tide Temp and Compass .................................................. 52
Altimeter .......................................................................... 61
Depth ................................................................................ 69
Yacht Racer ...................................................................... 74
Chrono Timer.................................................................... 85
3GMT .............................................................................. 101
Tachymeter Function ..................................................... 108
Slide-Rule Bezel Function .............................................. 109
How to Adjust Bracelet .................................................. 114
Bracelet Link Removal .................................................... 116
Battery ............................................................................ 117
Warranty ......................................................................... 119

4
5
HOW TO START YOUR WATCH
(Does not apply to Perpetual Calendar models.) To start
your watch remove the plastic guard from under the
crown, then press the crown in against the case.
Some watches require the setting crown to be screwed
in. If your watch case has a protrusion with screw
threads, the crown must be screwed in after setting the
watch.
To screw in, push the crown firmly against the threaded
protrusion and hold in while turning the crown clockwise.
Continue to screw in the crown until it is tight. You will
need to unscrew the crown (counter-clockwise) before
pulling it out the next time you want to set your watch.
Welcome to the world of Timex
®
watches with
Intelligent Quartz
™
technology, the future of quartz
analogue technology. Intelligent Quartz technology
brings the power of a micro-processor to the reliability
and accuracy of quartz analogue timekeeping. With Timex
Intelligent Quartz watches, the technology is written into
the design, delivering a new level of dial complication.
Uses up to three additional independent hands to display
an array of information, normally only available in digital
watches, in a traditional analogue format.

6
7
WARNING: TO MAINTAIN WATER-RESISTANCE, DO
NOT PRESS ANY BUTTONS UNDER WATER UNLESS
YOUR WATCH IS INDICATED AS 200 METER WATER-
RESISTANT. NEVER PULL OUT THE CROWN WHILE
UNDER WATER.
1. Watch is water-resistant only as long as crystal, crown
and case remain intact.
2. Watch is not a certified Diver’s watch.
3. Rinse watch with fresh water after exposure to salt
water.
4. Shock-resistance will be indicated on the watch face
or caseback. Watches are designed to pass ISO test for
shock-resistance. However, care should be taken to
avoid damaging the crystal.
WATER AND SHOCK RESISTANCE
If your watch is water-resistant, meter marking (WR_M)
is indicated.
Water-Resistance Depth p.s.i.a.* Water Pressure
Below Surface
30m/98ft 60
50m/164ft 86
100m/328ft 160
200m/656ft 284

8
9
DATE AND TIME SETTING
NOTE: The watch crown has three positions: closed,
middle and outer. To familiarize yourself with the
difference between the various positions extend the
crown to its outer position and then push the crown very
lightly until you feel it click into the middle position.
To set the date and time:
Time
Pull the crown to its outer position and turn it until the
correct time is shown. Ensure AM/PM setting is correct by
verifying that the date changes at midnight, not noon.
Date (Does not apply to Perpetual Calendar)
Pull the crown to its middle position and turn it until the
correct date appears in the date window. Note: The date
changes between 10 pm and 2 am. Do not change the
INDIGLO
®
NIGHT-LIGHT
Press button or crown to activate light.
Electroluminescent technology used in the INDIGLO
®
night-light illuminates the watch face at night and in low
light conditions.
OR

10
11
date during this timeframe. Doing so could damage the
watch movement.
Push crown to closed position after setting date/time. The
second hand will begin moving.
NOTE: For months with fewer than 31 days, the date will
need to be adjusted.
PERPETUAL CALENDAR
OVERVIEW
A
B
1 2
3
1 2
3
HOUR HAND
DAY HAND
DATE HAND
SECOND HAND
MINUTE HAND
CROWN
MONTH HAND
BUTTON A
(RECESSED)
BUTTON B
(RECESSED)
CLOSED
POSITION
MIDDLE
POSITION
OUTER
POSITION

12
13
LEAP YEAR OFFSET
To maintain the correct date, the watch includes a setting
for the current leap year offset. This setting is made at the
Timex factory or after battery replacement and cannot be
changed, only viewed.
To view the offset, pull the crown to its middle position.
The date hand shows the offset: 1 = 1 year after leap year;
2 = 2 years after leap year; 3 = 3 years after leap year; 4
= leap year. Push the crown in when done and the hands
resume their normal display of day, month, and date.
INTRODUCTION
With your watch’s perpetual calendar feature, the
date does not need adjustment until 2100. The watch
automatically accounts for short months and leap years,
always showing the correct day and date. The day and date
were preset at the Timex factory. You only need to adjust
the time. The watch has two recessed push buttons for
use by Timex Service Center to set the day and date after
battery replacement. They have no use otherwise.

14
15
4TH CENTER HAND ADJUSTMENT
To readjust a misaligned 4th center hand:
1. Pull the crown to its outer position. The upper and
lower hands reset to the ends of their sweeps
automatically.
2. 4th center hand should point to 12 o’clock. If within
5 seconds of pulling the crown to its outer position the
4th center hand does not point to 12 o’clock, press
Button A or B to move the hand counterclockwise or
clockwise until it points to 12 o’clock.
3. Push crown to closed position when finished.
FLY-BACK CHRONOGRAPH
OVERVIEW
AA
B
23
1 2
3
1 2
3
UPPER HAND
CHRONO HOURS
2ND TIME ZONE
4TH CENTER HAND
SECOND HAND
DATE WINDOW
CROWN
CHRONO MINUTES SCALE
LOWER HAND
BUTTON A
BUTTON B
MINUTE HAND
HOUR HAND
CLOSED
POSITION
MIDDLE
POSITION
OUTER
POSITION

16
17
TO SET THE SECOND TIME ZONE:
1. Pull crown to its middle position. The upper hand
shows the second time zone time and the 4th center
hand shows the minutes.
2. Assuming that the second time zone time has the
same minutes value as the first time zone, the 4th
center hand should be aligned with the minute hand.
If the hands are not aligned, or if your second time
zone is a different minute within the hour, press
Button B to move the 4th center hand forward until
it is in the desired position.
3. Press Button A to move the upper hand forward in
one-hour increments until it reaches desired second
time zone hour. To move the hand quickly, press and
hold Button A.
4. Push the crown in when finished.
SECOND TIME ZONE
The upper hand shows the time for the second time
zone. Note that the scale is 24-hours, with midnight at
either end and noon in
the middle. Most often,
time zones differ in hour
increments. In such
cases, the minute value
of the second time zone
will be the same as that
displayed by the watch’s
minute hand.
AA
B
23
1 2
3
1 2
3

18
19
4. To reset the fly-back chronograph to zero position,
press Button B (FLY-BACK/RESET).
When the chronograph is reset, all hands move to
zero position. After another eight seconds, the watch
resumes normal display of the second time zone.
5. To reset and/or restart the fly-back chronograph while
it is running, press and hold Button B (FLY-BACK/
RESET). Release it when you wish to restart.
FLY-BACK CHRONOGRAPH
The watch provides a 4-hour fly-back chronograph.
1. To start, press Button A (START/STOP).
The 4th center hand shows the seconds with 1/5
second resolution. The lower hand shows the last
digit of the minutes, counting up to ten and repeating.
The upper hand shows the total time, including hours
and minutes, with divisions every ten minutes. The
chronograph counts up to four hours before stopping
automatically.
2. To stop, press Button A (START/STOP) again. All hands
stop moving.
3. To resume, press Button A (START/STOP) again.

20
21
INDICATOR HAND (4TH CENTER HAND) ADJUSTMENT
To readjust a misaligned indicator hand:
1. Pull the crown to its outer position. The upper and
lower hands reset to the ends of their sweeps
automatically.
2. The 4th center hand should point to 12 o’clock. If it
does not within 5 seconds of pulling the crown to
its outer position, press A or B to move the hand
counterclockwise or clockwise, respectively, until it
points to 12 o’clock.
3. Push the crown in when done.
FLY-BACK CHRONOGRAPH COMPASS
OVERVIEW
A
C
B
1 2
3
1 2
3
UPPER HAND
CHRONO HOURS
2ND TIME ZONE
4TH CENTER HAND
SECOND HAND
DATE WINDOW
CROWN
CHRONO MINUTES SCALE
LOWER HAND
BUTTON A
BUTTON B
HOUR HAND
MINUTE HAND
CLOSED
POSITION
MIDDLE
POSITION
OUTER
POSITION
BUTTON C

22
23
2. Press B to move the 4th center hand forward. Hold the
button to move the hand quickly. The upper and 4th
center hands move together; as the 4th center hand
makes one revolution, the upper hand moves one
hour. Assuming that the second time zone time has
the same minutes value as your first time zone, the
4th center and minute hands should be aligned.
3. Press A to move the upper hand forward in one-hour
increments. Hold the button to move the hand quickly.
4. Push the crown in when finished.
The second time zone time can alternatively be used to
display your home time on a 24-hour format, if you prefer.
When setting the second time in this manner, ensure
that the hour/minute display corresponds to the 24-hour
display by verifying that the date changes at midnight,
not noon.
SECOND TIME ZONE
The upper hand normally shows the time for the second
time zone. Note that the scale is 24 hours, with midnight
at either end and noon in the middle.
To set the second time zone time:
1. Pull the crown to its
middle position. The
upper hand shows
the second time zone
time in military hours
and the 4th center
hand shows the
minutes.
A
C
B
1 2
3
1 2
3

24
25
2. To stop, press A again (START/STOP). All hands freeze.
3. To resume, press A (START/STOP) again, or to reset the
chronograph to zero, press B (FLY-BACK/RESET).
When the chronograph is reset, all hands move to
zero. After eight seconds, the watch resumes the
normal display of the second time zone time.
4. You may also reset and/or restart the chronograph
while it is running. To do so, press and hold B (FLY-
BACK/RESET) to zero the chronograph and release it
when you wish to restart. You do not have to wait for
all hands to reach zero before releasing the button;
the timing will start internally from the button release.
This “fly-back” feature allows you to measure lap time.
The compass may be used while the chronograph is
running without interfering with its operation. See
COMPASS OPERATION.
FLY-BACK CHRONOGRAPH
The watch provides a 4-hour fly-back chronograph.
1. To start, press A (START/STOP). The 4th center hand
shows the seconds with 1/5-second resolution and
the lower hand shows
the last digit of the
minutes, counting up
to ten and repeating.
The upper hand shows
the total time, includ-
ing hours and minutes,
with divisions every
ten minutes. The chro-
nograph counts up
to four hours before
stopping automatically.
A
C
B
1 2
3
1 2
3

26
27
COMPASS CALIBRATION
Before use, the compass must be calibrated.
Since a compass uses the earth’s magnetic field, you
must be aware of large metallic objects, such as vehicles
or bridges, or objects that give off electromagnetic
radiation, such as televisions or computers, which
could affect the magnetic field around the watch. If the
compass is calibrated near such objects, it will only
work properly in that same location. If the compass
is calibrated away from such objects, it will not work
properly near them. For best results, calibrate in the area
of intended use.
In calibrating and taking headings, it is important, as with
all compasses, to keep the compass level. Calibrating or
taking a heading when the watch is not level can result
in large errors. Also avoid areas that may exhibit higher
than normal concentrations of hard and soft iron, as they
may cause inaccurate headings. Whenever a heading is
suspect, recalibrate.
Do not store the watch near any source of magnetism,
such as a computer, appliance, or television, as the
watch can take on a magnetic charge, yielding inaccurate
headings. Typical accuracy of wrist-worn instruments is
within +/- 10 degrees.
To calibrate the compass:
1. Pull the crown to its middle position and wait for the
indicator hands to stop moving.
2. Keep the watch level or place it on a level surface (if
the band interferes, place the watch on an inverted
cup). The watch may be face down, but take care to
protect the watch face.

28
29
5. If you do not wish to set the magnetic declination,
push the crown in. Otherwise, to have watch
automatically compensate for the declination angle,
turn the compass ring until north is at 12 o’clock.
6. Press A or B to move the 4th center hand west (-)
or east (+), respectively, to point to your location’s
declination angle using the declination scale. Hold a
button to move the hand quickly. See the figure below
for an example.
7. Push the crown in when done.
A
B
Magnetic declination set to -14° (14°W)
3. Press C (COMPASS) to begin. The 4th center hand
rotates two revolutions to remind you to rotate the
watch. While level, SLOWLY rotate the watch two
revolutions, taking at least 15 seconds per revolution.
4. When done, press C (COMPASS), keeping the watch
level. The 4th center hand moves back and forth to
acknowledge the end of calibration and then moves to
the current magnetic declination setting.

30
31
available through buttons A (START/STOP) and B (FLY-
BACK/RESET).
NOTE: During compass operation, the second hand
moves in two-second increments. Also, when the
compass is activated, the upper and lower hands may
shift position slightly, returning to their proper positions
when the compass is deactivated. This operation is
normal and yields the most accurate compass reading.
COMPASS OPERATION
Normally, the compass is inactive, with the 4th center
hand pointing to 12 o’clock or showing the chronograph
seconds.
While holding the watch level, press C (COMPASS) to
activate the compass. The compass hand moves to
point north. If the watch is turned, the 4th center hand
will continue to move, always pointing north. After 20
seconds, the compass will automatically turn off and the
4th center hand will return to its normal operation. This
conserves battery life. Press C (COMPASS) at any time to
keep the compass on for another 20 seconds.
The compass may be activated while the chronograph is
in use. The 4th center hand merely switches operation
temporarily. The upper and lower hands continue to show
the chronograph time and all chronograph functions are

32
33
LINEAR CHRONOGRAPH
OVERVIEW
LINEAR AND 4TH CENTER HAND ADJUSTMENT
To readjust a misaligned 4th center hand:
1. Pull the crown to its outer position. The lower hand
resets to the end of its sweep automatically.
2. 4th center hand should point to 12 o’clock. If within
5 seconds of pulling the crown to its outer position the
4th center hand does not point to 12 o’clock, press
Button A to move the hand clockwise until it points to
12 o’clock.
3. If the chronograph has been reset and the linear hand
is not pointing to zero, press and hold Button B for
5 seconds to engage a full calibration of the linear
indicator, which will take up to 32 seconds to perform.
4. Push crown to closed position when finished.
SECOND HAND
DATE WINDOW
CROWN
LOWER HAND
BUTTON A
BUTTON B
4TH CENTER HAND
HOUR HAND
LINEAR
HAND
MINUTE
HAND
A
B
1
2
3

34
35
SECOND TIME ZONE
The lower hand
shows the time for
the second time zone.
Note that the scale
is 24-hours, with
midnight at either
end and noon in the
middle. Most often,
time zones differ in
hour increments.
In such cases, the
minute value of the second time zone will be the same as
that displayed by the watch’s minute hand.
TO SET THE SECOND TIME ZONE:
1. Pull crown to its middle position. The lower hand
shows the second time zone time and the 4th center
hand shows the minutes.
2. Assuming that the second time zone time has the
same minutes value as the first time zone, the 4th
center hand should be aligned with the minute hand. If
the hands are not aligned, or if your second time zone
is a different minute within the hour, press Button B
to move the 4th center hand forward until it is in the
desired position.
3. Press Button A to move the lower hand forward in
one-hour increments until it reaches desired second
time zone hour. To move the hand quickly, press and
hold Button A.
4. Push the crown in when finished.
A
B
1
2
3

36
37
LINEAR CHRONOGRAPH
The watch provides a 4-hour split chronograph.
1. To start, press Button A (START/STOP). The 4th center
hand shows the seconds with 1/5 second resolution.
The linear hand shows the minutes, counting up to
thirty and repeating. The lower hand shows the total
time, including hours and minutes, with divisions every
ten minutes. The chronograph counts up to four hours
before stopping automatically.
2. To stop, press Button A (START/STOP) again. All hands
stop moving.
3. To reset the chronograph to zero position, press But-
ton B (SPLIT/RESET).
When the chronograph is reset, all hands move to zero
position. After another eight seconds, the watch resumes
normal display of the second time zone. While the
chronograph is running, you may take a split time. Press
Button B (SPLIT/RESET) and all hands will stop while the
chronograph continues to run. Press Button B (SPLIT/
RESET) again to resume the display of the running
chronograph elapsed time.

38
39
TO SET THE WORLD TIME:
1. Pull the crown to its middle position. The center hand
shows the world time zone city and the upper hand
shows the time in that city.
A
B
C
1 2 3
WORLD TIME
OVERVIEW
A
B
C
1 2
3
corrected 3.3.11 with Paulo’s new cities
24 CITIES
WORLD TIME
SCALE
SECOND HAND
DATE WINDOW
CROWN
LOWER HAND
BUTTON A
BUTTON B
BUTTON C
4TH CENTER HAND
SEASON SCALE
UPPER HAND
HOUR HAND
MINUTE HAND
CLOSED
POSITION
MIDDLE
POSITION
OUTER
POSITION

40
41
2. Press A or B to move the center hand to the city that
represents your home time zone. Hold a button to
move the hand quickly. Any city may be used.
3. Pull the crown to its outer position. The city selector
hand will revert back to the 12:00 position as indicated
in INDICATOR HAND ADJUSTMENT. After a five second
pause, the upper hand will show the world time (the
time in the city selected in previous step), the center
hand shows the minutes of the world time, and the
lower hand shows the season (see SEASON SETTING).
IMPORTANT: Do not manipulate any of the pushers
or the crown until the center hand has completed its
adjustment. (Approximately 10 seconds after crown is
pulled to its outer position).
4. If the displayed season is not correct for the home
time zone, press C to change it. If the home time zone
observes daylight savings time, the upper hand will
move by one hour.
5. Press A or B to move the time backward or forward,
respectively, to set the world time zone to be the
same as the home time zone. Hold a button to change
the time quickly. The hands move together; as the
center hand makes one revolution, the upper hand
moves one hour. After setting, the center and minute
hands should be aligned.
6. Push the crown in when finished.

42
43
INDICATOR HAND (4TH CENTER HAND) ADJUSTMENT
To readjust a misaligned indicator hand:
1. Pull the crown to its outer position. The upper and
lower hands reset to the ends of their sweeps,
automatically.
2. The 4th center hand should point to 12 o’clock. If it
does not within 5 seconds of pulling the crown to
its outer position, press A or B to move the hand
counterclockwise or clockwise, respectively, until it
points to 12 o’clock.
3. Push the crown in when finished.
NOTE: If no button is pressed for five seconds after the
hands stop, the watch proceeds to the world time setting
operation (see WORLD TIME SETTING).
CITY TIME DISPLAY
A
B
C
1 2 3
Press A or B to
move the center
hand backward or
forward, respec-
tively, and select a
city. The upper hand
moves to show the
time in the selected
city. Note that the
scale is 24 hours, with midnight at either end and noon
in the middle.
SEASON SETTING
The season setting allows the watch to compensate for
daylight savings time (also called “summer time”).

44
45
COMPASS
OVERVIEW
I
I
14
CENTER
CROWN
MIDDLE
SET DATE
I
I
14
OUT
SET TIME
CROWN
B
A (COMPASS)
DECLINATION SCALE
COMPASS HAND
(NORTH END IS RED
POINTED/LONGER)
The watch provides one setting to represent the two peri-
ods all cities that observe daylight savings time have. For
the watch, the period of daylight savings time is SUMMER
and the period of standard time is WINTER.
When the season in one city is set to SUMMER, all cities in
the same hemisphere are automatically set to SUMMER,
while all cities in the other hemisphere are automatically
set to WINTER. The watch knows which cities are in each
hemisphere.
Press C to change the season in the selected city.

46
47
COMPASS HAND ADJUSTMENT
Pull CROWN all the way out. Compass hand should point
to 12 o’clock. If it does not, press either A or B to move
compass hand until it points to 12 o’clock. Hold button to
move hand fast. Push CENTER CROWN in when done and
recalibrate compass.
COMPASS CALIBRATION
Before use, the compass must be calibrated.
Since a compass uses the earth’s magnetic field, you
must be aware of large metallic objects, such as vehicles
or bridges, or objects that give off electromagnetic
radiation, such as televisions or computers, which
could affect the magnetic field around the watch. If the
compass is calibrated near such objects, it will only
work properly in that same location. If the compass
is calibrated away from such objects, it will not work
properly near them. For best results, calibrate in the area
of intended use.
In calibrating and taking headings, it is important, as with
all compasses, to keep the compass level. Calibrating or
taking a heading when the watch is not level can result
in large errors. Also avoid areas that may exhibit higher
than normal concentrations of hard and soft iron, as they
may cause inaccurate headings. Whenever a heading is
suspect, recalibrate.
Do not store the watch near any source of magnetism,
such as a computer, appliance, or television, as the
watch can take on a magnetic charge, yielding inaccurate
headings. Typical accuracy of wrist-worn instruments is
within +/- 10 degrees.

48
49
To calibrate the compass:
1. Pull the crown to its middle position and wait for the
indicator hands to stop moving.
2. Keep the watch level or place it on a level surface (if
the band interferes, place the watch on an inverted
cup). The watch may be face down, but take care to
protect the watch face.
3. Press A or B to begin. The 4th center hand rotates two
revolutions to remind you to rotate the watch. While
level, SLOWLY rotate the watch two revolutions, taking
at least 15 seconds per revolution.
4. When done, press A or B, keeping the watch level. The
4th center hand moves back and forth to acknowledge
the end of calibration and then moves to the current
magnetic declination setting.
5. If you do not wish to set the magnetic declination,
push the crown in. Otherwise, to have watch
automatically compensate for the declination angle,
turn the compass ring until north is at 12 o’clock.
6. Press A or B to move the 4th center hand west (-)
or east (+), respectively, to point to your location’s
declination angle using the declination scale. Hold a
button to move the hand quickly. See the figure on
next page for an example.
7. Push the crown in when done.

50
51
A
B
Magnetic declination set to -14° (14°W)
COMPASS OPERATION
Normally, the compass is inactive, with the 4th center
hand pointing to 12 o’clock or showing the chronograph
seconds.
While holding the watch level, press A or B to activate
the compass. The compass hand moves to point north.
If the watch is turned, the 4th center hand will continue
to move, always pointing north. After 20 seconds, the
compass will automatically turn off and the 4th center
hand will return to its normal operation. This conserves
battery life. Press A or B at any time to keep the compass
on for another 20 seconds.
NOTE: During compass operation, the second hand
moves in two-second increments.

52
53
TIDE TEMP AND COMPASS
OVERVIEW
INDICATOR HAND ADJUSTMENT
Pull crown all the way out. Indicator hand should point
to 12 o’clock. If it does not, press either TIDE or TEMP
push button to move hand until it points to 12 o’clock.
TIDE and TEMP push buttons move hand clockwise and
counterclockwise, respectively. Hold push button to move
hand fast. Push crown in when done.
TIDE/TEMPERATURE SELECTION
Indicator hand shows either tide or temperature constant-
ly. When temperature is shown, press TIDE push button
to select tide clock. Hand moves to low tide and then to
current tide. When tide is shown, press TEMP push button
to select thermometer. Hand moves to beginning of ther-
mometer scale and then to current temperature.
OUTER-SET TIME
DECLINATION
SCALE
INDICATOR
HAND
C (COMPASS)
B (TIDE)
A (TEMP)
CROWN
TURNING
COMPASS
RING
DATE
TIDE SCALE
TEMPERATURE SCALE
MIDDLE-SET DATE

54
55
THERMOMETER
When worn on wrist, thermometer reading is affected by
body heat. For more accurate readings, remove watch
and put in shade for at least several minutes.
Watch can measure water temperature also, if sub-
merged. Be sure to select temperature display before
placing watch in water, as buttons should not be pressed
when watch is underwater.
Thermometer readings are taken every minute, more
frequently, if temperature is changing.
TIDE CLOCK
For tide clock, indicator hand always rotates clockwise, so
tide is rising when hand is pointing left and falling when
pointing right. Number of hours to next high/low tide is
shown on tide scale.
Tides are influenced by sun position and shape of shore-
line, so tide clock cannot precisely give times of high and
low tides. Periodic adjustment may be necessary.
To set tide clock, pull crown to MIDDLE position. Press either
TIDE or TEMP push button to move hand to current tide. TIDE
and TEMP push buttons move hand clockwise and counter-
clockwise, respectively. Push crown in when done.
COMPASS CALIBRATION
Before use, the compass must be calibrated.
Since a compass uses the earth’s magnetic field, you
must be aware of large metallic objects, such as vehicles
or bridges, or objects that give off electromagnetic
radiation, such as televisions or computers, which
could affect the magnetic field around the watch. If the
compass is calibrated near such objects, it will only

56
57
work properly in that same location. If the compass
is calibrated away from such objects, it will not work
properly near them. For best results, calibrate in the area
of intended use.
In calibrating and taking headings, it is important, as with
all compasses, to keep the compass level. Calibrating or
taking a heading when the watch is not level can result
in large errors. Also avoid areas that may exhibit higher
than normal concentrations of hard and soft iron, as they
may cause inaccurate headings. Whenever a heading is
suspect, recalibrate.
Do not store the watch near any source of magnetism,
such as a computer, appliance, or television, as the
watch can take on a magnetic charge, yielding inaccurate
headings. Typical accuracy of wrist-worn instruments is
within +/- 10 degrees.
To calibrate the compass:
1. Pull the crown to its middle position and wait for the
indicator hands to stop moving.
2. Keep the watch level or place it on a level surface (if
the band interferes, place the watch on an inverted
cup). The watch may be face down, but take care to
protect the watch face.
3. Press C (COMPASS) to begin. The 4th center hand
rotates two revolutions to remind you to rotate the
watch. While level, SLOWLY rotate the watch two
revolutions, taking at least 15 seconds per revolution.

58
59
4. When done, press C (COMPASS), keeping the watch
level. The 4th center hand moves back and forth to
acknowledge the end of calibration and then moves to
the current magnetic declination setting.
5. If you do not wish to set the magnetic declination,
push the crown in. Otherwise, to have watch
automatically compensate for the declination angle,
turn the compass ring until north is at 12 o’clock.
6. Press A or B to move the 4th center hand west (-)
or east (+), respectively, to point to your location’s
declination angle using the declination scale. Hold a
button to move the hand quickly. See the figure on
next page for an example.
7. Push the crown in when done.
A
B
Magnetic declination set to -14° (14°W)
COMPASS OPERATION
Normally, the compass is inactive, with the 4th center
hand pointing to 12 o’clock or showing the chronograph
seconds.
While holding the watch level, press C (COMPASS) to
activate the compass. The compass hand moves to
point north. If the watch is turned, the 4th center hand
will continue to move, always pointing north. After 20

60
61
seconds, the compass will automatically turn off and the
4th center hand will return to its normal operation. This
conserves battery life. Press C (COMPASS) at any time to
keep the compass on for another 20 seconds.
NOTE: During compass operation, the second hand
moves in two-second increments.
ALTIMETER
OVERVIEW
ALIMETER
SCALE
(HUNDREDS)
UPPER
RETROGRADE
(THOUSANDS)
BUTTON C
(UNITS)
BUTTON A
(MAXIMUM
ALTITUDE)
BUTTON B
(MINIMUM ALTITUDE)
LOWER RETROGRADE
(UNITS)
CROWN

62
63
INDICATOR HAND (4TH CENTER HAND) ADJUSTMENT
Pull crown all the way out. The upper and lower retro-
grade hands reset to the start of their scales automati-
cally. Indicator hand (4th center hand) should point to 12
o’clock. If it does not, press either A and/or B button to
move hand until it points to 12 o’clock. A and B buttons
move hand clockwise and counterclockwise, respectively.
Hold button to move hand fast. Push crown in when done.
ALTIMETER CALIBRATION
Before use, the altimeter must be calibrated.
Since an altimeter uses pressure to determine the altitude
and pressure varies from place to place, it is important to
set the altimeter to a known reference altitude value, or
to a standard reference altitude of a given place. Sudden
changes in pressure due to changes in weather can cause
your altimeter reading to be off by +-100m (328 ft), even
if your location has not changed. Recalibrate to a known
altitude when drastic pressure changes occur.
To calibrate the altimeter:
1. Pull the crown to its middle position and wait for the
indicator hands to stop moving.
2. If the altimeter was OFF at the moment of crown
pulling, the lower retrograde hand will point to the unit
selected the last time the altimeter was used, other-
wise the lower retrograde hand points to the current
selected unit in altitude display. The 4th center hand
and upper retrograde hand should point to the current
altitude.
3. Press A or B to move the 4th center hand counter-
clockwise or clockwise, respectively, until it points
to the desired calibration altitude. Holding A or B

64
65
will move the center hand more rapidly. The upper
retrograde hand moves relative to the altitude value
displayed by the 4th center hand.
4. Push crown in when done.
ALTIMETER ON/OFF
To turn the altimeter on, press C. The lower retrograde
hand points to METERS. Using the markings on the top
ring, the 4th center hand shows the current altitude’s
hundreds and tens value with divisions every ten
METERS/FEET. The upper retrograde hand shows the cur-
rent altitude’s thousands value with divisions every one
thousand METERS/FEET.
To change the unit from METERS to FEET, press C a
second time. To change the unit from FEET to METERS,
press C twice (altimeter is turned off first then turned
back on with the unit in METERS).
Example : Altitude=2310 m Example : Altitude=7580 ft

66
67
To turn the altimeter off with the current unit set to
FEET, press C. To turn the altimeter off with the unit set
to METERS, press C twice (lower hand goes to FEET first
before going to the OFF position).
The watch will automatically turn the altimeter off
60 minutes after activation.
ALTIMETER MIN/MAX ALTITUDE RECALL
To view the maximum recorded altitude, press A. The
lower retrograde hand shows the unit of measure that
the maximum altitude was recorded in if the altimeter
was OFF at the moment of button press, otherwise
it will show the maximum altitude using the current
selected unit. The 4th center hand shows the maximum
altitude’s hundreds and tens value with divisions every
ten METERS/FEET. The upper retrograde hand shows the
maximum altitude’s thousands value with divisions every
one thousand METERS/FEET.
The maximum recorded altitude is displayed for ten
seconds. To extend the display duration for another ten
seconds, press A before the previous ten second duration
expires.
To change the unit from METERS to FEET or FEET to
METERS, press C.
To view the minimum recorded altitude, press B. The
lower retrograde hand shows the unit of measure that
the minimum altitude was recorded in if the altimeter
was OFF at the moment of button press, otherwise
it will show the minimum altitude using the current
selected unit. The 4th center hand shows the minimum
altitude’s hundreds and tens value with divisions every

68
69
ten METERS/FEET. The upper retrograde hand shows the
minimum altitude’s thousands value with divisions every
one thousand METERS/FEET.
The minimum recorded altitude is displayed for ten
seconds. To extend the display duration for another ten
seconds, press B before the previous ten second duration
expires To change the unit from METERS to FEET or FEET
to METERS, press C.
DEPTH
OVERVIEW
3
AA
B
1
2
3
2
3
2
3
CENTER HAND
OFF INDICATOR
BUTTON A
BUTTON B
LOWER HAND
CROWN
Note: The center and lower hands will automatically
calibrate when you move the crown to position 3 to set
the time.

70
71
TEMPERATURE
The temperature sensor is always on and will take a
reading at least once every 60 seconds. The temperature
is indicated by the lower hand and accompanying scale.
When worn on wrist, temperature reading is affected by
body heat. For more accurate readings, remove watch
from wrist.
DEPTH SENSOR ON/OFF
The sensor is normally off, and must be turned on
manually prior to submersion. Push and release button B
to turn the sensor on. The 4th center hand will move from
the OFF (6 o’clock) position to the 12 o’clock position
and begin to take readings at least once every 5 seconds.
As the depth increases, the 4th center hand will point to
the actual depth as indicated on the depth scale. If the
readings remain in the range of 0 to 2 meters (0-6 feet)
for 5 minutes, the sensor will automatically turn off. To
turn the sensor off manually, press and hold button B
for 2 seconds. The 4th center hand will move to the OFF
(6 o’clock) position.
RECALL MAXIMUM DEPTH/MINIMUM TEMPERATURE
After coming to the surface, unscrew the crown and pull
to the middle position. The center and lower hands will
move to display the maximum depth value and the mini-
mum temperature value, respectively, recorded during the
most recent descent. When the depth sensor is activated
again, the memory will be cleared.
If the watch has not yet been used, then the center and
lower hands shall move to display 0 meters/feet and
0ºC/32 ºF, respectively. The crown must be screwed back
in prior to use/submersion.

72
73
BATTERY LEVEL DETECTION
The watch determines the battery level status and
provides the user with a visual indication corresponding
to the current battery level. The battery level status is
classified as Normal Level, Battery Low Level, and Replace
Battery Level, with each level indicated by the movement
of the second hand.
For the Normal Level status, the second hand shall move one
hand position every one second, which is its normal operation.
When the watch is in Battery Low Level status, the second
hand shall only move at 2-second intervals and shall
move by two hand positions. It is recommended that the
user replace the battery when the watch is at Battery Low
Level status.
When the watch is in Replace Battery Level status, the
second hand shall only move at 5-second intervals and
shall move by five hand positions. At this point, depth
sensor cannot be activated, and the user must replace
the battery immediately.

74
75
PERFECT DATE
With your watch’s Perfect Date
™
feature, the date does
not need adjustment until 2060. The watch automatically
accounts for short months and leap years, and will always
display the correct date upon demand. The date was
preset at the Timex factory. When initially starting your
new watch, if the date displays the date before or behind
the date in your location, you will need to revise the date
for your local date. Pull the crown out to the outer posi-
tion. The 4th center hand will rotate around the dial one
revolution, will stop at 12:00 o’clock position for about 5
seconds and then move to the date at which the watch
is currently set. Rotate the crown forward to increase
the time to the current date (backward to decrease the
time to the current date). Each time you pass midnight
the date will change by one day. After you have set the
YACHT RACER
2 31
A
B
C
SECOND HAND
4TH
CENTER
HAND
UPPER
HAND
PERFECT DATE
™
SCALE
HOUR HAND
CROWN
LOWER HAND
MINUTE HAND

76
77
date to your local date, continue rotating the crown to
position the hands to the current local time, being mindful
of am/pm. Once the time is set, push the crown back in
to the closed position. In normal operation the 4th center
hand will display the date when the crown is pushed.
The hand will travel to the position of the current date as
shown on the top ring of the case. The hand will pause
for you to be able to read the date and then return back
to the 12 o’clock resting position. Please note that the
Perfect Date
™
function will only operate in the Time
mode. When the battery is depleted and is replaced, the
Perfect Date function must be recalibrated. When the
battery requires replacement, it is highly recommended
the watch be sent to a Timex service center, where the
battery will be replaced and the Perfect Date function will
be recalibrated to the current date for the location where
the watch is to be returned.
4TH CENTER HAND ADJUSTMENT
To readjust a misaligned 4th center hand:
1. Pull the crown out to position 3. The upper and lower
hands reset to the ends of their sweeps automatically.
2. Within 10 seconds of pulling the crown to position 3,
the 4th center hand should point to 12 o’clock, if it
does not point to 12 o’clock, press button A or B to
move the hand counterclockwise or clockwise until
it points to 12 o’clock. Pressing and holding button A
or B will make the hand move at a fast rate. Please
note: after 5 seconds without action with the crown
in position 3, the 4th center hand will move to display
the current date.
3. Push crown in to position 1 when finished.

78
79
MODE SELECTION
Press button C to advance the upper hand to the desired
function.
TIME:
Displays the current time only (Perfect Date function will
operate only in the Time mode).
YACHT RACE TIMER 5:
The countdown timer will start at 5 minutes and begin the
chronograph once it reaches zero.
YACHT RACE TIMER 3:
The countdown timer will start at 3 minutes and begin the
chronograph once it reaches zero.
YACHT RACE TIMER 1:
The countdown timer will start at 1 minute and begin the
chronograph once it reaches zero.
CHRONO:
The chronograph will operate without the countdown
timer.
YACHT RACE TIMER OPERATION
The watch provides a 5, 3 or 1 minute countdown timer.
Once the countdown timer reaches zero a one hour
chronograph will automatically start.
1. Press button C until the upper hand displays the
desired 5, 3, or 1 minute Yacht Race Timer mode.
2. To start, press button A (START/STOP). The 4th center
hand displays the seconds counting down and the
lower hand shows the minutes, counting down.
(Please note: buttons B and C are disabled while the
countdown timer is in operation).
3. To stop, press button A (START/STOP) which will stop

80
81
the countdown process. (Please note: button C is
disabled until the countdown timer is reset).
4. To reset, press and hold button B (SPLIT/RESET) for
2 seconds, which will reset the countdown timer back
to the originally selected 5, 3 or 1 minute duration.
In the normal operation of the Yacht Race Timer, once
the countdown timer has reached zero, the chronograph
will automatically start. There is also an audible alert as
the countdown timer reaches each minute mark as well
as when the final minute reaches the last 5 seconds and
begins the chronograph function. The chronograph will
cycle through the 30-minute sequence twice, for a total
maximum time of one hour.
CHRONOGRAPH OPERATION
The watch provides a one hour chronograph which may
be operated independently from the Yacht Race Timer.
1. Press button C until the upper hand is at the beginning
of the 30-minute chronograph scale.
2. To start, press button A (START/STOP). The 4th center
hand displays the seconds counting up; the lower
hand shows the minutes, counting up in a 5-minute
scale and the upper hand shows the half hour count-
ing up in a 30-minute scale. Each time the lower hand
reaches the five minute mark, it will return to the zero
position while the upper hand will continue to advance
through the 30 minute scale. (Please note: button C is
disabled while the chronograph is in operation).

82
83
3. To take a split time, press button B (SPLIT/RESET).
The upper, lower, and 4th center hands will hold their
positions for you to note the split (lap) time. The chro-
nograph is still maintaining the timing sequence while
the hands are stopped. To release the hands, press
button B (SPLIT/RESET) and the hands will quickly
catch up to display the total elapsed time.
4. To stop, press button A (START/STOP) which will stop
the chronograph. (Please note: button C is disabled
while the chronograph is stopped until the chrono-
graph is reset).
5. To reset, press and hold button B (SPLIT/RESET) for
3 seconds, which will reset the chronograph back to
the beginning of the 30-minute scale.
In normal operation the Chronograph will cycle through
the 30-minute sequence twice for a total maximum of
one hour. Once this hour has elapsed, the upper hand
will remain on the 30 minute marker and the lower hand
will return to zero. The chronograph function will need
to be reset prior to using the chronograph function again
or before changing to a different mode. (Please note:
button A is disabled when the maximum one hour time
has elapsed and will not function until the chronograph
has been reset by pressing and holding button B for
3 seconds).

84
85
INDIGLO
®
NIGHT-LIGHT (PRO VERSION ONLY)
Yacht Racer PRO includes the addition of the INDIGLO
®
night-light feature. During low or no-light conditions the
dial can easily be read by activating the INDIGLO
®
night-
light function by pressing in the crown. The Yacht Racer
PRO uses a special luminescent material on the dial which
will glow and create an illumination bright enough to be
able to read the dial, but ensures that your night vision is
not reduced once the light has been extinguished.
CHRONO TIMER
SECOND HAND
4TH
CENTER
HAND
UPPER
HAND
PERFECT DATE
™
SCALE
MINUTE HAND
HOUR HAND
CROWN
LOWER HAND
2 31
A
B
C

86
87
PERFECT DATE
With your watch’s Perfect Date
™
feature, the date does
not need adjustment until 2060. The watch automatically
accounts for short months and leap years, and will always
display the correct date upon demand. The date was
preset at the Timex factory. When initially starting your new
watch, if the date displays the date before or behind the
date in your location, you will need to revise the date for
your local date. Pull the crown out to the outer position.
The 4th center hand will rotate around the dial one revolu-
tion, will stop at 12:00 o’clock position for about 5 seconds
and then move to the date at which the watch is currently
set. Rotate the crown forward to increase the time to the
current date (backward to decrease the time to the current
date). Each time you pass midnight the date will change
by one day. After you have set the date to your local date,
continue rotating the crown to position the hands to the
current local time, being mindful of am/pm. Once the time
is set, push the crown back in to the closed position. In
normal operation the 4th center hand will display the date
when the crown is pushed. The hand will travel to the
position of the current date as shown on the top ring of
the case. The hand will pause for you to be able to read
the date and then return back to the 12 o’clock resting
position. Please note that the Perfect Date
™
function
will only operate in the Time mode. When the battery is
depleted and is replaced, the Perfect Date function must
be recalibrated. When the battery requires replacement,
it is highly recommended the watch be sent to a Timex
service center, where the battery will be replaced and the
Perfect Date function will be recalibrated to the current
date for the location where the watch is to be returned.

88
89
4TH CENTER HAND ADJUSTMENT
To readjust a misaligned 4th center hand:
1. Pull the crown out to position 3. The upper and lower
hands reset to the ends of their sweeps automatically.
2. When it stops moving, the 4th center hand should
point to 12 o’clock, if it does not point to 12 o’clock,
press button A or B to move the hand counterclock-
wise or clockwise until it points to 12 o’clock. Pressing
and holding button A or B will make the hand move at
a fast rate. Please note: after 5 seconds without action
with the crown in position 3, the 4th center hand will
move to display the current date.
3. Push crown in to position 1 when finished.
MODE SELECTION
Press button C to advance the upper hand to the desired
function.
TIME:
Displays the current time only (Perfect Date
™
function will
operate only in the Time mode).
CHRONOGRAPH OPERATION
The watch provides a four hour chronograph. At the end
of the four hour period the Chronograph will automati-
cally turn off. This will save the battery in the event of an
accidental activation of the Chronograph.
1. Press button C until the upper hand is at the beginning
of the upper hand chronograph scale, the lower hand
to 0 on the lower scale.

90
91
2. To start, press button A (START/STOP). The 4th center
hand displays the seconds counting up; the lower
hand shows the minutes, counting up in a 30-minute
scale and the upper hand shows the hour counting up
on the 4-hour scale. Each time the lower hand reaches
the 30 minute mark, it will return to the zero position
to begin the next 30 minute period, while the upper
hand will continue to advance through the 4-hour
scale. (Please note: button C is disabled while the
chronograph is in operation).
3. To take a split time, press button B (SPLIT/RESET).
The upper, lower, and 4th center hands will hold their
positions for you to note the split (lap) time. The chro-
nograph is still maintaining the timing sequence while
the hands are stopped. To release the hands, press
button B (SPLIT/RESET) and the hands will quickly
catch up to display the total elapsed time.
4. To stop, press button A (START/STOP) which will stop
the chronograph. (Please note: button C is disabled
while the chronograph is stopped until the chrono-
graph is reset).
5. To reset the chronograph after it is stopped, press but-
ton B (SPLIT/RESET), which will reset the chronograph
back to the beginning of the 30-minute and 4-hour
scales on the two sub-dials.
In normal operation the Chronograph will cycle through
the 30-minute sequence 8 times for a total maximum of
four hours. Once this four hour period has elapsed, the
upper hand will remain on the four hour marker and the
lower hand will return to zero. The chronograph function

92
93
will need to be reset prior to using the chronograph func-
tion again or before changing to a different mode. (Please
note: button A is disabled when the maximum four hour
time has elapsed and will not function until the chrono-
graph has been reset by pressing button B).
COUNT-DOWN TIMER
The watch provides a count-down timer function.
Special note: The upper hand, lower hand, and 4th
center hand are united during steps 3, 4 and 5 below. As
you move the minute and second hands forward/back-
ward, you will see all three hands reacting to the addition
or subtraction to the length of time for the countdown
timer duration. After pulling the crown out to the middle
position, pressing button C will advance you through the
cycle of hand engagement as follows: Upper hand (press
button C) - Lower hand (press button C) - 4th Center hand
(press button C) back to Upper hand….this allows you to
advance through the cycle to engage the hands you need
to adjust to achieve setting the desired length of time to
count down. Pressing the crown in will end the setting
procedure and confirms the values set so far at any point
in this cycle.
SETTING THE COUNTDOWN TIMER
The countdown timer may only be set when the count-
down timer function is not in operation. If the countdown
timer was previously used, it will need to be reset. If the
timer is currently in operation, it must be stopped and
reset in order to set the countdown timer.
1. Press button C until the upper hand is at some point
on the Timer scale. If the Timer has previously been

94
95
set, the hand will point to the time previously set. If
this is the first time the timer is being set, it will point
to the 0 on the timer scale.
2. Pull the crown out to the middle position.
3. To set the desired number of hours in half hour incre-
ments (up to the maximum time of 4:00:00), press
button A to move the upper hand counterclockwise
(pressing button B will move this hand clockwise),
until the desired number of hours has been selected.
Please note that you are selecting the number of
hours in the closest half-hour increment to the total
desired time (example: for a total desired countdown
time of 2:53:30, you will select 3 hours). Once you
have completed setting the number of hours, press
button C to confirm your selection.
4. Now you may set the desired number of minutes in
one minute increments by pressing button A to move
the lower hand counterclockwise (pressing button
B will move this hand clockwise), until the desired
number of minutes has been selected. Please note
that you are adjusting the number minutes forward
or backwards to get to the desired time (example: for
a total desired countdown time of 2:53:30, you will
press button A seven times which will move the total
countdown time from 3 hours to 2:53:00). You will no-
tice the hour hand will move slightly backwards from
the 3 hour marker towards the 2.5 hour marker. Once
you have adjusted the time to the correct number of
minutes, press button C to confirm your selection.
5. Now you may set the desired number of seconds in
one second increments by pressing button A to move

96
97
the fourth hand counterclockwise (pressing button B
will move this hand clockwise), until the desired num-
ber of seconds has been selected. Please note that
you are adding or subtracting the number seconds to
complete the total desired time (example: for a total
desired countdown time of 2:53:30, you will push
button B 30 times to select 30 seconds). Once you
have completed setting the number of seconds, push
the crown in to position 1 to confirm your complete
countdown timer value selection.
COUNTDOWN TIMER OPERATION
Once you have set the countdown timer to the desired
length of time to count down, you can now operate the
countdown timer.
Starting the countdown sequence: Press button A to
start the countdown timer. The fourth center hand and
the lower hand will begin to move counterclockwise. The
upper hand will move clockwise. The hands will continue
to indicate the remaining time left in the countdown
sequence until the length of time you have set the count-
down timer has passed and the value of remaining time
reaches zero. When the remaining time in the sequence
reaches zero, the chime will sound signaling to you the
countdown sequence has completed.

98
99
Interrupting the countdown sequence: If you wish
to stop the countdown sequence prior to the sequence
reaching zero, you may do so by pressing button A (the
fourth center hand as well as the upper and lower hands
will stop moving). If you wish to later begin the sequence
from the point at which you stopped the countdown, sim-
ply press button A again (the fourth center hand as well
as the upper and lower hands will resume moving).
Resetting the countdown sequence: Once the count-
down sequence has reached zero and the chime has
sounded, you may reset the countdown timer to the set
value by pressing button B (the fourth center hand as well
as the upper and lower hands will move to indicate the
value of time you set prior to using the countdown timer
function).
Clearing the countdown timer value: If desired, you
may clear the value of the countdown timer to zero.
This can only be done if the countdown timer is not in
operation and has been reset. If the countdown timer is
running, you must first stop the countdown sequence
by pressing button A, followed by pressing button B. This
will stop and reset the countdown timer to the currently
selected time value. To clear the countdown timer value
to zero, push and hold button B for two seconds. You
should now follow the instructions to set the countdown
timer value to the new desired length of time.

100
101
Split time function: While the countdown timer is in
operation, you may employ the split function to note the
remaining time in the countdown sequence.
To use the split time function, press button B, which will
make the upper, lower and 4th center hands freeze in
place. The countdown function will continue to operate
internally while the hands are frozen.
To resume the movement of the upper, lower and 4th
center hands, press button B again and the hands will
reposition themselves in proper placement to show the
current time within the countdown sequence.
3GMT
SECOND
HAND
CROWN
ROTATING TOP RING
(24-HOUR FORMAT)
4TH CENTER HAND
MINUTE
HAND
HOUR HAND
INNER RING /
NUMERALS
(24-HOUR FORMAT)
A
2 31

102
103
3 TIME ZONE FUNCTION
Your watch has the ability to display three time zones:
1. Hour and Minute hands: Displays the time in a stan-
dard 12 hour format. Please note: The date displayed
in the date window is linked to the time displayed by
these two hands.
2. 4th center hand and inner ring: Displays the time in a
24-hour format.
3. 4th center hand and case rotating top ring: Displays
the time in a 24-hour format.
4TH CENTER HAND ADJUSTMENT
To readjust a misaligned 4th center hand:
1. Pull the crown out to position 3.
2. 4th center hand should point to 12 o’clock. If within
5 seconds of pulling the crown to position 3 the 4th
center hand does not point to 12 o’clock, press button
A to move the hand clockwise until it points to 12
o’clock. Pressing and holding button A will make the
hand move at a fast rate.
3. Push crown in to position 1 when finished.

104
105
4TH CENTER HAND CALIBRATION
The 4th center hand is calibrated at the Timex factory to
reflect the standard minutes within the hour as defined
by Universal Time Coordinated. Globally a majority of
locations use the standard minutes. If the location you are
using for the 2nd and 3rd time zone uses the standard
minutes, the 4th center hand does not require recalibra-
tion. Only if you wish to have the second and third time
zones to reflect locations that do not follow the standard
minute, the instructions to recalibrate the 4th center hand
are as follows:
1. Pull the crown out to position 3. The 4th center hand
will point to 12 o’clock.
2. Rotate the crown to position the minute hand in the
correct position within the hour required for the loca-
tion you are wishing to use for the 2nd and 3rd time
zones.
3. Push the crown in to position 2. The 4th center hand
will point to its currently calibrated position of the
minutes within the hour.
4. Push button A to move the 4th center hand clockwise
until it aligns with the minute hand. Pressing and hold-
ing button A will make the hand move at a fast rate.
5. Pull the crown out to position 3. The 4th center hand
will point to 12 o’clock.
6. Rotate the crown to position hour and minute hands
to the correct time.

106
107
7. Push crown in to position 1 when finished.
Please note: The 4th center hand will track the time using
the current calibration of the minutes within the hour.
Time zones 2 and 3 both utilize the 4th center hand and
therefore the locations being tracked in time zones 2 and
3 must both utilize the same minutes within the hour for
these time zones to be displayed properly.
SETTING THE 4TH CENTER HAND (TIME ZONE II)
Note the current time in the location you wish to track
as the 2nd time zone. Press button A until the 4th center
hand is pointing to that time on the inner ring. (Please
note: this scale is a 24-hour format). The 4th center hand
will advance 30 minutes each time button A is pressed.
Pressing and holding button A will make the hand move at
a fast rate. This will set the 2nd time zone on the watch.
SETTING THE CASE ROTATING TOP RING
(TIME ZONE III)
The 3rd time zone is set by using the existing setting of
the 4th center hand and adjusting the case rotating top
ring to the desired time of the 3rd time zone. (Please note:
this scale is a 24-hour format). The top ring has 72 posi-
tions. To advance the top ring one hour you will advance
it three positions (3 “clicks”). Note the current time in the
location you wish to track as the 3rd time zone. Rotate
the case top ring counter clockwise to position the cor-
rect hour marker for that time with the 4th center hand.

108
109
TACHYMETER FUNCTION
(not all models)
The tachymeter will only determine speeds greater than
60 units per hour using this method; slower speeds can
be measured by decreasing the unit of measurement.
The function performed by a tachymeter is independent
of the unit of distance (e.g. statute miles, nautical miles,
kilometers, meters etc.) as long as the same unit of length
is used for all calculations.
1. Determine the start and finish markers for your
pre-determined distance.
2. Start the chronograph once the target for speed
measurement passes the start marker.
3. Stop the chronograph once the target for speed
measurement passes the finish marker.
4. The chronograph second hand is compared to the
tachymeter markings to determine the target’s speed.
SLIDE-RULE BEZEL FUNCTION
The slide rule function of the top ring operates by rotating
the outer ring. The inner ring does not move. The outer
ring is always related to “distance” or “speed”, or any
data that varies with time. The inner ring only notes units
of time.
Outer Ring
On the outer ring, the figure “10” represents factors or
multiples of 10, such as 0.1, 1.0, 10, or 100.

110
111
Inner Ring
On the inner ring, “MPH” (mile per hour) refers to “speed in-
dex”. This index is used to calculate the speed involving any
data per hour
. On the inner ring, “STAT” (statute miles) and
“NAUT” (nautical miles) are for conversion of distance units.
OUTER RING
INNER RING
The following examples serve as a guide of how to use
the slide rule.
SPEED CALCULATION:
What speed is required to go 10 nautical miles in
15 minutes?
Known Factors: Distance: 10 nautical miles Time:
15 minutes
• Align “10” arrow on the outer ring with “15” on the
inner ring.
• The speed required can be found directly above the
“MPH” marking on the inner ring.
The answer: 40 nautical miles per hour
Time Calculation: How long will it take to go 10 nauti-
cal miles at a speed of 40 miles per hour?

112
113
Known Factors: Speed: 40 miles per hour Distance:
10 nautical miles
• Align “40” on the outer ring with the mark “MPH”
marking on the inner ring.
• The time required can be found directly below the “10”
arrow on the outer ring, which is “15” on the inner ring.
The answer: 15 minutes
DISTANCE CALCULATION:
How far can you travel at 40 miles per hour for
15 minutes?
Known Factors: Speed: 40 nautical miles per hour Time:
15 minutes
• Align “40” on the outer ring directly above the mark
“MPH” on the inner ring.
• The distance travelled can be obtained above the “15”
marker on the inner ring. The number indicated on the
outer ring is “10”.
The answer: The distance travelled is 10 nautical
miles.
UNIT CONVERSION:
To convert distance from nautical miles to statute miles
and kilometers.
Known Factor: Distance to convert is 10 nautical miles
• Align the “10” arrow on the outer ring above the
“NAUT” on the inner ring. The conversion in statute
miles (11.5) is found above the inner ring “STAT” mark-
ing, and the conversion to kilometers (18.5) is found
above the inner ring “MPH” marking.

114
115
HOW TO ADJUST BRACELET
(Variations of the following bracelet sections apply to all
watch models).
SLIDING CLASP BRACELET
1. Open locking plate.
2. Move clasp to desired
bracelet length.
3. Exert pressure while
holding locking plate and
slide clasp back and forth until it engages in grooves
on underside of bracelet.
4. Press locking plate down until it snaps closed. Clasp
can be damaged if excessive force is used.
FOLDOVER CLASP BRACELET
1. Find spring bar that connects bracelet to clasp.
2. Using a pointed tool, push in spring bar and gently
twist bracelet to disengage.
3. Determine wrist size, then insert spring bar in correct
bottom hole.
4. Push down on spring bar, align with top hole and
release to lock in place.

116
117
BRACELET LINK REMOVAL
REMOVING LINKS:
1. Place bracelet upright and insert pointed tool in
opening of link.
2. Push pin forcefully in direction of arrow until link is
detached (pins are designed to be difficult to remove).
3. Repeat until desired number of links are removed.
RE-ASSEMBLY:
1. Rejoin bracelet parts.
2. Push pin back into link in opposite direction of arrow.
3. Press pin down securely into bracelet until it is flush.
BATTERY
The battery should provide 4-6 years of normal watch use.
The actual battery life may vary depending on actual use.
When the battery needs to be changed, we recommend
that only TIMEX replace it. Your watch will need to be
recalibrated to correct time and date after changing the
battery. To return your watch to Timex use a pre-paid
shipper. To obtain a pre-paid shipper please call 1-800-
448-4639 or visit the retailer where you purchased your
watch or go to www.Timex.com. Please include the
following with your watch to cover postage and handling
(this is not a repair charge); a U.S.$8.00 check or money
order in the U.S.; a CAN$12.00 cheque or money order
in Canada; In other countries Timex will charge you for
postage and handling.

118
119
NEVER INCLUDE A SPECIAL WATCHBAND OR ANY
OTHER ARTICLE OF PERSONAL VALUE IN YOUR
SHIPMENT.
DO NOT DISPOSE OF BATTERY IN FIRE. DO NOT
RECHARGE. KEEP LOOSE BATTERIES AWAY FROM
CHILDREN.
TIMEX INTERNATIONAL WARRANTY
Your TIMEX
®
watch is warranted against manufacturing
defects by Timex Group USA, Inc. for a period of ONE
YEAR from the original purchase date. Timex and its
worldwide affiliates will honor this International Warranty.
Please note that Timex may, at its option, repair your
watch by installing new or thoroughly reconditioned and
inspected components or replace it with an identical or
similar model. IMPORTANT — PLEASE NOTE THAT THIS
WARRANTY DOES NOT COVER DEFECTS OR DAMAGES
TO YOUR WATCH:
1. after the warranty period expires;
2. if the watch was not originally purchased from an
authorized Timex retailer;

120
121
3. from repair services not performed by Timex;
4. from accidents, tampering or abuse; and
5. lens or crystal, strap or band, watch case, attachments
or battery. Timex may charge you for replacing any of
these parts.
THIS WARRANTY AND THE REMEDIES CONTAINED HEREIN
ARE EXCLUSIVE AND IN LIEU OF ALL OTHER WARRANTIES,
EXPRESS OR IMPLIED, INCLUDING ANY IMPLIED
WARRANTY OF MERCHANTABILITY OR FITNESS FOR
PARTICULAR PURPOSE. TIMEX IS NOT LIABLE FOR ANY
SPECIAL, INCIDENTAL OR CONSEQUENTIAL DAMAGES.
Some countries and states do not allow limitations
on implied warranties and do not allow exclusions or
limitations on damages, so these limitations may not
apply to you. This warranty gives you specific legal rights
and you may also have other rights, which vary from
country to country and state to state.
To obtain warranty service, please return your watch to
Timex, one of its affiliates or the Timex retailer where the
watch was purchased, together with a completed original
Watch Repair Coupon or, in the U.S. and Canada only, the
completed original Watch Repair Coupon or a written
statement identifying your name, address, telephone
number and date and place of purchase. Please include
the following with your watch to cover postage and
handling (this is not a repair charge): a US$ 8.00 check or
money order in the U.S.; a CAN$12.00 cheque or money
order in Canada; and a UK£3.50 cheque or money order
in the U.K. In other countries, Timex will charge you
for postage and handling. NEVER INCLUDE A SPECIAL

122
123
WATCHBAND OR ANY OTHER ARTICLE OF PERSONAL
VALUE IN YOUR SHIPMENT.
For the U.S., please call 1-800-448-4639 for additional
warranty information. For Canada, call 1-800-263-0981.
For Brazil, call +11 2664 1001. For Mexico, call 01-800-
01-060-00. For Central America, the Caribbean, Bermuda
and the Bahamas, call (501) 370-5775 (U.S.). For Asia, call
852-2815-0091. For the U.K., call 44 020 8687 9620. For
France, call 33 3 81 63 42 51. For Germany/Austria, call
+43 662 889 2130. For other areas, please contact your
local Timex retailer or Timex distributor for warranty
information.
If your Timex
®
watch should ever need servicing, send it
to Timex as set forth in the Timex International Warranty
or addressed to: TG SERVICE CENTER, P.O. Box 2740, Little
Rock, AR 72203. For service questions, call 1-800-328-
2677 or [email protected]
EXTENDED WARRANTY
Available in U.S. only. Extend your warranty for an ad-
ditional 4 years from date of purchase for $5. You can
pay with AMEX, Discover, Visa or MasterCard by calling
1 800-448-4639 during normal business hours. Payment
must be made within 30 days of purchase. Name, ad-
dress, telephone number, purchase date, and 5-digit
model number required. You can also mail a check for $5
to: Timex Extended Warranty, P.O. Box 1676, Dept. EF, Little
Rock, AR 72203.
©2015 Timex Group USA, Inc. TIMEX, INDIGLO, PERFECT DATE and
INTELLIGENT QUARTZ are trademarks of Timex Group B.V. and its
subsidiaries.

125
TIMEX
®
-ARMBANDUHREN
Herzlichen Glückwunsch zum Kauf Ihrer TIMEX
®
INTELLIGENT QUARTZ
™
-Uhr. Bitte lesen Sie die
Bedienungsanleitung für Ihre Timex-Uhr genau durch.
Ihre Uhr besitzt eventuell nicht alle der hier aufgeführten
Funktionen.
Weitere Informationen finden Sie auf der nachstehenden
Website, auf der Sie außerdem Ihre
Uhr registrieren können:
www.timex.com

126
127
INHALT
Inbetriebnahme der Uhr ................................................. 129
Wasser- und Stossfestigkeit........................................... 130
Indiglo
®
-Zifferblattbeleuchtung ...................................... 132
Einstellen von Uhrzeit und Datum ................................. 133
Ewiger Kalender ............................................................. 135
Flyback-Chronograph ..................................................... 138
Fly-back-Chronograph-Kompass ................................... 144
Linearchronograph ......................................................... 158
Weltzeit .......................................................................... 164
Kompass ......................................................................... 171
Gezeiten Temperatur und Kompass .............................. 178
Höhenmesser ................................................................. 188
Tiefe ................................................................................ 196
Yacht Racer .................................................................... 201
Chrono-Timer ................................................................. 213
3GMT .............................................................................. 230
Tachymeterfunktion ....................................................... 238
Rechenschieberfunktion ................................................ 240
Justieren des Armbands ................................................ 246
Herausnehmen von Armbandgliedern ........................... 249
Batterie ........................................................................... 250
Garantie .......................................................................... 252

128
129
INBETRIEBNAHME DER UHR
(Trifft nicht auf Modelle mit ewigem Kalender zu.) Ent neh-
men Sie zunächst den Plastikschutz unter der Krone und
drücken Sie diese dann gegen das Gehäuse.
Manche Modelle sind mit einer einschraubbaren
Einstellkrone ausgestattet. Wenn das Uhrengehäuse einen
Schraubgewindeaufsatz hat, muss die Krone im Anschluss
an die Einstellung der Uhr eingeschraubt werden.
Halten Sie dazu die Krone fest gegen den Gewindeaufsatz
gedrückt und schrauben Sie sie im Uhrzeigersinn ein, bis
sie fest sitzt. Wenn die Uhr neu gestellt werden soll, muss
die Krone vor dem Herausziehen ausgedreht werden
(gegen den Uhrzeigersinn).
Willkommen in der Welt der Timex
®
-Uhren mit
Intelligent Quartz
™
-Technologie, der Zukunft der
analogen Quarz-Technologie. Die Timex Intelligent
Quartz-Technologie verbindet die Leistungsfähigkeit eines
Mikroprozessors mit der Zuverlässigkeit und Genauigkeit
der analogen Quarz-Zeitmessung. Bei Timex Intelligent
Quartz-Uhren spiegelt sich die Technologie im Design
wider, was dem Zifferblatt völlig neue Ebenen eröffnet.
Diese analoge Uhr hat bis zu drei zusätzliche, voneinander
unabhängige Zeiger, die zahlreiche, normalerweise
digitalen Uhren vorbehaltene Informationen bieten.

130
131
ACHTUNG: BEI UHREN, DIE NICHT BIS ZU 200 METERN
WASSERFEST SIND, UNTER WASSER AUF KEINEN FALL
KNÖPFE DRÜCKEN, DAMIT DIE WASSERFESTIGKEIT
GEWÄHRLEISTET BLEIBT. UNTER WASSER NIEMALS DIE
KRONE HERAUSZIEHEN.
1. Die Uhr ist nur dann wasserdicht, wenn Glas, Krone
und Gehäuse intakt sind.
2. Die Uhr ist keine zertifizierte Taucheruhr.
3. Spülen Sie die Uhr nach jedem Salzwasserkontakt mit
Frischwasser ab.
4. Die Stoßfestigkeit ist auf dem Zifferblatt oder der
Gehäuserückseite angegeben. Die Uhren entsprechen
den ISO-Anforderungen für Stoßfestigkeit. Dennoch
sollte darauf geachtet werden, dass das Glas nicht
beschädigt wird.
WASSER- UND STOSSFESTIGKEIT
Wasserdichte Uhren sind mit Tiefenangabe in Metern
(WR_M) gekennzeichnet.
Wasserfestigkeit/Tiefe psia* Unterwasserdruck
30 m 60
50 m 86
100 m 160
200 m 284

132
133
EINSTELLEN VON UHRZEIT UND DATUM
HINWEIS: Die Krone Ihrer Uhr verfügt über drei
Positionen: eingedrückt, mittlere Stellung und heraus-
gezogen. Zur Gewöhnung an die unterschiedlichen
Positionen die Krone zuerst in die Außenposition ziehen
und sie dann langsam zurückdrücken, bis sie in die
Mittelposition einklickt.
Das Datum und die Uhrzeit werden wie folgt
eingestellt:
Uhrzeit
Ziehen Sie die Krone ganz heraus und drehen Sie sie, bis
die korrekte Zeit erscheint. Achten Sie auf die richtige
Einstellung von AM/PM (vor-/nachmittags). Verifizieren Sie
hierzu, dass das Datum um Mitternacht und nicht mittags
umspringt.
INDIGLO
®
-ZIFFERBLATTBELEUCHTUNG
Die Beleuchtung wird durch Drücken des Knopfs oder der
Krone aktiviert. Die für die INDIGLO
®
-Funktion verwendete
Elektroleuchttechnik erhellt bei Nacht und Dunkelheit das
Zifferblatt.
ODER

134
135
Datum (trifft nicht auf Modelle mit ewigem
Kalender zu)
Ziehen Sie die Krone auf die mittlere Stellung heraus und
drehen Sie sie, bis im Datumsfenster das korrekte Datum
erscheint. Anmerkung: Das Datum springt zwischen
22 Uhr und 2 Uhr um. In diesem Zeitraum darf das Datum
nicht geändert werden. Bei Zuwiderhandlung kann das
Uhrwerk beschädigt werden.
Wenn Datum und Uhrzeit korrekt eingestellt sind, drücken
Sie die Krone ganz ein. Der Sekundenzeiger setzt sich in
Bewegung.
ANMERKUNG: In Monaten mit weniger als 31 Tagen muss
das Datum justiert werden.
EWIGER KALENDER
ÜBERBLICK
A
B
1 2
3
1 2
3
STUNDENZEIGER
TAGESZEIGER
DATUMSZEIGER
SEKUNDENZEIGER
MINUTENZEIGER
KRONE
MONATSZEIGER
KNOPF A
(VERSENKT
MONTIERT)
KNOPF B
(VERSENKT
MONTIERT)
NORMAL-
STELLUNG
(EIN GE DRÜCKT)
MITTLERE
STELLUNG
(HALB HER AUS-
GEZ OGEN)
ÄUSSERE STELLUNG
(GANZ HERAUSGEZOGEN)

136
137
SCHALTJAHRAUSGLEICH
Zur Aufrechterhaltung des korrekten Datums besitzt die
Uhr eine Schaltjahr-Ausgleichsfunktion. Diese Einstellung
wird im Timex-Werk bzw. nach einem Batterieaustausch
vorgenommen und kann nicht geändert, sondern nur
eingesehen werden.
Ziehen Sie hierzu die Krone in die mittlere Stellung heraus.
Der Datumszeiger stellt den Ausgleich wie folgt dar: 1 =
1 Jahr nach Schaltjahr; 2 = 2 Jahre nach Schaltjahr; 3 =
3 Jahre nach Schaltjahr; 4 = Schaltjahr. Drücken Sie die
Krone anschließend wieder ein. Die Zeiger rücken wieder
in ihre Normalstellung für Wochentag, Monat und Datum.
EINLEITUNG
Dank der Funktion Ewiger Kalender muss das Datum bis
zum Jahr 2100 nicht justiert werden. Die Uhr passt die
Monate und Schaltjahre automatisch an und zeigt Zeit
und Datum stets korrekt an. Wochentag und Datum sind
werksseitig voreingestellt. Sie brauchen nur noch die Zeit
einzustellen. Die Uhr hat zwei versenkt montierte Knöpfe,
mit deren Hilfe Ihr Timex Service Center nach einem
Batteriewechsel wieder den Wochentag und das Datum
einstellen kann. Sie haben sonst keine Funktion.

138
139
EINSTELLEN DES VIERTEN MITTLEREN ZEIGERS
Der vierte mittlere Zeiger wird wie folgt justiert:
1. Ziehen Sie die Krone ganz heraus. Der obere
und untere Zeiger rücken automatisch in ihre
Endstellungen.
2. Der vierte mittlere Zeiger muss auf 12 Uhr zeigen.
Sollte dieser innerhalb von 5 Sekunden nach dem
Herausziehen der Krone nicht in die 12-Uhr-Stellung
rücken, muss er durch Drücken von Knopf A oder B
entweder im oder gegen den Uhrzeigersinn in die
12-Uhr-Stellung gedreht werden.
3. Wenn Sie fertig sind, drücken Sie die Krone ganz ein.
FLYBACK-CHRONOGRAPH
ÜBERBLICK
AA
B
23
1 2
3
1 2
3
OBERER
ZEIGER
CHRONOSTUNDEN
2. ZEITZONE
VIERTER MITTLERER
ZEIGER
SEKUNDENZEIGER
DATUMSFENSTER
KRONE
CHRONO-
MINUTENSKALA
UNTERER ZEIGER
KNOPF A
KNOPF B
MINUTENZEIGER
STUNDENZEIGER
NORMAL-
STELLUNG
(EIN GE DRÜCKT)
MITTLERE
STELLUNG
(HALB HER AUS-
GEZ OGEN)
ÄUSSERE STELLUNG
(GANZ HERAUSGEZOGEN)

140
141
EINSTELLEN DER ZWEITEN ZEITZONE
1. Ziehen Sie die Krone halb (in die mittlere Stellung)
heraus. Der obere Zeiger zeigt die Uhrzeit in der zweiten
Zeitzone, der vierte mittlere Zeiger die Minuten an.
2. Angenommen, die Uhrzeit in der zweiten Zeitzone
hat den gleichen Minutenwert wie die erste Zeitzone.
In dem Fall muss der vierte mittlere Zeiger mit dem
Minutenzeiger ausgerichtet sein. Falls nicht, oder
wenn der Minutenwert der zweiten Zeitzone von dem
der ersten abweichen sollte, muss der vierte mittlere
Zeiger durch Drücken von Knopf B vorgerückt werden,
bis er den gewünschten Minutenwert erreicht hat.
3. Drücken Sie Knopf A, bis der obere Zeiger in 1-Stunden-
Inkrementen auf den gewünschten Stundenwert für
die zweite Zeitzone vorgerückt ist. Zur Beschleunigung
dieses Vorgangs kann Knopf A niedergehalten werden.
ZWEITE ZEITZONE
Der obere Zeiger zeigt
die Uhrzeit für die
zweite Zeitzone an. Bitte
beachten Sie, dass es
sich um eine 24-Stunden-
Skala handelt. Die
Endpunkte sind je weils
Mitternacht, die Mitte ist
12 Uhr mittags. In den
meisten Fällen weichen
die Zeitzonen um volle
Stunden ab. In solchen Fällen entspricht der Minutenwert
der zweiten Zeitzone dem vom Minutenzeiger
angezeigten Wert.
AA
B
23
1 2
3
1 2
3

142
143
3. Zur Wiederaufnahme der Messung betätigen Sie Knopf
A (START/STOP) nochmals.
4. Nullen Sie den Flyback-Chronographen mithilfe von
Knopf B (FLYBACK/RESET).
Alle Zeiger rücken dann in ihre Nullstellung. Nach
weiteren acht Sekunden schaltet die Uhr wieder in die
normale Anzeige der zweiten Zeitzone.
5. Zum Rücksetzen bzw. Neustarten des laufenden
Flyback-Chronographen halten Sie Knopf B (FLYBACK/
RESET) so lange nieder, bis er neu starten soll.
4. Wenn Sie fertig sind, drücken Sie die Krone wieder ein.
FLYBACK-CHRONOGRAPH
Die Uhr hat einen Chronographen mit 4-Stunden-Flyback.
1. Drücken Sie zum Starten Knopf A (START/STOP).
Der vierte mittlere Zeiger zeigt die Sekunden mit
einer 1/5-Sekunden-Auflösung an. Der untere Zeiger
zeigt die letzte Minutenstelle an, wobei er bis zu zehn
zählt und dann wiederholt. Der obere Zeiger zeigt die
Gesamtzeit an, einschließlich Stunden und Minuten,
mit 10-Minuten-Unterteilung. Der Chronograph zählt
bis zu vier Stunden und stoppt dann automatisch.
2. Drücken Sie zum Stoppen Knopf A (START/STOP)
erneut. Alle Zeiger werden angehalten.

144
145
EINSTELLEN DES INDIKATORZEIGERS
(VIERTER MITTLERER ZEIGER)
Der Indikatorzeiger kann bei Bedarf wie folgt neu justiert
werden:
1. Ziehen Sie die Krone ganz heraus. Der obere
und untere Zeiger rücken automatisch in ihre
Endstellungen.
2. Der vierte mittlere Zeiger muss auf 12 Uhr zeigen.
Sollte dieser innerhalb von 5 Sekunden nach dem
Herausziehen der Krone nicht in die 12-Uhr-Stellung
rücken, muss er mithilfe von Knopf A oder B entweder
im oder gegen den Uhrzeigersinn in die 12-Uhr-
Stellung gedreht werden.
3. Drücken Sie anschließend die Krone wieder ein.
FLY-BACK-CHRONOGRAPH-KOMPASS
ÜBERBLICK
A
C
B
1 2
3
1 2
3
OBERER
ZEIGER
CHRONO
STUNDEN 2.
ZEITZONE
VIERTER MITTLERER
ZEIGER
SEKUNDENZEIGER
DATUMSFENSTER
KRONE
CHRONO-MINUTENSKALA
UNTERER ZEIGER
KNOPF A
KNOPF B
STUNDENZEIGER
MINUTENZEIGER
KNOPF C
NORMAL-
STELLUNG
(EIN GE DRÜCKT)
MITTLERE
STELLUNG
(HALB HER AUS-
GEZ OGEN)
ÄUSSERE STELLUNG
(GANZ HERAUSGEZOGEN)

146
147
2. Rücken Sie den vierten mittleren Zeiger mithilfe von
Knopf B vor. Zur Beschleunigung dieses Vorgangs
können Sie den Knopf niederhalten. Der obere und der
vierte mittlere Zeiger bewegen sich gleichzeitig, wobei
Letzterer eine volle Umdrehung ausführt und der
obere Zeiger um eine Stunde vorrückt. Angenommen,
die Uhrzeit in der zweiten Zeitzone hat den gleichen
Minutenwert wie die erste Zeitzone. In dem Fall muss
der vierte mittlere Zeiger mit dem Minutenzeiger
ausgerichtet sein.
3. Rücken Sie den oberen Zeiger mithilfe von Knopf A
in 1-Stunden-Inkrementen vor. Zur Beschleunigung
dieses Vorgangs können Sie den Knopf niederhalten.
4. Wenn Sie fertig sind, drücken Sie die Krone wieder ein.
ZWEITE ZEITZONE
Der obere Zeiger zeigt gewöhnlich die Uhrzeit für die
zweite Zeitzone an. Bitte beachten Sie, dass es sich
um eine 24-Stunden-Skala handelt. Die Endpunkte sind
jeweils Mitternacht, die Mitte ist 12 Uhr mittags.
Die Uhrzeit für die zweite Zeitzone wird wie folgt
eingestellt:
1. Ziehen Sie die Krone
halb (in die mittlere
Stellung) heraus. Der
obere Zeiger zeigt die
Uhrzeit für die zweite
Zeitzone an, der vierte
mittlere Zeiger die
Minuten.
A
C
B
1 2
3
1 2
3

148
149
Zeiger zeigt die Sekunden mit einer Auflösung
von 1/5 Sekunden, der untere Zeiger die letzte
Minutenstelle an, wobei er bis zu zehn zählt und dann
wiederholt. Der obere Zeiger zeigt die Gesamtzeit an,
einschließlich Stunden und Minuten, mit 10-Minuten-
Unterteilung. Der Chronograph zählt bis zu vier
Stunden und stoppt dann automatisch.
2. Zum Stoppen betätigen Sie erneut Knopf A (START/
STOP). Alle Zeiger bleiben stehen.
3. Zur Wiederaufnahme der Messung drücken Sie Knopf
A (START/STOP) nochmals bzw. zum Nullen des
Chronographen Knopf B (FLYBACK/RESET).
Bei einer Nullung rücken alle Zeiger in ihre Nullstellung.
Nach acht Sekunden nimmt die Uhr wieder die
normale Zeitanzeige der zweiten Zeitzone auf.
Auf Wunsch können Sie mithilfe der zweiten Zeitzone
alternativ auch Ihre Standardzeit im 24-Stunden-Format
anzeigen. Wenn Sie die Zweitzeit auf diese Weise
einstellen, muss die Stunden/Minuten-Anzeige unbedingt
der 24-Stunden-Anzeige entsprechen. Verifizieren Sie
hierzu, dass das Datum um Mitternacht und nicht mittags
umspringt.
FLYBACK-
CHRONOGRAPH
Die Uhr hat einen
Chronographen mit
4-Stunden-Flyback.
1. Drücken Sie zum
Starten Knopf A
(START/STOP). Der
vierte mittlere
A
C
B
1 2
3
1 2
3

150
151
4. Der Chronograph kann auch bei laufendem Betrieb
zurückgesetzt bzw. neu gestartet werden. Halten Sie
hierzu Knopf B (FLYBACK/RESET) nieder und lassen
Sie ihn los, wenn er neu starten soll. Sie können den
Knopf loslassen, bevor alle Zeiger auf Null stehen;
die Zeitmessung beginnt intern, sobald der Knopf
losgelassen wird. Mit dieser „Flyback“-Funktion kann
die Rundenzeit gemessen werden.
Der Kompass kann bei laufendem Chronographen
benutzt werden, ohne dessen Betrieb zu
beeinträchtigen. Weitere Informationen finden Sie
unter KOMPASSMODUS.
KALIBRIEREN DES KOMPASSES
Vor Gebrauch muss der Kompass kalibriert werden.
Da ein Kompass mit dem Erdmagnetfeld arbeitet, ist auf
große metallene Objekte wie Fahrzeuge und Brücken
sowie auf Gegenstände mit elektromagnetischer
Strahlung wie Fernseher und Computer zu achten, die
das Magnetfeld im Bereich der Uhr beeinflussen können.
Wird der Kompass in der Nähe derartiger Objekte
kalibriert, funktioniert er nur an dieser Stelle korrekt.
Wird er dagegen fern von derartigen Objekten kalibriert,
so funktioniert er in ihrer Nähe nicht ordnungsgemäß.
Optimale Ergebnisse werden erzielt, wenn die Kalibrierung
im Bereich der beabsichtigten Verwendung erfolgt.
Wie alle Kompasse muss auch die Uhr bei der Kalibrierung
und Richtungsfindung waagerecht gehalten werden.
Andernfalls kann es zu großen Fehlern kommen. Außerdem
sind Bereiche mit übermäßigen Konzentrationen von
Hart- und Weicheisen zu meiden, da sie zu ungenauen
Richtungsangaben führen können. Bei fragwürdigen
Richtungsangaben muss erneut kalibriert werden.

152
153
3. Drücken Sie zunächst den Knopf C (KOMPASS). Der
vierte mittlere Zeiger vollführt zwei Umdrehungen und
erinnert Sie so daran, dass die Uhr gedreht werden
muss. Die Uhr muss waagerecht bleiben. Drehen
Sie sie LANGSAM um zwei, jeweils mindestens 15
Sekunden dauernde volle Umdrehungen.
4. Drücken Sie dann erneut den Knopf C (KOMPASS),
wobei die Uhr nach wie vor waagerecht bleiben muss.
Der vierte mittlere Zeiger bewegt sich hin und her,
was den Abschluss der Kalibrierung anzeigt, und rückt
dann in die aktuelle Deklinationseinstellung.
Die Uhr darf nicht in der Nähe von Magnetfeldquellen,
beispielsweise Computern, Haushaltsgeräten oder
Fernsehern, aufbewahrt werden, da sie sich magnetisch
aufladen und dann falsche Richtungsangaben anzeigen
kann. Die Genauigkeit von Handgelenkskompassen liegt
gewöhnlich in einem Rahmen von +/- 10 Grad.
Der Kompass wird wie folgt kalibriert:
1. Ziehen Sie die Krone halb (mittlere Stellung) heraus
und warten Sie ab, bis der Indikatorzeiger stillsteht.
2. Halten Sie die Uhr waagerecht oder legen Sie sie auf
eine waagerechte Fläche (sollte das Armband im Weg
sein, legen Sie die Uhr auf eine umgedrehte Tasse).
Das Uhrglas kann unten liegen, muss jedoch vorsichtig
behandelt werden.

154
155
Deklination auf -14° (14°W) eingestellt
KOMPASSMODUS
Der Kompassmodus ist normalerweise deaktiviert und der
vierte mittlere Zeiger steht auf 12.00 Uhr bzw. zeigt die
Chronographsekunden an.
Der Kompass wird durch Drücken von Knopf C (KOMPASS)
aktiviert. Die Uhr muss dabei waagerecht gehalten
werden. Der Kompasszeiger rückt in die Norden-Stellung.
Wird die Uhr gedreht, rückt der vierte mittlere Zeiger so
weiter, dass er stets auf Norden zeigt. Nach 20 Sekunden
5. Wenn Sie die Deklination nicht einstellen möchten,
drücken Sie die Krone ein. Andernfalls kann die Uhr
den Deklinationswinkel automatisch ausgleichen.
Drehen Sie hierzu den Kompassring so, dass Norden
auf 12 Uhr zeigt.
6. Rücken Sie den vierten mittleren Zeiger mithilfe von
Knopf A oder B nach Westen (-) oder Osten (+), sodass
der Kompass unter Zuhilfenahme der Deklinationsskala
auf den Deklinationswinkel Ihres Standorts zeigt.
Dieser Vorgang kann durch Niederhalten des Knopfs
beschleunigt werden. Die nachstehende Abbildung
zeigt ein Beispiel.
7. Drücken Sie die Krone ein, wenn Sie fertig sind.
A
B

156
157
schaltet sich der Kompass automatisch ab und der vierte
mittlere Zeiger kehrt in seinen Normalmodus zurück.
Dadurch wird die Batterie geschont. Durch erneutes
Betätigen von Knopf C (KOMPASS) kann der Kompass
jederzeit erneut für 20 Sekunden aktiviert werden.
Der Kompass kann auch bei laufendem Chronographen
aktiviert werden. Der vierte mittlere Zeiger schaltet
lediglich vorübergehend in den Kompassmodus um. Der
obere und untere Zeiger zeigen weiterhin die Chro no-
gra phenzeit an und alle Chronographenfunktionen sind
über die Knöpfe A (START/STOP) und B (FLYBACK/RESET)
verfügbar.
ANMERKUNG: Im Kompassmodus bewegt sich der
Sekundenzeiger in 2-Sekunden-Inkrementen. Außerdem
können sich bei aktiviertem Kompass der obere und
untere Zeiger geringfügig verschieben; sie kehren jedoch
in ihre korrekten Stellungen zurück, sobald der Kompass
deaktiviert wird. Das ist normal und sorgt für eine
möglichst genaue Kompassmessung.

158
159
LINEARCHRONOGRAPH
ÜBERBLICK
EINSTELLEN DES LINEAR- UND VIERTEN
MITTLEREN ZEIGERS
Der vierte mittlere Zeiger wird wie folgt justiert:
1. Krone ganz herausziehen. Der untere Zeiger wird
automatisch an das Ende seiner Gleitbewegung
zurückgesetzt.
2. Der vierte mittlere Zeiger muss auf 12 Uhr zeigen.
Sollte dieser innerhalb von 5 Sekunden nach dem
Herausziehen der Krone nicht in die 12-Uhr-Stellung
rücken, muss er durch Drücken von Knopf A im
Uhrzeigersinn in die 12-Uhr-Stellung gedreht werden.
3. Wenn der Chronograph zurückgesetzt wurde, der
Linearzeiger aber nicht auf Null zeigt, den Knopf
B drücken und 5 Sekunden lang halten, um eine
vollständige Kalibrierung des linearen Zeigers
durchzuführen (kann bis zu 32 Sekunden dauern.)
SEKUNDENZEIGER
DATUMSFENSTER
KRONE
UNTERER ZEIGER
KNOPF A
KNOPF B
VIERTER MITTLERER
ZEIGER
STUNDENZEIGER
LINEARZEIGER
MINUTENZEIGER
A
B
1
2
3

160
161
4. Nach Einstellung die Krone wieder hineindrücken.
ZWEITE ZEITZONE
Der untere Zeiger
zeigt die Zeit für
die zweite Zeitzone
an. Bitte beachten
Sie, dass es sich um
eine 24-Stunden-
Skala handelt. Die
Endpunkte sind jeweils
Mitternacht, die Mitte
ist 12 Uhr mittags. In
den meisten Fällen
weichen die Zeitzonen um volle Stunden ab. In solchen
Fällen entspricht der Minutenwert der zweiten Zeitzone
dem vom Minutenzeiger angezeigten Wert.
EINSTELLEN DER ZWEITEN ZEITZONE:
1. Krone bis zur Mittelposition herausziehen. Der untere
Zeiger zeigt die Zeit in der zweiten Zeitzone an und der
vierte mittlere Zeiger die Minuten.
2. Davon ausgehend, dass die Zeit in der zweiten
Zeitzone denselben Minutenwert wie die Standardzeit
hat, sollten der vierte mittlere Zeiger und der
Minutenzeiger übereinstimmen. Falls nicht, oder wenn
der Minutenwert der zweiten Zeitzone vom dem der
ersten abweichen sollte, muss der vierte mittlere
Zeiger durch Drücken von Knopf B vorgerückt werden,
bis er den gewünschten Minutenwert erreicht hat.
3. A drücken, um den unteren Zeiger in einstündigen
Intervallen bis zur gewünschten zweiten Zeitzone
vorzustellen. Den Knopf für einen schnellen Durchlauf
des Zeigers gedrückt halten.
A
B
1
2
3

162
163
3. B (SPLIT/RESET [Zwischenzeit/Zurücksetzen])
drücken, um den Chronograph auf die Nullposition
zurückzusetzen.
Ist der Chronograph zurückgestellt, zeigen alle Zeiger
auf Null. Nach acht Sekunden nimmt die Uhr wieder
die normale Zeitanzeige der zweiten Zeitzone auf. Es
ist möglich, eine Zwischenzeit zu messen, während
der Chronograph läuft. B (SPLIT/RESET [Zwischenzeit/
Zurücksetzen]) drücken und alle Zeiger werden
angehalten, während der Chronograph weiterläuft.
Nochmals B (SPLIT/RESET) drücken, um die Anzeige der
abgelaufenen Zeit des Chronographen fortzusetzen.
4. Nach Einstellung die Krone wieder hineindrücken.
LINEARCHRONOGRAPH
Die Uhr verfügt über einen Chronographen mit 4-Stunden-
Teilung.
1. A (START/STOP) drücken, um zu beginnen. Der
vierte mittlere Zeiger zeigt die Sekunden mit
1/5-Sekundenschritten. Der Linearzeiger zeigt die
Minuten an, zählt bis dreißig und wiederholt dies. Der
untere Zeiger zeigt die Gesamtzeit, inkl. Stunden und
Minuten an, mit Unterteilungen alle zehn Minuten. Der
Chronograph misst bis zu vier Stunden und hört dann
automatisch auf.
2. A (START/STOP) drücken, um zu beginnen. Alle Zeiger
werden angehalten.

164
165
WELTZEIT
ÜBERBLICK
EINSTELLEN DER WELTZEIT
1. Krone bis zur Mittelposition herausziehen. Der
mittlere Zeiger zeigt die jeweilige Stadt einer
bestimmten Weltzeitzone an und der obere Zeiger die
entsprechende Zeit in der Stadt.
A
B
C
1 2 3
2. Rücken Sie mithilfe von Knopf A oder B den mittleren
Zeiger auf den Ort, der Ihrer Ortszeit entspricht.
A
B
C
1 2
3
corrected 3.3.11 with Paulo’s new cities
24 ORTE
WELTZEIT-
SKALA
SEKUNDENZEIGER
DATUMSFENSTER
KRONE
UNTERER ZEIGER
KNOPF A
KNOPF B
KNOPF C
VIERTER MITTLERER
ZEIGER
JAHRESZEITENSKALA
OBERER
ZEIGER
STUNDENZEIGER
MINUTENZEIGER
NORMAL-
STELLUNG
(EIN GE DRÜCKT)
MITTLERE STELLUNG
(HALB
HER AUS GE -
Z OGEN)
ÄUSSERE STELLUNG
(GANZ HERAUSGEZOGEN)

166
167
Dieser Vorgang kann durch Niederhalten des Knopfs
beschleunigt werden. Sie können einen beliebigen
Ort wählen.
3. Ziehen Sie die Krone ganz heraus. Der Zeiger für die
Ortsauswahl kehrt in die 12.00-Uhr-Stellung zurück
(siehe EINSTELLEN DES INDIKATORZEIGERS). Nach
fünf Sekunden zeigt der obere Zeiger die Weltzeit (die
Uhrzeit des zuvor ausgewählten Orts), der mittlere
Zeiger die Minuten der Weltzeit und der untere Zeiger
die Jahreszeit an (siehe EINSTELLEN DER JAHRESZEIT).
WICHTIG: Die Knöpfe oder die Krone dürfen erst dann
wieder betätigt werden, wenn die Einstellung des
mittleren Zeigers abgeschlossen ist. (Dies ist etwa 10
Sekunden nach dem Herausziehen der Krone in die
äußere Stellung der Fall).
4. Sollte die angezeigte Jahreszeit nicht Ihrer Standard-
zeitzone entsprechen, ändern Sie sie mithilfe
von Knopf C. Wenn in Ihrer Standardzeitzone die
Sommerzeit gilt, rückt der obere Zeiger um eine
Stunde vor.
5. Stellen Sie die Uhrzeit mit Knopf A oder B vor bzw.
zurück, bis die Weltzeitzonenzeit mit Ihrer Standard-
zeitzonenzeit übereinstimmt. Dieser Vorgang kann
durch Niederhalten eines der Knöpfe beschleunigt
werden. Die Zeiger bewegen sich gleichzeitig, wobei
der mittlere eine volle Umdrehung ausführt und der
obere um eine Stunde weiterrückt. Im Anschluss an
den Einstellvorgang müssen der mittlere Zeiger und
der Minutenzeiger miteinander ausgerichtet sein.
6. Wenn Sie fertig sind, drücken Sie die Krone wieder ein.

168
169
Weltzeit-Einstellmodus (siehe EINSTELLEN DER WELTZEIT).
ORTSZEITANZEIGE
Drehen Sie den mittleren
Zeiger mit Knopf A oder
B vor bzw. zurück und
wählen Sie einen Ort
aus. Der obere Zeiger
rückt auf die Uhrzeit für
den gewählten Ort. Bitte
beachten Sie, dass es sich
um eine 24-Stunden-Skala
handelt. Die Endpunkte sind jeweils Mitternacht, die Mitte
ist 12 Uhr mittags.
EINSTELLEN DER JAHRESZEIT
Anhand der Jahreszeitfunktion kann die Uhr automatisch
auf Sommerzeit umschalten.
EINSTELLEN DES INDIKATORZEIGERS
(VIERTER MITTLERER ZEIGER)
Der Indikatorzeiger kann bei Bedarf wie folgt neu justiert
werden:
1. Ziehen Sie die Krone ganz heraus. Der obere
und untere Zeiger rücken automatisch in ihre
Endstellungen.
2. Der vierte mittlere Zeiger muss auf 12 Uhr zeigen.
Sollte dieser innerhalb von 5 Sekunden nach dem
Herausziehen der Krone nicht in die 12-Uhr-Stellung
rücken, muss er mithilfe von Knopf A oder B entweder
im oder gegen den Uhrzeigersinn in die 12-Uhr-
Stellung gedreht werden.
3. Wenn Sie fertig sind, drücken Sie die Krone wieder ein.
ANMERKUNG: Wird innerhalb von 5 Sekunden nach dem
Stillstand der Zeiger kein Knopf gedrückt, schaltet die Uhr in den
A
B
C
1 2 3

170
171
Sie bietet zwei Einstellungen, mit deren Hilfe dies für alle
Orte mit Sommerzeitumstellung erreicht werden kann.
Diese sind SOMMER für Sommerzeit und WINTER für die
Standardzeit.
Ist ein Ort auf SOMMER eingestellt, stehen alle Orte
in derselben Hemisphäre ebenfalls auf SOMMER und
alle Orte in der anderen Hemisphäre befinden sich
automatisch auf WINTER. Die Uhr ordnet die Orte der
korrekten Hemisphäre zu.
Die Jahreszeit in dem gewählten Ort wird mit Knopf C
geändert.
KOMPASS
ÜBERBLICK
I
I
14
MITTLERE
KRONE
MITTLERE
STELLUNG
DATUMSEINSTELLUNG
I
I
14
HERAUSGEZOGEN
UHRZEITEINSTELLUNG
KRONE
B
A (KOMPASS)
DEKLINATIONSSKALA
KOMPASSZEIGER
(DAS NORDENDE
IST ROT SPITZ/
LÄNGER)

172
173
EINSTELLEN DES KOMPASSZEIGERS
Ziehen Sie die KRONE ganz heraus. Der Kompasszeiger
muss auf 12 Uhr weisen. Wenn nicht, drehen Sie ihn
mithilfe von Knopf A oder B in die 12-Uhr-Stellung.
Durch Niederhalten des Knopfs können Sie den Vorgang
beschleunigen. Wenn Sie fertig sind, drücken Sie die
MITTLERE KRONE ein und kalibrieren den Kompass erneut.
KALIBRIEREN DES KOMPASSES
Vor Gebrauch muss der Kompass kalibriert werden.
Da ein Kompass mit dem Erdmagnetfeld arbeitet, ist auf
große metallene Objekte wie Fahrzeuge und Brücken sowie
auf Gegenstände mit elektromagnetischer Strahlung wie
Fernseher und Computer zu achten, die das Magnetfeld im
Bereich der Uhr beeinflussen können. Wird der Kompass in
der Nähe derartiger Objekte kalibriert, funktioniert er nur an
dieser Stelle korrekt. Wird er dagegen fern von derartigen
Objekte kalibriert, so funktioniert er in ihrer Nähe nicht
ordnungsgemäß. Optimale Ergebnisse werden erzielt, wenn
die Kalibrierung im Bereich der beabsichtigten Verwendung
erfolgt.
Wie alle Kompasse muss auch die Uhr bei der
Kalibrierung und Richtungsfindung waagerecht gehalten
werden. Andernfalls kann es zu großen Fehlern
kommen. Außerdem sind Bereiche mit übermäßigen
Konzentrationen von Hart- und Weicheisen zu meiden, da
sie zu ungenauen Richtungsangaben führen können. Bei
fragwürdigen Richtungsangaben muss erneut kalibriert
werden.
Die Uhr darf nicht in der Nähe von Magnetfeldquellen,
beispielsweise Computern, Haushaltsgeräten oder
Fernsehern, aufbewahrt werden, da sie sich magnetisch
aufladen und dann falsche Richtungsangaben anzeigen

174
175
kann. Die Genauigkeit von Handgelenkskompassen liegt
gewöhnlich in einem Rahmen von +/- 10 Grad.
Der Kompass wird wie folgt kalibriert:
1. Ziehen Sie die Krone halb (mittlere Stellung) heraus
und warten Sie ab, bis der Indikatorzeiger stillsteht.
2. Halten Sie die Uhr waagerecht oder legen Sie sie auf
eine waagerechte Fläche (sollte das Armband im Weg
sein, legen Sie die Uhr auf eine umgedrehte Tasse).
Das Uhrglas kann unten liegen, muss jedoch vorsichtig
behandelt werden.
3. Drücken Sie zunächst Knopf A oder B. Der vierte mitt-
lere Zeiger vollführt zwei Umdrehungen und erinnert
Sie so daran, dass die Uhr gedreht werden muss.
Die Uhr muss waagerecht bleiben. Drehen Sie sie
LANGSAM um zwei, jeweils mindestens 15 Sekunden
dauernde volle Umdrehungen.
4. Drücken Sie dann erneut den Knopf A oder B, wobei
die Uhr nach wie vor waagerecht bleiben muss. Der
vierte mittlere Zeiger bewegt sich hin und her, was den
Abschluss der Kalibrierung anzeigt, und rückt dann in
die aktuelle Deklinationseinstellung.
5. Wenn Sie die Deklination nicht einstellen möchten,
drücken Sie die Krone ein. Andernfalls kann die Uhr
den Deklinationswinkel automatisch ausgleichen.
Drehen Sie hierzu den Kompassring so, dass Norden
auf 12 Uhr zeigt.

176
177
6. A oder B drücken, um den vierten mittleren Zeiger
nach Westen (-) oder Osten (+) zu bewegen, um
mit Hilfe der Deklinationsskala auf die magnetische
Deklination Ihres Standortes zu zeigen. Dieser Vorgang
kann durch Niederhalten des Knopfs beschleunigt
werden. Auf der nächsten Seite finden Sie eine
Abbildung mit einem Beispiel.
7. Drücken Sie die Krone ein, wenn Sie fertig sind.
A
B
Deklination auf -14° (14°W) eingestellt
KOMPASSMODUS
Der Kompassmodus ist normalerweise deaktiviert und der
vierte mittlere Zeiger steht auf 12.00 Uhr bzw. zeigt die
Chronographsekunden an.
Der Kompass wird durch Drücken von Knopf A oder
B aktiviert. Die Uhr muss dabei waagerecht gehalten
werden. Der Kompasszeiger rückt in die Norden-Stellung.
Wird die Uhr gedreht, rückt der vierte mittlere Zeiger so
weiter, dass er stets auf Norden zeigt. Nach 20 Sekunden
schaltet sich der Kompass automatisch ab und der vierte
mittlere Zeiger kehrt in seinen Normalmodus zurück.
Dadurch wird die Batterie geschont. Durch erneutes
Betätigen von Knopf A oder B kann der Kompass jederzeit
erneut für 20 Sekunden aktiviert werden.
ANMERKUNG: Im Kompassmodus bewegt sich der
Sekundenzeiger in 2-Sekunden-Inkrementen.

178
179
GEZEITEN TEMPERATUR UND KOMPASS
ÜBERBLICK
EINSTELLEN DES INDIKATORZEIGERS
Ziehen Sie die Krone ganz heraus. Der Indikatorzeiger
muss auf 12 Uhr weisen. Sollte das nicht der Fall sein,
rücken Sie ihn entweder mit Knopf B (GEZEITEN) oder
Knopf A (TEMPERATUR) in die 12-Uhr-Stellung. GEZEITEN
rückt den Zeiger im, TEMP entgegen dem Uhrzeigersinn
weiter. Durch Niederhalten des Knopfs wird der Vorgang
beschleunigt. Wenn Sie fertig sind, drücken Sie die Krone
wieder ein.
UMSCHALTEN ZWISCHEN GEZEITEN UND TEMPERATUR
Der Indikatorzeiger zeigt konstant entweder die Gezeit
oder die Temperatur an. Bei angezeigter Temperatur
können Sie mit dem GEZEITEN-Knopf (B) die Gezeitenuhr
wählen. Zuerst wird Ebbe, dann der aktuelle Stand
angezeigt. Bei aktiver Gezeitenanzeige schalten sie mit
dem TEMP-Knopf (A) auf das Thermometer um. Der Zeiger
ÄUSSERE STELLUNG -
UHRZEIT -
EIN STELLUNG
DEKLINATION S-
SKALA
INDIKATOR-
ZEIGER
C (KOMPASS)
B (GEZEITEN)
A (TEMP)
KRONE
KOMPASS-
DREHRING
DATUM
GEZEITENSKALA
TEMPERATURSKALA
MITTLERE STELLUNG -
DATUMSEINSTELLUNG

180
181
rückt zunächst auf den Anfang der Thermometerskala und
dann auf die aktuelle Temperatur.
THERMOMETER
Wird die Uhr am Handgelenk getragen, wird die
abgelesene Temperatur von der Körperwärme beeinflusst.
Genauere Messungen erzielen Sie, wenn Sie die Uhr
abnehmen und mindestens einige Minuten lang in den
Schatten legen.
Die Uhr kann auch die Wassertemperatur messen.
Schalten Sie die Uhr jedoch unbedingt in den Tem pe ra-
turmodus, bevor Sie sie ins Wasser tauchen, da unter
Wasser keine Knöpfe gedrückt werden dürfen.
Thermometermessungen werden jede Minute
vorgenommen; öfter bei wechselnder Temperatur.
GEZEITENUHR
Im Gezeitenmodus dreht sich der Indikatorzeiger immer
im Uhrzeigersinn. Steigendes Wasser wird von einem nach
links, fallendes Wasser von einem nach rechts weisenden
Zeiger markiert. Die Anzahl der Stunden bis zur nächsten
Flut/Ebbe ist auf der Gezeitenskala zu sehen.
Da die Gezeiten auch vom Sonnenstand und von der
Küstenform abhängen, kann die Uhr die Zeit für Ebbe und
Flut nicht genau bestimmen. Daher muss die Gezeitenuhr
u.U. periodisch justiert werden.
Hierzu muss die Krone halb (in die MITTLERE Stellung)
herausgezogen werden. Rücken Sie dann mithilfe des
GEZEITEN- (B) oder TEMP-Knopfs (A) den Zeiger auf die
aktuelle Gezeit. GEZEITEN rückt den Zeiger im, TEMP
entgegen dem Uhrzeigersinn weiter. Wenn Sie fertig sind,
drücken Sie die Krone wieder ein.

182
183
KALIBRIEREN DES KOMPASSES
Vor Gebrauch muss der Kompass kalibriert werden.
Da ein Kompass mit dem Erdmagnetfeld arbeitet, ist auf
große metallene Objekte wie Fahrzeuge und Brücken
sowie auf Gegenstände mit elektromagnetischer
Strahlung wie Fernseher und Computer zu achten, die
das Magnetfeld im Bereich der Uhr beeinflussen können.
Wird der Kompass in der Nähe derartiger Objekte
kalibriert, funktioniert er nur an dieser Stelle korrekt.
Wird er dagegen fern von derartigen Objekte kalibriert,
so funktioniert er in ihrer Nähe nicht ordnungsgemäß.
Optimale Ergebnisse werden erzielt, wenn die
Kalibrierung im Bereich der beabsichtigten Verwendung
erfolgt.
Wie alle Kompasse muss auch die Uhr bei der
Kalibrierung und Richtungsfindung waagerecht gehalten
werden. Andernfalls kann es zu großen Fehlern
kommen. Außerdem sind Bereiche mit übermäßigen
Konzentrationen von Hart- und Weicheisen zu meiden, da
sie zu ungenauen Richtungsangaben führen können. Bei
fragwürdigen Richtungsangaben muss erneut kalibriert
werden.
Die Uhr darf nicht in der Nähe von Magnetfeldquellen,
beispielsweise Computern, Haushaltsgeräten oder
Fernsehern, aufbewahrt werden, da sie sich magnetisch
aufladen und dann falsche Richtungsangaben anzeigen
kann. Die Genauigkeit von Handgelenkskompassen liegt
gewöhnlich in einem Rahmen von +/- 10 Grad.
Der Kompass wird wie folgt kalibriert:
1. Ziehen Sie die Krone halb (mittlere Stellung) heraus
und warten Sie ab, bis der Indikatorzeiger stillsteht.

184
185
2. Halten Sie die Uhr waagerecht oder legen Sie sie auf
eine waagerechte Fläche (sollte das Armband im Weg
sein, legen Sie die Uhr auf eine umgedrehte Tasse).
Das Uhrglas kann unten liegen, muss jedoch vorsichtig
behandelt werden.
3. Drücken Sie zunächst den Knopf C (KOMPASS). Der
vierte mittlere Zeiger vollführt zwei Umdrehungen und
erinnert Sie so daran, dass die Uhr gedreht werden
muss. Die Uhr muss waagerecht bleiben. Drehen
Sie sie LANGSAM um zwei, jeweils mindestens 15
Sekunden dauernde volle Umdrehungen.
4. Drücken Sie dann erneut den Knopf C (KOMPASS),
wobei die Uhr nach wie vor waagerecht bleiben muss.
Der vierte mittlere Zeiger bewegt sich hin und her,
was den Abschluss der Kalibrierung anzeigt, und rückt
dann in die aktuelle Deklinationseinstellung.
5. Wenn Sie die Deklination nicht einstellen möchten,
drücken Sie die Krone ein. Andernfalls kann die Uhr
den Deklinationswinkel automatisch ausgleichen.
Drehen Sie hierzu den Kompassring so, dass Norden
auf 12 Uhr zeigt.
6. A oder B drücken, um den vierten mittleren Zeiger
nach Westen (-) oder Osten (+) zu bewegen, um
mit Hilfe der Deklinationsskala auf die magnetische
Deklination Ihres Standortes zu zeigen. Dieser Vorgang
kann durch Niederhalten des Knopfs beschleunigt

186
187
werden. Auf der nächsten Seite finden Sie eine
Abbildung mit einem Beispiel.
7. Drücken Sie die Krone ein, wenn Sie fertig sind.
Deklination auf -14° (14°W) eingestellt
KOMPASSMODUS
Der Kompassmodus ist normalerweise deaktiviert und der
vierte mittlere Zeiger steht auf 12.00 Uhr bzw. zeigt die
Chronographsekunden an.
Der Kompass wird durch Drücken von Knopf C (KOMPASS)
aktiviert. Die Uhr muss dabei waagerecht gehalten
werden. Der Kompasszeiger rückt in die Norden-Stellung.
Wird die Uhr gedreht, rückt der vierte mittlere Zeiger so
weiter, dass er stets auf Norden zeigt. Nach 20 Sekunden
schaltet sich der Kompass automatisch ab und der vierte
mittlere Zeiger kehrt in seinen Normalmodus zurück.
Dadurch wird die Batterie geschont. Durch erneutes
Betätigen von Knopf C (KOMPASS) kann der Kompass
jederzeit erneut für 20 Sekunden aktiviert werden.
ANMERKUNG: Im Kompassmodus bewegt sich der
Sekundenzeiger in 2-Sekunden-Inkrementen.
A
B

188
189
HÖHENMESSER
ÜBERBLICK
EINSTELLEN DES INDIKATORZEIGERS
(VIERTER MITT LERER ZEIGER)
Ziehen Sie die Krone ganz heraus. Der obere und untere
retrograde Zeiger werden automatisch auf den Anfang
ihrer Skalen zurückgesetzt. Der Indikatorzeiger (vierter
mittlerer Zeiger) muss auf 12 Uhr zeigen. Falls nicht,
rücken Sie ihn mithilfe von Knopf A oder B auf 12 Uhr.
A rückt den Zeiger im, B entgegen dem Uhrzeigersinn
weiter. Durch Niederhalten des Knopfs können Sie den
Vorgang beschleunigen. Wenn Sie fertig sind, drücken Sie
die Krone wieder ein.
KALIBRIEREN DES HÖHENMESSERS
Vor Gebrauch muss der Höhenmesser kalibriert werden.
Da ein Höhenmesser die Höhe mithilfe von Druck
ermittelt und sich dieser von einem Standort zum
andern unterscheidet, ist es wichtig, das Instrument
HÖHENMESSERSKALA
(HUNDERTE)
OBERER
RETROGRADER
ZEIGER (TAUSENDE)
KNOPF C
(MASSEINHEITEN)
KNOPF A
(HÖCHSTHÖHE)
KNOPF B
(MINDESTHÖHE)
UNTERER RETRO-
GRADER ZEIGER
(MASSEINHEITEN)
KRONE

190
191
auf einen bekannten Referenzhöhenwert oder eine
Standard referenzhöhe an einem gegebenen Standort
einzustellen. Plötzliche Druckänderungen aufgrund von
Wetterumschwüngen können dazu führen, dass Ihre
Höhenmessung bis zu +/-100 m abweicht, selbst wenn
sich Ihr Standort nicht geändert hat. Führen Sie bei
drastischen Druckänderungen eine erneute Kalibrierung
aus.
Der Höhenmesser wird wie folgt kalibriert:
1. Ziehen Sie die Krone halb (mittlere Stellung) heraus
und warten Sie ab, bis der Indikatorzeiger stillsteht.
2. Ist der Höhenmesser beim Herausziehen der
Krone ausgeschaltet, zeigt der untere retrograde
Zeiger auf die beim letzten Gebrauch des Höhen-
messers gewählte Einheit, andernfalls auf die aktuell
ausgewählte Einheit in der Höhenanzeige. Der vierte
mittlere Zeiger und der obere retrograde Zeiger
müssen auf die aktuelle Höhe zeigen.
3. Drehen Sie mithilfe von Knopf A oder B den vierten
mittleren Zeiger im oder gegen den Uhrzeigersinn, bis
er auf die gewünschte Kalibrierungshöhe zeigt. Durch
Niederhalten des Knopfs können Sie diesen Vorgang
beschleunigen. Der obere retrograde Zeiger bewegt
sich in Relation zu dem vom vierten mittleren Zeiger
angezeigten Höhenwert.
4. Wenn Sie fertig sind, drücken Sie die Krone wieder ein.

192
193
HÖHENMESSER EIN/AUS
Der Höhenmesser wird durch Betätigen von Knopf C
eingeschaltet. Der untere retrograde Zeiger zeigt auf
METERS. Anhand der Markierungen auf dem oberen
Ring zeigt der vierte mittlere Zeiger die aktuelle Höhe in
Hunderterwerten mit einer Unterteilung von jeweils 10
Meter/Fuß, der obere retrograde Zeiger die aktuelle Höhe
in Tausenderwerten mit einer Unterteilung von jeweils
1000 Meter/Fuß an.
Zum Umschalten von Meter auf Fuß drücken Sie Knopf
C ein zweites Mal und zum Zurückschalten von Fuß auf
Meter zweimal (der Höhenmesser wird zunächst aus- und
dann mit Meter-Einheiten wieder eingeschaltet).
Soll der Höhenmesser mit eingestellter Fußeinheit
ausgeschaltet werden, drücken Sie Knopf C einmal. Soll
er dagegen mit eingestellter Metereinheit ausgeschaltet
werden, betätigen Sie Knopf C zweimal (der untere Zeiger
dreht sich zunächst auf FEET und dann auf OFF).
Die Uhr schaltet den Höhenmesser automatisch
60 Minuten nach Aktivierung aus.
Beispiel: Höhe = 2310 m Beispiel: Höhe =7580 Fuß

194
195
ABRUFEN DER MIN/MAX-HÖHENMESSUNG
Die aufgezeichnete Höchsthöhe wird durch Drücken von
Knopf A angezeigt. Der untere retrograde Zeiger zeigt
die Maßeinheit an, in der die Höchsthöhe aufgezeichnet
wurde, sofern der Höhenmesser zum Zeitpunkt der
Knopfbetätigung ausgeschaltet war. Andernfalls
wird die Höchst höhe in der aktuell ausgewählten
Maßeinheit angezeigt. Der vierte mittlere Zeiger zeigt die
Hunderterwerte der Höchsthöhe mit einer Unterteilung
von jeweils 10 METER/FUSS, der obere retrograde Zeiger
die Tausenderwerte mit einer Unterteilung von jeweils
1000 METER/FUSS an.
Durch Drücken von Knopf C können Sie von Meter auf
Fuß und umgekehrt umschalten.
Die aufgezeichnete Höchsthöhe wird 10 Sekunden
lang angezeigt. Soll die Anzeigedauer um 10 Sekunden
verlängert werden, muss vor Ablauf des ersten
10-Sekunden-Intervalls Knopf A betätigt werden.
Die aufgezeichnete Mindesthöhe wird mit Knopf B
angezeigt. Der untere retrograde Zeiger zeigt die
Maßeinheit an, in der die Mindesthöhe aufgezeichnet
wurde, sofern der Höhenmesser zum Zeitpunkt der
Knopfbetätigung ausgeschaltet war. Andernfalls
wird die Mindesthöhe in der aktuell ausgewählten
Maßeinheit angezeigt. Der vierte mittlere Zeiger zeigt die
Hunderterwerte der Mindesthöhe mit einer Unterteilung
von jeweils 10 METER/FUSS, der obere retrograde Zeiger
die Tausenderwerte mit einer Unterteilung von jeweils
1000 Meter/Fuß an.
Die aufgezeichnete Mindesthöhe wird 10 Sekunden lang
angezeigt. Soll die Anzeigedauer um 10 Sekunden verlängert
werden, muss vor Ablauf des ersten 10-Sekunden-Intervalls

196
197
Knopf B betätigt werden. Durch Drücken von Knopf C
können Sie von Meter auf Fuß und umgekehrt umschalten.
TIEFE
ÜBERBLICK
3
AA
B
1
2
3
2
3
2
3
MITTLERER ZEIGER
AUS-ANZEIGE
KNOPF A
KNOPF B
UNTERER ZEIGER
KRONE
Hinweis: der mittlere und der untere Zeiger werden
automatisch kalibriert, wenn Sie die Krone auf Position 3
bringen, um die Zeit einzustellen.
TEMPERATUR
Der Temperatursensor ist stets eingeschaltet und nimmt
mindestens einmal alle 60 Sekunden eine Messung
vor. Die Temperatur wird vom unteren Zeiger auf der
zugehörigen Skala angezeigt.
Wird die Uhr am Handgelenk getragen, wirkt sich die
Körperwärme auf die Temperaturmessung aus. Genauere
Messwerte erhalten Sie, wenn Sie die Uhr abnehmen.
TIEFENSENSOR EIN/AUS
Dieser Sensor ist normalerweise ausgeschaltet und muss
vor dem Eintauchen manuell eingeschaltet werden.
Drücken Sie hierzu kurz Knopf B. Der vierte mittlere

198
199
Zeiger rückt von der AUS-Stellung (6 Uhr) in die 12-Uhr-
Stellung und nimmt dann mindestens alle 5 Sekunden
eine Messung vor. Mit zunehmender Tiefe zeigt der vierte
mittlere Zeiger auf der Tiefenskala die tatsächliche Tiefe
an. Bleibt der Messwert 5 Minuten lang in einem Bereich
zwischen 0 und 2 Metern, schaltet sich der Sensor
automatisch ab. Sie können den Sensor auch manuell
abschalten. Halten Sie hierzu Knopf B 2 Sekunden lang
nieder. Der vierte mittlere Zeiger dreht sich in die AUS-
Stellung (6 Uhr).
ABRUFEN VON MAXIMALER TIEFE/MINIMALER
TEMPERATUR
Nach Erreichen der Oberfläche die Krone ausdrehen
und in die mittlere Position setzen. Der mittlere und der
untere Zeiger bewegen sich, wobei Ersterer die größte
Tiefe und Letzterer die niedrigste Temperatur anzeigt, die
während des letzten Abstiegs verzeichnet wurden. Wenn
der Tiefensensor wieder aktiviert wird, wird der Speicher
gelöscht.
Bei einer noch nicht benutzten Uhr zeigt der mittlere
Zeiger 0 Meter und der untere Zeiger 0° C an. Die Krone
muss wieder festgeschraubt werden, bevor die Uhr in
Gebrauch genommen bzw. eingetaucht wird.
BATTERIELADESTAND
Die Uhr überwacht den Ladestand der Batterie und zeigt
anhand der Bewegung des Sekundenzeigers visuell
den aktuellen Ladestand an. Dieser wird in drei Stufen
angezeigt – Normal, Niedrig und Ersetzen.
Bei normalem Ladestand rückt der Sekundenzeiger pro
Sekunde um eine Zeigerstellung weiter.

200
201
Bei niedrigem Ladestand rückt der Sekundenzeiger
nur alle 2 Sekunden um zwei Zeigerstellungen vor. Es
empfiehlt sich, die Batterie bei niedrigem Ladestand
auszutauschen.
Bei „Ersetzen“ rückt der Sekundenzeiger nur alle
5 Sekunden um fünf Zeigerstellungen vor. Zu diesem
Zeitpunkt kann der Tiefensensor nicht aktiviert werden
und die Batterie muss unverzüglich ausgewechselt
werden.
YACHT RACER
STUNDENZEIGER
SEKUNDENZEIGER
VIERTER
MITTLERER
ZEIGER
KRONE
OBERER
ZEIGER
PERFECT DATE
™
-
SKALA
UNTERER ZEIGER
MINUTENZEIGER
2 31
A
B
C

202
203
PERFECT DATE
Mit der Perfect Date
™
-Funktion muss das Datum bis
zum Jahre 2060 nicht mehr umgestellt werden. Die Uhr
berücksichtigt automatisch kurze Monate und Schaltjahre
und zeigt bei Bedarf immer das richtige Datum an. Das
Datum wurde vom Timex-Werk bereits eingegeben.
Wenn beim Erststart einer neuen Uhr das Datum als
früher oder später relativ zum Datum an Ihrem Standort
angezeigt wird, muss das Datum auf Ihr Ortsdatum
umgestellt werden. Die Krone auf die Außenposition
herausziehen. Der vierte mittlere Zeiger dreht sich eine
Umdrehung auf dem Zifferblatt, hält auf der 12-Uhr-
Position etwa 5 Sekunden lang an und rückt dann auf
das Datum vor, auf das die Uhr aktuell eingestellt ist. Die
Krone nach vorne drehen, um die Zeit auf das aktuelle
Datum heraufzusetzen (bzw. nach hinten drehen, um
die Zeit auf das aktuelle Datum herabzusetzen). Jedes
Mal, wenn Sie Mitternacht durchlaufen, ändert sich
das Datum um einen Tag. Nachdem das Datum auf die
Ortszeit eingestellt wurde, die Krone weiterdrehen, um
die Zeiger auf die aktuelle Ortszeit zu setzen. Dabei darauf
achten, dass die AM/PM-Einstellung berücksichtigt wird.
Wenn die korrekte Uhrzeit eingestellt ist, die Krone ganz
eindrücken. Im normalen Betrieb zeigt der vierte mittlere
Zeiger das Datum an, sobald die Krone gedrückt wird. Der
Zeiger wird auf die Position des aktuellen Datums gemäß
des Außenrings des Gehäuses gesetzt. Der Zeiger wird
angehalten, sodass das Datum ablesbar ist, und kehrt
dann wieder in die 12-Uhr-Haltestellung zurück. Es ist zu
beachten, dass die Perfect Date
™
-Funktion nur im
Zeitmodus funktioniert. Wenn die Batterie verbraucht ist
und ausgetauscht wird, muss die Perfect Date-Funktion

204
205
erneut kalibriert werden. Wenn die Batterie ausgetauscht
werden muss, sollten Sie die Uhr an ein Timex-
Servicezentrum senden, wo die Batterie ausgetauscht
und die Perfect Date-Funktion wieder auf das aktuelle
Datum für den Standort kalibriert wird, an den die Uhr
zurückgesandt wird.
EINSTELLEN DES VIERTEN MITTLEREN ZEIGERS
Der vierte mittlere Zeiger wird wie folgt justiert:
1. Die Krone auf Position 3 herausziehen. Die Zeiger
vervollständigen einen Umlauf und stellen sich dann
automatisch ein.
2. Innerhalb von 10 Sekunden nach dem Herzausziehen
der Krone auf deren Außenposition sollte der vierte
mittlere Zeiger auf 12 zeigen. Sollte dies nicht der Fall
sein, Knopf A oder B drücken, um den Zeiger entgegen
des Uhrzeigersinns oder im Uhrzeigersinn zu rücken,
bis er auf 12 zeigt. Durch das Halten von Knopf A oder
B bewegt sich der Zeiger schneller. Bitte beachten Sie,
dass nach 5 Sekunden der Krone auf Position 3 ohne
weitere Aktion, der vierte mittlere Zeiger zur Anzeige
des aktuellen Datums gesetzt wird.
3. Nach Einstellung die Krone wieder in Position 1
drücken.
MODUSAUSWAHL
Knopf C drücken, um den oberen Zeiger auf die
gewünschte Funktion zu setzen.
UHRZEIT:
Zeigt nur die aktuelle Uhrzeit an (die Perfect Date-
Funktion funktioniert nur im Zeitmodus).

206
207
YACHT RACE TIMER 5:
Der Countdown-Timer beginnt bei 5 Minuten und startet
den Chronograph, sobald Null erreicht wird.
YACHT RACE TIMER 3:
Der Countdown-Timer beginnt bei 3 Minuten und startet
den Chronograph, sobald Null erreicht wird.
YACHT RACE TIMER 1:
Der Countdown-Timer beginnt bei 1 Minute und startet
den Chronograph, sobald Null erreicht wird.
CHRONOGRAPH:
Der Chronograph funktioniert ohne den Countdown-Timer.
BETRIEB DES YACHT RACE TIMERS
Die Uhr verfügt über einen Countdown-Timer von 5, 3
oder 1 Minute. Sobald der Countdown-Timer Null erreicht,
wird automatisch ein 1 Stunde andauernder Chronograph
gestartet.
1. C drücken, bis der obere Zeiger den gewünschten Yacht
Race Timer-Modus von 5, 3 oder 1 Minute anzeigt.
2. A (START/STOP) drücken, um zu beginnen. Der vierte
mittlere Zeiger zeigt die rückwärtszählenden Sekunden
und der untere Zeiger die rückwärtszählenden
Minuten an. (Achten Sie darauf, dass die Knöpfe B und
C bei laufendem Countdown-Timer deaktiviert sind.)
3. Zum Abbruch des Countdown-Prozesses A (START/
STOP) drücken. (Achten Sie darauf, dass der Knopf C
aktiviert ist, bis der Countdown-Timer zurückgesetzt
wird.)

208
209
4. Zum Zurücksetzen den Knopf B (SPLIT/RESET
[Zwischenzeit/Zurücksetzen]) 3 Sekunden lang
halten. Hierdurch wird der Countdown-Timer auf
die ursprünglich ausgewählte Dauer von 5, 3 oder 1
Minute zurückgesetzt.
Beim normalen Betrieb des Yacht Race Timers wird
der Chronograph automatisch gestartet, sobald der
Countdown-Timer Null erreicht. Wenn der Countdown-
Timer eine volle Minute erreicht, erklingt ein Signalton.
Dieses ist auch zu hören, wenn die letzten 5 Sekunden
erreicht werden und die Chronograph-Funktion einsetzt.
Der Chronograph durchläuft die 30-minütige Abfolge
zweimal, um insgesamt 1 Stunde zu erreichen.
BETRIEB DES CHRONOGRAPHEN
Die Uhr verfügt über einen einstündigen Chronograph,
der unabhängig vom Yacht Race Timer verwendet
werden kann.
1. Den Knopf C drücken, bis sich der obere Zeiger am
Beginn der 30-minütigen Chronograph-Skala befindet.
2. A (START/STOP) drücken, um zu beginnen. Der
vierte mittlere Zeiger zeigt die rückwärtszählenden
Sekunden an, der untere Zeiger zeigt die Minuten an,
die in einer 5-Minuten-Skala rückwärtsgezählt werden,
und der obere Zeiger zeigt die halbe Stunde an, die in
einer 30-Minuten-Skala vorwärtsgezählt wird. Jedes
Mal, wenn der untere Zeiger 5 Minuten erreicht, kehrt
er auf die Nullposition zurück, wohingegen der obere
Zeiger weiterhin die 30-Minuten-Skala durchläuft.

210
211
(Achten Sie darauf, dass der Knopf C bei laufendem
Countdown-Timer deaktiviert ist.)
3. Zum Messen einer Zwischenzeit den Knopf B (SPLIT/
RESET [Zwischenzeit/Zurücksetzen]) drücken. Die
oberen, unteren und mittleren Zeiger halten deren
Positionen, so dass Sie die Zwischen- oder Rundenzeit
notieren können. Der Chronograph behält die
Zeitmessung bei, auch wenn die Zeiger dies nicht
anzeigen. Um die Zeiger wieder freizugeben, den
Knopf B (ZWISCHENZEIT/ZURÜCKSETZEN) drücken. Die
Zeiger werden dann rasch auf die Position gesetzt, die
die gesamte verstrichene Zeit anzeigt.
4. Zum Abbruch des Chronographen A (START/STOP)
drücken. (Achten Sie darauf, dass der Knopf C bei
laufendem Countdown-Timer deaktiviert ist, bis der
Chronograph zurückgesetzt wird.)
5. Zum Zurücksetzen den Knopf B (SPLIT/RESET
[Zwischenzeit/Zurücksetzen]) 3 Sekunden lang halten.
Hierdurch wird der Chronograph wieder auf den
Beginn der 30-Minuten-Skala zurückgesetzt.
Im Normalbetrieb durchläuft der Chronograph die
30-minütige Abfolge zweimal, um insgesamt 1 Stunde zu
erreichen. Nach Ablauf dieser Stunde verbleibt der obere
Zeiger auf der 30-Minuten-Markierung und der untere
Zeiger kehrt auf Null zurück. Die Chronograph-Funktion
muss zurückgesetzt werden, bevor die Funktion erneut
verwendet wird oder bevor ein anderer Modus eingesetzt
wird. (Es ist zu beachten, dass Knopf A deaktiviert wird,
sobald die Höchstzeit von 1 Stunde erreicht wird, und
nicht mehr funktioniert, bis der Chronograph durch das
30-sekündige Halten von Knopf B zurückgesetzt wird.)

212
213
INDIGLO
®
ZIFFERBLATTBELEUCHTUNG
(NUR PRO-VERSION)
Yacht Racer PRO umfasst zusätzlich die INDIGLO
®
-
Zifferblattbeleuchtung. Bei Dunkelheit kann das Zifferblatt
durch Aktivieren der INDIGLO
®
-Zifferblattbeleuchtung
durch Drücken der Krone ganz einfach abgelesen
werden. Die Yacht Racer PRO verwendet ein spezielles
Lumineszenzmaterial auf dem Zifferblatt, das stark
genug leuchtet, um die Uhr ablesen zu können, aber
gewährleistet, dass Ihre Nachtsicht nicht reduziert wird,
wenn das Licht verlöscht.
CHRONO-TIMER
SEKUNDENZEIGER
4.
MITTLERER
ZEIGER
OBERER
ZEIGER
PERFECT DATE
™
-
SKALA
MINUTENZEIGER
STUNDENZEIGER
KRONE
UNTERER
ZEIGER
2 31
A
B
C

214
215
PERFECT DATE
Mit der Perfect Date
™
-Funktion Ihrer Uhr muss das
Datum bis zum Jahre 2060 nicht mehr umgestellt werden.
Die Uhr berücksichtigt automatisch kurze Monate und
Schaltjahre und zeigt bei Bedarf immer das richtige
Datum an. Das Datum wurde vom Timex-Werk bereits
eingegeben. Wenn beim Erststart einer neuen Uhr das
Datum als früher oder später relativ zum Datum an
Ihrem Standort angezeigt wird, muss das Datum auf
Ihr Ortsdatum umgestellt werden. Die Krone auf die
Außenposition herausziehen. Der vierte mittlere Zeiger
dreht sich eine Umdrehung auf dem Zifferblatt, hält auf
der 12-Uhr-Position etwa 5 Sekunden lang an und rückt
dann auf das Datum vor, auf das die Uhr aktuell eingestellt
ist. Die Krone nach vorne drehen, um die Zeit auf das
aktuelle Datum heraufzusetzen (bzw. nach hinten drehen,
um die Zeit auf das aktuelle Datum herabzusetzen).
Jedes Mal, wenn Sie Mitternacht durchlaufen, ändert sich
das Datum um einen Tag. Nachdem das Datum auf die
Ortszeit eingestellt wurde, die Krone weiterdrehen, um
die Zeiger auf die aktuelle Ortszeit zu setzen. Dabei darauf
achten, dass die AM/PM-Einstellung berücksichtigt wird.
Wenn die korrekte Uhrzeit eingestellt ist, die Krone ganz
eindrücken. Im normalen Betrieb zeigt der vierte mittlere
Zeiger das Datum an, sobald die Krone gedrückt wird. Der
Zeiger wird auf die Position des aktuellen Datums gemäß
des Außenrings des Gehäuses gesetzt. Der Zeiger wird
angehalten, sodass das Datum ablesbar ist, und kehrt
dann wieder in die 12-Uhr-Haltestellung zurück. Es ist zu
beachten, dass die Perfect Date
™
-Funktion nur im
Zeitmodus funktioniert. Wenn die Batterie verbraucht ist
und ausgetauscht wird, muss die Perfect Date-Funktion

216
217
erneut kalibriert werden. Wenn die Batterie ausgetauscht
werden muss, sollten Sie die Uhr an ein Timex-
Servicezentrum senden, wo die Batterie ausgetauscht
und die Perfect Date-Funktion wieder auf das aktuelle
Datum für den Standort kalibriert wird, an den die Uhr
zurückgesandt wird.
EINSTELLEN DES VIERTEN MITTLEREN ZEIGERS
Der vierte mittlere Zeiger wird wie folgt justiert:
1. Die Krone auf Position 3 herausziehen. Die Zeiger
vervollständigen einen Umlauf und stellen sich dann
automatisch ein.
2. Wenn der Zeiger anhält, sollte der vierte mittlere
Zeiger auf 12 zeigen. Sollte dies nicht der Fall sein,
Knopf A oder B drücken, um den Zeiger entgegen des
Uhrzeigersinns oder im Uhrzeigersinn zu rücken, bis
er auf 12 zeigt. Durch das Halten von Knopf A oder B
bewegt sich der Zeiger schneller. Bitte beachten Sie,
dass nach 5 Sekunden der Krone auf Position 3 ohne
weitere Aktion, der vierte mittlere Zeiger zur Anzeige
des aktuellen Datums gesetzt wird.
3. Nach Einstellung die Krone wieder in Position 1
drücken.
MODUSAUSWAHL
Knopf C drücken, um den oberen Zeiger auf die
gewünschte Funktion zu setzen.
ZEIT:
Zeigt nur die aktuelle Uhrzeit an (die Perfect Date
™
-
Funktion funktioniert nur im Zeitmodus).

218
219
BETRIEB DES CHRONOGRAPHEN
Die Uhr hat einen 4-Stunden-Chronographen. Am
Ende des Zeitraums von vier Stunden schaltet sich der
Chronograph automatisch ab. Dadurch wird Batterie
gespart, falls der Chronograph versehentlich aktiviert
wird.
1. Knopf C drücken, bis der obere Zeiger sich am Beginn
der oberen Chronograph-Skala befindet und der
untere auf dem 0 auf der unteren Skala.
2. A (START/STOP) drücken, um zu beginnen. Der
vierte mittlere Zeiger zeigt die rückwärtszählenden
Sekunden an, der untere Zeiger zeigt die Minuten
an, die in einer 30-Minuten-Skala rückwärtsgezählt
werden, und der obere Zeiger zeigt die Stunde an, die
in einer 4-Minuten-Skala vorwärtsgezählt wird. Jedes
Mal, wenn der untere Zeiger 30 Minuten erreicht, kehrt
er auf die Nullposition zurück, um mit dem nächsten
30-Minuten-Zeitraum zu beginnen, wohingegen der
obere Zeiger weiterhin die 4-Minuten-Skala durchläuft.
(Achten Sie darauf, dass der Knopf C bei laufendem
Chronograph deaktiviert ist.)
3. Zum Messen einer Zwischenzeit den Knopf B
(ZWISCHENZEIT/ZURÜCKSTELLEN) drücken. Die oberen,
unteren und mittleren Zeiger halten deren Positionen,
so dass Sie die Zwischen- oder Rundenzeit notieren
können. Der Chronograph behält die Zeitmessung
bei, auch wenn die Zeiger dies nicht anzeigen.
Um die Zeiger wieder freizugeben, den Knopf B
(ZWISCHENZEIT/ZURÜCKSTELLEN) drücken. Die Zeiger
werden dann rasch auf die Position gesetzt, die die
gesamte verstrichene Zeit anzeigt.

220
221
4. Zum Abbruch des Chronographen A (START/STOP)
drücken. (Achten Sie darauf, dass der Knopf C bei
angehaltenem Chronograph deaktiviert ist, bis der
Chronograph zurückgesetzt wird.)
5. Um den Chronographen nach dem Anhalten
zurückzusetzen, Knopf B (SPLIT/RESET - Zwischenzeit/
Zurückstellen) drücken. Dadurch wird der Chronograph
wieder auf den Beginn der 30-Minuten- und
4-Stunden-Skalen auf den beiden Unterzifferblättern
zurückgesetzt.
Im Normalbetrieb durchläuft der Chronograph die
30-minütige Abfolge acht Mal, um insgesamt vier
Stunden zu erreichen. Nach Ablauf dieses 4-Stunden-
Zeitraums verbleibt der obere Zeiger auf der 4-Stunden-
Markierung und der untere Zeiger kehrt auf Null zurück.
Die Chronograph-Funktion muss zurückgesetzt werden,
bevor die Funktion erneut verwendet wird oder bevor ein
anderer Modus eingesetzt wird. (Es ist zu beachten,
dass Knopf A deaktiviert wird, sobald die Höchstzeit von
vier Stunden erreicht wird, und nicht mehr funktioniert,
bis der Chronograph durch Drücken von Knopf B
zurückgesetzt wird.)
COUNTDOWN-TIMER
Die Uhr hat eine Countdown-Timer-Funktion.
Besonderer Hinweis: Der obere Zeiger, der untere
Zeiger und der vierte mittlere Zeiger sind in den Schritten
3, 4 und 5 unten vereint. Wenn Sie die Minuten- und
Sekundenzeiger vor/zurück bewegen, sehen Sie, dass
alle drei Zeiger auf die Addition oder Subtraktion der
Zeit für die Countdown-Timer-Dauer reagieren. Wenn
Sie die Krone auf die mittlere Position herausgezogen

222
223
haben, durchlaufen Sie durch Drücken von Knopf C den
Zeigerzyklus wie folgt: Oberer Zeiger (Knopf C drücken) –
Unterer Zeiger (Knopf C drücken) – vierter mittlerer Zeiger
(Knopf C drücken) zurück zu oberem Zeiger ... Dadurch
können Sie den Zyklus mit den Zeigern durchlaufen,
die Sie einstellen müssen, um die gewünschte
Countdownzeit festzulegen. Durch Drücken der Krone
wird das Einstellverfahren beendet und die bis zu diesem
Punkt im Zyklus eingestellten Werte werden bestätigt.
EINSTELLEN DES COUNTDOWN-TIMERS
Der Countdown-Timer kann nur eingestellt werden, wenn
diese Funktion gerade nicht läuft. Wurde der Countdown-
Timer zuvor bereits verwendet, muss er zurückgesetzt
werden. Ist der Timer derzeit in Betrieb, muss er
angehalten und zurückgesetzt werden, um ihn einstellen
zu können.
1. Den Knopf C drücken, bis sich der obere Zeiger an
einem Punkt in der Timer-Skala befindet. Wurde der
Timer bereits zuvor eingestellt, steht der Zeiger auf
der zuvor eingestellten Zeit. Wird der Timer zum ersten
Mal eingestellt, steht der Zeiger auf der Timer-Skala
auf 0.
2. Die Krone auf die mittlere Position herausziehen.
3. Um die gewünschte Anzahl von Stunden in
30-Minuten-Inkrementen (bis zur maximalen Zeit
von 4:00:00) einzustellen, Knopf A drücken, um den
oberen Zeiger gegen den Uhrzeigersinn zu bewegen
(durch Drücken von Knopf B wird dieser Zeiger im
Uhrzeigersinn bewegt), bis die gewünschte Anzahl von
Stunden ausgewählt wurde. Bitte beachten, dass Sie
die Anzahl der Stunden mit dem nächsten 30-Minuten-
Inkrement zur gewünschten Gesamtzeit wählen

224
225
(Beispiel: für einen gewünschten Countdown von
2:53:30 wählen Sie 3 Stunden). Wenn die Einstellung
der Anzahl der Stunden abgeschlossen ist, Knopf C
drücken, um Ihre Auswahl zu bestätigen.
4. Um die gewünschte Anzahl von Minuten in 1-Minute-
Inkrementen einzustellen, Knopf A drücken, um den
unteren Zeiger gegen den Uhrzeigersinn zu bewegen
(durch Drücken von Knopf B wird dieser Zeiger im
Uhrzeigersinn bewegt), bis die gewünschte Anzahl
von Minuten ausgewählt wurde. Bitte beachten,
dass Sie die Anzahl der Minuten vor- oder rückwärts
einstellen, um die gewünschte Zeit zu erhalten
(Beispiel: Für eine gewünschte Gesamt-Countdownzeit
von 2:53:30, Knopf A sieben Mal drücken, dadurch
wird die Gesamtcountdownzeit von 3 Stunden auf
2:53:00 verringert). Sie werden sehen, dass sich der
Stundenzeiger von der 3-Stunden-Markierung etwas
zurück zur 2,5-Stunden-Markierung bewegt. Wenn die
Einstellung der Anzahl der Minuten abgeschlossen ist,
Knopf C drücken, um Ihre Auswahl zu bestätigen.
5. Um die gewünschte Anzahl von Sekunden in
1-Sekunde-Inkrementen einzustellen, Knopf A drücken,
um den vierten Zeiger gegen den Uhrzeigersinn
zu bewegen (durch Drücken von Knopf B wird
dieser Zeiger im Uhrzeigersinn bewegt), bis die
gewünschte Anzahl von Sekunden ausgewählt wurde.
Bitte beachten, dass Sie die Anzahl der Sekunden
addieren oder subtrahieren, um die gewünschte
Gesamtzeit zu erhalten (Beispiel: Für eine gewünschte
Gesamtcountdownzeit von 2:53:30 Knopf B 30 Mal
drücken, um 30 Sekunden auszuwählen). Wenn Sie die
Anzahl der Sekunden eingestellt haben, die Krone auf

226
227
Position 1 drücken, um zu bestätigen, dass die Auswahl
des Countdown-Timer-Werts abgeschlossen ist.
COUNTDOWN-TIMER-BETRIEB
Wenn Sie den Countdown-Timer auf die gewünschte Zeit
für den Countdown eingestellt haben, können Sie ihn jetzt
in Betrieb nehmen.
Countdown-Sequenz starten: Zum Starten des
Countdown-Timers Knopf A drücken. Der vierte mittlere
Zeiger und der untere Zeiger beginnen, sich gegen den
Uhrzeigersinn zu bewegen. Der obere Zeiger bewegt
sich im Uhrzeigersinn. Die Zeiger geben weiterhin die
in der Countdown-Sequenz verbleibende Zeit an, bis
die eingestellte Countdown-Timer-Zeit abgelaufen ist
und der Wert der restlichen Zeit Null erreicht. Erreicht
die verbleibende Zeit in der Sequenz Null, ertönt ein
Signalton, der Sie darauf hinweist, dass die Countdown-
Sequenz abgeschlossen ist.
Countdown-Sequenz unterbrochen: Wenn Sie die
Countdown-Sequenz anhalten möchten, bevor Null
erreicht wird, den Knopf A drücken (der vierte mittlere
Zeiger sowie der obere und der untere Zeiger bewegen
sich dann nicht mehr). Wenn Sie die Countdown-Sequenz
zu einem späteren Zeitpunkt wieder fortsetzen möchten,
einfach den Knopf A drücken (der vierte mittlere Zeiger
sowie der obere und der untere Zeiger bewegen sich
dann wieder).
Countdown-Sequenz zurücksetzen: Wenn die
Countdown-Sequenz Null erreicht hat und der Signalton
ertönt ist, können Sie den Countdown-Timer auf den
eingestellten Wert zurücksetzen. Dazu Knopf B drücken
(der vierte mittlere Zeiger sowie der obere und der

228
229
untere Zeiger bewegen sich, um den vorher mittels
der Countdown-Timer-Funktion eingestellten Zeitwert
anzugeben).
Countdown-Timer-Wert löschen: Sie können den Wert
des Countdown-Timer auf Null zurücksetzen. Dies ist nur
möglich, wenn der Countdown-Timer nicht in Betrieb ist
und zurückgesetzt wurde. Läuft der Countdown-Timer,
müssen Sie die Countdown-Sequenz zunächst durch
Drücken von Knopf A und dann Knopf B stoppen. Dadurch
wird der Countdown-Timer angehalten und auf den
derzeit ausgewählten Zeitwert zurückgesetzt. Um den
Countdown-Timer-Wert auf Null zurückzusetzen, Knopf
B drücken und zwei Sekunden lang gedrückt halten.
Sie sollten nun den Anweisungen zum Einstellen des
Countdown-Timer-Werts auf die gewünschte Zeit folgen.
Zwischenzeit-Funktion: Während der Countdown-Timer
in Betrieb ist, können Sie mit der Zwischenzeit-Funktion
die restliche Zeit in der Countdown-Sequenz ablesen:
Um die Zwischenzeit-Funktion zu verwenden, Knopf B
drücken. Dadurch werden der obere, der untere und
der vierte mittlere Zeiger angehalten. Die Countdown-
Funktion läuft aber intern weiter, auch wenn die Zeiger
angehalten wurden.
Um die Bewegung des oberen, unteren und vierten
mittleren Zeigers fortzusetzen, Knopf B noch einmal
drücken. Die Zeiger rücken auf die richtige Position, um
die aktuelle Zeit in der Countdown-Sequenz anzuzeigen.

230
231
3GMT
SEKUNDENZEIGER
KRONE
DREHBARER
AUSSENRING
(24-STUNDEN-FORMAT)
VIERTER MITTLERER
ZEIGER
MINUTEN-
ZEIGER
STUNDENZEIGER
INNENRING/ZIFFERN
(24-STUNDEN-
FORMAT)
A
2 31
3-ZEITZONEN-FUNKTION
Ihre Uhr kann drei Zeitzonen anzeigen.
1. Stunden- und Minutenzeiger: Zeigt die Zeit in einem
Standard-12-Stunden Format an. Bitte beachten: Das
im Datumsfenster angezeigte Datum ist mit der von
diesen beiden Zeigern angezeigten Zeit verknüpft.
2. Vierter mittlerer Zeiger und Innenring: Zeigt die Zeit in
einem 24-Stunden-Format an.
3. Vierter mittlerer Zeiger und Gehäuse-Außenring: Zeigt
die Zeit in einem 24-Stunden-Format an.

232
233
KALIBRIERUNG DES VIERTEN MITTLEREN ZEIGERS
Der vierte mittlere Zeiger wird im Timex-Werk auf die
Standardminuten innerhalb 1 Stunde gemäß Universal
Time Coordinated kalibriert. Weltweit verwenden die
meisten Standorte die Standardminuten. Sollte für den
Standort, den Sie für die zweite und dritte Zeitzone
einsetzen, die Standardminuten verwenden, muss der
vierte mittlere Zeiger nicht erneut kalibriert werden. Nur
wenn Sie wünschen, dass die zweite und dritte Zeitzone
Standorte wiedergibt, die nicht den Standardminuten
folgen, müssen Sie den nachfolgenden Anweisungen zur
erneuten Kalibrierung der vierten mittleren Zeigers folgen:
1. Die Krone auf Position 3 herausziehen. Der vierte
mittlere Zeiger zeigt auf 12 Uhr.
2. Die Krone drehen, um den Minutenzeiger in die
korrekte Stellung innerhalb der Stunde für den
EINSTELLEN DES VIERTEN MITTLEREN ZEIGERS
Der vierte mittlere Zeiger wird wie folgt justiert:
1. Die Krone auf Position 3 herausziehen.
2. Der vierte mittlere Zeiger muss auf 12 Uhr zeigen.
Sollte der vierte mittlere Zeiger innerhalb von 5
Sekunden nach dem Herausziehen der Krone auf die
Position 3 nicht in die 12-Uhr-Stellung rücken, muss
er durch Drücken von Knopf A im Uhrzeigersinn in die
12-Uhr-Stellung gedreht werden. Durch das Halten von
Knopf A bewegt sich der Zeiger schneller.
3. Nach Einstellung die Krone wieder in Position 1
drücken.

234
235
Standort setzen, für den Sie die zweiten und dritten
Zeitzonen einrichten wollen.
3. Krone in Position 2 drücken. Der vierte mittlere Zeiger
zeigt auf die derzeit kalibrierte Stellung der Minuten
innerhalb der Stunde.
4. Knopf A erneut drücken, um den vierten mittleren
Zeiger im Uhrzeigersinn vorzurücken, bis er mit den
Minutenzeiger gleichsteht. Durch das Halten von Knopf
A bewegt sich der Zeiger schneller.
5. Die Krone auf Position 3 herausziehen. Der vierte
mittlere Zeiger zeigt auf 12 Uhr.
6. Die Krone drehen, bis die Stunden- und Minutenzeiger
die korrekte Zeit anzeigen.
7. Nach Einstellung die Krone wieder in Position 1
drücken.
Bitte beachten: Der vierte mittlere Zeiger zeichnet die
Zeit mit der derzeit kalibrierten Stellung der Minuten
innerhalb der Stunde auf. Zeitzonen 2 und 3 nutzen beide
den vierten mittleren Zeiger, und deswegen müssen
die in Zeitzonen 2 und 3 aufgezeichneten Standorte zur
korrekten Anzeige dieser Zeitzonen die gleichen Minuten
innerhalb der Stunde verwenden.

236
237
EINSTELLEN DES VIERTEN MITTLEREN ZEIGERS
(ZEITZONE II)
Achten Sie auf die aktuelle Uhrzeit in dem Standort, für
den Sie die zweite Zeitzone einstellen wollen. Knopf A
drücken, bis der vierte mittlere Zeiger im Innenring auf
diese Zeit zeigt. (Achten Sie darauf, dass diese Skala
einem 24-Stunden-Format entspricht). Der vierte mittlere
Zeiger rückt jedes Mal 30 Minuten vor, wenn Knopf A
gedrückt wird. Durch das Halten von Knopf A bewegt sich
der Zeiger schneller. Hierdurch wird die zweite Zeitzone
auf der Uhr eingestellt.
EINSTELLEN DES GEHÄUSE-AUSSENRINGS
(ZEITZONE III)
Die dritte Zeitzone wird eingestellt, indem gemäß der
bestehende Einstellung des vierten mittleren Zeigers
der Gehäuse-Außenring auf die gewünschte Zeit der
dritten Zeitzone gesetzt wird. (Achten Sie darauf, dass
diese Skala einem 24-Stunden-Format entspricht). Der
Außenring verfügt über 72 Positionen. Zum Vorrücken
des Außenrings um 1 Stunde müssen Sie diesen um drei
Positionen nach vorne setzen (3 Klicks). Achten Sie auf
die aktuelle Uhrzeit in dem Standort, für den Sie die dritte
Zeitzone einstellen wollen. Drehen Sie den Gehäuse-
Außenring entgegen dem Uhrzeigersinn, um die korrekte
Stundenmarkierung für diese Uhrzeit mit dem vierten
mittleren Zeiger festzusetzen.

238
239
TACHYMETERFUNKTION
(nicht bei allen Modellen)
Anhand dieser Methode bestimmt das Tachymeter le-
diglich Geschwindigkeiten über 60 Einheiten pro Stunde.
Sollen langsamere Geschwindigkeiten gemessen werden,
muss eine kleinere Maßeinheit gewählt werden. Die
Tachymeterfunktion ist unabhängig von der Entfernungs-
einheit (d.h. Meilen, Seemeilen, Kilometer, Meter usw.),
solange für alle Berechnungen dieselbe Längeneinheit
benutzt wird.
1. Legen Sie die Start- und Endmarkierungen für Ihre
vorbestimmte Entfernung fest.
2. Starten Sie den Chronographen, sobald das Objekt für
die Geschwindigkeitsmessung die Startmarkierung
passiert.
3. Stoppen Sie den Chronographen, sobald das Objekt
für die Geschwindigkeitsmessung die Endmarkierung
passiert.
4. Bestimmen Sie durch Vergleichen des Chronographen-
Sekundenzeigers mit den Tachymetermarkierungen
die Geschwindigkeit des Objekts.

240
241
RECHENSCHIEBERFUNKTION
Die Rechenschieberfunktion des oberen Rings wird
durch Drehen des Außenrings bedient. Der Innenring
ist nicht beweglich. Der Außenring bezieht sich immer
auf „Entfernung“ oder „Geschwindigkeit“ oder andere
Daten, die zeitlich variieren. Der Innenring weist lediglich
Zeiteinheiten auf.
Außenring
Auf dem Außenring steht die Zahl „10“ für Teiler oder das
Vielfache von 10, wie z. B. 0,1, 1,0, 10 oder 100.
Innenring
Auf dem Innenring steht „MPH“ (Meilen pro Stunde) für
den „Geschwindigkeitsindex“. Mithilfe dieses Indexes
wird die Geschwindigkeit von beliebigen Daten pro
Stunde berechnet. Die Beschriftungen „STAT“ (statute
miles – britische Meilen) und „NAUT“ (nautical miles –
Seemeilen) auf dem Innenring dienen der Umrechnung
von Entfernungseinheiten.
AUSSENRING
INNENRING

242
243
Die folgenden Beispiele erläutern, wie der Rechenschieber
zu verwenden ist.
GESCHWINDIGKEITSBERECHNUNG:
Mit welcher Geschwindigkeit werden 10 Seemeilen
in 15 Minuten zurückgelegt?
Bekannte Faktoren: Entfernung: 10 Seemeilen Zeit:
15 Minuten
• Den „10“-Pfeil auf dem Außenring mit „15“ auf dem
Innenring ausrichten.
• Die erforderliche Geschwindigkeit wird direkt über der
Markierung „MPH“ auf dem Innenring angezeigt.
Die Antwort: 40 Seemeilen pro Stunde
Zeitberechnung: Wie lange dauert es, 10 Seemeilen
mit einer Geschwindigkeit von 40 Meilen pro Stunde
zurückzulegen?
Bekannte Faktoren: Geschwindigkeit: 40 Meilen pro
Stunde Entfernung: 10 Seemeilen
• „40“ auf dem Außenring mit der Markierung „MPH“ auf
dem Innenring ausrichten.
• Die erforderliche Zeit wird direkt unter dem „10“-Pfeil
auf dem Außenring angezeigt, nämlich „15“ auf dem
Innenring.
Die Antwort: 15 Minuten

244
245
KONVERTIERUNG VON EINHEITEN:
Um Entfernung von Seemeilen zu britischen Meilen und
Kilometern umzurechnen.
Bekannter Faktor: Zu konvertierende Entfernung beträgt
10 Seemeilen
• Den „10“-Pfeil auf dem Außenring über „NAUT“ auf
dem Innenring ausrichten. Die Konvertierung zu
britischen Meilen (11,5) wird über der Markierung
„STAT“ auf dem Innenring angezeigt und zu Kilometern
(18,5) über der Markierung „MPH“.
ENTFERNUNGSBERECHNUNG:
Was für eine Entfernung kann bei 40 Meilen pro
Stunde und einer Zeit von 15 Minuten zurückgelegt
werden?
Bekannte Faktoren: Geschwindigkeit: 40 Seemeilen pro
Stunde Zeit: 15 Minuten
• „40“ auf dem Außenring direkt über der Markierung
„MPH“ auf dem Innenring ausrichten.
• Die zurückgelegte Entfernung kann direkt über der
Markierung „15“ auf dem Innenring abgelesen werden.
Die dort angezeigte Zahl ist „10“.
Die Antwort: Die zurückgelegte Entfernung beträgt
10 Meilen.

246
247
JUSTIEREN DES ARMBANDS
(Die nachstehenden Armbandanleitungen gelten,
eventuell mit leichten Abweichungen, für alle
Uhrenmodelle.)
ARMBAND MIT SCHIEBEVERSCHLUSS
1. Öffnen Sie die
Verschlussplatte.
2. Schieben Sie den Verschluss
an die gewünschte Stelle.
3. Halten Sie die
Verschlussplatte unter
Druckausübung fest und bewegen Sie den Verschluss
hin und her, bis er mit den Rillen an der Unterseite des
Armbands im Eingriff ist.
4. Drücken Sie die Verschlussplatte an, bis sie einrastet.
Nicht gewaltsam schließen. Der Verschluss kann
beschädigt werden.
ARMBAND MIT FALTVERSCHLUSS
1. Finden Sie den Federsteg, der das Armband mit dem
Verschluss verbindet.
2. Drücken Sie den Federsteg mit einem spitzen
Instrument ein und drehen Sie vorsichtig das Armband,
bis es sich löst.
3. Bestimmen Sie die Größe Ihres Handgelenks und führen
Sie den Federsteg in das passende untere Loch ein.

248
249
4. Drücken Sie den Federsteg nach unten, richten Sie ihn
mit dem oberen Loch aus und geben Sie ihn dann frei,
sodass er einrastet.
HERAUSNEHMEN VON ARMBANDGLIEDERN
GLIEDER WERDEN WIE FOLGT HERAUSGENOMMEN:
1. Stellen Sie das Armband aufrecht und führen Sie ein
spitzes Instrument in die Gliedöffnung ein.
2. Drücken Sie den Stift kräftig in Pfeilrichtung, bis sich
das Glied löst (die Stifte lassen sich absichtlich nur
schwer entfernen).
3. Wiederholen Sie diesen Schritt, bis alle gewünschten
Glieder entfernt sind.
WIEDERMONTAGE:
1. Verbinden Sie die Armbandteile.
2. Drücken Sie den Stift gegen die Pfeilrichtung wieder in
das Glied.
3. Achten Sie darauf, dass er fest sitzt und bündig
abschließt.

250
251
BATTERIE
Bei normaler Benutzung hat die Batterie gewöhnlich eine
Lebensdauer von vier bis sechs Jahren. Sie kann jedoch
abhängig vom tatsächlichen Gebrauch variieren.
Wir empfehlen, die Batterie nur von TIMEX auswechseln
zu lassen. Im Anschluss an einen Batteriewechsel
müssen die Uhrzeit und das Datum neu kalibriert
werden. Schicken Sie Ihre Uhr bitte in einer frankierten
Versandverpa ckung an Timex ein. Eine frankierte
Versandverpackung erhalten Sie telefonisch unter der
Nummer 1-800-448-4639. Sie können sich auch an
den Händler wenden, der Ihnen die Uhr verkauft hat,
oder unter www.Timex.com nachsehen. Schicken Sie
zusammen mit Ihrer Uhr den folgenden Betrag für Porto-
und Verpackungsgebühren ein (hierbei handelt es sich
nicht um Reparaturkosten): in den USA einen Scheck
oder eine Zahlungsanweisung über USD12,00 und in
Kanada einen Scheck oder eine Zah lungsanweisung über
CAD7,00. In allen anderen Ländern stellt Timex die Porto-
und Verpackungskosten in Rechnung.
SCHICKEN SIE BITTE NIEMALS BESONDERE
ARMBÄNDER ODER SONSTIGE ARTIKEL VON
PERSÖNLICHEM WERT MIT EIN.
DIE BATTERIE DARF AUF KEINEN FALL VERBRANNT
WERDEN. SIE IST NICHT AUFLADBAR. BATTERIEN VON
KINDERN FERNHALTEN.

252
253
INTERNATIONALE TIMEX-GARANTIE
Für ihre TIMEX
®
-Uhr übernimmt die Timex Group USA, Inc.
für die Dauer EINES JAHRES ab dem Erstverkaufsdatum eine
Garantie auf Herstellungsmängel. Timex und seine Partner
erkennen diese internationale Garantie weltweit an.
Bitte beachten Sie, dass Timex nach eigenem Ermessen
durch den Einbau neuer oder gründlich überholter und
überprüfter Komponenten die Uhr reparieren bzw. durch
ein identisches oder ähnliches Modell ersetzen kann.
WICHTIG — BITTE BEACHTEN SIE, DASS UNTER
FOLGENDEN BEDINGUNGEN MÄNGEL ODER SCHÄDEN
AN IHREM PRODUKT VON DIESER GARANTIE
AUSGENOMMEN SIND:
1. nach Ablauf der Garantiezeit auftretende Mängel oder
Schäden
2. wenn die Uhr nicht bei einem Timex-Vertragshändler
gekauft worden ist
3. wenn Reparaturen nicht von Timex ausgeführt worden
sind
4. Mängel oder Schäden infolge von Unfällen, unbefugten
Eingriffen oder unsachgemäßer Behandlung
5. Schäden oder Mängel an Glas, Armband,
Uhrengehäuse, Zubehör oder Batterie. Timex kann den
Ersatz solcher Teile in Rechnung stellen.
DIESE GARANTIE UND DIE DARIN ENTHALTENEN ABHILFEN
GELTEN AUSSCHLIESSLICH UND ANSTATT ALLER ANDEREN
AUSDRÜCKLICHEN ODER STILLSCHWEIGENDEN GARANTIEN,
EINSCHLIESSLICH JEDER STILLSCHWEIGENDEN GARANTIE
DER HANDELSÜBLICHEN QUALITÄT ODER EIGNUNG
ZU EINEM BESTIMMTEN ZWECK. TIMEX ÜBERNIMMT

254
255
KEINE HAFTUNG FÜR BEILÄUFIG ENTSTANDENE
ODER FOLGESCHÄDEN BZW. AUFWENDUNGEN BEI
VERTRAGSERFÜLLUNG. In manchen Ländern sind
Einschränkungen stillschweigender Garantien bzw.
Ausschlüsse oder Einschränkungen von Schadensersatz-
ansprüchen nicht erlaubt, sodass diese Einschränkungen
für Sie möglicherweise keine Geltung haben. Diese
Garantie verleiht Ihnen bestimmte Rechte. Darüber
hinaus haben Sie u.U. weitere Rechte, die je nach Land
unterschiedlich sind.
Wenn Sie Garantieleistungen in Anspruch nehmen
möchten, senden Sie Ihre Uhr bitte an Timex, einen
Timex-Partner oder den Timex-Händler, bei dem Sie
die Uhr gekauft haben, mit dem ausgefüllten Original-
Reparaturschein als Anlage ein. Ausschließlich für
USA und Kanada: Legen Sie den ausgefüllten Original-
Reparaturschein oder eine schriftliche Erklärung
mit Namen, Adresse, Telefonnummer, Kaufort und
-datum bei. Schicken Sie bitte zusammen mit Ihrer Uhr
folgenden Betrag für Porto- und Verpackungskosten ein
(hierbei handelt es sich nicht um Reparaturkosten): in
den USA einen Scheck oder eine Zahlungsanweisung
über USD8,00, in Kanada einen Scheck oder eine
Zahlungsanweisung über CAD12,00 und in GB einen
Scheck oder eine Zahlungsanweisung über GBP 3,50.
In allen anderen Ländern stellt Timex die Porto- und
Verpackungskosten in Rechnung. SCHICKEN SIE BITTE
NIEMALS BESONDERE ARMBÄNDER ODER SONSTIGE
ARTIKEL VON PERSÖNLICHEM WERT MIT EIN.
Für die USA erhalten Sie zusätzliche Garantie informationen
unter der Nummer 1 800 448 4639. Für Kanada wählen
Sie die Nummer 1-800-263-0981. Für Brasilien wählen Sie

256
257
die Nummer +11 2664 1001. Für Mexiko wählen Sie die
Nummer 01-800-01-060-00. Für Mittelamerika, die Karibik,
Bermuda und die Bahamas wählen Sie die Nummer
(501) 370-5775 (USA). Für Asien wählen Sie die Nummer
852-2815-0091. Für Großbritannien wählen Sie die Nummer
44 020 8687 9620. Für Frankreich wählen Sie die Nummer
33 3 81 63 42 51.
Für Deutschland/Österreich wählen Sie
die Nummer +43 662 889 2130. Für andere Länder wenden
Sie sich bitte für Garantieinformationen an Ihren örtlichen
Timex-Händler oder Timex-Großhändler.
Für Service schicken Sie Ihre Timex
®
-Uhr an Timex, wie in
der internationalen Timex-Garantie beschrieben oder an:
TG SERVICE CENTER, P.O. Box 2740, Little Rock, AR 72203,
USA. Für Service-Fragen wählen Sie 1-800-328-2677 (USA
und Kanada) oder senden Sie eine E-Mail an custserv@
timex.com
ERWEITERTE GARANTIE
Nur in den USA erhältlich. Für $5 können Sie Ihre Garantie
um weitere 4 Jahre ab dem Kaufdatum verlängern. Sie
können während der normalen Geschäftszeiten mit
AMEX, Discover, Visa oder MasterCard telefonisch unter
der Nummer 1 800-448-4639 bezahlen. Die Zahlung muss
innerhalb von 30 Tagen nach dem Kaufdatum erfolgen.
Name, Adresse, Telefonnummer, Kaufdatum und die
5-stellige Modellnummer müssen angegeben werden. Sie
können auch einen Scheck i.H.v. $5 einsenden an: Timex
Extended Warranty, P.O. Box 1676, Dept. EF, Little Rock,
AR 72203, USA.
©2015 Timex Group USA, Inc., TIMEX, INDIGLO PERFECT DATE und
INTELLIGENT QUARTZ sind Marken der Timex Group B.V. und ihrer
angeschlossenen Unternehmen.

259
RELOJES TIMEX
®
Felicitaciones por la compra de su reloj TIMEX
®
INTELLIGENT QUARTZ
™
. Por favor lea atentamente las
instrucciones para saber cómo funciona su reloj Timex.
Es posible que su reloj no tenga todas las características
descritas en este folleto.
Para obtener más información
y registrar su producto, visite:
www.timex.com

260
261
ÍNDICE DE CONTENIDOS
Cómo inicializar su reloj ................................................. 263
Resistencia al agua y a golpes ....................................... 264
Luz nocturna Indiglo
®
.................................................... 266
Programación de fecha y hora ....................................... 267
Calendario Perpetuo ...................................................... 269
Cronógrafo Fly-back ....................................................... 272
Brújula y Cronógrafo Fly-back ........................................ 278
Cronógrafo Lineal .......................................................... 291
Hora mundial ................................................................. 298
Brújula ............................................................................ 305
Marea temperatura y brújula ......................................... 312
Altímetro ........................................................................ 322
Profundidad .................................................................... 331
Yacht Racer .................................................................... 336
Cronógrafo temporizador .............................................. 348
3GMT (Hora de Greenwich) ............................................ 365
Función taquímetro........................................................ 372
Función de Regla Deslizante ......................................... 374
Cómo ajustar la pulsera ................................................. 380
Remoción de eslabones de la pulsera ........................... 382
Pila .................................................................................. 383
Garantía .......................................................................... 384

262
263
CÓMO INICIALIZAR SU RELOJ
(No se aplica a los modelos de calendario perpetuo.) Para
inicializar su reloj retire el protector plástico de abajo de
la corona y luego presione la corona contra la caja.
Algunos relojes requieren ajustar la corona para ser
atornillada. Si la caja de su reloj tiene una protuberancia
roscada, la corona debe atornillarse después de ajustar
el reloj.
Para atornillarla, empuje la corona con firmeza contra la
protuberancia roscada y mantenga la presión mientras
gira la corona en sentido horario. Continúe atornillando
la corona hasta que esté firme. Necesitará desatornillar
la corona (en sentido antihorario) antes de tirarla hacia
afuera la próxima vez que quiera ajustar su reloj.
Bienvenido al mundo de relojes Timex
®
con
tecnología inteligente Quartz
™
, el futuro de la
tecnología análoga de cuarzo. La tecnología de
cuarzo inteligente de Timex brinda el poder de un
microprocesador con la eficiencia y exactitud del
medidor de tiempo análogo de cuarzo. Con los relojes
Timex de cuarzo inteligentes, la tecnología se inscribe
dentro del diseño, entregando un nuevo nivel de
complejidad en la esfera. Usa hasta tres manecillas
adicionales independientes para presentar más variedad
de información, normalmente disponible sólo en relojes
digitales en un formato análogo tradicional.

264
265
ADVERTENCIA: PARA MANTENER LA RESISTENCIA
AL AGUA, NO APRIETE NINGÚN BOTÓN DEBAJO DEL
AGUA A MENOS QUE SU RELOJ ESTÉ INDICADO PARA
UNA RESISTENCIA AL AGUA DE 200 METROS. JAMÁS
TIRE DE LA CORONA MIENTRAS ESTÉ BAJO EL AGUA.
1. El reloj es resistente al agua solamente mientras el
cristal, la corona y la caja estén intactos.
2. El reloj no está certificado para buceo.
3. Enjuague el reloj con agua dulce después de haber
estado expuesto al agua salada.
4. La resistencia a los golpes estará indicada en la esfera
del reloj o en la parte de atrás de la caja. Los relojes
están diseñados para pasar la prueba ISO de resisten-
cia a los golpes. Sin embargo, se debe tener cuidado
para evitar dañar el cristal.
RESISTENCIA AL AGUA Y A GOLPES
Si su reloj es resistente al agua, se indicarán los metros
(WR_M).
Profundidad de
resistencia al agua en
p.s.i.a.* Presión del agua
bajo la superficie
30m/98pies 60
50m/164pies 86
100m/328pies 160
200m/656pies 284

266
267
PROGRAMACIÓN DE FECHA Y HORA
NOTA: La corona tiene tres posiciones: cerrada, media y
externa. Para que se acostumbre a la diferencia entre las
distintas posiciones, extienda la corona hasta la posición
más externa y luego pulse ligeramente la corona hasta
que sienta un clic en la posición media.
Para fijar la fecha y la hora:
Hora
Jale la corona hasta su posición externa y gírela hasta
que se muestre la hora correcta. Asegure el parámetro
correcto de AM/PM (mañana/tarde) verificando que la
fecha cambie a la medianoche y no al mediodía.
Fecha (no se aplica al calendario perpetuo)
Jale la corona hasta su posición media y gírela hasta que
aparezca la fecha correcta en la ventanilla de la fecha.
LUZ NOCTURNA INDIGLO
®
Pulse el botón o la corona para activar la luz. La
tecnología electroluminiscente utilizada en la luz nocturna
INDIGLO
®
ilumina toda la esfera del reloj por la noche y en
condiciones de poca luz.
O

268
269
Nota: La fecha cambia entre las 10 pm y las 2 am. No
cambie la fecha durante este período. Al hacerlo, podría
dañar el movimiento del reloj.
Pulse la corona a la posición cerrada después de fijar la
fecha u hora. El segundero se pondrá en movimiento.
NOTA: Se requerirá ajustar la fecha en los meses que
tengan menos de 31 días.
CALENDARIO PERPETUO
DESCRIPCIÓN GENERAL
A
B
1 2
3
1 2
3
MANECILLA
HORARIA
MANECILLA
DEL DÍA
MANECILLA DE LA
FECHA
SEGUNDERO
MANECILLA
DE MINUTOS
CORONA
MANECILLA DE MES
BOTÓN A
(EMPOTRADO)
BOTÓN B
(EMPOTRADO)
POSICIÓN
CERRADA
POSICIÓN
MEDIA
POSICIÓN
EXTERNA

270
271
COMPENSACIÓN DEL AÑO BISIESTO
Para mantener la fecha correcta, el reloj incluye una
configuración para la compensación del año bisiesto en
curso. Esta configuración es hecha en la fábrica de Timex
o después del reemplazo de la pila y no se puede cambiar,
sólo observar.
Para ver la compensación, jale la corona hasta su posición
media. La manecilla de fecha muestra la compensación:
1 = 1 año después del año bisiesto; 2 = 2 años después
del año bisiesto; 3 = 3 años después del año bisiesto;
4 = año bisiesto. Pulse la corona hacia dentro cuando
termine y las manecillas vuelven a mostrar normalmente
día, mes y fecha.
INTRODUCCIÓN
Con su reloj de calendario perpetuo, la fecha nunca
necesita ajuste hasta el 2100. El reloj toma en cuenta
automáticamente los meses cortos y los años bisiestos,
presentando siempre fecha y día correctos. El día y la
fecha fueron programados en la fábrica de Timex. Sólo
necesita ajustar la hora. El reloj tiene dos botones de
activación empotrados para uso del Centro de servicio
de Timex para ajustar la fecha y el día después del
reemplazo de la pila. Fuera de lo mencionado no tienen
otro uso.

272
273
AJUSTE DE LA 4TA MANECILLA CENTRAL
Para reajustar una 4ta manecilla central desalineada:
1. Jale la corona hasta su posición externa. Las
manecillas superior e inferior se mueven hasta el final
de sus ciclos, auto-ajustándose en forma automática.
2. La 4ta manecilla central debe señalar las 12 en punto.
Si en los 5 segundos posteriores de haber pulsado
la corona a la posición más externa la 4ta manecilla
central no señala las 12 en punto, pulse los botones A
o B para mover la manecilla en sentido antihorario u
horario hasta que señale las 12 en punto.
3. Pulse la corona a la posición cerrada cuando acabe.
CRONÓGRAFO FLY-BACK
DESCRIPCIÓN GENERAL
AA
B
23
1 2
3
1 2
3
MANECILLA
SUPERIOR
2A ZONA
HORARIA
CUARTA MANECILLA
CENTRAL
SEGUNDERO
VENTANILLA
DE FECHA
CORONA
ESCALA DE MINUTOS
DEL CRONÓGRAFO
MANECILLA
INFERIOR
BOTÓN A
BOTÓN B
MANECILLA
DE MINUTOS
MANECILLA HORARIA
POSICIÓN
CERRADA
POSICIÓN
MEDIA
POSICIÓN
EXTERNA

274
275
PARA AJUSTAR LA SEGUNDA ZONA HORARIA:
1. Jale la corona hasta su posición media. La manecilla
superior muestra la hora de la segunda zona horaria
y la 4ta. manecilla central muestra los minutos.
2. Suponiendo que la segunda zona horaria tiene el
mismo valor de minutos como su hora, la 4ta mane-
cilla central y el minutero deben estar alineados. Si las
manecillas no están alineadas, o si la segunda zona
horaria difiere por minutos dentro de la hora, pulse el
botón B para mover la 4ta manecilla central hasta que
esté en la posición deseada.
3. Pulse el botón A para mover la manecilla superior
hacia adelante, en incrementos de una hora, hasta
que llegue a la hora deseada de la segunda zona
horaria. Para mover la manecilla rápidamente, pulse
y sostenga el botón A.
SEGUNDA ZONA HORARIA
La manecilla supe-
rior muestra la hora
para la segunda zona
horaria. Observe que la
escala es de 24 horas, con
medianoche a cualquier
extremo y mediodía en la
mitad. Lo más común es
que las zonas horarias di-
fieran en incrementos de
una hora. En tales casos,
el valor de minutos de la segunda zona horaria será el
mismo que el indicado por el minutero del reloj.
AA
B
23
1 2
3
1 2
3

276
277
3. Para reanudar, pulse el botón A (START/STOP)
nuevamente.
4. Para reiniciar el cronógrafo fly-back desde cero, pulse
el botón B (FLY-BACK/RESET).
Cuando se reinicia el cronógrafo, todas las manecillas
se ponen a la posición cero. Después de otros ocho
segundos, el reloj continúa mostrando normalmente la
segunda zona horaria.
5. Para reiniciar y/o poner en cero el cronógrafo fly-back
mientras está funcionando, pulse y sostenga el botón
B (FLY-BACK/RESET). Suéltelo cuando desee reiniciar.
4. Pulse la corona hacia adentro cuando termine.
CRONÓGRAFO FLY-BACK
El reloj tiene un cronógrafo “fly-back” (que revisa
marcajes anteriores) de 4 horas.
1. Para comenzar, pulse el botón A (START/STOP).
La 4ta manecilla central muestra los segundos con una
resolución de 1/5 de segundo. La manecilla inferior
muestra el último dígito de los minutos, contando
hasta diez y repitiendo. La manecilla superior muestra
el tiempo total, incluyendo horas y minutos, con divi-
siones a cada diez minutos. El cronógrafo cuenta hasta
4 horas antes de detenerse automáticamente.
2. Para detener, pulse el botón A (START/STOP)
nuevamente. Todas las manecillas se detienen.

278
279
AJUSTE DE LA MANECILLA INDICADORA
(4TA MANECILLA CENTRAL)
Para reajustar una manecilla desalineada:
1. Jale la corona hasta su posición externa. Las maneci-
llas superior e inferior se mueven hasta el final de sus
ciclos, auto-ajustándose en forma automática.
2. La 4ta manecilla central debe señalar las 12 en punto.
Si no lo hace en los 5 segundos posteriores de haber
pulsado la corona a la posición más externa, pulse A
o B para mover la manecilla en sentido antihorario u
horario, respectivamente, hasta que señale las 12 en
punto.
3. Pulse la corona hacia adentro cuando termine.
BRÚJULA Y CRONÓGRAFO FLY-BACK
DESCRIPCIÓN GENERAL
A
C
B
1 2
3
1 2
3
MANECILLA
SUPERIOR
2A ZONA
HORARIA
CUARTA MANECILLA
CENTRAL
SEGUNDERO
VENTANILLA
DE FECHA
CORONA
ESCALA DE MINUTOS
DEL CRONÓGRAFO
MANECILLA INFERIOR
BOTÓN A
BOTÓN B
MANECILLA
HORARIA
MANECILLA DE MINUTOS
POSICIÓN
CERRADA
POSICIÓN
MEDIA
POSICIÓN
EXTERNA
BOTÓN C

280
281
2. Pulse B para mover hacia delante la 4ta manecilla
central. Sostenga el botón para mover con rapidez
la manecilla. Las manecillas superior y 4ta manecilla
central se mueven a la vez; mientras la 4ta manecilla
central da una vuelta, la manecilla superior se mueve
una hora. Suponiendo que la segunda zona horaria
tiene el mismo valor de minutos como su hora, la 4ta
manecilla central y de minutos deben estar alineadas.
3. Pulse A para mover la manecilla superior en incremen-
tos de una hora. Sostenga el botón para mover con
rapidez la manecilla.
4. Pulse la corona hacia adentro cuando termine.
La hora de la segunda zona horaria puede ser usada alter-
nativamente para representar su hora en una escala de
24 horas, si lo prefiere. Cuando se ajusta la segunda zona
horaria de esta manera, asegúrese que la visualización
SEGUNDA ZONA HORARIA
La manecilla superior normalmente muestra la hora
para la segunda zona horaria. Observe que la escala
es de 24 horas, con medianoche a cualquier extremo y
mediodía en la mitad.
Para ajustar la segunda zona horaria:
1. Jale la corona hasta
su posición media.
La manecilla superior
muestra la hora de la
segunda zona horaria
en tiempo militar y la
4ta manecilla central
muestra los minutos.
A
C
B
1 2
3
1 2
3

282
283
muestra el tiempo total, incluyendo horas y minutos,
con divisiones a cada diez minutos. El cronógrafo
cuenta hasta 4 horas antes de detenerse automática-
mente.
2. Para detener, pulse A nuevamente (START/STOP).
Todas las manecillas se inmovilizan.
3. Para reanudar, pulse A (START/STOP) de nuevo, o para
reiniciar (desde cero) el cronógrafo, pulse B (FLY-BACK/
RESET).
Cuando se reinicia el cronógrafo, todas las manecillas
se ponen en cero. Después de otros ocho segundos, el
reloj continúa mostrando normalmente la hora de la
segunda zona horaria.
4. También puede volver a poner a cero o reiniciar el
cronógrafo mientras está en uso. Para hacerlo, pulse
de horas y minutos corresponda con la de las 24 horas,
al verificar que la fecha cambie a medianoche y no al
mediodía.
CRONÓGRAFO FLY-BACK
El reloj tiene un cronógrafo ‘fly-back” (que revisa marcajes
anteriores) de 4 horas.
1. Para comenzar, pulse A (START/STOP). La 4ta mane-
cilla central muestra
los segundos con
resolución de 1/5 de
segundo y la mane-
cilla inferior muestra
el último dígito de los
minutos, contando
hasta diez y repitiendo.
La manecilla superior
A
C
B
1 2
3
1 2
3

284
285
y sostenga B (FLY-BACK/RESET) para poner a cero el
cronógrafo y suéltelo cuando desee reiniciarlo. No
tiene que esperar a que todas las manecillas lleguen
a cero antes de soltar el botón; el conteo comenzará
internamente cuando suelte el botón. Esta función
“fly-back” le permite medir el tiempo de vuelta.
La brújula puede ser usada mientras el cronógrafo
está en marcha sin que interfiera con su funciona-
miento. Ver FUNCIONAMIENTO DE LA BRÚJULA.
CALIBRACIÓN DE LA BRÚJULA
Hay que calibrar la brújula, antes de usarse.
Dado que la brújula usa el campo magnético de la
Tierra, usted debe tener cuidado de objetos metálicos
grandes tales como vehículos o puentes, u objetos que
emitan radiación electromagnética como televisores
y computadoras, porque podrían afectar el campo
magnético alrededor del reloj. Si la brújula se calibra
cerca de tales objetos, sólo funcionará apropiadamente
en ese mismo lugar. Si la brújula se calibra lejos de tales
objetos, no funcionará apropiadamente en la cercanía de
ellos. Para resultados óptimos, realice la calibración en el
área donde va a ser usada.
Al calibrar y tomar rumbos es importante, como con
todas las brújulas, mantener la brújula a nivel. Calibrar
y tomar un rumbo cuando el reloj no está a nivel puede
resultar en errores grandes. Hay que evitar también áreas
que pudieran exhibir concentraciones de hierro duro y
suave más elevadas de lo normal, pues pueden ocasionar
rumbos incorrectos. Cuando un rumbo no infunda con-
fianza, vuelva a calibrar.

286
287
LENTAMENTE, tomando aproximadamente 15 segun-
dos por rotación.
4. Cuando haya acabado, pulse C (BRÚJULA), mante-
niendo el reloj a nivel. La 4ta manecilla central se
mueve hacia atrás y adelante indicando el final de la
calibración y después se mueve a la configuración
actual de declinación magnética.
5. Si usted no desea ajustar la declinación magnética,
pulse la corona hacia adentro. De otro modo, para
No guarde el reloj cerca de alguna fuente de magnetismo
como computadoras, electrodomésticos o televisores,
pues el reloj puede recoger la carga magnética y conducir
a rumbos inexactos. La exactitud típica de los instrumen-
tos de uso en la muñeca es de +/- 10 grados.
Para calibrar la brújula:
1. Jale la corona a su posición media y espere a que las
manecillas indicadoras se detengan.
2. Mantenga el reloj a nivel o colóquelo sobre una super-
ficie horizontal (si la pulsera interfiere, coloque el reloj
sobre un vaso invertido). El reloj puede estar bocabajo,
pero tome precauciones para proteger el cristal.
3. Pulse C (BRÚJULA) para comenzar. La 4ta manecilla
central gira dos vueltas para recordarle a usted rotar
el reloj. Todavía a nivel, dé dos rotaciones al reloj

288
289
FUNCIONAMIENTO DE LA BRÚJULA
Normalmente, la brújula está apagada y la 4ta manecilla
central apunta a las 12 en punto o muestra los segundos
del cronógrafo.
Mientras mantiene el reloj a nivel, pulse C (BRÚJULA)
para activar la brújula. La aguja de la brújula se mueve y
apunta hacia el Norte. Si se gira el reloj, la 4ta manecilla
central continuará moviéndose, apuntando siempre al
Norte. Después de 20 segundos, la brújula se apagará
automáticamente y la 4ta manecilla central retornará a su
operación normal. Esto alarga la duración de la pila. Pulse
C (BRÚJULA) en cualquier momento para mantener la
brújula encendida durante otros 20 segundos.
La brújula puede ser activada mientras está operando el
cronógrafo. La 4ta manecilla central cambia de opera-
ciones temporalmente. Las manecillas superior e inferior
hacer que el reloj compense automáticamente el
ángulo de declinación, mueva el anillo giratorio de la
brújula hasta que el Norte esté a las 12 en punto.
6. Pulse A o B para mover la 4ta manecilla central hacia
el Oeste (-) o Este (+), respectivamente, y apuntar ha-
cia el ángulo de declinación de su posición usando la
escala de declinación. Sostenga un botón para mover
con rapidez la manecilla. Observe la figura de abajo
como ejemplo.
7. Pulse la corona hacia adentro cuando termine.
A
B
Declinación magnética establecida a -14° (14°W)

290
291
continúan mostrando la hora en el cronógrafo y todas las
funciones del cronógrafo están disponibles mediante los
botones A (START/STOP) y B (FLY-BACK/RESET).
NOTA: Mientras se usa la brújula, el segundero se mueve
en incrementos de dos segundos. De igual modo, cuando
la brújula está activada, la manecilla superior e inferior
pueden cambiar de posición ligeramente, volviendo a sus
posiciones habituales cuando la brújula es desactivada.
Este funcionamiento es normal y da una lectura más
exacta de la brújula.
CRONÓGRAFO LINEAL
DESCRIPCIÓN GENERAL
MANECILLA
DE SEGUNDOS
VENTANILLA
DE FECHA
CORONA
MANECILLA INFERIOR
BOTÓN A
BOTÓN B
4TA MANECILLA
CENTRAL
MANECILLA HORARIA
MANECILLA
LINEAL
MANECILLA
DE MINUTOS
A
B
1
2
3

292
293
AJUSTE DE LA MANECILLA LINEAL
Y 4TA MANECILLA CENTRAL
Para reajustar una 4ta manecilla central desalineada:
1. Jale la corona hasta su posición externa. La manecilla
inferior se mueve hasta el final de su barrido con
ajuste automático.
2. La 4ta manecilla central debe señalar las 12 en punto.
Si en los 5 segundos posteriores de haber pulsado
la corona a la posición más externa la 4ta manecilla
central no señala las 12 en punto, pulse el botón A
para mover la manecilla en sentido antihorario hasta
que señale las 12 en punto.
3. Si el cronógrafo es reiniciado y la manecilla lineal
no está en 0, pulse y sostenga el botón B durante
5 segundos para hacer una calibración completa del
indicador lineal, lo cual demorará hasta 32 segundos
en completarse.
4. Pulse la corona a la posición cerrada cuando acabe.

294
295
SEGUNDA ZONA HORARIA
La manecilla inferior
muestra la hora para la
segunda zona horaria.
Observe que la escala
es de 24 horas, con
medianoche a cual-
quier extremo y me-
diodía en la mitad. Lo
más común es que las
zonas horarias difieran
en incrementos de una
hora. En tales casos,
el valor de minutos de la segunda zona horaria será el
mismo que el indicado por el minutero del reloj.
PARA FIJAR LA SEGUNDA ZONA HORARIA:
1. Jale la corona hasta su posición media. La manecilla
inferior muestra la hora de la segunda zona horaria y
la 4ta. manecilla central muestra los minutos.
2. Suponiendo que la segunda zona horaria tiene el
mismo valor de minutos como la primera zona horaria,
la 4ta manecilla central y el minutero deben estar
alineados. Si las manecillas no están alineadas, o si la
segunda zona horaria difiere por minutos dentro de
la hora, pulse el botón B para mover la 4ta manecilla
central hasta que esté en la posición deseada.
3. Pulse el botón A para mover la manecilla inferior
hacia adelante, en incrementos de una hora, hasta
que llegue a la hora deseada de la segunda zona
horaria. Para mover la manecilla rápidamente, pulse y
sostenga el botón A.
A
B
1
2
3

296
297
4. Pulse la corona hacia adentro cuando termine.
CRONÓGRAFO LINEAL
El reloj tiene un cronógrafo interválico de 4 horas.
1. Para comenzar, pulse el botón A (START/STOP). La 4ta
manecilla central muestra los segundos con una reso-
lución de 1/5 de segundo. La manecilla lineal muestra
los minutos, contando hasta treinta y repitiendo. La
manecilla inferior muestra el tiempo total, incluyendo
horas y minutos, con divisiones a cada diez minutos. El
cronógrafo cuenta hasta 4 horas antes de detenerse
automáticamente.
2. Para detener, pulse el botón A (START/STOP) nueva-
mente. Todas las manecillas se detienen.
3. Para reiniciar el cronógrafo a la posición cero, pulse el
botón B (SPLIT/RESET).
Cuando se reinicia el cronógrafo, todas las manecillas se
mueven a la posición cero. Después de otros ocho segun-
dos, el reloj continúa mostrando normalmente la segunda
zona horaria. Mientras el cronógrafo está en marcha, se
puede tomar un intervalo. Pulse el botón B (SPLIT/RESET)
y todas las manecillas se detendrán mientras el cronó-
grafo sigue andando. Pulse B (SPLIT/RESET) nuevamente
para seguir viendo el tiempo transcurrido del cronógrafo
en marcha.

298
299
HORA MUNDIAL
DESCRIPCIÓN GENERAL
A
B
C
1 2
3
corrected 3.3.11 with Paulo’s new cities
24 CIUDADES
ESCALA DE
HORA MUNDIAL
SEGUNDERO
VENTANILLA
DE FECHA
CORONA
MANECILLA INFERIOR
BOTÓN A
BOTÓN B
BOTÓN C
CUARTA MANECILLA
CENTRAL
ESCALA
DE ESTACIÓN
MANECILLA
SUPERIOR
MANECILLA HORARIA
MANECILLA
DE MINUTOS
POSICIÓN
CERRADA
POSICIÓN
MEDIA
POSICIÓN
EXTERNA
PARA FIJAR LA HORA MUNDIAL:
1. Jale la corona hasta su posición media. La manecilla
central muestra la hora mundial de la ciudad y la
manecilla superior muestra la hora de dicha ciudad.
2. Pulse A o B para seleccionar la ciudad que representa
su zona horaria local. Sostenga un botón para mover
A
B
C
1 2 3

300
301
con rapidez la manecilla. Se puede utilizar cualquier
ciudad.
3. Jale la corona hasta su posición externa. La manecilla
de selección de la ciudad se reajustará a la posición de
las 12:00 como lo indica el AJUSTE DE LA MANECILLA
INDICADORA. Después de una pausa de cinco segun-
dos, la manecilla superior mostrará la hora mundial
(la hora en la ciudad seleccionada en el paso previo),
la manecilla central muestra los minutos de la hora
mundial y la manecilla inferior muestra la estación
(ver AJUSTE DE ESTACIÓN). IMPORTANTE: No manipule
ninguno de los pulsores hasta que la manecilla
central de la corona se haya ajustado completamente.
(Aproximadamente 10 segundos después que se haya
jalado la corona a la posición más externa).
4. Si la estación presentada no es la correcta para la
zona horaria local, presione C para cambiarla. Si la
zona horaria local observa el horario de verano, la
manecilla superior se moverá una hora.
5. Pulse A o B para adelantar o atrasar la hora respectiva-
mente, para fijar la hora mundial de tal manera que
sea la misma que la de la zona horaria local. Sostenga
un botón para cambiar rápidamente la hora. Las
manecillas se mueven a la vez; mientras la manecilla
central da una vuelta, la manecilla superior se mueve
una hora. Después del ajuste, la manecilla central y el
minutero deberían estar alineados.
6. Pulse la corona hacia adentro cuando termine.

302
303
AJUSTE DE LA MANECILLA INDICADORA
(4TA MANECILLA CENTRAL)
Para reajustar una manecilla desalineada:
1. Jale la corona hasta su posición externa. Las maneci-
llas superior e inferior se mueven hasta el final de sus
ciclos, auto-ajustándose en forma automática.
2. La 4ta manecilla central debe señalar las 12 en punto.
Si no lo hace en los 5 segundos posteriores de haber
pulsado la corona a la posición más externa, pulse A o B
para mover la manecilla en sentido antihorario u horario,
respectivamente, hasta que señale las 12 en punto.
3. Pulse la corona hacia adentro cuando termine.
NOTA: Si no se pulsa botón alguno durante cinco segun-
dos después que se detienen las manecillas, el reloj pasa
a realizar el ajuste de hora mundial (ver AJUSTE DE HORA
MUNDIAL)
VISUALIZACIÓN DE LA HORA DE LA CIUDAD
Pulse A o B para mover
la manecilla central hacia
atrás o hacia adelante
respectivamente, y
seleccionar una ciudad.
La manecilla superior se
mueve para mostrar la
hora en la ciudad selec-
cionada. Observe que la
escala es de 24 horas, con
medianoche a cualquier extremo y mediodía en la mitad.
AJUSTE DE ESTACIÓN
El ajuste de estación permite al reloj compensar por la
hora de aprovechamiento de luz solar (también llamada
“hora de verano”).
A
B
C
1 2 3

304
305
El reloj se encarga de esto dando una configuración
para representar los dos periodos que tienen todas las
ciudades que observan la hora de verano. Para el reloj,
el periodo de hora de verano es VERANO y el periodo de
hora estándar es INVIERNO.
Cuando la estación de una ciudad se establece en
VERANO, todas las ciudades en el mismo hemisferio son
programadas automáticamente a VERANO, mientras que
las ciudades en el otro hemisferio son programadas au-
tomáticamente a INVIERNO. El reloj sabe cuáles ciudades
están dentro de cada hemisferio.
Pulse C para cambiar la estación en la ciudad seleccionada.
BRÚJULA
DESCRIPCIÓN GENERAL
I
I
14
CORONA
CENTRAL
MEDIO
FIJAR LA FECHA
I
I
14
AFUERA
FIJAR LA
HORA
CORONA
B
A (BRÚJULA)
ESCALA DE DECLINACIÓN
AGUJA DE LA
BRÚJULA
(EL EXTREMO NORTE
ES ROJO PUNTI-
AGUDO/ALARGADO)

306
307
AJUSTE DE LA AGUJA DE LA BRÚJULA
Jale la CORONA totalmente hacia afuera. La aguja de la
brújula debe señalar las 12 en punto. Si no las señala,
oprima ya sea A o B para mover la aguja de la brújula
hasta las 12 en punto. Sostenga el botón de activación
para mover la aguja con rapidez. Pulse la CORONA CEN-
TRAL hacia adentro cuando termine y vuelva a calibrar
la brújula.
CALIBRACIÓN DE LA BRÚJULA
Hay que calibrar la brújula, antes de usarse.
Dado que la brújula usa el campo magnético de la Tierra,
usted debe tener cuidado de objetos metálicos grandes
tales como vehículos o puentes, u objetos que emitan
radiación electromagnética como televisores y com-
putadoras, porque podrían afectar el campo magnético
alrededor del reloj. Si la brújula se calibra cerca de tales
objetos, sólo funcionará apropiadamente en ese mismo
lugar. Si la brújula se calibra lejos de tales objetos, no
funcionará apropiadamente en la cercanía de ellos. Para
resultados óptimos, realice la calibración en el área donde
va a ser usada.
Al calibrar y tomar rumbos es importante, como con
todas las brújulas, mantener la brújula a nivel. Calibrar
y tomar un rumbo cuando el reloj no está a nivel puede
resultar en errores grandes. Hay que evitar también áreas
que pudieran exhibir concentraciones de hierro duro y
suave más elevadas de lo normal, pues pueden ocasionar
rumbos incorrectos. Cuando un rumbo no infunda con-
fianza, vuelva a calibrar.
No guarde el reloj cerca de alguna fuente de magnetismo
como computadoras, electrodomésticos o televisores,
pues el reloj puede recoger la carga magnética y conducir

308
309
a rumbos inexactos. La exactitud típica de los instrumen-
tos de uso en la muñeca es de +/- 10 grados.
Para calibrar la brújula:
1. Jale la corona a su posición media y espere a que las
manecillas indicadoras se detengan.
2. Mantenga el reloj a nivel o colóquelo sobre una super-
ficie horizontal (si la pulsera interfiere, coloque el reloj
sobre un vaso invertido). El reloj puede estar bocabajo,
pero tome precauciones para proteger el cristal.
3. Pulse A o B para comenzar. La 4ta manecilla central
gira dos vueltas para recordarle a usted rotar el reloj.
Todavía a nivel, dé dos rotaciones al reloj LENTAMENTE,
tomando aproximadamente 15 segundos por rotación.
4. Cuando haya acabado, pulse A o B, manteniendo el
reloj a nivel. La 4ta manecilla central se mueve hacia
atrás y adelante indicando el final de la calibración
y después se mueve a la configuración actual de
declinación magnética.
5. Si usted no desea ajustar la declinación magnética,
pulse la corona hacia adentro. De otro modo, para
hacer que el reloj compense automáticamente el

310
311
ángulo de declinación, mueva el anillo giratorio de la
brújula hasta que el Norte esté a las 12 en punto.
6. Pulse A o B para mover la 4ta manecilla central hacia
el Oeste (-) o Este (+), respectivamente, y apuntar
hacia el ángulo de declinación de su posición usando
la escala de declinación. Sostenga un botón para
mover con rapidez la manecilla. Observe la figura en la
siguiente página como ejemplo.
7. Pulse la corona hacia adentro cuando termine.
Declinación magnética establecida a -14° (14°W)
A
B
FUNCIONAMIENTO DE LA BRÚJULA
Normalmente, la brújula está apagada y la 4ta manecilla
central apunta a las 12 en punto o muestra los segundos
del cronógrafo.
Mientras mantiene el reloj a nivel, pulse A o B para activar
la brújula. La aguja de la brújula se mueve y apunta hacia
el Norte. Si se gira el reloj, la 4ta manecilla central conti-
nuará moviéndose, apuntando siempre al Norte. Después
de 20 segundos, la brújula se apagará automáticamente y
la 4ta manecilla central retornará a su operación normal.
Esto alarga la duración de la pila. Pulse A o B en cualquier
momento para mantener la brújula encendida durante
otros 20 segundos.
NOTA: Mientras se usa la brújula, el segundero se mueve
en incrementos de dos segundos.

312
313
MAREA TEMPERATURA Y BRÚJULA
DESCRIPCIÓN GENERAL
EXTERNA-FIJAR
LA HORA
ESCALA DE
DECLINACIÓN
AGUJA
INDICADORA
C (BRÚJULA)
B (MAREA)
A (TEMP)
CORONA
ANILLO GIRATORIO
DE BRÚJULA
FECHA
ESCALA DE MAREA
ESCALA DE
TEMPERATURA
MEDIO-FIJAR LA FECHA
AJUSTANDO LA AGUJA INDICADORA
Jale la corona totalmente hacia afuera. La aguja indica-
dora debe señalar las 12 en punto. Si no las señala, pulse
cualquiera de los botones MAREA o TEMPERATURA
hasta que la aguja marque las 12 en punto. Los botones
MAREA y TEMPERATURA mueven la aguja en el sentido
de las manecillas del reloj y a la inversa, respectivamente.
Sostenga el botón de activación para mover la aguja con
rapidez. Pulse la corona hacia adentro cuando termine.
SELECCIÓN DE MAREA/TEMPERATURA
La aguja indicadora muestra de continuo tanto la marea
como la temperatura. Cuando se muestra la temperatura,
pulse el botón MAREA para seleccionar el reloj de marea.
La aguja se mueve a marea baja y luego a la marea actual.
Cuando se muestra la marea, pulse el botón TEMPERATU-
RA para seleccionar el termómetro. La aguja se mueve al

314
315
comienzo del termómetro y luego a la temperatura actual.
TERMÓMETRO
Cuando se lleva puesto en la muñeca, la lectura del
termómetro es afectada por el calor corporal. Para lograr
una lectura más exacta, quítese el reloj y déjelo a la
sombra durante unos minutos.
El reloj puede medir también la temperatura del agua si
está sumergido. Recuerde seleccionar la pantalla para
temperatura antes de introducir el reloj en el agua, puesto
que los botones no deben pulsarse mientras el reloj esté
sumergido.
Las lecturas del termómetro se toman a cada minuto, y
con más frecuencia si la temperatura está cambiando.
RELOJ DE MAREA
Para el reloj de marea, la aguja indicadora siempre rota
en el sentido de las manecillas del reloj, de modo que la
marea va subiendo cuando la aguja señala a la izquierda y
bajando cuando señala a la derecha. El número de horas
para la siguiente marea alta/baja se muestra en la escala
de marea.
Las mareas también están influenciadas por la posición
del sol y la forma del contorno de la costa, por consi-
guiente el reloj de marea no puede dar con precisión las
horas de las mareas altas y bajas. Se pudieran necesitar
ajustes periódicos.
Para calibrar el reloj de marea, jale la corona hacia el ME-
DIO. Pulse cualquiera de los botones MAREA o TEMPERA-
TURA para mover la aguja a la marea actual. Los botones
MAREA y TEMPERATURA mueven la aguja en el sentido
de las manecillas del reloj y a la inversa, respectivamente.
Pulse la corona hacia adentro cuando termine.

316
317
CALIBRACIÓN DE LA BRÚJULA
Se debe calibrar la brújula, antes de usarse.
Dado que la brújula usa el campo magnético de la Tierra,
usted debe tener cuidado de objetos metálicos grandes
tales como vehículos o puentes, u objetos que emitan
radiación electromagnética como televisores y compu-
tadoras, porque podrían afectar el campo magnético
alrededor del reloj. Si la brújula se calibra cerca de tales
objetos, sólo funcionará apropiadamente en ese mismo
lugar. Si la brújula se calibra lejos de tales objetos, no
funcionará apropiadamente en la cercanía de ellos. Para
resultados óptimos, realice la calibración en el área donde
va a ser usada.
Al calibrar y tomar rumbos es importante, como con
todas las brújulas, mantener la brújula a nivel. Calibrar
y tomar un rumbo cuando el reloj no está a nivel puede
resultar en errores grandes. Hay que evitar también áreas
que pudieran exhibir concentraciones de hierro duro y
suave más elevadas de lo normal, pues pueden ocasionar
rumbos incorrectos. Cuando un rumbo no infunda con-
fianza, vuelva a calibrar.
No guarde el reloj cerca de alguna fuente de magnetismo
como computadoras, electrodomésticos o televisores,
pues el reloj puede recoger la carga magnética y conducir
a rumbos inexactos. La exactitud típica de los instrumen-
tos de uso en la muñeca es de +/- 10 grados.
Para calibrar la brújula:
1. Jale la corona a su posición media y espere a que las
manecillas indicadoras se detengan.
2. Mantenga el reloj a nivel o colóquelo sobre una super-
ficie horizontal (si la pulsera interfiere, coloque el reloj

318
319
sobre un vaso invertido). El reloj puede estar bocabajo,
pero tome precauciones para proteger el cristal.
3. Pulse C (BRÚJULA) para comenzar. La 4ta manecilla
central gira dos vueltas para recordarle a usted rotar
el reloj. Todavía a nivel, dé dos rotaciones al reloj
LENTAMENTE, tomando aproximadamente 15 segun-
dos por rotación.
4. Cuando haya acabado, pulse C (BRÚJULA), mante-
niendo el reloj a nivel. La 4ta manecilla central se
mueve hacia atrás y adelante indicando el final de la
calibración y después se mueve a la configuración
actual de declinación magnética.
5. Si usted no desea ajustar la declinación magnética,
pulse la corona hacia adentro. De otro modo, para
hacer que el reloj compense automáticamente el
ángulo de declinación, mueva el anillo giratorio de la
brújula hasta que el Norte esté a las 12 en punto.
6. Pulse A o B para mover la 4ta manecilla central hacia
el Oeste (-) o Este (+), respectivamente, y apuntar ha-
cia el ángulo de declinación de su posición usando la
escala de declinación. Sostenga un botón para mover
con rapidez la manecilla. Observe la figura en la página
siguiente como ejemplo.

320
321
7. Pulse la corona hacia adentro cuando termine.
Declinación magnética establecida a -14° (14°W)
FUNCIONAMIENTO DE LA BRÚJULA
Normalmente, la brújula está apagada y la 4ta manecilla
central apunta a las 12 en punto o muestra los segundos
del cronógrafo.
Mientras mantiene el reloj a nivel, pulse C (BRÚJULA)
para activar la brújula. La aguja de la brújula se mueve y
apunta hacia el Norte. Si se gira el reloj, la 4ta manecilla
central continuará moviéndose, apuntando siempre al
A
B
Norte. Después de 20 segundos, la brújula se apagará
automáticamente y la 4ta manecilla central retornará a su
operación normal. Esto alarga la duración de la pila. Pulse
C (BRÚJULA) en cualquier momento para mantener la
brújula encendida durante otros 20 segundos.
NOTA: Mientras se usa la brújula, el segundero se mueve
en incrementos de dos segundos.

322
323
AJUSTE DE LA MANECILLA INDICADORA
(4TA MANECILLA CENTRAL)
Jale la corona totalmente hacia afuera. Las manecil-
las retrógradas superior e inferior se reinician hasta el
comienzo de sus escalas automáticamente. La manecilla
indicadora (4ta manecilla central) debe señalar las 12 en
punto. Si no las señala, pulse cualquiera de los botones
A o B para mover la aguja hasta que marque las 12 en
punto. Los botones A y B mueven la aguja en el sentido
de las manecillas del reloj y a la inversa, respectivamente.
Sostenga el botón para mover la aguja con rapidez. Pulse
la corona hacia adentro cuando termine.
CALIBRACIÓN DEL ALTÍMETRO
Se debe calibrar el altímetro, antes de usarse.
Puesto que el altímetro utiliza la presión para determinar
la altitud y la presión varía de lugar a lugar, es importante
ALTÍMETRO
DESCRIPCIÓN GENERAL
ESCALA DE
ALTÍMETRO
(CENTENAS)
RETRÓGRADA
SUPERIOR
(MILES)
BOTÓN C
(UNIDADES)
BOTÓN A
(ALTITUD MÁXIMA)
BOTÓN B
(ALTITUD MÍNIMA)
RETRÓGRADA
INFERIOR
(UNIDADES)
CORONA

324
325
en la pantalla de altitud. La 4ta manecilla central y la
retrógrada superior deben apuntar a la altitud actual.
3. Pulse A o B para mover la 4ta manecilla central en
sentido antihorario u horario, respectivamente, hasta
que apunte a la altitud deseada de calibración. Sos-
tener A o B moverá la manecilla central más rápido.
La manecilla retrógrada superior se mueve relativa al
valor de altitud señalado por la 4ta manecilla central.
4. Pulse la corona hacia adentro cuando termine.
programar el altímetro a una altitud de referencia
conocida, o a una referencia de altitud estándar de un
determinado lugar. Cambios repentinos en presión debido
a cambios en el clima pueden hacer que la lectura del
altímetro esté desfasada por +-100m (328 ft), incluso si su
ubicación no ha cambiado. Vuelva a calibrar a una altitud
conocida cuando ocurran cambios drásticos de presión.
Para calibrar el altímetro:
1. Jale la corona a su posición media y espere a que las
manecillas indicadoras se detengan.
2. Si el altímetro estaba APAGADO en el momento
de jalar la corona, la manecilla retrógrada inferior
apuntará a la unidad seleccionada la última vez que se
usó el altímetro; de otro modo la manecilla retrógrada
inferior apunta hacia la unidad seleccionada presente

326
327
Para apagar el altímetro con la unidad ajustada en PIES,
pulse C. Para apagar el altímetro con la unidad ajustada
en METROS, pulse C dos veces (la manecilla inferior se va
a PIES primero antes de ir a la posición APAGADO).
Ejemplo: Altitud=2310 m Ejemplo: Altitud=7580 pies
ALTÍMETRO ENCENDIDO/APAGADO
Para encender el altímetro pulse C. La manecilla
retrógrada inferior apunta a METROS. Usando las marcas
en el anillo superior, la 4ta manecilla central muestra las
decenas y centenas del valor de la altitud actual con di-
visiones cada diez METROS/PIES. La manecilla retrógrada
superior muestra los miles del valor de la altitud actual
con divisiones cada mil METROS/PIES.
Para cambiar la unidad de METROS a PIES, pulse C una
segunda vez. Para cambiar la unidad de PIES a METROS,
pulse C dos veces (el altímetro se apaga primero, luego se
vuelve a encender con la unidad en METROS).

328
329
La máxima altitud grabada aparece durante diez segun-
dos. Para extender la duración de la pantalla durante
otros diez segundos, pulse A antes de que termine la
duración previa de diez segundos.
Para cambiar la unidad de METROS a PIES o de PIES a
METROS, pulse C.
Para ver la altitud mínima registrada, pulse B. La manecilla
retrógrada inferior muestra la unidad de medida en la
que la altitud mínima fue grabada si el altímetro estaba
apagado en el momento de oprimir el botón; de otro
modo ésta mostrará la altitud mínima usando la actual
unidad seleccionada. La 4ta manecilla central muestra el
valor de la mínima altitud en centenas y decenas con di-
visiones cada diez METROS/PIES. La manecilla retrógrada
superior muestra la altitud mínima actual en miles con
divisiones cada mil METROS/PIES.
El reloj apagará el altímetro automáticamente después de
60 minutos desde la activación.
MEMORIA DE ALTITUD MÍNIMA/MÁXIMA
Para ver la altitud máxima registrada, pulse A. La mane-
cilla retrógrada inferior muestra la unidad de medida en
la que la altitud máxima fue grabada si el altímetro estaba
apagado en el momento de oprimir el botón; de otro
modo ésta mostrará la altitud máxima usando la actual
unidad seleccionada. La 4ta manecilla central muestra
el valor de la máxima altitud en centenas y decenas
con divisiones cada diez METROS/PIES. La manecilla
retrógrada superior muestra la altitud máxima en miles
con divisiones cada mil METROS/PIES.

330
331
PROFUNDIDAD
DESCRIPCIÓN GENERAL
Nota: La manecilla central y la inferior calibrarán
automáticamente cuando se mueve la corona a la
posición 3 para fijar la hora.
3
AA
B
1
2
3
2
3
2
3
MANECILLA
CENTRAL
INDICADOR
APAGADO
BOTÓN A
BOTÓN B
MANECILLA INFERIOR
CORONA
La altitud mínima grabada aparece durante diez segun-
dos. Para extender la duración de la pantalla durante
otros diez segundos, pulse B antes de que termine la
duración previa de diez segundos. Para cambiar la unidad
de METROS a PIES o de PIES a METROS, pulse C.

332
333
apuntará a la profundidad del momento como se indica
en la escala de profundidad. Si la lectura permanece en
el rango de 0 a 2 metros (0 a 6 pies) durante 5 minutos,
el sensor se apagará automaticamente. Para apagar el
sensor manualmente, pulse y sostenga el botón B durante
2 segundos. La 4ta manecilla central se moverá a la
posición APAGADO (6 en punto).
MEMORIA DE TEMPERATURA MÁXIMA/MÍNIMA
Y PROFUNDIDAD.
Después de llegar a la superficie, desenrosque la
corona y tírela hasta la posición media. La manecilla
inferior y la central se moverán para mostrar el valor de
profundidad máxima y el valor de temperatura mínima,
respectivamente, grabados durante el descenso más
reciente. Cuando el sensor de profundidad se active
nuevamente, se limpiará la memoria.
TEMPERATURA
El sensor de temperatura está siempre activado y tomará
una lectura al menos cada 60 segundos. La tempera-
tura está indicada por la manecilla inferior y la escala
correspondiente.
Cuando está puesto en la muñeca, la lectura de la tem-
peratura es afectada por el calor corporal. Para lecturas
más certeras, quítese el reloj de la muñeca.
SENSOR DE PROFUNDIDAD ENCENDIDO/APAGADO
El sensor está normalmente apagado y se debe encender
manualmente antes de la inmersión. Pulse y suelte el
botón B antes de encender el sensor. La 4ta manecilla
central se moverá de la posición APAGADO (las 6 en
punto) a la posición de las 12 en punto y empieza a tomar
lecturas al menos una vez cada 5 segundos. A medida
que aumenta la profundidad, la 4ta manecilla central

334
335
2 segundos en desplazamientos de dos posiciones de
manecilla. Se recomienda que el usuario reemplace la pila
cuando el nivel de la bateria es bajo.
Cuando el reloj esté en estado de reemplazar la pila, el
segundero deberá moverse solamente a intervalos de
5 segundos en desplazamientos de cinco posiciones de
manecilla. En este punto, el sensor de profundidad no
puede activarse y el usuario deberá reemplazar la pila
inmediatamente.
Si el reloj no ha sido usado todavía, las manecillas central
e inferior mostrarán en la pantalla 0 metros/pies y 0ºC/32
ºF, respectivamente. La corona se debe enroscar nueva-
mente antes del uso o la inmersión.
NIVEL DE LA PILA
El reloj determina el nivel actual de la pila y le da al usu-
ario una indicación visual sobre el nivel de la pila en ese
momento. El nivel del estado de la pila se clasifica como
Normal, Bajo y Reemplazar pila, con cada nivel indicado
por el movimiento del segundero.
Para el estatus de Normal, el segundero deberá moverse
una posición de manecilla a cada segundo, lo cual es la
operación normal.
Cuando el estatus del reloj indica Nivel de pila bajo, el
segundero deberá moverse solamente a intervalos de

336
337
YACHT RACER
2 31
A
B
C
PERFECT DATE (FECHA PERFECTA)
Con la función Perfect Date
™
la fecha no necesita
ajustarse hasta el 2060. El reloj tiene en cuenta los
meses cortos y los años bisiestos automáticamente,
y siempre mostrará la fecha correcta a pedido. La
fecha fue programada en la fábrica de Timex. Cuando
inicie su reloj por primera vez, si la fecha mostrada no
corresponde con la fecha en su ubicación, necesitará
reajustar la fecha a la fecha local. Tire de la corona hacia
afuera hasta la posición externa. La 4a manecilla central
girará una revolución en la esfera, se detendrá en la
posición de 12:00 en punto unos 5 segundos y después
se moverá a la fecha a la cual está ajustado el reloj. Gire
la corona hacia adelante para aumentar la hora hasta la
fecha actual (o hacia atrás para disminuir la hora hasta
la fecha actual). Cada vez que pase la medianoche la
MANECILLA
HORARIA
SEGUNDERO
4TA
MANE CILLA
CENTRAL
CORONA
MANECILLA
SUPERIOR
ESCALA DE
PERFECT
DATE
™
MANECILLA
INFERIOR
MINUTERO

338
339
fecha cambiará un día. Después de ajustar la fecha a la
fecha local, continúe girando la corona para ubicar las
manecillas en la hora local, fijándose si está en am o pm.
Una vez ajustada la hora, empuje la corona de vuelta a
la posición cerrada. En el funcionamiento normal la 4a
manecilla central mostrará la fecha cuando se presiona
la corona. La manecilla se desplazará hasta la fecha
actual como se muestra en el anillo superior en la caja.
La manecilla hará la pausa para permitirle leer la fecha
y retornar a la posición de reposo de las 12 en punto.
Tenga en cuenta que la función Perfect Date
™
sólo
será operativa en el modo horario. Cuando la pila está
agotada y se reemplaza, la función Perfect Date debe
ser calibrada de nuevo. Cuando la pila deba cambiarse,
se recomienda enfáticamente enviar el reloj al centro de
servicio Timex donde la pila será reemplazada y la función
Perfect Date será calibrada nuevamente a la fecha actual
para el sitio a donde el reloj será retornado.
AJUSTE DE LA 4TA MANECILLA CENTRAL
Para reajustar una 4ta manecilla central desalineada:
1. Tire de la corona, hacia afuera hasta la posición 3. Las
manecillas superior e inferior se mueven hasta el final
de sus ciclos, auto-ajustándose en forma automática.
2. En los 10 segundos posteriores de haber tirado la
corona a la posición 3, la 4ta manecilla central debe
señalar a las 12 en punto, y si no lo hace, pulse los
botones A o B para mover la manecilla en sentido
antihorario u horario hasta que señale las 12 en punto.
Pulsar y sostener el botón A o B hará que la manecilla
se mueva más rápido. Tenga en cuenta: después de
5 segundos sin actividad con la corona en la posición

340
341
3, la 4ta manecilla central se moverá a mostrar la
fecha actual.
3. Empuje la corona adentro a la posición 1 cuando
termine.
SELECCIÓN DE MODO
Pulse el botón C para mover la manecilla superior a la
función deseada.
HORA:
Muestra la hora actual únicamente (la función Perfect Date
[Fecha perfecta] sólo será operativa en modo horario).
TEMPORIZADOR 5 YACHT RACE:
El contador regresivo comenzará a los 5 minutos e inicia
el cronógrafo cuando éste llega a cero.
TEMPORIZADOR 3 YACHT RACE:
El contador regresivo comenzará a los 3 minutos e inicia
el cronógrafo cuando éste llega a cero.
TEMPORIZADOR 1 YACHT RACE:
El contador regresivo comenzará al 1er minuto e inicia el
cronógrafo cuando éste llega a cero.
CRONÓGRAFO:
El cronógrafo funcionará sin el temporizador de cuenta
regresiva.
CÓMO FUNCIONA EL TEMPORIZADOR YACHT RACE:
El reloj dispone de un temporizador de conteo regresivo
de 5, 3 y 1 minutos. Una vez que el contador llega a cero
arrancará automáticamente el cronógrafo de 1 hora.
1. Pulse el botón C hasta que la manecilla superior
muestre el modo deseado de 5, 3 o 1 minutos del
temporizador Yacht Race

342
343
2. Para comenzar, pulse el botón A (START/STOP). La 4ta
manecilla central muestra los segundos de conteo
regresivo y la manecilla inferior muestra los minutos,
en conteo regresivo. (Tenga en cuenta: los botones B
y C quedan inoperativos mientras está funcionando el
contador regresivo).
3. Para interrumpir, pulse el botón A (START/STOP) lo
que detendrá el proceso de conteo regresivo. (Tenga
en cuenta: el botón C queda inoperativo hasta que el
temporizador se reinicie).
4. Para reiniciar, pulse y sostenga el botón B (SPLIT/
RESET) durante 3 segundos, lo que reiniciará el
contador regresivo hasta la duración originalmente
seleccionada de 5, 3 o 1 minutos.
En operación normal del temporizador Yacht Race,
cuando el contador regresivo llega a cero el cronógrafo
arrancará automáticamente. Igualmente, hay una alerta
acústica que marca cada vez que el contador pasa por
cada minuto, que también sonará faltando 5 segundos
para completar el último minuto y comience la función
cronógrafo. El cronógrafo circulará por una secuencia de
30 minutos dos veces, para un tiempo total máximo de
1 hora.
CÓMO FUNCIONA EL CRONÓGRAFO
El reloj dispone de un cronógrafo de una hora que puede
funcionar independientemente del temporizador Yacht
Race.
1. Pulse el botón C hasta que la manecilla superior esté
al comienzo de la escala de 30 minutos del cronógrafo
2. Para comenzar, pulse el botón A (START/STOP). La 4ta

344
345
manecilla central muestra los segundos ascendentes;
la manecilla inferior muestra los minutos ascendentes
en una escala de 5 minutos y la manecilla superior
muestra la media hora contando ascendentemente
en escala de 30 minutos. Cada vez que la manecilla
inferior llega a la marca de 5 minutos, se devolverá
a la posición cero mientras la manecilla superior
continuará avanzando en la escala de 30 minutos.
(Tenga en cuenta: el botón C queda inoperativo
mientras el cronógrafo está funcionando).
3. Para tomar un tiempo fraccionario, pulse el botón
B (SPLIT/RESET). La manecilla superior, la inferior y
la 4ta conservarán sus posiciones para que usted
observe el tiempo fraccionario (vuelta). El cronógrafo
sigue todavía manteniendo la secuencia de conteo
mientras las manecillas están detenidas. Para soltar
las manecillas, pulse el botón B (SPLIT/RESET) y éstas
rápidamente se moverán para mostrar el tiempo
transcurrido total.
4. Para interrumpir, pulse el botón A (START/STOP), lo que
detendrá al cronógrafo. (Tenga en cuenta: el botón C
queda inoperativo mientras el cronógrafo está parado
hasta que éste sea reiniciado).
5. Para reiniciar, pulse y sostenga el botón B (SPLIT/
RESET) durante 3 segundos, lo cual reiniciará al
cronógrafo hasta el comienzo de la escala de 30
minutos.

346
347
En funcionamiento normal el cronógrafo circulará por
una secuencia de 30 minutos dos veces, hasta el máximo
total de 1 hora. Una vez haya transcurrido esa hora,
la manecilla superior permanecerá en la marca de 30
minutos y la manecilla inferior se devolverá a cero. La
función cronógrafo necesitará ser reiniciada antes de
ser usada nuevamente o antes de cambiar a una función
diferente. (Tenga en cuenta: el botón A queda inoperable
cuando el tiempo máximo de 1 hora ha transcurrido y no
funcionará sino hasta que el cronógrafo sea reiniciado
pulsando y sosteniendo el botón B durante 3 segundos).
LUZ NOCTURNA INDIGLO
®
(ÚNICAMENTE EN LA VERSIÓN PRO)
Yacht Racer PRO incluye la adición de la función de luz
nocturna INDIGLO
®
. Cuando hay poca o ninguna luz la
esfera se puede leer fácilmente activando la función de
luz nocturna INDIGLO
®
presionando la corona. El Yacht
Racer PRO usa un material luminiscente especial en la
esfera que brillará y creará una iluminación suficiente-
mente brillante para leer la esfera, pero asegura que su
visión nocturna no se reduzca una vez que la luz se haya
extinguido.

348
349
CRONÓGRAFO TEMPORIZADOR
SEGUNDERO
4TA
MANECILLA
CENTRAL
MANECILLA
SUPERIOR
PERFECT DATE
™
ESCALA
MINUTERO
MANECILLA
HORARIA
CORONA
MANECILLA
INFERIOR
2 31
A
B
C
PERFECT DATE (FECHA PERFECTA)
Con la función Perfect Date
™
de su reloj, la fecha no
necesita ajustarse hasta 2060. El reloj tiene en cuenta
los meses cortos y los años bisiestos automáticamente,
y siempre mostrará la fecha correcta a pedido. La
fecha fue programada en la fábrica de Timex. Cuando
inicie su reloj por primera vez, si la fecha mostrada no
corresponde con la fecha en su ubicación, necesitará
reajustar la fecha a fecha local. Tire de la corona hacia
afuera hasta la posición externa. La 4a manecilla central
girará una revolución en la esfera, se detendrá en la
posición de 12:00 en punto unos 5 segundos y después
se moverá a la fecha a la cual está ajustado el reloj. Gire
la corona hacia adelante para aumentar la hora hasta la
fecha actual (o hacia atrás para disminuir la hora hasta
la fecha actual). Cada vez que pase la medianoche la

350
351
fecha cambiará un día. Después de ajustar la fecha a la
fecha local, continúe girando la corona para ubicar las
manecillas en la hora local, fijándose si está en am o pm.
Una vez ajustada la hora, empuje la corona de vuelta a
la posición cerrada. En el funcionamiento normal la 4a
manecilla central mostrará la fecha cuando se presiona
la corona. La manecilla se desplazará hasta la fecha
actual como se muestra en el anillo superior de la caja.
La manecilla hará una pausa para permitirle leer la fecha
y retornar a la posición de reposo de las 12 en punto.
Tenga en cuenta que la función Perfect Date
™
sólo
funcionará en el modo horario. Cuando la pila está
agotada y se reemplaza, la función Perfect Date debe
ser calibrada de nuevo. Cuando la pila deba cambiarse,
se recomienda enfáticamente enviar el reloj al centro
de servicio Timex donde la pila será reemplazada y la
función Perfect Date (Fecha perfecta) será calibrada
nuevamente a la fecha actual para el sitio a donde el reloj
será retornado.
AJUSTE DE LA 4A MANECILLA CENTRAL
Para reajustar una 4a manecilla central desalineada:
1. Tire de la corona, hacia afuera hasta la posición 3. Las
manecillas superior e inferior se mueven hasta el final
de sus ciclos, ajustándose en forma automática.
2. Cuando deje de moverse, la 4ta manecilla central
debe señalar a las 12 en punto, y si no lo hace, pulse
los botones A o B para mover la manecilla en sentido
antihorario u horario hasta que señale las 12 en punto.
Pulsar y sostener el botón A o B hará que la manecilla
se mueva más rápido. Tenga en cuenta: después de
5 segundos sin actividad con la corona en la posición

352
353
3, la 4ta manecilla central se moverá para mostrar la
fecha actual.
3. Empuje la corona a la posición 1 cuando termine.
SELECCIÓN DE MODO
Pulse el botón C para mover la manecilla superior a la
función deseada.
HORA
Muestra la hora actual únicamente (la función Perfect
Date
™
sólo será operativa en modo horario).
FUNCIONAMIENTO DEL CRONÓGRAFO
El reloj tiene un cronógrafo de cuatro horas. Al final
del periodo de cuatro horas el cronógrafo se apagará
automáticamente. Esto ahorrará pila en el caso de una
activación accidental del cronógrafo.
1. Pulse el botón C hasta que la manecilla superior
esté al inicio de la escala superior del cronógrafo, la
manecilla inferior en 0 en la escala inferior.
2. Para comenzar, pulse el botón A (START/STOP). La 4a
manecilla central muestra los segundos ascendentes;
la manecilla inferior muestra los minutos ascendentes
en una escala de 30 minutos y la manecilla superior
muestra las horas contando ascendentemente en
una escala de 4 horas. Cada vez que la manecilla
inferior llega a la marca de 30 minutos, volverá a la
posición cero para comenzar el siguiente periodo de
30 minutos, mientras la manecilla superior continuará
avanzando en la escala de 4 horas. (Tenga en cuenta:
el botón C está desactivado mientras el cronógrafo
está funcionando)

354
355
desde el inicio de las escalas de 30 minutos y 4 horas
en las dos esferas.
En el funcionamiento normal, el cronógrafo circulará por
una secuencia de 30 minutos 8 veces, hasta el máximo
total de cuatro horas. Una vez que haya transcurrido
ese periodo de cuatro horas, la manecilla superior
permanecerá en la marca de cuatro horas y la manecilla
inferior volverá a cero. La función cronógrafo necesitará
ser reiniciada antes de ser usada nuevamente o antes de
cambiar a una función diferente. (Tenga en cuenta: el bo-
tón A queda inactivo cuando el tiempo máximo de cuatro
horas ha transcurrido y no funcionará sino hasta que el
cronógrafo sea reiniciado pulsando el botón B).
3. Para tomar un tiempo fraccionario, pulse el botón
B (SPLIT/RESET). La manecilla superior, la inferior
y la 4a conservarán sus posiciones para que usted
observe el tiempo fraccionario (vuelta). El cronógrafo
sigue todavía manteniendo la secuencia de conteo
mientras las manecillas están detenidas. Para soltar
las manecillas, pulse el botón B (SPLIT/RESET) y estas
rápidamente se moverán para mostrar el tiempo
transcurrido total.
4. Para parar, pulse el botón A (START/STOP), lo que
detendrá al cronógrafo. (Tenga en cuenta: el botón C
está desactivado mientras el cronógrafo está parado
hasta que este sea reiniciado)
5. Para reiniciar el cronógrafo después de pararlo, pulse
el botón B (SPLIT/RESET), que reiniciará el cronógrafo

356
357
para lograr el periodo de tiempo deseado para la cuenta
regresiva. Presionar la corona terminará el procedimiento
de ajuste y confirma los valores establecidos hasta ese
momento en cualquier punto del ciclo.
AJUSTE DEL TEMPORIZADOR REGRESIVO
El temporizador regresivo sólo puede ajustarse cuando la
función de temporizador regresivo no está funcionando.
Si el contador regresivo se usó previamente, necesita
reiniciarse. Si el temporizador está en funcionamiento,
hay que pararlo y reiniciarlo para poder ajustarlo.
1. Pulse el botón C hasta que la manecilla superior esté
en algún punto en la escala del temporizador. Si el
temporizador se ajustó previamente, la manecilla
apuntará a donde se ajustó previamente. Si es la
primera vez que se ajusta el temporizador, apuntará al
0 en la escala del temporizador.
TEMPORIZADOR REGRESIVO
El reloj cuenta con una función de temporizador
regresivo.
Nota especial: La manecilla superior, la manecilla inferior
y la 4a manecilla central se unen durante los pasos 3, 4
y 5 a continuación. A medida que mueve las manecillas
de minutos y segundos hacia adelante/atrás, verá que las
tres manecillas reaccionan a la suma o resta del periodo
de tiempo que dura la cuenta regresiva. Después de
tirar de la corona hacia afuera a la posición intermedia,
pulsar el botón C lo hará avanzar a través del siguiente
ciclo de conexión con las manecillas: Manecilla superior
(pulse el botón C) - Manecilla inferior (pulse el botón C)
- 4a manecilla central (pulse el botón C) de regreso a la
manecilla superior….esto le permite avanzar en el ciclo
para conectar con las manecillas que necesite ajustar

358
359
(pulsar el botón B moverá la manecilla en sentido
horario), hasta que haya seleccionado el número
deseado de minutos. Tenga en cuenta que está
ajustando el número de minutos hacia adelante o
hacia atrás para tener el tiempo deseado (por ejemplo:
para un tiempo total deseado de 2:53:30 deberá pulsar
el botón A siete veces lo que moverá el tiempo total
de 3 horas hasta 2:53:00). Notará que la manecilla
de la hora se moverá ligeramente hacia atrás desde
el marcador de las 3 horas hacia el marcador de las
2.5 horas. Cuando haya ajustado el tiempo al número
correcto de minutos, pulse el botón C para confirmar
su selección.
5. Ahora puede ajustar el número deseado de segundos
en incrementos de un segundo pulsando el botón A
para mover la cuarta manecilla inferior en sentido
2. Tire de la corona hacia afuera hasta la posición media.
3. Para ajustar el número deseado de horas en
incrementos de media hora (hasta un tiempo máximo
de 4:00:00) pulse el botón A para mover la manecilla
superior en sentido antihorario (pulsar el botón B
moverá la manecilla en sentido horario), hasta que
haya seleccionado el número deseado de horas. Tenga
en cuenta que está seleccionando el número de horas
con el incremento de medias horas más cercano al
tiempo total deseado (por ejemplo: para un tiempo
total deseado de 2:53:30, seleccione 3 horas). Cuando
haya completado el ajuste del número de horas, pulse
el botón C para confirmar su selección.
4. Ahora puede ajustar el número deseado de minutos
en incrementos de un minuto pulsando el botón A
para mover la manecilla inferior en sentido antihorario

360
361
FUNCIONAMIENTO DEL TEMPORIZADOR REGRESIVO
Cuando haya ajustado el temporizador regresivo al
tiempo deseado, puede poner a funcionar la cuenta
regresiva.
Inicio de la secuencia regresiva: Pulse el botón A
para iniciar una cuenta regresiva. La cuarta manecilla
central y la manecilla inferior comenzarán a moverse
en sentido antihorario. La manecilla superior se moverá
en sentido horario. Las manecillas seguirán indicando
el tiempo restante en la secuencia regresiva hasta que
transcurra el tiempo que se haya ajustado y el valor del
tiempo restante llegue a cero. Cuando el valor del tiempo
restante llegue a cero, sonará una campana indicando
que se ha completado la secuencia regresiva.
antihorario (pulsar el botón B moverá la manecilla
en sentido horario), hasta que haya seleccionado el
número deseado de segundos. Tenga en cuenta que
está sumando o restando el número de segundos
para completar el tiempo deseado (por ejemplo: para
un tiempo total deseado de 2:53:30 deberá pulsar
el botón B 30 veces para seleccionar 30 segundos).
Cuando haya terminado de ajustar el número de
segundos, empuje la corona a la posición 1 para
confirmar la selección del valor para el temporizador
regresivo.

362
363
Borrado del valor del temporizador regresivo: Si lo
desea, puede borrar el valor del temporizador a cero.
Esto sólo puede hacerse si el temporizador regresivo no
está funcionando y se ha reiniciado. Si el temporizador
está corriendo, primero debe parar la secuencia
regresiva pulsando el botón A y después pulsar el botón
B. Esto detendrá el contador regresivo hasta el valor
de tiempo seleccionado previamente. Para borrar el
valor del temporizador a cero, pulse y mantenga el
botón B durante dos segundos. Ahora deberá seguir las
instrucciones para ajustar el valor del contador regresivo
al nuevo tiempo deseado.
Función de tiempo parcial: Mientras el contador
regresivo está corriendo, puede usar la función de tiempo
parcial para saber cuánto tiempo queda en la secuencia
regresiva:
Interrupción de secuencia regresiva: Si desea interrum-
pir la secuencia regresiva antes que llegue a cero, puede
hacerlo pulsando el botón A (la cuarta manecilla central
así como la superior e inferior dejarán de moverse). Si
desea retomar la secuencia regresiva en el punto en que
la detuvo, simplemente pulse el botón A nuevamente (la
cuarta manecilla central así como la superior e inferior
volverán a moverse).
Reinicio de la secuencia regresiva: Cuando la secuencia
regresiva haya llegado a cero y la campana haya sonado,
puede reiniciar el temporizador regresivo al valor
ajustado pulsando el botón B (la cuarta manecilla central
así como la superior y la inferior se moverán para indicar
el valor del tiempo que se ajustó antes de usar la función
del temporizador regresivo).

364
365
3GMT (HORA DE GREENWICH)
SEGUNDERO
CORONA
ANILLO SUPERIOR
GIRATORIO
(FORMATO DE 24 HORAS)
4TA MANECILLA CENTRAL
MINUTERO
MANECILLA
HORARIA
ANILLO INTERNO/
NUMERALES
(FORMATO
DE 24 HORAS)
A
2 31
Para usar la función de tiempo parcial, pulse el botón B, lo
que hará que las manecillas superior, inferior y cuarta se
congelen en su posición. La cuenta regresiva continuará
funcionando internamente mientras las manecillas están
congeladas.
Para retomar el movimiento de las manecillas superior,
inferior y cuarta, pulse el botón B nuevamente y las
manecillas se reubicarán en el lugar correcto para
mostrar el tiempo actual dentro de la secuencia regresiva.

366
367
punto. Si en los 5 segundos después de haber tirado
la corona a la posición 3 la 4ta manecilla central no
señala las 12 en punto, pulse el botón A para mover
la manecilla en sentido horario hasta que señale las
12 en punto. Pulsar y sostener el botón A hará que la
manecilla se mueva más rápido.
3. Empuje la corona adentro a la posición 1 cuando
termine.
AJUSTE DE LA 4TA MANECILLA CENTRAL
La 4ta manecilla central tiene calibración de fábrica por
Timex para reflejar los minutos estándar dentro de la
hora como lo define el Tiempo Universal Coodinado.
Globalmente, la mayoría de ubicaciones usan minutos
estándar. Si la ubicación que se está usando para la
2da y 3ra zona horaria utiliza los minutos estándar, la
4ta manecilla central no requiere nueva calibración.
3 ZONAS HORARIAS
El reloj puede mostrar tres zonas horarias:
1. Manecillas de hora y minutos: muestra la hora en
formato estándar de 12 horas. Tenga en cuenta: La
fecha mostrada en la ventanilla de fecha está ligada a
la hora mostrada por estas dos manecillas.
2. 4ta manecilla central y anillo interno: muestra la hora
en formato de 24 horas.
3. 4ta manecilla central y anillo superior giratorio:
muestra la hora en formato de 24 horas.
AJUSTE DE LA 4TA MANECILLA CENTRAL
Para reajustar una 4ta manecilla central desalineada:
1. Tire de la corona, hacia afuera hasta la posición 3.
2. La 4ta manecilla central debe señalar las 12 en

368
369
Pulsar y sostener el botón A hará que la manecilla se
mueva más rápido.
5. Tire de la corona, hacia afuera hasta la posición 3. La
4ta manecilla central apuntará a las 12 en punto.
6. Gire la corona para colocar la manecilla horaria y el
minutero en la hora correcta.
7. Empuje la corona adentro a la posición 1 cuando
termine.
Tenga en cuenta: La 4ta manecilla central registrará el
tiempo usando la calibración actual de los minutos dentro
de la hora. Ambas zonas horarias, 2 y 3, utilizan la 4ta
manecilla central, y por tanto las ubicaciones siendo
rastreadas en las zonas horarias 2 y 3 deben utilizar
igualmente los mismos minutos dentro de la hora, para
que estas zonas horarias se muestren adecuadamente.
Solamente si usted desea hacer que la segunda y tercera
zona horaria reflejen las ubicaciones que no siguen los
minutos estándar, las instrucciones para recalibrar la 4ta
manecilla central están a continuación:
1. Tire de la corona, hacia afuera hasta la posición 3. La
4ta manecilla central debe señalar las 12 en punto.
2. Gire la corona hasta colocar al minutero en la posición
correcta dentro de la hora requerida para la ubicación
que se desea usar para la 2da y 3ra zonas horarias.
3. Empuje la corona hacia adentro, a la posición 2. La
4ta manecilla central apuntará a su actual posición
calibrada de los minutos dentro de la hora.
4. Pulse el botón A para mover la 4ta manecilla central
en sentido horario hasta que se alinee con el minutero.

370
371
CONFIGURACIÓN DE LA 4TA MANECILLA CENTRAL
(ZONA HORARIA II)
Observe la hora actual en la ubicación que desea rastrear
como 2da zona horaria. Pulse el botón A hasta que la 4ta
manecilla central esté apuntando a esa hora en el anillo
interno. (Tenga en cuenta: esta escala está en formato de
24 horas). La 4ta manecilla central avanzará 30 minutos
cada vez que se oprime el botón A. Pulsar y sostener el
botón A hará que la manecilla se mueva más rápido. Esto
programará la 2da zona horaria en el reloj.
CONFIGURACIÓN DEL ANILLO SUPERIOR GIRATORIO
DE LA CAJA (ZONA HORARIA III)
La 3ra zona horaria se programa usando la existente
configuración de la 4ta manecilla central y ajustando
el anillo superior giratorio de la caja a la hora deseada
de la 3ra zona horaria. (Tenga en cuenta: esta escala
está en formato de 24 horas). El anillo superior tiene 72
posiciones. Para avanzar al anillo superior en una hora,
se lo avanzará tres posiciones (3 clics). Observe la hora
actual en la ubicación que desea rastrear como 3ra
zona horaria. Gire el anillo superior de la caja en sentido
antihorario para colocar la marca de hora correcta para
esa hora con la 4ta manecilla central.

372
373
FUNCIÓN TAQUÍMETRO
(no todos los modelos)
El taquímetro sólo determina velocidades que sean
mayores a 60 unidades por hora usando este método;
velocidades más bajas pueden medirse disminuyendo
la unidad de medida. La función desempeñada por un
taquímetro es independiente de la unidad de distancia
(p.ej.millas terrestres, millas náuticas, kilómetros, metros,
etc.) en tanto se use la misma unidad de longitud para
todos los cálculos.
1. Determine el punto inicial y el final de la distancia
preestablecida.
2. Inicie el cronógrafo una vez el objetivo para la medida
de velocidad pase por el punto inicial.
3. Detenga el cronógrafo cuando el objetivo para la
medida de velocidad pase por el punto final.
4. El segundero del cronógrafo es comparable con
los marcadores del taquímetro para determinar la
velocidad del objetivo.

374
375
FUNCIÓN DE REGLA DESLIZANTE
La función de regla deslizante integrada al anillo giratorio
superior se utiliza rotando el aro. El anillo interno no se
mueve. El aro siempre se refiere a distancia o velocidad,
o a cualquier dato que varíe con tiempo. El anillo interno
solo anota unidades de tiempo.
Aro
En el aro (anillo externo), la figura “10” representa facto-
res o múltiplos de 10, tales como 0.1, 1.0, 10, ó 100.
Anillo interno
En el anillo interno, “MPH” (millas por hora) se refiere al
“índice de velocidad”. Este índice se usa para calcular la
velocidad que conlleve cualquier dato por hora. En el aro,
“STAT” (millas terrestres) y “NAUT” (millas náuticas) son
para conversión de unidades de distancia.
ARO
ANILLO INTERNO

376
377
Los siguientes ejemplos sirven de guía para el uso de la
regla deslizante.
CÁLCULO DE VELOCIDAD:
¿Cuál velocidad se requiere para ir a 10 millas náuti-
cas en 15 minutos?
Factores conocidos: Distancia: Tiempo para 10 millas
náuticas: 15 minutos
• Alinear la flecha “10” sobre el aro con el “15” en el
anillo interno.
• La velocidad requerida se puede encontrar directa-
mente encima de la marca “MPH” en el anillo interno.
Respuesta: 40 millas náuticas por hora.
Cálculo de tiempo: ¿En cuánto tiempo se harán 10
millas náuticas a una velocidad de 40 millas por hora?
Factores conocidos: Velocidad: 40 millas por hora
Distancia: 10 millas náuticas
• Alinear “40” sobre el aro con la marca “MPH” en el
anillo interno.
• El tiempo requerido se puede encontrar directamente
debajo de la flecha “10” en el aro, que es “15” en el
anillo interno.
Respuesta: 15 Minutos

378
379
CÁLCULO DE DISTANCIA:
¿A qué distancia se puede viajar a 40 millas por hora
durante 15 minutos?
Factores conocidos: Velocidad: 40 millas náuticas por
hora Tiempo: 15 minutos
• Alinear “40” sobre el aro directamente encima de la
marca “MPH” en el anillo interno.
• La distancia recorrida se puede obtener encima del
marcador “15” en el anillo interno. El número indicado
en el aro es “10”.
Respuesta: la distancia recorrida es 10 millas
náuticas.
CONVERSIÓN DE UNIDADES:
Para convertir distancia de millas náuticas a millas
terrestres y kilómetros:
Factor conocido: Distancia a convertir es 10 millas
náuticas
• Alinear la flecha “10” sobre el aro encima de “NAUT”
en el anillo interno. La conversión a millas terrestres
(11.5) se encuentra encima de la marca“STAT” del
anillo interno, y la conversión a kilómetros (18.5)
se encuentra encima de la marca“MPH” del anillo
interno.

380
381
CÓMO AJUSTAR LA PULSERA
(Las variaciones de las siguientes secciones de pulseras
se aplican a todos los modelos de relojes).
PULSERA CON BROCHE DESLIZANTE
1. Abra la chapa de cierre.
2. Mueva el broche hasta
lograr la longitud de
pulsera deseada.
3. Ejerza presión mientras
sostiene la chapa de
cierre y deslice el broche
hacia atrás y hacia adelante hasta que se acople en
las ranuras situadas en la parte de abajo de la pulsera.
4. Presione hacia abajo la chapa de cierre hasta que se
acople a presión y quede cerrada. El broche puede
dañarse si se usa una fuerza excesiva.
PULSERA CON BROCHE PLEGABLE
1. Localice la barra de resorte que conecta la pulsera al
broche.
2. Utilizando una herramienta puntiaguda, empuje el
perno de resorte hacia adentro y gire suavemente la
pulsera para desacoplarla.
3. Determine el tamaño de la muñeca y después
introduzca el perno de resorte en el agujero inferior
correcto.
4. Empuje el perno hacia abajo, alinéelo con el agujero
superior y suéltelo para que encaje en su sitio.

382
383
REMOCIÓN DE ESLABONES DE LA PULSERA
CÓMO QUITAR LOS ESLABONES:
1. Coloque la pulsera en posición vertical e introduzca la
herramienta puntiaguda en la abertura del eslabón.
2. Empuje el pasador con fuerza en el sentido de la
flecha hasta que el eslabón se suelte (los pasadores
están diseñados para ser difíciles de quitar).
3. Repita el procedimiento hasta que se haya quitado el
número de eslabones deseado.
REENSAMBLE:
1. Vuelva a unir las piezas de la pulsera.
2. Empuje el perno nuevamente al interior del eslabón en
sentido contrario al indicado por la flecha.
3. Presione hacia abajo el pasador hasta que se acople
firmemente en la pulsera y quede al ras.
PILA
La pila debe durar 4 a 6 años con uso normal del reloj. La
vida real de la pila puede variar según el uso que tenga.
Si necesita cambiar la pila, recomendamos que sólo
TIMEX la reemplace. Su reloj necesitará ser calibrado a
la hora y fecha correctas después del cambio de pila.
Para devolver su reloj a Timex use un envío de prepago.
Para obtener un envío prepago llame al 1-800-448-4639
o visite el comercio donde adquirió su reloj o visite www.
TIMEX.com. Incluya lo siguiente con su reloj para cubrir el
franqueo y el manejo (este no es el costo de reparación):
En EUA, un cheque o giro por valor de US $ 8,00 (dólares
estadounidenses); en Canadá, un cheque o giro por valor
de CAN $12,00 (dólares canadienses). En otros países,
Timex le cobrará el franqueo y el manejo.

384
385
NO INCLUIR CON EL ENVÍO UNA PULSERA ESPECIAL NI
NINGÚN OTRO ARTÍCULO DE VALOR PERSONAL.
NO TIRE LA PILA AL FUEGO. NO LA RECARGUE. MAN-
TENGA LAS PILAS SUELTAS FUERA DEL ALCANCE DE
LOS NIÑOS.
GARANTÍA INTERNACIONAL DE TIMEX
Timex Group USA, Inc garantiza el reloj TIMEX
®
contra
defectos de fabricación durante un periodo de UN AÑO
a partir de la fecha de compra original. Timex y sus
sucursales en todo el mundo respaldarán esta garantía
internacional.
Cabe aclarar que Timex tiene la libertad de optar por
reparar el reloj con componentes nuevos o reacondi-
cionados e inspeccionados, y también podría optar por
reemplazarlo por un modelo idéntico o similar. IMPOR-
TANTE: POR FAVOR ADVIERTA QUE ESTA GARANTÍA
NO CUBRE DEFECTOS O DAÑOS A SU RELOJ:
1. después de vencido el plazo de la garantía;
2. si el reloj inicialmente no se compró a un distribuidor
autorizado por Timex;
3. si las reparaciones efectuadas no las hizo Timex;
4. si son consecuencia de accidentes, manipulación no
autorizada o abuso, y
5. en el cristal, la correa o pulsera, la caja, los accesorios
o la pila. Timex podría cobrarle por el reemplazo de
cualquiera de estas piezas.
ESTA GARANTÍA SE OFRECE EN FORMA EXCLUSIVA Y EN
LUGAR DE CUALQUIER OTRA GARANTÍA, SEA EXPRESA
O IMPLÍCITA, INCLUSIVE TODA GARANTÍA IMPLÍCITA
PARA FINES COMERCIALES O DE ADECUACIÓN A FINES

386
387
PARTICULARES. TIMEX NO SE HARÁ RESPONSABLE POR
CUALQUIER DAÑO ESPECIAL, SECUNDARIO O A CONSE-
CUENCIA. En ciertos países y estados no se permiten
limitaciones de las garantías implícitas ni exclusiones o
limitaciones de daños, por lo cual puede que estas limita-
ciones no sean de aplicación en su caso particular. Esta
garantía le concede derechos legales específicos; usted
también podría estar amparado por otros derechos, que
varían según el país y el estado donde viva.
Para solicitar los servicios incluidos en la garantía,
devuelva el reloj a Timex a una de sus sucursales o al
comercio minorista adonde se compró el reloj junto
con el cupón de reparación del reloj original o, en EUA
y Canadá únicamente, el cupón de reparación del
reloj original o una nota en la que figure su nombre,
domicilio, número de teléfono y fecha y lugar de compra.
Para cubrir el costo de envío, por favor adjunte el
siguiente importe (este importe no es para el pago de la
reparación): En EUA, un cheque o giro por valor de US $
8,00 (dólares estadounidenses); en Canadá, un cheque o
giro por valor de CAN $12,00 (dólares canadienses); en
el Reino Unido, un cheque o giro por valor de UK £ 3,50
(libras). En otros países, Timex se encargará de cobrarle
el importe por el franqueo y el manejo. NUNCA INCLUYA
CON EL RELOJ UNA PULSERA ESPECIAL NI NINGÚN OTRO
ARTÍCULO DE VALOR PERSONAL.
En EUA puede llamar al número 1-800-448-4639 para
obtener información adicional sobre la garantía. En
Canadá, llame al 1-800-263-0981. En Brasil, llame al
+11 2664 1001. En México, llame al 01-800-01-060-00. En
América Central, el Caribe, Bermudas y Bahamas, llame
al (501) 370-5775 (EUA). En Asia, llame al 852-2815-0091.

388
389
En el Reino Unido, llame al 44 020 8687 9620. En Francia,
llame al 33 3 81 63 42 51. En Alemania/Austria, llame al
+43 662 889 2130. En otras regiones, comuníquese con
su minorista local de Timex o el distribuidor de Timex
para obtener información sobre la garantía.
Si su reloj Timex
®
tuviera que ser reparado, envíelo a
Timex según lo indicado en la Garantía Internacional de
Timex o bien envíelo a: TG SERVICE CENTER, P.O. Box
2740, Little Rock, AR 72203. Si tiene consultas sobre el
servicio, llame al 1-800-328-2677 o [email protected]
GARANTÍA EXTENDIDA
Sólo disponible en EUA. Extienda su garantía por 4 años
más a partir de la fecha de compra por $5. Puede pagar
con AMEX, Discover, Visa o MasterCard llamando al 1 800-
448-4639 en horas normales de oficina. El pago deberá
efectuarse dentro de los 30 días siguientes a la fecha
de compra. Indique el nombre, dirección, número de
teléfono, fecha de compra y número de modelo
(5 dígitos). También puede enviar un cheque de $5 por
correo a: Timex Extended Warranty, P.O. Box 1676, Dept.
EF, Little Rock, AR 72203.
©2015 Timex Group USA, Inc. TIMEX, INDIGLO, PERFECT DATE
e INTELLIGENT QUARTZ son marcas registradas de Timex Group B.V.
y sus afiliados.

391
RELÓGIOS TIMEX
®
Parabéns por ter adquirido um relógio TIMEX
®
INTELLIGENT QUARTZ
™
. Leia cuidadosamente as
instruções para saber como operar o relógio Timex.
É possível que o seu relógio não possua todos os recursos
descritos neste folheto.
Para obter mais informações e registrar seu
produto, visite:
www.timex.com

392
393
ÍNDICE
Como iniciar o funcionamento do relógio ..................... 395
À prova d’água e de choque .......................................... 396
Luz noturna Indiglo
®
..................................................... 398
Configuração da data e hora ......................................... 399
Calendário perpétuo ...................................................... 401
Cronógrafo Fly-back ....................................................... 404
Bússola e cronógrafo Fly-back ....................................... 410
Cronógrafo linear ........................................................... 423
Hora mundial ................................................................. 429
Bússola ........................................................................... 436
Maré, temperatura e bússola ........................................ 444
Altímetro ........................................................................ 454
Profundidade .................................................................. 463
Corrida de iate................................................................ 468
Timer de cronógrafo ...................................................... 480
3TMG .............................................................................. 497
Função do taquímetro ................................................... 504
Função da escala deslizante de bisel ............................ 506
Como ajustar a pulseira ................................................. 511
Retirada dos elos da pulseira ......................................... 513
Bateria ............................................................................ 514
Garantia .......................................................................... 516

394
395
COMO INICIAR O FUNCIONAMENTO
DO RELÓGIO
(Não se aplica aos modelos com calendário perpétuo.)
Retire a proteção plástica abaixo da coroa e pressione a
coroa contra a caixa para iniciar o funcionamento
do relógio.
A coroa de alguns relógios precisa ser atarraxada. Se a
caixa do seu relógio tiver uma saliência com rosca, a coroa
deverá ser atarraxada depois de configurar o relógio.
Para atarraxar, mantenha pressionada a coroa firmemente
contra a saliência rosqueada e gire-a simultaneamente
no sentido horário. Continue a atarraxar a coroa até
que esteja firme. Da próxima vez que desejar configurar
o relógio, você deverá desatarraxar a coroa (sentido
anti-horário) antes de puxá-la para fora .
Bem-vindo ao mundo dos relógios Timex
®
com
tecnologia Intelligent Quartz
™
, o futuro da tecnologia
de quartzo analógico. A tecnologia Intelligent Quartz
dá ao seu poderoso microprocessador a confiabilidade
e precisão para medição da hora analógica com quartzo.
Com os relógios Timex Intelligent Quartz, a tecnologia
está impressa no design, oferecendo um novo nível de
complexidade do mostrador. Utiliza até três ponteiros
extra independentes para mostrar uma vasta gama
de informações, normalmente disponíveis apenas nos
relógios digitais, em formato analógico tradicional.

396
397
ADVERTÊNCIA – PARA MANTER A RESISTÊNCIA À
ÁGUA, NÃO PRESSIONE NENHUM BOTÃO EMBAIXO
D’ÁGUA, A MENOS QUE O RELÓGIO SEJA RESISTENTE
À ÁGUA A UMA PROFUNDIDADE DE 200 METROS.
NUNCA PUXE A COROA PARA FORA EMBAIXO D’ÁGUA.
1. Essa resistência à água continuará invariável sempre
que o cristal, a coroa e a caixa permanecerem intactos.
2. O relógio não é certificado para mergulhar.
3. Enxágue o relógio com água doce logo após entrar em
contato com a água salgada.
4. A resistência a choques será indicada mostrador ou
na tampa do relógio. Os relógios são fabricados para
passarem na prova de resistência a choques da ISO.
Contudo, deve-se ter cuidado para não danificar
o cristal.
À PROVA D’ÁGUA E DE CHOQUE
Se o relógio for à prova d’água, haverá uma indicação de
profundidade em metros (WR_M).
Profundidade da
resistência à água
Pressão da água abaixo
da superfície em p.s.i.a.*
30m/98ft 60
50m/164ft 86
100m/328ft 160
200m/656ft 284

398
399
CONFIGURAÇÃO DA DATA E HORA
OBSERVAÇÃO – A coroa do relógio tem três posições:
fechada, no meio e para fora. Para se acostumar com a
diferença entre as diversas posições, puxe a coroa para
fora e empurre-a delicadamente até sentir um clique na
posição central.
Para configurar a data e a hora:
Time
Puxe a coroa para fora e gire-a até a hora correta ser
exibida. Certifique-se da correta configuração de
AM/PM verificando se a data muda à meia-noite,
e não ao meio-dia.
LUZ NOTURNA INDIGLO
®
Pressione o botão ou a coroa para ativar a luz. A tecnologia
eletroluminescente utilizada na luz noturna INDIGLO
®
ilumina todo o mostrador do relógio à noite e em
condições de pouca luz.
OU

400
401
Data (Não se aplica aos modelos com
calendário perpétuo)
Puxe a coroa até a posição do meio e gire-a até a data
correta ser exibida na janela da data. Observação – A
data muda entre as 22h00 e as 2h00. Não mudar a data
durante este período. Isso pode prejudicar o mecanismo
do relógio.
Ao terminar a configuração da data e da hora, empurre
a coroa para a posição fechada. O segundo ponteiro
começará a se movimentar.
OBSERVAÇÃO – Para os meses com menos de 31 dias,
será preciso ajustar a data.
CALENDÁRIO PERPÉTUO
VISÃO GERAL
A
B
1 2
3
1 2
3
PONTEIRO DAS
HORAS
PONTEIRO
DOS DIAS
PONTEIRO DA DATA
PONTEIRO DOS
SEGUNDOS
PONTEIRO DOS
MINUTOS
COROA
PONTEIRO DOS
MESES
BOTÃO A
(ENCAIXADO)
BOTÃO B
(ENCAIXADO)
POSIÇÃO
FECHADA
POSIÇÃO
INTERMEDIÁRIA
POSIÇÃO
EXTERNA

402
403
Para ver a compensação, puxe a coroa para a sua posição
intermediária. O ponteiro da data mostra a compensação:
1 = 1 ano após o ano bissexto; 2 = 2 anos após o ano
bissexto; 3 = 3 anos após o ano bissexto; 4 = ano
bissexto. Empurre a coroa para dentro quando terminar
e os ponteiros voltam ao visor normal de dia, mês e data.
INTRODUÇÃO
Com o recurso de calendário perpétuo, a data não precisa
ser ajustada até 2100. O relógio trabalha automaticamente
levando em consideração os meses curtos e os anos
bissextos, sempre mostrando o dia e a data corretos. O dia
e a data foram previamente ajustados na fábrica Timex.
Você só precisa ajustar a hora. O relógio tem dois botões
encaixados somente utilizados pelo Centro de Serviço
Timex para ajustar o dia e a data após a substituição da
bateria. Não cumprem nenhuma outra função.
COMPENSAÇÃO DO ANO BISSEXTO
Para manter a data correta, o relógio inclui uma confi-
gur ação para a compensação do ano bissexto atual. Essa
configuração é realizada na fábrica Timex ou após
a substituição da bateria e não pode ser alterada,
somente vista.

404
405
AJUSTE DO 4º PONTEIRO CENTRAL
Para reajustar o 4º ponteiro central quando está
desalinhado:
1. Puxar a coroa para a sua posição externa. Os
ponteiros superior e inferior reconfiguram automa-
ticamente ao final de suas respectivas voltas.
2. O 4º ponteiro central deve apontar para as 12h00.
Se em 5 segundos depois de puxar a coroa para fora
o 4º ponteiro central não apontar para as 12h00,
pressione o botão A ou B para mover o ponteiro no
sentido anti-horário ou horário até o ponteiro apontar
para as 12h00.
3. Ao terminar, empurre a coroa para a posição fechada.
CRONÓGRAFO FLY-BACK
VISÃO GERAL
AA
B
23
1 2
3
1 2
3
PONTEIRO
SUPERIOR
CRONÓGRAFO
E HORAS DO 2°
FUSO HORÁRIO
4º PONTEIRO
CENTRAL
PONTEIRO
DOS SEGUNDOS
JANELA DA DATA
COROA
ESCALA DE MINUTOS
DO CRONÓGRAFO
PONTEIRO INFERIOR
BOTÃO A
BOTÃO B
PONTEIRO
DOS MINUTOS
PONTEIRO DAS HORAS
POSIÇÃO
FECHADA
POSIÇÃO
INTERME DIÁRIA
POSIÇÃO
EXTERNA

406
407
PARA CONFIGURAR O SEGUNDO FUSO HORÁRIO:
1. Puxe a coroa até a posição intermediária. O ponteiro
superior mostra a hora do segundo fuso horário,
e o 4º ponteiro central mostra os minutos.
2. Presumindo que a hora do segundo fuso horário tenha
o mesmo valor dos minutos que a sua hora, o 4º
ponteiro central deve estar alinhado com o ponteiro
dos minutos. Se os ponteiros não estão alinhados ou,
se o segundo fuso horário tem os minutos diferentes
dentro da mesma hora, pressione o botão B para
mover o 4º ponteiro central para a frente até que fique
na posição desejada.
3. Pressione o botão A para que o ponteiro superior avance
em espaços de 1 hora até alcançar a hora desejada do
segundo fuso horário. Para mover o ponteiro com mais
rapidez, mantenha pressionado o botão A.
SEGUNDO FUSO HORÁRIO
O ponteiro superior mostra a hora do segundo fuso
horário. Observe que a
escala é de 24 horas,
sendo que a meia-noite
fica em qualquer extremi-
dade e o meio-dia fica ao
centro. Os fusos horários
normalmente diferem em
espaços de horas. Nestes
casos, o valor do minuto
referente ao segundo fuso
horário será o mesmo que
o exibido pelo ponteiro de minutos do relógio.
AA
B
23
1 2
3
1 2
3

408
409
4. Para reconfigurar o cronógrafo fly-back para a posição
zero, pressione o botão B (FLY-BACK/RESET).
Ao reconfigurar o cronógrafo, todos os ponteiros
passam para a posição zero. Depois de oito segundos,
o relógio volta ao visor normal do segundo fuso
horário.
5. Para reconfigurar e/ou reiniciar o cronógrafo fly-back
enquanto estiver em funcionamento, mantenha
pressionado o botão B (Fly-back/Reset). Solte o botão
quando desejar reiniciar.
4. Pressione a coroa quando terminar.
CRONÓGRAFO FLY-BACK
O relógio tem um cronógrafo fly-back de 4 horas.
1. Para começar, pressione o botão A (START/STOP).
O 4º ponteiro central mostra os segundos com uma
resolução de 1/5 de segundo. O ponteiro inferior
mostra o último dígito dos minutos, contando até dez
e repetindo. O ponteiro superior mostra o tempo total,
incluindo horas e minutos, com divisões a cada dez
minutos. O cronógrafo conta até quatro horas antes
de parar automaticamente.
2. Para parar, pressione novamente o botão A (START/
STOP). Todos os ponteiros param de se movimentar.
3. Para continuar, pressione novamente o botão A
(START/STOP).

410
411
AJUSTE DO PONTEIRO INDICADOR
(4º PONTEIRO CENTRAL)
Para reajustar o ponteiro indicador quando estiver
desalinhado:
1. Puxar a coroa para a sua posição externa.
Os ponteiros superior e inferior reconfiguram automa-
ticamente ao final de suas respectivas voltas.
2. O 4º ponteiro central deve apontar para as 12h00.
Se isso não ocorrer dentro de 5 segundos depois de
puxar a coroa para a sua posição exterior, pressione
os botões A ou B para mover o ponteiro no sentido
anti-horário (A) ou horário (B), respectivamente, até
o ponteiro apontar para as 12h00.
3. Pressione a coroa quando terminar.
BÚSSOLA E CRONÓGRAFO FLY-BACK
VISÃO GERAL
A
C
B
1 2
3
1 2
3
PONTEIRO
SUPERIOR
CRONÓGRAFO
HORAS DO 2°
FUSO HORÁRIO
4º PONTEIRO
CENTRAL
PONTEIRO DOS
SEGUNDOS
JANELA DA DATA
COROA
ESCALA DE MINUTOS
DO CRONÓGRAFO
PONTEIRO INFERIOR
BOTÃO A
BOTÃO B
PONTEIRO
DAS HORAS
PONTEIRO DOS MINUTOS
POSIÇÃO
FECHADA
POSIÇÃO
INTER-
MEDIÁRIA
POSIÇÃO
EXTERNA
BOTÃO C

412
413
2. Pressione o botão B para mover o 4º ponteiro central
para a frente. Para mover o ponteiro com mais
rapidez, mantenha o botão pressionado. O ponteiro
superior e o 4º ponteiro central movem-se juntos;
quando o 4º ponteiro central faz uma volta completa,
o ponteiro superior move-se o equivalente a uma
hora. Tendo em conta que a hora do segundo fuso
horário tem o mesmo valor dos minutos que a sua
hora, o 4º ponteiro central deve estar alinhado com
o ponteiro dos minutos.
3. Pressione o botão A para que o ponteiro superior
avance em espaços de 1 hora. Para mover o ponteiro
com mais rapidez, mantenha o botão pressionado.
4. Pressione a coroa quando terminar.
Se preferir, o segundo fuso horário pode ser utilizado
como uma alternativa para mostrar a sua hora local
SEGUNDO FUSO HORÁRIO
O ponteiro superior geralmente mostra a hora do
segundo fuso horário. Observe que a escala é de 24 horas,
sendo que a meia-noite fica em qualquer extremidade
e o meio-dia fica no centro.
Para configurar o segundo fuso horário:
1. Puxe a coroa até a
posição intermediária.
O ponteiro superior
mostra a hora do
segundo fuso horário
em hora militar
(formato de 24 horas)
e o 4° ponteiro central
mostra os minutos.
A
C
B
1 2
3
1 2
3

414
415
O ponteiro superior mostra o tempo total, incluindo
horas e minutos, com divisões a cada dez minutos.
O cronógrafo conta até quatro horas antes de parar
automaticamente.
2. Para parar, pressione o botão A (START/STOP)
novamente. Os ponteiros param todos.
3. Para recomeçar, pressione o botão A (START/STOP)
novamente ou, para reconfigurar o cronógrafo para
a posição zero, pressione o botão B (FLY-BACK/RESET).
Ao reconfigurar o cronógrafo, todos os ponteiros
passam para a posição zero. Depois de oito segundos,
o relógio volta ao visor normal do segundo fuso horário.
4. Você também pode zerar e/ou reiniciar o cronógrafo
enquanto este estiver em funcionamento. Para
fazê-lo, mantenha pressionado o botão B (FLY-BACK/
no formato de 24 horas. Ao configurar o segundo fuso
horário, certifique-se de que o visor da hora/minuto
corresponda ao visor de 24 horas verificando se a data
muda à meia-noite, e não ao meio-dia.
CRONÓGRAFO FLY-BACK
O relógio tem um cronógrafo fly-back de 4 horas.
1. Para começar, pressione o botão A (START/STOP).
O 4º ponteiro
central mostra os
segundos com uma
resolução de 1/5 de
segundo e o ponteiro
inferior mostra o
último dígito dos
minutos, contando
até dez e repetindo.
A
C
B
1 2
3
1 2
3

416
417
RESET) para zerar o cronógrafo e solte quando quiser
que reinicie. Você não tem que esperar até que
os ponteiros cheguem a zero para soltar o botão;
a cronometragem começará internamente assim que
soltar o botão. Esta função “fly-back” permite contar
o tempo de uma volta.
A bússola pode ser utilizada quando o cronógrafo está
trabalhando sem interferir com o seu funcionamento.
Ver FUNCIONAMENTO DA BÚSSOLA.
CALIBRAÇÃO DA BÚSSOLA
Você tem de calibrar a bússola antes de usá-la.
Uma vez que a bússola utiliza o campo magnético da
Terra, é preciso estar consciente de grandes objetos
metálicos, tais como, veículos ou pontes, ou objetos
que emitem radiações eletromagnéticas (televisões ou
computadores), o que poderia afetar o campo magnético
em torno do relógio. Se a bússola for calibrada perto de
tais objetos, ela apenas trabalhará corretamente neste
local. Se a bússola for calibrada longe de tais objetos,
não trabalhará corretamente perto deles. Para obter os
melhores resultados, faça a calibração na área em que
a vá utilizar.
Durante a calibração e quando fizer as leituras de posição,
é importante, como com todas as bússolas, manter
a bússola nivelada. Fazer a calibração ou determinar
direções quando o relógio estiver desnivelado pode
causar erros graves. Evite também as áreas onde possam
existir concentrações acima do normal de minério de
ferro e ferro industrial, pois poderão causar leituras
incorretas. Sempre que suspeitar que a determinação
de direção não está correta, volte a calibrar a bússola.

418
419
3. Pressione o botão C (COMPASS) para começar.
O 4º ponteiro central executa duas voltas completas
para que não se esqueça de girar o relógio. Com
o relógio nivelado, gire-o LENTAMENTE dando duas
voltas completas, demorando pelo menos 15 segun-
dos em cada volta.
4. Quando terminar, pressione o botão C (Compass),
mantendo o relógio nivelado. O 4º ponteiro central
Não guarde o relógio perto de fontes magnéticas,
como computadores, eletrodomésticos ou televisores,
porque o relógio poderá adquirir uma carga magnética
e produzir leituras de determinação de direção incorretas.
A precisão típica de instrumentos de usar no pulso é de
+/- 10 graus.
Para calibrar a bússola:
1. Puxe a coroa para a posição do meio e espere que os
ponteiros indicadores parem de mover-se.
2. Mantenha o relógio nivelado ou coloque-o sobre uma
superfície nivelada (se a correia do relógio atrapalhar,
coloque o relógio sobre um copo virado para baixo).
O relógio pode ser colocado com o mostrador virado
para baixo mas, nesse caso, proteja o mostrador
do relógio.

420
421
A
B
Declinação magnética configurada para -14° (14°W)
FUNCIONAMENTO DA BÚSSOLA
Normalmente, a bússola inativa está com o 4º ponteiro
central apontando para as 12h00 ou mostrando os
segundos do cronógrafo.
Mantendo o relógio nivelado, pressione o botão C
(COMPASS) para ativar a bússola. O ponteiro da bússola
move-se para apontar o norte. Se girar o relógio, o 4º pon-
teiro central continuará movendo-se e sempre apontando
para o norte. Depois de 20 segundos, a bússola desligará
automaticamente e o 4º ponteiro central voltará para a
vai para trás e para a frente para assinalar o fim da
calibração e, a seguir, move-se para a configuração da
declinação magnética atual.
5. Caso não queira configurar a declinação magnética,
pressione a coroa para dentro. Caso contrário, para
que o relógio defina automaticamente o ângulo de
declinação, gire o anel da bússola até o norte apontar
para as 12h00.
6. Pressione os botões A ou B para mover o 4º ponteiro
central para Oeste (-) ou Este (+), respectivamente,
para apontar para o ângulo de declinação do local
utilizando a escala de declinação. Para mover
o ponteiro com mais rapidez, mantenha o botão
pressionado. Como exemplo, veja a figura a seguir.
7. Pressione a coroa quando terminar.

422
423
operação normal. Isto permite poupar a bateria. Pressione
o botão C (COMPASS) em qualquer momento para manter
a bússola ativada durante outros 20 segundos.
A bússola pode ser ativada quando o cronógrafo estiver
sendo usado. O 4º ponteiro central muda simplesmente
de operação temporariamente. Os ponteiros superior e
inferior continuam a apresentar o tempo do cronógrafo e
todas as funções do cronógrafo estão disponíveis através
dos botões A (START/STOP) e B (FLY-BACK/RESET).
OBSERVAÇÃO – Durante o funcionamento da bússola,
o segundo ponteiro move-se de dois em dois segundos.
Além disso, quando a bússola é ativada, os ponteiros
superior e inferior podem mudar ligeiramente de posição,
regressando às posições devidas quando a bússola for
desativada. Esta operação é normal e permite uma leitura
mais precisa da bússola.
CRONÓGRAFO LINEAR
VISÃO GERAL
PONTEIRO DOS
SEGUNDOS
JANELA DA DATA
COROA
PONTEIRO INFERIOR
BOTÃO A
BOTÃO B
4º PONTEIRO
CENTRAL
PONTEIRO DAS HORAS
PONTEIRO
LINEAR
PONTEIRO DOS
MINUTOS
A
B
1
2
3

424
425
AJUSTE DO PONTEIRO LINEAR E 4º PONTEIRO CENTRAL
Para reajustar o 4º ponteiro central quando está fora de
alinhamento:
1. Puxe a coroa para fora. O ponteiro inferior volta auto-
maticamente para o final do seu ciclo.
2. O 4º ponteiro central deve apontar para as 12h00. Se
em 5 segundos depois de puxar a coroa para fora o 4º
ponteiro central não apontar para as 12h00, pressione
o botão A para mover o ponteiro no sentido horário até
este apontar para as 12h00.
3. Se o cronógrafo foi zerado e o ponteiro linear não estiver
apontando para zero, mantenha o botão B pressionado
durante 5 segundos para iniciar uma calibragem comple-
ta do indicador linear, a qual levará até 32 segundos para
finalizar.
4. Ao terminar, empurre a coroa para a posição de fechada.
SEGUNDO FUSO HORÁRIO
O ponteiro inferior
mostra a hora do
segundo fuso horário.
Observe que a escala
é de 24 horas, sendo
que a meia-noite
fica em qualquer
extremidade e o
meio-dia fica ao
centro. Os fusos
horários normalmente
diferem em espaços
de horas. Nestes casos, o valor dos minutos referente ao
segundo fuso horário será o mesmo que o exibido pelo
ponteiro de minutos do relógio.
A
B
1
2
3

426
427
PARA CONFIGURAR O SEGUNDO FUSO HORÁRIO:
1. Puxe a coroa até à posição do meio. O ponteiro
inferior mostra a hora do segundo fuso horário
e o 4º ponteiro central mostra os minutos.
2. Tendo em conta que a hora do segundo fuso horário
tenha o mesmo valor dos minutos que a sua hora, o 4º
ponteiro central deve estar alinhado com o ponteiro
dos minutos. Se os ponteiros não estão alinhados ou,
se o segundo fuso horário tem os minutos diferentes
dentro da mesma hora, pressione o botão B para
mover o 4º ponteiro central para a frente até que fique
na posição desejada.
3. Pressione o botão A para que o ponteiro inferior
avance em espaços de 1 hora até alcançar a hora de-
sejada do segundo fuso horário. Para mover o ponteiro
com mais rapidez, mantenha o botão A pressionado.
4. Pressione a coroa quando terminar.
CRONÓGRAFO LINEAR
O relógio tem um cronógrafo de tempo fracionado
de 4 horas.
1. Para começar, pressione o botão A (Start/Stop).
O 4º ponteiro central mostra os segundos com uma
resolução de 1/5 de segundo. O ponteiro linear mostra
os minutos, contando até trinta e voltando a contar.
O ponteiro inferior mostra o tempo total, incluindo
horas e minutos, com divisões a cada dez minutos.
O cronógrafo conta até quatro horas antes de parar
automaticamente.

428
429
HORA MUNDIAL
VISÃO GERAL
A
B
C
1 2
3
corrected 3.3.11 with Paulo’s new cities
24 CIDADES
ESCALA DE
HORÁRIO MUNDIAL
PONTEIRO DOS
SEGUNDOS
JANELA DA DATA
COROA
PONTEIRO INFERIOR
BOTÃO A
BOTÃO B
BOTÃO C
4º PONTEIRO CENTRAL
ESCALA DAS
ESTAÇÕES DO ANO
PONTEIRO
SUPERIOR
PONTEIRO DAS HORAS
PONTEIRO
DOS MINUTOS
POSIÇÃO
FECHADA
POSIÇÃO
INTER-
MEDIÁRIA
POSIÇÃO
EXTERNA
2. Para parar, pressione novamente o botão A
(Start/Stop). Todos os ponteiros param de se
movimentar.
3. Para zerar o cronógrafo, pressione o botão B
(Split/Reset).
Ao reconfigurar o cronógrafo, todos os ponteiros passam
para a posição zero. Depois de oito segundos, o relógio
volta ao mostrador normal do segundo fuso horário.
Enquanto o cronógrafo está correndo, você pode registrar
um tempo repartido. Pressione o botão B (Split/Reset)
e todos os ponteiros param enquanto o cronógrafo
continua a contagem. Pressione o botão B (Split/Reset)
novamente para continuar a ver o mostrador
do cronógrafo contando o tempo decorrido.

430
431
PARA AJUSTAR A HORA MUNDIAL:
1. Puxe a coroa até à posição do meio. O ponteiro central
mostra o fuso horário mundial da cidade
e o ponteiro superior mostra a hora em essa cidade.
A
B
C
1 2 3
2. Pressione os botões A ou B para mover o ponteiro
central para a cidade que representa o seu fuso
horário. Para mover o ponteiro com mais rapidez,
mantenha o botão pressionado. Poderá ser utilizada
qualquer cidade.
3. Puxar a coroa para a sua posição externa. O ponteiro
selecionador de cidade voltará para a posição das
12h00, conforme está descrito na CONFIGURAÇÃO
DO PONTEIRO INDICADOR. Após uma pausa de
5 segundos, o ponteiro superior apresentará a hora
mundial (a hora na cidade selecionada no passo
anterior), o ponteiro central apresenta os minutos da
hora mundial e o ponteiro inferior apresenta a estação
(ver CONFIGURAÇÃO DA ESTAÇÃO DO ANO). IMPOR-
TANTE – Não manipule nenhum dos controles nem a
coroa até que ponteiro central tenha concluído o seu
ajuste. (Aproximadamente 10 segundos após a coroa
ter sido puxada para a sua posição exterior).

432
433
4. Se a estação do ano apresentada não estiver correta
para o fuso horário principal, pressione em C para
a alterar. Se o fuso horário principal seguir o horário
de Verão, o ponteiro superior se moverá uma hora.
5. Pressione os botões A ou B para mover a hora para
trás ou para a frente, respetivamente, para configurar
o fuso horário mundial para que seja o mesmo que
o fuso horário da sua cidade. Para mover o ponteiro
com mais rapidez, mantenha o botão pressionado.
Os ponteiros movem-se ao mesmo tempo; quando
o 4º ponteiro central completa uma volta, o ponteiro
superior move-se o equivalente a uma hora. Depois
de fazer a configuração, os ponteiros central e o dos
minutos devem estar alinhados.
6. Pressione a coroa quando terminar.
AJUSTE DO PONTEIRO INDICADOR
(4º PONTEIRO CENTRAL)
Para reajustar o ponteiro indicador quando estiver
desalinhado:
1. Puxar a coroa para a sua posição externa. Os pon-
teiros, superior e inferior, reconfiguram automatica-
mente ao final de suas respectivas voltas.
2. O 4º ponteiro central deve apontar para as 12h00.
Se isso não ocorrer dentro de 5 segundos depois de
puxar a coroa para a sua posição exterior, pressione
os botões A ou B para mover o ponteiro no sentido
anti-horário (A) ou horário (B), respectivamente, até
o ponteiro apontar para as 12h00.
3. Pressione a coroa quando terminar.
OBSERVAÇÃO – Se não for pressionado nenhum botão
durante cinco segundos após os ponteiros pararem,

434
435
CONFIGURAÇÃO DA ESTAÇÃO DO ANO
A configuração da estação permite ao relógio estabelecer
o horário de Verão.
O relógio dispõe de uma configuração para representar os
dois períodos de todas as cidades que adotam o horário
de Verão. Para o relógio, o período de horário de Verão
é SUMMER (Verão) e o período de horário normal é WINTER
(Inverno).
Quando a estação de uma cidade está configurada para
VERÃO, todas as cidades do mesmo hemisfério são
automaticamente reguladas para VERÃO, enquanto todas
as cidades do outro hemisfério são automaticamente
reguladas para INVERNO. O relógio sabe quais são as
cidades de cada hemisfério.
Pressione o botão C para alterar a estação na cidade
selecionada.
o relógio continua para a operação de configuração da
hora mundial (ver CONFIGURAÇÃO DA HORA MUNDIAL).
APRESENTAÇÃO DAS HORAS NAS CIDADES
Pressione o botão A ou
B para mover o ponteiro
central respectivamente
para a frente ou para
trás, para selecionar
uma cidade. O ponteiro
superior se move para
mostrar a hora na cidade
selecionada. Observe que
a escala é de 24 horas,
sendo que a meia-noite fica em qualquer extremidade
e o meio-dia fica no centro.
A
B
C
1 2 3

436
437
BÚSSOLA
VISÃO GERAL
AJUSTE DO PONTEIRO DA BÚSSOLA
Puxe a COROA completamente para fora. O ponteiro da
bússola deve apontar para as 12h00. Se isso não acon-
tecer, pressione os botões A ou B para mover o ponteiro
da bússola até este apontar para as 12h00. Mantenha
o botão pressionado para mover o ponteiro com rapidez.
Quando terminar, empurre a COROA DO CENTRO para
dentro e volte a calibrar a bússola.
CALIBRAÇÃO DA BÚSSOLA
Você tem de calibrar a bússola antes de usá-la.
Uma vez que a bússola utiliza o campo magnético da
Terra, é preciso estar consciente de grandes objetos
metálicos, tais como, veículos ou pontes, ou objetos
que emitem radiações eletromagnéticas (televisões ou
computadores), o que poderia afetar o campo magnético
em torno do relógio. Se a bússola for calibrada perto de
I
I
14
COROA DO
CENTRO
MEIO
AJUSTAR DATA
I
I
14
PARA FORA
AJUSTAR HORA
COROA
B
A (BÚSSOLA)
ESCALA DE DECLINAÇÃO
PONTEIRO DA
BÚSSOLA (O LADO
QUE INDICA O
NORTE É VERMELHO
PONTIAGUDO/MAIS
COMPRIDO)

438
439
tais objetos, ela apenas trabalhará corretamente neste
local. Se a bússola for calibrada longe de tais objetos,
não trabalhará corretamente perto deles. Para obter os
melhores resultados, faça a calibração na área em que
a vá utilizar.
Durante a calibração e quando fizer as leituras de posição,
é importante, como com todas as bússolas, manter
a bússola nivelada. Fazer a calibração ou determinar
direções quando o relógio estiver desnivelado pode
causar erros graves. Evite também as áreas onde possam
existir concentrações acima do normal de minério de
ferro e ferro industrial, pois poderão causar leituras
incorretas. Sempre que suspeitar que a determinação de
direção não está correta, volte a calibrar a bússola.
Não guarde o relógio perto de fontes magnéticas,
como computadores, eletrodomésticos ou televisores,
porque o relógio poderá adquirir uma carga magnética
e produzir leituras de determinação de direção incorretas.
A precisão típica de instrumentos de usar no pulso é de
+/- 10 graus.
Para calibrar a bússola:
1. Puxe a coroa para a posição do meio e espere que os
ponteiros indicadores parem de mover-se.
2. Mantenha o relógio nivelado ou coloque-o sobre uma
superfície nivelada (se a correia do relógio atrapalhar,
coloque o relógio sobre um copo virado para baixo).
O relógio pode ser colocado com o mostrador virado
para baixo mas, nesse caso, proteja o mostrador
do relógio.
3. Pressione os botões A ou B para começar. O 4º pon-
teiro central executa duas voltas completas para

440
441
5. Caso não queira configurar a declinação magnética,
pressione a coroa para dentro. Caso contrário, para
que o relógio defina automaticamente o ângulo de
declinação, gire o anel da bússola até o norte apontar
para as 12h00.
6. Pressione em A ou B para mover o 4º ponteiro
central para Oeste (-) ou Este (+), respectivamente,
para apontar para o ângulo de declinação do local
utilizando a escala de declinação. Para mover o
ponteiro com mais rapidez, mantenha o botão
pressionado. Como exemplo, veja a figura na página
seguinte.
7. Pressione a coroa quando terminar.
que não se esqueça de girar o relógio. Com o relógio
nivelado, gire-o LENTAMENTE dando duas voltas
completas, demorando pelo menos 15 segundos em
cada volta.
4. Quando terminar, pressione os botões A ou B,
mantendo o relógio nivelado. O 4º ponteiro central
vai para trás e para a frente para assinalar o fim da
calibração e, a seguir, move-se para a configuração da
declinação magnética atual.

442
443
A
B
Declinação magnética configurada para -14° (14°W)
FUNCIONAMENTO DA BÚSSOLA
Normalmente, a bússola inativa está com o 4º ponteiro
central apontando para as 12h00 ou mostrando os
segundos do cronógrafo.
Mantendo o relógio nivelado, pressione os botões A ou
B para ativar a bússola. O ponteiro da bússola move-se
para apontar o norte. Se girar o relógio, o 4º ponteiro
central continuará movendo-se e sempre apontando
para o norte. Depois de 20 segundos, a bússola desligará
automaticamente e o 4º ponteiro central voltará para a
operação normal. Isto permite poupar a bateria. Pressione
os botões A ou B em qualquer momento para manter a
bússola ativada durante outros 20 segundos.
OBSERVAÇÃO – Durante o funcionamento da bússola,
o segundo ponteiro move-se de dois em dois segundos.

444
445
MARÉ, TEMPERATURA E BÚSSOLA
VISÃO GERAL
AJUSTE DO PONTEIRO INDICADOR
Puxe a coroa completamente para fora. O ponteiro
indicador deve apontar para as 12h00. Se isso não
acontecer, pressione os botões TIDE ou TEMP para mover
o ponteiro até este apontar para as 12h00. Ao pressionar
os botões TIDE e TEMP faz com que o ponteiro se mova
no sentido horário e anti-horário, respectivamente.
Mantenha o botão pressionado para mover o ponteiro
com rapidez. Pressione a coroa quando terminar.
SELEÇÃO MARÉ/TEMPERATURA
O ponteiro indicador mostra continuamente a maré ou
a temperatura. Quando a temperatura estiver sendo
mostrada, pressione o botão TIDE para selecionar
o relógio das marés. O ponteiro desloca-se para a maré
baixa e a seguir para a maré atual. Quando a maré estiver
sendo mostrada, pressione o botão TEMP para selecionar
FORA-CONFIGURAR
A HORA
ESCALA DE
DECLINAÇÃO
PONTEIRO
INDICADOR
C (BÚSSOLA)
B (MARÉ)
A (TEMP)
COROA
BÚSSOLA
GIRATÓRIA ANEL
DATA
ESCALA DA MARÉ
ESCALA DA
TEMPERATURA
MEIO-CONFIGURAR A DATA

446
447
o termómetro. O ponteiro desloca-se para o início da
escala do termômetro e a seguir para a temperatura atual.
TERMÔMETRO
Se usar o relógio no pulso, a leitura da temperatura
será afetada pelo calor do corpo. Para obter valores
de temperatura mais precisos, tire o relógio do pulso
e deixe-o à sombra durante vários minutos.
O relógio também pode medir a temperatura da água,
se estiver submerso. Não se esqueça de selecionar
o mostrador da temperatura antes de colocar o relógio
na água, porque os botões não devem ser pressionados
quando o relógio estiver dentro d’água.
Os valores da temperatura são medidos a cada minuto e
com maior frequência se forem detectadas alterações na
temperatura.
RELÓGIO DAS MARÉS
Para o relógio das marés, o ponteiro indicador gira sempre
no sentido horário; quando estiver apontando para a
esquerda a maré estará subindo e descendo quando
o ponteiro estiver apontando para a direita. Na escala das
marés é apresentado o número de horas que faltam para
a próxima maré cheia ou maré baixa.
As marés são influenciadas pela posição do Sol e pela
forma da linha da costa, por isso o relógio das marés não
pode determinar com exatidão as horas em que ocorrem
a maré cheia e a maré baixa. Poderá ser necessário fazer
um ajuste periódico.
Para acertar o relógio das marés, puxe a coroa para a
posição DO MEIO. Pressione um dos botões TIDE ou TEMP
para mover o ponteiro para a maré atual. Ao pressionar
os botões TIDE e TEMP faz com que o ponteiro se mova

448
449
no sentido horário e anti-horário, respectivamente.
Pressione a coroa quando terminar.
CALIBRAÇÃO DA BÚSSOLA
Você tem de calibrar a bússola antes de usá-la.
Uma vez que a bússola utiliza o campo magnético da
Terra, é preciso estar consciente de grandes objetos
metálicos, tais como, veículos ou pontes, ou objetos
que emitem radiações eletromagnéticas (televisões ou
computadores), o que poderia afetar o campo magnético
em torno do relógio. Se a bússola for calibrada perto de
tais objetos, ela apenas trabalhará corretamente neste
local. Se a bússola for calibrada longe de tais objetos,
não trabalhará corretamente perto deles. Para obter os
melhores resultados, faça a calibração na área em que
a vá utilizar.
Durante a calibração e quando fizer as leituras de posição,
é importante, como com todas as bússolas, manter
a bússola nivelada. Fazer a calibração ou determinar
direções quando o relógio estiver desnivelado pode
causar erros graves. Evite também as áreas onde possam
existir concentrações acima do normal de minério de
ferro e ferro industrial, pois poderão causar leituras
incorretas. Sempre que suspeitar que a determinação
de direção não está correta, volte a calibrar a bússola.
Não guarde o relógio perto de fontes magnéticas,
como computadores, eletrodomésticos ou televisores,
porque o relógio poderá adquirir uma carga magnética
e produzir leituras de determinação de direção incorretas.
A precisão típica de instrumentos de usar no pulso é de
+/- 10 graus.

450
451
Para calibrar a bússola:
1. Puxe a coroa para a posição do meio e espere que os
ponteiros indicadores parem de mover-se.
2. Mantenha o relógio nivelado ou coloque-o sobre uma
superfície nivelada (se a correia do relógio atrapalhar,
coloque o relógio sobre um copo virado para baixo).
O relógio pode ser colocado com o mostrador virado
para baixo mas, nesse caso, proteja o mostrador do
relógio.
3. Pressione o botão C (COMPASS) para começar.
O 4º ponteiro central executa duas voltas completas
para que não se esqueça de girar o relógio. Com
o relógio nivelado, gire-o LENTAMENTE dando duas
voltas completas, demorando pelo menos 15 segun-
dos em cada volta.
4. Quando terminar, pressione o botão C (Compass),
mantendo o relógio nivelado. O 4º ponteiro central
vai para trás e para a frente para assinalar o fim da
calibração e, a seguir, move-se para a configuração
da declinação magnética atual.
5. Caso não queira configurar a declinação magnética,
pressione a coroa para dentro. Caso contrário, para
que o relógio defina automaticamente o ângulo de
declinação, gire o anel da bússola até o norte apontar
para as 12h00.

452
453
6. Pressione em A ou B para mover o 4º ponteiro
central para Oeste (-) ou Este (+), respectivamente,
para apontar para o ângulo de declinação do local
utilizando a escala de declinação. Para mover o
ponteiro com mais rapidez, mantenha o botão
pressionado. Como exemplo, veja a figura na
página seguinte.
7. Pressione a coroa quando terminar.
A
B
Declinação magnética configurada para -14° (14°W)
FUNCIONAMENTO DA BÚSSOLA
Normalmente, a bússola inativa está com o 4º ponteiro
central apontando para as 12h00 ou mostrando os
segundos do cronógrafo.
Mantendo o relógio nivelado, pressione o botão C
(COMPASS) para ativar a bússola. O ponteiro da bússola
move-se para apontar o norte. Se girar o relógio, o 4º
ponteiro central continuará movendo-se e sempre
apontando para o norte. Depois de 20 segundos, a
bússola desligará automaticamente e o 4º ponteiro
central voltará para a operação normal. Isto permite
poupar a bateria. Pressione o botão C (COMPASS) em
qualquer momento para manter a bússola ativada durante
outros 20 segundos.
OBSERVAÇÃO – Durante o funcionamento da bússola,
o segundo ponteiro move-se de dois em dois segundos.

454
455
ALTÍMETRO
VISÃO GERAL
AJUSTE DO PONTEIRO INDICADOR
(4º PONTEIRO CENTRAL)
Puxe a coroa completamente para fora. Os ponteiros
retrógrados superior e inferior voltam automatica-
mente ao início das suas escalas. O ponteiro indicador
(4º ponteiro central) deve apontar para as 12h00. Se isso
não acontecer, pressione os botões A e/ou B para mover
o ponteiro até este apontar para as 12h00. Os botões
de pressão A e B fazem mover o ponteiro no sentido
horário e anti-horário, respectivamente. Mantenha
o botão pressionado para mover o ponteiro com rapidez.
Pressione a coroa quando terminar.
CALIBRAÇÃO DO ALTÍMETRO
Você tem de calibrar o altímetro antes de usá-lo.
Porque o altímetro utiliza a pressão atmosférica para de-
terminar a altitude e, já que esta varia de lugar para lugar,
ESCALA DO
ALTÍMETRO
(CENTENAS)
RETRÓGRADO
SUPERIOR
(MILHARES)
BOTÃO C
(UNIDADES)
BOTÃO A
(ALTITUDE MÁXIMA)
BOTÃO B
(ALTITUDE MÍNIMA)
RETRÓGRADO
INFERIOR
(UNIDADES)
COROA

456
457
é importante calibrar o altímetro para um valor de altitude
de referência conhecido ou para a altitude de referência
padrão de um determinado lugar. Mudanças bruscas
de pressão devidas a mudanças do clima, podem causar
que o seu altímetro apresente leituras com erros de
± 100 metros (328 pés), mesmo que não tenha mudado
de lugar. Volte a calibrar para uma altitude conhecida
quando ocorrerem mudanças bruscas de pressão.
Para calibrar o altímetro:
1. Puxe a coroa para a posição do meio e espere que os
ponteiros indicadores parem de mover-se.
2. Se o altímetro estava DESLIGADO no momento em que
puxou a coroa, o ponteiro retrógrado inferior estará
apontando para a unidade selecionada da última vez
que o altímetro foi usado, caso contrário, o ponteiro
retrógrado inferior aponta para a unidade atual
selecionada no mostrador de altitude. O 4º ponteiro
central e o ponteiro retrógrado superior apontam para
a altitude atual.
3. Pressione em A ou B para mover o 4º ponteiro central
no sentido anti-horário ou horário, respectivamente,
até ele apontar para a altitude da calibração desejada.
Mantendo pressionado A ou B o ponteiro central se
moverá mais rapidamente. O ponteiro retrógrado
superior move-se de acordo com o valor da altitude
mostrado pelo 4º ponteiro central.
4. Pressione a coroa quando terminar.

458
459
ALTÍMETRO LIGADO/DESLIGADO
Para ligar o altímetro, pressione em C. O ponteiro
retrógrado inferior aponta para METROS. Utilizando as
marcas no anel superior, o 4º ponteiro central mostra os
valores das centenas da altitude atual e o das dezenas
com divisões cada dez METROS/PÉS. O ponteiro retrógra-
do superior mostra o valor dos milhares da altitude atual
com divisões cada mil METROS/PÉS.
Para mudar a unidade de medida de METROS para PÉS,
pressione em C uma segunda vez. Para mudar a unidade
de medida de PÉS para METROS, pressione duas vezes
em C (o altímetro primeiro desliga e, em seguida, liga com
a unidade de medida em METROS).
Para desligar o altímetro com a unidade de medida atual
em PÉS, pressione em C. Para desligar o altímetro com
a unidade de medida em METROS, pressione duas vezes
em C (o ponteiro inferior vai primeiro para PÉS e, depois,
vai para a posição de DESLIGADO).
Exemplo: Altitude = 2310 m Exemplo: Altitude = 7580 pés

460
461
O relógio desliga o altímetro automaticamente 60 minu-
tos depois de ter sido ativado.
REVISÃO DA ALTITUDE MIN/MAX DO ALTÍMETRO
Para ver a altitude máxima registrada, pressione em A.
O ponteiro retrógrado inferior mostra a unidade de
medida na qual a altitude máxima foi registrada, se
o altímetro estava DESLIGADO no momento em que
o botão foi pressionado, caso contrário mostrará a
altitude máxima atingida, utilizando a unidade de medida
atual. O 4º ponteiro central mostra o valor das centenas
e das dezenas da altitude máxima, com divisões cada
dez METROS/PÉS. O ponteiro retrógrado superior mostra
o valor dos milhares da altitude máxima com divisões
cada mil METROS/PÉS.
O valor da altitude máxima registrado é mostrado durante
dez segundos. Para estender o tempo de visualização
por mais dez segundos, pressione em A antes dos dez
segundos anteriores terem terminado.
Para mudar a unidade de medida de METROS para PÉS ou
de PÉS para METROS, pressione em C.
Para ver a altitude mínima registrada, pressione em B.
O ponteiro retrógrado inferior mostra a unidade de
medida na qual a altitude máxima foi registrada, se
o altímetro estava DESLIGADO no momento em que
o botão foi pressionado, caso contrário mostrará a
altitude máxima atingida, utilizando a unidade de medida
atual. O 4º ponteiro central mostra o valor das centenas
e das dezenas da altitude mínima, com divisões cada
dez METROS/PÉS. O ponteiro retrógrado superior mostra
o valor dos milhares da altitude mínima com divisões
cada mil METROS/PÉS.

462
463
O valor da altitude mínima registrado é mostrado durante
dez segundos. Para estender o tempo de visualização por
mais dez segundos, pressione em B antes dos dez segun-
dos anteriores terem terminado. Para mudar a unidade
de medida de METROS para PÉS ou de PÉS para METROS,
pressione em C.
PROFUNDIDADE
VISÃO GERAL
Observação – Os ponteiros central e inferior se ajustam
automaticamente quando coloca a coroa na posição 3
para configurar a hora.
3
AA
B
1
2
3
2
3
2
3
PONTEIRO
CENTRAL
INDICADOR
DESLIGADO
BOTÃO A
BOTÃO B
PONTEIRO INFERIOR
COROA

464
465
TEMPERATURA
O sensor da temperatura está sempre ligado e fará uma
leitura pelo menos uma vez a cada 60 segundos. A tem-
p era tura é indicada pelo ponteiro inferior e a escala
correspondente.
Se usar o relógio no pulso, a leitura da temperatura
será afetada pelo calor do corpo. Para obter valores de
temperatura mais precisos, tire o relógio do pulso.
SENSOR DE PROFUNDIDADE LIGADO/DESLIGADO
O sensor normalmente está desligado e tem que ser
ligado manualmente antes de mergulhar. Pressione e solte
o botão B para ligar o sensor. O 4º ponteiro central irá
mover-se da posição de DESLIGADO (6h00) para a posição
das 12h00 e começará a fazer leituras pelo menos uma
vez a cada 5 segundos. À medida que a profundidade au-
menta, o 4º ponteiro central apontará para a profundidade
atual na escala de profundidade. Se as leituras permane-
cerem na faixa de valores de 0 a 2 metros (0 a 6 pés)
durante 5 minutos, o sensor desligará automaticamente.
Para desligar o sensor manualmente, mantenha pressio-
nado o botão B durante 2 segundos. O 4º ponteiro central
irá mover-se para a posição de DESLIGADO (6h00).
REVISÃO DA PROFUNDIDADE
MÁXIMA/TEMPERATURA MÍNIMA
Depois de chegar à superfície, desatarraxe a coroa
e puxe-a para a posição intermediária. Os ponteiros
central e inferior irão mover-se para mostrar os valores
da profundidade máxima e da temperatura mínima,
respectivamente, registradas durante a descida mais
recente. Quando o sensor de profundidade é ativado
novamente, a memória será apagada.

466
467
Se o relógio ainda não foi usado, então os ponteiros central
e inferior deverão mover-se para mostrar 0 metros/pés e
0 ºC/32 ºF, respectivamente. A coroa dever ser atarraxada
como estava antes para usar o relógio ou mergulhar.
VERIFICAÇÃO DA CARGA DA BATERIA
O relógio determina o estado da carga da bateria e fornece
ao usuário uma indicação visual correspondente à carga
atual da bateria. O nível da carga da bateria é classificado
como Normal, Baixo e Bateria a substituir, com o nível da
carga indicado pelo movimento do segundo ponteiro.
Para o nível de Carga Normal, o segundo ponteiro deverá
mover-se uma posição do ponteiro para a frente a cada
segundo, o qual representa a operação normal.
Quando o relógio está com o nível da Carga da Bateria
Baixo, o segundo ponteiro deverá mover-se em intervalos
de 2 segundos e deverá mover-se duas posições do pon-
teiro para a frente. Recomenda-se que o usuário substitua
a bateria quando o relógio apresenta o nível de Carga da
Bateria Baixo.
Quando o relógio apresenta o status de Substituir a
Bateria, o segundo ponteiro deverá mover-se apenas
em espaços de 5 segundos e deverá mover-se cinco
posições. Neste caso, o sensor de profundidade não
pode ser ativado e, o usuário, deverá substituir a bateria
imediatamente.

468
469
CORRIDA DE IATE
2 31
A
B
C
A DATA PERFEITA
Com o recurso da Perfect Date
™
no seu relógio, a data
não precisa ser ajustada até 2060. O relógio trabalha
automaticamente levando em consideração os meses
curtos e os anos bissextos, sempre mostrando o dia e a
data corretos. A data foi previamente ajustada na fábrica
Timex. Ao usar o seu relógio pela primeira vez, se a data
exibida não for a mesma que a sua data local, você preci-
sará de acertá-la. Puxe a coroa para a posição exterior. O
4º ponteiro central dará uma volta completa, parando na
posição das 12:00 horas por 5 segundos e, em seguida,
irá para a data configurada atualmente no relógio. Gire
a coroa para a frente para aumentar o tempo até à data
atual (para trás para diminuir o tempo até à data atual).
Cada vez que passar na meia-noite, a data mudará um
dia. Depois de ter configurado a data para a sua data
PONTEIRO
DAS HORAS
PONTEIRO DOS
SEGUNDOS
4°
PONTEIRO
CENTRAL
COROA
PONTEIRO
SUPERIOR
ESCALA DA
DATA PERFEITA
PONTEIRO INFERIOR
PONTEIRO DOS
MINUTOS

470
471
local, continue girando a coroa para colocar os ponteiros
na sua hora local atual, lembrando-se de acertar am/pm.
Uma vez que tenha configurado a hora, empurre a coroa
de volta para a posição fechada. Em funcionamento
normal, o 4º ponteiro central mostrará a data quando a
coroa é pressionada. O ponteiro irá para a posição da
data atual como é mostrado no anel superior da caixa.
O ponteiro fará uma pausa para você poder ver a data e,
em seguida, volta para a sua posição de descanso nas
12 horas. Observe que o recurso de Perfect Date
™
trabalha apenas no modo de Hora. Quando a bateria
se descarrega e é substituída, o recurso de data perfeita
tem de ser reajustado. Quando a bateria necessita de ser
substituída, recomendamos que o relógio seja enviado
para um centro de serviço Timex onde a bateria será
substituída e o recurso de data perfeita será reajustado
para a data atual do local onde o relógio será retornado.
AJUSTE DO 4° PONTEIRO CENTRAL
Para reajustar o 4° ponteiro central quando está fora
de alinhamento:
1. Puxe a coroa para fora, para a posição 3. Os ponteiros
superior e inferior reconfiguram automaticamente
para o final de seus respectivos percursos.
2. Dentro de 10 segundos depois de puxar a coroa para
a posição 3, o 4° ponteiro central deverá apontar
para as 12h00; se este não apontar para a 12h00,
pressione o botão A ou B para mover o ponteiro no
sentido anti-horário ou horário até este apontar para
as 12h00. Mantendo o botão A ou B pressionado fará
com que o ponteiro se mova mais rápido. Observe:
depois de 5 segundos sem qualquer ação com a coroa

472
473
na posição 3, o 4º ponteiro central se moverá para
mostrar a data atual.
3. Ao terminar, empurre a coroa para a posição 1.
SELEÇÃO DO MODO
Pressione o botão C para deslocar o ponteiro superior
para a função desejada.
HORA:
Mostra apenas a hora atual (o recurso de data perfeita
trabalha apenas no modo de hora).
TIMER 5 DA CORRIDA DE IATE:
O timer de contagem regressiva começará aos 5 minutos
e iniciará o cronógrafo quando chegar a zero.
TIMER 3 DA CORRIDA DE IATE:
O timer de contagem regressiva começará aos 3 minutos
e iniciará o cronógrafo quando chegar a zero.
TIMER 1 DA CORRIDA DE IATE:
O timer de contagem regressiva começará em 1 minuto
e iniciará o cronógrafo quando chegar a zero.
CRONÓGRAFO:
O cronógrafo começará a contagem sem timer de
contagem regressiva.
OPERAÇÃO DO TIMER DA CORRIDA DE IATE
O relógio dispõe de timers de contagem regressiva de
5, 3 e 1 minuto. Quando o timer de contagem regressiva
chega a zero o cronógrafo começa automaticamente a
contagem de 1 hora.

474
475
1. Pressione o botão C até que o ponteiro superior
mostre o modo de timer da corrida de iate desejado
de 5, 3 ou 1 minuto.
2. Para começar, pressione o botão A (START/STOP).
O 4° ponteiro central mostra os segundos da
contagem regressiva e o ponteiro inferior apresenta os
minutos da mesma. (Observe: os botões B e C estão
desativados enquanto o timer de contagem regressiva
estiver em operação).
3. Para parar, pressione o botão A (START/STOP)
o qual fará parar o processo de contagem regressiva.
(Observe: o botão C está desativado até que o timer
de contagem regressiva seja reiniciado).
4. Para reiniciar, mantenha pressionado o botão B
(SPLIT/RESET) por 3 segundos, o qual reiniciará
o timer de contagem regressiva para o seu valor inicial
anteriormente selecionado de 5, 3 ou 1 minuto.
Durante a operação normal do timer da corrida de iate,
uma vez que o timer de contagem regressiva chega a
zero, o cronógrafo começará automaticamente. Também
emite um alerta sonoro quando o timer de contagem
regressiva atinge cada minuto assim como, no minuto
final quando conta os últimos 5 segundos e começa a
função de cronógrafo. O cronógrafo fará um ciclo com
uma sequência de 30 minutos duas vezes, para um tempo
total máximo de 1 hora.

476
477
OPERAÇÃO DO CRONÓGRAFO
O relógio dispõe de um cronógrafo de uma hora o qual
pode ser operado independentemente do timer da
corrida de iate.
1. Pressione o botão C até que o ponteiro superior fique
no início da escala de 30 minutos do cronógrafo.
2. Para começar, pressione o botão A (START/STOP).
O 4º ponteiro central mostra os segundos da
contagem crescente, o ponteiro inferior mostra os
minutos, na contagem crescente em uma escala
de 5 minutos e o ponteiro superior mostra a meia
hora em uma contagem crescente de uma escala de
30 minutos. Cada vez que o ponteiro inferior atinge a
marca de 5 minutos, volta à posição de zero enquanto
o ponteiro superior continuará a avançar na escala
de 30 minutos. (Observe: o botão C estará desativado
enquanto o cronógrafo estiver em operação).
3. Para tirar um tempo fracionado, pressione o botão B
(SPLIT/RESET). Os ponteiros superior, inferior e o 4º
ponteiro central param nas suas posições para você
tirar o tempo fracionado (ou da volta). O cronógrafo
continua a cronometragem enquanto os ponteiros
estão parados. Para soltar os ponteiros, pressione
o botão B (SPLIT/RESET) e os ponteiros voltarão a
mostrar rapidamente o tempo total decorrido.
4. Para parar, pressione o botão A (START/STOP) o qual
fará parar o cronógrafo. (Observe: o botão C está
desativado enquanto o cronógrafo estiver parado e até
que seja reiniciado).

478
479
5. Para reiniciar, mantenha pressionado o botão B
(SPLIT/RESET) por 3 segundos, o qual voltará a colocar
o cronógrafo no início da escala de 30 minutos.
Na operação normal, o cronógrafo fará um ciclo com uma
sequência de 30 minutos duas vezes, para um tempo
total máximo de 1 hora. Uma vez que tenha decorrido
uma hora, o ponteiro superior permanecerá na marca de
30 minutos e o ponteiro inferior voltará à posição zero.
A função de cronógrafo necessitará de ser reiniciada
para usar a função de cronógrafo novamente ou antes
de mudar para um modo diferente. (Observe: o botão A
está desativado enquanto o tempo máximo de uma hora
está a decorrer e não funcionará até que o cronógrafo
seja reiniciado, mantendo o botão B pressionado por
3 segundos).
LUZ NOTURNA INDIGLO
®
(APENAS NA VERSÃO PROFISSIONAL)
O Yacht Racer PRO (corrida de iate profissional) inclui
a função adicional de luz noturna INDIGLO
®
. Durante
condições de pouca ou nenhuma luz, pode ler o
mostrador facilmente ativando a função de luz noturna
INDIGLO
®
, pressionado a coroa. O Yacht Racer PRO usa
um material luminescente especial no mostrador, o qual
brilha e cria uma iluminação suficiente para ser capaz de
ler o mostrador, mas assegura que a sua visão noturna
não é reduzida quando a luz se extingue.

480
481
TIMER DE CRONÓGRAFO
PONTEIRO DOS
SEGUNDOS
4º
PONTEIRO
CENTRAL
PONTEIRO
SUPERIOR
ESCALA DA
PERFECT DATE
™
PONTEIRO DOS
MINUTOS
PONTEIRO DAS
HORAS
COROA
PONTEIRO
INFERIOR
2 31
A
B
C
A DATA PERFEITA
Com o recurso da Perfect Date
™
no seu relógio, a data
não precisa ser ajustada até 2060. O relógio trabalha
automaticamente levando em consideração os meses
curtos e os anos bissextos, sempre mostrando o dia e a
data corretos. A data foi previamente ajustada na fábrica
Timex. Ao usar o seu relógio pela primeira vez, se a data
exibida não for a mesma que a sua data local, você preci-
sará de acertá-la. Puxe a coroa para a posição exterior. O
4º ponteiro central dará uma volta completa, parando na
posição das 12:00 horas por 5 segundos e, em seguida,
irá para a data configurada atualmente no relógio. Gire
a coroa para a frente para aumentar o tempo até à data
atual (para trás para diminuir o tempo até à data atual).
Cada vez que passar na meia-noite, a data mudará um

482
483
dia. Depois de ter configurado a data para a sua data
local, continue girando a coroa para colocar os ponteiros
na sua hora local atual, lembrando-se de acertar am/pm.
Uma vez que tenha configurado a hora, empurre a coroa
de volta para a posição fechada. Em funcionamento
normal, o 4º ponteiro central mostrará a data quando a
coroa é pressionada. O ponteiro irá para a posição da
data atual como é mostrado no anel superior da caixa.
O ponteiro fará uma pausa para você poder ver a data e,
em seguida, volta para a sua posição de descanso nas
12 horas. Observe que o recurso de Perfect Date
™
trabalha apenas no modo de Hora. Quando a bateria
se descarrega e é substituída, o recurso de data perfeita
tem de ser reajustado. Quando a bateria necessita de ser
substituída, recomendamos que o relógio seja enviado
para um centro de serviço Timex onde a bateria será
substituída e o recurso de data perfeita será reajustado
para a data atual do local onde o relógio será retornado.
AJUSTE DO 4° PONTEIRO CENTRAL
Para reajustar o 4° ponteiro central quando está fora de
alinhamento:
1. Puxe a coroa para fora, para a posição 3. Os ponteiros
superior e inferior reconfiguram automaticamente ao
final de suas respectivas voltas.
2. Quando para de se mover, o 4° ponteiro central deverá
apontar para as 12h00; se este não apontar para a
12h00, pressione o botão A ou B para mover o pontei-
ro no sentido anti-horário ou horário até este apontar
para as 12h00. Mantendo o botão A ou B pressionado
fará com que o ponteiro se mova mais rápido. Obser-
ve: depois de 5 segundos sem qualquer ação com a

484
485
coroa na posição 3, o 4º ponteiro central se moverá
para mostrar a data atual.
3. Ao terminar, empurre a coroa para a posição 1.
SELEÇÃO DO MODO
Pressione o botão C para deslocar o ponteiro superior
para a função desejada.
HORA:
Mostra apenas a hora atual (o recurso de Perfect Date
™
trabalha apenas no modo de hora).
OPERAÇÃO DO CRONÓGRAFO
O relógio tem um cronógrafo de 4 horas. No final do perí-
odo de 4 horas o cronógrafo desligará automaticamente.
Isto economizará a bateria no caso de uma ativação
acidental do cronógrafo.
1. Pressione o botão C até o ponteiro superior ficar no
princípio da escala do cronógrafo do ponteiro superior,
e o ponteiro inferior no 0 (zero) da escala inferior.
2. Para começar, pressione o botão A (START/STOP). O
4º ponteiro central mostra a contagem crescente dos
segundos, o ponteiro inferior mostra os minutos, na
contagem crescente em uma escala de 30 minutos e
o ponteiro superior mostra a hora em uma contagem
crescente de uma escala de 4 horas. Cada vez que o
ponteiro inferior atinge a marca de 30 minutos, volta
à posição de zero para começar a contar o próximo
período de 30 minutos, enquanto o ponteiro superior
continuará a avançar na escala de 4 horas. (Observe:
o botão C estará desativado enquanto o cronógrafo
estiver em operação)

486
487
3. Para tirar um tempo fracionado, pressione o botão B
(SPLIT/RESET). Os ponteiros superior, inferior e o 4º
ponteiro central param nas suas posições para você
anotar o tempo fracionado (ou da volta). O cronógrafo
continua a cronometragem enquanto os ponteiros
estão parados. Para soltar os ponteiros, pressione
o botão B (SPLIT/RESET) e os ponteiros voltarão a
mostrar rapidamente o tempo total decorrido.
4. Para parar, pressione o botão A (START/STOP) o qual
fará parar o cronógrafo. (Observe: o botão C está
desativado enquanto o cronógrafo estiver parado e até
que seja reiniciado)
5. Para reiniciar o cronógrafo depois de estar parado,
pressione o botão B (SPLIT/RESET), o qual voltará a
colocar o cronógrafo no princípio das escalas de 30
minutos e de 4 horas nos 2 mostradores secundários.
Na operação normal, o cronógrafo fará um ciclo com
uma sequência de 30 minutos 8 vezes, para um tempo
total máximo de 4 horas. Uma vez que tenha decorrido o
período de 4 horas, o ponteiro superior permanecerá na
marca de 4 horas e o ponteiro inferior voltará à posição
zero. A função de cronógrafo necessitará de ser reiniciada
para usar a função de cronógrafo novamente ou antes de
mudar para um modo diferente. (Observe: o botão A está
desativado enquanto o tempo máximo de 4 horas está
a decorrer e não funcionará até que o cronógrafo seja
reiniciado, pressionando o botão B).

488
489
TIMER DE CONTAGEM REGRESSIVA
O relógio apresenta a função de timer de contagem
regressiva.
Observação especial: O ponteiro superior, ponteiro
inferior e o 4º ponteiro central estão unidos durante os
passos 3, 4 e 5 abaixo. Ao mesmo tempo que você move
os ponteiros dos minutos e dos segundos para trás e para
diante, você verá todos 3 reagirem à adição ou subtração
do comprimento do tempo para a duração do timer de
contagem regressiva. Depois de puxar a coroa para fora
para a posição do meio, pressionando o botão C, fará
você avançar através do ciclo de engrenagem de pontei-
ros como segue: Ponteiro superior (pressione o botão C)
- Ponteiro inferior (pressione o botão C) - 4º ponteiro cen-
tral (pressione o botão C) de volta ao ponteiro superior…
isto permite-lhe avançar através do ciclo para engrenar
os ponteiros que você necessita para ajustar e atingir a
configuração da quantidade de tempo desejada para a
contagem regressiva. Pressionando a coroa terminará
o procedimento de configuração e confirma os valores
definidos até agora em qualquer ponto neste ciclo.
CONFIGURAÇÃO DO TIMER DE CONTAGEM REGRESSIVA
O timer de contagem regressiva pode apenas ser configu-
rado quando a função de timer de contagem regressiva
não estiver em processo. Se o timer de contagem
regressiva foi usado anteriormente, necessita de ser rei-
niciado. Se o timer está atualmente em processo, deverá
ser parado e reiniciado para poder configurar o timer de
contagem regressiva.
1. Pressione o botão C até que o ponteiro superior fique
em um ponto sobre a escala do timer. Se o timer foi

490
491
configurado anteriormente, o ponteiro estará apon-
tando para o tempo previamente configurado. Se esta
é a primeira vez que o timer está sendo configurado,
estará apontado para o 0 (zero) na escala do timer.
2. Puxe a coroa para a posição do meio.
3. Para configurar o número de horas desejado em
incrementos de meia hora (até ao tempo máximo de
4:00:00), pressione o botão A para mover o ponteiro
superior no sentido anti-horário (pressionando o botão
B moverá este ponteiro no sentido horário), até que o
número de horas desejado seja selecionado. Observe
que você está selecionando o número de horas no
incremento de meia hora mais próximo ao do tempo
total desejado (exemplo: para um tempo de contagem
regressiva total desejado de 02:53:30, você seleciona-
rá 3 horas). Depois de ter concluído a configuração do
número de horas, pressione o botão C para confirmar
a sua seleção.
4. Agora, você pode configurar o número de minutos
desejado em incrementos de 1 minuto, pressione o
botão A para mover o ponteiro inferior no sentido
anti-horário (pressionando o botão B moverá este
ponteiro no sentido horário), até que o número de
minutos desejado tenha sido selecionado. Observe
que você está ajustando o número minutos para a
frente ou para trás para chegar ao tempo desejado
(exemplo: para um tempo de contagem regressiva
total desejado de 02:53:30, você pressionará o botão
A 7 vezes o qual vai passar o tempo total de contagem
regressiva de 3 horas para 2:53:00). Você notará que o

492
493
ponteiro das horas irá mover-se ligeiramente para trás
do marcador de três horas em direção ao marcador de
2,5 horas. Depois de ter concluído a configuração do
número de minutos correto, pressione o botão C para
confirmar a sua seleção.
5. Agora, você pode configurar o número de segundos
desejado em incrementos de 1 segundo, pressionando
o botão A para mover o 4º ponteiro no sentido anti-ho-
rário (pressionando o botão B moverá este ponteiro
no sentido horário), até que o número de segundos
desejado tenha sido selecionado. Observe que você
está adicionando ou subtraindo o número de segun-
dos para completar o tempo total desejado (exemplo:
para um tempo de contagem regressiva total desejado
de 02:53:30, você vai empurrar o botão B 30 vezes
para selecionar 30 segundos). Depois de ter concluído
a configuração do número de segundos, empurre a
coroa para a posição 1 para confirmar a sua seleção
do valor do timer de contagem regressiva completo.
FUNCIONAMENTO DO TIMER DE CONTAGEM REGRESSIVA
Depois de configurar o timer de contagem regressiva para
a quantidade de tempo desejada para a contagem, agora
pode pôr o timer de contagem regressiva a funcionar.
Iniciando a sequência de contagem regressiva: Pres-
sione o botão A para iniciar o timer de contagem regressi-
va. O 4º ponteiro central e o ponteiro inferior começarão
a mover-se no sentido anti-horário. O ponteiro superior
move-se no sentido horário. Os ponteiros continuarão a
indicar o tempo restante da contagem regressiva até que
o período de tempo que você ajustou para a contagem
regressiva tenha passado e o valor do tempo restante

494
495
chegue a zero. Quando o tempo restante da sequência
chega a zero, o sinal sonoro será emitido e a contagem
regressiva foi concluída.
Interrompendo a sequência de contagem regressiva:
Se você quiser parar a sequência de contagem regressiva
antes da sequência chegar a zero, você pode fazê-lo
pressionando o botão A (o 4º ponteiro central, bem como
os ponteiros superior e inferior param de se movimentar).
Se você quiser continuar mais tarde a sequência de con-
tagem regressiva que você parou antes de chegar a zero,
você pode fazê-lo pressionando o botão A novamente (o
4º ponteiro central, bem como os ponteiros superior e
inferior continuarão a se movimentar).
Reiniciando a sequência de contagem regressiva:
Uma vez que a contagem regressiva chegou a zero e o
sinal sonoro tocou, você pode voltar o timer de contagem
regressiva para o valor configurado anteriormente,
pressionando o botão B (o 4º ponteiro central, bem como
os ponteiros superior e inferior se movimentarão para
indicar o valor de tempo definido antes de usar a função
timer de contagem regressiva).
Apagando o valor do timer de contagem regressiva
Se desejar, você pode levar o valor do timer de contagem
regressiva para zero. Isso só pode ser feito se o timer
não está em funcionamento e foi reiniciado. Se o timer
de contagem regressiva está em processo, você deve
primeiro parar a contagem regressiva, pressionando o
botão A e, em seguida, pressionando o botão B. Isto irá
parar e reiniciar o timer de contagem regressiva para o
valor de tempo selecionado. Para apagar o valor do timer
de contagem regressiva para zero, manter o botão B pres-
sionado por dois segundos Agora, você deve seguir as

496
497
instruções para configurar o valor do timer de contagem
regressiva para o novo período de tempo desejado.
Função de tempo fracionado: Enquanto o timer de con-
tagem regressiva está em processo, você pode empregar
a função de tempo fracionado para anotar o tempo
restante da sequência de contagem regressiva:
Para utilizar a função de tempo fracionado, pressione o
botão B, o que fará com que os ponteiros superior, inferior
e o 4º central congelem onde estão. A função de conta-
gem regressiva continuará em progresso internamente,
enquanto os ponteiros estão congelados
Para retomar o movimento dos ponteiros superior, inferior
e 4º central, pressione o botão B novamente e os pontei-
ros irão reposicionar-se nos apropriados para mostrar o
tempo atual na contagem regressiva.
3TMG
PONTEIRO
DOS
SEGUNDOS
COROA
ANEL DE ROTAÇÃO
SUPERIOR
(FORMATO DE 24 HORAS)
4° PONTEIRO CENTRAL
PONTEIRO
DOS
MINUTOS
PONTEIRO
DAS HORAS
ANEL INTERIOR /
NUMERAIS
(FORMATO
DE 24 HORAS)
A
2 31

498
499
Se em 5 segundos depois de puxar a coroa para a
posição 3, o 4º ponteiro central não apontar para as
12h00, pressione o botão A para mover o ponteiro
no sentido horário até este apontar para as 12h00.
Mantendo o botão A pressionado fará com que o
ponteiro se mova mais rápido.
3. Ao terminar, empurre a coroa para a posição 1.
CALIBRAÇÃO DO 4° PONTEIRO CENTRAL
O 4º ponteiro central é calibrado na fábrica Timex para
refletir os minutos padrão dentro da hora, tal como está
definido pelo Tempo Universal Coordenado. Globalmente,
a maioria dos locais usa os minutos padrão. Se o local
que você usa como 2º ou 3º fuso horário utiliza os
minutos padrão, o 4º ponteiro central não necessita de
recalibragem. Apenas se você deseja ter o segundo e
o terceiro fusos horários em locais que não seguem o
3 FUNÇÕES DE FUSO HORÁRIO
O seu relógio pode mostrar 3 fusos horários:
1. Ponteiros das horas e dos minutos: Apresenta a hora
no formato normal de 12 horas. Observe: A data
apresentada na janela da data está ligada à hora
apresentada por estes dois ponteiros.
2. O 4º ponteiro central e o anel interior: Apresenta a
hora no formato de 24 horas.
3. O 4º ponteiro central e o anel superior de rotação da
caixa: Apresenta a hora no formato de 24 horas.
AJUSTE DO 4° PONTEIRO CENTRAL
Para reajustar o 4° ponteiro central quando está fora de
alinhamento:
1. Puxe a coroa para fora, para a posição 3.
2. O 4º ponteiro central deverá apontar para as 12h00.

500
501
minuto padrão, as instruções para recalibrar o 4º ponteiro
central são como se segue:
1. Puxe a coroa para fora, para a posição 3. O 4° ponteiro
central estará apontando para as 12h00.
2. Rode a coroa para posicionar o ponteiro dos minutos
na posição correta com a hora requerida pelo local
que você quer usar para o 2º e 3º fusos horários.
3. Puxe a coroa para a posição 2. O 4º ponteiro central
apontará para a sua posição calibrada atual dos
minutos dentro da hora.
4. Puxe o botão A para mover o 4º ponteiro central no
sentido horário até que ele se alinhe com o ponteiro
dos minutos. Mantendo o botão A pressionado fará
com que o ponteiro se mova mais rápido.
5. Puxe a coroa para fora, para a posição 3. O 4° ponteiro
central estará apontando para as 12h00.
6. Rode a coroa para posicionar os ponteiros das horas e
dos minutos para a hora correta.
7. Ao terminar, empurre a coroa para a posição 1.
Observe: O 4º ponteiro central estará controlando o
tempo usando a calibração atual dos minutos dentro
da hora. Tanto o fuso horário 2 como o 3 utilizam o
4º ponteiro central e, portanto, os locais que estão
a ser seguidos nos fusos 2 e 3 devem ambos utilizar
os mesmos minutos dentro da hora para estes fusos
horários sejam mostrados corretamente.

502
503
CONFIGURANDO O 4º PONTEIRO CENTRAL
(FUSO HORÁRIO II)
Observe a hora atual no local em que você deseja seguir
como o segundo fuso horário. Pressione o botão A até
que o 4º ponteiro central esteja apontando para essa hora
sobre o anel interior. (Observe: esta escala tem o formato
de 24 horas). O 4º ponteiro central avançará 30 minutos
cada vez que o botão A é pressionado. Mantendo o botão
A pressionado fará com que o ponteiro se mova mais
rápido. Isto configurará o 2º fuso horário no relógio.
CONFIGURANDO O ANEL SUPERIOR DE ROTAÇÃO
DA CAIXA (FUSO HORÁRIO III)
O 3º fuso horário é configurado utilizando a configuração
existente para o 4º ponteiro central e ajustando o anel
superior de rotação da caixa para a hora desejada para
o 3º fuso horário. (Observe: esta escala tem o formato
de 24 horas). O anel superior tem 72 posições. Para
avançar o anel superior uma hora, você deverá avançar
3 posições (3 “cliques”). Observe a hora atual no local que
você deseja seguir como o 3º fuso horário. Rode o anel
superior da caixa no sentido anti-horário para posicionar
o marcador na posição correta para essa hora com o 4º
ponteiro central.

504
505
FUNÇÃO DO TAQUÍMETRO
(não é para todos os modelos)
O taquímetro medirá apenas velocidades superiores
a 60 unidades por hora utilizando este método; as
velocidades mais baixas podem ser medidas diminuindo
o tamanho da unidade de medida. A função executada
pelo taquímetro é independente da unidade de distância
(p. ex.: milhas terrestres, milhas náuticas, quilômetros,
metros, etc.) sempre que a mesma unidade de medida
seja usada para todos os cálculos.
1. Defina os pontos de começo e fim para a sua distância
predeterminada.
2. Inicie o cronógrafo quando o objeto de que você quer
medir a velocidade passou pelo ponto de partida.
3. Pare o cronógrafo uma vez que o objeto do qual quer
medir a velocidade passou pela meta.
4. O ponteiro secundário do cronógrafo é comparado
com as marcas do taquímetro para determinar a
velocidade do objeto.

506
507
FUNÇÃO DA ESCALA DESLIZANTE DE BISEL
A função da escala deslizante do anel superior funciona
rodando o anel exterior. O anel interior não se move. O
anel exterior está sempre relacionado com a “distância”
ou “velocidade” ou quaisquer dados que variem com o
tempo. O anel interior apenas indica unidades de tempo.
Anel Exterior
Sobre o anel exterior, o número “10” representa múltiplos
ou submúltipos de 10, tais como 0,1, 1,0, 10 ou 100.
Anel Interior
Sobre o anel interior, “MPH” (milhas/h) se refere ao
“índice de velocidade”. Este índice é usado para calcular
a velocidade de qualquer um dos dados por hora. Sobre o
anel interior, “STAT” (milhas terrestres) e “NAUT” (milhas
náuticas) são para conversão das unidades de distância.
ANEL EXTERIOR
ANEL INTERIOR
Os exemplos seguintes servem de guia de como usar a
escala deslizante.

508
509
CÁLCULO DE VELOCIDADE:
Qual é a velocidade necessária para percorrer 10
milhas náuticas em 15 minutos?
Fatores conhecidos: A distância: 10 milhas náuticas;
O tempo: 15 minutos
• Alinhe a seta do nº “10” sobre o anel exterior com o
“15” sobre o anel interior.
• A velocidade necessária pode ser vista diretamente
por cima da marca de “MPH” sobre o anel interior.
A resposta é: 40 milhas náuticas por hora
Cálculo do tempo: Quanto tempo leva para percorrer
10 milhas náuticas a uma velocidade de 40 milhas
por hora?
Fatores conhecidos: A velocidade: 40 milhas por hora;
a distância: 10 milhas náuticas
• Alinhe o nº “40” sobre o anel exterior com a marca
“MPH” sobre o anel interior.
• O tempo requerido pode ser visto diretamente por
baixo da seta do nº “10” sobre o anel exterior, o qual
é “15” sobre o anel interior.
A resposta é: 15 minutos
CÁLCULO DA DISTÂNCIA:
Que distância você pode percorrer a 40 milhas por
hora durante 15 minutos?
Fatores conhecidos: a velocidade: 40 milhas náuticas
por hora; o tempo: 15 minutos
• Alinhe o nº “40” sobre o anel exterior diretamente por
cima da marca de “MPH” sobre o anel interior.
• A distância percorrida pode ser vista por cima da

510
511
marca do nº “15” sobre o anel interior. O número
indicado sobre o anel exterior é “10”.
A resposta é: a distância percorrida são 10 milhas
náuticas.
CONVERSÃO DE UNIDADES:
Para converter distâncias de milhas náuticas a milhas
terrestres e quilômetros.
Fator conhecido: a distância a converter são 10 milhas
náuticas
• Alinhe a seta do nº “10” sobre o anel exterior, por
cima de “NAUT” sobre o anel interior. A conversão
em milhas terrestres (11,5) se encontra por cima da
marca de “STAT” no anel interior e, a conversão em
quilômetros (18,5) se encontra por cima da marca de
“MPH” no anel interior.
COMO AJUSTAR A PULSEIRA
(Variações das seguintes seções das pulseiras aplicam-se
a todos os modelos de relógio).
PULSEIRA DE FIVELA DESLIZANTE
1. Abra o fecho.
2. Mova a fivela até o com-
primento desejado da
pulseira.
3. Pressione ao mesmo
tempo que segura
o fecho e deslize a fivela para frente e para trás até se
engatar nas ranhuras situadas no lado inferior
da pulseira.
4. Pressione o fecho para baixo até se encaixar e fechar.
A fivela pode sofrer danos se aplicar demasiada força.

512
513
PULSEIRA DE FIVELA DOBRÁVEL
1. Encontre a barra de mola que une a pulseira à fivela.
2. Empurre a barra de mola com uma ferramenta
pontuda e torça delicadamente a pulseira para
desprendê-la.
3. Meça o tamanho do pulso e insira a barra de mola no
orifício inferior correto.
4. Empurre a barra de mola para baixo, alinhe-a com
o orifício superior e solte-a para travá-la no lugar.
RETIRADA DOS ELOS DA PULSEIRA
RETIRADA DOS ELOS:
1. Coloque a pulseira na vertical e insira uma ferramenta
pontuda na abertura do elo.
2. Empurre o pino com força no sentido da seta até que
o elo se desprenda (os pinos foram desenhados para
dificultar a sua retirada).
3. Repita a operação até retirar o número desejado
de elos.
REMONTAGEM:
1. Volte a juntar as peças da pulseira.
2. Empurre o pino de volta no elo no sentido oposto
da seta.
3. Pressione firmemente o pino para baixo para dentro
da pulseira até se alinhar e se encaixar.

514
515
BATERIA
A bateria deve ter uma durabilidade de 4 a 6 anos de uso
normal do relógio. A duração real da bateria variará com
o seu uso real.
Quando houver necessidade, recomendamos que a troca
da bateria seja realizada somente pela TIMEX. Depois de
trocar a bateria você deverá reajustar para corrigir a hora
e a data do relógio. Para devolver o relógio à Timex,
faça-o por meio de um remetente com frete pré-pago.
Para obter um remetente com frete pré-pago ligue para
o 1-800-448-4639 (nos Estados Unidos), visite o seu
revendedor ou utilize o site www.Timex.com. Para cobrir
os gastos de frete (não se trata de custos de conserto),
lembre-se de incluir um cheque ou vale postal no valor de
8,00 dólares americanos quando for nos Estados Unidos e
de 12,00 dólares canadenses quando for no Canadá. Para
outros países a Timex lhe cobrará o frete.
NUNCA INCLUA NENHUMA PULSEIRA ESPECIAL
OU OUTRO ARTIGO DE VALOR PESSOAL NA SUA
REMESSA.
NÃO JOGUE A BATERIA NO FOGO. NÃO RECARREGUE
A BATERIA. MANTENHA AS BATERIAS NÃO UTILIZA-
DAS FORA DO ALCANCE DAS CRIANÇAS.

516
517
GARANTIA INTERNACIONAL TIMEX
A Timex Group USA, Inc. dá garantia ao relógio TIMEX
®
contra defeitos de fabricação por um período de UM
ANO a partir da data original da compra. A Timex e suas
filiais em todo o mundo reconhecerão esta Garantia
Internacional.
Observe que a Timex poderá, tem a opção de consertar
o relógio colocando componentes novos ou totalmente
recondicionados e inspecionados ou substituí-lo por um
modelo idêntico ou similar. IMPORTANTE – OBSERVE
QUE ESTA GARANTIA NÃO COBRE DEFEITOS OU
DANOS OCASIONADOS AO SEU RELÓGIO:
1. após vencer o período de garantia;
2. se o relógio não foi comprado originalmente de um
revendedor Timex autorizado;
3. se for por consertos não executados pela Timex;
4. se for devido a acidentes, adulteração ou mau uso e
5. se o defeito for no cristal, na pulseira, na caixa do reló-
gio, nos acessórios ou na bateria. A Timex poderá cobrar
o custo de substituição de qualquer uma dessas peças.
ESTA GARANTIA E OS RECURSOS AQUI CONTIDOS SÃO EX-
CLUSIVOS E SUBSTITUEM TODAS AS OUTRAS GARANTIAS,
EXPRESSAS OU IMPLÍCITAS, INCLUSIVE QUALQUER GARAN-
TIA IMPLÍCITA DE COMERCIABILIDADE OU ADEQUAÇÃO A
UM FIM PARTICULAR. A TIMEX NÃO ASSUME NENHUMA
RESPONSABILIDADE QUANTO A DANOS ESPECIAIS,
INCIDENTAIS OU INDIRETOS. Alguns países e Estados
não permitem limitações sobre garantias implícitas nem
permitem exclusões ou limitações de danos, por isso,
essas limitações poderão não se aplicar ao seu caso. Esta

518
519
garantia lhe confere direitos legais específicos, bem como
outros direitos os quais variam de um país para outro e de
um estado para outro.
Para obter o serviço de garantia, devolva o relógio à
Timex, a uma das filiais ou ao revendedor autorizado
Timex onde o relógio foi comprado, juntamente com
o Cupom de Conserto do Relógio original devidamente
preenchido ou, somente nos Estados Unidos e no Canadá,
o Cupom de Conserto do Relógio original devidamente
preenchido ou uma declaração por escrito identificando
o seu nome, endereço, número de telefone e data e local
da compra. Inclua com o relógio o seguinte pagamento
para cobrir as despesas de envio (não se refere a custos
de consertos): nos Estados Unidos, um cheque ou vale
postal no valor de 8,00 dólares americanos; no Canadá,
um cheque ou vale postal no valor de 12,00 dólares
canadenses; no Reino Unido, um cheque ou vale postal
no valor de 3,50 libras esterlinas. Nos outros países,
você deverá pagar as despesas de frete. NUNCA INCLUA
NENHUMA PULSEIRA ESPECIAL OU OUTRO ARTIGO DE
VALOR PESSOAL NA SUA REMESSA.
Nos EUA, ligue para 1-800-448-4639 para obter informa-
ções adicionais sobre a garantia. No Canadá, ligue para
1-800-263-0981. No Brasil, ligue para +11 2664 1001. No
México, ligue para 01-800-01-060-00. Na América Central,
no Caribe, nas Bermudas e nas Bahamas, ligue para (501)
370-5775 (EUA). Na Ásia, ligue para 852-2815-0091. No
Reino Unido, ligue para 44 020 8687 9620. Na França,
ligue para 33 3 81 63 42 51. Na Alemanha/Áustria, ligue
para +43 662 889 2130. Para outras regiões, entre em
contato com o representante autorizado ou distribuidor
Timex para obter informações sobre garantia.

520
521
Se o seu relógio Timex
®
precisar de conserto, envie
o produto para a Timex como indicado na Garantia
Internacional Timex ou para: TG SERVICE CENTER, P.O.
Box 2740, Little Rock, AR 72203 – EUA Para perguntas
sobre o serviço, ligue para 1-800-328-2677 (nos EUA) ou
EXTENSÃO DA GARANTIA
Disponível somente nos Estados Unidos. Amplie a sua
garantia por quatro anos adicionais a partir da data da
compra por 5,00 dólares americanos. Você pode pagar
com os cartões de crédito AMEX, Discover, Visa ou
MasterCard pelo fone 1 800-448-4639, durante o horário
comercial. O pagamento deve ser feito em 30 dias a partir
da data da compra. Nome, endereço, número de telefone,
data da compra e o número de cinco dígitos do modelo
são informações obrigatórias. Você também pode enviar
um cheque de 5,00 dólares americanos por correio ao
seguinte endereço: Timex Extended Warranty, P.O. Box
1676, Dept. EF, Little Rock, AR 72203.
©2015 Timex Group USA, Inc. TIMEX, INDIGLO, PERFECT DATE e
INTELLIGENT QUARTZ são marcas comerciais registradas da Timex
Group B.V. e suas subsidiárias.

W273 AS 355-095019
Perpetual Calendar • Fly-back Chronograph
• Fly-back Chrono Compass • Linear Chronograph • World Time
• Compass • Tide Temp and Compass Altimeter • Depth
• Yacht Racer • Yacht Racer Pro • Chrono Timer • 3GMT
万年历 • 飞返计时码表 • 飞返计时指南针 • 线性计时码表
• 世界时间 • 指南针 • 潮汐温度指南针 • 高度计 • 深度
• 帆船赛手 • 秒表计时器 • 秒表计时器 Pro • 三时区
永 久 カレ ン ダ ー • フライバッククロノグラフ • フライバッククロノコン パ ス
• リニ アクロノグ ラフ • ワールドタイム • コン パ ス • 潮の干満、温度、コンパス
• 高度計 • 深度 • ヨット レ ー サ ー • クロノグ ラフタイマー • 3GMT
•
• -k
• • •
• •
• • Yacht Racer ( ) • Chrono Timer • 3GMT
®

English .............................. Page 1
中文 ................................... 页码 125
日本語 ................................ 225 ページ
P .............................. с траница 337

1
TIMEX
®
WATCHES
Congratulations on purchasing your TIMEX
®
INTELLIGENT
QUARTZ
™
watch. Please read these instructions carefully
to understand how to operate your Timex watch.
Your watch may not have all of the features described in
this booklet.
For more information, and to register your
product please visit:
www.timex.com

2
3
TABLE OF CONTENTS
How to Start Your Watch .................................................... 5
Water and Shock Resistance ............................................. 6
Indiglo
®
Night-Light ............................................................ 8
Date and Time Setting ........................................................ 9
Perpetual Calendar .......................................................... 11
Fly-Back Chronograph ...................................................... 14
Fly-back Chronograph Compass ...................................... 20
Linear Chronograph ........................................................ 32
World time ....................................................................... 38
Compass........................................................................... 45
Tide Temp and Compass .................................................. 52
Altimeter .......................................................................... 61
Depth ................................................................................ 69
Yacht Racer ...................................................................... 74
Chrono Timer.................................................................... 85
3GMT .............................................................................. 101
Tachymeter Function ..................................................... 108
Slide-Rule Bezel Function .............................................. 109
How to Adjust Bracelet .................................................. 114
Bracelet Link Removal .................................................... 116
Battery ............................................................................ 117
Warranty ......................................................................... 119

4
5
HOW TO START YOUR WATCH
(Does not apply to Perpetual Calendar models.) To start
your watch remove the plastic guard from under the
crown, then press the crown in against the case.
Some watches require the setting crown to be screwed
in. If your watch case has a protrusion with screw
threads, the crown must be screwed in after setting the
watch.
To screw in, push the crown firmly against the threaded
protrusion and hold in while turning the crown clockwise.
Continue to screw in the crown until it is tight. You will
need to unscrew the crown (counter-clockwise) before
pulling it out the next time you want to set your watch.
Welcome to the world of Timex
®
watches with
Intelligent Quartz
™
technology, the future of quartz
analogue technology. Intelligent Quartz technology
brings the power of a micro-processor to the reliability
and accuracy of quartz analogue timekeeping. With Timex
Intelligent Quartz watches, the technology is written into
the design, delivering a new level of dial complication.
Uses up to three additional independent hands to display
an array of information, normally only available in digital
watches, in a traditional analogue format.

6
7
WARNING: TO MAINTAIN WATER-RESISTANCE, DO
NOT PRESS ANY BUTTONS UNDER WATER UNLESS
YOUR WATCH IS INDICATED AS 200 METER WATER-
RESISTANT. NEVER PULL OUT THE CROWN WHILE
UNDER WATER.
1. Watch is water-resistant only as long as crystal, crown
and case remain intact.
2. Watch is not a certified Diver’s watch.
3. Rinse watch with fresh water after exposure to salt
water.
4. Shock-resistance will be indicated on the watch face
or caseback. Watches are designed to pass ISO test for
shock-resistance. However, care should be taken to
avoid damaging the crystal.
WATER AND SHOCK RESISTANCE
If your watch is water-resistant, meter marking (WR_M)
is indicated.
Water-Resistance Depth p.s.i.a.* Water Pressure
Below Surface
30m/98ft 60
50m/164ft 86
100m/328ft 160
200m/656ft 284

8
9
DATE AND TIME SETTING
NOTE: The watch crown has three positions: closed,
middle and outer. To familiarize yourself with the
difference between the various positions extend the
crown to its outer position and then push the crown very
lightly until you feel it click into the middle position.
To set the date and time:
Time
Pull the crown to its outer position and turn it until the
correct time is shown. Ensure AM/PM setting is correct by
verifying that the date changes at midnight, not noon.
Date (Does not apply to Perpetual Calendar)
Pull the crown to its middle position and turn it until the
correct date appears in the date window. Note: The date
changes between 10 pm and 2 am. Do not change the
INDIGLO
®
NIGHT-LIGHT
Press button or crown to activate light.
Electroluminescent technology used in the INDIGLO
®
night-light illuminates the watch face at night and in low
light conditions.
OR

10
11
date during this timeframe. Doing so could damage the
watch movement.
Push crown to closed position after setting date/time. The
second hand will begin moving.
NOTE: For months with fewer than 31 days, the date will
need to be adjusted.
PERPETUAL CALENDAR
OVERVIEW
A
B
1 2
3
1 2
3
HOUR HAND
DAY HAND
DATE HAND
SECOND HAND
MINUTE HAND
CROWN
MONTH HAND
BUTTON A
(RECESSED)
BUTTON B
(RECESSED)
CLOSED
POSITION
MIDDLE
POSITION
OUTER
POSITION

12
13
LEAP YEAR OFFSET
To maintain the correct date, the watch includes a setting
for the current leap year offset. This setting is made at the
Timex factory or after battery replacement and cannot be
changed, only viewed.
To view the offset, pull the crown to its middle position.
The date hand shows the offset: 1 = 1 year after leap year;
2 = 2 years after leap year; 3 = 3 years after leap year; 4
= leap year. Push the crown in when done and the hands
resume their normal display of day, month, and date.
INTRODUCTION
With your watch’s perpetual calendar feature, the
date does not need adjustment until 2100. The watch
automatically accounts for short months and leap years,
always showing the correct day and date. The day and date
were preset at the Timex factory. You only need to adjust
the time. The watch has two recessed push buttons for
use by Timex Service Center to set the day and date after
battery replacement. They have no use otherwise.

14
15
4TH CENTER HAND ADJUSTMENT
To readjust a misaligned 4th center hand:
1. Pull the crown to its outer position. The upper and
lower hands reset to the ends of their sweeps
automatically.
2. 4th center hand should point to 12 o’clock. If within
5 seconds of pulling the crown to its outer position the
4th center hand does not point to 12 o’clock, press
Button A or B to move the hand counterclockwise or
clockwise until it points to 12 o’clock.
3. Push crown to closed position when finished.
FLY-BACK CHRONOGRAPH
OVERVIEW
AA
B
23
1 2
3
1 2
3
UPPER HAND
CHRONO HOURS
2ND TIME ZONE
4TH CENTER HAND
SECOND HAND
DATE WINDOW
CROWN
CHRONO MINUTES SCALE
LOWER HAND
BUTTON A
BUTTON B
MINUTE HAND
HOUR HAND
CLOSED
POSITION
MIDDLE
POSITION
OUTER
POSITION

16
17
TO SET THE SECOND TIME ZONE:
1. Pull crown to its middle position. The upper hand
shows the second time zone time and the 4th center
hand shows the minutes.
2. Assuming that the second time zone time has the
same minutes value as the first time zone, the 4th
center hand should be aligned with the minute hand.
If the hands are not aligned, or if your second time
zone is a different minute within the hour, press
Button B to move the 4th center hand forward until
it is in the desired position.
3. Press Button A to move the upper hand forward in
one-hour increments until it reaches desired second
time zone hour. To move the hand quickly, press and
hold Button A.
4. Push the crown in when finished.
SECOND TIME ZONE
The upper hand shows the time for the second time
zone. Note that the scale is 24-hours, with midnight at
either end and noon in
the middle. Most often,
time zones differ in hour
increments. In such
cases, the minute value
of the second time zone
will be the same as that
displayed by the watch’s
minute hand.
AA
B
23
1 2
3
1 2
3

18
19
4. To reset the fly-back chronograph to zero position,
press Button B (FLY-BACK/RESET).
When the chronograph is reset, all hands move to
zero position. After another eight seconds, the watch
resumes normal display of the second time zone.
5. To reset and/or restart the fly-back chronograph while
it is running, press and hold Button B (FLY-BACK/
RESET). Release it when you wish to restart.
FLY-BACK CHRONOGRAPH
The watch provides a 4-hour fly-back chronograph.
1. To start, press Button A (START/STOP).
The 4th center hand shows the seconds with 1/5
second resolution. The lower hand shows the last
digit of the minutes, counting up to ten and repeating.
The upper hand shows the total time, including hours
and minutes, with divisions every ten minutes. The
chronograph counts up to four hours before stopping
automatically.
2. To stop, press Button A (START/STOP) again. All hands
stop moving.
3. To resume, press Button A (START/STOP) again.

20
21
INDICATOR HAND (4TH CENTER HAND) ADJUSTMENT
To readjust a misaligned indicator hand:
1. Pull the crown to its outer position. The upper and
lower hands reset to the ends of their sweeps
automatically.
2. The 4th center hand should point to 12 o’clock. If it
does not within 5 seconds of pulling the crown to
its outer position, press A or B to move the hand
counterclockwise or clockwise, respectively, until it
points to 12 o’clock.
3. Push the crown in when done.
FLY-BACK CHRONOGRAPH COMPASS
OVERVIEW
A
C
B
1 2
3
1 2
3
UPPER HAND
CHRONO HOURS
2ND TIME ZONE
4TH CENTER HAND
SECOND HAND
DATE WINDOW
CROWN
CHRONO MINUTES SCALE
LOWER HAND
BUTTON A
BUTTON B
HOUR HAND
MINUTE HAND
CLOSED
POSITION
MIDDLE
POSITION
OUTER
POSITION
BUTTON C

22
23
2. Press B to move the 4th center hand forward. Hold the
button to move the hand quickly. The upper and 4th
center hands move together; as the 4th center hand
makes one revolution, the upper hand moves one
hour. Assuming that the second time zone time has
the same minutes value as your first time zone, the
4th center and minute hands should be aligned.
3. Press A to move the upper hand forward in one-hour
increments. Hold the button to move the hand quickly.
4. Push the crown in when finished.
The second time zone time can alternatively be used to
display your home time on a 24-hour format, if you prefer.
When setting the second time in this manner, ensure
that the hour/minute display corresponds to the 24-hour
display by verifying that the date changes at midnight,
not noon.
SECOND TIME ZONE
The upper hand normally shows the time for the second
time zone. Note that the scale is 24 hours, with midnight
at either end and noon in the middle.
To set the second time zone time:
1. Pull the crown to its
middle position. The
upper hand shows
the second time zone
time in military hours
and the 4th center
hand shows the
minutes.
A
C
B
1 2
3
1 2
3

24
25
2. To stop, press A again (START/STOP). All hands freeze.
3. To resume, press A (START/STOP) again, or to reset the
chronograph to zero, press B (FLY-BACK/RESET).
When the chronograph is reset, all hands move to
zero. After eight seconds, the watch resumes the
normal display of the second time zone time.
4. You may also reset and/or restart the chronograph
while it is running. To do so, press and hold B (FLY-
BACK/RESET) to zero the chronograph and release it
when you wish to restart. You do not have to wait for
all hands to reach zero before releasing the button;
the timing will start internally from the button release.
This “fly-back” feature allows you to measure lap time.
The compass may be used while the chronograph is
running without interfering with its operation. See
COMPASS OPERATION.
FLY-BACK CHRONOGRAPH
The watch provides a 4-hour fly-back chronograph.
1. To start, press A (START/STOP). The 4th center hand
shows the seconds with 1/5-second resolution and
the lower hand shows
the last digit of the
minutes, counting up
to ten and repeating.
The upper hand shows
the total time, includ-
ing hours and minutes,
with divisions every
ten minutes. The chro-
nograph counts up
to four hours before
stopping automatically.
A
C
B
1 2
3
1 2
3

26
27
COMPASS CALIBRATION
Before use, the compass must be calibrated.
Since a compass uses the earth’s magnetic field, you
must be aware of large metallic objects, such as vehicles
or bridges, or objects that give off electromagnetic
radiation, such as televisions or computers, which
could affect the magnetic field around the watch. If the
compass is calibrated near such objects, it will only
work properly in that same location. If the compass
is calibrated away from such objects, it will not work
properly near them. For best results, calibrate in the area
of intended use.
In calibrating and taking headings, it is important, as with
all compasses, to keep the compass level. Calibrating or
taking a heading when the watch is not level can result
in large errors. Also avoid areas that may exhibit higher
than normal concentrations of hard and soft iron, as they
may cause inaccurate headings. Whenever a heading is
suspect, recalibrate.
Do not store the watch near any source of magnetism,
such as a computer, appliance, or television, as the
watch can take on a magnetic charge, yielding inaccurate
headings. Typical accuracy of wrist-worn instruments is
within +/- 10 degrees.
To calibrate the compass:
1. Pull the crown to its middle position and wait for the
indicator hands to stop moving.
2. Keep the watch level or place it on a level surface (if
the band interferes, place the watch on an inverted
cup). The watch may be face down, but take care to
protect the watch face.

28
29
5. If you do not wish to set the magnetic declination,
push the crown in. Otherwise, to have watch
automatically compensate for the declination angle,
turn the compass ring until north is at 12 o’clock.
6. Press A or B to move the 4th center hand west (-)
or east (+), respectively, to point to your location’s
declination angle using the declination scale. Hold a
button to move the hand quickly. See the figure below
for an example.
7. Push the crown in when done.
A
B
Magnetic declination set to -14° (14°W)
3. Press C (COMPASS) to begin. The 4th center hand
rotates two revolutions to remind you to rotate the
watch. While level, SLOWLY rotate the watch two
revolutions, taking at least 15 seconds per revolution.
4. When done, press C (COMPASS), keeping the watch
level. The 4th center hand moves back and forth to
acknowledge the end of calibration and then moves to
the current magnetic declination setting.

30
31
available through buttons A (START/STOP) and B (FLY-
BACK/RESET).
NOTE: During compass operation, the second hand
moves in two-second increments. Also, when the
compass is activated, the upper and lower hands may
shift position slightly, returning to their proper positions
when the compass is deactivated. This operation is
normal and yields the most accurate compass reading.
COMPASS OPERATION
Normally, the compass is inactive, with the 4th center
hand pointing to 12 o’clock or showing the chronograph
seconds.
While holding the watch level, press C (COMPASS) to
activate the compass. The compass hand moves to
point north. If the watch is turned, the 4th center hand
will continue to move, always pointing north. After 20
seconds, the compass will automatically turn off and the
4th center hand will return to its normal operation. This
conserves battery life. Press C (COMPASS) at any time to
keep the compass on for another 20 seconds.
The compass may be activated while the chronograph is
in use. The 4th center hand merely switches operation
temporarily. The upper and lower hands continue to show
the chronograph time and all chronograph functions are

32
33
LINEAR CHRONOGRAPH
OVERVIEW
LINEAR AND 4TH CENTER HAND ADJUSTMENT
To readjust a misaligned 4th center hand:
1. Pull the crown to its outer position. The lower hand
resets to the end of its sweep automatically.
2. 4th center hand should point to 12 o’clock. If within
5 seconds of pulling the crown to its outer position the
4th center hand does not point to 12 o’clock, press
Button A to move the hand clockwise until it points to
12 o’clock.
3. If the chronograph has been reset and the linear hand
is not pointing to zero, press and hold Button B for
5 seconds to engage a full calibration of the linear
indicator, which will take up to 32 seconds to perform.
4. Push crown to closed position when finished.
SECOND HAND
DATE WINDOW
CROWN
LOWER HAND
BUTTON A
BUTTON B
4TH CENTER HAND
HOUR HAND
LINEAR
HAND
MINUTE
HAND
A
B
1
2
3

34
35
SECOND TIME ZONE
The lower hand
shows the time for
the second time zone.
Note that the scale
is 24-hours, with
midnight at either
end and noon in the
middle. Most often,
time zones differ in
hour increments.
In such cases, the
minute value of the second time zone will be the same as
that displayed by the watch’s minute hand.
TO SET THE SECOND TIME ZONE:
1. Pull crown to its middle position. The lower hand
shows the second time zone time and the 4th center
hand shows the minutes.
2. Assuming that the second time zone time has the
same minutes value as the first time zone, the 4th
center hand should be aligned with the minute hand. If
the hands are not aligned, or if your second time zone
is a different minute within the hour, press Button B
to move the 4th center hand forward until it is in the
desired position.
3. Press Button A to move the lower hand forward in
one-hour increments until it reaches desired second
time zone hour. To move the hand quickly, press and
hold Button A.
4. Push the crown in when finished.
A
B
1
2
3

36
37
LINEAR CHRONOGRAPH
The watch provides a 4-hour split chronograph.
1. To start, press Button A (START/STOP). The 4th center
hand shows the seconds with 1/5 second resolution.
The linear hand shows the minutes, counting up to
thirty and repeating. The lower hand shows the total
time, including hours and minutes, with divisions every
ten minutes. The chronograph counts up to four hours
before stopping automatically.
2. To stop, press Button A (START/STOP) again. All hands
stop moving.
3. To reset the chronograph to zero position, press But-
ton B (SPLIT/RESET).
When the chronograph is reset, all hands move to zero
position. After another eight seconds, the watch resumes
normal display of the second time zone. While the
chronograph is running, you may take a split time. Press
Button B (SPLIT/RESET) and all hands will stop while the
chronograph continues to run. Press Button B (SPLIT/
RESET) again to resume the display of the running
chronograph elapsed time.

38
39
TO SET THE WORLD TIME:
1. Pull the crown to its middle position. The center hand
shows the world time zone city and the upper hand
shows the time in that city.
A
B
C
1 2 3
WORLD TIME
OVERVIEW
A
B
C
1 2
3
corrected 3.3.11 with Paulo’s new cities
24 CITIES
WORLD TIME
SCALE
SECOND HAND
DATE WINDOW
CROWN
LOWER HAND
BUTTON A
BUTTON B
BUTTON C
4TH CENTER HAND
SEASON SCALE
UPPER HAND
HOUR HAND
MINUTE HAND
CLOSED
POSITION
MIDDLE
POSITION
OUTER
POSITION

40
41
2. Press A or B to move the center hand to the city that
represents your home time zone. Hold a button to
move the hand quickly. Any city may be used.
3. Pull the crown to its outer position. The city selector
hand will revert back to the 12:00 position as indicated
in INDICATOR HAND ADJUSTMENT. After a five second
pause, the upper hand will show the world time (the
time in the city selected in previous step), the center
hand shows the minutes of the world time, and the
lower hand shows the season (see SEASON SETTING).
IMPORTANT: Do not manipulate any of the pushers
or the crown until the center hand has completed its
adjustment. (Approximately 10 seconds after crown is
pulled to its outer position).
4. If the displayed season is not correct for the home
time zone, press C to change it. If the home time zone
observes daylight savings time, the upper hand will
move by one hour.
5. Press A or B to move the time backward or forward,
respectively, to set the world time zone to be the
same as the home time zone. Hold a button to change
the time quickly. The hands move together; as the
center hand makes one revolution, the upper hand
moves one hour. After setting, the center and minute
hands should be aligned.
6. Push the crown in when finished.

42
43
INDICATOR HAND (4TH CENTER HAND) ADJUSTMENT
To readjust a misaligned indicator hand:
1. Pull the crown to its outer position. The upper and
lower hands reset to the ends of their sweeps,
automatically.
2. The 4th center hand should point to 12 o’clock. If it
does not within 5 seconds of pulling the crown to
its outer position, press A or B to move the hand
counterclockwise or clockwise, respectively, until it
points to 12 o’clock.
3. Push the crown in when finished.
NOTE: If no button is pressed for five seconds after the
hands stop, the watch proceeds to the world time setting
operation (see WORLD TIME SETTING).
CITY TIME DISPLAY
A
B
C
1 2 3
Press A or B to
move the center
hand backward or
forward, respec-
tively, and select a
city. The upper hand
moves to show the
time in the selected
city. Note that the
scale is 24 hours, with midnight at either end and noon
in the middle.
SEASON SETTING
The season setting allows the watch to compensate for
daylight savings time (also called “summer time”).

44
45
COMPASS
OVERVIEW
I
I
14
CENTER
CROWN
MIDDLE
SET DATE
I
I
14
OUT
SET TIME
CROWN
B
A (COMPASS)
DECLINATION SCALE
COMPASS HAND
(NORTH END IS RED
POINTED/LONGER)
The watch provides one setting to represent the two peri-
ods all cities that observe daylight savings time have. For
the watch, the period of daylight savings time is SUMMER
and the period of standard time is WINTER.
When the season in one city is set to SUMMER, all cities in
the same hemisphere are automatically set to SUMMER,
while all cities in the other hemisphere are automatically
set to WINTER. The watch knows which cities are in each
hemisphere.
Press C to change the season in the selected city.

46
47
COMPASS HAND ADJUSTMENT
Pull CROWN all the way out. Compass hand should point
to 12 o’clock. If it does not, press either A or B to move
compass hand until it points to 12 o’clock. Hold button to
move hand fast. Push CENTER CROWN in when done and
recalibrate compass.
COMPASS CALIBRATION
Before use, the compass must be calibrated.
Since a compass uses the earth’s magnetic field, you
must be aware of large metallic objects, such as vehicles
or bridges, or objects that give off electromagnetic
radiation, such as televisions or computers, which
could affect the magnetic field around the watch. If the
compass is calibrated near such objects, it will only
work properly in that same location. If the compass
is calibrated away from such objects, it will not work
properly near them. For best results, calibrate in the area
of intended use.
In calibrating and taking headings, it is important, as with
all compasses, to keep the compass level. Calibrating or
taking a heading when the watch is not level can result
in large errors. Also avoid areas that may exhibit higher
than normal concentrations of hard and soft iron, as they
may cause inaccurate headings. Whenever a heading is
suspect, recalibrate.
Do not store the watch near any source of magnetism,
such as a computer, appliance, or television, as the
watch can take on a magnetic charge, yielding inaccurate
headings. Typical accuracy of wrist-worn instruments is
within +/- 10 degrees.

48
49
To calibrate the compass:
1. Pull the crown to its middle position and wait for the
indicator hands to stop moving.
2. Keep the watch level or place it on a level surface (if
the band interferes, place the watch on an inverted
cup). The watch may be face down, but take care to
protect the watch face.
3. Press A or B to begin. The 4th center hand rotates two
revolutions to remind you to rotate the watch. While
level, SLOWLY rotate the watch two revolutions, taking
at least 15 seconds per revolution.
4. When done, press A or B, keeping the watch level. The
4th center hand moves back and forth to acknowledge
the end of calibration and then moves to the current
magnetic declination setting.
5. If you do not wish to set the magnetic declination,
push the crown in. Otherwise, to have watch
automatically compensate for the declination angle,
turn the compass ring until north is at 12 o’clock.
6. Press A or B to move the 4th center hand west (-)
or east (+), respectively, to point to your location’s
declination angle using the declination scale. Hold a
button to move the hand quickly. See the figure on
next page for an example.
7. Push the crown in when done.

50
51
A
B
Magnetic declination set to -14° (14°W)
COMPASS OPERATION
Normally, the compass is inactive, with the 4th center
hand pointing to 12 o’clock or showing the chronograph
seconds.
While holding the watch level, press A or B to activate
the compass. The compass hand moves to point north.
If the watch is turned, the 4th center hand will continue
to move, always pointing north. After 20 seconds, the
compass will automatically turn off and the 4th center
hand will return to its normal operation. This conserves
battery life. Press A or B at any time to keep the compass
on for another 20 seconds.
NOTE: During compass operation, the second hand
moves in two-second increments.

52
53
TIDE TEMP AND COMPASS
OVERVIEW
INDICATOR HAND ADJUSTMENT
Pull crown all the way out. Indicator hand should point
to 12 o’clock. If it does not, press either TIDE or TEMP
push button to move hand until it points to 12 o’clock.
TIDE and TEMP push buttons move hand clockwise and
counterclockwise, respectively. Hold push button to move
hand fast. Push crown in when done.
TIDE/TEMPERATURE SELECTION
Indicator hand shows either tide or temperature constant-
ly. When temperature is shown, press TIDE push button
to select tide clock. Hand moves to low tide and then to
current tide. When tide is shown, press TEMP push button
to select thermometer. Hand moves to beginning of ther-
mometer scale and then to current temperature.
OUTER-SET TIME
DECLINATION
SCALE
INDICATOR
HAND
C (COMPASS)
B (TIDE)
A (TEMP)
CROWN
TURNING
COMPASS
RING
DATE
TIDE SCALE
TEMPERATURE SCALE
MIDDLE-SET DATE

54
55
THERMOMETER
When worn on wrist, thermometer reading is affected by
body heat. For more accurate readings, remove watch
and put in shade for at least several minutes.
Watch can measure water temperature also, if sub-
merged. Be sure to select temperature display before
placing watch in water, as buttons should not be pressed
when watch is underwater.
Thermometer readings are taken every minute, more
frequently, if temperature is changing.
TIDE CLOCK
For tide clock, indicator hand always rotates clockwise, so
tide is rising when hand is pointing left and falling when
pointing right. Number of hours to next high/low tide is
shown on tide scale.
Tides are influenced by sun position and shape of shore-
line, so tide clock cannot precisely give times of high and
low tides. Periodic adjustment may be necessary.
To set tide clock, pull crown to MIDDLE position. Press either
TIDE or TEMP push button to move hand to current tide. TIDE
and TEMP push buttons move hand clockwise and counter-
clockwise, respectively. Push crown in when done.
COMPASS CALIBRATION
Before use, the compass must be calibrated.
Since a compass uses the earth’s magnetic field, you
must be aware of large metallic objects, such as vehicles
or bridges, or objects that give off electromagnetic
radiation, such as televisions or computers, which
could affect the magnetic field around the watch. If the
compass is calibrated near such objects, it will only

56
57
work properly in that same location. If the compass
is calibrated away from such objects, it will not work
properly near them. For best results, calibrate in the area
of intended use.
In calibrating and taking headings, it is important, as with
all compasses, to keep the compass level. Calibrating or
taking a heading when the watch is not level can result
in large errors. Also avoid areas that may exhibit higher
than normal concentrations of hard and soft iron, as they
may cause inaccurate headings. Whenever a heading is
suspect, recalibrate.
Do not store the watch near any source of magnetism,
such as a computer, appliance, or television, as the
watch can take on a magnetic charge, yielding inaccurate
headings. Typical accuracy of wrist-worn instruments is
within +/- 10 degrees.
To calibrate the compass:
1. Pull the crown to its middle position and wait for the
indicator hands to stop moving.
2. Keep the watch level or place it on a level surface (if
the band interferes, place the watch on an inverted
cup). The watch may be face down, but take care to
protect the watch face.
3. Press C (COMPASS) to begin. The 4th center hand
rotates two revolutions to remind you to rotate the
watch. While level, SLOWLY rotate the watch two
revolutions, taking at least 15 seconds per revolution.

58
59
4. When done, press C (COMPASS), keeping the watch
level. The 4th center hand moves back and forth to
acknowledge the end of calibration and then moves to
the current magnetic declination setting.
5. If you do not wish to set the magnetic declination,
push the crown in. Otherwise, to have watch
automatically compensate for the declination angle,
turn the compass ring until north is at 12 o’clock.
6. Press A or B to move the 4th center hand west (-)
or east (+), respectively, to point to your location’s
declination angle using the declination scale. Hold a
button to move the hand quickly. See the figure on
next page for an example.
7. Push the crown in when done.
A
B
Magnetic declination set to -14° (14°W)
COMPASS OPERATION
Normally, the compass is inactive, with the 4th center
hand pointing to 12 o’clock or showing the chronograph
seconds.
While holding the watch level, press C (COMPASS) to
activate the compass. The compass hand moves to
point north. If the watch is turned, the 4th center hand
will continue to move, always pointing north. After 20

60
61
seconds, the compass will automatically turn off and the
4th center hand will return to its normal operation. This
conserves battery life. Press C (COMPASS) at any time to
keep the compass on for another 20 seconds.
NOTE: During compass operation, the second hand
moves in two-second increments.
ALTIMETER
OVERVIEW
ALIMETER
SCALE
(HUNDREDS)
UPPER
RETROGRADE
(THOUSANDS)
BUTTON C
(UNITS)
BUTTON A
(MAXIMUM
ALTITUDE)
BUTTON B
(MINIMUM ALTITUDE)
LOWER RETROGRADE
(UNITS)
CROWN

62
63
INDICATOR HAND (4TH CENTER HAND) ADJUSTMENT
Pull crown all the way out. The upper and lower retro-
grade hands reset to the start of their scales automati-
cally. Indicator hand (4th center hand) should point to 12
o’clock. If it does not, press either A and/or B button to
move hand until it points to 12 o’clock. A and B buttons
move hand clockwise and counterclockwise, respectively.
Hold button to move hand fast. Push crown in when done.
ALTIMETER CALIBRATION
Before use, the altimeter must be calibrated.
Since an altimeter uses pressure to determine the altitude
and pressure varies from place to place, it is important to
set the altimeter to a known reference altitude value, or
to a standard reference altitude of a given place. Sudden
changes in pressure due to changes in weather can cause
your altimeter reading to be off by +-100m (328 ft), even
if your location has not changed. Recalibrate to a known
altitude when drastic pressure changes occur.
To calibrate the altimeter:
1. Pull the crown to its middle position and wait for the
indicator hands to stop moving.
2. If the altimeter was OFF at the moment of crown
pulling, the lower retrograde hand will point to the unit
selected the last time the altimeter was used, other-
wise the lower retrograde hand points to the current
selected unit in altitude display. The 4th center hand
and upper retrograde hand should point to the current
altitude.
3. Press A or B to move the 4th center hand counter-
clockwise or clockwise, respectively, until it points
to the desired calibration altitude. Holding A or B

64
65
will move the center hand more rapidly. The upper
retrograde hand moves relative to the altitude value
displayed by the 4th center hand.
4. Push crown in when done.
ALTIMETER ON/OFF
To turn the altimeter on, press C. The lower retrograde
hand points to METERS. Using the markings on the top
ring, the 4th center hand shows the current altitude’s
hundreds and tens value with divisions every ten
METERS/FEET. The upper retrograde hand shows the cur-
rent altitude’s thousands value with divisions every one
thousand METERS/FEET.
To change the unit from METERS to FEET, press C a
second time. To change the unit from FEET to METERS,
press C twice (altimeter is turned off first then turned
back on with the unit in METERS).
Example : Altitude=2310 m Example : Altitude=7580 ft

66
67
To turn the altimeter off with the current unit set to
FEET, press C. To turn the altimeter off with the unit set
to METERS, press C twice (lower hand goes to FEET first
before going to the OFF position).
The watch will automatically turn the altimeter off
60 minutes after activation.
ALTIMETER MIN/MAX ALTITUDE RECALL
To view the maximum recorded altitude, press A. The
lower retrograde hand shows the unit of measure that
the maximum altitude was recorded in if the altimeter
was OFF at the moment of button press, otherwise
it will show the maximum altitude using the current
selected unit. The 4th center hand shows the maximum
altitude’s hundreds and tens value with divisions every
ten METERS/FEET. The upper retrograde hand shows the
maximum altitude’s thousands value with divisions every
one thousand METERS/FEET.
The maximum recorded altitude is displayed for ten
seconds. To extend the display duration for another ten
seconds, press A before the previous ten second duration
expires.
To change the unit from METERS to FEET or FEET to
METERS, press C.
To view the minimum recorded altitude, press B. The
lower retrograde hand shows the unit of measure that
the minimum altitude was recorded in if the altimeter
was OFF at the moment of button press, otherwise
it will show the minimum altitude using the current
selected unit. The 4th center hand shows the minimum
altitude’s hundreds and tens value with divisions every

68
69
ten METERS/FEET. The upper retrograde hand shows the
minimum altitude’s thousands value with divisions every
one thousand METERS/FEET.
The minimum recorded altitude is displayed for ten
seconds. To extend the display duration for another ten
seconds, press B before the previous ten second duration
expires To change the unit from METERS to FEET or FEET
to METERS, press C.
DEPTH
OVERVIEW
3
AA
B
1
2
3
2
3
2
3
CENTER HAND
OFF INDICATOR
BUTTON A
BUTTON B
LOWER HAND
CROWN
Note: The center and lower hands will automatically
calibrate when you move the crown to position 3 to set
the time.

70
71
TEMPERATURE
The temperature sensor is always on and will take a
reading at least once every 60 seconds. The temperature
is indicated by the lower hand and accompanying scale.
When worn on wrist, temperature reading is affected by
body heat. For more accurate readings, remove watch
from wrist.
DEPTH SENSOR ON/OFF
The sensor is normally off, and must be turned on
manually prior to submersion. Push and release button B
to turn the sensor on. The 4th center hand will move from
the OFF (6 o’clock) position to the 12 o’clock position
and begin to take readings at least once every 5 seconds.
As the depth increases, the 4th center hand will point to
the actual depth as indicated on the depth scale. If the
readings remain in the range of 0 to 2 meters (0-6 feet)
for 5 minutes, the sensor will automatically turn off. To
turn the sensor off manually, press and hold button B
for 2 seconds. The 4th center hand will move to the OFF
(6 o’clock) position.
RECALL MAXIMUM DEPTH/MINIMUM TEMPERATURE
After coming to the surface, unscrew the crown and pull
to the middle position. The center and lower hands will
move to display the maximum depth value and the mini-
mum temperature value, respectively, recorded during the
most recent descent. When the depth sensor is activated
again, the memory will be cleared.
If the watch has not yet been used, then the center and
lower hands shall move to display 0 meters/feet and
0ºC/32 ºF, respectively. The crown must be screwed back
in prior to use/submersion.

72
73
BATTERY LEVEL DETECTION
The watch determines the battery level status and
provides the user with a visual indication corresponding
to the current battery level. The battery level status is
classified as Normal Level, Battery Low Level, and Replace
Battery Level, with each level indicated by the movement
of the second hand.
For the Normal Level status, the second hand shall move one
hand position every one second, which is its normal operation.
When the watch is in Battery Low Level status, the second
hand shall only move at 2-second intervals and shall
move by two hand positions. It is recommended that the
user replace the battery when the watch is at Battery Low
Level status.
When the watch is in Replace Battery Level status, the
second hand shall only move at 5-second intervals and
shall move by five hand positions. At this point, depth
sensor cannot be activated, and the user must replace
the battery immediately.

74
75
PERFECT DATE
With your watch’s Perfect Date
™
feature, the date does
not need adjustment until 2060. The watch automatically
accounts for short months and leap years, and will always
display the correct date upon demand. The date was
preset at the Timex factory. When initially starting your
new watch, if the date displays the date before or behind
the date in your location, you will need to revise the date
for your local date. Pull the crown out to the outer posi-
tion. The 4th center hand will rotate around the dial one
revolution, will stop at 12:00 o’clock position for about 5
seconds and then move to the date at which the watch
is currently set. Rotate the crown forward to increase
the time to the current date (backward to decrease the
time to the current date). Each time you pass midnight
the date will change by one day. After you have set the
YACHT RACER
2 31
A
B
C
SECOND HAND
4TH
CENTER
HAND
UPPER
HAND
PERFECT DATE
™
SCALE
HOUR HAND
CROWN
LOWER HAND
MINUTE HAND

76
77
date to your local date, continue rotating the crown to
position the hands to the current local time, being mindful
of am/pm. Once the time is set, push the crown back in
to the closed position. In normal operation the 4th center
hand will display the date when the crown is pushed.
The hand will travel to the position of the current date as
shown on the top ring of the case. The hand will pause
for you to be able to read the date and then return back
to the 12 o’clock resting position. Please note that the
Perfect Date
™
function will only operate in the Time
mode. When the battery is depleted and is replaced, the
Perfect Date function must be recalibrated. When the
battery requires replacement, it is highly recommended
the watch be sent to a Timex service center, where the
battery will be replaced and the Perfect Date function will
be recalibrated to the current date for the location where
the watch is to be returned.
4TH CENTER HAND ADJUSTMENT
To readjust a misaligned 4th center hand:
1. Pull the crown out to position 3. The upper and lower
hands reset to the ends of their sweeps automatically.
2. Within 10 seconds of pulling the crown to position 3,
the 4th center hand should point to 12 o’clock, if it
does not point to 12 o’clock, press button A or B to
move the hand counterclockwise or clockwise until
it points to 12 o’clock. Pressing and holding button A
or B will make the hand move at a fast rate. Please
note: after 5 seconds without action with the crown
in position 3, the 4th center hand will move to display
the current date.
3. Push crown in to position 1 when finished.

78
79
MODE SELECTION
Press button C to advance the upper hand to the desired
function.
TIME:
Displays the current time only (Perfect Date function will
operate only in the Time mode).
YACHT RACE TIMER 5:
The countdown timer will start at 5 minutes and begin the
chronograph once it reaches zero.
YACHT RACE TIMER 3:
The countdown timer will start at 3 minutes and begin the
chronograph once it reaches zero.
YACHT RACE TIMER 1:
The countdown timer will start at 1 minute and begin the
chronograph once it reaches zero.
CHRONO:
The chronograph will operate without the countdown
timer.
YACHT RACE TIMER OPERATION
The watch provides a 5, 3 or 1 minute countdown timer.
Once the countdown timer reaches zero a one hour
chronograph will automatically start.
1. Press button C until the upper hand displays the
desired 5, 3, or 1 minute Yacht Race Timer mode.
2. To start, press button A (START/STOP). The 4th center
hand displays the seconds counting down and the
lower hand shows the minutes, counting down.
(Please note: buttons B and C are disabled while the
countdown timer is in operation).
3. To stop, press button A (START/STOP) which will stop

80
81
the countdown process. (Please note: button C is
disabled until the countdown timer is reset).
4. To reset, press and hold button B (SPLIT/RESET) for
2 seconds, which will reset the countdown timer back
to the originally selected 5, 3 or 1 minute duration.
In the normal operation of the Yacht Race Timer, once
the countdown timer has reached zero, the chronograph
will automatically start. There is also an audible alert as
the countdown timer reaches each minute mark as well
as when the final minute reaches the last 5 seconds and
begins the chronograph function. The chronograph will
cycle through the 30-minute sequence twice, for a total
maximum time of one hour.
CHRONOGRAPH OPERATION
The watch provides a one hour chronograph which may
be operated independently from the Yacht Race Timer.
1. Press button C until the upper hand is at the beginning
of the 30-minute chronograph scale.
2. To start, press button A (START/STOP). The 4th center
hand displays the seconds counting up; the lower
hand shows the minutes, counting up in a 5-minute
scale and the upper hand shows the half hour count-
ing up in a 30-minute scale. Each time the lower hand
reaches the five minute mark, it will return to the zero
position while the upper hand will continue to advance
through the 30 minute scale. (Please note: button C is
disabled while the chronograph is in operation).

82
83
3. To take a split time, press button B (SPLIT/RESET).
The upper, lower, and 4th center hands will hold their
positions for you to note the split (lap) time. The chro-
nograph is still maintaining the timing sequence while
the hands are stopped. To release the hands, press
button B (SPLIT/RESET) and the hands will quickly
catch up to display the total elapsed time.
4. To stop, press button A (START/STOP) which will stop
the chronograph. (Please note: button C is disabled
while the chronograph is stopped until the chrono-
graph is reset).
5. To reset, press and hold button B (SPLIT/RESET) for
3 seconds, which will reset the chronograph back to
the beginning of the 30-minute scale.
In normal operation the Chronograph will cycle through
the 30-minute sequence twice for a total maximum of
one hour. Once this hour has elapsed, the upper hand
will remain on the 30 minute marker and the lower hand
will return to zero. The chronograph function will need
to be reset prior to using the chronograph function again
or before changing to a different mode. (Please note:
button A is disabled when the maximum one hour time
has elapsed and will not function until the chronograph
has been reset by pressing and holding button B for
3 seconds).

84
85
INDIGLO
®
NIGHT-LIGHT (PRO VERSION ONLY)
Yacht Racer PRO includes the addition of the INDIGLO
®
night-light feature. During low or no-light conditions the
dial can easily be read by activating the INDIGLO
®
night-
light function by pressing in the crown. The Yacht Racer
PRO uses a special luminescent material on the dial which
will glow and create an illumination bright enough to be
able to read the dial, but ensures that your night vision is
not reduced once the light has been extinguished.
CHRONO TIMER
SECOND HAND
4TH
CENTER
HAND
UPPER
HAND
PERFECT DATE
™
SCALE
MINUTE HAND
HOUR HAND
CROWN
LOWER HAND
2 31
A
B
C

86
87
PERFECT DATE
With your watch’s Perfect Date
™
feature, the date does
not need adjustment until 2060. The watch automatically
accounts for short months and leap years, and will always
display the correct date upon demand. The date was
preset at the Timex factory. When initially starting your new
watch, if the date displays the date before or behind the
date in your location, you will need to revise the date for
your local date. Pull the crown out to the outer position.
The 4th center hand will rotate around the dial one revolu-
tion, will stop at 12:00 o’clock position for about 5 seconds
and then move to the date at which the watch is currently
set. Rotate the crown forward to increase the time to the
current date (backward to decrease the time to the current
date). Each time you pass midnight the date will change
by one day. After you have set the date to your local date,
continue rotating the crown to position the hands to the
current local time, being mindful of am/pm. Once the time
is set, push the crown back in to the closed position. In
normal operation the 4th center hand will display the date
when the crown is pushed. The hand will travel to the
position of the current date as shown on the top ring of
the case. The hand will pause for you to be able to read
the date and then return back to the 12 o’clock resting
position. Please note that the Perfect Date
™
function
will only operate in the Time mode. When the battery is
depleted and is replaced, the Perfect Date function must
be recalibrated. When the battery requires replacement,
it is highly recommended the watch be sent to a Timex
service center, where the battery will be replaced and the
Perfect Date function will be recalibrated to the current
date for the location where the watch is to be returned.

88
89
4TH CENTER HAND ADJUSTMENT
To readjust a misaligned 4th center hand:
1. Pull the crown out to position 3. The upper and lower
hands reset to the ends of their sweeps automatically.
2. When it stops moving, the 4th center hand should
point to 12 o’clock, if it does not point to 12 o’clock,
press button A or B to move the hand counterclock-
wise or clockwise until it points to 12 o’clock. Pressing
and holding button A or B will make the hand move at
a fast rate. Please note: after 5 seconds without action
with the crown in position 3, the 4th center hand will
move to display the current date.
3. Push crown in to position 1 when finished.
MODE SELECTION
Press button C to advance the upper hand to the desired
function.
TIME:
Displays the current time only (Perfect Date
™
function will
operate only in the Time mode).
CHRONOGRAPH OPERATION
The watch provides a four hour chronograph. At the end
of the four hour period the Chronograph will automati-
cally turn off. This will save the battery in the event of an
accidental activation of the Chronograph.
1. Press button C until the upper hand is at the beginning
of the upper hand chronograph scale, the lower hand
to 0 on the lower scale.

90
91
2. To start, press button A (START/STOP). The 4th center
hand displays the seconds counting up; the lower
hand shows the minutes, counting up in a 30-minute
scale and the upper hand shows the hour counting up
on the 4-hour scale. Each time the lower hand reaches
the 30 minute mark, it will return to the zero position
to begin the next 30 minute period, while the upper
hand will continue to advance through the 4-hour
scale. (Please note: button C is disabled while the
chronograph is in operation).
3. To take a split time, press button B (SPLIT/RESET).
The upper, lower, and 4th center hands will hold their
positions for you to note the split (lap) time. The chro-
nograph is still maintaining the timing sequence while
the hands are stopped. To release the hands, press
button B (SPLIT/RESET) and the hands will quickly
catch up to display the total elapsed time.
4. To stop, press button A (START/STOP) which will stop
the chronograph. (Please note: button C is disabled
while the chronograph is stopped until the chrono-
graph is reset).
5. To reset the chronograph after it is stopped, press but-
ton B (SPLIT/RESET), which will reset the chronograph
back to the beginning of the 30-minute and 4-hour
scales on the two sub-dials.
In normal operation the Chronograph will cycle through
the 30-minute sequence 8 times for a total maximum of
four hours. Once this four hour period has elapsed, the
upper hand will remain on the four hour marker and the
lower hand will return to zero. The chronograph function

92
93
will need to be reset prior to using the chronograph func-
tion again or before changing to a different mode. (Please
note: button A is disabled when the maximum four hour
time has elapsed and will not function until the chrono-
graph has been reset by pressing button B).
COUNT-DOWN TIMER
The watch provides a count-down timer function.
Special note: The upper hand, lower hand, and 4th
center hand are united during steps 3, 4 and 5 below. As
you move the minute and second hands forward/back-
ward, you will see all three hands reacting to the addition
or subtraction to the length of time for the countdown
timer duration. After pulling the crown out to the middle
position, pressing button C will advance you through the
cycle of hand engagement as follows: Upper hand (press
button C) - Lower hand (press button C) - 4th Center hand
(press button C) back to Upper hand….this allows you to
advance through the cycle to engage the hands you need
to adjust to achieve setting the desired length of time to
count down. Pressing the crown in will end the setting
procedure and confirms the values set so far at any point
in this cycle.
SETTING THE COUNTDOWN TIMER
The countdown timer may only be set when the count-
down timer function is not in operation. If the countdown
timer was previously used, it will need to be reset. If the
timer is currently in operation, it must be stopped and
reset in order to set the countdown timer.
1. Press button C until the upper hand is at some point
on the Timer scale. If the Timer has previously been

94
95
set, the hand will point to the time previously set. If
this is the first time the timer is being set, it will point
to the 0 on the timer scale.
2. Pull the crown out to the middle position.
3. To set the desired number of hours in half hour incre-
ments (up to the maximum time of 4:00:00), press
button A to move the upper hand counterclockwise
(pressing button B will move this hand clockwise),
until the desired number of hours has been selected.
Please note that you are selecting the number of
hours in the closest half-hour increment to the total
desired time (example: for a total desired countdown
time of 2:53:30, you will select 3 hours). Once you
have completed setting the number of hours, press
button C to confirm your selection.
4. Now you may set the desired number of minutes in
one minute increments by pressing button A to move
the lower hand counterclockwise (pressing button
B will move this hand clockwise), until the desired
number of minutes has been selected. Please note
that you are adjusting the number minutes forward
or backwards to get to the desired time (example: for
a total desired countdown time of 2:53:30, you will
press button A seven times which will move the total
countdown time from 3 hours to 2:53:00). You will no-
tice the hour hand will move slightly backwards from
the 3 hour marker towards the 2.5 hour marker. Once
you have adjusted the time to the correct number of
minutes, press button C to confirm your selection.
5. Now you may set the desired number of seconds in
one second increments by pressing button A to move

96
97
the fourth hand counterclockwise (pressing button B
will move this hand clockwise), until the desired num-
ber of seconds has been selected. Please note that
you are adding or subtracting the number seconds to
complete the total desired time (example: for a total
desired countdown time of 2:53:30, you will push
button B 30 times to select 30 seconds). Once you
have completed setting the number of seconds, push
the crown in to position 1 to confirm your complete
countdown timer value selection.
COUNTDOWN TIMER OPERATION
Once you have set the countdown timer to the desired
length of time to count down, you can now operate the
countdown timer.
Starting the countdown sequence: Press button A to
start the countdown timer. The fourth center hand and
the lower hand will begin to move counterclockwise. The
upper hand will move clockwise. The hands will continue
to indicate the remaining time left in the countdown
sequence until the length of time you have set the count-
down timer has passed and the value of remaining time
reaches zero. When the remaining time in the sequence
reaches zero, the chime will sound signaling to you the
countdown sequence has completed.

98
99
Interrupting the countdown sequence: If you wish
to stop the countdown sequence prior to the sequence
reaching zero, you may do so by pressing button A (the
fourth center hand as well as the upper and lower hands
will stop moving). If you wish to later begin the sequence
from the point at which you stopped the countdown, sim-
ply press button A again (the fourth center hand as well
as the upper and lower hands will resume moving).
Resetting the countdown sequence: Once the count-
down sequence has reached zero and the chime has
sounded, you may reset the countdown timer to the set
value by pressing button B (the fourth center hand as well
as the upper and lower hands will move to indicate the
value of time you set prior to using the countdown timer
function).
Clearing the countdown timer value: If desired, you
may clear the value of the countdown timer to zero.
This can only be done if the countdown timer is not in
operation and has been reset. If the countdown timer is
running, you must first stop the countdown sequence
by pressing button A, followed by pressing button B. This
will stop and reset the countdown timer to the currently
selected time value. To clear the countdown timer value
to zero, push and hold button B for two seconds. You
should now follow the instructions to set the countdown
timer value to the new desired length of time.

100
101
Split time function: While the countdown timer is in
operation, you may employ the split function to note the
remaining time in the countdown sequence.
To use the split time function, press button B, which will
make the upper, lower and 4th center hands freeze in
place. The countdown function will continue to operate
internally while the hands are frozen.
To resume the movement of the upper, lower and 4th
center hands, press button B again and the hands will
reposition themselves in proper placement to show the
current time within the countdown sequence.
3GMT
SECOND
HAND
CROWN
ROTATING TOP RING
(24-HOUR FORMAT)
4TH CENTER HAND
MINUTE
HAND
HOUR HAND
INNER RING /
NUMERALS
(24-HOUR FORMAT)
A
2 31

102
103
3 TIME ZONE FUNCTION
Your watch has the ability to display three time zones:
1. Hour and Minute hands: Displays the time in a stan-
dard 12 hour format. Please note: The date displayed
in the date window is linked to the time displayed by
these two hands.
2. 4th center hand and inner ring: Displays the time in a
24-hour format.
3. 4th center hand and case rotating top ring: Displays
the time in a 24-hour format.
4TH CENTER HAND ADJUSTMENT
To readjust a misaligned 4th center hand:
1. Pull the crown out to position 3.
2. 4th center hand should point to 12 o’clock. If within
5 seconds of pulling the crown to position 3 the 4th
center hand does not point to 12 o’clock, press button
A to move the hand clockwise until it points to 12
o’clock. Pressing and holding button A will make the
hand move at a fast rate.
3. Push crown in to position 1 when finished.

104
105
4TH CENTER HAND CALIBRATION
The 4th center hand is calibrated at the Timex factory to
reflect the standard minutes within the hour as defined
by Universal Time Coordinated. Globally a majority of
locations use the standard minutes. If the location you are
using for the 2nd and 3rd time zone uses the standard
minutes, the 4th center hand does not require recalibra-
tion. Only if you wish to have the second and third time
zones to reflect locations that do not follow the standard
minute, the instructions to recalibrate the 4th center hand
are as follows:
1. Pull the crown out to position 3. The 4th center hand
will point to 12 o’clock.
2. Rotate the crown to position the minute hand in the
correct position within the hour required for the loca-
tion you are wishing to use for the 2nd and 3rd time
zones.
3. Push the crown in to position 2. The 4th center hand
will point to its currently calibrated position of the
minutes within the hour.
4. Push button A to move the 4th center hand clockwise
until it aligns with the minute hand. Pressing and hold-
ing button A will make the hand move at a fast rate.
5. Pull the crown out to position 3. The 4th center hand
will point to 12 o’clock.
6. Rotate the crown to position hour and minute hands
to the correct time.

106
107
7. Push crown in to position 1 when finished.
Please note: The 4th center hand will track the time using
the current calibration of the minutes within the hour.
Time zones 2 and 3 both utilize the 4th center hand and
therefore the locations being tracked in time zones 2 and
3 must both utilize the same minutes within the hour for
these time zones to be displayed properly.
SETTING THE 4TH CENTER HAND (TIME ZONE II)
Note the current time in the location you wish to track
as the 2nd time zone. Press button A until the 4th center
hand is pointing to that time on the inner ring. (Please
note: this scale is a 24-hour format). The 4th center hand
will advance 30 minutes each time button A is pressed.
Pressing and holding button A will make the hand move at
a fast rate. This will set the 2nd time zone on the watch.
SETTING THE CASE ROTATING TOP RING
(TIME ZONE III)
The 3rd time zone is set by using the existing setting of
the 4th center hand and adjusting the case rotating top
ring to the desired time of the 3rd time zone. (Please note:
this scale is a 24-hour format). The top ring has 72 posi-
tions. To advance the top ring one hour you will advance
it three positions (3 “clicks”). Note the current time in the
location you wish to track as the 3rd time zone. Rotate
the case top ring counter clockwise to position the cor-
rect hour marker for that time with the 4th center hand.

108
109
TACHYMETER FUNCTION
(not all models)
The tachymeter will only determine speeds greater than
60 units per hour using this method; slower speeds can
be measured by decreasing the unit of measurement.
The function performed by a tachymeter is independent
of the unit of distance (e.g. statute miles, nautical miles,
kilometers, meters etc.) as long as the same unit of length
is used for all calculations.
1. Determine the start and finish markers for your
pre-determined distance.
2. Start the chronograph once the target for speed
measurement passes the start marker.
3. Stop the chronograph once the target for speed
measurement passes the finish marker.
4. The chronograph second hand is compared to the
tachymeter markings to determine the target’s speed.
SLIDE-RULE BEZEL FUNCTION
The slide rule function of the top ring operates by rotating
the outer ring. The inner ring does not move. The outer
ring is always related to “distance” or “speed”, or any
data that varies with time. The inner ring only notes units
of time.
Outer Ring
On the outer ring, the figure “10” represents factors or
multiples of 10, such as 0.1, 1.0, 10, or 100.

110
111
Inner Ring
On the inner ring, “MPH” (mile per hour) refers to “speed in-
dex”. This index is used to calculate the speed involving any
data per hour
. On the inner ring, “STAT” (statute miles) and
“NAUT” (nautical miles) are for conversion of distance units.
OUTER RING
INNER RING
The following examples serve as a guide of how to use
the slide rule.
SPEED CALCULATION:
What speed is required to go 10 nautical miles in
15 minutes?
Known Factors: Distance: 10 nautical miles Time:
15 minutes
• Align “10” arrow on the outer ring with “15” on the
inner ring.
• The speed required can be found directly above the
“MPH” marking on the inner ring.
The answer: 40 nautical miles per hour
Time Calculation: How long will it take to go 10 nauti-
cal miles at a speed of 40 miles per hour?

112
113
Known Factors: Speed: 40 miles per hour Distance:
10 nautical miles
• Align “40” on the outer ring with the mark “MPH”
marking on the inner ring.
• The time required can be found directly below the “10”
arrow on the outer ring, which is “15” on the inner ring.
The answer: 15 minutes
DISTANCE CALCULATION:
How far can you travel at 40 miles per hour for
15 minutes?
Known Factors: Speed: 40 nautical miles per hour Time:
15 minutes
• Align “40” on the outer ring directly above the mark
“MPH” on the inner ring.
• The distance travelled can be obtained above the “15”
marker on the inner ring. The number indicated on the
outer ring is “10”.
The answer: The distance travelled is 10 nautical
miles.
UNIT CONVERSION:
To convert distance from nautical miles to statute miles
and kilometers.
Known Factor: Distance to convert is 10 nautical miles
• Align the “10” arrow on the outer ring above the
“NAUT” on the inner ring. The conversion in statute
miles (11.5) is found above the inner ring “STAT” mark-
ing, and the conversion to kilometers (18.5) is found
above the inner ring “MPH” marking.

114
115
HOW TO ADJUST BRACELET
(Variations of the following bracelet sections apply to all
watch models).
SLIDING CLASP BRACELET
1. Open locking plate.
2. Move clasp to desired
bracelet length.
3. Exert pressure while
holding locking plate and
slide clasp back and forth until it engages in grooves
on underside of bracelet.
4. Press locking plate down until it snaps closed. Clasp
can be damaged if excessive force is used.
FOLDOVER CLASP BRACELET
1. Find spring bar that connects bracelet to clasp.
2. Using a pointed tool, push in spring bar and gently
twist bracelet to disengage.
3. Determine wrist size, then insert spring bar in correct
bottom hole.
4. Push down on spring bar, align with top hole and
release to lock in place.

116
117
BRACELET LINK REMOVAL
REMOVING LINKS:
1. Place bracelet upright and insert pointed tool in
opening of link.
2. Push pin forcefully in direction of arrow until link is
detached (pins are designed to be difficult to remove).
3. Repeat until desired number of links are removed.
RE-ASSEMBLY:
1. Rejoin bracelet parts.
2. Push pin back into link in opposite direction of arrow.
3. Press pin down securely into bracelet until it is flush.
BATTERY
The battery should provide 4-6 years of normal watch use.
The actual battery life may vary depending on actual use.
When the battery needs to be changed, we recommend
that only TIMEX replace it. Your watch will need to be
recalibrated to correct time and date after changing the
battery. To return your watch to Timex use a pre-paid
shipper. To obtain a pre-paid shipper please call 1-800-
448-4639 or visit the retailer where you purchased your
watch or go to www.Timex.com. Please include the
following with your watch to cover postage and handling
(this is not a repair charge); a U.S.$8.00 check or money
order in the U.S.; a CAN$12.00 cheque or money order
in Canada; In other countries Timex will charge you for
postage and handling.

118
119
NEVER INCLUDE A SPECIAL WATCHBAND OR ANY
OTHER ARTICLE OF PERSONAL VALUE IN YOUR
SHIPMENT.
DO NOT DISPOSE OF BATTERY IN FIRE. DO NOT
RECHARGE. KEEP LOOSE BATTERIES AWAY FROM
CHILDREN.
TIMEX INTERNATIONAL WARRANTY
Your TIMEX
®
watch is warranted against manufacturing
defects by Timex Group USA, Inc. for a period of ONE
YEAR from the original purchase date. Timex and its
worldwide affiliates will honor this International Warranty.
Please note that Timex may, at its option, repair your
watch by installing new or thoroughly reconditioned and
inspected components or replace it with an identical or
similar model. IMPORTANT — PLEASE NOTE THAT THIS
WARRANTY DOES NOT COVER DEFECTS OR DAMAGES
TO YOUR WATCH:
1. after the warranty period expires;
2. if the watch was not originally purchased from an
authorized Timex retailer;

120
121
3. from repair services not performed by Timex;
4. from accidents, tampering or abuse; and
5. lens or crystal, strap or band, watch case, attachments
or battery. Timex may charge you for replacing any of
these parts.
THIS WARRANTY AND THE REMEDIES CONTAINED HEREIN
ARE EXCLUSIVE AND IN LIEU OF ALL OTHER WARRANTIES,
EXPRESS OR IMPLIED, INCLUDING ANY IMPLIED
WARRANTY OF MERCHANTABILITY OR FITNESS FOR
PARTICULAR PURPOSE. TIMEX IS NOT LIABLE FOR ANY
SPECIAL, INCIDENTAL OR CONSEQUENTIAL DAMAGES.
Some countries and states do not allow limitations
on implied warranties and do not allow exclusions or
limitations on damages, so these limitations may not
apply to you. This warranty gives you specific legal rights
and you may also have other rights, which vary from
country to country and state to state.
To obtain warranty service, please return your watch to
Timex, one of its affiliates or the Timex retailer where the
watch was purchased, together with a completed original
Watch Repair Coupon or, in the U.S. and Canada only, the
completed original Watch Repair Coupon or a written
statement identifying your name, address, telephone
number and date and place of purchase. Please include
the following with your watch to cover postage and
handling (this is not a repair charge): a US$ 8.00 check or
money order in the U.S.; a CAN$12.00 cheque or money
order in Canada; and a UK£3.50 cheque or money order
in the U.K. In other countries, Timex will charge you
for postage and handling. NEVER INCLUDE A SPECIAL

122
123
WATCHBAND OR ANY OTHER ARTICLE OF PERSONAL
VALUE IN YOUR SHIPMENT.
For the U.S., please call 1-800-448-4639 for additional
warranty information. For Canada, call 1-800-263-0981.
For Brazil, call +11 2664 1001. For Mexico, call 01-800-
01-060-00. For Central America, the Caribbean, Bermuda
and the Bahamas, call (501) 370-5775 (U.S.). For Asia, call
852-2815-0091. For the U.K., call 44 020 8687 9620. For
France, call 33 3 81 63 42 51. For Germany/Austria, call
+43 662 889 2130. For other areas, please contact your
local Timex retailer or Timex distributor for warranty
information.
If your Timex
®
watch should ever need servicing, send it
to Timex as set forth in the Timex International Warranty
or addressed to: TG SERVICE CENTER, P.O. Box 2740, Little
Rock, AR 72203. For service questions, call 1-800-328-
2677 or [email protected]
EXTENDED WARRANTY
Available in U.S. only. Extend your warranty for an ad-
ditional 4 years from date of purchase for $5. You can
pay with AMEX, Discover, Visa or MasterCard by calling
1 800-448-4639 during normal business hours. Payment
must be made within 30 days of purchase. Name, ad-
dress, telephone number, purchase date, and 5-digit
model number required. You can also mail a check for $5
to: Timex Extended Warranty, P.O. Box 1676, Dept. EF, Little
Rock, AR 72203.
©2015 Timex Group USA, Inc. TIMEX, INDIGLO, PERFECT DATE and
INTELLIGENT QUARTZ are trademarks of Timex Group B.V. and its
subsidiaries.

125
TIMEX
®
手表
感谢您选购 TIMEX
®
INTELLIGENT QUARTZ
™
手表。请仔细阅读
下面的说明,以了解
TIMEX 表的操作方法。
您的手表不一定具备本手册描述的全部功能。
欲知更多详情及注册自己的产品,
请访问:
www.timex.com

126
127
目录表
启用方法 ..................................................................................129
防水防震 ..................................................................................130
INDIGLO
®
夜间照明功能 ..........................................................132
时间和日期设置 .......................................................................133
万年历 ...................................................................................... 135
飞返计时码表 ........................................................................... 137
飞返计时码表指南针 ................................................................142
线性计时码表 .......................................................................... 152
世界时间 ..................................................................................157
指南针 ...................................................................................... 163
潮汐温度和指南针 .................................................................... 169
高度计 ...................................................................................... 176
深度 .........................................................................................183
YACHT RACER (帆船赛手) ......................................................187
秒表计时器 ...............................................................................195
3GMT (三时区) ........................................................................206
测速计功能 ...............................................................................211
飞行滑尺表圈功能 .................................................................... 212
如何调整表带 ........................................................................... 216
拆卸表链环扣 ........................................................................... 218
电池 .........................................................................................219
保修 .........................................................................................220

128
129
启用方法
(不适用于带万年历的款式)要启用手表,请从表冠下方揭
掉塑料保护罩,然后将表冠按向表壳。
有些型的手表需要将设置表冠旋入固定。如果您的表壳上有
带镙纹的凸起部分,则必须在设置好手表后将表冠旋入。
旋入时,请将表冠紧贴带螺纹的凸起部分,同时沿顺时针方
向旋转表冠。继续旋转直到将表冠拧紧。下一次设置手表
时,需要先旋出表冠(沿逆时针方向)才能将其拔出。
欢迎来到
TIMEX
®
具有智能 Quartz
™
石英科技型手表世
界,亦是未来的石英模拟科技。
Intelligent Quartz(智能石
英)以微处理器般的能力为石英模拟计时提供可靠性和准确
性。
TIMEX Intelligent Quartz 技术已融入此表的内在设计,呈
现出新水准的表盘多重显示。装备三个额外独行指针,能在
传统的模拟格式中显示通常仅出现在数字表上的多重信息。

130
131
警告:为保持防水性能,请勿在水中按任何键钮,除非您的
手表标明其防水深度为
200 米。切勿在水中将表冠拔出。
1. 只有在晶片、表冠和表壳保持完整无损的情况下,手表
才具有防水性。
2. 本手表是未经过潜水用表认证。
3. 接触盐水后,请用清水冲洗。
4. 表盘或表壳背面会注明防震性能。本表的防震设计通过
了
ISO 国际标准测试。但应注意避免损坏水晶。
防水防震
如果您的手表具有防水性能,则会显示米数刻度 (WR_M)。
防水深度
p.s.i.a. * 水面以下
水压
30米/98英尺 60
50米/164英尺 86
100米/328英尺 160
200米/656英尺 284

132
133
时间和日期设置
注:表冠有三种位置:关闭、中间和外部三档位。为熟悉表
冠的不同档位,请将表冠拔出至外部档位,然后轻按表冠直
至您感觉到其扣进中间档位。
要设置日期和时间:
时间
将表冠拔出至外部档位,然后转动表冠直至显示出正确的时
间。检查日期是在午夜而不是正午改变的,以确认
AM/PM
设置正确。
INDIGLO
®
夜间照明功能
按下键钮或表冠打开照明灯。INDIGLO
®
夜间照明灯采用了电
致发光技术,可在夜间和低光度环境下照亮整个表盘。
或

134
135
日期(不适用于带万年历的款式)
将表冠拔出至中间档位,并转动表冠直至日期显示窗显示出
正确的日期。注:日期变更是在晚上
10 点至凌晨 2 点。请
勿在此期间更改日期。这样做可能会损坏手表机芯。
设置日期/时间后,将表冠推回至关闭位置。此时,秒针将
开始走动。
注:至于不足
31 天的月份,则需调整日期。
万年历
概览
A
B
1 2
3
1 2
3
时针
星期指针
日期指针
秒针
分针
表冠
月份指针
A 键钮
(嵌入)
B 键钮
(嵌入)
关闭
档位
中间
档位
外部
档位

136
137
飞返计时码表
概览
前言
您的手表拥有万年历功能,
2100 年之前都无需调校日期。
手表将根据小月和闰年自动调整,总能正确地显示星期和日
期。星期和日期已在
TIMEX 工厂预先设置。您只需要调校时
间。手表有两个嵌入键钮,供
TIMEX 服务中心在更换电池后
用于设置星期和日期。除此之外,没有其它用途。
闰年调整
为保证日期正确,手表包含了当前闰年调整设置。此设置在
TIMEX 出厂时或在电池更换后完成,仅可查看,不可变更。
要查看调整数,将表冠拔到中间档位。日期指针指示调整
数:
1 = 闰年后1年;2 = 闰年后 2 年;3 = 闰年后3年;
4 = 闰年。完成后将表冠按回,指针恢复正常显示星期、
月份和日期。
AA
B
23
1 2
3
1 2
3
上端指针
计时码表时钟
第二时区
第 4 中心指针
秒针
日期显示窗
表冠
计时码表分钟刻度
下端指针
A 键钮
B 键钮
分针
时针
关闭档位 中间档位 外部档位

138
139
第二时区
上端指针指示的是第二时区
的时间。请注意:刻度为
24
小时制式,两端为午夜,中
间为正午。大多数情况下,
各时区之间的差异是以小时
来递增。因此,第二时区的
分钟数将会与手表分针显示
的分钟数相同。
要设置第二时区:
1. 将表冠拔出至中间档位。上端指针显示第二时区的时
间,第
4 中心指针显示分钟。
2. 假设第二时区时间的分钟值与第一时区时间保持一致,
那么第
4 中心指针和分针应重合。如果指针未重合,或
是您的第二时区时间的分钟值在一小时内与第一时区时
间不同,请按
B 键钮,向前调第 4 中心指针,直至它在
所需的位置。
第
4 中心指针调整
要重调偏离的第
4 中心指针:
1. 将表冠拔出至外部位置。上端指针和下端指针自动重置
至刻度尽头。
2. 第 4 中心指针 应指向 12 点整。如果在表冠拔出至
外部档位
5 秒内第 4 中心指针未指向 12 点方向,可按
A 或 B 键钮,将指针逆时针或顺时针转动直至其指向
12 点方向。
3. 校准完成后,将表冠推回至关闭位置。
AA
B
23
1 2
3
1 2
3

140
141
4. 要将飞返计时码表重置归零,按 B 键钮(FLY-BACK/
RESET
[飞返/重置])。
计时码表重置时,所有指针归零。再过 8 秒种后,手表
恢复正常显示第二时区的时间。
5. 要在飞返计时码表运行时重置和/或重启它,可按住 B 键
钮(
FLY-BACK/RESET [飞返/重置])。在要重启时,松开 B
键钮。
3. 按 A 键钮将上端指针以一小时为递增量向前调,直至达到
所需的第二时区时钟。要快速转动指针,可按住
A 键钮。
4. 完成后将表冠按回。
飞返计时码表
本表提供
4 小时飞返计时码表功能。
1. 按 A 键钮(START/STOP [开始/停止])开始计时。
第 4 中心指针以 1/5 秒差来显示秒数。第4中心指针以
1/5 秒差来显示秒数。下端指针显示分钟的最后一位数
字,数到
10 后重复。上端指针每 10 分钟显示一次总时
间,包括小时和分钟。计时码表计时到
4 小时后自动停
止。
2. 再次按 A 键钮(START/STOP [开始/停止])可停止计时。
所有指针停止转动。
3. 再按 A 键钮(START/STOP [开始/停止])可恢复计时。

142
143
指针(第 4 中心指针)调整
要重调偏离的指针:
1. 将表冠拔出至外部位置。上端指针和下端指针自动重置
至刻度尽头。
2. 第 4 中心指针应指向 12 点整。如果指针没有指向该方
向,则在拔出表冠至外部档位
5 秒内按 A 或 B 键钮,将
指针分别逆时针或顺时针转动直至指向
12 点方向。
3. 完成后将表冠按回。
飞返计时码表指南针
概览
A
C
B
1 2
3
1 2
3
上端指针
计时码表
时钟第二时区
第 4 中心指针
秒针
日期显示窗
表冠
计时码表分钟刻度
下端指针
A 键钮
B 键钮
时针
分针
关闭档位 中间档位 外部档位
C 键钮

144
145
3. 按 A 键钮将上端指针以一小时为递增量移动。按住键钮
可快速移动指针。
4. 完成后将表冠按回。
如果您愿意,第二时区时间也可以 24 小时制式显示您本地
时间。以此方式设置第二时区时,请检查日期改变是在午夜
而非正午,以确保时钟/分钟的显示是采用
24 小时制式。
第二时区
上端指针正常显示的是第二时区时间。请注意:刻度为
24
小时制式,两端为午夜,中间为正午。
设置第二时区时间:
1. 将表冠拔出至中间档位。上端指针以 24 小时格式显示第
二时区的时钟,而第
4 中心指针显示分钟。
2. 按 B 键钮向前移动第 4 中心指针。按住键钮可快速移动
指针。上端指针和第
4
中心指针同时转动,第
4 中心指针转一圈,上
端指针走一小时。假设
第二时区时间在分钟上
与您的第一时区时间保
持一致,那么第
4 中
心指针和分针应重合。
A
C
B
1 2
3
1 2
3

146
147
4. 您也可在计时码表运行过程中重置及/或重新开始。如
果要这么做,按住
B (FLY-BACK/RESET [飞返/重置]),将
计时码表归零,等您想重新开始时再松开。您无须等所
有指针都归零后再松开键钮,键钮松开时内部会开始计
时。这一“飞返”特色使您能测量分段时间。计时码表
运转时,可以使用指南针,不会产生干扰。请参阅“指
南针操作”。
指南针校准
指南针使用前必须先校准。
由于指南针利用了地球磁场,您必须注意较大的金属物体,
如车辆或桥梁,或发出电磁辐射的物体,如电视或电脑,
这些物体会影响手表周围的磁场。如果指南针在这些物体
附近校准,那么它只会在同样的位置才正常运作。如果指
南针在远离这些物体的地方校准,那么在这些物体附近就
不能正常运作。为取得最佳效果,请在您预定使用的地方
校准指南针。
飞返计时码表
本表提供
4 小时飞返计时码
表功能。
1. 按 A(START/STOP [开始/
停止])开始计时。第
4 中
心指针以
1/5 秒 分辨度显
示秒数。下端指针显示分
钟的最后一位数字,数到
10 后重复。上端指针每 10
分钟显示一次总时间,包括小时和分钟。计时码表计时
到
4 小时后自动停止。
2. 如要停止,再按 A (开始/停止)。所有指针停止。
3. 如要继续,再按 A (开始/停止);或是要重置计时码表
归零,按
B(FLY-BACK/RESET [飞返/重置])。
计时码表重置时,所有指针归零。八秒种后,手表恢复
正常显示第二时区时间。
A
C
B
1 2
3
1 2
3

148
149
4. 完成后,按 C 键钮(COMPASS [指南针]),保持手表水
平。第
4 中心指针来回摆动表示校准结束,然后指向当
前磁偏角设置。
5. 如果您不想设置磁偏角,可将表冠按回。否则,让手表
自动改正偏角度,转动指南针刻度外圈直到北端指向
12
点方向。
6. 按 A 或 B 键钮,使用偏角刻度将第 4 中心指针分别向西
(-) 或东 (+) 移动,指向您所在地的偏角度。按住键钮可快
速移动指针。见下图为例。
在校准和测方向时请一定注意,和所有指南针一样,需水平
放置。校准和测方向时如未水平放置指南针,将导致大偏
差。同时请避开硬铁和软铁浓度超过正常值的地区,这些
地区也可能导致方向不准确。任何时候方向可疑时,请重新
校准指南针。
请勿将手表置于磁体源附近,如电脑、家电或电视,因为手
表可能吸收磁性,导致指示方向不准确。腕表通常准确性在
+/-10 度以内。
要校准指南针:
1. 将表冠拔出至中间位置,并等待指针停止移动。
2. 将手表持平或放置在水平表面(如表带干扰,将手表置于
倒放的杯子上)。手表可以倒置,但请注意保护表面。
3. 按 C 键钮(COMPASS [指南针])开始。第 4 中心指针旋
转两圈提示您旋转手表。水平放置时,缓慢旋转手表两
圈,每圈至少用
15 秒。

150
151
7. 完成后将表冠按回。
A
B
磁偏角设为 -14° (西14°)
指南针操作
通常情况下,指南针处于非工作状态,第 4 中心指针指向
12 点方向或显示计时码表秒钟。
在手表水平时,按 C 键钮(COMPASS [指南针])启动指南
针。指南针指针指向北端。如果转动手表,第
4 中心指针将
继续移动,一直指向北端。
20 秒后,指南针功能将自动关
闭,第
4 中心指针恢复正常运行。这样可节省电池。可随时
按
C 键钮(COMPASS [指南针])让指南针继续运行 20 秒。
指南针可以在使用计时码表时启用。第
4 中心指针仅会暂时
转换运行。上端指针和下端指针继续显示计时码表时间,所
有计时码表功能可通过
A 键钮(START/STOP [开始/停止])
和
B 键钮 (FLY-BACK/RESET [飞返 / 重置]) 实现。
注:指南针运作时,秒针以两秒的间隔移动。此外,启动指
南针时,上端指针和下端指针可能微微改变位置。指南针功
能停止后会回复正常。这一现象是正常的,并会取得最准确
的指南针指示。

152
153
线性计时码表
概览
线性和第 4 中心指针调校
要重调偏离的第
4 中心指针:
1. 将表冠拔出至外部档位。下端指针自动重置至刻度尽头。
2. 第 4 中心指针应指向 12 点方向。如果在表冠拔出至外部
档位
5 秒内第 4 中心指针未指向 12 点方向,可按键钮
A,将指针顺时针转动直至其指向 12 点方向。
3. 如果计时码表已经重置,且线性指针未指向零,可按住
键钮
B 达 5 秒,全面校准线性指针,这个过程最多将需
要
32 秒来完成。
4. 校准完成后,将表冠推回至关闭位置。
秒针
日期显示窗
表冠
下端指针
键钮A
键钮B
第 4 中心指针
时针
线性指针
分针
A
B
1
2
3

154
155
第二时区
下端指针指示的是第二
时区的时间。请注意:
刻度为
24 小时制式,
两端为午夜,中间为正
午。大多数情况下,各
时区之间的差异是时钟
的递增量。在此情况
下,第二时区的分钟数
将会与手表分针显示的
分钟数相同。
要设置第二时区:
1. 将表冠拔出至中间档位。下端指针指示第二时区的时
间,第
4 中心指针指示分钟。
2. 假设第二时区时间的分钟值与第一时区时间保持一致,
那么第
4 中心指针和分针应保持重合。如果指针未重
合,或如果同一钟点内第二时区的分钟值不同,请按键
钮
B,向前调第 4 中心指针,直至位于所需位置。
3. 按键钮 A 将下端指针以一小时为递增量向前调,直至达到
所需的第二时区时钟。要快速转动指针,可按住键钮
A。
4. 完成后将表冠按回。
A
B
1
2
3

156
157
线性计时码表
本表提供
4 小时分时计时码表功能。
1. 按键钮 A(START/STOP [开始/停止])开始计时。第 4 中
心指针以
1/5 秒量级显示秒数。线性指针显示分钟数,数
到
30 后重复。下端指针每 10 分钟显示一次总时间,包
括小时和分钟。计时码表计时到
4 小时后自动停止。
2. 再次按键钮 A(START/STOP [开始/停止])可停止计时。
所有指针停止转动。
3. 要将计时码表重置归零,按键钮 B(SPLIT/RESET [分时/
重置])。
计时码表重置时,所有指针归零。再过
8 秒钟后,手表恢复
正常显示第二时区的时间。计时码表运转时,可进行分时计
时。按键钮
B(SPLIT/RESET [分时/重置]),所有指针将停
止,但计时码表仍会继续运转。再次按键钮
B(SPLIT/RESET
[分时/重置]),重新显示正在运转的计时码表的运行时间。
世界时间
概览
A
B
C
1 2
3
corrected 3.3.11 with Paulo’s new cities
24 城市
世界时间
刻度
秒针
日期显示窗
表冠
下端指针
A 键钮
B 键钮
C 键钮
第 4 中心指针
季节刻度
上端指针
时针
分针
关闭档位 中间档位 外部档位

158
159
要设置世界时间:
1. 将表冠拔出至中间档位。中心指针指示世界时区城市,
上端指针指示该城市时间。
A
B
C
1 2 3
2. 按 A 或 B 键钮转动中心指针指向您当地时区的城市所在
处。按住键钮可快速移动指针。可以选择任何城市。
3. 将表冠拔出至外部位置。如“指针调整”中所述,城市
选择指针将回到
12:00 的位置。暂停 5 秒后,上端指针
将显示世界时间(先前步骤中所选择城市的时间),中
心指针显示世界时间的分钟,下端指针显示季节(请参
阅“季节设置”)。重要说明:中心指针完成调校之前
不要触碰任何键钮或表冠。(拔出表冠至外部档位后约
10 秒)。
4. 如果当地时区显示的季节不正确,请按 C 键钮更改。如
果当地时区实行日光节约时间时,上端指针将移动一小
时。
5. 按 A 或 B 键钮分别将时间向后或向前移动,将世界时间
时区与您的当地时区设置成一致。按住键钮可快速移动
指针。指针一起移动,中心指针转一圈,上端指针走一
小时。设置完成后,中心指针和分针应重合。
6. 完成后将表冠按回。

160
161
指针(第 4 中心指针)调整
要重调偏离的指针:
1. 将表冠拔出至外部位置。上端指针和下端指针自动重置
至刻度尽头。
2. 第 4 中心指针应指向 12 点整。如果指针没有指向该方
向,则在拔出表冠至外部档位
5 秒内按 A 或 B 键钮,将
指针分别逆时针或顺时针转动直至指向
12 点方向。
3. 完成后将表冠按回。
注:如果在指针停止后未按任何键钮持续 5 秒钟,手表将进
入世界时间设置操作(请参阅“世界时间设置”)。
城市时间显示
按
A 或 B 键钮分别将
中心指针前后移动,选
择城市。上端指针移动
显示所选城市的时间。
请注意:刻度为
24 小
时制式,两端为午夜,
中间为正午。
A
B
C
1 2 3

162
163
季节设置
季节设置功能使手表可以改正日光节约时间
(也称“夏令时间”)。
本表提供了一项设置用以表示实行日光节约时间所有城市
的两个周期。本表日光节约时间的周期为夏季,正常周期
为冬季。
当一个城市的季节设置为夏季,与其在同个半球的所有城市
都将自动设置为夏季,同时另一个半球的所有城市将自动设
置为冬季。本表识别各个半球上有哪些城市。
按
C 键钮更改所选城市的季节。
指南针
概览
I
I
14
中心
表冠
中间
设置日期
I
I
14
外部
设置时间
表冠
B
A(指南针)
磁偏角
指南针指针
(北端是红色
箭头指向/较长)

164
165
指南针指针调整
将表冠完全拔出。指南针指针应指向
12 点整。如果没有指
向
12 点整,请按 A 或 B 键钮移动指针,直至指向 12 点
整。按住键钮可快速移动指针。完成后将中心表冠推入,并
重新校准指南针。
指南针校准
指南针使用前必须先校准。
由于指南针利用了地球磁场,您必须注意较大的金属物体,
如车辆或桥梁,或发出电磁辐射的物体,如电视或电脑,
这些物体会影响手表周围的磁场。如果指南针在这些物体
附近校准,那么它只会在同样的位置才正常运作。如果指
南针在远离这些物体的地方校准,那么在这些物体附近就
不能正常运作。为取得最佳效果,请在您预定使用的地方
校准指南针。
在校准和测方向时请一定注意,和所有指南针一样,需水平
放置。校准和测方向时如未水平放置指南针,将导致大偏
差。同时请避开硬铁和软铁浓度超过正常值的地区,这些
地区也可能导致方向不准确。任何时候方向可疑时,请重新
校准指南针。
请勿将手表置于磁体源附近,如电脑、家电或电视,因为手
表可能吸收磁性,导致指示方向不准确。腕表通常准确性在
+/-10 度以内。
要校准指南针:
1. 将表冠拔出至中间位置,并等待指针停止移动。
2. 将手表持平或放置在水平表面(如表带干扰,将手表
置于倒放的杯子上)。手表可以倒置,但请注意保护表
面。

166
167
3. 按 A 或 B 键钮开始。第 4 中心指针旋转两圈提示您旋转
手表。水平放置时,缓慢旋转手表两圈,每圈至少用
15 秒。
4. 完成后,按 A 或 B 键钮,保持手表水平。第 4 中心指针
来回摆动表示校准结束,然后指向当前磁偏角设置。
5. 如果您不想设置磁偏角,可将表冠按回。否则,让手表
自动改正偏角度,转动指南针刻度外圈直到北端指向
12
点方向。
6. 按键钮 A 或 B,使用偏角刻度将第 4 中心指针分别向西
(
-) 或东 (+) 移动,指向您所在地的偏角度。按住键钮可
快速移动指针。见下页图为例。
7. 完成后将表冠按回。
A
B
磁偏角设为 -14° (西14°)

168
169
指南针操作
通常情况下,指南针处于非工作状态,第
4 中心指针指向
12 点方向或显示计时码表秒钟。
在手表水平时,按 A 或 B 键钮启动指南针。指南针指针指
向北端。如果转动手表,第
4 中心指针将继续移动,一直指
向北端。
20 秒后,指南针功能将自动关闭,第 4 中心指针
恢复正常运行。这样可节省电池。随时按
A 或 B 键钮可让
指南针继续运行
20 秒。
注:指南针运作时,秒针以两秒的间隔移动。
潮汐温度和指南针
概览
外部-设置时间
磁偏角
指针
C(指南针)
B(潮汐)
A(温度)
表冠
转动指南针
刻度环
日期
潮汐刻度
温标
中间-设置日期

170
171
指针调整
将表冠完全拔出。指针应指向
12 点整。如果没有指向 12 点
整,请按
TIDE 或 TEMP 键钮移动指针,直至指向 12 点整。
按
TIDE 或 TEMP 键钮可分别顺时针方向及逆时针方向移动
指针。按住键钮可快速移动指针。完成后将表冠按回。
潮汐/温度选择
无论潮汐或温度,指针会不断显示。当温度显示时,按
TIDE
键钮选择潮汐时钟。指针移动到低潮汐再到当前潮汐。当潮
汐显示时,按
TEMP 键钮选择温度表。指针移动到温度计刻
度起端,再到当前温度。
温度计
手表戴在手腕上时,温度计的读数会受到体温的影响。要
获取更加准确的读数,请摘下手表并放置在阴凉处至少几
分钟的时间。
手表如果浸于水中,亦可以测量水的温度。手表放置在水中
前,切记要先选择温度显示屏,因为当手表在水中时就不应
该按任何键钮。
手表会每分钟读取温度计值,如果水温不断变化,则读取的
频率会更快。
潮汐时钟
对于潮汐时钟,指针总是顺时针方向旋转,当指针指向左边
时,潮水上涨,指针指向右边时,潮水下降。到下一个高/低
潮的数小时纪录均会显示在潮汐的刻度中。
潮汐是受太阳的位置和海岸线的形状所影响。故无法准确的
计算涨潮和退潮的时间。定期调整也许是必要的。
要设置潮汐时钟,将表冠拔出至“中间”位置。按
TIDE 或
TEMP 任一键钮移动指针至目前的潮流。按 TIDE 或 TEMP 键
钮可分别顺时针方向及逆时针方向移动指针。完成后将表
冠按回。

172
173
指南针校准
指南针使用前必须先校准。
由于指南针利用了地球磁场,您必须注意较大的金属物体,
如车辆或桥梁,或发出电磁辐射的物体,如电视或电脑,这
些物体会影响手表周围的磁场。如果指南针在这些物体附近
校准,那么它只会在同样的位置才正常运作。如果指南针在
远离这些物体的地方校准,那么在这些物体附近就不能正常
运作。为取得最佳效果,请在您预定使用的地方校准指南针。
在校准和测方向时请一定注意,和所有指南针一样,需水平
放置。校准和测方向时如未水平放置指南针,将导致大偏
差。同时请避开硬铁和软铁浓度超过正常值的地区,这些
地区也可能导致方向不准确。任何时候方向可疑时,请重新
校准指南针。
请勿将手表置于磁体源附近,如电脑、家电或电视,因为手
表可能吸收磁性,导致指示方向不准确。腕表通常准确性
在 +/-
10 度以内。
要校准指南针:
1. 将表冠拔出至中间位置,并等待指针停止移动。
2. 将手表持平或放置在水平表面(如表带干扰,将手表置于
倒放的杯子上)。手表可以倒置,但请注意保护表面。
3. 按 C 键钮(指南针)开始。第 4 中心指针旋转两圈提示
您旋转手表。水平放置时,缓慢旋转手表两圈,每圈至
少用
15 秒。
4. 完成后,按 C 键钮(指南针),保持手表水平。第 4
中心指针来回摆动表示校准结束,然后指向当前磁偏
角设置。

174
175
5. 如果您不想设置磁偏角,可将表冠按回。否则,让手表
自动改正偏角度,转动指南针刻度外圈直到北端指向
12
点方向。
6. 按键钮 A 或 B,使用偏角刻度将第 4 中心指针分别向西
(
-) 或东 (+) 移动,指向您所在地的偏角度。按住键钮可
快速移动指针。见下页图为例。
7. 完成后将表冠按回。
A
B
磁偏角设为 -14° (西14°)
指南针操作
通常情况下,指南针处于非工作状态,第
4 中心指针指向 12
点方向或显示计时码表秒钟。
在手表水平时,按
C 键钮(指南针)启动指南针。指南针指
针指向北端。如果转动手表,第
4 中心指针将继续移动,一
直指向北端。
20 秒后,指南针功能将自动关闭,第 4 中心指
针恢复正常运行。这样可节省电池。可随时按
C 键钮(指南
针)让指南针继续运行
20 秒。
注:指南针运作时,秒针以两秒的间隔移动。

176
177
高度计
概览
高度计刻度
(以百计)
上端逆跳指针
(以千计)
C 键钮
(单位)
A 键钮
(最大高度)
B 键钮
(最小高度)
下端逆跳指针
(单位)
表冠
指针(第 4 中心指针)调整
将表冠完全拔出。上端和下端逆跳指针将自动复位至刻度
起点。指针(第
4 中心指针)应指向 12 点整。如果没有指
向
12 点整,请按 A 和/或 B 键钮移动指针,直至指向 12 点
整。按
A 和 B 键钮可分别顺时针方向及逆时针方向移动指
针。按住键钮可快速移动指针。完成后将表冠按回。
高度计校准
高度计使用前必须先校准。
由于高度计通过压力来确定高度,而每个地点的压力各不相
同,因此必须为高度计设置已知的参照高度值,或设置特定
地点的标准参照高度。如果因天气变化而造成压力骤然变
化,即使您的位置没有变,高度计读数也可能会偏差
+/-100
米(328 英尺)。压力急剧变化时,请将高度计重新校准至
已知高度。

178
179
校准高度计:
1. 将表冠拔出至中间位置,并等待指针停止移动。
2. 拔出表冠时,如果高度计已关闭,下端逆跳指针将指向
上次使用高度计时所选的单位;如果高度计已开启,下
端逆跳指针则会指向当前所选的高度显示单位。第
4 中
心指针和上端逆跳指针应指向当前高度。
3. 按 A 或 B 键钮分别逆时针或顺时针方向移动第 4 中心指
针,直到指针指向所需的校准高度。按住
A 或 B 键钮可
快速移动指针。上端逆跳指针根据第
4 中心指针显示的
高度值进行移动。
4. 完成后将表冠按回。
开/关高度计
要打开高度计,请按
C 键钮。下端逆跳指针将指向
METERS(米)。第 4 中心指针通过外圈的标度显示当前高
度(以百和十计),每十米/十英尺用分隔符隔开。上端逆
跳指针显示当前的高度值(以千计),每一千米/一千英尺
用分隔符隔开。
要将单位从
METERS(米)改为 FEET(英尺),再按一下
C 键钮。要将单位从 FEET(英尺)改为 METERS(米),
按两次
C 键钮(高度计将先关闭,然后重新开启,并以米
为单位)。

180
181
当前单位设置为 FEET(英尺)时,要关闭高度计,请按 C
键钮。当前单位设置为
METERS(米)时,要关闭高度计,
请按两次
C 键钮(下端指针先指向 FEET[英尺],然后指向
OFF [关]位置)。
高度计开启 60 分钟之后,手表将自动关闭高度计。
例如:高度=2310米 例如:高度=7580英尺
调看高度计最小/最大高度
要查看记录的最大高度,请按
A 键钮。按 A 键钮时,如果
高度计已关闭,则下端逆跳指针将显示记录该高度时所用的
测量单位;如果高度计已开启,指针将以当前所选单位显示
最大高度。第
4 中心指针显示最大高度(以百和十计),每
十米/十英尺用分隔符隔开。上端逆跳指针显示最大高度值
(以千计),每一千米/一千英尺用分隔符隔开。
记录的最大高度将显示 10 秒。要将显示时间再延长 10 秒,
请在上一
10 秒结束之前按 A 键钮。
要将单位从 METERS(米)改为 FEET(英尺),请按 C 键
钮,反之亦然。

182
183
要查看记录的最小高度,请按 B 键钮。按 B 键钮时,如果
高度计已关闭,则下端逆跳指针将显示记录该高度时所用的
测量单位;如果高度计已开启,指针将以当前所选单位显示
该最小高度。第
4 中心指针显示最小高度(以百和十计),
每十米/十英尺用分隔符隔开。上端逆跳指针显示最小高度值
(以千计),每一千米/一千英尺用分隔符隔开。
记录的最小高度将显示 10 秒。要将显示时间再延长 10 秒,
请在上一
10 秒结束之前按 B 键钮。要将单位从 METERS
(
米)改为 FEET(英尺),请按 C 键钮,反之亦然。
深度
概览
注:当你将表冠移动至第
3 档位设置时间时,中心指针
和下端指针会自动校准。
3
AA
B
1
2
3
2
3
2
3
中心指针
关闭指针
A 键钮
B 键钮
下端指针
表冠

184
185
温度
温度传感器始终是开着,并至少每
60 秒读取一次。下端指
针指示温度和对应刻度。
手表戴在手腕上时,温度读数会受到体温的影响。要获取更
加准确的读数,请从手腕上摘下手表。
深度传感器开/关
传感器通常是关闭的,并且必须在浸水之前手动开启。按入
然后松开
B 键钮开启传感器。第 4 中心指针将由关(6点)
的位置移到
12 点的位置,并以至少每 5 秒的间隔开始读取
深度数据。当深度增加时,第
4 中心指针将指到深度表上的
实际深度。若读取的深度维持于
0-2米(0-6尺)之间达 5 分
钟之久,传感器将自动关闭。要手动关闭传感器,按住
B 键
钮
2 秒钟。第 4 中心指针将由关(6点)的位置。
调看最大深度/最低温度
回到海面上后,先旋出表冠,将表冠拔出至中间档位。中
心指针与下端指针将分别指出最近潜水活动所记录的最大
深度值与最低温度值。当深度传感器再次启动后,记忆数
据将被清除。
若手表尚未使用时,中心指针与下端指针将分别指在
0 米/
尺与摄氏
0 度/华氏 32 度。手表在使用/下水前务必将表冠
旋回。
电池电量检测
本表能断定电池电量状况,并提供使用者一个显示电池蓄电
现状水平。电池蓄电水平等级分成正常等级,电池电量低等
级和更换电池等级,蓄电水平等级是由秒钟指出。
电池电量在正常等级时,秒针的正常操作是每一秒移动一个
位置。

186
187
当手表的电池电量处于低等级状态时,秒针是以每两秒移动
两个位置。当手表的电池电量处于低等级状态时,建议使用
者更换电池。
当手表的电池电量处于“更换电池等级”状态时,秒针每五
秒移动一次,一次移动五个位置。此时,不能启用深度传感
器,用户必需即刻更换电池。
YACHT RACER (帆船赛手)
时针
秒针
第
4 中
心指针
表冠
上端
指针
PERFECT DATE
™
刻度
下端指针
分针
2 31
A
B
C

188
189
完美日期
您的手表拥有完美日期(Perfect Date
™
)功能,在 2060 年
之前都无须调校日期。手表会自动将小月和闰年考虑进去,
将总能按需正确显示日期。日期已在
Timex 工厂预先设置。
您的新表刚开始走时时,如果显示日期早于或晚于您本地的
日期,您必须将日期修改为您的本地日期。将表冠拉出至外
部档位。第
4 中心指针将绕表盘旋转一周,将会在 12 点位
置停留约
5 秒钟,然后移动到手表当前设置的日期。向前
转动表冠可以增加当前日期上的时间(向后转动可以减少当
前日期上的时间)。每次越过午夜十二点时,日期将变动一
天。在您将日期设置为本地日期后,继续旋转表冠,将指针
指向本地的当前时间,并考虑到上午/下午。设置好时间之
后,将表冠推回至关闭位置。在正常工作状态下按下表冠
时,第
4 中心指针将指示日期。此指针将行进至表壳的表
圈上显示当前日期的位置。然后指针将暂停,方便您查看日
期值,随后,指针返回
12 点休止位置。
请注意,完美日期
(
Perfect Date
™
)功能只在时间模式下可用。
当电池电量耗
尽,更换电池后,完美日期功能必须重新进行校准。如需更
换电池,强烈建议您将手表发送回
Timex 服务中心。服务
中心将更换电池并将完美日期功能重新校准至手表返回地
的当前日期。
第
4 中心指针调整
要重调偏离的第
4 中心指针:
1. 将表冠拉出至 3 档位置。上端指针和下端指针自动重置
至刻度尽头。
2. 将表冠拔出至 3 档位置后 10 秒内,第 4 中心指针应指
向
12 点方向。如第 4 中心指针未指向 12 点方向,可
按
A 或 B 键钮,将指针逆时针或顺时针转动直至其指向
12 点方向。按住 A 或 B 键钮,指针可快速移动。请注
意:如表冠位于
3 档位置 5 秒后没有动作,第 4 中心指
针将移动为指示当前日期。

190
191
3. 校准完成后,将表冠推回至 1 档位置。
选用模式
按
C 键钮将上端指针前推至所需的功能标记处。
时间:
只显示当前时间 (完美日期功能仅在时间模式下可用)。
Yacht Race Timer 5 (帆船赛计时器 5):
倒计时时间为
5 分钟,倒计时归零时,秒表计时器启动。
Yacht Race Timer 3 (帆船赛计时器 5):
倒计时时间为
3 分钟,倒计时归零时,秒表计时器启动。
Yacht Race Timer 1 (帆船赛计时器 5):
倒计时时间为
1 分钟,倒计时归零时,秒表计时器启动。
秒表计时:
秒表计时器将在无倒计时器计时的条件下运行。
操作帆船赛计时器:
本表提供
5 分钟、3 分钟或 1 分钟倒计时功能。当倒计时归
零时,一个时长为一小时的秒表计时器将自动启动。
1. 按 C 键钮直到上端指针指向您所需要的 5、3 或 1 分钟
帆船赛计时器模式。
2. 按 A (START/STOP [开始/停止]) 键钮开始计时。下端指针
指示倒计时的分钟数,第
4 中心指针则指示倒计时的秒
数。(请注意:倒计时器工作时
B 和 C 键钮将被禁用)
3. 如需停止倒计时,请按 A (START/STOP [开始/停止]) 键
钮。(请注意:倒计时器工作时
C 键钮被禁用,直到倒计
时器被重置后才可恢复)
4. 如需重置倒计时器,请按住 B (SPLIT/RESET [分项计时/
重置]) 键钮
3 秒钟,这将重置倒计时器,回到最初选择
5、3 或 1 分钟时间段的状态 。

192
193
在帆船赛计时器的正常工作状态下,一旦倒计时器归零,秒
表计时器将自动启动。当倒计时器达到整数分钟值、最后
一分钟进入最后
5 秒以及秒表计时启动时,手表都会发出
一声警报鸣音。秒表计时器将循环两次
30 分钟走时,总长
共计一小时。
秒表计时操作
本表有一个时长一小时的秒表计时器,可在帆船赛计时器之
外独立走表。
1. 按 C 键钮,直到上端指针位于 30 分钟秒表计时器刻度
的开始位置。
2. 按 A (START/STOP [开始/停止]) 键钮开始计时。第 4 中
心指针指示正向计时的秒数,下端指针指示在一个
5 分
钟刻度范围内不断增长的分钟数,而上端指针为半小时
计,指示在一个
30 分钟刻度范围内不断增长的分钟数。
当下端指针抵达五分钟满刻度标记,该指针将返回零
位,而上端指针将继续在
30 分钟刻度线上走针。 (请注
意:秒表计时器工作时
C 键钮被禁用)
3. 如需分项计时,请按 B (SPLIT/RESET [分项计时/重置]) 键
钮。上端指针、下端指针和第
4 中心指针将保持不动,
方便您记录分项 (分段) 时间。其实秒表计时器仍然在按
部就班地默默计时,只是相关指针暂停不动了。再按一
次
B (SPLIT/RESET [分项计时/重置]) 键钮,各指针将从停
止中恢复,然后快速移动,直到正确指向实际经过的总
时间。
4. 按 A (START/STOP [开始/停止]) 键钮即可停止秒表计时
器。(请注意:秒表计时器停止时
C 键钮被禁用,直到秒
表计时器被重置后才可恢复)
5. 如需重置秒表计时器,请按住 B (SPLIT/RESET [分项计时/
重置]) 键钮
3 秒钟,这将重置秒表计时器,回到 30 分钟
刻度线的开始位置。

194
195
在正常工作状态下,秒表计时器将循环两次 30 分钟走时,
总时长共计一小时。一旦走完这整整一小时,上端指针将保
留在
30 分钟标记处,而下端指针将归零。此后,秒表计时
功能将需要重置,然后才能再次使用此功能或更换模式。
(请注意:当走完一小时总时长后,
A 键钮将被禁用,只有
通过按住
B 键钮 3 秒钟重置秒表计时功能后 A 键钮才能继
续使用。)
INDIGLO
®
夜间照明(仅专业版支持此功能)
帆船赛手专业版附加了 INDIGLO
®
夜间照明功能。在无光或
低光度环境下,按下表冠启用
INDIGLO
®
夜间照明功能后可
以轻松查看表盘。帆船赛手专业版在表盘上使用了一种特
殊的发光材料,其发出的光华足以照亮表盘,同时又能确
保此光华熄灭后仍有余光,使手表的夜视能力继续保持一
段时间。
秒表计时器
秒针
第
4
中心
指针
上端
指针
PERFECT DATE
™
刻度
分针
时针
表冠
下端指针
2 31
A
B
C

196
197
PERFECT DATE (完美日期)
您的手表拥有完美日期(Perfect Date
™
)功能,在 2060 年
之前都无须调校日期。手表会自动将小月和闰年考虑进去,
将总能按需正确显示日期。日期已在
Timex 工厂预先设置。
您的新表刚开始走时时,如果显示日期早于或晚于您本地的
日期,您必须将日期修改为您的本地日期。将表冠拉出至外
部档位。第
4 中心指针将绕表盘旋转一周,将会在 12 点位
置停留约
5 秒钟,然后移动到手表当前设置的日期。向前
转动表冠可以增加当前日期上的时间(向后转动可以减少当
前日期上的时间)。每次越过午夜十二点时,日期将变动一
天。在您将日期设置为本地日期后,继续旋转表冠,将指针
指向本地的当前时间,并考虑到上午/下午。设置好时间之
后,将表冠推回至关闭位置。在正常工作状态下按下表冠
时,第
4 中心指针将指示日期。此指针将行进至表壳的表
圈上显示当前日期的位置。然后指针将暂停,方便您查看日
期值,随后,指针返回
12 点休止位置。
请注意,完美日期
(
Perfect Date
™
)功能只在时间模式下可用。
当电池电量
耗尽,更换电池后,完美日期功能必须重新进行校准。如需
更换电池,强烈建议您将手表发送回
Timex 服务中心。服
务中心将更换电池并将完美日期功能重新校准至手表返回地
的当前日期。
第
4 中心指针调整
要重调偏离的第
4 中心指针:
1. 将表冠拉出至 3 档位置。上端指针和下端指针自动重置
至刻度尽头。
2. 第 4 中心指针停走后,应指向 12 点方向。如第 4 中心
指针未指向
12 点方向,可按 A 或 B 键钮,将指针逆时
针或顺时针转动直至其指向
12 点方向。按住 A 或 B 键
钮,指针可快速移动。请注意:如表冠位于
3 档位置 5
秒后没有动作,第
4 中心指针将移动为指示当前日期。
3. 校准完成后,将表冠按回至 1 档位置。

198
199
选用模式
按 C 键钮将上端指针前推至所需的功能标记处。
时间:
只显示当前时间(完美日期功能仅在时间模式下可用)。
秒表计时操作
本表提供四小时秒表计时功能。此四小时结束时秒表计时将
自动关闭。如遭遇秒表计时意外启动,此设计将可以省电。
1. 按 C 键钮,直到上端指针位于上端指针秒表计时器刻度
的开始位置,而下端指针位于下端刻度的
0 位置。
2. 按 A(开始/停止)键钮开始计时。第 4 中心指针指示正
向计时的秒数,下端指针指示在一个
30 分钟刻度范围内
不断增长的分钟数,而上端指针为小时计,指示在一个
4
小时刻度范围内不断增长的小时数。当下端指针抵达
30
分钟满刻度标记,该指针将返回零位并开始下一个
30 分
钟周期,而上端指针将继续在
4 小时刻度线上走针。
(请注意:秒表计时器工作时 C 键钮被禁用)。
3. 如需分项计时,请按 B(分项计时/重置)键钮。上端指
针、下端指针和第
4 中心指针将保持不动,方便您记录
分项(分段)时间。其实秒表计时器仍然在按部就班地
默默计时,只是相关指针暂停不动了。再按一次
B(分项
计时/重置)键钮,各指针将从停止中恢复,然后快速移
动,直到正确指向实际经过的总时间。
4. 按 A(启动/停止)键钮即可停止秒表计时器。(请注
意:秒表计时器停止时
C 键钮被禁用,直到秒表计时器
被重置后才可恢复)
5. 如需在秒表计时器停止后将其重置,请按 B(分项计时/
重置)键钮,这会在
30 分钟和 4 小时刻度这两个子表盘
上将秒表计时器重置回各表盘的开始位置。

200
201
在正常工作状态下,秒表计时器将循环 8 次 30 分钟走时,
总时长共计四小时。一旦走完这四小时,上端指针将保留
在四小时标记处,而下端指针将归零。此后,秒表计时功能
将需要重置,然后才能再次使用此功能或更换模式。(请注
意:当走完四小时总时长后,
A 键钮将被禁用,只有通过按
下
B 键钮重置秒表计时功能后 A 键钮才能继续使用。)
倒计时器
本表提供倒计时功能。
特别说明:上端指针、下端指针和第 4 中心指针在下面的步
骤
3、4 和 5 中会联动移动。当您向前/向后移动分针和秒针
时,您会看见所有三个指针同时对倒计时时长的加减作出响
应。将表冠拉出至中间档位后,按
C 键钮将如下循环调整联
动指针的当前指针:上端指针(按
C 键钮)- 下端指针(按
C 键钮)- 第 4 中心指针(按 C 键钮)返回上端指针……这
样,您可以将需要调整的不同指针循环指定为联动指针的当
前指针,以便精确设置所需的倒计时时长。将表冠按入,结
束设置过程,此次循环中任何点上已设置的值都会被确认。
设置倒计时器
仅当当前未执行倒计时器功能时,才可设置倒计时器。如此
前执行过倒计时器,需要先将其重置。如倒计时器正在工
作,必须先将其停止并重置,以便设置倒计时器。
1. 按 C 键钮,直到上端指针位于计时刻度的某一位置。如此
前设置过计时器,指针将指向此前设置的时间。如果这是
第一次设置计时器,指针将指向计时器刻度的
0 位置。
2. 将表冠拉出至中部档位。
3. 要以半小时为增量设置所需的小时数(总时间最长为 4
小时整),按
A 键钮逆时针移动上端指针(如按 B 键
钮,将顺时针移动此指针),直到所需的小时数已被选
中。请注意:您要选择的是距所需总时间最接近的以半
小时为增量的小时数(例如:如所需的倒计时总时间为

202
203
2:53:30,您将选择 3 小时)。您设置好小时数之后,请
按下
C 键钮确认您的选择。
4. 现在,您可以以一分钟为增量设置所需的分钟数,方法
是按
A 键钮逆时针移动下端指针(如按 B 键钮,将顺
时针移动此指针),直到所需的分钟数已被选中。请注
意:您将要向前或向后调整所需的分钟数从而得到所需
时间(例如:如所需的倒计时总时间为
2:53:30,您将
从
3 小时开始按 A 键钮七次,从而将倒计时总时间设为
2:53:00)。您将会注意到时针从 3 小时标记处向 2.5 小
时标记处稍微后移了一点。您将时间调整至正确的分钟
数之后,请按下
C 键钮确认您的选择。
5. 现在,您可以以一秒钟为增量设置所需的秒数,方法是
按
A 键钮逆时针移动第四指针(如按 B 键钮,将顺时针
移动此指针),直到所需的秒数已被选中。请注意,您
将要添加或减去所需的秒数从而得到所需时间(例如:
如所需的倒计时总时间为
2:53:30,您将按 B 键钮 30 次
来选择 30 秒)。一旦您完成了秒数的设置,将表冠推至
1 档位置确认您选择的倒计时总时长完整值。
倒计时器操作
一旦设置了所需的倒计时时长,您就可以进行倒计时操作
了。
启动倒计时:按
A 键钮启动倒计时器。第四中心指针和下端
指针将开始逆时针移动。上端指针将顺时针移动。这些指针
将持续指示倒计时剩余的时间,直到走完您设置的倒计时时
长,此时剩余时间值将变为
0。当倒计时的剩余时间归于零
后,您会听见一声鸣音,通知您整个倒计时走时已完成。
中断倒计时:如果您想要在倒计时读数归零之前停止倒计
时,可以按下
A 键钮(第四中心指针及上下端指针都将停
止移动)。如果稍后您想要从倒计时停止处继续倒计时走
时,只需再次按下
A 键钮(第四中心指针及上下端指针都
将恢复移动)。

204
205
重置倒计时:当倒计时最终归零且鸣音响过之后,您可以
按
B 键钮重置倒计时器至设置的值(第四中心指针及上下
端指针将会移动以指示您在使用倒计时器功能之前设置的
时间值)。
清除倒计时器的值:如果需要,您可以将倒计时器的值清
零。仅当您当前未使用倒计时器功能,且其已被重置时才可
这么做。如果倒计时器正在工作,您必须先按
A 键钮停止
倒计时,接着按
B 键钮。这将停止倒计时器并重置其至当前
选定的时间值。要将倒计时器的值清零,请按下并按住
B 键
钮两秒钟。现在,您应按说明的指示重新设置您所需的倒计
时器总时长值。
分隔时间功能:当倒计时器正在工作时,您可以使用分项计
时功能记录倒计时的剩余时间。
要使用分项计时功能,请按下
B 键钮,这将使上端指针、下
端指针和第
4 中心指针原地停下。倒计时功能将于内部继续
执行,但各指针都被冻结。
要恢复上下端指针和第
4 中心指针的运动,再次按下 B 键
钮,所有指针都将重新定位到各自正确的位置,以显示内部
倒计时的当前时间。

206
207
3GMT (三时区)
秒针
表冠
可旋转表圈
(24 小时制)
第 4 中心指针
分针
时针
内圈/数字
(24 小时制)
A
2 31
三时区功能
您的手表能显示三个时区:
1. 时针和分针:以标准的 12 小时制指示时间。请注意:
在日期窗口中显示的日期与由这两个指针所指示的时间
相连接。
2. 第 4 中心指针和内圈:以 24 小时制指示时间。
3. 第 4 中心指针和表壳的可旋转表圈:以 24 小时制指示时
间。
第
4 中心指针调整
要重调偏离的第
4 中心指针:
1. 将表冠拉出至 3 档位置。
2. 第 4 中心指针应指向 12 点方向。如果在表冠拔出至
3 档位置 5 秒内第 4 中心指针未指向 12 点方向,可按 A
键钮,将指针顺时针转动直至其指向
12 点方向。按住 A
键钮,指针可快速移动。

208
209
3. 校准完成后,将表冠推回至 1 档位置。
第 4 中心指针校准
第
4 中心指针在 Timex 工厂校准,以反映由协调世界时
(
UTC) 定义的小时内的标准分钟数。全世界大部分地区使用
标准的分钟数。如果您指定的第二和第三时区所在地区使用
标准分钟数,则第
4 中心指针不需要重新校准。仅当您希望
为第二和第三时区指定的地区未采用标准分钟,才需要遵循
如下所示的指示对第
4 中心指针进行重新校准:
1. 将表冠拉出至 3 档位置。第 4 中心指针将指向 12 点方向。
2. 旋转表冠,将分针放置在小时内的特定位置,也即是您希
望为第二和第三时区设置地区时要求的小时内的位置。
3. 将表冠按回至 2 档位置。第 4 中心指针将指向一小时内
为其校准的分钟数位置。
4. 按 A 键钮顺时针移动第 4 中心指针,直到其与分针对
齐。按住
A 键钮,指针可快速移动。
5. 将表冠拉出至 3 档位置。第 4 中心指针将指向 12 点方
向。
6. 旋转表冠,使时针和分针指向正确的时间。
7. 校准完成后,将表冠按回至 1 档位置。
请注意:第 4 中心指针将使用小时内当前校准的分钟数追踪
时间。第二和第三时区的设置都使用了第
4 中心指针,因
此,为确保正确显示第二和第三时区,第二和第三时区中追
踪的位置都必须使用小时中的相同分钟数。
设置第
4 中心指针 (第二时区)
记下您想要当作第二时区进行追踪的地点的当前时间。按
A
键钮,直到第
4 中心指针指向内圈上的该时间。(请注意:
内圈刻度值为
24 小时制)。每按一次 A 键钮,第 4 中心指
针将前进
30 分钟。按住 A 键钮,指针可快速移动。这样即
设置了手表的第二时区。

210
211
设置表壳的旋转表圈 (第三时区)
第三时区可通过使用第
4 中心指针的现有设置并将表壳的旋
转表圈调整到第三时区所需的时间来设置。(请注意:表圈刻
度值为
24 小时制)。表圈上有 72 个档位。如需将表圈前移
一小时,您将需要前移三个档位 (
3 次“咔嗒”)。记下您想
要当作第三时区进行追踪的地点的当前时间。逆时针转动表
壳的表圈,将该时间的正确小时标记与第
4 中心指针正对。
测速计功能
(不包含所有款式)
使用此方法,本测速计只能检测每小时大于 60 单位的速
度;更慢的速度可以通过减少计量单位来测量。只要使用相
同的长度单位进行所有计算,测速计的功能与距离单位无关
(如法定英里、海里数、公里、米等)。
1. 确定预定距离起点和终点的标志。
2. 被测目标一旦经过起点标志,立刻启动计时码表。
3. 被测目标一旦经过终点标志,立刻停止计时码表。
4. 计时码表的秒针将与测速计标度进行比较来确定目标的
速度。

212
213
飞行滑尺表圈功能
上圈的飞行滑尺功能可通过旋转外圈来操作。内圈不能转
动。外圈与“距离”或“速度”或者随时间变化的任何数据
相关。内圈仅标示时间单位。
外圈
在外圈上,数字“
10”表示系数或 10 的倍数,例如 0.1、
1.0、 10 或 100。
内圈
在内圈上,“
MPH”(每小时英里数)是指“速度指数”。
该指数用于计算与任何数据相关的时速。在内圈上,“
STAT”
(法定英里)和“
NAUT”(海里)用于换算距离单位。
外圈
内圈
以下示例为如何使用飞行滑尺的指南。

214
215
速度计算:
在
15 分钟要行驶 10 海里需要什么样的速度?
已知因素:距离:
10 海里;时间:15 分钟
• 将外圈箭头“10”与内圈上的“15”对准。
• 在内圈“MPH”标记正上方可以找到所需速度。
答案:每小时 40 海里
时间计算:以每小时 40 海里的速度行驶 10 海里需要多
长时间?
已知因素:速度:每小时
40 海里; 距离:10 海里
• 将外圈上的“40”与内圈“MPH”标记对准。
• 在外圈箭头“10”正下方可以找到所需时间,即内圈上
的“
15”。
答案:15 分钟
距离计算:
已知因素:速度:每小时
40 海里;时间:15 分钟
• 将外圈上的“40”置于内圈“MPH”标记正上方,使其
对准。
• 可在内圈标记“15”的上方获得行驶距离。
外圈上指示的数字为“
10”。
答案:行驶距离为
10 海里。
单位换算:
要将距离从海里换算到法定英里和千米。
已知因素:要换算的距离为
10 海里。
• 将外圈箭头“10”与内圈上的“NAUT”对准。在内
圈“
STAT”标记上方可以找到法定英里换算值 (11.5),
在内圈“
MPH”标记上方可以找到千米换算值 (18.5)。

216
217
如何调整表带
(以下有关各种不同表链的描述适用于所有的表型)。
滑扣式表带
1. 打开锁盖。
2. 移动搭扣,使表带达到所
需长度。
3. 用力按住锁盖并来回滑动
搭扣,直到搭扣被卡入表
链底侧的槽内。
4. 将锁盖按下卡紧。请勿过
分用力,否则可能损坏搭扣。
翻扣式表链
1. 找到连接表带和搭扣的弹簧轴。
2. 用一个带尖头的工具将弹簧轴推进去,然后轻轻扭动表
带,使其脱扣。
3. 确定好腕长之后,将弹簧轴插入正确的底端轴孔。
4. 将弹簧轴按入,与上端轴孔对齐,然后松开使之锁定到
位。

218
219
拆卸表链环扣
拆卸环扣:
1. 垂立放置表带,并用带尖头工具插入环扣上的针口。
2. 沿箭头方向用力推挤插针,使环扣脱节(插针经专门设
计,难以拆卸)。
3. 重复上述步骤,直到拆掉所有不需要的环扣。
重新组装:
1. 将表带各配件重新接好。
2. 按箭头反方向把插针推入环扣。
3. 用力将插针按入表链,直到针尾与孔口保持齐平。
电池
手表正常使用时电池可维持 4-6 年。电池寿命长短取决于实
际使用方式。
如需更换电池,我们建议仅使用
TIMEX 电池。换好电池后,
需要重新校准手表的时间和日期。将手表送回给
Timex 时,
请使用邮资预付的托运公司。请致电
1-800-448-4639、前往
您购置手表的商店或访问
www.Timex.com 获得有关邮资预
付托运公司的信息。请随表按以下费率寄交邮费和手续费
(这不属于修理费):美国用户请寄一张
8.00 美元的支票或
汇票;加拿大用户请寄一张
12.00 加元的支票或汇票;其它
国家和地区的用户,
Timex 会收取邮费和手续费。
切勿在寄送的包裹内夹带特殊款式的表带或其他个人贵重
物品。
切勿将电池扔到火中。请勿为电池充电。请将拆下的电池放
在远离儿童的地方。

220
221
TIMEX 国际保修
自原购买日起,您的 TIMEX
®
手表享受 Timex Group USA, Inc.
提供的为期一年的无制造缺陷保修。Timex 及其遍布全球的
联属机构都会承诺这项国际保修义务。请注意,
Timex 在为
您修理手表时,可酌情安装新配件或经过全面修复和检验的
配件,也可用相同或类似的型号加以更换。请注意 — 本保
修内容不包含以下原因造成的手表故障或损坏:
1. 保修期已过;
2. 如果手表是从未经授权的 Timex 零售店购买;
3. 手表由 Timex 之外的机构进行维修;
4. 意外事故、自行拨弄或使用不当;以及
5. 镜面或水晶、表带或表链、表壳、附件或电池受
损。
Timex 会为更换这些配件向您收取一定费用。
本保修规定及其所含补偿条款具有专有性质,并取代所有其
他明示或暗示的保修承诺,包括任何对适销性和针对任何特
定目的的适用性的暗示保证。
Timex 对任何特别、附带或因
之而产生的损失概不负责。部分国家和州不允许限制暗示性
保证,也不允许排除或限制有关损失,因此上述限制可能对
您无效。本保修规定赋予您某些法律权利,您还可享有其他
权利,这些权利因所在国家/地区或州而异。
如需保修服务,请将您的手表送回给
Timex、其联属机构
或购买该表的
Timex 零售店,同时附上填好的“手表维修
单”(
Watch Repair Coupon) 原件。如果您在美国或加拿大,
则可附上填好的“手表维修单”原件或一份书面声明,其中
注明您的姓名、住址、电话号码以及购买日期和地点。请随
表按以下费率寄交邮费和手续费(这不属于修理费):美国
用户请寄一张
8.00 美元的支票或汇票;加拿大用户请寄一
张
12.00 加元的支票或汇票;英国用户则请寄一张 3.50 英镑
的支票或汇票。其它国家和地区的用户,
Timex 会收取邮费

222
223
和手续费。和手续费。切勿在寄送的包裹内夹带特殊款式的
表带或其他个人贵重物品。
如需了解有关保修方面的其他信息,美国用户请致电
1-800-
448-4639
,加拿大用户请致电 1-800-263-0981,巴西用户请
致电
+11 2664 1001,墨西哥用户请致电 01-800-060-00,位
于中美洲、加勒比海、百慕大和巴哈马的用户请致电
(501)
370-5775
(美国),亚洲用户请致电 852-2815-0091,英国
用户请致电
44 020 8687 9620,法国用户请致电 33 381 63
42 51
,德国/奥地利用户请致电 +43 662 889 2130,其他地
区用户请与当地
Timex 零售商或 Timex 经销商联系并了解
有关保修信息。
一旦您的
Timex
®
表需要维修服务,请按照 Timex 国际保
修规定寄交
Timex,或寄至以下地址:TG SERVICE CENTER,
P.O.Box 2740, Little Rock, AR 72203。如对我们的服务有任
何疑问,请致电
1-800-328-2677 或发电子邮件给 custserv@
timex.com 。
延长保修期
仅限在美国提供。只需付 5 美元,您就可以把从购买日开
始计算的保修期再延长
4 年。您可以在正常营业时间内拨
打
1-800-448-4639,使用 AMEX (美国运通)、Discover (发
现)、
Visa 或 MasterCard 等信用卡付款。购买后 30 天内
必须付款。必须注明您的姓名、住址、电话号码、购买日
期以及
5 位数的型号。您也可以将一张 $5 美元的支票寄
至:
TIMEX Extended Warranty, P.O. Box 1676, Dept. EF, Little
Rock, AR 72203.
©2015 Timex Group USA, Inc、TIMEX、INDIGLO、PERFECT
DATE 和 INTELLIGENT QUARTZ 是 Timex Group B.V. 及其子公司
的商标。

225
TIMEX
®
腕時計
TIMEX
®
INTELLIGENT QUARTZ
™
腕時計をお買い上げいただきあ
り が と う ご ざ い ま す 。
Timex 腕時計をご使用の際は、 取り扱い
説明書をよくお読みください。
腕時計によっては記載されているすべての機能が備わっていな
い 場 合 が あ り ま す 。
使い方の詳細やお客様の腕時計の登録は
下記にアクセスしてください:
www.timex.com

226
227
目次
腕時計をスタートさせるには
..............................................229
耐水性と耐衝撃性 .................................................................230
Indiglo
®
ナイトライト ........................................................... 232
日付と時間の設定 .................................................................233
永久カレンダー .....................................................................235
フライバッククロノグラフ .................................................238
フライバッククロノグラフ・コンパス .............................. 244
リニアクロノグラフ ............................................................256
ワールドタイム .....................................................................262
コンパス ................................................................................. 268
潮の干満、 温度、 コンパス ............................................... 274
高度計 ..................................................................................... 282
深度 .........................................................................................289
ヨットレーサー .....................................................................293
クロノグラフタイマー .........................................................302
3GMT .......................................................................................314
タキメーターの機能 .............................................................320
計算尺ベゼルリングの機能 .................................................321
ブレスレットを調整するには..............................................326
ブレスレットのリンクの取りはずし .................................. 328
電池 .........................................................................................329
保証書 ..................................................................................... 331

228
229
腕 時 計 をスタートさせるには
(永久カレンダーのモデルには適用しません)。 腕時計をスター
トさせるには
、 リューズ の 下 からプ ラス チックの ガードをは ずし た
後
、 リューズをケースに向かって押し込みます。
時計によってはリューズをネジで止める必 要 があるものもありま
す。 腕時計のケースにネジ山のある突起が付いている場合は
、
腕時計を設定した後でリューズをネジ込む必要があります。
リューズをネジ込 むには、 リューズをネジ山の付いた突 起に強
く押しつけ
、 右に回して 押し込みます。 リューズがしっかり締ま
る ま で ネ ジ 込 み ま す 。次 回
、 腕時計を設定する際には、 リュー ズ
を引き出す前に
、 リューズを反時計回りに回してネジをゆるめる
必 要 が あ り ま す 。
Timex
®
Intelligent Quartz
™
腕時計をお買い上げいただき
ありがとうございます。 この腕時計はクオーツによるアナログ
技術の未来を表すものです。
Intelligent Quartz の 技 術 は マ イク
ロプロセッサーの パワーを 発 揮し
、 確実性とクオーツによるアナ
ログ時計の精密さをもたらします。
Timex Intelligent Quartz 腕
時計では
、 技術がデザインに組み込まれ、 文字盤を新たなレベ
ルにまで複雑化させています。 追加の独立した
3 針 を 使 うこと
によって
、 普通はデジタル腕時計のみでしか得られない様々な
情報を従来のアナログのフォーマットで表示します。

230
231
警告: 耐水性を維持するため、 お買い上げの腕時計に 200 メ
ートルの耐水性があると表記されている場合以外は
、 水中でボ
タンを押したりしないでください。 水中では絶対にリューズを引
き 出 し た りし な い で くだ さい 。
1. 腕時計の耐水性はクリスタル、 リュー ズ 、 ケースが無傷の場
合に限り保たれます。
2. 腕時計は保証されたダイバーウオッチではありません。
3. 腕時計が塩水にさらされた場合は真水ですすいでください。
4. 耐衝撃性は腕時計の文字盤または裏面に表示されていま
す。 腕時計は
ISO の耐衝撃性試験に合格するよう設計され
ていますが
、 ク リ ス タ ル を 傷 つ け な い よ う に 注 意 し て 下 さ い 。
耐水性と耐衝撃性
腕時計に耐水性がある場合は、 メート ル の マ ーク ( WR_M) が
表 記 さ れ て い ま す 。
耐水性深度
p.s.i.a.* 水面下水圧
30m/98ft 60
50m/164ft 86
100m/328ft 160
200m/656ft 284

232
233
日付と時間の設定
注意: 腕時計のリューズには内側、 中間、 外側の 3 つの位置が
あります。 各位置の違いに慣れるため
、 リューズを外側の位置
まで 引き出した後
、 軽く押してカチッと中間の位置にはまる感
触 を 覚 え て ください 。
日付と時間を設定するには:
時間
リューズを外側の位置まで引き出し
、 正しい時 刻 が示されるま
で回します。 日付が正午ではなく
、 真夜中に変わることを確認
して
、 正確に AM/PM を 設 定 し て く だ さ い 。
INDIGLO
®
ナ イト ラ イト
ボタンまたはリューズを押してライトを作動させます。 INDIGLO
®
ナ イト ラ イト に 使 用 さ れ て い る エ レ クト ロ ル ミ ネ ッ セ ント 技 術 に よ
り
、 夜間や暗い場所で腕時計の文字盤全体が明るくなります。
または

234
235
日付(永久カレンダーには適用されません)
リューズを中間の位置まで引き出し
、 日付の窓に正しい日付が
表れるまで回します。 注意: 日付は午後
10 時と午前 2 時の
間に変わります。 この時間枠に日付の設定をしないでください。
腕時計の稼働機能を損なうことがあります。
日付 / 時間を設定したらリューズを内側の位置まで押します。
秒 針 が 動 き 始 め ま す 。
注 意: 日数が
31 日未満の月は日付を調整する必要があり
ま す 。
永 久 カレン ダ ー
概要
A
B
1 2
3
1 2
3
時針
曜日針
日付針
秒針
分針
リューズ
月針
ボ タン A
(引っ込 ん だもの)
ボ タン B
(引っ込 ん だもの)
内側の
位置
中間の
位置
外側の
位置

236
237
うるう年のオフセット
正確な日付を維持するため
、 この腕時計には近年のうるう年を
オフセットする設定が含まれています。 この設定は
Timex の工
場または電池交換後に行われ
、 見 る だ け で 変 更 は で き ま せ ん 。
このオフセットを見るには、 リューズを中間の位置まで引き出し
ます。 日付針がオフセットを示します:
1 = うるう年後 1 年; 2 = うるう年後 2 年; 3 = うるう年後
3 年; 4 = うるう年。 終了したらリューズを押します。
針が通常の曜日
、 月、 日付の表示に戻ります。
はじめに
この腕時計は永久カレンダーの機能によって、 2100 年まで日付
を調整する必要はありません。 腕時計が小の月やうるう年を自
動的に調整し
、 常に正確な曜日と日付を示します。 曜日と日付
は
Timex の工場でプリセットしてあります。 お客様は時間のみ
を調整してください。 この腕時計には引っ込んだところに
2 つ
のプッシ ュボ タン があります が
、 Timex サービ ス セン ター が 電 池
交換後に日付と曜日を設定するために使うもので
、 その他に使
う こ と は あ り ま せ ん 。

238
239
第 4 中央針の調整
ずれた第
4 中央針を再調整するには:
1. リューズを外側の位置まで引き出します。 上方針と下方針
が自動的にその端にリセットします。
2. 第 4 中央針は 12 時を指しているはずです。 リューズを外
側の位置まで引き出して
5 秒以内に第 4 中央針が 12 時
を指さない場 合 は
、 ボタン A または B を押して 、 針が 12
時を指すまで反時計回りまたは時計回りに回します。
3. 終了したらリューズを内側の位置まで押します。
フライバッククロノグラフ
概要
AA
B
23
1 2
3
1 2
3
上方針
クロノの時刻
第 2 時間帯
第
4 中央針
秒針
日付の窓
リューズ
クロノの分の目盛り
下方針
ボ タン A
ボ タン B
分針
時針
内側の
位置
中間の
位置
外側の
位置

240
241
第 2 時間帯の設定:
1. リューズを中間の位置まで引き出します。 上方針が第 2 時
間帯の時刻
、 第 4 中央針が分を示します。
2. 第 2 時間帯の分が最初の時間帯の分と同じだと、 第 4 中
央針は分針と並ぶはずです。 針が並ばない
、 または第 2 時
間帯でその時間内の分が異なる場合
、 ボタン B を押して、
第 4 中央針を希望する位置まで動かしてください。
3. ボ タン A を押して上方針を 1 時間ごとに前方に動かし、 希
望する第
2 時間帯の時刻にします。 針を速く動かすには、
ボタン A を押し続けます。
4. 終 了したらリューズを押し戻します。
第 2 時間帯
上方針は第 2 時間帯の時刻
を示します。 目盛りは
24 時
間で
、 真夜中が両端で、 正午
が 真 ん 中に あることに 注 意し
て く だ さ い 。 ほ と ん ど の 場 合
、
時間帯の間は時刻ごとで異な
り ま す 。 そ の 場 合
、 第
2 時間帯の分は腕時計が表
示 す る 分 と 同 じ で す 。
AA
B
23
1 2
3
1 2
3

242
243
4. フライバッククロノグラフを ゼロの 位 置 にリセットするには 、
ボタン B (FLY-BACK/RESET [フライバック / リセット]) を押し
ま す 。
ク ロ ノ グ ラ フ を リ セット す る と
、 すべての針がゼロの位置に動
き ま す 。
8 秒後、 腕時計は第 2 時間帯の通常表示を再開し
ま す 。
5. フライバッククロノグラフを作動中にリセットしてリスタート、
リセットま た はリスタートする場 合 は 、 ボタン B ( FLY-BACK/
RESET [
フライバック / リセット] )を 押し 続 け ます 。 リスタート
し た い と き に ボ タ ン を 放 し ま す 。
フライバッククロノグラフ
この腕時計には
4 時間のフライバッククロノグラフが備わって
い ま す 。
1. 開始するには、 ボタン A (START/STOP [開始 / 停止])
を 押 し ま す 。
第
4 中央針が秒を 1/5 秒ごとに示します。 下方針は分の一
の位の数字を示し
、 10 ま で カ ウ ン ト ア ッ プ し て 繰 り 返 し ま す 。
上方針は時間と分 (
10 分単位) を含むトータルタイムを示
し ま す 。 ク ロ ノ グ ラ フ は
4 時間までカウントアップし、 自動的
に 停 止 し ま す 。
2. 停 止するには 、 もう一 度 ボ タン A (START/STOP [開始 / 停止])
を 押 し ま す 。 す べ て の 針 が 動 き を 止 め ま す 。
3. 再 開するには 、 もう一 度 ボ タン A (START/STOP [開始 / 停止])
を 押 し ま す 。

244
245
指示針 (第 4 中央針) の調整
ずれた指示針を再調整するには:
1. リューズを外側の位置まで引き出します。 上方針と下方針
が自動的にその端にリセットします。
2. 第 4 中央針は 12 時を指しているはずです。 リューズを外
側の位置まで引き出して
5 秒以内に第 4 中央針が 12 時
を指さない場 合 は
、 ボタン A または B を押して 、 針が 12
時を指すまで反時計回りまたは時計回りに回します。
3. 終 了したらリューズを押し戻します。
フラ イバッククロノグ ラフ・コン パ ス
概要
A
C
B
1 2
3
1 2
3
上方針
クロノ 時刻
第 2 時間帯
第
4 中央針
秒針
日付の窓
リューズ
クロノの分の目盛り
下方針
ボ タン A
ボ タン B
時針
分針
内側の
位置
中間の
位置
外側の
位置
ボ タン C

246
247
と第 4 中央針は一緒に動きます。 第 4 中央針が 1 回転す
ると
、 上方針が 1 時間動きます。 第 2 時間帯の分が最初
の時間帯の分と同じだと
、 第 4 中央針は分針と並ぶはずで
す 。
3. A を押して上方針を 1 時間ごとに前方へ動かします。 ボタ
ン を お さ え て 針 を 速 く 動 か し ま す 。
4. 終 了したらリューズを押し戻します。
第 2 時間帯は希望によっては 24 時間フォーマットでのホーム
タイムを表示することもできます。 第
2 時間帯をこのように設
定するには
、 日付が正午ではなく、 真夜中に変わることを確か
めて
、 時刻 / 分の表示が 24 時間フォーマットの表示と対応し
て い る こ と を 確 認 し ま す 。
第 2 時間帯
通常
、 上方針は第 2 時間帯の時刻を示します。 目盛りは 24
時間で
、 真夜中が両端で、 正午が真ん中にあることに注意し
て く だ さ い 。
第
2 時間帯の時間の設定:
1. リューズを中間の位置
ま で 引 き 出 し ま す 。 上
方針が第
2 時間帯の
時刻を
24 時間式で示
し
、 第 4 中央針が分を
示 し ま す 。
2. B を押して第 4 中央針
を 前 方 に 動 か し ま す 。
ボタン を おさえ て 針 を 速
く動かします。 上方針
A
C
B
1 2
3
1 2
3

248
249
2. フライバッククロノグラフを停止するには再び A (START/
STOP) を 押 し ま す 。 す べ て の 針 が 動 き を 止 め ま す 。
3. 再開するには、 もう一度 A (START/STOP) を押すか、 または
ク ロ ノ グ ラ フ を ゼ ロ にリ セ ット す る た め
B (FLY-BACK/RESET)
を 押 し ま す 。
ク ロ ノ グ ラ フ を リ セット す る と
、 す べ て の 針 は ゼ ロ に 動 き ま す 。
8 秒後、 腕時計は第 2 時間帯の時刻の通常表示を再開し
ま す 。
4. クロノグラフが作動中に、 リセットし てリスタート 、 リ セ ット ま
た は リ ス タ ー ト で き ま す 。 そ う す る に は
、 B (FLY-BACK/RESET)
を押し続けてクロノグラフをゼロにし
、 リス タートし た いとき
にボタン を 放し ます 。 ボ タン を 放 す 前 にすべ て の 針 がゼロに
戻るまで待つ必要はありません。 計測はボタンを放したとき
から内部で始まります。 この 「フライバック」 機能によって
、
ラップタイムを計ることができます。
フライバッククロノグラフ
この腕時計には
4 時間のフライバッククロノグラフが備わって
い ま す 。
1. フライバッククロノグラフを開始するには、 A (START/STOP)
を押します。 第
4 中央
針が秒を
1/5 秒ごとに
示し
、 下方針が分の一
の位の数字を示して
10
ま で カウントアップし
、
繰り返します。 上方針
は時間と分 (
10 分単
位) を含むトータルタイ
ムを示します。 クロノグ
ラフは
4 時間までカウ
ントアップし
、 自動的に
停 止 し ま す 。
A
C
B
1 2
3
1 2
3

250
251
コンパスはクロノグラフが作動中に、 その働きを妨げず使う
ことができます。 「コンパスの操作」を参照。
コン パ ス の 校 正
コンパスをご使用の前に校正する必要があります。
コンパスは地球の磁場によって作動します。 車両や鉄橋などの
大きな金属物体
、 またはテレビやコンピューターなどの電磁波を
放射する物体に注意してください。 これらは 腕時計の周りの磁
場に影響を及ぼすことがあります。 コンパスをそのような物体の
近くで校正した場合
、 コンパスはその場所でしか正しい読み取
りができません。 コンパスをそのような物体から離れて校正し
た場合
、 それらの近くでは正しい読み取りができません。 正確
な結果を得るには
、 コンパスを使う地域内で校正してください。
す べ て のコン パ ス に い え るように 、 校正や読み取りを行う場合は
コンパスを水平に保ってください。 腕時計が水平ではない状態
で 校 正 ま た は 読 み 取りを 行 うと
、 大 き な 誤 差 が 生 じ ま す 。 ま た
鋼鉄や軟鉄が普通より高い割合で凝縮している地域は
、 正確
な読み取りを妨げることがありますので避けてください。 読み取
りが疑わしい場合は再校正してください。
腕時計をコンピューター
、 電気器具、 テレビ など、 磁気を発する
物の近くに保管しないでください。 腕時計が磁気を帯びて正
確な読み取りができなくなります。 腕時計の一般的な精度は
+/– 10 度以内です。
コン パ ス を 校 正 す る に は:
1. リューズを中間の位置まで引き出し、 指示針が止まるのを
待 ち ま す 。
2. 腕時計を水平に保つか、 または水平な平面に置きます
(バンドが邪魔になる場合は
、 逆 さ に し た カ ッ プ の 上 に ) 。
腕時計の文字盤を下にして置くこともできますが
、
文字盤に傷がつかないように注意してください。

252
253
5. 磁気偏角を設定したくない場合はリューズを押し戻します。
そうでない場合は腕時計が自動的に偏角を補正するよう
、
北が 12 時を指すまでコンパスリングを回します。
6. A または B を押して第 4 中央針をそれぞれ西 (–) または
東 (
+) に 動 かし、 偏角の目盛りを使って、 お客様の現在置
の偏角を指すようにします。 ボタンをおさえて針を速く動か
し ま す 。 例 と し て 下 記 の 図 を ご 覧 く だ さ い 。
7. 終 了したらリューズを押し戻します。
A
B
磁気偏角を -14° (14°W) に設定
3. C (COMPASS) を押して始動させます。 第 4 中央針が 2 回
転して腕時計を回転させるよう促します。 腕時計を水平にし
た 状 態 で ゆ っくりと
2 回転させ、 1 回転ごとに少なくとも 15
秒 か け ま す 。
4. 終了したら、 腕時計を水平にしたまま C (コン パス ) を 押しま
す。 第
4 中央針が前後に動いて校正の終わりを示し、 その
後で現在の磁気偏角の設定に動きます。

254
255
注 意: コンパス操作中は秒針が 2 秒 ご と に 動 き ま す 。 ま た コ
ン パスが 作 動しているとき
、 上方針と下方針が少しずれるこ
とが ありま す が
、 コンパスを解除すると正しい位置に戻ります。
この動きは 普 通で
、 もっとも正確なコンパスの読み取りが得ら
れ ま す 。
コン パ ス の 操 作
通常コンパスは休止しており
、 第 4 中央針は 12 時を指すか、
ま た は ク ロ ノ グ ラ フ の 秒 を 示 し ま す 。
腕時計を水平に持っている間に、 C (COMPASS) を 押し てコン パ
スを作動させます。 コンパスの針が動いて北を指します。 腕時
計を回 すと
、 第 4 中央針は動き続けて常に北を指します。 20
秒後
、 コンパスは自動的にオフになり、 第 4 中央針は通常の働
き に 戻 り ま す 。 こ れ は 電 池 を 長 持 ち さ せ ま す 。
C (COMPASS) を
押すと
、 い つ で もコン パ ス が さら に 20 秒 間オンになります。
コンパスはクロノグラフを使用中に作動させることができます。
第
4 中央針が一時的に操作を切り替えます。 上方針と下方針
は継 続してクロノグラフのタイムを示し
、 クロノグ ラフ のすべ て
の 機 能 は ボ タン
A (START/STOP) と B (FLY-BACK/RESET) に
よ っ て 作 動 し ま す 。

256
257
リニア クロノグ ラフ
概要
リニア 針と第 4 中央針の調整
ずれた第 4 中央針を再調整するには:
1. リューズを外側の位置まで引き出します。下方針が自動的に
目 盛 り の 端 に リ セ ッ ト し ま す 。
2. 第 4 中央針は 12 時を指すはずです。 リューズを外側の位
置まで引き出しても
5 秒以内に第 4 中央針が 12 時を指さ
ない場合は
、 ボタン A を押し、 針が 12 時を指すまで時計
回りに 回しま す 。
3. ク ロ ノ グ ラ フ を リ セット し て も リ ニ ア 針 が 0 を指していない場
合には
、 ボタン B を 5 秒間押し続けてリニア針のフル調整
を開始します。 フル調整には
32 秒間かかります。
4. 終了したらリューズを内側の位置まで押します。
秒針
日付の窓
リューズ
下方針
ボ タン A
ボ タン B
第 4 中央針
時針
リニア 針
分針
A
B
1
2
3

258
259
第 2 時間帯
下方針は第
2 時間帯
の時刻を示します。目盛
りは
24 時間になってお
り
、 午前0時が両端で、
正午が中央にあることに
注 意 し て く だ さ い 。 ほ と
んどの場 合
、 時間帯間
の時差は時間単位です。
その場合
、 第 2 時間帯
の分は腕時計が表示す
る 分 と 同 じ に な り ま す 。
第 2 時間帯の設定:
1. リューズを中間の位置まで引き出します。下方針が第 2 時
間 帯 の時を示し
、 第 4 中央針が分を示します。
2. 第 2 時間帯の時刻の分が第 1 時間帯の分と同じであれ
ば
、 第 4 中央針は分針と並ぶはずです。 この 2 つの針が
並んでいないか
、 第 2 時間帯の分が第 1 時間帯の分と異
なる場合には
、 ボタン B を押して 第 4 中央針を希望の位置
ま で 動 かし てください 。
3. ボタン A を押して下方針を 1 時間刻みで進め、 希望する
第
2 時間帯の時刻にします。 針を速く動かすには、 ボタン
A を押し続けます。
4. 終 了したらリューズを押して 内 側 の 位 置に 戻します。
A
B
1
2
3

260
261
リニアクロノグ ラフ
この腕時計には、 ス プ リット タ イ ム を 4 時間まで計測できるクロ
ノグラフ機能が備わっています。
1. 計測を開始するには、 ボ タン A ( START/STOP [開始 /
停止]) を押します。第
4 中央針が秒を 1/5 秒刻みで示しま
す。 リニア針は分を示し
、 30 分まで積算してリピートします。
下方針は時間と分 (
10 分単位) を含むトータルタイムを示
し ま す 。 ク ロ ノ グ ラ フ は
4 時間まで計測し、
自動的に停止します。
2. 計測を停止するには、 もう一 度 ボタン A ( START/STOP)を 押
し ま す 。 す べ て の 針 が 動 き を 停 止 し ま す 。
3. クロノグ ラフを 0 位置にリセットするには、 ボタン B
(
SPLIT/RESET [スプリット / リセット]) を押します。
ク ロ ノ グ ラ フ を リ セット す る と 、 すべての針が 0 位置に動きます。
8 秒後、 腕時計は第 2 時間帯の通常の時刻表示を再開しま
す 。ク ロ ノ グ ラ フ が 作 動 し て い る 間 は
、 ス プ リット タ イ ム を 計 測 す
ることができます。 ボタン
B (SPLIT/RESET) を押 すと、 すべての
針の動きが停 止しますが
、 クロノグラフはその間も作動し続けま
す 。 ボ タ ン
B (SPLIT/RESET) をもう一度押すと、 作動中のクロノ
グラフの経過時間の表示が再開されます。

262
263
ワールドタ イム
概要
ワー ルド タ イム の 設 定:
1. リューズを中間の位置まで引き出します。 中央針がワールド
タイムの時間帯の都市を示し
、 上方針がその都市の現地時
刻を示します。
2. A または B を押して中央針をホームタイムの時間帯と同じ
都 市 に 合 わ せ ま す 。 ボ タ ン を お さ え て 針 を 速 く 動 か し ま す 。
ど の 都 市 で も 選 べ ま す 。
A
B
C
1 2
3
corrected 3.3.11 with Paulo’s new cities
24 の都市
ワールドタイ
ムの目盛り
秒針
日付の窓
リューズ
下方針
ボ タン A
ボ タン B
ボ タン C
第 4 中央針
季節の目盛り
上方針
時針
分針
内側の
位置
中間の
位置
外側の
位置
A
B
C
1 2 3

264
265
3. リューズを外側の位置まで引き出します。 都市選択針が
12:00 時の位置に逆戻りして、 INDICATOR HAND ADJUST-
MENT
と 示 さ れ ま す 。 5 秒間止まった後で、 上方針がワール
ドタイム (前記のステップで選んだ都市の時刻) を示し
、 中
央 針 がワー ルドタイムの 分を 示し
、 下方針が季節 (「季節の
設定」 を参照) を示します。 重要:中央針が調整を完了する
まで
、 プッシャーまたはリューズをいじらないでください。
(リューズを外側の位置に引き出した後
、 約 10 秒後)。
4. 表示された季節がホームタイムの時間帯と合わない場合は
C を押して 変 えます。 ホームタイムの時 間 帯がデイライトセ
ービングタイムを採用している場合
、 上方針が 1 時間動き
ま す 。
5. A または B を押して、 時刻をそれぞれ前方または後方に動
かし
、 ワールドタイムの時間帯がホームタイムの時間帯と同
じになるよう設定します。 ボタンをおさえて時刻を速く変え
ます。 針は一緒に動き、 中央針が 1 回転すると、 上方針が
1 時間動きます。 設定後は中央針と分針が並びます。
6. 終 了したらリューズを押し戻します。
指示針 (第 4 中央針) の調整
ずれた指示針を再調整するには:
1. リューズを外側の位置まで引き出します。 上方針と下方針
が自動的にその端にリセットします。
2. 第 4 中央針は 12 時を指しているはずです。 リューズを外
側の位置まで引き出して
5 秒以内に第 4 中央針が 12 時
を指さない場 合 は
、 ボタン A または B を押して 、 針が 12
時を指すまで反時計回りまたは時計回りに回します。
3. 終 了したらリューズを押し戻します。
注 意: 針が止まった後 5 秒間、 どの ボ タンも 押 さないと 、 腕
時 計はワールドタイムの設 定に進 みます(「ワールドタイムの 設
定 」を 参 照 )。

266
267
都市の時刻を表示
A または B を押して中央針
を前方または後方に動かし
、
ひ と つ の 都 市 を 選 び ま す 。
上方針が動いて選んだ都市
の時刻を示します。 目盛りは
24 時間で、 真夜中が両端
で
、 正 午 が 真 ん中にあること
に 注 意 し て く だ さ い 。
季節の設定
季節を設定することによって腕時計がデイライトセービングタイ
ム (「夏時間」 とも呼ばれます) を調整します。
この腕時計はひとつの設定によって
、 デ イラ イト セ ービ ン グ タ イ
ムを採用しているすべての都市の
2 つの期間を表します。 腕
時計用として
、 デ イラ イト セ ービ ン グ タ イ ム の 期 間 を 夏 、 スタン
ダ ー ド タ イ ム の 期 間 を 冬 と し ま す 。
ひとつの都市を夏と設定すると
、 同じ半球にあるすべての都市
は自動的に夏と設定され
、 反対側の半球にあるすべての都市
は自動的に冬と設定されます。 この腕時計はどの都市がどの半
球にあるかを認識しています。
C を押して選んだ都 市の季 節を変えます。
A
B
C
1 2 3

268
269
コン パ ス 針 の 調 整
リューズを一番外側まで引き出します。 コンパス針は
12 時を
指しているはずです。 指していない場合は
、 A または B を押し
て
、 針が 12 時を指すまで動かします。 ボタンを押し続けると
針が速く動きます。 終 了したらセンターリューズを押し
、 コン パ
スを再校正します。
コン パ ス の 校 正
コンパスをご使用の前に校正する必要があります。
コンパスは地球の磁場によって働くため
、 車両や鉄橋などの大
きな金属物体
、 またはテレビやコンピューターなどの電磁波を放
射する物体に注意してください。 これらは腕時計の周りの磁場
に影響を及ぼすことがあります。 コンパスをそのような物体の近
くで校正した場合
、 コンパスはその場所でしか正しい読み取り
ができません。 コンパスをそのような物体から離れて校正した
場合
、 それらの近くでは正しい読み取りができません。 正確な
結果を得るには
、 コンパスを使う地域内で校正してください。
コン パ ス
概要
I
I
14
中央の
リューズ
中間
日付の設定
I
I
14
外側
時刻の設定
リューズ
B
A( コ ン パ ス )
偏角の目盛り
コン パス 針
(北端は赤
先 の 尖 った / より長 い )

270
271
す べ て のコン パ ス に い え るように 、 校正や読み取りを行う場合は
コンパスを水平に保ってください。 腕時計が水平ではない状態
で 校 正 ま た は 読 み 取りを 行 うと
、 大 き な 誤 差 が 生 じ ま す 。 ま た
鋼鉄や軟鉄が普通より高い割合で凝縮している地域は
、 正確
な読み取りを妨げることがありますので避けてください。 読み取
りが疑わしい場合は再校正してください。
腕時計をコンピューター
、 電気器具、 テレビ など、 磁気を発する
物の近くに保管しないでください。 腕時計が磁気を帯びて正
確な読み取りができなくなります。 腕時計の一般的な精度は
+/– 10 度以内です。
コン パ ス を 校 正 す るに は:
1. リューズを中間の位置まで引き出し、 指示針が止まるのを
待 ち ま す 。
2. 腕時計を水平に保つか、 または水平な平面に置きます (バ
ンドが邪魔になる場合は
、 逆さにしたカップの上に)。 腕時計
の文字盤を下にして置くこともできますが
、 文字盤に傷がつ
か な い よ う に 注 意 し て く だ さ い 。
3. A または B を押して始動させます。 第 4 中央針が 2 回転
して腕時計を回転させるよう促します。 腕時計を水平にし
た 状 態 で ゆ っくりと
2 回転させ、 1 回転ごとに少なくとも 15
秒 か け る よ う に し ま す 。
4. 終了したら、 腕時計を水平にしたまま A または B を押しま
す。 第
4 中央針が前後に動いて校正の終わりを示し、 その
後で現在の磁気偏角の設定に動きます。

272
273
5. 磁気偏角を設定したくない場合はリューズを押し戻します。
そうでない場合は腕時計が自動的に偏角を補正するよう
、
北が 12 時を指すまでコンパスリングを回します。
6. A または B を押して第 4 中央針をそれぞれ西 (–) または
東 (
+) に 動 かし、 偏角の目盛りを使って、 現在地の偏角を
指すようにします。 針を速く動かすにはボタンを押し続けま
す。 例として次のページの図をご覧ください。
7. 終 了したらリューズを押し戻します。
A
B
磁気偏角を -14° (14°W) に設定
コン パ ス の 操 作
通常コンパスは休止しており
、 第 4 中央針は 12 時を指すか、
ま た は ク ロ ノ グ ラ フ の 秒 を 示 し ま す 。
腕時計を水平に持っている間に、 A または B を 押 し てコン パス
を作動させます。 コンパスの針が動いて北を指します。 腕時計
を回すと
、 第 4 中央針は動き続けて常に北を指します。 20 秒
後
、 コンパスは自動的にオフになり、 第 4 中央針は通常の働き
に 戻 り ま す 。 こ れ は 電 池 を 長 持 ち さ せ ま す 。
A または B を押す
と
、 い つ で もコン パ ス が さら に 20 秒 間オンになります。
注 意: コンパス操作中は秒針が 2 秒 ご と に 動 き ま す 。

274
275
指示針の調整
リューズを一番外側まで引き出します。 指示針は
12 時を指し
ているはずです。 指していない場 合は
、 TIDE または TEMP のプ
ッシュボ タン を 押し て
、 針が 12 時 を 指 す ま で 動 か し ま す 。 TIDE
プッシュボタンは針を時計回り (右回り) に
、 TEMP プッシュボタ
ンは針を反時計回り (左回り) に動かします。 ボタンを押し続け
ると針が速く動きます。 終 了したらリューズを押し戻します。
潮の干満 / 温度の選択
指示針は潮の干満と温度を常に示しています。 温度が表れて
いるとき
、 TIDE プ ッシ ュ ボ タ ン を 押 す と タ イドク ロックに な りま
す。 針は干潮になり
、 そして現在の潮汐へと動きます。 潮の干
満 が示され ているとき
、 TEMP プッシュボタンを押すと温度計に
なります。 針は温度計の目盛りの最初の部分
、 そして 現 在 の 温
度 へ と 動 き ま す 。
潮の干満、 温度、 コンパス
概要
時刻の外側設定
偏角の目盛り
指示針
C (コンパス)
B (潮汐)
A (温度)
リューズ
ター ニング コン パ ス
リン グ
日付
潮汐の目盛り
温度の目盛り
日付の中間設定

276
277
温度計
手首につけた場合
、 温度計の読み込みが体温によって影響さ
れます。より正確な読み込みのため
、 腕時計をはずして、 日陰
に少なくとも数分間置いてください。
腕時計は水中に入れると水温も測定できます。 腕時計を水中
に入 れる前に
、 温度表示を選んであることを確認し、 腕時計が
水中にある間はボタンを押さないように注意してください。
温度は
1 分ごとに計測されますが、 温 度 が 変 化しているときに
はより頻繁に計測されます。
タ イド ク ロック
タイドクロックは指示針が常に右回りに回転し
、 針が 左を指した
ときは 潮が 上 昇し
、 右を指したときは潮が下がります。 次の満
潮 / 干潮の時間は潮汐の目盛りに表れます。
潮の干満は太陽の位置と海岸の地形によって影響をうけますの
で
、 タイドクロックは満潮と干潮の正確な時間を示すことはでき
ません。 定期的な調整が必要な場合もあります。
タ イドクロック を 設 定 す る に は
、 リューズを中間の位置まで引き
出 し ま す 。
TIDE または TEMP プッシュボ タン を 押し て 、 針を現
在 の 潮 汐 ま で 動 か し ま す 。
TIDE プッシュボタンは針を 時 計 回り
(右回り) に
、 TEMP プッシュボタンは針を反時計回り (左回り) に
動かします。 終 了したらリューズを押し戻します。
コン パ ス の 校 正
コンパスをご使用の前に校正する必要があります。
コンパスは地球の磁場によって働くため
、 車両や鉄橋などの大
きな金属物体
、 またはテレビやコンピューターなどの電磁波を放
射する物体に注意してください。 これらは腕時計の周りの磁場
に影響を及ぼすことがあります。 コンパスをそのような物体の近
くで校正した場合
、 コンパスはその場所でしか正しい読み取り
ができません。 コンパスをそのような物体から離れて校正した
場合
、 それらの近くでは正しい読み取りができません。 正確な
結果を得るには
、 コンパスを使う地域内で校正してください。

278
279
す べ て のコン パ ス に い え るように 、 校正や読み取りを行う場合は
コンパスを水平に保ってください。 腕時計が水平ではない状態
で 校 正 ま た は 読 み 取りを 行 うと
、 大 き な 誤 差 が 生 じ ま す 。 ま た
鋼鉄や軟鉄が普通より高い割合で凝縮している地域は
、 正確
な読み取りを妨げることがありますので避けてください。 読み取
りが疑わしい場合は再校正してください。
腕時計をコンピューター
、 電気器具、 テレビ など、 磁気を発する
物の近くに保管しないでください。 腕時計が磁気を帯びて正
確な読み取りができなくなります。 腕時計の一般的な精度は
+/– 10 度以内です。
コン パ ス を 校 正 す るに は:
1. リューズを中間の位置まで引き出し、 指示針が止まるのを
待ちます。
2. 腕時計を水平に保つか、 または水平な平面に置きます (バ
ンドが邪魔になる場合は
、 逆さにしたカップの上に)。 腕時計
の文字盤を下にして置くこともできますが
、 文字盤に傷がつ
か な い よ う に 注 意 し て く だ さ い 。
3. C (COMPASS) を押して始動させます。 第 4 中央針が 2 回
転して腕時計を回転させるよう促します。 腕時計を水平にし
た 状 態 で ゆ っくりと
2 回転させ、 1 回転ごとに少なくとも
15 秒 か け る よ う に し ま す 。
4. 終了したら、 腕時計を水平にしたまま C (コン パス ) を 押しま
す。 第
4 中央針が前後に動いて校正の終わりを示し、 その
後で現在の磁気偏角の設定に動きます。

280
281
5. 磁気偏角を設定したくない場合はリューズを押し戻します。
そうでない場合は腕時計が自動的に偏角を補正するよう
、
北が 12 時を指すまでコンパスリングを回します。
6. A または B を押して第 4 中央針をそれぞれ西 (–) または
東 (
+) に 動 かし、 偏角の目盛りを使って、 現在地の偏角を
指すようにします。 針を速く動かすにはボタンを押し続けま
す。 例として次のページの図をご覧ください。
7. 終 了したらリューズを押し戻します。
A
B
磁気偏角を -14° (14°W) に設定
コン パ ス の 操 作
通常コンパスは休止しており
、 第 4 中央針は 12 時を指すか、
ま た は ク ロ ノ グ ラ フ の 秒 を 示 し ま す 。
腕時計を水平に持っている間に、 C (COMPASS) を 押し てコン パ
スを作動させます。 コンパスの針が動いて北を指します。 腕時
計を回 すと
、 第 4 中央針は動き続けて常に北を指します。 20
秒後
、 コンパスは自動的にオフになり、 第 4 中央針は通常の働
き に 戻 り ま す 。 こ れ は 電 池 を 長 持 ち さ せ ま す 。
C (COMPASS) を
押すと
、 い つ で もコン パ ス が さら に 20 秒 間オンになります。
注 意: コンパス操作中は秒針が 2 秒 ご と に 動 き ま す 。

282
283
高度計
概要
指示針(第 4 中央針)の調整
リューズを一番外側まで引き出します。 上方と下方の逆進針が
その目盛りの開始位置に自動的にリセットします。 指示針 (第
4 中央針) は 12 時を指しているはずです。 指していない場合
は
、 A と B ボタン 、 あるいそのいずれかを押して、 針が 12 時を
指 す ま で 動 か し ま す 。
A ボタンは針を時計回り (右回り) に、 B
ボタンは針を反時計回り (左回り) に動かします。 ボタンを押し
続けると針 が速く動きます。 終了したらリューズを押し戻します。
高度計の校正
高度計をご使用の前に校正する必要があります。
高度計は圧力によって高度を測定しますが
、 圧力は場所によっ
て異なるため
、 高度計をすでに分かっている高度値か、 または
ある場所の標準の高度に合わせることが大切です。 天候の変
化で突然圧力が変わった場合
、 お客様の位置が変わらなくて
も
、 高度計の読み込みが +-100 メートル (328 フィート ) オフ に
高度計の目盛り
(百)
上方の逆進針
(千の位の数値)
ボ タン C
(単位)
ボ タン A
(最高の高度)
ボ タン B
(最低の高度)
下方の逆進針
(単位)
リューズ

284
285
なることがあります。 圧力が激しく変わった場合は、 すでに分 か
っている高度に再校正してください。
高度計を校正するには:
1. リューズを中間の位置まで引き出し
、 指示針が止まるのを
待ちます。
2. リュー ズ を 引 い た ときに 、 高度計が OFF の場合は、 下方の
逆進針が高度計を最後に使ったときに選んだ単位を指しま
す 。 そ う で な い 場 合 は
、 下方の逆進針が高度計の表示に現
在選んでいる単位を指します。 第
4 中央針と上方の逆進針
は現在の高度を指しているはずです。
3. A を押して第 4 中央針を反時計回りに、 または B を押して
時計回りに回して
、 第 4 中央針が校正の高度を指すまで回
し ま す 。
A または B を押し続けると、 中央針が速く動きま
す。 上方の逆進針は
、 第 4 中央針で表示される高度値に
関 係 し て 動 き ま す 。
4. 終 了したらリューズを押し戻します。
高度計のオン / オフ
高度計をオンにするには
C を押します。 下方の逆進針が
METERS を 指 し ま す 。 ト ッ プ リ ン グ の 目 盛 り に よ っ て 、 第 4 中央
針が現在の高度の百と十の位の数値を
、 10 METERS/FEET ごと
の目盛りで示します。 上方の逆進針は現在の高度の千の位の
数値を
1,000 METERS/FEET ご と の 目 盛 り で 示 し ま す 。
単位を METERS から FEET に変 えるには C をもう一度押しま
す。 単位を
FEET から METERS に変 えるには C を 2 回押しま
す(高度計がオフになった後 でオンに戻り
、 単位が METERS に
変 わ っ て い ま す )。

286
287
高度計の現在の単位を FEET に設定してオフにするには C を
押します。 高度計の単位を
METERS に設定してオフにするには
C を 2 回押します(下方針が最初に FEET を指した後 で OFF
を 指 し ま す )。
高度計は
、 作 動 させ て から 60 分後に自動的にオフになります。
高度計の最低 / 最高の高度のリコール
記録した最高の高度を見るには
A を押します。 ボタンを押し
たときに高度計がオフの場合
、 下方の逆進針が記録した計測
単位で最高の高度を示します。 第
4 中央針は最高の高度の
百と十の位の数値を
、 10 METERS/FEET ごとの 目 盛りで 示し
ます。 上方の逆進針は最高の高度の千の位の数値を
、 1,000
METERS/FEET ご と の 目 盛 り で 示 し ま す 。
記録した最高の高度は 10 秒間表示されます。 表示をもう 10
秒間継続したい場合は
、 最初の 10 秒間が終わる前に A を
押 し ま す 。
単位を
METERS から FEET に、 または FEET から METERS に変
えるには
C を 押 し ま す 。
例: 高度 = 2310 メート ル 例: 高度 = 7580 フィート

288
289
記録した最低の高度を見るには B を押します。 ボタンを押し
たときに高度計がオフの場合
、 下方の逆進針が記録した計測
単位で最低の高度を示します。 そうでない場合は
、 現在選んで
いる単位によって最低の高度を示します。 第
4 中央針が最低
の高度の百と十の位の数値を
、 10 METERS/FEET ごとの目 盛り
で示します。 上方の逆進針は最高の高度の千の位の数値を
、
1
,000 METERS/FEET ご と の 目 盛 り で 示 し ま す 。
記録した最低の高度は 10 秒間表示されます。 表示をもう 10
秒間継続したい場合は
、 最初の 10 秒間が終わる前に B を
押します。 単位を
METERS から FEET に、 または FEET から
METERS に変 えるには C を 押 し ま す 。
深度
概要
注 意: 時間を設定する際
、 リューズを 3 の位置に引き出すと
中央針と下方針は自動的に測定します。
3
AA
B
1
2
3
2
3
2
3
中央針
表示 OFF
ボ タン A
ボ タン B
下方針
リューズ

290
291
温度
温度のセンサーは常にオンになっていて
、 少 な くとも 60 秒に 1
回は度数を表示します。 温度は下方針と目盛りで示されます。
手首につけた場合
、 温度計の読み込みが体温によって影響され
ま す 。 よ り 正 確 に 読 み 込 む に は
、 腕時計を手首から外します。
深度センサーのオン / オフ
センサーはふつうはオフになっており
、 水につける前に手でオン
に す る 必 要 が あ り ま す 。 ボ タ ン
B を押して 放し、 センサーをオン
にします。 第
4 中央針が OFF (6 時) の位置から 12 時の位置
まで動き
、 少 な くとも 5 秒に 1 度読み込みを始めます。 深度が
増すと
、 深度の目盛りが示され第 4 中央針の針が実際の深さ
を指します。 読み込みが
5 分間 0 から 2 メートル (0 から 6 フ
ィート) のままの場合
、 センサーは自動的にオフになります。 セ
ンサーを 手 でオフにするには
、 ボタン B を 2 秒間押し続けま
す。 第
4 中央針が OFF (6 時) の位置まで動きます。
最大深度 / 最低温度のリコール
水面に浮上した後
、 リューズ を ゆ る め 、 中間の位置まで引き出
します。 中央針が
、 最新の潜水中に記録された最大深度の数
値を示し
、 下方針が最低温度の数値を示します。 深度センター
を 再 び 作 動させると
、 記録は消去されます。
腕時計がまだ使用されていなかったときは、 中央針は 0 メー
ト ル / フィート ま で
、 下方針は 0°C/32°F ま で 動 く は ず で す 。 リ ュ
ーズは
、 使用、 または水につける前に元どうりにしめる必 要が
あ り ま す 。

292
293
バッテリー残量の検出
腕時計はバッテリー残量の状況を測定し
、 現 在 の バッテ
リー残量を視覚的に表示します。 バッテリー残量のレベルは
、
「普通」
、 「低」、 「電池交換が必要」 で分類され、 それぞれ秒針
の 動 き で 示 さ れ ま す 。
「普通」 レベルの場合
、 秒針は普通に作動して、 毎 秒ごとにひと
つ 針 の 位 置 が 動 き ま す 。
腕時計のバッテリー残量が 「低」 レベルになると
、 秒針は 2 秒
間隔で動き
、 二つの針の位置で動きます。 腕時計のバッテリー
残量が 「低」 になったときには電池の交換をおすすめします。
腕時計の電池残量が交換が必要なレベルになると、
秒針が 5
秒間隔でしか動かなくなり、
5 刻みの針位置で動くことになりま
す 。こ の 時 点 で は 、
深度センサーを作動させることは できなくな
り、
直ちに電池交換が必要です。
ヨット レ ー サ ー
2 31
A
B
C
時針
秒針
第 4
中央針
リューズ
上方
針
PERFECT
DATE
™
目盛
下方針
分針

294
295
PERFECT DATE (パーフェクト日付)
腕時計の PERFECT DATE
™
機能で、 2060 年まで調整が不要で
す。 時計は自動的に小の月とうるう年を考慮して、
常に正しい
日付を表示します。 日付は
Timex の 工 場 で プ リセットし て あり
ます。 ご購入された時計を最初にご使用になるときに、
日付表
示がお住まいの現地日付より前または後である場合は、
現地
日付に更新する必要があります。 リューズを外側の位置まで引
き出します。 第 4 の針が文字盤を 1 回転し、
約 5 秒間 12 時
の位置で停止したら、
現在設定されている日付に移動します。
リューズを前に回して時刻を現在の日付の方に進めます (後ろ
に回すと現在の日付の方に戻ります)。 深夜を過ぎるごとに日
付が
1 日変更されます。 現地日付を設定した後リューズを回
し続けて、
午前/午後を含め、 針が現地時刻の位置になるよう
にします。 時刻を設定したら、
リューズを押して元の位置に戻
し て 閉 じ ま す 。 リ ュ ー ズ を 押 す と 第
4 中央針が日付を表示しま
す 。 こ の 針 は 、
ケースのトップリングに示された現在の日付ま
で移動します。 この針は日付が読める程度の時間停止してか
ら
12 時間の静止位置に戻ります。 PERFECT DATE™
機能は
時間モードでのみ作動することにご注意ください。
電池を交換
した場合は、
PERFECT DATE
™
機能を較正し直してください。 電
池交換が必要になった場合は、
時計を Timex サービ ス セン タ
ーに送付されることを推奨します。 同センターでは電池を交換
し、
時計のお届け先の現地時間で PERFECT DATE
™
機能を再
較 正し たします 。
第 4 中央針の調整
ずれた第
4 中央針を再調整するには:
1. リューズを位置 3 までに引き出します。 上方針と下方針が
自動的にその端にリセットします。
2. もしリューズを位置 3 まで 引き出して から 10 秒以内に第 4
中央針が
12 時を指さない場合は、 ボタン A または B を押
して
、 針が 12 時を指すまで反時計回りまたは時計回りに回
し ま す 。 ボ タ ン
A または B を 押し たままでいると針 の 回 転

296
297
が速くなります。 注意: リューズを位置 3 まで引き出してか
ら
5 秒間何もしないと、 第 4 中央針が移動して現在の日付
を表 示します。
3. 終了したらリューズを位置 1 まで押し込みます。
モ ード 選 択
ボタン
C を押して上方針を必要な機能まで進めます。
時間:
現在の時刻のみを表示します (パーフェクト日付機能は時間モ
ードのみで作動します)。
ヨットレ ー サ ー タ イ マ ー 5:
カウントダウン タイマーが
5 分 前 に ス タートし 、 ゼロになるとクロ
ノグラフが開始されます。
ヨットレ ー サ ー タ イ マ ー 3:
カウントダウン タイマーが
3 分 前 に ス タートし 、 ゼロになるとクロ
ノグラフが開始されます。
ヨットレ ー サ ー タ イ マ ー 1:
カウントダウン タイマーが
1 分 前 に ス タートし 、 ゼロになるとクロ
ノグラフが開始されます。
ク ロ ノ:
クロノグ ラフ は カウントダウン タイマーなし で 作 動しま す 。
ヨットレ ー サ ー タ イ マ ー の 操 作
この腕時計には
、 5、 3、 1 分間のカウントダウンタイマー機能が
搭 載 され てい ま す 。 カウントダウン タイマー が ゼロに なると
、 1 時
間のクロノグラフが自動的にスタートします。
1. ボ タン C を押 すと、 上方針が設定したい 5、 3、 1 分間の ヨ
ットレ ー ス タ イ マ ー モ ード を 表 示 し ま す 。
2. タイマーを開始するには、 ボタン A (START/STOP [開始/停
止])を押します。 第
4 中央針が秒カウントダウンを表示し、
下方針が分カウントダウンを表示します。 (注意: カウントダ
ウンタイマーが作動中は、 ボタン B と C は 作 動 し ま せ ん 。)
3. タイマーを停止させるには、 ボタン A(START/STOP [開始/停

298
299
止 ] )を 押 す と 、 カウントダウンプロセスが停止します。 (注意:
カウントダウン タイマーがリセットされ るま で ボ タン
C は作動
し ま せ ん 。)
4. リ セット す る に は 、 ボタン B (SPLIT/RESET [ ス プ リット / リ セ ッ
ト]) を
3 秒間押し続けると、 カウントダ ウン タイマー が 最 初
に選 択した
5、3、 1 分間で再開します。
ヨットレーサータイマーの通常操作では、 カウントダウン タイマー
がゼロに 達すると
、 クロノグラフが自動的にスタートします。 ま
た
、 カウントダ ウン タイマー が 1 分ごとに 、 そして最 後 の 1 分の
最後の
5 秒前に警告音を発し、 クロノグラフ機能がスタートしま
す 。 ク ロ ノ グ ラ フ は
30 分間のシーケンスでサイクル 2 回、 合計
1 最大時間作動します。
クロノグ ラフ操 作
この腕時計は
1 時間のクロノグラフ機能が搭載されており、 ヨッ
トレーサータイマーとは独立に作動することができます。
1. 上方針が 30 分間のクロノグラフフ目盛りの開始点に位置す
るま で ボ タン C を押します。
2. タイマーを開始するには、 ボタン A (START/STOP [開始/停
止]) を押します。 第
4 中央針が秒カウントアップを表示し、
下方針が 5 分 間 の ス ケ ー ル で 分 カウントアップ を 、 そして 上
方針が
30 分間のスケールで 30 分 間 カウントアップ を 示し
ます。 下方針が
5 分 の印に達 すると、 ゼロの位 置に 戻り、 上
方針は
30 分間スケールで継続して進みます。 (注意: クロ
ノグラフが作動中はボタン
C は 作 動 し ま せ ん 。)
3. スプリット時間を取るにはボタン B (SPLIT/RESET [ ス プ リッ
ト/リセット]) を押します。 上方針
、 下方針、 第 4 中央針が
それぞれの位置で停止し
、 スプリット (ラップ) 時間であるこ
とを示します
、 クロノグ ラフ は タイミン グ シーケン ス を 維 持 し
ますが
、 張りは停止しています。 針を動かすには、 B (SPLIT/
RESET [スプリット/リセット]) を押すと、 針 は 素 早 く動 い て 経
過時間合計を表示します。
4. 停止させるには、 ボ タン A (START/STOP [開始/停止])を押

300
301
すと、 クロノグラフが停止します。 (注意: クロノグラフを停
止させ ると
、 ク ロ ノグ ラ フ が リ セ ット さ れ る ま で 、 ボタン C は
作 動 し ま せ ん 。)
5. リ セット す る に は 、 ボタン B (SPLIT/RESET [ ス プ リット / リ セ ッ
ト]) を
3 秒間押し続けると、 クロノグ ラフが 30 分間の最初
に 戻りま す 。
通常の操作ではクロノグラフは
30 分間のシーケンスでサイクル
2 回、 合計 1 最大時間作動します。 この時間が経過すると、 上
方針は
30 分間印に止まり、 下方針はゼロに戻ります。 クロノグ
ラフ機能を再度利用するには
、 利用前にこの機能をリセットす
る必要があります。 (注意: 最大
1 時間が経過すると、 ボ タン B
を 3 秒間以上押し続けてクロノグラフをリセットするまえ、 ボタ
ン
A は 作 動 し ま せ ん 。)
INDIGLO
®
ナ イト ラ イト ( PRO バ ージョン の み )
Yacht Racer PRO に は 、 INDIGLO
®
ナ イト ラ イト 機 能 が 追 加 さ
れています。 暗がりや光がない条件下でもリューズを押して
INDIGLO
®
ナイトライト機能を作動させれば、 文字盤を容易に
読み取ることができます。
Yacht Racer PRO には文字盤に特殊
蛍光素材が使用されており、 発光すると文字盤を読み取るのに
十分な照度が得られますが、
消光後には使用者の夜間視力は
低 減し ない ように な って いま す 。

302
303
クロノグ ラフタ イマー
秒針
台
4
中央針
上方
針
PERFECT
DATE™
目盛
分針
時針
リューズ
下方針
2 31
A
B
C
PERFECT DATE (パーフェクト日付)
時計の PERFECT DATE
™
機能で 2060 年まで調整が不要で
す。 時計は自動的に小の月とうるう年を考慮して、 常に正しい
日付を表示します。 日付は
Timex の 工 場 で プ リセットし て あり
ます。 ご購入された時計を最初にご使用になるときに、 日付
表示が現地日付より前または後である場合は、 現地日付に更
新する必要があります。 リューズを外側の位置まで引き出しま
す 。 第
4 中央針が文字盤を1回転し、 12 時の位置で約 5 秒間
停止したら、 日付を現在設定されている日付に移動します。 リ
ューズを前に回して時刻を現在の日付の方に進めます (後ろに
回すと現在の日付の方に戻ります)。 深夜
12 時 を 過 ぎるごとに
日付が
1 日変更されます。 現地日付を設定した後リューズを回
し続けて、 午前/午後を含め、 針が現地時刻の位置になるよう
にします。 時刻を設定したら、 リューズを押して元の位置に戻
して閉じます。 時計が正常に作動していれば、 リューズを押す
と第
4 中央針が日付を表示します。 この針は、 ケースのトップ

304
305
リングに示された現在の日付まで移動します。 この針は日付が
読める程度の時間停止してから
12 時の静止位置に戻ります。
PERFECT DATE
™
機能は
、
時 間 モードで の み 作 動することに
ご 注 意 く だ さ い 。
電池を交換した場合は、 PERFECT DATE 機能
を較正し直してください。 電池交換が必要になった場合は、 時
計を
Timex サービスセンターに送付されることを推奨します。
同センターでは電池を交換し、 時計のお届け先の現地時間で
PERFECT DATE 機能を再較正したします。
第 4 中央針の調整
ずれた第
4 中央針を再調整するには:
1. リューズを位置 3 までに引き出します。 上方針と下方針が
自動的にそれぞれの端にリセットされます。
2. もしリューズを位置 3 まで 引き出して から 10 秒以内に第 4
中央針が
12 時を指さない場合は、 ボタン A または B を押
し て 、 針 が
12 時を指すまで反時計回りまたは時計回りに回
し ま す 。 ボ タ ン
A または B を 押し たままでいると針 の 回 転
が速くなります。 注:リューズを位置 3 まで 引き出してから 5
秒間何もしないと、 第
4 中央針が移動して現在の日付を表
示します。
3. 終了したらリューズを位置 1 まで押し込みます。
モ ード 選 択
ボタン C を押して上方針を必要な機能まで進めます。
時刻
現在の時刻のみを表示します (PERFECT DATE
™
能機は時間モ
ードのみで作動します)。
クロノグ ラフ操 作
この腕時計には、 スプリットタイムを
4 時間まで計測できるクロ
ノグラフ機能か備わっています。 4 時間後にクロノグラフは自動
的に作動停止します。 これにより、 クロノグラフが不意に作動し
ても電池残量が節約されます。

306
307
1. 文字盤上方の針がクロノグラフの上方針目盛の開始点に、
下方の針が下方針目盛の
0 に 位 置 するまでボタン C を押
します。
2. タイマーを開始するには、 ボタン A( START/STOP [開始 / 停
止]) を押します。 第
4中央針が秒カウントアップを表示し、
下方針が
30 分間の目盛で分カウントアップを、 そして上方
針が
4 時間の目盛で時間カウントアップを示します。 下方
針は
30 分のマークに達すると、 ゼロの位置に戻り次の 30
分を開始しますが、 上方針は
4 時間目盛で継続して進みま
す。 (注:クロノグラフが作動中はボタン
C は 作 動 し ま せ ん 。)
3. スプリット時間を取るにはボタン B (SPLIT/RESET [ ス プ リッ
ト/リセット]) を押します。 上方針、 下方針、 第
4 中央針が
それぞれの位置で停止し、 スプリット (ラップ) 時間である
ことを示します、 クロノグラフはタイミングシーケンスを維 持
し ま す が 、 針 は 停 止 し て い ま す 。 針 を 動 か す に は 、 ボ タ ン
B
(
SPLIT/RESET [スプリット/リセット]を押すと、 針は素早く動い
て経過時間合計を表示します。
4. 停止させるには、 ボタン A ( START/STOP [開始 / 停止]) を
押すと、 クロノグラフが停止します。 (注:クロノグラフを停止
さ せ る と 、 ク ロ ノ グ ラ フ が リ セ ッ ト さ れ る ま で 、 ボ タ ン C は作
動 し ま せ ん 。)
5. クロノグラフを停止後にリセットするには、 ボタン B (SPLIT/
RESET [スプリット/リセット]) を押して、 クロノグラフを 2 つ
のサブダ イヤル の
30分と 4 時間の目盛開始点に戻します。
通常の操作ではクロノグラフは 30 分間のシーケンスでサイク
ル
28 回、 合計 4 最大時間作動します。 この時間が経過する
と、 上方針は
30 分のマークで止まり、 下方針はゼロに戻りま
す。 クロノグラフ機能を再度利用するには、 利用前にこの機能
をリセットする必要があります。 (注:最大
4 時間が経過すると、
ボタン
B を押してクロノグラフをリセットする前には、 ボタン A
は 作 動 し ま せ ん 。)

308
309
カウントダ ウン タイマー
この時計にはカウトダウンタイマー機能が備わっています。
特記事項:上方針、 下方針、 大4中央針は、 下記のステップ 3,
4, 5 では連動します。 分針と秒針を前進/後退させるに従い、 カ
ウントダウンタイマー作動中に時間を加算または減算するよう
3
本の針が一緒に反応することが分かります。 リューズを中間位
置から外側に引き出した後にボタン
C を 押 す と 、 次 の よ う な 針
の連動サイクルが進みます: 上方針 (ボタン
Cを押す) - 下方針
( ボタン
C を押す) - 第 4 中央針 (ボタン C を押す) を上方針に
戻す…. この操作でサイクルを進めて、 カウントダウンしたい時
間を設定するための必要な針の調整が可能となります。 リュー
ズを押し込むと設定手順が終了し、 このサイクルの任意の時点
でのそれまでの設定値を確認することができます。
カウントダ ウン タイマーを設 定 す るには
カウントダウン タイマーは 、 カウントダウン 機 能 が 作 動してい な
い 場 合 の み で 設 定 すること が できま す 。 カウントダウン タイマー
を以前に使用したことがあれば、 リセットは不要です。 タイマー
が現在作動中である場合は、 それを停止させてから、 カウント
ダウンタイマーを設定するためにリセットしなければなりません。
1. 上方針がタイマー目盛のどこかに位置するまでボタン C を
押 し ま す 。 タ イ マ ー を 以 前 に 設 定 し た こ と が あ る と 、 こ の 針
は以前に設定された時間を示します。 最初にタイマーを設
定する場合は、 この針はタイマー目盛の
0 を 示 し ま す 。
2. リューズを中間の位置まで引き出します。
3. 希望する時間を 30 分単位で (最長 4:00:00 まで) 設定す
る に は 、 ボ タ ン
A を押して上方針を反時計回り (ボタン B
を押すと時計回り) に移動させて、 希望する時間に設定し
ます。 希望する時間を
30 分単位の数値で設定しているこ

310
311
とに留意してください (例: 希望するカウントダウン時間が
2:53:30 であれば3時間を選択します)。時間数設定が完了し
た ら 、 ボ タ ン
C を押して 設 定 を確認します。
4. 希望する分数が選択できるまで、 ボタン A を押して下方針
を反時計回り (ボタン
B を押すと時計回り) に移動させるこ
とにより、 希望する時間を
1 分単位で設定することができ
るようになりました。 希望する時間を
1 分単位の数値で希
望時間に調整していることに留意してください (例: 希望す
るカウントダウン 時 間 が
2:53:30 で あ れ ば 、 ボ タ ン A を 7
回押して、 カウントダウン時間合計を
3 時間から 2:53:00 に
移動させます)。 時間針が
3 時間のマーカーから 2.5 時間マ
ーカーに向かい、 やや後退することが分かります。 分数の正
確な設定が完了したら、 ボタン
C を押して 設 定 を確認しま
す。
5. 希望する秒数が選択できるまで、 ボタン A を押して 第 4 中
央針を反時計回り (ボタン
B を押すと時計回り) に移動させ
ることにより、 希望する時間を1秒単位で設定することがで
きるようになりました。 希望する時間
1 秒単位の数値で設
定していることに留意してください (例: 希望するカウントダ
ウン 時 間 が 2:53:30 であ れ ば ボタン B を 30 回押して 30 秒
を選択します)。 秒数設定が完了したら、 リューズを位置
1
に押して、 完了したカウントダウンタイマーの値選択を確認
します。
カウントダ ウン タイマーの 操 作
カウントダウン タイマーを 希 望 するカウントダウン 長さに 設 定 す
れ ば 、 カウントダウン タイマーを 作 動 させることが で きま す 。
カウントダ ウンシー ケン ス を 開 始するに は: ボタン
A を押して
カウントダウン タイマーを 開 始 させます 。 第
4中央針と下方針が
反時計回りに動き出します。 上方針は時計回りに動きます。 こ
れらの針は、 カウントダウンタイマーが設定時間を終了し残り
時 間 が ゼロに なるま で 、 カウントダウンシ ーケン ス で の 残り時
間 を 継 続し て 示します 。 カウントダウンシ ーケン ス の 残り時 間

312
313
が ゼ ロに な ると 、 チャイム が 鳴りカウントダ ウン が 完 了し たこと
を知らせます。
カウントダ ウンシー ケン ス を 中 断するに は: カウントダ ウンシー
ケンス が ゼロになる前に停 止させたい 場 合は 、 ボタン
A を押し
て停止させます (第
4 中央針そして上方針、 下方針が停止しま
す) カウントダウンシーケンスを停止した時点からシーケンスを
再開させたい場合は、 ボタン
A をもう一度押して再開させます
(第
4 中央針そして上方針、 下方針が再度動き出します)。
カウントダ ウンシー ケン ス をリセットするに は: カウントダウンシ
ーケン ス が ゼロに なりチャイム が 鳴 れ ば 、 ボタン
B を 押し て カウ
ントダ ウン タイマーをリセットす ることが できま す ( カウントダウン
機能を使用する前に、 第
4中央針と上方針、 下方針が移動して
設定値を示します)。
カウントダ ウン タイマー値 をクリするには : 必 要 で あ れ ば 、 カ ウ
ントダ ウン タイマー の 値 をゼロにクリアすること が できます 。 カウ
ントダウンタイマーが作動しておらずリセットされている場合の
みにクリア 操 作 を 行 うことが できます 。 カウントダ ウン タイマー
が作動中であれば、 最初にボタン
A を押し て カウントダ ウンシ
ーケンスを停 止させてからボタン
B を 押 し ま す 。 こ れ に よ り 、 カ
ウントダウンタイマーが現在選択されている値にリセットされま
す 。 カウントダ ウン タイマー の 値 をゼロにクリア するに は 、 ボタン
B を 2 秒間押し続けます。 説明に従いカウントダウンタイマーの
値を新たに希望する時間に設定します。
ス プリット タ イム 機 能: カウントダ ウン タイマーが 作 動 中 に 、 ス プ
リット機能を利用してカウントダウンシーケンスの残り時間を知
ることができます。
スプリット機能を使用するには、 ボタン
B を押して、 上方針、
下方針、 第
4 中央針の動きを止めます。 針の動きが止まって
い てもカウントダ ウン 機 能 は 作 動し て い ます 。
上方針、 下方針、 第
4 針の動きを再開するには、 ボタン B を
もう一度押して針を正しい位置に移動させると、 カウントダウン
シーケンスの現在の時間を示します。

314
315
3GMT
秒針
リューズ
回 転トップ リン グ
(24 時間表示)
第 4 中央針
分針
時針
内側リング/数字
(24 時間表示)
A
2 31
3 タイムゾーン 機 能
この腕時計には
3 ヶ所のタイムゾーンを表示する機能が搭載
さ れ て お ま す:
1. 時刻と分の針: 標準 12 時間表示で時間を示します。
注意: 日付ウィンドウに表示される日付は
、 これら 2 本の針
で表示される時刻と連動しています。
2. 第 4 中央針と内側リング: 標準 24 時間表示で時間を示し
ます。
3. 第 4 中央針とケース回転トップリング: 24 時間表示で時間
を示します。
第 4 中央針の調整
ずれた第
4 中央針を再調整するには:
1. リューズを位置 3 ま で に 引 き 出 し ま す 。
2. 第 4 中央針は 12 時 を 指 す は ず で す 。 5 秒以内にリューズ
を外側の位置まで引き出しても 第
4 中央針が 3 秒以内に

316
317
3. リューズを位置 2 に引き出します。 第 4 中央針が、 その時
刻内で分の現在調整された位置を指します。
4. ボ タン A を押して第 4 中央針を時計回りに移動させ、 分針
と 一 致 さ せ ま す 。 ボ タ ン
A を押し たまま でいると針 の 回 転 が
速 くなりま す 。
5. リューズを位置 3 までに引き出します。 第 4 中央針は 12
時を指します。
6. リューズを回して、 時間針と分針が正しい時刻に位置させま
す 。
7. 終了したらリューズを位置1ま で 押 し 込 み ま す 。
注意: 第
4 中央針は、 その時刻内で分の現在調整された時
間を追跡します。 第
2、3 タイムゾ ーン は 両 方とも第 4 中央針
を利 用しますので
、 第 2、 3 タイムゾーンで 追 跡され ている 2
ヶ所は 共に、 その時刻内で同じ分を利用して正確な時間を刻
表 し ま す 。
12 時を指さない場合は、 ボタン A を押し、 針が 12 時を指
すまで時計回りに回します。 ボタン
A を押し たまま でいると
針 の 回 転 が 速 く な り ま す 。
3. 終了したらリューズを位置 1 まで押し込みます。
第 4 中央針の調整
第
4 中央針は協定世界時 で定義された時刻内で標準分を反
映 す るよう
、 Timex 工場で調整されています。 世界中でほとんど
の地域がこの標準分を使用しています。 第
2、 3 の タイムゾーン
を使用する場所が標準分を使用している場合は
、 第 4 中央針
は調整し直す必要はありません。 第
2、 3 タイムゾーンが標準分
に従わない場所を反映させたい場合のみに
、 次 の ように 第 4 中
央針を際調整します:
1. リューズを位置 3 までに引き出します。 指示針(第 4 中央
針 )は
12 時を指します。
2. リュー ズ を 回 し て 、 第 2、 3 タイムゾーンを使用したい場所に
必要な時刻内で分針を正しい位置にします。

318
319
第 4 中央針の調整 (タイムゾーン II)
第
2 タイムゾーンとして追跡したい場所での現在の時刻をメモ
します。 第
4 中央針が内側リングの該当時刻を指すまでボタン
A を押します。 (注意: 目盛りは 24 時間表示です。) ボタン A を
押すたびに第
4 中央針は 30 分 進 み ま す 。 ボ タ ン A を押したま
までいると針の回転が速くなります。 これで時計の第
2 タイム
ゾーンが 設 定され ます。
ケース回転トップリングの設定 (タイムゾーン
III)
第
4 中央針の既存設定そしてケース回転トップリングの調整に
よって 第
3 タイムゾーンが設定されます。 (注意: 目盛りは 24
時間表示です。) トップリングには 72 刻 み の 位 置 が あ り ま す 。
トップ リング を
1 時間進めるには位置を 3 刻み (3 “ ク リ ッ ク ”)
進めます。 第
3 タイムゾーンとして追跡したい場所での現在の
時刻をメモします。 ケーストップリングを半時計回りに回し
、 第
4 中央針に対して正しい時刻印になるように位置させます。

320
321
タキメーターの 機 能
(限定モデルのみ)
タキ メー ターは 1 時間に 60 単位以上のスピードのみを計測し
ます。 これより遅いスピードは計測単位を減少させて計ります。
タキ メー ター の 機 能 は
、 すべての計算に同じ長さの単位を使う限
り
、 距離の単位 (例えば、 法定マイル 、 海里、 キ ロ メート ル 、 メー
トルなど) とは独立しています。
1. 一定の区間で、 開始点のマーカーと終点のマーカーを決めま
す 。
2. スピードを計るターゲットが開始点のマーカーを通過したらク
ロ ノ グ ラ フ を 始 動 さ せ ま す 。
3. スピードを計るターゲットが終点のマーカーを通過したらクロ
ノ グ ラ フ を 止 め ま す 。
4. クロノグラフの秒針が指すタキメーターの目盛りによってそ
のターゲットの時速が分かります。
計算尺ベゼルリングの機能
トップリングの計算尺機能は、 外側のリングを回転させて使用
するようになっています。 内側のリングは動きません。 外側のリ
ングは常に「距離」や「速度」、 あるいは時間とともに変化するあ
らゆるデータに関係する役割を果たします。 内側のリングには
時間の単位だけが記されています。
外 側 のリン グ
外 側 の リ ン グ の 「
10」 は 、 0.1、 1.0、 10、 100 など、 10 の約数や
倍 数を表しています。
内 側 のリン グ
内 側 の リ ン グ の 「
MPH」 (マイル毎時) は 「速度指数」 を指しま
す。 この指数はあらゆる毎時データに関係する速度計算に使用
されます。 内側のリングの 「
STAT」 (法定マイル) と 「NAUT」 (海
里) は
、 距離単位の換算に使用します。

322
323
外 側 のリン グ
内 側 のリン グ
以下の例は、 計算尺の使用ガイドとしてお使いください。
速度計算:
15 分間に 10 海里移動するにはどのぐらいの速度が必要で
しょうか?
既知の要素: 距離:
10 海里 時間: 15 分
• 外 側 の リ ン グ の 「 10」 の矢印を内側のリングの 「15」 に 合 わ
せます。
• 内 側 の リ ン グ の「 MPH」のマークのすぐ上に表示されている
数字が必要な速度です。
答え: 時速 40 海里
時間計算: 時速 40 マイルで10海里移動するにはどのぐらいの
時間が必要でしょうか?
既知の要素: 速度: 時速
40 マイル 距離: 10 海里

324
325
• 外 側 の リ ン グ の 「 40」 を 内 側 の リ ン グ の 「 MPH」 の マ ー ク に
合わせます。
• 外 側 の リ ン グ の 「 10」 のすぐ下に表示されている内側のリン
グ の 「
15」 が必要な時間です。
答え: 15 分
距離計算:
時速 40 マイルで15分間に移動できる距離はどのぐらいでし
ょうか?
既知の要素: 速度: 時速
40 海里 時間: 15 分
• 外 側 の リ ン グ の 「 40」 を 内 側 の リ ン グ の 「 MPH」 の マ ー ク の
すぐ上に 合 わせます。
• 内 側 の リ ン グ の 「 15」 の上に表示されている数字が移動で
きる距離です。 外側のリングに示されている数字は 「
10」 で
す。
答え: 移動できる距離は 10 海里です。
単位換算:
距離を海里から法定マイルとキロメートルに換算します。
既知の要素: 換算する距離は
10 海里です。
• 外 側 の リ ン グ の 「 10」 の矢印を内側のリングの 「NAUT」 に
合わせます。 内側のリングの 「
STAT」 の マ ー ク の 上 に 示 さ れ
ているのが法定マイルへの換算値 (
11.5) で、 内 側 のリン グ
の 「
MPH」 の上に示されているのがキロメートルへの換算値
(
18.5) です。

326
327
ブ レ ス レ ット を 調 整 す る に は
(下記のブレスレットの部品の種類はすべての腕時計のモデル
に適用します。 )
ス ラ イド 式 留 め 金 ブ レ ス レット
1. ロッキングプレートを開け
ま す 。
2. 希望の長さになるように
留 め 金 を 外 し ま す 。
3. ロッ キ ン グ プ レ ート をしっ
かりと 持 ち
、 ブ レ ス レット
の下側にある溝とかみ合
わ さ れ る ま で 留 め 金 を 前 後 に ス ラ イ ド さ せ ま す 。
4. ロッキングプレートがカチッと締まるまで押し下げます。
力を入れすぎると留め金を損傷することがあります。
折 り重 ね 式 留 め 金 ブ レ ス レ ット
1. ブレスレットと留め金をつないでいるスプリング棒をみつけ
ま す 。
2. 先の尖った道具を使ってスプリング棒を押し、 ブ レ ス レット を
そ っ と ね じ っ て 外 し ま す 。
3. 手首に合わせて長さを決めたら、 正し い 下 穴 に ス プリン グ 棒
を 入 れ ま す 。
4. スプリング棒を押し下げ、 上 穴 に あ て て リリー ス し 、 定位置
に は め 込 み ま す 。

328
329
ブ レ ス レ ット のリン ク の 取 りは ず し
リンクの取り外し:
1. ブ レ ス レ ット を 垂 直 に 立 て て 置 き 、 先の尖った道具を使って
リ ン ク の 隙 間 に 入 れ ま す 。
2. 力をいれてピンを矢印の方向に押し上げ、 リン ク を 外 し ま す
( ピ ン は は ず れ に く い よ う に 設 計 さ れ て い ま す )。
3. 必 要 な数 のリンクを 取り外 すまで繰り返します。
接 続:
1. ブレスレットの部分を再接続します。
2. ピンを矢印と逆向きに押してリンクに戻します。
3. ブレスレットの側面が平らになるまで、 ピン をしっかりと 押し
込 み ま す 。
電池
電池は腕時計を通常に使用して 4~6 年もちます。 電池の寿命
は 実 際 の 使 い 方 に よ っ て 異 な り ま す 。
腕時計の電池の交換が必要な場合は
、 TIMEX でのみ交換する
ようにお勧めします。 お客様の腕時計は
、 電池の交換後、 正し
い時間と日付に合わせるよう再調整する必要があります。 腕時
計を
Timex に返送する場合は、 郵送料支払い済みの封筒(pre-
paid shipper
)をご利用ください。 郵送料支払い済みの封筒をご
希望の場合は
1-800-448-4639 へお電話いただくか、 またはお
客様の腕時計をお買い上げの販売店でお受け取りになるか
、 ま
たは
www.Timex.com. にアクセスしてください。 お客様の腕時
計と一緒に
、 郵送料と手数料 (修理費ではありません) として、
米国では 8 ドルの小切手かマネーオーダー、 カナダ では 12 カ

330
331
ナダドルの小切手かマネーオーダーを同封してください。 その
他の国でも
Timex が郵送料と手数料を請求させていただきま
す の で ご 了 承 く だ さ い 。
腕時計を送る際に
、 特製の腕時計バンドや個人的な飾りなど
は絶対に同封しないでください。
電池を焼却しないでください。再充電はできません。はずした電
池はお子様の手が届かないように注意してください。
TIMEX 国際保証書
お買い上げの TIMEX
®
腕時計はお買い上げの日より 1 年間、
Timex
Group, USA, Inc. の製造上の欠陥に対して保証されてい
ま す 。
Timex および世界各地の関連会社がこの国際保証を履
行 し ま す 。
Timex は当社の判断に基づき、 お客様の腕時計を新
品
、 または再調整して検査済みの部品を使用して修理するか、
あるいは同等または類似のモデルと交換する場合もありますの
で ご 了 承 く だ さ い 。 重要 — この保証は下記の場合の腕時計の
欠陥
、 または損傷に対しては適用されません:
1. 保証期間後
2. 腕時計が正規の Timex 販売店以外から購入された場合
3. Timex 以外での修理によって生じた場合
4. 事故、 改造、 乱用によって生じた場合
5. レンズまたはクリスタル、 ストラップ ま たは バンド 、 腕時計の

332
333
ケース、 付属品または電池。 Timex ではこれらの部品の交
換は有償対応とさせていただくことがあります。
この保証およびここに含まれる救済は排他的なものであり
、
商品性または特定目的適合性に関する黙示の保証を含めて
、
明示または黙示を問わず他のすべての保証に代わるもので
す 。
TIMEX は、 いかなる特別損害、 付随的損害、 派生的損害
に対する責任も負いません。 国や州によっては
、 黙示の保証に
対する制限および損害に対する免責もしくは制限を認めてい
ない場 合もあるため
、 お客様にこれらの制限が適用されない
場合もあります。 この保証はお客様に特定の法的権利を与え
るもの であり
、 国や州によって異なるその他の権利を有する場
合 も あ り ま す 。
保証によるサービスを受けるには
、 お客様の腕時計を Timex
かその関連会社
、 または腕時計をお買い上げになった正規の
Timex 販売店にご返送ください。 腕時計と一緒に、 腕時計修理
クーポンのオリジナルに記入してください。 また米国とカナダの
みにおいては、 腕時計修理クーポンのオリジナルに記入するか、
またはお客様のお名前、 ご住所、 電話番号、 購入日、 購入場
所を明記した報告書を同封してください。 腕時計とともに下記
の送料と手数料(修理費ではありません)を同封してください。
米国の場合は 8 ドルの小切手かマネーオーダー、 カナダ の 場
合は
12 カナダドルの小切手かマネーオーダー、 英国の場合は
3.50 ポンドの小切手かマネーオーダー。 その他の国においては
TIMEX がお客様に郵送料および手数料を請求させていただきま
す。 腕時計を送る際に
、 特製の腕時計バンドや個人的な飾りな
どは絶対に同封しないでください。
米国では、 保証の詳細情報のお問い合わせには
1-800-448-
4639 を お か け く だ さ い 。 カ ナ ダ で は 1-800-263-0981 におかけ
く だ さ い 。 ブ ラ ジ ル で は 、 +
11 2664 1001 に お か け く だ さ い 。 メ
キシコでは
01-800-060-00 におかけください。 中米、 カリブ海
域 、 バ ミ ュ ー ダ 、 バ ハ マ で は (
501) 370-5775 (U.S.) におかけく
だ さ い 。 ア ジ ア 諸 国 で は
852-2815-0091 に お か け く だ さ い 。 英

334
335
国 で は 、 44 (020) 8687 9620 に お か け く だ さ い 。 フ ラ ン ス で は 、
33 3 81 63 42 51 に お か け く だ さ い 。 ド イ ツ / オ ー ス ト リ ア で は 、
+
43 662 889 2130 におかけください。 その他の地域では、 保証
に関する情報は地元の
TIMEX 販売店、 または TIMEX 販売代
理店にお問い合わせください。
Timex
®
時計に万一修理が必要になった場合は、 Timex 国際保
証書に記述された
Timex 社または以下の住所に送付してくだ
さい:
TG SERVICE CENTER, P.O.Box 2740, Little Rock, AR 72203
U.S.A. 修理に関するお問い合わせは、 1-800-328-2677 または
custserv@timex.com にお問い合わせください。
保証の延長
米国内のみに適用。 お客様の保証を 5 ドルで腕時計のご購入
日 から
4 年間延長できます。 ご希望の場合は通常の営業時間
中に
1 800-448-4639 へお電話いただき、 ア メリカン エ キ ス プ レ
ス
、 デ ィス カバー 、 ビサ、 マ ス タ ー カ ー ド で お 支 払 い く だ さ い 。 お
支払いはご購入日から
30 日以内とさせていただきます。 お名
前
、 ご住所、 電話番号、 ご購入日、 5 桁のモデル番号が必要
で す 。
5 ドル分の小切手を Timex 宛てに郵送することもできま
す:
Timex Extended Warranty, P.O. Box 1676, Dept. EF,
Little Rock, AR 72203.
©2015 Timex Group U.S.A., Inc. TIMEX, INDIGLO, PERFECT DATE
(パーフェクト日付), INTELLIGENT QUARTZ は Timex Group B.V. とそ
の関連会社の商標です。

337
TIMEX®
Поздравляем Вас с покупкой часов TIMEX® INTELLIGENT
QUARTZ™. Пожалуйста, внимательно прочитайте инструкцию
по эксплуатации, чтобы понять как правильно пользоваться
часами Timex.
В Ваших часах могут отсутствовать те или иные
характеристики, описание которых приводится в настоящем
буклете.
За дополнительной информацией и для регистрации Вашего
изделия обращайтесь на сайт:
www.timex.com

338
339
С чего начать настройку Ваших часов .....................................................341
Водонепроницаемость и ударопрочность ..........................................342
Ночная подсветка Indiglo® ..............................................................................344
Установка даты и времени ................................................................................345
Вечный календарь ..................................................................................................347
Хронограф с функцией обратного хода .................................................350
Хронограф-компас с функцией обратного хода ..............................356
Линейный хронограф: ........................................................................................371
Мировое время .......................................................................................................377
Компас .............................................................................................................................384
Индикатор приливов термометр и компас..........................................392
Высотомер ....................................................................................................................404
Глубина ...........................................................................................................................413
Yacht Racer (Гонки на яхте) ...............................................................................418
Chrono Timer ...............................................................................................................430
3GMT .................................................................................................................................446
Функция тахиметра ................................................................................................453
Безель с функцией логарифмической линейки ................................454
Регулирование браслета ...................................................................................460
Удаление лишних звеньев браслета .........................................................462
Батарейка ......................................................................................................................463
Гарантия .........................................................................................................................465

340
341
(Не относится к моделям с вечным календарем). Для запуска часов
удалите из-под заводной головки блокировочную вставку.
Надавив на головку, задвиньте ее до упора.
В некоторых моделях часов необходимо вкрутить заводную
головку. Если на корпусе Ваших часов имеется выступ с
винтовой резьбой, необходимо вкрутить головку после
настройки часов.
Для того, чтобы вкрутить заводную головку, прижмите ее
сильно к выступу с винтовой резьбой и, придерживая,
вращайте головку по часовой стрелке. Продолжайте
завинчивать головку до тех пор, пока она не будет плотно
закреплена. В следующий раз, когда Вам будет необходимо
произвести настройку часов, для того чтобы выдвинуть головку,
Вы должны будете ее отвинтить (против часовой стрелки).
Timex®
Intelligent Quartz™ —
. Технология Timex Intelligent Quartz добавляет
мощность микропроцессора к надежности и точности
кварцевого аналогового отслеживания времени. В часах Timex
Intelligent Quartz технология вписывается в дизайн, перенося
сложность циферблата на другой уровень. Использует
вплоть до трех дополнительных независимых стрелок для
отображения потока информации в традиционном аналоговом
формате — функция, обычно имеющаяся только в цифровых
часах.

342
343
:
,
,
200 .
.
1. Часы сохраняют водонепроницаемость только до тех
пор, пока стекло циферблата, кнопки и корпус остаются
неповрежденными.
2. Часы не являются водолазными.
3. После контакта с морской водой часы следует сполоснуть
в пресной воде.
4. Ударопрочные модели имеют соответствующую
маркировку на лицевой стороне часов или задней
части корпуса. Такие часы отвечают требованиям MOC
по противоударности. Тем не менее, следует избегать
повреждения стекла циферблата.
Если Ваши часы водонепроницаемы, на них будет обозначена
соответствующая глубина в метрах (WR_M).
/. *
30м/98футов 60
50м/164футов 86
100м/328футов 160
200м/656футов 284

344
345
: Заводная головка часов имеет три положения:
закрытое, среднее и крайнее. Чтобы оценить разницу между
различными положениями, вытяните заводную головку в
крайнее положение, потом слегка нажмите на неё, пока Вы не
услышите щелчок, и заводная головка не перейдёт в среднее
положение.
:
Вытяните заводную головку в крайнее положение и вращайте
ее до тех пор, пока не будет выставлено правильное время.
Позаботьтесь о правильной установке временного формата
AM/PM (до полудня/после полудня); убедитесь, что дата
меняется в полночь, а не в полдень.
INDIGLO®
Для освещения циферблата нажмите кнопку или заводную
головку. Электролюминесцентная технология, используемая
в устройстве ночной подсветки INDIGLO®, освещает весь
дисплей часов ночью, а также в условиях слабого освещения.
ИЛИ

346
347
( )
Вытяните заводную головку в среднее положение и вращайте
ее до тех пор, пока правильная дата не появится в окне даты.
Примечание: Дата меняется автоматически между 22 часами
(10 pm) и 2 часами ночи (2 am). Не меняйте дату в этот
промежуток времени. Это может помешать ходу часов.
Задвиньте заводную головку в закрытое положение после
установки даты/времени. Начнет двигаться секундная стрелка.
: В тех случаях, когда в месяце меньше 31 дня,
дату необходимо будет регулировать.
A
B
1 2
3
1 2
3
ЧАСОВАЯ СТРЕЛКА
СТРЕЛКА
ДНЯ
СТРЕЛКА ДАТЫ
СЕКУНДНАЯ
СТРЕЛКА
МИНУТНАЯ
СТРЕЛКА
ЗАВОДНАЯ ГОЛОВКА
СТРЕЛКА МЕСЯЦА
A
B
ЗАКРЫТОЕ
ПОЛОЖЕНИЕ
СРЕДНЕЕ
ПОЛОЖЕНИЕ
КРАЙНЕЕ
ПОЛОЖЕНИЕ

348
349
Для просмотра настройки вытяните заводную головку в
среднее положение. Стрелка даты отображает настройку:
1 = 1 год после високосного года; 2 = 2 года после
високосного года; 3 = 3 года после високосного года;
4 = високосный год. По окончании установки задвиньте
заводную головку в исходное положение. Стрелки затем
возвращаются к нормальному указанию дня, месяца и даты.
С функцией вечного календаря Ваших часов Вам не надо будет
регулировать дату до 2100. Часы автоматически учитывают
короткие месяцы и високосные годы, всегда правильно
отображая день и дату. День и дата были заранее выставлены
на фабрике Timex. Вы должны только выставить время. В
часах имеются две углубленные кнопки, предназначенные
для использования центром обслуживания Timex с целью
настройки дня и даты после замены батарейки. Другого
предназначения для них нет.
Для поддержания правильной даты в часах имеется настройка
регулировки текущего високосного года. Настройка делается
на фабрике Timex или после замены батарейки. Ее нельзя
изменить, но можно просмотреть.

350
351
4
Чтобы отрегулировать 4-ую центральную стрелку:
1. Вытяните заводную головку в крайнее положение. Позиции
верхней и нижней стрелок автоматически переведутся на
конец цикла.
2. 4-ая центральная стрелка должна указывать на 12 часов.
Если по истечении 5 секунд после того, как Вы вытянули
заводную головку в крайнее положение, 4-ая центральная
стрелка не указывает на 12 часов, нажмите кнопку A или
B, чтобы передвинуть стрелку по часовой или против
часовой стрелки, пока стрелка не укажет на 12 часов.
3. Задвиньте заводную головку в закрытое положение по
окончании установки.
AA
B
23
1 2
3
1 2
3
ВЕРХНЯЯ
СТРЕЛКА
ЧАСЫ
ХРОНОГРАФА
ВТОРОЙ
ЧАСОВОЙ ПОЯС
4АЯ ЦЕНТРАЛЬНАЯ
СТРЕЛКА
СЕКУНДНАЯ
СТРЕЛКА
ОКНО ДАТЫ
ЗАВОДНАЯ
ГОЛОВКА
ШКАЛА МИНУТ
ХРОНОГРАФА
НИЖНЯЯ СТРЕЛКА
A
B
МИНУТНАЯ
СТРЕЛКА
ЧАСОВАЯ СТРЕЛКА
ЗАКРЫТОЕ
ПОЛОЖЕНИЕ
СРЕДНЕЕ
ПОЛОЖЕНИЕ
КРАЙНЕЕ
ПОЛОЖЕНИЕ

352
353
:
1. Вытяните заводную головку в среднее положение. Верхняя
стрелка показывает время второго часового пояса, а 4-ая
центральная стрелка показывает минуты.
2. С учетом того, что время второго часового пояса имеет
такое же значение минут, как время первого часового
пояса, 4-ая центральная стрелка должна совпадать с
минутной стрелкой. Если стрелки не совпадают, или если
минуты второго часового пояса отличаются в пределах
одного часа, нажимайте на кнопку B, чтобы передвинуть
4-ую центральную стрелку вперед, до тех пор, пока она не
совпадет с минутной стрелкой.
3. Нажимайте на кнопку A, чтобы передвигать верхнюю
стрелку вперед часовыми интервалами, пока она не
сравняется со значением часа второго временного пояса.
Верхняя стрелка показывает
время второго часового
пояса. При этом, отсчет
ведется на протяжении 24
часов; он начинается или
заканчивается в полночь,
а полдень находится
посередине. Разница между
часовыми поясами чаще
всего выражается в часовых
интервалах. В таких случаях
значение минут второго часового пояса будет совпадать
с показаниями минутной стрелки часов.
AA
B
23
1 2
3
1 2
3

354
355
2. Чтобы остановить хронограф, нажмите кнопку A
(START/STOP) снова. Все стрелки перестанут двигаться.
3. Чтобы восстановить движение стрелок, нажмите на кнопку
A (START/STOP) снова.
4. Чтобы обнулить хронограф с функцией обратного хода,
нажмите кнопку B (FLY-BACK/RESET).
После сброса хронографа все стрелки вернутся в нулевую
позицию.По истечении восьми секунд часы восстановят
нормальное индицирование времени второго часового
пояса.
5. Чтобы произвести сброс и/или заново запустить
хронограф с функцией обратного хода, когда он работает,
нажмите и держите нажатой кнопку B (FLY-BACK/RESET).
Отпустите кнопку, когда Вам нужно будет опять запустить
хронограф.
Чтобы быстро передвинуть стрелку, нажмите и держите
нажатой кнопку A.
4. По окончании задвиньте заводную головку.
Часы оснащены хронографом с 4-х часовой функцией
обратного хода.
1. Для начала нажмите на кнопку A (START/STOP).
4-ая центральная стрелка показывает секунды с точностью
до 1/5 секунды, а нижняя стрелка показывает последнюю
цифру минут, считая до десяти и повторяя сначала. Верхняя
стрелка показывает время полностью, включая часы и
минуты, с разделителями каждые десять минут. Хронограф
считает вплоть до четырёх часов, затем автоматически
останавливается.

356
357
4
Чтобы отрегулировать 4-ую центральную стрелку:
1. Вытяните заводную головку в крайнее положение. Позиции
верхней и нижней стрелок автоматически переведутся на
конец цикла.
2. 4-ая центральная стрелка должна указывать на 12 часов.
Если по истечении 5 секунд после того, как Вы вытянули
заводную головку в крайнее положение, 4-ая центральная
стрелка не указывает на 12 часов, нажмите кнопку A или
B, чтобы передвинуть стрелку по часовой или против
часовой стрелки, пока стрелка не укажет на 12 часов.
3. По окончании задвиньте заводную головку.
A
C
B
1 2
3
1 2
3
ВЕРХНЯЯ
СТРЕЛКА
ХРОНОГРАФ
ЧАСЫ ВТОРОГО
ЧАСОВОГО
ПОЯСА
4АЯ ЦЕНТРАЛЬНАЯ
СТРЕЛКА
СЕКУНДНАЯ
СТРЕЛКА
ОКНО ДАТЫ
ЗАВОДНАЯ ГОЛОВКА
ШКАЛА МИНУТ
ХРОНОГРАФА
НИЖНЯЯ СТРЕЛКА
A
B
ЧАСОВАЯ
СТРЕЛКА
МИНУТНАЯ СТРЕЛКА
ЗАКРЫТОЕ
ПОЛОЖЕНИЕ
СРЕДНЕЕ
ПОЛОЖЕНИЕ
КРАЙНЕЕ
ПОЛОЖЕНИЕ
C

358
359
2. Нажмите кнопку B, чтобы переместить 4-ю центральную
стрелку вперед. Чтобы передвинуть стрелку быстро,
необходимо держать кнопку в нажатом положении.
Верхняя стрелка и 4-ая центральная стрелка двигаются
вместе. Когда 4-ая центральная стрелка проходит один
полный круг, верхняя стрелка передвигается на час вперед.
С учетом того, что время второго часового пояса имеет
такое же значение минут, как время первого часового
пояса, 4-ая центральная стрелка должна совпадать с
минутной стрелкой.
3. Нажимайте на кнопку A, чтобы передвигать верхнюю
стрелку вперед часовыми интервалами. Чтобы
передвинуть стрелку быстро, необходимо держать кнопку
в нажатом положении.
4. По окончании задвиньте заводную головку.
Верхняя стрелка обычно показывает время второго часового
пояса. При этом, отсчет ведется на протяжении 24 часов; он
начинается или заканчивается в полночь, а полдень находится
посередине.
Чтобы установить второй часовой пояс:
1. Вытяните заводную головку в среднее положение. Верхняя
стрелка показывает
время второго часового
пояса в 24-часовом
формате, а 4-ая
центральная стрелка
показывает минуты.
A
C
B
1 2
3
1 2
3

360
361
Часы оснащены хронографом с 4-х часовой функцией
обратного хода.
1. Для начала нажмите
кнопку A (START/STOP).
4-ая центральная стрелка
показывает секунды с
точностью до 1/5 секунды,
а нижняя стрелка
показывает последнюю
цифру минут, считая
до десяти и повторяя
сначала. Верхняя стрелка показывает время полностью,
включая часы и минуты, с разделителями каждые десять
минут. Хронограф считает вплоть до четырех часов, затем
автоматически останавливается.
По желанию, время второго часового пояса может также
быть использовано для индикации времени Вашей зоны в
24-часовом формате. Во время установки второго формата
времени таким образом, убедитесь в том, что индикация
часов/минут соответствует 24-часовой индикации, проверив,
чтобы дата изменялась в полночь, а не в полдень.
A
C
B
1 2
3
1 2
3

362
363
2. Чтобы остановить хронограф, нажмите кнопку A
(START/STOP) снова. Все стрелки перестанут двигаться.
3. Чтобы восстановить работу хронографа, нажмите кнопку A
(START/STOP) снова. Для обнуления хронографа нажмите
кнопку B (FLY-BACK/RESET).
После сброса хронографа все стрелки вернутся в нулевую
позицию. По истечении восьми секунд часы восстановят
нормальное индицирование времени второго часового
пояса.
4. Вы также можете произвести сброс и/или заново запустить
хронограф, когда он работает. Для этого нажмите и держите
нажатой кнопку B (FLY-BACK/RESET), чтобы обнулить
хронограф, и отпустите ее, когда захотите заново запустить
хронограф. Не обязательно дожидаться, пока все стрелки
достигнут нулевой позиции перед тем, как отпустить
кнопку; отсчет времени начнется с момента, когда кнопка
будет отпущена. Эта функция «обратного хода» (fly-back)
позволяет Вам измерять временные отрезки.
Компас может быть использован при работающем
хронографе без помех для его работы. См. ПРИНЦИП
РАБОТЫ КОМПАСА.
Перед началом эксплуатации высотомер необходимо
откалибровать.
Поскольку в работе компаса используется магнитное
поле Земли, необходимо учитывать присутствие больших
металлических предметов или объектов (например,
автомобилей или мостов) или предметов, создающих
электромагнитное излучение (например, телевизоров или
персональных компьютеров), которые могут влиять на

364
365
Не храните часы вблизи предметов, обладающих сильным
магнитным полем, таких как компьютер, бытовой прибор или
телевизор, поскольку часы могут намагнититься и начнут
показывать неверные результаты. Как правило, точность
измерений наручных часов — +/- 10 градусов.
Калибровка компаса:
1. Вытяните заводную головку в среднее положение и
подождите, пока стрелки не перестанут двигаться.
2. Держите часы в горизонтальном положении или поместите
их на ровную поверхность (если ремешок не позволяет
обеспечить горизонтальное положение, поместите часы на
перевернутую чашку). Можно положить часы циферблатом
вниз, только не забудьте обеспечить защиту циферблата от
повреждений.
магнитное поле вокруг часов. Если калибровка компаса будет
произведена вблизи подобных объектов, он будет правильно
работать только в том же местоположении. Если калибровка
компаса будет произведена вдали от подобных объектов, он
не будет правильно работать рядом с ними. Для наиболее
точных результатов проводите калибровку в том месте, в
котором Вы собираетесь использовать компас.
При калибровке и вычислении направления очень важно
держать компас в горизонтальном положении. Произведение
калибровки или вычисление направления, когда часы не
находятся в горизонтальном положении, может привести
к серьезным ошибкам. Также избегайте местностей с
концентрацией твердого или мягкого железа, превышающей
норму, так как это может спровоцировать неточное вычисление
направления. Если по какой-то причине направление Вам
кажется неправильным, повторите калибровку.

366
367
4. По окончании, удерживая часы в горизонтальном
положении, нажмите кнопку C (COMPASS). 4-ая
центральная стрелка начнет колебаться взад и вперед,
что свидетельствует об окончании калибровки. Затем
стрелка перейдет к установке действующего магнитного
склонения.
5. Если Вы не хотите устанавливать угол магнитного
склонения, нажатием верните заводную головку в
исходное положение. В противном случае если Вы хотите,
чтобы часы автоматически настроили угол магнитного
склонения, поворачивайте кольцо компаса до тех пор,
пока северный конец стрелки не будет показывать 12
часов.
6. Нажмите кнопку A или B, чтобы передвинуть стрелку
компаса на восток (+) или на запад (–) соответственно, для
установки магнитного склонения для Вашей местности,
3. Нажмите C (COMPASS), чтобы начать калибровку. 4-ая
центральная стрелка проделает два полных оборота,
чтобы напомнить Вам повернуть часы. Удерживая
корпус часов в горизонтальной плоскости, МЕДЛЕННО
поворачивайте часы, пока не сделаете два полных оборота
(продолжительность каждого оборота – не менее 15
секунд).

368
369
используя шкалу магнитных склонений. Для быстрого
передвижения стрелки держите кнопку нажатой. В
качестве примера смотрите изображение ниже.
7. По окончании задвиньте заводную головку.
A
B
-14° (14°W)
Компас обычно остается отключенным, при этом 4-ая
центральная стрелка указывает на 12 часов или показывает
секунды хронографа.
Удерживая корпус часов в горизонтальной плоскости, нажмите
кнопку C (COMPASS) для включения компаса. Стрелка компаса
повернется и будет показывать на север. Если Вы повернете
часы, стрелка компаса будет продолжать двигаться и всегда
будет показывать на север. Через 20 секунд компас отключится
автоматически, и 4-ая центральная стрелка вернется в свое
первоначальное положение. Такой режим работы продлевает
срок действия батарейки. В любой момент Вы можете
нажать кнопку C (COMPASS) для того, чтобы оставить компас
включенным еще на 20 секунд.

370
371
Компас может быть включен при работающем хронографе.
4-ая центральная стрелка при этом просто временно меняет
свою функцию. Верхняя и нижняя стрелки продолжают
отображать время хронографа, и все функции хронографа
работают при помощи нажатия кнопок A (START/STOP) и B
(FLY-BACK/RESET).
: Во время работы компаса секундная
стрелка передвигается интервалами в две секунды. Также
при включении компаса верхняя и нижняя стрелки могут
немного сменить свое положение. Они вернутся на свое
исходное положение после выключения компаса. Такое
функционирование является нормальным и дает наиболее
точные показания компаса.
:
СЕКУНДНАЯ
СТРЕЛКА
ОКНО ДАТЫ
ЗАВОДНАЯ
ГОЛОВКА
НИЖНЯЯ СТРЕЛКА
B
4АЯ
ЦЕНТРАЛЬНАЯ
СТРЕЛКА
ЧАСОВАЯ СТРЕЛКА
ЛИНЕЙНАЯ
СТРЕЛКА
МИНУТНАЯ
СТРЕЛКА
A
B
1
2
3

372
373
4
Чтобы отрегулировать 4-ую центральную стрелку:
1. Вытяните заводную головку в крайнее положение. Позиция
нижней стрелки автоматически переведется на конец цикла.
2. 4-ая центральная стрелка должна указывать на 12 часов.
Если по истечении 5 секунд после того, как Вы вытянули
заводную головку в крайнее положение, 4-ая центральная
стрелка не указывает на 12 часов, нажмите кнопку A, чтобы
передвинуть стрелку по часовой стрелке, пока стрелка не
укажет на 12 часов.
3. Если после сброса хронографа линейная стрелка не
указывает на ноль, нажмите кнопку B и удерживайте ее в
нажатом положении в течение 5 секунд, чтобы произвести
полную калибровку линейного индикатора. Вся процедура
займет до 32 секунд.
4. По окончании задвиньте заводную головку в закрытое
положение.
Нижняя стрелка
показывает время второго
часового пояса. При
этом, отсчет ведется на
протяжении 24 часов;
он начинается или
заканчивается в полночь,
а полдень находится
посередине. Разница
между часовыми поясами
чаще всего выражается в часовых интервалах. В таких случаях
значение минут второго часового пояса будет совпадать с
показаниями минутной стрелки часов.
A
B
1
2
3

374
375
:
1. Вытяните заводную головку в среднее положение. Нижняя
стрелка показывает время второго часового пояса, а 4-ая
центральная стрелка показывает минуты.
2. С учетом того, что время второго часового пояса имеет
такое же значение минут, как время первого часового
пояса, 4-ая центральная стрелка должна совпадать с
минутной стрелкой. Если стрелки не совпадают, или если
минуты второго часового пояса отличаются в пределах
одного часа, нажимайте на кнопку B, чтобы передвинуть
4-ую центральную стрелку вперед, до тех пор, пока она не
совпадет с минутной стрелкой.
3. Нажимайте на кнопку A, чтобы передвигать нижнюю
стрелку вперёд часовыми интервалами, пока она не
сравняется со значением часа второго временного пояса.
Чтобы быстро передвинуть стрелку, нажмите и держите
нажатой кнопку A.
4. По окончании задвиньте заводную головку в исходное
положение.
Часы оснащены хронографом с 4-х часовой функцией
измерения промежуточного времени.
1. Для начала нажмите на кнопку A (START/STOP). 4-ая
центральная стрелка показывает секунды с точностью
до 1/5 секунды. Линейная стрелка показывает минуты,
считая до тридцати и повторяя сначала. Нижняя стрелка
показывает время полностью, включая часы и минуты,
с разделителями каждые десять минут. Хронограф
считает вплоть до четырёх часов, затем автоматически
останавливается.

376
377
2. Чтобы остановить хронограф, нажмите на кнопку A (START/
STOP) снова. Все стрелки остановятся.
3. Чтобы обнулить хронограф, нажмите на кнопку B (SPLIT/
RESET).
После сброса хронографа все стрелки вернутся в нулевую
позицию. По истечении восьми секунд часы восстановят
нормальное индицирование времени второго часового пояса.
Вы можете произвести замер промежуточного времени при
включенном хронографе. Нажатие кнопки B (SPLIT/RESET)
остановит все стрелки, а хронограф при этом продолжит
работу. Повторное нажатие кнопки B (SPLIT/RESET) вернет на
дисплей отображение истекшего времени, зафиксированного
хронографом.
A
B
C
1 2
3
corrected 3.3.11 with Paulo’s new cities
24 ГОРОДА
ШКАЛА
МИРОВОГО
ВРЕМЕНИ
СЕКУНДНАЯ
СТРЕЛКА
ОКНО ДАТЫ
ЗАВОДНАЯ
ГОЛОВКА
НИЖНЯЯ СТРЕЛКА
A
B
C
4АЯ ЦЕНТРАЛЬНАЯ
СТРЕЛКА
ШКАЛА СЕЗОНОВ
ВЕРХНЯЯ
СТРЕЛКА
ЧАСОВАЯ СТРЕЛКА
МИНУТНАЯ
СТРЕЛКА
ЗАКРЫТОЕ
ПОЛОЖЕНИЕ
СРЕДНЕЕ
ПОЛОЖЕНИЕ
КРАЙНЕЕ
ПОЛОЖЕНИЕ

378
379
:
1. Вытяните заводную головку в среднее положение.
Центральная стрелка показывает город из часового
пояса мирового времени, а верхняя центральная стрелка
показывает время в этом городе.
A
B
C
1 2 3
2. Нажмите кнопку A или B, чтобы передвинуть центральную
стрелку, направив ее на город из Вашего часового пояса.
Для быстрого передвижения стрелки держите кнопку
нажатой. Вы можете использовать любой город.
3. Вытяните заводную головку в крайнее положение. Стрелка
для выбора города вернется назад на позицию 12 часов,
как указано в разделе РЕГУЛИРОВКА УКАЗАТЕЛЬНОЙ
СТРЕЛКИ. После пятисекундной паузы верхняя стрелка
укажет мировое время (время в городе, выбранном в
предыдущем шаге). Центральная стрелка указывает минуты
мирового времени, а нижняя стрелка указывает сезон (см.
НАСТРОЙКА СЕЗОНА). ВНИМАНИЕ: Не используйте кнопки
или заводную головку, пока регулирование центральной
стрелки не закончено. (Это занимает приблизительно
10 секунд после того, как заводная головка вытянута в
крайнее положение).

380
381
4
Чтобы отрегулировать 4-ую центральную стрелку:
1. Вытяните заводную головку в крайнее положение. Позиции
верхней и нижней стрелок автоматически переведутся на
конец цикла.
2. 4-ая центральная стрелка должна указывать на 12 часов.
Если по истечении 5 секунд после того, как Вы вытянули
заводную головку в крайнее положение, 4-ая центральная
стрелка не указывает на 12 часов, нажмите кнопку A или
B, чтобы передвинуть стрелку по часовой или против
часовой стрелки, пока стрелка не укажет на 12 часов.
3. По окончании задвиньте заводную головку.
: Если ни одна кнопка не нажата в течение 5
секунд после остановки стрелок, часы перейдут к настройке
мирового времени (см. НАСТРОЙКА МИРОВОГО ВРЕМЕНИ).
4. Если показываемый сезон не является правильным
сезоном для Вашего часового пояса, нажмите кнопку
C, чтобы его изменить. Если в Вашем часовом поясе
соблюдается переход на летнее/зимнее время, верхняя
стрелка передвинется на один час.
5. Нажимая кнопку A или B, переставьте время назад или
вперед соответственно, чтобы настроить мировое
время на время Вашего часового пояса. Для быстрого
передвижения стрелки держите кнопку нажатой. Стрелки
двигаются вместе. За один цикл центральной стрелки
верхняя стрелка проходит один час. После настройки
центральная и минутная стрелки должны совпасть.
6. По окончании задвиньте заводную головку.

382
383
Нажимайте кнопки А
или В для перемещения
центральной стрелки назад
и вперед соответственно и
выберите город. Верхняя
стрелка передвинется, чтобы
показать время выбранного
города. При этом, отсчет
ведется на протяжении 24
часов; он начинается или
заканчивается в полночь, а полдень находится посередине.
Настройка сезона позволяет учитывать переход на летнее или
зимнее время.
В часах имеется одна настройка для двух периодов, которые
есть во всех городах, переходящих с зимнего на летнее
время и наоборот. В данных часах период летнего времени
называется SUMMER (ЛЕТО), а период зимнего — WINTER
(ЗИМА).
Когда сезон в одном городе выставлен на SUMMER, сезон
во всех городах в том же полушарии автоматически
настраивается на SUMMER, в то время как во всех городах
другого полушария сезон настраивается на WINTER. Часы
«знают», какие города находятся в каком полушарии.
Нажмите кнопку C для смены сезона в выбранном городе.
A
B
C
1 2 3

384
385
I
I
14
НИЖНЯЯ
ЗАВОДНАЯ
ГОЛОВКА
СРЕДНEЕ
ПОЛОЖЕНИЕ
УСТАНОВКА
ДАТЫ
I
I
14
КРАЙНЕЕ
ПОЛОЖЕНИЕ
УСТАНОВКА
ВРЕМЕНИ
ЗАВОДНАЯ
ГОЛОВКА
B
A
ШКАЛА МАГНИТНОГО
СКЛОНЕНИЯ
СТРЕЛКА КОМПАСА
СЕВЕРНЫЙ КОНЕЦ
КРАСНОГО ЦВЕТА
/ДЛИННЕЕ
Вытяните ЗАВОДНУЮ ГОЛОВКУ в крайнее положение. Стрелка
компаса должна указывать на 12 часов.Если она не указывает
на 12 часов, необходимо нажимать кнопку А и/или В до тех
пор, пока стрелка не будет указывать на 12 часов. Чтобы
передвинуть стрелку быстро, необходимо держать кнопку
в нажатом положении. По окончании нажатием верните
ЦЕНТРАЛЬНУЮ ЗАВОДНУЮ ГОЛОВКУ в исходное положение и
приступите к калибровке компаса.
Перед началом эксплуатации компас необходимо
откалибровать.
Поскольку в работе компаса используется магнитное
поле Земли, необходимо учитывать присутствие больших
металлических предметов или объектов (например,
автомобилей или мостов) или предметов, создающих

386
387
неточное вычисление направления. Если по какой-то
причине направление Вам кажется неправильным, повторите
калибровку.
Не храните часы вблизи предметов, обладающих сильным
магнитным полем, таких как компьютер, бытовой прибор или
телевизор, поскольку часы могут намагнититься и начнут
показывать неверные результаты. Как правило, точность
измерений наручных часов — +/- 10 градусов.
:
1. Вытяните заводную головку в среднее положение и
подождите, пока стрелки не перестанут двигаться.
2. Держите часы в горизонтальном положении или поместите
их на ровную поверхность (если ремешок не позволяет
обеспечить горизонтальное положение, поместите часы на
перевернутую чашку). Можно положить часы циферблатом
электромагнитное излучение (например, телевизоров или
персональных компьютеров), которые могут влиять на
магнитное поле вокруг часов. Если калибровка компаса будет
произведена вблизи подобных объектов, он будет правильно
работать только в том же местоположении. Если калибровка
компаса будет произведена вдали от подобных объектов, он
не будет правильно работать рядом с ними. Для наиболее
точных результатов проводите калибровку в том месте,
в котором Вы собираетесь использовать компас.
При калибровке и вычислении направления очень
важно держать компас в горизонтальном положении.
Произведение калибровки или вычисление направления,
когда часы не находятся в горизонтальном положении,
может привести к серьезным ошибкам. Также избегайте
местностей с концентрацией твердого или мягкого железа,
превышающей норму, так как это может спровоцировать

388
389
вниз, только не забудьте обеспечить защиту циферблата от
повреждений.
3. Нажмите кнопку A или B, чтобы начать калибровку. 4-ая
центральная стрелка проделает два полных оборота,
чтобы напомнить Вам повернуть часы. Удерживая
корпус часов в горизонтальной плоскости, МЕДЛЕННО
поворачивайте часы, пока не сделаете два полных оборота
(продолжительность каждого оборота – не менее 15
секунд).
4. По окончании, удерживая часы в горизонтальном
положении, нажмите кнопку A или B. 4-ая центральная
стрелка начнет колебаться взад и вперед, что
свидетельствует об окончании калибровки. Затем
стрелка перейдет к установке действующего магнитного
склонения.
5. Если Вы не хотите устанавливать угол магнитного
склонения, нажатием верните заводную головку в
исходное положение. В противном случае если Вы хотите,
чтобы часы автоматически настроили угол магнитного
склонения, поворачивайте кольцо компаса до тех пор,
пока северный конец стрелки не будет показывать 12
часов.
6. Нажмите кнопку A или B, чтобы передвинуть стрелку
компаса на восток (+) или на запад (–) соответственно, для
установки магнитного склонения для Вашей местности,

390
391
используя шкалу магнитных склонений. Для быстрого
передвижения стрелки удерживайте кнопку в нажатом
положении. В качестве примера смотрите изображение
ниже.
7. По окончании задвиньте заводную головку.
A
B
-14° (14°W)
Компас обычно остается отключенным, при этом 4-ая
центральная стрелка указывает на 12 часов или показывает
секунды хронографа.
Удерживая корпус часов в горизонтальной плоскости, нажмите
кнопку A или B для включения компаса. Стрелка компаса
повернется и будет показывать на север. Если Вы повернете
часы, стрелка компаса будет продолжать двигаться и всегда
будет показывать на север. Через 20 секунд компас отключится
автоматически, и 4-ая центральная стрелка вернется в свое
первоначальное положение. Такой режим работы продлевает
срок действия батарейки. В любой момент Вы можете нажать
кнопку A или B для того, чтобы оставить компас включенным
еще на 20 секунд.
: Во время работы компаса секундная стрелка
передвигается интервалами в две секунды.

392
393
КРАЙНЕЕ
ПОЛОЖЕНИЕ
УСТАНОВКА
ВРЕМЕНИ
ШКАЛА
МАГНИТНОГО
СКЛОНЕНИЯ
СТРЕЛКА
ИНДИКАТОРА
C
B
A
ЗАВОДНАЯ
ГОЛОВКА
ПОВОРОТНОЕ
КОЛЬЦО
КОМПАСА
ДАТА
ШКАЛА ПРИЛИВОВ
ТЕМПЕРАТУРНАЯ ШКАЛА
СРЕДНЕЕ ПОЛОЖЕНИЕ
УСТАНОВКА ДАТЫ
HACTPOKA HKATOPA
Вытяните заводную головку в крайнее положение. Стрелка
компаса должна указывать на 12 часов. Если стрелка
индикатора не указывает на 12 часов, необходимо нажимать
кнопку TIDE (ПРИЛИВ) или TEMP (ТЕМПЕРАТУРА) до тех
пор, пока стрелка не будет указывать на 12 часов. Кнопки
TIDE(ПРИЛИВ) и TEMP (ТЕМПЕРАТУРА) перемещают стрелку
соответственно по часовой стрелке или против часовой
стрелки. Чтобы передвинуть стрелку быстро, необходимо
держать кнопку в нажатом положении. По окончании
задвиньте заводную головку.

394
395
/
Стрелка индикатора постоянно показывает температуру
или силу прилива. Для перехода от индикации температуры
к индикации силы прилива нажмите кнопку TIDE (ПРИЛИВ).
Стрелка переместится к отливу, а затем к величине прилива
на настоящий момент. Для перехода от индикации прилива к
индикации температуры нажмите кнопку TEMP (ТЕМПЕРАТУРА).
Стрелка переместится к началу шкалы термометра, а затем к
величине температуры на настоящий момент.
При ношении часов на запястье температура тела влияет
на показания термометра. Чтобы получить более точные
показания, снимите часы и положите их на несколько минут
в тень.
Часы также могут измерять температуру воды, если они
погружены в воду. Перед тем, как погрузить часы в воду,
убедитесь, что вы переключили дисплей на термометр, так как
в погруженном состоянии кнопки нажимать нельзя.
Термометр производит измерения каждую минуту или чаще,
если температура меняется.
При индикации приливов и отливов, индикатор всегда
двигается по часовой стрелке, то есть перемещение стрелки
влево указывает на прилив, вправо – на отлив. Количество
часов до следующего прилива/отлива показано на шкале
приливов и отливов.

396
397
На приливы и отливы также оказывает влияние положение
солнца и конфигурация береговой линии, в результате чего
часы не могут абсолютно точно определить время приливов и
отливов. Может понадобиться периодическая корректировка.
Для установки часов приливов и отливов, вытяните часовую
головку в СРЕДНЕЕ положение. Нажмите кнопку TIDE(ПРИЛИВ)
или TEMP (ТЕМПЕРАТУРА), чтобы переместить стрелку на
происходящий в настоящий момент прилив или отлив. Кнопки
TIDE(ПРИЛИВ) и TEMP (ТЕМПЕРАТУРА) перемещают стрелку
соответственно по часовой стрелке или против часовой
стрелки. Чтобы передвинуть стрелку быстро, необходимо
держать кнопку в нажатом положении. По окончании
задвиньте заводную головку.
Перед началом эксплуатации компас необходимо
откалибровать.
Поскольку в работе компаса используется магнитное
поле Земли, необходимо учитывать присутствие больших
металлических предметов или объектов (например,
автомобилей или мостов) или предметов, создающих
электромагнитное излучение (например, телевизоров или
персональных компьютеров), которые могут влиять на
магнитное поле вокруг часов. Если калибровка компаса будет
произведена вблизи подобных объектов, он будет правильно
работать только в том же местоположении. Если калибровка
компаса будет произведена вдали от подобных объектов, он
не будет правильно работать рядом с ними. Для наиболее
точных результатов проводите калибровку в том месте,
в котором Вы собираетесь использовать компас.

398
399
При калибровке и вычислении направления очень
важно держать компас в горизонтальном положении.
Произведение калибровки или вычисление направления,
когда часы не находятся в горизонтальном положении,
может привести к серьезным ошибкам. Также избегайте
местностей с концентрацией твердого или мягкого железа,
превышающей норму, так как это может спровоцировать
неточное вычисление направления. Если по какой-то
причине направление Вам кажется неправильным, повторите
калибровку.
Не храните часы вблизи предметов, обладающих сильным
магнитным полем, таких как компьютер, бытовой прибор или
телевизор, поскольку часы могут намагнититься и начнут
показывать неверные результаты. Как правило, точность
измерений наручных часов — +/- 10 градусов.
:
1. Вытяните заводную головку в среднее положение и
подождите, пока стрелки не перестанут двигаться.
2. Держите часы в горизонтальном положении или поместите
их на ровную поверхность (если ремешок не позволяет
обеспечить горизонтальное положение, поместите часы на
перевернутую чашку). Можно положить часы циферблатом
вниз, только не забудьте обеспечить защиту циферблата от
повреждений.
3. Нажмите C (COMPASS), чтобы начать калибровку.
4-ая центральная стрелка проделает два полных оборота,
чтобы напомнить Вам повернуть часы. Удерживая
корпус часов в горизонтальной плоскости, МЕДЛЕННО
поворачивайте часы, пока не сделаете два полных оборота
(продолжительность каждого оборота – не менее
15 секунд).

400
401
4. По окончании, удерживая часы в горизонтальном
положении, нажмите кнопку C (COMPASS). 4-ая
центральная стрелка начнет колебаться взад и вперед,
что свидетельствует об окончании калибровки. Затем
стрелка перейдет к установке действующего магнитного
склонения.
5. Если Вы не хотите устанавливать угол магнитного
склонения, нажатием верните заводную головку в
исходное положение. В противном случае если Вы хотите,
чтобы часы автоматически настроили угол магнитного
склонения, поворачивайте кольцо компаса до тех пор,
пока северный конец стрелки не будет показывать 12
часов.
6. Нажмите кнопку A или B, чтобы передвинуть стрелку
компаса на восток (+) или на запад (–) соответственно, для
установки магнитного склонения для Вашей местности,
используя шкалу магнитных склонений. Для быстрого
передвижения стрелки удерживайте кнопку в нажатом
положении. В качестве примера смотрите изображение
ниже.
7. По окончании задвиньте заводную головку.

402
403
A
B
-14° (14°W)
Компас обычно остается отключенным, при этом 4-ая
центральная стрелка указывает на 12 часов или показывает
секунды хронографа.
Удерживая корпус часов в горизонтальной плоскости, нажмите
кнопку C (COMPASS) для включения компаса. Стрелка компаса
повернется и будет показывать на север. Если Вы повернете
часы, стрелка компаса будет продолжать двигаться и всегда
будет показывать на север. Через 20 секунд компас отключится
автоматически, и 4-ая центральная стрелка вернется в свое
первоначальное положение. Такой режим работы продлевает
срок действия батарейки. В любой момент Вы можете
нажать кнопку C (COMPASS) для того, чтобы оставить компас
включенным еще на 20 секунд.
: Во время работы компаса секундная стрелка
передвигается интервалами в две секунды.

404
405
ШКАЛА
ВЫСОТОМЕРА
В СОТЫХ ДОЛЯХ
ВЕРХНИЙ
ИНДИКАТОР
ОБРАТНОГО
ОТСЧ ЕТА
В ТЫСЯЧАХ
C
В ЕД. ИЗМЕРЕНИЯ
A
МАКСИМАЛЬНАЯ
ВЫСОТА
B
МИНИМАЛЬНАЯ ВЫСОТА
НИЖНИЙ ИНДИКАТОР
ОБРАТНОГО ОТСЧЕТА
В ЕД.ИЗМЕРЕНИЯ
ЗАВОДНАЯ
ГОЛОВКА
4
Вытяните заводную головку в крайнее положение. Стрелка
компаса должна указывать на 12 часов. Стрелки верхнего
и нижнего индикаторов обратного отсчета автоматически
устанавливаются на начало своих шкал. Если стрелка
индикатора не указывает на 12 часов, необходимо нажимать
кнопку A или B до тех пор, пока стрелка не будет указывать на
12 часов. Кнопки A и B перемещают стрелку соответственно
по часовой стрелке или против часовой стрелки. Чтобы
передвинуть стрелку быстро, необходимо держать кнопку
в нажатом положении. По окончании задвиньте заводную
головку.

406
407
Перед началом эксплуатации высотомер необходимо
откалибровать.
Поскольку высотомер определяет высоту путем измерения
давления, которое варьируется в зависимости от
местоположения, важно установить высотомер на величину
известной эталонной высоты или на стандартную отсчетную
высоту данного места. Внезапные изменения давления,
вызванные погодными изменениями, могут послужить
причиной погрешности измерений высотомера +-100м (328
футов), даже при неизменном положении прибора. В случае
сильных колебаний давления перекалибруйте высотомер на
известную высоту.
:
1. Вытяните заводную головку в среднее положение и
подождите, пока стрелки не перестанут двигаться.
2. Если на момент вытяжки заводной головки высотомер
был выключен, стрелка нижнего индикатора обратного
отсчета будет указывать на деление шкалы, выбранное
при последнем использовании высотомера, в противном
случае, стрелка нижнего индикатора обратного отсчета
будет указывать на выбранное в данный момент деление
дисплея высоты. 4-ая центральная стрелка и стрелка
верхнего индикатора обратного отсчета должны указывать
на величину высоты на настоящий момент.
3. Нажимайте кнопки А или В для перемещения 4-ой
центральной стрелки соответственно против или по

408
409
часовой стрелке до тех пор, пока она не будет указывать
на требуемую калибровочную высоту. Для быстрого
перемещения центральной стрелки держите кнопку А или
В в нажатом положении. Стрелка верхнего индикатора
обратного отсчета перемещается относительно значения
высоты, которое показывает 4-ая центральная стрелка.
4. По окончании задвиньте заводную головку.
Включение высотомера производится нажатием кнопки С.
Стрелка нижнего индикатора обратного отсчета указывает
на МЕТРЫ. Стрелка нижнего индикатора обратного отсчета
указывает на МЕТРЫ. Стрелка верхнего индикатора обратного
отсчета указывает значение тысяч единиц высоты на данный
момент с делениями на каждую тысячу МЕТРОВ/ФУТОВ.
Переход от МЕТРОВ к ФУТАМ в качестве единицы измерения
осуществляется повторным нажатием кнопки С. Для перехода
от ФУТОВ к МЕТРАМ нажмите С дважды (высотомер сначала
выключится, затем опять включится, при этом единицы
измерения будут установлены на МЕТРЫ).
: Высота–2310 м : Высота–7580 футов

410
411
Для выключения высотомера с сохранениeм установки единиц
измерения на ФУТЫ нажмите кнопку С. Для выключения
высотомера с сохранениeм установки единиц измерения на
МЕТРЫ нажмите кнопку С дважды (нижняя стрелка сначала
переходит на ФУТЫ, затем переходит в положение ВЫКЛ).
Часы автоматически выключат высотомер через 60 минут
после включения.
/
MIN/MAX
Для просмотра максимальной записанной высоты нажмите
кнопку А. Стрелка нижнего индикатора обратного отсчета
показывает единицы измерения, в которых было записано
значение максимальной высоты, если на момент нажатия
кнопки высотомер был выключен. В противном случае,
стрелка покажет
максимальную высоту в выбранных на данный момент
единицах измерения. 4-ая центральная стрелка показывает
сотни и десятки значения максимальной высоты с делениями
каждые десять МЕТРОВ/ФУТОВ. Стрелка верхнего индикатора
обратного отсчета показывает тысячи значения максимальной
высоты с делениями каждую тысячу МЕТРОВ/ФУТОВ.
Длительность индикации максимальной записанной высоты
равна десяти секундам. Длительность индикации можно
увеличить еще на десять секунд. Для этого необходимо нажать
кнопку А до истечения первых десяти секунд.
Переход от одних единиц измерения к другим (от МЕТРОВ к
ФУТАМ и обратно) производится нажатием кнопки С.
Для просмотра минимальной записанной высоты нажмите
кнопку B. Стрелка нижнего индикатора обратного отсчета
показывает единицы измерения, в которых было записано

412
413
значение минимальной высоты, если на момент нажатия
кнопки высотомер был выключен. В противном случае,
стрелка покажет минимальную высоту в выбранных на данный
момент единицах измерения. 4-ая центральная стрелка
показывает сотни и десятки значения минимальной высоты с
делениями каждые десять МЕТРОВ/ФУТОВ. Стрелка верхнего
индикатора обратного отсчета показывает тысячи значения
минимальной высоты с делениями каждую тысячу МЕТРОВ/
ФУТОВ.
Длительность индикации минимальной записанной высоты
равна десяти секундам. Длительность индикации можно
увеличить еще на десять секунд. Для этого необходимо нажать
кнопку В до истечения первых десяти секунд. Переход от
одних единиц измерения к другим (от МЕТРОВ к ФУТАМ и
обратно) производится нажатием кнопки С.
3
AA
B
1
2
3
2
3
2
3
4АЯ ЦЕНТРАЛЬНАЯ
СТРЕЛКА
ИНДИКАТОР OFF
ОТКЛЮЧЕН
A
B
НИЖНЯЯ СТРЕЛКА
ЗАВОДНАЯ
ГОЛОВКА
: Центральная и нижняя стрелки произведут
автоматическую калибровку после того, как заводная головка
будет переведена в положение 3 для настройки времени.

414
415
Сенсор температуры всегда находится во включенном состоянии
и считывает показания температуры как минимум один раз в 60
секунд. Значения температуры указываются нижней стрелкой и
на соответствующей шкале.
При ношении часов на запястье температура тела влияет
на показания температуры. Чтобы получить более точные
показания, снимите часы с руки.
/
Сенсор обычно находится в отключенном состоянии,
и его необходимо включить вручную перед погружением.
Чтобы включить сенсор, нажмите и отпустите кнопку B. 4-ая
центральная стрелка передвинется с позиции OFF (ВЫКЛ) (6
часов) на позицию 12-ти часов и начнет считывать показания
как минимум каждые 5 секунд. По мере возрастания глубины
4-ая центральная стрелка будет указывать на текущую глубину
по шкале глубины. Если показания останутся в пределах от
0 до 2 метров (0-6 футов) на протяжении 5 минут, сенсор
автоматически отключится. Нажмите и держите нажатой
кнопку B в течение 2 секунд, чтобы отключить сенсор вручную.
4-ая центральная стрелка передвинется на позицию OFF
(ВЫКЛ) (6 часов).
/
После подъема на поверхность открутите заводную
головку и вытяните ее в среднее положение. Центральная и
нижняя стрелка передвинутся, отображая, соответственно,
максимальное значение глубины и минимальное значение
температуры, зарегистрированные во время последнего
погружения. При следующем включении сенсора глубины будет
произведена очистка памяти.

416
417
Если часы еще не были использованы, центральная и нижняя
стрелки передвинутся на отметку 0 метров/футов и 0ºC/32ºF,
соответственно. Необходимо вкрутить заводную головку
обратно перед использованием часов/погружением.
Часы определяют статус уровня заряда батарейки и
предоставляют пользователю часов визуальное отображение
соответствующего текущего уровня заряда батарейки.
Уровень заряда батарейки определяется согласно следующей
классификации: нормальный уровень заряда батарейки,
низкий уровень заряда батарейки и уровень замены
батарейки, при этом каждый уровень указывается движением
секундной стрелки.
Для индикации нормального уровня заряда батарейки
секундная стрелка будет передвигаться на одну позицию
каждую секунду, что является нормальной работой часов.
Когда часы достигают низкого уровня заряда батарейки,
секундная стрелка будет передвигаться только 2-секундными
интервалами и будет передвигаться на 2 позиции стрелки. Мы
рекомендуем пользователям заменить батарейку, когда часы
указывают низкий уровень заряда батарейки.
Когда часы находятся в режиме замены батареи, секундная
стрелка только перемещается на пять делений с интервалом
в 5 секунд. При этом датчик глубины не включается, и
пользователю необходимо немедленно заменить батарею.

418
419
YACHT RACER
ЧАСОВАЯ
СТРЕЛКА
СЕКУНДНАЯ
СТРЕЛКА
4АЯ ЦЕНТ
РАЛЬНАЯ
СТРЕЛКА
ЗАВОДНАЯ
ГОЛОВКА
ВЕРХНЯЯ
СТРЕЛКА
ШКАЛА PERFECT
DAT E™
НИЖНЯЯ СТРЕЛКА
МИНУТНАЯ
СТРЕЛКА
2 31
A
B
C
PERFECT DATE
Поскольку ваши часы оснащены функцией Perfect Date™,
дата не будет нуждаться в регулировке до 2060 года. Часы
автоматически учитывают короткие месяцы и високосные
годы, всегда по запросу правильно отображая дату. Дата
была заранее выставлена на заводе Timex. Если при
первоначальном запуске часов указанная на часах дата
отличается в ту или иную сторону от даты в месте вашего
нахождения, вам необходимо будет настроить дату согласно
вашей местной дате. Вытяните заводную головку в крайнее
положение. 4-я центральная стрелка пройдет один полный
круг вокруг циферблата часов, задержится на позиции
12:00 часов приблизительно на 5 секунд, а затем перейдет в
положение, указывающее дату, которая установлена на часах
в настоящий момент. Крутите заводную головку вперед для
перевода времени вперед в направлении текущей даты (назад

420
421
для перевода времени назад в направлении текущей даты).
При каждом прохождении полуночи значение даты изменится
на один день. По завершении настройки даты места вашего
нахождения продолжайте крутить заводную головку, чтобы
привести стрелки в положение, указывающее местное время,
обращая внимание на AM (до полудня)/PM (после полудня).
После того, как правильное время установлено, нажмите
на заводную головку, чтобы вернуть ее обратно в закрытое
положение. В нормальном режиме эксплуатации при нажатой
заводной головке 4-я центральная стрелка показывает дату.
Стрелка передвинется в положение, указывающее текущую
дату, как показано на верхнем кольце корпуса. Стрелка
приостановится, позволяя вам прочитать дату, а затем
вернется на 12 часов. Просьба обратить внимание, что
функция Perfect Date™ будет работать исключительно
в режиме индикации времени. При разряде батареи и после
ее замены необходимо заново произвести настройку функции
Perfect Date. При возникновении необходимости замены
батареи мы рекомендуем отправить часы в сервисный центр
Timex, где батарею заменят, а функцию Perfect Date настроят с
выставлением текущей даты на значение, соответствующее той
географической зоне, в которую необходимо будет вернуть
часы.
4
Чтобы отрегулировать 4-ую центральную стрелку:
1. Вытяните заводную головку в положение 3. Позиции
верхней и нижней стрелок автоматически переведутся на
конец цикла.
2. По истечении 10 секунд после того, как Вы вытянули
заводную головку в положение 3, 4-ая центральная стрелка

422
423
должна указывать на 12 часов. Если она не указывает на
12 часов, нажмите кнопку A или B, чтобы передвинуть
стрелку по часовой или против часовой стрелки, пока
стрелка не укажет на 12 часов. Чтобы заставить стрелку
двигаться быстрее, нажимайте и держите нажатой
кнопку A или B. Обратите внимание: если по истечении 5
секунд нахождения заводной головки в положении 3 не
предпринято никаких шагов, 4-ая центральная стрелка
сдвинется и укажет дату на настоящий момент.
3. По окончании задвиньте заводную головку в положение 1.
Нажмите кнопку C для продвижения верхней стрелки на
желаемое положение.
TIME :
Отображает исключительно текущее время (функция Perfect
Date будет работать только в режиме Time).
YACHT RACE TIMER 5 5:
Таймер обратного отсчета начнет отсчет с 5 минут, а по
достижении нулевой позиции включится хронограф.
YACHT RACE TIMER 3 3:
Таймер обратного отсчета начнет отсчет с 3 минут, а по
достижении нулевой позиции включится хронограф.
YACHT RACE TIMER 1 1:
Таймер обратного отсчета начнет отсчет с 1 минуты, а по
достижении нулевой позиции включится хронограф.
CHRONO :
Хронограф будет работать без таймера обратного отсчета.
YACHT RACE
В часах имеются таймеры обратного отсчета на 5, 3 и 1
минуту. Когда таймера обратного отсчета доходит до нуля,
автоматически запускается хронограф на один час.

424
425
1. Нажимайте кнопку C, пока верхняя стрелка не укажет на
желаемый режим таймера Yacht Race на 5, 3 или 1 минуту .
2. Для начала нажмите на кнопку A (START/STOP). 4-ая
центральная стрелка показывает обратный отсчет секунд,
а нижняя стрелка показывает обратный отсчет минут.
(Обратите внимание: во время работы таймера обратного
отсчета кнопки B и C отключены).
3. Для остановки нажмите кнопку A (START/STOP). Это
остановит процесс обратного отсчета. (Обратите внимание:
кнопка C отключена, пока не произведен сброс таймера
обратного отсчета).
4. Для сброса нажмите и держите нажатой в течение 3
секунд кнопку B (SPLIT/RESET). Это произведет сброс
таймера обратного отсчета к первоначально выбранной
продолжительности в 5, 3 или 1 минуту.
При нормальной работе таймера Yacht Race, по достижении
таймером обратного отсчета нулевой позиции автоматически
включается хронограф. По достижении таймером обратного
отсчета каждой минутной отметки, а также по достижении
последних 5 секунд финальной минуты и начала работы
хронографа, раздается слышимое звуковое оповещение.
Хронограф пройдет через 30-минутный цикл дважды, с общей
максимальной продолжительностью до одного часа.
Часы оснащены 1-часовым хронографом, который может
работать независимо от таймера Yacht Race.
1. Нажимайте кнопку C до тех пор, пока верхняя стрелка не
окажется в начале 30-минутной шкалы хронографа.
2. Для начала нажмите на кнопку A (START/STOP). 4-ая
цент ральная стрелка показывает отсчет секунд в

426
427
восходящем порядке, нижняя стрелка показывает отсчет
минут в восходящем порядке по 5-минутной шкале, а
верхняя стрелка показывает получасовые интервалы,
отсчитываемые по 30-минутной шкале. Каждый раз,
когда нижняя стрелка достигает 5-минутной отметки, она
возвращается обратно на нулевую позицию, в то время
как верхняя стрелка продолжает движение вперед по
30-минутной шкале. (Обратите внимание: при работающем
хронографе кнопка C отключена).
3. Нажмите кнопку B (SPLIT/RESET), чтобы начать отсчет
времени определенного отрезка. Верхняя, нижняя и 4-ая
центральная стрелки остановятся на своих позициях, чтобы
позволить Вам отметить свое промежуточное время (время
временного отрезка). Даже когда стрелки остановлены,
хронограф продолжает отслеживать временную
последовательность. Нажмите кнопку B (SPLIT/RESET),
чтобы отпустить стрелки, и стрелки быстро передвинутся и
покажут значение общего истекшего времени.
4. Для остановки нажмите кнопку A (START/STOP). Это
остановит хронограф. (Обратите внимание: кнопка
C отключена при остановленном хронографе до
произведения сброса хронографа).
5. Для сброса нажмите и держите нажатой в течение 3 секунд
кнопку B (SPLIT/RESET). Это произведет сброс хронографа к
началу 30-минутной шкалы.
При нормальной работе хронограф пройдет через
30-минутный цикл дважды, с общей максимальной
продолжительностью до одного часа. По прохождении этого
часа верхняя стрелка останется на 30-минутной отметке, а
нижняя стрелка вернется к нулевой позиции. Необходимо
будет произвести сброс функции хронографа перед ее

428
429
последующим использованием или перед переходом
к другому режиму. (Обратите внимание: когда истекает
максимально допустимое время продолжительностью в один
час, кнопка A отключается и не будет работать до тех пор,
пока не будет произведен сброс хронографа нажатием и
удержанием нажатой в течение 3 секунд кнопки B).
INDIGLO® PRO
В часах Yacht Racer PRO дополнительно имеется функция
подсветки INDIGLO®. При слабом освещении или в темноте
показания на циферблате легко прочитать, нажав на заводную
головку и включив функцию подсветки INDIGLO®. Циферблат
часов Yacht Racer PRO покрыт специальным люминесцентным
материалом, который светится и создает достаточно яркое
освещение для того, чтобы показания циферблата были видны,
но при этом, чтобы после отключения подсветки не страдало
ваше ночное зрение.

430
431
CHRONO TIMER
СЕКУНДНАЯ
СТРЕЛКА
4Я
ЦЕНТРАЛЬНАЯ
СТРЕЛКА
ВЕРХНЯЯ
СТРЕЛКА
PERFECT DATE™
ШКАЛА
МИНУТНАЯ
СТРЕЛКА
ЧАСОВАЯ
СТРЕЛКА
ЗАВОДНАЯ
ГОЛОВКА
НИЖНЯЯ
СТРЕЛКА
2 31
A
B
C
PERFECT DATE
Поскольку в ваших часах имеется функция Perfect Date™,
дата не будет нуждаться в регулировке до 2060 года. Часы
автоматически учитывают короткие месяцы и високосные
годы, всегда по запросу правильно отображая дату. Дата
была заранее выставлена на заводе Timex. Если при
первоначальном запуске часов указанная на часах дата
отличается в ту или иную сторону от даты в месте вашего
нахождения, вам необходимо будет настроить дату согласно
вашей местной дате. Вытяните заводную головку в крайнее
положение. 4-я центральная стрелка пройдет один полный
круг вокруг циферблата часов, задержится на позиции
12:00 часов приблизительно на 5 секунд, а затем перейдет в
положение, указывающее дату, которая установлена на часах
в настоящий момент. Крутите заводную головку вперед для
перевода времени вперед в направлении текущей даты (назад

432
433
для перевода времени назад в направлении текущей даты).
При каждом прохождении полуночи значение даты изменится
на один день. По завершении настройки даты места вашего
нахождения продолжайте крутить заводную головку, чтобы
привести стрелки в положение, указывающее местное время,
обращая внимание на AM (до полудня)/PM (после полудня).
После того, как правильное время установлено, нажмите
на заводную головку, чтобы вернуть ее обратно в закрытое
положение. В нормальном режиме эксплуатации при нажатой
заводной головке 4-я центральная стрелка показывает дату.
Стрелка передвинется в положение, указывающее текущую
дату, как показано на верхнем кольце корпуса. Стрелка
приостановится, позволяя вам прочитать дату, а затем
вернется на 12 часов. Просьба обратить внимание, что
функция Perfect Date™ будет работать исключительно
в режиме индикации времени. При истощении батареи
и ее замене функция Perfect Date потребует повторной
настройки. При возникновении необходимости замены
батареи мы рекомендуем отправить часы в сервисный центр
Timex, где батарею заменят, а функцию Perfect Date настроят с
выставлением текущей даты на значение, соответствующее той
географической зоне, в которую необходимо будет вернуть
часы.
4
Чтобы отрегулировать 4-ю центральную стрелку:
1. Вытяните заводную головку в положение 3. Верхняя и
нижняя стрелки автоматически переместятся в свое
конечное положение.
2. Когда они остановятся, 4-я центральная стрелка должна
указывать на 12 часов. Если она указывает не на 12 часов,
нажмите кнопку А или кнопку В для перемещения стрелки

434
435
вперед или назад, пока она не остановится против 12
часов. Чтобы заставить стрелку двигаться быстрее, нажмите
и задержите кнопку A или B. Обратите внимание: если
по истечении 5 секунд нахождения заводной головки
в положении 3 не предпринято никаких действий, 4-я
центральная стрелка сдвинется и укажет текущую дату.
3. По окончании нажмите на заводную головку, переведя ее в
положение 1.
Нажмите кнопку C для перемещения верхней стрелки в
нужное положение.
Отображается исключительно текущее время (функция Perfect
Date ™будет работать только в режиме индикации времени).
Часы оснащены 4-часовым хронографом. В конце 4-часового
промежутка времени хронограф автоматически отключится.
Это позволит сохранить заряд батареи при случайном
включении хронографа.
1. Нажмите кнопку С и держите, пока верхняя стрелка не
окажется в начале шкалы хронографа верхней стрелки,
а нижняя стрелка - против 0 нижней шкалы.
2. Для начала нажмите на кнопку A (START/STOP). Четвертая
центральная стрелка показывает отсчет секунд в
восходящем порядке, нижняя стрелка показывает отсчет
минут в восходящем порядке по 30-минутной шкале, а
верхняя стрелка показывает часы в в восходящем порядке
на 4-часовой шкале. Каждый раз, когда нижняя стрелка
достигает 30-минутной отметки, она возвращается обратно
в нулевое положение, и начинается отсчет следующих 30

436
437
минут, в то время как верхняя стрелка продолжает движение
вперед по 4-часовой шкале. (Просьба обратить внимание:
при работающем хронографе кнопка C отключена)
3. Нажмите кнопку B (SPLIT/RESET), чтобы начать отсчет
промежуточного времени. Верхняя, нижняя и 4-я
центральная стрелки задержатся в своих положениях,
чтобы позволить Вам отметить свое промежуточное
время (время временного отрезка). Даже когда стрелки
остановлены, хронограф продолжает отсчитывать время.
Нажмите кнопку B (SPLIT/RESET), чтобы стрелки снова
пришли в движение, и они быстро передвинутся и покажут
значение суммарного истекшего времени.
4. Для остановки нажмите кнопку A (START/STOP). Это
остановит хронограф. (Просьба обратить внимание: кнопка
C не работает, пока хронограф остановлен и пока на нем
не будет снова задан промежуток времени).
5. Для перепрограммирования хронографа после его
остановки нажмите кнопку В (SPLIT/RESET), что приведет к
возврату хронографа в начало 30-минутного и 4-часового
циклов на обоих малых циферблатах.
В нормальном режиме хронограф пройдет 30-минутный
цикл 8 раз, что соответствует максимуму в четыре часа. По
истечении этих четырех часов верхняя стрелка останется
на четырех-часовой отметке, а нижняя стрелка вернется
на нуль. Необходимо будет произвести сброс функции
хронографа прежде, чем ею можно будет воспользоваться
повторно, или перед переходом в другой режим. (Просьба
обратить внимание: когда истекает максимальный период
продолжительностью в четыре часа, кнопка A отключается
и не работает до тех пор, пока нажатием кнопки B не будет
произведен сброс хронографа).

438
439
В часах имеется функция таймера обратного отсчета.
: Верхняя, нижняя и 4-я
центральная стрелки связаны в 3, 4 и 5 шагах. При
перемещении минутной и секундной стрелок вперед/назад
вы увидите, что все три стрелки реагируют на уменьшение
или увеличение промежутка времени таймера обратного
отсчета. После того, как заводная головка вытянута в среднее
положение, нажатия кнопки С будут задействовать стрелки
в следующей последовательности: Верхняя стрелка (нажать
кнопку С) - нижняя стрелка (начать кнопку С) - 4-я центральная
стрелка (нажать кнопку С) затем снова верхняя стрелка...
Это позволяет вам пройти цикл и задействовать стрелки,
положение которых вам необходимо корректировать, чтобы
получить необходимые настройки для обратного отсчета.
Нажатие на заводную головку в любой точке цикла завершает
процедуру настройки и подтверждает выбранные на
настоящий момент значения.
Таймер обратного отсчета может настраиваться только, когда
функция таймера обратного отсчета отключена. Если таймер
обратного отсчета ранее использовался, его необходимо
будет обнулить. Если таймер в настоящее время работает, его
необходимо остановить и сбросить, чтобы настроить таймер
обратного отсчета.
1. Нажимайте кнопку C до тех пор, пока верхняя стрелка не
окажется в какой-то точке шкалы таймера. Если таймер
ранее настраивался, стрелка будет указывать на ранее
заданное время. Если таймер настраивается в первый раз,
она будет указывать на 0 на шкале таймера.
2. Вытяните заводную головку в среднее положение.

440
441
3. Чтобы задать нужное количество часов с шагом по полчаса
(до максимального периода в 4:00:00) нажмите на кнопку А,
чтобы переместить верхнюю стрелку назад (при нажатии
кнопки В эта стрелка переместится вперед), пока не
будет выбрано нужное число часов. Просьба обратить
внимание, что вы выбираете полное заданное число часов
с точностью до получаса (например, если необходимое
общее время обратного отсчета составляет 2:53:00, вы
выберете 3 часа). Закончив задавать число часов, нажмите
кнопку С для подтверждения выбора.
4. Теперь вы можете выбрать необходимое число минут с
шагом в одну минуту нажатием кнопки А для перемещения
нижней стрелки назад (нажатием кнопки В эту стрелку
можно переместить вперед), пока не будет выбрано
нужное число минут. Просьба обратить внимание, что вы
переставляете на нужное число минут назад или вперед,
чтобы получить нужное время (пример: чтобы получить
необходимое суммарное время обратного отсчета, равное
2:53:30, вам нужно будет нажать кнопку А семь раз, чтобы
уменьшить общее время обратного отсчета с 3 часов
до 2:53:00). При этом часовая стрелка немного отойдет
назад от 3-часовой отметки в сторону 2,5 часов. Выставив
нужное число минут, нажмите кнопку С для подтверждения
выбора.
5. Теперь вы можете выбрать необходимое число секунд
с шагом в одну секунду нажатием кнопки А для
перемещения четвертой стрелки назад (нажатием кнопки
В эту стрелку можно переместить вперед), пока не
будет выбрано нужное число секунд. Просьба обратить
внимание, что вы добавляете или вычитаете нужное
число секунд, чтобы получить необходимое суммарное
время (пример: чтобы получить необходимое суммарное

442
443
время обратного отсчета, равное 2:53:30, вам нужно
будет нажать кнопку В 30 раз, чтобы отсчитать 30 секунд).
Завершив настройку нужного значения секунд, нажмите
на заводную головку для приведения ее в положение 1 и
подтверждения полного значения на таймере обратного
отсчета.
После того, как таймер обратного отсчета настроен на
заданное значение времени для обратного отсчета, вы можете
его включить.
: Чтобы запустить таймер
обратного отсчета, нажмите на кнопку А. Четвертая
центральная и нижняя стрелки начнут движение назад.
Верхняя стрелка пойдет вперед. Стрелки будут продолжать
показывать оставшееся до конца обратного отсчета время
до того момента, пока заданный вами на таймере обратного
отсчета промежуток времени не истечет, и значение
оставшегося времени не станет равным нулю. Когда
оставшееся время обратного отсчета станет равным нулю,
прозвучит звуковой сигнал, что будет свидетельствовать о том,
что обратный отсчет завершился.
: Если вы хотите остановить
обратный отсчет до того, как он дойдет до нуля, вы можете
это сделать, нажав на кнопку А (четвертая средняя, а также
верхняя и нижняя стрелки остановятся). Если впоследствии
вы захотите возобновить обратный отсчет с того момента,
в который вы его остановили, просто еще раз нажмите на
кнопку А (четвертая средняя, а также верхняя и нижняя
стрелки возобновят движение).

444
445
: После того, как обратный отсчет
дошел до нуля и прозвучал звуковой сигнал, можно повторно
настроить таймер обратного отсчета на заданное значение
нажатием кнопки В (четвертая центральная, а также верхняя и
нижняя стрелки переместятся в положения, соответствующие
времени, заданному вами до начала использования функции
таймера обратного отсчета).
: При необходимости вы
можете сбросить значение таймера обратного отсчета на нуль.
Это можно сделать, только если таймер обратного отсчета
не работает и возвращен к заданному значению. Если таймер
обратного отсчета запущен, необходимо сначала остановить
обратный отсчет последовательным нажатием кнопок А, затем
В. При этом таймер обратного отсчета остановится и вернется
к первоначально заданному значению. Чтобы сбросить
значение таймера обратного отсчета до нуля, нажмите кнопку
В и задержите ее в течение двух секунд в нажатом положении.
Теперь необходимо выполнить инструкции по заданию на
таймере нового значения времени обратного отсчета.
: Когда таймер
обратного отсчета запущен, вы можете воспользоваться
функцией промежуточного времени, чтобы запомнить
оставшееся время обратного отсчета:
Чтобы воспользоваться функцией промежуточного времени,
нажмите кнопку В, после чего верхняя, нижняя и 4-я средняя
стрелки замрут на месте. Функция обратного отсчета продолжит
работать в фоновом режиме, пока стрелки стоят на месте.
Для возобновления движения верхней, нижней и 4-й
центральной стрелок снова нажмите на кнопку В, и стрелки
перейдут в то положение, которое соответствует текущему
моменту времени в обратном отсчете.

446
447
3GMT
A
2 31
СЕКУНДНАЯ
СТРЕЛКА
ЗАВОДНАЯ
ГОЛОВКА
ПОВОРОТНОЕ
ВЕРХНЕЕ КОЛЬЦО
24ЧАСОВОЙ ФОРМАТ
4АЯ ЦЕНТРАЛЬНАЯ СТРЕЛКА
МИНУТНАЯ
СТРЕЛКА
ЧАСОВАЯ СТРЕЛКА
ВНУТРЕННЕЕ
КОЛЬЦО /ЦИФРЫ
24ЧАСОВОЙ ФОРМАТ
Ваши часы обладают возможностью отображения трех часовых
поясов.
1. Часовая и минутная стрелки: Отображаю время в
12-часовом формате. Обратите внимание: Дата,
показываемая в окошке для даты, связана со временем,
показываемым этими двумя стрелками.
2. 4-ая центральная стрелка и внутреннее кольцо:
Отображаю время в 24-часовом формате.
3. 4-ая центральная стрелка и верхнее поворотное кольцо
корпуса: Отображаю время в 24-часовом формате.

448
449
4
Чтобы отрегулировать 4-ую центральную стрелку:
1. Вытяните заводную головку в положение 3.
2. 4-ая центральная стрелка должна указывать на 12 часов.
Если по истечении 5 секунд после того, как Вы вытянули
заводную головку в положение 3, 4-ая центральная
стрелка не указывает на 12 часов, нажмите кнопку A, чтобы
передвинуть стрелку по часовой стрелке, пока стрелка
не укажет на 12 часов. Чтобы заставить стрелку двигаться
быстрее, нажимайте и держите нажатой кнопку A.
3. По окончании задвиньте заводную головку в положение 1.
4
Калибровка 4-ой центральной стрелки произведена на
фабрике Timex, чтобы отражать стандартные минуты в рамках
часа в соответствии со Всемирным Координированным
Временем (Universal Time Coordinated). Большинство
местоположений в мире следуют стандартному ходу минут.
Если местоположение, используемое Вами для 2-го и 3-го
часовых поясов, следует стандартному ходу минут, нет
необходимости произведения калибровки 4-й центральной
стрелки. Только в том случае, если Вы захотите, чтобы второй
и третий часовые пояса отображали время местоположений,
не следующих стандартному ходу минут, следуйте данным
инструкциям повторной калибровки 4-й центральной
стрелки,:
1. Вытяните заводную головку в положение 3. 4-ая
центральная стрелка укажет на 12 часов.
2. Поверните заводную головку так, чтобы минутная
стрелка указывала на правильное время в рамках часа,
соответствующего времени местоположения, выбранного
Вами для 2-го и 3-го часовых поясов.

450
451
3. Задвиньте заводную головку в положение 2. 4-ая
центральная стрелка укажет на позицию минут в рамках
часа, соответствующую текущей калибровке
4. Нажимайте кнопку A, чтобы передвигать 4-ую центральную
стрелку по часовой стрелке до тех пор, пока она не
совпадет с минутной стрелкой. Чтобы заставить стрелку
двигаться быстрее, нажимайте и держите нажатой кнопку A.
5. Вытяните заводную головку в положение 3. 4-ая
центральная стрелка укажет на 12 часов.
6. Поверните заводную головку так, чтобы часовая и
минутная стрелки указывали на правильное время.
7. По окончании задвиньте заводную головку в положение 1.
Обратите внимание: 4-ая центральная стрелка будет
отслеживать время в рамках часа, соответствующую
текущей калибровке. Как для 2-го, так и для 3-го часового
пояса используется 4-ая центральная стрелка, поэтому
местоположения, время которых отслеживается в часовых
поясах 2 и 3, должны следовать одному и тому же ходу
минут в рамках часа, чтобы эти часовые пояса отображались
правильно.
4
2
Обратите внимание на текущее время в местоположении,
время которого Вы желаете отслеживать в качестве времени
2-го часового пояса. Нажимайте кнопку A до тех пор, пока
4-ая центральная стрелка не укажет на время на внутреннем
кольце. (Обратите внимание: используется шкала 24-часового
формата). 4-ая центральная стрелка продвинется на 30 минут
вперед при каждом нажатии кнопки A. Чтобы заставить
стрелку двигаться быстрее, нажимайте и держите нажатой
кнопку A. Это выставит время 2-го часового пояса на часах.

452
3
Чтобы настроить 3-й часовой пояс, используя имеющую
настройку 4-й центральной стрелки, настройте верхнее
поворотное кольцо корпуса на указание времени
выставленного Вами 3-го часового пояса. (Обратите внимание:
используется шкала 24-часового формата). Верхнее кольцо
имеет 72 положения. Для продвижения верхнего кольца
на один час, Вам необходимо будет продвинуть его на три
позиции (3 “нажатия”) Обратите внимание на текущее время
в местоположении, время которого Вы желаете отслеживать
в качестве времени 3-го часового пояса. Поверните верхнее
кольцо корпуса против часовой стрелки в положение
правильной отметки текущего часа времени, которое
указывает 4-ая центральная стрелка.
( )
Тахиметр определяет только скорости свыше 60 единиц
в час этим способом; меньшие показания скорости
могут быть измерены при помощи уменьшения единицы
измерения. Функция, выполняемая тахиметром, независима
от единицы расстояния (напр., английских миль, морских
миль, километров, метров и т.д.) в том случае, если для всех
измерений используется одна и та же единица длины.
1. Определите начальные и конечные отметки для заранее
определенного Вами расстояния.
2. Запустите хронограф, как только объект, скорость которого
измеряется, пройдет начальную отметку.

454
455
3. Запустите хронограф, как только объект, скорость которого
измеряется, пройдет начальную отметку.
4. Секундная стрелка хронографа сопоставляется с
отметками тахиметра для определения скорости объекта.
Верхнее кольцо, выполняющее функцию логарифмической
линейки, работает при помощи поворота внешнего кольца.
Внутреннее кольцо остается неподвижным. Внешнее кольцо
всегда связано с “расстоянием” или “скоростью” или с любыми
данными, меняющимися со временем. Внутреннее кольцо
только отмечает единицы времени.
Цифра “10” на внешнем кольце представляет собой
коэффициенты или числа, кратные 10, такие как 0,1, 1,0, 10
или 100.
Обозначение “MPH” (миль в час) на внутреннем кольце
является “показателем скорости”. Этот показатель используется
для вычисления скорости с применением каких-либо данных,
полученных за час. Обозначения “STAT” (английские мили) или
“NAUT” (морские мили) на внутреннем кольце используются
для перевода единиц расстояния.

456
457
ВНЕШНЕЕ КОЛЬЦО
ВНУТРЕННЕЕ
КОЛЬЦО
Следующие примеры приведены в качестве инструкций по
использованию логарифмической линейки.
:
10
15 ?
: Расстояние: 10 морских миль Время: 15 минут
• Совместите стрелку “10” на внешнем кольце со стрелкой
“15” на внутреннем кольце.
• Необходимая скорость будет показана непосредственно
над указателем “MPH” на внутреннем кольце.
: 40
: ,
10 40
?
: Скорость: 40 миль в час Расстояние: 10 морских миль
• Совместите “40” на внешнем кольце с отметкой “MPH” на
внутреннем кольце.

458
459
• Необходимая скорость будет показана непосредственно
под стрелкой “10” на внешнем кольце, что также является “15”
на внутреннем кольце.
: 15
:
40
15 ?
: Скорость: 40 морских миль в час Время: 15 минут
• Поместите “40” на внешнем кольце непосредственно над
указателем “MPH” на внутреннем кольце.
• Пройденное расстояние будет получено непосредственно
над отметкой “15” на внутреннем кольце. Число, указанное
на внешнем кольце, - “10”.
: 10 .
:
Перевод единиц расстояния из морских миль в английские
мили или километры.
: Расстояние для перевода единиц - 10 морских миль
• Поместите стрелку “10” на внешнем кольце над указателем
“NAUT” на внутреннем кольце. Перевод в английские мили
(11.5) указан над отметкой “STAT” на внутреннем кольце, а
перевод в километры (18.5) указан над отметкой “MPH” на
внутреннем кольце.

460
461
(Один из приведенных ниже параграфов по регулированию
браслета относится к Вашей модели часов).
1. Откройте блокировочную
пластину.
2. Переместите застежку до
нужной длины браслета.
3. Удерживая и прижимая
блокировочную пластину,
двигайте застежку взад-вперед, пока она не встанет в
направляющие канавки на нижней стороне браслета.
4. Закройте блокировочную пластину, вдавив ее до
защелкивания. Учтите, что избыточная сила может привести
к повреждению застежки.
1. Найдите подпружиненный стержень, соединяющий
браслет с застежкой.
2. С помощью инструмента с острым концом нажмите на этот
стержень и аккуратным поворотом отсоедините браслет.
3. Определите размер запястья, затем установите стержень в
соответствующее нижнее отверстие.
4. Нажмите на подпружиненный стержень, направьте
в верхнее отверстие и отпустите, чтобы стержень встал на
место.

462
463
:
1. Поставьте браслет на торец и вставьте инструмент
с острым концом в открытое отверстие звена.
2. Сильно нажмите на штифт в направлении стрелки, чтобы
отсоединить звено (конструкция предусматривает
необходимость приложения усилия для удаления штифта).
3. Повторяйте процедуру до тех пор, пока не будет
отсоединено нужное количество звеньев.
:
1. Соедините элементы браслета.
2. Вставьте штифт обратно в звено в направлении,
противоположном направлению стрелки.
3. Жмите вниз на штифт до тех пор, пока он не зайдет
в ячейку браслета до конца вровень с кромкой.
Батарейка рассчитана на 4-6 лет нормальной работы.
Фактический срок службы батарейки может меняется
в зависимости от условий использования.
Фирма TIMEX рекомендует обращаться только к производителю
часов для замены батарейки. После замены батарейки
необходимо будет заново произвести калибровку для
установки правильного времени и даты. Для отправки
Ваших часов на фирму Timex воспользуйтесь специальной
предоплаченной почтовой упаковкой с уже напечатанным
адресом получателя. Эту упаковку можно получить, позвонив
по телефону 1-800-448-4639 или обратившись к дистрибьютеру,
у которого были приобретены часы, а также через сайт www.
TIMEX.com. Пожалуйста, включите оплату почтовых расходов и
затрат на упаковку (не включенных в стоимость ремонта) в виде:
чека или платежного поручения на сумму 8.00 долларов США

464
465
на территории США; чека или платежного поручения на сумму
12.00 канадских долларов на территории Канады. В других
странах фирма Timex предъявит Вам счет за почтовые расходы и
затраты на упаковку.
- ,
.
.
.
.
TIMEX
Фирма Timex Group USA, Inc. гарантирует отсутствие в Ваших
часах TIMEX® каких-либо производственных дефектов на
период до ОДНОГО ГОДА со дня первоначальной покупки.
Фирма Timex и ее международные филиалы признают
настоящую международную гарантию.Пожалуйста, учтите, что
фирма Timex может, на свое усмотрение, отремонтировать
Ваши часы с использованием новых или полностью
отремонтированных и прошедших инспекцию компонентов
или заменить изделием той же или аналогичной модели.
— , ,
:
1. по истечении срока гарантии;

466
467
2. если часы были первоначально приобретены не у
официального распространителя продукции фирмы Timex;
3. если повреждения явились результатом ремонта или
обслуживания, произведенного не фирмой Timex;
4. если повреждения явились результатом аварии, вскрытия
часов или других недозволенных действий; кроме того,
5. гарантия не распространяется на стекло, ремешок или
браслет, футляр от часов, прочие принадлежности и
батарейку. Замена этих частей может быть произведена
фирмой Timex за дополнительную плату.
НАСТОЯЩАЯ ГАРАНТИЯ И ПРЕДУСМОТРЕННЫЕ ЕЮ МЕРЫ
ЯВЛЯЮТСЯ ИСКЛЮЧИТЕЛЬНЫМИ И ЗАМЕНЯЮТ ВСЕ ДРУГИЕ
ГАРАНТИИ, ЯВНЫЕ ИЛИ ПОДРАЗУМЕВАЕМЫЕ, ВКЛЮЧАЯ ЛЮБЫЕ
ПОДРАЗУМЕВАЕМЫЕ ГАРАНТИИ КОММЕРЧЕСКОГО КАЧЕСТВА
ИЛИ ПРИГОДНОСТИ ДЛЯ КАКОГО-ЛИБО СПЕЦИФИЧЕСКОГО
ПРИМЕНЕНИЯ. КОМПАНИЯ TIMEX НЕ НЕСЕТ НИКАКОЙ
ОТВЕТСТВЕННОСТИ ЗА КАКИЕ-ЛИБО ОСОБЫЕ, ПОБОЧНЫЕ
ИЛИ ВТОРИЧНЫЕ ПОВРЕЖДЕНИЯ. Некоторые страны и штаты
не допускают ограничений в отношении подразумеваемых
гарантий и не допускают исключений или ограничений в
отношении повреждений. В таком случае на Вас не будут
распространяться эти ограничения. Настоящая гарантия
предоставляет Вам конкретные юридические права, но Вы
можете иметь также и другие права, которые могут отличаться
в зависимости от конкретной страны или штата.
Для получения гарантийного обслуживания, пожалуйста,
отправьте Ваши часы на фирму Timex, в одно из её отделений
или официальному распространителю её продукции, у
которого часы были куплены. Пожалуйста, приложите
заполненный оригинал Гарантийного талона на ремонт часов,
а в США и Канаде - заполненный оригинал Гарантийного

468
469
талона на ремонт часов или сопроводительное письмо с
указанием Вашего имени, адреса, номера телефона, а также
даты и места покупки часов. Пожалуйста, включите оплату
почтовых расходов и затрат на упаковку (не включенных в
стоимость ремонта) в виде: чека или платёжного поручения
на сумму 8.00 долларов США на территории США, чека или
платёжного поручения на сумму 12.00 канадских долларов
на территории Канады, чека или платёжного поручения на
сумму 3.50 английских фунтов стерлингов на территории
Великобритании. В других странах фирма Timex предъявит
Вам счет за почтовые расходы и затраты на упаковку. НИ ПРИ
КАКИХ ОБСТОЯТЕЛЬСТВАХ НЕ ПРИЛАГАЙТЕ К ВАШЕЙ ПОСЫЛКЕ
КАКИЕ-ЛИБО ПРЕДМЕТЫ, ПРЕДСТАВЛЯЮЩИЕ ДЛЯ ВАС ЛИЧНУЮ
ЦЕННОСТЬ.
Для получения дополнительной информации по гарантийному
обслуживанию в США звоните по телефону 1-800-448-4639.
В Канаде звоните по телефону 1-800-263-0981. В Бразилии
звоните по телефону +11 2664 1001. В Мексике звоните по
телефону 01-800-01-060-00. В Центральной Америке, странах
Карибского бассейна, на Бермудских и Багамских островах
звоните по телефону (501) 370-5775 (США). В Азии звоните
по телефону 852-2815-0091. В Великобритании звоните
по телефону 44 020 8687 9620. Во Франции звоните по
телефону 33 3 81 63 42 51. В Германии/Австрии звоните по
телефону +43 662 889 2130. В других регионах для получения
дополнительной информации о гарантии, просьба связываться
с местным розничным представителем или дистрибьютором
фирмы Timex.

470
471
Если Вашим часам Timex® понадобится техническое
обслуживание, отправьте их на фирму Timex согласно
указаниям, приведенным в Международной гарантии
фирмы Timex, или по адресу: TG SERVICE CENTER, P.O. Box
2740, Little Rock, AR 72203. По всем вопросам, связанным с
обслуживанием, обращайтесь по телефону 1-800-328-2677 или
по адресу электронной почты custser[email protected]
Имеется только в США. Продлите гарантию на свои часы
еще на 4 года с даты покупки за 5 долларов США. Вы можете
произвести оплату при помощи карты AMEX, Discover, Visa или
MasterCard по телефону 1 800-448-4639 во время нормального
рабочего времени. Платеж должен быть произведен в течение
30 дней со дня покупки. Вам будет необходимо предоставить
свое имя, адрес, номер телефона, дату покупки и 5-значный
номер модели часов. Вы также можете прислать чек на 5
долларов США почтой по адресу: Timex Extended Warranty,
P.O. Box 1676, Dept. EF, Little Rock, AR 72203.
© 2015 Timex Group USA, Inc. TIMEX, INDIGLO и INTELLIGENT QUARTZ
являются товарными знаками компании Timex Group B.V. и ее филиалов.
-
 1
1
-
 2
2
-
 3
3
-
 4
4
-
 5
5
-
 6
6
-
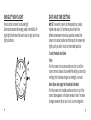 7
7
-
 8
8
-
 9
9
-
 10
10
-
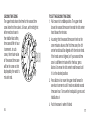 11
11
-
 12
12
-
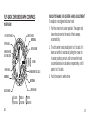 13
13
-
 14
14
-
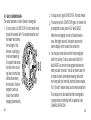 15
15
-
 16
16
-
 17
17
-
 18
18
-
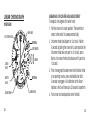 19
19
-
 20
20
-
 21
21
-
 22
22
-
 23
23
-
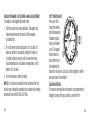 24
24
-
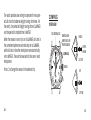 25
25
-
 26
26
-
 27
27
-
 28
28
-
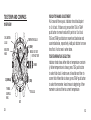 29
29
-
 30
30
-
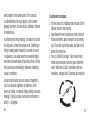 31
31
-
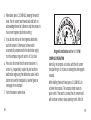 32
32
-
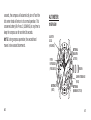 33
33
-
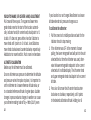 34
34
-
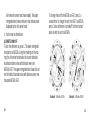 35
35
-
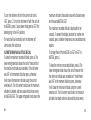 36
36
-
 37
37
-
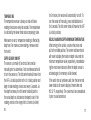 38
38
-
 39
39
-
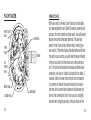 40
40
-
 41
41
-
 42
42
-
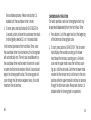 43
43
-
 44
44
-
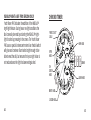 45
45
-
 46
46
-
 47
47
-
 48
48
-
 49
49
-
 50
50
-
 51
51
-
 52
52
-
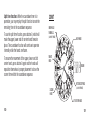 53
53
-
 54
54
-
 55
55
-
 56
56
-
 57
57
-
 58
58
-
 59
59
-
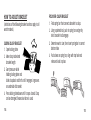 60
60
-
 61
61
-
 62
62
-
 63
63
-
 64
64
-
 65
65
-
 66
66
-
 67
67
-
 68
68
-
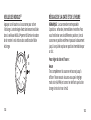 69
69
-
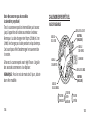 70
70
-
 71
71
-
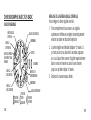 72
72
-
 73
73
-
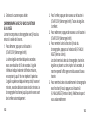 74
74
-
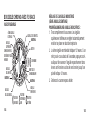 75
75
-
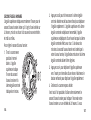 76
76
-
 77
77
-
 78
78
-
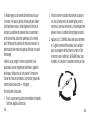 79
79
-
 80
80
-
 81
81
-
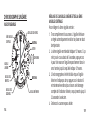 82
82
-
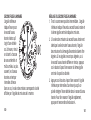 83
83
-
 84
84
-
 85
85
-
 86
86
-
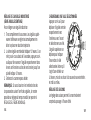 87
87
-
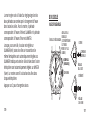 88
88
-
 89
89
-
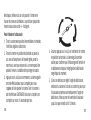 90
90
-
 91
91
-
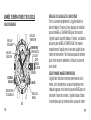 92
92
-
 93
93
-
 94
94
-
 95
95
-
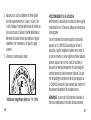 96
96
-
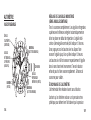 97
97
-
 98
98
-
 99
99
-
 100
100
-
 101
101
-
 102
102
-
 103
103
-
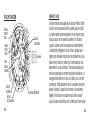 104
104
-
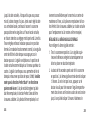 105
105
-
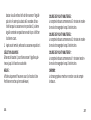 106
106
-
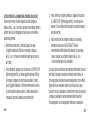 107
107
-
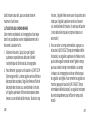 108
108
-
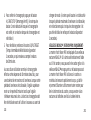 109
109
-
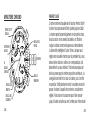 110
110
-
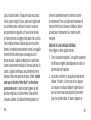 111
111
-
 112
112
-
 113
113
-
 114
114
-
 115
115
-
 116
116
-
 117
117
-
 118
118
-
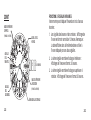 119
119
-
 120
120
-
 121
121
-
 122
122
-
 123
123
-
 124
124
-
 125
125
-
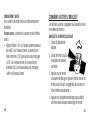 126
126
-
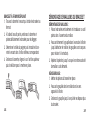 127
127
-
 128
128
-
 129
129
-
 130
130
-
 131
131
-
 132
132
-
 133
133
-
 134
134
-
 135
135
-
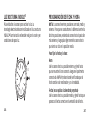 136
136
-
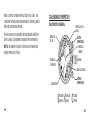 137
137
-
 138
138
-
 139
139
-
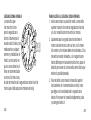 140
140
-
 141
141
-
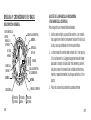 142
142
-
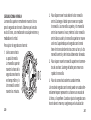 143
143
-
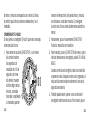 144
144
-
 145
145
-
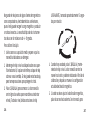 146
146
-
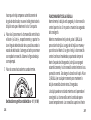 147
147
-
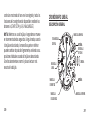 148
148
-
 149
149
-
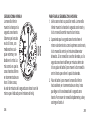 150
150
-
 151
151
-
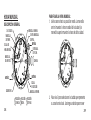 152
152
-
 153
153
-
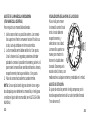 154
154
-
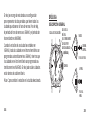 155
155
-
 156
156
-
 157
157
-
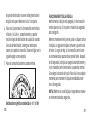 158
158
-
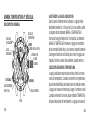 159
159
-
 160
160
-
 161
161
-
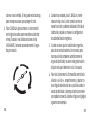 162
162
-
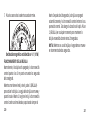 163
163
-
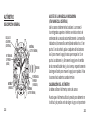 164
164
-
 165
165
-
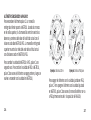 166
166
-
 167
167
-
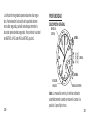 168
168
-
 169
169
-
 170
170
-
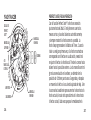 171
171
-
 172
172
-
 173
173
-
 174
174
-
 175
175
-
 176
176
-
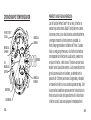 177
177
-
 178
178
-
 179
179
-
 180
180
-
 181
181
-
 182
182
-
 183
183
-
 184
184
-
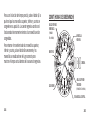 185
185
-
 186
186
-
 187
187
-
 188
188
-
 189
189
-
 190
190
-
 191
191
-
 192
192
-
 193
193
-
 194
194
-
 195
195
-
 196
196
-
 197
197
-
 198
198
-
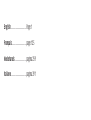 199
199
-
 200
200
-
 201
201
-
 202
202
-
 203
203
-
 204
204
-
 205
205
-
 206
206
-
 207
207
-
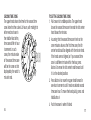 208
208
-
 209
209
-
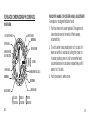 210
210
-
 211
211
-
 212
212
-
 213
213
-
 214
214
-
 215
215
-
 216
216
-
 217
217
-
 218
218
-
 219
219
-
 220
220
-
 221
221
-
 222
222
-
 223
223
-
 224
224
-
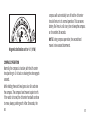 225
225
-
 226
226
-
 227
227
-
 228
228
-
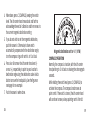 229
229
-
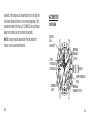 230
230
-
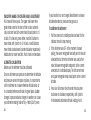 231
231
-
 232
232
-
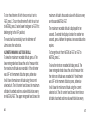 233
233
-
 234
234
-
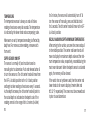 235
235
-
 236
236
-
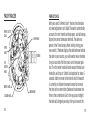 237
237
-
 238
238
-
 239
239
-
 240
240
-
 241
241
-
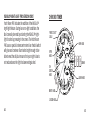 242
242
-
 243
243
-
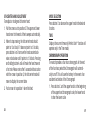 244
244
-
 245
245
-
 246
246
-
 247
247
-
 248
248
-
 249
249
-
 250
250
-
 251
251
-
 252
252
-
 253
253
-
 254
254
-
 255
255
-
 256
256
-
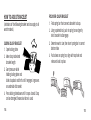 257
257
-
 258
258
-
 259
259
-
 260
260
-
 261
261
-
 262
262
-
 263
263
-
 264
264
-
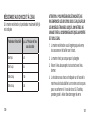 265
265
-
 266
266
-
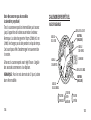 267
267
-
 268
268
-
 269
269
-
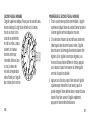 270
270
-
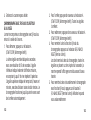 271
271
-
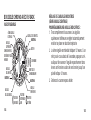 272
272
-
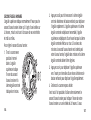 273
273
-
 274
274
-
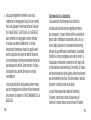 275
275
-
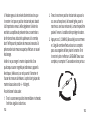 276
276
-
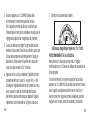 277
277
-
 278
278
-
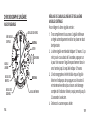 279
279
-
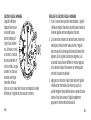 280
280
-
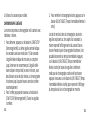 281
281
-
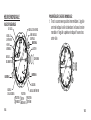 282
282
-
 283
283
-
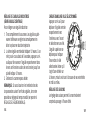 284
284
-
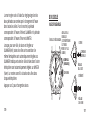 285
285
-
 286
286
-
 287
287
-
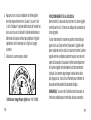 288
288
-
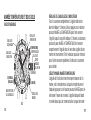 289
289
-
 290
290
-
 291
291
-
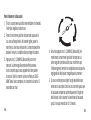 292
292
-
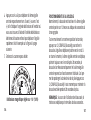 293
293
-
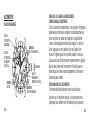 294
294
-
 295
295
-
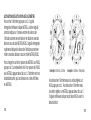 296
296
-
 297
297
-
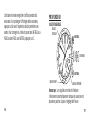 298
298
-
 299
299
-
 300
300
-
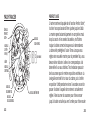 301
301
-
 302
302
-
 303
303
-
 304
304
-
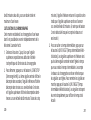 305
305
-
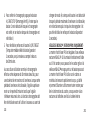 306
306
-
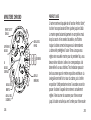 307
307
-
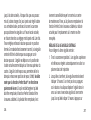 308
308
-
 309
309
-
 310
310
-
 311
311
-
 312
312
-
 313
313
-
 314
314
-
 315
315
-
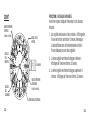 316
316
-
 317
317
-
 318
318
-
 319
319
-
 320
320
-
 321
321
-
 322
322
-
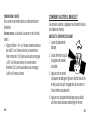 323
323
-
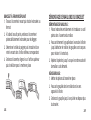 324
324
-
 325
325
-
 326
326
-
 327
327
-
 328
328
-
 329
329
-
 330
330
-
 331
331
-
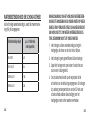 332
332
-
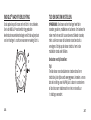 333
333
-
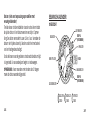 334
334
-
 335
335
-
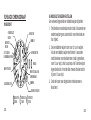 336
336
-
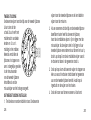 337
337
-
 338
338
-
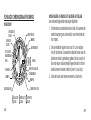 339
339
-
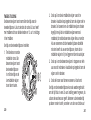 340
340
-
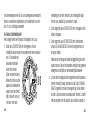 341
341
-
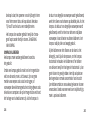 342
342
-
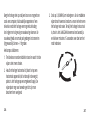 343
343
-
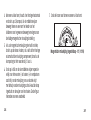 344
344
-
 345
345
-
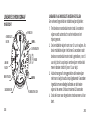 346
346
-
 347
347
-
 348
348
-
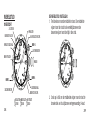 349
349
-
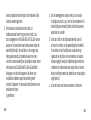 350
350
-
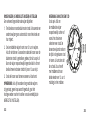 351
351
-
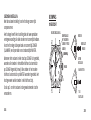 352
352
-
 353
353
-
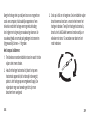 354
354
-
 355
355
-
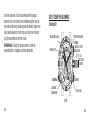 356
356
-
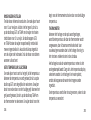 357
357
-
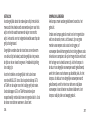 358
358
-
 359
359
-
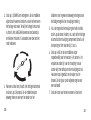 360
360
-
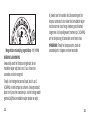 361
361
-
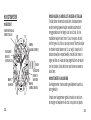 362
362
-
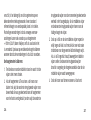 363
363
-
 364
364
-
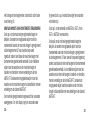 365
365
-
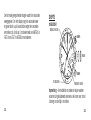 366
366
-
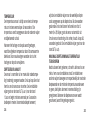 367
367
-
 368
368
-
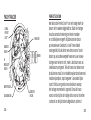 369
369
-
 370
370
-
 371
371
-
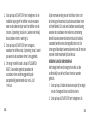 372
372
-
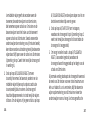 373
373
-
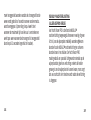 374
374
-
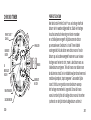 375
375
-
 376
376
-
 377
377
-
 378
378
-
 379
379
-
 380
380
-
 381
381
-
 382
382
-
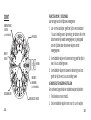 383
383
-
 384
384
-
 385
385
-
 386
386
-
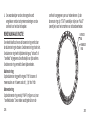 387
387
-
 388
388
-
 389
389
-
 390
390
-
 391
391
-
 392
392
-
 393
393
-
 394
394
-
 395
395
-
 396
396
-
 397
397
-
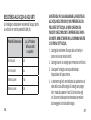 398
398
-
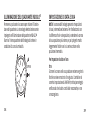 399
399
-
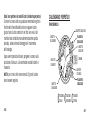 400
400
-
 401
401
-
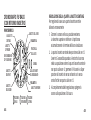 402
402
-
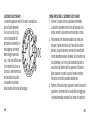 403
403
-
 404
404
-
 405
405
-
 406
406
-
 407
407
-
 408
408
-
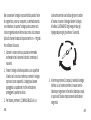 409
409
-
 410
410
-
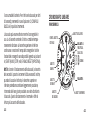 411
411
-
 412
412
-
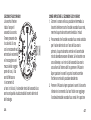 413
413
-
 414
414
-
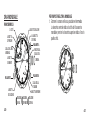 415
415
-
 416
416
-
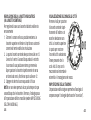 417
417
-
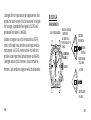 418
418
-
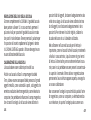 419
419
-
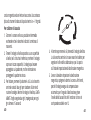 420
420
-
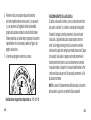 421
421
-
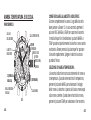 422
422
-
 423
423
-
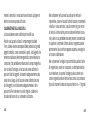 424
424
-
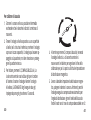 425
425
-
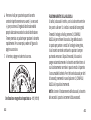 426
426
-
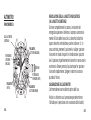 427
427
-
 428
428
-
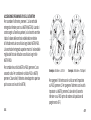 429
429
-
 430
430
-
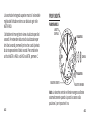 431
431
-
 432
432
-
 433
433
-
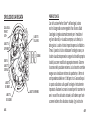 434
434
-
 435
435
-
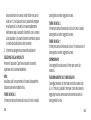 436
436
-
 437
437
-
 438
438
-
 439
439
-
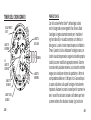 440
440
-
 441
441
-
 442
442
-
 443
443
-
 444
444
-
 445
445
-
 446
446
-
 447
447
-
 448
448
-
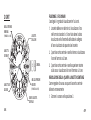 449
449
-
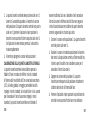 450
450
-
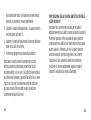 451
451
-
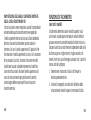 452
452
-
 453
453
-
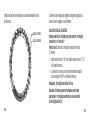 454
454
-
 455
455
-
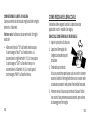 456
456
-
 457
457
-
 458
458
-
 459
459
-
 460
460
-
 461
461
-
 462
462
-
 463
463
-
 464
464
-
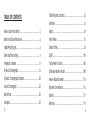 465
465
-
 466
466
-
 467
467
-
 468
468
-
 469
469
-
 470
470
-
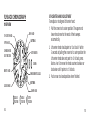 471
471
-
 472
472
-
 473
473
-
 474
474
-
 475
475
-
 476
476
-
 477
477
-
 478
478
-
 479
479
-
 480
480
-
 481
481
-
 482
482
-
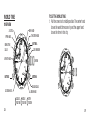 483
483
-
 484
484
-
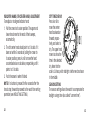 485
485
-
 486
486
-
 487
487
-
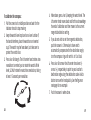 488
488
-
 489
489
-
 490
490
-
 491
491
-
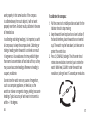 492
492
-
 493
493
-
 494
494
-
 495
495
-
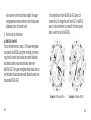 496
496
-
 497
497
-
 498
498
-
 499
499
-
 500
500
-
 501
501
-
 502
502
-
 503
503
-
 504
504
-
 505
505
-
 506
506
-
 507
507
-
 508
508
-
 509
509
-
 510
510
-
 511
511
-
 512
512
-
 513
513
-
 514
514
-
 515
515
-
 516
516
-
 517
517
-
 518
518
-
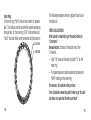 519
519
-
 520
520
-
 521
521
-
 522
522
-
 523
523
-
 524
524
-
 525
525
-
 526
526
-
 527
527
-
 528
528
-
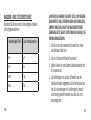 529
529
-
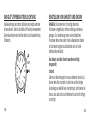 530
530
-
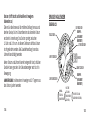 531
531
-
 532
532
-
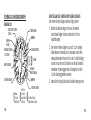 533
533
-
 534
534
-
 535
535
-
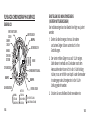 536
536
-
 537
537
-
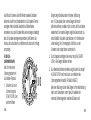 538
538
-
 539
539
-
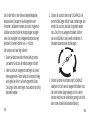 540
540
-
 541
541
-
 542
542
-
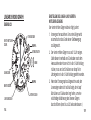 543
543
-
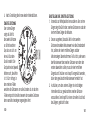 544
544
-
 545
545
-
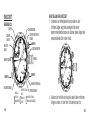 546
546
-
 547
547
-
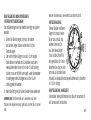 548
548
-
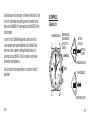 549
549
-
 550
550
-
 551
551
-
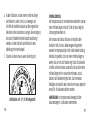 552
552
-
 553
553
-
 554
554
-
 555
555
-
 556
556
-
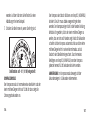 557
557
-
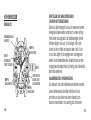 558
558
-
 559
559
-
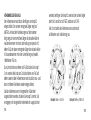 560
560
-
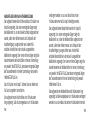 561
561
-
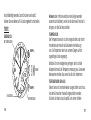 562
562
-
 563
563
-
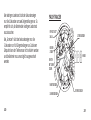 564
564
-
 565
565
-
 566
566
-
 567
567
-
 568
568
-
 569
569
-
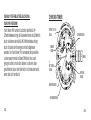 570
570
-
 571
571
-
 572
572
-
 573
573
-
 574
574
-
 575
575
-
 576
576
-
 577
577
-
 578
578
-
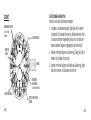 579
579
-
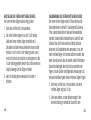 580
580
-
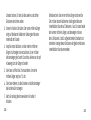 581
581
-
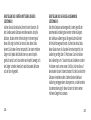 582
582
-
 583
583
-
 584
584
-
 585
585
-
 586
586
-
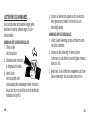 587
587
-
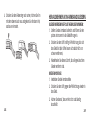 588
588
-
 589
589
-
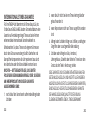 590
590
-
 591
591
-
 592
592
-
 593
593
-
 594
594
-
 595
595
-
 596
596
-
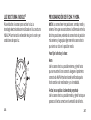 597
597
-
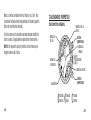 598
598
-
 599
599
-
 600
600
-
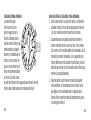 601
601
-
 602
602
-
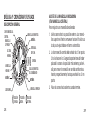 603
603
-
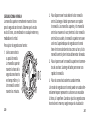 604
604
-
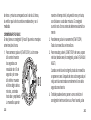 605
605
-
 606
606
-
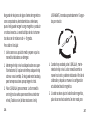 607
607
-
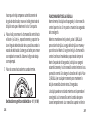 608
608
-
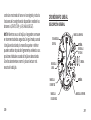 609
609
-
 610
610
-
 611
611
-
 612
612
-
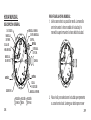 613
613
-
 614
614
-
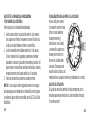 615
615
-
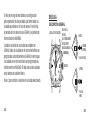 616
616
-
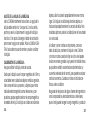 617
617
-
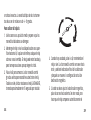 618
618
-
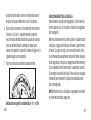 619
619
-
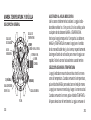 620
620
-
 621
621
-
 622
622
-
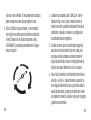 623
623
-
 624
624
-
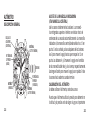 625
625
-
 626
626
-
 627
627
-
 628
628
-
 629
629
-
 630
630
-
 631
631
-
 632
632
-
 633
633
-
 634
634
-
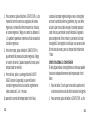 635
635
-
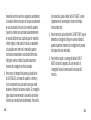 636
636
-
 637
637
-
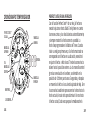 638
638
-
 639
639
-
 640
640
-
 641
641
-
 642
642
-
 643
643
-
 644
644
-
 645
645
-
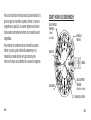 646
646
-
 647
647
-
 648
648
-
 649
649
-
 650
650
-
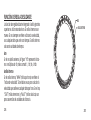 651
651
-
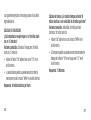 652
652
-
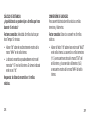 653
653
-
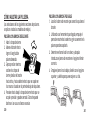 654
654
-
 655
655
-
 656
656
-
 657
657
-
 658
658
-
 659
659
-
 660
660
-
 661
661
-
 662
662
-
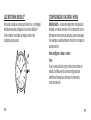 663
663
-
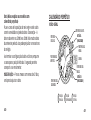 664
664
-
 665
665
-
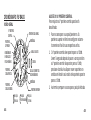 666
666
-
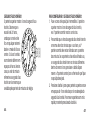 667
667
-
 668
668
-
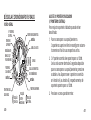 669
669
-
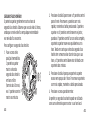 670
670
-
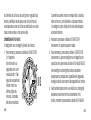 671
671
-
 672
672
-
 673
673
-
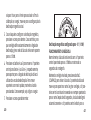 674
674
-
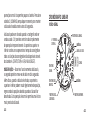 675
675
-
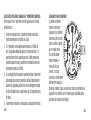 676
676
-
 677
677
-
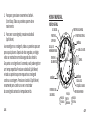 678
678
-
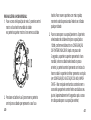 679
679
-
 680
680
-
 681
681
-
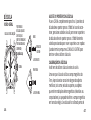 682
682
-
 683
683
-
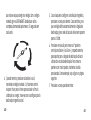 684
684
-
 685
685
-
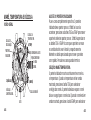 686
686
-
 687
687
-
 688
688
-
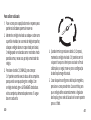 689
689
-
 690
690
-
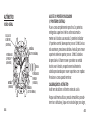 691
691
-
 692
692
-
 693
693
-
 694
694
-
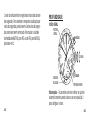 695
695
-
 696
696
-
 697
697
-
 698
698
-
 699
699
-
 700
700
-
 701
701
-
 702
702
-
 703
703
-
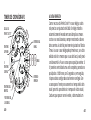 704
704
-
 705
705
-
 706
706
-
 707
707
-
 708
708
-
 709
709
-
 710
710
-
 711
711
-
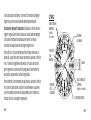 712
712
-
 713
713
-
 714
714
-
 715
715
-
 716
716
-
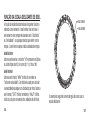 717
717
-
 718
718
-
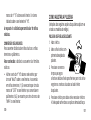 719
719
-
 720
720
-
 721
721
-
 722
722
-
 723
723
-
 724
724
-
 725
725
-
 726
726
-
 727
727
-
 728
728
-
 729
729
-
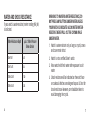 730
730
-
 731
731
-
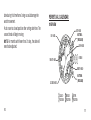 732
732
-
 733
733
-
 734
734
-
 735
735
-
 736
736
-
 737
737
-
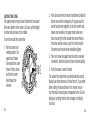 738
738
-
 739
739
-
 740
740
-
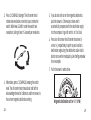 741
741
-
 742
742
-
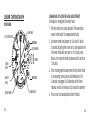 743
743
-
 744
744
-
 745
745
-
 746
746
-
 747
747
-
 748
748
-
 749
749
-
 750
750
-
 751
751
-
 752
752
-
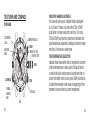 753
753
-
 754
754
-
 755
755
-
 756
756
-
 757
757
-
 758
758
-
 759
759
-
 760
760
-
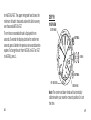 761
761
-
 762
762
-
 763
763
-
 764
764
-
 765
765
-
 766
766
-
 767
767
-
 768
768
-
 769
769
-
 770
770
-
 771
771
-
 772
772
-
 773
773
-
 774
774
-
 775
775
-
 776
776
-
 777
777
-
 778
778
-
 779
779
-
 780
780
-
 781
781
-
 782
782
-
 783
783
-
 784
784
-
 785
785
-
 786
786
-
 787
787
-
 788
788
-
 789
789
-
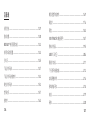 790
790
-
 791
791
-
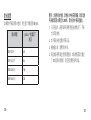 792
792
-
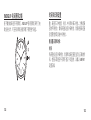 793
793
-
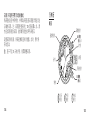 794
794
-
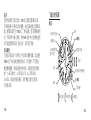 795
795
-
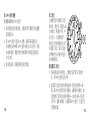 796
796
-
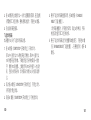 797
797
-
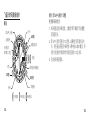 798
798
-
 799
799
-
 800
800
-
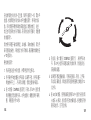 801
801
-
 802
802
-
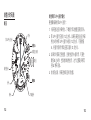 803
803
-
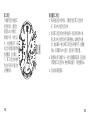 804
804
-
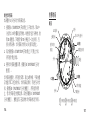 805
805
-
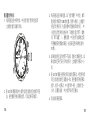 806
806
-
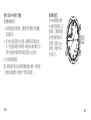 807
807
-
 808
808
-
 809
809
-
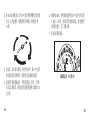 810
810
-
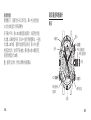 811
811
-
 812
812
-
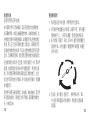 813
813
-
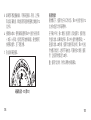 814
814
-
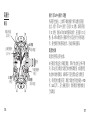 815
815
-
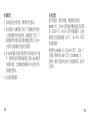 816
816
-
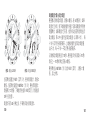 817
817
-
 818
818
-
 819
819
-
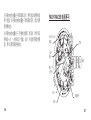 820
820
-
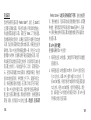 821
821
-
 822
822
-
 823
823
-
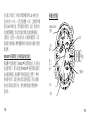 824
824
-
 825
825
-
 826
826
-
 827
827
-
 828
828
-
 829
829
-
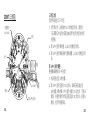 830
830
-
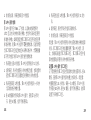 831
831
-
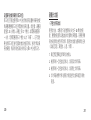 832
832
-
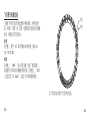 833
833
-
 834
834
-
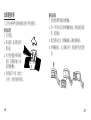 835
835
-
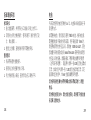 836
836
-
 837
837
-
 838
838
-
 839
839
-
 840
840
-
 841
841
-
 842
842
-
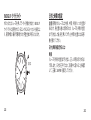 843
843
-
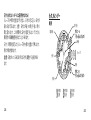 844
844
-
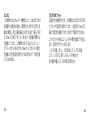 845
845
-
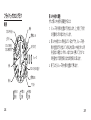 846
846
-
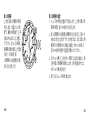 847
847
-
 848
848
-
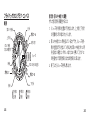 849
849
-
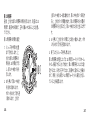 850
850
-
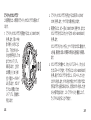 851
851
-
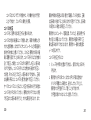 852
852
-
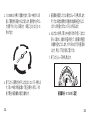 853
853
-
 854
854
-
 855
855
-
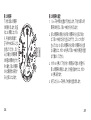 856
856
-
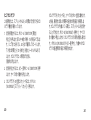 857
857
-
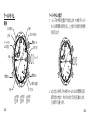 858
858
-
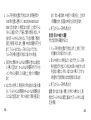 859
859
-
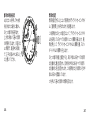 860
860
-
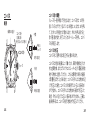 861
861
-
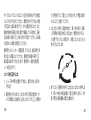 862
862
-
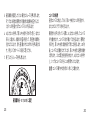 863
863
-
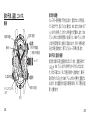 864
864
-
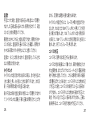 865
865
-
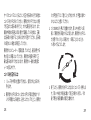 866
866
-
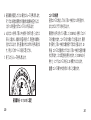 867
867
-
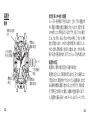 868
868
-
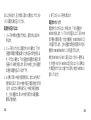 869
869
-
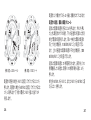 870
870
-
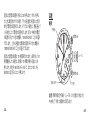 871
871
-
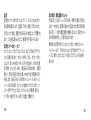 872
872
-
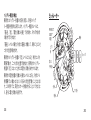 873
873
-
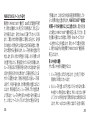 874
874
-
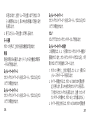 875
875
-
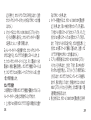 876
876
-
 877
877
-
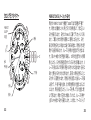 878
878
-
 879
879
-
 880
880
-
 881
881
-
 882
882
-
 883
883
-
 884
884
-
 885
885
-
 886
886
-
 887
887
-
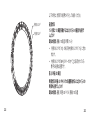 888
888
-
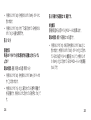 889
889
-
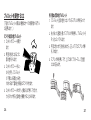 890
890
-
 891
891
-
 892
892
-
 893
893
-
 894
894
-
 895
895
-
 896
896
-
 897
897
-
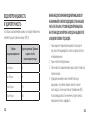 898
898
-
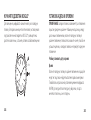 899
899
-
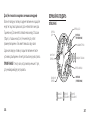 900
900
-
 901
901
-
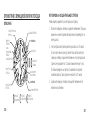 902
902
-
 903
903
-
 904
904
-
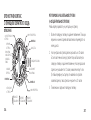 905
905
-
 906
906
-
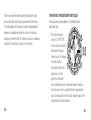 907
907
-
 908
908
-
 909
909
-
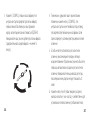 910
910
-
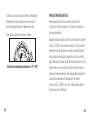 911
911
-
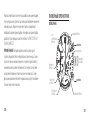 912
912
-
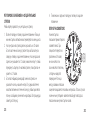 913
913
-
 914
914
-
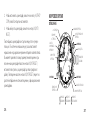 915
915
-
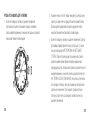 916
916
-
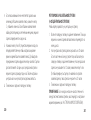 917
917
-
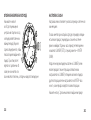 918
918
-
 919
919
-
 920
920
-
 921
921
-
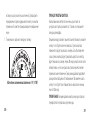 922
922
-
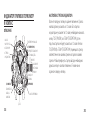 923
923
-
 924
924
-
 925
925
-
 926
926
-
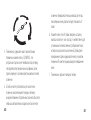 927
927
-
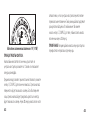 928
928
-
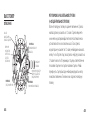 929
929
-
 930
930
-
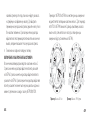 931
931
-
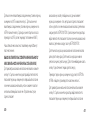 932
932
-
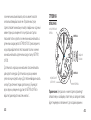 933
933
-
 934
934
-
 935
935
-
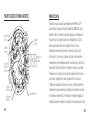 936
936
-
 937
937
-
 938
938
-
 939
939
-
 940
940
-
 941
941
-
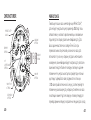 942
942
-
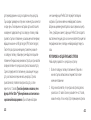 943
943
-
 944
944
-
 945
945
-
 946
946
-
 947
947
-
 948
948
-
 949
949
-
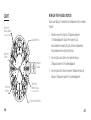 950
950
-
 951
951
-
 952
952
-
 953
953
-
 954
954
-
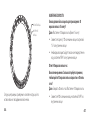 955
955
-
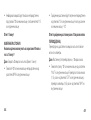 956
956
-
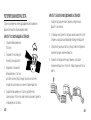 957
957
-
 958
958
-
 959
959
-
 960
960
-
 961
961
-
 962
962


Timex World Time Guía del usuario
- Categoría
- Relojes
- Tipo
- Guía del usuario
en otros idiomas
- français: Timex World Time Mode d'emploi
- italiano: Timex World Time Guida utente
- English: Timex World Time User guide
- português: Timex World Time Guia de usuario
- 日本語: Timex World Time ユーザーガイド
Artículos relacionados
-
Timex Intelligent Quartz FlyBack Chrono-Compass Manual de usuario
-
Timex Intelligent Quartz Manual de usuario
-
-
-
-
-
-
Timex TW2T75800VQ Allied Armbanduhr El manual del propietario
-
-
Timex E-Tide Temp Compass Guía del usuario
Otros documentos
-
Bulova FS00/01/10 Manual de usuario
-
Freestyle Touch Compass El manual del propietario
-
-
timberland VD36 Manual de usuario
-
-
-
-
Shark FREESTYLE CLASSIC TIDE El manual del propietario
-
-