Home Decorators Collection D10024-12W Guía del usuario
- Tipo
- Guía del usuario

Item #1000 052 989
Model #D10024-12W
USE AND CARE GUIDE
Questions, problems, missing parts? Before returning to the store,
call Home Decorators Collection Customer Service
8 a.m. - 6 p.m., EST, Monday - Friday
1-800-986-3460
HOMEDEPOT.COM/HOMEDECORATORS
THANK YOU
We appreciate the trust and condence you have placed in Home Decorators Collection through the purchase of this vanity. We strive to
continually create quality products designed to enhance your home. Visit us online to see our full line of products available for your home
improvement needs. Thank you for choosing Home Decorators Collection!
CRANBURY 24 IN. VANITY IN COOL GRAY WITH VITREOUS CHINA VANITY TOP IN WHITE

2
Table of Contents
Table of Contents ...........................2
Safety Information ...........................2
Warranty ...................................2
What is covered ...................................2
What is not covered ................................2
Pre-Installation .............................3
Planning Installation ...............................3
Installation .................................5
Door Adjustment ............................7
Care and Cleaning ...........................8
Safety Information
SPECIFIC SAFETY RULES AND
PRECAUTIONS
Please read over the instructions; it will be a time-saver in the long
run. Before working with the vanity, please be sure to work on a soft
at surface to avoid any damage to the nish.
This product must be installed in strict compliance with local
plumbing codes.
□ Vitreous china tops are in compliance with UPC, cUPC and IPC.
□ Products are in compliance with ASME A112.19.2-2008/CSA
B45.1-08.
□ Vitreous china products have been tested by an IAPMO R&T
recognized laboratory.
□ Follow standard bathroom clearance procedures.
□ Shut off the water supply lines at the bathroom, or at the home’s
main supply if necessary.
□ Ensure the room is well-lit and safe for occupants of all ages.
DANGER: Indicates an imminently hazardous situation,
which, if not avoided, will result in death or serious injury.
WARNING: Indicates a potentially hazardous situation,
which, if not avoided, could result in death or serious injury.
CAUTION: Indicates a potentially hazardous situation
which, if not avoided may result in minor or moderate injury.
NOTICE: Improper installation may create a condition where the
operation of the product could cause personal injury or property
damage. Failure to carefully read and follow all instructions in this
manual can result in personal injury and/or property damage.
Warranty
LIMITED LIFETIME
WHAT IS COVERED
All products in the package carry a One-Year Limited Lifetime warranty. This warranty applies only to the original purchaser and to the
original installation of the product.
WHAT IS NOT COVERED
Damage caused during moving or during installation is not a defect or warranty issue and will not be considered as such. This warranty
does not cover product failure caused by abusive treatment, surface scratches, misuse, neglect or damage due to handling or faulty
installations. All wood naturally ages, darkens, changes in color, and mellows over time due to exposure to light. While this color change
is imperceptible from day to day, it may be signicant over a long period of time, or due to amount of light the wood is exposed to.
Imperfections such as small surface splits, small dark holes or darker mineral streaks are natural and are not considered defects.
Contact the Customer Service Team at 1-800-986-3460 or visit www.homedepot.com/homedecorators.
HOMEDEPOT.COM/HOMEDECORATORS
For questions, contact customer service at 1-800-986-3460 for assistance

3
Pre-Installation
PLANNING INSTALLATION
There may be some issues during the installation of your new vanity. It is highly recommended that before you undergo this task, take a
moment to pre-plan the installation.
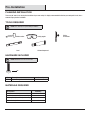
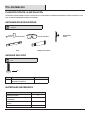
TOOLS REQUIRED
NOTE: Tools that may be required during installation.
Rubber mallet Safety goggles
Phillips
screwdriver
Level Silicone Compound
HARDWARE INCLUDED
NOTE: Hardware not shown to actual size.
Part Description Quantity
AA Leg levelers (pre-installed on legs) 4
MATERIALS REQUIRED
Description Quantity
Wood screws 2
2” x 6” lumber (cut to t between studs) 1
5/16” Lag Bolts (min 250lbs) load bearing 2
Washers for Lag Bolts 2
AA

4
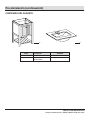
Pre-Installation (continued)
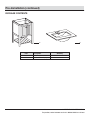
PACKAGE CONTENTS
Part Description Quantity
A Cabinet body 1
B Vitreous china vanity top 1
A
B
HOMEDEPOT.COM/HOMEDECORATORS
For questions, contact customer service at 1-800-986-3460 for assistance

5
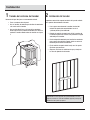
Installation
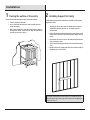
1 Tracing the outline of the vanity
Determine the ideal location for your new bath furniture.
□ Trace its outline on the wall.
□ Use a stud nder to locate the studs to which you will
attach the vanity.
□ With a level, draw lines along the studs from the oor to
the top of the vanity. These lines will help you spot where
to place the screws in Step 3.
2 Installing Support for Vanity
Provide 2x6 backing material behind the nished wall to properly
support the vanity.
□ To properly secure the vanity, the middle of the required
2x6 backing material must be 32” (815mm) from the
nished oor.
□ Extend the backing material beyond the width of the vanity
to the nearest stud. This will ensure proper support for the
vanity.
□ Front-notch the studs to ensure the 2x6 backing material is
ush against the studs.
□ Secure the 2x6 backing material to the studs with framing
nails.
□ Rough-in the water supply and drain lines into the rough-in
plumbing areas of the vanity.
)
NOTICE: To avoid the risk of product damage, the nished wall must
be straight and plumb. If the nished wall is not straight and plumb,
the vanity will not be properly supported and will cause misalignment
of the sink and door.
32” (815mm)
2”x6” backing material

6
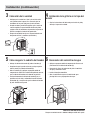
Installation (continued)
3 Attaching the vanity
□ Verify the vanity is level and back rail is plumb against the
wall. If necessary, turn the leg levelers (AA) to adjust the
vanity.
□ Using drill bit, drill two pilot holes through the back rail and
the nished wall. Verify the pilot holes are positioned to
ensure the lag bolts will engage the 2x6 backing material.
□ Secure the vanity to the nished wall with two 5/16” lag
bolts and washers (not provided).
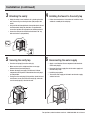
4 Installing the faucet to the vanity top
□ Follow the manufacturer’s instructions to install the faucet
and drain assembly to the vanity top.
5 Securing the vanity top
□ Place the vanity top (B) over the vanity (A).
□ Make sure the wall is straight and there are no gaps
between the wall and vanity top (B).
□ Remove the top (B) and apply a small bead of silicone
compound to the top of the cabinet before the vanity top is
set into position.
□ Firmly press the vanity top (B) into position; check the level
and evenness across the front of the vanity (A), and make
sure the vanity top (B) is ush to the wall.
6 Reconnecting the water supply
□ Apply a small bead of silicone compound to the backside
of the vanity top (B).
□ Reconnect the faucet supply lines to the water supply and
reconnect the p-trap.
□ Install the pop-up drain.
□ Turn on the water supply or the home’s main water supply
and test for leaks.
B
A
AA
A
HOMEDEPOT.COM/HOMEDECORATORS
For questions, contact customer service at 1-800-986-3460 for assistance

7
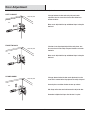
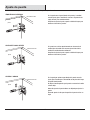
Door Adjustment
LEFT TO RIGHT
If the gap between the door and vanity side panel needs
adjustment, turn the screw closest to the door clockwise or
counter clockwise.
Make sure to adjust both the top and bottom hinges to keep the
door level.
If the door is not aligned perfectly with the vanity frame, turn
the screw closest to the vanity side panel clockwise or counter
clockwise.
Make sure to adjust both the top and bottom hinges to keep the
door level.
If the gap above or below the door needs adjustment, turn the
screw that is mounted to the hinge plate of the vanity side panel.
Loosening the screw allows the door to move up or down.
Both hinges of the door need to be loosened to adjust the door.
Remember to tighten the hinges after the door is in place.
FRONT TO BACK
UP AND DOWN
Refer to the illustration and note on the screwdriver location for the desired adjustment.
door
door
door
vanity side panel
vanity side panel
vanity side panel

8
Care and Cleaning
WOOD DOORS AND PANELS
Dust cabinets frequently with a soft, lint-free cloth. You may dampen the cloth with water or with a spray-type dust remover. Clean up spills
immediately. Use a clean, damp cloth if necessary. Wipe dry with another clean soft cloth. Cloth is better than paper towels for this purpose.
For maintenance cleaning of your cabinetry, there are a number of products available for your wood cleaning needs, typically promoted as
furniture care products. We suggest using mild soap with a damp cloth to remove any build up on cabinets. Any product used should be
applied and then quickly and completely removed with a damp cloth. Dry the cabinet completely after cleaning as excess moisture can be
damaging to any ne wood nish. In addition, do not drape wet or damp cloths over the edge of doors.
Do not use detergents, soap pads, steel wool or any other type of abrasive pad on your cabinetry. These products will damage the wood
nish. We also suggest not using citrus oils, wax, or polishes that contain silicone because they leave a residue that is sometimes difcult
to remove and attracts dust. Finally, do not use solvents such as ammonia, bleach, acetone, lacquer thinner or cleaners such as goof-off or
WD40, all of which may damage or dissolve some or all of the nish.
LAMINATES
You can clean all laminted surfaces by using a damp, soft cloth. Do not use excessive amounts of water, it will seep into the seams of the
cabinet. Sink base cabinets are the most common cabinet to have water damage and can usually be protected with a plastic liner or pan.
PREVENTING HEAT OR HUMIDITY DAMAGE
The bathroom environment is very common place for humidity. It is very important to dissipate the humidity in the room and not let it stay
for long periods of time. If higher temperature settings are used for extended periods of time, the heat may be excessive and the doors and
drawer fronts should be removed. This is particularly important on laminated panels, which cannot be exposed to extended temperatures
beyond 160 degrees Fahrenheit without risking permanent damage.
SUNLIGHT AND AGING
Over time, exposure to sunlight, smoke and chemicals may cause some materials to face or vary from their original color. Cabinets or
accessories added at a later date may not match cabinets previously installed. For the same reason, nish samples on displays may not
represent the exact color of cabinets received at the time of shipment.
VITREOUS CHINA
Vitreous china vanity tops and sinks are very durable. The glazing process provides years of enjoyment if cared for correctly. Rinse
thoroughly and use a soft cloth to wipe the product dry after each use to prevent hard water stains. Soft abrasive cleaners may be used
when necessary to clean vitreous china products.
GRANITE OR MARBLE TOPS
Natural stone is a porous material. Therefore, it may stain if not properly cared for. Granite countertops should be sealed before using.
Follow the instructions on the sealer label. The easiest way to clean granite countertops is to simply use warm water and mild liquid dish
soap, preferably without aromatics. This is a gentle way to clean the grease and grime from your granite counters without damaging
them. If you use plain soap and water, this can lead to soap build up and over time, will dull the glossy nish of your polished granite. After
cleaning you should rinse the countertop thoroughly and dry with a soft cotton cloth.
QUARTZ TOPS
Quartz is easy to maintain. It is a non-porous material that is highly resistant to stain, scratches and heat. However, it is not stain, scratch,
or heat proof. Spills should be cleaned as soon as possible with soap and water on a regular basis to keep the polished quartz looking like
new. Use warm water and a damp cloth with a small amount of non-abrasive cleaner that does not contain bleach.
HOMEDEPOT.COM/HOMEDECORATORS
For questions, contact customer service at 1-800-986-3460 for assistance

Questions, problems, missing parts? Before returning to the store,
call Home Decorators Collection Customer Service
8 a.m.-6 p.m., EST, Monday - Friday
1-800-986-3460
HOMEDEPOT.COM/HOMEDECORATORS
Retain this manual for future use.

10
HOMEDEPOT.COM/HOMEDECORATORS
For questions, contact customer service at 1-800-986-3460 for assistance

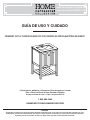
GUÍA DE USO Y CUIDADO
¿Tiene preguntas, problemas, o faltan piezas? Antes de regresar a la tienda,
llame a Servicio al Cliente de Home Decorators Collection
de lunes a viernes de 8 a.m. a 6 p.m., hora local del Este
1-800-986-3460
HOMEDEPOT.COM/HOMEDECORATORS
GRACIAS
Agradecemos la conanza que ha puesto en Home Decorators Collection a través de la compra de este tocador. Nos esforzamos por crear
continuamente productos de calidad diseñados para mejorar su hogar. Visítenos en internet para ver nuestra línea completa de productos
disponibles para sus necesidades de mejorar su hogar. Gracias por elegir a ¡Home Decorators Collection!
CRANBURY 24 PLG. TOCADOR EN GRIS FRÍO CON CUBIERTA DE PORCELANA VÍTREA EN BLANCO
núm. de artículo 1000 052 989
núm. de modelo D10024-12W

12
Tabla de contenido
Tabla de contenido .........................11
Información de seguridad. . . . . . . . . . . . . . . . . . . . 11
Garantía ..................................11
Lo que está cubierto ..............................11
Lo que no está cubierto ............................11
Pre-Instalación. . . . . . . . . . . . . . . . . . . . . . . . . . . . . 12
planicación de la instalación .......................12
Instalación ................................14
Ajuste de puerta ...........................16
Cuidado y limpieza .........................17
Información de seguridad
REGLAS PRECAUCIONES DE
SEGURIDAD ESPECÍFICAS
Por favor, lea las instrucciones; le ahorrar tiempo a la larga. Antes de
trabajar con el tocador, asegúrese de trabajar sobre una supercie
plana y suave para evitar cualquier daño al acabado.
Este producto debe instalarse en estricto cumplimiento de los
códigos de fontanería locales.
□ Las cubiertas de porcelana vitrea están en conformidad con la
UPC, cUPC e IPC.
□ Los productos están en cumplimiento con ASME A112.19.2-
2008/CSA B45.1-08.
□ Los productos de porcelana vítrea han sido probados por un
laboratorio IAPMO R & T reconocido.
□ Siga los procedimientos estandares de espacio de baño.
□ Cierre las líneas de suministro de agua en el baño, o en el
suministro principal de la casa si es necesario.
□ Asegúrese de que la habitación está bien iluminada y segura
para los ocupantes de todas las edades.
PELIGRO: indica una situación peligrosa inminente que,
si no se evita, resultará en muerte o lesiones serias.
ADVERTENCIA: Indica una situación peligrosa potencial
quesi no se evita, podría resultar en la muerte o lesiones
serias.
PRECAUCIÓN: Indica una situación peligrosa potencial
que, si no evita, puede resultar en lesiones leves o
moderadas.
AVISO: La instalación inapropiada puede crear una condición
donde la operación del producto podria causar lesiones personales
o daños a la propiedad. No leer cuidadosamente y seguir todas las
instrucciones en este manual puede resultar en lesiones personales
y/o daños a la propiedad.
GARANTÍA DE POR VIDA LIMITADA
LO QUE ESTÁ CUBIERTO
Todos los productos en el paquete llevan una garantía limitada de por vida de un año. Esta garantía aplica únicamente al comprador original y a la
instalación original del producto.
LO QUÉ NO ESTÁ CUBIERTO
Los daños causados durante el traslado o durante la instalación no son defectos o problemas de la garantía y no serán considerados como tales. Esta
garantía no cubre fallas del producto causadas por tratamiento abusivo, rayones de la supercie, mal uso, negligencia o daños debidos al manejo o
instalaciones defectuosas. Toda la madera envejece naturalmente , se oscurece, cambia de color, y se ablanda con el tiempo debido a la exposición a
la luz. A pesar de que este cambio de color es imperceptible de un día al otro , puede ser signicativo durante un largo período de tiempo, o debido a
la cantidad de luz a la que la madera está expuesta. Las imperfecciones como pequeñas suras en la supercie, pequeños agujeros oscuros o venas
minerales más oscuros son naturales y no son considerados defectos.
Póngase en contacto con el Equipo de Servicio al Cliente llamando al 1-800-986-3460 o visite www.homedepot.com/homedecorators.
Garantía
HOMEDEPOT.COM/HOMEDECORATORS
Póngase en contacto con el 1-800-986-3460 para recibir más ayuda.

13
Pre-Instalación
PLANIFICACIÓN DE LA INSTALACIÓN
Pueden haber algunos problemas durante la instalación de su nuevo tocador. Se recomienda fuertemente que antes de someterse a esta
tarea, se tome un momento para planicar la instalación.
HERRAMIENTAS REQUERIDAS
NOTA: Herramientas que se pueden necesitar durante la
instalación.
Mazo de goma Gafas de seguridad
Destornillador
Phillips
Nivel Compuesto de silicona
HERRAJE INCLUIDO
NOTA: No se muestra el herraje en el tamaño
real.
Pieza Descripción Cantidad
AA Niveladores de pata (planicar-
instalado en las piernas)
4
MATERIALES NECESARIOS
Descripción Cantidad
Tornillos para madera 2
2” x 6” madera (corte para encajar entre
los montantes)
1
5/16” tirafondos (250lbs min) de soporte
de carga
2
Arandelas para tirafondos 2
AA

14
Pre-Instalación (continuación)
CONTENIDO DEL PAQUETE
Pieza Descripción Cantidad
A Cuerpo del gabinete 1
B Cubierta de tocador de
porcelana vítrea
1
A
B
HOMEDEPOT.COM/HOMEDECORATORS
Póngase en contacto con el 1-800-986-3460 para recibir más ayuda.

15
Instalación
1 Trazado del contorno del tocador
Determine el lugar ideal para su nuevo mueble de baño.
□ Trace su contorno sobre la pared.
□ Use un localizar de montante para localizar los montantes
a los cuales unirá el tocador.
□ Con un nivel, dibuje líneas a lo largo de los montantes
desde el piso hasta la cubierta del tocador. Estas líneas le
ayudarán a localizar dónde colocar los tornillos en el paso
3.
2 Instalación del tocador
Proporcionar material de soporte 2x6 detrás de la pared acabada
para soportar adecuadamente el tocador.
□ Para asegurar correctamente la vanidad, la mitad del
material de soporte 2x6 requerido debe ser de 32
“(815mm) desde el piso terminado.
□ Extender el material de soporte más allá de la anchura de
la vanidad al perno más cercano. Esto garantizará el apoyo
adecuado para la tocador.
□ Frente categoría de montante para localizar los montantes
para asegurar el material de soporte 2x6 al ras contra de
montante para localizar los montantes.
□ Fije el material de soporte 2x6 el herraje en el los postes
con clavos que enmarcan.
□ Áspero-en las líneas de suministro de agua y drenaje en
las áreas de plomería de el tocador.
)
AVISO: Para evitar el riesgo de daños en el producto, la pared
acabada debe ser recta ya plomo. Si la pared acabada no es recto
ya plomo, el tocador no será adecuadamente apoyada y hará que la
desalineación de la pileta y la puerta.
32” (815mm)
2”x6” backing material

16
Instalación (continuación)
3 Colocación de la vanidad
□ Verique que la vanidad es el nivel y el carril de vuelta
esté a plomo contra la pared. Si es necesario, gire los
niveladores de las patas (AA) para ajustar la tocador.
□ Usando una broca, perfore dos agujeros guía a través del
carril de espalda y la pared acabada. Vericar el piloto
agujeros están en condiciones de garantizar los pernos de
jación se acoplará el material de soporte 2x6.
□ Asegure la vanidad el herraje en el la pared acabada con
dos pernos de 5/16” y arandelas (no incluidos).
4 Instalación de la grifería en la tapa del
tocador
□ Siga las instrucciones del fabricante para instalar el grifo y
drenaje a la tapa de la vanidad.
5 Cómo asegurar la cubierta del tocador
□ Coloque la cubierta del tocador (B) sobre el tocador (A).
□ Asegúrese de que la pared esté recta y no haya espacios
entre la pared y la cubierta del tocador (B).
□ Retire la cubierta (B) y aplique un pequeno cordón de
compuesto de silicona en la cubierta del gabinete antes de
que la cubierta del tocador esté colocada en posición.
□ Presione rmemente la cubierta del tocador (B) en su
posición; revise el nivel y uniformidad a través del frente
del tocador (A), y asegúrese de que la cubierta del tocador
(B) esté alineada con la pared.
6 Reconexión del suministro de agua
□ Aplique un pequeno cordón de compuesto de silicona en la
parte trasera de la cubierta del tocador (B).
□ Reconecte las líneas de suminstro del grifo al suministro
de agua y reconecte el sifón.
□ Instale el desagüe automático.
□ Abra el suministro de agua o el suministro de agua
principal de la casa y haga pruebas de fugas.
B
A
AA
A
HOMEDEPOT.COM/HOMEDECORATORS
Póngase en contacto con el 1-800-986-3460 para recibir más ayuda.

17
Ajuste de puerta
IZQUIERDA A DERECHA
Si el espacio entre el panel lateral de la puerta y la vanidad
necesita ajuste, gire el tornillo más cercano a la puerta de las
agujas del reloj o en sentido contrario.
Asegúrese de ajustar la parte superior e inferior bisagras para
mantener el nivel de las puertas.
Si la puerta no se alinea perfectamente con el marco de la
vanidad, girar el tornillo más cercano al panel lateral de la
vanidad en sentido horario o antihorario.
Asegúrese de ajustar la parte superior e inferior bisagras para
mantener el nivel de las puertas.
Si el espacio por encima o por debajo de la puerta necesita
ajuste, gire el tornillo que está montado en del placa de bisagra
del panel lateral tocador.
Al aojar el tornillo permite que la puerta se mueva hacia arriba
o hacia abajo.
Ambas bisagras de la puerta deben ser aojado para ajustar la
puerta.
Recuerde apretar las bisagras después de la puerta está en su
lugar.
ADELANTE HACIA ATRÁS
ARRIBA Y ABAJO
Consulte la ilustración y la nota sobre la ubicación destornillador para el ajuste deseado.
puerta
panel lateral tocador
puerta
panel lateral tocador
puerta
panel lateral tocador

18
Cuidado y limpieza
PANELES Y PUERTAS DE MADERA
Gabinetes de polvo con frecuencia con un paño suave y sin pelusa. Usted puede humedecer el paño con agua o con un removedor de polvo en forma de
aerosol. Limpie los derrames inmediatamente. Utilice un paño limpio y húmedo si es necesario. Seque con otro paño limpio y suave. El paño es mejor que
las toallas de papel para este propósito.
Para la limpieza de mantenimiento de sus gabinetes, hay una serie de Los productos disponibles para sus necesidades de limpieza de madera,
normalmente promovidas como productos de cuidado de los muebles. Le recomendamos que utilice un jabón suave con un paño húmedo para eliminar
cualquier acumulación en los gabinetes. Cualquier producto utilizado debe ser aplicado y luego se retira rápida y completamente con un paño húmedo.
Seque el gabinete completo después de la limpieza como el exceso de humedad puede ser perjudicial para cualquier acabado de madera na. Además, no
cuelgue paños húmedos o mojados sobre el borde de las puertas.
No utilice detergentes, pastillas de jabón, lana de acero o cualquier otro tipo de estropajo abrasivo en sus gabinetes. Estos productos pueden dañar del
acabado de la madera. También sugerimos no usar aceites cítricos, cera o limpiadores que contengan silicona porque dejan un residuo que es a veces
difícil de eliminar y atrae el polvo. Por último, no utilice disolventes como el amoniaco, lejía, acetona, diluyente de laca o productos de limpieza tales como
Goof-off o WD40, todo lo cual puede dañar o disolver una parte o la totalidad de la meta.
LAMINADOS
Usted puede limpiar todas las supercies laminadas con un paño suave y húmedo. No utilice cantidades excesivas de agua, que se ltran en las costuras
de la caja. Armarios bajos fregadero son el gabinete más común tener daños por agua y por lo general se pueden proteger con un forro de plástico o en
una cazuela.
PREVENCIÓN DE DAÑOS POR CALOR O HUMEDAD
El ambiente del baño es un lugar muy común para la humedad. Es muy importante para disipar la humedad en la habitación y no dejar que se quede
por largos períodos de tiempo. Si los ajustes de temperatura más altas se usan durante períodos prolongados de tiempo, el calor puede ser excesivo
y las puertas y frentes de cajón debe ser eliminado. Esto es particularmente importante en los paneles laminados, que no pueden estar expuestos a
temperaturas extendido más allá de los 160 grados Fahrenheit sin arriesgar daño permanente.
LUZ DEL SOL Y ENVEJECIMIENTO
Con el tiempo, la exposición a la luz solar, el humo y los productos químicos puede causar algunos materiales a cara o variar en su color original. Gabinetes
o accesorios adicionales en una fecha posterior pueden no coincidir con los gabinetes instalados anteriormente. Por la misma razón, las muestras de
acabado en las pantallas no pueden representar el color exacto de los gabinetes recibidos en el momento del envío.
PORCELANA VÍTREA
Encimeras de lavabos de porcelana vítrea y son muy durables. El proceso de esmaltado ofrece años de disfrute si lo cuida correctamente. Enjuague bien y
utilice un paño suave para limpiar el producto seco después de cada uso para evitar las manchas de agua dura. Limpiadores abrasivos suaves se pueden
utilizar cuando sea necesario para limpiar Los productos de porcelana vitricada.
CUBIERTAS DE GRANITO O MÁRMOL
La piedra natural es un material poroso. Por lo tanto, se puede manchar si no se usa correctamente. Encimeras de granito deben sellarse antes de usar.
Siga las instrucciones de la etiqueta del sellador. La forma más fácil de limpiar encimeras de granito es simplemente usar agua tibia y jabón suave líquido
para platos, preferiblemente sin aromáticos. Esta es una manera suave para limpiar la grasa y la suciedad de sus mostradores de granito sin dañarlos. Si
utiliza agua y jabón, esto puede conducir a la acumulación de jabón y con el tiempo, podrían dañar el terminado brillante de su granito pulido. Después de
la limpieza se debe enjuagar la encimera bien y secar con un paño suave de algodón.
CUBIERTAS DE CUARZO
El cuarzo es fácil de mantener. Se trata de un material no poroso que es altamente resistente a las manchas, arañazos y calor. Sin embargo, no se mancha,
rasguño, o una prueba de calor. Los derrames deben ser limpiados tan pronto como sea posible con agua y jabón de forma regular para mantener el
cuarzo pulido como nuevo. Use agua tibia y un paño húmedo con una pequeña cantidad de limpiador no abrasivo que no contenga cloro.
HOMEDEPOT.COM/HOMEDECORATORS
Póngase en contacto con el 1-800-986-3460 para recibir más ayuda.

19

¿Tiene preguntas, problemas, o faltan piezas? Antes de regresar a la tienda,
llame a Servicio al Cliente de Home Decorators Collection
de lunes a viernes de 8 a.m. a 6 p.m., hora local del Este
1-800-986-3460
HOMEDEPOT.COM/HOMEDECORATORS
Conserve este manual para uso futuro.
REV. 101514
-
 1
1
-
 2
2
-
 3
3
-
 4
4
-
 5
5
-
 6
6
-
 7
7
-
 8
8
-
 9
9
-
 10
10
-
 11
11
-
 12
12
-
 13
13
-
 14
14
-
 15
15
-
 16
16
-
 17
17
-
 18
18
-
 19
19
-
 20
20


Home Decorators Collection D10024-12W Guía del usuario
- Tipo
- Guía del usuario
en otros idiomas
Artículos relacionados
-
Home Decorators Collection DT7024-12 Manual de usuario
-
-
Home Decorators Collection 0277000250 Manual de usuario
-
-
-
-
Home Decorators Collection RLGV4922 Instrucciones de operación
-
-
-
Otros documentos
-
Hembry Creek PEGCVT-250-ISS Guía de instalación
-
-
-
-
Runfine RFVA0198C Instrucciones de operación
-
-
-
 Commercial Electric 50501 Guía de instalación
-
 Commercial Electric 69570 Guía de instalación
-
 Commercial Electric 39700H Guía de instalación


