Celexon PTZ camera Full HD video conferencing system VKS2040 El manual del propietario
- Categoría
- Altavoces de la barra de sonido
- Tipo
- El manual del propietario
Este manual también es adecuado para

Bedienungsanleitung
celexon PTZ Kamera Full HD
Videokonferenzsystem VKS2040
Vielen Dank für den Kauf dieses Produkts.
Für eine optimale Leistung und Sicherheit lesen Sie diese Anweisungen bitte sorgfältig
durch, bevor Sie dieses Produkt anschließen oder betreiben. Bitte bewahren Sie diese
Anleitung für eine spätere Verwendung auf.
Version: 32422_051

1
Lesen und befolgen Sie bitte alle unten und auf dem Produkt aufgeführten Sicherheits-
hinweise, bevor Sie die Kamera an eine Stromquelle anschließen. Die Nichteinhaltung
der Sicherheitshinweise kann zu Brand, Stromschlag, oder Personenschäden führen und
könnte die im Gerät enthaltenen Sicherheitsvorkehrungen beschädigen oder beeinträch-
tigen. Bitte bewahren Sie alle Sicherheitshinweise auf.
• Jegliches Zubehör und jegliche Kabel müssen vor dem Transport der Kamera ent-
fernt werden.
• Ergreifen Sie beim Transport der Kamera nicht den Kamerakopf.
• Verwenden Sie immer die Fernbedienung zum Drehen des Kamerakopfes. Drehen
Sie den Kamerakopf nicht mit der Hand. Sie riskieren sonst mechanische Schäden.
• Vergewissern Sie sich beim Drehen der Kamera, dass sich keine Hindernisse inner-
halb des Drehbereichs der Kamera benden.
• Die Kamera darf ausschließlich nur mit dem mitgelieferten Netzteil betrieben wer-
den.
• Die Kamera darf nicht dem direkten Sonnenlicht ausgesetzt oder an feuchten, fetti-
gen oder staubigen Orten platziert werden, wo das Gerät und die Zubehörteile mit
Regen, Rauch oder Dampf in Kontakt kommen könnten.
• Setzen Sie das Gerät oder seine Bestandteile nie Regen oder Feuchtigkeit aus, um
Brandgefahr oder die Gefahr eines Stromschlags zu reduzieren.
• Die Kamera darf nicht fallen gelassen werden.
• Es dürfen keine Flüssigkeiten auf die Kamera verschüttet werden. Verschüttete Flüs-
sigkeiten können zur Beschädigung der Kamera oder zu Personenschäden führen.
• Es dürfen keine Quellen offener Flammen, z. B. brennende Kerzen, auf die Kamera
gestellt werden.
• Die Kamera darf nicht über einen längeren Zeitraum unter extrem hellen Bedingun-
gen verwendet werden.
• Die Kamera darf nicht in der Nähe von starker elektromagnetischer Strahlung, wie z.
B. Fernseher oder Funksender verwendet werden. Die spezische Frequenz elektro-
magnetischer Felder kann das Kamerabild beeinträchtigen.
• Verwenden Sie das mitgelieferte Stromkabel. Schließen Sie das Stromkabel an eine
Steckdose mit Schutzleiteranschluss an.
• Die Kamera darf nicht an Orten installiert werden, die mechanischen Schwingungen
ausgesetzt sind.
• Die Kamera darf nicht auf eine instabile Oberäche gestellt werden. Dies könnte zu
ernsthaften Personenschäden und Kameraschaden führen. Vergewissern Sie sich,
dass Sie bei der Befestigung der Kamera auf einem Stativ die Anweisungen des Her-
WARNHINWEISE

2
stellers befolgen. Benutzen Sie nur die vom Hersteller empfohlenen Befestigungs-
materialien.
• Halten Sie beim Ausstecken des Stromkabels den Stecker und nicht das Kabel fest.
• Stellen Sie sicher, dass niemand auf das Stromkabel tritt oder es abgeklemmt wird,
insbesondere an der Steckdose, vor anderen Anschlussbuchsen oder am Verbin-
dungspunkt zur Kamera.
• Stecken Sie die Kamera aus, falls Sie sie über einen längeren Zeitraum nicht verwen-
det wird.
• Die Kamera darf nicht außerhalb der angegebenen Temperatur, Luftfeuchtigkeits-
und Leistungsbereiche verwendet werden.
• Entfernen Sie die Kamera vom Stromnetz, falls Sie sie reinigen müssen. Es darf nur
ein weiches, trockenes Tuch zur Reinigung der Kamera und der Kameralinse ver-
wendet werden. Verwenden Sie niemals Alkohol, Lösungsmittel oder auf Ammoniak
basierende Flüssigkeiten bei dieser Kamera.
• Die Fernbedienung der Kamera verwendet Batterien. Vergewissern Sie sich, dass
die Polarität der Batterien (+/-) richtig ausgerichtet ist. Entsorgen Sie gebrauchte
Batterien gemäß den örtlichen Entsorgungsrichtlinien.
• Reparaturen dürfen ausschließlich von qualiziertem Personal durchgeführt werden.
Das Gehäuse darf nicht geöffnet werden. Die Eigenwartung Ihrer Kamera kann für
Sie gefährlich sein und führt zum Erlöschen der Garantie.
• Verwenden Sie nur von celexon spezizierte Ersatzteile. Nicht genehmigte Ersatz-
teile könnten Brand, Stromschlag oder Personenschäden verursachen und führen
zum Erlöschen der Garantie.
• Befolgen Sie diese Anweisungen, um die Bildqualität während der gesamten Le-
bensdauer der Kamera sicherzustellen. Die Nichtbefolgung dieser Anweisungen
kann die Garantie beeinträchtigen.
• Sollten Sie äußerliche Beschädigungen an dem Gerät oder unerwartete oder un-
übliche Funktionsweisen feststellen, darf das Produkt nicht weiter genutzt werden.
Schalten Sie in diesen Fällen das Produkt umgehend aus und nehmen es vom Strom.
Kontaktieren Sie umgehend den Händler, bei dem Sie das Produkt gekauft haben
oder celexon direkt (Web: www.celexon.de, Mail: info@celexon.de) für weitere Infor-
mationen.
• Bei Nichtbeachtung obiger Anweisungen kann es zu Personenschäden und Beschä-
digungen des Produktes oder Geräten die daran angeschlossen sind kommen. Auch
kann bei fehlerhafter Installation oder Verwendung die Garantie erlöschen.
• Wenn Sie beim Verwenden des Produktes unsicher sind, kontaktieren Sie ei-
nen Fachmann, Ihren Händler oder celexon direkt (Web: www.celexon.de, Mail:
info@celexon.de).

3
HAFTUNGSAUSSCHLUSS
Die Angaben in diesem Dokument können ohne vorherige Ankündigung durch
den Hersteller geändert werden. Änderungen werden jeweils in den folgenden
Versionen dieses Handbuchs ergänzt. Der Hersteller übernimmt keine Garantie
oder Gewährleistung auf die Richtigkeit der Angaben in diesem Dokument.
• Technische Änderungen und Irrtümer vorbehalten.
Der Hersteller übernimmt keine Verantwortung für Sachschäden oder Personenschäden,
wenn das Produkt außerhalb der empfohlenen Spezikationen verwendet wird, oder bei
unsachgemäßer Installation.
LIEFERUMFANG
1x PTZ Kamera 1x 12V Netzteil1x IR Fernbedienung 1x Mikrofon & Lautsprecher
2x USB 2.0 Kabel

4
KAMERAPARAMETER
Zoom 10x
Bildsensor 1/ 2.8“ Exmor CMOS
Pixel 2.7 Megapixel
HOV 72°
Auösung 1920x1080@30fps // 1280x720 // 640x480
640x360 // 352x288 // 320x240
Min. Illu 0.[email protected]
Elektrizität Kommunikation
Stromversorgung DC12V Übertragungsrate 2400/4800/9600/
19200/38400
Stromverbrauch 12W Protokoll VISCA/PELCO-D
PELCO-P
Dekodierer Eingebaut Adress-
einstellungen 1-255
Operation Umgebung
Schwenkrotation -178°~ +178° Abmessungen 115 x 115 x 135 mm
Neigrotation -30°~ +90° Betriebs-
temperatur -10°C ~ +50°C
Speicherplätze
Fernbedienung max. 9
Speicherplätze Gesamtgewicht 1.2 kg
Insgesamt bis zu max.
255 Speicherplätze
möglich
Installations-
möglichkeiten Wand/Decke/Stativ

5
FUNKTIONSUMFANG PTZ KAMERA
FUNKTIONSUMFANG FERNBEDIENUNG
Linse
IR Empfängerauge
On / Off Anzeige
RS232 Anschluss
USB 2.0 Anschluss
DC12V Stromanschluss
Power Kamera schaltet in Standby
P/T RST Kamera startet Ausrichtung
FLIP Kamerabild wird gedreht
Camera Select Kamera auswählen, die gesteuert
werden soll
BLC BLC Ein-/ Ausschalten
MENU Menü öffnen/ schließen
Navigation Home = Kamera mittig ausrichten
PRESET Preset + Zahl 1-9 = Voreinstellung
speichern
RESET Reset + Zahl 1-9 = Reset gespeicherte
Voreinstellung
FOCUS Auto = automatisch fokussieren
Manual = manuelles fokussieren
Far = man. Fokus, Hintergrund scharf stellen
Near = man. Fokus, Vordergrund scharf stellen
ZOOM + rein-zoomen
- raus-zoomen
Zahlen Speicherplätze 1-9
Stumm
Leiser
Lauter
1
2
3
4
5 6
7
89
10 11
12
1
2 3
1
2
3
4
4
5
5
6
6

6
INBETRIEBNAHME
Schließen Sie die Kamera immer gleich an, egal ob die Kamera mit einem fest
installierten PC oder mit einem mobilen Laptop kombiniert wird.
1. Verbinden Sie die Kamera mit dem DC12V Netzteil und schließen es an die
Stromquelle an. Sobald die LED (3) aueuchtet, ist die Kamera eingeschaltet
und betriebsbereit.
Hinweis: Achten Sie darauf, dass die Kamera, besonders aber der Schwenkkopf
frei von Verpackungsmaterial ist und keine Gegenstände den Schwenkbereich
der Kamera blockieren. Die Kamera richtet sich zu Beginn von selbst mittig aus.
Es ist nicht notwendig den Schwenkkopf per Hand auszurichten.
2. Verbinden Sie die Kamera mit dem USB A-A Kabel und schließen es an Ihren
Computer an. Optional kann die Kamera auch mit einem RS232 Datenkabel
(DIN8M) gesteuert werden (nicht im Lieferumfang enthalten).
3. Sobald die Kamera und das Mikrofon & Lautsprecher-Modul von Ihrem Sys-
tem erkannt wurden, können diese mit allen gängigen Video-Konferenzpro-
grammen verwendet werden.

7
Hersteller: celexon Europe GmbH
Adresse: Gutenbergstraße 2, 48282 Emsdetten, DE
Produktname: celexon PTZ Kamera Full HD
Videokonferenzsystem VKS2040
Hiermit erklärt celexon Europe GmbH, dass das celexon PTZ Kamera Full HD
Videokonferenzsystem VKS2040 der Richtlinie 2014/53/EU entspricht. Die
EU-Konformitätserklärung kann unter folgender Adresse heruntergeladen
werden: www.celexon.de/zertikate
INFORMATION ZUR EU-KONFORMITÄT
Das Symbol weist auf die getrennte Rücknahme elektrischer und elektro-
nischer Geräte in EU-Ländern hin. Bitte werfen Sie das Gerät nicht in den
Hausmüll. Informieren Sie sich über das in Ihrem Land gültige Rücknah-
mesystem und wenden Sie sich bei Fragen zum Entsorgungsprozess an
Ihre Kommune oder Ihre örtliche Wert-und Schadstoffsammelstelle.

Operating instructions
celexon PTZ Camera Full HD Video
Conference System VKS2040
Thank you for purchasing this product.
For optimum performance and safety, please read these instructions carefully before
connecting or operating this product. Please retain these instructions for future use.
Version: 32422_051

1
Please read and follow all the safety instructions below and on the product before
connecting the camera to a power source. Failure to comply with the safety instructions
may result in re, electric shock, or personal injury, and could affect the safety features
contained in the unit. Please retain all safety instructions.
• All accessories and cables must be removed before transporting the camera.
• Do not grasp the camera head when transporting the camera.
• Always use the remote control to turn the camera head. Do not turn the camera
head by hand. You risk mechanical damage.
• When turning the camera, make sure that there are no obstacles within the camera‘s
turning range.
• The camera may only be operated with the power pack supplied.
• Do not expose the camera to direct sunlight or to damp, greasy or dusty places or
where the camera could come into contact with rain, smoke or steam.
• Never expose this equipment or its components to rain or moisture to reduce the
risk of re or electric shock.
• Do not drop the camera.
• Do not spill liquids on the camera.
• Do not place sources of open ames, such as lit candles.
• Do not use the camera in extremely bright conditions for long periods of time.
• The camera must not be used in the vicinity of strong electromagnetic radiation, e.g.
televisions and radio transmitters. The specic frequency of electromagnetic elds
can affect the camera image.
• Use the supplied power cable. Connect the power cable to a socket with a
protective earth connection. It is recommended to use a multiple socket outlet with
surge protection. The wall sockets must not be overloaded.
• The camera must not be installed in places subject to mechanical vibrations.
• The camera must not be placed on an unstable surface. This could result in
serious personal injury and camera damage. When mounting the camera on a tripod,
make sure that you follow the manufacturer‘s instructions. Use only the mounting
materials recommended by the manufacturer.
• When unplugging the power cable, hold the plug and not the cable.
• Make sure that no one steps on the power cable especially at the power socket, or
at the connection point to the camera.
• Unplug the camera if you will not be using it for a long period of time.
SAFETY INSTRUCTIONS

2
• The camera must not be used outside the specied temperature,humidity and
power ranges.
• Unplug the camera from the mains if you need to clean it. Only use a soft, dry cloth
to clean the camera and camera lens. Never use alcohol, solvents or ammonia-based
liquids on this camera.
• Wash your hands after handling the cables supplied with this camera.
• The remote control of the camera uses batteries. Make sure that the polarity of
the batteries (+/-) is correctly aligned. Dispose of used batteries according to local
disposal regulations.
• Repairs may only be carried out by qualied personnel. The cover must not be
removed. Unauthorised maintenance of your camera can be dangerous and will
invalidate the warranty.
• Only use spare parts specied by celexon. Unauthorised spare parts could cause
re, electric shock or personal damage and will invalidate the warranty.
• Follow these instructions to ensure image quality throughout the life of the camera.
Failure to follow these instructions may invalidate the warranty.
• Should you notice any external damage to the unit or unexpected or unusual
operation, do not continue to use the product. In these cases switch off the
product immediately and disconnect it from the power supply. Immediately contact the
dealer from whom you purchased the product or celexon directly (Web:
www.celexon.co.uk, Mail: info@celexon.co.uk) for further information.
• Failure to follow the above instructions may result in personal injury or damage to
the product or equipment connected to it. Incorrect installation or use may also be
invalidated if the product is installed or used incorrectly.
• If you are unsure about the use of the product, contact a professional, your dealer or
celexon directly. (Web: www.celexon.co.uk, Mail: info@celexon.co.uk).
• Technical changes and errors are possible.
The manufacturer accepts no responsibility for damage to property or personal injury
if the product is used outside the recommended specications or if it is improperly
installed.
DISCLAIMER
The information in this document is subject to change without notice by the
manufacturer.
Changes will be added to subsequent versions of this manual. The manufac-
turer does not guarantee or warranty for the correctness of the information in
this document.

3
IN THE BOX
1x PTZ camera 1x 12V power supply unit1x IR remote control 1x Microphone &
Loudspeaker
2x USB 2.0 cable
CAMERA PARAMETERS
Zoom 10x
Image Sensor 1/ 2.8“ Exmor CMOS
Pixels 2.7 Megapixel
HOV 72°
Resolution 1920x1080@30fps // 1280x720 // 640x480
640x360 // 352x288 // 320x240
Min. Illu 0.[email protected]
Electricity Commuication
Power supply DC12V Transmission Rate 2400/4800/9600/
19200/38400
Power
consumption 12W Protocol VISCA/PELCO-D
PELCO-P
Decoder Built in Address insettings 1-255
Operation Surroundings
Pivot rotation -178°~ +178° Surroundings 115 x 115 x 135 mm
Tilt rotation -30°~ +90° Operating
temperature -10°C ~ +50°C
Memory
Remote control max. 9
memory locations Weight 1.2 kg
A total of up to max.
255 memory locations
possible
Installation
possibilities Wall/Ceiling/Tripod

4
PTZ CAMERA IN DETAIL
Lens
IR receiver eye
On / Off indicator
RS232 connector
USB 2.0 port
DC12V power connector
Mute
Quieter
Louder
REMOTE CONTROL FUNCTIONS
Power On / Standby
P/T RST Camera starts alignment
FLIP Camera image is rotated
Camera Select Select the camera to be
controlled
BLC Switch BLC on/off
MENU Open / Close Menu
Navigation Home = Align camera centrally
PRESET Preset + number 1-9 = preset save
RESET Reset + number 1-9 = reset stored preset
FOCUS Auto = auto. Focus
Manual = manual focus
Far = manu. Focus, background in focus
Near = manu. Focus, foreground in focus
ZOOM + zoom in
- zoom out
Numbers Memory locations 1-9

5
INSTALLATION
Always connect the camera in the same way, regardless of whether the camera
is connected to a permanently installed PC or a mobile laptop.
1) Connect the camera to the DC12V power supply and plug it in to power.
As soon as the LED (3) lights up, the camera is switched on and ready for
operation.
Note: Make sure that the camera is free of packaging material and that no
objects are blocking the camera‘s range of movements. The camera will centre
itself in the beginning. It is not necessary to align the camera by hand.
2) Connect the camera with the USB A-A cable and connect it to the PC.
Optionally, the camera can also be controlled with an RS232 data cable
(DIN8M) (not included in the box).
3) Connect the microphone & loudspeaker module with the other USB cable to
a free USB port on your PC.
4) As soon as the PC has recognised the camera and microphone & loudspe-
aker module, the conference system can be started. The system can be used
with all common video conferencing programs.

6
Manufacturer: celexon Europe GmbH
Adress: Gutenbergstraße 2, 48282 Emsdetten, DE
Productname: celexon PTZ Camera Full HD
Video Conference System VKS2040
Products that are marked with the UKCA mark meet all requirements of
the relevant UK directives. The UK declaration of conformity can be downloaded
at the following address at: www.celexon.de/zertikate
INFORMATION ON UK CONFORMITY
The symbol indicates the separate collection of electrical and electronic
equipment in EU countries. Please do not throw the appliance into the
household waste. Please nd out about the take-back system in force
in your country and if you have any questions about them, contact your
local municipality or your local recycling and hazardous waste collection
centre.

Notice d’utilisation
Caméra Full HD celexon PTZ
Système de visioconférence
VKS2040
Merci d’avoir choisi ce produit.
Pour une performance et une sécurité optimales, veuillez lire attentivement les présentes
instructions avant de connecter ou d’utiliser ce produit. Veuillez conserver la présente
notice pour une utilisation ultérieure.
Version : 32422_051

1
Veuillez lire et suivre toutes les consignes de sécurité mentionnées ci-dessous et sur le
produit avant de connecter la caméra à une source d’alimentation. Le non-respect des
consignes de sécurité peut entraîner un incendie, une électrocution ou des dommages
corporels et pourrait endommager ou compromettre les dispositifs de sécurité contenus
dans l’appareil. Veuillez conserver toutes les consignes de sécurité.
• Tous les accessoires et tous les câbles doivent être retirés avant de transporter la
caméra.
• Ne saisissez pas la tête de la caméra lorsque vous la transportez.
• Utilisez toujours la télécommande pour le pivotement de la tête de la caméra. Ne
faites pas pivoter la tête de la caméra à la main. Vous risquez des dommages mé-
caniques.
• Lorsque vous faites pivoter la caméra, assurez-vous qu’aucun obstacle ne se trouve
dans la zone de rotation de la caméra.
• La caméra ne doit être utilisée qu’avec le bloc d’alimentation fourni.
• Ne pas exposer la caméra à la lumière directe du soleil ni la placer dans des endroits
exposés à l’humidité, à la graisse ou à la poussière, dans lesquels l’appareil et ses
accessoires pourraient entrer en contact avec la pluie, la fumée ou la vapeur.
• N’exposez jamais l’appareil ou ses composants à la pluie ou à l’humidité an de ré-
duire les risques d’incendie ou de choc électrique.
• Il ne faut pas laisser tomber la caméra.
• Aucun liquide ne doit être renversé sur la caméra. Les liquides renversés peuvent
endommager la caméra ou causer des dommages corporels.
• Aucune source de amme nue, telle qu’une bougie allumée, ne doit être placée sur
la caméra.
• La caméra ne doit pas être utilisée pendant une période prolongée dans des condi-
tions de luminosité extrême.
• La caméra ne doit pas être utilisée à proximité d’un fort rayonnement électromagné-
tique, tel qu’un téléviseur ou un émetteur radio. La fréquence spécique des champs
électromagnétiques peut affecter l’image de la caméra.
• Utilisez le câble d’alimentation fourni. Branchez le câble d’alimentation sur une prise
de courant avec raccordement à la terre.
• La caméra ne doit pas être installée dans des endroits soumis à des vibrations mé-
caniques.
• La caméra ne doit pas être posée sur une surface instable. Cela pourrait entraîner
des blessures corporelles et des dommages matériels importants. Assurez-vous de
suivre les instructions du fabricant lors de la xation de la caméra sur un pied. Utili-
AVERTISSEMENTS

2
sez uniquement le matériel de xation recommandé par le fabricant.
• Lorsque vous débranchez le câble d’alimentation, tenez la che et non le câble.
• Assurez-vous que personne ne marche sur le câble d’alimentation ou ne le dé-
branche, en particulier au niveau de la prise de courant, devant d’autres prises de
raccordement ou au point de connexion avec la caméra.
• Débranchez la caméra si vous ne l’utilisez pas pendant une période prolongée.
• La caméra ne doit pas être utilisée en dehors des plages de températures, d’humidi-
tés et de puissances indiquées.
• Débranchez la caméra si vous devez la nettoyer. Seul un chiffon doux et sec peut
être utilisé pour nettoyer la caméra et son objectif. N’utilisez jamais d’alcool, de sol-
vants ou de liquides à base d’ammoniaque avec cette caméra.
• La télécommande de la caméra utilise des piles. Assurez-vous que la polarité des
piles (+/-) est correctement orientée. Éliminez les piles usagées conformément aux
directives locales en matière d’élimination.
• Les réparations doivent exclusivement être effectuées par un personnel qualié. Le
boîtier ne doit pas être ouvert. L’entretien de votre caméra par vous-même peut être
dangereux pour vous et entraîne l’annulation de la garantie.
• Utilisez uniquement les pièces de rechange spéciées par celexon. Les pièces de
rechange non homologuées pourraient provoquer un incendie, une électrocution ou
des dommages corporels et annuleraient la garantie.
• Suivez ces instructions pour garantir la qualité de l’image pendant toute la durée de
vie de la caméra. Le non-respect de ces instructions peut affecter la garantie.
• Si vous constatez des dommages extérieurs sur l’appareil ou des fonctionnements
inattendus ou inhabituels, le produit ne doit plus être utilisé. Dans ce cas, éteignez
immédiatement le produit et débranchez-le. Contactez immédiatement le reven-
deur auprès duquel vous avez acheté le produit ou directement celexon (web :
www.celexon.fr, mail : info@celexon.fr) pour de plus amples informations.
• Le non-respect des instructions énoncées ci-dessus peut entraîner des dommages
corporels et endommager le produit ou les appareils qui y sont raccordés. Une ins-
tallation ou une utilisation incorrecte peut entraîner l’annulation de la garantie.
• Si vous n’êtes pas sûr lors de l’utilisation du produit, contactez le personnel spé-
cialisé, votre revendeur ou directement celexon (Web : www.celexon.fr, Mail :
info@celexon.fr).
• Sous réserve de modications techniques et d’erreurs.
Le fabricant décline toute responsabilité en cas de dommages matériels ou corporels si
le produit est utilisé en dehors des spécications recommandées ou s’il n’est pas installé
correctement.

3
EXCLUSION DE RESPONSABILITÉ
Les informations contenues dans le présent document peuvent être modiées
sans préavis par le fabricant. Les modications seront ajoutées dans les ver-
sions suivantes de ce manuel. Le fabricant n’offre aucune garantie ou assurance
quant à l’exactitude des informations contenues dans le présent document.
CONTENU DE LA LIVRAISON
1x caméra PTZ 1x bloc d’alimentation 12 V1x télécommande IR 1x microphone & enceinte
2x câbles USB 2.0

4
PARAMÈTRES DE LA CAMÉRA
Zoom 10x
Capteur
d’images
1/ 2,8“ Exmor CMOS
pixels 2.7 mégapixels
HOV 72°
Résolution 1920x1080@30fps // 1280 x 720 // 640 x 480 640 x 360 //
352 x 288 // 320 x 240
Min. Illu 0.[email protected]
Électricité Communication
Alimentation DC12V Vitesse de trans-
mission
2400/4800/9600/
19200/38400
Consommation
électrique
12 W Protocole VISCA/PELCO-D
PELCO-P
Décodeur Intégré Paramètres
d’adresse 1-255
Exploitation Environnement
Rotation en pivo-
tement
-178°~ +178° Dimensions 115 x 115 x 135 mm
Rotation en incli-
naison
-30°~ +90° Température de
service -10°C ~ +50°C
Emplacements
Télécommande max. 9
Emplacements Poids total 1,2 kg
Au total jusqu’à max.
25 emplacements
possibles
Possibilités
d’installation Mur/plafond/pied

5
FONCTIONS DE LA CAMÉRA PTZ
FONCTIONS DE LA TÉLÉCOMMANDE
Lentille
Œil du récepteur IR
Af chage On / Off
Port RS232
Port USB 2.0
Connexion électrique
DC12V
Power La caméra se met en Standby
P/T RST La caméra démarre l’alignement
FLIP L’image de la caméra est pivotée
Camera Select Sélectionner la caméra qui
doit être commandée
BLC Allumer / éteindre le BLC
MENU Ouvrir / fermer le menu
Navigation Home = Aligner la caméra au centre
PRESET Preset + nombre 1-9 = enregistrer
préréglage
RESET Reset + nombre 1-9 = Reset préréglage
enregistré
MISE AU POINT Auto = mise au point automatique
Manual = mise au point manuelle
Far = mise au point de l’arrière-plan
Near = mise au point du premier plan
ZOOM + zoomer à l’intérieur
- zoomer à l’extérieur
Nombres Emplacements 1-9
Muet
Plus bas
Plus fort
1
2
3
4
5 6
7
89
10 11
12
1
2 3
1
2
3
4
4
5
5
6
6

6
MISE EN SERVICE
Connectez toujours la caméra de la même manière, qu’elle soit combinée à un
PC xe ou à un ordinateur portable mobile.
1. Reliez la caméra au bloc d’alimentation DC12V et branchez-le à la source
d’alimentation. Dès que la LED (3) s’allume, la caméra est sous tension et opé-
rationnelle.
Remarque : Veillez à ce que la caméra, toutefois en particulier la tête pivotante,
soit exempte de matériaux d’emballage et qu’aucun objet n’obstrue la zone de
pivotement de la caméra. Au départ, la caméra s’aligne automatiquement au
centre. Il n’est pas nécessaire d’aligner la tête pivotante à la main.
2. Reliez la caméra au câble USB A-A et raccordez-le à votre ordinateur. En
option, la caméra peut également être commandée par un câble de données
RS232 (DIN8M) (non fourni).
3. Dès que la caméra et le module microphone & enceinte ont été reconnus par
votre système, ils peuvent être utilisés avec tous les systèmes de visioconfé-
rence standard.

7
Fabricant : celexon Europe GmbH
Adresse : Gutenbergstraße 2, 48282 Emsdetten, DE
Nom du produit : Caméra Full HD celexon PTZ
Système de visioconférence VKS2040
La société celexon Europe GmbH déclare, par la présente, que le système de
visioconférence caméra celexon PTZ Full HD VKS2040 respecte la directive
2014/53/EU. La déclaration de conformité UE peut être téléchargée à l’adresse
suivante : www.celexon.de/zertikate
INFORMATION CONCERNANT LA CONFORMITÉ EUROPÉENNE
Ce symbole indique que les appareils électriques et électroniques sont
collectés séparément dans les pays de l’UE. Veuillez ne pas jeter l’appareil
avec les ordures ménagères. Renseignez-vous sur le système de collecte
en vigueur dans votre pays et adressez-vous à votre commune ou à votre
centre de collecte local pour toute question relative au processus d’élimi-
nation.

Manual de instrucciones
Cámara Full HD celexon PTZ
Sistema de videoconferencia
VKS2040
Gracias por adquirir este producto.
Para un rendimiento y seguridad óptimos, lea atentamente estas instrucciones antes de
conectar o utilizar este producto. Conserve estas instrucciones para futuras consultas.
Versión: 32422_051

1
Lea y siga todas las instrucciones de seguridad que aparecen a continuación y en el pro-
ducto antes de conectar la cámara a una fuente de alimentación. El incumplimiento de
las instrucciones de seguridad puede provocar incendios, descargas eléctricas o lesiones
personales y podría dañar o perjudicar los dispositivos de seguridad contenidos en el
dispositivo. Respete todas las instrucciones de seguridad.
• Retire todos los accesorios y cables antes de transportar la cámara.
• No sujete el cabezal de la cámara cuando la transporte.
• Utilice siempre el mando a distancia para girar el cabezal de la cámara. No gire el
cabezal de la cámara con la mano. De lo contrario, corre el riesgo de sufrir daños
mecánicos.
• Al girar la cámara, asegúrese de que no haya obstáculos en el radio de giro de la
cámara.
• La cámara solo puede utilizarse con la fuente de alimentación suministrada.
• No exponga la cámara a la luz solar directa ni la coloque en lugares húmedos, gra-
sientos o polvorientos donde el dispositivo y los accesorios puedan entrar en con-
tacto con la lluvia, humo o vapor.
• No exponga nunca el dispositivo o sus componentes a la lluvia o la humedad para
reducir el riesgo de incendio o descarga eléctrica.
• La cámara no debe dejarse caer.
• No derrame ningún líquido sobre la cámara. Los líquidos derramados pueden causar
daños a la cámara o lesiones personales.
• No deben colocarse fuentes de llamas abiertas, por ejemplo, velas encendidas, so-
bre la cámara.
• No utilice la cámara durante un largo periodo de tiempo en condiciones de lumino-
sidad extrema.
• La cámara no debe utilizarse cerca de radiaciones electromagnéticas intensas,
como televisores o radiotransmisores. La frecuencia especíca de los campos elec-
tromagnéticos puede afectar a la imagen de la cámara.
• Utilice el cable de alimentación suministrado. Conecte el cable de alimentación a un
enchufe con toma de tierra de protección.
• La cámara no debe instalarse en lugares expuestos a vibraciones mecánicas.
• La cámara no debe colocarse sobre una supercie inestable. Esto podría provocar
lesiones personales graves y daños en la cámara. Asegúrese de seguir las instruc-
ciones del fabricante cuando monte la cámara en un trípode. Utilice únicamente los
materiales de jación recomendados por el fabricante.
• Cuando desenchufe el cable de alimentación, sujete el enchufe y no el cable.
ADVERTENCIAS

2
• Asegúrese de que nadie pise el cable de alimentación ni lo desconecte, especial-
mente en la toma de corriente, delante de otras tomas de conexión o en el punto de
conexión a la cámara.
• Desenchufe la cámara si no va a utilizarla durante un largo periodo de tiempo.
• La cámara no debe utilizarse fuera de los rangos de temperatura, humedad y po-
tencia especicados.
• Desenchufe la cámara si necesita limpiarla. Para limpiar la cámara y la lente solo
debe utilizarse un paño suave y seco. No utilice nunca alcohol, disolventes ni líqui-
dos a base de amoniaco con esta cámara.
• El mando a distancia de la cámara utiliza pilas. Asegúrese de que la polaridad de las
pilas (+/-) sea correcta. Elimine las pilas usadas de acuerdo con las normas locales
de eliminación.
• Las reparaciones solo deben ser realizadas por personal cualicado. La carcasa
no debe abrirse. Realizar el mantenimiento de su cámara por su cuenta puede ser
peligroso para usted y anulará la garantía.
• Utilice únicamente piezas de repuesto especicadas por celexon. Las piezas de re-
puesto no autorizadas pueden provocar incendios, descargas eléctricas o lesiones
personales e invalidarán la garantía.
• Siga estas instrucciones para garantizar la calidad de imagen durante toda la vida
útil de la cámara. El incumplimiento de estas instrucciones puede afectar a la ga-
rantía.
• Si observa algún daño externo en el dispositivo o un funcionamiento inesperado
o inusual, deje de utilizar el producto. En estos casos, apague inmediatamente el
producto y desconéctelo de la red eléctrica. Póngase en contacto inmediatamente
con el distribuidor al que compró el producto o directamente con celexon (web:
www.celexon.es, correo: info@celexon.es) para obtener más información.
• Si no se siguen las instrucciones anteriores, pueden producirse lesiones personales
y daños en el producto o en los equipos conectados a él. Además, la instalación o el
uso incorrectos pueden invalidar la garantía.
• Si tiene dudas sobre el uso del producto, póngase en contacto con un especialis-
ta, con su distribuidor o directamente con celexon (web: www.celexon.es, correo:
info@celexon.es).
• Salvo cambios y errores técnicos.
El fabricante no acepta ninguna responsabilidad por daños materiales o personales si el
producto se utiliza fuera de las especicaciones recomendadas o si se instala incorrec-
tamente.

3
EXENCIÓN DE RESPONSABILIDAD
La información contenida en este documento está sujeta a cambios sin previo
aviso por parte del fabricante. Los cambios se añadirán en las siguientes ver-
siones de este manual. El fabricante no garantiza la exactitud de la información
contenida en este documento.
VOLUMEN DE SUMINISTRO
1x cámara PTZ 1x fuente de alimentación
12V
1x mando a distancia IR 1x micrófono y altavoz
2x cables USB 2.0

4
PARÁMETROS DE LA CÁMARA
Zoom 10x
Sensor de
imagen
1/ 2,8” CMOS Exmor
Píxeles 2,7 megapíxeles
HOV 72°
Resolución 1920x1080@30fps // 1280x720 // 640x480
640x360 // 352x288 // 320x240
Ilu. mín. 0.[email protected]
Electricidad Comunicación
Alimentación eléc-
trica
CC12V Velocidad de trans-
misión
2400/4800/9600/
19200/38400
Consumo eléctrico 12W Protocolo VISCA/PELCO-D
PELCO-P
Decodicador Incorporado Ajustes de
dirección 1-255
Operación Entorno
Rotación de giro -178°~ +178° Dimensiones 115 x 115 x 135 mm
Rotación de incli-
nación
-30°~ +90° Temperatura de
funcionamiento -10°C ~ +50°C
Posiciones de
memoria
Mando a distancia
máx. 9
Posiciones de memoria
Peso total 1,2 kg
En total hasta un
máximo
de 255 posiciones de
memoria
posibles
Posibilidades de
instalación Pared/techo/trípode

5
RANGO FUNCIONAL DE LA CÁMARA PTZ
RANGO FUNCIONAL DEL MANDO A DISTANCIA
Lente
Ojo receptor IR
Indicador On/Off
Conexión RS232
Conexión USB 2.0
Conexión eléctrica
CC12V
Power La cámara pasa al modo de espera
P/T RST La cámara inicia la alineación
FLIP La imagen de la cámara gira
Camera Select Seleccionar la cámara que
deba ser controlada
BLC Encender/apagar BLC
MENU Abrir/cerrar menú
Navegación Home = alinear cámara en el centro
PRESET Preset + número 1-9 = guardar
preajuste
RESET Reset + número 1-9 = restablecer preajuste
guardado
FOCUS Auto = enfoque automático
Manual = enfoque manual
Far = enfoque man., enfocar fondo
Near = enfoque man., enfocar primer plano
ZOOM + acercar
- alejar
Números Posiciones de memoria 1-9
Silencio
Más bajo
Más alto
1
2
3
4
5 6
7
89
10 11
12
1
2 3
1
2
3
4
4
5
5
6
6

6
PUESTA EN SERVICIO
Conecte siempre la cámara de la misma forma, independientemente de si la
cámara se combina con un PC instalado de forma permanente o con un por-
tátil.
1. Conecte la cámara a la fuente de alimentación CC12V y esta a la red eléc-
trica. En cuanto se enciende el led (3), la cámara está encendida y lista para
funcionar.
Nota: Asegúrese de que la cámara, y especialmente el cabezal panorámico,
estén libres de material de embalaje y de que ningún objeto bloquee el rango
panorámico de la cámara. La cámara se centra sola al principio. No es necesa-
rio alinear la cabeza giratoria a mano.
2. Conecte la cámara con el cable USB A-A y este a su ordenador. Opcional-
mente, la cámara también se puede controlar con un cable de datos RS232
(DIN8M) (no incluido en la entrega).
3. Una vez que la cámara y el módulo de micrófono y altavoz han sido recono-
cidos por su sistema, pueden utilizarse con todos los programas de videocon-
ferencia habituales.

7
Fabricante: celexon Europe GmbH
Dirección: Gutenbergstraße 2, 48282 Emsdetten, DE
Nombre de producto: Cámara Full HD celexon PTZ Sistema de
videoconferencia VKS2040
Por la presente, celexon Europe GmbH declara que el sistema de videocon-
ferencia Full HD VKS2040 celexon PTZ cumple la Directiva 2014/53/UE.
La declaración de conformidad de la UE puede descargarse de la siguiente
dirección: www.celexon.de/zertikate
INFORMACIÓN SOBRE LA CONFORMIDAD DE LA UE
El símbolo hace referencia a la recogida selectiva de dispositivos eléctri-
cos y electrónicos en los países de la UE. No tire el aparato a la basura
doméstica. Infórmese sobre el sistema de recogida aplicable en su país
y póngase en contacto con su ayuntamiento o con el punto local de re-
cogida de residuos peligrosos y reciclados si tiene alguna duda sobre el
proceso de eliminación.

Istruzioni per l’uso
Telecamera PTZ celexon Full HD
Sistema per videoconferenze
VKS2040
Grazie per aver acquistato questo prodotto.
Per garantire prestazioni e sicurezza ottimali, leggere attentamente le presenti istruzioni
prima di collegare o utilizzare il prodotto. Conservare queste istruzioni per riferimenti
futuri.
Versione: 32422_051

1
Prima di collegare la telecamera a una fonte di alimentazione, leggere e seguire tutte le
istruzioni di sicurezza riportate di seguito e sul prodotto. La mancata osservanza delle
istruzioni di sicurezza può provocare incendi, scosse elettriche o lesioni personali e può
danneggiare o compromettere le funzioni di sicurezza incluse nel prodotto. Conservare
tutte le istruzioni di sicurezza.
• Tutti gli accessori e i cavi devono essere rimossi prima di trasportare la telecamera.
• Non afferrare la testa della telecamera quando la si trasporta.
• Utilizzare sempre il telecomando per ruotare la testa della telecamera. Non ruotare
con la mano la testa della telecamera. Altrimenti si rischiano danni meccanici.
• Quando si ruota la telecamera, accertarsi che non vi siano ostacoli nel raggio di
rotazione della telecamera.
• La telecamera può essere utilizzata solo con l’alimentatore in dotazione.
• Non esporre la telecamera alla luce solare diretta e non collocarla in luoghi umidi,
unti o polverosi, dove l’unità e gli accessori potrebbero entrare in contatto con piog-
gia, fumo o vapore.
• Non esporre mai il dispositivo o i suoi componenti alla pioggia o all’umidità per ri-
durre il rischio di incendi o scosse elettriche.
• Non far cadere la telecamera.
• Non versare liquidi sulla telecamera. Le fuoriuscite possono causare danni alla tele-
camera o lesioni personali.
• Sulla telecamera non devono essere collocate fonti di amme libere, come candele
accese.
• Non utilizzare la telecamera in condizioni di estrema luminosità per periodi prolun-
gati.
• La telecamera non deve essere utilizzata in prossimità di forti radiazioni elettroma-
gnetiche, come ad esempio televisori o trasmettitori radio. La frequenza specica
dei campi elettromagnetici può inuire sull’immagine della telecamera.
• Utilizzare il cavo di alimentazione in dotazione con la telecamera. Collegare il cavo
di alimentazione a una presa con collegamento a terra di protezione.
• Non installare la telecamera in luoghi soggetti a vibrazioni meccaniche.
• Non collocare la telecamera su una supercie instabile. Ciò potrebbe causare gravi
lesioni personali e danni alla telecamera. Per il montaggio della telecamera su un
treppiede, accertarsi di seguire le istruzioni del produttore. Utilizzare solo i materiali
di ssaggio raccomandati dal produttore.
• Quando si scollega il cavo di alimentazione, afferrare la spina e non il cavo.
• Assicurarsi che nessuno calpesti il cavo di alimentazione o lo scolleghi, soprattutto
AVVERTENZE

2
in corrispondenza della presa di corrente, davanti ad altre prese di collegamento o
nel punto di collegamento alla telecamera.
• Scollegare la telecamera se non la si utilizza per un lungo periodo di tempo.
• Non utilizzare la telecamera al di fuori degli intervalli di temperatura, umidità e po-
tenza specicati.
• Scollegare la telecamera se è necessario pulirla. Per la pulizia della telecamera e
dell’obiettivo usare solo un panno morbido e asciutto. Non utilizzare mai alcool,
solventi o liquidi a base di ammoniaca su questa telecamera.
• Il telecomando della telecamera è a batterie. Assicurarsi che la polarità delle batterie
(+/-) sia correttamente allineata. Smaltire le batterie usate secondo le normative
locali in materia di smaltimento.
• Le riparazioni devono essere effettuate esclusivamente da personale qualicato.
Non aprire l’alloggiamento. La manutenzione in proprio della telecamera può essere
pericolosa per l’utilizzatore e invalida la garanzia.
• Utilizzare solo parti di ricambio specicate da celexon. L’uso di parti di ricambio non
autorizzate potrebbe causare incendi, scosse elettriche o lesioni personali e invalida
la garanzia.
• Seguire queste istruzioni per garantire la qualità delle immagini per tutta la durata
della telecamera. La mancata osservanza di queste istruzioni può compromettere
la garanzia.
• Se si notano danni esterni al dispositivo o un funzionamento imprevisto o insoli-
to, interrompere l’utilizzo del prodotto. In questi casi, spegnere immediatamente il
prodotto e scollegarlo dall’alimentazione. Contattare immediatamente il rivendito-
re presso il quale è stato acquistato il prodotto o direttamente celexon (sito web:
www.celexon.it, e-mail: info@celexon.it) per ulteriori informazioni.
• La mancata osservanza di queste istruzioni può causare lesioni personali e danni al
prodotto o ai dispositivi ad esso collegati. Inoltre, un’installazione o un utilizzo non
corretti possono invalidare la garanzia.
• In caso di dubbi sull’uso del prodotto, contattare un esperto qualica-
to, il rivenditore o direttamente celexon (sito web: www.celexon.it, e-mail:
info@celexon.it).
• Con riserva di modiche tecniche ed errori.
Il produttore non si assume alcuna responsabilità per danni a cose o persone se il pro-
dotto viene utilizzato al di fuori delle speciche raccomandate o se viene installato in
modo non corretto.

3
ESCLUSIONE DI RESPONSABILITÀ
Le informazioni contenute in questo documento sono soggette a modiche
senza preavviso da parte del produttore. Le modiche saranno aggiunte alle
versioni successive di questo manuale. Il produttore non garantisce o assicura
l’accuratezza delle informazioni contenute nel presente documento.
VOLUME DI FORNITURA
1x telecamera PTZ 1x alimentatore da 12 V1x telecomando a infrarossi 1x microfono e altoparlante
2x cavi USB 2.0

4
PARAMETRI DELLA TELECAMERA
Zoom 10x
Sensore di
immagine
Exmor CMOS 1/ 2.8”
Pixel 2,7 megapixel
HOV 72°
Risoluzione 1920x1080@30fps // 1280x720 // 640x480
640x360 // 352x288 // 320x240
Illum. min. 0.[email protected]
Elettricità Comunicazione
Alimentazione DC12V Velocità di trasmis-
sione
2400/4800/9600/
19200/38400
Consumo di ener-
gia
12 W Protocollo VISCA/PELCO-D
PELCO-P
Decodicatore Integrato Impostazioni
dell’indirizzo 1-255
Operazione Ambiente
Rotazione gire-
vole
-178°~ +178° Dimensioni 115 x 115 x 135 mm
Rotazione di
inclinazione
-30°~ +90° Temperatura di
esercizio -10 °C ~ +50 °C
Slot di memoria
Telecomando max. 9
Slot di memoria Peso totale 1,2 kg
Totale no a max.
255 slot di memoria
possibili
Possibilità di
installazione Parete/softto/trep-
piede

5
AMBITO FUNZIONALE DEL TELECOMANDO
Obiettivo
Occhio del ricevitore a
infrarossi
Display On/Off
Connessione RS232
Connessione USB 2.0
Collegamento di alimen-
tazione DC12V
Power La telecamera passa in standby
P/T RST La telecamera inizia l’allineamento
FLIP L’immagine della telecamera viene ruotata
Camera Select Selezionare la telecamera da
controllare
BLC Accensione/spegnimento BLC
MENU Aprire/chiudere il menu
Navigazione Home = allineamento centrale della telecamera
PRESET Preset + numero 1-9 = salvataggio della
preimpostazione
RESET Reset + numero 1-9 = ripristino della preimposta
zione memorizzata
FOCUS Auto = messa a fuoco automatica
Manual = messa a fuoco manuale
Far = messa a fuoco man., messa a fuoco sfondo
Near = messa a fuoco man., messa a fuoco primo piano
ZOOM + zoom in
- zoom out
Numeri Slot di memoria 1-9
Muto
Volume più basso
Volume più alto
1
2
3
4
5 6
7
89
10 11
12
1
2 3
1
2
3
4
4
5
5
6
6
AMBITO FUNZIONALE DELLA TELECAMERA PTZ

6
MESSA IN FUNZIONE
Collegare sempre la telecamera nello stesso modo, indipendentemente dal fat-
to che sia abbinata a un PC sso o a un portatile.
1. Collegare la telecamera all’alimentatore DC12V e collegarla alla fonte di ali-
mentazione. Non appena il LED (3) si accende, la telecamera è accesa e pronta
per il funzionamento.
Nota: assicurarsi che la telecamera, e in particolare la testa di rotazione, sia
priva di materiale di imballaggio e che nessun oggetto blocchi il campo di ro-
tazione della telecamera. La telecamera si allinea centralmente all’inizio. Non è
necessario allineare manualmente la testa di rotazione.
2. collegare la telecamera al cavo USB A-A e connetterla al computer. In al-
ternativa, la telecamera può essere controllata anche con un cavo dati RS232
(DIN8M) (non incluso in dotazione).
3. una volta riconosciute dal sistema, la telecamera e il microfono e il modulo
degli altoparlanti possono essere utilizzati con tutti i più comuni programmi di
videoconferenza.

7
Produttore: celexon Europe GmbH
Indirizzo: Gutenbergstraße 2, 48282 Emsdetten, DE
Denominazione del prodotto: Telecamera PTZ celexon Full HD
Sistema per videoconferenze VKS2040
Con la presente, celexon Europe GmbH dichiara che la telecamera PTZ ce-
lexon Full HD sistema per videoconferenze VKS2040 è conforme alla direttiva
2014/53/UE. La dichiarazione di conformità UE può essere scaricata dal seguente
indirizzo: www.celexon.de/zertikate
INFORMAZIONI SULLA CONFORMITÀ UE
Il simbolo indica la raccolta differenziata dei dispositivi elettrici ed elet-
tronici nei Paesi dell’UE. Non gettare il dispositivo nei riuti domestici.
Informarsi sul sistema di ritiro in vigore nel proprio Paese e contattare
l’autorità locale o il punto di raccolta dei riuti pericolosi e di riciclaggio in
caso di domande sul processo di smaltimento.

Instrukcja obsługi
Kamera celexon PTZ Full HD
System wideokonferencji VKS2040
Dziękujemy za zakup tego produktu.
Aby zapewnić optymalne działanie i bezpieczeństwo, przed podłączeniem lub obsługą
tego produktu należy uważnie przeczytać niniejsze instrukcje. Prosimy o zachowanie
niniejszej instrukcji do wykorzystania w przyszłości.
Wersja: 32422_051

1
Przed podłączeniem kamery do źródła zasilania należy przeczytać i przestrzegać wszyst-
kich wskazówek bezpieczeństwa podanych poniżej i na produkcie. Nieprzestrzeganie
wskazówek bezpieczeństwa może spowodować pożar, porażenie prądem elektrycznym
lub obrażenia ciała, a także może uszkodzić lub osłabić środki zabezpieczające znajdują-
ce się w urządzeniu. Wszystkie wskazówki bezpieczeństwa należy przechowywać.
• Przed transportem kamery należy odłączyć wszystkie akcesoria i kable.
• Podczas transportu kamery nie chwytać za głowicę kamery.
• Zawsze używać pilota zdalnego sterowania do obracania głowicy kamery. Nie ob-
racać głowicy kamery ręcznie. W przeciwnym razie grozi to uszkodzeniem mecha-
nicznym.
• Podczas obracania kamery upewnić się, że w jej zasięgu nie ma żadnych przeszkód.
• Kamera może być używana wyłącznie z dostarczonym zasilaczem.
• Kamery nie należy wystawiać na bezpośrednie działanie promieni słonecznych ani
umieszczać w wilgotnych, tłustych lub zakurzonych miejscach, w których urządze-
nie i jego akcesoria mogłyby mieć kontakt z deszczem, dymem lub parą.
• Aby zmniejszyć ryzyko pożaru lub porażenia prądem, nigdy nie wystawiać urządze-
nia ani żadnego z jego elementów na działanie deszczu lub wilgoci.
• Nie wolno dopuścić do upadku kamery.
• Na kamerę nie wolno wylewać żadnych płynów. Rozlane płyny mogą uszkodzić ka-
merę lub spowodować obrażenia ciała.
• Na kamerze nie wolno stawiać źródeł otwartego ognia np. zapalonych świec.
• Kamery nie należy używać przez dłuższy czas w bardzo jasnym otoczeniu.
• Kamery nie należy używać w pobliżu silnego promieniowania elektromagnetyczne-
go np. telewizorów lub nadajników radiowych. Określona częstotliwość pól elektro-
magnetycznych może wpływać na obraz z kamery.
• Użyć dostarczonego przewodu zasilającego. Podłączyć kabel zasilający do gniazdka
z uziemieniem ochronnym.
• Kamery nie wolno instalować w miejscach narażonych na wibracje mechaniczne.
• Kamery nie należy umieszczać na niestabilnej powierzchni. Może to spowodować
poważne obrażenia ciała i uszkodzenie kamery. Montując kamerę na statywie po-
stępować zgodnie z instrukcjami producenta. Używać wyłącznie materiałów mocu-
jących zalecanych przez producenta.
• Podczas odłączania przewodu zasilającego należy trzymać za wtyczkę, a nie za
przewód.
• Nie pozwalać nikomu nadepnąć ani przycisnąć przewodu zasilającego, zwłaszcza
WSKAZÓWKI OSTRZEGAWCZE

2
przy gniazdku, przed innymi gniazdami lub w miejscu, w którym łączy się on z apa-
ratem.
• Odłączyć kamerę, jeśli nie będzie używana przez dłuższy czas.
• Kamera nie może być używana poza określonymi zakresami temperatury, wilgot-
ności i mocy.
• Przed czyszczeniem kamery należy odłączyć ją od prądu. Do czyszczenia kamery i
obiektywu należy używać wyłącznie miękkiej, suchej szmatki. W przypadku tej ka-
mery nigdy nie używać alkoholu, rozpuszczalników ani płynów na bazie amoniaku.
• Pilot zdalnego sterowania kamery jest zasilany bateriami. Upewnić się, że bieguno-
wość baterii (+/-) jest prawidłowa. Zużyte baterie należy utylizować zgodnie z lokal-
nymi wytycznymi dotyczącymi utylizacji.
• Naprawy mogą być przeprowadzane wyłącznie przez wykwalikowany personel.
Nie wolno otwierać obudowy. Samodzielne serwisowanie kamery może być nie-
bezpieczne dla użytkownika i spowoduje utratę gwarancji.
• Używać wyłącznie części zamiennych określonych przez rmę celexon. Nieautory-
zowane części zamienne mogą spowodować pożar, porażenie prądem elektrycz-
nym lub obrażenia ciała i unieważnią gwarancję.
• Postępować zgodnie z tymi instrukcjami, aby zapewnić jakość obrazu przez cały
okres użytkowania kamery. Niezastosowanie się do tych instrukcji może spowodo-
wać utratę gwarancji.
• Jeśli widoczne są zewnętrzne uszkodzenia urządzenia lub w przypadku stwierdze-
nia niespodziewanego lub nietypowego sposobu działania nie wolno dalej używać
produktu. W takich przypadkach należy natychmiast wyłączyć produkt i odłączyć
go od źródła zasilania. Należy bezzwłocznie skontaktować się ze sprzedawcą, u któ-
rego nabyto produkt lub bezpośrednio z rmą celexon (Internet: www.celexon.pl,
e-mail: info@celexon.pl), aby uzyskać więcej informacji.
• Niezastosowanie się do powyższych instrukcji może spowodować obrażenia ciała
oraz uszkodzenie produktu lub podłączonych do niego urządzeń. Niewłaściwa in-
stalacja lub użytkowanie może również doprowadzić do wygaśnięcia gwarancji.
• Jeśli nie ma pewności w odniesieniu do korzystania z produk-
tu, skontaktować się z wykwalikowanym specjalistą, sprzedaw-
cą lub bezpośrednio z rmą celexon (Internet: www.celexon.pl, e-mail:
info@celexon.pl).
• Zastrzega się możliwość zmian technicznych i błędów.
Producent nie ponosi odpowiedzialności za szkody materialne lub obrażenia ciała, jeśli
produkt jest używany niezgodnie z zalecanymi specykacjami lub jeśli jest nieprawidło-
wo zainstalowany.

3
WYŁĄCZENIE ODPOWIEDZIALNOŚCI
Informacje zawarte w tym dokumencie mogą ulec zmianie bez uprzedniego
powiadomienia ze strony producenta. Zmiany będą dodawane do kolejnych
wersji niniejszej instrukcji. Producent nie udziela gwarancji ani rękojmi odno-
śnie poprawności informacji zawartych w tym dokumencie.
ZAKRES DOSTAWY
1x kamera PTZ 1x zasilacz 12 V1x pilot zdalnego sterowa-
nia na podczerwień (IR)
1x mikrofon i głośnik
2x kabel USB 2.0

4
PARAMETRY KAMERY
Zoom 10x
Czujnik obrazu 1/ 2.8“ Exmor CMOS
Pixel 2.7 Megapixel
HOV 72°
Rozdzielczość 1920x1080@30fps // 1280x720 // 640x480
640x360 // 352x288 // 320x240
Min. ilu. 0.1Lux@F1.8
Elektryczność Komunikacja
Zasilanie DC 12 V Szybkość transmisji 2400/4800/9600/
19200/38400
Zużycie prądu 12W Protokół VISCA/PELCO-D
PELCO-P
Dekoder Wbudowany Ustawienia
adresu 1-255
Operacja Otoczenie
Rotacja z wychy-
leniem
-178°~ +178° Wymiary 115 x 115 x 135 mm
Rotacja z nachy-
leniem
-30°~ +90° Temperatura
robocza -10°C ~ +50°C
Miejsca na
zapisywanie w
pamięci
Pilot zdalnego stero-
wania maks. 9
Miejsca na zapisywa-
nie w pamięci
Masa całkowita 1,2 kg
Łącznie do maks.
255 miejsc na zapisy-
wanie w pamięci
możliwych
Możliwości
instalacji Ściana/sut/statyw

5
ZAKRES FUNKCJI KAMERY PTZ
ZAKRES FUNKCJI PILOTA ZDALNEGO STEROWANIA
Soczewka
Oczko odbiornika pod-
czerwieni
Wskaźnik On/Off
Przyłącze RS232
Przyłącze USB 2.0
Przyłącze prądu DC 12 V
Power Kamera przełącza się w tryb czuwania
P/T RST Kamera rozpoczyna ustawianie kierunku
FLIP Obraz kamery zostaje obrócony
Camera Select Wybór kamery do sterowania
BLC Włączanie/wyłączanie BLC
MENU Otwieranie/zamykanie menu
Nawigacja Home = ustawianie kamery na środku
PRESET Preset + cyfra 1-9 = ustawienie wstępne
zapis
RESET Reset + cyfra 1-9 = Reset zapisanego
ustawienia wstępnego
FOCUS Auto = automatyczne ogniskowanie
Manual = ręczne ogniskowanie
Far = man. ogniskowanie, ustawianie ostrego tła
Near = man. ogniskowanie, ustawianie ostrego
pierwszego planu
ZOOM + przybliżanie
- oddalanie
Cyfry Miejsca na zapisywanie w pamięci 1-9
Wyciszony
Ciszej
Głośniej
1
2
3
4
56
7
89
10 11
12
1
2 3
1
2
3
4
4
5
5
6
6

6
URUCHOMIENIE
Zawsze podłączać kamerę w ten sam sposób, niezależnie od tego, czy kamera
jest podłączana z zainstalowanym na stałe komputerem PC, czy z przenośnym
laptopem.
1. Podłączyć kamerę do zasilacza DC12V i podłączyć zasilacz do źródła zasilania.
Gdy tylko dioda LED (3) zaświeci się, kamera jest włączona i gotowa do użycia.
Wskazówka: Upewnić się, że kamera, a zwłaszcza głowica obrotowa, są wolne
od materiałów opakowaniowych i że żadne przedmioty nie blokują zakresu
obrotu kamery. Kamera wyśrodkowuje się na początku użytkowania samo-
czynnie. Nie jest konieczne ręczne ustawianie głowicy obrotowej.
2. Podłączyć kamerę za pomocą kabla USB A-A do komputera. Opcjonalnie
kamerą można również sterować za pomocą kabla danych RS232 (DIN8M)
(brak w zestawie).
3. Gdy tylko kamera oraz moduł mikrofonu i głośnika zostaną rozpoznane
przez system, można ich używać z wszystkimi popularnymi programami do
wideokonferencji.

7
Producent: celexon Europe GmbH
Adres: Gutenbergstraße 2, 48282 Emsdetten, DE
Nazwa produktu: Kamera celexon PTZ Full HD
System wideokonferencji VKS2040
Firma celexon Europe GmbH niniejszym oświadcza, że urządzenie ce-
lexon PTZ Kamera Full HD system wideokonferencji VKS2040 jest zgod-
ne z dyrektywą 2014/53/UE. Deklarację zgodności UE można pobrać pod
adresem: www.celexon.de/zertikate
INFORMACJA O ZGODNOŚCI Z PRZEPISAMI UE
Symbol oznacza, że w krajach UE urządzenia elektryczne i elektroniczne
są odbierane osobno. Prosimy nie wyrzucać urządzenia do odpadów do-
mowych. Należy pozyskać informacje o systemie odbioru obowiązującym
w danym kraju i skontaktować się z władzami lokalnymi lub lokalnym
punktem recyklingu i zbiórki zanieczyszczeń, jeśli istnieją jakiekolwiek
pytania dotyczące procesu utylizacji.

Handleiding
celexon PTZ camera Full HD
Videoconferentiesysteem VKS2040
Hartelijk dank voor uw aankoop van dit product.
Voor optimale prestaties en veiligheid moet u deze aanwijzingen zorgvuldig doorlezen
voordat u dit product aansluit of gebruikt. Bewaar deze handleiding voor later gebruik.
Versie: 32422_051

1
Lees alle hieronder en op het product vermelde veiligheidsaanwijzingen en neem deze
in acht voordat u de camera op een stroombron aansluit. Niet-inachtneming van de
veiligheidsaanwijzingen kan leiden tot brand, elektrische schok of letsel en kan de in het
apparaat aangebrachte voorzorgsmaatregelen beschadigen of beïnvloeden. Bewaar alle
veiligheidsaanwijzingen.
• Alle accessoires en kabels moeten voor het transport van de camera worden ver-
wijderd.
• Pak bij het transport van de camera niet de camerakop beet.
• Gebruik altijd de afstandsbediening voor het draaien van de camerakop. Draai de
camerakop niet met de hand. U riskeert anders mechanische schade.
• Zorg er bij het draaien van de camera voor dat er zich geen obstakels in het draai-
bereik van de camera bevinden.
• De camera mag uitsluitend met de bijgevoegde adapter worden gebruikt.
• De camera mag niet aan direct zonlicht worden blootgesteld of op vochtige, vettige
of stofge plekken worden geplaatst, waar het apparaat en de accessoires met re-
gen, rook of damp in aanraking kunnen komen.
• Stel het apparaat of de onderdelen nooit bloot aan regen of vocht om brandgevaar
of het gevaar van een elektrische schok te verlagen.
• De camera mag niet vallen.
• Er mogen geen vloeistoffen op de camera worden gemorst. Gemorste vloeistoffen
kunnen leiden tot beschadiging van de camera of letsel.
• Er mogen geen bronnen van open vuur, zoals brandende kaarsen, op de camera
worden gezet.
• De camera mag niet gedurende langere periode onder extreem verlichte omstan-
digheden worden gebruikt.
• De camera mag niet in de buurt van sterke elektromagnetische straling, zoals tv's of
draadloze zenders, worden gebruikt. De specieke frequentie van elektromagneti-
sche velden kan het camerabeeld beïnvloeden.
• Gebruik de meegeleverde stroomkabel. Sluit de stroomkabel op een stopcontact
met randaardeaansluiting aan.
• De camera mag niet op plekken die zijn blootgesteld aan mechanische trillingen
worden geïnstalleerd.
• De camera mag niet op een instabiel oppervlak worden geplaatst. Dit zou kunnen
leiden tot ernstig letsel en cameraschade. Zorg ervoor dat u bij bevestiging van de
camera op een statief de aanwijzingen van de fabrikant in acht neemt. Gebruik al-
leen de door de fabrikant aanbevolen bevestigingsmaterialen.
WAARSCHUWINGEN

2
• Als de stroomkabel uit het stopcontact wordt getrokken, moet de stekker en niet de
kabel worden vastgehouden.
• Zorg ervoor dat niemand op de stroomkabel stapt of dat deze wordt afgeklemd,
met name bij het stopcontact, voor andere aansluitbussen of op het verbindings-
punt met de camera.
• Trek de stekker van de camera uit het stopcontact als de camera langere tijd niet
zal worden gebruikt.
• De camera mag niet buiten de aangegeven temperatuurs-, luchtvochtigheids- en
prestatiebereiken worden gebruikt.
• Koppel de camera los van het stroomnet als u de camera moet reinigen. Voor de rei-
niging van de camera en de cameralens mag alleen een zachte, droge doek worden
gebruikt. Gebruik nooit alcohol, oplosmiddel of op ammoniak gebaseerde vloeistof-
fen bij deze camera.
• De afstandsbediening van de camera werkt op batterijen. Zorg ervoor dat de po-
lariteit van de batterijen (+/-) correct is. Verwijder gebruikte batterijen conform de
plaatselijke verwijderingsvoorschriften.
• Reparaties mogen uitsluitend door gekwaliceerd personeel worden uitgevoerd. De
behuizing mag niet geopend worden. Eigen onderhoud aan uw camera kan gevaar-
lijk voor u zijn en leidt tot het vervallen van de garantie.
• Gebruik alleen door celexon gespeciceerde reserveonderdelen. Niet-toegestane
reserveonderdelen kunnen brand, elektrische schok of letsel veroorzaken en leiden
tot het vervallen van de garantie.
• Neem deze aanwijzingen in acht om de beeldkwaliteit tijdens de gehele levensduur
van de camera te waarborgen. Niet-inachtneming van deze aanwijzingen kan de
garantie beïnvloeden.
• Mocht u beschadigingen aan de buitenkant van het apparaat of een onverwachte of
ongebruikelijke werking constateren, mag het product niet verder worden gebruikt.
Schakel in deze gevallen het product onmiddellijk uit en koppel het los van stroom.
Neem voor meer informatie onmiddellijk contact op met de dealer waarbij u het
product hebt gekocht of rechtstreeks met celexon (internet: www.celexon.nl, e-mail:
info@celexon.nl).
• Bij niet-inachtneming van bovenstaande aanwijzingen kunnen letsel en beschadi-
gingen van het product of daaraan aangesloten apparaten ontstaan. Bij foutieve
installatie of gebruik kan de garantie ook komen te vervallen.
• Als u twijfelt bij het gebruik van het product, neem dan contact op met een vak-
man, uw dealer of rechstreeks met celexon (internet: www.celexon.nl, e-mail:
info@celexon.nl).

3
UITSLUITING VAN AANSPRAKELIJKHEID
De informatie in dit document kan zonder voorafgaande kennisgeving door de
fabrikant worden gewijzigd. Wijzigingen worden telkens in de volgende versies
van dit handboek aangevuld. De fabrikant geeft geen garantie op de juistheid
van de informatie in dit document.
• Technische wijzigingen en fouten zijn voorbehouden.
De fabrikant is niet aansprakelijk voor materiële schade of letsel als het product buiten
de aanbevolen specicaties wordt gebruikt of bij ondeskundige installatie.
LEVERINGSOMVANG
1x PTZ camera 1x 12 V Adapter1x infrarood-afstandsbe-
diening
1x microfoon & luidspreker
2x USB 2.0-kabel

4
CAMERAPARAMETERS
Zoom 10x
Beeldsensor 1/ 2.8" Exmor CMOS
Pixel 2,7 megapixel
HOV 72°
Resolutie 1920x1080@30fps // 1280x720 // 640x480
640x360 // 352x288 // 320x240
Min. illu 0.[email protected]
Elektriciteit Communicatie
Voeding DC12V Overdrachtssnel-
heid
2400/4800/9600/
19200/38400
Stroomverbruik 12 W Protocol VISCA/PELCO-D
PELCO-P
Decodeerder Ingebouwd Adresinstellingen 1-255
Gebruik Omgeving
Zwenkrotatie -178°~ +178° Afmetingen 115 x 115 x 135 mm
Kantelrotatie -30°~ +90° Bedrijfstempe-
ratuur -10°C ~ +50°C
Opslaglocaties
Afstandsbediening
max. 9
Opslaglocaties
Totaalgewicht 1,2 kg
In totaal tot max.
255 opslaglocaties
mogelijk
Installatiemoge-
lijkheden Wand/plafond/sta-
tief

5
FUNCTIE-OMVANG PTZ CAMERA
FUNCTIES VAN DE AFSTANDSBEDIENING
Lens
IR-ontvangeroog
On / Off-weergave
RS232-aansluiting
USB 2.0-aansluiting
DC12V-stroomaanslui-
ting
Power Camera schakelt naar stand-by
P/T RST Camera start uitlijning
FLIP Camerabeeld wordt gedraaid
Camera Select Camera selecteren, die aangestuurd
moet worden
BLC BLC in-/uitschakelen
MENU Menu openen/sluiten
Navigatie Home = camera in het midden uitlijnen
PRESET Preset + getal 1-9 = voorinstelling
opslaan
RESET Reset + getal 1-9 = resetten van opgeslagen
voorinstelling
FOCUS Auto = automatisch scherpstellen
Manual = handmatig scherpstellen
Far = handm. scherpstellen, achtergrond
scherpstellen
Near = handm. scherpstellen, voorgrond
scherpstellen
ZOOM + inzoomen
- uitzoomen
Getallen Opslaglocaties 1-9
Geluid gedempt
Stiller
Harder
1
2
3
4
5 6
7
89
10 11
12
1
2 3
1
2
3
4
4
5
5
6
6

6
INBEDRIJFSTELLING
Sluit de camera altijd direct aan, ongeacht of de camera met een vast geïnstal-
leerde pc of met een mobiele laptop wordt gecombineerd.
1. Verbind de camera met de DC12V-voeding en sluit deze op een stroombron
aan. Zodra de led (3) brandt, is de camera ingeschakeld en klaar voor gebruik.
Aanwijzing: Let erop, dat al het verpakkingsmateriaal van de camera en met
name van de zwenkkop is verwijderd en dat er geen voorwerpen zijn die het
zwenkbereik van de camera blokkeren. De camera lijnt zichzelf aan het begin
vanzelf in het midden uit. Het is niet nodig om de zwenkkop met de hand uit
te lijnen.
2. Verbind de camera met de USB A-A-kabel en sluit deze op uw computer
aan. De camera kan eventueel ook met een RS232-datakabel (DIN8M) worden
aangestuurd (niet meegeleverd).
3. Zodra de camera en de microfoon & luidspreker-module door uw systeem
werden herkend, kunnen deze met alle gebruikelijke videoconferentieprogram-
ma's worden gebruikt.

7
Fabrikant: celexon Europe GmbH
Adres: Gutenbergstraße 2, 48282 Emsdetten, DE
Productnaam: celexon PTZ camera Full HD
Videoconferentiesysteem VKS2040
Hiermee verklaart celexon Europe GmbH, dat het celexon PTZ camera Full
HD videoconferentiesysteem VKS2040 voldoet aan de richtlijn 2014/53/
EU. De EU-conformiteitsverklaring kan op het volgende adres worden
gedownload: www.celexon.de/zertikate
INFORMATIE OVER EU-CONFORMITEIT
Het symbool wijst op de gescheiden inzameling van elektrische en elek-
tronische apparaten in EU-landen. Verwijder het apparaat niet met het
huishoudelijk afval. Informeer uzelf over het in uw land geldende inzame-
lingssysteem en neem bij vragen over het verwijderingsproces contact op
met uw gemeente of uw plaatselijke inzamelpunt.

Bruksanvisning
celexon PTZ-kamera Full HD
Videokonferenssystem VKS2040
Tack för att du har valt denna produkt!
Läs igenom denna bruksanvisning noga innan du ansluter eller använder produkten för
att garantera säkerheten och uppnå bästa möjliga prestanda. Spara denna bruksanvis-
ning för framtida bruk.
Version: 32422_051

1
Läs och följ alla säkerhetsanvisningar som nns nedan och på själva produkten innan
du ansluter kameran till en strömkälla. Om säkerhetsanvisningarna inte följs kan följden
bli brand, elektrisk stöt eller personskador och detta kan skada eller inverka negativt
på säkerhetsmekanismerna som nns i apparaten. Spara alla säkerhetsanvisningar för
framtida bruk.
• Alla tillbehör och alla kablar måste kopplas bort innan kameran transporteras.
• Håll inte i kamerahuvudet när kameran transporteras.
• Använd alltid fjärrkontrollen för att vrida på kamerahuvudet. Vrid inte på kamerahu-
vudet med handen. Annars nns det risk för skador på mekanismen.
• Det ska inte nnas några hinder i vägen i kamerans rörelseområde när kameran ska
vridas.
• Kameran får endast användas tillsammans med den medföljande nätadaptern.
• Kameran får inte utsättas för direkt solljus eller placeras på fuktiga, oljiga eller dam-
miga platser, eller på platser där kameran eller tillbehören kan komma i kontakt med
regn, rök eller ånga.
• Utsätt aldrig kameran eller dess komponenter för regn eller fukt för att minska risken
för bränder eller elektriska stötar.
• Kameran får inte tappas eller falla i golvet.
• Inga vätskor får spillas på kameran. Om vätskor spills på kameran kan det leda till att
kameran eller människor skadas.
• Inga antändningskällor med öppen låga, som till exempel brinnande stearinljus, får
ställas på kameran.
• Kameran får inte användas under en längre tid under extremt ljusstarka förhållan-
den.
• Kameran får inte användas i närheten av stark elektromagnetisk strålning, som t.ex.
från tv-apparater eller radiosändare. De elektromagnetiska fältens specika frek-
vens kan påverka kamerabilden.
• Använd den medföljande strömkabeln. Anslut strömkabeln till ett jordat eluttag.
• Kameran får inte installeras på platser som är utsatta för mekaniska vibrationer.
• Kameran får inte ställas på en instabil yta. Det kan leda till allvarliga personskador
och skador på kameran. Se till att du följer tillverkarens instruktioner om du fäster
kameran på ett stativ. Använd endast de fästmaterial som rekommenderas av till-
verkaren.
• Håll alltid i kontakten och inte i själva kabeln när du drar ut strömkabeln.
• Se till så att ingen kliver på strömkabeln och att den inte kopplas från, särskilt vid
eluttaget, vid andra grenuttag eller vid anslutningspunkten till kameran.
VARNINGAR

2
• Dra ur kontakten till kameran om du inte ska använda den på länge.
• Kameran får inte användas utanför de angivna tillåtna områdena för temperatur,
luftfuktighet och effekt.
• Koppla bort kameran från elnätet om du måste rengöra den. Kameran och kame-
ralinsen får endast rengöras med en mjuk och torr trasa. Använd aldrig alkohol,
lösningsmedel eller vätskor som innehåller ammoniak för att rengöra denna kamera.
• Fjärrkontrollen till kameran använder batterier. Kontrollera att batterierna har satts
i med polerna (+/-) åt rätt håll. Lämna in förbrukade batterier enligt de regler och
föreskrifter som gäller på användningsplatsen.
• Reparationer får endast utföras av kvalicerad personal. Höljet får inte öppnas. Om
du försöker reparera kameran på egen hand utsätter du dig för fara och garantin
upphör att gälla.
• Använd endast reservdelar som speciceras av celexon. Ej godkända reservdelar
kan orsaka brand, elektriska stötar eller personskador och om sådana används upp-
hör garantin att gälla.
• Följ dessa anvisningar för att bibehålla bildkvaliteten under kamerans hela livslängd.
Om dessa anvisningar inte följs kan garantin begränsas.
• Om du hittar utvändiga skador på produkten eller om den inte fungerar som den ska
eller om den beter sig onormalt så får produkten inte användas längre. Stäng i så fall
omedelbart av produkten och koppla bort strömmen till produkten. Kontakta ome-
delbart återförsäljaren som du köpte produkten av eller vänd dig direkt till celexon
(webbplats: www.celexon.se, e-post: info@celexon.se) för mer information.
• Om anvisningarna ovan inte följs kan detta leda till personskador eller skador på
produkten eller på utrustning som är ansluten till den. Garantin kan också upphöra
att gälla vid felaktig installation eller felaktig användning.
• Om du är osäker på hur produkten ska användas ber vi dig kontakta en ex-
pert, din återförsäljare eller celexon direkt (webbplats: www.celexon.se, e-post:
info@celexon.se).
• Med reservation för tekniska ändringar och fel.
Tillverkaren ansvarar inte för sakskador eller personskador som uppstår om produkten
inte används enligt de rekommenderade specikationerna, eller om installationen är fel-
aktigt utförd.

3
ANSVARSFRISKRIVNING
Informationen i detta dokument kan ändras av tillverkaren utan förvarning.
Ändringar införs i de efterföljande versionerna av denna bruksanvisning. Till-
verkaren garanterar inte att uppgifterna i detta dokument är korrekta.
LEVERANSOMFATTNING
1 st. PTZ-kamera 1 st. 12 V-nätadapter1 st. infraröd fjärrkontroll 1 st. mikrofon och högtalare
2 st. USB 2.0-kablar

4
KAMERANS PARAMETRAR
Zoom 10x
Bildsensor 1/ 2.8“ Exmor CMOS
Pixlar 2,7 megapixlar
Synfält 72°
Upplösning 1920x1080@30fps//1280x720//640x-
480640x360//352x288//320x240
Minsta belys-
ning
Elektricitet Kommunikation
Strömförsörjning DC 12 V Överföringshas-
tighet
2400/4800/9600/
19200/38400
Strömförbrukning 12 W Protokoll VISCA/PELCO-D
PELCO-P
Avkodare Integrerad Adress-
inställningar 1-255
Drift Omgivning
Panorering -178°~ +178° Mått 115 x 115 x 135 mm
Vinkling -30°~ +90° Drifts-
temperatur -10 °C ~ +50 °C
Minnesplatser
Fjärrkontroll max. 9
Minnesplatser Total vikt 1,2 kg
Sammanlagt upp till
max.
255 minnesplatser
möjliga
Installations-
möjligheter Vägg/tak/stativ

5
PTZ-KAMERANS FUNKTIONER
FJÄRRKONTROLLENS FUNKTIONER
Lins
IR-mottagaröga
Av/på-indikator
RS232-uttag
USB 2.0-port
DC 12 V-strömanslutning
Power Kameran går över till standby-läget
P/T RST Kameran börjar ställa in sig
FLIP Kamerabilden vänds
Camera Select Välj kameran som ska
styras
BLC Slå på/av BLC
MENU Öppna/stänga meny
Navigation Home = centrera kameran
PRESET Preset + nummer 1–9 = spara
förinställning
RESET Reset + nummer 1–9 = återställer sparad
förinställning
FOCUS Auto = fokusera automatiskt
Manual = fokusera manuellt
Far = man. fokus, fokusera bakgrunden
Near = man. fokus, fokusera förgrunden
ZOOM + zooma in
- zooma ut
Nummer Minnesplatser 1–9
Tyst läge
Sänk volymen
Höj volymen
1
2
3
4
5 6
7
89
10 11
12
1
2 3
1
2
3
4
4
5
5
6
6

6
FÖRSTA ANVÄNDNINGEN
Anslut alltid kameran på samma sätt, oavsett om den ansluts till en stationär
dator eller till en bärbar dator.
1. Anslut först kameran till DC 12 V-nätadaptern och anslut sedan nätadaptern
till elnätet. När lampan (3) tänds är kameran påslagen och klar att användas.
OBS! Kontrollera att kameran, särskilt det svängbara kamerahuvudet, är fritt
från förpackningsmaterial och att det inte nns några föremål som blockerar
kamerans svängområde. När kameran startas centrerar den sig själv. Det är inte
nödvändigt att rikta in det svängbara huvudet för hand.
2. Anslut USB A-A-kabeln till kameran först och sedan till din dator. Kameran
kan också styras via en RS232-datakabel (DIN8M) (ingår inte i leveransen).
3. Så snart kameran och mikrofon och högtalarmodulen har detekterats av ditt
system kan de användas tillsammans med alla vanliga videokonferensprogram.

7
Tillverkare: celexon Europe GmbH
Adress: Gutenbergstraße 2, 48282 Emsdetten, DE
Produktens namn: celexon PTZ-kamera Full HD
Videokonferenssystem VKS2040
Härmed intygar celexon Europe GmbH att celexon PTZ-kamera Full HD Vi-
deokonferenssystem VKS2040 uppfyller kraven i direktiv 2014/53/EU. Den
tillhörande EU-försäkran om överensstämmelse kan laddas ner på följande
adress: www.celexon.de/zertikate
INFORMATION OM EU-FÖRSÄKRAN
Denna symbol anger att elektriska och elektroniska apparater måste läm-
nas in separat till återvinning inom EU. Släng inte apparaten i de vanliga
soporna. Ta reda på vad som gäller för återvinningssystemet i ditt land
och vänd dig till din kommun eller din lokala återvinningscentral om du
har frågor.
-
 1
1
-
 2
2
-
 3
3
-
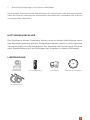 4
4
-
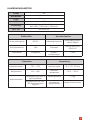 5
5
-
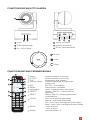 6
6
-
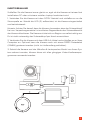 7
7
-
 8
8
-
 9
9
-
 10
10
-
 11
11
-
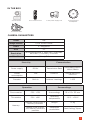 12
12
-
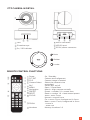 13
13
-
 14
14
-
 15
15
-
 16
16
-
 17
17
-
 18
18
-
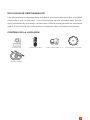 19
19
-
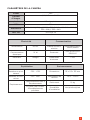 20
20
-
 21
21
-
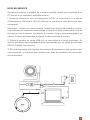 22
22
-
 23
23
-
 24
24
-
 25
25
-
 26
26
-
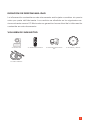 27
27
-
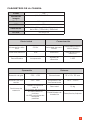 28
28
-
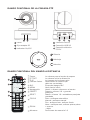 29
29
-
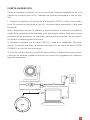 30
30
-
 31
31
-
 32
32
-
 33
33
-
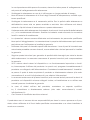 34
34
-
 35
35
-
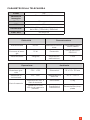 36
36
-
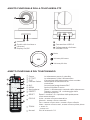 37
37
-
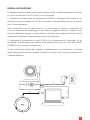 38
38
-
 39
39
-
 40
40
-
 41
41
-
 42
42
-
 43
43
-
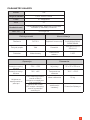 44
44
-
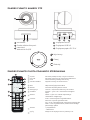 45
45
-
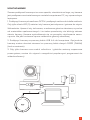 46
46
-
 47
47
-
 48
48
-
 49
49
-
 50
50
-
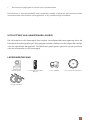 51
51
-
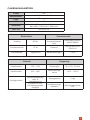 52
52
-
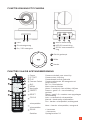 53
53
-
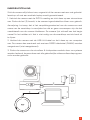 54
54
-
 55
55
-
 56
56
-
 57
57
-
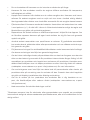 58
58
-
 59
59
-
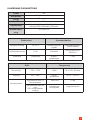 60
60
-
 61
61
-
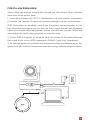 62
62
-
 63
63


Celexon PTZ camera Full HD video conferencing system VKS2040 El manual del propietario
- Categoría
- Altavoces de la barra de sonido
- Tipo
- El manual del propietario
- Este manual también es adecuado para
en otros idiomas
- français: Celexon PTZ camera Full HD video conferencing system VKS2040 Le manuel du propriétaire
- italiano: Celexon PTZ camera Full HD video conferencing system VKS2040 Manuale del proprietario
- Deutsch: Celexon PTZ camera Full HD video conferencing system VKS2040 Bedienungsanleitung
- Nederlands: Celexon PTZ camera Full HD video conferencing system VKS2040 de handleiding
- polski: Celexon PTZ camera Full HD video conferencing system VKS2040 Instrukcja obsługi
Artículos relacionados
-
Celexon PTZ Videokonferenzkamera VK1080 Full HD El manual del propietario
-
-
-
-
-
-
-
-
-