
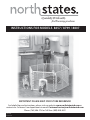
INSTRUCTIONS FOR MODELS 8657 / 8799 / 8807
Quality Products
for the way you live
IMPORTANT: PLEASE KEEP FOR FUTURE REFERENCE!
For helpful tips and instructions, please visit our website: www.northstatesind.com or
contact our Customer Care department via email: CustomerService@northstatesind.com
Phone: (763) 486-1754 or Toll Free: (800) 848-8421
PN 25775
Rev 8/2021

WARNING
Page 2
User instructions . . . . . . . . . . . . . . . . .page 2
Instrucciones para el usuario. . . . . .página 5
Your enclosure contains the following: A. Enclosure
B. Carry Strap
C. Skid-Resistant Pads
Note: Model 8799 comes
with 16 skid-resistant pads
and Model 8807 comes
with 8.
x12
B
C
To ensure safe operation, additional or replacement parts should be obtained only from North States or its
authorized distributors. Contact information appears on the cover of these instructions. Replacement parts
can be ordered at www.northstatesind.com
Any damage to property during installation of your enclosure is the sole responsibility of the end user.
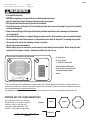
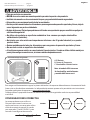
We recommend that you use your
Petyard only as an enclosure not as
a barrier unless using the wall
mount kit (sold separately). See
FIGURE 1 for proper conguration.
INCORRECT
INCORRECT
PROPER SET-UP CONFIGURATIONS
x1 A
• For use with pets only.
• STOP using when a pet can climb over or dislodge the enclosure.
• Install only with locking/latching mechanism securely engaged.
• This product will not necessarily prevent all accidents.
• Periodically check all fasteners to be sure they are tight and secure, stop using if any parts are missing
or become damaged.
• Never leave anything in the Petyard that could provide a foothold or create a danger of suffocation
or strangulation.
• Do not use this product on a smooth slippery surface unless skid-resistant pads are used (included).
• Do not attempt to use this enclosure in temperatures less than 40 degrees F, or damage may result.
• Do not use as a barrier for stairways, stoves or heaters.
• Do not use on uneven surfaces.
• When setting up as an enclosure, do not connect more than 8 panels together. When using the wall
mount kit to set up as a barrier, maximum number of panels is six.
FIGURE 1 CORRECT CORRECTCORRECT

Page 3
SET-UP INSTRUCTIONS
Begin setting up your enclosure by unsnapping
the gray carrying strap and carefully unfolding the
panels to the proper configuration on page 2.
(NOTE: Model 8799 consists of eight panels which
will form an octagon when set up properly. Model
8807 consists of four panels which form a square.)
Once the panels are unfolded and formed into the
(unconnected) shape of a hexagon/octagon/
square, confirm that the dark gray carpet foot (D)
is facing upwards, as shown in FIGURE 4.
Begin connecting the panels together by gently
lifting up on panel 1 and setting the opening “A”
(as shown in FIGURE 5) over pin “B” located on
panel 2.
Locate the slot on the lower end of cylinder “D” as
shown in FIGURE 6. This slot tapers to an opening
that accommodates pin “C”.
Gently press down on panel 1 while aligning pin
“C” with the slot in cylinder “D”. While maintaining
downward pressure on panel 1, lift slightly on
panel 2, and slide pin “C” through the slot and into
the opening as shown.
EXTENSION INSTALLATION
Some models have two-panel extensions that are colored appropriately for your yard and are available
either from your retailer or direct from www.northstatesind.com
The extension contains two additional panels that enable you to expand the size of your enclosure
from 18.5 square feet to 34.4 square feet.
The extension is installed by following the “SET-UP INSTRUCTIONS” that appear above.
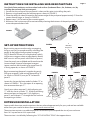
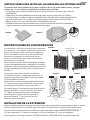
INSTRUCTIONS FOR INSTALLING SKID-RESISTANT PADS
FIGURE 2 FIGURE 3
Your North States enclosure can be used on hard surfaces (hardwood oors, tile, linoleum, etc.) by
installing the enclosed skid-resistant pads.
1. Ensure that the surface of the yard panel is clean and dry prior to installing the pads.
2. Remove a single pad from the release paper as shown in FIGURE 2.
3. Place the adhesive side of the pad on the bottom edge of the yard panel approximately 2” from the
center of each hinge, as shown in FIGURE 3.
4. Repeat steps 2 & 3 for each of the remaining pads.
5. Maximum skid-resistance will be maintained by cleaning the bottoms of the pads periodically with a
water-dampened clean cloth.
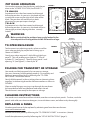
FIGURE 4
P
Dark Gray
Carpet Foot
PANEL 1 PANEL 2
D
C
A B
FIGURE 5 FIGURE 6
PANEL 1 PANEL 1
PANEL 2 PANEL 2
OPENING A PIN B PIN C
SLOT IN
CYLINDER D

Page 4
TO OPEN ENCLOSURE
FIGURE 8
To disconnect two adjoining panels, select one of the
joints where a dark gray carpet foot is facing up, as
shown in FIGURE 8.
Gently press down on panel 1 while lifting slightly on
panel 2. This will enable you to slide pin “C” free of
cylinder “D” (see figure 6). Then lift up on panel 1 until
opening “A” (see figure 5) is free of pin “B”.
CLEANING INSTRUCTIONS
Your enclosure is manufactured from durable, weather-resistant plastic panels. To clean, wash the
panels with mild, non-abrasive detergent, rinse with clean water, and allow to dry thoroughly.
FIGURE 9
FOLDING FOR TRANSPORT OR STORAGE
Your enclosure folds compactly for transport or storage.
You must, however, fold the panels properly. Disassembly and
folding is accomplished by first following the “TO OPEN
ENCLOSURE” instructions above.
Gently fold the panels (without jerking them or slamming them
together) in alternating directions like an accordion as shown in
FIGURE 9.
Slip one end of the gray carrying strap through the mesh near
the top middle of each outside panel and snap it closed.
The enclosure is now ready for transport or storage.
REPLACING A PANEL
A broken panel can easily be replaced by obtaining one from the manufacturer.
www.northstatesind.com
Remove the broken panel by following the “TO OPEN ENCLOSURE” instructions (above).
Install the replacement panel by following the “SET-UP INSTRUCTIONS” (page 3).
FIGURE 9
FIGURE 7
PET DOOR OPERATION
Your enclosure comes from the factory with the pet
door in the “LOCKED” POSITION (See FIGURE 7).
TO UNLOCK
Squeeze and twist the front center knob located
below the pet door. As you twist, the knob will line
up with the arrows on the right or left sides of the
knob. The pet door will move freely in both
directions for your pet to pass through.
TO LOCK
Squeeze and twist the front center knob located
below the pet door. As you twist, the knob will be in
the upright position, keeping the door securely
locked. Squeeze and Twist to Open
Locked Position
Open Position
(Front View)
Locked Position
(Back View)
WARNING
Make certain that the pet door is securely locked in the
closed position if using with a child 6-24 months of age.
!
Dark Gray
Carpet Foot
PANEL 1 PANEL 2

Productos de calidad
para su estilo de vida
IMPORTANTE: ¡CONSERVE COMO REFERENCIA FUTURA!
Para obtener consejos útiles e instrucciones, visite nuestro sitio web: www.northstatesind.com, o
Comuníquese con nuestro Departamento de Atención al Cliente por correo electrónico:
CustomerService@northstatesind.com
Teléfono: +1 (763) 486-1754 o número gratuito: (800) 848-8421
INSTRUCCIONES PARA TODOS LOS MODELOS
8657 / 8799 / 8807

ADVERTENCIA
Página 6
User instructions . . . . . . . . . . . . . . . . .page 2
Instrucciones para el usuario. . . . . .página 5
x12
x1 A
B
C
• Para uso exclusivo con mascotas.
• DEJE de usarla cuando una mascota pueda trepar sobre la puerta o desprenderla.
•Instálela únicamente con el mecanismo de bloqueo y enganche debidamente enganchado.
• Este portón no necesariamente evita todos los accidentes.
• Revisar periódicamente todos los afianzadores para asegurarse de que estén apretados y firmes, deje de
usar si alguna de sus partes está dañada.
• No deje objetos en el Petyard que podrían ser utilizados como puntos de apoyo o constituir un peligro de
asfixia o estrangulación.
• No utilice este producto en superficies resbaladizas lisas a menos que emplee almohadillas
antideslizantes (incluidas).
• No intentar usar este recinto con temperatureas inferiores a los 40 grados fahrenheit, o se pueden
producir daños.
• Revisar periódicamente todos los afianzadores para asegurarse de que estén apretados y firmes.
• No usar este recinto en superficies desniveladas.
• Al configurar como un recinto, no conecte más de 8 paneles juntos. Cuando se utiliza el kit de montaje en
pared para configurar como barrera, el número máxima de paneles es seis.
Su recinto incluye lo siguiente:
A. El Recinto
B. Correa de Transporte
C. Almohadillas Antideslizantes
Nota: el modelo 8799 viene con
16 almohadillas antideslizantes
y modelo 8807 viene con 8.
Para asegurar el funcionamiento seguro, las piezas adicionales o de repuesto deben obtenerse únicamente de North
States o de sus distribuidores autorizados. La información de contacto aparece en la portada de estas instrucciones.
Se pueden pedir piezas de repuesto en www.northstatesind.com
Cualquier daño a la propiedad durante la instalación de su puerta de seguridad es exclusiva responsabilidad
usario fínal.
Le recomendamos que utilice su
Petyard solo como un recinto, no
como una barrera, a menos que utilice
el kit de montaje en pared (se vende
por separado). Vea la FIGURA 1, para
conocer la conguración correcta.
CONFIGURACIONES CORRECTAS
INCORRECTO
INCORRECTO
FIGURA 1 CORRECTO CORRECTOCORRECTO

Página 7
INSTRUCCIONES PARA INSTALAR LAS ALMOHADILLAS ANTIDESLIZANTES
FIGURA 2 FIGURA 3
INSTRUCCIONES DE CONFIGURACIÓN
Para comenzar a configurar el recinto, abra la correa de
transporte gris y, con cuidado, extienda los paneles para
formar un hexágono,
como se muestra en página 6
.
(NOTA: El modelo 8799 consiste en ocho paneles que
formarán un octágono si se configura de manera
correcta. El modelo 8807 consiste en cuatro paneles
que formarán un cuadrado.)
Una vez que los paneles estén desplegados y tengan
la forma (desconectada) de un hexágono / octágono /
cuadrado, conrme que el pie de alfombra gris oscuro
(D) esté mirando hacia arriba, como se muestra en la
FIGURA 4.
Comience a conectar los paneles, levantando
suavemente el panel 1 y colocando la abertura “A”
(como se muestra en la FIGURA 5) sobre el pasador
“B” localizado en el panel 2.
Localice la ranura en el extremo inferior del cilindro
“D”, como se muestra en la FIGURA 6. Esta ranura se
estrecha hacia una abertura para el pasador “C”.
Presione el panel 1 suavemente hacia abajo mientras
alinea el pasador “C” con el la ranura en el cilindro
“D”. Mientras mantiene la presión hacia abajo
sobre el panel 1, levante un poco el panel 2 y
deslice el pasador “C” por la ranura hasta la
abertura, como se muestra.
INSTALACIÓN DE LA EXTENSIÓN
Algunos modelos tienen extensiones de dos paneles que están pintados apropiadamente para su recinto
y que están disponibles en su tienda minorista o bien en forma directa en www.northstatesind.com
La extensión contiene dos paneles adicionales, que le permiten ampliar el tamaño del recinto de
18.5 pies cuadrados (1.72 metros cuadrados) a 34.4 pies cuadrados (3.2 metros cuadrados).
La extensión se instala siguiendo las “INSTRUCCIONES DE CONFIGURACIÓN” que aparecen arriba.
El recinto North States puede usarse sobre supercies duras (pisos de maderas duras, azulejos,
linóleo, etc.) si se instalan las almohadillas antideslizantes incluidas.
1. Compruebe que la supercie del panel del recinto esté limpia y seca antes de instalar las
almohadillas.
2. Separe una sola almohadilla de la cubierta de papel, como se muestra en la FIGURA 2.
3. Coloque el lado con adhesivo de la almohadilla sobre el borde inferior del panel del recinto,
aproximadamente a 2”(5 cm) del centro de la bisagra, como se muestra en la FIGURA 3.
4. Repita los pasos 2 y 3 con cada una de las almohadillas restantes.
5. Obtendrá el máximo efecto antideslizante si limpia la parte inferior de las almohadillas
regularmente con un paño limpio humedecido con agua.
FIGURA 5 FIGURA 6
PANEL 1 PANEL 1
PANEL 2 PANEL 2
ABERTURA “A” PASADOR “B”
PASADOR “C”
RANURA EN EL
CILINDRO D
FIGURA 4
P
Pata gris oscuro
para alfombra
PANEL 1 PANEL 2
D
C
A B

Página 8
PARA ABRIR EL RECINTO
Para desconectar dos paneles contiguos, seleccione
una de las juntas donde un pie de alfombra gris oscuro
está hacia arriba, como se muestra en la FIGURA 8.
Presione el panel 1 ligeramente hacia abajo mientras
levanta con suavidad el panel 2. Esto le permitirá
deslizar el pasador “C” fuera del cilindro “D” (vea la
figura 6). Después levante el panel 1 hasta que la
abertura “A” (vea la figura 5) quede libre del pasador “B”.
INSTRUCCIONES DE LIMPIEZA
El recinto está hecho de duraderos paneles de plástico resistente a la intemperie. Para limpiar, lave los
paneles con un detergente suave, no abrasivo, enjuague con agua limpia y permita que seque bien.
FIGURE 9
PLEGADO PARA EL TRANSPORTE O ALMACENAMIENTO
El recinto se pliega de manera compacta para el transporte o
almacenamiento. Sin embargo, deberá plegar los paneles de manera
correcta. El desarmado y plegado se llevan a cabo siguiendo primero las
instrucciones de “PARA ABRAR EL RECINTO”.
Doble suavemente los paneles (sin sacudirlos ni golpearlos) en direcciones
alternas como un acordeón, como se muestra en la FIGURA 9.
Introduzca un extremo de la correa de transporte gris por la malla localizada
cerca de la parte media superior de cada panel externo, y enganche la correa
para cerrarla. El recinto ya está listo para el transporte o almacenamiento.
REEMPLAZO DE UN PANEL
Un panel roto puede reemplazarse fácilmente, obteniendo uno de repuesto del fabricante a
www.northstatesind
Quite el panel roto, siguiendo las instrucciones de “PARA ABRIR EL RECINTO”.
Instale el panel de repuesto, siguiendo las “INSTRUCCIONES DE CONFIGURACIÓN” (página 7).
FIGURA 9
FUNCIONAMIENTO DE LA
PUERTA DE MASCOTAS
El recinto se entrega de fábrica con la puerta de mascotas
en la POSICIÓN “BLOQUEADA” (vea la FIGURA 7).
DESBLOQUEADO
Apriete y gire la perilla central frontal situada debajo de la
puerta de mascotas. A medida que gira la perilla, ésta se
alineará con las flechas en los lados derecho o izquierdo
de la perilla. La puerta de mascotas se moverá libremente
en ambas direcciones para que su mascota pueda pasar.
BLOQUEADO
Apriete y gire la perilla central frontal situada debajo de
la puerta de mascotas. A medida que gira la perilla, ésta
pasará a la posición vertical y mantendrá la puerta
firmemente bloqueada.
ADVERTENCIA
Asegúrese de que la puerta de mascotas esté firmemente bloqueada en la
posición cerrada si usa este producto con niños de 6 a 24 meses de edad.
!
FIGURA 7
Presión y gire para abrir
Posición “Bloqueada”
Posición Abierta
(vista frontal)
Posición bloqueado
(vista posterior)
FIGURA 8
Pata gris
oscuro para alfombra
PANEL 1 PANEL 2
-
 1
1
-
 2
2
-
 3
3
-
 4
4
-
 5
5
-
 6
6
-
 7
7
-
 8
8


North States MyPet 8657R Manual de usuario
- Tipo
- Manual de usuario
en otros idiomas
- English: North States MyPet 8657R User manual
Artículos relacionados

Otros documentos
-
 NORTH STATES 8766 Instructions Manual
-
 NORTH STATES 8750 Instructions Manual
-
 NORTH STATES 8750 Superyard Colorplay Ultimate Instrucciones de operación
-
 NORTH STATES 8620 Instructions Manual
-
 NORTH STATES 5455 MyPet Wide Walk Thru EasyPass Pet Gate Manual de usuario
-
 NORTH STATES 5446 Wide Deco EasyPass Pet Gate Manual de usuario
-
 NORTH STATES 4916 Instructions Manual
-
Carlson 0480 DS Manual de usuario
-
Delta SDES848-MB-R Guía de instalación


