Groupe Brandt BC-200 El manual del propietario
- Categoría
- Escalas personales
- Tipo
- El manual del propietario

ES - MANUAL DE INSTRUCCIONES
PT - MANUAL DE INSTRUÇÕES
EN - INSTRUCTIONS FOR USE
FR - MANUEL D’UTILISATION
DE - GEBRAUCHSANWEISUNG
IT - MANUALE DI ISTRUZIONI
EL - ENTY¶√ √¢∏°πøN
HU - HASZNÁLATI ÚTMUTATÓ
CZ - NÁVOD K POUŽITÍ
SK - NÁVOD NA POUŽITIE
PL - INSTRUKCJA OBSŁUGI
BG - ИНСТРУКЦИЯ ЗА УПОТРЕБА
RU -
ИНСТРУКЦИЯ ПО ЭКСПЛУАТАЦИИ
N.I.F. F-20.020.517 - Bº. San Andrés, nº 18 • Apartado 49 - 20500 MONDRAGON (Guipúzcoa) ESPAÑA
Marzo 2006
El fabricante se reserva los derechos de modificar los modelos descritos en este Manual de Instrucciones.
O fabricante, reserva-se os direitos de modificar os modelos descritos neste Manual de Instruções.
The manufacturer reserves the right to modify the models described in this User’s Manual.
Le fabricant se réserve le droit de modifier les modèles décrit dans le présente notice.
Der Hersteller behält sich das Recht vor, die in dieser Gebrauchsanweisung beschrieben Modelle zu verändern.
Il fabbricante si riserva il diritto a modificare i modelli descritti in questo Manuale d’Istruzioni.
O k·t·ÛkÂv·Ût‹ç ‰È·tËp› ·okÏÂÈÛtÈk¿ to ‰Èk·›ˆÌ· v· tpoooÈ‹Û› t· Ìovt¤Ï· ou ÂpÈyp¿ºovt·È Ûto ·pfiv Evtuo O‰ËyÈÒv
A gyártó fenntartja magának a jogot a használati útmutatóban közölt műszaki adatok megváltoztatására.
Výrobce si vyhrazuje právo modifikovat modely popsané v tomto uživatelském návodu.
Výrobca si vyhradzuje právo modifikovať modely opísané v tomto užívateľskom návode.
Producent zastrzega sobie prawo do modyfikowania modeli opisanych w niniejszej instrukcji obsługi.
Производителя си запазва правото променя моделите описани в този наръчник.
Производитель оставляет за собой право замены модели, описанные в данном Руководстве пользователя.
MOD.: BC-200
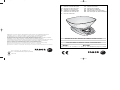
BALANZA DE COCINA / BALANÇA DE COZINHA / KITCHEN SCALES /
BALANCE CULINAIRE / KÜCHENWAAGE / BILANCIA DA CUCINA / ZÀ°∞ƒπA
∫√À∑I¡∞™ / KONYHAI MÉRLEG / KUCHYŇSKÁ VÁHA / KUCHYNSKÁ VÁHA /
WAGA KUCHENNA / КУХНЕНСКИ КАНТАР / КУХОННЫЕ ВЕСЫ
N.I.F. F-20.020.517 - Bº. San Andrés, nº 18 •
Apartado 49 - 20500 MONDRAGON (Guipúzcoa) ESPAÑA
portada .qxd 8/3/06 10:23 Página 1

1 42
ES
1. Capacidad máxima: 5 kg
2. División: 2gr
3. Pila de 9V (no incluida)
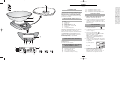
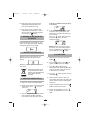
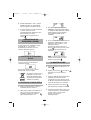
2. DEFINICIÓN DEL PRODUCTO (FIG. 1)
1. Bol
2. Plataforma
3. Botón I/O
4. Botón O/T- Selector ▲
5. Temporizador
6. Botón Kg/lb - Selector ▼
7. Pantalla
8. Compartimento pila
Supresión de interferencias: Este aparato
ha sido desparasitado conforme a las
directivas sobre supresión de interferencias.
Compatibilidad electromagnética: Este
aparato ha sido desparasitado conforme a
las directivas CEM (compatibilidad
electromagnética).
1. INTRODUCCIÓN
Antes de poner en marcha la balanza por
primera vez, lea con atención este manual
de instrucciones con el fin de utilizarla de
manera correcta y mantenerla en buenas
condiciones. Guarde las instrucciones para
posteriores consultas.
5. PUESTA A PUNTO
1. Retire la tapa del compartimento de la
pila (8) en la parte inferior de la
balanza. Instale una pila de 9V.
2. Coloque la balanza sobre una superficie
sólida y horizontal, asegúrese de que
está firme, luego coloque el bol sobre la
plataforma (2).
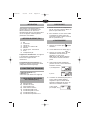
6. FUNCIONAMIENTO
1. Presione sobre el botón para
conectar la balanza.
2. La pantalla se activará mostrando todos
lo iconos. (Fig. 2).
3. Presione el botón Kg/lb
para seleccionar la unidad de medida
que desee, en lb o en Kg.
Nota: Cuando encienda la balanza
aparecerá la unidad utilizada en la
anterior pesada.
4. Según se haya seleccionado en gramos
o en libras, en la pantalla se visualizará
lo siguiente:
a) en kilogramos
b) en lb.
5. La balanza ya está preparada para
pesar. Intente mantener el objeto a
pesar en el centro del bol. Lea la
pantalla cuando la lectura esté fija, se
visualizará en el siguiente formato:
3. CARACTERÍSTICAS TÉCNICAS
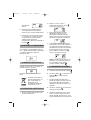
a) Temporizador/alarma
b) Función de tara activa
c) Valor negativo tara
d) Peso cero/tara inactiva
e) Visualización de peso en kg
4. VISUALIZACIÓN DE LOS ICONOS
EN LA PANTALLA (FIG. 2)
окружающей среды и здоровья людей,
которые могут иметь место вследствие
неправильной утилизации, а также
позволяет повторно использовать
материалы, входящие в состав этих
приборов, и добиться, таким образом,
существенной экономии энергии и
ресурсов.
Чтобы подчеркнуть необходимость
раздельной утилизации, на данном
приборе нанесен знак,
предупреждающий о запрете
использования традиционных мусорных
контейнеров.
Для получения более подробной
информации свяжитесь с местным
органом власти или с магазином, где Вы
приобрели данный продукт.
f) Visualización de peso en lb
g) Visualización de peso en gr
h) Visualización de temperatura en ºC
portada .qxd 8/3/06 10:23 Página 2

a. Conecte la balanza pulsando el botón
b. Presione el botón se visualizará una
campana en la parte superior
izquierda.
c. Presione ▲ o ▼ para programar el
período de tiempo necesario. Cada vez
que presione
▲ o ▼ incrementará o
disminuirá el intervalo de tiempo en 10
segundos.
d. Presione el pulsador de nuevo para
comenzar la cuenta atrás.
e. Cuando el temporizador cuente hasta
"
00:00 ", la alarma saltará en forma de
"pitido". El pitido sonará hasta 30 veces
y luego automáticamente se desactivará.
2
1. Ponga a punto la balanza como se ha
descrito anteriormente.
8. INDICACIÓN DE PILA BAJA
Cuando la pila necesite ser sustituida, la
pantalla mostrará lo siguiente:
En tal caso, siga los pasos de la puesta a
punto.
Recuerde que las pilas no
son basura doméstica. Las
pilas usadas deben ser
depositadas en los
contenedores destinados
especialmente a ello.
9. UTILIZACIÓN DEL BOTÓN TARA (4)
10. TEMPORIZADOR DE ALARMA
7. ADVERTENCIA: NO SOBRECARGAR
Si se sobrepasa la capacidad de carga en
un 1%, puede provocar daños en la balanza
y la pantalla comenzará a indicar el
mensaje de aviso:
Que equivale
a 65 gr
6. Asegúrese de que la balanza muestra
"cero" como peso antes de realizar la
pesada. Si no es así pulse el botón tara (4).
7. Cuando no se realiza ninguna pesada
en un máximo de 1 minuto, la balanza
se desconectara automáticamente.
También puede desconectar
manualmente la balanza presionando el
pulsador
2. Empiece a pesar. Si quiere
añadir algún artículo más, pulse
para poner la balanza a
0:
3. Ahora puede añadir los artículos
adicionales que desee pesar al
bol/recipiente, repitiendo estos dos
últimos pasos si lo desea. El peso neto
del artículo se mostrará en la pantalla:
4. Si comienza a retirar los artículos del
bol/recipiente, verá un valor negativo (-)
que representa el valor del peso de la
cantidad del artículo que está retirando.
Puede utilizar de nuevo la tecla
para restablecer la lectura a cero,
cada vez que quite un artículo:
NOTA: Cuando active por primera vez
la balanza, si la lectura no muestra o
no se estabiliza en cero, puede
presionar también el botón.
interior 8/3/06 10:35 Página 1

3
13. INFORMACIÓN PARA LA
CORRECTA GESTIÓN DE LOS
RESIDUOS DE APARATOS
ELÉCTRICOS Y ELECTRÓNICOS
Al final de la vida útil del
aparato, éste no debe
eliminarse mezclado con los
residuos domésticos
generales.
Puede entregarse, sin coste
alguno, en centros específicos de recogida,
diferenciados por las administraciones
locales, o distribuidores que faciliten este
servicio.
Eliminar por separado un residuo de
electrodoméstico, significa evitar posibles
consecuencias negativas para el medio
ambiente y la salud, derivadas de una
eliminación inadecuada, y permite un
tratamiento, y reciclado de los materiales
que lo componen, obteniendo ahorros
importantes de energía y recursos.
Para subrayar la obligación de colaborar
con una recogida selectiva, en el producto
aparece el marcado que se muestra como
advertencia de la no utilización de
contenedores tradicionales para su
eliminación.
Para mas información, ponerse en contacto
con la autoridad local o con la tienda donde
adquirió el producto.
12. MANTENIMIENTO, LIMPIEZA Y
USO CORRECTO
1. La balanza es un instrumento de precisión.
Evite golpearla, no la guarde cargada con
peso durante un período largo.
2. No presione el pulsador muy fuerte o
con objetos punzantes como la punta
de un bolígrafo.
3. Cuando encienda la balanza después
de presionar el botón si ve que no
aparece nada en la pantalla, asegúrese
y compruebe que la pila está instalada
y bien conectada. En caso de que ya
esté instalada, ésta puede estar baja,
sustitúyala por una nueva.
4. No utilice disolventes químicos o
abrasivos para limpiar la balanza. Se
recomienda utilizar un paño suave seco
para limpiar la superficie externa de la
balanza. NO INTRODUZCA LA
BALANZA EN AGUA.
5. Mantenga siempre la balanza lejos de
fuentes de calor, es decir, hornos, para
evitar el deterioro de los pulsadores
porque dañaría el aparato.
6. Cuando esté utilizando la balanza
manténgala lejos de interferencias
electromagnéticas (EMI), es decir,
teléfonos móviles, para evitar que
interfiera en la precisión.
7. Retire la pila si no va a utilizar la
balanza durante un largo período.
8. Esta balanza es solo para uso
doméstico.
El sensor de temperatura funciona
automáticamente siempre que se conecta
la balanza. Detectará la temperatura
ambiente e indicará la temperatura real.
11. SENSOR E INDICACIÓN DE
TEMPERATURA (h)
f. Para parar la alarma, pulse el botón
apagará la balanza.
g. Para parar la marcha atrás pulse el
botón y para programar de nuevo
púlselo de nuevo.
interior 8/3/06 10:35 Página 2

7
EN
1. Maximum capacity: 5 kg
2. Division: 2gr
3. 9V battery (not included)
2. PRODUCT DEFINITION (FIG. 1)
1. Bowl
2. Platform
3. I/O button
4. O/T button / ▲ button
5. Timer
6. Kg/lb button - ▼ button
7. Display
8. Battery compartment
Interference suppression: The
interference of this appliance has been
suppressed in accordance with interference
suppression standards.
Electromagnetic compatibility: This
appliance complies with the CEM standards
of electromagnetic compatibility.
1. INTRODUCTION
Before using the scales for the first time,
read this manual carefully in order to use
them correctly and keep them in good
condition. Keep the instructions for later
reference.
5. ADJUSTMENT
1. Remove the lid from the battery
compartment (8) on the underside of the
scales and insert a 9V battery.
2. Place the scales on a flat, solid surface,
making sure they are firmly positioned.
Then place the bowl on the platform (2).
6. FUNCTIONING
3. TECHNICAL CHARACTERISTICS
a) Timer/alarm
b) Tare function active
c) Negative tare value
d) Zero weight /tare inactive
e) Weight displayed in kg
f) Weight displayed in lb
g) Weight displayed in gr
h) Temperature displayed in ºC
4. ICON DISPLAY (FIG. 2)
1. Press on the button to connect the
scales.
2. The screen will be activated displaying
all the icons. (Fig. 2).
3. Press the Kg/lb button to select
the unit of measurement, in lb or en Kg.
Note: When the scales are switched on
the unit used previously will appear.
4. Depending on whether grams or pounds
have been selected, the screen will
display the following:
a) in kilograms
b) in lb.
5. The scales are now ready for use.
Place the object to be weighed in the
centre of the bowl. When the digits on
the display remain fixed, you can make
the reading. The display reading is as
follows:
This means
65 gr
interior 8/3/06 10:35 Página 6

8
7. WARNING: DO NOT OVERLOAD
THE SCALES
If the load capacity is exceed by 1%, the
scales may be damaged and the following
warning will appear on the display:
1. Adjust the scales as described above.
2. Weigh the first article. If you wish to add
further articles, press to set the
scales to
0:
3. You can now place any additional articles
to be weighed in the bowl, repeating
these last two steps if you wish. The net
8. BATTERY LOW INDICATOR
When the battery needs replacing, the
following message will appear on the
display:
When this happens, follow the adjustment
instructions.
Remember that batteries are
not household waste. Spent
batteries must be disposed of
in the special containers
provided.
9. USING THE TARE BUTTON (4)
6. Make sure that the scales show "zero"
weight before starting to weigh. If not,
press the tare button to reset (4).
7. If the scales are not used, they will
automatically switch off after 1 minute.
You can also switch them off manually
by pressing the button.
weight of the additional article will appear
on the display:
4. If you remove an article from the bowl,
a negative value (-) will appear. This
represents the weight of the article you
have removed.
Press the button again each time
you remove an article, to set the
reading to 0 again:
NOTE: When you activate the scales
for the first time, if no reading appears
or if the reading does not stabilise at 0,
you can also press the button.
a. Switch on the scales by pressing the
button.
b. Press the button. A bell ( ) will
appear at the top left of the display.
c. Press ▲ or ▼ to programme the
desired time lapse. Each time
▲ or ▼ is
pressed, the time interval will increase
or decrease by 10 seconds.
d. Press the button again to start the
countdown.
e. When the timer reaches "00:00 ", the
alarm buzzer will sound. The buzzer will
sound 30 times and then automatically
switch off.
f. To stop the alarm buzzer, press the
button to switch off the scales.
g. To stop the countdown, press the
button. To reprogramme it, press it
again.
10. ALARM TIMER
interior 8/3/06 10:35 Página 7

9
13. INFORMATION FOR THE CORRECT
DISPOSAL OF ELECTRICAL AND
ELECTRONIC APPLIANCES
At the end of its working life,
the product must not be
disposed of as urban waste.
It must be taken to a special
local authority differentiated
waste collection centre or to
a dealer providing this service. Disposing of
a household appliance separately avoids
possible negative consequences for the
environment and health deriving from
inappropriate disposal and enables the
constituent materials to be recovered to
obtain significant savings in energy and
resources.
To remind you that you must collaborate
with a selective collection scheme, the
symbol shown appears on the product
warning you not to dispose of it in traditional
refuse containers.
For further information, contact your local
authority or the shop where you bought the
product.
The temperature sensor functions
automatically when the scales are switched
on. It detects the ambient temperature and
shows the real temperature on the display.
11. TEMPERATURE SENSOR AND
INDICATOR (h)
12. MAINTENANCE AND CLEANING
1. These scales are a precision
instrument. Make sure they receive no
knocks. Do not store the scales with a
weight on them for long periods.
2 Always press the buttons gently. Do not
use any sharp objects such as ballpoint
pens to press them down.
3. If nothing appears on the screen when
you switch on the scales using the
button, check the battery is inserted and
correctly connected. If this is the case,
the battery may have run down.
Replace it with a new one.
4. Do not chemical solvents or abrasive
substances to clean the scales. The use
of a soft, dry cloth is recommended for
cleaning the outer surface of the scales.
DO NOT SUBMERGE THE SCALES IN
WATER.
5. Always keep the scales away from heat
sources, e.g. ovens, as this could
deteriorate the buttons and damage the
appliance.
6. When the scales are in use, keep them
away from any electromagnetic
interference (EMI), i.e. mobile phones,
as this would affect their accuracy.
7. Remove the battery if the scales are
likely to be out of use for some time.
8. These scales are for domestic use only.
interior 8/3/06 10:35 Página 8

10
FR
1. Capacité maximum: 5 kg
2. Division: 2gr
3. Pile de 9V (non fournie avec l’appareil)
2. DEFINITION DU PRODUIT (FIG. 1)
1. Bol
2. Plate-forme
3. Touche I/O
4. Touche O/T- Sélecteur ▲
5. Minuteur
6. Touche Kg/Lb - Sélecteur ▼
7. Écran
8. Compartiment pile
Suppression d’interférences: Cet appareil
a été déparasité, conformément aux
Directives de suppression des
interférences.
Compatibilité électromagnétique: Cet
appareil est conforme aux Directives CEM
(Compatibilité Électromagnétique).
1. INTRODUCTION
Avant d’utiliser cette balance pour la
première fois, lisez attentivement cette
Notice d’Utilisation, afin d’assurer le
fonctionnement correct et une longue durée
de vie de l’appareil. Gardez-la pour de
postérieures consultations.
5. MISE AU POINT
1. Extraire le couvercle du compartiment à
pile (8), situé sous la balance. Mettre en
place une pile alcaline de 9V.
2. Poser la balance sur une surface solide
et horizontale et vérifier qu’elle soit
fermement installée. Déposer ensuite le
bol sur la plate-forme (2).
6. FONCTIONNEMENT
3. CARACTÉRISTIQUE TECHNIQUES
a) Minuteur/alarme
b) Fonction tare active
c) Valeur négative tare
d) Poids zéro/tare inactive
e) Visualisation poids en Kg
f) Visualisation poids en Livres
g) Visualisation poids en g
h) Visualisation température en ºC
4. VISUALISATION DES ICÔNES
SUR L’ÉCRAN (FIG. 2)
1. Appuyer sur la touche pour allumer
la balance.
2. L’écran affichera tous les icônes (Fig. 2).
3. Appuyer sur la touche Kg/Lb pour
sélectionner l’unité de mesure
souhaitée, en Lb ou en Kg.
Note: Après avoir allumé la balance,
l’écran affiche l’unité de la dernière
pesée.
4. Selon l’unité de poids sélectionnée,
grammes ou livres, l’écran affichera les
indications suivantes:
a) en Kilogrammes
b) en Lb
5. La balance est maintenant prête pour la
pesée. Veiller à toujours déposer
l’ingrédient à peser au milieu du bol.
Attendre la stabilisation de l’écran, qui
affichera les indications suivantes:
Si vous pesez,
par exemple, 65 g.
interior 8/3/06 10:35 Página 9

11
a. Allumer la balance en appuyant sur la
touche
b. Appuyer sur la touche Une cloche
apparaîtra sur l’écran, en haut à
gauche..
c. Appuyer sur ▲ ou ▼ pour programmer
la période de temps nécessaire.
Chaque fois que vous appuyez sur
▲
ou ▼ vous augmenterez ou diminuerez
l’intervalle de temps de 10 secondes..
d. Appuyer à nouveau sur la touche
pour déclencher le compte à rebours.
e. Lorsque le minuteur atteint "00:00 ", une
sonnerie signalera la fin du décompte,
jusqu’à 30 fois successivement.
Ensuite, elle s’arrêtera
automatiquement.
1. Mettre au point la balance, selon les
indications fournies ci-dessus.
2. Vous pouvez maintenant commencer à
peser. Si vous souhaitez ajouter un
ingrédient, appuyez sur la touche
pour remettre la balance à
0:
8. INDICATEUR DE CHANGEMENT
DE PILE
Si la pile est usée, l’écran affichera
l’indication suivante:
Pour insérer une pile neuve, suivre la
démarche de la mise au point.
Ne pas jeter les piles usées à
la poubelle. Les piles usées
doivent être déposées dans
les containeurs spécialement
destinés à leur collecte.
9. UTILISATION DE LA TOUCHE TARE (4)
10. MINUTEUR ALARME
7. PRÉCAUTION: NE PAS
SURCHARGER L’APPAREIL
Si vous dépassez la capacité de charge
maximale de 1%, vous risquez
d’endommager la balance et l’écran
affichera l’indication suivante:
6. Attendre l’affichage du « zéro » avant de
procéder à la pesée. Si l’écran n’affiche
pas zéro, appuyer sur la touche tare (4).
7. Si aucune pesée n’est réalisée pendant
1 minute, la balance cesse
automatiquement de fonctionner. Vous
pouvez également l’arrêter
manuellement en appuyant sur la
touche
3. Vous pouvez ajouter des ingrédients
additionnels à peser dans le bol/récipient,
en répétant les deux démarches ci-dessus
autant de fois que vous le souhaitez.
L’écran affichera le poids net de
l’ingrédient.
4. Au fur et à mesure de l’enlèvement des
ingrédients du bol/récipient, l’écran
affichera la valeur négative (-) des
ingrédients enlevés.
Vous pouvez utiliser à nouveau la
touche pour remettre l’écran à zéro,
chaque fois que vous enlevez un
ingrédient.
NOTE: Si lorsque vous allumez la
balance l’écran n’affiche pas zéro,
appuyez sur la touche
interior 8/3/06 10:35 Página 10

12
1. Cette balance est un appareil de
précision. Veiller à éviter les chocs et à
ne pas la ranger avec du poids dessus.
2. Ne pas appuyer trop fort sur les touches
ni avec des objets pointus, comme la
pointe d’un stylo, par exemple.
3. Si après avoir allumé la balance en
appuyant sur la touche l’écran
n’affiche aucune indication, vérifiez que
la pile est correctement mise en place.
Si nécessaire, remplacez-la par une pile
neuve.
4. Ne pas utiliser de produits chimiques ou
abrasifs pour nettoyer la balance. Utiliser
un chiffon doux et sec pour nettoyer
l’extérieur de la balance. NE PAS
IMMERGER LA BALANCE DANS L’EAU.
5. Veiller à maintenir la balance éloignée de
toute source de chaleur, comme un four
ou une flamme, pour éviter la
détérioration des touches et de l’appareil.
6. Ne pas exposer la balance à des
champs électromagnétiques (EMI)
comme ceux émis par les téléphones
cellulaires, qui risquent de provoquer
des interférences et des perturbations
de l’affichage du poids.
7. Retirez la pile de l’appareil si vous
n’allez pas l’utiliser pendant une longe
période de temps.
8. Cette balance a été conçue uniquement
pour un usage domestique.
Le capteur de température fonctionne
automatiquement chaque fois que la balance
est allumée. Il détecte la température
ambiante et indique la température réelle.
11. CAPTEUR ET INDICATION DE
TEMPÉRATURE (h)
12. MAINTENANCE ET ENTRETIEN
13. INFORMATION POUR LA
CORRECTE GESTION DES RÉSIDUS
D'APPAREILS ÉLECTRIQUES ET
ÉLECTRONIQUES
A la fin de la vie utile de
l’appareil, ce dernier ne doit
pas être éliminé mélangé aux
ordures ménagères brutes.
Il peut être porté aux centres
spécifiques de collecte,
agréés par les administrations locales, ou
aux prestataires qui facilitent ce service.
L’élimination séparée d’un déchet
d’électroménager permet d’éviter
d’éventuelles conséquences négatives pour
l’environnement et la santé, dérivées d’une
élimination inadéquate, tout en facilitant le
traitement et le recyclage des matériaux
qu’il contient, avec la considérable
économie d’énergie et de ressources que
cela implique.
Afin de souligner l’obligation de collaborer à
la collecte sélective, le marquage ci-dessus
apposé sur le produit vise à rappeler la non-
utilisation des conteneurs traditionnels pour
son élimination.
Pour davantage d’information, contacter les
autorités locales ou votre revendeur.
f. Pour arrêter l’alarme, appuyer sur la
touche et la balance s’éteindra.
g. Pour arrêter le compte à rebours,
appuyer sur la touche Pour le
programmer à nouveau, appuyer à
nouveau sur cette même touche.
interior 8/3/06 10:35 Página 11

13
DE
1. Höchstgewicht: 5 kg
2. Wiegeskala: 2gr
3. 9V Batterie (wird nicht mitgeliefert)
2. BESCHREIBUNG DES PRODUKTES (ABB. 1)
1. Schale
2. Sockel
3. Knopf I/O
4. Knopf O/T- Schalter ▲
5. Zeitschaltuhr
6. Knopf kg/lb -Schalter ▼
7. Display
8. Batteriefach
Störungsunterdrückung: Dieses Gerät
wurde gem. der Richtlinien zur
Unterdrückung von Interferenzen entstört.
Elektromagnetische Vereinbarkeit: Dieses
Gerät wurde gem. der EMV-Vorschriften
(elektromagnetische Vereinbarkeit) entstört.
1. EINÜHRUNG
Lesen Sie vor der ersten Inbetriebnahme
der Waage bitte genau die vorliegende
Bedienungsanleitung, um ein einwandfreies
Funktionieren und die Instandhaltung der
Waage zu garantieren. Bewahren Sie diese
Bedienungsanleitung zum späteren
Nachschlagen auf.
5. WAAGE VORBEREITEN
1. Öffnen Sie den Deckel des
Batteriefachs (8) auf der Unterseite der
Waage. Legen Sie eine 9V Batterie ein.
2. Stelle Sie die Waage auf eine feste und
wagerechte Oberfläche und versichern
Sie sich, dass die Waage gut steht.
Stellen Sie dann die Schale auf den
Sockel. (2).
6. FUNKTIONSWEISE
1. Betätigen Sie den Knopf, um die
Waage einzuschalten.
2. Das Display schaltet ein und zeigt alle
Ikonen an. (ABB. 2).
3. Betätigen Sie den Knopf kg/lb , um
die gewünschte Maßeinheit (lb oder kg)
einzustellen.
Anmerkun: Beim Einschalten der
Waage erscheint die bei der letzten
Benutzung der Waage eingestellte
Maßeinheit.
4. Je nach Einstellung (Gramm oder lb),
erscheint auf dem Display folgende
Anzeige:
a) in Kilo
b) in lb.
5. Die Waage ist jetzt bereit zum wiegen.
Geben Sie das Wiegegut immer in die
Mitte der Schale. Sobald die Anzeige
auf dem Display zum Stillstand
gekommen ist, erscheint das Ergebnis
3. TECHNISCHE EIGENSCHAFTEN
a) Zeitschaltuhr / Alarm
b) Tarierfunktion aktiviert
c) Negativer Tarierwert
d) Gewicht null/ Tarierfunktion nicht aktiv
e) Gewicht wird angezeigt in kg
f) Gewicht wird angezeigt in lb
g) Gewicht wird angezeigt in g
h) Temperatur wird angezeigt in ºC
4. DARSTELLUNG DER SYMBOLE
AUF DEM BILDSCHIRM (ABB. 2)
interior 8/3/06 10:35 Página 12

14
7. WARNHINWEIS: NICHT
ÜBERLASTEN
Wird die Wiegekapazität der Waage um 1 %
überschritten, kann dies die Waage
beschädigen. Zur Warnung erscheint auf
dem Display der folgende Hinweis:
1. Bereiten Sie die Waage entsprechend
der vorherigen Beschreibung vor.
8. HINWEIS BATTERIEWECHSEL
Muss die Batterie gewechselt werden,
erscheint auf dem Display der folgende
Hinweis:
Führen Sie in diesem Fall erneut die
Schritte zum Vorbereiten der Waage aus.
Bitte denken Sie daran, dass
Batterien kein Hausmüll sind.
Geben Sie die verbrauchten
Batterien in speziell dafür
vorgesehenen Behälter.
9. BEDIENEN DER TARIERFUNKTION (4)
2. Beginnen Sie mit dem Wiegen. Möchten
Sie ein weiteres Wiegegut hinzugeben,
drücken Sie den Knopf, um die
Waage erneut auf „Null" zu stellen:
3. Jetzt können Sie weiteres Wiegegut in
die Schale geben. Wiederholen Sie bei
jeder neuen Zugabe die beiden vorher
beschriebenen Schritte und es erscheint
auf dem Display das Gewicht jedes
einzelnen hinzugegebenen Wiegeguts.
4. Wenn Sie das hinzugegebene Wiegegut
wieder aus der Schale entnehmen,
erscheint auf dem Display ein
Negativwert (-). Dieser entspricht dem
Gewicht des Wiegeguts das zuletzt
entnommen wurde.
Mit dem Knopf können Sie die
Waage erneut auf "Null" stellen, jedes
Mal nachdem Sie Wiegegut entnommen
haben:
HINWEIS: Erscheint beim ersten
Einschalten der Waage keine Anzeige
auf dem Display oder das Display steht
nicht auf "Null", drücken Sie diesen
Knopf:
in dem folgenden Format:
entspricht 65 g
6. Achten Sie darauf, dass das Display der
Waage vor dem Wiegen den Gewichtswert
"null" anzeigt. Wenn dem nicht so ist,
betätigen Sie bitte die Tariertaste (4).
7. Wird nicht erneut gewogen, schaltet
sich die Waage nach einer Minute
automatisch ab. Sie können die Waage
ebenfalls manuell durch drücken des
Ein/Aus Knopfes abschalten
a. Schalten Sie die Waage durch Drücken
des Knopfes ein.
b. Drücken Sie den Knopf: Auf der
linken oberen Seite erscheint ein
Glockensymbol.
c. Drücken Sie ▲ oder ▼ zum Einstellen
der gewünschten Zeit. Bei jedem
Drücken von
▲ oder ▼ erhöht oder
verringert sich der Zeitabstand um 10
Sekunden.
10. ZEITSCHALTUHR MIT
AKUSTISCHEM SIGNAL
interior 8/3/06 10:35 Página 13

12. INSTANDHALTUNG UND
REINIGUNG
1. Die Waage ist ein Präzisionsinstrument.
Setzen Sie sie keinen Schlägen oder
Stößen aus und belasten Sie sie nicht
über längere Zeit mit Gewicht.
2 Tippen Sie zum Betätigen der Tasten
diese nur leicht an und benutzen Sie
dazu keine spitzen Gegenstände, wie
z.B. einen Kugelschreiber.
3. Erscheint nach dem Einschalten der
Waage mit dem Einschaltknopf
keine Anzeige auf dem Display,
überprüfen Sie, ob eine Batterie eingelegt
ist und ob diese richtig eingelegt wurde.
Ist eine Batterie vorhanden, kann es sein
dass diese zu schwach ist und durch eine
Neue ersetzt werden muss.
4. Benutzen Sie zum Reinigen der Waage
keine chemischen Lösungs- oder
Scheuermittel. Es wird empfohlen, zum
Reinigen der Waage ein trockenes,
weiches Tuch zu verwenden. GEBEN
SIE DIE WAAGE NICHT IN WASSER.
5. Halten Sie die Waage fern von
Wärmequellen wie z.B. Backöfen, um die
Beschädigung der Bedienknöpfe und
damit des einwandfreien Funktionierens
der Waage zu vermeiden.
6. Achten Sie beim Benutzen der Waage
darauf, dass diese sich nicht in der Nähe
elektromagnetischer Felder (EMI), wie
15
13. INFORMATION ZUR
ORDNUNGSGEMÄSSEN
ENTSORGUNG ELEKTRISCHER UND
ELEKTRONISCHER ALTGERÄTE
Am Ende seiner Nutzzeit darf
das Produkt NICHT
zusammen mit dem Hausmüll
beseitigt werden.
Es kann zu den eigens von
den örtlichen Behörden
eingerichteten Sammelstellen
oder zu den Fachhändlern, die einen
Rücknahmeservice anbieten, gebracht
werden. Die getrennte Entsorgung eines
Haushaltsgerätes vermeidet mögliche
negative Auswirkungen auf die Umwelt und
die Gesundheit, die durch eine nicht
vorschriftsmäßige Entsorgung bedingt sind.
Zudem ermöglicht sie die Wiederverwertung
der Bestandteile des Gerätes, was wiederum
eine bedeutende Einsparung an Energie und
Ressourcen mit sich bringt.
Zum Unterstreichen der Verpflichtung zur
Mitwirkung bei der getrennten Entsorgung ist
auf dem Produkt ein Hinweissymbol dafür
angebracht, dass dieses Produkt nicht in
üblichen Hausmüllcontainern entsorgt
werden darf.
Für weitere Informationen wenden Sie sich bitte
an die örtliche Verwaltung oder an den Händler,
bei dem Sie das Produkt erworben haben.
Der Temperaturmesser wird beim
Einschalten der Waage automatisch in
Betrieb gesetzt. Er misst die
Raumtemperatur und zeigt sie auf dem
Display an.
11. TEMPERATURMESSER UND
ANZEIGE (h)
d. Drücken Sie erneut zum Starten
der Zeitschaltuhr.
e. Ist die Zeitschaltuhr wieder auf "00:00 "
angelangt, ertönt ein akustisches
Signal. Das akustische Signal ertönt
etwa 30 Mal, danach schaltet es sich
automatisch ab.
f. Zum Abschalten des akustischen
Signals drücken Sie den Knopf zum
Abschalten der Waage.
g. Zum Anhalten der Zeitschaltuhr drücken
Sie den Knopf. Zum erneuten
Programmieren der Zeitschaltuhr
drücken Sie ihn erneut.
z.B. von Mobiltelefonen, befindet. Diese
können eine Einfluss auf die Präzision
der Waage haben.
7. Wenn Sie die Waage über einen längeren
Zeitraum nicht benutzen, nehmen Sie die
Batterien heraus.
8. Diese Waage ist nur für den Gebrauch im
Haushalt bestimmt.
interior 8/3/06 10:35 Página 14
-
 1
1
-
 2
2
-
 3
3
-
 4
4
-
 5
5
-
 6
6
-
 7
7
-
 8
8
-
 9
9
-
 10
10
-
 11
11
-
 12
12
-
 13
13


Groupe Brandt BC-200 El manual del propietario
- Categoría
- Escalas personales
- Tipo
- El manual del propietario
en otros idiomas
Artículos relacionados
Otros documentos
-
 Smart Weigh top2kg Manual de usuario
-
Adam Equipment CQT 5000 Manual de usuario
-
-
Brabantia 122668 TASTY+ LIGHT GREY El manual del propietario
-
Brabantia 480560 El manual del propietario
-
 Smart Weigh FBA_ACE200 Manual de usuario
-
Silvercrest 285527 El manual del propietario
-
-
Fagor BC-350X El manual del propietario

