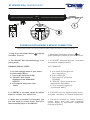
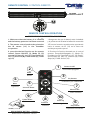
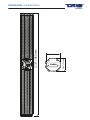
DS18 SB37BT: sonido envolvente para tu música, películas y más.
Con una instalación sencilla y una variedad de opciones de conectividad, el DS18 SB37BT es la barra de sonido perfecta para mejorar tu experiencia de audio en casa. Conéctala a tu televisor a través de Bluetooth o con el cable auxiliar incluido, y disfruta de un sonido claro y potente para tus películas, programas de televisión y videojuegos.
También puedes reproducir música desde tu teléfono o tableta a través de Bluetooth, o conectar una memoria USB a través del puerto USB para reproducir tus canciones favoritas.


-
 1
1
-
 2
2
-
 3
3
-
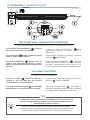 4
4
-
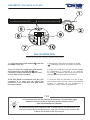 5
5
-
 6
6
-
 7
7
-
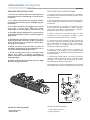 8
8
-
 9
9
-
 10
10
-
 11
11
-
 12
12
-
 13
13
-
 14
14
-
 15
15


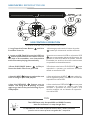
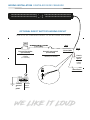
DS18 SB37BT: sonido envolvente para tu música, películas y más.
Con una instalación sencilla y una variedad de opciones de conectividad, el DS18 SB37BT es la barra de sonido perfecta para mejorar tu experiencia de audio en casa. Conéctala a tu televisor a través de Bluetooth o con el cable auxiliar incluido, y disfruta de un sonido claro y potente para tus películas, programas de televisión y videojuegos.
También puedes reproducir música desde tu teléfono o tableta a través de Bluetooth, o conectar una memoria USB a través del puerto USB para reproducir tus canciones favoritas.
en otros idiomas
- English: DS18 SB37BT Owner's manual
Otros documentos
-
Samsung HW-J7501R Manual de usuario
-
KlipXtreme KSB-220 Pristine El manual del propietario
-
Lenco SB-080 BK Manual de usuario
-
-
Lenco Bluetooth Manual de usuario
-
Samsung HW-J7500 Manual de usuario
-
-
Thomson SB552BTS Manual de usuario
-
-
Sanyo FWSB426F El manual del propietario