
Questions, problems, missing parts?
Please call Customer Service:1-800-800-4950
USE AND CARE GUIDE
H-24 / H-25
© 2018 Jack-Post Corporation SH-ZI-5306 10/18
warranty
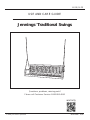
Jennings™
Traditional Swings

H-24 / H-25
© 2018 Jack-Post Corporation 10/18

H-24 / H-25
© 2018 Jack-Post Corporation 10/18

This furniture has been made from seasoned wood and has already been factory primed and finished
with an oil-based paint. With proper maintenance, it will give you years of enjoyable service. Wood
is a natural material and its appearance will change when exposed to the elements; surface splits and
checking may appear, particularly on the end grain and to a lesser extent on the surface within a few
weeks if left exposed to the elements. The furniture is designed with this in mind to remain strong and
durable. If left exposed to the weather, your furniture will fade in color. The exact color will depend on
the environment; for example, less fading will occur if the furniture is placed in a shady location under
a tree. To help preserve the color, cover the furniture with a garden furniture cover when not in use.
Wood expands and contracts with changes in relative humidity. To prevent over drying and excessive
cracking, do not store in a heated place.
REFINSHING
Based on exposure to the elements the finish may need to be restored. Proceed as follows:
OIL-BASED PAINTED WOOD CARE GUIDE
PLEASE READ THIS INFORMATION CAREFULLY - IT WILL HELP YOU TO MAINTAIN YOUR FURNITURE
1. Cover the floor area with a suitable liquid resistant ground sheet to contain dust, dirt or spills.
2. Use suitable protective clothing, i.e., rubber gloves, apron, safety glasses, dust mask, etc.
3. Check and retighten all furniture hardware
4. Remove any finish that has become loose or cracked by using a scraper or wire brush.
DO NOT USE STEEL WOOL as the fine particles may result in dark rusty blotching.
5. In a well-ventilated area or outdoors, lightly sand using 100-200 grit sand paper.
6. Remove any dust by wiping with a damp cloth.
7. Allow item to dry completely.
8. Use an oil-based primer on any bare wood spots.
9. Brush or spray on new finish using the manufacturer’s instructions – using an oil-based paint
available at any paint retailer.
1. We recommend cleaning the surface of dirt, bird droppings, tree sap, grease. etc. Scrub
with a cloth or soft brush using a mild household cleaner, dish or laundry detergent.
2. Rinse thoroughly.
3. Allow to dry completely and retighten all hardware.
CARE AND MAINTENANCE
H-24 / H-25
© 2018 Jack-Post Corporation 10/18
THIS PRODUCT DESIGNED FOR A MAXIMUM CAPACITY OF 400 POUNDS.
NOTE: Save assembly instruction sheet for future reference.
WARNINGS:

H-24 / H-25
© 2018 Jack-Post Corporation 10/18
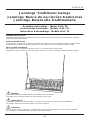
Assembly Instructions – Model H-24 / 25
Instrucciones de armado – Modelo H-24 / 25
Instructions d'assemblage – Modèle H-24 / 25
Jennings™
Traditional Swings
Jennings™
Banco de oscilación tradicional
Jennings™
Balancelle traditionnelle
FINISHING INSTRUCTIONS
To preserve and beautify the wooden parts, they should be painted or varnished on all sides before assembly
with good quality exterior finish.
WARNING:
If left unfinished and exposed to weather, the wooden parts can weaken.
The swing can fail causing someone to fall and suffer serious injury.
INSTRUCCIÓN DE ACABO
Para preservar y embellecer las piezas de madera, antes del montaje, es aconsejable de pintar o poner barniz
a cada lado de las piezas de madera. Mejor de usar una pintura o barniz de exterior de buena calidad.
ADVERTENCIA:
Si no quieres pintar o barnizar la madera y si dejas el banco afuera, la madera se puede debilitarse.
Por lo tanto, el banco de oscilación podría caer y herir a alguien.
INSTRUCTIONS DE FINITION
Afin de préserver et d’embellir les pièces en bois, il est conseillé avant l’assemblage,
de peindre ces pièces ou de les vernir de chaque coté avec un vernis où peinture extérieur de bonne qualité.
ATTENTION:
Si vous décidez de ne pas peindre ou vernir le bois, et de le laisser a l’extérieur, le bois risque de s’affaiblir.
Par conséquent, la balancelle risque de tomber et blesser quelqu’un.

*Los artículos estándar de ferretería se pueden reemplazar en forma local.
LISTE DE PIÈCES DE QUINCAILLERIE
(À L'ÉCHELLE)
*Les articles de quincaillerie standard peuvent être remplacés localement.
H-24 / H-25
06
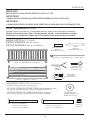
HARDWARE PARTS LIST (SHOWN TO SCALE)
*Standard hardware items may be replaced locally.
LISTA DE PIEZAS DE FERRETERÍA
(SE MUESTRAN A ESCALA)
ú ú
À '
È
É
Hammer and 10 mm wrench, or adjustable wrench, pliers, and a standard screwdriver.
.
LARGE PARTS (NOT TO SCALE)
PIEZAS GRANDES
(NO A ESCALA)
PIÈCES GRANDES
(PAS À L'ÉCHELLE)
© 2018 Jack-Post Corporation 10/18
ARM SUPPORT (2)
BRAS (2)
BRAS DE SUPPORT (2)
ARM (2)
BRAZO (2)
BRAZO DE SOPORTE (2)
BACK (1) RESPALDO (1) DOSSIER (1)
SEAT (1) ASIENTO (1) SIEGE (1)
EYE BOLT (2) PERNO DE OJO (2) PITON A OEIL (2)
CHAIN (2)
CADENA (2)
CHAÎNE(2)
EYE BOLT (2)
TORNILLO DE OJO (2)
ECROU A OEIL (2)
QUICK LINKS (2)
GANCHO (2)
MOUSQUETON (2)
M6 x 65 mm SCREWS (2) M6 x 70 mm SCREWS (2)
FLAT WASHERS (10)
LOCK NUT (6)
ARANDELA PLANA (10)
TUERCA (6)
Tornillo de 6 mm x 65 mm (2) Tornillo de 6 mm x 70 mm (2)
Vis de 6 x 65 mm SCREWS (2) Vis de 6 x 70 mm SCREWS (2)
RONDELLE PLATE (10)
ECROU (6)

H-24 / H-25
07
© 2018 Jack-Post Corporation 10/18
STEP 1
Position and insert 65 mm screws in 2 holes in back.
Place screws through 2 holes in seat using washer and lock nut.
NOTE: Do not mount back assembly incorrectly.
PASO 1
Posicionar y insertar los pernos de 65mm a través los agujeros del respaldo y del asiento.
Inserte las arandelas y tuercas en cada lado.
NOTA: No ensambla el respaldo incorrectamente.
ETAPE 1
Positionner et insérer les boulons de 65 mm dans les trous du dossier et du siège.
Insérer les rondelles et les écrous de chaque coté.
NOTE : Ne pas monter le dossier incorrectement.
65mm SCREW
PERNO DE 65mm
BOULON DE 65mm
65mm SCREW
PERNO DE 65mm
BOULON DE 65mm
65mm SCREW
PERNO DE 65mm
BOULON DE 65mm
CORRECT
CORECTO
CORRECT
INCORRECT
INCORECTO
INCORRECT WASHER & NUT
ARANDELA &TUERCA
RONDELLE & ECROU
WASHER & NUT
ARANDELA &TUERCA
RONDELLE & ECROU
WASHER & NUT
ARANDELA &TUERCA
RONDELLE & ECROU
WASHER & NUT
ARANDELA &TUERCA
RONDELLE & ECROU

H-24 / H-25
08
© 2018 Jack-Post Corporation 10/18
WASHER & NUT
ARANDELA &TUERCA
RONDELLE & ECROU
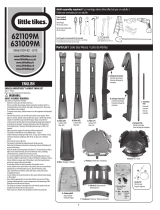
STEP 2
Attach each arm to back by placing70 mm screws through chain, thenthrough the hole in tapered end of
the arm (straight edge of the arm facing in), then attach to back with a washer and a nut.
PASO 2
Conectar cada brazo con el respaldo, colocando primero los Tornillo de 70mm a través de la cadena,
después a través de los agujeros del brazo lateral cónica (lado derecho hacia el interior).
Además, conectar el respaldo con una arandela y tuerca.
ETAPE 2
Attacher chaque bras au dossier en plaçant d’abord les Vis de 70mm à travers la chaine,
ensuite à travers les trous du bras coté fuselé (le coté droit fait face à l’intérieur).
Ensuite attacher au dossier en ajoutant une rondelle et un écrou.
70 mm SCREW
TORNILLO DE 70MM
Vis de 70MM
WASHER
ARANDELA
RONDELLE
WARNING:
Before using the chain, inspect each link in the chain to make sure all are welded closed and secure.
Failure of the chain could cause serious injury.
Should any defect be found, contact Customer Service for a free replacement.
ADVERTENCIA:
Antes de utilizar la cadena, inspeccionar cada enlace para asegurar que son cerrado y seguro.
Asegúrese de verificar si no, se puede ser peligroso. Si usted encuentra un defecto en la cadena,
gracias de llamar el Servicio al Cliente para obtener un reemplazo gratis.
ATTENTION:
Avant d’utiliser la chaine, inspecter chaque maillon afin de vérifier qu’ils soient bien fermés et sécurisés.
Soyez sur de vérifier sinon cela peut être dangereux.
Si vous trouvez un défaut sur la chaine, merci de contacter le Service Client pour un remplacement gratuit.

H-24 / H-25
09
© 2018 Jack-Post Corporation 10/18
Washer & Nut
Arandela & Tuerca
Rondelle & Ecrou
Washer
Arandela
Rondelle
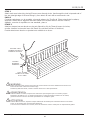
STEP 3
Place arm supports between each arm and seat at the front of the swing. Hook link of chain on each
side on 12" eye bolts and slide eye bolts through arms, supports, and seat as shown. Using nuts and
washers,tighten eye bolts until they indent the surface.This will prevent the chain from coming loose
from the eye.
PASO 3
Colocar los brazos de soporte entre el asiento y cada brazo en la parte delantera del banco de
oscilación. Unir la cadena y los pernos de ojo de 12 pulgadas en cada lado y deslice los pernos de
ojo a través de los brazos y de los soportes como se indica. Adjuntar tuercas y arandelas y apriete
cada perno de ojo hasta que toquen la superficie del brazo. Esto permitirá a la cadena de no escapar.
ETAPE 3
Placer les bras de support entre le siège et chaque bras à l’avant de la balancelle. Attacher au maillon
de la chaine les pitons à oeil de 12 pouces de chaque coté et glisser les pitons à œil à travers les bras,
les supports et le siège comme indiqué. Ajouter les écrous et rondelles et serrer chaque piton à œil
jusqu'à ce qu’ils touchent la surface du bras. Ceci permettra à la chaine de ne pas glisser et s’échapper.
Short lengths
Cadena pequeña
Chaine courte
Long length
Cadena larga
Longue chaine
Chain
Cadena
Chaine
12" Eye bolt
Perno de ojo de 12 pulgadas
Piton à œil de 12 pouces
NOTE: Make sure that the two short, equal lengths of chain
connect to the swing arm while the longer length of chain
attaches the swing to the ceiling or swing frame.
NOTA: Asegúrese de que las dos pequeñas partes de la
cadena se conecta a los brazos mientras que la larga cadena
unida el banco al techo o al soporte de banco (si tiene uno).
NOTE: Faites en sorte que les deux petites parties de la chaine
soit connectées aux bras alors que la longue chaine attache la
balancelle au plafond ou à la monture (si vous en avez une).
NOTE: To avoid a possible hazard,please cut off
eye bolts flush with thebottom of the nuts after
assembly is complete.
NOTA: Para evitar problemas, asegúrese de
cortar el extremo del perno de ojo una vez que
la instalación está bien hecho.
NOTE: Afin d’éviter tout incident, veiller à couper
le bout du boulon à oeil une fois que le montage
soit bien terminé.

H-24 / H-25
10
© 2018 Jack-Post Corporation 10/18
STEP 2
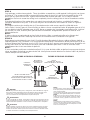
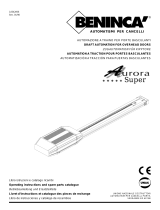
STEP 4
Your package contains two eyebolts. These should be screwed into a solid material (ceiling joists) as shown
in Figure A. The screws should be spaced 46 inches apart for the H-24, and 58 inches apart for the H-25.
Drill a 1/4 inch pilot hole for each eyebolt and lubricate the threads with wax, oil, or soap for easiest
installation. Be sure to screw the ceiling hook completely into the ceiling joists so that no threads are visible.
NOTE:
If the desired location of the swing does not match the overhead joist location, a suitable 2x4 header
should be attached to the joists. The hooks may then be screwed into the header as shown in Figure B.
PASO 4
Su paquete contiene dos tornillos de ojo. Estos deben estar unido a una superficie sólida del techo
(techo listón). Vea la Figura A. Estos tornillos se deben colocar a una distancia de 46 pulgadas para el H-24,
y a una distancia de 58 pulgadas para el H-25. Hacer un agujero de ¼ pulgadas para cada tornillo. Lubricar
los tornillos con cera, aceite o jabón para facilitar la instalación. Asegúrese de apretar las tuercas a los
listones del techo.
NOTA:
Si quiere colocar su swing donde no hay listón de techo sólido, se puede atornillar a los listones del
techo una madera de 2x4. Puede fijar los tornillos a la madera como se muestra en la figura B.
ETAPE 4
Votre paquet contient deux écrous à œil. Ceux-là devraient être attachés à une surface solide au plafond
(latte du plafond). Voir Schéma A. Ces écrous doivent être placés à une distance de 46 pouces pour le H-24,
et à une distance de 58 pouces pour le H-25. Percer un trou de ¼ pouces pour chaque écrous et lubrifier ces
écrous avec de la cire, de l’huile ou du savon pour une installation plus facile. Faire en sorte de visser
complètement les écrous aux lattes du plafond.
NOTE:
Si vous souhaitez positionner votre balancelle où il n’y a pas de latte solide au plafond, vous pouvez toujours
visser aux lattes du plafond une planche de 2x4. Vous pouvez ensuite attacher les écrous à œil à la planche
comme indiqué sur le schéma B.
FIGURE A FIGURA A SCHEMA A FIGURE B FIGURA B SCHEMA B
CORRECT
CORRECTO
CORRECT
INCORRECT
INCORRECTO
INCORRECT
JOISTS
LISTON DEL TECHO
LATTE EN BOIS DU PLAFOND
HEADER
MADERA 2X4
PLANCHE EN BOIS
NOTE POSITION NOTA
POSICIN NOTEZ LA POSITION
POSICION DEL TORNILLO DE OJO
POSITION DE L’ECROU A OEIL
NOTE:
The quick link is used to attach the chain to the eyebolt.
In its open position, it should be passed through the
chain and the eyebolt.
The nut portion should be turmed onto the threads
completely; then tightened with pliers or a wrench.
NOTA:
El gancho se usa para unir los tornillos de ojo y la
cadena. En su posición abierta, insertar la cadena
y el tornillo. Cerrar y apretar con una llave o unos
alicates.
NOTE:
Le mousqueton sert à attacher l’écrou a œil et la
chaine. Dans sa position ouverte, insérer la chaine
et l’écrou. Serrer fermement le mousqueton à l’aide
d’une clé ou d’une pince.
WARNING:
Periodically check the swing chain, ceiling hooks, and all hardware for signs of
wear and possible metal fatigue that could allow the swing to fall and cause
serious injury. Check all hardware to be sure bolts and nuts are tight.
Call our Customer Service Department for replacement parts.
ADVERTENCIA:
A veces,comprobar la cadena, los tornillos en el techo para asegurarse de que
nada está dañado para evitar un incidente. Comprobar que todas las tuercas y
tornillos estén bien apretados. Llamar al Servicio al cliente para el reemplazo.
ATTENTION:
Verifier de temps en temps la chaine, les écrous du plafond et tous les autres
boulons et écrous afin de s’assurer que rien ne soit usé ou endommagé afin
d’éviter tout incident. Verifier que tous les boulons et écrous soient bien serrés.
Contacter le Service à la clientèle pour tout remplacement

H-24 / H-25
© 2018 Jack-Post Corporation 10/18
CORPORATION
800 East Third Street
Buchanan, Michigan 49107-1803
Customer Service 1-800-800-4950
Mon. thru Fri. 8:00am – 8:00pm EST
E-mail [email protected]
English, Español, François
11
Questions, problems, missing parts?
Please call Customer Service: 1-800-800-4950
-
 1
1
-
 2
2
-
 3
3
-
 4
4
-
 5
5
-
 6
6
-
 7
7
-
 8
8
-
 9
9
-
 10
10
-
 11
11


Jack Post H-24N Manual de usuario
- Tipo
- Manual de usuario
- Este manual también es adecuado para
en otros idiomas
- français: Jack Post H-24N Manuel utilisateur
- English: Jack Post H-24N User manual
Otros documentos
-
 Style Selections TA7005 Guía de instalación
-
RIDGID Tornillos de banco para soldar tubos Instrucciones de operación
-
 Little Tikes Endless Adventures Lookout Swing Set Manual de usuario
-
 Flexible Flyer 41550T Manual de usuario
-
Dolmar 116 El manual del propietario
-
 Hampton Bay 27206 Guía de instalación
-
 Beninca Aurora Super Guía del usuario
-
 Hampton Bay 27205 Guía de instalación
-
Westinghouse 6304400 Guía de instalación
-
Swing-N-Slide Playsets WS 4481 Instrucciones de operación


