Masterpro BGMP-9169-BK-ES Pizza Oven Manual de usuario
- Tipo
- Manual de usuario

HORNO PARA PIZZA · PIZZA OVEN
FORNO PER PIZZA · FOUR À PIZZA
PIZZAOFEN · FORNO PARA PIZZA
Manual de instrucciones • Instruction manual
Manuale di istruzioni • Manuel d’instructions
Bedienungsanleitung • Manual de instruções
Disposal of Old Electrical & Electronic Equipment
(Applicable in the European Union and other European
countries with separate collection systems)
This symbol on the product or on its packaging indicates that
this product shall not be treated as household waste. Instead it
shall be handed over to the applicable collection point for the
recycling of electrical and electronic equipment. By ensuring
this product is disposed of correctly, you will help prevent
potential negative consequences for the environment and
human health, which could otherwise be caused by inappropri-
ate waste handling of this product. The recycling of materials will
help to conserve natural resources. For more detailed informa-
tion about recycling of this product, please cantact your local city
office, your household waste disposal service or the shop where
you purchased the product.

USAR SÓLO AL ALIRE LIBRE
LEA ESTE MANUAL DE INSTRUCCIONES CON ATENCIÓN ANTES DE
ENSAMBLAR Y CONSÉRVELO PARA FUTURAS CONSULTAS
ENSAMBLAJE
PLANO DE DESPIECE
ADVERTENCIA:
Aunque se hecho todo el esfuerzo por evitar los cantos agudos en la fabricación de su
horno para pizzas, debe manipular los componentes con cuidado para no lesionarse
accidentalmente.
Herramientas que podría requerir: Un destornillador de punta en cruz (Philips) o un
destornillador de punta plana, y una llave o un alicate.
ENSAMBLAJE:
Por favor, lea todas las instrucciones detenidamente antes de proceder. Elija un lugar
espacioso y limpio para ensamblar su horno de gas para pizzas. Por favor, consulte la
lista de piezas y el diagrama de ensamblaje según lo requiera.
NOTA:
¡Asegúrese de retirar todas las protecciones de plástico antes de ensamblar!
ES
ADVERTENCIA
Es responsabilidad del usuario asegurarse de que la barbacoa esté bien ensamblada,
instalada y mantenida.
El incumplimiento de las instrucciones de este manual puede dar lugar a lesiones o
daños a la propiedad.
Peligro de incendios o explosiones si se ignoran las instrucciones
1. Corte el suministro de gas desde la bombona.
2. Apague todas las llamas y cualquier aparato eléctrico.
3. Ventile el área.
4. Siga las instrucciones de este manual para comprobar si hay alguna fuga.
5. Si el olor persiste, póngase en contacto con su distribuidor o compañía suministra-
dora de gas inmediatamente.
Medidas de seguridad en caso de oler a gas:
1. Compruebe que no haya fugas en ninguna de las conexiones después de cada
cambio de bombona y antes de cada uso.
2. Nunca busque fugas con una cerilla encendida o una llama al descubierto.
3. No guarde o utilice gasolina, u otros líquidos o gases inflamables, cerca de este o
cualquier otro aparato.
4. Las bombonas que no estén conectadas y no se vayan a utilizar no deberán
guardarse cerca de este o cualquier otro aparato.
Precauciones:
• Conserve este manual para futuras consultas.
• Utilice sólo al aire libre.
• Advertencia: las partes accesibles podrían estar muy calientes. Mantenga a los niños
pequeños alejados.
• No mueva el aparato cuando esté en uso.
• Corte el suministro de gas desde la bombona cuando termine de utilizar.
• No modifique el aparato.
• Este aparato debe permanecer alejado de materiales inflamables cuando se esté
utilizando.
• El regulador y la manguera deben estar conectados correctamente al aparato. La
tuerca se debe apretar a la rosca del racor con una llave.
Lea las instrucciones antes de usar el aparato.
SPANISH
01 02

ADVERTENCIA:
• Mantenga siempre la bombona de gas de pie.
• Cuando el aparato no se esté utilizando, el
suministro de gas debe estar cortado desde
la bombona.
• La bombona que se utilice debe incluir un
collar para proteger la válvula de la bombona.
• El aparato y la bombona deben estar a una
distancia mínima de 1 metro una de otra.
LISTA DE PIEZAS
ES ES
ENSAMBLAJE :
Antes de ensamblar, asegúrese de que se hayan incluido todas las piezas. No trate de
ensamblar el aparato si falta alguna pieza o está dañada. Contacte con el servicio de
atención al cliente para solicitar piezas de repuesto.
1: Despliegue las patas.
2: Introduzca la piedra para pizzas.
Ref. CantidadDescripción
1 1Cabezal frontal
2 2Fogón
3 1Quemador
4 1Piedra para pizzas
5 1Base
6 1Patas de soporte
7 1Deflector térmico
8 1Termopar
9 1Válvula
10 1Base del mando
11 1Mando
12 1Encendedor
13 1Cubierta térmica
14 1Carcasa
3: Conecte el regulador y la manguera al horno para pizzas.
Observe que el regulador y la manguera vienen ya montados al horno para pizzas de
fábrica.
4: Conecte la bombona de gas.
03 04

ES
IMPORTANTE
Lea las instrucciones siguientes detenidamente y procure que su horno de gas para
pizzas esté correctamente instalado, ensamblado y mantenido. El incumplimiento de
las instrucciones siguientes podría causar lesiones serias o daños a la propiedad.
Si tiene alguna duda sobre su ensamblaje u operación, consulte con su distribuidor o
con la compañía suministradora de gas.
Cuando se utilice apoyado en el suelo, coloque siempre el aparato y la bombona sobre
un suelo llano y nivelado.
Su horno de gas para pizzas puede usarse con bombonas de gas de 11 a 15 kg.
Tamaño máximo de la bombona de gas: Diámetro: 320 mm; altura: 600 mm. Siga la
información técnica del manual de instrucciones y compruebe que la compañía
suministradora de gas disponga de bombonas de gas apropiadas para su horno para
pizzas.
NOTA PARA EL CONSUMIDOR: Conserve para futuras consultas
CÓMO CONECTAR LA BOMBONA DE GAS AL APARATO
Este aparato sólo debe usarse, bien con gas butano o propano a baja presión, o bien
con mezclas de LPG, y acoplarse a un regulador de baja presión apropiado mediante
una manguera flexible.
La manguera debe asegurarse al regulador y al aparato mediante las abrazaderas de
la manguera. Asegúrese de que la manguera flexible no entre en contacto con
superficies calientes y procure no torcerla.
Utilice un regulador apropiado con las certificaciones BSEN 12864 o EN 16129.
Asegúrese de que el regulador y la manguera flexible cumplan con la normativa local.
Por favor, solicite a su distribuidor de gas LPG información sobre reguladores apropia-
dos para la bombona.
Regulador y manguera
Utilice solamente reguladores y mangueras homologados para LPG a las presiones
mencionadas anteriormente. La vida útil estimada del regulador es de 2 años.
No es seguro usar un regulador o manguera equivocados. Compruebe siempre que
tiene los componentes correctos antes de hacer funcionar el aparato.
La manguera debe cumplir con los estándares pertinentes del país donde se utilice. La
manguera deberá reemplazarse si está desgastada o dañada. Asegúrese de que la
manguera no esté obstruida, doblada o en contacto con alguna parte del aparato que
no sea el racor.
Sobre la manguera flexible
Evite torcer la manguera flexible cuando utilice el aparato. La longitud de la manguera
flexible no deberá exceder 1,5 m. En Finlandia, la longitud no deberá exceder 1,2 m. La
manguera debe estar certificada de acuerdo con la norma EN para electrodomésticos
y cumplir con la normativa local.
Almacenamiento del aparato
El almacenamiento del aparato en un lugar de interior sólo es permisible si la bombo-
na ha sido desconectada y apartada del aparato. Cuando el aparato no se vaya a
utilizar por un tiempo, deberá guardarse en su caja original y almacenarse en un
entorno seco y sin polvo.
Bombona de gas
¡La bombona de gas no debe sufrir impactos o manipularse con brusquedad! La
bombona debe desconectarse cuando el aparato no esté en uso. Coloque el capuchón
de la bombona cuando la desconecte del aparato. La bombona de gas debe colocarse
en un lugar fuera del cuerpo del aparato.
La bombona de gas siempre se debe conectar o reemplazar en lugares con buena
ventilación y alejados de fuentes de ignición; nunca en presencia de llamas, chispas o
fuentes de calor. Las bombonas deben guardarse de pie en un lugar al aire libre y
fuera del alcance de los niños. La bombona nunca debe guardarse en un lugar que
pueda alcanzar los 50 °C. No guarde la bombona cerca de llamas, llamas de encendi-
do, o alguna otra fuente de ignición. NO FUMAR.
Este horno de gas para pizzas está diseñado para usarse al aire libre, en lugares
alejados de materiales inflamables. Es importante que no haya obstrucciones encima
del aparato y que quede un espacio mínimo de 1 metro a los lados y la parte posterior
del aparato. Es importante que las ranuras de aire del aparato no estén obstruidas. El
aparato debe utilizarse sobre una superficie nivelada y estable. El aparato debe
resguardarse o protegerse de las corrientes de aire y de la penetración del agua (p. ej.,
lluvia).
Asegúrese de que el compartimento de la bombona de gas (de haberlo) no esté
obstruido y manténgalo ventilado y limpio.
Las partes selladas por el fabricante o su agente no deben ser alteradas por el
usuario. No se deben llevar a cabo modificaciones en ninguna parte del horno para
pizzas. Asimismo, las tareas de mantenimiento y reparación sólo deberán llevarlas a
cabo técnicos acreditados.
Conexión al aparato
Antes de conectar, asegúrese de que no haya residuos en el cabezal de la bombona de
gas, el regulador, el quemador, o los puertos del quemador. Las arañas y los insectos
pueden anidar en su interior y obturar el quemador o el orificio del tubo de Venturi.
Un quemador obturado podría causar un incendio debajo del aparato.
Enrosque la manguera a la rosca del racor del aparato con una llave. En caso de
reemplazar la manguera, ésta deberá asegurarse al aparato y al racor del regulador
ES
con abrazaderas. Desconecte el regulador de la bombona (siguiendo las instrucciones
suministradas con el regulador) cuando no se vaya a utilizar el aparato.
El aparato debe utilizarse en un lugar con buena ventilación. No obstruya el flujo de
aire de la combustión del quemador cuando se esté utilizando el aparato.
UTILICE EL HORNO DE GAS PARA PIZZAS AL AIRE LIBRE SOLAMENTE.
05 06

Lea las instrucciones siguientes detenidamente y procure que su horno de gas para
pizzas esté correctamente instalado, ensamblado y mantenido. El incumplimiento de
las instrucciones siguientes podría causar lesiones serias o daños a la propiedad.
Si tiene alguna duda sobre su ensamblaje u operación, consulte con su distribuidor o
con la compañía suministradora de gas.
Cuando se utilice apoyado en el suelo, coloque siempre el aparato y la bombona sobre
un suelo llano y nivelado.
Su horno de gas para pizzas puede usarse con bombonas de gas de 11 a 15 kg.
Tamaño máximo de la bombona de gas: Diámetro: 320 mm; altura: 600 mm. Siga la
información técnica del manual de instrucciones y compruebe que la compañía
suministradora de gas disponga de bombonas de gas apropiadas para su horno para
pizzas.
NOTA PARA EL CONSUMIDOR: Conserve para futuras consultas
CÓMO CONECTAR LA BOMBONA DE GAS AL APARATO
Este aparato sólo debe usarse, bien con gas butano o propano a baja presión, o bien
con mezclas de LPG, y acoplarse a un regulador de baja presión apropiado mediante
una manguera flexible.
La manguera debe asegurarse al regulador y al aparato mediante las abrazaderas de
la manguera. Asegúrese de que la manguera flexible no entre en contacto con
superficies calientes y procure no torcerla.
Utilice un regulador apropiado con las certificaciones BSEN 12864 o EN 16129.
Asegúrese de que el regulador y la manguera flexible cumplan con la normativa local.
Por favor, solicite a su distribuidor de gas LPG información sobre reguladores apropia-
dos para la bombona.
Regulador y manguera
Utilice solamente reguladores y mangueras homologados para LPG a las presiones
mencionadas anteriormente. La vida útil estimada del regulador es de 2 años.
No es seguro usar un regulador o manguera equivocados. Compruebe siempre que
tiene los componentes correctos antes de hacer funcionar el aparato.
La manguera debe cumplir con los estándares pertinentes del país donde se utilice. La
manguera deberá reemplazarse si está desgastada o dañada. Asegúrese de que la
manguera no esté obstruida, doblada o en contacto con alguna parte del aparato que
no sea el racor.
Sobre la manguera flexible
Evite torcer la manguera flexible cuando utilice el aparato. La longitud de la manguera
flexible no deberá exceder 1,5 m. En Finlandia, la longitud no deberá exceder 1,2 m. La
manguera debe estar certificada de acuerdo con la norma EN para electrodomésticos
y cumplir con la normativa local.
Almacenamiento del aparato
El almacenamiento del aparato en un lugar de interior sólo es permisible si la bombo-
na ha sido desconectada y apartada del aparato. Cuando el aparato no se vaya a
utilizar por un tiempo, deberá guardarse en su caja original y almacenarse en un
entorno seco y sin polvo.
Bombona de gas
¡La bombona de gas no debe sufrir impactos o manipularse con brusquedad! La
bombona debe desconectarse cuando el aparato no esté en uso. Coloque el capuchón
de la bombona cuando la desconecte del aparato. La bombona de gas debe colocarse
en un lugar fuera del cuerpo del aparato.
La bombona de gas siempre se debe conectar o reemplazar en lugares con buena
ventilación y alejados de fuentes de ignición; nunca en presencia de llamas, chispas o
fuentes de calor. Las bombonas deben guardarse de pie en un lugar al aire libre y
fuera del alcance de los niños. La bombona nunca debe guardarse en un lugar que
pueda alcanzar los 50 °C. No guarde la bombona cerca de llamas, llamas de encendi-
do, o alguna otra fuente de ignición. NO FUMAR.
Este horno de gas para pizzas está diseñado para usarse al aire libre, en lugares
alejados de materiales inflamables. Es importante que no haya obstrucciones encima
del aparato y que quede un espacio mínimo de 1 metro a los lados y la parte posterior
del aparato. Es importante que las ranuras de aire del aparato no estén obstruidas. El
aparato debe utilizarse sobre una superficie nivelada y estable. El aparato debe
resguardarse o protegerse de las corrientes de aire y de la penetración del agua (p. ej.,
lluvia).
Asegúrese de que el compartimento de la bombona de gas (de haberlo) no esté
obstruido y manténgalo ventilado y limpio.
Las partes selladas por el fabricante o su agente no deben ser alteradas por el
usuario. No se deben llevar a cabo modificaciones en ninguna parte del horno para
pizzas. Asimismo, las tareas de mantenimiento y reparación sólo deberán llevarlas a
cabo técnicos acreditados.
Conexión al aparato
Antes de conectar, asegúrese de que no haya residuos en el cabezal de la bombona de
gas, el regulador, el quemador, o los puertos del quemador. Las arañas y los insectos
pueden anidar en su interior y obturar el quemador o el orificio del tubo de Venturi.
Un quemador obturado podría causar un incendio debajo del aparato.
Enrosque la manguera a la rosca del racor del aparato con una llave. En caso de
reemplazar la manguera, ésta deberá asegurarse al aparato y al racor del regulador
ES ES
Para apagar el horno de gas para pizzas, se recomienda cerrar primero la bombona y
dejar que el gas restante de la manguera se queme. Esto llevará un par de segundos.
A continuación, apague el quemador.
Mientras el horno para pizzas se está enfriando, retire la piedra para pizzas y guárdela
bien hasta su próximo uso.
Se recomienda usar guantes protectores (p. ej., guantes para horno) cuando manip-
ule componentes especialmente calientes.
DESPUÉS DE COCINAR
Cree una solución de 60 a 90 ml para detectar fugas combinando líquido lavavajillas
con agua en un proporción de 1 a 3.
Asegúrese de que la válvula esté en la posición cerrada.
Conecte el regulador a la bombona y a la válvula del quemador procurando que las
conexiones estén bien aseguradas y abra el gas.
Aplique la solución a la manguera y las juntas. La aparición de burbujas indicará que
tiene una fuga, la cual deberá ser reparada antes de volver a usar el aparato.
Vuelva a comprobar que no haya fugas una vez reparada la fuga.
Cierre el gas desde la bombona cuando termine de hacer la prueba.
Si detecta una fuga que no puede ser rectificada, absténgase de repararla y consulte
con la compañía suministradora de gas.
CÓMO BUSCAR FUGAS
1. Asegúrese de que haya una buena ventilación antes de encender el quemador.
2. Compruebe que el mando esté en la posición cerrada (OFF). A continuación, empuje
el mando hacia dentro y gírelo despacio hacia la izquierda hasta la posición «HI»
durante 5 segundos hasta que escuche un clic y el quemador se encienda (A).
Repita este paso en caso de no encenderse.
3. El fuego puede ajustarse de «HI» a «LOW» girando el mando despacio hacia la
derecha (B).
4. Por favor, gire el mando a la posición «HI» y empújelo hacia dentro y hacia la
posición «OFF» para apagar el horno para pizzas (C).
5. Si el quemador no se ha encendido después de reintentarlo, espere 5 minutos y
repita de nuevo el paso 2.
INSTRUCCIONES DE ENCENDIDO
1. Compruebe que el mando esté en la posición cerrada (OFF).
2. Empuje el mando hacia dentro, gírelo hacia la izquierda hasta la posición «HIGH» (se
escucharán unos clics) y acerque la cerilla encendida a los puertos del quemador
para encenderlo. Si el quemador no se enciende, repita el paso anterior.
3. Si el quemador no se ha encendido después de reintentarlo, espere 5 minutos y
repita de nuevo el paso 2.
4. Ajuste la llama girando el mando de la posición «HI» a «LOW».
5. Para apagar el horno para pizzas, cierre la llave de la válvula de la bombona o el
regulador y, a continuación, gire el mando del aparato hacia la posición «OFF».
ENCENDER CON CERILLA
ANTES DE USAR, COMPRUEBE QUE NO HAYA FUGAS
Nunca busque fugas con una llama al descubierto. Utilice
siempre una solución de agua jabonosa
ADVERTENCIA:
Si el quemador no se enciende, gire el mando hacia la derecha hasta la posición «OFF»
y cierre la llave de la válvula de la bombona. Espere cinco minutos antes de intentar
encenderlo de nuevo.
Antes de cocinar por primera vez, deje el horno para pizzas encendido unos 15 minutos
con el gas en la posición «LOW». Esto limpiará con el calor las partes internas y disipará
los olores del acabado de pintura.
con abrazaderas. Desconecte el regulador de la bombona (siguiendo las instrucciones
suministradas con el regulador) cuando no se vaya a utilizar el aparato.
El aparato debe utilizarse en un lugar con buena ventilación. No obstruya el flujo de
aire de la combustión del quemador cuando se esté utilizando el aparato.
UTILICE EL HORNO DE GAS PARA PIZZAS AL AIRE LIBRE SOLAMENTE.
07 08

ES ES
LIMPIEZA Y CUIDADO
ATENCIÓN:
Todas las tareas de limpieza y mantenimiento deben llevarse a cabo una vez que el
horno para pizzas se haya enfriado y se haya cortado el suministro de gas de la
bombona.
Guarde el horno para pizzas en un lugar protegido de la luz directa del sol siempre que
sea posible y cuando lo vaya almacenar por largos periodos. El horno para pizzas no
debe quedar expuesto a condiciones climáticas extremas como nieve, lluvias copiosas
o vientos fuertes.
Espere a que el horno para pizzas se enfríe por completo antes de moverlo.
Piedra para hornear pizzas
1. NO coloque la piedra sobre una llama al descubierto.
2. No deje la piedra expuesta a cambios extremos de la temperatura. NO coloque
comidas congeladas sobre la piedra caliente.
3. La piedra es frágil y puede romperse si sufre una caída o un impacto.
4. La piedra se calienta mucho durante su uso y permanece caliente por un periodo
prolongado después de usarse.
5. NO enfríe la piedra con agua cuando esté caliente.
6. Después de lavar con agua, seque la piedra antes de volver a usarla. Esto puede
hacerse en un horno convencional a 60 °C (140 °F) durante 2 horas.
Mantenimiento
1. Mantenga el aparato alejado y libre de materiales combustibles, gasolina, y otros
líquidos y gases inflamables.
2. No obstruya el flujo de aire de la combustión ni las ranuras de aire.
3. Mantenga las ranuras de aire del compartimento de la bombona libre de residuos.
4. Limpie el aparato, incluidas las superficies especiales, con los productos de limpieza
recomendados si fuera necesario.
5. Revise y limpie los tubos de los quemadores de insectos y nidos. Un tubo obturado
podría causar un incendio debajo del aparato.
Su horno para pizzas tendrá un mejor aspecto y durará más si lo mantiene limpio.
CÓMO BUSCAR FUGAS
Si huele a gas (en caso de descubrirse una fuga de gas): Corte el suministro de gas
desde la válvula de la bombona.
Asegúrese de que la válvula esté en la posición cerrada.
Conecte el regulador a la bombona y a la válvula del quemador procurando que las
conexiones estén bien aseguradas y abra el gas.
Aplique agua jabonosa en la manguera y las juntas. La aparición de burbujas indicará
que tiene una fuga, la cual deberá ser reparada antes de volver a usar el aparato.
Vuelva a comprobar que no haya fugas una vez reparada la fuga.
Corte el suministro de gas desde la bombona cuando termine de usar.
Si detecta una fuga que no puede ser rectificada, absténgase de repararla y consulte
con la compañía suministradora de gas.
CUIDADO Y MANTENIMIENTO
Aparte de la limpieza, su horno de gas para pizzas requiere muy poco mantenimiento.
Se recomienda mirar un par de cosas (acuérdese de cortar y desconectar el gas antes
de llevar a cabo cualquier tarea de mantenimiento).
1. Si su horno de gas para pizzas usa una manguera flexible para conectar el gas, revise
el estado de la junta tórica del regulador del extremo de la manguera una vez al año
como mínimo. Reemplácela si parece estar desgastada o agrietada.
2. Si utiliza una bombona de gas LPG portátil, deberá llevarla a que la revisen o
reemplacen cada diez años. La fecha de la última revisión debe aparecer estampada
en el cuello de la bombona.
3. También se recomienda utilizar un cobertor para proteger el horno de gas para
pizzas de la lluvia y de las condiciones del tiempo.
09 10

ES
USE OUTDOORS ONLY
PLEASE READ INSTRUCTIONS CAREFULLY BEFORE ASSEMBLY
RETAIN THIS MANUAL FOR FUTURE REFERENCE
WARNING
It is the consumer's responsibility to see that the barbecue is properly assembled,
installed, and taken care of.
Failure to follow instructions in this manual could result in bodily injury and/or
property damage.
Hazardous fire or explosion may result if instructions are ignored
1. Turn off gas supply at gas cylinder.
2. Extinguish all naked flames; do not operate any electrical appliances.
3. Ventilate the area.
4. Check for leaks as detailed in this manual.
5. If odour persists, contact your dealer or gas supplier immediately.
For your safety if you smell gas:
1. Leak test all connections after each cylinder refill or before each use.
2. Never check for leaks with a match or open flame.
3. Do not store of use gasoline or other flammable vapours and liquids in the vicinity of
this or any other appliance.
4. Any gas cylinder not connected for use shall not be stored in the vicinity of this or
any other appliance.
Precautions:
• Retain this manual for future reference.
• Use outdoors only.
• Warning accessible parts may be very hot. Keep young children away.
• Do not move the appliance during use.
• Turn off the gas supply at the gas cylinder after use.
• Do not modify the appliance.
• This appliance must be kept away from flammable materials during use.
• The regulator and hose must be connected correctly to the appliance. A spanner
must be used to tighten the nut onto the connection thread.
Read the instructions before using the appliance.
ENGLISH
Fabricante Bergner Europe S.L.
Dirección Ctra. del Aeropuerto Km. 4, Edificio San Lamberto,
Planta 3, 50011 Zaragoza, España
Modelo BGMP-9169-BK-ES / BGMP-9169-BK-DE /
BGMP-9169-BK-IT
Tipo de aparato Horno de gas para pizzas
Categoría de gas I3+(28-30/37) I3B/P(30) I3B/P(50)
Tipo de gas Butano Propano
28-30 mbar 37 mbar 28-30 mbar 50 mbar
4.0 kW
(290 g/h)
4.0 kW
(285 g/h)
4.0 kW
(290 g/h)
4.0 kW
(290 g/h)
BE, FR, IT, LU, IE, GB, GR, PT,
ES, CY, CZ, LT, SK, CH, SI and
LV
LU, NL, DK, FI,
SE, CY, CZ,
EE, LT, MT,
SK, SI, BG, IS,
NO, TR, HR,
RO, IT, HU
and LV
DE, AT, CH,
SK, LU
Butano, propano o
mezclas de ambos
Presión del gas
Aporte total
nominal de calor
Países
destinatarios
P.I.N Code: 2531DM-0118
S/N
Usar sólo al aire libre.
Lea las instrucciones antes de
usar este aparato.
ADVERTENCIA
Las partes accesibles podrían
estar muy calientes. Mantenga
a los niños pequeños alejados.
FABRICADO EN CHINA
Componentes
Quemador principal
Quemador lateral
28-30mbar
Tamaño del orificio
0.8mm
0.58mm
50mbar
0.7mm
0.5mm
11 12

Read the following instructions carefully and be sure your gas pizza oven is properly
installed, assembled and cared for. Failure to follow these instructions may result in
serious bodily injury and/or property damage.
If you have any questions concerning assembly or operation, consult your dealer or
LPG Gas Company.
When used on the ground always place the appliance and cylinder on flat level
ground.
Your gas pizza oven can be used with gas cylinders between 11 kg and 15 kg. The
maximum size of the gas cylinder should be: Dia. 320mm, Height: 600 mm. Follow
the technical information as stated in the instruction manual and Check with your
local gas supplier to have a suitable gas cylinder for your pizza.
NOTE FOR CONSUMER: Retain for future Reference
CONNECTING THE GAS CYLINDER TO THE APPLIANCE
This appliance is only suitable for use with low-pressure butane or propane gas or LPG
mixtures, fitted with the appropriate low-pressure regulator via a flexible hose.
The hose should be secured to the regulator and the appliance with hose clips. Make
sure the flexible hose could not come in contact with hot surface and avoid twisting.
Use a suitable regulator that is certified to BSEN 12864 or EN 16129. Make sure the
regulator and flexible hose comply with local code.
Please consult your LPG dealer for information regarding a suitable regulator for the
gas cylinder.
Regulator and Hose
Use only regulators and hose approved for LP Gas at the above pressures. The life
expectancy of the regulator is estimated as 2 years.
The use of the wrong regulator or hose is unsafe; always check that you have the
correct items before operating the appliance.
The hose used must conform to the relevant standard for the country of use. Worn or
damaged hose must be replaced. Ensure that the hose is not obstructed, kinked, or in
contact with any part of the appliance other than at its connection.
For Flexible hose
Avoid twisting the flexible tube when the appliance is in use. The length of flexible
hose shall not exceed 1.5m. In Finland, the length shall not exceed 1.2m. The hose
should certified according to applicable EN Standard and comply with local code.
Storage of Appliance
Storage of an appliance indoors is only permissible if the cylinder is disconnected and
removed from the appliance. When the appliance is not to be used for a period of time
it should be stored in its original packaging and stored in a dry dust free environment.
Gas Cylinder
The gas cylinder should not be dropped or handled roughly! If the appliance is not in
use, the cylinder must be disconnected. Replace the protective cap on the cylinder
after disconnecting the cylinder from the appliance. The gas cylinder must be sited
outside the body of the appliance.
Always connect or replace the cylinder in a well-ventilated area and away from any
source of ignition, never in the presence of a flame, spark or heat source. Cylinders
must be stored outdoors in an upright position and out of the reach of children. The
cylinder must never be stored where temperatures can reach over 50°C. Do not store
the cylinder near flames, pilot lights or other sources of ignition. DO NOT SMOKE.
This gas pizza oven is designed for use outdoors, away from any flammable materials.
It is important that there are no overhead obstructions and that there is a minimum
distance of 1 m from the side or rear of the appliance. It is important that the ventila-
tion openings of the appliance are not obstructed. The appliance must be used on a
levels, stable surface. The appliance should be protected from direct draughts and
shall be positioned or protected against direct penetration by any trickling water (e.g.
rain).
Make sure that the gas cylinder compartment (if any) is not obstructed, keep it
ventilated and clean.
Parts sealed by the manufacturer or his agent must not be altered by the user. No
modifications should be made to any part of this pizza oven and repairs and mainte-
nance should only be carried out by a registered service engineer.
Connection to Appliance
Before connection, ensure that there is no debris caught in the head of the gas
cylinder, regulator, burner and burner ports. Spiders and insects can nest within and
clog the burner/venturi tube at the orifice. A clogged burner can lead to a fire beneath
the appliance.
Fit the hose to the appliance using a spanner to tighten it onto the connection thread.
If the hose is replaced it must be secured to the appliance and regulator connections
with hose clips. Disconnect the regulator from the cylinder (according to the direc-
tions supplied with the regulator) when the appliance is not in use.
The appliance must be used in a well ventilated area. Do not obstruct the flow of
combustion air to the burner when the appliance is in use.
ONLY USE THIS GAS PIZZA OVEN OUTDOORS.
ASSEMBLY
EXPANDED VIEW
WARNING:
Whilst every effort has made in manufacture of your pizza oven to remove any sharp
edge, you should handle all components with care to avoid accidental injury.
Tools may required: Either a Philips crosshead or flat-bladed screwdriver and either a
spanner or a pair pliers.
ASSEMBLY:
Please read all instructions thoroughly before proceeding. Find a large, clean area in
which to assemble your gas pizza oven. Please refer to the parts list and assembly
diagram as necessary.
NOTICE:
Make sure all the plastic protection rip off before assembling!
PART LIST
ENEN
ASSEMBLY :
Before assembly, please make sure all parts are present. If any part is missing or
damaged, do not attempt to assemble the appliance. Contact customer service for
replacement parts.
1: Unfold legs.
Ref QuantityDescription
1 1Front head
2 2Firebox
3 1Burner
4 1Pizza stone
5 1Base
6 1Base support
7 1Thermal baffle
8 1Thermocouple
9 1Valve
10 1Knob base
11 1Knob
12 1Ignitor
13 1Thermal shroud
14 1Shell
13 14

EN
IMPORTANTE
Read the following instructions carefully and be sure your gas pizza oven is properly
installed, assembled and cared for. Failure to follow these instructions may result in
serious bodily injury and/or property damage.
If you have any questions concerning assembly or operation, consult your dealer or
LPG Gas Company.
When used on the ground always place the appliance and cylinder on flat level
ground.
Your gas pizza oven can be used with gas cylinders between 11 kg and 15 kg. The
maximum size of the gas cylinder should be: Dia. 320mm, Height: 600 mm. Follow
the technical information as stated in the instruction manual and Check with your
local gas supplier to have a suitable gas cylinder for your pizza.
NOTE FOR CONSUMER: Retain for future Reference
CONNECTING THE GAS CYLINDER TO THE APPLIANCE
This appliance is only suitable for use with low-pressure butane or propane gas or LPG
mixtures, fitted with the appropriate low-pressure regulator via a flexible hose.
The hose should be secured to the regulator and the appliance with hose clips. Make
sure the flexible hose could not come in contact with hot surface and avoid twisting.
Use a suitable regulator that is certified to BSEN 12864 or EN 16129. Make sure the
regulator and flexible hose comply with local code.
Please consult your LPG dealer for information regarding a suitable regulator for the
gas cylinder.
Regulator and Hose
Use only regulators and hose approved for LP Gas at the above pressures. The life
expectancy of the regulator is estimated as 2 years.
The use of the wrong regulator or hose is unsafe; always check that you have the
correct items before operating the appliance.
The hose used must conform to the relevant standard for the country of use. Worn or
damaged hose must be replaced. Ensure that the hose is not obstructed, kinked, or in
contact with any part of the appliance other than at its connection.
For Flexible hose
Avoid twisting the flexible tube when the appliance is in use. The length of flexible
hose shall not exceed 1.5m. In Finland, the length shall not exceed 1.2m. The hose
should certified according to applicable EN Standard and comply with local code.
Storage of Appliance
Storage of an appliance indoors is only permissible if the cylinder is disconnected and
removed from the appliance. When the appliance is not to be used for a period of time
it should be stored in its original packaging and stored in a dry dust free environment.
Gas Cylinder
The gas cylinder should not be dropped or handled roughly! If the appliance is not in
use, the cylinder must be disconnected. Replace the protective cap on the cylinder
after disconnecting the cylinder from the appliance. The gas cylinder must be sited
outside the body of the appliance.
Always connect or replace the cylinder in a well-ventilated area and away from any
source of ignition, never in the presence of a flame, spark or heat source. Cylinders
must be stored outdoors in an upright position and out of the reach of children. The
cylinder must never be stored where temperatures can reach over 50°C. Do not store
the cylinder near flames, pilot lights or other sources of ignition. DO NOT SMOKE.
This gas pizza oven is designed for use outdoors, away from any flammable materials.
It is important that there are no overhead obstructions and that there is a minimum
distance of 1 m from the side or rear of the appliance. It is important that the ventila-
tion openings of the appliance are not obstructed. The appliance must be used on a
levels, stable surface. The appliance should be protected from direct draughts and
shall be positioned or protected against direct penetration by any trickling water (e.g.
rain).
Make sure that the gas cylinder compartment (if any) is not obstructed, keep it
ventilated and clean.
Parts sealed by the manufacturer or his agent must not be altered by the user. No
modifications should be made to any part of this pizza oven and repairs and mainte-
nance should only be carried out by a registered service engineer.
Connection to Appliance
Before connection, ensure that there is no debris caught in the head of the gas
cylinder, regulator, burner and burner ports. Spiders and insects can nest within and
clog the burner/venturi tube at the orifice. A clogged burner can lead to a fire beneath
the appliance.
Fit the hose to the appliance using a spanner to tighten it onto the connection thread.
If the hose is replaced it must be secured to the appliance and regulator connections
with hose clips. Disconnect the regulator from the cylinder (according to the direc-
tions supplied with the regulator) when the appliance is not in use.
The appliance must be used in a well ventilated area. Do not obstruct the flow of
combustion air to the burner when the appliance is in use.
ONLY USE THIS GAS PIZZA OVEN OUTDOORS.
WARNING:
• Please always keep the gas bottle in upright
position.
• If the appliance is not in use, the gas must be
turned OFF at the supply cylinder.
• The cylinder used must include a collar to
protect the cylinder valve.
• The minimum distance for the appliance and
the gas tank is 1m apart.
EN
2: Insert the pizza stone.
3: Connection regulator and hose to pizza oven.
Please note the factory setting that the regulator and hose had been assembled to
the pizza oven.
4: Connecting to gas tank.
15 16

Read the following instructions carefully and be sure your gas pizza oven is properly
installed, assembled and cared for. Failure to follow these instructions may result in
serious bodily injury and/or property damage.
If you have any questions concerning assembly or operation, consult your dealer or
LPG Gas Company.
When used on the ground always place the appliance and cylinder on flat level
ground.
Your gas pizza oven can be used with gas cylinders between 11 kg and 15 kg. The
maximum size of the gas cylinder should be: Dia. 320mm, Height: 600 mm. Follow
the technical information as stated in the instruction manual and Check with your
local gas supplier to have a suitable gas cylinder for your pizza.
NOTE FOR CONSUMER: Retain for future Reference
CONNECTING THE GAS CYLINDER TO THE APPLIANCE
This appliance is only suitable for use with low-pressure butane or propane gas or LPG
mixtures, fitted with the appropriate low-pressure regulator via a flexible hose.
The hose should be secured to the regulator and the appliance with hose clips. Make
sure the flexible hose could not come in contact with hot surface and avoid twisting.
Use a suitable regulator that is certified to BSEN 12864 or EN 16129. Make sure the
regulator and flexible hose comply with local code.
Please consult your LPG dealer for information regarding a suitable regulator for the
gas cylinder.
Regulator and Hose
Use only regulators and hose approved for LP Gas at the above pressures. The life
expectancy of the regulator is estimated as 2 years.
The use of the wrong regulator or hose is unsafe; always check that you have the
correct items before operating the appliance.
The hose used must conform to the relevant standard for the country of use. Worn or
damaged hose must be replaced. Ensure that the hose is not obstructed, kinked, or in
contact with any part of the appliance other than at its connection.
For Flexible hose
Avoid twisting the flexible tube when the appliance is in use. The length of flexible
hose shall not exceed 1.5m. In Finland, the length shall not exceed 1.2m. The hose
should certified according to applicable EN Standard and comply with local code.
Storage of Appliance
Storage of an appliance indoors is only permissible if the cylinder is disconnected and
removed from the appliance. When the appliance is not to be used for a period of time
it should be stored in its original packaging and stored in a dry dust free environment.
Gas Cylinder
The gas cylinder should not be dropped or handled roughly! If the appliance is not in
use, the cylinder must be disconnected. Replace the protective cap on the cylinder
after disconnecting the cylinder from the appliance. The gas cylinder must be sited
outside the body of the appliance.
Always connect or replace the cylinder in a well-ventilated area and away from any
source of ignition, never in the presence of a flame, spark or heat source. Cylinders
must be stored outdoors in an upright position and out of the reach of children. The
cylinder must never be stored where temperatures can reach over 50°C. Do not store
the cylinder near flames, pilot lights or other sources of ignition. DO NOT SMOKE.
This gas pizza oven is designed for use outdoors, away from any flammable materials.
It is important that there are no overhead obstructions and that there is a minimum
distance of 1 m from the side or rear of the appliance. It is important that the ventila-
tion openings of the appliance are not obstructed. The appliance must be used on a
levels, stable surface. The appliance should be protected from direct draughts and
shall be positioned or protected against direct penetration by any trickling water (e.g.
rain).
Make sure that the gas cylinder compartment (if any) is not obstructed, keep it
ventilated and clean.
Parts sealed by the manufacturer or his agent must not be altered by the user. No
modifications should be made to any part of this pizza oven and repairs and mainte-
nance should only be carried out by a registered service engineer.
Connection to Appliance
Before connection, ensure that there is no debris caught in the head of the gas
cylinder, regulator, burner and burner ports. Spiders and insects can nest within and
clog the burner/venturi tube at the orifice. A clogged burner can lead to a fire beneath
the appliance.
Fit the hose to the appliance using a spanner to tighten it onto the connection thread.
If the hose is replaced it must be secured to the appliance and regulator connections
with hose clips. Disconnect the regulator from the cylinder (according to the direc-
tions supplied with the regulator) when the appliance is not in use.
The appliance must be used in a well ventilated area. Do not obstruct the flow of
combustion air to the burner when the appliance is in use.
ONLY USE THIS GAS PIZZA OVEN OUTDOORS.
ENEN
Make 2-3 fluid ounces of leak detecting solution by mixing one part washing up liquid
with 3 parts water.
Ensure the control valve is "OFF".
Connect the regulator to the cylinder and ON/OFF valve to the burner, ensure the
connections are secure then turn ON the gas.
Brush the soapy solution onto the hose and all joints. If bubbles appear you have a
leak, which must be rectified before use.
Retest after fixing the fault.
Turn OFF the gas at the cylinder after testing.
If leakage is detected and cannot be rectified. Do not attempt to cure leakage but
consult your gas dealer.
TO CHECK FOR LEAKS
1. Ensure well ventilation before lighting the burner.
2. Make sure the knob is in the "OFF" position. Then push the control knob and slowly
turn the knob anticlockwise to "HI” position for 5 seconds until you hear a click and
the burner ignites (A). If not repeat this process.
3. You can adjust the fire from HI to LOW by slowly turn the control knob clockwise (B)
4. Please turn the control knob to "HI” position, then push the knob and clockwise to
"OFF” position to turn off your pizza oven. (C)
5. If the burner has not lit after retrying wait 5 minutes and repeat step 2.
LIGHTING INSTRUCTIONS
BEFORE USE CHECK FOR LEAKS
Never check for leaks with a naked flame, always use a soapy
water solution
17 18

EN
Read the following instructions carefully and be sure your gas pizza oven is properly
installed, assembled and cared for. Failure to follow these instructions may result in
serious bodily injury and/or property damage.
If you have any questions concerning assembly or operation, consult your dealer or
LPG Gas Company.
When used on the ground always place the appliance and cylinder on flat level
ground.
Your gas pizza oven can be used with gas cylinders between 11 kg and 15 kg. The
maximum size of the gas cylinder should be: Dia. 320mm, Height: 600 mm. Follow
the technical information as stated in the instruction manual and Check with your
local gas supplier to have a suitable gas cylinder for your pizza.
NOTE FOR CONSUMER: Retain for future Reference
CONNECTING THE GAS CYLINDER TO THE APPLIANCE
This appliance is only suitable for use with low-pressure butane or propane gas or LPG
mixtures, fitted with the appropriate low-pressure regulator via a flexible hose.
The hose should be secured to the regulator and the appliance with hose clips. Make
sure the flexible hose could not come in contact with hot surface and avoid twisting.
Use a suitable regulator that is certified to BSEN 12864 or EN 16129. Make sure the
regulator and flexible hose comply with local code.
Please consult your LPG dealer for information regarding a suitable regulator for the
gas cylinder.
Regulator and Hose
Use only regulators and hose approved for LP Gas at the above pressures. The life
expectancy of the regulator is estimated as 2 years.
The use of the wrong regulator or hose is unsafe; always check that you have the
correct items before operating the appliance.
The hose used must conform to the relevant standard for the country of use. Worn or
damaged hose must be replaced. Ensure that the hose is not obstructed, kinked, or in
contact with any part of the appliance other than at its connection.
For Flexible hose
Avoid twisting the flexible tube when the appliance is in use. The length of flexible
hose shall not exceed 1.5m. In Finland, the length shall not exceed 1.2m. The hose
should certified according to applicable EN Standard and comply with local code.
Storage of Appliance
Storage of an appliance indoors is only permissible if the cylinder is disconnected and
removed from the appliance. When the appliance is not to be used for a period of time
it should be stored in its original packaging and stored in a dry dust free environment.
Gas Cylinder
The gas cylinder should not be dropped or handled roughly! If the appliance is not in
use, the cylinder must be disconnected. Replace the protective cap on the cylinder
after disconnecting the cylinder from the appliance. The gas cylinder must be sited
outside the body of the appliance.
Always connect or replace the cylinder in a well-ventilated area and away from any
source of ignition, never in the presence of a flame, spark or heat source. Cylinders
must be stored outdoors in an upright position and out of the reach of children. The
cylinder must never be stored where temperatures can reach over 50°C. Do not store
the cylinder near flames, pilot lights or other sources of ignition. DO NOT SMOKE.
This gas pizza oven is designed for use outdoors, away from any flammable materials.
It is important that there are no overhead obstructions and that there is a minimum
distance of 1 m from the side or rear of the appliance. It is important that the ventila-
tion openings of the appliance are not obstructed. The appliance must be used on a
levels, stable surface. The appliance should be protected from direct draughts and
shall be positioned or protected against direct penetration by any trickling water (e.g.
rain).
Make sure that the gas cylinder compartment (if any) is not obstructed, keep it
ventilated and clean.
Parts sealed by the manufacturer or his agent must not be altered by the user. No
modifications should be made to any part of this pizza oven and repairs and mainte-
nance should only be carried out by a registered service engineer.
Connection to Appliance
Before connection, ensure that there is no debris caught in the head of the gas
cylinder, regulator, burner and burner ports. Spiders and insects can nest within and
clog the burner/venturi tube at the orifice. A clogged burner can lead to a fire beneath
the appliance.
Fit the hose to the appliance using a spanner to tighten it onto the connection thread.
If the hose is replaced it must be secured to the appliance and regulator connections
with hose clips. Disconnect the regulator from the cylinder (according to the direc-
tions supplied with the regulator) when the appliance is not in use.
The appliance must be used in a well ventilated area. Do not obstruct the flow of
combustion air to the burner when the appliance is in use.
ONLY USE THIS GAS PIZZA OVEN OUTDOORS.
EN
To turn the gas pizza oven off ,it is best to turn off the cylinder first, and allow all the
gas remaining in the hose to burn off, this will only take a couple of seconds. Then
turn off burner.
While the pizza oven is cool down, then remove the pizza stone and stock it well for
next using.
It is recommended that protective gloves (e.g. oven gloves) be used when handling
particularly hot components.
AFTER COOKING
1. Make sure the knob is in the "OFF" position.
2. Push down the knob and keep pressing whilst turning anti-clockwise to the "HIGH"
position (a clicking sound is heard), put the lighted match near the ports of the
burner, this will light the burner. Observe if the burner has lit. if not repeat this
process
3. If the burner has not lit after retrying wait 5 minutes and repeat step 2.
4. Adjust the heat by turning the knob to the High/Low position.
5. To turn the pizza oven 'OFF' turn the cylinder valve or regulator switch to the 'OFF'
position and then turn the control knob on the appliance clockwise to the 'OFF'
position.
LIGHTING BY MATCH CLEANING AND CARE
CAUTION:
All cleaning and maintenance should be carried out when the pizza oven is cool and
with the fuel supply turned OFF at the gas cylinder.
Store Pizza oven out of direct sunlight and indoors where possible and when storing
for extended periods of time. The pizza oven should not be exposed to harsh weather
conditions such as snow, heavy rain and strong winds.
Wait for the pizza oven to cool completely before moving.
Pizza Baking Stone
1. DO NOT use the stone over an open flame.
2. Avoid extreme temperature change to the stone. DO NOT place frozen foods on a
hot stone.
3. The stone is fragile and can break if bumped or dropped.
4. The stone is very hot during use and stays hot for a long time after use.
5. DO NOT cool the stone with water when the stone is hot.
6. After cleaning the stone with water, please dry the stone before use. This can be
done in a conventional oven at 60°C (140°F) for 2 hours.
Maintenance
1. Keeping appliance area clear and free from combustible materials, gasoline, and
other flammable vapors and liquids;
2. Not obstructing the flow of combustion and ventilation air;
3. Keeping the ventilation opening(s) of the cylinder enclosure free and clear from
debris;
4. Cleaning appliance, including special surfaces, with recommended cleaning agents,
if necessary;
5. Checking and cleaning burner tubes for insects and insect nests. A clogged tube
can lead to a fire beneath the appliance.
Your pizza oven will look better and last longer if you keep it clean.
WARNING:
If the burner fails to ignite, turn the control knob off (clockwise) and also turn the
cylinder valve off. Wait five minutes before attempting to relight with ignition
sequence.
Before cooking for the first time, operate the pizza oven for about 15 minutes and the
gas turned on LOW. This will "heat clean" the internal parts and dissipate odour from
the painted finish.
19 20

EN
TO CHECK FOR LEAKS
If you smell gas:( In the event of gas leakage found).
Turn off the gas supply at the gas cylinder valve.
Ensure the control valve is "OFF".
Connect the regulator to the cylinder and ON/OFF valve to the burner, ensure the
connections are secure then turn ON the gas.
Brush the soapy water onto the hose and all joints. If bubbles appear you have a leak,
which must be rectified before use. Retest after fixing the fault.
Turn off the gas supply at the gas container after use.
If leakage is detected again and cannot be rectified. Do not attempt to cure leakage
but consult your gas dealer.
CARE AND MAINENANCE
Apart from cleaning, your gas pizza oven is a fairly low maintenance item. A couple of
things are worth looking at through. Remember to turn off and disconnect the gas
before any maintenance is carried out.
1. If your gas pizza oven uses a flexible hose to connect to the gas, check the rubber
O-ring on the regulator end of the hose assembly at least once a year. If it appears
worn or cracked, have it replaced.
2. If you use a portable LPG gas cylinder, you will need to have the cylinder serviced or
replaced every ten years. The date of the last service should be stamped on the neck
of the bottle.
3. A rain cover is also recommended to cover your gas pizza oven and maintain and
protect from all weather conditions.
EN
Manufacture Bergner Europe S.L.
Add. Ctra. del Aeropuerto Km. 4, Edificio San Lamberto,
Planta 3, 50011 Zaragoza, España
Model BGMP-9169-BK-ES / BGMP-9169-BK-DE /
BGMP-9169-BK-IT
Appliance Type Gas Pizza Oven
Gas Category I3+(28-30/37) I3B/P(30) I3B/P(50)
Gas Type Butane Propane
28-30 mbar 37 mbar 28-30 mbar 50 mbar
4.0 kW
(290 g/h)
4.0 kW
(285 g/h)
4.0 kW
(290 g/h)
4.0 kW
(290 g/h)
BE, FR, IT, LU, IE, GB, GR, PT,
ES, CY, CZ, LT, SK, CH, SI and
LV
LU, NL, DK, FI,
SE, CY, CZ,
EE, LT, MT,
SK, SI, BG, IS,
NO, TR, HR,
RO, IT, HU
and LV
DE, AT, CH,
SK, LU
Butane,Propane or their
mixtures
Gasp Pressure
Total Nominal
Heat Input
Destination
countries
P.I.N Code: 2531DM-0118
S/N
Use outdoors only.
Read the instructions before
using the appliance.
WARNING
accessible parts may be very
hot. Keep young children away.
MADE IN CHINA
Componets
Main Burner
Side Burner
28-30mbar
Orifice Size
0.8mm
0.58mm
50mbar
0.7mm
0.5mm
21 22

NUR IM FREIEN VERWENDEN
LESEN SIE VOR DER MONTAGE DIE ANLEITUNG SORGFÄLTIG DURCH
UND BEWAHREN SIE DIESE ZUM SPÄTEREN NACHSCHLAGEN AUF
MONTAGE
EXPLOSIONSZEICHNUNG
WARNUNG:
Bei der Herstellung Ihres Pizzaofens wurde darauf geachtet, dass dieser keine
scharfen Kanten aufweist. Dennoch müssen Sie alle Bauteile mit Vorsicht handhaben,
um Verletzungen vorzubeugen.
Erforderliche Werkzeuge: Kreuzschlitz- oder Flachschraubendreher und Schrauben-
schlüssel oder Zange.
MONTAGE:
Lesen Sie vor der Montage sämtliche Anweisungen sorgfältig durch. Suchen Sie sich
zur Montage Ihres Gas-Pizzaofens einen geräumigen, sauberen Bereich. Nehmen Sie
bei Bedarf die Teileliste und das Montagediagramm zur Hand.
HINWEIS:
Entfernen Sie vor der Montage sämtliche Verpackungen und Schutzfolien!
DE
WARNUNG
Der Anwender haftet für die ordnungsgemäße Montage, Installation und Instandhal-
tung des Ofens.
Die Nichtbeachtung der Anweisungen dieser Gebrauchsanleitung kann zu Verletzun-
gen und/oder Sachschäden führen.
Die Nichtbeachtung der Anleitung kann zu Brand oder Explosion führen
1. Schließen Sie die Gaszufuhr an der Gasflasche.
2. Löschen Sie alle offenen Flammen und schalten Sie alle elektrischen Geräte aus.
3. Lüften Sie den Bereich.
4. Prüfen Sie die Dichtheit der Anlage, wie in dieser Anleitung beschrieben.
5. Falls der Geruch anhält, wenden Sie sich unverzüglich an Ihren Händler oder Ihren
Gaslieferanten.
Achten sie bei gasgeruch auf ihre sicherheit:
1. Überprüfen Sie die Dichtheit aller Anschlüsse nach jedem Flaschenwechsel und vor
jedem Gebrauch.
2. Überprüfen Sie die Dichtheit niemals mit einer offenen Flamme (wie beispielsweise
einem brennenden Streichholz).
3. Lagern oder verwenden Sie kein Benzin und keine anderen brennbaren Dämpfe
oder Flüssigkeiten in der Nähe dieses Geräts oder anderer Geräte.
4. Nicht für den Gebrauch angeschlossene Gasflaschen dürfen nicht in der Nähe
dieses Geräts oder anderer Geräte aufbewahrt werden.
Vorsichtsmassnahmen:
• Bewahren Sie diese Gebrauchsanleitung zum späteren Nachschlagen auf.
• Nur im Freien verwenden.
• Warnung: die zugänglichen Teile können sehr heiß werden. Halten Sie kleine Kinder
fern.
• Bewegen Sie das Gerät nicht während des Gebrauchs.
• Schließen Sie nach dem Gebrauch die Gaszufuhr an der Gasflasche.
• Verändern Sie das Gerät nicht.
• Dieses Gerät muss während des Gebrauchs von brennbaren Materialien ferngehalten
werden.
• Regler und Schlauch müssen richtig an das Gerät angeschlossen werden. Die Mutter
am Anschlussgewinde ist mit einem Schraubenschlüssel festzuziehen.
Lesen Sie vor dem Gebrauch des Geräts die Anweisungen durch.
GERMANY
01 02

WARNUNG:
• Die Gasflasche muss immer senkrecht
stehen.
• Bei Nichtgebrauch des Geräts muss das
Ventil der Gasflasche GESCHLOSSEN werden.
• Verwenden Sie nur Gasflaschen mit Ventil-
schutzkragen.
• Der Mindestabstand zwischen Gerät und
Gasflasche beträgt 1 Meter.
TEILELISTE
DE DE
MONTAGE :
Vergewissern Sie sich vor der Montage, dass alle Teile vorhanden sind. Versuchen Sie
nicht, das Gerät zusammenzubauen, wenn ein Teil fehlt oder beschädigt ist. Ersatzteile
erhalten Sie beim Kundendienst.
1: Klappen Sie die Standfüße aus.
2: Setzen Sie den Pizzastein ein.
Nr. AnzahlBezeichnung
1 1Vorderes Abschlussteil
2 2Backkammer
3 1Brenner
4 1Pizzastein
5 1Unterteil
6 1Standfüße
7 1Wärmeabweisblech
8 1Thermoelement
9 1Ventil
10 1Drehknopfplatte
11 1Drehknopf
12 1Zünder
13 1Wärmeisolierung
14 1Gehäuse
3: Anschluss des Druckreglers und des Schlauchs an den Pizzaofen.
Der Druckregler und der Schlauch sind bereits werkseitig am Pizzaofen montiert.
4: Schließen Sie den Regler an die Gasflasche an.
03 04

DE
WICHTIG
Lesen Sie die nachstehende Anleitung sorgfältig durch und achten Sie darauf, dass Ihr
Gas-Pizzaofen ordnungsgemäß aufgestellt, montiert und instandgehalten wird. Die
Nichtbeachtung dieser Anweisungen kann zu ernsten Verletzungen und/oder
Sachschäden führen.
Bei Problemen mit der Montage oder dem Betrieb dieses Geräts wenden Sie sich an
Ihren Händler oder an das Flüssiggasunternehmen.
Stellen Sie das Gerät und die Flasche bei Verwendung auf dem Boden immer auf
einem ebenen Untergrund auf.
Ihr Gas-Pizzaofen kann mit Gasflaschen mit 11 bis 15 kg Gewicht verwendet werden.
Maximale Größe der Gasflasche: Durchm. 320 mm, Höhe: 600 mm. Richten Sie sich
nach den in der Gebrauchsanleitung genannten technischen Daten und fragen Sie
Ihr örtliches Gasunternehmen nach einer geeigneten Gasflasche für Ihren Pizzaofen.
VERBRAUCHERHINWEIS: Zum späteren Nachschlagen aufbewahren
ANSCHLUSS DER GASFLASCHE AN DAS GERÄT
Dieses Gerät ist nur zur Verwendung mit Niederdruck-Butan- oder Propangas oder
Flüssiggasmischungen und einem passenden Niederdruckregler und einem Schlauch
geeignet.
Der Schlauch muss mit Schlauchschellen am Regler und am Gerät befestigt werden.
Achten Sie darauf, dass der Schlauch nicht mit heißen Oberflächen in Berührung
kommen kann und nicht verdreht wird.
Verwenden Sie einen geeigneten Druckregler, der nach BSEN 12864 oder EN 16129
zertifiziert ist. Der Regler und der Schlauch müssen den örtlichen Vorschriften
entsprechen.
Informationen über einen geeigneten Regler für die Gasflasche erhalten Sie von Ihrem
Gasflaschenhändler.
Druckregler und Schlauch
Verwenden Sie nur Regler und Schläuche, die für Flüssiggas mit dem oben genannten
Druck zugelassen sind. Die Nutzungsdauer eines Druckreglers beträgt etwa 2 Jahre.
Die Verwendung eines falschen Reglers oder Schlauchs ist gefährlich. Überprüfen Sie
vor Gebrauch des Geräts immer, dass das richtige Zubehör installiert ist.
Der verwendete Schlauch muss den für das Einsatzland geltenden Vorschriften
entsprechen. Ein abgenutzter oder beschädigter Schlauch muss ausgetauscht
werden. Achten Sie darauf, dass der Schlauch nicht verstopft oder geknickt ist und
dass er außer seinem Anschluss kein weiteres Teil des Geräts berührt.
Hinweise zum Schlauch
Verdrehen Sie den Schlauch nicht während des Gerätegebrauchs. Der Schlauch darf
nicht länger als 1,5 m sein. In Finnland darf die Länge 1,2 m nicht überschreiten. Der
Schlauch muss nach der geltenden EN-Norm zertifiziert sein und den örtlichen
Vorschriften entsprechen.
Aufbewahrung des Geräts
Um das Gerät in einem geschlossenen Raum aufzubewahren, müssen zuvor der
Gasanschluss abgezogen und die Gasflasche vom Gerät entfernt werden. Wenn das
Gerät längere Zeit nicht verwendet wird, sollte es in seiner Originalverpackung an
einem trockenen staubfreien Ort aufbewahrt werden.
Gasflasche
Die Gasflasche muss stets mit Vorsicht behandelt werden und darf nicht herunterfall-
en! Wenn das Gerät nicht verwendet wird, muss die Gasflasche entfernt werden.
Setzen Sie nach dem Abziehen der Flasche vom Gerät die Schutzkappe wieder auf die
Flasche. Die Gasflasche muss außerhalb des Gerätegehäuses aufgestellt werden.
Verbinden oder wechseln Sie die Flasche immer in einem gut gelüfteten Bereich und
in sicherer Entfernung von Zündquellen, niemals in der Nähe von Flammen, Funken
oder Wärmequellen. Gasflaschen müssen im Freien senkrecht und außer Reichweite
von Kindern gelagert werden. Die Gasflasche darf auf keinen Fall bei Temperaturen
über 50 °C aufbewahrt werden. Lagern Sie die Gasflasche nicht in der Nähe von
Flammen, Zündflammen oder anderen Zündquellen. NICHT RAUCHEN.
Dieser Gas-Pizzaofen ist zur Verwendung im Freien in sicherem Abstand von brenn-
baren Materialien bestimmt. Es ist wichtig, dass sich keine Hindernisse über dem
Gerät befinden und dass mindestens 1 m Freiraum an den Seiten und auf der Rück-
seite des Geräts eingehalten wird. Die Lüftungsöffnungen des Geräts dürfen nicht
verstopft sein. Das Gerät muss auf einem ebenen, stabilen Untergrund verwendet
werden. Das Gerät ist vor direkter Zugluft zu schützen und so aufzustellen oder zu
schützen, dass kein Wasser (z. B. Regen) eindringen kann.
Achten Sie darauf, dass die Lüftungsöffnungen des Gasflaschenschranks (sofern
vorhanden) nicht verstopft sind und der Schrank belüftet und sauber ist.
Vom Hersteller oder dessen Händler versiegelte Teile dürfen vom Benutzer nicht
verändert werden. An diesem Pizzaofen dürfen keine Veränderungen vorgenommen
werden. Reparaturen und Instandhaltungsarbeiten sind von einem zugelassenen
Kundendiensttechniker auszuführen.
Anschluss an das Gerät
Vergewissern Sie sich vor dem Anschluss, dass sich keine Ablagerungen im Ventil der
Gasflasche, im Druckregler, im Brenner und in den Brenneröffnungen befinden. An
diesen Stellen nistende Spinnen oder andere Insekten können die Öffnung des
Brenners / der Venturi-Düse verstopfen. Ein verstopfter Brenner kann zu einem Brand
unter dem Gerät führen.
DE
Schrauben Sie den Schlauch mit einem Schraubenschlüssel am Anschlussgewinde
fest. Beim Wechsel des Schlauchs muss dieser mit Schlauchschellen am Gerät und am
Regler befestigt werden. Ziehen Sie den Regler (nach der Gebrauchsanleitung des
Reglers) von der Gasflasche ab, wenn das Gerät nicht verwendet wird.
Das Gerät muss in einem gut belüfteten Bereich verwendet werden. Die Verbrennung-
sluftzufuhr zum Brenner darf während des Gerätebetriebs nicht behindert werden.
VERWENDEN SIE DIESEN GAS-PIZZAOFEN NUR IM FREIEN.
05 06

Lesen Sie die nachstehende Anleitung sorgfältig durch und achten Sie darauf, dass Ihr
Gas-Pizzaofen ordnungsgemäß aufgestellt, montiert und instandgehalten wird. Die
Nichtbeachtung dieser Anweisungen kann zu ernsten Verletzungen und/oder
Sachschäden führen.
Bei Problemen mit der Montage oder dem Betrieb dieses Geräts wenden Sie sich an
Ihren Händler oder an das Flüssiggasunternehmen.
Stellen Sie das Gerät und die Flasche bei Verwendung auf dem Boden immer auf
einem ebenen Untergrund auf.
Ihr Gas-Pizzaofen kann mit Gasflaschen mit 11 bis 15 kg Gewicht verwendet werden.
Maximale Größe der Gasflasche: Durchm. 320 mm, Höhe: 600 mm. Richten Sie sich
nach den in der Gebrauchsanleitung genannten technischen Daten und fragen Sie
Ihr örtliches Gasunternehmen nach einer geeigneten Gasflasche für Ihren Pizzaofen.
VERBRAUCHERHINWEIS: Zum späteren Nachschlagen aufbewahren
ANSCHLUSS DER GASFLASCHE AN DAS GERÄT
Dieses Gerät ist nur zur Verwendung mit Niederdruck-Butan- oder Propangas oder
Flüssiggasmischungen und einem passenden Niederdruckregler und einem Schlauch
geeignet.
Der Schlauch muss mit Schlauchschellen am Regler und am Gerät befestigt werden.
Achten Sie darauf, dass der Schlauch nicht mit heißen Oberflächen in Berührung
kommen kann und nicht verdreht wird.
Verwenden Sie einen geeigneten Druckregler, der nach BSEN 12864 oder EN 16129
zertifiziert ist. Der Regler und der Schlauch müssen den örtlichen Vorschriften
entsprechen.
Informationen über einen geeigneten Regler für die Gasflasche erhalten Sie von Ihrem
Gasflaschenhändler.
Druckregler und Schlauch
Verwenden Sie nur Regler und Schläuche, die für Flüssiggas mit dem oben genannten
Druck zugelassen sind. Die Nutzungsdauer eines Druckreglers beträgt etwa 2 Jahre.
Die Verwendung eines falschen Reglers oder Schlauchs ist gefährlich. Überprüfen Sie
vor Gebrauch des Geräts immer, dass das richtige Zubehör installiert ist.
Der verwendete Schlauch muss den für das Einsatzland geltenden Vorschriften
entsprechen. Ein abgenutzter oder beschädigter Schlauch muss ausgetauscht
werden. Achten Sie darauf, dass der Schlauch nicht verstopft oder geknickt ist und
dass er außer seinem Anschluss kein weiteres Teil des Geräts berührt.
Hinweise zum Schlauch
Verdrehen Sie den Schlauch nicht während des Gerätegebrauchs. Der Schlauch darf
nicht länger als 1,5 m sein. In Finnland darf die Länge 1,2 m nicht überschreiten. Der
Schlauch muss nach der geltenden EN-Norm zertifiziert sein und den örtlichen
Vorschriften entsprechen.
Aufbewahrung des Geräts
Um das Gerät in einem geschlossenen Raum aufzubewahren, müssen zuvor der
Gasanschluss abgezogen und die Gasflasche vom Gerät entfernt werden. Wenn das
Gerät längere Zeit nicht verwendet wird, sollte es in seiner Originalverpackung an
einem trockenen staubfreien Ort aufbewahrt werden.
Gasflasche
Die Gasflasche muss stets mit Vorsicht behandelt werden und darf nicht herunterfall-
en! Wenn das Gerät nicht verwendet wird, muss die Gasflasche entfernt werden.
Setzen Sie nach dem Abziehen der Flasche vom Gerät die Schutzkappe wieder auf die
Flasche. Die Gasflasche muss außerhalb des Gerätegehäuses aufgestellt werden.
Verbinden oder wechseln Sie die Flasche immer in einem gut gelüfteten Bereich und
in sicherer Entfernung von Zündquellen, niemals in der Nähe von Flammen, Funken
oder Wärmequellen. Gasflaschen müssen im Freien senkrecht und außer Reichweite
von Kindern gelagert werden. Die Gasflasche darf auf keinen Fall bei Temperaturen
über 50 °C aufbewahrt werden. Lagern Sie die Gasflasche nicht in der Nähe von
Flammen, Zündflammen oder anderen Zündquellen. NICHT RAUCHEN.
Dieser Gas-Pizzaofen ist zur Verwendung im Freien in sicherem Abstand von brenn-
baren Materialien bestimmt. Es ist wichtig, dass sich keine Hindernisse über dem
Gerät befinden und dass mindestens 1 m Freiraum an den Seiten und auf der Rück-
seite des Geräts eingehalten wird. Die Lüftungsöffnungen des Geräts dürfen nicht
verstopft sein. Das Gerät muss auf einem ebenen, stabilen Untergrund verwendet
werden. Das Gerät ist vor direkter Zugluft zu schützen und so aufzustellen oder zu
schützen, dass kein Wasser (z. B. Regen) eindringen kann.
Achten Sie darauf, dass die Lüftungsöffnungen des Gasflaschenschranks (sofern
vorhanden) nicht verstopft sind und der Schrank belüftet und sauber ist.
Vom Hersteller oder dessen Händler versiegelte Teile dürfen vom Benutzer nicht
verändert werden. An diesem Pizzaofen dürfen keine Veränderungen vorgenommen
werden. Reparaturen und Instandhaltungsarbeiten sind von einem zugelassenen
Kundendiensttechniker auszuführen.
Anschluss an das Gerät
Vergewissern Sie sich vor dem Anschluss, dass sich keine Ablagerungen im Ventil der
Gasflasche, im Druckregler, im Brenner und in den Brenneröffnungen befinden. An
diesen Stellen nistende Spinnen oder andere Insekten können die Öffnung des
Brenners / der Venturi-Düse verstopfen. Ein verstopfter Brenner kann zu einem Brand
unter dem Gerät führen.
DE DE
Stellen Sie sich aus einem Teil Spülmittel und 3 Teilen Wasser etwa 60-90 ml
Lecksuchlösung her.
Vergewissern Sie sich, dass das Ventil geschlossen ist.
Verbinden Sie den Druckregler mit der Flasche und das EIN/AUS-Ventil mit dem
Brenner, prüfen Sie die Anschlüsse und drehen Sie dann das Gas auf.
Bepinseln Sie den Schlauch und alle Verbindungsstellen mit der Spülmittellösung.
Sollten sich Blasen bilden, deutet dies auf eine undichte Stelle hin, die vor dem
Gebrauch beseitigt werden muss.
Wiederholen Sie den Test nach Beheben der Leckstelle.
Schließen Sie nach dem Test die Gaszufuhr an der Gasflasche.
Falls ein Leck festgestellt wird und dieses nicht behoben werden kann. Versuchen Sie
nicht, das Leck zu reparieren, sondern wenden Sie sich an Ihren Gashändler.
PRÜFUNG AUF DICHTHEIT
1. Achten Sie vor dem Zünden des Brenners auf ausreichende Belüftung.
2. Vergewissern Sie sich, dass der Drehknopf auf „OFF“ (AUS) steht. Drücken Sie dann
den Drehknopf und drehen Sie ihn langsam gegen den Uhrzeigersinn in die
Stellung „HI“. Nach etwa 5 Sekunden hören Sie ein Klickgeräusch, und der Brenner
zündet (A). Wenn der Brenner nicht zündet, muss dieser Vorgang wiederholt
werden.
3. Durch langsames Drehen des Drehknopfs (B) im Uhrzeigersinn von HI auf LOW
können Sie das Feuer regeln.
4. Zum Ausschalten Ihres Pizzaofens drehen Sie den Drehknopf zunächst in die
Stellung „HI“, drücken dann den Drehknopf und drehen ihn im Uhrzeigersinn auf
„OFF“. (C)
5. Falls der Brenner nach dem erneuten Versuch nicht zündet, warten Sie 5 Minuten
und wiederholen Sie Schritt 2.
INBETRIEBNAHME
1. Vergewissern Sie sich, dass der Drehknopf auf „OFF“ (AUS) steht.
2. Halten Sie den Drehknopf gedrückt und drehen Sie ihn gleichzeitig gegen den
Uhrzeigersinn in die Stellung „HIGH“ (ein Klickgeräusch ist zu hören). Halten Sie das
brennende Streichholz an die Öffnungen des Brenners, damit er zündet. Sehen Sie
nach, ob der Brenner gezündet hat. Falls nicht, muss dieser Vorgang wiederholt
werden.
3. Falls der Brenner nach dem erneuten Versuch nicht zündet, warten Sie 5 Minuten
und wiederholen Sie Schritt 2.
4. Stellen Sie die Temperatur durch Drehen des Drehknopfs in die Stellung High/Low
ein.
5. Zum Ausschalten des Pizzaofens schließen Sie das Flaschenventil oder den Druck-
regler und drehen Sie dann den Drehknopf des Geräts im Uhrzeigersinn in die
Stellung „OFF“.
ANZÜNDEN MIT EINEM STREICHHOLZ
ÜBERPRÜFEN SIE DIE ANLAGE VOR DEM GEBRAUCH AUF UNDICHTE STELLEN
Benutzen Sie für diese Lecksuche niemals eine offene Flamme, sondern
immer eine Spülmittellösung
WARNUNG:
Falls der Brenner nicht zündet, drehen Sie den Drehknopf im Uhrzeigersinn auf Aus
und schließen Sie außerdem das Flaschenventil. Warten Sie fünf Minuten, bevor Sie
einen erneuten Zündversuch unternehmen.
Nehmen Sie den Pizzaofen vor dem ersten Gebrauch etwa 15 Minuten lang bei
niedriger Temperatur (LOW) in Betrieb. Durch die Hitze werden die inneren Teile
gereinigt und Geruch von den lackierten Oberflächen beseitigt.
Schrauben Sie den Schlauch mit einem Schraubenschlüssel am Anschlussgewinde
fest. Beim Wechsel des Schlauchs muss dieser mit Schlauchschellen am Gerät und am
Regler befestigt werden. Ziehen Sie den Regler (nach der Gebrauchsanleitung des
Reglers) von der Gasflasche ab, wenn das Gerät nicht verwendet wird.
Das Gerät muss in einem gut belüfteten Bereich verwendet werden. Die Verbrennung-
sluftzufuhr zum Brenner darf während des Gerätebetriebs nicht behindert werden.
VERWENDEN SIE DIESEN GAS-PIZZAOFEN NUR IM FREIEN.
07 08

DE DE
Um den Gas-Pizzaofen auszuschalten, schließen Sie zuerst die Gaszufuhr an der
Flasche und warten Sie einige Sekunden, bis das im Schlauch verbliebene Gas
abgebrannt ist. Schalten Sie dann den Brenner aus.
Lassen Sie den Pizzaofen abkühlen, nehmen Sie dann den Pizzastein heraus und
bewahren Sie ihn für den nächsten Gebrauch gut auf.
Es wird empfohlen, zur Handhabung heißer Teile Schutzhandschuhe (z. B. Ofenhand-
schuhe) zu tragen.
NACH DEM BACKEN
REINIGUNG UND PFLEGE
VORSICHT:
Für alle Reinigungs- und Instandhaltungsarbeiten muss der Pizzaofen kalt und die
Gaszufuhr geschlossen sein.
Bewahren Sie den Pizzaofen vor direkter Sonneneinstrahlung geschützt und bei
längerer Lagerung möglichst in einem geschlossenen Raum auf. Der Pizzaofen darf
keiner rauen Witterung wie Schnee, starkem Regen und starkem Wind ausgesetzt
werden.
Lassen Sie den Pizzaofen vollständig abkühlen, bevor Sie ihn von der Stelle bewegen.
Pizzastein
1. Verwenden Sie den Stein NICHT auf einer offenen Flamme.
2. Vermeiden Sie extreme Temperaturschwankungen am Stein. Legen Sie KEINE
gefrorenen Speisen auf einen heißen Stein.
3. Der Stein ist zerbrechlich und kann brechen, wenn er anstößt oder herunterfällt.
4. Der Stein wird während des Gebrauchs stark aufgeheizt und bleibt auch nach dem
Gebrauch noch längere Zeit heiß.
5. Kühlen Sie einen heißen Stein NICHT mit Wasser ab.
6. Nach der Reinigung des Steins mit Wasser muss der Stein vor Gebrauch getrocknet
werden. Zum Trocknen kann der Stein 2 Stunden lang bei 60 °C in einen herköm-
mlichen Ofen gelegt werden.
Instandhaltung
1. Gerätebereich sauber und frei von brennbaren Materialien, Benzin und anderen
entzündlichen Dämpfen und Flüssigkeiten halten.
2. Zu- und Abluftöffnungen nicht blockieren.
3. Lüftungsöffnung(en) des Gasflaschenschranks freihalten.
4. Bei Bedarf Reinigung des Geräts einschließlich spezieller Flächen mit empfohlenen
Reinigungsmitteln.
5. Prüfung der Brennerrohre auf Insekten und Insektennester und Reinigung. Ein
verstopftes Rohr kann zu einem Brand unter dem Gerät führen.
Ihr Pizzaofen sieht besser aus und hält länger, wenn Sie ihn sauber halten.
PRÜFUNG AUF DICHTHEIT
Bei Gasgeruch / bei Gasleck: Schließen Sie die Gaszufuhr am Gasflaschenventil.
Vergewissern Sie sich, dass das Ventil geschlossen ist.
Verbinden Sie den Druckregler mit der Flasche und das EIN/AUS-Ventil mit dem
Brenner, prüfen Sie die Anschlüsse und drehen Sie dann das Gas auf.
Bepinseln Sie den Schlauch und alle Verbindungsstellen mit Spülmittellösung. Sollten
sich Blasen bilden, deutet dies auf eine undichte Stelle hin, die vor dem Gebrauch
beseitigt werden muss. Wiederholen Sie den Test nach Beheben der Leckstelle.
Schließen Sie nach dem Gebrauch die Gaszufuhr am Gasbehälter.
Falls erneut ein Leck festgestellt wird und dieses nicht behoben werden kann.
Versuchen Sie nicht, das Leck zu reparieren, sondern wenden Sie sich an Ihren
Gashändler.
INSTANDHALTUNG
Abgesehen von der Reinigung ist der Wartungsaufwand Ihres Gas-Pizzaofens sehr
niedrig. Einige Punkte sollten jedoch beachtet werden. Denken Sie vor der Instandhal-
tung daran, die Gaszufuhr zu schließen und vom Gerät zu trennen.
1. Falls Ihr Gas-Pizzaofen mit einem Schlauch an die Gasflasche angeschlossen wird,
überprüfen Sie mindestens einmal jährlich den Gummidichtring am Druckregleren-
de des Schlauchs. Ein abgenutzter oder rissiger Dichtring muss ausgetauscht
werden.
2. Bei Verwendung einer tragbaren Flüssiggasflasche muss diese gewartet oder alle
zehn Jahre ersetzt werden. Das Datum der letzten Wartung muss auf dem
Flaschenhals aufgestempelt sein.
3. Es wird außerdem ein Regenschutz zur Abdeckung Ihres Gas-Pizzaofens und zum
Schutz vor der Witterung empfohlen.
09 10

DE
USE OUTDOORS ONLY
PLEASE READ INSTRUCTIONS CAREFULLY BEFORE ASSEMBLY
RETAIN THIS MANUAL FOR FUTURE REFERENCE
WARNING
It is the consumer's responsibility to see that the barbecue is properly assembled,
installed, and taken care of.
Failure to follow instructions in this manual could result in bodily injury and/or
property damage.
Hazardous fire or explosion may result if instructions are ignored
1. Turn off gas supply at gas cylinder.
2. Extinguish all naked flames; do not operate any electrical appliances.
3. Ventilate the area.
4. Check for leaks as detailed in this manual.
5. If odour persists, contact your dealer or gas supplier immediately.
For your safety if you smell gas:
1. Leak test all connections after each cylinder refill or before each use.
2. Never check for leaks with a match or open flame.
3. Do not store of use gasoline or other flammable vapours and liquids in the vicinity of
this or any other appliance.
4. Any gas cylinder not connected for use shall not be stored in the vicinity of this or
any other appliance.
Precautions:
• Retain this manual for future reference.
• Use outdoors only.
• Warning accessible parts may be very hot. Keep young children away.
• Do not move the appliance during use.
• Turn off the gas supply at the gas cylinder after use.
• Do not modify the appliance.
• This appliance must be kept away from flammable materials during use.
• The regulator and hose must be connected correctly to the appliance. A spanner
must be used to tighten the nut onto the connection thread.
Read the instructions before using the appliance.
ENGLISH
Hersteller Bergner Europe S.L.
Hinzufügen Ctra. del Aeropuerto Km. 4, Edificio San Lamberto,
Planta 3, 50011 Zaragoza, Spanien
Modell BGMP-9169-BK-ES / BGMP-9169-BK-DE /
BGMP-9169-BK-IT
Gerätetyp Gas-Pizzaofen
Gaskategorie I3+(28-30/37) I3B/P(30) I3B/P(50)
Gasart Butan Propan
28-30 mbar 37 mbar 28-30 mbar 50 mbar
4.0 kW
(290 g/h)
4.0 kW
(285 g/h)
4.0 kW
(290 g/h)
4.0 kW
(290 g/h)
BE, FR, IT, LU, IE, GB, GR, PT,
ES, CY, CZ, LT, SK, CH, SI and
LV
LU, NL, DK, FI,
SE, CY, CZ,
EE, LT, MT,
SK, SI, BG, IS,
NO, TR, HR,
RO, IT, HU
and LV
DE, AT, CH,
SK, LU
Butan, Propan oder
deren Mischungen
Gasdruck
Nennwärmeleis-
tung gesamt
Bestimmung-
sländer
P.I.N Code: 2531DM-0118
S/N
Nur im Freien verwenden.
Lesen Sie vor dem Gebrauch
des Geräts die Anleitung.
WARNUNG
die zugänglichen Teile können
sehr heiß werden. Halten Sie
kleine Kinder fern.
HERGESTELLT IN CHINA
Bauteile
Hauptbrenner
Nebenbrenner
28-30mbar
Öffnungsgröße
0.8mm
0.58mm
50mbar
0.7mm
0.5mm
11 12
-
 1
1
-
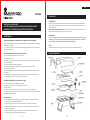 2
2
-
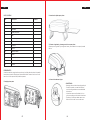 3
3
-
 4
4
-
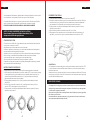 5
5
-
 6
6
-
 7
7
-
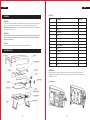 8
8
-
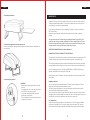 9
9
-
 10
10
-
 11
11
-
 12
12
-
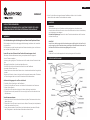 13
13
-
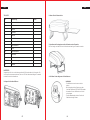 14
14
-
 15
15
-
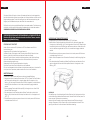 16
16
-
 17
17
-
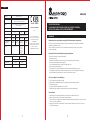 18
18


Masterpro BGMP-9169-BK-ES Pizza Oven Manual de usuario
- Tipo
- Manual de usuario
en otros idiomas
Otros documentos
-
Create 131199-271795 Manual de usuario
-
Create Pizza Maker Pro Gas Portable Oven Manual de usuario
-
Infiniton PG-HF2 El manual del propietario
-
-
Morso Forno Spin Instrucciones de operación
-
Barbecook CAMPO INOX El manual del propietario
-
Ooni Koda Manual de usuario
-
GGM Gastro GEP4#N El manual del propietario
-
Electrolux GT60X
-
 COOK N EAT BARBECUE 3 bruleurs + plancha El manual del propietario
