
HP 10BT/100TX NightDIRECTOR/100
Ethernet Card
Installation Guide
HP 10BT/100TX NightDIRECTOR/100
Ethernet-Karte
Installationshandbuch
Guide d’installation de la carte
Ethernet
HP 10BT/100TX NightDIRECTOR/100
Guía de Instalación de la Tarjeta
HP 10BT/100TX NightDIRECTOR/100
Ethernet
Léase esto primero
Guida di installazione
della scheda Ethernet
HP 10BT/100TX NightDIRECTOR/100
book.bk : Frontcov.fb4 Page i Monday, October 13, 1997 6:08 PM

book.bk : Frontcov.fb4 Page ii Monday, October 13, 1997 6:08 PM

English
English . . . . . . . . . . . . . . . . . . . . . . . . . . . Chapter 1
Deutsch . . . . . . . . . . . . . . . . . . . . . . . . . . . Kapitel 2
Français. . . . . . . . . . . . . . . . . . . . . . . . . . . Chapitre 3
Español . . . . . . . . . . . . . . . . . . . . . . . . . . . Capítulo 4
Italiano . . . . . . . . . . . . . . . . . . . . . . . . . . . Capitolo 5
book.bk : glob_toc.fb Page iii Monday, October 13, 1997 6:08 PM

English
book.bk : glob_toc.fb Page iv Monday, October 13, 1997 6:08 PM

1
HP 10BT/100TX NightDIRECTOR/100
Ethernet Card Installation Guide
book.bk : title.fb Page i Monday, October 13, 1997 6:08 PM

ii EnglishFrancais
Notice
The information contained in this document is subject to change
without notice.
Hewlett-Packard makes no warranty of any kind with regard to this
material, including, but not limited to, the implied warranties of
merchantability and fitness for a particular purpose. Hewlett-Packard
shall not be liable for errors contained herein or for incidental or
consequential damages in connection with the furnishing, performance,
or use of this material.
Hewlett-Packard assumes no responsibility for the use or reliability of
its software on equipment that is not furnished by Hewlett-Packard.
This document contains proprietary information that is protected by
copyright. All rights are reserved. No part of this document may be
photocopied, reproduced, or translated to another language without the
prior written consent of Hewlett-Packard Company.
Acrobat
®
and Adobe
®
are trademarks of Adobe Systems Incorporated
and may be registered in certain jurisdictions.
CompuServe
TM
is a U.S. trademark of CompuServe, Inc.
Magic Packet
TM
and PCnet
TM
are U.S. trademarks of AMD Corporation.
Microsoft
®
, NT
®
, and Windows
®
are U.S. registered trademarks of
Microsoft Corporation.
Hewlett-Packard France
38053 Grenoble Cedex 9
France
1997 Hewlett-Packard Company
book.bk : title.fb Page ii Monday, October 13, 1997 6:08 PM

Contents
English iii
1 Installing the HP LAN Card
What’s in the Service Pack? . . . . . . . . . . . . . . . . . . . . . . . . . . . . . . . . . . 2
Installation Requirements. . . . . . . . . . . . . . . . . . . . . . . . . . . . . . . . . . . . 3
Overview of the Installation Procedure . . . . . . . . . . . . . . . . . . . . . . . . 5
Pre-installation Procedure . . . . . . . . . . . . . . . . . . . . . . . . . . . . . . . . . . . 6
Pre-installation on a Windows 95 System . . . . . . . . . . . . . . . . . . . . . . . . . . 6
Pre-installation on a Windows NT 4.0 System . . . . . . . . . . . . . . . . . . . . . . 6
Installing the HP LAN Card . . . . . . . . . . . . . . . . . . . . . . . . . . . . . . . . . . 8
Updating LAN-specific Fields in the HP PC Setup Utility . . . . . . . . . 9
Post-installation Procedure . . . . . . . . . . . . . . . . . . . . . . . . . . . . . . . . . 10
Post-installation on a Windows 95 System . . . . . . . . . . . . . . . . . . . . . . . . 10
Post-installation on a Windows NT 4.0 System . . . . . . . . . . . . . . . . . . . . 10
Connecting to a Network . . . . . . . . . . . . . . . . . . . . . . . . . . . . . . . . . . . 11
Checking the Installation . . . . . . . . . . . . . . . . . . . . . . . . . . . . . . . . . . . 11
Troubleshooting. . . . . . . . . . . . . . . . . . . . . . . . . . . . . . . . . . . . . . . . . . . 12
HP Support Services . . . . . . . . . . . . . . . . . . . . . . . . . . . . . . . . . . . . . . . 13
HP LAN Card Specifications . . . . . . . . . . . . . . . . . . . . . . . . . . . . . . . . 14
Physical Layout . . . . . . . . . . . . . . . . . . . . . . . . . . . . . . . . . . . . . . . . . . . . . 14
Hardware Features . . . . . . . . . . . . . . . . . . . . . . . . . . . . . . . . . . . . . . . . . . 14
Software Features . . . . . . . . . . . . . . . . . . . . . . . . . . . . . . . . . . . . . . . . . . . 14
Technical Specifications of the HP LAN Card . . . . . . . . . . . . . . . . . . . . . 15
book.bk : book.toc Page iii Monday, October 13, 1997 6:08 PM

iv English
Regulatory Information . . . . . . . . . . . . . . . . . . . . . . . . . . . . . . . . . . . . 16
FCC (for USA only). . . . . . . . . . . . . . . . . . . . . . . . . . . . . . . . . . . . . . . . . . 17
Notice for Canada . . . . . . . . . . . . . . . . . . . . . . . . . . . . . . . . . . . . . . . . . . . 17
Hardware Warranty . . . . . . . . . . . . . . . . . . . . . . . . . . . . . . . . . . . . . . . 18
book.bk : book.toc Page iv Monday, October 13, 1997 6:08 PM

1
Installing the HP LAN Card
book.bk : chapter.fb Page 1 Monday, October 13, 1997 6:08 PM

1 Installing the HP LAN Card
What’s in the Service Pack?
2English
What’s in the Service Pack?
The service pack contains:
• 10 HP LAN cards (10BT/100TX)
• A set of diskettes:
❒ one HP LAN setup diskette
❒ two HP LAN driver diskettes
❒ two Adobe
®
Acrobat
®
Reader diskettes (Version 2.2)
Use Acrobat Reader to read the online Network Administrator’s
guide (in English only) available on one of the HP LAN drivers
diskettes. The Network Administrator’s guide is for advanced
users only.
• 10 external start cables
• This Installation Guide.
book.bk : chapter.fb Page 2 Monday, October 13, 1997 6:08 PM

English 3
1 Installing the HP LAN Card
Installation Requirements
Installation Requirements
Supported Platforms The HP LAN accessory kit is supported by HP Vectra VE4 PCs and
Kayak XA, XU and XW PC Workstations, running the following
operating systems (in English, French, German, Spanish or Italian):
• Windows 95 (all models except Kayak XW, Kayak XU 6/266
FastRAID and Kayak XU 6/300 FastRAID)
• Windows NT 4.0 (all models)
Number of Network
Cards Supported
The HP LAN card installation program supports a maximum of one LAN
card only per PC. If you want to install the HP LAN card in a PC which
already has a LAN card installed, you must install the HP LAN card
software manually. Information on how to do this is included in a
readme.txt file on one of the drivers diskettes in the kit (the PC’s
operating system determines which diskette contains the appropriate
readme.txt file).
Only one HP integrated LAN card is supported per PC. This is because
HP PCs have only one External Start connector on the system board.
Booting/Starting from
Diskette Drive
The PC must be able to boot from the diskette drive. This feature is
configured in the HP PC Setup utility, which is accessed by pressing
during the PC’s startup routine. The location of the setting in the HP PC
Setup utility is typically Security
➜Boot Devices Security➜Start from
Floppy.
NT Service Pack If an NT service pack is already installed on the PC, it must be re-
installed after the HP LAN card and software is installed.
For NT4.0 systems, the HP LAN card installation program does not
work on Danish, Dutch, Italian or Norwegian systems where NT service
pack 2 (SP2) is already installed. Service pack 3 (SP3) or higher must
be installed before the HP LAN card installation program is run.
book.bk : chapter.fb Page 3 Monday, October 13, 1997 6:08 PM

1 Installing the HP LAN Card
Installation Requirements
4English
Default Configuration The LAN card installation program’s default configuration is: client for
Microsoft
®
Networks, IPX, NetBEUI and NDIS. If you want to obtain a
different configuration you must install the HP LAN card software
manually. Information on how to do this is included in a readme.txt file
on one of the drivers diskettes in the kit (the PC’s operating system
determines which diskette contains the appropriate readme.txt file).
HP LAN Setup Diskette The HP LAN Setup diskette must not be write protected during the HP
LAN card installation process.
Operating System
Master Diskettes
The HP LAN card installation program may need to access some of the
operating system’s files. You should have the master diskettes available.
book.bk : chapter.fb Page 4 Monday, October 13, 1997 6:08 PM

English 5
1 Installing the HP LAN Card
Overview of the Installation Procedure
Overview of the Installation Procedure
CAUTION Make sure that you read the section entitled “Installation
Requirements” on the previous two pages before you install the HP LAN
card and software.
Installing the HP LAN card is a 4-stage process. You need to:
1 Carry out the pre-installation steps.
2 Install the HP LAN card.
3 Update fields in the HP PC Setup utility.
4 Carry out the post-installation steps.
Pre-installation The pre-installation stage involves:
• Running the HP LAN setup program.
• Re-starting the PC to update the BIOS. The installation program
performs this task automatically.
You must carry out the pre-installation before you physically install the
HP LAN card in the PC.
Installing the HP LAN
Card
This is when you physically install the HP LAN card in a free PCI slot in
the PC. You can install the card in a minitower or in a desktop model.
Updating LAN-Specific
Fields in the HP PC
Setup Utility
You need to check that all the LAN-specific fields in the HP PC Setup
utility are correctly set to enable the HP LAN card to function.
Post-installation During this stage, the installation program performs a number of checks
on the PC and, if necessary, updates some software components before
letting the operating system install the HP LAN drivers.
book.bk : chapter.fb Page 5 Monday, October 13, 1997 6:08 PM

1 Installing the HP LAN Card
Pre-installation Procedure
6English
Pre-installation Procedure
CAUTION Perform the pre-installation before you physically install the HP LAN
card in the PC.
Pre-installation on a Windows 95 System
1 With Windows 95 running, insert the HP LAN Setup diskette into the
diskette drive.
2 Click Start, and then Run.... The Run dialog box opens.
3 In the command line, type a:\setup and click OK. A network
setup dialog box opens.
4 Click Next. A second network setup dialog box opens.
5 Click Finish. The PC reboots under DOS and displays a message
asking you whether there is another LAN card already installed.
6 Type n, then remove the HP LAN Setup diskette from the diskette
drive and turn off the PC.
7 Now go to “Installing the HP LAN Card” on page 8.
Pre-installation on a Windows NT 4.0 System
1 With Windows NT running, insert the HP LAN Setup diskette into
the diskette drive.
2 Click Start, then Run....
3 In the command line, type a:\setup and click OK. An account
information dialog box opens.
4 Enter the name of an account which is a member of the
administrator group, and the corresponding password. If you are
already logged on with administrator’s rights, the field for the
account name is automatically filled in with your account name.
5 Click Next. A dialog box is displayed.
book.bk : chapter.fb Page 6 Monday, October 13, 1997 6:08 PM

English 7
1 Installing the HP LAN Card
Pre-installation Procedure
6 Click Finish. The PC reboots under DOS and displays a message
asking you whether there is another LAN card already installed.
7 Type n, then remove the HP LAN Setup diskette from the diskette
drive and turn off the PC.
8 Now go to “Installing the HP LAN Card” on page 8.
book.bk : chapter.fb Page 7 Monday, October 13, 1997 6:08 PM

1 Installing the HP LAN Card
Installing the HP LAN Card
8English
Installing the HP LAN Card
For complete information on how to install an accessory card (or
board), refer to your PC User’s Guide. The following steps are given as
a guide.
1 With the PC turned off, disconnect the power cord and any
connection to a telecommunications network, and then remove the
cover.
2 Depending on the PC model, you may need to remove the accessory
slot’s retaining bracket, which can be found at the back of the PC.
3 Remove the slot cover.
4 Connect the External Start cable and, without bending it, insert the
card into the accessory slot.
5 Secure the card by replacing the slot cover screw or the retaining
bracket and its screw, as appropriate for the PC.
6 Replace the cover. Reconnect the power cord and any connection to
a telecommunications network.
The card may be installed in a minitower
model or in a desktop model.
Refer to “HP LAN Card Specifications”
on page 14 for the position of the
External Start connector on the HP LAN
card. Refer to the PC’s user or technical
documentation for the position of the
External Start connector on the system
board.
book.bk : chapter.fb Page 8 Monday, October 13, 1997 6:08 PM

English 9
1 Installing the HP LAN Card
Updating LAN-specific Fields in the HP PC Setup Utility
Updating LAN-specific Fields in the HP PC Setup Utility
Having physically installed the HP LAN card in the PC, you now need to
check that the BIOS is configured to use the card. To do this you need
to use the HP PC Setup utility.
Starting the HP PC
Setup Utility
1 Restart the PC.
2 Press when
F2=Setup is displayed on the screen during the PC’s
startup routine. The opening window of the HP PC Setup utility is
displayed.
Using the HP PC Setup
Utility
Refer to the User’s Guide for the PC to find out how to navigate through
the HP PC Setup utility and how to make changes to fields.
Which Fields Need
Updating?
You need to check, and update if necessary, all the fields that are
LAN-related.
The User’s Guide supplied with the PC should contain a section
explaining how to configure a LAN interface. The bulleted list given
below should be used as a guideline. The field names used in your
version of the Setup program may be slightly different to those shown
below. Refer to the PCs User’s Guide for more information.
• Check that the integrated LAN interface is enabled
(Advanced
➜Integrated Network Interface➜Integrated Ethernet
Interface [Enabled]).
• Check that the PC can be started (booted and logged on) from the
network (Security
➜Boot Devices Security➜Start from Network
[Enabled]).
• Check that the PC can be woken up from the network
(Power
➜Suspend Wakeup➜Integrated Network [Enabled]).
• Check that the PC can be powered on from the network
(Power
➜Power-On➜Integrated Network [Enabled]).
book.bk : chapter.fb Page 9 Monday, October 13, 1997 6:08 PM

1 Installing the HP LAN Card
Post-installation Procedure
10English
Post-installation Procedure
CAUTION Make sure that you have installed the HP LAN card before you perform
the post-installation step.
Post-installation on a Windows 95 System
1 Restart the PC. Windows 95 automatically detects, and installs the
software for, the HP LAN card. You may be asked to insert one of the
Windows 95 installation diskettes.
2 Restart your PC when prompted to do so. Remember to remove the
HP LAN Setup diskette before you do this.
The HP LAN card is now ready to use.
Post-installation on a Windows NT 4.0 System
1 Restart the PC and start Windows. You do not need to
press ++ to log on.
2 When prompted to do so, insert the HP LAN Setup diskette into the
diskette drive, and click OK. The setup wizard starts, and displays a
dialog box indicating that the PC is ready to install the HP LAN card.
3 Type the path to the NT master disk (C:\I386 if the operating system
files were copied to the hard disk during the installation of Windows
NT), then click Next. The installation of the HP LAN card starts
automatically. When the installation is complete, the last page of the
wizard is displayed.
4 Click Finish to end the wizard.
5 Restart your PC when prompted to do so. Remember to remove the
HP LAN Setup diskette before you do this.
CAUTION If a service pack was already installed on the PC before the HP LAN card
was installed, the service pack must be re-installed before the HP LAN
card will function.
The HP LAN card is now ready to use.
book.bk : chapter.fb Page 10 Monday, October 13, 1997 6:08 PM

English 11
1 Installing the HP LAN Card
Connecting to a Network
Connecting to a Network
Connect the network cable to the RJ-45 UTP (Unshielded Twisted
Pair) LAN connector. The LAN card supports both 10 Mbits/s and
100 Mbits/s operation.
Remote Wake Up
(RWU) and Remote
Power On (RPO)
The HP LAN card has the ability to power up the PC upon receipt of a
special sequence (known as a Magic Packet
TM
) from the network.
The RWU mode allows the PC to resume normal functioning when it is
in sleep (suspend) mode.
The RPO mode allows the PC to start when it is switched off.
Checking the Installation
Test whether the HP LAN card functions on the network by finding
another network device or performing a network operation. If it does
not work correctly, refer to “Troubleshooting” on page 12.
10BT/100TX
Connector
book.bk : chapter.fb Page 11 Monday, October 13, 1997 6:08 PM

1 Installing the HP LAN Card
Troubleshooting
12English
Troubleshooting
The HP LAN card does
not work
• Check that the installation requirements have been adhered to (refer
to page 3).
• Check that:
❒ The pre-installation steps have been followed (refer to page 6).
❒ The HP LAN card is correctly installed (refer to page 8).
❒ The LAN-specific fields in the HP PC Setup utility are correctly
set (refer to page 9).
❒ The post-installation steps have been followed (refer to page 10).
• Check the network cables. In particular, check that the network
cable connections are secure and that the cables are not damaged. If
you find any loose connections or damaged cables, fix them and then
see if your PC can communicate on the network.
• Check with the network administrator whether the network is active.
The light on the HP LAN card’s rear panel is off when there is no
autonegotiation response, for example, when the LAN cable is not
connected to the network HUB.
• Check that the PCI slot in which the HP LAN card is installed is
enabled in the HP PC Setup utility (Advanced
➜PCI Configuration).
The PC cannot be
started or woken up
from the network
• Check that the external start connector cable is connected to the HP
LAN card and to the PC’s system board.
• Check that the LAN-specific fields in the HP PC Setup utility are
correctly set (refer to page 9).
book.bk : chapter.fb Page 12 Monday, October 13, 1997 6:08 PM

English 13
1 Installing the HP LAN Card
HP Support Services
HP Support Services
Drivers and utilities are available from the following HP Support
Services:
• HP World Wide Web site:
http://www.hp.com/go/pcsupport
OR
http://www.hp.com/go/kayaksupport
• HP Forum on CompuServe
TM
:
At the CompuServe prompt (!), type GO HP.
• HP Forum on America Online:
Select Keyword Search from the menu, type HP and press .
• HP BBS Library:
Worldwide number: +1 (208) 344 1691.
book.bk : chapter.fb Page 13 Monday, October 13, 1997 6:08 PM

1 Installing the HP LAN Card
HP LAN Card Specifications
14English
HP LAN Card Specifications
Physical Layout
Hardware Features
• Fits in a standard PCI slot.
• One 10BT/100TX port dedicated to the support of Magic Packet,
supporting Remote Power On (RPO) and Remote Wake Up (RWU).
• One Flash socket for remote start up and anti-virus checking.
Software Features
BIOS Functions
• BOOTROM. This is a special BIOS which enables the PC to boot from
a network resource.
• RPO/RWU support.
External
Start
Connector
AMD PCnet
TM
-FAST chip
Flash
Socket
10BT/100TX
Connector
book.bk : chapter.fb Page 14 Monday, October 13, 1997 6:08 PM

English 15
1 Installing the HP LAN Card
HP LAN Card Specifications
Technical Specifications of the HP LAN Card
AMD PCnet-FAST Chip
• Compatible with ISO 8802.3 and Ethernet standards.
• Direct interface to PCI.
• Burst support.
• 32-bit Bus Master architecture with integrated DMA buffer
management.
• Full duplex.
• Magic Packet support.
• Optional Boot PROM for disk-less node application.
• Automatic port selection.
Flash Support • Disk-less node application. This enables booting from a server on the
network instead of from a system resource (hard disk, diskette drive
or a CD-ROM drive).
• Virus Scan support via the Flash socket (not part of the HP LAN kit).
• TCP/IP Boot Flash support (not part of the HP LAN kit).
External Start
Connector
• RPO (when the PC is turned off) and RWU (when the PC is in sleep
mode) signals are supplied through this connector.
LAN Connection Status
LED (Light)
There is an LED on the rear of the HP LAN card which indicates the
LAN connection status as follows:
• Off - when there is no autonegotiation response (for example, when
the LAN cable is not connected to the network HUB).
• Blinking - during autonegotiation.
• Green (ON) - the connection has passed the autonegotiation and a
link has been established between the HP LAN card and the network
HUB/Switch.
book.bk : chapter.fb Page 15 Monday, October 13, 1997 6:08 PM

1 Installing the HP LAN Card
Regulatory Information
16English
Regulatory Information
DECLARATION OF CONFORMITY
according to ISO/IEC Guide 22 and EN 45014
Manufacturer’s Name: HEWLETT-PACKARD
Manufacturer’s Address: 5 Avenue Raymond Chanas
38320 Eybens, FRANCE
Declares that the product:
Product Name: D3999A
Conforms to the following Product Specifications:
SAFETY
International: IEC 950: 1991+A1+A2 +A3 + A4
Europe: EN 60950: 1992+A1+A2 + A3
EMC
CISPR 22: 1993 /EN 55022: 1994 Class B
EN 50082-1: 1992
IEC 801-2: 1992 / prEN 55024-2: 1992 - 4 kV CD, 8 kV AD
IEC 801-3: 1984 / prEN 55024-3: 1991 - 3 V/m
IEC 801-4: 1988 / prEN 55024-4: 1992 - 0.5 kV Signal Lines,
1 kV Power Lines
IEC 555-2:1982 + A1:1985 / EN 60555-2:1987
IEC 1000-3-3:1994 / EN 61000-3-3:1995
Supplementary information:
The product herewith complies with the requirements of the EMC Directive
89/336/EEC and the Low Voltage Directive 73/23/EEC, both amended by Directive 93/68/EEC, and carries
the CE marking accordingly.
Grenoble Jean-Marc JULIA
September 1997 Product Quality Manager
book.bk : chapter.fb Page 16 Monday, October 13, 1997 6:08 PM

English 17
1 Installing the HP LAN Card
Regulatory Information
FCC (for USA only)
Federal Communications Commission Radio Frequency Interference Statement
Warning:
This equipment has been tested and found to comply with the limits for a Class B digital device, pursuant to Part
15 of the FCC Rules. These limits are designed to provide reasonable protection against harmful interference in
a residential installation. This equipment generates and uses, and can radiate radio frequency energy and, if not
installed and used in accordance with the instructions, may cause harmful interference to radio
communications. However, there is no guarantee that interference will not occur in a particular installation. If
this equipment does cause harmful interference to radio or television reception, which can be determined by
turning the equipment off and on, the user is encouraged to correct the interference by one or more of the
following measures:
•reorient or relocate the receiving antenna
•increase the separation between the equipment and the receiver
•connect the equipment into an outlet on a circuit different from that to which the receiver is connected
•consult the dealer or an experienced radio/TV technician for help.
Hewlett-Packard’s FCC Compliance Tests were conducted with HP-supported peripheral devices and HP
shielded cables, such as those you receive with your system. Changes or modifications not expressly approved
by Hewlett-Packard could void the user’s authority to operate the equipment.
Notice for Canada
This Class B digital apparatus meets all requirements of the Canadian Interference-Causing Equipment
Regulations.
Cet appareil numérique de la Class B respecte toutes les exigences du Règlement sur le matériel brouilleur du
Canada.
book.bk : chapter.fb Page 17 Monday, October 13, 1997 6:08 PM

1 Installing the HP LAN Card
Hardware Warranty
18English
Hardware Warranty
This HP accessory is covered by a limited hardware warranty for a period of one year from the date of purchase
by the original end-user. The type of service provided is return to an HP or repair-authorized reseller service-
center.
At Hewlett-Packard's discretion, a defective accessory will be repaired or replaced by a new unit, either of the
same type or of an equivalent model.
If this accessory is purchased and used together with an HP Vectra personal computer or an HP Kayak PC
workstation, it will be covered by the warranty of this computer or workstation, under the same conditions of
service and duration.
Please, refer to the warranty statement provided with your HP personal computer for warranty limitations,
customer responsibilities and other terms and conditions.
book.bk : chapter.fb Page 18 Monday, October 13, 1997 6:08 PM

2
HP 100BT/100TX NightDIRECTOR/100
Ethernet-Karte Installationshandbuch
book.bk : TITLE.FB Page i Monday, October 13, 1997 6:08 PM

ii DeutschFrancais
Hinweis
Änderungen vorbehalten.
Hewlett-Packard übernimmt keinerlei Verantwortung für den Inhalt
dieser Dokumentation und schließt insbesondere direkte und indirekte
Verantwortung für die Marktgängigkeit oder die Eignung für bestimmte
Einsatzzwecke aus. Hewlett-Packard übernimmt keine Haftung für
Fehler, die in diesem Handbuch enthalten sind, oder für zufällige oder
Folgeschäden im Zusammenhang mit der Lieferung, Leistungsfähigkeit
oder dem Gebrauch dieses Handbuchs.
Hewlett-Packard übernimmt keine Verantwortung für den Gebrauch
oder die Zuverlässigkeit seiner Software auf Geräten, die nicht von
Hewlett-Packard geliefert wurden.
Diese Dokumentation ist urheberrechtlich geschützt. Alle Rechte
vorbehalten. Kein Teil dieser Dokumentation darf ohne vorherige
schriftliche Genehmigung von Hewlett-Packard fotokopiert,
reproduziert oder übersetzt werden.
Acrobat
®
und Adobe
®
sind - in bestimmten Ländern auch eingetragene
- Warenzeichen von Adobe System Incorporated.
CompuServe
TM
ist in den USA ein Warenzeichen von CompuServe, Inc.
Magic Packet
TM
und PCnet
TM
sind in den USA Warenzeichen von AMD
Corporation.
Microsoft
®
, NT
®
und Windows
®
sind in den USA eingetragene
Warenzeichen von Microsoft Corporation.
Hewlett-Packard France
38053 Grenoble Cedex 9
France
1997 Hewlett-Packard Company
book.bk : TITLE.FB Page ii Monday, October 13, 1997 6:08 PM

Inhaltsverzeichnis
Deutsch iii
2 Installieren der HP LAN-Karte
Inhalt des Service-Pack. . . . . . . . . . . . . . . . . . . . . . . . . . . . . . . . . . . . . . 2
Installationsanforderungen . . . . . . . . . . . . . . . . . . . . . . . . . . . . . . . . . . 3
Überblick über die Installationsprozedur . . . . . . . . . . . . . . . . . . . . . . 5
Vorbereiten der Installation . . . . . . . . . . . . . . . . . . . . . . . . . . . . . . . . . . 6
Vorbereiten der Installation auf einem System mit Windows 95. . . . . . . . 6
Vorbereiten der Installation auf einem System mit WindowsNT4.0 . . . . 6
Installieren der HP LAN-Karte . . . . . . . . . . . . . . . . . . . . . . . . . . . . . . . . 8
Aktualisieren LAN-spezifischer Felder im HP PC Setup-Programm. 9
Abschließen der Installation . . . . . . . . . . . . . . . . . . . . . . . . . . . . . . . . 11
Abschließen der Installation auf einem System mit Windows95 . . . . . . 11
Abschließen der Installation auf einem System mit WindowsNT4.0. . . 11
Anschließen an ein Netzwerk . . . . . . . . . . . . . . . . . . . . . . . . . . . . . . . 13
Überprüfen der Installation . . . . . . . . . . . . . . . . . . . . . . . . . . . . . . . . . 13
Fehlerbehebung . . . . . . . . . . . . . . . . . . . . . . . . . . . . . . . . . . . . . . . . . . . 14
HP Unterstützungsdienste . . . . . . . . . . . . . . . . . . . . . . . . . . . . . . . . . . 15
Spezifikationen der HP LAN-Karte . . . . . . . . . . . . . . . . . . . . . . . . . . . 16
Physischer Aufbau . . . . . . . . . . . . . . . . . . . . . . . . . . . . . . . . . . . . . . . . . . . 16
Hardware-Eigenschaften . . . . . . . . . . . . . . . . . . . . . . . . . . . . . . . . . . . . . . 16
Software-Eigenschaften. . . . . . . . . . . . . . . . . . . . . . . . . . . . . . . . . . . . . . . 16
book.bk : BOOK.TOC Page iii Monday, October 13, 1997 6:08 PM

iv Deutsch
Technische Daten der HP LAN-Karte . . . . . . . . . . . . . . . . . . . . . . . . . . . 17
Wichtige Hinweise und Bestimmungen. . . . . . . . . . . . . . . . . . . . . . . 19
Hardware-Gewährleistung . . . . . . . . . . . . . . . . . . . . . . . . . . . . . . . . . 20
book.bk : BOOK.TOC Page iv Monday, October 13, 1997 6:08 PM

2
Installieren der HP LAN-Karte
book.bk : CHAPTER.FB Page 1 Monday, October 13, 1997 6:08 PM

2 Installieren der HP LAN-Karte
Inhalt des Service-Pack
2Deutsch
Inhalt des Service-Pack
Das Service-Pack enthält:
• 10 HP LAN-Karten (10BT/100TX)
• Einen Satz Disketten:
❒ eine HP LAN-Setup-Diskette
❒ zwei HP LAN-Treiberdisketten
❒ zwei Adobe
®
Acrobat
®
Reader-Disketten (Version 2.2)
Mit Acrobat Reader können Sie das Online-Handbuch “Network
Administrator’s Guide” (nur in Englisch) lesen, das auf einer der
HP LAN-Treiberdisketten enthalten ist. Dieses Handbuch ist nur
für erfahrene Benutzer bestimmt.
• 10 externe Startkabel
• Dieses Installationshandbuch
book.bk : CHAPTER.FB Page 2 Monday, October 13, 1997 6:08 PM

Deutsch 3
2 Installieren der HP LAN-Karte
Installationsanforderungen
Installationsanforderungen
Unterstützte
Plattformen
Das HP LAN-Zubehörkit wird von den HP Vectra VE4 PCs und von den
PC Workstations Kayak XA, XU und XW untern den folgenden
Betriebssystemen (in Deutsch, Englisch, Französisch, Italienisch oder
Spanisch) unterstützt:
• Windows 95 (alle Modelle außer Kayak XW, Kayak XU 6/266
FastRAID und Kayak XU 6/300 FastRAID)
• Windows NT 4.0 (alle Modelle)
Anzahl der
unterstützten
Netzwerkkarten
Das Installationsprogramm der HP LAN-Karte unterstützt maximal eine
LAN-Karte pro PC. Wenn Sie die HP LAN-Karte in einem PC installieren
möchten, der bereits mit einer LAN-Karte ausgestattet ist, müssen Sie
die Software zur HP LAN-Karte manuell installieren. Informationen
hierzu finden Sie in einer readme.txt-Datei auf einer der im Kit
enthaltenen Treiberdisketten (die Diskette mit der entsprechenden
readme.txt-Datei wird vom Betriebssystem des PC festgelegt).
Pro PC wird nur eine integrierte HP LAN-Karte unterstützt, weil auf der
Systemplatine von HP PCs nur ein Anschluß für externe Starts
vorhanden ist.
Booten/Starten vom
Diskettenlaufwerk
Dem PC muß das Starten vom Diskettenlaufwerk möglich sein. Diese
Funktion wird im HP PC Setup-Programm festgelegt. Dieses Programm
kann durch Drücken von während des Startvorgangs des PC
aufgerufen werden. Im HP PC Setup-Programm finden Sie die
entsprechende Einstellung in der Regel wie folgt:
Sicherheit
➜Stargeräteschutz➜Start von Diskette.
book.bk : CHAPTER.FB Page 3 Monday, October 13, 1997 6:08 PM

2 Installieren der HP LAN-Karte
Installationsanforderungen
4Deutsch
NT-Service-Pack Wenn auf dem PC bereits ein NT-Service-Pack installiert ist, muß dieser
nach der Installation der HP LAN-Karte und der dazugehörigen
Software erneut installiert werden.
Bei Systemen unter NT4.0 funktioniert das Installationsprogramm der
HP LAN-Karte nicht auf dänischen, italienischen, niederländischen
oder norwegischen Systemen, auf denen bereits das NT-Service-Pack 2
(SP2) installiert ist. Vor dem Start des Installationsprogramms der HP
LAN-Karte muß das Service-Pack 3 (SP3) oder höher installiert
werden.
Standardkonfiguration Standardmäßig ist das Installationsprogramm der HP LAN-Karte wie
folgt konfiguriert: Client für Microsoft
®
-Netzwerke, IPX, NetBEUI und
NDIS. Wenn Sie eine andere Konfiguration wünschen, müssen Sie die
Software der HP LAN-Karte manuell installieren. Informationen hierzu
finden Sie in einer readme.txt-Datei auf einer der im Kit enthaltenen
Treiberdisketten (die Diskette mit der entsprechenden readme.txt-
Datei wird vom Betriebssystem des PC festgelegt).
HP LAN-Setup-Diskette Die Diskette HP LAN Setup darf während der Installation der HP LAN-
Karte nicht schreibgeschützt sein.
Master-Disketten vom
Betriebssystem
Das Installationsprogramm der HP LAN-Karte muß möglicherweise auf
einige Dateien des Betriebssystems zugreifen. Die entsprechenden
Master-Disketten sollten griffbereit vorliegen.
book.bk : CHAPTER.FB Page 4 Monday, October 13, 1997 6:08 PM

Deutsch 5
2 Installieren der HP LAN-Karte
Überblick über die Installationsprozedur
Überblick über die Installationsprozedur
VORSICHT Lesen Sie unbedingt den Abschnitt “Installationsanforderungen” auf
den beiden vorhergehenden Seiten, bevor Sie die HP LAN-Karte und die
entsprechende Software installieren.
Die Installation der HP LAN-Karte erfolgt in den nachstehenden vier
Schritten:
1 Vorbereiten der Installation
2 Installieren der HP LAN-Karte
3 Aktualisieren der Felder im HP PC Setup-Programm
4 Abschließen der Installation
Vorbereiten der
Installation
Die Installation wird wie folgt vorbereitet:
• Ausführen des HP LAN-Setup-Programms
• Neustarten des PC zur Aktualisierung des BIOS. Diese Aufgabe wird
vom Installationsprogramm automatisch durchgeführt.
Sie müssen die Vorbereitung der Installation vor der eigentlichen
Installation der HP LAN-Karte im PC vornehmen.
Installieren der
HP LAN-Karte
Dies erfolgt, wenn Sie die HP LAN-Karte physisch in einem freien PCI-
Steckplatz im PC installieren. Die Karte kann sowohl in einem
Minitower-Modell als auch in einem Desktop-Modell installiert werden.
Aktualisieren der LAN-
spezifischen Felder im
HP PC Setup-Programm
Sie müssen überprüfen, ob im HP PC Setup-Programm alle LAN-
spezifischen Felder korrekt eingestellt sind, um die Funktion der
HPLAN-Karte zu ermöglichen.
Abschließen der
Installation
In diesem Schritt führt das Installationsprogramm mehrere Tests am PC
durch und aktualisiert einige Software-Komponenten (falls
erforderlich), bevor es vom Betriebssystem die HP LAN-Treiber
installieren läßt.
book.bk : CHAPTER.FB Page 5 Monday, October 13, 1997 6:08 PM

2 Installieren der HP LAN-Karte
Vorbereiten der Installation
6Deutsch
Vorbereiten der Installation
VORSICHT Führen Sie die Vorbereitung der Installation durch, bevor Sie die
HPLAN-Karte im PC physisch installieren.
Vorbereiten der Installation auf einem System mit Windows 95
1 Während Windows 95 aktiv ist, legen Sie die Diskette HP LAN Setup
im Diskettenlaufwerk ein.
2 Klicken Sie auf “Start” und anschließen auf “Ausführen...”.
3 Geben Sie in der Befehlszeile a:\setup ein, und klicken Sie dann
auf OK. Es erscheint ein Dialogfenster für das Netzwerk-Setup.
4 Klicken Sie auf “Weiter”. Ein zweites Dialogfenster für das Netzwerk-
Setup erscheint.
5 Klicken Sie auf “Fertigstellen”. Der PC startet neu unter DOS und
zeigt eine Meldung an, in der Sie gefragt werden, ob bereits eine
andere LAN-Karte installiert ist.
6 Geben Sie n ein. Nehmen Sie die Diskette HP LAN Setup aus dem
Diskettenlaufwerk, und schalten Sie dann den PC aus.
7 Fahren Sie jetzt mit dem Abschnitt “Installieren der HP LAN-Karte”
auf Seite 8 fort.
Vorbereiten der Installation auf einem System mit
WindowsNT4.0
1 Während Windows NT aktiv ist, legen Sie die Diskette HP LAN Setup
im Diskettenlaufwerk ein.
2 Klicken Sie auf “Start” und anschließen auf “Ausführen...”.
3 Geben Sie in der Befehlszeile a:\setup ein, und klicken Sie dann
auf OK. Es erscheint ein Dialogfenster mit Informationen über
Benutzerkonten.
4 Geben Sie den Namen eines Kontos, das Mitglied der
Verwaltergruppe ist, und das entsprechende Kennwort ein. Wenn
Sie sich bereits mit Verwalterrechten angemeldet haben, erscheint
im Feld für den Kontennamen bereits automatisch Ihr Kontenname.
book.bk : CHAPTER.FB Page 6 Monday, October 13, 1997 6:08 PM

Deutsch 7
2 Installieren der HP LAN-Karte
Vorbereiten der Installation
5 Klicken Sie auf “Weiter”. Es erscheint ein Dialogfenster.
6 Klicken Sie auf “Beenden”. Der PC startet neu unter DOS und zeigt
eine Meldung an, in der Sie gefragt werden, ob bereits eine andere
LAN-Karte installiert ist.
7 Geben Sie n ein. Nehmen Sie die Diskette HP LAN Setup aus dem
Diskettenlaufwerk, und schalten Sie dann den PC aus.
8 Fahren Sie jetzt mit dem Abschnitt “Installieren der HP LAN-Karte”
auf Seite 8 fort.
book.bk : CHAPTER.FB Page 7 Monday, October 13, 1997 6:08 PM

2 Installieren der HP LAN-Karte
Installieren der HP LAN-Karte
8Deutsch
Installieren der HP LAN-Karte
Umfassende Informationen zur Installation von Zubehörkarten (oder
anderen Karten) finden Sie im PC Benutzerhandbuch. Die folgenden
Schritte dienen als Richtlinie.
1 Wenn der PC ausgeschaltet ist, ziehen Sie das Netzkabel und alle
anderen Kabel zu einem Telekommunikationsnetz ab. Nehmen Sie
die Gehäuseabdeckung ab.
2 Abhängig von Ihrem PC-Modell müssen Sie möglicherweise die
Halterungsklammer des Zubehörsteckplatzes entfernen. Diese
befindet sich auf der Rückseite des PC.
3 Entfernen Sie die Steckplatzabdeckung.
4 Schließen Sie das Kabel zum externen Starten (“External Start”) an,
und setzen Sie die Karte in den Zubehörsteckplatz. Achten Sie
hierbei darauf, daß Sie die Karte nicht verbiegen.
5 Befestigen Sie die Karte mit den Schrauben der
Steckplatzabdeckung oder mit der Halterungsklammer und den
dazugehörigen Schrauben (entsprechend für Ihren PC).
6 Bringen Sie die Gehäuseabdeckung wieder an. Schließen Sie das
Netzkabel und alle anderen Kabel zu einem Telekommunikations-
netz wieder an.
Die Karte kann in einem Minitower- oder
in einem Desktop-Modell installiert
werden.
Die Anordnung des Anschlusses
“External Start” auf der HP LAN-Karte
können Sie dem Abschnitt
“Spezifikationen der HP LAN-Karte” auf
Seite 16 entnehmen. Informationen zur
Anordnung des Anschlusses “External
Start” auf der Systemplatine finden Sie
im Benutzerhandbuch zum PC.
book.bk : CHAPTER.FB Page 8 Monday, October 13, 1997 6:08 PM

Deutsch 9
2 Installieren der HP LAN-Karte
Aktualisieren LAN-spezifischer Felder im HP PC Setup-Programm
Aktualisieren LAN-spezifischer Felder im HP PC Setup-
Programm
Nachdem Sie die HP LAN-Karte physisch im PC installiert haben,
müssen Sie jetzt überprüfen, ob das BIOS für die Verwendung der
Karte konfiguriert ist. Hierfür müssen Sie das HP PC Setup-Programm
verwenden.
Starten des HP PC
Setup-Programms
1 Starten Sie den PC neu.
2 Drücken Sie , wenn während des Startvorgangs des PC am
Bildschirm die Meldung
F2=Setup erscheint. Es wird der
Begrüßungsbildschirm des HP PC Setup-Programms angezeigt.
Verwenden des HP PC
Setup-Programms
Informationen zum Navigieren im HP PC Setup-Programm und zum
Verändern von Feldinhalten finden Sie im Benutzerhandbuch zum PC.
Welche Felder müssen
aktualisiert werden?
Sie müssen alle LAN-bezogenen Felder überprüfen und ggf.
aktualisieren.
In dem mit dem PC gelieferten Benutzerhandbuch sollte ein Abschnitt
enthalten sein, in dem die Konfiguration von LAN-Schnittstellen
erläutert wird. Betrachten Sie die nachstehende Liste als Anhaltspunkt.
Die Feldnamen, die in Ihrer Version des Setup-Programms verwendet
werden, können sich von den hier genannten geringfügig
unterscheiden. Einzelheiten entnehmen Sie dem Benutzerhandbuch
Ihres PCs.
• Überprüfen Sie, ob die integrierte LAN-Schnittstelle aktiviert ist
(Erweitert
➜Integr. Netzwerkschnittstelle➜Interface Ethernet-
Schnittstelle [Aktiviert]).
• Überprüfen Sie, ob der PC über das Netzwerk angesprochen
(gestartet und angemeldet) werden kann
(Sicherheit
➜Startgerätschutz➜Start von Netzwerk [Aktiviert]).
book.bk : CHAPTER.FB Page 9 Monday, October 13, 1997 6:08 PM

2 Installieren der HP LAN-Karte
Aktualisieren LAN-spezifischer Felder im HP PC Setup-Programm
10Deutsch
•
Überprüfen Sie, ob der PC über das Netzwerk aktiviert werden kann
(Power (Netz)
➜Aussetz-Aktivierung➜Integr. Netzwerkschn.
[Aktiviert]).
• Überprüfen Sie, ob der PC über das Netzwerk eingeschaltet werden
kann (Power (Netz)
➜Einschalten➜Integr. Netzwerkschn.
[Aktiviert]).
book.bk : CHAPTER.FB Page 10 Monday, October 13, 1997 6:08 PM

Deutsch 11
2 Installieren der HP LAN-Karte
Abschließen der Installation
Abschließen der Installation
VORSICHT Stellen Sie sicher, daß Sie die HP LAN-Karte bereits installiert haben,
bevor Sie die Installation abschließen.
Abschließen der Installation auf einem System mit Windows95
1 Starten Sie den PC neu. Windows 95 erkennt automatisch die
HPLAN-Karte und installiert die dazugehörige Software. Eventuell
werden Sie dazu aufgefordert, eine der Installationsdisketten von
Windows 95 einzulegen.
2 Starten Sie Ihren PC neu, wenn Sie dazu aufgefordert werden.
Entnehmen Sie zuvor die Diskette HP LAN Setup aus dem
Laufwerk.
Die HP LAN-Karte ist jetzt betriebsbereit.
Abschließen der Installation auf einem System mit
WindowsNT4.0
1 Starten Sie den PC neu, und starten Sie Windows. Sie müssen
++ drücken, um sich anzumelden.
2 Wenn Sie dazu aufgefordert werden, legen Sie die Diskette
HPLANSetup im Diskettenlaufwerk ein, und klicken Sie auf OK. Es
wird der Setup-Assistent aufgerufen, und es erscheint ein
Dialogfenster. Dies weist darauf hin, daß der PC für die Installation
der HP LAN-Karte vorbereitet ist.
3 Geben Sie den Pfad zum NT-Master-Laufwerk ein (C:\I386, wenn die
Dateien des Betriebssystems während der Installation von
WindowsNT auf das Festplattenlaufwerk kopiert wurden). Klicken
Sie dann auf “Weiter”. Die Installation der LAN-Karte wird
automatisch gestartet. Nach Abschluß der Installation erscheint die
letzte Seite des Assistenten.
4 Klicken Sie auf “Beenden”, um den Assistenten zu verlassen.
Entf
book.bk : CHAPTER.FB Page 11 Monday, October 13, 1997 6:08 PM

2 Installieren der HP LAN-Karte
Abschließen der Installation
12Deutsch
5 Starten Sie Ihren PC neu, wenn Sie dazu aufgefordert werden.
Nehmen Sie zuvor die Diskette HP LAN Setup aus dem Laufwerk.
VORSICHT Wenn das Service-Pack bereits vor der Installation der HP LAN-Karte
auf dem PC installiert war, muß es erneut installiert werden, um die
Funktionsfähigkeit der HP LAN-Karte zu gewährleisten.
Die HP LAN-Karte ist jetzt betriebsbereit.
book.bk : CHAPTER.FB Page 12 Monday, October 13, 1997 6:08 PM

Deutsch 13
2 Installieren der HP LAN-Karte
Anschließen an ein Netzwerk
Anschließen an ein Netzwerk
Schließen Sie das Netzwerkkabel an einem der RJ-45 UTP (Unshielded
Twisted Pair) LAN-Anschlüsse an. Die HP LAN-Karte unterstützt einen
Betrieb mit 10 Mb/s und mit 100 Mb/s.
Remote Wake Up
(RWU, entferntes
Aktivieren) und Remote
Power On (RPO,
entferntes Einschalten)
Mit Hilfe der HP LAN-Karte kann der PC durch den Empfang einer
speziellen Befehlsfolge (die als Magic Packet
TM
bezeichnet wird) über
das Netzwerk eingeschaltet werden.
Der RWU-Modus ermöglicht es, daß der PC wieder den normalen
Betrieb aufnimmt, wenn sich dieser zuvor im Schlaf- (Aussetz-) Modus
befand.
Der RPO-Modus ermöglicht es, daß der PC gestartet wird, wenn er
zuvor ausgeschaltet wurde.
Überprüfen der Installation
Testen Sie, ob die HP LAN-Karte im Netzwerk funktioniert, indem Sie
ein anderes Netzwerkgerät auffinden oder eine Netzwerkoperation
durchführen. Wenn dies nicht korrekt funktioniert, lesen Sie den
nachfolgenden Abschnitt “Fehlerbehebung”.
10BT/100TX-
Anschlüsse
book.bk : CHAPTER.FB Page 13 Monday, October 13, 1997 6:08 PM

2 Installieren der HP LAN-Karte
Fehlerbehebung
14Deutsch
Fehlerbehebung
Die HP LAN-Karte
funktioniert nicht
• Überprüfen Sie, ob die Anforderungen der Installation erfüllt wurden
(siehe Seite 3).
• Überprüfen Sie die folgenden Punkte:
❒ Wurden die Schritte zur Vorbereitung der Installation beachtet
(siehe Seite 6)?
❒ Ist die HP LAN-Karte korrekt installiert (siehe Seite 8)?
❒ Sind die LAN-spezifischen Felder im HP PC Setup-Programm
korrekt eingestellt (siehe Seite 9)?
❒ Wurden die Schritte zum Abschließen der Installation beachtet
(siehe Seite 11)?
• Überprüfen Sie die Netzwerkkabel. Prüfen Sie insbesondere, ob die
Verbindungen der Netzwerkkabel fest sitzen und ob die Kabel nicht
beschädigt sind. Sichern Sie lockere Verbindungen und reparieren
Sie beschädigte Kabel. Kontrollieren Sie dann, ob zwischen Ihrem
PC und dem Netzwerk eine Kommunikation möglich ist.
• Überprüfen Sie mit dem Netzwerkverwalter, ob das Netzwerk aktiv
ist. An der rückseitigen Anschlußleiste der HP LAN-Karte leuchtet
die Anzeige, wenn keine Reaktion bei automatischem
Verbindungsaufbau erfolgt, zum Beispiel, wenn das LAN-Kabel nicht
an den Netzwerk-HUB angeschlossen ist.
• Überprüfen Sie, ob der PCI-Steckplatz, in dem die HP LAN-Karte
installiert ist, im HP PC Setup-Programm aktiviert ist
(Erweitert
➜PCI-Konfiguration).
Der PC kann über das
Netzwerk nicht
gestartet oder aktiviert
werden
• Überprüfen Sie, ob das Kabel für das externe Starten an der
HPLAN-Karte und an der Systemplatine des PC angeschlossen ist.
• Überprüfen Sie, ob die LAN-spezifischen Felder im HP PC Setup-
Programm korrekt eingestellt sind (siehe Seite 9).
book.bk : CHAPTER.FB Page 14 Monday, October 13, 1997 6:08 PM

Deutsch 15
2 Installieren der HP LAN-Karte
HP Unterstützungsdienste
HP Unterstützungsdienste
Über die folgenden HP Unterstützungsdienste sind Treiber und
Dienstprogramme verfügbar:
• HP World Wide Web Site:
http://www.hp.com/go/pcsupport
ODER
http://www.hp.com/go/kayaksupport
• HP Forum in CompuServe
TM
:
Geben Sie nach der CompuServe-Eingabeaufforderung (!) GO HP
ein.
• HP Forum in America Online:
Wählen Sie “Keyword Search” im Menü aus, und geben Sie HP ein.
Drücken Sie dann .
• HP BBS-Bibliothek:
Weltweit gültige Nummer: +1 (208) 344 1691
book.bk : CHAPTER.FB Page 15 Monday, October 13, 1997 6:08 PM

2 Installieren der HP LAN-Karte
Spezifikationen der HP LAN-Karte
16Deutsch
Spezifikationen der HP LAN-Karte
Physischer Aufbau
Hardware-Eigenschaften
• Kann in Standard-PCI-Steckplatz eingesetzt werden.
• Ein 10BT/100TX-Anschluß für die Unterstützung von Magic Packet,
mit Unterstützung von “Remote Power On” (RPO, entferntes
Einschalten) und “Remote Wake Up” (RWU, entferntes Aktivieren).
• Ein Flash-Sockel für entferntes Starten und Anti-Viren-Prüfung.
Software-Eigenschaften
BIOS-Funktionen
• BOOTROM. Dies ist ein spezielles BIOS, das das Starten des PC über
eine Netzwerk-Ressource ermöglicht.
• RPO/RWU-Unterstützung.
Anschluß für
externen
Start
AMD PCnet
TM
-FAST-Chip
Flash-
Sockel
10BT/100TX-
Anschluß
book.bk : CHAPTER.FB Page 16 Monday, October 13, 1997 6:08 PM

Deutsch 17
2 Installieren der HP LAN-Karte
Spezifikationen der HP LAN-Karte
Technische Daten der HP LAN-Karte
AMD PCnet-FAST-Chip
• Kompatibel mit ISO 8802.3- und Ethernet-Standards
• Direkte PCI-Schnittstelle
• Burst-Unterstützung
• 32-Bit-Bus-Master-Architektur mit integrierter DMA-Puffer-
Verwaltung
• Voll-Duplex
• Unterstützung von “Magic Packet”
• Optionaler Boot-PROM für Netzknotenanwendungen ohne
Plattenzugriff
• Automatische Anschlußauswahl
Flash-Unterstützung • Netzknotenanwendungen ohne Plattenzugriff. Diese Funktion
ermöglicht das Starten über einen Server im Netzwerk anstatt über
eine Systemressource (Festplatten-, Disketten- oder CD-ROM-
Laufwerk).
• Virus-Scan-Unterstützung via Flash-Sockel (nicht im HP LAN-Kit
enthalten)
• TCP/IP-Boot-Flash-Unterstützung (nicht im HP LAN-Kit enthalten)
Anschluß für externes
Starten
• Über diesen Anschluß werden RPO-Signale (wenn der PC
ausgeschaltet ist) und RWU-Signale (wenn sich der PC im
Schlafmodus befindet) gesendet.
book.bk : CHAPTER.FB Page 17 Monday, October 13, 1997 6:08 PM

2 Installieren der HP LAN-Karte
Spezifikationen der HP LAN-Karte
18Deutsch
LAN-
Verbindungsstatus-LED
(Leuchtdiode)
Auf der Rückseite der HP LAN-Karte befindet sich ein LED, das den
LAN-Verbindungsstatus wie folgt anzeigt:
• Aus - wenn beim automatischen Verbindungsaufbau keine Reaktion
erfolgt (zum Beispiel, wenn das LAN-Kabel nicht an den Netzwerk-
HUB angeschlossen ist).
• Blinken - während des automatischen Verbindungsaufbaus.
• Grün (EIN) - die automatische Verbindung wurde aufgebaut, und
zwischen der HP LAN-Karte und dem Netzwerk-HUB/Schalter
besteht eine Verbindung.
book.bk : CHAPTER.FB Page 18 Monday, October 13, 1997 6:08 PM

Deutsch 19
2 Installieren der HP LAN-Karte
Wichtige Hinweise und Bestimmungen
Wichtige Hinweise und Bestimmungen
KONFORMITÄTSERKLÄRUNG
entsprechend ISO/IEC Guide 22 und EN 45014
Name des Herstellers: HEWLETT-PACKARD
Anschrift des Herstellers: 5 Avenue Raymond Chanas
38320 Eybens, FRANCE
erklärt, daß das Produkt:
Produktname: D3999A
folgenden Produktspezifikationen entspricht:
SICHERHEIT
International: IEC 950: 1991+A1+A2 +A3 + A4
Europa: EN 60950: 1992+A1+A2 + A3
EMC
CISPR 22: 1993 /EN 55022: 1994 Klasse B
EN 50082-1: 1992
IEC 801-2: 1992 / prEN 55024-2: 1992 - 4 kV CD, 8 kV AD
IEC 801-3: 1984 / prEN 55024-3: 1991 - 3 V/m
IEC 801-4: 1988 / prEN 55024-4: 1992 - 0,5 kV Signalleitungen,
1 kV Netzleitungen
IEC 555-2:1982 + A1:1985 / EN 60555-2:1987
IEC 1000-3-3:1994 / EN 61000-3-3:1995
Weitere Information:
Das Produkt hält folgende Bestimmungen ein: Richtlinie 89/336/EWG über die elektro-
magnetische Verträglichkeit und die Niederspannungsrichtlinie 73/23/EWG, beide wurden durch die
Richtlinie 93/68/EWG ergänzt. Das Produkt trägt entsprechend das CE-Zeichen.
Grenoble Jean-Marc JULIA
September 1997 Qualitätswesen
book.bk : CHAPTER.FB Page 19 Monday, October 13, 1997 6:08 PM

2 Installieren der HP LAN-Karte
Hardware-Gewährleistung
20Deutsch
Hardware-Gewährleistung
Für dieses HP-Zubehör gilt eine Hardware-Garantie von einem Jahr ab Kauf durch den ersten Endverbraucher.
Garantieleistungen bestehen bei Rückgabe an ein Kundendienstzentrum von HP oder von zur Reparatur
befugten Vertragshändlern.
Hewlett-Packard entscheidet, ob ein defektes Zubehörteil repariert oder durch ein neues Teil desselben oder
eines gleichwertigen Typs ersetzt wird.
Wurde das Zubehör zusammen mit einem Personalcomputer des Typs HP Vectra oder einer HP Kayak PC
Workstation gekauft und betrieben, gilt dafür die Garantie dieses Computers oder dieser Workstation mit
demselben Leistungsumfang und derselben Dauer.
Den mit dem Personalcomputer von HP ausgelieferten Garantiebedingungen entnehmen Sie Einzelheiten zu
Garantiebeschränkungen, Obliegenheiten des Kunden und anderen Themen.
book.bk : CHAPTER.FB Page 20 Monday, October 13, 1997 6:08 PM

3
Guide d’installation de la carte Ethernet
HP 10BT/100TX NightDIRECTOR/100
book.bk : title.fb Page i Monday, October 13, 1997 6:08 PM

ii FrançaisFrancais
Avertissement
Les informations contenues dans ce document peuvent être modifiées
sans préavis.
Hewlett-Packard n’accorde aucune garantie de quelque sorte que ce
soit concernant, sans que ce soit limitatif, les garanties implicites de
qualité commerciale de ce matériel ou la bonne adaptation de celui-ci à
un usage particulier.
Hewlett-Packard ne garantit ni la fiabilité, ni les conséquences de
l’utilisation de ses logiciels lorsqu’ils sont exploités sur des matériels qui
ne sont pas de marque Hewlett-Packard.
Les informations contenues dans ce document sont originales et
protégées par copyright. Tous droits réservés. L’acheteur s’interdit en
conséquence de les photocopier, de les reproduire ou de les traduire
dans toute autre langue, en tout ou en partie, sauf accord préalable et
écrit de Hewlett-Packard Company.
Acrobat
®
et Adobe
®
sont des marques déposées de Adobe Systems
Incorporated et peuvent être déposées devant certaines juridictions.
CompuServe
TM
est une appellation commerciale aux Etats-Unis de
CompuServe, Inc.
Magic Packet
TM
et PCnet
TM
sont des marques déposées aux Etats-Unis
de AMD Corporation.
Microsoft
®
, NT
®
et Windows
®
sont des marques déposées aux Etats-
Unis de Microsoft Corporation.
Hewlett-Packard France
38053 Grenoble Cedex 9
France
1997 Hewlett-Packard Company
book.bk : title.fb Page ii Monday, October 13, 1997 6:08 PM

Table des matières
Français iii
3 Installation de la carte LAN HP
Que contient le Service Pack ?. . . . . . . . . . . . . . . . . . . . . . . . . . . . . . . . 2
Exigences requises pour l’installation . . . . . . . . . . . . . . . . . . . . . . . . . 3
Présentation de la procédure d’installation . . . . . . . . . . . . . . . . . . . . . 5
Procédure de pré-installation. . . . . . . . . . . . . . . . . . . . . . . . . . . . . . . . . 6
Pré-installation sur un système Windows 95 . . . . . . . . . . . . . . . . . . . . . . . 6
Pré-installation sur un système Windows NT 4.0. . . . . . . . . . . . . . . . . . . . 6
Installation de la carte LAN HP . . . . . . . . . . . . . . . . . . . . . . . . . . . . . . . 8
Mise à jour des champs spécifiques au LAN dans le
programme Setup de l’ordinateur HP . . . . . . . . . . . . . . . . . . . . . . . . . . 9
Procédure de post-installation. . . . . . . . . . . . . . . . . . . . . . . . . . . . . . . 10
Post-installation sur un système Windows 95 . . . . . . . . . . . . . . . . . . . . . 10
Post-installation sur un système Windows NT 4.0 . . . . . . . . . . . . . . . . . . 10
Connexion à un réseau . . . . . . . . . . . . . . . . . . . . . . . . . . . . . . . . . . . . . 11
Vérification de l’installation . . . . . . . . . . . . . . . . . . . . . . . . . . . . . . . . . 11
Dépannage . . . . . . . . . . . . . . . . . . . . . . . . . . . . . . . . . . . . . . . . . . . . . . . 12
Services d’assistance HP . . . . . . . . . . . . . . . . . . . . . . . . . . . . . . . . . . . 13
Spécifications de la carte LAN HP. . . . . . . . . . . . . . . . . . . . . . . . . . . . 14
Présentation physique . . . . . . . . . . . . . . . . . . . . . . . . . . . . . . . . . . . . . . . . 14
Caractéristiques matérielles . . . . . . . . . . . . . . . . . . . . . . . . . . . . . . . . . . . 14
Caractéristiques logicielles . . . . . . . . . . . . . . . . . . . . . . . . . . . . . . . . . . . . 14
Spécifications techniques de la carte LAN HP . . . . . . . . . . . . . . . . . . . . . 15
book.bk : Book.toc Page iii Monday, October 13, 1997 6:08 PM

iv Français
Informations réglementaires. . . . . . . . . . . . . . . . . . . . . . . . . . . . . . . . 16
Garantie HP pour les accessoires matériels . . . . . . . . . . . . . . . . . . . 17
book.bk : Book.toc Page iv Monday, October 13, 1997 6:08 PM

3
Installation de la carte LAN HP
book.bk : Chapter.fb Page 1 Monday, October 13, 1997 6:08 PM

3 Installation de la carte LAN HP
Que contient le Service Pack ?
2Français
Que contient le Service Pack ?
Le service pack contient :
• 10 cartes HP LAN (10BT/100TX)
• Une série de disquettes :
❒ une disquette d’installation LAN HP
❒ deux disquettes pilotes LAN HP
❒ deux disquettes Adobe
®
Acrobat
®
Reader (Version 2.2)
Acrobat Reader vous permet de lire le guide en ligne
d’administration de réseau (disponible en anglais uniquement)
fourni sur l’une des disquettes pilotes LAN HP. Le guide
d’administration de réseau est réservé aux utilisateurs experts.
• 10 câbles externes de démarrage
• Le présent Guide d’installation.
book.bk : Chapter.fb Page 2 Monday, October 13, 1997 6:08 PM

Français 3
3 Installation de la carte LAN HP
Exigences requises pour l’installation
Exigences requises pour l’installation
Plates-formes
prises en charge
Le kit d’accessoires LAN HP est pris en charge par les modèles
HP Vectra VE4 et les stations de travail Kayak XA, XU et XW, avec les
systèmes d’exploitation suivants (en anglais, français, allemand,
espagnol ou italien) :
• Windows 95 (tous les modèles sauf Kayak XW, Kayak XU 6/266
FastRAID et Kayak XU 6/300 FastRAID)
• Windows NT 4.0 (tous les modèles)
Nombre de
cartes réseau
prises en charges
Le programme d’installation de la carte LAN HP prend en charge au
maximum une carte LAN par ordinateur. Si vous souhaitez installer la
carte LAN HP sur un ordinateur déjà équipé d’une telle carte, vous
devrez installer le logiciel de la carte LAN HP manuellement. Pour plus
d’informations à ce sujet, reportez-vous au fichier readme.txt de l’une
des disquettes pilotes fournies avec le kit (le système d’exploitation de
l’ordinateur détermine laquelle de ces disquettes contient le fichier
readme.txt approprié).
Une seule carte LAN HP intégrée est prise en charge par ordinateur. En
effet, il n’y a qu’un seul connecteur externe de démarrage sur la carte
système des ordinateurs HP.
Amorçage/Démarrage
à partir du
lecteur de disquette
Le PC doit être capable de s’amorcer à partir du lecteur de disquette,
fonctionnalité configurée dans le programme Setup de l’ordinateur HP.
Celui-ci est accessible en appuyant sur pendant la phase de
démarrage de l’ordinateur. L’emplacement de ce paramètre dans le
programme Setup de l’ordinateur HP est généralement le suivant :
Sécurité
➜Sécurité unités➜Démarre depuis disquette.
Service Pack NT Si un service pack NT est déjà installé sur l’ordinateur, il doit être
réinstallé une fois que le logiciel et la carte LAN HP ont été installés.
book.bk : Chapter.fb Page 3 Monday, October 13, 1997 6:08 PM

3 Installation de la carte LAN HP
Exigences requises pour l’installation
4Français
Configuration par
défaut
La configuration par défaut du programme d’installation de carte LAN
est la suivante : client pour Microsoft
®
Networks, IPX, NetBEUI et
NDIS. Pour obtenir une configuration différente, vous devrez installer le
logiciel de la carte LAN HP manuellement. Pour plus d’informations à ce
sujet, reportez-vous au fichier readme.txt de l’une des disquettes
pilotes fournies avec le kit (le système d’exploitation de l’ordinateur
détermine laquelle de ces disquettes contient le fichier readme.txt
approprié).
Disquette HP LAN
Setup
La disquette HP LAN Setup ne doit pas être protégée en écriture
pendant l’installation de la carte LAN HP.
Disquettes originales du
système d’exploitation
Il se peut que le programme d’installation de la carte LAN HP doive
intervenir dans certains fichiers du système d’exploitation ; c’est
pourquoi, il vous faut avoir les disquettes originales à disposition.
book.bk : Chapter.fb Page 4 Monday, October 13, 1997 6:08 PM

Français 5
3 Installation de la carte LAN HP
Présentation de la procédure d’installation
Présentation de la procédure d’installation
ATTENTION Assurez-vous que vous avez lu la section intitulée “Exigences requises
pour l’installation” (deux pages précédentes) avant d’installer le logiciel
et la carte LAN HP.
L’installation de la carte LAN HP se déroule selon une procédure en
4 étapes. Vous devez :
1 Suivre les procédures de pré-installation.
2 Installer la carte LAN HP.
3 Mettre à jour les champs du programme Setup de l’ordinateur HP.
4 Suivre les procédures de post-installation.
Pré-installation L’étape de pré-installation se décompose comme suit :
• Exécution du programme setup LAN HP.
• Redémarrage de l’ordinateur pour mettre à jour le BIOS ; le
programme d’installation réalise cette opération automatiquement.
Vous devez réaliser la procédure de pré-installation avant d’installer la
carte LAN HP dans l’ordinateur.
Installation de
la carte LAN HP
Il s’agit de l’installation physique de la carte LAN HP dans un logement
PCI libre de l’ordinateur, laquelle est possible aussi bien dans un modèle
mini-tour que dans un modèle desktop.
Mise à jour des champs
spécifiques au LAN
dans le Setup de
l’ordinateur HP
Vous devez vérifier que tous les champs spécifiques au LAN du
programme Setup de l’ordinateur HP sont correctement paramétrés
pour permettre le fonctionnement de la carte LAN HP.
Post-installation Au cours de cette étape, le programme d’installation effectue toute une
série de contrôles au niveau de l’ordinateur et, le cas échéant, met à jour
certains composants logiciels avant de permettre au système
d’exploitation d’installer les pilotes LAN HP.
Chapter.fb Page 5 Tuesday, October 14, 1997 9:06 AM

3 Installation de la carte LAN HP
Procédure de pré-installation
6Français
Procédure de pré-installation
ATTENTION Effectuez la procédure de pré-installation avant d’installer
physiquement la carte LAN HP dans l’ordinateur.
Pré-installation sur un système Windows 95
1 Lancez Windows 95, puis insérez la disquette HP LAN Setup dans le
lecteur.
2 Cliquez sur Démarrer, puis sur Exécuter.... La boîte de dialogue
Exécuter apparaît à l’écran.
3 Dans la ligne de commande, tapez a:\setup, puis cliquez sur OK.
Une boîte de dialogue d’installation réseau apparaît à l’écran.
4 Cliquez sur Suivant. Une deuxième boîte de dialogue d’installation
réseau apparaît à l’écran.
5 Cliquez sur Terminer. Le PC se réamorce sous DOS et affiche un
message vous demandant de préciser si une autre carte LAN est déjà
installée dans l’ordinateur.
6 Tapez n, puis retirez la disquette HP LAN Setup du lecteur et mettez
l’ordinateur hors tension.
7 Reportez-vous alors à la section intitulée “Installation de la carte
LAN HP” on page 8.
Pré-installation sur un système Windows NT 4.0
1 Lancez Windows NT, puis insérez la disquette HP LAN Setup dans
le lecteur.
2 Cliquez sur Démarrer, puis sur Exécuter....
3 Dans la ligne de commande, tapez a:\setup, puis cliquez sur OK.
Une boîte de dialogue d’informations utilisateur apparaît.
4 Entrez le nom d’un utilisateur membre du groupe d’administrateurs,
ainsi que le mot de passe correspondant. Si vous êtes déjà enregistré,
le nom de l’utilisateur s’inscrit automatiquement dans le champ
correspondant.
Chapter.fb Page 6 Tuesday, October 14, 1997 9:07 AM

Français 7
3 Installation de la carte LAN HP
Procédure de pré-installation
5 Cliquez sur Suivant. Une boîte de dialogue apparaît.
6 Cliquez sur Terminer. L’ordinateur se réamorce sous DOS et affiche
un message vous demandant de préciser si une autre carte LAN est
déjà installée dans l’ordinateur.
7 Tapez n, puis retirez la disquette HP LAN Setup du lecteur et mettez
l’ordinateur hors tension.
8 Reportez-vous alors à la section “Installation de la carte LAN HP” on
page 8.
book.bk : Chapter.fb Page 7 Monday, October 13, 1997 6:08 PM

3 Installation de la carte LAN HP
Installation de la carte LAN HP
8Français
Installation de la carte LAN HP
Reportez-vous au Guide d’utilisation de votre ordinateur pour
obtenir des informations complètes sur la façon d’installer une carte
d’extension (ou un module). Les étapes ci-dessous vous sont indiquées
à titre indicatif.
1 Mettez l’ordinateur hors tension, débranchez le câble d’alimentation
et toutes les connexions au réseau de télécommunications, puis
retirez le capot de l’ordinateur.
2 En fonction de l’ordinateur dont vous disposez, il se peut que vous
ayez à retirer les éventuels crochets de fixation du logement situés à
l’arrière de l’ordinateur.
3 Retirez l’obturateur du logement.
4 Branchez le câble de démarrage externe et, sans la plier, insérez la
carte dans le logement.
5 Fixez la carte en remettant en place la vis de l’obturateur du
logement ou le crochet de fixation et ses vis, en fonction de
l’ordinateur dont vous disposez.
6 Remontez le capot de l’ordinateur. Rebranchez le cordon
d’alimentation et toutes les connexions au réseau de
télécommunications.
La carte peut être installée dans un
modèle mini-tour ou desktop.
Reportez-vous à la section “Spécifications
de la carte LAN HP” on page 14 pour
connaître la position du connecteur
externe de démarrage sur la carte LAN
HP. Reportez-vous au guide d’utilisation
ou à la documentation technique de
l’ordinateur pour connaître la position du
connecteur externe de démarrage de la
carte système.
book.bk : Chapter.fb Page 8 Monday, October 13, 1997 6:08 PM

Français 9
3 Installation de la carte LAN HP
Mise à jour des champs spécifiques au LAN dans le programme Setup de l’ordinateur HP
Mise à jour des champs spécifiques au LAN dans le
programme Setup de l’ordinateur HP
Une fois que vous avez physiquement installé la carte LAN HP dans
l’ordinateur, vous devez vérifiez que le BIOS est configuré pour
permettre l’utilisation de la carte. Vous devez pour ce faire utiliser le
programme Setup de l’ordinateur HP.
Démarrage du Setup de
l’ordinateur HP
1 Redémarrez l’ordinateur.
2 Appuyez sur lorsque
F2=Setup s’affiche au cours de la phase de
démarrage de l’ordinateur. La fenêtre d’ouverture du programme
Setup apparaît à l’écran.
Utilisation du Setup de
l’ordinateur HP
Reportez-vous au Guide d’utilisation de l’ordinateur pour savoir
comment vous déplacer dans le programme et comment effectuer des
modifications dans les champs qui le composent.
Quels sont les champs à
mettre à jour ?
Vous devez vérifier et, si nécessaire, mettre à jour tous les champs
relatifs au LAN.
Le Guide d’utilisation fourni avec votre ordinateur contient une
section sur la configuration d’interface LAN. La liste figurant ci-dessous
est donnée à titre indicatif. En effet, dans la version du programme
Setup que vous avez, les intitulés des champs peuvent être légèrement
différents de ceux qui sont indiqués plus bas. Pour plus d’informations,
reportez-vous au Guide d’utilisation de votre ordinateur.
• Vérifier que l’interface LAN intégrée est activée (Avancé➜ Interface
réseau intégrée
➜Interface Ethernet intégrée [Activé]).
• Vérifier que l’ordinateur peut être lancé (amorçage et connexion) à
partir du réseau (Sécurité
➜Sécurité unités➜Démarre depuis réseau
[Activé]).
• Vérifier que l’ordinateur peut être réveillé à partir du réseau
(Energie
➜Réveil par IRQ➜Réseau intégré [Activé]).
• Vérifier que l’ordinateur peut être mis sous tension à partir du réseau
(Energie
➜Mise sous tension➜Réseau intégré [Activé]).
book.bk : Chapter.fb Page 9 Monday, October 13, 1997 6:08 PM

3 Installation de la carte LAN HP
Procédure de post-installation
10Français
Procédure de post-installation
ATTENTION Assurez-vous que vous avez installé la carte LAN HP avant de passer à
l’étape de post-installation.
Post-installation sur un système Windows 95
1 Redémarrez l’ordinateur. Windows 95 reconnaît automatiquement la
carte LAN HP et installe le logiciel correspondant. Il se peut que vous
ayez à insérer l’une des disquettes d’installation de Windows 95.
2 Redémarrez l’ordinateur lorsque vous y êtes invité. N’oubliez pas de
retirer la disquette HP LAN Setup avant d’effectuer cette opération.
La carte LAN HP est alors prête à être utilisée.
Post-installation sur un système Windows NT 4.0
1 Redémarrez l’ordinateur et lancez Windows. Vous n’avez pas à
appuyer sur ++ pour débuter une session.
2 Lorsque vous y êtes invité, insérez la disquette HP LAN Setup dans
le lecteur, puis cliquez sur OK. L’assistant d’installation est lancé et
affiche une boîte de dialogue qui indique que l’ordinateur est prêt à
installer la carte LAN HP.
3 Tapez le chemin d’accès au disque principal NT (C:\I386 si les
fichiers du système d’exploitation ont été copiés sur le disque dur au
moment de l’installation de Windows NT), puis cliquez sur Suivant.
L’installation de la carte LAN HP est lancée automatiquement.
Lorsque l’installation est terminée, la dernière page de l’assistant
apparaît à l’écran.
4 Cliquez sur Terminer pour quitter l’assistant.
5 Redémarrez l’ordinateur lorsque vous y êtes invité. N’oubliez pas de
retirer la disquette HP LAN Setup avant d’effectuer cette opération.
ATTENTION Si un service pack a été installé sur l’ordinateur avant la carte LAN HP,
il doit être réinstallé pour que la carte LAN HP fonctionne.
La carte LAN HP est alors prête à être utilisée.
Chapter.fb Page 10 Tuesday, October 14, 1997 9:08 AM

Français 11
3 Installation de la carte LAN HP
Connexion à un réseau
Connexion à un réseau
Branchez le câble réseau sur le connecteur LAN RJ-45 UTP
(Unshielded Twisted Pair pour paire torsadée non blindée). La carte
LAN prend en charge 10 et 100 méga-bits/seconde.
Modes RWU (Remote
Wake Up) et RPO
(Remote Power On)
La carte LAN HP a la capacité de mettre l’ordinateur sous tension à
partir du réseau à la réception d’une séquence spéciale (connue sous le
nom de Magic Packet
TM
).
Le mode RWU permet à l’ordinateur de reprendre un fonctionnement
normal lorsqu’il se trouve en mode sommeil/veille.
Le mode RPO permet à l’ordinateur de démarrer lorsqu’il est hors tension.
Vérification de l’installation
Effectuez un test des fonctions de la carte LAN HP sur le réseau en
recherchant un autre périphérique du réseau ou en réalisant une
opération sur le réseau. Si la carte ne fonctionne pas correctement,
reportez-vous à la section intitulée “Dépannage” on page 12.
Connecteur
10BT/100TX
book.bk : Chapter.fb Page 11 Monday, October 13, 1997 6:08 PM

3 Installation de la carte LAN HP
Dépannage
12Français
Dépannage
La carte LAN HP ne
fonctionne pas
• Vérifiez que les exigences requises pour l’installation sont bien
remplies (reportez-vous en page 3).
• Vérifiez que :
❒ Les étapes de pré-installation ont été respectées (reportez-vous
en page 6).
❒ La carte LAN HP est correctement installée (reportez-vous en
page 8).
❒ Les champs spécifiques au LAN du programme Setup sont
correctement paramétrés (reportez-vous en page 9).
❒ Les étapes de post-installation ont été respectées (reportez-vous
en page 10).
• Vérifiez les câbles réseau, notamment que les connexions des câbles
réseau sont correctes et que les câbles ne sont pas endommagés. Si
l’une des connexions est incorrecte ou si l’un des câbles est
endommagé, fixez-les correctement, puis voyez si votre ordinateur
peut communiquer sur le réseau.
• Vérifiez avec l’administrateur réseau que le réseau est actif.
Le voyant lumineux situé sur le panneau arrière de la
carte LAN HP est éteint quand il n’y a pas de réponse d’auto-
négociation, par exemple quand le câble LAN n’est pas connecté au
hub.
• Vérifiez dans le programme Setup de l’ordinateur HP que le
logement PCI dans lequel la carte LAN HP est installée est activé
(Avancé
➜Configuration PCI).
L’ordinateur ne peut pas
être démarré ou réveillé
à partir du réseau
• Vérifiez que le câble du connecteur externe de démarrage est
connecté à la carte LAN HP et à la carte système de l’ordinateur.
• Vérifiez que les champs spécifiques au LAN du programme Setup de
l’ordinateur HP sont correctement paramétrés (reportez-vous en
page 9).
book.bk : Chapter.fb Page 12 Monday, October 13, 1997 6:08 PM

Français 13
3 Installation de la carte LAN HP
Services d’assistance HP
Services d’assistance HP
Les pilotes et les utilitaires sont disponibles auprès des services
d’assistance HP suivants :
• Site World Wide Web HP :
http://www.hp.com/go/pcsupport
OU
http://www.hp.com/go/kayaksupport
• Forum HP sur CompuServe
TM
:
Dans la boîte de dialogue ALLER A, tapez HP.
• Forum HP sur AOL :
Dans le menu, sélectionnez Keyword Search (Recherche par mots
clés), tapez HP, puis appuyez sur .
• Messagerie électronique HP (BBS) :
Numéro dans le monde entier : +1 (208) 344 1691.
book.bk : Chapter.fb Page 13 Monday, October 13, 1997 6:08 PM

3 Installation de la carte LAN HP
Spécifications de la carte LAN HP
14Français
Spécifications de la carte LAN HP
Présentation physique
Caractéristiques matérielles
• Taille d’un logement PCI standard.
• Un port 10BT/100TX dédié à la prise en charge de Magic Packet,
prenant en charge les modes RPO (Remote Power On) et RWU
(Remote Wake Up).
• Un support pour composant Flash pour le passage d’un anti-virus et
le démarrage à distance.
Caractéristiques logicielles
Fonctions BIOS
• BOOTROM. Il s’agit d’un BIOS spécial permettant à l’ordinateur de
s’amorcer à partir d’une ressource réseau.
• Prise en charge des modes RPO/RWU.
Connecteur externe
de démarrage
Puce PCnet
TM
-FAST AMD
Support pour
composant flash
Connecteur
10BT/100TX
book.bk : Chapter.fb Page 14 Monday, October 13, 1997 6:08 PM

Français 15
3 Installation de la carte LAN HP
Spécifications de la carte LAN HP
Spécifications techniques de la carte LAN HP
Puce PCnet-FAST AMD
• Compatible avec les normes ISO 8802.3 et Ethernet.
• Interface directe avec PCI.
• Prise en charge de la rafale.
• Architecture Master Bus 32-bit avec gestion intégrée du buffer DMA.
• Duplex intégral.
• Prise en charge de Magic Packet.
• Boot PROM optionnel pour application en noeud sans disque.
• Sélection automatique du port.
Prise en charge du Flash • Application en noeud sans disque. Cela vous permet d’amorcer
l’ordinateur à partir d’un serveur sur le réseau et non pas à partir
d’une ressource système (disque dur, lecteur de disquette ou lecteur
de CD-ROM).
• Prise en charge de Virus Scan via le support pour composant Flash
(ne fait pas partie du kit LAN HP).
• Prise en charge de Flash Boot TCP/IP (ne fait pas partie du kit LAN HP).
Connecteur externe de
démarrage
• Les signaux RPO (lorsque l’ordinateur est mis hors tension) et RWU
(lorsque l’ordinateur est en mode sommeil) sont transmis via ce
connecteur.
LED (voyant) de statut
de connexion au réseau
Le voyant lumineux situé sur le panneau arrière de la carte LAN HP
indique le statut de la connexion au réseau de la façon suivante :
• Eteint - quand il n’y a pas de réponse d’auto-négociation, par
exemple quand le câble LAN n’est pas connecté au hub.
• Clignote - pendant l’auto-négociation.
• Vert (ON) - l’auto-négociation a réussi et la connexion entre la carte
LAN HP et le hub ou le Commutateur de réseau est établie.
book.bk : Chapter.fb Page 15 Monday, October 13, 1997 6:08 PM

3 Installation de la carte LAN HP
Informations réglementaires
16Français
Informations réglementaires
CERTIFICAT DE CONFORMITE
suivant Guide 22 ISO/IEC et EN 45014
Nom du constructeur : HEWLETT-PACKARD
Adresse du constructeur : 5 Avenue Raymond Chanas
38320 Eybens, FRANCE
Certifie le produit :
Nom de produit : D3999A
Conforme aux spécifications suivantes :
SECURITE
International : IEC 950 : 1991+A1+A2 +A3 + A4
Europe : EN 60950 : 1992+A1+A2 + A3
EMC
CISPR 22 : 1993 /EN 55022: 1994 Classe B
EN 50082-1 : 1992
IEC 801-2 : 1992 / prEN 55024-2 : 1992 - 4 kV CD, 8 kV AD
IEC 801-3 : 1984 / prEN 55024-3 : 1991 - 3 V/m
IEC 801-4 : 1988 / prEN 55024-4 : 1992 - 0.5 kV (signaux),
1 kV (alimentation)
IEC 555-2 :1982 + A1 : 1985 / EN 60555-2 : 1987
IEC 1000-3-3 : 1994 / EN 61000-3-3 : 1995
Informations complémentaires :
Ce produit est conforme aux exigences de la directive EMC 89/336/EEC et la
directive basse tension 73/23/EEC, modifiées par la directive 93/68/EEC et porte les mentions CE corre-
spondantes.
Grenoble Jean-Marc JULIA
Septembre 1997 Responsable qualité
book.bk : Chapter.fb Page 16 Monday, October 13, 1997 6:08 PM

Français 17
3 Installation de la carte LAN HP
Garantie HP pour les accessoires matériels
Garantie HP pour les accessoires matériels
Cet accessoire HP est couvert par une garantie matérielle limitée pour une période d’un an à compter de la date
d’achat par l’utilisateur final initial. Le type de prestation offerte est le retour à un centre de maintenance ou à
un distributeur agréé HP autorisé à effectuer des réparations.
HP choisira de réparer ou de remplacer l’accessoire défectueux par un modéle identique ou équivalent.
Si cet accessoire est acheté et utilisé avec un ordinateur HP ou une station de travail HP Kayak, il est couvert
par la garantie de cet ordinateur ou de cette station de travail, aux mêmes conditions de maintenance et de
durée.
Veuillez vous reporter à la garantie fournie avec votre ordinateur HP concernant les restrictions de garantie, les
obligations du client, et tout autre terme.
book.bk : Chapter.fb Page 17 Monday, October 13, 1997 6:08 PM

book.bk : Chapter.fb Page 18 Monday, October 13, 1997 6:08 PM

4
Guía de Instalación de la Tarjeta
HP 10BT/100TX NightDIRECTOR/100
Ethernet
book.bk : title.fb Page i Monday, October 13, 1997 6:08 PM

ii EspañolFrancais
Aviso
La información contenida en este documento está sujeta a modificación
sin previo aviso.
Hewlett-Packard no ofrece garantía alguna con respecto a este material,
incluyendo, aunque sin limitarse a, las garantías implícitas de
comerciabilidad e idoneidad para fines específicos. Hewlett-Packard no
se hace responsable de los errores que pueda contener este documento
ni de los daños accidentales o circunstanciales derivados del suministro,
funcionamiento o uso de este material.
Hewlett-Packard no asume ninguna responsabilidad sobre el uso o
fiabilidad del software de su equipo que no haya sido proporcionado por
Hewlett-Packard.
Este documento contiene información original protegida por la
legislación en materia de derechos de autor. Reservados todos los
derechos. Se prohibe la copia, reproducción o traducción a otro idioma
de cualquier parte de este documento sin el consentimiento previo por
escrito de Hewlett-Packard Company.
Acrobat
®
y Adobe
®
son marcas de Adobe Systems Incorporated y
pueden estar registradas en algunas jurisdicciones.
CompuServe
TM
es una marca comercial en EE.UU. de CompuServe, Inc.
Magic Packet
TM
y PCnet
TM
son marcas comerciales en EE.UU. de AMD
Corporation.
Microsoft
®
, NT
®
y Windows
®
son marcas comerciales registradas en
EE.UU. de Microsoft Corporation.
Hewlett-Packard France
38053 Grenoble Cedex 9
France
1997 Hewlett-Packard Company
book.bk : title.fb Page ii Monday, October 13, 1997 6:08 PM

Tabla de Contenido
Español iii
4 Cómo Instalar la Tarjeta LAN de HP
¿Qué Contiene el Paquete de Servicio?. . . . . . . . . . . . . . . . . . . . . . . . . 2
Requisitos para la Instalación . . . . . . . . . . . . . . . . . . . . . . . . . . . . . . . . 3
Descripción General del Proceso de Instalación. . . . . . . . . . . . . . . . . 5
Procedimiento Previo a la Instalación . . . . . . . . . . . . . . . . . . . . . . . . . 6
Procedimiento Previo a la Instalación en un Sistema con
Windows 95 . . . . . . . . . . . . . . . . . . . . . . . . . . . . . . . . . . . . . . . . . . . . . . . . . 6
Procedimiento Previo a la Instalación en un Sistema con
Windows NT 4.0 . . . . . . . . . . . . . . . . . . . . . . . . . . . . . . . . . . . . . . . . . . . . . . 6
Instalación de la Tarjeta LAN de HP . . . . . . . . . . . . . . . . . . . . . . . . . . . 8
Actualización de los Campos Específicos de LAN en la
Utilidad HP Setup del PC . . . . . . . . . . . . . . . . . . . . . . . . . . . . . . . . . . . . 9
Procedimiento Posterior a la Instalación . . . . . . . . . . . . . . . . . . . . . . 10
Procedimiento Posterior a la Instalación en un Sistema con
Windows 95 . . . . . . . . . . . . . . . . . . . . . . . . . . . . . . . . . . . . . . . . . . . . . . . . 10
Procedimiento Posterior a la Instalación en un Sistema con
Windows NT 4.0 . . . . . . . . . . . . . . . . . . . . . . . . . . . . . . . . . . . . . . . . . . . . . 10
Cómo Conectarse a la Red . . . . . . . . . . . . . . . . . . . . . . . . . . . . . . . . . . 12
Cómo Verificar la Instalación. . . . . . . . . . . . . . . . . . . . . . . . . . . . . . . . 12
Resolución de Problemas . . . . . . . . . . . . . . . . . . . . . . . . . . . . . . . . . . . 13
Servicios de Soporte de HP . . . . . . . . . . . . . . . . . . . . . . . . . . . . . . . . . 14
Especificaciones de la Tarjeta LAN de HP . . . . . . . . . . . . . . . . . . . . . 15
book.bk : book.toc Page iii Monday, October 13, 1997 6:08 PM

iv Español
Disposición Física . . . . . . . . . . . . . . . . . . . . . . . . . . . . . . . . . . . . . . . . . . . 15
Características de Hardware. . . . . . . . . . . . . . . . . . . . . . . . . . . . . . . . . . . 15
Características de Software . . . . . . . . . . . . . . . . . . . . . . . . . . . . . . . . . . . 15
Especificaciones Técnicas de la Tarjeta LAN de HP . . . . . . . . . . . . . . . . 16
Información Regulatoria . . . . . . . . . . . . . . . . . . . . . . . . . . . . . . . . . . . 17
Garantía del Hardware HP . . . . . . . . . . . . . . . . . . . . . . . . . . . . . . . . . 20
book.bk : book.toc Page iv Monday, October 13, 1997 6:08 PM

4
Cómo Instalar la Tarjeta LAN de HP
book.bk : chapter.fb Page 1 Monday, October 13, 1997 6:08 PM

4 Cómo Instalar la Tarjeta LAN de HP
¿Qué Contiene el Paquete de Servicio?
2Español
¿Qué Contiene el Paquete de Servicio?
El paquete de servicio contiene:
• 10 tarjetas LAN de HP (10BT/100TX)
• Un juego de disquetes:
❒ un disquete HP LAN setup
❒ dos disquetes HP LAN driver
❒ dos disquetes de Acrobat
®
Reader de Adobe
®
(versión 2.2)
Utilice Acrobat Reader para leer la Guía del administrador de red
en línea (sólo disponible en inglés), disponible en uno de los
disquetes de controladores de HP LAN. La Guía del
administrador de red está destinada solamente a usuarios
avanzados.
• 10 cables de inicio externos
• Esta Guía de Instalación.
book.bk : chapter.fb Page 2 Monday, October 13, 1997 6:08 PM

Español 3
4 Cómo Instalar la Tarjeta LAN de HP
Requisitos para la Instalación
Requisitos para la Instalación
Plataformas Soportadas El kit de accesorio de HP LAN se soporta en PCs HP Vectra VE4 y
estaciones de trabajo de PC Kayak XA, XU y XW, con los sistemas
operativos siguientes (en inglés, francés, alemán, español o italiano):
• Windows 95 (todos los modelos excepto Kayak XW, Kayak XU 6/266
FastRAID y Kayak XU 6/300 FastRAID)
• Windows NT 4.0 (todos los modelos)
Número de Tarjetas de
Red Soportadas
El programa de instalación de la tarjeta LAN de HP soporta como
máximo una tarjeta LAN por cada PC. Si desea instalar la tarjeta LAN de
HP en un PC que ya tiene instalada una tarjeta LAN, deberá instalar el
software de la tarjeta LAN manualmente. La información sobre cómo
hacerlo se incluye en un archivo readme.txt que se encuentra en uno
de los disquetes del kit (el sistema operativo del PC determina qué
disquete contiene el archivo readme.txt adecuado).
Sólo se soporta una única tarjeta integrada HP LAN por cada PC. Esto
se debe a que los PCs HP cuentan con un solo conector de Inicio
Externo en la placa del sistema.
Arrancar/Iniciar Desde
la Unidad de Disquetes
Es necesario que el PC pueda arrancar desde la unidad de disquetes.
Esta opción se configura en la utilidad HP Setup del PC, a la que se
accede oprimiendo la tecla durante la rutina de arranque del PC. La
ubicación de la opción en la utilidad HP Setup del PC es normalmente
Seguridad
➜Seguridada de los dispositivos de arranque➜Iniciar desde
disquete.
Paquete de Servicio
para NT
Si ya tiene instalado un paquete de servicio para NT en el PC, tendrá que
reinstalarlo después de instalar la tarjeta de HP LAN y el software.
book.bk : chapter.fb Page 3 Monday, October 13, 1997 6:08 PM

4 Cómo Instalar la Tarjeta LAN de HP
Requisitos para la Instalación
4Español
Configuración por
Omisión
La configuración por omisión del programa de instalación de la tarjeta
de LAN es: cliente para Microsoft
®
Networks, IPX, NetBEUI y NDIS. Si
desea utilizar otra configuración, debe instalar manualmente el software
de la tarjeta HP LAN. Para obtener más información acerca de cómo
realizar esta operación, consulte el archivo readme.txt de uno de los
disquetes de controladores del kit (el sistema operativo del PC
determina qué disquete contiene el archivo readme.txt adecuado).
Disquete HP LAN Setup El disquete HP LAN Setup no debe estar protegido contra escritura
durante el proceso de instalación de la tarjeta HP LAN.
Disquetes Maestros del
Sistema Operativo
Es posible que el programa de instalación de la tarjeta LAN de HP
necesite acceder a algunos archivos del sistema operativo. Debe tener a
mano los disquetes maestros.
book.bk : chapter.fb Page 4 Monday, October 13, 1997 6:08 PM

Español 5
4 Cómo Instalar la Tarjeta LAN de HP
Descripción General del Proceso de Instalación
Descripción General del Proceso de Instalación
PRECAUCION Asegúrese de leer la sección titulada “Requisitos para la Instalación” de
las dos páginas anteriores antes de instalar la tarjeta LAN de HP y el
software.
El proceso de instalación de la tarjeta LAN de HP consta de 4 fases.
Usted tiene que:
1 Efectuar el procedimiento previo a la instalación.
2 Instalar la tarjeta LAN de HP.
3 Actualizar los campos de la utilidad HP Setup del PC.
4 Efectuar el procedimiento posterior a la instalación.
Procedimiento Previo a
la Instalación
La fase previa a la instalación implica:
• Ejecutar el programa setup de HP LAN.
• Reiniciar el PC para actualizar el BIOS. El programa de instalación
realiza esta tarea automáticamente.
Debe efectuar el procedimiento previo a la instalación antes de instalar
físicamente la tarjeta LAN de HP en el PC.
Instalación de la Tarjeta
LAN de HP
Consiste en la instalación física de la tarjeta LAN de HP en una ranura
PCI libre del PC. Puede instalar la tarjeta en un modelo minitorre o en
un modelo de sobremesa.
Actualización de los
Campos Específicos de
LAN en la Utilidad HP
Setup del PC
Debe comprobar que todos los campos específicos de LAN de la utilidad
HP Setup del PC están configurados correctamente para permitir que
funcione la tarjeta LAN de HP.
Procedimiento
Posterior a la
Instalación
Durante esta fase, el programa de instalación realiza diversas
comprobaciones en el PC y, si es necesario, actualiza algunos
componentes de software antes de permitir que el sistema operativo
instale los controladores de LAN de HP.
book.bk : chapter.fb Page 5 Monday, October 13, 1997 6:08 PM

4 Cómo Instalar la Tarjeta LAN de HP
Procedimiento Previo a la Instalación
6Español
Procedimiento Previo a la Instalación
PRECAUCION Efectúe el procedimiento previo a la instalación antes de instalar
físicamente la tarjeta LAN de HP en el PC.
Procedimiento Previo a la Instalación en un Sistema con
Windows 95
1 Ejecute Windows 95 e inserte el disquete HP LAN Setup en la
unidada de disquetes.
2 Haga clic en Inicio y, a continuación, en Ejecutar... Se abrirá el
cuadro de diálogo Ejecutar.
3 En la línea de comandos, escriba a:\setup y haga clic en Aceptar.
Aparecerá un cuadro de diálogo de configuración de red.
4 Haga clic en Siguiente. Aparecerá un segundo cuadro de diálogo de
configuración de red.
5 Haga clic en Terminar. El PC se reiniciará en DOS y mostrará un
mensaje para preguntarle si ya tiene instalada otra tarjeta LAN.
6 Escriba n y, a continuación, retire el disquete HP LAN Setup de la
unidad de disquetes y apague el PC.
7 Vaya a “Instalación de la Tarjeta LAN de HP” en la página 8.
Procedimiento Previo a la Instalación en un Sistema con
Windows NT 4.0
Windows NT 4.0
1 Ejecute Windows NT e inserte el disquete HP LAN Setup en la
unidad de disquetes.
2 Haga clic en Inicio y, a continuación, en Ejecutar...
3 En la línea de comandos, escriba a:\setup y, a continuación, haga
clic en Aceptar. Aparecerá un cuadro de diálogo de información
sobre la cuenta.
book.bk : chapter.fb Page 6 Monday, October 13, 1997 6:08 PM

Español 7
4 Cómo Instalar la Tarjeta LAN de HP
Procedimiento Previo a la Instalación
4 Introduzca el nombre de una cuenta que sea miembro del grupo de
administradores y la contraseña correspondiente. Si ya ha iniciado la
sesión con derechos de administrador, el campo correspondiente al
nombre de la cuenta se rellenará automáticamente con su nombre de
cuenta.
5 Haga clic en Siguiente. Aparecerá un cuadro de diálogo.
6 Haga clic en Terminar. El PC se reiniciará en DOS y mostrará un
mensaje para preguntarle si ya tiene instalada otra tarjeta LAN.
7 Escriba n y, a continuación, retire el disquete HP LAN Setup de la
unidad de disquetes y apague el PC.
8 Vaya a “Instalación de la Tarjeta LAN de HP” en la página 8.
book.bk : chapter.fb Page 7 Monday, October 13, 1997 6:08 PM

4 Cómo Instalar la Tarjeta LAN de HP
Instalación de la Tarjeta LAN de HP
8Español
Instalación de la Tarjeta LAN de HP
Si desea información detallada sobre cómo instalar una tarjeta (o
placa) accesoria, consulte la Guía del Usuario de su PC. Los pasos
siguientes le servirán de guía.
1 Con el PC apagado, desconecte el cable de alimentación y cualquier
conexión con una red de telecomunicaciones y, a continuación,
retire la cubierta.
2 Dependiendo de cuál sea el modelo de PC, es posible que necesite
retirar la abrazadera de sujeción de la ranura accesoria, que se
encuentra en la parte posterior del PC.
3 Retire la cubierta de la ranura.
4 Conecte el cable de inicio externo y, sin doblarlo, inserte la tarjeta en
la ranura accesoria.
5 Fije la tarjeta colocando otra vez el tornillo de la cubierta de la ranura
o la abrazadera de sujeción y su tornillo, según corresponda a su
modelo de PC.
6 Coloque otra vez la cubierta. Conecte otra vez el cable de
alimentación y las conexiones con redes de telecomunicaciones.
La tarjeta se puede instalar en un
modelo minotorre o en un modelo
sobremesa.
Para conocer la posición del conector
Inicio Externo de la tarjeta LAN de HP,
consulte “Especificaciones de la Tarjeta
LAN de HP” en la página 15. Consulte la
posición del conector Inicio Externo en la
placa de sistema en la documentación
técnica o de usuario del PC.
book.bk : chapter.fb Page 8 Monday, October 13, 1997 6:08 PM

Español 9
4 Cómo Instalar la Tarjeta LAN de HP
Actualización de los Campos Específicos de LAN en la Utilidad HP Setup del PC
Actualización de los Campos Específicos de LAN en la
Utilidad HP Setup del PC
Una vez instalada físicamente la tarjeta LAN de HP en el PC, ahora es
necesario comprobar que el BIOS está configurado para usar la tarjeta.
Para ello, utilice la utilidad HP Setup del PC.
Cómo Iniciar la Utilidad
HP Setup del PC
1 Reinicie el PC.
2 Cuando
F2=Setup aparezca en la pantalla durante la rutina de
arranque del PC, oprima la tecla . Aparecerá la ventana inicial de
la utilidad HP Setup del PC.
Cómo Usar la Utilidad
HP Setup del PC
Si desea saber cómo desplazarse por la utilidad HP Setup del PC y cómo
realizar cambios en los campos, consulte la Guía del Usuario del PC.
¿Qué Campos Hay Que
Actualizar?
Debe comprobar y, si es necesario, actualizar todos los campos
relacionados con la LAN:
La Guía del usuario suministrada con el PC debe contener una
sección en la que se explica cómo configurar una interfaz de LAN.
Como guía, utilice la lista que aparece a continuación. Los nombres de
los campos utilizados en esta versión del programa Setup pueden
diferir ligeramente de los que se indican a continuación. Consulte la
Guía del usuario del PC para obtener más información.
• Compruebe que la interfase de LAN integrada está activada
(Avanzado
➜Interfase de red integrada➜Interfase Ethernet
integrada [Activado]).
• Compruebe que se puede utilizar el PC (iniciarlo e iniciar una sesión)
desde la red (Seguridad
➜Seguridada de los dispositivos de
arranque
➜Iniciar desde la red [Activado]).
• Compruebe que el PC se puede despertar desde la red
(Alimentación
➜Despertar de suspensión➜Red integrada
[Activado]).
• Compruebe que el PC se puede encender desde la red
(Alimentación
➜Encendido➜Red integrada [Activado]).
book.bk : chapter.fb Page 9 Monday, October 13, 1997 6:08 PM

4 Cómo Instalar la Tarjeta LAN de HP
Procedimiento Posterior a la Instalación
10Español
Procedimiento Posterior a la Instalación
PRECAUCION Asegúrese de que ha instalado la tarjeta LAN de HP antes de efectuar el
procedimiento posterior a la instalación.
Procedimiento Posterior a la Instalación en un Sistema con
Windows 95
1 Reinicie el PC. Automáticamente, Windows 95 detecta la tarjeta LAN
de HP e instala el software para ella. Es posible que se le pida que
inserte alguno de los disquetes de instalación de Windows 95.
2 Reinicie el PC cuando se le indique. Recuerde que debe retirar el
disquete HP LAN Setup antes de hacerlo.
Ahora la tarjeta LAN de HP está lista para su uso.
Procedimiento Posterior a la Instalación en un Sistema con
Windows NT 4.0
1 Reinicie el PC e inicie Windows. No es necesario oprimir
++para iniciar una sesión.
2 Cuando se le indique, inserte el disquete HP LAN Setup en la unidad
de disquetes y haga clic en Aceptar. Se iniciará el Asistente de
instalación y aparecerá un cuadro de diálogo en el que se le indica
que el PC está listo para instalar la tarjeta LAN de HP.
3 Escriba la ruta de acceso del disco maestro de NT (si los archivos del
sistema operativo se copiaron al disco duro durante la instalación de
Windows NT, la ruta de acceso es C:\I386) y, a continuación, haga
clic en Siguiente. La instalación de la tarjeta HP LAN se inicia
automáticamente. Cuando concluya, aparecerá la última página del
Asistente.
4 Haga clic en Terminar para salir del Asistente.
5 Reinicie el PC cuando se le indique. Recuerde que debe retirar el
disquete HP LAN Setup antes de hacerlo.
book.bk : chapter.fb Page 10 Monday, October 13, 1997 6:08 PM

Español 11
4 Cómo Instalar la Tarjeta LAN de HP
Procedimiento Posterior a la Instalación
PRECAUCION Si ya tenía instalado un paquete de servicio en el PC antes de instalar la
tarjeta LAN de HP, tendrá que reinstalar el paquete de servicio para que
la tarjeta LAN de HP funcione.
Ahora la tarjeta LAN de HP está lista para su uso.
book.bk : chapter.fb Page 11 Monday, October 13, 1997 6:08 PM

4 Cómo Instalar la Tarjeta LAN de HP
Cómo Conectarse a la Red
12Español
Cómo Conectarse a la Red
Conecte el cable de red a un conector de LAN RJ-45 UTP (par trenzado
no apantallado). La tarjeta de LAN soporta el funcionamiento tanto a
10 Mbits/s como a 100 Mbits/s.
Remote Wake Up
(Despertar Remoto) y
Remote Power On
(Encendido Remoto)
La tarjeta LAN de HP es capaz de encender el PC al recibir una
secuencia especial (denominada Magic Packet
TM
) desde la red.
El modo Remote Wake Up (Despertar Remoto) permite que el PC
reanude su funcionamiento normal si está en el modo sleep
(suspendido).
El modo Remote Power On (Encendido Remoto) permite iniciar el PC
si está apagado.
Cómo Verificar la Instalación
Compruebe si la tarjeta LAN de HP funciona con la red; para ello,
busque otro dispositivo de red o realice una operación de red. Si no
funciona correctamente consulte la sección “Resolución de Problemas”
en la página 13.
Conector
10BT/100TX
book.bk : chapter.fb Page 12 Monday, October 13, 1997 6:08 PM

Español 13
4 Cómo Instalar la Tarjeta LAN de HP
Resolución de Problemas
Resolución de Problemas
La tarjeta LAN
de HP no funciona
• Compruebe si se cumplen los requisitos de la instalación (consulte la
página 3).
• Compruebe que:
❒ Se ha efectuado el procedimiento previo a la instalación (consulte
la página 6).
❒ La tarjeta LAN de HP está instalada correctamente (consulte la
página 8).
❒ Los campos específicos de LAN en la utilidad HP Setup de HP
están configurados correctamente (consulte la página 9).
❒ Se ha efectuado el procedimiento posterior a la instalación
(consulte la página 10).
• Verifique los cables de red. En particular, compruebe que las
conexiones del cable de red son seguras y que los cables no están
dañados. Si encuentra alguna conexión suelta o algún cable dañado,
arréglelo y compruebe si el PC se puede comunicar por la red.
• Pregunte al administrador de red si la red está activa. La luz del panel
posterior de la tarjeta HP LAN se apaga cuando no hay respuestas de
autonegociación, por ejemplo cuando el cable de la LAN no está
conectado al HUB de la red.
• Compruebe que la ranura PCI en la que está instalada la tarjeta LAN
de HP está activada en la utilidad HP Setup del PC (Avanzado
➜
Configuratión PCI).
No se puede arrancar o
iniciar el PC desde la red
• Compruebe que el cable del conector de inicio externo está
conectado a la tarjeta LAN de HP y a la placa de sistema del PC.
• Compruebe que los campos específicos de LAN en la utilidad HP
Setup del PC están configurados correctamente (vea la página 9).
book.bk : chapter.fb Page 13 Monday, October 13, 1997 6:08 PM

4 Cómo Instalar la Tarjeta LAN de HP
Servicios de Soporte de HP
14Español
Servicios de Soporte de HP
Dispone de controladores y utilidades en los siguientes Servicios de
Soporte de HP:
• Páginas de HP en el World Wide Web:
http://www.hp.com/go/pcsupport
O bien
http://www.hp.com/go/kayaksupport
• Fórum de HP en CompuServe
TM
:
En el indicador de CompuServe (!), escriba GO HP.
• Fórum de HP en America Online:
En el menú, seleccione Keyword Search, escriba HP y oprima
.
• Biblioteca BBS de HP:
Número mundial: +1 (208) 344 1691.
book.bk : chapter.fb Page 14 Monday, October 13, 1997 6:08 PM

Español 15
4 Cómo Instalar la Tarjeta LAN de HP
Especificaciones de la Tarjeta LAN de HP
Especificaciones de la Tarjeta LAN de HP
Disposición Física
Características de Hardware
• Cabe en una ranura PCI estándar.
• Un puerto 10BT/100TX dedicado al soporte del Magic Packet, que
soporta las funciones Remote Power On (Encendido Remoto) y
Remote Wake Up (Despertar Remoto).
• Un zócalo Flash para el arranque remoto y la verificación antivirus.
Características de Software
Funciones del BIOS
• BOOTROM. Es un BIOS especial que permite que el PC arranque
desde un recurso de red.
• Soporte de Remote Power On (Encendido Remoto) y Remote Wake
Up (Despertar Remoto).
Conector
Inicio
Externo
Chip AMD PCnet
TM
-FAST
Zócalo
Flash
Conector
10BT/100TX
book.bk : chapter.fb Page 15 Monday, October 13, 1997 6:08 PM

4 Cómo Instalar la Tarjeta LAN de HP
Especificaciones de la Tarjeta LAN de HP
16Español
Especificaciones Técnicas de la Tarjeta LAN de HP
Circuito AMD
PCnet-FAST
• Compatible con los estándares ISO 8802.3 y Ethernet.
• Interfase directa con PCI.
• Soporte de ráfagas.
• Arquitectura Maestro de Bus de 32 bits con gestión de búfer DMA
integrada.
• Dúplex completo.
• Soporte de Magic Packet.
• PROM de arranque opcional para aplicaciones de nodos sin disco.
• Selección automática del puerto.
Soporte de Flash • Aplicación de nodo sin disco, que permite arrancar desde un servidor
de la red en lugar de un recurso del sistema (disco duro, unidad de
disquetes o unidad de CD-ROM).
• Soporte de antivirus mediante el zócalo Flash (no forma parte del kit
de LAN de HP).
• Soporte Flash para arranque TCP/IP (no forma parte del kit de LAN
de HP).
Conector de Inicio
Externo
• A través de este conector se suministran las señales de Remote
Power On (Encendido Remoto) cuando el PC está apagado y Remote
Wake Up (Despertar Remoto) cuando el PC está en modo sleep.
LED (luz) de Estado
de la Conexión
La parte posterior de la tarjeta HP LAN cuenta con un LED que indica
el estado de la conexión de la LAN, que puede ser uno de los siguientes:
• Encendida: No hay respuesta de autonegociación (por ejemplo,
cuando el cable de la LAN no está conectado al HUB de la red).
• Parpadea: Durante la autonegociación.
• Verde (ENCENDIDA): La conexión superó la autonegociación y se
estableció un enlace entre la tarjeta HO LAN y el HUB/Switch de la
red.
book.bk : chapter.fb Page 16 Monday, October 13, 1997 6:08 PM

Español 17
4 Cómo Instalar la Tarjeta LAN de HP
Información Regulatoria
Información Regulatoria
DECLARACIÓN DE CONFORMIDAD
de acuerdo con la Guía 22 y EN 45014 de ISO/IEC
Nombre del Fabricante: HEWLETT-PACKARD
Dirección del Fabricante: 5 Avenue Raymond Chanas
38320 Eybens, FRANCE
Declara que el producto:
Nombre del Producto:D3999A
Cumple las siguientes Especificaciones del Producto:
SEGURIDAD
Internacional: IEC 950: 1991+A1+A2 +A3 + A4
Europa: EN 60950: 1992+A1+A2 + A3
EMC
CISPR 22: 1993 /EN 55022: 1994 Clase B
EN 50082-1: 1992
IEC 801-2: 1992 / prEN 55024-2: 1992 - 4 kV CD, 8 kV AD
IEC 801-3: 1984 / prEN 55024-3: 1991 - 3 V/m
IEC 801-4: 1988 / prEN 55024-4: 1992 - Líneas de Señal de 0,5 kV,
Potencia de líneas de 1 kV
IEC 555-2:1982 + A1:1985 / EN 60555-2:1987
IEC 1000-3-3:1994 / EN 61000-3-3:1995
Información complementaria:
El producto cumple con los requisitos de la Directiva EMC 89/336/EEC y de la Directiva
de bajo voltaje 73/23/EEC, ambas enmendadas por la Directiva 93/68/ECC y lleva la marca de CE
correspondiente.
Grenoble Jean-Marc JULIA
Septiembre 1997 Director de Calidad de Producto
book.bk : chapter.fb Page 17 Monday, October 13, 1997 6:08 PM

4 Cómo Instalar la Tarjeta LAN de HP
Información Regulatoria
18Español
Póliza de Garantía Para Usuarios en México
Hewlett-Packard de México, S.A. de C.V. con domicilio en:
Garantiza este producto por el término de doce meses en todas sus partes y mano de obra contra
cualquier defecto de fabricación y funcionamiento a partir de la fecha de entrega al consumidor
final. En el caso de productos que requieran de enseñanza o adiestramiento en su manejo o en su
instalación, a partir de la fecha en que hubiere quedado operando normalmente el producto
después de su instalación en el domicilio que señale el consumidor.
CONDICIONES:
1. Centros de Servicio, Refacciones y Partes:
Para hacer efectiva esta garantía, no podrán exigirse mayores requisitos que la presentación de
esta póliza junto con el producto en el lugar donde fue adquirido o en cualquiera de los centros de
servicio ubicados en los domicilios de la parte superior de esta hoja, mismos en los que se pueden
adquirir refacciones y partes.
2. Cobertura:
La Empresa se compromete a reparar o cambiar el producto, así como las piezas y componentes
defectuosos del mismo, sin ningún cargo para el consumidor. Los gastos de transportación que se
deriven de su cumplimiento serán cubiertos por Hewlett-Packard de México, S.A. de C.V.
3. Tiempo de Reparación:
El tiempo de reparación en ningún caso será mayor a treinta días contados a partir de la recepción
del producto en cualquiera de los sitios en donde pueda hacerse efectiva la garantía.
4. Limitaciones:
Esta garantía no es válida en los siguientes casos:
• Cuando el producto ha sido utilizado en condiciones distintas a las normales.
• Cuando el producto no ha sido operado de acuerdo con el instructivo de uso en idioma Español
proporcionado.
• Cuando el producto ha sido alterado o reparado por personas no autorizadas por
Hewlett-Packard de México, S.A. de C.V.
Guadalajara, Jalisco
Montemorelos No. 229
Fracc. Loma Bonita, 45060
Tel. 669 95 00
Monterrey, Nvo. León
Calz. Del Valle O. No. 409
4º Piso, Col. Del Valle
Garza García, 76030
Tel. 78 42 40
México, D.F.
Prolongación Reforma No. 470
Col. Lomas de Sta. Fe, 01210
Delegación Alvaro Obregón
Tel. 326 46 00
México, D.F.
Monte Pelvoux No. 111
Lomas de Chapultepec, 11000
Tel. 202 01 55
Producto Marca Modelo
No. de Serie Nombre del Distribuidor
book.bk : chapter.fb Page 18 Monday, October 13, 1997 6:08 PM

Español 19
4 Cómo Instalar la Tarjeta LAN de HP
Información Regulatoria
Notas:
El consumidor podrá solicitar que se haga efectiva la garantía ante la propia casa comercial donde
adquirió el producto. En caso de que la presente garantía se extraviara, el consumidor puede
recurrir a su proveedor para que se le expida otra póliza de garantía, previa presentación de la nota
de compra o factura respectiva.
¡FELICIDADES! Hewlett-Packard aumentó el tiempo de garantía de su monitor, comprado como
parte de su equipo, de cómputo hasta doce meses.
Dirección (Calle, Número, Colonia o Poblado, Delegación o Municipio)
C.P. Ciudad Estado Teléfono
Fecha de entrega o instalación
book.bk : chapter.fb Page 19 Monday, October 13, 1997 6:08 PM

4 Cómo Instalar la Tarjeta LAN de HP
Garantía del Hardware HP
20Español
Garantía del Hardware HP
Este accesorio de HP está cubierto por una garantía limitada de hardware durante un periodo de un año a partir
de la fecha de adquisición por el usuario final original. El tipo de servicio proporcionado es el retorno a un centro
de servicio técnico de HP o un centro de reparaciones autorizado.
Según disponga Hewlett-Packard, los accesorios defectuosos se repararán o se sustituirán con accesorios
nuevos, ya sean del mismo tipo o de un modelo equivalente.
Si este accesorio se adquirió con un computador personal HP Vectra y se utiliza en este equipo o en una estación
de trabajo de PC Kayak, estará cubierto por la garantía de este computador o estación de trabajo, con las
mismas condiciones de servicio técnico y duración.
Consulte la declaración de garantía suministrada con su computador personal, para saber más acerca de las
limitaciones de la garantía, las responsabilidades del cliente y otros términos y condiciones.
book.bk : chapter.fb Page 20 Monday, October 13, 1997 6:08 PM

5
Guida di installazione della scheda
Ethernet
10BT/100TX NightDIRECTOR/100
book.bk : TITLE.FB Page i Monday, October 13, 1997 6:08 PM

ii ItalianoFrancais
Avviso
Le informazioni contenute in questo documento sono soggette a
cambiamento senza preavviso.
Hewlett-Packard non rilascia garanzie di alcun tipo riguardo a questo
materiale, comprese le garanzie implicite di commercializzazione e di
idoneità per uno scopo particolare, e non limitatamente a queste.
Hewlett-Packard non verrà ritenuta responsabile per eventuali errori
qui contenuti o per danni accidentali o conseguenti alla fornitura, alle
prestazioni o all’utilizzo di questo materiale.
Hewlett-Packard non si assume alcuna responsabilità per l’uso o
l’affidabilità del suo software su apparecchiature di altre marche.
Questo documento contiene informazioni di proprietà protette da
copyright. Tutti i diritti sono riservati. Nessuna parte di questo
documento può essere fotocopiata, riprodotta o tradotta in un’altra
lingua senza il consenso scritto di Hewlett-Packard.
Acrobat
®
e Adobe
®
sono marchi registrati di Adobe Systems
Incorporated e possono venire registrati in certe giurisdizioni.
CompuServe
TM
è un marchio statunitense di CompuServe, Inc.
Magic Packet
TM
e PCnet
TM
sono marchi statunitensi di AMD
Corporation.
Microsoft
®
, NT
®
eWindows
®
sono marchi registrati negli Stati Uniti di
Microsoft Corporation.
Hewlett-Packard France
38053 Grenoble Cedex 9
France
1997 Hewlett-Packard Company
book.bk : TITLE.FB Page ii Monday, October 13, 1997 6:08 PM

Sommario
Italiano iii
5 Installazione della scheda HP LAN
Contenuto del Service Pack . . . . . . . . . . . . . . . . . . . . . . . . . . . . . . . . . . 2
Requisiti per l’installazione . . . . . . . . . . . . . . . . . . . . . . . . . . . . . . . . . . 3
Descrizione della procedura di installazione . . . . . . . . . . . . . . . . . . . . 5
Procedura di preinstallazione . . . . . . . . . . . . . . . . . . . . . . . . . . . . . . . . 6
Preinstallazione su un sistema Windows 95 . . . . . . . . . . . . . . . . . . . . . . . . 6
Preinstallazione su un sistema Windows NT 4.0 . . . . . . . . . . . . . . . . . . . . 6
Installazione di una scheda HP LAN . . . . . . . . . . . . . . . . . . . . . . . . . . . 8
Aggiornamento di campi LAN in HP PC Setup . . . . . . . . . . . . . . . . . . 9
Procedura di postinstallazione . . . . . . . . . . . . . . . . . . . . . . . . . . . . . . 10
Postinstallazione su un sistema Windows 95 . . . . . . . . . . . . . . . . . . . . . . 10
Postinstallazione su un sistema Windows NT 4.0. . . . . . . . . . . . . . . . . . . 10
Collegamento in rete . . . . . . . . . . . . . . . . . . . . . . . . . . . . . . . . . . . . . . . 11
Controllo dell’installazione. . . . . . . . . . . . . . . . . . . . . . . . . . . . . . . . . . 11
Risoluzione dei problemi . . . . . . . . . . . . . . . . . . . . . . . . . . . . . . . . . . . 12
Servizi di supporto HP . . . . . . . . . . . . . . . . . . . . . . . . . . . . . . . . . . . . . 13
Specifiche della scheda HP LAN . . . . . . . . . . . . . . . . . . . . . . . . . . . . . 14
Disposizione dei componenti. . . . . . . . . . . . . . . . . . . . . . . . . . . . . . . . . . . 14
Caratteristiche hardware. . . . . . . . . . . . . . . . . . . . . . . . . . . . . . . . . . . . . . 14
Caratteristiche software . . . . . . . . . . . . . . . . . . . . . . . . . . . . . . . . . . . . . . 14
Specifiche tecniche della scheda HP LAN . . . . . . . . . . . . . . . . . . . . . . . . 15
book.bk : BOOK.TOC Page iii Monday, October 13, 1997 6:08 PM

iv Italiano
Norme . . . . . . . . . . . . . . . . . . . . . . . . . . . . . . . . . . . . . . . . . . . . . . . . . . 16
Garanzia hardware. . . . . . . . . . . . . . . . . . . . . . . . . . . . . . . . . . . . . . . . 17
book.bk : BOOK.TOC Page iv Monday, October 13, 1997 6:08 PM

5
Installazione della scheda HP LAN
book.bk : CHAPTER.FB Page 1 Monday, October 13, 1997 6:08 PM

5 Installazione della scheda HP LAN
Contenuto del Service Pack
2Italiano
Contenuto del Service Pack
Il Service Pack contiene:
• 10 schede HP LAN (10BT/100TX)
• Un set di dischetti:
❒ un dischetto HP LAN Setup
❒ due dischetti di driver HP LAN
❒ due dischetti Adobe
®
Acrobat
®
Reader (versione 2.2)
Utilizzare Acrobat Reader per leggere la guida in linea
dell’amministratore di rete (solo in inglese) disponibile su uno
dei dischetti HP lAN. La guida dell’amministratore di rete è solo
per utenti esperti.
• 10 cavi di avvio esterni
• Questa Guida di installazione.
book.bk : CHAPTER.FB Page 2 Monday, October 13, 1997 6:08 PM

Italiano 3
5 Installazione della scheda HP LAN
Requisiti per l’installazione
Requisiti per l’installazione
Piattaforme supportate Il kit accessorio della rete HP è destinato ai modelli HP Vectra VE4 e alle
stazioni di lavoro Kayak XA, XU e XW, con i seguenti sistemi operativi
(in inglese, francese, tedesco, spagnolo o italiano):
• Windows 95 (tutti i modelli eccetto Kayak XW, Kayak XU 6/266
FastRAID e Kayak XU 6/300 FastRAID)
• Windows NT 4.0 (tutti i modelli)
Numero delle schede di
rete supportate
Il programma di installazione della scheda HP LAN supporta non più di
una scheda di rete per PC. Se si desidera installare una scheda di rete
HP LAN su un PC che ha già una scheda di rete installata, occorre
installare il software della scheda manualmente. Per ulteriori
informazioni su come procedere, vedere il file readme.txt contenuto in
uno dei dischetti dei driver del kit (il sistema operativo del PC indica
quale dischetto contiene il file readme.txt appropriato).
Per ogni PC è supportata solo una scheda HP LAN integrata perché i PC
HP hanno un solo connettore External Start sulla scheda di sistema.
Avvio dall’unità a
dischetto
Il PC deve poter essere avviato dall’unità a dischetto. Tale funzione può
essere configurata nel programma di utilità HP PC Setup, cui si accede
premendo durante la routine di avvio del PC. La posizione delle
impostazioni nel programma di utilità HP PC Setup è generalmente
Sicurezza
➜Sicurezza dispositivi di avvio➜Avvio da dischetto.
NT Service Pack Se sul PC è già installato un NT Service Pack, questo deve essere
reinstallato dopo che si è installato la scheda HP LAN e il relativo
software.
Per i sistemi NT 4.0 il programma di installazione della scheda HP LAN
non funziona sui sistemi danesi, olandesi, italiani o norvegesi in cui è già
installato un NT Service Pack 2 (SP2). Prima di eseguire il programma
di installazione della scheda HP LAN è necessario installare il Service
Pack 3 (SP3) o superiore.
book.bk : CHAPTER.FB Page 3 Monday, October 13, 1997 6:08 PM

5 Installazione della scheda HP LAN
Requisiti per l’installazione
4Italiano
Configurazione di
default
La configurazione di default del programma di installazione della scheda
LAN è client per Microsoft
®
Networks, IPX, NetBEUI e NDIS. Se si vuole
ottenere una configurazione diversa, occorre installare manualmente il
software della scheda HP LAN. Per maggiori informazioni fare
riferimento al file readme.txt contenuto su uno dei dischetti dei driver
del kit (il sistema operativo del PC determina quale dischetto contiere il
file readme.txt appropriato).
Dischetto di
installazione di HP LAN
Il dischetto HP LAN Setup non deve essere protetto in scrittura durante
il processo di installazione della scheda HP LAN.
Dischetti master del
sistema operativo
Il programma di installazione della scheda HP LAN potrebbe richiedere
l’accesso ad alcuni file del sistema operativo. Occorre quindi che siano
disponibili i dischetti master.
book.bk : CHAPTER.FB Page 4 Monday, October 13, 1997 6:08 PM

Italiano 5
5 Installazione della scheda HP LAN
Descrizione della procedura di installazione
Descrizione della procedura di installazione
ATTENZIONE Prima di installare la scheda HP LAN e il software relativo, leggere
attentamente la parte intitolata “Requisiti per l’installazione” nelle due
pagine precedenti.
L’installazione della scheda HP LAN prevede 4 fasi. Occorre:
1 Eseguire le operazioni di preinstallazione.
2 Installare la scheda HP LAN.
3 Aggiornare i campi del programma di utilità HP PC Setup.
4 Eseguire le operazioni di postinstallazione.
Preinstallazione La fase di preinstallazione prevede:
• Esecuzione del programma HP LAN setup.
• Riavvio del PC per aggiornare il BIOS. Il programma di installazione
esegue questo processo automaticamente.
Prima di installare fisicamente la scheda HP LAN nel PC, è necessario e
eseguire la preinstallazione.
Installazione della
scheda HP LAN
A questo punto si installa fisicamente la scheda HP LAN in uno slot PCI
libero del PC. La scheda può essere intallata su modelli sia minitower
che desktop.
Aggiornamento di
campi LAN specifici nei
programmi di utilità HP
PC Setup
Verificare che tutti i campi LAN specifici nel programma di utilità HP PC
Setup siano impostati correttamente per far funzionare la scheda HP
LAN.
Postinstallazione In questa fase, il programma di installazione esegue una serie di controlli
sul PC e, se necessario, aggiorna alcuni componenti software prima di
lasciare che il sistema operativo installi i driver HP LAN.
book.bk : CHAPTER.FB Page 5 Monday, October 13, 1997 6:08 PM

5 Installazione della scheda HP LAN
Procedura di preinstallazione
6Italiano
Procedura di preinstallazione
ATTENZIONE Prima di installare fisicamente la scheda HP LAN nel PC eseguire la
preinstallazione.
Preinstallazione su un sistema Windows 95
1 Sotto Windows 95, inserire il dischetto HP LAN Setup nell’unità.
2 Fare clic su Avvio e poi su Esegui.... Si apre la finestra di dialogo
Esegui.
3 Digitare a:\setup sulla riga di comando e fare click su OK. Si apre
una finestra di dialogo di impostazione della rete.
4 Fare clic su Avanti. Si apre una seconda finestra di dialogo di
impostazione della rete.
5 Fare clic su Fine. Il PC viene riavviato sotto DOS e visualizza un
messaggio che chiede se è già installata un’altra scheda LAN.
6 Digitare n, quindi togliere quindi il dischetto HP LAN Setup
dall’unità a dischetto e spegnere il PC.
7 Vedere “Installazione di una scheda HP LAN” a pagina 8.
Preinstallazione su un sistema Windows NT 4.0
1 Sotto Windows NT, inserire il dischetto HP LAN Setup nell’unità a
dischetto.
2 Fare clic su Avvio e poi su Esegui....
3 Digitare a:\setup sulla riga di comando e fare poi click su OK. Si
apre una finestra di dialogo di informazioni sull’account.
4 Immettere il nome di un account che sia membro del gruppo
amministratore e la relativa password. Se ci si è già registrati
condiritti amministrativi, nel campo del nome account viene
automaticamente registrato il nome di account.
book.bk : CHAPTER.FB Page 6 Monday, October 13, 1997 6:08 PM

Italiano 7
5 Installazione della scheda HP LAN
Procedura di preinstallazione
5 Fare click su Avanti. Viene visualizzzata una finestra di dialogo.
6 Fare click su Fine. Il PC viene riavviato sotto DOS e visualizza un
messaggio che chiede se è già installata un’altra scheda LAN.
7 Digitare n, togliere quindi il dischetto HP LAN Setup dall’unità a
dischetto e spegnere il PC.
8 A questo punto passare a “Installazione di una scheda HP LAN” a
pagina 8.
book.bk : CHAPTER.FB Page 7 Monday, October 13, 1997 6:08 PM

5 Installazione della scheda HP LAN
Installazione di una scheda HP LAN
8Italiano
Installazione di una scheda HP LAN
Per ulteriori informazioni su come installare una scheda accessoria,
consultare la Guida d’uso del PC oppure seguire questa procedura:
1 Spegnere il PC, scollegare i cavi di alimentazione e tutte le
connessioni alla rete di telecomunicazioni e togliere il coperchio.
2 In alcuni modelli potrebbe essere necessario togliere i fermi dello slot
accessorio che si trovano sul retro del PC.
3 Togliere il coperchio dello slot.
4 Collegare il cavo External Start e, senza piegarlo, inserire la scheda
nello slot accessorio.
5 Fissare la scheda rimettendo la vite del coperchio dello slot o il fermo
e la vite in base al tipo di PC.
6 Riposizionare il coperchio. Ricollegare il cavo di alimentazione e
tutte le connessioni alla rete di telecomunicazioni.
La scheda può essere installata su
modelli sia minitower sia desktop.
Vedere “Specifiche della scheda HP
LAN” a pagina 14 per la posizione del
connettore External Start sulla scheda
HP LAN. Consultare la documentazione
tecnica o di uso del PC per la posizione
del connettore External Start sulla
scheda di sistema.
book.bk : CHAPTER.FB Page 8 Monday, October 13, 1997 6:08 PM

Italiano 9
5 Installazione della scheda HP LAN
Aggiornamento di campi LAN in HP PC Setup
Aggiornamento di campi LAN in HP PC Setup
Dopo aver fisicamente installato la scheda HP LAN nel PC, è necessario
verificare che il BIOS sia configurato per usare la scheda. Per farlo
occorre usare il programma di utilità HP PC Setup.
Avvio del programma di
utilità HP PC Setup
1 Riavvio del PC.
2 Premere quando compare
F2=Setup sullo schermo durante una
routine di avvio del PC. Si apre la finestra del programma di utilità
HP PC Setup.
Uso del programma di
utilità del HP PC Setup
Consultare la Guida d’uso del PC per scoprire come navigare attraverso
il programma di utilità HP PC Setup e come modificare i campi.
I campi che hanno
bisogno di essere
aggiornati
I campi che possono richiedere un controllo ed un eventuale
aggiornamento sono tutti quelli relativi alla rete locale.
Il manuale utente fornito con il PC dovrebbe contenere una sezione in
cui viene spiegato come configurare un’interfaccia LAN. L’elenco
riportato di seguito funge da guida. I nomi dei campi usati nella versione
del programma Setup possono differire leggermente da quelli indicati di
seguito. Per maggiori informazioni fare riferimento al manuale utente
del PC.
• Verificare che l’interfaccia LAN integrata sia abilitata
(Avanzato
➜Interfaccia di rete integrata➜Interfaccia Ethernet
integrata [Abilitata]).
• Verificare che si possa avviare i PC (avvio e accesso) dalla rete
(Sicurezza
➜Priorità dispositivi di avvio➜Avvio dalla rete [Abilitato]).
• Verificare che il PC possa essere risvegliato
(Alimentazione
➜Risveglio da Sospendi➜Rete integrata [Abilitata]).
• Verificare che il PC possa essere acceso dalla rete
(Alimentazione
➜Accensione➜Rete integrata [Abilitata]).
book.bk : CHAPTER.FB Page 9 Monday, October 13, 1997 6:08 PM

5 Installazione della scheda HP LAN
Procedura di postinstallazione
10Italiano
Procedura di postinstallazione
ATTENZIONE Accertarsi di aver installato la scheda HP LAN prima di eseguire
l’operazione di postinstallazione.
Postinstallazione su un sistema Windows 95
1 Riavviare il PC. Windows 95 automaticamente individua la scheda
HP LAN e installa il software relativo. Può venire richiesto di inserire
uno dei dischetti di installazione di Windows 95.
2 Riavviare il PC alla richiesta del sistema, ma prima ricordarsi di
togliere il dischetto HP LAN Setup.
La scheda HP LAN è ora pronta per l’uso.
Postinstallazione su un sistema Windows NT 4.0
1 Riavviare il PC e avviare Windows. Per accedere non è necessario
premere ++.
2 Alla richiesta del sistema, inserire il dischetto HP LAN Setup
nell’unità a dischetto e fare click su OK. Inizia il setup guidato e viene
visualizzata una finestra di dialogo che indica che il PC è pronto per
l’installazione della scheda HP LAN.
3 Digitare il percorso per il disco master NT (C:\I386 se i file del
sistema operativo sono stati copiati sul disco rigido durante
l’installazione di Windows NT), fare quindi click su Avanti.
L’installazione della scheda HP LAN parte automaticamente. Una
volta terminata l’installazione, viene visualizzata l’ultima pagina
dell’installazione guidata.
4 Fare click su Arresta per terminare l’installazione guidata.
5 Riavviare il PC quando richiesto dal sistema, ma prima togliere il
dischetto HP LAN Setup.
ATTENZIONE Se nel PC era già installato un service pack prima che fosse installata la
scheda HP LAN, questo deve essere reinstallato prima che sia messa in
funzione la scheda di rete HP.
La scheda HP LAN è adesso pronta per l’uso.
book.bk : CHAPTER.FB Page 10 Monday, October 13, 1997 6:08 PM

Italiano 11
5 Installazione della scheda HP LAN
Collegamento in rete
Collegamento in rete
Collegare il cavo di rete al connettore LAN RJ-45 UTP (Unshielded
Twisted Pair), La scheda LAN supporta il funzionamento sia a 10
Mbits/s che a 100 Mbits/s.
Sospensione remota
(RWU) e accensione
remota (RPO)
La scheda di rete HP LAN è in grado di accendere il PC tramite la
ricezione di una speciale sequenza (detta Magic Packet
TM
) dalla rete.
La modalità RWU permette al PC di riprendere il funzionamento
quando si trova in modalità consumo minimo (sospendi).
La modalità RPO permette al PC di ripartire dopo essere stato spento.
Controllo dell’installazione
Verificare se la scheda HP LAN funziona individuando un altro
dispositivo di rete o eseguendo un’operazione di rete. Se non funziona
correttamente, vedere “Risoluzione dei problemi” a pagina 12.
Connettore
10BT/100TX
book.bk : CHAPTER.FB Page 11 Monday, October 13, 1997 6:08 PM

5 Installazione della scheda HP LAN
Risoluzione dei problemi
12Italiano
Risoluzione dei problemi
La scheda di rete HP
non funziona
• Verificare che i requisiti di installazione siano stati rispettati (vedere
a pagina 3).
• Verificare di:
❒ aver seguito la procedura di preinstallazione (vedere a pagina 6).
❒ aver installato la scheda HP LAN (vedere a pagina 8).
❒ aver impostato correttamente i campi LAN specifici nel
programma di utilità HP PC Setup (vedere a pagina 9).
❒ aver seguito la procedura di postinstallazione (vedere a pagina
10).
• Controllare i cavi di rete. In particolare, controllare che i
collegamenti dei cavi di rete siano saldi e non danneggiati. Se si
trovano collegamenti laschi o danneggiati, fissarli bene e verificare se
il PC riesce a comunicare in rete.
• Verificare assieme all’amministratore di rete che la rete sia attiva. La
luce sul pannello posteriore della schade HP LAN è spenta quando
non vi è alcuna risposta di autonegoziazione, per esempio quando il
cavo LAN non è collegato alla rete HUB.
• Verificare che lo slot PCI in cui è installata la scheda HP LAN sia
abilitata nel programma di utilità HP PC Setup
(Avanzata
➜Configurazione PCI).
Non si riesce ad avviare
o risvegliare il PC dalla
rete
• Verificare che il cavo del connettore di avvio esterno sia collegato alla
scheda di rete HP e alla scheda di sistema del PC.
• Verificare che i campi di rete specifici nel programma di utilità HP PC
Setup utility siano impostati correttamente (vedere a pagina 9).
book.bk : CHAPTER.FB Page 12 Monday, October 13, 1997 6:08 PM

Italiano 13
5 Installazione della scheda HP LAN
Servizi di supporto HP
Servizi di supporto HP
Sono disponibili driver e programmi di utilità presso i seguenti servizi
di supporto HP:
• sito HP World Wide Web:
http://www.hp.com/go/pcsupport
OPPURE
http://www.hp.com/go/kayaksupport
• HP Forum su CompuServe
TM
:
Alla richiesta di CompuServe (!), digitare GO HP.
• HP Forum su America Online:
Selezionare Keyword Search dal, digitare HP e premere .
• Biblioteca HP BBS:
numero internazionale: +1 (208) 344 1691.
book.bk : CHAPTER.FB Page 13 Monday, October 13, 1997 6:08 PM

5 Installazione della scheda HP LAN
Specifiche della scheda HP LAN
14Italiano
Specifiche della scheda HP LAN
Disposizione dei componenti
Caratteristiche hardware
• Adatto a slot PCI standard.
• Una porta 10BT/100TX dedicata al supporto di Magic Packet, che
supporta Remote Power On (RPO) e Remote Wake Up (RWU).
• Un connettore Flash per avvio remoto e controllo antivirus.
Caratteristiche software
Funzioni del BIOS
• BOOTROM. Si tratta di un BIOS speciale che abilita il PC all’avvio da
una risorsa di rete.
• Supporto RPO/RWU.
Connettore
10BT/100TX
Connettore
di avvio
esterno
Chip AMD PCnet
TM
FAST
Connettore
Flash
Chapter.fb Page 14 Monday, October 13, 1997 6:58 PM

Italiano 15
5 Installazione della scheda HP LAN
Specifiche della scheda HP LAN
Specifiche tecniche della scheda HP LAN
Chip AMD PCnet-FAST
• Compatibile con ISO 8802.3 e gli standard Ethernet.
• Interfaccia diretta al PCI.
• Supporto Burst.
• Architettura Bus Master a 32 bit con gestione di buffer DMA
integrata.
• Full duplex.
• Supporto Magic Packet.
• PROM di avvio opzionale per applicazione di nodo senza disco.
• Selezione di porta automatica.
Supporto flash • Applicazione di nodo senza disco che abilita l’avvio da un server di
rete piuttosto che da una risorsa di sistema (disco rigido, unità a
dischetto o unità CD-ROM).
• Supporto Virus Scan tramite connettore flash (non incluso nel kit di
rete HP).
• Supporto per TCP/IP Boot Flash (non incluso nel kit di rete HP).
Connettore di avvio
esterno
• I segnali RPO (quando il PC è spento) e RWU (quando il PC è in
modo consumo minimo) viaggiano attraverso questo connettore.
LED dello stato del
collegamento LAN
Vi è un LED sul retro della scheda HP LAN che indica lo stato del
collegamento LAN nel seguente modo:
• Spento - quando non vi è alcuna risposta di autonegoziazione, per
esempio quando il cavo LAN non è collegato alla rete HUB.
• Lampeggiante - durante l’autonegoziazione.
• Verde(acceso) - il collegamento ha passato l’autonegoziazione ed è
stato stabilito un collegamento tra la scheda HP LAN e l’HUB/Switch
di rete.
book.bk : CHAPTER.FB Page 15 Monday, October 13, 1997 6:08 PM

5 Installazione della scheda HP LAN
Norme
16Italiano
Norme
DICHIARAZIONE DI CONFORMITA’
alle norme ISO/IEC Guida 22 e EN 45014
Il costruttore: HEWLETT-PACKARD
Indirizzo del costruttore: 5 Avenue Raymond Chanas
38320 Eybens, FRANCE
Dichiara che il prodotto:
Nome del prodotto:D3999A
E’ conforme alle seguenti specifiche di prodotto:
SICUREZZA
Internazionale: IEC 950: 1991+A1+A2 +A3 + A4
Europa: EN 60950: 1992+A1+A2 + A3
EMC
CISPR 22: 1993 /EN 55022: 1994 Classe B
EN 50082-1: 1992
IEC 801-2: 1992 / prEN 55024-2: 1992 - 4 kV CD, 8 kV AD
IEC 801-3: 1984 / prEN 55024-3: 1991 - 3 V/m
IEC 801-4: 1988 / prEN 55024-4: 1992 - 0.5 kV Linee segnale
1 kV Linee alimentazione
IEC 555-2:1982 + A1:1985 / EN 60555-2:1987
IEC 1000-3-3:1994 / EN 61000-3-3:1995
Informazioni supplementari :
Il prodotto è conforme ai requisiti delle direttive EMC 89/336/EEC e 73/23/EEC
sulla bassa tensione, entrambe emendate dalla direttiva 93/68/EEC e porta il relativo marchio CE.
Grenoble Jean-Marc JULIA
Settembre 1997 Product Quality Manager
book.bk : CHAPTER.FB Page 16 Monday, October 13, 1997 6:08 PM

Italiano 17
5 Installazione della scheda HP LAN
Garanzia hardware
Garanzia hardware
Questo accessorio HP è coperto da una garanzia hardware limitata per un periodo di un anno dalla data di
acquisto da parte dell’utente finale. Il tipo di servizio fornito è il rinvio dell’accessorio al centro di assistenza HP
o di un rivenditore autorizzato.
HP, a suo giudizio, riparerà o sostituirà gli accessori che si dimostrino difettosi con modelli equivalenti o simil
i.
Se l’accessorio è stato acquistato per venire utilizzato con un personal computer HP Vectra o HP Kaya ,allora
l’accessorio è coperto con i termini e le condizioni della Garanzia hardware HP, per tutto il tempo rimasto.
Consultare ladichiarazione sulla garanzia fornita con il PC HP per le restrizioni sulla garanzia, le responsabilità
del cliente ed altri termini e condizioni.
book.bk : CHAPTER.FB Page 17 Monday, October 13, 1997 6:08 PM

book.bk : CHAPTER.FB Page 18 Monday, October 13, 1997 6:08 PM

book.bk : Backcov.fb4 Page 117 Monday, October 13, 1997 6:08 PM

Part Number
Printed in
D3999-90001
Paper not bleached with chlorine
book.bk : Backcov.fb4 Page 118 Monday, October 13, 1997 6:08 PM

HP 10BT/100TX NightDIRECTOR/100 Ethernet Card D3999-90001
book.bk : Spine.fb4 Page 119 Monday, October 13, 1997 6:08 PM
-
 1
1
-
 2
2
-
 3
3
-
 4
4
-
 5
5
-
 6
6
-
 7
7
-
 8
8
-
 9
9
-
 10
10
-
 11
11
-
 12
12
-
 13
13
-
 14
14
-
 15
15
-
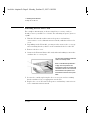 16
16
-
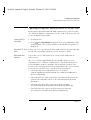 17
17
-
 18
18
-
 19
19
-
 20
20
-
 21
21
-
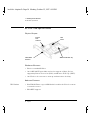 22
22
-
 23
23
-
 24
24
-
 25
25
-
 26
26
-
 27
27
-
 28
28
-
 29
29
-
 30
30
-
 31
31
-
 32
32
-
 33
33
-
 34
34
-
 35
35
-
 36
36
-
 37
37
-
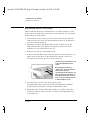 38
38
-
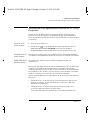 39
39
-
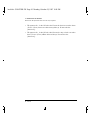 40
40
-
 41
41
-
 42
42
-
 43
43
-
 44
44
-
 45
45
-
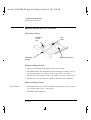 46
46
-
 47
47
-
 48
48
-
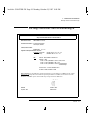 49
49
-
 50
50
-
 51
51
-
 52
52
-
 53
53
-
 54
54
-
 55
55
-
 56
56
-
 57
57
-
 58
58
-
 59
59
-
 60
60
-
 61
61
-
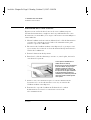 62
62
-
 63
63
-
 64
64
-
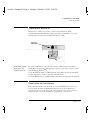 65
65
-
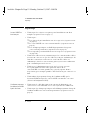 66
66
-
 67
67
-
 68
68
-
 69
69
-
 70
70
-
 71
71
-
 72
72
-
 73
73
-
 74
74
-
 75
75
-
 76
76
-
 77
77
-
 78
78
-
 79
79
-
 80
80
-
 81
81
-
 82
82
-
 83
83
-
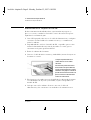 84
84
-
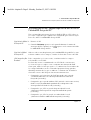 85
85
-
 86
86
-
 87
87
-
 88
88
-
 89
89
-
 90
90
-
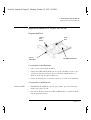 91
91
-
 92
92
-
 93
93
-
 94
94
-
 95
95
-
 96
96
-
 97
97
-
 98
98
-
 99
99
-
 100
100
-
 101
101
-
 102
102
-
 103
103
-
 104
104
-
 105
105
-
 106
106
-
 107
107
-
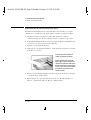 108
108
-
 109
109
-
 110
110
-
 111
111
-
 112
112
-
 113
113
-
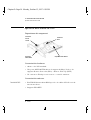 114
114
-
 115
115
-
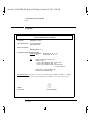 116
116
-
 117
117
-
 118
118
-
 119
119
-
 120
120
-
 121
121


HP (Hewlett-Packard) 10BT NightDIRECTOR/100 Manual de usuario
- Tipo
- Manual de usuario
- Este manual también es adecuado para
en otros idiomas
Artículos relacionados
Otros documentos
-
HP 48x CD-ROM Drive Guía de instalación
-
HP USB Web Camera Guía de instalación
-
-
SMC Networks 1255TX-2 - annexe 1 Manual de usuario
-
HP LaserJet 9050 Printer series Guía de inicio rápido
-
EUROCOM M590KE EMPEROR-X Manual de usuario
-
-
-
Yamaha CVP-309GP El manual del propietario
-
HP Designjet 130 Serie Guía de inicio rápido