Electrolux IK255TR12L Manual de usuario
- Categoría
- Frigoríficos-congeladores
- Tipo
- Manual de usuario
Este manual también es adecuado para

EN
I
F
Einbau-Kühlschrank Réfrigérateur à encastrer Frigorifero da incasso Built-in Refrigerator
GEBRAUCHSANWEISUNG
MODE D’EMPLOI
ISTRUZIONI PER L’USO
OPERATING INSTRUCTIONS
D
IK 255 Trio 11

2
Inhaltsverzeichnis
Bedienungsanleitungen
4 Einleitung
4 Sicherheitshinweise und Warnungen
5 Bedien- und Kontrollelemente
7 Einfrieren
8 Variable Innentür
8 Abtauen
9 Kühlraum
9 Reinigung
10 Tipps
10 LED ersetzen
11 Störungen
11 Garantie
12 Betriebsgeräusche
13 Einbau / Masse
Table des matières
Mode d’emploi
14 Introduction
14
Instructions de sécurité et avertissements
15 Elément de commande et de contrôlé
17 Congélation
18 Contre-porte variable
18 Dégivrage
19 Compartiment réfrigérant
20 Nettoyage
20 Conseils
21 Remplacement DEL
22 Pannes
22 Garantie
23 Bruits de fonctionnement
24 Encastrement / cotes

3
Sommario
Istruzioni per l’uso
25 Introduzione
25 Norme di sicurezza e avvertenze
26 Elementi di comando e di controllo
28 Congelamento
29 Retroporta variabile
29 Sbranimento
30 Vano frigorifero
30 Pulizia
31 Consigli
31 Sostituzione della lampadina
32 Guasti
33 Garanzia
34 Rumori di funzionamento
35 Installazione / dimensioni
Contents
Operating instructions
36 Introduction
36 Safety information and warnings
37 Operating and Control Panel
39 Freezing
39 Variable inner doors
40 Defrosting
41 Refrigerator
41 Cleaning
41 Tips
42 Replacing LED
43 Malfunctions
43 Guarantee
44 Operating noises
45 Installation / dimensions

4
Sehr geehrte Kundin,
sehr geehrter Kunde
Sie sind im Besitz eines modernen und
damit stromsparenden Kühlschrankes. Wir
gratulieren Ihnen zu diesem Gerät!
Dieses Kühlgerät wurde nach den aktuellen
europäischen Richtlinien sowie den aktuel-
len, nationalen und internationalen Normen
konstruiert und hergestellt. Mit der An brin g-
ung des CE-Zeichens, nach Prüfung des Pro-
duktes durch zugelassene Prüfstellen, be stä-
tigt der Hersteller die Einhaltung der für
Haushaltskühl- und Haus halts kühl ge frier-
geräte gültigen Richt linien und Normen.
Entsorgung des Altgerätes
Ausgediente Geräte sofort unbrauchbar
machen
(z.B. Anschlusskabel abschneiden).
Bitte achten Sie darauf, dass die Rohr lei-
tungen Ihres Gerätes bis zum Ab trans port
zu einer sachgerechten, um welt freund-
lichen Entsorgung nicht be schä digt wer-
den. Für die Entsorgung der Altgeräte
wenden Sie sich bitte an die zu ständigen
Stellen Ihrer Gemeinde. (Scharniere lösen
und Tür entfernen, damit sich spielende
Kinder nicht selbst einschliessen und in
Lebensgefahr kommen.)
Entsorgung der Verpackung
Alle verwendeten Verpackungsmaterialien
sind um weltverträglich und wiederverwert-
bar.
Sicherheitshinweise und Warnungen
Lesen Sie bitte vor Inbetriebnahme des Ge -
rätes die in der Bedienungsanleitung auf ge-
führten Infor ma tio nen sorgfältig durch und
bewahren Sie diese für Nachbenützer auf.
■
Die elektrische Sicherheit (Berührungs schutz)
ist durch den Einbau sicher zu stellen
.
■
Benutzen Sie dieses Gerät nur für Haus halt-
zwecke und
wie es in der Bedie nungs-
anleitung beschrieben ist.
■ Dieses Gerät ist nicht zur Nutzung durch
Personen mit verminderten körperlichen,
sensorischen oder geistigen Fähig kei ten
oder mangelnder Erfahrung und Kennt-
nis bestimmt, ausser wenn sie durch eine
für ihre Sicherheit verantwort li che Person
betreffend Gebrauch des Gerätes über-
wacht oder instruiert werden.
Kinder sollten beaufsichtigt werden, um
sicher zu stellen, dass sie nicht mit dem
Gerät spielen.
■ Haben Sie ein beschädigtes Gerät erhal-
ten, setzen Sie sich sofort mit Ihrem
Lieferanten in Verbindung.
■ Verwenden Sie keine Verlänge rungs ka bel.
■ Reparaturen und andere Eingriffe dürfen
nur von einem Servicemonteur durchge-
führt werden.
■ Beim Reinigen Stromzufuhr unterbre-
chen: Stecker ausziehen oder Sicherung
ausschalten. Ziehen Sie den Stecker nie
am Kabel oder mit nassen Hän den aus
der Steckdose. Greifen Sie immer den
Stecker und ziehen Sie ihn gerade aus
der Steck dose.
■ Hochprozentigen Alkohol nur dicht ver-
schlossen und stehend lagern, ausser-
dem keine explosiven Stoffe im Gerät
lagern. Explosionsgefahr!
■ Dieses Gerät ist FCKW- und FKW-frei
und enthält das umweltverträgliche Käl-
te mittel Isobutan (R600a) in geringen
Mengen.
■ Bei der Handhabung des Gerätes muss
darauf geachtet werden, dass der Kälte-
kreislauf nicht beschädigt wird. Sollte
der Kältekreislauf dennoch beschädigt
werden, so sind offenes Feuer und Zünd-
quellen jeder Art zu vermeiden. Der
Raum in dem das Gerät steht, ist für eini-
ge Minuten zu lüften.

5
■ Ein Gerät mit beschädigtem Kreislauf
darf nicht in Betrieb genommen werden.
■ Im eingebauten Zustand ist darauf zu
ach ten, dass die Be- und Entlüftungs öff-
nun gen nicht abgedeckt oder zugestellt
sind.
■ Zur Beschleunigung der Abtauung dür-
fen keine anderen mechanischen oder
sonstige künstliche Mittel als die emp-
fohlenen benutzt werden.
■ Wird das Gerät zweckentfremdet, falsch
bedient oder nicht fachgerecht repariert,
kann keine Haf tung für eventuelle Schä-
den übernommen werden. In diesem Fall
entfallen Garantie oder weitere Haf-
tungs ansprüche.
■ Wenn die Anschlussleitung dieses Gerä-
tes beschädigt wird, muss sie durch
den Hersteller, seinen Kundendienst
oder eine ähnlich qualifizierte Person
ersetzt werden, um eine Gefährdung zu
vermeiden.
■ Warnung: Keine elektrischen Geräte
innerhalb des Lebensmittellagerraumes
betreiben.
Bedien- und Kontrollelemente
Kindersicherung:
Die Tasten müssen mindestens 3 Sekunden
betätigt werden.
Alarmquittierung:
Jede Taste kann zur Quittierung der Alarm-
funktion genutzt werden.
1 Haupttaster EIN / AUS:
2 Ferienschaltung:
Der Kühlteil wird abgeschaltet, der
Gefrier teil bleibt in Betrieb.
Bei längerer Abwesenheit Tür des Kühl-
teils öffnen, um Geruchsbildung zu ver-
meiden. An der Tem pe raturanzeige.
Kühlraum (5) wird OF angezeigt.
5
6
7
8
9
0
3
4
1
2

6
3 Kühlraumtemperatur wärmer
(bis max. 9 °C):
Nach 3 Sekunden beginnt die Tem pe ra-
turanzeige zu blinken und zeigt den
ge wählten Temperaturwert an. Mit jeder
Tastenberührung kann jetzt der Tempe-
raturwert um 1 °C wärmer gestellt wer-
den. Bleibt der Finger auf der Taste so
wird der Wert automatisch hoch gezählt
bis der Finger von der Taste genommen
wird oder der Maximalwert erreicht ist.
Zirka 5 Sekunden nach dem Loslassen
der Taste wird das Blinken der Anzeige
beendet und die aktuelle Mittel tem pe-
ratur wird wieder angezeigt.
4 Kühlraumtemperatur kälter
(bis min. 3 °C):
Nach 3 Sekunden beginnt die Tempe ra-
turanzeige zu blinken und zeigt den
ge wählten Temperaturwert an. Mit jeder
Tastenberührung kann jetzt der Tempe-
raturwert um 1 °C kälter gestellt wer-
den. Bleibt der Finger auf der Taste so
wird der Wert automatisch herunter
ge zählt bis der Finger von der Taste ge-
nommen wird oder der Minimalwert
erreicht ist. Zirka 5 Sekunden nach dem
Loslassen der Taste wird das Blinken der
Anzeige beendet und die aktuelle Mittel-
temperatur wird wieder angezeigt.
5 Temperaturanzeige Kühlraum:
Es wird ein über 2 Stunden gemittelter
Temperaturwert angezeigt, der ge le gen t-
lich vom eingestellten Sollwert abwei-
chen kann. Dies wird vor allem nach
dem Abtauen oder nach längeren Tür öff-
nungen der Fall sein. Bei Temperaturen
kälter -5 °C wird LO angezeigt, bei
Temperaturen wärmer +20 °C wird HI
angezeigt.
6 Temperaturanzeige Gefrierraum:
Es wird ein über 2 Stunden gemittelter
Istwert angezeigt, der gelegentlich vom
eingestellten Sollwert abweichen kann.
Dies wird von allem nach längeren
Türöffnungen oder nach dem Einbringen
grösserer Mengen warmer Ware der Fall
sein. Bei Temperaturen kälter -30 °C
wird LO angezeigt, bei Temperaturen
wärmer -5 °C wird HI angezeigt.
7 Gefrierraumtemperatur wärmer
(bis max. -14 °C):
Nach 3 Sekunden beginnt die Temper a-
turanzeige zu blinken und zeigt den
gewählten Temperaturwert an. Mit jeder
Tastenberührung kann jetzt der Tempe-
raturwert um 1 °C wärmer gestellt wer-
den. Bleibt der Finger auf der Taste so
wird der Wert automatisch hoch gezählt
bis der Finger von der Taste genommen
wird oder der Maximalwert erreicht ist.
Zirka 5 Sekunden nach dem Loslassen
der Taste wird das Blinken der Anzeige
beendet und die aktuelle Mittel tem pera-
tur wird wieder angezeigt.
8 Gefrierraumtemperatur kälter
(bis min. -24 °C):
Nach 3 Sekunden beginnt die Tempe ra-
turanzeige zu blinken und zeigt den
ge wählten Temperaturwert an. Mit jeder
Tastenberührung kann jetzt der Tempe-
raturwert um 1 °C kälter gestellt werden.
Bleibt der Finger auf der Taste so wird
der Wert automatisch herunter gezählt
bis der Finger von der Taste genommen
wird oder der Minimalwert erreicht ist.
Zirka 5 Sekunden nach dem Loslassen
der Taste wird das Blinken der Anzeige
beendet und die aktuelle Mittel tem-
peratur wird wieder angezeigt.

7
9 Schnellgefriertaste:
Für den Gefrierraum wird maximale
Kälteleistung zur Verfügung gestellt. In
der Anzeige leuchtet eine Schneeflocke.
Nach 24 Stunden wird automatisch auf
die ursprüngliche Sollwerteinstellung zu -
rück gestellt. Die Anzeige der Schnee flocke
erlischt. Die Schnell gefrier funk tion kann
auch vorzeitig, manuell durch erneutes
Betätigen der Taste, abgeschaltet werden.
0 Schnellkühltaste:
Für den Kühlraum wird maximale Kälte-
leistung zur Verfügung gestellt. In der
An zeige leuchtet ein Ventilatorsymbol.
Nach 24 Stunden wird automatisch auf
die ursprüngliche Sollwerteinstellung
zurück gestellt. Die Schnellkühlanzeige
erlischt. Die Schnellkühlfunktion kann
auch vorzeitig, manuell durch erneutes
Betätigen der Taste, abgeschaltet wer-
den. Nach Beendigung der
Schnellkühlfunktion wird der Kühlteil
automatisch abgetaut.
Türoffenwarnung Kühlraum
Nach 2 Min. blinkt die LED im Abstand von
15 Sekunden. Rück stel lung durch beliebi-
ge Taste.
Nach 3 Min. blinkt die LED im Abstand von
5 Sekunden. Rück stel lung durch beliebige
Taste.
Nach 4 Min. blinkt die LED rhythmisch im
Sekundentakt. Rückstel lung durch beliebi-
ge Taste.
Nach 10 Min.: akus tischer Alarm. Rück-
stellung durch beliebige Taste.
Dauer 3 Minuten, Wiederholung nach 30
Minuten
Ist die Gefrierraumtür länger als 10
Minuten geöffnet ertönt ein akustischer
Alarm bis die Gefrierraumtür geschlossen
wird oder der Alarm über die Betätigung
einer Taste abgestellt wird.
Temperaturalarm
Es ertönt ein akustischer Alarm, wenn die
Temperatur im Kühlraum 10 °C über den
gewählten Temperaturwert angestiegen
ist, im Gefrierraum die gemittelte Tem-
peratur wärmer als -9 °C ist oder im
Sonderfach die Temperatur am Tem pe-
raturfühler erheblich abweicht. Zusätzlich
blinkt die entsprechende Tem peratur an-
zeige oder die Betriebsanzeige des Sonder-
faches. Der Tem pe raturalarm kann durch
Betätigung einer beliebigen Taste ausge-
schaltet werden.
Einfrieren
■ Nur frische Lebensmittel sind für das
Einfrieren geeignet.
■ Damit die Temperatur des bereits einge-
lagerten Gefriergutes nicht zu stark
an steigt, nur kleine Men gen auf einmal
ein frieren. Es kann in allen Gefriergut-
scha len eingefroren werden. Es ist vorteil-
haft nur kleine Portionen abzupacken.
■ Zum Einfrieren der maximalen Menge
(Siehe Typschild) muss die obere Schub-
lade verwendet werden. Hierzu sollte die
Schnellgefriertaste nach dem Einlegen
der Ware gedrückt werden. Die Tempe-
ratureinstellung von Kühlraum und
Gefrierraum muss nicht geändert wer-
den. Nach 24 Stunden wird die Schnell-
gefrierfunktion automatisch abgeschaltet
■ Zum Einfrieren kleinerer Mengen kann
ebenfalls die Schnellgefriertaste ge drückt
werden. Es ist jedoch nicht nötig die
Schnellgefrierfunktion über 24 Stunden
einzuschalten.
■ Einzufrierende Lebensmittel dürfen nicht
mit be reits eingefrorenen in Berüh rung
kommen. Aufgetautes Gefriergut darf
nicht nochmals eingefroren werden, weil
Lebensmittel verderben können.

8
Variable Innentür
Die Einhängeschalen (Bild 2) in der Innen tür
sind leicht verstellbar und bieten Ihnen die
Möglichkeit einer individuellen Ein tei lung.
Verstellen der Einhängeschalen und Fla-
schen halter: zuerst nach oben drücken und
herausziehen, ge wünschte Höhe einstellen
und in umgekehrter Rei henfolge einsetzen.
Beachten Sie, dass der Deckel zur obersten
Einhängeschale nicht verstellbar ist.
Sonderfach
Das Sonderfach (Bild 3) ermöglicht Ihnen
eine bis zu dreimal so lange Lagerzeit für
verschiedene frische Lebensmittel wir bei
einem herkömmlichen Kühlschrank. Die
Temperatur im Sonderfach beträgt zwi-
schen 0 °C und 3 °C (bei ca. 5 °C einge-
stellter Solltemperatur)
Herausnehmen und Einsetzen der Sonder-
fachsschubladen: Schublade bis zum
Anschlag herausziehen, anheben und
seitlich abdrehen (Bild 4). Das Einsetzen
der Schublade erfolgt in umgekehrter
Reihenfolge.
Hinweis: (+ Bild 5)
Die Luftfeuchtigkeit lässt sich bei ausgezo-
gener Schublade stufenlos einstellen:
– Kleines Feuchtesymbol (links) niedrige
Luftfeuchtigkeit (ca 45%)
- Grosses Feuchtesymbol (rechts) höhere
Luftfeuchtigkeit (max. 90%)
Die Feuchtigkeit im Sonderfach ist abhän-
gig von:
– Menge und Feuchtegehalt der eingeleg-
ten Lebensmittel.
– Art der Verpackung
– Häufigkeit des Sonderfachöffnens.
Das Sonderfach eignet sich besonders zum
Einlagern von:
– Beeren, Blattsalat, Gemüse, Obst, Pilzen
etc. (Einstellung Luftfeuchtigkeit hoch,
Symbol rechts)
2
3
4

9
– Fleisch, Fisch, Geflügel, Wurst, etc.
(Einstellung Luftfeuchtigkeit niedrig,
Symbol links)
Hinweis:
Nicht ins Sonderfach gehören Kartoffeln,
Hartkäse, kälteempfindliches Gemüse wie
Auberginen, Bohnen, Gurken, Kürbisse,
Peperoni, Tomaten, Zucchini.
Alle kälteempfindlichen Südfrüchte wie Ana-
nas, Avocados, Bananen, Grapefruits, Man-
gos, Melonen, Papayas, Passionsfrüchte usw.
Diese gehören in geschlossenen Schalen in
den Kühlteil (Austrocknung wird vermieden).
Abtauen
Der Kühlraum taut vollautomatisch ab.
Dabei wird das Eis, welches sich an der
Rückwand bildet, geschmolzen. Dies
geschieht ca. ein bis zwei Mal am Tag in
Abhängigkeit von den Türöffnungen. Wäh-
rend des Abtauens steigt die Temperatur
im Kühlraum an damit das Eis an der
Kühlraumrückwand vollständig abtaut.
Nach dem Abtauen wird die Temperatur
wieder auf den eingestellten Sollwert
abgesenkt. Das Tauwasser fliesst durch das
Ablaufloch aus und verdunstet in der
Auffangschale ausserhalb des Gerätes.
Halten Sie den Sammelkanal und das
Ablaufloch sauber, damit das Tauwasser
ungehindert abfliessen kann.
Das Gefrierabteil bei starker Eisbildung
abtauen. Eine dicke Eisschicht verschlech-
tert die Kälteabgabe an das Gefriergut.
Gefriergut während der Abtauzeit mög-
lichst kühl und gut isoliert lagern, z.B. in
Zei tun gen einpacken.
Achtung: Verwenden Sie keine spitzen
Gegenstände um Eis oder Festgefrorenes
zu lösen. Ge brauchen Sie keine elektri-
schen Heizgeräte oder offene Flammen
zum Abtauen.
– Kühlgerät am Haupttaster
auf «off» schalten.
– Tauwasserablauf herausziehen (Bild 6)
– Wasserauffanggefäss unter
Tauwasserablauf platzieren (Bild 7)
– Tür offen lassen.
– Nach dem Abtauen Innenraum reinigen
und gut trocknen.
– Gerät am Haupttaster wieder
einschalten
Kühlraum
Die bruchsicheren Glas tablare sind indivi-
duell in der Höhe verstellbar. Die beiden
Riegel seitlich ganz nach innen ziehen (Bild
8a) und zum Fixieren abwärts nach hinten
drehen (Bild 8b). Das Glastablar aus der
hinteren Führung ziehen und an ge wün sch-
ter Position in umgekehrter Reihenfolge
wieder einsetzen. Halbe Abstellflächen
er möglichen, dass hohe Gefässe stehend
aufbewahrt werden können.
5

10
Reinigung
Für die hygienische Aufbewahrung der
Spei sen den Innenraum möglichst sauber
halten. Den Innenraum von Zeit zu Zeit mit
einer milden Seifenlauge auswaschen und
nachtrocknen. Ein gelegentliches Aus rei-
ben mit Essigwasser wirkt geruchsbindend
und ist zu empfehlen. Durch Sauberhalten
der Tür dichtungen kann ein Festkleben
und damit deren Beschädigung vermieden
werden. Keine scheuernden Reinigungs-
mittel oder kratzenden Lappen verwen-
den. Türdichtungen mit einer weichen
Bürste oder einem Pinsel reinigen. Bei län-
gerem Nichtgebrauch das Gerät am
Haupt taster auf «off» schalten. Gerät aus-
räumen, abtau en, reinigen und Gerätetür
sowie Gefrier abteiltür offen lassen.
– Das Bedien- und Kontrollelement nur
mit einem leicht angefeuchteten Lappen
reinigen.
– Darauf achten, dass möglichst kein Rei-
ni gungs wasser durch die Ablauf öff nung
in die Verdunsterschale läuft.
– Vor Inbetriebnahme müssen das Gerät
und die Dichtungen von Gerätetür und
Gefrier abteiltür
voll kom men trocken sein.
Hinweise für eine
energiesparende Nutzung
■ Verwenden Sie das Kühlgerät möglichst so,
wie es geliefert wurde. Die An ord nung der
Schubladen, Tablare und Etageren sorgt für
eine bestmögliche Temperaturverteilung.
■ Installieren Sie das Gerät möglichst nicht
in der Nähe von Heizkörpern, Heizrohren
oder Rauchabzügen und schützen Sie es
möglichst vor direkter Sonnen ein strah lung
6
7
8a
8b

11
■ Halten Sie die Gerätetüren möglichst
kurz geöffnet. Je schneller Sie die Türen
wieder schliessen, umso weniger Kälte
geht verloren.
■ Achten Sie auf das vollständige, richtige
Schliessen der Türen. Die Türdichtung
muss am Kühlschrankrahmen gut anlie-
gen.
■ Lassen Sie warmes oder gar heisses
Lager gut ausserhalb des Gerätes abküh-
len.
■ Das Einlagern von feuchtigkeitsabge-
benden Lebensmitteln führt zu einer
verstärkten Vereisung der Kühlschrank-
rückwand und zur Reduktion der Kühl-
leistung
Tipps
Bei der Benutzung des neuen Gerätes sind
folgende Punkte zu beachten:
■ Ein neu in Betrieb genommenes Gerät
be
nötigt ca. 15 Std. (mit Lebensmittel)
bis es die nor
malen Betriebs tempe ra tu-
ren erreicht hat.
■ Bei Türöffnung über 2 Minuten beginnt
die Beleuchtung zu blinken. Verge wis-
sern Sie sich beim Schliessen, dass die Tür
überall vollständig abdichtet. Die selbst-
schliessenden Schar niere unterstützen dies.
■ Die Abkühldauer von Getränken und
anderen Lebensmittel von Raum tempe-
ra tur auf Kühl raumtemperatur kann bis
zu 6 Stun den dauern. Je mehr warme
Speisen eingelagert
werden, um so mehr
verlängert sich diese Dauer.
■
Verstellen der Temperatureinstellung hat
keinen
Ein fluss auf die Abkühlge schwin-
digkeit, sondern nur auf das Tempera-
turniveau.
■ Durch das Einlagern von feuchtigkeits-
ab ge bender Lebensmittel kann es zu
Kon dens bildungen an den Glas tablaren
kom men.
■ Die elektronische Regelung taut den
Kühlraum nur noch ungefähr einmal am
Tag ab. Eine meistens sichtbare Eisbil-
dung an der Rückwand im Kühlraum ist
deshalb normal.
■ Achten Sie darauf, dass das Kühlgut
nicht mit der Rückwand des Kühl rau mes
in Berührung kommt, damit es nicht
anfriert und beim Abtauen das Wasser
nicht in den Kühlraum abgeleitet wird.
■ Beim Einordnen beachten:
– Öl und Fett nicht mit den Kunst-
stoffteilen und der Türdichtung in
Berüh rung bringen.
– Im Kühlraum befinden sich bei jeder
Betriebs stellung der Temp era tur ein-
stellung die kältesten Be reiche an der
Rück wand und über der untersten
Ablage.
Empfindliche Lebensmittel daher auf
die unterste Ablage legen.
■ Einordnungsbeispiel:
– Im Gefrierabteil Lebensmittel einfrie-
ren, lagern und Eis zubereiten.
– Auf den Tablaren von oben nach
unten Back wa ren, fertige Speisen,
Molkereiprodukte, Fleisch- und
Wurstwaren.
– In den Einhängeschalen von oben
nach unten: Butter und Käse,
Tuben, kleine Dosen und Eier, grosse
Flaschen.
– In der Gemüseschale Gemüse, Obst
und Salate.

12
LED Beleuchtung auswechseln
Stromzufuhr unterbrechen: Stecker aus-
ziehen oder Sicherung ausschalten.
Klicken Sie die LED-Beleuchtung aus (Bild 9).
Lösen Sie die Steckverbindung zur LED-
Beleuch tung (Bild 0). Die neue LED-Beleuch-
tung bitte in umgekehrter Reihenfolge
einsetzen.
Hinweis: Verwenden Sie bitte nur origi-
nal LED-Beleuchtungen vom Her steller.
LED Beleuchtung oberhalb
des Sonderfachs
Ziehen Sie die transparente Abdeckung
nach unten (Bild ß a).
Klicken Sie die LED-Beleuchtung aus
(Bild ß b).
Lösen Sie die Steckverbindung zur LED-
Beleuchtung (Bild ß c).
Die neue LED-Beleuchtung in umgekehr-
ter Reihenfolge wieder einsetzen und die
transparente Abdeckung wieder einrasten.
0
9
ß a
ß b
ß c

13
Störungen
Das Gerät wurde vor der Auslieferung auf
einwandfreie Funktion geprüft. Im Falle
von Betriebs störungen wenden Sie sich
bitte an die nächstgelegene Service stelle
unter Angaben der Modellnummer sowie
der festgestellten Mängel.Störungen kön-
nen auch durch das An sprechen elektri-
scher Sicherungen entstehen. Der Schaden
ist leicht behoben, wenn Sie die entspre-
chende Siche rung wieder aktivieren.
Anzeige nach Stromunterbruch
Ein Stromunterbruch wird dann angezeigt,
wenn die Gefrierraumtemperatur nach
dem Wiedereinschalten wärmer als -9 °C
ist. In diesem Fall blinken die beiden Tem-
pe raturanzeigen und zeigen die Temper-
aturwerte an, welche nach dem Wieder-
einschalten gemessen wurden. Das Blinken
der Temperaturanzeigen wird durch
Be tätigung einer beliebigen Taste abge-
stellt und die aktuellen Temperatur mittel-
werte werden angezeigt.
Fühlerfehlfunktionen
– Fehleranzeige F1 am Temperaturdisplay
links = Temperatursensor im Kühlraum
defekt.
– Fehleranzeige F2 am Temperaturdisplay
rechts (Lufttemperatur Sonderfach) =
Temperatursensor im Sonderfach
defekt.
– Fehleranzeige F3 am Temperaturdisplay
rechts = (Verdampfertemperatur
Sonderfach) = Temperatursensor im
Sonderfach defekt.
– Fehleranzeige F4 am Temperaturdisplay
rechts (Temperatur Tiefkühlraum) =
Temperatursensor im Gefrierraum
defekt.
– Fehleranzeige F7 am Temperaturdisplay
rechts = Umgebungstemperatursensor
defekt
Notbetrieb
Wird ein Fühlerfehler angezeigt, so wird
der Kühlschrank im Not be trieb, unabhän-
gig von den defekten Fühlern, zeitgesteu-
ert weiter betrieben.
Garantie
Wir gewähren die Garantie ab Liefer datum
des Gerätes.
Allfällige Mängel, die während dieser Zeit
trotz vorschriftsmässigem Gebrauch auf-
treten und auf einen Material- oder Fabri-
kationsfehler zurückzuführen sind, werden
im Rahmen dieser Garantie durch den
Kundendienst behoben.
Nicht unter Garantie fallen:
– LED-Defekte
– Bruch von Glasplatten und Kunststoffteilen
– Defekte durch Nichtbefolgen der
Bedienungs anleitung oder unsachgemä-
ssen Ge brauch
– Schadenersatzansprüche, die über
unsere Garantieleistungen hinausgehen
– Geräte, welche durch Dritte repariert
wur den.

14
Betriebsgeräusche
Ganz normale Geräusche
Das Kühlen wird durch ei nen
Kompressor
(Kälteaggregat) ermöglicht.
Der Kompressor pumpt das Kältemittel durc
h
das Kühlsystem. Dabei entstehen Betriebs-
geräusche. Auch nach dem Ausschalten
des Kom pres sors sind Geräusche durch
Druck- und Tem peraturunterschiede unver-
meidbar.
Dieses Gerät ist nach dem neuesten Stand
der Entwicklung, mit einem leisen Kom-
pressor und einem geräuschoptimierten
Kältekreis ausgestattet.
Dennoch lassen sich bestimmte Geräusche
nicht ganz vermeiden und sind in ihrer
Laut stärke abhängig von der Geräte grösse
und Einbausituation.
Unmittelbar nach
dem Einschalten des Kom
pressors sind die
Betriebsgeräusche am besten hörbar.
Sie werden mit fortschreitender Betriebs-
dauer leiser.
Nicht normale Geräusche
Meist entstehen ungewöhnliche Geräu sche
durch einen ungeeigneten Einbau.
Das Gerät muss waagerecht und stabil auf-
gestellt bzw. eingebaut sein.
Rohrleitungen dürfen auf keinen Fall an
einer Wand oder anderen Möbeln anste-
hen.
Auch dürfen die Rohrleitungen sich nicht
gegenseitig berühren.
In offenen Küchen oder bei in Raumteiler
eingebauten Geräten werden die norma-
len Betriebsgeräusche intensiver wahr-
genommen. Dies ist jedoch kein Mangel
sondern bedingt durch die Architektur.
Stichwort Ursache Bemerkung
Brummen Kälteaggregat normales Arbeitsgeräusch des Kälteaggregates,
Lautstärke abhängig von der Gerätegrösse und von der
lastabhängigen Drehzahl des Kompressormotors
Surren Ventilator normales Betriebsgeräusch, durch Belüftung
Gurgeln Kältekreislauf normales Betriebgeräusch, durch Strömung des
Blubbern Kältemittels im Kältekreis
Rauschen
Zischen Kältekreislauf normales Betriebsgeräusch durch Einspritzen des
Kältemittels in den Verdampfer
Klappern Tablare, Körbe, Innenteile so anordnen, dass sie sich nicht berühren
Einhängeschalen bzw. dass sie fixiert sind.
Beladung etc.
Knacken Gehäuse normale, temperaturbedingte Spannungsdehnungen
der Materialien z.B. Kunststoffe, Isolation
Klicken Ventil normales Schaltgeräusch des Ventils

15
Einbaukühlschrank
Nische SMS 14/6 (1778 mm)
Türblätter CH
Türblätter EU
Dicke
16 – 24 mm
max. 594
Integriert CH
Dekorrahmen
Integriert EU
min. 50
(420)
2050 SMS-Norm
Gerät 1776
Nische 1778
min. 50
547
-
0
2
Dicke
16 – 20 mm
100
120
Gerät 570
Nische 605
Gerät 545
525
602
555
Nische 605
Gerät 545
Nische 550
Gerät 548
Nische 550
Gerät 548
Nische 550
Gerät 548
Nische 560–568
100° 105° 100°
Detail A
A
Lüftungsquerschnitt
oben und unten min. 200 cm
2
Bei Nischentiefen 550 werden die
Leistungsdaten des Gerätes ebenfalls
garantiert
1270
1143 + Nischenüberstand
oben -Spalt/2
508
635+Nischenüberstand
unten -Spalt/2
200
430
Lüftung
10/6-Spalt4/6-Spalt
Die elektrische Sicherheit (Berührungsschutz) ist durch den Einbau
sicherzustellen. Ist der Netzstecker nach dem Aufstellen des Gerätes
nicht mehr zugänglich, so ist installationsseitig eine Trennvor rich tung
vorzusehen. Als Trennvorrichtung gelten Schalter mit einer Kon takt-
öffnung von mindestens 3 mm, dazu gehören LS-Schalter und Siche -
rungen so wie Schütze.

16
Chère Cliente,
Cher Client,
Vous possédez un réfrigérateur moderne,
consommant donc peu de courant. Nous
vous félicitons de votre achat!
Ce réfrigérateur a été conçu et fabriqué
conformément aux directives européen-
nes, aux normes nationales et internatio-
nales en vigueur. Avec l‘apposition du
marquage CE, après contrôle du produit
par des organismes de contrôle agréés, le
fabricant certifie le respect des normes et
directives en vigueur relatives aux réfrigé-
rateurs et aux congélateurs.
Elimination de l’ancien appareil
Rendre immédiatement inutilisables les appa
-
reils usagés (p.ex. couper le cordon
d’alimentation). Veillez, ce faisant, à ce
que les conduites de votre appareil ne
soient pas endommagées jusqu’à son
transport en un lieu où il sera éliminé dans
les règles conformes à la protection de
l’environnement. A cet effet, adressez-
vous au service compétent de votre com-
mune. (Dégager les charnières et enlever
les portes afin que des enfants en train de
jouer ne s’enferment pas à l’intérieur met-
tant ainsi leur vie en danger).
Elimination de l’emballage
Tous les matériaux d’emballage employés
sont compatibles avec l’environnement et
recyclables.
Instructions de sécurité et avertissements
Avant de mettre l’appareil en service, nous
vous prions de lire attentivement les
instruc tions figurant dans le mode
d’emploi et de conserver ce dernier pour
un futur utilisateur éventuel de l’appareil.
■
Mettre en sûreté électrique (protection
contre les contacts accidentels) en l’enca-
strant comme il faut.
■
N’utilisez cet appareil qu’à des usages
domestiques et comme décrit dans le
mode d’emploi.
■ Cet appareil n‘est pas conçu pour être
utilisé par les personnes aux capacités
physiques, sensorielles ou intellectuelles
ré duites ou ne disposant pas d‘expérience
et de connaissances suffisantes, sauf si
elles sont surveillées ou instruites par
une personne responsable de leur sécuri-
té quant à l‘utilisation de l‘appareil.
Surveiller les enfants pour s‘assurer qu‘ils
ne jouent pas avec l‘appareil.
■ Si votre l‘appareil vous a été livré endom-
magé, mettez-vous immédiatement en
contact avec votre fournisseur.
■ Ne pas utiliser de rallonge.
■ Les réparations et autres interventions
ne doivent être réalisées que par un
dépanneur qualifié.
■ Pour le nettoyage, couper l’alimentation
électrique: sortir la fiche ou déconnecter
le fusible. Ne jamais tirer la fiche de la
prise par le câble ou avec des mains
mouillées. Toujours saisir la fiche et
l’extraire droite de la prise.
■ Conserver les alcools concentrés unique-
ment fermés et placés debout. De plus,
ne jamais ranger de matières explosives
dans l’appareil. Risques d’explosion!
■
Cet appareil ne comporte pas de CFC et de
FC. Il contient le réfrigérant écologique
isobutane (R600a) en petites quantités.
■ Lors de la manipulation de l’appareil,
toujours veiller à ce que le circuit réfri
gé-
rant ne soit pas endommagé. Si, ce pen
-
dant, le cas se présentait, éviter la pré-
sence de toute flamme vive ou sources
d’étincelles. Aérer le local où se trouve
l’appareil pendant quelques minutes.
■ Un appareil ayant un circuit réfrigérant en -
dommagé ne doit pas être mis en service.

17
■ En montage encastré, il faut veiller à ce
que les orifices d’admission et de sortie
d’air ne soient pas obstrués ou recou-
verts.
■ Pour accélérer le dégivrage, aucun moy-
en mécanique ou artificiels autres que
ceux recommandés ne doivent être
em ployés.
■ Si l’appareil est utilisé à d’autres usages
que ceux pour lesquels il a été prévu,
manipulé ou réparé de manière impropre
et incompétente, toute responsabilité
sera déclinée en cas de dommages éven-
tuels consécutifs.
■ Si le câble de raccordement de cet appa-
reil est endommagé, il doit être remplacé
par le fabricant ou son service après-vente,
ou par un technicien qualifié, pour éviter
tout danger.
■ Remarque importante: ne pas utiliser
d’appareils électriques dans le comparti-
ment destiné aux produits alimentaires.
Eléments de contrôle et de commande:
Sécurité enfants:
Les touches doivent être maintenues
enfoncées au moins 3 secondes.
Acquittement de l’alarme:
N’importe quelle touche peut être utilisée
pour acquitter la fonction d’alarme.
1 Interrupteur principal MARCHE/ARRÊT:
2 Mode «vacances»:
Le réfrigérateur est arrêté, le congélateur
reste en service. L’afficheur de températu-
re du réfrigérateur (5) indique OF.
3 Augmenter la température du réfrigéra-
teur (jusqu’à 9 °C au maximum):
Au bout de 3 secondes, l’affichage de la
température se met à clignoter et
indique la température sélectionnée.
5
6
7
8
9
0
3
4
1
2

18
Chaque appui sur la touche permet
d’augmenter la température de 1 °C. Si
on garde le doigt appuyé sur la touche,
la valeur augmente automatiquement
jusqu’à ce que l’on relâche la touche ou
que la valeur maximale soit atteinte.
Environ 5 secondes après que la touche
a été relâchée, l’affichage cesse de clig-
noter et la température moyenne actuel-
le est à nouveau affichée.
4 Abaissement de la température
du réfrigérateur
(jusqu’à 3 °C au minimum):
Au bout de 3 secondes, l’affichage de la
température se met à clignoter et indique
la température sélectionnée. Chaque
appui sur la touche permet de réduire la
température de 1 °C. Si on garde le doigt
appuyé sur la touche, la valeur diminue
automatiquement jusqu’à ce que l’on
relâche la touche ou que la valeur minima-
le soit atteinte. Environ 5 secondes après
que la touche a été relâchée, l’affichage
cesse de clignoter et la température moy-
enne actuelle est à nouveau affichée.
5 Affichage de la température du
réfrigérateur:
La température affichée est une moyenne
sur 2 heures qui peut parfois s’écarter de
la valeur de consigne réglée, notamment
après un dégivrage ou une ouverture
prolongée de la porte. L’affichage
indique LO si la température est inférieu-
re à –5 °C et HI si elle dépasse +20 °C.
6 Affichage de la température
du congélateur:
La température affichée est une moy-
enne sur 2 heures qui peut parfois
s’écarter de la valeur de consigne réglée,
en particulier après une ouverture pro-
longée de la porte ou l’introduction de
quantités importantes de produits tiè-
des. L’affi chage indique LO si la tempé-
rature est inférieure à -30 °C et HI si elle
dépasse
-5 °C.
7 Augmentation de la température
du congélateur
(jusqu’à -14 °C au maximum):
Au bout de 3 secondes, l’affichage de la
température se met à clignoter et
indique la température sélectionnée.
Chaque appui sur la touche permet
d’augmenter la température de 1°C. Si
on garde le doigt appuyé sur la touche,
la valeur augmente automatiquement
jusqu’à ce que l’on relâche la touche ou
que la valeur maximale soit atteinte.
Environ 5 secondes après que la touche
a été relâchée, l’affichage cesse de clig-
noter et la température moyenne actuel-
le est à nouveau affichée.
8 Abaissement de la température
du congélateur
(jusqu’à -24 °C au minimum):
Au bout de 3 secondes, l’affichage de la
température se met à clignoter et
indique la température sélectionnée.
Chaque appui sur la touche permet de
réduire la température de 1°C. Si on gar-
de le doigt appuyé sur la touche, la
valeur baisse automatiquement jusqu’à
ce que l’on relâche la touche ou que la
valeur minimale soit atteinte. Environ 5
secondes après que la touche a été relâ-
chée, l’affichage cesse de clignoter et la
température moyenne actuelle est à
nouveau affichée.
9 Touche de congélation rapide:
Le rendement frigorifique maximal est
fourni pour le congélateur. L’affichage
représente un flocon de neige. Au bout
de 24 heures, la température revient
automatiquement à la valeur de consig-

19
ne initiale. Le flocon de neige s’éteint. La
fonction de congélation rapide peut aus-
si être interrompue avant 24 heures en
appuyant à nouveau sur la touche.
0 Touche de réfrigération rapide:
Le rendement frigorifique maximal est
fourni pour le réfrigérateur. L’affichage
représente un ventilateur. Au bout de 24
heures, la température revient automa-
tiquement à la valeur de consigne initia-
le. Le symbole de réfrigération rapide
s’éteint. La fonction de réfrigération
rapide peut aussi être interrompue avant
24 heures en appuyant à nouveau sur la
touche. Après la fin de la réfrigération
rapide, le réfrigérateur dégivre automa-
tiquement.
Alerte d’ouverture de la porte du
réfrigérateur
Au bout de 2 minutes, la DEL clignote à
intervalles de 15 secondes. Réinitialisation
par n’importe quelle touche.
Au bout de 3 minutes, la DEL clignote à
intervalles de 5 secondes. Réinitialisation
par n’importe quelle touche.
Au bout de 4 minutes, la DEL clignote 1
fois par seconde. Réinitialisation par
n’importe quelle touche.
Au bout de 10 minutes, alarme sonore.
Réinitialisation par touche quelconque.
Durée 3 minutes, répétition après 30
minutes.
Si la porte du congélateur reste ouverte
pendant plus de 10 minutes, une alarme
sonore se déclenche jusqu’à ce que la por-
te soit refermée ou que l’alarme soit neut-
ralisée en appuyant sur une touche.
Alarme de température
Une alarme sonore se déclenche si la tem pé-
rature dans le réfrigérateur dépasse la
valeur réglée de 10 °C, si la température
moyenne dans le congélateur est supérieu-
re à -9 °C lorsque la température moyenne
dans le compartiment de congélation est
supérieure à -9°C ou lorsque la températu-
re dans le compartiment spécial diverge
fortement de celle du capteur de tempéra-
ture. Par ailleurs, le voyant lumineux de la
température concernée ou celui du bon
fonctionnement du compartiment spécial
clignote.
Congélation
■ Seules des aliments fraîches conviennent
à la congélation.
■ Pour éviter que la température des ali-
ments déjà surgelées s’éléve de trop, ne
congeler que de petites quantités à la
fois. Il est possible de congeler dans
chac une des bacs. Il est préférable de
n’em baller que par peti tes portions.
■
Pour congeler la quantité maximale (voir
plaque signalétique), utiliser le tiroir du
haut. Appuyer sur la touche de congélati-
on rapide après avoir introduit les pro-
duits. Ne pas modifier les réglages de
température du réfrigérateur et du con-
gélateur. La fonction de congélation rapi-
de est désactivée automatiquement au
bout de 24 heures.
■
Pour congeler de petites quantités, il est
possible d’utiliser la fonction de congéla-
tion rapide, mais il n’est pas nécessaire de
la maintenir pendant 24 heures.
■ Les aliments à congeler ne doivent pas
entrer en contact avec celles déjà surge-
lées. Les produits alimentaires déconge-
lés ne doivent pas être recongelés, car ils
risquent de s’altérer.

20
Contre-porte variable
Les balconets (figure 2) de la contre-porte
sont facilement réglables et vous offrent la
possibilité d’une répartition individuelle.
Ajustage des balconets et des galeries de
maintien des bouteilles: presser d’abord
vers le haut et tirer, régler la hauteur dési-
rée et insérer dans l’ordre inverse. Noter
que le couvercle du balconet supérieur
n’est pas réglable.
Compartiment spécial
Le compartiment spécial (figure 3) permet
une durée de conservation jusqu’à trois fois
plus longue pour différentes alimentaires
fraîches par rapport au réfrigérateur con-
ventionnel. La température dans le com-
partiment spécial se situe entre 0°C et +3°
C (env. à 5° C valeur de consigne reglée).
Sortir et remettre le compartiment spécial
Tirer le bac du compartiment spécial jus-
qu’à l’arrêt. Sortir le bac en le soulevant
légèrement et le faire pivoter latéralement
(figure 4). Remettre le bac en le posant
sur les glissières sorties et le poussant vers
l’arrière.
Remarque: (+ figure 5)
L’humidité de l’air est réglable comme
suit:
– Petit symbole d’humidité (à gauche):
humidité de l’air basse (env. 45%)
– Grande symbole d’humidité (à droite):
humidité de l’air plus élevée (max. 90%)
L’humidité dans le compartiment spécial
dépend:
– De la quantité et du degrè d’humidité
des denrées alimentaires ainsi que de
leurs emballages
– Du nombre des ouvertures du
compartiment spécial
– Emballage
2
3
4

21
Le compartiment spécial se prête
spécialement à la conservation de:
– Baies, salades, légumes, fruits, champig-
nons etc.
(position d’humidité élevée, symbole à
droite)
– Viande, poisson, volaille, saucisse etc.
(position d’humidité basse, à gauche)
Remarque:
Ne doivent pas être placés dans le compar-
timent spécial: Pommes de terre, fromage
à pâte dure, les légumes sensibles au froid
tels que aubergines, haricots, concombres,
courgettes, poivrons, tomates, zucchini.
Tous les fruits exotiques sensibles au froid,
tels que ananas, avocats, bananes, pam-
pelmousses, mangues, melons, papayes,
fruits de passion etc.
Ceux-ci doivent être placées dans des bacs
fermés dans le compartiment de réfrigera-
tion (le séchage est évité).
Dégivrage
Le réfrigérateur dégivre automatiquement
pour faire fondre la glace qui se forme sur
la paroi du fond. Cette opération a lieu
une ou deux fois par jour, selon la fré-
quence d’ouverture des portes. Pendant
le dégivrage, la température augmente à
l’intérieur du réfrigérateur et la glace
déposée sur la paroi arrière fond complè-
tement. Une fois la glace fondue, la tem-
pérature est ramenée à la consigne réglée.
L’eau de dégivrage sort par le trou
d’évacuation et s’évapore dans le bac coll-
ecteur, à l’extérieur de l’appareil.
Maintenir le canal collecteur et le trou
d’évacuation bien propres de manière à ce
que l’eau de dégivrage puisse s’écouler sans
encombre.
Dégivrer le compartiment de congélation
lorsqu’une épaisse couche de glace s’est
formée. Cette couche entrave la congéla-
tion des aliments. Pendant le dégivrage,
entreposer les produits surgelés dans un
endroit aussi froid que possible en les iso-
lant bien à l’aide, p.ex. de papier journal.
– déclencher l’appareil au moyen de la
touche principale.
– Tirer le canal d‘évacuation (figure 6).
– Placer un bac de récupération de l’eau
de dégivrage sous le canal d’évacuation
(figure 7).
– Laisser la porte ouverte.
Le dégivrage peut être sensiblement accéléré
en plaçant un récipient contenant de l’eau
chaude dans le compartiment de congélati-
on. Attention: ne jamais utiliser d’objets
pointus pour détacher la glace ou les
matières prises dans celle-ci. Ne pas employ-
er d’appareils de chauffage électriques ou de
flammes vives pour dégivrer.
– Après le dégivrage, nettoyer et bien
sécher l’intérieur.
– enclencher l’appareil au moyen de la
touche principale.
5

22
Compartiment réfrigérant
Les étagères en verre incassable sont
réglables individuellement en hauteur.
Tirer les deux taquets à fond vers l’intérieur
(fig. 8a) et pour fixer les tourner en bas
vers l’arrière (fig. 8b). Tirer la plaque de
verre du guidage arrière et la replacer en
sens inverse à la position souhaitée. La sur-
face de rangement subdivisée permet de
conserver en position verticale des récipi-
ents de grande hauteur.
Nettoyage
L‘appareil doit être maintenu bien propre
pour une conservation hygiénique des ali-
ments. Le nettoyer de temps en temps avec
de l’eau savonneuse peu concentrée et le
sécher. Il est recommandé de le frotter
occasionnellement avec de l’eau vinaigrée
pour enlever les odeurs. En nettoy ant les
joints de porte, on évite qu’ils se collent sur
la carcasse et se détériorent en consé-
quence. Ne pas employer de détersifs abra-
sifs ou de chiffons rugueux susceptibles de
provoquer des égratignures. Nettoyer les
joints de porte à l’aide d’une brosse ou d’un
pinceau souple. Si l‘appareil n’est pas utilisé
pendant une période prolongée, déclen-
cher l’appareil au moyen de la touche prin-
cipale. Le vider, dégivrer, nettoyer et laisser
ouvertes les portes du compartiment réfri-
gérant et du compartiment congélateur.
7
6 8a
8b

23
– Nettoyer les élements de commande et
de contrôle seulement aven un chiffon
humide.
– Veiller, autant que possible, à ce que de
l’eau de nettoyage ne s’écoule pas dans
le bac collecteur par le trou d’évacuation.
– Avant la mise en service, veiller à ce que
l’appareil et les joints des portes du com-
partiment réfrigérant et du congélateur
soient complètement secs.
Informations pour une utilisation
économe en énergie
■ Utilisez autant que possible le réfrigéra-
teur tel qu’il vous a été livré. La dispositi-
on de base des tiroirs, des tablettes et des
étagères assure une répartition optimale
de la température.
■ Dans la mesure du possible, n’installez
pas l’appareil à proximité de radiateurs,
de tuyaux de chauffage ou de conduits
de fumée, et protégez-le autant que pos-
sible du rayonnement solaire direct.
■ Laissez les portes de l’appareil ouvertes
le moins longtemps possible. Plus vous
refermez les portes rapidement, moins il y
a de perte de froid.
■ Veillez à bien refermer les portes complè-
tement. Le joint d’étanchéité des portes
doit être bien plaqué contre le cadre du
réfrigérateur.
■ Laissez refroidir les produits à entreposer
chauds, ou même brûlants, à l’extérieur
de l’appareil.
■ L’entreposage de denrées alimentaires
dégageant de l’humidité entraîne une
augmentation du givrage au niveau de
la paroi arrière du réfrigérateur et une
réduction de la puissance de réfrigérati-
on.
Conseils
Tenir compte des points suivants lors de
l’utilisation de votre nouvel appareil:
■ Un appareil nouvellement mis en service
a besoin d’env. 15 heures (avec des ali-
ments) pour atteindre les températures
normales de service.
■ Lors d’ouvertures dépassant 2 minu-
tes, l’éclairage commence à clignoter.
S’assurer en fermant que la porte soit
partout bien hermétique. Les charnières
autorabattantes assistent l’opération.
■ La durée de refroidissement des boissons
et autres aliments depuis la tempéra
ture
ambiante à celle de réfrigération peut
demander jusqu’à 6 heures. Plus de ali-
ments chaudes sont entreposées, plus
cette durée se prolonge.
■
Le réglage du sélecteur de température
n’a aucune influence sur la vitesse de
refroidissement, mais uniquement sur le
niveau de température.
■ Le stockage de marchandises dégageant
de l’humidité peut entraîner la formation
d’eau de condensation sur les étagères
en verre.
■ La commande électronique ne dégivre
le compartiment réfrigérant qu’environ
une fois par jour. Souvent une couche
de glace est visible sur la face arrière du
compartiment réfrigérant – ceci est donc
nor mal.
■ Veiller à ce que les aliments réfrigérées
ne touchent pas la paroi arrière du com-
partiment réfrigé rant de manière à ce
qu’elles ne gèlent pas au contact celle-ci
et que lors du dégivrage, l’eau ne soit
pas dérivée dans le compartiment.
■ Lors du rangement, veiller à ce que:
– Les huiles et graisses n’entrent pas en
contact avec les pièces en plastique
et le joint de la porte.

24
– Dans le compartiment réfrigérant, les
zones les plus froides se trouvent, pour
toutes les positions du sélecteur de
température, près de la paroi arrière et
au dessus de l’étagère en verre infé-
ri eure. En conséquence, mettre les ali-
ments sensibles sur l’étagère inférieure.
■ Exemple de rangement:
– Surgeler et entreposer les aliments
alimentaires, préparer les glaçons dans
le congélateur.
– Placer sur les étagères de haut en bas,
pâtisseries, repas préparés, produits
laitiers, viandes et charcuterie.
– Dans les balconets de haut en bas:
beurre et fromages, tubes, petites
boîtes et œufs, grandes bouteilles.
– Dans les bacs à légumes: légumes,
fruits et salades.
Changement de l’éclairage
Couper l‘alimentation électrique: sortir
la fiche ou déconnecter le fusible.
Décliquer l’éclairage par DEL (figure 9).
Desserrer le cavalier de l’éclairage (figure
0). Remettre le nouvel éclairage dans le
sens contraire.
Remarque: Utiliser uniquement des
DEL d’origine!
Eclairage par LED au-dessus du com-
partiment spécial
Enlever le film de protection transparent
en le tirant vers le bas (Image ßa).
Décliquer l’éclairage par LED (Image ßb).
Couper la connexion de l’éclairage par LED
(Image ßc).
9
0
ß b
ß a

25
Pannes
Le parfait fonctionnement de l‘appareil a
été vérifié avant sa livraison. En cas de pan-
ne, s’adresser au point de service le plus
proche en indiquant le numéro de modèle
et la défaillance constatée.
Des pannes peuvent également survenir à
la suite de déclenchements de coupe-
circuits électriques. On remédie facilement
au dommage en réactivant le coupe-circuit
concerné.
Affichage après coupure de courant
Une coupure de courant est signalée si la
température du congélateur dépasse –9 °C
lors du rétablissement de la tension. Dans
ce cas, les deux indicateurs de température
clignotent et indiquent la température
mesurée après le redémarrage. Le clignote-
ment s’arrête lorsqu’on appuie sur une
touche quelconque et les indicateurs de
température affichent les températures
moyennes actuelles.
Défaut de fonction d’une sonde:
– message d’erreur F1 à gauche de
l’affichage = sonde température frigo
défectueuse
– message d’erreur F2 à droite de
l’affichage (température d’air du com-
partiment spécial) = sonde température
compartiment spécial défectueuse
– message d’erreur F3 à droite de
l’affichage (température evaporateur du
compartiment spécial) = sonde tempéra-
ture compartiment spécial défectueuse
- Affichage d’erreur F4 sur l’afficheur de
température à droite (température dans
le congélateur) = sonde de température
défectueuse dans le congélateur.
– message d’erreur F7 à droite de
l’affichage = sonde temperature
environnement défectueuse
Fonctionnement en mode dégradé
Si un défaut d’une sonde est signalé, le
réfrigérateur passe en mode dégradé et
continue à fonctionner avec un contrôle
en fonction du temps, indépendamment
des sondes défectueuses.
Garantie
Nous vous accordons la garantie dès la
date de livraison de l’appareil.
Toute défaillance survenant pendant cette
période malgré une utilisation conforme
aux instructions du mode d’emploi et due
à un défaut de matériel ou de fabrication,
sera réparée gratuitement dans le cadre de
cette garantie par le service après-vente.
Ne sont pas couverts par la garantie:
– DEL defectueux
– bris de plaques en verre et de pièces en
plastique
– pannes dues à la non observation du
mode d’emploi ou usage inapproprié
– demandes de dédommagement
dépassant nos prestations de garantie
– appareils réparés par des tiers.
ß c

26
Bruits de fonctionnement
Bruits tout à fait normaux
C‘est un compresseur (groupe frigorifique)
qui permet la réfrigération. Le compres-
seur pompe le fluide ré frigérant et le fait
passer dans le système de réfrigé ration.
Cela provoque des bruits de fonctionne-
ment. Même lorsque le compresseur est
au repos, les bruits dus aux différences de
pression et de température sont inévitab-
les.
Cet appareil ultramoderne est équipé d‘un
compresseur silencieux et d‘un circuit
frigorifique dont le niveau sonore a été
optimisé.
Il est toutefois impossible d‘éviter complè-
tement certains bruits et leur volume sono-
re dépend de la taille de l‘appareil.
Dès que le compresseur se met en marche,
c‘est à ce moment-là que les bruits de fonc-
tionnement sont le plus audibles. Ils dimi-
nuent d‘intensité au fur et à mesure.
Bruits anormaux
Les bruits insolites tiennent la plupart du
temps au fait que l‘appareil n‘est pas cor-
rectement installé.
L‘appareil doit être installé ou encastré sur
une surface plane et être stable.
Les tuyaux ne doivent en aucun cas tou-
cher un mur ou d‘autres meubles.
Les tuyaux ne doivent pas non plus s’entre-
toucher.
On perçoit plus les bruits de fonctionne-
ment normaux dans les cuisines ouvertes
ou lorsque les appareils sont encastrés
dans une séparation de pièce. Il ne s‘agit
pas là d‘un défaut de l‘appareil, mais d‘un
problème d‘architecture.
Bruit Cause Remarque
Ronflement Groupe frigorifique Bruit normal du groupe frigorifique en marche,
le volume dépend de la taille de l‘appareil et de la vitesse
de rotation du moteur du compresseur qui varie en
fonction de la charge.
Ronronnement Ventilateur Bruit de fonctionnement normal dû à la ventilation
Gargouillement Cycle frigorifique Bruit de fonctionnement normal dû à la circulation du
Glouglous fluide réfrigérant dans le circuit frigorifique
Bruit de liquide
Sifflement Cycle frigorifique Bruit de fonctionnement normal dû à l‘injection du fluide
réfrigérant dans l‘évaporateur
Cliquetis Clayettes, bacs, Fixer les éléments intérieurs ou éviter qu‘ils se touchent
balconnets,
chargement, etc.
Craquement Habillage du Tensions et allongements normaux des matériaux, p. ex.,
réfrigérateur des matières plastiques, de l‘isolation, dus à la température
Déclic Soupape Bruit normal de mise en route de la Soupape

27
Réfrigérateur à encastrer
niche SMS 14/6 (1778 mm)
panneaux de porte CH
panneaux de porte EU
épaisseur
16 – 24 mm
max. 594
intégré CH
cadre décoratif
intégré EU
min. 50
(420)
2050 SMS-Norm
appareil 1776
niche 1778
min. 50
547
-
0
2
épaisseur
16 – 20 mm
100
120
appareil 570
niche 605
appareil 545
525
602
555
niche 605
appareil 545
niche 550
appareil 548
niche 550
appareil 548
niche 550
appareil 548
niche 560–568
100° 105° 100°
détail A
A
Section d’aération en haut et
en bas min. 200 cm
2
Les caractéristiques de performance sont
également assurées pour les niches de
profondeur 550
1270
1143+dépassement de
niche en haut -fente/2
508
635+dépassement de niche
en bas -fente/2
200
430
aération
10/6-fente4/6-fente
Mettre en sûreté électrique (protection contre les contacts acciden-
tels) en l’encastrant comme il faut. Si la prise de courant n’est plus
accessible après l’encastrement de l’appareil, il faut prévoir un organe
de coupure sur l’installation. Comme organe de coupure sont admis
les interrupteurs avec une distance de contacts d’au moins 3 mm, les
fusibles, les disjoncteurs automatiques et les contacteurs.

28
Stimata cliente,
stimato cliente
Lei è in possesso di un moderno frigorifero
con basso consumo di elettricità. Ci con-
gratuliamo con Lei per il suo acquisto!
Questo frigorifero è stato costruito e prodot-
to conformemente alle attuali direttive euro-
pee e alle norme nazionali e internazionali in
vigore. L’applicazione del marchio CE, dopo
la verifica del prodotto da parte degli enti
preposti, conferma che il produttore rispetta
le direttive e le norme valide per frigoriferi e
frigocongelatori ad uso domestico.
Lo smaltimento di un vecchio apparecchio
Gli apparecchi fuori uso devono essere
immediatamente resi inutilizzabili (p.es.
tagliare il cavo di alimentazione). Abbia
cura che le tubazioni dell’impianto appa-
recchio non vengano danneggiate prima
che l’apparecchio venga portato via per
essere eliminato in maniera
ecologica. Per
l’eliminazione del suo vecchio
apparecchio
voglia rivolgersi all’ufficio competente del
suo comune. (Mollare le cerniere e togliere
le porte, in modo che i bambini che gioca-
no non si chiudano dentro mettendo la loro
vita in pericolo.)
Eliminazione dell’imballaggio
Tutti i materiali d’imballaggio utilizzati sono
rispettosi dell’ambiente e riciclabili.
Norme di sicurezza e avvertenze
Prima di mettere in funzione l’apparecchio,
leggete attentamente le istruzioni per l’uso
e conservatele anche per gli altri utilizzatori.
■
La protezione contro le scariche elettriche
deve essere assicurata dall’installatore.
■
Utilizzate questo apprecchio solo per uso
domestico e come descritto nelle istruzioni.
■ Non è previsto l’uso del presente appa-
recchio da parte di persone con ridotte
ca pacità fisiche, sensoriali e intellettuali
oppure con insufficienti conoscenze o
scarsa esperienza, a meno che queste per-
sone non vengano sorvegliate o istruite
da un responsabile per la loro sicurezza
per quanto riguarda l’utilizzo dell’appa-
recchio.
Prestare attenzione ai bambini per assicu-
rare che non possano giocare con l’appa-
recchio.
■ Se l’apparecchio che avete ricevuto fosse
difettoso, mettetevi immediatamente in
contatto con il vostro fornitore.
■ Non utilizzate cavi di prolunga.
■ Riparazioni e altri interventi possono
essere effettuati esclusivamente da un
tecnico manutentore.
■ Per la pulizia togliete la corrente: stacca-
te la spina e aprite l’interruttore automa-
tico o togliete il fusibile. Non staccate mai
la spina tirandola per il cavo né afferran-
dola con le mani bagnate. Afferrate
sempre saldamente la spina e tiratela in
fuori diritta dalla presa.
■ Conservate i liquidi ad alta gradazione
alcolica solo in bottiglie ben chiuse e
poste in piedi, inoltre non coservate nel
frigorifero sostanze esplosive. Pericolo
d’esplosione!
■ Questo frigorifero è privo di CFC e FC e
contiene una quantità limitata del refri-
gerante isobutano (R600a), che non
danneggia l’ambiente.
■ Nell’uso dell‘apparecchio occorre presta-
re attenzione a non danneggiare il circui-
to refrigerante. Se dovesse però capitare
un inconveniente del genere, evitate
fiamme vive e fonti d’accensione di qual-
siasi genere. Il locale in cui si trova
l’apparecchio deve essere ventilato per
alcuni minuti.
■ Non si deve assolutamente mettere in
funzione un apparecchio il cui circuito
re frigerante è danneggiato.

29
■ Se l’apparecchio è incassato, bisogna
fare attenzione a non coprire né chiude-
re le aperture di entrata e di uscita
dell’aria di ventilazione.
■ Per accelerare lo sbrinamento non si
devono utilizzare mezzi meccanici o arti-
ficiali di qualsiasi genere, diversi da quelli
consigliati.
■ Se l’apparecchio viene adibito a uno sco-
po improprio, usato nel modo sbagliato
o non è riparato a regola d’arte, si decli-
na qualsiasi responsabilità per gli eventu-
ali danni. In un caso del genere decado-
no la garanzia e qualsiasi pretesa di
responsabi lità.
■ Nel caso il cavo di collegamento di questo
apparecchio dovesse essere danneggia-
to, deve essere sostituito dal fabbricante,
o dal suo servizio assistenza clienti o da
una persona adeguatamente qualificata,
per evitare pericoli.
■ Avvertimento. Non usare apparecchi
elettrici all’interno del deposito di derrate
alimentari.
Elementi di comando e di controllo
Sicurezza bambini:
I tasti devono essere azionati almeno per 3
secondi.
Reset dell’allarme:
Per resettare l’allarme, può essere utilizza-
to un qualsiasi tasto.
1 Interruttore principale ON / OFF:
2 Modalità ferie:
Il frigorifero viene spento, il congelatore
rimane in funzione. Sul display della
temperatura per il vano frigorifero (5)
appare OFF.
3 Aumento della temperatura nel vano
frigorifero (fino a max. 9 °C):
Tenendo premuto il tasto per più di 3
secondi, il display della temperatura ini-
5
6
7
8
9
0
3
4
1
2

30
zia a lampeggiare e segna il valore selezi-
onato. Ad ogni pressione del tasto cor-
risponde un aumento della temperatura
di 1 °C. Tenendo premuto il tasto, il
valore sale automaticamente fino a rag-
giungere il valore massimo oppure fin-
ché si rilascia il dito. Circa 5 secondi
dopo il rilascio, il display smette di lam-
peggiare e viene di nuovo indicato il
valore medio attuale della temperatura.
4 Diminuzione della temperatura nel vano
frigorifero (fino a un mimino di 3 °C):
Tenendo premuto il tasto per più di 3
secondi, il display della temperatura inizia
a lampeggiare e segna il valore seleziona-
to. Ad ogni pressione del tasto corrispon-
de una diminuzione della temperatura di
1 °C. Tenendo premuto il tasto, il valore
diminuisce automaticamente fino a rag-
giungere il valore minimo oppure finché
si rilascia il dito. Circa 5 secondi dopo il
rilascio, il display smette di lampeggiare e
viene di nuovo indicato il valore medio
attuale della temperatura.
5 Indicazione della temperatura nel vano
frigo:
Viene indicato il valore medio delle ulti-
me due ore, che a volte può differire dal
valore nominale impostato. Questo suc-
cede soprattutto dopo lo sbrinamento
oppure quando la porta rimane aperta a
lungo. Con temperature inferiori a -5 °C
appare la scritta LO, con temperature
maggiori di +20 °C viene indicato HI.
6 Indicazione della temperatura nel vano
freezer:
Viene indicato il valore medio delle ulti-
me due ore, che a volte può differire dal
valore nominale impostato. Questo suc-
cede soprattutto quando la porta rimane
aperta a lungo o quando vengono intro-
dotte grandi quantità di cibo da congela-
re. Con temperature inferiori a -30 °C
appare la scritta LO, con temperature
maggiori di -5 °C viene indicato HI.
7 Aumento della temperatura nel vano
freezer (fino a max. -14 °C):
Tenendo premuto il tasto per più di 3
secondi, il display della temperatura inizia
a lampeggiare e segna il valore seleziona-
to. Ad ogni pressione del tasto corrispon-
de un aumento della temperatura di
1 °C. Tenendo premuto il tasto, il valore
aumenta automaticamente fino a quan-
do non si rilascia il dito oppure fino a
raggiungere il valore massimo. Circa 5
secondi dopo il rilascio, il display smette
di lampeggiare e viene di nuovo indicato
il valore medio attuale della temperatura.
8 Diminuzione della temperatura nel vano
freezer (fino a un minimo di -24 °C):
Tenendo premuto il tasto per più di 3
secondi, il display della temperatura inizia
a lampeggiare e segna il valore seleziona-
to. Ad ogni pressione del tasto corrispon-
de una diminuzione della temperatura di
1 °C. Tenendo premuto il tasto, il valore
diminuisce automaticamente fino a
quando non si rilascia il dito oppure fino
a raggiungere il valore minimo. Circa 5
secondi dopo il rilascio, il display smette
di lampeggiare e viene di nuovo indicato
il valore medio attuale della temperatura.
9 Tasto congelamento rapido:
Per il vano freezer viene messa a disposi-
zione la massima potenza di raffredda-
mento. Sul display appare il simbolo del
cristallo di neve. Dopo 24 ore l‘imposta-
zione torna automaticamente indietro
sul valore nominale originale e il simbolo
del cristallo di neve si spegne. È possibile
disattivare la funzione di congelamento
veloce manualmente anche prima di 24
ore, premendo di nuovo il tasto.

31
0 Tasto raffreddamento rapido:
Per il vano frigorifero viene messa a disposi-
zione la massima potenza di raffreddamen-
to. Sul display appare il simbolo di un venti-
latore. Dopo 24 ore l‘impostazione torna
automaticamente indietro sul valore nomi-
nale originale e il simbolo della funzione di
raffreddamento rapido si spegne. È possibi-
le disattivare questa funzione manualmen-
te anche prima di 24 ore, premendo di
nuovo il tasto. Al termine della funzione di
raffreddamento rapido, inizia automatica-
mente lo sbrinamento del vano frigorifero.
Allarme porta aperta del vano
frigorifero
Dopo 2 minuti, il LED inizia a lampeggiare
ad intervalli di 15 secondi. Il reset può
essere fatto premendo un qualsiasi tasto.
Dopo 3 minuti, il LED inizia a lampeggiare
ad intervalli di 5 secondi. Il reset può essere
fatto premendo un qualsiasi tasto.
Dopo 4 minuti, il LED inizia a lampeggiare
ad intervalli di 1 secondo. Il reset può esse-
re fatto premendo un qualsiasi tasto.
Dopo 10 minuti viene attivato l’allarme
acustico. Il reset può essere fatto premen-
do un qualsiasi tasto.
Durata: 3 minuti, con ripetizione dopo 30
minuti.
Se la porta del freezer rimane aperta per
più di 10 minuti, l’allarme acustico conti-
nua a suonare fino a quando la porta non
viene chiusa oppure l‘allarme non viene
spento premendo un qualsiasi tasto.
Allarme temperatura
Un segnale acustico viene attivato ogni
qualvolta la temperatura nel frigorifero
supera di 10° C il valore di temperatura
selezionato, nel vano freezer la temperatu-
ra media è superiore a -9 °C, la temperatu-
ra media del congelatore è superiore a
-9°C oppure la temperatura del comparto
speciale indicata sul sensore subisce una
variazione importante. Inoltre, l‘indicatore
di temperatura o di funzionamento del
comparto speciale è acceso.
Congelamento
■ Solo gli alimenti freschi sono adatti per il
congelamento.
■ Per evitare che la temperatura dei cibi
già congelati aumenti troppo, congelare
volta per volta solo piccole quantità. Si puo
congelare in tutti le vaschette. E’ consigli-
abile pre parare solo delle piccole porzio-
ni.
■
Per congelare la massima quantità di pro-
dotti (vedi etichetta dei dati), si deve utiliz-
zare il vano superiore. Dopo aver introdot-
to il cibo, è consigliabile premere il tasto
del congelamento rapido. Non è necessa-
rio cambiare la temperatura del frigorifero
o del freezer. Dopo 24 ore la funzione di
congelamento rapido viene automatica-
mente disattivata.
■
Anche per congelare quantità più piccole si
può premere il tasto di congelamento rapi-
do. In questo caso non è tuttavia necessario
lasciare attiva questa funzione per 24 ore.
■ Gli alimenti da congelare non devono
essere messi a contatto con quelli già
congelati. Alimenti che sono già stati
congelati non devono essere congelati di
nuovo, perché possono deperire.

32
Retroporta variabile
Gli scaffaletti (figura 2) della retroporta
possono essere spostati facilmente e per-
mettono di disporre lo spazio secondo le
proprie esigenze.
Per spostare gli scaffaletti e i portabottiglie:
premere prima verso in alto e tirare fuori,
regolare l’altezza desiderata ed inserirli in
ordine inverso. Osservate che il coperchio
dello scaffaletto superiore non è regolabile.
Scomparto speciale
Lo scomparto speciale (figura 3) da la possi-
bilità di conservare diversi generi alimentari
freschi fino a 3 volte più a lungo che in un
frigorifero tradizionale. La temperatura nel-
lo scomparto speciale oscilla tra 0° e +3° C
(a 5° C dal valore nominale impostato).
Estrazione e reinsermento dello scomparto
speciale:
Tirare il cassetto speciale fino all’arresto,
sollevarlo leggermente e girarlo late-
ralmente (figura 4). Il reinsermento del
cassetto speciale avviene in successione
inversa a quello dell’estrazione.
Indicazione: (+ figura 5)
Regolazione dell’umidità:
– Simbolo di umidità piccolo (a sinistra)
bassa umidità (ca. 45%)
– Simbolo di umidità grande (a destra)
alta umidità (massimo 90%)
2
4
3

33
L’umidità nello scomparto speciale
dipende da:
– Quantita e umidità del genere
alimentare genere d’imballaggio
– Frequenza dell’appertura della porta
scomparto speciale.
– Imballaggio
Indicazione:
Nello scomparto speciale non vanno con-
servati patate, formaggi a pasta dura,
verdure sesibili al freddo come melanzane,
fagioli, cetrioli, zucche, peperoni, pomodo-
ri, zucchini.
Tutti i frutti tropicali sensibili al freddo
come ananas, avocado, banane, pom-
pelmi, manghi, meloni, papaie, frutti di
passione ecc.
Questi prodotti vanno deposti nel refri-
geratore in contenitori chiusi (si evita la
disidratazione).
Sbrinamento
Lo sbrinamento del vano frigorifero avviene
in modo completamente automatico e
determina lo scioglimento del ghiaccio, che
si forma sulla parete posteriore. Questo
avviene da 1 - 2 volte al giorno a seconda
del numero di aperture della porta. Durante
lo sbrinamento la temperatura nel vano fri-
go sale per consentire lo scioglimento com-
pleto del ghiaccio sulla parete posteriore del
frigorifero. Dopo lo sbrinamento, la tempe-
ratura scende di nuovo al valore impostato.
L’acqua defluisce attraverso il foro di scarico
ed evapora nella bacinella di raccolta ester-
na all’apparecchio.
65
7

34
Abbiate cura di mantenere sempre puliti il
canale di raccolta e il foro di scarico, in
modo che l’acqua di sbrinamento possa
scorrere via liberamente.
Sbrinare il reparto congelatore quando si è
formato troppo ghiaccio. Se il ghiaccio è
eccessivamente spesso, impedisce il pas-
saggio del freddo ai cibi congelati. Durante
il periodo di sbrinamento conservare i cibi
congelati il più possibile al freddo e isolati,
p.es. avvolgerli in giornali.
– Mettere l’interruttore generale nella
posizione «off».
– Tirare lo scarico dell‘acqua scongelata
(figura 6).
– Il raccoglitore dell’acqua deve venire
deposto sotto lo scarico dell’acqua scon-
gelata (figura 7).
– Lasciare aperta la porta.
Lo sbrinamento può essere notevolmente
accelerato mettendo nel vano congelatore
un recipiente pieno con acqua calda.
Attenzione: non utilizzate oggetti appunti-
ti per staccare il ghiaccio o altre incrostazi-
oni gelate. Non usate stufette elettriche né
fiamme vive per lo sbrinamento.
– Dopo lo sbrinamento, pulire e asciugare
bene l’interno del congelatore.
– Rimettere l’interruttore generale nella
posizione «on»
Vano frigorifero
Le lastre di vetro infrangibili sono regolabili
individualmente nell’altezza. Tirare le lin-
guette in dentro (fig. 8a) e per fissarle
girare in baso verso dietro (fig 8b). Tirare
fuori il ripiano di vetro dalla guida posterio-
re e rimetterlo all’inverso nella posizione
scelta. La superficie d’appoggio divisibile
permette la conservazione in verticale di
contenitori grandi.
Pulizia
Per conservare igienicamente gli alimenti
bisogna mantenere pulito l’apparecchio. Il
vano frigorifero va lavato di tanto in tanto
con acqua a cui è stato aggiunto un deter-
sivo delicato. Passando di tanto in tanto
l’interno con acqua e aceto si evitano i
cattivi odori e quindi è un’operazione
raccomandata. Mantenendo pulite la guar-
nizioni delle porte si evita che si incollino e
vengano danneggiate. Evitare assoluta-
mente detersivi o panni abrasivi. Pulire le
guarnizioni della porta con una spazzola
morbida o un pennello. Se l’apparecchio
non viene utilizzato per lungo tempo, met-
tere l’interruttore generale nella posizione
«off». Svuotare l’apparecchio, sbrinarlo,
pulirlo e lasciare aperte le porte del vano e
del vano congelatore.
8a
8b

35
■ Quando l’apertura delle porte passa
i 2 minuti comincia a lampeggiare
l’illuminazione. Quan do chiudete la
porta, accertatevi che la guarnizione sia
ermetica. Le cerniere autochiudenti sos-
tengono l’operazione.
■ Il tempo del raffreddamento di bevande
e altri alimenti da temperatura ambiente
a quella del frigorifero può durare fino a
6 ore. Più alimenti caldi si mettono, più si
prolunga questo tempo.
■
Regolare il termostato non ha nessun
influsso sulla velocità di raffreddamento,
ma soltanto sul livello della temperatura.
■ Con lo stockage di alimenti umidi posso-
no formarsi dell’acqua di condensazione
agli scaffaletti di vetro.
■ La regolazione elettronica scongela il vano
frigorifero circa una volta al giorno. Uno
strato di ghiaccio si forma sulla parete
pos teriore del vano frigorifero. Questo è
normale.
■ Non mettere gli alimenti a contatto
della parete posteriore, per evitare che
si attacchino e durante lo sbrinamento
l’acqua finisca all’interno del vano.
■ Quando si ripongono gli alimenti:
– Evitare che oli e grassi vengano a
contatto delle parti di plastica e della
guarnizione della porta.
– Indipendentemente dalla posizione
del termostato, le zone più fredde
del frigorifero sono vicino alla parete
posteriore e sotto all’ultimo ripiano in
basso. Pertanto porre gli alimenti
delicati sull’ultimo ripiano in basso.
■ Esempio di disposizione:
– nel vano congelatore congelare gli ali-
menti, conservarli e preparare il ghiaccio
– sui ripiani, dall’alto verso il basso,
pane e pasticceria, cibi pronti, latticini,
carni e salumi
– Pulire gli elementi di comando e di con-
trollo solo con uno straccio umido.
– Abbiate cura che possibilmente l’acqua
di lavaggio non vada a finire nella
vaschetta di evaporazione attraverso il
foro di scarico.
– Prima della messa in servizio
l’apparecchio e le guarnizioni del vano e
del congelatore devono essere comple-
tamente asciutte.
Informazioni per un utilizzo attento
al consumo
■ Utilizzare l‘apparecchio possibilmente
com‘è stato consegnato. La disposizione
di cassetti e ripiani assicura la migliore
distribuzione della temperatura.
■ Non collocare l‘apparecchio vicino a
fonti di calore, tubi del riscaldamento o
fuoriuscite di fumi e tenere al riparo dai
raggi diretti del sole.
■ Aprire le porte dell‘apparecchio solo per
il tempo strettamente necessario. Più
rapidamente vengono chiuse le porte,
meno si disperde il fresco dell‘interno.
■ Accertarsi che le porte siano comple-
tamente chiuse. La porta deve aderire
perfettamente al telaio del frigorifero.
■ Lasciar raffreddare fuori dal frigorifero
alimenti tiepidi o caldi.
■ Il deposito di alimenti che rilasciano umi-
dità può far aumentare la formazione di
ghiaccio sulle pareti del frigorifero ridu-
cendo la capacità refrigerante.
Consigli
Utilizzando il nuovo apparecchio bisogna
osservare i punti seguenti:
■ Un apparecchio appena messo in servizio ha
bisogno di ca. 15 ore (con alimenti) per rag-
giungere le temperature d’esercizio normali.

36
– negli scaffaletti retroporta, dall’alto
verso il basso: burro e formaggio,
tubi, piccole scatole e uova, bottiglie
grandi
– nella vaschetta per la verdura, verdu-
ra, frutta e insalata.
Sostituire la lampada dell’illuminazione
Togliete la corrente: staccate la spina o
togliete il fusibile.
Sganciare la copertura della lampadina
(figura 9). Allentare il collegamento a spi-
na con la lampadina dell’illuminazione
(figura 0). Inserire la nuova lampadina pro-
cedendo in ordine inverso.
Avvertenza! Utilizzare solo lampadine
originali del produttore!
Illuminazione LED sotto
il cassetto speciale
Tirate il coperchio trasparente verso il bas-
so (fig. ßa).
Sganciate l’illuminazione LED. (Fig. ßb)
Staccate la spina dell’illuminazione LED
(fig. ßc).
0
9
ß a
ß b
ß c

37
Guasti
Prima della consegna l’apparecchio è stato
controllato per accertarne il buon funzion-
amento. In caso di guasto vogliate rivolger-
vi al centro di assistenza tecnica più
vicino, indicando numero di modello e il
tipo di guasto.
I malfunzionamenti possono essere anche
la conseguenza dell’intervento di un inter-
ruttore automatico. Il danno è subito ripa-
rato riarmando l’interruttore automatico.
Indicazione dopo un’interruzione
della corrente
Un’interruzione della corrente viene seg-
nalata, se dopo la riaccensione la tempera-
tura nel vano freezer era superiore a -9°C.
In questo caso lampeggiano insieme i due
display della temperatura e indicano i valo-
ri, che sono stati rilevati al momento della
riaccensione. Il lampeggio dei display può
essere disattivato premendo un qualsiasi
tasto. In seguito appaiono i valori delle
temperature medie attuali.
Funzione anomala del sensore:
– messaggio d’errore F1 sul display a sinis-
tra = sensore temperatura frigorifero
diffettoso
– messaggio d’errore F2 sul display a des-
tra (sensore temperatura dell’aria dello
scomparto speziale) = sensore tempera-
tura scomparto speciale diffettoso
– messgio d’errore F3 sul display a destra
(sensore temperatura dell’evaporatore
dello scomparto speciale) = sensore tem-
peratura scomparto speciale diffettoso
– Messaggio di errore F4 sul display della
temperatura a destra (temperatura del
vano freezer) = il sensore della tempera-
tura del vano freezer è difettoso.
– messaggio d’errore F7 sul display a destra
= sensore temperatura ambiente diffettoso
Funzionamento d’emergenza
Quando appare un messaggio di errore F1
o F4 relativo alle sonde, il funzionamento
del frigorifero continua in modalità emer-
genza con comando a tempo, indipenden-
temente dalle sonde difettose.
Garanzia
Le concediamo la garanzia a partire dalla
data di consegna dell’apparecchio.
Gli eventuali difetti che durante tale perio-
do dovessero manifestarsi, malgrado l’uso
conforme alle prescrizioni, e dovuti a un
difetto di materiale o di fabbricazione,
vengono eliminati dal nostro servizio dopo-
vendita, nel quadro della presente garan-
zia.
Non sono coperti da garanzia:
– i difetti della lampadina
– la rottura di lastre di vetro e parti di
plastica
– i difetti derivanti da inosservanza delle
istruzioni per l’uso improprio
– le pretese di risarcimento per danni che
superano le nostre prestazioni di
garanzia
– gli apparecchi che sono stati riparati da
terzi.

38
Rumori di funzionamento
Rumori del tutto normali
Il raffreddamento è assicurato da un com-
pressore (generatore del freddo).
Il compressore pompa il refrigerante attra-
ver so il sistema di refrigerazione. Questo
pro cesso è inevitabilmente accompagnato
da rumori, che continuano anche dopo
lo spegnimento del compressore a causa
delle variazioni di pressione e temperatura.
Il presente impianto apparecchio è stato
concepito secondo lo stato più attuale
delle conoscenze ed è stato dotato di un
compressore molto silenzioso e di un cir-
cuito del freddo ottimizzato dal punto di
vista della rumorosità.
Ciononostante non è possibile evitare
com pletamente determinati rumori, la
cui inten
sità dipende dalla dimensione
dell‘apparecchio.
Tali rumori di funzionamento sono udibili
maggiormente subito dopo l’accensione
del compressore e perdono d’intensità nel
corso del funzionamento.
Rumori anomali
Rumori anomali sono da imputare normal-
mente ad un’installazione non adeguata. Il
apparecchio deve essere installato o incas-
sato orizzontalmente ed in modo stabile.
Le tubazioni non devono essere assolut-
amente a contatto con una parete o con
altri mobili, come non devono toccarsi tra
di loro.
In cucine aperte oppure in presenza
di apparecchi inseriti in pareti divisorie
dell’ambiente, i normali rumori di funzi-
onamento vengono avvertiti più intensa-
mente. Questo non costituisce un difetto
dell‘apparecchio, ma è semplicemente
dovuto alle circostanze architettoniche.
Anomalia Causa Annotazione
Borbottio Generatore del freddo Normale rumore di funzionamento del generatore del
freddo; l’intensità dipende dalla dimensione
dell‘apparecchio e dal numero di giri del motore
del compressore, che dipende dal carico
Ronzio Ventilatore Normale rumore di funzionamento dovuto alla ventilazione
Gorgoglio Circuito del freddo Normale rumore di funzionamento dovuto al passaggio del
Fruscio refrigerante nel circuito del freddo
Fischio Circuito del freddo Normale rumore di funzionamento dovuto all’iniezione del
refrigerante nel evaporatore
I vassoi, cesti o il carico, ecc. sbattono Disponete gli elementi interni in modo che non siano a
contatto tra di loro e in modo che i vassoi risultino ben
fissati.
Scricchiolio della cassa Dilatazioni normali dei materiali dovute alla temperatura,
p.es. del materiale sintetico e di quello isolante
Rumore tipo valvola Normale rumore della valvola
«clic»

39
Frigorifero da incasso
nicchia SMS 14/6 (1778 mm)
panello della porta CH
panello della porta EU
spessore
16 – 24 mm
max. 594
integrato CH
quadro decorativo
integrato EU
min. 50
(420)
2050 SMS-Norm
apparecchio 1776
nicchia 1778
min. 50
547
-
0
2
spessore
16 – 20 mm
100
120
apparecchio 570
nicchia 605
apparecchio 545
525
602
555
nicchia 605
apparecchio 545
nicchia 550
apparecchio 548
nicchia 550
apparecchio 548
nicchia 550
apparecchio 548
nicchia 560–568
100° 105° 100°
particolare A
A
Sezione d’aerazione min. 200 cm
2
,
superiore ed inferiore
Il funzionamento ottimale
dell’apparecchio è garantito anche
per la nicchia profonda 550
1270
1143+sporgente della nicchia
sopra -fessura/2
508
635+porgente della nicchia
sotto -fessura/2
200
430
aerazione
10/6-fessura4/6-fessura
La protezione contro le scariche elettriche deve essere assicurata
dall’installatore. Se la presa di corrente non è più accessibile dopo
l’incastro dell’appa recchio, é necessario prevedere un sistema di disins-
erzione. Ammessi sono i sistemi di disinserzione con interruttori aventi
un’apertura fra i contatti di almeno 3 mm e che interrompono la reta
tramite un teleruttore assicurato da dei fusibili.

40
Dear customer
You are the owner of a modern and thus
energy-saving refrigerator. Congratulations
on your new appliance!
This refrigerator has been designed and
manufactured to the latest European direc-
tives and in accordance with the latest natio-
nal and international standards. By affixing
the CE mark subsequent to inspection of the
product by authorised testing agencies, the
manufacturer confirms compliance with the
relevant directives and standards for
household refrigerator appliances and
household refrigerator/freezer appliances.
Disposal of the old appliance
Old appliance should be rendered unservi-
ceable immediately (e.g. cut off the power
cable). Please ensure that the piping of
your appliance is not damaged before it is
transported to the proper environmentally-
friendly disposal facility. For disposal of
your old appliance, please contact the
appropriate facilities of your local authori-
ties. (Unfasten the hinges and remove the
doors so that children playing cannot lock
themselves in and be in mortal danger).
Disposal of the packing material
All packing materials used are environmen-
tally compatible and recyclable.
Safety information and warnings
Before putting the appliance into service,
please read carefully the information given
in the operating instructions and keep
them carefully for use by a later owner.
■ Electrical safety must be ensured (con-
tact safety) by the installation.
■ This appliance is only for household use
as described in the operating instructions.
■ This appliance is not to be used by per-
sons with reduced physical, sensory or
mental capacity, or limited experience
and un derstanding, other than when
they are supervised or instructed in how
to use this appliance by a person respon-
sible for their safety. Children should be
supervised to ensure that they do not
play with the appliance.
■ If you have been supplied with a dama-
ged appliance please contact your sup-
plier immediately.
■ Do not use an extension cable.
■ Repairs and other service work must only
be carried out by a service technician.
■ When cleaning switch off the power
supply; pull out the power supply plug
or deactivate the fuse. Never pull the
plug out of the socket by pulling on the
cable or with wet hands. Always grip the
plug itself and pull it straight out of the
power supply socket.
■ High proof alcohol must only be stored
well sealed and upright; further, do not
store explosive materials in the appliance.
Explosion danger!
■ This appliance is CFC and FC-free and con-
tains small quantities of isobutane (R600a),
an environmentally-friendly coolant.
■ When operating the appliance, care must
be taken that the cooling circuit does not
get damaged. Should the cooling circuit
get damaged then keep it clear of open
fires and any type of ignition source. The
room in which the appliance is located
should be ventilated for a few minutes.
■ Appliance with a damaged cooling cir-
cuit must not be put into operation.
■ When the appliance is in operation care
must be taken that the ventilation vents
are not covered over or closed.
■ No mechanical devices or synthetic mate-
rials other than those recommended
must be used to accelerate defrosting.

41
■ No liability will be accepted for any pos-
sible damage if the appliance is used for
any other purpose, incorrectly operated,
or not repaired by a professional techni-
cian. In such cases the guarantee and
other liabilities are rendered null and
void.
■ If the connection cable of the appliance
is damaged it must be replaced by the
manufacturer or by his customer service
or by a similarly qualified person to avoid
any liability.
■ Warning: do not operate any electrically-
driven devices inside the foodstuff com-
partment.
Controls
Child safety lock
The buttons must be pressed for at least 3
seconds.
Alarm acknowledgement
Any button can be used to acknowledge
the alarm function.
1 Main ON/OFF button
2 Holiday function:
The refrigerator is swiched off and the
freezer remains in operation. OF is
shown on the refrigerator temperature
display (5).
3 Increase refrigerator temperature
(up to max. 9 °C):
After 3 seconds the temperature display
starts to flash and shows the selected
temperature value. Each time you now
press the button, the temperature value
is increased by 1 °C. If you hold down
the button, the value increases automa-
tically until you release the button or the
maximum value is reached. Approx. 5
seconds after releasing the button, the
display stops flashing and the current
average temperature is displayed again.
5
6
7
8
9
0
3
4
1
2

42
4 Decrease refrigerator temperature
(down to min. 3 °C):
After 3 seconds the temperature display
starts to flash and shows the selected
temperature value. Each time you now
press the button, the temperature value
is decreased by 1 °C. If you hold down
the button, the value decreases automa-
tically until you release the button or the
minimum value is reached. Approx. 5
seconds after releasing the button, the
display stops flashing and the current
average temperature is displayed again.
5 Refrigerator temperature display:
A temperature value averaged over 2
hours is displayed, which may be diffe-
rent from the set value. This can be the
case particularly after defrosting or if the
door has been open for a while. If the
temperature is lower than -5 °C, «LO» is
displayed; if it is higher than 20 °C, «HI»
is displayed.
6 Freezer temperature display
An actual value averaged over 2 hours is
displayed, which may be different from
the set value. This can be the case parti-
cularly if the door has been open for a
while or if a large amount of warm food-
stuffs have just been stored. If the tem-
perature is lower than -30°C, «LO» is
displayed; if it is higher than -5 °C, «HI»
is displayed.
7 Increase freezer temperature
(up to max. -14°C):
After 3 seconds the temperature display
starts to flash and shows the selected
temperature value. Each time you now
press the button, the temperature value
is increased by 1°C. If you hold down the
button, the value increases automatically
until you release the button or the maxi-
mum value is reached. Approx. 5
seconds after releasing the button, the
display stops flashing and the current
average temperature is displayed again.
8 Decrease freezer temperature
(down to min. -24 °C):
After 3 seconds the temperature display
starts to flash and shows the selected
temperature value. Each time you now
press the button, the temperature value
is decreased by 1 °C. If you hold down
the button, the value decreases automa-
tically until you release the button or the
minimum value is reached. Approx. 5
seconds after releasing the button, the
display stops flashing and the current
average temperature is displayed again.
9 Fast freeze button
This activates maximum chilling perfor-
mance for the freezer. A snowflake
appears on the display. After 24 hours
the system is reset to the original setting
and the snowflake disappears. The fast
freeze function can also be disabled
before this time by pressing the button
manually again.
0 Fast cool button
This activates maximum chilling perfor-
mance for the refrigerator. A fan icon
appears on the display. After 24 hours
the system is reset to the original setting
and the fan disappears. The fast cool
function can also be disabled before this
time by pressing the button manually
again. Once the fast cool function is
finished, the refrigerator automatically
defrosts.

43
Refrigerator door alarm
After 2 minutes the LED flashes at
15-second intervals. Reset by pressing any
button.
After 3 minutes the LED flashes at
5-second intervals. Reset by pressing any
button.
After 4 minutes the LED flashes rhythmi-
cally once a second. Reset by pressing any
button.
After 10 minutes: Audible alarm. Reset by
any button. Lasts for 3 minutes - repeated
every 30 minutes.
If the freezer door is left open for longer
than 10 minutes, an audible alarm sounds
until the freezer door is closed or the alarm
is stopped by pressing any button.
Temperature alarm
An audible alarm sounds if the temperatu-
re in the refrigerator rises 10°C above the
selected temperature value, the average
temperature in the freezer is warmer than
-9°C or the average temperature in the
freezer compartment is warmer than -9°C
or the temperature on the temperature
sensor in the special compartment has
changed significantly. In addition, the rele-
vant temperature display or the special
compartment operating display flashes.
Freezing
■ Only fresh produce is suitable for free-
zing.
■ Only small quantities should be frozen at
one time so that the temperature in the
freezer does not increase too much.
Freezing can be carried out in all freezer
compartments. It is best to pre-pack
small portions only.
■ To freeze the maximum amount of food-
stuffs (see ID plate), the top compart-
ment must be used. Press the Fast Freeze
button after inserting the foodstuffs.
The temperature setting of the freezer
and refrigerator must not be changed.
After 24 hours the Fast Freeze function
is automatically deactivated.
■ The Fast Freeze button can also be used
to freeze smaller amounts. However, it is
not necessary to activate the Fast Freeze
function for 24 hours.
■ Products for freezing should not be bro-
ught into contact with products which
are already frozen. Products which have
been thawed out must not be re-frozen
because foodstuffs can spoil.
Variable inner doors
The cover inserts (Figure 2) in the inner
doors can be adjusted somewhat and offer
the option of a customized setting. To
change the location of the inserts and bot-
tle holder: first lift upwards and lift out,
then set the required height and replace in
the reverse sequence. Please note that the
location of the cover of the uppermost
cover cannot be adjusted.
2

44
Special compartment
The special compartment (Figure 3) can
be used for storing various fresh food
products up to three times longer than a
conventional fridge. The temperature in
the special compartment in beetween 0°
C and 3°C (by 5° C selectet temperature
value).
Removing and fitting the drawers of the
special compartment: Pull out fully, lift and
remove laterally (Figure 4)
Note: (+ Figure 5)
The humidity can be infinitely adjusted:
– Small humidity Symbol (left) low humidi-
ty (about 45%)
– Large humidity symbol (right) higher
humidity (max. 90%)
The humidity in the special compartment
depends on:
– Quantity and moisture content of the
stored food products
– Type of packaging
– Compartment opening frequency
– packaging
Note:
The special compartment should not be
used for potatoes, hard cheese, cold-
sensitive vegetables such as aubergines,
beans, cucumbers, pumpkins, chillies,
tomatoes, courgettes.
4
3
5

45
All cold-sensitive tropical fruits such as
pineapple, avocados, bananas, grapefruits,
mangos, melons, papayas, passion fruit,
etc. should be stored in closed compart-
ments in the fridge (to prevent drying out).
Defrosting
The refrigerator defrosts completely auto-
matically, thus melting any ice that has
built up on the back panel. This happens
approx. twice a day depending on how
often and for how long the door is open-
ed. During the defrosting procedure the
temperature in the refrigerator rises so
that the ice on the back panel defrosts
completely. After defrosting, the tempera-
ture drops back to the original setting. The
water flows out through a drain hole and
evaporates in the collecting tray outside
the device.
Be sure to keep the collection channel and
the drainage channel clean, so that the
melted water can flow out easily.
Defrost the freezer compartment if the ice
formation becomes excessive. A thick coa-
ting of ice reduces the effectiveness of the
cold transfer to the frozen products.
Keep the frozen products as cold as pos-
sible and well insulated during the defros-
ting time, e.g. pack them in newspaper.
– Turn off the appliance by using the main
switch (3 sec.)
– Pull out the water drain hole (Figure 6)
– Place water catcher under the defrosted
water drainage channel (Figure 7)
– Leave the doors open.
Defrosting can be accelerated significantly
if you place a bowl of hot water in the fre-
ezer compartment. Attention: do not use
sharp implements to remove ice or any-
thing hard frozen. Do not use an electrical
heater or an open flame for defrosting.
– After defrosting clean the interior and
dry it thoroughly.
– Turn on the appliance by using the main
switch (3 sec.)
6
7

46
Refrigerator
The height of the unbreakable secured
glass shelves can be adjusted individually.
Pulling both holders sideways inwardly
(Figure 8a) and for fixation turn them
down and backwards (Figure 8b). Pull the
glass shelf out of the guidance and replace
it in reversed order at the desired position.
Cleaning
The appliance is to be kept clean for the
hygienic storage of foodstuffs. It should be
washed out from time to time with a mild
soapy solution and then dried. An occasio-
nal wiping with a vinegar solution suppres-
ses odours and is recommended. Keeping
the door seals clean stops them from sti-
cking and thus avoids them being dama-
ged.
No scouring cleaners or scratching cloths
are to be used. Clean the door seals with a
soft brush. If the appliance has not been
used for some time, turn off by using the
main switch (3 sec.). Empty the appliance,
defrost it, clean, and then leave the cold
room as well as the freezer compartment
open.
– For cleaning the control element please
use only a humid flannel.
– Be careful that as little cleaning water as
possible goes though the drainage
channel into the collection dish.
– Before being put back in use, the appli-
ance and the seals of the cold room and
the freezer must all be completely dry.
Informations for energy-saving use
■ As far as possible, use the cooling unit in
its as-delivered state. The arrangement
of drawers, shelves and trays ensures the
best possible temperature distribution.
■ Do not install the unit near radiators,
radiator pipes or smoke extractors and
protect it as far as possible from direct
sunlight
■ Make sure the unit doors are kept open
for as short a time as possible. The qui-
cker the doors are closed again, the less
cold is lost.
■ Make sure that the doors are closed fully
and correctly. The door seal must be
flush against the frame of the fridge.
■ Leave warm or even hot items to cool
down outside the unit.
■ The storage of moisture-releasing food-
stuffs leads to increased build-up of ice
on the rear of the fridge and a reduction
in cooling power.
8a
8b

47
Tips
The following points should be noted
when using the new appliance:
■ A appliance which has just been put
into use needs approx. 15 hours (with
products) until it has reached its normal
operating temperatures.
■ If the doors are open for longer than 2
minutes then the lamp starts to flash.
Make sure after closing that the doors
are fully sealed. The self-closing hinges
assist this.
■ The cooling time for beverages and other
products can take up to 6 hours from
room temperature down to the cold
room temperature. The warmer they are
when put in, the longer this time will be.
■ Re-setting the temperature control has
no effect on the cooling rate, only on
the temperature reached.
■ Condensation can form on the glass
shelves if products are stored which emit
water vapour.
■ The electronic control defrosts the cold
room only about once per day. A cat ice
may be visible oftentimes at the back
board of the cold room – this is though
normal.
■ Be careful that products do not come
into contact with the rear wall of the
cold room so that they do not freeze
to it and that, during defrosting, water
does not get diverted into the cold
room.
■ When filling be careful that:
– Oil and fats do not come into contact
with the polymer parts and the door
seals.
– The coldest locations in the cold room
for any setting of the temperature
controller are at the back wall and
above the lowest shelf. Sensitive pro-
ducts should therefore be put on the
lowest shelf.
■ Example of how to use:
– Freeze and store foodstuffs and make
ice in the freezer compartment.
– On the shelves from top to bottom:
baked products, ready-made meals,
dairy products, meat and sausages.
– In the suspended trays from top to
bottom: butter and cheese, tubes,
small cans and eggs, large bottles.
– In the vegetable compartment: vegetab-
les, fruit and salad.

48
Changing the LED lighting
Switch off the power supply: pull out
the power supply plug or deactivate
the fuse.
Click off the LED lighting (Figure 9).
Disconnect the plug to the LED lighting
(Figure 0). Please insert the new LED light-
ing in the reverse sequence.
N.B.: Please only use original LED light-
ing from the manufacturer.
LED light above the special
compartment
Pull the transparent cover down (Fig. ßa).
Click the LED light off (Fig. ßb)
Undo the connection to the LED light
(Fig. ßc)
0
9
ß a
ß b
ß c

49
Malfunctions
The appliance is checked for trouble-free
operation before being supplied. Should
you have any problems please contact your
nearest service facility, advising them of
the model number and the details of the
problem.
A malfunction can occur if the electrical
fuse is tripped. This problem can be solved
easily if the fuse mechanism is re-activated.
Display following power failure
An interruption to the power supply is only
displayed if the freezer temperature is war-
mer than -9°C after restart. In this case the
two temperature displays flash and show
the temperature values that were measu-
red after restart. You can stop the tempe-
rature displays flashing by pressing any
button. The current average temperature
values are then displayed.
Sensor error functions:
– Sensor error F1 on the left-hand side of
temperature display = temperature sen-
sor in the cold room is defective
– Sensor error F2 on the right-hand tempe-
rature display (air temperature of special
compartment) = temperature sensor in
the special compartment is defective
– Sensor error F3 on the right-hand tempe-
rature display (evaporator temperature
of special compartment) = temperature
sensor in the special compartment is
defective
- Error message F4 on the right-hand tem-
perature display (freezer temperature) =
temperature sensor in the freezer defec-
tive.
– Sensor error F7 on the right-hand side of
temperature display = surrounding room
temperature sensor defective
Emergency mode
If a sensor error is displayed, the entire unit
continues to operate in a time-controlled
emergency mode independently of the
defective sensors.
Guarantee
We warrant the guarantee as of the delivery
date of the appliance.
Any malfunctions which might occur
during this time despite correct operation
and which are caused by material or const-
ruction errors will be corrected under this
guarantee by our customer service.
Not covered by the guarantee:
– LED defects
– Breakage of the glass shelves or polymer
parts
– Defects resulting from not following the
operating instructions or incorrect usage
– Damage claims beyond the guarantee
– Appliance which have been repaired by
third parties.

50
Operating Noises
Noises which are entirely normal
The chill cabinet is cooled by a compressor
(refrigeration aggregate). The compres-
sor pumps coolant through the cooling
system, producing operating noises. Even
when the compressor cuts out, noises
caused by changes in temperature and
pressure are unavoidable.
This appliance is fitted with a quiet com-
pressor and a low-noise cooling circuit
designed in line with the latest technical
developments.
However, a certain level of noise, depen-
dent on the size of the appliance, is inevi-
table. Operating noise will be most audible
immediately after the compressor cuts in.
It becomes quieter as the operating period
continues.
Noises which are not normal
Unusual noise is normally the result of
improper installation. The appliance must
be installed or built-in so that it is level
and stable. Under no circumstances must
tubing come into contact with a wall,
other furniture or with another tubing.
Where the appliances are installed in
open-plan kitchens or in partition walls,
the level of operating noise will be heard
more acutely. However, this is due to the
surrounding architecture and not to a fault
with the appliance.
Description Cause Notes
Droning Cooling aggregate Normal operating noise of the cooling aggregate.
The level is dependent on the size of appliance and on the
load-dependent speed of the compressor motor
Humming Fan Normal operating noise of the fan.
Gurgling Cooling circuit Normal operating noise as coolant flows through
Babbling the circuit.
Murmuring
Hissing Cooling circuit Normal operating noise as coolant is injected into
the condenser.
Rattle Shelves, contents Arrange the shelves and contents so that they are fixed
and not touching one another.
Cracking Housing Normal as materials expand and contract caused
by temperature variations (e.g. plastics, insulation).
Hissing valve Normal operating noise of the valve

51
Fitted refrigerator
Recess SMS 14/6 (1778 mm)
Door leaves CH
Door leaves EU
Thickness
16 – 24 mm
max. 594
Integral CH
Decorative frames
Integral EU
Min. 50
(420)
2050 SMS-Standard
appliance 1776
Recess 1778
Min. 50
547
-
0
2
Thickness
16 – 20 mm
100
120
appliance 570
Recess 605
appliance 545
525
602
555
Recess 605
appliance 545
Recess 550
appliance 548
Recess 550
appliance 548
Recess 550
appliance 548
Recess 560–568
100° 105° 100°
Detail A
A
Ventilation cross-section
top and bottom min. 200 cm
2
For recess depths of 550,
the power data of the appliance
are guaranteed the same
1270
1143 + recess projection
above - opening/2
508
635+recess projection
below -opening/2
200
430
Ventilation
10/6-opening4/6-opening
Electrical safety (personnel protection safety) is to be ensured during
fitting. If the mains power supply is not accessible after installation
then a separation device is to be provided by the installer. This can be
a switch with a contact opening of at least 3 mm, this includes line
protection cut-outs as well as contactors.

KUNDENDIENST
Servicestellen Points de service Servizio dopo vendita Point of service
5506 Mägenwil/Zürich
Industriestr. 10
9000 St. Gallen
Zürcherstrasse 204 e
4052 Basel
St. Jakob-Turm
Birsstrasse 320B
6020 Emmenbrücke
Seetalstrasse 11
7000 Chur
Comercialstrasse 19
3018 Bern
Morgenstrasse 131
1028 Préverenges
Le Trési 6
6916 Grancia
Zona Industriale E
Ersatzteilverkauf / Point de vente de rechange / Vendita pezzi di ricambio / spare parts service
5506 Mägenwil, Industriestrasse 10, Tel. 0848 848 023
Fachberatung, Verkauf/Demonstration, Vente/Consulente (cucina), Vendita/consulting, sales
8048 Zürich, Badenerstrasse 587, Tel. 044 405 81 11
Garantie
Für jedes Produkt gewähren wir ab Verkauf bzw. Lieferdatum an den Endverbraucher eine
Garantie von 2 Jahren. (Ausweis durch Garantieschein, Faktura oder Verkaufsbeleg).
Die Garantieleistung umfasst die Kosten für Material, Arbeits- und Reisezeit.
Die Garantieleistung entfällt bei Nichtbeachtung der Gebrauchsanweisung und Betriebs-
vorschriften, unsachgerechter Installation, sowie bei Beschädigung durch äussere Einflüsse,
höhere Gewalt, Eingriffe Dritter und Verwendung von Nicht-Original Teilen.
Garantie
Nous octroyons sur chaque produit 2 ans de garantie à partir de la date de livraison ou de la
mise en service au consommateur (documenté au moyen d’une facture, d’un bon de garantie
ou d’un justificatif d’achat). Notre garantie couvre les frais de mains d’œuvres et de
déplacement, ainsi que les pièces de rechange.
Les conditions de garantie ne sont pas valables en cas d’intervention d’un tiers non autorisé,
de l’emploi de pièces de rechange non originales, d’erreurs de maniement ou d’installation
dues à l’inobser-vation du mode d’emploi, et pour des dommages causés par des influences
extérieures ou de force majeure.
Garanzia
Per ogni prodotto concediamo una garanzia di 2 anni a partire dalla data di consegna o dalla
sua messa in funzione. (fa stato la data della fattura, del certificato di garanzia o dello scontrino
d’acquisto) Nella garanzia sono comprese le spese di manodopera, di viaggio e del materiale.
Dalla copertura sono esclusi il logoramento ed i danni causati da agenti esterni, intervento di
terzi, utilizzo di ricambi non originali o dalla inosservanza delle prescrizioni d’istallazione ed
istruzioni per l’uso.
Warranty
For each product we provide a two-year guarantee from the date of purchase or delivery to the
consumer (with a guarantee certificate, invoice or sales receipt serving as proof).
The guarantee covers the costs of materials, labour and travel.
The guarantee will lapse if the operating instructions and conditions of use are not adhered to,
if the product is incorrectly installed, or in the event of damage caused by external influences,
force majeure, intervention by third parties or the use of non-genuine components.
10143781
-
 1
1
-
 2
2
-
 3
3
-
 4
4
-
 5
5
-
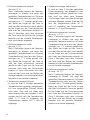 6
6
-
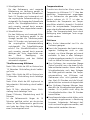 7
7
-
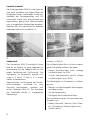 8
8
-
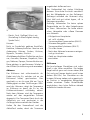 9
9
-
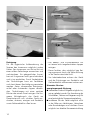 10
10
-
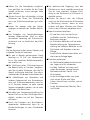 11
11
-
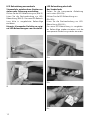 12
12
-
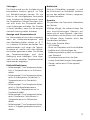 13
13
-
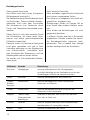 14
14
-
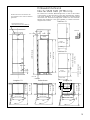 15
15
-
 16
16
-
 17
17
-
 18
18
-
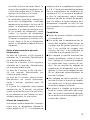 19
19
-
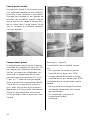 20
20
-
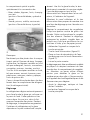 21
21
-
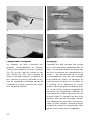 22
22
-
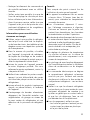 23
23
-
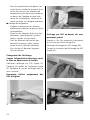 24
24
-
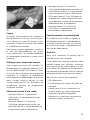 25
25
-
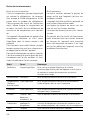 26
26
-
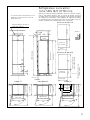 27
27
-
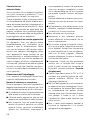 28
28
-
 29
29
-
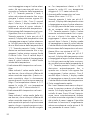 30
30
-
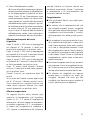 31
31
-
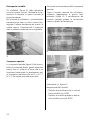 32
32
-
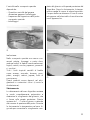 33
33
-
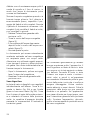 34
34
-
 35
35
-
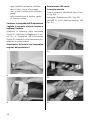 36
36
-
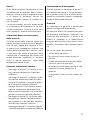 37
37
-
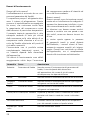 38
38
-
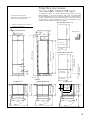 39
39
-
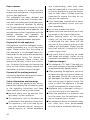 40
40
-
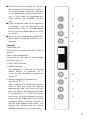 41
41
-
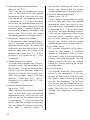 42
42
-
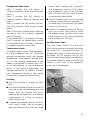 43
43
-
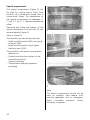 44
44
-
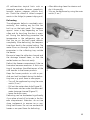 45
45
-
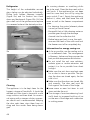 46
46
-
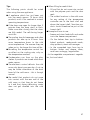 47
47
-
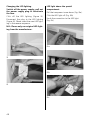 48
48
-
 49
49
-
 50
50
-
 51
51
-
 52
52


Electrolux IK255TR12L Manual de usuario
- Categoría
- Frigoríficos-congeladores
- Tipo
- Manual de usuario
- Este manual también es adecuado para
En otros idiomas
- français: Electrolux IK255TR12L Manuel utilisateur
- italiano: Electrolux IK255TR12L Manuale utente
- English: Electrolux IK255TR12L User manual
- Deutsch: Electrolux IK255TR12L Benutzerhandbuch
Documentos relacionados
Otros documentos
-
Groupe Brandt RG9299F1 El manual del propietario
-
Candy RBC 3383 A Manual de usuario
-
Aeg-Electrolux A75100GA4 Manual de usuario
-
Siemens KG39EAICA El manual del propietario
-
Bosch KGE58AICP El manual del propietario
-
Bosch SERIE 6 KDE33AL40 El manual del propietario
-
Bosch Bosch Freestanding Multidoor Manual de usuario
-
Bauknecht KVE 6S700R Guía del usuario
-
JennAir Bottom Mount Refrigerator Instrucciones de operación
-
JennAir JBBFX24NHX Manual de usuario