
IMPORTANT: Failure to follow instructions carefully may cause damage!
SAVE INSTRUCTIONS for damage-free removal or visit command.com
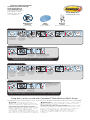
To Attach Soap Dish
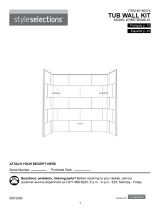
Para fijar la jabonera
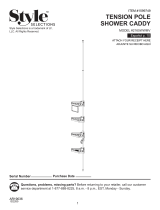
To Remove
IMPORTANTE: Si no sigue las instrucciones con cuidado, ¡pueden producirse daños!
GUARDE LAS INSTRUCCIONES para retirar las tiras sin causar daños o visite command.com
Para retirar
Failure to follow instructions
carefully may cause damage.
Save instructions or
visit command.com
Si no sigue las instrucciones
pueden producirse daños.
Guarde las instrucciones o
visite command.com
BATH14-ES
command.com
Removes
Cleanly
No deja residuos al retirar
Damage-Free
Hanging
Colgar sin dañar
Holds
Strongly
Sujeta firmemente
Soap dish can be reused with Command
®
Bath Medium Refill Strips.
La jabonera se puede volver a usar con las tiras de baño medianas de repuesto Command
®
.
PRECAUCIÓN: No cuelgue sobre camas o utilice en papel tapiz. No
cuelgue artículos valiosos o irremplazables o imágenes con marco.
Aplicar y usar entre -9º y 50ºC
Garantía limitada y límite de responsabilidad (para producto vendido
en E.U.A.): Este producto no tendrá defectos de fabricación. Si tiene
defectos, su única solución será, a opción de 3M, el reemplazo del
producto o el reembolso del precio de compra. 3M no será
responsable de ninguna pérdida o daño que se deriven de este
producto, ya sea directos, indirectos, especiales, fortuitos o
resultantes.
CAUTION: Do not hang over beds or on
wallpaper. Do not hang valuable or irreplaceable
items or framed pictures. Apply and use 15º-125ºF.
Limited Warranty and Limitation of Liability (for
product sold in USA): This product will be free from
manufacturing defects. If defective, your exclusive
remedy shall be, at 3M's option, product
replacement or refund. 3M will not be liable for any
loss or damage arising from this product, whether
direct, indirect, special, incidental or consequential.
1 2 3
3 4
4
Select Location
If possible, choose a
location where strips
are not over grout lines.
Important: Allow space
above and below soap
dish for removal.
REMOVE RED liner.
PRESS adhesive to
mounting base of soap
dish. Repeat with
second strip.
REMOVE BLACK liners.
PRESS soap dish to
surface for 10 seconds.
Press base FIRMLY for
30 seconds.
Clean & Dry
Surface
Clean surface with
isopropyl rubbing
alcohol, let dry. DO NOT
use household cleaners
to prep the surface.
Separate strips.
2
Hold Base Lightly
To prevent base from
snapping your fingers,
lightly hold mounting
base. DO NOT press
base against wall.
Remove Strip
SL OWLY stretch strip straight down
along the wall. Stretch strip 12 inches
(30 cm) until mounting base releases
from wall. Remove one strip at a time.
Repeat steps with second strip.
Remove Soap Dish
Slide soap dish up to
remove from mounting
bases.
IM P ORTANT
For maximum holding
strength slide soap dish
up to remove from
mounting base.
NEVER pull strip
towards you. Strip could
break or damage
surface if
pulled outward.
ImportantImportant
6
30
SECONDS
RED
SIDE
RED
SIDE
BLACK
SIDE
BLACK
SIDE
2X2X
UP
5
Slide soap dish onto
mounting base.
Wait 1 hour before use.
DOWN
UP
DOWN
7
UP
1
UP
1 2 3
3 4
4
Escoja el lugar
De ser posible, elija un
lugar en el cual las tiras
no queden colocadas
sobre las líneas de
juntas. Importante:
Deje espacio por
encima y por debajo
de la jabonera
para retirarla.
REMUEVA el
revestimiento ROJO.
PRESIONE el adhesivo a
la base de soporte de la
jabonera. Repita el
proceso con la
segunda tira.
REMUEVA los
revestimientos NEGROS.
PRESIONE la jabonera
contra la superficie
durante 10 segundos.
Presione la base
FIRMEMENTE durante
30 segundos.
Limpie y seque la
superficie
Limpie la superficie con
alcohol isopropílico de
uso tópico y deje secar.
NO utilice limpiadores
de uso doméstico para
preparar la superficie.
Separe las tiras.
2
Sujete ligeramente la
base de montaje
Para prevenir que la base de
montaje lastime los dedos,
sujétela ligeramente. NO
presione la base contra la pared.
Retire la tira
Estire LENTAMENTE la tira hacia abajo
a lo largo de la pared. Estire la tira al
menos 30 cm
hasta que la base se
suelte de la pared. Retire una tira a la
vez. Repita los pasos con las tiras
adicionales.
Retire la jabonera
Deslice la jabonera
hacia arriba para retirar
la de las bases
de montaje.
NUNCA hale la tira
hacia usted. Ésta se
podría romper o podría
dañar la superficie si se
tira hacia afuera.
IM P ORTANT E
Para lograr la máxima
resistencia de fijación,
deslice la jabonera
hacia arriba para
retirarla de la base
de montaje.
ImportanteImportante
6
30
SEGUNDOS
LADO
NEGRO
LADO
NEGRO
2X2X
ARRIBA
5
Deslice la jabonera en
la base de montaje.
Espere 1 hora
antes de usar.
ABAJO
ARRIBA
ABAJO
7
ARRIBA
1
ARRIBA
LADO
ROJO
LADO
ROJO
8
1
HOUR
8
1
HORA
-
 1
1

Command BATH14-ES Instrucciones de operación
- Tipo
- Instrucciones de operación
- Este manual también es adecuado para
Artículos relacionados

Otros documentos
-
3M Command™ Large Wire Hook Instrucciones de operación
-
 Style Selections 2165WWMV Guía de instalación
-
 Style Selections RBE6026-67 Guía de instalación
-
Kohler K-8520-CP Guía de instalación
-
-
-
Glacier Bay 815N-0001 Guía de instalación
-
-
-

