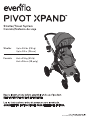
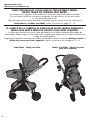
Evenflo Pivot Xpand Manual de usuario
- Categoría
- Cochecitos
- Tipo
- Manual de usuario

Up to 55 lbs (25 kg)
Up to 38 in. (96 cm)
Stroller
Hasta 25 kg (55 lb)
Hasta 96 cm (38 pulg)
Carriola
Stroller/Travel System
Carriola/Sistema de viaje
25701331 3/18
©2018
U.S. Patent Pending

2
TABLE OF CONTENTS
ÍNDICE
Warnings ...................................................................................... 4
Important Information ............................................................................ 8
Identification of Parts ............................................................................. 9
Choosing Mode of Use ............................................................................10
Assembling Your Stroller ....................................................................... 11-14
Using Your Stroller ........................................................................... 15-25
Using your Stroller with the Recommended Infant Car Seats on your Stroller Frame ........................... 26-28
Using your Stroller as a Double Stroller ............................................................ 29-32
Pivot Xpand Use Configurations ..................................................................33-35
Care and Maintenance ........................................................................... 36
Limited Warranty ............................................................................... 36
Advertencias
.....................................................................................6
Información importante. . . . . . . . . . . . . . . . . . . . . . . . . . . . . . . . . . . . . . . . . . . . . . . . . . . . . . . . . . . . . . . . . . . . . . . . . . . . .8
Identificación de las partes ..........................................................................9
Cómo elegir el modo de uso ........................................................................10
Cómo ensamblar la carriola .....................................................................11-14
Cómo usar la carriola ..........................................................................15-25
Uso de la carriola con los asientos de bebé para el automóvil recomendados en el armazón de la carriola ...........26-28
Uso de la carriola como carriola doble ............................................................. 29-32
Configuraciones de uso de Pivot Xpand .............................................................33-35
Cuidado y mantenimiento ..........................................................................36
Garantía limitada ................................................................................36

3
Holds Evenflo SafeMax™ and LiteMax™ Infant Car Seats Only (see page 26-35)
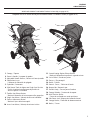
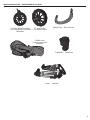
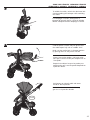
FEATURES
CARACTERÍSTICAS
1
8
6
1. Canopy / Capota
2.
Parent’s Handle / Asa para los padres
3. Adjustable Handle Buttons / Botones del asa ajustable
4. Fold Release Levers
/ Palancas de liberación de plegado
5. Cupholder / Portavasos
6. Slide Mount Track for Upper and Single Seat Position
/ Deslice la guía de montaje para la posición de
asiento superior e individual
7. Toddler Seat Release Button
/ Botón de liberación del asiento para niños pequeños
8. Single Seat Mount / Montaje de asiento individual
9. Footrest Adjustment Button
/ Botón de ajuste del descansapiés
10
. Lower Seat Mount / Montaje de asiento inferior
11. Second Seating Option Release Button
/ Botón de liberación de opción de segundo asiento
12. Swivel Wheel / Rueda con pivote
13. Footrest / Descansapiés
14. Buckle / Hebilla
15.
Harness Covers / Cubiertas del arnés
16
. Bumper Bar / Barra de tope
17.
Shoulder Straps /
Correas para el hombro
18.
Canopy Window / Ventana de la capota
19. Multi-Position Recline
/ Correa de reclinado con varias posiciones
20. Side Frame Lock / Bloqueo del armazón lateral
21. Storage Basket / Canastilla de almacenamiento
22. Brakes / Frenos
19
2
9
4
17
12
20
21
22
14
15
16
Compatible solo con los asientos de bebé para el automóvil LiteMax™ o SafeMax™ Evenflo (ver página 26-35)
5
7
3
10
13
11
18

4
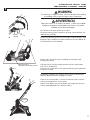
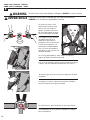
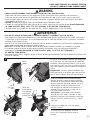
READ AND FOLLOW ALL WARNINGS AND INSTRUCTIONS! FAILURE TO DO SO COULD RESULT
IN SERIOUS INJURY OR DEATH!
• Only use Evenflo SafeMax™ and LiteMax™ infant car seats with this stroller.
Other infant car seats or carriers are not designed to fit the stroller frame unless specified in the instructions. If any
car seats are used that are not specified in the instructions this may result in serious injury to your child.
• NEVER leave child unattended. ALWAYS keep child in view while in the stroller.
• Adult assembly required. Take care when unpacking and assembling; contains small parts and some items with sharp
edges.
• To prevent a possible choking hazard, remove and discard packing material before using this product.
• Avoid serious injury from falling or sliding out. ALWAYS use waist restraint.
• DO NOT carry or roll stroller on stairs or escalators with child in it.
• DO NOT hang items on handle bar or place them on the canopy as they can tip stroller over and injure child.
• Be sure stroller is fully assembled and locked in unfolded position before using.
• ALWAYS exercise care when going over curbs or steps, and never use stroller for anything other than transporting
your child. Push stroller at a normal walking pace only; faster strolling can cause a loss of control and injury to the
child.
• DO NOT place hot liquids in cup holder. Spills can burn you or your child.
• To avoid serious injury from child falling out of stroller, DO NOT raise or recline seat with child in stroller.
• DO NOT use stroller if any parts are missing or broken.
• DO NOT allow child to climb on, into, out of, or around stroller.
• DO NOT allow child to stand on the footrest. Stroller may tip over and injure child.
• DO NOT carry additional children, goods, or accessories in or on this stroller except as advised in these instructions.
The stroller is intended for use with two children and to accommodate only the additional weights in storage as listed
in these instructions.
• Care must be taken when folding or unfolding stroller to prevent finger injury to you or your child in hinge areas.
Make sure child is not in the seat or near the stroller when folding or unfolding.
• NEVER leave stroller on a hill or incline, even with brakes set. Stroller may tip, injuring the child.
• To avoid accidental rolling, ALWAYS set brakes when stroller is not being pushed.
• AVOID STRANGULATION:
– DO NOT suspend strings or toys from the canopy.
– DO NOT place stroller anywhere near cords from window blinds, draperies, phone, etc.
– DO NOT place items with a string around your child’s neck such as hood strings or pacifier cords.
– If not properly secured, the child may slip into leg openings and strangle.
• When making adjustments to the stroller, ALWAYS ensure that all parts of the child’s body are clear of any moving
parts of the stroller.
• The canopy is not intended to provide UV protection.
• Sharp or heavy objects placed in pockets may cause damage to the stroller, or injury to the child.
• To ensure safety for your baby, please refer to the manufacturer’s instructions for the use of your recommended
infant car seats and keep all instructions available for reference.
• DO NOT lift stroller by using the infant car seat handle when installed on stroller.
• If unable to securely attach the infant car seat to this stroller, remove the car seat and contact Evenflo ParentLink
at 1-800-233-5921 (USA), 1-937-773-3971 (Canada), or 01-800-706-12-00 (Mexico).
WARNING

5
READ AND FOLLOW ALL WARNINGS AND INSTRUCTIONS! FAILURE TO DO SO COULD RESULT
IN SERIOUS INJURY OR DEATH!
WARNING
• To avoid stroller instability and tip-overs, DO NOT load cup holder with over 1 lb (0.45 kg) , and the main cargo
basket with over 10 lbs (4.5 kg).
• Never use the toddler seat without the canopy attached.
• Never lift or carry the toddler seat by the armbar.
• Never use the stroller frame without the toddler seat or car seat attached.
• Never use toddler seat in a motor vehicle or use it as a booster seat.
• To avoid falls, never remove toddler seat from the stroller with child in it.
• To avoid falls, always make sure the toddler seat or car seat is securely attached into the seat mounts on both
sides of the stroller before placing child in the seat.
• When stroller seat is in infant mode, it is intended for a child up to 6 months of age.
• Never use seat in the infant mode position unless the straps under the seat are unbuckled and the seat is set up in
infant mode as per the instructions.
• To avoid tipping, always remove the heavier weight child from a seating position before removing the lighter
weight child.
• To avoid serious injury, NEVER use the stroller in any other configuration other than what is shown in the
instruction manual. This stroller can be used in multiple configurations both as a single and double stroller,
(see page 33-35)
• DO NOT
exceed the maximum weight limits defined in the infant car seat or accessory manuals.
• For additional use configurations with optional accessories, you can refer to the manuals that are provided
with the Pivot Xpand Accessories, which are sold separately. These include but are not limited to: infant car seat
adapters for other manufacturer’s carseats, a Rider Board and a Second Toddler Seat option.

6
LEA Y SIGA TODAS LAS ADVERTENCIAS E INSTRUCCIONES. NO HACERLO PODRÍA OCASIONAR LESIONES
GRAVES O LA MUERTE.
• Use solo los asientos de bebé para el automóvil LiteMax™ o SafeMax™ Evenflo
con esta carriola.
Otros autoasientos para bebé o portabebés no están diseñados para ajustarse al armazón de la carriola, a menos que
se especifique en las instrucciones. Si se usan autoasientos que no están especificados en las instrucciones, esto puede
ocasionar lesiones graves al niño.
• NUNCA deje al niño sin supervisión. Mantenga al niño SIEMPRE a la vista al usar la carriola.
• Requiere ensamblado por un adulto. Tenga cuidado al desempacar y ensamblar el producto; contiene partes pequeñas
y algunos artículos con bordes afilados.
• Para evitar un posible peligro de asfixia, retire y deseche el material de empaque antes de usar este producto.
• Evite lesiones graves causadas por una caída o deslizamiento. Use SIEMPRE el cinturón de seguridad.
• NO levante ni haga rodar la carriola en las escaleras convencionales o eléctricas mientras el niño esté en el interior.
• NO cuelgue artículos en el manubrio ni los coloque sobre la capota ya que pueden volcar la carriola y lesionar al niño.
• Asegúrese de que la carriola esté completamente ensamblada y bloqueada en la posición desplegada antes de usarla.
• Tenga cuidado SIEMPRE al subir o bajar aceras o peldaños y nunca use la carriola para ningún otro propósito que
no sea transportar al niño. Empuje la carriola solo a un paso normal; hacerlo con rapidez puede causar pérdida de
control y lesionar al niño.
• NO coloque líquidos calientes en los portavasos. Los derrames podrían quemarlo a usted o al niño.
• Para evitar que el niño sufra daños graves si se cae fuera de la carriola, NO levante ni recline el asiento mientras el
niño esté en la carriola.
• NO use la carriola si faltan partes o están rotas.
• NO permita que el niño trepe, entre, salga o camine alrededor de la carriola.
• NO permita que el niño se pare en el descansapiés. La carriola se podría volcar y lesionar al niño.
• NO coloque a otros niños, artículos ni accesorios dentro ni sobre esta carriola excepto como lo recomiendan estas
instrucciones. La carriola está diseñada para usarla con dos niños como pasajero y para soportar solo los pesos
adicionales de almacenamiento enumerados en estas instrucciones
• Se debe tener cuidado al plegar o desplegar la carriola para evitar que usted o el niño sufran lesiones en los dedos
causadas por las áreas con bisagras. Asegúrese de que el niño no esté en el asiento ni cerca de la carriola al plegarla
o desplegarla.
• NUNCA deje la carriola en una colina o pendiente, aun si tiene puestos los frenos. La carriola se podría volcar y
lesionar al niño.
• Para evitar que ruede accidentalmente, SIEMPRE aplique los frenos cuando la carriola este inmóvil.
• EVITE LA ESTRANGULACIÓN:
– NO cuelgue cordones ni juguetes en la capota.
– NO coloque la carriola en ningún lugar cerca de cordones de persianas, cortinas, teléfono, etc.
– NO coloque artículos con cordón alrededor del cuello del niño, como lazos de gorros o cordones de chupón.
– Si el niño no está correctamente sujetado, podría deslizare a través de la abertura para las piernas y estrangularse.
• Al hacer ajustes a la carriola, SIEMPRE asegúrese de que todas las partes del cuerpo del niño estén alejadas de
cualquier parte en movimiento de la carriola.
• La capota no está diseñada para proteger contra los rayos ultravioleta.
• Colocar objetos afilados o pesados en los bolsillos puede causar daños a la carriola o lesiones al niño.
• Para garantizar la seguridad de su bebé, consulte las instrucciones del fabricante al usar los asientos de bebé para el
automóvil recomendados y mantenga las instrucciones a la mano como referencia.
• NO levante la carriola usando el asa del asiento de bebé para el automóvil cuando esté instalada en la carriola.
• Si no puede asegurar el asiento de bebé para el automóvil a la carriola, retire el asiento para el automóvil y
comuníquese con Evenflo ParentLink al 1-800-233-5921 (EUA), 1-937-773-3971 (Canadá) o
01-800-706-1200 (México).
ADVERTENCIA

7
• Para evitar inestabilidad y volcaduras en la carriola, NO coloque más de 0.45 kg en el portavasos ni más de 4.5 kg
en la canasta principal de almacenamiento.
• Nunca use el asiento para niños pequeños sin acoplar la capota.
• Nunca use la barra de tope para levantar o llevar el asiento para niños pequeños.
• Nunca use el armazón para la carriola sin el acoplar el asiento para niños pequeños o el asiento para el automóvil.
• Nunca use asiento para niños pequeños en un vehículo motorizado ni lo use como asiento elevador.
• Para evitar caídas, nunca retire el asiento para niños pequeños de la carriola mientras el niño lo esté usando.
• Para evitar caídas, asegúrese siempre de que el asiento para niños pequeños o el asiento para el automóvil esté
acoplado firmemente en los montajes del asiento en ambos lados de la carriola antes de colocar al niño en el asiento.
• Cuando el asiento de la carriola está en modo para bebé, está destinada para niños de hasta
6 meses de edad.
• Nunca use el asiento en la posición de modo para bebé a menos que las correas debajo del asiento estén
desabrochadas y el asiento esté configurado en modo para bebé, como se indica en las instrucciones.
• Para evitar volcaduras, retire siempre del asiento al niño con mayor peso antes de retirar al niño de peso más
ligero.
• Para evitar lesiones graves, NUNCA use la carriola en ninguna otra configuración que no sea la que se muestra
en este manual de instrucciones. Esta carriola se puede usar en varias configuraciones, ya sea como carriola individual
o doble, (vea las páginas 33-35)
• NO
exceda los límites de peso máximo definidos en los manuales del autoasiento para bebé o de los accesorios.
• Para configuraciones de uso adicionales con accesorios opcionales, puede consultar los manuales que
se proporcionan con los accesorios Pivot Xpand que se venden por separado. Estos incluyen, pero no se limitan a:
adaptadores para autoasientos para bebé para autoasientos de otros fabricantes, una plataforma Rider y una
opción de segundo asiento para niños pequeños.
LEA Y SIGA TODAS LAS ADVERTENCIAS E INSTRUCCIONES. NO HACERLO PODRÍA OCASIONAR LESIONES
GRAVES O LA MUERTE.
ADVERTENCIA

8
Child Requirements - When stroller seat is in infant mode, it is intended for a child up to 6 months of age. Only use the
stroller in the upright position with a child who is capable of sitting upright unassisted.
Maximum weight: 55 lbs (25 kg) in toddler seat, 55lbs (25 kg) in second toddler seat (sold separately), 50 lbs (22.6 kg) on the
Rider board (sold separately)
Maximum height: 38 inches (96 cm)
IMPORTANT: Read instructions carefully before use. Save these instructions for future reference. It is very important to assemble
the stroller according to these instructions. If you are missing parts, do not use stroller and call Evenflo ParentLink at
1-800-233-5921 (U.S.A.), 1-937-773-3971 (Canada), or 01-800-706-12-00 (Mexico) to order replacement parts.
IMPORTANT INFORMATION / INFORMACIÓN IMPORTANTE
For future reference, record the Model Number and Date of Manufacture below. You can find this
information on one of the rear stroller legs.
Model Number: Date of Manufacture:
Registration Information
Please register this product so we can reach you if there is a safety alert or recall. We will not sell, rent, or share your personal
information. To register your product, please complete and mail the card that came with it or visit our online registration at
www.evenflo.com/registerproduct.
Requisitos para el niño - Cuando el asiento de la carriola está en modo para bebé, está indicada para niños de hasta 6
meses de edad. Use la carriola en la posición vertical solo con niños que se pueden sentar erguidos sin ayuda.
Peso máximo: 25 kg (55 lb) en el asiento para niños pequeños, 25 kg (55 lb) en el segundo asiento para niños pequeños (se vende
por separado), 22.6 kg (50 lb) en la plataforma Rider (se vende por separado)
Altura máxima: 96 cm (38 in)
IMPORTANTE: Lea detenidamente las instrucciones antes de usar el producto. Guarde estas instrucciones para referencia futura.
Es muy importante que ensamble la carriola de acuerdo con estas instrucciones. Si faltan partes, no use la carriola y llame a
Evenflo ParentLink al 1-800-233-5921 (EUA), 1-937-773-3971 (Canadá) o 01-800-706-12-00 (México) para pedir
partes de repuesto.
Para referencia futura, anote el número de modelo y la fecha de fabricación abajo. Puede encontrar
esta información en una de las patas traseras de la carriola.
Número de modelo: Fecha de fabricación:
Información de registro
Registre este producto para que podamos comunicarnos con usted en caso de un aviso de seguridad o retiro de producto del
mercado. No venderemos, alquilaremos ni compartiremos su información personal. Para registrar su producto, llene debidamente y
envíe por correo la tarjeta que se incluye o visite nuestro registro en línea en
www.evenflo.com/registerproduct.

9
IDENTIFICATION OF PARTS / IDENTIFICACIÓN DE LAS PARTES
(2) Front Wheel Assembly
/ (2) Ensamble de las ruedas
delanteras
Bumper Bar / Barra de tope
(2) Rear Wheel
/ (2) Rueda trasera
Frame / Armazón
Cupholder / Portavasos
Toddler Seat
/ Asiento para niños
pequeños

10
Toddler Seat Mode / Modo de asiento
para niños pequeños
Infant Mode / Modo para bebé
CHOOSING MODE OF USE
CÓMO ELEGIR EL DE MODO DE USO
YOUR STROLLER SEAT CAN BE USED IN TWO DIFFERENT MODES.
INFANT MODE OR TODDLER SEAT MODE.
Your stroller seat is shipped in infant mode with the buckles unfastened under the footrest.
You will need to follow the instructions completely to make sure you set up your stroller
in your preferred mode of use.
After the frame and the wheels have been assembled, you can choose to set the stroller up in
Infant Mode or Toddler Seat Mode. Follow instructions on pages 13 - 23.
EL ASIENTO DE LA CARRIOLA SE PUEDE USAR EN DOS MODOS DIFERENTES.
MODO PARA BEBÉ O MODO DE ASIENTO PARA NIÑOS PEQUEÑOS.
El asiento de la carriola se envía en modo para bebé con las hebillas desabrochadas debajo del
descansapiés. Deberá seguir las instrucciones por completo para asegurarse de instalar la carriola en el
modo de uso que prefiera.
Después de ensamblar el armazón y las ruedas, puede elegir instalar la carriola en Modo para bebé o
Modo de asiento para niños pequeños; siga las instrucciones en las páginas 13 - 23.

11
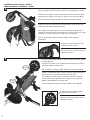
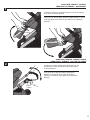
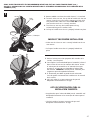
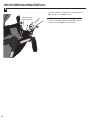
ASSEMBLING YOUR STROLLER - FRAME
CÓMO ENSAMBLAR LA CARRIOLA - ARMAZÓN
1
WARNING
To avoid injury to fingers or hands, care must be taken when folding
or unfolding stroller to prevent finger injury in hinge areas.
Press buttons and rotate handle up as shown.
To protect flooring, place a protective covering (carton) beneath the
stroller during assembly.
Unlatch side frame lock. Continue holding the lock open while
unfolding the stroller.
Grab the parent’s handle and pull upward until the stroller opens
fully with an audible click.
Make sure the stroller locks in the open position by pushing down on
the parent’s handle.
CLICK!
ADVERTENCIA
Para evitar lesiones en los dedos o las manos, se debe tener cuidado
al plegar o desplegar la carriola para evitar lesiones en los dedos
causadas por las áreas con bisagras.
Presione los botones y gire el asa hacia arriba, como se muestra. Para
proteger el piso, coloque una cubierta protectora (cartón) debajo de
la carriola durante el ensamblado.
Desbloquee el bloqueo del armazón lateral. Continúe sosteniendo
abierto el bloqueo mientras despliega la carriola.
Sujete el asa para los padres y jale hacia arriba hasta que la carriola
se abra por completo con un chasquido.
Empuje hacia abajo el asa para los padres para asegurarse de que la
carriola quede bloqueada en la posición abierta.
Side Frame Lock
/ Bloqueo del armazón lateral
Button
/ Botón

12
CLICK!
ASSEMBLING YOUR STROLLER - WHEELS
CÓMO ENSAMBLAR LA CARRIOLA - RUEDAS
2
Turn the stroller so the front of the stroller is facing upwards, as shown.
To attach front wheels, line up the metal pin with the hole in the front
wheel mount and push on to frame as shown until it clicks into place.
PULL ON wheels to make sure both of them are securely attached.
CLICK!
Turn the stroller upside down, as shown, so the rear of the stroller
is facing upwards.
To attach rear wheels, push wheel onto rear leg tube until it clicks
into place. Repeat on other side.
Pull on wheels to make sure both of them are securely attached.
3
CLICK!
Voltee la carriola de manera que la parte delantera de la carriola esté
orientada hacia arriba, como se muestra.
Para acoplar las ruedas delanteras, alinee el pasador de metal con el
agujero en el montaje de la rueda delantera y empuje el armazón, como
se muestra, hasta que encaje en su lugar con un chasquido.
JALE las ruedas para asegurarse de que ambas estén acopladas
firmemente.
Voltee la carriola boca abajo, como se muestra, de manera que la
parte trasera de la carriola esté orientada hacia arriba.
Para acoplar las ruedas traseras, empuje la rueda en el tubo de
la pata trasera hasta que encaje en su lugar con un chasquido.
Repita el procedimiento en el otro lado.
Jale las ruedas para asegurarse de que ambas estén acopladas.
To remove, insert flat tool into slot
and pull wheel off stroller.
Para retirarlas, inserte la herramienta
plana en la ranura y jale para retirar la
rueda de la carriola.
To remove, insert flat tool into slot
and pull wheel off stroller.
Para retirarlas, inserte la herramienta
plana en la ranura y jale para retirar la
rueda de la carriola.

13
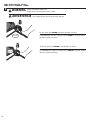
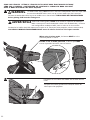
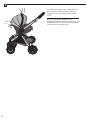
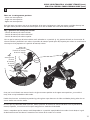
ASSEMBLING YOUR STROLLER - TODDLER SEAT MODE
CÓMO ENSAMBLAR LA CARRIOLA - MODO DE ASIENTO PARA NIÑOS PEQUEÑOS
4
To attach toddler seat, slide seat onto the mounts until they
click into place as shown. The toddler seat may be attached
forward-facing or rear-facing.
PULL UP on seat to make sure it is securely attached to the
mounts.
CLICK!
CLICK!
To set up seat in toddler seat mode, flip toddler seat over
and attach the buckles on the seat as shown.
5
CLICK!
Mount / Montaje
Para instalar el asiento en el modo de asiento para niños
pequeños, voltee el asiento para niños pequeños y acople
las hebillas en el asiento, como se muestra.
Para acoplar el asiento para niños pequeños, deslice el
asiento en los montajes hasta que encajen en su lugar
con un chasquido, como se muestra. El asiento para niños
pequeños se puede acoplar orientado hacia adelante u
orientado hacia atrás.
JALE HACIA ARRIBA el asiento para asegurarse que esté
firmemente acoplado a los montajes.
OR /O
Mount / Montaje

14
6
To attach bumper bar, push tabs into
openings on stroller. Make sure bumper bar
locks into position with audible clicks.
PULL ON the bumper bar to make sure it is
locked into place.
CLICK!
CLICK!
To remove the bumper bar, push both tabs and remove the bar from the
stroller.
Para acoplar la barra de tope, empuje las
lengüetas en las aberturas de la carriola.
Asegúrese de que la barra de tope quede
bloqueada en su lugar con chasquidos.
JALE la barra de tope para asegurarse de que
quede bloqueada en su lugar.
Para retirar la barra de tope, empuje ambas lengüetas y retire la barra de
la carriola.
ASSEMBLING YOUR STROLLER -BUMPER BAR
CÓMO ENSAMBLAR LA CARRIOLA - BARRA DE TOPE
To attach cupholder, slide down on the mount on the side
of the canopy as shown.
CUPHOLDER
PORTAVASOS
7
Para acoplar el portavasos, deslice hacia abajo el montaje en
un lado de la capota, como se muestra.

15
2
To adjust the Parent Handle: push the buttons on the
outside of the Parent Handle and adjust up or down
to desired position.
To adjust the footrest, push both buttons and lift the footrest
up or down to desired position.
1
USING YOUR STROLLER - FOOTREST
CÓMO USAR LA CARRIOLA - DESCANSAPIÉS
Button
/Boton
Button
/ Botón
USING YOUR STROLLER - PARENT’S HANDLE
CÓMO USAR LA CARRIOLA - ASA PARA LOS PADRES
Para ajustar el asa para los padres: presione los
botones en el exterior del asa para los padres y
ajústela hacia arriba o hacia abajo hasta la posición
deseada.
Para ajustar el descansapiés, presione ambos botones y mueva
el descansapiés hacia arriba o hacia abajo hasta la posición
deseada.

16
To lock, push lever DOWN at bottom of brake as shown.
USING YOUR STROLLER - BRAKES
CÓMO USAR LA CARRIOLA - FRENOS
3
Always lock brakes. Make sure
brakes are on by trying to push the stroller.
WARNING
CLICK!
CLICK!
To unlock, push lever DOWN at top of brake as shown.
Para desbloquear, empuje la palanca hacia ABAJO en la parte superior
del freno, como se muestra.
Bloquee siempre frenos. Intente empujar la carriola
para asegurarse de que los frenos estén puestos.
ADVERTENCIA
Para bloquearlo, presione la palanca hacia ABAJO en la parte inferior
del freno, como se muestra.

17
4
To extend canopy, pull it forward as shown.
To close, push canopy toward parent’s handle as shown.
Para cerrarla, empuje la capota hacia el asa para los padres,
como se muestra.
Para extender la capota, jálela hacia adelante, como se
muestra.
USING YOUR STROLLER - CANOPY
CÓMO USAR LA CARRIOLA - CAPOTA
Open or close canopy
window as shown.
To remove canopy, unfasten canopy mounts from sides
of stroller then unfasten Velcro on rear of seat and pull
fabric off the handle. To re-attach, reverse the steps.
5
Abre o cierre la ventana
de la capota como se
muestra.
Para retirar la capota, desabroche los montajes de la
capota de los lados de la carriola, luego desabroche el
Velcro en la parte trasera del asiento y jale la tela del
asa. Para volver a colocarla, invierta los pasos.

18
USING YOUR STROLLER - RECLINING SEAT
CÓMO USAR LA CARRIOLA - ASIENTO DE RECLINADO
6
To recline toddler seat, lift handle at the top of the
seat and rotate seat into one of 3 positions.
To avoid serious injury, DO NOT raise or recline seat
with child in stroller.
WARNING
Para reclinar el asiento para niños pequeños, levante
el asa en la parte superior del asiento y gire el asiento
en una de las 3 posiciones.
Para evitar lesiones graves, NO levante ni recline el asiento
mientras el niño esté en la carriola.
ADVERTENCIA
Handle
/ Asa

19
USING YOUR STROLLER - REMOVING THE TODDLER SEAT
CÓMO USAR LA CARRIOLA - CÓMO RETIRAR EL ASIENTO PARA NIÑOS PEQUEÑOS
To remove toddler seat, push in the buttons on both sides of the
seat and lift seat up as shown.
Para retirar el asiento para niños pequeños, empuje los botones en
ambos lados del asiento y levante el asiento, como se muestra.
7
Button / Botón

20
WARNING
USING YOUR STROLLER - HARNESS
CÓMO USAR LA CARRIOLA - ARNÉS
8
Para evitar lesiones graves causadas por una caída o deslizamiento,
SIEMPRE
use el cinturón de seguridad de la cintura.
ADVERTENCIA
To avoid serious injury from falling or sliding out, ALWAYS use waist restraint.
To attach the harness, click
buckles into the crotch strap
buckle. Pull waist straps to
tighten. Shoulder straps must
be at shoulder height or lower,
closest to the baby’s shoulders.
CLICK!
To unlock harness, push the button on the crotch buckle.
For a snug, comfortable fit, adjust height of strap and
tighten, pull down on free end of strap.
To loosen straps, push up on retainer and pull the shoulder
strap down.
Para acoplar el arnés, abroche
las hebillas del arnés en la
hebilla de la correa para la
entrepierna. Jale las correas para
la cintura para apretarlas. Las
correas para el hombro deben
estar a la altura del hombro o
más abajo, lo más cercanas a los
hombros del bebé.
Para un ajuste cómodo y ceñido, ajuste la altura de la correa
y apriete, jale hacia abajo del extremo libre de la correa.
Para aflojar las correas, empuje hacia arriba el sujetador y
jale hacia abajo la correa para el hombro.
Para desbloquear el arnés, presione el botón en la hebilla
para la entrepierna.

21
To avoid serious injury,
never
use seat in the infant
mode position unless the straps under the seat are
unbuckled and the seat is set up in infant mode as per
the instructions.
Lift handle up and rotate seat down.
10
USING YOUR STROLLER - SETTING UP STROLLER SEAT IN INFANT MODE FROM TODDLER SEAT MODE
CÓMO USAR LA CARRIOLA - CONFIGURACIÓN DEL ASIENTO DE LA CARRIOLA EN MODO PARA BEBÉ
DESDE EL MODO DE ASIENTO PARA NIÑOS PEQUEÑOS
9
Para evitar lesiones graves,
nunca
use el
asiento en la posición de modo para bebé a
menos que las correas debajo del asiento
estén desabrochadas y el asiento esté
configurado en modo para bebé, como se indica
en las instrucciones.
Levante el asa y gire el asiento hacia abajo.
WARNING
ADVERTENCIA

22
Press down on the inside of the toddler seat to flatten out the
inside.
12
USING YOUR STROLLER - SETTING UP STROLLER SEAT IN INFANT MODE FROM TODDLER SEAT MODE
CÓMO USAR LA CARRIOLA - CONFIGURACIÓN DEL ASIENTO DE LA CARRIOLA EN MODO PARA BEBÉ
DESDE EL MODO DE ASIENTO PARA NIÑOS PEQUEÑOS
11
Unfasten the buckles behind the leg rest on toddler seat as shown below. THE BUCKLES MUST BE UNFASTENED
before placing child into the seating area.
Desabroche las hebillas detrás del soporte para las patas en el asiento para niños pequeños, como se muestra abajo.
LAS HEBILLAS DEBEN ESTAR DESABROCHADAS antes de colocar al niño en el área para sentarlo.
Para aplanar el interior, presione hacia abajo el interior del
asiento para niños pequeños.
When using in infant mode, the footrest MUST be in the
horizontal position as shown.
Cuando se use en modo para bebé, el descansapiés DEBE
estar en la posición horizontal, como se muestra.
To avoid serious injury,
never
use seat in the infant mode position unless the straps under
the seat are unbuckled and the seat is set up in infant mode as per the instructions.
Para evitar lesiones graves,
nunca
use el asiento en la posición de modo para
bebé a menos que las correas debajo del asiento estén desabrochadas y el asiento
esté configurado en modo para bebé, como se indica en las instrucciones.
WARNING
ADVERTENCIA

23
To avoid falls, NEVER lift or carry toddler seat by the bumper bar or with child in it.
The toddler seat is not a carrier.
WARNING
USING YOUR STROLLER - REVERSING SEAT POSITION
CÓMO USAR LA CARRIOLA - INVERTIR LA POSICIÓN DEL ASIENTO
13
To remove and use in rear-facing mode: push in the release
buttons on both sides of the toddler seat. Lift the seat off
stroller frame and turn it around and re-attach.
CHECK to make sure it is securely attached on both sides
by pulling up on it.
Para evitar caídas, Nunca use la barra de tope para levantar o llevar el
asiento para niños pequeños, ni mientras el niño lo esté usando. El asiento
para niños pequeños no es un portabebé.
ADVERTENCIA
Button / Botón
CLICK!
Para retirar y usar en el modo orientado hacia atrás:
presione los botones de liberación en ambos lados del
asiento para niños pequeños. Levante el asiento del
armazón de la carriola y gírelo para volver a acoplarlo.
Jale para COMPROBAR que esté acoplado firmemente en
ambos lados.

24
Stroller will not fold when toddler seat is parent-facing. To fold the stroller, adjust
seat back to upright position, lock the rear brakes, close the canopy, and remove
your child.
Adjust handle to the most forward position to allow stroller to stand when
folded.
Pull the levers on both sides of the stroller and lower frame until the side frame
lock clicks into place.
For more compact fold: Fold footrest down and place toddler seat in upper slide
position. You can also remove the toddler seat before folding the stroller frame.
NEVER fold the stroller when the toddler seat is in the infant mode.
Care must be taken when folding or unfolding
stroller to prevent finger injury in hinge areas.
WARNING
Rotate handle down until the side frame lock closes. You may need to push
stroller together in order for the side frame lock to fully lock into place.
15
CLICK!
USING YOUR STROLLER - FOLDING STROLLER
CÓMO USAR LA CARRIOLA - PLEGAR LA CARRIOLA
14
Double check side frame lock is securely closed.
In order for stroller to stand when folded, make sure the front wheels are
facing forward.
Gire el asa hacia abajo hasta que se cierre el bloqueo del armazón lateral.
Es posible que necesite empujar hasta juntar la carriola para que el cierre del
armazón quede completamente bloqueado en su lugar.
Compruebe dos veces que el bloqueo del armazón lateral esté cerrado
firmemente.
Con el fin de que la carriola permanezca en posición vertical al plegarla,
asegúrese de que las ruedas delanteras estén orientadas hacia adelante.
La carriola no se plegará si el asiento para niños pequeños está orientado hacia
los padres. Para plegar la carriola, ajuste el respaldo del asiento en la posición
vertical; bloquee los frenos traseros, cierre la capota y retire al niño.
Ajuste el asa a la posición más hacia adelante para permitir que la carriola se
mantenga en posición vertical al plegarla.
Jale las palancas en ambos lados de la carriola y baje el armazón hasta que el
bloqueo del armazón lateral encaje en su lugar con un chasquido.
Para un plegado más compacto: Pliegue el descansapiés hacia abajo y ponga
el asiento para niños pequeños está en la posición de deslizamiento superior.
Puede retirar el asiento para niños pequeños antes de plegar el armazón de la
carriola.
NUNCA pliegue la carriola cuando el asiento para niños pequeños esté en
modo para bebé.
Se debe tener cuidado al plegar o desplegar
la carriola para evitar lesiones en los dedos
causadas por las áreas con bisagras.
ADVERTENCIA

25
To unfold the stroller, unlatch the side frame lock.
Continue holding the lock open while unfolding
the stroller.
17
CLICK!
USING YOUR STROLLER - UNFOLDING STROLLER
CÓMO USAR LA CARRIOLA - DESPLEGAR LA CARRIOLA
16
Grab the parent’s handle and pull upward until
the stroller opens fully with an audible “click”.
Make sure the stroller locks in the open position
by pushing down on the parent’s handle.
Para desplegar la carriola, desenganche el
bloqueo del armazón lateral y continúe dejando
abierto el bloqueo mientras despliega la carriola.
Sujete el asa para los padres y jale hacia arriba
hasta que la carriola se abra por completo con un
“chasquido”.
Empuje hacia abajo el asa para los padres para
asegurarse de que la carriola quede bloqueada en
la posición abierta.
Push buttons on side of handle and rotate
handle to desired position.
Presione los botones en un lado del asa y
gire el asa a la posición deseada.

26
USING YOUR STROLLER WITH THE RECOMMENDED INFANT CAR SEATS ON YOUR STROLLER FRAME
USO DE LA CARRIOLA CON LOS ASIENTOS DE BEBÉ PARA EL AUTOMÓVIL RECOMENDADOS EN EL ARMAZÓN DE LA
CARRIOLA
WARNING
• Only use
Evenflo SafeMax™ and LiteMax™ infant
car seats with this stroller.
Other infant car seats or carriers are not designed to fit the stroller frame unless specified in the instructions.
If any car seats are used that are not specified in the instructions this may result in serious injury to your child.
• Before using the infant car seat with this stroller, read all the instructions provided with it and keep the instructions
stored properly for future use.
• DO NOT lift stroller by using the infant car seat handle when installed on stroller.
• If unable to securely attach your infant car seat to this stroller, remove the car seat and contact Evenflo ParentLink
at 1-800-233-5921 (USA), 1-937-773-3971 (Canada), or 01-800-706-12-00 (Mexico).
• To avoid serious injury, make sure the infant car seat is securely snapped onto the car seat mounts.
ADVERTENCIA
• Use solo los asientos de bebé para el automóvil LiteMax™ o SafeMax™ con esta carriola.
Otros autoasientos para bebé o portabebés no están diseñados para ajustarse al armazón de la carriola, a menos que
se especifique en las instrucciones. Si se usan autoasientos que no están especificados en las instrucciones, esto puede
ocasionar lesiones graves al niño.
• Antes de usar el asiento de bebé para el automóvil con esta carriola, lea todas las instrucciones que se proporcionan y
manténgalas almacenadas correctamente para uso futuro.
• NO levante la carriola usando el asa del asiento de bebé para el automóvil cuando esté instalada en la carriola.
• Si no puede asegurar el asiento de bebé para el automóvil a la carriola, retire el asiento para el automóvil y
comuníquese con Evenflo ParentLink al 1-800-233-5921 (EUA), 1-937-773-3971 (Canadá) o
01-800-706-1200 (México).
• Para evitar lesiones graves, asegúrese de que el asiento de bebé para el automóvil esté bien acoplado a los montajes del
asiento del vehículo.

27
1. Remove toddler seat from the stroller frame if it is attached.
2. To attach infant car seat, line up hub of handle with the seat
mounts. Insert the car seat into the mounts until they click
into place on both sides of the frame. LIFT UP on the car
seat to make sure that it is securely attached.
3. The infant car seat may be installed parent-facing
or forward-facing on the stroller frame.
4. Pull up on handle to test that it is properly locked into place.
CHECKLIST FOR PROPER INSTALLATION
• Make sure the infant car seat is securely locked into the car
seat mounts.
• Pull up on handle to test that it is properly locked into
place.
CLICK!
1
CLICK!
Hub
/ Buje
Mounts / Montajes
1. Retire el asiento para niños pequeños del armazón de la
carriola, si está acoplad.
2. Para acoplar el asiento de bebé para el automóvil, alinee el
buje circular del asa con los montajes del asiento. Inserte
el asiento para el automóvil en los montajes hasta que
encajen en su lugar con un chasquido en ambos lados
del armazón. LEVANTE el asiento para el automóvil para
asegurarse que esté acoplado firmemente.
3. El autoasiento para bebé se puede instalar orientado
hacia los padres u orientado hacia adelante en el armazón
de la carriola.
4. Jale hacia arriba el asa para asegurarse de que esté
bloqueada correctamente en su lugar.
LISTA DE VERIFICACIÓN PARA LA
INSTALACIÓN CORRECTA
• Asegúrese de que el asiento de bebé para el automóvil esté
bloqueado firmemente en los montajes del asiento para el
automóvil.
• Jale hacia arriba el asa para asegurarse de que esté
bloqueada correctamente en su lugar.
USING YOUR STROLLER WITH THE RECOMMENDED INFANT CAR SEATS ON YOUR STROLLER FRAME (cont.)
USO DE LA CARRIOLA CON LOS ASIENTOS DE BEBÉ PARA EL AUTOMÓVIL RECOMENDADOS EN EL ARMAZÓN DE LA
CARRIOLA (cont.)

28
To remove the infant car seat, lock brakes then
pull the release handle with one hand while
lifting up on the carry handle with the other
hand.
E
F
2
Para retirar el asiento de bebé para el
automóvil, bloquee los frenos y luego jale el asa
de liberación con una mano mientras levanta el
asa para llevar con la otra mano.

29
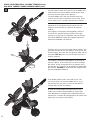
USING YOUR STROLLER AS A DOUBLE STROLLER
USO DE LA CARRIOLA COMO CARRIOLA DOBLE
TO SET UP AS A DOUBLE STROLLER, lock brakes then
set up the lower seat mount position by squeezing
the button. While squeezing button in, pull up, then
push tube away from you. This will rotate the mounts
forward into position until the tube clicks into place as
shown.
Helpful Hint: You must squeeze the button first
before pulling up. If the button gets stuck, press the
mounts down so button clicks out and start again.
1
CLICK!
If mounts are folded over, click into upright
position as shown.
CLICK!
CLICK!
WARNING
• Only use
Evenflo SafeMax™ and LiteMax™ infant
car seats with this stroller.
Other infant car seats or carriers are not designed to fit the stroller frame unless specified in the instructions.
If any car seats are used that are not specified in the instructions this may result in serious injury to your child.
• Before using the infant car seat with this stroller, read all the instructions provided with it and keep the instructions
stored properly for future use.
• DO NOT lift stroller by using the infant car seat handle when installed on stroller.
• If unable to securely attach your infant car seat to this stroller, remove the car seat and contact Evenflo ParentLink
at 1-800-233-5921 (USA), 1-937-773-3971 (Canada), or 01-800-706-12-00 (Mexico).
• To avoid serious injury, make sure the infant car seat is securely snapped onto the car seat mounts.
ADVERTENCIA
• Use solo los asientos de bebé para el automóvil LiteMax™ o SafeMax™ con esta carriola.
Otros autoasientos para bebé o portabebés no están diseñados para ajustarse al armazón de la carriola, a menos que
se especifique en las instrucciones. Si se usan autoasientos que no están especificados en las instrucciones, esto puede
ocasionar lesiones graves al niño.
• Antes de usar el asiento de bebé para el automóvil con esta carriola, lea todas las instrucciones que se proporcionan y
manténgalas almacenadas correctamente para uso futuro.
• NO levante la carriola usando el asa del asiento de bebé para el automóvil cuando esté instalada en la carriola.
• Si no puede asegurar el asiento de bebé para el automóvil a la carriola, retire el asiento para el automóvil y
comuníquese con Evenflo ParentLink al 1-800-233-5921 (EUA), 1-937-773-3971 (Canadá) o
01-800-706-1200 (México).
• Para evitar lesiones graves, asegúrese de que el asiento de bebé para el automóvil esté bien acoplado a los montajes del
asiento del vehículo.
Lower seat
mount postion
/ Posición de
montaje de
asiento inferior
PARA CONFIGURAR COMO CARRIOLA DOBLE,
bloquee los frenos y luego configure la posición
de montaje de asiento inferior apretando el botón.
Mientras mantiene apretando el botón, jale hacia
arriba, empuje el tubo para alejarlo de usted.
Esto hará girar los montajes hacia adelante a su
posición hasta que encaje en su lugar con un
chasquido, como se muestra.
Consejo útil: Primero debe apretar el botón
antes de jalar hacia arriba. Si el botón se atora,
presione los montajes hacia abajo de manera que
el botón salte hacia afuera con un clic, y vuelva a
intentarlo.
Si los montajes están plegados, muévalos
con un clic a la posición vertical, como se
muestra.
Pull up
/ Jale hacia
arriba
Button
/ Botón
CLICK!

30
2
USING YOUR STROLLER AS A DOUBLE STROLLER (cont.)
USO DE LA CARRIOLA COMO CARRIOLA DOBLE (cont.)
TO FOLD LOWER SEAT MOUNTS, squeeze button in
1
, then push mount
2
forward.
Squeeze button
/ Apriete el botón
PARA PLEGAR LA POSICIÓN DE MONTAJE DE
ASIENTO INFERIOR, apriete el botón
1
, entonces
empuje el montaje
2
hacia del delantera.
1
2

31
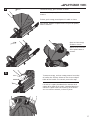
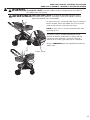
There are 3 seating mount positions:
- Lower seat mount position
- Single seat mount position
- Upper seat mount position
Once the lower seat mounts are set up into position (p.29) press the button on single seat mounts and slide them up into
the upper mount position to allow for room to place a car seat or toddler seat in the lower mount position.
3
Once you have slid both seat mounts from the single seat mount position to the upper mount positions, your stroller is
ready to be set up into double stroller mode.
Double check mounts are locked into position by pushing them up or down on the slide track before placing either the car
seat or stroller seat onto the stroller.
Single seat
mount position
/ Posición
de montaje
de asiento
individual
Upper seat
mount position
/ Posición de montaje
de asiento superior
Button
/ Botón
Hay 3 posiciones de montaje del asiento:
- Posición de montaje de asiento inferior
- Posición de montaje de asiento individual
- Posición de montaje de asiento superior
Una vez que los montajes del asiento inferior estén colocados en su posición (p. 29), presione el botón en los montajes de
asiento individual y deslícelos hacia arriba a la posición de montaje superior para dejar espacio para colocar un autoasiento o
asiento para niños pequeños en la posición de montaje inferior.
CLICK!
Una vez que haya deslizado ambos montajes, desde la posición de montaje de asiento individual hasta las posiciones de
montaje superiores, la carriola estará lista para configurarla en modo de carriola doble.
Vuelva a comprobar que los montajes estén bloqueados en su posición empujándolos hacia arriba o hacia abajo en la guía
de deslizamiento antes de colocar el autoasiento o el asiento de la carriola en la carriola.
USING YOUR STROLLER AS A DOUBLE STROLLER (cont.)
USO DE LA CARRIOLA COMO CARRIOLA DOBLE (cont.)

32
Hub
/ Buje
To attach infant car seat to the upper mount position, line
up hub of handle with the seat mounts. Insert the car seat
into the mounts until they click into place on both sides of
the frame. LIFT UP on the car seat to make sure that it is
securely attached.
CLICK!
You will need to attach either the car seat or toddler seat
onto the lower seat mount before attaching your other
accessory onto the upper mount position.
To attach toddler seat, slide seat onto the lower seat
mounts until they click into place as shown. PULL UP on
seat to make sure it is securely attached to the mounts.
Deberá acoplar el autoasiento o el asiento para niños
pequeños en el montaje de asiento inferior antes de
acoplar el otro accesorio en la posición de montaje
superior.
Para acoplar el asiento para niños pequeños, deslice el
asiento en los montajes de asiento inferior hasta que
encajen en su lugar con un chasquido, como se muestra.
JALE HACIA ARRIBA el asiento para asegurarse que esté
firmemente acoplado a los montajes.
CLICK!
Your double stroller mode is now ready to use. You
can use the infant car seat and toddler seat in any of
the locations that are shown in the Pivot Expand Use
Configurations section that follows.
Para acoplar el autoasiento para bebé en la posición de
montaje superior, alinee el buje del asa con los montajes
del asiento. Inserte el autoasiento en los montajes hasta
que encajen en su lugar con un chasquido en ambos lados
del armazón. LEVANTE el autoasiento para asegurarse de
que esté acoplado firmemente.
El modo de carriola doble está ahora listo para usar.
Puede usar el autoasiento para bebé y el asiento para
niños pequeños en cualquiera de las ubicaciones que se
muestran en la sección de Configuraciones de uso de Pivot
Xpand que se muestra a continuación.
4
USING YOUR STROLLER AS A DOUBLE STROLLER (cont.)
USO DE LA CARRIOLA COMO CARRIOLA DOBLE (cont.)

33
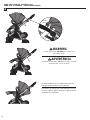
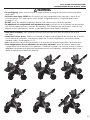
PIVOT XPAND USE CONFIGURATIONS
CONFIGURACIONES DE USO DE PIVOT XPAND
WARNING
• To avoid tipping, always remove the heavier weight child from a seating position before removing the lighter
weight child.
• To avoid serious injury, NEVER use the stroller in any other configuration other than what is shown in this
instruction manual. This stroller can be used in multiple configurations both as a single and double stroller,
(see page 33-35)
• DO NOT
exceed the maximum weight limits defined in the infant car seat or accessory manuals.
• For additional use configurations with optional accessories, you can refer to the manuals that are provided
with the Pivot Xpand Accessories, which are sold separately. These include but are not limited to: infant car seat
adapters for other manufacturer’s carseats, a Rider Board and a Second Toddler Seat option.
• Para evitar volcaduras, retire siempre del asiento al niño con mayor peso antes de retirar al niño de peso
más ligero.
• Para evitar lesiones graves, NUNCA use la carriola en ninguna otra configuración que no sea la que se muestra
en este manual de instrucciones. Esta carriola se puede usar en varias configuraciones, ya sea como carriola
individual o doble, (vea las páginas 33-35)
• NO
exceda los límites de peso máximo definidos en los manuales del autoasiento para bebé o de los accesorios.
• Para configuraciones de uso adicionales con accesorios opcionales, puede consultar los manuales que
se proporcionan con los accesorios Pivot Xpand que se venden por separado. Estos incluyen, pero no se limitan a:
adaptadores para autoasientos para bebé para autoasientos de otros fabricantes, una plataforma Rider y una
opción de segundo asiento para niños pequeños.

34
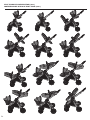
PIVOT XPAND USE CONFIGURATIONS (cont.)
CONFIGURACIONES DE USO DE PIVOT XPAND (cont.)

35
PIVOT XPAND USE CONFIGURATIONS (cont.)
CONFIGURACIONES DE USO DE PIVOT XPAND (cont.)

36
• www.evenflo.com • USA: 1-800-233-5921 8 AM – 5 PM E.T.
• Canada: 1-937-773-3971 • México: 01-800-706-12-00
For a period of 90 days from the original purchase of this Product, Evenflo warrants to the original end user (“Purchaser”)
this Product (including any accessories) against defects in material or workmanship. Evenflo’s sole obligation under this
express limited warranty shall be, at Evenflo’s option, to repair or replace any Product that is determined to be defective by
Evenflo and determined to be covered by this warranty.
Repair or replacement as provided under this warranty is the exclusive remedy of the Purchaser. Proof of purchase in the
form of a receipted invoice or bill of sale evidencing that the Product is within the warranty period must be presented to
obtain warranty service. This express limited warranty is extended by Evenflo ONLY to the original Purchaser of the Product
and is not assignable or transferable to subsequent purchasers or end users of the Product. For warranty service, contact
Evenflo’s ParentLink Consumer Resource Center at 1-800-233-5921 or www.evenflo.com.
EXCEPT TO THE EXTENT PROHIBITED BY APPLICABLE LAW, ANY IMPLIED WARRANTY OF MERCHANTABILITY OR FITNESS
FOR A PARTICULAR PURPOSE ON THIS PRODUCT IS HEREBY DISCLAIMED. EVENFLO SHALL NOT BE LIABLE FOR ANY
INCIDENTAL, CONSEQUENTIAL, SPECIAL OR PUNITIVE DAMAGES OF ANY KIND FOR BREACH OF THE EXPRESS LIMITED
WARRANTY ON THIS PRODUCT, OR ANY WARRANTY IMPLIED BY OPERATION OF LAW. OTHER THAN THE EXPRESS
LIMITED WARRANTY SET FORTH ABOVE, THERE ARE NO OTHER WARRANTIES THAT ACCOMPANY THIS PRODUCT AND
ANY ORAL, WRITTEN OR ANY OTHER EXPRESS REPRESENTATION OF ANY KIND IS HEREBY DISCLAIMED.
LIMITED WARRANTY
GARANTÍA LIMITADA
Durante un periodo de noventa días a partir de la fecha de compra original de este Producto, Evenflo garantiza al usuario
final original (“Comprador”) que este Producto (incluido cualquier accesorio) está libre de defectos de material o mano de
obra. La única obligación de Evenflo bajo esta garantía limitada expresa será, a opción de Evenflo, reparar o reemplazar un
Producto que Evenflo haya determinado que es defectuoso y que esté cubierto bajo esta garantía.
La reparación o reemplazo tal como se especifica en esta garantía es el único recurso del Comprador. Para obtener el
servicio de garantía, es necesario presentar el comprobante de compra, en forma de recibo o factura, en donde conste
que el Producto está dentro del periodo de garantía. Evenflo extiende esta garantía limitada expresa EXCLUSIVAMENTE al
Comprador original del Producto y no podrá asignarse o transferirse a compradores o usuarios finales subsiguientes. Para
obtener servicio de garantía, comuníquese con el centro ParentLink Consumer Resource Center de Evenflo al
1-800-233-5921 o en www.evenflo.com.
EXCEPTO EN LA MEDIDA QUE LA LEY VIGENTE LO PROHÍBA, POR MEDIO DE LA PRESENTE SE NIEGA CUALQUIER
GARANTÍA IMPLÍCITA DE COMERCIABILIDAD O IDONEIDAD REFERENTE A CUALQUIER USO GENERAL O ESPECÍFICO DE
ESTE PRODUCTO. EVENFLO NO SERÁ RESPONSABLE DE NINGÚN DA—O INCIDENTAL, CONSECUENTE, ESPECIAL O
PUNITIVO DE NINGUNA CLASE CAUSADO POR EL INCUMPLIMIENTO DE LA GARANTÍA LIMITADA EXPRESA O CUALQUIER
GARANTÍA IMPLÍCITA POR APLICACIÓN DE LA LEY RESPECTO A ESTE PRODUCTO. A EXCEPCIÓN DE LA GARANTÍA
LIMITADA EXPRESA QUE SE INDICA ANTERIORMENTE, NINGUNA OTRA GARANTÍA ACOMPA—A A ESTE PRODUCTO Y SE
NIEGA CUALQUIER OTRA DECLARACIÓN VERBAL, ESCRITA O EXPRESA DE CUALQUIER TIPO.
• Clean minor spills and stains on cloth or plastic surfaces with cold water and mild soap. Air dry.
• Metal and plastic parts can be wiped clean with a soft damp cloth and dried with a soft cloth. DO NOT use abrasive cleaners or
solvents.
• An occasional drop of vegetable oil may reduce wear and tear on moving parts.
CARE AND MAINTENANCE
CUIDADO Y MANTENIMIENTO
• Limpie las manchas y derrames menores sobre las superficies de tela y plástico con agua fría y jabón suave. Deje secar al aire.
• Las partes de metal y plástico pueden limpiarse con un paño húmedo suave y secarse con un paño suave. NO use solventes ni
limpiadores abrasivos.
• Una gota ocasional de aceite vegetal puede reducir el uso y desgaste de las partes móviles.
-
 1
1
-
 2
2
-
 3
3
-
 4
4
-
 5
5
-
 6
6
-
 7
7
-
 8
8
-
 9
9
-
 10
10
-
 11
11
-
 12
12
-
 13
13
-
 14
14
-
 15
15
-
 16
16
-
 17
17
-
 18
18
-
 19
19
-
 20
20
-
 21
21
-
 22
22
-
 23
23
-
 24
24
-
 25
25
-
 26
26
-
 27
27
-
 28
28
-
 29
29
-
 30
30
-
 31
31
-
 32
32
-
 33
33
-
 34
34
-
 35
35
-
 36
36


Evenflo Pivot Xpand Manual de usuario
- Categoría
- Cochecitos
- Tipo
- Manual de usuario
En otros idiomas
- English: Evenflo Pivot Xpand User manual
Documentos relacionados
-
Evenflo Pivot Xpand Second Seat Manual de usuario
-
-
-
Evenflo Sibby Manual de usuario
-
Evenflo PIVOT VIZOR Manual de usuario
-
-
-
-
-