Mr.Coffee BVMC-PC14BL2 Manual de usuario
- Categoría
- Cafeteras
- Tipo
- Manual de usuario
Este manual también es adecuado para

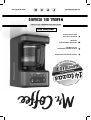
BVMC-PC14 SERIES
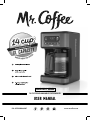
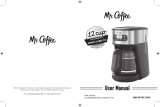
14 CUP PROGRAMMABLE COFFEEMAKER
USER MANUAL
P.N. ART0000866087 www.mrcoffee.com

INTRODUCTION IMPORTANT SAFEGUARDS
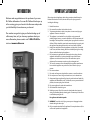
Welcome and congratulations on the purchase of your new
Mr. Coffee coffeemaker. Your new Mr. Coffee will wake you up
in the morning, give you a boost in the afternoon and provide
you the exibility to brew however you choose!
Our number one goal is to give you the best-tasting cup of
coffee every time, so if you have any questions about your
new coffeemaker, please contact us at 1-800-672-6333 or
visit us at www.mrcoffee.com.
When using electrical appliances, basic safety precautions should always be
followed to reduce the risk of re, electric shock, and/or injury to persons
including the following:
1. Read all instructions.
2. Do not touch hot surfaces. Use handles or knobs.
3. To protect against electric shock, do not place or immerse cord, plugs, or
appliance in water or other liquid.
4. This appliance is not intended for use by children or by persons with
reduced physical, sensory, or mental capabilities, or lack of experience and
knowledge. Close supervision is necessary when any appliance is used near
children. Children should be supervised to ensure that they do not play with
the appliance. Keep the appliance and its cord out of reach of children.
5. Unplug from outlet when either the appliance or display clock (if provided)
is not in use, and before cleaning. Allow to cool before putting on or taking
off parts, and before cleaning the appliance.
6. Do not operate any appliance with a damaged cord or plug or after the
appliance malfunctions, or has been damaged in any manner. Return
appliance to an Authorized Service Center for examination, repair or
adjustment. Do not attempt to replace or splice a damaged cord.
7. The use of an accessory not recommended by the appliance manufacturer
for use with this appliance may result in re, electric shock or injury to
persons.
8. Do not use outdoors.
9. Do not let cord hang over edge of table or counter, or touch hot surfaces.
10. Do not place on or near a hot gas or electric burner, or in a heated oven.
11. Always attach plug to appliance rst, then plug cord into the wall outlet (for
appliances with detachable cords). To disconnect, turn any control to the off
position, then remove plug from wall outlet.
12. Do not use appliance for other than intended use.
13. All lids should be closed during use.
14. Scalding may occur if the lid is removed or brew basket door is opened
during or immediately after the brewing cycles. Contents may be hot. Allow
to cool before opening the lid.
For appliances with sealed capsules:
15. WARNING: To avoid the risk of injury, never open or disengage the brew
chamber during the brew cycle.
16. Only use capsules intended for this appliance. If the capsule does not t, do
not force the capsule into the appliance.
2 3

For appliances with glass containers:
17. The container is designed for use with this appliance. It must never be used
on a range top.
18. Do not set a hot container on a wet or cold surface.
19. Avoid sudden temperature changes, such as rinsing, washing, lling, or
immersing a hot container with cold liquids.
20. Do not use a cracked or chipped container or a container having a loose or
weakened handle.
21. Do not clean container with cleansers, steel wool pads, or other abrasive
material.
For appliances with service panels:
22. WARNING: TO REDUCE THE RISK OF FIRE OR ELECTRICAL SHOCK, DO
NOT REMOVE THIS COVER. NO USER-SERVICEABLE PARTS INSIDE. REPAIR
SHOULD BE DONE BY AUTHORIZED SERVICE PERSONNEL ONLY.
A short power-supply cord (or detachable power-supply cord) may be provided
to reduce risks resulting from becoming entangled in or tripping over a longer
cord. Longer detachable power-supply cords or extension cords are available
and may be used if care is exercised in their use. If a long detachable power-
supply cord or extension cord is used:
a. The marked electrical rating of the detachable power-supply cord or
extension cord should be at least as great as the electrical rating of the
appliance;
b. If the appliance is of the grounded type, the extension cord should be a
grounding type 3-wire cord; and
c. The longer cord should be arranged so that it will not drape over the
counter top or table where it can be pulled on by children or tripped over
unintentionally.
Do not pull, twist or otherwise abuse the power cord.
1. Place the appliance on a hard, at, level surface to avoid interruption of
airow underneath the coffeemaker.
2. Glass decanters only: Discard the decanter immediately if it is ever boiled
dry.
3. Glass decanters only: Protect the decanter from sharp blows, scratches or
rough handling.
4. Do not operate the appliance with an empty water tank.
5. Keep the area above the appliance clear during use, as hot steam will
escape the appliance.
IMPORTANT SAFEGUARDS CONT.
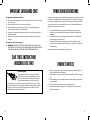
SAVE THESE INSTRUCTIONS
HOUSEHOLD USE ONLY
Polarized plug
This appliance has a polarized plug, (one blade is
wider than the other). As a safety feature to reduce
the risk of electrical shock, this plug is intended to
t in a polarized outlet only one way. If the plug
does not t fully in the outlet, reverse the plug. If it still does not t, contact
a qualied electrician. Do not attempt to defeat this safety feature or modify
the plug in any way. If the plug ts loosely into the AC outlet or if the AC
outlet feels warm do not use that outlet.
POWER CORD INSTRUCTIONS
PRODUCT NOTICES
4 5

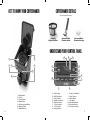
GET TO KNOW YOUR COFFEEMAKER COFFEEMAKER EXTRAS
(Not included with all models)
Reusable
Nylon Coffe Filter Advanced Water
Filtration Holder Advanced Water
Filtration Cartridge
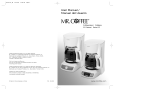
A. Clock Display
B. AM/PM Indicator
C. Clean Indicator
D. Brew Now Indicator
E. Brew Now Button
F. 1-4 Cup Indicator
G. 1-4 Cup Button
H. Strong Indicator
I. Strong / Clean Button
J. Clean Function
K. Minute Button
L. Hour Button
M. Keep Warm Button
N. Brew Later Button
O. Brew Later Indicator
UNDERSTAND YOUR CONTROL PANEL
1
3 6
4
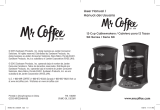
1. Brew Basket
2. Carafe
3. Control Panel
4. Brewer Base
5. Grab-a-cup Auto Pause
6. Warming Plate
7. Water Reservoir
2
5
7
E
D
F
HI
G
J
K
L
M
N
O
A B C
6 7

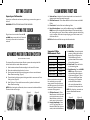
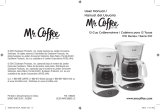
The improved 2-step advanced water ltration system reduces impurities like
chlorine and calcium to make coffee taste better.
1. Soak the advanced water ltration cartridge in cold water for 5 minutes.
2. Rinse the soaked cartridge for about 1 minute.
3. Open bottom hatch where the cartridge goes and insert a new Advanced
Water Filtration cartridge. (Figure 1)
4. Close the hatch and place system in designated slot in water reservoir. Press
rmly in place. (Figure 2)
5. After 30 days or 30 uses (whichever comes rst), replace the Advanced
Water Filtration cartridge.
NOTE: When cleaning the coffeemaker, be sure to remove the Advanced Water
Filtration holder and cartridge.
GETTING STARTED CLEAN BEFORE FIRST USE
BREWING COFFEE
SETTING THE CLOCK
ADVANCED WATER FILTRATION SYSTEM
(Not included with all models)
Unpack your Coffeemaker
Unpack your coffeemaker and remove plastic bags, cartons and any tape on
the unit.
WARNING: KEEP PLASTIC BAGS AWAY FROM CHILDREN.
Plug in brewer into an outlet. Press the HR
and MIN buttons to set the clock. 5 seconds
of inactivity will set the clock at the time
selected.
1. Wash the Parts - Wash the Carafe and brew basket in a mixture of mild
detergent and water. Rinse each thoroughly.
2. Fill Water Reservoir - Fill the Water Reservoir with fresh water to the MAX
ll line.
3. Place Carafe - Set the Carafe on the Warming Plate.
4. Run a Cleansing Brew - Leave the Brew Basket empty. Press the BREW
NOW button once so that the Brew Now Indicator is illuminated to begin
the Cleansing Brew cycle. There will be an audible signal when the brewing
cycle is complete. Once the unit stops dripping, pour the hot water in the
carafe into the sink.
NOTE: Brew Basket and Carafe are top rack dishwasher safe.
Please note that when using extra
ne and decaf you may notice
some grounds in the carafe due to
the ltering process. If you nd this
bothersome, please increase the
coarseness of the grounds.
1. Fill Water Reservoir - Fill the
Water Reservoir with fresh water
to the desired amount. Use the
Water Window to check how
much water is in the reservoir.
2. Line the Brew Basket - Place
an 8-12 Cup Paper Filter or a
Reusable Coffee Filter (for best
results) inside the Brew Basket.
3. Add Coffee - Scoop the desired
amount of coffee into the Brew
Basket. (Figure 3) Refer to the
Coffee Measuring Chart for
guidance based on the number
of cups being brewed.
4. Place Carafe - Place the Carafe
on the warming plate.
5. Begin Brewing - Press the BREW
NOW button of the unit once
so that the Brew Now Indicator
is illuminated. (Figure 4). There
will be an audible signal when
the brewing cycle is complete
and the Brew Now Indicator
will remain illuminated for the
duration of the keep warm time.
NOTE: For a fresh cup, remember to
clean the Brew Basket between
each use.
Suggested Coffee
Measurement Chart:
Water to Brew Ground Coffee
14 cups = 70 oz. 11.5 tbsp.
12 cups = 60 oz. 9 tbsp.
10 cups = 50 oz. 7.5 tbsp.
8 cups = 40 oz. 6 tbsp.
6 cups = 30 oz. 4.5 tbsp.
4 cups = 20 oz. 3 tbsp.
(Figure 3)
(Figure 1) (Figure 2)
(Figure 4)
8 9

STRONG BREW 1-4 CUPBREW LATER KEEP WARM
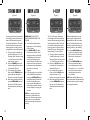
The strong brew function slows down
the brewing process to allow the hot
water to fully saturate the grounds
and extract bolder avors. There will
be a brief intermittent pause in the
brewing process in order to pull the
strong taste from your coffee grounds.
1. To enjoy a richer and bolder cup
of coffee, follow steps 1-4 in the
“Brewing Coffee” section or steps
1-3 in the “How to Use the Brew
Later Function” section.
2. Press the STRONG Button once
so that the Strong Brew Indicator
is illuminated. (Figure 5)
3. If you change your mind mid-
brew, press the STRONG Button
again so that the Strong Brew
Indicator is no longer illuminated.
4. After making the brew selection,
press the BREW NOW button of
the unit once. The Brew Now is
illuminated and the brewing will
start.
The 1-4 Cup Function slows down
the brewing process to allow the hot
water to fully saturate the grounds for
smaller batches of coffee. There will
be a brief intermittent pause in the
brewing process in order to pull the
full avor from your coffee grounds
when brewing 1-4 cups of coffee.
1. To enjoy a richer and bolder cup
of coffee, follow steps 1-4 in the
“Brewing Coffee” section or steps
1-3 in the “Brew Later” section.
2. Press the 1-4 CUP Button once
so that the 1-4 Cup Indicator is
illuminated. (Figure 7)
3. If you change your mind mid-
brew, press the 1-4 CUP Button
again so that the 1-4 Cup
Indicator is no longer illuminated.
4. After making the brew selection,
press the BREW NOW button of
the unit once. The Brew Now is
illuminated and the brewing will
start.
IMPORTANT: YOU MUST SET
THE CLOCK BEFORE USING THIS
FEATURE.
1. To set the Brew Later function,
follow steps 1-4 in the “Brewing
Coffee” section.
2. Press BREW LATER. The Brew
Later Indicator will ash. To set
desired brew time, press the HR
and MIN buttons. 5 seconds of
inactivity will set Brew Later at
the time selected. The Brew Later
Indicator will remain illuminated
to indicate that the coffeemaker is
set to brew at a later time.
(Figure 6)
3. If you change your mind and wish
to turn off the Brew Later feature,
simply press BREW LATER again
and the Brew Later indicator will
turn off. Once the Brew Later
time is set, the coffeemaker will
automatically remember the time
until you change it or unplug the
machine.
NOTE: As a reminder, if you want
to continue to use the Brew Later
feature, you will have to repeat these
steps each time. Your coffeemaker
will not automatically start again the
next day.
The default Keep Warm time is 4
Hours and your coffeemaker will
automatically shut off 4 hours after
brewing. The Keep Warm function
helps you customize how long your
warming plate is on after brewing.
1. Press the KEEP WARM button
and the clock display will show
the number of hours the Keep
Warm time is currently set at.
(Figure 8)
2. Press the KEEP WARM button
until the desired Keep Warm
time is displayed on the clock.
The options are 1, 2, 3, or 4 hours.
5 seconds of inactivity will set
the Keep Warm time on the
hour selected.
NOTE: Once the Keep Warm time is
set, the coffeemaker will automatically
remember the time until you change
it or unplug the machine.
(Figure 5) (Figure 6) (Figure 7) (Figure 8)
10 11

WATER
ROUTINE CLEANING
DECALCIFYING
While it may not seem like an important ingredient, coffee is 98 percent water.
The type of water that you brew with greatly affects the nal taste. Always use
fresh, cold water that is ltered and free of impurities - avoid soft water or well
water. Please refer to the “Advanced Water Filtration System” section to learn
more about how your coffeemaker reduces impurities in water.
A clean coffeemaker is essential to brewing great tasting coffee each and
every time.
Daily Cleaning
CAUTION: Make sure your coffeemaker is unplugged and has cooled
completely before cleaning.
Remove the Brew Basket, Reusable Coffee Filter, and Carafe and wash them in
a solution of hot water and mild liquid soap, and dry thoroughly. You can also
place the Brew Basket, Reusable Coffee Filter, and Carafe in the dishwasher; top-
rack only. Do not wash the Advanced Water Filtration cartridge with soap.
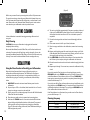
Using the Clean Function to Decalcify your Coffeemaker
Minerals (calcium/limestone) found in water will leave deposits in your
coffeemaker and affects its performance. The CLEAN word will appear on
the display underneath the clock when it is recommended to decalcify your
coffeemaker using vinegar. To decalcify your coffeemaker, follow the steps
below:
1. IMPORTANT: Remove the advanced water ltration system from the
coffeemaker.
2. Prepare 4 cups or 20 . oz. of undiluted, white household vine ar. Pour the
vinegar into the water reservoir on the carafe side.
3. Place an empty 8-12 cup basket-style paper lter or the Mr. Coffee Reusable
Coffee Filter into the brew basket.
4. Place the empty carafe on the unit, centered on the warming plate.
5. Hold down the STRONG button for 3 seconds so that the Clean Indicator
begins blinking and the Brew Now Indicator is illuminated. The prepared
cleaning solution will begin being brewing through the coffeemaker
(Figure 9). When the cleaning process starts, then CLEAN starts blinking on
& off throughout the process.
6. The entire cycle will take approximately 45 minutes to complete. At the end
of the cycle, the BREW NOW indicator light will turn off, an audible signal
will beep and the clock time will turn into CLn to indicate the process is
completed.
7. Discard the cleaning solution and rinse the carafe thoroughly with clean
water.
8. Fill the water reservoir with 14 cups of clean, fresh water.
9. Place the empty carafe back on the coffeemaker, centered on the warming
plate.
10. Remove and discard the paper lter used during the cleaning cycle. If a Mr.
Coffee Reusable Coffee Filter was used during cleaning, remove it and rinse
it thoroughly before replacing it in the brew basket.
11. Press BREW NOW so that the Brew Now Indicator is illuminated and allow
the full brew cycle to complete, rinsing the coffeemaker with hot water.
12. Discard the water from the carafe and rinse the carafe thoroughly with clean
water.
13. Repeat steps 8 through 12 one more time, to ensure the coffeemaker is fully
rinsed.
If you wish to stop the Clean function once it has already begun, press the
BREW NOW button or the STRONG button and the Cleaning function will stop
and the Brew Now and Clean Indicators will turn off. Press the BREW NOW
button again to ensure the cleaning solution is completely brewed through the
machine and follow steps 7-12.
If you wish to turn off the Clean indicator without running a decalcication cycle,
simply hold down the STRONG button for 3 seconds so that the Clean Indicator
and Brew Now Indicator is illuminated. Then quickly press BREW NOW and the
Clean and Brew Now Indicators will shut off.
If the Clean Indicator is not illuminated, but you wish to use the Clean function,
you can still follow steps 1-13.
Cleaning Frequency
Type of Water Cleaning Frequency
Soft Water Every 80 Brew Cycles
Hard Water Every 40 Brew Cycles
(Figure 9)
12 13

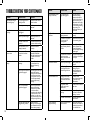
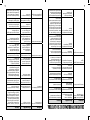
TROUBLESHOOTING YOUR COFFEEMAKER
Problem Possible Cause Solution
The BREW NOW light
does not light up. It is not plugged into a
working outlet. Reset the outlet and/or
circuit breaker.
There’s a power outage. Wait for power to be
restored.
The coffee is not
brewing. The appliance is
unplugged. Plug unit in.
There’s a power outage. Wait for power to be
restored.
No water in the water
reservoir. Fill water reservoir above
minimum level marking.
The brew basket is not
properly inserted. Insert brew basket
correctly.
The coffeemaker only
brews water. There are no coffee
grounds in the brew
basket.
Add the paper lter or
reusable coffee lter
with the desired amount
of coffee to the brew
basket.
The coffeemaker brews
slowly. The coffeemaker needs
cleaning. Clean coffeemaker
as described in the
“Routine Cleaning”
section.
The Strong Brew function
might be engaged. The Strong Brew function
causes the brewing
process to slow down for
more avor extraction.
If this function is on, the
unit will intermittently
pause briey during
brewing.
The 1-4 Cup function
might be engaged. The 1-4 Cup function
causes the brewing
process to slow down
for the best avor
extraction when brewing
a smaller batch. If this
function is on, the unit
will intermittently pause
briey during brewing.
The water tank might be
clogged with grounds. Clean the water
reservoir to ensure that
the coffeemaker will be
able to brew properly.
Problem Possible Cause Solution
The coffeemaker brews
slowly. (continued) The Clean function
might be engaged. The Clean function
causes the brewing
process to slow down
to allow for the cleaning
solution to clean your
coffeemaker thoroughly.
If this function is on, the
unit will resume brewing
after pausing. The
process can take up to
45 minutes.
The lter basket
overows. The lter basket is not
properly inserted. Insert the lter basket
correctly.
The carafe is not placed
all the way on the
warming plate.
Place the carafe correctly
on the warming plate.
Too many coffee
grounds were placed in
the lter.
Remove lter and discard
grounds. If paper lter,
replace. If permanent
lter, rinse. Begin brewing
process again.
The carafe was removed
from the warming
plate for more than 30
seconds.
Turn off and unplug the
unit. Allow to cool. Wipe
up the spill.
The coffee is not hot. There’s a power outage. Wait for power to be
restored.
The Warming Plate was
not congured for the
desired length of time.
Check to ensure the
Warming Plate is
properly congured
and that Brew Now is
illuminated.
The coffee tastes bad. Coffee grounds other
than for an automatic
drip coffeemaker were
used.
Use fresh coffee
grounds recommended
for automatic drip
coffeemakers.
The ground coffee-
to-water ration was
unbalanced.
Use the correct coffee-to-
water ratio.
The coffeemaker needs
cleaning. Clean coffeemaker as
described in “Routine
Cleaning” section.
The water is not ltered. Use cold, ltered or
bottled water.
The unit suddenly
stopped brewing. There is no water in the
water reservoir. Fill the water reservoir
with fresh, cold water to
the desired water level,
up to the MAX line.
14 15

WARRANTY INFORMATION
1-YEAR LIMITED WARRANTY
Sunbeam Products, Inc, (“Sunbeam”) warrants that for a period of one year
from the date of purchase, this product will be free from defects in material and
workmanship. Sunbeam, at its option, will repair or replace this product or any
component of the product found to be defective during the warranty period.
Replacement will be made with a new or remanufactured product or
component. If the product is no longer available, replacement may be made
with a similar product of equal or greater value. This is your exclusive warranty
from Sunbeam.
This warranty is valid for the original retail purchaser from the date of initial
retail purchase and is not transferable. Keep the original sales receipt. Proof of
purchase is required to obtain warranty performance. Sunbeam dealers, service
centers, or retail stores selling Sunbeam products do not have the right to alter,
modify or any way change the terms and conditions of this warranty.
This warranty does not cover normal wear of parts or damage resulting from
any of the following: negligent use or misuse of the product, use on improper
voltage or current, use contrary to the operating instructions, disassembly, repair
or alteration by anyone other than Sunbeam or an authorized Sunbeam service
center. Further, the warranty does not cover: Acts of God, such as re, ood,
hurricanes and tornadoes.
What are the Limits on Sunbeam’s Liability?
Sunbeam shall not be liable for any incidental or consequential damages
caused by the breach of any express, implied or statutory warranty or condition.
Except to the extent prohibited by applicable law, any implied warranty or
condition of merchantability or tness for a particular purpose is limited in
duration to the duration of the above warranty.
Sunbeam disclaims all other warranties, or conditions or representations,
express, implied, statutory or otherwise.
Sunbeam shall not be liable for any damages of any kind resulting from the
purchase, use or misuse of, or inability to use the product including incidental,
special, consequential or similar damages or loss of prots, or for damages
arising from any tort, including negligence or gross negligence, or fault
committed by Sunbeam, its agents or employees or for any breach of contract,
fundamental or otherwise, or for any claim brought against purchaser by any
other party.
Some states or jurisdictions do not allow the exclusion or limitation of incidental
or consequential damages or limitations on how long an implied warranty lasts,
so the above limitations or exclusions may not apply to you. This warranty gives
you specic legal rights, and you may also have other rights that vary from state
to state or jurisdiction to jurisdiction.
How to Obtain Warranty Service
If you have any question regarding this warranty or would like to obtain
warranty service, please call 1-800-672-6333 and a convenient service center
address will be provided to you.
This appliance has no user serviceable parts. Any servicing beyond that
described in the Cleaning Section should be performed by an Authorized
Service Representative only. See warranty available online.
Service Maintenance and Warranty can be found online at www.mrcoffee.com
or call us toll-free at the Consumer Service Department, 1-800-MR COFFEE
(1-800-672-6333).
USER MAINTENANCE
SERVICE MAINTENANCE
AND WARRANTY
16 17

© 2021 Sunbeam Products, Inc. All rights reserved. Distributed by Sunbeam Products, Inc.
Boca Raton, Florida 33431. Made in China.
© 2021 Sunbeam Products, Inc. Todos los derechos reservados. Distribuido por Sunbeam
Products, Inc. Boca Ratón, Florida 33431. Boca Raton, Florida 33431. Fabricado en China.

INFORMACIÓN DE GARANTÍA
GARANTÍA LIMITADA POR UN AÑO
Sunbeam Products, Inc. (“Sunbeam”) garantiza que, por un período de un año
a partir de la fecha de compra, este producto no tendrá defectos de materiales
ni de mano de obra. Sunbeam, a su elección, reparará o reemplazará este
producto o cualquier componente del mismo que tenga defectos durante el
período de garantía.
El reemplazo se realizará por un producto o componente nuevo o reparado.
Si el producto ya no estuviera disponible, se lo reemplazará por un producto
similar de valor igual o superior. Ésta es su garantía exclusiva de Sunbeam.
La garantía es válida para el comprador minorista original a partir de la fecha
de la compra inicial y no es transferible. Conserve el recibo de compra original.
Para solicitar servicio en garantía se requiere presentar un recibo de compra. Los
agentes y Centros de Servicio de Sunbeam o las tiendas minoristas que venden
productos Sunbeam no tienen derecho a alterar, modicar ni cambiar de ningún
otro modo los términos y las condiciones de esta garantía.
Esta garantía no cubre el desgaste normal de las piezas ni los daños que se
produzcan como resultado de: uso negligente o mal uso del producto, uso de
tensión o corriente inapropiada, uso contrario a las instrucciones operativas,
desarmado, reparación o alteración por un tercero que no sea Sunbeam o un
Centro de Servicio Sunbeam autorizado. Asimismo, la garantía no cubre: actos
de fuerza mayor tales como incendios, inundaciones, huracanes y tornados.
¿Cuál es el límite de responsabilidad de Sunbeam?
Sunbeam no será responsable de daños incidentales o emergentes causados
por el incumplimiento de alguna garantía o condición expresa, implícita o legal.
Excepto en la medida en que lo prohíba la ley aplicable, cualquier garantía o
condición implícita de comerciabilidad o aptitud para un n determinado se
limita, en cuanto a su duración, a la duración de la garantía antes mencionada.
Sunbeam queda exenta de toda otra garantía, condición o manifestación,
expresa, implícita, legal o de cualquier otra naturaleza.
Sunbeam no será responsable de ningún tipo de daño emergente de la compra,
uso o mal uso del producto, o imposibilidad de usar el producto, incluidos
los daños incidentales, especiales, emergentes o similares, o la pérdida de
ganancias, ni de los daños emergentes de un hecho ilícito civil, incluidos
negligencia, culpa grave o culpa por parte de Sunbeam, sus representantes o
empleados, ni de ningún incumplimiento contractual, sea de una obligación
esencial o de otra naturaleza, ni de ningún reclamo iniciado contra el comprador
por un tercero.
Algunos estados o jurisdicciones no permiten la exclusión o limitación de
los daños incidentales o emergentes ni las limitaciones a la duración de las
garantías implícitas, de modo que es posible que la exclusión o las limitaciones
antes mencionadas no se apliquen en su caso. Mediante esta garantía, se le
otorgan derechos legales especícos y es posible que tenga otros derechos
que varíen de un estado o una jurisdicción a otros.
Cómo solicitar servicio en garantía
Si tiene alguna pregunta sobre esta garantía o desea obtener el servicio en
garantía, llame al 1-800-672-6333 y podrá obtener la dirección del Centro de
Servicio que le resulte más conveniente.
Este aparato no contiene partes que el usuario pueda reparar. Cualquier
servicio de mantenimiento que no sea lo descrito en la sección Limpieza deberá
ser realizado únicamente por un representante autorizado del servicio de
mantenimiento. Consulte la garantía disponible en línea.
El servicio de mantenimiento y garantía se puede consultar en línea en
www.mrcoffee.com. También puede llamarnos sin cargo al Departamento de
Atención al Consumidor al 1-800-MR COFFEE (1-800-672-6333).
MANTENIMIENTO DEL USUARIO
SERVICIO DE MANTENIMIENTO
Y GARANTÍA
16 17

Problema Causa posible Solución
La luz del botón “BREW
NOW” (preparar ahora)
no se enciende.
El aparato no está
enchufado a una
toma de corriente que
funcione.
Reinicie el tomacorriente y/o
el interruptor automático.
Hay un corte de energía
eléctrica. Espere a que se restituya la
energía elétrica.
No se prepara el café. El aparato está
desenchufado. Enchufe la unidad.
Hay un corte de energía
eléctrica. Espere a que se restituya la
energía elétrica.
El depósito de agua
está vacío. Llene el depósito de agua por
encima de nivel mínimo de
llenado.
La cesta de preparación
está colocada de forma
incorrecta.
Coloque la cesta de
preparación de forma
correcta.
La cafetera solo prepara
agua. No hay café molido en
la cesta de preparación. Agregue un ltro de papel
o el ltro de café reutilizable
con la cantidad de café
que desee en la cesta de
preparación.
La cafetera es muy lenta. Se requiere limpieza de
la cafetera. Limpie la cafetera como
se describe en la sección
“Limpieza de rutina”.
Podría estar activada la
función “Preparación
intensa”.
La función “Preparación
intensa” ralentiza el proceso
de preparación para extraer
más sabor. Si esta función
está encendida, la unidad
se pausa brevemente de
forma intermitente durante la
preparación.
Podría estar activada la
función “Preparar de 1 a
4 tazas”.
La función “Preparar de 1 a 4
tazas” ralentiza el proceso de
preparación para extraer el
mejor sabor al preparar pocas
tazas de café. Si esta función
está encendida, la unidad
se pausa brevemente de
forma intermitente durante la
preparación.
El tanque de agua
puede estar obstruido
con residuos.
Limpie el depósito de agua
para asegurarse de que
la cafetera pueda hacer la
preparación correctamente.
Problema Causa posible Solución
La cafetera es muy lenta.
(Continuación). Podría estar activada la
función “Limpiar”. La función “Limpiar” ralentiza
el proceso de preparación
para permitir que la solución
de limpieza limpie bien la
cafetera. Si esta función está
activada, la unidad continuará
con la preparación luego de
la pausa. El proceso puede
llevar hasta 45 minutos.
La cesta de ltrado se
desborda. La cesta de ltrado
está colocada de forma
incorrecta.
Coloque la cesta de ltrado
de forma correcta.
La jarra no está ubicada
en toda la placa de
calentamiento.
Coloque la jarra correctamente
en la placa de calentamiento.
Hay demasiado café
molido en el ltro. Retire el ltro y deseche el
café. Si está usando un ltro
de papel, reemplácelo. Si está
usando un ltro permanente,
enjuáguelo. Comience el
proceso de preparación
nuevamente.
La jarra permaneció
fuera de la placa de
calentamiento por más
de 30 segundos.
Apague la unidad y
desenchúfela. Deje que
se enfríe. Limpie el líquido
derramado.
El café no está caliente. Hay un corte de energía
eléctrica. Espere a que se restituya la
energía eléctrica.
La placa de
calentamiento no
se conguró para el
período de tiempo
deseado.
Verique que la placa
de calentamiento esté
congurada correctamente
y que “Brew Now” esté
iluminado.
El café tiene mal sabor. Se usó un café
molido distinto del
recomendado para
una cafetera de goteo
automática.
Use café molido fresco
recomendado para cafeteras
de goteo automáticas.
La proporción café
molido-agua no es
correcta.
Use la proporción café-agua
correspondiente.
Se requiere limpieza de
la cafetera. Limpie la cafetera como
se describe en la sección
“Limpieza de rutina”.
El agua no esta ltrada. Utilice agua fría, ltrada o
embotellada.
La unidad detuvo la
preparación de repente. El depósito de agua
está vacío. Llene el depósito con agua
potable y fría hasta el nivel
que desee sin pasarse de la
línea que indica nivel máximo
14 15
SOLUCIONE PROBLEMAS DE SU CAFETERA

AGUA
LIMPIEZA DE RUTINA
DESCALCIFICACIÓN
Si bien puede parecer que no es un ingrediente importante, el café contiene
98 % de agua. El tipo de agua con la que prepara el café afecta enormemente
el sabor nal. Siempre utilice agua limpia y potable que esté ltrada y sin
impurezas; evite el agua blanda o el agua de pozo. Consulte la sección “Sistema
de ltrado avanzado de agua” para obtener más información sobre cómo la
cafetera reduce las impurezas del agua.
Una cafetera limpia es esencial para preparar siempre un café de excelente
sabor.
Limpieza diaria
PRECAUCIÓN: Asegúrese de que la cafetera esté desenchufada y de que se
haya enfriado completamente antes de la limpieza.
Retire la cesta de preparación, el ltro de café reutilizable y la jarra y lávelos
con una solución de agua caliente y jabón líquido suave; luego séquelos bien.
También puede colocar la cesta de preparación, el ltro de café reutilizable y la
jarra en el lavavajillas (solo en el estante superior). No lave con jabón el cartucho
de ltrado avanzado de agua.
Usar la función “Limpiar” para descalcicar su cafetera
Los minerales (calcio/piedra caliza) que se encuentran en el agua dejarán
depósitos en la cafetera y afectarán su rendimiento. La palabra “CLEAN”
(limpiar) aparecerá en la pantalla, debajo del reloj, cuando sea recomendable
descalcicar su cafetera con vinagre. Para descalcicar su cafetera, siga los pasos
a continuación:
1. IMPORTANTE: Retire el sistema de ltrado avanzado de agua de la
cafetera.
2. Prepare cuatro tazas o 20 onzas líquidas de vinagre blanco de cocina sin
diluir. Vierta el vinagre en el depósito de agua del lado de la jarra.
3. Coloque un ltro de papel tipo cesta para 8 a 12 tazas vacío o un ltro de
café reutilizable Mr. Coffee en la cesta de preparación.
4. Coloque la jarra vacía en la unidad, centrada en la placa de calentamiento.
5. Mantenga presionado el botón “STRONG” (intenso) durante 3 segundos,
de modo que comience a parpadear el indicador “Limpiar” y se encienda el
indicador “Preparar ahora”. La solución de limpieza preparada comenzará
a circular dentro de la cafetera (gura 9). Cuando comienza el proceso de
limpieza, la palabra “CLEAN” (limpiar) comienza a parpadear durante todo
el proceso.
6. El ciclo completo tardará aproximadamente 45 minutos en completarse.
Al nal del ciclo, la luz indicadora “BREW NOW” se apagará, se emitirá una
señal audible y la hora del reloj cambiará a CLn para indicar que el proceso
se completó.
7. Deseche la solución de limpieza y enjuague bien la jarra con agua limpia.
8. Llene el depósito de agua con 14 tazas de agua limpia y potable.
9. Coloque la jarra vacía nuevamente en la cafetera, centrada en la placa de
calentamiento.
10. Retire y deseche el ltro de papel utilizado durante el ciclo de limpieza. Si
se usó un ltro de café reutilizable Mr. Coffee durante la limpieza, quítelo y
enjuáguelo bien antes de volver a colocarlo en la cesta de preparación.
11. Presione “BREW NOW” (preparar ahora), de modo que se encienda el
indicador “Preparar ahora” y deje que se complete el ciclo de preparación
para que se enjuague la cafetera con agua caliente.
12. Deseche el agua de la jarra y enjuáguela bien con agua limpia.
13. Repita los pasos del 8 al 12 una vez más para asegurarse de que la cafetera
esté completamente enjuagada.
Si desea detener la función “Limpiar” una vez que ya haya comenzado, presione
el botón “BREW NOW” (preparar ahora) o el botón “STRONG” (intenso), se
detendrá la función “Limpieza” y se apagarán los indicadores “Preparar ahora” y
“Limpiar”. Presione el botón “BREW NOW” (preparar ahora) nuevamente para
asegurarse de que la solución de limpieza haya circulado por completo a través
de la máquina y siga los paso del 7 al 12.
Si desea apagar el indicador “Limpiar” sin activar el ciclo de descalcicación,
basta con mantener presionado el botón “STRONG” (intenso) durante 3
segundos, de modo que se enciendan los indicadores “Limpiar” y “Preparar
ahora”. Luego presione rápidamente el botón “BREW NOW” (preparar ahora) y
se apagarán los indicadores “Limpiar” y “Preparar ahora”.
Si el indicador “Limpiar” no se enciende, pero desea usar esa función, puede
seguir los pasos del 1 al 13.
Frecuencia de limpieza
Tipo de agua Frecuencia de limpieza
Agua blanda Cada 80 ciclos de preparación
Agua dura Cada 40 ciclos de preparación
(Figura 9)
12 13

PREPARACIÓN
INTENSA 1-4 TAZASPREPARAR
MÁS TARDE MANTENER
CALIENTE
La función de preparación intensa
ralentiza el proceso de preparación
y permite que el agua caliente sature
por completo el café molido y extraiga
los sabores más fuertes. Durante el
proceso de preparación, habrá una
pausa intermitente breve a n de
obtener el sabor intenso del café.
1. Para disfrutar de una taza de
café más rica e intensa, siga los
pasos del 1 al 4 en la sección
“Preparación del café” o los pasos
del 1 al 3 en la sección “Cómo usar
la función ‘Preparar más tarde’”.
2. Presione el botón “STRONG”
(intenso) una vez, de modo
que se encienda el indicador
“Preparación intensa” (gura 5).
3. Si cambia de opinión a mitad
de la preparación, presione el
botón “STRONG” (intenso) otra
vez, de modo que el indicador
“Preparación intensa” se apague.
4. Después de hacer la selección
de preparación, presione el
botón “BREW NOW” (preparar
ahora) una vez, de modo que se
encienda el indicador “Brew Now”
y comenzará la preparación.
La función “Preparar de 1 a 4 tazas”
ralentiza el proceso de preparación y
permite que el agua caliente sature por
completo el café molido para obtener
cantidades más pequeñas de café.
Durante el proceso de preparación,
habrá una pausa intermitente breve a
n de obtener el sabor total de su café
molido cuando prepare de una a cuatro
tazas.
1. Para disfrutar de una taza de
café más rica e intensa, siga los
pasos del 1 al 4 en la sección
“Preparación del café” o los pasos
del 1 al 3 en la sección “Preparar
más tarde”.
2. Presione el botón “1-4 CUP” (1-4
tazas) una vez, de modo que se
encienda el indicador de la función
“Preparar de 1 a 4 tazas” (gura 7).
3. Si cambia de opinión a mitad de
la preparación, presione el botón
“1-4 CUP” (1-4 tazas) otra vez, de
modo que el indicador “Preparar
de 1 a 4 tazas” se apague.
4. Después de hacer la selección
de preparación, presione el
botón “BREW NOW” (preparar
ahora) una vez, de modo que se
encienda el indicador “Brew Now”
y comenzará la preparación.
IMPORTANTE: DEBE CONFIGURAR EL
RELOJ PARA USAR ESTA FUNCIÓN.
1. Para congurar la función “Preparar
más tarde”, siga los pasos del 1 al 4
en la sección “Preparación del café”.
2. Presione “BREW LATER” (preparar
más tarde). El indicador “Preparar
más tarde” se encenderá de modo
intermitente. Para congurar la hora
de preparación deseada, presione
los botones “HR” (horas) y “MIN”
(minutos). Después de 5 segundos
de inactividad, se congurará la
función “Preparar más tarde” a la
hora seleccionada. El indicador
“Preparar más tarde” se encenderá,
lo que indica que la cafetera está
congurada para comenzar con la
preparación más tarde (gura 6)
3. Si cambia de opinión y desea
desactivar la función “Preparar más
tarde”, solo tiene que presionar
nuevamente el botón “BREW
LATER” (preparar más tarde) y
el indicador se apagará. Una vez
congurada la hora de la función
“Preparar más tarde”, la cafetera
recordará automáticamente
esa hora hasta que la cambie o
desenchufe la máquina.
NOTA: A modo de recordatorio, si
desea continuar utilizando la función
“Preparar más tarde”, debe repetir
estos pasos cada vez que lo desee.
La cafetera no volverá a arrancar
automáticamente al día siguiente.
El tiempo de la función “Mantener
caliente” está congurado en 4 horas
de forma predeterminada, por lo que
la cafetera automáticamente se apaga
4 horas después de la preparación.
La función “Mantener caliente”
permite personalizar el tiempo
en que la placa de calentamiento
permanece encendida después de la
preparación.
1. Presione el botón “KEEP WARM”
(mantener caliente) y, en la
pantalla del reloj, se mostrará la
cantidad de horas actualmente
congurada para la función
“Mantener caliente” (gura 8).
2. Presione el botón “KEEP WARM”
(mantener caliente) hasta que
se muestre en el reloj el tiempo
deseado para mantener caliente
la placa. Las opciones son 1,
2, 3 o 4 horas. Después de 5
segundos de inactividad, se
congurará el tiempo de la
función “Mantener caliente” en la
hora seleccionada.
NOTA: Una vez congurada la hora
de la función “Mantener caliente”, la
cafetera recordará automáticamente
esa hora hasta que la cambie o
desenchufe la máquina.
(Figura 5) (Figura 6) (Figura 7) (Figura 8)
10 11

Tenga en cuenta que al usar extrano
y descafeinado, es posible que
observe algunos granos en la jarra
debido al proceso de ltrado. Si le
resulta molesto, aumente la aspereza
de los granos.
Llene el depósito de agua. Llene el
depósito de agua con la cantidad de
agua potable que desee. Use el visor
de agua para vericar la cantidad de
agua que hay en el depósito.
1. Cubra la cesta de preparación.
Coloque un ltro de papel para
8 a 12 tazas o un ltro de café
reutilizable (para lograr mejores
resultados) dentro de la cesta de
preparación.
2. Agregue café. Mida con una
cuchara y agregue la cantidad
de café que desee en la cesta de
preparación (gura 3). Consulte
la tabla de medición de café para
orientarse según la cantidad de
tazas que desea preparar.
3. Coloque la jarra. -Coloque
la jarra en la placa de
calentamiento.
4. Comience con la preparación.
Presione el botón “BREW NOW”
(preparar ahora), de modo que se
encienda el indicador “Preparar
ahora” (gura 4). Escuchará
una señal sonora cuando se
complete el ciclo de preparación
y el indicador “Preparar ahora”
permanecerá encendido durante
el tiempo congurado para
mantener caliente la placa.
NOTA: Para una taza de café
fresco, recuerde limpiar la cesta de
preparación entre usos.
GUÍA DE INICIO LIMPIE LA CAFETERA ANTES DEL PRIMER USO
PREPARACIÓN DEL CAFÉ
CONFIGURACIÓN DEL RELOJ
SISTEMA DE FILTRADO AVANZADO DE AGUA
(no incluido en todos los modelos)
Desembale la cafetera
Desembale la cafetera y retire de la unidad las bolsas de plástico, los cartones
y cualquier cinta.
ADVERTENCIA: MANTENGA LAS BOLSAS DE PLÁSTICO LEJOS DE LOS
NIÑOS
Enchufe la cafetera a un tomacorriente de
la pared. Presione los botones “HR” (horas)
y “MIN” (minutos) para congurar el reloj.
Después de 5 segundos de inactividad, se
congurará el reloj a la hora seleccionada.
Gracias al mejorado sistema de ltrado avanzado de agua en dos pasos, se
reducen las impurezas como el cloro y el calcio para mejorar el sabor del café.
1. Sumerja el cartucho de ltrado avanzado de agua en agua fría durante 5
minutos.
2. Enjuague el cartucho mojado durante 1 minuto.
3. Abra la trampilla inferior donde se coloca el cartucho e inserte un nuevo
cartucho de ltrado avanzado de agua. (Figura 1)
4. Cierre la trampilla y coloque el sistema en el espacio previsto en el depósito
de agua. Presione rmemente para colocarlo. (Figura 2)
5. Luego de 30 días o de 30 usos (lo que suceda primero), reemplace el
cartucho de ltrado avanzado de agua.
NOTA: Al limpiar la cafetera, asegúrese de quitar el ltro y el cartucho de
ltrado avanzado de agua.
1. Lave las piezas- Lave la jarra y la cesta de preparación con una mezcla de
detergente suave y agua. Enjuague bien cada una de las piezas.
2. Llene el depósito de agua. Llene el depósito de agua con agua potable
hasta la línea de llenado máximo (“MAX”).
3. Coloque la jarra. Coloque la jarra en la placa de calentamiento.
4. Realice un ciclo de lavado. Deje la cesta de preparación vacía. Presione el
botón “BREW NOW” (preparar ahora) una vez, de modo que se encienda
el indicador “Preparar ahora” y comience un ciclo de lavado. Escuchará una
señal sonora cuando se complete el ciclo de preparación. Cuando la unidad
deje de gotear, vierta el agua caliente de la jarra en el fregadero.
NOTA: La cesta de preparación y la jarra son aptas para el estante superior del
lavavajillas.
Tabla de medición
de café sugerida:
Agua de
preparación Café molido
14 tazas = 70 onzas 11.5 cucharadas
12 tazas = 60 onzas 9 cucharadas
10 tazas = 50 onzas 7.5 cucharadas
8 tazas = 40 onzas 6 cucharadas
6 tazas = 30 onzas 4.5 cucharadas
4 tazas = 20 onzas 3 cucharadas
(Figura 1)
(Figura 3)
(Figura 2)
(Figura 4)
8 9

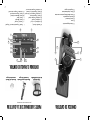
CONOZCA SU CAFETERA
ENTIENDA EL PANEL DE CONTROL
PARTES ADICIONALES DE LA CAFETERA
(No incluidas en todos los modelos)
Filtro de café
de nailon reutilizable Dispositivo para ltrado
avanzado de agua Cartucho de ltrado
avanzado de agua
A. Pantalla del reloj
B. Indicador “a. m./p. m.”
C. Indicador “Limpiar”
D. Indicador “Preparar ahora”
E. Botón “Preparar ahora”
F. Indicador “Preparar de 1 a 4 tazas”
G. Botón “Preparar de 1 a 4 tazas”
H. Indicador “Preparación intensa”
I. Botón “Preparación intensa” / “Limpiar”
J. Función “Limpiar”
K. Botón “Minutos”
L. Botón “Hora”
M. Botón “Mantener caliente”
N. Botón “Preparar más tarde”
O. Indicador “Preparar más tarde”
1
3 6
4
2
5
7
6 7
1. Cesta de preparación
2. Jarra
3. Panel de control
4. Base de preparación
5. Pausa automática para tomar una taza
6. Placa de calentamiento
7. Depósito de agua
E
D
F
HI
G
J
K
L
M
N
O
A B C

Se puede proporcionar un cable de alimentación corto (o cable de alimentación
desmontable) para reducir los riesgos ocasionados por el enredo o tropiezo
con un cable más largo. Hay cables de alimentación desmontables más largos o
cables de extensión que se pueden utilizar con precaución. Si se utiliza un cable
de alimentación desmontable largo o un cable de extensión, se debe tener en
cuenta lo siguiente:
a. The marked electrical rating of the detachable power-supply cord or
extension cord should be at least as great as the electrical rating of the
appliance.
b. b. Si el aparato es del tipo con conexión a tierra, el cable de extensión debe
ser un cable de 3 hilos con conexión a tierra.
c. El cable más largo debe estar dispuesto de modo que no cuelgue de
la encimera o la mesa donde los niños puedan tirar de él o tropezarse
accidentalmente.
No tire, tuerza ni dañe el cable de alimentación.
1. Coloque el aparato sobre una supercie dura, plana y nivelada para evitar
la interrupción del ujo de aire debajo de la cafetera.
2. Solo para decantadores de vidrio: Deseche el decantador de inmediato si
el contenido se evapora por completo.
3. Solo para decantadores de vidrio: Proteja el decantador de golpes fuertes,
rayones o manipulación brusca.
4. No ponga en funcionamiento el aparato con el tanque de agua vacío.
5. El vapor caliente saldrá por la parte superior del aparato; manténgala
despejada cuando esté en uso.
MEDIDAS DE SEGURIDAD IMPORTANTES
(CONTINUACIÓN)
CONSERVE ESTAS INSTRUCCIONES
SOLO PARA USO EN EL HOGAR
Enchufe polarizado
Este aparato tiene un enchufe polarizado (una
cuchilla es más ancha que la otra). Como una
característica de seguridad para reducir el riesgo de
descarga eléctrica, este enchufe está diseñado para
encajar en un tomacorriente polarizado de una sola
manera. Si el enchufe no encaja completamente en el tomacorriente, invierta
el enchufe. Si sigue sin encajar, comuníquese con un electricista calicado.
No intente anular esta característica de seguridad ni modicar el enchufe de
ninguna forma. Si el enchufe encaja holgadamente en el tomacorriente de
CA o si este está caliente, no lo utilice.
INSTRUCCIONES SOBRE EL CABLE
DE ALIMENTACIÓN
AVISOS SOBRE EL PRODUCTO
4 5
Para aparatos con jarras de vidrio:
17. La jarra está diseñada para su uso con este aparato. Nunca debe utilizarse
sobre una estufa.
18. No coloque la jarra caliente sobre una supercie húmeda o fría.
19. Evite los cambios bruscos de temperatura, como el enjuague, el lavado, el
llenado o la inmersión del recipiente caliente con líquidos fríos.
20. No utilice la jarra si está rota o astillada ni si tiene el mango suelto o
deteriorado.
21. No limpie la jarra con productos de limpieza, almohadillas de lana de acero
u otro material abrasivo..
Para aparatos con paneles de servicio:
22. ADVERTENCIA: PARA REDUCIR EL RIESGO DE INCENDIO O DESCARGA
ELÉCTRICA, NO QUITE ESTA CUBIERTA. ESTE APARATO NO CONTIENE
PARTES QUE EL USUARIO PUEDA REPARAR. ÚNICAMENTE EL PERSONAL
DE SERVICIO AUTORIZADO PUEDE REALIZAR LA REPARACIÓN.

INTRODUCCIÓN
Bienvenido y felicitaciones por la compra de su nueva
cafetera Mr. Coffee. ¡Gracias a su nueva Mr. Coffee, se
despertará en la mañana, tendrá energía en la tarde y
gozará de la exibilidad para preparar su café como desee!
Nuestro objetivo principal es ofrecerle siempre la taza de
café más deliciosa, así que si tiene alguna pregunta sobre
su cafetera nueva, comuníquese con nosotros llamando al
1-800-672-6333 o visítenos en www.mrcoffee.com.
MEDIDAS DE SEGURIDAD IMPORTANTES
Cuando se utilizan aparatos eléctricos, siempre se deben seguir las precauciones
básicas de seguridad para disminuir el riesgo de incendio, descarga eléctrica o
lesiones personales, incluidas las siguientes:
1. Lea todas las instrucciones.
2. No toque las supercies calientes. Utilice las asas o manijas.
3. Para protegerse contra las descargas eléctricas, no coloque ni sumerja el
cable, los enchufes ni el aparato en agua u otro líquido.
4. Los niños o las personas con disminución de sus capacidades físicas,
sensoriales o mentales o sin experiencia ni conocimientos no deben utilizar
este aparato. Se requiere una estricta supervisión cuando el aparato se utiliza
cerca de los niños. Se debe supervisar a los niños para asegurarse de que no
jueguen con el aparato. Mantenga el aparato y el cable de alimentación fuera
del alcance de los niños.
5. Desenchufe el aparato del tomacorriente cuando el aparato o la pantalla del
reloj (si se incluye) no estén en uso y antes de limpiarlo. Deje que el aparato
se enfríe antes de poner o quitar alguna parte, y antes de limpiarlo.
6. No haga funcionar ningún aparato con un cable o enchufe dañado o
después de alguna falla en el funcionamiento o daño de cualquier tipo.
Devuelva el aparato a un centro de servicio autorizado para que lo examinen,
reparen o ajusten. No intente reemplazar o empalmar un cable dañado.
7. El uso de un accesorio no recomendado para este aparato por el fabricante
puede provocar incendios, descargas eléctricas o lesiones personales.
8. No lo utilice al aire libre.
9. No deje que el cable cuelgue del borde de la mesa o encimera, ni que toque
supercies calientes.
10. No lo coloque sobre un quemador eléctrico o a gas que esté caliente, ni
cerca del quemador, o en un horno caliente.
11. Siempre conecte primero el enchufe al aparato, luego enchufe el cable al
tomacorriente de la pared (para aparatos con cables desmontables). Para
desconectar, apague todos los controles poniéndolos en OFF (apagado) y
luego retire el enchufe del tomacorriente de la pared.
12. No utilice el aparato para otro uso que no sea el previsto.
13. Todas las tapas deben estar cerradas durante el uso.
14. Se pueden sufrir quemaduras si se retira la tapa o si se abre la tapa de la
cesta de preparación durante el ciclo de preparación o inmediatamente
después. El contenido puede estar caliente. Deje enfriar antes de abrir la
tapa.
15. ADVERTENCIA: Para evita el riesgo de lesiones, nunca abra ni desenganche
la cámara durante el ciclo de preparación.
16. Solo use cápsulas diseñadas para este aparato. Si la cápsula no encaja en el
aparato, no la fuerce.
2 3

CAFETERA PROGRAMABLE DE 14 TAZAS
MANUAL DEL USUARIO
P.N. ART0000866087 www.mrcoffee.com
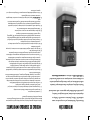
selector para preparación fuerte
ciclo de limpieza automática
con recordatorio
Ajuste de 1 a 4 tazas
para menos raciones
cabezal de salida de agua
avanzado
SERIE BVMC-PC14
-
 1
1
-
 2
2
-
 3
3
-
 4
4
-
 5
5
-
 6
6
-
 7
7
-
 8
8
-
 9
9
-
 10
10
-
 11
11
-
 12
12
-
 13
13
-
 14
14
-
 15
15
-
 16
16
-
 17
17
-
 18
18
-
 19
19


Mr.Coffee BVMC-PC14BL2 Manual de usuario
- Categoría
- Cafeteras
- Tipo
- Manual de usuario
- Este manual también es adecuado para
En otros idiomas
- English: Mr.Coffee BVMC-PC14BL2 User manual
Documentos relacionados

Otros documentos
-
 Mr. Coffee BVMC-EM100 Manual de usuario
-
 Mr. Coffee 115949 Manual de usuario
-
 Mr. Coffee PSTX Serie Manual de usuario
-
 Mr. Coffee 114202 Manual de usuario
-
 Mr. Coffee SKX23-RB Guía del usuario
-
 Mr. Coffee VB13-NP Manual de usuario
-
 Mr. Coffee Correct SKU Guía del usuario
-
Mr. Coffee SK12 Manual de usuario
-
Mr. Coffee AD SERIES Manual de usuario
-
Mr. Coffee 110687 Manual de usuario


