Lindy 5 Port Seamless Multiview KVM Switch Manual de usuario
- Categoría
- Conmutadores KVM
- Tipo
- Manual de usuario

© LINDY Group - FIRST EDITION (October 2023)
5 Port HDMI 4K60 Seamless Multiview
KVM Switch
User Manual English
Benutzerhandbuch Deutsch
Manuel Utilisateur Français
Manuale Italiano
Manual de Usuario Español
No. 32330
lindy.com

User Manual English
Safety Instructions
WARNING
Please read the following safety information carefully and always keep this document with
the product.
Failure to follow these precautions can result in serious injuries or death from electric
shock, fire or damage to the product.
Touching the internal components or a damaged cable may cause electric shock, which
may result in death.
This device is a switching type power supply and can work with supply voltages in the range 100 - 240
VAC For worldwide usability four different AC adapters are enclosed: Euro type, UK type, US/Japan type
and Australia/New Zealand type. Use the appropriate AC adapter as shown in the picture and ensure it
is firmly secured in place and does not detach by pulling before installing into a power socket.
To reduce risk of fire, electric shocks or damage:
Do not open the product nor its power supply. There are no user serviceable parts inside.
Only qualified servicing personnel may carry out any repairs or maintenance.
Never use damaged cables.
Do not expose the product to water or places of moisture.
Do not use this product outdoors it is intended for indoor use only.
Do not place the product near direct heat sources. Always place it in a well-ventilated place.
Do not place heavy items on the product or the cables.
Please ensure any adapters are firmly secured and locked in place before inserting into a wall
socket.
Instructions for Use of Power Supply
To connect the adapter
Slide the desired plug adapter into the power supply until it locks
into place.
To remove the adapter
Press the push button latch.
While pressed, remove the adapter.

User Manual English
Introduction
Thank you for purchasing the 5 Port HDMI 4K60 Seamless Multiview KVM Switch. This product has been
designed to provide trouble free, reliable operation. It benefits from both a LINDY 2 year warranty and free
lifetime technical support. To ensure correct use, please read this manual carefully and retain it for future
reference.
This advanced KVM switch allows the control of four HDMI and one Type C sources such as computers,
laptops, game consoles and so on from a single HDMI 4K display simultaneously with the screen split in
many different Multiview modes; the user can interact with each HDMI device from a console with mouse
and keyboard connecting the respective USB ports to the sources, also in any Multiview mode by simply
moving the mouse pointer from one quadrant to another. Thanks to seamless feature, switching from one
source to another happens instantly without any lag or black screen, making it perfect for any critical
application such as control rooms, broadcasting, E-Sports and security.
User can easily manage the switch via front panel buttons, IR remote control, hot-keys, RS-232 or TCP/IP
commands and control software while a second HDMI mirrored output can be used for additional local
monitoring or for video capture adding a HDMI to USB video capture device.
Package Contents
5 Port HDMI 4K60 Seamless Multiview KVM Switch
IR remote control
4-Pin Terminal Block
2 x Mounting Ears with screws
12VDC 2.5A Multi-country Power Supply (UK, EU, US & AUS), DC Jack: 5.5/2.1mm
Lindy Manual
Features
Supports resolutions up to 3840x2160@60Hz 4:4:4 8bit
KVM function to allow the connection of keyboard and mouse to control the inputs
Seamless inputs switching
2 mirrored HDMI outputs
5 different Multiview modes
Support USB mouse roaming
EDID management
Audio Pass-through of all HDMI audio formats including LPCM, AC3, DD+, DTS, DTS-HD up to 7.1
3.5mm and TosLink (optical) Audio outputs, support volume control and independent Audio selection
Manageable via front panel buttons with OSD, IR remote control, control software (for Windows),
keyboard hot-keys (for KVM selection), RS-232 or TCP/IP commands
Specification
HDMI 2.0b, 18Gbps compliant
HDCP 2.2/1.4 pass-through
ESD Protection: ± 8kV (air-gap discharge)
Human Body Model: ± 4kV (contact discharge)
Operating Temperature: 0°C - 40°C (32°F - 104°F)
Storage Temperature: -20°C - 60°C (-4°F - 140°F)
Relative Humidity: 10 - 70% RH (Non-condensing)
Metal Housing
Colour: Black
Power Requirements: AC100-240V 50/60Hz
Power Consumption: 15W

User Manual English
Installation
Front
1. IR: IR signal receiver.
2. AUTO / 1080P:
- Press this button to enable or disable the Auto Switching function on single display mode.
- Long press this button for 3 seconds to change the output resolution to 1080p60.
3. HDMI 1 / HDMI 2 / HDMI 3 / HDMI 4 / USB-C:
- Press these buttons to select HDMI 1, HDMI 2, HDMI 3, HDMI 4 or USB-C (AV only) input.
- Long press HDMI 1 button for 3 seconds to select SINGLE mode.
- Long press HDMI 2 button for 3 seconds to select PIP mode.
- Long press HDMI 3 button for 3 seconds to select PBP mode.
- Long press HDMI 4 button for 3 seconds to select 3xWIN mode.
- Long press USB-C button for 3 seconds to select 4xWIN mode.
4. WINDOW / AUDIO:
- Press this button to show a border on window 1, press again to show it on window 2, 3 or 4; then
press one input button to select the source signal to be displayed in the current selected window.
- Long press this button for 3 seconds, an Audio selection list will appear on the screen; use
buttons to browse and MENU button to confirm the selection.
The LED will stay always on when working on each Multiview mode, not on SINGLE mode.
5. KVM: Press this button to select one window as KVM source; for example press 2 times to show a
border on window 2, in this way the Mouse and Keyboard connected to the USB ports on the rear
panel will control the source showed on window 2.
Please Note: HDMI 4 and USB-C ports cannot be selected as a KVM source at the same time.
6. MENU / EXIT / : OSD menu navigation buttons.

User Manual English
Rear
1. HDMI A / HDMI B OUTPUT: Connect to two HDMI displays, HDMI A is the main output.
2. HDMI 1 / HDMI 2 / HDMI 3 / HDMI 4 / USB-C INPUT: Connect to HDMI and Type C source devices.
3. 12V DC: Connect the 12VDC 3A PSU to an AC wall outlet and securely connector to the unit.
4. SERVICE: USB Type A port. Connect to a PC for firmware update.
5. LAN: TCP/IP control port.
6. CONTROL: RS-232 port (5V output, Tx, Ground and Rx). Connect to a PC, Serial Controller or Serial
device via phoenix block 4-way connection for the pass-through transmission of RS-232 commands.
7. AUDIO OUT:
- L/R: 3.5mm analog stereo output port.
- TOSLINK: digital audio optical output port.
8. USB-KVM:
- Mouse / Keyboard: USB Type A ports, connect to a USB mouse and keyboard.
- HOST1 / HOST2 / HOST3 / HOST4: USB Type B ports related to each respective input for KVM
control. Please Note: HOST4 port can be used for KVM control of HDMI 4 or USB-C input (not
possible to use both at the same time).
9. Connect the housing to the ground.
Operation
The Switch supports resolutions up to 4K60 and audio formats such as LPCM, AC3, DD+, DTS, DTSHD,
up to 7.1 channel (pass-through function via HDMI cable, USB-C input supports only LPCM 2.0 audio).
LPCM format audio volume can be controlled as shown below in many ways, the following video output
resolutions are supported:
No.
Output Resolution
No.
Output Resolution
1
4096x2160p 60Hz
9
1920x1080p 50Hz
2
4096x2160p 50Hz
10
1360x768p 60Hz
3
3840x2160p 60Hz
11
1280x800p 60Hz
4
3840x2160p 50Hz
12
1280x720p 60Hz
5
3840x2160p 30Hz
13
1280x720p 50Hz
6
3840x2160p 25Hz
14
1024x768 60Hz
7
1920x1200p 60Hz RB
15
AUTO
8
1920x1080p 60Hz
16
USER

User Manual English
EDID & HDCP settings
The following EDID modes can be selected:
No. EDID Mode No. EDID Mode
1 4K60 – 2.0CH 10 1600x1200
2 4K60 – 5.1CH 11 1440x900
3 4K30 – 2.0CH 12 1360x768
4 4K30 – 5.1CH 13 1280x1024
5 1080p – 2.0CH 14 1024x768
6 1080p – 5.1CH 15 AUTO
7 720p 16 4K60 – 7.1CH
8 1920x1200 17 4K30 – 7.1CH
9 1680x1050 18 1080p – 7.1CH
19 USER
The HDMI output supports 2 HDCP options: FORCE-1.4 and FORCE-2.2.
Multiview
The switch support 5 Multiview display modes:
The following different operations can be done for each Multiview mode:
SINGLE: Inputs selection.
PIP: Inputs selection, Sub window size and position selection.
PBP, 3xWIN, 4xWIN: Inputs selection, Window Ratio selection, Display aspect selection.
Keyboard-Hotkeys KVM Selection
KVM selection can be done with the following Hotkeys:
Ctrl + Ctrl + 1, 2, 3 or 4: Input signal corresponding to WIN1, 2, 3 or 4 will be selected as KVM source.
Ctrl + Ctrl + R + N: Disable USB Roaming function.
Ctrl + Ctrl + R + Y: Enable USB Roaming function.
Ctrl + Ctrl + M + 1, 2, 3, 4 or 5: Switch multiview mode to SINGLE, PIP, PBP, 3xWIN, or 4xWIN mode.
Ctrl + Ctrl + W + “m” + SET + “n”: Display source “n” on window “m” (“m” stands for window number, “n”
stands for input number).
Ctrl + Ctrl + A + “n”: Switch Audio source (“n” stands for 1, ..5 to select an input or A to select WIN 1).
Ctrl + Ctrl + A + N: Mute Audio.
Ctrl + Ctrl + A + Y: Unmute Audio.

User Manual English
OSD Menu
OSD Menu can be activated pushing MENU button on the front panel, then all options can be browsed
pushing UP, DOWN, LEFT and RIGHT buttons. MENU button can be used also to confirm the choice,
EXIT button to go one step back or to exit from OSD Menu.
Output
Function Default Choices
Resolution 3840x2160p60 See Resolution table
VKA Black screen Black screen,
Blue screen
4K-Auto ON ON, OFF
ITC* OFF ON, OFF
Multiview
Single Input select HDMI1, HDMI2,..
PIP
Win1 select HDMI1, HDMI2,..
Win2 select HDMI1, HDMI2,..
PIP position Right bottom,..
PIP size Small,..
PBP
Win1 select HDMI1, HDMI2,..
Win2 select HDMI1, HDMI2,..
Mode 1, 2, 3
Aspect Full, 16:9
3xWIN
Win1 select HDMI1, HDMI2,..
Win2 select HDMI1, HDMI2,..
Win3 select HDMI1, HDMI2,..
Mode 1, 2
Aspect Full, 16:9
4xWIN
Win1 select HDMI1, HDMI2,..
Win2 select HDMI1, HDMI2,..
Win3 select HDMI1, HDMI2,..
Win4 select HDMI1, HDMI2,..
Mode 1, 2
Aspect Full, 16:9

User Manual English
Audio
Audio select Win1 Win1, HDMI1,..
Volume 100 0..100
Audio-mute OFF ON, OFF
System
Language English English, 中文
EDID 4K60 - 2.0 4K60 - 2.0,..
USB roaming** OFF ON, OFF
Baud rate 9600 9600, 19200, 38400,
57600, 115200
Reset
FW version Read only
IP Address Read only
*: as ITC setting, OFF is suggested for video display and ON for PC (specially for desktop display).
**: USB roaming function can be enabled only on PBP, 3xWIN or 4xWIN Multiview modes. Please note
that KVM function can be assigned to HDMI4 or USB-C port, not both together.
IR Remote control
1. Return / Exit
2. Video input selection
3. OSD menu navigation buttons: Menu (Enter), Up, Down, Left
Right
4. Multiview mode selection
5. Audio input selection
6. USB-KVM selection
TCP/IP Control

User Manual English
TCP/IP control
Default parameters
IP address: 192.168.0.247
Sub Mask: 255.255.255.0
Gateway: 192.168.0.1
Net Port: 2000
All the parameters can be changed by Software GUI and RS-232 command.
Software GUI (Windows only)
Download ViewerMate application from our website and install it on a Windows PC.
Default User: admin
Default Password: 111111
Click on Edit to change the default password and Login to enter.
Connect
RS232 and Network settings of the unit and IP address and SubMask info of the Computer connected.

User Manual English
Output
Select resolution and other output options as shown in the tables and features above.
Multiview
Select the Multiview mode to display and assign the inputs to the desired windows. Is possible to save
different layouts and recall them, click on Read button to activate the functions selected.
Audio
Select the audio input, change the volume (from 0 to 100) and set On/Off the mute function.

User Manual English
System
RS232, Network Firmware information and EDID functions; select an EDID mode (please see the table
above) or load an EDID file, then click on Read to confirm the choice.
RS-232 Control
Default: Baud rate 9600, 8 data bits, 1 stop bit, no parity. Baud rate can be changed via OSD menu or
software GUI. All the commands begin with SET or GET, end always with new line character (CR).
Command
Details
GET HELP
Get the Commands list
SET RESET
Recover to default setting
GET VERSION
Get firmware version
Return: VERSION w (w is version number)
SET BAUDRATE w
w is 9600, 19200, 38400, 57600 or 115200
Return: BAUDRATE w
GET BAUDRATE w
Return: BAUDRATE w
SET IP ADDRESS w
For example: SET IP ADDRESS 192.168.0.247
Return: IP ADDRESS w
GET IP ADDRESS
Return: IP ADDRESS w
SET SUBMASK w
For example: SET SUBMASK 255.255.255.0
Return: SUBMASK w
GET SUBMASK
Return: SUBMASK w
SET GATEWAY w
For example: SET GATEWAY 192.168.0.1
Return: GATEWAY w
GET GATEWAY
Return: GATEWAY w
SET NETPORT w
For example: SET NETPORT 2000
Return: NETPORT w
GET NETPORT
Return: NETPORT w
SET NETWORK-INFO IP PORT
SUBMASK GATEWAY
For Example:
SET NETWORK-INFO 192.168.0.247 2000 255.255.255.0
192.168.0.1
Return: NETWORK-INFO 192.168.0.247 2000 255.255.255.0
192.168.0.1
GET NETWORK-INFO
Return: NETWORK-INFO IP PORT SUBMASK GATEWAY

User Manual English
Switching command, only available on SINGLE mode
Commands
Details
SET AUTO SWITCH w
w is ON or OFF, default OFF
Return: AUTO SWITCH w
GET AUTO SWITCH
Return: AUTO SWITCH w
SET IN SOURCE w
w is one of the following:
HDMI1, HDMI2, HDMI3, HDMI4, USB-C
Return: IN SOURCE w
GET IN SOURCE
Get current input channel selection information
Return: IN SOURCE w
GET IN RESOLUTION
Get current input resolution
Return: IN RESOLUTION w (w is input resolution)
GET IN STATUS
Get status of all input ports
x is HDMI1…HMDI4, USB-C
Return: IN STATUS x VALID (or INVALID)
If input port is vaild,
Return: IN STATUS x InputRes ColorSpace ColorDepth
Output command
Commands
Details
SET OUT RESOLUTION w
w is one of the following, default: 3840x2160p60
4096x2160p60, 4096x2160p50,
3840x2160p60, 3840x2160p50,
3840x2160p30, 3840x2160p25,
1920x1200p60RB, 1920x1080p60,
1920x1080p50, 1360x768p60,
1280x800p60, 1280x720p60,
1280x720p50, 1024x768p60,
AUTO, USER
Return: OUT RESOLUTION w
GET OUT RESOLUTION
Get current output resolution setting
Return: OUT RESOLUTION w
SET RESO-USER Width Height
Set user define output resolution
Width is horizontal active pixels
Height is vertical active lines
For user define output resolution, the frame rate is always 60Hz
Return: RESO-USER Width Height
GET RESO-USER
Return: RESO-USER Width Height
SET OUT 4K-AUTO w
w is ON or OFF, default ON
If we set 4K output to a displayer which can’t support 4K, then the
ON setting can change the resolution to 1080p or 4K-4:2:0
Return: OUT 4K-AUTO w
GET OUT 4K-AUTO
Get current OUT 4K-AUTO mode
Return: OUT 4K-AUTO w
SET OUT HDCP w
w is one of the following, default FORCE-1.4
FORCE-1.4, FORCE-2.2
Return: OUT HDCP w
GET OUT HDCP
Return: OUT HDCP w
SET OUT VKA w
w is BLUESCREEN or BLACKSCREEN.
Default BLACKSCREEN. It is for no signal display
Return: OUT VKA w
GET OUT VKA
Return: OUT VKA w
SET OUT ITC w
w is ON or OFF, default OFF
Return: OUT ITC w

User Manual English
GET OUT ITC
Return: OUT ITC w
Multiview command
Commands
Details
SET MULTIVIEW w
Select one Multiview mode for current display
w is one of the following, default SINGLE
SINGLE , PIP , PBP , 3xWIN , 4xWIN
Return: MULTIVIEW w
GET MULTIVIEW
Get the current Multiview mode
Return: MULTIVIEW w
SET WINDOWx IN y
Select one input for one display window for the current Multiview
mode. x is one of 1, 2, 3 or 4
y is one of HDMI1, HDMI2, HDMI3, HDMI4, USB-C
Return: WINDOWx IN y
GET WINDOWx IN
This command to get which is the input source for one display
window for the current Multiview mode
Return: WINDOWx IN y
SET FREEZE-WINx w
Freeze the display window,x is one of 1, 2, 3 ,4 or ALL, w is ON
or OFF
Return: FREEZE-WINx w
GET FREEZE-WINx
x is one of 1, 2, 3 ,4.
Return: FREEZE-WINx w (w is ON or OFF)
SET PIP POS w
This command to select the PIP sub window position.
w is one of the following, default RightBottom
LeftTop, LeftBottom, RightTop, RightBottom, USER
Return: PIP POS w
GET PIP POS
This command to get the PIP sub window position
Return: PIP POS w
SET PIP SIZE w
This command to select the PIP sub window size.
w is one of the following, default LARGE
SMALL, MIDDLE, LARGE, USER
Return: PIP SIZE w
GET PIP SIZE
Return: PIP SIZE w
SET PIP USER HStart VStart
HSize VSize
Return: PIP USER HStart VStart HSize VSize
This command allows users to customize a PIP layout include
sub window position and size.
This customized PIP layout will replace other pre-defined PIP
modes (such as LeftTop,LARGE) and display on the screen
Please note
HStart plus HSize less than or equal to 101
VStart plus VSize less than or equal to 101
GET PIP USER
Return: PIP USER HStart VStart HSize VSize
SET PBP MODE w
Set the PBP display mode
w is one of 1,2 or 3, default 1
Return: PBP MODE w
Please note for PBP mode 3, the window 1 can capture part of
the input image area. It is main used for presenter show when
work with conference camera situations

User Manual English
The capture area can be defined by SET PBP-PRESENTER
command
GET PBP MODE
Return: PBP MODE w
SET PBP ASPECT w
Set the PBP window display aspect
w is FULL or 16:9, default FULL
Return: PBP ASPECT w
GET PBP ASPECT
Return: PBP ASPECT w
SET PBP-PRESENTER HStart
VStart HSize VSize
Set window 1 capture area for PBP mode 3
This command only valid when the switch is on PBP mode 3
Return: PBP-PRESENTER HStart VStart HSize VSize
Default HStart 38, VStart 13, HSize 25, VSize 75
Please note
HStart plus HSize less than or equal to 101
VStart plus VSize less than or equal to 101
GET PBP-PRESENTER
Return: PBP-PRESENTER HStart VStart HSize VSize
SET 3xWIN MODE w
Set the 3xWIN display mode
w is one of 1,2,3 or 4, default 1
Return: 3xWIN MODE w
GET 3xWIN MODE
Return: 3xWIN MODE w
SET 3xWIN ASPECT w
Set the 3xWIN window display aspect
w is FULL or 16:9, default FULL
Return: 3xWIN ASPECT w
GET 3xWIN ASPECT
Return: 3xWIN ASPECT w
SET 4xWIN MODE w
Set the 4xWIN display mode
w is 1 or 2, default 1

User Manual English
Return: 4xWIN MODE w
GET 4xWIN MODE
Return: 4xWIN MODE w
SET 4xWIN ASPECT w
Set the 4xWIN window display aspect
w is FULL or 16:9, default FULL
Return: 4xWIN ASPECT w
GET 4xWIN ASPECT
Return: 4xWIN ASPECT w
GET MULTIVIEW-SYNC
Return Multiview layout information
SET SAVE SCENE w
Save current display scene
w is 1, 2,…20
Return: SAVE SCENE w
SET LOAD SCENE w
Load display scene
w is 1, 2,…20
Return: LOAD SCENE w
Audio command
Commands
Details
SET AUDIO SOURCE w
w is one of the following:
WIN1, HDMI1, HDMI2, HDMI3, HDMI4, USB-C
Return: AUDIO SOURCE w
GET AUDIO SOURCE
Return: AUDIO SOURCE w
SET AUDIO VOL+
Increase audio out volume
Return: AUDIO VOL w (w is the volume value)
SET AUDIO VOL-
Decrease audio out volume
Return: AUDIO VOL w (w is the volume value)
SET AUDIO VOL w
Set audio volume value
w is 0,1…, or 100, default 100
For example: SET AUDIO VOL 100
Return: AUDIO VOL w
GET AUDIO VOL
Return: AUDIO VOL w
SET AUDIO-MUTE w
Mute or unmute audio output
Here w is ON or OFF, default OFF
Return: AUDIO-MUTE w
GET AUDIO-MUTE
Return: AUDIO-MUTE w
KVM command
Commands
Details
SET KVM w
w is one of WIN1, WIN2, WIN3, WIN4
Return: KVM w
SET USB ROAMING w
w is ON or OFF, default OFF
Return: USB ROAMING w
GET USB ROAMING
Return: USB ROAMING w
Please note when work on SINGLE display mode, the KVM function of current selected source is always
activated.

User Manual English
EDID command
The following commands are used to set EDID mode for the inputs
Commands
Details
SET IN EDIDMODE w
w is one of the following:
4K60-2.0, 4K60-5.1, 4K60-7.1, 4K30-2.0,
4K30-5.1, 4K30-7.1, 1080p60-2.0,1080p60-5.1,
1080p60-7.1,1920x1200, 1680x1050, 1600x1200, 1440x900,
1360x768, 1280x1024, 1024x768, 720p, AUTO, USER
Default: 4K60-2.0
Return: IN EDIDMODE w
SET EDID-USER w
Switcher can only support 256 bytes EDID-USER data.
w is 256 bytes EDID data.
Return: EDID-USER OK
GET IN EDIDMODE
Return: IN EDIDMODE w
Troubleshooting
There is no image displayed on the screen.
Please check the max. resolution supported by the source and the screen and if the output resolution
is set to 4K and the 4K-AUTO setting is OFF.
Long press the AUTO button on the front panel to change the output resolution to the needed one and
set 4K-AUTO to ON.
There is no audio signal.
Since audio selection is separated from the video selection, please check if the audio selection comes
from the required source. By default is set on Win1.
Please check if Audio-Mute is enabled.
Please check if Audio Volume value is more than 0; if there is no feedback adjusting the volume it
should be because the audio source is a non-LPCM format such as AC3 or DTS 5.1. The volume can
be changed only with LPCM format.
Please check if the audio format selected is supported by the audio device connected.
There is no TCP/IP connection.
Please check the IP address, NetPort, Baud rate settings. The switch and the router connected must
be in the same network segment.

Benutzerhandbuch Deutsch
Sicherheitshinweise
GEFAHR
Bitte lesen Sie die folgenden Sicherheitshinweise sorgfältig durch und bewahren Sie
dieses Dokument immer zusammen mit dem Produkt auf.
Die Nichtbeachtung dieser Vorsichtsmaßnahmen kann zu schweren Verletzungen oder
zum Tod durch Stromschlag, Feuer oder Schäden am Produkt führen.
Das Berühren der internen Komponenten oder eines beschädigten Kabels kann einen
elektrischen Schlag verursachen, der zum Tod führen kann.
Dieses Schaltnetzteil arbeitet mit Anschlussspannungen im Bereich von 100…240 VAC. Für weltweiten
Einsatz sind vier verschiedene AC-Adapter für Europa, Großbritannien, USA/Japan und
Australien/Neuseeland enthalten. Verwenden Sie den geeigneten Adapter wie es die Abbildung zeigt.
Stellen Sie bitte sicher, dass der Adapter fest eingerastet ist und sich nicht abziehen lässt, bevor Sie ihn
in die Steckdose stecken.
Um die Gefahr von Bränden, Stromschlägen oder Schäden zu verringern:
Öffnen Sie weder das Produkt noch sein Netzteil. Es befinden sich keine vom Benutzer zu
wartenden Teile im Inneren.
Ausschließlich qualifiziertes Personal darf Reparaturen oder Wartungen durchführen.
Verwenden Sie niemals beschädigte Kabel.
Setzen Sie das Produkt nicht Wasser oder Feuchtigkeit aus.
Dieses Produkt ist nur für den Gebrauch in geschlossenen Räumen bestimmt.
Stellen Sie das Produkt nicht in der Nähe von direkten Wärmequellen auf. Stellen Sie es immer an
einem gut belüfteten Ort auf.
Stellen Sie keine schweren Gegenstände auf das Produkt oder die Kabel.
Bitte stellen Sie vor der Verwendung sicher, dass alle Adapter sicher und fest eingerastet sind
Anwendungshinweise für das Netzteil
So schließen Sie den Adapter an:
Schieben Sie den gewünschten Steckeradapter in das Netzteil,
bis er einrastet.
Um den Adapter zu entfernen drücken Sie die
Druckknopfverriegelung.
Halten Sie den Druckknopf gedrückt und ziehen Sie den
Adapter heraus.

Benutzerhandbuch Deutsch
Einführung
Wir freuen uns, dass Ihre Wahl auf ein LINDY-Produkt gefallen ist und danken Ihnen für Ihr Vertrauen. Sie
können sich jederzeit auf unsere Produkte und einen guten Service verlassen. Dieser 5 Port HDMI 4K60
Seamless Multiview KVM Switch unterliegt einer 2-Jahres LINDY Herstellergarantie und lebenslangem
kostenlosen, technischen Support. Bitte lesen Sie diese Anleitung sorgfältig und bewahren Sie sie auf.
Dieser professionelle KVM-Switch ermöglicht die Steuerung von vier HDMI- und einer Typ-C-Quelle wie
Computer, Laptops, Spielkonsolen usw. von einem einzigen HDMI 4K-Display aus, wobei der Bildschirm
in viele verschiedene Multiview-Modi aufgeteilt werden kann. Der Benutzer kann mit jedem HDMI-Gerät
von einer Konsole aus mit Maus und Tastatur interagieren, indem er die jeweiligen USB-Ports mit den
Quellen verbindet, auch in jedem Multiview-Modus, indem er einfach den Mauszeiger von einem
Quadranten zum anderen bewegt. Dank der ‚Seamless‘-Funktion erfolgt der Wechsel von einer Quelle zur
anderen sofort und ohne Verzögerung oder schwarzen Bildschirm - perfekt für alle kritischen
Anwendungen wie Kontrollräume, Rundfunk, E-Sport und Sicherheitsanwendungen.
Der Benutzer kann den Switch ganz einfach über die Tasten an der Vorderseite, die IR-Fernbedienung,
Hot-Keys, RS-232- oder TCP/IP-Befehle und Steuersoftware verwalten. Ein zweiter gespiegelter HDMI-
Ausgang kann für zusätzliches lokales Monitoring oder für Videoaufnahmen verwendet werden, indem ein
HDMI-auf-USB-Videoaufnahmegerät hinzugefügt wird.
Lieferumfang
5 Port HDMI 4K60 Seamless Multiview KVM Switch
IR-Fernbedienung
4-polige Klemmleiste
2 x Montagebügel mit Schrauben
12VDC 2.5A Multi Country Netzteil (UK, EU, US & AUS), DC-Buchse: 5.5/2.1mm
Lindy Handbuch
Eigenschaften
Unterstützt Auflösungen bis zu 3840x2160@60Hz 4:4:4 8bit
KVM-Funktion, die den Anschluss von Tastatur und Maus zur Steuerung der Eingänge ermöglicht
Verzögerungsfreies Umschalten der Eingänge
2 gespiegelte HDMI-Ausgänge
5 verschiedene Multiview-Modi
Unterstützung von USB-Maus-Roaming
EDID-Verwaltung
Audio-Pass-Through aller HDMI-Audioformate einschließlich LPCM, AC3, DD+, DTS, DTS-HD bis zu
7.1
3.5-mm- und TosLink-Audioausgänge (optisch), Unterstützung von Lautstärkeregelung und
unabhängiger Audioauswahl
Verwaltbar über Tasten an der Vorderseite mit OSD, IR-Fernbedienung, Steuerungssoftware (für
Windows), Tastatur-Hotkeys (für KVM-Auswahl), RS-232 oder TCP/IP-Befehle
Spezifikationen
HDMI 2.0b, 18Gbit/s-konform
HDCP 2.2/1.4 Pass-through
ESD-Schutz: ± 8 kV (Luftspaltentladung)
Human Body Model: ± 4 kV (Kontaktentladung)
Betriebstemperatur: 0°C - 40°C (32°F - 104°F)
Lagertemperatur: -20°C - 60°C (-4°F - 140°F)
Relative Luftfeuchtigkeit: 10 - 70% RH (nicht kondensierend)

Benutzerhandbuch Deutsch
Metallgehäuse
Farbe: Schwarz
Strombedarf: AC100-240V 50/60Hz
Energieverbrauch: 15W
Installation
Vorderseite:
1. IR: Infrarot-Signalempfänger
2. AUTO / 1080P:
- Drücken Sie diese Taste, um die automatische Umschaltfunktion im Einzelanzeigemodus zu
aktivieren oder zu deaktivieren.
- Halten Sie diese Taste 3 Sekunden lang gedrückt, um die Ausgangsauflösung auf 1080p60 zu
ändern.
3. HDMI 1 / HDMI 2 / HDMI 3 / HDMI 4 / USB-C:
- Drücken Sie diese Tasten, um den Eingang HDMI 1, HDMI 2, HDMI 3, HDMI 4 oder USB-C (nur
AV) auszuwählen.
- Drücken Sie die Taste HDMI 1 drei Sekunden lang, um den SINGLE-Modus auszuwählen.
- Drücken Sie die Taste HDMI 2 drei Sekunden lang, um den PIP-Modus auszuwählen.
- Drücken Sie die Taste HDMI 3 drei Sekunden lang, um den PBP-Modus auszuwählen.
- Drücken Sie die Taste HDMI 4 drei Sekunden lang, um den Modus 3xWIN auszuwählen.
- Drücken Sie die USB-C-Taste drei Sekunden lang, um den 4xWIN-Modus auszuwählen.
4. WINDOW / AUDIO:
- Drücken Sie diese Taste, um einen Rahmen in Fenster 1 anzuzeigen, drücken Sie sie erneut, um
ihn in Fenster 2, 3 oder 4 anzuzeigen; drücken Sie dann eine Eingangstaste, um das Quellsignal
auszuwählen, das im aktuell ausgewählten Fenster angezeigt werden soll.
- Wenn Sie diese Taste 3 Sekunden lang gedrückt halten, wird eine Audio-Auswahlliste auf dem
Bildschirm angezeigt; verwenden Sie die Tasten zum Blättern und die Taste
MENU zum Bestätigen der Auswahl.
Die LED leuchtet immer, wenn Sie im Multiview-Modus arbeiten, allerdings nicht im SINGLE-Modus.
5. KVM: Drücken Sie diese Taste, um ein Fenster als KVM-Quelle auszuwählen; drücken Sie z. B. 2
Mal, um einen Rahmen auf Fenster 2 anzuzeigen. Auf diese Weise steuern die Maus und die Tastatur,
die an die USB-Anschlüsse auf der Rückseite angeschlossen sind, die auf Fenster 2 angezeigte
Quelle.
Bitte beachten Sie: HDMI 4 und USB-C-Ports können nicht gleichzeitig als KVM-Quelle ausgewählt
werden.
6. MENU / EXIT / : OSD-Menü-Navigationstasten

Benutzerhandbuch Deutsch
Rückseite:
1. HDMI A / HDMI B OUTPUT: Anschluss an zwei HDMI-Bildschirme, HDMI A ist der Hauptausgang.
2. HDMI 1 / HDMI 2 / HDMI 3 / HDMI 4 / USB-C INPUT: Anschluss an HDMI- und Typ-C-Quellgeräte.
3. 12V DC: Schließen Sie das 12VDC 3A Netzteil an einer Steckdose an und verbinden Sie es fest mit
dem Gerät.
4. SERVICE: USB Typ A Port. Anschluss an den PC für ein Firmwareupdate.
5. LAN: TCP/IP-Kontrollport.
6. CONTROL: RS-232 Port (5V-Ausgang, Tx, Masse und Rx). Anschluss an einen PC, seriellen
Controller oder ein serielles Gerät über eine Phoenixblock-Verbindung (4 Pin) zum Pass-through von
RS-232-Befehlen.
7. AUDIO OUT:
- L/R: 3.5mm Analog-Stereo-Ausgangsport.
- TOSLINK: digitaler, optischer Audio-Ausgangsport.
8. USB-KVM:
- Mouse / Keyboard: USB Typ A Ports, zum Anschluss einer USB-Maus und einer USB-Tastatur.
- HOST1 / HOST2 / HOST3 / HOST4: USB Typ B Ports für die jeweiligen Eingänge zur KVM-
Steuerung. Bitte beachten Sie: Der HOST4-Anschluss kann für die KVM-Steuerung des HDMI-4-
oder des USB-C-Eingangs verwendet werden (es ist nicht möglich, beide gleichzeitig zu verwenden).
9. Erden Sie das Gehäuse.
Betrieb
Der Switch unterstützt Auflösungen bis zu 4K60 und Audioformate wie LPCM, AC3, DD+, DTS, DTSHD,
bis zu 7.1-Kanal (Pass-Through-Funktion über HDMI-Kabel, USB-C-Eingang unterstützt nur LPCM 2.0
Audio). Die Lautstärke des LPCM-Audioformats kann wie unten gezeigt auf verschiedene Weise gesteuert
werden. Folgende Videoausgangsauflösungen werden unterstützt:
No.
Output Resolution
No.
Output Resolution
1
4096x2160p 60Hz
9
1920x1080p 50Hz
2
4096x2160p 50Hz
10
1360x768p 60Hz
3
3840x2160p 60Hz
11
1280x800p 60Hz
4
3840x2160p 50Hz
12
1280x720p 60Hz
5
3840x2160p 30Hz
13
1280x720p 50Hz
6
3840x2160p 25Hz
14
1024x768 60Hz
7
1920x1200p 60Hz RB
15
AUTO
8
1920x1080p 60Hz
16
USER

Benutzerhandbuch Deutsch
EDID- & HDCP-Einstellungen
Folgende EDID-Modi können ausgewählt werden:
No. EDID-Modus No. EDID-Modus
1
4K60 – 2.0CH
10
1600x1200
2
4K60 – 5.1CH
11
1440x900
3
4K30 – 2.0CH
12
1360x768
4
4K30 – 5.1CH
13
1280x1024
5
1080p – 2.0CH
14
1024x768
6
1080p – 5.1CH
15
AUTO
7
720p
16
4K60 – 7.1CH
8
1920x1200
17
4K30 – 7.1CH
9
1680x1050
18
1080p – 7.1CH
19
USER
Der HDMI-Ausgang unterstützt 2 HDCP-Optionen: FORCE-1.4 und FORCE-2.2.
Multiview
Der Switch unterstützt 5 Multiview-Displaymodi:
Für jeden Multiview-Modus können die folgenden verschiedenen Operationen durchgeführt werden:
SINGLE: Auswahl der Eingänge.
PIP: Auswahl der Eingänge, Auswahl der Größe und Position des Unterfensters.
PBP, 3xWIN, 4xWIN: Auswahl der Eingänge, Auswahl des Anzeigemodus, Auswahl des Anzeigeformats.
Tastatur-Hotkeys KVM-Auswahl
Die KVM-Auswahl kann mit den folgenden Hotkeys erfolgen:
Ctrl + Ctrl + 1, 2, 3 oder 4: Das Eingangssignal, das WIN1, 2, 3 oder 4 entspricht, wird als KVM-Quelle
ausgewählt.
Ctrl + Ctrl + R + N: USB-Roaming-Funktion deaktivieren.
Ctrl + Ctrl + R + Y: Aktivieren der USB-Roaming-Funktion.
Ctrl + Ctrl + M + 1, 2, 3, 4 oder 5: Umschalten des Multiview-Modus auf den Modus SINGLE, PIP, PBP,
3xWIN oder 4xWIN.
Ctrl + Ctrl + W + “m” + SET + “n”: Quelle "n" auf Fenster "m" anzeigen ("m" steht für die Fensternummer,
"n" steht für die Eingangsnummer).
Ctrl + Ctrl + A + “n”: Audioquelle umschalten ("n" steht für 1, ..5 zur Auswahl eines Eingangs oder A zur
Auswahl von WIN 1).
Ctrl + Ctrl + A + N: Audio stummschalten.
Ctrl + Ctrl + A + Y: Stummschaltung aufheben.

Benutzerhandbuch Deutsch
OSD-Menü
Das OSD-Menü kann durch Drücken der Taste MENU auf der Vorderseite aktiviert werden, dann können
alle Optionen durch Drücken der Tasten UP, DOWN, LEFT und RIGHT durchlaufen werden. Die Taste
MENU kann auch zur Bestätigung der Auswahl verwendet werden, die Taste EXIT, um einen Schritt
zurück zu gehen oder das OSD-Menü zu verlassen.
Output
Funktion Standard Auswahl
Auflösung/Resolution 3840x2160p60 Siehe Auflösungen
VKA Black Screen Black screen,
Blue screen
4K-Auto ON ON, OFF
ITC* OFF ON, OFF
Multiview
Single Input select HDMI1, HDMI2,..
PIP
Win1 select HDMI1, HDMI2,..
Win2 select HDMI1, HDMI2,..
PIP-Position Right bottom,..
PIP size Small,..
PBP
Win1 select HDMI1, HDMI2,..
Win2 select HDMI1, HDMI2,..
Mode 1, 2, 3
Aspect Full, 16:9
3xWIN
Win1 select HDMI1, HDMI2,..
Win2 select HDMI1, HDMI2,..
Win3 select HDMI1, HDMI2,..
Mode 1, 2
Aspect Full, 16:9
4xWIN
Win1 select HDMI1, HDMI2,..
Win2 select HDMI1, HDMI2,..
Win3 select HDMI1, HDMI2,..
Win4 select HDMI1, HDMI2,..
Mode 1, 2
Aspect Full, 16:9

Benutzerhandbuch Deutsch
Audio
Audio select Win1 Win1, HDMI1,..
Volume 100 0..100
Audio-mute OFF ON, OFF
System
Language English English, 中文
EDID 4K60 - 2.0 4K60 - 2.0,..
USB roaming** OFF ON, OFF
Baud rate 9600 9600, 19200, 38400,
57600, 115200
Reset
FW version Read only
IP Address Read only
*: als ITC-Einstellung wird OFF für Video-Display und ON für PC empfohlen (speziell für Desktop-Display).
**: Die USB-Roaming-Funktion kann nur im PBP-, 3xWIN- oder 4xWIN-Multiview-Modus aktiviert werden.
Bitte beachten Sie, dass die KVM-Funktion entweder dem HDMI4- oder dem USB-C-Anschluss
zugewiesen werden kann, nicht beiden zusammen.
IR-Fernbedienung
1. Zurück / Beenden
2. Auswahl des Videoeingangs
3. OSD-Menü-Navigationstasten: Menü (Enter), Auf, Ab,
Links, Rechts
4. Auswahl des Multiview-Modus
5. Auswahl des Audioeingangs
6. USB-KVM-Auswahl
TCP/IP Control

Benutzerhandbuch Deutsch
TCP/IP-Kontrolle
Standardparameter
IP address: 192.168.0.247
Sub Mask: 255.255.255.0
Gateway: 192.168.0.1
Net Port: 2000
Alle Parameter können über die Software-GUI und RS-232-Befehle geändert werden.
Software GUI (nur Windows)
Laden Sie die Anwendung ViewerMate von unserer Website herunter und installieren Sie sie auf einem
Windows-PC.
Default (Standard) User: admin
Default (Standard) Password: 111111
Klicken Sie auf Edit/Bearbeiten, um das Standardpasswort zu ändern, und auf Login/Anmelden, um das
Passwort einzugeben.
Connect
RS232- und Netzwerkeinstellungen des Geräts sowie IP-Adresse und SubMask-Informationen des
angeschlossenen Computers.

Benutzerhandbuch Deutsch
Output
Wählen Sie die Auflösung und andere Ausgabeoptionen wie in den Tabellen und Funktionen oben gezeigt.
Multiview
Wählen Sie den Multiview-Modus zur Anzeige und weisen Sie die Eingänge den gewünschten Fenstern
zu. Es ist möglich, verschiedene Layouts zu speichern und abzurufen, klicken Sie auf die Schaltfläche
Read/Lesen, um die ausgewählten Funktionen zu aktivieren.
Audio
Wählen Sie den Audioeingang, ändern Sie die Lautstärke (von 0 bis 100) und schalten Sie die
Stummschaltfunktion ein/aus.

Benutzerhandbuch Deutsch
System
RS232, Netzwerk-Firmware-Informationen und EDID-Funktionen; wählen Sie einen EDID-Modus (siehe
Tabelle oben) oder laden Sie eine EDID-Datei und klicken Sie dann auf Read/Lesen, um die Auswahl zu
bestätigen.
RS-232-Steuerung
Voreinstellung: Baudrate 9600, 8 Datenbits, 1 Stoppbit, keine Parität. Die Baudrate kann über das OSD-
Menü oder die Software-GUI geändert werden. Alle Befehle (Commands) beginnen mit SET oder GET
und enden immer mit .
Command
Details
GET HELP
Abrufen der Befehlsliste
SET RESET
Wiederherstellen der Standardeinstellung
GET VERSION
Firmware-Version abfragen
Return: VERSION w (w is version number)
SET BAUDRATE w
w ist 9600, 19200, 38400, 57600 oder 115200
Return: BAUDRATE w
GET BAUDRATE w
Return: BAUDRATE w
SET IP ADDRESS w
Beispiel: SET IP ADDRESS 192.168.0.247
Return: IP ADDRESS w
GET IP ADDRESS
Return: IP ADDRESS w
SET SUBMASK w
Beispiel: SET SUBMASK 255.255.255.0
Return: SUBMASK w
GET SUBMASK
Return: SUBMASK w
SET GATEWAY w
Beispiel: SET GATEWAY 192.168.0.1
Return: GATEWAY w
GET GATEWAY
Return: GATEWAY w
SET NETPORT w
Beispiel: SET NETPORT 2000
Return: NETPORT w
GET NETPORT
Return: NETPORT w
SET NETWORK-INFO IP PORT
SUBMASK GATEWAY
Beispiel:
SET NETWORK-INFO 192.168.0.247 2000 255.255.255.0
192.168.0.1

Benutzerhandbuch Deutsch
Beispiel: NETWORK-INFO 192.168.0.247 2000 255.255.255.0
192.168.0.1
GET NETWORK-INFO
Return: NETWORK-INFO IP PORT SUBMASK GATEWAY
Switching Command, nur im SINGLE-Modus verfügbar
Commands
Details
SET AUTO SWITCH w
w ist EIN oder AUS, Standard ist AUS
Return: AUTO SWITCH w
GET AUTO SWITCH
Return: AUTO SWITCH w
SET IN SOURCE w
w ist einer der folgenden Werte:
HDMI1, HDMI2, HDMI3, HDMI4, USB-C
Return: IN SOURCE w
GET IN SOURCE
Informationen zur Auswahl des aktuellen Eingangskanals abrufen
Return: IN SOURCE w
GET IN RESOLUTION
Aktuelle Eingangsauflösung abrufen
Return: IN RESOLUTION w (w ist die Eingangsauflösung)
GET IN STATUS
Status aller Eingangsanschlüsse abfragen
x ist HDMI1…HMDI4, USB-C
Return: IN STATUS x VALID (oder INVALID)
Wenn der Eingangsanschluss gültig ist,
Return: IN STATUS x InputRes ColorSpace ColorDepth
Output Command
Commands
Details
SET OUT RESOLUTION w
w ist einer der folgenden Werte, Standard: 3840x2160p60
4096x2160p60, 4096x2160p50,
3840x2160p60, 3840x2160p50,
3840x2160p30, 3840x2160p25,
1920x1200p60RB, 1920x1080p60,
1920x1080p50, 1360x768p60,
1280x800p60, 1280x720p60,
1280x720p50, 1024x768p60,
AUTO, USER
Return: OUT RESOLUTION w
GET OUT RESOLUTION
Aktuelle Einstellung der Ausgabeauflösung abrufen
Return: OUT RESOLUTION w
SET RESO-USER Width Height
Benutzerdefinierte Ausgabeauflösung einstellen
Breite ist horizontal aktive Pixel
Höhe ist vertikal aktive Zeilen
Bei der benutzerdefinierten Ausgabeauflösung beträgt die
Bildfrequenz immer 60Hz.
Return: RESO-USER Width Height
GET RESO-USER
Return: RESO-USER Width Height
SET OUT 4K-AUTO w
w ist ON oder OFF, Standardeinstellung ON
Wenn wir die 4K-Ausgabe auf einen Bildschirm einstellen, der 4K
nicht unterstützt, dann kann die Einstellung ON die Auflösung auf
1080p oder 4K-4:2:0 ändern.
Return: OUT 4K-AUTO w
GET OUT 4K-AUTO
Aktuellen OUT 4K-AUTO-Modus abfragen
Return: OUT 4K-AUTO w
SET OUT HDCP w
w ist einer der folgenden Werte, default FORCE-1.4
FORCE-1.4, FORCE-2.2
Return: OUT HDCP w
GET OUT HDCP
Return: OUT HDCP w
w ist BLUESCREEN oder BLACKSCREEN

Benutzerhandbuch Deutsch
SET OUT VKA w
Standard BLACKSCREEN.
Return: OUT VKA w
GET OUT VKA
Return: OUT VKA w
SET OUT ITC w
w ist ON oder OFF, default OFF
Return: OUT ITC w
GET OUT ITC
Return: OUT ITC w
Multiview Command
Commands
Details
SET MULTIVIEW w
Wählen Sie einen Multiview-Modus für die aktuelle Anzeige
w ist einer der folgenden Werte, Standard SINGLE
SINGLE , PIP , PBP , 3xWIN , 4xWIN
Return: MULTIVIEW w
GET MULTIVIEW
Abrufen des aktuellen Multiview-Modus
Return: MULTIVIEW w
SET WINDOWx IN y
Auswahl eines Eingangs für ein Anzeigefenster für den aktuellen
Multiview-Modus. x ist entweder 1, 2, 3 oder 4
y ist entweder HDMI1, HDMI2, HDMI3, HDMI4, USB-C
Return: WINDOWx IN y
GET WINDOWx IN
Abrufen der Eingangsquelle für ein Anzeigefenster für den
aktuellen Multiview-Modus
Return: WINDOWx IN y
SET FREEZE-WINx w
Einfrieren des Anzeigefensters, x ist eines von 1, 2, 3, 4 oder
ALL, w ist ON oder OFF
Return: FREEZE-WINx w
GET FREEZE-WINx
x ist eines von 1, 2, 3, 4
Return: FREEZE-WINx w (w ist ON oder OFF)
SET PIP POS w
Wählen Sie die Größe des PIP-Unterfensters.
w ist einer der folgenden Werte, Standard RightBottom
LeftTop, LeftBottom, RightTop, RightBottom, USER
Return: PIP POS w
GET PIP POS
Dieser Befehl ermittelt die Position des PIP-Unterfensters
Return: PIP POS w
SET PIP SIZE w
Mit diesem Befehl können Sie die Größe des PIP-Unterfensters
auswählen.
w ist einer der folgenden Werte, Standard LARGE
SMALL, MIDDLE, LARGE, USER
Return: PIP SIZE w
GET PIP SIZE
Return: PIP SIZE w
SET PIP USER HStart VStart
HSize VSize
Return: PIP USER HStart VStart HSize VSize
Mit diesem Befehl kann der Benutzer ein PIP-Layout mit Position
und Größe des Unterfensters anpassen.
Dieses angepasste PIP-Layout ersetzt andere vordefinierte PIP-
Modi (wie LeftTop, LARGE) und wird auf dem Bildschirm
angezeigt
Bitte beachten Sie
HStart plus HSize kleiner als oder gleich 101
VStart plus VSize kleiner als oder gleich 101
GET PIP USER
Return: PIP USER HStart VStart HSize VSize

Benutzerhandbuch Deutsch
SET PBP MODE w
Einstellen des PBP-Anzeigemodus
w ist entweder 1, 2 oder 3, Standard 1
Return: PBP MODE w
Bitte beachten Sie, dass im PBP-Modus 3 das Fenster 1 einen
Teil des Eingangsbildbereichs erfassen kann. Es wird
hauptsächlich für die Moderatoren-Show verwendet, wenn Sie
mit einer Konferenzkamera arbeiten.
Der Aufnahmebereich kann mit dem Befehl SET PBP-
PRESENTER definiert werden
GET PBP MODE
Return: PBP MODE w
SET PBP ASPECT w
Einstellen des Anzeigeformats des PBP-Fensters
w ist FULL oder 16:9, Standard FULL
Return: PBP ASPECT w
GET PBP ASPECT
Return: PBP ASPECT w
SET PBP-PRESENTER HStart
VStart HSize VSize
Fenster 1 Erfassungsbereich für PBP-Modus 3 einstellen
Dieser Befehl ist nur gültig, wenn sich der Schalter im PBP-
Modus 3 befindet.
Return: PBP-PRESENTER HStart VStart HSize VSize
Default HStart 38, VStart 13, HSize 25, VSize 75
Bitte beachten Sie
HStart plus HSize less than or equal to 101
VStart plus VSize less than or equal to 101
GET PBP-PRESENTER
Return: PBP-PRESENTER HStart VStart HSize VSize
SET 3xWIN MODE w
Einstellen des 3xWIN-Anzeigemodus
w ist entweder 1, 2, 3 oder 4, Standard 1
Return: 3xWIN MODE w
GET 3xWIN MODE
Return: 3xWIN MODE w
SET 3xWIN ASPECT w
Einstellen des Anzeigeformats des 3xWIN-Fensters
w ist FULL oder 16:9, Standard FULL

Benutzerhandbuch Deutsch
Return: 3xWIN ASPECT w
GET 3xWIN ASPECT
Return: 3xWIN ASPECT w
SET 4xWIN MODE w
Einstellen des 4xWIN-Anzeigemodus
w ist 1 oder 2, Standard 1
Return: 4xWIN MODE w
GET 4xWIN MODE
Return: 4xWIN MODE w
SET 4xWIN ASPECT w
Einstellen des Anzeigeformats des 4xWIN-Fensters
w ist FULL oder 16:9, Standard FULL
Return: 4xWIN ASPECT w
GET 4xWIN ASPECT
Return: 4xWIN ASPECT w
GET MULTIVIEW-SYNC
Rückgabe von Multiview-Layout-Informationen
SET SAVE SCENE w
Speichern der aktuellen Anzeigeszene
w ist 1, 2,…20
Return: SAVE SCENE w
SET LOAD SCENE w
Display-Szene laden
w ist 1, 2,…20
Return: LOAD SCENE w
Audio Command
Commands
Details
SET AUDIO SOURCE w
w ist einer der folgenden Werte:
WIN1, HDMI1, HDMI2, HDMI3, HDMI4, USB-C
Return: AUDIO SOURCE w
GET AUDIO SOURCE Return: AUDIO SOURCE w
SET AUDIO VOL+
Lautstärke der Audioausgabe erhöhen
Return: AUDIO VOL w (w ist der Lautstärkepegel)
SET AUDIO VOL-
Lautstärke der Audioausgabe reduzieren
Return: AUDIO VOL w (w ist der Lautstärkepegel)
SET AUDIO VOL w
Audio-Lautstärke einstellen
w ist 0, 1…, oder 100, Standard 100
Beispiel: SET AUDIO VOL 100
Return: AUDIO VOL w
GET AUDIO VOL
Return: AUDIO VOL w
SET AUDIO-MUTE w
Stummschalten oder Aufheben der Stummschaltung der
Audioausgabe
w ist EIN oder AUS, Standard AUS
Return: AUDIO-MUTE w
GET AUDIO-MUTE
Return: AUDIO-MUTE w
KVM Command
Commands
Details
SET KVM w
w ist entweder WIN1, WIN2, WIN3 oder WIN4
Return: KVM w
SET USB ROAMING w
w ist EIN oder AUS, Standard AUS
Return: USB ROAMING w
GET USB ROAMING
Return: USB ROAMING w

Benutzerhandbuch Deutsch
Bitte beachten Sie, dass im SINGLE-Anzeigemodus immer die KVM-Funktion der aktuell ausgewählten
Quelle aktiviert ist.
EDID Command
Die folgenden Befehle werden verwendet, um den EDID-Modus für die Eingänge einzustellen.
Commands
Details
SET IN EDIDMODE w
w ist einer der folgenden Werte:
4K60-2.0, 4K60-5.1, 4K60-7.1, 4K30-2.0,
4K30-5.1, 4K30-7.1, 1080p60-2.0, 1080p60-5.1,
1080p60-7.1, 1920x1200, 1680x1050, 1600x1200, 1440x900,
1360x768, 1280x1024, 1024x768, 720p, AUTO, USER
Standard: 4K60-2.0
Return: IN EDIDMODE w
SET EDID-USER w
Der Switcher kann nur 256 Byte EDID-USER-Daten unterstützen.
w ist 256 Byte EDID-Daten.
Return: EDID-USER OK
GET IN EDIDMODE
Return: IN EDIDMODE w
Fehlersuche
Es wird kein Bild auf dem Bildschirm angezeigt.
Bitte überprüfen Sie die maximale Auflösung, die von der Quelle und dem Bildschirm unterstützt wird,
ob die Ausgangsauflösung auf 4K eingestellt ist und die 4K-AUTO-Einstellung auf AUS steht.
Drücken Sie lange auf die AUTO-Taste an der Vorderseite des Geräts, um die gewünschte
Ausgangsauflösung einzustellen, und setzen Sie 4K-AUTO auf EIN.
Es ist kein Audiosignal vorhanden.
Da die Audioauswahl von der Videoauswahl getrennt ist, überprüfen Sie bitte, ob die Audioauswahl
von der gewünschten Quelle stammt. Standardmäßig ist dies auf Win1 eingestellt.
Bitte prüfen Sie, ob die Audio-Stummschaltung aktiviert ist.
Überprüfen Sie, ob der Wert für die Audiolautstärke größer als 0 ist. Wenn es keine Rückmeldung gibt,
wenn Sie die Lautstärke einstellen, liegt das daran, dass die Audioquelle kein LPCM-Format hat wie
AC3 oder DTS 5.1. Die Lautstärke kann nur im LPCM-Format geändert werden.
Bitte überprüfen Sie, ob das gewählte Audioformat von dem angeschlossenen Audiogerät unterstützt
wird.
Es besteht keine TCP/IP-Verbindung.
Bitte überprüfen Sie die Einstellungen von IP-Adresse, NetPort und Baudrate. Der Switch und der
angeschlossene Router müssen sich im gleichen Netzwerksegment befinden.

Manuel Utilisateur Français
Consignes de sécurité
ATTENTION
Merci de lire attentivement ces instructions de sécurité et de les conserver avec le
produit.
Le non-respect de ces précautions peut causer un choc électrique entrainant des
blessures graves, voire mortelles, un incendie ou des dommages au produit.
Toucher les composants internes ou un câble endommagé peut provoquer un choc
électrique pouvant entraîner la mort.
Cet appareil est une alimentation à découpage et peut fonctionner avec des tensions d'alimentation de
100...240 VAC Pour une utilisation dans le monde entier, quatre adaptateurs secteur différents sont
inclus : Type Euro, type UK, type US/Japon et type Australie/Nouvelle-Zélande. Utilisez l'adaptateur
secteur approprié comme indiqué sur la photo et assurez-vous qu'il est solidement fixé en place et qu'il
ne se détache pas en tirant avant de l'installer dans une prise électrique.
Pour éviter les risques d'incendie, de choc électrique ou de dommages:
N'ouvrez pas l'appareil ni son alimentation électrique. Il n'y a pas de pièces réparables par
l'utilisateur à l'intérieur.
Seul un personnel d'entretien qualifié est autorisé à effectuer toute réparation ou entretien.
Ne jamais utiliser de câble endommagé.
Ne pas mouiller le produit et ne pas l'exposer à l'humidité.
N'utilisez pas ce produit à l'extérieur, il est destiné à un usage intérieur uniquement.
Ne pas placer le produit à proximité de sources de chaleur. Toujours le placer dans un endroit
suffisamment ventilé.
Ne pas déposer de charge lourde sur le produit ou sur les câbles.
Veuillez vous assurer que l'adaptateur utilisé est fermement fixé et verrouillé en place avant de
l'insérer dans une prise murale.
Instructions d’utilisation de l’alimentation
Pour connecter l’adaptateur
Glissez l’adaptateur secteur requis dans l’alimentation jusqu’à ce
qu’il se verrouille en place.
Pour retirer l’adaptateur appuyez sur le bouton de déverrouillage.
Tout en maintenant l’appui, retirez l’adaptateur.

Manuel Utilisateur Français
Introduction
Nous sommes heureux que votre choix se soit porté sur un produit LINDY et vous remercions de votre
confiance. Vous pouvez compter à tout moment sur la qualité de nos produits et de notre service. Ce 5
Port HDMI 4K60 Seamless Multiview KVM Switch est soumis à une durée de garantie LINDY de 2
année(s) et d’une assistance technique gratuite à vie. Merci de lire attentivement ces instructions et de les
conserver pour future référence.
Ce commutateur KVM avancé permet de contrôler quatre sources HDMI et une source de type C telles
que des ordinateurs, des ordinateurs portables, des consoles de jeu, etc. à partir d'un seul écran HDMI
4K simultanément avec l'écran divisé en plusieurs modes Multiview différents ; l'utilisateur peut interagir
avec chaque périphérique HDMI à partir d'une console avec une souris et un clavier en connectant les
ports USB respectifs aux sources, également dans n'importe quel mode Multiview en déplaçant
simplement le pointeur de la souris d'un quadrant à l'autre. Grâce à cette fonction transparente, le passage
d'une source à l'autre se fait instantanément, sans décalage ni écran noir, ce qui le rend parfait pour toutes
les applications critiques telles que les salles de contrôle, la radiodiffusion, les sports électroniques et la
sécurité.
L'utilisateur peut facilement gérer le commutateur via les boutons du panneau avant, la télécommande IR,
les touches de raccourci, les commandes RS-232 ou TCP/IP et le logiciel de contrôle. Une deuxième
sortie HDMI en miroir peut être utilisée pour un contrôle local supplémentaire ou pour la capture vidéo en
ajoutant un dispositif de capture vidéo HDMI vers USB.
Contenu de l’emballage
5 Port HDMI 4K60 Seamless Multiview KVM Switch
Télécommande IR
Bloc terminal à 4 broches
2 x oreilles de montage avec vis
Alimentation multi-pays 12VDC 2.5A (UK, EU, US & AUS), DC Jack : 5.5/2.1mm
Manuel Lindy
Caractéristiques
Prend en charge des résolutions allant jusqu'à 3840x2160@60Hz 4:4:4 8bit
Fonction KVM permettant la connexion d'un clavier et d'une souris pour contrôler les entrées
Commutation transparente des entrées
2 sorties HDMI en miroir
5 modes Multiview différents
Prise en charge de l'itinérance de la souris USB
Gestion de l'EDID
Transmission audio de tous les formats audio HDMI, y compris LPCM, AC3, DD+, DTS, DTS-HD
jusqu'à 7.1
Sorties audio 3.5mm et TosLink (optique), avec contrôle du volume et sélection audio indépendante
Gérable via les boutons du panneau avant avec OSD, la télécommande IR, le logiciel de contrôle (pour
Windows), les raccourcis clavier (pour la sélection KVM), les commandes RS-232 ou TCP/IP
Spécifications
Compatible HDMI 2.0b, 18Gbit/s
Passage HDCP 2.2/1.4
Protection contre les décharges électrostatiques : ± 8kV (décharge dans l’air)
Modèle de corps humain : ± 4kV (décharge par contact)
Température de fonctionnement : 0°C - 40°C (32°F - 104°F)
Température de stockage : -20°C - 60°C (-4°F - 140°F)

Manuel Utilisateur Français
Humidité relative : 10 - 70% HR (sans condensation)
Boîtier métallique
Couleur : noir
Alimentation électrique : AC100-240V 50/60Hz
Consommation électrique : 15W
Installation
Avant
1. IR: récepteur de signaux IR.
2. AUTO / 1080P:
- Appuyez sur ce bouton pour activer ou désactiver la fonction de commutation automatique en
mode d'affichage unique.
- Appuyez sur ce bouton pendant 3 secondes pour modifier la résolution de sortie en 1080p60.
3. HDMI 1 / HDMI 2 / HDMI 3 / HDMI 4 / USB-C:
- Appuyez sur ces boutons pour sélectionner l’entrée HDMI 1, HDMI 2, HDMI 3, HDMI 4 ou USB-C
(AV uniq.).
- Appuyez 3 secondes sur HDMI 1 pour sélectionner SINGLE mode.
- Appuyez 3 secondes sur HDMI 2 pour sélectionner PIP mode.
- Appuyez 3 secondes sur HDMI 3 pour sélectionner PBP mode.
- Appuyez 3 secondes sur HDMI 4 pour sélectionner 3xWIN mode.
- Appuyez 3 secondes sur USB-C pour sélectionner 4xWIN mode.
4. WINDOW / AUDIO:
- Appuyez sur ce bouton pour voir une bordure sur window 1, appuyez encore pour la voir sur
window 2, 3 ou 4; puis appuyez sur un des boutons d’entrée pour sélectionner la source à afficher
dans la fenêtre active.
- Appuyez pendant 3 secondes, une liste de sélection Audio apparait à l’écran; utilisez les boutons
pour naviguer et MENU pour confirmer la sélection.
La LED sera toujours allumée en mode Multiview, et non en mode SINGLE.
5. KVM: appuyez sur ce bouton pour sélectionner une des fenêtres comme source KVM; par exemple
appuyez deux fois pour voir une bordure sur window 2, de cette manière souris et clavier connectés
aux ports USB sur le panneau arrière permettent de contrôler la source affichée dans window 2.
Merci de noter: les ports HDMI 4 et USB-C ne peuvent pas être sélectionnés comme sources KVM
en même temps.
6. MENU / EXIT / : bouton de navigation du menu OSD.

Manuel Utilisateur Français
Arrière
1. HDMI A / HDMI B OUTPUT: Connecte deux écrans HDMI, HDMI A est la sortie principale.
2. HDMI 1 / HDMI 2 / HDMI 3 / HDMI 4 / USB-C INPUT: Connecte les sources HDMI et Type C.
3. 12V DC: Connecte l’alimentation 12VDC 3A.
4. SERVICE: port USB Type A pour les mises à jour du firmware.
5. LAN: port de contrôle TCP/IP.
6. CONTROL: port RS-232 (sortie 5V, Tx, masse et Rx). Connecte un PC, contrôleur série ou
périphérique sérié via connecteur phoenix 4 broches pour passer les commandes RS-232.
7. AUDIO OUT:
- L/R: port de sortie stéréo analogique 3.5mm.
- TOSLINK: port de sortie audio optique numérique.
8. USB-KVM:
- Mouse / Keyboard: ports USB Type A, connecte une souris et un clavier USB.
- HOST1 / HOST2 / HOST3 / HOST4: ports USB Type B pour chacune des entrées KVM. Merci de
noter: le port HOST4 peut être utilisé pour le contrôle KVM HDMI 4 ou USB-C (il n’est pas possible
d’utiliser les deux en même temps).
9. Connectez le boitier à la masse.
Utilisation
Le Switch prend en charge les résolutions jusqu'à 4K60 et les formats audio tels que LPCM, AC3, DD+,
DTS, DTSHD, jusqu'à 7.1 canaux (fonction pass-through via le câble HDMI, l'entrée USB-C ne prend en
charge que l'audio LPCM 2.0). Le volume audio du format LPCM peut être contrôlé de plusieurs manières,
comme indiqué ci-dessous. Les résolutions de sortie vidéo suivantes sont prises en charge:
No.
Output Resolution
No.
Output Resolution
1
4096x2160p 60Hz
9
1920x1080p 50Hz
2
4096x2160p 50Hz
10
1360x768p 60Hz
3
3840x2160p 60Hz
11
1280x800p 60Hz
4
3840x2160p 50Hz
12
1280x720p 60Hz
5
3840x2160p 30Hz
13
1280x720p 50Hz
6
3840x2160p 25Hz
14
1024x768 60Hz
7
1920x1200p 60Hz RB
15
AUTO
8
1920x1080p 60Hz
16
USER

Manuel Utilisateur Français
Paramètres EDID & HDCP
Les modes EDID suivants peuvent être sélectionnés :
No.
Mode EDID
No.
Mode EDID
1
4K60 – 2.0CH
10
1600x1200
2
4K60 – 5.1CH
11
1440x900
3
4K30 – 2.0CH
12
1360x768
4
4K30 – 5.1CH
13
1280x1024
5
1080p – 2.0CH
14
1024x768
6
1080p – 5.1CH
15
AUTO
7
720p
16
4K60 – 7.1CH
8
1920x1200
17
4K30 – 7.1CH
9
1680x1050
18
1080p – 7.1CH
19
USER
Les sorties HDMI prennent en charge les 2 options HDCP : FORCE-1.4 et FORCE-2.2.
Multiview
Le switch prend en charge 5 modes d’affichage Multiview :
Les différentes opérations suivantes peuvent être effectuées pour chaque mode Multiview :
SINGLE : Sélection des entrées.
PIP : Sélection des entrées, sélection de la taille et de la position de la fenêtre secondaire.
PBP, 3xWIN, 4xWIN : sélection des entrées, sélection du mode d'affichage, sélection de l'aspect de
l'affichage.
Raccourcis clavier KVM
La sélection KVM peut être effectuée avec les raccourcis clavier suivants :
Ctrl + Ctrl + 1, 2, 3 ou 4 : Le signal d'entrée correspondant à WIN1, 2, 3 ou 4 sera sélectionné comme
source KVM.
Ctrl + Ctrl + R + N : Désactiver la fonction USB Roaming.
Ctrl + Ctrl + R + Y : Activer la fonction USB Roaming.
Ctrl + Ctrl + M + 1, 2, 3, 4 ou 5 : Passez du mode multiview au mode SINGLE, PIP, PBP, 3xWIN, ou
4xWIN.
Ctrl + Ctrl + W + “m” + SET + “n” : Affiche la source "n" sur la fenêtre "m" ("m" représente le numéro de
la fenêtre, "n" représente le numéro de l'entrée).
Ctrl + Ctrl + A + “n” : Changer de source audio ("n" signifie 1, ..5 pour sélectionner une entrée ou A pour
sélectionner WIN 1)
Ctrl + Ctrl + A + N : Couper le son.
Ctrl + Ctrl + A + Y : Rétablir le son.

Manuel Utilisateur Français
Menu OSD
Le menu OSD peut être activé en appuyant sur le bouton MENU sur le panneau avant, puis toutes les
options peuvent être parcourues en appuyant sur les boutons UP, DOWN, LEFT et RIGHT. Le bouton
MENU peut également être utilisé pour confirmer le choix, le bouton EXIT pour revenir en arrière ou pour
quitter le menu OSD.
Output
Fonction Par défaut Choix
Résolution 3840x2160p60 See Resolution table
VKA Black screen Black screen,
Blue screen
4K-Auto ON ON, OFF
ITC* OFF ON, OFF
Multiview
Single Input select HDMI1, HDMI2,..
PIP
Win1 select HDMI1, HDMI2,..
Win2 select HDMI1, HDMI2,..
PIP position Right bottom,..
PIP size Small,..
PBP
Win1 select HDMI1, HDMI2,..
Win2 select HDMI1, HDMI2,..
Mode 1, 2, 3
Aspect Full, 16:9
3xWIN
Win1 select HDMI1, HDMI2,..
Win2 select HDMI1, HDMI2,..
Win3 select HDMI1, HDMI2,..
Mode 1, 2
Aspect Full, 16:9
4xWIN
Win1 select HDMI1, HDMI2,..
Win2 select HDMI1, HDMI2,..
Win3 select HDMI1, HDMI2,..
Win4 select HDMI1, HDMI2,..
Mode 1, 2
Aspect Full, 16:9

Manuel Utilisateur Français
Audio
Audio select Win1 Win1, HDMI1,..
Volume 100 0..100
Audio-mute OFF ON, OFF
System
Langue English English, 中文
EDID 4K60 - 2.0 4K60 - 2.0,..
USB roaming** OFF ON, OFF
Baud rate 9600 9600, 19200, 38400,
57600, 115200
Reset
FW version Read only
IP Address Read only
*: comme réglage ITC, OFF est suggéré pour l'affichage vidéo et ON pour le PC (spécialement pour
l'affichage de bureau).
**: La fonction roaming USB ne peut être activée que dans les modes PBP, 3xWIN ou 4xWIN Multiview.
Veuillez noter que la fonction KVM peut être assignée au port HDMI4 ou au port USB-C, mais pas aux
deux à la fois.
Télécommande IR
1. Return / Exit
2. Sélection de l’entrée Video
3. Boutons de navigation du medu OSD: Menu (Enter), Up,
Down, Left Right
4. Sélection du mode Multiview
5. Sélection entrée Audio
6. Sélection USB-KVM
Contrôle TCP/IP

Manuel Utilisateur Français
Contrôle TCP/IP
Paramètres par défaut
Adresse IP : 192.168.0.247
Sub Mask : 255.255.255.0
Gateway : 192.168.0.1
Net Port : 2000
Tous les paramètres peuvent être modifiés par l'interface graphique du logiciel et par les commandes RS-
232.
Software GUI (Windows uniquement)
Téléchargez l'application ViewerMate à partir de notre site web et installez-la sur un PC Windows.
User par défaut: admin
Mot de passe par défaut: 111111
Cliquez sur Edit pour changer le mot de passe par défaut et Login pour entrer.
Connect
Paramètres RS232, réseau de l'unité avec adresse IP et sous-masque de l'ordinateur connecté.

Manuel Utilisateur Français
Output
Sélectionnez la résolution et les autres options de sortie comme indiqué dans les tableaux et les
caractéristiques ci-dessus.
Multiview
Sélectionnez le mode Multiview à afficher et affectez les entrées aux fenêtres souhaitées. Il est possible
d'enregistrer différentes dispositions et de les rappeler, en cliquant sur le bouton Lire pour activer les
fonctions sélectionnées.
Audio
Sélectionner l'entrée audio, modifier le volume (de 0 à 100) et activer/désactiver la fonction de sourdine.

Manuel Utilisateur Français
System
RS232, informations sur le micrologiciel du réseau et fonctions EDID ; sélectionnez un mode EDID (voir
le tableau ci-dessus) ou chargez un fichier EDID, puis cliquez sur Read pour confirmer votre choix.
RS-232 Control
Par défaut : Baud rate 9600, 8 data bits, 1 stop bit, no parity. Le débit en bauds peut être modifié via le
menu OSD ou l'interface graphique du logiciel. Toutes les commandes commencent par SET ou GET et
se terminent toujours par .
Commandes
Détails
GET HELP
Liste des commandes
SET RESET
Paramètres par défaut
GET VERSION
Version du firmware
Retour : VERSION w (w est le numéro de version)
SET BAUDRATE w
w est 9600, 19200, 38400, 57600 ou 115200
Retour : BAUDRATE w
GET BAUDRATE w
Retour : BAUDRATE w
SET IP ADDRESS w
Exemple : SET IP ADDRESS 192.168.0.247
Retour : IP ADDRESS w
GET IP ADDRESS
Retour : IP ADDRESS w
SET SUBMASK w
Exemple : SET SUBMASK 255.255.255.0
Retour : SUBMASK w
GET SUBMASK
Retour : SUBMASK w
SET GATEWAY w
Exemple : SET GATEWAY 192.168.0.1
Retour : GATEWAY w
GET GATEWAY
Retour : GATEWAY w
SET NETPORT w
Exemple : SET NETPORT 2000
Retour : NETPORT w
GET NETPORT
Retour : NETPORT w
SET NETWORK-INFO IP PORT
SUBMASK GATEWAY
Exemple :
SET NETWORK-INFO 192.168.0.247 2000 255.255.255.0
192.168.0.1

Manuel Utilisateur Français
Retour : NETWORK-INFO 192.168.0.247 2000 255.255.255.0
192.168.0.1
GET NETWORK-INFO
Retour : NETWORK-INFO IP PORT SUBMASK GATEWAY
Commandes de commutation, disponibles en SINGLE mode uniquement
Commandes
Détails
SET AUTO SWITCH w
w est ON ou OFF, par défaut
Retour : AUTO SWITCH w
GET AUTO SWITCH
Retour : AUTO SWITCH w
SET IN SOURCE w
w est un des suivants :
HDMI1, HDMI2, HDMI3, HDMI4, USB-C
Retour : IN SOURCE w
GET IN SOURCE
Obtenir des informations sur la sélection du canal d'entrée actuel
Retour : IN SOURCE w
GET IN RESOLUTION
Obtenir la résolution de l'entrée actuelle
Retour : IN RESOLUTION w (w est la résolution en entrée)
GET IN STATUS
Obtenir l'état de tous les ports d'entrée
x is HDMI1…HMDI4, USB-C
Return: IN STATUS x VALID (or INVALID)
If input port is vaild,
Return: IN STATUS x InputRes ColorSpace ColorDepth
Commandes Output
Commandes
Détails
SET OUT RESOLUTION w
w est un des suivants, par défaut: 3840x2160p60
4096x2160p60, 4096x2160p50,
3840x2160p60, 3840x2160p50,
3840x2160p30, 3840x2160p25,
1920x1200p60RB, 1920x1080p60,
1920x1080p50, 1360x768p60,
1280x800p60, 1280x720p60,
1280x720p50, 1024x768p60
AUTO, USER
Retour : OUT RESOLUTION w
GET OUT RESOLUTION
Voir la résolution de sortie actuelle
Retour : OUT RESOLUTION w
SET RESO-USER Width Height
Définition de la résolution de sortie par l'utilisateur
La largeur correspond aux pixels actifs horizontaux
La hauteur correspond aux lignes actives verticales
Pour la résolution de sortie définie par l'utilisateur, la fréquence
d'images est toujours de 60Hz
Retour : RESO-USER Width Height
GET RESO-USER
Retour : RESO-USER Width Height
SET OUT 4K-AUTO w
w est ON ou OFF, par défaut ON
En réglant la sortie 4K sur un écran qui ne peut pas prendre en
charge la 4K, le réglage ON peut changer la résolution en 1080p
ou 4K-4:2:0.
Retour : OUT 4K-AUTO w
GET OUT 4K-AUTO
Obtenir le mode OUT 4K-AUTO actuel
Retour : OUT 4K-AUTO w
SET OUT HDCP w
w est un des suivants, par défaut FORCE-1.4
FORCE-1.4, FORCE-2.2
Retour : OUT HDCP w

Manuel Utilisateur Français
GET OUT HDCP
Retour : OUT HDCP w
SET OUT VKA w
w est BLUESCREEN ou BLACKSCREEN
Par défaut BLACKSCREEN.
Retour : OUT VKA w
GET OUT VKA
Retour : OUT VKA w
SET OUT ITC w
w est ON ou OFF, par défaut OFF
Retour : OUT ITC w
GET OUT ITC
Retour : OUT ITC w
Commandes Multiview
Commandes
Détails
SET MULTIVIEW w
Sélectionner un mode Multiview pour l'affichage en cours
w est un des suivants, par défaut SINGLE
SINGLE , PIP , PBP , 3xWIN , 4xWIN
Retour : MULTIVIEW w
GET MULTIVIEW
Voir le mode Multiview actif
Retour : MULTIVIEW w
SET WINDOWx IN y
Sélection d'une entrée pour une fenêtre d'affichage dans le mode
Multiview actuel. x est 1, 2, 3 ou 4
y est HDMI1, HDMI2, HDMI3, HDMI4, USB-C
Retour : WINDOWx IN y
GET WINDOWx IN
Obtenir la source d'entrée pour une fenêtre d'affichage dans le
mode Multiview actuel
Retour : WINDOWx IN y
SET FREEZE-WINx w
Gel de la fenêtre d'affichage, x est l'une des valeurs suivantes : 1,
2, 3, 4 ou ALL, w est ON ou OFF
Retour : FREEZE-WINx w
GET FREEZE-WINx
x est l'un des 1, 2, 3 ,4
Retour : FREEZE-WINx w (w est ON ou OFF)
SET PIP POS w
Sélectionner la position de la sous-fenêtre PIP.
w est un des suivants, par défaut RightBottom
LeftTop, LeftBottom, RightTop, RightBottom, USER
Retour : PIP POS w
GET PIP POS
Voir la position de la fenêtre PIP
Retour : PIP POS w
SET PIP SIZE w
Cette commande permet de sélectionner la taille de la sous-
fenêtre PIP.
w est l'une des valeurs suivantes, par défaut LARGE
SMALL, MIDDLE, LARGE, USER
Retour : PIP SIZE w
GET PIP SIZE
Retour : PIP SIZE w
SET PIP USER HStart VStart
HSize VSize
Retour : PIP USER HStart VStart HSize VSize
Cette commande permet aux utilisateurs de personnaliser une
présentation PIP, y compris la position et la taille de la sous-
fenêtre.
Cette présentation PIP personnalisée remplacera les autres
modes PIP prédéfinis (tels que LeftTop, LARGE) et afficher à
l'écran
A noter
HStart plus HSize inférieur ou égal à 101

Manuel Utilisateur Français
VStart plus VSize inférieur ou égal à 101
GET PIP USER
Retour : PIP USER HStart VStart HSize VSize
SET PBP MODE w
Régler le mode d'affichage PBP
w est l'une des valeurs suivantes : 1, 2 ou 3, default 1
Retour : PBP MODE w
Veuillez noter que pour le mode PBP 3, la fenêtre 1 peut capturer
une partie de la zone d'image d'entrée. Elle est principalement
utilisée pour le spectacle du présentateur lorsque l'on travaille
avec des caméras de conférence.
La zone de capture peut être définie par la commande SET PBP-
PRESENTER.
GET PBP MODE
Retour : PBP MODE w
SET PBP ASPECT w
Définir l'aspect de l'affichage de la fenêtre PBP
w est FULL ou 16:9, par défaut FULL
Retour : PBP ASPECT w
GET PBP ASPECT
Retour : PBP ASPECT w
SET PBP-PRESENTER HStart
VStart HSize VSize
Définir la zone de capture de la fenêtre 1 pour le mode PBP 3
Cette commande n'est valable que si le commutateur fonctionne
déjà en mode PBP 3
Retour : PBP-PRESENTER HStart VStart HSize VSize
Default HStart 38, VStart 13, HSize 25, VSize 75
A noter
HStart plus HSize inférieur ou égal à 101
VStart plus VSize inférieur ou égal à 101
GET PBP-PRESENTER
Retour : PBP-PRESENTER HStart VStart HSize VSize
SET 3xWIN MODE w
Définir le mode d’affichage 3xWIN
w est 1, 2, 3 ou 4, par défaut 1
Retour : 3xWIN MODE w
GET 3xWIN MODE
Retour : 3xWIN MODE w
SET 3xWIN ASPECT w
Définir l'aspect de l'affichage de la fenêtre 3xWIN
w est FULL ou 16:9, par défaut FULL

Manuel Utilisateur Français
Retour : 3xWIN ASPECT w
GET 3xWIN ASPECT
Retour : 3xWIN ASPECT w
SET 4xWIN MODE w
Régler le mode d'affichage 4xWIN
w est 1 ou 2, par défaut 1
Retour : 4xWIN MODE w
GET 4xWIN MODE
Retour : 4xWIN MODE w
SET 4xWIN ASPECT w
Définir l'aspect de l'affichage de la fenêtre 4xWIN
w est FULL ou 16:9, par défaut FULL
Retour : 4xWIN ASPECT w
GET 4xWIN ASPECT
Retour : 4xWIN ASPECT w
GET MULTIVIEW-SYNC
Renvoi des informations sur la disposition de la vue multiple
SET SAVE SCENE w
Sauvegarde de la scène d'affichage actuelle
w est 1, 2,…20
Retour : SAVE SCENE w
SET LOAD SCENE w
Charger la scène d'affichage
w est 1, 2,…20
Retour : LOAD SCENE w
Commandes Audio
Commandes
Détails
SET AUDIO SOURCE w
w est un des suivants:
WIN1, HDMI1, HDMI2, HDMI3, HDMI4, USB-C
Retour : AUDIO SOURCE w
GET AUDIO SOURCE Retour : AUDIO SOURCE w
SET AUDIO VOL+
Augmente le volume audio en sortie
Retour : AUDIO VOL w (w est la valeur du volume)
SET AUDIO VOL-
Baisse le volume audio en sortie
Retour : AUDIO VOL w (w est la valeur du volume)
SET AUDIO VOL w
Définir la valeur du volume audio
w est 0, 1…, ou 100, par défaut 100
Exemple : SET AUDIO VOL 100
Retour : AUDIO VOL w
GET AUDIO VOL
Retour : AUDIO VOL w
SET AUDIO-MUTE w
Couper ou rétablir le son de la sortie audio
w est ON ou OFF, par défaut OFF
Retour : AUDIO-MUTE w
GET AUDIO-MUTE
Retour : AUDIO-MUTE w

Manuel Utilisateur Français
Commandes KVM
Commandes
Détails
SET KVM w
W est WIN1, WIN2, WIN3, WIN4
Retour : KVM w
SET USB ROAMING w
w est ON ou OFF, par défaut OFF
Retour : USB ROAMING w
GET USB ROAMING
Retour : USB ROAMING w
Veuillez noter qu'en mode d'affichage UNIQUE, la fonction KVM de la source sélectionnée est toujours
activée.
Commandes EDID
Les commandes suivantes permettent de définir le mode EDID pour les entrées
Commandes
Détails
SET IN EDIDMODE w
w est un des suivants :
4K60-2.0, 4K60-5.1, 4K60-7.1, 4K30-2.0,
4K30-5.1, 4K30-7.1, 1080p60-2.0, 1080p60-5.1,
1080p60-7.1, 1920x1200, 1680x1050, 1600x1200, 1440x900,
1360x768, 1280x1024, 1024x768, 720p, AUTO, USER
Par défaut : 4K60-2.0
Retour : IN EDIDMODE w
SET EDID-USER w
Le switch peut seulement prendre en charge les données 256
bytes EDID-USER.
w est 256 bytes EDID data.
Retour : EDID-USER OK
GET IN EDIDMODE
Retour : IN EDIDMODE w
Dépannage
Aucune image ne s'affiche à l'écran.
Veuillez vérifier la résolution maximale prise en charge par la source et l'écran et si la résolution de
sortie est réglée sur 4K et le réglage 4K-AUTO sur OFF.
Appuyez longuement sur le bouton AUTO du panneau avant pour modifier la résolution de sortie et
régler 4K-AUTO sur ON.
Il n'y a pas de signal audio.
La sélection audio étant séparée de la sélection vidéo, vérifiez que la sélection audio provient de la
source requise. La sélection audio est réglée par défaut sur Win1.
Veuillez vérifier si la fonction Audio-Mute est activée.
Vérifiez si la valeur du volume audio est supérieure à 0 ; s'il n'y a pas de rétroaction lors de l'ajustement
du volume, c'est que la source audio n'est pas au format LPCM, comme AC3 ou DTS 5.1. Le volume
ne peut être modifié qu'avec le format LPCM.
Veuillez vérifier si le format audio sélectionné est pris en charge par le périphérique audio connecté.
Il n'y a pas de connexion TCP/IP.
Veuillez vérifier les paramètres de l'adresse IP, du NetPort et du débit en bauds. Le commutateur et
le routeur connectés doivent se trouver sur le même segment de réseau.

Manuale Italiano
Istruzioni di sicurezza
ATTENZIONE
Per favore leggete la seguente informativa e conservate sempre questo documento con
il prodotto.
La mancata osservanza di queste precauzioni può causare seri infortuni o la morte per
folgorazione, incendi o danneggiare il prodotto.
Toccare i componenti interni o un cavo danneggiato può causare uno shock elettrico che può condurre
alla morte.
Questo dispositivo ha un alimentatore a commutazione che può funzionare con tensioni di alimentazione
all’interno del range 100…240 VAC. La fornitura comprende quattro adattatori AC per prese di tutto il
mondo: Euro, UK, US/Giappone e Australia/Nuova Zelanda. Utilizzate l’adattatore AC appropriato e
montatelo come mostrato nell’immagine, assicurandovi che sia fissato correttamente e che non si
stacchi estraendolo dalla presa.
Per ridurre il rischio di incendi, folgorazione o danni:
Non aprite il prodotto o l’alimentatore. Non esistono componenti utilizzabili all'interno.
La riparazione o manutenzione del prodotto può essere effettuata solo da personale qualificato.
Non utilizzare mai cavi danneggiati.
Non fate entrare il prodotto in contatto con acqua e non utilizzatelo in luoghi umidi.
Questo prodotto è pensato esclusivamente per l’uso in ambienti interni.
Non posizionate il prodotto nelle vicinanze di sorgenti di calore. Installatelo sempre in luoghi ben
ventilati.
Non appoggiate oggetti pesanti sul prodotto o sui cavi.
Vi preghiamo di assicurarvi che ogni adattatore sia fermamente inserito e bloccato in sede prima di
collegarlo a una presa di corrente.
Istruzioni per l’uso dell’alimentatore
Per collegare l'adattatore
Inserire l'adattatore desiderato nella rispettiva sede
sull’alimentatore finché non si blocca in posizione.
Per rimuovere l'adattatore
Premere il pulsante di bloccaggio.
Mentre è premuto, rimuovere l'adattatore.

Manuale Italiano
Introduzione
Vi ringraziamo per aver acquistato lo Switch KVM HDMI 4K60 Seamless Multiview, 5 Porte. Questo
prodotto è stato progettato per garantirvi la massima affidabilità e semplicità di utilizzo ed è coperto da 2
anni di garanzia LINDY oltre che da un servizio di supporto tecnico a vita. Per assicurarvi di farne un uso
corretto vi invitiamo a leggere attentamente questo manuale e a conservarlo per future consultazioni.
Questo avanzato switch KVM consente di controllare quattro sorgenti HDMI e una tipo C, come computer,
laptop, console di gioco ecc, da un unico display HDMI 4K simultaneamente con diverse modalità
Multiview; l'utente può interagire con ogni dispositivo HDMI da una console con mouse e tastiera
collegando le rispettive porte USB alle sorgenti, anche in modalità Multiview semplicemente spostando il
puntatore del mouse da un quadrante all'altro. Grazie alla funzione seamless, il passaggio da una sorgente
all'altra avviene istantaneamente senza alcun lag o schermo nero, rendendolo perfetto per qualsiasi
applicazione critica come sale di controllo, broadcasting, E-Sports e sicurezza.
L'utente può gestire facilmente lo switch tramite i pulsanti del pannello frontale, il telecomando IR, i tasti
di scelta rapida, i comandi RS-232 o TCP/IP e il software di controllo, mentre una seconda uscita HDMI
speculare può essere utilizzata per un ulteriore monitoraggio locale o per l'acquisizione di video
aggiungendo un dispositivo di acquisizione video da HDMI a USB.
Contenuto della confezione
Switch KVM HDMI 4K60 Seamless Multiview, 5 Porte
Telecomando IR
Morsettiera a 4 pin
2 x staffe di montaggio con viti
Alimentatore multi country 12VDC 2.5A (UK, EU, US e AUS), Jack DC: 5.5/2.1mm
Manuale Lindy
Caratteristiche
Supporta risoluzioni fino a 3840x2160@60Hz 4:4:4 8bit
Funzione KVM per consentire il collegamento di tastiera e mouse per controllare gli ingressi
Commutazione degli ingressi senza soluzione di continuità
2 uscite HDMI speculari
5 diverse modalità Multiview
Supporto USB mouse roaming
Gestione EDID
Passaggio audio di tutti i formati audio HDMI, compresi LPCM, AC3, DD+, DTS, DTS-HD fino a 7.1
Uscite audio da 3.5mm e TosLink (ottico), supporto del controllo del volume e della selezione audio
indipendente
Gestibile tramite pulsanti del pannello frontale con OSD, telecomando IR, software di controllo (per
Windows), hotkeys (per la selezione KVM), comandi RS-232 o TCP/IP
Specifiche
Compatibile con le specifiche HDMI 2.0b, 18Gbps
HDCP 2.2/1.4
Protezione ESD: ± 8kV (scarica in aria)
Modello corpo umano: ± 4kV (scarica di contatto)
Temperatura di funzionamento: 0°C - 40°C (32°F - 104°F)
Temperatura di stoccaggio: -20°C - 60°C (-4°F - 140°F)
Umidità relativa: 10 - 70% RH (senza condensa)
Alloggiamento in metallo
Colore: nero

Manuale Italiano
Requisiti di alimentazione: AC100-240V 50/60Hz
Consumo di energia: 15W
Installazione
Pannello Frontale
1. IR: Ricevitore di segnale IR.
2. AUTO / 1080P:
- Premere questo pulsante per attivare o disattivare la funzione di commutazione automatica in
modalità display singolo.
- Premere questo pulsante per 3 secondi per cambiare la risoluzione di uscita in 1080p60.
3. HDMI 1 / HDMI 2 / HDMI 3 / HDMI 4 / USB-C:
- Premere questi pulsanti per selezionare l'ingresso HDMI 1, HDMI 2, HDMI 3, HDMI 4 o USB-C
(solo AV).
- Tenere premuto per 3 secondi il pulsante HDMI 1 per selezionare la modalità SINGOLA.
- Tenere premuto per 3 secondi il pulsante HDMI 2 per selezionare la modalità PIP.
- Tenere premuto per 3 secondi il pulsante HDMI 3 per selezionare la modalità PBP.
- Tenere premuto per 3 secondi il pulsante HDMI 4 per selezionare la modalità 3xWIN.
- Tenere premuto per 3 secondi il pulsante USB-C per selezionare la modalità 4xWIN.
4. WINDOW / AUDIO:
- Premere questo pulsante per visualizzare un bordo nella finestra 1, premere di nuovo per
visualizzarlo nella finestra 2, 3 o 4; quindi premere un pulsante di ingresso per selezionare il segnale
sorgente da visualizzare nella finestra correntemente selezionata.
- Premendo questo tasto per 3 secondi, sullo schermo apparirà un elenco di selezione audio;
usare i pulsanti per navigare e il pulsante MENU per confermare la selezione.
Il LED rimane sempre acceso quando si lavora in modalità Multiview, non in modalità SINGOLA.
5. KVM: Premere questo pulsante per selezionare una finestra come sorgente KVM; ad esempio,
premere 2 volte per visualizzare un bordo sulla finestra 2; in questo modo il mouse e la tastiera
collegati alle porte USB sul pannello posteriore controlleranno la sorgente visualizzata sulla finestra
2.
Nota bene: le porte HDMI 4 e USB-C non possono essere selezionate contemporaneamente come
sorgente KVM.
6. MENU / EXIT / : OSD pulsanti di navigazione del menu.

Manuale Italiano
Pannello Posteriore
1. HDMI A / HDMI B OUTPUT: Collega due schermi HDMI, HDMI A è l'uscita principale.
2. HDMI 1 / HDMI 2 / HDMI 3 / HDMI 4 / USB-C INPUT: Collegamento a sorgenti HDMI e tipo C.
3. 12V DC: Collegare l'alimentatore da 12V DC 3A a una presa a muro e collegare saldamente il
connettore all'unità.
4. SERVICE: Porta USB tipo A. Collegamento a un PC per l'aggiornamento del firmware.
5. LAN: Porta di controllo TCP/IP.
6. CONTROL: Porta RS-232 (uscita 5V, Tx, Terra e Rx). Collegamento a un PC, a un controller seriale
o a un dispositivo seriale tramite connessione phoenix block a 4 vie per la trasmissione passante di
comandi RS-232.
7. AUDIO OUT:
- L/R: Porta di uscita stereo analogica da 3.5mm.
- TOSLINK: porta di uscita audio digitale ottica.
8. USB-KVM:
- Mouse / Keyboard: Porte USB di tipo A, per il collegamento di mouse e tastiera USB.
- HOST1 / HOST2 / HOST3 / HOST4: Porte USB tipo B relative a ciascun ingresso per il controllo
KVM. Nota bene: la porta HOST4 può essere utilizzata per il controllo KVM dell'ingresso HDMI 4 o
USB-C (non è possibile utilizzarle entrambe contemporaneamente)
9. Collegare l'alloggiamento alla messa a terra.
Operazioni
Lo Switch supporta risoluzioni fino a 4K60 e formati audio come LPCM, AC3, DD+, DTS, DTSHD, fino a
7.1 canali (funzione pass-through tramite cavo HDMI, l'ingresso USB-C supporta solo l'audio LPCM 2.0).
Il volume dell'audio in formato LPCM può essere controllato in molti modi, come mostrato di seguito, e
sono supportate le seguenti risoluzioni di uscita video:
No.
Output Resolution
No.
Output Resolution
1
4096x2160p 60Hz
9
1920x1080p 50Hz
2
4096x2160p 50Hz
10
1360x768p 60Hz
3
3840x2160p 60Hz
11
1280x800p 60Hz
4
3840x2160p 50Hz
12
1280x720p 60Hz
5
3840x2160p 30Hz
13
1280x720p 50Hz
6
3840x2160p 25Hz
14
1024x768 60Hz
7
1920x1200p 60Hz RB
15
AUTO
8
1920x1080p 60Hz
16
USER

Manuale Italiano
Impostazioni EDID & HDCP
È possibile selezionare le seguenti modalità EDID:
No.
EDID Mode
No.
EDID Mode
1
4K60 – 2.0CH
10
1600x1200
2
4K60 – 5.1CH
11
1440x900
3
4K30 – 2.0CH
12
1360x768
4
4K30 – 5.1CH
13
1280x1024
5
1080p – 2.0CH
14
1024x768
6
1080p – 5.1CH
15
AUTO
7
720p
16
4K60 – 7.1CH
8
1920x1200
17
4K30 – 7.1CH
9
1680x1050
18
1080p – 7.1CH
19
USER
L'uscita HDMI supporta 2 opzioni HDCP: FORCE-1.4 e FORCE-2.2.
Multiview
Lo switch supporta 5 modalità di visualizzazione multiview:
Per ogni modalità Multiview è possibile effettuare le seguenti operazioni:
SINGLE: selezione degli ingressi.
PIP: Selezione degli ingressi, selezione delle dimensioni e della posizione della sottofinestra.
PBP, 3xWIN, 4xWIN: Selezione degli ingressi, selezione della modalità di visualizzazione, selezione
dell'aspetto del display.
Selezione KVM tramite Keyboard-Hotkeys
La selezione di KVM può essere effettuata con i seguenti tasti di scelta rapida:
Ctrl + Ctrl + 1, 2, 3 o 4: Il segnale di ingresso corrispondente a WIN1, 2, 3 o 4 sarà selezionato come
sorgente KVM.
Ctrl + Ctrl + R + N: Disabilita la funzione USB Roaming.
Ctrl + Ctrl + R + Y: Abilita la funzione USB Roaming.
Ctrl + Ctrl + M + 1, 2, 3, 4 o 5: Commuta tra le modalità multiview SINGLE, PIP, PBP, 3xWIN, o 4xWIN.
Ctrl + Ctrl + W + “m” + SET + “n”: Visualizza la sorgente “n” sulla finestra “m” (“m” indica il numero della
finestra, “n” indica il numero dell’ingresso).
Ctrl + Ctrl + A + “n”: Commuta sorgente Audio (“n” da 1 a 5 per selezionare un ingresso o A per
selezionare WIN 1).
Ctrl + Ctrl + A + N: Distattiva Audio.
Ctrl + Ctrl + A + Y: Attiva Audio.

Manuale Italiano
OSD Menu
Il menu OSD può essere attivato premendo il pulsante MENU sul pannello frontale, quindi tutte le opzioni
possono essere consultate premendo i pulsanti SU, GIÙ, SINISTRA e DESTRA. Il pulsante MENU può
essere utilizzato anche per confermare la scelta, il pulsante EXIT per tornare indietro o per uscire dal
menu OSD.
Output
Funzioni Default Selezione
Resolution 3840x2160p60 See Resolution table
VKA Black screen Black screen,
Blue screen
4K-Auto ON ON, OFF
ITC* OFF ON, OFF
Multiview
Single Input select HDMI1, HDMI2,..
PIP
Win1 select HDMI1, HDMI2,..
Win2 select HDMI1, HDMI2,..
PIP position Right bottom,..
PIP size Small,..
PBP
Win1 select HDMI1, HDMI2,..
Win2 select HDMI1, HDMI2,..
Mode 1, 2, 3
Aspect Full, 16:9
3xWIN
Win1 select HDMI1, HDMI2,..
Win2 select HDMI1, HDMI2,..
Win3 select HDMI1, HDMI2,..
Mode 1, 2
Aspect Full, 16:9
4xWIN
Win1 select HDMI1, HDMI2,..
Win2 select HDMI1, HDMI2,..
Win3 select HDMI1, HDMI2,..
Win4 select HDMI1, HDMI2,..
Mode 1, 2
Aspect Full, 16:9

Manuale Italiano
Audio
Audio select Win1 Win1, HDMI1,..
Volume 100 0..100
Audio-mute OFF ON, OFF
System
Language English English, 中文
EDID 4K60 - 2.0 4K60 - 2.0,..
USB roaming** OFF ON, OFF
Baud rate 9600 9600, 19200, 38400,
57600, 115200
Reset
FW version Solo lettura
IP Address Solo lettura
*: come impostazione ITC, si suggerisce OFF per la visualizzazione video e ON per il PC (specialmente
per la visualizzazione desktop).
**: la funzione USB roaming può essere utilizzata solo nelle modalità PBP, 3xWIN o 4xWIN. La funzione
KVM può essere assegnata alla porta HDMI4 o USB-C, non ad entrambe contemporaneamente.
Telecomando IR
1. Return / Uscita
2. Selezione ingresso Video
3. Pulsanti di navigazione del menu OSD: Menu (Invio), Su, Giù,
Sinistra Destra
4. Selezione della modalità multiview
5. Selezione dell'ingresso audio
6. Selezione USB-KVM

Manuale Italiano
Controllo TCP/IP
Parametri di Default
IP address: 192.168.0.247
Sub Mask: 255.255.255.0
Gateway: 192.168.0.1
Net Port: 2000
I parametri possono essere modificati tramite Software GUI e comandi RS-232.
Software GUI (solo per Windows)
Scaricare l'applicazione ViewerMate dal nostro sito web e installarla su un PC Windows.
Default User: admin
Default Password: 111111
Cliccare su Edit per modificare la password predefinita e su Login per entrare.
Connect
Impostazioni RS232 e di rete dell'unità e informazioni su indirizzo IP e SubMask del computer collegato.

Manuale Italiano
Output
Selezionare la risoluzione e le altre opzioni di output come indicato nelle tabelle e nelle caratteristiche
sopra riportate. Fare clic sul pulsante Read per confermare.
Multiview
Selezionare la modalità Multiview da visualizzare e assegnare gli ingressi alle finestre desiderate. È
possibile salvare diversi layout e richiamarli; fare clic sul pulsante Read per attivare le funzioni selezionate.
Audio
Selezionare l'ingresso audio, modificare il volume (da 0 a 100) e attivare/disattivare la funzione mute.

Manuale Italiano
System
RS232, informazioni sul firmware di rete e funzioni EDID; selezionare una modalità EDID (vedere la tabella
precedente) o caricare un file EDID, quindi fare clic su Leggi per confermare la scelta.
Comandi RS-232
Predefinito: Baud rate 9600, 8 bit di dati, 1 bit di stop, no parity. La velocità di trasmissione può essere
modificata tramite il menu OSD o la GUI del software. Tutti i comandi iniziano con 's' (per Set) o 'r' (per
Get) e terminano sempre con ' ’.
Comandi
Dettagli
GET HELP
Ottenere l'elenco dei comandi
SET RESET
Ripristino delle impostazioni predefinite
GET VERSION
Ottenere la versione del firmware
Restituzione: VERSION w (w è il numero di versione)
SET BAUDRATE w
w è 9600, 19200, 38400, 57600 o 115200
Ritorno: BAUDRATE w
GET BAUDRATE w
Ritorno: BAUDRATE w
SET IP ADDRESS w
Ad esempio: SET IP ADDRESS 192.168.0.247
Restituzione: IP ADDRESS w
GET IP ADDRESS
Return: IP ADDRESS w
SET SUBMASK w
Ad esempio: SET SUBMASK 255.255.255.0
Ritorno: SUBMASK w
GET SUBMASK
Ritorno: SUBMASK w
SET GATEWAY w
Ad esempio: SET GATEWAY 192.168.0.1
Ritorno: GATEWAY w
GET GATEWAY
Ritorno: GATEWAY w
SET NETPORT w
Ad esempio: SET NETPORT 2000
Ritorno: NETPORT w
GET NETPORT
Ritorno: NETPORT w
SET NETWORK-INFO IP PORT
SUBMASK GATEWAY
Ad esempio:
s NETWORK-INFO 192.168.0.247 2000 255.255.255.0
192.168.0.1Return: NETWORK-INFO 192.168.0.247 2000
255.255.255.0 192.168.0.1
GET NETWORK-INFO
Ritorno: NETWORK-INFO IP PORT SUBMASK GATEWAY

Manuale Italiano
Comando di commutazione, disponibile solo in modalità SINGLE
Comandi
Dettagli
SET AUTO SWITCH w
w è ON o OFF, l'impostazione predefinita è OFF
Ritorno: AUTO SWITCH w
GET AUTO SWITCH
Ritorno: AUTO SWITCH w
SET IN SOURCE w
w è uno dei seguenti:
HDMI1, HDMI2, HDMI3, HDMI4, USB-C
Ritorno: IN SOURCE w
GET IN SOURCE
Ottenere informazioni sulla selezione del canale di ingresso
corrente
Ritorno: IN SOURCE w
GET IN RESOLUTION
Ottenere la risoluzione di ingresso corrente
Ritorno: IN RESOLUTION w (w è la risoluzione di ingresso)
GET IN STATUS
Ottenere lo stato degli ingressi
x è HDMI1…HMDI4, USB-C
Ritorno: IN STATUS x VALID (o INVALID)
Se l’ingresso è vaild,
Ritorno: IN STATUS x InputRes ColorSpace ColorDepth
Comandi uscite
Comandi
Dettagli
SET OUT RESOLUTION w
w è uno dei seguenti, predefinito: 3840x2160p60
4096x2160p60, 4096x2160p50,
3840x2160p60, 3840x2160p50,
3840x2160p30, 3840x2160p25,
1920x1200p60RB, 1920x1080p60,
1920x1080p50, 1360x768p60,
1280x800p60, 1280x720p60,
1280x720p50, 1024x768p60,
AUTO, USER
Ritorno: OUT RESOLUTION w
GET OUT RESOLUTION
Ottenere l'impostazione della risoluzione di uscita corrente
Ritorno: OUT RESOLUTION w
SET RESO-USER Width Height
Impostare la risoluzione in uscita definita dall’utente
La larghezza è costituita da pixel attivi orizzontali
L'altezza è rappresentata dalle linee verticali attive
Per la risoluzione di uscita definita dall'utente, la frequenza dei
fotogrammi è sempre di 60Hz
Ritorno: RESO-USER Width Height
GET RESO-USER
Ritorno: RESO-USER Width Height
SET OUT 4K-AUTO w
w è ON o OFF, l'impostazione predefinita è ON
Impostando l'uscita 4K su uno schermo che non può supportare il
4K, l'impostazione ON può modificare la risoluzione in 1080p o
4K-4:2:0.
Ritorno: OUT 4K-AUTO w
GET OUT 4K-AUTO
Ottenere la modalità OUT 4K-AUTO corrente
Ritorno: OUT 4K-AUTO w
SET OUT HDCP w
w è uno dei seguenti, predefinito FORCE-1.4
FORCE-1.4, FORCE-2.2
Ritorno: OUT HDCP w
GET OUT HDCP
Ritorno: OUT HDCP w
SET OUT VKA w
w è BLUESCREEN o BLACKSCREEN
Predefinito BLACKSCREEN.
Ritorno: OUT VKA w
GET OUT VKA
Ritorno: OUT VKA w

Manuale Italiano
SET OUT ITC w
w è ON o OFF, l'impostazione predefinita è OFF
Ritorno: OUT ITC w
GET OUT ITC
Ritorno: OUT ITC w
Comandi Multiview
Comandi
Dettagli
SET MULTIVIEW w
Selezionare una modalità Multiview per la visualizzazione
corrente w è una delle seguenti, l'impostazione predefinita è
SINGLE
SINGLE , PIP , PBP , 3xWIN , 4xWIN
Ritorno: MULTIVIEW w
GET MULTIVIEW
Ottiene la modalità Multiview corrente
Ritorno: MULTIVIEW w
SET WINDOWx IN y
Seleziona un ingresso per una finestra di visualizzazione per la
modalità Multiview corrente. x è uno tra 1, 2, 3 o 4
y è uno tra HDMI1, HDMI2, HDMI3, HDMI4, USB-C
Ritorno: WINDOWx IN y
GET WINDOWx IN
Ottiene la sorgente di ingresso per una finestra di visualizzazione
per la modalità Multiview attuale
Ritorno: WINDOWx IN y
SET FREEZE-WINx w
Bloccare la finestra di visualizzazione, x è uno tra 1, 2, 3 ,4 o
ALL, w è ON o OFF
Ritorno: FREEZE-WINx w
GET FREEZE-WINx
x è uno tra 1, 2, 3 ,4
Ritorno: FREEZE-WINx w (w è ON o OFF)
SET PIP POS w
Selezionare la posizione della finestra secondaria PIP.
w è uno dei seguenti, predefinito RightBottom
LeftTop, LeftBottom, RightTop, RightBottom, USER
Ritorno: PIP POS w
GET PIP POS
Ottiene la posizione della finestra secondaria PIP
Ritorno: PIP POS w
SET PIP SIZE w
Selezionare la dimensione della finestra secondaria PIP.
w è una delle seguenti, l'impostazione predefinita è LARGE
SMALL, MIDDLE, LARGE, USER
Ritorno: PIP SIZE w
GET PIP SIZE
Ritorno: PIP SIZE w
SET PIP USER HStart VStart
HSize VSize
Ritorno: PIP USER HStart VStart HSize VSize
Comando per personalizzare la posizione e dimensione della sub
window in un layout PIP.
Il layout PIP personalizzato sostituisce la precedente modalità
PIP (ad esempio LeftTop, LARGE)
Nota bene
HStart più HSize minore o uguale a 101
VStart più VSize minore o uguale a 101
GET PIP USER
Ritorno: PIP USER HStart VStart HSize VSize
SET PBP MODE w
Impostare la modalità di visualizzazione del PBP
w è uno tra 1, 3 o 3, l'impostazione predefinita è 1
Ritorno: PBP MODE w

Manuale Italiano
Per la modalità PBP 3, la finestra 1 può catturare parte dell'area
dell'immagine di ingresso. È utilizzata principalmente per
presentazioni o conferenze.
L'area di cattura può essere definita dal comando SET PBP-
PRESENTER
GET PBP MODE
Ritorno: PBP MODE w
SET PBP ASPECT w
Impostare l'aspetto di visualizzazione della finestra PBP
w is FULL or 16:9, predefinito FULL
Ritorno: PBP ASPECT w
GET PBP ASPECT
Return: PBP ASPECT w
SET PBP-PRESENTER HStart
VStart HSize VSize
Impostare l'area di acquisizione della finestra 1 per la modalità
PBP 3
Questo comando è valido solo se lo switch lavora già in modalità
PBP 3
Ritorno: PBP-PRESENTER HStart VStart HSize VSize
Default HStart 38, VStart 13, HSize 25, VSize 75
Nota bene
HStart più HSize minore o uguale a 101
VStart più VSize minore o uguale a 101
GET PBP-PRESENTER
Return: PBP-PRESENTER HStart VStart HSize VSize
SET 3xWIN MODE w
Impostare la modalità di visualizzazione 3xWIN
w è 1, 2, 3 o 4, predefinito 1
Ritorno: 3xWIN MODE w
GET 3xWIN MODE
Ritorno: 3xWIN MODE w
SET 3xWIN ASPECT w
Impostare l'aspetto di visualizzazione della finestra 3xWIN
w è FULL o 16:9, predefinito FULL
Ritorno: 3xWIN ASPECT w
GET 3xWIN ASPECT
Ritorno: 3xWIN ASPECT w
Impostare la modalità di visualizzazione 4xWIN

Manuale Italiano
SET 4xWIN MODE w
w è 1 or 2, predefinito 1
Ritorno: Modalità 4xWIN w
GET 4xWIN MODE
Ritorno: Modalità 4xWIN w
SET 4xWIN ASPECT w
Impostare l'aspetto di visualizzazione della finestra 4xWIN
w è FULL o 16:9, predefinito FULL
Ritorno: 4xWIN ASPECT w
GET 4xWIN ASPECT
Ritorno: 4xWIN ASPECT w
GET MULTIVIEW-SYNC
Restituzione delle informazioni sul layout di Multiview
SET SAVE SCENE w
Salva la scena di visualizzazione corrente
w è 1, 2,...20
Ritorno: SAVE SCENE w
SET LOAD SCENE w
Caricare la scena di visualizzazione
w è 1, 2,...20
Ritorno: LOAD SCENE w
Comandi Audio
Comandi
Dettagli
SET AUDIO SOURCE w
w è uno dei seguenti:
WIN1, HDMI1, HDMI2, HDMI3, HDMI4, USB-C
Ritorno: AUDIO SOURCE w
GET AUDIO SOURCE Ritorno: AUDIO SOURCE w
SET AUDIO VOL+
Aumentare il volume dell'uscita audio
Ritorno: AUDIO VOL w (w è il valore del volume)
SET AUDIO VOL-
Diminuire il volume dell'uscita audio
Ritorno: AUDIO VOL w (w è il valore del volume)
SET AUDIO VOL w
Impostare il valore del volume audio
w è 0, 1..., o 100, valore predefinito 100
Ad esempio: SET AUDIO VOL 100
Ritorno: AUDIO VOL w
GET AUDIO VOL
Ritorno: AUDIO VOL w
SET AUDIO-MUTE w
Disattivare o disattivare l'uscita audio
w è ON o OFF, l'impostazione predefinita è OFF
Ritorno: AUDIO-MUTE w
GET AUDIO-MUTE
Ritorno: AUDIO-MUTE w
Comandi KVM
Comandi
Dettagli
SET KVM w
w è uno tra WIN1, WIN2, WIN3, WIN4
Ritorno: KVM w
SET USB ROAMING w
w è ON o OFF, l'impostazione predefinita è OFF
Ritorno: ROAMING USB w
GET USB ROAMING
Ritorno: ROAMING USB w
Quando si lavora in modalità di visualizzazione SINGLE, la funzione KVM della sorgente correntemente
selezionata è sempre attivata.

Manuale Italiano
Comandi EDID
Per impostare la modalità EDID sugli ingressi si utilizzano i seguenti comandi
Comandi
Dettagli
SET IN EDIDMODE w
w è uno dei seguenti:
4K60-2.0, 4K60-5.1, 4K60-7.1, 4K30-2.0,
4K30-5.1, 4K30-7.1, 1080p60-2.0, 1080p60-5.1,
1080p60-7.1, 1920x1200, 1680x1050, 1600x1200, 1440x900,
1360x768, 1280x1024, 1024x768, 720p, AUTO, USER
Predefinito: 4K60-2.0
Ritorno: IN EDIDMODE w
SET EDID-USER w
Lo switch può supportare solo 256 byte di dati EDID-USER.
w è un dato EDID di 256 byte.
Ritorno: EDID-USER OK
GET IN EDIDMODE
Ritorno: IN EDIDMODE w
Risoluzione dei problemi
Sullo schermo non viene visualizzata alcuna immagine.
Controllare la risoluzione massima supportata dalla sorgente e dallo schermo e se la risoluzione di
uscita è impostata su 4K e l'impostazione 4K-AUTO è OFF.
Premere a lungo il tasto AUTO sul pannello frontale per cambiare la risoluzione di uscita in quella
necessaria e impostare 4K-AUTO su ON.
Non c'è segnale audio.
Poiché la selezione dell'audio è separata da quella del video, verificare che la selezione dell'audio
provenga dalla sorgente richiesta. Per impostazione predefinita è impostato su Win1.
Controllare se l'Audio-Mute è abilitato.
Controllare se il valore del volume audio è superiore a 0; se non c'è risposta regolando il volume, può
essere perché la sorgente audio non è in formato LPCM, ad esempio AC3 o DTS 5.1. Il volume può
essere modificato solo con il formato LPCM.
Verificare che il formato audio selezionato sia supportato dal dispositivo audio collegato.
Non c'è connessione TCP/IP.
Controllare le impostazioni di indirizzo IP, NetPort e velocità di trasmissione. Lo switch e il router
collegati devono trovarsi nello stesso segmento di rete.

Manual de Usuario España
Información de seguridad
ADVERTENCIA
Lea atentamente la siguiente información de seguridad y guarde siempre este
documento junto con el producto.
El incumplimiento de estas precauciones puede provocar lesiones graves o la muerte
por descarga eléctrica, incendio o daños al producto.
Este dispositivo es una fuente de alimentación de tipo de conmutación y puede funcionar
con voltajes de suministro en el rango de 100 a 240 VCA. Para su uso en todo el mundo, se incluyen
cuatro adaptadores de CA diferentes: tipo Euro, tipo Británico, tipo Estadounidense / Japonés y tipo
Australiano / Neozelandés. Utilice el adaptador de CA apropiado como se muestra en la imagen y
cerciórese de que esté firmemente asegurado en su lugar y que no se separe tirando levemente antes de
instalarlo en una toma de corriente.
Para reducir el riesgo de incendio, descargas eléctricas o daños:
No abra el producto. No hay partes internas que puedan ser reparables por el usuario.
Solo personal de servicio cualificado puede realizar reparaciones o mantenimiento.
No utilice nunca cables dañados.
No exponga el producto al agua ni a lugares húmedos.
No utilice este producto al aire libre, esta únicamente diseñado para su uso en interiores.
No coloque el producto cerca de fuentes de calor directas. Colóquelo siempre en un lugar bien
ventilado.
No coloque objetos pesados sobre el producto o los cables.
Asegúrese de que los cables estén firmemente asegurados y bloqueados en su lugar antes de
insertarlos en una toma de corriente.
Instrucciones para el uso de la fuente de alimentación
Para conectar el adaptador:
Deslice el adaptador de enchufe deseado en la fuente de
alimentación mientras presiona el botón hasta que encaje en su
sitio, luego suelte el botón para bloquear el adaptador.
Para quitar el adaptador:
Presione el botón del pestillo.
Mientras presiona, quite el adaptador.

Manual de Usuario España
Introducción
Gracias por la compra de nuestro producto Conmutador KVM HDMI 4K60 de 5 puertos Seamless
Multiview. Este producto ha sido diseñado para proporcionar un funcionamiento confiable y sin problemas.
Se beneficia tanto de una garantía LINDY 3 años, así como de nuestro soporte técnico gratuito de por
vida. Para garantizar su uso correcto, lea este manual detenidamente y consérvelo para consultarlo en el
futuro.
Este conmutador KVM avanzado permite controlar cuatro fuentes HDMI y una de tipo C, como
ordenadores, portátiles, videoconsolas, etc. desde una única pantalla HDMI 4K simultáneamente con la
pantalla dividida en muchos modos Multiview diferentes; el usuario puede interactuar con cada dispositivo
HDMI desde una consola con ratón y teclado conectando los respectivos puertos USB a las fuentes,
también en cualquier modo Multiview simplemente moviendo el puntero del ratón de un cuadrante a otro.
Gracias a la función seamless, el cambio de una fuente a otra se produce instantáneamente sin ningún
tipo de retardo o pantalla en negro, lo que lo hace perfecto para cualquier aplicación crítica como salas
de control, radiodifusión, E-Sports y seguridad.
El usuario puede manejar fácilmente el conmutador mediante los botones del panel frontal, el mando a
distancia por infrarrojos, las teclas de acceso rápido, los comandos RS-232 o TCP/IP y el software de
control, mientras que una segunda salida HDMI en espejo puede utilizarse para monitorización local
adicional o para captura de vídeo añadiendo un dispositivo de captura de vídeo HDMI a USB.
Contenido del paquete
Conmutador KVM HDMI 4K60 de 5 puertos Seamless Multiview
Mando a distancia IR
Bloque de terminales de 4 pines
2 x Orejas de montaje con tornillos
12VDC 2.5A Fuente de alimentación multi-país (UK, EU, US & AUS), toma DC: 5.5/2.1mm
Manual de Lindy
Características
Admite resoluciones de hasta 3840x2160@60Hz 4:4:4 8bit
Función KVM para permitir la conexión de teclado y ratón para controlar las entradas
Conmutación de entradas sin interrupciones
2 salidas HDMI duplicadas
5 modos Multiview diferentes
Soporta roaming de ratón USB
Gestión EDID
Audio Pass-through de todos los formatos de audio HDMI, incluidos LPCM, AC3, DD+, DTS, DTS-HD
hasta 7.1
Salidas de audio de 3.5mm y TosLink (óptico), con control de volumen y selección de audio
independiente
Manejable mediante botones del panel frontal con OSD, mando a distancia por infrarrojos, software
de control (para Windows), teclas de acceso directo del teclado (para selección KVM), RS-232 o
comandos TCP/IP
Especificaciones
HDMI 2.0b, compatible con 18 Gbps
Paso de HDCP 2.2/1.4
Protección ESD: ± 8 kV (descarga por entrehierro)
Modelo de cuerpo humano: ± 4 kV (descarga de contacto)
Temperatura de funcionamiento: 0°C - 40°C (32°F - 104°F)

Manual de Usuario España
Temperatura de almacenamiento: -20°C - 60°C (-4°F - 140°F)
Humedad relativa: 10 - 70% HR (sin condensación)
Carcasa metálica
Color: Negro
Requisitos de alimentación: AC100-240V 50/60Hz
Consumo de energía: 15W
Instalación
Frontal
1. IR: Receptor de señal IR.
2. AUTO / 1080P:
- Pulse este botón para activar o desactivar la función de conmutación automática en el modo de
pantalla única.
- Mantenga presionado este botón durante 3 segundos para cambiar la resolución de salida a
1080p60.
3. HDMI 1 / HDMI 2 / HDMI 3 / HDMI 4 / USB-C:
- Presione estos botones para seleccionar la entrada HDMI 1, HDMI 2, HDMI
3, HDMI 4 o USB-C (solo AV).
- Mantenga presionado el botón HDMI 1 durante 3 segundos para seleccionar el modo SINGLE.
- Mantenga presionado el botón HDMI 2 durante 3 segundos para seleccionar el modo PIP.
- Mantenga presionado el botón HDMI 3 durante 3 segundos para seleccionar el modo PBP.
- Mantenga presionado el botón HDMI 4 durante 3 segundos para seleccionar el modo 3xWIN.
- Mantenga presionado el botón USB-C durante 3 segundos para seleccionar el modo 4xWIN.
4. WINDOW / AUDIO:
- Pulse este botón para mostrar un borde en la ventana 1, pulse de nuevo para mostrarlo en la
ventana 2, 3 o 4; a continuación, pulse un botón de entrada para seleccionar la señal de origen que
se mostrará en la ventana seleccionada actualmente.
- Mantenga presionado este botón durante 3 segundos, aparecerá una lista de selección de audio
en la pantalla; use los botones para navegar y el botón MENU para confirmar la
selección.
El LED permanecerá siempre encendido cuando se trabaje en cada modo Multiview, no en el modo
SINGLE.
5. KVM: Pulse este botón para seleccionar una ventana como fuente KVM; por ejemplo, presione 2
veces para mostrar un borde en la ventana 2, de esta manera el ratón y el teclado conectados a los
puertos USB en el panel posterior controlarán la fuente que se muestra en la ventana 2.
Nota: Los puertos HDMI 4 y USB-C no se pueden seleccionar como fuente KVM al mismo tiempo.
6. MENU / EXIT /: Menú OSD botones de navegación.

Manual de Usuario España
Trasera
1. OUTPUT HDMI A / HDMI B: Conéctelo a dos pantallas HDMI, HDMI A es la salida principal.
2. ENTRADA HDMI 1/HDMI 2/HDMI 3/HDMI 4/USB-C: Conecte a dispositivos fuente HDMI y Tipo C.
3. 12V: conecte la fuente de alimentación de 12VCC 3A a una toma de pared de CA y conecte de
forma segura a la unidad.
4. SERVICIO: Puerto USB tipo A. Conéctelo a un PC para actualizar el firmware.
5. LAN: Puerto de control TCP/IP.
6. CONTROL: Puerto RS-232 (salida 5V, Tx, tierra y Rx). Conecte a un PC, controlador serie o
dispositivo serie a través de la conexión Phoenix Block de 4-vias para la transmisión de paso de
comandos RS-232.
7. AUDIO OUT:
- L/R: puerto de salida estéreo analógica de 3.5mm.
- TOSLINK: puerto de salida óptica de audio digital.
8. USB-KVM:
- Ratón/Teclado: puertos USB tipo A, conectar a un ratón USB y teclado.
- HOST1/HOST2/HOST3/HOST4: puertos USB tipo B relacionados con cada entrada respectiva
para el control KVM. Nota: El puerto HOST4 se puede utilizar para el control KVM de la entrada
HDMI 4 o USB-C (no es posible utilizar ambos al mismo tiempo).
9. Conecte la carcasa a toma de tierra.
Funcionamiento
El Switch admite resoluciones de hasta 4K60 y formatos de audio como LPCM, AC3, DD+, DTS,
DTSHD, hasta 7.1 canales (función de paso a través de cable HDMI, entrada USB-C solo admite audio
LPCM 2.0). El volumen de audio en formato LPCM se puede controlar como se muestra a continuación
de muchas maneras, se admiten las siguientes resoluciones de salida de video:
No.
Output Resolution
No.
Output Resolution
1
4096x2160p 60Hz
9
1920x1080p 50Hz
2
4096x2160p 50Hz
10
1360x768p 60Hz
3
3840x2160p 60Hz
11
1280x800p 60Hz
4
3840x2160p 50Hz
12
1280x720p 60Hz
5
3840x2160p 30Hz
13
1280x720p 50Hz
6
3840x2160p 25Hz
14
1024x768 60Hz
7
1920x1200p 60Hz RB
15
AUTO
8
1920x1080p 60Hz
16
USER

Manual de Usuario España
Configuración de EDID y HDCP
Se pueden seleccionar los siguientes modos EDID:
No.
Modo EDID
No.
Modo EDID
1
4K60 – 2.0CH
10
1600x1200
2
4K60 – 5.1CH
11
1440x900
3
4K30 – 2.0CH
12
1360x768
4
4K30 – 5.1CH
13
1280x1024
5
1080p - 2.0CH
14
1024x768
6
1080p - 5.1CH
15
AUTO
7
720p
16
4K60 – 7.1CH
8
1920x1200
17
4K30 – 7.1CH
9
1680x1050
18
1080p - 7.1CH
19
USER
La salida HDMI admite 2 opciones HDCP: FORCE-1.4 y FORCE-2.2.
Multivista
El switch admite 5 modos de visualización Multiview:
Se pueden realizar las siguientes operaciones diferentes para cada modo Multiview:
SINGLE: Selección de entradas.
PIP: Selección de entradas, tamaño de sub-ventana y selección de posición.
PBP, 3xWIN, 4xWIN: Selección de entradas, Selección del modo de visualización, Selección de aspecto
de visualización.
Selección KVM de teclas de atajo de teclado
La selección de KVM se puede realizar con las siguientes teclas de acceso rápido:
Ctrl + Ctrl + 1, 2, 3 ó 4: La señal de entrada correspondiente a WIN1, 2, 3 ó 4 se seleccionará como
fuente KVM.
Ctrl + Ctrl + R + N: Desactivar la función USB Roaming.
Ctrl + Ctrl + R + Y: Activar la función USB Roaming.
Ctrl + Ctrl + M + 1, 2, 3, 4 ó 5: cambia el modo multivista a SINGLE, PIP, PBP, 3xWIN o 4xWIN.
Ctrl + Ctrl + W + “m” + SET + “n”: Muestra la fuente "n" en la ventana "m" ("m" significa número de
ventana, "n" número de entrada).
Ctrl + Ctrl + A + “n”: Cambiar fuente de audio ("n" significa 1, ..5 para seleccionar una entrada o A para
seleccionar WIN 1).
Ctrl + Ctrl + A + N: Silenciar audio.
Ctrl + Ctrl + A + Y: Desactivar audio.

Manual de Usuario España
Menú OSD
El menú OSD se puede activar presionando el botón MENU en el panel frontal, luego se puede navegar
por todas las opciones presionando los botones ARRIBA, ABAJO, IZQUIERDA y DERECHA. El botón
MENU también se puede usar para confirmar la elección, el botón EXIT para retroceder un paso o para
salir del menú OSD.
Salida
Función Predeterminado Opciones
Resolution 3840x2160p60 Ver tabla de resolución
VKA Black screen Pantalla negra,
pantalla azul
4K-Auto ON ON, OFF
ITC* OFF ON, OFF
Multiview
Single Input select HDMI1, HDMI2,..
PIP
Win1 select HDMI1, HDMI2,..
Win2 select HDMI1, HDMI2,..
PIP position Abajo derecho,..
PIP size Pequeño..
PBP
Win1 select HDMI1, HDMI2,..
Win2 select HDMI1, HDMI2,..
Mode 1, 2, 3
Aspect Completo, 16:9
3xWIN
Win1 select HDMI1, HDMI2,..
Win2 select HDMI1, HDMI2,..
Win3 select HDMI1, HDMI2,..
Mode 1, 2
Aspect Completo, 16:9
4xWIN
Win1 select HDMI1, HDMI2,..
Win2 select HDMI1, HDMI2,..
Win3 select HDMI1, HDMI2,..
Win4 select HDMI1, HDMI2,..
Mode 1, 2
Aspect Completo, 16:9

Manual de Usuario España
Audio
Audio select Win1 Win1, HDMI1,..
Volume 100 0..100
Audio-mute OFF ON, OFF
System
Language English Inglés, 中文
EDID 4K60 - 2.0 4K60 - 2.0,..
USB roaming** OFF ON, OFF
Baud rate 9600 9600, 19200, 38400,
57600, 115200
Reset
FW version Sólo lectura
IP Address Sólo lectura
*: como configuración ITC, se sugiere OFF para la visualización de video y ON para PC (especialmente
para la pantalla de escritorio).
**: La función de itinerancia USB solo se puede activar en los modos PBP, 3xWIN o 4xWIN Multiview.
Tenga en cuenta que la función KVM se puede asignar al puerto HDMI4 o USB-C, no a ambos juntos.
Control remoto IR
1. Enter / Salida
2. Selección de entrada de vídeo
3. Botones de navegación del menú OSD: Menú (Enter), Arriba,
Abajo, Izquierda derecha
4. Selección del modo Multivista
5. Selección de entrada de audio
6. Selección USB-KVM

Manual de Usuario España
Control TCP/IP
Parámetros predeterminados
Dirección IP: 192.168.0.247
Sub Máscara: 255.255.255.0
Puerta de enlace: 192.168.0.1
Net Port: 2000
Todos los parámetros se pueden cambiar mediante la GUI del software y comandos RS-232.
Software GUI (sólo para Windows)
Descargue la aplicación ViewerMate de nuestro sitio web e instálela en un PC con Windows.
Usuario predeterminado: admin
Contraseña predeterminada: 111111
Haga clic en Editar para cambiar la contraseña predeterminada e inicie sesión para entrar.
Conectar
RS232 y configuración de red de la unidad y dirección IP e información de SubMask del ordenador
conectado.

Manual de Usuario España
Salida
Seleccione la resolución y otras opciones de salida como se muestra en las tablas y características
anteriores.
Multivista
Seleccione el modo Multivista para mostrar y asignar las entradas a las ventanas deseadas. Es posible
guardar diferentes diseños y recuperarlos, haga clic enel botón Read para activar las funciones
seleccionadas.
Audio
Seleccione la entrada de audio, cambie el volumen (de 0 a 100) y active / desactive la función de silencio.

Manual de Usuario España
System
RS232, información de firmware de red y funciones EDID; seleccione un modo EDID (consulte la tabla
anterior) o cargue un archivo EDID, luego haga clic en Leer para confirmar la elección.

Manual de Usuario España
RS-232 Control
Valor predeterminado: velocidad en baudios 9600, 8 bits de datos, 1 bit de parada, sin paridad. La
velocidad en baudios se puede cambiar a través del menú OSD o la interfaz gráfica de usuario del
software. Todos los comandos comienzan con 's' (para Set) o 'r' (para Get), terminan siempre con ‘ ’.
Comando
Detalles
GET HELP
Obtener la lista de comandos
SET RESET
Recuperar a la configuración predeterminada
GET VERSION
Obtener la versión del firmware
Devolución: VERSION w (w es número de versión)
SET BAUDRATE w
W es 9600, 19200, 38400, 57600 o 115200
Devuelve: BAUDRATE w
GET BAUDRATE w
Devuelve: BAUDRATE w
SET IP ADDRESS w
Por ejemplo: SET IP ADDRESS 192.168.0.247
Devuelve: IP ADDRESS w
GET IP ADDRESS
Devuelve: IP ADDRESS w
SET SUBMASK w
Por ejemplo: SET SUBMASK 255.255.255.0
Devuelve: SUBMASK w
GET SUBMASK
Devuelve: SUBMASK w
SET GATEWAY w
Por ejemplo: SET GATEWAY 192.168.0.1
Devuelve: GATEWAY w
GET GATEWAY
Devuelve: GATEWAY w
SET NETPORT w
Por ejemplo: SET NETPORT 2000
Devuelve: NETPORT w
GET NETPORT
Devuelve: NETPORT w
SET NETWORK-INFO IP PORT
SUBMASK GATEWAY
Por ejemplo:
s NETWORK-INFO 192.168.0.247 2000 255.255.255.0
192.168.0.1
Devuelve: NETWORK-INFO 192.168.0.247 2000 255.255.255.0
192.168.0.1
GET NETWORK-INFO
Devuelve: NETWORK-INFO IP PORT SUBMASK GATEWAY
Comando de conmutación, solo disponible en modo SINGLE
Comandos
Detalles
SET AUTO SWITCH w
w está ON o OFF, predeterminado OFF
Devuelve: AUTO SWITCH w
GET AUTO SWITCH
Devuelve: AUTO SWITCH w
SET IN SOURCE w
w es uno de los siguientes:
HDMI1, HDMI2, HDMI3, HDMI4, USB-C
Devuelve: IN SOURCE w
GET IN SOURCE
Obtener información actual sobre la selección del canal de
entrada
Devuelve: IN SOURCE w
GET IN RESOLUTION
Obtener la resolución de entrada actual
Devuelve: IN RESOLUTION w (w es resolución de entrada)
GET IN STATUS
Obtener el estado de todos los puertos de entrada
x es HDMI1...HMDI4, USB-C
Devuelve: IN STATUS x VALID (o INVALID)
Si el puerto de entrada es válido,
Devuelve: IN STATUS x InputRes ColorSpace ColorDepth
Comando de salida
Comandos
Detalles

Manual de Usuario España
SET OUT RESOLUTION w
w es uno de los siguientes, valor predeterminado: 3840x2160p60
4096x2160p60, 4096x2160p50,
3840x2160p60, 3840x2160p50,
3840x2160p30, 3840x2160p25,
1920x1200p60RB, 1920x1080p60,
1920x1080p50, 1360x768p60,
1280x800p60, 1280x720p60,
1280x720p50, 1024x768p60,
AUTO, USER
Devuelve: OUT RESOLUTION w
GET OUT RESOLUTION
Obtener la configuración de resolución de salida actual
Regreso: OUT RESOLUTION w
SET RESO-USER Width Height
Resolución de salida definida por el usuario
La anchura son los píxeles horizontales activos
La altura son las líneas verticales activas
Para la resolución de salida definida por el usuario, la frecuencia
de imagen es siempre de 60Hz.
Devuelve: RESO-USER Width Height
GET RESO-USER
Devuelve: RESO-USER Width Height
SET OUT 4K-AUTO w
w está ON o OFF, predeterminado ON
Ajusta a salida 4K una pantalla que no puede soportar 4K, luego
la configuración ON puede cambiar la resolución a 1080p o
4K-4:2:0
Devuelve: OUT 4K-AUTO w
GET OUT 4K-AUTO
Obtén el modo OUT 4K-AUTO actual
Devuelve: OUT 4K-AUTO w
SET OUT HDCP w
w es uno de los siguientes valores predeterminados FORCE-1.4
FORCE -1.4, FORCE -2.2
Regreso: OUT HDCP w
GET OUT HDCP
Regreso: OUT HDCP w
SET OUT VKA w
w es BLUESCREEN o BLACKSCREEN
Pantalla negra predeterminada.
Devuelve: OUT VKA w
GET OUT VKA
Devuelve: OUT VKA w
SET OUT ITC w
w está ON o OFF, predeterminado OFF
Devuelve: OUT ITC w
GET OUT ITC
Devuelve: OUT ITC w
Comando Multivista
Comandos
Detalles
SET MULTIVIEW w
Seleccione un modo Multiview para la visualización actual
w es uno de los siguientes, predeterminado SINGLE
SINGLE , PIP , PBP , 3xWIN , 4xWIN
Devuelve: MULTIVIEW w
GET MULTIVIEW
Obtenga el modo Multiview actual
Devuelve: MULTIVIEW w
SET WINDOWx IN y
Seleccione una entrada para una ventana de visualización para
el modo Multiview actual. x es uno de 1, 2, 3 o 4
y es uno de HDMI1, HDMI2, HDMI3, HDMI4, USB-C
Devuelve: WINDOWx IN y
GET WINDOWx IN
Obtiene la fuente de entrada para una pantalla y ventana en el
modo Multiview actual
Devuelve: WINDOWx IN y
SET FREEZE-WINx w
Congelar la ventana de visualización, x es uno de 1, 2, 3 ,4 o
ALL, w es ON u OFF

Manual de Usuario España
Devuelve: FREEZE-WINx w
GET FREEZE-WINx
x es uno de 1, 2, 3 o 4
Devuelve: FREEZE-WINx w (w es ON u OFF)
SET PIP POS w
Selecciona la posición de la subventana PIP.
w es uno de los siguientes, predeterminado RightBottom
LeftTop, LeftBottom, RightTop, RightBottom, USER
Devuelve: PIP POS w
GET PIP POS
Obtiene la posición de la subventana PIP
Devuelve: PIP POS w
SET PIP SIZE w
Selecciona el tamaño de la subventana PIP.
w es uno de los siguientes, predeterminado LARGE
SMALL, MIDDLE, LARGE, USER
Devuelve: PIP SIZE w
GET PIP SIZE
Devuelve: PIP SIZE w
SET PIP USER HStart VStart
HSize VSize
Devuelve: PIP USER HStart VStart HSize VSize
Este comando permite a los usuarios personalizar un diseño PIP
incluyendo la posición y el tamaño de la ventana secundaria.
Este diseño PIP personalizado sustituirá a otros modos PIP
predefinidos (como LeftTop, LARGE) y se mostrará en la pantalla
Tenga en cuenta que
HStart más HSize menor o igual a 101
VStart más VSize menor o igual a 101
GET PIP USER
Devuelve: PIP USER HStart VStart HSize VSize
SET PBP MODE w
Establecer el modo de visualización PBP
w es uno de 1, 2 o 3, valor predeterminado 1
Devuelve: PBP MODE w
Tenga en cuenta que para el modo PBP 3, la ventana 1 puede
capturar parte del área de la imagen de entrada. Se utiliza
principalmente para el show del presentador cuando se trabaja
con situaciones de cámara de conferencia.
El área de captura puede definirse mediante el comando SET
PBP-PRESENTER
GET PBP MODE
Devuelve: PBP MODE w
SET PBP ASPECT w
Ajuste el aspecto de la ventana PBP
w es FULL o 16:9, valor predeterminado FULL
Devuelve: PBP ASPECT w
GET PBP ASPECT
Devuelve: PBP ASPECT w
Configurar el área de captura de la ventana 1 para el modo PBP
3
Este comando sólo es válido cuando el conmutador ya funciona
en modo PBP 3
Devuelve: PBP-PRESENTER HStart VStart HSize VSize

Manual de Usuario España
SET PBP-PRESENTER HStart
VStart HSize VSize
Por defecto HStart 38, VStart 13, HSize 25, VSize 75
Tenga en cuenta que
HStart más HSize menor o igual a 101
VStart más VSize menor o igual a 101
GET PBP-PRESENTER
Devuelve: PBP-PRESENTER HStart VStart HSize VSize
SET 3xWIN MODE w
Establecer el modo de visualización 3xWIN
w es uno de 1, 2, 3 o 4, valor predeterminado 1
Devuelve: 3xWIN MODE w
GET 3xWIN MODE
Devuelve: 3xWIN MODE w
SET 3xWIN ASPECT w
Establecer el aspecto de visualización de la ventana 3xWIN
w es FULL o 16:9, predeterminado FULL
Devuelve: 3xWIN ASPECT w
GET 3xWIN ASPECT
Devuelve: 3xWIN ASPECT w
SET 4xWIN MODE w
Establecer el modo de visualización 4xWIN
w es 1 o 2, valor predeterminado 1
Devuelve: 4xWIN MODE w
GET 4xWIN MODE
Devuelve: 4xWIN MODE w
SET 4xWIN ASPECT w
Establecer el aspecto de visualización de la ventana 4xWIN
w es FULL o 16:9, predeterminado FULL
Devuelve: 4xWIN ASPECT w
GET 4xWIN ASPECT
Devuelve: 4xWIN ASPECT w
GET MULTIVIEW-SYNC
Devuelve información de diseño Multiview
SET SAVE SCENE w
Guardar la escena de visualización actual
w es 1, 2,... 20
Devuelve: SAVE SCENE w
SET LOAD SCENE w
Cargar escena de visualización
w es 1, 2,... 20

Manual de Usuario España
Devuelve: LOAD SCENE w
Comando de audio
Comandos
Detalles
SET AUDIO SOURCE w
w es uno de los siguientes:
WIN1, HDMI1, HDMI2, HDMI3, HDMI4, USB-C
Regreso: AUDIO SOURCE w
GET AUDIO SOURCE Devuelve: AUDIO SOURCE w
SET AUDIO VOL+
Aumentar el volumen de salida de audio
Devuelve: AUDIO VOL w (w es el valor de volumen)
SET AUDIO VOL-
Disminuir el volumen de salida de audio
Devuelve: AUDIO VOL w (w es el valor de volumen)
SET AUDIO VOL w
Establecer el valor del volumen de audio
w es 0, 1..., o 100, valor predeterminado 100
Por ejemplo: SET AUDIO VOL 100
Regreso: AUDIO VOL w
GET AUDIO VOL
Devuelve: AUDIO VOL w
SET AUDIO-MUTE w
Silenciar o reactivar la salida de audio
w está ON o OFF, predeterminado OFF
Devuelve: AUDIO-MUTE w
GET AUDIO-MUTE
Devuelve: AUDIO-MUTE w
Comando KVM
Comandos
Detalles
SET KVM w
w es uno de WIN1, WIN2, WIN3, WIN4
Devuelve: KVM w
SET USB ROAMING w
w está ON o OFF, predeterminado OFF
Regreso: USB ROAMING w
GET USB ROAMING
Regreso: USB ROAMING w
Tenga en cuenta que cuando se trabaja en el modo de visualización SINGLE, la función KVM de la
fuente seleccionada actual siempre está activada.
Comando EDID
Los siguientes comandos se utilizan para establecer el modo EDID para las entradas
Comandos
Detalles
SET IN EDIDMODE w
w es uno de los siguientes:
4K60-2.0, 4K60-5.1, 4K60-7.1, 4K30-2.0,
4K30-5.1, 4K30-7.1, 1080p60-2.0, 1080p60-5.1,
1080p60-7.1, 1920x1200, 1680x1050, 1600x1200, 1440x900,
1360x768, 1280x1024, 1024x768, 720p, AUTO, USER
Valor predeterminado: 4K60-2.0
Devuelve: IN EDIDMODE w
SET EDID-USER w
Switcher solo puede admitir datos EDID-USER de 256 bytes.
w es 256 bytes de datos EDID.
Devuelve: EDID-USER OK
GET IN EDIDMODE
Devuelve: IN EDIDMODE w

Manual de Usuario España
Solución de problemas
No se muestra ninguna imagen en la pantalla.
Por favor, compruebe la resolución máxima soportada por la fuente y la pantalla y si la resolución de
salida está ajustada a 4K y el ajuste 4K-AUTO está en OFF.
Mantenga pulsado el botón AUTO del panel frontal para cambiar la resolución de salida a la necesaria
y ajuste 4K-AUTO en ON.
No hay señal de audio.
Dado que la selección de audio está separada de la selección de vídeo, por favor compruebe si la
selección de audio proviene de la fuente requerida. Por defecto está configurado en Win1.
Por favor, compruebe si Audio-Mute está activado.
Por favor, compruebe si el valor de Volumen de Audio es superior a 0; si no hay respuesta ajustando
el volumen debe ser porque la fuente de audio es un formato no-LPCM como AC3 o DTS 5.1. El
volumen sólo se puede cambiar con el formato LPCM.
Compruebe si el formato de audio seleccionado es compatible con el dispositivo de audio conectado.
No hay conexión TCP/IP.
Compruebe la dirección IP, el puerto de red y la velocidad de transmisión. El switch y el router
conectados deben estar en el mismo segmento de red.

Recycling Information
WEEE (Waste of Electrical and Electronic Equipment), Recycling of Electronic Products
Europe, United Kingdom
In 2006 the European Union introduced regulations (WEEE) for the collection and recycling of all
waste electrical and electronic equipment. It is no longer allowable to simply throw away electrical and
electronic equipment. Instead, these products must enter the recycling process. Each individual EU
member state, as well as the UK, has implemented the WEEE regulations into national law in slightly
different ways. Please follow your national law when you want to dispose of any electrical or electronic
products. More details can be obtained from your national WEEE recycling agency.
The following batteries or accumulators are included in this electrical appliance
Battery Quantity and Type
Chemical System
2 x AAA
non-rechargeable Alkaline
Information on the safe removal of batteries or accumulators
1. Warning: Make sure the battery is completely drained.
2. Carefully remove the battery from the IR remote control.
3. The battery and the device can now be disposed of separately.
Germany / Deutschland Elektro- und Elektronikgeräte
Informationen für private Haushalte sowie gewerbliche Endverbraucher
Hersteller-Informationen gemäß § 18 Abs. 4 ElektroG (Deutschland)
Das Elektro- und Elektronikgerätegesetz (ElektroG) enthält eine Vielzahl von Anforderungen an den
Umgang mit Elektro- und Elektronikgeräten. Die wichtigsten sind hier zusammengestellt.
1. Bedeutung des Symbols „durchgestrichene Mülltonne“
Das auf Elektro- und Elektronikgeräten regelmäßig abgebildete Symbol einer durchgestrichenen
Mülltonne weist darauf hin, dass das jeweilige Gerät am Ende seiner Lebensdauer getrennt vom
unsortierten Siedlungsabfall zu erfassen ist.
2. Getrennte Erfassung von Altgeräten
Elektro- und Elektronikgeräte, die zu Abfall geworden sind, werden als Altgeräte bezeichnet. Besitzer von
Altgeräten haben diese einer vom unsortierten Siedlungsabfall getrennten Erfassung zuzuführen.
Altgeräte gehören insbesondere nicht in den Hausmüll, sondern in spezielle Sammel- und
Rückgabesysteme.
3. Batterien und Akkus sowie Lampen
Besitzer von Altgeräten haben Altbatterien und Altakkumulatoren, die nicht vom Altgerät umschlossen
sind, sowie Lampen, die zerstörungsfrei aus dem Altgerät entnommen werden können, im Regelfall vor
der Abgabe an einer Erfassungsstelle vom Altgerät zu trennen. Dies gilt nicht, soweit Altgeräte einer
Vorbereitung zur Wiederverwendung unter Beteiligung eines öffentlich-rechtlichen Entsorgungsträgers
zugeführt werden.
Information gemäß § 4 Absatz 4 Elektrogesetz
Folgende Batterien bzw. Akkumulatoren sind in diesem Elektrogerät enthalten
Batterieanzahl und -typ
Chemisches System
2 x AAA
Nicht wiederaufladbare Alkali-Mangan
Angaben zur sicheren Entnahme der Batterien oder der Akkumulatoren
• Warnhinweis: Vergewissern sie sich, ob die Batterie entleert ist.
• Entnehmen die Batterie vorsichtig aus der IR-Fernbedienung.
• Die Batterie und das Gerät können jetzt getrennt entsorgt werden.

Recycling Information
4. Möglichkeiten der Rückgabe von Altgeräten
Besitzer von Altgeräten aus privaten Haushalten können diese bei den Sammelstellen der öffentlich-
rechtlichen Entsorgungsträger oder bei den von Herstellern oder Vertreibern im Sinne des ElektroG
eingerichteten Rücknahmestellen unentgeltlich abgeben.
Rücknahmepflichtig sind Geschäfte mit einer Verkaufsfläche von mindestens 400 m² für Elektro- und
Elektronikgeräte sowie diejenigen Lebensmittelgeschäfte mit einer Gesamtverkaufsfläche von mindestens
800 m², die mehrmals pro Jahr oder dauerhaft Elektro- und Elektronikgeräte anbieten und auf dem Markt
bereitstellen. Dies gilt auch bei Vertrieb unter Verwendung von Fernkommunikationsmitteln, wenn die
Lager- und Versandflächen für Elektro- und Elektronikgeräte mindestens 400 m² betragen oder die
gesamten Lager- und Versandflächen mindestens 800m² betragen. Vertreiber haben die Rücknahme
grundsätzlich durch geeignete Rückgabemöglichkeiten in zumutbarer Entfernung zum jeweiligen
Endnutzer zu gewährleisten.
Die Möglichkeit der unentgeltlichen Rückgabe eines Altgerätes besteht bei rücknahmepflichtigen
Vertreibern unter anderem dann, wenn ein neues gleichartiges Gerät, das im Wesentlichen die gleichen
Funktionen erfüllt, an einen Endnutzer abgegeben wird. Wenn ein neues Gerät an einen privaten Haushalt
ausgeliefert wird, kann das gleichartige Altgerät auch dort zur unentgeltlichen Abholung übergeben
werden; dies gilt bei einem Vertrieb unter Verwendung von Fernkommunikationsmitteln für Geräte der
Kategorien 1, 2 oder 4 gemäß § 2 Abs. 1 ElektroG, nämlich „Wärmeüberträger“, „Bildschirmgeräte“ oder
„Großgeräte“ (letztere mit mindestens einer äußeren Abmessung über 50 Zentimeter). Zu einer
entsprechenden Rückgabe-Absicht werden Endnutzer beim Abschluss eines Kaufvertrages befragt.
Außerdem besteht die Möglichkeit der unentgeltlichen Rückgabe bei Sammelstellen der Vertreiber
unabhängig vom Kauf eines neuen Gerätes für solche Altgeräte, die in keiner äußeren Abmessung größer
als 25 Zentimeter sind, und zwar beschränkt auf drei Altgeräte pro Geräteart.
5. Datenschutz-Hinweis
Altgeräte enthalten häufig sensible personenbezogene Daten. Dies gilt insbesondere für Geräte der
Informations- und Telekommunikationstechnik wie Computer und Smartphones. Bitte beachten Sie in
Ihrem eigenen Interesse, dass für die Löschung der Daten auf den zu entsorgenden Altgeräten jeder
Endnutzer selbst verantwortlich ist.
France
En 2006, l'union Européenne a introduit la nouvelle réglementation (DEEE) pour le recyclage de tout
équipement électrique et électronique. Chaque Etat membre de l’Union Européenne a mis en application
la nouvelle réglementation DEEE de manières légèrement différentes. Veuillez suivre le décret
d’application correspondant à l’élimination des déchets électriques ou électroniques de votre pays.
Italy
Nel 2006 l’unione europea ha introdotto regolamentazioni (WEEE) per la raccolta e il riciclo di apparecchi
elettrici ed elettronici. Non è più consentito semplicemente gettare queste apparecchiature, devono essere
riciclate. Ogni stato membro dell’EU ha tramutato le direttive WEEE in leggi statali in varie misure. Fare
riferimento alle leggi del proprio Stato quando si dispone di un apparecchio elettrico o elettronico. Per
ulteriori dettagli fare riferimento alla direttiva WEEE sul riciclaggio del proprio Stato.
España
En 2006, la Unión Europea introdujo regulaciones (WEEE) para la recolección y reciclaje de todos los
residuos de aparatos eléctricos y electrónicos. Ya no está permitido simplemente tirar los equipos
eléctricos y electrónicos. En cambio, estos productos deben entrar en el proceso de reciclaje. Cada estado
miembro de la UE ha implementado las regulaciones de WEEE en la legislación nacional de manera
ligeramente diferente. Por favor, siga su legislación nacional cuando desee deshacerse de cualquier
producto eléctrico o electrónico. Se pueden obtener más detalles en su agencia nacional de reciclaje de
WEEE.

CE/FCC Statement
CE Certification
LINDY declares that this equipment complies with relevant European CE requirements.
CE Konformitätserklärung
LINDY erklärt, dass dieses Equipment den europäischen CE-Anforderungen entspricht
UKCA Certification
LINDY declares that this equipment complies with relevant UKCA requirements.
FCC Certification
This equipment has been tested and found to comply with the limits for a Class B digital device, pursuant
to part 15 of the FCC Rules. These limits are designed to provide reasonable protection against harmful
interference in a residential installation.
You are cautioned that changes or modification not expressly approved by the party responsible for
compliance could void your authority to operate the equipment.
This device complies with part 15 of the FCC Rules.
Operation is subject to the following two conditions:
1. This device may not cause harmful interference, and
2. This device must accept any interference received, including interference that may cause undesired
operation.
The enclosed power supply has passed Safety test requirements, conforming to the US American versions
of the international Standard IEC 60950-1 or 60065 or 62368-1.
LINDY Herstellergarantie – Hinweis für Kunden in Deutschland
LINDY gewährt für dieses Produkt über die gesetzliche Regelung in Deutschland hinaus eine zweijährige
Herstellergarantie ab Kaufdatum. Die detaillierten Bedingungen dieser Garantie finden Sie auf der LINDY
Website aufgelistet bei den AGBs.
Hersteller / Manufacturer (EU): Manufacturer (UK):
LINDY-Elektronik GmbH LINDY Electronics Ltd
Markircher Str. 20 Sadler Forster Way
68229 Mannheim Stockton-on-Tees, TS17 9JY
Germany England
Email: [email protected], T: +49 (0)621 470050 [email protected], T: +44 (0)1642 754000
No. 32330
1st Edition, October 2023
lindy.com
Tested to comply with
FCC
standards.
For home and office use.
-
 1
1
-
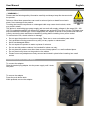 2
2
-
 3
3
-
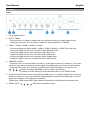 4
4
-
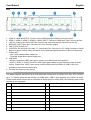 5
5
-
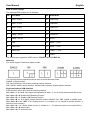 6
6
-
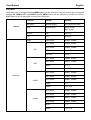 7
7
-
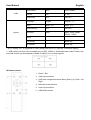 8
8
-
 9
9
-
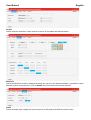 10
10
-
 11
11
-
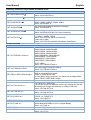 12
12
-
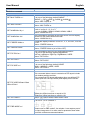 13
13
-
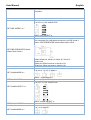 14
14
-
 15
15
-
 16
16
-
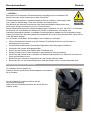 17
17
-
 18
18
-
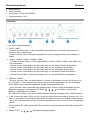 19
19
-
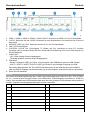 20
20
-
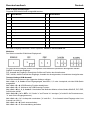 21
21
-
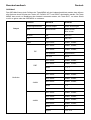 22
22
-
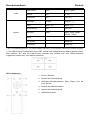 23
23
-
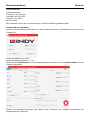 24
24
-
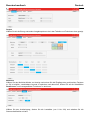 25
25
-
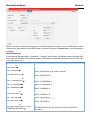 26
26
-
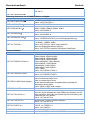 27
27
-
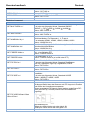 28
28
-
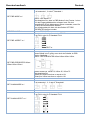 29
29
-
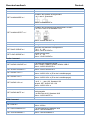 30
30
-
 31
31
-
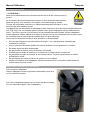 32
32
-
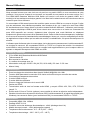 33
33
-
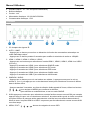 34
34
-
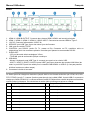 35
35
-
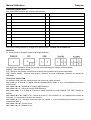 36
36
-
 37
37
-
 38
38
-
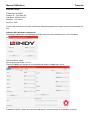 39
39
-
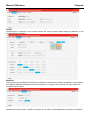 40
40
-
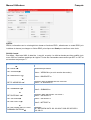 41
41
-
 42
42
-
 43
43
-
 44
44
-
 45
45
-
 46
46
-
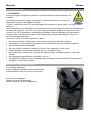 47
47
-
 48
48
-
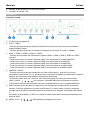 49
49
-
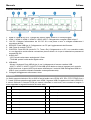 50
50
-
 51
51
-
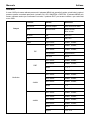 52
52
-
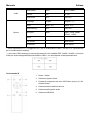 53
53
-
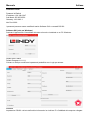 54
54
-
 55
55
-
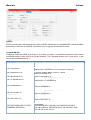 56
56
-
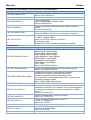 57
57
-
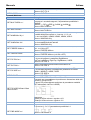 58
58
-
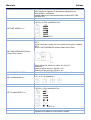 59
59
-
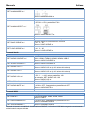 60
60
-
 61
61
-
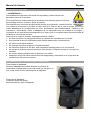 62
62
-
 63
63
-
 64
64
-
 65
65
-
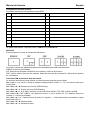 66
66
-
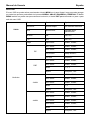 67
67
-
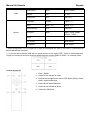 68
68
-
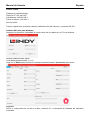 69
69
-
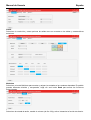 70
70
-
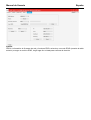 71
71
-
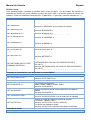 72
72
-
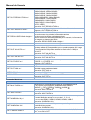 73
73
-
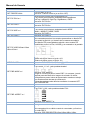 74
74
-
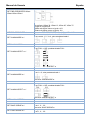 75
75
-
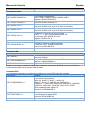 76
76
-
 77
77
-
 78
78
-
 79
79
-
 80
80


Lindy 5 Port Seamless Multiview KVM Switch Manual de usuario
- Categoría
- Conmutadores KVM
- Tipo
- Manual de usuario
en otros idiomas
Otros documentos
-
Philips BDM4350UC/27 Manual de usuario
-
Philips BDM4350UC/01 Manual de usuario
-
-
Philips 499P9H/00 Manual de usuario
-
Philips 498P9/01 Manual de usuario
-
-
Philips 346P1CRH/00 Manual de usuario
-
Philips 329P9H/00 Manual de usuario
-
-
Philips 346B1C/01 Manual de usuario