La página se está cargando...

ASSEMBLY INSTRUCTIONS / PLANO DE ARMADO
Congratulations! You have purchased a
product of excellent quality, made from
MDP or MDF wood veneer, extracted
from renewable forests. It has high
strength and current design.
Felicitaciones! Usted compró a un
producto de excelente calidad,
fabricado con placa de madera de MDP
o MDF, proveniente de florestas
renovables. Tiene alta resistencia y
diseño actual.
Before assembling the furniture,
carefully read the assembly instructions!
Antes de armar el mueble, lea con
atención el manual de ensamble!
1) Care and cleaning should be
done with a cloth slightly
moistened with water.
La conservación y limpieza
debe ser hecha con un trapo
levemente humedecido en agua.
2) Don't use abrasive products, such as
soap, detergents and steel sponge.
No use productos abrasivos, como
saponáceo, detergentes y esponja de acero.
3) Don't use wax or oil to shine the furniture.
No use cera o aceites para darle brillo al
mueble.
!
2) When starting the assembly,
don't support the parts on the
wall.
Al empezar el armado, no
apoyes las partes en la pared.
5) Begin assembly by following the
step-by-step instructions.
Comience el armado siguiendo la
instrucciones paso a paso.
4) The furniture must be mounted on the
floor, to do this, use the box itself to protect
and not damage the floor.
El mueble suele ser armando al piso, para
eso, use la propria caja para protegerlo y no
dañar al piso.
ATENTION
ATENCIÓN
1) Check all parts before starting
assembly.
Verifique todas las partes
antes de empezar el armado.
3) When placing parts and hardware aside,
be careful not to lose them.
Al poner las piezas y herrages a parte,
cuidado para no dañarlas.
6) It's the assembler's responsibility to
follow the instructions in this manual, which
are fundamental to the structure of the
furniture.
Es de responsabilidad del armador seguir
las instrucciones de este manual, que son
fundamentales para la estructura del mueble.
CARE
CUIDADOS
4) Don't expose the furniture to weather or
excessive heat.
No exponer el mueble a interperies ni al
calor excesivo.
5) When the assembly is finished, clean the
room and the furniture.
Al terminar el armado, limpie al ambiente y
al mueble.
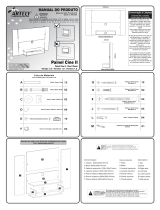
3004 - AMBER 4 DRAWERS DRESSER
ASSEMBLY INSTRUCTIONS
PLANO DE ARMADO

No
Num
DESCRIPTION
DESCRIPCIÓN
QTY
CANT
LGTH
LARG
(mm)
WDTH
ANCH
(mm)
1RIGHT SIDE PANEL
LATERAL DERECHA
DPTH
GROS
(mm)
2LEFT SIDE PANEL
LATERAL IZQUIERDA
3BOTTOM
BASE
4TOP
TABLERO
5PLATE
TRAVESAÑO
6
DRAWER SIDE
LATERAL DEL CAJÓN
7
DRAWER BACK
TRASERO DEL CAJÓN
8
DRAWER BOTTOM PANEL
FONDO DEL CAJÓN
9
PARTS / PIEZAS
3
1
2
4
9
5
6
7
7
8
10 BACK PANEL
TRASERO
DRAWER FRONT
FRENTE DEL CAJÓN
10
10
10
1 902 450 15
1 15
115
1691 450 15
4 651 221 15
8 350 105 15
3 635 105 15
4614 360 3
3 684 309 3
902 450
691 450
1 658 80 15

USE THE RULER TO IDENTIFY THE SCREWS
UTILICE LA REGLA PARA IDENTIFICAR LOS TORNILLOS
10090
80
706050
4030
2010
0
(mm)
WEIGHT SUPPORTED / PESO SOPORTADO
44
LB
6,5
LB
WOODEN DOWEL
TARUGO
A 26
MINIFIX SCREW
TORNILLO MINIFIX
B 26
LEG
PATA
C4
SCREW 5X50mm
TORNILLO 5X50mm
D 5
PROTECTION FELT
FIELTRO DE PROTECCIÓN
E 4
TIP OVER RESTRAINT
PLACA DE FIJACIÓN
F 1
SCREW 4X12mm
TORNILLO 4X12mm
G 34
MINIFIX DRUM
TAMBOR MINIFIX
H 26
LEFT SIDE SLIDE
CORREDERA LATERAL IZQUIERDA
I-E 4
HOLE COVER
TAPA AGUJERO
J 18
NAIL
CLAVO
K 82
BUSHING
BUJE
L 1
LEFT DRAWER SLIDE
CORREDERA DEL CAJÓN IZQUIERDA
M-E 4
HANDLE
TIRADOR
N8
FRONT SCREW HANDLE
TORNILLO DELANTERO TIRADOR
O 8
REAR SCREW HANDLE
TORNILLO TRASERO TIRADOR
P 8
DESCRIPTION
DESCRIPCIÓN
CODE
COD
QTY
CANT
HARDWARE / HERRAJES
RIGHT SIDE SLIDE
CORREDERA LATERAL DERECHA
I-D 4
RIGHT DRAWER SLIDE
CORREDERA DEL CAJÓN DERECHA
M-D 4 SLIDE IDENTIFICATION / IDENTIFICACIÓN CORREDERA
D
D
E
E
TOOLS / HERRAMIENTAS
RUBBER HAMMER
MARTILLO GOMA
HAMMER
MARTILLO
PHILLIPS SCREWDRIVER
LLAVE PHILLIPS
MEASURING TAPE
CINTA MÉTRICA
DRILLING MACHINE
TALADRO
PROFILE I
PERFIL I
Q2

21
34
A
10x
1
2
5B
10x
3
4
2
1
C
4x
D
4x
D
DD
D
C
C
C
C
3
E
4x
E
E
E
E
3
D
E
Fit the Wooden Dowels.
Encajar los Tarugos.
Insert the Minifix Screws.
Insertar los Tornillos Minifix.
Fix the Legs.
Fije las Patas. Glue Felts.
Pegar Fieltros.
Warning:
Before assembling the mini fix screw make sure you are using
the correct hole. For this process, consider the last hole
before the edge of the plate. To be sure, the measurement
between the center of the holes must be 15,11 inch for plates 3
and 4, and 7,16 inch for plate 1 and 2.
Advertencia:
Antes de montar el tornillo mini fix, asegúrese de que está
utilizando el orificio correcto. Para este proceso, considere
el último agujero antes del borde de la placa. Para estar
seguros, la medida entre el centro de los agujeros debe ser
de 15,11 pulgadas para las placas 3 y 4, y de 7,16 pulgadas
para las placas 1 y 2.
B
B
B
B
B
B
B
B
B
B
Edge
Edge
Edge
Edge
Edge
Warning:
Before fit the wooden dowels, make sure you are
using the correct hole. For this process, consider the
second hole before the edge of the plate. To be sure,
the measurement between the center of the holes
must be 12,59 inch for plates 1 and 2, and 2,2 inch for
piece 5.
Advertencia:
Antes de colocar los tarugo, asegúrese de estar
utilizando el agujero correcto. Para este proceso,
considere el segundo agujero antes del borde de la
placa. Para estar seguros, la medida entre el centro de
los agujeros debe ser de 12,59 pulgadas para las
placas 1 y 2, y de 2,2 pulgadas para la pieza 5.
A
A
A
A
A
A
A
A
A
A
12,59in
12,59in
Edge
Edge
Edge
Edge
2,20in from edge
7,16in
15,11in
15,11in
7,16in

7
56
F
4
G
G
H
HH
H
21
3
H
4x
G
2x
F
1x
H
2x
HH
G
G
F
H
H
Attach the tip over restraint in
middle of the piece.
Fije la Placa de Fijación en el medio
de la pieza.
Fit the Sides Panels to the
Bottom. Afterwards, fit the
Minifix Drums on the Sides Panels
and turn clockwise.
Encaja las Laterales en la Base.
Luego, coloque los Tambores
Minifix en las Laterales y gírelos en
el sentido de las agujas del reloj.
Fit the Plate to the Sides Panels.
Afterwards, fit the Minifix Drums
on the Plate and turn clockwise.
Encaja el Travesaño en las
Laterales. Luego, coloque los
Tambores Minifix el Travesaño y
gírelos en el sentido de las agujas
del reloj.
5
8
H
4x
H
HH
H
21
4
H
Fit the Top to the Sides Panels.
Afterwards, fit the Minifix Drums on the
Sides Panels and turn clockwise.
Encaja el Tablero en las Laterales. Luego,
coloque
los Tambores Minifix en las Laterales y
gírelos en el sentido de las agujas del
reloj.

10
11 12
J
2x
JJ
21
K
K
K
K
K
K
K
K
K
K
K
K
K
K
K
K
K
K
K
K
K
K
KKKKKK
10
10
10
K
30x
L
42,9" (109cm)
WALL
PARED
FLOOR
SUELO
L
1x
J
Glue the Hole Covers.
Pegar los Tapa-Agujeros.
Drill the wall with a 5/16" (8mm)
drill where you want to fix the tip
over restraint. The hole should be
42,9" (109cm) from the floor. After
drilling the wall, fix the Bushing
according to the instruction on the
next page.
Taladre la pared con un taladro de
5/16 "(8 mm) donde desee fijar la
placa de fijación. El orificio debe
estar a 42,9" (109 cm) del piso.
Después de perforar la pared, fije el
Buje de acuerdo con las
instrucciones de la página siguiente.
9
G
16x
21
G
G
I-E
8x
G
G
G
G
G
G
I-E
G
G
G
G
G
G
G
G
I-D
G
Attach the Slides.
Fije las Correderas.
I-D
I-D
I-D
I-D
I-E
I-E
I-E
I-D
8x
TIP OVER RESTRAINT INSTRUCTIONS
Fix the Back Panel
and fit profile I.
Asegurar los Traseros
y coloque el perfil I.
T10
10
K
K
10
10
Q
2x
Q
Q

WALL MATERIAL: Wood wall panel
with wooden beam;
FIXING SYSTEM: Fixing screw inserted
directly into the wooden beam.
MATERIAL DE LA PARED: Panel de
yeso o estuco con viga de madera;
SISTEMA DE FIJACIÓN: Tornillo de
fijación insertado directamente en la
viga de madera.
WALL MATERIAL: Drywall without
wooden beam;
FIXING SYSTEM: Fixing screw with
plastic bushing.
MATERIAL DE LA PARED: Panel de
yeso sin viga de madera;
SISTEMA DE FIJACIÓN: Tornillo de
fijación con buje de plástico.
WALL MATERIAL: Masonry wall
(concrete or brick);
FIXING SYSTEM: Fixing screw with
plastic bushing.
MATERIAL DE LA PARED: Albañileria
(hormigón o ladrillo);
SISTEMA DE FIJACIÓN: Tornillo de
fijación con buje de plástico.
USE THE BUSHING ACCORDING TO THE WALL MATERIAL
USE LA BUJE DE ACUERDO CON EL MATERIAL DE LA PARED
13 14
D
1x
D
B
B
B
B6
8
B
16x
4x
B
D
Place the forniture
agaist a wall and fix the
forniture with tip over
hardware. Coloque el
mueble contra una pared
y fíjelo con la placa de
fijación.
Insert the Minifix Screws.
Insertar los Tornillos Minifix.
Warning:
Make sure that the hole to be used for the
mini fix screw is the second from the side
of the rip.
Advertencia:
Asegúrese de que el orificio que se utilizará
para el tornillo mini fix sea el segundo desde
el lado de la rasgadura.
Edge
Edge

17 18
15 16
A
7
A
16x
8x
H
H
6
7
7
H
8x
4x
7
7J
16x
4x 4x
A
J
Fit the Wooden Dowels.
Encajar los Tarugos.
Fit the Drawers Front to the
Drawers Sides. Afterwards,
fit the Minifix Drums on the
Drawers Sides and turn
clockwise.
Encaja las Frentes del
Cajónes en las Laterales del
Cajónes. Luego, coloque
los Tambores Minifix en las
Laterales del Cajónes y
gírelos en el sentido de las
agujas del reloj.
Glue the Hole Covers.
Pegar los Tapa-Agujeros.
J
A
H
H
H
8
H
8x
H
Fit the Drawers Bottom
Panel into the groove then
fit the Drawers Back to the
Drawers Sides. Afterwards,
fit the Minifix Drums on the
Drawers Sides and turn
clockwise.
Coloque el panel inferior de
los cajones en la ranura y
luego coloque la parte
trasera de los cajones en los
lados de los cajones. Luego,
coloque
los Tambores Minifix en las
Laterales del Cajónes y
gírelos en el sentido de las
agujas del reloj.
J
J
7
7
Warning:
Make sure that the hole to be used for the
wooden dowels is the first from the side of
the rip.
Advertencia:
Asegúrese de que el orificio que se utilizará
para los tarugo sea el primero desde el lado
de la rasgadura.
Edge

21 22
19 20
G
16x
G
G
G
G
9
7
4x
M-D
M-E
M-E
8x
N
8x
O
8x
N
O
8x
P
8x
P
P
6
4x
P
G
Put the Drawers.
Poner los Cajónes.
Attach the Slides.
Fije las Correderas.
HANDLE ASSEMBLY
- Fit the Plastic Screw in the central hole of the Handle;
- Fold the Handle and fit the hole at the farthest end into the
Screw;
- Finally, fit the remaining hole into the Screw.
MONTAJE DEL TIRADOR
- Coloque el Tornillo de Plástico en el orificio central del Tirador;
- Doble el Tirador y coloque el orificio del extremo más alejado en el
tornillo;
- Finalmente, coloque el orificio restante en el Tornillo.
Fix the Handle.
Asegure el Tirador.
M-D
8x


ASSEMBLY INSTRUCTIONS / PLANO DE ARMADO
Congratulations! You have purchased a
product of excellent quality, made from
MDP or MDF wood veneer, extracted
from renewable forests. It has high
strength and current design.
Felicitaciones! Usted compró a un
producto de excelente calidad,
fabricado con placa de madera de MDP
o MDF, proveniente de florestas
renovables. Tiene alta resistencia y
diseño actual.
Before assembling the furniture,
carefully read the assembly instructions!
Antes de armar el mueble, lea con
atención el manual de ensamble!
1) Care and cleaning should be
done with a cloth slightly
moistened with water.
La conservación y limpieza
debe ser hecha con un trapo
levemente humedecido en agua.
2) Don't use abrasive products, such as
soap, detergents and steel sponge.
No use productos abrasivos, como
saponáceo, detergentes y esponja de acero.
3) Don't use wax or oil to shine the furniture.
No use cera o aceites para darle brillo al
mueble.
!
2) When starting the assembly,
don't support the parts on the
wall.
Al empezar el armado, no
apoyes las partes en la pared.
5) Begin assembly by following the
step-by-step instructions.
Comience el armado siguiendo la
instrucciones paso a paso.
4) The furniture must be mounted on the
floor, to do this, use the box itself to protect
and not damage the floor.
El mueble suele ser armando al piso, para
eso, use la propria caja para protegerlo y no
dañar al piso.
ATENTION
ATENCIÓN
1) Check all parts before starting
assembly.
Verifique todas las partes
antes de empezar el armado.
3) When placing parts and hardware aside,
be careful not to lose them.
Al poner las piezas y herrages a parte,
cuidado para no dañarlas.
6) It's the assembler's responsibility to
follow the instructions in this manual, which
are fundamental to the structure of the
furniture.
Es de responsabilidad del armador seguir
las instrucciones de este manual, que son
fundamentales para la estructura del mueble.
CARE
CUIDADOS
4) Don't expose the furniture to weather or
excessive heat.
No exponer el mueble a interperies ni al
calor excesivo.
5) When the assembly is finished, clean the
room and the furniture.
Al terminar el armado, limpie al ambiente y
al mueble.
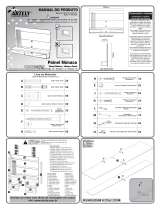
3003 - AMBER DOUBLE DRESSER
ASSEMBLY INSTRUCTION
PLANO DE ARMADO

No
Num
DESCRIPTION
DESCRIPCIÓN
QTY
CANT
LGTH
LARG
(mm)
WDTH
ANCH
(mm)
1RIGHT SIDE PANEL
LATERAL DERECHA
DPTH
GROS
(mm)
2LEFT SIDE PANEL
LATERAL IZQUIERDA
3BOTTOM
BASE
4TOP
TABLERO
5PARTITION
DIVISORIA
6
DRAWER SIDE
LATERAL DEL CAJÓN
7
DRAWER BACK
TRASERO DEL CAJÓN
8
DRAWER BOTTOM PANEL
FONDO DEL CAJÓN
9
PARTS / PIEZAS
3
1
2
4
9
5
6
7
7
8
10 BACK PANEL
TRASERO
DRAWER FRONT
FRENTE DEL CAJÓN
1 678 450 15
1 15
115
11364 450 15
115
6 651 221 15
12 350 105 15
6 633 105 15
6 614 360 3
4678 352 3
678 450
1364 450
678 450
10 10
10
10

USE THE RULER TO IDENTIFY THE SCREWS
UTILICE LA REGLA PARA IDENTIFICAR LOS TORNILLOS
10090
8070
6050
4030
2010
0
(mm)
WEIGHT SUPPORTED / PESO SOPORTADO
44
LB
6,5
LB
DESCRIPTION
DESCRIPCIÓN
WOODEN DOWEL
TARUGO
CODE
COD
A
QTY
CANT
36
HARDWARE / HERRAJES
MINIFIX SCREW
TORNILLO MINIFIX
B 36
LEG
PATA
C 5
SCREW 5X50mm
TORNILLO 5X50mm
D 6
PROTECTION FELT
FIELTRO DE PROTECCIÓN
E5
TIP OVER RESTRAINT
PLACA DE FIJACIÓN
F1
SCREW 4X12mm
TORNILLO 4X12mm
G38
MINIFIX DRUM
TAMBOR MINIFIX
H36
LEFT SIDE SLIDE
CORREDERA LATERAL IZQUIERDA
I-E 6
SCREW M4X10mm
TORNILLO M4X10mm
J6
FEMALE UNION SCREW
TORNILLO UNIÓN HEMBRA
K 6
HOLE COVER
TAPA AGUJERO
L 27
NAIL
CLAVO
M39
METALLIC CLAW
GRAB METALICA
N 5
BUSHING
BUJE
O 1
LEFT DRAWER SLIDE
CORREDERA DEL CAJÓN IZQUIERDA
P-E 6
HANDLE
TIRADOR
Q12
FRONT SCREW HANDLE
TORNILLO DELANTERO TIRADOR
R 12
REAR SCREW HANDLE
TORNILLO TRASERO TIRADOR
S12
I-D RIGHT SIDE SLIDE
CORREDERA LATERAL DERECHA 6
RIGHT DRAWER SLIDE
CORREDERA DEL CAJÓN DERECHA
P-D 6
SLIDE IDENTIFICATION / IDENTIFICACIÓN CORREDERA
D
D
E
E
TOOLS / HERRAMIENTAS
RUBBER HAMMER
MARTILLO GOMA
HAMMER
MARTILLO
PHILLIPS SCREWDRIVER
LLAVE PHILLIPS
MEASURING TAPE
CINTA MÉTRICA
DRILLING MACHINE
TALADRO
PROFILE I
PERFIL I
T 2

A
12x
1
2
5
B
12x
C
5x
D
5x
E
5x
B
B
B
B
B
B
B
B
B
B
B
B
D
D
D
D
D
C
C
C
C
C
E
E
E
E
E
4
3
3
3
21
34
Fit the Wooden Dowels.
Encajar los Tarugos.
Insert the Minifix Screws.
Insertar los Tornillos Minifix.
Fix the Legs.
Fije las Patas. Glue Felts.
Pegar Fieltros.
AA
D
C
E
Warning:
Before assembling the mini fix screw make sure you
are using the correct hole. For this process, consider
the last hole before the edge of the plate. To be sure,
the measurement between the center of the holes
must be 15,11 inch according to the drawing.
Advertencia:
Antes de montar el tornillo mini fix, asegúrese de
que está utilizando el orificio correcto. Para este
proceso, considere el último agujero antes del borde
de la placa. Sin duda, la medida entre el centro de
los agujeros debe ser de 384mm según el dibujo.
B
Edge
Edge
Edge
Warning:
Before fit the wooden dowels, make sure you are using the
correct hole. For this process, consider the second hole
before the edge of the plate. To be sure, the measurement
between the center of the holes must be 12,59 inch
according to the drawing.
Advertencia:
Antes de colocar los tarugo, asegúrese de estar utilizando el
agujero correcto. Para este proceso, considere el segundo
agujero antes del borde de la placa. Para estar seguro, la
medida entre el centro de los agujeros debe ser de 320mm
según el dibujo.
A
A
A
A
A
A
A
A
A
A
A
A
12,59in
12,59in
12,59in
15,11in

H
6x
H
H
H
HH
H
5
21
3
F
G
G
G
2x
F
1x
4
56
7 8
H
6x
HH
251
4
HH
HH
G
12x
I-E
3x
Attach the tip over restraint
respecting the measure.
Fije la Placa de Fijación
respetando la medida.
Fit the Sides Panels and Partition to the Bottom. Afterwards, fit the
Minifix Drums on the Sides Panels and Partition and turn clockwise.
Encaja las Laterales y Divisoria en la Base. Luego, coloque los Tambores
Minifix en las Laterales y Divisoria y gírelos en el sentido de las agujas
del reloj.
Fit the Top to the Sides Panels and Partition. Afterwards, fit the
Minifix Drums on the Sides Panels and Partition and turn clockwise.
Encaja el Tablero en las Laterales y Divisoria. Luego, coloque
los Tambores Minifix en las Laterales y Divisorias y gírelos en el sentido
de las agujas del reloj.
G
G
F
0,8in
H
H
I-D
3x
1
2
G
G
G
G
G
G
G
G
G
G
G
G
GI-D
I-D
I-D
I-D
I-E
I-E
I-E
Attach the Slides.
Fije las Correderas.

9 10
11 12
K
6x
J
J
J
J
J
J
K
K
K
K
K
K
5
J
6x
I-D
I-D
I-D
I-E
I-E
I-E
I-E
3x
L
3x
LLL
251
M
39x
N
5x
MMMMMM
M
M
M
M
M
MMMMMMMMMMMMM
M
M
M
M
M
M
M
M
M
M
M
M
M
M
M
N
N
N
N
N
10
10
10
10
O
O
1x
34,2 (87cm)
WALL
PARED
FLOOR
SUELO
J
K
I-E
I-D
Attach the Slides.
Fije las Correderas. Glue the Hole Covers.
Pegar los Tapa-Agujeros.
Fix the Back Panel
and fit profile I.
Asegurar los Traseros
y coloque el perfil I.
Drill the wall with a 5/16" (8mm)
drill where you want to fix the tip
over restraint. The hole should be
34,2" (87cm) from the floor. After
drilling the wall, fix the Bushing
according to the instruction on the
next page.
Taladre la pared con un taladro de
5/16 "(8 mm) donde desee fijar la
placa de fijación. El orificio debe
estar a 34,2" (87 cm) del piso.
Después de perforar la pared, fije el
Buje de acuerdo con las
instrucciones de la página siguiente.
L
M
M
N
I-D
3x
T10
10 T
2x
T
T
T
10
10 TIP OVER RESTRAINT INSTRUCTION

13 14
WALL MATERIAL: Wood wall panel
with wooden beam;
FIXING SYSTEM: Fixing screw inserted
directly into the wooden beam.
MATERIAL DE LA PARED: Panel de
yeso o estuco con viga de madera;
SISTEMA DE FIJACIÓN: Tornillo de
fijación insertado directamente en la
viga de madera.
WALL MATERIAL: Dry wall without
wooden beam;
FIXING SYSTEM: Fixing screw with
plastic bushing.
MATERIAL DE LA PARED: Panel de
yeso sin viga de madera;
SISTEMA DE FIJACIÓN: Tornillo de
fijación con buje de plástico.
WALL MATERIAL: Masonry (concrete
or brick);
FIXING SYSTEM: Fixing screw with
plastic bushing.
MATERIAL DE LA PARED: Albañileria
(hormigón o ladrillo);
SISTEMA DE FIJACIÓN: Tornillo de
fijación con buje de plástico.
USE THE BUSHING ACCORDING TO THE WALL MATERIAL
USE LA BUJE DE ACUERDO CON EL MATERIAL DE LA PARED
D
D
1x
6
8
B
24x
6x
Place the forniture
agaist a wall and fix
forniture with tip over
hardware.
Coloque el mueble
contra una pared y fíjelo
con la placa de fijación.
Insert the Minifix Screws.
Insertar los Tornillos Minifix.
B
D
B
B
B
B
Warning:
Make sure that the hole to be used for the
mini fix screw is the second from the side
of the rip.
Advertencia:
Asegúrese de que el orificio que se utilizará
para el mini tornillo de fijación sea el
segundo desde el lado de la rasgadura.

18
15 16
A
A
7
A
24x
12x
H
H
6
7
7
H
12x
6x
L
L
L
L
7
7
L
24x
6x
Fit the Wooden Dowels.
Encajar los Tarugos.
Glue the Hole Covers.
Pegar los Tapa-Agujeros.
A
H
L
17
H
H
8
7
7
H
12x
6x
Fit the Drawers Front to the
Drawers Sides. Afterwards,
fit the Minifix Drums on the
Drawers Sides and turn
clockwise.
Encaja las Frentes del
Cajónes en las Laterales del
Cajónes. Luego, coloque
los Tambores Minifix en las
Laterales del Cajónes y
gírelos en el sentido de las
agujas del reloj.
Fit the Drawers Bottom
Panel into the groove then
fit the Drawers Back to the
Drawers Sides. Afterwards,
fit the Minifix Drums on the
Drawers Sides and turn
clockwise.
Coloque el panel inferior de
los cajones en la ranura y
luego coloque la parte
trasera de los cajones en los
lados de los cajones. Luego,
coloque
los Tambores Minifix en las
Laterales del Cajónes y
gírelos en el sentido de las
agujas del reloj.
H
Warning:
Make sure that the hole to be used for the
wooden dowels is the first from the side of
the rip.
Advertencia:
Asegúrese de que el orificio que se utilizará
para los tarugo sea el primero desde el lado
de la rasgadura.

21
Put the Drawers.
Poner los Cajónes.
22
19 20
G
24x
G
G
G
G
9
7
6x
PD
PE
PD
6x
Q
12x
R
12x
Q
R12x
S
12x
S
S
6
6x
Attach the Slides.
Fije las Correderas.
HANDLE ASSEMBLY
- Fit the Plastic Screw in the central hole of the Handle;
- Fold the Handle and fit the hole at the farthest end into the
Screw;
- Finally, fit the remaining hole into the Screw.
MONTAJE DEL TIRADOR
- Coloque el Tornillo de Plástico en el orificio central del Tirador;
- Doble el Tirador y coloque el orificio del extremo más alejado en el
tornillo;
- Finalmente, coloque el orificio restante en el Tornillo.
Fix the Handle.
Asegure el Tirador.
G
S
PE
6x

/