
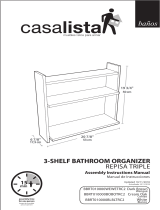
baños
Manual de Instrucciones
Cream Oak BBOV010000BOBOTRC2
Actualizado 11/11/2018
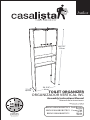
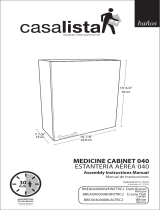
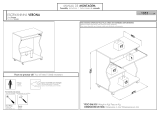
TOILET ORGANIZER
ORGANIZADOR VERTICAL WC
Assembly Instructions Manual
White
BBOV010000BLBLTRC2
Cenizo
Blanco
Updated 11/11/2018
Dark Brown BBOV010000WEWETRC2
Wengué
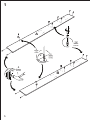
175 cm
68 7/8"
24 3/4"
63 cm
18,4 cm
7 1/4"
assembly time
for two person
tiempo de ensamblaje
para dos persona
45

Max11 lb
Peso máx5 Kg
1
Espacio máximo W.C.:
60 cm ancho x 80 cm alto
Maximum space W.C .:
60 cm wide x 80 cm high
max
max
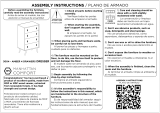
¡CONGRATULATIONS! ¡Felicidades!
You have acquired a Casalista furniture product, specially designed to provide you with the
highest quality and comfort. We assure an easy and fast assembly process, following this
step-by-step instructions manual. The final product will be a furniture piece that will bring you
years of enjoyment.
Usted ha adquirido un producto Casalista especialmente diseñado para brindarle la más alta calidad
y confort. Aseguramos un armado fácil y rápido siguiendo paso a paso el práctico instructivo creado
para usted. El producto final será un mueble que le brindará años de disfrute.
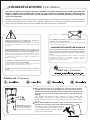
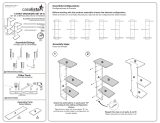
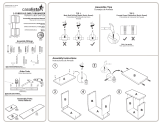
Verifique que todas las piezas estén incluidas. Los tableros
se encuentran identificados con letras para su fácil
ubicación.
Verify that all parts are included. The boards are
identified with letters for easy location.
Open the fittings bag carefully so you do not lose any
parts. Check the item count is accurate and divide all
the parts into groups for an easier assembly process.
Abra con mucho cuidado la bolsa de herrajes para no
perder ninguno. Compruebe si el contenido es el correcto
y sepárelos en grupos para facilitar su identificación
durante el armado.
Se recomienda armar el mueble sobre la caja o sobre una
superficie plana y cubierta para no rayarlo.
Assembly is recommended on the box or on a flat and
covered surface to prevent scratching.
Assemble the unit near the place where you plan to
use it.
Procure armar el mueble cerca del sitio donde será usado.
For additional questions on how to assemble your
furniture, you can contact us at:
Para cualquier consulta sobre cómo armar su mueble, puede
comunicarse con nosotros al:
If you must replace damaged or missing parts we will be
pleased to assist you. Have the instructions, furniture
code and invoice on hand so that we can process your
claim.
Si usted necesita reemplazar piezas dañadas o faltantes,
estaremos complacidos en atenderle. Tenga a mano las
instrucciones, código de producto y factura para que
podamos procesar su reclamo.
Visit us / Visítenos
Follow us / Síguenos
?
Este mueble fue diseñado para soportar el peso máximo. No
sobrecargue la unidad; si cualquier parte del mueble se arquea,
puede colapsar o voltearse y causar lesiones graves y/o daños a otros
objetos.
This furniture piece was designed to support the maximum
weight. Do not exceed the weight limit; if any shelf, top or
bottom of unit bows or bends, can cause the unit to collapse and
tip over, causing serious bodily injury and/or damage to other
objects.
Evite que los niños suban sobre el mueble
o se cuelguen de sus travesaños, ya que la
unidad puede voltearse y causar lesiones
graves e incluso mortales.
Never allow children to climb or hang on the shelves. The unit
may tip over causing serious and even fatal injuries.

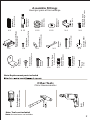
X 6 X 12 X 12 X 12
X 2 X 8 X 4
2
X 4 X 8
X 4
X 2 X 4
X 4 X 4 X 4 X 4
Ramplú
Tornillo para Ramplú
X 16
Clavo
Ramplug
Platen screw
Ramplug Screw
Nails
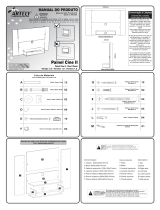
Assemble Fittings
Herrajes para el Ensamblaje
Wooden Pin
Minifix Dowel
Tarugo de Madera
Perno Minifix
Minifix Cam
Tambor Minifix
Minifix Cover
Tapa Minifix
Bisagra pivote
Pivot hinge
Tornillo para Bisagra e Imán
Hinges/Lacth Screw
Magntic Latch W/Platen
Platen Screw
Imán con Pletina
Tornillo Plano para Pletina
Shelf Support
Soporte de Entrepaño
Handles
Tirador
Handle Screw
Tornillo para Tirador
Furniture Slider
Deslizador
Tornillo para pletina
Taladro
Other Tools
Otras Herramientas
Hammer
Star Screwdriver
Drill
Note: Tools not included
Nota: Herramientas no incluidas
L-bracket
Pletina en L
Destornillador de estrías
Note: Replacement parts included
X 4
Tornillo Drywall
Drywall Screw
Ramplú expansión
Anchor Plug
X 4

3
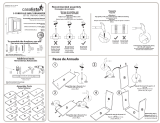
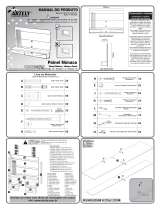
Consejos de Armado
Assembly Tips
Allen Screw Drilling Depth
Minifix Dowel Drilling Depth
Profundidad de Perforación del
Tornillo Allen
Profundidad de Perforación del
Perno Minifix
Wooden Pin Placement
Profundidad de Colocación del Tarugo de Madera
TIP 1 TIP 2
Minifix Assembly Information
Información de Montaje Conjunto Minifix
Paso 2
Step 2
Paso 1
Step 1
TIP 3
TIP 4
Note: tap gently
Nota: golpear suavemente

4
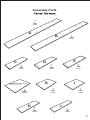
A
B
C
D
E
G
I
H J
Fondo 44,95 x 31,5 cm
Assembly Parts
1
Part
Pieza
1
Part
Pieza
1
Part
Pieza
1
Part
Pieza
1
Part
Pieza
1
Part
Pieza
1
Part
Pieza
1
Part
Pieza
1
Part
Pieza
2
Parts
Piezas
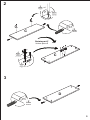
Back Panel 17.72 x 12.59"

1
5
A
B
1.18"
3 cm
2
Parts
Platen Screw
Piezas
Tornillo Pletina
4
Parts
Piezas
12
Parts
Piezas
2
Parts
Platen
Piezas
Pletina

3
6
2
C
D
C
Rotate part C
Voltear pieza C
2
Parts
Magnet
Piezas
Imán
2
Parts
Piezas
2
Parts
Piezas
2
Parts
Platen
Piezas
Pletina
2
Parts
Platen Screw
Piezas
Tornillo Pletina
4
Parts
Hinges/Lacths
Screw
Piezas
Tornillo para Bisagra

4
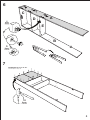
5
7
E
C
D
E
B
6
Parts
Minifix Dowel
Piezas
Tambor Minifix
6
Parts
Piezas
2
Parts
Piezas

6
7
8
A
C
D
E
B
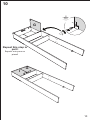
16
Parts
Piezas
6
Parts
Minifix Dowel
Piezas
Tambor Minifix
6
Parts
Piezas
Fondo 44,95 x 31,5 cm
Back Panel 17.72" x 12.59"

8
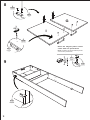
9
9
G
I
2
Parts
Platen
Piezas
Pletina
4
Parts
Platen Screw
Piezas
Tornillo Pletina
4
Parts
Handle Screw
Piezas
Tornillo Tirador
2
Parts
Handle
Piezas
Tirador
4
Parts
Pivot Hinge
Piezas
Bisagra pivote
Nota: la pletina del imán también puede
venir de una perforación
1
Part
Platen Screw
Pieza
Tornillo Pletina Imán
1
Part
Platen
Pieza
Pletina Imán
Note: the magnet platen could
come with one perforation
Magnetic Latch
W/Platen

10
10
G
G
I
2
Parts
Hinges/Lacth screw
Pieza
Tornillo para bisagra
e imán
Repeat this step in
part I
Repetir este paso en
pieza I

11
11
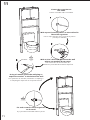
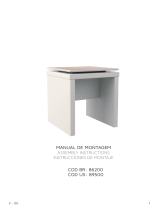
Con un lápiz, marque en la pared los 4 puntos
para fijar el mueble
Centre el mueble sobre el inodoro
Fije y atornille el mueble sobre la pared.
With a pencil, mark 4 points on the wall to fix
the toilet organizer
Con un taladro con mecha de 5/16",
perforar la pared donde realizó los 4 puntos
With a 5/16" drill wick, perforate the wall
where you marked the 4 points
4
Parts
Ramplug
Piezas
Ramplú
Con ayuda de un martillo, introduzca el ramplug o
el ramplug de expansión en las perforaciones
Using a hammer, place the wall plug or
expansion anchor in the hole of the wall
4
Parts
Ramplug Screw
Piezas
Tornillo Ramplú
Fix and screw the toilet organizer
on the wall
Center the organizer on
the toilet

12
12
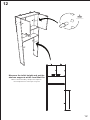
Mida la altura del WC y ubique los soportes
de entrepaño en el nivel que se ajuste
8
Parts
Shelf Supports
Piezas
Soporte de entrepaños
Measure the toilet height and put the
shelves supports at the level that fits

13
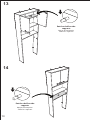
H
13
J
14
Put the shelf on the
supports
Apoye el entrepaño
sobre los soportes
Put the shelf on the
supports
Apoye el entrepaño
sobre los soportes

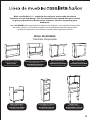
Repisa triple
53 cm x 50 cm x 17,5 cm
3-Shelf Bathroom Organizer
20 7/8” x 19 3/4” x 6 7/8”
14
Estantería aérea 010
50 cm x 50 cm x 18 cm
Bathroom organizer & Towel bar
19 3/4” x 19 3/4” x 7 1/8”
Estantería aérea 020
61,5 cm x 50 cm x 18 cm
Mirror Cabinet 020
24 1/4” x 19 3/4” x 7 1/8”
Estantería aérea 030
42,8 cm x 50 cm x 19,5 cm
Mirror Cabinet 030
16 7/8” x 19 3/4” x 7 5/8”
Auxiliar con ruedas
50 cm x 72 cm x 36 cm
Mobile Sink Cabinet
19 3/4” x 28 3/8” x 14 1/8”
Estantería vertical
33 cm x 120 cm x 30 cm
1-Door bathroom Pantry
13” x 47 1/4” x 11 3/4”
Organizador vertical
63 cm x 175 cm x 18,4 cm
Toilet pantry
24 3/4” x 68 7/8” x 7 1/4”
También Disponible
Also Available
With casalistabaños, make the most of your spaces with functional
furniture of style and design. This furniture line was created with you in mind
to give you practical and innovative solutions, ideal for organizing your
bathroom.
Con
casalistabaños aprovecha al máximo tus espacios con muebles funcionales
de estilo y diseño. Su línea de muebles fue creada pensando en ti para darte
soluciones prácticas e innovadoras, ideales para organizar tu baño.

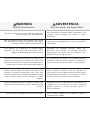
WARNING
Safety Precautions
This unit contains small parts which could cause
choking hazard for small children.
We recommend that you protect your work
surface during assembly to prevent scratching or
damage on the surface of the furniture.
Two people are suggested to handle heavy
furniture. Do not drag the unit, please lift it
slightly with the help of another person.
Do not overload the furniture, if any shelf, top or
bottom of unit bows or bends, can cause the
furniture to collapse and tip-over, causing serious
bodily injury and/or damage to other objects.
Always unload the unit before moving it. The
weight of personal belongings can cause the
furniture to become unstable and break, causing
serious bodily injury and/or damage to other
objects.
Never let children climb or hang on shelves, the
unit may tip-over causing serious and even fatal
injuries.
ADVERTENCIA
Precauciones de Seguridad
Este producto contiene piezas pequeñas que
pueden causar peligro de asfixia a niños
pequeños.
Recomendamos que proteja su área de trabajo
durante el ensamblaje para no rayar la superficie
del mueble.
Manipule los muebles pesados entre dos
personas. No arrastre la unidad, levántela
ligeramente con ayuda de otra persona para
desplazarla de un lugar a otro.
No sobrecargue la unidad, si cualquier parte del
mueble se arquea, puede colapsar o voltearse y
causar lesiones graves y/o daños a otros objetos.
Vacíe siempre la unidad antes de moverla de
lugar. El peso de los objetos puede resultar que el
mueble pueda desarmarse o romperse y causar
lesiones graves y/o daños a otros objetos.
Evite que los niños suban encima del mueble o se
cuelguen de sus travesaños ya que la unidad
puede voltearse y causar lesiones graves e
incluso mortales.
Evite colocar objetos muy calientes sobre la
superficie del mueble.
Do not place hot objects on furniture surfaces.
-
 1
1
-
 2
2
-
 3
3
-
 4
4
-
 5
5
-
 6
6
-
 7
7
-
 8
8
-
 9
9
-
 10
10
-
 11
11
-
 12
12
-
 13
13
-
 14
14
-
 15
15
-
 16
16


en otros idiomas
- English: CasaLista OV010BL Installation guide
Artículos relacionados

Otros documentos
-
 Casa Lista RT010BO Guía del usuario
-
 Casa Lista RE060WE Guía del usuario
-
 Casa Lista EA040BO Guía del usuario
-
 Casa Lista RE050BO Guía del usuario
-
 Manhattan Comfort Amber Double Wide and Tall Dresser - Set of 2 Assembly Manual
-
 Casa Lista RE030BL Guía del usuario
-
 Politorno Verona Desk 1055 Assembly Instructions
-
 Artely Cine II Manual de usuario
-
 Artely Monaco Manual de usuario
-
 Manhattan Comfort 86200 Assembly Instructions Manual


