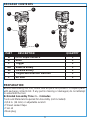
Kobalt SGY-AIR290 Air Impact Wrench Manual de usuario
- Categoría
- Llaves de impacto eléctricas
- Tipo
- Manual de usuario

ATTACH YOUR RECEIPT HERE
Serial Number Purchase Date
Questions, problems, missing parts? Before returning to your
retailer, call our customer service department at 888-3KOBALT
(888-356-2258), 8:00 a.m.-8:00 p.m., EST, Monday-Sunday.
You could also contact us at [email protected].
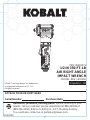
SS22212 1
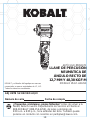
ITEM #5091971
MODEL #SGY-AIR290
1/2-IN 350-FT-LB
AIR RIGHT ANGLE
IMPACT WRENCH
Español p. 18
KOBALT and logo design are trademarks
or registered trademarks of LF, LLC.
All rights reserved.

2
TABLE OF CONTENTS
Safety Information..........................................................................................3
Compressor Requirements.............................................................................2
Package Contents..........................................................................................9
Product Specifications....................................................................................3
Preparation...................................................................................................10
Assembly Instructions...................................................................................10
Operating Instructions..................................................................................12
Care and Maintenance.................................................................................13
Troubleshooting............................................................................................14
Warranty.......................................................................................................15
Replacement Parts List................................................................................ 16
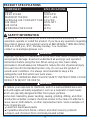
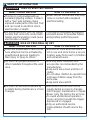
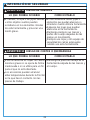
COMPRESSOR REQUIREMENTS
IMPORTANT: To operate correctly, this tool requires airflow of at least 6.4
Standard Cubic Feet per Minute (SCFM) at 90 Pounds per Square Inch (PSI)
at the tool. The air hose length could affect how much air pressure the tool is
actually receiving. You may need to adjust the air pressure higher on the air
regulator to achieve the working pressure of 90 PSI.
6.4
SCFM 90
PSI
Tool Requirements
Exigences relatives aux outils
Requisitos de herramientas
@

3
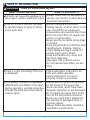
PRODUCT SPECIFICATIONS SPECIFICATIONS
COMPONENT
SAFETY INFORMATION
Please read and understand this entire manual before attempting to
assemble, operate or install the product. If you have any questions regarding
the product, please call customer service
at 888-3KOBALT (888-356-2258),
8:00 a.m.-8:00 p.m., EST, Monday-Sunday. You could also
contact us at [email protected].
WARNING
Improper operation or maintenance of this tool could result in serious injury
and property damage. Read and understand all warnings and operation
instructions before using this tool. When using any tool, basic safety
precautions should always be followed to reduce the risk of personal injury.
Use each tool for its intended function only. Do not use this product in
unsafe work conditions. It is always recommended to keep a fire
extinguisher and first aid kit near work areas.
FAILURE TO OBSERVE AND FOLLOW SAFETY INSTRUCTIONS COULD
RESULT IN INJURY OR DEATH.
1/2 IN.
7,000 RPM
350 FT.-LBS.
6.4 SCFM
1/4 IN. NPT
3/8 IN.
90 PSI
DRIVE
FREE SPEED
MAXIMUM TORQUE
AVERAGE AIR CONSUMPTION
AIR INLET
AIR HOSE
WORKING PRESSURE
WARNING
To reduce your exposure to chemicals, work in a well-ventilated area and
Some dust created by power sanding, sawing, grinding, drilling, and other
construction activities contains chemicals known to the state of California to
cause cancer, birth defects, or other reproductive harm. Some examples of
these chemicals are:
Lead from lead-based paints
work with approved safety equipment, such as a respirator or dust masks
which are specially designed to filter microscopic particles.
Crystalline silica from bricks, cement, and other masonry products
Arsenic and chromium from chemically-treated lumber

4
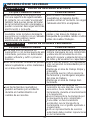
SAFETY INFORMATION
RISK OF EYE OR HEAD INJURY
WARNING
WARNING
WARNING
WHAT COULD HAPPEN HOW TO PREVENT IT
WHAT COULD HAPPEN HOW TO PREVENT IT
WHAT COULD HAPPEN HOW TO PREVENT IT
This air powered tool is capable of
propelling materials such as
fasteners, metal chips, and other
debris at high speed which could
result in serious injury.
Always wear ANSI approved Z87.1
safety glasses.
Never leave operating tool
unattended.
Disconnect tool from air supply when
tool is not in use or when changing
accessories to prevent accidental
operation.
Compressed air can be hazardous,
propelling objects or particles that
can cause injury into soft tissues
such as eyes and ears.
For additional protection, use an
approved face shield in addition to
safety glasses.
Tool attachments can become loose
or break and fly apart, becoming
projectiles or propelling other objects
at the operator or bystanders in the
work area.
Make sure all attachments are
properly assembled and securely
fastened before use.
Always use the tool at a safe distance
from others in the work area.
Maintain awareness of work area
safety at all times.
RISK OF LOSS OF HEARING
RISK OF FIRE OR EXPLOSION
Always wear ANSI S3.19 hearing
protection.
Exposure to noise produced by air
tools can lead to permanent hearing
loss.
This tool is capable of generating
sparks, which can result in ignition of
flammable materials.
Never operate tools near flammable
substances such as gasoline,
naphtha, cleaning solvents, etc.
Work in a clean, well-ventilated area
free of combustible materials.
Never use oxygen, carbon dioxide or
other bottled gases as a power
source for air tools.

5
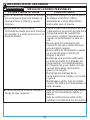
SAFETY INFORMATION
WARNING
WARNING
WHAT COULD HAPPEN HOW TO PREVENT IT
WHAT COULD HAPPEN HOW TO PREVENT IT
RISK OF ENTANGLEMENT
RISK OF CUTS OR BURNS
Loose hair, clothing, jewelry or other
loose objects can become entangled
in the moving elements of this tool
and can cause serious injury.
Do not wear loose clothing, jewelry,
or anything that may get caught or
tangled when using tool.
Remove any jewelry which may be
caught by the tool.
Always keep hands and body parts
away from moving parts.
Always wear properly fitted clothing
and other properly fitted safety
equipment when using this tool.
This tool is capable of causing
serious injury if operated improperly,
or in a manner for which the tool is
not intended.
Keep the working part of the tool
away from hands and body.
Accessories can become extremely
hot through friction where they
contact the workpiece.

6
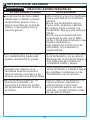
SAFETY INFORMATION
RISK OF ELECTRIC SHOCK
WARNING
WARNING
WHAT COULD HAPPEN HOW TO PREVENT IT
WHAT COULD HAPPEN HOW TO PREVENT IT
RISK OF PERSONAL INJURY
This tool is not provided with an
insulated gripping surface. Contact
with a “live” wire will also make
exposed metal parts of the tool “live”
and can result in electrical shock,
electrocution or death.
Never use air tools where they may
come in contact with energized
electrical wiring.
Thoroughly investigate workpieces
and work areas for possible hidden
wiring before performing work.
Air tool accessories such as impact
sockets that come into contact with
hidden electrical wiring could cause
electrocution or death.
A tool left unattended or with the air
hose attached can be activated by
unauthorized persons leading to
their injury or injury to others.
Air tools can propel fasteners or
other materials throughout the work
area.
Air tools can become activated by
accident during maintenance or tool
changes.
Disconnect the tool from the air
supply during accessory changes,
tool changes, maintenance or repair.
Never carry the tool by the air hose.
To avoid unintentional operation,
never carry the tool with the trigger
depressed or engaged.
Only an authorized service
representative should service the
tool.
Remove air hose when the tool is
not in use and store tool in a secure
location away from reach of children
and untrained users.
Use only parts, fasteners and
accessories recommended by the
manufacturer.
Keep work area clean and free of
clutter.
Do not allow children to operate tool,
and keep children away from the
work area.
Keep work area well lit.

7
SAFETY INFORMATION
RISK OF PERSONAL INJURY
WARNING
WHAT COULD HAPPEN HOW TO PREVENT IT
Air tools can cause the workpiece to
move upon contact, leading to injury. Always make sure the workpiece is
secure. Use clamps or other devices
to prevent movement.
Before changing accessories,
making repairs, or when tool is not in
use, shut off the air supply and
release/drain air pressure from hose.
Disconnect tool from air supply and
store in a safe location.
Never use the tool while using drugs
or alcohol.
Loss of control of the tool can lead
to operator injury or injury to others
in the work area.
There is a risk of bursting if the tool
is damaged.
Poor quality, improper or damaged
attachments can detach or fly apart
during operation, sending projectiles
through the work area and causing
serious injury.
Follow lubrication instructions for
best and safest operation.
Follow instructions on how to
properly change accessories.
Always use tool attachments rated
for the speed of the power tool.
Never use tools, which have been
dropped, impacted, or are damaged.
Do not apply excessive force to the
tool; let the tool perform the work.
Never use a tool that is leaking air,
has missing or damaged parts, or
requires repairs.
Keep proper footing at all times when
handling tools. Slipping, tripping
and/or falling are major causes of
serious injury and or death.
Keep tool handles dry, clean and
free from oil/grease.
Stay alert. Use common sense.
Do not operate tools when you are
tired.
Always follow assembly, operation,
maintenance instructions.

8
SAFETY INFORMATION
RISK OF PERSONAL INJURY
WARNING
WHAT COULD HAPPEN HOW TO PREVENT IT
Improperly maintained tools and
accessories can cause serious injury.
Using an accessory not intended for
a specific tool increases the risk of
injury to the operator and everyone
else in the work area.
Repetitive motions, awkward
positions and exposure to vibration
can be harmful to hands and arms.
Discontinue use of tool if discomfort,
tingling feeling or pain occurs.
Consult a physician before resuming
use if any of these symptoms occur.
Always use accessories and
attachments designed for the tool
and the work at hand.
Do not improvise or modify tools or
accessories.
Maintain the tool and accessories
with care.
Keep tools clean and properly oiled
for best and safest performance.

9
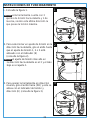
PACKAGE CONTENTS
PREPARATION
DESCRIPTION QUANTITY
1
1
1
1
1
1
1
PART
A
B
C
DR
DF
F
1/2 in. Impact Wrench
Anvil
Trigger
Reverse Rotary
Forward Rotary
Air Inlet
E Torgue and Direction Indicator
Before assembling this tool, make sure all parts are present. Compare parts
with package contents list. If any part is missing or damaged, do not attempt
to assemble the tool.
Tools and Materials Required for Assembly (not included):
• 9/16 in. (14 mm) or adjustable wrench
• Thread sealant tape
• Tool oil
• Male plug
Estimated Assembly Time: 1 – 3 minutes
A
B
C
F
DF
DR
E

10
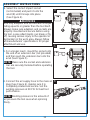
ASSEMBLY INSTRUCTIONS 1
2
1. Remove plastic air inlet protective cap
from air inlet (F) (See Figure 1).
2. Insert the male plug into the air inlet (F).
Tighten the male plug by turning it
clockwise using a 9/16 in. (14 mm)
wrench (not included) for an air tight
connection. DO NOT OVERTIGHTEN.
33. Place 2 – 3 drops of air tool oil
(not included) into the opening of the
male air plug before each use
(See Figure 3).
NOTE: Use threaded sealant tape
(not included) on the threading of the
male plug.
F
F

11
ASSEMBLY INSTRUCTIONS
6. Connect the air supply hose to the male air
plug (See Figure 6), making sure it is
completely seated and secure. Set the
working pressure at 90 PSI for best tool
performance.
5. For a longer reach, mount the socket onto
the end of an extension bar (not provided)
and then push the extension bar onto the
anvil (See Figure 5).
Working pressure is the amount of
air pressure the tool sees when spinning
freely.
NOTE:
4. Select the correct impact socket
(not included) and push it onto the
anvil (B) until it snaps into place
(See Figure 4).
Use only adapters and sockets with a torque
rating equal to or greater than the tool itself.
Always make sure adapters and sockets are
properly mounted and secure before using
the tool. Loose attachments can break or fly
off, causing serious injury to the operator or
bystanders in the work area. Always follow
all manufacturers’ specifications for proper
attachment and use.
WARNING
NOTE: Make sure the socket and extension
bar are securely fastened before operating
the tool.
5
6
TM
4
B
B

12
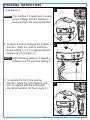
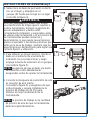
OPERATING INSTRUCTIONS
1. See Figure 1.
3. To operate the tool in the reverse
direction, rotate the collar towards (DR)
and it is aligned with the torque and
directional indicator (E) (See Figure 3).
This tool has 3 forward and 1 reverse
torque settings with the maximum
torque being in the reverse direction.
2. To select a torque setting in the forward
direction, rotate the collar to where the
torque setting 1, 2 or 3 is aligned with the
indicator (E) (See Figure 2).
1
DF
3
DR
2
NOTE:
Highest torque setting in Forward is
setting 3 and the lowest is setting 1.
NOTE:
DR DF
E
E

13
CARE AND MAINTENANCE
ALWAYS DISCONNECT TOOL FROM THE AIR SUPPLY BEFORE
PERFORMING ANY MAINTENANCE ON THE TOOL.
Always make sure the tool is properly lubricated during operation. Proper
lubrication is shown in this instruction manual.
An in-line oiler (not included) is recommended to help increase tool life and
keep the tool properly lubricated. The in-line oiler should be regularly
checked and filled with air tool oil as needed. Proper adjustment of the in-line
oiler can be performed by placing a sheet of paper next to the tool’s exhaust
ports while holding the throttle completely open for 30 seconds. When a light
stain of oil collects on the paper, the oiler is properly adjusted. Excessive
amounts of oil should be avoided.
Clean the entire tool with a cotton rag and lubricate the tool after each use.
If storing the tool for an extended period, run for approximately
30 seconds to ensure oil has been evenly distributed throughout the tool.
Always store tools in a clean, dry environment away from the reach of
children.
Recommended lubricants: air tool oil or any other high grade turbine oil
containing moisture absorbent, rust inhibitors, metal wetting agents and an
EP (Extreme Pressure) additive. Consult your local retailer for further
assistance in selecting air tool oil best suited for proper lubrication.
STORING:
Tool must be well cleaned and lightly lubricated before storing.
Store tool in a dry, safe place out of the reach of children.

14
TROUBLESHOOTING
POSSIBLE PROBLEM SOLUTION
Air hose leaks
Replace rotor blade.
Water in compressor tank; drain tank. (See air
compressor manual.)
Oil the tool and run until no water is evident.
Oil the tool again and run 1 – 2 seconds.
Low air pressure
Worn rotor blade
Moisture blowing out of
tool exhaust
Be sure the hose is the proper size. Long hoses
or tools using large volumes of air may require
an internal diameter of 1/2 in. or larger,
depending on total hose length.
Do not use multiple hoses connected together
with quick-connect fittings. This causes additional
loss of pressure and reduces the tool’s power.
Use single hose of the proper length.
Tighten and seal hose fittings if leaks are found.
Use sealing tape.
If the tool runs slowly or will not operate, check these possible problems and
take the required corrective action:
Grit or gum in tool
No oil in tool
Low air pressure Lubricate the tool.
Adjust the regulator on the tool to the maximum
setting.
Adjust the compressor regulator to tool
maximum of 90 PSI.
NOTE: Air hoses may cause up to 15 PSI loss
in pressure, so you may need to set a higher
compressor output to maintain the required
90 PSI pressure at the tool.
Flush the tool with air tool oil.

15
WARRANTY
This tool is warranted by the manufacturer to the original purchaser from the
original purchase date for three (3) years subject to the warranty coverage
described herein.
This tool is warranted to the original user to be free from defect in material
and workmanship. If you believe that a tool is defective, return the tool with
proper proof of purchase to the point of purchase. If it is determined that the
tool is defective and covered by this warranty, the distributor will replace the
tool or refund the purchase price.
This warranty is void if: defects in materials or workmanship or damages
result from repairs or alterations which have been made or attempted by
others or the unauthorized use of nonconforming parts; the damage is due
to normal wear, damage is due to abuse (including overloading of the tool
beyond capacity), improper maintenance, neglect or accident; or the damage
is due to the use of the tool after partial failure or use with improper
accessories or unauthorized repair or alteration.
This warranty gives you specific legal rights, and you may also have other
rights that vary from state to state.
For warranty questions, call our customer service department at
1-888-3KOBALT (888-356-2258), 8:00 a.m.-8:00 p.m., EST,
Monday-Sunday. You could also contact us at [email protected].
Printed in China

16
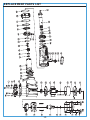
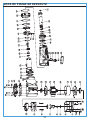
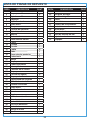
REPLACEMENT PARTS LIST

17
REPLACEMENT PARTS LIST
PART DESCRIPTION QTY
1 8
8
1
1
1
2
1
8
1
1
1
1
1
1
Hex screw
Gasket
Hammer Case
Gasket
Circlip
O ring
Anvil
Hammer Pin
Hammer Cage
Hammer
Bearing
Front end Plate
Plug
Cylinder
2
3
4
5
6
7
8
9
10
11
12
13
14
151 niP
661 enaV
1Rotor17
1Rear end Plate18
PART DESCRIPTION QTY
42 1
1
1
1
1
1
1
1
1
1
O-ring
O-ring
O-ring
O-ring
Air Inlet
Circlip
Gasket
Air Inlet Screen
Rear Air Cover
Copper Sleeve
Trigger Pin
Trigger
43
44
45
46
47
48
49
50
51
152
153
19 1
1
1
1
4
4
1
2
1
1
1
1
1
Bearing
Handle
Gasket
Back Cover
Reversing Switch
Valve Bushing
Hex Screw
Inlet Gasket
Gasket
Rubber Gasket
Inlet Valve
Inlet Spring
O-ring
O-ring
Stall Knob
O-ring
Hand Handle
Pin
Intake Knob
Spring
Plug
Retaining Ring
Paper Pad
20
21
22
23
24
25
26
27
28
29
30
31
132
133
134
135
136
137
138
139
140
141

ADJUNTE SU RECIBO AQUÍ
Número de serie Fecha de compra
¿Preguntas, problemas, piezas faltantes? Antes de volver a la
tienda, llame a nuestro Departamento de Servicio al Cliente al
888-3KOBALT (888-356-2258), de lunes a domingo de
8:00 a.m. a 8:00 p.m., hora estándar del Este. También puede
ponerse en contacto con nosotros en [email protected].
18
ARTÍCULO #5091971
MODELO #SGY-AIR290
LLAVE DE PERCUSIÓN
NEUMÁTICA DE
ÁNGULO RECTO DE
12,7 MM Y 48,38 KGF-M
KOBALT y el diseño del logotipo son marcas
comerciales o marcas registradas de LF, LLC.
Todos los derechos reservados.

Lista de piezas de repuesto ........................................................................33
19
ÍNDICE
Información de seguridad.............................................................................20
Requerimientos del compresor.....................................................................19.
Contenido del paquete.................................................................................26
Especificaciones del producto......................................................................20
Preparación..................................................................................................27
Instrucciones de ensamblaje........................................................................27
Instrucciones de funcionamiento................................................................. 29
Cuidado y mantenimiento............................................................................30
Solución de problemas.................................................................................31
Garantía.......................................................................................................32
REQUERIMIENTOS DEL COMPRESOR
IMPORTANTE:para funcionar de manera correcta, esta herramienta
necesita un flujo de aire de al menos 181,22 litros por minuto a 90 PSI en la
herramienta. El largo de la manguera de aire podría afectar la cantidad de
presión de aire que recibe realmente la herramienta. Es posible que deba
ajustar la presión de aire más alta en el regulador de aire para lograr la
presión de trabajo de 90 PSI.
181,22
LPM
620,52
KPA
Requerimientos
de la herramienta
@

20
REQUERIMIENTOS DEL COMPRESOR
ESPECIFICACIONES
COMPONENTE
INFORMACIÓN DE SEGURIDAD
Lea y comprenda completamente este manual antes de intentar ensamblar,
usar o instalar el producto. Si tiene preguntas relacionadas con el producto,
llame al Departamento de Servicio al Cliente al 888-3KOBALT
(888-356-2258), de lunes a domingo de 8:00 a.m. a 8:00 p.m., hora
estándar del Este. También puede ponerse en contacto con nosotros en
ADVERTENCIA
El uso o el mantenimiento inadecuado de esta herramienta pueden
ocasionar lesiones graves y daños a la propiedad. Lea y comprenda todas
las advertencias y las instrucciones de funcionamiento antes de usar esta
herramienta. Cuando utilice cualquier herramienta, siga siempre las medidas
de precaución básicas para reducir el riesgo de lesiones personales. Use
cada una de las herramientas solo para el fin para el cual fue concebida.
No use este producto en condiciones de trabajo inseguras. Se recomienda
tener siempre un extintor de incendios y un kit de primeros auxilios cerca del
área de trabajo.
NO CUMPLIR NI SEGUIR LAS INSTRUCCIONES DE SEGURIDAD
PODRÍA PROVOCAR LESIONES O LA MUERTE.
12,7 MM
7000 RPM
48,38 KGF-M
181,22 LPM
NPT DE 6,35 MM
9,52 MM
620,52 KPA
TRACCIÓN
VELOCIDAD SIN CARGA
TORSIÓN MÁXIMA
CONSUMO DE AIRE PROMEDIO
ENTRADA DE AIRE
MANGUERA DE AIRE COMPRIMIDO
PRESIÓN DE TRABAJO
To reduce your exposure to chemicals, work in a well-ventilated area and
work with approved safety equipment, such as a respirator or dust masks
which are specially designed to filter microscopic particles.
Some dust created by power sanding, sawing, grinding, drilling, and other
construction activities contains chemicals known to the state of California to
cause cancer, birth defects, or other reproductive harm. Some examples of
these chemicals are:
ADVERTENCIA
Plomo de pinturas a base de plomo
Sílice cristalina de ladrillos, cemento y otros productos de mampostería
Arsénico y cromo de madera tratada con químicos

21
INFORMACIÓN DE SEGURIDAD
RIESGO DE LESIONES EN LOS OJOS O LA CABEZA
WARNING
WARNING
LO QUE PODRÍA OCURRIR CÓMO EVITARLO
LO QUE PODRÍA OCURRIR CÓMO EVITARLO
LO QUE PODRÍA OCURRIR CÓMO EVITARLO
Esta herramienta neumática puede
lanzar materiales como sujetadores,
astillas de metal y otros residuos a
alta velocidad, lo que puede
provocar lesiones graves.
Siempre utilice gafas de seguridad
aprobadas por la norma ANSI Z87.1.
Nunca deje la herramienta en
funcionamiento sin supervisión.
Desconecte la herramienta del
suministro de aire cuando no esté en
uso o mientras cambia los accesorios
con el fin de evitar cualquier operación
accidental.
El aire comprimido puede ser
peligroso ya que puede lanzar
objetos y partículas que pueden
causar lesiones a zonas de tejido
blando como los ojos y orejas.
Para una protección adicional, use
una máscara protectora aprobada,
además de las gafas de seguridad.
Los accesorios de la herramienta
pueden soltarse o romperse y
desprenderse transformándose en
proyectiles, o pueden lanzar otros
objetos al operador y los que estén
en la zona de trabajo.
Asegúrese de que todos los accesorios
estén ajustados adecuadamente y bien
fijados antes del uso.
Siempre use la herramienta a una
distancia segura de las demás personas
que se encuentran en el lugar de trabajo.
Manténgase constantemente alerta con
relación a la seguridad del área de trabajo.
RIESGO DE PÉRDIDA DE LA AUDICIÓN
RIESGO DE INCENDIO O EXPLOSIÓN
Use siempre protección para los
oídos aprobada por la norma ANSI
S3.19.
La exposición al ruido producido por las
herramientas neumáticas puede producir
la pérdida permanente de la audición.
Esta herramienta puede producir
chispas, las cuales podrían causar
la ignición de materiales inflamables.
Nunca use herramientas cerca de
sustancias inflamables como gasolina,
nafta, solventes de limpieza, etc.
Trabaje en un área limpia y bien ventilada
libre de materiales combustibles.
Nunca utilice oxígeno, dióxido de
carbono u otros gases embotellados
como fuente de alimentación para las
herramientas neumáticas.
ADVERTENCIA
ADVERTENCIA
ADVERTENCIA

ADVERTENCIA
ADVERTENCIA
22
INFORMACIÓN DE SEGURIDAD
LO QUE PODRÍA OCURRIR CÓMO EVITARLO
LO QUE PODRÍA OCURRIR CÓMO EVITARLO
RIESGO DE ENREDOS
RIESGO DE CORTES O QUEMADURAS
El cabello, la ropa o las joyas sueltas,
u otros objetos sueltos pueden
enredarse en los elementos móviles
de esta herramienta y provocar una
lesión grave.
No use vestimenta suelta, joyas o
elementos que puedan atascarse o
enredarse cuando utilice la herramienta.
Sáquese las joyas que puedan
atascarse en la herramienta.
Mantenga siempre sus manos y
partes del cuerpo alejadas de las
piezas en movimiento.
Siempre use ropa y otro equipo de
seguridad de calces adecuados
cuando use esta herramienta.
Esta herramienta es capaz de causar
lesiones graves si se opera de forma
inadecuada o si se utiliza para un fin
para el que no está diseñada.
Mantenga la pieza de trabajo de la
herramienta alejada de las manos y
el cuerpo.
Los accesorios pueden alcanzar
altas temperaturas durante la fricción
en la que hacen contacto con las
piezas de trabajo.

ADVERTENCIA
ADVERTENCIA
LO QUE PODRÍA OCURRIR CÓMO EVITARLO
LO QUE PODRÍA OCURRIR CÓMO EVITARLO
23
INFORMACIÓN DE SEGURIDAD
RIESGO DE DESCARGA ELÉCTRICA
RIESGO DE LESIONES PERSONALES
Esta herramienta no se proporciona
con una superficie de agarre aislada.
El contacto con un cable “energizado”
también hará que las piezas de metal
de la herramienta estén energizadas y
pueden ocasionar descargas eléctricas,
electrocución o la muerte.
Nunca utilice herramientas
neumáticas en lugares donde
puedan entrar en contacto con algún
cableado eléctrico energizado.
Inspeccione completamente las
piezas y las áreas de trabajo en
búsqueda de posibles cables ocultos
antes de realizar trabajos.
Los accesorios de la herramienta
neumática como los tubos de impacto
que entran en contacto con un cableado
eléctrico oculto podrían causar
electrocución o la muerte.
Si se deja una herramienta sin
supervisión o con la manguera de aire
conectada, personas no autorizadas
pueden activarla y sufrir o provocar
lesiones.
Las herramientas neumáticas
pueden activarse por accidente
durante el mantenimiento o el
cambio de accesorios.
Las herramientas neumáticas pueden
lanzar sujetadores u otros materiales
en el área del trabajo.
Desconecte la herramienta del
suministro de aire mientras cambia los
accesorios, hace cambios en la
herramienta, durante el mantenimiento
o la reparación.
Nunca transporte la herramienta por
la manguera de aire comprimido.
Para evitar un funcionamiento
accidental, nunca transporte la
herramienta con el gatillo apretado o
enganchado.
Solo un representante de servicio
autorizado debe realizar reparaciones
en la herramienta.
Cuando la herramienta no esté en uso,
retire la manguera de aire comprimido
y almacene la herramienta en una
ubicación segura y alejada del alcance
de niños y de usuarios no capacitados.
Utilice solo las piezas, los sujetadores
y los accesorios recomendados por el
fabricante.
Mantenga el área de trabajo limpia y
ordenada.
No permita que los niños operen la
herramienta y manténgalos alejados
del área de trabajo.
Mantenga el área de trabajo bien
iluminada.

LO QUE PODRÍA OCURRIR CÓMO EVITARLO
24
INFORMACIÓN DE SEGURIDAD
Las herramientas neumáticas pueden
provocar que la pieza de trabajo se
mueva al tener contacto y causar
lesiones.
Asegúrese siempre de que la pieza
de trabajo esté firme. Utilice
abrazaderas u otros dispositivos
para evitar que se mueva.
Cierre el paso del suministro de aire
y libere/drene la presión de aire de la
manguera antes de cambiar los
accesorios, realizar reparaciones o
cuando la herramienta no esté en
uso.
Desconecte la herramienta del
suministro de aire y almacénela en
una ubicación segura.
Nunca utilice la herramienta cuando
se encuentre bajo el efecto de
drogas o alcohol.
La pérdida del control de la
herramienta puede provocar lesiones
al operador o a otras personas en el
área de trabajo.
Mantenga una posición adecuada
en todo momento al manipular las
herramientas. Los deslizamientos,
los tropezones y las caídas son las
causas principales de lesiones
graves o la muerte.
Mantenga las manijas de la
herramienta seca, limpia y sin aceite
ni grasa.
Manténgase alerta. Use el sentido
común. No utilice las herramientas si
está cansado.
ADVERTENCIA
RIESGO DE LESIONES PERSONALES
Si la herramienta se daña, existe el
riesgo de que reviente.
Siga las instrucciones de lubricación
para un funcionamiento óptimo y
seguro.
Siga las instrucciones sobre cómo
cambiar correctamente los accesorios.

LO QUE PODRÍA OCURRIR CÓMO EVITARLO
Los accesorios de mala calidad,
inadecuados o dañados pueden
desprenderse durante el uso y
lanzar proyectiles por el área de
trabajo, lo que puede provocar
lesiones graves.
Utilice siempre accesorios clasificados
para la velocidad de la herramienta
eléctrica.
Nunca use herramientas que se
hayan caído, golpeado o dañado.
No aplique fuerza excesiva a la
herramienta; deje que esta realice el
trabajo.
Nunca use una herramienta que
tenga fugas de aire, que le falten
piezas o tenga piezas dañadas o que
requiera reparaciones.
Siga siempre las instrucciones de
ensamblaje, funcionamiento y
mantenimiento.
25
INFORMACIÓN DE SEGURIDAD
Las herramientas y los accesorios
con mantenimiento inadecuado
pueden causar lesiones graves.
El uso de accesorios que no estén
diseñados para utilizarse con la
herramienta específica aumenta el
riesgo de lesiones al operador y a las
personas que estén en el área de trabajo.
Los movimientos repetidos, las
posiciones incómodas y la
exposición a la vibración pueden
ser perjudiciales para las manos y
los brazos.
Deje de utilizar la herramienta si se
siente incómodo, experimenta
entumecimiento o tiene dolor.
Si se presentan algunos de estos
síntomas, consulte al médico antes
de reanudar el trabajo.
Utilice siempre accesorios diseñados
para la herramienta y el trabajo a realizar.
No modifique ni improvise con las
herramientas o los accesorios.
Realice un mantenimiento adecuado
de la herramienta y los accesorios.
Mantenga las herramientas limpias y
bien lubricadas para obtener un
rendimiento óptimo y seguro.
ADVERTENCIA
RIESGO DE LESIONES PERSONALES

26
CONTENIDO DEL PAQUETE
PREPARACIÓN
DESCRIPCIÓN CANTIDAD
1
1
1
1
1
1
1
PIEZA
A
B
C
DR
DF
F
Llave de percusión de 12,7mm
Yunque
Gatillo
Giratorio de reversa
Giratorio hacia delante
Entrada de aire
E Indicador de torsión y dirección
Antes de comenzar a ensamblar esta herramienta, asegúrese de tener todas
las piezas. Compare las piezas con la lista de contenido del paquete. No
intente ensamblar la herramienta si alguna pieza falta o está dañada.
Herramientas y materiales necesarios para el ensamblaje (no se incluyen):
• Llave ajustable o de 9/16 pulg. (14,28 mm)
• Cinta selladora para roscas
• Aceite para herramientas
• Conector macho
Tiempo estimado de ensamblaje: 1 a 3 minutos
A
B
C
F
DF
DR
E

27
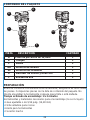
INSTRUCCIONES DE ENSAMBLAJE 1
2
1. Retire la tapa protectora plástica de la
entrada de aire de la entrada de aire (F)
(consulte la figura 1).
2. Coloque el conector macho en la entrada
de aire (F). Apriete el conector macho.
Para ello, gírelo en dirección de las
manecillas del reloj con una llave de
14 mm (no se incluye) para lograr una
conexión hermética.
NO APRIETE DEMASIADO.
33. Coloque de 2 a 3 gotas de aceite para
herramientas neumáticas (no se incluye)
en la apertura del conector macho antes
de cada uso (consulte la figura 3).
NOTA: use cinta selladora para
roscas (no se incluye) en las roscas del
conector macho.
F
F

28
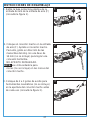
INSTRUCCIONES DE ENSAMBLAJE
6. Conecte la manguera de suministro de aire
al conector de aire macho
(consulte la figura 6) y asegúrese de que
está encajada y segura. Establezca la
presión de trabajo en 90 PSI para
obtener el mejor rendimiento de la
herramienta.
5. Para obtener un mayor alcance, monte el
dado en el extremo de una barra de
extensión (no se proporciona) y luego
empuje la barra de extensión en el yunque
(consulte la figura 5).
la presión de trabajo es la cantidad
de presión de aire de que la herramienta
detecta al girar libremente.
NOTA:
4. Seleccione el dado de percusión correcto
(no se incluye) y empújelo en el
yunque (B) hasta que encaje en su lugar
(consulte la figura 4).
Solo use adaptadores y dados que tengan
una clasificación de torque igual o superior a
la de la herramienta. Siempre asegúrese de
que los adaptadores y dados estén
correctamente instalados y asegurados antes
de utilizar esta herramienta. Los accesorios de
las herramientas pueden romperse y
desprenderse, lo que puede causar lesiones
graves al operador o las demás personas que
estén en la zona de trabajo. Siempre siga las
especificaciones del fabricante para lograr una
correcta fijación y utilización.
ADVERTENCIA
NOTA: asegúrese de que el dado y la barra
de extensión estén debidamente
asegurados antes de operar la herramienta.
5
6
TM
4
B
B

29
INSTRUCCIONES DE FUNCIONAMIENTO
1. Consulte la figura 1.
3. Para operar la herramienta en dirección
reversa, gire el anillo hacia (DR) y este se
alinea con el indicador de torsión y
dirección (E) (consulte la figura 3).
esta herramienta cuenta con 3
ajustes de torsión hacia delante y 1 de
reversa, siendo esta última dirección la
que posee la torsión máxima.
2. Para seleccionar un ajuste de torsión en la
dirección hacia delante, gire el anillo hasta
que el ajuste de torsión 1, 2 o 3 esté
alineado con el indicador (E)
(consulte la figura 2).
1
DF
3
DR
2
NOTA:
el ajuste de torsión más alto en
la dirección hacia delante es el 3 y el más
bajo es el ajuste 1.
NOTA:
DR DF
E
E

30
CUIDADO Y MANTENIMIENTO
Desconecte siempre la herramienta del suministro de aire antes de realizar
cualquier tarea de mantenimiento.
Siempre asegúrese de que la herramienta esté lubricada correctamente
mientras dura su ejecución. La lubricación adecuada se muestra en este
manual de instrucciones.
Se recomienda usar un lubricador en línea (no incluido) para aumentar la
vida útil de la herramienta y mantenerla correctamente lubricada. Se debe
verificar regularmente el lubricador en línea y llenarlo con aceite para
herramientas neumáticas según sea necesario. El ajuste adecuado del
lubricador en línea puede realizarse colocando una hoja de papel junto a los
orificios de escape de la herramienta y manteniendo el regulador
completamente abierto por 30 segundos. Cuando aparece una leve mancha
de aceite en el papel, el lubricador en línea está ajustado de manera
adecuada. Se deben evitar las cantidades excesivas de aceite.
Limpie completamente la herramienta con un trapo de algodón y lubríquela
después de cada uso. Si la herramienta estuvo guardada por un período
largo, hágala funcionar por aproximadamente 30 segundos para garantizar
que el aceite se haya distribuido en forma pareja en toda la herramienta.
Siempre almacene las herramientas en un lugar limpio, seco y alejado del
alcance de los niños.
Lubricantes recomendados: aceite para herramientas neumáticas o cualquier
otro aceite de alta calidad para turbinas que contenga absorbente de
humedad, antioxidante, agentes de humidificación de metales y un aditivo
para presión extrema (EP, por sus siglas en inglés). Consulte a su
distribuidor local para obtener más ayuda para seleccionar el aceite para
herramienta neumática más adecuado para la lubricación apropiada.
ALMACENAJE:
La herramienta debe estar bien limpia y ligeramente lubricada antes de
almacenarla.
Almacene la herramienta en un lugar seco y seguro, fuera del alcance de
los niños.

31
SOLUCIÓN DE PROBLEMAS
POSIBLE PROBLEMA SOLUCIÓN
Hay fugas en la manguera
de aire comprimido.
Remplace el aspa del rotor.
Vierta agua en el tanque del compresor; drene
el tanque. (Consulte el manual del compresor).
Lubrique la herramienta y hágala funcionar
hasta que no haya evidencia de agua.
Vuelva a lubricar la herramienta y hágala
funcionar durante 1 a 2 segundos.
La presión de aire es
baja.
Las aspas del rotor están
desgastadas.
Sale humedad del escape
de la herramienta.
Asegúrese de que la manguera sea del tamaño
adecuado. Las mangueras largas o las
herramientas que usen grandes volúmenes de aire
pueden requerir un diámetro interno de 12,7 mm o
más, según el largo total de la manguera.
No utilice varias mangueras conectadas entre
sí con conectores de conexión rápida. Esto
causa pérdidas de presión adicionales y reduce
la potencia de la herramienta. Utilice una
manguera simple del largo apropiado.
Apriete y selle los conectores de la manguera
si se encuentran fugas. Use cinta de sellado.
Si la herramienta funciona lentamente o no funciona, verifique estos posibles
problemas y realice la acción correctiva correspondiente:
Hay polvo o goma en la
herramienta.
No hay aceite en la
herramienta.
La presión de aire es
baja.
Lubrique la herramienta.
Ajuste el regulador en la herramienta en la
configuración más alta.
Ajuste el regulador del compresor al máximo de
la herramienta en 90 PSI.
NOTA: las mangueras de aire comprimido
pueden causar una pérdida de hasta 15 PSI
en la presión, de manera que puede necesitar
configurar la potencia más alta del compresor
para mantener la presión requerida en la
herramienta de 90 PSI.
Enjuague la herramienta con aceite para
herramientas neumáticas.

32
GARANTÍA
Esta herramienta está garantizada por el fabricante para el comprador
original desde la fecha de compra original por tres (3) años y está sujeta a la
cobertura de garantía que se describe en el presente.
Esta herramienta tiene una garantía para el usuario original contra defectos
en los materiales y la mano de obra. Si cree que una herramienta presenta
defectos, devuelva la herramienta con una adecuada prueba de compra al
lugar de la compra. Si se determina que la herramienta presenta defectos y
estos están cubiertos por esta garantía, el distribuidor reemplazará la
herramienta o reembolsará el precio de compra.
Esta garantía es nula si: los defectos en los materiales o la mano de obra o
los daños son consecuencia de reparaciones o modificaciones que realizaron
o intentaron realizar terceros, o del uso no autorizado de piezas que no
cumplan con los requisitos; el daño es producto del desgaste normal, el
abuso (lo que incluye la sobrecarga de la herramienta por encima de su
capacidad), el mantenimiento inadecuado, la negligencia o un accidente; o el
daño es producto del uso de la herramienta después de una falla parcial, del
uso con accesorios inadecuados o de una reparación o modificación no
autorizada.
Esta garantía le otorga derechos legales específicos, pero podría tener
también otros derechos que varían según el estado.
Si tiene preguntas sobre la garantía, llame a nuestro Departamento de
Servicio al Cliente al 1-888-3KOBALT (888-356-2258), de lunes a domingo
de 8:00 a.m. a 8:00 p.m., hora estándar del Este. También puede ponerse
en contacto con nosotros en [email protected].
Impreso en China

33
LISTA DE PIEZAS DE REPUESTO

34
LISTA DE PIEZAS DE REPUESTO
PIEZA DESCRIPCIÓN CANT. PIEZA DESCRIPCIÓN CANT.
1 8
8
1
1
1
2
1
8
1
1
1
1
1
1
Tornillo hexagonal
Empaque
Caja de martillo
Empaque
Sujetador circular
Junta tórica
Yunque
Pasador del percutor
Caja del percutor
Martillo
Rodamiento
Placa exterior frontal
Tapón
Cilindro
2
3
4
5
6
7
8
9
10
11
12
13
14
1rodasaP15
6allilbaT16
1Rotor17
1Placa exterior posterior18
42 1
1
1
1
1
1
1
1
1
1
Junta tórica
Junta tórica
Junta tórica
Junta tórica
Entrada de aire
Sujetador circular
Empaque
Malla de entrada de aire
Cubierta de aire posterior
Manguito de cobre
Pasador del gatillo
Gatillo
43
44
45
46
47
48
49
50
51
152
153
19 1
1
1
1
4
4
1
2
1
1
1
1
1
Rodamiento
Manija
Empaque
Cubierta posterior
Interruptor de reversa
Conector de la válvula
Tornillo hexagonal
Empaque de entrada
Empaque
Empaquetadura de goma
Válvula de entrada
Resorte de entrada
Junta tórica
Junta tórica
Perilla de detención
Junta tórica
Manija de mano
Pasador
Perilla de entrada
Resorte
Tapón
Anillo de contención
Bloc de papel
20
21
22
23
24
25
26
27
28
29
30
31
132
133
134
135
136
137
138
139
140
141
PIEZA DESCRIPCIÓN CANT.
-
 1
1
-
 2
2
-
 3
3
-
 4
4
-
 5
5
-
 6
6
-
 7
7
-
 8
8
-
 9
9
-
 10
10
-
 11
11
-
 12
12
-
 13
13
-
 14
14
-
 15
15
-
 16
16
-
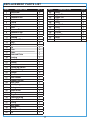 17
17
-
 18
18
-
 19
19
-
 20
20
-
 21
21
-
 22
22
-
 23
23
-
 24
24
-
 25
25
-
 26
26
-
 27
27
-
 28
28
-
 29
29
-
 30
30
-
 31
31
-
 32
32
-
 33
33
-
 34
34


Kobalt SGY-AIR290 Air Impact Wrench Manual de usuario
- Categoría
- Llaves de impacto eléctricas
- Tipo
- Manual de usuario
en otros idiomas
Artículos relacionados
-
Kobalt SGY-AIR166 Guía de instalación
-
-
-
-
-
-
-
-
-
Kobalt H 9-Drawer Manual de usuario