Pioneer CD-HF1 Manual de usuario
- Categoría
- Teléfonos móviles
- Tipo
- Manual de usuario

Über dieses Produkt
Wird dieses Gerät in Verbindung mit dem Pioneer Hauptgerät für ein Freisprech-Systemkit bei
Aktivierung der Freisprechfunktion dem Hauptgerät verwendet, ist es möglich, mit dem
Mobiltelefon zu telefonieren, ohne es in der Hand zu halten (Handsfree).
Bei Erkennung des ankommenden Rufsignals vom Mobiltelefon schaltet dieses Hauptgerät
automatisch von der benutzten Programmquelle auf den Telefonmodus um. Durch Drücken der
Empfangstaste am Mobiltelefon sind Sie in der Lage, unter Verwendung des mitgelieferten
Mikrofons und der Lautsprecher der Auto-Stereoanlage einen Anruf über das Mobiltelefon zu
tätigen.
Sobald der Anruf beendet ist, schaltet das Hauptgerät auf den vorherigen Modus zurück.
• Dieses Produkt kann sowohl mit analogen als auch digitalen Mobiltelefonen im Bereich zwischen
800 MHz und 1,8 GHz verwendet werden.
• Mobiltelefone des Typs CDMA können nicht mit diesem Produkt verwendet werden.
• Falls ein zusätzliches Mobiltelefon im Fahrzeug benutzt wird, schaltet das Hauptgerät u.U. auf
Telefonmodus oder bleibt im Telefonmodus, selbst wenn das an dieses Gerät angeschlossene
Mobiltelefon ausgeschaltet wird. Schalten Sie in diesem Fall das Mobiltelefon, das nicht an dieses Gerät
angeschlossen ist, aus.
• In einer Gegend mit schlechtem Mobiltelefonempfang kann es vorkommen, dass das Hauptgerät nicht
auf den Telefonmodus umschaltet oder während der Benutzung aus dem Telefonmodus herausschaltet.
• Im Telefonmodus ist der Betrieb dem Hauptgerät auf Lautstärke-und Balance-Einstellung beschränkt.
Die vorgenommenen Lautstärke-und Balance-Einstellungen bleiben als Telefonmodus-Einstellungen
gespeichert.
• Um Heulen während der Telefonbenutzung zu reduzieren, wird der Mikrofonton nicht übertragen,
während der andere Teilnehmer spricht (Eingangsprioritätssystem). Warten Sie, bis der Teilnehmer
aufhört zu sprechen, bevor Sie sprechen, um Tonstörungen zu vermeiden.
• Falls Heulen auftritt, die Lautstärke-und Balance-Einstellung ändern.
• Während eines Telefongesprächs kann der zum anderen Teilnehmer übertragene Ton ein Echo
aufweisen. Dies kann durch Einstellen der Empfangslautstärke am Mobiltelefon gemildert werden.
• Fahrgeräusche, Windgeräusche, das Geräusch der Klimaanlage des Fahrzeugs usw. können die ankom-
menden und abgehenden Signale in Form von Rauschen beeinträchtigen. Reduzieren Sie in diesem Fall
den Geräuschpegel im Fahrzeug, indem Sie an einem sicheren Platz anhalten, die Richtung des
Mikrofons korrigieren, die Fenster schließen, die Klimaanlage schwächer stellen usw.
• Die Lage dieses Gerätes in Bezug auf das Hauptgerät kann Störungen in Form von Rauschen im abge-
henden Signal und im Ton dem Hauptgerät verursachen. In diesem Fall ist dieses Gerät erneut in
größerem Abstand von dem Hauptgerät zu installieren.
• Die Tonqualität hängt auch von der verwendeten Telefonleitung ab und kann außerdem beeinträchtigt
werden, wenn der andere Teilnehmer ebenfalls ein Freisprechsystem oder einen bestimmten Telefontyp
verwendet.
• Dieses Gerät erkennt die vom Mobiltelefon abgegebenen Funkwellen und arbeitet nicht einwandfrei,
wenn das Mobiltelefon zu weit vom Gerät entfernt ist. Bringen Sie daher das Mobiltelefon zum
Gebrauch stets an diesem Gerät an.
• Benutzen Sie dieses Gerät nicht, wenn das Mobiltelefon an ein Ladegerät angeschlossen ist, das vom
Bordnetz des Fahrzeugs gespeist wird.
• Schalten Sie die Stromspar-und Rauschunterdrückungsfunktionen am Mobiltelefon aus.
• Wenn das Mobiltelefon über eine automatische Abruffunktion verfügt, schalten Sie diese Funktion ein.
• Dieses Gerät verwendet Magnete zum Halten des Mobiltelefons. Um Funktionsstörungen oder
Beschädigung zu vermeiden, halten Sie Uhren, Magnetkarten usw. von diesem Gerät fern.
• Tätigen und Annehmen von Anrufen oder andere Bedienungsvorgänge am Mobiltelefon können nicht
von diesem Gerät aus durchgeführt werden.
VORSICHTSMASSNAHME
• Es ist äußerst gefährlich das Mikrofonkabel um die Lenksäule oder den Gangschalthebel zu wickeln.
Beim Einbau unbedingt darauf achten, daß das Gerät den Fahrer nicht behindert.
• Dieses Produkt entspricht den EMC-Richtlinien (89/336/EEC, 92/31/EEC) und CE-
Markierungsrichtlinien (93/68/EEC).
Vor Gebrauch dieses Produkts <DEUTSCH>Before Using This Product <ENGLISH>
About This Product
By using this product in combination with the Pioneer head unit for a Handsfree system kit
with the head unit’s handsfree setting to “ON”, it is possible to talk on the cellular phone with-
out holding it in your hand (Handsfree).
Upon detection of an incoming call signal from the cellular phone, the head unit will automati-
cally switch from the source in use to telephone mode. By pressing the reception button on the
cellular phone you will be able to talk over the cellular phone using the supplied microphone
and the car stereo speakers. When the telephone call ends the head unit will revert to the previ-
ous mode.
• This product may be used with both analogue and digital cellular phones between 800 MHz and
1.8 GHz.
• CDMA type cellular phones cannot be used with this product.
• If a separate cellular phone is in use inside the car, the head unit may switch to telephone mode, or may
remain in telephone mode even when the cellular phone connected to this product is turned off. If this
should happen, turn off the cellular phone that is not connected to this product.
• In a location where cellular phone reception is not good, the head unit may fail to switch to telephone
mode, or may switch out of telephone mode during use.
• When in telephone mode, operation of the head unit is limited to volume and balance adjustment only.
The adjusted volume and balance adjustment settings are retained in memory as the telephone mode set-
ting.
• In order to reduce howling during telephone use, sounds from the microphone are not relayed while the
other person is speaking (incoming priority system). Wait for the other person to finish speaking before
you speak, to ensure clarity of sound.
• If howling occurs, adjust the volume and balance adjustment.
• During a telephone call the sound transmitted to the other person may have an echo. This may be allevi-
ated by adjusting the reception volume on the cellular phone.
• Road noise, wind noise, the sound of the car air conditioner etc., may interfere with both incoming and
outgoing signals in the form of noise. If this happens, reduce the noise level in the car by pulling over
where it is safe to do so, adjusting the direction of the microphone, closing the windows, turning down
the air conditioning, etc.
• The location of this product in relation to the head unit may cause interference in the form of noise in
the outgoing signal and in the head unit sound. If this happens, re-install this product at a distance from
the head unit.
• The sound may be adversely affected if the other person is also using a handsfree system, or certain
types of telephone, or depending on the telephone lines being used.
• This product operates by detecting the radio waves emitted by the cellular phone, and will not operate
properly if the cellular phone is at a distance from the unit. Always set the cellular phone on this product
for use.
• Do not use this product with the cellular phone connected to a recharger that takes its power from the
car.
• Turn the Battery Save and Noise Cancel settings on the cellular phone to OFF.
• When the cellular phone has an auto pick-up function, turn this function ON.
• This product uses magnets to hold the cellular phone. To avoid the possibility of malfunction or damage,
keep watches, magnetic cards, etc., away from this product.
• Making and receiving calls, or other operations on the cellular phone cannot be carried out from this
unit.
CAUTION
• It is extremely dangerous to allow the microphone lead to become wound around the steering column or
shift lever. Be sure to install the unit in such a way that it will not obstruct driving.
• This product complies with the EMC Directives (89/336/EEC, 92/31/EEC) and CE Marking
Directive (93/68/EEC).
PIONEER CORPORATION
4-1, MEGURO 1-CHOME, MEGURO-KU, TOKYO 153-8654, JAPAN
PIONEER ELECTRONICS (USA) INC.
P.O. Box 1760, Long Beach, California 90801, U.S.A.
TEL: (800) 421-1404
PIONEER EUROPE N.V.
Haven 1087 Keetberglaan 1, 9120 Melsele, Belgium
TEL: (0) 3/570.05.11
PIONEER ELECTRONICS AUSTRALIA PTY. LTD.
178-184 Boundary Road, Braeside, Victoria 3195, Australia
TEL: (03) 9586-6300
PIONEER ELECTRONICS OF CANADA, INC.
300 Allstate Parkway, Markham, Ontario L3R 0P2, Canada
TEL: (905) 479-4411
PIONEER ELECTRONICS DE MEXICO, S.A. de C.V.
San Lorenzo Num 1009 3er piso Desp. 302
Col. Del Valle, Mexico D.F. C.P. 03100
TEL: 5-688-52-90
Published by Pioneer Corporation.
Copyright © 2000 by Pioneer Corporation.
All rights reserved.
Publication de Pioneer Corporation.
Copyright © 2000 Pioneer Corporation.
Tous droits de reproduction et de traduction
réservés.
Printed in Japan
Imprimé au Japon
<CRD3258-A> E<00C00F0R01>
Sobre este producto
La combinación de este producto con la unidad principal Pioneer para el kit de sistema manos
libres permite hablar por el teléfono celular sin usar las manos (manos libres), cuando la
opción manos libres del kit se encuentre ajustado a “ON”.
Al detectar una señal de llamada entrante en el teléfono celular, la unidad principal conmuta
automáticamente de la fuente que se está escuchando al modo de teléfono. Al presionar el
botón de recepción del teléfono celular podrá hablar por teléfono a través del micrófono sum-
inistrado y de los altavoces estereofónicos del automóvil. Al terminar la llamada, la unidad
principal vuelve al modo anterior.
• Este producto se puede utilizar con ambos tipos de teléfonos celulares, analógico y digital, entre
800 MHz y 1,8 GHz.
• Los teléfonos celulares tipo CDMA no se pueden utilizar con este producto.
• Si hay otro teléfono celular en uso dentro del vehículo, puede suceder que la unidad principal cambie al
modo de teléfono o que permanezca en el modo de teléfono aunque el teléfono celular conectado a este
producto se encuentre apagado. Si así sucede, apague el teléfono celular no conectado a este producto.
• En lugares donde la recepción del teléfono celular no sea satisfactoria, puede suceder que la unidad
principal no cambie al modo de teléfono, o que desactive el modo de teléfono durante el uso.
• Estando en el modo de teléfono celular, la operación de la unidad principal queda limitada solamente a
los ajustes de volumen y de equilibrio. Las opciones ajustadas para el volumen y el equlibrio se almace-
nan en la memoria como opción para el modo de teléfono.
• Con el fin de reducir el aullido durante el uso del teléfono, el sonido del micrófono no se retransmite
mientras la otra persona está hablando (sistema de prioridad entrante). Para mejorar la claridad de
sonido, procure no hablar mientras está hablando su interlocutor.
• Si se produce aullido, cambie el ajuste de volumen y de equilibrio.
• Durante una llamada telefónica, el sonido transmitido al interlocutor puede tener un eco. Esto puede
reducirse ajustando el volumen de recepción en el teléfono celular.
• Los ruidos del camino, el ruido del viento, el sonido producido por el acondicionador de aire, etc.,
puede interferir tanto en las señales entrantes como salientes, produciendo ruido. En tal caso, es preciso
reducir el nivel de ruido en el automóvil; para ello, estacione en un lugar seguro, ajuste la dirección del
micrófono, cierre las ventanillas, apague el acondicionador de aire, etc.
• Dependiendo de la ubicación de este producto con respecto a la unidad principal, se pueden producir
interferencias que se manifiestan en forma de ruidos en la señal saliente y en el sonido de la unidad
principal. En tal caso, reinstale este producto alejándolo de la unidad principal.
• El sonido también puede ser afectado si el interlocutor también está usando un sistema manos libres,
ciertos tipos de teléfonos o de las líneas telefónicas utilizadas.
• Este producto funciona detectando las ondas radioeléctricas emitidas por el teléfono celular, y no fun-
cionará correctamente si éste se encuentra alejado de la unidad. Coloque siempre en teléfono celular en
este producto para su uso.
• No utilice este producto con el teléfono celular conectado a un recargador alimentado eléctricamente
desde el automóvil.
• Desactive las opciones de ahorro de energía y de cancelación de ruido en el teléfono celular.
• Cuando el teléfono celular dispone de la función de recepción automática, active esta función.
• Este producto utiliza imanes para el soporte del teléfono celular. Para evitar la posibilidad de daños o
fallos de funcionamiento, mantenga los relojes, tarjetas magnéticas, etc., alejados de este producto.
• Desde esta unidad no es posible realizar o recibir llamadas ni efectuar otras operaciones en el teléfono
celular.
PRECAUCIÓN
• Es peligrosísimo dejar que el cable del micrófono se enrolle en la base del volante o en la palanca de
cambios. Asegúrese de instalar la unidad de forma que ésta no sea un obstáculo para la conducción.
• Este producto cumple con las Directivas EMC (89/336/CEE, 92/31/CEE) y Directiva de
Marcación CE (93/68/CEE).
Antes de usar este producto <ESPAÑOL>
Handsfree system kit
Module téléphonique mains libres
Owner’s Manual
Mode d’emploi
CD-HF1
This product conforms to new cord colors.
Los colores de los cables de este producto se conforman con un nuevo código de col-
ores.
Dieses Gerät entspricht den neuen kabelfarben.
Le code de couleur des câbles utilisé pour ce produit est nouveau.
Questo prodotto è conforme ai nuovi codici colori.
De kleuren van de snoeren van dit toestel zijn gewijzigd.
La página se está cargando...

Nota:
• Este producto es para vehículos con batería de 12
voltios y con conexión a tierra. Antes de instalar
la unidad en un vehículo recreativo, camioneta, o
autobús, revise el voltaje de la batería.
• Para evitar cortocircuitos en el sistema eléctrico,
asegúrese de desconectar el cable de la batería ≠
antes de comenzar con la instalación.
• Luego de completar la instalación y cableado,
realice una doble verificación para cerciorarse de
que no hay errores. Vuelva a instalar las partes
retiradas del automóvil durante la instalación,
luego conecte el terminal negativo de la batería.
• Asegure el cableado con abrazaderas de cables o
con cinta adhesiva. Para proteger el cableado,
envuélvalo con cinta adhesiva donde éstos se
apoyan sobre las piezas de metal.
• Coloque y asegure todo el cableado de tal manera
que no toque las piezas en movimiento, tal como
la palanca de cambio de velocidades, el freno de
mano, y los pasamanos de los asientos.
No coloque el cableado en lugares que se calien-
tan, tal como cerca de la salida de un calefactor.
Si el material aislante del cableado se derritiera o
se gastara, habrá el peligro de un cortocircuito del
cableado a la carrocería del vehículo.
• No acorte ninguna guía. Si lo hiciera, la protec-
ción del circuito podría fallar al funcionar cuando
debería.
• Nunca alimente energía a otros equipos cortando
el aislamiento de la guía de alimentación provista
de la unidad y haciendo un empalme con la guía.
La capacidad de corriente de la guía se excederá,
causando el recalentamiento.
Diagrama de conexión (Fig. 1)
Precaución:
• Cuando el teléfono celular no disponga de un
conector para auriculares, utilice el adaptador del
conector de micrófono para teléfono celular y
conéctelo con un cable de conexión.
1. Unidad principal
2. Micrófono
3. Al terminal MIC de la unidad principal (diám.
3,5 mm).
4. Al terminal TEL de la unidad principal (diám.
2,5 mm).
5. Control remoto de sistema
6. Cable de enmudecimiento
7. Teléfono celular (en venta por separado)
8. Este producto
9. Cable de conexión
10.Azul/blanco
Al control remoto de sistema de la unidad princi-
pal.
11.Amarillo/negro
Al cable de enmudecimiento de la unidad princi-
pal.
12.Negro (masa)
A la carrocería del veículo (parte metálica).
Conexión de las unidades <ESPAÑOL>
Hinweis:
• Dieses Produkt ist für Fahrzeuge mit 12-V-
Batterie und negativer Erdung konzipiert. Bevor
Sie es in ein Freizeitfahrzeug, einen LKW oder
Bus einbauen, müssen Sie die Batteriespannung
überprüfen.
• Um Kurzschlüsse beim elektrischen System zu
vermeiden, unbedingt das Massekabel ≠ der
Batterie abklemmen, bevor mit der Installation
begonnen wird.
• Nach vollständiger Installation und Verkabelung
sollten Sie sicherstellen, daß keine Fehler began-
gen worden sind. Bauen Sie alle Teile, die Sie
während der Installation ausgebaut haben, wieder
ein, und schließen Sie dann das Massekabel der
Batterie wieder an.
• Sichern Sie die Kabel mit Kabelklemmen oder
Klebeband. Zum Schutz der Kabel umwickeln Sie
diese an Berührungsstellen mit Metallteilen mit
Klebeband.
• Verlegen und sichern Sie alle Kabel so, daß diese
keine beweglichen Teile, wie z.B. Schalthebel,
Handbremse und Sitzschienen, berühren können.
Verlegen Sie Kabel nicht an Stellen, die heiß wer-
den können, wie z.B. in der Nähe des
Heizungsauslasses. Falls eine Kabelisolierung
schmilzt oder rissig wird, besteht die Gefahr eines
Kurzschlusses zwischen Kabel und
Karosseriemasse.
• Schließen Sie kein Kabel kurz, da anderenfalls die
Schutzschaltung ausfallen kann, wenn sie in Kraft
treten sollte.
• Führen Sie niemals Strom anderen Geräten zu,
indem Sie das Stromversorgungskabel des Geräts
abisolieren und es mit einem anderen Kabel
verbinden, da dadurch die Belastbarkeit des
Kabels überschritten und Überhitzung verursacht
wird.
Anschlußzeichnung (Abb. 1)
Zur besonderen Beachtung:
• Wenn das Mobiltelefon keine Ohrhörerbuchse
besitzt, verwenden Sie einen
Mikrofonbuchsenadapter für Mobiltelefon, und
nehmen Sie den Anschluss mit einem
Verbindungskabel vor.
1. Hauptgerät
2. Mikrofon
3. An Buchse MIC des Hauptgerät (Durchm.
3,5 mm).
4. An Buchse TEL des Hauptgerät (Durchm.
2,5 mm).
5. System-Fernbedienung
6. Stummschaltungskabel
7. Mobiltelefon (getrennt erhätlich)
8. Dieses Produkt
9. Verbindungskabel
10.Blau/weiß
An Systemfernbedienung des Hauptgerät.
11.Gelb/schwarz
An Stummschaltungskabel des Hauptgerät.
12.Schwarz (Erdung)
An die Karosserie (Metallteil) anschließen.
Anschließen der Einheiten <DEUTSCH>
Note:
• This product is for vehicles with a 12-volt battery
and negative grounding. Before installing it in a
recreational vehicle, truck, or bus, check the bat-
tery voltage.
• To avoid shorts in the electrical system, be sure to
disconnect the ≠ battery cable before beginning
installation.
• After completing installation and wiring, double
check that there are no mistakes. Re-install any
parts removed from the car during installation,
then connect the battery negative terminal.
• Secure the wiring with cable clamps or adhesive
tape. To protect the wiring, wrap adhesive tape
around them where they lie against metal parts.
• Route and secure all wiring so it cannot touch any
moving parts, such as the gear shift, handbrake
and seat rails. Do not route wiring in places that
get hot, such as near the heater outlet. If the insu-
lation of the wiring melts or gets torn, there is a
danger of the wiring short-circuiting to the vehicle
body.
• Do not shorten any leads. If you do, the protection
circuit may fail to work when it should.
• Never feed power to other equipment by cutting
the insulation of the power supply lead of the unit
and tapping into the lead. The current capacity of
the lead will be exceeded, causing overheating.
• Cords for this product and those for other prod-
ucts may be different colors even if they have the
same function. When connecting this product to
another product, refer to the supplied Installation
manuals of both products and connect cords that
have the same function.
Connection Diagram (Fig. 1)
Precaution:
• When the cellular phone does not have an ear-
phone jack, use a microphone jack adapter for the
cellular phone and connect with a connecting
cord.
1. Head Unit
2. Microphone
3. To head unit’s MIC terminal (dia. 3.5 mm).
4. To head unit’s TEL terminal (dia. 2.5 mm).
5. System remote control
6. Mute lead
7. Cellular phone (sold separately)
8. This product
9. Connecting cord
10.Blue/White
To head unit’s system remote control.
11.Yellow/Black
To head unit’s mute lead.
12.Black (ground)
To vehicle (metal) body.
Connecting the Units <ENGLISH>
10.Blue/White
To head unit’s
system remote control.
11. Yellow/Black
To head unit’s mute lead.
12.Black (ground)
To vehicle (metal) body.
5. System remote control
6. Mute lead
1. Head Unit
8. This product
7. Cellular phone
(sold separately)
9. Connecting cord
2. Microphone
4. To head unit’s TEL
terminal (dia. 2.5 mm).
3. To head unit’s MIC
terminal (dia. 3.5 mm).
Fig. 1
Abb. 1
Afb. 1
• Kabel dieses Produkts und die anderer Produkte
können unterschiedliche Farben haben, auch
wenn sie die gleichen Funktionen haben. Beim
Anschluß dieses Produkts an ein anderes Produkt
unter Bezugnahme auf die mit beiden Produkten
mitgelieferten Installationsanleitungen die Kabel
mit derselben Funktion verbinden.
• Los cables para este producto y aquéllas para
otros productos pueden ser de colores diferentes
aun si tienen la misma función. Cuando se
conecta este producto a otro, refiérase a los man-
uales de instalación de ambos productos y conecte
los cables que tienen la misma función.
La página se está cargando...
La página se está cargando...

Remarque:
• Avant d’effectuer l’installation définitive de ce
produit, procédez à un câblage provisoire de façon
à vous assurer que tous les éléments sont correcte-
ment reliés et fonctionnent convenablement.
• Pour réaliser une installation correcte, n’utilisez
que les pièces qui sont fournies avec l’appareil.
L’utilisation d’autres pièces peut provoquer une
anomalie.
• Installez l’appareil de telle manière qu’il ne gêne
pas le conducteur et ne puisse pas blesser un
passager en cas d’arrêt brusque ou d’urgence.
• N’installez pas l’appareil près d’une bouche de
chauffage car la température peut perturber son
fonctionnement, ni près d’une portière car il craint
la pluie.
• N’installez pas l’appareil dans un endroit où il
serait exposé à la lumière directe du soleil, par
exemple le tableau de bord ou la plage de custode.
Installation de l’appareil (Fig. 2)
Précaution:
• Avant d’utiliser un morceau de ruban adhésif dou-
ble face, nettoyez soigneusement l’emplacement
sur lequel vous désirez le fixer.
• Lors de l’utilisation d’un téléphone cellulaire
pesant plus de 200 g, installez cet appareil hori-
zontalement.
1. Ce produit
2. Ruban double face
3. Siège du passager
Installation au moyen du support (Fig. 3)
Quand la console n’est pas assez large pour permet-
tre l’installation.
Installation à l’aide d’un ruban
double face (Fig. 4)
Précaution:
• Avant d’utiliser un morceau de ruban adhésif dou-
ble face, nettoyez soigneusement l’emplacement
sur lequel vous désirez le fixer.
2. Ruban double face
3. Siège du passager
Installation au moyen des vis (Fig. 5)
Précaution:
• Avant de percer un trou de fixation, assurez-vous
que vous pouvez le faire sans danger pour les
organes essentiels du véhicule (conduite de carbu-
rant, conduite de frein, câblage électrique, etc.) et
que les vis ne seront pas en contact avec ces
organes.
2. Ruban double face
3. Siège du passager
4. Non utilisé
5. vie (4 × 12 mm)
6. Percez 2 trous de 2.5 mm de diamètre.
Installation du microphone
Installez le microphone en le dirigeant vers le con-
ducteur et à une distance telle qu’il puisse aisément
capter la voix de celui-ci.
Fixation au pare-soleil
1.
Engagez le microphone dans son
attache. (Fig. 6)
2.
Fixez l’attache au pare-soleil. (Fig. 7)
Fixez le microphone au pare-soleil relevé. Le micro-
phone ne peut pas capter correctement la voix du
conducteur si le pare-soleil est abaissé.
7. Microphone
8. Attache du microphone
9. Collier (blanc)
Fixation à la colonne de direction
1. Engagez le microphone dans son
attache. (Fig. 8)
2. Fixez l’attache du microphone à
la colonne de direction. (Fig. 9)
7. Microphone
8. Attache du microphone
9. Collier (blanc)
10.Placez le cordon du microphone dans la rainure.
11.Ruban double face
12.Fixez l’attache à la colonne de direction de
manière qu’elle soit dirigée vers l’arrière.
Installation le téléphone cellulaire
(Fig. 10)
13.Placez une feuille de métal pour aligner la posi-
tion des aimants de façon que le téléphone cellu-
laire soit fixé solidement.
14.Aimants
15.Fixez le cordon de connexion dans la rainure.
16.Feuille de métal
Il y a deux tailles de feuille de métal: grande
(60 × 30 mm) et petite (40 × 20 mm).
Choisissez
la taille correspondant à votre téléphone cellulaire.
17.Collier (noir)
Attachez les deux cordons ensemble avec le cor-
don de connexion pour la partie intérieure et avec
le cordon de l’appareil pour la partie extérieure.
Remarque:
• Si le téléphone cellulaire glisse un peu de sa posi-
tion à cause de vibrations, etc., remettez-le cor-
rectement en place. Sinon, un arrêt brusque peut
le faire tomber.
• Nous vous recommandons d’utiliser la grande
feuille de métal (60 × 30 mm).
Installation <FRANÇAIS>
Hinweis:
• Bevor Sie das Gerät endgültig einbauen, schließen
Sie die Kabel provisorisch an, und überzeugen Sie
sich, daß alle Anschlüsse stimmen, und daß das
ganze System richtig funktioniert.
•
Verwenden Sie für den Einbau nur die mitgeliefer-
ten Teile. Durch den Gebrauch von ungeeigneten
Teilen können Betriebsstörungen verursacht werden.
• Installieren Sie die Anlage so, daß sie den Fahrer
nicht stört und keinen Mitfahrer verletzen kann,
z.B. im Falle einer Notbremsung.
• Bringen Sie dieses Gerät nicht in der Nähe des
Heizungsauslasses an, wo es durch die
Wärmeabstrahlung beeinträchtigt werden könnte,
oder in der Nähe der Türen, wo es Feuchtigkeit
ausgesetzt werden könnte.
• Montieren Sie das Gerät nicht an Stellen, die
direktem Sonnenlicht ausgesetzt sind, z.B. auf
dem Armaturenbrett oder auf der Heckablage.
Installieren des Gerätes (Abb. 2)
Zur besonderen Beachtung:
• Vor dem Gebrauch von doppelseitig haftendem
Klebeband die Oberflächen reinigen, an denen das
Klebeband befestigt werden soll.
• Wenn Sie ein Mobiltelefon von mehr als 200 g
Gewicht benutzen, installieren Sie dieses Gerät
horizontal.
1. Dieses Produkt
2.
Doppelseiting haftendes Klebeband
3. Beifahresitz
Installation mittels Halterung (Abb. 3)
Wenn die Konsole nicht breit genug für die
Installation ist.
Befestigung mit doppelseitig
haftendem Klebeband (Abb. 4)
Zur besonderen Beachtung:
• Vor dem Gebrauch von doppelseitig haftendem
Klebeband die Oberflächen reinigen, an denen das
Klebeband befestigt werden soll.
2. Doppelseiting haftendes Klebeband
3. Beifahrersitz
Einbau unter Verwendung von
Schrauben (Abb. 5)
Zur besonderen Beachtung:
• Vor dem Bohren von Montagelöchern sicher-
stellen, daß die Schrauben keinerlei negative
Auswirkung auf irgendein Fahrzeugsystem (z.B.
Kraftstoff- und Bremsleitungen, Verdrahtung der
elektrischen Anlage usw.) haben können.
2. Doppelseiting haftendes Klebeband
3. Beifahrersitz
4. Nicht verwenden
5. Schrauben (4 × 12 mm)
6. Zwei Löcher mit einem Durchmesser von 2 – 2.5
mm bohren.
Einbauen des Mikrofons
Bringen Sie das Mikrofon an einer Stelle an, die von
der Richtung und Entfernung her zur Erfassung der
Sprachkommandos des Fahrers am geeignetsten ist.
Befestigung an der Sonnenblende
1. Setzen Sie das Mikrofon in den
Mikrofonhalter ein. (Abb. 6)
2. Anbringen des Mikrofonhalters
an der Sonnenblende. (Abb. 7)
Bringen Sie das Mikrofon in gehobener Position der
Sonnenblende an dieser an. Wenn die Sonnenblende
heruntergeklappt ist, können Sprachkommandos vom
Fahrer nicht erkannt werden.
7. Mikrofon
8. Mikrofonhalter
9. Klemme (weiß)
Installation an der Lenksäule
1. Setzen Sie das Mikrofon in den
Mikrofonhalter ein. (Abb. 8)
2.
Befestigen Sie den Mikrofonhalter
an der Lenksäule. (Abb. 9)
7. Mikrofon
8. Mikrofonhalter
9. Klemme (weiß)
10.Führen Sie das Mikrofonkabel in die Nut ein.
11.Doppelseiting haftendes Klebeband
12.Bringen Sie den Halter nach hinten weisend an
der Lenksäule an.
Einbauen des Mobiltelefons (Abb. 10)
13.Damit das Mobiltelefon einwandfrei gehalten
wird, bringen Sie eine Metallplatte an der
Position der Magneten an.
14.Magnete
15.Führen Sie das Verbindungskabel in die Nut ein.
16.Metallplatte
Es gibt Metallplatten in zwei Größen: groß (60 ×
30 mm) und klein (40 × 20 mm). Wählen Sie die
für Ihr Mobiltelefon passende Größe.
17.Klemme (schwarz)
Klemmen Sie beide Kabel so zusammen, dass
das Verbindungskabel innen und das Gerätekabel
außen liegt.
Hinweis:
• Falls das Mobiltelefon durch Vibrationen o.ä. ver-
rutscht, bringen Sie es wieder in seine korrekte
Position. Anderenfalls kann es bei einer plöt-
zlichen Bremsung herunterfallen.
• Es wird empfohlen, die große Metallplatte
(60 × 30 mm) zu benutzen.
Einbauverfahren <DEUTSCH>
Nota:
• Antes de instalar finalmente la unidad, conecte el
cableado temporariamente y asegúrese de que
todas las conexiones están correctas y que la
unidad funciona adecuadamente.
• Utilice solamente las partes incluidas con la
unidad para asegurar una instalación adecuada. El
uso de partes no autorizadas pueden ocasionar fal-
las de funciona-miento.
• Instale la unidad en un lugar en donde no inter-
fiera con el conductor y no pueda lesionar a los
pasajeros en caso de una parada repentina, tal
como una al frenar por una emergencia.
• No coloque este producto cerca de la salida de
calefacción, en donde podría ser afectada por el
calor, o cerca de las puertas, en donde el agua de
lluvia podría salpicarla.
• No monte la unidad bajo la luz directa del sol,
como en el panel de instrumentos o en el portae-
quipajes posterior.
Instalación de la unidad (Fig. 2)
Precaución:
• Antes de usar una cinta con adhesivo en ambos
lados, limpie toda suciedad sobre la superficie a la
que se fija la cinta con adhesivo en ambos lados.
• Asegúrese de instalar este producto horizontal-
mente cuando utilice un teléfono celular que pese
más de 200 g.
1. Este producto
2. Cinta con adhesivo en ambos lados
3. Asiento de pasajero
Instalación usando la ménsula (Fig. 3)
Cuando la consola no es lo suficientemente amplia
para disponer de espacio de instalación.
Instalación con una cinta con
adhesivo en ambos lados (Fig. 4)
Precaución:
• Antes de usar una cinta con adhesivo en ambos
lados, limpie toda suciedad sobre la superficie a la
que se fija la cinta con adhesivo en ambos lados.
2. Cinta con adhesivo en ambos lados
3. Asiento de pasajero
Instalación con los tornillos (Fig. 5)
Precaución:
• Antes de taladrar cualquier orificio de montaje,
confirme que los tornillos no interferirán con
ninguno de los sistemas de operación del
automóvil (tales como la línea de combustible,
líneas de freno, cableado eléctrico, etc.).
2. Cinta con adhesivo en ambos lados
3. Asiento de pasajero
4. No usada
5. Tornillos (4 × 12 mm)
6. Orificios de taladrado 2 – 2.5 mm de diámetro.
Instalación del micrófono
Instale el micrófono en un lugar en donde su direc-
ción y distancia desde el conductor, pueda captar al
máximo la voz del conductor.
Montaje en la visera
1.
Instale el micrófono en el sujetador
de micrófono. (Fig. 6)
2.
Fije el sujetador de micrófono a la
visera. (Fig. 7)
Instale el micrófono en la visera cuando se encuentra
en la posición superior. No podrá reconocer la voz
del conductor si la visera se encuentra en la posición
inferior (hacia abajo).
7. Micrófono
8. Sujetador de micrófono
9. Retén (blanco)
Instalación en la columna de dirección
1.
Instale el micrófono en el sujetador
de micrófono. (Fig. 8)
2.
Monte el sujetador de micrófono
en la columna de dirección. (Fig. 9)
7. Micrófono
8. Sujetador de micrófono
9. Retén (blanco)
10.Fije el micrófono en la ranura.
11.Cinta con adhesivo en ambos lados
12.Instale el sujetador en la columna de direccción
hacia atrás.
Instalación del teléfono celular (Fig. 10)
13.Para que el teléfono celular quede firmemente
asegurado, sujete una lámina metálica alineán-
dola con la posición de los imanes.
14.Imanes
15.Fije el cable de conexión en la ranura.
16.Lámina metálica
La lámina metálica se encuentra disponible en
dos tamaños, grande (60 × 30 mm) y pequeña
(40 × 20 mm). Escoja el tamaño apropiado para
su teléfono celular.
17.Retén (negro)
Sujete ambos cordones conjuntamente con el
cable de conexión en el interior y el cable de la
unidad en el otro lado.
Nota:
• Si el teléfono celular no se mantiene en su lugar
debido a la vibración, etc., reinstálelo en su posi-
ción correcta. De lo contrario, una frenada brusca
puede producir su caída.
• Se recomienda utilizar la lámina metálica de
tamaño grande (60 × 30 mm).
Instalación <ESPAÑOL>
Note:
• Before finally installing the unit, connect the
wiring temporarily, makeing sure it is all connect-
ed up properly, and the unit and the system work
properly.
• Use only the parts included with the unit to ensure
proper installation. The use of unauthorized parts
can cause malfunctions.
• Install the unit where it does not get in the driver’s
way and cannot injure the passenger if there is a
sudden stop, like an emergency stop.
• Do not mount this product near the heater outlet,
where it would be affected by heat, or near the
doors, where rainwater might splash onto it.
• Do not mount the unit in direct sunlight, like on
the dashboard or the rear shelf.
Installing the Unit (Fig. 2)
Precaution:
• Before using double-sided tape, clean off any dirt
on the surface to which the double-sided tape is to
be attached.
• When using a cellular phone weighing in excess
of 200 g, ensure that this product is installed hori-
zontally.
1. This product
2. Double-sided tape
3. Passenger seat
Installation Using the Bracket (Fig. 3)
When the console is not wide enough to have instal-
lation space.
Installation with double-sided tape
(Fig. 4)
Precaution:
• Before using double-sided tape, clean off any dirt
on the surface to which the double-sided tape is to
be attached.
2. Double-sided tape
3. Passenger seat
Installation with the screws (Fig. 5)
Precaution:
• Before drilling any mounting holes, confirm that
the screws will not interfere with any of the cars
operating systems (such as the fuel line, brake
lines, electrical wiring, etc.).
2. Double-sided tape
3. Passenger seat
4. Not used
5. Screws (4 × 12 mm)
6. Drill holes 2 – 2.5 mm in diameter.
Installing the Microphone
Install the microphone in a place where its direction
and distance from the driver make it most easy to
pick up the driver’s voice.
Mounting on the sun visor
1. Install the microphone in the mic
clip. (Fig. 6)
2. Attach the mic clip to sun visor.
(Fig. 7)
Install the microphone on the sun visor when it is in
the up position. It cannot recognize the driver’s voice
if the sun visor is in the down position.
7. Microphone
8. Mic clip
9. Clamper (white)
Installation on the steering column
1. Install the microphone in the mic
clip. (Fig. 8)
2. Mount the mic clip on the steering
column. (Fig. 9)
7. Microphone
8. Mic clip
9. Clamper (white)
10.Fit the mic cord in the groove.
11.Double-sided tape
12.Install the clip on the steering column toward the
back.
Installing the Cellular Phone (Fig. 10)
13.So that the cellular phone will be firmly secured,
affix a metal sheet to align with the position of
the magnets.
14.Magnets
15.Fit the connecting cord in the groove.
16.Metal sheet
There are two sizes of metal sheet; large
(60 × 30 mm) and small (40 × 20 mm). Choose
the size to match your cellular phone.
17.Clamper (black)
Clamp both cords together with the connecting
cord on the inside and the unit cord on the out-
side.
Note:
• If the cellular phone slips out of place because of
vibration, etc., return it to its proper position.
Otherwise, a sudden stop may cause it to fall.
• The large size metal sheet (60 × 30 mm) is recom-
mended to use.
Installation <ENGLISH>
La página se está cargando...

Utilisez un tournevis petit et fin, ou un instrument
similaire.
Remarque:
• Si vous utilisez un tournevis petit et fin, ou un
instrument similaire, n’appuyez pas fortement sur
les commutateurs et témoins car cela pourrait les
endommager et se traduire par des anomalies de
fonctionnement.
Réglage du commutateur (Fig. 11)
1. Sélecteur de sensibilité
Ce sélecteur vous permet de choisir la sensibilité
de l’appareil vis-à-vis des signaux de téléphones-
cellulaires.
Niveau de sensibilité faible Ô Niveau de sensi-
bilité élevée
Le niveau de sensibilité peut premdre trois
valeurs. Si l’appareil fonctionne en raison de la
réception de signaux provenant d’un autre télé-
phone cellulaire placé hors du véhicule, ou de
tout autre signal, placez le commutateure de
niveau de sensibilité sur la position correspon-
dent á la valeure la plus basse. Si l’appareil ne
fonctionne pas au moment où vous émettez ou
recevez un appel, placez le commutateur de
niveau de sensibilité sur la position correspon-
dant à la valeure la plus élevée.
2. Témoin de température
Ce témoin s’éclaire lorsque la température
interne de l’appareil est élevée. En ce cas, l’ali-
mentation est automatiquement coupée. Elle est
automatiquement rétabile lorsque la température
interne est à nouveau inférieure à la valeur maxi-
male.
3. Interrupteur d’alimentation
Losque vous utilisez cet appareil, conservez l’in-
terrupteur sur la position ON. L’interrupteur d’al-
imentation est dépendant de celui de l’élément
central et se trouve donc automatiquent sur la
position de marche ou d’arrêt en fonction de ce
qui se produit sur l’élément central.
Opération <FRANÇAIS>
Operate with a small standard tip screwdriver or
something similar.
Note:
• When operating with a small standard tip screw-
driver or something similar, strongly pressing or
pulling switches or indicators may damage parts
resulting in faulty operation.
Setting the Switch (Fig. 11)
1. Sensitivity level switch
This allows you to adjust the sensitivity over
which cellular signals can be received.
Low sensitivity level Ô High sensitivity level
The sensitivity level can be changed in three
steps. If this product operates by receiving sig-
nals from another cellular phone outside your car
or other signals, set the sensitivity level switch to
the lower level. If this product does not operate
when making or receiving a call, set the sensitivi-
ty level switch to the higher level.
2. Heat indicator
This lights when the unit’s internal temperature
becomes high. Power automatically switches
OFF. Power automatically switches ON when the
internal temperature decreases.
3. Power switch
Keep the switch in the ON position when using
this product. The power switch is interlocked
with that of the head unit, and is automatically
switched on and off as the head unit is operated.
Operation <ENGLISH>
Opere con un destornillador normal pequeño o algo
similar.
Nota:
• Cuando utilice un destornillador normal pequeño
o algo similar, la presión o extracción fuerte de
los interruptores o indicadores puede dañar las
piezas y causar un funcionamiento defectuoso.
Ajuste del interruptor (Fig. 11)
1. Interruptor de nivel de sensibilidad
Eso le permite ajustar la sensibilidad sorbre la
cual las señales celulares se pueden recibir.
Nivel de sensibilidad baja Ô Nivel de sensibili-
dad alta
El nivel de sensibilidad se puede cambiar en tres
pasos. Si la unidad funciona mediante la recep-
ción de señales de un otro teléfono celular fuera
de su automóvil u otros señales, ajuste el inter-
ruptor de nivel de sensibilidad para un nivel más
bajo. Si la unidad no funciona al hacer o recibir
una llamada, ajuste el interruptor de nivel de sen-
sibilidad para un nivel más alto.
2. Indicator de calor
Se ilumina cuando la temperatura interna de la
unidad se pone alta. La alimentación se
desconecta automáticamente. La alimentación se
conecta automáticamente cuando la temperatura
interna diminuye.
3. Interruptor de alimentactión
Mantenga el interruptor en la posición ON cuan-
do utilice esta unidad. El interruptor de ali-
mentación está sincronizado con el interruptor de
la unidad principal, y se activa o desactiva
automáticamente cuando se opera la unidad prin-
cipal.
Operación <ESPAÑOL>
Fig. 11
Abb. 11
Afb. 11
Verwenden Sie einen kleinen
Normalschraubendreher oder etwas Ähnliches zur
Betätigung.
Hinweis:
• Starkes Drücken oder Ziehen von Schaltern oder
Anzeigen bei Betätigung mit einem kleinen
Normalschraubendreher oder einem ähnlichen
Werkzeug kann zu Beschädigung von Teilen und
fehlerhaftem Betrieb führen.
Einstellen des Schalters (Abb. 11)
1. Empfindlichkeitspegelschalter
Dieser Schalter gestattet die Einstellung der
Empfindlichkeit zum Empfang der
Mobiltelefonsignale.
Niedriger Empfindlichkeitspegel Ô Hoher
Empfindlichkeitspegel
Der Empfindlichkeitspegel kann in drei Stufen
eingestellt werden. Falls dieses Gerät auf die
Signale anderer Mobiltelefone außerhalb des
Fahrzeugs oder anderer Geräte anspricht, stellen
Sie den Schalter auf einen niedrigeren
Empfindlichkeitspegel ein. Falls dieses Gerät
beim Tätigen oder Annehmen eines Anrufs nicht
anspricht, stellen Sie den Schalter auf einen
höheren Empfindlichkeitspegel ein.
2. Wärmeanzeige
Diese Anzeige leuchtet auf, wenn die
Innentemperatur des Gerätes zu hoch wird. Die
Stromversorgung wird automatisch ausgeschaltet.
Sobald die Innentemperatur sinkt, schaltet sich
die Stromversorgung wieder ein.
3. Hauptschalter
Zur Benutzung dieses Gerätes muss sich dieser
Schalter in der Stellung ON befinden. Der
Hauptschalter ist mit der Kopfgarnitur gekoppelt
und wird beim Betrieb der Kopfgarnitur automa-
tisch ein- und ausgeschaltet.
Bedienung <DEUTSCH>
Gebruik een kleine normale schroevendraaier of iets
dergelijks.
Opmerking:
• Wanneer u een kleine normale schroevendraaier of
iets dergelijks gebruikt kunt u onderdelen
beschadigen als u er te krachtig op drukt of als u
te hard trekt aan schakelaars of indicators, hetgeen
kan resulteren in storingen.
Instellen van de schakelaar (Afb. 11)
1. Schakelaar voor het gevoeligheidsniveau
Deze stelt u in staat om de gevoeligheid voor de
signalen van de draagbare telefoons te regelen.
Lage gevoeligheid Ô Hoge gevoeligheid
Het gevoeligheidsniveau kan in drie stappen wor-
den geregeld. Als dit product begint te werken als
er signalen worden ontvangen van andere draag-
bare telefoons buiten uw auto of door andere sig-
nalen, dient u de gevoeligheid te verlagen. Als
het product niet begint te werken wanneer u een
telefoongesprek wilt maken of ontvangen, dient u
de gevoeligheid te verhogen.
2. Oververhittingsindicator
Deze indicator zal oplichten wanneer de temper-
atuur binnenin het toestel te hoog oploopt. De
stroom zal in dat geval automatisch worden uit-
geschakeld. Wanneer de temperatuur in het toes-
tel voldoende gedaald is, zal de stroom weer
worden ingeschakeld.
3. Aan/uit schakelaar
Houd deze schakelaar in de ON (aan) stand wan-
neer u dit product gebruikt. Deze schakelaar is
gekoppeld aan die van het hoofdtoestel en zal
automatisch aan en uitschakelen met het hoofd-
toestel.
Bediening <NEDERLANDS>
Lavorare con un cacciavite piccolo a punta normale
o qualcosa di simile.
Nota:
• Quando si lavora con un cacciavite piccolo a
punta normale o qualcosa di simile, se si preme
forte o se si tirano gli interruttori o le spie è possi-
bile danneggiare le parti con conseguenti problemi
di funzionamento.
Impostazione dell’interruttore (Fig. 11)
1. Interruttore del livello di sensibilità
Esso consente di regolare la sensibilità con la
quale viene ricevuto il segnale del telefono cellu-
lare.
Basso livello di sensibilità Ô Alto livello di sen-
sibilità
È possibile cambiare il livello di sensibilità in tre
passaggi. Se questo prodotto funziona ricevendo
segnali da un altro telefono cellulare al di fuori
dell’automobile o altri segnali, impostare l’inter-
ruttore del livello di sensibilità sul livello più
basso. Se questo prodotto non funziona quando si
effettua o si riceve una chiamata, impostare l’in-
terruttore del livello di sensibilità sul livello più
alto.
2. Indicatore di riscaldamento
S’illumina quando la temperatura interna di ques-
ta unità diventa troppo alta. L’unità viene spenta,
automaticamente. Quando la temperatura interna
diminuisce, l’unità si accende, automaticamente.
3. Interruttore di alimentazione
Lasciare l’interruttore in posizione ON (atti-
vazione) quando si utilizza questo prodotto.
L’interruttore di alimentazione è collegato al fun-
zionamento di quello dell’apparecchio principale
e viene acceso e spento automaticamente insieme
all’apparecchio principale.
Esecuzione <ITALIANO>
2. Heat indicator
This lights when the unit’s internal temperature
becomes high. Power automatically switches
OFF. Power automatically switches ON when the
internal temperature decreases.
1. Sensitivity level switch
This allows you to adjust the sensitivity over
which cellular signals can be received.
Low sensitivity level Ô High sensitivity level
The sensitivity level can be changed in three
steps. If this product operates by receiving sig-
nals from another cellular phone outside your car
or other signals, set the sensitivity level switch to
the lower level. If this product does not operate
when making or receiving a call, set the sensitivi-
ty level switch to the higher level.
3. Power switch
Keep the switch in the ON position when using
this product. The power switch is interlocked
with that of the head unit, and is automatically
switched on and off as the head unit is operated.
Transcripción de documentos
Handsfree system kit Before Using This Product Module téléphonique mains libres <ENGLISH> About This Product • This product complies with the EMC Directives (89/336/EEC, 92/31/EEC) and CE Marking Directive (93/68/EEC). Owner’s Manual Mode d’emploi CD-HF1 This product conforms to new cord colors. Los colores de los cables de este producto se conforman con un nuevo código de colores. Dieses Gerät entspricht den neuen kabelfarben. Le code de couleur des câbles utilisé pour ce produit est nouveau. Questo prodotto è conforme ai nuovi codici colori. De kleuren van de snoeren van dit toestel zijn gewijzigd. PIONEER CORPORATION 4-1, MEGURO 1-CHOME, MEGURO-KU, TOKYO 153-8654, JAPAN PIONEER ELECTRONICS (USA) INC. P.O. Box 1760, Long Beach, California 90801, U.S.A. TEL: (800) 421-1404 PIONEER EUROPE N.V. Haven 1087 Keetberglaan 1, 9120 Melsele, Belgium TEL: (0) 3/570.05.11 PIONEER ELECTRONICS AUSTRALIA PTY. LTD. 178-184 Boundary Road, Braeside, Victoria 3195, Australia TEL: (03) 9586-6300 PIONEER ELECTRONICS OF CANADA, INC. 300 Allstate Parkway, Markham, Ontario L3R 0P2, Canada TEL: (905) 479-4411 PIONEER ELECTRONICS DE MEXICO, S.A. de C.V. San Lorenzo Num 1009 3er piso Desp. 302 Col. Del Valle, Mexico D.F. C.P. 03100 TEL: 5-688-52-90 Published by Pioneer Corporation. Copyright © 2000 by Pioneer Corporation. All rights reserved. Publication de Pioneer Corporation. Copyright © 2000 Pioneer Corporation. Tous droits de reproduction et de traduction réservés. Printed in Japan Imprimé au Japon <00C00F0R01> <CRD3258-A> E Antes de usar este producto <ESPAÑOL> Sobre este producto • Este producto cumple con las Directivas EMC (89/336/CEE, 92/31/CEE) y Directiva de Marcación CE (93/68/CEE). Vor Gebrauch dieses Produkts <DEUTSCH> Über dieses Produkt • Dieses Produkt entspricht den EMC-Richtlinien (89/336/EEC, 92/31/EEC) und CEMarkierungsrichtlinien (93/68/EEC). By using this product in combination with the Pioneer head unit for a Handsfree system kit with the head unit’s handsfree setting to “ON”, it is possible to talk on the cellular phone without holding it in your hand (Handsfree). Upon detection of an incoming call signal from the cellular phone, the head unit will automatically switch from the source in use to telephone mode. By pressing the reception button on the cellular phone you will be able to talk over the cellular phone using the supplied microphone and the car stereo speakers. When the telephone call ends the head unit will revert to the previous mode. La combinación de este producto con la unidad principal Pioneer para el kit de sistema manos libres permite hablar por el teléfono celular sin usar las manos (manos libres), cuando la opción manos libres del kit se encuentre ajustado a “ON”. Al detectar una señal de llamada entrante en el teléfono celular, la unidad principal conmuta automáticamente de la fuente que se está escuchando al modo de teléfono. Al presionar el botón de recepción del teléfono celular podrá hablar por teléfono a través del micrófono suministrado y de los altavoces estereofónicos del automóvil. Al terminar la llamada, la unidad principal vuelve al modo anterior. Wird dieses Gerät in Verbindung mit dem Pioneer Hauptgerät für ein Freisprech-Systemkit bei Aktivierung der Freisprechfunktion dem Hauptgerät verwendet, ist es möglich, mit dem Mobiltelefon zu telefonieren, ohne es in der Hand zu halten (Handsfree). Bei Erkennung des ankommenden Rufsignals vom Mobiltelefon schaltet dieses Hauptgerät automatisch von der benutzten Programmquelle auf den Telefonmodus um. Durch Drücken der Empfangstaste am Mobiltelefon sind Sie in der Lage, unter Verwendung des mitgelieferten Mikrofons und der Lautsprecher der Auto-Stereoanlage einen Anruf über das Mobiltelefon zu tätigen. Sobald der Anruf beendet ist, schaltet das Hauptgerät auf den vorherigen Modus zurück. • This product may be used with both analogue and digital cellular phones between 800 MHz and 1.8 GHz. • CDMA type cellular phones cannot be used with this product. • If a separate cellular phone is in use inside the car, the head unit may switch to telephone mode, or may remain in telephone mode even when the cellular phone connected to this product is turned off. If this should happen, turn off the cellular phone that is not connected to this product. • In a location where cellular phone reception is not good, the head unit may fail to switch to telephone mode, or may switch out of telephone mode during use. • When in telephone mode, operation of the head unit is limited to volume and balance adjustment only. The adjusted volume and balance adjustment settings are retained in memory as the telephone mode setting. • In order to reduce howling during telephone use, sounds from the microphone are not relayed while the other person is speaking (incoming priority system). Wait for the other person to finish speaking before you speak, to ensure clarity of sound. • If howling occurs, adjust the volume and balance adjustment. • During a telephone call the sound transmitted to the other person may have an echo. This may be alleviated by adjusting the reception volume on the cellular phone. • Road noise, wind noise, the sound of the car air conditioner etc., may interfere with both incoming and outgoing signals in the form of noise. If this happens, reduce the noise level in the car by pulling over where it is safe to do so, adjusting the direction of the microphone, closing the windows, turning down the air conditioning, etc. • The location of this product in relation to the head unit may cause interference in the form of noise in the outgoing signal and in the head unit sound. If this happens, re-install this product at a distance from the head unit. • The sound may be adversely affected if the other person is also using a handsfree system, or certain types of telephone, or depending on the telephone lines being used. • This product operates by detecting the radio waves emitted by the cellular phone, and will not operate properly if the cellular phone is at a distance from the unit. Always set the cellular phone on this product for use. • Do not use this product with the cellular phone connected to a recharger that takes its power from the car. • Turn the Battery Save and Noise Cancel settings on the cellular phone to OFF. • When the cellular phone has an auto pick-up function, turn this function ON. • This product uses magnets to hold the cellular phone. To avoid the possibility of malfunction or damage, keep watches, magnetic cards, etc., away from this product. • Making and receiving calls, or other operations on the cellular phone cannot be carried out from this unit. • Este producto se puede utilizar con ambos tipos de teléfonos celulares, analógico y digital, entre 800 MHz y 1,8 GHz. • Los teléfonos celulares tipo CDMA no se pueden utilizar con este producto. • Si hay otro teléfono celular en uso dentro del vehículo, puede suceder que la unidad principal cambie al modo de teléfono o que permanezca en el modo de teléfono aunque el teléfono celular conectado a este producto se encuentre apagado. Si así sucede, apague el teléfono celular no conectado a este producto. • En lugares donde la recepción del teléfono celular no sea satisfactoria, puede suceder que la unidad principal no cambie al modo de teléfono, o que desactive el modo de teléfono durante el uso. • Estando en el modo de teléfono celular, la operación de la unidad principal queda limitada solamente a los ajustes de volumen y de equilibrio. Las opciones ajustadas para el volumen y el equlibrio se almacenan en la memoria como opción para el modo de teléfono. • Con el fin de reducir el aullido durante el uso del teléfono, el sonido del micrófono no se retransmite mientras la otra persona está hablando (sistema de prioridad entrante). Para mejorar la claridad de sonido, procure no hablar mientras está hablando su interlocutor. • Si se produce aullido, cambie el ajuste de volumen y de equilibrio. • Durante una llamada telefónica, el sonido transmitido al interlocutor puede tener un eco. Esto puede reducirse ajustando el volumen de recepción en el teléfono celular. • Los ruidos del camino, el ruido del viento, el sonido producido por el acondicionador de aire, etc., puede interferir tanto en las señales entrantes como salientes, produciendo ruido. En tal caso, es preciso reducir el nivel de ruido en el automóvil; para ello, estacione en un lugar seguro, ajuste la dirección del micrófono, cierre las ventanillas, apague el acondicionador de aire, etc. • Dependiendo de la ubicación de este producto con respecto a la unidad principal, se pueden producir interferencias que se manifiestan en forma de ruidos en la señal saliente y en el sonido de la unidad principal. En tal caso, reinstale este producto alejándolo de la unidad principal. • El sonido también puede ser afectado si el interlocutor también está usando un sistema manos libres, ciertos tipos de teléfonos o de las líneas telefónicas utilizadas. • Este producto funciona detectando las ondas radioeléctricas emitidas por el teléfono celular, y no funcionará correctamente si éste se encuentra alejado de la unidad. Coloque siempre en teléfono celular en este producto para su uso. • No utilice este producto con el teléfono celular conectado a un recargador alimentado eléctricamente desde el automóvil. • Desactive las opciones de ahorro de energía y de cancelación de ruido en el teléfono celular. • Cuando el teléfono celular dispone de la función de recepción automática, active esta función. • Este producto utiliza imanes para el soporte del teléfono celular. Para evitar la posibilidad de daños o fallos de funcionamiento, mantenga los relojes, tarjetas magnéticas, etc., alejados de este producto. • Desde esta unidad no es posible realizar o recibir llamadas ni efectuar otras operaciones en el teléfono celular. • Dieses Produkt kann sowohl mit analogen als auch digitalen Mobiltelefonen im Bereich zwischen 800 MHz und 1,8 GHz verwendet werden. • Mobiltelefone des Typs CDMA können nicht mit diesem Produkt verwendet werden. • Falls ein zusätzliches Mobiltelefon im Fahrzeug benutzt wird, schaltet das Hauptgerät u.U. auf Telefonmodus oder bleibt im Telefonmodus, selbst wenn das an dieses Gerät angeschlossene Mobiltelefon ausgeschaltet wird. Schalten Sie in diesem Fall das Mobiltelefon, das nicht an dieses Gerät angeschlossen ist, aus. • In einer Gegend mit schlechtem Mobiltelefonempfang kann es vorkommen, dass das Hauptgerät nicht auf den Telefonmodus umschaltet oder während der Benutzung aus dem Telefonmodus herausschaltet. • Im Telefonmodus ist der Betrieb dem Hauptgerät auf Lautstärke-und Balance-Einstellung beschränkt. Die vorgenommenen Lautstärke-und Balance-Einstellungen bleiben als Telefonmodus-Einstellungen gespeichert. • Um Heulen während der Telefonbenutzung zu reduzieren, wird der Mikrofonton nicht übertragen, während der andere Teilnehmer spricht (Eingangsprioritätssystem). Warten Sie, bis der Teilnehmer aufhört zu sprechen, bevor Sie sprechen, um Tonstörungen zu vermeiden. • Falls Heulen auftritt, die Lautstärke-und Balance-Einstellung ändern. • Während eines Telefongesprächs kann der zum anderen Teilnehmer übertragene Ton ein Echo aufweisen. Dies kann durch Einstellen der Empfangslautstärke am Mobiltelefon gemildert werden. • Fahrgeräusche, Windgeräusche, das Geräusch der Klimaanlage des Fahrzeugs usw. können die ankommenden und abgehenden Signale in Form von Rauschen beeinträchtigen. Reduzieren Sie in diesem Fall den Geräuschpegel im Fahrzeug, indem Sie an einem sicheren Platz anhalten, die Richtung des Mikrofons korrigieren, die Fenster schließen, die Klimaanlage schwächer stellen usw. • Die Lage dieses Gerätes in Bezug auf das Hauptgerät kann Störungen in Form von Rauschen im abgehenden Signal und im Ton dem Hauptgerät verursachen. In diesem Fall ist dieses Gerät erneut in größerem Abstand von dem Hauptgerät zu installieren. • Die Tonqualität hängt auch von der verwendeten Telefonleitung ab und kann außerdem beeinträchtigt werden, wenn der andere Teilnehmer ebenfalls ein Freisprechsystem oder einen bestimmten Telefontyp verwendet. • Dieses Gerät erkennt die vom Mobiltelefon abgegebenen Funkwellen und arbeitet nicht einwandfrei, wenn das Mobiltelefon zu weit vom Gerät entfernt ist. Bringen Sie daher das Mobiltelefon zum Gebrauch stets an diesem Gerät an. • Benutzen Sie dieses Gerät nicht, wenn das Mobiltelefon an ein Ladegerät angeschlossen ist, das vom Bordnetz des Fahrzeugs gespeist wird. • Schalten Sie die Stromspar-und Rauschunterdrückungsfunktionen am Mobiltelefon aus. • Wenn das Mobiltelefon über eine automatische Abruffunktion verfügt, schalten Sie diese Funktion ein. • Dieses Gerät verwendet Magnete zum Halten des Mobiltelefons. Um Funktionsstörungen oder Beschädigung zu vermeiden, halten Sie Uhren, Magnetkarten usw. von diesem Gerät fern. • Tätigen und Annehmen von Anrufen oder andere Bedienungsvorgänge am Mobiltelefon können nicht von diesem Gerät aus durchgeführt werden. CAUTION • It is extremely dangerous to allow the microphone lead to become wound around the steering column or shift lever. Be sure to install the unit in such a way that it will not obstruct driving. PRECAUCIÓN • Es peligrosísimo dejar que el cable del micrófono se enrolle en la base del volante o en la palanca de cambios. Asegúrese de instalar la unidad de forma que ésta no sea un obstáculo para la conducción. VORSICHTSMASSNAHME • Es ist äußerst gefährlich das Mikrofonkabel um die Lenksäule oder den Gangschalthebel zu wickeln. Beim Einbau unbedingt darauf achten, daß das Gerät den Fahrer nicht behindert. Connecting the Units 7. Cellular phone (sold separately) 2. Microphone Note: 1. Head Unit 8. This product 3. To head unit’s MIC terminal (dia. 3.5 mm). 9. Connecting cord 4. To head unit’s TEL terminal (dia. 2.5 mm). 5. System remote control 10. Blue/White To head unit’s system remote control. 6. Mute lead 11. Yellow/Black To head unit’s mute lead. 12. Black (ground) To vehicle (metal) body. Fig. 1 Abb. 1 Afb. 1 • This product is for vehicles with a 12-volt battery and negative grounding. Before installing it in a recreational vehicle, truck, or bus, check the battery voltage. • To avoid shorts in the electrical system, be sure to disconnect the ≠ battery cable before beginning installation. • After completing installation and wiring, double check that there are no mistakes. Re-install any parts removed from the car during installation, then connect the battery negative terminal. • Secure the wiring with cable clamps or adhesive tape. To protect the wiring, wrap adhesive tape around them where they lie against metal parts. • Route and secure all wiring so it cannot touch any moving parts, such as the gear shift, handbrake and seat rails. Do not route wiring in places that get hot, such as near the heater outlet. If the insulation of the wiring melts or gets torn, there is a danger of the wiring short-circuiting to the vehicle body. • Do not shorten any leads. If you do, the protection circuit may fail to work when it should. • Never feed power to other equipment by cutting the insulation of the power supply lead of the unit and tapping into the lead. The current capacity of the lead will be exceeded, causing overheating. • Cords for this product and those for other products may be different colors even if they have the same function. When connecting this product to another product, refer to the supplied Installation manuals of both products and connect cords that have the same function. <ENGLISH> Connection Diagram (Fig. 1) Precaution: • When the cellular phone does not have an earphone jack, use a microphone jack adapter for the cellular phone and connect with a connecting cord. 1. Head Unit 2. Microphone 3. To head unit’s MIC terminal (dia. 3.5 mm). 4. To head unit’s TEL terminal (dia. 2.5 mm). 5. System remote control 6. Mute lead 7. Cellular phone (sold separately) 8. This product 9. Connecting cord 10. Blue/White To head unit’s system remote control. 11. Yellow/Black To head unit’s mute lead. 12. Black (ground) To vehicle (metal) body. Conexión de las unidades Nota: • Este producto es para vehículos con batería de 12 voltios y con conexión a tierra. Antes de instalar la unidad en un vehículo recreativo, camioneta, o autobús, revise el voltaje de la batería. • Para evitar cortocircuitos en el sistema eléctrico, asegúrese de desconectar el cable de la batería ≠ antes de comenzar con la instalación. • Luego de completar la instalación y cableado, realice una doble verificación para cerciorarse de que no hay errores. Vuelva a instalar las partes retiradas del automóvil durante la instalación, luego conecte el terminal negativo de la batería. • Asegure el cableado con abrazaderas de cables o con cinta adhesiva. Para proteger el cableado, envuélvalo con cinta adhesiva donde éstos se apoyan sobre las piezas de metal. • Coloque y asegure todo el cableado de tal manera que no toque las piezas en movimiento, tal como la palanca de cambio de velocidades, el freno de mano, y los pasamanos de los asientos. No coloque el cableado en lugares que se calientan, tal como cerca de la salida de un calefactor. Si el material aislante del cableado se derritiera o se gastara, habrá el peligro de un cortocircuito del cableado a la carrocería del vehículo. • No acorte ninguna guía. Si lo hiciera, la protección del circuito podría fallar al funcionar cuando debería. • Nunca alimente energía a otros equipos cortando el aislamiento de la guía de alimentación provista de la unidad y haciendo un empalme con la guía. La capacidad de corriente de la guía se excederá, causando el recalentamiento. • Los cables para este producto y aquéllas para otros productos pueden ser de colores diferentes aun si tienen la misma función. Cuando se conecta este producto a otro, refiérase a los manuales de instalación de ambos productos y conecte los cables que tienen la misma función. <ESPAÑOL> Diagrama de conexión (Fig. 1) Precaución: • Cuando el teléfono celular no disponga de un conector para auriculares, utilice el adaptador del conector de micrófono para teléfono celular y conéctelo con un cable de conexión. 1. Unidad principal 2. Micrófono 3. Al terminal MIC de la unidad principal (diám. 3,5 mm). 4. Al terminal TEL de la unidad principal (diám. 2,5 mm). 5. Control remoto de sistema 6. Cable de enmudecimiento 7. Teléfono celular (en venta por separado) 8. Este producto 9. Cable de conexión 10. Azul/blanco Al control remoto de sistema de la unidad principal. 11. Amarillo/negro Al cable de enmudecimiento de la unidad principal. 12. Negro (masa) A la carrocería del veículo (parte metálica). Anschließen der Einheiten Hinweis: • Dieses Produkt ist für Fahrzeuge mit 12-VBatterie und negativer Erdung konzipiert. Bevor Sie es in ein Freizeitfahrzeug, einen LKW oder Bus einbauen, müssen Sie die Batteriespannung überprüfen. • Um Kurzschlüsse beim elektrischen System zu vermeiden, unbedingt das Massekabel ≠ der Batterie abklemmen, bevor mit der Installation begonnen wird. • Nach vollständiger Installation und Verkabelung sollten Sie sicherstellen, daß keine Fehler begangen worden sind. Bauen Sie alle Teile, die Sie während der Installation ausgebaut haben, wieder ein, und schließen Sie dann das Massekabel der Batterie wieder an. • Sichern Sie die Kabel mit Kabelklemmen oder Klebeband. Zum Schutz der Kabel umwickeln Sie diese an Berührungsstellen mit Metallteilen mit Klebeband. • Verlegen und sichern Sie alle Kabel so, daß diese keine beweglichen Teile, wie z.B. Schalthebel, Handbremse und Sitzschienen, berühren können. Verlegen Sie Kabel nicht an Stellen, die heiß werden können, wie z.B. in der Nähe des Heizungsauslasses. Falls eine Kabelisolierung schmilzt oder rissig wird, besteht die Gefahr eines Kurzschlusses zwischen Kabel und Karosseriemasse. • Schließen Sie kein Kabel kurz, da anderenfalls die Schutzschaltung ausfallen kann, wenn sie in Kraft treten sollte. • Führen Sie niemals Strom anderen Geräten zu, indem Sie das Stromversorgungskabel des Geräts abisolieren und es mit einem anderen Kabel verbinden, da dadurch die Belastbarkeit des Kabels überschritten und Überhitzung verursacht wird. • Kabel dieses Produkts und die anderer Produkte können unterschiedliche Farben haben, auch wenn sie die gleichen Funktionen haben. Beim Anschluß dieses Produkts an ein anderes Produkt unter Bezugnahme auf die mit beiden Produkten mitgelieferten Installationsanleitungen die Kabel mit derselben Funktion verbinden. <DEUTSCH> Anschlußzeichnung (Abb. 1) Zur besonderen Beachtung: • Wenn das Mobiltelefon keine Ohrhörerbuchse besitzt, verwenden Sie einen Mikrofonbuchsenadapter für Mobiltelefon, und nehmen Sie den Anschluss mit einem Verbindungskabel vor. 1. Hauptgerät 2. Mikrofon 3. An Buchse MIC des Hauptgerät (Durchm. 3,5 mm). 4. An Buchse TEL des Hauptgerät (Durchm. 2,5 mm). 5. System-Fernbedienung 6. Stummschaltungskabel 7. Mobiltelefon (getrennt erhätlich) 8. Dieses Produkt 9. Verbindungskabel 10. Blau/weiß An Systemfernbedienung des Hauptgerät. 11. Gelb/schwarz An Stummschaltungskabel des Hauptgerät. 12. Schwarz (Erdung) An die Karosserie (Metallteil) anschließen. Installation Note: • Before finally installing the unit, connect the wiring temporarily, makeing sure it is all connected up properly, and the unit and the system work properly. • Use only the parts included with the unit to ensure proper installation. The use of unauthorized parts can cause malfunctions. • Install the unit where it does not get in the driver’s way and cannot injure the passenger if there is a sudden stop, like an emergency stop. • Do not mount this product near the heater outlet, where it would be affected by heat, or near the doors, where rainwater might splash onto it. • Do not mount the unit in direct sunlight, like on the dashboard or the rear shelf. Installing the Unit (Fig. 2) Precaution: • Before using double-sided tape, clean off any dirt on the surface to which the double-sided tape is to be attached. • When using a cellular phone weighing in excess of 200 g, ensure that this product is installed horizontally. 1. This product 2. Double-sided tape 3. Passenger seat Installation Using the Bracket (Fig. 3) When the console is not wide enough to have installation space. Installation with double-sided tape (Fig. 4) Precaution: • Before using double-sided tape, clean off any dirt on the surface to which the double-sided tape is to be attached. 2. Double-sided tape 3. Passenger seat Installation with the screws (Fig. 5) Precaution: • Before drilling any mounting holes, confirm that the screws will not interfere with any of the cars operating systems (such as the fuel line, brake lines, electrical wiring, etc.). 2. Double-sided tape 3. Passenger seat 4. Not used 5. Screws (4 × 12 mm) 6. Drill holes 2 – 2.5 mm in diameter. <ENGLISH> Installing the Microphone Install the microphone in a place where its direction and distance from the driver make it most easy to pick up the driver’s voice. Mounting on the sun visor 1. Install the microphone in the mic clip. (Fig. 6) 2. Attach the mic clip to sun visor. (Fig. 7) Install the microphone on the sun visor when it is in the up position. It cannot recognize the driver’s voice if the sun visor is in the down position. 7. Microphone 8. Mic clip 9. Clamper (white) Installation on the steering column 1. Install the microphone in the mic clip. (Fig. 8) 2. Mount the mic clip on the steering column. (Fig. 9) 7. Microphone 8. Mic clip 9. Clamper (white) 10. Fit the mic cord in the groove. 11. Double-sided tape 12. Install the clip on the steering column toward the back. Installing the Cellular Phone (Fig. 10) 13. So that the cellular phone will be firmly secured, affix a metal sheet to align with the position of the magnets. 14. Magnets 15. Fit the connecting cord in the groove. 16. Metal sheet There are two sizes of metal sheet; large (60 × 30 mm) and small (40 × 20 mm). Choose the size to match your cellular phone. 17. Clamper (black) Clamp both cords together with the connecting cord on the inside and the unit cord on the outside. Note: • If the cellular phone slips out of place because of vibration, etc., return it to its proper position. Otherwise, a sudden stop may cause it to fall. • The large size metal sheet (60 × 30 mm) is recommended to use. Instalación Nota: • Antes de instalar finalmente la unidad, conecte el cableado temporariamente y asegúrese de que todas las conexiones están correctas y que la unidad funciona adecuadamente. • Utilice solamente las partes incluidas con la unidad para asegurar una instalación adecuada. El uso de partes no autorizadas pueden ocasionar fallas de funciona-miento. • Instale la unidad en un lugar en donde no interfiera con el conductor y no pueda lesionar a los pasajeros en caso de una parada repentina, tal como una al frenar por una emergencia. • No coloque este producto cerca de la salida de calefacción, en donde podría ser afectada por el calor, o cerca de las puertas, en donde el agua de lluvia podría salpicarla. • No monte la unidad bajo la luz directa del sol, como en el panel de instrumentos o en el portaequipajes posterior. Instalación de la unidad (Fig. 2) Precaución: • Antes de usar una cinta con adhesivo en ambos lados, limpie toda suciedad sobre la superficie a la que se fija la cinta con adhesivo en ambos lados. • Asegúrese de instalar este producto horizontalmente cuando utilice un teléfono celular que pese más de 200 g. 1. Este producto 2. Cinta con adhesivo en ambos lados 3. Asiento de pasajero Instalación usando la ménsula (Fig. 3) Cuando la consola no es lo suficientemente amplia para disponer de espacio de instalación. Instalación con una cinta con adhesivo en ambos lados (Fig. 4) Precaución: • Antes de usar una cinta con adhesivo en ambos lados, limpie toda suciedad sobre la superficie a la que se fija la cinta con adhesivo en ambos lados. 2. Cinta con adhesivo en ambos lados 3. Asiento de pasajero Instalación con los tornillos (Fig. 5) Precaución: • Antes de taladrar cualquier orificio de montaje, confirme que los tornillos no interferirán con ninguno de los sistemas de operación del automóvil (tales como la línea de combustible, líneas de freno, cableado eléctrico, etc.). 2. Cinta con adhesivo en ambos lados 3. Asiento de pasajero 4. No usada 5. Tornillos (4 × 12 mm) 6. Orificios de taladrado 2 – 2.5 mm de diámetro. <ESPAÑOL> Instalación del micrófono Instale el micrófono en un lugar en donde su dirección y distancia desde el conductor, pueda captar al máximo la voz del conductor. Montaje en la visera 1. Instale el micrófono en el sujetador de micrófono. (Fig. 6) 2. Fije el sujetador de micrófono a la visera. (Fig. 7) Instale el micrófono en la visera cuando se encuentra en la posición superior. No podrá reconocer la voz del conductor si la visera se encuentra en la posición inferior (hacia abajo). 7. Micrófono 8. Sujetador de micrófono 9. Retén (blanco) Instalación en la columna de dirección 1. Instale el micrófono en el sujetador de micrófono. (Fig. 8) 2. Monte el sujetador de micrófono en la columna de dirección. (Fig. 9) 7. Micrófono 8. Sujetador de micrófono 9. Retén (blanco) 10. Fije el micrófono en la ranura. 11. Cinta con adhesivo en ambos lados 12. Instale el sujetador en la columna de direccción hacia atrás. Instalación del teléfono celular (Fig. 10) 13. Para que el teléfono celular quede firmemente asegurado, sujete una lámina metálica alineándola con la posición de los imanes. 14. Imanes 15. Fije el cable de conexión en la ranura. 16. Lámina metálica La lámina metálica se encuentra disponible en dos tamaños, grande (60 × 30 mm) y pequeña (40 × 20 mm). Escoja el tamaño apropiado para su teléfono celular. 17. Retén (negro) Sujete ambos cordones conjuntamente con el cable de conexión en el interior y el cable de la unidad en el otro lado. Nota: • Si el teléfono celular no se mantiene en su lugar debido a la vibración, etc., reinstálelo en su posición correcta. De lo contrario, una frenada brusca puede producir su caída. • Se recomienda utilizar la lámina metálica de tamaño grande (60 × 30 mm). Einbauverfahren Hinweis: • Bevor Sie das Gerät endgültig einbauen, schließen Sie die Kabel provisorisch an, und überzeugen Sie sich, daß alle Anschlüsse stimmen, und daß das ganze System richtig funktioniert. • Verwenden Sie für den Einbau nur die mitgelieferten Teile. Durch den Gebrauch von ungeeigneten Teilen können Betriebsstörungen verursacht werden. • Installieren Sie die Anlage so, daß sie den Fahrer nicht stört und keinen Mitfahrer verletzen kann, z.B. im Falle einer Notbremsung. • Bringen Sie dieses Gerät nicht in der Nähe des Heizungsauslasses an, wo es durch die Wärmeabstrahlung beeinträchtigt werden könnte, oder in der Nähe der Türen, wo es Feuchtigkeit ausgesetzt werden könnte. • Montieren Sie das Gerät nicht an Stellen, die direktem Sonnenlicht ausgesetzt sind, z.B. auf dem Armaturenbrett oder auf der Heckablage. <DEUTSCH> Einbauen des Mikrofons Bringen Sie das Mikrofon an einer Stelle an, die von der Richtung und Entfernung her zur Erfassung der Sprachkommandos des Fahrers am geeignetsten ist. Befestigung an der Sonnenblende 1. Setzen Sie das Mikrofon in den Mikrofonhalter ein. (Abb. 6) 2. Anbringen des Mikrofonhalters an der Sonnenblende. (Abb. 7) Installieren des Gerätes (Abb. 2) Bringen Sie das Mikrofon in gehobener Position der Sonnenblende an dieser an. Wenn die Sonnenblende heruntergeklappt ist, können Sprachkommandos vom Fahrer nicht erkannt werden. 7. Mikrofon 8. Mikrofonhalter 9. Klemme (weiß) Zur besonderen Beachtung: Installation an der Lenksäule • Vor dem Gebrauch von doppelseitig haftendem Klebeband die Oberflächen reinigen, an denen das Klebeband befestigt werden soll. • Wenn Sie ein Mobiltelefon von mehr als 200 g Gewicht benutzen, installieren Sie dieses Gerät horizontal. 1. Dieses Produkt 2. Doppelseiting haftendes Klebeband 3. Beifahresitz 1. Setzen Sie das Mikrofon in den Mikrofonhalter ein. (Abb. 8) 2. Befestigen Sie den Mikrofonhalter an der Lenksäule. (Abb. 9) Installation mittels Halterung (Abb. 3) Wenn die Konsole nicht breit genug für die Installation ist. Befestigung mit doppelseitig haftendem Klebeband (Abb. 4) Zur besonderen Beachtung: • Vor dem Gebrauch von doppelseitig haftendem Klebeband die Oberflächen reinigen, an denen das Klebeband befestigt werden soll. 2. Doppelseiting haftendes Klebeband 3. Beifahrersitz Einbau unter Verwendung von Schrauben (Abb. 5) Zur besonderen Beachtung: • Vor dem Bohren von Montagelöchern sicherstellen, daß die Schrauben keinerlei negative Auswirkung auf irgendein Fahrzeugsystem (z.B. Kraftstoff- und Bremsleitungen, Verdrahtung der elektrischen Anlage usw.) haben können. 2. Doppelseiting haftendes Klebeband 3. Beifahrersitz 4. Nicht verwenden 5. Schrauben (4 × 12 mm) 6. Zwei Löcher mit einem Durchmesser von 2 – 2.5 mm bohren. 7. Mikrofon 8. Mikrofonhalter 9. Klemme (weiß) 10. Führen Sie das Mikrofonkabel in die Nut ein. 11. Doppelseiting haftendes Klebeband 12. Bringen Sie den Halter nach hinten weisend an der Lenksäule an. Einbauen des Mobiltelefons (Abb. 10) 13. Damit das Mobiltelefon einwandfrei gehalten wird, bringen Sie eine Metallplatte an der Position der Magneten an. 14. Magnete 15. Führen Sie das Verbindungskabel in die Nut ein. 16. Metallplatte Es gibt Metallplatten in zwei Größen: groß (60 × 30 mm) und klein (40 × 20 mm). Wählen Sie die für Ihr Mobiltelefon passende Größe. 17. Klemme (schwarz) Klemmen Sie beide Kabel so zusammen, dass das Verbindungskabel innen und das Gerätekabel außen liegt. Hinweis: • Falls das Mobiltelefon durch Vibrationen o.ä. verrutscht, bringen Sie es wieder in seine korrekte Position. Anderenfalls kann es bei einer plötzlichen Bremsung herunterfallen. • Es wird empfohlen, die große Metallplatte (60 × 30 mm) zu benutzen. Installation Remarque: • Avant d’effectuer l’installation définitive de ce produit, procédez à un câblage provisoire de façon à vous assurer que tous les éléments sont correctement reliés et fonctionnent convenablement. • Pour réaliser une installation correcte, n’utilisez que les pièces qui sont fournies avec l’appareil. L’utilisation d’autres pièces peut provoquer une anomalie. • Installez l’appareil de telle manière qu’il ne gêne pas le conducteur et ne puisse pas blesser un passager en cas d’arrêt brusque ou d’urgence. • N’installez pas l’appareil près d’une bouche de chauffage car la température peut perturber son fonctionnement, ni près d’une portière car il craint la pluie. • N’installez pas l’appareil dans un endroit où il serait exposé à la lumière directe du soleil, par exemple le tableau de bord ou la plage de custode. Installation de l’appareil (Fig. 2) Précaution: • Avant d’utiliser un morceau de ruban adhésif double face, nettoyez soigneusement l’emplacement sur lequel vous désirez le fixer. • Lors de l’utilisation d’un téléphone cellulaire pesant plus de 200 g, installez cet appareil horizontalement. 1. Ce produit 2. Ruban double face 3. Siège du passager Installation au moyen du support (Fig. 3) Quand la console n’est pas assez large pour permettre l’installation. Installation à l’aide d’un ruban double face (Fig. 4) Précaution: • Avant d’utiliser un morceau de ruban adhésif double face, nettoyez soigneusement l’emplacement sur lequel vous désirez le fixer. 2. Ruban double face 3. Siège du passager Installation au moyen des vis (Fig. 5) Précaution: • Avant de percer un trou de fixation, assurez-vous que vous pouvez le faire sans danger pour les organes essentiels du véhicule (conduite de carburant, conduite de frein, câblage électrique, etc.) et que les vis ne seront pas en contact avec ces organes. 2. Ruban double face 3. Siège du passager 4. Non utilisé 5. vie (4 × 12 mm) 6. Percez 2 trous de 2.5 mm de diamètre. <FRANÇAIS> Installation du microphone Installez le microphone en le dirigeant vers le conducteur et à une distance telle qu’il puisse aisément capter la voix de celui-ci. Fixation au pare-soleil 1. Engagez le microphone dans son attache. (Fig. 6) 2. Fixez l’attache au pare-soleil. (Fig. 7) Fixez le microphone au pare-soleil relevé. Le microphone ne peut pas capter correctement la voix du conducteur si le pare-soleil est abaissé. 7. Microphone 8. Attache du microphone 9. Collier (blanc) Fixation à la colonne de direction 1. Engagez le microphone dans son attache. (Fig. 8) 2. Fixez l’attache du microphone à la colonne de direction. (Fig. 9) 7. Microphone 8. Attache du microphone 9. Collier (blanc) 10. Placez le cordon du microphone dans la rainure. 11. Ruban double face 12. Fixez l’attache à la colonne de direction de manière qu’elle soit dirigée vers l’arrière. Installation le téléphone cellulaire (Fig. 10) 13. Placez une feuille de métal pour aligner la position des aimants de façon que le téléphone cellulaire soit fixé solidement. 14. Aimants 15. Fixez le cordon de connexion dans la rainure. 16. Feuille de métal Il y a deux tailles de feuille de métal: grande (60 × 30 mm) et petite (40 × 20 mm). Choisissez la taille correspondant à votre téléphone cellulaire. 17. Collier (noir) Attachez les deux cordons ensemble avec le cordon de connexion pour la partie intérieure et avec le cordon de l’appareil pour la partie extérieure. Remarque: • Si le téléphone cellulaire glisse un peu de sa position à cause de vibrations, etc., remettez-le correctement en place. Sinon, un arrêt brusque peut le faire tomber. • Nous vous recommandons d’utiliser la grande feuille de métal (60 × 30 mm). Operation Operate with a small standard tip screwdriver or something similar. 1. Sensitivity level switch This allows you to adjust the sensitivity over which cellular signals can be received. Low sensitivity level Ô High sensitivity level The sensitivity level can be changed in three steps. If this product operates by receiving signals from another cellular phone outside your car or other signals, set the sensitivity level switch to the lower level. If this product does not operate when making or receiving a call, set the sensitivity level switch to the higher level. 2. Heat indicator This lights when the unit’s internal temperature becomes high. Power automatically switches OFF. Power automatically switches ON when the internal temperature decreases. Note: • When operating with a small standard tip screwdriver or something similar, strongly pressing or pulling switches or indicators may damage parts resulting in faulty operation. Setting the Switch (Fig. 11) Opere con un destornillador normal pequeño o algo similar. Nota: • Cuando utilice un destornillador normal pequeño o algo similar, la presión o extracción fuerte de los interruptores o indicadores puede dañar las piezas y causar un funcionamiento defectuoso. Ajuste del interruptor (Fig. 11) Fig. 11 Abb. 11 Afb. 11 2. Heat indicator This lights when the unit’s internal temperature becomes high. Power automatically switches OFF. Power automatically switches ON when the internal temperature decreases. 3. Power switch Keep the switch in the ON position when using this product. The power switch is interlocked with that of the head unit, and is automatically switched on and off as the head unit is operated. 1. Sensitivity level switch This allows you to adjust the sensitivity over which cellular signals can be received. Low sensitivity level Ô High sensitivity level The sensitivity level can be changed in three steps. If this product operates by receiving signals from another cellular phone outside your car or other signals, set the sensitivity level switch to the lower level. If this product does not operate when making or receiving a call, set the sensitivity level switch to the higher level. Operación 3. Power switch Keep the switch in the ON position when using this product. The power switch is interlocked with that of the head unit, and is automatically switched on and off as the head unit is operated. <ENGLISH> 1. Interruptor de nivel de sensibilidad Eso le permite ajustar la sensibilidad sorbre la cual las señales celulares se pueden recibir. Nivel de sensibilidad baja Ô Nivel de sensibilidad alta El nivel de sensibilidad se puede cambiar en tres pasos. Si la unidad funciona mediante la recepción de señales de un otro teléfono celular fuera de su automóvil u otros señales, ajuste el interruptor de nivel de sensibilidad para un nivel más bajo. Si la unidad no funciona al hacer o recibir una llamada, ajuste el interruptor de nivel de sensibilidad para un nivel más alto. Bedienung Verwenden Sie einen kleinen Normalschraubendreher oder etwas Ähnliches zur Betätigung. Hinweis: • Starkes Drücken oder Ziehen von Schaltern oder Anzeigen bei Betätigung mit einem kleinen Normalschraubendreher oder einem ähnlichen Werkzeug kann zu Beschädigung von Teilen und fehlerhaftem Betrieb führen. Einstellen des Schalters (Abb. 11) 1. Empfindlichkeitspegelschalter Dieser Schalter gestattet die Einstellung der Empfindlichkeit zum Empfang der Mobiltelefonsignale. Niedriger Empfindlichkeitspegel Ô Hoher Empfindlichkeitspegel Der Empfindlichkeitspegel kann in drei Stufen eingestellt werden. Falls dieses Gerät auf die Signale anderer Mobiltelefone außerhalb des Fahrzeugs oder anderer Geräte anspricht, stellen Sie den Schalter auf einen niedrigeren <ESPAÑOL> 2. Indicator de calor Se ilumina cuando la temperatura interna de la unidad se pone alta. La alimentación se desconecta automáticamente. La alimentación se conecta automáticamente cuando la temperatura interna diminuye. 3. Interruptor de alimentactión Mantenga el interruptor en la posición ON cuando utilice esta unidad. El interruptor de alimentación está sincronizado con el interruptor de la unidad principal, y se activa o desactiva automáticamente cuando se opera la unidad principal. Opération Utilisez un tournevis petit et fin, ou un instrument similaire. Remarque: • Si vous utilisez un tournevis petit et fin, ou un instrument similaire, n’appuyez pas fortement sur les commutateurs et témoins car cela pourrait les endommager et se traduire par des anomalies de fonctionnement. Réglage du commutateur (Fig. 11) 1. Sélecteur de sensibilité Ce sélecteur vous permet de choisir la sensibilité de l’appareil vis-à-vis des signaux de téléphonescellulaires. Niveau de sensibilité faible Ô Niveau de sensibilité élevée Le niveau de sensibilité peut premdre trois valeurs. Si l’appareil fonctionne en raison de la réception de signaux provenant d’un autre téléphone cellulaire placé hors du véhicule, ou de tout autre signal, placez le commutateure de niveau de sensibilité sur la position correspon- <DEUTSCH> Empfindlichkeitspegel ein. Falls dieses Gerät beim Tätigen oder Annehmen eines Anrufs nicht anspricht, stellen Sie den Schalter auf einen höheren Empfindlichkeitspegel ein. 2. Wärmeanzeige Diese Anzeige leuchtet auf, wenn die Innentemperatur des Gerätes zu hoch wird. Die Stromversorgung wird automatisch ausgeschaltet. Sobald die Innentemperatur sinkt, schaltet sich die Stromversorgung wieder ein. 3. Hauptschalter Zur Benutzung dieses Gerätes muss sich dieser Schalter in der Stellung ON befinden. Der Hauptschalter ist mit der Kopfgarnitur gekoppelt und wird beim Betrieb der Kopfgarnitur automatisch ein- und ausgeschaltet. <FRANÇAIS> dent á la valeure la plus basse. Si l’appareil ne fonctionne pas au moment où vous émettez ou recevez un appel, placez le commutateur de niveau de sensibilité sur la position correspondant à la valeure la plus élevée. 2. Témoin de température Ce témoin s’éclaire lorsque la température interne de l’appareil est élevée. En ce cas, l’alimentation est automatiquement coupée. Elle est automatiquement rétabile lorsque la température interne est à nouveau inférieure à la valeur maximale. 3. Interrupteur d’alimentation Losque vous utilisez cet appareil, conservez l’interrupteur sur la position ON. L’interrupteur d’alimentation est dépendant de celui de l’élément central et se trouve donc automatiquent sur la position de marche ou d’arrêt en fonction de ce qui se produit sur l’élément central. Esecuzione Lavorare con un cacciavite piccolo a punta normale o qualcosa di simile. Nota: • Quando si lavora con un cacciavite piccolo a punta normale o qualcosa di simile, se si preme forte o se si tirano gli interruttori o le spie è possibile danneggiare le parti con conseguenti problemi di funzionamento. Impostazione dell’interruttore (Fig. 11) 1. Interruttore del livello di sensibilità Esso consente di regolare la sensibilità con la quale viene ricevuto il segnale del telefono cellulare. Basso livello di sensibilità Ô Alto livello di sensibilità È possibile cambiare il livello di sensibilità in tre passaggi. Se questo prodotto funziona ricevendo segnali da un altro telefono cellulare al di fuori dell’automobile o altri segnali, impostare l’interruttore del livello di sensibilità sul livello più basso. Se questo prodotto non funziona quando si Bediening Gebruik een kleine normale schroevendraaier of iets dergelijks. Opmerking: • Wanneer u een kleine normale schroevendraaier of iets dergelijks gebruikt kunt u onderdelen beschadigen als u er te krachtig op drukt of als u te hard trekt aan schakelaars of indicators, hetgeen kan resulteren in storingen. Instellen van de schakelaar (Afb. 11) 1. Schakelaar voor het gevoeligheidsniveau Deze stelt u in staat om de gevoeligheid voor de signalen van de draagbare telefoons te regelen. Lage gevoeligheid Ô Hoge gevoeligheid Het gevoeligheidsniveau kan in drie stappen worden geregeld. Als dit product begint te werken als er signalen worden ontvangen van andere draagbare telefoons buiten uw auto of door andere signalen, dient u de gevoeligheid te verlagen. Als het product niet begint te werken wanneer u een telefoongesprek wilt maken of ontvangen, dient u de gevoeligheid te verhogen. <ITALIANO> effettua o si riceve una chiamata, impostare l’interruttore del livello di sensibilità sul livello più alto. 2. Indicatore di riscaldamento S’illumina quando la temperatura interna di questa unità diventa troppo alta. L’unità viene spenta, automaticamente. Quando la temperatura interna diminuisce, l’unità si accende, automaticamente. 3. Interruttore di alimentazione Lasciare l’interruttore in posizione ON (attivazione) quando si utilizza questo prodotto. L’interruttore di alimentazione è collegato al funzionamento di quello dell’apparecchio principale e viene acceso e spento automaticamente insieme all’apparecchio principale. <NEDERLANDS> 2. Oververhittingsindicator Deze indicator zal oplichten wanneer de temperatuur binnenin het toestel te hoog oploopt. De stroom zal in dat geval automatisch worden uitgeschakeld. Wanneer de temperatuur in het toestel voldoende gedaald is, zal de stroom weer worden ingeschakeld. 3. Aan/uit schakelaar Houd deze schakelaar in de ON (aan) stand wanneer u dit product gebruikt. Deze schakelaar is gekoppeld aan die van het hoofdtoestel en zal automatisch aan en uitschakelen met het hoofdtoestel.-
 1
1
-
 2
2
-
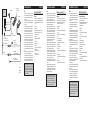 3
3
-
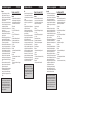 4
4
-
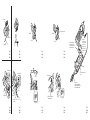 5
5
-
 6
6
-
 7
7
-
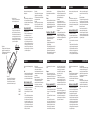 8
8


Pioneer CD-HF1 Manual de usuario
- Categoría
- Teléfonos móviles
- Tipo
- Manual de usuario
en otros idiomas
- français: Pioneer CD-HF1 Manuel utilisateur
- italiano: Pioneer CD-HF1 Manuale utente
- English: Pioneer CD-HF1 User manual
- Deutsch: Pioneer CD-HF1 Benutzerhandbuch
- Nederlands: Pioneer CD-HF1 Handleiding