Legrand In One Celiane 672 15 Manual de usuario
- Tipo
- Manual de usuario

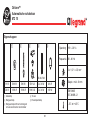
Céliane™
Inter automatique
672 15
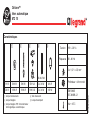
Caractéristiques
110 V 500 W 500 W 500 VA 2 x 36 W 80 W
230 V 1000 W 1000 W 1000 VA 2 x 36 W 160 W
Ø 26 Ø 38
Lampe incandescente
Lampe halogène
Lampe halogène TBT à transformateur
ferromagnétique ou électronique
Tube fluorescent
Lampe fluocompact
Tension 100 - 240 VA
Fréquence 50 - 60 Hz
2 x 1,5 / 1 x 2,5 mm
2
Profondeur = 40 mm mini
0 à + 45°C
EN 50065
IEC 60669-2-1
N0064JS9/00

2
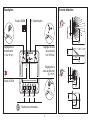
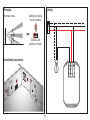
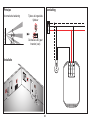
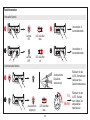
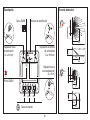
Mode automatique
La led bleue s’allume
(fixe)
Allumage pendant la
durée sélectionnée
L
N
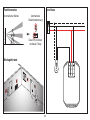
CâblagePrincipe
Précaution d’installation

3
2.5 mm
2.5 mm
2.5 mm
ON
OFFAUTO
Description Zone de détection
Réglage de la
temporisation
(1 s à 16 mn)
Réglage du seuil
de luminosité
(3 à 1000 lux)
Réglage de la
zone de détection
(3 à 10 m)
Voyant LEARN
Touches de commandes
N° d’identification
Touche LEARN
10 m
4 m
1.5 m
5 m
5 m
10 m
3 m
1.5 m
1.3 m
0.5 m
3 m
1.5 m
1.2 m
1.2 m
3 m
10 m
3 m
10 m

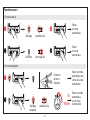
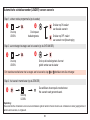
4
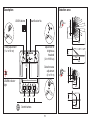
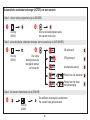
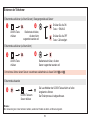
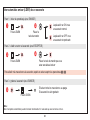
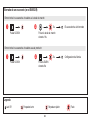
Allumage Led bleue fixe
Extinction Led rouge fixe
Retour
en mode
automatique
Retour
en mode
automatique
Allumage
temporisé
Led bleue fixe
Retour en mode
automatique à la
sortie de la zone
de détection
Extinction
durant la
détection
Retour en mode
automatique
à la fin de la
temporisation
ON
AUTO
OFF
1s
16 mn
12
60
30
15
10
5
20
25
35
40
50
55
45
11
10
3
4
5
7
8
1
2
6
9
ON
OFFAUTO
ON
OFFAUTO
ON
OFFAUTO
ON
OFFAUTO
ON
OFFAUTO
ON
OFFAUTO
Fonctionnement
En mode manuel
En mode dérogation

5
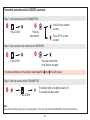
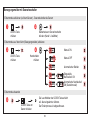
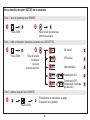
Inter automatique émetteur (LEADER) d’un scénario
Appuyer sur
LEARN
Appuyer sur
LEARN
Appuyer sur
LEARN
Appuyer sur la touche de commande
qui doit être associée au leader
Les voyants de tous les produits s'éteignent.
Le scénario est enregistré.
Etape 1 : débuter l'apprentissage (sur l’ÉMETTEUR)
Etape 2 : ajouter un récepteur au scénario (sur le RÉCEPTEUR)
Etape 3 : enregistrer le scénario (sur l’ÉMETTEUR)
Pour ajouter plusieurs produits au scénario, répéter pour chaque récepteur les opérations et .
Remarque :
Deux interrupteurs automatiques peuvent être utilisés en va-et-vient. Il faut alors que l’un soit émetteur de l’autre et réciproquement.
L‘appui sur OFF créé
un scénario temporisé
L‘appui sur ON créé
un scénario classique
Appuyer sur
la touche
de commande

6
AUTO
AUTO
AUTO
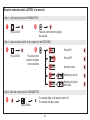
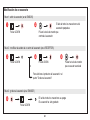
Inter automatique récepteur (ACTEUR) d’un scénario
Appuyer sur
LEARN
Appuyer sur la touche de commande
qui doit piloter le scénario
Appuyer sur
LEARN
Appuyer sur
LEARN
Appuyer sur la
touche de commande
qui doit être
associée à l’émetteur
Les voyants de tous les produits s'éteignent.
Le scénario est enregistré.
Etape 1 : débuter l'apprentissage (sur l’ÉMETTEUR)
Etape 2 : ajouter un interrupteur automatique au scénario (sur le RÉCEPTEUR)
Etape 3 : enregistrer le scénario (sur l’ÉMETTEUR)
ON forcé
OFF forcé
mode automatique
Priorité à l’allumage
Priorité à l’extinction
avec temporisation

7
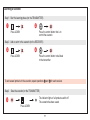
Apprentissage du scénario
Appuyer sur
LEARN
Appuyer sur la touche de commande
qui doit piloter le scénario
Appuyer sur
LEARN
Appuyer sur
LEARN
Appuyer sur la touche de commande
qui doit être associée à l’émetteur
Les voyants de tous les produits s'éteignent.
Le scénario est enregistré.
Etape 1 : débuter l'apprentissage (sur le l’ÉMETTEUR)
Etape 2 : ajouter un acteur au scénario (sur le RÉCEPTEUR)
Etape 3 : enregistrer le scénario (sur l’ÉMETTEUR)
Pour ajouter plusieurs produits au scénario, répéter pour chaque récepteur les opérations et .

8
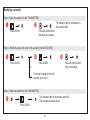
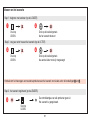
Modification d’un scénario
Appuyer sur
LEARN
Appuyer sur la touche
de commande qui
pilote le scénario
Appuyer sur la touche
de commande que
l'on souhaite associer
Etape 1 : ouvrir le scénario (sur l’ÉMETTEUR)
Appuyer sur
LEARN
ou
Appuyer sur
LEARN
Pour supprimer le produit
du scénario passer à l'étape 3
Etape 2 : modifier l'état d'un acteur du scénario (sur le RÉCEPTEUR)
Appuyer sur
LEARN
Les voyants de tous les produits s'éteignent.
Le scénario est enregistré.
Etape 3 : enregistrer le scénario (sur l’ÉMETTEUR)
Les voyants de tous les produits
du scénario clignotent.

9
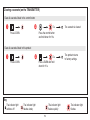
Effacement d’un scénario (sur l’ÉMETTEUR)
Appuyer sur
LEARN
Le scénario est effacé
Appuyer sur la touche de
commande et maintenir 10s
Effacer tous les scénarios liés à la touche de commande
Appuyer sur
LEARN
Retour du produit
en configuration usine
Appuyer sur LEARN
et maintenir 10s
Effacer tous les scénarios liés à ce produit
5 s
5 s
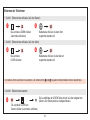
Légende
Le voyant s'éteint Le voyant clignote
lentement
Le voyant clignote
rapidement
Le voyant flashe

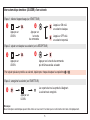
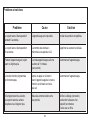
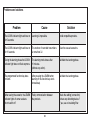
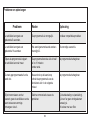
Problèmes et solutions
10
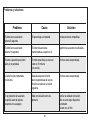
Problème Cause Solution
Le voyant learn s'allume pendant L'apprentissage est impossible. Installer des produits compatibles.
pendant 5 secondes.
Le voyant learn s'allume pendant Le nombre des émetteurs Supprimer les scénarios inutilisés.
10 secondes. mémorisés est supérieur à 32.
Pendant l'apprentissage le voyant Le mode apprentissage se ferme Recommencer l'apprentissage.
learn ne clignote plus. au bout de 10 minutes
(sans action).
La touche fonction programmée Après un appui sur le bouton Recommencer l'apprentissage.
ne fonctionne pas. learn l'apprentissage de la touche
fonction se fait dans la minu
te
qui suit.
A l'enregistrement du scénario, Mauvaise communication entre Vérifier le câblage (connexion).
les voyants learn de certains les produits. Rechercher l'existence d'un
récepteurs ne s'éteignent pas. dispositif perturbateur.
L'isoler avec un filtre.

Céliane™
Automatic switch
672 15
110 V 500 W 500 W 500 VA 2 x 36 W 80 W
230 V 1000 W 1000 W 1000 VA 2 x 36 W 160 W
Ø 26 Ø 38
Incandescent lamp
Halogen lamp
ELV halogen lamp with ferromagnetic
or electronic transformer
Fluorescent tube
Compact fluorescent lamp
Voltage 100 - 240 VA
Frequency 50 - 60 Hz
2 x 1,5 / 1 x 2,5 mm
2
Depth = min. 40 mm
0 to + 45°C
EN 50065
IEC 60669-2-1
Features

12
Automatic mode
The blue LED
switches on (fixed)
Switching on during
the set timeframe
L
N
CablingPrinciple
Installation precautions

13
2.5 mm
2.5 mm
2.5 mm
ON
OFFAUTO
Description Detection area
Timing adjustment
(1 s to 16 mn)
Adjustment of
brightness
threshold
(3 to 1000 lux)
Detection area
adjustment
(3 to 10 m)
LEARN indicator
light
Control buttons
Identification No.
LEARN button
10 m
4 m
1.5 m
5 m
5 m
10 m
3 m
1.5 m
1.3 m
0.5 m
3 m
1.5 m
1.2 m
1.2 m
3 m
10 m
3 m
10 m

14
Switching
on
Fixed blue
LED
Switching
off
Fixed red
LED
Return to
automatic
mode
Return to
automatic
mode
Timed
switching on
Fixed blue
LED
Return to
automatic mode
at the area exit
detection
Switching off
during
detection
Return to
automatic mode
at the end of
timing
ON
AUTO
OFF
1s
16 mn
12
60
30
15
10
5
20
25
35
40
50
55
45
11
10
3
4
5
7
8
1
2
6
9
ON
OFFAUTO
ON
OFFAUTO
ON
OFFAUTO
ON
OFFAUTO
ON
OFFAUTO
ON
OFFAUTO
Operation
Manual operation
Override mode

15
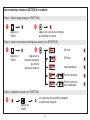
Transmitter automatic switch (LEADER) a scenario
Press LEARN
Press LEARN
Press LEARN
Press the control button
to be linked to the leader
The indicator lights of all products switch off.
The scenario has been saved.
Step 1 : start the learning (on the TRANSMITTER)
Step 2 : Add a receiver to the scenario (on the RECEIVER)
Step 3 : Save the scenario (on the TRANSMITTER)
To add several products to the scenario, repeat operations and for each receiver.
Note :
Two automatic switches can be used as a two-way switch. In this case, one must be the RECEIVER of the other and vice/versa.
Press OFF for a timed
scenario
Press ON for a standard
scenario
Press the
control button

16
AUTO
AUTO
AUTO
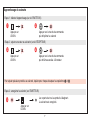
Receiver automatic switch (ACTOR) of a scenario
Press LEARN Press the control button that pilots
the scenario
Press LEARN
Press LEARN
Press the control
button to be linked
to the transmitter
The indicator lights of all products switch off.
The scenario has been saved.
Step 1 : start the learning (on the TRANSMITTER)
Step 2 : add an automatic switch to the scenario (on the RECEIVER)
Step 3 : Save the scenario (on the TRANSMITTER)
Forced ON
Forced OFF
Automatic mode
Switching on priority
Switching off priority
with timing

17
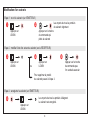
Learning a scenario
Press LEARN Press the control button that is to
control the scenario
Press LEARN
Press LEARN
Press the control button to be linked
to the transmitter
The indicator lights of all products switch off.
The scenario has been saved.
Step 1 : Start the learning phase (on the TRANSMITTER)
Step 2 : Add an actor to the scenario (on the RECEIVER)
Step 3 : Save the scenario (on the TRANSMITTER)
To add several products to the scenario, repeat operations and for each receiver.

18
Modifying a scenario
Press LEARN Press the control button
that pilots the scenario
The indicator lights of all products in
the scenario flash.
Press the control button
that is to be linked
Step 1: Open the scenario (on the TRANSMITTER)
Press LEARN
or
Press LEARN
To remove the product from the
scenario, go to step 3
Step 2 : Modify the state of an actor in the scenario (on the RECEIVER)
Step 3 : Save the scenario (on the TRANSMITTER)
Press LEARN
The indicator lights of all products switch off.
The scenario has been saved.

19
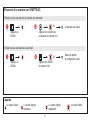
Clearing a scenario (on the TRANSMITTER)
Press LEARN
The scenario is cleared
Press the control button
and hold down for 10 s
Clear all scenarios linked to the control button
Press LEARN
The product returns
to factory settings
Press LEARN and hold
down for 10 s
Clear all scenarios linked to this product
5 s
5 s
Key
The indicator light
switches off
The indicator light
flashes slowly
The indicator light
flashes quickly
The indicator light
flashes

20
Problems and solutions
Problem Cause Solution
The LEARN indicator light switches on Learning is impossible. Install compatible products.
for 5 seconds.
The LEARN indicator light switches on The number of recorded transmitters Clear the unused scenarios.
for 10 seconds. is more than 32.
During the learning phase the LEARN The learning mode closes after Reinitiate the learning phase.
indicator light does not flash anymore. 10 minutes.
(without any action).
The programmed function key does After pressing the LEARN button, Reinitiate the learning phase.
not work. learning of the function key starts
immediately.
When saving the scenario, the LEARN Faulty communication between Check the cabling (connection).
indicator lights of some receivers the products. Is there any disturbing device ?
d
o not switch off. If yes, use an insulating filter.

21
Céliane™
Automatische schakelaar
672 15
Eigenschappen
110 V 500 W 500 W 500 VA 2 x 36 W 80 W
230 V 1000 W 1000 W 1000 VA 2 x 36 W 160 W
Ø 26 Ø 38
Gloeilamp
Halogeenlamp
Halogeenlamp ZLS met ferromagneti
sche of elektronische transformator
TL-buis
Fluocompactlamp
Spanning 100 - 240 VA
Frequentie 50 - 60 Hz
2 x 1,5 / 1 x 2,5 mm
2
Diepte = mini. 40 mm
- 5°C tot + 45°C
EN 50065
IEC 60669-2-1

22
Automatische bediening
De blauwe LED gaat
branden (vast)
Tijdens de ingestelde
tijdsduur
L
N
AansluitingPrincipe
Installatie

23
2.5 mm
2.5 mm
2.5 mm
ON
OFFAUTO
Beschrijving Detectiezone
Instelling van de
tijdsvertraging
(1s tot 16mn)
Instelling van de
lichtdrempel
(1000 bij 3 lux)
Instelling van het bereik
van de detectiezone
( 3 tot 10m)
Controlelampje
LEARN
Bedieningstoetsen
Toets LEARN
10 m
4 m
1.5 m
5 m
5 m
10 m
3 m
1.5 m
1.3 m
0.5 m
3 m
1.5 m
1.2 m
1.2 m
3 m
10 m
3 m
10 m

24
Lamp aan Blauwe LED aan
Lamp uit Rode LED aan
Terug naar
automatische
werking
Terug naar
automatische
werking
Lamp aan volgens
tijdsvertraging
Blauwe
LED aan
Terug naar auto-
matische werking
na verlaten van de
detectiezone
Lamp uit
gedurende de
detectie
Terug naar auto-
matische werking
na verlopen van de
tijdsvertraging
ON
AUTO
OFF
1s
16 mn
12
60
30
15
10
5
20
25
35
40
50
55
45
11
10
3
4
5
7
8
1
2
6
9
ON
OFFAUTO
ON
OFFAUTO
ON
OFFAUTO
ON
OFFAUTO
ON
OFFAUTO
ON
OFFAUTO
Werking
Manuele werking
Geforceerde werking

25
Automatische schakelaar zender (LEADER) van een scenario
Druk op
LEARN
Druk op
LEARN
Druk op
LEARN
Druk op de bedieningstoets die moet
gelinkt worden aan de leader
De verklikkers doven op alle mechanismen.
Het scenario werd gememoriseerd.
Stap 1 : starten met de programmatie (op de zender)
Stap 2 : een ontvanger toevoegen aan het scenario (op de ONTVANGER)
Stap 3 : het scenario memoriseren (op de ZENDER)
Om meerdere mechanismen toe te voegen aan het scenario, stap en herhalen voor elke ontvanger.
Opmerking :
Twee automatische schakelaars kunnen als wisselschakelaars gebruikt worden. Hiervoor moet de ene schakelaar als zender geprogrammeerd
worden voor de andere, en omgekeerd.
Drukken op OFF creëert
een scenario met tijdsvertraging
Drukken op ON creëert
een klassiek scenario
Druk op een
bedieningstoets

26
AUTO
AUTO
AUTO
Automatische schakelaar ontvanger (ACTOR) van een scenario
Druk op
LEARN
Druk op de bedieningstoets welke
het scenario moet sturen
Druk op
LEARN
Druk op
LEARN
Druk op de
bedieningstoets die
moet gelinkt worden
met de zender
De verklikkers doven op alle mechanismen.
Het scenario werd gememoriseerd.
Stap 1 : starten met de programmatie (op de ZENDER)
Stap 2 : een automatische schakelaar toevoegen aan het scenario (op de ONTVANGER)
Stap 3 : het scenario memoriseren (op de ZENDER)
ON geforceerd
OFF geforceerd
Automatische werking
Prioriteit voor het aansteken
Prioriteit voor het doven
met tijdsvertraging

27
Inlezen van het scenario
Druk op
LEARN
Druk op de bedieningstoets
die het scenario bestuurt
Druk op
LEARN
Druk op
LEARN
Druk op de bedieningstoets
die aan de leider moet zijn toegevoegd
De controlelampjes van alle producten gaan uit.
Het scenario is geregistreerd.
Stap 1 : beginnen met aanleren (op de LEADER)
Stap 2 : voeg een actor toe aan het scenario (op de ACTOR)
Stap 3 : het scenario registreren (op de LEADER)
Herhaal voor het toevoegen van meerdere producten aan het scenario voor iedere actor de handelingen en .

28
Wijziging van een scenario
Druk op
LEARN
Druk op de bedieningstoets
die het scenario bestuurt
Druk op de bedienings-
toets die u toe wilt voegen
Stap 1 : het scenario openen (op de LEADER)
Druk op
LEARN
of
Druk op
LEARN
Ga voor het wissen van het product
uit het scenario naar stap 3
Stap 2 : de staat van een actor van het scenario wijzigen (op de ACTOR)
Druk op
LEARN
De controlelampjes van alle producten gaan uit.
Het scenario is geregistreerd.
Stap 3 : het scenario registreren (op de LEADER)
De controlelampjes van alle producten van
het scenario knipperen.

29
Wissen van een scenario
Druk op
LEARN
Het scenario is gewist
Druk op de bedieningstoets
en houd deze 10 s ingedrukt
Wis alle scenario’s die verbonden zijn met de bedieningstoets (op de LEADER)
Druk op
LEARN
Terugkeer van het product
naar de standaardconfiguratie
Druk op LEARN
en houd
deze 10 s ingedrukt
Wis alle scenario’s die bij dit product horen (op de LEADER)
5 s
5 s
Legende
Het controlelampje
gaat uit
Het controlelampje
knippert langzaam
Het controlelampje
knippert snel
Het controlelampje
flitst

30
Problemen en oplosisngen
Probleem Reden Oplossing
Le verklikker learn gaat aan De programmatie is onmogelijk . Installeer compatibele produkten.
gedurende 5 seconden.
Le verklikker learn gaat aan Het aantal gememoriseerde zenders Wis onnodige scenarioís.
gedurende 10 seconden. overstijgt 32.
Tijdens de programmatie knippert De programmatiemodus sluit zichzelf De programmatie herbeginnen.
de verklikker learn niet meer. af na 10 minuten
zonder actie.
De toets geprogrammeerde functie Na een druk op de learn-knop De programmatie herbeginnen.
werkt niet. voltrekt de programmatie van de
functietoets zich in de volgende
minuut.
Bij het memoriseren van het Slechte communicatie tussen de Kijk de bekabeling na (aansluiting).
scenario, gaan de verklikkers van de pro
dukten. Kijk na of er geen storingselement
learn-toetsenvan sommige aanwezig is.
ontvangers niet uit. Dit isoleren met een filter.

31
Céliane™
Bewegungsmelder 3-Leiter
672 15
Technische Daten
110 V 500 W 500 W 500 VA 2 x 36 W 80 W
230 V 1000 W 1000 W 1000 VA 2 x 36 W 160 W
Ø 26 Ø 38
Glühlampe
Hochvolt- Halogenlampe
Niedervolthalogenlampen mit konven-
tionellem oder elektronischem Trafo
Leuchtstofflampen
Kompaktleuchtstofflampen
Spannung 100 - 240 VA
Frequenz 50 - 60 Hz
2 x 1,5 / 1 x 2,5 mm
2
Einbautiefe = min. 40 mm
0 bis + 45°C
EN 50065
IEC 60669-2-1

32
Automatischer Betrieb
Dauer EIN (Drücken
der blauen Taste)
Automatische
Detektionserkennung
L
N
AnschlussFunktionsweise
Montagehinweis

33
2.5 mm
2.5 mm
2.5 mm
ON
OFFAUTO
Bedienung Detektionsbereich
Ausschalt-
verzögerung :
1 Sek.- 16 min
Helligkeits-
schwellwert :
3 - 1000 Lux
Detektions-
reichweite :
3- 10 Meter
Leuchtdiode der
LEARN-Taste
Bedientasten
Gerätenummer(Technologie
LEARN-Taste
10 m
4 m
1.5 m
5 m
5 m
10 m
3 m
1.5 m
1.3 m
0.5 m
3 m
1.5 m
1.2 m
1.2 m
3 m
10 m
3 m
10 m

34
Lampe
ON
LED leuchtet
blau
Lampe
OFF
LED leuchtet
rot
Umschalten in
Automatikbetrieb
Umschalten in
Automatikbetrieb
Ausschaltver-
zögerung
LED leuchtet
blau
Rückkehr in den
AUTO- Betrieb nach
verlassen des
Detektionsbereiches
Automatische
Detektion-
serkennung
Rückkehr in den
AUTO- Betrieb
nach Ablauf der
eingestellten
Nachlaufzeit
ON
AUTO
OFF
1s
16 mn
12
60
30
15
10
5
20
25
35
40
50
55
45
11
10
3
4
5
7
8
1
2
6
9
ON
OFFAUTO
ON
OFFAUTO
ON
OFFAUTO
ON
OFFAUTO
ON
OFFAUTO
ON
OFFAUTO
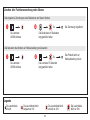
Funktionsweise
Manueller Betrieb
Automatischer Betrieb

35
Einlernen der Teilnehmer
LEARN Taste
drücken
LEARN Taste
drücken
LEARN Taste am
Sensor drücken
Bedientaste drücken, die dem
Sensor zugeordnet werden soll
Die Leuchtdioden der LEARN Taste erlischt auf allen
eingelernten Aktoren.
Der Einlernprozess ist abgeschlossen.
Einlernmodus aktivieren (auf dem Sensor), Bewegungsmelde als Sensor
Einlernmodus aktivieren (auf dem Aktor)
Einlernmodus beenden
Um mehrere Aktoren einem Sensor zuzuordnene wiederholen sie diesen Schritt und .
Hinweis :
Bei Verwendung von 2 oder mehreren Geräten, werden die Produkte als Aktor und Sensor eingesetzt.
Drücken Sie die OFF
Taste> Zeitverzögert
Drücken Sie die ON
Taste > EIN/AUS
Bedientaste drücken,
die dem Aktor
zugeordnet werden soll

36
AUTO
AUTO
AUTO
Bewegungsmelder mit Szenarioschalter
LEARN Taste
drücken
Bedientaste am Szenarioschalter
drücken (Kanal 1-4 wählbar)
LEARN Taste
drücken
LEARN Taste am
Sensor drücken
Handschalter
drücken
Die Leuchtdioden der LEARN Taste erlischt
auf allen eingelernten Aktoren.
Der Einlernprozess ist abgeschlossen.
Einlernmodus aktivieren (auf dem Sensor) - Szenarioschalter als Sensor
Einlernmodus auf dem Aktor (Bewegungsmelder) aktivieren
Einlernmodus beenden
Manuel ON
Manuel OFF
Automatischer Betrieb
Eingestellte
Nachlaufzeit ON
Automatische Nachlaufzeit
ON (Detektionszeit)

37
Einlernen der Teilnehmer
Die Lerntaste LEARN drücken
(Lernmodus aktivieren)
Bedientaste drücken, die dem Aktor
zugeordnet werden soll.
Die Lerntaste
LEARN drücken
Die Lerntaste LEARN am
Sensor drücken (Lernmodus schließen)
Bedientaste drücken, die den Sensor
zugeordnet werden soll.
Die Leuchtdiode der LEARN Taste erlischt auf allen eingelernten
Aktoren. Der Einlernprozess ist abgeschlossen.
1. Schritt : Einlernmodus aktivieren (auf dem Sensor)
2. Schritt : Einlernmodus aktivieren (auf dem Aktor)
3. Schritt : Einlernmodus beenden
Um mehrere Aktor einen Sensor zuzuordnen,. die Arbeitsschritte und bei jedem der betreffenden Aktoren wiederholen.

38
Änderung einer Funktionszuordnung (löschen oder zusätzlich einlernen)
Die Lerntaste
LEARN drücken
Bedientaste drücken, welche die
Aktoren ansteuern.
Die Leuchtdioden auf allen zugeordneten
Aktoren blinken.
Die Bedientaste drücken, die
zugeordnet werden soll.
1. Schritt : Auswahl der Funktion am Sensor
Die Lerntaste
LEARN drücken
oder
Die Lerntaste
LEARN drücken
Um den Aktor aus der Sensor Konfiguration zu löschen, die Lerntaste LEARN
drücken. Die Leuchtdioden der LEARN Taste erlischt auf allen Aktoren. Der
Prozess ist abgeschlossen.
2. Schritt : Aktor am Sensor hinzufügen oder löschen (am AKTOR)
Die Lerntaste
LEARN drücken
Die Leuchtdioden der LEARN Taste erlischt auf allen Aktoren.
Der Prozess ist abgeschlossen.
3. Schritt : Funktionszuordnung beenden

39
Legende
Die Leuchtdiode
erlischt
Die Leuchtdiode blinkt
langsam ca.1Hz
Die Leuchtdiode blinkt
schnell ca. 2Hz
Die Leuchtdiode
blitzt ca. 5Hz
Löschen aller Funktionszuordnung oder Aktoren
Die Lerntaste
LEARN drücken
Die Zuordnung ist gelöscht
Die Bedientaste 10 Sekunden
lang gedrückt halten.
Alle eingelernte Zuordnungen einer Bedienteste am Sensor löschen
Die Lerntaste
LEARN drücken
Das Produkt kehrt zur
Werkseinstellung zurück.
Die Lerntaste 10 Sekunden
lang gedrückt halten.
Alle Sensoren oder Aktoren auf Werkseinstellung zurücksetzten
5 s
5 s

40
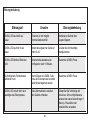
Störungsbehebung
Störungsart Ursache Störungsbehebung
LEARN- LED leuchtet 5 sek. Einlernen ist nicht möglich, Kontaktieren Sie bitte Ihren
Dauer. Kommunikationskonflikt. Legrand Support.
LEARN- LED leuchtet 10 sek. Anzahl der eingelernten Geräte ist Löschen Sie nicht benötigte
Dauer. mehr als 32. Konfigurationen.
LEARN- LED blinkt bei Einlernen Automatisches beenden einer Restart der LEARN- Phase.
nicht. Konfiguration nach 10 Minuten.
Die Konfigurierte Funktionstaste Nach Drûcken der LEARN- Taste Restart der LEARN- Phase.
funktioniert nicht. muss der Einlernprozess innerhalb
einer Minute begonnen werden.
LEARN- LED erlischt nicht nach Keine Kommunikation zwischen Überprüfen Sie Verbindung und
beendigen des Einlernprozess. den Gerâten vorhanden. Anschluss. Gibt es möglicherweise
externe bzw. interne Netzstöru
ngen ?
Wenn ja, Phasenfilter oder
Isolationsfilter verwenden.

41
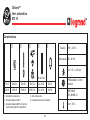
Céliane™
Inter automático
672 15
Características
110 V 500 W 500 W 500 VA 2 x 36 W 80 W
230 V 1000 W 1000 W 1000 VA 2 x 36 W 160 W
Ø 26 Ø 38
Lámpara incandescente
Lámpara halógena 240 V
Lámpara halógena MBT con transfor-
mador ferromagnético o electrónico
Tubo fluorescente
Lámpara fluorescente compacta
Tension 100 - 240 VA
Frecuencia 50 - 60 Hz
2 x 1,5 / 1 x 2,5 mm
2
0 a + 45°C
EN 50065
IEC 60669-2-1
Profundidad = 40 mm
minimo

42
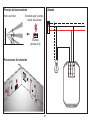
Modo automático
El led azul
permanece fijo
Encendido según la tempo-
rización seleccionada
L
N
CableadoPrincipio de funcionamiento
Precauciones de instalación

43
2.5 mm
2.5 mm
2.5 mm
ON
OFFAUTO
Descripción Zona de detección
Regulación de la
temporización
(1s a 16 min)
Regulación del umbral
de luminosidad
(3 a 1000 lux)
Regulación de la
zona de detección
(3 a 10 m)
Piloto LEARN
Teclas de mando
Número de identificación
Tecla LEARN
10 m
4 m
1.5 m
5 m
5 m
10 m
3 m
1.5 m
1.3 m
0.5 m
3 m
1.5 m
1.2 m
1.2 m
3 m
10 m
3 m
10 m

44
Encendido Led azul fijo
Apagado Led rojo fijo
Retorno
al modo
automático
Retorno
al modo
automático
Encendido tem-
porizado
Led azul fijo
Retorno al
modo automático
al finalizar
la detección
Apagado
durante la
detección
Retorno al
modo automático
al finalizar
la temporización
ON
AUTO
OFF
1s
16 mn
12
60
30
15
10
5
20
25
35
40
50
55
45
11
10
3
4
5
7
8
1
2
6
9
ON
OFFAUTO
ON
OFFAUTO
ON
OFFAUTO
ON
OFFAUTO
ON
OFFAUTO
ON
OFFAUTO
Funcionamiento
En modo manual
En modo derogación

45
Inter automático emisor (LIDER) de un escenario
Pulsar LEARN
Pulsar LEARN
Pulsar LEARN
Pulsar la tecla de mando que va a
estar asociada al emisor
El led en todos los mecanismos se apaga.
El escenario ha sido grabado
Paso 1 : iniciar el aprendizaje (en el EMISOR)
Paso 2 : añadir un actor al escenario (en el RECEPTOR)
Paso 3 : grabar el escenario (en el EMISOR)
Para añadir más mecanismos al escenario, repetir en cada receptor las operaciones y .
Nota :
Dos interruptores automáticos pueden funcionar conmutados. Es necesario que sean emisores entre si.
La pulsación en OFF crea
un escenario temporizado
La pulsación en ON crea
un escenario normal
Pulsar la
tecla de mando

46
AUTO
AUTO
AUTO
Inter automático receptor (ACTOR) de un escenario
Pulsar LEARN Pulsar la tecla de mando que
controla el escenario
Pulsar LEARN
Pulsar LEARN
Pulsar la tecla de
mando que
va a estar
asociada al emisor
El led de todos los mecanismos se apaga.
El escenario se ha grabado
Paso 1 : iniciar el aprendizaje (en el EMISOR)
Paso 2 : añadir un interruptor automático al escenario (en el RECEPTOR)
Paso 3 : grabar el escenario (en el EMISOR)
ON manual
OFF manual
modo automático
Temporización ON
Temporización OFF
(temporización reactivada
por detección)

47
Aprendizaje del escenario
Pulsar LEARN Pulsar la tecla de mando que va a
controlar el escenario
Pulsar LEARN
Pulsar LEARN
Pulsar la tecla de mando que va a
estar asociada al líder
El led en todos los mecanismos se apaga
El escenario ha sido grabado
Paso 1 : crear el escenario, fase LEARN (en el EMISOR)
Paso 2 : añadir un actor al escenario (en el RECEPTOR)
Paso 3 : grabar el escenario (en el EMISOR)
Para asociar más mecanismos al escenario, repetir en cada receptor las operaciones y .

48
Modificación de un escenario
Pulsar LEARN Pulsar la tecla de mando que
controla el escenario
El led de todos los mecanismos del
escenario parpadea
Pulsar la tecla de mando
que va a estar asociada
Paso 1 : abrir el escenario (en el EMISOR)
Pulsar LEARN
o
Pulsar LEARN
Para eliminar el producto del escenario ir al
punto "Grabar el escenario"
Paso 2 : modificar el estado de un actor del escenario (en el RECEPTOR)
Pulsar LEARN
El led de todos los mecanimos se apaga
El escenario ha sido grabado
Paso 3 : grabar el escenario (en el EMISOR)

49
Borrado de un escenario (en el EMISOR)
Pulsar LEARN
El escenario ha sido borrado
Pulsar la tecla de mando
durante 10s
Borrar todos los escenarios vinculados a la tecla de mando
Pulsar LEARN
Configuracion de fabrica
Pulsar LEARN
durante10s
Borrar todos los escenarios vinculados a este producto
5 s
5 s
Leyenda
Led Off Parpadeo lento
Parpadeo rápido Flash

50
Problemas y soluciones
Problema Causa Solucíon
El piloto learn se enciende El aprendizaje es imposible. Instalar productos compatibles.
durante 5 segundos.
El piloto learn se enciende El número de emisores Suprimir los escenarios no utilizados.
durante 10 segundos. memorizados es superior a 32.
Durante el aprendizaje el piloto El modo aprendizaje se cierra al Initiar de nuevo el aprendizaje.
learn ya no parpadea. cabo de 10 minutos
(sin acción).
La tecla función programada Después de pulsar el botón Initiar de nuevo el aprendizaje.
no funciona. learn el aprendiza
je de la tecla
función se realiza en el minuto
siguiente.
En la grabación del escenario, Mala comunicación entre los Verificar el cableado (conexión).
los pilotos learn de algunos producto. Mirar si existe algún dispositivo
receptores no se apagan. perturbador.
Aislarlo con un filtro.


-
 1
1
-
 2
2
-
 3
3
-
 4
4
-
 5
5
-
 6
6
-
 7
7
-
 8
8
-
 9
9
-
 10
10
-
 11
11
-
 12
12
-
 13
13
-
 14
14
-
 15
15
-
 16
16
-
 17
17
-
 18
18
-
 19
19
-
 20
20
-
 21
21
-
 22
22
-
 23
23
-
 24
24
-
 25
25
-
 26
26
-
 27
27
-
 28
28
-
 29
29
-
 30
30
-
 31
31
-
 32
32
-
 33
33
-
 34
34
-
 35
35
-
 36
36
-
 37
37
-
 38
38
-
 39
39
-
 40
40
-
 41
41
-
 42
42
-
 43
43
-
 44
44
-
 45
45
-
 46
46
-
 47
47
-
 48
48
-
 49
49
-
 50
50
-
 51
51
-
 52
52


Legrand In One Celiane 672 15 Manual de usuario
- Tipo
- Manual de usuario
en otros idiomas
Otros documentos
-
Chacon 54766 Manual de usuario
-
Bticino 3573 Instrucciones de operación
-
-
-
-
-
-
-
Hager EE610 Manual de usuario
-
Comelit Minitouch Manual de usuario