Conair GS121 Manual de usuario
- Categoría
- Limpiadores a vapor de ropa
- Tipo
- Manual de usuario
Este manual también es adecuado para

BOOKLETINSTRUCTION
yment For your safety and continued enjo
ead the instruction ays r alwof this product,
.e usingefully beforbook car
PROFESSIONAL
STEAM & PRESS
ALL GS121 MODELS
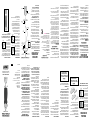
(Fig. 4)
ANT SAFETYTIMPOR
UCTIONSINSTR
- espeWhen using electrical appliances,
basic esent,e pren arhildrcially when c
en,ays be takecautions should alwsafety pr
wing:including the follo
UCTIONSREAD ALL INSTR
BEFORE USING
-ppliance is elecy aAn –ANGERD
witch is off.trically live even when the s
th by electric shock:o reduce the risk of deaT
Always unplug appliance immediately. 1
after using.
ppliance where itDo not place or store a2.
can fall or be pulled into a tub or sink.
ter or otherDo not place in or drop into wa3.
liquids.
unplug it,terppliance falls into waIf an a4.
Do not reach into the water .telyimmedia
o reduce the risk ofT
– ARNINGW
y to persons: or injur fire, electric shock,
burns,
This appliance should never be left. 1
unattended when plugged in.
on,,ppliance should not be used byThis a2.
or near children or individuals with certain
vised use could result in Unsuperdisabilities.
.yfire or personal injur
ppliance only for its intendedUse this a3.
Do notuse as described in this manual.
ttachments not recommended by theuse a
.manufacturer
Never operate this appliance if it has a. 4
if it is not workingdamaged cord or plug,
or if it has been dropped or,properly
Do not.damaged or dropped into water
Incorrectattempt to repair the appliance.
reassembly or repair could cause a risk
y to persons or injur electric shock,of fire,
Return thewhen the appliance is used.
vice centerappliance to an authorized ser
.xamination and repairfor e
ted surfaces.way from heaKeep the cord a5.
ted surfaces.w cord to touch heaDo not allo
ppliance cool Let aDo not pull or twist cord.
.waycompletely before putting a
ppliance has a polarized plug (oneThis a6.
As a safety blade is wider than the other).
this plug will fit in a polarized outletture,fea
If the plug does not fit fully.only one way
If it still does reverse the plug.in the outlet,
Do not contact a qualified electrician.not fit,
ture.t this safety feattempt to defeaa
yy object into anNever drop or insert an7.
opening or hose.
te whereDo not use outdoors or opera8.
aerosol (spray) products are being used or
where oxygen is being administered.
teDo not use an extension cord to opera9.
ppliance.a
ppliance may be hotSurfaces of this a10.
ted surfaces Do not let heawhen in use.
touch eyes or skin.
Do not place the steam nozzle directly on11.
wer cordppliance poy surface or on the aan
Use the standwhile it is hot or plugged in.
provided.
ppliance before filling orUnplug this a12.
Do not overfill.emptying.
ppliance this aWhile emitting steam, 13.
lose to themay cause burns if it is used too c
. scalp or eyes or if it is used incorrectlyskin,
tero reduce the risk of contact with hot waT
ppliance test adischarging from steam vents,
.yway from bodbefore each use by holding it a
te steamer without properlyDo not opera14.
.terter tank with wafilling the wa
ways keep the hose and nozzleAl15.
ter tank.ted above the waeleva
ank cord to disconnect fromNever y16.
grasp plug and pull to Instead,outlet.
disconnect.
Burns could occur from touching hot17.
Use care or steam.,ter hot wametal parts,
ter tank or when you turnwhen removing wa
wn – there mayppliance upside doa steam a
.voirter in reserbe hot wa
o reduce likelihood of circuit overload,T18.
ge ttate another high-wado not opera
t the same ppliance on the same circuit aa
time.
If an extension cord is absolutely19.
ted cord should a 15 ampere-ra,ynecessar
ge mayted for less ampera Cords rabe used.
Care should be taken to arranget.overhea
t it cannot be pulled orthe cord so tha
.tripped over
ter tank from theways remove the waAl20.
.terppliance before filling it with distilled waa
please bettachments,When changing a21.
sure the unit is off and no steam is being
void contact with hotreleased in order to a
.terwa
ttachments, Use caution when changing a22.
tion.ter from condensaas there may be hot wa
y and cooledttachments are drBe sure the a
void contact with hotoff before changing to a
.terwa
t you orlothes thaNever steam c23.
someone else is wearing.
Do not hold hand in front of steam.24.
TIONSAFEDERAL COMMUNIC
TICECOMMISSION NO
tionsChanges or modifica ARNING:W
pproved by the party to this unit not expressly a
s responsible for compliance could void the user’
te the equipment.authority to opera
This equipment has been tested and found TE:NO
to comply with the limits for a Class B digital
art 15 of the FCC Rules. pursuant to Pdevice,
These limits are designed to provide reasonable
gainst harmful interference in a protection a
tes,This equipment genera tion.residential installa
y y energte radio frequencuses and can radia
if not installed and used in accordance with and,
may cause harmful interference the instructions,
there is no ,wever Hotions.to radio communica
t interference will not occur in a guarantee tha
If this equipment does tion.particular installa
cause harmful interference to radio or television
which can be determined by turning the reception,
ged to the user is encouraequipment off and on,
y to correct the interference by one or more of tr
wing measures:the follo
te the receiving antenna.Reorient or reloca•
tion between the equipmentIncrease the separa•
.and receiver
Connect the equipment into an outlet on a•
t to which the receiver iscircuit different from tha
connected.
Consult the dealer or an experienced radio/TV•
technician for help.
(Fig. 1)
TION SUPPLIER’S DECLARA
OF CONFORMITY
®
ConairBrand:
GS121 Model No.:
Garment SteamerDescription:
tion, Conair Corporaarty:Responsible P
CT 06902 Stamford,oint Road,1 Cummings P
351-9000(203)
art 15 Subpart B, FCC PStandards:
ANSI C63.4-2014
art 15 of the FCC This device complies with P
wing tion is subject to the follo OperaRules.
two conditions:
This device may not cause harmful(1)
yThis device must accept an and (2) interference,
tluding interference tha incinterference received,
tion.may cause undesirable opera
XX/XX/XXXXTE OF ISSUE: AD
VE THESE SA
UCTIONSINSTR
YFOR HOUSEHOLD USE ONL
UCTIONSACKING INSTRUNP
t surface. fla,y sturdPlace the box on a large,
ppliance from the Carefully remove the a
way gs a Keep all plastic baterial.packing ma
Some assembly required.from children.
YSTEAMER ASSEMBL
ole and Rotating elescopic PAttaching the T
Hanger
lockwise.Loosen the pole locking nut c1.
Insert the telescopic pole into the opening of 2.
wn firmly to ensure Press dothe locking nut.
urnT the pole has reached the bottom.
lockwise to fasten the locking nut.counterc
makingFully extend the telescopic pole, 3.
gingsure to lock the pole upright by enga
lips.the three c
t top of the pole,Place hanger assembly a4.
Place the steam nozzle onto the cradle.5.
tion forHang your garment in prepara 6.
way wrinkles.steaming a
ter fill the way to steam,When you are read 7.
ANKTER TASee FILLING THE W tank.
section in this booklet for details.
Plug the steamer unit into a standard 125V 8.
wer outlet.AC po
te delica silicone band,The bristle brush, 9.
ttachmentsfabric spacer and creaser a
te for use.p over the soleplaeasily sna
ACHMENTS section in thisTTSee A
booklet for details.
OUR STEAMERGET TO KNOW Y
ment Multi-gar
Steam nozzle with
hanger
metal soleplate
4-position,
Clips for
360°
steaming
rotatable
pants
hanger
Steam button
king Loc
clip
57 in.
xible hosefle
wer Lo
pants clips
Blue light logo
Main ON/OFF
TURNING STEAMER ON
fill withter tank from base,Remove wa 1.
wn into and press tank do,terdistilled wa
the main unit.
tedPress the foot-activa 2.
witch to turn thewer spo
1).ig. (Funit on.
theting,ter is heaWhile wa 3.
blue light logo will blink.
the unit is,yOnce the blue light is stead 4.
y to use.read
Press the steam button 5.
on the rear of steam head
t highto release steam a
.w (LOW) velocity(HI) or lo
ig.2)(F
tures a steamThis unit fea 6.
ture when the nozzle ispause fea
Simply hang.placed on the hanger
nozzle to temporarily stop steam and
pick up nozzle to restart the steam.
witch ster runs out of the tank,When wa 7.
Be sure to.terthe steam off and refill wa
ter level line.t minimum water arefill wa
witch to turn offPress the foot pedal s 8.
after each use.
the unit willAfter 30 minutes without use, 9.
tically shut off.automa
(Fig. 2)
STEMANTS CLIP SYUSING P
The fabric steamer is equipped with a pants
lip system for holding pants taut for faster c
te the Rotaand more effective steaming.
lips are in t the pants changer 180° so tha
Use the two top pants the front position.
ttached to the hanger to lips which are ac
secure the top of your
The 3) ig. (Fgarment.
lips can be bottom c
adjusted by pulling them
up to reach the bottom
of the pants you are
steaming.
Please note: Some pants may be too long
If that is the case,lips.to use the bottom c
lips and let your pants just use the top c
.hang freely
(Fig. 3)
TINGOPERA
UCTIONSINSTR
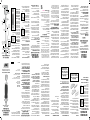
ANK TER TAFILLING THE W
(PRIOR TO PLUGGING IN THE APPLIANCE)
ter tank Remove the wa
by gripping the recessed
urn T handle of the tank.
wn the tank upside do
and unscrew the bottom
voir ill reser Fp.screw ca
asten Fter to desired level.with distilled wa
An anti-calcium cartridge is p.the screw ca
p,ttached to the screw caa
it is replaceable after a
4)ig. (Fperiod time.
ter tank on osition the waP
the base and make certain
ted properly in the it is sea
unit.
TER.AT WANK WITH HOT FILL THE TDO NO
.TER IS BESTATERED WDISTILLED OR FIL
ACHMENTS TTA
Removable accessories make professional
results fast and simple.
Silicone Band pulls fabric taut for eas•
steaming and wrinkle removal.
Bristle Brush loosens fibers for faste•
tion.steam penetra
gileabric Spacer protects frate FDelic•
fabrics and trims while steaming.
ts and folds.Creaser for perfect ple•
AUTION: C
Make sure your steamer is off
and has cooled before adding
ving attachments.or remo
HOW TO STEAM
Grasp the handle of the steam nozzle with
wly Sloway from you.te facing athe solepla
move the nozzle onto the fabric for steaming.
Use steam to freshen and help remove
te to help remove Use the soleplaodors.
te vier and less delica hea,wrinkles in thicker
fabrics.
est fabric for color fastness in an T TE:NO
wels, tope linens, Drainconspicuous spot.
pkins over a rod and nahandkerchiefs,
vier fabrics Heawel rack.or place on a to
t as Repeated steaming.may require repea
you will gain speed With practice, .ynecessar
ou will soon learn which Y .yand efficienc
tions.pplicafabrics require multiple steam a
silk or other Do not directly touch velvet,
Use abrics with the steam head.delicate f
xtra caution when steaming delicate e
abrics.f
TO STEAM DRAPES
according pes as directed,y draash and drW
pes and steam Rehang drato fabric type.
when they are in place.
AUTION: C
Soleplate will be hot when in use.
Keep void prolonged contact.A
ving while steam head mo
steaming your garment.
CLEANING AND STORING
-witch to the OFF posiurn the ON/OFF sT1.
wer source.tion and unplug from the po
ait for the steamer to cool completely—W 2.
t least 30 minutes.for a
openter tank from unit,Remove the wa 3.
bottom cover and empty unused contents.
.y-drw to airAllo
pse telescopic hanger pole.Colla4.
ter tank.Replace wa5.
Store the unit.6.
TIONAALCIFICDEC
ppliance begins to produce steam If the a
wly than usual or stops producing more slo
you may need gain,steam and then starts a
tion Decalcifica.to decalcify your steamer
refers to removing the calcium deposits
t form over time on the metal parts of tha
or best performance from the F.the steamer
decalcify the unit once a month.,steamer
w often you y depends upon hoThe frequenc
.use the steamer
1
3
cup white /
add a solution of ,o decalcifyT
2
3
ter to the cup distilled wa/vinegar and
ter tank in the unit. Place the water tank.wa
urn to the T Plug the unit into electrical outlet.
ON position and run until half the amount
urn the unit to the T has steamed (1 liter).
unplug from electrical outlet,OFF position,
w to sit for 30 minutes.and allo
y t the above procedure as manRepea
y until a normal steam times as necessar
With each usually 2–3 times.te returns,ra
use a fresh solution of le,ycted crepea
le of yc Run one c.tervinegar and distilled wa
ter without vinegar through distilled wafresh,
tion t the completion of decalcificathe unit a
gain to steam before using the unit a
garments.
TING THE STEAMERTROUBLESHOO
t.PROBLEM - Steamer fails to hea •
CAUSE - Steamer not plugged in.
SOLUTION - Plug into electrical outlet.
PROBLEM - No steam. •
.wter level is loaW - ESUAC
witch to offff sOn/Ourn - TSOLUTION
ter tank.and refill wa
oor steam performance.PROBLEM - P •
CAUSE - Sediment in tank.
voir andSOLUTION - Decalcify reser
tion instructions. See decalcificater tank.wa
-Dye on steam nozzle. PROBLEM•
ouchingTabric not colorfast / CAUSE - F
steam nozzle to fabric.
- Move steam nozzle ½ inchSOLUTION
Clean steamway from fabric during use.a
leaner and rinsenozzle with household c
.terp and wawith soa
tion.abric discolora - FPROBLEM •
- Dye on surface of fabric needsCAUSE
abricleaning / Ftment and cspecialty trea
not suitable for steaming.
- Some custom specialty fabricsSOLUTION
AST andt are NOT COLORFyes thave dha
est fabricT are not suitable for steaming.
for colorfastness in an inconspicuous spot
before steaming.
Amounts of chemicals in water TE:NO
o ensure Ty in different areas.arwill v
use ,continued operation of the steamer
Never store without .only distilled water
xcess water from ving eleaning and remoc
voir and water tank.the reser
ARRANTYLIMITED ONE-YEAR W
Y)A ONLANAD AND C(U.S.
t our option) yourConair will repair or replace (a
unit free of charge for 12 months from the
ppliance is defective inte of purchase if the ada
terials.workmanship or ma
return the,vice under this warrantyo obtain serT
vice center listed,defective product to the ser
together with your purchase receipt.
California residents need only provide proof of
purchase and should call 1-800-3-CONAIR
In the absence of afor shipping instructions.
the warranty period shall bepurchase receipt,
te of manufacture.12 months from the da
TIONS, OBLIGAARRANTIES,ANY IMPLIED W
T INCLUDING BUT NOOR LIABILITIES,
ARRANTY OFLIMITED TO THE IMPLIED W
ABILITY AND FITNESS FOR AMERCHANT
SHALL BE LIMITED INTICULAR PURPOSE,ARP
TION OFTION TO THE 12-MONTH DURADURA
Some.ARRANTY LIMITED WTHIS WRITTEN,
w long antions on how limitates do not allosta
tions so the above limitaimplied warranty lasts,
pply to you.may not a
IN NO EVENT SHALL CONAIR BE LIABLE
ORAL, INCIDENTFOR ANY SPECIAL,
AMAGES FOR BREACH OFCONSEQUENTIAL D
EXPRESS,ARRANTYTHER WTHIS OR ANY O
tes do Some staTSOEVER. WHA,OR IMPLIED
tion of special,lusion or limitaw the excnot allo
so theges, or consequential damaincidental,
This pply to you.tion may not aabove limita
and youwarranty gives you specific legal rights,
y from which varve other rights,may also ha
te.te to stasta
vice CenterSer
Conair Corporation
vice DepartmentSer
Glen Harbor Blvd.7475 N.
85307 AZ Glendale,
call y Conair product,tion on anor informaF
t1-800-3-CONAIR or visit us on the web a
.com.conairwww
t Please register this product a
.com/registration.conairwww
tion©2021 Conair Corpora
Made in China
IB-17004
A07538220P

que permite lograr un desarrugado más
manera que las pinzas
INSTRUCCIONESDE MANUAL
Para su seguridad y para disfrutar plenamente
de este producto, siempre lea cuidadosamente
las instrucciones antes del uso.
VAPORIZADOR
DE PRENDAS/
PRENSA DE VAPOR
PROFESIONAL
MODELOS GS121
(TODAS LAS VERSIONES)
a
o
MEDIDAS DE
SEGURIDAD
IMPORTANTES
Al usar aparatos eléctricos, especialmente
en presencia de niños, siempre debe tomar
precauciones básicas de seguridad, entre
ellas las siguientes:
LEA TODAS LAS
ANTES INSTRUCCIONES
DEL USO
Cualquier aparato –PELIGRO
enchufado permanece bajo tensión, aunque
esté apagado.
Para reducir el riesgo de electrocución:
Siempre desenchufe el aparato1.
inmediatamente después del uso.
No coloque ni guarde el aparato donde2.
pueda caerse o ser empujado a una bañera
un lavabo.o
No coloque el aparato ni lo deje caer al3.
agua u otro líquido.
Si el aparato se cae al agua, desenchúfelo4.
no trate de alcanzar lainmediatamente;
unidad en el agua.
Para
– ADVERTENCIA
descarga
reducir el riesgo de quemaduras,
eléctrica, incendio o heridas:
Nunca descuide/deje el aparato sin1.
vigilancia mientras está conectado.
Este aparato no debe ser usado por, en2.
cerca de niños o personas con ciertaso
discapacidades. El uso sin supervisión de
este aparato puede causar un incendio o una
herida.
Use este aparato únicamente con el3.
propósito para el cual fue diseñado y
solamente según las instrucciones. Solo use
accesorios recomendados por el fabricante.
No use este aparato si el cable o el4.
enchufe están dañados, si no funciona
correctamente, si está dañado, o
después de que se haya caído, incluso
en el agua; no intente reparar el aparato.
El ensamblar las partes de manera
incorrecta aumenta los riesgos de
incendio, descarga eléctrica y heridas.
Devuelva el aparato a un centro de
servicio autorizado para su revisión y
reparación.
Mantenga el cable alejado de superficies5.
calientes. No permita que el cable haga
contacto con las partes calientes. No jale ni
retuerza el cable. Permita que el aparato se
enfríe completamente antes de guardarlo.
El cable de este aparato cuenta con un6.
enchufe polarizado (una pata es más ancha
que la otra). Como medida de seguridad, se
podrá enchufar de una sola manera en la
toma de corriente polarizada. Si no entra en
la toma de corriente, inviértalo. Si aun así no
entra completamente, comuníquese con un
electricista. No intente alterar esta función
de seguridad.
Nunca deje caer ni inserte ningún objeto7.
en ninguna de las aberturas.
No use el aparato en exteriores, ni lo8.
haga funcionar donde se estén usando
productos en aerosol (spray) o donde se esté
administrando oxígeno.
No use un cable alargador/de extensión9.
con este aparato.
Las superficies de este aparato pueden10.
ponerse muy calientes durante el uso;
mantenga los ojos y la piel alejados de las
superficies calientes.
No coloque la boquilla en ninguna11.
superficie mientras está caliente o mientras
el aparato está enchufado. Manténgala
alejada del cable eléctrico. Use el soporte
incluido.
Desenchufe el aparato antes de llenar el12.
depósito de agua. No sobrellene el depósito.
El vapor que sale de la boquilla durante13.
el uso puede causar quemaduras si usa
la unidad muy cerca de la piel, del cuero
cabelludo o de los ojos, o si la usa en
forma incorrecta. Para reducir el riesgo de
quemadura, pruebe el vapor lejos de su
cuerpo antes de usarlo.
Siempre llene el depósito de agua con14.
agua antes de encender el aparato.
Siempre mantenga la boquilla y la15.
manguera a un nivel más alto que el
depósito.
Nunca jale el cable para desconectar el16.
aparato. agárrelo por el enchufe.
Las piezas metálicas calientes, el17.
agua caliente y el vapor pueden causar
quemaduras. Tenga cuidado al vaciar el
depósito de agua o al voltear el aparato,
puesto que el depósito interno puede
contener agua caliente.
Para evitar el riesgo de sobrecarga, no18.
conecte otro aparato de alta potencia al
mismo circuito eléctrico que este aparato.
Si debe usar un cable alargador/de19.
extensión, use uno de 15 amperios. Un cable
alargador/de extensión de menor amperaje
puede calentar excesivamente. Coloque el
cable alargador/de extensión de manera que
nadie lo pueda jalar o tropezar con él.
Siempre retire el depósito de agua de la20.
base antes de llenarlo con agua destilada.
Cerciórese de que el aparato está21.
apagado y que no está emitiendo vapor
antes de cambiar los accesorios.
Cambie los accesorios con cuidado,22.
puesto que podrían estar calientes o
contener agua caliente. Asegúrese de que
están secos y fríos antes de manipularlos.
Nunca use el aparato en prendas que23.
usted o alguien lleven puestas.
No ponga la mano frente al vapor.24.
AVISO DE LA COMISIÓN FEDERAL
DE COMUNICACIONES (FCC)
Se advierte que las ADVERTENCIA:
modificaciones no aprobadas expresamente por la
autoridad competente en materia de conformidad
podrían rescindir el permiso del usuario para
operar el equipo.
Este equipo ha sido probado y se ha NOTA:
determinado que cumple con los límites de un
dispositivo digital de Clase B, según la Sección
15 de la Normativa FCC. Estos límites están
diseñados para proporcionar una protección
razonable contra las interferencias perjudiciales
en una instalación residencial. Este equipo
genera, usa y puede irradiar energía de
radiofrecuencia (RF) y, si no ha sido instalado
usado conforme a las instrucciones, puedeo
ocasionar interferencias perjudiciales para
las comunicaciones por radio. No obstante, no
hay garantía de que aquellas interferencias no
ocurran en una instalación particular. Si este
equipo produce alguna interferencia perjudicial
en la recepción de radio o televisión, lo que podrá
determinarse encendiendo y apagando el equipo,
se recomienda tratar de corregir la interferencia,
adoptando una o más de las siguientes medidas:
Reorientar o reubicar la antena receptora.•
Aumentar la distancia entre el equipo y el•
receptor.
Conectar el equipo a un circuito distinto al que•
esté conectado el receptor.
Consultar con el distribuidor o un técnico•
especializado en radio/TV.
DECLARACIÓN DE CONFORMIDAD
DEL PROVEEDOR
®
ConairMarca:
GS121 Modelo:
Vaporizador de prendasDescripción:
Conair Corporation,Parte responsable:
1 Cummings Point Road, Stamford, CT 06902
351-9000(203)
Normas de la FCC,Normas:
Sección 15, subsección B
ANSI C63.4-2014
Este artefacto cumple con la Sección 15 de la
Normativa FCC. Su funcionamiento está sujeto a
las dos condiciones siguientes:
Este artefacto no puede causar ninguna(1)
interferencia perjudicial, y (2) Este artefacto debe
aceptar cualquier interferencia recibida, incluso
aquellas que pueden causar un funcionamiento no
deseado.
XX/XX/XXXXFECHA DE PUBLICACIÓN:
GUARDE ESTAS
INSTRUCCIONES
PARA USO DOMÉSTICO SOLAMENTE
INSTRUCCIONES DE DESEMBALAJE
Ponga la caja sobre una superficie espaciosa,
plana y segura. Retire el aparato del material
de embalaje. Mantenga las bolsas de plástico
fuera del alcance de los niños. Requiere
ensamblaje.
ENSAMBLAJE
Ensamblaje del soporte/tubo telescópico
y de la percha giratoria
Afloje la tuerca de bloqueo del soporte/1.
tubo telescópico, girando en sentido
horario.
Introduzca el soporte/tubo telescópico en 2.
la base del aparato, a través de la tuerca
de bloqueo. Presione firmemente para
cerciorase de que el soporte ha llegado al
fondo. Gire la tuerca de bloqueo en sentido
antihorario para sujetar el soporte/tubo
telescópico.
Extienda completamente el soporte/tubo 3.
telescópico, bloqueando cada sección con
un clip.
Coloque la percha arriba del soporte/tubo 4.
telescópico.
Cuelgue la boquilla de vapor en su 5.
soporte, arriba de la percha
Simplemente cuelgue su ropa para 6.
desarrugarla.
Cuando esté listo/a para usar el aparato, 7.
Véase lallene el depósito con agua.
sección “INSTRUCCIONES DE LLENADO
DEL DEPÓSITO DE AGUA” para más
detalles.
Enchufe el aparato en una toma de 8.
V ACcorriente de 125
El cepillo de cerdas, el accesorio con 9.
tira de silicona, el separador para tejidos
delicados y el accesorio para pliegues
se enganchan fácilmente en la suela/
Véase la secciónplaca para su uso.
“ACCESORIOS” para más información.
OPERACIÓN BÁSICA
Retire el depósito de agua de la base, 1.
llénelo con agua destilada, y luego vuelva
a colocarlo en su sitio, presionando
hacia abajo para que encaje en la unidad
principal.
Presione el pedal de 2.
encendido/apagado para
encender la unidad (Fig. 1).
El agua empezará a 3.
calentar; la luz verde
parpadeará durante este
tiempo.
Cuando la luz deje de parpadear, la 4.
unidad está lista para su uso.
Presione el botón de vapor 5.
en la parte posterior del
cabezal para liberar el
vapor a velocidad alta o
baja (Fig. 2).
El vapor dejará de salir 6.
de la boquilla de vapor
automáticamente al colocar esta en
su soporte. Simplemente cuelgue la
boquilla de vapor para detener el vapor
(Fig. 1).
(Fig. 2).
temporalmente y agárrela de nuevo para
reiniciar el vapor.
Cuando el depósito de agua esté vacío, 7.
apague la unidad y vuelva a llenar el
depósito. Cerciórese de llenar el depósito
hasta la línea de llenado mínimo.
Presionar el pedal para apagar la unidad 8.
después de cada uso.
Después de 30 minutos de inactividad, la 9.
unidad se apagará automáticamente.
SISTEMA PARA
COLGAR PANTALONES
Este vaporizador de
prendas cuenta con un
sistema de pinzas
móviles para colgar y
estirar los pantalones, lo
rápido y efectivo. Gire la percha 180° de
estén en frente. Use las
dos pinzas superiores para
sujetar la cintura del
pantalón (Fig. 3). Ajuste
las pinzas inferiores para
sujetar las piernas del
pantalón.
Nota: Si los pantalones
son demasiado largos
para usar las pinzas
inferiores, solo use las
pinzas superiores y deje
que los pantalones
cuelguen libremente.
(Fig. 3).
FAMILIARÍCESE CON SU
VAPORIZADOR DE PRENDAS
Manguera
flexible
de 57 in.
(1.45 m)
Percha
giratoria
360° con 4
posiciones
Pinzas
para colgar
pantalones
Percha para varios
tipos de prendas
Pinzas
inferiores
para
pantalones
Pedal de
encendido/
apagado
Clip de
bloqueo
Boquilla de
vapor con
suela/placa
de metal
Botón de vapor
Logotipo
con luz azul
INSTRUCCIONES
DE OPERACIÓN
INSTRUCCIONES DE LLENADO DEL
DEPÓSITO DE AGUA (ANTES DE CONECTAR
EL APARATO)
Retire el depósito de agu
de la unidad agarrando
la manija empotrada del
mismo. Voltee el depósit
de agua y desenrosque
la tapa inferior. Llene el
depósito con agua destilada hasta el nivel
deseado. Vuelva a enroscar la tapa. La tapa
cuenta con un cartucho antisarro integrado,
el cual es reemplazable
después de un período de
tiempo (Fig. 4).
Coloque el depósito en
la base, comprobando
que está correctamente
instalado.
NO LLENE EL DEPÓSITO CON AGUA
CALIENTE.
LE RECOMENDAMOS QUE USE AGUA
DESTILADA O FILTRADA.
(Fig. 4).
ACCESORIOS
Los accesorios removibles permiten
conseguir resultados profesionales rápido y
fácilmente.
El accesorio con tira de silicona estira la•
tela para un desarrugado más fácil
El cepillo de cerdas suelta las fibras para•
una mejor penetración del vapor.
El separador para tejidos delicados protege•
los tejidos y adornos delicados.
El accesorio para pliegues forma pliegues•
y rayas de pantalones perfectos.
PRECAUCIÓN:
Apague y desenchufe el aparato,
y permita que se enfríe, antes de
instalar/sacar accesorios.
CÓMO DESARRUGAR PRENDAS
Sostenga la boquilla con la suela frente a
la prenda. Mueva la boquilla lentamente
contra la prenda. Use el vapor para refrescar
las telas y eliminar los olores. Use la suela/
placa para desarrugar las telas más gruesas/
pesadas y menos delicadas.
Haga una prueba en un área discreta NOTA:
de la tela antes de desarrugar la prenda.
Se le hará más fácil desarrugar toallas,
servilletas y manteles si están colgados
en una barra. Las telas gruesas pueden
necesitar más de una pasada. Repita
cuantas veces sea necesario. Con práctica,
desarrugar prendas se hará más fácil y
rápido cada vez, y usted aprenderá cuáles
telas necesitan varias pasadas.
No permita que la boquilla de vapor haga
contacto con seda, terciopelo u otras
telas delicadas. Desarrugue las telas
delicadas con mucho cuidado.
CONSEJOS PARA DESARRUGAR CORTINAS
Lave y seque las cortinas según las
instrucciones del fabricante. Vuelva a colgar
las cortinas antes de desarrugarlas.
PRECAUCIÓN:
La suela/placa se pone muy
caliente durante el uso; evite el
contacto prolongado. Mantenga
el cabezal en movimiento al
desarrugar sus prendas.
LIMPIEZA Y ALMACENAMIENTO
Apague (“OFF”) y desenchufe el aparato1.
antes de limpiarlo.
Permita que el aparato se enfríe 2.
completamente, por un mínimo de 30
minutos.
Retire el depósito de agua de la base, 3.
abra la tapa y tire el agua restante.
Permita que se seque al aire.
Repliegue el soporte/tubo telescópico.4.
Vuelva a colocar el depósito de agua en5.
la base.
Guarde el aparato.6.
DESCALCIFICACIÓN
Si nota que el aparato produce menos
vapor o funciona de manera intermitente,
puede ser necesario limpiar el depósito de
agua para eliminar el calcio/sarro. Con el
tiempo, depósitos de calcio/sarro pueden
acumularse en las piezas metálicas internas
del aparato. Para conseguir un rendimiento
óptimo, deberá eliminarlos regularmente. La
frecuencia de la limpieza dependerá de la
frecuencia de uso del aparato.
1
3
de vinagre /
Para eliminar el sarro: Mezcle
2
3
de agua destilada y vierta /blanco con
la mezcla en el depósito de agua. Coloque
el depósito en la base. Enchufe el cable
en una toma de corriente. Deje el aparato
encendido hasta que la mitad del líquido (1
litro) se haya evaporado. Después, apague
y desenchufe el aparato, y permita que se
enfríe por 30 minutos.
Repita estos pasos 2 o 3 veces, usando cada
vez una nueva mezcla de agua con vinagre,
hasta que el vapor salga normalmente de la
boquilla. Antes de volver a usar el aparato
para desarrugar prendas, repita estos pasos
con un depósito de agua destilada fresca
(sin vinagre).
RESOLUCIÓN DE PROBLEMAS
PROBLEMA - La unidad no se calienta. •
CAUSA - La unidad no está enchufada.
SOLUCIÓN - Enchufe la unidad en una
toma de corriente.
PROBLEMA - La unidad no produce vapor. •
CAUSA - El nivel de agua está bajo.
SOLUCIÓN - Apague la unidad y vuelva a
llenar el depósito de agua.
PROBLEMA - La unidad produce poco vapor. •
CAUSA - Depósitos de calcio/sarro en el
depósito de agua.
SOLUCIÓN - Descalcifique el depósito
de agua y el depósito interno (véase la
sección “Descalcificación”).
- Hay tintura en la boquilla. PROBLEMA•
CAUSA - Tela que se destiñe ha estado en
contacto la boquilla.
- Sostenga la boquilla a ½ in.SOLUCIÓN
de la tela durante el uso. Limpie la boquilla
de vapor con un limpiador doméstico y
enjuáguela con agua y jabón.
- La tela se destiñe. PROBLEMA•
- La tintura usada para teñir la telaCAUSA
no está sellada o la tela no es apta para
ser planchada/desarrugada con vapor.
- Algunos tejidos contienenSOLUCIÓN
tintura que SE DESTIÑE. Las prendas
hechas de este tipo de tejido no pueden
ser desarrugadas con vapor. Haga una
prueba en un área discreta antes de
desarrugar la prenda.
En algunas áreas, el agua de NOTA:
la llave puede tener un alto nivel
de minerales y químicos. Para un
rendimiento óptimo, use solamente agua
destilada. Vacíe el agua restante en el
depósito de agua y el depósito interno
después de cada uso.
GARANTÍA LIMITADA DE UN AÑO
(VÁLIDA EN LOS EE.UU. Y EN
CANADÁ SOLAMENTE)
Conair reparará o remplazará (a su opción) este
producto sin cargo por un período de 12 meses
a partir de la fecha de compra si presenta
defectos de fabricación o materiales.
Para obtener servicio técnico bajo esta
garantía, devuelva el producto defectuoso al
Centro de Servicio indicado a continuación,
junto con su recibo de compra.
Los residentes de California solo necesitan
dar una prueba de compra y deben llamar al
1-800-3-CONAIR para recibir instrucciones de
envío. En ausencia del recibo de compra, el
período de garantía será de 12 meses a partir
de la fecha de fabricación.
CUALQUIER GARANTÍA, OBLIGACIÓN
O RESPONSABILIDAD IMPLÍCITAS,
INCLUYENDO, PERO NO LIMITADAS A LA
GARANTÍA IMPLÍCITA DE COMERCIABILIDAD
Y APTITUD PARA UN PROPÓSITO
ESPECÍFICO, ESTARÁN LIMITADAS POR
LOS 12 MESES DE LA PRESENTE GARANTÍA
Algunos Estados no permiten ESCRITA.
limitaciones en la duración de una garantía
implícita, de modo que las limitaciones
mencionadas pueden no regir para usted.
CONAIR NO SERÁ RESPONSABLE, EN NINGÚN
CASO, POR NINGÚN DAÑO ESPECIAL,
INCIDENTAL O CONSECUENTE DEBIDO AL
INCUMPLIMIENTO DE ESTA O CUALQUIER
OTRA GARANTÍA, EXPRESA O IMPLÍCITA.
Algunos Estados no permiten la exclusión o
limitación de daños especiales, incidentales o
consecuentes, de modo que las limitaciones
mencionadas pueden no regir para usted. Esta
garantía le otorga derechos legales específicos
y usted puede tener otros derechos que varían
de un Estado a otro.
Centro de servicio
Conair Corporation
Service Department
7475 N. Glen Harbor Blvd.
AZ 85307Glendale,
Para más información sobre los productos Conair,
llame al 1-800-3-CONAIR o visítenos en
www.conair.com
Para registrar este producto, visítenos en:
www.conair.com/registration
©2021 Conair Corporation
Hecho en China
IB-17004
20PA075382
-
 1
1
-
 2
2


Conair GS121 Manual de usuario
- Categoría
- Limpiadores a vapor de ropa
- Tipo
- Manual de usuario
- Este manual también es adecuado para
En otros idiomas
- English: Conair GS121 User manual
Documentos relacionados
-
Conair GS88 Manual de usuario
-
-
Conair GS2WB Instrucciones de operación
-
Conair GS33R Manual de usuario
-
-
Conair GS28L Manual de usuario
-
-
-
Conair GS60 Instrucciones de operación
-