
Preparación
Insertar las Cuchillas
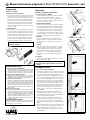
1. Cuchilla para láminas perimétricas
Quite una cuchilla del paquete de 5. Quite la tuerca y la placa
de la cubierta. Alinee el orificio de la cuchilla sobre la rosca.
Asegúrese de que el borde afilado de la cuchilla esté sobre la
curva en la manija. Vuelva a montar la placa de la cubierta.
Ajuste la cuchilla a uno de tres ajustes: Tablero de lámina
perimétrica de doble grosor / tablero de espuma (completa-
mente extendido), estándar (ajuste del centro) o ajuste de
seguridad (completamente contraído). Apriete la tuerca para
asegurar en su lugar.
2. Cortador de Bisel
Quite el Tornillo de Sujeción de la Cuchilla del frente del Cor-
tador de Bisel. Quite una cuchilla del paquete de 5 cuchillas.
Deslice la cuchilla hacia el FRENTE del sujetador cromado de
la cuchilla. (El borde filudo hacia abajo) hasta que la esquina
de la mano derecha de la cuchilla entre en la ranura de la
cuchilla y el orificio en la cuchilla se alinee con el orificio en
el sujetador cromado de la cuchilla. Reemplace el Tornillo
Sujetador de la Cuchilla en el orificio y vuélvalo a apretar.
Manual de Instrucción y Operación Modelo 424-1 | 440-1
Team System Plus
Logan Graphic Products Inc., 1100 Brown Street, Wauconda, IL 60084 847-526-5515 www.logangraphic.com
L405N 1/10
3. Zuschnitt
Halten Sie die Schiene mit Ihrer linken Hand fest und halten
Sie mit der rechten Hand das Messer vertikal, dass der Griff
in einem 45 Grad Winkel ist und die Spitze an der geraden
Kante anliegt. Abb. 2. Wenn sie einen Passepartoutkarton
schneiden, setzen Sie die Klinge einfach an der Kante des
Passepartouts an und ziehen das Messer vollkommen durch
den Karton.
4. Schneiden
Ziehen Sie das Passepartoutmesser geradlinig auf Sie zu und
üben Sie dabei Druck aus. Abb. 3.
WARNUNG! Seien Sie vorsichtig, wenn Sie ans Ende des
Passepartouts kommen, damit das Messer nicht auf Sie
„zuspringt“..
Operación
Cuchilla para láminas perimétricas
Corte de un Tablero a Medida
La cuchilla para láminas perimétricas se utiliza para recortar
tableros de lámina perimétrica o tableros de espuma a
medida para las dimensiones exteriores. El cuchillo tiene tres
ajustes según lo mencionado arriba: seguridad, simple grosor
y doble grosor o tablero de espuma.
1. Utilice una Hoja de Respaldo
Antes de cortar, asegúrese de utilizar una hoja de respaldo de
tablero de lámina perimétrica de desecho del mismo tamaño
o más grande que la pieza que va a cortar, debajo del tablero
de lámina perimétrica que va a cortar. Por ahora utilice una
de las 10 piezas provistas en la caja. La Hoja de respaldo pro-
vee un lugar para que vaya la punta de la cuchilla de modo de
no cortar la superficie donde está cortando y también ayuda a
estabilizar la cuchilla para conseguir cortes rectos nítidos.
2. Medición
Dibuje líneas del lápiz en el dorso del tablero de lámina
perimétrica al tamaño deseado. Ponga el lado del canal del
borde del carril a lo largo del lado izquierdo de la línea de
lápiz. Fig. 1
Cortador de Bisel
Corte de una Sola Lámina Perimétrica
1. Utilizando el lado del borde recto de la escala, marque el dorso
de la lámina perimétrica para el borde exacto que usted desea.
2. Coloque la lámina perimétrica cara abajo sobre la Hoja de
respaldo. Ponga el Borde Recto EXACTAMENTE sobre la franja
de la mano izquierda para alinear el borde exterior del canal a
lo largo de la línea de lápiz. Fig 4. Asegúrese que el bulto de la
lámina perimétrica esté al lado de la mano derecha del borde
recto. Tener la lámina perimétrica al lado izquierdo del borde
recto daría lugar a un corte invertido del cartabón. Enganche el
Cortador de Bisel 302 sobre el borde recto encajando las guías
de nylon negro sobre el borde levantado del canal. Coloque
el cortador de lámina perimétrica de modo que la línea del
indicador de plata se alinee con la línea a lápiz de abajo que
interseca. Fig. 5
3. Mantenga la presión hacia abajo en el Borde Recto con su
mano izquierda. Coloque el pulgar de su mano derecha en el
rebaje para el pulgar del Sujetador de la Cuchilla retractable y
hunda la cuchilla en la lámina perimétrica.
4. Manteniendo la presión hacia abajo en el Sujetador de la
cuchilla, deslice el Cortador de Bisel lejos de usted hasta que
la línea de plata en ella se intercepte con la línea de lápiz su-
perior. Asegúrese de mantener la presión uniforme hacia abajo.
Fig. 6
5. Utilice su pulgar para tirar del sujetador de la cuchilla de vuelta
a la posición alta de modo que se extraiga la cuchilla de la
lámina perimétrica. Repita estos pasos para los tres lados
restantes. ¡Felicitaciones! Usted acaba de cortar su primera
lámina perimétrica.
¡¡Precaución!! Las Cuchillas de Corte de Lámina
Perimétrica son Filudas
Tablero de Respaldo
Tablero de lámina perimétrica
Fig. 2
Fig. 3
Fig. 6
Fig. 4
Fig. 5
Fig. 1
Abb. 4
Preparation
Inserting Blades
1. Mat Knife
Remove one blade from pack of 5. Remove nut and Cover
Plate. Align blade hole over thread. Be sure sharp edge of
blade is facing downward. Reassemble Cover Plate. Adjust
blade to double thick, standard or safety setting. Tighten nut
to lock in place.
2. Bevel Cutter
Remove the Blade Holding Screw from the front of the Bevel
Cutter. Remove one blade from the package of 5. Slide the
blade down onto the FRONT of the chrome Blade Holder,
sharp edge down, until the bottom right hand corner of the
blade enters into the Blade Slot and the hole in the blade
lines up with the hole in the chrome Blade Holder. Replace
Blade Holding Screw in hole and re-tighten.
Instruction Manual Model 424-1 | 440-1
Team System Plus
Logan Graphic Products Inc., 1100 Brown Street, Wauconda, IL 60084 847-526-5515 www.logangraphic.com
Slip Sheet
Matboard
Operation
Mat Knife
Cutting a Board to Size
The Mat Knife is used for trimming matboard or foamboard
to size for the outside dimensions. The Mat Knife has three
settings: Double thick mat board/foam board (fully extended),
standard (middle setting) or safety setting (fully retracted).
1. Use a Slip Sheet
Before cutting, be sure to use a slip sheet of scrap matboard
the same size or larger than the piece you are going to cut
underneath the matboard you will be cutting. The slip sheet
provides a place for the blade tip to go so it won’t cut into the
surface you are cutting on and also helps stabilize the blade
to get nice straight cuts.
2. Measuring
Draw pencil lines on back of matboard at desired size. Place
the channel side of the rail edge along the left side of the
pencil line. Fig. 1
Caution!! Mat Cutting Blades are Sharp
3. Precut
Hold the rail firmly in place with your left hand. With your right
hand hold the Mat Knife vertical so that the handle is at a 45
degree angle putting the tip against the Straight Edge. Fig. 2
If you are cutting across a sheet of matboard, simply start the
blade beyond the top edge of the board and pull the Mat Knife
completely through.
4. Cutting
Draw the Mat Knife toward you along the Straight Edge
keeping constant pressure on the Straight Edge and downward
pressure on the Mat Knife. Fig. 2
WARNING! Be careful when knife reaches the end of the
mat so that it does not ”jump” toward you.
Operation
Bevel Cutter
Cutting a Single Mat
1. Using the scale side of Straight Edge, mark the back of the
mat for the exact border you want.
2. Place the mat face down on the Slip Sheet. Place the Straight
Edge EXACTLY on the left hand border so that the outside
edge of the channel is lined up along the pencil line. Fig. 4
Make sure that the bulk of the mat is to the right hand side
of the Straight Edge. Having the mat on the left side of the
Straight Edge will result in a reversed bevel cut. Attach the
302 Bevel Cutter to the straight edge by fitting the black
nylon guides over the raised edge of the channel. Position the
Mat Cutter so that the silver indicator line lines up with the
bottom intersecting pencil line. Fig. 5
3. Hold downward pressure on the Straight Edge with your left
hand. Place the thumb of your right hand on the thumb divot
on the retractable Blade Holder and plunge the blade into the
mat.
4. Keeping downward pressure on the Blade Holder, slide
the Bevel Cutter away from you until the silver line on it
intersects with the upper pencil line. Be sure to keep even
downward pressure. Fig. 6
5. Use your thumb to pull the Blade Holder back into the up
position so the blade is removed from the mat. Repeat these
steps for the remaining three sides. Congratulations! You
have just cut your first mat.
Fig. 2
Fig. 3
Fig. 6
Fig. 4
Fig. 5
Fig. 1
Solución de Fallas
El corte de Bisel tiene un Borde Áspero
1. Puede necesitar cambiar su cuchilla más a menudo. Las cuchillas
romas arrastran a través la lámina perimétrica en vez de cortarla.
2. Cambie su Hoja de Respaldo. Cortar en varias ocasiones sobre la
misma área en la Hoja de Respaldo puede causar cortes desiguales.
No Cortar a Través la Lámina perimétrica
1. Mantenga presión uniforme hacia abajo sobre el Sujetador
Cromado de la Cuchilla a través del corte. Disminuir la presión
permitirá que la cuchilla se salga de la lámina perimétrica.
Cortes Excesivos en las Esquinas
1. Compruebe la profundidad de su cuchilla. La profundidad adi-
cional de la cuchilla puede causar que la punta de la cuchilla
corte más allá de las líneas marcadas produciendo un corte
excesivo. Utilizando al tornillo hundido en la parte baja del Cor-
tador de Bisel, ajuste la punta de la cuchilla para permitir 1/8”
expuesta. La cuchilla debe apenas marcar la superficie de la
Hoja de respaldo.
Ganchos o Curvas en el Corte
1. Compruebe la profundidad de su cuchilla. La profundidad adi-
cional de la cuchilla puede hacer que la punta de la cuchilla
se expanda produciendo un gancho o una curva. Utilizando al
tornillo a ras en la parte baja del Cortador de Bisel, ajuste la
punta de la cuchilla para dejarla expuesta 1/8”. La cuchilla
debe apenas marcar la superficie de la Hoja de respaldo.
2. Cambie la Cuchilla. Una cuchilla roma se expandirá causando
un gancho o una curva.
UNA NOTA SOBRE LAS CUCHILLAS:
No hay dos cuchillas que tengan la misma duración de vida útil.
Comience siempre con una cuchilla nueva antes de cada proyecto
para asegurar los mejores resultados.
Fig. 3
Fig. 2
-
 1
1

en otros idiomas
- English: Logan 440-1 Owner's manual
Artículos relacionados
-
Logan 655 El manual del propietario
-
-
Logan 650 El manual del propietario
-
-
-
-
-
-