
OWENS CORNING ROOFING AND ASPHALT, LLC
ONE OWENS CORNING PARKWAY
TOLEDO, OHIO, USA 43659
1
-
800
-
GET
-
PINK
®
w ww.roofing.owenscorning.com
Pub. No. 10011722-A. Printed in U.S.A. October 2010. THE PINK
PANTHER
™
& © 19 64
–
2010 Metro -Goldw yn- Mayer Studios Inc. All Rights
Reserved. The color PINK is a registered trademark of Owens Corning.
©2010 Owens Corning.
RIZERidge
®
Hip and Ridge Shingles
Installation Instructions
Precautionary Notes
Owens Corning
™
RIZERidge
®
Hip and Ridge Shingles are packaged 22 shingles per
bundle with 3 perforated hip and ridge pieces per shingle.
Fastener requirements. Use galvanized steel, stainless steel, or aluminum nails minimum
12 gauge shank with
3
⁄8" diameter head with a length long enough to penetrate through
the roo ng material a minimum of ¾ " into roo ng sheathing. Where the roof sheathing
is less that ¾ " thick, the fasteners shall penetrate through the sheathing. Fasteners shall
comply with ASTM F 1667
Preparation of Hip and Ridge
Separate hip and ridge at the perforation, each piece should measure 12" x 12", there are
3 pieces per shingle (See Fig. 1)
1. Starter course for a ridge
Fold the upper portion of the individual hip and ridge shingle. (See Fig. 2) Once folded
cut the 6" exposed region off from the folded stack. Use this folded stack section as
the starter for the rst hip and ridge shingle (See Fig. 3).
2. Starter should be installed opposite the prevailing wind for gable end homes. For hip
roofs start at the eves edge.
3. Place the shingle edge of the hip and ridge on top of the starter and nail in place into
the double folded area of the shingle.
4. 2 Nail Standard Application
The nails should be placed 7" from the bottom edge and 1" from each side edge
(See Fig. 4)
5. 4 Nail 130-MPH Application for Duration
®
Premium Shingles
Four nails and hand sealing must be used to maintain the 130-MPH wind warranty.*
The nails should be placed 7" from the bottom edge and 1 and 2" in from each side
edge. (See Fig. 4A) Apply a ¼ " wide by 2" long bead of elastomeric sealant that meets
ASTM C-920 approximately 1½ " in from side edge. (See Fig. 4A)
6. Place and align another folded shingle onto the secured shingle and repeat across the
ridge. (See Fig. 5)
*See actual warranty for complete details, limitations and requirements.
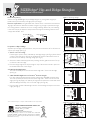
Figure 1 Hip & Ridge Shingle
12" 12" 12"
36"
2"
2"
8"
12"
Decking
Shingle
Properly Driven
½"
8" min.
diameter
¾" min.
¼"
Improperly Driven
Fold Under
Doblado hacia abajo
Fold Over
Doblado hacia arriba
Figure 2 Folded Hip & Ridge Shingle
2"
Exposure
Exposición
6"
Removed
Recortadas
Nail 1"
from Edge
and Center
on the
Starter piece.
Clave 1 pulg.
desde el borde
y el centro de la pieza de inicio.
Figure 3 Folded Ridge Starter Shingle
1"
1"
7"
Nails
Clavos
Figure 4 Two Nail Standard Application
1"
Nails
Clavos
2"
1"
2"
7"
Sealant
Sellador
Sealant
Sellador
Figure 4A Four Nail 130-mph Application
Nail
Clavo
6"
Exposure
Exposición
6"
Exposure
Exposición
6"
Exposure
Exposición
Figure 5 Succeeding Courses

Mensaje importante
Las tejas RIZERidge
®
para caballetes y cumbres de Owens Corning
™
se empacan en
paquetes de 22 tejas, con tres piezas perforadas para caballete y cumbre por teja.
Requisitos para la instalación. Utilice clavos de aluminio, acero inoxidable o acero
galvanizado que tengan un calibre 12 como mínimo, una cabeza de
3
⁄8 pulg. de diámetro
y una longitud su ciente para penetrar el material y las placas del techo un mínimo de ¾
de pulgada. Cuando las placas de techo tengan menos de ¾ pulg. de espesor, los clavos
deben penetrar toda la placa. Los clavos deben cumplir con la norma ASTM F 1667
Preparación de las tejas
Separe las tejas para caballete y cumbre en la perforación. Cada pieza debe medir 12” x
12”. Hay 3 piezas por teja (Ver la Fig. 1)
1. Hilera inicial de una cumbre.
Doble la parte superior de la teja para caballete y cumbres. (Ver la Fig. 2) Una vez
doblada, corte las 6 pulgadas expuestas de la parte doblada. Utilice esta sección
doblada como hilera inicial de la teja para los caballetes y las cumbres (Ver la Fig. 3).
2. En casas con hastial, la hilera inicial se debe instalar al nal del hastial. Para los techos
con caballetes empiece en la parte inferior de los aleros.
3. Coloque el borde de la teja de caballete y cumbre en la parte superior de la hilera
inicial y clávela en el área doblada de la teja.
4. Instalación estándar con 2 clavos
Los clavos se deben colocar a 7 pulgadas del borde inferior y a 1 pulgada de cada
borde lateral (Ver Fig. 4)
5. Instalación para 130 MPH con 4 clavos en tejas Duration
®
Premium
Para mantener la garantía de protección contra vientos de 130-MPH, se deben usar
cuatro clavos y sellado manual. Los clavos se deben colocar a 7 pulgadas del borde
inferior y a 1 y 2 pulgadas de cada borde lateral. (Ver la Fig. 4A) Aplique una capa de
¼ pulg. de ancho por 2 pulg. de largo de sellador elastomérico que cumpla con el
ASTM C-920 a aproximadamente 1 ½ pulg. hacia en interior del borde. (Ver la Fig.
4A)
6. Coloque y alinee otra teja doblada en la teja clavada y repita a lo largo de la cumbre
(Ver Fig. 5)
Entablonado
Teja
Colocado correctamente
½"
8"
diámetro mínimo
¾" min.
¼"
Colocado incorrectamente
Fig. 1 Teja de caballete y de cumbre
12" 12" 12"
36"
2"
2"
8"
12"
Fold Under
Doblado hacia abajo
Fold Over
Doblado hacia arriba
Fig. 2 Tejas para caballete y cumbre dobladas
2"
Exposure
Exposición
6"
Removed
Recortadas
Nail 1"
from Edge
and Center
on the
Starter piece.
Clave 1 pulg.
desde el borde
y el centro de la pieza de inicio.
Fig. 3 Tejas doblada para la hilera inicial en
la cumbre
1"
1"
7"
Nails
Clavos
Fig. 4 Instalación estándar con 2 clavos
1"
Nails
Clavos
2"
1"
2"
7"
Sealant
Sellador
Sealant
Sellador
Fig. 4A Instalación con 4 clavos para
130 MPH
Nail
Clavo
6"
Exposure
Exposición
6"
Exposure
Exposición
6"
Exposure
Exposición
Fig. 5 Hileras siguientes
Las tejas RIZERidge
®
para caballetes y cumbres
de Owens Corning
Instrucciones para la colocación
OWENS CORNING ROOFING AND ASPHALT, LLC
ONE OWENS CORNING PARKWAY
TOLEDO, OHIO, USA 43659
1
-
800
-
GET
-
PINK
®
w ww.roofing.owenscorning.com
Núm. de Pub. 10011722-A. Impreso en EE. UU. octubre 2010. THE PINK
PANTHER
™
y © 1964-2010 Metro-Goldwyn-Mayer Studios Inc. Todos los derechos
reservados. El color PINK es una marca comercial registrada de Owens Corning.
© 2010 Owens Corning.
-
 1
1
-
 2
2


En otros idiomas
Documentos relacionados
-
Owens Corning ST43 Guía de instalación
-
-
-
-
-
-
-