
Operating Instructions
Home Network System
Access Keypad
Model No. KX-HNK101
Thank you for purchasing a Panasonic product.
This document explains how to operate the access keypad properly.
For details about how to use the system, refer to the User’s Guide
(page 15).
Please read this document before using the unit and save it for future
reference.
For assistance, please contact us at 1-800-272-7033 or visit our Web
site: http://shop.panasonic.com/support for customers in the U.S.A.
Please register your product: http://shop.panasonic.com/support
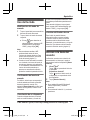
In order to use this device:
R Download the latest version of the [Home Network] app.
R Update your hub to the latest firmware version
(version 5.50 or later).
For more information, refer to the User’s Guide (page 15).
Printed in China
HNK101_(en_es)_0618_ver.041.pdf 1 2015/06/18 20:12:03

Introduction
Accessory information ...............3
Important Information
About this system ......................4
For your safety ...........................
4
Important safety instructions ......5
For best performance ................5
Other information .......................6
Setup
Part names and functions ..........7
Touchpanel buttons ...................7
LED indicator .............................8
Setup overview ..........................8
Registering the keypad ..............8
Confirming the usage area ........9
Installation ...............................10
Appendix
Using the keypad .....................15
Features available when using the
[Home Network] app ................15
Accessing the User’s Guide ....15
Specifications ..........................16
FCC and other information ......17
Customer services ...................18
Limited Warranty (ONLY FOR
U.S.A.) .....................................19
2
Table of Contents
HNK101_(en_es)_0618_ver.041.pdf 2 2015/06/18 20:12:05

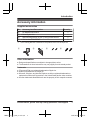
Accessory information
Supplied accessories
No. Accessory item/Part number Quantity
A AC adaptor/PNLV226KZ 1
B
Mounting bracket
*
1
1
C Wall mounting screws (25 mm (1 inch))/XTB4+25AVW 2
D Wall anchors/PNHR2264Z 2
*1 The mounting bracket is attached to the product at the time of shipment.
A
B
*1
C D
Other information
R D
esign and specifications are subject to change without notice.
R The illustrations in these instructions may vary slightly from the actual product.
Trademarks
R i
Phone and iPad are registered trademarks of Apple Inc.
R Android is a trademark of Google Inc.
R Microsoft, Windows, and Internet Explorer are either registered trademarks or
trademarks of Microsoft Corporation in the United States and/or other countries.
R All other trademarks identified herein are the property of their respective owners.
For a
ssistance, please visit http://shop.panasonic.com/support
3
Introduction
HNK101_(en_es)_0618_ver.041.pdf 3 2015/06/18 20:12:05

About this system
R This system is an auxiliary system; it
is not designed to provide complete
protection from property loss.
Panasonic will not be held
responsible in the event that
property loss occurs while this
system is in operation.
R The system’s wireless features are
subject to interference, therefore
functionality in all situations cannot
be guaranteed. Panasonic will not
be held responsible for injury or
damage to property that occurs in
the event of wireless communication
error or failure.
For your safety
T
o prevent severe injury and loss of life/
property, read this section carefully
before using the product to ensure
proper and safe operation of your
product.
WARNING
Power connection
R U
se only the power source marked
on the product.
R Do not overload power outlets and
extension cords. This can result in
the risk of fire or electric shock.
R Completely insert the AC adaptor/
power plug into the power outlet.
Failure to do so may cause electric
shock and/or excessive heat
resulting in a fire.
R Regularly remove any dust, etc.
from the AC adaptor/power plug by
pulling it from the power outlet, then
wiping with a dry cloth. Accumulated
d
ust may cause an insulation defect
from moisture, etc. resulting in a fire.
R Unplug the product from power
outlets if it emits smoke, an
abnormal smell, or makes an
unusual noise. These conditions can
cause fire or electric shock. Confirm
that smoke has stopped emitting
and contact us at http://
shop.panasonic.com/support
R Unplug from power outlets and
never touch the inside of the product
if its casing has been broken open.
Danger of electric shock exists.
R Never touch the plug with wet
hands. Danger of electric shock
exists.
R Do not connect non-specified
devices.
Installation
R T
o prevent the risk of fire or
electrical shock, do not expose the
product to rain or any type of
moisture.
R Do not place or use this product
near automatically controlled
devices such as automatic doors
and fire alarms. Radio waves
emitted from this product may cause
such devices to malfunction
resulting in an accident.
R Do not allow the AC adaptor to be
excessively pulled, bent or placed
under heavy objects.
R Keep small parts (screws, etc.) out
of the reach of children. There is a
risk of swallowing. In the event they
are swallowed, seek medical advice
immediately.
4
For a
ssistance, please visit http://shop.panasonic.com/support
Important Information
HNK101_(en_es)_0618_ver.041.pdf 4 2015/06/18 20:12:05

Operating safeguards
R Unplug the product from power
outlets before cleaning. Do not use
liquid or aerosol cleaners.
R Do not disassemble the product.
R Never put metal objects inside the
product. If metal objects enter the
product, turn off the circuit breaker
and contact an authorized service
center.
Medical
R C
onsult the manufacturer of any
personal medical devices, such as
pacemakers or hearing aids, to
determine if they are adequately
shielded from external RF (radio
frequency) energy. DECT features
operate between 1.92 GHz and
1.93 GHz with a peak transmission
power of 115 mW.
R Do not use the product in health
care facilities if any regulations
posted in the area instruct you not to
do so. Hospitals or health care
facilities may be using equipment
that could be sensitive to external
RF energy.
CAUTION
Installation and location
R N
ever install wiring during a lightning
storm.
R The AC adaptor is used as the main
disconnect device. Ensure that the
AC outlet is installed near the
product and is easily accessible.
Important safety
instructions
When using your product, basic safety
precautions should always be followed
to reduce the risk of fire, electric shock,
and injury to persons, including the
following:
1. Do not use this product near water
for example, near a bathtub,
washbowl, kitchen sink, or laundry
tub, in a wet basement or near a
swimming pool.
2. Use only the power cord indicated
in this document.
SAVE THESE INSTRUCTIONS
For b
est performance
Hub location/avoiding noise
T
he hub and other compatible
Panasonic devices use radio waves to
communicate with each other.
R For maximum coverage and
noise-free communications, place
your hub:
– at a convenient, high, and central
location with no obstructions
between the product and hub in
an indoor environment.
– away from electronic appliances
such as TVs, radios, personal
computers, wireless devices, or
other phones.
– facing away from radio frequency
transmitters, such as external
antennas of mobile phone cell
stations. (Avoid putting the hub
on a bay window or near a
window.)
For a
ssistance, please visit http://shop.panasonic.com/support
5
Important Information
HNK101_(en_es)_0618_ver.041.pdf 5 2015/06/18 20:12:05

R I
f the reception for a hub location is
not satisfactory, move the hub to
another location for better reception.
Environment
R K
eep the product away from
electrical noise generating devices,
such as fluorescent lamps and
motors.
R The product should be kept free
from excessive smoke, dust, high
temperature, and vibration.
R The product should not be exposed
to direct sunlight.
R Do not place heavy objects on top of
the product.
R When you leave the product unused
for a long period of time, unplug the
product from the power outlet.
R The product should be kept away
from heat sources such as heaters,
kitchen stoves, etc. It should not be
placed in rooms where the
temperature is less than 0 °C (32 °F)
or greater than 40 °C (104 °F).
Damp basements should also be
avoided.
R Operating the product near electrical
appliances may cause interference.
Move away from the electrical
appliances.
Other information
Routine care
R W
ipe the outer surface of the
product with a soft moist cloth.
R Remove any dirt from the
touchpanel by wiping it with a soft,
dry cloth. When wiping the
touchpanel, use your fingers to
gently hold it in place, taking care
not to scratch it with your fingernails.
R D
o not use any cleaning products
that contain alcohol, polish powder,
powder soap, benzine, thinner, wax,
petroleum, or boiling water. Also do
not spray the product with
insecticide, glass cleaner, or hair
spray. This may cause a change in
color or quality of the product.
Notice
6
For a
ssistance, please visit http://shop.panasonic.com/support
Important Information
HNK101_(en_es)_0618_ver.041.pdf 6 2015/06/18 20:12:05

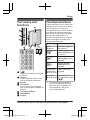
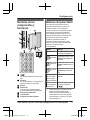
Part names and
functions
D
G
E
F
A
C
B
M N
U
sed when registering the keypad
to the hub.
Volume
U
sed to adjust the volume of the
sounds emitted by the keypad.
Speaker
Touchpanel
When no buttons are displayed
here, touch this area to display the
buttons.
Touchpanel buttons
LED indicator
DC jack
Touchpanel buttons
These buttons allow you to confirm and
change the system’s arm mode. During
normal operation, the button that
corresponds to the current arm mode is
lit by default, and all other buttons are
dimmed. When you tap the touchpanel,
the arm mode buttons light for 10
seconds. During this time, you can tap
an arm mode button to switch to the
corresponding arm mode.
Button Status
None
d
isplayed
No power, or buttons
are turned off
*1
.
, lit
Normal operation,
[
Arm: At Home] mode
is selected.
, lit
Normal operation,
[
Arm: Away] mode is
selected.
, lit
Normal operation,
[
Disarm] mode is
selected.
Current arm
m
ode button
blinking slowly
Alarm system was
triggered.
All buttons
b
linking slowly
Registration mode
(you pressed and held
M
N)
*1 You can configure the keypad so
that its arm mode buttons do not
light during normal operation. For
more information, refer to the
User’s Guide (page 15).
For a
ssistance, please visit http://shop.panasonic.com/support
7
Setup
HNK101_(en_es)_0618_ver.041.pdf 7 2015/06/18 20:12:05

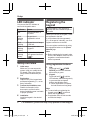
LED indicator
You can use the LED indicator to
confirm the keypad’s status.
Indicator Status
Off Normal operation, or
n
o power
Red,
b
linking
slowly
Keypad is not
registered to a hub.
Red,
b
linking
Keypad is out of range
of the hub.
Red,
b
linking
quickly
Alarm system was
triggered.
Green,
b
linking
slowly
Registration mode
(You pressed and held
M N)
Setup overview
1 I
nitial setup
Make sure you can access the
system using your mobile device.
For details, refer to the System
Setup Guide included with your
hub.
2 Registration
Required only if the keypad was
purchased separately (i.e., not as
part of a bundle).
3 Confirm the installation area
Read the information in this
document to confirm that the
desired installation area is suitable
to proper operation.
4 Installation
Install the keypad in the desired
location.
Registering the
keypad
This procedure is not required for
d
evices that were included as part of
a bundle.
Before you can use the keypad, it must
be registered to the hub.
If you purchased devices separately
(i.e., not as part of a bundle), you must
register each device to the hub.
You can register each device by using
the registration buttons or the [Home
Network] app.
Note:
R Before registering the keypad, make
sure the AC adaptors of the hub and
keypad are connected and each
device is powered.
Using registration buttons
1 H
ub:
Press and hold M
OTHER
D
EVICEN until the LED indicator
blinks slowly in green.
2 Keypad:
Press and hold M
N until the
LED indicator starts blinking slowly
in green and the touchpanel
buttons start blinking slowly.
R When registration is complete,
the hub sounds one long beep.
Note:
R To cancel without registering the
keypad, press M N
on the hub
and on the keypad again.
R If registration fails, the hub sounds
several short beeps.
8
For a
ssistance, please visit http://shop.panasonic.com/support
Setup
HNK101_(en_es)_0618_ver.041.pdf 8 2015/06/18 20:12:05

Using the app
When you register the keypad by using
the [Home Network] app, you can
assign a name to your devices and
group them by location. For more
information, refer to the User’s Guide
(page 15).
Confirming the
u
sage area
Wireless communication
r
ange
The wireless communication range of
each device in the system from the hub
is approximately 50 m (160 feet)
indoors and approximately 300 m
(1,000 feet) outdoors. Wireless
communication may be unreliable
when the following obstacles are
located between the hub and other
devices.
R Metal doors or screens
R Walls containing aluminum-sheet
insulation
R Walls made of concrete or
corrugated iron
R Double-pane glass windows
R Multiple walls
R When using each device on
separate floors or in different
buildings
Note:
R The keypad’s LED indicator blinks in
red if it is out of range of the hub. In
this case, confirm all connections,
including those of the hub.
Usage area cautions
Using the keypad in the following areas
may cause deformation, malfunction, or
operational failure.
R In direct sunlight
R Areas exposed to grease or steam,
such as kitchens
R Near fire or heating devices
R Near magnetic fields (such as near
microwaves and magnets)
R Areas subject to extreme
temperature changes, such as next
to air conditioners
R Areas with reflective objects, such
as glass, that can interfere with
detection of temperature variation
R Areas where the temperature is
affected by strong illuminating
objects (such as fluorescent lights)
R Near devices that emit strong radio
waves, such as mobile phones
For a
ssistance, please visit http://shop.panasonic.com/support
9
Setup
HNK101_(en_es)_0618_ver.041.pdf 9 2015/06/18 20:12:05

Installation
To mount the keypad flat against the wall, use the mounting bracket.
Note:
R Mount the keypad on the stable location where the keypad can be adequately
supported when mounting.
R Do not mount keypad on a soft material. It may fall down, break, or cause injury.
R Do not mount the keypad on a plywood surface that is less than 25.4 mm
(1 inch) thick.
R The pull-out strength of the installation area must be at least 29.4 N (3 kgf).
Determining the installation location
N
ote:
R Make sure there is at least 20 cm (7 7/8 inches) of space to the left of the
keypad (when mounted) so that the buttons on the side of the keypad can be
accessed.
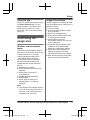
1 Remove the mounting bracket.
R Place the keypad face-down on a flat surface, slide the bracket toward the
bottom of the keypad (A) by pushing it with your thumbs as shown (B),
and then lift the bracket up and away from the keypad (C).
B
A
C
10
For a
ssistance, please visit http://shop.panasonic.com/support
Setup
HNK101_(en_es)_0618_ver.041.pdf 10 2015/06/18 20:12:05

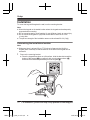
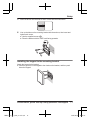
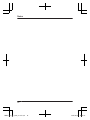
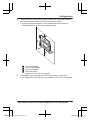
2 P
lace the mounting bracket against the wall and determine where the
mounting bracket will be installed. Mark the screw openings on the wall.
R Refer to the information below. The dotted lines indicate where the edges of
the keypad will be in relation to the mounting bracket.
C
B
D
A
C
16 mm (5/8 inches)
59 mm (2 5/16 inches)
19 mm (3/4 inches)
Screw openings
6
0 mm (2 11/32 inches) apart
3 Drill pilot holes where you marked the screw openings in the previous step.
R The screw openings must be 60 mm (2 11/32 inches) apart.
For a
ssistance, please visit http://shop.panasonic.com/support
11
Setup
HNK101_(en_es)_0618_ver.041.pdf 11 2015/06/18 20:12:05

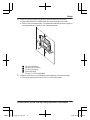
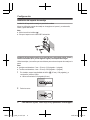
Installing the mounting bracket
Installing the mounting bracket on wooden walls
L
ine up the holes on the mounting bracket with the holes in the wall, then insert
and tighten each screw.
Note:
R Use the supplied screws (
1
).
R Place the bracket with the “UP” mark facing upwards.
1
1
Installing the mounting bracket on gypsum board, ALC (autoclaved
lightweight cellular concrete), or concrete blocks
Use the supplied anchors and screws to mount the mounting bracket to the wall.
Note:
R Supplied anchors ø: 5 mm ´ 25 mm (ø: 3/16 inches ´ 1 inch).
R Supplied screws ø: 4 mm ´ 25 mm (ø: 5/32 inches ´ 1 inch).
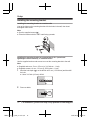
1 Mark the hole depth (
1
) on the drill bit at 35 mm (1 3/8 inches) and then drill
t
he hole.
R Use a 3/16 inch (4.8 mm) drill bit.
1
2 R
emove debris.
12
For a
ssistance, please visit http://shop.panasonic.com/support
Setup
HNK101_(en_es)_0618_ver.041.pdf 12 2015/06/18 20:12:06

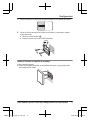
3 I
nsert the anchor into the hole so that it is flush with the wall surface.
4 Line up the holes on the mounting bracket with the anchors, then insert and
tighten each screw.
R Use the supplied screws (
2
).
R P
lace the bracket with the “UP” mark facing upwards.
2
2
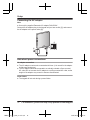
Installing the keypad to the mounting bracket
A
ttach the keypad to the bracket.
R Insert the grooves on the keypad to the 4 tabs on the bracket, and then push
down the keypad.
For a
ssistance, please visit http://shop.panasonic.com/support
13
Setup
HNK101_(en_es)_0618_ver.041.pdf 13 2015/06/18 20:12:06

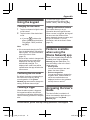
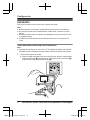
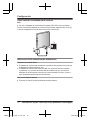
Connecting the AC adaptor
Note:
R Use only the supplied Panasonic AC adaptor PNLV226-K.
Connect the AC adaptor plug to the keypad until you hear a click (A) and connect
the AC adaptor to the power outlet (B).
2
1
Note about power connections
AC adaptor connection
R T
he AC adaptor must remain connected at all times. (It is normal for the adaptor
to feel warm during use.)
R The AC adaptor should be connected to a vertically oriented or floor-mounted
AC outlet. Do not connect the AC adaptor to a ceiling-mounted AC outlet, as the
weight of the adaptor may cause it to become disconnected.
Power failure
R T
he keypad will not work during a power failure.
14
For a
ssistance, please visit http://shop.panasonic.com/support
Setup
HNK101_(en_es)_0618_ver.041.pdf 14 2015/06/18 20:12:06

Using the keypad
Changing the arm mode
1 T
ap the touchpanel to light the arm
mode buttons.
2 Tap the button of the desired arm
mode.
R If you tap
to disarm the
a
larm system, enter the disarm
PIN (default: “0000”) and then
tap MOKN.
Note:
R We recommend changing the PIN
from the default before operating the
alarm system. For more information,
refer to the User’s Guide
(page 15).
R When the arm mode is changed with
the keypad, the arm mode icons
displayed on the app will not be
automatically changed. The
displayed arm mode icons will be
updated when the app refreshes the
home screen.
Confirming the arm mode
B
y default, the button corresponding to
the current arm mode is lit during
normal operation. If the [Home
Network] app was used to change this
setting, the button does not light.
Canceling a trigger
W
hen the alarm system is triggered,
the keypad sounds an alert and the
current arm mode button blinks slowly.
Use the following procedure to stop the
alert.
To cancel the trigger, tap the
t
ouchpanel, enter the disarm PIN
(default: “0000”), and then tap MOKN.
Talking notification feature
T
his feature allows you to get
information about a triggered sensor.
When a sensor is triggered, the keypad
can announce the location of the
sensor detected, the sensor name, and
the type of detection. For more
information, refer to the User’s Guide
(page 15).
Features available
w
hen using the
[Home Network] app
Some of the keypad’s features that are
available when using the [Home
Network] app are listed below. For
more information, refer to the User’s
Guide (page 15).
– Alarm system
You can use the app to arm and
disarm the alarm system.
– Device management
You can use the app to change the
keypad’s name, select whether or
not the arm mode buttons are
displayed, and turn voice guidance
and key tones on and off.
Accessing the User’s
G
uide
The User’s Guide is a collection of
online documentation that helps you
get the most out of the [Home
Network] app.
For a
ssistance, please visit http://shop.panasonic.com/support
15
Appendix
HNK101_(en_es)_0618_ver.041.pdf 15 2015/06/18 20:12:06

1 i
Phone
®
/iPad
®
Tap
in the app’s home screen.
A
ndroid™ devices
Tap
or press your mobile
d
evice’s menu button in the app’s
home screen.
2 Tap [User’s Guide].
Note:
R Microsoft® Windows® Internet
Explorer® 8 and earlier versions are
not supported.
R Android 4.1 or later versions are
recommended.
R You can also access the User’s
Guide at the web page listed below.
www.panasonic.net/pcc/support/tel/
h
omenetwork/manual/
Specifications
R S
tandards
DECT (Digital Enhanced Cordless
Telecommunications)
R Frequency range
DECT: 1.92 GHz – 1.93 GHz
R RF transmission power
DECT: 115 mW (max.)
R Power source
120 V AC, 60 Hz
R Power consumption
Standby: Approx. 0.6 W
Maximum: Approx. 2.0 W
R Operating conditions
0 °C – 40 °C (32 °F – 104 °F)
R Dimensions (height ´ width ´
depth)
Approx. 120 mm ´
120 mm ´ 21 mm
(4 23/32 inches ´ 4 23/32 inches ´
27/32 inches)
R Mass (weight)
Approx. 163 g (0.36 lb) (without the
mounting bracket attached)
16
For a
ssistance, please visit http://shop.panasonic.com/support
Appendix
HNK101_(en_es)_0618_ver.041.pdf 16 2015/06/18 20:12:06

FCC and other
information
This device complies with Part 15 of
the FCC Rules. Operation is subject to
the following two conditions:
(1) This device may not cause harmful
interference, and (2) this device must
accept any interference received,
including interference that may cause
undesired operation.
Privacy of communications may not be
ensured when using this device.
CAUTION:
Any changes or modifications not
expressly approved by the party
responsible for compliance could void
the user’s authority to operate this
device.
NOTE:
This equipment has been tested and
found to comply with the limits for a
Class B digital device, pursuant to Part
15 of the FCC Rules. These limits are
designed to provide reasonable
protection against harmful interference
in a residential installation. This
equipment generates, uses, and can
radiate radio frequency energy and, if
not installed and used in accordance
with the instructions, may cause
harmful interference to radio
communications. However, there is no
guarantee that interference will not
occur in a particular installation. If this
equipment does cause harmful
interference to radio or television
reception, which can be determined by
turning the equipment off and on, the
user is encouraged to try to correct the
interference by one or more of the
f
ollowing measures:
– Reorient or relocate the receiving
antenna.
– Increase the separation between the
equipment and receiver.
– Connect the equipment into an
outlet on a circuit different from that
to which the receiver is connected.
– Consult the dealer or an
experienced radio/TV technician for
help.
Some devices operate at frequencies
that may cause interference to nearby
TVs and VCRs. To minimize or prevent
such interference, the devices should
not be placed near or on top of a TV or
VCR. If interference is experienced,
move this device further away from the
TV or VCR. This will often reduce or
eliminate interference.
FCC RF Exposure Warning:
R This product complies with FCC
radiation exposure limits set forth for
an uncontrolled environment.
R To comply with FCC RF exposure
requirements, the device must be
installed and operated 20 cm
(8 inches) or more between the
product and all person’s body.
R This product may not be collocated
or operated in conjunction with any
other antenna or transmitter.
R For body-worn operation, the device
must be used only with a
non-metallic accessory. Use of other
accessories may not ensure
compliance with FCC RF exposure
requirements.
Notice:
R FCC ID can be found on the rear of
the unit.
For a
ssistance, please visit http://shop.panasonic.com/support
17
Appendix
HNK101_(en_es)_0618_ver.041.pdf 17 2015/06/18 20:12:06

Customer services
You may also contact us directly at: 1-800-272-7033,
Monday - Friday 9 am to 9 pm;
Saturday - Sunday 10 am to 7 pm, EST.
Accessories!
h!p://shop.panasonic.com/support
Customer Services Directory
Shop
for all your Panasonic gear
Go to
Get everything you need to get the most out of
your Panasonic products
Accessories & Parts for your Camera, Phone, A/V
products, TV, Computers & Networking, Personal
Care, Home Appliances, Headphones, Ba!eries,
Backup Chargers & more…
For Product Informa"on, Opera"ng Assistance,
Parts, Owner’s Manuals, Dealer and Service info
go to h!p://shop.panasonic.com/support
For the hearing or speech impaired TTY: 1- 877-833-8855
As of June 2015
18
For a
ssistance, please visit http://shop.panasonic.com/support
Appendix
HNK101_(en_es)_0618_ver.041.pdf 18 2015/06/18 20:12:06

Limited Warranty (ONLY FOR U.S.A.)
Limited Warranty Coverage (For USA Only)
Labor
One (1) Year
Parts
One (1) Year
To submit a new repair request and for quick repair status visit our Web Site at
http://shop.panasonic.com/support
Panasonic Products Limited Warranty
Online Repair Request
Mail-In Service--Online Repair Request
If your product does not work properly because of a defect in materials or workmanship,
Panasonic Corporation of North America (referred to as “the warrantor”) will, for the length
of the period indicated on the chart below, which starts with the date of original purchase
(“warranty period”), at its option either (a) repair your product with new or refurbished parts,
(b) replace it with a new or a refurbished equivalent value product, or (c) refund your
purchase price. The decision to repair, replace or refund will be made by the warrantor.
During the “Labor” warranty period there will be no charge for labor. During the “Parts”
warranty period, there will be no charge for parts. This Limited Warranty excludes both
parts and labor for non-rechargeable batteries, antennas, and cosmetic parts (cabinet).
This warranty only applies to products purchased and serviced in the United States.
This warranty is extended only to the original purchaser of a new product which was
not sold “as is”.
Home Network System Products
microSD card (Included model only)
90 days N/A
When shipping the unit, carefully pack, include all supplied accessories listed in the
Owner’s Manual, and send it prepaid, adequately insured and packed well in a carton box.
When shipping Lithium Ion batteries please visit our Web Site at
http://shop.panasonic.com/support as Panasonic is committed to providing the most up to
date information. Include a letter detailing the complaint, a return address and provide a
daytime phone number where you can be reached. A valid registered receipt is required
under the Limited Warranty.
IF REPAIR IS NEEDED DURING THE WARRANTY PERIOD, THE PURCHASER WILL
BE REQUIRED TO FURNISH A SALES RECEIPT/PROOF OF PURCHASE INDICATING
DATE OF PURCHASE, AMOUNT PAID AND PLACE OF PURCHASE. CUSTOMER WILL
BE CHARGED FOR THE REPAIR OF ANY UNIT RECEIVED WITHOUT SUCH PROOF
OF PURCHASE.
Product or Part Name
For a
ssistance, please visit http://shop.panasonic.com/support
19
Appendix
HNK101_(en_es)_0618_ver.041.pdf 19 2015/06/18 20:12:06

Limited Warranty Limits and Exclusions
(As examples, this excludes damages for lost time, travel to and from the servicer,
loss of or damage to media or images, data or other memory or recorded content.
The items listed are not exclusive, but for illustration only.)
This warranty ONLY COVERS failures due to defects in materials or workmanship,
and DOES NOT COVER normal wear and tear or cosmetic damage. The warranty
ALSO DOES NOT COVER damages which occurred in shipment, or failures which
are caused by products not supplied by the warrantor, or failures which result from
accidents, misuse, abuse, neglect, mishandling, misapplication, alteration, faulty
installation, set-up adjustments, misadjustment of consumer controls, improper
maintenance, power line surge, lightning damage, modification, introduction of sand,
humidity or liquids, commercial use such as hotel, office, restaurant, or other business
or rental use of the product, or service by anyone other than a Factory Service Center
or other Authorized Servicer, or damage that is attributable to acts of God.
THERE ARE NO EXPRESS WARRANTIES EXCEPT AS LISTED UNDER
“LIMITED WARRANTY COVERAGE”.
THE WARRANTOR IS NOT LIABLE FOR INCIDENTAL OR CONSEQUENTIAL
DAMAGES RESULTING FROM THE USE OF THIS PRODUCT, OR ARISING OUT
OF ANY BREACH OF THIS WARRANTY.
ALL EXPRESS AND IMPLIED WARRANTIES, INCLUDING THE WARRANTY OF
MERCHANTABILITY, ARE LIMITED TO THE PERIOD OF THE LIMITED WARRANTY.
PARTS AND SERVICE, WHICH ARE NOT COVERED BY THIS LIMITED WARRANTY,
ARE YOUR RESPONSIBILITY.
Some states do not allow the exclusion or limitation of incidental or consequential damages,
or limitations on how long an implied warranty lasts, so the exclusions may not apply to you.
This warranty gives you specific legal rights and you may also have other rights which vary
from state to state. If a problem with this product develops during or after the warranty period,
you may contact your dealer or Service Center. If the problem is not handled to your
satisfaction, then write to:
Consumer Affairs Department
Panasonic Corporation of North America
661 Independence Pkwy
Chesapeake, VA 23320
As of June 2015
20
For a
ssistance, please visit http://shop.panasonic.com/support
Appendix
HNK101_(en_es)_0618_ver.041.pdf 20 2015/06/18 20:12:06

21
Notes
HNK101_(en_es)_0618_ver.041.pdf 21 2015/06/18 20:12:06

22
Notes
HNK101_(en_es)_0618_ver.041.pdf 22 2015/06/18 20:12:06

23
Notes
HNK101_(en_es)_0618_ver.041.pdf 23 2015/06/18 20:12:06

A
B
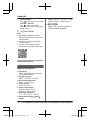
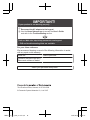
Reconnect the AC adaptor to the keypad.
If your product is not working properly. . .
IMPORTANT!
Visit our Web site: http://shop.panasonic.com/support
• FAQ and troubleshooting hints are available.
Use the Home Network app to access the User’s Guide
and refer to the Troubleshooting section.
For your future reference
W
e recommend keeping a record of the following information to assist
with any repair under warranty.
Serial No. Date of purchase
(found on the rear of the unit)
N
ame and address of dealer
Attach your purchase receipt here.
Two Riverfront Plaza, Newark, NJ 07102-5490
© Panasonic System Networks Co., Ltd. 2015
HNK101_(en_es)_0618_ver.041.pdf 24 2015/06/18 20:12:06

Manual de instrucciones
Sistema de red doméstico
Teclado de acceso
Modelo n° KX-HNK101
Gracias por adquirir un producto Panasonic.
Este documento explica cómo operar el teclado de acceso de forma correcta.
Para obtener detalles sobre cómo usar el sistema, consulte la Guía del usua-
rio (página 11).
Lea este documento antes de usar la unidad, y guárdelo para consultarlo en el
futuro.
Para obtener ayuda, comuníquese con nosotros llamando al 1-800-272-7033 o
visite nuestro sitio web: http://shop.panasonic.com/support para clientes en
los EE. UU. (solo en inglés)
Por favor, registre su producto: http://shop.panasonic.com/support
Para utilizar este dispositivo:
R Descargue la versión más reciente de la aplicación [Home Network].
R Actualice el hub a la versión de firmware más reciente (versión 5.50 o
posterior). Para obtener más información, consulte la Guía del usuario
(página 11).
PNQX7273ZA CC0615WK0 (E)
HNK101_(es_es)_0619_ver.007.pdf 1 2015/06/19 13:33:21

Configuración
Nombres de los componentes y
funciones .........................................3
Botones del panel táctil ...................3
Led indicador ...................................4
Resumen de configuración ..............4
Registro del teclado .........................4
Confirmación del área de uso ..........5
Instalación .......................................6
Apéndice
Uso del teclado ..............................11
Acceso a la Guía del usuario .........11
2
Tabla de Contenido
HNK101_(es_es)_0619_ver.007.pdf 2 2015/06/19 13:33:22

Nombres de los
componentes y
funciones
D
G
E
F
A
C
B
M N
Se usa para registrar el teclado en el
hub.
Volumen
Se usa para ajustar el volumen de los
sonidos emitidos por el teclado.
Altavoz
Panel táctil
Si los botones no aparecen aquí,
toque esta área para que aparezcan.
Botones del panel táctil
Led indicador
Clavija de corriente continua
Botones del panel táctil
Estos botones le permiten confirmar y
cambiar el sistema actual del modo de
armado. Durante un funcionamiento
normal, el botón que corresponde al modo
de armado en curso está encendido de
forma predeterminada y todos los otros
botones están atenuados. Cuando toca el
panel táctil, los botones del modo de
armado se encienden durante 10
segundos. Durante este tiempo, puede
tocar un botó
n del modo de armado para
cambiar al modo de armado
correspondiente.
Botón Estado
No aparece Sin alimentación, o los bo-
tones están apagados
*1
.
, encendi-
do
Operación normal, modo
[Armar: En casa] selec-
cionado.
, encendi-
do
Operación normal, modo
[Armar: Fuera] seleccio-
nado.
, encendi-
do
Operación normal, modo
[Desarmar] selecciona-
do.
El botón del mo-
do de armado
actual parpa-
dea lentamente
Se disparó el sistema de
alarma.
Todos los boto-
nes parpadean
lentamente
Modo de registro (oprimió
y mantuvo oprimido
M
N)
*1 Puede configurar el teclado de forma
tal que los botones del modo de
armado no se enciendan durante el
funcionamiento normal. Para obtener
más información, consulte la Guía del
usuario (página 11).
Para obtener ayuda, visite http://shop.panasonic.com/support
3
Configuración
HNK101_(es_es)_0619_ver.007.pdf 3 2015/06/19 13:33:22

Led indicador
Puede usar el Led indicador para confirmar
el estado del teclado.
Indicador Estado
Apagado Operación normal o sin
alimentación
Rojo, parpa-
deando len-
tamente
El teclado no está regis-
trado en el hub.
Rojo, parpa-
deante
El teclado está fuera de
alcance del hub.
Rojo, parpa-
deo rápido
Se disparó el sistema de
alarma.
Verde, par-
padeando
lentamente
Modo de registro (Opri-
mió y mantuvo oprimido
M
N)
Resumen de
configuración
1 Configuración inicial
Asegúrese de poder acceder al
sistema mediante su dispositivo móvil.
Para obtener más detalles, consulte la
Guía de configuración del sistema que
viene con su hub.
2 Registro
Solo se requiere si se compró el
teclado por separado (es decir, no
como parte de un paquete).
3 Confirme el área de instalación
Lea la información de este documento
para confirmar que el área
de
instalación deseada sea la adecuada
para el correcto funcionamiento.
4 Instalación
Instale el teclado en la ubicación
deseada.
Registro del teclado
Este procedimiento no es necesario para
unidades que son parte de un paquete.
Antes de que pueda usar el teclado, se
debe registrar en el hub.
Si compró los dispositivos por separado (es
decir, no como parte de un paquete), debe
registrar cada dispositivo en el hub.
Puede registrar cada unidad mediante los
botones de registro o la aplicación [Home
Network].
Nota:
R Antes de registrar el teclado, asegúrese
que todos los adaptadores de corriente
del hub y el teclado estén conectados y
cad
a dispositivo reciba alimentación.
Uso de los botones de registro
1 Hub:
Oprima y mantenga oprimido M
OTHER DEVICEN hasta que el Led
indicador parpadee lentamente en
verde.
2 Teclado:
Mantenga oprimido M
N hasta que
el Led indicador comience a
parpadear lentamente en verde y los
botones del panel táctil comiencen a
parpadear lentamente.
R Cuando se ha completado el
registro, el hub emitirá un pitido
largo.
4
Para obtener ayuda, visite http://shop.panasonic.com/support
Configuración
HNK101_(es_es)_0619_ver.007.pdf 4 2015/06/19 13:33:22

Nota:
R Para cancelar sin registrar el teclado,
oprima M
N en el hub y en el teclado
nuevamente.
R Si el registro falla, el hub emitirá varios
pitidos cortos.
Uso de la aplicación
Cuando registre su teclado con la
aplicación [Home Network], puede asignar
un nombre a sus dispositivos y agruparlos
por ubicación. Para obtener más
información, consulte la Guía del usuario
(página 11).
Confirmación del área
de uso
Alcance de la comunicación
inalámbrica
El alcance de la comunicación inalámbrica
de cada dispositivo en el sistema del hub
es de aproximadamente 50 m (160 pies) en
interiores y de aproximadamente 300 m
(1,000 pies) en el exterior. Es posible que la
comunicación inalámbrica no sea tan
confiable cuando se encuentran los
obstáculos siguientes entre el hub y otros
dispositivos.
R Puertas o pantallas metálicas
R Par
edes que contengan aislamiento de
aluminio
R Paredes de hormigón o hierro corrugado
R Ventanas de vidrio doble
R Varias paredes
R Cuando los dispositivos están en pisos o
edificios diferentes
Nota:
R Si el Led indicador del teclado parpadea
en rojo, se encuentra fuera del alcance
del hub. En este caso, confirme todas
las conexiones, incluso las del hub.
Precauciones respecto al área
de uso
Usar el teclado en las áreas siguientes
puede causar deformación, averías o fallas
de operación.
R A la luz del sol
R En áreas expuestas a grasa o vapor,
como en cocinas
R Cerca del fuego o calefactores
R Cerca de campos magnéticos (como
cerca de hornos microondas e imanes)
R Áreas sujetas a cambios extremos de
temperatura, como cerca de aires
acondicionados
R Áreas con objetos re
flectivos, como
vidrios, que pueden interferir con la
detección de la variación de temperatura
R Áreas donde objetos de iluminación
afectan la temperatura (como luces
fluorescentes)
R Cerca de dispositivos que emiten ondas
de radio potentes, como teléfonos
móviles
Para obtener ayuda, visite http://shop.panasonic.com/support
5
Configuración
HNK101_(es_es)_0619_ver.007.pdf 5 2015/06/19 13:33:22

Instalación
Para montar el teclado contra la pared, utilice el soporte de montaje.
Nota:
R Monte el teclado en una ubicación estable donde se pueda sostener correctamente.
R No coloque el teclado sobre un material blando. Podría caerse, romperse o provocar
lesiones.
R No monte el teclado sobre una superficie contrachapada que tenga menos de 25.4 mm
(1 pulgada) de grosor.
R La resistencia a la tracción del áre
a de instalación debe ser por lo menos de 29.4 N
(3 kgf).
Cómo determinar la ubicación de la instalación
Nota:
R Asegúrese de que haya por lo menos 20 cm (7 7/8 pulgadas) de espacio a la izquierda
del teclado (una vez montado) para poder acceder a los botones del lateral del teclado.
1 Cómo retirar el soporte de montaje.
R Ubique el teclado hacia abajo sobre una superficie plana, deslice el soporte debajo
de la base del teclado (A) empujándolo con los pulgares ta
l como se muestra (B),
y luego levante y quite el soporte del teclado (C).
B
A
C
6
Para obtener ayuda, visite http://shop.panasonic.com/support
Configuración
HNK101_(es_es)_0619_ver.007.pdf 6 2015/06/19 13:33:22

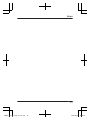
2 Ubique el soporte de montaje contra la pared y determine la ubicación de instalación
del soporte de montaje. Marque los orificios para tornillos en la pared.
R Consulte la siguiente información. La línea punteada indica dónde estarán los
bordes del teclado en relación con el soporte de montaje.
C
B
D
A
C
16 mm (5/8 pulgadas)
59 mm (2 5/16 pulgadas)
19 mm (3/4 pulgadas)
Orificios de tornillos
Separación de 60 mm (2 11/32 pulgadas)
3 Taladre agujeros guía donde marcó los orificios para tornillos en el paso previo.
R Los orificios para tornillos deben tener una separación de 60 mm (2 11/32 pulgadas).
Para obtener ayuda, visite http://shop.panasonic.com/support
7
Configuración
HNK101_(es_es)_0619_ver.007.pdf 7 2015/06/19 13:33:22

Instalación del soporte de montaje
Instalación del soporte de montaje en paredes de madera
Alinee los orificios del soporte de montaje con los agujeros en la pared y, a continuación,
inserte y ajuste cada tornillo.
Nota:
R Utilice los tornillos incluidos (
1
).
R Coloque el soporte con la marca “UP” hacia arriba.
1
1
Instalación del soporte de montaje en un panel de yeso, en hormigón celular, liviano y
curado en autoclave (ALC, por sus siglas en inglés) o en bloques de hormigón
Utilice los anclajes y los tornillos que se suministran para colocar el soporte de montaje en la
pared.
Nota:
R Anclajes suministrados ø: 5 mm ´ 25 mm (ø: 3/16 pulgadas ´ 1 pulgada).
R Tornillos suministrados ø: 4 mm ´ 25 mm (ø: 5/32 pulgadas ´
1 pulgada).
1 En el taladro, marque la profundidad del orificio (
1
) 35 mm (1 3/8 pulgadas) y, a
continuación, perfore el orificio.
R Utilice una mecha de 3/16 pulgadas (4.8 mm).
1
2 Retire los restos.
8
Para obtener ayuda, visite http://shop.panasonic.com/support
Configuración
HNK101_(es_es)_0619_ver.007.pdf 8 2015/06/19 13:33:22

3 Inserte el anclaje en el orificio para que quede nivelado con la superficie de la pared.
4 Alinee los orificios del soporte de montaje con el anclaje y, a continuación, inserte y
ajuste cada tornillo.
R Utilice los tornillos incluidos (
2
).
R Coloque el soporte con la marca “UP” hacia arriba.
2
2
Instale el teclado al soporte de montaje
Instale el teclado al soporte.
R Inserte las 4 lengüetas del teclado en las pestañas del soporte y luego ejerza presión
hacia abajo sobre el teclado.
Para obtener ayuda, visite http://shop.panasonic.com/support
9
Configuración
HNK101_(es_es)_0619_ver.007.pdf 9 2015/06/19 13:33:22

Cómo conectar el adaptador para corriente
Nota:
R Use solo el adaptador de corriente alterna Panasonic PNLV226-K que se suministra.
Conecte el enchufe del adaptador de corriente alterna al teclado hasta escuchar un clic (A)
y conecte el adaptador de corriente alterna a la toma de corriente (B).
2
1
Nota acerca de las conexiones de alimentación
Adaptador de corriente alterna
R El adaptador de corriente debe permanecer conectado en todo momento (es normal que
el adaptador se caliente durante su uso).
R El adaptador de corriente debe estar conectado a un enchufe de corriente orientado
verticalmente o en una toma de corriente alterna colocada en el piso. No conecte el
adaptador de corriente alterna a una toma de corriente montada en el techo, ya q
ue el
peso del adaptador puede hacer que se desconecte.
Falla en el suministro eléctrico
R El teclado no funciona durante las fallas del suministro eléctrico.
10
Para obtener ayuda, visite http://shop.panasonic.com/support
Configuración
HNK101_(es_es)_0619_ver.007.pdf 10 2015/06/19 13:33:22

Uso del teclado
Modificación del modo de
armado
1 Toque el panel táctil para encender los
botones del modo de armado.
2 Toque el botón del modo de armado
requerido.
R Si toca
para desactivar el
sistema de alarma, ingrese el NIP
de desactivación (por defecto:
“0000”) y luego toque MOKN.
Nota:
R Recomendamos cambiar el NIP
predeterminado antes de hacer
funcionar el sistema de alarma. Para
obtener más información, consulte la
Guía del usuario (página 11).
R Cuando el modo de armado se cambia
con el teclado, los iconos del modo de
armado que aparecen en la aplicación
no se cambiarán auto
máticamente. Los
iconos del modo de armado que
aparecen se actualizarán cuando la
aplicación actualice la pantalla de inicio.
Confirmación del modo de
armado
Por defecto, el botón que corresponde al
modo de armado actual está encendido
durante la operación normal. Si la
aplicación [Home Network] se utilizó para
cambiar la configuración, el botón no se
encenderá.
Cancelación de un disparador
Cuando se dispara la alarma, el teclado
emite un sonido de alerta y el modo de
armado actual parpadea lentamente. Utilice
el siguiente procedimiento para detener la
alerta.
Para cancelar el disparo, toque el panel
táctil, ingrese el NIP de desactivación (por
defecto: “0000”), y luego toque MOKN.
Función notificación de voz
Esta función le permitirá obtener
información sobre un sensor activado.
Cuando el sensor se activa, el teclado
puede anunciar la ubicación del sensor
detectado, el nombre del sensor y el tipo de
detección. Para obtener más información,
consulte la Guía del usuario (página 11).
Acceso a la Guía del
usuario
La Guía del usuario es una colección de
documentación en línea que lo ayuda a
aprovechar al máximo la aplicación [Home
Network].
1 iPhone
®
/iPad
®
Toque
en la pantalla de inicio de
la aplicación.
Dispositivos Android™
Toque
u oprima el botón menú de
su dispositivo en la pantalla de inicio
de la aplicación.
2 Toque [Guía del Usuario].
Nota:
R No se admite Microsoft® Windows®
Internet Explorer® 8 y versiones
anteriores.
R Se recomienda Android 4.1 y versiones
posteriores.
Para obtener ayuda, visite http://shop.panasonic.com/support
11
Apéndice
HNK101_(es_es)_0619_ver.007.pdf 11 2015/06/19 13:33:22

R También puede acceder a la Guía del
usuario mediante la página web a
continuación.
www.panasonic.net/pcc/support/tel/
homenetwork/manual/
12
Para obtener ayuda, visite http://shop.panasonic.com/support
Apéndice
HNK101_(es_es)_0619_ver.007.pdf 12 2015/06/19 13:33:22
-
 1
1
-
 2
2
-
 3
3
-
 4
4
-
 5
5
-
 6
6
-
 7
7
-
 8
8
-
 9
9
-
 10
10
-
 11
11
-
 12
12
-
 13
13
-
 14
14
-
 15
15
-
 16
16
-
 17
17
-
 18
18
-
 19
19
-
 20
20
-
 21
21
-
 22
22
-
 23
23
-
 24
24
-
 25
25
-
 26
26
-
 27
27
-
 28
28
-
 29
29
-
 30
30
-
 31
31
-
 32
32
-
 33
33
-
 34
34
-
 35
35
-
 36
36


Panasonic KXHN6091 Instrucciones de operación
- Tipo
- Instrucciones de operación
en otros idiomas
Artículos relacionados
-
Panasonic KXHNK101 Instrucciones de operación
-
-
-
Panasonic KXHN6002 Instrucciones de operación
-
-
-
-
-
-