Canon PIXMA TS5120 El manual del propietario
- Categoría
- Impresión
- Tipo
- El manual del propietario
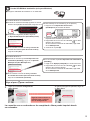
La impresora Canon PIXMA TS5120 es una impresora multifunción inalámbrica que imprime, copia, escanea y envía faxes con la comodidad de conectarse a redes inalámbricas. Con la aplicación Canon PRINT puedes imprimir y escanear desde tu smartphone o tablet, y la aplicación Easy-PhotoPrint Editor te permite editar e imprimir fotos fácilmente. También puedes imprimir fotos directamente desde una cámara compatible con PictBridge o desde una tarjeta de memoria.
La impresora Canon PIXMA TS5120 es una impresora multifunción inalámbrica que imprime, copia, escanea y envía faxes con la comodidad de conectarse a redes inalámbricas. Con la aplicación Canon PRINT puedes imprimir y escanear desde tu smartphone o tablet, y la aplicación Easy-PhotoPrint Editor te permite editar e imprimir fotos fácilmente. También puedes imprimir fotos directamente desde una cámara compatible con PictBridge o desde una tarjeta de memoria.


-
 1
1
-
 2
2
-
 3
3
-
 4
4
-
 5
5
-
 6
6
-
 7
7
-
 8
8
-
 9
9
-
 10
10
-
 11
11
-
 12
12
-
 13
13
-
 14
14
-
 15
15
-
 16
16
-
 17
17
-
 18
18
-
 19
19
-
 20
20


Canon PIXMA TS5120 El manual del propietario
- Categoría
- Impresión
- Tipo
- El manual del propietario
La impresora Canon PIXMA TS5120 es una impresora multifunción inalámbrica que imprime, copia, escanea y envía faxes con la comodidad de conectarse a redes inalámbricas. Con la aplicación Canon PRINT puedes imprimir y escanear desde tu smartphone o tablet, y la aplicación Easy-PhotoPrint Editor te permite editar e imprimir fotos fácilmente. También puedes imprimir fotos directamente desde una cámara compatible con PictBridge o desde una tarjeta de memoria.
en otros idiomas
- English: Canon PIXMA TS5120 Owner's manual
Artículos relacionados
-
Canon PIXMA TS3100/TS3120 El manual del propietario
-
Canon PIXMA TR7020 Guía de inicio rápido
-
Canon PIXMA TS9120 El manual del propietario
-
Canon PIXMA TS8120 El manual del propietario
-
Canon PIXMA TS6120 El manual del propietario
-
Canon PIXMA TS302 El manual del propietario
-
Canon Pixma TR-4551 Manual de usuario
-
Canon PIXMA TS6150 Manual de usuario
-
Canon PIXMA TS3151 Manual de usuario
-
Canon PIXMA TR7520 El manual del propietario