GE PT925SNSS Guía de instalación
- Categoría
- Hornos
- Tipo
- Guía de instalación

1
Single Double Wall Oven
Installation
Instructions
Before You Begin
Read these instructions carefully and completely.
• IMPORTANT³6DYHWKHVH
instructions for local inspector’s use.
•
IMPORTANT³2EVHUYHDOO
governing codes and ordinances.
1RWHWR,QVWDOOHU³%HVXUHWROHDYHWKHVH
instructions with the consumer.
1RWHWR&RQVXPHU³.HHSWKHVH
instructions for future reference.
• Proper installation is the responsibility of the
installer and product failure due to improper
installation is NOT covered under warranty.
127(³7KLVDSSOLDQFHPXVWEHSURSHUO\
grounded.
•
ATTENTION INSTALLER
All electric wall ovens must be hard wired
(direct wired) into an approved junction box.
A plug and receptacle is NOT permitted on
these products.
Tools Needed
1/8” (3 mm) Drill Bit and
Electric or Hand Drill
Nut Driver 7/16”
(11 mm)
Materials Needed
Strain Relief Clamp for
1/2” conduit
Junction Box
Wire Nuts
String 72”
(183 cm)
31-110046 08-16 GEA
Parts Included
(Appearance will vary)
Screws For Installation
(8-18 x .625 Black Dome
Phillips Head)
Lower Oven
Rack Supports
with Hex Nuts
PT925
30” (76.2 cm)
Metal Bottom Trim Assembly
Hex Nuts
If you have questions, call GE Appliances at 800.GE.CARES (800.432.2737)
or visit our website at: GEAppliances.com
Wire Strippers
Phillips #2
Screwdriver

2
Electrical Requirements
Rating plate is located on oven side trim, side
front frame or lower front frame.
We recommend you have the electrical wiring
and hookup of your oven connected by a
TXDOL¿HGHOHFWULFLDQ$IWHULQVWDOODWLRQKDYHWKH
electrician show you how to disconnect power
from the range.
Check with your local utilities for electrical codes
which apply in your area. Failure to wire your
oven according to governing codes could result
in a hazardous condition. If there are no local
codes, your oven must be wired and fused to
meet the requirements of the National Electrical
Code, NFPA No. 70–Latest Edition, available from
the National Fire Protection Association.
(ȺHFWLYH-DQXDU\WKH1DWLRQDO
Electrical Code requires that new, but not
existing, construction utilize a four-conductor
connection to an electric oven. When installing
an electric oven in new construction, a mobile
home, recreational vehicle or an area where
local codes prohibit grounding through the
neutral conductor, follow the instructions in the
section on NEW CONSTRUCTION AND FOUR-
CONDUCTOR BRANCH CIRCUIT CONNECTION.
You must use a single-phase 120/208 VAC or
120/240 VAC, 60 hertz electrical system. If you
connect to aluminum wiring, properly installed
connectors approved for use with aluminum
wiring must be used.
IMPORTANT SAFETY INSTRUCTIONS
Installation Instructions
For Your Safety
• Be sure your oven is installed properly by
DTXDOL¿HGLQVWDOOHURUVHUYLFHWHFKQLFLDQ
• Be sure the oven is securely installed in a
FDELQHWWKDWLV¿UPO\DWWDFKHGWRWKHKRXVH
structure. Weight on the oven door could
cause the oven to tip and result in injury.
Never allow anyone to climb, sit, stand or
hang on the oven door.
• Make sure the cabinets and wall
coverings around the oven can withstand
the temperatures (up to 200°F [93.3°C])
generated by the oven.
WARNING: The electrical
power to the oven supply line must
EHVKXWRȹZKLOHOLQHFRQQHFWLRQVDUH
being made. Failure to do so could
result in serious injury or death.
Rating Plate Location
Electrical Requirements
This appliance must be supplied with the proper
voltage and frequency, and connected to an
individual, properly grounded branch circuit,
protected by a circuit breaker or fuse. See the rating
plate located on the oven frame to determine
the rating of the product. Use the chart below to
determine the minimum recommended dedicated
circuit protection.
Recommended
.:5DWLQJ .:5DWLQJ &LUFXLW6L]H
240V 208V (Dedicated)
.: .: $PS
.:².: .:².: $PS
.:².: .:².: $PS
.:².: .:².: $PS

3
Open oven door and remove literature
pack and oven racks.
Remove Installation Instructions from
literature pack and read them carefully
before you begin.
Be sure to place all literature, Owner’s
Manual, Installations, etc. in a safe place
for future reference.
Upper door should not be removed during
installation.
Lower door removal is not recommended.
If required, see removal and installation
instructions in appendix.
Remove packaging materials.
Check behind hinges and under
elements. Remove labels on the
outside of the door, plastic on trims
and panel, all tape around the oven.
Installation Instructions
Pre-Installation Checklist
ALL INSTALLATION INFORMATION ON THE
FOLLOWING PAGES IS TO BE USED FOR
SINGLE DOUBLE WALL OVEN INSTALLATION!
DO NOT LIFT THE DOOR BY THE HANDLE!
Place the oven on a table or platform even
with the cutout opening. Platform must
VXSSRUWOEV.J
Remove the bottom trim from the top of
the oven. The trim is wrapped separately
and taped to the top of the unit. It will be
installed before unit is pushed fully into the
cabinet, 4" out from cabinet
Flat Rack with Handles
Literature
Pack
E
AS
Y
IN
S
T
AL
L
A
T
IO
N
O
F
YO
U
R
N
EW
3
0
"
W
AL
L
O
V
E
N
B
e
f
o
r
e
y
o
u
b
e
g
i
n
-
R
e
a
d
th
e
s
e
i
n
s
t
r
u
c
ti
o
n
s
c
o
m
p
l
e
te
ly
a
n
d
c
a
r
e
f
u
l
l
y
.
I
M
P
O
R
T
A
N
T
-
S
a
v
e
th
e
s
e
i
n
s
tr
uc
t
i
o
n
s
f
o
r
lo
ca
l
i
n
s
p
e
c
to
r
’
s
us
e
.
I
M
P
O
R
T
A
N
T
-
O
B
SE
R
V
E
A
L
L
G
O
V
E
R
N
I
N
G
C
O
D
E
S
A
N
D
O
R
D
I
A
N
C
E
S
.
N
o
te
to
I
n
s
ta
ll
e
r
-
B
e
s
u
r
e
to
l
e
a
v
e
t
h
e
s
e
i
n
s
tr
u
c
ti
o
n
s
w
i
th
t
h
e
c
o
n
s
u
m
e
r
.
O
W
N
E
R
-
Ke
e
p
t
h
e
s
e
i
n
s
tr
u
c
ti
o
n
s
f
o
r
f
u
tur
e
r
e
f
e
r
e
n
c
e
.
N
o
t
e
-
T
h
i
s
a
p
p
li
a
n
c
e
m
u
s
t
b
e
p
r
o
p
e
r
ly
g
r
o
u
n
d
e
d
(
i
f
a
p
p
l
i
c
a
b
l
e
)
.
B
e
f
o
r
e
y
o
u
b
e
g
i
n
-
R
e
a
d
th
e
s
e
i
n
s
tr
u
c
t
i
o
n
s
c
o
m
p
l
e
te
ly
a
n
d
c
a
r
e
f
u
l
l
y
.
I
M
P
O
R
T
A
N
T
-
S
av
e
th
e
s
e
i
n
s
tr
u
c
ti
o
n
s
f
o
r
l
o
c
a
l
i
n
s
p
e
c
t
o
r
’
s
u
s
e
.
I
M
P
O
R
T
A
N
T
-
O
B
S
E
R
V
E
A
L
L
G
OV
E
R
N
I
N
G
C
O
D
E
S
A
N
D
O
R
D
I
A
N
C
E
S
.
N
o
te
to
I
n
s
ta
l
le
r
-
B
e
s
u
r
e
t
o
le
av
e
th
e
s
e
i
n
s
t
ru
ct
i
o
n
s
wi
t
h
th
e
c
o
n
s
u
m
e
r.
O
W
N
E
R
-
Ke
e
p
t
h
e
s
e
i
n
s
tr
u
c
t
i
o
n
s
f
o
r
f
u
tu
r
e
r
e
f
e
re
n
c
e
.
N
o
t
e
-
T
h
i
s
a
p
p
li
a
n
c
e
m
u
s
t
b
e
p
r
o
p
e
r
l
y
g
r
o
u
n
d
e
d
(i
f
ap
p
l
i
c
a
b
le
).
F
O
R
Y
O
U
R
S
A
F
E
T
Y
B
e
f
o
r
e
y
o
u
b
e
g
i
n
-
R
e
a
d
th
e
s
e
i
n
s
tr
u
c
ti
o
n
s
c
o
m
p
l
e
te
ly
a
n
d
c
a
r
e
f
u
ll
y
.
I
M
P
O
R
T
A
N
T
-
Sa
v
e
th
e
s
e
i
n
s
t
ru
c
ti
o
n
s
f
o
r
l
o
c
a
l
i
n
s
p
e
c
t
o
r
’
s
u
s
e
.
I
M
P
O
R
T
A
N
T
-
OB
S
E
R
V
E
A
L
L
G
O
V
E
R
N
I
N
G
C
OD
E
S
A
N
D
O
R
D
I
A
N
C
E
S
.
N
o
te
to
I
n
s
ta
ll
e
r
-
B
e
s
u
re
to
l
e
a
v
e
t
h
e
s
e
i
n
s
tr
u
c
ti
o
n
s
w
i
th
t
h
e
c
o
n
s
u
m
e
r
.
O
W
N
E
R
-
K
e
e
p
th
e
s
e
i
n
s
tr
u
c
ti
o
n
s
f
o
r
f
u
t
u
r
e
r
e
f
e
re
n
c
e
.
N
o
t
e
-
T
h
i
s
a
p
p
li
a
n
c
e
m
u
s
t
b
e
p
r
o
p
e
r
ly
g
ro
u
n
d
e
d
(i
f
a
p
p
l
i
c
a
b
l
e
)
.
B
e
f
o
r
e
y
o
u
b
e
g
i
n
-
R
e
a
d
th
e
s
e
i
n
s
tr
u
c
ti
o
n
s
c
o
m
p
l
e
te
l
y
a
n
d
c
a
r
e
f
u
l
ly
.
I
M
P
OR
T
A
N
T
-
S
a
v
e
th
e
s
e
i
n
s
tr
u
c
ti
o
n
s
f
o
r
lo
c
a
l
i
n
s
p
e
c
to
r
’
s
u
s
e
.
I
M
P
O
R
T
A
N
T
-
O
B
SE
R
V
E
A
L
L
G
O
V
E
R
N
I
N
G
C
O
D
E
S
A
N
D
O
R
D
I
A
N
C
E
S
.
N
o
t
e
to
I
n
s
ta
l
l
e
r
-
B
e
s
u
r
e
to
l
e
a
v
e
th
e
s
e
i
n
s
t
r
u
c
t
i
o
n
s
w
i
t
h
th
e
co
n
s
u
m
e
r
.
O
W
N
E
R
-
K
e
e
p
th
e
s
e
i
n
s
t
r
uc
ti
o
n
s
f
o
r
f
utu
r
e
r
e
f
e
r
e
n
c
e
.
N
o
te
-
T
h
i
s
ap
p
l
i
a
n
c
e
m
u
s
t
b
e
p
r
o
p
e
r
l
y
g
r
o
u
n
d
e
d
(i
f
a
p
p
l
i
c
a
b
l
e
).
E
L
E
C
T
R
I
C
A
L
R
E
Q
U
I
R
E
M
E
N
T
S
B
e
f
o
r
e
y
o
u
b
e
g
i
n
-
R
e
a
d
th
e
s
e
i
n
s
tr
u
c
ti
o
n
s
c
o
m
p
l
e
t
e
l
y
a
n
d
c
a
r
e
f
u
l
ly
.
I
M
P
O
R
T
A
N
T
-
S
a
v
e
th
e
s
e
i
n
s
tru
c
t
i
o
n
s
f
o
r
l
o
c
a
l
i
n
s
p
e
c
to
r
’
s
u
s
e
.
I
M
P
O
R
T
A
N
T
-
O
B
S
E
R
V
E
A
L
L
G
O
VE
R
N
I
N
G
C
O
D
E
S
A
N
D
O
R
D
I
A
N
C
E
S
.
N
o
te
to
I
n
s
ta
l
l
e
r
-
B
e
s
u
r
e
to
l
e
a
v
e
t
h
e
s
e
i
n
s
tr
u
c
ti
o
n
s
w
i
th
t
h
e
c
o
n
s
u
m
e
r
.
O
W
N
E
R
-
K
e
e
p
th
e
s
e
i
n
s
tr
u
c
ti
o
n
s
f
o
r
f
u
tu
r
e
r
e
f
e
r
e
n
c
e
.
N
o
t
e
-
T
h
i
s
a
p
p
l
i
a
n
c
e
m
u
s
t
b
e
p
r
o
p
e
r
l
y
g
r
o
u
n
d
e
d
(i
f
a
p
p
l
i
c
a
b
l
e
).
B
e
f
o
r
e
y
o
u
b
e
g
i
n
-
R
e
a
d
t
h
e
s
e
i
n
s
tr
u
c
ti
o
n
s
c
o
m
p
l
e
te
ly
a
n
d
c
a
r
e
f
u
ll
y
.
I
M
P
O
R
T
A
N
T
-
S
a
v
e
th
e
s
e
i
n
s
tr
u
c
ti
o
n
s
f
o
r
l
o
c
a
l
i
n
s
p
e
c
to
r
’
s
u
s
e
.
I
M
P
O
R
T
A
N
T
-
O
B
S
E
R
V
E
A
L
L
GO
V
E
R
N
I
N
G
C
O
D
E
S
A
N
D
O
R
D
I
A
N
C
E
S
.
N
o
te
to
I
n
s
t
a
l
l
e
r
-
B
e
s
ur
e
to
le
a
v
e
th
e
s
e
i
n
s
tr
u
c
ti
o
n
s
w
i
th
th
e
c
o
n
s
u
m
e
r
.
O
W
N
E
R
-
K
e
e
p
th
e
s
e
i
n
s
tr
u
c
ti
o
n
s
f
o
r
f
u
t
u
r
e
re
f
e
r
e
n
ce
.
N
o
te
-
T
h
i
s
a
p
p
l
i
a
n
c
e
m
u
s
t
b
e
p
r
o
p
e
r
l
y
g
r
o
u
n
d
e
d
(i
f
ap
p
l
i
c
a
b
le
).
B
e
f
o
r
e
y
o
u
b
e
g
i
n
-
R
e
a
d
t
h
e
s
e
i
n
s
tr
u
c
ti
o
n
s
c
o
m
p
le
te
l
y
a
n
d
c
a
r
e
f
u
ll
y
.
I
M
P
O
R
T
A
N
T
-
S
a
v
e
th
e
s
e
i
n
s
t
r
u
c
ti
o
n
s
f
o
r
l
o
c
a
l
i
n
s
p
e
c
t
o
r
’
s
u
s
e
.
I
M
P
O
R
T
A
N
T
-
O
B
SE
R
V
E
A
L
L
G
O
V
E
R
N
I
N
G
C
O
D
E
S
A
N
D
O
R
D
I
A
N
C
E
S
.
N
o
te
t
o
I
n
s
ta
l
l
e
r
-
B
e
s
u
r
e
to
l
e
a
v
e
th
e
s
e
i
n
s
tr
u
c
ti
o
n
s
w
i
th
th
e
c
o
n
s
u
m
e
r
.
O
W
N
E
R
-
K
e
e
p
t
h
e
s
e
i
n
s
tr
u
c
ti
o
n
s
f
o
r
f
u
tu
r
e
r
e
f
e
r
e
n
c
e
.
N
o
te
-
T
h
i
s
a
p
p
l
i
a
n
c
e
m
us
t
b
e
p
r
o
p
e
r
l
y
g
r
o
u
n
d
e
d
(i
f
a
p
p
l
i
c
a
b
l
e
).
B
e
f
o
r
e
y
o
u
b
e
g
i
n
-
R
e
a
d
th
e
s
e
i
n
s
tr
u
c
ti
o
n
s
c
o
m
p
l
e
te
l
y
a
n
d
c
a
r
e
f
u
l
ly
.
I
M
P
O
R
T
A
N
T
-
S
a
v
e
th
e
s
e
i
n
s
tru
c
t
i
o
n
s
f
o
r
lo
c
a
l
i
n
s
p
e
c
to
r’
s
u
s
e
.
I
M
P
O
R
T
A
N
T
-
O
B
SE
R
V
E
A
L
L
GO
V
E
R
N
I
N
G
C
O
D
E
S
A
N
D
O
R
D
I
A
N
C
E
S
.
N
o
te
to
I
n
s
t
a
l
l
e
r
-
B
e
s
u
r
e
to
l
e
a
v
e
th
e
s
e
i
n
s
tr
u
c
ti
o
n
s
wi
th
th
e
c
o
n
s
u
m
e
r
.
O
W
N
E
R
-
K
e
e
p
t
h
e
s
e
i
n
s
tr
u
c
ti
o
n
s
f
o
r
f
u
tu
r
e
r
e
f
e
r
e
n
c
e
.
N
o
te
-
T
h
i
s
ap
p
l
i
a
n
c
e
m
u
s
t
b
e
p
ro
p
e
r
l
y
g
r
o
u
n
d
e
d
(i
f
a
p
p
l
i
c
ab
l
e
).
B
e
f
o
r
e
y
o
u
b
e
g
i
n
-
R
e
a
d
th
e
s
e
i
n
s
tr
u
c
t
i
o
n
s
c
o
m
p
l
e
te
ly
a
n
d
c
a
r
e
f
u
l
l
y
.
I
M
P
O
R
T
A
N
T
-
S
av
e
th
e
s
e
i
n
s
tr
u
c
ti
o
n
s
f
o
r
l
o
c
a
l
i
n
s
p
e
c
t
o
r
’
s
u
s
e
.
I
M
P
O
R
T
A
N
T
-
O
B
S
E
R
V
E
A
L
L
G
OV
E
R
N
I
N
G
C
O
D
E
S
A
N
D
O
R
D
I
A
N
C
E
S
.
N
o
te
to
I
n
s
ta
l
le
r
-
B
e
s
u
r
e
t
o
le
av
e
th
e
s
e
i
n
s
t
ru
ct
i
o
n
s
wi
t
h
th
e
c
o
n
s
u
m
e
r.
O
W
N
E
R
-
Ke
e
p
t
h
e
s
e
i
n
s
tr
u
c
t
i
o
n
s
f
o
r
f
u
tu
r
e
r
e
f
e
re
n
c
e
.
N
o
t
e
-
T
h
i
s
a
p
p
li
a
n
c
e
m
u
s
t
b
e
p
r
o
p
e
r
l
y
g
r
o
u
n
d
e
d
(i
f
ap
p
l
i
c
a
b
le
).
F
O
R
Y
O
U
R
S
A
F
E
T
Y
B
e
f
o
r
e
y
o
u
b
e
g
i
n
-
R
e
a
d
th
e
s
e
i
n
s
tr
u
c
ti
o
n
s
c
o
m
p
l
e
te
ly
a
n
d
c
a
r
e
f
u
ll
y
.
I
M
P
O
R
T
A
N
T
-
Sa
v
e
th
e
s
e
i
n
s
t
ru
c
ti
o
n
s
f
o
r
l
o
c
a
l
i
n
s
p
e
c
t
o
r
’
s
u
s
e
.
I
M
P
O
R
T
A
N
T
-
OB
S
E
R
V
E
A
L
L
G
O
V
E
R
N
I
N
G
C
OD
E
S
A
N
D
O
R
D
I
A
N
C
E
S
.
N
o
te
to
I
n
s
ta
ll
e
r
-
B
e
s
u
re
to
l
e
a
v
e
t
h
e
s
e
i
n
s
tr
u
c
ti
o
n
s
w
i
th
t
h
e
c
o
n
s
u
m
e
r
.
O
W
N
E
R
-
K
e
e
p
th
e
s
e
i
n
s
tr
u
c
ti
o
n
s
f
o
r
f
u
t
u
r
e
r
e
f
e
re
n
c
e
.
N
o
t
e
-
T
h
i
s
a
p
p
li
a
n
c
e
m
u
s
t
b
e
p
r
o
p
e
r
ly
g
ro
u
n
d
e
d
(i
f
a
p
p
l
i
c
a
b
l
e
)
.
B
e
f
o
r
e
y
o
u
b
e
g
i
n
-
R
e
a
d
th
e
s
e
i
n
s
tr
u
c
ti
o
n
s
c
o
m
p
l
e
te
l
y
a
n
d
c
a
r
e
f
u
l
ly
.
I
M
P
OR
T
A
N
T
-
S
a
v
e
th
e
s
e
i
n
s
tr
u
c
ti
o
n
s
f
o
r
lo
c
a
l
i
n
s
p
e
c
to
r
’
s
u
s
e
.
I
M
P
O
R
T
A
N
T
-
O
B
SE
R
V
E
A
L
L
G
O
V
E
R
N
I
N
G
C
O
D
E
S
A
N
D
O
R
D
I
A
N
C
E
S
.
N
o
t
e
to
I
n
s
ta
l
l
e
r
-
B
e
s
u
r
e
to
l
e
a
v
e
th
e
s
e
i
n
s
t
r
u
c
t
i
o
n
s
w
i
t
h
th
e
co
n
s
u
m
e
r
.
O
W
N
E
R
-
K
e
e
p
th
e
s
e
i
n
s
t
r
uc
ti
o
n
s
f
o
r
f
utu
r
e
r
e
f
e
r
e
n
c
e
.
N
o
te
-
T
h
i
s
ap
p
l
i
a
n
c
e
m
u
s
t
b
e
p
r
o
p
e
r
l
y
g
r
o
u
n
d
e
d
(i
f
a
p
p
l
i
c
a
b
l
e
).
E
L
E
C
T
R
I
C
A
L
R
E
Q
U
I
R
E
M
E
N
T
S
B
e
f
o
r
e
y
o
u
b
e
g
i
n
-
R
e
a
d
th
e
s
e
i
n
s
tr
u
c
ti
o
n
s
c
o
m
p
l
e
t
e
l
y
a
n
d
c
a
r
e
f
u
l
ly
.
I
M
P
O
R
T
A
N
T
-
S
a
v
e
th
e
s
e
i
n
s
tru
c
t
i
o
n
s
f
o
r
l
o
c
a
l
i
n
s
p
e
c
to
r
’
s
u
s
e
.
I
M
P
O
R
T
A
N
T
-
O
B
S
E
R
V
E
A
L
L
G
O
VE
R
N
I
N
G
C
O
D
E
S
A
N
D
O
R
D
I
A
N
C
E
S
.
N
o
te
to
I
n
s
ta
l
l
e
r
-
B
e
s
u
r
e
to
l
e
a
v
e
t
h
e
s
e
i
n
s
tr
u
c
ti
o
n
s
w
i
th
t
h
e
c
o
n
s
u
m
e
r
.
O
W
N
E
R
-
K
e
e
p
th
e
s
e
i
n
s
tr
u
c
ti
o
n
s
f
o
r
f
u
tu
r
e
r
e
f
e
r
e
n
c
e
.
N
o
t
e
-
T
h
i
s
a
p
p
l
i
a
n
c
e
m
u
s
t
b
e
p
r
o
p
e
r
l
y
g
r
o
u
n
d
e
d
(i
f
a
p
p
l
i
c
a
b
l
e
).
B
e
f
o
r
e
y
o
u
b
e
g
i
n
-
R
e
a
d
t
h
e
s
e
i
n
s
tr
u
c
ti
o
n
s
c
o
m
p
l
e
te
ly
a
n
d
c
a
r
e
f
u
ll
y
.
I
M
P
O
R
T
A
N
T
-
S
a
v
e
th
e
s
e
i
n
s
tr
u
c
ti
o
n
s
f
o
r
l
o
c
a
l
i
n
s
p
e
c
to
r
’
s
u
s
e
.
I
M
P
O
R
T
A
N
T
-
O
B
S
E
R
V
E
A
L
L
GO
V
E
R
N
I
N
G
C
O
D
E
S
A
N
D
O
R
D
I
A
N
C
E
S
.
N
o
te
to
I
n
s
t
a
l
l
e
r
-
B
e
s
ur
e
to
le
a
v
e
th
e
s
e
i
n
s
tr
u
c
ti
o
n
s
w
i
th
th
e
c
o
n
s
u
m
e
r
.
O
W
N
E
R
-
K
e
e
p
th
e
s
e
i
n
s
tr
u
c
ti
o
n
s
f
o
r
f
u
t
u
r
e
re
f
e
r
e
n
ce
.
N
o
te
-
T
h
i
s
a
p
p
l
i
a
n
c
e
m
u
s
t
b
e
p
r
o
p
e
r
l
y
g
r
o
u
n
d
e
d
(i
f
ap
p
l
i
c
a
b
le
).
B
e
f
o
r
e
y
o
u
b
e
g
i
n
-
R
e
a
d
t
h
e
s
e
i
n
s
tr
u
c
ti
o
n
s
c
o
m
p
le
te
l
y
a
n
d
c
a
r
e
f
u
ll
y
.
I
M
P
O
R
T
A
N
T
-
S
a
v
e
th
e
s
e
i
n
s
t
r
u
c
ti
o
n
s
f
o
r
l
o
c
a
l
i
n
s
p
e
c
t
o
r
’
s
u
s
e
.
I
M
P
O
R
T
A
N
T
-
O
B
SE
R
V
E
A
L
L
G
O
V
E
R
N
I
N
G
C
O
D
E
S
A
N
D
O
R
D
I
A
N
C
E
S
.
N
o
te
t
o
I
n
s
ta
l
l
e
r
-
B
e
s
u
r
e
to
l
e
a
v
e
th
e
s
e
i
n
s
tr
u
c
ti
o
n
s
w
i
th
th
e
c
o
n
s
u
m
e
r
.
O
W
N
E
R
-
K
e
e
p
t
h
e
s
e
i
n
s
tr
u
c
ti
o
n
s
f
o
r
f
u
tu
r
e
r
e
f
e
r
e
n
c
e
.
N
o
te
-
T
h
i
s
a
p
p
l
i
a
n
c
e
m
us
t
b
e
p
r
o
p
e
r
l
y
g
r
o
u
n
d
e
d
(i
f
a
p
p
l
i
c
a
b
l
e
).
B
e
f
o
r
e
y
o
u
b
e
g
i
n
-
R
e
a
d
th
e
s
e
i
n
s
t
r
u
c
ti
o
n
s
c
o
m
p
l
e
te
ly
a
n
d
c
a
r
e
f
u
l
l
y
.
I
M
P
O
R
T
A
N
T
-
S
a
v
e
th
e
s
e
i
n
s
tr
uc
t
i
o
n
s
f
o
r
lo
ca
l
i
n
s
p
e
c
to
r
’
s
us
e
.
I
M
P
O
R
T
A
N
T
-
O
B
SE
R
V
E
A
L
L
G
O
V
E
R
N
I
N
G
C
O
D
E
S
A
N
D
O
R
D
I
A
N
C
E
S
.
N
o
te
to
I
n
s
ta
ll
e
r
-
B
e
s
u
r
e
to
l
e
a
v
e
t
h
e
s
e
i
n
s
tr
u
c
ti
o
n
s
w
i
th
t
h
e
c
o
n
s
u
m
e
r
.
O
W
N
E
R
-
Ke
e
p
t
h
e
s
e
i
n
s
tr
u
c
ti
o
n
s
f
o
r
f
u
tur
e
r
e
f
e
r
e
n
c
e
.
N
o
t
e
-
T
h
i
s
a
p
p
li
a
n
c
e
m
u
s
t
b
e
p
r
o
p
e
r
ly
g
r
o
u
n
d
e
d
(i
f
a
p
p
l
i
c
a
b
l
e
).
B
e
f
o
r
e
y
o
u
b
e
g
i
n
-
R
e
a
d
th
e
s
e
i
n
s
tr
u
c
t
i
o
n
s
c
o
m
p
l
e
te
ly
a
n
d
c
a
r
e
f
u
l
l
y
.
I
M
P
O
R
T
A
N
T
-
S
av
e
th
e
s
e
i
n
s
tr
u
c
ti
o
n
s
f
o
r
l
o
c
a
l
i
n
s
p
e
c
t
o
r
’
s
u
s
e
.
I
M
P
O
R
T
A
N
T
-
O
B
S
E
R
V
E
A
L
L
G
OV
E
R
N
I
N
G
C
O
D
E
S
A
N
D
O
R
D
I
A
N
C
E
S
.
N
o
te
to
I
n
s
ta
l
le
r
-
B
e
s
u
r
e
t
o
le
av
e
th
e
s
e
i
n
s
t
ru
ct
i
o
n
s
wi
t
h
th
e
c
o
n
s
u
m
e
r.
O
W
N
E
R
-
Ke
e
p
t
h
e
s
e
i
n
s
tr
u
c
t
i
o
n
s
f
o
r
f
u
tu
r
e
r
e
f
e
re
n
c
e
.
N
o
t
e
-
T
h
i
s
a
p
p
li
a
n
c
e
m
u
s
t
b
e
p
r
o
p
e
r
l
y
g
r
o
u
n
d
e
d
(i
f
ap
p
l
i
c
a
b
le
).
F
O
R
Y
O
U
R
S
A
F
E
T
Y
B
e
f
o
r
e
y
o
u
b
e
g
i
n
-
R
e
a
d
th
e
s
e
i
n
s
tr
u
c
ti
o
n
s
c
o
m
p
l
e
te
ly
a
n
d
c
a
r
e
f
u
ll
y
.
I
M
P
O
R
T
A
N
T
-
Sa
v
e
th
e
s
e
i
n
s
t
ru
c
ti
o
n
s
f
o
r
l
o
c
a
l
i
n
s
p
e
c
t
o
r
’
s
u
s
e
.
I
M
P
O
R
T
A
N
T
-
OB
S
E
R
V
E
A
L
L
G
O
V
E
R
N
I
N
G
C
OD
E
S
A
N
D
O
R
D
I
A
N
C
E
S
.
N
o
te
to
I
n
s
ta
ll
e
r
-
B
e
s
u
re
to
l
e
a
v
e
t
h
e
s
e
i
n
s
tr
u
c
ti
o
n
s
w
i
th
t
h
e
c
o
n
s
u
m
e
r
.
O
W
N
E
R
-
K
e
e
p
th
e
s
e
i
n
s
tr
u
c
ti
o
n
s
f
o
r
f
u
t
u
r
e
r
e
f
e
re
n
c
e
.
N
o
t
e
-
T
h
i
s
a
p
p
li
a
n
c
e
m
u
s
t
b
e
p
r
o
p
e
r
ly
g
ro
u
n
d
e
d
(i
f
a
p
p
l
i
c
a
b
l
e
)
.
B
e
f
o
r
e
y
o
u
b
e
g
i
n
-
R
e
a
d
th
e
s
e
i
n
s
tr
u
c
ti
o
n
s
c
o
m
p
l
e
te
l
y
a
n
d
c
a
r
e
f
u
l
ly
.
I
M
P
OR
T
A
N
T
-
S
a
v
e
th
e
s
e
i
n
s
tr
u
c
ti
o
n
s
f
o
r
lo
c
a
l
i
n
s
p
e
c
to
r
’
s
u
s
e
.
I
M
P
O
R
T
A
N
T
-
O
B
SE
R
V
E
A
L
L
G
O
V
E
R
N
I
N
G
C
O
D
E
S
A
N
D
O
R
D
I
A
N
C
E
S
.
N
o
t
e
to
I
n
s
ta
l
l
e
r
-
B
e
s
u
r
e
to
l
e
a
v
e
th
e
s
e
i
n
s
t
r
u
c
t
i
o
n
s
w
i
t
h
th
e
co
n
s
u
m
e
r
.
O
W
N
E
R
-
K
e
e
p
th
e
s
e
i
n
s
t
r
uc
ti
o
n
s
f
o
r
f
utu
r
e
r
e
f
e
r
e
n
c
e
.
N
o
te
-
T
h
i
s
ap
p
l
i
a
n
c
e
m
u
s
t
b
e
p
r
o
p
e
r
l
y
g
r
o
u
n
d
e
d
(i
f
a
p
p
l
i
c
a
b
l
e
).
E
L
E
C
T
R
I
C
A
L
R
E
Q
U
I
R
E
M
E
N
T
S
B
e
f
o
r
e
y
o
u
b
e
g
i
n
-
R
e
a
d
th
e
s
e
i
n
s
tr
u
c
ti
o
n
s
c
o
m
p
l
e
t
e
l
y
a
n
d
c
a
r
e
f
u
l
ly
.
I
M
P
O
R
T
A
N
T
-
S
a
v
e
th
e
s
e
i
n
s
tru
c
t
i
o
n
s
f
o
r
l
o
c
a
l
i
n
s
p
e
c
to
r
’
s
u
s
e
.
I
M
P
O
R
T
A
N
T
-
O
B
S
E
R
V
E
A
L
L
G
O
VE
R
N
I
N
G
C
O
D
E
S
A
N
D
O
R
D
I
A
N
C
E
S
.
N
o
te
to
I
n
s
ta
l
l
e
r
-
B
e
s
u
r
e
to
l
e
a
v
e
t
h
e
s
e
i
n
s
tr
u
c
ti
o
n
s
w
i
th
t
h
e
c
o
n
s
u
m
e
r
.
O
W
N
E
R
-
K
e
e
p
th
e
s
e
i
n
s
tr
u
c
ti
o
n
s
f
o
r
f
u
tu
r
e
r
e
f
e
r
e
n
c
e
.
N
o
t
e
-
T
h
i
s
a
p
p
l
i
a
n
c
e
m
u
s
t
b
e
p
r
o
p
e
r
l
y
g
r
o
u
n
d
e
d
(i
f
a
p
p
l
i
c
a
b
l
e
).
B
e
f
o
r
e
y
o
u
b
e
g
i
n
-
R
e
a
d
t
h
e
s
e
i
n
s
tr
u
c
ti
o
n
s
c
o
m
p
l
e
te
ly
a
n
d
c
a
r
e
f
u
ll
y
.
I
M
P
O
R
T
A
N
T
-
S
a
v
e
th
e
s
e
i
n
s
tr
u
c
ti
o
n
s
f
o
r
l
o
c
a
l
i
n
s
p
e
c
to
r
’
s
u
s
e
.
I
M
P
O
R
T
A
N
T
-
O
B
S
E
R
V
E
A
L
L
GO
V
E
R
N
I
N
G
C
O
D
E
S
A
N
D
O
R
D
I
A
N
C
E
S
.
N
o
te
to
I
n
s
t
a
l
l
e
r
-
B
e
s
ur
e
to
le
a
v
e
th
e
s
e
i
n
s
tr
u
c
ti
o
n
s
w
i
th
th
e
c
o
n
s
u
m
e
r
.
O
W
N
E
R
-
K
e
e
p
th
e
s
e
i
n
s
tr
u
c
ti
o
n
s
f
o
r
f
u
t
u
r
e
re
f
e
r
e
n
ce
.
N
o
te
-
T
h
i
s
a
p
p
l
i
a
n
c
e
m
u
s
t
b
e
p
r
o
p
e
r
l
y
g
r
o
u
n
d
e
d
(i
f
ap
p
l
i
c
a
b
le
).
B
e
f
o
r
e
y
o
u
b
e
g
i
n
-
R
e
a
d
t
h
e
s
e
i
n
s
tr
u
c
ti
o
n
s
c
o
m
p
le
te
l
y
a
n
d
c
a
r
e
f
u
ll
y
.
I
M
P
O
R
T
A
N
T
-
S
a
v
e
th
e
s
e
i
n
s
t
r
u
c
ti
o
n
s
f
o
r
l
o
c
a
l
i
n
s
p
e
c
t
o
r
’
s
u
s
e
.
I
M
P
O
R
T
A
N
T
-
O
B
SE
R
V
E
A
L
L
G
O
V
E
R
N
I
N
G
C
O
D
E
S
A
N
D
O
R
D
I
A
N
C
E
S
.
N
o
te
t
o
I
n
s
ta
l
l
e
r
-
B
e
s
u
r
e
to
l
e
a
v
e
th
e
s
e
i
n
s
tr
u
c
ti
o
n
s
w
i
th
th
e
c
o
n
s
u
m
e
r
.
O
W
N
E
R
-
K
e
e
p
t
h
e
s
e
i
n
s
tr
u
c
ti
o
n
s
f
o
r
f
u
tu
r
e
r
e
f
e
r
e
n
c
e
.
N
o
te
-
T
h
i
s
a
p
p
l
i
a
n
c
e
m
us
t
b
e
p
r
o
p
e
r
l
y
g
r
o
u
n
d
e
d
(i
f
a
p
p
l
i
c
a
b
l
e
).
Before you begin-Read these instructions completely and carefully.
IMPORTANT- Save these instructions for local inspector’s use.
IMPORTANT- OBSERVE ALL GOVERNING CODES AND ORDIANCES.
Note to Installer- Be sure to leave these instructions with the consumer.
OWNER- Keep these instructions for future reference.
Note- This appliance must be properly grounded (if applicable).
Before you begin-Read these
instructions completely and
carefully.
IMPORTANT- Save these
instructions for local inspector’s use.
IMPORTANT- OBSERVE ALL
GOVERNING CODES AND ORDIANCES.
Note to Installer- Be sure to leave
these instructions with the consumer.
OWNER- Keep these instructions
for future reference.
Note- This appliance must be
properly grounded (if applicable).
FOR YOUR SAFETY
Before you begin-Read these instructions completely and carefully.
IMPORTANT- Save these instructions for local inspector’s use.
IMPORTANT- OBSERVE ALL GOVERNING CODES AND ORDIANCES.
Note to Installer- Be sure to leave these instructions with the consumer.
OWNER- Keep these instructions for future reference.
Note- This appliance must be properly grounded (if applicable).
ELECTRICAL REQUIREMENTS
Before you begin-Read these
instructions completely and
carefully.
IMPORTANT- Save these
instructions for local inspector’s use.
IMPORTANT- OBSERVE ALL
GOVERNING CODES AND ORDIANCES.
Note to Installer- Be sure to leave
these instructions with the consumer.
OWNER- Keep these instructions
for future reference.
Note- This appliance must be
properly grounded (if applicable).
Before you begin-Read these instructions completely and carefully.
IMPORTANT- Save these instructions for local inspector’s use.
IMPORTANT- OBSERVE ALL GOVERNING CODES AND ORDIANCES.
Note to Installer- Be sure to leave these instructions with the consumer.
OWNER- Keep these instructions for future reference.
Note- This appliance must be properly grounded (if applicable).
Before you begin-Read these
instructions completely and
carefully.
IMPORTANT- Save these
instructions for local inspector’s use.
IMPORTANT- OBSERVE ALL
GOVERNING CODES AND ORDIANCES.
Note to Installer- Be sure to leave
these instructions with the consumer.
OWNER- Keep these instructions
for future reference.
Note- This appliance must be
properly grounded (if applicable).
FOR YOUR SAFETY
Before you begin-Read these instructions completely and carefully.
IMPORTANT- Save these instructions for local inspector’s use.
IMPORTANT- OBSERVE ALL GOVERNING CODES AND ORDIANCES.
Note to Installer- Be sure to leave these instructions with the consumer.
OWNER- Keep these instructions for future reference.
Note- This appliance must be properly grounded (if applicable).
Before you begin-Read these instructions completely and carefully.
IMPORTANT- Save these instructions for local inspector’s use.
IMPORTANT- OBSERVE ALL GOVERNING CODES AND ORDIANCES.
Note to Installer- Be sure to leave these instructions with the consumer.
OWNER- Keep these instructions for future reference.
Note- This appliance must be properly grounded (if applicable).
ELECTRICAL REQUIREMENTS
Before you begin-Read these
instructions completely and
carefully.
IMPORTANT- Save these
instructions for local inspector’s use.
IMPORTANT- OBSERVE ALL
GOVERNING CODES AND ORDIANCES.
Note to Installer- Be sure to leave
these instructions with the consumer.
OWNER- Keep these instructions
for future reference.
Note- This appliance must be
properly grounded (if applicable).
Before you begin-Read these
instructions completely and
carefully.
IMPORTANT- Save these
instructions for local inspector’s use.
IMPORTANT- OBSERVE ALL
GOVERNING CODES AND ORDIANCES.
Note to Installer- Be sure to leave
these instructions with the consumer.
OWNER- Keep these instructions
for future reference.
Note- This appliance must be
properly grounded (if applicable).
Before you begin-Read these
instructions completely and
carefully.
IMPORTANT- Save these
instructions for local inspector’s use.
IMPORTANT- OBSERVE ALL
GOVERNING CODES AND ORDIANCES.
Note to Installer- Be sure to leave
these instructions with the consumer.
OWNER- Keep these instructions
for future reference.
Note- This appliance must be
properly grounded (if applicable).
Before you begin-Read these instructions completely and carefully.
IMPORTANT- Save these instructions for local inspector’s use.
IMPORTANT- OBSERVE ALL GOVERNING CODES AND ORDIANCES.
Note to Installer- Be sure to leave these instructions with the consumer.
OWNER- Keep these instructions for future reference.
Note- This appliance must be properly grounded (if applicable).
EASY INSTALLATION OF YOUR NEW
30" WALL OVEN
Before you begin-Read these
instructions completely and
carefully.
IMPORTANT- Save these
instructions for local inspector’s use.
IMPORTANT- OBSERVE ALL
GOVERNING CODES AND ORDIANCES.
Note to Installer- Be sure to leave
these instructions with the consumer.
OWNER- Keep these instructions
for future reference.
Note- This appliance must be
properly grounded (if applicable).
FOR YOUR SAFETY
Before you begin-Read these instructions completely and carefully.
IMPORTANT- Save these instructions for local inspector’s use.
IMPORTANT- OBSERVE ALL GOVERNING CODES AND ORDIANCES.
Note to Installer- Be sure to leave these instructions with the consumer.
OWNER- Keep these instructions for future reference.
Note- This appliance must be properly grounded (if applicable).
ELECTRICAL REQUIREMENTS
Before you begin-Read these
instructions completely and
carefully.
IMPORTANT- Save these
instructions for local inspector’s use.
IMPORTANT- OBSERVE ALL
GOVERNING CODES AND ORDIANCES.
Note to Installer- Be sure to leave
these instructions with the consumer.
OWNER- Keep these instructions
for future reference.
Note- This appliance must be
properly grounded (if applicable).
Before you begin-Read these
instructions completely and
carefully.
IMPORTANT- Save these
instructions for local inspector’s use.
IMPORTANT- OBSERVE ALL
GOVERNING CODES AND ORDIANCES.
Note to Installer- Be sure to leave
these instructions with the consumer.
OWNER- Keep these instructions
for future reference.
Note- This appliance must be
properly grounded (if applicable).
Before you begin-Read these
instructions completely and
carefully.
IMPORTANT- Save these
instructions for local inspector’s use.
IMPORTANT- OBSERVE ALL
GOVERNING CODES AND ORDIANCES.
Note to Installer- Be sure to leave
these instructions with the consumer.
OWNER- Keep these instructions
for future reference.
Note- This appliance must be
properly grounded (if applicable).
Temperature
Probe
Rack Supports with Hex Nuts
Upper Door
Do not remove
during installation
Lower Door
Removal not
required for
installation
Flat Rack without Handles
2ȹVHW5DFNZLWKRXW+DQGOHV

4
Installation Instructions
Cutout for 30” (76.2 cm) Single Double
Wall Oven
A
Cabinet Width 30” (76.2 cm)
Recommended
Cutout Location
from Floor 26 1/2” (67.3 cm) Max.
Cutout Depth 23 1/2” (59.7 cm) Min.
Cutout Width 28 1/2” (72.4 cm) Min.
28 5/8” (72.7 cm) Max.
Cutout Height 27 1/4” (69.2 cm) Min.
27 5/16” (69.4 cm) Max.
These ovens are not approved for stackable
installations.
Side by Side Installations
Install two wall ovens in separate cutouts.
NOTE: If marks, blemishes or the cutout
opening are visible above the installed
oven, it may be necessary to add wood
shims under the runners and front trim
until the marks or opening are covered.
Caution:
Users may be burned when using an oven
mounted too high. The recommended
mounting height is based on a 5 ft tall
user.
NOTE: If the cabinet does not have
a front frame and the sides are less
than 3/4” (1.9 cm) thick, shim both
sides equally to establish the cutout
width.
CUTOUT
HEIGHT
27 1/4" MIN.
27 5/16" MAX.
CUTOUT
WIDTH
28 1/2" MIN.
28 5/8" MAX.
5"
22" TO
BOTTOM OF
JUNCTION BOX
JUNCTION
B
LOCATIO
N
RECOMMENDED
CUTOUT
LOCATION
32 1/2"
FROM THE
FLOOR
CABINET
WIDTH
30"
ALLOW 11/16" FOR
OVERLAP OF THE
OVEN OVER SIDE
EDGES OF CUTOUT
THE OPENING
BETWEEN INSIDE
WALLS MUST
BE AT LEAST
28 1/2"WIDE
ALLOW 1" FOR
OVERLAP
ON OVEN TOP
AND BOTTOM
OF CUTOUT
21"
ALLOW A MINIMUM
F
21" FOR CLEARANCE
ADJACENT CORNERS,
R
AWERS, WALLS ETC.
N
THE DOOR IS OPENED.
Allow 11/16”
(1.75 cm) for
overlap of oven
over side edges of
cutout
Cutout
Width
28 1/2”
(72.4 cm)
Min.
28 5/8”
(72.7 cm)
Max.
15”
(38.1 cm)
Cabinet
Width
30”
(76.2 cm)
Allow a minimum
of 15” (38.1 cm) for
clearance to adjacent
corners, drawers,
walls, etc. when
door is open
Allow 1” (2.5 cm)
minimum for
overlap of oven
top and 1 1/4”
(3.2 cm) overlap
of oven bottom
of cutout
Recommended
cutout
location from
ÀRRUµ
(67.3 cm) max
Opening
Between
Inside Walls
Must Be
At Least
28 1/2”
(72.4 cm)
Wide
Junction Box
Location
(junction box
may be
located in adja-
cent cabinet)
9 1/2”
(12.7 cm)
Max.
Cutout
Height
27 1/4”
(69.2 cm) Min.
27 5/16”
(69.4 cm) Max.
22” (55.9 cm)
Min. to
Bottom of
Junction Box
If the cabinet does not have a solid bottom, two
braces or runners must be installed level with the
bottom of the cutout to support the weight of the
oven. For single ovens, the runners and braces
PXVWVXSSRUWOEV.J
C
L
T
2
"
E
Q
R
U
21 5/8"
OVER CENTERLINE
OF CABINET
21 5/8”
(54.9 cm) Over
Centerline
of Cabinet
Cutout – observe all
dimensions and
requirements.
Center Line
30.5”
(77.5 cm)
Center Line
2” (5.1 cm) Min.
2” x 4”
(5 cm x 10 cm)
or equivalent
runners level
with bottom
of cutout
Suitable
Bracing
to Support
Runners
Cutout – observe all
dimensions and
requirements.

5
NOTE: This oven is only approved
WREHLQVWDOOHGXQGHUWKHVSHFL¿F
models as labeled on this unit.
Installation Instructions
Cutout for 30”
(76.2 cm)
Single Double Oven
Under Counter
08676833257/%6.J
240V / 208V Junction Box Location
(junction box may be in adjacent cabinet)
Allow 1” (2.5 cm)
overlap top
of oven,
11/16” (1.8 cm)
overlap side edges of
cutout and
1 1/4” (3.2 cm)
overlap bottom
of oven.
7RSDQGRUVLGH¿OOHUV
may be necessary
if unit is positioned
between existing cabi-
nets. Be sure
they are attached
securely, since they will
anchor the oven in the
cabinet.
Only some electric cooktops may be installed over this oven. No gas cooktops are approved. See
FRRNWRSLQVWDOODWLRQLQVWUXFWLRQVIRUFXWRXWVL]H6HHODEHORQWRSRIRYHQIRUDSSURYHGFRRNWRSPRGHOV
28 1/2” (72.4 cm) Min.
28 5/8” (72.7 cm) Max.
27 1/4” (69.2 cm) Min.
27 5/16” (69.4 cm) Max.
A
36” (91.4 cm)
Countertop
Height
22” (55.9 cm) Min.
Above Support
Platform
9 1/2”
(24.1 cm)
Max.
25” (63.5 cm)
Must
match
toekick
height
4” (10.2 cm)
Toekick
3/4” (1.9 cm)
Support Platform
Required
Side by Side Installation
Install two wall ovens in separate cutouts.
24” (61 cm)
Cutout – observe all
dimensions and
requirements.
Center Line
30.5”
(77.5 cm)
Center Line
2” (5.1 cm) Min.
Cutout – observe all
dimensions and
requirements.

6
NOTE: Additional clearances between cutouts
may be required. Check to be sure the oven
supports above the Warming Drawer location
do not obstruct the required interior depth and
height.
Note: Install the
oven only with spe-
FL¿FPRGHOVOLVWHG
on the label located
on top of the oven.
Cabinetry
Single Double 30” (76.2 cm)
Oven Over a Warming Drawer
Cutout for 30” (76.2 cm) Single Double Wall
Oven – Over a Warming Drawer
A
2” (5.1 cm)
Min.
Per Warming
Drawer
Requirement
Anti-Tip Block Against
Rear Wall Per Warming
Drawer Requirement
1” (2.5 cm) Min. Above Toekick or
Adjust to Oven Installation Height

7
Installation Instructions
Electrical Connections
ATTENTION INSTALLER
All electric wall ovens must be hard wired
(direct wired) into an approved junction box. A
plug and receptacle is NOT permitted on these
products.
DO NOTVKRUWHQWKHÀH[LEOHFRQGXLW7KH
conduit strain relief clamp must be securely
DWWDFKHGWRWKHMXQFWLRQER[DQGWKHÀH[LEOH
conduit must be securely attached to the
FODPS,IWKHÀH[LEOHFRQGXLWZLOOQRW¿WZLWKLQ
the clamp, do not install the oven until a clamp
RIWKHSURSHUVL]HLVREWDLQHG
NOTE TO ELECTRICIAN: The 3 power leads
VXSSOLHGZLWKWKLVDSSOLDQFHDUH8/UHFRJQL]HG
for connection to heavier gauge household
wiring. The insulation of these 3 leads is
rated at temperatures much higher than the
temperature rating of household wiring. The
current carrying capacity of the conductor
is governed by the wire gauge and the
temperature rating of the insulation around
the wire.
7XUQRȺWKHFLUFXLWEUHDNHURUUHPRYH
fuses to the oven branch circuit.
With the oven supported on a table or
platform in front of the cabinet opening,
FRQQHFWWKHÀH[LEOHFRQGXLWWRWKH
electrical junction box as shown below.
Position the conduit in such a manner that
it will lie in a natural loop, in the conduit
pocket behind the unit, when the oven
is installed. You will need to purchase
an appropriate strain relief clamp to
complete the connection of the conduit to
the junction box.
WARNING: Improper
connection of aluminum house
wiring to copper leads can result
LQDQHOHFWULFDOKD]DUGRU¿UH
Use only connectors designed
for joining copper to aluminum
and follow the manufacturer’s
recommended procedure closely.
B2
B1
B
Junction Box
Location
Strain Relief Clamp
(not included)
must be used at
Junction Box.
Conduit
Place oven on a
support to assist
in connecting
conduit, must
support 200lbs
(91kg).
GROUND
RED
WHITE
%/$&.

8
Installation Instructions
B4
Three-Conductor Branch
Circuit Connection
NOTE: If residence leads are aluminum conduc-
tors, see WARNING on page 8.
When connecting to a three-conductor branch
circuit, if local codes permit:
a. Connect the oven ground conductor along
with the neutral (white) lead to the branch
circuit neutral (white or gray in color), using a
wire nut.
b. Connect the oven red lead to the branch cir-
cuit red lead and
the oven black lead to the branch circuit
black lead in accordance with local codes,
using wire nuts.
c. Install proper strain relief clamp.
d. Install junction box cover.
B3
New Construction and
Four-Conductor Branch
Circuit Connection
• When installing in new construction, or
• When installing in a mobile home, or
• When installing in a recreational vehicle, or
• When local codes do not permit grounding
through neutral:
NOTE: If residence leads or ground are
aluminum conductors, see WARNING on page 8.
When connecting to a four-conductor branch
circuit, if local codes permit:
a. Free the neutral (white) lead from being
restrained to any other wires. If necessary, cut
the neutral (white) lead and then re-strip it to
expose the proper length of conductor.
b. Attach the appliance grounding lead (green or
bare copper) in accordance with local codes.
c. Connect the oven neutral (white) lead to
the branch circuit neutral (white or gray) in
accordance with local codes, using a wire nut.
d. Connect the oven red lead to the branch
circuit red lead and the oven black lead to the
branch circuit black lead in accordance with
local codes, using wire nuts.
e. Install proper strain relief clamp.
f. Install junction box cover.
Ground and
neutral wires (white)
Tape or Crimp
Neutral wire
connection
Black
Red
Branch
circuit
Alternate
knockout
Range
conduit
snaps
into box
Junction Box Cover
Junction Box Cover
White
Black
Red
Branch
circuit
Ground
wires
Alternate
knockout
Range
conduit
snaps
into box

9
Installation Instructions
Securing the Oven in the Opening
Sliding the Oven Into the
Opening
a. Loop (do not tie) a 72” (183 cm) string around
the conduit before the oven is slid into place.
This will keep the conduit from falling behind
the oven.
b. Lift oven into cabinet cutout using the oven
opening as a grip. Do not lift the door by the
handle! Carefully push against oven front
frame. Do not push against outside edges.
c. As you slide the oven back, pull the string
so that the conduit will lie in a natural loop,
behind the oven.
d. When you are sure the conduit is out of the
way, slide the oven 3/4 way back into the
opening. Remove the string by pulling on one
end of the loop.
C
C1
Pull out on string
loop while push-
ing the oven into
the cabinet
Installing the Metal
Bottom Trim
IMPORTANT: If this unit is ever removed
from the cabinet or the oven is ever
pulled out for service, pull unit out 4” and
remove the bottom trim. This will prevent
damage to the trim.
C2
Bottom Trim
Trim Screw
Install bottom trim
with unit 4”
out of cabinet
a. Place the bottom metal trim under air
GLYLGHUZLWKVLGHÀXVKDJDLQVWVLGHWULP
Do this with the unit 4” out of the cabinet.
b. Using two trim screws provided, secure
the bottom trim to the bottom duct asm.
4”

10
Installation Instructions
Installing the Lower Oven
Rack Supports and Oven
Racks
C4
Oven Rack Supports
Place the rack support with slotted holes over
the rear bolts and round holes over the front
bolts. Using a nut driver 7/16” (11 mm), lightly
secure with four nuts but do not overtighten or
the enamel could be chipped. Repeat for the
second rack support.
Oven Racks:
Place the rear rack lock bar over and onto the
rack supports, slide the rack all the way in until
the rear rack lock bar drops below the rack
supports. Pull rack forward and make sure the
rear rack lock bar is engaged under the rack
support.
WARNING:
Mounting screws
must be used. Failure to do so could
result in the oven falling out of the
cabinet causing serious injury.
Drilling the Pilot Holes and
Mounting the Oven
a. Drill through the mounting holes of the side
trim, for the #8 screws provided.
b. Secure the oven to cabinet with screws
provided.
NOTE: If the cabinet is particle board, you must
use #8 x 3/4” particle board screws. These may
be purchased at any hardware store.
NOTE: Before drilling the pilot holes, make
sure the oven is pushed as far back into
the opening as it will go and centered.
C3
Mounting Hole
Locations
(two provided)
Slotted
holes over
rear bolts
Round
holes over
front bolts

11
Installation Instructions
5HPRYHDOOSURWHFWLYH¿OPLISUHVHQW
and any stickers.
Check to be sure that all wiring is secure
and not pinched or in contact with
moving parts.
Pre-Test Checklist
Check that the bottom trim is installed
properly (see page 11).
Check to be sure the mounting screws
DUHLQVWDOOHGDQGÀXVKZLWKWKHVLGHWULP
(see page 10).
Remove all items from the inside
of the oven.
Check that conduit is securely
connected to the junction box.
Turn on the power to the oven. (Refer to
your Owner’s Manual.) Verify that the
bake and broil units, and all cooking
functions operate properly.
Check that the circuit breaker is not
tripped nor the house fuse blown.
See your Owner’s Manual for
troubleshooting list.
Operation Checklist
NOTE TO ELECTRICIAN: The power
leads supplied with this appliance
DUH8/UHFRJQL]HGIRUFRQQHFWLRQV
to larger gauge household wiring.
The insulation of these leads is rated
at temperatures much higher than
the temperature rating of household
wiring. The current carrying capacity
of a conductor is governed by the wire
gauge and also the temperature rating
of the insulation around the wire.
NOTE: ALUMINUM WIRING
A.
WARNING:
IMPROPER
CONNECTION OF ALUMINUM HOUSE
WIRING TO THE COPPER LEADS CAN
RESULT IN AN ELECTRICAL HAZARD
OR FIRE.
B. Splice copper wires to aluminum
wiring using special connectors
designed and UL approved for
joining copper to aluminum,
and follow the manufacturer’s
recommended connector
procedure closely.
NOTE: Wire used, location and
enclosure of splices, etc., must
conform to good wiring practice
and local codes.

12
DO NOT LIFT THE DOOR BY THE HANDLE!
Place hands on both sides of
the door, and close the oven
door to the removal position,
which is most of the way closed.
Lift door up and
out until the
hinge arms
clear the slots.
Hinge
Unlocked
Position
Hinge
Slot
Hinge
Arm
Hinge
Unlocked
Position
Hinge
Slot
Hinge
Arm
Hinge Clears Slot
Appendix
Lower Oven Door Removal and
Installation Instructions
1
2
3
4
Bottom door removal is not recommended
for installation of the product.
Open the oven door as far as it will go.
Pull both hinge locks
down toward the door
frame, to the unlocked
position. This may
UHTXLUHDÀDWEODGH
screwdriver.
Lift oven door by placing
one hand on each side.
The door is heavy; you
may need help. Do not
lift the door by the handle.
With door at the same angle as removal
position, (most of the way closed), seat the
notch of the hinge arm into the bottom
edge of the hinge slot. The notch of the
hinge arm must be fully seated into the
bottom of the slot.
Open the oven door as far as it will open.
Close the oven door.
Push the hinge locks up against the front
frame of the oven cavity, to the locked
position.
NOTE:
The oven door is heavy. You may
need help lifting the door high enough to
slide it into the hinge slots. Do not lift the
door by the handle.
1
2
3
5
4
Bottom Edge
of Slot
Notch of Hinge
Securely Fitted
into Bottom of
Hinge Slot
Hinge in Locked Position
Hinge Arm
Hinge Notch
DOOR REMOVAL
DOOR REPLACMENT

1
Horno de pared simple doble
Instrucciones
de instalación
Antes de empezar
Lea estas instrucciones cuidadosa y completamente.
• IMPORTANTE³*XDUGHHVWDV
instrucciones y téngalas disponibles
para el inspector local.
•
IMPORTANTE³2EVHUYHWRGRV
ORVFyGLJRV\RUGHQDQ]DVYLJHQWHV
1RWDDOLQVWDODGRU³&HUFLyUHVHGHGHMDU
estas instrucciones con el propietario.
1RWDDOFRQVXPLGRU³*XDUGHHVWDV
instrucciones para usarlas como
referencia en el futuro.
•
La instalación apropiada es responsabilidad
del instalador y la falla del producto por una
instalación incorrecta NO está cubierta por la
garantía.
127$³(VWHDSDUDWRGHEHHVWDUFRQHFWDGRD
tierra adecuadamente.
• £$7(1&,Ï1$/,167$/$'25!
Todos los hornos electrónicos de pared deben
VHUFDEOHDGRVGLUHFWDPHQWHHQXQDFDMDGH
conexión aprobada. Un “enchufe-receptáculo”
12(6SHUPLWLGRHQHVWRVSURGXFWRV
Herramientas
necesarios
Una broca de 1/8” (3 mm) para
taladro eléctrico o manual
Llave de tuercas de
7/16” (11 mm)
Materiales necesarios
Abrazadera de alivio
de presión para
conducto de 1/2”
Caja de
conexión
Tuercas para alambres
Cordón de
72” (183 cm)
31-110046 08-16 GEA
Partes incluidas
ODDSDULHQFLDSXHGHYDULDU
Tornillos para instalación
(Cabeza de estrella tapa
negra de 8-18 x .625)
Soportes de la
bandeja del horno
inferior con tuercas
hexagonales
PT925
30” (76,2 cm)
Montaje de reborde
inferior de metal
Tuercas
hexagonales
Ante cualquier duda, llame a GE Appliances al 800.GE.CARES (800.432.2737)
o visite nuestro sitio Web en: GEAppliances.com
Alicates pelacables
Destornillador de
estrella #2

2
Requisitos eléctricos
La placa de potencia se encuentra en la moldura lateral
del horno, el marco lateral frontal del horno o el marco
frontal inferior del horno.
Recomendamos que el cableado y la conexión eléctrica
GHVXKRUQRORVUHDOLFHXQHOHFWULFLVWDFDOL¿FDGR
Después
de la instalación, solicite al electricista que le indique
cómo desconectar la energía de la cocina.
Consulte con su compañía de servicios local
para obtener los códigos eléctricos que sean aplicables
en su área. No hacer el cableado de su horno de manera
apropiada, respetando los códigos vigentes, podría
resultar en condiciones peligrosas. Si no existen códigos
locales, su aparato debe usar un cableado y fusibles que
cumplan con los requisitos del Código Eléctrico Nacional,
ANSI/NFPA No. 70–Última edición. Usted puede obtener
una copia de este código disponible en National Fire
Protection Association (Asociación Nacional de Protección
contra Incendios).
A partir del 1ro. de enero de 1996, el Código
Eléctrico Nacional requiere que todas las construcciones
nuevas, pero no existentes, usen una conexión de 4
conductores hacia cualquier horno eléctrico. Cuando
instale un horno eléctrico en una construcción nueva,
casa móvil, vehículo de recreación o un área donde los
códigos locales prohíban la conexión a tierra a través del
conductor neutro, siga las instrucciones en la Sección
CONSTRUCCIONES NUEVAS Y CONEXIONES DE CIRCUITOS
RAMALES DE 4 CONDUCTORES.
Usted debe usar un sistema eléctrico de fase única
de 120/208 VAC o 120/240 VAC de 60 hercios.
Si hace una conexión a alambres de aluminio, debe
usar conectores adecuadamente instalados que estén
aprobados para ser utilizados con cableados
de aluminio.
,16758&&,21(6'(6(*85,'$'
,03257$17(6
Instrucciones de instalación
Para su seguridad
• Cerciórese de que su horno sea instalado
DGHFXDGDPHQWHSRUXQLQVWDODGRUFDOL¿FDGR
o por un técnico de servicio.
•&HUFLyUHVHGHTXHVXKRUQRHVWp¿UPHPHQWH
LQVWDODGRHQXQJDELQHWHTXHHVWp¿UPHPHQWH
adherido a la estructura de la casa. El peso sobre
la puerta del horno podría causar que el horno se
voltee resultando en lesiones. Nunca permita que
nadie se suba, se siente, se pare o se cuelgue de la
puerta del horno.
• Cerciórese de que los gabinetes y los revestimientos
de la pared alrededor del horno puedan soportar
las temperaturas (hasta 200°F [93,3°C]) generadas
por el horno.
$'9(57(1&,$ La energía
eléctrica hacia la línea de suministro
del horno debe ser desconectada
mientras se hacen las conexiones.
No hacer esto podría resultar en
OHVLRQHVJUDYHVHLQFOXVRSURYRFDU
la muerte.
Ubicación de la placa
de potencia
Requisitos eléctricos
Este aparato debe abastecerse con la frecuencia
y el voltaje adecuados, y conectarse a un circuito eléctrico
individual con conexión a tierra con protección de un
fusible o interruptor automático. Consulte la placa de
potencia ubicada en el marco del horno para determinar
la potencia del producto. Utilice el cuadro
a continuación para determinar la protección mínima
recomendada para el circuito eléctrico especializado.
Recomendable
Potencia KW Potencia KW Tamaño del circuito
9 9 (VSHFLDOL]DGR
.: .: $PS
.:².: .:².: $PS
.:².: .:².: $PS
.:².: .:².: $PS

3
Abra la puerta del horno y extraiga el paquete
de instrucciones y las parrillas del horno.
Extraiga las instrucciones de instalación del
paquete y léalas cuidadosamente antes de
empezar la instalación.
Cerciórese de guardar bien todas las
instrucciones, Manual del propietario,
Instalación, etc. para referencia en el futuro.
La puerta superior no debe removerse durante
la instalación.
No se recomienda desmontar la puerta inferior.
Si fuera necesario, consulte las instrucciones de
remoción e instalación del apéndice.
Retire los materiales de embalaje. Revise detrás
de las bisagras y debajo del fondo falso. Retire
las etiquetas de la puerta, el plástico de las
reborde y panel, todas las cintas alrededor del
horno.
Instrucciones de instalación
Lista de control antes de la instalación
¡TODA LA INFORMACIÓN PARA LA INSTALACIÓN
EN LAS PÁGINAS SIGUIENTES ES PARA SER
USADA EN LA INSTALACIÓN '(+25126
'(3$5(' 6,03/('2%/(6
£12/(9$17(/$38(57$'(/$0$1,-$
Coloque el horno sobre la mesa o plataforma
al nivel de la abertura del gabinete. La
plataforma debe soportar
OEV.J
Extraiga el reborde de metal de la parte
superior del horno.
La reborde de metal
está envuelta por separado y pegada a la
parte superior de la unidad.
Se instalará
antes de que la unidad se coloque por
completo dentro del gabinete, a 4” fuera
del gabinete.
%DQGHMDSODQDFRQPDQLMDV
Paquete de
instrucciones
E
AS
Y
IN
S
T
AL
L
A
T
IO
N
O
F
YOU
R
N
E
W
3
0
"
W
AL
L
O
V
E
N
B
e
f
o
r
e
y
o
u
b
e
g
i
n
-
R
e
a
d
th
e
s
e
i
n
s
tr
u
c
ti
o
n
s
c
o
m
p
l
e
te
ly
a
n
d
c
a
r
e
f
ul
ly
.
I
M
P
O
R
T
A
N
T
-
S
a
v
e
th
e
s
e
i
n
s
tru
c
t
i
o
n
s
f
o
r
l
o
cal
i
n
s
p
e
c
to
r
’
s
us
e
.
I
M
P
O
R
T
A
N
T
-
O
B
SE
R
V
E
A
L
L
G
O
V
E
R
N
I
N
G
C
O
D
E
S
A
N
D
O
R
D
I
A
N
C
E
S
.
N
o
te
to
I
n
s
ta
l
l
e
r
-
B
e
s
u
r
e
to
l
e
a
v
e
t
h
e
s
e
i
n
s
tr
u
c
ti
o
n
s
w
i
th
th
e
c
o
n
s
u
m
e
r
.
O
W
N
E
R
-
Ke
e
p
t
h
e
s
e
i
n
s
tr
u
c
ti
o
n
s
f
o
r
f
u
ture
r
e
f
e
r
e
n
c
e
.
N
o
t
e
-
T
h
i
s
a
p
p
l
i
a
n
c
e
m
u
s
t
b
e
p
ro
p
e
r
ly
g
r
o
u
n
d
e
d
(
i
f
a
p
p
l
i
c
ab
l
e
)
.
B
e
f
o
r
e
y
o
u
b
e
g
i
n
-
R
e
a
d
th
e
s
e
i
n
s
tru
c
ti
o
n
s
c
o
m
p
l
e
t
e
ly
an
d
c
a
r
e
f
u
l
ly
.
I
M
P
O
R
T
A
N
T
-
S
a
v
e
th
e
s
e
i
n
s
t
r
u
c
ti
o
n
s
f
o
r
l
o
c
a
l
i
n
s
p
e
c
t
o
r’
s
u
s
e
.
I
M
P
O
R
T
A
N
T
-
O
B
S
E
R
V
E
A
L
L
G
OV
E
R
N
I
N
G
C
O
D
E
S
A
N
D
O
R
D
I
A
N
C
E
S
.
N
o
te
to
I
n
s
ta
l
le
r
-
B
e
s
u
r
e
to
l
e
a
v
e
th
e
s
e
i
n
s
t
ru
c
t
i
o
n
s
wi
t
h
th
e
c
o
n
s
u
m
e
r
.
O
W
N
E
R
-
Ke
e
p
th
e
s
e
i
n
s
tr
uc
t
i
o
n
s
f
o
r
f
u
tu
r
e
r
e
f
e
re
n
c
e
.
N
o
t
e
-
T
h
i
s
ap
p
l
i
a
n
c
e
m
u
s
t
b
e
p
r
o
p
e
r
l
y
g
r
o
u
n
d
e
d
(i
f
ap
p
li
c
a
b
l
e
).
F
O
R
Y
O
U
R
S
A
F
E
T
Y
B
e
f
o
r
e
y
o
u
b
e
g
i
n
-
R
e
a
d
th
e
s
e
i
n
s
tr
u
c
ti
o
n
s
c
o
m
p
l
e
te
ly
a
n
d
c
a
r
e
f
u
l
ly
.
I
M
P
O
R
T
A
N
T
-
Sa
v
e
th
e
s
e
i
n
s
t
r
u
c
ti
o
n
s
f
o
r
l
o
c
a
l
i
n
s
p
e
c
t
o
r
’
s
u
s
e
.
I
M
P
O
R
T
A
N
T
-
OB
S
E
R
V
E
A
L
L
G
O
V
E
R
N
I
N
G
C
OD
E
S
A
N
D
O
R
D
I
A
N
C
E
S
.
N
o
te
to
I
n
s
ta
l
l
e
r
-
B
e
s
u
r
e
to
l
e
a
v
e
t
h
e
s
e
i
n
s
tr
u
c
ti
o
n
s
w
i
th
t
h
e
c
o
n
s
u
m
e
r
.
O
W
N
E
R
-
K
e
e
p
th
e
s
e
i
n
s
tr
u
c
ti
o
n
s
f
o
r
f
u
tu
re
r
e
f
e
r
e
n
c
e
.
N
o
t
e
-
T
h
i
s
a
p
p
l
i
a
n
c
e
m
u
s
t
b
e
p
r
o
p
e
r
ly
g
ro
u
n
d
e
d
(
i
f
a
p
p
l
i
c
a
b
l
e
)
.
B
e
f
o
r
e
y
o
u
b
e
g
i
n
-
R
e
a
d
th
e
s
e
i
n
s
tr
u
c
ti
o
n
s
c
o
m
p
l
e
te
l
y
a
n
d
c
a
r
e
f
u
l
ly
.
I
M
P
OR
T
A
N
T
-
S
a
v
e
th
e
s
e
i
n
s
tr
u
c
ti
o
n
s
f
o
r
lo
c
a
l
i
n
s
p
e
c
to
r
’
s
u
s
e
.
I
M
P
O
R
T
A
N
T
-
O
BSE
R
V
E
A
L
L
G
O
V
E
R
N
I
N
G
C
O
D
E
S
A
N
D
O
R
D
I
A
N
C
E
S
.
N
o
t
e
to
I
n
s
ta
l
le
r
-
B
e
s
u
r
e
to
l
e
a
v
e
th
e
s
e
i
n
s
t
r
u
ct
i
o
n
s
w
i
t
h
th
e
c
o
n
s
u
m
e
r.
O
W
N
E
R
-
K
e
e
p
th
e
s
e
i
n
s
t
r
u
c
ti
o
n
s
f
o
r
f
u
tu
r
e
r
e
f
e
r
e
n
c
e
.
N
o
te
-
T
h
i
s
a
p
p
l
i
a
n
c
e
m
u
s
t
b
e
p
r
o
p
e
r
ly
g
r
o
u
n
d
e
d
(i
f
a
p
p
li
c
a
b
l
e
).
E
L
E
C
T
R
I
C
A
L
R
E
Q
U
I
R
E
M
E
N
T
S
B
e
f
o
r
e
y
o
u
b
e
g
i
n
-
R
e
a
d
th
e
s
e
i
n
s
t
r
u
c
ti
o
n
s
c
o
m
p
l
e
t
e
l
y
an
d
c
a
r
e
f
u
l
l
y
.
I
M
P
O
R
T
A
N
T
-
S
a
v
e
th
e
s
e
i
n
s
tr
u
c
t
i
o
n
s
f
o
r
l
o
ca
l
i
n
s
p
e
c
to
r
’
s
u
s
e
.
I
M
P
O
R
T
A
N
T
-
O
B
S
E
R
V
E
A
L
L
G
O
VE
R
N
I
N
G
C
O
D
E
S
A
N
D
O
R
D
I
A
N
C
E
S
.
N
o
te
to
I
n
s
ta
l
l
e
r
-
B
e
s
u
r
e
to
l
e
a
v
e
t
h
e
s
e
i
n
s
tr
u
c
ti
o
n
s
w
i
th
t
h
e
c
o
n
s
u
m
e
r
.
O
W
N
E
R
-
K
e
e
p
t
h
e
s
e
i
n
s
tr
u
c
ti
o
n
s
f
o
r
f
u
t
u
r
e
r
e
f
e
r
e
n
c
e
.
N
o
t
e
-
T
h
i
s
a
p
p
l
i
a
n
c
e
m
u
s
t
b
e
p
r
o
p
e
r
ly
g
r
o
u
n
d
e
d
(i
f
a
p
p
l
i
c
a
b
l
e
).
B
e
f
o
r
e
y
o
u
b
e
g
i
n
-
R
e
a
d
th
e
s
e
i
n
s
tr
u
c
ti
o
n
s
c
o
m
p
l
e
te
ly
a
n
d
c
a
r
e
f
u
l
l
y
.
I
M
P
O
R
T
A
N
T
-
S
a
v
e
th
e
s
e
i
n
s
tr
u
c
ti
o
n
s
f
o
r
l
o
c
a
l
i
n
s
p
e
c
to
r
’
s
u
s
e
.
I
M
P
O
R
T
A
N
T
-
O
B
S
E
R
V
E
A
L
L
GO
V
E
R
N
I
N
G
C
O
D
E
S
A
N
D
O
R
D
I
A
N
C
E
S
.
N
o
te
to
I
n
s
t
a
ll
e
r-
B
e
s
ur
e
to
le
a
v
e
th
e
s
e
i
n
s
tr
u
c
ti
o
n
s
w
i
th
th
e
c
o
n
s
u
m
e
r
.
O
W
N
E
R
-
K
e
e
p
th
e
s
e
i
n
s
tr
u
c
ti
o
n
s
f
o
r
f
u
t
u
re
r
e
f
e
r
e
n
c
e
.
N
o
te
-
T
h
i
s
a
p
p
li
a
n
c
e
m
u
s
t
b
e
p
r
o
p
e
r
l
y
g
r
o
u
n
d
e
d
(i
f
ap
p
li
c
a
b
l
e
).
B
e
f
o
r
e
y
o
u
b
e
g
i
n
-
R
e
a
d
t
h
e
s
e
i
n
s
tr
u
c
ti
o
n
s
c
o
m
p
l
e
te
l
y
a
n
d
c
a
r
e
f
u
l
l
y
.
I
M
P
O
R
T
A
N
T
-
S
a
v
e
th
e
s
e
i
n
s
tr
u
c
ti
o
n
s
f
o
r
l
o
c
a
l
i
n
s
p
e
c
to
r
’
s
u
s
e
.
I
M
P
O
R
T
A
N
T
-
O
B
SE
R
V
E
A
L
L
G
O
V
E
R
N
I
N
G
C
O
D
E
S
A
N
D
O
R
D
I
A
N
C
E
S
.
N
o
te
t
o
I
n
s
ta
l
le
r
-
B
e
s
u
r
e
to
le
a
v
e
th
e
s
e
i
n
s
tr
u
c
ti
o
n
s
w
i
th
th
e
c
o
n
s
u
m
e
r
.
O
W
N
E
R
-
K
e
e
p
t
h
e
s
e
i
n
s
tr
u
c
ti
o
n
s
f
o
r
f
u
tu
r
e
r
e
f
e
r
e
n
c
e
.
N
o
te
-
T
h
i
s
a
p
p
l
i
a
n
c
e
m
us
t
b
e
p
r
o
p
e
r
l
y
g
r
o
u
n
d
e
d
(i
f
a
p
p
l
i
c
a
b
l
e
).
B
e
f
o
r
e
y
o
u
b
e
g
i
n
-
R
e
a
d
th
e
s
e
i
n
s
tr
u
c
ti
o
n
s
c
o
m
p
l
e
te
ly
a
n
d
c
a
r
e
f
ul
ly
.
I
M
P
O
R
T
A
N
T
-
S
a
v
e
th
e
s
e
i
n
s
tru
c
t
i
o
n
s
f
o
r
lo
c
al
i
n
s
p
e
c
to
r
’
s
u
s
e
.
I
M
P
O
R
T
A
N
T
-
O
B
SE
R
V
E
A
L
L
G
O
V
E
R
N
I
N
G
C
O
D
E
S
A
N
D
O
R
D
I
A
N
C
E
S
.
N
o
te
to
I
n
s
t
a
l
l
e
r
-
B
e
s
u
r
e
to
l
e
a
v
e
th
e
s
e
i
n
s
tr
u
c
ti
o
n
s
wi
th
th
e
c
o
n
s
u
m
e
r
.
O
W
N
E
R
-
K
e
e
p
t
h
e
s
e
i
n
s
tr
u
c
ti
o
n
s
f
o
r
f
u
tu
re
r
e
f
e
r
e
n
c
e
.
N
o
te
-
T
h
i
s
a
p
p
l
i
a
n
c
e
m
u
s
t
b
e
p
r
o
p
e
r
ly
g
r
o
u
n
d
e
d
(i
f
a
p
p
l
i
c
a
b
l
e
).
B
e
f
o
r
e
y
o
u
b
e
g
i
n
-
R
e
a
d
th
e
s
e
i
n
s
tru
c
ti
o
n
s
c
o
m
p
l
e
t
e
ly
an
d
c
a
r
e
f
u
l
ly
.
I
M
P
O
R
T
A
N
T
-
S
a
v
e
th
e
s
e
i
n
s
t
r
u
c
ti
o
n
s
f
o
r
l
o
c
a
l
i
n
s
p
e
c
t
o
r’
s
u
s
e
.
I
M
P
O
R
T
A
N
T
-
O
B
S
E
R
V
E
A
L
L
G
OV
E
R
N
I
N
G
C
O
D
E
S
A
N
D
O
R
D
I
A
N
C
E
S
.
N
o
te
to
I
n
s
ta
l
le
r
-
B
e
s
u
r
e
to
l
e
a
v
e
th
e
s
e
i
n
s
t
ru
c
t
i
o
n
s
wi
t
h
th
e
c
o
n
s
u
m
e
r
.
O
W
N
E
R
-
Ke
e
p
th
e
s
e
i
n
s
tr
uc
t
i
o
n
s
f
o
r
f
u
tu
r
e
r
e
f
e
re
n
c
e
.
N
o
t
e
-
T
h
i
s
ap
p
l
i
a
n
c
e
m
u
s
t
b
e
p
r
o
p
e
r
l
y
g
r
o
u
n
d
e
d
(i
f
ap
p
li
c
a
b
l
e
).
F
O
R
Y
O
U
R
S
A
F
E
T
Y
B
e
f
o
r
e
y
o
u
b
e
g
i
n
-
R
e
a
d
th
e
s
e
i
n
s
tr
u
c
ti
o
n
s
c
o
m
p
l
e
te
ly
a
n
d
c
a
r
e
f
u
l
ly
.
I
M
P
O
R
T
A
N
T
-
Sa
v
e
th
e
s
e
i
n
s
t
r
u
c
ti
o
n
s
f
o
r
l
o
c
a
l
i
n
s
p
e
c
t
o
r
’
s
u
s
e
.
I
M
P
O
R
T
A
N
T
-
OB
S
E
R
V
E
A
L
L
G
O
V
E
R
N
I
N
G
C
OD
E
S
A
N
D
O
R
D
I
A
N
C
E
S
.
N
o
te
to
I
n
s
ta
l
l
e
r
-
B
e
s
u
r
e
to
l
e
a
v
e
t
h
e
s
e
i
n
s
tr
u
c
ti
o
n
s
w
i
th
t
h
e
c
o
n
s
u
m
e
r
.
O
W
N
E
R
-
K
e
e
p
th
e
s
e
i
n
s
tr
u
c
ti
o
n
s
f
o
r
f
u
tu
re
r
e
f
e
r
e
n
c
e
.
N
o
t
e
-
T
h
i
s
a
p
p
l
i
a
n
c
e
m
u
s
t
b
e
p
r
o
p
e
r
ly
g
ro
u
n
d
e
d
(
i
f
a
p
p
l
i
c
a
b
l
e
)
.
B
e
f
o
r
e
y
o
u
b
e
g
i
n
-
R
e
a
d
th
e
s
e
i
n
s
tr
u
c
ti
o
n
s
c
o
m
p
l
e
te
l
y
a
n
d
c
a
r
e
f
u
l
ly
.
I
M
P
OR
T
A
N
T
-
S
a
v
e
th
e
s
e
i
n
s
tr
u
c
ti
o
n
s
f
o
r
lo
c
a
l
i
n
s
p
e
c
to
r
’
s
u
s
e
.
I
M
P
O
R
T
A
N
T
-
O
BSE
R
V
E
A
L
L
G
O
V
E
R
N
I
N
G
C
O
D
E
S
A
N
D
O
R
D
I
A
N
C
E
S
.
N
o
t
e
to
I
n
s
ta
l
le
r
-
B
e
s
u
r
e
to
l
e
a
v
e
th
e
s
e
i
n
s
t
r
u
ct
i
o
n
s
w
i
t
h
th
e
c
o
n
s
u
m
e
r.
O
W
N
E
R
-
K
e
e
p
th
e
s
e
i
n
s
t
r
u
c
ti
o
n
s
f
o
r
f
u
tu
r
e
r
e
f
e
r
e
n
c
e
.
N
o
te
-
T
h
i
s
a
p
p
l
i
a
n
c
e
m
u
s
t
b
e
p
r
o
p
e
r
ly
g
r
o
u
n
d
e
d
(i
f
a
p
p
li
c
a
b
l
e
).
E
L
E
C
T
R
I
C
A
L
R
E
Q
U
I
R
E
M
E
N
T
S
B
e
f
o
r
e
y
o
u
b
e
g
i
n
-
R
e
a
d
th
e
s
e
i
n
s
t
r
u
c
ti
o
n
s
c
o
m
p
l
e
t
e
l
y
an
d
c
a
r
e
f
u
l
l
y
.
I
M
P
O
R
T
A
N
T
-
S
a
v
e
th
e
s
e
i
n
s
tr
u
c
t
i
o
n
s
f
o
r
l
o
ca
l
i
n
s
p
e
c
to
r
’
s
u
s
e
.
I
M
P
O
R
T
A
N
T
-
O
B
S
E
R
V
E
A
L
L
G
O
VE
R
N
I
N
G
C
O
D
E
S
A
N
D
O
R
D
I
A
N
C
E
S
.
N
o
te
to
I
n
s
ta
l
l
e
r
-
B
e
s
u
r
e
to
l
e
a
v
e
t
h
e
s
e
i
n
s
tr
u
c
ti
o
n
s
w
i
th
t
h
e
c
o
n
s
u
m
e
r
.
O
W
N
E
R
-
K
e
e
p
t
h
e
s
e
i
n
s
tr
u
c
ti
o
n
s
f
o
r
f
u
t
u
r
e
r
e
f
e
r
e
n
c
e
.
N
o
t
e
-
T
h
i
s
a
p
p
l
i
a
n
c
e
m
u
s
t
b
e
p
r
o
p
e
r
ly
g
r
o
u
n
d
e
d
(i
f
a
p
p
l
i
c
a
b
l
e
).
B
e
f
o
r
e
y
o
u
b
e
g
i
n
-
R
e
a
d
th
e
s
e
i
n
s
tr
u
c
ti
o
n
s
c
o
m
p
l
e
te
ly
a
n
d
c
a
r
e
f
u
l
l
y
.
I
M
P
O
R
T
A
N
T
-
S
a
v
e
th
e
s
e
i
n
s
tr
u
c
ti
o
n
s
f
o
r
l
o
c
a
l
i
n
s
p
e
c
to
r
’
s
u
s
e
.
I
M
P
O
R
T
A
N
T
-
O
B
S
E
R
V
E
A
L
L
GO
V
E
R
N
I
N
G
C
O
D
E
S
A
N
D
O
R
D
I
A
N
C
E
S
.
N
o
te
to
I
n
s
t
a
ll
e
r-
B
e
s
ur
e
to
le
a
v
e
th
e
s
e
i
n
s
tr
u
c
ti
o
n
s
w
i
th
th
e
c
o
n
s
u
m
e
r
.
O
W
N
E
R
-
K
e
e
p
th
e
s
e
i
n
s
tr
u
c
ti
o
n
s
f
o
r
f
u
t
u
re
r
e
f
e
r
e
n
c
e
.
N
o
te
-
T
h
i
s
a
p
p
li
a
n
c
e
m
u
s
t
b
e
p
r
o
p
e
r
l
y
g
r
o
u
n
d
e
d
(i
f
ap
p
li
c
a
b
l
e
).
B
e
f
o
r
e
y
o
u
b
e
g
i
n
-
R
e
a
d
t
h
e
s
e
i
n
s
tr
u
c
ti
o
n
s
c
o
m
p
l
e
te
l
y
a
n
d
c
a
r
e
f
u
l
l
y
.
I
M
P
O
R
T
A
N
T
-
S
a
v
e
th
e
s
e
i
n
s
tr
u
c
ti
o
n
s
f
o
r
l
o
c
a
l
i
n
s
p
e
c
to
r
’
s
u
s
e
.
I
M
P
O
R
T
A
N
T
-
O
B
SE
R
V
E
A
L
L
G
O
V
E
R
N
I
N
G
C
O
D
E
S
A
N
D
O
R
D
I
A
N
C
E
S
.
N
o
te
t
o
I
n
s
ta
l
le
r
-
B
e
s
u
r
e
to
le
a
v
e
th
e
s
e
i
n
s
tr
u
c
ti
o
n
s
w
i
th
th
e
c
o
n
s
u
m
e
r
.
O
W
N
E
R
-
K
e
e
p
t
h
e
s
e
i
n
s
tr
u
c
ti
o
n
s
f
o
r
f
u
tu
r
e
r
e
f
e
r
e
n
c
e
.
N
o
te
-
T
h
i
s
a
p
p
l
i
a
n
c
e
m
us
t
b
e
p
r
o
p
e
r
l
y
g
r
o
u
n
d
e
d
(i
f
a
p
p
l
i
c
a
b
l
e
).
B
e
f
o
r
e
y
o
u
b
e
g
i
n
-
R
e
a
d
th
e
s
e
i
n
s
tr
u
c
ti
o
n
s
c
o
m
p
l
e
te
ly
a
n
d
c
a
r
e
f
ul
ly
.
I
M
P
O
R
T
A
N
T
-
S
a
v
e
th
e
s
e
i
n
s
tru
c
t
i
o
n
s
f
o
r
l
o
cal
i
n
s
p
e
c
to
r
’
s
us
e
.
I
M
P
O
R
T
A
N
T
-
O
B
SE
R
V
E
A
L
L
G
O
V
E
R
N
I
N
G
C
O
D
E
S
A
N
D
O
R
D
I
A
N
C
E
S
.
N
o
te
to
I
n
s
ta
l
l
e
r
-
B
e
s
u
r
e
to
l
e
a
v
e
t
h
e
s
e
i
n
s
tr
u
c
ti
o
n
s
w
i
th
th
e
c
o
n
s
u
m
e
r
.
O
W
N
E
R
-
Ke
e
p
t
h
e
s
e
i
n
s
tr
u
c
ti
o
n
s
f
o
r
f
u
ture
r
e
f
e
r
e
n
c
e
.
N
o
t
e
-
T
h
i
s
a
p
p
l
i
a
n
c
e
m
u
s
t
b
e
p
ro
p
e
r
ly
g
r
o
u
n
d
e
d
(i
f
a
p
p
l
i
c
a
b
l
e
).
B
e
f
o
r
e
y
o
u
b
e
g
i
n
-
R
e
a
d
th
e
s
e
i
n
s
tru
c
ti
o
n
s
c
o
m
p
l
e
t
e
ly
an
d
c
a
r
e
f
u
l
ly
.
I
M
P
O
R
T
A
N
T
-
S
a
v
e
th
e
s
e
i
n
s
t
r
u
c
ti
o
n
s
f
o
r
l
o
c
a
l
i
n
s
p
e
c
t
o
r’
s
u
s
e
.
I
M
P
O
R
T
A
N
T
-
O
B
S
E
R
V
E
A
L
L
G
OV
E
R
N
I
N
G
C
O
D
E
S
A
N
D
O
R
D
I
A
N
C
E
S
.
N
o
te
to
I
n
s
ta
l
le
r
-
B
e
s
u
r
e
to
l
e
a
v
e
th
e
s
e
i
n
s
t
ru
c
t
i
o
n
s
wi
t
h
th
e
c
o
n
s
u
m
e
r
.
O
W
N
E
R
-
Ke
e
p
th
e
s
e
i
n
s
tr
uc
t
i
o
n
s
f
o
r
f
u
tu
r
e
r
e
f
e
re
n
c
e
.
N
o
t
e
-
T
h
i
s
ap
p
l
i
a
n
c
e
m
u
s
t
b
e
p
r
o
p
e
r
l
y
g
r
o
u
n
d
e
d
(i
f
ap
p
li
c
a
b
l
e
).
F
O
R
Y
O
U
R
S
A
F
E
T
Y
B
e
f
o
r
e
y
o
u
b
e
g
i
n
-
R
e
a
d
th
e
s
e
i
n
s
tr
u
c
ti
o
n
s
c
o
m
p
l
e
te
ly
a
n
d
c
a
r
e
f
u
l
ly
.
I
M
P
O
R
T
A
N
T
-
Sa
v
e
th
e
s
e
i
n
s
t
r
u
c
ti
o
n
s
f
o
r
l
o
c
a
l
i
n
s
p
e
c
t
o
r
’
s
u
s
e
.
I
M
P
O
R
T
A
N
T
-
OB
S
E
R
V
E
A
L
L
G
O
V
E
R
N
I
N
G
C
OD
E
S
A
N
D
O
R
D
I
A
N
C
E
S
.
N
o
te
to
I
n
s
ta
l
l
e
r
-
B
e
s
u
r
e
to
l
e
a
v
e
t
h
e
s
e
i
n
s
tr
u
c
ti
o
n
s
w
i
th
t
h
e
c
o
n
s
u
m
e
r
.
O
W
N
E
R
-
K
e
e
p
th
e
s
e
i
n
s
tr
u
c
ti
o
n
s
f
o
r
f
u
tu
re
r
e
f
e
r
e
n
c
e
.
N
o
t
e
-
T
h
i
s
a
p
p
l
i
a
n
c
e
m
u
s
t
b
e
p
r
o
p
e
r
ly
g
ro
u
n
d
e
d
(
i
f
a
p
p
l
i
c
a
b
l
e
)
.
B
e
f
o
r
e
y
o
u
b
e
g
i
n
-
R
e
a
d
th
e
s
e
i
n
s
tr
u
c
ti
o
n
s
c
o
m
p
l
e
te
l
y
a
n
d
c
a
r
e
f
u
l
ly
.
I
M
P
OR
T
A
N
T
-
S
a
v
e
th
e
s
e
i
n
s
tr
u
c
ti
o
n
s
f
o
r
lo
c
a
l
i
n
s
p
e
c
to
r
’
s
u
s
e
.
I
M
P
O
R
T
A
N
T
-
O
BSE
R
V
E
A
L
L
G
O
V
E
R
N
I
N
G
C
O
D
E
S
A
N
D
O
R
D
I
A
N
C
E
S
.
N
o
t
e
to
I
n
s
ta
l
le
r
-
B
e
s
u
r
e
to
l
e
a
v
e
th
e
s
e
i
n
s
t
r
u
ct
i
o
n
s
w
i
t
h
th
e
c
o
n
s
u
m
e
r.
O
W
N
E
R
-
K
e
e
p
th
e
s
e
i
n
s
t
r
u
c
ti
o
n
s
f
o
r
f
u
tu
r
e
r
e
f
e
r
e
n
c
e
.
N
o
te
-
T
h
i
s
a
p
p
l
i
a
n
c
e
m
u
s
t
b
e
p
r
o
p
e
r
ly
g
r
o
u
n
d
e
d
(i
f
a
p
p
li
c
a
b
l
e
).
E
L
E
C
T
R
I
C
A
L
R
E
Q
U
I
R
E
M
E
N
T
S
B
e
f
o
r
e
y
o
u
b
e
g
i
n
-
R
e
a
d
th
e
s
e
i
n
s
t
r
u
c
ti
o
n
s
c
o
m
p
l
e
t
e
l
y
an
d
c
a
r
e
f
u
l
l
y
.
I
M
P
O
R
T
A
N
T
-
S
a
v
e
th
e
s
e
i
n
s
tr
u
c
t
i
o
n
s
f
o
r
l
o
ca
l
i
n
s
p
e
c
to
r
’
s
u
s
e
.
I
M
P
O
R
T
A
N
T
-
O
B
S
E
R
V
E
A
L
L
G
O
VE
R
N
I
N
G
C
O
D
E
S
A
N
D
O
R
D
I
A
N
C
E
S
.
N
o
te
to
I
n
s
ta
l
l
e
r
-
B
e
s
u
r
e
to
l
e
a
v
e
t
h
e
s
e
i
n
s
tr
u
c
ti
o
n
s
w
i
th
t
h
e
c
o
n
s
u
m
e
r
.
O
W
N
E
R
-
K
e
e
p
t
h
e
s
e
i
n
s
tr
u
c
ti
o
n
s
f
o
r
f
u
t
u
r
e
r
e
f
e
r
e
n
c
e
.
N
o
t
e
-
T
h
i
s
a
p
p
l
i
a
n
c
e
m
u
s
t
b
e
p
r
o
p
e
r
ly
g
r
o
u
n
d
e
d
(i
f
a
p
p
l
i
c
a
b
l
e
).
B
e
f
o
r
e
y
o
u
b
e
g
i
n
-
R
e
a
d
th
e
s
e
i
n
s
tr
u
c
ti
o
n
s
c
o
m
p
l
e
te
ly
a
n
d
c
a
r
e
f
u
l
l
y
.
I
M
P
O
R
T
A
N
T
-
S
a
v
e
th
e
s
e
i
n
s
tr
u
c
ti
o
n
s
f
o
r
l
o
c
a
l
i
n
s
p
e
c
to
r
’
s
u
s
e
.
I
M
P
O
R
T
A
N
T
-
O
B
S
E
R
V
E
A
L
L
GO
V
E
R
N
I
N
G
C
O
D
E
S
A
N
D
O
R
D
I
A
N
C
E
S
.
N
o
te
to
I
n
s
t
a
ll
e
r-
B
e
s
ur
e
to
le
a
v
e
th
e
s
e
i
n
s
tr
u
c
ti
o
n
s
w
i
th
th
e
c
o
n
s
u
m
e
r
.
O
W
N
E
R
-
K
e
e
p
th
e
s
e
i
n
s
tr
u
c
ti
o
n
s
f
o
r
f
u
t
u
re
r
e
f
e
r
e
n
c
e
.
N
o
te
-
T
h
i
s
a
p
p
li
a
n
c
e
m
u
s
t
b
e
p
r
o
p
e
r
l
y
g
r
o
u
n
d
e
d
(i
f
ap
p
li
c
a
b
l
e
).
B
e
f
o
r
e
y
o
u
b
e
g
i
n
-
R
e
a
d
t
h
e
s
e
i
n
s
tr
u
c
ti
o
n
s
c
o
m
p
l
e
te
l
y
a
n
d
c
a
r
e
f
u
l
l
y
.
I
M
P
O
R
T
A
N
T
-
S
a
v
e
th
e
s
e
i
n
s
tr
u
c
ti
o
n
s
f
o
r
l
o
c
a
l
i
n
s
p
e
c
to
r
’
s
u
s
e
.
I
M
P
O
R
T
A
N
T
-
O
B
SE
R
V
E
A
L
L
G
O
V
E
R
N
I
N
G
C
O
D
E
S
A
N
D
O
R
D
I
A
N
C
E
S
.
N
o
te
t
o
I
n
s
ta
l
le
r
-
B
e
s
u
r
e
to
le
a
v
e
th
e
s
e
i
n
s
tr
u
c
ti
o
n
s
w
i
th
th
e
c
o
n
s
u
m
e
r
.
O
W
N
E
R
-
K
e
e
p
t
h
e
s
e
i
n
s
tr
u
c
ti
o
n
s
f
o
r
f
u
tu
r
e
r
e
f
e
r
e
n
c
e
.
N
o
te
-
T
h
i
s
a
p
p
l
i
a
n
c
e
m
us
t
b
e
p
r
o
p
e
r
l
y
g
r
o
u
n
d
e
d
(i
f
a
p
p
l
i
c
a
b
l
e
).
Before you begin-Read these instructions completely and carefully.
IMPORTANT- Save these instructions for local inspector’s use.
IMPORTANT- OBSERVE ALL GOVERNING CODES AND ORDIANCES.
Note to Installer- Be sure to leave these instructions with the consumer.
OWNER- Keep these instructions for future reference.
Note- This appliance must be properly grounded (if applicable).
Before you begin-Read these
instructions completely and
carefully.
IMPORTANT- Save these
instructions for local inspector’s use.
IMPORTANT- OBSERVE ALL
GOVERNING CODES AND ORDIANCES.
Note to Installer- Be sure to leave
these instructions with the consumer.
OWNER- Keep these instructions
for future reference.
Note- This appliance must be
properly grounded (if applicable).
FOR YOUR SAFETY
Before you begin-Read these instructions completely and carefully.
IMPORTANT- Save these instructions for local inspector’s use.
IMPORTANT- OBSERVE ALL GOVERNING CODES AND ORDIANCES.
Note to Installer- Be sure to leave these instructions with the consumer.
OWNER- Keep these instructions for future reference.
Note- This appliance must be properly grounded (if applicable).
ELECTRICAL REQUIREMENTS
Before you begin-Read these
instructions completely and
carefully.
IMPORTANT- Save these
instructions for local inspector’s use.
IMPORTANT- OBSERVE ALL
GOVERNING CODES AND ORDIANCES.
Note to Installer- Be sure to leave
these instructions with the consumer.
OWNER- Keep these instructions
for future reference.
Note- This appliance must be
properly grounded (if applicable).
Before you begin-Read these
instructions completely and
carefully.
IMPORTANT- Save these
instructions for local inspector’s use.
IMPORTANT- OBSERVE ALL
GOVERNING CODES AND ORDIANCES.
Note to Installer- Be sure to leave
these instructions with the consumer.
OWNER- Keep these instructions
for future reference.
Note- This appliance must be
properly grounded (if applicable).
Before you begin-Read these
instructions completely and
carefully.
IMPORTANT- Save these
instructions for local inspector’s use.
IMPORTANT- OBSERVE ALL
GOVERNING CODES AND ORDIANCES.
Note to Installer- Be sure to leave
these instructions with the consumer.
OWNER- Keep these instructions
for future reference.
Note- This appliance must be
properly grounded (if applicable).
Before you begin-Read these instructions completely and carefully.
IMPORTANT- Save these instructions for local inspector’s use.
IMPORTANT- OBSERVE ALL GOVERNING CODES AND ORDIANCES.
Note to Installer- Be sure to leave these instructions with the consumer.
OWNER- Keep these instructions for future reference.
Note- This appliance must be properly grounded (if applicable).
Before you begin-Read these
instructions completely and
carefully.
IMPORTANT- Save these
instructions for local inspector’s use.
IMPORTANT- OBSERVE ALL
GOVERNING CODES AND ORDIANCES.
Note to Installer- Be sure to leave
these instructions with the consumer.
OWNER- Keep these instructions
for future reference.
Note- This appliance must be
properly grounded (if applicable).
FOR YOUR SAFETY
Before you begin-Read these instructions completely and carefully.
IMPORTANT- Save these instructions for local inspector’s use.
IMPORTANT- OBSERVE ALL GOVERNING CODES AND ORDIANCES.
Note to Installer- Be sure to leave these instructions with the consumer.
OWNER- Keep these instructions for future reference.
Note- This appliance must be properly grounded (if applicable).
Before you begin-Read these instructions completely and carefully.
IMPORTANT- Save these instructions for local inspector’s use.
IMPORTANT- OBSERVE ALL GOVERNING CODES AND ORDIANCES.
Note to Installer- Be sure to leave these instructions with the consumer.
OWNER- Keep these instructions for future reference.
Note- This appliance must be properly grounded (if applicable).
ELECTRICAL REQUIREMENTS
Before you begin-Read these
instructions completely and
carefully.
IMPORTANT- Save these
instructions for local inspector’s use.
IMPORTANT- OBSERVE ALL
GOVERNING CODES AND ORDIANCES.
Note to Installer- Be sure to leave
these instructions with the consumer.
OWNER- Keep these instructions
for future reference.
Note- This appliance must be
properly grounded (if applicable).
Before you begin-Read these
instructions completely and
carefully.
IMPORTANT- Save these
instructions for local inspector’s use.
IMPORTANT- OBSERVE ALL
GOVERNING CODES AND ORDIANCES.
Note to Installer- Be sure to leave
these instructions with the consumer.
OWNER- Keep these instructions
for future reference.
Note- This appliance must be
properly grounded (if applicable).
Before you begin-Read these
instructions completely and
carefully.
IMPORTANT- Save these
instructions for local inspector’s use.
IMPORTANT- OBSERVE ALL
GOVERNING CODES AND ORDIANCES.
Note to Installer- Be sure to leave
these instructions with the consumer.
OWNER- Keep these instructions
for future reference.
Note- This appliance must be
properly grounded (if applicable).
Before you begin-Read these instructions completely and carefully.
IMPORTANT- Save these instructions for local inspector’s use.
IMPORTANT- OBSERVE ALL GOVERNING CODES AND ORDIANCES.
Note to Installer- Be sure to leave these instructions with the consumer.
OWNER- Keep these instructions for future reference.
Note- This appliance must be properly grounded (if applicable).
EASY INSTALLATION OF YOUR NEW
30" WALL OVEN
Before you begin-Read these
instructions completely and
carefully.
IMPORTANT- Save these
instructions for local inspector’s use.
IMPORTANT- OBSERVE ALL
GOVERNING CODES AND ORDIANCES.
Note to Installer- Be sure to leave
these instructions with the consumer.
OWNER- Keep these instructions
for future reference.
Note- This appliance must be
properly grounded (if applicable).
FOR YOUR SAFETY
Before you begin-Read these instructions completely and carefully.
IMPORTANT- Save these instructions for local inspector’s use.
IMPORTANT- OBSERVE ALL GOVERNING CODES AND ORDIANCES.
Note to Installer- Be sure to leave these instructions with the consumer.
OWNER- Keep these instructions for future reference.
Note- This appliance must be properly grounded (if applicable).
ELECTRICAL REQUIREMENTS
Before you begin-Read these
instructions completely and
carefully.
IMPORTANT- Save these
instructions for local inspector’s use.
IMPORTANT- OBSERVE ALL
GOVERNING CODES AND ORDIANCES.
Note to Installer- Be sure to leave
these instructions with the consumer.
OWNER- Keep these instructions
for future reference.
Note- This appliance must be
properly grounded (if applicable).
Before you begin-Read these
instructions completely and
carefully.
IMPORTANT- Save these
instructions for local inspector’s use.
IMPORTANT- OBSERVE ALL
GOVERNING CODES AND ORDIANCES.
Note to Installer- Be sure to leave
these instructions with the consumer.
OWNER- Keep these instructions
for future reference.
Note- This appliance must be
properly grounded (if applicable).
Before you begin-Read these
instructions completely and
carefully.
IMPORTANT- Save these
instructions for local inspector’s use.
IMPORTANT- OBSERVE ALL
GOVERNING CODES AND ORDIANCES.
Note to Installer- Be sure to leave
these instructions with the consumer.
OWNER- Keep these instructions
for future reference.
Note- This appliance must be
properly grounded (if applicable).
6RQGDGH
temperatura
6RSRUWHVGHODEDQGHMDFRQ
tornillos hexagonales
Puerta superior
No quitar durante
la instalación
Puerta inferior
No se requiere
quitar para la
instalación
%DQGHMDSODQDVLQPDQLMDV
%DQGHMDGHVOL]DEOH
VLQPDQLMDV

4
Instrucciones de instalación
&RUWHSDUDORVKRUQRVVLPSOHGREOHV
de
30”
FP solamente
A
Ancho del
gabinete 30” (76,2 cm)
Ubicación
recomendada
para el corte
desde el piso 26 1/2” (67,3 cm)
Profundidad
del corte 23 1/2” (59,7 cm) Mín.
Ancho del corte 28 1/2” (72,4 cm) Mín.
28 5/8” (72,7 cm) Máx.
Altura de corte 27 1/4” (69,2 cm) Mín.
27 5/16” (69,4 cm) Máx.
Estos hornos no están aprobados para las
instalaciones apilables.
Instalaciones de lado a lado
Instale dos hornos de pared en aberturas separadas.
127$6LODVPDUFDVLPSHUIHFFLRQHV
RODDEHUWXUDGHOJDELQHWHVRQYLVLEOHV
por encima del horno instalado, quizás
VHDQHFHVDULRDJUHJDUUHOOHQRGHEDMR
de las correderas y reborde delantera
hasta que se cubran.
3UHFDXFLyQ
Los usuarios pueden quemarse cuando
se usa un horno montado a una altura
PX\HOHYDGD/DDOWXUDGHPRQWDMH
recomendada se basa en un usuario con
una altura de 5 pies.
127$6LHOJDELQHWHQRWLHQHXQPDUFR
IURQWDO\ORVODGRVVRQPHQRUHVGH”
FPHQJURVRUFRORTXHDPERV
lados en línea para establecer el
ancho del corte.
CUTOUT
HEIGHT
27 1/4" MIN.
27 5/16" MAX.
CUTOUT
WIDTH
28 1/2" MIN.
28 5/8" MAX.
5"
22" TO
BOTTOM OF
JUNCTION BOX
JUNCTION
B
LOCATIO
N
RECOMMENDED
CUTOUT
LOCATION
32 1/2"
FROM THE
FLOOR
CABINET
WIDTH
30"
ALLOW 11/16" FOR
OVERLAP OF THE
OVEN OVER SIDE
EDGES OF CUTOUT
THE OPENING
BETWEEN INSIDE
WALLS MUST
BE AT LEAST
28 1/2"WIDE
ALLOW 1" FOR
OVERLAP
ON OVEN TOP
AND BOTTOM
OF CUTOUT
21"
ALLOW A MINIMUM
F
21" FOR CLEARANCE
ADJACENT CORNERS,
R
AWERS, WALLS ETC.
N
THE DOOR IS OPENED.
3HUPLWD”
FPSDUD
sobrepaso del
horno sobre los
bordes laterales
del corte
Ancho
del corte
”
FPMín.
”
FP0i[
15”
FP
Ancho del
gabinete
30” FP
Permita un mínimo
GHµFP
de espacio para las
HVTXLQDVFDMRQHVSD-
redes, etc., adyacentes
cuando
la puerta esté abierta
Permita un mínimo
de 1”FPSDUD
el sobrepaso
del horno por enci-
PD\µ
FPSRU
GHEDMRGHOFRUWH
Ubicación
recomendada
para el corte
desde el piso
µ
FPMáx
Abertura
entre los
paredes
interiores
debe estar
un mínimo
GH”
FP
de ancho
Ubicación
GHODFDMD
de conexión
ODFDMD
de conexión
puede estar
ubicada en
un gabinete
DG\DFHQWH
”
FP
Max.
Altura
del corte
”
FP0tQ
”
FP0i[.
22”FP
Mín. hasta
la parte inferior
GHODFDMD
de conexión
Si el gabinete no tiene un fondo sólido, entonces
se deben instalar dos abrazaderas o correderas
nivelada con el fondo del corte para sostener el
peso del horno. Para hornos simple/dobles, las
correderas o abrazaderas deben soportar
200
libras
.J
C
L
T
2
"
E
Q
R
U
21 5/8"
OVER CENTERLINE
OF CABINET
µ
FP/tQHD
de centro sobre
gabinetes
Abertura – cum-
pla con todas las
dimensiones y
requerimientos.
Línea central
30.5”
FP
Línea central
µFPMín.
2” x 4”
FP[FP
o correderas
HTXLYDOHQWHV
QLYHODGD
con el fondo
del corte
Abrazaderas
de soporte
adecuadas para
las correderas
Abertura – cum-
pla con todas las
dimensiones y
requerimientos.

5
127$(VWHKRUQRHVWiDSUREDGR
VyORSDUDLQVWDODUVHEDMRORVPR-
GHORVHVSHFt¿FRVLQGLFDGRV
en esta unidad.
Instrucciones de instalación
&RUWHSDUDORVKRUQRVVLPSOHGREOHV
de
30”
FP
²GHEDMRGHODVXSHU¿FLH
del gabinete
'(%(623257$5 200 /,%5$6.J
8ELFDFLyQGHODFDMDGHFRQH[LyQ99
ODFDMDGHFRQH[LyQSXHGHHVWDUXELFDGDHQ
XQJDELQHWHDG\DFHQWH
Permita 1”FP
para el sobrepaso
del horno por
HQFLPD”
FPSDUDHO
sobrepaso de los
bordes laterales
GHOFRUWH\”
FPSDUD
el sobrepaso
GHOKRUQRGHEDMR
Material de relleno para
ODSDUWHVXSHULRU\RODGRV
podría ser necesario si la
unidad está ubicada entre
gabinetes existentes. Ase-
gúrese de que esté pegado
¿UPHPHQWH\DTXH
éste anclará el horno
en el gabinete.
6yORDOJXQDVHVWXIDVHOpFWULFDVSXHGHQLQVWDODUVHVREUHHVWHKRUQR1RVHHQFXHQWUDDSUREDGDQLQJXQDHVWXID
DJDV&RQVXOWHODVLQVWUXFFLRQHVGHODHVWXIDSDUDHOWDPDxRGHOFRUWH&RQVXOWHODHWLTXHWDHQFLPD
del horno para los modelos de estufas aprobados.
” FP0tQ
” FP0i[
” FP0tQ
” FP0i[
A
36” FP
Altura del
gabinete
22” FP0tQ
Por encima de
la plataforma
de soporte
”
FP
Máx.
25” FP
'HEHHTXLSDUDU
la altura
del zócalo
4”FP
Zócalo
3ODWDIRUPDGH”
FPGH
soporte requerid
Instalaciones de lado a lado
Instale dos hornos de pared en
aberturas separadas.
24” FP
Abertura – cum-
pla con todas las
dimensiones y
requerimientos.
Línea central
30.5”
FP
Línea central
µFPMín.
Abertura – cum-
pla con todas las
dimensiones y
requerimientos.

6
127$ Puede necesitarse una separación
DGLFLRQDOHQWUHODVDEHUWXUDV9HUL¿TXH
para asegurarse de que los apoyos del
horno por encima de la ubicación de
ODJDYHWDGHFDOHQWDPLHQWRQRGL¿FXOWHQ
la profundidad y altura interior requerida.
127$Instale el
horno sólo con los
PRGHORVHVSHFt¿FRV
enumerados en
la etiqueta que se
ubica en la parte
superior del horno.
*DELQHWHV
+RUQRLQGLYLGXDOGH
30”FP
VREUHXQDJDYHWDGHFDOHQWDPLHQWR
Abertura para
KRUQRVVLPSOHGREOHV
de 30”
FP
HPSRWUDGRV6REUHXQD
JDYHWDGHFDOHQWDPLHQWR
A
2”FP
Mín.
%DVDGRHQ
requerimientos
GHODJDYHWD
de calentamiento
%ORTXHHVWDEOH
contra la pared trasera
SDUDODJDYHWDGH
calentamiento requisitos
1”FP0tQ3RUHQFLPDGHO]yFDOR
RDMXVWDUDODDOWXUDGHODLQVWDODFLyQ
del horno

7
Instrucciones de instalación
&RQH[LRQHVHOpFWULFDV
$7(1&,Ï1$/,167$/$'25
Todos los hornos eléctricos de pared deben
VHUFDEOHDGRVGLUHFWDPHQWHHQXQDFDMDGH
FRQH[LyQ8Q´HQFKXIHUHFHSWiFXORµ12(6
permitido en estos productos.
12DFRUWHHOFRQGXFWRÀH[LEOH/D
abrazadera para controlar la presión debe
HVWDU¿UPHPHQWHDGKHULGDDODFDMDGH
FRQH[LyQ\HOFRQGXFWRUÀH[LEOHGHEHHVWDU
¿UPHPHQWHDGKHULGRDODDEUD]DGHUD6LHO
FRQGXFWRÀH[LEOHQRVHDMXVWDDOLQWHULRUGH
la abrazadera, no instale el horno hasta que
obtenga el tamaño apropiado.
127$$/(/(&75,&,67$/RVDODPEUHV
eléctricos proporcionados con este aparato
son reconocidos por la UL para conexiones a
cableado residencial de mayor calibre.
El aislante de estos 3 alambres supera las
HVSHFL¿FDFLRQHVGHWHPSHUDWXUDLQGLFDGDV
para cableado residencial. La capacidad
actual de conducción del cable depende del
FDOLEUHGHOFDEOHDGR\GHODFODVL¿FDFLyQGH
la temperatura del aislamiento alrededor del
alambre.
Desconecte el interruptor del circuito
o retire los fusibles que alimentan el
circuito ramal del horno.
Con el horno enfrente de la abertura del
gabinete, sobre una mesa o plataforma
FRQHFWHHOFRQGXFWRÀH[LEOHDODFDMD
de conexión como se muestra en la
¿JXUD&RORTXHHOFRQGXFWRGHPDQHUD
que quede apoyado sobre la parte
superior del horno en forma de bucle
natural cuando se instale el horno.
Usted necesitará comprar una
abrazadera liberadora de presión
para completar la conexión del
conducto hacia la caja de conexión.
$'9(57(1&,$
Una
conexión inapropiada del cableado
de aluminio residencial con cobre,
podría resultar en un peligro
eléctrico o hasta en incendio. Use
solamente conectores diseñados
para unir cobre con aluminio y siga
las recomendaciones del fabricante
con mucho cuidado.
%
%
%
Ubicación de la
FDMDGHFRQH[LyQ
Abrazadera liberadora
GHSUHVLyQQRLQFOXLGD
GHEHXVDUVHHQODFDMD
de conexión
&RQGXFWR
&RORTXHHOKRUQR
en el soporte para
ayudar en la cone-
xión del conductor,
debe soportar 200
OLEUDVNJ
TIERRA
52-2
%/$1&2
1(*52
$/$0%5(6'(
&21(;,Ï1$
TIERRA

Instrucciones de instalación
%
&RQH[LyQGHFLUFXLWRUDPDO
de tres conductores
127$ Si los cables domésticos son conductores
de aluminio, ver la ADVERTENCIA en la página 8.
Cuando conecte un circuito derivado de tres
conductores, si lo permiten los códigos locales:
a. Evite que el conductor neutro (blanco) quede
enredado con cualquier otro cable. De ser
necesario, corte el conductor neutro (blanco)
\OXHJRYXHOYDDSHODUHOPLVPRD¿QGH
exponer la longitud adecuada del conductor.
b. Conecte el cable rojo del horno al cable rojo
del circuito derivado y el cable negro del
horno al cable negro del circuito derivado de
acuerdo con los códigos locales, utilizando
tapones de alambre.
c. Instale una abrazadera adecuada de alivio de
tensión.
d. Instale la tapa de la caja de conexiones.
%
&RQH[LyQSDUDQXHYD
construcción y de circuito
ramal de cuatro conductores
• Cuando se instale en una construcción nueva, o
• Cuando se instale en una casa móvil, o
• Al instalar en un vehículo de recreacíon, o
• Cuando los códigos locales no permitan hacer
conexión a tierra a través de un cable neutro:
127$ Si los cables del hogar poseen conductores de
aluminio, ver la ADVERTENCIA en la página 8.
Cuando conecte un circuito derivado de cuatro
conductores, si lo permiten los códigos locales:
a. Conecte el conductor de conexión a tierra
junto con el cable neutro (blanco) al neutro
del circuito de empalmes (de color blanco o
gris), usando una tuerca para cables.
b. Conecte el cable a tierra del artefacto (verde
o cobre) de acuerdo con los códigos locales.
c. Conecte el cable neutral (blanco) del horno
con el neutral de circuito derivado (blanco
o gris) de acuerdo con códigos locales,
utilizando un tapón de alambre.
d. Conecte el cable rojo del horno al cable rojo
del circuito derivado y el cable negro del
horno al cable negro del circuito derivado de
acuerdo con los códigos locales, utilizando
tapones de alambre.
e. Instale una abrazadera adecuada de alivio de
tensión.
f. Instale la tapa de la caja de conexiones.
Tapa de la caja de conexiones
Blanco
Negro
Rojo
Circuito
ramificado
Cables a
tierra
Agujero ciego
alternativo
El tubo de
la estufa
se ajusta
en la caja
Cables a tierra
y neutrales (blanco)
Encinte o Prense
Cable neutral
conexión
Negro
Rojo
Circuito
ramificado
Agujero ciego
alternativo
El tubo de
la estufa
se ajusta
en la caja
Tapa de la caja de conexiones

9
Instrucciones de instalación
3RVLFLyQ¿UPHGHOKRUQRHQODDEHUWXUD
&yPRGHVOL]DUHOKRUQRHQHO
interior de la abertura
a. Coloque VLQDWDU una cuerda de 72”
(183 cm) alrededor del conductor antes de
deslizar el horno en su lugar. Esto evitará
que el conducto se caiga detrás del horno.
b. Levante el horno hacia el interior del corte
en el gabinete usando la abertura del horno
para agarrarlo. Empuje contra el marco
frontal del horno cuidadosamente. No
empuje contra los bordes externos.
c. A medida que el horno se desliza hacia atrás,
tire de la cuerda para que el conducto quede
encima del horno de forma natural.
d.
Cuando esté seguro de que el conducto está
fuera del camino, deslice el horno 3/4 del
trayecto hacia atrás y hacia el interior de
la abertura. Retire la cuerda halando de
un extremo.
&
&
Tire hacia afuera
por el lazo de la
cuerda mientras
HPSXMDHOKRUQR
hacia el interior
del gabinete
&yPRWDODGUDUORVRUL¿FLRV
piloto y montar el horno
,03257$17(6LHVWDXQLGDGDOJXQDYH]
se quita del gabinete o el horno se retira
para efectuar mantenimiento, tire de
la unidad 4” y saque el reborde inferior.
(VWRHYLWDUiGDxRVDOUHERUGH
&
Reborde inferior
Tornillo del reborde
Instale el reborde inferior
FRQODXQLGDGµFP
fuera del gabinete
a. Coloque el reborde de metal inferior debajo
del separador de aire, con el costado
alineado con el reborde lateral. Haga esto
con la unidad a 4” (10 cm) fuera del gabinete.
b. Utilizando los dos tornillos de reborde
SURYLVWRV¿MHHOUHERUGHLQIHULRUDOPRQWDMH
del conducto inferior.
4”
FP

10
Instrucciones de instalación
&yPRLQVWDODUORVVRSRUWHVGH
ODEDQGHMD\ODVEDQGHMDVGHO
horno del horno inferior
&
6RSRUWHVGHODVEDQGHMDVGHO
horno
Coloque el soporte de la bandeja con los
RUL¿FLRVUDQXUDGRVVREUHORVSHUQRVWUDVHURV\
ORVRUL¿FLRVUHGRQGRVVREUHORVSHUQRVIURQWDOHV
Utilizando una llave de tuercas de 7/16” (11
mm), ajuste suavemente con cuatro tuercas,
pero no ajuste de más porque el esmalte podría
saltarse. Repita para el segundo soporte de la
bandeja.
%DQGHMDVGHOKRUQR
Coloque la barra de bloqueo de la bandeja
trasera sobre los soportes de la bandeja,
deslice la bandeja hacia adentro hasta que la
barra de bloqueo de la bandeja trasera caiga
debajo de los soportes de la bandeja. Tire la de
EDQGHMDKDFLDDGHODQWH\YHUL¿TXHTXHODEDUUD
de bloqueo de la bandeja trasera esté sujeta
debajo del soporte de la bandeja.
$'9(57(1&,$
6HGHEHQXVDUWRUQLOORVGHPRQWDMH
No hacerlo podría resultar en que
el horno se caiga del gabinete,
causando lesiones serias.
&yPRWDODGUDUORVRUL¿FLRV
piloto y montar el horno
a.3HUIRUHDWUDYpVGHORVRUL¿FLRVGHPRQWDMHGH
la moldura lateral, para los tornillos #8 que se
proporcionan.
b. Ajuste bien el horno al gabinete con los
tornillos que se proporcionan.
127$Si el gabinete es de tabla aglomerada
debe usar tornillos #8 x 3/4”. Los puede adquirir
en cualquier ferreteria.
127$$QWHVGHSHUIRUDUORVRUL¿FLRV
piloto, cerciórese de que el horno se
HPSXMyKDVWDHOIRQGR\GHTXHHVWp
centrado.
&
Ubicación de
ORVRUL¿FLRV
GHPRQWDMH(dos
SURYLVWRV
2UL¿FLRVUDQXUD-
dos sobre pernos
traseros
2UL¿FLRVUHGRQGRV
sobre pernos frontales

11
Instrucciones de instalación
Retire cualquier cinta de protección y eti-
queta que todavía esté presente.
Revise para asegurarse de que todos
los alambres estén bien conectados y
no aplastados o en contacto con partes
móviles.
Lista de control antes de la prueba
Inspeccione la moldura de fondo para
cerciorarse de que está instalada
apropiadamente (ver página 11).
Inspeccione para cerciorarse de que los
tornillos de montura están instalados y
apretados hasta quedar al mismo nivel
de la moldura lateral (ver página 10).
Retire cualquier artículo del interior
del horno.
Cerciórese de que el conducto está
FRQHFWDGR¿UPHPHQWHDODFDMDGH
conexión eléctrica.
Conecte la energía hacia el horno. (Consulte
VX0DQXDOGHOSURSLHWDULR9HUL¿TXHTXH
las unidades de horneado y asado, y
todas las funciones de cocción operan
correctamente.
Cerciórese de que el interruptor de circuito
no se haya disparado o de que los fusibles
de la casa no estén quemados.
Consulte el manual del propietario para una
lista de problemas eventuales.
Lista de control para la operación
NOTA$/(/(&75,&,67$
Los alambres
eléctricos proporcionados con este
aparato son reconocidos por la UL para
conexiones cableado residencial de mayor
calibre. El aislante de estos alambres
VXSHUDODVHVSHFL¿FDFLRQHVLQGLFDGDV
para cableado residencial. La capacidad
actual de conducción del cable depende
GHODFODVL¿FDFLyQGHODWHPSHUDWXUDGHO
aislamiento alrededor del alambre.
127$&$%/($'2'($/80,1,2
A. $'9(57(1&,$
81$&21(;,Ï1,1$3523,$'$
'(/&$%/($'2'(/$/80,1,2
5(6,'(1&,$/&21(/&2%5(32'5Ë$
5(68/7$5(1352%/(0$66(5,262(1
,1&(1',2
% &RQHFWHORVDODPEUHVGHFREUHD
los alambres de aluminio usando
conectores especiales diseñados
y aprobados por UL para unir cobre
y aluminio y siga cuidadosamente
el procedimiento para hacer las
conexiones recomendadas por
el fabricante.
127$(ODODPEUDGRTXHVHXVH
la ubicación y el tipo de conexión,
etc., deben cumplir con las buenas
prácticas de alambrado y los códigos
locales.

12
£12/(9$17(/$38(57$'(/$0$1,-$
Coloque las manos en ambos
lados de la puerta y cierre la
puerta del horno hasta la posición
de remoción, que es casi cerrada.
Levante la puerta
hasta que los brazos
de la bisagra hayan
salido de las ranuras.
La bisagra sale de la ranura
Apéndice
Instrucciones de instalación y de remoción
de la puerta del horno inferior
1
2
3
4
No se recomienda quitar la puerta inferior
para la instalación del producto.
Abra la puerta del horno en su totalidad.
Presione ambas trabas de la bisagra hacia
abajo en dirección del marco de la puerta
hasta destrabarlas. Para esto
puede hacer falta un
destornillador
de lados planos.
Levante la puerta del
horno colocando una
mano en cada lado.
La puerta es pesada y
quizás necesite ayuda.
No levante la puerta
por la empuñadura.
Con la puerta en el mismo ángulo que la
posición para remoción, que está cerra-
do la mayor parte del tiempo, coloque
la muesca del brazo de la bisagra en el
interior del borde inferior de la ranura
de la bisagra. La muesca del brazo de la
bisagra debe apoyarse completamente al
fondo de la ranura.
Abra la puerta del horno hasta el máximo.
Cierre la puerta del horno.
Empuje los topes de las bisagras contra
el marco frontal de la cavidad del horno,
hasta alcanzar la posición de cierre.
127$
La puerta del horno es pesada.
4XL]iVQHFHVLWHD\XGDSDUDOHYDQWDU\
GHVOL]DUODSXHUWDKDFLDDEDMRVREUH
ODVELVDJUDV1ROHYDQWHODSXHUWDSRU
la empuñadura.
1
2
3
5
4
%RUGHLQIHULRU
de la ranura
Muesca de la
ELVDJUDDMXVWDGD
¿UPHPHQWHHQ
el fondo de la
ranura de
la bisagra
%LVDJUDHQODSRVLFLyQGHFLHUUH
%UD]RGHODELVDJUD
Muesca de la bisagra
&Ï0248,7$5/$38(57$
&Ï025((03/$=$5/$38(57$
Hinge
Unlocked
Position
Hinge
Slot
Hinge
Arm
Posición
destrabada
de la
bisagra
Ranura
de la
bisagra
Brazo de la
bisagra
-
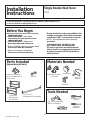 1
1
-
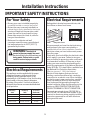 2
2
-
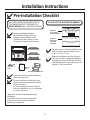 3
3
-
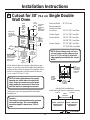 4
4
-
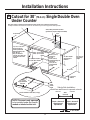 5
5
-
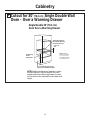 6
6
-
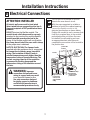 7
7
-
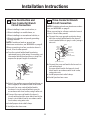 8
8
-
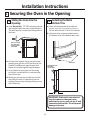 9
9
-
 10
10
-
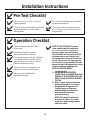 11
11
-
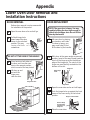 12
12
-
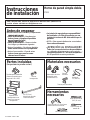 13
13
-
 14
14
-
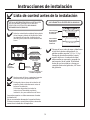 15
15
-
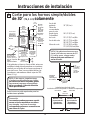 16
16
-
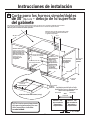 17
17
-
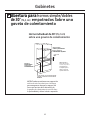 18
18
-
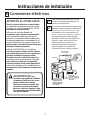 19
19
-
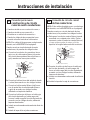 20
20
-
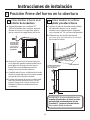 21
21
-
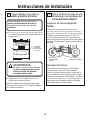 22
22
-
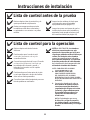 23
23
-
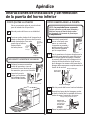 24
24


GE PT925SNSS Guía de instalación
- Categoría
- Hornos
- Tipo
- Guía de instalación
en otros idiomas
- English: GE PT925SNSS Installation guide
