La página se está cargando...

5240-01 2.0
Assembly Instructions (English)
353 West 39
th
Street, 2
nd
Floor, New York, NY 10018
Tel: (212) 736 4440 Fax: (212) 736 4806
www.adessohome.com
ASSEMBLY INSTRUCTION FOR
Kingston Pendant
Model# 5240-01
Professional installation recommended.
Note: Socket ring comes pre-assembled to the socket. Before placing the shade onto the socket, please unscrew this socket
ring.
1. Ensure power to the ceiling junction box is shut off. Gently pull wiring down from the ceiling juction box and allow it to
hang.
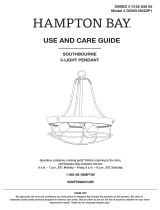
2. Fasten the mounting plate (A) to junction box with screw (B) .
3. Attach the copper ground wire from the pendant to the ground wire which in the junction box . Wrap connected wires
with wiring cap (C) and turn it clockwise until tight.
4. Attach the ("+") electrical wire from the pendant to the ("+") electrical wire in the junction box (usually black). Attach the
("-") electrical wire from the pendant to the ("-") electrical wire in the junction box (usually white). Wrap connected wires
with wiring cap (C) and turn it clockwise until tight.
5. Secure canopy (D) onto mounting plate (A) with screw (E) by using screwdriver.
6. Socket ring comes pre-assembled to the socket. Before placing the shade onto the socket, please unscrew this socket ring.
7. Place the shade (F) onto the socket and tighten it with socket ring (G).
8. Install vintage bulb (H) onto socket.
GENERAL PRODUCT INFORMATION:
This product is suitable for dry locations only.
---------------------------------------------------------------
BULB TYPE: Use only with maximum of 1*60W globe vintage bulb (bulb included).
PARTS DIAGRAM
(1) * Mounting plate (A) (2)* Screw (B) (3)* Wiring cap C)
(1) * Canopy (D) (2) * Screw (E) (1)* Socket ring (G)
(1) * globe vintage bulb(H)

5240-01 2.0
INSTRUCCIONES DE ENSAMBLAJE PARA
Kingston Lámpara Colgante
Modelo# 5240-01
353 West 39
th
Street, 2
nd
Floor, New York, NY 10018
Tel: (212) 736 4440 Fax: (212) 736 4806
www.adessohome.com
Se recomienda instalación profesional.
Nota: El anillo de la boquilla viene pre-montado a la boquilla. Antes de colocar la pantalla en la boquilla, desenrosque este
anillo.
1. Asegúrese de que la alimentación de la caja de conexiones del techo esté apagada. Tire suavemente del cableado hacia
abajo desde la caja de conexiones del techo y deje que cuelgue.
2. Fije la placa de montaje (A) a la caja de conexiones con el tornillo (B) .
3. Conecte el cable de tierra de cobre del colgante al cable de tierra que se encuentra en la caja de conexiones. Envuelva
los cables conectados con la tapa del cableado (C) y gírelo hacia la derecha hasta que quede apretado.
4. Conecte el cable eléctrico ("+") del colgante al cable eléctrico ("+") en la caja de conexiones (generalmente negro).
Conecte el cable eléctrico ("-") del colgante al cable eléctrico ("-") en la caja de conexiones (generalmente blanco).
Envuelva los cables conectados con la tapa del cableado (C) y gírelo hacia la derecha hasta que quede apretado.
5. Asegure el dosel (D) en la placa de montaje (A) con el tornillo (E) usando un destornillador.
6. El anillo de la boquilla viene pre-montado en la boquilla. Antes de colocar la pantalla en la boquilla, desenrosque el
anillo.
7. Coloque la pantalla (F) en la boquilla y apriétela con el anillo de la boquilla (G).
8. Coloque la bombilla vintage (H) en la boquilla.
INFORMACION GENERAL DEL PRODUCTO:
Este producto es adecuado sólo para lugares secos.
---------------------------------------------------------------
TIPO DE BOMBILLA: Use solamente con una bombilla vintage de 60 vatios máximo
(bombilla incluida)
DIAGRAMA DE LAS PIEZAS
(1) * Placa de montaje (A) (2)* Tornillo (B) (3)* Tapa del cableado C)
(1) * Dosel (D) (2) * Tornillo (E) (1) * Anillo de la boquilla (G)
(1) * Bombilla Vintage (H)
! INSPIRATE Y COMPARTE TU ESTILO ¡
#myadesso
Visite www.adessohome.com para más detalles
Caja de empalme
1/2