
4280-01/02 2.0
Assembly Instructions (English)
353 West 39
th
Street, 2
nd
Floor, New York, NY 10018
Tel: (212) 736 4440 Fax: (212) 736 4806
www.adessohome.com
ASSEMBLY INSTRUCTION FOR
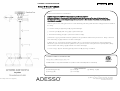
Oscar 5-Head Pendant
Model# 4280-01 /02
Professional installation recommended.
BEFORE STARTING- SHUT OFF BREAKER AT MAIN DISCONNECT
Make sure all power is disconnected at existing fixture and that there are no live wires in the junction box.
Not all junction boxes include simple wiring. If you are unsure or have doubts of electrical connection, call an
electrician for assembly.
1. Ensure power to the ceiling junction box is shut off. Gently pull wiring down from the ceiling juction box and allow
it to hang.
2. Screw the shade part (A) with pole (B) together until tight .
3. Screw the pole (B),(C) and canopy (D) together until tight.
4. Fasten the mounting plate (F) to junction box with screw (E) .
5. Attach the copper ground wire from the pendant to the ground wire which in the junction box . Wrap connected
wires with wiring cap (G) and turn it clockwise until tight.
6. Attach the ("+") electrical wire from the pendant to the ("+") electrical wire in the junction box (usually black).
Attach the ("-") electrical wire from the pendant to the ("-") electrical wire in the junction box (usually white). Wrap
connected wires with wiring cap (G) and turn it clockwise until tight.
7. Secure canopy (D) onto mounting plate (F) with screw (H) by using screwdriver.
GENERAL PRODUCT INFORMATION:
This product is suitable for dry locations only.
---------------------------------------------------------------
BULB TYPE: Use only with maximum of 1*40W incandescent bulb (bulb not included).
PARTS DIAGRAM
(1) * Mounting plate (F) (2)* Screw (E) (3)* Wiring cap (G)
(1) * Canopy (D) (2) * Screw (H)

4280-01/02 2.0
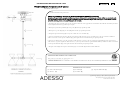
INSTRUCCIONES DE ENSAMBLAJE PARA
Oscar Lámpara Colgante de 5 Luces
Modelo# 4280-01 /02
353 West 39
th
Street, 2
nd
Floor, New York, NY 10018
Tel: (212) 736 4440 Fax: (212) 736 4806
www.adessohome.com
Se recomienda instalación profesional.
ANTES DE COMENZAR: APAGUE EL INTERRUPTOR EN LA CONEXIÓN PRINCIPAL
Asegúrese de que toda la energía esté desconectada en el dispositivo existente y que no haya cables con corriente en la
caja de conexiones. No todas las cajas de conexiones incluyen cableado simple. Si no está seguro o tiene dudas sobre la
conexión eléctrica, llame a un electricista para su montaje.
1. Asegúrese de que la energía en la caja de conexiones del techo esté apagada. Tire suavemente del cableado hacia abajo desde la
caja de empalme del techo y permita que cuelgue.
2. Enrosque la pieza de la pantalla (A) en el poste (B) hasta que quede apretada.
3. Enrosque los postes (B), (C) y el dosel (D) juntos hasta que queden apretados.
4. Asegure la placa de montaje (F) a la caja de conexiones con el tornillo (E).
5. Conecte el cable de tierra de cobre desde el colgante al cable de tierra que se encuentra en la caja de conexiones. Cubra los
cables conectados con la tapa de cableado (G) y enrosquela hacia la derecha hasta que quede apretada.
6. Conecte el cable eléctrico ("+") del colgante al cable eléctrico ("+") en la caja de conexiones (generalmente negro). Conecte el
cable eléctrico ("-") del colgante al cable eléctrico ("-") en la caja de conexiones (generalmente blanco). Cubra los cables conectados
con la tapa de cableado (G) y enrosquela hacia la derecha hasta que quede apretada.
7. Asegure el dosel (D) sobre la placa de montaje (F) con el tornillo (H) usando un destornillador.
INFORMACION GENERAL DEL PRODUCTO:
Este producto es adecuado sólo para lugares secos .
---------------------------------------------------------------
TIPO DE BOMBILLA: Use solamente con bombillas incandescentes de 40 vatios máximo (bombillas no incluidas).
DIAGRAMA DE LAS PARTES:
(1) * Placa de montaje (F) (2)* Tornillo (E) (3)* Tapa de Cableado (G)
(1) * Dosel (D) (2) * Tornillo (H)
Caja de
-
 1
1
-
 2
2


ROOMS TO GO 90642806 Assembly Instructions
- Tipo
- Assembly Instructions
- Este manual también es adecuado para
en otros idiomas
- English: ROOMS TO GO 90642806
Artículos relacionados
-
ROOMS TO GO 90634087 Assembly Instructions
-
-
-
-
-
-
-
-