ROOMS TO GO 90334079 Assembly Instructions
- Tipo
- Assembly Instructions

4199-12 1.0
Assembly Instructions(English)
ASSEMBLY INSTRUCTION FOR
Cabana Arc Lamp
Model# 4199-12
353 West 39
th
Street 2
nd
Floor New York, NY 10018
Tel: (212) 736 4440 Fax: (212) 736 4806
www.adessohome.com
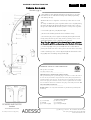
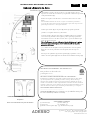
1. Assemble arc arms (D),(E) and (F) by placing the top arc tube
into the bottom arc tube and securing each arm by tightening
each metal joint (C).
Attention: Be sure to align the consistency of the curve on each
arm.
To easily assemble the joints together, make sure to slightly lift up
the arms (D), (E) & (F) while tightening the metal joint to relieve
the pressure. This will allow for the joints to easily screw together.
2. Screw tube (A) onto part (B) until tight.
3. Remove the bushing from the base and throw away.
4. Insert tube (A ) to base (G) & washer (H), then tighten it with
nut (I) using wrench (J). You may need to pull any excess cord
gently through the poles so that these two parts fit.
Note: The Arc lamp should face forward in the same direction
as the switch, with the cord coming out of the back of the base.
5. Socket rings(M) comes pre-assembled to the sockets. Before
placing the shade onto the socket, please unscrew this socket ring.
6. Place shades (L) onto sockets (K) and tighten them with socket
rings (M) before installing vintage bulbs (N).
GENERAL PRODUCT INFORMATION:
This product is suitable
for dry locations only.
---------------------------------------------------------------
IMPORTANT SAFETY INSTRUCTIONS:
This portable lamp has a polarized plug as a feature to reduce the risk of
electric shock (one blade is larger than the other). This plug will fit in a
polarized outlet only one way. If the plug does not fit fully in the outlet,
reverse the plug. If it still does not fit, contact a qualified electrician.Do
not use with an extension cord unless the plug can be fully inserted. DO
NOT ALTER THE PLUG .
----------------------------------------------------
BULB TYPE : Use only with maximum of 3*60W vintage bulb ( bulb
included).
PARTS DIAGRAM
(1) * washer (H) (1) *allen wrench (J)
(1) *Nut(I) (3) * shade(L)
(3) *socket ring(M) (3) * Vintage bulb (N)

4199-12 1.0
INSTRUCCIONES DE ENSAMBLAJE PARA
Cabana Lámpara de Arco
Modelo# 4199-12
353 West 39
th
Street 2
nd
Floor New York, NY 10018
Tel: (212) 736 4440 Fax: (212) 736 4806
www.adessohome.com
1. Ensamble los brazos de arco D, E y F colocando el tubo de arco
superior en el tubo de arco inferior y asegurando cada brazo apretando
cada junta metálica (C).
Atención: asegúrese de alinear la consistencia de la curva en cada
brazo.
Para ensamblar fácilmente las uniones, asegúrese de levantar ligeramente los
postes (D), (E) y (F) mientras aprieta la unión metálica para aliviar la presión. Esto
permitirá que las uniones se enrosquen fácilmente.
2. Enrosque el tubo (A) en la parte (B) hasta que quede apretado.
3. Retire el casquillo de la base y deséchelo.
4. Inserte el tubo (A) en la base (G) y la arandela (H), luego apriételo
con la tuerca (I) usando la llave (J). Es posible que tenga que halar
suavemente el exceso de cable a través de los postes de manera que
estas dos piezas encajen.
Nota: La lámpara de arco debe mirar hacia adelante en la misma
dirección que el interruptor, con el cable saliendo de la parte
posterior de la base.
5. Los anillos de las boquillas vienen premontados en las boquillas.
Antes de colocar las pantallas en las boquillas, desenrosque los
anillos.
6. Coloque las pantallas (L) en las boquillas (K) y apriételas con los
anillos de las boquillas (M) antes de instalar las bombillas vintage (N).
DIAGRAMA DE PIEZAS
(1) * Arandela (H) (1) *Llave Allen (J)
(1) *Tuerca (I) (3) * Pantallas (L)
(3) *Anillos de la Boquillas (M) (3) * Bombilla Vintage (N)
INFORMACION GENERAL DEL PRODUCTO:
Este producto es adecuado sólo
para lugares secos.
---------------------------------------------------------------
INSTRUCCIONES IMPORTANTES DE SEGURIDAD :
Esta lámpara portátil tiene un enchufe polarizado (una paleta es más ancha
que la otra), función de seguridad que reduce el riesgo de una descarga
eléctrica. Este enchufe encajará en un tomacorriente polarizado en un sólo
sentido. Si el enchufe no entra completamente en el tomacorriente, invierta el
enchufe. Si aún así no encaja, llame a un electricista calificado. Nunca use un
cable de extensión a menos que el enchufe pueda insertarse por completo.
NO MODIFICAR EL ENCHUFE.
-------------------------------------------------------
TIPO DE BOMBILLA: Use solamente con 3 bombillas vintage de
60 vatios máximo (bombilla incluida).
! INSPIRATE Y COMPARTE TU ESTILO ¡
#myadesso
Visite www.adessohome.com para más detalles
-
 1
1
-
 2
2


ROOMS TO GO 90334079 Assembly Instructions
- Tipo
- Assembly Instructions
en otros idiomas
- English: ROOMS TO GO 90334079
Artículos relacionados
-
ROOMS TO GO 90234077 Assembly Instructions
-
-
-
-
-
-
-
-
-