Surtek LB521B El manual del propietario
- Categoría
- Herramientas eléctricas
- Tipo
- El manual del propietario

ATENCIÓN: Lea, entienda y siga las instrucciones de seguridad contenidas en este
manual antes de operar esta herramienta.
WARNING: Read, understand and follow the safety rules in this manual, before operating this tool.
LB521B
Lijadora de Banda
Belt Sander
Manual de Usuario y Garantía.
User’s Manual and Warranty.
LB521B manual.indd 1 06/07/15 11:56

2
ENGLISH ESPAÑOL
General safety rules
Electric safety
Personal safety
Tool use and care
Specific safety rules for
belt sanders
Features
Operation instructions
Maintenance
Technical data
Notes
Warranty policy
Normas generales de seguridad
Seguridad eléctrica
Seguridad personal
Utilización y cuidados de las
herramientas eléctricas
Advertencias de seguridad para
lijadoras de banda
Características
Instrucciones de operación
Mantenimiento
Especificaciones técnicas
Notas
Garantía
9
9
9
10
10
11
12
13
13
14
16
3
3
3
4
5
5
6
7
8
14
16
CONTENIDO CONTENT
SÍMBOLOS SYMBOLS
PELIGRO, ADVERTENCIA, PRECAUCIÓN:
Indica un riesgo personal o la posibilidad
de un daño.
Herramientas tipo II: Doble aislamiento,
protege las herramientas eléctricas.
DANGER, CAUTION, WARNING: Indicates risk of
personal injury and/or the possibility of damage.
Type II power tools: Indicates double insulation.
LB521B manual.indd 2 06/07/15 11:56

ESPAÑOL•Manual de Usuario
3
NORMAS GENERALES DE SEGURIDAD
Esta LIJADORA DE BANDA tiene características
que harán su trabajo más rápido y fácil. Seguri-
dad, comodidad y confiabilidad fueron previs-
tos como prioridad para el diseño del mismo,
haciendo más fácil su operación.
ADVERTENCIA: Lea todas las advertencias
de seguridad y todas las instrucciones. La omi-
sión de alguna de las advertencias e instruccio-
nes que se enlistan a continuación puede dar
como resultado un choque eléctrico, fuego y/o
un daños serios.
CONSERVE TODAS LAS ADVERTENCIAS Y
TODAS LAS INSTRUCCIONES.
SEGURIDAD EN EL ÁREA DE TRABAJO
Mantenga el área de trabajo limpia y bien ilu-
minada. Las áreas desordenadas y oscuras pro-
vocan accidentes.
No maneje herramientas eléctricas en atmós-
feras explosivas, tales como en presencia de
líquidos inflamables, gases o polvo. Las herra-
mientas eléctricas crean chispas que pueden
encender el polvo o los humos.
Mantenga alejados a los niños y curiosos
mientras maneja una herramienta eléctrica.
Las distracciones pueden causarle la pérdida
del control.
SEGURIDAD ELÉCTRICA
La clavija de la herramienta eléctrica debe
coincidir con receptáculo. No modificar nunca
la clavija de ninguna manera. No usar ningún
adaptador de clavijas con herramientas eléctri-
cas puestas a tierra. Clavijas no modificadas y
bases coincidentes reducirán el riesgo de cho-
que eléctrico.
Evite el contacto del cuerpo con superficies
puestas a tierra como tuberías, radiadores, co-
cinas eléctricas y refrigeradores. Hay un riesgo
aumentado de choque eléctrico si su cuerpo
está puesto a tierra.
No exponga las herramientas eléctricas a la llu-
via o a condiciones de humedad. El agua que
entre en la herramienta aumentará el riesgo
de choque eléctrico.
No abuse del cable. No usar nunca el cable para
llevar, levantar o desenchufar la herramienta
eléctrica. Mantenga el cable lejos del calor,
aceite, cantos vivos o piezas en movimiento.
Los cables dañados o enredados aumentan el
riesgo de choque eléctrico.
Cuando maneje una herramienta eléctrica en
el exterior, use una prolongación de cable ade-
cuada para uso en el exterior. El uso de una
prolongación de cable adecuada para uso en el
exterior reduce el riesgo de choque eléctrico.
“ESTA HERRAMIENTA CUENTA CON UN
SUJETACABLE TIPO “Y“, EN CASO DE DAÑAR-
SE EL CORDÓN DE ALIMENTACIÓN, ÉSTE DE-
BERÁ SER REEMPLAZADO POR EL FABRICANTE,
SUS CENTROS DE SERVICIO AUTORIZADOS, O
PERSONAL CALIFICADO A FIN DE EVITAR RIES-
GOS.”
EXTENSIONES DE CABLE
NOTA: El uso de cables dañados incrementa el
riesgo de descargas eléctricas o quemaduras.
Si es necesario un cable de extensión, debe ser
usado un cable con el tamaño adecuado de los
conductores. La tabla de la siguiente página,
muestra el tamaño correcto para usar depen-
diendo en la longitud del cable y el rango de
amperaje especificado en la etiqueta de valo-
res nominales del producto. Si está en duda,
use el rango próximo más grande.
Siempre use cables de extensión listados en UL,
CSA o NOM.
TAMAÑOS RECOMENDADOS DE EXTENSIONES
DE CABLE:
Cuando esté usando el producto afuera, use
una extensión para exteriores marcadas con lo
siguiente: “WA” o “W”. Estas extensiones están
pensadas para trabajar en exteriores y reducen
el riesgo de descarga eléctrica.
SEGURIDAD PERSONAL
Esté alerta, vigile lo que está haciendo y use el
sentido común cuando maneje una herramien-
ta eléctrica. No use una herramienta eléctrica
cuando esté cansado o bajo la influencia de
LB521B manual.indd 3 06/07/15 11:56

4
drogas, alcohol o medicamentos. Un momento
de distracción mientras maneja herramientas
eléctricas puede causar un daño personal serio.
Use equipo de seguridad. Lleve siempre pro-
tección para los ojos. La utilización para las
condiciones apropiadas de un equipo de segu-
ridad tal como mascarilla anti-polvo, zapatos
no resbaladizos, gorro duro, o protección para
los oídos reducirá los daños personales.
Evite un arranque accidental. Asegúrese de
que el interruptor está en posición apagado
antes de conectar a la red y/o a la batería, co-
ger o transportar la herramienta. Transportar
herramientas eléctricas con el dedo sobre el
interruptor o enchufar herramientas eléctricas
que tienen en interruptor en posición encendi-
do invita a accidentes.
Retire llaves o herramienta antes de arrancar
la herramienta eléctrica. Una llave o herra-
mienta dejada unida a una pieza rotativa de
una herramienta eléctrica puede causar un
daño personal.
No se sobrepase. Mantenga los pies bien asen-
tados sobre el suelo y conserve el equilibrio en
todo momento. Esto permite un mejor control
de la herramienta eléctrica en situaciones in-
esperadas.
Vista adecuadamente. No vista ropa suelta o
joyas. Mantenga su pelo, su ropa y guantes
alejados de las piezas en movimiento. La ropa
suelta, las joyas o el pelo largo pueden ser co-
gidos en las piezas en movimiento.
Si hay dispositivos para la conexión de medios
de extracción y recolección de polvo, asegúre-
se de que éstos estén conectados y se usen co-
rrectamente. El uso de estos dispositivos puede
reducir los peligros relacionados con el polvo.
IMPORTANTE: Este aparato no se destina
para utilizarse por personas (incluyendo niños)
cuyas capacidades físicas, sensoriales o menta-
les sean diferentes o estén reducidas, o carez-
can de experiencia o conocimiento, a menos
que dichas personas reciban una supervisión o
capacitación para el funcionamiento del apa-
rato por una persona responsable de su segu-
ridad. Los niños deben supervisarse para ase-
gurar que ellos no empleen los aparatos como
juguete.
UTILIZACIÓN Y CUIDADOS DE LAS
HERRAMIENTAS ELÉCTRICAS
No fuerce la herramienta eléctrica. Use la he-
rramienta eléctrica correcta para su aplicación.
La herramienta eléctrica correcta hará el tra-
bajo mejor y más seguro al ritmo para la que
fue concebida.
No use la herramienta eléctrica si el interrup-
tor no gira “encendido” y “apagado”. Cual-
quier herramienta eléctrica que no pueda con-
trolarse con el interruptor es peligrosa y debe
repararse.
Desenchufe la clavija de la fuente de alimen-
tación y/o de la batería antes de efectuar
cualquier ajuste, cambio de accesorios, o de
almacenar las herramientas eléctricas. Tales
medidas preventivas de seguridad reducen el
riesgo de arrancar la herramienta accidental-
mente.
Almacene las herramientas eléctricas inactivas
fuera del alcance de los niños y no permita el
manejo de la herramienta eléctrica a personas
no familiarizadas con las herramientas o con
estas instrucciones. Las herramientas eléctricas
son peligrosas en manos de usuarios no entre-
nados.
Mantenga las herramientas eléctricas. Com-
pruebe que las partes móviles no estén des-
alineadas o trabadas, que no haya piezas ro-
tas u otras condiciones que puedan afectar la
operación de las herramientas eléctricas. Las
herramientas eléctricas se reparan antes de su
uso, cuando están dañadas. Muchos acciden-
tes son causados por herramientas eléctricas
pobremente mantenidas.
Mantenga las herramientas de corte afiladas y
limpias. Las herramientas de corte mantenidas
correctamente con los bordes de corte afilados
son menos probables de trabarse y más fáciles
de controlar.
Use la herramienta eléctrica, accesorios y pun-
tas de herramienta, etc. de acuerdo con estas
instrucciones y de la manera prevista para el
tipo particular de herramienta eléctrica, te-
niendo en cuenta las condiciones de trabajo
y el trabajo a desarrollar. El uso de la herra-
mienta eléctrica para aplicaciones diferentes
de las previstas podría causar una situación de
peligro.
LB521B manual.indd 4 06/07/15 11:56

ESPAÑOL•Manual de Usuario
5
SERVICIO
Haga revisar su herramienta eléctrica por un
servicio de reparación calificado usando sola-
mente piezas de reemplazo idénticas. Esto ga-
rantizará que la seguridad de la herramienta
eléctrica se mantiene.
ADVERTENCIAS DE SEGURIDAD
PARA LIJADORAS DE BANDA
Nunca deje la traba del interruptor de encen-
dido en la posición “encendido”. Antes de en-
chufar la máquina asegúrese que el interruptor
esté en la posición “apagado”.
Cuando arranque la máquina déjela correr por
algunos minutos antes de usarla en la pieza de
trabajo. Mire la vibración o la ondulación que
puedan indicar una instalación pobre.
No toque las piezas móviles. No coloque sus
manos, dedos, ni demás partes del cuerpo cer-
ca de las piezas móviles de la herramienta.
Asegure el material a ser trabajado. Nunca lo
sostenga con sus manos o con sus piernas.
Siempre use anteojos de seguridad y máscara
de polvo cuando esté trabajando, especial-
mente cuando esté trabajando sobre el nivel
de su cabeza.
Maneje correctamente la herramienta de
acuerdo con las instrucciones ofrecidas aquí.
No deje caer ni tire la herramienta. No permita
que los niños ni otras personas no autorizadas
ni familiarizadas con la operación de la herra-
mienta utilicen ésta.
Mantenga todos los tornillos, pernos, y cubier-
tas firmemente fijos en su lugar. Mantenga
todos los tornillos, pernos, y cubiertas firme-
mente montados. Compruebe periódicamente
su condición.
Mantenga limpio el conducto de ventilación
del motor. El conducto de ventilación del mo-
tor limpio para que el aire pueda circular libre-
mente en todo momento. Compruebe frecuen-
temente y limpie el polvo acumulado.
No toque la pieza de trabajo inmediatamente
después de la operación. Puede estar muy ca-
liente y puede quemar su piel.
Esta lijadora no está diseñada para realizar tra-
bajos de lijado húmedos.
La inhalación del residuo de lijado es peligrosa
para su salud. Es recomendable usar siempre
el sistema de extracción de polvo, para esto
conecte la manguera de succión de una aspi-
radora a un contenedor de una aspiradora a
la salida de extracción de la lijadora usando
adaptadores en el caso que sean necesarios.
Asegure la pieza de trabajo. Use mordazas o
un dispositivo para sostener la pieza de traba-
jo, esto es más seguro que usar sus manos y le
permite tener sus dos manos libres para usar la
herramienta.
Alinee la marca de la flecha interna de la cinta
de lijado con la dirección de giro de la polea
de marcha.
Tras la operación, limpie el polvo de lijado de
la bolsa de polvo para evitar graves accidentes.
No utilice agua o aceite como lubricante.
Observe que la pieza a trabajar no tiene clavos
u otras materias extrañas.
No se recomienda utilizar la lijadora sobre fi-
bra de vidrio.
Tras la operación, elimine el polvo de la banda
de lija y de las poleas.
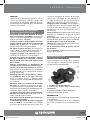
CARACTERÍSTICAS
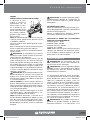
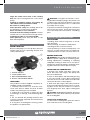
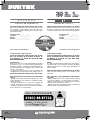
CONOZCA SU HERRAMIENTA
Antes de intentar usar este producto, familiarí-
cese con todas las características de operación
y requerimientos de seguridad.
1. INTERRUPTOR DE ENCENDIDO.
2. BOTÓN DE TRABA PARA OPERACIONES
CONTINUAS.
3. PUERTO DE EXPULSIÓN DE RESIDUOS.
4. PERILLA DE AJUSTE DE LIJA.
DESEMBALAJE
Esta máquina ha sido empacada completamen-
te ensamblada.
1. Saque la herramienta de la caja. Asegúrese
que todos los elementos se encuentren inclui-
dos.
1
4
3
2
LB521B manual.indd 5 06/07/15 11:56

6
2. Haga una inspección rápida y asegúrese que
la herramienta no se haya dañado durante el
embalaje.
3. No tire el empaque sin antes asegurarse que
la herramienta funciona correctamente.
4. Si alguna parte se encuentra dañada o fal-
tante, regrese el producto para su reemplazo.
PRECAUCIÓN: Si cualquier parte de la he-
rramienta no se encuentra en el empaque o si
nota que alguna parte este rota, no lo conecte
hasta que haya encontrado la parte faltante
o haya sido reparado. El hacer caso omiso de
esta advertencia puede resultar en daños per-
sonales.
INSTRUCCIONES DE OPERACIÓN
APLICACIONES
• Acabado de lijado y acabado de revestimiento
para suelos de productos de carpintería.
• Pulido de base de planos revestidos de
madera.
• Acabados de lijado de supercies metálicas.
• Pulido de base de planos revestidos de metal,
eliminación de óxido o retirada de pintura
para terminados.
• Acabado supercial de pizarra, hormigón,
etc.
CARACTERÍSTICAS GENERALES
Esta lijadora es adecuada para lijar con lijas de
grano grueso, medio y fino. Realiza un termi-
nado libre de marcas.
ANTES DE SU OPERACIÓN
ADVERTENCIA: Su lijadora nunca debe
permanecer conectada a la fuente de poder
cuando ensamble partes, realizando ajustes,
ajustando o instalando nuevas lijas, limpiando
o cuando no lo esté utilizando.
El desconectar la lijadora de la fuente de po-
der evitará arranques accidentales que podrían
causar daños personales severos.
INSTALANDO LA BANDA DE LIJA
1. Tire la palanca de liberación de lija que aflo-
jará la polea delantera.
2. Coloque la lija por sobre ambas poleas (de-
lantera y trasera) asegurándose de que la fle-
cha que indica la dirección del grano de la lija
coincida con la dirección de giro de la polea de
conducción.
3. Vuelva a colocar la palanca de liberación,
esto hará que la polea delantera se posicione
de tal manera que tensione la banda de lija.
IMPORTANTE: La banda de lija que haya
sido instalada de manera incorrecta, hará que
decaiga la eficacia del trabajo y acortará la vida
de la lijadora.
DESINSTALANDO LA BANDA DE LIJA
Para quitar la banda de lija, tire de la palanca
de liberación de la polea y retire la banda de
lija.
ELIMINACIÓN DE RESIDUOS
Cuando haya demasiado polvo depositado en
la bolsa recolectora, la eficacia de la aspiración
de polvo descenderá en gran medida.
Retire el polvo de la bolsa cuando esté deposi-
tado hasta aproximadamente 2/3 de su capaci-
dad de recolección.
OPERACIÓN DE ENCENDIDO
1) El interruptor de encendido cuenta con
tres funciones: “ENCENDIDO“, “APAGADO“ y
trabajo continuo en modo de “ENCENDIDO“.
2) Para encender presione y sostenga el
interruptor de encendido, para apagar suelte
el interruptor.
3) Para una operación continua presione
el botón de traba mientras mantiene el
interruptor de encendido apretado.
NOTA: Procure no dejar la máquina con el
botón de traba activado. Esto provocara que
la herramienta se encienda accidentalmente. El
no seguir con estas recomendaciones causaran
daños a la máquina y a su operador.
DURANTE LA OPERACIÓN
ADVERTENCIAS
• Asegúrese de no cubrir las ranuras de ventila-
ción de la lijadora.
• Asegure la pieza de trabajo. Una pieza de
trabajo mal asegurada puede ser lanzada hacia
el operador durante la operación, evite daños
innecesarios.
LB521B manual.indd 6 06/07/15 11:56

ESPAÑOL•Manual de Usuario
7
LIJADO
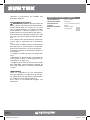
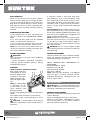
COMO AJUSTAR LA POSICIÓN DE LIJADO
1. Presione el inte-
rruptor y coloque la
herramienta de tal
manera que se mues-
tre la banda de lija.
Ajuste la banda de lija
de tal manera que am-
bos bordes sobresal-
gan de 1,6 mm a 3mm
de los rodillos.
NOTA: Si la banda de lija se encuentra muy cer-
ca de las poleas puede causar abrasión contra
la máquina y dañarla.
Ajuste la posición de la banda girando la peri-
lla de ajuste:
Gire en sentido de las manecillas del reloj para
llevar el rodillo de ajuste hacia adentro.
Gire en sentido opuesto a las manecillas del re-
loj para sacarlo.
IMPORTANTE: Si la banda de lija se mueve
durante el lijado, puede realizar el ajuste du-
rante el proceso de operación.
2. Sostenga la lijadora hacia el frente, lejos de
usted, manténgalo en una posición libre por
encima de la pieza de trabajo. Encienda su lija-
dora y deje que el motor llegue a su velocidad
máxima. Gradualmente coloque la lijadora en
la pieza de trabajo con un pequeño movimien-
to hacia el frente. Muévalo lentamente hacia
adelante y hacia atrás.
PRECAUCIÓN: No encienda la lijadora cuan-
do la mantenga en contacto con la pieza de
trabajo, esto le provocará un descontrol de la
herramienta y puede causar daños al operador
y a la misma máquina.
¡NO LO FUERCE! La misma máquina provee la
presión adecuada para su funcionamiento. El
aplicar una presión adicional alentará el motor,
se desgastará más rápidamente la lija y reduci-
rá la velocidad de lijado.
Una presión excesiva sobrecargará el motor
causándole daños, sobrecalentamiento y cau-
sará una calidad inferior de trabajo.
NOTA: Cualquier terminado o resinado en la
madera pueden reblandecerse debido a la fric-
ción. No lije en un solo lugar por mucho tiem-
po ya que el movimiento rápido de la lijadora
puede rebajar el material y hacer la superficie
desigual.
PRECAUCIÓN: No toque la pieza de trabajo
inmediatamente después de la operación ya
que se encontrará caliente y puede causarle
quemaduras.
MOVIMIENTO DE LIJADO
Sujete la máquina por el mango frontal y pos-
terior. Mantenga bien sujetada la herramienta
durante el funcionamiento.
Mueva la máquina hacia adelante y después
hacia atrás, repitiendo este movimiento.
SELECCIONE LA BANDA DE LIJA ADECUADA
PARA CADA FUNCIONAMIENTO:
Acabado grueso; 30-40
Acabado medio; 40-100
Acabado semi-fino; 80-240
Acabado fino; 180-40
NOTA: Utilice el mismo grueso de lija hasta que
obtenga una superficie con terminado unifor-
me. El cambiarlos durante el proceso de lijado
puede llevar a un mal terminado.
MANTENIMIENTO
ADVERTENCIA: Se recomienda que cual-
quier reparación o servicio sean realizados en
un centro de servicio calificado.
ADVERTENCIA: Para su seguridad, apague
SIEMPRE la sierra y desenchúfela de la fuente
de alimentación antes de realizar cualquier
mantenimiento o limpieza.
Las herramientas eléctricas tienen un desgas-
te y fallas prematuras cuando se utilizan sobre
botes de fibra de vidrio y autos deportivos,
tabla roca, compuesto de relleno o yeso. Las
astillas y residuos de estos materiales son alta-
mente abrasivos para la piezas de herramien-
tas eléctricas, tales como rodamientos, cepillos,
conmutadores, etc. Consecuentemente, no se
recomienda que esta herramienta sea utilizada
para trabajos extensos sobre cualquiera de es-
tos materiales. Durante cualquier uso sobre es-
tos materiales, es extremadamente importante
que la herramienta sea limpiada con frecuen-
cia usando un compresor de aire.
ADVERTENCIA: Use siempre lentes de se-
guridad con guardas laterales al operar he-
rramientas eléctricas, o al soplar polvo. Si la
LB521B manual.indd 7 06/07/15 11:56

8
operación es polvorienta, use también una
mascarilla antipolvo.
MANTENIMIENTO DE RUTINA
ADVERTENCIA: NUNCA deje que fluido de
frenos, gasolina, productos a base de petróleo,
aceites penetrantes, etc. entren en contacto
con las piezas plásticas. Los químicos pueden
dañar, debilitar o destruir el plástico, lo cual
podría resultar en lesiones personales graves.
El mantenimiento periódico permite una vida
útil larga y un funcionamiento libre de proble-
mas.
Como práctica de mantenimiento preventivo
común, siga los siguientes pasos recomenda-
dos:
• Al nalizar el trabajo, limpie la herramienta
para permitir un funcionamiento ininterrum-
pido de la herramienta a lo largo del tiempo.
• Use paños limpios y húmedos para limpiar la
herramienta.
• Verique el estado de todos los cables eléc-
tricos.
• Mantenga las aberturas del motor libres de
aceite, grasa y aserrín o astillas y guarde la he-
rramienta en un lugar seco.
• Asegúrese que todas las piezas móviles estén
bien lubricadas, particularmente después de
una larga exposición a condiciones húmedas
o sucias.
LUBRICACIÓN
Todas los rodamientos en esta herramienta
han sido lubricados con lubricante de alto gra-
do suficiente para la vida útil de la herramienta
en condiciones normales de operación.
Por lo tanto, no se requiere de ninguna otra
lubricación.
ESPECIFICACIONES TÉCNICAS
VOLTAJE-FRECUENCIA
VELOCIDAD DE BANDA
CAPACIDAD DE LIJA
POTENCIA
TIEMPO DE OPERACIÓN
PESO
120 V ~ 60 Hz
380 m/min
3"x 21" (76 mm x 533 mm)
950 W
20 min / 10 min
3,8 kg (8,3 lb)
LB521B manual.indd 8 06/07/15 11:56

9
ENGLISH•User's manual
GENERAL SAFETY RULES
Your SANDER BELT has many features that will
make your job faster and easier. Safety, per-
formance and reliability have been given top
priority in the design of this tool, qualities to
make easy to maintain and to operate.
WARNING: Read and understand all in-
structions. Failure to follow all indications list-
ed below, may result in electric shock, fire and/
or serious personal injury.
SAVE THESE INSTRUCTIONS.
SAFETY IN WORKING AREA
Keep your work area clean and well lit. Clut-
tered benches and dark areas may cause acci-
dents.
Do not operate power tools in explosive atmo-
spheres, such as in the presence of flammable
liquids, gases or dust. Some power tools create
sparks which may provoke fire.
Keep away observers, children and visitors
while operating a power tool. Distractions can
cause you to lose control.
ELECTRIC SAFETY
Double insulation eliminates the need for the
three wire grounded power cord and ground-
ed power supply system.
Avoid the body contact with grounded surfac-
es such as pipes, radiators and refrigerators.
There is an increased risk of electric shock if
your body is grounded.
Don’t expose power tools to rain or wet condi-
tions. The presence of water into power tools
will increase the risk of electric shock.
Do not abuse of the power cord. Never use the
power cord to carry the tool and do not pull
the plug off the outlet. Keep the cable away of
heat, oil, sharp edges or moving parts. Replace
damaged cords immediately. Damaged cords
increase the risk of electric shock.
When operating a power tool outside, use an
outdoor extension cord marked “W-A” or “W”.
These cords are rated for outdoor use and re-
duce the risk of electric shock.
EXTENSION CORDS
Replace damaged cords immediately. The use
of damaged cords can shock, burn or electric
shock. If an extension cord is necessary, a cord
with adequate size conductors should be used
to prevent excessive voltage drop, loss of pow-
er or overheating. The table below shows the
correct size to use, depending on cord length
and nameplate amperage rating of tools. In
case of doubt use the next heavier gauge. Al-
ways use UL listed extension cords.
SIZE RECOMMEND EXTENSION CABLES
PERSONAL SAFETY
Stay alert, watch what you are doing and use
common sense when operating a power tool.
Don’t use the tool if you are tired or under the
influence of drugs, alcohol or medication. A
moment of inattention while operating power
tools may cause a serious personal injury.
Dress properly. Do not wear loose clothing
or jewelry. Contain long hair. Keep your hair,
clothing and gloves away of moving parts.
Loose clothes, jewelry or long hair can be
caught in moving parts.
Avoid an accidental starting. Be sure that the
switch is OFF before plugging in. Carrying
tools with the finger on the switch or plug in
the tool switch in ON may cause accidents.
Remove the adjusting keys or wrenches be-
fore turning the tool on. A wrench or a key
that is left close to a rotating part of the tool
may provoke a personal injury.
Do not overreach. Keep proper footing and
balance at all times. Proper footing and bal-
ance enables better control of the tools on un-
expected situations.
Use safety equipment. Always wear eye pro-
tection. Dust mask, nonskid safety shoes, hard
hat, or hearing protection must be used for ap-
propriate conditions.
Before connecting the tool to a power source
(receptacle, outlet, etc.) be sure that the volt-
age supplied is the same as that one specified
on the nameplate of the tool. To use a not
LB521B manual.indd 9 06/07/15 11:56

10
specified voltage may cause a serious injury to
the user as well as damage the tool.
IMPORTANT: This appliance is not intended
for use by persons (including children) with re-
duced physical, sensory or mental capabilities
may be different or reduced, or lack of experi-
ence or knowledge, unless such persons are su-
pervised or trained to operate the product by
a person responsible for their safety. Children
should be supervised to ensure they do not use
the devices as toys.
TOOL USE AND CARE
Do not force the power tool. Use the correct
tool for the application. The correct tool will
do the job better and more safely at the rate
that it was designed to work at.
Do not use tools if switch does not turn it on
or off. Any tool that cannot be controlled with
the switch is dangerous and must be repaired.
Disconnect the plug from the power source
before making any adjustments, changing ac-
cessories or storing the tool. This preventive
safety measures reduce the risk of accidental
starting of the tool.
When the power tool is not in use, store it out
of the reach of children, and do not allow in-
dividuals who are not familiar with the power
tool or these instructions to operate it. Power
tools are dangerous in the hands on untrained
users.
Maintain the power tool. Check for misalign-
ment or binding of moving parts, broken parts,
and any other condition that may affect the
operation of the power tool. If it is damaged,
have it repaired before using. Many accidents
are caused by poorly maintained power tools.
Check for misalignment or bonding of moving
parts, breakage parts, and any other condition
that may affect the tools operation. If you find
a damaged tool, take it to service before use it.
Use only accessories that are recommended by
the manufacturer of your model. Suitable ac-
cessories for one tool, may become hazardous
when are used on another tool.
Keep cutting tools, sharpened and clean. Cut-
ting tools in good condition with sharpened
edges, are less likely to stuck in workpieces or
easier to control.
Is recommendable to use a safety device suit-
able, such a thermal and differential switch
when you are using an electric equipment.
SERVICE
Tool service must be performed only by quali-
fied repair personnel. Service or maintenance
performed by unqualified personnel could re-
sult in a risk of injury.
SPECIFIC SAFETY RULES FOR
SANDER BELT
Never leave the switch of the ignition in the
position ON, before plugging the machine as-
sure that the switch is locked in the position
off.
When it starts up the machine let it run for
some minutes before using it in the work
piece. Look at the vibration or wave that it can
indicate a poor installation.
Never touch moving parts. Never place your
hands, fingers or other body parts near the
tool’s moving parts.
Assure the material to be worked. Never hold
it witch your hand or with your legs.
Handle tool correctly. Operate the tool accord-
ing to the instructions provided herein.
Do not drop or throw the tool. Never allow
the tool to be operated by children, individuals
unfamiliar with its operation or unauthorized
personnel.
Keep all screws, bolts and covers tightly in
place. Keep all screws, bolts, and plates tightly
mounted. Check their condition periodically.
Always wear eye protection and mask, espe-
cially when you are working at the level of
your head.
Keep motor air vent clean. The tool’s motor air
vent must be kept clean so that air can freely
flow at all times. Check for dust build-up fre-
quently.
This sander is not designed for carry out wet
sandy.
The inhalation dust is danger for your health.
Is recommend always use the system of extrac-
tion dust, for this connect the suction hose of
vacuum cleaner to connector of vacuum clean
leave for extraction of the sander using adapt-
ing when is necessary.
LB521B manual.indd 10 06/07/15 11:56

11
ENGLISH•User's manual
Align the inside arrow mark of the sanding
belt with the revolving direction of the drive
pulley.
Sanding by applying impact and cutting by
side of belt contact should be avoided.
Be careful of sanding sparks.
After operation sweep the sanding dust from
the dust bag to avoid serious accidents.
Don’t use water, or oil as lubricant.
Ascertain that the sanding workpiece contains
neither nails nor other harmful foreign matter.
Sanding glass fiber is not recommended.
After operation, blow away the dust on the
belt and the pulleys.
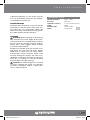
FEATURES
KNOW YOUR TOOL
Before attempting to use this product, become
familiar with all of its operating features and
safety requirements.
1. ON/OFF SWITCH.
2. LOCK-ON BUTTON.
3. DUST MANAGEMENT BAG.
4. PULLEY ADJUSTMENT KNOB.
UNPACKING
This product has been shipped completely as-
sembled, except cutting blade.
1. Carefully remove the tool and the acces-
sories from the box. Make sure that all items
listed in the packing list are included.
2. Inspect the tool carefully to make sure that
no breakage or damage occurred during ship-
ping.
3. Do not discard the packing material until
you have carefully inspected and satisfactorily
operated the tool.
4. If any parts are damaged or missing, return
the product for replacement.
WARNING: If any parts are broken or miss-
ing, DO NOT attempt to plug in the power cord
or operate the saw until the broken or missing
parts are replaced. Failure to do so could result
in possibly serious injury.
To prevent accidental starting that could cause
serious personal injury, always disconnect the
tool from the power source when assembling
parts.
OPERATION INSTRUCTIONS
APPLICATIONS
• Sanding nish and ooring nish of wood-
work products.
• Base polishing of Lumber-coated planes.
• Sanding nishes of metal surfaces.
• Base polishing of metal-coated planes, rust
removal, or paint removal paint to refinishing.
• Supercial nish of slate, concrete, and so on.
BEFORE OPERATION
WARNING: This sander should never be con-
nected to power supply when assembling parts,
making adjustments, assembling or replacing
sandpaper, cleaning or when not in use. Discon-
necting the sander will prevent accidental start-
ing that could cause serious personal injury.
INSTALLING THE SANDING BELT
1. Position the sander with base facing up-
ward. Pull lever with finger, idle pulley will
then move backward.
2. Place on drive pulley and idle pulley passing
it over the outside of shoe plate and making
sure that arrow on inside of belt coincides with
rotational direction of drive pulley.
3. Push lever with finger, idle pulley will then
move forward and give proper tension to sand-
ing belt. In this case, be careful not to be hit
your finger by lever. Then, adjust sanding belt
position.
CAUTION: Sanding belt installed in the wrong
direction will lower work efficiency and shorten
life of sanding belt.
UNISTALLING SANDING BELT
To remove the sanding belt, pull the release
lever and remove the sanding belt.
1
4
3
2
LB521B manual.indd 11 06/07/15 11:56

12
DUST REMOVAL
When an excessive amount of dust is depos-
ited in the dust bag, dust-collecting efficien-
cy will sharply drop. Remove dust from the
bag when it is deposited up to about 2/3 the
bag capacity, where by dust collecting effi-
ciency (as well as working efficiency) will be
ensured.
STARTING THE MACHINE
1) The machine has an OF / OFF feature as
well as a button for CONTINUOUS OPERA-
TION.
2) To start up press and hold the ON/OFF
switch, to stop release the button.
3. For a continuous operation press the lock-
on button while pressing the on/off switch.
NOTE: Do not leave the machine with the
continuous operation feature activated. This
can cause accidental starting.
DURING OPERATION
WARNINGS
• Be careful not to let your hand completely
cover air vents.
• Secure workpiece. Unsecured workpiece
could be thrown towards operator during
sanding causing injury.
SANDING
HOW TO ADJUST SANDING POSITION
Push switch and turn
sanding belt te check
position. Adjust sand-
ing belt so that both
edges protrude 1/6”–
1/8” past edges of pul-
leys.
NOTE: lf sanding belt
is operated too far
on the inside, it may
ceuse abrasion and
damage machine.
Adjust sanding belt position by turning adjust
screw:
Turn adjust screw clockwise to move belt in.
Turn adjust screw counterclockwise to move
belt out.
CAUTION: If sanding belt moves during
operation, adjustment can be made while in
operation.
2. Hold the sander in front and away from
you, keeping it clear of the workpiece. Start
the sander and let the motor reach its maxi-
mum speed. Gradually lower the sander on the
workpiece with a slight forward movement.
Move it slowly using forward and backward
strokes.
DO NOT FORCE IT! The weight of the unit sup-
plies adequate pressure, so let the belt sander
do the work. Applying additional pressure only
slows the motor, rapidly wears sandpaper and
greatly reduces sander speed.
NOTE: Any finish or resin on wood may soften
from the frictional heat. Do not allow sanding
on one spot too long as the sander’s rapid ac-
tion may remove too much material, making
the surface uneven.
WARNING: Do not touch workpiece right
after sanding operation it will be hot and may
cause burning.
SANDING MOVEMENT
Hold the unit by the front and back handle.
Move the machine forward and then back-
ward, repeating this movement.
SELECT ABRASIVE BELT APPROPRIATE TO
EACH WORK:
Finished thickness, 30-40
Medium finish; 40-100
Semi-fine finish, 80-240
Fine finish, 180-40
NOTE: Use the same thickness of sandpaper
until you get a uniform finished surface.
Changing during the sanding process can
lead to a poor finish.
MAINTENANCE
WARNING: It is recommended that all the
repair or replacement for the tool shall be per-
formed by a qualified service technician.
GENERAL MAINTENANCE
Before each use inspect the grinder, switch and
cord for damage.
Check for damaged, missing, or worn parts.
Check for loose screws, misalignment or bind-
ing of moving parts, or any other conditions
that may affect the operation.
LB521B manual.indd 12 06/07/15 11:56

13
ENGLISH•User's manual
If abnormal vibration or noise occurs, turn the
tool off immediately and have the problem
corrected before further use.
CARBON BRUSHES
The brush and commutator of the tool shall be
examined for several months. Their good con-
tact makes the tool energetically. When the
spark around the commutator become greater
the carbon brushes may be changed.
CLEANING
WARNING: Before cleaning or performing
any maintenance, power supply shall be dis-
connected from tool. Compressed dry air blow
may be the most effective cleaning method.
Always wear safety goggles when cleaning
tools with compressed air.
Keep the tool handles clean, dry and free of oil
and grease. Use only mild soap and a slightly
damp cloth to clean your tool. Many house-
hold cleaners contain chemicals which could
seriously damage the plastic and other insu-
lated parts. Ventilation openings must be kept
clean. Do not attempt to clean by inserting
pointed objects through openings.
CAUTION: No chemical agents are allowed
to used in cleaning the power tool. DO NOT
use petrol, turpentine, lacquer or paint thin-
ners or similar products.
TECHNICAL DATA
VOLTAGE-FREQUENCY
BELT SPEED
SANDER BELT CAPACITY
POWER
OPERATION TIME
WEIGHT
120 V ~ 60 Hz
380 m/min
3"x 21" (76 mm x 533 mm)
950 W
20 min / 10 min
3,8 kg (8,3 lb)
LB521B manual.indd 13 06/07/15 11:56

14
Notas / Notes
LB521B manual.indd 14 06/07/15 11:56

15
Manual de usuario / User’s manual
Notas / Notes
LB521B manual.indd 15 06/07/15 11:56

16
ESPAÑOL
POLIZA DE GARANTÍA
ENGLISH
WARRANT POLICY
Urrea Herramientas Profesionales S.A. de C.V.
Warranties this product for a period of 2 years in
its parts, components and manual labour against
any manufacture defect from the purchasing date.
Purchase date: ____/____/____
Product:____________________
Brand:______________________
Model:______________________
______________________________
Distributor seal and signature
Sold and Imported by:
Urrea Herramientas Profesionales S.A. de C.V.
km 11,5 Carretera A El Castillo, El Salto, Jalis-
co, México. C. P. 45680, Tel. (33) 3208 7900,
RFC UHP900402Q29
Terms:
In order to make warranty effective you must pres-
ent the product along with the warranty properly
fillled and signed to an authorized distributor or
service center.
Urrea Herramientas Profesionales S.A. de C.V.
will cover the transportation cost related to the
warranty.
This warranty is not applicable in the follow-
ing cases:
· When the product has not been used according
to normal conditions or natural wear of its parts.
· When the product has not been used according
with this user’s manual instructions.
· When the product has been fixed or modified by
unauthorized or unqualified person.
Urrea Herramientas Profesionales S.A. de C.V.
garantiza este producto por el termino de 2 años
en sus piezas, componentes y mano de obra con-
tra cualquier defecto de fabricación a partir de la
fecha de entrega.
Fecha de venta: ____/____/____
Producto: ___________________
Marca: ______________________
Modelo: ____________________
______________________________
Sello y firma de distribuidor
Comercializado e Importado por:
Urrea Herramientas Profesionales S.A. de C.V.
km 11,5 Carretera A El Castillo, El Salto, Ja-
lisco, México. C. P. 45680, Tel. (33) 3208 7900,
RFC UHP900402Q29
Condiciones:
Para hacer efectiva la garantía deberá presentar
el producto junto con la poliza de garantia debi-
damente firmada y sellada por el establecimiento
donde la adquirio, en cualquiera de los centros de
servicio autorizados.
Los gastos de transportación que se deriven del
cumplimiento de la garantía seran cubiertos por:
Urrea Herramientas Profesionales S.A. de C.V.
Esta garantía no será valida en los siguientes
casos:
· Cuando el producto haya sido utilizado en condi-
ciones distintas a las normales o al desgaste natu-
ral de sus partes.
· Cuando el producto no haya sido operado de
acuerdo al instructivo de uso que lo acompaña.
· Cuando el producto haya sido alterado o repara-
do por personas no autorizadas.
LB521B manual.indd 16 06/07/15 11:56
-
 1
1
-
 2
2
-
 3
3
-
 4
4
-
 5
5
-
 6
6
-
 7
7
-
 8
8
-
 9
9
-
 10
10
-
 11
11
-
 12
12
-
 13
13
-
 14
14
-
 15
15
-
 16
16


Surtek LB521B El manual del propietario
- Categoría
- Herramientas eléctricas
- Tipo
- El manual del propietario
en otros idiomas
- English: Surtek LB521B Owner's manual
Otros documentos
-
URREA LB821 El manual del propietario
-
RIDGID R27401 Guía del usuario
-
RIDGID ZRR2740 Manual de usuario
-
Genesis GBS321A Manual de usuario
-
KNOVA KN BD-46B El manual del propietario
-
Truper LIBA-3X21A2 El manual del propietario
-
-
Ryobi BE3182G Manual de usuario
-
Ryobi BE319 Manual de usuario